Embed Size (px)
Citation preview

Page 1 of 13 April-2019
ARUP eSupply Reference Guide This guide will introduce you to the ARUP eSupply application
Step 1: Order Information
Enter the contact information for this order. Notifications about this order will be sent to the email addresses entered here.
Step 2: Shipping Information
To select a site, click the desired site name in the pre-populated list, or enter a search term in the Site Search box to filter the list.
The Site Search box will search the Site Name, Street Address, City, State, and Postal Code fields for results (exact matches only, i.e. "UT" vs. "Utah").
The Ship-To Address fields will populate automatically with the site information once a site has been selected.
Step 3: Item Information
To add an item to your order, use the Additional Item drop-down to select an item. You may filter the drop-down list by choosing a Category, or by typing a search term in the Search items field.
Items listed in the "Frequently Ordered Items" section are your most commonly ordered items in the last 90 days. This list is updated dynamically.
To add an item to your order, type the desired quantity in the Quantity field and click "Add". The item will be added to the "Shopping Cart" section.
To remove an item from your order click the "Remove" button. The item will be removed from the "Shopping Cart."
Step 4: Submit Order
Click "Submit Order". You will receive a final "Review Your Shopping Cart" screen that displays all order information. To finalize your order, click the "Checkout" button. You will receive an order number on the next page and an order confirmation will be emailed to the address provided on the order.
Note: These columns display the allowed Monthly Orderable Quantity (MOQ) as well as the remaining quantity available to order.
Note: Upon submitting an order, the system will validate your ship-to address. It may suggest alternate addresses. You may select from the list of suggestions, or go back to your order and edit the address.
Note: Clicking an Item # hyperlink will open the Item Details pop-up, which contains a photo of the item, and links to relevant documents: Safety Data Sheets, Validation and Additional Info (if applicable)
Note: A Purchase Order # may be specified on an order.
Checking this box will save the PO # for the selected site, and the PO # will appear on future orders placed for the site.

ARUP eSupply Reference Guide
Page 2 of 13 April-2019
Review Orders
Review / Confirm Orders
Clicking the Review Orders tab provides a listing of all orders excluding standing orders.
Hovering over this tab will reveal a submenu allowing you to refine your listings to only back orders or standing orders.
The numbers shown on the menu indicate the total number of orders found for that group. All Orders counts the total number of Not Confirmed, Confirmed, In Process, Back Order, and Completed orders.
Filters
There are several filtering options to limit the number of orders shown, or help you locate a specific order.
Multiple filters can be used at the same time. For example, if you wish to search for an order placed between October 1, 2018 and October 31, 2018 that was shipped to "ARUP Known Client Laboratories", enter "ARUP Known Client Laboratories" in the Order Information text box, and then select 01-Oct-2018 and 31-Oct-2018 by either typing it in or by selecting the dates from the calendar. Clicking either of the “Search” buttons will filter the order list by your input.
To reset the filters click on the “Remove Search Filters” button that appears at the bottom right of the filters section when you have active filters.
Sorting
Orders can be sorted by clicking on an underlined table header link.
Headers that can be sorted include: Order No., Order Date, Date Completed, Requestor, and Site Name. By default, the order list is sorted by order date, beginning with the most recent.
Clicking on a header once will sort it in descending order (most recent first in the case of a date, larger to smaller in the case of numbers, and reverse alphabetically in the case of text).
Clicking on the same header again sorts the list in ascending order.

ARUP eSupply Reference Guide
Page 3 of 13 April-2019
Review Orders
Common columns include:
Order No.
The order number is the unique identifier for an order. Clicking an order number link will bring up additional information on that order.
Order Date
Order Date indicates the date the order was submitted.
Status
The current status of the order:
• Not Confirmed – The order has been reopened for editing and has not yet been submitted for processing
• Draft – Order has not been submitted for processing but will be saved for 72 hours to allow edits/submission
• Confirmed – Order has been submitted to ARUP and is ready to be processed
• In Process – ARUP is currently filling the order
• Partial – Components of this order have not yet been shipped
• Completed – The order has been filled and shipped
• Cancelled – The order has been cancelled
Date Completed
If the order is marked as completed a date will be provided indicating when ARUP completed the order.
Requestor
Requestor refers to the contact information provided in the first section of the order form. Typically the requestor is the user who placed the order.
Client ID
This column will show the Client ID with which the order is associated.
Site Name
The “Site Name” column will show the client’s facility name associated with the order.
Tracking Number(s)
This column will be populated with associated tracking numbers for the order. Multiple tracking numbers will be listed together one per line. Each tracking number is linked to the shipper’s website for further tracking information when applicable. A “Track All” link will also be provided for orders associated with more than one tracking number.

ARUP eSupply Reference Guide
Page 4 of 13 April-2019
Review Sites
Review Sites
The review sites page allows complete control of site information. From here site information may be viewed, sites may be edited, activated or deactivated, and new sites may be created.
Include Bldg/Flr/Ste/Clinic if applicable to ensure accurate delivery.
Viewing a Site
Click the radio button on the left of a site listing and then click the “Show Details” button to view additional information for the site. You may also view site details by clicking on the site name hyperlink.
Activating or Deactivating a Site
Deactivating a site means it will be removed from the site search on the order form. Deactivating a site does not affect any existing orders. Clicking on the appropriate radio button and then the “Activate/Deactivate” button will toggle between active and inactive states for the selected site. If a site is deactivated it will be listed in gray text on the site listing.
Editing a Site
Click the radio button on the left side of a site and then click the “Edit Site” button to enter the Edit Site screen. Revise the information of a site through the text boxes on this page. Fields marked with an asterisk (*) are required. When finished, click “Save Changes.”
Important Note: Your Primary Site is not editable. Requests to edit your primary site must be directed to ARUP.
Creating a New Site
To create a new site click on the “Add Site” button located at the top right or bottom right portion of the site listing. Enter the site information into the provided text boxes to create a site. Note that all fields marked with an asterisk (*) are required. When finished, click on the “Save Site” button to add the site.
Sites created more than 6 months from date of purge and HAVE NOT had any orders placed for them in the last 6 months are automatically removed from eSupply.
Address Validation
When Creating or Editing a site, eSupply will check the address against an authoritative database of addresses to see if the address is valid. eSupply may present you with alternative addresses to choose from. You may select one of the suggestions or your original address, or you may go back and edit your address.

ARUP eSupply Reference Guide
Page 5 of 13 April-2019
Monthly Orderable Quantity Adjustment Request Form
Request an adjustment to a Monthly Orderable Quantity per item using this form located under "User Options."
Request a Temporary Adjustment (one-time increase) or a Permanent Adjustment (your new desired Monthly Orderable
Quantity).
Step 2:
Enter a valid Item Number, and the desired quantity.
For a Temporary Adjustment, enter the additional quantity needed for the current month.
For a Permanent Adjustment, enter the new desired MOQ.
Step 1:
Indicate whether this is a Temporary or a Permanent Adjustment.
Step 3:
Enter a valid Ship To Address for the additional quantity requested.
You will be notified of the outcome of your request via email.
Note:
Reasons for adjustments are extremely important in keeping ARUP operating within compliance and helping us set orderable quantities that meet your specific needs. Please include as much detail as possible.

ARUP eSupply Reference Guide
Page 6 of 13 April-2019
eSupply Catalog
The eSupply Catalog
can be accessed via the
button at the top of
each screen in eSupply.
The eSupply Catalog contains a listing of every item that can be ordered, and provides a simple method for searching
items and obtaining additional details about items, including Safety Data Sheets, Validation, Pictures and Additional Info.
(if applicable). The Catalog may be filtered using the Search box at the top of the item list.
View Item Details:
Clicking an Item No. hyperlink opens the Item Details screen.
The Item Details screen displays an image of the item, as well as links to Safety Data Sheets, Validation and Additional Info. (if applicable).
Shopping Cart Button:
The shopping cart buttons provide a quick and easy method of adding an item to an order.
Shopping Cart buttons are accessible from the eSupply Catalog and Item Details screens.

ARUP eSupply Reference Guide
Page 7 of 13 April-2019
Save Order as Draft
When placing an order, if you attempt to navigate away from the order form (e.g. clicking the "Review Orders" tab, or
the "User Options" link), eSupply will ask if you would like to save the order as a draft or discard it.
Clicking the "Save Draft" button will save the order to the Review Orders page. The order will appear with a
Status of "Draft".
Clicking the "Discard" button will delete all information previously entered on the create order screen and take you
directly to the place you are trying to navigate to.
To continue with the order, simply click the Order No., which will open the Order Form with the previously selected
Ship-To address and items pre-populated.
A draft order will remain in the Review
Orders page for 72 hours. After 72 hours
the draft order will be deleted if not
edited or submitted.

ARUP eSupply Reference Guide
Page 8 of 13 April-2019
Notification Opt-Out
eSupply provides two methods to opt-out of email notifications.
Opt-Out of all Future Notifications
To opt out of all future Order and Shipment notifications, click the User Options link and click "Stop sending me confirmations".
One-Time Opt-Out
To opt out of Order and Shipment notifications for a single order, click the Opt Out checkbox on the Order Form.
ARUP eSupply Reference Guide
Page 9 of 13 April-2019
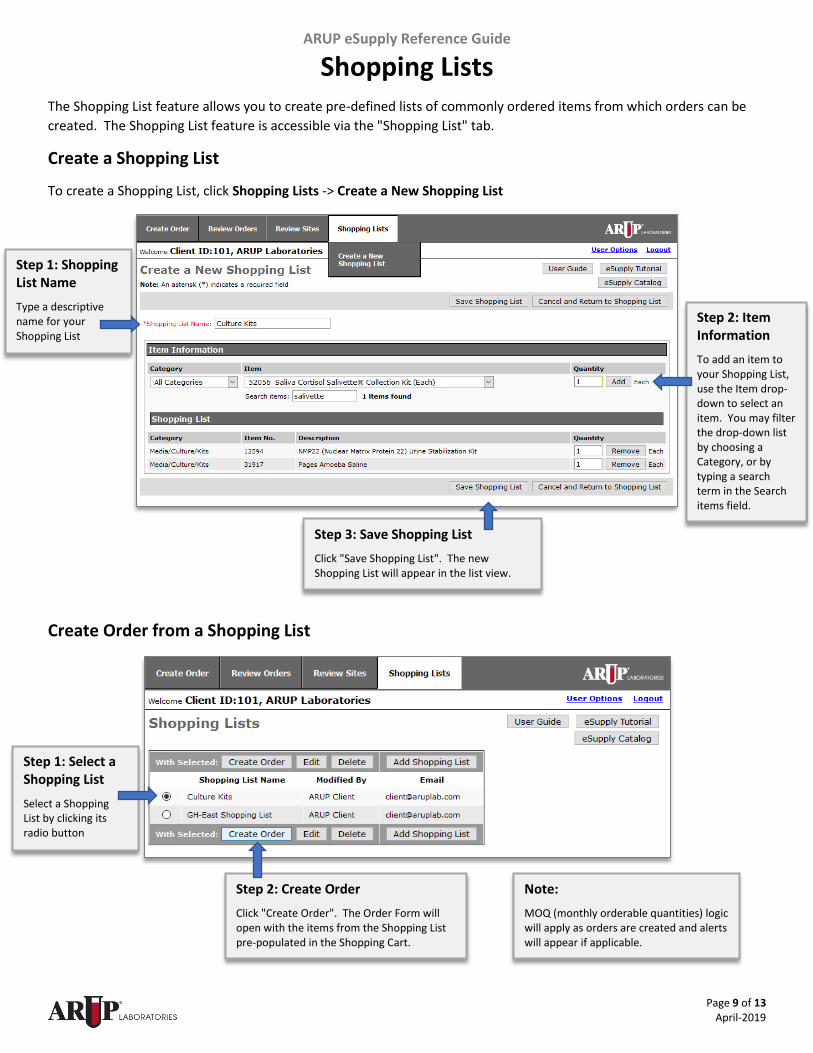
Shopping Lists
The Shopping List feature allows you to create pre-defined lists of commonly ordered items from which orders can be
created. The Shopping List feature is accessible via the "Shopping List" tab.
Create a Shopping List
To create a Shopping List, click Shopping Lists -> Create a New Shopping List
Create Order from a Shopping List
Step 1: Shopping List Name
Type a descriptive name for your Shopping List
Step 2: Item Information
To add an item to your Shopping List, use the Item drop-down to select an item. You may filter the drop-down list by choosing a Category, or by typing a search term in the Search items field.
Step 3: Save Shopping List
Click "Save Shopping List". The new Shopping List will appear in the list view.
Step 1: Select a Shopping List
Select a Shopping List by clicking its radio button
Step 2: Create Order
Click "Create Order". The Order Form will open with the items from the Shopping List pre-populated in the Shopping Cart.
Note:
MOQ (monthly orderable quantities) logic will apply as orders are created and alerts will appear if applicable.

ARUP eSupply Reference Guide
Page 10 of 13 April-2019
Clone Order
The Clone Order feature of eSupply allows you to create a copy of an existing order, edit the order, and submit it as a
new order.
Step 1: Select an Order
In the Review Orders page, click the desired Order No. to review the Order Detail.
Step 2: Clone This Order
Click the "Clone this order" button
Step 3: Edit and Submit the Order
The Order Form appears with the Order Information, Shipping Information, and Shopping Cart pre-populated.
You may now edit this order as needed and submit it as a new order.
Note:
MOQ (monthly orderable quantities) logic will apply as orders are created and alerts will appear if applicable.

ARUP eSupply Reference Guide
Page 11 of 13 April-2019
Notifications
The following alerts may be seen when attempting to submit an Order in eSupply. These alerts are informational, and
should be reviewed closely.
Existing Order
If an order exists in eSupply that is currently in process and contains an item that you have selected on your new order, a message will appear asking if you would like to proceed with adding that item to your new order. This message is intended to help prevent duplicate orders for the same item being mistakenly placed.
Short Expiring Item Notifications
If you will be receiving an item that may expire in less than 60 days, that item will be identified when reviewing your shopping cart and will also appear on the packing slip you receive when your order arrives.

ARUP eSupply Reference Guide
Page 12 of 13 April-2019
Copy/Paste
Within the eSupply Catalog, each Item Number and Item Description can be copied using the copy icons located next
to each item.
The copied item can now be used to look up an item in the following places in eSupply by pasting into the search field:
MOQ Adjustment Request
Create a New Shopping List
Step 1:
From the eSupply Catalog or Item Details screens, click the copy icon of the item you would like to select

ARUP eSupply Reference Guide
Page 13 of 13 April-2019
Contacting ARUP
At the bottom-left corner of every page in eSupply, there is a "Contact ARUP" link. You may click this link to send an
email to ARUP Client Services.