Embed Size (px)
Citation preview

OFFICE: +27 (0)87 807 7753 Mobile: +27 (0)74 319 1609 Fax: +27 (0)86 515 4964 E-mail: [email protected] Skype: francois_mcd Web site: www.multicad.co.za
1 | P a g e
Francois Swanepoel
MultiCad Design Solution CC.
Registered Graphisoft SA Solution Centre
Western Cape Regional Office
I. ArchiCad DWF Publishing Setup & Tools
This sounds like a "mouth full" but here I want to show you how simple and very
powerful this underutilized workflow in ArchiCad actually is.
Document Index
I. ArchiCad DWF Publishing Setup & Tools
II. ArchiCad DWF Web Tools & communication
III. Importing Mark-up / Redlining info from DWF Web files into ArchiCad
In this document you will get a basic understanding of when & how to use the built in export function in
ArchiCAD to generate .DWF files of your project. This set of exported documents can be used to share
project info with clients, and project teams for info, collaboration and interaction. The receiver will not
need any BIM or CAD software or relevant experience to view these documents and interact with them.
They will only need a computer or device that has w web browser. Notes can be made on the documents,
saved and sent back to the sender for implementation to the project as needed.
What is .DWF file format?
Design Web Format (DWF) is a secure file format developed by Autodesk for the efficient
distribution and communication of rich design data to anyone who needs to view, review, or
print design files. There are several Viewer applications available with varying features & tools.

OFFICE: +27 (0)87 807 7753 Mobile: +27 (0)74 319 1609 Fax: +27 (0)86 515 4964 E-mail: [email protected] Skype: francois_mcd Web site: www.multicad.co.za
2 | P a g e
What is Project Reviewer?
Project Reviewer is a Java applet that lets you view DWF, JPG, GIF, and TXT files saved in ArchiCAD using the
Project Publisher command. It also allows you to add Mark-up / Redline information to DWF files without
having ArchiCAD installed on your computer. This Mark-up / Redline information can again be imported directly
into your ArchiCAD Solo / Teamwork project in an instant.
(This is particularly amazing if you notice that these tools & workflow has been available to ArchiCAD users at
least since Version 7!)
Note:
It is important to note that ArchiCAD can only save 2D Views of your project out to .DWG file format. This
means you can save plans, sections, elevations, detail drawings, lists, schedules, layout (title block with
saved views), rendered images of a 3D view and 3D Document to the .DWF format and therefore not a
live 3D Model.
Navigator Areas

OFFICE: +27 (0)87 807 7753 Mobile: +27 (0)74 319 1609 Fax: +27 (0)86 515 4964 E-mail: [email protected] Skype: francois_mcd Web site: www.multicad.co.za
3 | P a g e
Example: 3D Document
“3D Documents” is a saved project view of the 3D window in ArchiCAD that has been available since
ArchiCAD 12. These 3D views are "live” automatically updatable 3D Documents complete with
dimensioning and annotation.
How do you save your ArchiCAD drawings to .DWF file format?
There are two ways to save the different views of your project to .DWF file format.
Method 1:
The first method is a simple “File/Save As” procedure from ArchiCAD’s “FILE Menu”.
• Open the chosen view (view types listed above) of your project from the “NAVIGATOR”
• On the “FILE Menu” click “File/Save As”
• Select the new file location from the “Save in” dropdown list
• Choose the .DWF File format from then “Save as Type” dropdown list
• Type / Edit the “File name” as required
• Click on the “SAVE” button and you are done.
This procedure have now saved this specific view / drawing in your project to the .DWF file format and
you can e-mail it to the waiting recipient for review / comment.

OFFICE: +27 (0)87 807 7753 Mobile: +27 (0)74 319 1609 Fax: +27 (0)86 515 4964 E-mail: [email protected] Skype: francois_mcd Web site: www.multicad.co.za
4 | P a g e
Method 2:
The second method is by using ArchiCAD’s “PUBLISHER”.
This method is a looks more tedious to set up, but it offers many benefits:
• Saving time on repetitive operations: You do the setup once only
• Changes is fast & easy: Changing one setting for the set, automatically applies the setting to all
the drawings in the set
• You have exact and predictable outcomes: The resulting files produce the same results every time
you publish a complete set or a selection of drawings from within the set, as it is controlled by the
pre-setup.
• You have control over the publishing outcomes: Any person in the office that has just very basic
knowledge of ArchiCAD can follow your instructions via phone / e-mail to open the correct file
and publish a specific set or a selection of drawings from within the set, without you even being
present.
• ArchiCAD’s publisher can include the “Project Review Web Environment”: This feature offers an
easy to use, user interface with navigation-, red lining & communication tools that makes it easy
for your client or project consultant to interact directly with your drawings without having
ArchiCAD installed or the need to learn ArchiCAD.
How do you save your ArchiCAD drawings to .DWF file format using ArchiCAD’s Publisher?
• Click on the “Window” Menu (1), click “Pallets” (2) and click “Organizer” (3) on the dropdown list
• or Click the “Dropdown Icon” (A) at the top right on the “Navigator” then click “Show Organizer” (B)
The “Organizer has two column windows:
• the Left window shows all source views & drawings
• the Right window shows all destination for views & drawings

OFFICE: +27 (0)87 807 7753 Mobile: +27 (0)74 319 1609 Fax: +27 (0)86 515 4964 E-mail: [email protected] Skype: francois_mcd Web site: www.multicad.co.za
5 | P a g e
Building the list of drawings to be published in this “Publishing Set”:
1. Activate the “Publisher” icon in the top above the Right window
2. Create the desired folder structure to organize your documents into
3. You can now drag any Folder with Saved Views, Selected Saved Views, Lists and Layouts, etc. from the
different Navigator areas in the Left window over to the destination folders inside the new
“Publishing Set” in the Right window
4. Select all Saved Views, Lists & Layouts in the folders for this “Publishing Set” and change the “Format”
setting in the dropdown list to .DWF
Settings for this “Publishing Set”:
1. Click on the “Arrow” to the right of the “Publishing Set” dropdown selector (1) list to move the list
below to one level up
2. Select the relevant DWF “Publishing Set” (2) in the list and click on the “Publishing Properties”
button (3) below the list window
3. Set the “Publishing Method” to Save files and browse to the destination folder to select the file path
4. Activate the radio button for “Create a real folder structure” then activate the Tick to ““Project Review
Web Environment” and click the “Options” button (4) to open the “Index” window
5. Type the “Index” name in the text box and select the “Style Sheet” type of your choice
(when you do this for the first time, you can publish the same “Publishing Set” with each different
style to choose the one you best prefer)
6. Click on both “OK” buttons (5) of the settings screens to return to the “Organizer”

OFFICE: +27 (0)87 807 7753 Mobile: +27 (0)74 319 1609 Fax: +27 (0)86 515 4964 E-mail: [email protected] Skype: francois_mcd Web site: www.multicad.co.za
6 | P a g e
7. Now you can publish a complete set (6) or a selection of drawings from within the set with the buttons
at the very bottom right of the “Organizer” and you are done with the publishing when the last item
on the list shown below shows the “Status” as “Saved” (see image below).
OFFICE: +27 (0)87 807 7753 Mobile: +27 (0)74 319 1609 Fax: +27 (0)86 515 4964 E-mail: [email protected] Skype: francois_mcd Web site: www.multicad.co.za
7 | P a g e
II. ArchiCad DWF Web Tools & communication
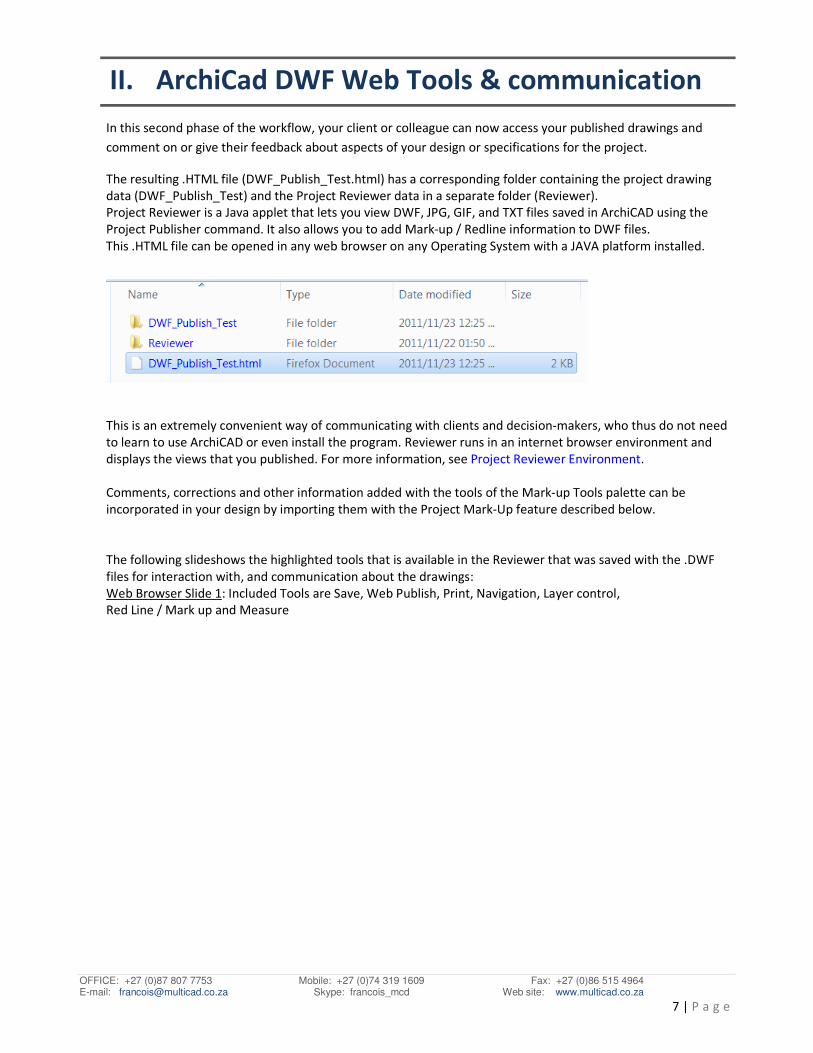
In this second phase of the workflow, your client or colleague can now access your published drawings and
comment on or give their feedback about aspects of your design or specifications for the project.
The resulting .HTML file (DWF_Publish_Test.html) has a corresponding folder containing the project drawing
data (DWF_Publish_Test) and the Project Reviewer data in a separate folder (Reviewer).
Project Reviewer is a Java applet that lets you view DWF, JPG, GIF, and TXT files saved in ArchiCAD using the
Project Publisher command. It also allows you to add Mark-up / Redline information to DWF files.
This .HTML file can be opened in any web browser on any Operating System with a JAVA platform installed.
This is an extremely convenient way of communicating with clients and decision-makers, who thus do not need
to learn to use ArchiCAD or even install the program. Reviewer runs in an internet browser environment and
displays the views that you published. For more information, see Project Reviewer Environment.
Comments, corrections and other information added with the tools of the Mark-up Tools palette can be
incorporated in your design by importing them with the Project Mark-Up feature described below.
The following slideshows the highlighted tools that is available in the Reviewer that was saved with the .DWF
files for interaction with, and communication about the drawings:
Web Browser Slide 1: Included Tools are Save, Web Publish, Print, Navigation, Layer control,
Red Line / Mark up and Measure

OFFICE: +27 (0)87 807 7753 Mobile: +27 (0)74 319 1609 Fax: +27 (0)86 515 4964 E-mail: [email protected] Skype: francois_mcd Web site: www.multicad.co.za
8 | P a g e
Web Browser Slide 1
In the following two slides, your collaborator can follow the six basic steps to 1) select the View / Layout,
2) activate the Mark-up Tool, 3) place all markup sketching, notes & clouds as needed, 4) activate the save
menu item, 5) select the file name & location and 6) save the info to the original or a new .DWF file to be sent
back to the Architect or Designer for further action.

OFFICE: +27 (0)87 807 7753 Mobile: +27 (0)74 319 1609 Fax: +27 (0)86 515 4964 E-mail: [email protected] Skype: francois_mcd Web site: www.multicad.co.za
9 | P a g e
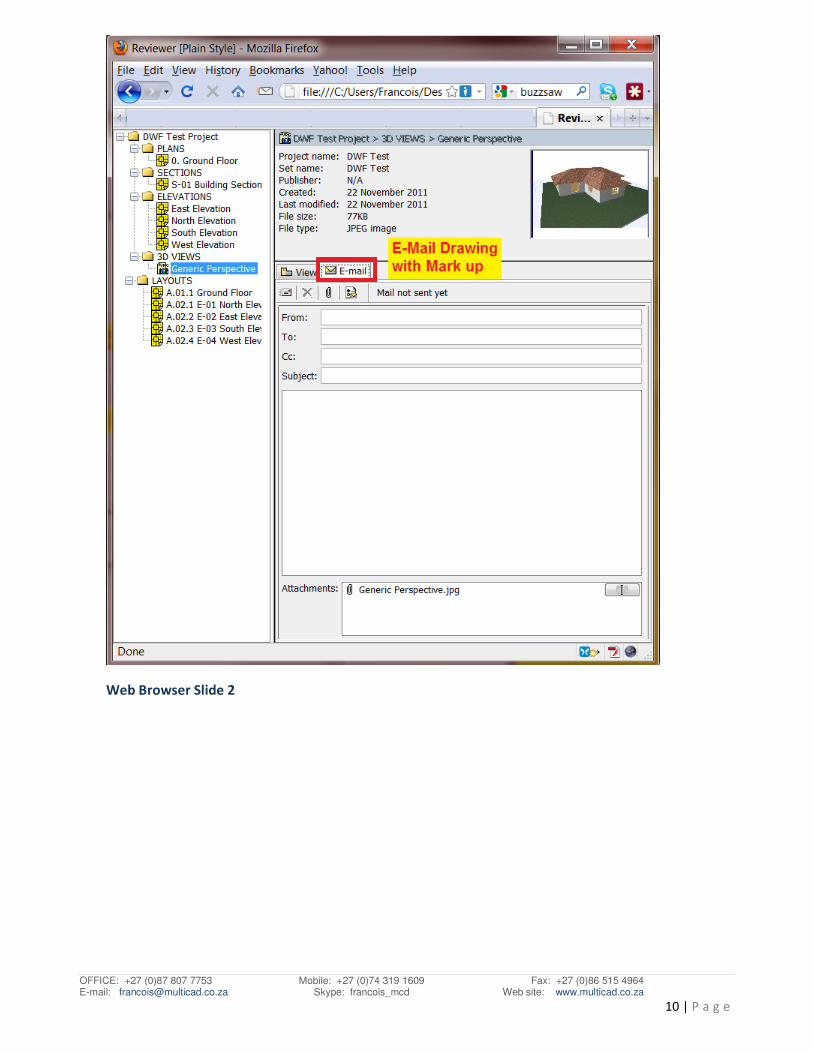
Web Browser Slide 2: shows additional E-mailing feature that automatically attaches the source view / drawing
together with the Mark-up info to be sent back to the Architect / Designer right from the Project Reviewer
interface.
OFFICE: +27 (0)87 807 7753 Mobile: +27 (0)74 319 1609 Fax: +27 (0)86 515 4964 E-mail: [email protected] Skype: francois_mcd Web site: www.multicad.co.za
10 | P a g e
Web Browser Slide 2

OFFICE: +27 (0)87 807 7753 Mobile: +27 (0)74 319 1609 Fax: +27 (0)86 515 4964 E-mail: [email protected] Skype: francois_mcd Web site: www.multicad.co.za
11 | P a g e
III. Importing Mark-up / Redlining info from
DWF Web files into ArchiCad
In this phase of the workflow this Mark-up / Redline information can again be imported directly into your
ArchiCAD Solo / Teamwork project in an instant. Now back in your ArchiCAD, the steps are very simple & quick:
1. Activate the Mark-up Tool Pallet from either the Documents / Mark-up Tools Menu {A1 & A2} or from
the Mark-up button {B1} on the Standard Top Toolbar as in the image below
2. From the Mark-up Tool Pallet select the “New Mark-up Entry” button {C1}, enter the reference name &
select the Mark-up Project Function {C2}
3. Select the “Import from Project Reviewer / DWF File” option and browse to & select the relevant file
{C3}
4. Select the Mark-up Status {C4} and press OK {C5}
OFFICE: +27 (0)87 807 7753 Mobile: +27 (0)74 319 1609 Fax: +27 (0)86 515 4964 E-mail: [email protected] Skype: francois_mcd Web site: www.multicad.co.za
12 | P a g e
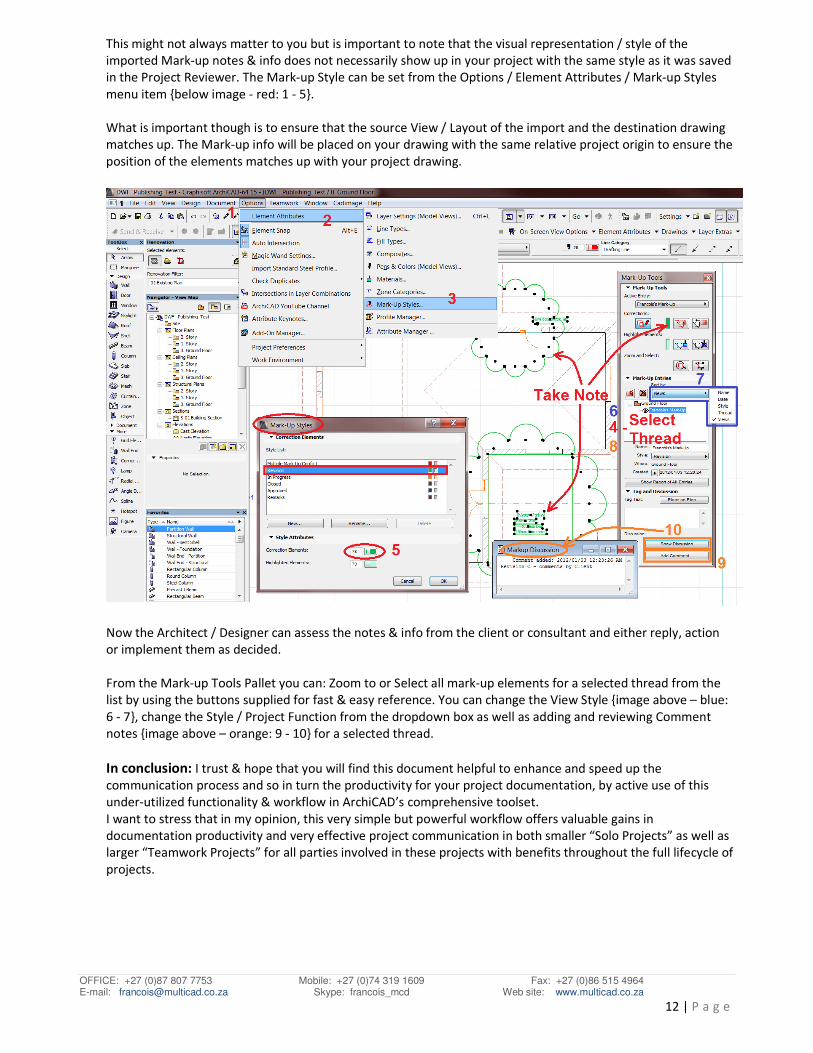
This might not always matter to you but is important to note that the visual representation / style of the
imported Mark-up notes & info does not necessarily show up in your project with the same style as it was saved
in the Project Reviewer. The Mark-up Style can be set from the Options / Element Attributes / Mark-up Styles
menu item {below image - red: 1 - 5}.
What is important though is to ensure that the source View / Layout of the import and the destination drawing
matches up. The Mark-up info will be placed on your drawing with the same relative project origin to ensure the
position of the elements matches up with your project drawing.
Now the Architect / Designer can assess the notes & info from the client or consultant and either reply, action
or implement them as decided.
From the Mark-up Tools Pallet you can: Zoom to or Select all mark-up elements for a selected thread from the
list by using the buttons supplied for fast & easy reference. You can change the View Style {image above – blue:
6 - 7}, change the Style / Project Function from the dropdown box as well as adding and reviewing Comment
notes {image above – orange: 9 - 10} for a selected thread.
In conclusion: I trust & hope that you will find this document helpful to enhance and speed up the
communication process and so in turn the productivity for your project documentation, by active use of this
under-utilized functionality & workflow in ArchiCAD’s comprehensive toolset.
I want to stress that in my opinion, this very simple but powerful workflow offers valuable gains in
documentation productivity and very effective project communication in both smaller “Solo Projects” as well as
larger “Teamwork Projects” for all parties involved in these projects with benefits throughout the full lifecycle of
projects.
OFFICE: +27 (0)87 807 7753 Mobile: +27 (0)74 319 1609 Fax: +27 (0)86 515 4964 E-mail: [email protected] Skype: francois_mcd Web site: www.multicad.co.za
13 | P a g e
References & recommended additional information:
• ArchiCAD 15 - Compatibility
http://www.archicadwiki.com/ArchiCAD15?highlight=%28dwf%29
• ArchiCAD 15 - Cost Calculation Using Interactive Schedules
http://www.archicadwiki.com/CostCalculation?highlight=%28dwf%29
• ArchiCAD 7 - Mark-Up Tool
http://www.archicadwiki.com/Mark-Up?highlight=%28dwf%29
• ArchiCAD 15 - Mark-Up Tool
http://www.graphisoft.com/ftp/publishing/ac15_help_INT/Files/wwhelp/wwhimpl/js/ht
ml/wwhelp.htm#href=05_Collaboration.08.104.html
• 3D Views & 3D Document
http://www.archicadwiki.com/ArchiCAD's 3D Views and 3D Documents
• Design Web Format (DWF)
http://en.wikipedia.org/wiki/Design_Web_Format


![Dwf 1098[1]](https://img.dokumen.tips/doc/110x75/55692d0cd8b42add468b49bf/dwf-10981.jpg)


