Embed Size (px)
Citation preview
Application
User Manual
E-Citatio Training
CARE Research & Development Laboratory
Computer Science Department
The University of Alabama
http://care.cs.ua.edu
DRAFT DRAFT January 26, 2008 DRAFT DRAFT

1
Table of Contents
1 INTRODUCTION .................................................................................................................................................. 4
1.1 eCrash: Process Summary (Quickstart) ...................................................................................................... 6
1.2 Getting Started ........................................................................................................................................... 8
2 MOVE AND LETS ................................................................................................................................................. 9
2.1 Opening MOVE ........................................................................................................................................... 9
2.2 Scanning Licenses ..................................................................................................................................... 12
2.3 Quick License/Quick Tag Entry (REQUIRES INTERNET CONNECTION) ..................................................... 14
2.4 LETS Search (ONLY WITH INTERNET CONNECTION) ................................................................................ 15
2.5 Training Mode .......................................................................................................................................... 20
2.6 GPS Coordinates Software ....................................................................................................................... 21
3 ECRASH OVERVIEW .......................................................................................................................................... 24
3.1 Starting eCrash ......................................................................................................................................... 24
3.2 How to Open New Crash Form ................................................................................................................ 25
3.3 Opening a Previously Started Crash form ................................................................................................ 26
3.4 How to amend a crash report or make an error correction .................................................................... 28
3.5 How to download a set of crash reports by date ..................................................................................... 28
3.6 Understanding the Layout of the eCrash Screen and Navigating the Form ............................................ 30
4 RECENT DATA ................................................................................................................................................... 35
4.1 Recent Data Features ............................................................................................................................... 35
4.2 Recent Data Features: Recent People ..................................................................................................... 35
4.3 Recent Data Features: Recent Vehicles ................................................................................................... 36
4.4 Recent Data Features: Recent Places ....................................................................................................... 37
5 ECRASH SECTIONS ............................................................................................................................................ 39
5.1 Overview Section of the Crash form ........................................................................................................ 39
5.2 Location and Time Section of the Crash form .......................................................................................... 40
5.2.1 Main Section Screen ........................................................................................................................ 40
5.2.2 Street Information ........................................................................................................................... 43
5.2.3 Circumstances .................................................................................................................................. 44
5.3 Units ......................................................................................................................................................... 45
5.4 Driver/Non-Motorist ................................................................................................................................ 49
5.4.1 License .............................................................................................................................................. 50
5.4.2 Condition .......................................................................................................................................... 52

2
5.4.3 Circumstances .................................................................................................................................. 54
5.5 Vehicle Information ................................................................................................................................. 55
5.5.1 Owner/Registration ......................................................................................................................... 57
5.5.2 Circumstances .................................................................................................................................. 57
5.5.3 Damage ............................................................................................................................................ 59
5.6 Non-Motorist ........................................................................................................................................... 60
5.7 Uninjured Occupants ............................................................................................................................... 60
5.8 Victims ...................................................................................................................................................... 62
5.9 Unit Roadway Information ....................................................................................................................... 66
5.9.1 Workzone Status .............................................................................................................................. 67
5.10 Truck/Bus Supplement ............................................................................................................................. 67
5.11 Diagram .................................................................................................................................................... 71
5.12 Narrative .................................................................................................................................................. 74
5.13 Crash Roadway Environment ................................................................................................................... 75
5.14 Investigation ............................................................................................................................................. 76
5.14.1 Witnesses ......................................................................................................................................... 77
5.14.2 Investigating Officers ....................................................................................................................... 79
6 ECRASH PROCEDURES ...................................................................................................................................... 81
6.1 Validating ................................................................................................................................................. 81
6.2 Saving Crash Forms .................................................................................................................................. 82
6.3 Transferring .............................................................................................................................................. 82
6.4 Printing ..................................................................................................................................................... 84
7 MOVE CONSIDERATIONS ................................................................................................................................. 85
7.1 The “About” Button in MOVE (Checking for Updates) ............................................................................ 85
7.2 The “Options” Button in MOVE ............................................................................................................... 86
7.3 Navigating MOVE and eCrash .................................................................................................................. 87
8 REVIEW AND FEEDBACK ................................................................................................................................... 89
8.1 Review of Menus ...................................................................................................................................... 89
8.2 Review of Shortcuts ................................................................................................................................. 90
8.3 Feedback and Technical Support ............................................................................................................. 95
APPENDIX A -- eCrash Website ................................................................................................................................ 96
A1 Introduction .................................................................................................................................................. 96
A2 How to Log into the Website ........................................................................................................................ 96
A3 Home Page ............................................................................................................................................... 97
3
A4 Search Page .............................................................................................................................................. 97
A5 Agency Page ............................................................................................................................................. 99
A6 Administration Page ............................................................................................................................... 101
a. How to Auto-Approve reports: .............................................................................................................. 101
b. How to add supervisors ......................................................................................................................... 102
c. How to remove supervisors ................................................................................................................... 102
A7 Support Page .......................................................................................................................................... 102
A8 How to View a Single Crash Report ........................................................................................................ 102
d. How to view the crash report ................................................................................................................ 103
e. How to view the history of the crash report .......................................................................................... 103
f. How to approve a crash report .............................................................................................................. 103
g. How to reject a crash report .................................................................................................................. 103
h. How to reassign a crash report .............................................................................................................. 104
4
1 INTRODUCTION
The purpose of this manual is to provide the documentation for training and reference in using the Ala-
bama electronic crash (eCrash) system for collecting and entering the data elements that describe motor
vehicle crashes that occur within the State of Alabama. The eCrash system is a major innovation in that
it enables the entry of this important data as close to the crash scene as possible, thus assuring complete-
ness, consistency and fewer interpretation errors. It is important that law enforcement officers who are
going to be using eCrash become familiar with the information in this User Guide so that their crash re-
ports are completed and submitted properly. Once this familiarity is attained, the User Guide should be
retained for reference purpose. It is also accessible in its respective parts by clicking the appropriate
help button on any eCrash screen.
At the same time that the state moves to eCrash it is also adopting a new set of data elements that com-
ply with standards that have been set by the federal government to assure that all states are collecting a
uniform minimal set of crash data. The meaning and interpretation of these data elements are described
in a separate document called the eCrash Data Element Guide, which is concerned with selecting and
entering the proper data element values within eCrash as opposed to the operational aspects of eCrash
that are covered here. Both of these documents are essential to proper eCrash use, and both can be ac-
cessed using the eCrash help capabilities.
This introductory section continues with a subsection (1.1) on the overall process. Essentially the steps
described therein reference the major sections of the User Guide and provide an overview of the entire
process. Users are strong encouraged to be familiar with this section. Finally, some history and refer-
ences for more help is provided in Section 1.2.

5

6
1.1 eCrash: Process Summary (Quickstart)
This section is meant to be a reminder of the process you go through when using the MOVE and
eCrash program to complete a crash form. The User Guide will go into the process in much
more detail, but for a quick reminder, you can easily refer to this section. The quick summary of
the steps follows:
1. Scan all of the drivers‟ licenses that are available.
2. If necessary, search for information on LETS.
3. Find your GPS Location.
4. Complete the crash form.
5. Validate the form data and correct all errors to create the record.
6. Transfer the record and submit it for supervisory approval.
7. Correct any faults in the record found by your supervisor.
8. If needed, print the record.
These steps will be elaborated in much more detail throughout this document. Some initial elab-
oration of these steps at this point might help, and it is given below.
1. If available, use the license scanner to scan the driver’s license for as many of the
drivers and victims in the crash as possible. If the license scanner is not available
or functioning, use the “Quick License” entry block in MOVE to search LETS for
any individual with an Alabama Driver‟s License. Licenses can be scanned ahead of
time – this does not have to wait until the information is needed in eCrash. The more
licenses you can scan of the individuals involved in the crash, the more time you will
save when completing the various sections of the crash report. See Sections 2.3 and
2.4 for more information on this process.
2. Use LETS to search for information on individuals who have Alabama Drivers’
Licenses. If you have access to the internet as well as the appropriate login infor-
mation, LETS can be used to access both Driver and Vehicle information. LETS can
be set up to run automatically once a license is scanned and/or once data is entered in
the Quick License and Quick Tag blanks in MOVE. To save time, gather vehicle in-
formation from LETS for all of the vehicles involved in the crash at one time. See
Section 2.4 for more information on this process.
3. Lock in your GPS location. Be sure that your vehicle is as close to the proximity of the
crash as possible and then lock it in by clicking the “Save Current GPS Position” button.
Once your location has been determined, you will want to be sure to include it on the
crash form. The GPS coordinates required by the AUTCR are those of the crash, not the
location where you fill out the form or the office, so lock in the GPS coordinates at the
crash location only. See Section 2.6 for more information on this process.
7
4. Complete the crash record by moving through the various sections of the form
as displayed in the eCrash program. The crash record is divided up into a number
of sections that will need to be filled out before the crash form is complete. The
number of sections that must be completed depends on the number of units involved
in the crash. All sections that must be completed are shown in the outline along the
left side of the eCrash program. See Sections 5.2 through 6.1 for more information
on this process.
5. Once you first complete the crash form, go back and work your way through
any errors that still remain. All of these errors will appear in a list at the bottom of
the screen underneath the crash form. Each error must be resolved before the form
can be submitted to your supervisor for review. See Section 6.2 for more information
on this process.
6. Once you have validated and saved the crash record, transfer it so that it can be
approved by your supervisor. This is done by clicking the button within your
eCrash program, but this requires an Internet connection. This can either be done af-
ter completing each crash report or at the end of your shift. See Section 6.4 for more
information on this process.
7. If your supervisor finds any errors in the report it will be returned to you for
changes and/or corrections. You can check on-line for any crash forms that have
been returned for correction. This should be done each time you login to eCrash.
Any crash form that has been returned to you will show up in the Error Manager list.
Once all errors are corrected and it is accepted by your supervisor, it will be transmit-
ted to the central database in Montgomery. See Sections 3.3, 4.1, and 6.4 for more in-
formation on this process.
8. If you need to print a crash form, that can be done from eCrash after a form has
been approved by your supervisor. If you would like to print a crash form, ensure
that you are connected to the Internet, then open the crash form and click the print
button in eCrash. The system will go out to the Internet and make sure that an ap-
proved version of the crash form exists. If it does, it will print the record. See Sec-
tion 7.1 for more information on this process.

8
1.2 Getting Started
In 2003 the eCite (electronic citation) program was introduced in the state of Alabama, begin-
ning with the Heflin weigh station. This program allows officers to utilize a license scanner,
GPS device and laptop to write a traffic citation quickly and easily from their vehicles. By 2007
this program was deployed to every state trooper, and it is now being rolled out to other law en-
forcement agencies throughout the state.
The need for a similar program for processing crashes utilizing the same equipment was also
recognized, and at about this same time the state of Alabama made the final decision to move to
a new version of the crash report form. Called the Alabama Uniform Traffic Crash Report
(AUTCR), the data elements for this updated report were under development for some time. It
was finalized in 2008 for full deployment in 2009. The eCrash program developed and being
deployed to officers in the state of Alabama totally supports the AUTCR.
The purpose of this User Guide is to direct reporting officers through all phases of the use of the
eCrash data entry program. It is not intended to demonstrate the meaning of the various data el-
ements in the AUTCR. A separate document exists for that purpose, and eCrash users should
thoroughly understand these data elements before attempting to create a crash record with
eCrash. This User Guide assumes that the reporting officers understand the new version of the
crash report. It focuses especially on how to use the eCrash program, which can reduce the time
and effort required for the officers to complete crash reports over manual methods.
If you have questions with regard to eCrash, please visit the eCrash website at:
http://ecrash.aladata.com
or call us toll-free at: 1-866-349-CARE or on the CARE Southern LINC phone at: 64*7427 or
205-361-1972 for further assistance.

9
2 MOVE AND LETS
2.1 Opening MOVE
To use any of the eCrash, eCite, LETS and/or Log Book programs, open the Mobile Officer Vir-
tual Environment (MOVE). This single program automates most of your data entry needs while
integrating the various searches and entries. The following considerations will guide you
through the use of MOVE as well as the use of the eCrash program.
1. With the introduction of eCrash, those who have been using eCite will experience a
change from the Officer‟s Desktop to MOVE. Some of the major changes between
the Officer‟s Desktop and MOVE are that: (a) the login screen appears different, (b)
you will be required to log in with your AlaCOP username and password, and (c) you
will have to select your agency at login.
2. To begin the process of entering a crash form, open MOVE. This is accomplished by
double clicking the following icon on your desktop:
3. Once you click on the MOVE button, the following login screen will appear:
4. From this login screen, enter your AlaCOP username and password and then click
OK. NOTE: the password is case sensitive. If you have trouble logging in, contact
the ACJIC Help Desk (1-800-392-8025).
5. If you have MOVE set up to allow you to enter multiple ORIs (i.e. you work for mul-
tiple agencies), you will see a screen like below. If you work for a single agency,
please go to item 7.

10
6. This screen is primarily designed to help officers who may do work for multiple
agencies at different times. This screen will only list those agencies that are applica-
ble to you. For officers that work several areas, select the agency for the crash record
that you are about to complete. Once you have highlighted the correct agency, click
“Accept.”
7. Once you successfully log in, the Mobile Officer Virtual Environment (MOVE) will
open and the image below will appear on your screen:

11
This will result in your icons being moved over to the right to accommodate this image without
hiding your desktop icons. You might wish to move the icons in the right two columns to ac-
commodate this move; this will keep your icons from being dislocated in the future. You can
still click on your icons or operate all other programs (such as Internet Explorer, Microsoft
Word, etc.) without problems while having MOVE open. These programs will appear in the area
to the right of the left bar and above the lower bar seen in the screen shot above.
This MOVE system screen gives you easy access to LETS, eCite, Log Book and the eCrash pro-
gram. If the Log Book button does not appear, it likely means that this program was not installed
on your computer and is not applicable for your department. If any of these programs do not ap-
pear, contact your administrator.

12
2.2 Scanning Licenses
1. As with eCite, the license scanner can be used to gather information about individuals
involved in the crash. The license scanner can be used to scan licenses for all drivers
involved in the crash as well as all victims and witnesses if they have a valid driver‟s
license. Scanning the licenses for all of these individuals at once will save a signifi-
cant amount of time.
2. To scan a driver‟s license, insert it into the closed slot for a barcode read or slide it
through the open slot for a magstripe reading. Currently driver‟s licenses can be
scanned from every state in the country except Georgia.
The scan method varies from state to state, since some states use a bar code, while
others use a mag stripe, and some use both. When a state has both a mag stripe and a
bar code, use the bar code because it typically contains more information. *NOTE:
For the new Alabama Driver‟s License (issued beginning in 2005) you will want to
use the bar code.
3. After you scan the license, you will hear a beep. This lets you know that the license
has been scanned correctly and the process is beginning. Once the scan has been
completed, the individual will be added to your Recent Data List. Accessing infor-
mation in the Recent Data List will be discussed in more detail below.
4. If your scan returns a message that says "The page cannot be displayed", then you
likely do not have a connection to the LETS program. Check to see if you have a
wireless signal. If LETS returns results with the DL#, DL STATE, and all other
fields blank, then the tag or license is not in the LETS system. Check to see if it is an
Alabama license and that you typed or scanned it correctly. If it is an Alabama license
and you typed it correctly, then suspect a forgery or other problem with the license.
5. If you have any problems getting your license scanner to work properly, first
look at the bottom right of your desktop (near the system clock) for an icon that looks
like a driver‟s license. If the icon has a small red x over it your scanner is not ready
for use and needs to be reconfigured.
6. To reconfigure the scanner, right click on the license scanner indicator icon and then
click on the “Configure Card Scanner” option. A screen should appear similar to the
one below:
License scanner indi-
cator

13
From this screen click the button that says “Auto-Detect Supported Scanners.” When
you do this your scanner should be found and should resume normal function.
Alternately, you can right click on the license scanner icon at the bottom right of the
screen and click the line that says “Find Card Scanner.” By using this method you
will not need to open the screen shown above.
Another common cause of problems with the scanner is the Velcro used to attach it to
the dashboard or tray of the vehicle. When you attach the scanner in your car, please
ensure that you do not cover any openings on the bottom of your scanner. This can
cause the scanner to malfunction.
If you still have problems with your scanner, please contact technical support.
7. To save time, scan as many licenses as possible for the individuals involved in or as-
sociated with the crash. You can scan these licenses before you begin completing the
crash form or at any point during the process of filling it out. The licenses that you
should scan include the licenses for the drivers, passengers and witnesses.
8. Each license that you scan will be added to the Recent Data section of MOVE. From
this location you will be able to drag and drop information from a license scan to any
point on the crash form. This process will be discussed in more detail later in the
“Recent Data” section.
Click here to
auto-detect
your license
scanner.

14
2.3 Quick License/Quick Tag Entry
NOTE: You must have some type of internet connection for this feature to work. This
internet connection can be of any type (wifi, air card, etc).
1. If you do not have a working scanner but have an internet connection, you can enter
queries into the Quick License or Quick Tag blocks in MOVE. These are located at
the bottom left of the MOVE overlay, as seen below. You can enter an Alabama
driver‟s license number in the Quick License blank, or an Alabama registered vehicle
tag number in the Quick Tag blank.
(Note: The Quick License search must be seven numeric characters. The Quick Tag
search must be an exact tag match, which is typically seven alphabetic or numeric
characters but may be shorter for personalized tags.)
After entering the DL or tag number, hit enter to run a LETS search. The information
returned will be added to your list of recent data.
2. If either the Quick License Search or the Quick Tag Search is taking too long, you
can click the STOP sign at any time in order to end the search.
You can use the Quick License and Quick Tag fields at the start of filling out the
crash form or at any point throughout the process. Once information is retrieved from
these queries it will be added to the “Recent Data” fields. At that point it can be
dragged and dropped into any part of the crash form. This process will be discussed
in greater detail in the “Recent Data” section.
Enter an individual’s
Driver’s License num-
ber here.
Enter a Vehicle Li-
cense Plate number
here.
Click here to stop a
Quick License search.

15
2.4 LETS Search
NOTE: You must have some type of internet connection for this feature to work. This
internet connection can be of any type (wifi, air card, etc).
1. Depending on your Internet connectivity and MOVE settings, once you scan the li-
cense, LETS will automatically open and search for the individual identified by the
license scan. If you do not have an Internet connection, or if LETS is not set to auto-
matically open, the data entered in the Recent Data section will be limited to that read
off of the DL card by the scanner.
2. The option to open LETS automatically is included under the Options button in
MOVE (discussed in Section 7.3). If you choose to enter an individual‟s license
number or tag number through the Quick License or the Quick Tag search, a LETS
run will be attempted regardless of the settings under MOVE Options. If no Internet
connection is found, the search will fail.
3. When LETS opens following a license scan, three different screens appear. The first
is a small screen that will pop up momentarily in the bottom right corner of the
screen. This is a LETS summary of the license information and will look similar to
that shown below:

16
4. The second screen, called the Person Detail page, will look similar to the one below.
It is a shortened version of the full LETS person search page, which contains sum-
mary information about the individual. This page is faster to run than a full LETS
page, allowing you to access the information quicker and on a single page.
LETS is only for individuals who have an Alabama driver‟s license. When you per-
form a license scan for an out of state license, the information off of the card will be
stored in your Recent Searches, but LETS will not attempt to run.
5. This screen contains all of the basic information about the person that is contained on
their driver‟s license. This page provides access to driver‟s history, tag history, and ti-
tle history.
6. Below the picture are tabs containing additional databases that are available for
search. Clicking on any of the database tabs will bring up a typical LETS page as
seen below. Results are indicated by the presence of a non-zero number on the tab.
General information from the person’s driver’s license
Click on any of these tabs to view the corresponding part of the LETS record.

17
7. An important piece of information that comes from LETS is the vehicle information.
In order to view the list of vehicles owned, click the Tag History tab. Click the VIN
number of the vehicle of interest as shown in the screen above.
8. Once a particular VIN number is selected from the list of vehicles owned, a screen
called the Vehicle Detail page will be generated, similar to the following.
Tag History When you find the vehicle of interest, click on the VIN
number. This will generate a separate page of infor-
mation for this vehicle.
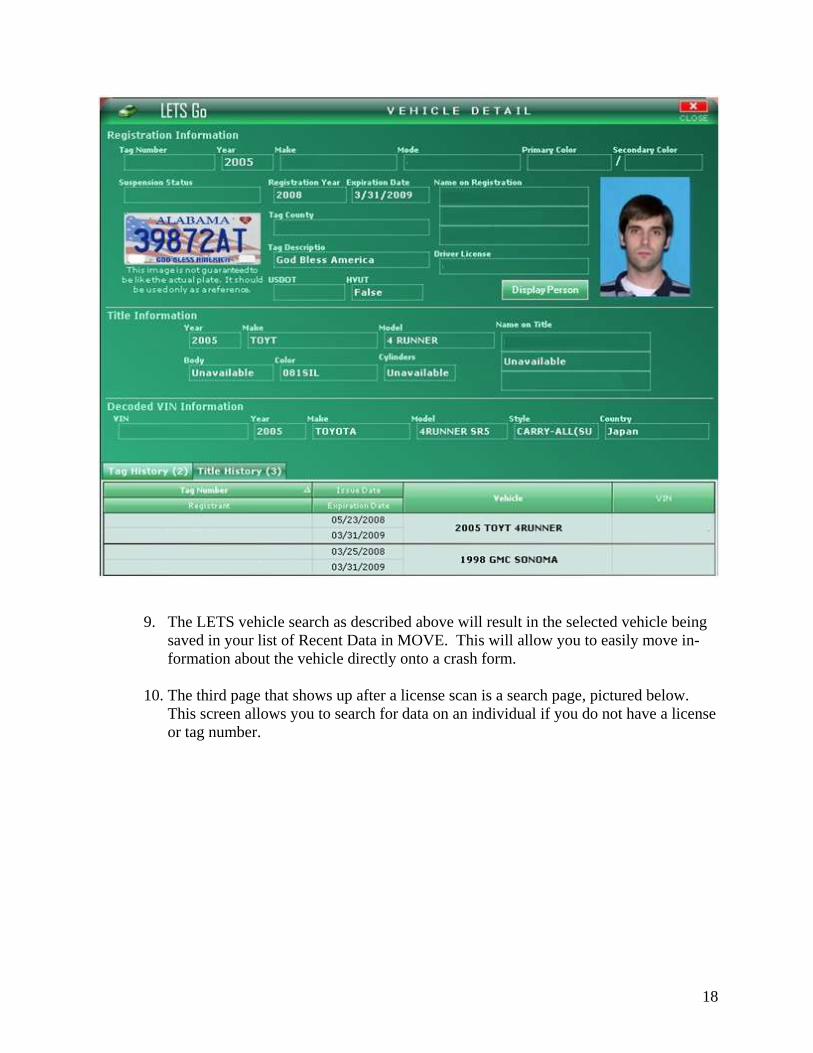
18
9. The LETS vehicle search as described above will result in the selected vehicle being
saved in your list of Recent Data in MOVE. This will allow you to easily move in-
formation about the vehicle directly onto a crash form.
10. The third page that shows up after a license scan is a search page, pictured below.
This screen allows you to search for data on an individual if you do not have a license
or tag number.

19
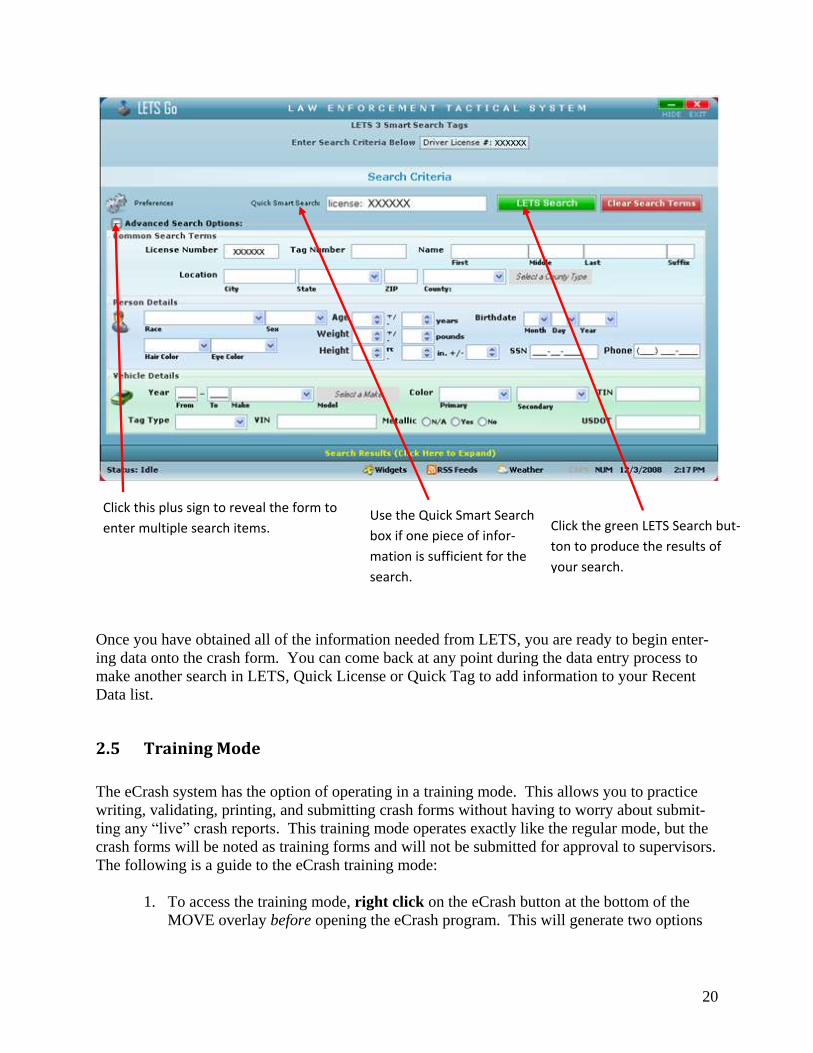
11. To enter your search criteria, click the yellow section labeled Search Criteria. Enter
one piece of information in the Quick Smart Search box or click the plus sign next to
Advanced Search Options. This will produce the screen seen below where you can
enter as little or as much information as is needed for the search.
12. When you have entered the search criteria, click the green LETS Search button in the
top right area of the screen to produce the results. This will produce a Person Detail
page, just like the one you automatically get when you do a license scan.
Click Search Criteria to enter the in-
formation for the search.
20
Once you have obtained all of the information needed from LETS, you are ready to begin enter-
ing data onto the crash form. You can come back at any point during the data entry process to
make another search in LETS, Quick License or Quick Tag to add information to your Recent
Data list.
2.5 Training Mode
The eCrash system has the option of operating in a training mode. This allows you to practice
writing, validating, printing, and submitting crash forms without having to worry about submit-
ting any “live” crash reports. This training mode operates exactly like the regular mode, but the
crash forms will be noted as training forms and will not be submitted for approval to supervisors.
The following is a guide to the eCrash training mode:
1. To access the training mode, right click on the eCrash button at the bottom of the
MOVE overlay before opening the eCrash program. This will generate two options
Use the Quick Smart Search
box if one piece of infor-
mation is sufficient for the
search.
Click this plus sign to reveal the form to
enter multiple search items.
Click the green LETS Search but-
ton to produce the results of
your search.

21
as shown below: Regular Mode (default) or Training Mode. Left click on the train-
ing mode option.
2. Once in the training mode, practice using eCrash as much as you would like. You
can verify that you are in training mode by “Training Mode” appearing in the top bar
of the eCrash screen.
3. To get out of the training mode, reverse the process. Or, recognizing that the default
mode is the “Regular” data entry mode, just close the eCrash program by clicking on
the X at the top right of the computer screen. You do not need to close MOVE, just
the eCrash program. When you reopen eCrash, it will be in the normal data entry
mode.
2.6 GPS Coordinates Software
If your vehicle is in very close proximity to the crash, take advantage of that fact to capture and
save your current GPS location. It is important to save the new GPS position every time you
go to a new crash location. Also, be sure that these updated location coordinates are trans-
ferred into the crash record.
1. To save the location, click on the button within the MOVE overlay that says “Save
Current GPS Position.”
This button is located on the left side of the screen just above the person information
that appears once you scan a license.
2. The following verifies that your current position has been saved.
Additionally, the coordinates appear on the left side of the screen in MOVE as seen
below.

22
3. The GPS coordinates will also be recorded in your Recent Places list to enable them
to be added to the crash record. This will be discussed in the Recent Data section.
4. If you have any problems getting your GPS unit to work properly, first look at the
bottom right of your desktop (near the system clock) for an icon that looks like a
globe. If the icon has a small red x over it, your GPS unit is not hooked up properly
or is not receiving a good signal. If this is a case, it may need to be reconfigured.
5. In order to reconfigure the GPS unit, right click on the GPS indicator icon and click
on the “Configure GPS Device” option. When you do that you will see a screen simi-
lar to the one below:
GPS Unit indicator
Click here to save your GPS coordinates.
Once you click to save the GPS coordinates, the most recent location that you saved will show up here on the left side of the screen.

23
6. Once you have this screen open, the majority of GPS problems can be solved by
clicking on the button that says “Auto-Detect GPS Device.”
Alternately, you can right click on the globe at the bottom right of the screen and
click the line that says “Find GPS Device.” By using this method you will not need
to open the screen shown above.
7. If problems with your GPS unit persist, contact Technical Support.
Click here to
Auto-Detect
your GPS De-
vice
24
3 ECRASH OVERVIEW
3.1 Starting eCrash
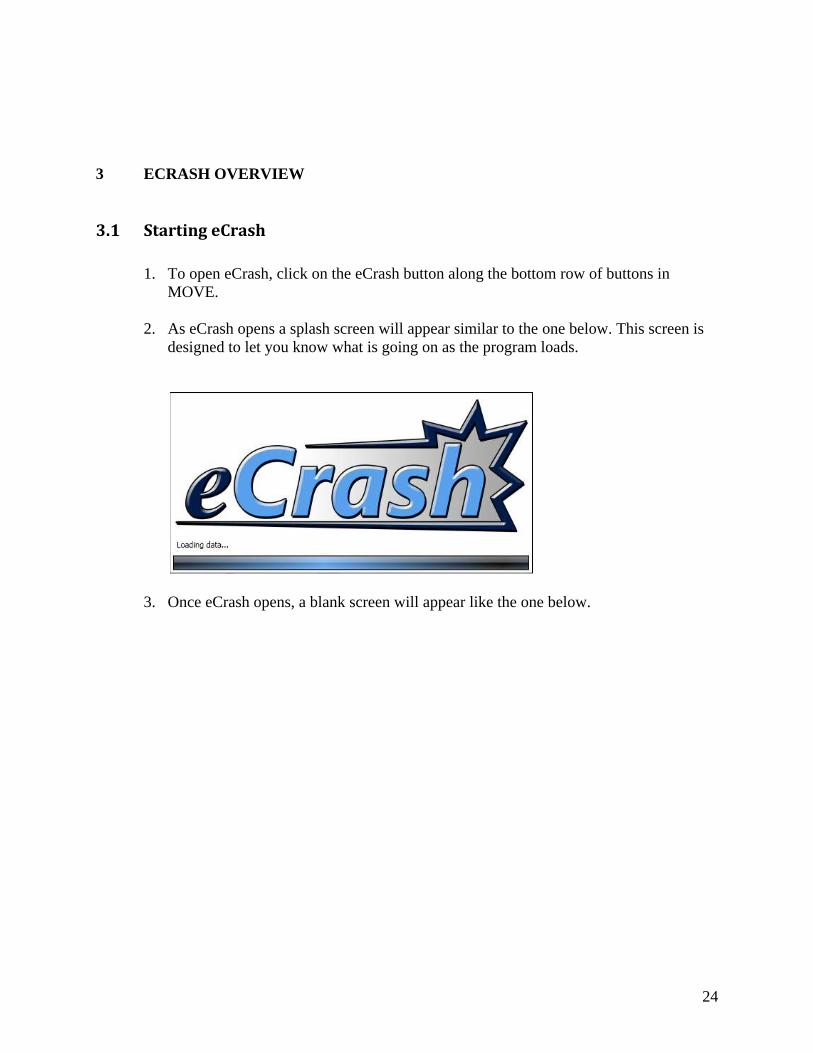
1. To open eCrash, click on the eCrash button along the bottom row of buttons in
MOVE.
2. As eCrash opens a splash screen will appear similar to the one below. This screen is
designed to let you know what is going on as the program loads.
3. Once eCrash opens, a blank screen will appear like the one below.

25
4. The eCrash program contains a few buttons at the top of the screen as well as a list of
menu items. These buttons are primarily used for opening a new crash form, re-
opening an old crash form, saving, printing, transferring and checking for forms that
have been returned for correction or amendment.
Each of these options will be discussed in greater detail in their appropriate sections
below.
3.2 How to Open New Crash Form
This section will show how to open a new crash form or resume work on an existing crash form
once in eCrash.
26
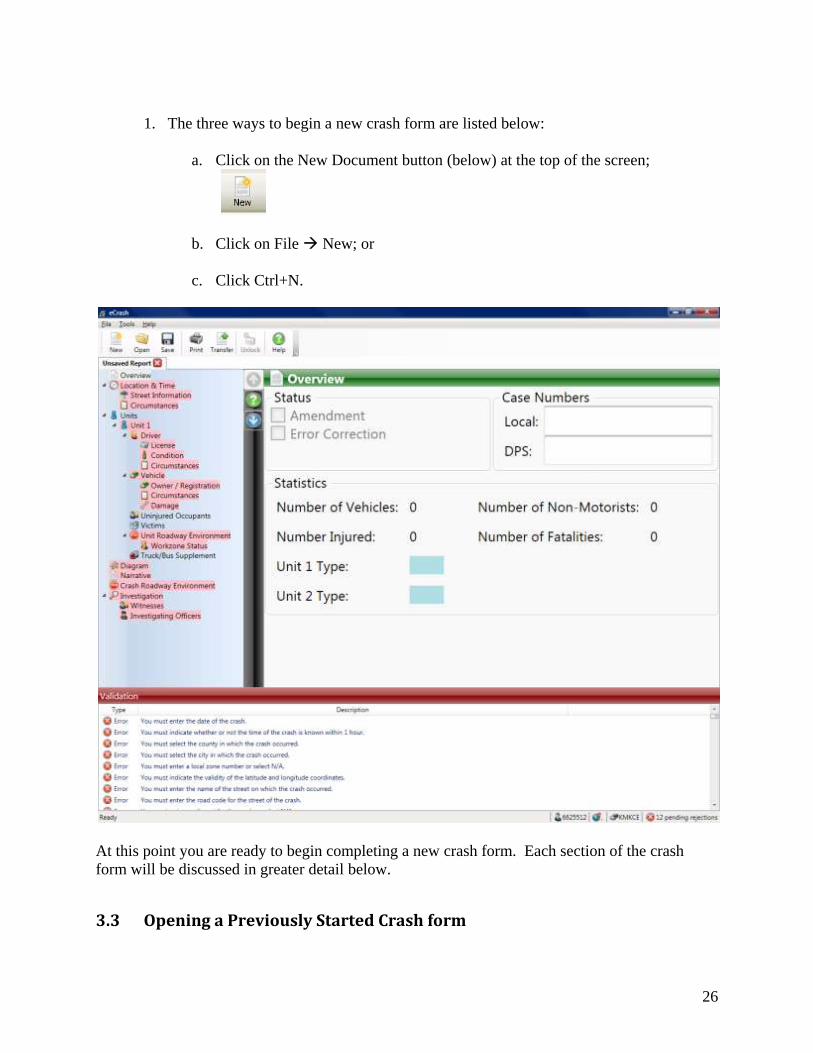
1. The three ways to begin a new crash form are listed below:
a. Click on the New Document button (below) at the top of the screen;
b. Click on File New; or
c. Click Ctrl+N.
At this point you are ready to begin completing a new crash form. Each section of the crash
form will be discussed in greater detail below.
3.3 Opening a Previously Started Crash form

27
You can reopen and edit a form at any time up until the time that you have submitted it to your
supervisor for approval. After you have transferred the report, you may still alter the crash re-
port, but you will have to set the report as an amendment. To resume work on a partially com-
pleted form, re-open it by clicking on the open folder button . You will see a new window
similar to the one below:
To open a previously opened crash report, simply find the crash report in the list on your left and
highlight it (by clicking it) and then click „OK‟.
As time passes, you will have a lot of crash reports to sort through to find the report you need to
open. To help this, eCrash has a filter box that allows you search for a specific crash report. For
instance, if you know the last name of a person involved, you may type that name and your re-
port list will be filtered by that last name.
You have the ability to open a previously saved crash report, a transferred crash report, and a
crash report that has been rejected or reassigned. Notice that the reports are grouped according
List of
crash
reports
to open
Brief
synopsis
of crash
report
Filter box
allows
you to
search
for spe-
cific
items
28
to the type of report. There are multiple types of reports: Transferred, Rejected/Reassigned,
New, etc.
You also have the ability to delete a crash report from your computer.
NOTE: If you delete a crash report that is already transferred, you will not delete the report from
the server. You can always re-download the report at a later date.
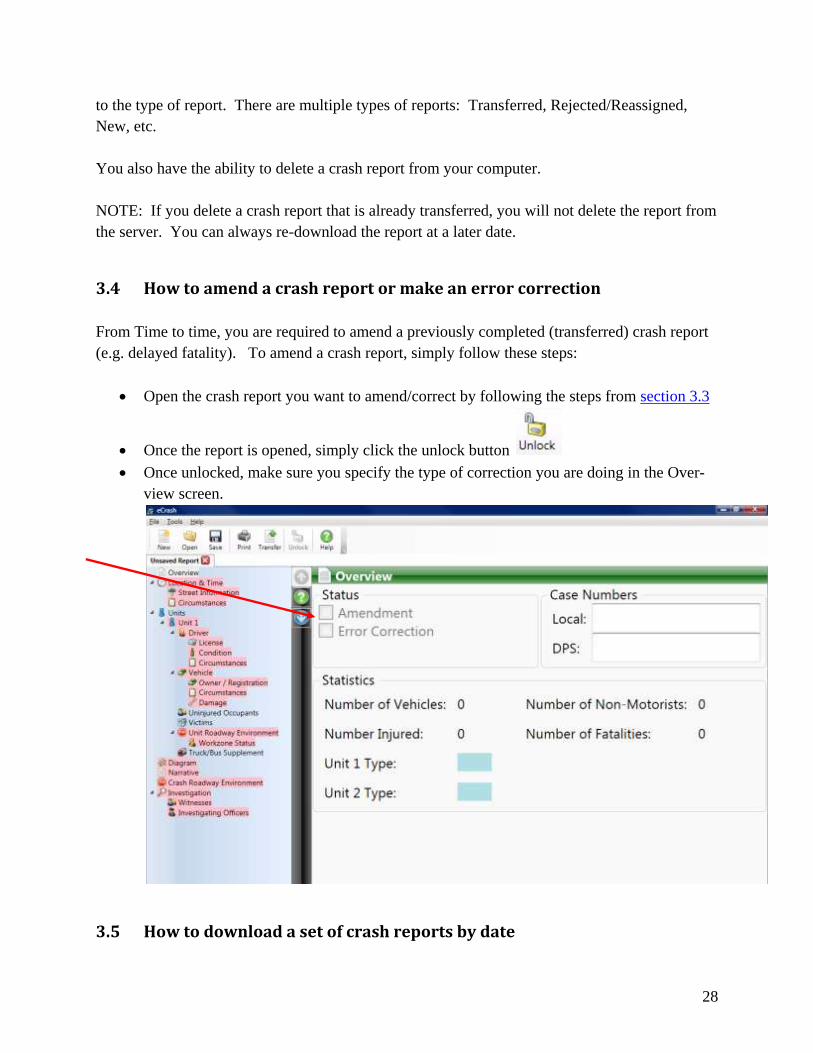
3.4 How to amend a crash report or make an error correction
From Time to time, you are required to amend a previously completed (transferred) crash report
(e.g. delayed fatality). To amend a crash report, simply follow these steps:
Open the crash report you want to amend/correct by following the steps from section 3.3
Once the report is opened, simply click the unlock button
Once unlocked, make sure you specify the type of correction you are doing in the Over-
view screen.
3.5 How to download a set of crash reports by date

29
On occasion, you will need to re-download a set of crash reports. For instance if you get a new
computer, or move to a different computer, there could be a need to download all the reports you
have transferred between a set of dates. To do this follows these steps:
Click on the Open button to open a crash report
Click the “Download Reports by Date” button
Specify the date range and click “OK.” eCrash will go and download all the crash reports
that you completed between the two dates you specified.
3.6 How to save a crash report
If you need to close and save a crash report to complete at a later time, there are three ways to do
so:
Click File Save
Use the keyboard shortcut ctrl+S
Close the crash report and you will be prompted to save with a similar screen below:
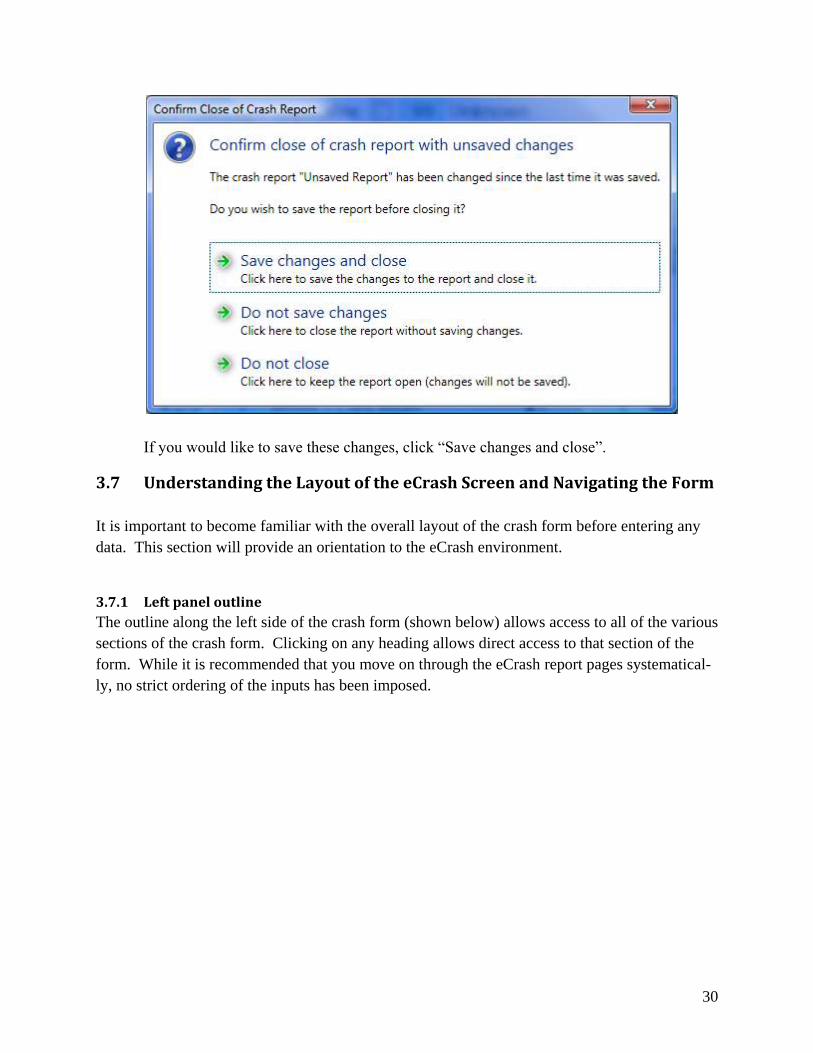
30
If you would like to save these changes, click “Save changes and close”.
3.7 Understanding the Layout of the eCrash Screen and Navigating the Form
It is important to become familiar with the overall layout of the crash form before entering any
data. This section will provide an orientation to the eCrash environment.
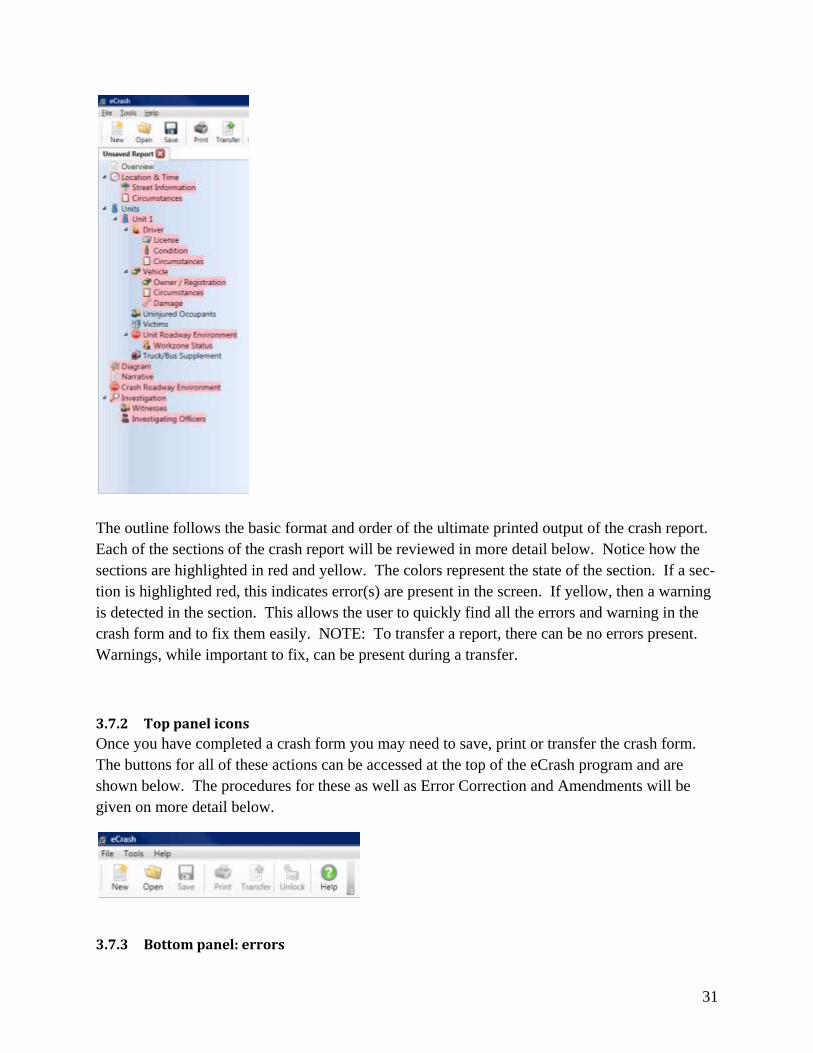
3.7.1 Left panel outline
The outline along the left side of the crash form (shown below) allows access to all of the various
sections of the crash form. Clicking on any heading allows direct access to that section of the
form. While it is recommended that you move on through the eCrash report pages systematical-
ly, no strict ordering of the inputs has been imposed.
31
The outline follows the basic format and order of the ultimate printed output of the crash report.
Each of the sections of the crash report will be reviewed in more detail below. Notice how the
sections are highlighted in red and yellow. The colors represent the state of the section. If a sec-
tion is highlighted red, this indicates error(s) are present in the screen. If yellow, then a warning
is detected in the section. This allows the user to quickly find all the errors and warning in the
crash form and to fix them easily. NOTE: To transfer a report, there can be no errors present.
Warnings, while important to fix, can be present during a transfer.
3.7.2 Top panel icons
Once you have completed a crash form you may need to save, print or transfer the crash form.
The buttons for all of these actions can be accessed at the top of the eCrash program and are
shown below. The procedures for these as well as Error Correction and Amendments will be
given on more detail below.
3.7.3 Bottom panel: errors

32
When you open a new crash form you will notice a section of the screen below the crash form
that lists the omission errors. Since a new form starts out blank, all of the items requiring entry
appear on the list.
As you begin entering data these errors will disappear from the list. The errors are listed in the
same order as the sections in the left panel, and within each section, from top to bottom and left
to right. Thus, if you complete the crash report in the normal order, the errors will disappear ac-
cordingly. All errors must be removed before the report can be printed or transferred. If you fin-
ish a crash form an errors remain, you have the ability to double-click an error and it will take
you to the element to be fixed.
3.7.4 Navigating within a page
There are two ways to move from field to field within any page of eCrash:
a. Press the Tab button on your keyboard to move from one field to the next.
b. Alternately, click on any field to move directly to it.
3.7.5 Navigating among pages
While being systematic in completing all data items is highly recommended, it is not necessary
to totally complete one page before moving to another. This flexibility was given to allow for
times when you need to skip around to enter something while it is still on your mind, or perhaps
to correct an error or make something consistent.
Example: use
the Tab key
to move
from the
Date field to
the Time
field.

33
There are two ways to move to a new page. As indicated above, click on the target section head-
ing on the outline on the left side of the screen (see below).
You can also click on the arrows at the top of the crash form to move to either the next or the
previous screen.
Click to another sec-
tion in the outline to
move to a different
section of the form.
Click to move
to either the
next or the
previous
screen.

34
To close a crash form, click the „X‟ in the tab for the particular crash form. If you have multiple
crash forms open, each will have its own tab. Select which crash form to close by clicking on
the „X‟ for that particular crash form. Incomplete records can be saved for later retrieval at any
time.
Most data item fields have dropdown selection lists. In order to select an item from a dropdown
lists; first activate the dropdown by clicking the arrow on the right of the item grey space. Then
select the item that best responds to the data item requirement. For long list, the method indicat-
ed below can be used instead of activating the drop down.
NOTE: Numbers are for reference only; type the code description in the drop down, not its
number. Numbers are shown in order to help users of the data see how the list matches with the
list given in the AUTCR Data Element Guide and other references. Some users find it easier to
remember and locate codes by number, but only the code description entry will produce the
code, not its number.
Click the ‘X’
box to close
the current
crash report
Begin typing the
code description
in the gray space.
Example: in the
the “Highway
Class” field, you
will type in the
letters C-O-U…
and the code for
“4 – County” will
appear in the
“Highway Class”
field.

35
The following sections of this document will give detailed instructions on how to complete each
of the individual sections in eCrash.
4 RECENT DATA
4.1 Recent Data Features
MOVE allows you to easily access recent people, vehicle and places by clicking the Recent Data
button at the bottom right in the MOVE screen:
This will cause a bar to slide into view on the right side of the screen that offers the following
three options:
Recent People
Recent Vehicles
Recent Places
These will be discussed in the next three sections.
As you move through the various sections of the crash form, you will find various places where
you can drag and drop items from the recent data list. You will know when you can drag and
drop from the list onto the crash form when you see a matching icon (person, vehicle or place)
within the various section of the crash form.
4.2 Recent Data Features: Recent People
Clicking the following icon:
will generate a list of your 50 most recent people searches (similar to that given below) from li-
cense scans or Quick License runs in MOVE.

36
Drag and drop information about any one of these individuals in places within the crash form
identified by the person icon given above. These will be identified as we move through the sec-
tions of the crash form. Be sure that you read the entry after you drag and drop it to be sure
that you inserted the right person information into the form. It is easy to drag and drop the
wrong person, and doing this could cause severe problems to the persons affected as well as
causing extensive administrative difficulties.
To validate information about any one of these individuals, double click the name in the list and
a screen similar to the one below will appear.
Clicking the Red X at the top right of the Recent People list will clear the list. If you do not use
this option to clear the list, the names will roll off the bottom of the list as you continue to add
new individuals to the list.
4.3 Recent Data Features: Recent Vehicles
To view recent vehicles, click the car icon:
A list of the 50
most recent Peo-
ple Searches.
Clicking the red X to
clear the list.

37
The bar on the far right will list the 50 most recent vehicle searches (similar to the one below).
These search results can come from a Vehicle search in LETS or a Quick Tag run in MOVE.
[NOTE: If you do not have Internet capabilities and have not been able to search for a vehicle in
LETS, there is no way to add vehicles to this list. Also, there is no way to add vehicles that are
not registered in the state of Alabama.]
Any location from this list can be added to the crash form using drag and drop. You will want to
add all of the vehicles from the crash to this list so that they can be accessed at any point when
completing the crash form.
Double clicking on one of the vehicles in the list will generate a screen similar to the one below.
The screen gives basic information about the vehicle from the Quick Tag search or LETS search.
4.4 Recent Data Features: Recent Places
List of the 50 most
recent Vehicle
Searches.
Clicking on the red X will
clear the list.

38
Clicking the globe icon given below
will list the 50 most recent places (similar to the list seen below). This functionality is available
to any eCrash user who has an operational GPS unit available. For more information on this
functionality, please see the “GPS Coordinates Software” section.
Any location from this list can be added to the crash form using drag and drop. As we move
through the various sections of the crash form, the various places where this drag and drop func-
tionality can be used will be discussed in more detail. To see a full description of the GPS coor-
dinates, click one of the coordinates seen in the Recent Data list. The screen below is an exam-
ple of what results from clicking one of the coordinates from the list.
List of the 50 most
recent Places.
Clicking on the red X will
clear the list.

39
5 ECRASH SECTIONS
5.1 Overview Section of the Crash form
We now move into a discussion of the various sections of the crash form. To this point, the dis-
cussion has focused on the format and functionality of the eCrash program and MOVE. The
next sections will move through the various sections seen in the outline on the left side of the
screen within eCrash. The first of these is the Overview section.
Notice that the first section listed on the left panel is “Overview.” The Overview screen is
shown below:
As discussed above, if appropriate, select the check box for “Amendment” or “Error Correction.”
The only other field that can be accessed is the Local Case Number. If your agency uses a local
case number, insert it here. This can be any combination of letters and numbers.
The current
section is
highlighted.
This heading indicates
the current section.

40
The statistics information within this section will be completed automatically as you move
through the different sections of the crash form. It is displayed here for validation purposes
when opening an existing crash report.
5.2 Location and Time Section of the Crash form
5.2.1 Main Section Screen
The next section listed in the outline is the Location and Time section displayed below.
Note the arrows below indicate that the Location & Time screen is current.
From this section, you will need to add the date and time for the crash. Note that there is a
“Today” button to the right of the date field that will automatically add the current
date to the crash form. If you are completing a crash form for a date in the past you can
click on the dropdown next to the “Date” field and select the correct date from the calendar
that appears.

41
When you enter the time you will have to select the format for the time field. You will typ-
ically want to select “Standard” or “Military” from the list.
Next select the County and City for the location of the crash. A dropdown list is available
for the list of counties. As you begin typing the name of the county “T-U-S…,” for exam-
ple, the first county with those letters be selected from the list. The city list will be limited
to the cities contained in the county that is selected. Either by using the dropdown list or
by starting to type in the name of the city, select the city from the list of available cities.

42
If the crash occurred outside of city limits, select the “Rural” item from the City list that is
given for that particular county.
If you need to enter a “Local Zone” for the crash, do that on this screen immediately below
the County and City fields.
Just below the Local Zone field is space for GPS Coordinates. Utilize your GPS unit and
the Recent Data fields to add the GPS coordinates to the crash form.
At this point notice that the Globe at the top of the eCrash form is now activated and lit. If
you are certain that the last GPS coordinates that you saved (as described in earlier sec-
tions) is the correct location for the crash, click on the globe to add the coordinates to the
crash form.

43
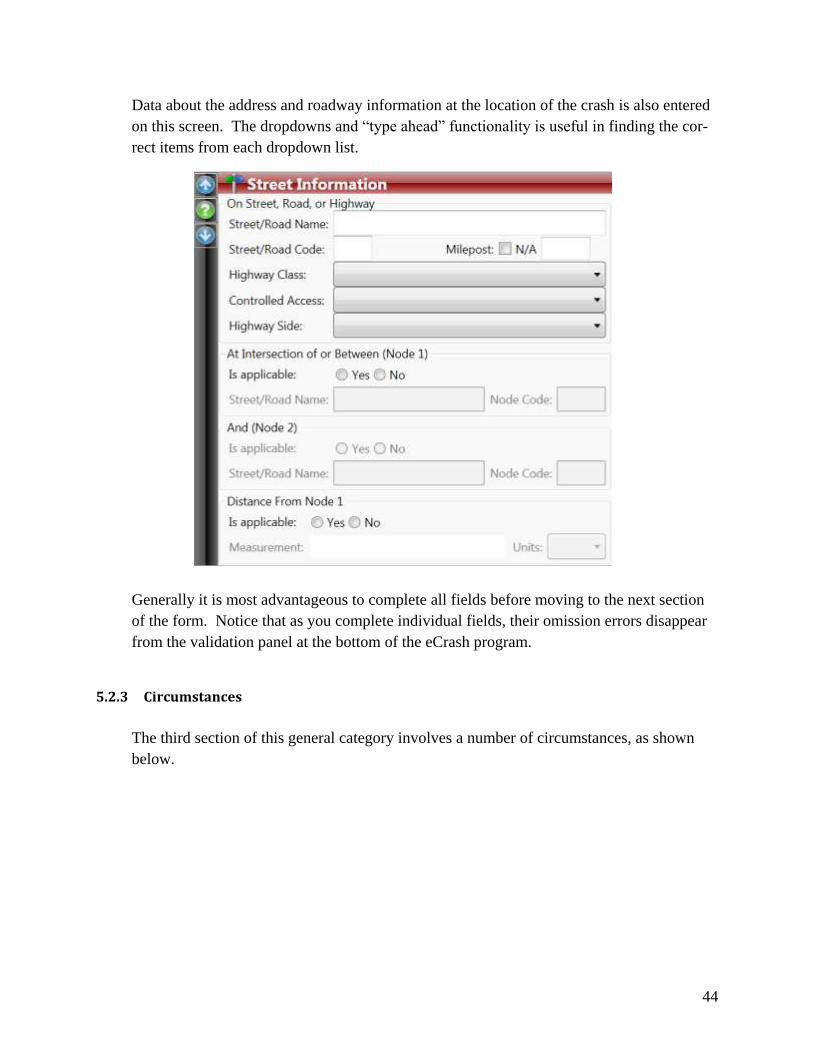
5.2.2 Street Information
The Street Information is a subheading under the Location & Time screen in the outline of
the crash form given on the left. The Street information is shown below.
Clicking the
globe will add
the most re-
cently saved
location to the
form. If you prefer, take a GPS
location from the Recent
Places list and drag it and
drop it from the list on
the right to the globe on
the Location & Time
screen.
44
Data about the address and roadway information at the location of the crash is also entered
on this screen. The dropdowns and “type ahead” functionality is useful in finding the cor-
rect items from each dropdown list.
Generally it is most advantageous to complete all fields before moving to the next section
of the form. Notice that as you complete individual fields, their omission errors disappear
from the validation panel at the bottom of the eCrash program.
5.2.3 Circumstances
The third section of this general category involves a number of circumstances, as shown
below.

45
If there is any doubt about the meanings of any of the fields, see the Data Element Manual
for a complete explanation of their meanings.
The “Circumstances” section of the crash form refers to the entire crash. Once this is com-
pleted it will be necessary to enter data on each of the units that were involved in the crash.
In the example that follows, two vehicles will be used to illustrate the unit information.
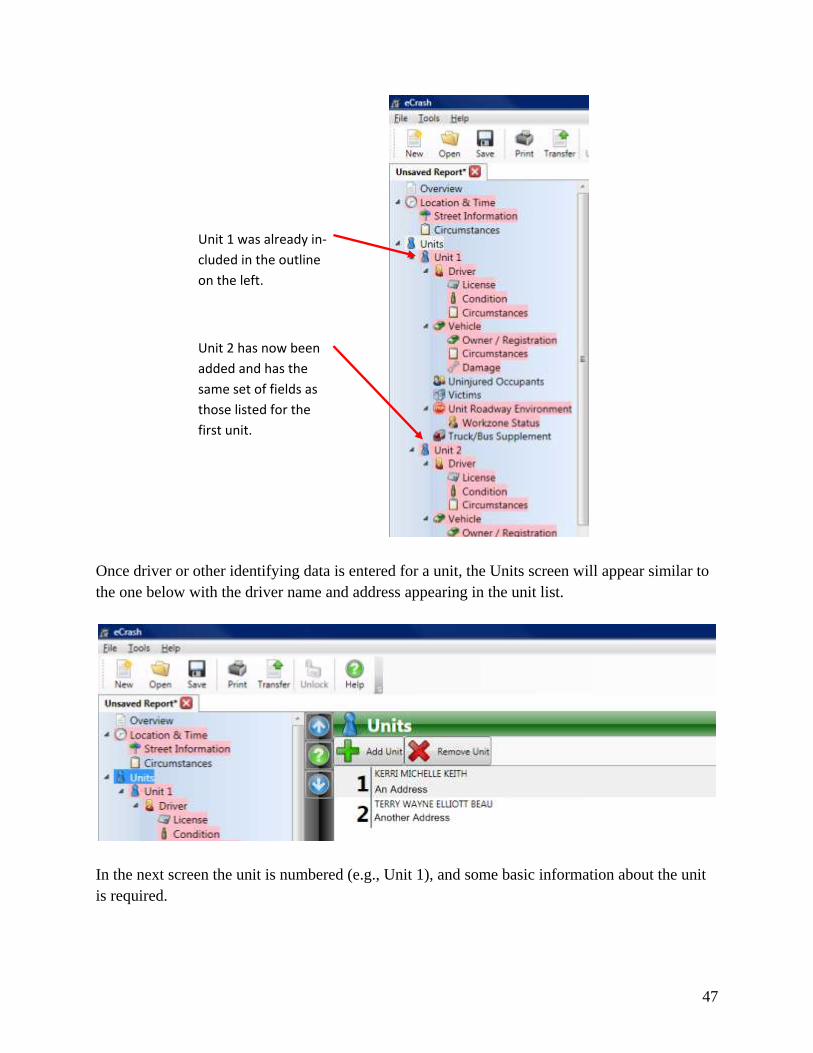
5.3 Units

46
The Units screen (shown below) is used to “create” units and to view summary information
about these units. Before completing information on the individual units, this screen will be ba-
sically blank. In the screen below you will see that there is a blank for Unit 1, but no information
is shown for that particular unit.
As you begin entering information, this screen will show key information for a particular unit. If
the crash involved other units, they can be added at this point by clicking the “Add Unit” button.
If for some reason too many units are created in error, click the “Remove Unit” button. These
buttons are found at the bottom of the unit summary.
When a unit is added to the crash report, an additional unit and all of its subsections will be add-
ed to the outline on the left side of the screen.
Click here to add a unit
to the crash form.
Click here to delete the
selected unit from the
crash form.
47
Once driver or other identifying data is entered for a unit, the Units screen will appear similar to
the one below with the driver name and address appearing in the unit list.
In the next screen the unit is numbered (e.g., Unit 1), and some basic information about the unit
is required.
Unit 1 was already in-
cluded in the outline
on the left.
Unit 2 has now been
added and has the
same set of fields as
those listed for the
first unit.

48
This screen will be repeated for each of the units in the crash. Note that the unit type is required.
Units may either be motor vehicles or non-motorists, and the various types are given in this
dropdown menu. Certain rules are important to note at this point:
The at-fault or causal unit, defined by the unit associated with the primary harmful
event must be either Unit 1 or Unit 2; one of these two must be chosen as the causal
unit in subsequent screens;
If there is a non-motorist involved in the crash, a motor vehicle must be in the Unit 1
position, and the non-motorist must go in the second or subsequent unit position.
In addition to the overall unit section, the following subsections of the crash report exist for each
unit:
Driver/Non-Motorist
o License
o Condition
o Circumstances
Vehicle
o Owner/Registration
o Circumstances
o Damage
Non-Motorist (if applicable)
Uninjured Occupants
Victims
Unit Roadway Environment
o Workzone Status
You will need to
fill out all
of the fields on
this screen be-
fore moving to
the Driver in-
formation for
the first unit.
If the unit is a Commercial Vehicle
and will require a Truck/Bus sup-
plement form, be sure to select the
correct option from this list.

49
Truck/Bus Supplement
Driver and Vehicle subsections will be considered within the following two sections and their
subsections. Uninjured Occupants, Victims, Unit Roadway Environment and Truck/Bus Sup-
plement will each have their separate sections.
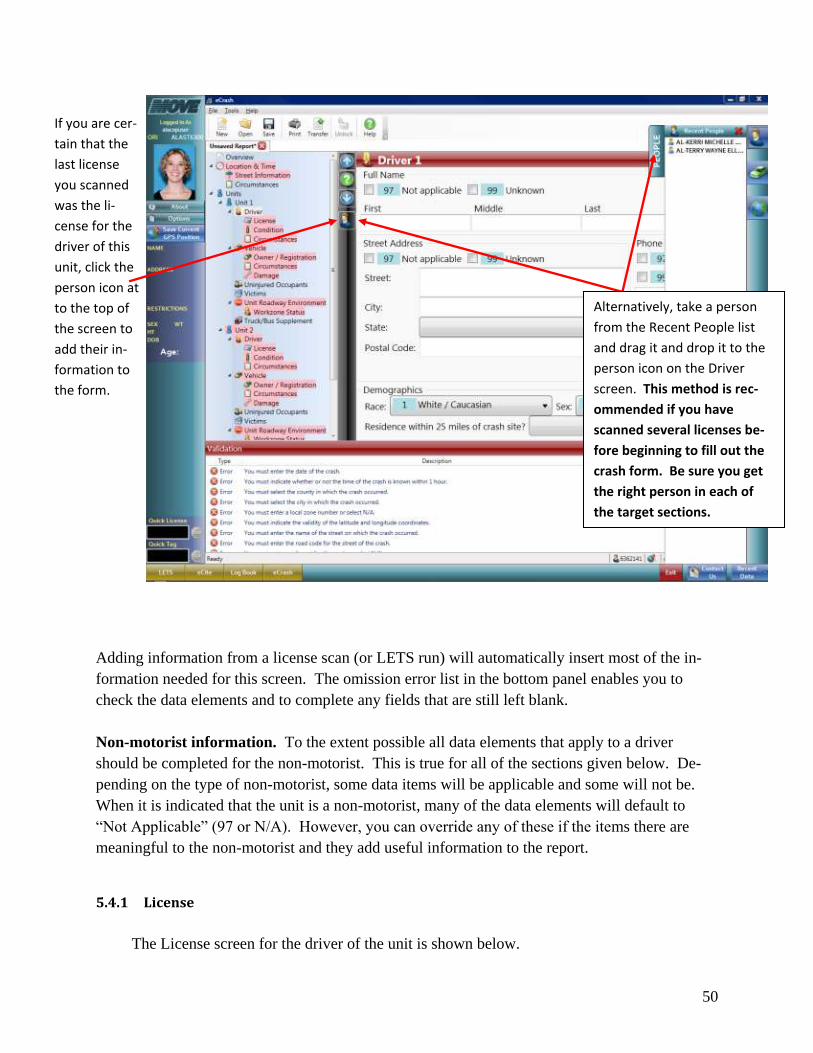
5.4 Driver/Non-Motorist
Once in the Driver/Non-Motorist screen, the basic fields shown below will need to be completed
for the driver or the non-motorist that corresponds to the unit. The license scanner and LETS
information can greatly facilitate this process, but if they are not available, these data elements
can be completed manually.
Notice that the Person icon is highlighted or lit up, indicating that you can bring in Recent Person
information into this section of the crash form. In order to insert Recent Person information, ei-
ther click directly on the Person icon at the top of the Driver screen (if you are sure that you last
license scan or LETS run was for the individual you want to include as the driver for this unit) or
drag and drop from the recent person list to this point on the screen.
50
Adding information from a license scan (or LETS run) will automatically insert most of the in-
formation needed for this screen. The omission error list in the bottom panel enables you to
check the data elements and to complete any fields that are still left blank.
Non-motorist information. To the extent possible all data elements that apply to a driver
should be completed for the non-motorist. This is true for all of the sections given below. De-
pending on the type of non-motorist, some data items will be applicable and some will not be.
When it is indicated that the unit is a non-motorist, many of the data elements will default to
“Not Applicable” (97 or N/A). However, you can override any of these if the items there are
meaningful to the non-motorist and they add useful information to the report.
5.4.1 License
The License screen for the driver of the unit is shown below.
If you are cer-
tain that the
last license
you scanned
was the li-
cense for the
driver of this
unit, click the
person icon at
to the top of
the screen to
add their in-
formation to
the form.
Alternatively, take a person
from the Recent People list
and drag it and drop it to the
person icon on the Driver
screen. This method is rec-
ommended if you have
scanned several licenses be-
fore beginning to fill out the
crash form. Be sure you get
the right person in each of
the target sections.

51
Some of the information on this screen will already be completed if the Recent Person in-
formation was used in completing the previous screen. Go in and complete the remaining
fields in the license information screen using the omission errors to assure that all items are
completed.
The Restriction Violations and Endorsement Violations fields allow for multiple items to
be entered. The following process should be used:
Select an item from the list.
Click the button to add that item to the list.
Rearrange the order of the items by selecting an item on the list and using the
up and down arrows . Be sure that you order the items so that those
that have most relevance to the crash are at the top.
To remove an item from the list, select it and click the icon.
This process is illustrated below.

52
The fields selected on this screen above are for a driver from the state of Alabama with a
suspended license. The driver also is required to use corrective lenses.
5.4.2 Condition
The conditions section contains information specific to the driver of the unit. Some of the
fields on this screen are text entry while others have a drop down list or check boxes.
Select an
item from
the list to
add a Re-
striction
Violation
Use these check
boxes if none of the
codes from the
dropdown lists apply.
Use these buttons to add an
item to the list, to move an
item up or down in priority
in the list, or to delete an
item from the list.
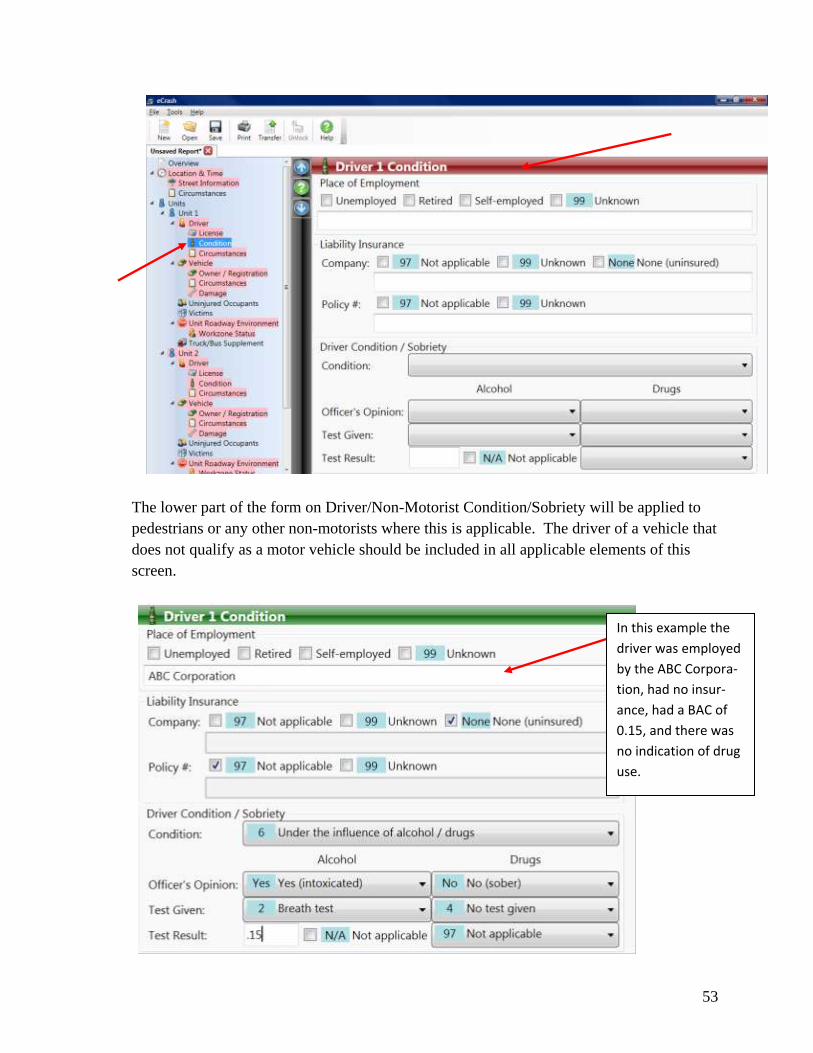
53
The lower part of the form on Driver/Non-Motorist Condition/Sobriety will be applied to
pedestrians or any other non-motorists where this is applicable. The driver of a vehicle that
does not qualify as a motor vehicle should be included in all applicable elements of this
screen.
In this example the
driver was employed
by the ABC Corpora-
tion, had no insur-
ance, had a BAC of
0.15, and there was
no indication of drug
use.

54
5.4.3 Circumstances
The fields included in the Circumstances screen are fields that deal with the circumstances
surrounding the driver for the unit in question.
The Circumstances screen for the unit is the final subsection under the Driver/Non-
Motorist heading. When this is completed the next screen will cover Vehicle information
for the unit.

55
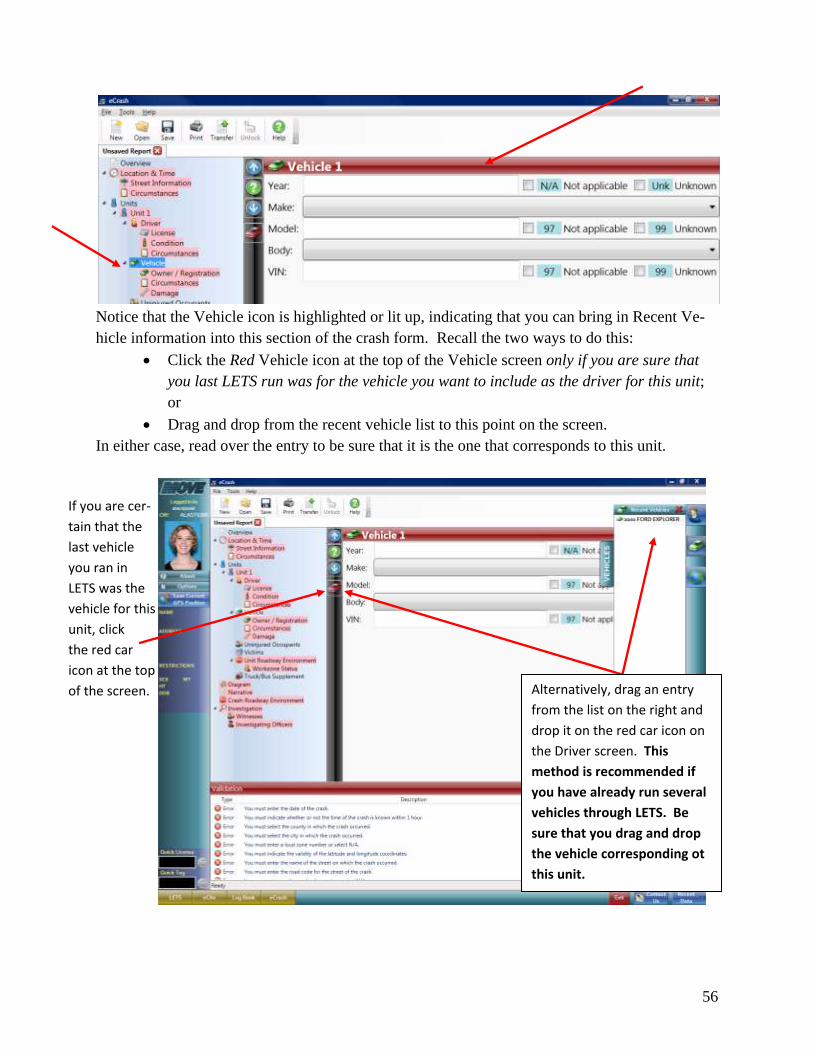
5.5 Vehicle Information
There is a main Vehicle screen and three screens under it. The Vehicle screen contains some
basic information about the vehicle for the particular unit under consideration. Note that the unit
number is carried throughout, so as long as that unit number remains the same, it will provide
vehicle information for the unit that matches the person information given in the sections above.
Some of this information may be readily accessible through LETS information. If you do not
have LETS access or the vehicle is from another state, complete all of the information using the
hard copy registration information provided by the drivers.
The fields selected
here are for a driver
who was traveling
North on Highway
69. The driver
crossed the center-
line and hit vehicle 2
in a head on colli-
sion.
NOTE: If there are not four actions
that can describe the Sequence of
Events, select “97 – Not Applicable”
for the remaining events. All fields
require some entry.
56
Notice that the Vehicle icon is highlighted or lit up, indicating that you can bring in Recent Ve-
hicle information into this section of the crash form. Recall the two ways to do this:
Click the Red Vehicle icon at the top of the Vehicle screen only if you are sure that
you last LETS run was for the vehicle you want to include as the driver for this unit;
or
Drag and drop from the recent vehicle list to this point on the screen.
In either case, read over the entry to be sure that it is the one that corresponds to this unit.
If you are cer-
tain that the
last vehicle
you ran in
LETS was the
vehicle for this
unit, click
the red car
icon at the top
of the screen. Alternatively, drag an entry
from the list on the right and
drop it on the red car icon on
the Driver screen. This
method is recommended if
you have already run several
vehicles through LETS. Be
sure that you drag and drop
the vehicle corresponding ot
this unit.

57
After pre-populating the fields as indicated above, check the omission errors at the bottom of the
screen to complete any fields that are still blank. At that point, move on to the three subsections
under the Vehicle/Non-Motorist.
5.5.1 Owner/Registration
The Owner/Registration section under the major Vehicle heading portion of the form is
given below. Much of this screen could already be pre-populated from LETS. However, if
you were not able to bring information over from LETS, it will need to be completed from
the hard copy registration information provided by the drivers.
If the Vehicle owner is not the same as the driver, change/correct the Vehicle Owner in-
formation at the top of this screen by un-checking the “Same” block at the top of the
screen. You may also need to correct some vehicle license tag information at the bottom of
this screen, so this should be checked over carefully.
5.5.2 Circumstances
The Circumstances screen within the Vehicle portion of the crash form is given below.

58
Most of the entries utilize dropdown lists in order to speed up the entry process. Some of
the fields will be “grayed out” automatically if generally they do not apply. For example, if
the vehicle is a personal vehicle (and not a commercial vehicle), fields such as Emergency
Status and the Hazardous material fields will be grayed out. However, if for some reason
these fields do apply, these “97 Not applicable” default entries may be overridden.
The example given here
is for a personal vehicle
with no attachment
and no contributing
defects. The driver was
traveling 80 mph on a
45 mph roadway, driv-
ing with a suspended
license and charged
with that by the officer.

59
5.5.3 Damage
The Damage subsection for the Vehicle is given below.
One notable change from the previous crash form is the more detailed vehicle damaged ar-
eas – there are now 12 areas around the car (similar to the clock, which is quite often used
to indicate direction). Multiple entries are allowed for damage areas; see below.
This is the final subsection of the Vehicle part of the report. The unit may contain occu-
pants either uninjured or injured (documented in the “Victims” section).
In this example the vehicle was
severely damaged to the point
of having to be towed. It was
towed by ACME Towing to the
City Lot. The damage done to
the vehicle was limited to sec-
tions 11, 12 and 01 (the sections
highlighted in yellow). The point
of initial impact was the front
section (or section 12).
Clicking an area
will turn the
number yellow
to indicate that
it was selected.
In this example,
sections 11, 12
and 01 are se-
lected as dam-
aged areas.

60
5.6 Non-Motorist
The Non-Motorist section contains information that is only pertaining to units that are described
as non-motorists. If you do not choose your unit type as non-motorist, you will not see this sec-
tion.
5.7 Uninjured Occupants
Bypass this section if there were no uninjured occupant in the unit vehicle. If there were unin-
jured occupants (including the driver), one of these sections of the report will be required for
each one in the unit. Uninjured occupants in other units get documented within their respective
units. It is critical to keep all occupants identified within their respective units.
Click here to add one or more
uninjured occupant to the list.

61
To add an uninjured occupant, click the “Add Occupant” button at the bottom of the uninjured
occupant screen as shown above. After you add an occupant, notice that the outline of the crash
form adds a screen for that (uninjured) occupant. Injured occupants (victims) including the driv-
ers if injured, should not be added at this point. They will be documented in the Victims section
for each unit.
The screen for each uninjured occupant screen is given below.
There are some additional data items required that were not on the old crash report form. These
data items are essential to obtaining some extremely important information, e.g., being able to
compare injured with uninjured occupants to see the effectiveness of restraint use for various age
groups.
A screen is added for each uninjured
occupant in the unit.

62
A completed uninjured occupant page should look similar to the one above. Add as many unin-
jured occupants needed for the unit under consideration.
GENERAL NOTE: When you have finished completing the Uninjured Occupants section and
the Victims section (described below) of a unit, it must include an entry for every person in that
unit. This will include the driver of the unit and all passengers of the unit. If the unit is a non-
motorist entity, it will include every person associated with that unit as well (e.g., pedestrians,
bicyclist etc.). Every individual of the unit will be accounted for in either the Uninjured Occu-
pants‟ or the Victims‟ screens, depending on whether or not they are injured. If the crash in-
volves multiple units, then they will all be documented within their respective units. In this way
every person involved in the crash will be documented as either an uninjured occupant or a vic-
tim.
5.8 Victims
Victims can be viewed as being totally comparable to non-injured occupants in every sense ex-
cept that there are a few more data elements that are required to document the medical aspects of
the victim injury. Adding victims‟ pages is comparable to adding non-occupant pages, as indi-
cated below.
This example is for an
uninjured passenger in
the back seat (passenger
side) of Vehicle 1. The
occupant was a female
between the ages of 16
and 20. She was wearing
a lap and shoulder belt
and the airbag deployed.
She was not ejected from
the car at the time of the
crash.

63
As with the uninjured occupants, after adding a victim, the outline of the crash form will be mod-
ified to indicate each victim that is added to the unit. A separate page (called Details) is also
added for each victim.
The first screen (labeled “Victim i”) is shown below. Here i = 1, 2, 3, … depending on the vic-
tim number within the unit.
Click here to add one or more
victims to the list.
A screen is added for each victim in the
unit. We have added one victim for
Unit 1. Note the Details page that is
added as well.

64
With the exception of “Injury Type” and “First Aid By”, this information is the same as that
gathered for Uninjured Occupants.
Once the Victim screen is completed, go on and complete the Details portion (or the second por-
tion) of the victim information. Do these together to keep them from getting disassociated – it is
critical that both pages reference the same victim.
It is possible to utilize the license scanner or LETS information to pre-populate some of the in-
formation for the victim. Notice that the Person icon is highlighted or lit up, indicating that Re-
cent Person information can be copied into this section of the crash form. In order to copy Re-
cent Person information in, either
Click directly on the Person icon at the top of the Victim screen (only if you are sure
that you last LETS run was for the person you want to include as the driver for this
unit); or
Drag and drop from the recent person list to this point on the screen.
In either case, proof and be sure that the person moved in is exactly the right person being de-
scribed in this part of the report.

65
A completed victim page should look similar to the one above. You can add as many victims as
are needed for the unit in question, and this will be reflected on the Victims main page. As an
example, if you added two victims to a unit‟s information, the Victims main page would look
like the following.
GENERAL NOTE: When you have finished completing the Uninjured Occupants section and
the Victims section (described below) of a unit, it must include an entry for every person in that
unit. This will include the driver of the unit and all passengers of the unit. If the unit is a non-
If you are cer-
tain that the
last person
you ran with
the license
scanner or
LETS was this
victim, click
the person
icon at to the
top of the
screen to add
that person
information to
the form.
Alternatively, take a person
from the Recent People list and
drag it from the list and drop it
on the person icon in the Vic-
tim Details screen. This meth-
od is recommended if you
have run several people
through the license scanner or
through LETS before beginning
to fill out the crash form.
66
motorist entity, it will include every person associated with that unit as well (e.g., pedestrians,
bicyclist etc.). Every individual of the unit will be accounted for in either the Uninjured Occu-
pants‟ or the Victims‟ screens, depending on whether or not they are injured. If the crash in-
volves multiple units, then they will all be documented within their respective units. In this way
every person involved in the crash will be documented as either an uninjured occupant or a vic-
tim.
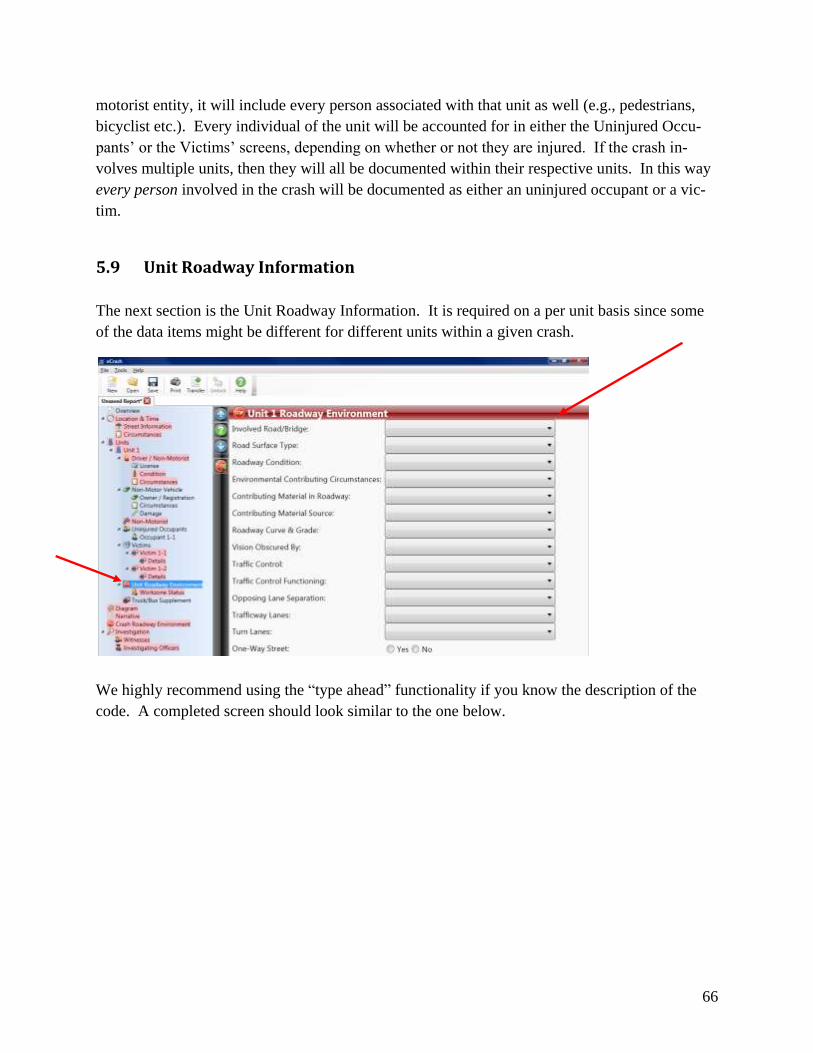
5.9 Unit Roadway Information
The next section is the Unit Roadway Information. It is required on a per unit basis since some
of the data items might be different for different units within a given crash.
We highly recommend using the “type ahead” functionality if you know the description of the
code. A completed screen should look similar to the one below.

67
Note the Stop icon . This icon will allow you to import the Unit Roadway Environment
data from another unit. Usually this data does not change between units, so this makes it easier
to complete the form.
5.9.1 Workzone Status
Workzone Status screen is the sub section in the Unit Roadway information section. This section
describes the details pertaining the crash happening within a workzone or not.
This example is for a dry, asphalt road.
The location of the crash did not in-
volve a bridge. No environmental con-
ditions contributed to the crash, and
the road took a slight curve to the left.
The driver’s vision was not obscured
and there was no traffic control at the
point of the crash. The crash occurred
on a two lane road with no turn lanes,
and with solid painted lines separating
the two lanes.

68
5.10 Truck/Bus Supplement
This section is only completed if a truck/bus supplement is required, i.e., if the unit qualifies as
requiring a Truck/Bus Supplement. There could be several units that qualify (trucks sometimes
hit other trucks).
Depending on the information completed thus far on the crash form, the eCrash program will at-
tempt to make a determination as to whether or not a Truck/Bus supplement is required for the
unit in question. This determination is based on data that you entered in the Unit field such as
the answer to “Is this unit a commercial vehicle?” Obviously it is essential that the relevant
questions have been completed for the eCrash to assess this properly. Check your omission er-
rors to see if there are data elements from back pages that need to be completed.
If the eCrash program does not believe that you require a truck/bus supplement, you should see a
screen that looks like the following:
If the eCrash program believes that you do require a truck/bus supplement, you will see a screen
that looks like the following:
To add a Truck/Bus Supplement to this unit, click the “Add Truck/Bus Supplement Sheet.” The
Truck/Bus supplement page will be made up of two sections in the crash form outline on the left
side of the screen. These are labeled:
eCrash believes does not believe that
this unit requires a Truck/Bus supple-
ment.
eCrash believes that this unit requires a
Truck/Bus Supplement.
Click here to add a Truck/Bus
Supplement sheet for this
unit.

69
Truck/Bus Supplement; and
Motor Carrier Informationas indicated below.
The first screen (labeled “Truck/Bus Supplement”) is made up of basic information about the
characteristics of the vehicle and the events surrounding the crash for that particular unit. Most
of these fields can be filled out using the dropdown lists provided for the particular field.
If there are not four events that occurred in the Sequence of Events, be sure to add Code 97 for
Not Applicable for the remaining events. A completed version of this sheet should look similar
to the following:
This example is for a truck
between 10,001 and 26,000
pounds not carrying any haz-
ardous materials. The vehi-
cle is classified as a tractor
with a semi-trailer carrying
household goods. The se-
quence of events describes a
vehicle that collides with an-
other vehicle and then runs
off the road.
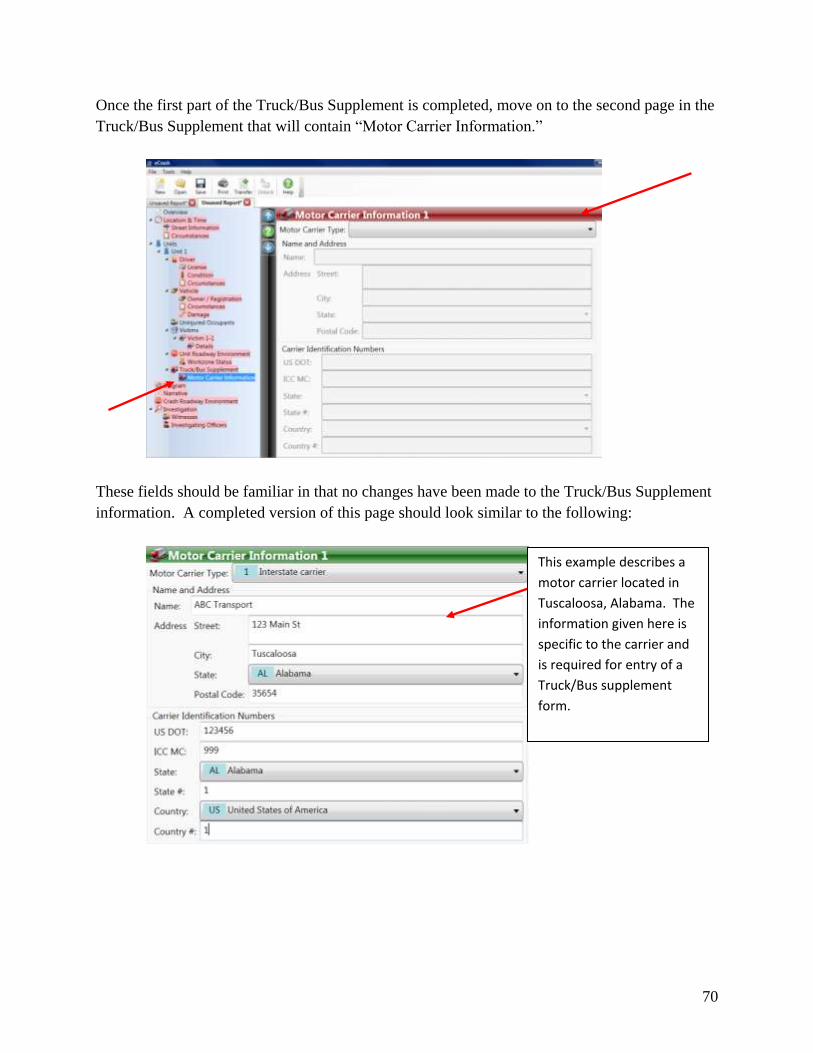
70
Once the first part of the Truck/Bus Supplement is completed, move on to the second page in the
Truck/Bus Supplement that will contain “Motor Carrier Information.”
These fields should be familiar in that no changes have been made to the Truck/Bus Supplement
information. A completed version of this page should look similar to the following:
This example describes a
motor carrier located in
Tuscaloosa, Alabama. The
information given here is
specific to the carrier and
is required for entry of a
Truck/Bus supplement
form.

71
5.11 Diagram
The eCrash program is fully integrated with the Easy Street Draw program, which has been set
up to assist in drawing a crash diagram in a format that can be included in an electronic format.
The Diagram screen is given below. Click the “Load Image…” button to include an image that
was drawn in another program. To start the Easy Street Draw program and draw the crash dia-
gram with that program, click the “Edit Easy Street Draw Diagram...” button.
If you click the “Load Image…” button you will see a screen that looks like the one below. This
allows you to select any image file that is stored on your computer. That image will now be in-
cluded on your crash form. NOTE: while it‟s possible to use a separate image besides Easy
Street, is HIGHLY encouraged that you use Easy Street Draw. Easy Street Draw is installed on
your computer as part of the eCrash client so there should never be a reason to no include a dia-
gram created by Easy Street Draw
Click the “Edit Easy Street Draw Dia-
gram…” button to open the Easy
Street Draw program and start the
diagram of the crash.
Click the “Load Image…”
button to include an im-
age that was drawn with
another program.
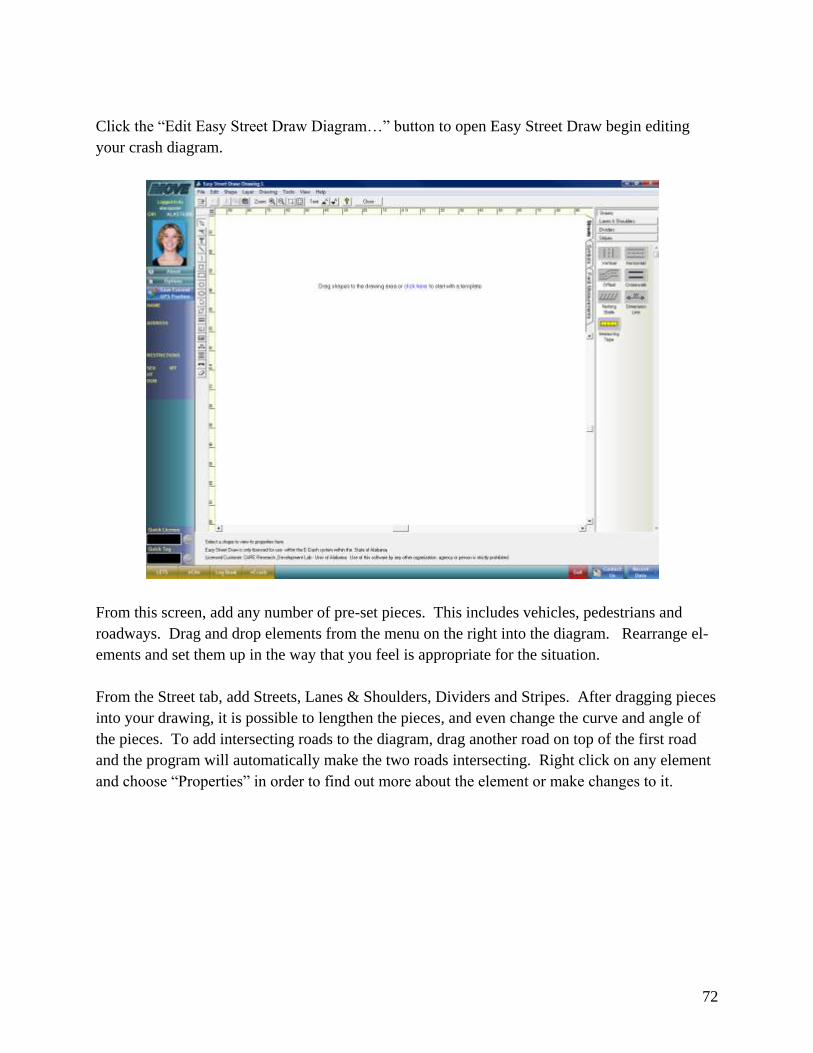
72
Click the “Edit Easy Street Draw Diagram…” button to open Easy Street Draw begin editing
your crash diagram.
From this screen, add any number of pre-set pieces. This includes vehicles, pedestrians and
roadways. Drag and drop elements from the menu on the right into the diagram. Rearrange el-
ements and set them up in the way that you feel is appropriate for the situation.
From the Street tab, add Streets, Lanes & Shoulders, Dividers and Stripes. After dragging pieces
into your drawing, it is possible to lengthen the pieces, and even change the curve and angle of
the pieces. To add intersecting roads to the diagram, drag another road on top of the first road
and the program will automatically make the two roads intersecting. Right click on any element
and choose “Properties” in order to find out more about the element or make changes to it.
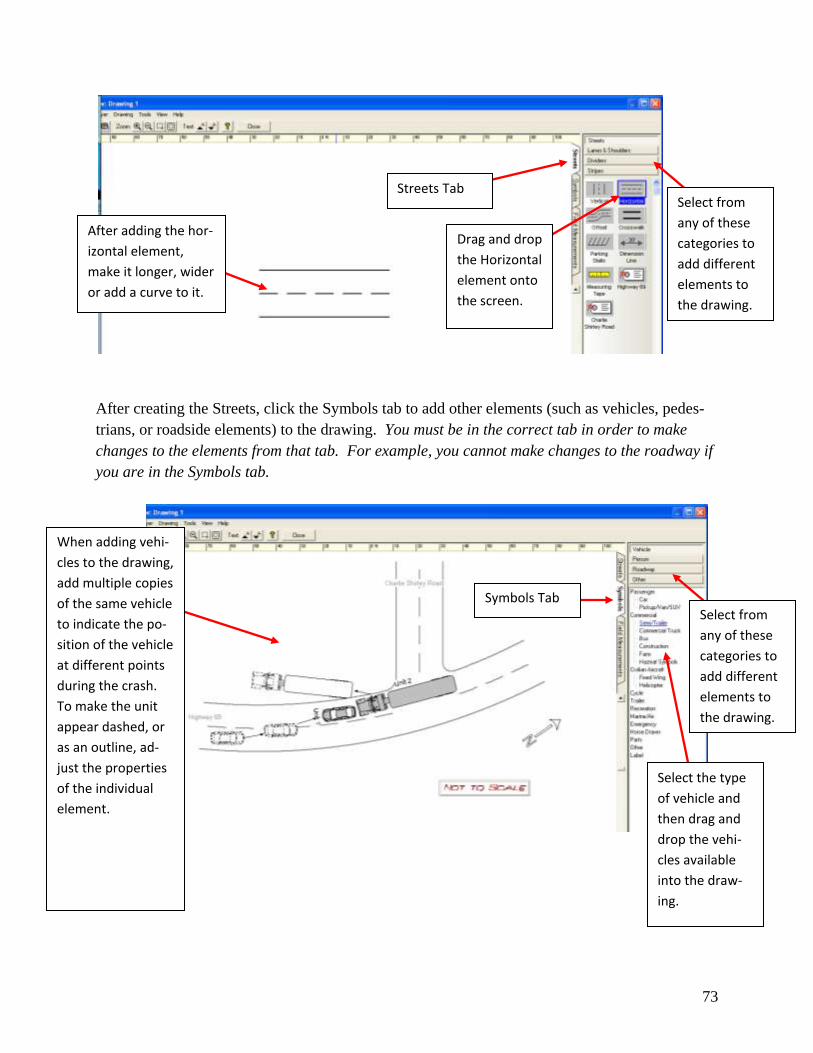
73
After creating the Streets, click the Symbols tab to add other elements (such as vehicles, pedes-
trians, or roadside elements) to the drawing. You must be in the correct tab in order to make
changes to the elements from that tab. For example, you cannot make changes to the roadway if
you are in the Symbols tab.
Streets Tab Select from
any of these
categories to
add different
elements to
the drawing.
Drag and drop
the Horizontal
element onto
the screen.
After adding the hor-
izontal element,
make it longer, wider
or add a curve to it.
Symbols Tab Select from
any of these
categories to
add different
elements to
the drawing.
Select the type
of vehicle and
then drag and
drop the vehi-
cles available
into the draw-
ing.
When adding vehi-
cles to the drawing,
add multiple copies
of the same vehicle
to indicate the po-
sition of the vehicle
at different points
during the crash.
To make the unit
appear dashed, or
as an outline, ad-
just the properties
of the individual
element.

74
Be sure that you label the unit numbers in the diagram.
When satisfied with the drawing, click the “Close” button at the top of the Easy Street Draw pro-
gram to close the Easy Street Draw program and insert the drawing into the crash form.
When you have closed the Easy Street Draw program and added the drawing to the eCrash pro-
gram, the results will look like the following:
It is permissible to edit the drawing at any point prior to submission of the crash form. To go in
and edit the crash diagram, click the “Edit Easy Street Draw Diagram…” button. This will reo-
pen the Easy Street Draw program where you can make changes or additions to the drawing.
5.12 Narrative
The Narrative is a fairly straight forward section of the crash form. Once moving into this sec-
tion, begin typing in the space available.
Click the “Close” button to close the
Easy Street Draw program and add
the drawing to the eCrash program.
This example diagram shows Vehicle 1 traveling
down the road and crossing the centerline. Up-
on crossing the centerline Vehicle 1 strikes Ve-
hicle 2 head on. This causes Vehicle 2 to run off
the road.

75
The text that you enter will be spell checked as you type, so be sure to correct any spelling errors
that may show up. These will be indicated with a red line under the misspelled word.
Once satisfied with the narrative you have entered, you are ready to move into the Crash Road-
way Environment section of the crash form.
5.13 Crash Roadway Environment
The Crash Roadway Environment section includes a few fields that need to be completed. These
fields apply to the crash as a whole and not to the individual unit.
The narrative given describes the situa-
tion shown throughout the example
given in this manual.

76
The following is an example of a completed Crash Roadway Environment section.
Once these entries are completed, you are ready to move to the final section of the crash form.
5.14 Investigation
The first portion of the Investigation screen includes information on the Photographer, time of
police notification and non-vehicular property damage.
This example describes a dark, unlit road in
clear conditions in a residential area. No
police were present when the crash oc-
curred, and a RR was not involved.
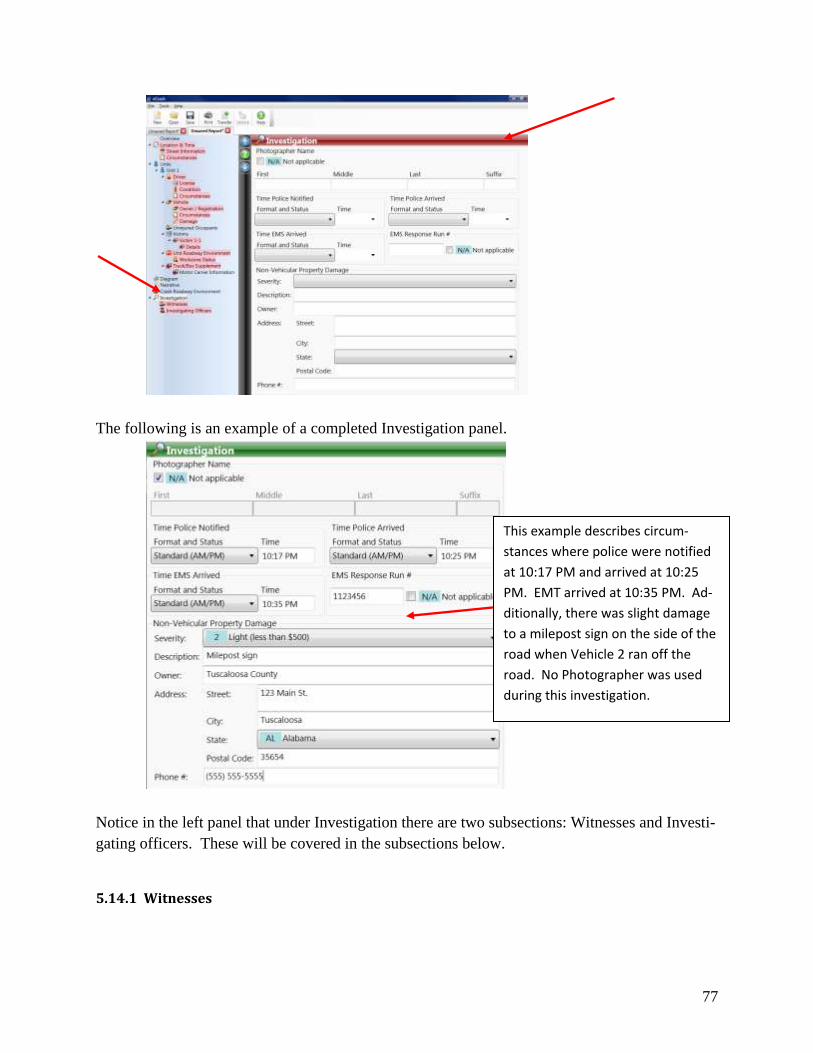
77
The following is an example of a completed Investigation panel.
Notice in the left panel that under Investigation there are two subsections: Witnesses and Investi-
gating officers. These will be covered in the subsections below.
5.14.1 Witnesses
This example describes circum-
stances where police were notified
at 10:17 PM and arrived at 10:25
PM. EMT arrived at 10:35 PM. Ad-
ditionally, there was slight damage
to a milepost sign on the side of the
road when Vehicle 2 ran off the
road. No Photographer was used
during this investigation.

78
The Witnesses section allows entry of information about any witnesses who might have
seen the crash. For this particular screen enter the information for the individual either
manually or use the license scanner to scan their license and drag and drop it onto the icon.
To include information about a witness from a previous license scan, first change the field
for “Is Applicable” to “Yes,” and then drag and drop information from the Recent People
list as described above.
A completed Witnesses screen for one witness to the crash should look similar to the screen
below:

79
5.14.2 Investigating Officers
The Investigating Officers section requires very little input at this point. Much of the in-
formation here will be pre-populated based on the login of the officer using the eCrash sys-
tem.
One witness by the name of
John Doe was available for this
crash.

80
Complete any missing information for the Primary Investigating Officer such as “Rank.” If
another officer was involved in the investigation, enter their information in the “Other In-
vestigating Officer” section of this screen.
An example of a completed version of the Investigating Officers screen is shown below.
This form was completed by
Sgt. John Rambo from the
Tuscaloosa Trooper Post.

81
6 ECRASH PROCEDURES
6.1 Validating
Once you finish every section of the crash form, there will probably still be a number of errors
and warnings listed at the bottom of the screen.
Before you can submit a crash form to your supervisor for approval you must resolve ALL Er-
rors. Warnings should also be considered, but they are merely suggestions and they do not have
to be corrected before the form can be submitted. Note the following considerations:
All Errors and Warnings are
listed at the bottom of crash
form.

82
1. Errors are listed in the order of the various screens within the eCrash program. If you
begin at the top of the Validation list, you will find the errors from the first sections of
the crash form.
2. Move to the top of the list and begin working your way through each error on the list.
As you resolve an error, it will immediately disappear from the list under the Valida-
tions heading.
3. When you are finished correcting the errors, the list at the bottom of the screen will
include no messages (or Warnings only), similar to the list seen below.
6.2 Saving Crash Forms
Once you have resolved all of the errors, you are ready to save and transfer your crash form.
Apply the following process to save the form:
1. In order to save the crash form, click the Save button at the top of the eCrash program
or click File Save or Ctrl + S.
2. All crash forms that have been changed since they were last saved will be shown with
an asterisk (*) next to the Crash form name. If you see an asterisk you need to be
sure to save the form before closing it.
3. It is recommended that you save the form throughout the process of completing the
crash form. If your computer were to crash, any data that you had entered but not
saved would be lost. It is best to get in the habit of saving the crash form every few
minutes.
6.3 Transferring

83
Once you have completed and saved your crash report, you will need to transfer it so that the re-
port can be reviewed and approved by your supervisor. Use the following procedure for trans-
ferring the crash report:
1. When ready to transfer the crash form, first ensure that your Internet connection is
functioning. Any type of internet connection is acceptable (dial-up, LAN, Wifi, etc).
2. Make the report that you wish to transfer current, and then press the Transfer button
at the top of the page or click File Transfer.
3. A pane that looks like the one below will appear. This lets you know that your form
is being transferred.
4. When your forms transfer successfully you will be notified to the fact that your forms
have been transferred. If for some reason your forms did not transfer correctly (pos-
sibly because you were not connected to the internet) you will see a screen that looks
like the one below.
5. If your forms did not transfer correctly, you will need to try and communicate your
forms again as soon as possible.
6. Once your crash forms have been transferred, they will show up in your supervisor‟s
online system for review and approval. Please refer to Appendix A for more infor-
mation about the eCrash Website.

84
7. If your report is rejected for some reason it will be sent back to you for correction or
amendment. You will be alerted to the fact that you have a form waiting for correc-
tion by looking at the bottom right of the eCrash program.
For more information on how to open a report to make an error correction, please
see section 3.4.
6.4 Printing
In order to print a crash report from the eCrash program, several criteria must be met:
1. The report itself must first be approved by the supervisor.
2. Your computer must have an internet connection.
3. Open the crash form and click on the Print button (alternatively: click File Print.
The eCrash system will go to the DPS crash record repository via the Internet to download the
crash report and print it. Please note that it may take up to 24 hours to view a printable crash re-
port that is not approved and up to 72 hours (or the time it takes for a supervisor to approve the
crash report) to view and print an approved crash report.
If an officer has any
forms that need to cor-
rected or amended,
that will be indicated
here at the bottom
right of the
eCrash program.

85
7 MOVE CONSIDERATIONS
7.1 The “About” Button in MOVE (Checking for Updates)
Clicking the “About” button on the left side of the MOVE system (just underneath the picture)
, will show a screen that contains a list of software systems similar to the fol-
lowing:
This shows you the version of various programs that are on your system, and it gives easy access
to the CRDL website and a link for sending questions, comments or suggestions.
Check for Updates. Probably the most commonly used button, it can be clicked whenever you
have an internet connection, to check for and download any program updates that are available.
This ensures that you are always using the latest version of eCrash and MOVE. Please note that
you might not have all the applications above. That is ok. This shows a list of all the applica-
tions that are installed from CRDL.

86
7.2 The “Options” Button in MOVE
Clicking on the “Options” button on the left side of the MOVE system (just underneath the pic-
ture and below the About button) , will show a screen that contains a variety
of system and user options similar to the following:
On the left panel of this screen you will see one or more software systems; possibilities are:
MOVE, eCite, eCrash and Log Book. The screen above lists only MOVE, and for MOVE there
are two categories: Unit Options and User Settings. The Unit Options Screen is given in the
right panel.
UNIT OPTIONS
Unit Type. “Unit” in this context is referring to the type of computer upon which the software
under question is installed. This is set at installation time and will not need to be changed unless
it was not set up properly or somehow got re-assigned.
Picture Box Settings. This option applies to the picture seen at the very top left of MOVE, and
it is a matter of your personal preference.
LETS Quick Search. This has the following options:
Run on Alabama License Scan. If this is checked, LETS will automatically open and
run when you perform a license scan. This will enter a LETS result into your recent
data but it will not open the full LETS search results.
Display Full LETS Web Page. If you want to see the full LETS output check this op-
tion.

87
Either of these options require your LETS 3 (or AlaCOP) username and password. This can be
done under MOVE: Options MOVE User Settings (see below).
NOTE: Some of these changes will not take effect until you restart the MOVE program.
USER SETTINGS
The User Settings screen under the MOVE Options is shown below.
Check all agencies on the list that apply to you (i.e., for which you might be completing an
eCrash report). This selection will affect the agency choice list that is available when you logon
to the MOVE system. Be sure to select any agency that you might work under.
If you are completing a report under one agency and need to complete a second one under anoth-
er agency heading, it will be necessary for you to log out and back in choosing the second agen-
cy when you do. It is very important to be logged in under the right agency because this agency
information gets transferred to the crash report and it cannot be overridden.
Your LETS Username and Password must also be entered on this screen. This will store them
and prevent you from having to re-enter them every time you run a license scan, Quick License
Search or Quick Tag Search.
7.3 Navigating MOVE and eCrash

88
MOVE and eCrash are set up for either mouse or keyboard navigation. Hot keys are used to
navigate with the keyboard. Commands such as “File” have these indicated by the first letter of
the word being underlined (e.g., File, as seen below.)
To use hot keys press the Alt key and the corresponding underlined letter. For example, to ac-
cess the file menu, you would press Alt + F and the items on the File Menu will appear. To ac-
cess any of the options under one of these hot keys, press the underlined letter in the command
you want to perform. For example, to save a crash form, hit Alt + F to see items under the file
menu, and then hit S to save the crash form.
Note: If you do not see the hot keys (where one letter is underlined) as seen in the graphic above,
you will need to hit the Alt key on your keyboard. This should cause the hot keys to appear in
the eCrash program.

89
8 REVIEW AND FEEDBACK
8.1 Review of Menus
This section presents an overall review of the menus available within eCrash.
File Menu:
File New – Opens new crash form. This crash form will be blank, except for the default val-
ues.
File Open – Opens an existing crash form. This allows any crash form that has been previ-
ously saved on your computer to be opened.
File Close – Closes the current crash form.
File Save – Saves the current crash form. A form can be saved at any point during the pro-
cess of completing the form and at the end of the process.

90
File Print – Opens the print menu. An Internet connection is required for printing, and you
cannot print a form that has not been approved by your supervisor.
File Transfer – Transfers the current crash report. The report must be error free before the
report can be transferred.
File Unlock – Unlocks the current crash report if the report is locked. A report is only locked
if the report has been transferred.
File Exit – Closes the eCrash program.
8.2 Review of Shortcuts
At the top of the main page in the eCrash program:
New Crash
Form
Save
Unlock Form for
Amendment
Open Crash Form
Transfer
Void
Help

91
New Crash Form – Clicking on the New icon produces a new crash form. This form will be
blank, except for the default values.
Open Crash Form – Opens an existing crash form. This allows any crash form that has been
previously saved on your computer to be opened.
Save – Saves the crash form that is currently active.
Print – Once a crash form has been approved by the supervisor the officer has the option to print
the crash form. In order to print a crash form the officer must also have an internet connection so
that the eCrash program can ensure that the crash form has been approved by the supervisor.
Transfer – Transfers all completed crash forms that are free of errors for supervisory approval;
requires an Internet connection.
Unlock – Allows you to open a crash form that requires an amendment or error correction. This
button must be clicked in order to make an amendment or error correction to a crash form.
Help – Allows you to open the Data Element Manual. This is where all the data elements are
explained in details and is the best source for finding information about any data element on the
crash form.
At the bottom of the main page in the MOVE program:
The buttons seen at the bottom of the MOVE program indicate which programs you have in-
stalled on your computer. Clicking these buttons will invoke the respective programs.
LETS – Pulls up or minimizes the LETS webpage.
eCite – Pulls up or minimizes the eCite electronic citation program. Used in combination with
the LETS button, you can toggle between the two programs.
Log Book – Allows you to record your events for the day and allows you to automatically bring
over the citations and crashes from the day. NOTE: Only DPS officers will have this application
button
eCrash – Pulls up or minimize the eCrash program. This can be used in combination with the
LETS button to pre-populate fields.
Exit – Closes the MOVE program.

92
Contact Us – Brings up a webpage where you can leave feedback about the program or ask
questions.
Recent Data – Causes the Recent Data bar to appear or disappear along the right side of the
screen. Clicking this once will cause the bar to appear with the small icons: man in blue shirt,
green car, and globe. Clicking this button again will cause the bar along the right side of the
screen to disappear.
NOTE:
You might not have all the applications above installed. That‟s ok. If you do not have eCite or
LogBook installed, that will not hinder your ability to use eCrash.

93
From the left and right sides of the main page in the MOVE program when the Recent Da-
ta button is pressed:
Recent People
Searches
Recent Vehicle
Searches About
Quick License Search
Quick Tag Search
License Scan Information
Recent Places
Searches
GPS Data
Saves your current
Location
Options
Login Information

94
Login Information – Shows the login information (username and ORI) used by the officer.
About – Opens the About screen. The officer can Check for Updates and check their version
number from this screen.
Options – Opens the Options screen.
Save Current GPS Position – Clicking this while connected to a GPS sensor will save your cur-
rent position so that it can be moved onto the crash form.
GPS Data – This displays the last GPS coordinates that were saved.
License Scan Information – This shows the basic information for the last license that was
scanned. This includes the name, address, sex, weight, height and date of birth as it appears on
the license.
Quick License Search – Allows entry of a driver‟s license number directly into MOVE. When
you enter a license here it will be searched for in LETS and will appear in your list of recent da-
ta.
Quick Tag Search – This allows you to enter a vehicle license plate number directly into
MOVE. When you enter a license here it will be searched for in LETS and will appear in your
list of recent data.
Recent People Searches – When you click on the icon of the man in the blue shirt, a list of the
most recent individuals that have been searched for will appear. The most recent searches will
be at the top of the list. This list allows you to easily drag and drop an individual from the list
into various points on the crash form. You can also double click on a name on the list and get
some basic information about them.
Recent Vehicle Searches – When you click on the icon of the green car, a list of the most recent
vehicles that have been searched for will appear. The most recent searches will be at the top of
the list. This list allows you to easily drag and drop a vehicle from the list into various points on
the crash form. You can also double click on a vehicle on the list and get some basic information
about the vehicle.
Recent Places Searches – When you click on the icon of the globe, a list of the most recent
places that have been searched for will appear. The most recent searches will be at the top of the
list. This list allows you to easily drag and drop a GPS location into the crash form. You can
also double click on a place in the recent places list to get the complete coordinates for a loca-
tion.

95
8.3 Feedback and Technical Support
Feedback
We want to hear from you! The best way for us to find out about problems with the products is
through the input and the feedback that you give us. No comment or question is out of bounds,
we can all learn from them. We have included a new easier way for you to contact us. By click-
ing on the Contact Us button at the bottom of MOVE, a webpage that looks like the one below
will open.
From this page you can ask us questions or give us comments and suggestions. The information
that you enter will go directly to our staff‟s e-mail box and we will work to address it as quickly
as possible.
Technical Support
If you should encounter difficulties and need technical assistance, please use the following con-
tact information.
E-mail:
Phone:
For further assistance, call us toll-free at: 1-866-349-CARE
Or we can be reached on our Southern LINC phone at: 64*7427 or 205-361-1972

96
APPENDIX A -- eCrash Website
A1 Introduction When a crash report is “transferred” it is sent to the eCrash server. At this point it can be viewed
on the eCrash website for any reviewing that might be required. The site is also the location
where supervisors view and either accept or reject the crash reports.
NOTE: every crash report must be either accepted or rejected from this website. Transferring it
alone from the eCrash client is not sufficient to complete the process. A supervisor must log in
and either accept or reject each of the forms.
The eCrash website allows certain individuals the ability to manage eCrash users as well. There
are three levels of user privileges for the eCrash application as indicated below.
User privileges:
AISO (Agency Information Security Officer) – has the privilege to add eCrash supervi-
sors to his or her agency;
Supervisor – has normal user privileges, but can also accept and reject crash forms trans-
ferred by other users within his or her agency;
Normal User – has privileges to access the website, download content, and view crash
forms
A2 How to Log into the Website To login, make sure you have a valid AlaCOP username and password. This can be obtained
from your AISO. Then, go to http://ecrash.aladata.com where you will see a screen like the one
below. Enter your username and password in the boxes provided. The domain should be set to
ALACOP.

97
Once you click „ENTER‟ a screen with a menu bar will appear as shown below. AISOs have an
additional tab on their menu bar for Administration purposes.
Menu bar icon for normal users and supervisors:
Menu bar icon for AISOs:
A3 Home Page
The home screen is the screen that users will first see when they log into the site. This
view will vary based on what type of user they are:
Normal User – the home page will only show crash reports that he/she has com-
pleted and transferred to the server. If no reports have been transferred, then the
only thing seen will be a blank page with the menu.
Supervisor – all of the pending crash reports from his/her agency that need to be
either accepted or rejected will appear. If there are no pending crash reports, then
the screen will be blank with only the menu showing.
A4 Search Page
The search page allows you to search for any crash report that has been submitted. It
allows you to view the status of a set of crash reports. It also allows you to view a specif-
ic crash report. To Search, enter any piece of information you have on the target crash
report in the appropriate box and click Search. All qualifying crash reports will be listed
on the Search Results dashboard.

98
The auto-fill feature allows you to start typing a search entry and it will give you a set of
possible items to search for. For example is when searching for an Agency or Officers
username, start typing in the appropriate box and it will auto fill for you as indicated be-
low.

99
A5 Agency Page The Agency page is the page to view the overall eCrash website settings for your particu-
lar settings. Normal users will only have the ability to view these settings, while AISOs
have a link to make changes to these settings.
All users have the ability to view the AISOs, supervisors and the overall list of trans-
ferred crash report the user‟s agency, as shown below.

100
The AISO view is the same as the normal user, but it also has a link to change agency
wide settings, as shown below.
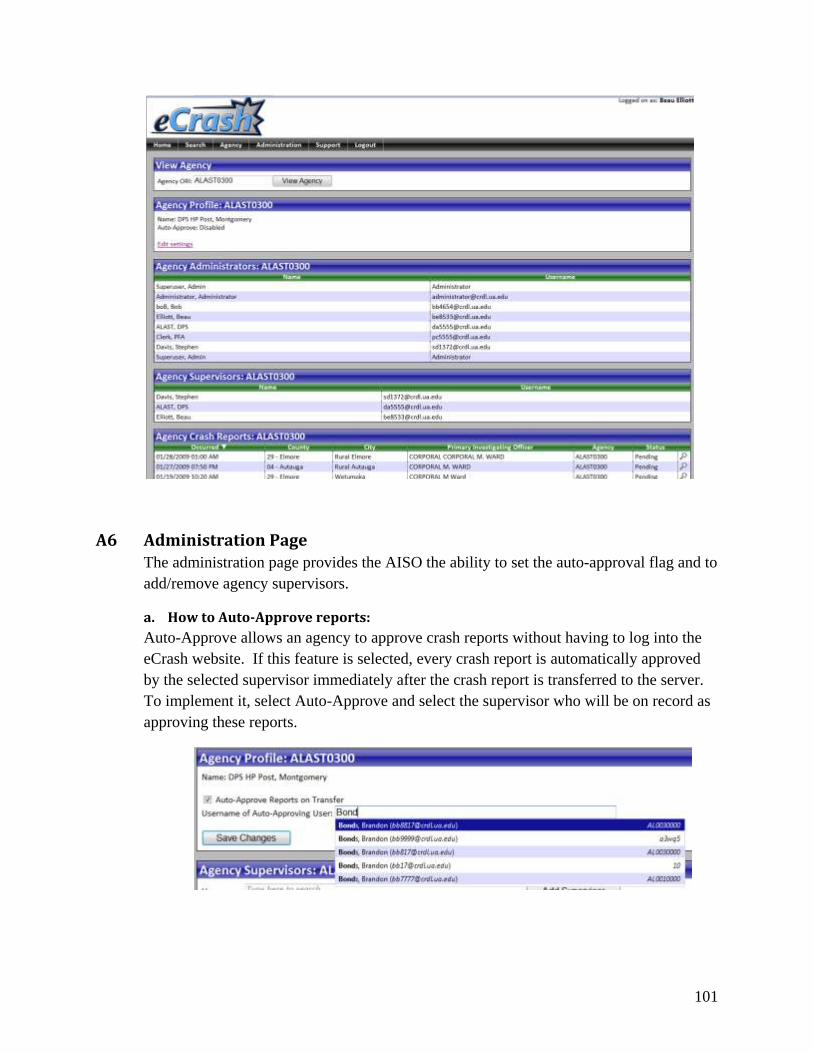
101
A6 Administration Page
The administration page provides the AISO the ability to set the auto-approval flag and to
add/remove agency supervisors.
a. How to Auto-Approve reports:
Auto-Approve allows an agency to approve crash reports without having to log into the
eCrash website. If this feature is selected, every crash report is automatically approved
by the selected supervisor immediately after the crash report is transferred to the server.
To implement it, select Auto-Approve and select the supervisor who will be on record as
approving these reports.

102
b. How to add supervisors
Type in the new supervisor user‟s name (their search results will return under the text box
as you type), and then click “Add Supervisor.”
c. How to remove supervisors
Just click the „X‟ to the right of their name.
A7 Support Page
A8 How to View a Single Crash Report
Click on the magnifying glass to the right of the crash report you want to view.
Once you select the crash report, you will be taken to the “view page” of the crash report.
Here you will have the ability to:
View the history of the crash report (who uploaded the report, who accept-
ed/rejected the report, etc),
View the report in a PDF format,
Reassign the report, and finally
Accept/reject the crash report.
These will be discussed in the subsections below.
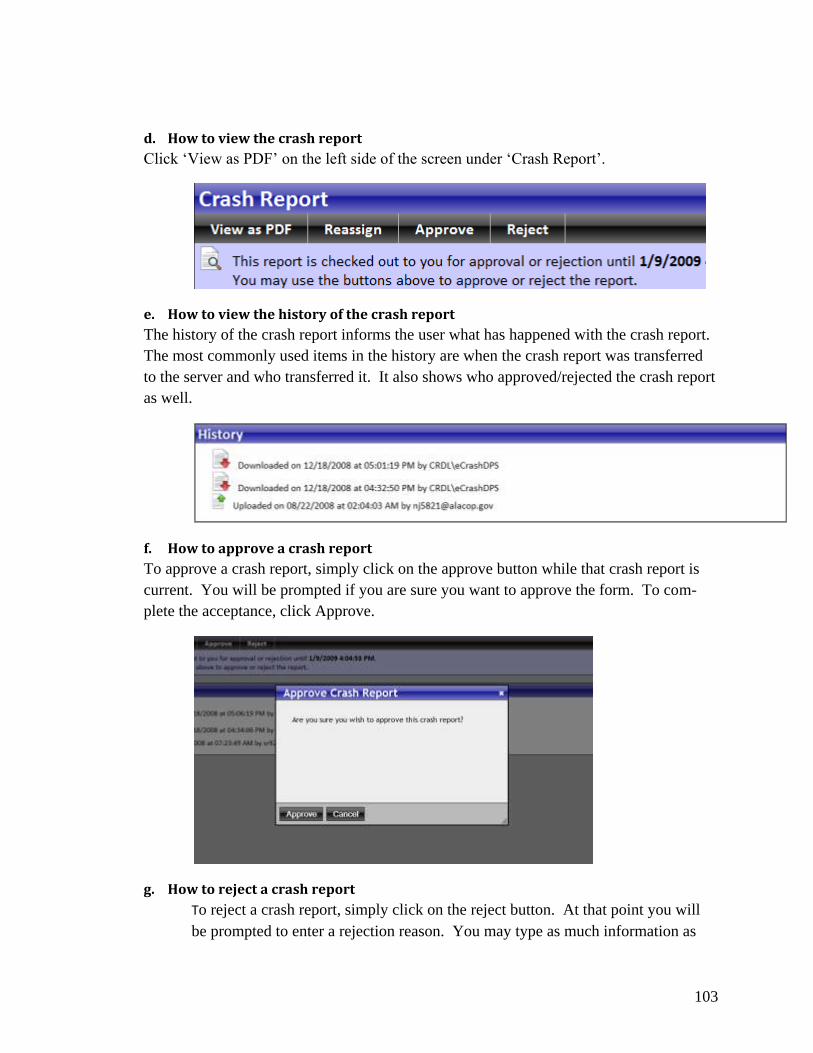
103
d. How to view the crash report
Click „View as PDF‟ on the left side of the screen under „Crash Report‟.
e. How to view the history of the crash report
The history of the crash report informs the user what has happened with the crash report.
The most commonly used items in the history are when the crash report was transferred
to the server and who transferred it. It also shows who approved/rejected the crash report
as well.
f. How to approve a crash report
To approve a crash report, simply click on the approve button while that crash report is
current. You will be prompted if you are sure you want to approve the form. To com-
plete the acceptance, click Approve.
g. How to reject a crash report
To reject a crash report, simply click on the reject button. At that point you will
be prompted to enter a rejection reason. You may type as much information as
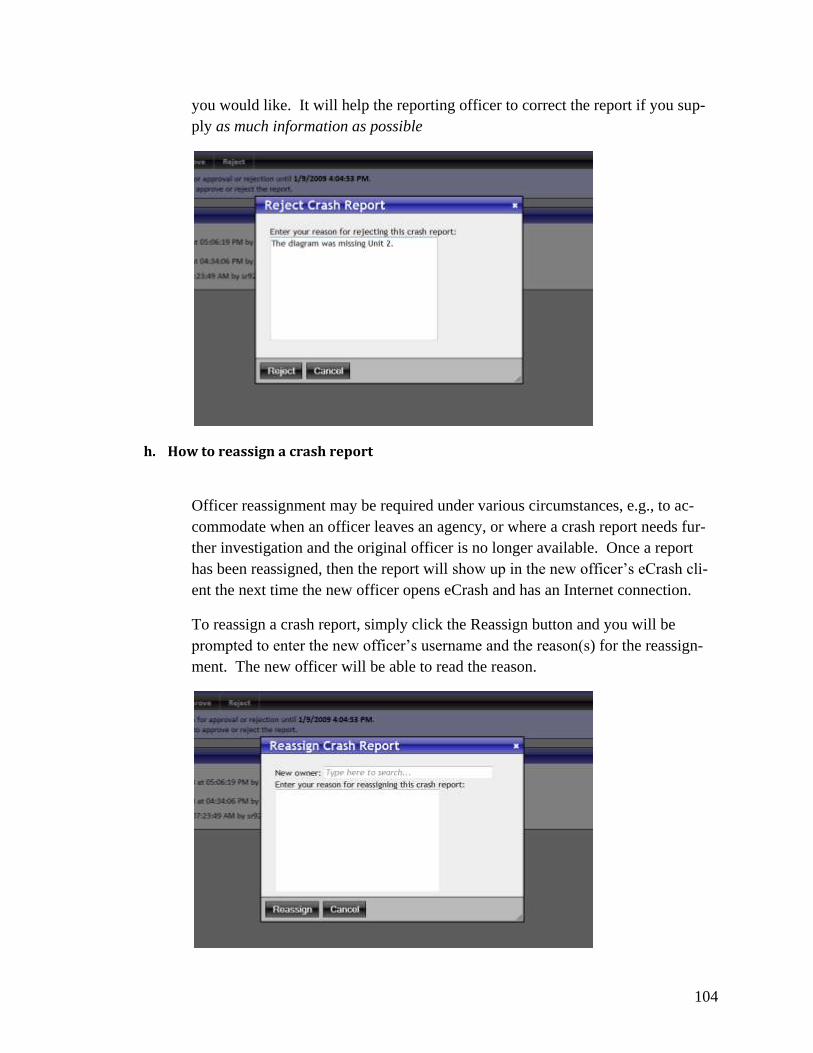
104
you would like. It will help the reporting officer to correct the report if you sup-
ply as much information as possible
h. How to reassign a crash report
Officer reassignment may be required under various circumstances, e.g., to ac-
commodate when an officer leaves an agency, or where a crash report needs fur-
ther investigation and the original officer is no longer available. Once a report
has been reassigned, then the report will show up in the new officer‟s eCrash cli-
ent the next time the new officer opens eCrash and has an Internet connection.
To reassign a crash report, simply click the Reassign button and you will be
prompted to enter the new officer‟s username and the reason(s) for the reassign-
ment. The new officer will be able to read the reason.