Embed Size (px)
Citation preview
1. Open Apple Mail. • If you are not prompted to create an account, go to Mail -> Preferences.
2. Click on the + button in the lower left hand corner.
Setting Up Apple® Mail IMAP EMAIL ACCOUNT SETUP
Copyright © EmailHosting.com LLC1
IMAP
Work, Personal
Your Name
imap.emailhosting.com
••••••••••
smtp.emailhosting.com

3. Enter the following information: • Full Name—Enter your first and last name. This is the name that will appear in the From field for messages that you send. • Email Address—Enter your entire email address (e.g., [email protected]). • Password—Enter the password for your email account.
4. Type in the incoming mail server information. • Account Type: IMAP • Description: imap.emailhosting.com • Incoming Mail Server: imap.emailhosting.com • User Name: Your Emailhosting Username • Password: Your Emailhosting Password • Click Continue.
Setting Up Apple® Mail IMAP EMAIL ACCOUNT SETUP (cont.)
Copyright © EmailHosting.com LLC2
Your Name
••••••••••
imap.emailhosting.com
imap.emailhosting.com
••••••••••

7. Type in the outgoing mail server information. • Description: smtp.emailhosting.com • Outgoing Mail Server: smtp.emailhosting.com • Make sure ‘Use only this server’ is checked. • Check on “Use Authentication” • Type in your Emailhosting username and password. • Click Continue.
6. Uncheck “Use Secure Sockets Layer (SSL)”. • Keep Authentication at Password. • Click Continue.
Setting Up Apple® Mail IMAP EMAIL ACCOUNT SETUP (cont.)
Copyright © EmailHosting.com LLC3
smtp.emailhosting.com
smtp.emailhosting.com
••••••••••

9. When the setup process is done, you will see an Account Summary window that summarizes your settings. • Click on the Create button.
8. Apple Mail will now attempt to detect the outgoing server settings. If the Outgoing Mail Security window appears, do the following: • Uncheck the Use Secure Sockets Layer (SSL) box. • In the Authentication drop-down menu, select Password. • Click on the Continue button.
Setting Up Apple® Mail IMAP EMAIL ACCOUNT SETUP (cont.)
Copyright © EmailHosting.com LLC4
imap.emailhosting.com
John Smith
imap.emailhosting.com
off
smtp.emailhosting.com
off
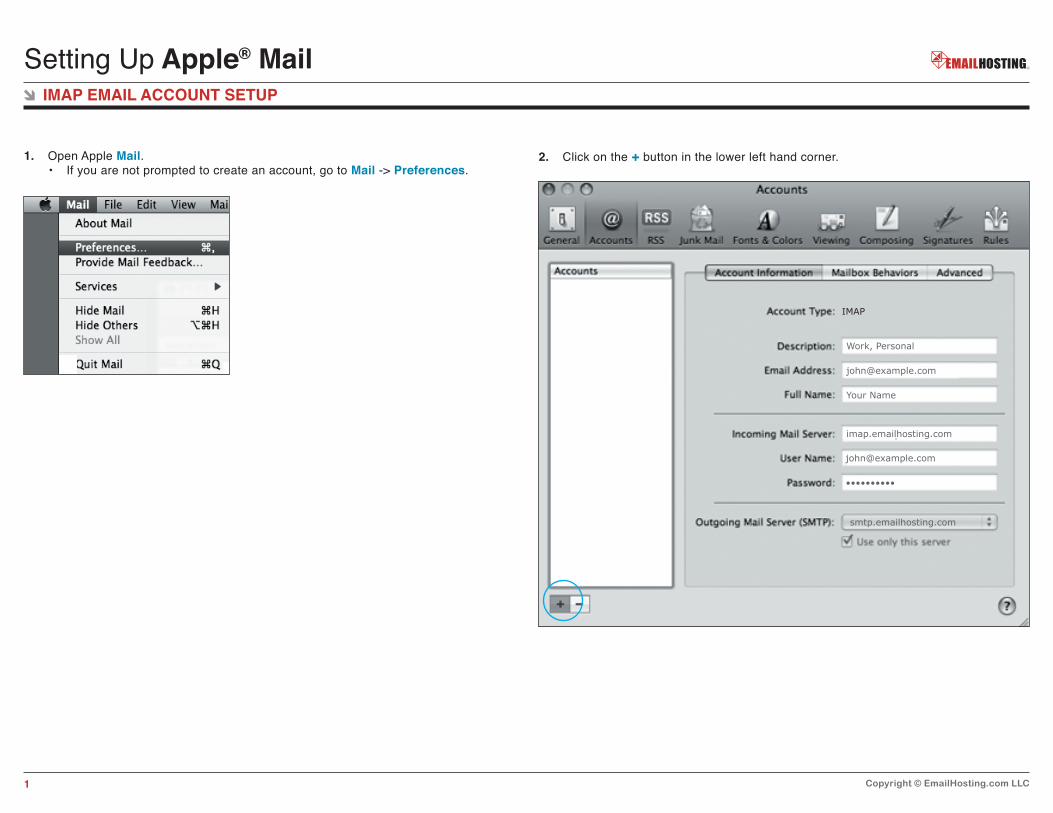
10. Click on “Use custom port:” and put in 2500. Be sure that “Use Secure Sockets Layer (SSL)” is still unchecked and that your username and password have been entered. • Click OK.
9. On the Accounts page, click on smtp.emailhosting.com next to “Outgoing Mail Server (SMTP)” and go to Edit Server List...
Setting Up Apple® Mail IMAP EMAIL ACCOUNT SETUP (cont.)
Copyright © EmailHosting.com LLC5
imap.emailhosting.com
john Smith
imap.emailhosting.com
smtp.emailhosting.com
smtp.emailhosting.comsmtp.emailhosting.com (Offline)
IMAP
imap.emailhosting.comIMAP
2500
smtp.emailhosting.com smtp.emailhosting.com imap.emailhosting.com
••••••••••

12. Click on the red button in the upper left hand corner to shut the window making sure to click on Save when prompted. • On the left hand side, you should see IMAP.EMAILHOSTING.COM with an arrow next to it. • Click on that arrow and you should see all of your folders.
11. Go to the Advanced tab along the top. • Change the option of “Keep copies of messages for offline viewing” to “Only messages I’ve read.” • Ensure that the Port listed there is 143 and not 993 and Use SSL is not checked.
Setting Up Apple® Mail IMAP EMAIL ACCOUNT SETUP (cont.)
Copyright © EmailHosting.com LLC6
143
imap.emailhosting.comIMAP
IMAP.EMAILHOSTING.COM
195

Setting Up Apple® Mail IMAP EMAIL ACCOUNT SETUP (cont.)
Copyright © EmailHosting.com LLC7
NOTE: As a courtesy, we provide information about how to use certain third-party products but we do not endorse or directly support third-party products, and we are not responsible for the functions or reliability of such products. Mac® Mail is a registered trademark of Apple Corporation in the United States and/or other countries. All rights reserved.
“imap.emailhosting.com”
Using IMAP FoldersTo simplify the organization of your messages, you can indicate which IMAP folders Mac Mail should use to store sent mail, drafts, spam, and trash.
1. Select Mail / Preferences.
2. Click the Accounts button located at the top of the window.
3. Click once on your IMAP account as it appears in the Accounts list.
4. Click the Mailbox Behaviors tab.
5. Clear all of the check boxes.
6. Close the Accounts window.
7. When prompted to save your changes, click the Save button.
8. In your IMAP folder, located in the Mailboxes pane (select View / Show Mailboxes to display the pane if it’s not there), do the following: • Click once on the Sent, Drafts, Spam, or Trash folder. • Select Mailbox / Use This Mailbox For. • Select Sent, Drafts, Junk, or Trash from the resulting list in the sub-menu.
9. The selected folder will disappear from your IMAP list and will now reappear as the corresponding Mac Mail folder.
TIPS
13. Click on your Sent Items folder. • Go to Mailbox -> Use This Mailbox For -> Sent.
14. Do the same for the Drafts and Deleted Items (Trash) folders. The setup is now complete.