Embed Size (px)
Citation preview
ANDROID TM
Quick Start Guide
Android MobileTechnology Platform4.4, KitKat®
ANDROID QUICK START GUIDE ii
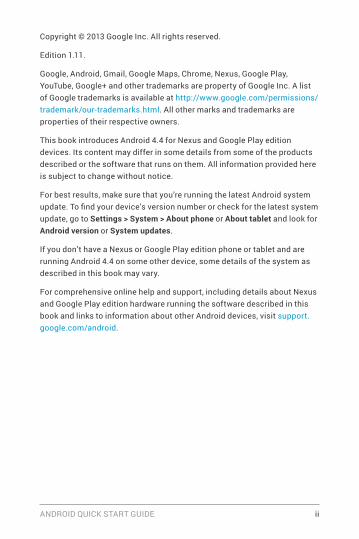
Copyright © 2013 Google Inc. All rights reserved.
Edition 1.11.
Google, Android, Gmail, Google Maps, Chrome, Nexus, Google Play, YouTube, Google+ and other trademarks are property of Google Inc. A list of Google trademarks is available at http://www.google.com/permissions/trademark/our-trademarks.html. All other marks and trademarks are properties of their respective owners.
This book introduces Android 4.4 for Nexus and Google Play edition devices. Its content may differ in some details from some of the products described or the software that runs on them. All information provided here is subject to change without notice.
For best results, make sure that you’re running the latest Android system update. To find your device’s version number or check for the latest system update, go to Settings > System > About phone or About tablet and look for Android version or System updates.
If you don’t have a Nexus or Google Play edition phone or tablet and are running Android 4.4 on some other device, some details of the system as described in this book may vary.
For comprehensive online help and support, including details about Nexus and Google Play edition hardware running the software described in this book and links to information about other Android devices, visit support.google.com/android.
ANDROID QUICK START GUIDE iii
Table of contents
1 Welcome to Android 1
About Android 4.4 1Set up your device 1Make yourself at home 2Get around 4Organise your Home screens 5Touch & type 7Help & support 8Android version & updates 9
2 Essentials 10
Google Now 10Tell Google what to do 13Notifications & settings 15Lock screen 19Android Beam 20Tap & pay 21Printing 21File storage 22Android Device Manager 24Screenshots 24
3 Use the keyboard 26
Enter & edit text 26Gesture Typing 29Keyboard dictionaries 30Type by speaking 31
ANDROID QUICK START GUIDE iv
4 Try some apps 33
All Apps 33Google Play 34Phone 35Gmail 36Gallery 40Photos 41People 42Hangouts & SMS 43Calendar 44
5 Settings 46
6 Accessibility 49
ANDROID QUICK START GUIDE WELCOME TO ANDROID 1
1
Welcome to Android
About Android 4.4
Android 4.4 (KitKat®) is the latest version of the world’s favourite operating system for mobile phones and tablets.
This guide introduces the Android 4.4 software available on Nexus and Google Play edition mobile devices. It doesn't describe hardware details such as SIM card instructions, battery information, specs and so on.
For comprehensive information about all types of Android phones and tablets, including more details about Nexus and Google Play edition devices, visit support.google.com/android.
Set up your device
When you first turn on your phone or tablet, you’ll see a Welcome screen. Choose the language that you want and touch Start or the Start icon.
IMPORTANT: To complete the setup process, you must have a Wi-Fi or mobile Internet connection.
ANDROID QUICK START GUIDE WELCOME TO ANDROID 2
When prompted, you can sign in with your Google Account or create one at that time. You can also choose to skip this step and create one later.
An email address that you use for any of the following counts as a Google Account:
• Gmail• YouTube• Google Apps• AdWords• Any other Google product
When you sign in with a Google Account, all the email, contacts, Calendar events and other data associated with that account are automatically synced with your device. If you have more than one Android device, they are all kept in sync.
For example, if you change a friend’s phone number on your phone, that change also appears on your tablet and on any computers where you’re logged in to your Google Account.
If you have multiple Google Accounts, you can add others later from Settings > Accounts > Add account.
Make yourself at home
After you finish setting up your device, the Home screen appears for the first time:
• To move between Home screens, swipe left or right. • To use Google Now, swipe up from the bottom of the screen
or, on some Google Play edition devices, press and hold the Home button. On Nexus 5, you can also swipe to the leftmost Home screen.
ANDROID QUICK START GUIDE WELCOME TO ANDROID 3
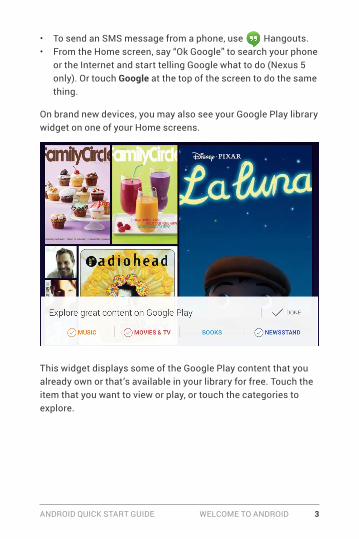
• To send an SMS message from a phone, use Hangouts.• From the Home screen, say “Ok Google” to search your phone
or the Internet and start telling Google what to do (Nexus 5 only). Or touch Google at the top of the screen to do the same thing.
On brand new devices, you may also see your Google Play library widget on one of your Home screens.
This widget displays some of the Google Play content that you already own or that’s available in your library for free. Touch the item that you want to view or play, or touch the categories to explore.
ANDROID QUICK START GUIDE WELCOME TO ANDROID 4
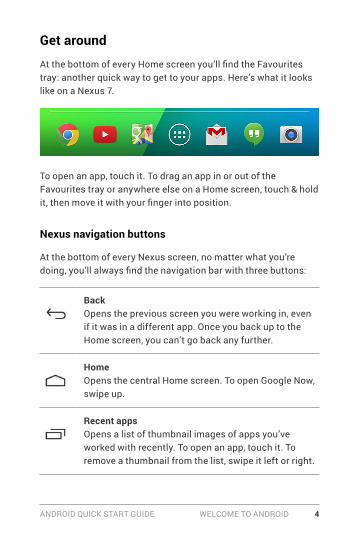
Get around
At the bottom of every Home screen you’ll find the Favourites tray: another quick way to get to your apps. Here’s what it looks like on a Nexus 7.
To open an app, touch it. To drag an app in or out of the Favourites tray or anywhere else on a Home screen, touch & hold it, then move it with your finger into position.
Nexus navigation buttons
At the bottom of every Nexus screen, no matter what you’re doing, you’ll always find the navigation bar with three buttons:
BackOpens the previous screen you were working in, even if it was in a different app. Once you back up to the Home screen, you can’t go back any further.
HomeOpens the central Home screen. To open Google Now, swipe up.
Recent appsOpens a list of thumbnail images of apps you’ve worked with recently. To open an app, touch it. To remove a thumbnail from the list, swipe it left or right.
ANDROID QUICK START GUIDE WELCOME TO ANDROID 5
Some apps hide these buttons temporarily or fade them to small dots in the same position. To bring them back, touch the dots, touch the screen in the middle or swipe up from the bottom.
Google Play edition navigation buttons
Some Google Play edition devices have two or three physical buttons just below the screen:
• Menu: This button opens options relating to the screen you’re on.
• Home: Opens Home. If you’re viewing a left or right Home screen, the main Home screen opens. To open Google Now, touch & hold this button.
• Back: Opens the previous screen that you were working in, even if it was in a different app. Once you back up to the Home screen, you can’t go back any further in your history.
Menus
Many screens in apps and Settings include either a Menu icon (for example, on Nexus devices) or items in the permanent Menu button at the bottom of the screen (on some Google Play edition devices). Touch it to explore additional options, including help.
Organise your Home screens
To change the wallpaper for your Home screens, touch & hold the background.
ANDROID QUICK START GUIDE WELCOME TO ANDROID 6
To add an app icon to a Home screen:
1. Go to the Home screen where you want to place the app.2. Touch the All Apps icon.3. Swipe from right to left, if necessary, to find the app that you
want.4. Touch & hold the app until the Home screen appears, slide it
into place and lift your finger.
NEXUS 5 TIPS: The Home screens on Nexus 5 work differently from Home screens on the other Nexus devices.
• To change your wallpaper, add a widget, adjust Search settings or change screen order, touch & hold the background of any Home screen.
• You can have any number of Home screens to the right. To add one, swipe to the rightmost screen and drag an app or widget to the right edge.
• The screen to the left of the main Home screen is reserved for Google Now and is available only when Google Now is turned on.
To add a widget to the Home screen on a Nexus 4, 7 or 10, follow the same steps, and keep swiping right through the All Apps screens to find the widget that you want.
On Nexus 5, touch & hold the background of any Home screen to reveal the widgets control.
To move an app or widget to another position:
1. Touch & hold the icon.2. Slide your finger to the new position.
ANDROID QUICK START GUIDE WELCOME TO ANDROID 7
To move between Home screens, slide towards the edge of the screen.To bump another icon out of the way, slide slowly into it.
3. Lift your finger.
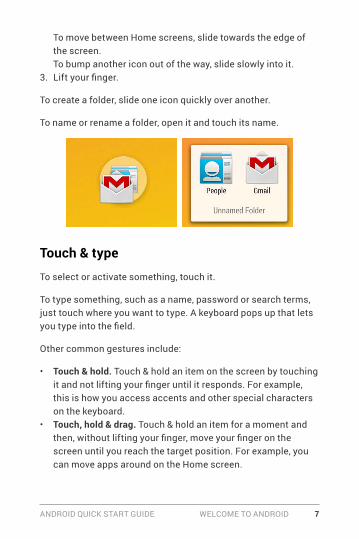
To create a folder, slide one icon quickly over another.
To name or rename a folder, open it and touch its name.
Touch & type
To select or activate something, touch it.
To type something, such as a name, password or search terms, just touch where you want to type. A keyboard pops up that lets you type into the field.
Other common gestures include:
• Touch & hold. Touch & hold an item on the screen by touching it and not lifting your finger until it responds. For example, this is how you access accents and other special characters on the keyboard.
• Touch, hold & drag. Touch & hold an item for a moment and then, without lifting your finger, move your finger on the screen until you reach the target position. For example, you can move apps around on the Home screen.
ANDROID QUICK START GUIDE WELCOME TO ANDROID 8
• Swipe or slide. Quickly move your finger across the surface of the screen, without pausing when you first touch (so you don’t drag something instead). For example, you can slide a Home screen left or right to view the other Home screens.
• Double-tap. Tap quickly twice on a web page, map or other screen to zoom. For example, double-tap a picture in Chrome to zoom in, and double-tap again to zoom out.
• Scale. In some apps (such as Maps, Chrome and Gallery), you can scale by placing two or more fingers on the screen at once and pinching them together (to enlarge scale) or spreading them apart (to reduce it). Alternatively, in some apps you can double-tap and then, without lifting your finger, drag up to reduce or down to enlarge the scale of the image.
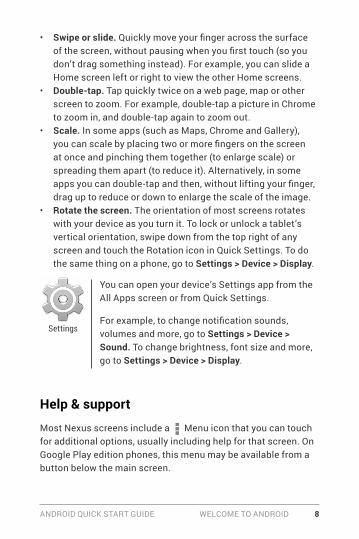
• Rotate the screen. The orientation of most screens rotates with your device as you turn it. To lock or unlock a tablet’s vertical orientation, swipe down from the top right of any screen and touch the Rotation icon in Quick Settings. To do the same thing on a phone, go to Settings > Device > Display.
You can open your device’s Settings app from the All Apps screen or from Quick Settings.
For example, to change notification sounds, volumes and more, go to Settings > Device > Sound. To change brightness, font size and more, go to Settings > Device > Display.
Help & support
Most Nexus screens include a Menu icon that you can touch for additional options, usually including help for that screen. On Google Play edition phones, this menu may be available from a button below the main screen.
Settings
ANDROID QUICK START GUIDE WELCOME TO ANDROID 9
This book introduces just a few of the key features and apps that come with Android 4.4. For more details about Android software and apps, Nexus and Google Play edition devices available on Google Play and all forms of support, visit:
• support.google.com/nexus• support.google.com/playedition
Android version & updates
To check your version number or get the latest system update for a Nexus or Google Play edition phone, first go to Settings > System > About phone or About tablet. Then look for these labels:
• System updates. Touch to check whether you have any pending system updates.
• Android version. Look partway down the list for this heading and the number just below it.
If you don’t have a Nexus or Google Play edition phone or tablet and are running Android 4.4 on some other device, some details of the system as described in this book may vary.
For comprehensive online help and support, including details about Nexus and Google Play edition hardware running the software described in this book and links to information about other Android devices, visit support.google.com/android.
ANDROID QUICK START GUIDE ESSENTIALS 10
2
Essentials
Google Now
Google Now is about getting you just the right information, at just the right time.
It tells you today’s weather before you start your day, how much traffic to expect before you leave for work, and even your favourite team’s score while they’re playing.
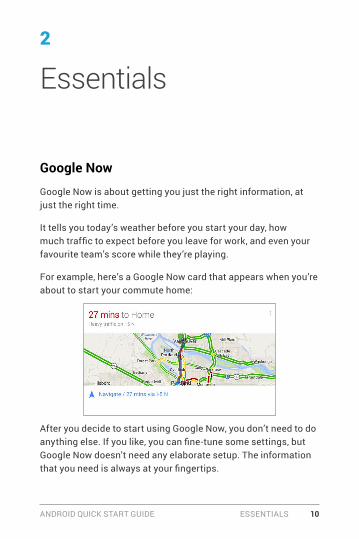
For example, here’s a Google Now card that appears when you’re about to start your commute home:
After you decide to start using Google Now, you don’t need to do anything else. If you like, you can fine-tune some settings, but Google Now doesn't need any elaborate setup. The information that you need is always at your fingertips.
ANDROID QUICK START GUIDE ESSENTIALS 11
How it works
When you decide to use Google Now, you’re also turning on Location Reporting and Location History:
• Location Reporting allows Google to periodically store and use your device’s most recent location data in connection with your Google Account. Location Reporting is a per-device setting.
• Location History allows Google to store a history of your location data from all devices where you’re logged into your Google Account and have enabled Location Reporting.
Google won’t share this information with other users or marketers without your permission.
You can control how Google Now uses your current location. To view the relevant settings, go to Settings > Personal > Location. When location services are turned on for your account on a given device, certain apps can use them to give you more relevant information, such as nearby restaurants or commute traffic.
If you opted in to Location History in the past, Google Now uses your previously recorded locations as well as ongoing locations when making suggestions. Turning off Location History pauses the collection of location information, but it doesn't delete your history.
To know when to display what information, Google Now uses contextual data from your device and from other Google products, plus data from third-party products that you allow Google Now to access.
ANDROID QUICK START GUIDE ESSENTIALS 12
For example, if you have searches stored in your Web History, Google Now can show cards based on sports scores, flight status and so on. To manage your Web History, visit google.com/history/. You can delete or pause your Web History and still use Google Now, but certain kinds of information, such as flight details, won’t show up.
Similarly, Google Now can use data that you may have stored in third-party products that you allow Google to access. For example, your device’s synced calendar may include entries from non-Google calendar products. If you have a synced calendar entry for a dentist appointment that includes the dentist’s address, Google Now can check traffic and suggest when to leave.
Give it a try
You have a chance to turn on Google Now when you first set up your phone or tablet. You can also turn it on or off at any time:
1. Touch the Google search bar on a Home screen. 2. Touch Get Google Now if you don’t already have it. Or, to
access the menu for the next step, perform a Google search for anything.
3. Open Menu > Settings and turn it on (or off) from there.
To open Google Now, follow the steps for your device:
• All Nexus devices: Swipe your finger up from the bottom of any screen.
• Nexus 5: In addition to swiping up from any screen, you can swipe to the leftmost Home screen.
• Google Play edition devices: Touch & hold the Home button.
ANDROID QUICK START GUIDE ESSENTIALS 13
When you want to see more cards, touch More at the bottom of the screen. When you don’t need them any more, swipe them out of the way.
NEXUS 5 TIP: To dismiss a card on Nexus 5, swipe from left to right. Swiping from right to left returns you to the main Home screen.
Updates appear in the form of Google Now cards. When you don’t need a card any more, swipe it out of the way.
That’s all there is to it. Google Now is always working for you as you go through your day. If you want, you can adjust the way certain cards get updated:
• Set reminders: Touch the Reminders icon.• Specify your sports teams, stocks, places and more: Touch
the Customise icon.• Answer questions about an individual card: Touch the
Menu icon.
For more details, visit Google Now. For a complete list of cards available, visit google.com/now.
Tell Google what to do
You can speak to your phone or tablet to search, get directions, send messages and perform other common tasks. To initiate a Voice Action or Voice Search from Google Now or a Home screen, say “Ok Google” or touch the Microphone icon.
Note: For devices other than Nexus 5, saying “Ok Google” works in Google Now, but not on Home screens. This feature is currently available in English only.
ANDROID QUICK START GUIDE ESSENTIALS 14
IMPORTANT: To detect when you say “Ok Google” to launch Voice Search or Voice Actions, Google analyses sound picked up by your device’s microphone in intervals of a few seconds or less. The sound is immediately discarded after analysis and is not stored on the device or sent to Google.
To see some examples of what you can tell Google to do, say or type “help”.
Turn hotword detection on or off
The ability to trigger a search or action by saying “Ok Google” is called hotword detection. To turn it off or on, open Google Now or the Google app and touch Menu > Settings > Voice > Hotword detection.
Voice Search
Spoken answers are supported for English only at this time.
After you touch the Microphone icon or say “Ok Google”, Google listens as you speak and initiates the search or action that you describe. If Voice Search doesn’t understand you, it lists some suggestions. Just touch the one that you want.
If you ask Google a question by speaking, the answer may be spoken back to you. The answer can be a fact, weather condition, stock price, flight status, sports score, currency conversion, mathematical calculation and more. Spoken answers are turned on by default for Voice Search.
For examples and more details, visit Voice Search.
ANDROID QUICK START GUIDE ESSENTIALS 15
Voice Actions
Voice Actions are supported only in English, French, German, Spanish and Italian.
You can use Voice Actions to perform common tasks, such as sending an email or opening an app.
After touching the Microphone icon or saying “Ok Google”, speak the Voice Action that you want to use. Or say “help” to see examples of the kinds of things that you can tell Google to do for you.
Examples include:
• “Set alarm for 8:30 a.m.”• “Send email to Marcus Foster. Subject: Coming tonight?
Message: Hope to see you later.”• “Navigate to Mike’s Bikes in Dover.”
For a list of Voice Actions you can try, visit Voice Action commands.
Notifications & settings
Notifications alert you to the arrival of new messages, calendar events and alarms, as well as ongoing events, such as video downloads.
When a notification arrives, its icon appears at the top of the screen. Icons for pending notifications appear on the left, and system icons showing things like Wi-Fi signal, mobile operator signal or battery strength on the right:
ANDROID QUICK START GUIDE ESSENTIALS 16
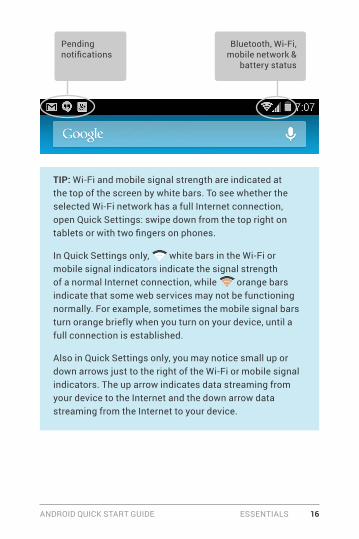
Bluetooth, Wi-Fi, mobile network &
battery status
Pending notifications
TIP: Wi-Fi and mobile signal strength are indicated at the top of the screen by white bars. To see whether the selected Wi-Fi network has a full Internet connection, open Quick Settings: swipe down from the top right on tablets or with two fingers on phones.
In Quick Settings only, white bars in the Wi-Fi or mobile signal indicators indicate the signal strength of a normal Internet connection, while orange bars indicate that some web services may not be functioning normally. For example, sometimes the mobile signal bars turn orange briefly when you turn on your device, until a full connection is established.
Also in Quick Settings only, you may notice small up or down arrows just to the right of the Wi-Fi or mobile signal indicators. The up arrow indicates data streaming from your device to the Internet and the down arrow data streaming from the Internet to your device.
ANDROID QUICK START GUIDE ESSENTIALS 17
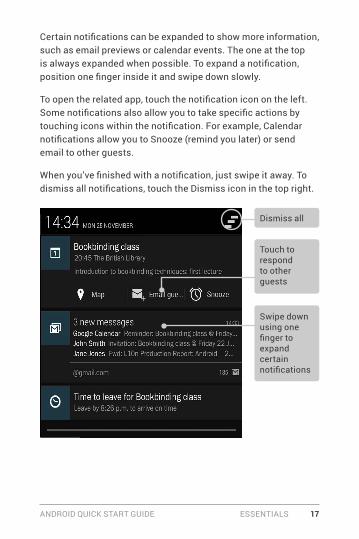
Certain notifications can be expanded to show more information, such as email previews or calendar events. The one at the top is always expanded when possible. To expand a notification, position one finger inside it and swipe down slowly.
To open the related app, touch the notification icon on the left. Some notifications also allow you to take specific actions by touching icons within the notification. For example, Calendar notifications allow you to Snooze (remind you later) or send email to other guests.
When you’ve finished with a notification, just swipe it away. To dismiss all notifications, touch the Dismiss icon in the top right.
Touch to respond to other guests
Swipe down using one finger to expand certain notifications
Dismiss all
ANDROID QUICK START GUIDE ESSENTIALS 18
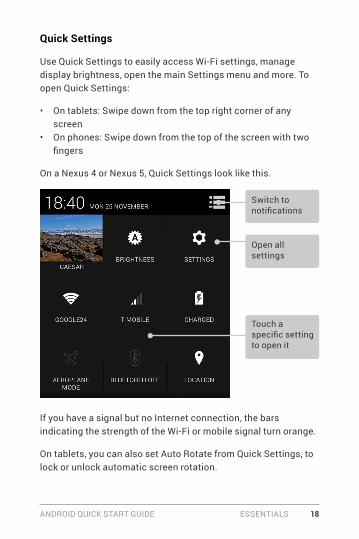
Quick Settings
Use Quick Settings to easily access Wi-Fi settings, manage display brightness, open the main Settings menu and more. To open Quick Settings:
• On tablets: Swipe down from the top right corner of any screen
• On phones: Swipe down from the top of the screen with two fingers
On a Nexus 4 or Nexus 5, Quick Settings look like this.
Open all settings
Switch to notifications
Touch a specific setting to open it
If you have a signal but no Internet connection, the bars indicating the strength of the Wi-Fi or mobile signal turn orange.
On tablets, you can also set Auto Rotate from Quick Settings, to lock or unlock automatic screen rotation.
ANDROID QUICK START GUIDE ESSENTIALS 19
Lock screen
If a lock is set for your screen, the screen goes dark and locks when the display goes to sleep or if you press the Power button.
You can set locks of different strengths using lock settings:
1. Go to Settings > Personal > Security > Screen lock.2. Touch the type of lock you’d like to use.
Lock screen actions
From the lock screen:
• If you have a tablet that’s set up for more than one user, you may need to touch your image at the bottom of the screen to see your own lock screen.
• On a phone, regardless of the lock that you choose, it’s always easy to take a picture. Swipe left from the right edge to bring Camera into view.
• To open Google Now from the lock screen, swipe up from the bottom of the lock screen. Enter your PIN, pattern or password if prompted.
For more information, visit Customise the lock screen.
Face Unlock
Face Unlock is one of the locks available. After you've set it up, you can unlock your device just by looking at it. Although Face Unlock is not as secure as Pattern, PIN or Password, it can be convenient and fun to use.
ANDROID QUICK START GUIDE ESSENTIALS 20
TIP: After you set up Face Unlock, look under Settings > Personal > Security for two additional settings: Improve face matching and Liveness check. Use these to make Face Unlock more reliable and secure.
Android Beam
You can beam a web page, a video or other content from your screen to another device by bringing the devices together (typically back to back).
Before you begin: Make sure that both devices are unlocked, support Near Field Communication (NFC), and have both NFC and Android Beam turned on. To check, go to Settings > Wireless & networks > More. Also make sure that you know where the NFC area is on the back of both devices – typically in the centre.
1. Open a screen that contains something that you’d like to share, such as a web page, YouTube video or place page in Maps.
2. Move the back of your device toward the back of the other device. When the devices connect, you hear a sound, the image on your screen reduces in size and you see the message Touch to beam.
3. Touch your screen anywhere. The other device displays the transferred content. Or, if the necessary app isn't installed, Google Play opens to a screen where your friend can download the app.
ANDROID QUICK START GUIDE ESSENTIALS 21
To turn on NFC, go to Settings > Wireless & networks > More > NFC.
To turn on Android Beam, go to Settings > Wireless & networks > More > Android Beam.
Tap & pay
When NFC is turned on, you can use the tap & pay feature to pay for items just by touching your phone to a reader at a register. To manage your tap & pay apps:
1. Go to Settings > Device > Tap & pay.2. Touch an app to make it your default payment app.
If your device doesn't have a default payment app, such as Google Wallet, you can browse Google Play for other payment apps.
IMPORTANT: Tap & pay manages payment apps like Google Wallet. The tap & pay setting doesn't apply to Android Beam and won’t include certain apps, such as money transfer apps.
Printing
With Android 4.4, you can print the content of certain screens (such as web pages displayed in Chrome) to a printer on the same Wi-FI network as your Android device.
Settings

ANDROID QUICK START GUIDE ESSENTIALS 22
Before you can print, you need a printing service installed on your device. To check what services are currently available, go to Settings > System > Printing.
From here, you can open each available service to turn it on or off, check which printers it makes available, add new printers and adjust the service’s settings.
To print a document, such as a web page in Chrome:
1. Touch Menu > Print.2. In the dialogue that appears, adjust settings such as printer,
copies, orientation and so on.3. Touch Print.
File storage
Android 4.4 makes it easy to store and browse through pictures, videos and other files on your device and attach them to an email, Hangout message and so on. You can also use stored images as your Home screen wallpaper.
For example, to attach an image to an email that you’re composing, choose Menu > Attach picture or Attach video.

ANDROID QUICK START GUIDE ESSENTIALS 23
A set of thumbnails appears. To view more choices, touch the Drawer icon at the top left. You’ll see something like this:
From here, you can view any of these sources:
• Recent shows you the photos or videos that you've taken or opened most recently.
• Drive lets you attach any Drive documents associated with your account.
• Images displays any photos, videos or other images on your device.
• Downloads includes most files (excluding Play content) that you’ve downloaded from emails or the web.
• Gallery lets you browse all the images and videos that have been uploaded to your account.
Use the Downloads app to view, reopen or delete files that you download from Gmail or other sources (excluding Google Play books, videos, magazines and other media).Downloads
ANDROID QUICK START GUIDE ESSENTIALS 24
In the Downloads app:
• Touch an item to open it.• Touch headings for earlier downloads to view them.• Tick items that you want to share. Then touch the Share
icon and choose a sharing method from the list.• Tick items that you want to delete. Then touch the
Recycle bin icon.
Because Google Play streams your purchases and rentals from Google servers while you’re playing them, they don’t occupy storage space persistently. Although you can pin (download) books, movies and other content in your Google Play apps so you can access it offline, Google Play content never appears in Downloads.
Android Device Manager
If you lose your phone or tablet, the Android Device Manager can help you find its approximate location, make it ring, lock it or erase its data.
These options are turned on by default. To view or change them, open the Google Settings app and touch Android Device Manager.
Then, if you lose your device, go to Android Device Manager and follow the instructions.
Screenshots
To take a screenshot from Nexus or Google Play edition devices:
1. Make sure the image you want to capture is displayed on the screen.

ANDROID QUICK START GUIDE ESSENTIALS 25
2. Press the Power and Volume down buttons simultaneously.
The screenshot is automatically saved in your Gallery.
TIP: To easily share your screenshot via Gmail, Google+ and more, swipe down the notification shade and touch the Share icon below the preview of your screenshot.
ANDROID QUICK START GUIDE USE THE KEYBOARD 26
3
Use the keyboard
Enter & edit text
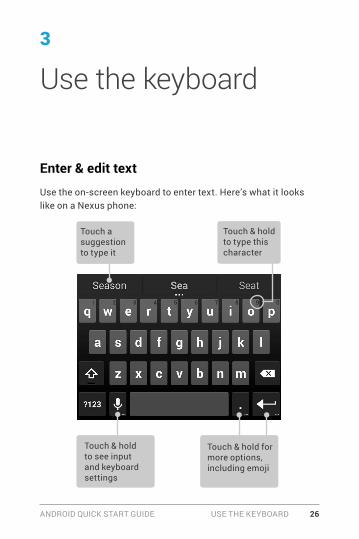
Use the on-screen keyboard to enter text. Here’s what it looks like on a Nexus phone:
Touch a suggestion to type it
Touch & hold to type this character
Touch & hold to see input and keyboard settings
Touch & hold for more options, including emoji
ANDROID QUICK START GUIDE USE THE KEYBOARD 27
Keyboards on tablets work in a similar way. To make the keyboard go away, touch the Back button below it.
Some apps open the keyboard automatically. In others, you first need to touch where you want to type.
Basic editing
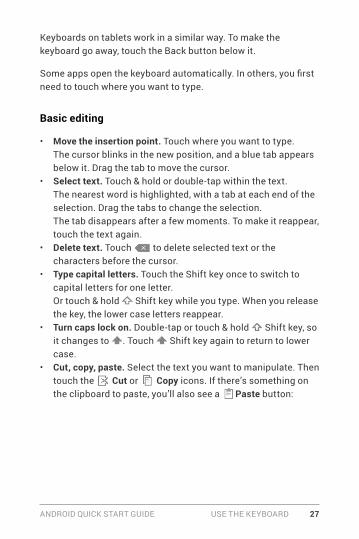
• Move the insertion point. Touch where you want to type.The cursor blinks in the new position, and a blue tab appears below it. Drag the tab to move the cursor.
• Select text. Touch & hold or double-tap within the text.The nearest word is highlighted, with a tab at each end of the selection. Drag the tabs to change the selection.The tab disappears after a few moments. To make it reappear, touch the text again.
• Delete text. Touch to delete selected text or the characters before the cursor.
• Type capital letters. Touch the Shift key once to switch to capital letters for one letter.Or touch & hold Shift key while you type. When you release the key, the lower case letters reappear.
• Turn caps lock on. Double-tap or touch & hold Shift key, so it changes to . Touch Shift key again to return to lower case.
• Cut, copy, paste. Select the text you want to manipulate. Then touch the Cut or Copy icons. If there’s something on the clipboard to paste, you’ll also see a Paste button:
ANDROID QUICK START GUIDE USE THE KEYBOARD 28
Emoji
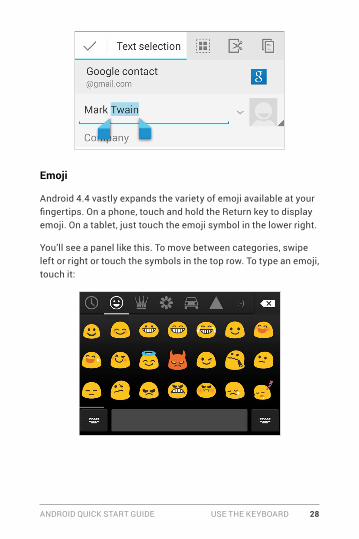
Android 4.4 vastly expands the variety of emoji available at your fingertips. On a phone, touch and hold the Return key to display emoji. On a tablet, just touch the emoji symbol in the lower right.
You’ll see a panel like this. To move between categories, swipe left or right or touch the symbols in the top row. To type an emoji, touch it:
ANDROID QUICK START GUIDE USE THE KEYBOARD 29
Use next-word suggestions
1. Touch the location where you want to input text.2. Start typing out a word. When the word you want is displayed
in a list above the keyboard, touch it.3. Continue to touch words unless the one that you want doesn't
appear. If so, type it.Android continues to suggest words as you type.
To change your keyboard and input methods, go to Settings > Personal > Language & input.
To turn next-word suggestions on or off, go to Settings > Personal > Language & input > Keyboard & input methods > Android keyboard. Touch the Settings icon, then tick the box next to Next-word suggestions.
Gesture Typing
Gesture Typing works best for English. Quality varies for other languages and some don't support it yet.
To input a word using Gesture Typing:
1. Touch the location where you want to type to open the keyboard.
2. Slide your finger slowly across the letters of the word you want to input.
3. Release your finger when the word that you want is displayed in the floating preview or the middle of the suggestion strip. To select one of the other words in the suggestion strip, touch it.
Settings
ANDROID QUICK START GUIDE USE THE KEYBOARD 30
If the word that you want isn't shown while using Gesture Typing, you can type it out manually. If you gesture a word and want to change it, touch the word to see other choices in the suggestion strip.
TIP: If there are letters that you want to emphasise – for instance, if the keyboard displays a similar word instead of the one that you want – pause over it slightly longer before moving on to the next letter.
Use Gesture Typing without the space bar
When you use Gesture Typing, there's no need to use the space bar - just continue to slide your finger across the letters you want to input, then lift your finger to start the next word.
To change Gesture Typing settings, go to Settings > Language & input > Keyboard & input methods > Android keyboard. Then touch Settings and look under Gesture Typing.
Keyboard dictionaries
To manage keyboard dictionaries, go to Settings > Personal > Language & input.
Settings

ANDROID QUICK START GUIDE USE THE KEYBOARD 31
Personal dictionary
You can add your own words to your personal dictionary so that your device remembers them. To add a word or phrase, including an optional shortcut, touch the Settings icon beside the keyboard that you’re using, then Personal dictionary and the language of the dictionary that you want to modify, then the Add icon.
Add-on dictionaries
1. Touch the Settings icon next to Google keyboard or whatever keyboard you’re using.
2. Touch Add-on dictionaries.You'll see dictionaries for other languages that you can download to your device.
3. Touch the dictionary you want, then Install.
Type by speaking
You can speak to enter text in most places where you can enter text with the on-screen keyboard.
1. Touch a text field, or a location in text you’ve already entered in a text field.
2. Touch the Microphone key on the on-screen keyboard.3. When you see the microphone image, speak what you want
to type.
In English only, you can also say “comma”, “full stop”, “question mark” or “exclamation mark” to enter punctuation.

ANDROID QUICK START GUIDE USE THE KEYBOARD 32
When you pause, what you spoke is transcribed by the speech-recognition service and entered in the text field, underlined. You can touch the Delete key to erase the underlined text. If you start typing or entering more text by speaking, the underline disappears.
To improve processing of your voice input, Google may record a few seconds of ambient background noise in temporary memory at any time. This recording remains on the device only fleetingly and is not sent to Google.
To change your speech settings, go to Settings > Personal > Language & input.
Settings
ANDROID QUICK START GUIDE TRY SOME APPS 33
4
Try some apps
All AppsTo see all your apps, touch the All Apps icon in the Favourites tray on any Home screen.
This is where you can see all your apps, including those downloaded on Google Play. You can move app icons to any of your Home screens.
From All Apps, you can:
• Move between screens. Swipe left or right.• Open an app. Touch its icon.• Place an app icon on a Home screen. Touch & hold the app
icon, slide your finger, and lift your finger to drop the icon in place.
• Browse widgets. Touch the Widgets tab at the top of any All Apps screen.
• Get more apps. Touch the Google Play icon in the list of app icons or the Shop icon in the top right.
To remove an app icon from the Home screen without removing it permanently from your device, touch & hold it, slide your finger towards the top of the screen and drop the app over the Remove icon.
All Apps
ANDROID QUICK START GUIDE TRY SOME APPS 34
To view info about an app from an All App screen, touch & hold it, slide your finger toward the top of the screen and drop the app over the App Info icon.
TIP: Some apps can harm you or your device. However, you don’t need to purchase anti-virus software for Nexus or Google Play edition devices. Google can verify apps to help prevent harmful software from being installed.
To control app verification, go to Google Settings > Verify apps. For more details, visit Protect against harmful apps.
Google PlayGoogle Play brings together all your favourite movies, TV programmes, books, music, magazines, apps and more in one place, so that you can reach it from any of your devices. To open the Google Play Store app, touch the Play Store icon.
If you purchased content on Google Play in the past, you’ll automatically have access to this content on any Android device – just make sure that you’re signed in using the same account that you used to purchase it. To check:
1. Open the Play Store app.2. Touch the Drawer icon at the top left.
From here, you can view the current account or switch to another, view your purchased apps, check your wish list and so on.
Play Store
ANDROID QUICK START GUIDE TRY SOME APPS 35
To set preferences, clear your search history and turn on user controls, go to Menu > Settings. For example, to filter Android apps based on maturity level or require a PIN before completing any purchase, touch Content filtering or Password.
To find your content, open any of the Google Play apps from the All Apps screen.
Google Play support
For more details about Google Play, including phone and email support options, visit support.google.com/googleplay.
PhoneUsing a Nexus or Google Play edition phone, you can place calls from the Phone app, the People app or other apps or widgets that display contact information. Wherever you see a phone number, you can usually touch it to dial.
To place a call to one of your contacts:
1. Touch the Phone icon on a Home or All Apps screen.2. To choose someone to call, scroll or search.
If the keypad’s in the way, touch the Back button to lower it.3. To place a call, touch the contact’s name.
Phone
ANDROID QUICK START GUIDE TRY SOME APPS 36
To view recent calls, touch the call log icon at the bottom of the screen. To use the keypad, touch the keypad icon.
TIP: On Nexus 4 and Nexus 5 only, Caller ID by Google identifies inbound and outbound numbers, even for callers not saved as contacts in the People app.
For more details, visit Use your phone.
GmailUse the Gmail app to read and write email from any mobile device. To open it, touch the Gmail icon on a Home or All Apps screen.
But Gmail isn't just about email. You can use your Gmail account to sign in to all Google apps and services, including these and many more:
• Google Now, for getting just the right information at just the right time
• Calendar• People, for keeping track of your contacts• Google Drive, for working with documents
While you’re reading a message:
• Touch the icons and menu along the top of the screen to archive, throw away, label or perform other actions on that message.
• Swipe left or right to read the previous or next conversation.
Gmail
ANDROID QUICK START GUIDE TRY SOME APPS 37
Organise your conversations: From the Inbox, touch & hold a conversation to select it. Then use the icons and menu along the top of the screen to manage the selected messages.
To change your settings, add an account or get help, touch the menu icon or button.
No matter where you are in Gmail, you can always get back to the Inbox by touching the Gmail icon at the top of the screen.
From the Inbox, touch the same icon to open the drawer that reveals available accounts, labels and so on.
For more information, visit Gmail help.
TIP: If you’re using Microsoft Exchange, you need to set up the Email app, which is available in All Apps.
CameraThe Camera app lets you take photos, panoramic photos, videos and immersive 360-degree photo sphere shots, including what’s above and below you.
To open Camera:
• From the lock screen, swipe from right to left.• From the Home screen, touch the Camera icon.
Camera
ANDROID QUICK START GUIDE TRY SOME APPS 38
The first time you open Camera, you may be asked if you want it to remember photo locations. This allows you, for example, to pinpoint the location of a particular photo with Google Maps.
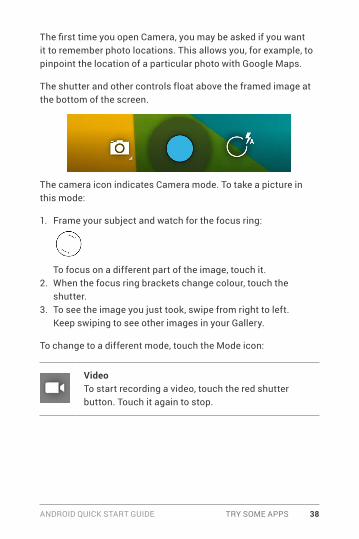
The shutter and other controls float above the framed image at the bottom of the screen.
The camera icon indicates Camera mode. To take a picture in this mode:
1. Frame your subject and watch for the focus ring:
To focus on a different part of the image, touch it.2. When the focus ring brackets change colour, touch the
shutter.3. To see the image you just took, swipe from right to left.
Keep swiping to see other images in your Gallery.
To change to a different mode, touch the Mode icon:
VideoTo start recording a video, touch the red shutter button. Touch it again to stop.
ANDROID QUICK START GUIDE TRY SOME APPS 39
PanoramaTo take a panoramic photo, touch the blue shutter button, slowly pan across the scene and touch the button again to stop.
Photo SphereTo capture a 360-degree or wide angle shot, pan or tilt until the circle in the centre of the screen moves over a white dot and records that portion of the image. Keep moving over the dots until you've finished and then touch the shutter button to finalise.
To change camera settings such as flash, exposure and so on, touch the circle to the right of the shutter.
NEXUS 5 TIP: HDR+ on Nexus 5 automatically snaps a rapid burst of photos and combines them to give you the best possible single shot. Daytime shots are vivid with clean shadows and night time shots are sharp with less noise.
To turn on HDR+, touch the circle to the right of the shutter, then HDR+.
For more details, visit Camera & Gallery help.
ANDROID QUICK START GUIDE TRY SOME APPS 40
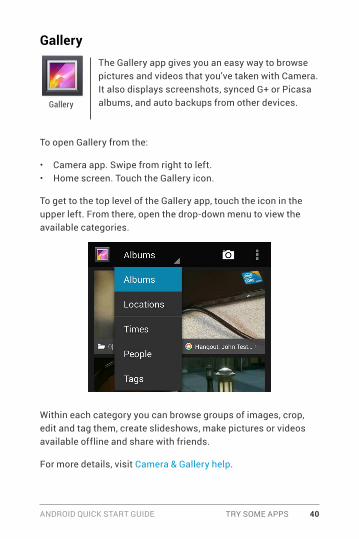
GalleryThe Gallery app gives you an easy way to browse pictures and videos that you've taken with Camera. It also displays screenshots, synced G+ or Picasa albums, and auto backups from other devices.
To open Gallery from the:
• Camera app. Swipe from right to left.• Home screen. Touch the Gallery icon.
To get to the top level of the Gallery app, touch the icon in the upper left. From there, open the drop-down menu to view the available categories.
Within each category you can browse groups of images, crop, edit and tag them, create slideshows, make pictures or videos available offline and share with friends.
For more details, visit Camera & Gallery help.
Gallery
ANDROID QUICK START GUIDE TRY SOME APPS 41
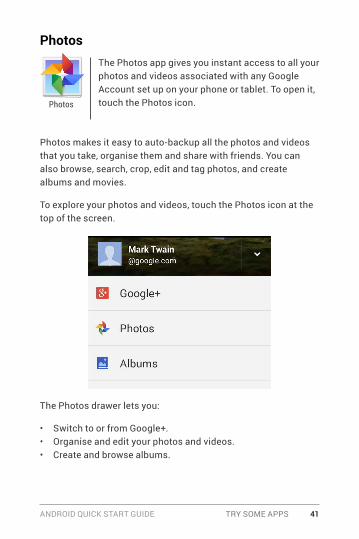
PhotosThe Photos app gives you instant access to all your photos and videos associated with any Google Account set up on your phone or tablet. To open it, touch the Photos icon.
Photos makes it easy to auto-backup all the photos and videos that you take, organise them and share with friends. You can also browse, search, crop, edit and tag photos, and create albums and movies.
To explore your photos and videos, touch the Photos icon at the top of the screen.
The Photos drawer lets you:
• Switch to or from Google+.• Organise and edit your photos and videos.• Create and browse albums.
Photos
ANDROID QUICK START GUIDE TRY SOME APPS 42
• Explore Auto-Awesome animations, panoramas or merged group shots created for you automatically.
• Browse photos of yourself.
For more details, visit Photos help.
PeopleThe People app gives you quick access to everyone you want to reach. To open it, touch the People icon on a Home or All Apps screen.
When you first turn on your device and sign into a Google Account, any existing contacts from that account are synced with your People app. After that, all your contacts stay in sync automatically on your different devices or a Web browser.
If you use Exchange, you can also sync that contact information with People.
All your People information is available from Gmail, Google Talk and other apps. As you add contacts from different sources, they’re synced automatically across all the places you need them.
When you open the People app, you can:
• View all contacts, favourites or groups. Choose from the top of the screen.
• Read details. Touch a name to see details for a contact or group.
• View recent activity. When viewing a contact, swipe to the right to see recent updates.
People
ANDROID QUICK START GUIDE TRY SOME APPS 43
• Edit details. While viewing a contact, touch icons at the top of the screen or the Menu icon to edit or share contact details, delete a contact and so on. You can also touch the star beside the contact’s name to add that contact to your Favourites list.
• Change your settings. While viewing the main list screen, touch the menu to import or export contacts, choose display options for the Groups and All tabs and add or edit accounts.
No matter where you are within People, you can always get back to the main lists by touching the People icon at the top of the screen.
For more information, visit People help.
Hangouts & SMSThe Hangouts app lets you send and receive instant messages and video calls, including SMS messages. To open it, touch the Hangouts icon on a Home or All Apps screen.
To start a Hangout or SMS message, touch the Add icon at the top of the main Hangouts screen and start typing a name, email address or phone number. Matching names and numbers from your contacts appear as you type.
What you do next depends on the type of Hangout that you want to start:
• SMS message: touch a phone number.• Text Hangout: touch a name.• Video call: touch a name, then touch the Video icon at the top
of the screen.
Hangouts
ANDROID QUICK START GUIDE TRY SOME APPS 44
To switch from one type of message to another, or in the case of SMS to a different phone number, touch the drop-down menu at the top of the screen.
To adjust notification preferences and other settings, touch Menu > Settings.
For more details, visit Hangouts help.
CalendarUse the Calendar app to view and edit your schedule. To open it, touch the Calendar icon on a Home or All Apps screen.
When you first set up your Android device, you have a chance to configure it to use a Google Account (such as Gmail). The first time that you open the Calendar app on your phone or tablet, it displays any existing calendar events from that Google Account on the web.
As you edit events, they’re synced automatically across all the places that you need them.
To change the Calendar view, choose Day, Week, Month or Agenda from the top of the screen.
From any of these views, you can:
• Read or edit event details. Touch an event to view its details.• Manage events and calendars. Touch icons across the top of
the screen or the menu to search or create events, return to today or adjust settings.
Calendar

ANDROID QUICK START GUIDE TRY SOME APPS 45
To email everyone who’s invited to an event, you have two options:
• Open the event from the Calendar app at any time and touch Email guests.
• When a notification of the event arrives just before the meeting starts, swipe down the notification shade. Then swipe using one finger to expand the notification if necessary, and touch Email guests.
For more information, visit Calendar help.
ANDROID QUICK START GUIDE SETTINGS 46
5
Settings
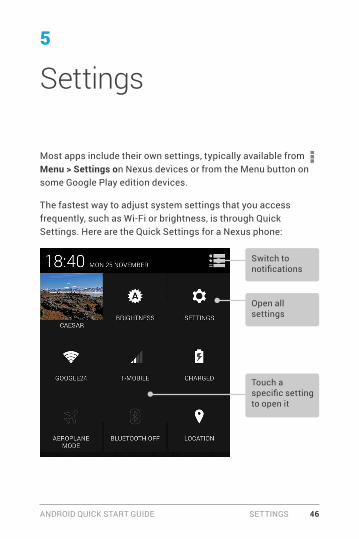
Most apps include their own settings, typically available from Menu > Settings on Nexus devices or from the Menu button on some Google Play edition devices.
The fastest way to adjust system settings that you access frequently, such as Wi-Fi or brightness, is through Quick Settings. Here are the Quick Settings for a Nexus phone:
Open all settings
Switch to notifications
Touch a specific setting to open it
ANDROID QUICK START GUIDE SETTINGS 47
To open Quick Settings:
• On tablets: Swipe down from the top right corner of any screen.
• On phones: Swipe down from the top of the screen with two fingers.
To open the Settings app from Quick Settings, touch the Settings icon.
The Settings app controls the core Android settings for networks, hardware, location, security, language, accounts and so on.
You can also open the Settings app from All Apps. To get more information about most Settings screens, choose Help from the screen’s menu.
These are the main types of system settings available. Click the links to see related help articles.
• Wireless & networks. Wi-Fi, Bluetooth, data usage, Android Beam and related settings.
• Device. Sound, battery, sleep and other display settings.• Personal. Location, language and backup/reset options.• Personal > Security. Passwords and certificates, app
verification, screen lock and encryption.• Accounts. Sync and other account settings.• System Date, time, accessibility and device information.
Some useful settings are also available from the Google Settings app.
Settings
ANDROID QUICK START GUIDE SETTINGS 48
Google Settings lets you adjust adjust preferences for commonly used Google apps and services in one place, including Google+, Location, Search and the Android Device Manager.
To open Google Settings, touch its icon in All Apps.
From here, you can also:
• Control how interest-based Google ads are displayed in non-Google apps.
• View all the apps that have access to your Google Account information, including the type of access granted to each app.
Settings
ANDROID QUICK START GUIDE ACCESSIBILITY 49
6
Accessibility
To use the accessibility options, open Settings > System > Accessibility.
To view detailed information about setting up these options, visit Nexus Accessibility. Options for people with visual impairments include the following:
• TalkBack is a pre-installed screen reader from Google. It uses spoken feedback to describe events, such as notifications, and the results of your actions, such as opening an app.
• Explore by Touch is a system feature that works with TalkBack, allowing you to touch your device’s screen and hear what’s under your finger via spoken feedback. This feature is helpful to people with no vision.
• Accessibility settings let you modify your device’s display and sound options, such as increasing the text size, changing the speed at which text is spoken and more.
If you have low vision and don’t plan to use Explore by Touch, visit support.google.com/android to see Help content formatted for sighted users. You can make reading and navigating this material easier by increasing the text size – just open Chrome, go to Menu > Settings > Accessibility, and drag the slider to adjust the text size.
ANDROID QUICK START GUIDE ACCESSIBILITY 50
You can also try magnification gestures, which allow you to zoom in and out, as well as temporarily magnify what’s under your finger. To try magnification gestures, go to Settings > Accessibility > Magnification gestures.