Embed Size (px)
Citation preview
Biology 232 Anatomy and Physiology II
Sylvania Laboratory Survival Guide
Lab Objectives and Worksheets to accompany
Fundamentals of Human Anatomy and Physiology, By Frederic Martini, 7th Edition
Fall 2008 Update
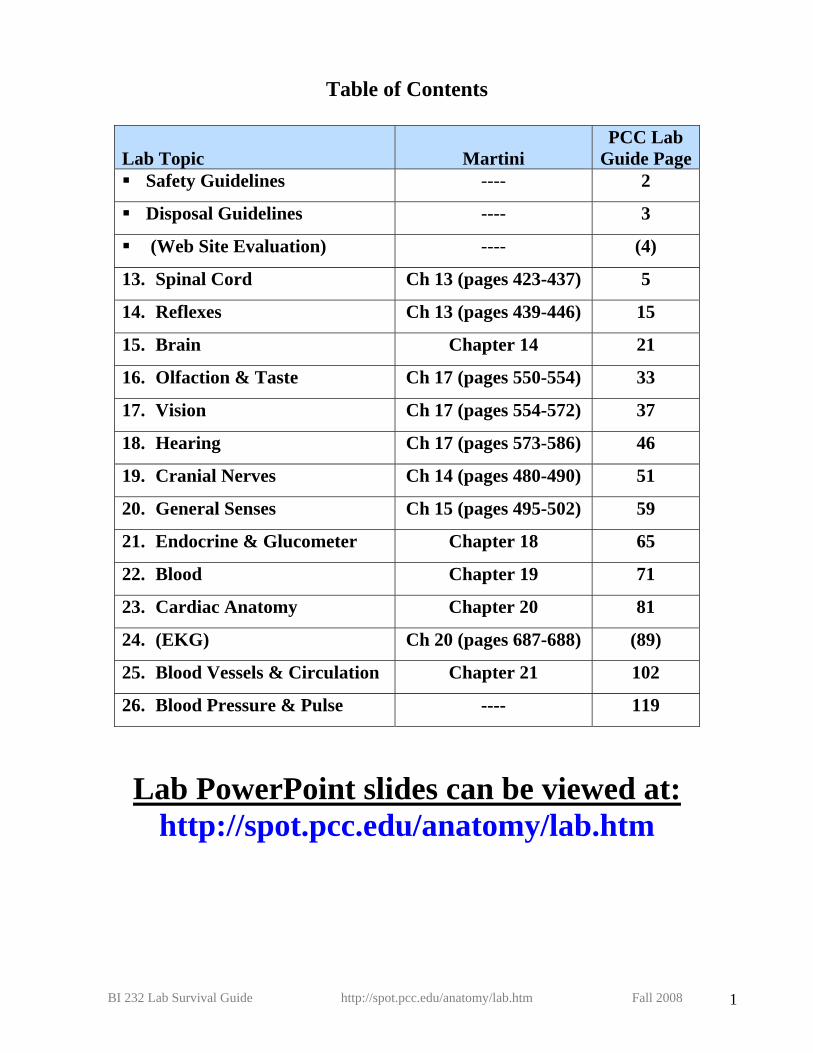
Table of Contents
Lab Topic
Martini
PCC Lab Guide Page
Safety Guidelines ---- 2
Disposal Guidelines ---- 3
(Web Site Evaluation) ---- (4)
13. Spinal Cord Ch 13 (pages 423-437) 5
14. Reflexes Ch 13 (pages 439-446) 15
15. Brain Chapter 14 21
16. Olfaction & Taste Ch 17 (pages 550-554) 33
17. Vision Ch 17 (pages 554-572) 37
18. Hearing Ch 17 (pages 573-586) 46
19. Cranial Nerves Ch 14 (pages 480-490) 51
20. General Senses Ch 15 (pages 495-502) 59
21. Endocrine & Glucometer Chapter 18 65
22. Blood Chapter 19 71
23. Cardiac Anatomy Chapter 20 81
24. (EKG) Ch 20 (pages 687-688) (89)
25. Blood Vessels & Circulation Chapter 21 102
26. Blood Pressure & Pulse ---- 119
Lab PowerPoint slides can be viewed at: http://spot.pcc.edu/anatomy/lab.htm
BI 232 Lab Survival Guide http://spot.pcc.edu/anatomy/lab.htm Fall 2008 1
PCC-Sylvania BI 232 Laboratory Supplement
1. Upon entering the laboratory, please locate the exits, fire extinguisher, eyewash station, and clean up materials for chemical spills. Your instructor will demonstrate the location of fire blanket, safety kit, and showers.
2. Read the general laboratory directions and any objectives before coming to lab.
3. Food and drink, including water, are prohibited in laboratory. This is per Federal laboratory guidelines
and per College Safety Policy. Do not chew gum, use tobacco products of any kind, store food or apply cosmetics in the laboratory. No drink containers of any kind may be on the benches.
4. Please keep all personal materials off the working area. Store backpacks and purses at the rear of the
laboratory, not beside or under benches. Some laboratory spaces have shelving in rear for this purpose.
5. For your safety, please restrain long hair, loose fitting clothing and dangling jewelry. Hair ties are available, ask your instructor. Hats and bare midriffs are not acceptable in the laboratory. Shoes, not sandals, must be worn at all times in laboratory. You may wear a laboratory apron or lab coat if you desire, but it is not required.
6. We do not wish to invade your privacy, but for your safety if you are pregnant, taking
immunosuppressive drugs or who have any other medical conditions (e.g. diabetes, immunological defect) that might necessitate special precautions in the laboratory must inform the instructor immediately. If you know you have an allergy to latex or chemicals, please inform instructor.
7. Decontaminate work surfaces at the beginning of every lab period using Amphyl solution.
Decontaminate bench following any practical quiz, when given, and after labs involving the dissection of preserved material.
8. Use safety goggles in all experiments in which solutions or chemicals are heated or when instructed to
do so. Never leave heat sources unattended: hot plates or Bunsen burners.
9. Wear disposable gloves when handling blood and other body fluids or when touching items or surfaces soiled with blood or other body fluids such as saliva and urine. (NOTE: cover open cuts or scrapes with a sterile bandage before donning gloves.) Wash your hands immediately after removing gloves.
10. Keep all liquids away from the edge of the lab bench to avoid spills. Immediately notify your instructor
of any spills. Keep test tubes in racks provided, except when necessary to transfer to water baths or hot plate. You will be advised of the proper clean-up procedures for any spill.
11. Report all chemical or liquid spills and all accidents, such as cuts or burns, no matter how minor, to the
instructor immediately.
12. Use mechanical pipetting devices only. Mouth pipetting is prohibited.
Students who do not comply with these safety guidelines will be excluded from the Laboratory
BI 232 Lab Survival Guide http://spot.pcc.edu/anatomy/lab.htm Fall 2008 2
Safe Disposal of Contaminated Materials
• Place disposable materials such as gloves, mouth pieces, swabs, toothpicks and paper towels that have come into contact with blood or other body fluids into a disposable Autoclave bag for decontamination by autoclaving. This bucket is not for general trash. • Place glassware contaminated with blood and other body fluids directly into a labeled bucket of 10% bleach solution. ONLY glass or plastic-ware is to be placed in this bucket, not trash. • Sharp’s container is for used lancets only. It is bright red. When using disposable lancets do not replace their covers.
1. Properly label glassware and slides, using china markers provided.
2. Wear disposable gloves when handling blood and other body fluids or when touching items or surfaces soiled with blood or other body fluids such as saliva and urine. (NOTE: cover open cuts or scrapes with a sterile bandage before donning gloves.) Wash your hands immediately after removing gloves.
3. Wear disposable gloves when handling or dissecting specimens fixed with formaldehyde or stored in
Carosafe/Wardsafe.
4. Wear disposable gloves when handling chemicals denoted as hazardous or carcinogenic by your instructor. Read labels on dropper bottles provided for an experiment, they will indicate the need for gloves or goggles, etc. Upon request, detailed written information is available on every chemical used (MSDS). Ask your instructor.
5. No pen or pencil is to be used at any time on any model or bone. The bones are fragile, hard to replace and
used by hundreds of students every year. To protect them and keep them in the best condition, please use pipe cleaners and probes provided instead of a writing instrument.
a. Probes may be used on models as well. The bones are very difficult and costly to replace, as are the models and may take a long time to replace.
6. At the end of an experiment:
a. Clean glassware and place where designated. Remove china marker labels at this time. b. Return solutions & chemicals to designated area. Do not put solutions or chemicals in cupboards!
7. You cannot work alone or unsupervised in the laboratory. 8. Microscopes should be cleaned before returning to numbered cabinet. Be sure objectives are clean, use lens
paper. Place objectives into storage position, and return to the storage cabinet. Be sure cord has been coiled and restrained. Your instructor may require microscope be checked before you put it away. Be sure it is in assigned cupboard.
9. Please replace your prepared slides into the box from which they came (slides and boxes are numbered), so
students using them after you will be able to find the same slide. Before placing slides in box, clean it with Kimwipes if it is dirty or covered with oil. If you break a slide, please, inform you instructor so the slide can be replaced. Please be aware that there is hundreds of dollars worth of slides in each box and handle the boxes with care when carrying to and from your workbench.
10. Be sure all paper towels used in cleaning lab benches and washing hands are disposed of in trash container
provided. Students who do not comply with these safety guidelines
and directions will be excluded from the Laboratory
BI 232 Lab Survival Guide http://spot.pcc.edu/anatomy/lab.htm Fall 2008 3
Lab Activity 13: Spinal Cord Martini Chapter 13, pages 423-437
Define these terms: 1. Tract
2. Nerve
3. Ganglia
4. Nucleus/nuclei
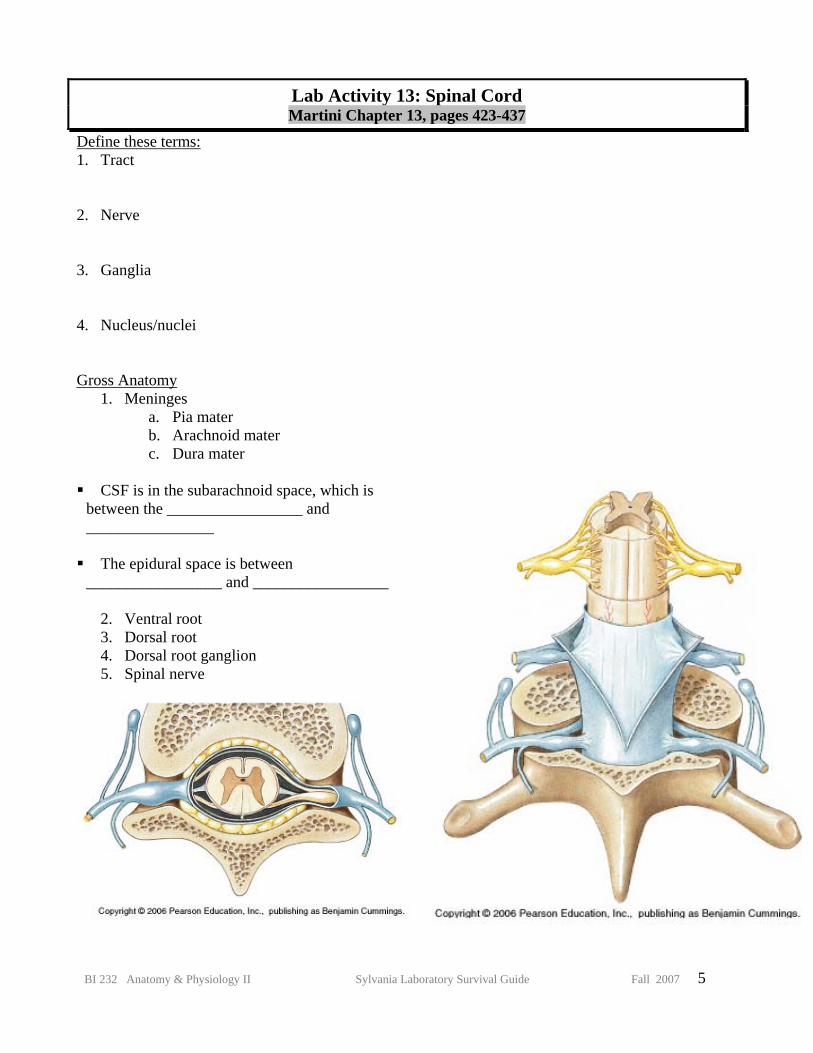
Gross Anatomy 1. Meninges
a. Pia mater b. Arachnoid mater c. Dura mater
CSF is in the subarachnoid space, which is between the _________________ and ________________ The epidural space is between _________________ and _________________
2. Ventral root 3. Dorsal root 4. Dorsal root ganglion 5. Spinal nerve
BI 232 Anatomy & Physiology II Sylvania Laboratory Survival Guide Fall 2007 5
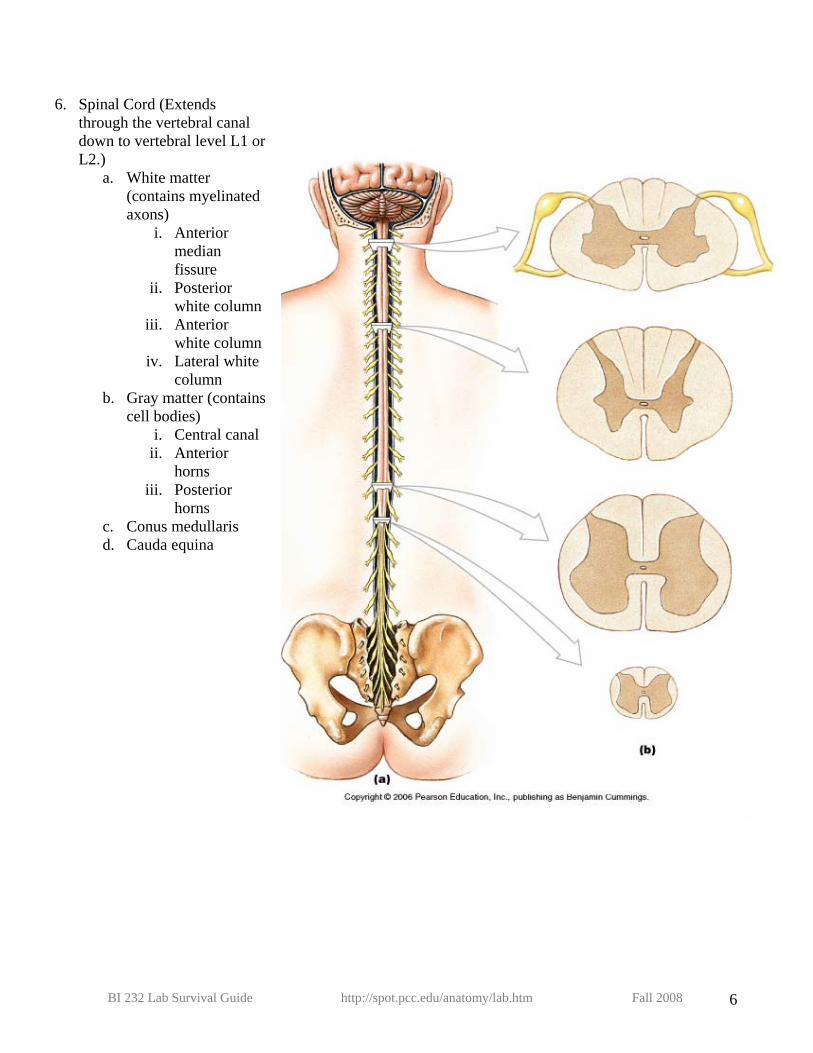
6. Spinal Cord (Extends
through the vertebral canal down to vertebral level L1 or L2.)
a. White matter (contains myelinated axons)
i. Anterior median fissure
ii. Posterior white column
iii. Anterior white column
iv. Lateral white column
b. Gray matter (contains cell bodies)
i. Central canal ii. Anterior
horns iii. Posterior
horns c. Conus medullaris d. Cauda equina
BI 232 Lab Survival Guide http://spot.pcc.edu/anatomy/lab.htm Fall 2008 6
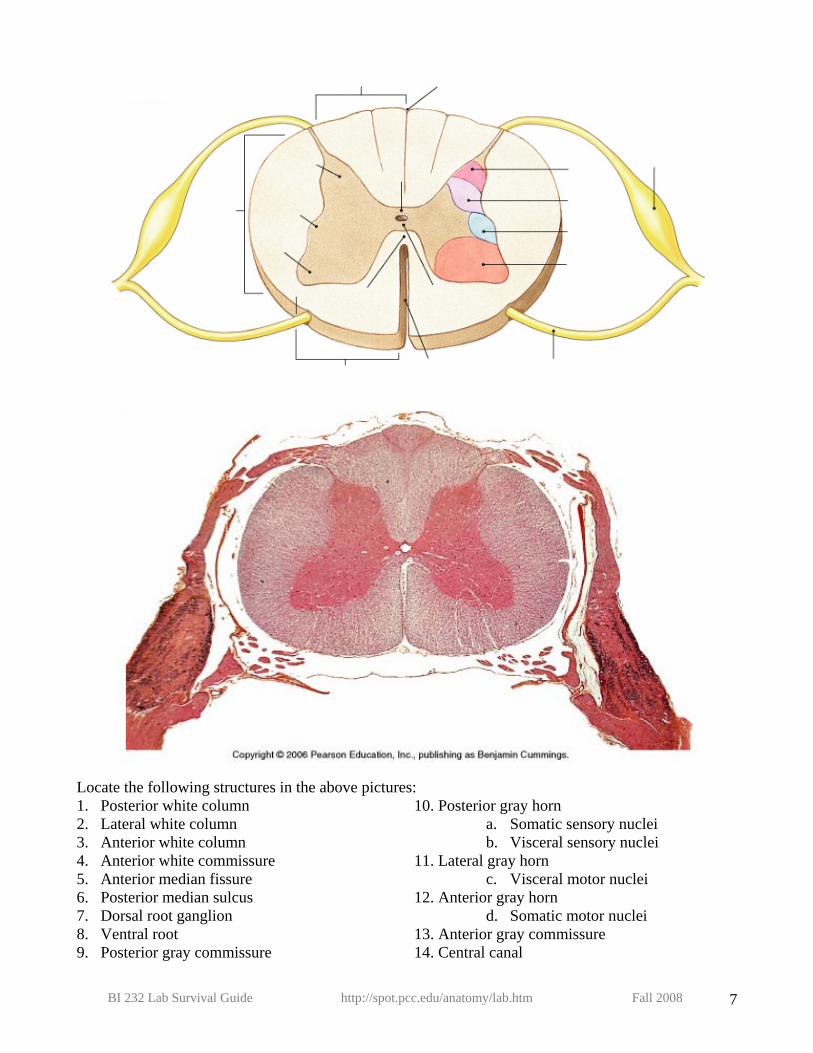
Locate the following structures in the above pictures: 1. Posterior white column 2. Lateral white column 3. Anterior white column 4. Anterior white commissure 5. Anterior median fissure 6. Posterior median sulcus 7. Dorsal root ganglion 8. Ventral root 9. Posterior gray commissure
10. Posterior gray horn a. Somatic sensory nuclei b. Visceral sensory nuclei
11. Lateral gray horn c. Visceral motor nuclei
12. Anterior gray horn d. Somatic motor nuclei
13. Anterior gray commissure 14. Central canal
BI 232 Lab Survival Guide http://spot.pcc.edu/anatomy/lab.htm Fall 2008 7
1. Does the dorsal root contain sensory or motor neurons? 2. Does the ventral root contain sensory or motor neurons?
3. What is in the dorsal root ganglion?
4. What is in the gray matter? a. Posterior gray horns b. Anterior gray horns
c. Lateral gray horns
i. Which 2 spinal areas are these located?
5. What do the ascending tracts of the white columns convey?
6. What do the descending tracts of the white columns convey?
7. Name 2 diseases that cause destruction of the anterior horn motor neurons.
a. What are the symptoms?
8. How many pairs of spinal nerves are there? a. Cervical: b. Thoracic: c. Lumbar: d. Sacral: e. Coccygeal: f. Total:
9. Are spinal nerves sensory, motor or both?
BI 232 Lab Survival Guide http://spot.pcc.edu/anatomy/lab.htm Fall 2008 8
10. Describe how cervical spinal nerves are named/numbered.
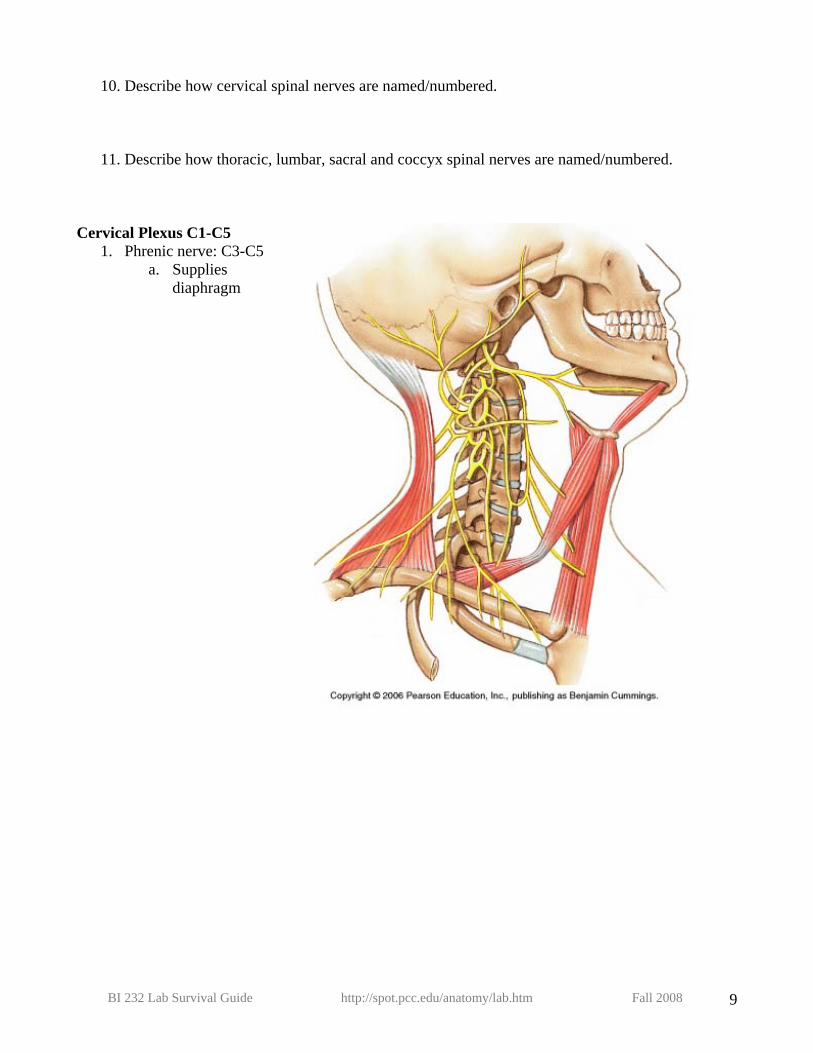
11. Describe how thoracic, lumbar, sacral and coccyx spinal nerves are named/numbered. Cervical Plexus C1-C5
1. Phrenic nerve: C3-C5 a. Supplies
diaphragm
BI 232 Lab Survival Guide http://spot.pcc.edu/anatomy/lab.htm Fall 2008 9
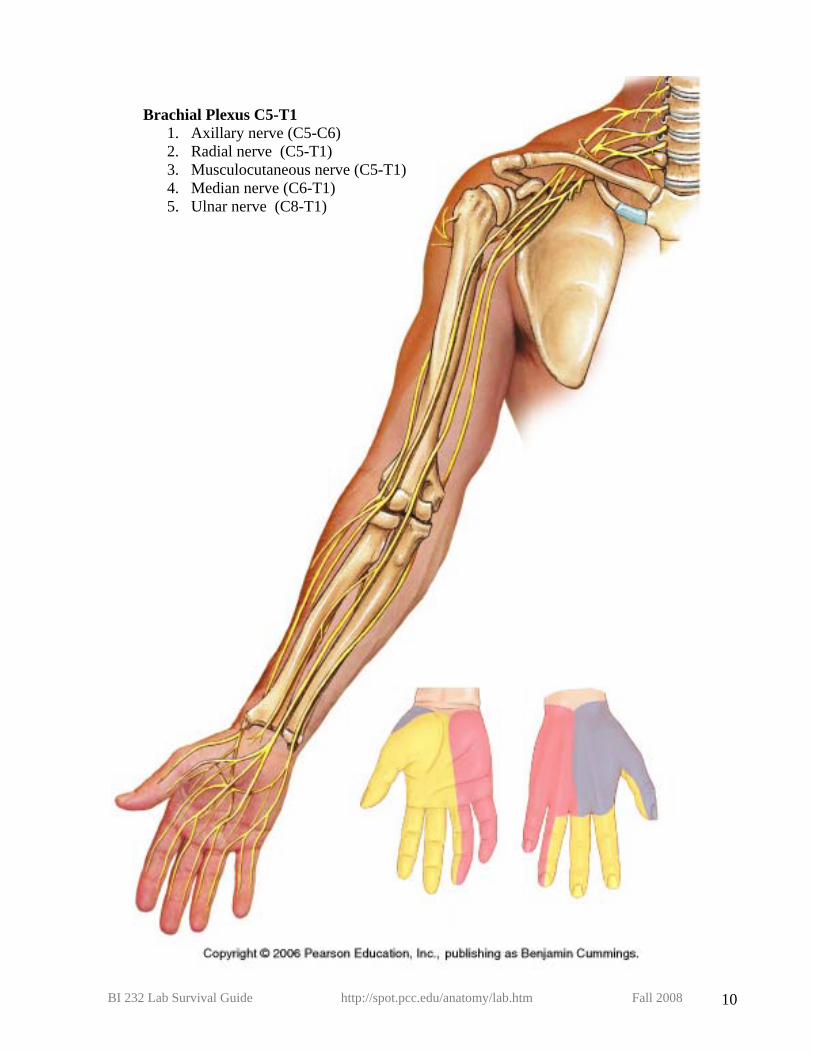
Brachial Plexus C5-T1 1. Axillary nerve (C5-C6) 2. Radial nerve (C5-T1) 3. Musculocutaneous nerve (C5-T1) 4. Median nerve (C6-T1) 5. Ulnar nerve (C8-T1)
BI 232 Lab Survival Guide http://spot.pcc.edu/anatomy/lab.htm Fall 2008 10
1. Which 2 muscles does the axillary nerve innervate?
2. What is the sensory distribution of the axillary nerve?
3. The musculocutaneous nerve innervates the ________________ muscles of the arm.
4. What is the sensory distribution of the musculocutaneous nerve?
5. What is the sensory distribution of the radial nerve?
6. The median nerve innervates the ________________ muscles of the forearm.
7. What is the sensory distribution of the median nerve?
8. The median nerve goes through the __________________ tunnel of the wrist.
9. What is the sensory distribution of the ulnar nerve?
BI 232 Lab Survival Guide http://spot.pcc.edu/anatomy/lab.htm Fall 2008 11
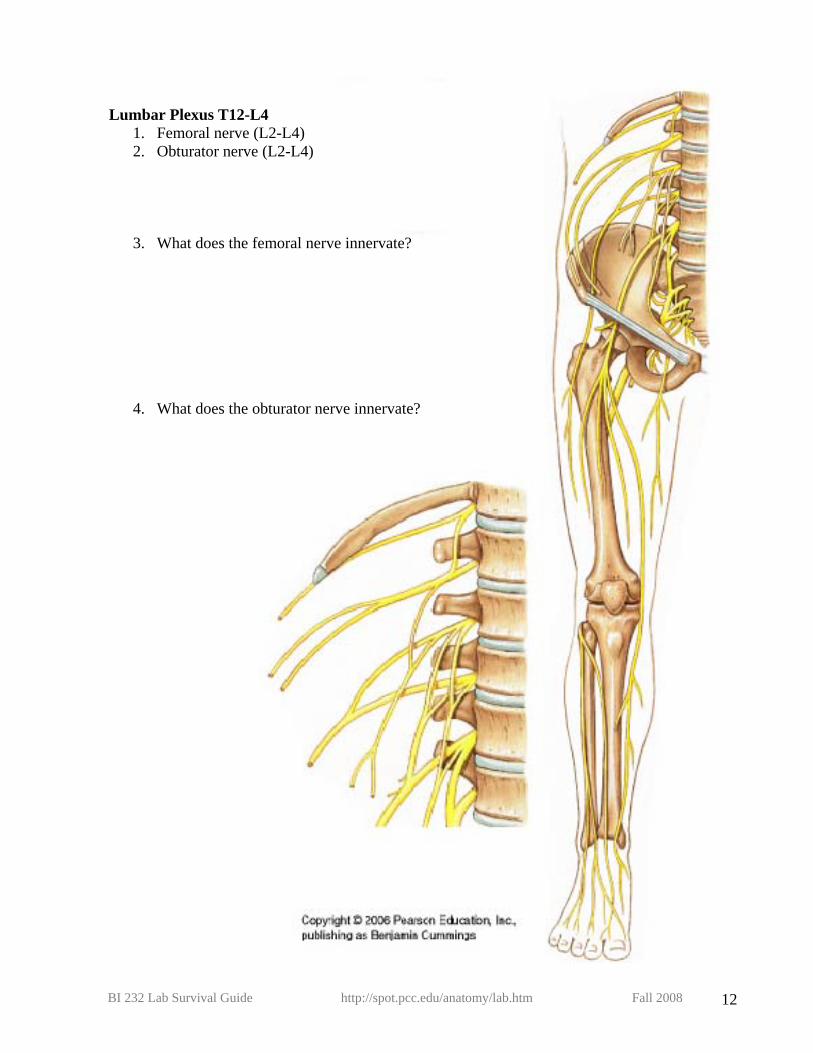
Lumbar Plexus T12-L4 1. Femoral nerve (L2-L4) 2. Obturator nerve (L2-L4)
3. What does the femoral nerve innervate?
4. What does the obturator nerve innervate?
BI 232 Lab Survival Guide http://spot.pcc.edu/anatomy/lab.htm Fall 2008 12
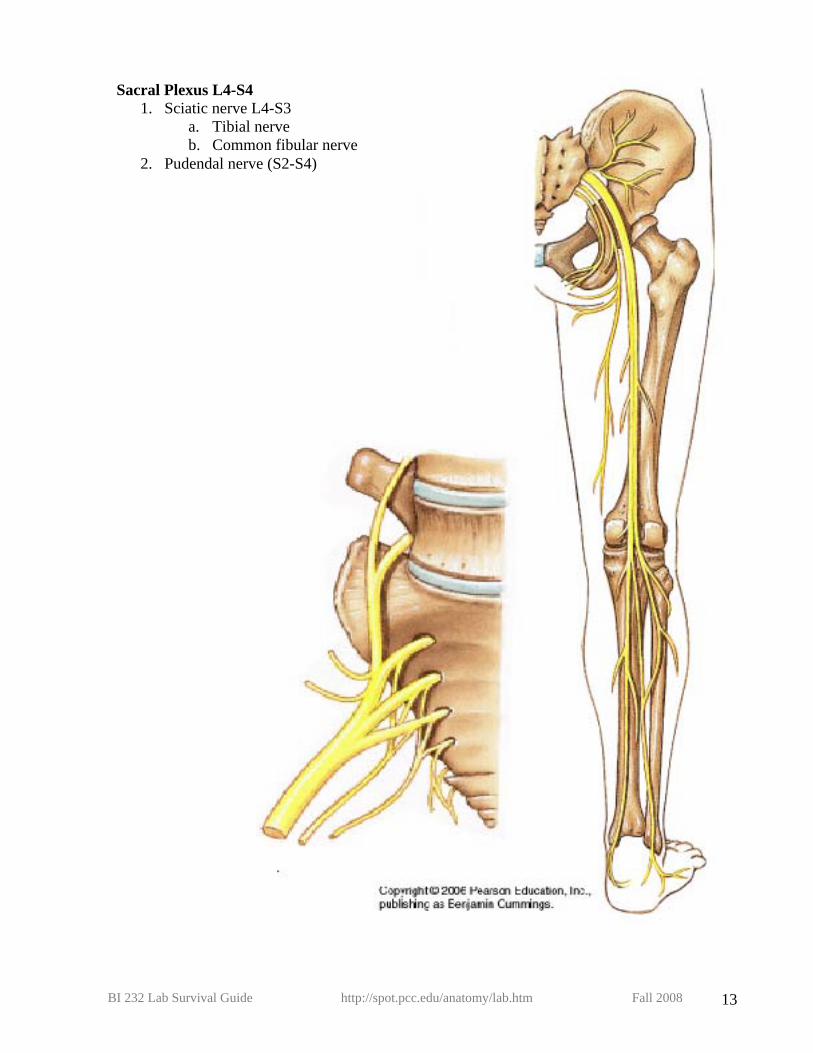
Sacral Plexus L4-S4 1. Sciatic nerve L4-S3
a. Tibial nerve b. Common fibular nerve
2. Pudendal nerve (S2-S4)
BI 232 Lab Survival Guide http://spot.pcc.edu/anatomy/lab.htm Fall 2008 13
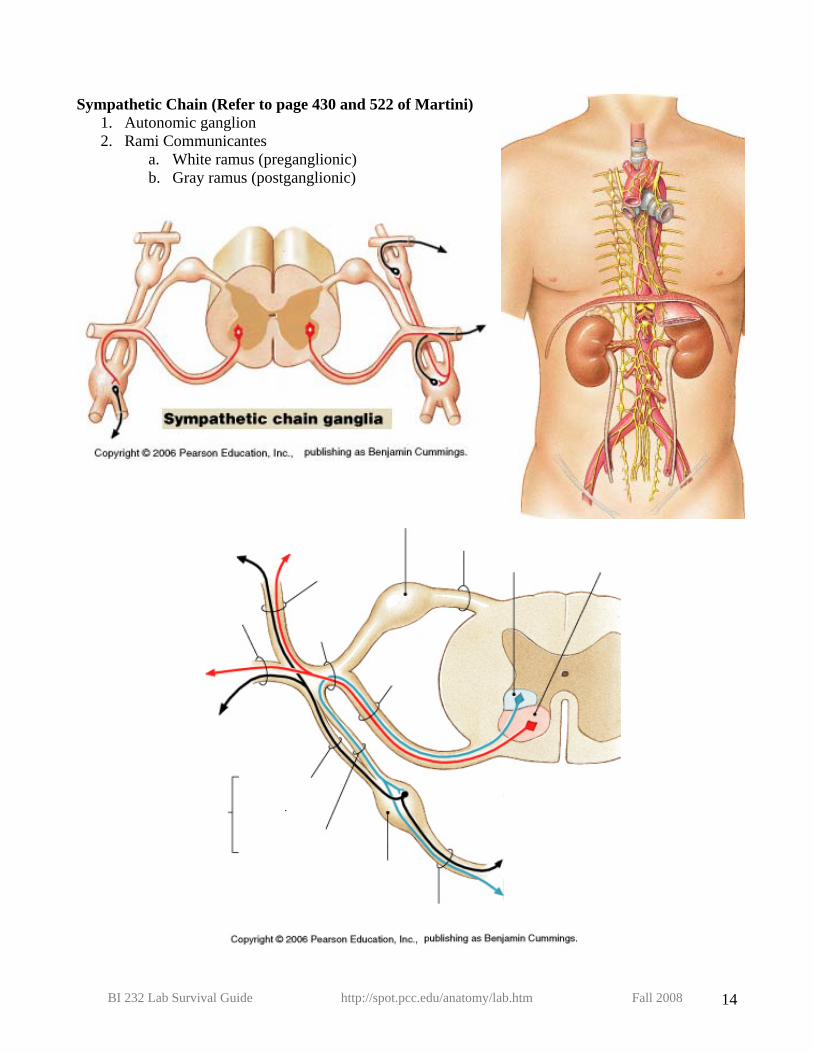
Sympathetic Chain (Refer to page 430 and 522 of Martini)
1. Autonomic ganglion 2. Rami Communicantes
a. White ramus (preganglionic) b. Gray ramus (postganglionic)
BI 232 Lab Survival Guide http://spot.pcc.edu/anatomy/lab.htm Fall 2008 14
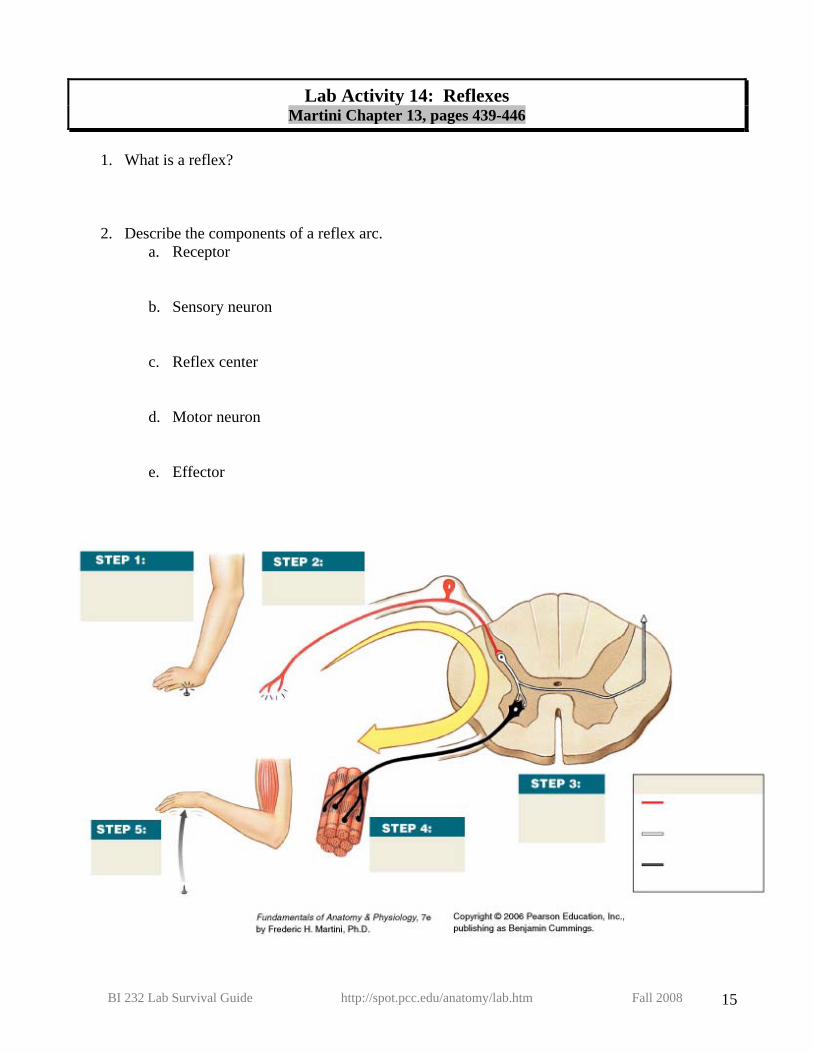
Lab Activity 14: Reflexes Martini Chapter 13, pages 439-446
1. What is a reflex?
2. Describe the components of a reflex arc. a. Receptor b. Sensory neuron
c. Reflex center
d. Motor neuron
e. Effector
BI 232 Lab Survival Guide http://spot.pcc.edu/anatomy/lab.htm Fall 2008 15
1. What is an innate reflex? Give an example. 2. What is an acquired reflex? Give an example. 3. What is a visceral (autonomic) reflex? 4. What is a somatic reflex? 5. What is a spinal reflex? 6. What is a cranial reflex? 7. Describe monosynaptic reflexes. 8. Describe polysynaptic reflexes. 9. What are upper motor neurons? 10. What are lower motor neurons?
BI 232 Lab Survival Guide http://spot.pcc.edu/anatomy/lab.htm Fall 2008 16
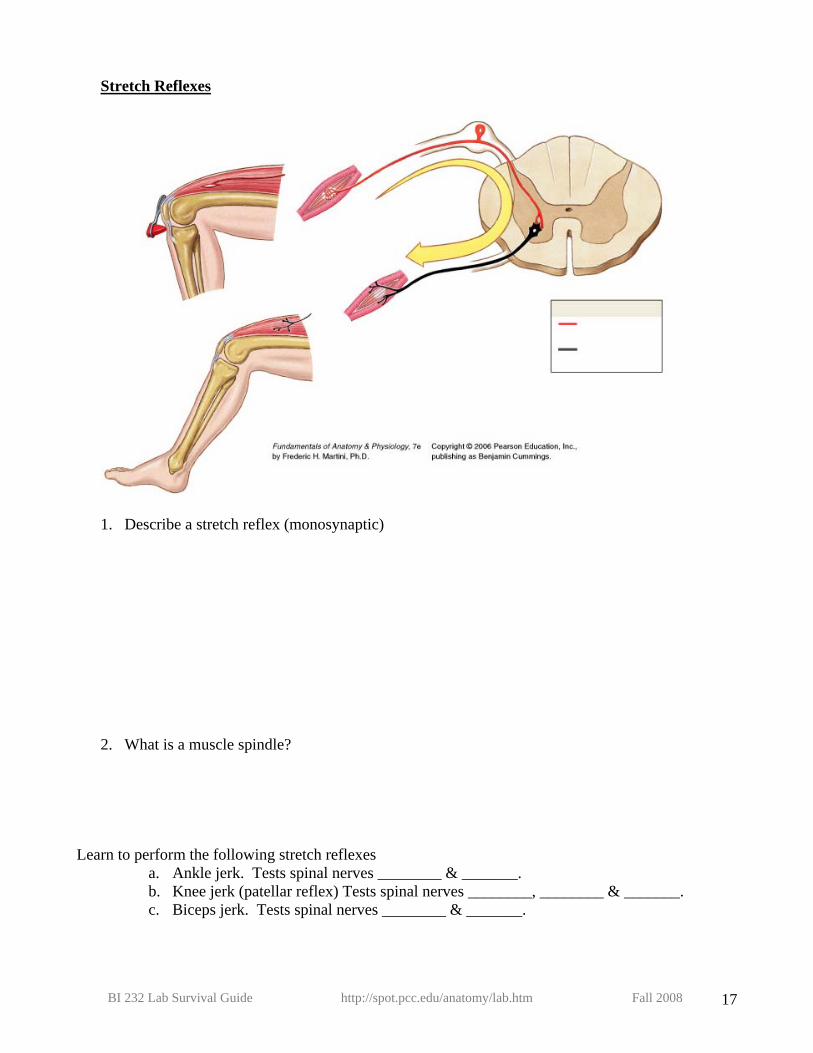
Stretch Reflexes
1. Describe a stretch reflex (monosynaptic)
2. What is a muscle spindle? Learn to perform the following stretch reflexes
a. Ankle jerk. Tests spinal nerves ________ & _______. b. Knee jerk (patellar reflex) Tests spinal nerves ________, ________ & _______. c. Biceps jerk. Tests spinal nerves ________ & _______.
BI 232 Lab Survival Guide http://spot.pcc.edu/anatomy/lab.htm Fall 2008 17
2. How are reflexes graded? a. 0+ means: b. 1+ means: c. 2+ means: d. 3+ means: e. 4+ means:
3. What conditions would diminish reflexes?
4. What conditions would cause increased reflexes? Tendon Reflexes
5. What is a tendon reflex?
6. Is the tendon reflex monosynaptic or polysynaptic?
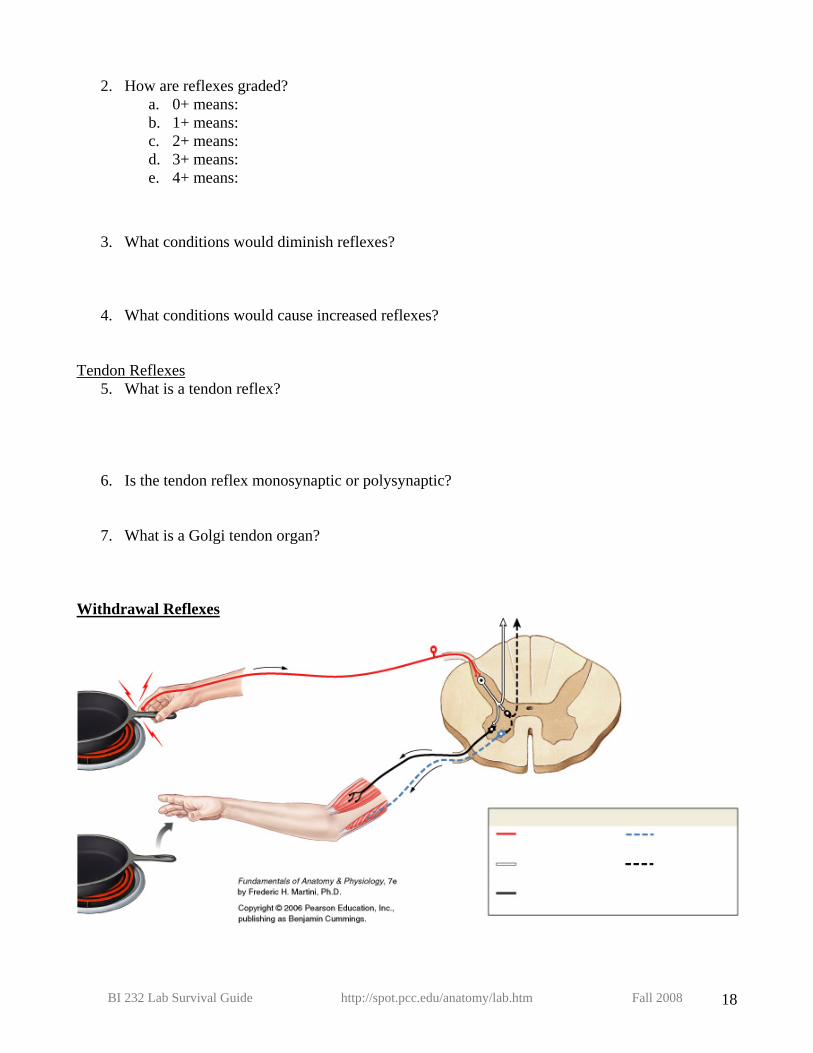
7. What is a Golgi tendon organ? Withdrawal Reflexes
BI 232 Lab Survival Guide http://spot.pcc.edu/anatomy/lab.htm Fall 2008 18
1. Describe a withdrawal reflex.
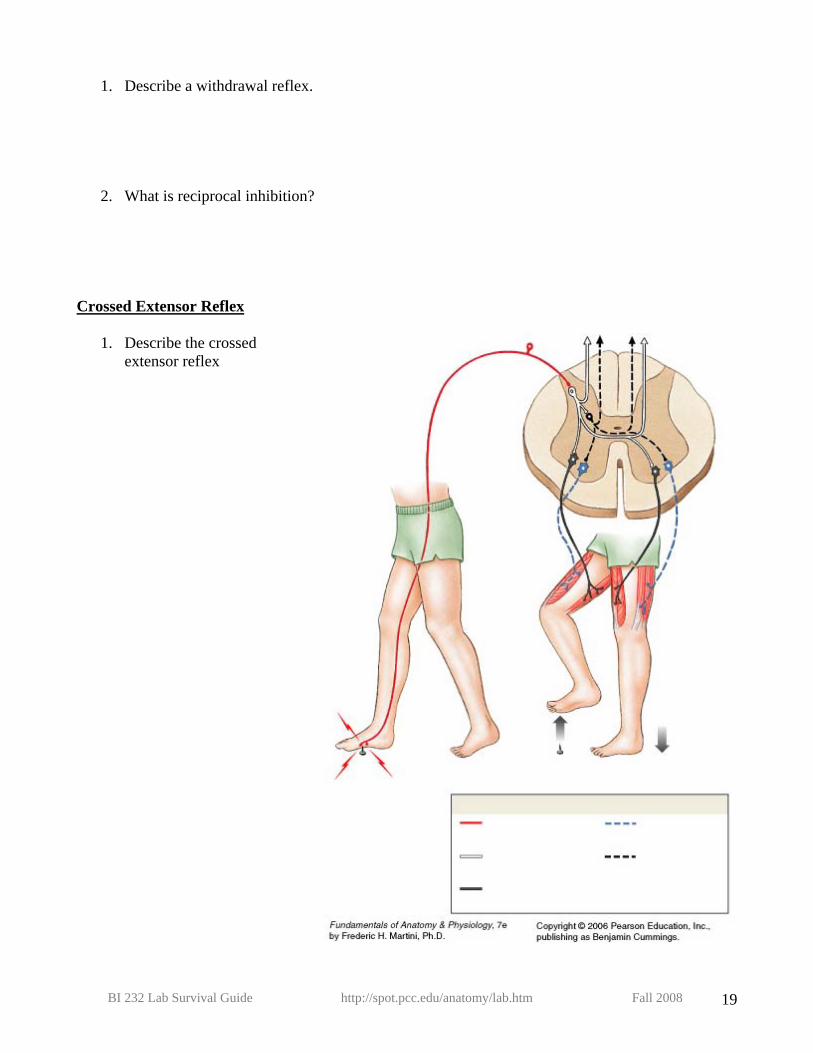
2. What is reciprocal inhibition? Crossed Extensor Reflex
1. Describe the crossed extensor reflex
BI 232 Lab Survival Guide http://spot.pcc.edu/anatomy/lab.htm Fall 2008 19
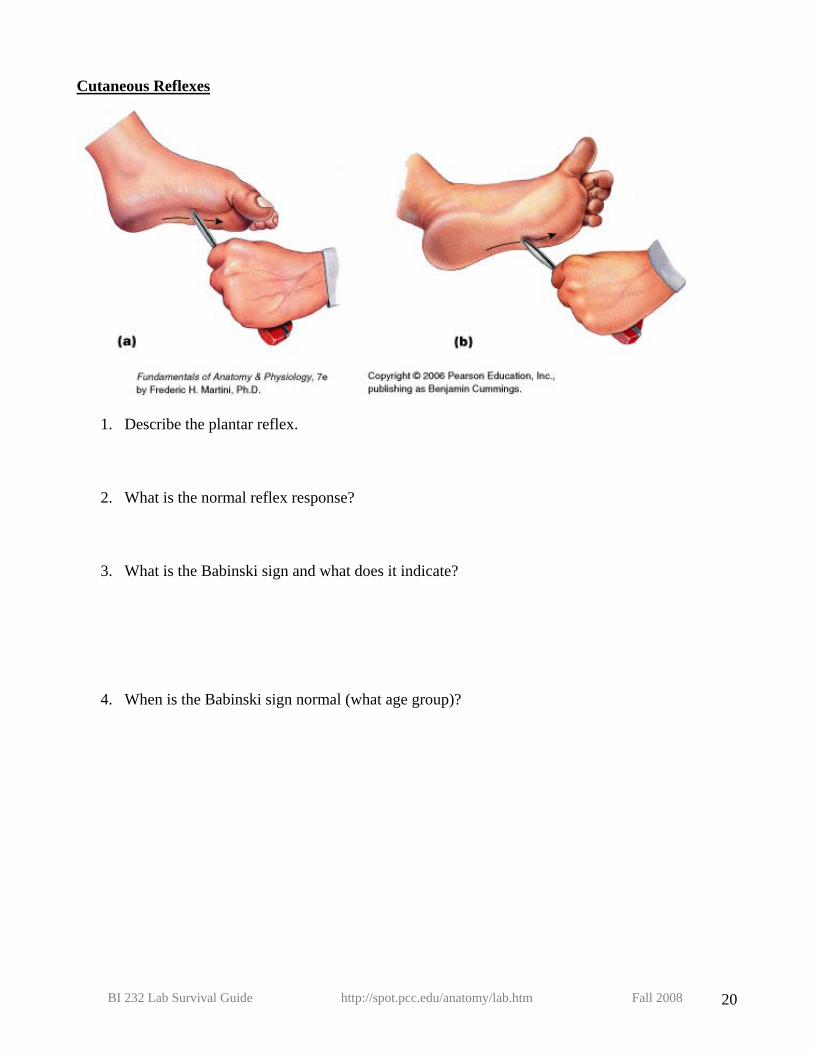
Cutaneous Reflexes
1. Describe the plantar reflex.
2. What is the normal reflex response?
3. What is the Babinski sign and what does it indicate?
4. When is the Babinski sign normal (what age group)?
BI 232 Lab Survival Guide http://spot.pcc.edu/anatomy/lab.htm Fall 2008 20
Activity 15: The Brain Martini Chapter 14
Define these terms and locate the structures. Meninges
1. Dura mater
a. How is it different than spinal dura mater?
b. What is contained between the inner and outer layers of dura mater?
c. What are venous sinuses?
d. What vessels do the venous sinuses drain into?
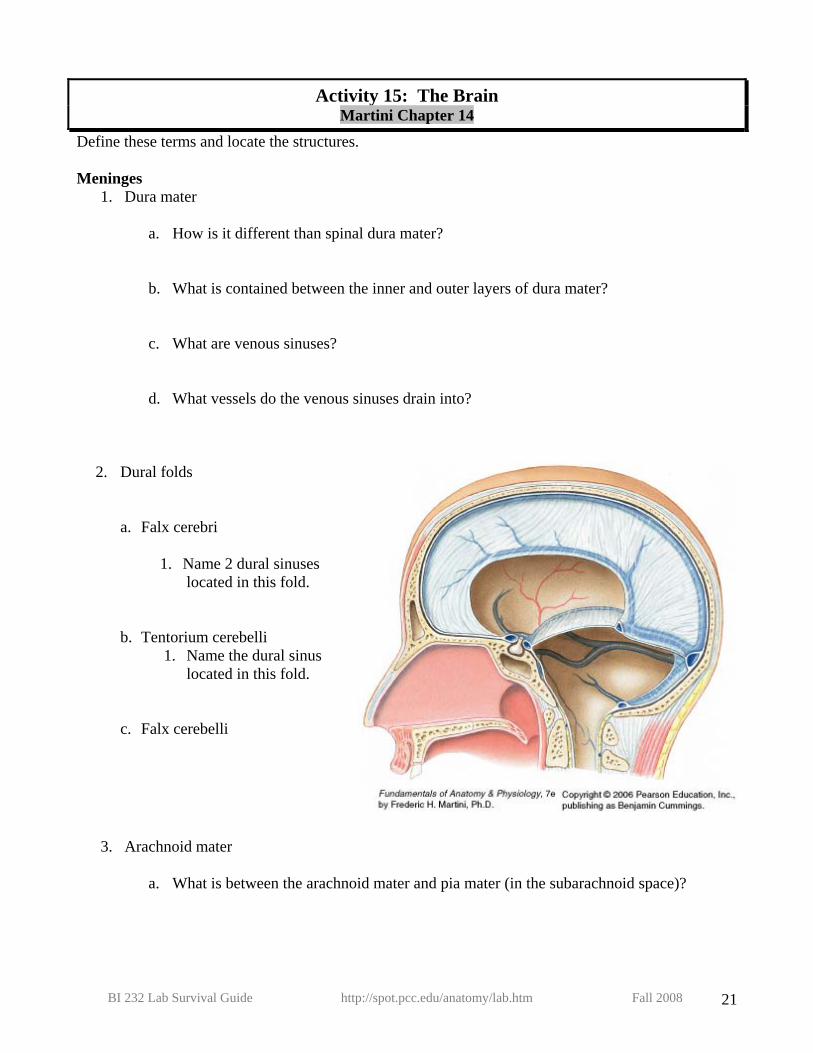
2. Dural folds
a. Falx cerebri
1. Name 2 dural sinuses located in this fold.
b. Tentorium cerebelli 1. Name the dural sinus
located in this fold.
c. Falx cerebelli
3. Arachnoid mater
a. What is between the arachnoid mater and pia mater (in the subarachnoid space)?
BI 232 Lab Survival Guide http://spot.pcc.edu/anatomy/lab.htm Fall 2008 21
4. Pia mater b. What attaches the pia mater to the brain surface?
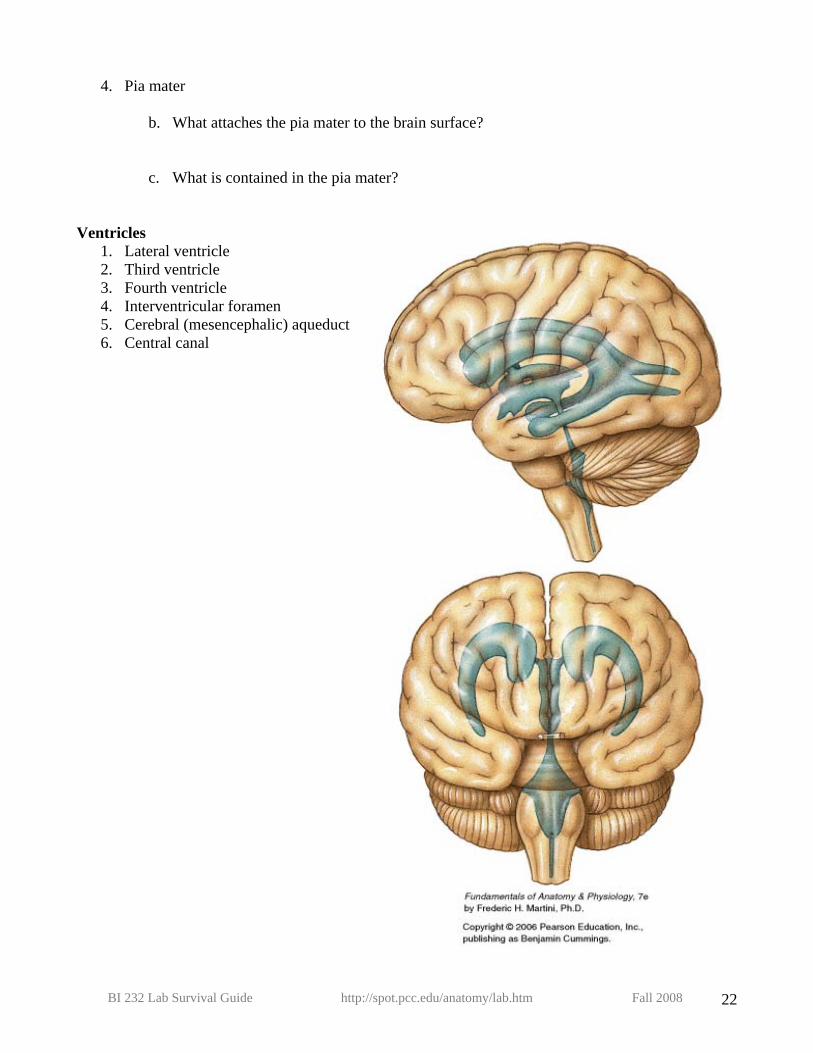
c. What is contained in the pia mater? Ventricles
1. Lateral ventricle 2. Third ventricle 3. Fourth ventricle 4. Interventricular foramen 5. Cerebral (mesencephalic) aqueduct 6. Central canal
BI 232 Lab Survival Guide http://spot.pcc.edu/anatomy/lab.htm Fall 2008 22
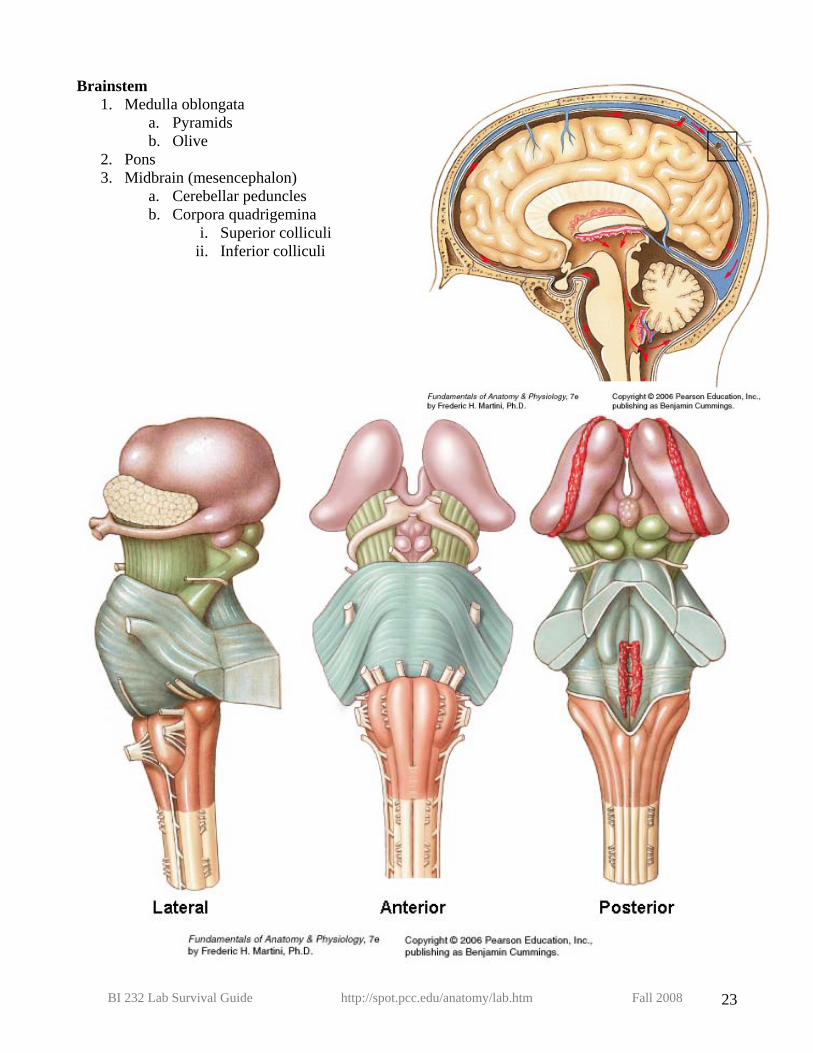
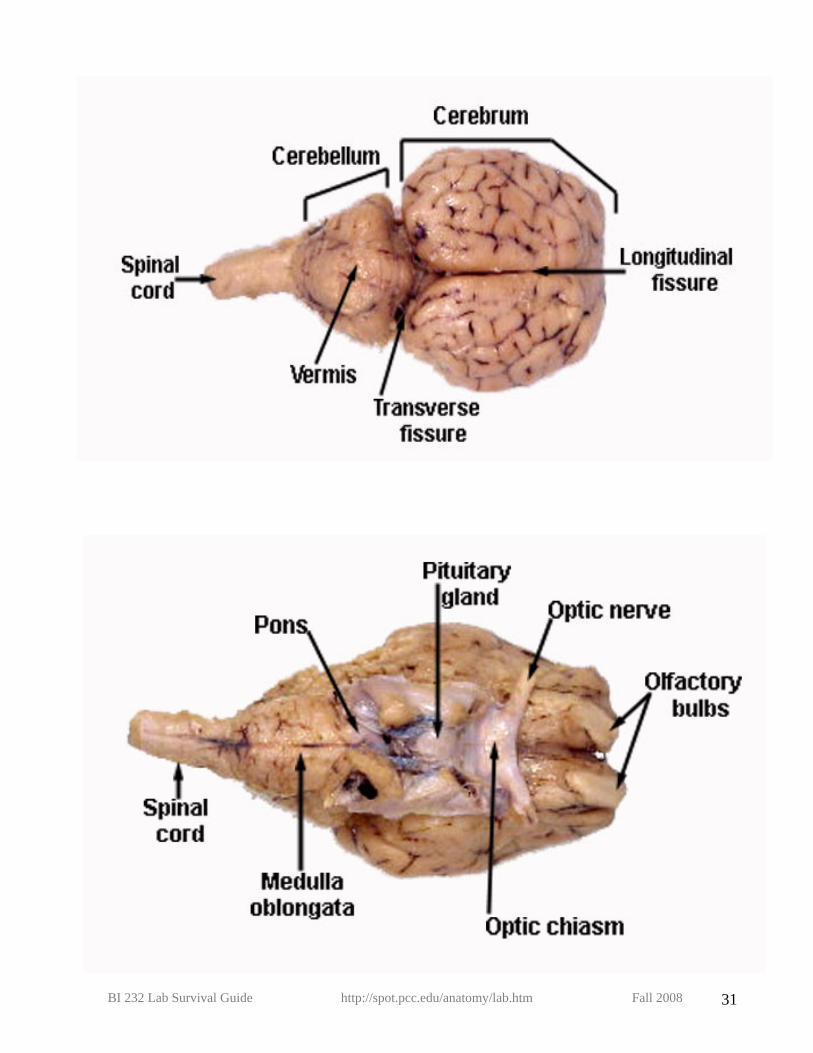
Brainstem 1. Medulla oblongata
a. Pyramids b. Olive
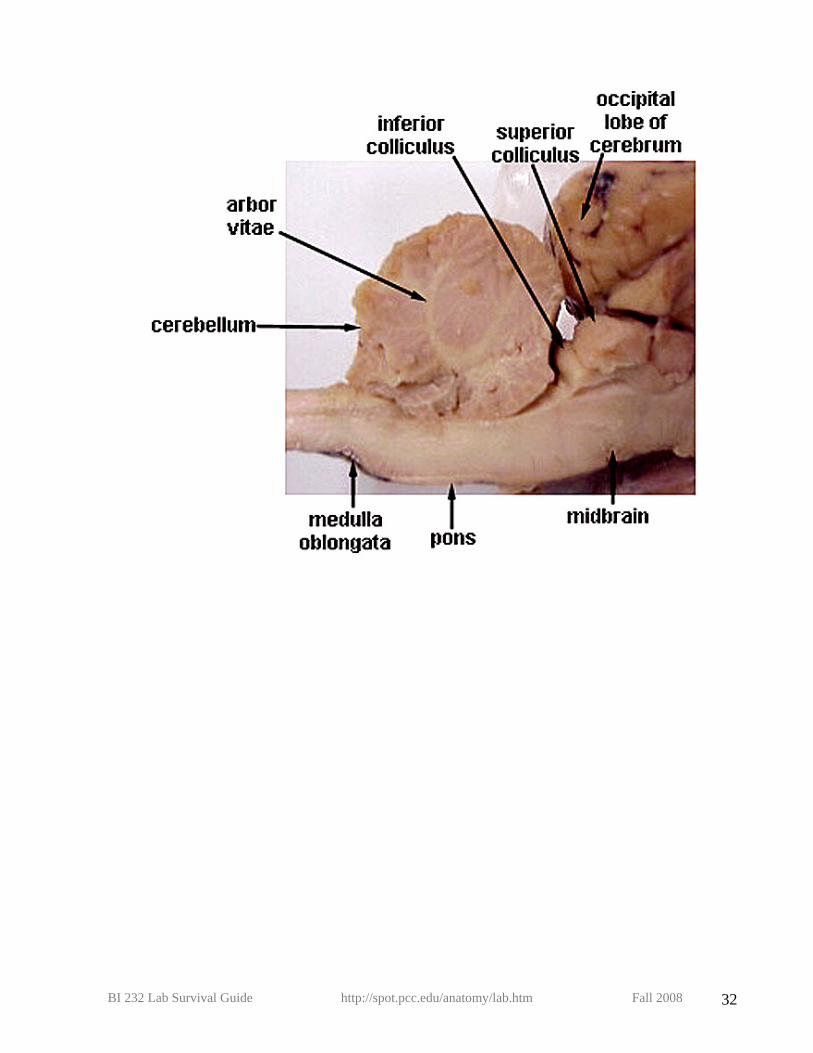
2. Pons 3. Midbrain (mesencephalon)
a. Cerebellar peduncles b. Corpora quadrigemina
i. Superior colliculi ii. Inferior colliculi
BI 232 Lab Survival Guide http://spot.pcc.edu/anatomy/lab.htm Fall 2008 23
4. What are the major functions of the medulla oblongata?
5. What is meant by “decussation of pyramids”?
6. What are the major functions of the pons?
7. What are the major functions of the midbrain?
8. What is the function of the superior colliculi?
9. What is the function of the inferior colliculi?
BI 232 Lab Survival Guide http://spot.pcc.edu/anatomy/lab.htm Fall 2008 24
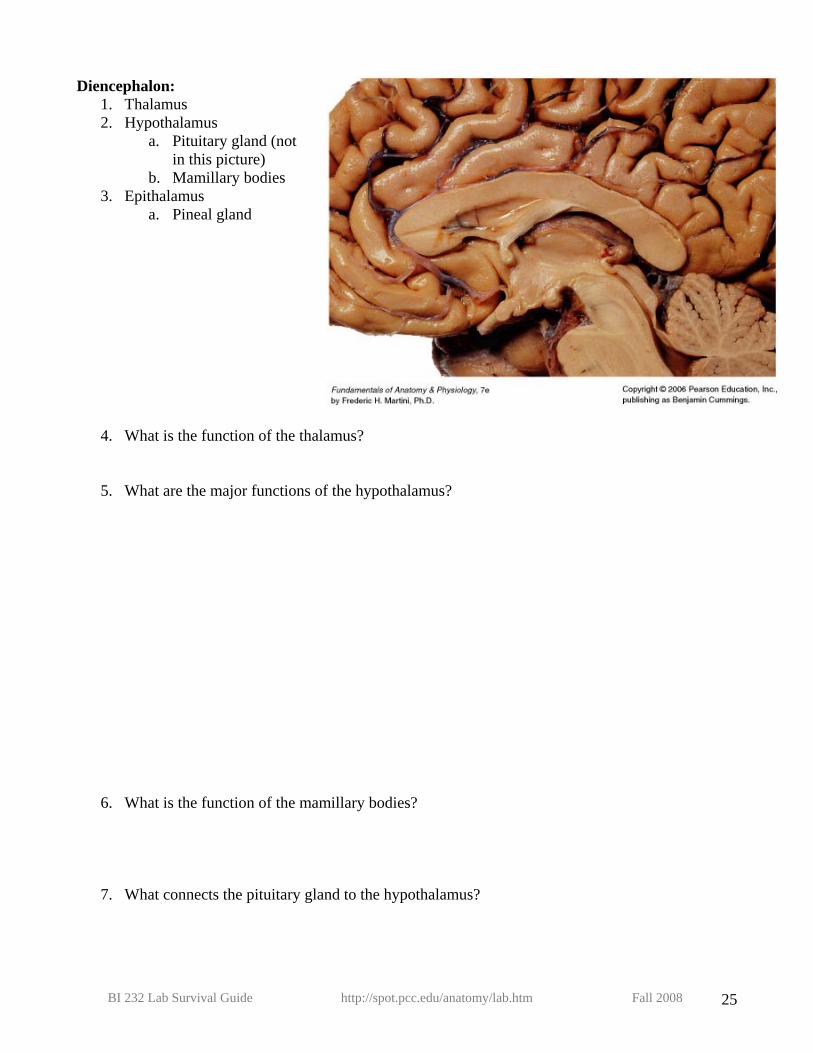
Diencephalon: 1. Thalamus 2. Hypothalamus
a. Pituitary gland (not in this picture)
b. Mamillary bodies 3. Epithalamus
a. Pineal gland
4. What is the function of the thalamus?
5. What are the major functions of the hypothalamus?
6. What is the function of the mamillary bodies?
7. What connects the pituitary gland to the hypothalamus?
BI 232 Lab Survival Guide http://spot.pcc.edu/anatomy/lab.htm Fall 2008 25
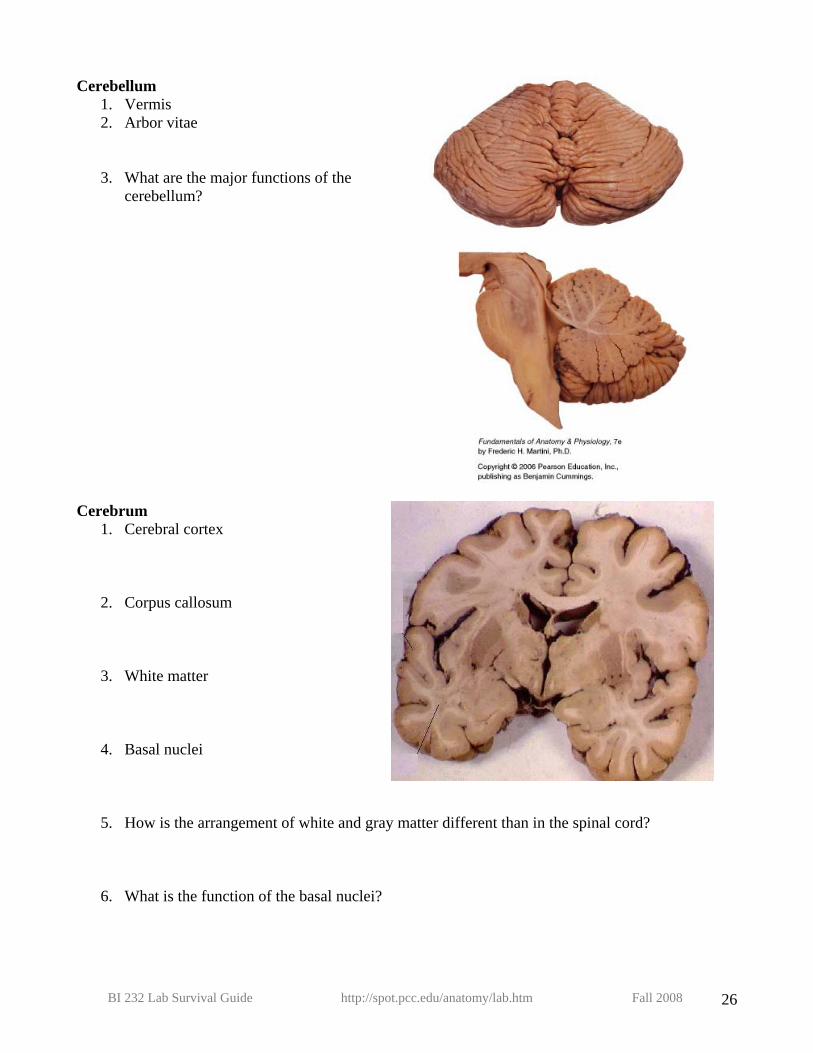
Cerebellum 1. Vermis 2. Arbor vitae
3. What are the major functions of the cerebellum?
Cerebrum 1. Cerebral cortex
2. Corpus callosum
3. White matter
4. Basal nuclei
5. How is the arrangement of white and gray matter different than in the spinal cord?
6. What is the function of the basal nuclei?
BI 232 Lab Survival Guide http://spot.pcc.edu/anatomy/lab.htm Fall 2008 26
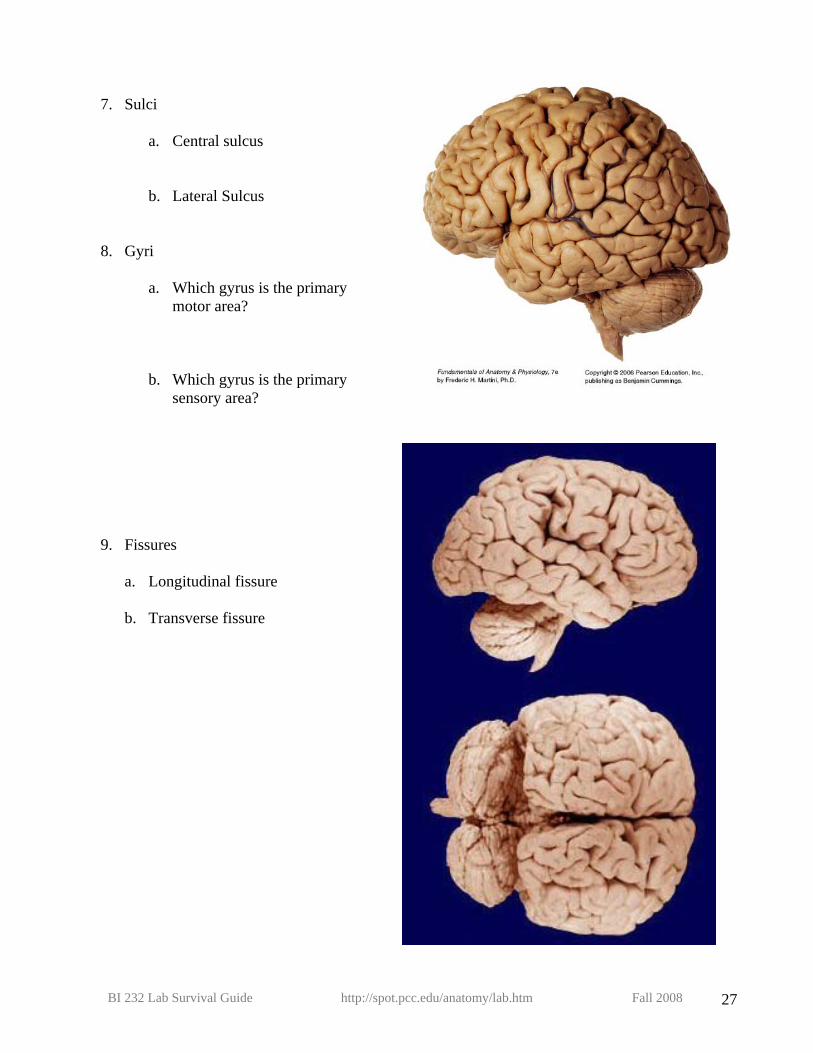
7. Sulci
a. Central sulcus
b. Lateral Sulcus
8. Gyri
a. Which gyrus is the primary motor area?
b. Which gyrus is the primary sensory area?
9. Fissures
a. Longitudinal fissure
b. Transverse fissure
BI 232 Lab Survival Guide http://spot.pcc.edu/anatomy/lab.htm Fall 2008 27
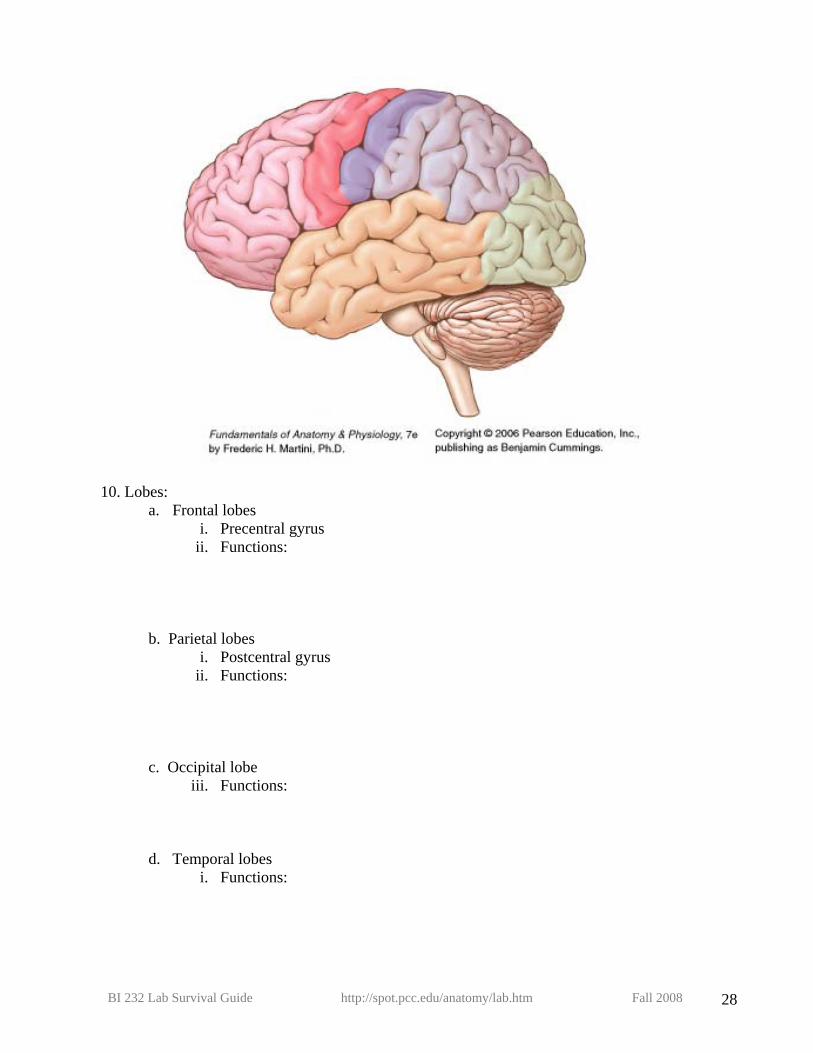
10. Lobes: a. Frontal lobes
i. Precentral gyrus ii. Functions:
b. Parietal lobes i. Postcentral gyrus
ii. Functions:
c. Occipital lobe iii. Functions:
d. Temporal lobes
i. Functions:
BI 232 Lab Survival Guide http://spot.pcc.edu/anatomy/lab.htm Fall 2008 28
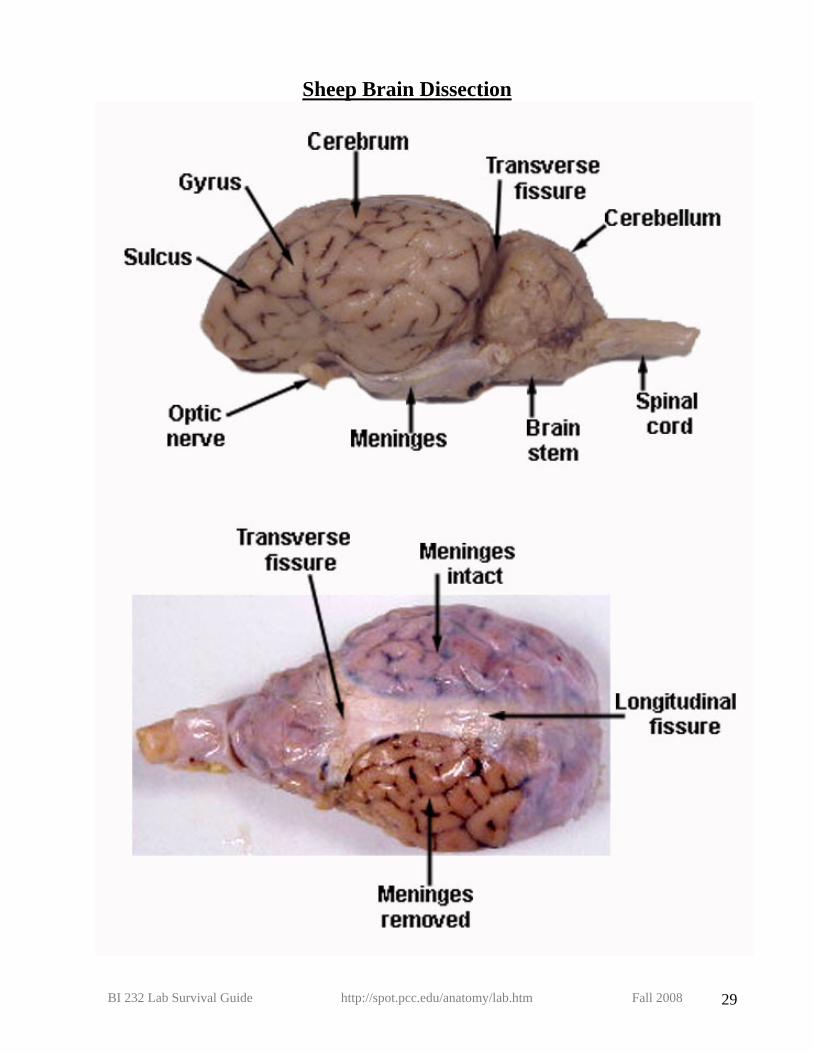
Sheep Brain Dissection
BI 232 Lab Survival Guide http://spot.pcc.edu/anatomy/lab.htm Fall 2008 29
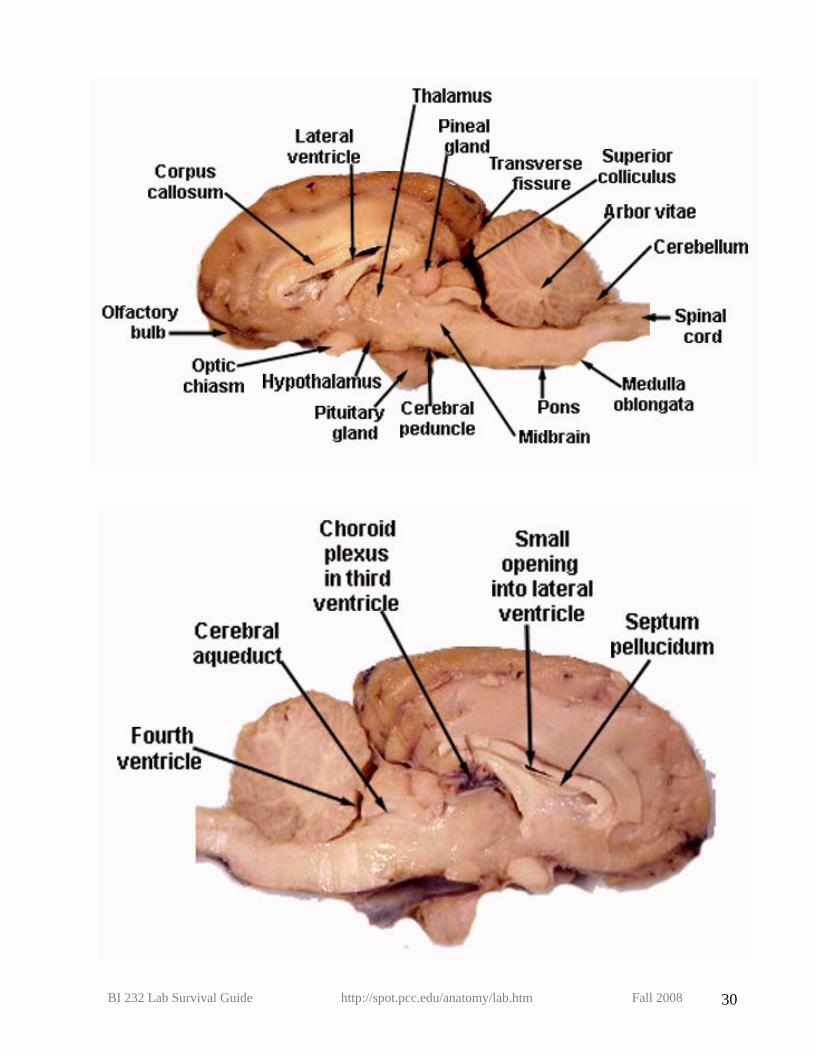
BI 232 Lab Survival Guide http://spot.pcc.edu/anatomy/lab.htm Fall 2008 30
BI 232 Lab Survival Guide http://spot.pcc.edu/anatomy/lab.htm Fall 2008 31
BI 232 Lab Survival Guide http://spot.pcc.edu/anatomy/lab.htm Fall 2008 32
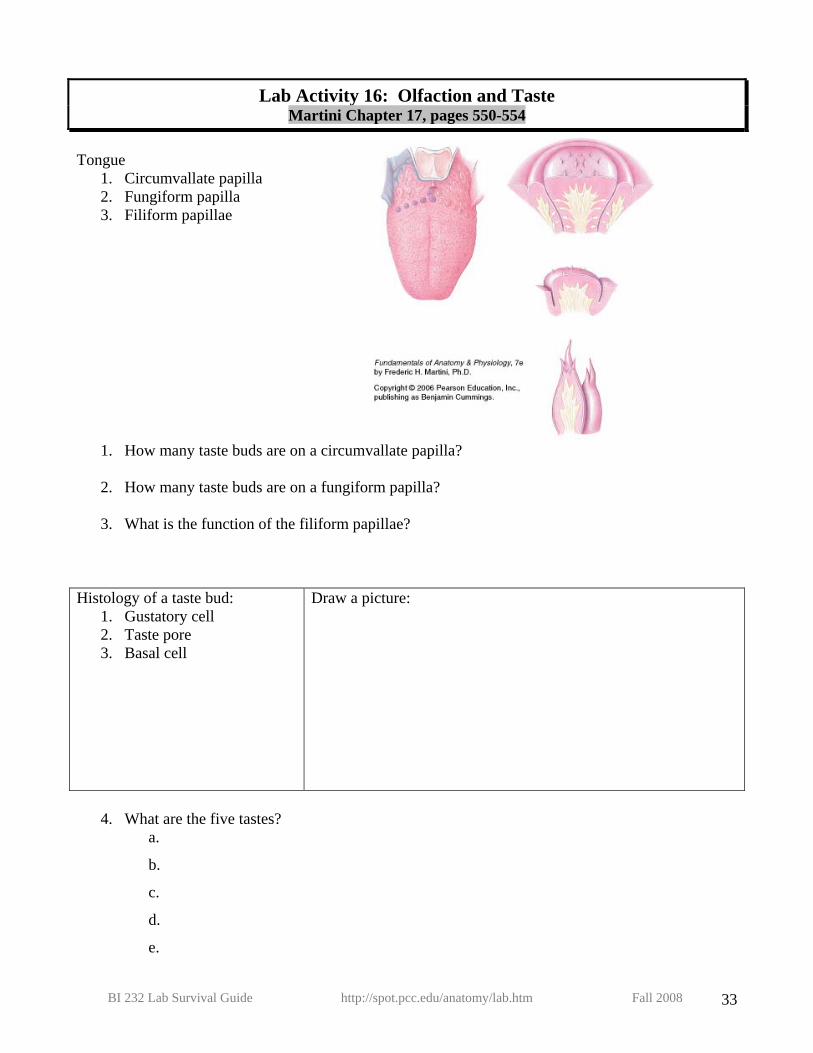
Lab Activity 16: Olfaction and Taste Martini Chapter 17, pages 550-554
Tongue
1. Circumvallate papilla 2. Fungiform papilla 3. Filiform papillae
1. How many taste buds are on a circumvallate papilla?
2. How many taste buds are on a fungiform papilla?
3. What is the function of the filiform papillae? Histology of a taste bud:
1. Gustatory cell 2. Taste pore 3. Basal cell
Draw a picture:
4. What are the five tastes?
a.
b.
c.
d.
e.
BI 232 Lab Survival Guide http://spot.pcc.edu/anatomy/lab.htm Fall 2008 33
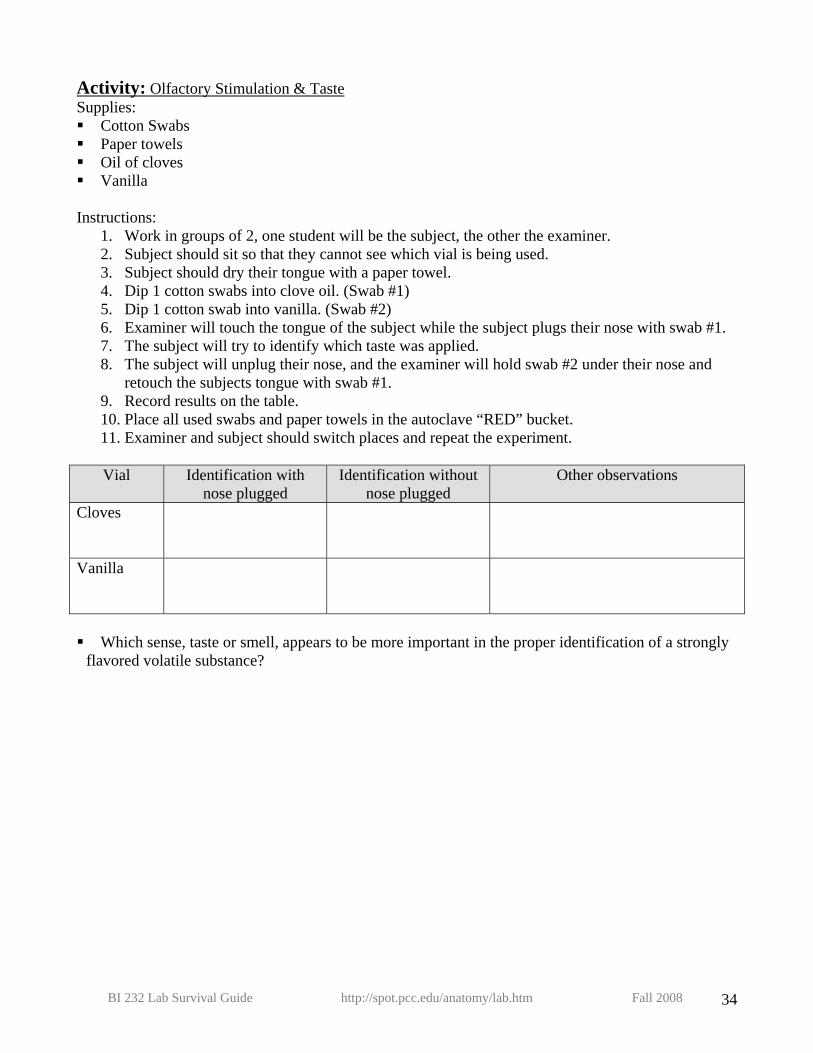
Activity: Olfactory Stimulation & Taste Supplies: Cotton Swabs Paper towels Oil of cloves Vanilla
Instructions:
1. Work in groups of 2, one student will be the subject, the other the examiner. 2. Subject should sit so that they cannot see which vial is being used. 3. Subject should dry their tongue with a paper towel. 4. Dip 1 cotton swabs into clove oil. (Swab #1) 5. Dip 1 cotton swab into vanilla. (Swab #2) 6. Examiner will touch the tongue of the subject while the subject plugs their nose with swab #1. 7. The subject will try to identify which taste was applied. 8. The subject will unplug their nose, and the examiner will hold swab #2 under their nose and
retouch the subjects tongue with swab #1. 9. Record results on the table. 10. Place all used swabs and paper towels in the autoclave “RED” bucket. 11. Examiner and subject should switch places and repeat the experiment.
Vial Identification with
nose plugged Identification without
nose plugged Other observations
Cloves
Vanilla
Which sense, taste or smell, appears to be more important in the proper identification of a strongly flavored volatile substance?
BI 232 Lab Survival Guide http://spot.pcc.edu/anatomy/lab.htm Fall 2008 34
Activity: Olfactory Adaptation Supplies: Two of the following:
o Oil of cloves o Black Pepper o Coffee o Chocolate o Mint
Instructions: 1. Press one nostril closed. 2. Hold the container under the open nostril and exhale through the mouth. 3. Record the time required for the odor to disappear (olfactory adaptation). ___________Seconds 4. Immediately test another vial with the nostril that has just experienced olfactory adaptation. What are the results?
What conclusions can you draw?
Activity: Stimulating taste buds Supplies: Paper towels Sugar packet
Instructions: 1. With a paper towel, dry the surface of your tongue. 2. Sprinkle a few sugar crystals on your dried tongue. 3. DO NOT close your mouth. 4. Record how long it takes to taste the sugar. ____________Seconds Why couldn’t you taste the sugar immediately?
Activity: Plotting taste bud distribution
BI 232 Lab Survival Guide http://spot.pcc.edu/anatomy/lab.htm Fall 2008 35
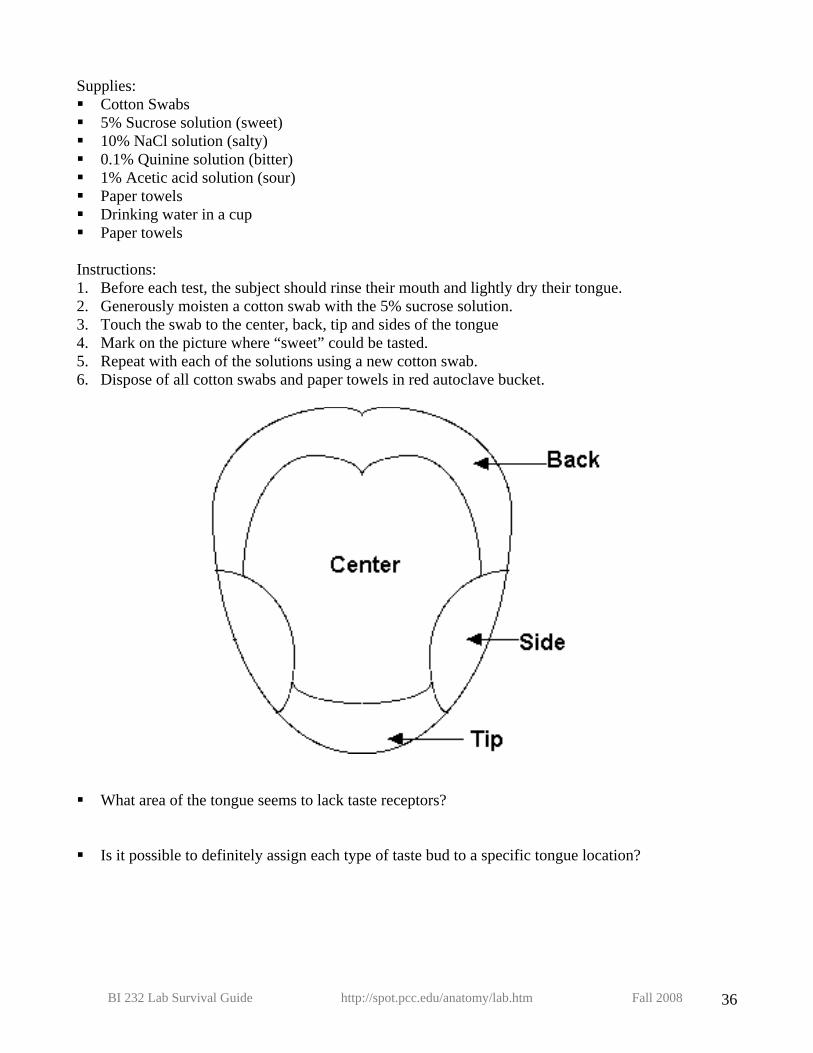
Supplies: Cotton Swabs 5% Sucrose solution (sweet) 10% NaCl solution (salty) 0.1% Quinine solution (bitter) 1% Acetic acid solution (sour) Paper towels Drinking water in a cup Paper towels
Instructions: 1. Before each test, the subject should rinse their mouth and lightly dry their tongue. 2. Generously moisten a cotton swab with the 5% sucrose solution. 3. Touch the swab to the center, back, tip and sides of the tongue 4. Mark on the picture where “sweet” could be tasted. 5. Repeat with each of the solutions using a new cotton swab. 6. Dispose of all cotton swabs and paper towels in red autoclave bucket.
What area of the tongue seems to lack taste receptors? Is it possible to definitely assign each type of taste bud to a specific tongue location?
BI 232 Lab Survival Guide http://spot.pcc.edu/anatomy/lab.htm Fall 2008 36
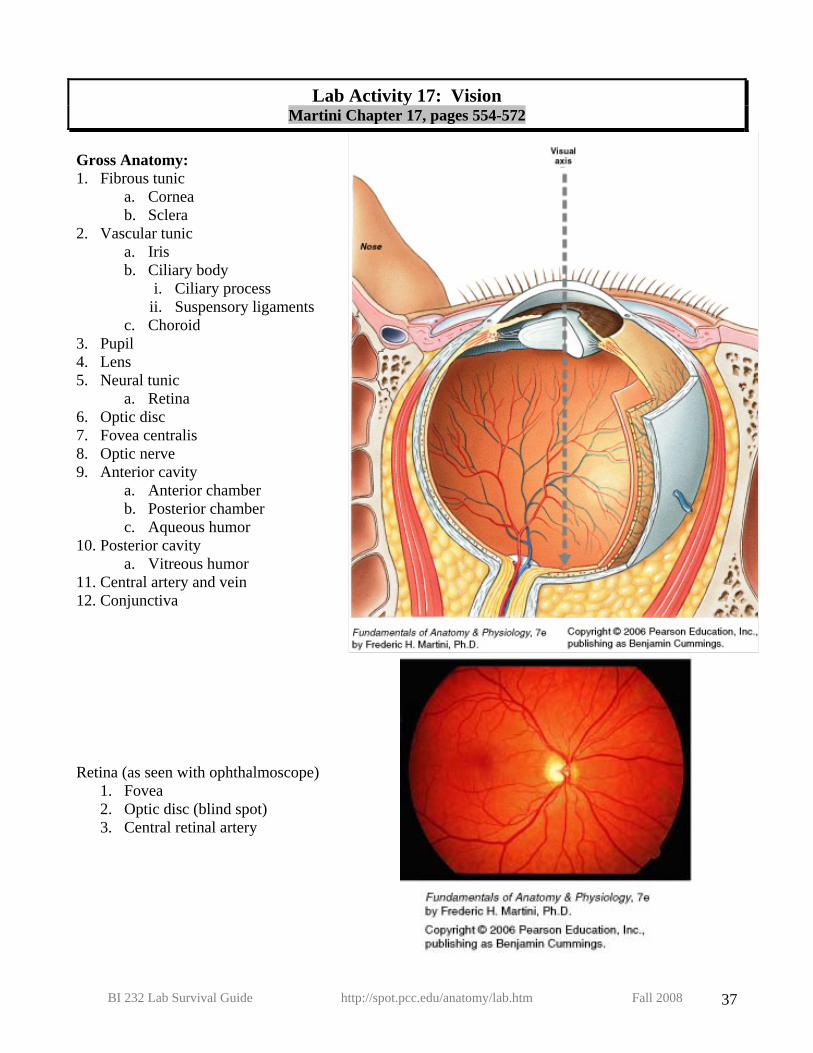
Lab Activity 17: Vision Martini Chapter 17, pages 554-572
Gross Anatomy: 1. Fibrous tunic
a. Cornea b. Sclera
2. Vascular tunic a. Iris b. Ciliary body
i. Ciliary process ii. Suspensory ligaments
c. Choroid 3. Pupil 4. Lens 5. Neural tunic
a. Retina 6. Optic disc 7. Fovea centralis 8. Optic nerve 9. Anterior cavity
a. Anterior chamber b. Posterior chamber c. Aqueous humor
10. Posterior cavity a. Vitreous humor
11. Central artery and vein 12. Conjunctiva
Retina (as seen with ophthalmoscope)
1. Fovea 2. Optic disc (blind spot) 3. Central retinal artery
BI 232 Lab Survival Guide http://spot.pcc.edu/anatomy/lab.htm Fall 2008 37
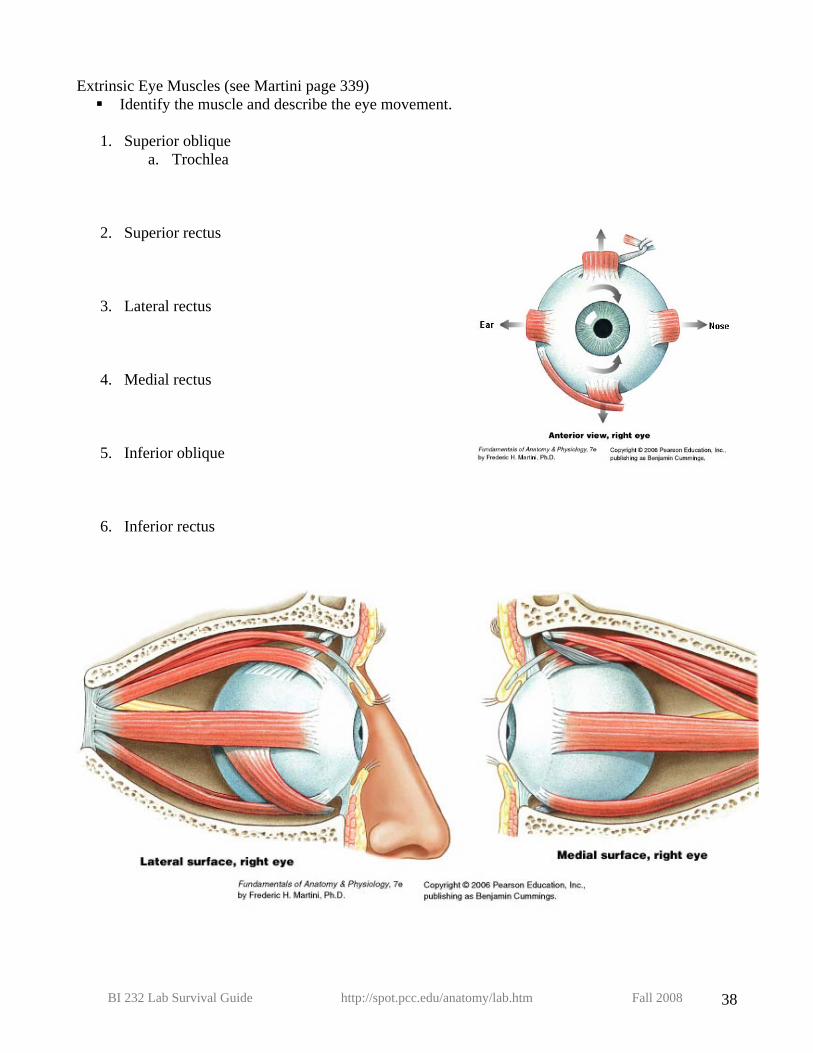
Extrinsic Eye Muscles (see Martini page 339) Identify the muscle and describe the eye movement. 1. Superior oblique
a. Trochlea
2. Superior rectus
3. Lateral rectus
4. Medial rectus
5. Inferior oblique
6. Inferior rectus
BI 232 Lab Survival Guide http://spot.pcc.edu/anatomy/lab.htm Fall 2008 38
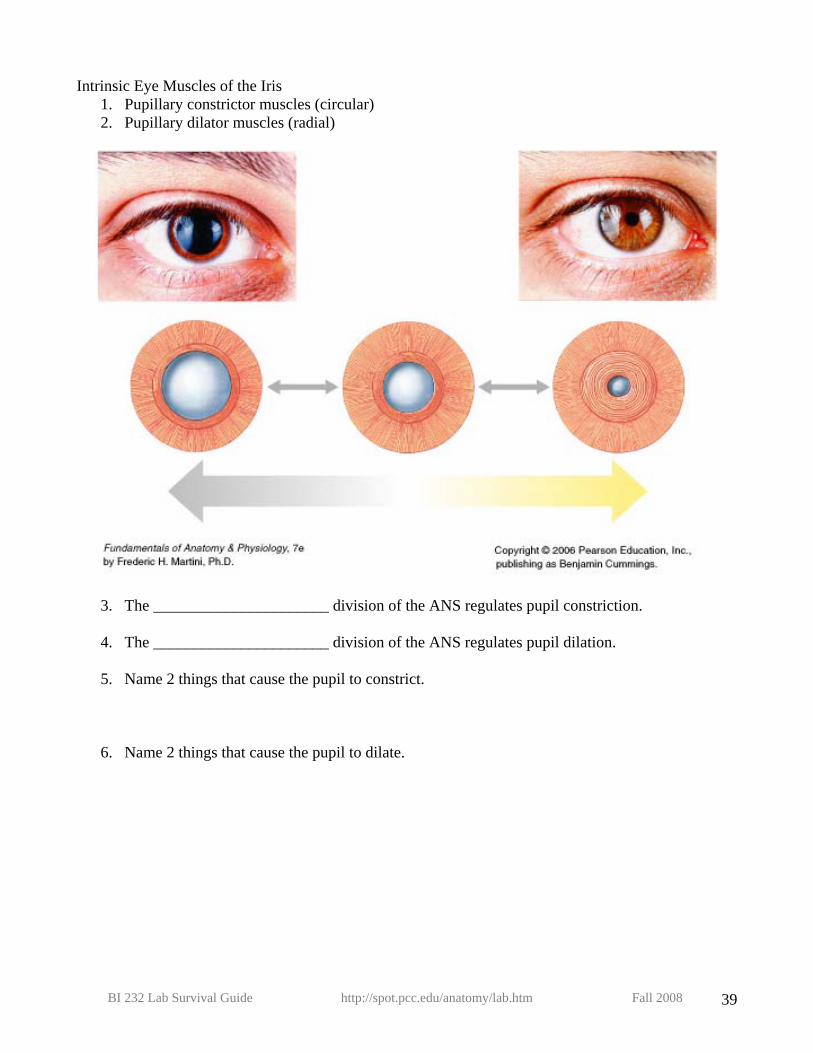
Intrinsic Eye Muscles of the Iris 1. Pupillary constrictor muscles (circular) 2. Pupillary dilator muscles (radial)
3. The ______________________ division of the ANS regulates pupil constriction. 4. The ______________________ division of the ANS regulates pupil dilation.
5. Name 2 things that cause the pupil to constrict.
6. Name 2 things that cause the pupil to dilate.
BI 232 Lab Survival Guide http://spot.pcc.edu/anatomy/lab.htm Fall 2008 39
Histology of the retina 1. Choroid 2. Pigmented epithelial layer of retina 3. Rods and cones 4. Bipolar cells 5. Ganglion cells
Draw picture:
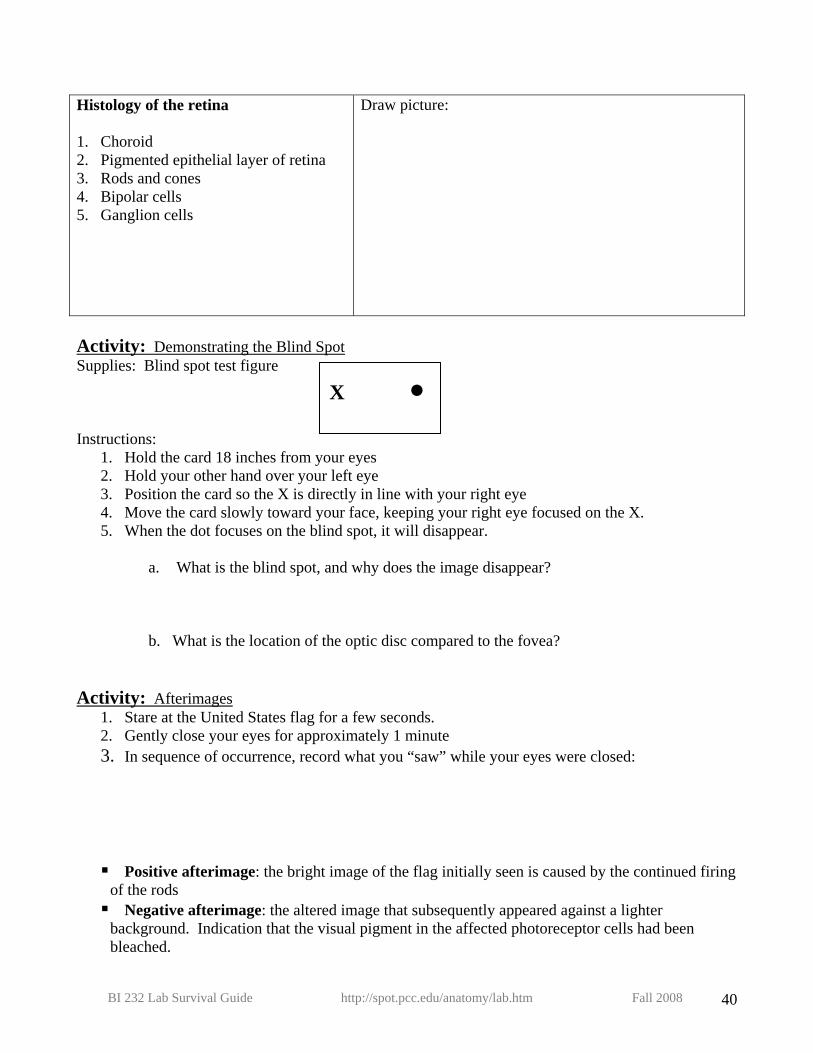
Activity: Demonstrating the Blind Spot Supplies: Blind spot test figure
X • Instructions:
1. Hold the card 18 inches from your eyes 2. Hold your other hand over your left eye 3. Position the card so the X is directly in line with your right eye 4. Move the card slowly toward your face, keeping your right eye focused on the X. 5. When the dot focuses on the blind spot, it will disappear.
a. What is the blind spot, and why does the image disappear?
b. What is the location of the optic disc compared to the fovea? Activity: Afterimages
1. Stare at the United States flag for a few seconds. 2. Gently close your eyes for approximately 1 minute 3. In sequence of occurrence, record what you “saw” while your eyes were closed:
Positive afterimage: the bright image of the flag initially seen is caused by the continued firing of the rods Negative afterimage: the altered image that subsequently appeared against a lighter background. Indication that the visual pigment in the affected photoreceptor cells had been bleached.
BI 232 Lab Survival Guide http://spot.pcc.edu/anatomy/lab.htm Fall 2008 40
Define the following terms: 1. Refraction
2. Focal Point
3. Focal Distance
a. Describe 2 factors that determine focal distance.
4. Accommodation
a. Near Objects the lens becomes _______________________ b. Far Objects the lens becomes ________________________
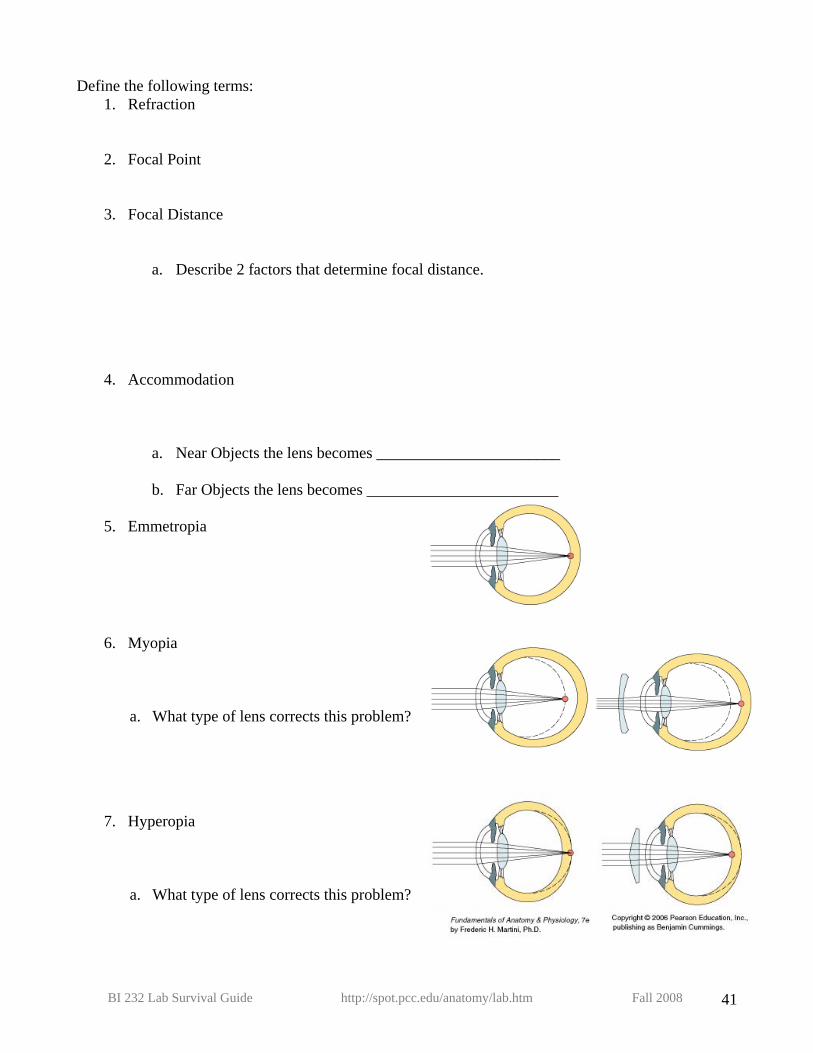
5. Emmetropia
6. Myopia
a. What type of lens corrects this problem?
7. Hyperopia
a. What type of lens corrects this problem?
BI 232 Lab Survival Guide http://spot.pcc.edu/anatomy/lab.htm Fall 2008 41
8. Astigmatism
9. Convergence
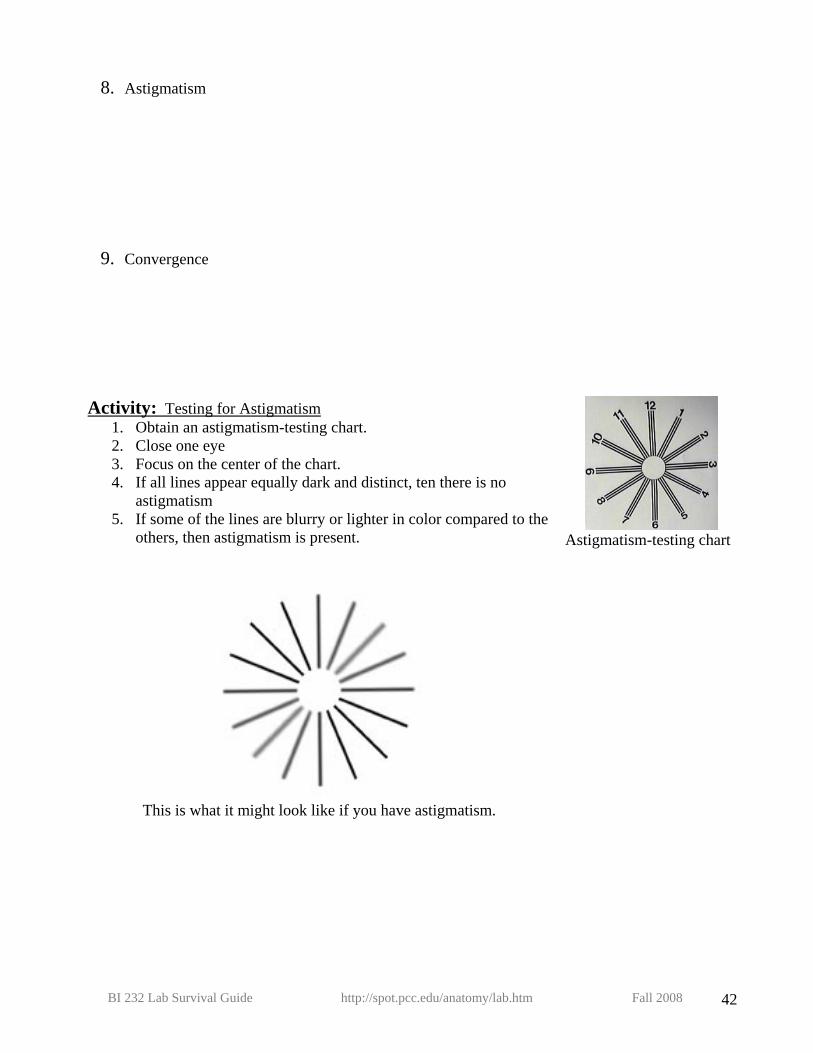
Activity: Testing for Astigmatism 1. Obtain an astigmatism-testing chart. 2. Close one eye 3. Focus on the center of the chart. 4. If all lines appear equally dark and distinct, ten there is no
astigmatism 5. If some of the lines are blurry or lighter in color compared to the
others, then astigmatism is present.
This is what it might look like if you have astigmatism.
Astigmatism-testing chart
BI 232 Lab Survival Guide http://spot.pcc.edu/anatomy/lab.htm Fall 2008 42
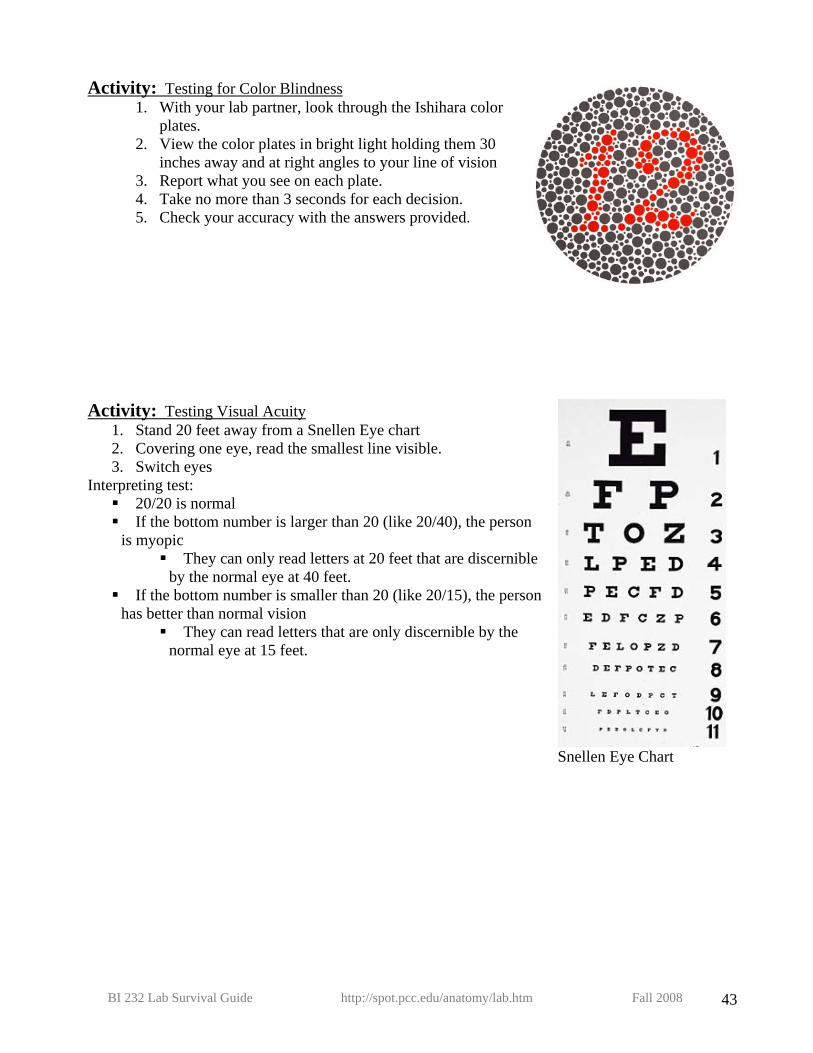
Activity: Testing for Color Blindness 1. With your lab partner, look through the Ishihara color
plates. 2. View the color plates in bright light holding them 30
inches away and at right angles to your line of vision 3. Report what you see on each plate. 4. Take no more than 3 seconds for each decision. 5. Check your accuracy with the answers provided.
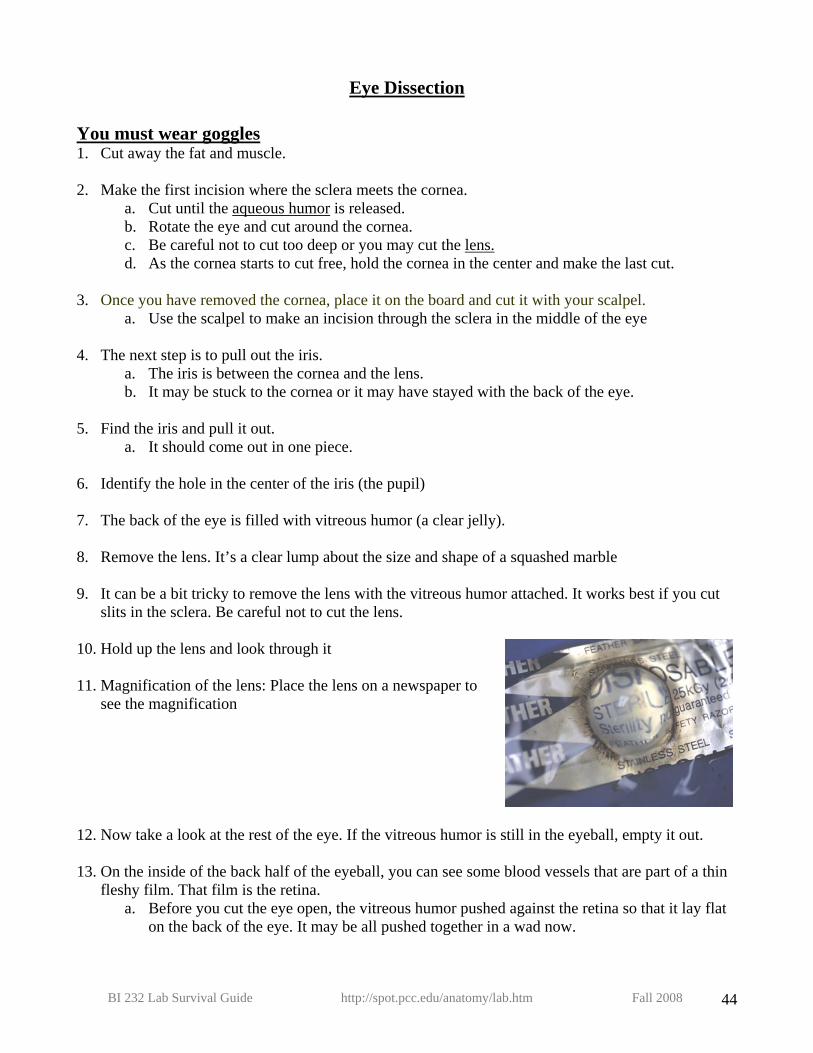
Activity: Testing Visual Acuity 1. Stand 20 feet away from a Snellen Eye chart 2. Covering one eye, read the smallest line visible. 3. Switch eyes
Interpreting test: 20/20 is normal If the bottom number is larger than 20 (like 20/40), the person is myopic
They can only read letters at 20 feet that are discernible by the normal eye at 40 feet.
If the bottom number is smaller than 20 (like 20/15), the person has better than normal vision
They can read letters that are only discernible by the normal eye at 15 feet.
Snellen Eye Chart
BI 232 Lab Survival Guide http://spot.pcc.edu/anatomy/lab.htm Fall 2008 43
Eye Dissection
You must wear goggles 1. Cut away the fat and muscle. 2. Make the first incision where the sclera meets the cornea.
a. Cut until the aqueous humor is released. b. Rotate the eye and cut around the cornea. c. Be careful not to cut too deep or you may cut the lens. d. As the cornea starts to cut free, hold the cornea in the center and make the last cut.
3. Once you have removed the cornea, place it on the board and cut it with your scalpel. a. Use the scalpel to make an incision through the sclera in the middle of the eye
4. The next step is to pull out the iris. a. The iris is between the cornea and the lens. b. It may be stuck to the cornea or it may have stayed with the back of the eye.
5. Find the iris and pull it out.
a. It should come out in one piece. 6. Identify the hole in the center of the iris (the pupil) 7. The back of the eye is filled with vitreous humor (a clear jelly). 8. Remove the lens. It’s a clear lump about the size and shape of a squashed marble 9. It can be a bit tricky to remove the lens with the vitreous humor attached. It works best if you cut
slits in the sclera. Be careful not to cut the lens. 10. Hold up the lens and look through it 11. Magnification of the lens: Place the lens on a newspaper to
see the magnification
12. Now take a look at the rest of the eye. If the vitreous humor is still in the eyeball, empty it out. 13. On the inside of the back half of the eyeball, you can see some blood vessels that are part of a thin
fleshy film. That film is the retina. a. Before you cut the eye open, the vitreous humor pushed against the retina so that it lay flat
on the back of the eye. It may be all pushed together in a wad now.
BI 232 Lab Survival Guide http://spot.pcc.edu/anatomy/lab.htm Fall 2008 44
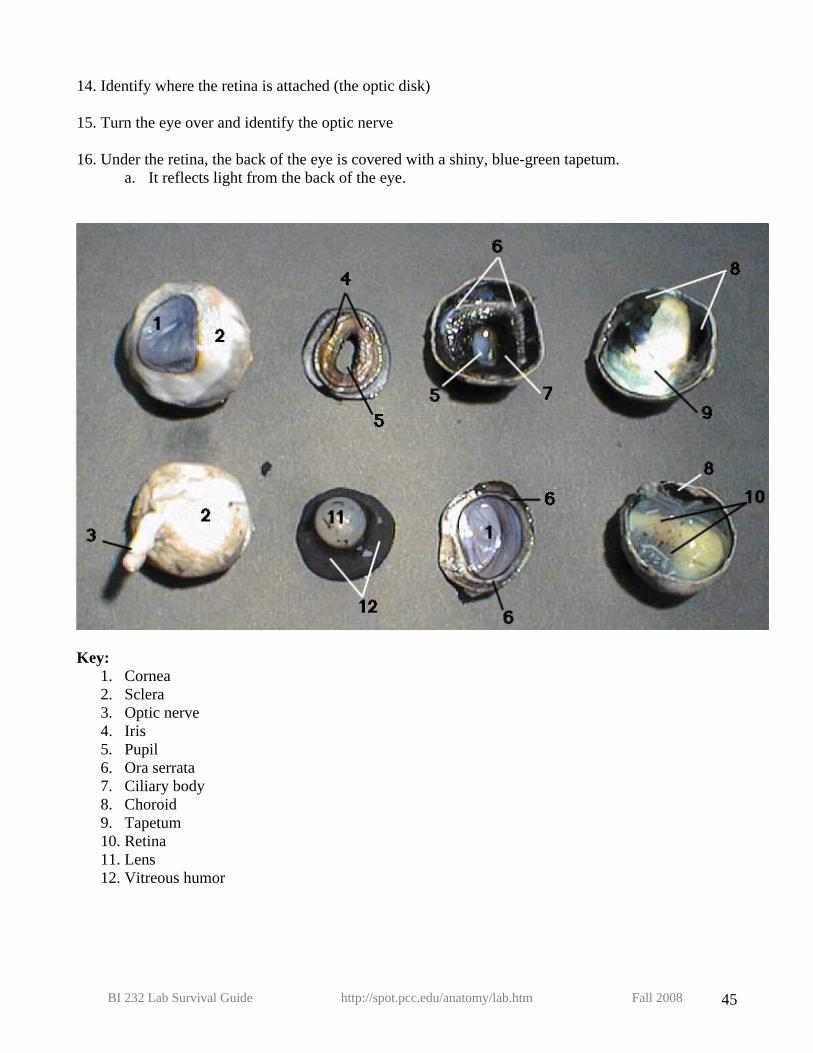
14. Identify where the retina is attached (the optic disk) 15. Turn the eye over and identify the optic nerve 16. Under the retina, the back of the eye is covered with a shiny, blue-green tapetum.
a. It reflects light from the back of the eye.
Key:
1. Cornea 2. Sclera 3. Optic nerve 4. Iris 5. Pupil 6. Ora serrata 7. Ciliary body 8. Choroid 9. Tapetum 10. Retina 11. Lens 12. Vitreous humor
BI 232 Lab Survival Guide http://spot.pcc.edu/anatomy/lab.htm Fall 2008 45

Lab Activity 18: Hearing and Equilibrium Martini Chapter 17, pages 573-586
1. Outer ear
a. Auricle b. External acoustic canal c. Tympanic membrane
2. Middle ear
a. Malleus b. Incus c. Stapes d. Auditory tube (Eustachian tube)
Which ossicle strikes the oval window? Where does the auditory tube lead?
?
BI 232 Lab Survival Guide http://spot.pcc.edu/anatomy/lab.htm Fall 2008 46
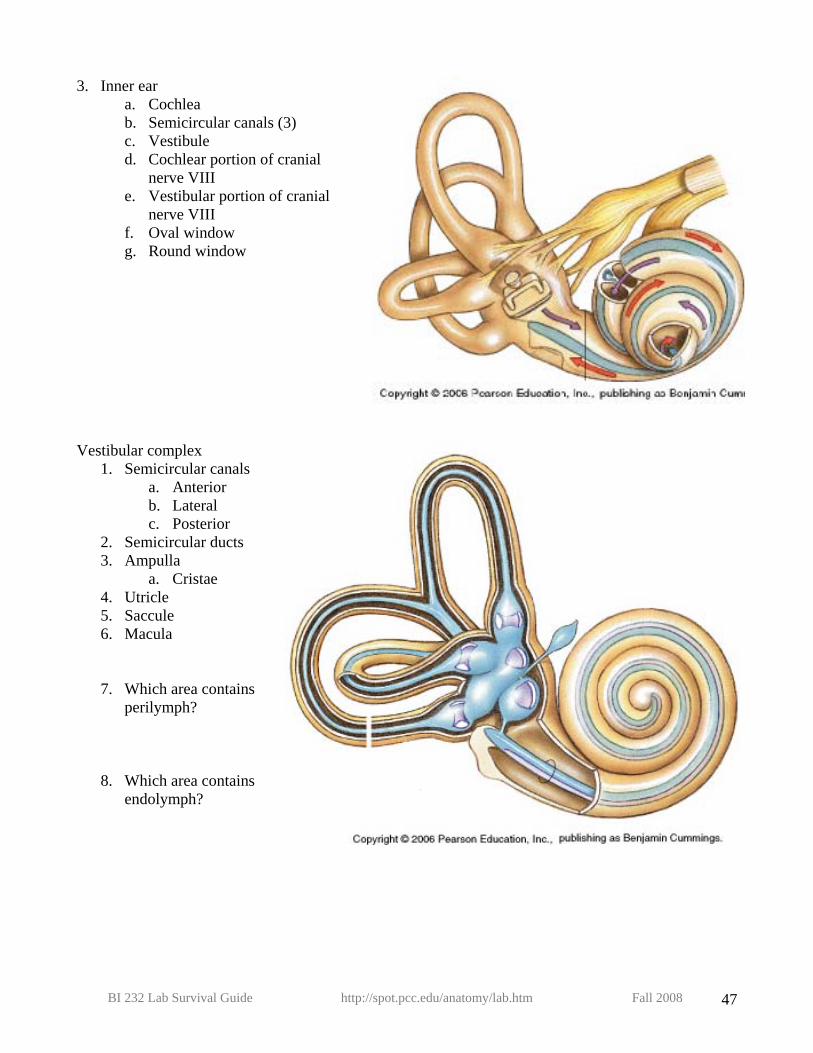
3. Inner ear a. Cochlea b. Semicircular canals (3) c. Vestibule d. Cochlear portion of cranial
nerve VIII e. Vestibular portion of cranial
nerve VIII f. Oval window g. Round window
Vestibular complex
1. Semicircular canals a. Anterior b. Lateral c. Posterior
2. Semicircular ducts 3. Ampulla
a. Cristae 4. Utricle 5. Saccule 6. Macula
7. Which area contains perilymph?
8. Which area contains endolymph?
BI 232 Lab Survival Guide http://spot.pcc.edu/anatomy/lab.htm Fall 2008 47
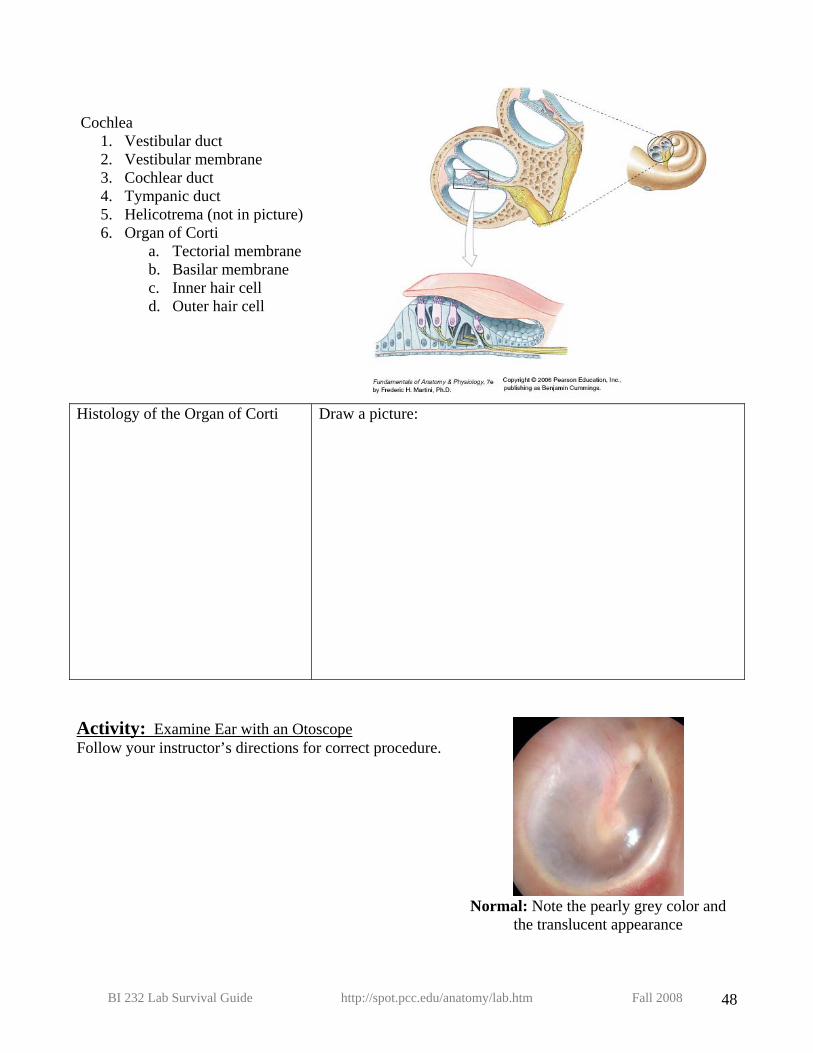
Cochlea
1. Vestibular duct 2. Vestibular membrane 3. Cochlear duct 4. Tympanic duct 5. Helicotrema (not in picture) 6. Organ of Corti
a. Tectorial membrane b. Basilar membrane c. Inner hair cell d. Outer hair cell
Histology of the Organ of Corti Draw a picture:
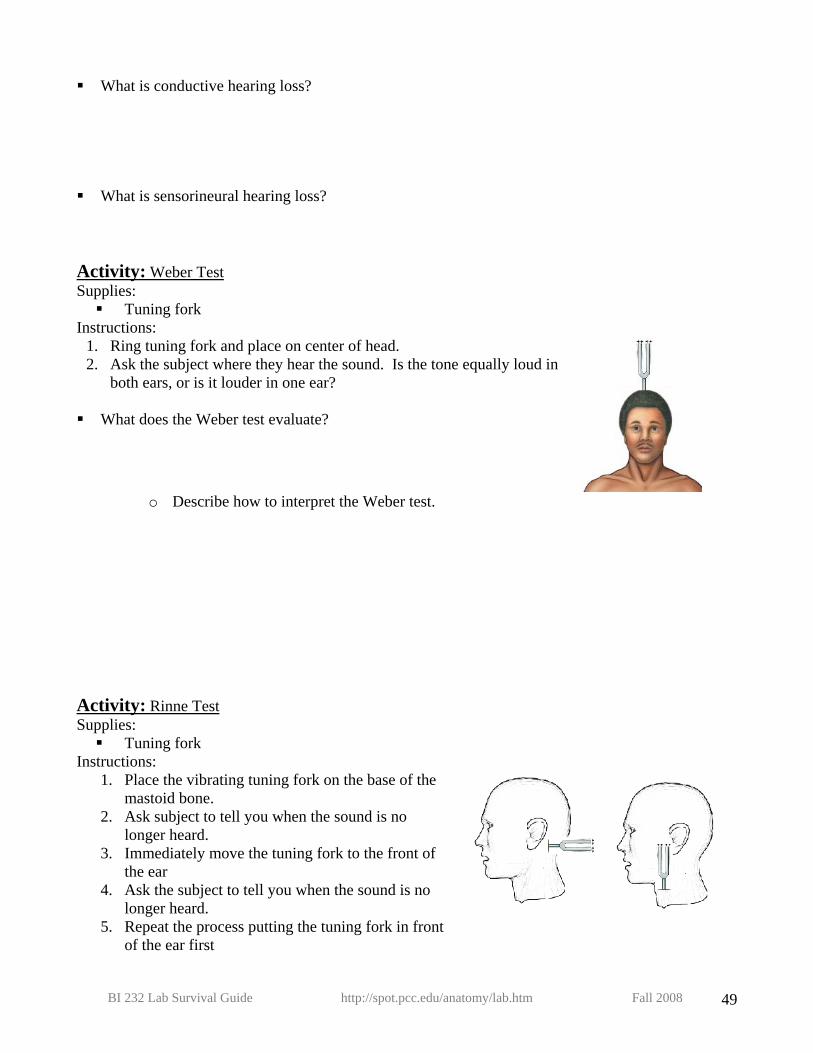
Activity: Examine Ear with an Otoscope Follow your instructor’s directions for correct procedure.
Normal: Note the pearly grey color and
the translucent appearance
BI 232 Lab Survival Guide http://spot.pcc.edu/anatomy/lab.htm Fall 2008 48
What is conductive hearing loss? What is sensorineural hearing loss?
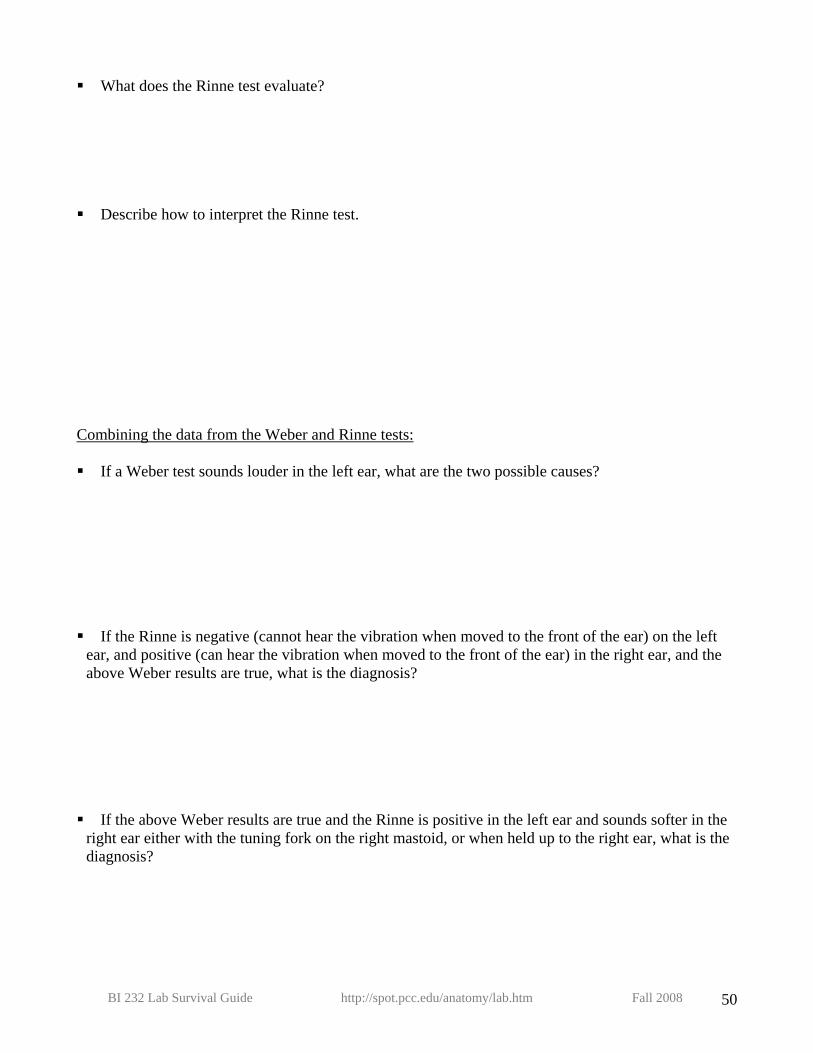
Activity: Weber Test Supplies:
Tuning fork Instructions:
1. Ring tuning fork and place on center of head. 2. Ask the subject where they hear the sound. Is the tone equally loud in
both ears, or is it louder in one ear? What does the Weber test evaluate?
o Describe how to interpret the Weber test. Activity: Rinne Test Supplies:
Tuning fork Instructions:
1. Place the vibrating tuning fork on the base of the mastoid bone.
2. Ask subject to tell you when the sound is no longer heard.
3. Immediately move the tuning fork to the front of the ear
4. Ask the subject to tell you when the sound is no longer heard.
5. Repeat the process putting the tuning fork in front of the ear first
BI 232 Lab Survival Guide http://spot.pcc.edu/anatomy/lab.htm Fall 2008 49
What does the Rinne test evaluate? Describe how to interpret the Rinne test.
Combining the data from the Weber and Rinne tests: If a Weber test sounds louder in the left ear, what are the two possible causes?
If the Rinne is negative (cannot hear the vibration when moved to the front of the ear) on the left ear, and positive (can hear the vibration when moved to the front of the ear) in the right ear, and the above Weber results are true, what is the diagnosis?
If the above Weber results are true and the Rinne is positive in the left ear and sounds softer in the right ear either with the tuning fork on the right mastoid, or when held up to the right ear, what is the diagnosis?
BI 232 Lab Survival Guide http://spot.pcc.edu/anatomy/lab.htm Fall 2008 50
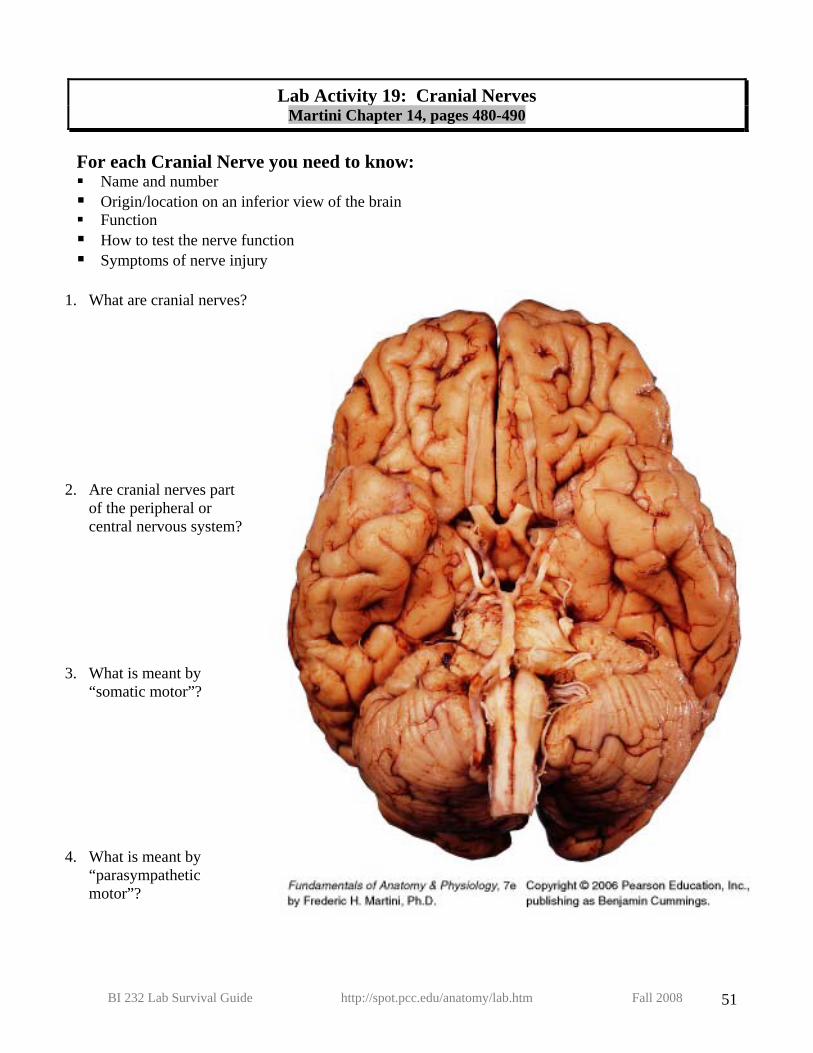
Lab Activity 19: Cranial Nerves Martini Chapter 14, pages 480-490
For each Cranial Nerve you need to know: Name and number Origin/location on an inferior view of the brain Function How to test the nerve function Symptoms of nerve injury
1. What are cranial nerves? 2. Are cranial nerves part
of the peripheral or central nervous system?
3. What is meant by
“somatic motor”? 4. What is meant by
“parasympathetic motor”?
BI 232 Lab Survival Guide http://spot.pcc.edu/anatomy/lab.htm Fall 2008 51
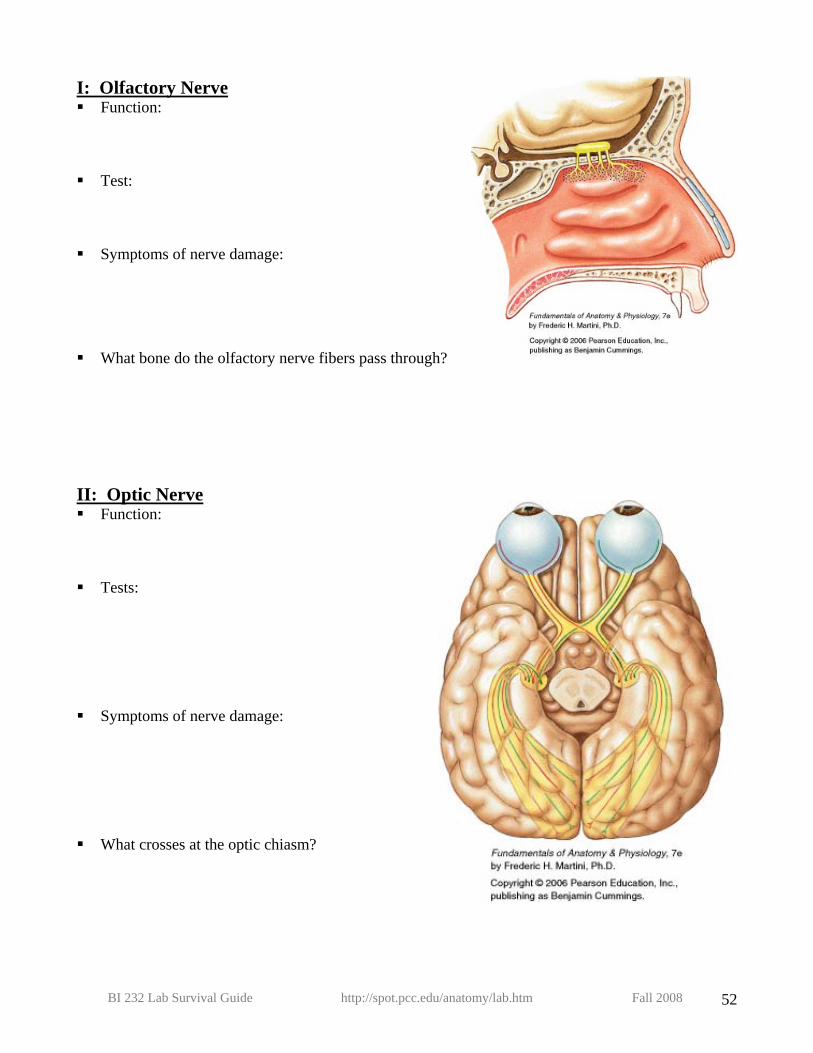
I: Olfactory Nerve Function:
Test:
Symptoms of nerve damage:
What bone do the olfactory nerve fibers pass through?
II: Optic Nerve Function:
Tests:
Symptoms of nerve damage:
What crosses at the optic chiasm?
BI 232 Lab Survival Guide http://spot.pcc.edu/anatomy/lab.htm Fall 2008 52
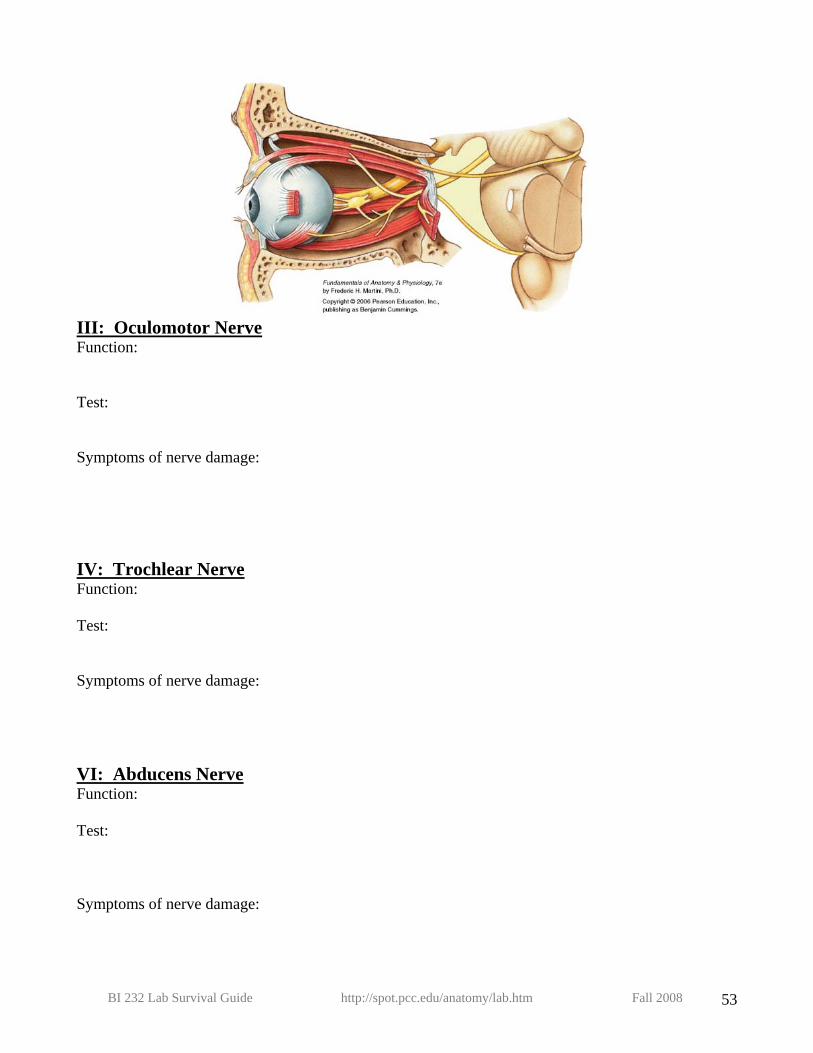
III: Oculomotor Nerve Function: Test: Symptoms of nerve damage:
IV: Trochlear Nerve Function: Test: Symptoms of nerve damage:
VI: Abducens Nerve Function: Test: Symptoms of nerve damage:
BI 232 Lab Survival Guide http://spot.pcc.edu/anatomy/lab.htm Fall 2008 53
Describe the pupillary reflex.
o What does “consensual” pupillary constriction mean?
o The afferent portion of the pupillary reflex involves cranial nerve _________ o The efferent portion of the pupillary reflex involves cranial nerve _________.
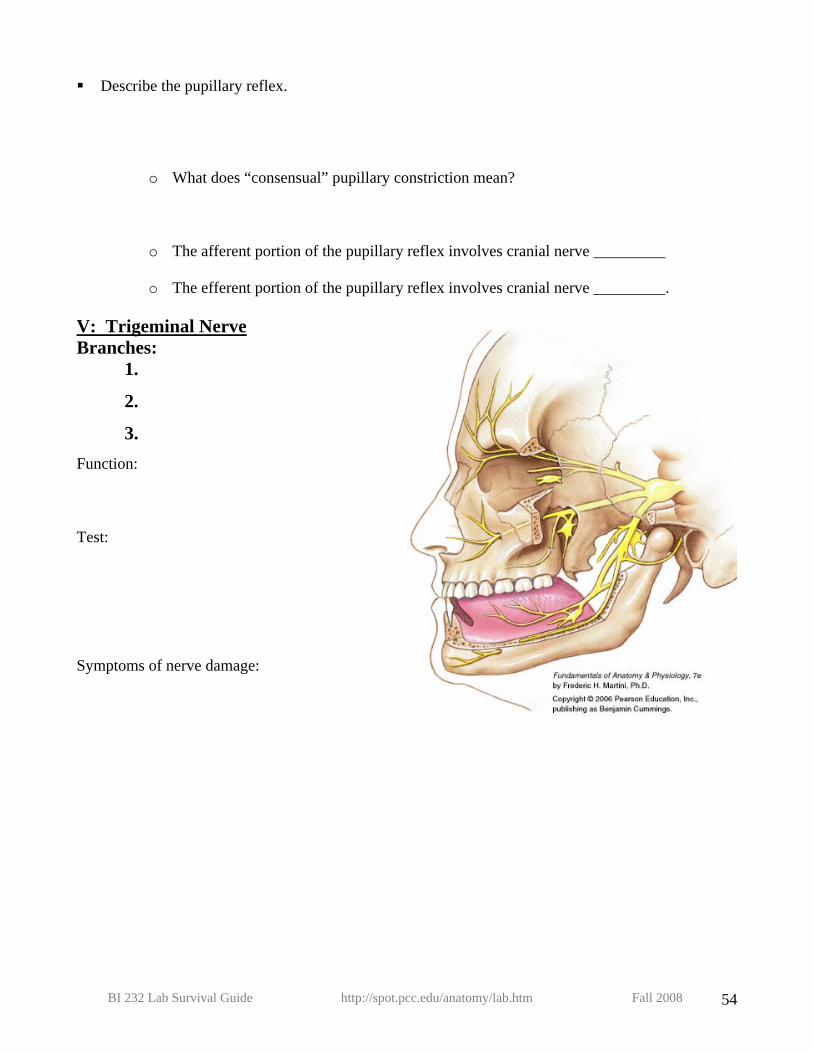
V: Trigeminal Nerve Branches:
1.
2.
3. Function: Test: Symptoms of nerve damage:
BI 232 Lab Survival Guide http://spot.pcc.edu/anatomy/lab.htm Fall 2008 54
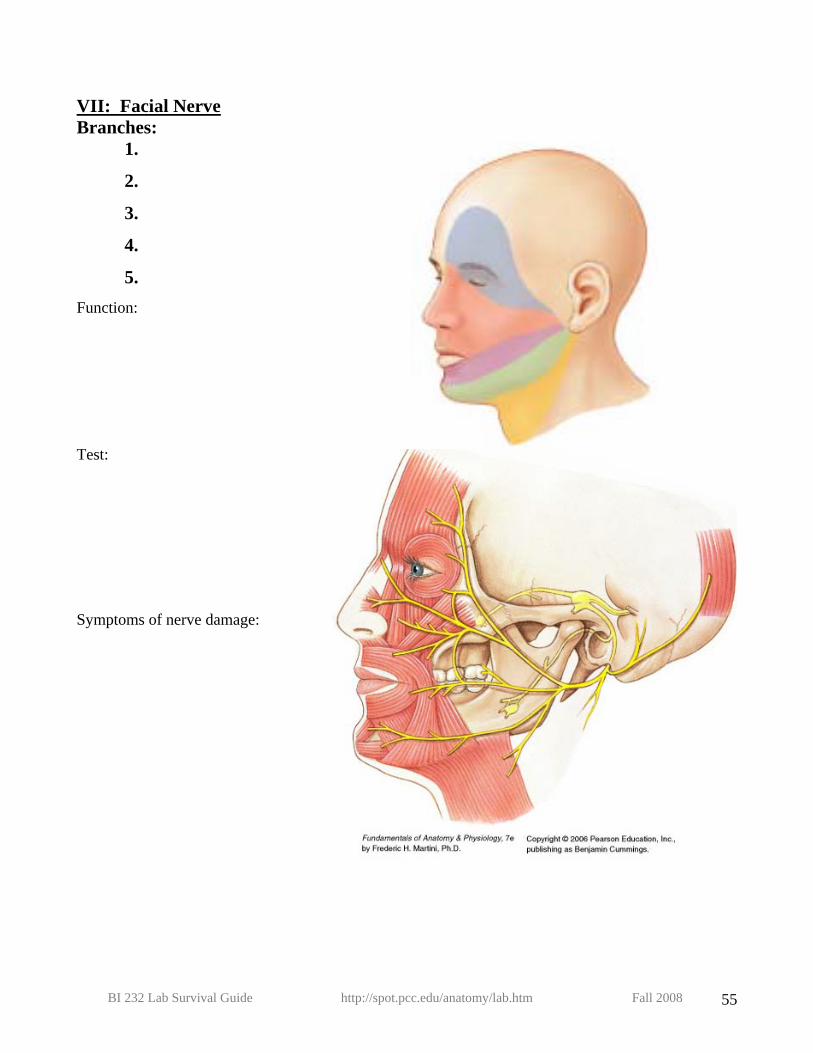
VII: Facial Nerve Branches:
1.
2.
3.
4.
5. Function: Test: Symptoms of nerve damage:
BI 232 Lab Survival Guide http://spot.pcc.edu/anatomy/lab.htm Fall 2008 55
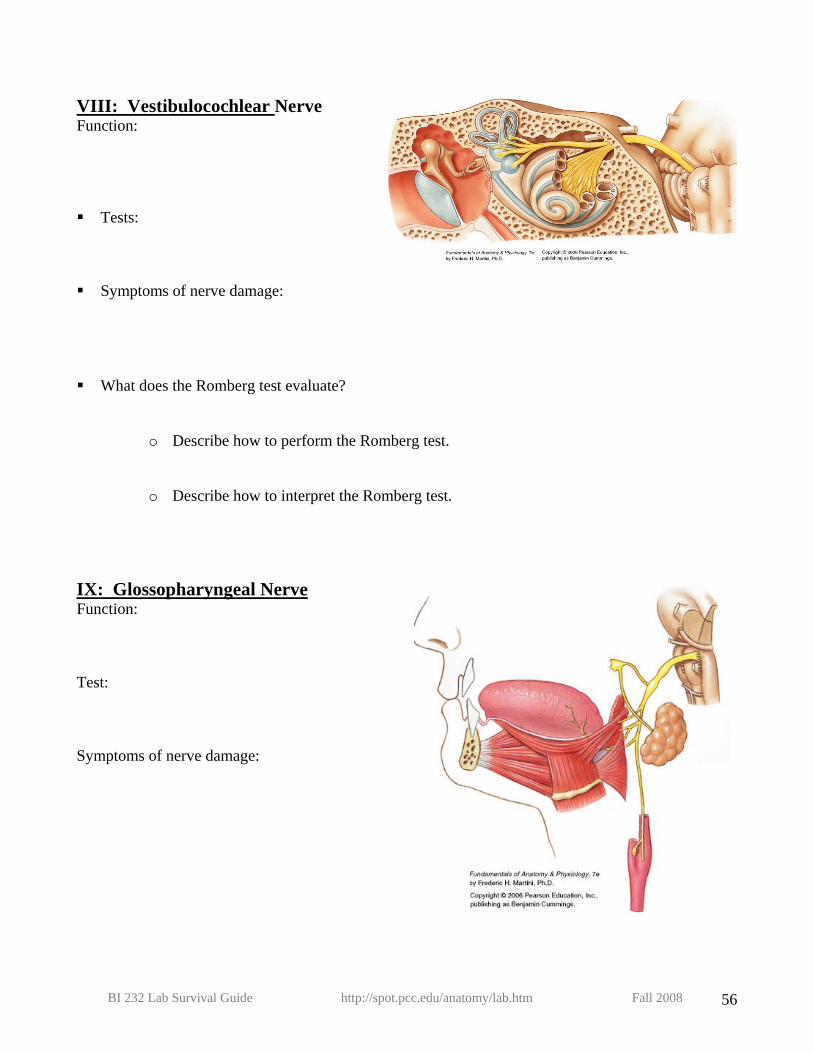
VIII: Vestibulocochlear Nerve Function: Tests:
Symptoms of nerve damage:
What does the Romberg test evaluate?
o Describe how to perform the Romberg test.
o Describe how to interpret the Romberg test.
IX: Glossopharyngeal Nerve Function: Test: Symptoms of nerve damage:
BI 232 Lab Survival Guide http://spot.pcc.edu/anatomy/lab.htm Fall 2008 56
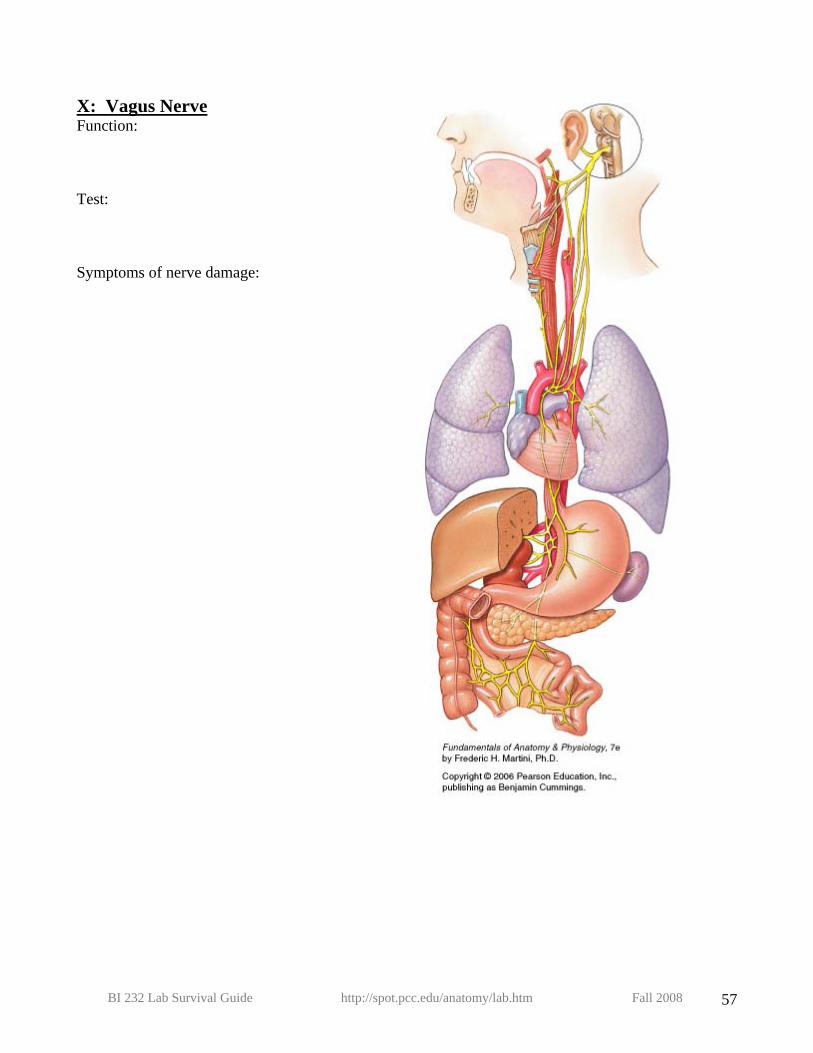
X: Vagus Nerve Function: Test: Symptoms of nerve damage:
BI 232 Lab Survival Guide http://spot.pcc.edu/anatomy/lab.htm Fall 2008 57
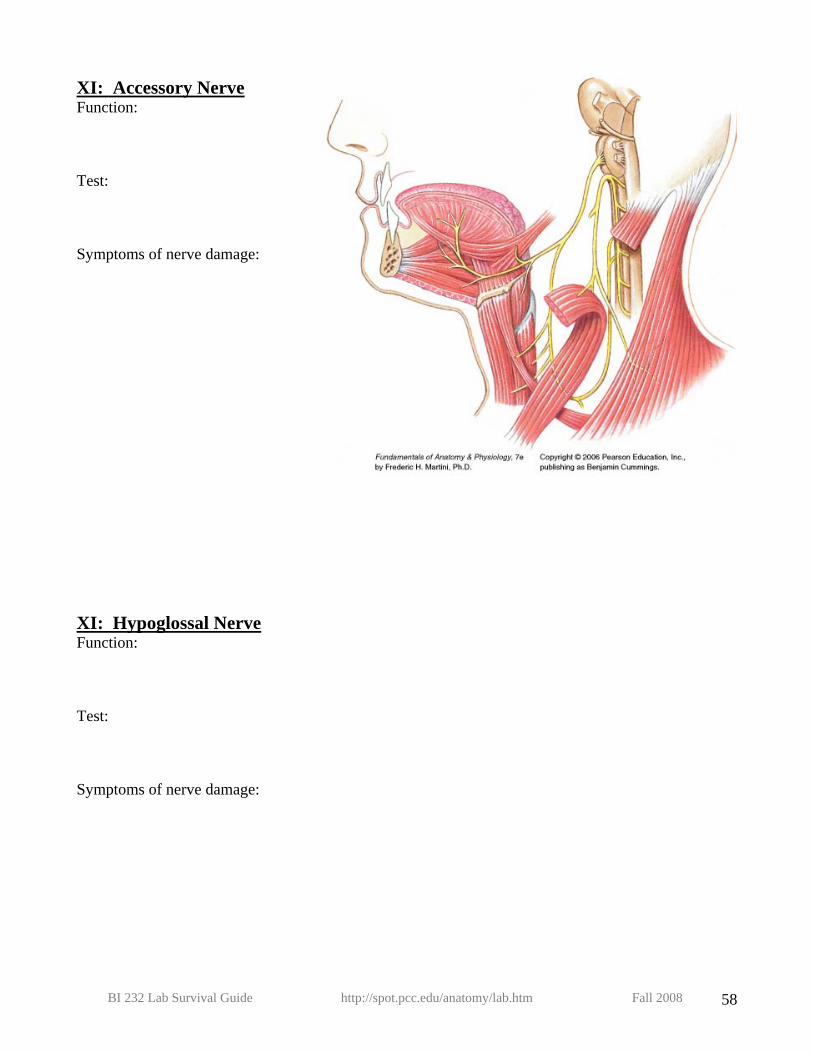
XI: Accessory Nerve Function: Test: Symptoms of nerve damage:
XI: Hypoglossal Nerve Function: Test: Symptoms of nerve damage:
BI 232 Lab Survival Guide http://spot.pcc.edu/anatomy/lab.htm Fall 2008 58
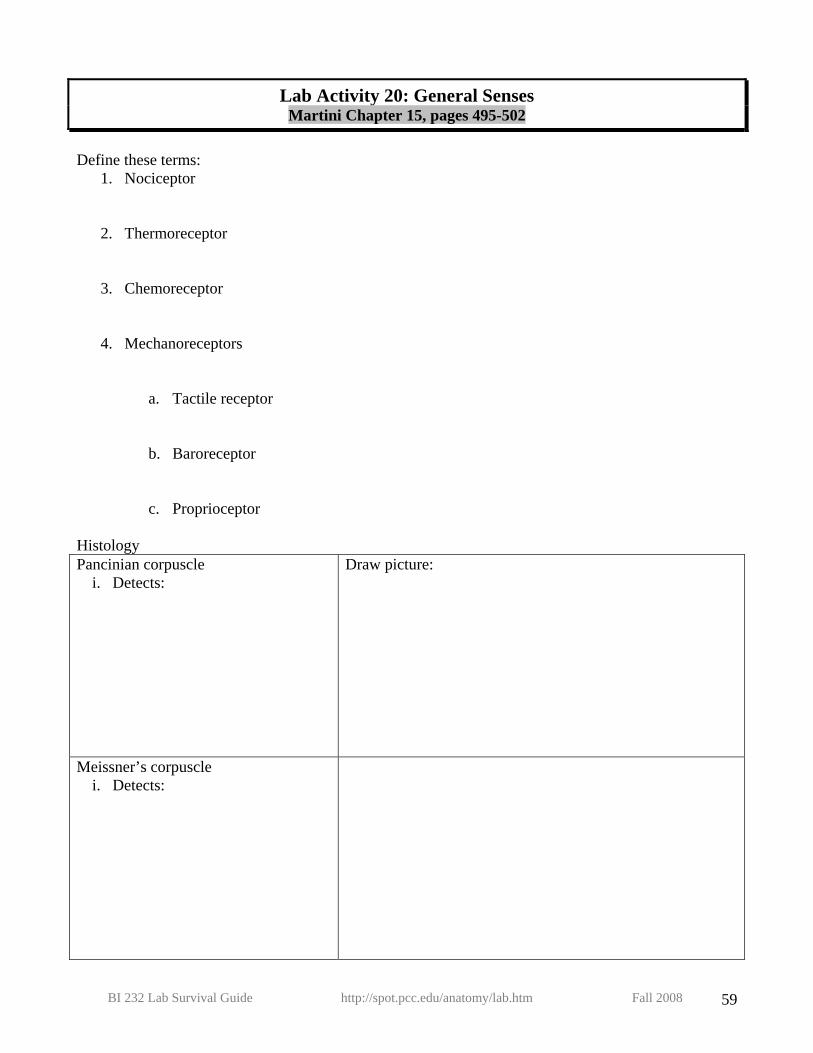
Lab Activity 20: General Senses Martini Chapter 15, pages 495-502
Define these terms:
1. Nociceptor
2. Thermoreceptor
3. Chemoreceptor
4. Mechanoreceptors
a. Tactile receptor
b. Baroreceptor
c. Proprioceptor Histology Pancinian corpuscle
i. Detects: Draw picture:
Meissner’s corpuscle i. Detects:
BI 232 Lab Survival Guide http://spot.pcc.edu/anatomy/lab.htm Fall 2008 59
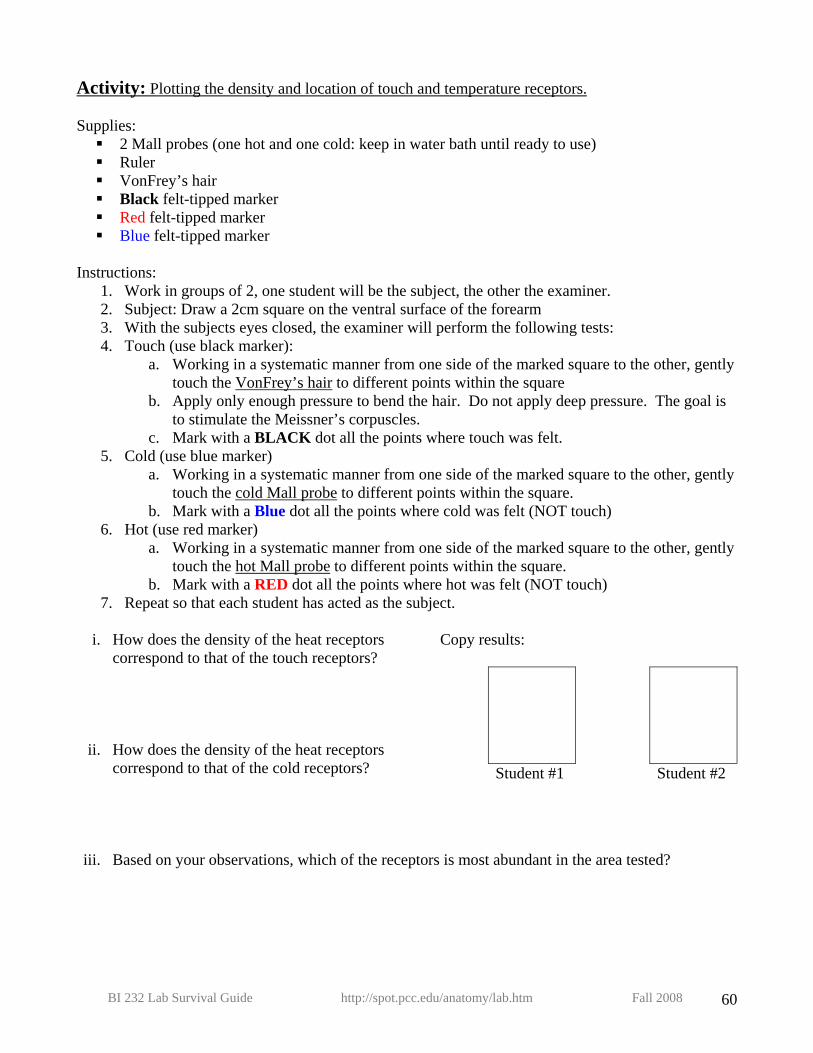
Activity: Plotting the density and location of touch and temperature receptors. Supplies:
2 Mall probes (one hot and one cold: keep in water bath until ready to use) Ruler VonFrey’s hair Black felt-tipped marker Red felt-tipped marker Blue felt-tipped marker
Instructions: 1. Work in groups of 2, one student will be the subject, the other the examiner. 2. Subject: Draw a 2cm square on the ventral surface of the forearm 3. With the subjects eyes closed, the examiner will perform the following tests: 4. Touch (use black marker):
a. Working in a systematic manner from one side of the marked square to the other, gently touch the VonFrey’s hair to different points within the square
b. Apply only enough pressure to bend the hair. Do not apply deep pressure. The goal is to stimulate the Meissner’s corpuscles.
c. Mark with a BLACK dot all the points where touch was felt. 5. Cold (use blue marker)
a. Working in a systematic manner from one side of the marked square to the other, gently touch the cold Mall probe to different points within the square.
b. Mark with a Blue dot all the points where cold was felt (NOT touch) 6. Hot (use red marker)
a. Working in a systematic manner from one side of the marked square to the other, gently touch the hot Mall probe to different points within the square.
b. Mark with a RED dot all the points where hot was felt (NOT touch) 7. Repeat so that each student has acted as the subject.
i. How does the density of the heat receptors
correspond to that of the touch receptors?
ii. How does the density of the heat receptors correspond to that of the cold receptors?
Copy results:
Student #1 Student #2
iii. Based on your observations, which of the receptors is most abundant in the area tested?
BI 232 Lab Survival Guide http://spot.pcc.edu/anatomy/lab.htm Fall 2008 60
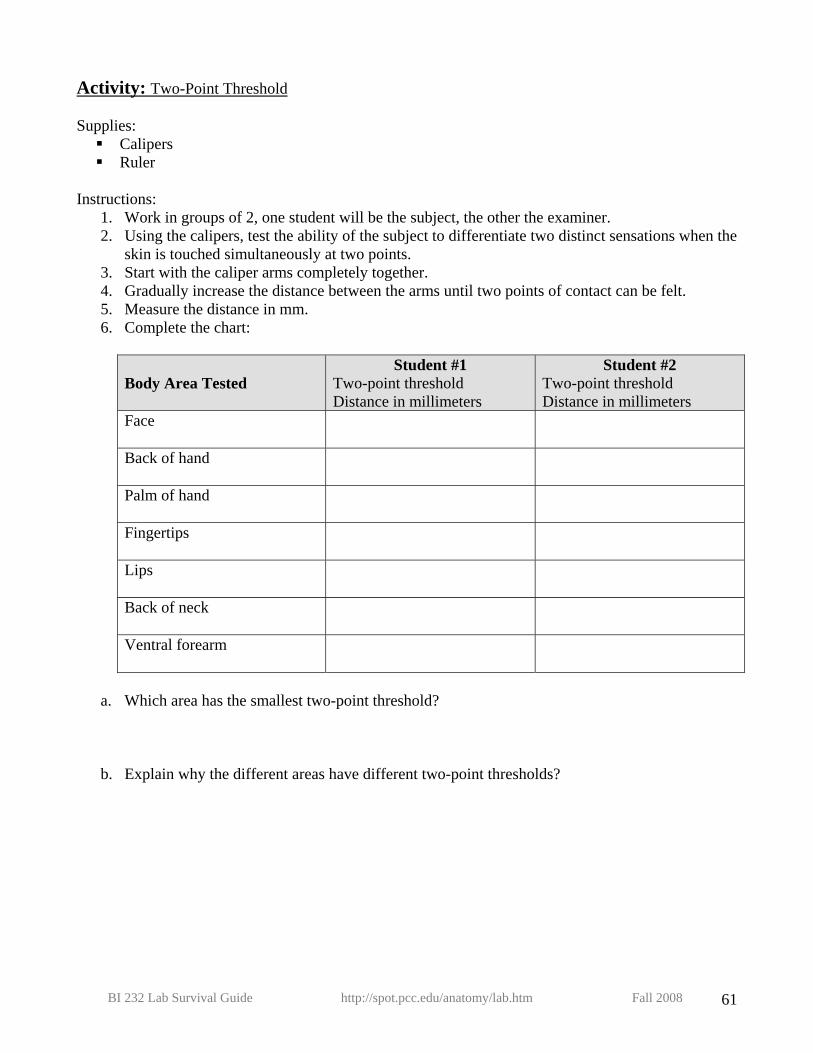
Activity: Two-Point Threshold Supplies:
Calipers Ruler
Instructions:
1. Work in groups of 2, one student will be the subject, the other the examiner. 2. Using the calipers, test the ability of the subject to differentiate two distinct sensations when the
skin is touched simultaneously at two points. 3. Start with the caliper arms completely together. 4. Gradually increase the distance between the arms until two points of contact can be felt. 5. Measure the distance in mm. 6. Complete the chart:
Body Area Tested
Student #1 Two-point threshold Distance in millimeters
Student #2 Two-point threshold Distance in millimeters
Face
Back of hand
Palm of hand
Fingertips
Lips
Back of neck
Ventral forearm
a. Which area has the smallest two-point threshold?
b. Explain why the different areas have different two-point thresholds?
BI 232 Lab Survival Guide http://spot.pcc.edu/anatomy/lab.htm Fall 2008 61
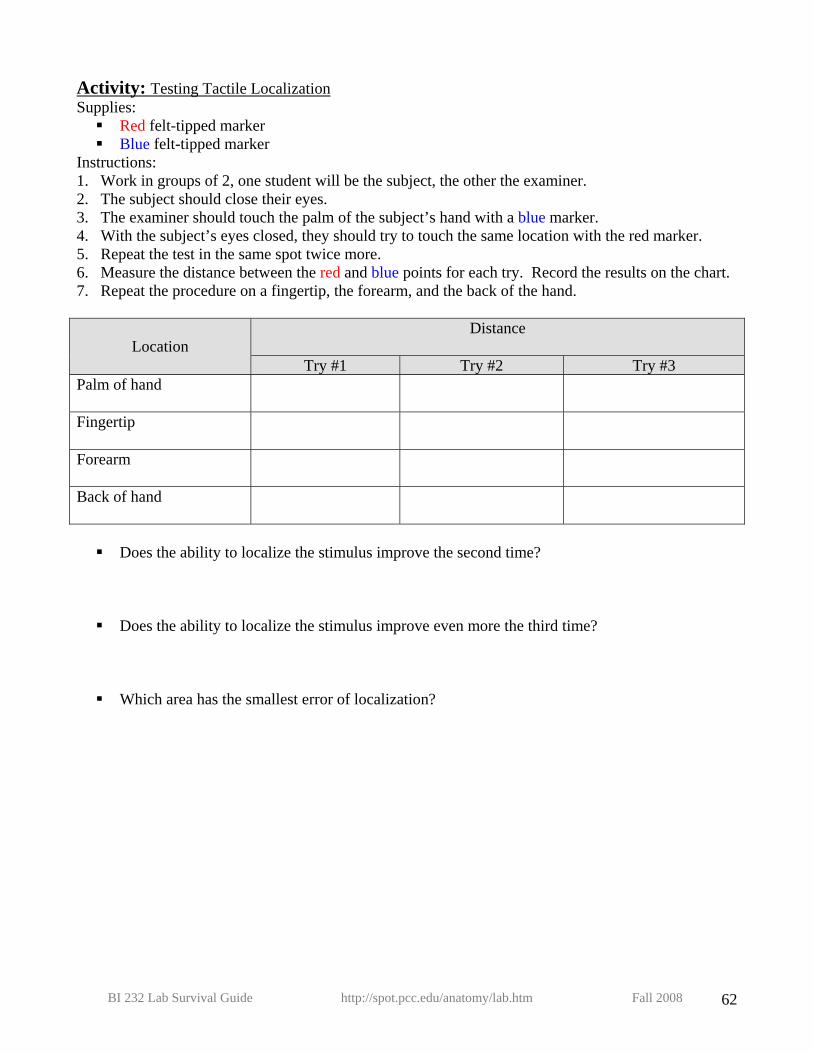
Activity: Testing Tactile Localization Supplies:
Red felt-tipped marker Blue felt-tipped marker
Instructions: 1. Work in groups of 2, one student will be the subject, the other the examiner. 2. The subject should close their eyes. 3. The examiner should touch the palm of the subject’s hand with a blue marker. 4. With the subject’s eyes closed, they should try to touch the same location with the red marker. 5. Repeat the test in the same spot twice more. 6. Measure the distance between the red and blue points for each try. Record the results on the chart. 7. Repeat the procedure on a fingertip, the forearm, and the back of the hand.
Location
Distance
Try #1 Try #2 Try #3 Palm of hand
Fingertip
Forearm
Back of hand
Does the ability to localize the stimulus improve the second time?
Does the ability to localize the stimulus improve even more the third time?
Which area has the smallest error of localization?
BI 232 Lab Survival Guide http://spot.pcc.edu/anatomy/lab.htm Fall 2008 62
Activity: Adaptation of Temperature Receptors Supplies:
1. 3 1000ml beakers. 2. Beaker 1: fill with 45°C water 3. Beaker 2: fill with ice water 4. Beaker 3: room temperature water
Instructions:
1. Put your left hand in the 45°C water a. What sensation do you feel?
2. After 1 minute, put your right hand in the same beaker. a. What is the sensation of the left hand after 1 minute compared to the sensation in the
right hand that was just immersed?
b. Has adaptation occurred in the left hand?
3. Remove hands, dry them and wait 5 minutes. 4. Put your left hand in the ice water and your right hand in the 45°C water. 5. Wait 2 minutes
a. What is the sensation in each hand after 2 minutes as compared to the sensation perceived when the hands were first immersed?
b. Which hand adapts more quickly?
6. Now take both hands out of the hot and cold beakers and immediately place them both in the room temperature water.
a. What sensation is felt in the left hand?
b. What sensation is felt in the right hand?
The sensations experiences when both hands are put in room temperature water are called negative afterimages.
BI 232 Lab Survival Guide http://spot.pcc.edu/anatomy/lab.htm Fall 2008 63
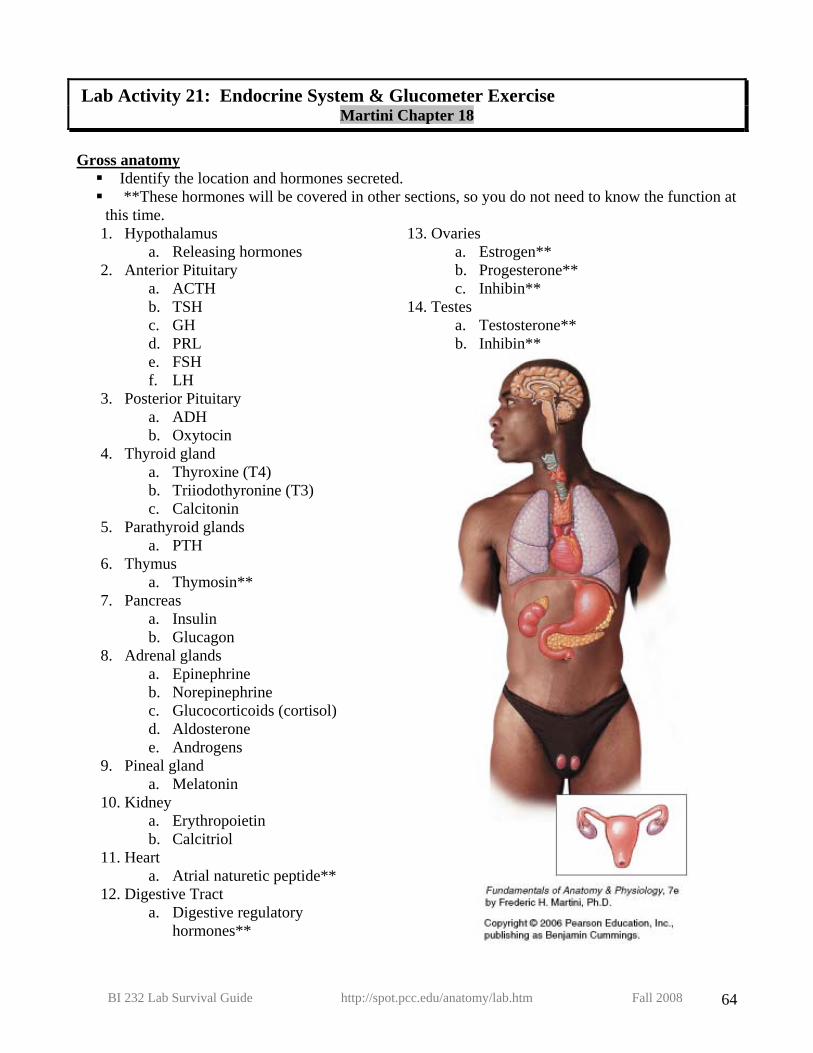
Lab Activity 21: Endocrine System & Glucometer Exercise Martini Chapter 18
Gross anatomy
Identify the location and hormones secreted. **These hormones will be covered in other sections, so you do not need to know the function at this time.
1. Hypothalamus a. Releasing hormones
2. Anterior Pituitary a. ACTH b. TSH c. GH d. PRL e. FSH f. LH
3. Posterior Pituitary a. ADH b. Oxytocin
4. Thyroid gland a. Thyroxine (T4) b. Triiodothyronine (T3) c. Calcitonin
5. Parathyroid glands a. PTH
6. Thymus a. Thymosin**
7. Pancreas a. Insulin b. Glucagon
8. Adrenal glands a. Epinephrine b. Norepinephrine c. Glucocorticoids (cortisol) d. Aldosterone e. Androgens
9. Pineal gland a. Melatonin
10. Kidney a. Erythropoietin b. Calcitriol
11. Heart a. Atrial naturetic peptide**
12. Digestive Tract a. Digestive regulatory
hormones**
13. Ovaries a. Estrogen** b. Progesterone** c. Inhibin**
14. Testes a. Testosterone** b. Inhibin**
BI 232 Lab Survival Guide http://spot.pcc.edu/anatomy/lab.htm Fall 2008 64
Hormone (Spell out the Abbreviations)
Major Effects
ACTH
TSH
GH
PRL
FSH
LH
ADH
Oxytocin
BI 232 Lab Survival Guide http://spot.pcc.edu/anatomy/lab.htm Fall 2008 65
Thyroid Hormones
Calcitonin
PTH
Insulin
Glucagon
Epinephrine & Norepinephrine (Adrenal medulla)
Cortisol (Adrenal cortex: Zona fasciculata)
Aldosterone (Adrenal cortex: Zona glomerulosa)
Androgens (Adrenal cortex: Zona reticularis)
BI 232 Lab Survival Guide http://spot.pcc.edu/anatomy/lab.htm Fall 2008 66

Melatonin
Erythropoietin
Calcitriol
Histology Gland and the structures to identify
Draw a picture of the histology
Pituitary 1. Anterior lobe
a. Pars distalis b. Pars intermedia
2. Posterior lobe
Thyroid Gland 1. Follicle cells 2. Colloid in follicle
(thyroglobulin) 3. C Cells (calcitonin)
BI 232 Lab Survival Guide http://spot.pcc.edu/anatomy/lab.htm Fall 2008 67
Parathyroid gland 1. Principal (chief) cells 2. Oxyphil cells
Adrenal Glands 1. Medulla 2. Cortex
a. Zona glomerulosa b. Zona fasciculata c. Zona reticularis
Pancreas 1. Islet of Langerhans 2. Acini (exocrine cells)
BI 232 Lab Survival Guide http://spot.pcc.edu/anatomy/lab.htm Fall 2008 68

Glucometer Exercise
Fasting Glucose Levels Oral Glucose Tolerance Test *Glucose level measured 2 hours after drinking 75gms of glucose
Review universal precaution (Blood lab, next section)
Oral Glucose Tolerance Test
4 volunteers are needed drink soda and check their glucose levels at intervals: 2 students that have been fasting for 10-16 hours (except for water) 2 students that have not been fasting
Directions: 1. Measure glucose level (follow instructor’s directions) 2. Drink two cans of Sprite 3. Check glucose level at intervals 4. Fill in the chart below
Student 1
(Fasting) Student 2 (Fasting)
Student 3 (Not fasting)
Student 4 (Not fasting)
Initial reading
30 minutes after drinking soda
1 hour after drinking soda
2 hours after drinking soda
BI 232 Lab Survival Guide http://spot.pcc.edu/anatomy/lab.htm Fall 2008 69
1. How many grams of sugar (fructose) are in one can of soda? How many in two cans?
2. Why weren’t the two “fasting” students’ blood sugars lower than the “non-fasting” students before drinking the soda?
a. What hormone prevented hypoglycemia?
3. If the blood sugar level rose immediately after the sugar was ingested, but then dropped, which hormone was responsible for the drop?
4. What is the cause of Type 1 diabetes?
5. What is the cause of Type 2 diabetes?
6. What is the normal blood glucose level? 7. How is diabetes mellitus diagnosed?
a. A fasting value over ________ mg/dl on at two separate occasions OR: b. A blood sugar over ________ mg/dl on the two-hour oral glucose tolerance test.
8. How is impaired glucose tolerance (pre-diabetes) diagnosed?
a. A fasting value over _____ mg/dl on two separate occasions. OR: b. A blood sugar between ________& ________ mg/dl on the two-hour oral
glucose tolerance test.
BI 232 Lab Survival Guide http://spot.pcc.edu/anatomy/lab.htm Fall 2008 70
Lab Activity 22: Blood Martini Chapter 19
OR-OSHA Blood-borne Pathogens Standard
1. Blood-borne Pathogens include: HIV, Hepatitis B & C Viruses, etc. 2. Universal Precautions
a. Fluids: all human blood and other body fluids such as semen, vaginal secretions, CSF, saliva, & any fluid contaminated with blood should be considered sources of blood-borne pathogens.
b. Approach: treat all of the above fluids as if they contain blood-borne pathogens
3. Protective Equipment
a. When to Use: When known occupational exposure will occur, employer (or school) needs to provide
b. Disposable, single-use gloves. Hypoallergenic, powderless or liners required to be supplied for those with allergies to powdered gloves.
c. Masks, Eye Protection, and Face shields: wear when splashes, spray, etc. may be generated & risk of eye, nose, or mouth contamination anticipated.
d. First Aid Pocket Masks: used with CPR
4. Housekeeping a. Contaminated work surfaces: decontaminate with appropriate disinfectant:
1/4 cup household bleach per 1/2 gallon water b. Contaminated laundry: bagged, transported with labels color coded in
compliance with OSHA standards.
All lancets should be disposed of in the “sharps” containers. All other materials that have contacted blood should be autoclaved.
BI 232 Lab Survival Guide http://spot.pcc.edu/anatomy/lab.htm Fall 2008 71

Complete this table: Cell Type Functions Draw a picture Erythrocyte Normal Count:
Iron deficient RBC
XXX
Sickle cell
XXX
Reticulocyte Normal Count:
Neutrophil Normal Count:
Neutrophilic band Normal Count:
BI 232 Lab Survival Guide http://spot.pcc.edu/anatomy/lab.htm Fall 2008 72
Eosinophil Normal Count:
Basophil Normal Count:
Monocyte Normal Count:
Lymphocyte Normal Count:
Platelets Normal Count:
BI 232 Lab Survival Guide http://spot.pcc.edu/anatomy/lab.htm Fall 2008 73
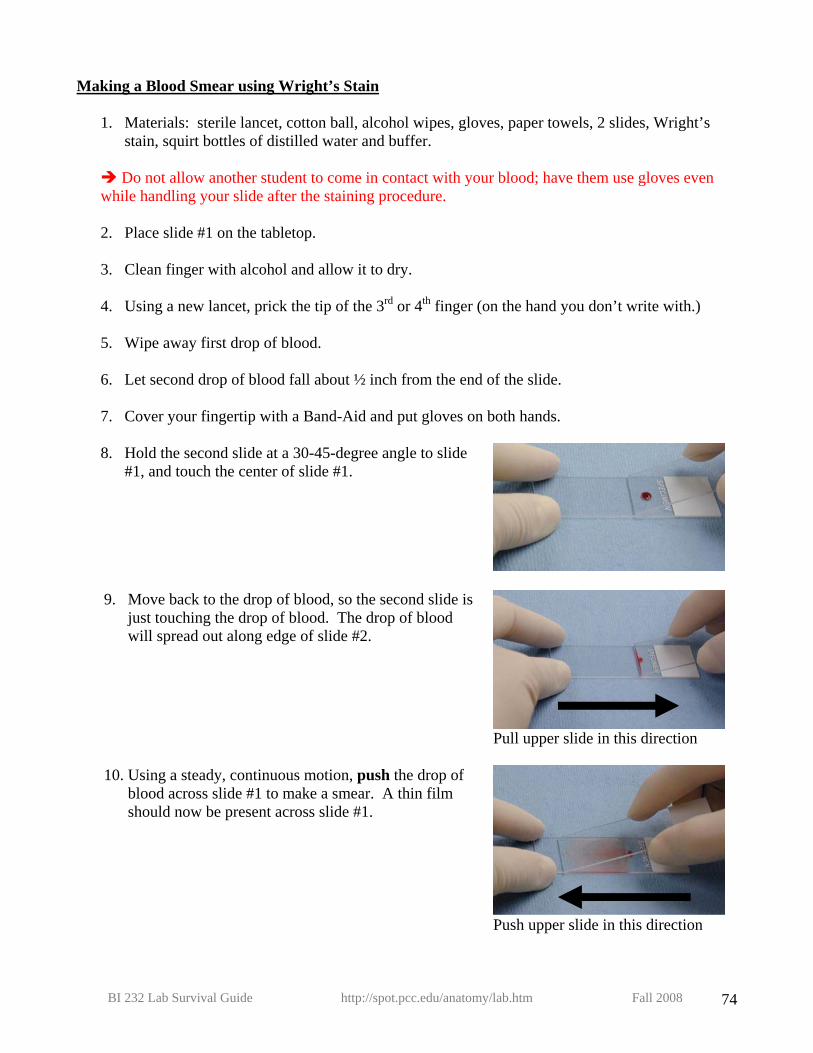
Making a Blood Smear using Wright’s Stain
1. Materials: sterile lancet, cotton ball, alcohol wipes, gloves, paper towels, 2 slides, Wright’s stain, squirt bottles of distilled water and buffer.
Do not allow another student to come in contact with your blood; have them use gloves even
while handling your slide after the staining procedure. 2. Place slide #1 on the tabletop. 3. Clean finger with alcohol and allow it to dry.
4. Using a new lancet, prick the tip of the 3rd or 4th finger (on the hand you don’t write with.)
5. Wipe away first drop of blood.
6. Let second drop of blood fall about ½ inch from the end of the slide.
7. Cover your fingertip with a Band-Aid and put gloves on both hands.
8. Hold the second slide at a 30-45-degree angle to slide
#1, and touch the center of slide #1.
9. Move back to the drop of blood, so the second slide is
just touching the drop of blood. The drop of blood will spread out along edge of slide #2.
Pull upper slide in this direction
10. Using a steady, continuous motion, push the drop of
blood across slide #1 to make a smear. A thin film should now be present across slide #1.
Push upper slide in this direction
BI 232 Lab Survival Guide http://spot.pcc.edu/anatomy/lab.htm Fall 2008 74
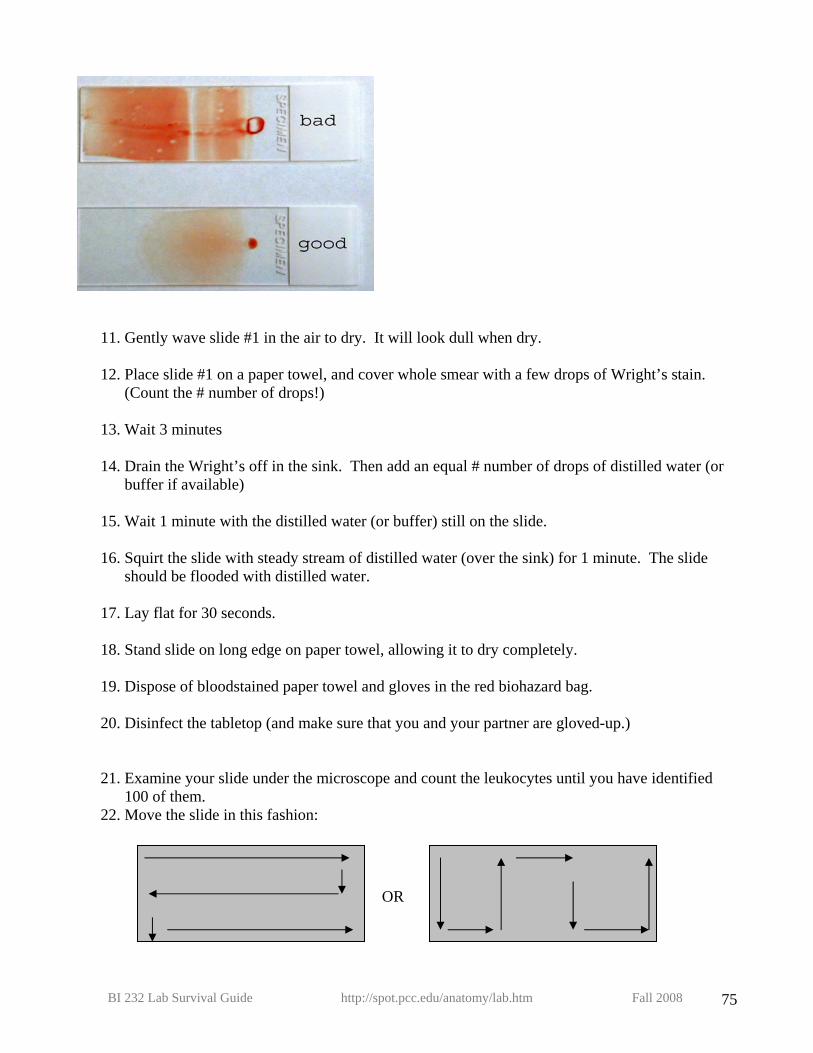
11. Gently wave slide #1 in the air to dry. It will look dull when dry.
12. Place slide #1 on a paper towel, and cover whole smear with a few drops of Wright’s stain. (Count the # number of drops!)
13. Wait 3 minutes
14. Drain the Wright’s off in the sink. Then add an equal # number of drops of distilled water (or
buffer if available)
15. Wait 1 minute with the distilled water (or buffer) still on the slide.
16. Squirt the slide with steady stream of distilled water (over the sink) for 1 minute. The slide should be flooded with distilled water.
17. Lay flat for 30 seconds.
18. Stand slide on long edge on paper towel, allowing it to dry completely.
19. Dispose of bloodstained paper towel and gloves in the red biohazard bag.
20. Disinfect the tabletop (and make sure that you and your partner are gloved-up.)
21. Examine your slide under the microscope and count the leukocytes until you have identified 100 of them.
22. Move the slide in this fashion:
OR
BI 232 Lab Survival Guide http://spot.pcc.edu/anatomy/lab.htm Fall 2008 75
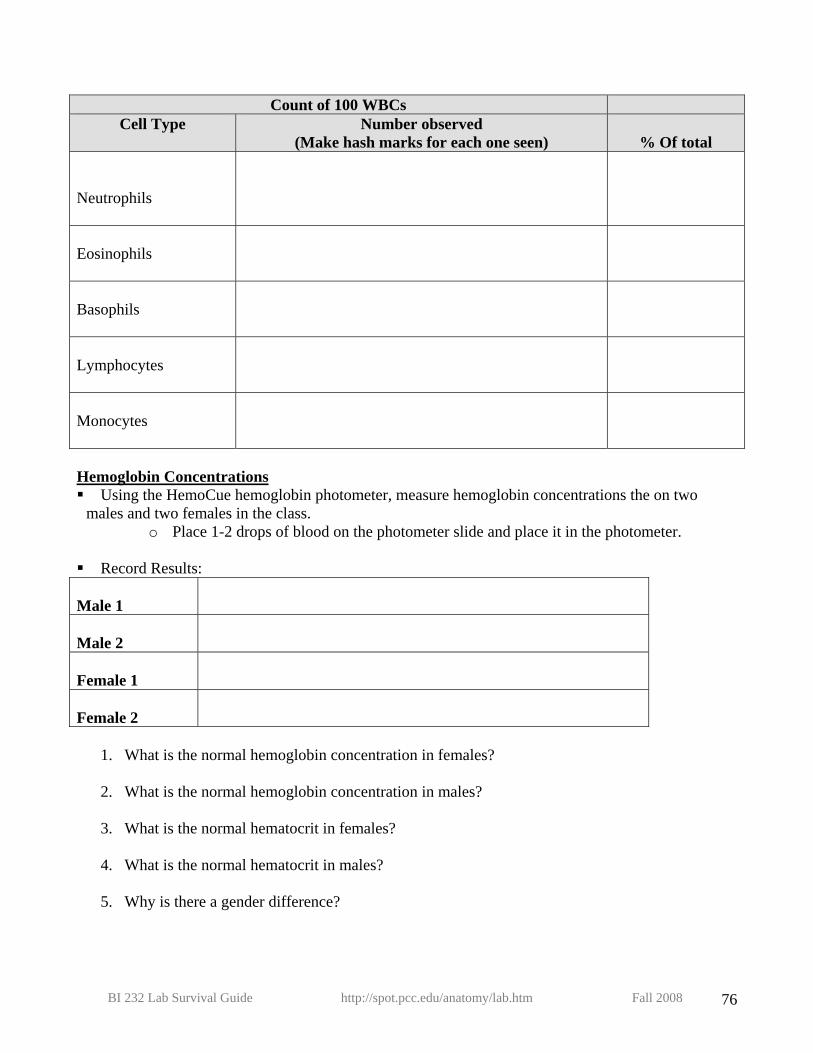
Count of 100 WBCs
Cell Type Number observed (Make hash marks for each one seen)
% Of total
Neutrophils
Eosinophils
Basophils
Lymphocytes
Monocytes
Hemoglobin Concentrations Using the HemoCue hemoglobin photometer, measure hemoglobin concentrations the on two males and two females in the class.
o Place 1-2 drops of blood on the photometer slide and place it in the photometer. Record Results:
Male 1
Male 2
Female 1
Female 2
1. What is the normal hemoglobin concentration in females?
2. What is the normal hemoglobin concentration in males?
3. What is the normal hematocrit in females?
4. What is the normal hematocrit in males?
5. Why is there a gender difference?
BI 232 Lab Survival Guide http://spot.pcc.edu/anatomy/lab.htm Fall 2008 76
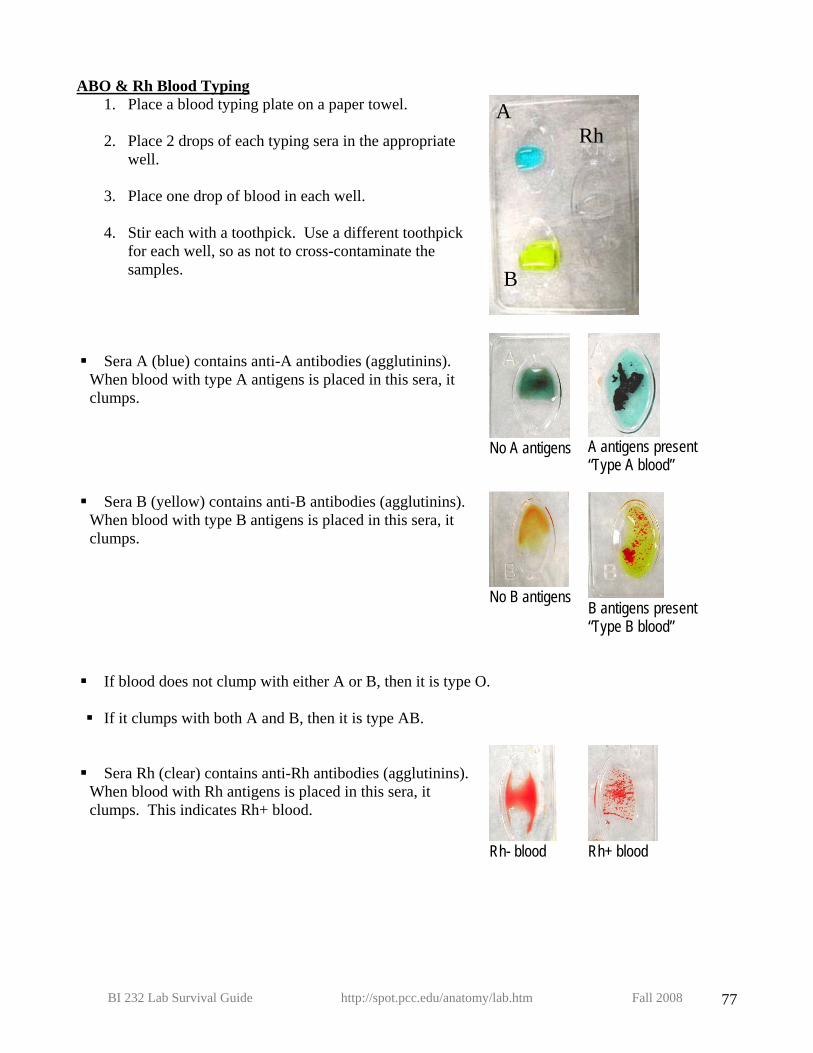
ABO & Rh Blood Typing 1. Place a blood typing plate on a paper towel. 2. Place 2 drops of each typing sera in the appropriate
well.
3. Place one drop of blood in each well.
4. Stir each with a toothpick. Use a different toothpick for each well, so as not to cross-contaminate the samples.
Sera A (blue) contains anti-A antibodies (agglutinins). When blood with type A antigens is placed in this sera, it clumps.
No A antigens
A antigens present “Type A blood”
Sera B (yellow) contains anti-B antibodies (agglutinins). When blood with type B antigens is placed in this sera, it clumps.
No B antigens B antigens present “Type B blood”
If blood does not clump with either A or B, then it is type O.
If it clumps with both A and B, then it is type AB. Sera Rh (clear) contains anti-Rh antibodies (agglutinins). When blood with Rh antigens is placed in this sera, it clumps. This indicates Rh+ blood.
Rh- blood
Rh+ blood
ARh
B
BI 232 Lab Survival Guide http://spot.pcc.edu/anatomy/lab.htm Fall 2008 77

Type A blood
A antigens on the RBC Anti-B antibodies in the plasma
Type B blood
B antigens on the RBC Anti-A antibodies in the plasma
Type AB blood A and B antigens on the RBC No antibodies in the plasma
Type O blood
No antigens on the RBC A and B antibodies in the plasma
B
B
A
A
B
B
A
AA
A
ABB
B
B B A
AA
B
Rh antigens Rh is a RBC antigen protein, similar to A and B. It is inherited (+), or not (-), independent of the ABO blood grouping. Individuals whose RBC's contain Rh antigens are called “positive,” while those without Rh antigens are called “negative.” “O negative” blood contain neither A, nor B, nor Rh antigen, while “AB positive” blood contains all three antigens.
BI 232 Lab Survival Guide http://spot.pcc.edu/anatomy/lab.htm Fall 2008 78
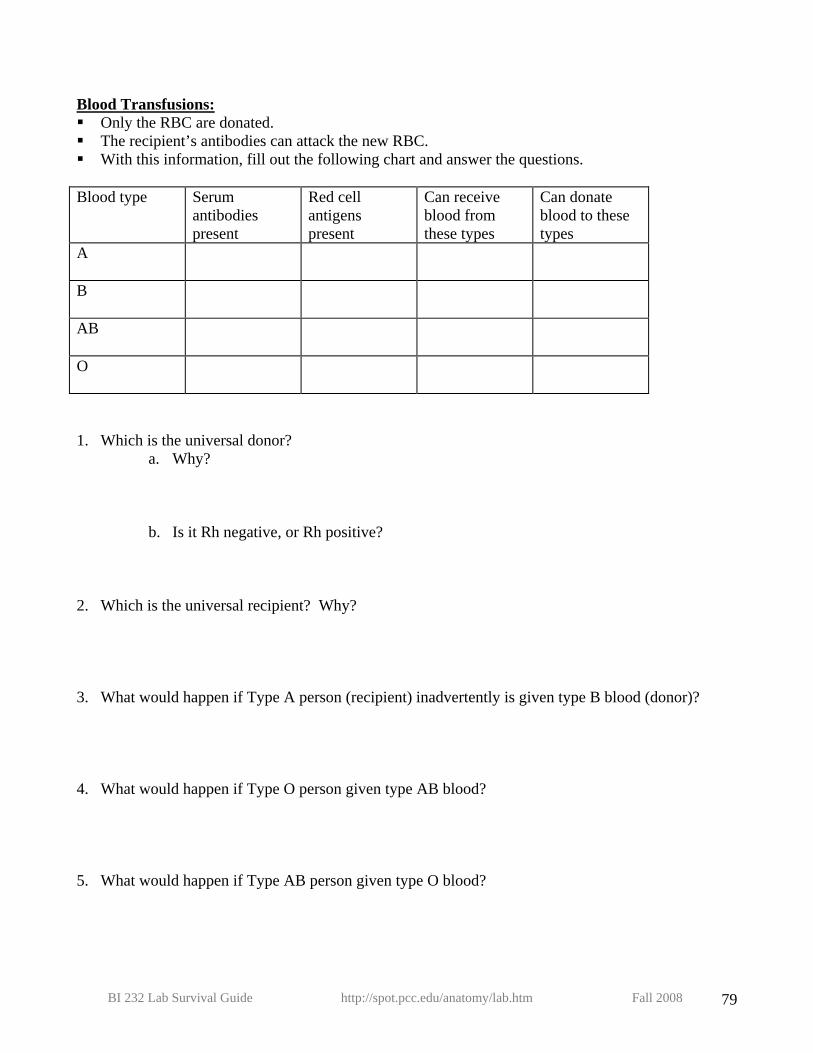
Blood Transfusions: Only the RBC are donated. The recipient’s antibodies can attack the new RBC. With this information, fill out the following chart and answer the questions.
Blood type Serum
antibodies present
Red cell antigens present
Can receive blood from these types
Can donate blood to these types
A
B
AB
O
1. Which is the universal donor?
a. Why?
b. Is it Rh negative, or Rh positive? 2. Which is the universal recipient? Why? 3. What would happen if Type A person (recipient) inadvertently is given type B blood (donor)? 4. What would happen if Type O person given type AB blood? 5. What would happen if Type AB person given type O blood?
BI 232 Lab Survival Guide http://spot.pcc.edu/anatomy/lab.htm Fall 2008 79
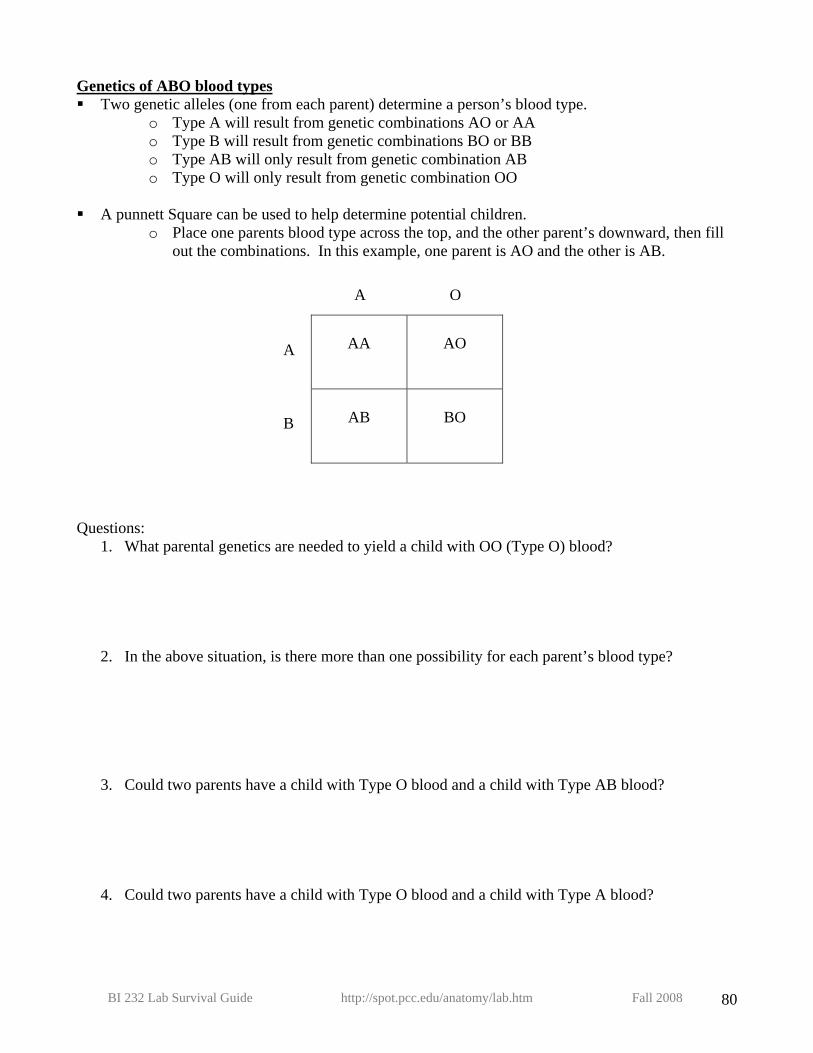
Genetics of ABO blood types Two genetic alleles (one from each parent) determine a person’s blood type.
o Type A will result from genetic combinations AO or AA o Type B will result from genetic combinations BO or BB o Type AB will only result from genetic combination AB o Type O will only result from genetic combination OO
A punnett Square can be used to help determine potential children. o Place one parents blood type across the top, and the other parent’s downward, then fill
out the combinations. In this example, one parent is AO and the other is AB.
A O A B
AA
AO
AB
BO
Questions: 1. What parental genetics are needed to yield a child with OO (Type O) blood?
2. In the above situation, is there more than one possibility for each parent’s blood type?
3. Could two parents have a child with Type O blood and a child with Type AB blood?
4. Could two parents have a child with Type O blood and a child with Type A blood?
BI 232 Lab Survival Guide http://spot.pcc.edu/anatomy/lab.htm Fall 2008 80
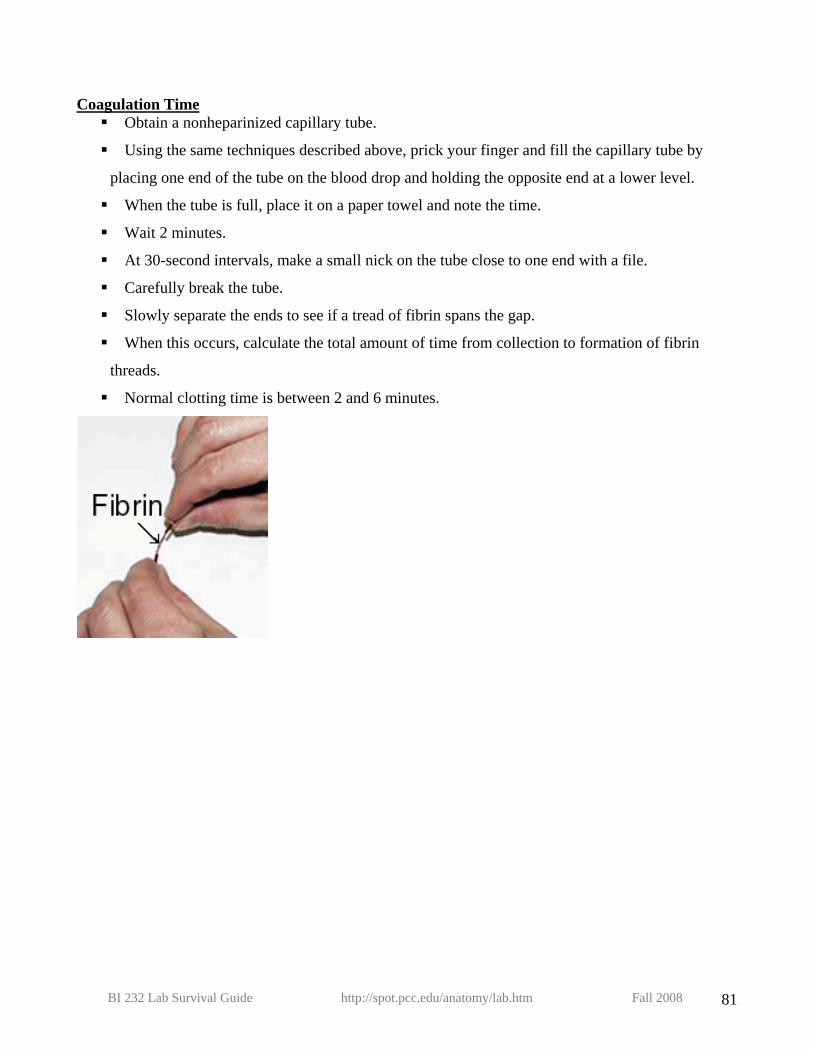
Coagulation Time
Obtain a nonheparinized capillary tube.
Using the same techniques described above, prick your finger and fill the capillary tube by
placing one end of the tube on the blood drop and holding the opposite end at a lower level.
When the tube is full, place it on a paper towel and note the time.
Wait 2 minutes.
At 30-second intervals, make a small nick on the tube close to one end with a file.
Carefully break the tube.
Slowly separate the ends to see if a tread of fibrin spans the gap.
When this occurs, calculate the total amount of time from collection to formation of fibrin
threads.
Normal clotting time is between 2 and 6 minutes.
BI 232 Lab Survival Guide http://spot.pcc.edu/anatomy/lab.htm Fall 2008 81
Lab Activity 23: Cardiac Anatomy Martini Chapter 20
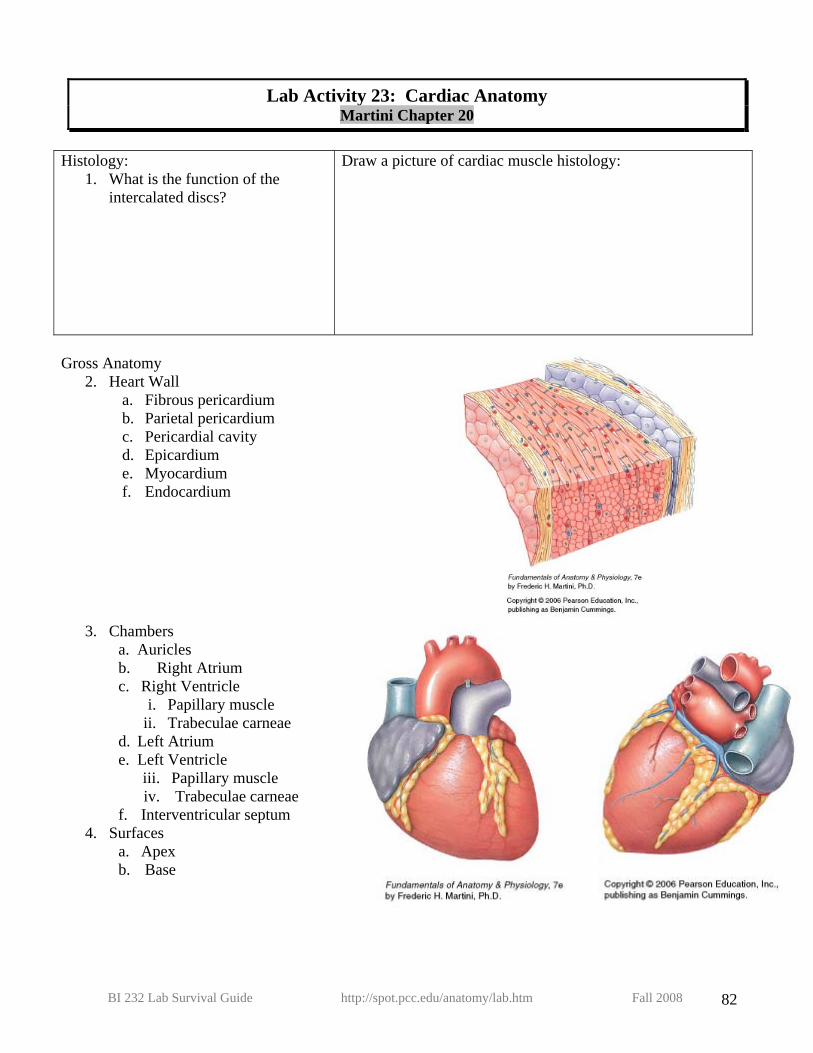
Histology:
1. What is the function of the intercalated discs?
Draw a picture of cardiac muscle histology:
Gross Anatomy
2. Heart Wall a. Fibrous pericardium b. Parietal pericardium c. Pericardial cavity d. Epicardium e. Myocardium f. Endocardium
3. Chambers a. Auricles b. Right Atrium c. Right Ventricle
i. Papillary muscle ii. Trabeculae carneae
d. Left Atrium e. Left Ventricle
iii. Papillary muscle iv. Trabeculae carneae
f. Interventricular septum 4. Surfaces
a. Apex b. Base
BI 232 Lab Survival Guide http://spot.pcc.edu/anatomy/lab.htm Fall 2008 82
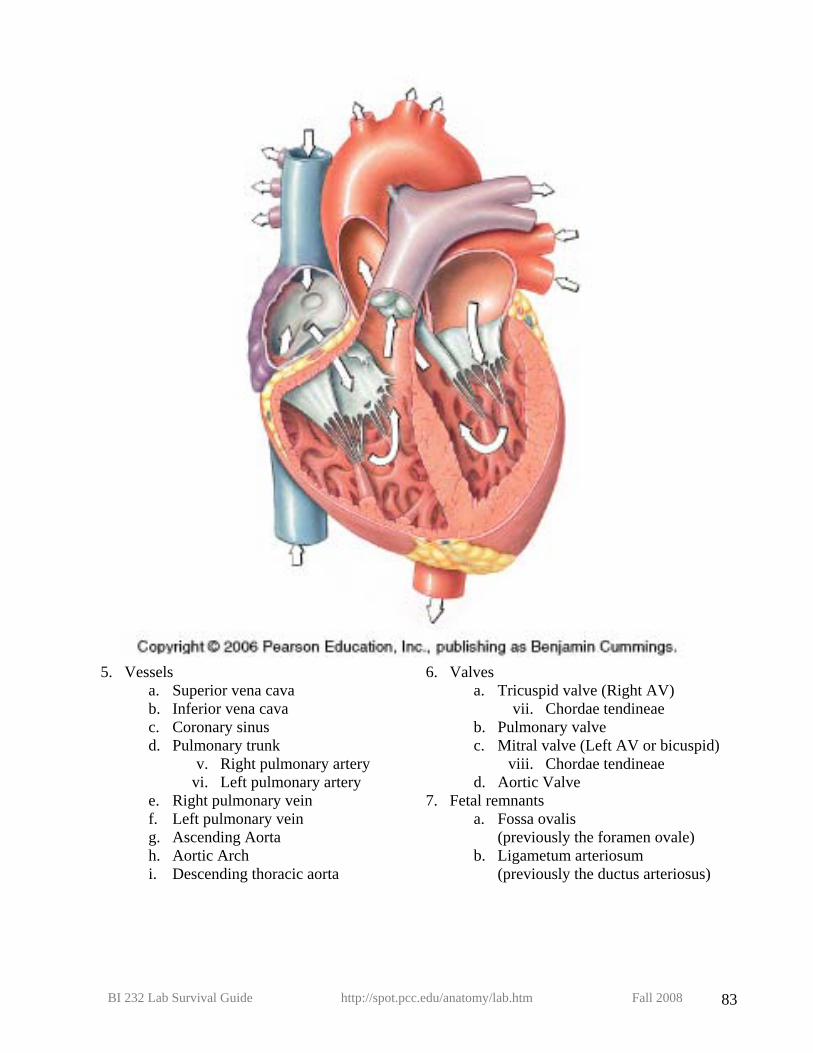
5. Vessels
a. Superior vena cava b. Inferior vena cava c. Coronary sinus d. Pulmonary trunk
v. Right pulmonary artery vi. Left pulmonary artery
e. Right pulmonary vein f. Left pulmonary vein g. Ascending Aorta h. Aortic Arch i. Descending thoracic aorta
6. Valves a. Tricuspid valve (Right AV)
vii. Chordae tendineae b. Pulmonary valve c. Mitral valve (Left AV or bicuspid)
viii. Chordae tendineae d. Aortic Valve
7. Fetal remnants a. Fossa ovalis
(previously the foramen ovale) b. Ligametum arteriosum
(previously the ductus arteriosus)
BI 232 Lab Survival Guide http://spot.pcc.edu/anatomy/lab.htm Fall 2008 83

Describe the position of the valves when the ventricles are relaxed and when they are contracted.
BI 232 Lab Survival Guide http://spot.pcc.edu/anatomy/lab.htm Fall 2008 84
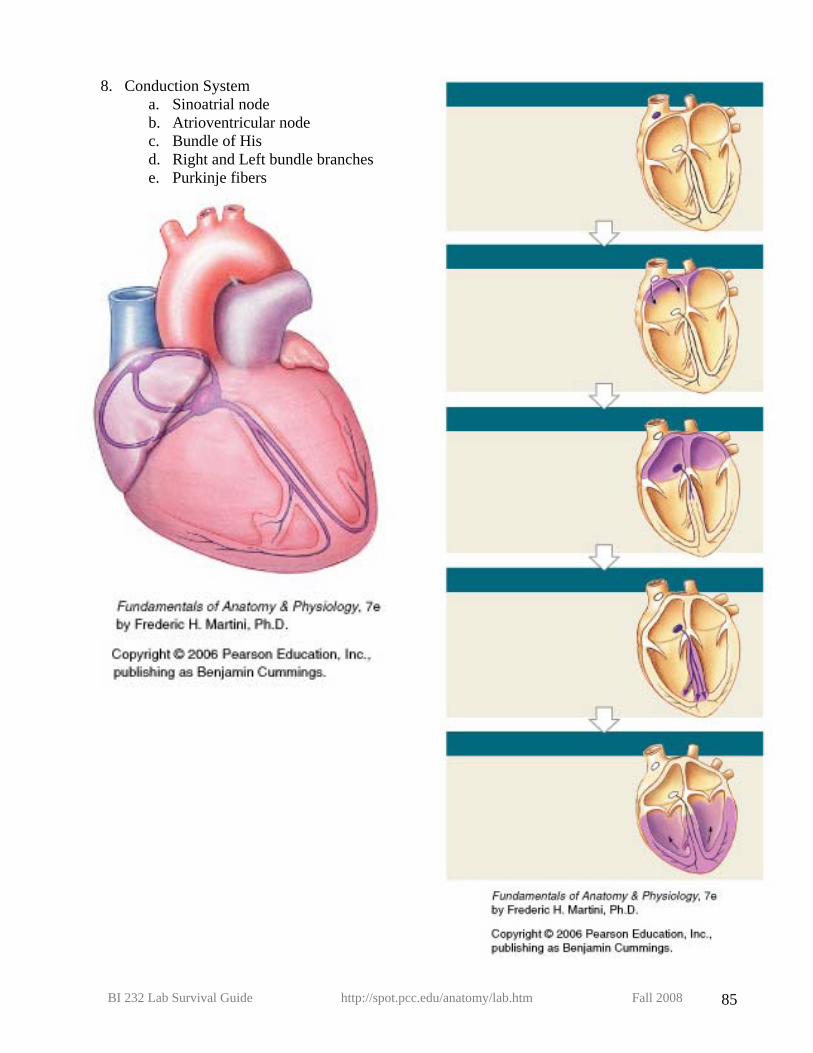
8. Conduction System a. Sinoatrial node b. Atrioventricular node c. Bundle of His d. Right and Left bundle branches e. Purkinje fibers
BI 232 Lab Survival Guide http://spot.pcc.edu/anatomy/lab.htm Fall 2008 85
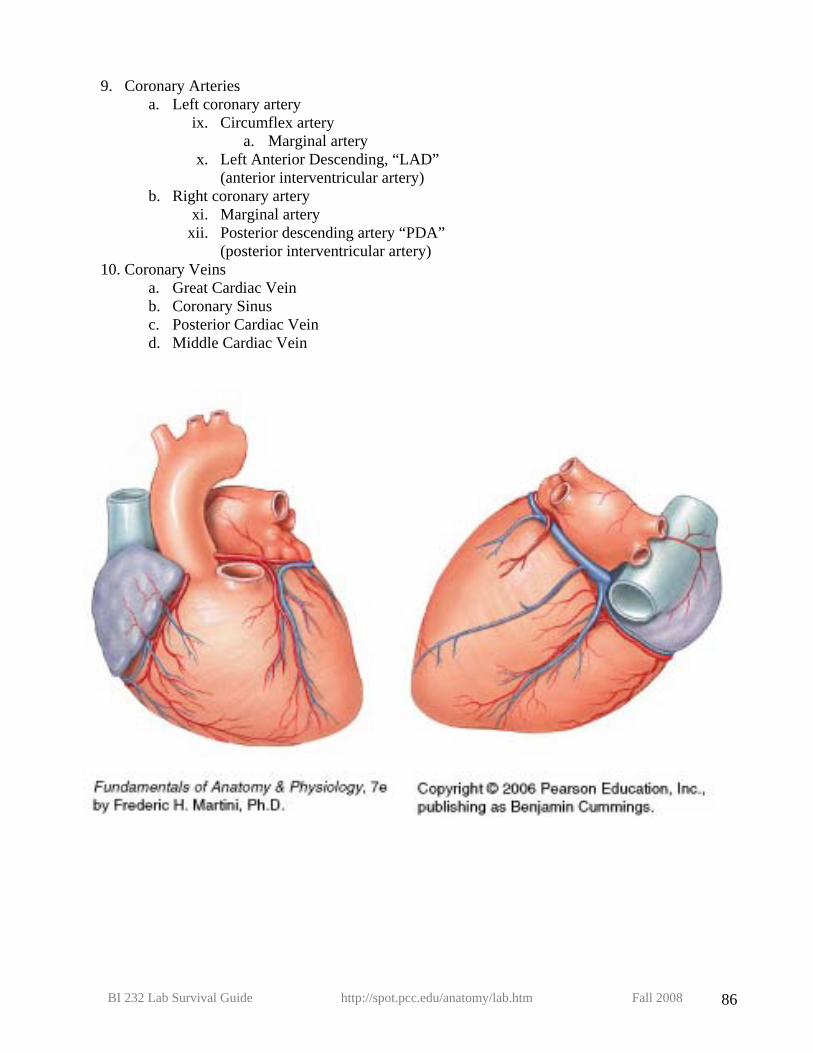
9. Coronary Arteries a. Left coronary artery
ix. Circumflex artery a. Marginal artery
x. Left Anterior Descending, “LAD” (anterior interventricular artery)
b. Right coronary artery xi. Marginal artery
xii. Posterior descending artery “PDA” (posterior interventricular artery)
10. Coronary Veins a. Great Cardiac Vein b. Coronary Sinus c. Posterior Cardiac Vein d. Middle Cardiac Vein
BI 232 Lab Survival Guide http://spot.pcc.edu/anatomy/lab.htm Fall 2008 86

11. Trace the pathway of blood through the systemic and pulmonary circulations.
BI 232 Lab Survival Guide http://spot.pcc.edu/anatomy/lab.htm Fall 2008 87
12. Define these terms:
a. Systole
b. Diastole
c. Cardiac cycle
d. S1 (lubb)
e. S2 (dupp)
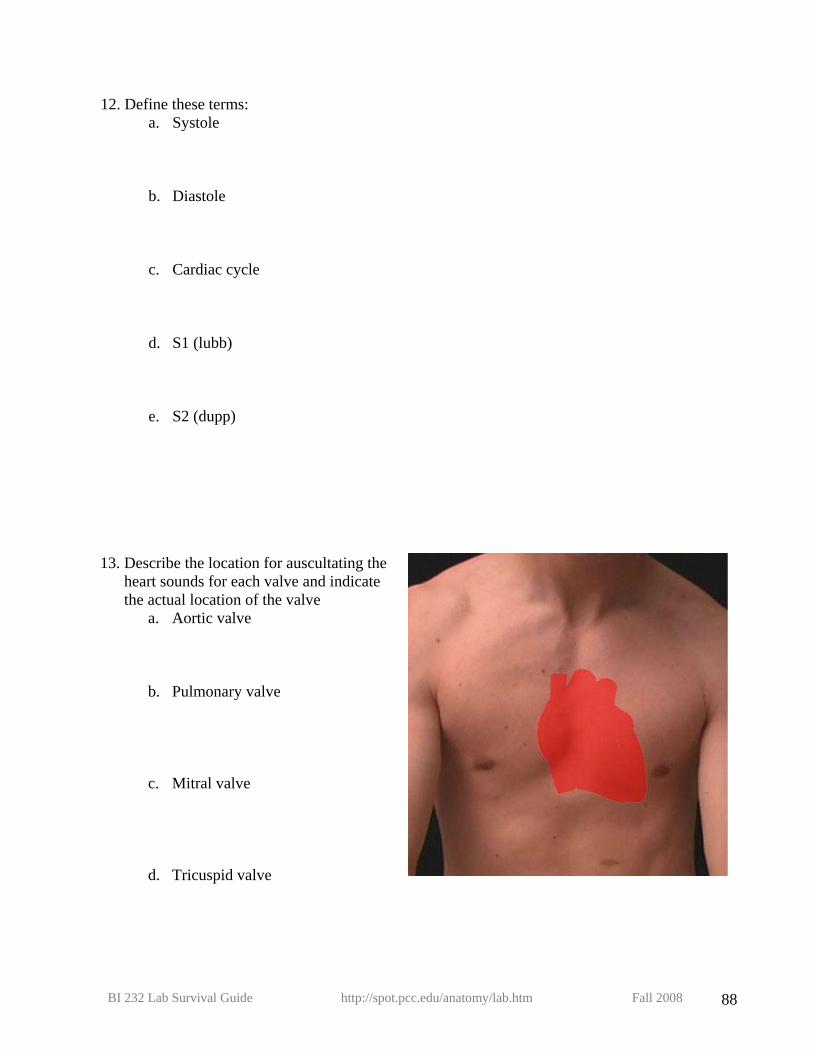
13. Describe the location for auscultating the heart sounds for each valve and indicate the actual location of the valve
a. Aortic valve
b. Pulmonary valve
c. Mitral valve
d. Tricuspid valve
BI 232 Lab Survival Guide http://spot.pcc.edu/anatomy/lab.htm Fall 2008 88
(Lab Activity 24: EKG) Martini Chapter 20, pages 687-688
EKG Paper (Enlarged):
←V
OL
TA
GE→
←TIME→
1. How much time does one little box represent?
2. How much time does one large box (5 little boxes) represent?
3. How many little boxes equal 1 second?
4. What voltage is represented by one little box?
5. How many little boxes equal 1mV?
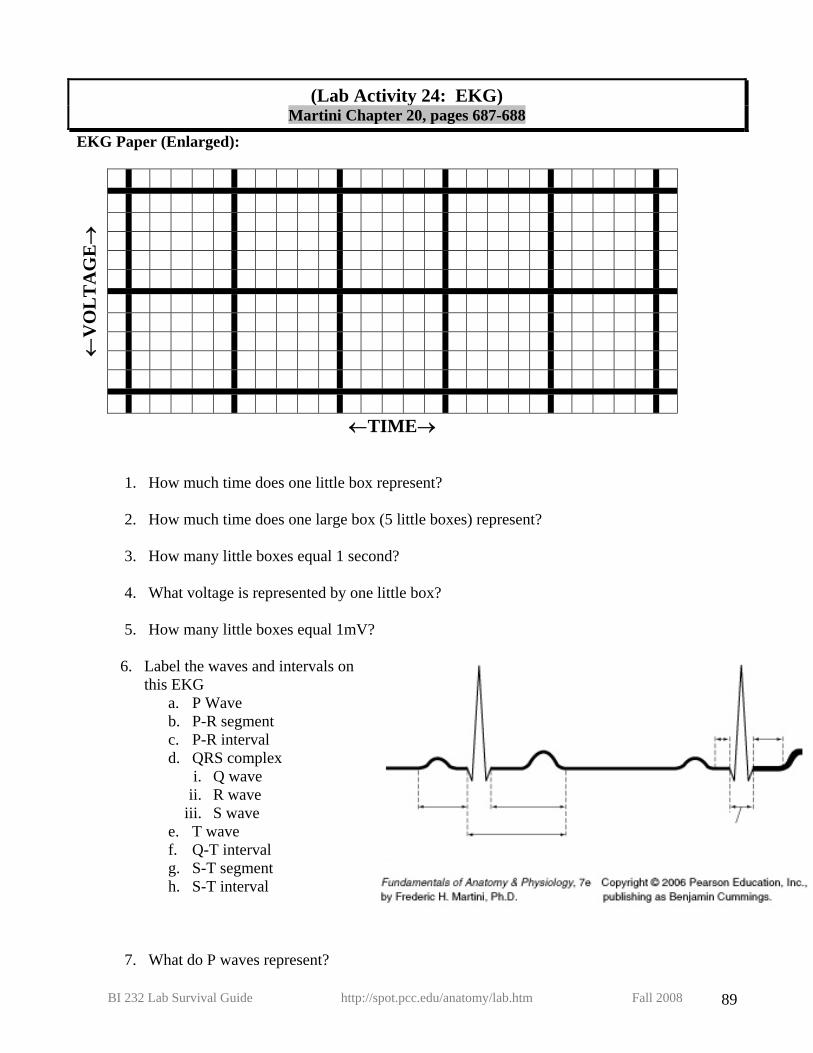
6. Label the waves and intervals on this EKG
a. P Wave b. P-R segment c. P-R interval d. QRS complex
i. Q wave ii. R wave
iii. S wave e. T wave f. Q-T interval g. S-T segment h. S-T interval
7. What do P waves represent?
BI 232 Lab Survival Guide http://spot.pcc.edu/anatomy/lab.htm Fall 2008 89
a. What is the normal duration?
b. What is the normal amplitude?
c. What would cause abnormalities in the P wave?
8. What does the PR segment represent?
9. What does the PR interval represent?
a. What is the normal duration?
10. What does the QRS complex represent?
a. What is the normal duration?
11. What does the ST segment represent?
12. What do T waves represent?
13. What does the ST interval represent?
14. What does the Q-T interval represent?
BI 232 Lab Survival Guide http://spot.pcc.edu/anatomy/lab.htm Fall 2008 90

Define these terms: 1. Normal Sinus Rhythm (NSR)
2. Sinus Tachycardia
3. Sinus Bradycardia Determining Rate:
When the rhythm is regular; the heart rate is 300 divided by the number of large squares between the QRS complexes.
For example, if there are 4 large squares between regular QRS complexes, the heart rate is 75 (300/4=75). Find an R wave on a heavy black line. If the next R wave lands on the next heavy black line to the right, then the HR is 300 beats / minute. If the next R wave lands on the 2nd black line, then the HR is 150 beats / minute. The subsequent black lines would show a heart rate of 100, 75, 60, and 50 beats / minute.
The second method can be used with an irregular rhythm to estimate the rate. Count the number of R waves in a 6 second strip and multiply by 10.
For example, if there are 7 R waves in a 6 second strip, the heart rate is 70 (7x10=70).
The third method (most accurate): 1500 ÷#small squares between R waves. Determine the rate for these EKGs:
#1 Rate:
#2 Rate: #3 Rate:
BI 232 Lab Survival Guide http://spot.pcc.edu/anatomy/lab.htm Fall 2008 91
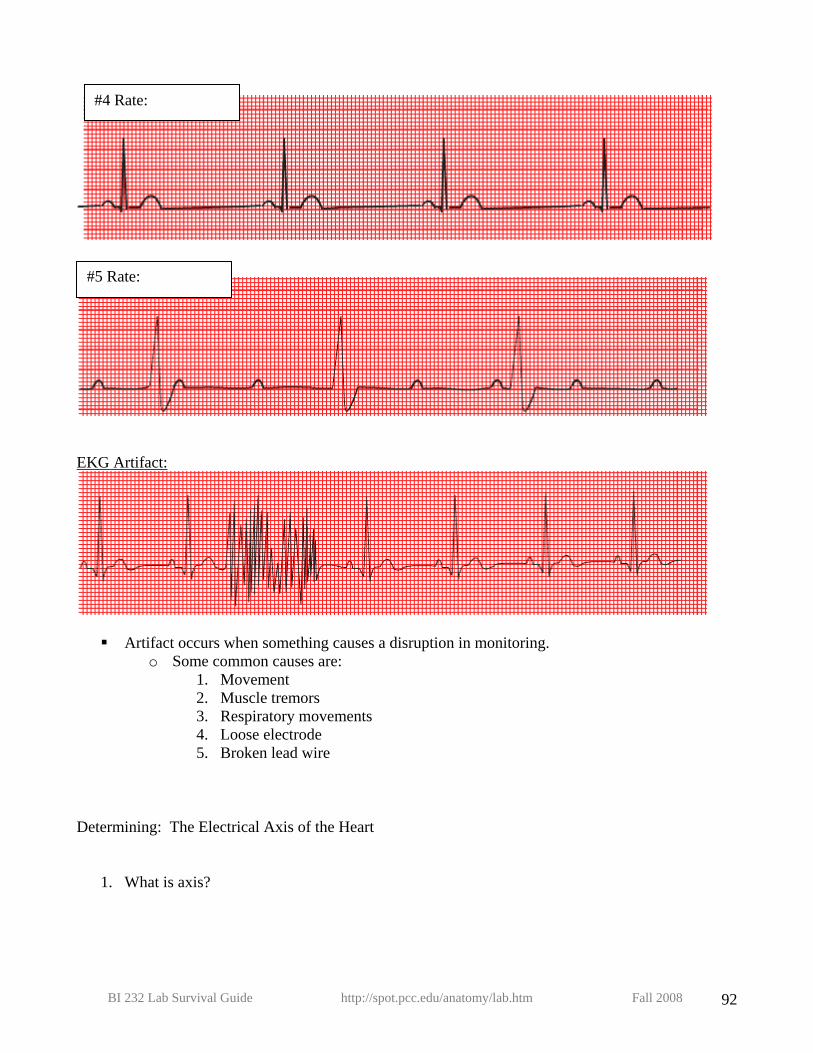
#4 Rate:
#5 Rate:
EKG Artifact:
Artifact occurs when something causes a disruption in monitoring. o Some common causes are:
1. Movement 2. Muscle tremors 3. Respiratory movements 4. Loose electrode 5. Broken lead wire
Determining: The Electrical Axis of the Heart
1. What is axis?
BI 232 Lab Survival Guide http://spot.pcc.edu/anatomy/lab.htm Fall 2008 92
2. What is a vector?
3. Name 2 disease processes that can change the average direction of the vector, and give a brief description of how they would change the direction.
4. What direction does the average vector in a normal heart point?
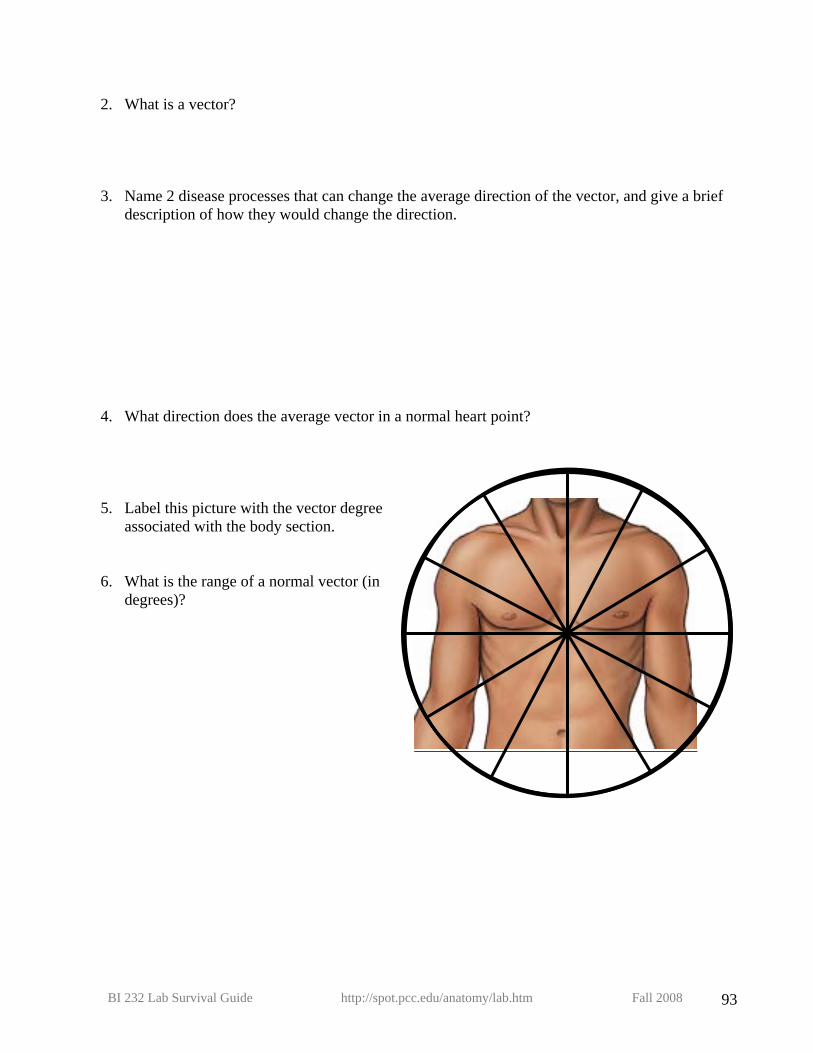
5. Label this picture with the vector degree associated with the body section.
6. What is the range of a normal vector (in degrees)?
BI 232 Lab Survival Guide http://spot.pcc.edu/anatomy/lab.htm Fall 2008 93
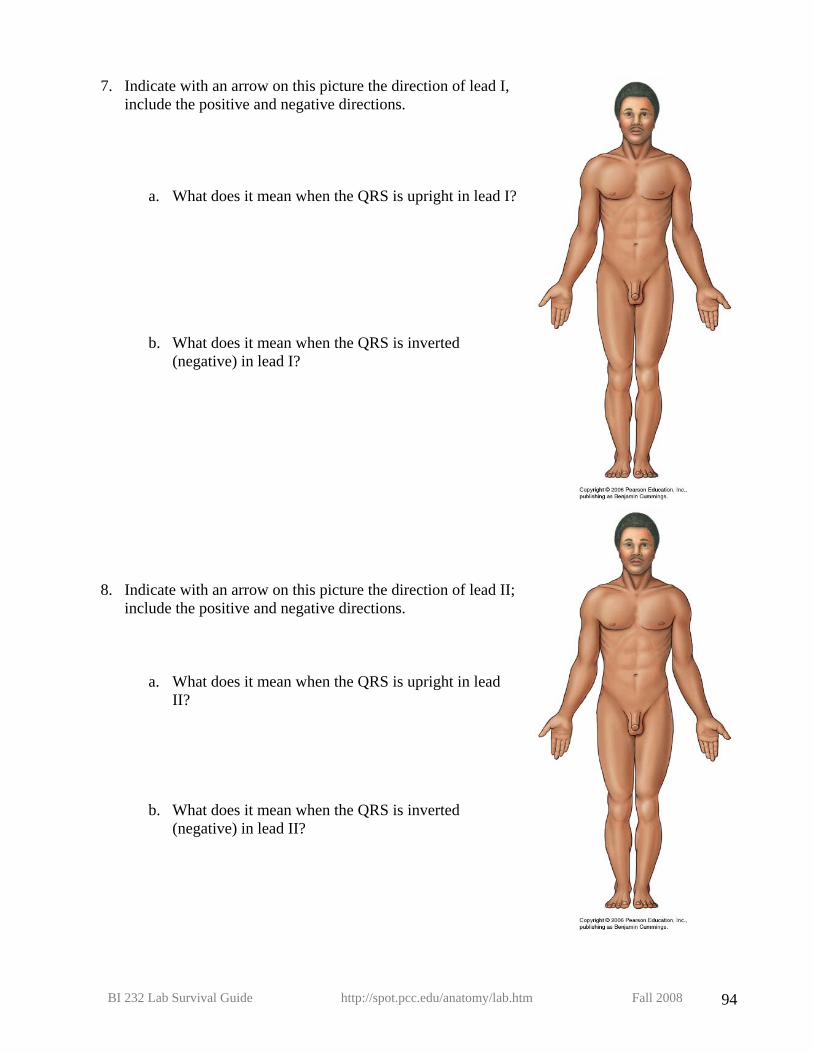
7. Indicate with an arrow on this picture the direction of lead I, include the positive and negative directions.
a. What does it mean when the QRS is upright in lead I?
b. What does it mean when the QRS is inverted (negative) in lead I?
8. Indicate with an arrow on this picture the direction of lead II;
include the positive and negative directions.
a. What does it mean when the QRS is upright in lead II?
b. What does it mean when the QRS is inverted (negative) in lead II?
BI 232 Lab Survival Guide http://spot.pcc.edu/anatomy/lab.htm Fall 2008 94
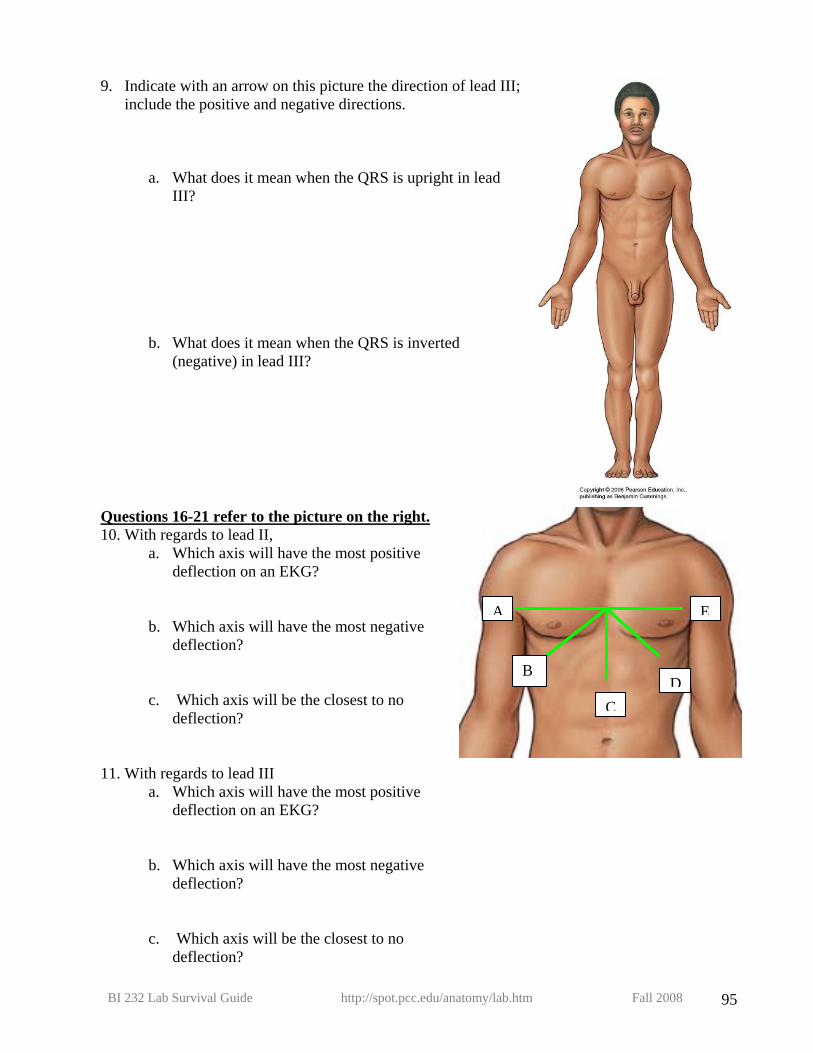
9. Indicate with an arrow on this picture the direction of lead III; include the positive and negative directions.
a. What does it mean when the QRS is upright in lead III?
b. What does it mean when the QRS is inverted (negative) in lead III?
Questions 16-21 refer to the picture on the right. 10. With regards to lead II,
a. Which axis will have the most positive deflection on an EKG?
b. Which axis will have the most negative deflection?
c. Which axis will be the closest to no deflection?
11. With regards to lead III a. Which axis will have the most positive
deflection on an EKG?
b. Which axis will have the most negative deflection?
c. Which axis will be the closest to no deflection?
EA
B D
C
BI 232 Lab Survival Guide http://spot.pcc.edu/anatomy/lab.htm Fall 2008 95
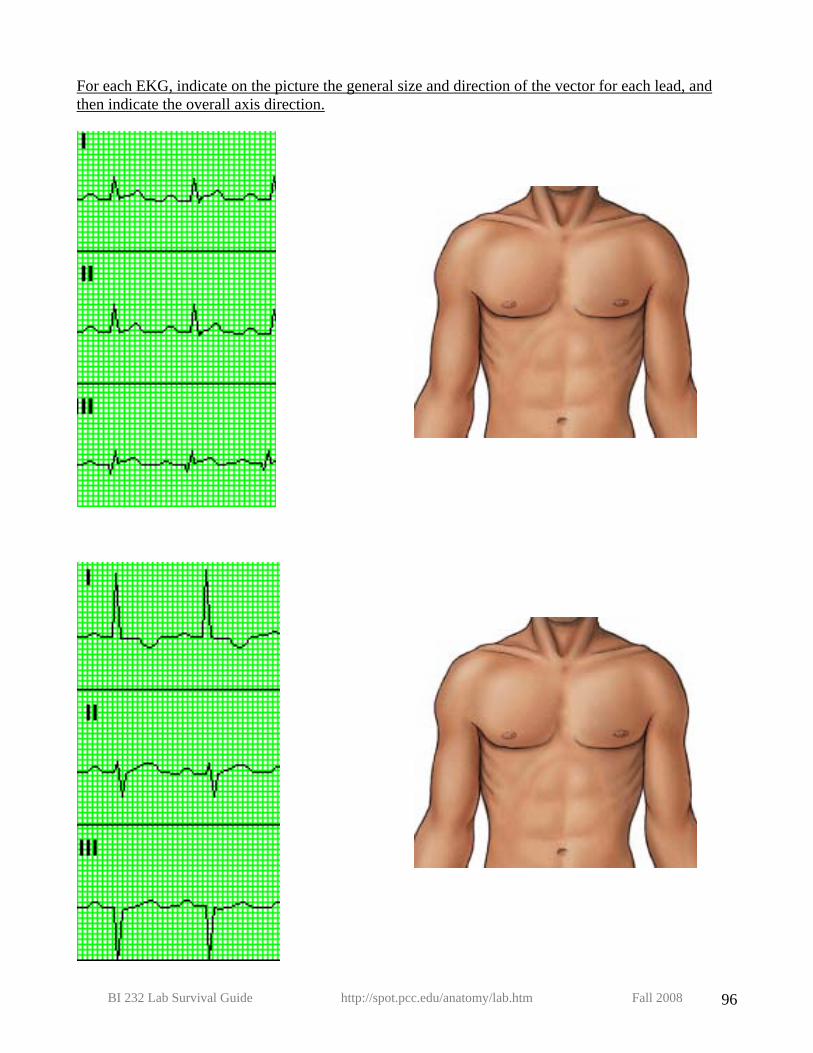
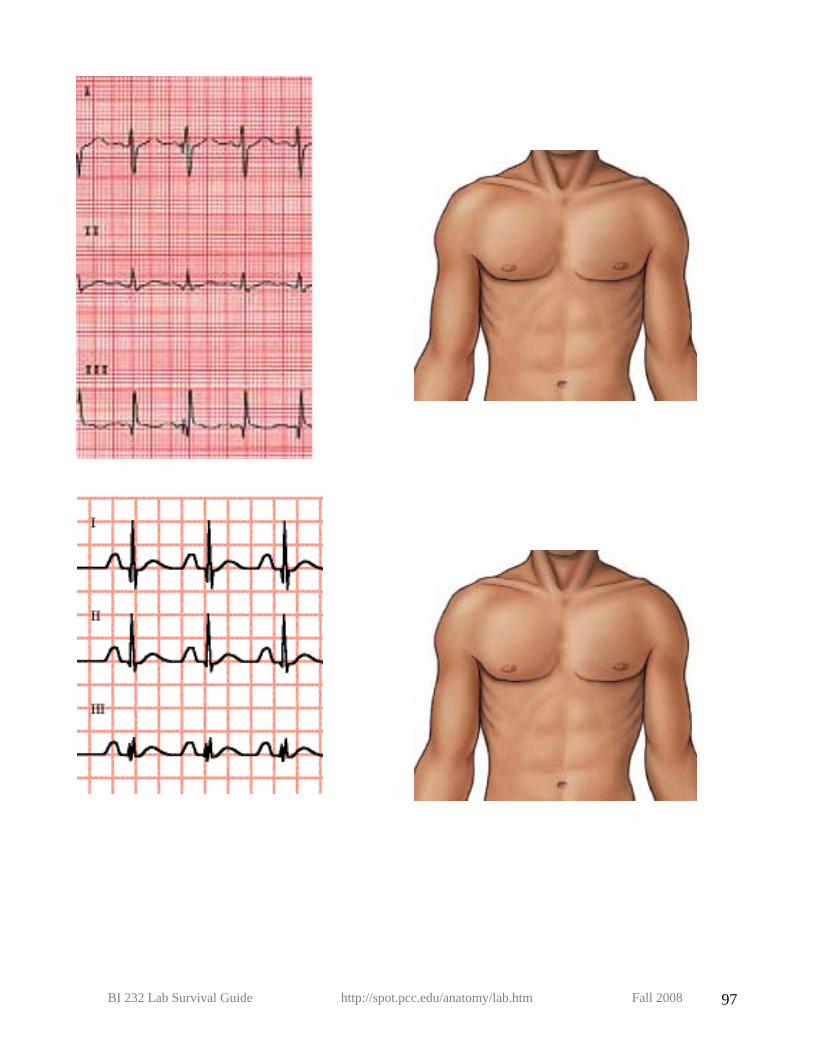
For each EKG, indicate on the picture the general size and direction of the vector for each lead, and then indicate the overall axis direction.
BI 232 Lab Survival Guide http://spot.pcc.edu/anatomy/lab.htm Fall 2008 96
BI 232 Lab Survival Guide http://spot.pcc.edu/anatomy/lab.htm Fall 2008 97
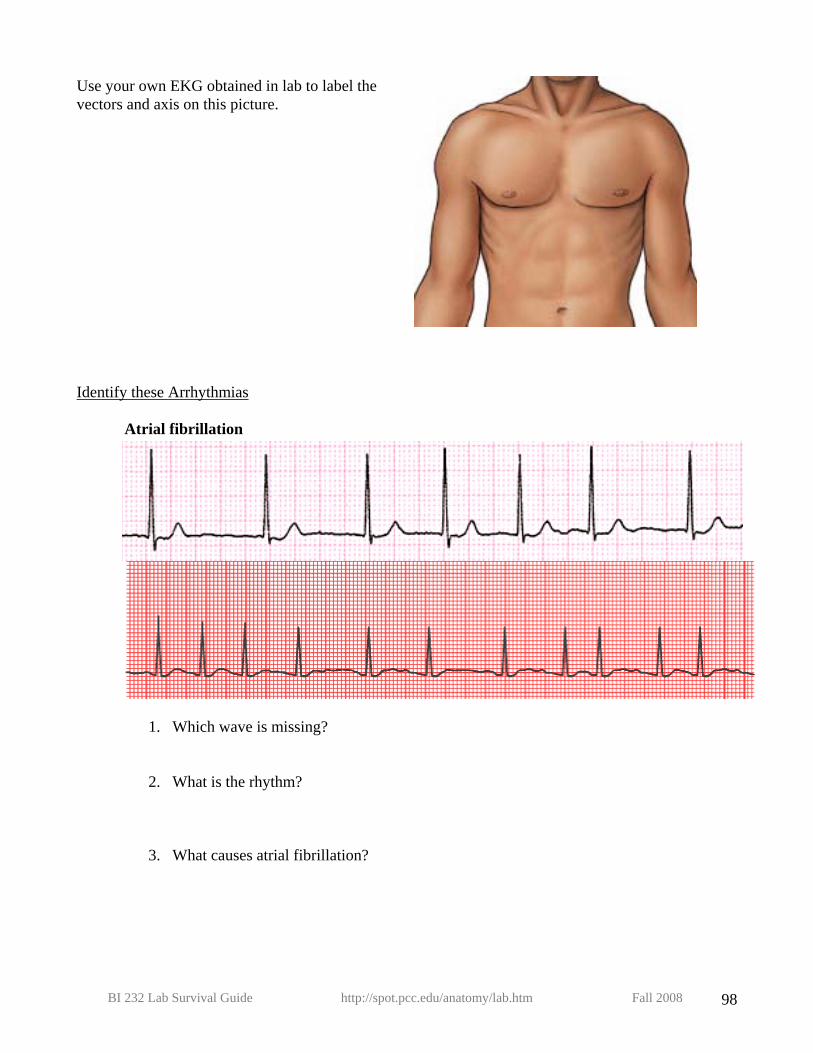
Use your own EKG obtained in lab to label the vectors and axis on this picture.
Identify these Arrhythmias
Atrial fibrillation
1. Which wave is missing?
2. What is the rhythm?
3. What causes atrial fibrillation?
BI 232 Lab Survival Guide http://spot.pcc.edu/anatomy/lab.htm Fall 2008 98
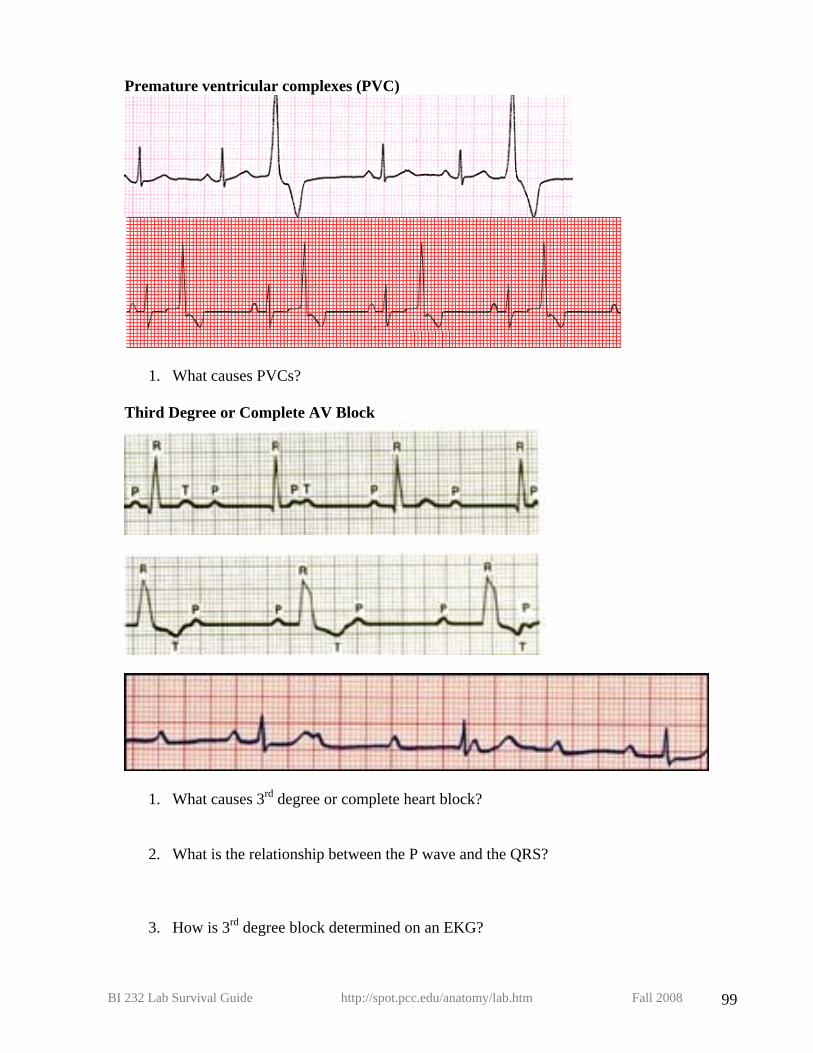
Premature ventricular complexes (PVC)
1. What causes PVCs?
Third Degree or Complete AV Block
1. What causes 3rd degree or complete heart block?
2. What is the relationship between the P wave and the QRS?
3. How is 3rd degree block determined on an EKG?
BI 232 Lab Survival Guide http://spot.pcc.edu/anatomy/lab.htm Fall 2008 99
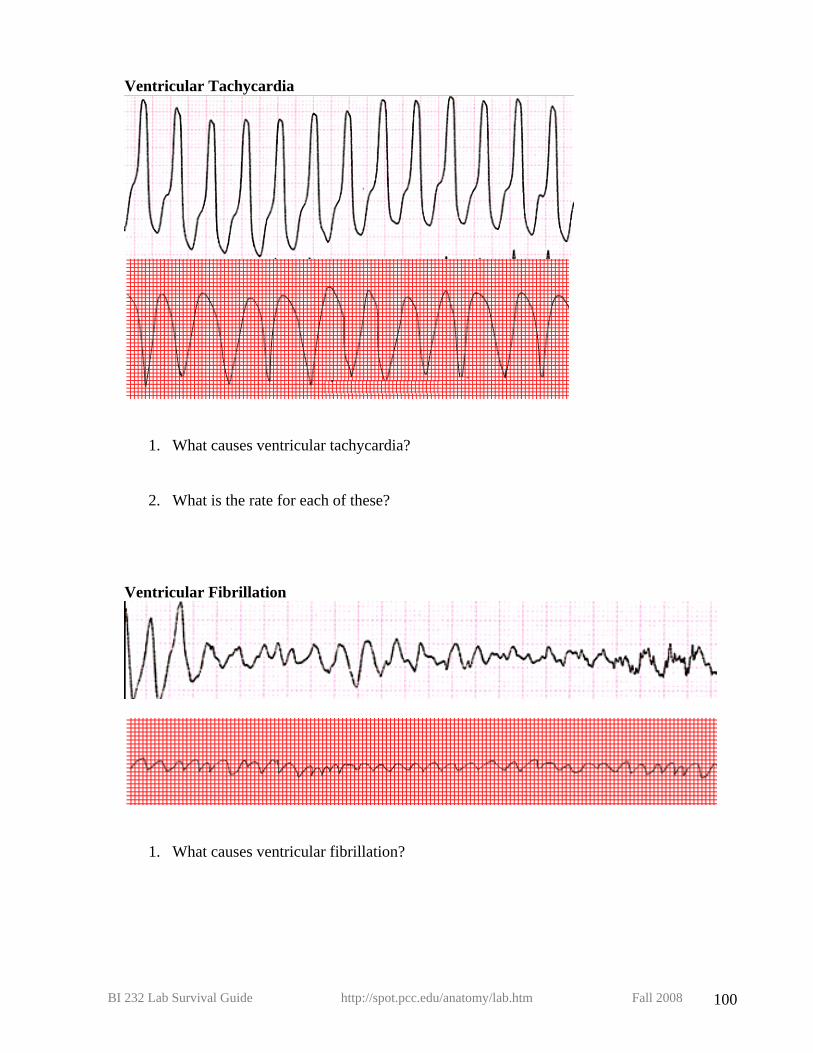
Ventricular Tachycardia
1. What causes ventricular tachycardia?
2. What is the rate for each of these? Ventricular Fibrillation
1. What causes ventricular fibrillation?
BI 232 Lab Survival Guide http://spot.pcc.edu/anatomy/lab.htm Fall 2008 100
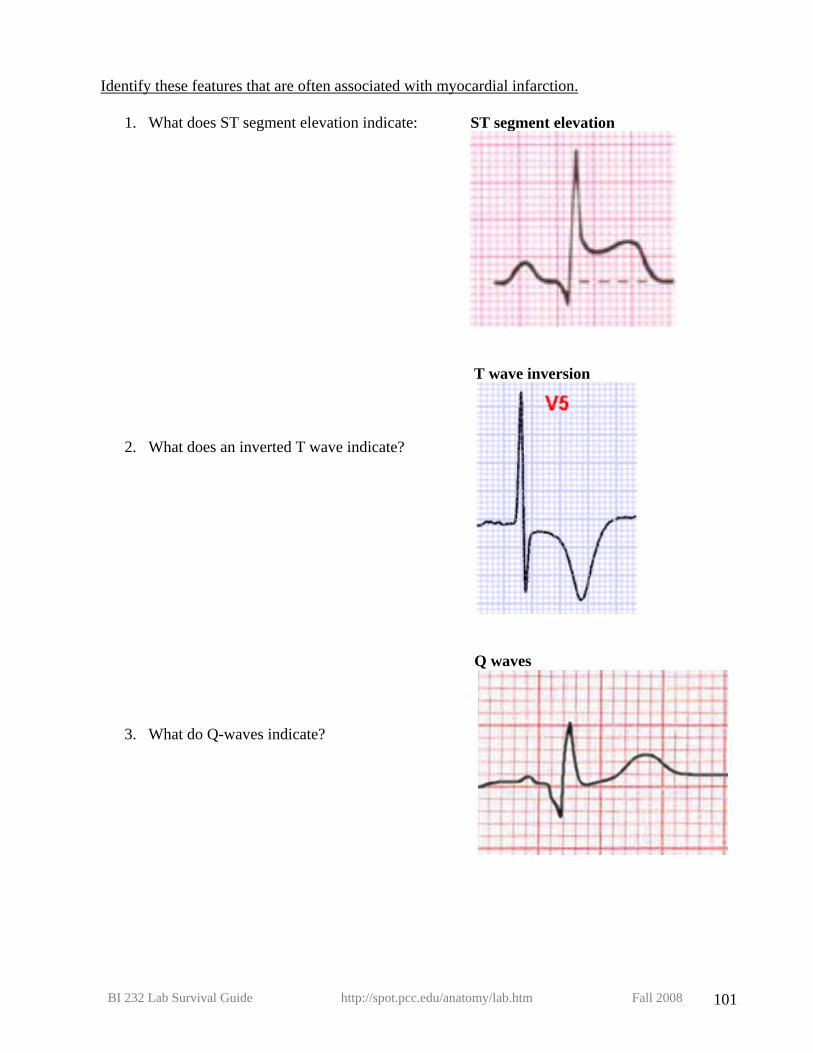
Identify these features that are often associated with myocardial infarction.
1. What does ST segment elevation indicate: ST segment elevation
2. What does an inverted T wave indicate?
T wave inversion
3. What do Q-waves indicate?
Q waves
BI 232 Lab Survival Guide http://spot.pcc.edu/anatomy/lab.htm Fall 2008 101
Lab Activity 25: Blood Vessels & Circulation Martini Chapter 21
Define these terms. Give examples where appropriate.
1. Artery
a. Elastic arteries
b. Muscular arteries
c. Arterioles
2. Capillary
a. Continuous
b. Fenestrated
c. Sinusoids
3. Vein
a. Venules
b. Medium-sized veins (valves)
c. Large veins
4. Vasa Vasorum
BI 232 Lab Survival Guide http://spot.pcc.edu/anatomy/lab.htm Fall 2008 102
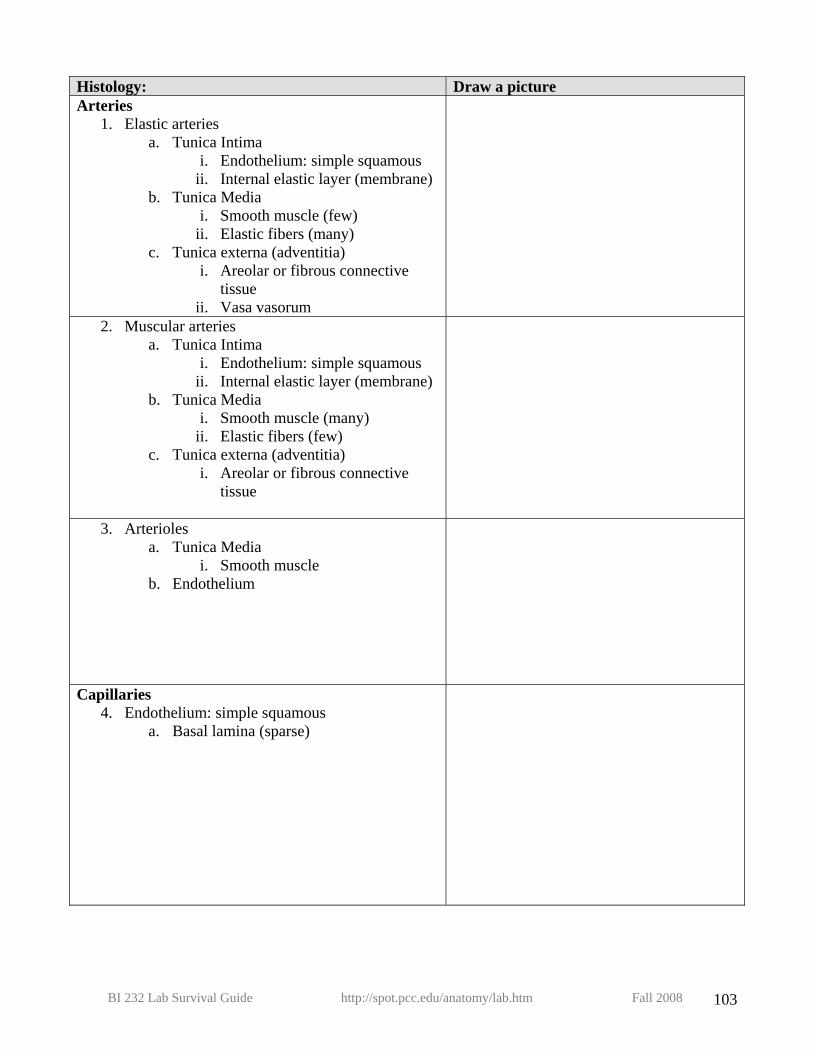
Histology: Draw a picture Arteries
1. Elastic arteries a. Tunica Intima
i. Endothelium: simple squamous ii. Internal elastic layer (membrane)
b. Tunica Media i. Smooth muscle (few)
ii. Elastic fibers (many) c. Tunica externa (adventitia)
i. Areolar or fibrous connective tissue
ii. Vasa vasorum
2. Muscular arteries a. Tunica Intima
i. Endothelium: simple squamous ii. Internal elastic layer (membrane)
b. Tunica Media i. Smooth muscle (many)
ii. Elastic fibers (few) c. Tunica externa (adventitia)
i. Areolar or fibrous connective tissue
3. Arterioles a. Tunica Media
i. Smooth muscle b. Endothelium
Capillaries 4. Endothelium: simple squamous
a. Basal lamina (sparse)
BI 232 Lab Survival Guide http://spot.pcc.edu/anatomy/lab.htm Fall 2008 103
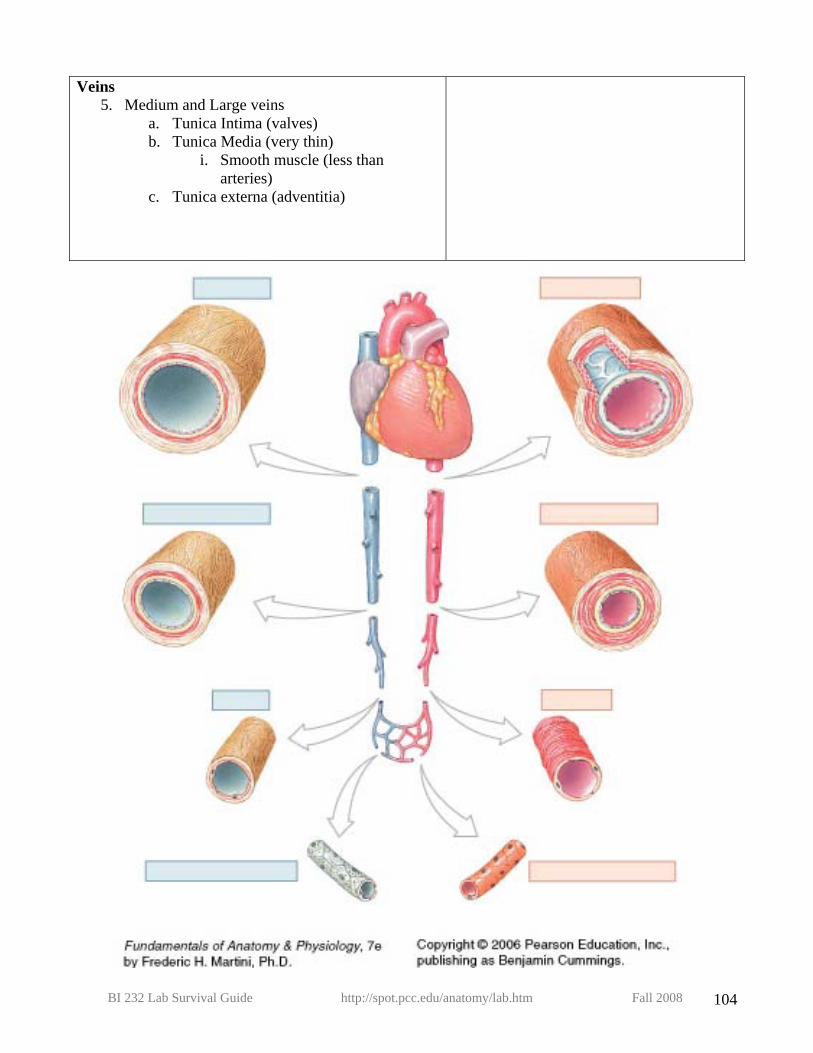
Veins 5. Medium and Large veins
a. Tunica Intima (valves) b. Tunica Media (very thin)
i. Smooth muscle (less than arteries)
c. Tunica externa (adventitia)
BI 232 Lab Survival Guide http://spot.pcc.edu/anatomy/lab.htm Fall 2008 104
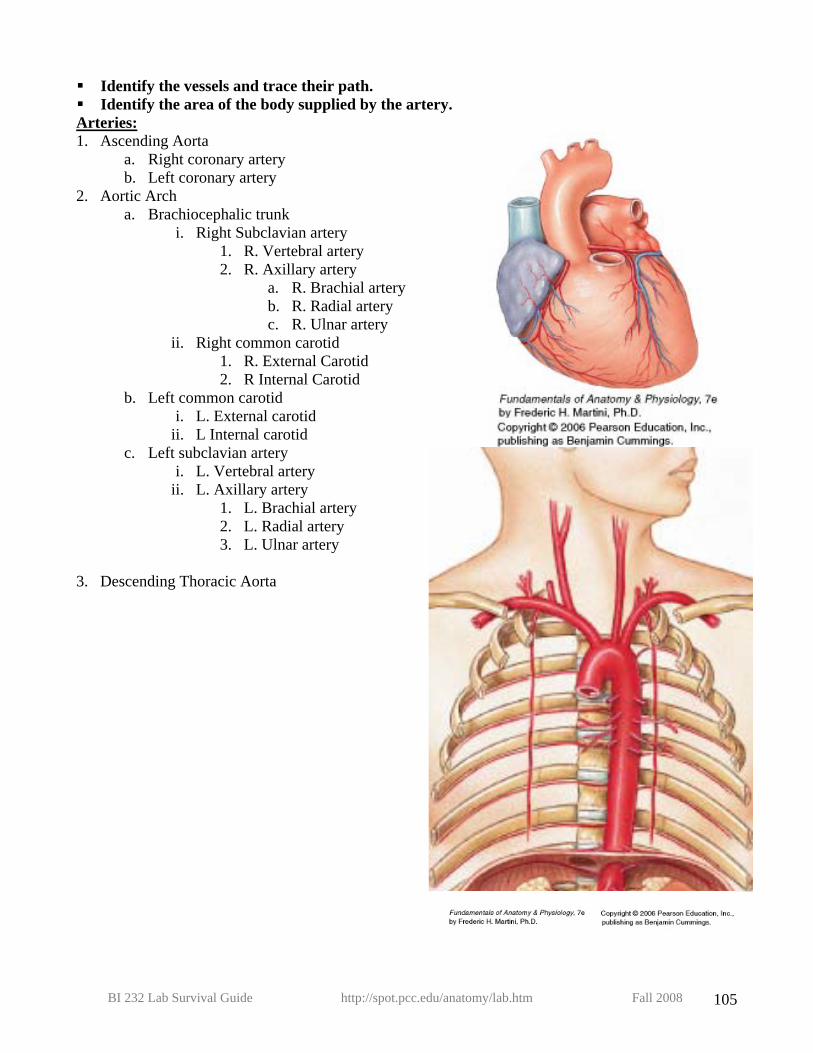
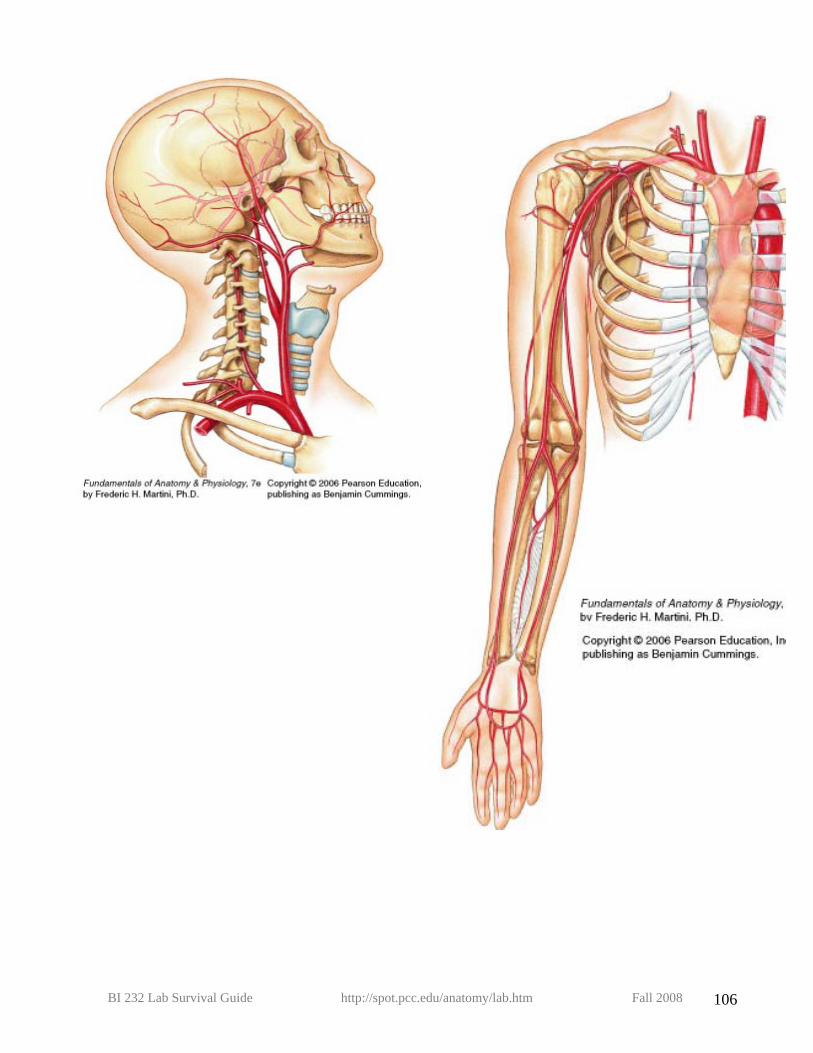
Identify the vessels and trace their path. Identify the area of the body supplied by the artery.
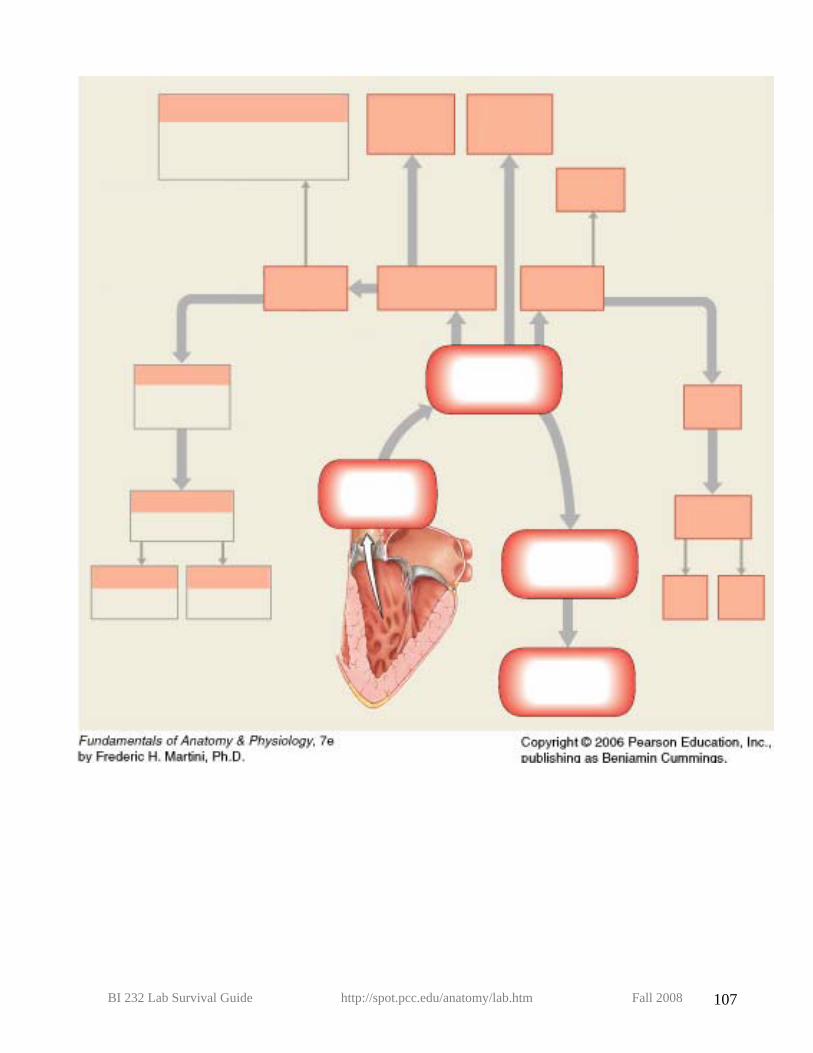
Arteries: 1. Ascending Aorta
a. Right coronary artery b. Left coronary artery
2. Aortic Arch a. Brachiocephalic trunk
i. Right Subclavian artery 1. R. Vertebral artery 2. R. Axillary artery
a. R. Brachial artery b. R. Radial artery c. R. Ulnar artery
ii. Right common carotid 1. R. External Carotid 2. R Internal Carotid
b. Left common carotid i. L. External carotid
ii. L Internal carotid c. Left subclavian artery
i. L. Vertebral artery ii. L. Axillary artery
1. L. Brachial artery 2. L. Radial artery 3. L. Ulnar artery
3. Descending Thoracic Aorta
BI 232 Lab Survival Guide http://spot.pcc.edu/anatomy/lab.htm Fall 2008 105
BI 232 Lab Survival Guide http://spot.pcc.edu/anatomy/lab.htm Fall 2008 106
BI 232 Lab Survival Guide http://spot.pcc.edu/anatomy/lab.htm Fall 2008 107
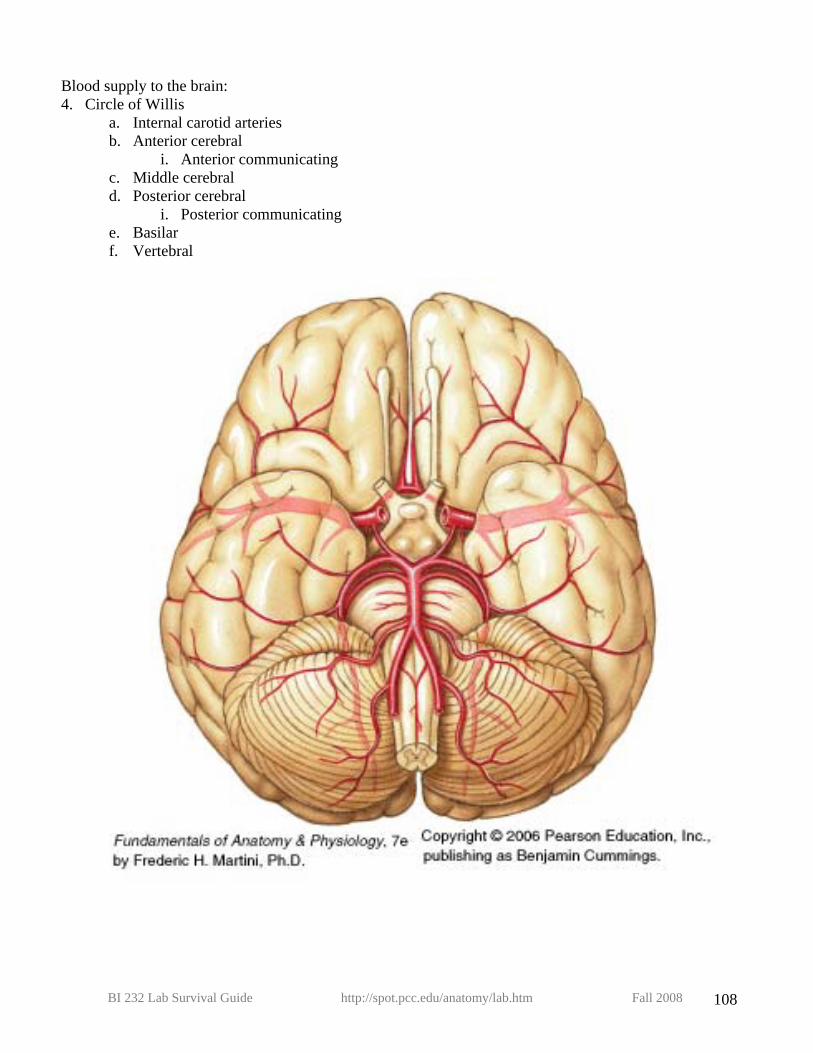
Blood supply to the brain: 4. Circle of Willis
a. Internal carotid arteries b. Anterior cerebral
i. Anterior communicating c. Middle cerebral d. Posterior cerebral
i. Posterior communicating e. Basilar f. Vertebral
BI 232 Lab Survival Guide http://spot.pcc.edu/anatomy/lab.htm Fall 2008 108
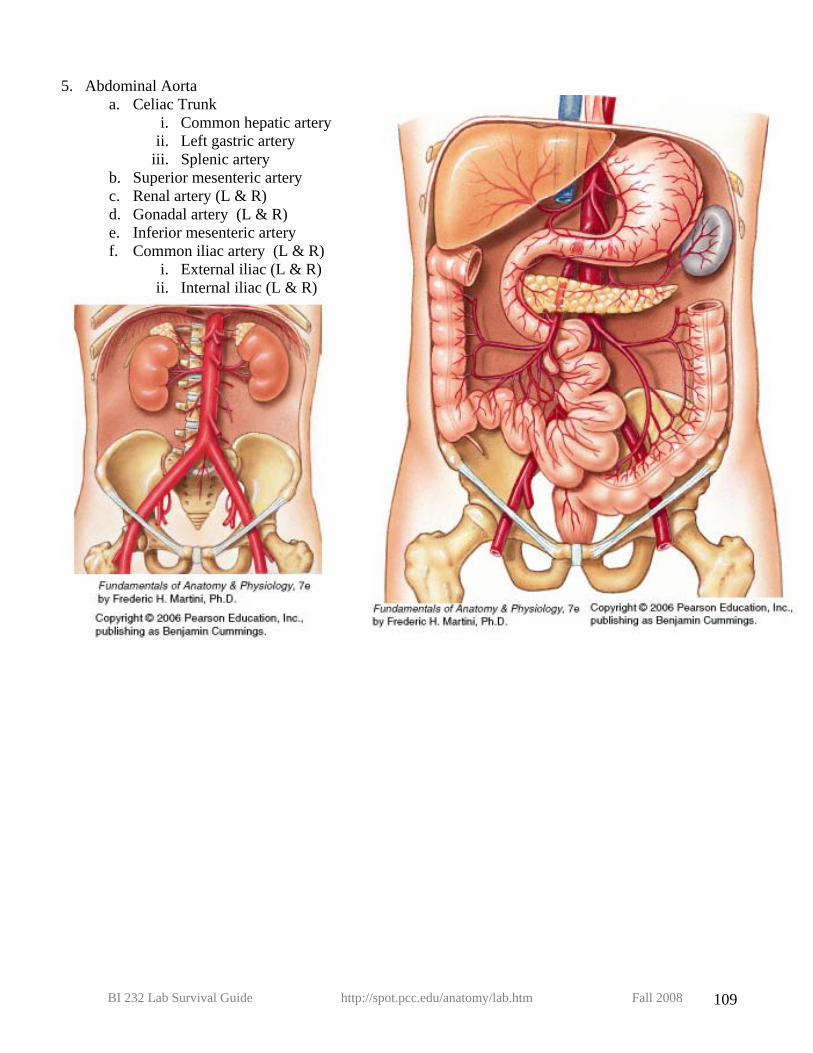
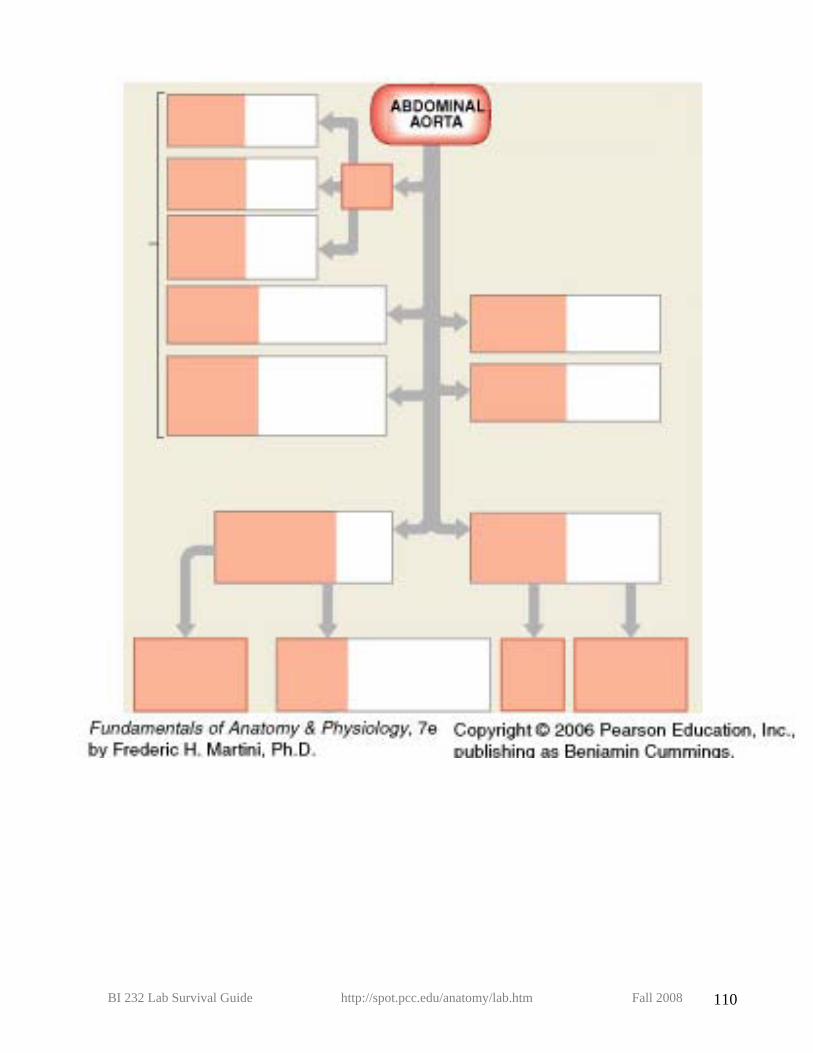
5. Abdominal Aorta a. Celiac Trunk
i. Common hepatic artery ii. Left gastric artery
iii. Splenic artery b. Superior mesenteric artery c. Renal artery (L & R) d. Gonadal artery (L & R) e. Inferior mesenteric artery f. Common iliac artery (L & R)
i. External iliac (L & R) ii. Internal iliac (L & R)
BI 232 Lab Survival Guide http://spot.pcc.edu/anatomy/lab.htm Fall 2008 109
BI 232 Lab Survival Guide http://spot.pcc.edu/anatomy/lab.htm Fall 2008 110
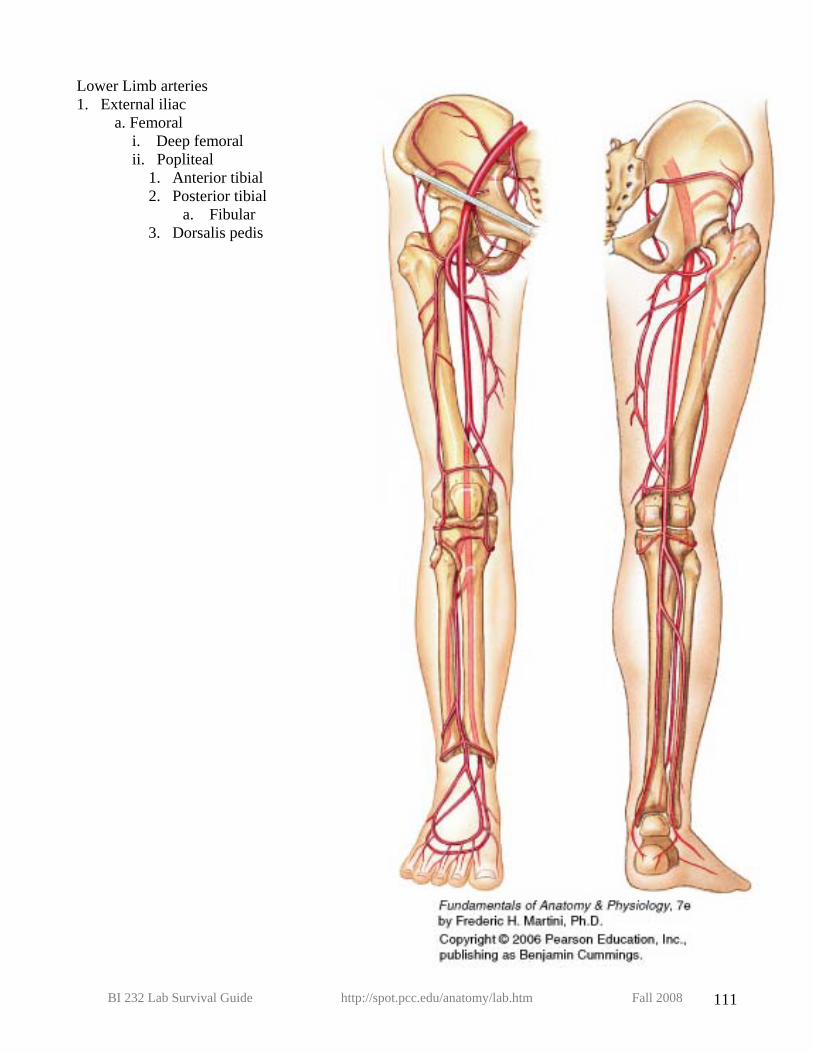
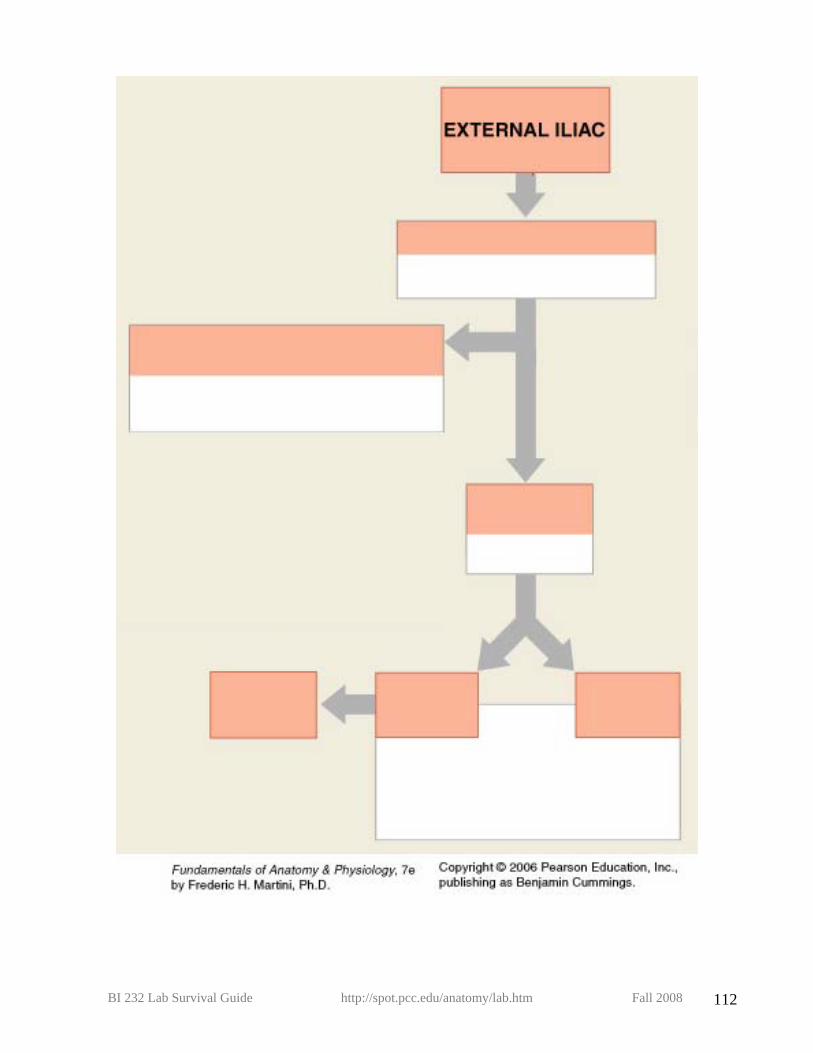
Lower Limb arteries 1. External iliac
a. Femoral i. Deep femoral ii. Popliteal
1. Anterior tibial 2. Posterior tibial
a. Fibular 3. Dorsalis pedis
BI 232 Lab Survival Guide http://spot.pcc.edu/anatomy/lab.htm Fall 2008 111
BI 232 Lab Survival Guide http://spot.pcc.edu/anatomy/lab.htm Fall 2008 112
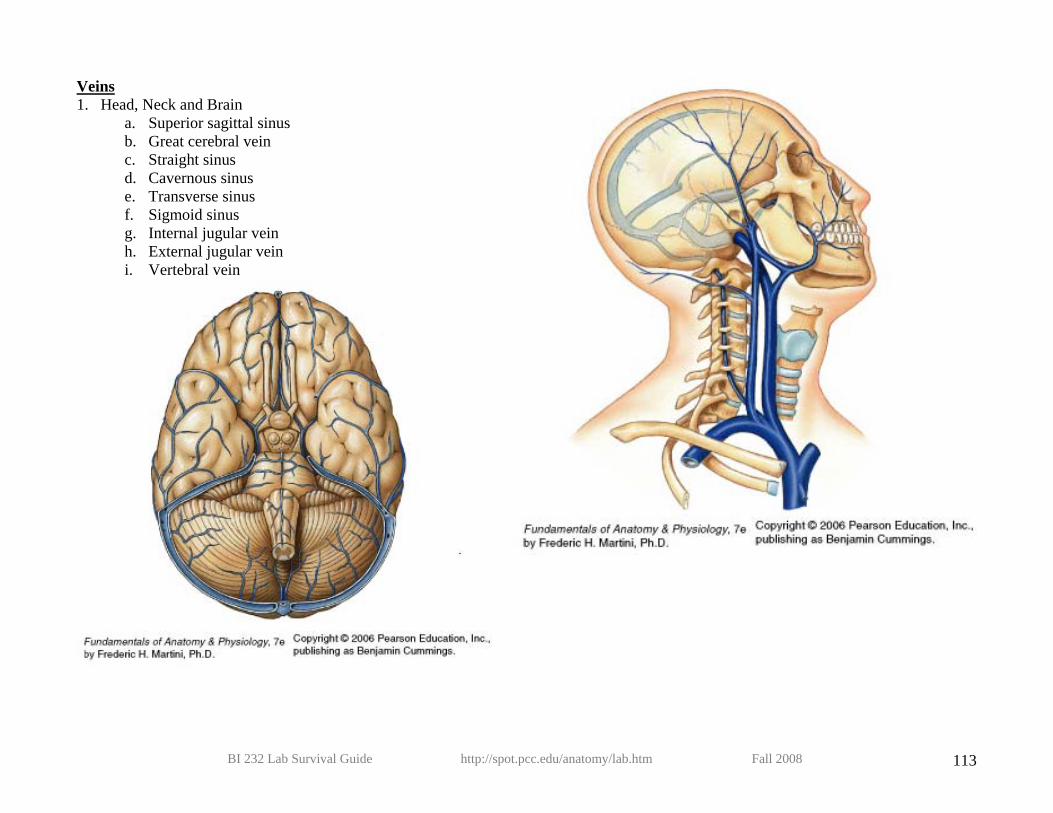
Veins 1. Head, Neck and Brain
a. Superior sagittal sinus b. Great cerebral vein c. Straight sinus d. Cavernous sinus e. Transverse sinus f. Sigmoid sinus g. Internal jugular vein h. External jugular vein i. Vertebral vein
BI 232 Lab Survival Guide http://spot.pcc.edu/anatomy/lab.htm Fall 2008 113

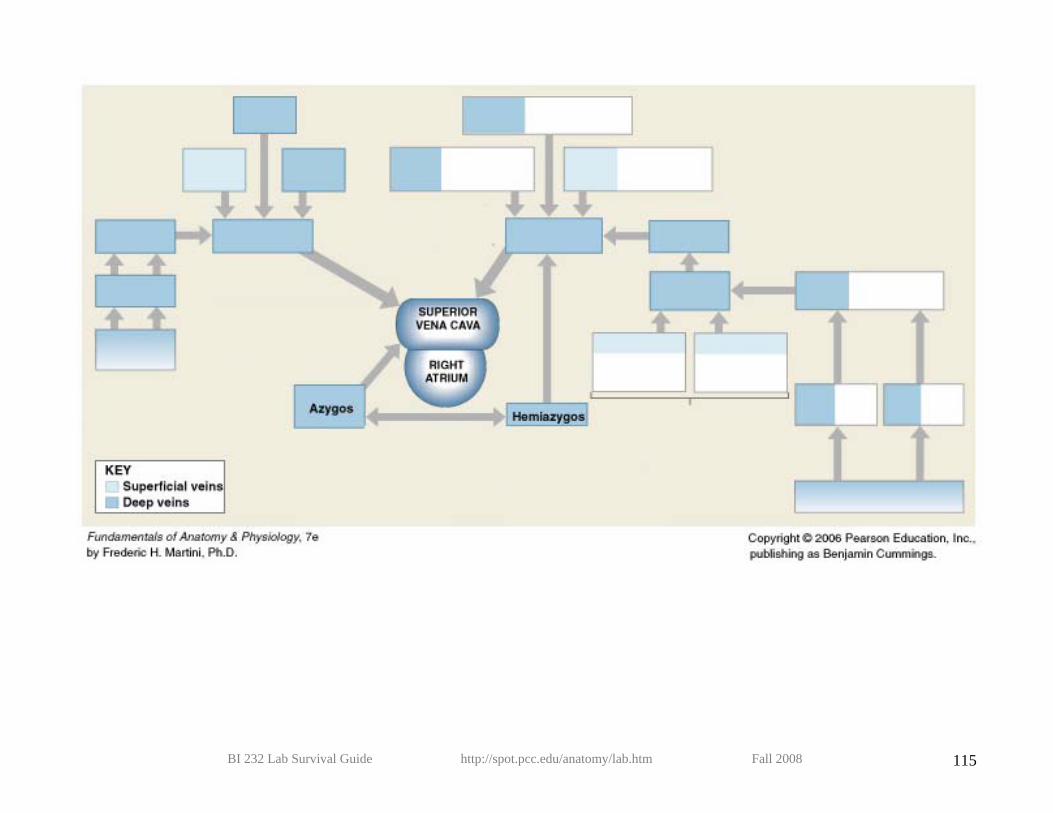
2. Superior Vena Cava
a. R & L brachiocephalic vein i. Subclavian vein
1. Axillary vein a. Basilic vein b. Cephalic vein
(arm) i. Median
cubital vein 2. Brachial vein
a. Radial vein b. Ulnar vein
ii. External jugular iii. Vertebral vein iv. Internal jugular
b. Azygos vein c. Hemiazygos vein
BI 232 Lab Survival Guide http://spot.pcc.edu/anatomy/lab.htm Fall 2008 114
BI 232 Lab Survival Guide http://spot.pcc.edu/anatomy/lab.htm Fall 2008 115

3. Inferior vena cava a. Hepatic veins b. Renal vein c. R & L Common iliac vein
i. External iliac vein ii. Internal iliac vein
BI 232 Lab Survival Guide http://spot.pcc.edu/anatomy/lab.htm Fall 2008 116

4. Lower Limb Veins a. External Iliac vein
i. Femoral 1. Deep femoral vein 2. Great saphenous vein 3. Small saphenous vein 4. Popliteal vein
a. Fibular vein b. Posterior tibial vein c. Anterior tibial vein
BI 232 Lab Survival Guide http://spot.pcc.edu/anatomy/lab.htm Fall 2008 117
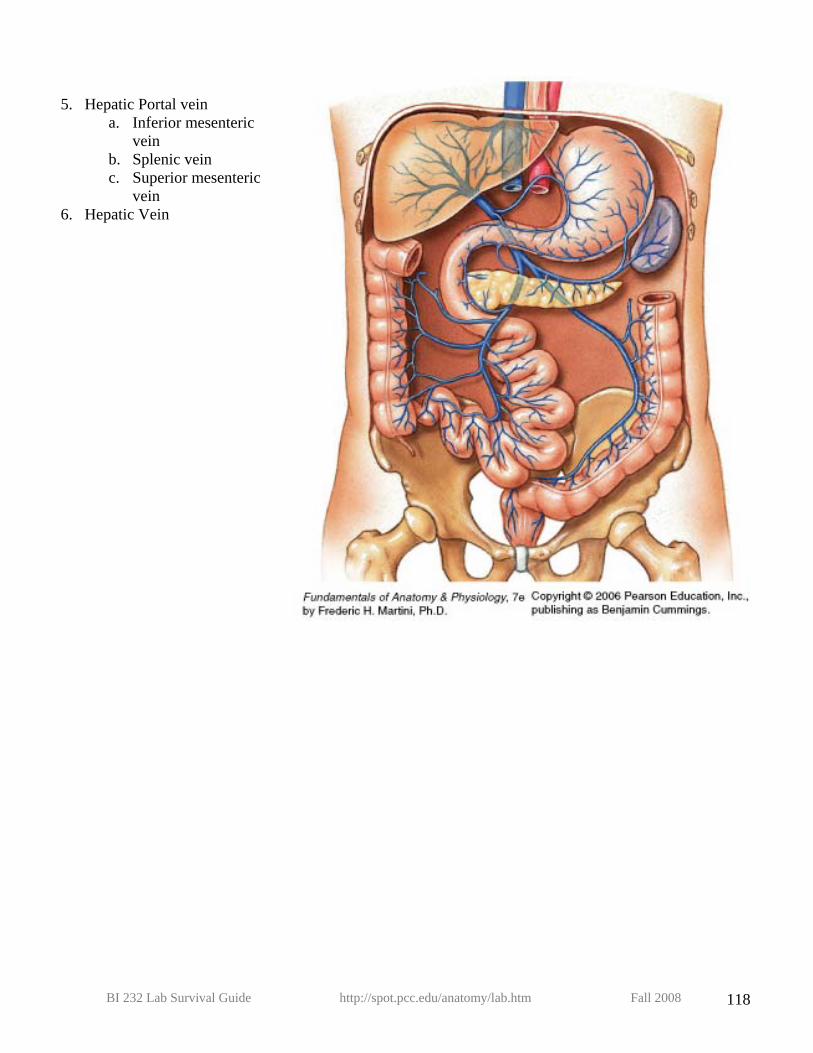
5. Hepatic Portal vein
a. Inferior mesenteric vein
b. Splenic vein c. Superior mesenteric
vein 6. Hepatic Vein
BI 232 Lab Survival Guide http://spot.pcc.edu/anatomy/lab.htm Fall 2008 118
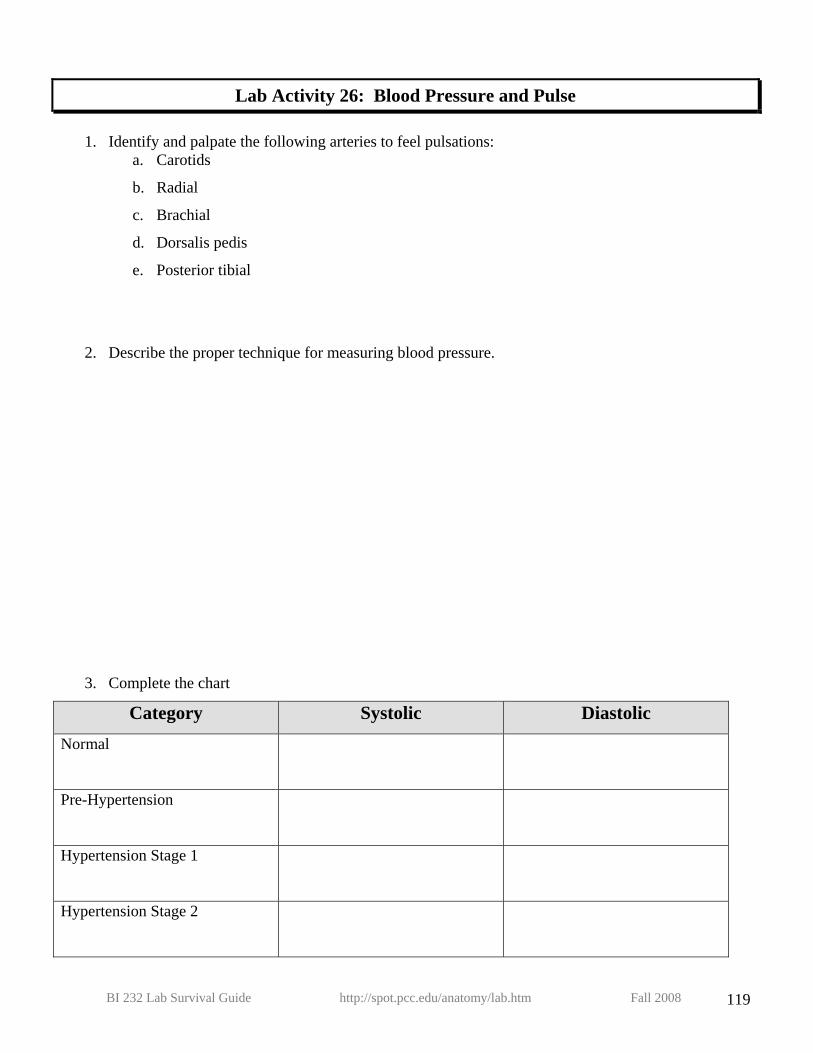
Lab Activity 26: Blood Pressure and Pulse
1. Identify and palpate the following arteries to feel pulsations: a. Carotids
b. Radial
c. Brachial
d. Dorsalis pedis
e. Posterior tibial
2. Describe the proper technique for measuring blood pressure.
3. Complete the chart
Category Systolic Diastolic Normal
Pre-Hypertension
Hypertension Stage 1
Hypertension Stage 2
BI 232 Lab Survival Guide http://spot.pcc.edu/anatomy/lab.htm Fall 2008 119
BI 232 Lab Survival Guide http://spot.pcc.edu/anatomy/lab.htm Fall 2008 120
4. What is hypotension?
5. What is orthostatic hypotension?
i. Describe how to take these measurements.
6. Give the diagnosis for these blood pressure measurements; assuming the person is otherwise
healthy.
a. 118/70
b. 125/60
c. 140/60
d. 110/85
e. 140/80
f. 160/90
g. 150/100
h. 120/95
i. 140/95
j. 80/40