Embed Size (px)
Citation preview

PDHonline Course C557 (2 PDH)
An Introduction to Repair of Rigid Pavements
2012
Instructor: J. Paul Guyer, P.E., R.A., Fellow ASCE, Fellow AEI
PDH Online | PDH Center5272 Meadow Estates Drive
Fairfax, VA 22030-6658Phone & Fax: 703-988-0088
www.PDHonline.orgwww.PDHcenter.com
An Approved Continuing Education Provider
www.PDHcenter.com PDHonline Course C557 www.PDHonline.org
© J. Paul Guyer 2012 Page 2 of 27
An Introduction to Repair of Rigid Pavements
J. Paul Guyer, P.E., R.A., Fellow ASCE, Fellow AEI
CONTENTS
1. PURPOSE 2. DEFINITIONS 3. GENERAL PROVISIONS
4. APPROVED EPOXY MATERIALS 5. APPLICATIONS
6. EFFECTIVE TEMPERATURE AND CONDITIONING 7. AGGREGATES FOR EPOXY RESIN CONCRETES AND MORTARS 8. SAMPLING AND TESTING EPOXY RESINS
9. TRIAL BATCHES 10. FIELD MIXING AND BATCH SIZE 11. PROCEDURES FOR CONDITIONS 1 AND 2 12. PROCEDURE FOR CONDITION 3 13. PROCEDURE FOR CONDITION 4
14. PROCEDURE FOR CONDITION 5
15. PROCEDURE FOR CONDITION 6 16. PROCEDURE FOR CONDITION 7 17. PROTECTION OF REPAIRED AREAS FROM WEATHER AND TRAFFIC 18. CLEANING OF EQUIPMENT AND TOOLS 19. SAFETY AND HEALTH PRECAUTIONS
This course is adapted from the Unified Facilities Criteria of the United States government, which is in the public domain, is authorized for unlimited distribution, and is not copyrighted.

www.PDHcenter.com PDHonline Course C557 www.PDHonline.org
© J. Paul Guyer 2012 Page 3 of 27
1. PURPOSE.
This Course presents an introduction to materials, criteria, and procedures for rapid
repair of uncontrolled cracks and spalls in rigid pavements by using epoxy resin grouts,
mortars, and concretes. This guidance is applicable to the repair of rigid pavements on
roads and airfields.
2. DEFINITIONS. 2.1 EPOXY RESIN. The resin component of a thermosetting polymer which contains
epoxy groups principally responsible for its polymerization.
2.2 EPOXY RESIN SYSTEM. The product resulting from the combination of all the
components supplied for use as an epoxy resin system.
2.3 BINDER. The cementitious part of a grout, mortar, or concrete that binds the
aggregate or filler into a cohesive mass.
2.4 COMPONENT. A constituent that is intended to be combined with one or more
other constituents to form the epoxy resin system.
2.5 FILLER. A finely divided solid, predominantly passing the No. 200 sieve, that is
used to improve certain properties of the epoxy resin system or to reduce cost.
2.6 EPOXY RESIN GROUT. The product obtained by combining a filler with the epoxy
resin system. The filler and the epoxy resin system are obtained from the formulator.
2.7 EPOXY RESIN MORTAR. The product obtained by combining a fine aggregate
with the epoxy resin system.
www.PDHcenter.com PDHonline Course C557 www.PDHonline.org
© J. Paul Guyer 2012 Page 4 of 27
2.8 EPOXY RESIN CONCRETE. The product obtained by combining both fine and
coarse aggregate with the epoxy resin system.
3. GENERAL PROVISIONS.
Expedient methods of repairing uncontrolled cracks and spalls in rigid pavements are
often required to minimize the time a pavement is closed to traffic. Approved epoxy
resins, described herein, provide binding agents particularly suitable for use in this type
of work where a high degree of bond in a short period of time is needed. The high
strengths obtainable in a short curing time usually permit regular traffic on the
pavements within 24 to 48 hours after the repair, depending upon temperature
conditions. The epoxy resins specified react most favorably when air and surface
temperatures are in the range of 70 degrees F to 100 degrees F, but satisfactory results
can be obtained at temperatures as low as 40 degrees F, if proper conditions are
provided as described herein. Generally pavement repairs with epoxy materials shall
not be initiated unless the air and pavement temperatures are above 40 degrees F and
rising. Class A epoxy resin shall be used if the temperature is below 40 degrees F.
4. APPROVED EPOXY MATERIALS. Many epoxy resins for repairing rigid pavement are available under a variety of trade
names. Selection of the proper epoxy resin is required to obtain satisfactory results for
the work described in this manual. Epoxy resins shall conform to the American Society
for Testing and Materials (ASTM) C 881. This ASTM specification designates three
types, grades, and classes of epoxy resins. Type I is used to bond hardened concrete
and other materials to hardened concrete; Type II is used to bond freshly mixed
concrete to hardened concrete; Type III is used to bond skid-resistant materials to
hardened concrete, and as a binder in epoxy resin mortars or epoxy resin concretes. A
bond strength of 1,400 pounds per square inch (psi) shall be used for Type III in lieu of
the 300 psi shown in Table 1 of ASTM C 881. The three grades are defined according
to viscosity: Grade 1-low viscosity, Grade 2-medium viscosity, Grade 3-nonsagging

www.PDHcenter.com PDHonline Course C557 www.PDHonline.org
© J. Paul Guyer 2012 Page 5 of 27
consistency or high viscosity. Grade 3 is used primarily on vertical faces. The three
classes are defined according to the range of temperatures for which they are suitable:
Class A for use below 40 degrees F, Class B for use between 40 and 60 degrees F, and
Class C for use above 60 degrees F.
5. APPLICATIONS.
The general applications or intended uses of the materials are as follows:
5.1 TYPE I. Used for cementing dowels in drilled and preformed holes and for pressure
grouting of nonworking cracks. Grade 1 shall be used for pressure grouting.
5.2 TYPE II. Used as the adhesive for bonding freshly mixed portland cement concrete
(PCC) to hardened PCC. Grade 2 is preferred, but Grade 1 can be used.
5.3 TYPE III. Used as a binder in epoxy resin mortars or epoxy resin concretes for
repairing spalls and for filling nonworking joints.
6. EFFECTIVE TEMPERATURE AND CONDITIONING.
6.1 PAVEMENTS. Three classes of epoxy resins are defined according to
temperature. If pavement and atmospheric temperatures are less than 70 degrees F
but not below 50 degrees F, satisfactory repairs can be obtained without creating an
artificial environment, provided the slightly increased cure time can be tolerated. The
artificial environment can be a suitable temporary structure designed to provide the
minimum specified temperature for repairs. If seasonal air temperatures are above 90
degrees F, repairs should be scheduled in early morning or the areas should be
protected from direct sunlight prior to initiating repair operations. High air temperature
(90 degrees F and above) will decrease the working time for placement of epoxy resin
mortars and epoxy resin concretes. When pavement temperatures are less than 50
degrees F, infrared heat lamps or other suitable heat sources should be placed over the

www.PDHcenter.com PDHonline Course C557 www.PDHonline.org
© J. Paul Guyer 2012 Page 6 of 27
area to be repaired for approximately 3 hours prior to placement operations. Gentle
winds can make the heat lamps ineffective; therefore, temporary windbreaks should be
used as necessary. The raising of the pavement temperature by the use of heat lamps
reduces the heat loss into the pavement and permits a desirable moderate heat buildup
from the exothermic reaction which occurs when the two components of the epoxy
system are combined. Although a satisfactory repair can be obtained if this moderate
heat buildup does not occur, the lack of moderate heat buildup may prolong a
satisfactory cure-out or hardening and thereby delay reopening to traffic. Similarly, the
cure-out or hardening period for epoxy resin concretes and mortars can be accelerated
during cool weather by the use of heated enclosures over the repaired area. The
method of attaining the desired air temperature in the enclosure must avoid creating
localized hot spots which may cause bubbling of the liquid epoxies and also induce
cracking. The best method for heating an enclosed area is to circulate heated air with
added precautions to ensure surface temperatures in the repaired areas do not exceed
100 degrees F during the hardening stage.
6.2 CONDITIONING OF AGGREGATES. In the preparation of epoxy resin concretes
and mortars, aggregates should be dry and conditioned to a temperature of 70 to 85
degrees F. The moisture content of the aggregates should not exceed 1.0 percent by
weight of the aggregates. The addition of epoxy material to cold aggregates will result in
increased viscosity and decreased stability of the mixture. Low temperatures of the final
mixture will be conducive to a reduced hardening rate. If the aggregates are too hot, the
epoxy-curing agent reaction will be accelerated, making placement and finishing difficult
and possibly resulting in cracking.
6.3 CONDITIONING OF EPOXY RESIN COMPONENTS. The viscosity of the two
components of an epoxy resin increases as temperatures decrease. In order to readily
obtain a homogeneous mixture of the two components, the materials should be
conditioned to 60 to 100 degrees F prior to mixing with a mechanical stirring device.
Although adequate uniformity of the mixture might be obtained at lower temperatures by
a prolonged mixing time when epoxy resin concretes or mortars are being prepared, an

www.PDHcenter.com PDHonline Course C557 www.PDHonline.org
© J. Paul Guyer 2012 Page 7 of 27
overly “rich” mixture (a mixture containing excess epoxy resin) could occur due to the
reduced wetting capability.
6.4 “TRIGGERING” CURING CHEMICAL REACTION. To expedite resumption of
traffic over a repair area for low pavement and atmospheric temperature conditions, the
early hardening rate of the epoxy binders can be appreciably accelerated. This may be
accomplished by warming the aggregates before the aggregates are added to the
epoxy resin. Aggregates may be warmed by storing in a heated building, by burners, or
by radiation. Care must be taken not to heat aggregates excessively because such
heating can limit the working life of the epoxy mortars and epoxy concretes. Aggregate
temperatures above 120 degrees F shall be avoided.
7. AGGREGATES FOR EPOXY RESIN CONCRETES AND MORTARS. 7.1 CONCRETES. The aggregates used for epoxy resin concretes should be clean,
dry, washed gravel or crushed stone, 3/8-inch or ½-inch maximum size, well graded
from coarse to fine, and of the same quality as those used for PCC and bituminous
mixtures. Fine aggregate and coarse aggregate of indicated sizes meeting the
requirements of ASTM C 33 should be specified for epoxy resin concrete mixtures.
7.2 MORTARS. The fine aggregate used for epoxy resin mortars is required to
conform to either ASTM C 144 or ASTM C 33. The aggregate should be well graded
from coarse to fine with a minimum amount of material passing the No. 100 sieve. The
maximum size required will depend on the intended use of the mortar. For example, in
the filling of saw kerfs, the normal width of the cut requires the use of an aggregate with
100 percent passing the No. 8 sieve. In general, for both epoxy resin concrete and
mortar, the maximum size aggregate should not exceed one-third of the thickness of the
layer being placed nor one-third of the width of the opening being filled.

www.PDHcenter.com PDHonline Course C557 www.PDHonline.org
© J. Paul Guyer 2012 Page 8 of 27
8. SAMPLING AND TESTING EPOXY RESINS.
All epoxy resins proposed for use should be tested for compliance with the
requirements of the applicable specification. The manufacturer*s certificates of
compliance with the requirements will not be accepted in lieu of tests for large jobs. If
epoxy resin concretes are to be used, samples of fine aggregate and coarse aggregate
should be submitted for testing. The contractor is required to supply the testing
laboratory the proportions of aggregate used by weight or volume.
9. TRIAL BATCHES. 9.1 EPOXY RESIN MORTARS AND EPOXY RESIN CONCRETES. Variations in
aggregate grading and particle shape may affect the proportions required to obtain an
economical mixture that has satisfactory placing and finishing characteristics.
Small laboratory trial batches shall be prepared and tested prior to the start of field
placement operations. The quantity of epoxy resin system prepared for use in these trial
batches should be at least 300 grams. The labels on the shipping containers will specify
the manufacturer’s recommended mixing proportions. A polyethylene container having a
hemispherical (convex) bottom should be used as the mixing vessel. The recommended
proportions of the two components are added to the mixing vessel and mixed until a
uniform mixture is obtained. The rate of stirring should be such that the amount of
entrapped air is minimized. Hand-mixing is usually unsatisfactory and a power-driven
(air or spark-proof), propeller-type blade should be used. The mixed epoxy resin system
must be uniform and homogeneous. Mixing may require 2 to 5 minutes depending on
the viscosity and density of the epoxy resin. Epoxy resin concrete proportions by weight
may vary from 6 to 10 parts aggregate to 1 part epoxy resin binder, which is equivalent
to a ratio of approximately 4 to 7 parts aggregate to 1 part epoxy resin binder by
volume. The aggregate mixture (fine and coarse aggregate) should contain 55 ± 5
percent fine aggregate by weight. The epoxy resin mortars may vary from 4 to 7 parts
aggregate by weight to 1 part epoxy resin binder, which is equivalent to a ratio of
approximately 3 to 5 parts aggregate to 1 part epoxy resin binder by volume. The
proportions suggested are applicable only to aggregates in the 2.60 to 2.80 specific

www.PDHcenter.com PDHonline Course C557 www.PDHonline.org
© J. Paul Guyer 2012 Page 9 of 27
gravity range. Aggregates having specific gravities above or below these values will
probably require adjustment of the suggested proportions. The trial batch procedure will
assist field personnel in obtaining the proper proportions of aggregate and binder in
preparing the larger field batches.
9.2 EPOXY RESIN SYSTEM AND EPOXY RESIN GROUT. Trial batches are not
required when using an epoxy resin system as a bonding medium between plastic and
hardened PCC or when using epoxy resin grout for filling cracks and/or placing dowels.
The two components of a grout will usually be mixed in the proportions specified by the
producer without additional fillers and/or aggregate.
10. FIELD MIXING AND BATCH SIZE. Small mechanical mixers of the drum type and mortar mixers have been used
successfully for mixing epoxy resin concrete and mortars. Small batches of
approximately 0.1 cubic foot (1 gallon) can be hand-mixed using a spatula or trowel.
The maximum batch size will be limited by the ability to thoroughly mix the epoxy resin
system and aggregate. Experience has demonstrated that the maximum batch size will
range from 200 to 300 pounds (1.5 to 2.0 cubic feet). Prior to starting operations, the
immediate on-site availability of all materials and the suitability and adequacy of the
mixing and placing tools shall be carefully checked. Several 2- to 5-gallon plastic
graduated buckets have been found to be satisfactory for proportioning by volume. The
mixing procedure of an epoxy resin system must produce a uniform and homogeneous
mix. The components of the epoxy resin system are mixed by stirring or agitation to
effectively put them into solution. For mixing epoxy resin systems in small containers (1
quart), a spatula, palette knife, or similar device can be used. For larger volumes, the
epoxy resin system shall be mechanically mixed in plastic buckets. A paint mixing
paddle driven by a low-speed electric drill may be used for the mixing. After mixing the
epoxy components, the mixture should be immediately transferred to the mixing pan
(small mixes) or the mechanical mixer (large mixes) and the aggregates immediately
added. Delays in adding the aggregate to the mixed epoxy resin system can result in a
www.PDHcenter.com PDHonline Course C557 www.PDHonline.org
© J. Paul Guyer 2012 Page 10 of 27
loss of the binder due to the accelerated chemical reaction. In mixing epoxy resin
concrete, the large aggregate should be added to the mixed epoxy resin binder first,
followed by the fine aggregate. This order of addition will help prevent the tendency of
the mix to “ball.” The mechanical mixers should be cleaned immediately after usage to
prevent the epoxy compounds from curing in the mixers. High-pressure water can be
used to remove the uncured epoxy if used shortly after the application. The most widely
used cleaning method is to immerse the tools and wash the mixers with solvents such
as methyl-ethyl-ketone or methylene chloride. Mineral spirits or toluene may also be
used with greater safety although they are not as efficient as the previously mentioned
solvents. If the epoxy resins have hardened on the tools or mixers, strippers,
mechanical abrasion, or burning will be necessary to remove the cured epoxies.
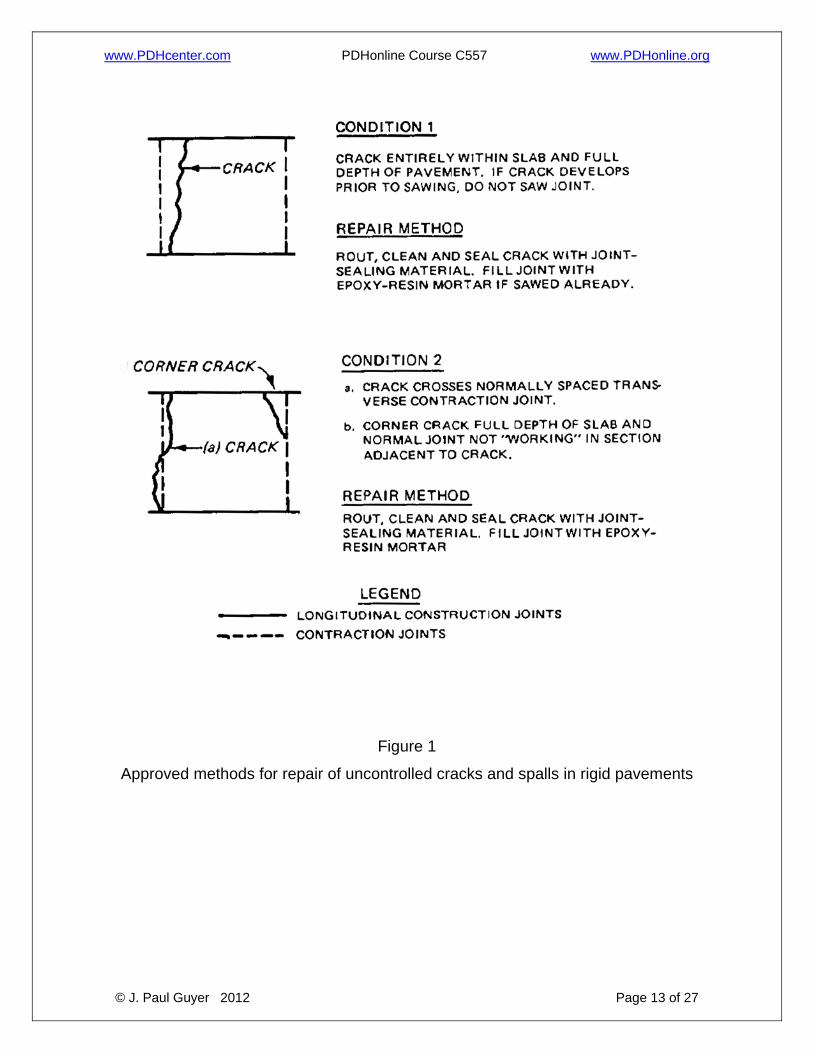
11. PROCEDURES FOR CONDITIONS 1 AND 2. Conditions of pavements, as described in this course, are shown in figure 1. Conditions
1 and 2 require that the random crack be widened with a rotary-type grooving tool and
sealed with a joint sealer so as to function as the working joint, and the existing
nonworking joint be filled with an epoxy resin mortar. The vertical faces of the joint
groove should be free of oils, greases, residual fines from sawing operation, or other
coatings. All fillers and joint sealant material should be removed from the joint. Oils and
greases will rarely be present, but if inspection indicates areas of even minor traces of
oil and grease, these areas shall be cleaned by sandblasting. Inspection of joints or
other small openings can be facilitated by using a small mirror to reflect light into the
opening. Residual fines from sawing operations or sandblasting should be removed by
the use of high-pressure water jet followed by an air jet to dry the concrete before
applying the epoxy resin system. A moderately rich epoxy resin mortar should be used
for filling joint grooves and other small openings where it may be difficult to hand-fill and
compact a lean mix. However, care should be exercised to ensure that the epoxy resin
mortar is not so rich that the material flows. The epoxy resin mortar batch size should
be adjusted so that the personnel available can complete all placing and finishing
operations before the epoxy resin mortar starts to gel. The batching operations will

www.PDHcenter.com PDHonline Course C557 www.PDHonline.org
© J. Paul Guyer 2012 Page 11 of 27
follow the same sequence as that for trial batches. The epoxy resin system is prepared
first and the fine aggregate gradually added while continuing mixing until all particles are
coated. After the joint or crack has been filled with the epoxy mortar, the surface should
be neatly finished, flush with the pavement surface, using appropriate hand tools.
Excess material shall be carefully removed and not thinly spread on the adjacent
concrete.
12. PROCEDURE FOR CONDITION 3.
Repair of this type of condition requires that the area within the broken corner (fig. 1) be
removed and replaced with new PCC. The new concrete will be bonded to the old
concrete with an epoxy resin system at the prepared vertical faces of the patch area.
The vertical face of the joint must be maintained to prevent the new PCC from bonding
to the adjacent slab. If the joint is not properly maintained, the concrete patch will break
loose due to slab movement caused by variations in temperature.
12.1 PREPARATION OF REPAIR AREA. The area to be repaired should be outlined
using a concrete saw. The saw cut lines should be located at least 2 inches outside the
crack in sound concrete, and not extend past the joint into the adjacent slab. The depth
of the saw cut should be at least 2 inches. Remove the broken corner and the
remaining concrete inside the saw cut to the full depth of the slab using air hammers. All
joint sealant material inside the repair area should also be removed. All exposed vertical
faces within the repair area should be cleaned. Prior to the placement of the new
concrete, the exposed subgrade should be reconditioned to comply with the specified
requirements.
12.2 MAINTAINING THE JOINT. To prevent bonding the new concrete to adjacent
slabs at the joints, the vertical faces should be protected with a bond-breaking medium.
The existing contraction joint may be maintained by the use of temporary inserts of
appropriate dimensions or by sawing the required kerf. Sawing must be done early
enough to prevent development of a random crack at the joint.

www.PDHcenter.com PDHonline Course C557 www.PDHonline.org
© J. Paul Guyer 2012 Page 12 of 27
12.3 PLACEMENT OF NEW CONCRETE. After removing the concrete and preparing
the subgrade, the cleaned vertical surfaces should be coated with at least a 20-mu film
of the epoxy resin system, using a stiff bristle brush or roller to ensure thorough wetting
of the concrete. Placement of the new concrete should be delayed until some degree of
tack has developed (30 minutes to 1 hour). When vibrators are used, it is essential to
allow the epoxy bond coat to reach a tacky state since vibration can displace the epoxy
from the existing concrete by emulsifying the fluid epoxy bond coat. Vibrators should not
come in contact with the epoxy coating. If the concrete placement is delayed until the
epoxy coating reaches a soft rubberlike stage, a second application of epoxy bond coat
equal to the amount of the first coat should be applied to the existing bond coat. If the
concrete placement is delayed until the epoxy coating is no longer tacky, the epoxy
coating will have to be removed or abraded by sandblasting and a fresh coat applied.
Forms, if needed, should be placed after the concrete pavement has been properly
prepared. The forms should be lined with polyethylene sheets or waxed paper to
prevent any adhesion to the form that may result from the override of epoxy onto the
form. The use of form oil will not be permitted. The concrete mixture should be
relatively dry and the slump of the concrete should not exceed 2 inches. The repair is to
be finished so as to match the texture of the surrounding concrete. After the concrete
has cured, the reconstructed joints should be sealed in the conventional manner.
13. PROCEDURE FOR CONDITION 4.
The repairs required under condition 4 do not use epoxy resin grouts, mortars, or
concrete.
www.PDHcenter.com PDHonline Course C557 www.PDHonline.org
© J. Paul Guyer 2012 Page 13 of 27
Figure 1
Approved methods for repair of uncontrolled cracks and spalls in rigid pavements

www.PDHcenter.com PDHonline Course C557 www.PDHonline.org
© J. Paul Guyer 2012 Page 14 of 27
Figure 1 (continued)
Approved methods for repair of uncontrolled cracks and spalls in rigid pavements

www.PDHcenter.com PDHonline Course C557 www.PDHonline.org
© J. Paul Guyer 2012 Page 15 of 27
Figure 1 (continued)
Approved methods for repair of uncontrolled cracks and spalls in rigid pavements

www.PDHcenter.com PDHonline Course C557 www.PDHonline.org
© J. Paul Guyer 2012 Page 16 of 27
Figure 1 (continued)
Approved methods for repair of uncontrolled cracks and spalls in rigid pavements
14. PROCEDURE FOR CONDITION 5. The repairs required under condition 5 (fig. 1) include all spalls which occur along joints
and along working cracks. The same general procedures as mentioned for condition 3
are used for the repair of isolated small surface spalls or pop-outs. The repair of all
spalls consists of removing unsound or damaged concrete, modifying the spall cavity
dimensions as necessary to prevent further breakout, taking precautions in the repair
procedure to ensure freedom of movement at working joints, and taking appropriate
measures to properly seal the joint. Large spall areas should be repaired using PCC
bonded with the proper epoxy resin system. “Pop-outs” are not normally repaired unless
hazardous to tires. If they are determined to be hazardous to tires, repair with epoxy
resin systems.

www.PDHcenter.com PDHonline Course C557 www.PDHonline.org
© J. Paul Guyer 2012 Page 17 of 27
14.1 REMOVING UNSOUND OR DAMAGED CONCRETE. All unsound or damaged
concrete must be removed prior to repairs. The defective areas to be removed can be
determined by tapping with a hammer or steel rod throughout the area and listening for
dull or hollow sounds. The Schmidt hammer can be used by those experienced with this
test. A tensile test that can be used in the field to check the soundness of the substrate
concrete has been suggested in the American Concrete Institute (ACI)
Committee Report 503; the test is designated as a “Field Test for Surface Soundness
and Adhesions.” The periphery of the area required to be removed should be sawed to
a depth consistent with the type of repair. Saw cutting delineates the repair area and
serves to essentially eliminate edge spalling and weakness that might be introduced by
outlining the repair area with other types of equipment. The saw cut lines should be
located outside the defective area and in sound concrete. The saw cut should not be
extended across the joint into the adjacent slab unless that area is also spalled. The
depth of the saw cut should be at least ½ inch for epoxy resin mortar repairs and 2
inches for epoxy resin concretes and epoxy resin bonded PCC. In preparing cutouts for
pop-outs or small spalls wholly within a structural component and not involving joints;
edges, or corners, featheredging is permissible. The feather-edge should be at least ¼
inch deep to provide a shoulder of sufficient depth to obtain a smooth finish. High-
frequency chipping hammers can be used to make cutouts for this type of repair in lieu
of saw cuts. Concrete removal inside the saw cut should be accomplished using
medium to lightweight air hammers. The bottom of the cutout should be smooth in order
to reduce the surface area and therefore reduce the quantity of epoxy resin concrete
needed for the patch. Also, in edge or joint replacement areas, concrete removal
working cracks, the cracks must be maintained like should have a bottom slope not
exceeding 30 degrees. The minimum depth of the concrete removal will depend on the
maximum depth of the spalled or damaged area. The concrete should be removed to a
sufficient depth to expose sound concrete in the entire patching area. The removal
depth should be at least 2 inches, except where interior slab spalls, such as pop-outs,
are to be repaired. In this case, the minimum depth should be 1 inch.

www.PDHcenter.com PDHonline Course C557 www.PDHonline.org
© J. Paul Guyer 2012 Page 18 of 27
14.2 SURFACE PREPARATION. All newly exposed surfaces are to be cleaned by
sandblasting. Dust and other debris resulting from the removal of deteriorated surfaces
or contaminants must be removed. Cleaning may be accomplished by jetting the
surface with compressed air, thorough washing with high-pressure water jets, or by use
of a high-suction vacuum. The vacuum method should only be used when other
procedures cannot be employed. All equipment for providing compressed air must have
oil and water traps in the air supply lines.
14.3 MAINTAINING THE WORKING JOINT. The regular working joint may be
maintained by the use of a fiberboard coated with a polyethylene film, polyethylene
foam strips, or other suitable material. The separating medium should be approximately
½ inch thick cut to closely fit the pattern of the cavity along the adjacent slab (see fig. 2).
If fiberboard is used, it should be coated with a polyvinyl film or vinyl duct tape to
prevent epoxy from binding to the board. If necessary, the irregular surface treated at
the crack of the pavement joint should be coated with a suitable bond-breaking medium.
A flexible latex caulking compound may be used to fill any voids underneath the sheet
material. The insert should be removed after the epoxy resin concrete hardens, or it
may be cut out with a concrete saw to form the joint sealant reservoir. The formed joint
is later sealed with an acceptable joint-sealant material. Oils, waxes, greases, or
silicones should not be used on the insert since these substances prevent bonding of
the joint-sealant materials.

www.PDHcenter.com PDHonline Course C557 www.PDHonline.org
© J. Paul Guyer 2012 Page 19 of 27
Figure 2
Use of sheet material to maintain working joint during repairs
14.4 SPALLS ALONG WORKING CRACKS. For spalls along working cracks, the
cracks must be maintained like a working joint. A different approach is required
because rigid temporary inserts cannot be used. In this case a bond-breaking medium
must be used to prevent bonding the epoxy concrete to the concrete adjacent to the
spall area which could possibly result in further spalling. One bond-breaking medium
uses polyethylene foam strips cut to fit the entire working face adjacent to the spall and
an appropriately sized flexible polyethylene backing rod which is temporarily embedded
to provide a groove for the joint-sealing material. Another bond breaking medium
involves coating the working face adjacent to the spall area with a bond-breaking
medium, such as grease, and temporarily embedding a backing rod for groove-forming
as in the previous case. With either of the suggested methods, the backing rod must be
removed after the epoxy concrete hardens.
14.5 REPAIR OF SPALLS WITHIN WORKING CRACKS. Where working cracks
continue through areas to be patched, the crack should be maintained as a joint through
the freshly placed epoxy resin concrete. After removal of the unsound concrete and

www.PDHcenter.com PDHonline Course C557 www.PDHonline.org
© J. Paul Guyer 2012 Page 20 of 27
cleaning of the prepared spall area, a polyethylene foam sheet should be cut to fit along
the alignment of the crack within the prepared cavity. The concrete surface along the
alignment of the crack should not be excessively irregular which would produce voids
greater than 1/4 inch deep below the sheet when placed over the crack. A small
chipping hammer equipped with a ½- to 1-inch-wide blade may be used to remove high
spots along the crack to form a regular surface. When placing the epoxy resin concrete,
placements need to be carefully made around the joint filler sheet to prevent tilting or
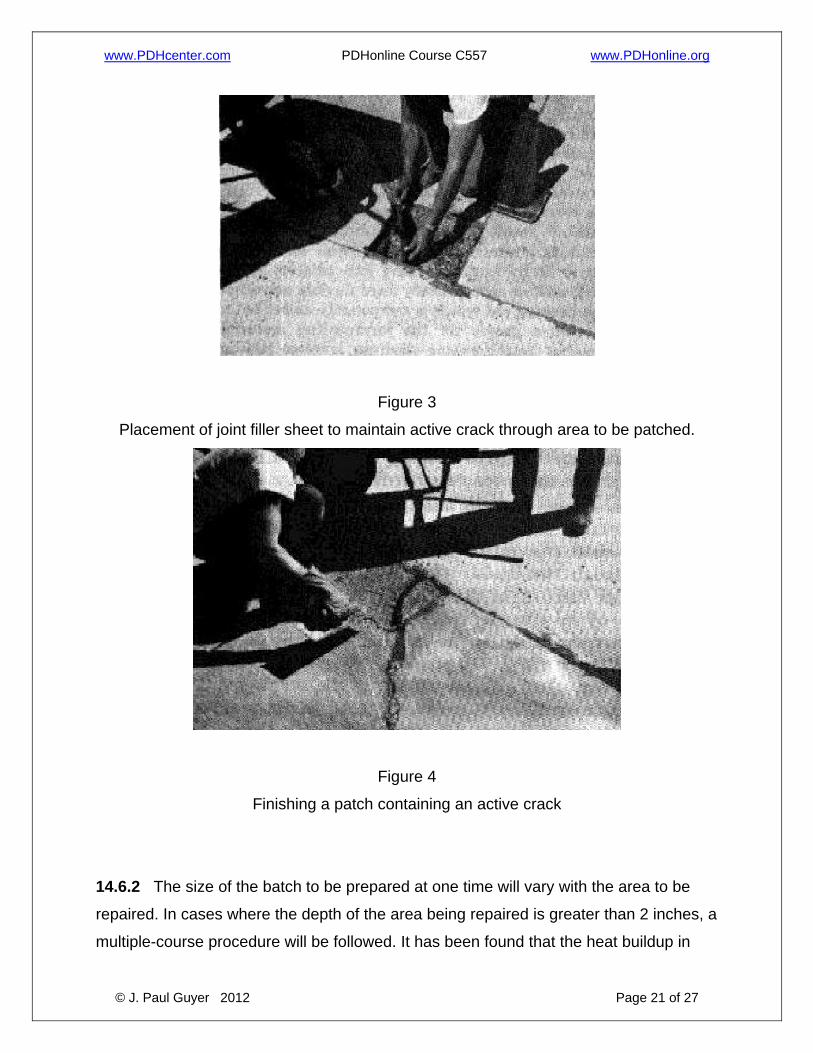
misalignment of the sheet. Maintaining an active crack through an area being repaired
is shown in figures 3 and 4.
14.6 PLACEMENT OF EPOXY RESIN CONCRETES AND MORTARS. In scheduling
the placement of epoxy resin concretes and/or mortars, the correct type and
classification of epoxy resin system should be procured, pavement and materials
temperatures should be carefully considered, and appropriate operational conditions
and procedures established.
14.6.1 Prior to the placement of epoxy resin concrete or mortars, the surface of the
cavity (except for the face of the working joint) shall be primed with the binder. The
primer should be applied in a relatively thin coat (15 to 20 mils) and briskly scrubbed
into the concrete surface with a stiff bristle brush or roller. Placement of the epoxy resin
concrete or mortar should begin immediately after application of the prime coat.
www.PDHcenter.com PDHonline Course C557 www.PDHonline.org
© J. Paul Guyer 2012 Page 21 of 27
Figure 3
Placement of joint filler sheet to maintain active crack through area to be patched.
Figure 4
Finishing a patch containing an active crack
14.6.2 The size of the batch to be prepared at one time will vary with the area to be
repaired. In cases where the depth of the area being repaired is greater than 2 inches, a
multiple-course procedure will be followed. It has been found that the heat buildup in

www.PDHcenter.com PDHonline Course C557 www.PDHonline.org
© J. Paul Guyer 2012 Page 22 of 27
courses thicker than 2 inches sometimes is sufficient to cause cracking. The placement
of an additional course or courses, if required, should be delayed until the peak
temperature has been reached and the temperature of the previously placed material is
decreasing. In most instances, large patches (typically those requiring more than 5
gallons of an epoxy resin system) should be made with PCC unless the repaired area
has to be opened to traffic within 48 hours.
14.6.3 The methods for epoxy resin concrete or mortar placement including
consolidation, screeding, and finishing will generally follow normal small area PCC
operations, except that delays cannot be tolerated. Because of the relatively thin layers
of courses necessary, the use of internal spud-type vibrators to properly consolidate the
mixtures is difficult. The use of a mechanical plate, screed, and float or float vibrators
has proven satisfactory. In many instances, because of dimensional and shape
restrictions, consolidation by hand tampers will be necessary.
14.6.4 In the final finishing operations, the surface shall not be left slick due to excess
epoxy resin bleeding to the top. Fine aggregate can be broadcast on top of slick areas
before the epoxy resin hardens to improve the surface texture. The final surface should
be left even with the surrounding pavement. Excess mortar or binder should be
removed since featheredge finishing usually will form a weak bond resulting in chipping
under traffic.
14.6.5 The formed joint should be sealed in the conventional manner. This work can
usually be initiated about 24 hours after epoxy resin concrete or mortar placement
unless low temperatures have appreciably retarded the hardening of the epoxy resin
binder.

www.PDHcenter.com PDHonline Course C557 www.PDHonline.org
© J. Paul Guyer 2012 Page 23 of 27
15. PROCEDURE FOR CONDITION 6. Repair of the type of failure in condition 6 (fig 1) involves remedial measures to stop
progression of the longitudinal crack in both directions. The procedure for this is similar
to the repair of spalled areas. The full length of the crack should be routed with a rotary
grooving tool after the pavement surface is carefully examined to locate the ends of the
crack. Since the crack termination points may be almost indiscernible, sandblasting and
high-pressure air jets should be used near the apparent ends to remove fines
embedded in the crevices. Also, laitance beyond the apparent ends should be removed
by sandblasting to make identification of the actual ends of the crack more accurate.
Core holes, 4 to 6 inches in diameter should be drilled at each end of the crack. These
core holes should be centered on the ends of the crack to assure complete crack
removal. After removal of the core, all residual fines on the core hole wall should be
removed by scrubbing the walls with a stiff bristle brush, followed by washing and
removal of excess water from the core hole. The removal of the residual fines is
necessary to ensure that the required bond of the epoxy resin concrete to the PCC is
obtained. The application of primer to the core hole wall and placement of the epoxy
resin concrete to fill the core hole should be similar to the procedures for the repair of
spalls. Because the FCC mass is much greater than that of the epoxy resin concrete,
the heat generated by the epoxy binder will be diffused rapidly; the thickness of the
courses placed may be increased to 6 inches. In some climatic areas or under certain
weather conditions where pavement temperatures may be relatively high, it may be
advisable to place thinner courses to avoid cracking. The thickness of courses and time
interval between courses should be such that the temperature of the epoxy resin
concrete never exceeds 140 degrees F during hardening. The peak temperature of the
epoxy resin concrete can be determined by placing the epoxy resin concrete into a
container, such as a can or pail approximately the same diameter as the core hole, and
measuring the temperature with a thermometer. The groove formed in the routing
operation will be sealed with an appropriate type of joint sealant in accordance with
accepted methods for sealing pavements.

www.PDHcenter.com PDHonline Course C557 www.PDHonline.org
© J. Paul Guyer 2012 Page 24 of 27
16. PROCEDURE FOR CONDITION 7.
The repairs required under condition 7 do not use epoxy resin grouts, mortars, or
concretes.
17. PROTECTION OF REPAIRED AREAS FROM WEATHER AND TRAFFIC. Repaired areas should be protected as follows:
17.1 TEMPERATURE. Pavement repairs made when ambient temperatures during the
following 24 hours may be 60 degrees F or lower require limited protection to maintain
the epoxy concrete or mortar at temperatures which will provide a normal hardening
rate. The use of tarpaulins supported several inches above the surface of the repaired
area will help to maintain the desired conditions, provided the temperature difference or
drop is not too great. Heated enclosures may also be used to provide effective
temperature conditions.
17.2 WATER. The epoxy resin grout and binder will bond to a damp concrete surface,
but greater bond strengths are obtained when the surface is dry. The epoxy resin
systems should not be applied to a concrete surface containing excessive moisture.
Excessive moisture may be detected by tightly covering the surface with a transparent
plastic film. If no moisture has accumulated under the film after 24 hours, capillary
moisture may be considered insufficient to adversely affect the bond. During the early
hardening stages, which may vary from 2 to 12 hours depending upon weather
conditions, the epoxy resin mortars and concretes should be protected from rain.
17.3 TRAFFIC. The repaired areas should be barricaded to prohibit traffic of all types
until the epoxy resin concrete or mortar has hardened. The time interval over which
protection against traffic is to be maintained will vary with weather conditions, but will
usually be less than 24 hours.
www.PDHcenter.com PDHonline Course C557 www.PDHonline.org
© J. Paul Guyer 2012 Page 25 of 27
18. CLEANING OF EQUIPMENT AND TOOLS.
Because of the nature of the hardened epoxy resin systems, all tools and equipment
must be thoroughly cleaned before the epoxy materials set. Toluene, xylene, or other
aromatic petroleum solvents must be used with proper precautions concerning the fire
and/or explosion hazard. In the cleaning operations the workmen must wear solvent-
resistant gloves and aprons, and the use of protective creams is desirable. Cleaning
should be done in a well ventilated area or respirators should be used in a closed area.
19. SAFETY AND HEALTH PRECAUTIONS. 19.1 GENERAL PRECAUTIONS. The materials used in the two epoxy systems and
the solvents used for cleanup do not ordinarily present a serious health hazard except
to hypersensitive individuals. Materials may be handled with complete safety if
adequate precautionary measures, such as the following, are observed:
19.1.1 Handle only in well ventilated areas.
19.1.2 Prevent skin contact.
19.1.3 Wear neoprene or other suitable impervious gloves whenever the possibility of
skin contact occurs. When gloves become contaminated, they should be discarded or
reconditioned by washing with soap and water, preferably while they are still on the
hands of the operator. Gloves should be dried and kept in a clean place. Powdering the
inside of the gloves with talcum is recommended. Contaminated gloves, aprons and
sleeves, clothing, and working tools shall not be removed from the work area, except for
discarding or cleaning.
19.1.4 Protective ointments or proprietary creams should be applied to exposed skin
surfaces before beginning work and should be removed by washing after the work is
completed.

www.PDHcenter.com PDHonline Course C557 www.PDHonline.org
© J. Paul Guyer 2012 Page 26 of 27
19.1.5 Wear full face shields or goggles during the blending and mixing operations.
WARNING: Goggles must be worn to protect eyes from the epoxy resin system.
Goggles are mandatory for persons doing the blending and mixing
operations, but the hazard is reduced for persons engaged in the placing
operations.
19.1.6 Restrict blending and mixing operations to the open areas or, if in a building,
near an operating hood ventilating system. Use disposable paper coverings in the work
area where drips or contamination may be expected.
19.1.7 Maintain good housekeeping and personal hygiene standards.
DANGER: SOLVENTS ARE FIRE HAZARDS.
19.1.8 Thorough instruction to the inspectors and e. Moving sensitized persons.
Remove from foremen concerning the danger of working with exposure individuals who
develop sensitivity to any resins and hardeners, the nature of skin irritation, of the epoxy
system constituents. The limiting or and measures to be taken to avoid skin irritation is
recommended.
19.1.9 Work rooms should be provided with new, unused cleaning rags.
19.2 PERSONAL SENSITIVITY. A few individuals have developed dermatitis from
skin contact of epoxy resin components and cleaning solvents (toluene, xylene, and
other aromatic petroleum solvents); therefore, adequate precautionary measures should
be exercised. Epoxy resin systems containing polysulfide curing agents have an
obnoxious odor from the polysulfide constituent which may nauseate some individuals.
Inhalation of the vapors should be avoided or kept to an absolute minimum. The amine-

www.PDHcenter.com PDHonline Course C557 www.PDHonline.org
© J. Paul Guyer 2012 Page 27 of 27
type curing agents incorporated in the epoxy resin system are caustic and may cause
tissue damage upon direct contact with the skin. Contamination of the eye by the curing
agent component can cause severe damage, and exposure to high vapor
concentrations may also irritate the eyes and mucous membranes.
19.3 FIRST AID. Provide necessities for prompt treatment of accidental skin or eye
contact.
19.3.1 EYES. In cases of accidental skin contamination, immediately and thoroughly
flush the affected eye for at least 15 minutes with running water, bathe the eye with a
normal saline solution, and see a physician if there is any possibility of potential eye
damage.
19.3.2 SKIN. Cleanse all areas thoroughly with soap and water following accidental
skin contact. If necessary, fresh alcohol, acetone, toluene, or methyl-ethyl-ketone may
be used as a solvent, but the use of such solvents should be kept to a minimum. In
cases of spills, clothing which may be involved should be immediately removed and
decontaminated in the manner described for gloves.
19.4 REMOVING SOURCE OF CONTACT. If a worker develops dermatitis, the source
of contact should be determined and eliminated. Treatment of such a condition should
be handled by a competent physician or dermatologist, with full information being
furnished as to the probable cause of the problem.
19.5 MOVING SENSITIZED PERSONS. Remove from exposure individuals who
develop sensitivity to any of the epoxy system constituents. The limiting or removal of
subsequent contact with materials will be made by a competent physician or
dermatologist.