Embed Size (px)
Citation preview

AMS Programming User Manual
Accumulator Management SystemLast Updated 1/11/16 Engineer: John Gehrig
OverviewThe purpose of this document is to show how to upload code to the AMS boards. A Virtual Machineis used so that a reproducible build can be performed each time the software is modified, built or uploaded.
STEP ONE
Navigate to http://sites.lafayette.edu/ece492-sp15/ams/ with your web browser, and download the AMS Build Environment Virtual Machine Image.
Google will warn you that the file cannot be scanned for viruses. The file is clean, and this warning can be safely ignored.
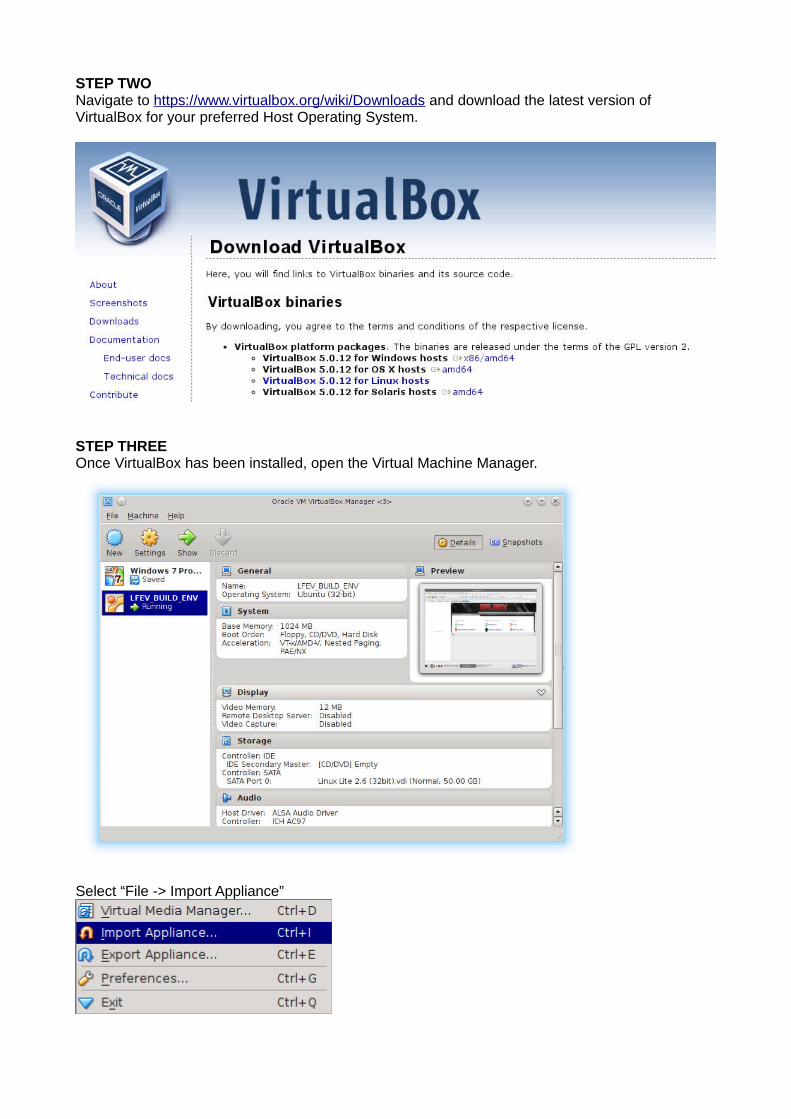
STEP TWONavigate to https://www.virtualbox.org/wiki/Downloads and download the latest version of VirtualBox for your preferred Host Operating System.
STEP THREEOnce VirtualBox has been installed, open the Virtual Machine Manager.
Select “File -> Import Appliance”

Navigate to the file you just downloaded, “LFEV_Build_2015-12.ova”
Complete the import procedure by clicking “Import”, all default settings should be acceptable.

STEP FOURPlug the PICKit3 into the Host Machine, and then click the “Settings” button.
Add a USB filter rule for the PICKit3.
Ensure that a USB filter rule is applied permanently for your PICKit3 programmer. It is essential that the rule be created through this dialog, as the PICkit3 reprograms itself every time a new binary image is uploaded. The process of reprogramming the PICkit causes it to disconnect itself.
Why MicroChip… Why?

NOTE: A Shared Folder is optional. This step is only necessary if you want to be able to edit/save the files in a Host Machine Folder.
All files can be downloaded directly to the Virtual Machine instead.
Add a shared folder to the Virtual Machine.
This folder should point to where the ams repository is located on the host machine.
NOTE: You can download the latest version of the software by navigating to the following link, and selecting “Download Repository”: https://bitbucket.org/lafayetteEV/ams/downloads.
Or you can use Mercurial, and run the command:hg clone https://bitbucket.org/lafayetteEV/ams
This will also download the latest working copy of the software repository.

Navigate to the location of the AMS Software Repository (see above note), and add it as a shared folder.
Virtual Box Shared Folders allow you to edit/save/modify files stored on the Host Machine from inside of your Guest Virtual Machine
NOTE: You will have to mount this shared folder at the command prompt later.
The command is:sudo mount -t vboxsf -o uid=$UID,gid=$(id -g) {Shared Folder Name} ams

STEP FIVEStart the “LFEB_BUILD_ENV” by clicking the “Start” button.
You should be greeted with the following screen.
The username and password for the machine are as follows:
Username: “osboxes” Password: “password”
Root Password: “password”
NOTE: The password is not necessary for regular operation, you will be logged in automatically.

STEP SIXPower must be applied to the AMS during programming.
It is recommended that you set the power supply limits to 3.5V and 3.00A.
The
PICKit3 programmer must be oriented as shown below.
The square hole and arrow marker should line up.
NOTE: It is recommended to place 0.1” x 6 pin 90 degree header into the PICkit3 instead of soldering pins to the programming port. If this technique is used, it may be necessary to apply some pressure to the PICkit while undergoing programming.

STEP SEVEN
NOTE: You can bypass this step if you downloaded the source code directly to the virtual machine.
Open a terminal session and mount the Shared Folder you created previously.
sudo mount -t vboxsf -o uid=$UID,gid=$(id -g) {Shared Folder Name} ams

STEP EIGHT (UPLOAD BINARY IMAGE)
This step shows how to upload a binary image using MPLAB. Skip to the next step if you want to build the binary image from source code.
Navigate to http://sites.lafayette.edu/ece492-sp15/ams/ with your virtual machine's web browser, and download the AMS Production Hex Image.
Extract the ZIP folder, and open MPLAB. A shortcut link is provided on the Desktop.

Create a New Project...
The project type should be “Prebuilt (Hex Loadable Image) Project”

Open the “firmware.production.hex” file you just extracted.
Device: PIC16F1827Hardware Tool: PICkit3
The last dialog will prompt you for a project location. Select a folder, and click “Finish”

Program the AMS Board by clicking the “Make and Program Device” toolbar icon.

STEP NINE (BUILD AND UPLOAD BINARY IMAGE) Once the machine has started, open MPLAB IDE.
You need the AMS Software Repository downloaded. The file can be in either the Shared Folder, orlocally to the guest virtual machine.
The repository can be downloaded in two ways:1. Run “hg clone https://bitbucket.org/lafayetteEV/ams” in a command prompt. 2. Download a zip folder from the Downloads Page of the AMS Software Repisitory.
Once you have downloaded the software repository to the virtual machine, open a new project.

Navigate to the project, and open it.
The project can now be modified, built, and uploaded to one or more AMS Boards.
After modifying the source code, you can program the AMS Board by clicking the “Make and Program Device” toolbar icon.