Embed Size (px)
Citation preview

AMERICAN HYDROTECH, INC
Garden Roof® Assembly
Installation Manual&
Maintenance Requirements(March 2012)


American Hydrotech, Inc. - Contractor Training Manual - © 2012 Page 1
TABLE OF CONTENTS
INTRODUCTION . . . . . . . . . . . . . . . . . . . . . . . . . . . . . . . . . . . . . . . . . . . 2-3 JOB SITE SAFETY . . . . . . . . . . . . . . . . . . . . . . . . . . . . . . . . . . . . . . . . . . 4 TOOLS AND EQUIPMENT . . . . . . . . . . . . . . . . . . . . . . . . . . . . . . . . . . . . . . . 5 MATERIAL PROCUREMENT . . . . . . . . . . . . . . . . . . . . . . . . . . . . . . . . . . . . . . 6 COMPONENTS – DESCRIPTION AND INSTALLATION Monolithic Membrane 6125® / Hydroflex 30 / Hydroflex RBII . . . . . . . . . . . . . . . . . . . . . . . . 7 Root Stop . . . . . . . . . . . . . . . . . . . . . . . . . . . . . . . . . . . . . . . . . . . . 8 Dow STYROFOAM® Insulation . . . . . . . . . . . . . . . . . . . . . . . . . . . . . . . . . . . . 9 Hydrodrain® AL / Moisture Mat . . . . . . . . . . . . . . . . . . . . . . . . . . . . . . . . . . . . 10 Gardendrain® – GR15, GR30, GR50 . . . . . . . . . . . . . . . . . . . . . . . . . . . . . . . . . . 11 Vegetation Free Zones . . . . . . . . . . . . . . . . . . . . . . . . . . . . . . . . . . . . . . . 12 Metal Edge Restraint . . . . . . . . . . . . . . . . . . . . . . . . . . . . . . . . . . . . . . . . 13 Inspection Chamber – for drains . . . . . . . . . . . . . . . . . . . . . . . . . . . . . . . . . . . . 14 Systemfilter . . . . . . . . . . . . . . . . . . . . . . . . . . . . . . . . . . . . . . . . . . . . 15 LiteTop® Growing Media . . . . . . . . . . . . . . . . . . . . . . . . . . . . . . . . . . . . . . . 16 Importance of Adequate Water for Vegetation. . . . . . . . . . . . . . . . . . . . . . . . . . . . . . . 17 Vegetation Cuttings . . . . . . . . . . . . . . . . . . . . . . . . . . . . . . . . . . . . . . . . . . . 18 Plugs . . . . . . . . . . . . . . . . . . . . . . . . . . . . . . . . . . . . . . . . . . . . 19 InstaGreen® Sedum Carpet . . . . . . . . . . . . . . . . . . . . . . . . . . . . . . . . . . . . 20 InstaGreen® Sedum Tile . . . . . . . . . . . . . . . . . . . . . . . . . . . . . . . . . . . . . 21 GardMat® . . . . . . . . . . . . . . . . . . . . . . . . . . . . . . . . . . . . . . . . . . . . . 22 INSTALLATION COMPLETION . . . . . . . . . . . . . . . . . . . . . . . . . . . . . . . . . . . . . . 23 MAINTENANCE Introduction . . . . . . . . . . . . . . . . . . . . . . . . . . . . . . . . . . . . . . . . . . . . 24 Acknowledgment of Receipt . . . . . . . . . . . . . . . . . . . . . . . . . . . . . . . . . . . . . . 25 Primary and Secondary Maintenance Tasks. . . . . . . . . . . . . . . . . . . . . . . . . . . . . . 26-28 Maintenance Schedule . . . . . . . . . . . . . . . . . . . . . . . . . . . . . . . . . . . . . . . . 29 Visitation Checklist . . . . . . . . . . . . . . . . . . . . . . . . . . . . . . . . . . . . . . . . . 30 Instructions for Submitting Photos . . . . . . . . . . . . . . . . . . . . . . . . . . . . . . . . . . . 30
PRODUCT DATA . . . . . . . . . . . . . . . . . . . . . . . . . . . . . . . . . . . . . . . . . 33-36
NOTE: This Installation Guideline primarily covers minimum-sloped (<3:12) Extensive Garden Roof Assembly. Each job is unique and will require different solutions. Please contact American Hydrotech’s Garden Roof Department with questions regarding specific conditions at 800.877.6125.

Page 2 American Hydrotech, Inc. - Contractor Training Manual - © 2012
WHY HAVE A VEGETATIVE ROOF? Besides being aesthetically pleasing, a vegetative roof can provide numerous ecological, technical, and owner benefits. Vegetative roofs can mitigate the urban heat island effect and become a natural habitat for animals and plants. They also provide stormwater retention/detention, increase thermal resistance, and reduce noise levels. Owners can benefit from an increased roof life expectancy, additional usable space, and increased property values. THE HYDROTECH ADVANTAGE Since 1963, Monolithic Membrane 6125® waterproofing roofing membrane has been used in numerous parking structures and plaza applications where large areas of planting were part of the overall design. These earth covered structures were engineered to accept the heavy loads because several feet of soil and various hardscape components were incorporated into the design. These installations were not referred to as “green roofs” back then but are today by many. The difference between those early applications and the current vegetative roof market is weight. Advancements in drainage/water retention technology and lightweight engineered growing media have greatly reduced the weight of a vegetative roof, allowing it to be used on a wider range of structures. Hydrotech’s first Garden Roof® Assembly (Mashantucket Pequot Museum) was installed in 1996; the first “single source” vegetative roof assembly (everything from the deck up) in America. Since that time, Hydrotech has expanded its product offerings to include a wide array of domestically sourced components, including growing media and extensive plants for our Garden Roof Assemblies. WARRANTY Hydrotech offers a range of warranty options to an owner providing long term assurance and peace of mind:
Watertightness of Hydrotech’s Monolithic Membrane 6125 Thermal value of Dow STYROFOAM Insulation Wind uplift resistance Integrity of the Garden Roof components Removal and replacement of the overburden Thrive plant warranty
o Sedum Plugs and Cuttings – Thrive and Coverage: 50% minimum coverage after the first year, 80% minimum coverage after the second year
o Sedum Carpet and Sedum Tile – Thrive and Coverage: 90% minimum coverage after the first and second years
o All other vegetation – Thrive only o Maintenance Plan must be followed.
NOTE: Please contact Hydrotech for specific warranty options and limitations.
American Hydrotech, Inc. - Contractor Training Manual - © 2012 Page 3
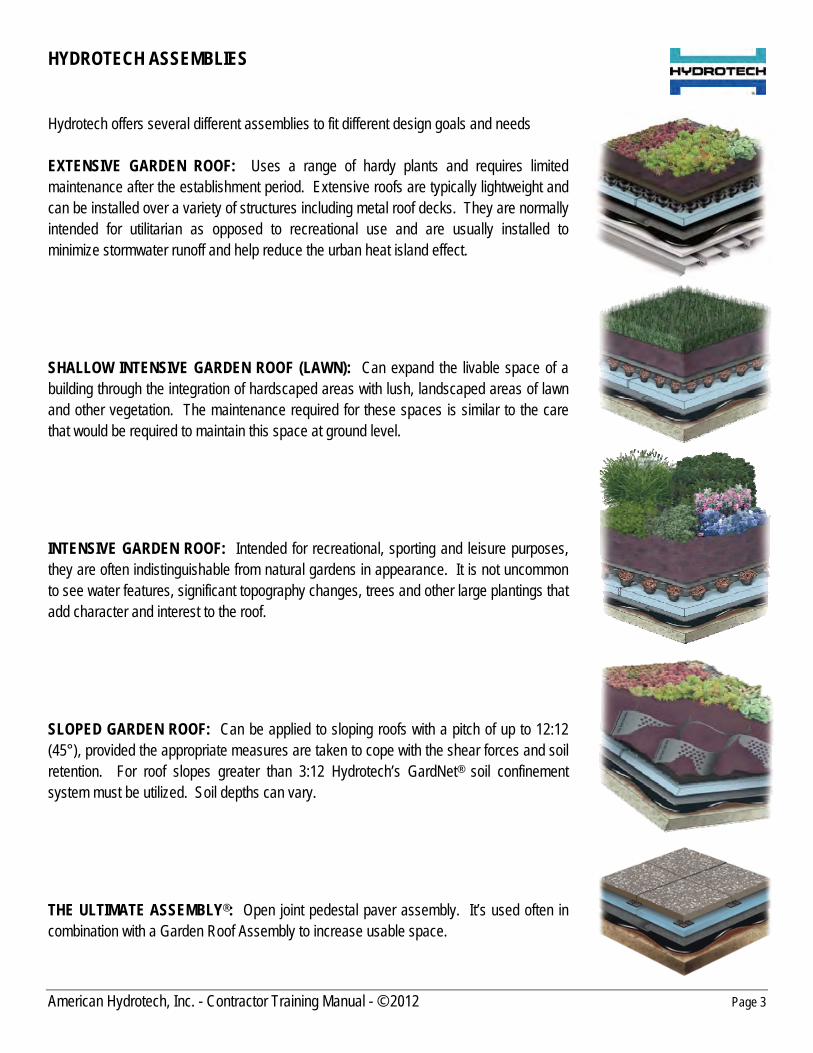
HYDROTECH ASSEMBLIES Hydrotech offers several different assemblies to fit different design goals and needs EXTENSIVE GARDEN ROOF: Uses a range of hardy plants and requires limited maintenance after the establishment period. Extensive roofs are typically lightweight and can be installed over a variety of structures including metal roof decks. They are normally intended for utilitarian as opposed to recreational use and are usually installed to minimize stormwater runoff and help reduce the urban heat island effect. SHALLOW INTENSIVE GARDEN ROOF (LAWN): Can expand the livable space of a building through the integration of hardscaped areas with lush, landscaped areas of lawn and other vegetation. The maintenance required for these spaces is similar to the care that would be required to maintain this space at ground level. INTENSIVE GARDEN ROOF: Intended for recreational, sporting and leisure purposes, they are often indistinguishable from natural gardens in appearance. It is not uncommon to see water features, significant topography changes, trees and other large plantings that add character and interest to the roof. SLOPED GARDEN ROOF: Can be applied to sloping roofs with a pitch of up to 12:12 (45°), provided the appropriate measures are taken to cope with the shear forces and soil retention. For roof slopes greater than 3:12 Hydrotech’s GardNet® soil confinement system must be utilized. Soil depths can vary. THE ULTIMATE ASSEMBLY®: Open joint pedestal paver assembly. It’s used often in combination with a Garden Roof Assembly to increase usable space.

Page 4 American Hydrotech, Inc. - Contractor Training Manual - © 2012
JOB SITE SAFETY Safety should be the first and most important consideration on a job site. Consult your General Contractor for staging plans and coordination of work zones between trades. Always keep in mind the load capacity of the roof when locating materials and equipment. Safety concerns in a rooftop application include, but are not limited to:
Personal protection equipment: o Hard hats, steel toed boots, eye protection, gloves,
safety vests Crane safety:
o Authorized operators only o Never stand under loads o Keep equipment away from overhead power lines
Fall protection: o Anchors, harnesses where appropriate and/or required o Maintain proper footing and awareness of
surroundings at all times Federal, State, and Local regulations
o Check with all applicable regulatory agencies to make sure you are in compliance

American Hydrotech, Inc. - Contractor Training Manual - © 2012 Page 5
TOOLS AND EQUIPMENT Always keep hand and power tools in good working order. Necessary tools and equipment include, but are not limited to:
Crane, elevator, conveyors or other hoist Shovels and rakes Wheelbarrows or heavy-duty buckets Compacting roller – 300-400 lbs. Heavy-duty shears and utility knives 4” grinder or circular saw Dibbles or hand trowels Fine-toothed saw Water source, hoses and sprinklers
Wheelbarrow
Heavy Duty Shears Compacting Roller 4” Grinder
Water Source Hand Trowel Landscape Rake
Telescoping Forklift Fine-toothed Saw

Page 6 American Hydrotech, Inc. - Contractor Training Manual - © 2012
MATERIAL PROCUREMENT STANDARD GARDEN ROOF COMPONENTS Quotes for Standard Garden Roof Components can be obtained from your local sales representative. Ordering and
delivery coordination of Standard Garden Roof components will be handled by an American Hydrotech Customer Service Representative – 800.877.6125
o When you order: 1. Credit must have already been established through Customer Service. 2. All communication shall be in written form. Orders should be signed Purchase Orders faxed or emailed to
Customer Service. 3. Double check ALL quantities before placing your order. Corrections to orders cause delays. Hydrotech is not
responsible for verifying quantities. 4. There is a 25% restocking fee for all standard Garden Roof components
Typical lead time for Standard Garden Roof components is 7-10 days. Standard components Include:
o Root Stop o Dow STYROFOAM Insulation o Hydrodrain o Moisture Mat o Garden Drain GR15, GR30 or GR50 o Systemfilter o Inspection Chambers/Extensions o Metal Edge Restraint o GardMat and disk anchors
SPECIALTY GARDEN ROOF COMPONENTS Quoting, ordering and delivery coordination of specialty Garden Roof components will be handled by the American
Hydrotech Garden Roof Department – 800.877.6125
o When you order: 1. Credit should have already been established through Customer Service. 2. All communication shall be in written form. Orders should be signed Purchase Orders faxed or emailed to the
Garden Roof Department. 3. Double check ALL quantities before placing your order. Corrections to orders cause delays. Hydrotech is not
responsible for verifying quantities. 4. 50% Down Payment required to reserve plant material. 5. Specialty Garden Roof components cannot be returned.
Typical lead time for specialty Garden Roof components vary:
o LiteTop Growing Media and Aggregate – 2 weeks min. o GardNet – 3-5 days for engineering, 3 weeks min. for components (The installation of GardNet is not covered in
this Installation Guideline) o Plants (Cuttings) – 4-8 weeks (regionally dependent) o Plants (Plugs) – 12-14 weeks min. (regionally dependent) o Plants (Sedum Carpet) – 6-12 weeks min. (regionally dependent) o Plants (Sedum Tile) – 6-8 weeks min. (regionally dependent)
American Hydrotech, Inc. - Contractor Training Manual - © 2012 Page 7
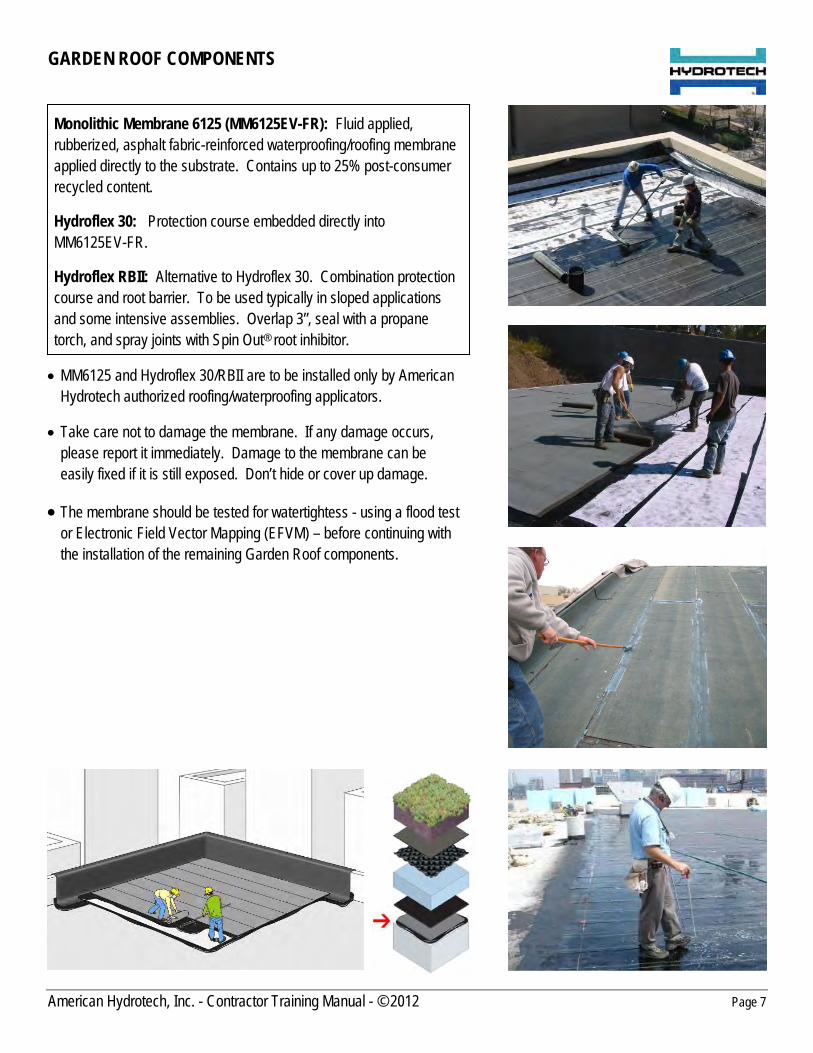
GARDEN ROOF COMPONENTS Monolithic Membrane 6125 (MM6125EV-FR): Fluid applied, rubberized, asphalt fabric-reinforced waterproofing/roofing membrane applied directly to the substrate. Contains up to 25% post-consumer recycled content.
Hydroflex 30: Protection course embedded directly into MM6125EV-FR.
Hydroflex RBII: Alternative to Hydroflex 30. Combination protection course and root barrier. To be used typically in sloped applications and some intensive assemblies. Overlap 3”, seal with a propane torch, and spray joints with Spin Out® root inhibitor.
MM6125 and Hydroflex 30/RBII are to be installed only by American Hydrotech authorized roofing/waterproofing applicators.
Take care not to damage the membrane. If any damage occurs, please report it immediately. Damage to the membrane can be easily fixed if it is still exposed. Don’t hide or cover up damage.
The membrane should be tested for watertightess - using a flood test or Electronic Field Vector Mapping (EFVM) – before continuing with the installation of the remaining Garden Roof components.
Page 8 American Hydrotech, Inc. - Contractor Training Manual - © 2012
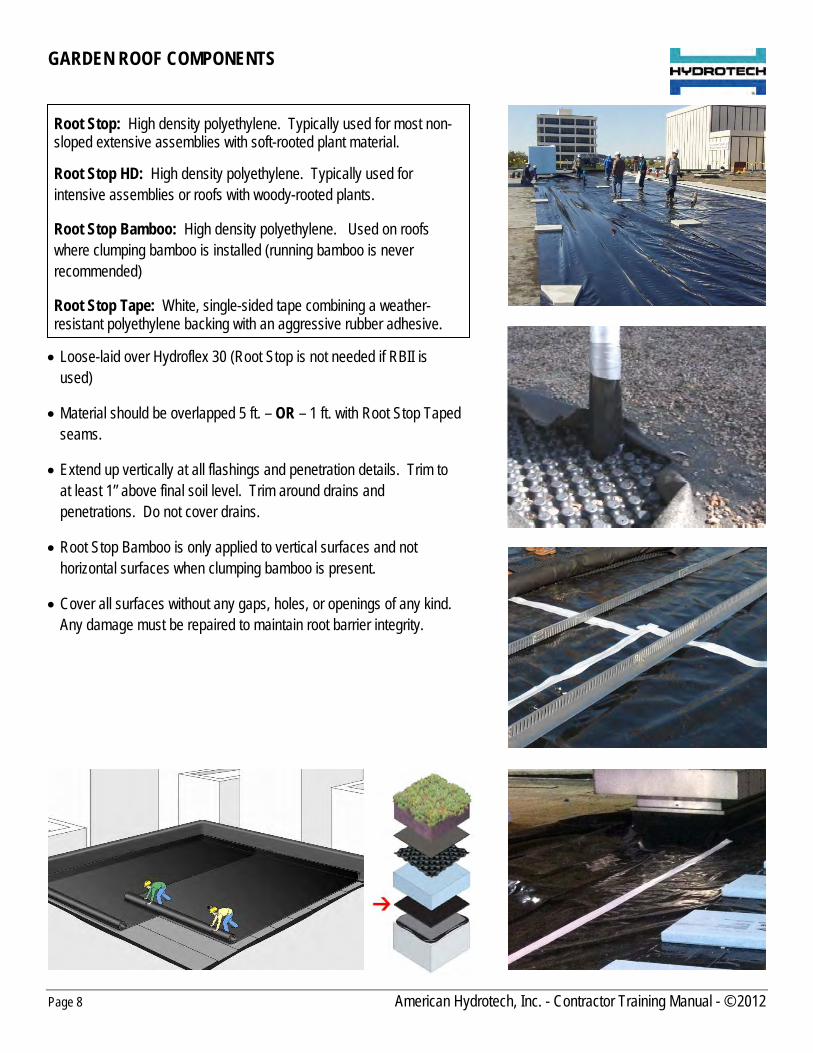
GARDEN ROOF COMPONENTS Root Stop: High density polyethylene. Typically used for most non-sloped extensive assemblies with soft-rooted plant material.
Root Stop HD: High density polyethylene. Typically used for intensive assemblies or roofs with woody-rooted plants.
Root Stop Bamboo: High density polyethylene. Used on roofs where clumping bamboo is installed (running bamboo is never recommended)
Root Stop Tape: White, single-sided tape combining a weather-resistant polyethylene backing with an aggressive rubber adhesive.
Loose-laid over Hydroflex 30 (Root Stop is not needed if RBII is used)
Material should be overlapped 5 ft. – OR – 1 ft. with Root Stop Taped seams.
Extend up vertically at all flashings and penetration details. Trim to at least 1” above final soil level. Trim around drains and penetrations. Do not cover drains.
Root Stop Bamboo is only applied to vertical surfaces and not horizontal surfaces when clumping bamboo is present.
Cover all surfaces without any gaps, holes, or openings of any kind. Any damage must be repaired to maintain root barrier integrity.
American Hydrotech, Inc. - Contractor Training Manual - © 2012 Page 9
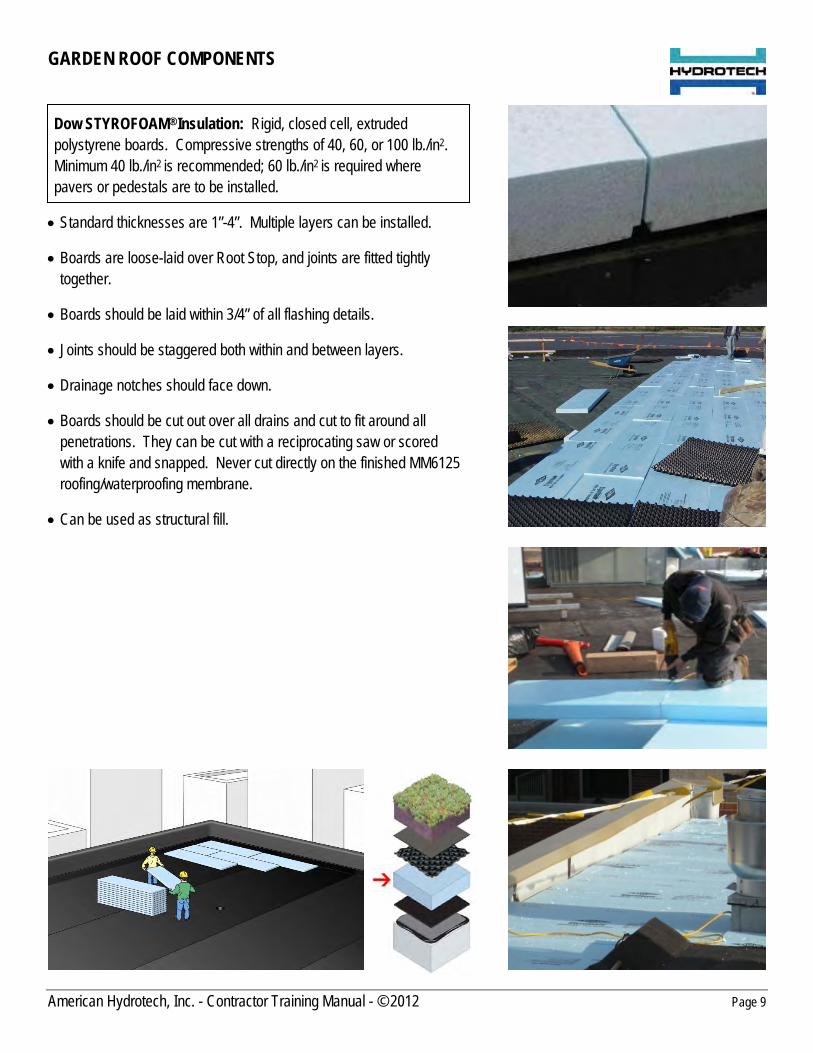
GARDEN ROOF COMPONENTS Dow STYROFOAM® Insulation: Rigid, closed cell, extruded polystyrene boards. Compressive strengths of 40, 60, or 100 lb./in2. Minimum 40 lb./in2 is recommended; 60 lb./in2 is required where pavers or pedestals are to be installed.
Standard thicknesses are 1”-4”. Multiple layers can be installed.
Boards are loose-laid over Root Stop, and joints are fitted tightly together.
Boards should be laid within 3/4” of all flashing details.
Joints should be staggered both within and between layers.
Drainage notches should face down.
Boards should be cut out over all drains and cut to fit around all penetrations. They can be cut with a reciprocating saw or scored with a knife and snapped. Never cut directly on the finished MM6125 roofing/waterproofing membrane.
Can be used as structural fill.
Page 10 American Hydrotech, Inc. - Contractor Training Manual - © 2012
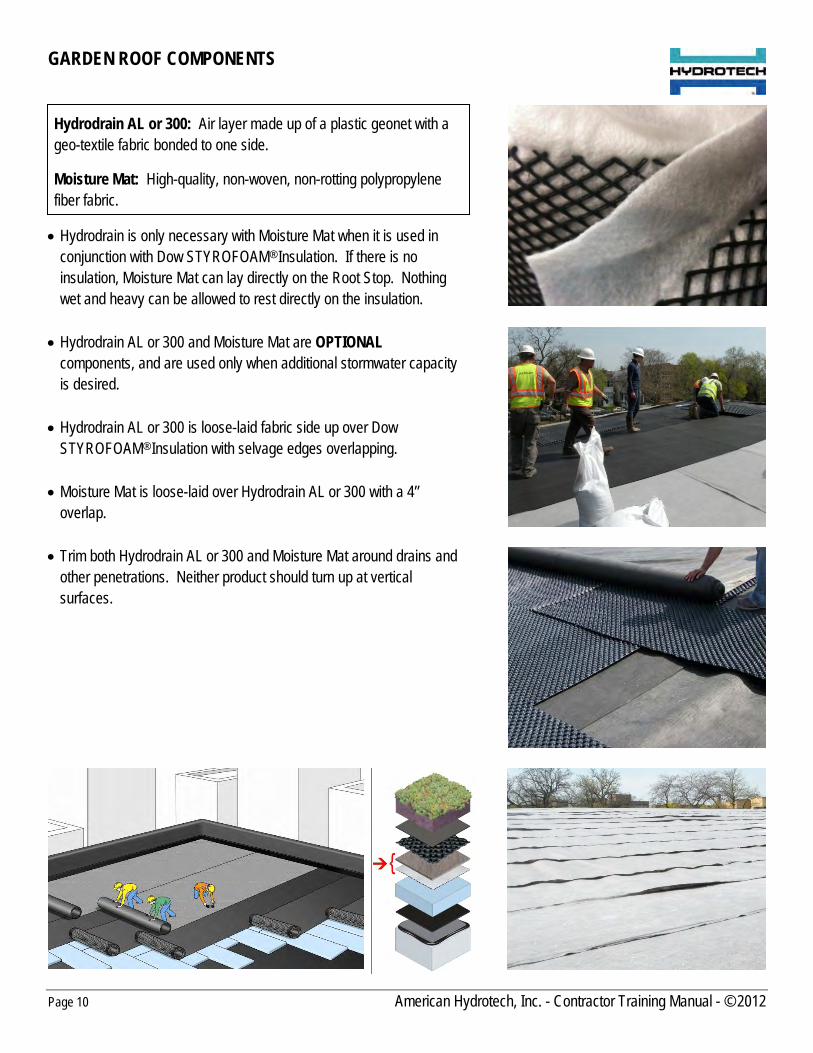
GARDEN ROOF COMPONENTS Hydrodrain AL or 300: Air layer made up of a plastic geonet with a geo-textile fabric bonded to one side.
Moisture Mat: High-quality, non-woven, non-rotting polypropylene fiber fabric.
Hydrodrain is only necessary with Moisture Mat when it is used in conjunction with Dow STYROFOAM® Insulation. If there is no insulation, Moisture Mat can lay directly on the Root Stop. Nothing wet and heavy can be allowed to rest directly on the insulation.
Hydrodrain AL or 300 and Moisture Mat are OPTIONAL components, and are used only when additional stormwater capacity is desired.
Hydrodrain AL or 300 is loose-laid fabric side up over Dow
STYROFOAM® Insulation with selvage edges overlapping. Moisture Mat is loose-laid over Hydrodrain AL or 300 with a 4”
overlap. Trim both Hydrodrain AL or 300 and Moisture Mat around drains and
other penetrations. Neither product should turn up at vertical surfaces.
American Hydrotech, Inc. - Contractor Training Manual - © 2012 Page 11
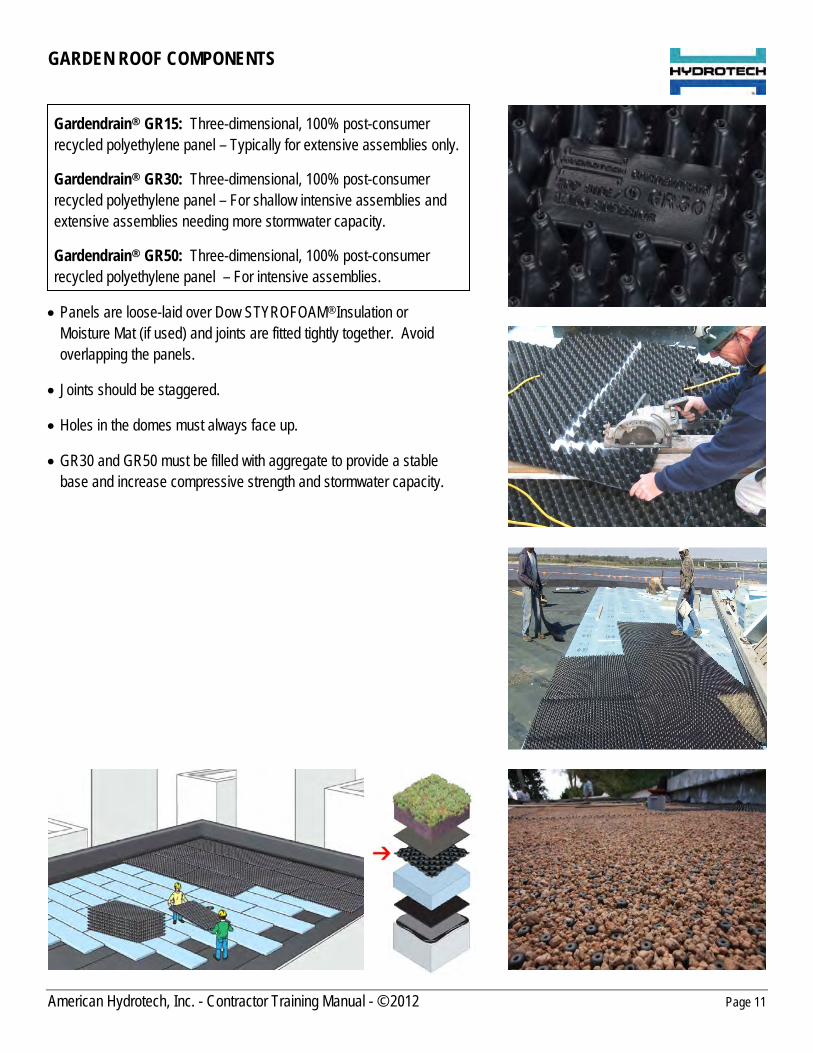
GARDEN ROOF COMPONENTS Gardendrain® GR15: Three-dimensional, 100% post-consumer recycled polyethylene panel – Typically for extensive assemblies only.
Gardendrain® GR30: Three-dimensional, 100% post-consumer recycled polyethylene panel – For shallow intensive assemblies and extensive assemblies needing more stormwater capacity.
Gardendrain® GR50: Three-dimensional, 100% post-consumer recycled polyethylene panel – For intensive assemblies.
Panels are loose-laid over Dow STYROFOAM® Insulation or Moisture Mat (if used) and joints are fitted tightly together. Avoid overlapping the panels.
Joints should be staggered.
Holes in the domes must always face up.
GR30 and GR50 must be filled with aggregate to provide a stable base and increase compressive strength and stormwater capacity.
Page 12 American Hydrotech, Inc. - Contractor Training Manual - © 2012
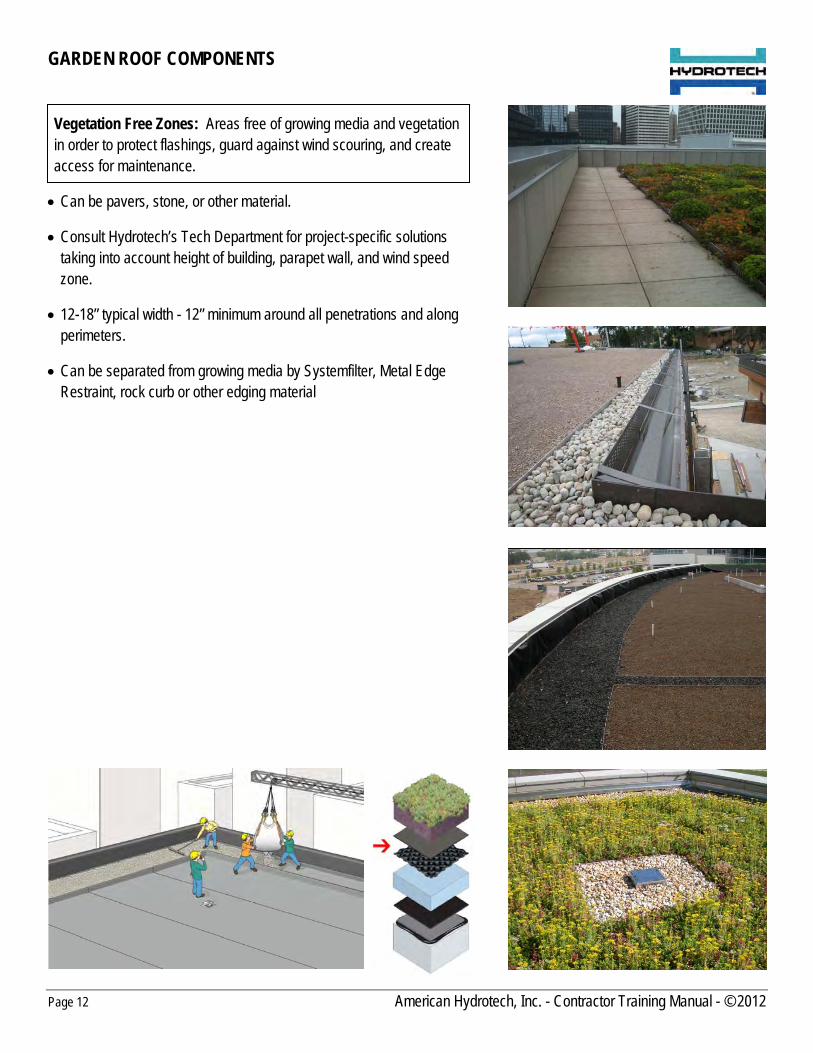
GARDEN ROOF COMPONENTS Vegetation Free Zones: Areas free of growing media and vegetation in order to protect flashings, guard against wind scouring, and create access for maintenance.
Can be pavers, stone, or other material.
Consult Hydrotech’s Tech Department for project-specific solutions taking into account height of building, parapet wall, and wind speed zone.
12-18” typical width - 12” minimum around all penetrations and along perimeters.
Can be separated from growing media by Systemfilter, Metal Edge Restraint, rock curb or other edging material

American Hydrotech, Inc. - Contractor Training Manual - © 2012 Page 13
GARDEN ROOF COMPONENTS Metal Edge Restraint: 10 gauge (0.1 inch thick) unfinished aluminum bent at a 90 degree angle, with a slotted vertical leg to allow for drainage. Standard heights are 3” – 8-1/2”. Custom heights are available. Sections with a “fingered” horizontal leg are also available to accommodate curved sections.
Used to contain growing media and divide it from “vegetation free zones” around drains and other penetrations.
Can be placed either on top of or below Gardendrain. Ends can be fastened together using connector clips.
Pre-bent corner sections are used to for outside/inside corners.
Flanges can face in under growing media or face out under ballast.
Edging should be at least ½” above final growing media level. If edging is placed below the Gardendrain, remember to include the height of that product when figuring the appropriate edging height.

Page 14 American Hydrotech, Inc. - Contractor Training Manual - © 2012
GARDEN ROOF COMPONENTS Inspection Chamber: 18 gauge stainless steel over-drain inspection boxes, with perforated sides and removable lids. Chambers come in 11”x11” and 18”x18”. Extensions are available in 1”, 3”, and 8-1/2” heights to increase the height for deeper growing media applications.
Systemfilter should cover the sides of the Inspection Chamber and be trimmed to the height of the ballast.
Ballast/Soil can be no higher than ½” below the bottom of the lid. Vegetation Free Zones should be a minimum 12” around all drains.
American Hydrotech, Inc. - Contractor Training Manual - © 2012 Page 15
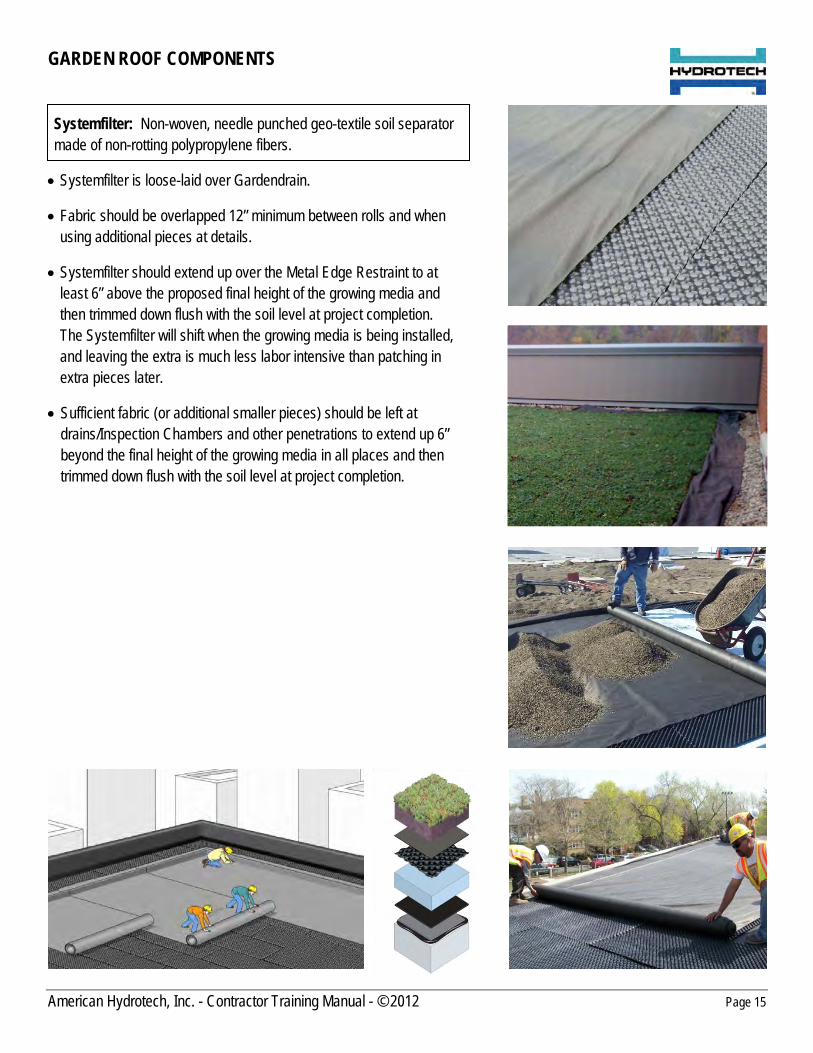
GARDEN ROOF COMPONENTS Systemfilter: Non-woven, needle punched geo-textile soil separator made of non-rotting polypropylene fibers.
Systemfilter is loose-laid over Gardendrain.
Fabric should be overlapped 12” minimum between rolls and when using additional pieces at details.
Systemfilter should extend up over the Metal Edge Restraint to at least 6” above the proposed final height of the growing media and then trimmed down flush with the soil level at project completion. The Systemfilter will shift when the growing media is being installed, and leaving the extra is much less labor intensive than patching in extra pieces later.
Sufficient fabric (or additional smaller pieces) should be left at drains/Inspection Chambers and other penetrations to extend up 6” beyond the final height of the growing media in all places and then trimmed down flush with the soil level at project completion.
Page 16 American Hydrotech, Inc. - Contractor Training Manual - © 2012
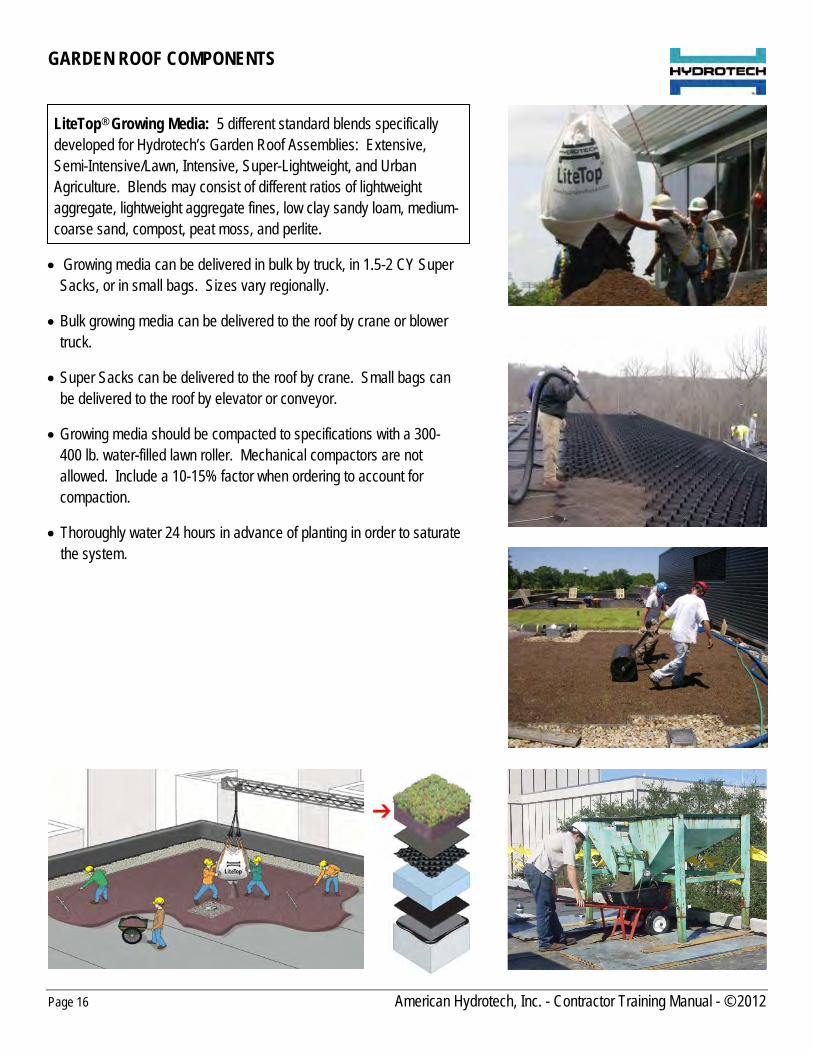
GARDEN ROOF COMPONENTS LiteTop® Growing Media: 5 different standard blends specifically developed for Hydrotech’s Garden Roof Assemblies: Extensive, Semi-Intensive/Lawn, Intensive, Super-Lightweight, and Urban Agriculture. Blends may consist of different ratios of lightweight aggregate, lightweight aggregate fines, low clay sandy loam, medium-coarse sand, compost, peat moss, and perlite.
Growing media can be delivered in bulk by truck, in 1.5-2 CY Super Sacks, or in small bags. Sizes vary regionally.
Bulk growing media can be delivered to the roof by crane or blower truck.
Super Sacks can be delivered to the roof by crane. Small bags can be delivered to the roof by elevator or conveyor.
Growing media should be compacted to specifications with a 300-400 lb. water-filled lawn roller. Mechanical compactors are not allowed. Include a 10-15% factor when ordering to account for compaction.
Thoroughly water 24 hours in advance of planting in order to saturate the system.
American Hydrotech, Inc. - Contractor Training Manual - © 2012 Page 17
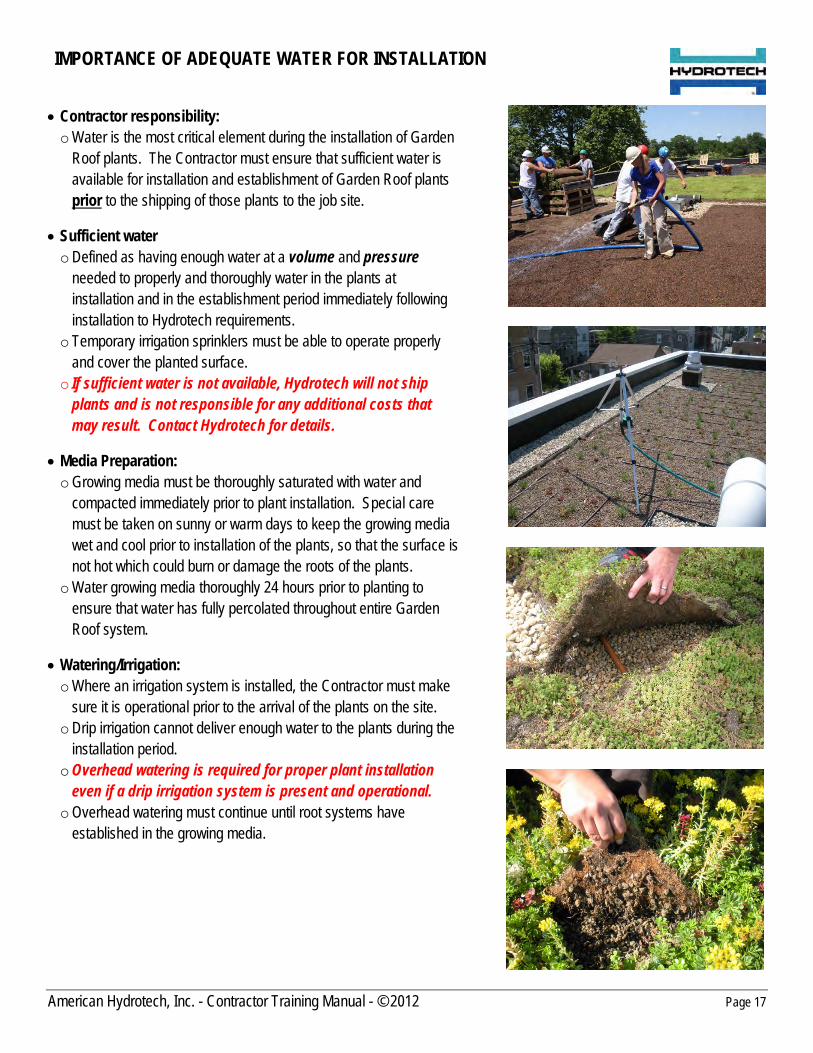
IMPORTANCE OF ADEQUATE WATER FOR INSTALLATION Contractor responsibility:
o Water is the most critical element during the installation of Garden Roof plants. The Contractor must ensure that sufficient water is available for installation and establishment of Garden Roof plants prior to the shipping of those plants to the job site.
Sufficient water o Defined as having enough water at a volume and pressure
needed to properly and thoroughly water in the plants at installation and in the establishment period immediately following installation to Hydrotech requirements.
o Temporary irrigation sprinklers must be able to operate properly and cover the planted surface.
o If sufficient water is not available, Hydrotech will not ship plants and is not responsible for any additional costs that may result. Contact Hydrotech for details.
Media Preparation: o Growing media must be thoroughly saturated with water and
compacted immediately prior to plant installation. Special care must be taken on sunny or warm days to keep the growing media wet and cool prior to installation of the plants, so that the surface is not hot which could burn or damage the roots of the plants.
o Water growing media thoroughly 24 hours prior to planting to ensure that water has fully percolated throughout entire Garden Roof system.
Watering/Irrigation: o Where an irrigation system is installed, the Contractor must make
sure it is operational prior to the arrival of the plants on the site. o Drip irrigation cannot deliver enough water to the plants during the
installation period. o Overhead watering is required for proper plant installation
even if a drip irrigation system is present and operational. o Overhead watering must continue until root systems have
established in the growing media.

Page 18 American Hydrotech, Inc. - Contractor Training Manual - © 2012
GARDEN ROOF COMPONENTS Plants - Cuttings: Cuttings are harvested from mature sedum plants and shipped in plastic bags in boxes to the job site. Cuttings mixes can be customized based on customer preferences. Cuttings are not available or appropriate in all areas of the country. Contact Hydrotech for further information. Crew of 5 per 8 hour day: 20,000-22,000 s.f.
. Delivery: o When delivered, sedum cuttings must be unpacked and installed as soon
as possible. If they can’t be sown the day of delivery, cuttings can be left in the boxes, but they must be opened and stored in a cool, shaded place for up to 1-2 days.
o Fluff and mist them with water as necessary. Media Preparation:
o Growing media should be thoroughly compacted and watered before installing cuttings.
Cutting Installation: o Cuttings should be installed in either late spring (4 weeks after last frost)
or early fall (4 weeks before first frost). Different regions will have different preferred installation dates. Contact Hydrotech for regional specifics.
o Cuttings are spread by hand on the surface of the media at the rate as specified in the plans and specifications.
Hydro-Mulching: o Cuttings shall be covered with a wet hydro-mulch immediately after
installation. Apply mulch at rate of 7 lbs. per 100 SF (3000 lbs. per acre). Hydromulch shall have a tackifier mixed into the slurry to aid in binding the mulch to the growing media and cuttings.
o Care must be taken to prevent drifting of hydromulch into vegetation-free zones or onto parapets, mechanical equipment or other finished surfaces.
Dry Mulching: o Where wet hydromulch is not practical, dry mulch with an integral
tackifier can be utilized. o Install dry mulch at rate of 7 lbs. per 100 SF (3000 lbs. per acre).
Immediately after installation of dry mulch, spray with water to activate tackifier and thoroughly anchor cuttings.
o On windy days, mulch and water should be installed concurrently to prevent drifting of mulch to vegetation-free zones or onto parapets, mechanical equipment or other finished surfaces. Contact Hydrotech for recommended products.
Watering/Irrigation: o Engage permanent drip or overhead irrigation system (if installed). o Engage temporary overhead irrigation system to thoroughly water-in
cuttings. Maintenance
o Required maintenance begins immediately after installation is completed.
American Hydrotech, Inc. - Contractor Training Manual - © 2012 Page 19
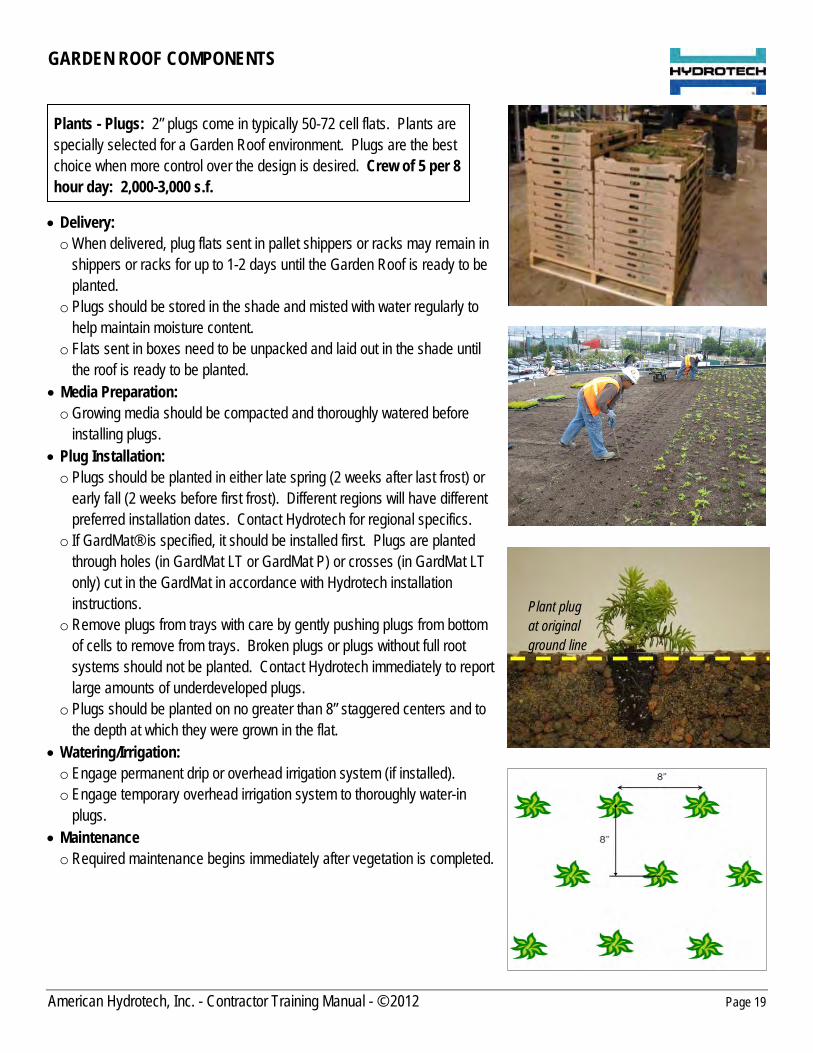
Plant plug at original ground line
GARDEN ROOF COMPONENTS Plants - Plugs: 2” plugs come in typically 50-72 cell flats. Plants are specially selected for a Garden Roof environment. Plugs are the best choice when more control over the design is desired. Crew of 5 per 8 hour day: 2,000-3,000 s.f.
Delivery: o When delivered, plug flats sent in pallet shippers or racks may remain in
shippers or racks for up to 1-2 days until the Garden Roof is ready to be planted.
o Plugs should be stored in the shade and misted with water regularly to help maintain moisture content.
o Flats sent in boxes need to be unpacked and laid out in the shade until the roof is ready to be planted.
Media Preparation: o Growing media should be compacted and thoroughly watered before
installing plugs. Plug Installation:
o Plugs should be planted in either late spring (2 weeks after last frost) or early fall (2 weeks before first frost). Different regions will have different preferred installation dates. Contact Hydrotech for regional specifics.
o If GardMat® is specified, it should be installed first. Plugs are planted through holes (in GardMat LT or GardMat P) or crosses (in GardMat LT only) cut in the GardMat in accordance with Hydrotech installation instructions.
o Remove plugs from trays with care by gently pushing plugs from bottom of cells to remove from trays. Broken plugs or plugs without full root systems should not be planted. Contact Hydrotech immediately to report large amounts of underdeveloped plugs.
o Plugs should be planted on no greater than 8” staggered centers and to the depth at which they were grown in the flat.
Watering/Irrigation: o Engage permanent drip or overhead irrigation system (if installed). o Engage temporary overhead irrigation system to thoroughly water-in
plugs. Maintenance
o Required maintenance begins immediately after vegetation is completed.

Page 20 American Hydrotech, Inc. - Contractor Training Manual - © 2012
GARDEN ROOF COMPONENTS Plants – Instagreen® Sedum Carpet : 9-15 sedum varieties are field grown into coconut coir mats. When harvested, plants are trimmed and mats are cut into 25 s.f. (4’x6.25’) pieces and rolled. Rolls are approximately 80 lbs. each dry, 125 lbs. when wet. Crew of 5 per 8 hour day: 10,000-12,000 s.f.
Delivery: o Sedum Carpet is generally delivered in a temperature-controlled truck on
pallets and should be installed the same day. o If same-day installation isn’t possible, Sedum Carpet must be unrolled in
a cool, shady area and watered to help maintain moisture content. Media Preparation:
o Growing media should be compacted and thoroughly watered before installing.
o If growing media has been in place for longer than two weeks or exhibits signs that larger aggregates have migrated to the surface, lightly rake media to bring finer media components to surface immediately prior to installation of Sedum Carpet.
Sedum Carpet Installation: o Carefully transfer rolls of Sedum Carpet to the surface of the growing
media taking care not to dislodge the plants in Sedum Carpet. o Unroll Sedum Carpet over wet growing media. Fit Sedum Carpet pieces
snugly against each other with no overlap or gaps. Stagger joints in rows of Sedum Carpet.
o If growing media from carpet is spilled onto adjacent Sedum Carpet, brush it away to expose plants below.
o Cut Sedum Carpet to fit around edging, drains and other penetrations. o Make sure Sedum Carpet is in full contact with the surface of the growing
media below. Do not roll Sedum Carpet after installation. Plugs:
o Where greater plant diversity or aesthetic interest is desired, plugs can be installed through the sedum carpet.
o Where specified, install plugs through Sedum Carpet to specified pattern. Cut small openings in Sedum Carpet and insert plugs into media below.
Watering/Irrigation: o Engage permanent drip or overhead irrigation system (if installed). o Engage temporary overhead irrigation system to thoroughly water in
Sedum Carpet. Maintenance:
o Required maintenance begins immediately after vegetation is completed.

American Hydrotech, Inc. - Contractor Training Manual - © 2012 Page 21
GARDEN ROOF COMPONENTS Plants – Instagreen® Sedum Tile: 6-8 sedum varieties are grown into 15” x 20” (2.08 s.f.) coconut coir tiles. Tiles are 4.5 lb. per square foot when saturated. Tiles can be grown with custom ordered mixes in as little as 8-10 weeks. Crew of 5 per 8 hour day: 10,000-12,000 s.f.
Delivery: o Sedum Tile is generally delivered in a temperature-controlled truck on
pallets and must be installed the same day. o If same-day installation isn’t possible, Sedum Tile must be unpacked and
laid out in a cool shady area and watered. Media Preparation:
o Growing media should be thoroughly compacted and watered before installing.
o If growing media has been in place for longer than two weeks or exhibits signs that larger aggregates have migrated to the surface, lightly rake media to bring finer media components to surface immediately prior to installation of Sedum Tile.
Tile Installation: o Install Sedum Tile over wet growing media. o Pieces should fit snugly against each other with no overlaps or gaps.
Stagger joints in rows of Sedum Tile. o Cut Sedum Tile to fit around edgings, drains and other penetrations. o Make sure Sedum Tile is in full contact with the surface of the growing
media below. Do not roll Sedum Tile after installation. Plugs:
o Plugs can be planted through Sedum Tile for a more customized look and more variety.
o Where specified, install plugs through Sedum Tile to specified pattern. Cut small opening in Sedum Tile and insert plug into media below Sedum Tile.
Watering/Irrigation: o Engage permanent drip or overhead irrigation system (if installed). o Engage temporary overhead irrigation system to thoroughly water in
Sedum Tile. Maintenance
o Required maintenance begins immediately after vegetation is completed.

Page 22 American Hydrotech, Inc. - Contractor Training Manual - © 2012
GARDEN ROOF COMPONENTS GardMat LT: Heavy-duty erosion control blanket made of 100% coconut fiber stitched between nettings. LT lasts 18-24 months and can be used on slopes up to 12:12.
GardMat P: Extra-heavy-duty erosion control blanket made of 100% coconut fiber between strong layers of UV-stable, non-biodegradable polypropylene netting. P is used for slopes up to 12:12, high-wind situations, and other areas where erosion control is a major concern.
Disk Anchor: The Garden Roof Disk Anchor is composed of a recycled polyethylene base disk and shaft piece and a steel top disk.
All GardMat products should be rolled out and staked into place using Hydrotech’s disk anchors and recommended staking patterns.
The appropriate product and staking pattern will vary depending on the wind concerns of a specific project. Contact Hydrotech for recommendations.
Tuck the GardMat underneath the ballast at all Vegetation Free Zones.
GardMat is only used with plugs and never with cuttings or Sedum Carpet/Tile. Plugs should be planted through holes cut into GardMat of a sufficient size for planting and optimum plant growth.

American Hydrotech, Inc. - Contractor Training Manual - © 2012 Page 23
INSTALLATION COMPLETION Watering/Irrigation:
o Make sure the project has been thoroughly and completely watered and that temporary overhead irrigation is established and functioning properly.
o If permanent irrigation is installed, be sure it is functioning properly.
Cleaning: o Clear drains, vegetation free zones, parapets and any adjacent surfaces
of debris and stray plant material. o Dispose of, reuse, or recycle any waste materials including boxes,
bags, and pallets.
Installation Photos: o Provide 10-20 high-resolution digital photographs of completed
installation to Hydrotech showing completed installation. Take photos of all parts of the Garden Roof installation including perimeters, vegetation free zones, inspection chambers, ladder areas, and other areas of interest.
o Hi-resolution files should be greater that 250Kb in size. Low-resolution files (e.g. files from phones) are often blurry and do not capture enough fine detail.
o Please include project name and date in the file name and submit photos electronically to Hydrotech.

Page 24 American Hydrotech, Inc. - Contractor Training Manual - © 2012
MAINTENANCE INTRODUCTION The Importance of Maintenance
A successful vegetative roof is one that receives proper maintenance, starting with the installation of the plant material. There is no such thing as a no-maintenance vegetative roof. Keeping a watchful eye on the roof will maximize plant health, maintain the aesthetics of the roof, and ensure any issues such as clogged drains, wind erosion, and irrigation malfunctions are handled before they become problems. A well thought out and executed maintenance plan will make certain the vegetative roof is performing as intended and meets the owner’s expectations.
What You Need to Know
The plan for maintenance of a vegetative roof must be considered in the design stage and in place before its installation so the roof isn’t neglected immediately after completion. There may be an extended period of time between the installation of the plant material and when the owner takes possession/responsibility. During this time it may not be clear where the maintenance responsibility lies, especially when the installing contractor is not responsible for the roof’s initial and/or long term maintenance. The owner must understand what is required in order to protect their investment. Each project is unique, and the best way to handle this transition period will vary. As the party responsible for the maintenance of a vegetative roof, it is important to understand what is required in order to keep valid any warranties associated with that roof. This includes not only performing the maintenance in a professional manner but also documenting and reporting the maintenance performed and the condition of the roof:
Sign and return the Acknowledgment of Receipt page stating you understand the tasks to be performed and the schedule on which they will be performed.
Conduct maintenance visits to the roof and perform the tasks outlined in the schedule as required.
Complete a Visitation Checklist at every required time interval listed on the Checklist and return it with photographs of sufficient number to document the general condition of the roof and any areas of concern.

American Hydrotech, Inc. - Contractor Training Manual - © 2012 Page 25
ACKNOWLEDGMENT OF RECEIPT Visitation Checklist
All pertinent information recorded by the Landscape Maintenance Contractor shall be submitted to both the Property Owner and Hydrotech at the required intervals listed on the Visitation Checklist and within ten (10) days of the date of the maintenance visit. Each submission shall include the following:
A signed and dated Visitation Checklist verifying the tasks performed and thoroughly and completely describing any items of concern.
Photographs of sufficient number to document the general condition of the roof and any areas of concern.
American Hydrotech Inc. Extensive Vegetation Warranty
Specific dates of maintenance/warranty visits and site inspections are flexible, but the contractor must perform the required tasks within the specified time frame. Timing of visits may be delayed, rescheduled, or added depending on factors such as climatic conditions, growing seasons, client concerns, or acts of nature. Coverage rates should be as follows:
Sedum Plugs and Cuttings – Thrive and Coverage: 50% minimum coverage after the first year, 80% minimum coverage after the second year.
Sedum Carpet and Sedum Tile – Thrive and Coverage: 90% minimum coverage after the first and second years. All other vegetation - Thrive only: Plants selected by Hydrotech will do well in the environment in which they were
installed.
At the end of the two year maintenance period Hydrotech’s warranty obligations to the owner will have been fulfilled.
Determining Plant Coverage
Warranty coverage percentage is to be determined for each 1000 square foot grid area of roof surface. Non-covered areas smaller than one-half of a square foot will not be counted against the overall warranted coverage percentage. Overall coverage is based on a visual inspection under these terms and is subject to Hydrotech approval prior to shipping any supplemental plant material. The maintenance contractor and/or owner is responsible for all labor costs during the 2-year maintenance period. I, the undersigned, acknowledge that I have thoroughly read and understand the American Hydrotech, Inc.’s Extensive Garden Roof Maintenance Plan and agree to meet the requirements stated within. I further acknowledge receipt of the accompanying Visitation Checklist that is to be periodically submitted to both the Property Owner and American Hydrotech, Inc.
Maintenance Contractor: ____________________________________________
Print Name: ____________________________________________ Title:______________________ Maintenance Contractor Representative Signature: ____________________________________________ Date:______________________
Please return to: American Hydrotech, Inc. Phone: (312) 337-4998 Email: [email protected] 303 E. Ohio Street, Suite 2700 Fax: (312) 661-0731 Chicago, IL 60611
Page 26 American Hydrotech, Inc. - Contractor Training Manual - © 2012
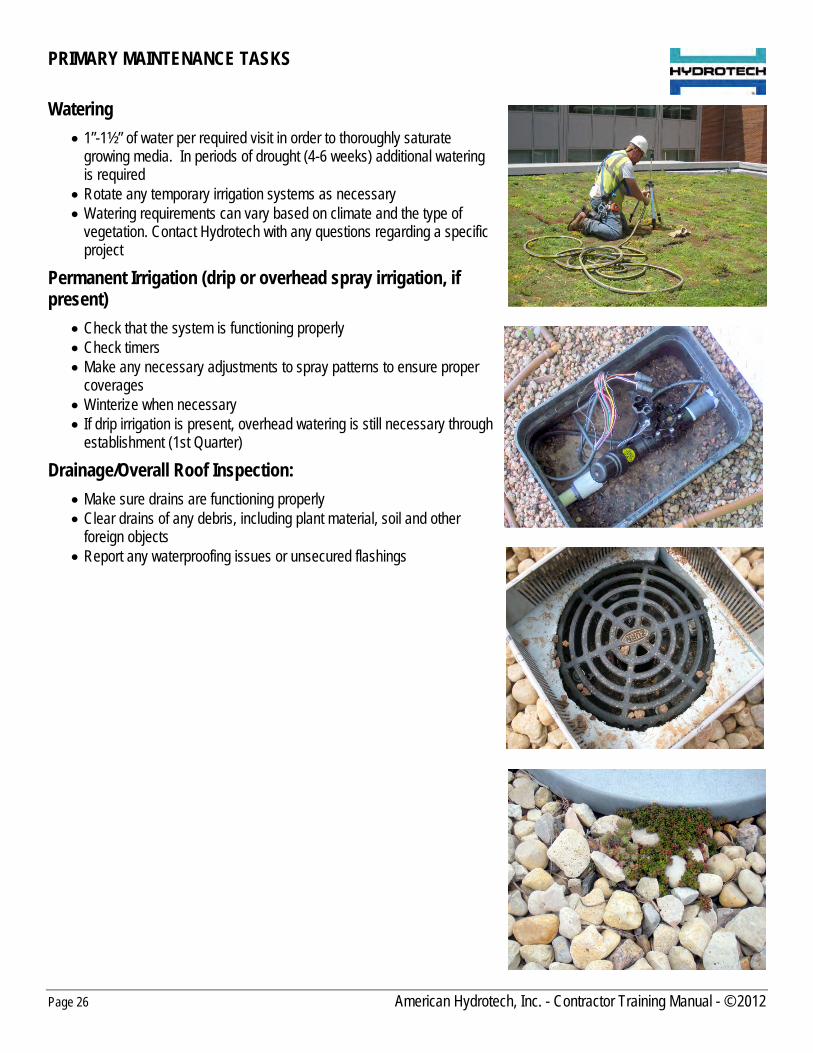
PRIMARY MAINTENANCE TASKS
Watering
1”-1½” of water per required visit in order to thoroughly saturate growing media. In periods of drought (4-6 weeks) additional watering is required
Rotate any temporary irrigation systems as necessary Watering requirements can vary based on climate and the type of
vegetation. Contact Hydrotech with any questions regarding a specific project
Permanent Irrigation (drip or overhead spray irrigation, if present)
Check that the system is functioning properly Check timers Make any necessary adjustments to spray patterns to ensure proper
coverages Winterize when necessary If drip irrigation is present, overhead watering is still necessary through
establishment (1st Quarter)
Drainage/Overall Roof Inspection:
Make sure drains are functioning properly Clear drains of any debris, including plant material, soil and other
foreign objects Report any waterproofing issues or unsecured flashings

American Hydrotech, Inc. - Contractor Training Manual - © 2012 Page 27
Oxalis
Nutsedge
Oxalis
PRIMARY MAINTENANCE TASKS Hand Weeding:
Be aware of which plants are intended to be growing on the roof and which ones aren’t. Remove any plants not intended to be growing on the roof.
Please contact Hydrotech if you do not have a list of the plants originally installed. Prompt removal of weeds will prevent them from becoming a much larger future problem. Certain weeds require
specialized handling and treatment to minimize or eliminate future re-growth. Remove ALL plants from Vegetation Free Zones at perimeters, drains and other penetrations.
For more serious weed problems, please contact Hydrotech for alternative methods of weed control.
Poplar seedlings
Purslane Lambsquarter
Nut Sedge
Spurge

Page 28 American Hydrotech, Inc. - Contractor Training Manual - © 2012
SECONDARY MAINTENANCE TASKS General Plant Inspection
Check plant material for overall health Look for signs of pests or disease Replant any viable plants, including Sedum Carpet and Sedum Tile as well as GardMat, that have been uprooted by
wind, erosion, or animals
LiteTop® Growing Media Replacement
Replace LiteTop Growing Media lost or displaced by wind or water erosion Report any major erosion issues to Hydrotech immediately
Debris and Trash Removal
Remove and properly dispose of any foreign objects, debris or garbage Make sure any recyclable materials are placed in the proper receptacles Remove any loose metal plates from GardMat Disk Anchors. At the end of the two-year maintenance period, all
metal plates should be removed control
Plant Replacement
See Hydrotech’s extensive vegetation warranty for plant performance standards Replace plants as necessary. Any warranty claims must be validated by a Hydrotech representative before
replacement plants can be ordered
OPTIONAL TASKS LiteTop Growing Media Testing and Monitoring
Test for pH, nutrient levels, salt content, etc. Contact Hydrotech for approved soil testing facilities. After analysis, Hydrotech can assist in determining any needed solutions.
Fertilizer Application
Do not apply fertilizer without the consent of Hydrotech and the Property Owner. Hydrotech can make recommendations for appropriate products.
Pesticide Application
Do not apply pesticide without the consent of Hydrotech and the Property Owner. Hydrotech can make recommendations for appropriate products and procedures.
Herbicide Application
Do not apply herbicide without the consent of Hydrotech and the Property Owner. Be careful not to impact the desirable plant material. Hydrotech can make recommendations for appropriate products and procedures.

American Hydrotech, Inc. - Contractor Training Manual - © 2012 Page 29
MAINTENANCE SCHEDULE
Please note the schedule of tasks listed may vary based on the region in which the project is located and the time of year the project was installed. If the growing season ends before the First Quarter tasks have been performed in their entirety, the contractor must start at that point after last frost in the spring. Some tasks may not need to be performed at every scheduled visit. Please contact Hydrotech with any specific questions.

Page 30 American Hydrotech, Inc. - Contractor Training Manual - © 2012
VISITATION CHECKLIST PROJECT NAME:
Location: Date of Visit:
Installation Contractor: Date of Installation:
Maintenance Contractor: Maint. Contract in place: Yes No
Water Sources at roof: Volume (GPM) Pressure (PSI) Length of Contract: An in-place and active maintenance contract is required for the warranty to be in effect.
Original Plant Material (check all that apply): Plugs Cuttings Sedum Carpet Sedum Tile Garden Tray Other:_____________
Scheduled Visit (check one): (Note: A visitation checklist is NOT required with every visit but should be submitted at the frequency outlined below. Consult the maintenance schedule on the previous page for a recommended visit schedule. Dependent on the date of installation and regional and climatic conditions, the frequency of maintenance may vary. Contact Hydrotech for details.
1st Quarter by Week: 1 2 3 4 5 6 7 8 9 10 11 12
First Year by Month: 1 2 3 4 5 6 7 8 9 10 11 12 see 1st Quarter above
Second Year by Quarter: 1 2 3 4
Photos submitted digitally? Yes No (See next page for instructions on submitting photos)
Primary Tasks Comments:
Chec
k all t
hat a
pply Watering
Irrigation Inspection Drainage Inspection Hand Weeding
Secondary Tasks Comments:
Chec
k all t
hat a
pply General Plant Inspection
LiteTop Replacement Debris / Trash Removal Plant Replacement
Optional Tasks Comments: (list any tasks performed) Additional comments
Estimated Plant Coverage at time of this visit: _______% Copy submitted to Property Owner? Yes No
I hereby certify that the above tasks have been performed in accordance with the American Hydrotech, Inc. Garden Roof Maintenance Plan.
Print Name: Title: Maintenance Contractor Representative Signature: Date: Please return to: American Hydrotech, Inc. Phone: (312) 337-4998 Email: [email protected] 303 E. Ohio Street, Suite 2700 Fax: (312) 661-0731
Chicago, IL 60611
American Hydrotech, Inc. - Contractor Training Manual - © 2012 Page 31
INSTRUCTION FOR SUBMITTING PHOTOS
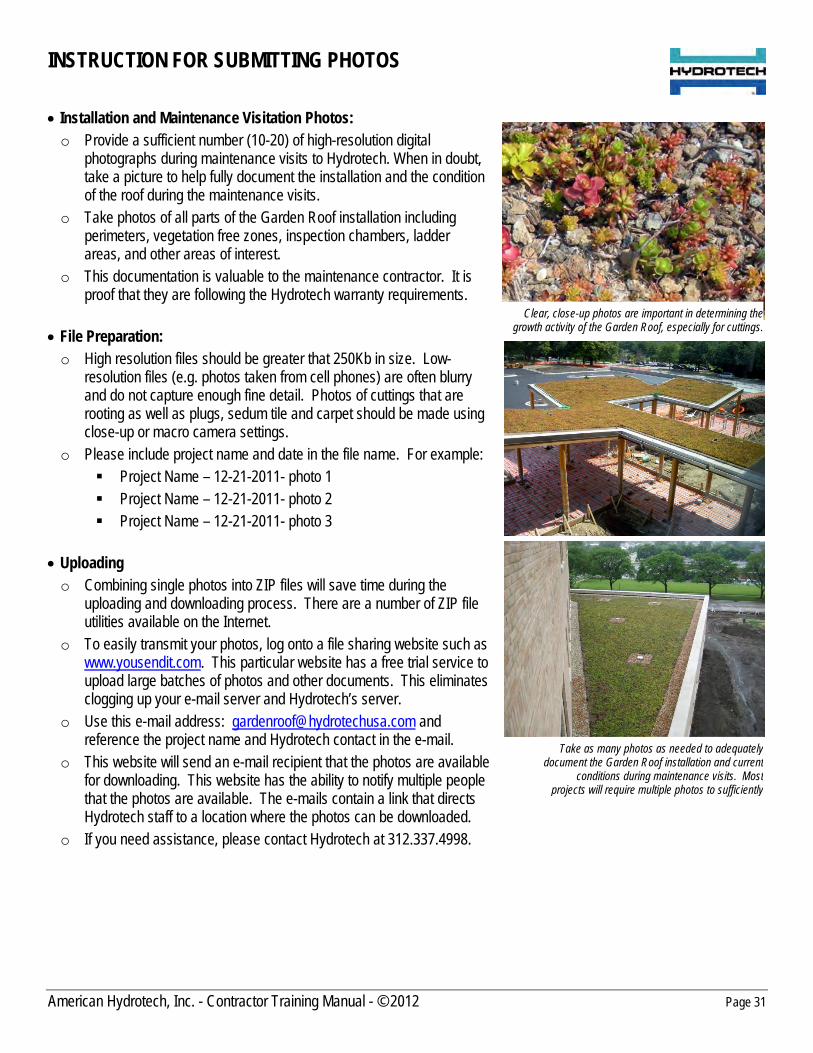
Installation and Maintenance Visitation Photos:
o Provide a sufficient number (10-20) of high-resolution digital photographs during maintenance visits to Hydrotech. When in doubt, take a picture to help fully document the installation and the condition of the roof during the maintenance visits.
o Take photos of all parts of the Garden Roof installation including perimeters, vegetation free zones, inspection chambers, ladder areas, and other areas of interest.
o This documentation is valuable to the maintenance contractor. It is proof that they are following the Hydrotech warranty requirements.
File Preparation: o High resolution files should be greater that 250Kb in size. Low-
resolution files (e.g. photos taken from cell phones) are often blurry and do not capture enough fine detail. Photos of cuttings that are rooting as well as plugs, sedum tile and carpet should be made using close-up or macro camera settings.
o Please include project name and date in the file name. For example: Project Name – 12-21-2011- photo 1 Project Name – 12-21-2011- photo 2 Project Name – 12-21-2011- photo 3
Uploading
o Combining single photos into ZIP files will save time during the uploading and downloading process. There are a number of ZIP file utilities available on the Internet.
o To easily transmit your photos, log onto a file sharing website such as www.yousendit.com. This particular website has a free trial service to upload large batches of photos and other documents. This eliminates clogging up your e-mail server and Hydrotech’s server.
o Use this e-mail address: [email protected] and reference the project name and Hydrotech contact in the e-mail.
o This website will send an e-mail recipient that the photos are available for downloading. This website has the ability to notify multiple people that the photos are available. The e-mails contain a link that directs Hydrotech staff to a location where the photos can be downloaded.
o If you need assistance, please contact Hydrotech at 312.337.4998.
Clear, close-up photos are important in determining thegrowth activity of the Garden Roof, especially for cuttings.
Take as many photos as needed to adequatelydocument the Garden Roof installation and current
conditions during maintenance visits. Mostprojects will require multiple photos to sufficiently

Page 32 American Hydrotech, Inc. - Contractor Training Manual - © 2012

American Hydrotech, Inc. - Contractor Training Manual - © 2012 Page 33
PRODUCT DATA
WEIGHT SIZE THICKNESS
MM6125EV-FR
1.4 lb./s.f. installed (7.3 kg./sq. m.)
50 lb. solid cakes 10 cakes per 55 gal. drum or
1 cake cardboard cartons 215 mils
Hydroflex 30
.75 lb./s.f. (3.66 kg/sq. m.)
39.4 ft. x 66 ft./50.25 ft. (1 m. x 20 m/15.33 m)
in rolls
.085” (2.2 mm)
Hydroflex RB II
.91 lb./s.f. (4.4 kg/sq. m)
39.4 ft. x 33.4 ft. (1 m x 10.2 m)
in rolls
Effective coverage: 98 sf.
160 mils (.16 in.)
(4.0 mm)
WEIGHT SIZE THICKNESS Root Stop
.05 lb./s.f. (.24 kg/sq.m)
15 ft. x 100 ft. (5.4 m x 36.3 m)
in rolls
Effective coverage: 950 s.f. with 5’ laps, 1386 s.f. with
1’ taped laps
10 mils (.01 in.)
( .25 mm)
Root Stop HD
.17 lb./s.f. (.83 kg/sq.m)
15 ft. x 100 ft. (5.4 m x 36.3 m)
in rolls
Effective coverage: 950 s.f. with 5’ laps, 1386 s.f. with 1’
taped laps
Root Stop Bamboo
.32 lb./s.f. (4.4 kg/sq.m)
15 ft. x 100 ft. (5.4 m x 36.3 m)
in rolls
60 mils (.06 in.)
(1.4 mm)
Page 34 American Hydrotech, Inc. - Contractor Training Manual - © 2012
PRODUCT DATA
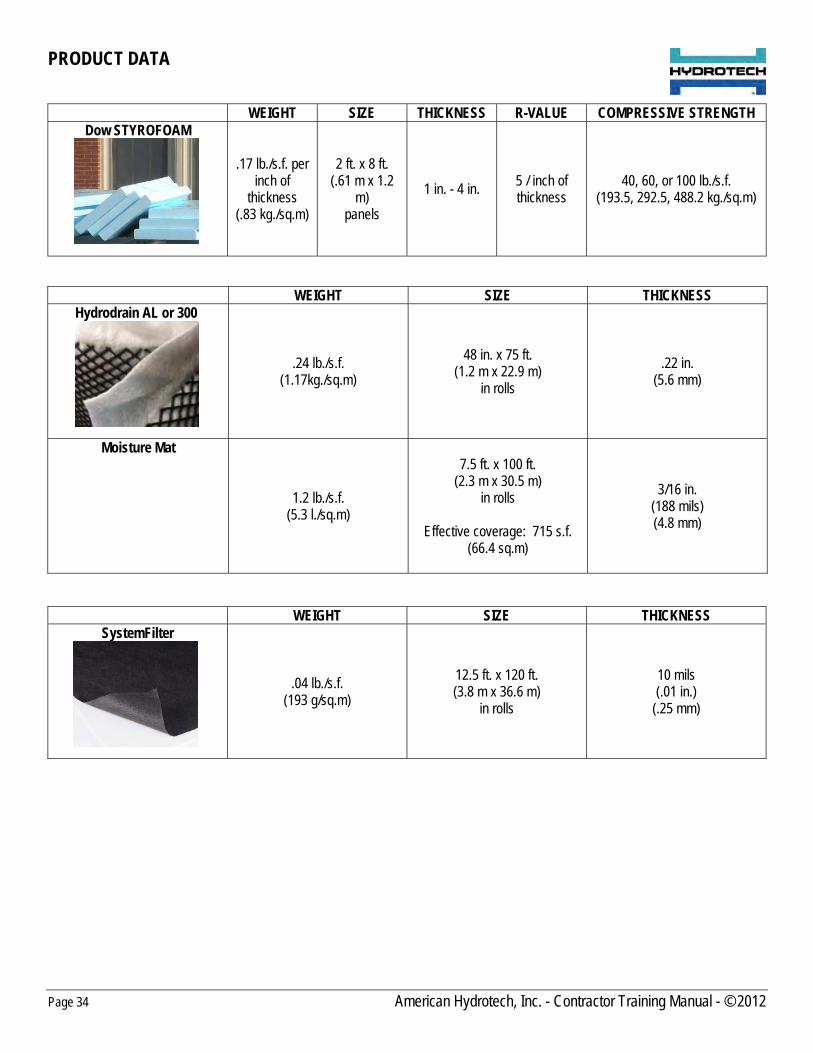
WEIGHT SIZE THICKNESS R-VALUE COMPRESSIVE STRENGTH
Dow STYROFOAM
.17 lb./s.f. per inch of
thickness (.83 kg./sq.m)
2 ft. x 8 ft. (.61 m x 1.2
m) panels
1 in. - 4 in. 5 / inch of thickness
40, 60, or 100 lb./s.f. (193.5, 292.5, 488.2 kg./sq.m)
WEIGHT SIZE THICKNESS SystemFilter
.04 lb./s.f. (193 g/sq.m)
12.5 ft. x 120 ft. (3.8 m x 36.6 m)
in rolls
10 mils (.01 in.)
(.25 mm)
WEIGHT SIZE THICKNESS Hydrodrain AL or 300
.24 lb./s.f. (1.17kg./sq.m)
48 in. x 75 ft. (1.2 m x 22.9 m)
in rolls
.22 in. (5.6 mm)
Moisture Mat
1.2 lb./s.f. (5.3 l./sq.m)
7.5 ft. x 100 ft. (2.3 m x 30.5 m)
in rolls
Effective coverage: 715 s.f. (66.4 sq.m)
3/16 in. (188 mils) (4.8 mm)

American Hydrotech, Inc. - Contractor Training Manual - © 2012 Page 35
PRODUCT DATA
SIZE THICKNESS WEIGHT COMPRESSIVE STRENGTH
Gardendrain GR15
3 ft. x 8 ft. (.9 m x 2.4 m)
5/8” (15 mm)
1.0 lb./s.f. (4.8 kg/sq.m) – empty wet
7,455 lb/s.f. (3.3 l./sq.m)
Gardendrain GR30
4 ft. x 6 ft. (1.2 m x 1.8
m)
1-1/4” (30 mm)
1.6 lb/s.f. (7.9 kg/sq.m) – empty/wet
3.8 lb/s.f. (19.2 kg/sq.m) – filled/wet
5,069 lb./s.f. - empty (243 kN/sq.m)
13,000+ lb./s.f. - filled
Gardendrain GR50
4 ft. x 6 ft. (1.2 m x 1.8
m)
2” (50 mm)
2.0 lb/s.f. (10.8 kg/sq.m) – empty/wet
6.3 lb/s.f. (31.8 kg/sq.m) – filled/wet
3,154 lb./s.f. - empty (151 kN/sq.m)
7,000+ lb./s.f. - filled
WEIGHT SIZE THICKNESS GardMat LT
8.83 oz./sq.yd. 6.7 ft. x 108 ft. (2 m x 33 m)
in rolls .26 in.
GardMat P
12.57 oz./sq.yd. 6.5 ft. x 55.5 ft. (2 m x 17 m)
in rolls .67 in.
Disk Anchor
N/A Base Disk: 5 in. diam.
Shaft: 12 in. Steel Top Disk: 5 in. diam.
Base Disk: .25 in. Shaft: .38 in. diam.
Steel Top Disk: .03 in.

Page 36 American Hydrotech, Inc. - Contractor Training Manual - © 2012
PRODUCT DATA
*LiteTop saturated weights and availability vary by region
SIZE WEIGHT VARIETIES Cuttings
18 in. x 18 in. x 9 in. box 20-25 lbs. per box Varies depending on region
Plugs
2 in. plugs in 50-72 cell trays
N/A Varies depending on region
InstaGreen Sedum Carpet
4 ft. x 6.25 ft. 25 s.f. rolls
80 lbs./roll – dry 125 lbs./roll – wet
9-15 varieties
InstaGreen Sedum Tile
15 in. x 20 in. 2.08 s.f. tiles
9.4 lbs./tile – wet 4 different standard blends Custom blends available 6-8 varieties per blend
USE AVAILABILITY WEIGHT LiteTop Extensive
Extensive applications Bulk, super sacks, and small bags*
+/- 6.5 lb./s.f. per inch of depth – wet*
LiteTop Shallow Intensive/Lawn Lawn applications
Bulk, super sacks, and small bags*
+/- 7.2 lb./s.f. per inch of depth – wet*
LiteTop Intensive Intensive applications
Bulk, super sacks, and small bags*
+/- 6.7 lb./s.f. per inch of depth – wet*
LiteTop Aggregate Typically intensive and law applications
Bulk, super sacks, and small bags*
+/- 5.0-6.0 lb./s.f. per inch of depth – wet*
LiteTop Urban Agriculture Vegetables and herbs
Bulk, super sacks, and small bags*
+/- 7.0 lb./s.f. per inch of depth – wet*
LiteTop Super Lightweight Extensive applications
Bulk, super sacks, and small bags*
+/- 5.0 lb./s.f. per inch of depth – wet*