Embed Size (px)
Citation preview

American Heart Association ECC Class Connector™
Instructor User Guide
ECC Class Connector – Instructor User Guide Page 1 of 23

ECC Class Connector – Instructor User Guide Page 2 of 23
Table of Contents TABLE OF CONTENTS ........................................................................................................................................................................2 USER GUIDE OVERVIEW ...................................................................................................................................................................3 USER GUIDE DEFINITIONS ...............................................................................................................................................................3 TIMELINE...............................................................................................................................................................................................3 HOW TO ADD A NEW CLASS.............................................................................................................................................................4
SELECT COURSE, TRAINING CENTER AND INSTRUCTOR.........................................................................................................................5 ADD NEW LOCATION.............................................................................................................................................................................6 CLASS PROFILE ......................................................................................................................................................................................8 ADD CLASS MEETING TIME ...................................................................................................................................................................9
HOW TO UPDATE AN EXISTING CLASS ......................................................................................................................................11 SELECT COURSE, INSTRUCTOR, CLASS ................................................................................................................................................11 CLASS PROFILE ....................................................................................................................................................................................12
HOW TO FINALIZE A CLASS RECORD ........................................................................................................................................14 SELECT COURSE, INSTRUCTOR, CLASS ................................................................................................................................................14 CLASS PROFILE ....................................................................................................................................................................................15 ADD PARTICIPANTS .............................................................................................................................................................................16 EMAIL ROSTER ....................................................................................................................................................................................17
HOW TO UPDATE YOUR INSTRUCTOR PROFILE ....................................................................................................................18 UPDATE LIST OF STATES......................................................................................................................................................................19 UPDATE LIST OF COURSES ...................................................................................................................................................................22

ECC Class Connector – Instructor User Guide Page 3 of 23
User Guide Overview This guide was developed to provide Instructors with the information needed to perform the following tasks to have their classes listed in the ECC Class Connector:
1. Add new class 2. Update existing classes 3. Finalize class record 4. Update Instructor Profile
This user guide will walk the Instructor through the basic steps to set up and maintain their own information as they want it to be displayed to the general public.
User Guide Definitions Course: The AHA defined course (i.e. BLS for Healthcare Providers Course) Class: A scheduled time/place instance of the defined course
EXAMPLE: Course: BLS for Healthcare Providers Course Date/Time: Monday, February 23 at 8:00am Location: AHA National Center Suite 100 Instructor: John Doe
Timeline AHA will disclose the General Public launch date to every Training Center Coordinator and Instructor. Please note that NO classes scheduled prior to that date will be displayed to the general public. As an Instructor, do not add any new classes that are scheduled to take place prior to the General Public Launch Date as communicated by AHA.

How To Add a New ClassAs an Instructor, you now have the ability to enter and maintain your class schedule. This schedule is displayed to the general public on the ECC Class Connector. To add a new class, follow these steps:
1. Go to the AHA Instructor Network - www.ahainstructornetwork.org 2. Enter your Instructor username/password in the Sign In box
3. You will see a new box titled “Class Maintenance.”
ECC Class Connector – Instructor User Guide Page 4 of 23
4. Click on the “Add new class” link. You will see this screen:
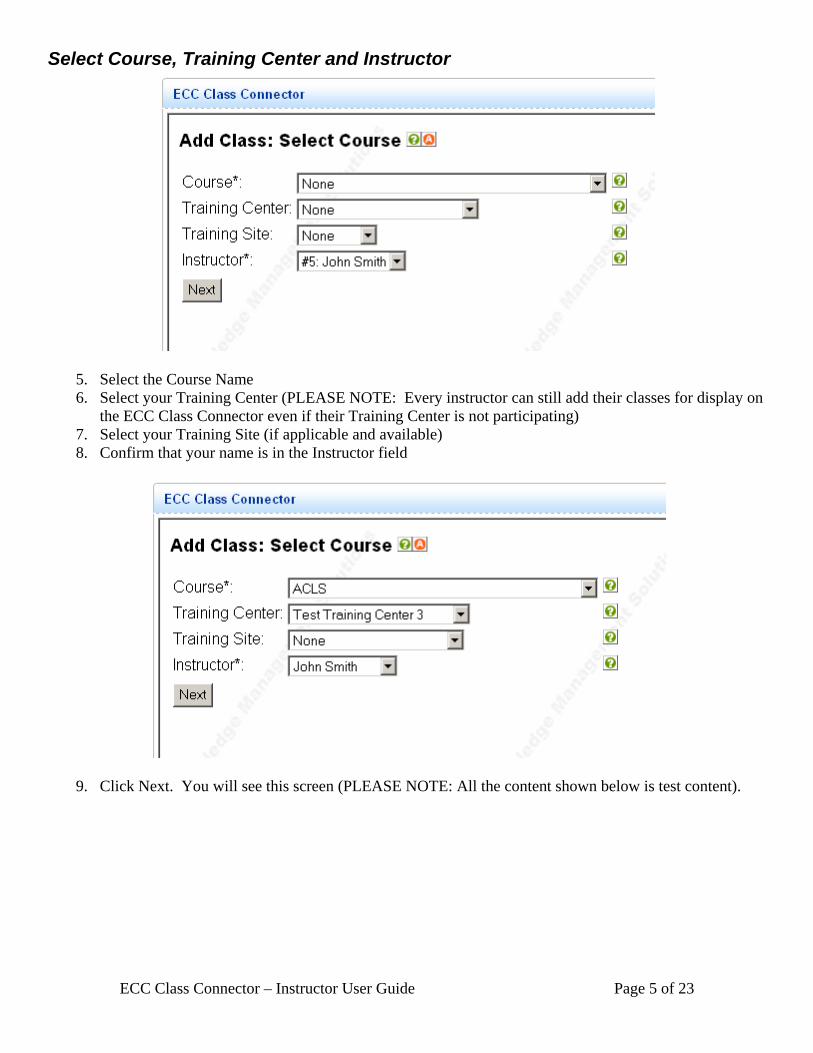
Select Course, Training Center and Instructor
5. Select the Course Name 6. Select your Training Center (PLEASE NOTE: Every instructor can still add their classes for display on
the ECC Class Connector even if their Training Center is not participating) 7. Select your Training Site (if applicable and available) 8. Confirm that your name is in the Instructor field
9. Click Next. You will see this screen (PLEASE NOTE: All the content shown below is test content).
ECC Class Connector – Instructor User Guide Page 5 of 23

Add New Location
10. If you already have a stored Location (physical place where the class is taking place), then select it from the drop down and Click “Next”.
11. If you do not already have a stored Location, click the button next to the “New Location” text. You will see this screen:
12. Fill in all the information. This is the location information that will be displayed on the ECC Class Connector website (Address 2 and Address 3 are not required). A map will be available to this location for the student interested in your class.
ECC Class Connector – Instructor User Guide Page 6 of 23

13. If you need to cancel off this screen, then click on the “Cancel New Location/Return to Add Class” and you will be taken back to the previous screen.
14. Click Next and you will see this screen:
ECC Class Connector – Instructor User Guide Page 7 of 23

Class Profile
15. You can change the following profile information on this screen:
Field Name Description Start Date The Start Date and time that your class begins. This date will be used when
finding matching classes through the search on the ECC Class Connector. The clock is a 24 hour clock, so please double check your time.
End Date The End Date and time that your class ends. The clock is a 24 hour clock, so please double check your time.
Class Notes You can add your notes in this field. For example, payment information, specific directions to finding the class, what to bring to the class, etc. This information will be included in the confirmation email to the student.
ECC Class Connector – Instructor User Guide Page 8 of 23

Roster Max The maximum number of people that you are going to allow to reserve a seat in this class online.
Enrollment Cut Off Date The date that your class will no longer be visible in search. It is defaulted to the year 2031 and can be left at the default.
Allow Waitlist You can select “Yes” if you want people to be able to put their name on a waitlist if someone cancels from the class.
Maximum Waitlist Size The maximum number of people that you want to be able to put their name on the waitlist.
Email “From” Address for Reminders
You have the ability to set up reminder emails to the students. This is the email address where the email will come from. You should put your email or your Training Centers email address in this field.
Reminder Time Period 1 and 2
If you would like reminder emails delivered to the students who have reserved a seat in your class, then you can specify when you want these emails delivered
Location The location that you selected on the previous screen. You can also change the location to a different one here if needed.
Add Class Meeting Time You will need to add the specific dates and times that your class meets. This will be explained in more depth below.
Review Class Meeting Time
You can update your already created dates and times that your class meets.
16. To Add a Class Meeting Time, you will see this screen:
Add Class Meeting Time
17. Enter the name of the activity 18. The Duration of the class meeting time in hours 19. The Date/Time – The clock is a 24 hour clock, so please double check your time. 20. The Time Zone
ECC Class Connector – Instructor User Guide Page 9 of 23

21. If you need to delete this activity, then click on the button next to the “Delete this Activity” text and you will be taken to the previous screen.
22. Once you have completed your entry, click Done. You will see this confirmation screen:
23. Click the Close Window button 24. You will be taken back to the Add Class Screen. 25. If you need to add additional meeting times, then follow the previous steps in this section to add
additional meeting times. 26. Once you have completed your class profile information, click on the “Done” button 27. You will see this confirmation screen:
At this point, you have successfully added your class. This information will be updated on the ECC Class Connector website for the general public immediately. If you need to update any of your information in the future, just follow these steps to complete the update.
ECC Class Connector – Instructor User Guide Page 10 of 23
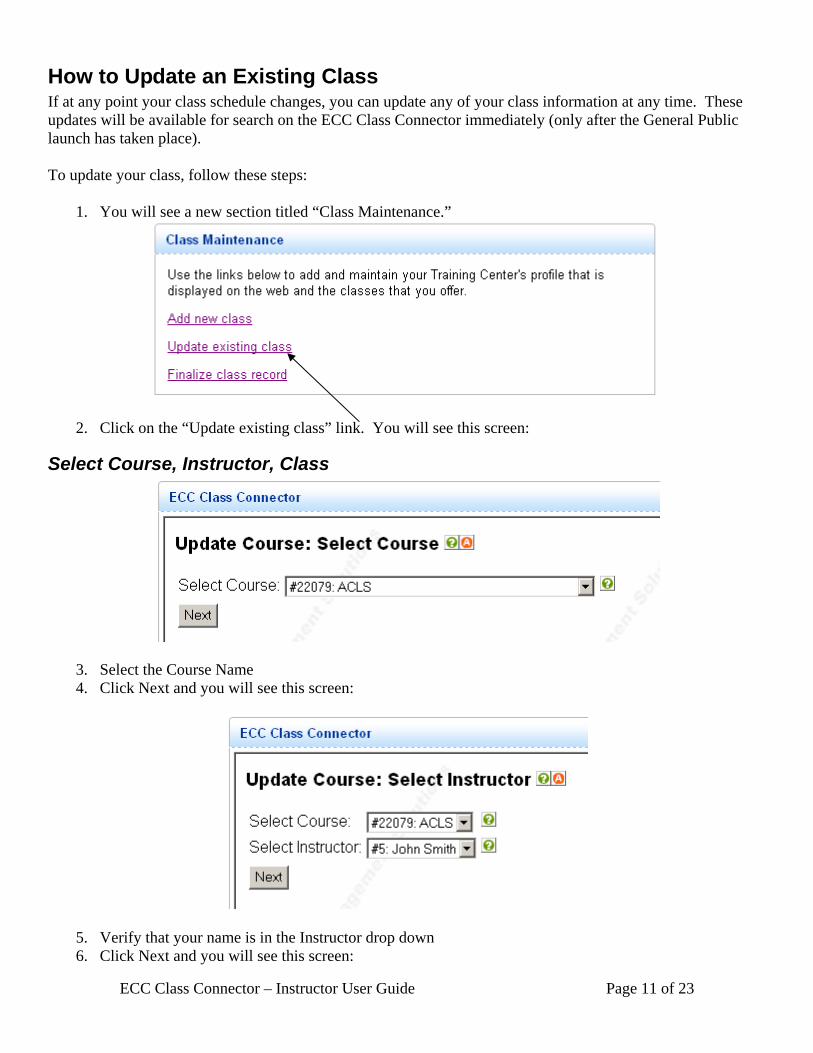
How to Update an Existing Class If at any point your class schedule changes, you can update any of your class information at any time. These updates will be available for search on the ECC Class Connector immediately (only after the General Public launch has taken place). To update your class, follow these steps:
1. You will see a new section titled “Class Maintenance.”
ECC Class Connector – Instructor User Guide Page 11 of 23
2. Click on the “Update existing class” link. You will see this screen:
Select Course, Instructor, Class
3. Select the Course Name 4. Click Next and you will see this screen:
5. Verify that your name is in the Instructor drop down 6. Click Next and you will see this screen:

7. Select your Class from the Class drop down. You class will be listed with the Course Name (i.e. ACLS Class) and the Start Date of your class (12/17/2008). This information will help you narrow down your list of classes.
8. Click Next and you will see this screen:
Class Profile
ECC Class Connector – Instructor User Guide Page 12 of 23

9. You can change any of your class information (for descriptions, see “Add New Class” section). 10. In addition, you can view this information:
Field Name Description
Current Students Enrolled This number will show you how many students have reserved a seat in this class.
Waitlisted Students This number will show up how many students have placed their name on the waiting list
Class Waitlist A popup window that will show you the list of students who have entered their name on the waiting list. You will be able to contact them from this list if needed.
Class Roster A report that will display the students who have reserved a seat in your class. You will have contact information so that you can contact them for payment, etc.
Send email to enrollees You can send an email to all students who have enrolled in this class. If you need to let students know a change in the location, time, or if they need to bring something, you can use this functionality to communicate with all students at one time.
11. Once you have updated all of your class information, click Done. You will see this screen:
At this point, you have successfully updated your class. This information will be updated on the ECC Class Connector website for the general public immediately. If you need to update any of your information in the future, just follow these previous steps to complete the update.
ECC Class Connector – Instructor User Guide Page 13 of 23
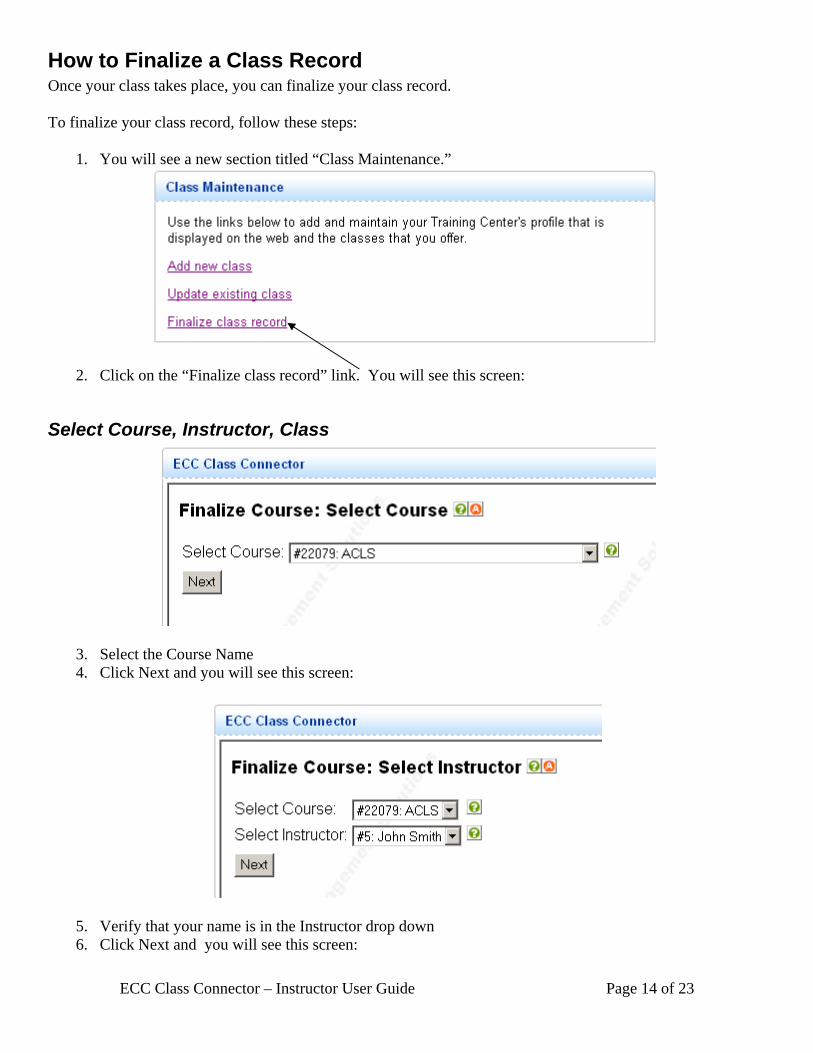
How to Finalize a Class Record Once your class takes place, you can finalize your class record. To finalize your class record, follow these steps:
1. You will see a new section titled “Class Maintenance.”
ECC Class Connector – Instructor User Guide Page 14 of 23
2. Click on the “Finalize class record” link. You will see this screen:
Select Course, Instructor, Class
3. Select the Course Name 4. Click Next and you will see this screen:
5. Verify that your name is in the Instructor drop down 6. Click Next and you will see this screen:

7. Select your Class from the Class drop down. You class will be listed with the Course Name (i.e. ACLS Class) and the Start Date of your class (12/17/2008). This information will help you narrow down your list of classes.
8. Click Next and you will see this screen:
Class Profile
9. You can see the profile of your class including the number of students enrolled and your class roster.
ECC Class Connector – Instructor User Guide Page 15 of 23

Add Participants 10. In addition, you can add Participants. Participants that you will add will be those students who enrolled
over the phone, walked in, etc. Anyone who did not reserve a seat for your class online can be added in this manner.
11. To Add Participants, click on the button next to the “Add Participants” text. You will see this screen.
12. Enter all the student’s required information and click Submit. This student will now show up on your Class Roster.
a. Required Fields are: i. First Name
ii. Last Name iii. Address iv. City v. State
vi. Zip Code vii. Country
viii. Institution ix. Email
ECC Class Connector – Instructor User Guide Page 16 of 23

13. In addition, if you want to add another enrollee, you can select the checkbox next to the “Add Second Enrollee” text.
14. When you are done, click on the “Close Window” button. 15. You will be taken back to the Class Profile screen.
Email Roster 16. From the class profile screen, you can also email your roster. Click on the button next to the “Email
Roster” text. You will see this screen:
17. Enter the email address that you want the roster delivered to and your email address in the “From” line. 18. Click on the “Email Roster” button. 19. Once you have completed all actions on this screen, click on the “Done” button. You will see this
confirmation screen.
ECC Class Connector – Instructor User Guide Page 17 of 23

How To Update Your Instructor Profile You now have the ability to maintain a profile for yourself online that is available for search only by Training Center Coordinators and AHA Staff members. This information is just to help identify you if you are willing to travel to teach classes. To update your instructor profile, follow these steps:
1. You will see a new section titled “Instructor Search.”
2. Click on the “Update Instructor Profile” link. You will see this screen:
ECC Class Connector – Instructor User Guide Page 18 of 23

3. You can change the following profile information on this screen:
Field Name Description
Show on web? This is a yes/no question. If you want your instructor profile to display within the search results on the AHA Instructor Network, then select “Yes”. You can select “No”, if you want to temporarily remove your instructor profile from the search.
First Name Your first name and how you would like it displayed in the search results. Last Name Your last name and how you would like it displayed in the search results. Full Name (last, first) Your full name and how you would like it displayed in the search results. City Your city State Your state Zip/Postal Code Your zip code Country Your country Public Email Address Your public email address. Please remember that this email address will appear in
the search results for others to see. Public Phone Number Your public phone number. Please remember that this phone number will appear
in the search results for others to see. List of states I’m willing to teach in
A list of all the states that you are willing to travel to in order to teach.
List of courses to include in search
A list of all course names that you are willing to travel to teach.
Update List of States 4. To change the list of states I’m willing to teach in, click on the button next to the text. You will see this
screen:
5. Click on the Add Button. You will see this screen:
6. Select the state from the drop down and click “Done”. You will see this screen:
ECC Class Connector – Instructor User Guide Page 19 of 23

7. Click Done. You will be taken back to the Instructor Profile screen. 8. To add more states, click the button next to the text. You will see this screen now:
9. Click “Add”. You will see this screen:
10. Select the state from the drop down and click “Done”. You will see this screen:
ECC Class Connector – Instructor User Guide Page 20 of 23

11. Click Done. You will be taken back to the Instructor Profile screen. 12. To delete a state, click the button next to the text. You will see this screen now:
13. Select the state that you want to delete and click “Next”. You will see this screen:
14. Click “Delete”. You will see this screen:
ECC Class Connector – Instructor User Guide Page 21 of 23

15. Click “OK”. You will be taken back to the list of states screen. 16. Click Done and you will be taken back to the Instructor Profile screen.
Update List of Courses 17. To change the list of courses that you are willing to teach, click on the button next to the text. You will
see this screen (what is displayed is not a complete list of courses):
18. Select which courses that you are willing to teach. 19. Click on the “Update” button. 20. You will see that your information has been updated:
ECC Class Connector – Instructor User Guide Page 22 of 23
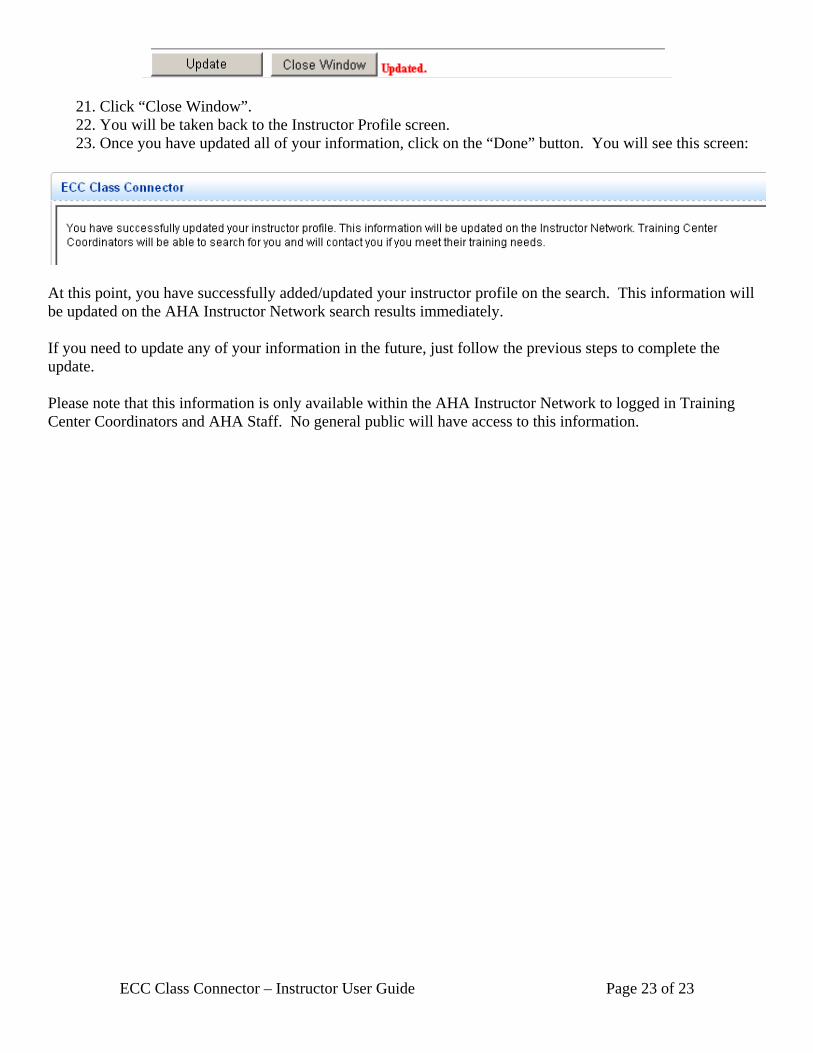
21. Click “Close Window”. 22. You will be taken back to the Instructor Profile screen. 23. Once you have updated all of your information, click on the “Done” button. You will see this screen:
At this point, you have successfully added/updated your instructor profile on the search. This information will be updated on the AHA Instructor Network search results immediately. If you need to update any of your information in the future, just follow the previous steps to complete the update. Please note that this information is only available within the AHA Instructor Network to logged in Training Center Coordinators and AHA Staff. No general public will have access to this information.
ECC Class Connector – Instructor User Guide Page 23 of 23


![MySQL Connector/J - School of ComputingMySQL Connector/J is distributed as a .zip or .tar.gz archive containing the sources, the class files, and the JAR archive named mysql-connector-java-[version]-bin.jar,](https://img.dokumen.tips/doc/110x75/5e5ff1e2b342241fda2983db/mysql-connectorj-school-of-mysql-connectorj-is-distributed-as-a-zip-or-targz.jpg)