Embed Size (px)
Citation preview
TT ee cc hh nn ii cc aa ll TT ii pp TT-0411406a -- Information -- 29-Nov-2004
Alteon Basic Firewall Load Balancing. Sample Configuration
Contents: Contents:.........................................................................................................................................................................1 Introduction: ....................................................................................................................................................................1 Associated Products: ......................................................................................................................................................1 Sample Configuration .....................................................................................................................................................2
Setup ..........................................................................................................................................................................2 Configuring PC ...........................................................................................................................................................3 Configuring CES1.......................................................................................................................................................3 Configuring CES2.......................................................................................................................................................8 Configuring Alteon1 (dirty side) ..................................................................................................................................8
Configuring Interfaces ............................................................................................................................................9 Enabling IP forwarding ...........................................................................................................................................9 Configuring static routes ......................................................................................................................................10 Enabling SLB globally ..........................................................................................................................................10 Configuring real servers .......................................................................................................................................10 Adding real servers to a group .............................................................................................................................11 Creating filters ......................................................................................................................................................11 Applying filters to ports .........................................................................................................................................13
Configuring Alteon2 (clean side) ..............................................................................................................................14 Configuring interfaces ..........................................................................................................................................14 Enabling IP forwarding .........................................................................................................................................15 Creating static routes ...........................................................................................................................................15 Enabling SLB globally ..........................................................................................................................................15 Configuring real servers .......................................................................................................................................15 Adding real servers to a group .............................................................................................................................15 Creating filters ......................................................................................................................................................16 Applying filters to ports .........................................................................................................................................17
Configuring Server....................................................................................................................................................17 Testing the configuration ..........................................................................................................................................20
Appendix A. Alteon1 (dirty side) configuration file ........................................................................................................21 Appendix B. Alteon2 (clean side) configuration file ......................................................................................................22
Introduction: This document shows a sample basic firewall load balancing configuration using two WebOS switches.
Associated Products: The information in this document is intended to be used with the following product(s) with the indicated software or hardware revisions:
Revision Information Product Name or Order Number Potentially Affected Corrected
Alteon WebOS switches: 180e, 180 Plus, 184, AD2, AD3, AD4 All N/A
©2005 Nortel Networks Limited. All Rights Reserved
TT-0411###r Alteon Basic Firewall Load Balancing. Sample Configuration
©2005 Nortel Networks Limited. All Rights Reserved Page: 2 of 23
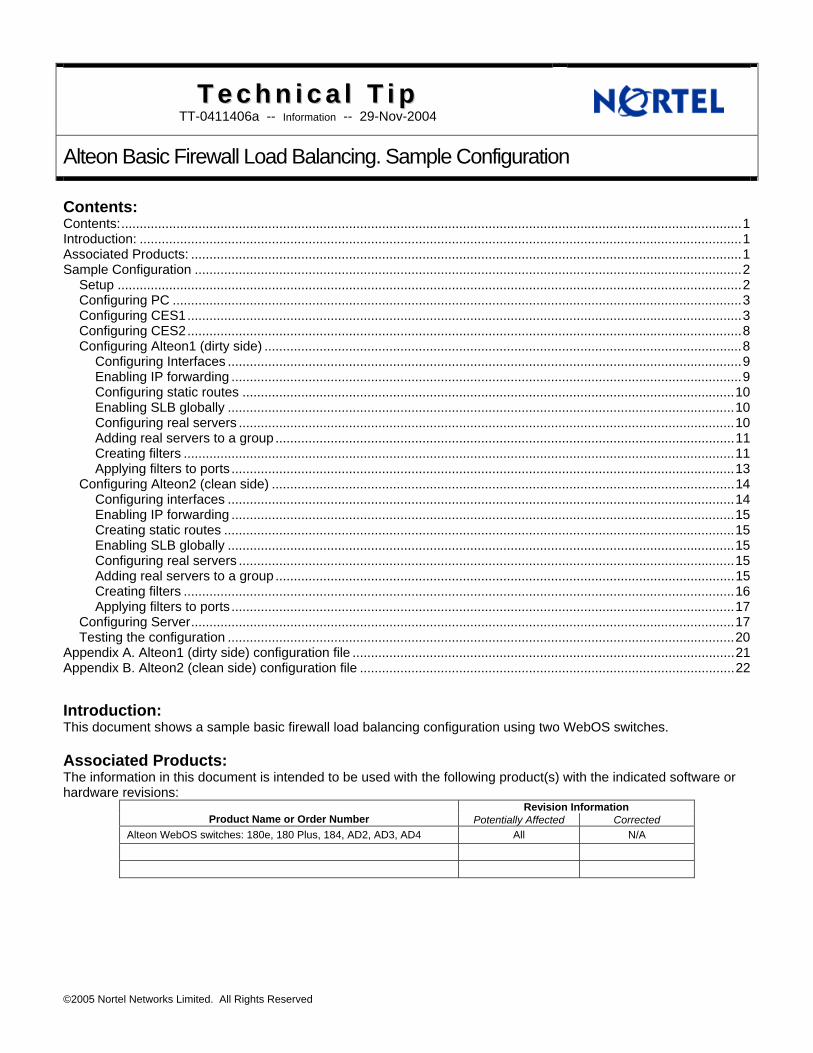
Sample Configuration
Setup
Dirty/public side Clean/private side
192.168.10.0/24
PC – Windows 2000 workstation, IP address 192.168.10.1/24; Alteon1 – Alteon WebOS switch AD3, interface 1 192.168.10.10/24; interface 2 192.168.20.20/24; interface 3 192.168.30.30/24; CES1 – Contivity Secure IP Services Gateway acting as a firewall only, management IP 192.168.40.44/24, private IP 192.168.40.4/24, public IP 192.168.20.2/24; CES2 - Contivity Secure IP Services Gateway acting as a firewall only, management IP 192.168.50.55/24, private IP 192.168.50.5/24, public IP 192.168.30.3/24; Alteon2 – Alteon WebOS switch AD3, interface 1 192.168.40.40/24; interface 2 192.168.50.50/24; interface 3 192.168.60.60/24; Server – Windows 2000 workstation with FTP service enabled, IP address 192.168.60.6/24. The goal of the configuration is to setup a basic firewall load balancing.
CES2
Server GW: 192.168.60.60
Alteon1 If1: 192.168.10.10/24 If2: 192.168.20.20/24 If3: 192.168.30.30/24
PC GW: 192.168.10.10
Alteon2 If1: 192.168.40.40/24 If2: 192.168.50.50/24 If3: 192.168.60.60/24
192.168.20.0/24 192.168.40.0/24 192.168.60.0/24
192.168.30.0/24 192.168.50.0/24
.2
.3
.4 .44
7 7 CES1
1 1 .6 .1
8 8
.55 .5
TT-0411###r Alteon Basic Firewall Load Balancing. Sample Configuration
©2005 Nortel Networks Limited. All Rights Reserved Page: 3 of 23
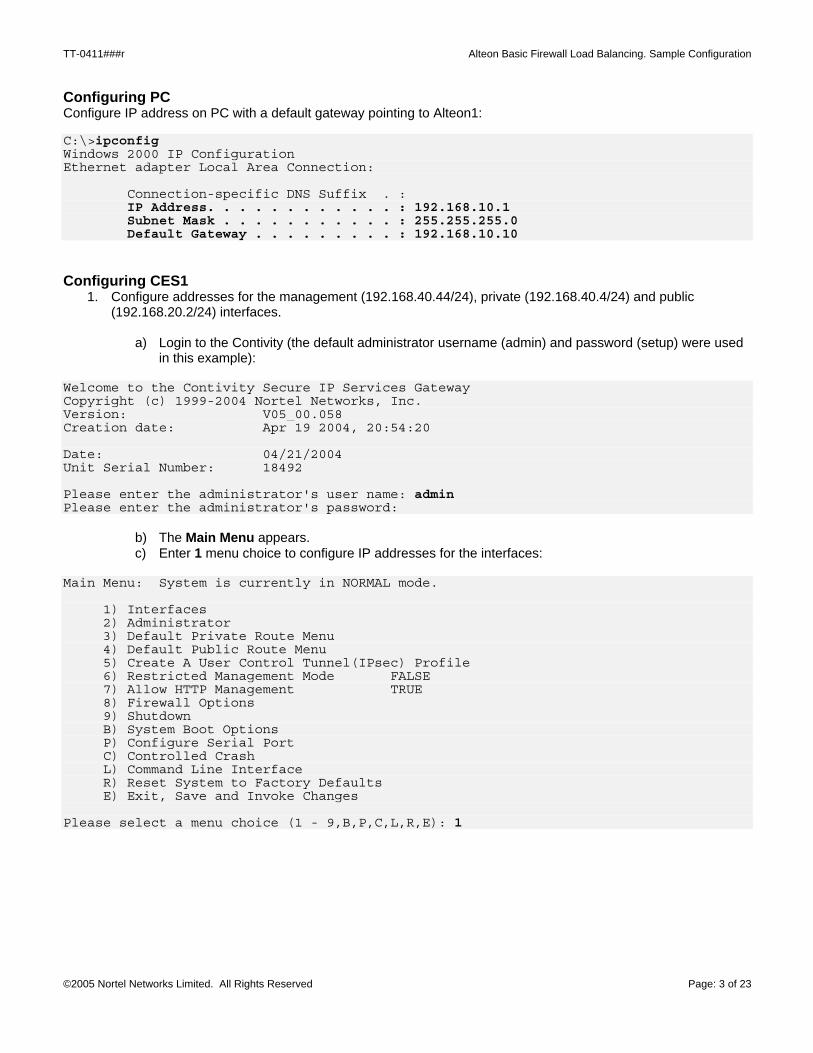
Configuring PC Configure IP address on PC with a default gateway pointing to Alteon1: C:\>ipconfig Windows 2000 IP Configuration Ethernet adapter Local Area Connection: Connection-specific DNS Suffix . : IP Address. . . . . . . . . . . . : 192.168.10.1 Subnet Mask . . . . . . . . . . . : 255.255.255.0 Default Gateway . . . . . . . . . : 192.168.10.10
Configuring CES1 1. Configure addresses for the management (192.168.40.44/24), private (192.168.40.4/24) and public
(192.168.20.2/24) interfaces.
a) Login to the Contivity (the default administrator username (admin) and password (setup) were used in this example):
Welcome to the Contivity Secure IP Services Gateway Copyright (c) 1999-2004 Nortel Networks, Inc. Version: V05_00.058 Creation date: Apr 19 2004, 20:54:20 Date: 04/21/2004 Unit Serial Number: 18492 Please enter the administrator's user name: admin Please enter the administrator's password:
b) The Main Menu appears. c) Enter 1 menu choice to configure IP addresses for the interfaces:
Main Menu: System is currently in NORMAL mode. 1) Interfaces 2) Administrator 3) Default Private Route Menu 4) Default Public Route Menu 5) Create A User Control Tunnel(IPsec) Profile 6) Restricted Management Mode FALSE 7) Allow HTTP Management TRUE 8) Firewall Options 9) Shutdown B) System Boot Options P) Configure Serial Port C) Controlled Crash L) Command Line Interface R) Reset System to Factory Defaults E) Exit, Save and Invoke Changes Please select a menu choice (1 - 9,B,P,C,L,R,E): 1
TT-0411###r Alteon Basic Firewall Load Balancing. Sample Configuration
©2005 Nortel Networks Limited. All Rights Reserved Page: 4 of 23
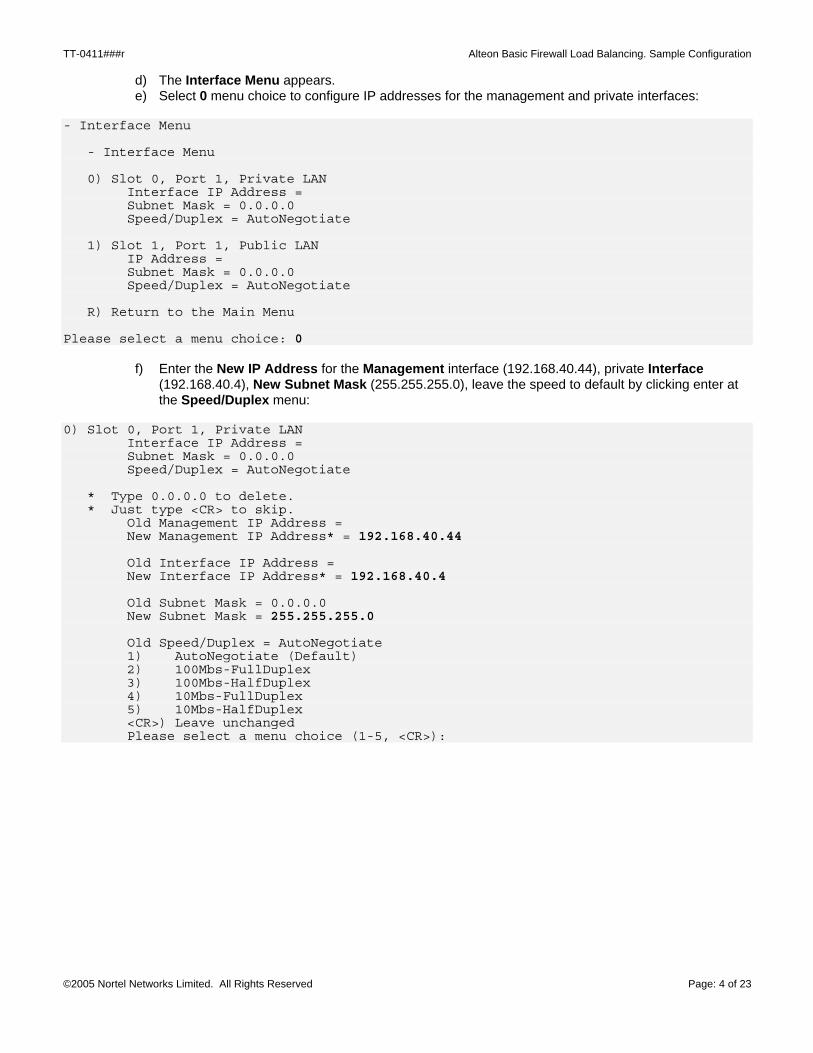
d) The Interface Menu appears. e) Select 0 menu choice to configure IP addresses for the management and private interfaces:
- Interface Menu - Interface Menu 0) Slot 0, Port 1, Private LAN Interface IP Address = Subnet Mask = 0.0.0.0 Speed/Duplex = AutoNegotiate 1) Slot 1, Port 1, Public LAN IP Address = Subnet Mask = 0.0.0.0 Speed/Duplex = AutoNegotiate R) Return to the Main Menu Please select a menu choice: 0
f) Enter the New IP Address for the Management interface (192.168.40.44), private Interface (192.168.40.4), New Subnet Mask (255.255.255.0), leave the speed to default by clicking enter at the Speed/Duplex menu:
0) Slot 0, Port 1, Private LAN Interface IP Address = Subnet Mask = 0.0.0.0 Speed/Duplex = AutoNegotiate * Type 0.0.0.0 to delete. * Just type <CR> to skip. Old Management IP Address = New Management IP Address* = 192.168.40.44 Old Interface IP Address = New Interface IP Address* = 192.168.40.4 Old Subnet Mask = 0.0.0.0 New Subnet Mask = 255.255.255.0 Old Speed/Duplex = AutoNegotiate 1) AutoNegotiate (Default) 2) 100Mbs-FullDuplex 3) 100Mbs-HalfDuplex 4) 10Mbs-FullDuplex 5) 10Mbs-HalfDuplex <CR>) Leave unchanged Please select a menu choice (1-5, <CR>):
TT-0411###r Alteon Basic Firewall Load Balancing. Sample Configuration
©2005 Nortel Networks Limited. All Rights Reserved Page: 5 of 23
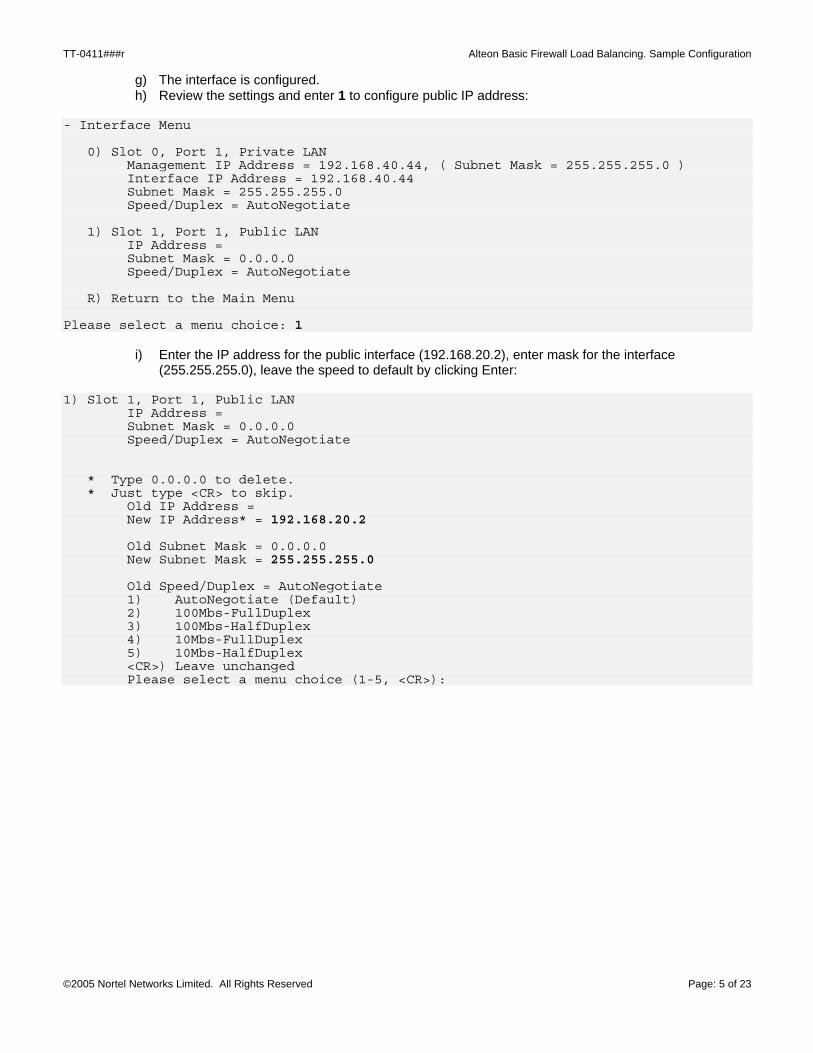
g) The interface is configured. h) Review the settings and enter 1 to configure public IP address:
- Interface Menu 0) Slot 0, Port 1, Private LAN Management IP Address = 192.168.40.44, ( Subnet Mask = 255.255.255.0 ) Interface IP Address = 192.168.40.44 Subnet Mask = 255.255.255.0 Speed/Duplex = AutoNegotiate 1) Slot 1, Port 1, Public LAN IP Address = Subnet Mask = 0.0.0.0 Speed/Duplex = AutoNegotiate R) Return to the Main Menu Please select a menu choice: 1
i) Enter the IP address for the public interface (192.168.20.2), enter mask for the interface (255.255.255.0), leave the speed to default by clicking Enter:
1) Slot 1, Port 1, Public LAN IP Address = Subnet Mask = 0.0.0.0 Speed/Duplex = AutoNegotiate * Type 0.0.0.0 to delete. * Just type <CR> to skip. Old IP Address = New IP Address* = 192.168.20.2 Old Subnet Mask = 0.0.0.0 New Subnet Mask = 255.255.255.0 Old Speed/Duplex = AutoNegotiate 1) AutoNegotiate (Default) 2) 100Mbs-FullDuplex 3) 100Mbs-HalfDuplex 4) 10Mbs-FullDuplex 5) 10Mbs-HalfDuplex <CR>) Leave unchanged Please select a menu choice (1-5, <CR>):
TT-0411###r Alteon Basic Firewall Load Balancing. Sample Configuration
©2005 Nortel Networks Limited. All Rights Reserved Page: 6 of 23
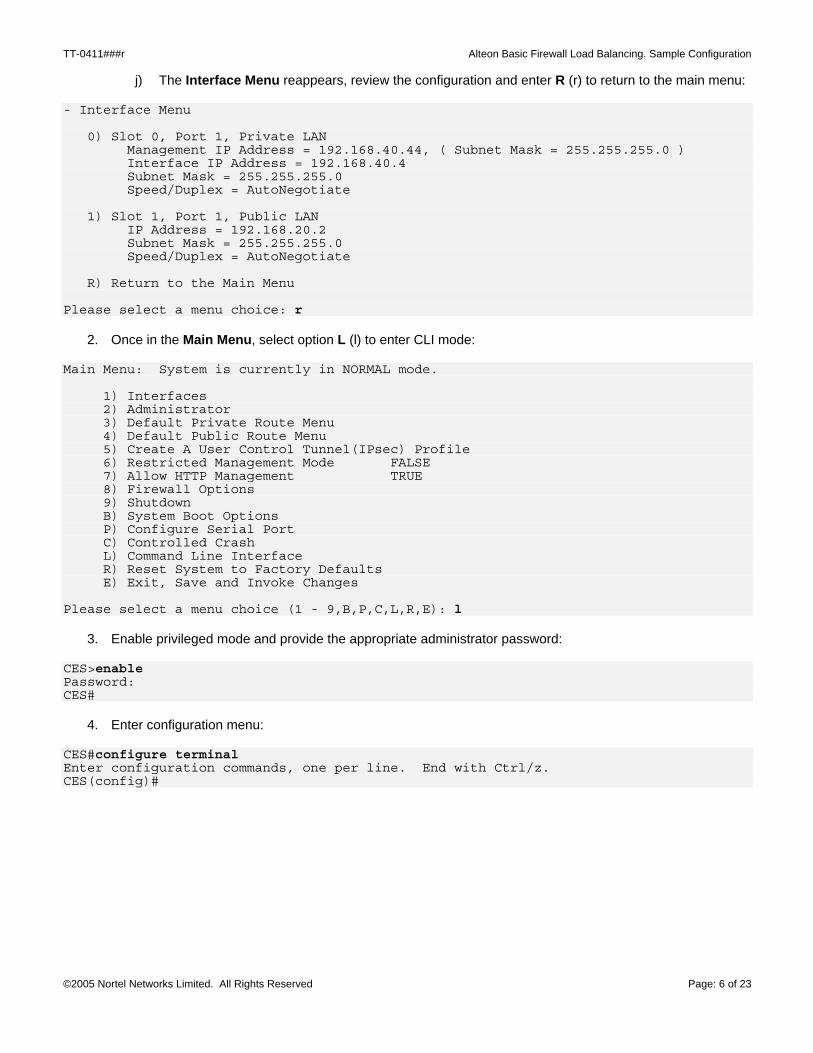
j) The Interface Menu reappears, review the configuration and enter R (r) to return to the main menu: - Interface Menu 0) Slot 0, Port 1, Private LAN Management IP Address = 192.168.40.44, ( Subnet Mask = 255.255.255.0 ) Interface IP Address = 192.168.40.4 Subnet Mask = 255.255.255.0 Speed/Duplex = AutoNegotiate 1) Slot 1, Port 1, Public LAN IP Address = 192.168.20.2 Subnet Mask = 255.255.255.0 Speed/Duplex = AutoNegotiate R) Return to the Main Menu Please select a menu choice: r
2. Once in the Main Menu, select option L (l) to enter CLI mode: Main Menu: System is currently in NORMAL mode. 1) Interfaces 2) Administrator 3) Default Private Route Menu 4) Default Public Route Menu 5) Create A User Control Tunnel(IPsec) Profile 6) Restricted Management Mode FALSE 7) Allow HTTP Management TRUE 8) Firewall Options 9) Shutdown B) System Boot Options P) Configure Serial Port C) Controlled Crash L) Command Line Interface R) Reset System to Factory Defaults E) Exit, Save and Invoke Changes Please select a menu choice (1 - 9,B,P,C,L,R,E): l
3. Enable privileged mode and provide the appropriate administrator password: CES>enable Password: CES#
4. Enter configuration menu: CES#configure terminal Enter configuration commands, one per line. End with Ctrl/z. CES(config)#
TT-0411###r Alteon Basic Firewall Load Balancing. Sample Configuration
©2005 Nortel Networks Limited. All Rights Reserved Page: 7 of 23
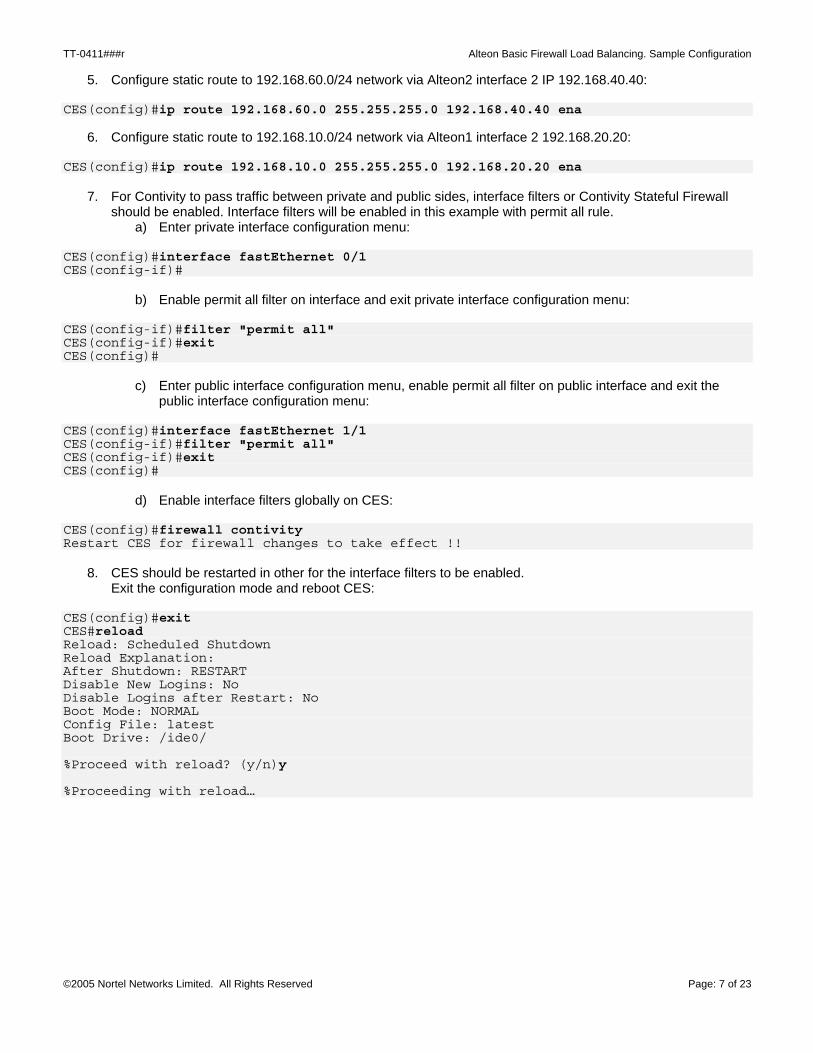
5. Configure static route to 192.168.60.0/24 network via Alteon2 interface 2 IP 192.168.40.40: CES(config)#ip route 192.168.60.0 255.255.255.0 192.168.40.40 ena
6. Configure static route to 192.168.10.0/24 network via Alteon1 interface 2 192.168.20.20: CES(config)#ip route 192.168.10.0 255.255.255.0 192.168.20.20 ena
7. For Contivity to pass traffic between private and public sides, interface filters or Contivity Stateful Firewall should be enabled. Interface filters will be enabled in this example with permit all rule.
a) Enter private interface configuration menu: CES(config)#interface fastEthernet 0/1 CES(config-if)#
b) Enable permit all filter on interface and exit private interface configuration menu: CES(config-if)#filter "permit all" CES(config-if)#exit CES(config)#
c) Enter public interface configuration menu, enable permit all filter on public interface and exit the public interface configuration menu:
CES(config)#interface fastEthernet 1/1 CES(config-if)#filter "permit all" CES(config-if)#exit CES(config)#
d) Enable interface filters globally on CES: CES(config)#firewall contivity Restart CES for firewall changes to take effect !!
8. CES should be restarted in other for the interface filters to be enabled. Exit the configuration mode and reboot CES:
CES(config)#exit CES#reload Reload: Scheduled Shutdown Reload Explanation: After Shutdown: RESTART Disable New Logins: No Disable Logins after Restart: No Boot Mode: NORMAL Config File: latest Boot Drive: /ide0/ %Proceed with reload? (y/n)y %Proceeding with reload…
TT-0411###r Alteon Basic Firewall Load Balancing. Sample Configuration
©2005 Nortel Networks Limited. All Rights Reserved Page: 8 of 23
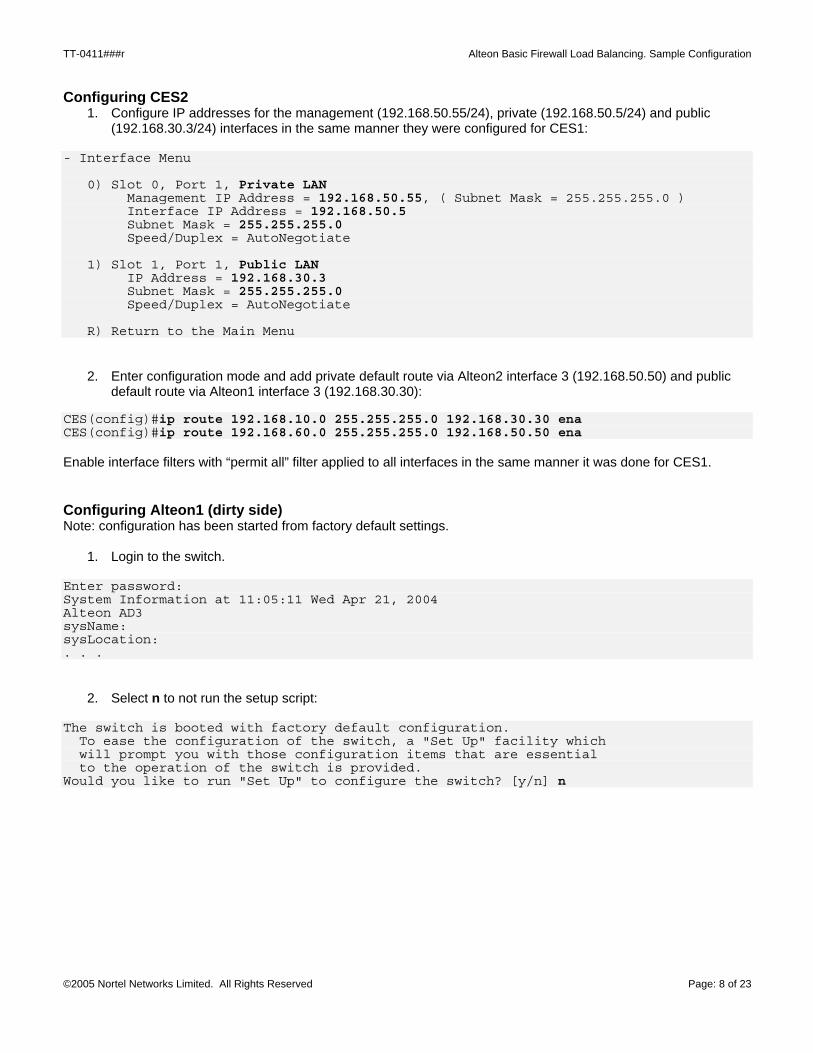
Configuring CES2 1. Configure IP addresses for the management (192.168.50.55/24), private (192.168.50.5/24) and public
(192.168.30.3/24) interfaces in the same manner they were configured for CES1: - Interface Menu 0) Slot 0, Port 1, Private LAN Management IP Address = 192.168.50.55, ( Subnet Mask = 255.255.255.0 ) Interface IP Address = 192.168.50.5 Subnet Mask = 255.255.255.0 Speed/Duplex = AutoNegotiate 1) Slot 1, Port 1, Public LAN IP Address = 192.168.30.3 Subnet Mask = 255.255.255.0 Speed/Duplex = AutoNegotiate R) Return to the Main Menu
2. Enter configuration mode and add private default route via Alteon2 interface 3 (192.168.50.50) and public default route via Alteon1 interface 3 (192.168.30.30):
CES(config)#ip route 192.168.10.0 255.255.255.0 192.168.30.30 ena CES(config)#ip route 192.168.60.0 255.255.255.0 192.168.50.50 ena Enable interface filters with “permit all” filter applied to all interfaces in the same manner it was done for CES1.
Configuring Alteon1 (dirty side) Note: configuration has been started from factory default settings.
1. Login to the switch. Enter password: System Information at 11:05:11 Wed Apr 21, 2004 Alteon AD3 sysName: sysLocation: . . .
2. Select n to not run the setup script: The switch is booted with factory default configuration. To ease the configuration of the switch, a "Set Up" facility which will prompt you with those configuration items that are essential to the operation of the switch is provided. Would you like to run "Set Up" to configure the switch? [y/n] n
TT-0411###r Alteon Basic Firewall Load Balancing. Sample Configuration
©2005 Nortel Networks Limited. All Rights Reserved Page: 9 of 23
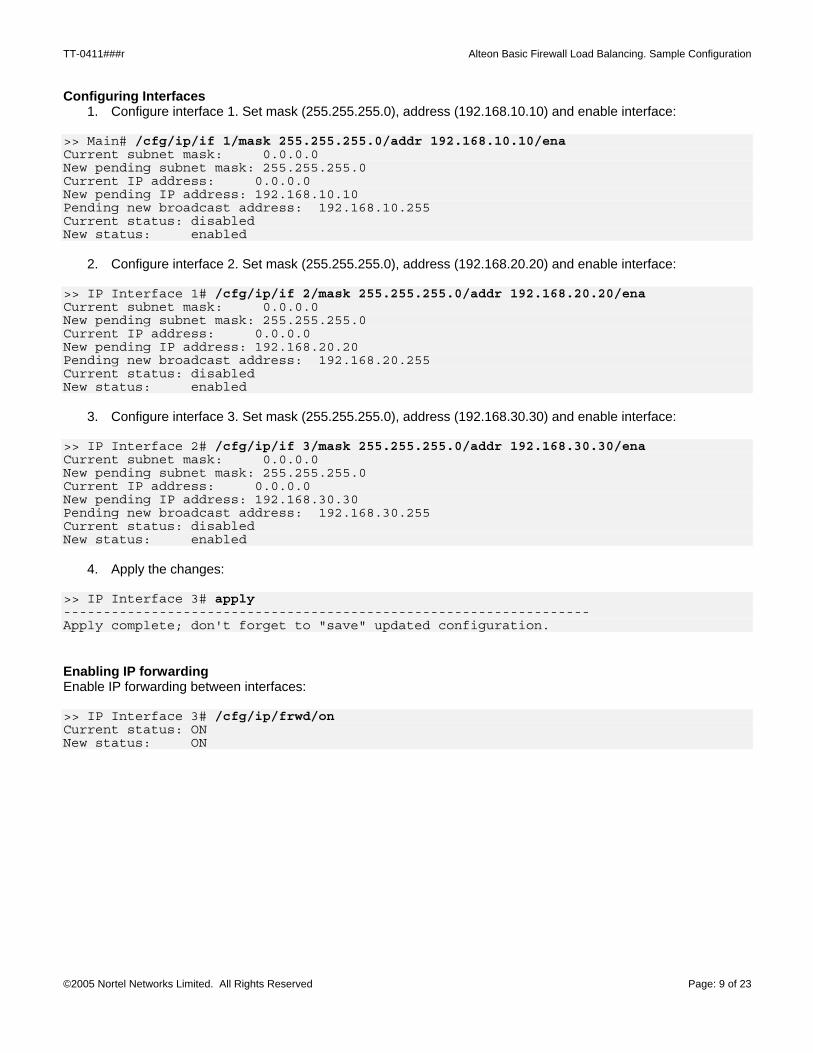
Configuring Interfaces 1. Configure interface 1. Set mask (255.255.255.0), address (192.168.10.10) and enable interface:
>> Main# /cfg/ip/if 1/mask 255.255.255.0/addr 192.168.10.10/ena Current subnet mask: 0.0.0.0 New pending subnet mask: 255.255.255.0 Current IP address: 0.0.0.0 New pending IP address: 192.168.10.10 Pending new broadcast address: 192.168.10.255 Current status: disabled New status: enabled
2. Configure interface 2. Set mask (255.255.255.0), address (192.168.20.20) and enable interface: >> IP Interface 1# /cfg/ip/if 2/mask 255.255.255.0/addr 192.168.20.20/ena Current subnet mask: 0.0.0.0 New pending subnet mask: 255.255.255.0 Current IP address: 0.0.0.0 New pending IP address: 192.168.20.20 Pending new broadcast address: 192.168.20.255 Current status: disabled New status: enabled
3. Configure interface 3. Set mask (255.255.255.0), address (192.168.30.30) and enable interface: >> IP Interface 2# /cfg/ip/if 3/mask 255.255.255.0/addr 192.168.30.30/ena Current subnet mask: 0.0.0.0 New pending subnet mask: 255.255.255.0 Current IP address: 0.0.0.0 New pending IP address: 192.168.30.30 Pending new broadcast address: 192.168.30.255 Current status: disabled New status: enabled
4. Apply the changes: >> IP Interface 3# apply ------------------------------------------------------------------ Apply complete; don't forget to "save" updated configuration.
Enabling IP forwarding Enable IP forwarding between interfaces: >> IP Interface 3# /cfg/ip/frwd/on Current status: ON New status: ON
TT-0411###r Alteon Basic Firewall Load Balancing. Sample Configuration
©2005 Nortel Networks Limited. All Rights Reserved Page: 10 of 23
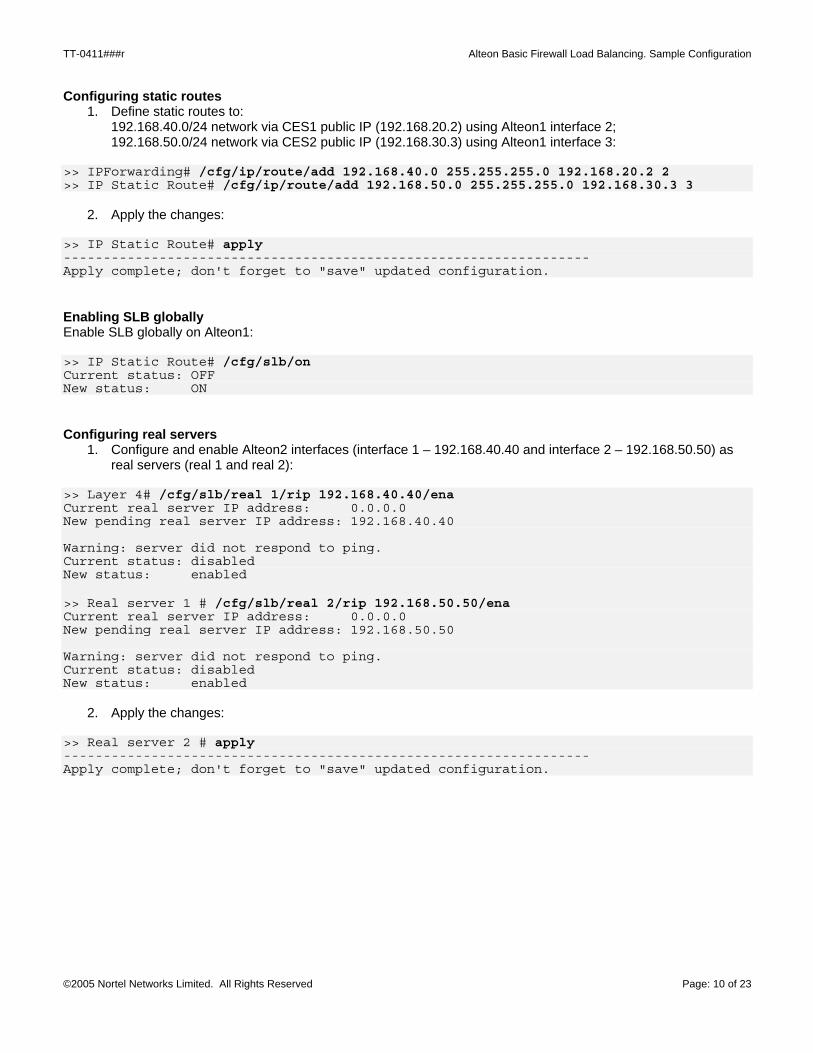
Configuring static routes 1. Define static routes to:
192.168.40.0/24 network via CES1 public IP (192.168.20.2) using Alteon1 interface 2; 192.168.50.0/24 network via CES2 public IP (192.168.30.3) using Alteon1 interface 3:
>> IPForwarding# /cfg/ip/route/add 192.168.40.0 255.255.255.0 192.168.20.2 2 >> IP Static Route# /cfg/ip/route/add 192.168.50.0 255.255.255.0 192.168.30.3 3
2. Apply the changes: >> IP Static Route# apply ------------------------------------------------------------------ Apply complete; don't forget to "save" updated configuration.
Enabling SLB globally Enable SLB globally on Alteon1: >> IP Static Route# /cfg/slb/on Current status: OFF New status: ON
Configuring real servers 1. Configure and enable Alteon2 interfaces (interface 1 – 192.168.40.40 and interface 2 – 192.168.50.50) as
real servers (real 1 and real 2): >> Layer 4# /cfg/slb/real 1/rip 192.168.40.40/ena Current real server IP address: 0.0.0.0 New pending real server IP address: 192.168.40.40 Warning: server did not respond to ping. Current status: disabled New status: enabled >> Real server 1 # /cfg/slb/real 2/rip 192.168.50.50/ena Current real server IP address: 0.0.0.0 New pending real server IP address: 192.168.50.50 Warning: server did not respond to ping. Current status: disabled New status: enabled
2. Apply the changes: >> Real server 2 # apply ------------------------------------------------------------------ Apply complete; don't forget to "save" updated configuration.

TT-0411###r Alteon Basic Firewall Load Balancing. Sample Configuration
©2005 Nortel Networks Limited. All Rights Reserved Page: 11 of 23
Adding real servers to a group 1. Create a group for real servers and add the created real servers to the group:
>> Real server 2 # /cfg/slb/group 1/add 1/add 2 Real server 1 added to real server group 1. Real server 2 added to real server group 1.
2. Set metric hash: >> Real server group 1# metric hash Current metric: leastconns New pending metric: hash
3. Set health to ICMP: >> Real server group 1# health icmp Current health check type: tcp New pending health check type: icmp
Creating filters 1. Create a local access filter (filter 15 in this example) to allow PC access to its local network 192.168.10.0/24.
a) Enter filter configuration menu:
>> Real server group 1# /cfg/slb/filt 15 ------------------------------------------------------------ [Filter 15 Menu] adv - Filter Advanced Menu name - Set filter name smac - Set source MAC address dmac - Set destination MAC address sip - Set source IP address smask - Set source IP mask dip - Set destination IP address dmask - Set destination IP mask proto - Set IP protocol sport - Set source TCP/UDP port or range dport - Set destination TCP/UDP port or range action - Set action group - Set real server group for redirection rport - Set real server port for redirection nat - Set which addresses are network address translated invert - Enable/disable filter inversion ena - Enable filter dis - Disable filter del - Delete filter cur - Display current filter configuration
TT-0411###r Alteon Basic Firewall Load Balancing. Sample Configuration
©2005 Nortel Networks Limited. All Rights Reserved Page: 12 of 23
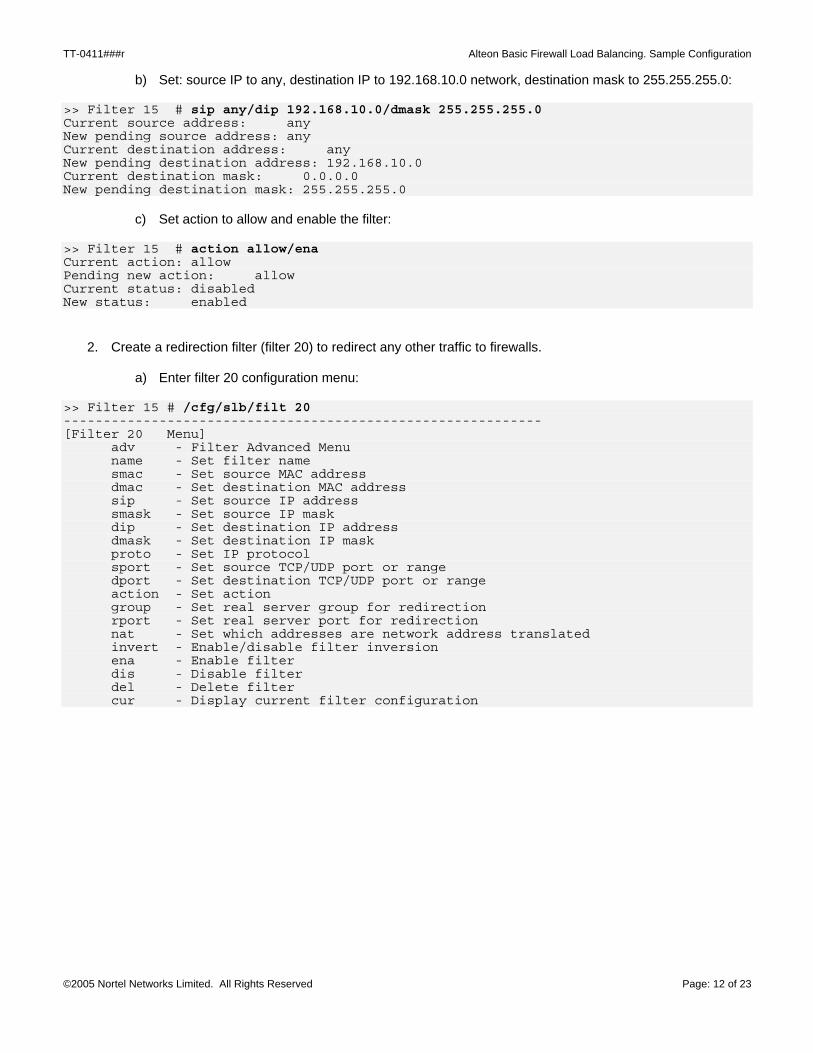
b) Set: source IP to any, destination IP to 192.168.10.0 network, destination mask to 255.255.255.0: >> Filter 15 # sip any/dip 192.168.10.0/dmask 255.255.255.0 Current source address: any New pending source address: any Current destination address: any New pending destination address: 192.168.10.0 Current destination mask: 0.0.0.0 New pending destination mask: 255.255.255.0
c) Set action to allow and enable the filter: >> Filter 15 # action allow/ena Current action: allow Pending new action: allow Current status: disabled New status: enabled
2. Create a redirection filter (filter 20) to redirect any other traffic to firewalls.
a) Enter filter 20 configuration menu: >> Filter 15 # /cfg/slb/filt 20 ------------------------------------------------------------ [Filter 20 Menu] adv - Filter Advanced Menu name - Set filter name smac - Set source MAC address dmac - Set destination MAC address sip - Set source IP address smask - Set source IP mask dip - Set destination IP address dmask - Set destination IP mask proto - Set IP protocol sport - Set source TCP/UDP port or range dport - Set destination TCP/UDP port or range action - Set action group - Set real server group for redirection rport - Set real server port for redirection nat - Set which addresses are network address translated invert - Enable/disable filter inversion ena - Enable filter dis - Disable filter del - Delete filter cur - Display current filter configuration
TT-0411###r Alteon Basic Firewall Load Balancing. Sample Configuration
©2005 Nortel Networks Limited. All Rights Reserved Page: 13 of 23
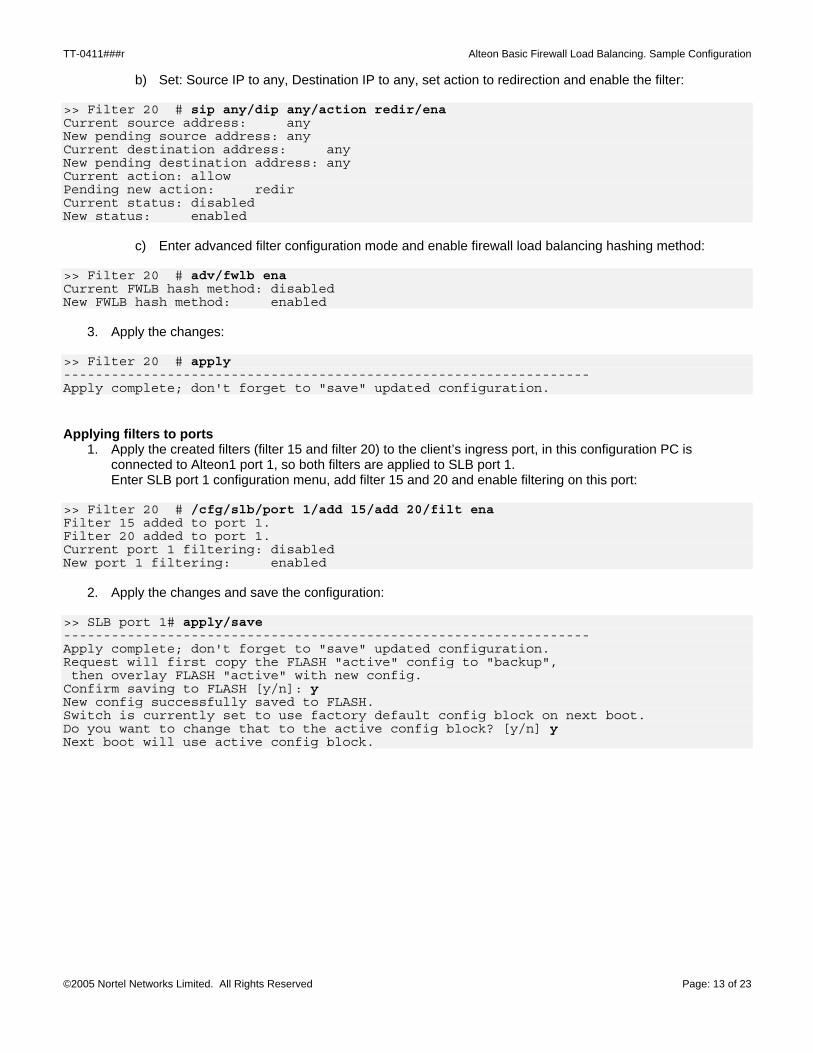
b) Set: Source IP to any, Destination IP to any, set action to redirection and enable the filter: >> Filter 20 # sip any/dip any/action redir/ena Current source address: any New pending source address: any Current destination address: any New pending destination address: any Current action: allow Pending new action: redir Current status: disabled New status: enabled
c) Enter advanced filter configuration mode and enable firewall load balancing hashing method: >> Filter 20 # adv/fwlb ena Current FWLB hash method: disabled New FWLB hash method: enabled
3. Apply the changes: >> Filter 20 # apply ------------------------------------------------------------------ Apply complete; don't forget to "save" updated configuration.
Applying filters to ports 1. Apply the created filters (filter 15 and filter 20) to the client’s ingress port, in this configuration PC is
connected to Alteon1 port 1, so both filters are applied to SLB port 1. Enter SLB port 1 configuration menu, add filter 15 and 20 and enable filtering on this port:
>> Filter 20 # /cfg/slb/port 1/add 15/add 20/filt ena Filter 15 added to port 1. Filter 20 added to port 1. Current port 1 filtering: disabled New port 1 filtering: enabled
2. Apply the changes and save the configuration: >> SLB port 1# apply/save ------------------------------------------------------------------ Apply complete; don't forget to "save" updated configuration. Request will first copy the FLASH "active" config to "backup", then overlay FLASH "active" with new config. Confirm saving to FLASH [y/n]: y New config successfully saved to FLASH. Switch is currently set to use factory default config block on next boot. Do you want to change that to the active config block? [y/n] y Next boot will use active config block.
TT-0411###r Alteon Basic Firewall Load Balancing. Sample Configuration
©2005 Nortel Networks Limited. All Rights Reserved Page: 14 of 23
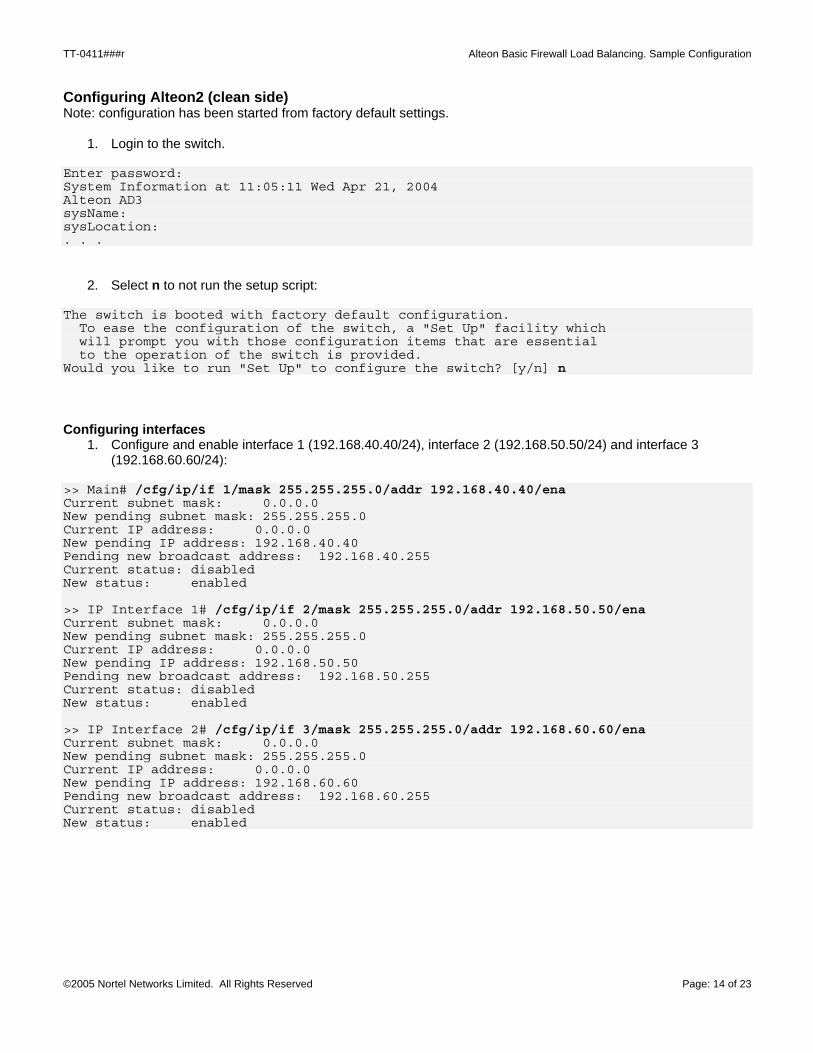
Configuring Alteon2 (clean side) Note: configuration has been started from factory default settings.
1. Login to the switch. Enter password: System Information at 11:05:11 Wed Apr 21, 2004 Alteon AD3 sysName: sysLocation: . . .
2. Select n to not run the setup script: The switch is booted with factory default configuration. To ease the configuration of the switch, a "Set Up" facility which will prompt you with those configuration items that are essential to the operation of the switch is provided. Would you like to run "Set Up" to configure the switch? [y/n] n
Configuring interfaces 1. Configure and enable interface 1 (192.168.40.40/24), interface 2 (192.168.50.50/24) and interface 3
(192.168.60.60/24): >> Main# /cfg/ip/if 1/mask 255.255.255.0/addr 192.168.40.40/ena Current subnet mask: 0.0.0.0 New pending subnet mask: 255.255.255.0 Current IP address: 0.0.0.0 New pending IP address: 192.168.40.40 Pending new broadcast address: 192.168.40.255 Current status: disabled New status: enabled >> IP Interface 1# /cfg/ip/if 2/mask 255.255.255.0/addr 192.168.50.50/ena Current subnet mask: 0.0.0.0 New pending subnet mask: 255.255.255.0 Current IP address: 0.0.0.0 New pending IP address: 192.168.50.50 Pending new broadcast address: 192.168.50.255 Current status: disabled New status: enabled >> IP Interface 2# /cfg/ip/if 3/mask 255.255.255.0/addr 192.168.60.60/ena Current subnet mask: 0.0.0.0 New pending subnet mask: 255.255.255.0 Current IP address: 0.0.0.0 New pending IP address: 192.168.60.60 Pending new broadcast address: 192.168.60.255 Current status: disabled New status: enabled
TT-0411###r Alteon Basic Firewall Load Balancing. Sample Configuration
©2005 Nortel Networks Limited. All Rights Reserved Page: 15 of 23
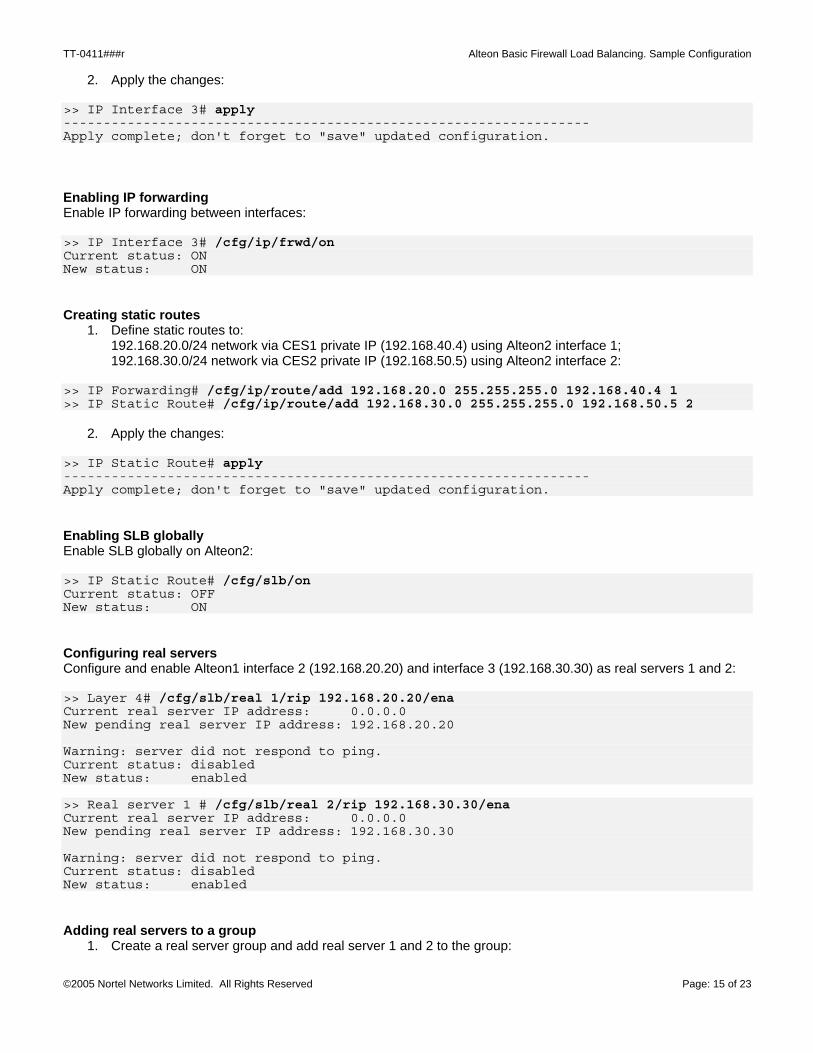
2. Apply the changes: >> IP Interface 3# apply ------------------------------------------------------------------ Apply complete; don't forget to "save" updated configuration.
Enabling IP forwarding Enable IP forwarding between interfaces: >> IP Interface 3# /cfg/ip/frwd/on Current status: ON New status: ON
Creating static routes 1. Define static routes to:
192.168.20.0/24 network via CES1 private IP (192.168.40.4) using Alteon2 interface 1; 192.168.30.0/24 network via CES2 private IP (192.168.50.5) using Alteon2 interface 2:
>> IP Forwarding# /cfg/ip/route/add 192.168.20.0 255.255.255.0 192.168.40.4 1 >> IP Static Route# /cfg/ip/route/add 192.168.30.0 255.255.255.0 192.168.50.5 2
2. Apply the changes: >> IP Static Route# apply ------------------------------------------------------------------ Apply complete; don't forget to "save" updated configuration.
Enabling SLB globally Enable SLB globally on Alteon2: >> IP Static Route# /cfg/slb/on Current status: OFF New status: ON
Configuring real servers Configure and enable Alteon1 interface 2 (192.168.20.20) and interface 3 (192.168.30.30) as real servers 1 and 2: >> Layer 4# /cfg/slb/real 1/rip 192.168.20.20/ena Current real server IP address: 0.0.0.0 New pending real server IP address: 192.168.20.20 Warning: server did not respond to ping. Current status: disabled New status: enabled >> Real server 1 # /cfg/slb/real 2/rip 192.168.30.30/ena Current real server IP address: 0.0.0.0 New pending real server IP address: 192.168.30.30 Warning: server did not respond to ping. Current status: disabled New status: enabled
Adding real servers to a group 1. Create a real server group and add real server 1 and 2 to the group:

TT-0411###r Alteon Basic Firewall Load Balancing. Sample Configuration
©2005 Nortel Networks Limited. All Rights Reserved Page: 16 of 23
>> Real server 2 # /cfg/slb/group 1/add 1/add 2 Real server 1 added to real server group 1. Real server 2 added to real server group 1.
2. Set metric for the group to hash and set health to ICMP: >> Real server group 1# metric hash/health icmp Current metric: leastconns New pending metric: hash Current health check type: tcp New pending health check type: icmp
3. Apply the changes: >> Real server group 1# apply ------------------------------------------------------------------ Apply complete; don't forget to "save" updated configuration.
Creating filters 1. Create a local access filter (filter 15 in this example) to allow Server to have access to its local network
192.168.60.0/24: >> Real server group 1# /cfg/slb/filt 15/sip any/dip 192.168.60.0/dmask 255.255.255.0/action allow/ena Current source address: any New pending source address: any Current destination address: any New pending destination address: 192.168.60.0 Current destination mask: 0.0.0.0 New pending destination mask: 255.255.255.0 Current action: allow Pending new action: allow Current status: disabled New status: enabled
2. Create a filter (filter 20) to redirect all the other traffic to firewalls: >> Filter 15 # /cfg/slb/filt 20/sip any/dip any/action redir/ena Current source address: any New pending source address: any Current destination address: any New pending destination address: any Current action: allow Pending new action: redir Current status: disabled New status: enabled
TT-0411###r Alteon Basic Firewall Load Balancing. Sample Configuration
©2005 Nortel Networks Limited. All Rights Reserved Page: 17 of 23
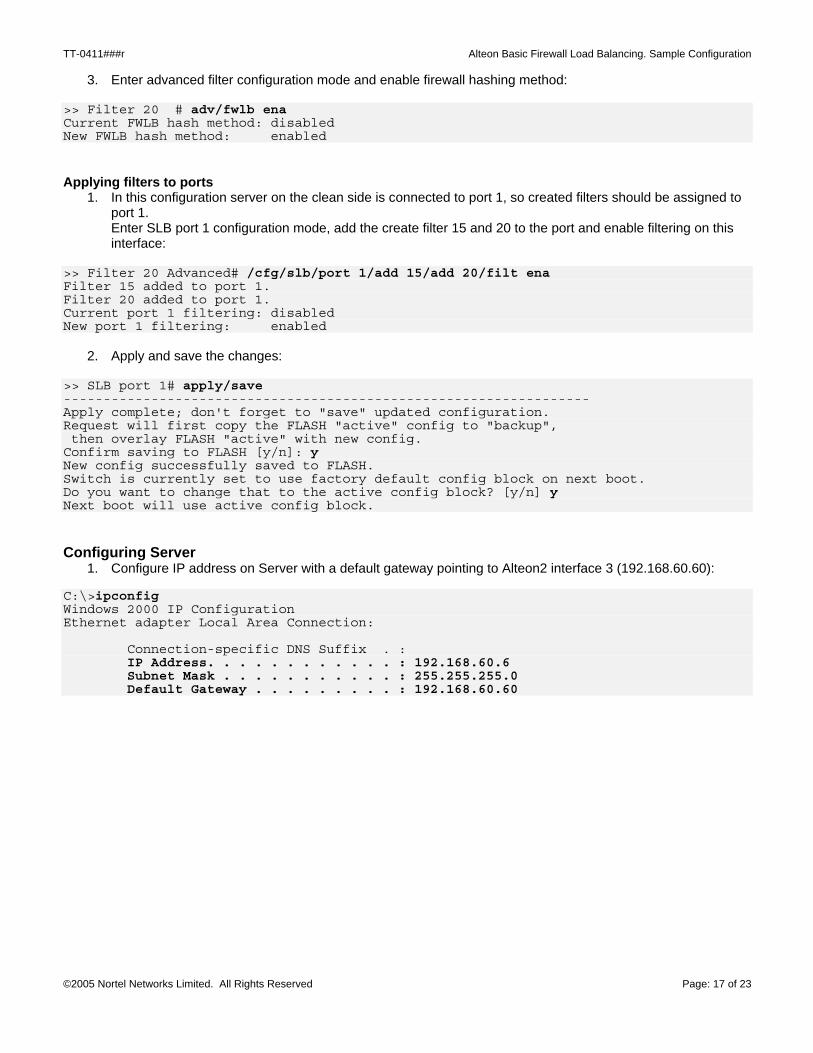
3. Enter advanced filter configuration mode and enable firewall hashing method: >> Filter 20 # adv/fwlb ena Current FWLB hash method: disabled New FWLB hash method: enabled
Applying filters to ports 1. In this configuration server on the clean side is connected to port 1, so created filters should be assigned to
port 1. Enter SLB port 1 configuration mode, add the create filter 15 and 20 to the port and enable filtering on this interface:
>> Filter 20 Advanced# /cfg/slb/port 1/add 15/add 20/filt ena Filter 15 added to port 1. Filter 20 added to port 1. Current port 1 filtering: disabled New port 1 filtering: enabled
2. Apply and save the changes: >> SLB port 1# apply/save ------------------------------------------------------------------ Apply complete; don't forget to "save" updated configuration. Request will first copy the FLASH "active" config to "backup", then overlay FLASH "active" with new config. Confirm saving to FLASH [y/n]: y New config successfully saved to FLASH. Switch is currently set to use factory default config block on next boot. Do you want to change that to the active config block? [y/n] y Next boot will use active config block.
Configuring Server 1. Configure IP address on Server with a default gateway pointing to Alteon2 interface 3 (192.168.60.60):
C:\>ipconfig Windows 2000 IP Configuration Ethernet adapter Local Area Connection: Connection-specific DNS Suffix . : IP Address. . . . . . . . . . . . : 192.168.60.6 Subnet Mask . . . . . . . . . . . : 255.255.255.0 Default Gateway . . . . . . . . . : 192.168.60.60
TT-0411###r Alteon Basic Firewall Load Balancing. Sample Configuration
©2005 Nortel Networks Limited. All Rights Reserved Page: 18 of 23
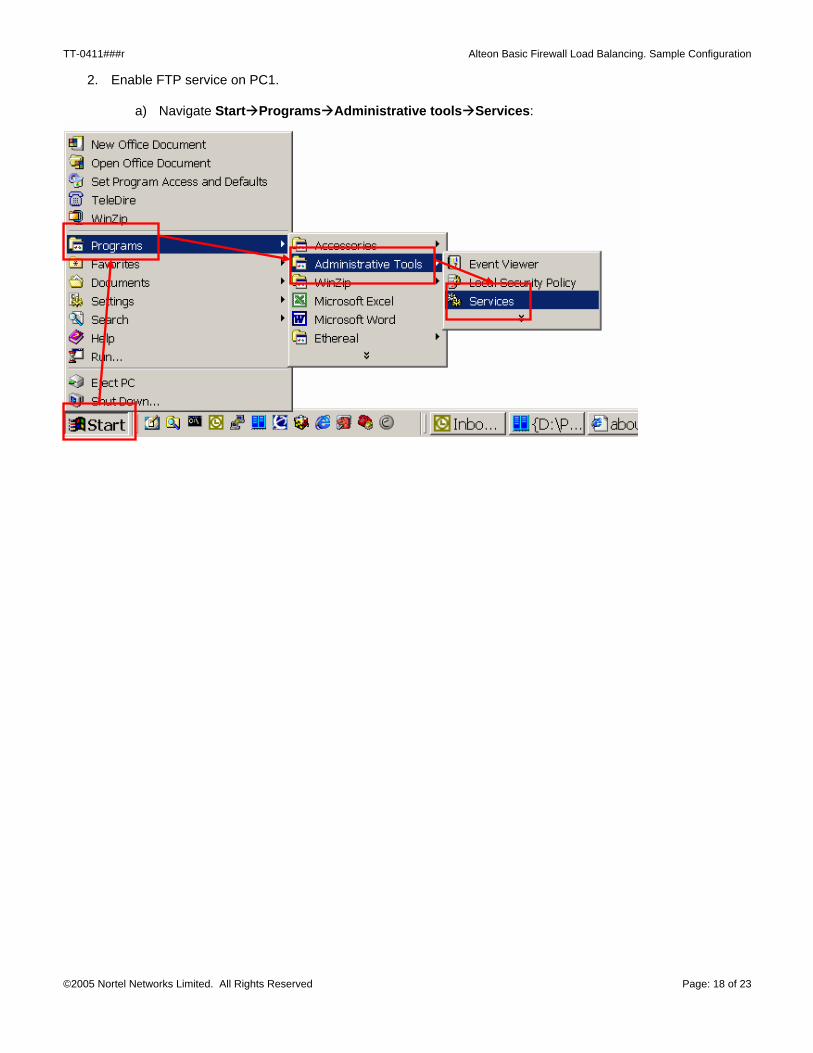
2. Enable FTP service on PC1.
a) Navigate Start Programs Administrative tools Services:
TT-0411###r Alteon Basic Firewall Load Balancing. Sample Configuration
©2005 Nortel Networks Limited. All Rights Reserved Page: 19 of 23
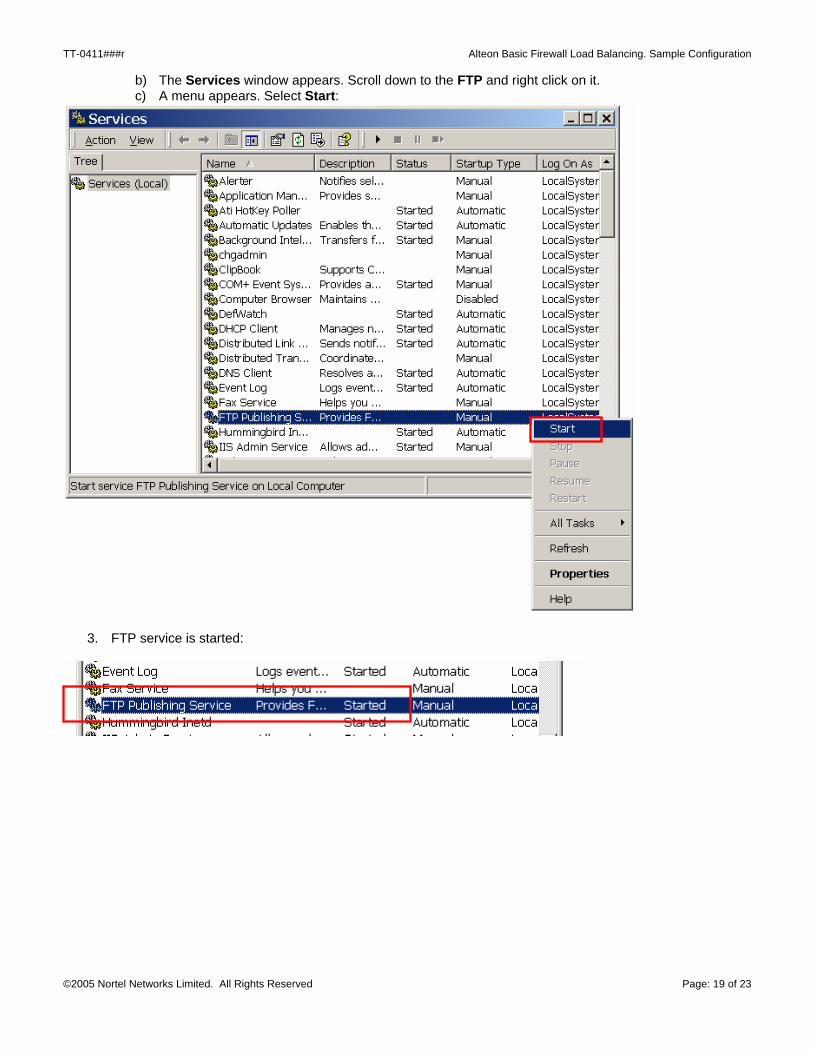
b) The Services window appears. Scroll down to the FTP and right click on it. c) A menu appears. Select Start:
3. FTP service is started:
TT-0411###r Alteon Basic Firewall Load Balancing. Sample Configuration
©2005 Nortel Networks Limited. All Rights Reserved Page: 20 of 23
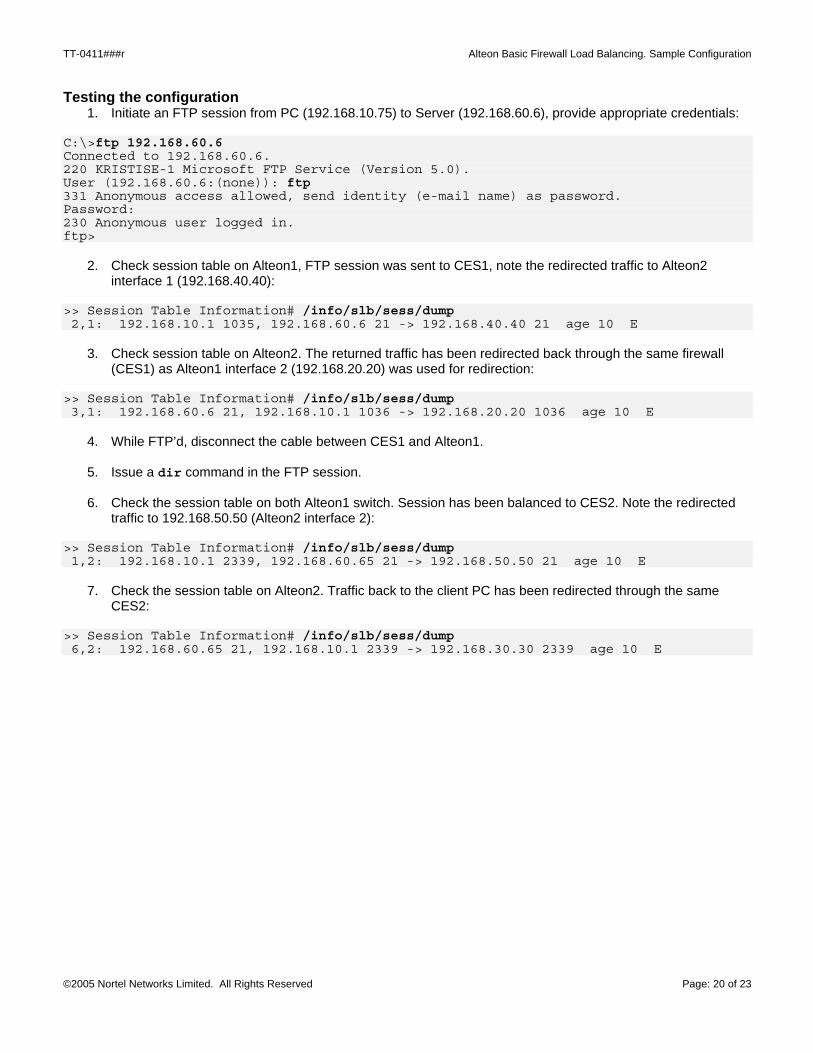
Testing the configuration 1. Initiate an FTP session from PC (192.168.10.75) to Server (192.168.60.6), provide appropriate credentials:
C:\>ftp 192.168.60.6 Connected to 192.168.60.6. 220 KRISTISE-1 Microsoft FTP Service (Version 5.0). User (192.168.60.6:(none)): ftp 331 Anonymous access allowed, send identity (e-mail name) as password. Password: 230 Anonymous user logged in. ftp>
2. Check session table on Alteon1, FTP session was sent to CES1, note the redirected traffic to Alteon2 interface 1 (192.168.40.40):
>> Session Table Information# /info/slb/sess/dump 2,1: 192.168.10.1 1035, 192.168.60.6 21 -> 192.168.40.40 21 age 10 E
3. Check session table on Alteon2. The returned traffic has been redirected back through the same firewall (CES1) as Alteon1 interface 2 (192.168.20.20) was used for redirection:
>> Session Table Information# /info/slb/sess/dump 3,1: 192.168.60.6 21, 192.168.10.1 1036 -> 192.168.20.20 1036 age 10 E
4. While FTP’d, disconnect the cable between CES1 and Alteon1.
5. Issue a dir command in the FTP session.
6. Check the session table on both Alteon1 switch. Session has been balanced to CES2. Note the redirected traffic to 192.168.50.50 (Alteon2 interface 2):
>> Session Table Information# /info/slb/sess/dump 1,2: 192.168.10.1 2339, 192.168.60.65 21 -> 192.168.50.50 21 age 10 E
7. Check the session table on Alteon2. Traffic back to the client PC has been redirected through the same CES2:
>> Session Table Information# /info/slb/sess/dump 6,2: 192.168.60.65 21, 192.168.10.1 2339 -> 192.168.30.30 2339 age 10 E
TT-0411###r Alteon Basic Firewall Load Balancing. Sample Configuration
©2005 Nortel Networks Limited. All Rights Reserved Page: 21 of 23
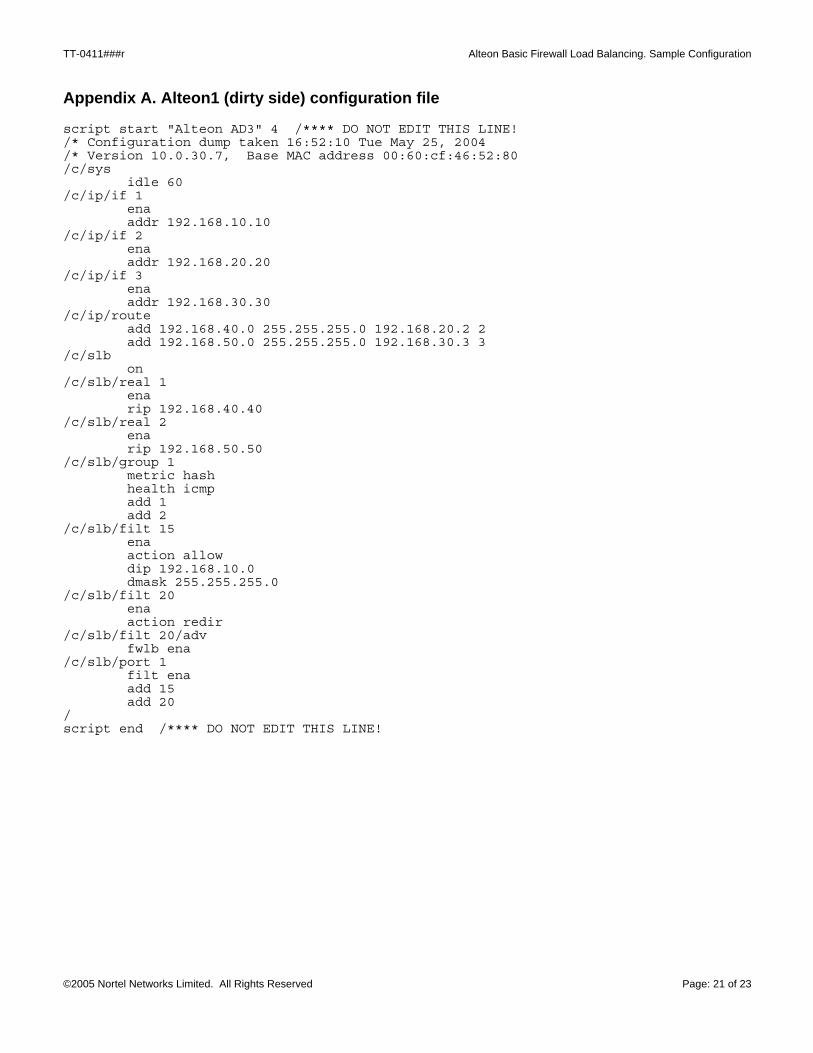
Appendix A. Alteon1 (dirty side) configuration file script start "Alteon AD3" 4 /**** DO NOT EDIT THIS LINE! /* Configuration dump taken 16:52:10 Tue May 25, 2004 /* Version 10.0.30.7, Base MAC address 00:60:cf:46:52:80 /c/sys idle 60 /c/ip/if 1 ena addr 192.168.10.10 /c/ip/if 2 ena addr 192.168.20.20 /c/ip/if 3 ena addr 192.168.30.30 /c/ip/route add 192.168.40.0 255.255.255.0 192.168.20.2 2 add 192.168.50.0 255.255.255.0 192.168.30.3 3 /c/slb on /c/slb/real 1 ena rip 192.168.40.40 /c/slb/real 2 ena rip 192.168.50.50 /c/slb/group 1 metric hash health icmp add 1 add 2 /c/slb/filt 15 ena action allow dip 192.168.10.0 dmask 255.255.255.0 /c/slb/filt 20 ena action redir /c/slb/filt 20/adv fwlb ena /c/slb/port 1 filt ena add 15 add 20 / script end /**** DO NOT EDIT THIS LINE!
TT-0411###r Alteon Basic Firewall Load Balancing. Sample Configuration
©2005 Nortel Networks Limited. All Rights Reserved Page: 22 of 23
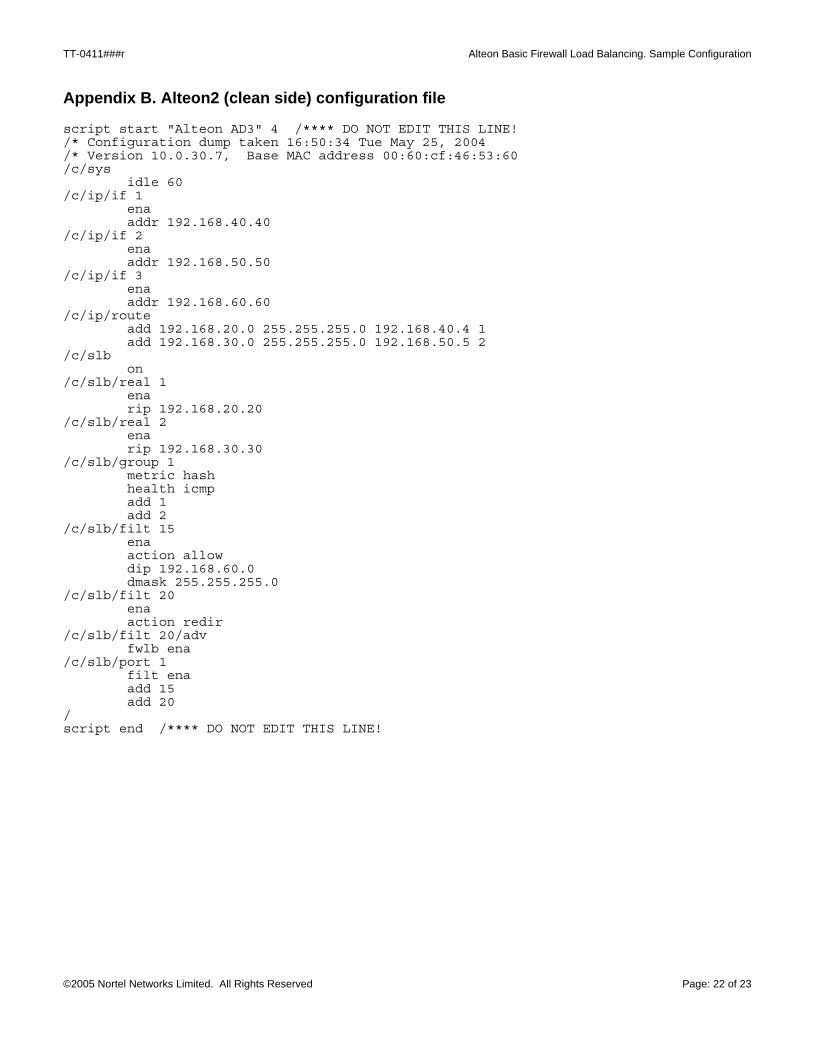
Appendix B. Alteon2 (clean side) configuration file script start "Alteon AD3" 4 /**** DO NOT EDIT THIS LINE! /* Configuration dump taken 16:50:34 Tue May 25, 2004 /* Version 10.0.30.7, Base MAC address 00:60:cf:46:53:60 /c/sys idle 60 /c/ip/if 1 ena addr 192.168.40.40 /c/ip/if 2 ena addr 192.168.50.50 /c/ip/if 3 ena addr 192.168.60.60 /c/ip/route add 192.168.20.0 255.255.255.0 192.168.40.4 1 add 192.168.30.0 255.255.255.0 192.168.50.5 2 /c/slb on /c/slb/real 1 ena rip 192.168.20.20 /c/slb/real 2 ena rip 192.168.30.30 /c/slb/group 1 metric hash health icmp add 1 add 2 /c/slb/filt 15 ena action allow dip 192.168.60.0 dmask 255.255.255.0 /c/slb/filt 20 ena action redir /c/slb/filt 20/adv fwlb ena /c/slb/port 1 filt ena add 15 add 20 / script end /**** DO NOT EDIT THIS LINE!
TT-0411###r Alteon Basic Firewall Load Balancing. Sample Configuration
©2005 Nortel Networks Limited. All Rights Reserved Page: 23 of 23
Copyright © 2004 Nortel Networks Limited - All Rights Reserved. Nortel, Nortel Networks, the Nortel logo, Globemark, and Alteon are trademarks of Nortel Networks Limited.
The information in this document is subject to change without notice. The statements, configurations, technical data, and recommendations in this document are believed to be accurate and reliable, but are presented without express or implied warranty. Users must take full responsibility for their applications of any products specified in this document. The information in this document is proprietary to Nortel Networks Limited.
To access more technical documentation, search our knowledge base, or open a service request online, please visit Nortel Networks Technical Support on the web at: http://www.nortel.com/support
If after following this guide you are still having problems, please ensure you have carried out the steps exactly as in this document. If problems still persist, please contact Nortel Networks Technical Support (contact information is available online at: http://www.nortel.com/cgi-bin/comments/comments.cgi?key=techsupport_cu).
We welcome you comments and suggestions on the quality and usefulness of this document. If you would like to leave a feedback please send your comments to: [email protected]