Embed Size (px)
Citation preview


All Rights Reserved
Copyright © 2008
The use, disclosure, modification, transfer, or transmittal of this work for any purpose, in any form, or by any means, without the written permission of the copyright holder, is strictly
forbidden.
Quintum Tenor DX Installation and Configuration Guide
Disclaimer
The content of this manual is subject to change without notice and should not be construed as a commitment by the distributor or IDT/Net2Phone. This manual is furnished for informational use only and IDT/Net2Phone assumes no responsibility or liability for any errors or inaccuracies that may appear herein.
05.15.2008
Quintum Tenor DX Installation and Configuration Guide
Page i
Table of Contents Hardware Connections.............................................................. 1 Configuring the Device ............................................................. 1
1. Launching the Configuration Manager ............................................. 1 2. Connecting to the Device .............................................................. 2 3. Using the Advanced Explore Menu. ................................................. 4 4. Configuring the IP Address ............................................................ 5 4. Setting the Dial Plan .................................................................... 7 6. Configuring the Outgoing Routing Protocol ...................................... 9 7. Configuring SIP Server Information ............................................. 10 8. Setting the Voice Codecs ............................................................ 14 9. Setting ISDN Signaling Settings ................................................... 16 10. Setting Hopoff Number Directory Settings................................... 19 11. Setting Trunk Circuit Routing Settings ........................................ 21 12. Setting Trunk Circuit Routing Settings ........................................ 24 13. Finalizing the Configuration ...................................................... 26
Appendix: Assigning the Device IP Address Manually ............. 27

Quintum Tenor DX Installation and Configuration Guide
Page 1
Hardware Connections
Connect your PC to the same network as the Quintum Tenor DX.
Configuring the Device
You need the Quintum Configuration Manager software to configure the Quintum Tenor DX. If you have not installed the software, download and install the latest version at http://ae.quintum.com/support/mgmt/index.shtml (scroll down to the Tenor Configuration Manager section of the page).
Perform the following steps to configure your device.
1. Launching the Configuration Manager
a. Click the Start button. Then click Programs-->Quintum-->Tenor Configuration Manager-->Tenor Configuration Manager. The Tenor Configuration Manager window opens.
Initial Configuration Manager Window
You will get 2 overlapping windows, window (1) is the Main Configuration Window and window (2) is the Address Book. Normally, the Address Book will be populated with the detected Quintum devices on your network.
If you need to verify your software version, do the following:
a. Click the Close button.
b. Verify that the Client Version is 106.10.00_121707 or higher by clicking Help-->About. If it is not, download and install the latest version of the Configuration Manager at http://ae.quintum.com/support/mgmt/index.shtml.

Quintum Tenor DX Installation and Configuration Guide
Page 2
If you have the correct version, proceed to the next section.
2. Connecting to the Device
a. If you closed the original Address Book window, on the menu bar at the top of the Main Configuration window, click File -->Connect. The Address Book window opens.
b. If you don’t find your device in the Address Book window, click the Discover button. The Configuration Manager will search the local network for active gateways and display the results in the Discovery window.
NOTE: If the Discovery window does not show any Quintum device, you might need to set the IP address manually. Go to the section Appendix: Assigning the Device IP Address Manually for the procedure.

Quintum Tenor DX Installation and Configuration Guide
Page 3
c. Click on the Tenor you wish to configure, and then click the Connect button. The Login and Password window opens.
NOTE: If more than one gateway is shown in the Discovery window and you are unsure which you want to configure, match the Serial Number displayed in the Discovery window to the Serial Number located on the bottom of the Gateway.
d. Login by using the default login: admin and the default password: admin. Then click the OK button.
The Configuration Manager window appears.
(1) shows your device IP address, serial number and the firmware version. (2) gives you the Basic Configuration options.
NOTE: If the Configuration Wizard does not start, restore the factory default settings by clicking on Action-->Set Factory from the Tenor Configuration Manager window. When the defaults have been restored, reconnect to the Tenor and the Wizard will start.
Quintum Tenor DX Installation and Configuration Guide
Page 4
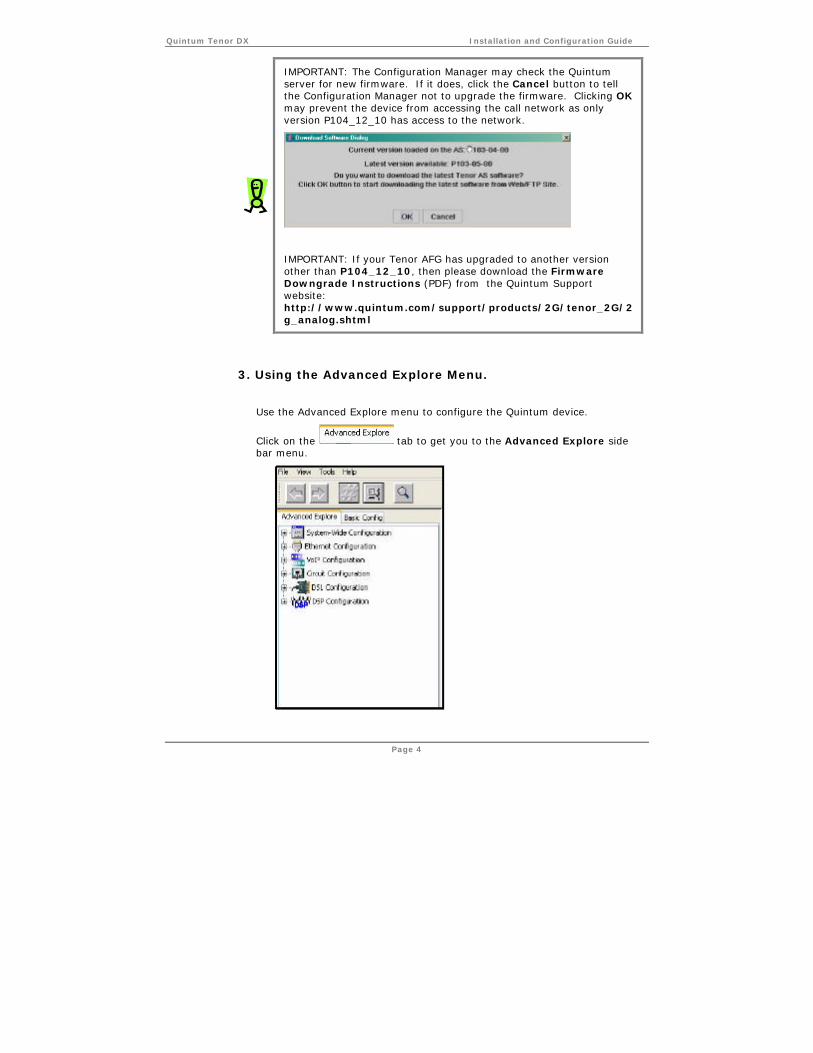
IMPORTANT: The Configuration Manager may check the Quintum server for new firmware. If it does, click the Cancel button to tell the Configuration Manager not to upgrade the firmware. Clicking OK may prevent the device from accessing the call network as only version P104_12_10 has access to the network.
IMPORTANT: If your Tenor AFG has upgraded to another version other than P104_12_10, then please download the Firmware Downgrade Instructions (PDF) from the Quintum Support website: http://www.quintum.com/support/products/2G/tenor_2G/2g_analog.shtml
3. Using the Advanced Explore Menu.
Use the Advanced Explore menu to configure the Quintum device.
Click on the tab to get you to the Advanced Explore side bar menu.

Quintum Tenor DX Installation and Configuration Guide
Page 5
4. Configuring the IP Address
Part I
a. On the left frame of the Configuration Manager, click the plus (+) sign next to System-Wide Configuration to expand the category. The subcategories display beneath System-Wide Configuration.
b. Click on DNS Server.
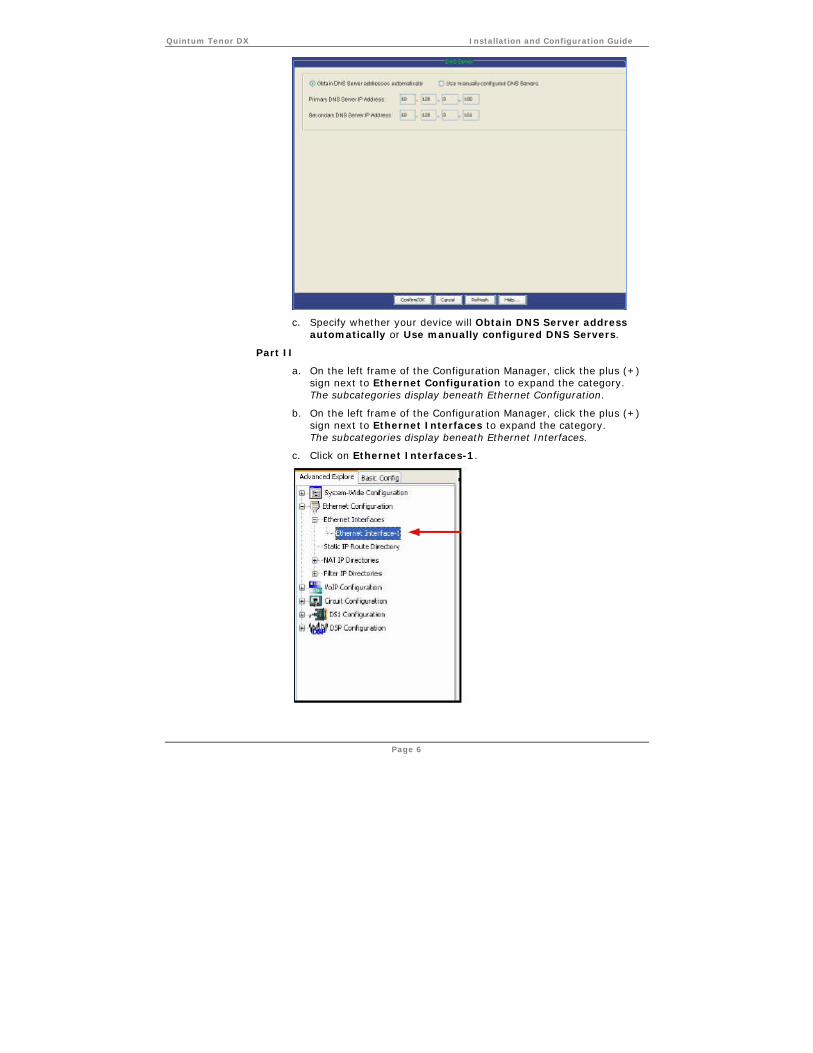
The DNS Server screen appears on the right frame of the Main Configuration window:
Quintum Tenor DX Installation and Configuration Guide
Page 6
c. Specify whether your device will Obtain DNS Server address automatically or Use manually configured DNS Servers.
Part II
a. On the left frame of the Configuration Manager, click the plus (+) sign next to Ethernet Configuration to expand the category. The subcategories display beneath Ethernet Configuration.
b. On the left frame of the Configuration Manager, click the plus (+) sign next to Ethernet Interfaces to expand the category. The subcategories display beneath Ethernet Interfaces.
c. Click on Ethernet Interfaces-1.
Quintum Tenor DX Installation and Configuration Guide
Page 7
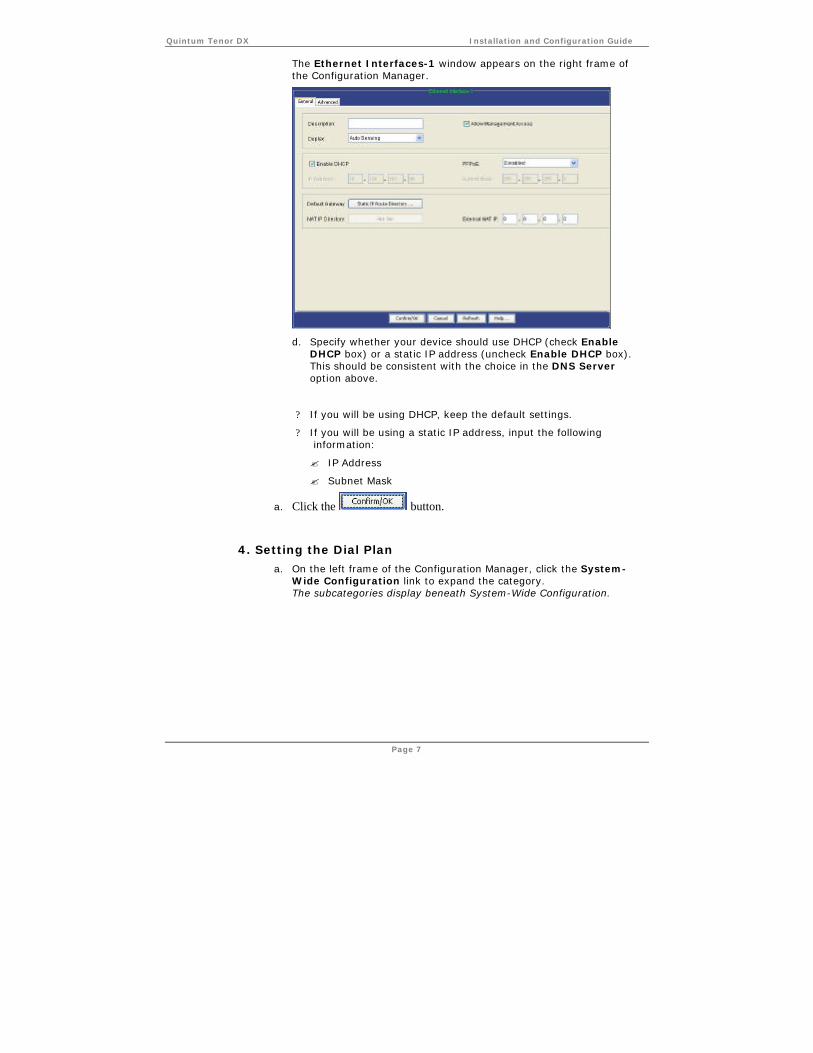
The Ethernet Interfaces-1 window appears on the right frame of the Configuration Manager.
d. Specify whether your device should use DHCP (check Enable DHCP box) or a static IP address (uncheck Enable DHCP box). This should be consistent with the choice in the DNS Server option above.
? If you will be using DHCP, keep the default settings.
? If you will be using a static IP address, input the following information:
? IP Address
? Subnet Mask
a. Click the button.
4. Setting the Dial Plan
a. On the left frame of the Configuration Manager, click the System-Wide Configuration link to expand the category. The subcategories display beneath System-Wide Configuration.

Quintum Tenor DX Installation and Configuration Guide
Page 8
b. From the expanded menu, click the Dial Plan link. The Dial Plan Window (General) appears on the left frame of the Configuration Manager.
On the Dial Plan screen, enter the appropriate entries for the following fields:
Quintum Tenor DX Installation and Configuration Guide
Page 9
? Set the Dial Plan Country drop-down menu to the country option of choice.
? Set the Minimum Dial Length to the minimum amount of digits that you will be dialing.
? Set the Maximum Dial Length to the maximum amount of digits that you will be dialing.
When you are done, click on the button.
NOTE: Most dialing schemes will support a Minimum Dial Digit Length of 3 and a Maximum Dial Digit Length of 20.
NOTE: Setting the Dial Plan Country value to None will remove all restrictions on the Dial Plan Configuration.
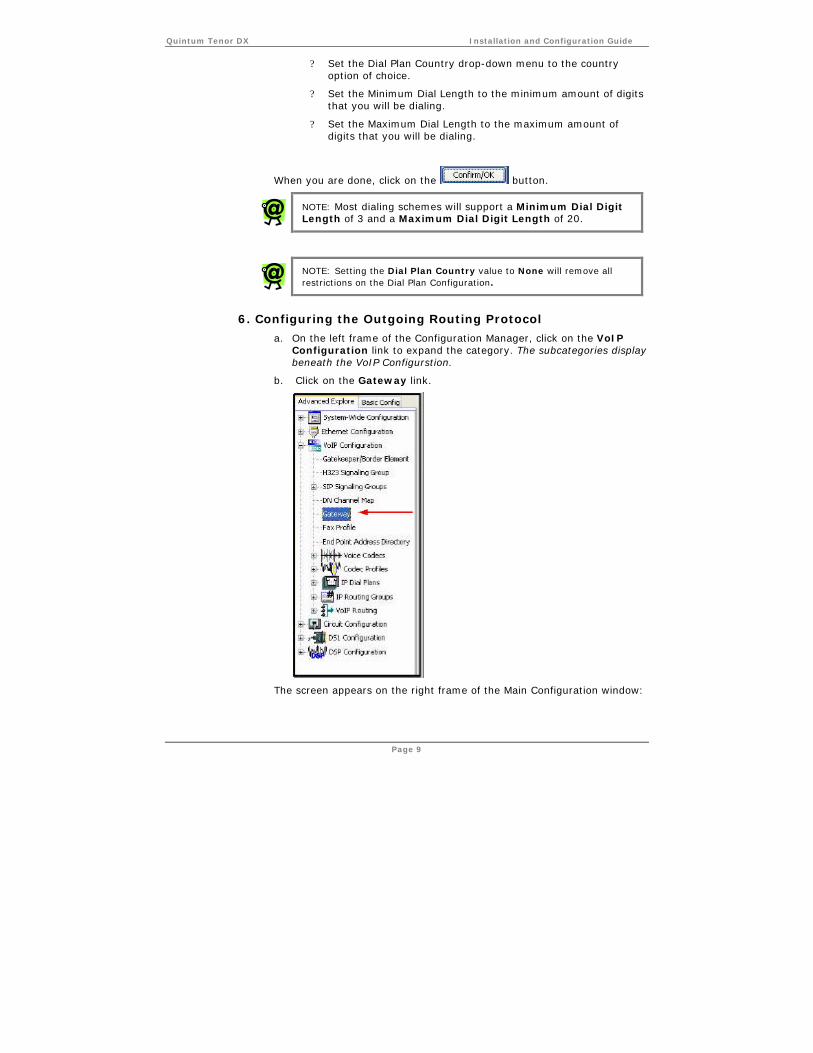
6. Configuring the Outgoing Routing Protocol
a. On the left frame of the Configuration Manager, click on the VoIP Configuration link to expand the category. The subcategories display beneath the VoIP Configurstion.
b. Click on the Gateway link.
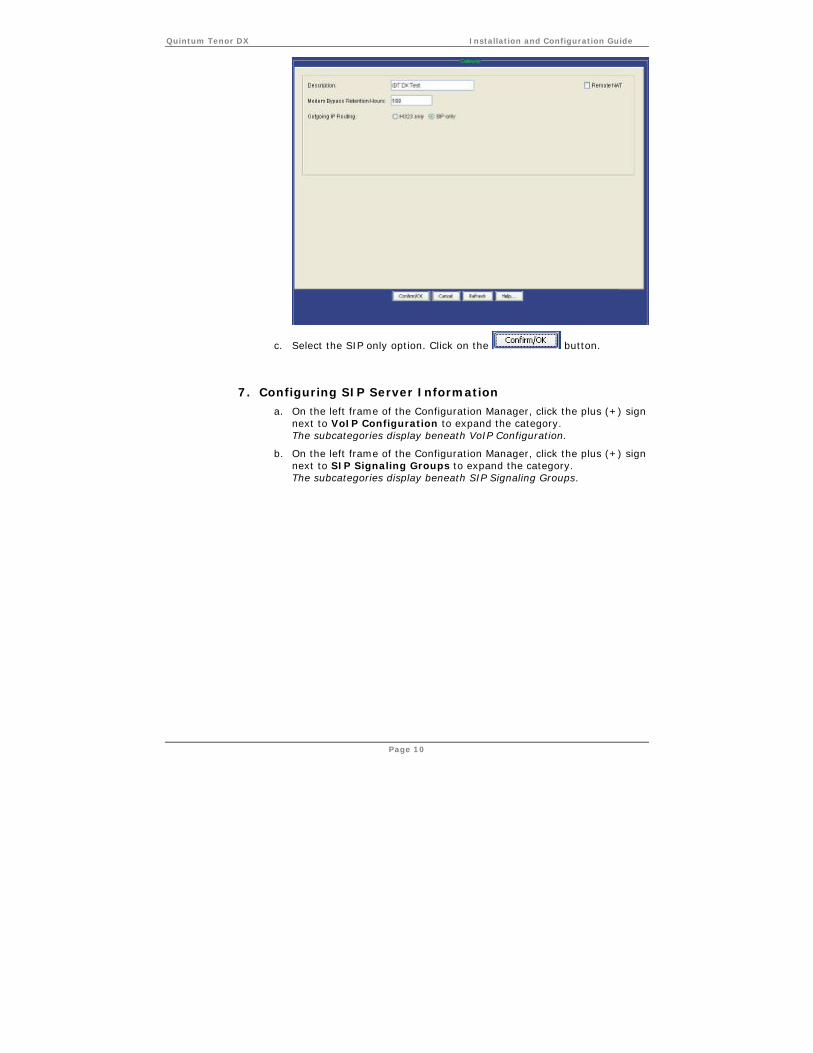
The screen appears on the right frame of the Main Configuration window:
Quintum Tenor DX Installation and Configuration Guide
Page 10
c. Select the SIP only option. Click on the button.
7. Configuring SIP Server Information
a. On the left frame of the Configuration Manager, click the plus (+) sign next to VoIP Configuration to expand the category. The subcategories display beneath VoIP Configuration.
b. On the left frame of the Configuration Manager, click the plus (+) sign next to SIP Signaling Groups to expand the category. The subcategories display beneath SIP Signaling Groups.

Quintum Tenor DX Installation and Configuration Guide
Page 11
c. Click SIP Signaling Group-1. The SIP Signaling Group-1 General View window appears.
d. Enter the following information as specified in the table below:
Quintum Tenor DX Installation and Configuration Guide
Page 12
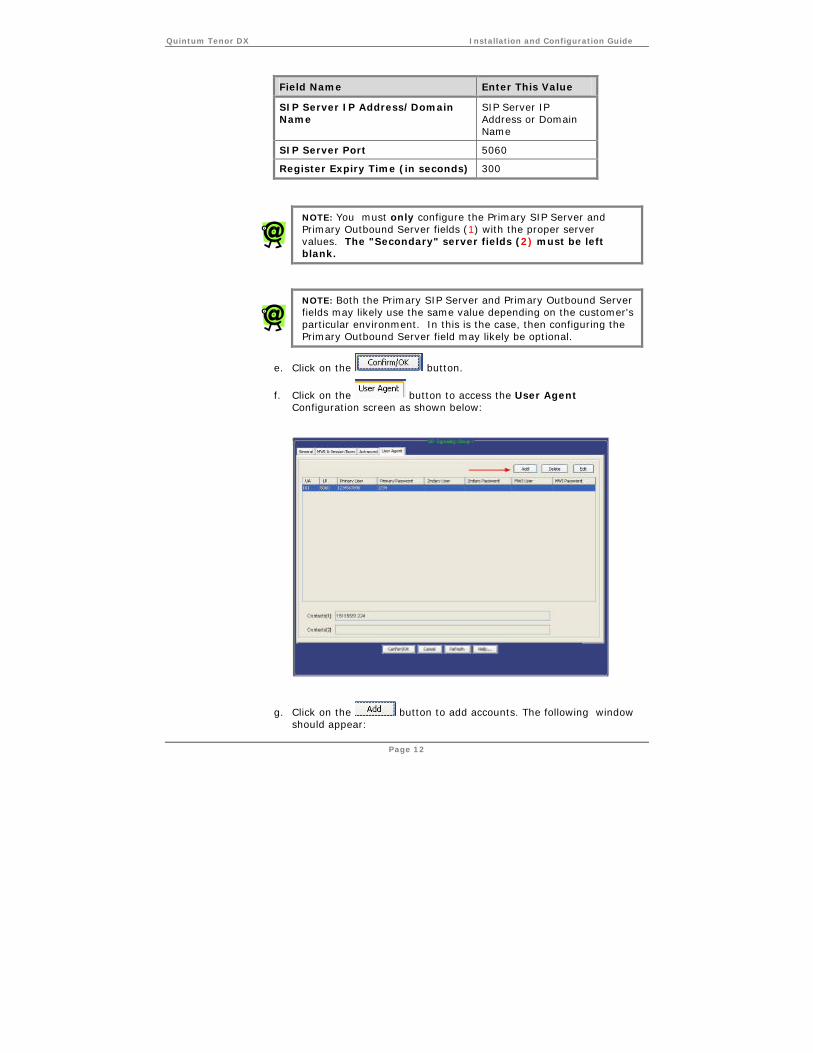
Field Name Enter This Value
SIP Server IP Address/Domain Name
SIP Server IP Address or Domain Name
SIP Server Port 5060
Register Expiry Time (in seconds) 300
NOTE: You must only configure the Primary SIP Server and Primary Outbound Server fields (1) with the proper server values. The "Secondary" server fields (2) must be left blank.
NOTE: Both the Primary SIP Server and Primary Outbound Server fields may likely use the same value depending on the customer's particular environment. In this is the case, then configuring the Primary Outbound Server field may likely be optional.
e. Click on the button.
f. Click on the button to access the User Agent Configuration screen as shown below:
g. Click on the button to add accounts. The following window should appear:
Quintum Tenor DX Installation and Configuration Guide
Page 13
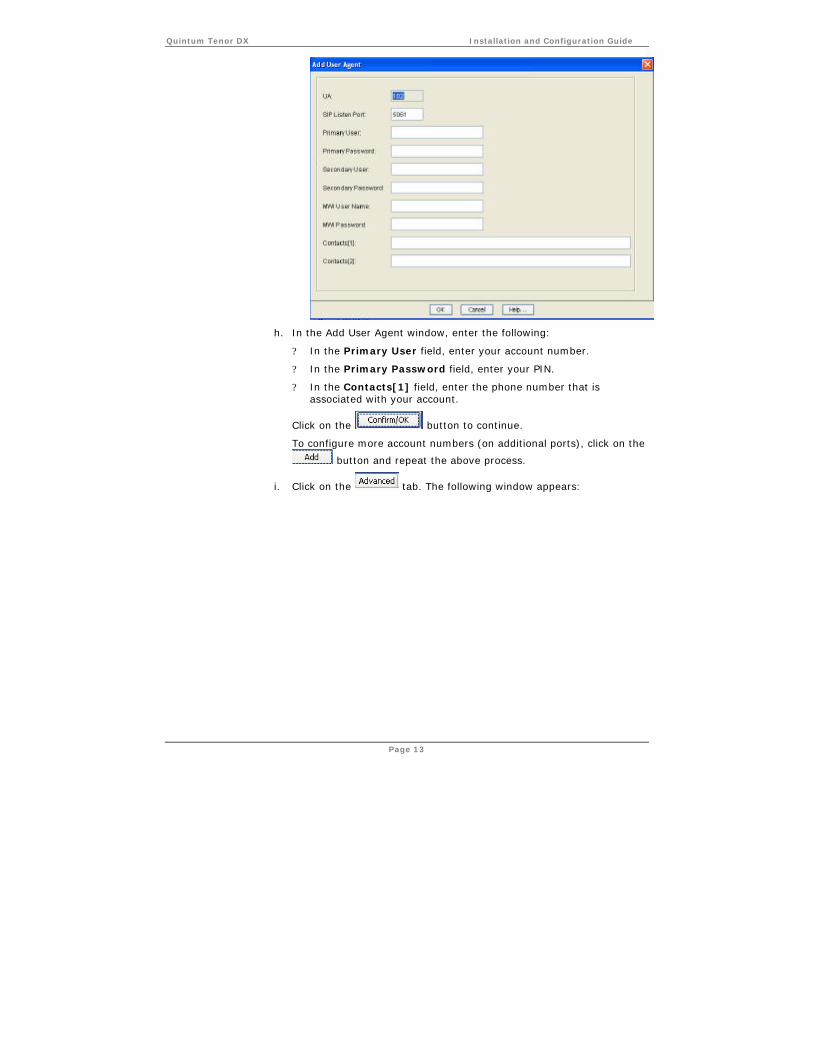
h. In the Add User Agent window, enter the following:
? In the Primary User field, enter your account number.
? In the Primary Password field, enter your PIN.
? In the Contacts[1] field, enter the phone number that is associated with your account.
Click on the button to continue.
To configure more account numbers (on additional ports), click on the
button and repeat the above process.
i. Click on the tab. The following window appears:

Quintum Tenor DX Installation and Configuration Guide
Page 14
Make sure that the Send 180 Progress checkbox is unchecked and that the Send 183 Ringing is checked.
Click on the button to continue.
8. Setting the Voice Codecs
To configure the voice codecs for the device, do the following:
a. On the left frame of the Configuration Manager, click on the VoIP Configuration link to expand the category. The subcategories display beneath Voice Configuration.
b. On the left frame of the Configuration Manager, click on the Voice Codecs link to expand the category. The subcategories display beneath Voice Codecs.

Quintum Tenor DX Installation and Configuration Guide
Page 15
c. Click Voice Codec-1. The Voice Codec –1 page displays.
d. Click the Voice Codec drop-down list, and select G.729AB 8.0 Kbps.
Quintum Tenor DX Installation and Configuration Guide
Page 16
e. Click on the button .
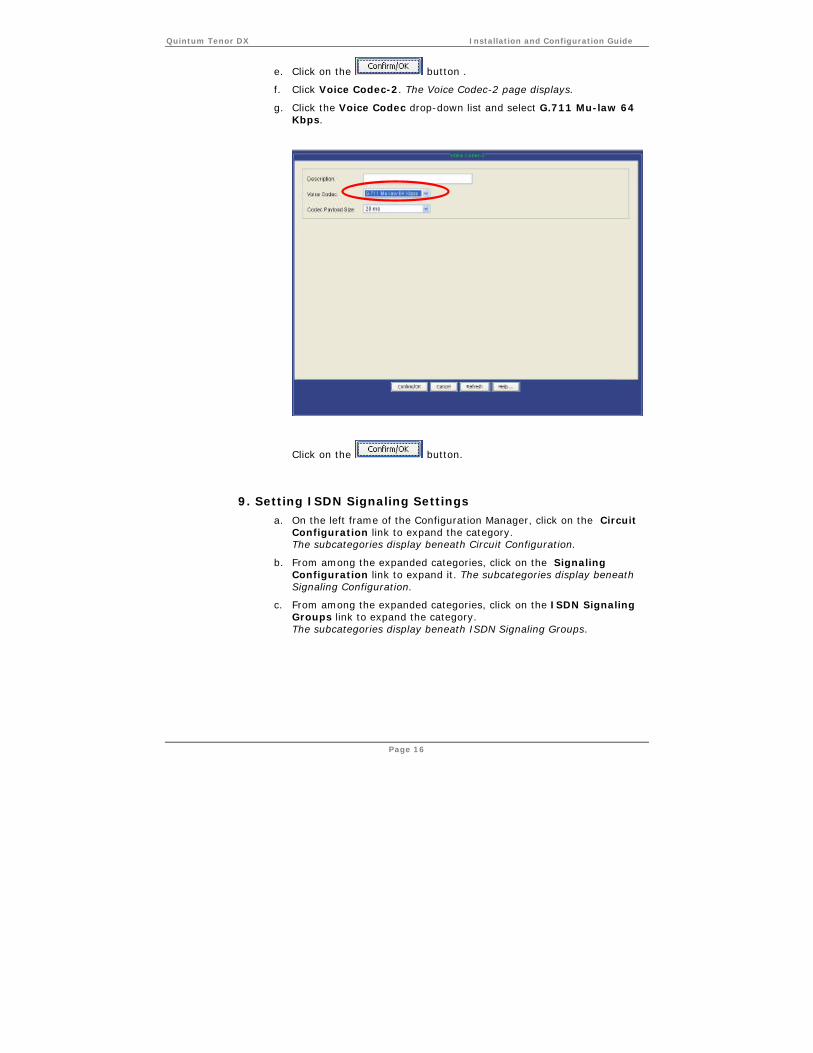
f. Click Voice Codec-2. The Voice Codec-2 page displays.
g. Click the Voice Codec drop-down list and select G.711 Mu-law 64 Kbps.
Click on the button.
9. Setting ISDN Signaling Settings
a. On the left frame of the Configuration Manager, click on the Circuit Configuration link to expand the category. The subcategories display beneath Circuit Configuration.
b. From among the expanded categories, click on the Signaling Configuration link to expand it. The subcategories display beneath Signaling Configuration.
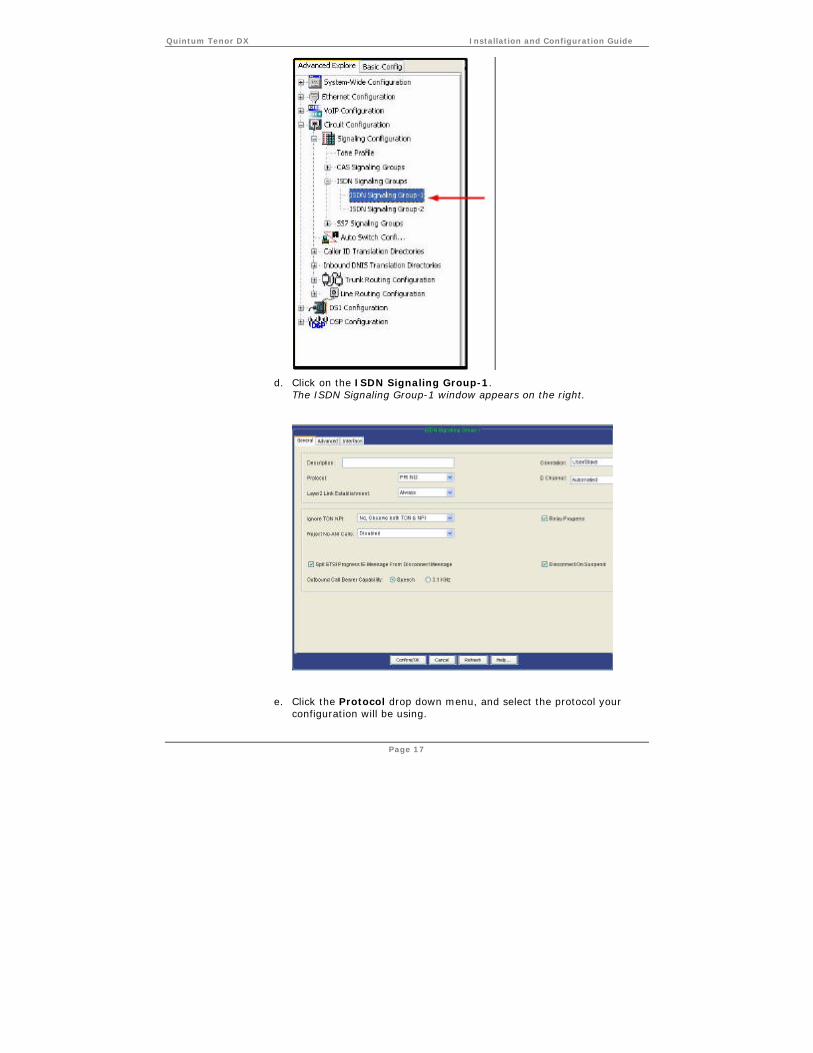
c. From among the expanded categories, click on the ISDN Signaling Groups link to expand the category. The subcategories display beneath ISDN Signaling Groups.
Quintum Tenor DX Installation and Configuration Guide
Page 17
d. Click on the ISDN Signaling Group-1. The ISDN Signaling Group-1 window appears on the right.
e. Click the Protocol drop down menu, and select the protocol your configuration will be using.

Quintum Tenor DX Installation and Configuration Guide
Page 18
Depending on the device, PRI and BRI protocols are supported. For a list of supported protocols, refer to the table on the following page.
It is important to find out the exact configuration of the lines beforehand. The following protocols are supported:
SUPPORTED PROTOCOLS
Protocol Description
PRI 5ESS 5ESS is the class 5 ISDN central office circuit switching system developed by AT&T.
PRI 4ESS 4ESS is the class 4 US AT&T proprietary version of ISDN.
PRI DMS DMS is a digital circuit-switching standard developed by Nortel Networks.
PRI NI2 This is the CCITT National ISDN 2 PRI standard.
PRI INSNET 1500
This is the standard digital switching developed by NTT in Japan.
PRI ETSI This is the standard developed by the European Telecommunications Standards Institute.
PRI QSIG The QSIG protocol provides signaling for Private Integrated services Network Exchange (PINX) devices. It is based on the ISDN Q.931 standard.
DASS2 Digital Access Signaling System 2 (DASS2) is a protocol defined by British Telecom for digital links to the PSTN based on ISDN.
BRI NET3 This supports NET3 (TBR3) ISDN, and covers Euro-ISDN, and is ETSI-compliant.
BRI CCITT QSIG
This supports switches with QSIG signaling per the Q.931/Q.921 ISDN spec.
BRI S031 This supports Australian S031 ISDN switches.
BRI 1TR6 This supports German 1TR6 ISDN switches.
BRI NTT This supports Japanese NTT ISDN switches.
BRI VNX This supports French VNx ISDN switches.
f. Click the Orientation drop-down menu, and select the ISDN signaling orientation your configuration will be using. Options are User/Slave (TE) and Network/Master (NT):
o When this signaling group is connected to a PSTN/Trunk-Side Connection or other types of devices such as switches (in which case, the PSTN would be the network), then set the Orientation parameter to User.

Quintum Tenor DX Installation and Configuration Guide
Page 19
o If this signaling group is connected to a PBX/Line-Side Connection, (which is typically User) then the Orientation is Network.
g. Click on the button.
NOTE: If the link light above the connected port of the Tenor DX is orange, try changing the value in the Orientation field.
10. Setting Hopoff Number Directory Settings
a. From the expanded menu below the Circuit Configuration link, click on the Trunk Routing Configuration link to expand the subcategory. The subcategories display beneath the Trun Routing Configuration.
b. Click on the Hopoff Number Directories link to expand the subcategory. The subcategories display beneath Hopoff Number Directories.
c. Click on the Hopoff Number Directory-1 link. The Hopoff Number Directory-1 window appears.

Quintum Tenor DX Installation and Configuration Guide
Page 20
d. Click the Add button. The Add Hopoff Number window displays.
e. In the Number Pattern field, enter the phone number of the configured SIP account.
f. In the Replacement field, enter the destination phone number or PBX extension. If the DX receives a call and the incoming Caller ID number matches the string value in the Number Pattern field, then the DX will re-route the call over ISDN to the destination number entered in the Replacement field.
Quintum Tenor DX Installation and Configuration Guide
Page 21
For example: If the Tenor DX should route inbound calls on a SIP account’s phone number 1234567890 (Number Pattern) to another destination number 1234567899 , enter 1234567890 in the Number Pattern field and 1234567899 in the Replacement field.
NOTE: To configure the Tenor DX to properly handle Hopoff Number functionality, it may be necessary to add individual entries for each number from 0 through 9.
Click on the button.
11. Setting Trunk Circuit Routing Settings
a. From the expanded menu below the Circuit Configuration sidebar link, cick on the Trunk Routing Configuration. The subcategories display beneath Trunk Routing Configuration.
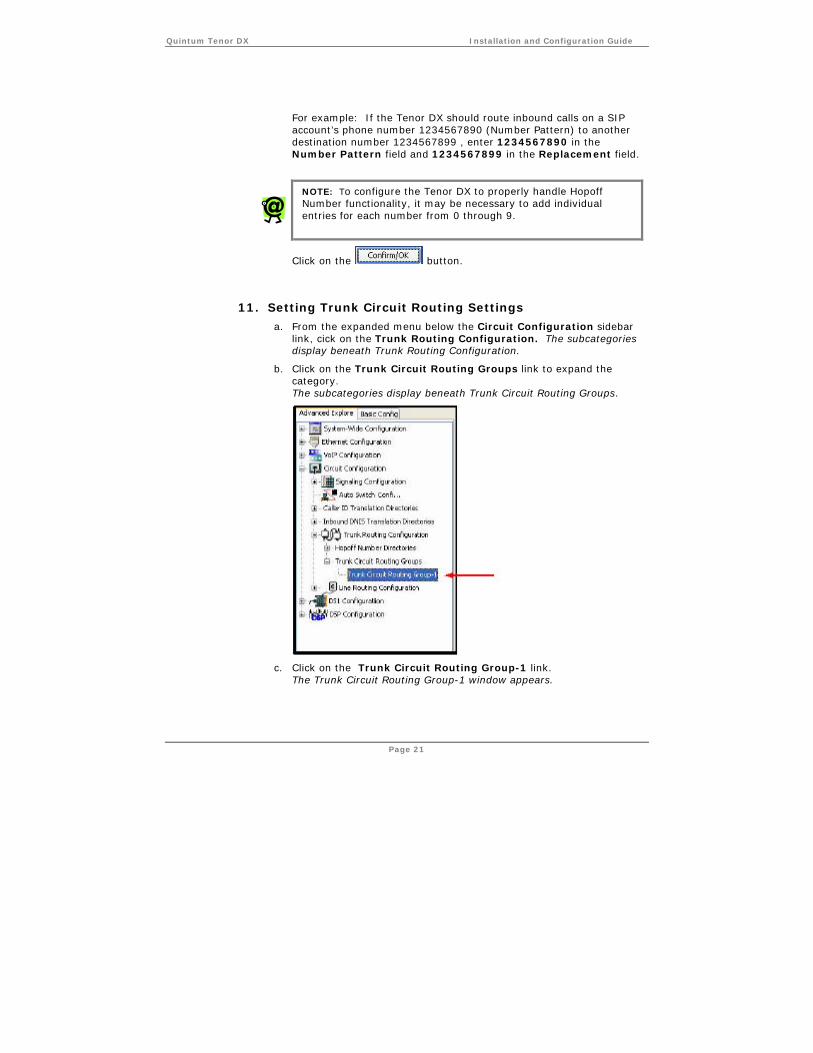
b. Click on the Trunk Circuit Routing Groups link to expand the category. The subcategories display beneath Trunk Circuit Routing Groups.
c. Click on the Trunk Circuit Routing Group-1 link. The Trunk Circuit Routing Group-1 window appears.

Quintum Tenor DX Installation and Configuration Guide
Page 22
d. From within the General tab, select the SIP User Agent value to be used in the SIP User Agent drop-down box.
e. Click the Overlap Dial checkbox to enable overlap dial.
f. Click the Provide Progress Tone checkbox to enable the feature.
g. Click on the button.
h. Click the IVR tab at the top of the screen. The IVR tab displays.

Quintum Tenor DX Installation and Configuration Guide
Page 23
i. To enable a second dial tone (provided by the Tenor when the phone number connected to the T1/E1 line is dialed), click the Type drop-down menu, and select Provide 2nd Dial Tone.
j. Click on the tab.
k. Click the Hold, Unattended Transfer, Attended Transfer, and Call Waiting boxes.
l. Click on the button
Quintum Tenor DX Installation and Configuration Guide
Page 24
12. Setting Trunk Circuit Routing Settings
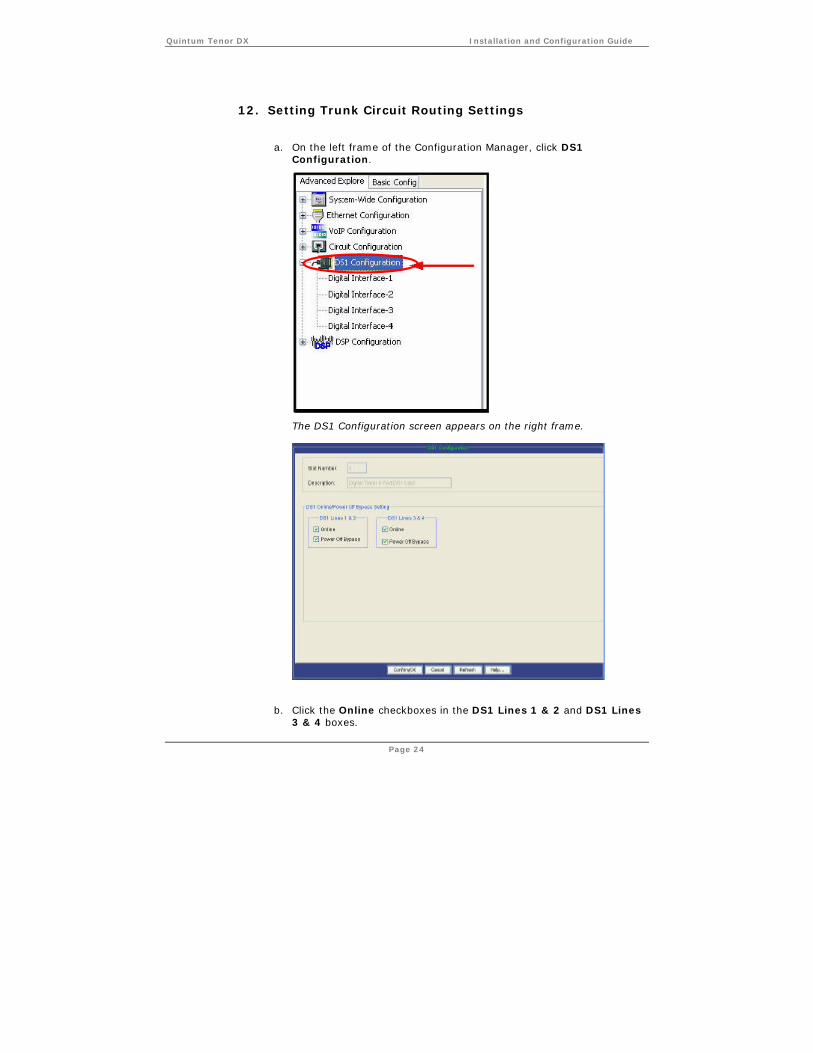
a. On the left frame of the Configuration Manager, click DS1 Configuration.
The DS1 Configuration screen appears on the right frame.
b. Click the Online checkboxes in the DS1 Lines 1 & 2 and DS1 Lines 3 & 4 boxes.

Quintum Tenor DX Installation and Configuration Guide
Page 25
c. Click the button at the bottom of the screen.
d. On the left frame of the Configuration Manager, click Digital Interface-1.
e. Click on the Channels tab, and then click on the Edit button. The Edit Channel Group window displays.

Quintum Tenor DX Installation and Configuration Guide
Page 26
f. Click the Associate Routing Group drop-down menu, and select Trunk Circuit Routing Group –1.
g. Click the OK button at the bottom of the screen. The Edit Channel Group window closes and the Digital Interface –1 window displays.
h. Click the button at the bottom of the screen.
Repeat the process for any additional Digital Interface lines listed in the DS1 section on the left frame of the Configuration Manager.
13. Finalizing the Configuration
Click the Submit Changes button on the menu bar to save the changes.
IMPORTANT: The Submit Changes button must be pressed every time configuration changes are made to the device; otherwise, the changes will not take effect.
Congratulations! You are now ready to start enjoying superior call quality on your Quintum Tenor DX.
Quintum Tenor DX Installation and Configuration Guide
Page 27
Appendix: Assigning the Device IP Address Manually
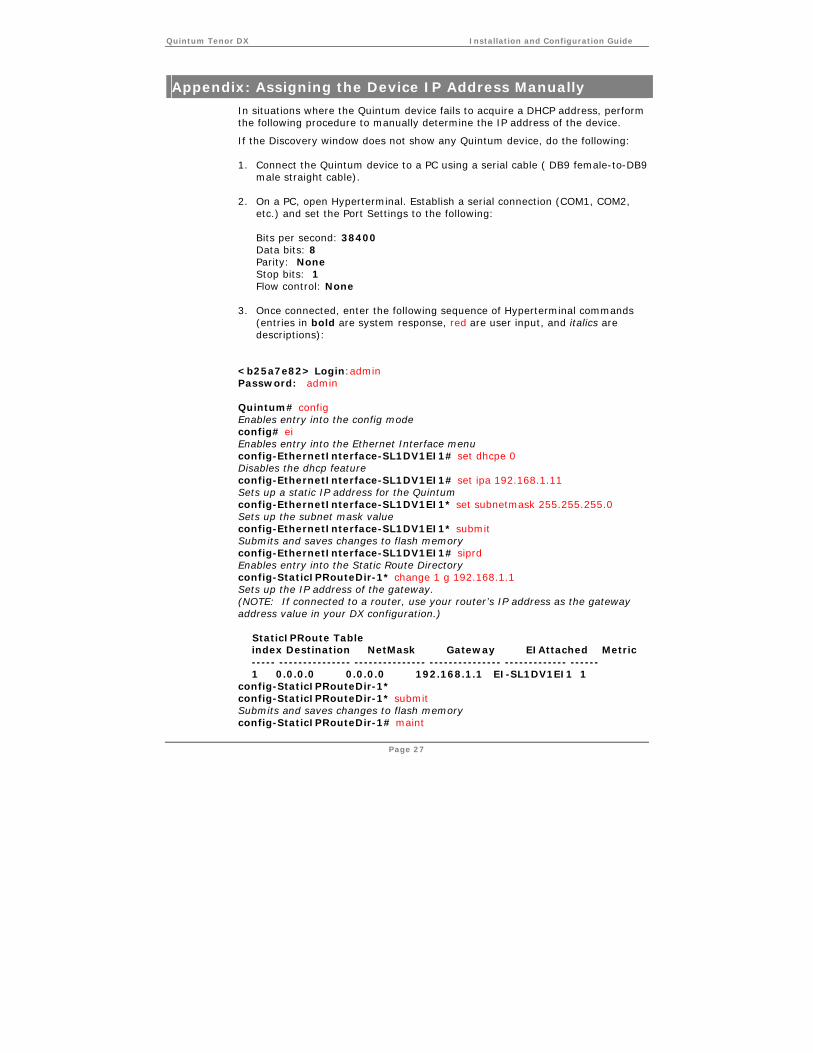
In situations where the Quintum device fails to acquire a DHCP address, perform the following procedure to manually determine the IP address of the device.
If the Discovery window does not show any Quintum device, do the following: 1. Connect the Quintum device to a PC using a serial cable ( DB9 female-to-DB9
male straight cable).
2. On a PC, open Hyperterminal. Establish a serial connection (COM1, COM2, etc.) and set the Port Settings to the following:
Bits per second: 38400 Data bits: 8 Parity: None Stop bits: 1 Flow control: None
3. Once connected, enter the following sequence of Hyperterminal commands
(entries in bold are system response, red are user input, and italics are descriptions):
<b25a7e82> Login:admin Password: admin Quintum# config Enables entry into the config mode config# ei Enables entry into the Ethernet Interface menu config-EthernetInterface-SL1DV1EI1# set dhcpe 0 Disables the dhcp feature config-EthernetInterface-SL1DV1EI1# set ipa 192.168.1.11 Sets up a static IP address for the Quintum config-EthernetInterface-SL1DV1EI1* set subnetmask 255.255.255.0 Sets up the subnet mask value config-EthernetInterface-SL1DV1EI1* submit Submits and saves changes to flash memory config-EthernetInterface-SL1DV1EI1# siprd Enables entry into the Static Route Directory config-StaticIPRouteDir-1* change 1 g 192.168.1.1 Sets up the IP address of the gateway. (NOTE: If connected to a router, use your router’s IP address as the gateway address value in your DX configuration.) StaticIPRoute Table index Destination NetMask Gateway EIAttached Metric ----- --------------- --------------- --------------- ------------- ------ 1 0.0.0.0 0.0.0.0 192.168.1.1 EI-SL1DV1EI1 1 config-StaticIPRouteDir-1* config-StaticIPRouteDir-1* submit Submits and saves changes to flash memory config-StaticIPRouteDir-1# maint
Quintum Tenor DX Installation and Configuration Guide
Page 28
Enables entry into Maintenance mode maintain-StaticIPRouteDir-1# mc Enables entry into the Master Chassis directory maintain-MasterChassis-1# reset Reboots the device 4. Once the device has obtained a valid IP address, return to the Quintum Tenor
Configuration Manager and run the Discover option, or simply go to Connect and add the IP address manually.
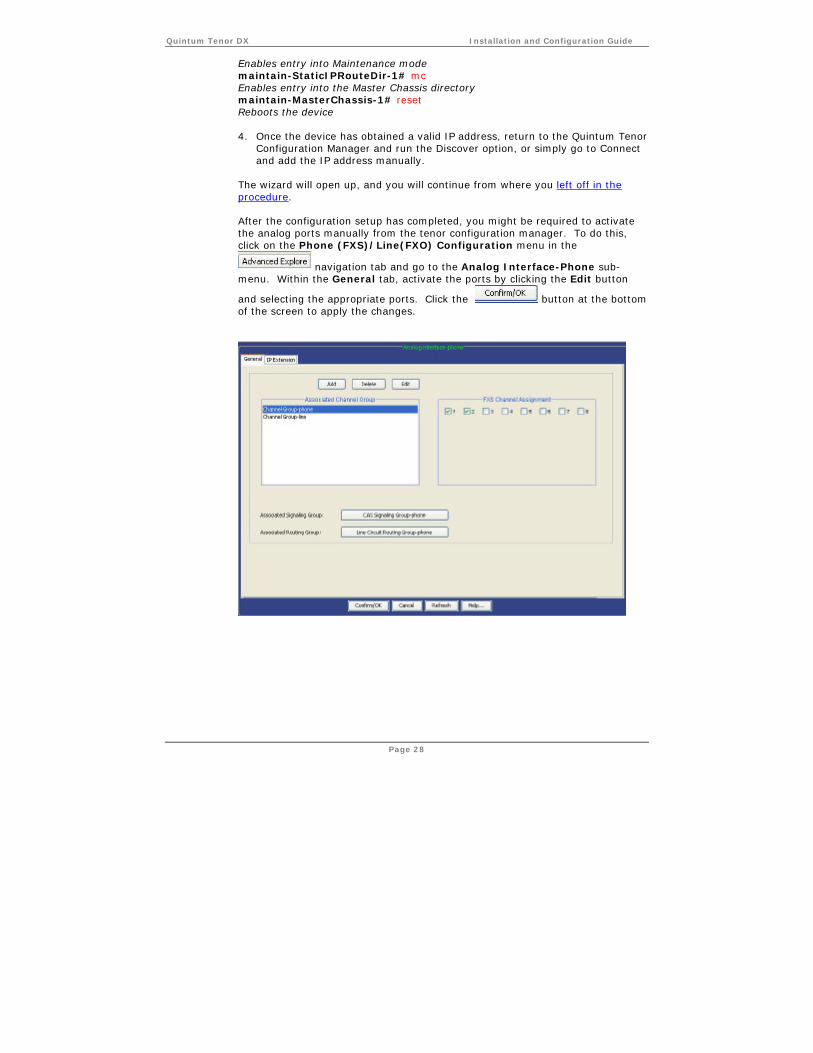
The wizard will open up, and you will continue from where you left off in the procedure. After the configuration setup has completed, you might be required to activate the analog ports manually from the tenor configuration manager. To do this, click on the Phone (FXS)/Line(FXO) Configuration menu in the
navigation tab and go to the Analog Interface-Phone sub-menu. Within the General tab, activate the ports by clicking the Edit button
and selecting the appropriate ports. Click the button at the bottom of the screen to apply the changes.