Embed Size (px)
Citation preview

headline bars
continuation tabs
notes
warnings
headline bars
continuation tabs
notes
warnings
model no. 058-0051-2
IMPORTANT:Please read this manual carefully before running this air brush kit and save it for reference.
INSTRUCTION MANUAL
AIR BRUSH KIT
headline bars
continuation tabs
notes
warnings
3headline bars
continuation tabs
notes
warnings
model no. 058-0051-2 | contact us 1-800-689-99282
Mastercraft is Canadian Tire’s exclusive line of reliable and hardworking hand tools, power tools and hardware products. Designed for the DIY customer but with the features and benefits of the leading professional series tools, there are over 100 practical and powerful products available under 6 different categories including; Stationary Power Tools, Handheld Power Tools, Hand Tools, Air Tools, Tool/Garage Storage, and Other Hardware accessories. Now more than ever, Canadians can
tackle just about any project around the house or garage with confidence using a Mastercraft product!
CanadianTire.ca
NOTE:If any parts are missing or damaged, or if you have any questions, please call our toll-free helpline at 1-800-689-9928.
SAVE THESE INSTRUCTIONSThis manual contains important safety and operating instructions. Read all instructions and follow them with use of this product.
TAblE Of CONTENTSSPECIFICATIONS 4SAFETY GUIDELINES 5KEY PARTS DIAGRAM 7SETUP 8OPERATING INSTRUCTIONS 9MAINTENANCE 15TROUBLESHOOTING 16PARTS LIST 17WARRANTY 18
TABL
E OF
CON
TENT
S

headline bars
continuation tabs
notes
warnings
model no. 058-0051-2 | contact us 1-800-689-99284 5SP
ECIF
ICAT
IONS
SPECIfICATIONSFeed type Siphon feed
Air brush nozzle diameter 0.35 mm
Interchangeable glass jars 22 cc (x2)
Air inlet 1/4" NPT
Operation pressure 15 – 50 PSI
SAfETY GUIDElINESThis air brush kit gives you the tool to increase capabilities of detail spraying a variety of inks and paints. It is great for the handyman, craftsman, hobbyist, and “Do-It-Yourselfer”.
• Keep the work area clean and well lighted. Cluttered benches and dark areas increase the risks of electric shock, fire and injury to persons.
• Keep bystanders, children and visitors away while operating the tool. Do not use this product with other people, children or pets in the work area.
• Stay alert. Watch what you are doing and use common sense when operating the tool. Do not use the tool while tired or under the influence of drugs, alcohol, or medication.
• Dress properly. Do not wear loose clothing or jewellery. Keep long hair and gloves away from moving parts.
• Do not overreach. Keep proper footing and balance at all times.
• Use a face mask/respirator and wear safety goggles when spraying. Always spray in a well-ventilated area to prevent health and fire hazards. Refer to Material Safety Data (MSDS) of spray materials for details.
• Never use oxygen, carbon dioxide, combustible gases or any bottled gas as an air source for the tool. Use only clean, dry, regulated compressed air at the rated pressure or within the rated pressure ranges for best air brush performance and extending air brush life.
• Keep hose away from sharp objects. Bursting air hose could result in personal injury. Examine air hoses regularly and replace them if damaged or broken.
• Check for misalignment or binding of moving parts, breakage of parts, and any other condition that affects the tool’s operation. If damaged, have the tool serviced before using.
• Always use air brush at a safe distance from other people in the work area.
• Do not aim the air brush at any dust or debris to avoid any damage to workpiece.
• Never aim or spray at yourself or anyone else, which could result in serious injury.
• Do not operate the tool if it is damaged during shipping, handling or use. Damage could result in bursting and cause injury and/or property damage.
• Do not spray acids, corrosive materials, toxic chemicals, fertilizers or pesticides. Using these materials could result in death or serious injury.
• Do not use pressure exceeding the operating pressure of any of the parts (hoses, fittings, etc.) in the painting system.
• Do not smoke in or near the work area. Always keep a fire extinguisher present in the work area.
• During cleaning and flushing, solvents can be forcefully expelled from liquid and air passages which could cause eye injury. Be sure that all others in the area are wearing impact-resistant eye and face protection. Even small objects can injure eyes and cause blindness.
SAFE
TY G
UIDE
LINE
S

headline bars
continuation tabs
notes
warnings
7headline bars
continuation tabs
notes
warnings
model no. 058-0051-2 | contact us 1-800-689-99286SA
FETY
GUI
DELI
NES
• Paints and solvents may be harmful or fatal if swallowed or inhaled. Avoid prolonged skin contact with solvents or paints as they will irritate skin. After any contact, immediately wash off exposed area with hot, soapy water.
• Always shut off air supply, drain hose of air pressure and disconnect air supply when not in use, before changing accessories or when making repairs. Turn off and detach the air supply, safely discharge any residual air pressure, and release the throttle and/or turn the switch to its off position before leaving the work area.
• Useonlyaccessoriesidentifiedbythemanufacturerforthespecifictoolmodel.
• Whenservicingatool,useonlyidenticalreplacementpartsand/orauthorizedparts.
• Useonlylubricantssuppliedwiththetoolorspecifiedbythemanufacturer.
• Storethetooloutofreachofchildrenandotheruntrainedpersonswhenitisidle.
• CAPROP65: This product contains chemicals known to the state of California to cause cancer and birth defects or other reproductive harm. Wash hands after handling.
WARNING!•Readallsafetywarningsandinstructions.Failuretofollowthewarningsandinstructionsmayresultinpersonalinjuryand
property damage. Save all warnings and instructions for future reference.
•Neversprayflammablematerialsinvicinityofopenflameornearignitionsources.Neverstoreflammableliquidsorgasesnear air compressor.
•Neverspraycloserthan3'(1m)totheaircompressor.Neversprayintothecompressor,compressorcontrolsorthemotor.
CAUTION!The warnings, precautions, and instructions discussed in this instruction manual cannot cover all possible conditions and situations that may occur. It must be understood by the operator that common sense and caution are factors which cannot be built into this product, but must be supplied by the operator.
KEY
PART
S DI
AGRA
M
No. Description
G Finger lever
H Needle chucking nut
IGlass jar with lid and fluid connector (22 cc)
J Glass jar with lid (22 cc)
K Air inlet
B
I
J
E
F
A
H
K
C
D
G
WARNING!If any part is missing or damaged, do not use the product until the missing or damaged part has been replaced.
KEY PARTS DIAGRAM
No. Description
A Air brush
B Nozzle
C Fluid needle
D Housing
E Protective cap
F Adjustment screw

headline bars
continuation tabs
notes
warnings
model no. 058-0051-2 | contact us 1-800-689-99288 9SE
TUP
OPER
ATIN
G IN
STRU
CTIO
NS
SETUP (fig. 1)1. Attach the glass jar (2) to the air brush (1) properly and
securely. The glass jar is held in place with friction and is not threaded.
IMPORTANT: It is suggested that you first fully insert the fluid connector on the glass jar lid to the fluid intake of the air brush and then turn approximately 1/5 of a full rotation. This will secure a tight connection between the glass jar and the air brush.
2. Connect air hose (not included) to the air inlet (3) of the air brush.
3. Connect other end of air hose to the outlet of an air brush compressor.
IMPORTANT: It is highly recommended that you use the Mastercraft air brush compressor which includes the air hose to operate the air brush for your best performance.
4. Add paint to the glass jar. Make sure that the paint has been mixed and thinned properly. (See “MIXING PAINT” in the OPERATING INSTRUCTIONS.)
OPERATING INSTRUCTIONS (fig. 2 to 3)MIXING PAINT
Colours can be custom mixed in any combination as long as the paints are compatible.
Make sure that the paint is free of lumps and strain if necessary.
Mix and soften paint in a palette, then transfer into the glass jar.
Mix paint with a top grade bristle brush such as a number 4 through 7 red sable brush. Using an inexpensive brush may cause bristles to fall out and clog the air brush.
THINNING PAINT
Most jar paints are too thick to spray and need thinning. Proportions of thinner needed may vary with different manufacturers. Use the following chart only as a guide for thinning spray materials:
1 part water to 1 part watercolour/ink
7 parts water to 1 part acrylic
2partslacquerthinnerto1partlacquer
IMPORTANT:Sinceacrylicsandlacquersdryquickly,donotsetairbrushdownforextendedperiodsoftimebetween spraying.
IMPORTANT: Keep an extra pan or jar of solvent nearby and dip head assembly in solvent to help prevent paint from clogging air brush. Refer to cleaning instructions for additional information.
OPERATION (fig. 2)
1. Turn your air brush compressor on.
2. Regulate the air pressure to the air brush. The air brush operation pressure ranges from 15 PSI to 50 PSI.
3. Pull off the protective cap (4) from the air brush (1). Press the finger lever (5) downward to begin air flow. Draw back slowly/gently on the finger lever until you achieve the air volume you need for your spray technique.
4. Continue to adjust the spray volume by using the finger lever, moving it front to back. When you have the
2
1
3Air hose
Mastercraft air brush compressor
Fig. 1
Fig. 2
1
69
5
4
10
78
WARNING!Before spraying, make sure that the needle chucking nut (6) is hand tightened firmly around the fluid needle. Never hand loosen the needle chucking nut during the operation, which will result in no material flow at your next spray.
CAUTION!•Thisairbrushfeaturesadualactionfingerlever.Pressthefingerlever(5)downwardONLYtobeginairflowforair
dusting on work surface if needed, then draw back slowly/gently on the finger lever till fluid comes out of the nozzle.
•Donotpullthefingerleverstraightback.Bothactionsarerequiredforproperoperationoftheairbrush.

headline bars
continuation tabs
notes
warnings
model no. 058-0051-2 | contact us 1-800-689-9928 1110OP
ERAT
ING
INST
RUCT
IONS
OPER
ATIN
G IN
STRU
CTIO
NS
correct spray volume, you may fix the position using the adjustment screw (8).
5. The spray pattern size is based on the distance between the work surface and the air brush nozzle (7). For extra-fine spray, hold the air brush nearer the work surface.
6. When you have finished painting, gently release pressure on the finger lever (first loosening the adjustment screw, if needed) and disconnect air supply.
IMPORTANT: If fluid blocks the nozzle while working, move the needle chucking nut (6) back and forth. If this does not clear the nozzle, try loosening the adjustment screw and gently moving the fluid needle (9) back and forth. This will allow a longer movement for the fluid needle and allow the blocked fluid to escape, clearing the nozzle.
7. After flushing the air brush completely with the proper solvent, spray any remaining solvent through the nozzle until clear solvent sprays from the end of the air brush tip.
IMPORTANT: All paints used with this air brush are fast drying by design and can damage your tool if they are not flushed immediately.
IMPORTANT: The glass jar with lid (10) has two uses. It is used for excess thinned paint, and also for solvent when it is time to clean the air brush.
IMPORTANT: The pressure for atomization is controlled by the regulator on the air brush compressor. The amount of fluid is adjusted by the finger lever pull length, the paint viscosity, and the air pressure.
IMPORTANT: To avoid cross-threading, all air brush parts should be screwed in hand tight initially. If the parts cannot easily be turned by hand, be sure that you have the correct parts, unscrew, realign, and try again. Never use excessive force in matching parts.
IMPORTANT: Only use air brush compressor for best performance of your air brush.
PAINTING PROCEDURE
Be sure that the workpiece is clean and free of dust, grease, etc. Mask off any area not to be painted. Hang or place small pieces (such as models) on a pedestal or stand so all paintable areas are easily accessible (a stand may be built from an ordinary wire coat hanger, or bottle, etc.).
Hold the air brush nozzle about 6" (15 cm) from the workpiece. Use short strokes, moving the air brush at a steady rate, parallel to the work surface. (fig. 3)
To achieve full coverage, first apply a light coat, then let paint dry and apply another coat. Repeat until desired coverage is achieved. Do not try for complete coverage with one pass.
TRIGGERING EXERCISES
IMPORTANT: Use cardboard or newspaper to perform triggering exercises.
Exercise 1 - Spraying
A steady, constant motion produces the best results. Start motion before pressing the trigger, follow through with motion after releasing the trigger as shown in fig. 3.
Be sure to keep the air brush parallel to the work surface when painting. If the air brush motion is moved in an arc or the motion is unsteady, the paint finish will be uneven. (fig. 4)
Exercise 2 - Position and Density Control
1.Lightlypencilagridof1/2"(1.25cm)squaresonapiece of paper.
2. Use diluted india ink or water-soluble materials for this exercise. Hold the air brush approximately 1/2" (1.25 cm) away from paper and spray small dots on the intersecting lines. (fig. 5)
3. After placement is accurately achieved, enlarge dot size by allowing more material to flow through the air brush and by increasing the distance between the air brush and the paper. (fig. 6)
WARNING!Do not exceed the air brush maximum operation pressure of 50 PSI.
CAUTION!•Alwaysusetheairbrushatasafedistancefromotherpeopleintheworkarea.
•CleantheairbrushIMMEDIATELYaftereachuse.Delayedorinadequatecleaningwillpermanentlyclogtheairbrush.
Fig. 3
Fig. 4
INCORRECT
Fig. 5
Fig. 6
headline bars
continuation tabs
notes
warnings
model no. 058-0051-2 | contact us 1-800-689-9928 1312OP
ERAT
ING
INST
RUCT
IONS
OPER
ATIN
G IN
STRU
CTIO
NS
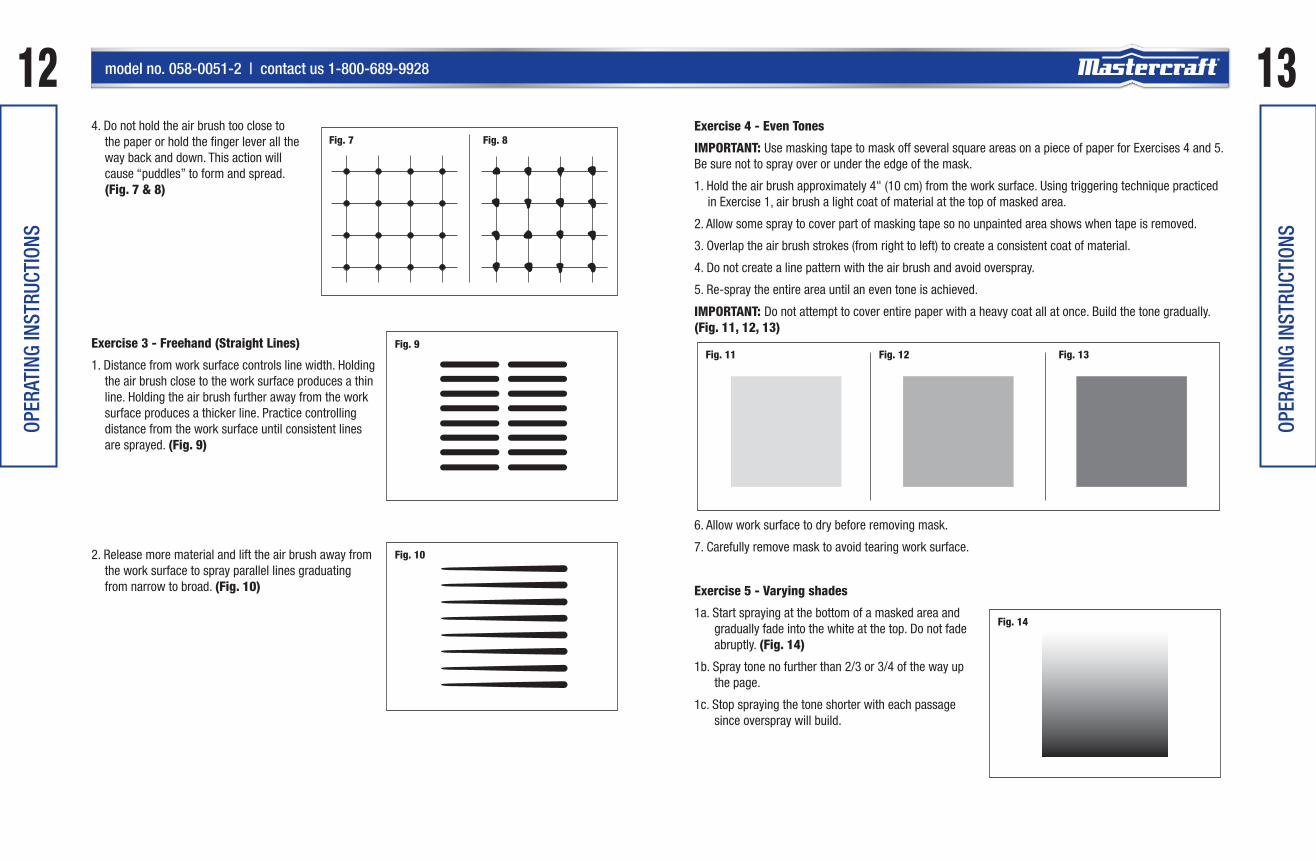
4. Do not hold the air brush too close to the paper or hold the finger lever all the way back and down. This action will cause “puddles” to form and spread. (fig. 7 & 8)
Exercise 3 - freehand (Straight lines)
1. Distance from work surface controls line width. Holding the air brush close to the work surface produces a thin line. Holding the air brush further away from the work surface produces a thicker line. Practice controlling distance from the work surface until consistent lines are sprayed. (fig. 9)
2. Release more material and lift the air brush away from the work surface to spray parallel lines graduating from narrow to broad. (fig. 10)
Fig. 7 Fig. 8
Fig. 9
Fig. 10
Exercise 4 - Even Tones
IMPORTANT: UsemaskingtapetomaskoffseveralsquareareasonapieceofpaperforExercises4and5.Be sure not to spray over or under the edge of the mask.
1.Holdtheairbrushapproximately4"(10cm)fromtheworksurface.Usingtriggeringtechniquepracticedin Exercise 1, air brush a light coat of material at the top of masked area.
2. Allow some spray to cover part of masking tape so no unpainted area shows when tape is removed.
3. Overlap the air brush strokes (from right to left) to create a consistent coat of material.
4. Do not create a line pattern with the air brush and avoid overspray.
5. Re-spray the entire area until an even tone is achieved.
IMPORTANT: Do not attempt to cover entire paper with a heavy coat all at once. Build the tone gradually. (fig. 11, 12, 13)
6. Allow work surface to dry before removing mask.
7. Carefully remove mask to avoid tearing work surface.
Exercise 5 - Varying shades
1a. Start spraying at the bottom of a masked area and gradually fade into the white at the top. Do not fade abruptly. (fig. 14)
1b. Spray tone no further than 2/3 or 3/4 of the way up the page.
1c. Stop spraying the tone shorter with each passage since overspray will build.
Fig. 11 Fig. 12 Fig. 13
Fig. 14
headline bars
continuation tabs
notes
warnings
15headline bars
continuation tabs
notes
warnings
model no. 058-0051-2 | contact us 1-800-689-992814OP
ERAT
ING
INST
RUCT
IONS
MAI
NTEN
ANCE
MAINTENANCEIMPORTANT: Always clean your air brush immediately after use. Do not leave spray material in glass jar for long period of time. Dried spray material can cause damage to the internal paint channels of the air brush.
1. Remove material from the glass jar.
2. Wash inside of the glass jar using a bristle brush dipped in the proper solvent or clear water.
3. Fill the glass jar with the proper solvent or clear water and spray until clear.
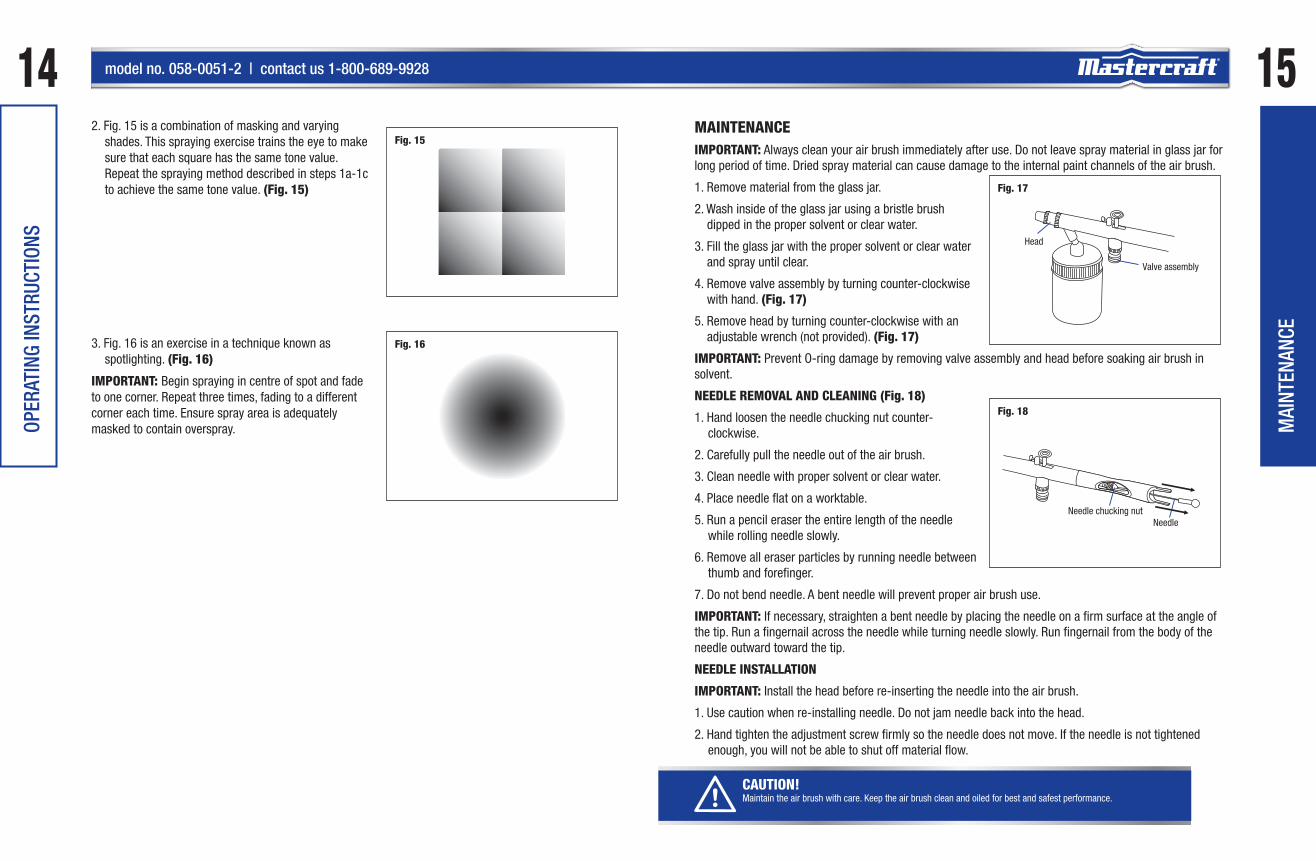
4. Remove valve assembly by turning counter-clockwise with hand. (fig. 17)
5. Remove head by turning counter-clockwise with an adjustable wrench (not provided). (fig. 17)
IMPORTANT: Prevent O-ring damage by removing valve assembly and head before soaking air brush in solvent.
NEEDlE REMOVAl AND ClEANING (fig. 18)
1. Hand loosen the needle chucking nut counter-clockwise.
2. Carefully pull the needle out of the air brush.
3. Clean needle with proper solvent or clear water.
4. Place needle flat on a worktable.
5. Run a pencil eraser the entire length of the needle while rolling needle slowly.
6. Remove all eraser particles by running needle between thumb and forefinger.
7. Do not bend needle. A bent needle will prevent proper air brush use.
IMPORTANT: If necessary, straighten a bent needle by placing the needle on a firm surface at the angle of the tip. Run a fingernail across the needle while turning needle slowly. Run fingernail from the body of the needle outward toward the tip.
NEEDlE INSTAllATION
IMPORTANT: Install the head before re-inserting the needle into the air brush.
1. Use caution when re-installing needle. Do not jam needle back into the head.
2. Hand tighten the adjustment screw firmly so the needle does not move. If the needle is not tightened enough, you will not be able to shut off material flow.
2. Fig. 15 is a combination of masking and varying shades. This spraying exercise trains the eye to make surethateachsquarehasthesametonevalue.Repeat the spraying method described in steps 1a-1c to achieve the same tone value. (fig. 15)
3.Fig.16isanexerciseinatechniqueknownasspotlighting. (fig. 16)
IMPORTANT: Begin spraying in centre of spot and fade to one corner. Repeat three times, fading to a different cornereachtime.Ensuresprayareaisadequatelymasked to contain overspray.
Fig. 15
Fig. 16
CAUTION!Maintain the air brush with care. Keep the air brush clean and oiled for best and safest performance.
Fig. 17
Head
Valve assembly
Fig. 18
Needle chucking nutNeedle

headline bars
continuation tabs
notes
warnings
17headline bars
continuation tabs
notes
warnings
model no. 058-0051-2 | contact us 1-800-689-992816
PART
S LI
ST
TROUblESHOOTING
Problem Possible Causes likely Solutions
Will not spray. 1. Misuse of finger lever.2. Needle chucking nut gets
loose.3. Nozzle and/or air passage
blocked.4. No air pressure at the air
brush.5. Air pressure too low. 6. Material too heavy.
1. First press finger lever downward and then draw back on the finger slowly/gently till fluid comes out of the nozzle.
2. Make sure that the needle chucking nut is hand tightened firmly around the fluid needle.
3. Clean.4. Check air supply and air line.5. Increase air pressure.6. Thin material properly.
Grain spray. Material too thick. 1. Add water or proper solvent sparingly to material.2. Check needle and tip for dried material.3. Adjust air supply; then test for proper spray.
Buckling paper. Material too thin. 1. Add material to thicken mixture.2. Airbrush less heavily in one area.3. Move air brush rapidly or lessen amount of spray.
Spray pattern appears to have flared ends.
Turning wrist while spraying. Always move arm parallel to work surface to have flared ends.
Spray pattern looks like a centipede.
Spraying too much material too close to paper.
1. Lightly pull back on finger lever.2. Hold brush further away from work surface.
Splattering. Allowing needle to snap back into tip.
1. Release lever gently.2. Check needle and tip for dried paint.
Curved spray pattern.
Arcing arm too close to work surface.
Always move arm parallel to work surface.
Spitting material. 1. Residue on needle or in glass jar.
2. Material too thick.
1. Clean needle or glass jar with proper solvent or clear water.
2. Thin material with proper solvent or clear water.
WARNING!Follow all safety precautions whenever diagnosing or servicing the air brush. Disconnect air supply before service.
MAI
NTEN
ANCE
STORING
1. When not using the air brush, it must be well cleaned and lightly lubricated.
2. Store the air brush in a dry and safe place out of reach of children.
17
18
43 621
19
910
811
2120
22
23
25 26
5
24
16
7
14
12 13
15
NOTE:The manufacturer and/or distributor has provided the parts list and assembly diagram in this manual as a reference tool only. Neither the manufac-turer nor distributor makes any representation or warranty of any kind to the buyer that he or she is qualified to make any repairs to the product, or that he or she is qualified to replace any parts of the product. In fact, the manufacturer and/or distributor expressly states that all repairs and parts replacements should be undertaken by certified and licensed technicians, and not by the buyer. The buyer assumes all risk and liability arising out of his or her repairs to the original product or replacement parts thereto, or arising out of his or her installation of replacement parts thereto.
No. Description Qty.
1 Protective cap 1
2 Air cap 1
3 Nozzle 1
4 Air cap body 1
5 O-ring 1
6 Packing 1
7 Packing nut 1
8 Housing 1
9 Adjustment screw 1
10 Finger lever 1
11 Rocker 1
12 Stopper 1
13 Needle chucking guide 1
No. Description Qty.
14 Spring 1
15 Spring case 1
16 Needle chucking nut 1
17 Handle 1
18 Needle 1
19 O-ring 1
20 Valve rod 1
21 O-ring 1
22 Spring 1
23 Valve screw 1
24 Valve body 1
25Glass jar with lid and fluid connector (22 cc)
1
26 Glass jar with lid (22 cc) 1
TROU
BLES
HOOT
ING

headline bars
continuation tabs
notes
warnings
19headline bars
continuation tabs
notes
warnings
model no. 058-0051-2 | contact us 1-800-689-9928183-YearLimitedWarranty
This Mastercraft product is guaranteed for a period of 3 years from the date of original retail purchase against defects in workmanship and materials, except for the following component:
Component A: Accessories, which are guaranteed for a period of 1-year from the date of original retail purchase against defects in workmanship and materials.
Subject to the conditions and limitations described below, this product, if returned to us with proof of purchase within the stated warranty period and if covered under this warranty, will be repaired or replaced (withthesamemodel,oroneofequalvalueorspecification),atouroption.Wewillbearthecostofanyrepair or replacement and any costs of labour relating thereto.
These warranties are subject to the following conditions and limitations
a) a bill of sale verifying the purchase and purchase date must be provided;
b) this warranty will not apply to any product or part thereof which is worn or broken or which has become inoperative due to abuse, misuse, accidental damage, neglect or lack of proper installation, operation or maintenance (as outlined in the applicable owner’s manual or operating instructions) or which is being used for industrial, professional, commercial or rental purposes;
c) this warranty will not apply to normal wear and tear or to expendable parts or accessories that may be supplied with the product which are expected to become inoperative or unusable after a reasonable period of use;
d) this warranty will not apply to routine maintenance and consumable items such as, but not limited to, fuel, lubricants, vacuum bags, blades, belts, sandpaper, bits, fluids, tune-ups or adjustments;
e) this warranty will not apply where damage is caused by repairs made or attempted by others (i.e. persons not authorized by the manufacturer);
f) this warranty will not apply to any product that was sold to the original purchaser as a reconditioned or refurbished product (unless otherwise specified in writing);
g) this warranty will not apply to any product or part thereof if any part from another manufacturer is installed therein or any repairs or alterations have been made or attempted by unauthorized persons;
h) this warranty will not apply to normal deterioration of the exterior finish, such as, but not limited to, scratches, dents, paint chips, or to any corrosion or discolouring by heat, abrasive and chemical cleaners; and
i) this warranty will not apply to component parts sold by and identified as the product of another company, which shall be covered under the product manufacturer’s warranty, if any.
Additional limitations
This warranty applies only to the original purchaser and may not be transferred. Neither the retailer not the manufacturer shall be liable for any other expense, loss or damage, including, without limitation, any indirect,incidental,consequentialorexemplarydamagesarisinginconnectionwiththesale,useorinabilityto use this product.
Notice to Consumer
This warranty gives you specific legal rights, and you may have other rights, which may vary from province to province. The provisions contained in this warranty are not intended to limit, modify, take away from, disclaim or exclude any statutory warranties set forth in any applicable provincial or federal legislation.
This product is not meant for industrial or commercial purposes. This product is for household projects, read manual carefully.
Made in China
Imported for
Mastercraft Canada Toronto, Canada M4S 2B8
wAR
RANT
Y
wAR
RANT
Y