Embed Size (px)
Citation preview

Agent Based Modeling Tutorial

AnyLogic 6 Agent Based Modeling Tutorial
Copyright © 1992-2007 XJ Technologies. All rights reserved.
XJ Technologies Company Ltd [email protected] http://www.xjtek.com/anylogic
2 © 1992-2007 XJ Technologies http://www.xjtek.com

AnyLogic 6 Agent Based Modeling Tutorial
Contents CONTENTS............................................................................................................................... 3
BASS DIFFUSION. AGENT BASED MODEL.......................................................................... 4
STEP 1. CREATING A NEW MODEL ...................................................................................... 5
STEP 2. CREATING AGENTS ................................................................................................. 7
STEP 3. ADDING ADOPTION FROM ADVERTISEMENT .................................................... 10
STEP 4. COUNTING THE PRODUCT ADOPTERS............................................................... 14
STEP 5. ADDING CHARTS .................................................................................................... 16
STEP 6. CONFIGURING SIMULATION ................................................................................. 18
STEP 7. RUNNING THE MODEL ........................................................................................... 19
STEP 8. ADDING ADOPTION FROM WORD OF MOUTH.................................................... 22
STEP 9. ADDING THE PRODUCT CONSUMPTION LOGIC ................................................ 28
STEP 10. ADDING AGENT ANIMATIONS............................................................................. 30
STEP 11. MAKING PEOPLE CONTACTS DISTANCE-BASED ........................................... 33
© 1992-2007 XJ Technologies http://www.xjtek.com 3

AnyLogic 6 Agent Based Modeling Tutorial
Bass Diffusion. Agent Based Model AnyLogic supports different modeling techniques. This tutorial covers the agent-based modeling approach, successfully applied in a wide range of fields such as ecology, sociology, economics, traffic simulation, and many others. Agent-based modeling is used to model markets (agent is a potential customer), competition and supply chains (agent is a company), population (agent is a family, a citizen, or a voter), etc. Agent-based models allow getting an insight into the general behavior of the system assuming the behavior of its elements, without having any global knowledge about the system.
AnyLogic is the only simulation tool, which allows creating flexible models with agents, interacting with each other and their environment. AnyLogic supports all known ways of specifying the agent behavior – statecharts, synchronous and asynchronous event scheduling.
This tutorial will briefly take you through the process of constructing a simulation model using AnyLogic. It is intended to introduce you to AnyLogic interface and many of its main features. We will create a simple illustrative example—the product life cycle model, used for forecasting sales of new products.
The first steps will take you through the process of construction of the classic Bass diffusion model. The model describes a product diffusion process. Potential adopters of a product are influenced into buying the product by advertising and by word of mouth from adopters – those who have already purchased the new product. Adoption of a new product driven by word of mouth is likewise an epidemic. Potential adopters come into contact with adopters through social interactions. A fraction of these contacts results in the purchase of the new product. The advertising causes a constant fraction of the potential adopter population to adopt each time period. Then we will expand our model by considering some details and introducing you to some advanced features of AnyLogic useful in agent-based modeling.
Note that there are several reference files available for this model representing the milestones of the editing. You can use reference files if you experience any difficulties creating a model and you would like to compare your model with the reference file. You can use Welcome Page to open those examples. Welcome Page appears automatically when you open AnyLogic. It can be opened whenever you like from AnyLogic menu: Help|Welcome.
4 © 1992-2007 XJ Technologies http://www.xjtek.com

AnyLogic 6 Agent Based Modeling Tutorial
Step 1. Creating a New Model First, we will create a new model.
Create a new model
1. Click the New Model toolbar button. The New Model dialog box is displayed.
2. Specify the name of the model. In the Model Name edit box, type Bass Diffusion Agent Based.
3. Specify the location where you want to store your model file. Browse for the existing folder using the Browse buton, or type the name of the folder you want to create in the Location edit box.
4. Click Finish.
New model is created. It already has one active object class called Main and experiment called Simulation.
Active objects are the main building blocks of AnyLogic model. They can be used to model very diverse objects of the real world.
In the center of the workspace you will see the graphical editor. It shows the diagram of the Main class. By default it does not contain any elements.
© 1992-2007 XJ Technologies http://www.xjtek.com 5

AnyLogic 6 Agent Based Modeling Tutorial
To the left of the graphical editor you can see the Project view. The Project view provides access to AnyLogic models currently opened in the workspace. The workspace tree provides easy navigation throughout the models.
On the right side of the workspace you can see the Palette view, and at the bottom - the Properties view. The Palette view simplifies the process of drawing diagrams, providing the list of model elements grouped by categories in a number of stencils.
The Properties view is used to view and modify the properties of a currently selected model item(s). When you select something – e.g., in the Project view or in a graphical editor – the Properties view displays the properties of the selection.
When working with a model, do not forget to save it by clicking Save .
6 © 1992-2007 XJ Technologies http://www.xjtek.com

AnyLogic 6 Agent Based Modeling Tutorial
Step 2. Creating Agents The first thing you do when creating agent-based model is create agents. Agent is the basic building block of the agent-based model. Agent-based model consists of multiple agents and their environment. Every agent is given a set of rules according to which it interacts with other agents; this interaction then generates the overall system behavior. In this model agents are people.
To create agents in AnyLogic, you define the agent’s internal structure using the active object class, and then create the required number of class instances, each one representing the individual agent.
Create new active object class for an agent
1. In the Project view, right-click the model item, and choose New|Active Object Class… from the popup menu.
2. The New Active Object Class dialog box is displayed.
3. Specify the name of the new active object class. Type Person in the Name field.
© 1992-2007 XJ Technologies http://www.xjtek.com 7

AnyLogic 6 Agent Based Modeling Tutorial
4. Click Finish. The Person class diagram is opened automatically.
5. Once you have created some new element, it becomes selected and its properties are displayed in the Properties view. You can adjust element properties here as your model requires. Please note that Properties view is context-sensitive view and it displays the properties of the currently selected element of the model. To adjust properties at a later time, first select the element (by clicking on the element in the graphical editor or in the Project view) and then modify the properties you want.
6. On the General page of the Properties view, select the Agent check box. This makes this active object class an agent.
You have successfully created the class that will define the agent’s internal structure. Now it’s a time to add agents into the model. To place agents into the model environment, you should encapsulate the object that models agent (Person) into the class that models environment (Main).
8 © 1992-2007 XJ Technologies http://www.xjtek.com

AnyLogic 6 Agent Based Modeling Tutorial
Place agents into the environment
1. Open the Main class diagram by double-clicking the Main item in the Project view.
2. Drag the Person class from the Project view onto the diagram of the Main class.
3. On the General page of the Properties view, type the object’s Name: people.
4. Specify the number of agents you want to have in your model. In the Replication edit box, specify the number of objects: 1000. The specified number of class instances will be automatically created, each one representing the individual agent.
We have created the required number of agents. Now we will model the adoption of the product influenced by advertisement.
© 1992-2007 XJ Technologies http://www.xjtek.com 9
AnyLogic 6 Agent Based Modeling Tutorial
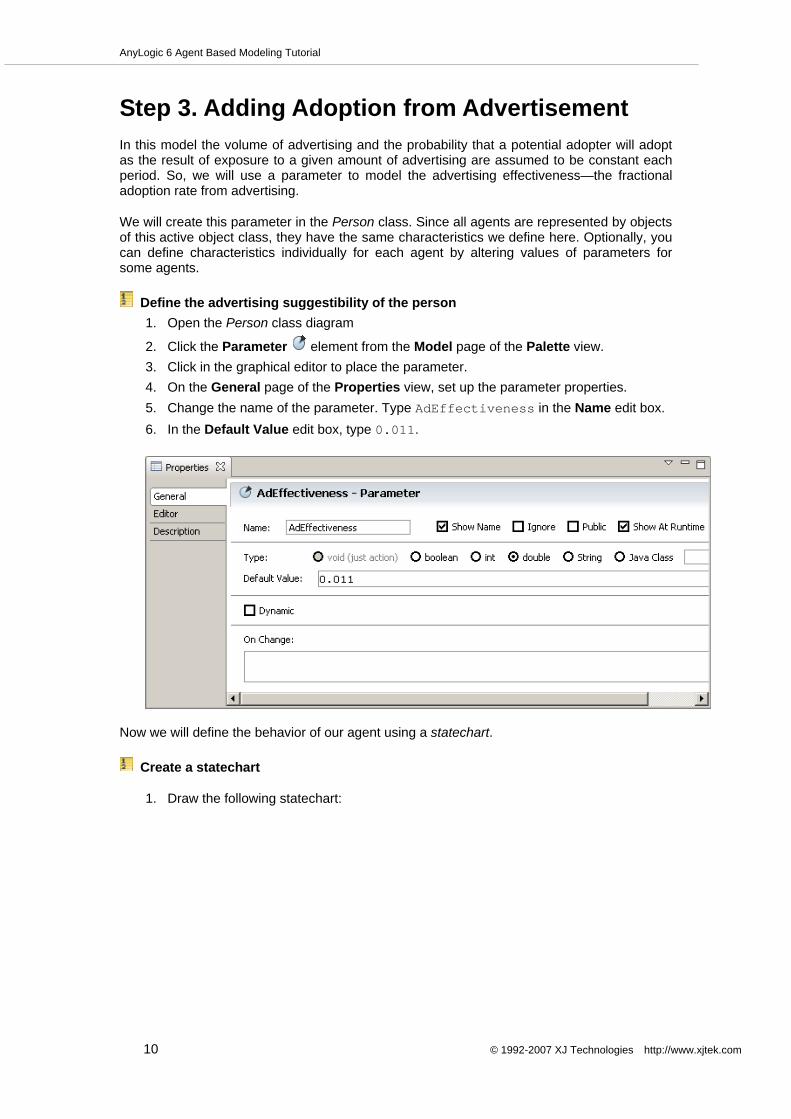
Step 3. Adding Adoption from Advertisement In this model the volume of advertising and the probability that a potential adopter will adopt as the result of exposure to a given amount of advertising are assumed to be constant each period. So, we will use a parameter to model the advertising effectiveness—the fractional adoption rate from advertising.
We will create this parameter in the Person class. Since all agents are represented by objects of this active object class, they have the same characteristics we define here. Optionally, you can define characteristics individually for each agent by altering values of parameters for some agents.
Define the advertising suggestibility of the person 1. Open the Person class diagram
2. Click the Parameter element from the Model page of the Palette view. 3. Click in the graphical editor to place the parameter. 4. On the General page of the Properties view, set up the parameter properties. 5. Change the name of the parameter. Type AdEffectiveness in the Name edit box. 6. In the Default Value edit box, type 0.011.
Now we will define the behavior of our agent using a statechart.
Create a statechart
1. Draw the following statechart:
10 © 1992-2007 XJ Technologies http://www.xjtek.com

AnyLogic 6 Agent Based Modeling Tutorial
2. First, draw a state. Choose the State element from the Model page of the Palette
view. 3. Click the diagram to place the first state and then resize it by dragging . Change its
Name to PotentialAdopter.
4. Add statechart entry pointer pointing to this state as shown on the figure
below. Choose the Entry Point element from the Model page of the Palette view. In the graphical editor, click the starting point of the statechart entry pointer a pair of grid cells above the state and then click the ending point of the pointer on an upper border of the state.
5. Now PotentialAdopter is an initial state of the statechart, since the atatechart entry
pointer points to it. The person remains a potential adopter until this state is active.
© 1992-2007 XJ Technologies http://www.xjtek.com 11

AnyLogic 6 Agent Based Modeling Tutorial
6. Add one more state below the created one. You can simply drag the PotentialAdopter state with Ctrl button pressed. This will create a copy of the state. Name this state Adopter. The person becomes an adopter, when this state becomes active.
7. Add a transition going from the PotentialAdopter state to the Adopter state. Choose
the Transition element from the Model page of the Palette view. Click the starting point of the transition (the PotentialAdopter state) and then click the ending point of the transition (the Adopter state).
8. This transition models the product purchase by this person. The time needed to come
to a conclusion to buy the product depends on the person’s advertising suggestibility exponentially. So, set up that this transition will be taken with AdEffectiveness rate. Go to the General page of the transition's Properties view and choose Rate from the Triggered by drop-down list. Type AdEffectiveness in the Rate field below. You can use the code completion assistant when typing the parameter name. Type only the first letters of the name and then press Ctrl+space. This will open the assistant dialog listing parameters, variables and functions of your model. Scroll to the AdEffectiveness parameter and insert its name by double-clicking on it.
12 © 1992-2007 XJ Technologies http://www.xjtek.com

AnyLogic 6 Agent Based Modeling Tutorial
© 1992-2007 XJ Technologies http://www.xjtek.com 13

AnyLogic 6 Agent Based Modeling Tutorial
Step 4. Counting the Product Adopters The main purpose of the model is to study how the new product is adopted, so we want to know how many people have already purchased our product at any given moment. Therefore we will define two statistics variables to count product adopters and potential adopters.
Create statistics variables to count adopters and potential adopters
1. Open the Main class diagram by double-clicking the Main item in the Project view. 2. Select the embedded object people. 3. Go to the Statistics page of the Properties view. 4. Define a statistics variable to calculate number of adopters. Click the Add Statistics
button. This will open the property section below. 5. Type adopters in the Name property field. 6. Leave the selected Type: Count. 7. Specify the Condition:
item.statechart.isStateActive(item.Adopter) This variable will count the number of people satisfying the specified condition, i.e. those who are in the Adopter state currently (adopters).
1. Create another statistics variable that will count potential adopters in the same way.
Name it potentialAdopters and specify the following Condition: item.statechart.isStateActive(item.PotentialAdopter)
Now we need to create data sets that will store the history of these statistics elements.
Create a data set for potentialAdopters
1. Open the Main class diagram.
1. Choose the Data Set element from the Analysis stencil of the Palette view. 2. Click in the graphical editor to add the data set on the diagram.
1. Modify some properties of the data set. Leave the Use time as horizontal axis value check box selected, since we want to store the trend of the variable during the simulation time.
14 © 1992-2007 XJ Technologies http://www.xjtek.com

AnyLogic 6 Agent Based Modeling Tutorial
2. Type people.potentialAdopters() in the Vertical axis value edit box. Here we tell the det set to store the history of potentialAdopters statistics element of the replicated object people. Since statistics element is playing a role of function, we put parenthesis after its name.
Create a data set for Adopters
3. Create a data set for Adopters variable in the same way. Place it beside PotentialAdoptersDS like shown on the figure below.
3. Name it AdoptersDS and specify people.potentialAdopters() as the Vertical
axis value.
© 1992-2007 XJ Technologies http://www.xjtek.com 15

AnyLogic 6 Agent Based Modeling Tutorial
Step 5. Adding Charts You can study the dynamics of the investigated process using AnyLogic charts. We will create a chart to show how populations of product adopters and potential adopters change with time.
We have created data sets that can be displayed on charts. Now it's time to add charts.
Draw a time plot displaying adopter and potential adopter population dynamics
1. Choose the Time Plot element from the Analysis page of the Palette view. 1. Click in the graphical editor where you want to place the chart and resize it to look as
in the figure below.
4. Go to the General page of the Properties view. 4. Specify data sets to be displayed on the time plot. 4. Add dsPotentialAdopters data set to be visualized on this plot by clicking the Add
Data Set button and defining settings for the data set in the property section above. 4. Type dsPotentialAdopters in the Data Set edit box (code completion is available). 4. Set Potential adopters as the Title of the data set. It will be displayed as the
legend of this data item. 4. Choose the first option from the Point Style drop-down list to turn off indicating data
set values with a marker. 4. Add dsAdopters data set. Set Adopters as the Title and modify its visual
properties in the same way. 4. Set Time Window: 8. 4. Define how the plot will be updated with new data set values. At the botom of the
properties page, choose Update automatically option and specify the update period in the Recurrence time edit box to the right: 0.1.
16 © 1992-2007 XJ Technologies http://www.xjtek.com

AnyLogic 6 Agent Based Modeling Tutorial
© 1992-2007 XJ Technologies http://www.xjtek.com 17

AnyLogic 6 Agent Based Modeling Tutorial
Step 6. Configuring Simulation Model simulation has a set of specific settings. A group of model settings is called an experiment, and experiments are displayed at the bottom of the model branch in the workspace tree. You can create several experiments for the same model with alternative model settings. One experiment is created by default and named Simulation.
If we start the model, it will work for 100 time units and then will stop. Since we want to observe only how the model behaves when the adoption process takes place, we need to stop the model when the system comes to equilibrium. The adoption process in this model lasts something over 8 years. Since in this model one model time unit corresponds to one year, we need to stop the model after 8 time units.
Set the model to stop at time 8
2. In the Project view, click the Simulation:Main experiment item.
2. On the Model Time tab of the Properties window, type 8 in the Stop Time edit box. The model will stop after 8 model time units elapse.
18 © 1992-2007 XJ Technologies http://www.xjtek.com

AnyLogic 6 Agent Based Modeling Tutorial
Step 7. Running the Model Build your project by clicking the Build Model toolbar button. If there are some errors in your model, the building fails and the Problems view appears listing all the errors found in your model. Double-click an error in the list to open the location of the error and fix it.
Problems view
After the model is successfully built, you can start it. Running the simulation, you automatically bring the current model up to date.
Start the model
1. Click the Run toolbar button and choose the experiment you want to run from the drop-down list. Your simulation experiment is called Bass Diffusion Agent Based/Simulation.
In the case this model is the only one opened in the workspace at the moment you will be prompted to run this particular experiment. Later on this button will start the previously run experiment. To run any other experiment, right-click the experiment in the Project view and choose Run from the context menu.
Having started the model, you will see the presentation window. It displays the presentation designed for your simulation experiment.
© 1992-2007 XJ Technologies http://www.xjtek.com 19

AnyLogic 6 Agent Based Modeling Tutorial
Click the button to Run the model and switch to Main view and observe the adoption process dynamics. The advertising causes a constant fraction of the potential adopter population to adopt each time period.
20 © 1992-2007 XJ Technologies http://www.xjtek.com

AnyLogic 6 Agent Based Modeling Tutorial
You can adjust the execution speed to your needs using Slow down and Speed up toolbar buttons.
© 1992-2007 XJ Technologies http://www.xjtek.com 21

AnyLogic 6 Agent Based Modeling Tutorial
Step 8. Adding Adoption from Word of Mouth In the current model people purchase the product affected by the advertising only. Actually, the advertising effect is great only when the product is launched on the market. Later on, people mostly purchase product under the influence of acquaintances that have already purchased it.
Now we will capture adoption from word of mouth. To consider the word of mouth influence, we should modify our model a little bit.
First of all, we will add special object defining the settings of the agent's environment.
Add an object to define the agent' s environment
2. Open the Main class diagram.
1. Choose the Environment element in the Model page of the Palette view and then click in the graphical editor to place it in the diagram.
2. Set this object as the environment for our agents. Select the embedded object people by clicking on it and type environment in its Environment property.
Now we need to define some new parameters: • ContactRate - the rate, with which potential adopters come into contact with
adopters; • AdoptionFraction - the person’s cogency affecting the proportion of contacts that are
sufficiently persuasive to induce his acquaintances to purchase the product.
22 © 1992-2007 XJ Technologies http://www.xjtek.com

AnyLogic 6 Agent Based Modeling Tutorial
Define the number of contacts of the person per year
1. Open the Person class diagram. 1. Add new parameter ContactRate. 1. Assume a contact rate of 100 per person per year. In the Default Value, type 100..
Define the person’s cogency
1. Add one more parameter. 1. Name it AdoptionFraction. 1. Set the default value to 0.015.
Modify the statechart to introduce inter-agent communication
1. Open the Person class diagram by double-clicking the Person item in the Project view.
1. Add an internal transition to the Adopter state. Choose the Transition element from the Model page of the Palette view and then alternately click on any two sides of the Adopter state.
3. This transition models how this person persuades his acquaintance to purchase the
product. Transition’s rate depends on this person’s cogency and contact rate. Go to the General page of the transition's Properties view. Choose Rate from the Triggered by drop-down list and set this transiton to be taken with the folowing Rate: ContactRate*AdoptionFraction
© 1992-2007 XJ Technologies http://www.xjtek.com 23

AnyLogic 6 Agent Based Modeling Tutorial
4. Specify the Action for the transition:
send("Buy!", RANDOM); This transition sends a message to the statechart of some acquaintance of this person. The send() method sends a message to some another agent. The first parameter specifies the message that is sent, and the second defines the agent-recipient. In our case we send our message to some randomly chosen agent, so we specify special constant RANDOM here. You can find the method's description on the Agent class page of the AnyLogic API Reference (since we have defined our Person class as an agent, it extends the Agent active object class, that provides additional API frequently needed by agents in agent-based models).
4. Draw one more transition from PotentialAdopter to Adopter state. This transition models the product purchase influenced by the acquaintance.
5. Modify the properties of the transition. This transition should be taken when the
statechart of the agent receives the "Buy!" message sent by its acquiantance. To make the transition message triggered, choose Message from the Triggered by drop-down list. Now set this transition to be triggered only by "Buy!" strings. For that, choose String as the Message type, set If message equals as the transition's Fire transition and type "Buy!" in the edit box below.
24 © 1992-2007 XJ Technologies http://www.xjtek.com

AnyLogic 6 Agent Based Modeling Tutorial
Now we should modify some properties of our agent to forward messages received by the acquaintance to its statechart.
Modify the agent properties
1. Click on the Person in the Project view to open the Person class properties and open the Agent page of the agent's Properties view.
1. In the field On Message Received, type statechart.receiveMessage(msg); Now when an agent receives a message sent by another agent, it forwards it to its statechart, where the message is processed as we have defined (namely, it triggers the transition modeling the product purchase).
© 1992-2007 XJ Technologies http://www.xjtek.com 25

AnyLogic 6 Agent Based Modeling Tutorial
Run the model and observe the adoption process. You can see the adoption becomes faster because of word of mouth.
26 © 1992-2007 XJ Technologies http://www.xjtek.com

AnyLogic 6 Agent Based Modeling Tutorial
You see classic S-shaped diffusion curves – the process somewhat resembles the epidemic diffusion. So far we have just reproduced the system dynamics model results!
© 1992-2007 XJ Technologies http://www.xjtek.com 27

AnyLogic 6 Agent Based Modeling Tutorial
Step 9. Adding the Product Consumption Logic The model we have created does not capture situations where the product is consumed, discarded, or upgraded, all of which lead to repeat purchases. We will model repeat purchase behavior by assuming that adopters becomes potential adopters when their first unit is discarded or consumed. Assume that the average duration of active use of our product is 1 year.
Modify the statechart
1. Open the Person class diagram by double-clicking the Person item in the Project view.
1. Add the transition from the Adopter state to the PotentialAdopter state. This transition should be taken after one time unit, so leave the default transition's properties (triggered by Timeout equal to 1).
We have finished modeling replacement product purchases.
Now we want to study the diffusion process over a long period of time, therefore configure the model to work infinitely.
Remove the model stop condition
1. In the Project view, click the Simulation:Main experiment item.
1. On the Model Time tab of the Properties window, clear the Stop model at specified time check box.
Run the model and study the product diffusion process with the chart. You can see that the market saturation is not reached in this model.
28 © 1992-2007 XJ Technologies http://www.xjtek.com

AnyLogic 6 Agent Based Modeling Tutorial
© 1992-2007 XJ Technologies http://www.xjtek.com 29

AnyLogic 6 Agent Based Modeling Tutorial
Step 10. Adding Agent Animations Now we will create a simple animation of our model to visualize the process. We want to draw agents on our presentation. Agents will be displayed relative to the coordinates they have in the modeled environment.Product adopters and potential adopters will be shown with the shapes of different colors.
Draw a shape depicting a person
2. Open the Person class diagram by double-clicking the Person item in the Project view.
2. Zoom the diagram in, say to 400% scale.
4. Drag the diagram a little bit down and to the right with the right mouse button
pressed. 4. Draw the agent shape like shown in the following figure:
7. Draw it using a curve. Therefore, choose the Curve element from the Presentation stencil of the Palette view (this stencil contains shapes and controls you can add on your presentation) and successively click at each curve point on the diagram and finally double-click to finish drawing.
6. Place the shape right in the upper left corner in the point (0,0) (the coordinates of the mouse cursor are shown in the status bar):
7. Zoom the diagram out. 7. Click on the agent shape and open the Dynamic properties of the shape. In the Fill
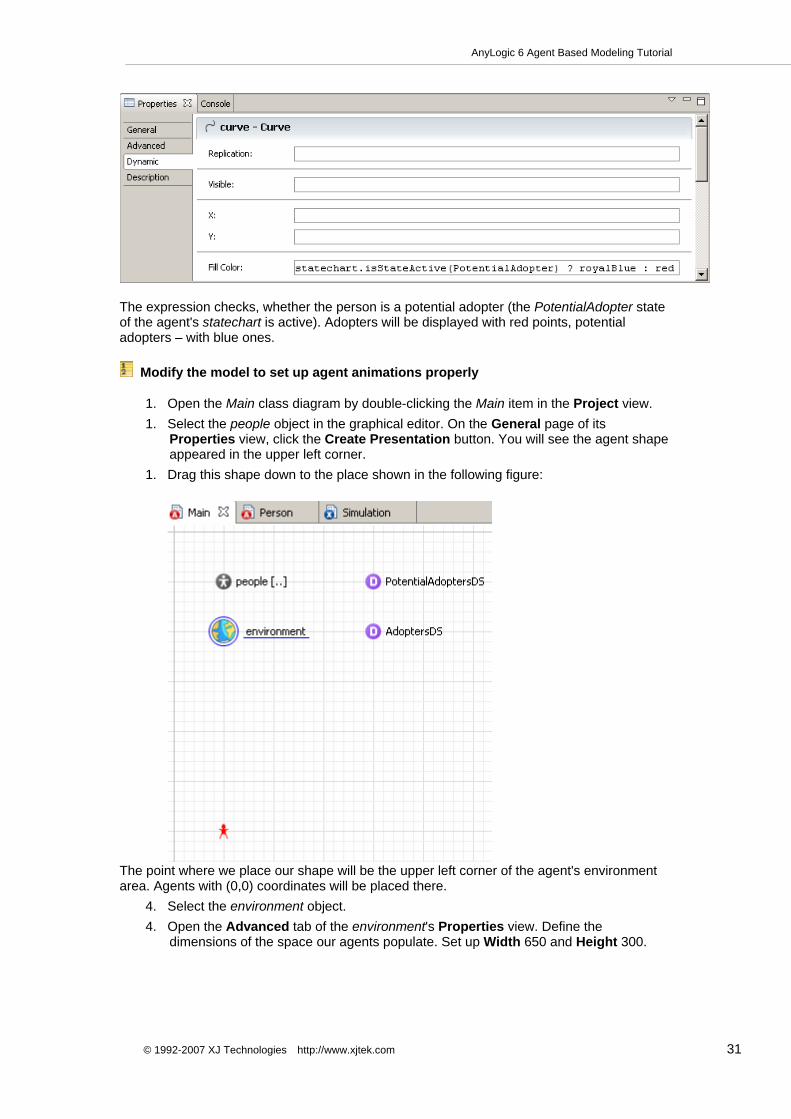
Color property, type statechart.isStateActive(PotentialAdopter) ? royalBlue : red
30 © 1992-2007 XJ Technologies http://www.xjtek.com
AnyLogic 6 Agent Based Modeling Tutorial
The expression checks, whether the person is a potential adopter (the PotentialAdopter state of the agent's statechart is active). Adopters will be displayed with red points, potential adopters – with blue ones.
Modify the model to set up agent animations properly
1. Open the Main class diagram by double-clicking the Main item in the Project view. 1. Select the people object in the graphical editor. On the General page of its
Properties view, click the Create Presentation button. You will see the agent shape appeared in the upper left corner.
1. Drag this shape down to the place shown in the following figure:
The point where we place our shape will be the upper left corner of the agent's environment area. Agents with (0,0) coordinates will be placed there.
4. Select the environment object. 4. Open the Advanced tab of the environment's Properties view. Define the
dimensions of the space our agents populate. Set up Width 650 and Height 300.
© 1992-2007 XJ Technologies http://www.xjtek.com 31

AnyLogic 6 Agent Based Modeling Tutorial
We have finished creating the animation. Run the model and watch the dynamics on the network.
32 © 1992-2007 XJ Technologies http://www.xjtek.com
AnyLogic 6 Agent Based Modeling Tutorial
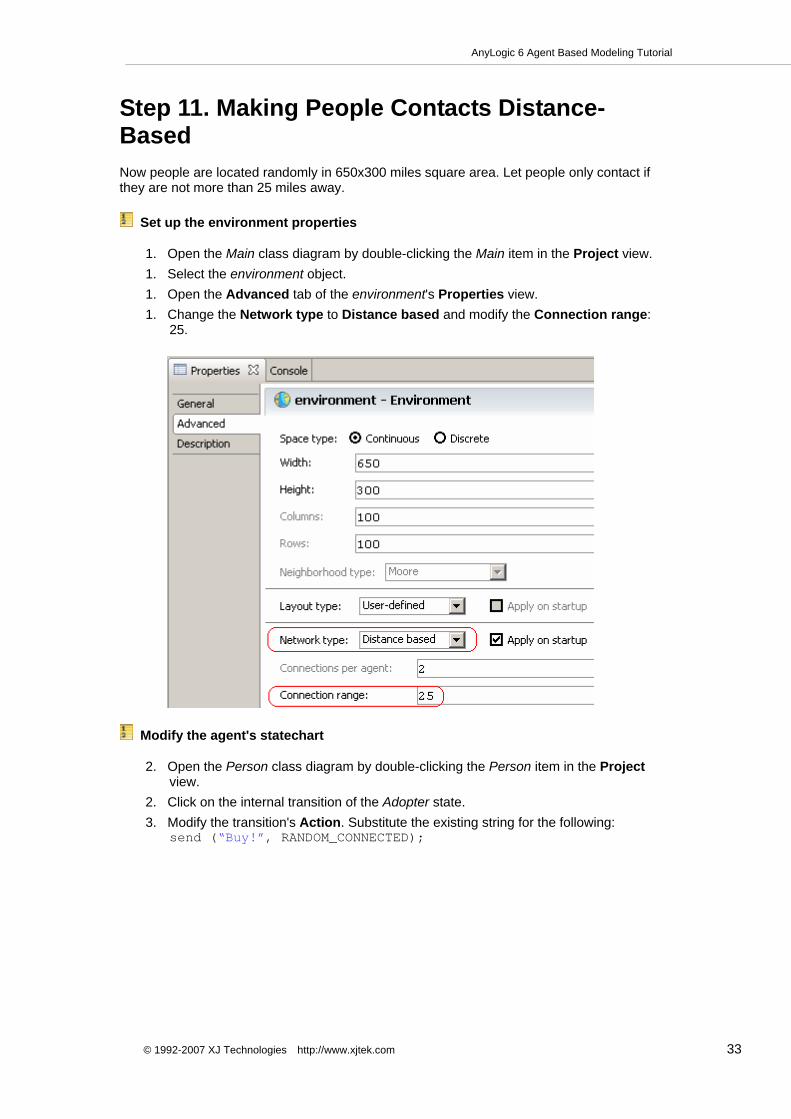
Step 11. Making People Contacts Distance-Based Now people are located randomly in 650x300 miles square area. Let people only contact if they are not more than 25 miles away.
Set up the environment properties
1. Open the Main class diagram by double-clicking the Main item in the Project view. 1. Select the environment object. 1. Open the Advanced tab of the environment's Properties view. 1. Change the Network type to Distance based and modify the Connection range:
25.
Modify the agent's statechart
2. Open the Person class diagram by double-clicking the Person item in the Project view.
2. Click on the internal transition of the Adopter state. 3. Modify the transition's Action. Substitute the existing string for the following:
send (“Buy!”, RANDOM_CONNECTED);
© 1992-2007 XJ Technologies http://www.xjtek.com 33

AnyLogic 6 Agent Based Modeling Tutorial
People will now contact only with their neighbors.
Now we will modify our animation a little bit to visualize the network of contacts.
Draw a line to depict people contacts
1. Open the Person class diagram. 2. Draw a line like shown in the figure below.
Choose the Line element from the Presentation page of the Palette view. Then click in the graphical editor at the point (0,0) to place the start point of the line and finally click aside where you want to draw the end point.
1. Open the Dynamic tab of the line's Properties view and modify some dynamic properties of the line.
5. In the Replication field, type: getConnectionsNumber() (you can use code completion assist when typing). Here we specify the number of contact lines for the agent. We need to draw a line for each connection of this agent. For that, we call the getConnectionsNumber() function, returning the number of agents currently connected to this one in our network.
6. Define line's location on the animation: In the dX field, type: getConnectedAgent(index).getX() - getX() In the dY field, type: getConnectedAgent(index).getY() - getY() Here we place the end point of each line to the point with the coordinates of the corresponding connected agent. Connected agents are alternately accessed using the getConnectedAgent(index) function.
34 © 1992-2007 XJ Technologies http://www.xjtek.com

AnyLogic 6 Agent Based Modeling Tutorial
Now those people who contact with each other will be shown on our presentation connected with lines.
We have finished creating the animation. Run the model and watch the dynamics on the network.
© 1992-2007 XJ Technologies http://www.xjtek.com 35

AnyLogic 6 Agent Based Modeling Tutorial
36 © 1992-2007 XJ Technologies http://www.xjtek.com