Embed Size (px)
Citation preview

ADVANCED USER’S GUIDE
MFC-7360NMFC-7460DNMFC-7860DW
Not all models are available in all countries.Version 0
UK/IRE/SAF

i
User's Guides and where do I find it?
Which manual? What's in it? Where is it?
Safety and Legal Read this Guide first. Please read the Safety Instructions before you set up your machine. See this Guide for trademarks and legal limitations.
Printed / In the Box
Quick Setup Guide Follow the instructions for setting up your machine and installing the drivers and software for the operating system and connection type you are using.
Basic User's Guide Learn the basic Fax, Copy and Scan operations and how to replace consumables. See troubleshooting tips.
Printed / In the Box
For HUN/BUL/ROM/POL/SVK/CZE: PDF file /Documentation CD-ROM /In the box
Advanced User's Guide Learn more advanced operations: Fax, Copy, security features, printing reports and performing routine maintenance.
PDF file / Documentation CD-ROM / In the Box
Software User’s Guide Follow these instructions for Printing, Scanning, Network Scanning, Remote Setup, PC-Fax and using the Brother ControlCenter utility.
Network Glossary This Guide provides basic information about advanced network features of Brother machines along with explanations about general networking and common terms.
Network User’s Guide This Guide provides useful information of wired and wireless network settings and security settings using the Brother machine. You can also find supported protocol information for your machine and detailed troubleshooting tips.

ii
Table of Contents1 General Setup 1
Memory Storage ....................................................................................................1Automatic daylight savings time ............................................................................1Ecology features ....................................................................................................2
Toner Save ......................................................................................................2Sleep Mode .....................................................................................................2Deep Sleep mode............................................................................................2
Toner Settings .......................................................................................................3Toner Setting (Continue Mode) .......................................................................3Receiving faxes in Continue Mode ..................................................................3Toner End in Continue Mode...........................................................................3
LCD Contrast .........................................................................................................4Mode Timer............................................................................................................4
2 Security features 5
Security..................................................................................................................5TX Lock (MFC-7360N and MFC-7460DN) ......................................................5Setting up the password ..................................................................................5Secure Function Lock 2.0 (MFC-7860DW) .....................................................6Setting Lock.....................................................................................................9Restricting dialling .........................................................................................10
3 Sending a fax 12
Additional sending options...................................................................................12Sending faxes using multiple settings ...........................................................12Contrast .........................................................................................................12Changing Fax Resolution ..............................................................................13
Additional sending operations..............................................................................13Sending a fax manually .................................................................................13Dual access ...................................................................................................13Broadcasting..................................................................................................14Real Time Transmission................................................................................15Overseas Mode .............................................................................................15Delayed Fax ..................................................................................................15Delayed batch transmission ..........................................................................16Checking and cancelling waiting jobs............................................................16Electronic cover page ....................................................................................16
Polling overview...................................................................................................18Polled transmit...............................................................................................18

iii
4 Receiving a fax 20
Remote Fax Options............................................................................................20Fax Forwarding..............................................................................................20Fax Storage ...................................................................................................20PC-Fax Receive ............................................................................................20Changing Remote Fax Options .....................................................................22Remote retrieval ............................................................................................23Remote fax commands..................................................................................25
Additional receiving operations............................................................................26Printing a reduced incoming fax ....................................................................26Duplex (2-sided) printing for Fax mode
(MFC-7460DN and MFC-7860DW) ...........................................................26Setting the Fax Receive Stamp .....................................................................26Receiving faxes into memory (MFC-7360N and MFC-7460DN) ...................27Setting the Print Density ................................................................................27Printing a fax from the memory .....................................................................27Out of Paper Reception .................................................................................28
Polling overview...................................................................................................28Polling receive ...............................................................................................28Stop polling....................................................................................................29
5 Dialling and storing numbers 30
Telephone line services .......................................................................................30Caller ID.........................................................................................................30Setting the telephone line type ......................................................................31BT Call Sign (U.K. only).................................................................................32
Additional dialling operations ...............................................................................32Combining quick dial numbers ......................................................................32
Additional ways to store numbers........................................................................33Setting up Groups for Broadcasting ..............................................................33Options for Setting Up Groups ......................................................................34Changing Group numbers .............................................................................36Deleting Group numbers ...............................................................................38
6 Printing reports 39
Fax reports...........................................................................................................39Transmission verification report.....................................................................39Fax Journal ....................................................................................................39
Reports ................................................................................................................40How to print a report ......................................................................................40
iv
7 Making copies 41
Copy settings .......................................................................................................41Stop copying..................................................................................................41Enlarging or reducing the image copied ........................................................41Using the Options key ...................................................................................43Improving copy quality...................................................................................44Sorting copies using the ADF ........................................................................44Adjusting Contrast and Brightness ................................................................44Making N in 1 copies (page layout) ...............................................................452 in 1 ID Copy................................................................................................47
Duplex Copying (1-sided to 2-sided) (MFC-7460DN and MFC-7860DW)...........48Duplex Copy (long edge flip) .........................................................................48Advanced Duplex Copy (short edge flip) .......................................................48
A Routine maintenance 49
Cleaning the machine..........................................................................................49Checking the machine .........................................................................................49
Checking the Page Counters.........................................................................49Checking the remaining life of parts ..............................................................49
Packing and shipping the machine......................................................................50
B Glossary 52
C Index 56

v

1
11
Memory Storage 1
Your menu settings are stored permanently, and in the event of a power failure will not be lost. Temporary settings (for example, Contrast, Overseas Mode) will be lost.
(For MFC-7860DW) During a power failure the machine will retain the date and time and programmed fax timer jobs (fx. Delayed Fax) for approximately 60 hours. Other fax jobs in the machine’s memory will not be lost.
(For MFC-7360N and MFC-7460DN) During a power failure the machine will retain the date and time for approximately 2 hours. The fax jobs in the machine’s memory will be lost.
Automatic daylight savings time 1
You can set the machine to change automatically for Daylight Savings Time. It will set itself forward one hour in the Spring, and back one hour in the Autumn.
a Press Menu, 0, 2, 2.
b Press a or b to choose On or Off.Press OK.
c Press Stop/Exit.
General Setup 1

Chapter 1
2
Ecology features 1
Toner Save 1
You can save toner using this feature. When you set Toner Save to On, prints appear lighter. The default setting is Off.
a Press Menu, 1, 4, 1.
b Press a or b to choose On or Off.Press OK.
c Press Stop/Exit.
NoteWe do not recommend Toner Save for printing Photo or Greyscale images.
Sleep Mode 1
The Sleep Mode Setting can reduce power consumption. When the machine is in Sleep Mode (Power Save mode) it acts as though it were turned off. Receiving data or starting an operation wakes up the machine from Sleep mode to Ready mode.
You can choose how long the machine must be idle before it goes into sleep mode. When the machine receives a fax, computer data or makes a copy, the timer will be reset. The default setting is 3 minutes.
While the machine is in sleep mode the LCD will show Sleep.
a Press Menu, 1, 4, 2.
b Enter the length of time the machine is idle before entering sleep mode.Press OK.
c Press Stop/Exit.
Deep Sleep mode 1
If the machine is in Sleep mode and does not receive any jobs for a certain length of time, the machine will automatically enter Deep Sleep mode, and the LCD will show Deep Sleep. Deep Sleep mode uses less power than Sleep mode. The machine will wake up and start warming up when the machine receives computer data or when you press a key on the control panel.
(For MFC-7860DW) If a wireless network is enabled, the machine does not enter Deep Sleep mode. To disable the wireless network, see Chapter 3 in the Network User’s Guide.
General Setup
3
1
Toner Settings 1
Toner Setting (Continue Mode)1
You can set the machine to continue printing after the LCD shows Replace Toner. The machine will continue printing until the LCD shows Toner Ended. The default setting is Stop.
a Press Menu, 1, 8.
b Press a or b to choose Continue or Stop.Press OK.
c Press Stop/Exit.
Note• If you continue printing in the Continue
mode, we cannot guarantee the print quality.
• While using Continue mode the print may appear faint.
• After replacing the toner cartridge with a new one, the Continue mode will go back to the default setting (Stop).
Receiving faxes in Continue Mode 1
The machine can store received faxes in the memory if you choose Continue mode when the LCD shows Replace Toner. When received faxes are printed in Continue mode the LCD will ask if the print quality of the fax is OK. If the quality is not good, choose 2.No. The machine will keep the faxes stored in the memory so you can reprint them after you replace the toner cartridge with a new one. If the print quality is good, choose 1.Yes. The LCD will ask if you want to delete the printed faxes from the memory. If you choose not to delete them, you will be asked again after you replace the toner cartridge with a new one.
Note• The MFC-7360N and MFC-7460DN can
store up to 400 faxes in memory and the MFC-7860DW can store up to 500 faxes in memory.
• (MFC-7360N and MFC-7460DN) If you turn off the power switch faxes in memory will be lost.
• The machine will keep faxes stored in Continue Mode even if you change the Continue setting to Stop.
• If you install a new toner cartridge when the LCD shows Toner Ended, the machine will ask if you want to print the stored faxes. Choose 1. Print to print stored faxes.
Toner End in Continue Mode 1
When the LCD shows Toner Ended the machine will stop printing. If the memory is full and you want to continue receiving faxes, you must install a new toner cartridge.

Chapter 1
4
LCD Contrast 1
You can change the contrast to make the LCD look lighter or darker.
a Press Menu, 1, 5.
b Press c to make the LCD darker. Or, press d to make the LCD lighter.Press OK.
c Press Stop/Exit.
Mode Timer 1
The machine has three mode keys on the control panel: FAX, SCAN, and COPY.
You can set how much time the machine takes after the last Copy or Scan operation to return to Fax mode. If you choose Off, the machine will stay in the mode you used last.
This setting also sets the time the machine will change from individual user to the Public mode when using Secure Function Lock. (See Switching Users on page 8.)
a Press Menu, 1, 1.
b Press a or b to choose 0 Sec, 30 Secs, 1 Min, 2 Mins, 5 Mins or Off.Press OK.
c Press Stop/Exit.
5
2
2
Security 2
You can set up your machine with multiple levels of security using TX Lock (For MFC-7360N and MFC-7460DN) or Secure Function Lock 2.0 (For MFC-7860DW) and Setting Lock. You will not be able to continue to schedule Delayed Faxes or Polling jobs. However, any prescheduled Delayed Faxes will be sent even if you turn on TX Lock or Secure Function Lock 2.0, so they will not be lost.
TX Lock (MFC-7360N and MFC-7460DN) 2
TX Lock lets you prevent unauthorized access to the machine. While TX Lock is on, the following operations are available:
Receiving faxes
Fax Forwarding (if Fax Forwarding was already on)
Paging (if Paging was already on)
Remote Retrieval (if Fax Storage was already on)
PC Fax Receive (if PC Fax Receive was already on) While TX Lock is on, the following operations are NOT available:
Sending faxes
Copying
PC printing
Scanning
Note• To print the faxes in memory, turn off TX
Lock.
• If you forget the TX Lock password, please call your Brother dealer.
Setting up the password 2
NoteIf you have already set the password, you will not need to set it again.
a Press Menu, 1, 6, 1.
b Enter a four-digit number for the password using numbers 0-9.Press OK.
c If you are entering the password for the first time, the LCD will show Verify:.Press OK.
d Re-enter the password.Press OK.
e Press Stop/Exit.
Changing the TX Lock password
a Press Menu, 1, 6, 1.
b Press a or b to choose Set Password.Press OK.
c Enter the registered four-digit password.Press OK.
d Enter a four-digit number for the new password.Press OK.
e If the LCD shows Verify:, re-enter the new password.Press OK.
f Press Stop/Exit.
Security features 2

Chapter 2
6
Secure Function Lock 2.0 (MFC-7860DW) 2
Secure Function Lock lets you restrict Public access to the following machine functions:
Fax Tx
Fax Rx
Copy
Scan
PC Print
This feature also prevents users from changing the Default settings of the machine by limiting access to the Menu settings.
Before using the security features you must first enter an administrator password.
Access to restricted operations can be enabled by creating a restricted user. Restricted users must enter a user password to use the machine.
Make a careful note of your password. If you forget it, you will have to reset the password stored in the machine. For information about how to reset the password call your Brother dealer for service.
Note• Secure Function Lock can be set manually
at the control panel, by using Web Based Management or by using BRAdmin Professional 3. We recommend using Web Based Management to configure this feature. For more information, see the Network User’s Guide.
• Only administrators can set limitations and make changes for each user.
• When Secure Function Lock is on, you can only use 1.Contrast, 6.Polled TX and 7.Coverpg Setup under 2.Setup Send in the Fax menu.
If Fax Tx is disabled, you cannot use any function in the Fax menu.
• Polling Receive is enabled only when both Fax Tx and Fax Rx are enabled.
Setting the password for the administrator 2
The password you set in these steps is for the administrator. This password is used to set up users and to turn Secure Function Lock on or off. (See Setting up restricted users on page 7 and Turning Secure Function Lock on/off on page 7.)
a Press Menu, 1, 6, 1.
b Enter a four-digit number for the password using numbers 0-9.Press OK.
c Re-enter the password when the LCD shows Verify:.Press OK.
d Press Stop/Exit.
Changing the password for the administrator 2
a Press Menu, 1, 6, 1.
b Press a or b to choose Set Password.Press OK.
c Enter the registered four-digit password.Press OK.
d Enter a four-digit number for the new password.Press OK.
e If the LCD shows Verify:, re-enter the new password.Press OK.
f Press Stop/Exit.
Security features
7
2
Setting up the public user mode 2
Public user mode restricts the functions that are available for Public users. Public users do not need to enter a password to access the features made available through this setting. You can set up one Public user.
a Press Menu, 1, 6, 1.
b Press a or b to choose Setup ID.Press OK.
c Enter the administrator password.Press OK.
d Press a or b to choose Public.Press OK.
e Press a or b to choose On or Off for Fax Tx.Press OK.After you have set Fax Tx, repeat this step for Fax Rx, Copy, Scan and PC Print. When the LCD shows Exit, press OK.
f Press Stop/Exit.
Setting up restricted users 2
You can set up users with restrictions and a password for functions that are available to them. You can set up more advanced restrictions, such as by page count or PC user login name, through Web Based Management. (For more information, see the Network User’s Guide.) You can set up to 25 restricted users with restrictions and a password.
a Press Menu, 1, 6, 1.
b Press a or b to choose Setup ID.Press OK.
c Enter the administrator password.Press OK.
d Press a or b to choose User01.Press OK.
e Use the numeric keys to enter the user name. (See Entering text in Appendix C of the Basic User's Guide.)Press OK.
f Enter a four-digit password for the user.Press OK.
g Press a or b to choose On or Off for Fax Tx.Press OK.After you have set Fax Tx, repeat this step for Fax Rx, Copy, Scan and PC Print. When the LCD shows Exit, press OK.
h Repeat steps d to g for entering each additional user and password.
i Press Stop/Exit.
NoteYou cannot use the same name as another user’s name.
Turning Secure Function Lock on/off 2
If you enter the wrong password, the LCD will show Wrong Password. Re-enter the correct password.
Turning Secure Function Lock on
a Press Menu, 1, 6, 1.
b Press a or b to choose Lock OffiOn.Press OK.
c Enter your four-digit administrator password.Press OK.

Chapter 2
8
Turning Secure Function Lock off
a Press Menu, 1, 6, 1.
b Press a or b to choose Lock OniOff.Press OK.
c Enter your four-digit administrator password.Press OK.
Switching Users 2
This setting allows you to switch between registered restricted users or Public mode when Secure Function Lock is turned on.
Changing to the restricted user Mode
a Hold down Shift as you press Secure.
b Press a or b to choose ID.Press OK.
c Enter your four-digit password.Press OK.
Changing to the Public Mode
After a restricted user has finished using the machine, it will return to the Public setting within the same time as the Mode Timer setting (Menu, 1, 1). (See Mode Timer on page 4.) You can also exit from the restricted user mode by pressing the current Mode key you are in. Then LCD will ask you Go to Public?.
Press 1 to choose 1.Yes.
Note• If the current ID is restricted to the function
you want to use, Access Denied will appear on the LCD and then the machine will ask your name. If you are allowed to access the function you want to use, press a or b to choose your name and enter your four-digit password. Press OK.
• If the function you want to use is restricted for all users, Not Available will appear on the LCD and then the machine will go back to the Ready mode. You cannot access to the function you want to use. Contact your administrator to check your Secure Function Lock Settings.
• If your ID has set page limit restrictions and already reached the maximum number of pages, the LCD will show Limit Exceeded when you print data. Contact your administrator to check your Secure Function Lock Settings.
Security features
9
2
Setting Lock 2
Setting Lock lets you set a password to stop other people from accidentally changing your machine settings.
Make a careful note of your password. If you forget it, you will have to reset the passwords stored in the machine. Please call your administrator or your Brother dealer.
While Setting Lock is On, you cannot change the following settings without a password:
Mode Timer
Paper
Volume
Ecology
LCD Contrast
Security
Document Scan
Address Book
Dial Restrict
Printer (Emulation 1, Duplex 2, Reset Printer)
Network settings (except Status, Mac
Address, Scan to FTP 2, Scan to E-mail 2)
Receive Mode
Date&Time
Station ID
Tone/Pulse
Dial Tone
Phone Line Set
Reset
1 For MFC-7860DW2 For MFC-7460DN and MFC-7860DW
Also, machine settings cannot be changed through the Remote Setup while Setting Lock is On.
Setting up the password 2
a Press Menu, 1, 6, 2.
b Enter a four-digit number for the password using numbers 0-9.Press OK.
c Re-enter your password when the LCD shows Verify:.Press OK.
d Press Stop/Exit.

Chapter 2
10
Changing your Setting Lock password2
a Press Menu, 1, 6, 2.
b Press a or b to choose Set Password.Press OK.
c Enter your four-digit password.Press OK.
d Enter a four-digit number for the new password.Press OK.
e Re-enter your new password when the LCD shows Verify:.Press OK.
f Press Stop/Exit.
Turning Setting Lock on/off 2
If you enter the wrong password when following the instructions below, the LCD will show Wrong Password. Re-enter the correct password.
Turning Setting Lock on
a Press Menu, 1, 6, 2.
b Press a or b to choose On.Press OK.
c Enter your four-digit password.Press OK.
d Press Stop/Exit.
Turning Setting Lock off
a Press Menu, 1, 6, 2.
b Enter your four-digit password. Press OK twice.
c Press Stop/Exit.
Restricting dialling 2
This feature is to prevent users from sending a fax or call to a wrong number by mistake. You can set the machine to restrict dialling by using the dial pad, One Touch and Speed Dial.
If you choose Off, the machine does not restrict the dialling method.
If you choose Enter # twice, the machine will prompt you to re-enter the number, and then if you re-enter the same number correctly, the machine will start dialling. If you re-enter the wrong number, the LCD will show an error message.
If you choose On, the machine will restrict all fax sending and outbound calls for that dialling method.
Dial pad restriction 2
a Press Menu, 2, 6, 1.
b Press a or b to choose Off, Enter # twice or On.Press OK.
c Press Stop/Exit.
One Touch restriction 2
a Press Menu, 2, 6, 2.
b Press a or b to choose Off, Enter # twice or On.Press OK.
c Press Stop/Exit.

Security features
11
2
Speed Dial restriction 2
a Press Menu, 2, 6, 3.
b Press a or b to choose Off, Enter # twice or On.Press OK.
c Press Stop/Exit.
Note• The Enter # twice setting will not work
if you lift an external handset before entering the number. You will not be asked to re-enter the number.
• If you chose On or Enter # twice, you cannot use the Broadcasting feature and cannot combine quick dial numbers when dialling.

12
3Additional sending options 3
Sending faxes using multiple settings 3
Before you send a fax, you can change any combination of these settings: contrast, resolution, overseas mode, delayed fax timer, polling transmission, real time transmission or cover page settings.
a Make sure you are in Fax mode .
After each setting is accepted, the LCD asks if you want to enter more settings.
Next1.Yes 2.No
b Do one of the following:
To choose more settings, press 1. The LCD returns to the Setup Send menu so you can choose another setting.
If you have finished choosing settings, press 2 and go to the next step for sending your fax.
Contrast 3
For most documents the default setting of Auto will give the best results. It automatically chooses the suitable contrast for your document.
If your document is very light or dark, changing the contrast may improve the quality of the fax.
Use Dark to make the faxed document lighter.
Use Light to make the faxed document darker.
a Make sure you are in Fax mode .
b Load your document.
c Press Menu, 2, 2, 1.
d Press a or b to choose Auto, Light or Dark.Press OK.
NoteEven if you choose Light or Dark, the machine will send the fax using the Auto setting if you choose Photo as the Fax Resolution.
Sending a fax 3

Sending a fax
13
3
Changing Fax Resolution 3
The quality of a fax can be improved by changing the Fax Resolution. Resolution can be changed for the next fax or for all faxes.
To change the Fax Resolution setting for the next fax 3
a Make sure you are in Fax mode .
b Load your document.
c Press Resolution, then a or b to choose the resolution.Press OK.
To change the default Fax Resolution setting 3
a Make sure you are in Fax mode .
b Press Menu, 2, 2, 2.
c Press a or b to choose the resolution you want.Press OK.
NoteYou can choose four different resolution settings.
Additional sending operations 3
Sending a fax manually 3
Manual transmission 3
Manual transmission lets you hear the dialling, ringing and fax-receiving tones while sending a fax.
a Make sure you are in Fax mode .
b Load your document.
c Pick up the handset of an external telephone and listen for a dial tone.
d Dial the fax number you want to call.
e When you hear the fax tone, press Start.
If you are using the scanner glass, press 1 to send a fax.
f Replace the handset of an external telephone.
Dual access 3
You can dial a number and start scanning the fax into memory—even when the machine is sending from memory, receiving faxes or printing PC data. The LCD will show the new job number.
The number of pages you can scan into the memory will vary depending on the data that is printed on them.
NoteIf you get an Out of Memory message while scanning the first page of a fax, press Stop/Exit to cancel scanning. If you get an Out of Memory message while scanning a subsequent page, you can press Start to send the pages scanned so far, or press Stop/Exit to cancel the operation.
fax resolution
Standard Suitable for most typed documents.
Fine Good for small print and transmits a little slower than Standard resolution.
S.Fine Good for small print or artwork and transmits slower than Fine resolution.
Photo Use when the document has varying shades of grey or is a photograph. This has the slowest transmission time.

Chapter 3
14
Broadcasting 3
Broadcasting lets you send the same fax message to more than one fax number. You can include Groups, One Touch, Speed Dial numbers and up to 50 manually dialled numbers in the same broadcast.
You can broadcast up to 258 different numbers. This will depend on how many Groups, access codes or credit card numbers you have stored, and on how many delayed or stored faxes in memory.
Before you begin the broadcast 3
One Touch and Speed Dial numbers must be stored in the machine's memory before they can be used in a broadcast. (See Storing One Touch Dial numbers and Storing Speed Dial numbers in Chapter 7 of the Basic User's Guide.)
Group numbers must also be stored in the machine's memory before they can be used in a broadcast. Group numbers include many stored One Touch Dial and Speed Dial numbers for easier dialling. (See Setting up Groups for Broadcasting on page 33.)
How to broadcast a fax 3
Note
Use (Address Book) to help you choose numbers easily.
a Make sure you are in Fax mode .
b Load your document.
c Enter a number.Press OK.You can use either a One Touch, Speed Dial, a Group number, or a number manually entered using the dial pad. (See How to dial in Chapter 7 of the Basic User's Guide.)
d Repeat step c until you have entered all the fax numbers you want to broadcast to.
e Press Start.
After the broadcast is finished the machine will print a broadcast report to let you know the results.
NoteThe scan profile of the One Touch, Speed Dial or Group number you chose first will be applied to the broadcast.
Cancelling a Broadcast in progress 3
While broadcasting you can cancel the fax currently being sent or the whole broadcast job.
a Press Menu, 2, 7.The LCD will display the Broadcast job number followed by the fax number being dialled (for example, #001 123456789) and the broadcast job number (for example, Broadcast#001).
Fax7.Remaining Jobs
b Press a or b to choose one of the following:
Choose the fax number being dialled, and press OK.
Choose the broadcast job number, and press OK.
c Press 1 to cancel the fax number or Broadcast job number you chose in step b, or press 2 to exit without cancelling.
If you chose to only cancel the fax currently being sent in step b, the LCD will ask you if you want to cancel the broadcast job. Press 1 to clear the whole broadcast job or 2 to exit.
d Press Stop/Exit.

Sending a fax
15
3
Real Time Transmission 3
When you are sending a fax, the machine will scan the documents into the memory before sending it. Then, as soon as the telephone line is free, the machine will start dialling and sending.
Sometimes, you may want to send an important document immediately, without waiting for memory transmission. You can set Real Time TX to On for all documents or Next Fax:On for the next fax only.
Note• If the memory is full and you are sending a
fax from the ADF, the machine will send the document in real time (even if Real Time TX is set to Off). If the memory is full, faxes from the scanner glass cannot be sent until you clear some of the memory.
• In Real Time Transmission, the automatic redial feature does not work when using the scanner glass.
Sending in real time for all faxes 3
a Make sure you are in Fax mode .
b Press Menu, 2, 2, 5.
c Press a or b to choose On.Press OK.
Sending in real time for the next fax only 3
a Make sure you are in Fax mode .
b Press Menu, 2, 2, 5.
c Press a or b to choose Next Fax:On.Press OK.
Not sending in real time for the next fax only 3
a Make sure you are in Fax mode .
b Press Menu, 2, 2, 5.
c Press a or b to choose Next Fax:Off.Press OK.
Overseas Mode 3
If you are having difficulty sending a fax overseas due to a bad connection, then turning on Overseas Mode may help.
This is a temporary setting, and will only be active for your next fax.
a Make sure you are in Fax mode .
b Load your document.
c Press Menu, 2, 2, 9.
d Press a or b to choose On or Off.Press OK.
Delayed Fax 3
You can store up to 50 faxes in the memory to be sent within a twenty four hour period.
a Make sure you are in Fax mode .
b Load your document.
c Press Menu, 2, 2, 3.
d Enter the time you want the fax to be sent (in 24-hour format).(For example, enter 19:45 for 7:45 PM.)Press OK.
NoteThe number of pages you can scan into the memory depends on the amount of data printed on each page.

Chapter 3
16
Delayed batch transmission 3
Before sending the delayed faxes, your machine will help you economize by sorting all the faxes in the memory by destination and scheduled time.
All delayed faxes that are scheduled to be sent at the same time to the same fax number will be sent as one fax to save transmission time.
a Make sure you are in Fax mode .
b Press Menu, 2, 2, 4.
c Press a or b to choose On or Off.Press OK.
d Press Stop/Exit.
Checking and cancelling waiting jobs 3
Check which jobs are still waiting in the memory to be sent. If there are no jobs, the LCD will show No Jobs Waiting. You can cancel a fax job that is stored and waiting in the memory.
a Press Menu, 2, 7.The number of jobs still to be sent will be displayed.
b Press a or b to scroll through the waiting jobs and press the job you want to cancel. Press OK.
c Do one of the following:
To cancel the job, press 1.
To exit without cancelling, press 2.
d When you have finished, press Stop/Exit.
Electronic cover page 3
This feature will not work unless you have already programmed your Station ID. (See the Quick Setup Guide.)
You can automatically send a cover page with every fax. Your cover page includes your Station ID, a comment, and the name (or number) stored in the One Touch or Speed Dial memory.
By choosing Next Fax:On you can also display the number of pages on the cover page.
You can choose one of the following preset comments.
1.Comment Off
2.Please Call
3.Urgent
4.Confidential
Instead of using one of the preset comments, you can enter two personal messages of your own, up to 27 characters long. Use the chart on Entering text in Appendix C of the Basic User's Guide for help entering characters.
(See Composing your own comments on page 16.)
5.(User Defined)
6.(User Defined)
Composing your own comments 3
You can set up two comments of your own.
a Make sure you are in Fax mode .
b Press Menu, 2, 2, 8.
c Press a or b to choose 5. or 6. to store your own comment.Press OK.
d Enter your own comment using the dial pad.Press OK.
Sending a fax
17
3
Use the chart on Entering text in Appendix C of the Basic User's Guide for help entering characters.
Send a cover page for the next fax 3
If you want to send a cover page only for the next fax, your machine will ask you to enter the number of pages you are sending so it can be printed on the cover page.
a Make sure you are in Fax mode .
b Load your document.
c Press Menu, 2, 2, 7.
d Press a or b to choose Next Fax:On (or Next Fax:Off).Press OK.
e Press a or b to choose a comment.Press OK.
f Enter two digits to show the number of pages you are sending.Press OK.For example, enter 0, 2 for 2 pages or 0, 0 to leave the number of pages blank. If you make a mistake, press d or Clear to back up and re-enter the number of pages.
Send a cover page for all faxes 3
You can set the machine to send a cover page whenever you send a fax.
a Make sure you are in Fax mode .
b Press Menu, 2, 2, 7.
c Press a or b to choose On (or Off).Press OK.
d Press a or b to choose a comment.Press OK.
Using a printed cover page 3
If you want to use a printed cover page that you can write on, you can print the sample page and attach it to your fax.
a Make sure you are in Fax mode .
b Press Menu, 2, 2, 7.
c Press a or b to choose Print Sample.Press OK.
d Press Start.
e After the machine prints a copy of your cover page, press Stop/Exit.
Chapter 3
18
Polling overview 3
Polling lets you set up your machine so other people can receive faxes from you, but they pay for the call. It also lets you call somebody else’s fax machine and receive a fax from it, so you pay for the call. The polling feature needs to be set up on both machines for this to work. Not all fax machines support polling.
Polled transmit 3
Polled transmit lets you set up your machine to wait with a document so another fax machine can call and retrieve it.
Setup for polled transmit 3
a Make sure you are in Fax mode .
b Load your document.
c Press Menu, 2, 2, 6.
d Press a or b to choose Standard.Press OK.
e Press 2 to choose 2.No if you do not want to enter more settings when the LCD asks you the following message:
Next1.Yes 2.No
f Press Start.
g If you are using the scanner glass, the LCD will prompt you to choose one of the options below:
Next Page?1.Yes 2.No(Send)
Press 1 to send another page. Go to step h.
Press 2 or Start to send the document.
h Place the next page on the scanner glass, press OK. Repeat steps f and g for each additional page.
The document will be stored in memory and wait to be polled.
NoteThe document will be stored and can be retrieved from any other fax machine until you delete the fax from memory.
To delete the fax from memory, press Menu, 2, 7. (See Checking and cancelling waiting jobs on page 16.)
Setup for polled transmit with a secure code 3
Secure polling lets you restrict who can get the documents you set up to be polled. Secure polling only works with Brother fax machines. If another person wants to retrieve a fax from your machine they will have to enter the secure code.
a Make sure you are in Fax mode .
b Load your document.
c Press Menu, 2, 2, 6.
d Press a or b to choose Secure.Press OK.
e Enter a four-digit number.Press OK.
f Press 2 to choose 2.No if you do not want to enter more settings when the LCD asks you the following message:
Next1.Yes 2.No
g Press Start.
Sending a fax
19
3
h If you use the scanner glass, the LCD will prompt you to choose one of the options below:
Next Page?1.Yes 2.No(Send)
Press 1 to send another page.
Go to step i.
Press 2 or Start to send the document.
i Place the next page on the scanner glass, press OK. Repeat steps h and i for each additional page.Your machine will automatically send the fax.

20
4Remote Fax Options 4
Remote Fax Options let you receive faxes while you are away from the machine.
You can use only one Remote Fax Option at a time.
Fax Forwarding 4
The Fax Forwarding feature lets you automatically forward your received faxes to another machine. If you choose Backup Print On, the machine will also print the fax.
a Press Menu, 2, 5, 1.
b Press a or b to choose Fax Forward.Press OK.The LCD will ask you to enter the fax number you want your faxes to be forwarded to.
c Enter the forwarding number (up to 20 digits).Press OK.
Note• If you store a Group on a One Touch key
or a Speed Dial location, the faxes will be forwarded to multiple fax numbers.
• You can also enter an E-mail address if your machine has been configured for the Internet Fax feature. (For details about Internet Fax, see the Network User’s Guide. For information about Fax Forward to E-mail, see the Brother Solutions Center at http://solutions.brother.com/.)
d Press a or b to choose On or Off.Press OK.
Backup PrintOn
e Press Stop/Exit.
IMPORTANTIf you choose Backup Print On, the machine will also print the fax at your machine so you will have a copy. This is a safety feature in case if there is a power failure before the fax is forwarded or a problem at the receiving machine. (For MFC-7360N and MFC-7460DN ) The faxes stored in the machine’s memory will be deleted.
Fax Storage 4
The Fax Storage feature lets you store your received faxes in the machine’s memory. You can retrieve stored fax messages from a fax machine at another location using the remote retrieval commands. (See Retrieving fax messages on page 23.) Your machine will automatically print a copy of the stored fax.
a Press Menu, 2, 5, 1.
b Press a or b to choose Fax Storage.Press OK.
c Press Stop/Exit.
PC-Fax Receive 4
If you turn on the PC-Fax Receive feature your machine will store received faxes in memory and send them to your PC automatically. You can then use your PC to view and store these faxes.
Even if you have turned off your PC (at night or the weekend, for example), your machine will receive and store your faxes in its memory. The LCD will show the number of stored faxes received, for example: PC Fax Msg:001.
Receiving a fax 4

Receiving a fax
21
4
When you start your PC and the PC-Fax Receiving software runs, your machine transfers your faxes to your PC automatically.
To transfer the received faxes to your PC you must have the PC-FAX Receiving software running on your PC. (For details, see PC-FAX receiving in the Software User’s Guide.)
a Press Menu, 2, 5, 1.
b Press a or b to choose PC Fax Receive.Press OK.
c The LCD shows a reminder to start the PC-FAX Receive program on your computer. If you have started the PC-FAX Receive program, press OK. If you have not started the PC-FAX Receive program, see PC-FAX receiving in the Software User’s Guide.
d Press a or b to choose <USB> or your computer name if the machine is connected to a network.Press OK.
e Press a or b to choose On or Off.
Backup PrintOff
Press OK.
f Press Stop/Exit.
IMPORTANTIf you choose Backup Print On, the machine will also print the fax at your machine so you will have a copy. This is a safety feature in case if there is a power failure before the fax is forwarded or a problem at the receiving machine. (For MFC-7360N and MFC-7460DN ) The faxes stored in the machine’s memory will be deleted.
Note• Before you can set up PC-Fax Receive
you must install the MFL-Pro Suite software on your PC. Make sure your PC is connected and turned on. (For details, see PC-FAX receiving in the Software User’s Guide.)
• If your machine has a problem and is unable to print faxes in memory, you can use this setting to transfer your faxes to a PC. (For details, see Error and maintenance messages in Appendix B of the Basic User's Guide.)
• PC-Fax Receive is not supported in Mac OS. (See PC-FAX receiving in the Software User’s Guide.)

Chapter 4
22
Changing Remote Fax Options 4
If received faxes are left in your machine’s memory when you change to another Remote Fax Option, the LCD will ask you the following message:
Erase All Doc?1.Yes 2.No
Print All Fax?1.Yes 2.No
If you press 1, faxes in the memory will be erased or printed before the setting changes. If a backup copy has already been printed it will not be printed again.
If you press 2, faxes in the memory will not be erased or printed and the setting will be unchanged.
If received faxes are left in the machine’s memory when you change to PC Fax Receive from another remote fax option (Fax Forward or Fax Storage), the LCD will ask you the following message:
Send Fax to PC?1.Yes 2.No
If you press 1, faxes in the memory will be sent to your PC before the setting changes.
If you press 2, faxes in the memory will not be erased or transferred to your PC and the setting will be unchanged.
IMPORTANTIf you choose Backup Print On, the machine will also print the fax at your machine so you will have a copy. This is a safety feature in case if there is a power failure before the fax is forwarded or a problem at the receiving machine. (For MFC-7360N and MFC-7460DN ) The faxes stored in the machine’s memory will be deleted.
Turning off Remote Fax Options 4
a Press Menu, 2, 5, 1.
b Press a or b to choose Off.Press OK.
NoteThe LCD will give you options if there are received faxes still in your machine’s memory. (See Changing Remote Fax Options on page 22.)
c Press Stop/Exit.
or

Receiving a fax
23
4
Remote retrieval 4
The remote retrieval feature lets you retrieve your stored fax messages when you are not at the machine. You can call your machine from any touch tone phone or fax machine, then use the Remote Access Code to retrieve your messages.
Setting a Remote Access Code 4
The Remote Access Code feature lets you access the remote retrieval features when you are away from your machine. Before you use the remote access and retrieval features, you have to set up your own code. The default code is an inactive code: – – –l.
a Press Menu, 2, 5, 2.
Remote Fax Opt2.Remote Access
b Enter a three-digit code using the numbers 0 – 9, l or #.Press OK.
c Press Stop/Exit.
NoteDO NOT use the same code used for your Remote Activation code (l51) or Remote Deactivation code (#51).(See Using Remote Codes in Chapter 6 of the Basic User's Guide.)
You can change your code at any time. If you want to make your code inactive, press Clear and OK in b to restore the default setting – – –l.
Using your Remote Access Code 4
a Dial your fax number from a telephone or another fax machine using touch tone.
b When your machine answers, immediately enter your Remote Access Code.
c The machine signals if it has received messages:
No beeps
No messages received.
1 long beep
Fax message received.
d The machine gives two short beeps to tell you to enter a command. The machine will hang up if you wait longer than 30 seconds before entering a command. If you enter an invalid command the machine will beep three times.
e Press 9 0 to reset the machine when you have finished.
f Hang up.
NoteIf your machine is set to Manual mode, you can still access the remote retrieval features. Dial the fax number as normal and let the machine ring. After 100 seconds you will hear a long beep to tell you to enter the remote access code. You will then have 30 seconds to enter the code.
Retrieving fax messages 4
a Dial your fax number from a telephone or another fax machine using touch tone.
b When your machine answers, immediately enter your Remote Access Code (3 digits followed by l). If you hear one long beep, you have messages.
c When you hear two short beeps, use the dial pad to press 9 6 2.

Chapter 4
24
d Wait for a long beep, and then use the dial pad to enter the number of the remote fax machine where you want your fax messages sent, followed by ## (up to 20 digits).
e Hang up after you hear your machine beep. Your machine will call the other machine, which will then print your fax messages.
NoteYou can insert a pause in a fax number by using the # key.
Changing the Fax Forwarding number4
You can change the default setting of your fax forwarding number from another telephone or fax machine using touch tone.
a Dial your fax number from a telephone or another fax machine using touch tone.
b When your machine answers, enter your Remote Access Code (3 digits followed by l). If you hear one long beep, you have messages.
c When you hear two short beeps, use the dial pad to press 9 5 4.
d Wait for a long beep, and then use the dial pad to enter the new number of the remote fax machine where you want your fax messages forwarded followed by ## (up to 20 digits).
e Press 9 0 to reset the machine when you have finished.
f Hang up after you hear your machine beep.
NoteYou can insert a pause in a fax number by using the # key.
Receiving a fax
25
4
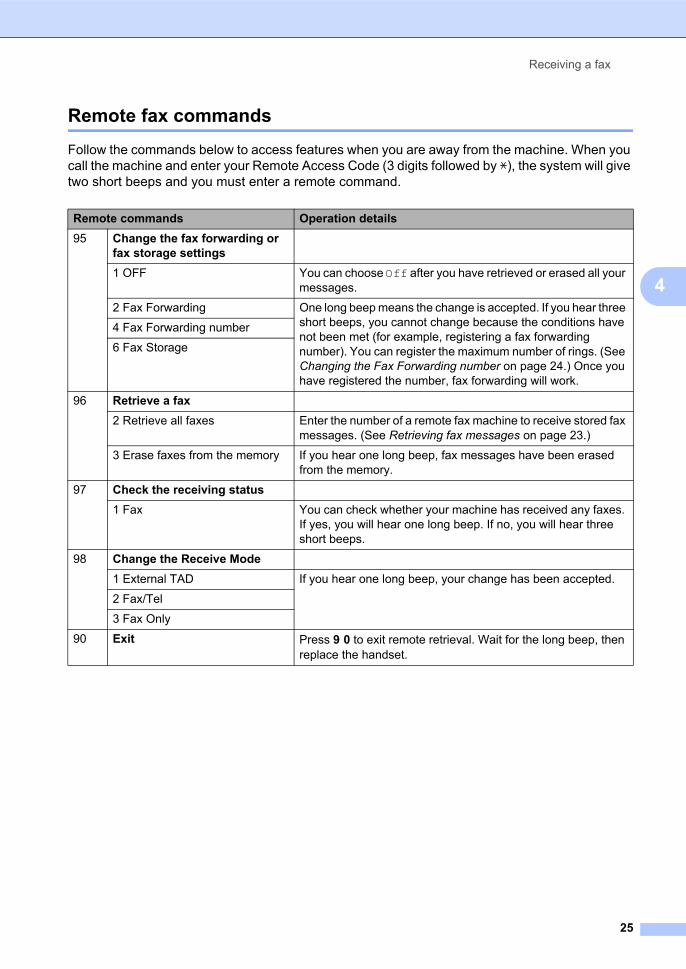
Remote fax commands 4
Follow the commands below to access features when you are away from the machine. When you call the machine and enter your Remote Access Code (3 digits followed by l), the system will give two short beeps and you must enter a remote command.
Remote commands Operation details
95 Change the fax forwarding or fax storage settings
1 OFF You can choose Off after you have retrieved or erased all your messages.
2 Fax Forwarding One long beep means the change is accepted. If you hear three short beeps, you cannot change because the conditions have not been met (for example, registering a fax forwarding number). You can register the maximum number of rings. (See Changing the Fax Forwarding number on page 24.) Once you have registered the number, fax forwarding will work.
4 Fax Forwarding number
6 Fax Storage
96 Retrieve a fax
2 Retrieve all faxes Enter the number of a remote fax machine to receive stored fax messages. (See Retrieving fax messages on page 23.)
3 Erase faxes from the memory If you hear one long beep, fax messages have been erased from the memory.
97 Check the receiving status
1 Fax You can check whether your machine has received any faxes. If yes, you will hear one long beep. If no, you will hear three short beeps.
98 Change the Receive Mode
1 External TAD If you hear one long beep, your change has been accepted.
2 Fax/Tel
3 Fax Only
90 Exit Press 9 0 to exit remote retrieval. Wait for the long beep, then replace the handset.

Chapter 4
26
Additional receiving operations 4
Printing a reduced incoming fax 4
If you choose On, the machine automatically reduces each page of an incoming fax to fit on one page of A4, Letter, Legal or Folio size paper.
The machine calculates the reduction ratio by using the page size of the fax and your Paper Size setting (Menu, 1, 2, 2).
a Make sure you are in Fax mode .
b Press Menu, 2, 1, 5.
c Press a or b to choose On or Off.Press OK.
d Press Stop/Exit.
Duplex (2-sided) printing for Fax mode (MFC-7460DN and MFC-7860DW) 4
Your machine can automatically print received faxes onto both sides of the paper when Duplex is set to On.
You can use A4, Letter, Legal or Folio size of
paper for this function (60 to 105 g/m2).
a Make sure you are in Fax mode .
b For MFC-7460DN, press Menu, 2, 1, 0.For MFC-7860DW, press Menu, 2, 1, 9.
c Press a or b to choose On (or Off).Press OK.
d Press Stop/Exit.
NoteWhen Duplex is turned on incoming faxes will automatically be reduced to fit the size of paper in the paper tray.
Setting the Fax Receive Stamp 4
You can set the machine to print the received date and time in the top centre of each received fax page.
a Make sure you are in Fax mode .
b For MFC-7360N and MFC-7460DN, press Menu, 2, 1, 9.For MFC-7860DW, press Menu, 2, 1, 8.
c Press a or b to choose On or Off.Press OK.
d Press Stop/Exit.
Note• The received time and date will not appear
when using Internet Fax.
• Make sure you have set the current date and time in the machine. (See the Quick Setup Guide.)

Receiving a fax
27
4
Receiving faxes into memory (MFC-7360N and MFC-7460DN) 4
As soon as the paper tray becomes empty during fax reception, the screen will display No Paper. Put some paper in the paper tray. (See Loading paper and print media in Chapter 2 of the Basic User’s Guide.) If you are unable to put paper in the paper tray the following will happen:
If Memory Receive is On: 4
The machine will carry on receiving the fax, with the remaining pages being stored in memory, if enough memory is available. Further incoming faxes will also be stored into memory until the memory is full. When the memory is full the machine will stop automatically answering calls. To print the faxes, put fresh paper in the tray and press Start.
If Memory Receive is Off: 4
The machine will carry on receiving the fax, with the remaining pages being stored in memory, if enough memory is available. The machine will then stop automatically answering calls until fresh paper is put in the paper tray. To print the last fax you received, put fresh paper in the tray.
a Make sure you are in Fax mode .
b Press Menu, 2, 1, 6.
c Use a or b to choose On or Off. Press OK.
d Press Stop/Exit.
Setting the Print Density 4
You can adjust the Print Density setting to make your printed pages darker or lighter.
a Make sure you are in Fax mode .
b For MFC-7360N and MFC-7460DN, press Menu, 2, 1, 7.For MFC-7860DW, press Menu, 2, 1, 6.
c Press c to make the print darker.Or, press d to make the print lighter.Press OK.
d Press Stop/Exit.
Printing a fax from the memory 4
If you are using the Fax Storage feature (Menu, 2, 5, 1), you can still print a fax from the memory when you are at your machine. (See Fax Storage on page 20.)
a Press Menu, 2, 5, 3.
b Press Start.
c Press Stop/Exit.

Chapter 4
28
Out of Paper Reception 4
As soon as the paper tray becomes empty during fax reception, the LCD shows No Paper. Put some paper in the paper tray. (See Loading paper and print media in Chapter 2 of the Basic User's Guide.)
The machine will carry on receiving the fax, with the remaining pages being stored in memory, if enough memory is available.
Incoming faxes will continue to be stored in the memory until the memory becomes full or paper is loaded in the paper tray. When the memory is full the machine will stop automatically answering calls. To print the faxes, put fresh paper in the tray and press Start.
(For MFC-7360N and MFC-7460DN) For details on how to set the Memory Receive manually, see Receiving faxes into memory (MFC-7360N and MFC-7460DN) on page 27.
Polling overview 4
Polling lets you set up your machine so other people can receive faxes from you, but they pay for the call. It also lets you call somebody else’s fax machine and receive a fax from it, so you pay for the call. The polling feature needs to be set up on both machines for this to work. Not all fax machines support polling.
Polling receive 4
Polling receive lets you call another fax machine to receive a fax.
a Make sure you are in Fax mode .
b For MFC-7360N and MFC-7460DN, press Menu, 2, 1, 8.For MFC-7860DW, press Menu, 2, 1, 7.
c Press a or b to choose Standard. Press OK.
d Enter the fax number you are polling. Press Start.
Secure polling 4
Secure polling lets you restrict who can get the documents you set up to be polled. Secure polling only works with Brother fax machines. If you want to get a fax from a secured Brother machine you have to enter the secure code.
a Make sure you are in Fax mode .
b For MFC-7360N and MFC-7460DN, press Menu, 2, 1, 8.For MFC-7860DW, press Menu, 2, 1, 7.
c Press a or b to choose Secure.Press OK.
d Enter a four-digit secure code.Press OK.This is the security code of the fax machine you are polling.

Receiving a fax
29
4
e Enter the fax number you are polling.
f Press Start.
Delayed polling 4
Delayed polling lets you set the machine to begin polling receive at a later time. You can only set up one delayed polling operation.
a Make sure you are in Fax mode .
b For MFC-7360N and MFC-7460DN, press Menu, 2, 1, 8.For MFC-7860DW, press Menu, 2, 1, 7.
c Press a or b to choose Timer.Press OK.
d Enter the time (in 24-hour format) you want to begin polling.For example, enter 21:45 for 9:45 PM.Press OK.
e Enter the fax number you are polling. Press Start.The machine makes the polling call at the time you entered.
Sequential polling 4
Sequential polling lets you request documents from several fax machines in one operation.
a Make sure you are in Fax mode .
b For MFC-7360N and MFC-7460DN, press Menu, 2, 1, 8.For MFC-7860DW, press Menu, 2, 1, 7.
c Press a or b to choose Standard, Secure or Timer.Press OK.
d Choose one of the options below.
If you choose Standard go to step e.
If you choose Secure, enter a four-digit number, press OK, go to step e.
If you chose Timer, enter the time (in 24-hours format) you want to begin polling and press OK, go to step e.
e Specify the destination fax machines you want to poll by using One Touch, Speed Dial, Search, a Group or the dial pad. You must press OK between each location.
f Press Start.
Stop polling 4
To cancel the polling process, Stop/Exit while the machine is dialling.
To cancel all sequential polling receive jobs, press Menu, 2, 7. (See Checking and cancelling waiting jobs on page 16.)

30
5Telephone line services 5
Caller ID 5
The Caller ID feature lets you use the Caller ID subscriber service offered by many local telephone companies. Call your telephone company for details. This service shows the telephone number, or name if it is available, of your caller as the line rings.
After a few rings, the LCD will show the telephone number of your caller (and name, if available). Once you answer a call, the Caller ID information disappears from the LCD, but the call information stays stored in the Caller ID memory.
You will see the number (or name) on the LCD.
The ID Unknown message means the call originated outside your Caller ID service area.
The ID Withheld message means the caller has intentionally blocked transmission of information.
You can print a list of the Caller ID information received by your machine. (See Printing the Caller ID List on page 30.)
Note• The Caller ID service varies with different
carriers. Call your local telephone company to find out about the kind of service available in your area.
• This feature may not be available in some countries.
Setting the Caller ID to On 5
If you have Caller ID on your line, then this function should be set to On to display the caller’s phone number on the LCD as the telephone rings.
a Press Menu, 2, 0, 3.The screen displays the current setting.
b Press a or b to choose On (or Off).Press OK.
c Press Stop/Exit.
Viewing the Caller ID List 5
Your machine stores information for the last thirty calls in the Caller ID list. You can view or print this list. When the thirty-first call comes in to the machine, it replaces information about the first call.
a Press Menu, 2, 0, 3.The screen displays the current setting.
b Press a or b to choose Display ID.Press OK.The Caller ID of the last call will appear on the display. If no ID is stored, the beeper will sound and No Caller ID will appear on the display, go to step d.
c Press a or b to scroll through the Caller ID memory to choose the Caller ID you want to view, and then press OK. The LCD will show the caller's number and the date and time of the call.
d To finish viewing, press Stop/Exit.
Printing the Caller ID List 5
a Press Menu, 2, 0, 3.
b Press a or b to choose Print Report.Press OK.
Dialling and storing numbers 5

Dialling and storing numbers
31
5
If no ID is stored, the beeper will sound and No Caller ID will appear on the LCD, go to step d.
c Press Start.
d After printing has finished, press Stop/Exit.
Setting the telephone line type 5
If you are connecting the machine to a line that features a PBX or ISDN to send and receive faxes, it is necessary to change the Telephone Line Type accordingly by completing the following steps. If you are using a line that features a PBX, you can set your machine to always gain access to an outside line, or not.
a Press Menu, 0, 6.
b Press a or b to choose PBX, ISDN (or Normal).Press OK.
c Do one of the following:
If you chose ISDN or Normal, go to g.
If you chose PBX, go to d.
d Do one of the following:
If you want to change the current prefix number, press 1 and go to e.
If you do not want to change the current prefix number, press 2 and go to g.
e Enter the prefix number (up to 5 digits) on the dial pad.Press OK.
Note• You can use the numbers 0 to 9, l, # and !.
(Press Tel/R to display “!”.)
You cannot use ! with any other numbers or characters.
If your telephone system requires a timed break recall, press Tel/R to enter the break.
• If the pulse dialling mode is on, l and # are not available to use.
f Press a or b to choose On or Always.Press OK.
Note• If you choose On, pressing Tel/R (the
screen displays “!”.) will let you access an outside line.
• If you choose Always, you can access an outside line without pressing Tel/R.
g Press Stop/Exit.
PBX and TRANSFER 5
The machine is initially set to Normal, which lets the machine connect to a standard PSTN (Public Switched Telephone Network) line. However, many offices use a central telephone system or Private Branch Exchange (PBX). Your machine can be connected to most types of PBX. The machine’s recall feature supports timed break recall only (TBR). TBR will work with most PBX systems allowing you to gain access to an outside line, or transfer calls to another extension. The feature works when Tel/R is pressed.

Chapter 5
32
BT Call Sign (U.K. only) 5
The BT Call Sign subscriber service is a way to have a separate number for your machine, it allows you to have at least two separate telephone numbers on one phone line. Each phone number has its own distinctive ringing pattern.
You can set up your machine so that it only responds to the second number.
When you set the BT Call Sign feature to ON, the receive mode is set to Manual automatically. Manual mode will not respond to incoming telephone calls, since the number you use for telephone calls will use the normal ring pattern. If you turn the feature off, your receive mode will remain on Manual.
To enable the machine to work with BT Call Sign 5
This feature will only work with your external phone.
a Press Menu, 2, 0, 2.The screen displays the current setting.
b Press a or b to choose On or Off.Press OK.
c Press Stop/Exit.
Additional dialling operations 5
Combining quick dial numbers 5
You can combine more than one Quick Dial number when you dial. This feature may be useful if you need to dial an access code for a cheaper rate from another long distance carrier.
For example, you might have stored ‘555’ on Speed Dial #003 and ‘7000’ on Speed Dial #002. You can use them both to dial ‘555-7000’ if you press the following keys:
Press (Address Book) 003.
Press (Address Book) 002 and Start.
Numbers can be added manually by entering them on the dial pad:
Press (Address Book) 003, 7001 (on the dial pad), and Start.
This would dial ‘555–7001’. You can also add a pause by pressing Redial/Pause key.
Dialling and storing numbers
33
5
Additional ways to store numbers 5
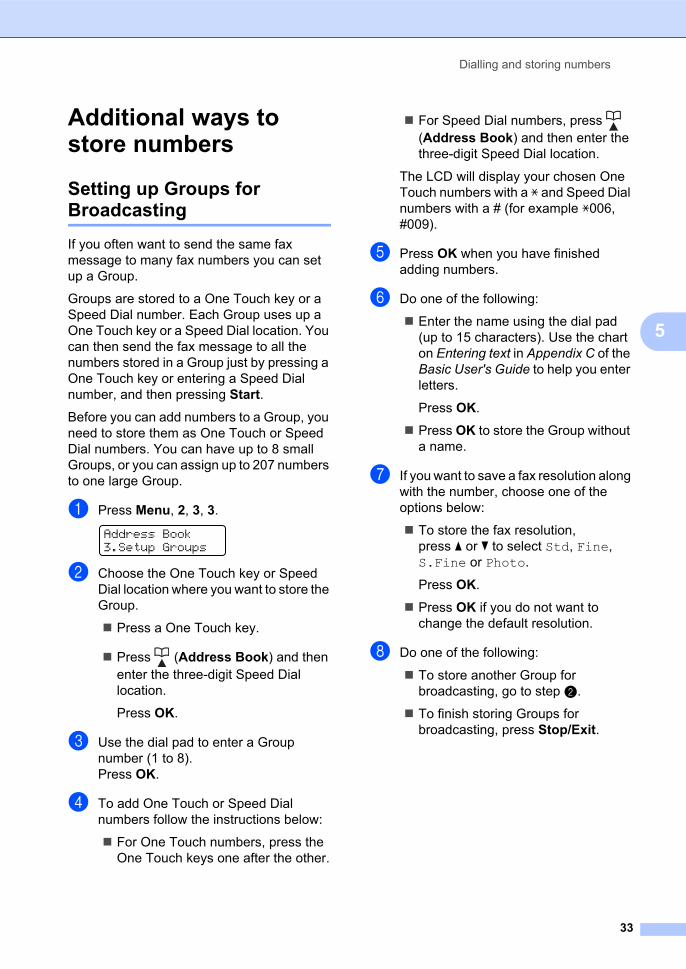
Setting up Groups for Broadcasting 5
If you often want to send the same fax message to many fax numbers you can set up a Group.
Groups are stored to a One Touch key or a Speed Dial number. Each Group uses up a One Touch key or a Speed Dial location. You can then send the fax message to all the numbers stored in a Group just by pressing a One Touch key or entering a Speed Dial number, and then pressing Start.
Before you can add numbers to a Group, you need to store them as One Touch or Speed Dial numbers. You can have up to 8 small Groups, or you can assign up to 207 numbers to one large Group.
a Press Menu, 2, 3, 3.
Address Book3.Setup Groups
b Choose the One Touch key or Speed Dial location where you want to store the Group.
Press a One Touch key.
Press (Address Book) and then enter the three-digit Speed Dial location.
Press OK.
c Use the dial pad to enter a Group number (1 to 8).Press OK.
d To add One Touch or Speed Dial numbers follow the instructions below:
For One Touch numbers, press the One Touch keys one after the other.
For Speed Dial numbers, press (Address Book) and then enter the three-digit Speed Dial location.
The LCD will display your chosen One Touch numbers with a l and Speed Dial numbers with a # (for example l006, #009).
e Press OK when you have finished adding numbers.
f Do one of the following:
Enter the name using the dial pad (up to 15 characters). Use the chart on Entering text in Appendix C of the Basic User's Guide to help you enter letters.
Press OK.
Press OK to store the Group without a name.
g If you want to save a fax resolution along with the number, choose one of the options below:
To store the fax resolution, press a or b to select Std, Fine, S.Fine or Photo.
Press OK.
Press OK if you do not want to change the default resolution.
h Do one of the following:
To store another Group for broadcasting, go to step b.
To finish storing Groups for broadcasting, press Stop/Exit.

Chapter 5
34
If you downloaded IFAX and E-mail options (MFC-7460DN and MFC-7860DW)
Options for Setting Up Groups 5
The following chart shows the additional selections for setting up Group numbers after you download the IFAX and E-mail options for MFC-7460DN and MFC-7860DW.
1 S.Fine does not appear if you add E-mail address in Step 4.
a Press Menu, 2, 3, 3.
b Choose the One Touch key or Speed Dial location where you want to store the Group.
Press a One Touch key.
Press (Address Book) and then enter the three-digit Speed Dial location.
Press OK.
c Use the dial pad to enter a Group number (1 to 8).Press OK.
Step 1
Enter Group Location
Step 2
Enter Group Number
Step 3
Select Registration Type
Step 4
Add Stored One Touch and Speed Dial Numbers to the Group
Step 5
Enter Group Name
Step 6
Select Resolution
Step 7
Select File type
One Touch or Speed Dial
(1 to 8) Fax/IFAX Fax Number or E-mail Address
(Name) Press OK.
Std, Fine,
S.Fine 1, Photo
—
Email Color PDF
E-mail Address
100dpi, 200dpi, 300dpi, 600dpi
PDF, SPDF
Email Color JPG
100dpi, 200dpi, 300dpi, 600dpi
—
Email Color XPS
100dpi, 200dpi, 300dpi, 600dpi
—
Email Gray PDF
100dpi, 200dpi, 300dpi
PDF, SPDF
Email Gray JPG
100dpi, 200dpi, 300dpi
—
Email Gray XPS
100dpi, 200dpi, 300dpi
—
Email B&W PDF
200dpi, 200x100dpi
PDF, SPDF
Email B&W TIFF
200dpi, 200x100dpi
—

Dialling and storing numbers
35
5
d Press a or b to select one of the following:Fax/IFAXEmail Color PDF Email Color JPG Email Color XPS Email Gray PDF Email Gray JPG Email Gray XPS Email B&W PDF Email B&W TIFFPress OK.
e To add One Touch or Speed Dial numbers follow the instructions below:
For One Touch numbers, press the One Touch keys one after the other.
For Speed Dial numbers, press (Address Book) and then enter the three-digit Speed Dial location.
The LCD will display your chosen One Touch numbers with a l and Speed Dial numbers with a # (for example l006, #009).
NoteWhen you include E-mail numbers all the other numbers in the Group must be E-mail numbers.
f Press OK when you have finished adding numbers.
g Do one of the following:
Enter the name using the dial pad (up to 15 characters). Use the chart on Entering text in Appendix C of the Basic User's Guide to help you enter letters.
Press OK.
Press OK to store the Group without a name.
h To choose the fax/scan resolution for the Group number, go to the appropriate next step, as shown in the following table.
i Press a or b to select Std, Fine, S.Fine 1 or Photo.Press OK, and then go to step n.1 S.Fine does not appear if you added an E-mail
address at step e.
j Press a or b to select 100dpi, 200dpi, 300dpi or 600dpi.Press OK.
If you chose Email Color PDF, go to step m.
If you chose Email Color JPG or Email Color XPS, go to step n.
k Press a or b to select 100dpi, 200dpi or 300dpi.Press OK.
If you chose Email Gray PDF, go to step m.
If you chose Email Gray JPG or Email Gray XPS, go to step n.
Option selected in step d
Go to step
Fax/IFAX i
Email Color PDF j
Email Color JPG
Email Color XPS
Email Gray PDF k
Email Gray JPG
Email Gray XPS
Email B&W PDF l
Email B&W TIFF

Chapter 5
36
l Press a or b to select 200dpi or 200x100dpi.Press OK.
If you chose Email B&W PDF, go to step m.
If you chose Email B&W TIFF, go to step n.
m Select the PDF type from PDF or SPDF (Secure PDF) that will be used to send to your PC.Press OK and then go to step n.
n Press Stop/Exit.
Note• When you do a broadcast and you have
saved a scan profile along with the number or E-mail address, the scan profile of the One-Touch, Speed-Dial or Group number you chose first will be applied to the broadcast.
• For details about the file format, see the Software User’s Guide.
• If you have selected Fax/IFAX in step d and added One-Touch or Speed-Dial numbers that are stored as 'IFax', you cannot select S.Fine.
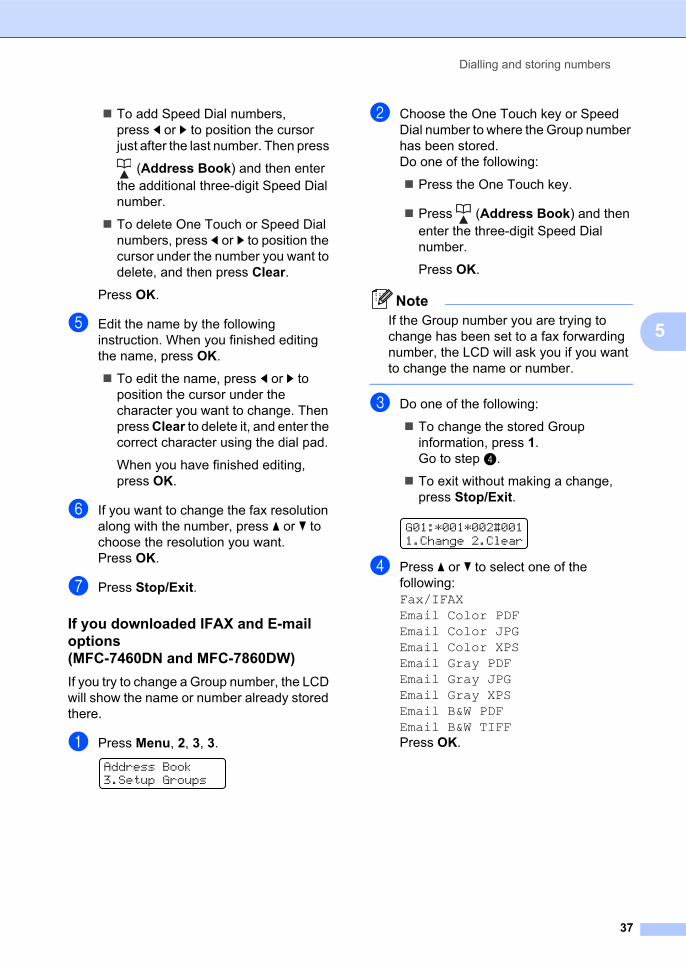
Changing Group numbers 5
If you try to change a Group number, the LCD will show the name or number already stored there.
a Press Menu, 2, 3, 3.
Address Book3.Setup Groups
b Choose the One Touch key or Speed Dial number where the Group number is stored.Do one of the following:
Press the One Touch key.
Press (Address Book) and then enter the three-digit Speed Dial number.
Press OK.
NoteIf the Group number you are trying to change has been set to a fax forwarding number, the LCD will ask you if you want to change the name or number.
c Do one of the following:
To change the stored Group information, press 1. Go to step d.
To exit without making a change, press Stop/Exit.
G01:*001*002#0011.Change 2.Clear
d Add or delete One Touch or Speed Dial numbers by following the instructions below:
To add One Touch numbers, press d or c to position the cursor just after the last number. Then press the additional One Touch key.
Dialling and storing numbers
37
5
To add Speed Dial numbers, press d or c to position the cursor just after the last number. Then press
(Address Book) and then enter the additional three-digit Speed Dial number.
To delete One Touch or Speed Dial numbers, press d or c to position the cursor under the number you want to delete, and then press Clear.
Press OK.
e Edit the name by the following instruction. When you finished editing the name, press OK.
To edit the name, press d or c to position the cursor under the character you want to change. Then press Clear to delete it, and enter the correct character using the dial pad.
When you have finished editing, press OK.
f If you want to change the fax resolution along with the number, press a or b to choose the resolution you want.Press OK.
g Press Stop/Exit.
If you downloaded IFAX and E-mail options (MFC-7460DN and MFC-7860DW) 5
If you try to change a Group number, the LCD will show the name or number already stored there.
a Press Menu, 2, 3, 3.
Address Book3.Setup Groups
b Choose the One Touch key or Speed Dial number to where the Group number has been stored.Do one of the following:
Press the One Touch key.
Press (Address Book) and then enter the three-digit Speed Dial number.
Press OK.
NoteIf the Group number you are trying to change has been set to a fax forwarding number, the LCD will ask you if you want to change the name or number.
c Do one of the following:
To change the stored Group information, press 1. Go to step d.
To exit without making a change, press Stop/Exit.
G01:*001*002#0011.Change 2.Clear
d Press a or b to select one of the following:Fax/IFAXEmail Color PDF Email Color JPG Email Color XPS Email Gray PDF Email Gray JPG Email Gray XPS Email B&W PDF Email B&W TIFFPress OK.
Chapter 5
38
e Add or delete One Touch or Speed Dial numbers by following the instructions below:
To add One Touch numbers, press d or c to position the cursor just after the last number. Then press the One Touch key of the number you want to add.
To add Speed Dial numbers, press d or c to position the cursor just after the last number. Then press
(Address Book) and enter the three-digit Speed Dial location of the number you want to add.
To delete One Touch or Speed Dial numbers, press d or c to position the cursor under the number you want to delete, and then press Clear.
Press OK.
f Edit the name as follows:
To edit the name, press d or c to position the cursor under the character you want to change. Then press Clear to delete it, and enter the correct character using the dial pad.
When you have finished editing, press OK.
g If you want to change the fax resolution for the Group, press a or b to choose the resolution you want.Press OK. For details, follow the directions beginning with step h in Options for Setting Up Groups. (See Options for Setting Up Groups on page 34.)
h Press Stop/Exit.
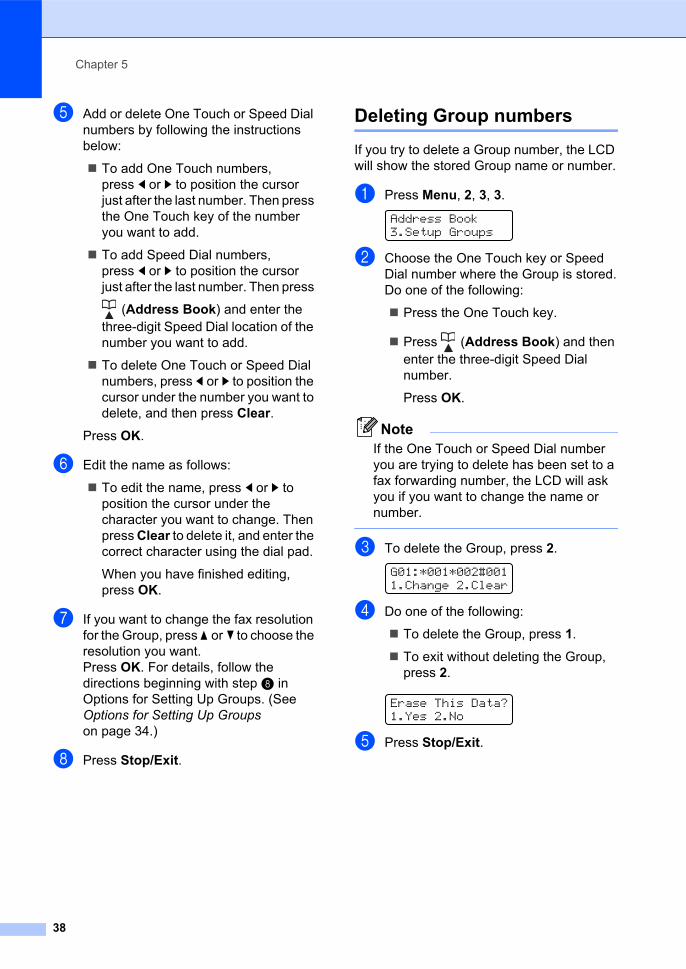
Deleting Group numbers 5
If you try to delete a Group number, the LCD will show the stored Group name or number.
a Press Menu, 2, 3, 3.
Address Book3.Setup Groups
b Choose the One Touch key or Speed Dial number where the Group is stored.Do one of the following:
Press the One Touch key.
Press (Address Book) and then enter the three-digit Speed Dial number.
Press OK.
NoteIf the One Touch or Speed Dial number you are trying to delete has been set to a fax forwarding number, the LCD will ask you if you want to change the name or number.
c To delete the Group, press 2.
G01:*001*002#0011.Change 2.Clear
d Do one of the following:
To delete the Group, press 1.
To exit without deleting the Group, press 2.
Erase This Data?1.Yes 2.No
e Press Stop/Exit.

39
6
6
Fax reports 6
Some fax reports (transmission verification and fax journal) can be printed automatically and manually.
Transmission verification report 6
You can use the Transmission Verification Report as proof that you sent a fax. (For details about how to set up the type of report you want, see Transmission Verification Report in Chapter 4 of the Basic User's Guide.)
Fax Journal 6
You can set the machine to print a fax journal (activity report) at specific intervals (every 50 faxes, 6, 12 or 24 hours, 2 or 7 days). The default setting is Every 50 Faxes, this means that your machine will print the journal when the machine has stored 50 jobs.
If you set the interval to Off, you can still print the report by following the steps on the next page.
a Press Menu, 2, 4, 2.
b Press a or b to choose an interval.Press OK.If you choose 7 days, you will be asked to choose a day when you want the 7 day countdown to begin.If you choose Every 50 Faxes, the LCD shows Accepted. Then go to step d.
c Enter the time to begin printing, in 24 hour format.For example: enter 19:45 for 7:45 PM.Press OK.
d Press Stop/Exit.
If you choose 6, 12, 24 hours, 2 or 7 days, the machine will print the report at the selected time and then erase all jobs from its memory. If the machine’s memory becomes full with 200 jobs before the time you chose has passed, the machine will print the journal early and then erase all jobs from memory.
If you want an extra report before it is due to print, you can print it manually without erasing the jobs from memory.
Printing reports 6
Chapter 6
40
Reports 6
The following reports are available:
1 XMIT Verify
Displays the Transmission Verification Report for your last outgoing 200 faxes and prints the last report.
2 Help List
Prints a list of commonly used functions to help you program your machine.
3 Tel Index List
Prints a list of names and numbers stored in the One Touch and Speed Dial memory in numerical or alphabetical order.
4 Fax Journal
Prints a list of information about your last 200 incoming and outgoing faxes. (TX: transmit.) (RX: receive.)
5 User Settings
Print a list of your current settings.
6 Network Config
Lists your network settings.
7 Order Form
You can print an accessories order form to fill out and send to your Brother dealer.
8 WLAN Report (MFC-7860DW)
Prints the result of wireless LAN connectivity diagnosis.
How to print a report 6
a For MFC-7360N and MFC-7460DN, press Menu, 4. For MFC-7860DW, press Menu, 5.
b Do one of the following:
Press a or b to choose the report you want.
Press OK.
Enter the number of the report you want to print. For example, press 2 to print the Help List.
c Press Start.
d Press Stop/Exit.

41
7
7
Copy settings 7
When you want to quickly change the copy settings temporarily for the next copy, use the temporary COPY keys. You can use different combinations.
MFC-7360N 7
MFC-7460DN and MFC-7860DW 7
The machine returns to its default settings one minute after copying, unless you have set the Mode Timer to 30 seconds or less. (See Mode Timer on page 4.)
To change a setting, press the temporary COPY keys. You can use Options,
Enlarge/Reduce or Duplex 1.
When you are finished choosing settings, press Start.
1 For MFC-7460DN and MFC-7860DW
Stop copying 7
To stop copying, press Stop/Exit.
Enlarging or reducing the image copied 7
You can choose the following enlargement or reduction ratios:
* The factory setting is shown in Bold with an asterisk.
Auto sets the machine to calculate the reduction ratio that best fits the size of paper.
Auto is only available when using the ADF.
Custom(25-400%) allows you to enter a ratio from 25% to 400%.
Making copies 7
Press
100%*
97% LTRiA494% A4iLTR91% Full Page
85% LTRiEXE83%
78%
70% A4iA550%
Custom(25-400%)
Auto
200%
141% A5iA4104% EXEiLTR

Chapter 7
42
To enlarge or reduce the next copy follow the instructions below:
a Make sure you are in Copy mode .
b Load your document.
c Use the dial pad to enter the number of copies (up to 99).
d Press Enlarge/Reduce.
e Do one of the following:
Press a or b to choose the enlargement or reduction ratio you want.
Press OK.
Press a or b to choose Custom(25-400%).
Press OK.
Use the dial pad to enter an enlargement or reduction ratio from 25% to 400%. (For example, press 5 3 to enter 53%.)
Press OK.
f Press Start.
NotePage Layout Options 2 in 1 (P), 2 in 1 (L), 2 in 1 (ID), 4 in 1 (P) and 4 in 1 (L) are not available with Enlarge/Reduce.
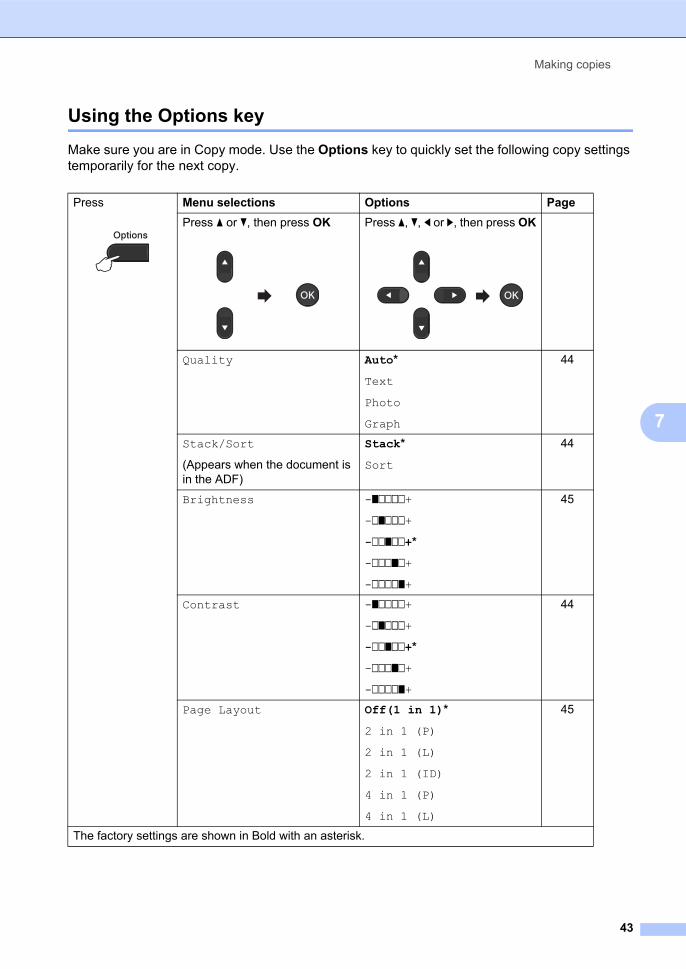
Making copies
43
7
Using the Options key 7
Make sure you are in Copy mode. Use the Options key to quickly set the following copy settings temporarily for the next copy.
Press
Menu selections Options Page
Press a or b, then press OK
Press a, b, d or c, then press OK
Quality Auto*
Text
Photo
Graph
44
Stack/Sort
(Appears when the document is in the ADF)
Stack*
Sort
44
Brightness -onnnn+-nonnn+-nnonn+*
-nnnon+-nnnno+
45
Contrast -onnnn+-nonnn+-nnonn+*
-nnnon+-nnnno+
44
Page Layout Off(1 in 1)*
2 in 1 (P)
2 in 1 (L)
2 in 1 (ID)
4 in 1 (P)
4 in 1 (L)
45
The factory settings are shown in Bold with an asterisk.
Chapter 7
44
Improving copy quality 7
You can choose from a range of quality settings. The default setting is Auto.
Auto
Auto is the recommended mode for ordinary printouts. Suitable for documents that contain both text and photographs.
Text
Suitable for documents containing mainly text.
Photo
Better copy quality for photographs.
Graph
Suitable for copying receipts.
To temporarily change the quality setting, follow the steps below:
a Make sure you are in Copy mode .
b Load your document.
c Use the dial pad to enter the number of copies (up to 99).
d Press Options.Press a or b to choose Quality.Press OK.
e Press a or b to choose Auto, Text, Photo or Graph.Press OK.
f Press Start.
To change the default setting, follow the steps below:
a Press Menu, 3, 1.
b Press a or b to choose the copy quality.Press OK.
c Press Stop/Exit.
Sorting copies using the ADF 7
You can sort multiple copies. Pages will be stacked in the order 1 2 3, 1 2 3, 1 2 3, and so on.
a Make sure you are in Copy mode .
b Load your document in the ADF.
c Use the dial pad to enter the number of copies (up to 99).
d Press Options. Press a or b to choose Stack/Sort.Press OK.
e Press a or b to choose Sort.Press OK.
f Press Start.
Adjusting Contrast and Brightness 7
Contrast 7
Adjust the contrast to help an image look sharper and more vivid.
To temporarily change the contrast setting, follow the steps below:
a Make sure you are in Copy mode .
b Load your document.
c Use the dial pad to enter the number of copies (up to 99).
d Press Options.Press a or b to choose Contrast.Press OK.
e Press d or c to increase or decrease the contrast.Press OK.
f Press Start.

Making copies
45
7
To change the default setting follow the steps below:
a Press Menu, 3, 3.
b Press d or c to increase or decrease the contrast.Press OK.
c Press Stop/Exit.
Brightness 7
Adjust the copy brightness to make copies darker or lighter.
To temporarily change the copy brightness setting, follow the steps below:
a Make sure you are in Copy mode .
b Load your document.
c Use the dial pad to enter the number of copies (up to 99).
d Press Options.Press a or b to choose Brightness.Press OK.
e Press d or c to make a lighter copy or a darker copy.Press OK.
f Press Start.
To change the default setting follow the steps below:
a Press Menu, 3, 2.
b Press d or c to make a lighter copy or a darker copy.Press OK.
c Press Stop/Exit.
Making N in 1 copies (page layout) 7
You can reduce the amount of paper used when copying by using the N in 1 copy feature. This allows you to copy two or four pages onto one page. If you want to copy both sides of an ID card onto one page, see 2 in 1 ID Copy on page 47.
IMPORTANT• Please make sure the paper size is set to Letter or A4.
• (P) means Portrait and (L) means Landscape.
• You cannot use the Enlarge/Reduce setting with the N in 1 feature.
a Make sure you are in Copy mode .
b Load your document.
c Use the dial pad to enter the number of copies (up to 99).
d Press Options. Press a or b to choose Page Layout.Press OK.
e Press a or b to choose 2 in 1 (P), 2 in 1 (L), 2 in 1 (ID) 1, 4 in 1 (P), 4 in 1 (L) or Off(1 in 1).Press OK.1 For details about 2 in 1 (ID), see 2 in 1 ID
Copy on page 47.
f Press Start to scan the page.If you placed the document in the ADF, the machine scans the pages and starts printing.If you are using the scanner glass, go to step g.

Chapter 7
46
g After the machine scans the page, press 1 to scan the next page.
Next Page?1.Yes 2.No
h Put the next page on the scanner glass.Press OK.Repeat steps g and h for each page of the layout.
i After all the pages have been scanned, press 2 in step g to finish.
If you are copying from the ADF: 7
Insert your document face up in the direction shown below:
2 in 1 (P)
2 in 1 (L)
4 in 1 (P)
4 in 1 (L)
If you are copying from the scanner glass: 7
Insert your document face down in the direction shown below:
2 in 1 (P)
2 in 1 (L)
4 in 1 (P)
4 in 1 (L)

Making copies
47
7
2 in 1 ID Copy 7
You can copy both sides of your identification card onto one page, keeping the original card size.
NoteYou can copy an identification card to the extent permitted under applicable laws. See Legal limitations for copying in the Safety and Legal booklet.
a Press (COPY).
b Place your identification card face down on the left side of the scanner glass.
Even if a document is placed in the ADF, the machine scans the data from the scanner glass.
c Press Options. Press a or b to choose Page Layout.Press OK.
d Press a or b to choose 2 in 1 (ID).Press OK.
e Press Start.After the machine scans the first side of the card, the LCD will display the following instruction.
Turn over the IDThen Press Start
f Turn over your identification card and place it at the left side of the scanner glass.
g Press Start.The machine scans the other side of the card and prints the page.
NoteWhen 2 in 1 ID Copy is chosen, the machine sets the quality to Photo and the contrast to +2 (-nnnno+).

Chapter 7
48
Duplex Copying (1-sided to 2-sided) (MFC-7460DN and MFC-7860DW) 7
If you want to use the duplex copy feature, load your document in the ADF.
Duplex Copy (long edge flip) 7
1 sided i 2 sided L
Portrait
Landscape
a Make sure you are in Copy mode .
b Load your document.
c Enter the number of copies (up to 99) using the dial pad.
d Press Duplex and a or b to select 1sidedi2sided L.Press OK.
e Press Start to copy the document.
Advanced Duplex Copy (short edge flip) 7
1 sided i 2 sided S
Portrait
Landscape
a Make sure you are in Copy mode .
b Load your document.
c Enter the number of copies (up to 99) using the dial pad.
d Press Duplex and a or b to select 1sidedi2sided S.Press OK.
e Press Start to copy the document.
12
11
2
11
212
1
2
11
2
11
21
2

49
A
A
Cleaning the machine A
Clean the outside and inside of the machine regularly with a dry, lint-free cloth. When you replace the toner cartridge or the drum unit, make sure that you clean the inside of the machine. For details about cleaning the machine, see the Basic User's Guide.
WARNING
DO NOT use cleaning materials that contain ammonia, alcohol, any type of spray, or any type of flammable substance to clean the outside or inside of the machine. Doing this may cause a fire or electrical shock. See To use the product safely in the Safety and Legal booklet for how to clean the machine.
Be careful not to inhale toner.
IMPORTANTUse neutral detergents. Cleaning with volatile liquids such as thinner or benzine will damage the surface of the machine.
Checking the machine A
Checking the Page Counters A
You can see the machine’s Page Counters for copies, printed pages, reports and lists, faxes or a summary total.
a For MFC-7360N and MFC-7460DN, press Menu, 6, 2. For MFC-7860DW, press Menu, 7, 2.
b Press a or b to see Total, Fax/List, Copy or Print.
c Press Stop/Exit.
Checking the remaining life of parts A
You can see the machine’s parts life on the LCD.
a For MFC-7360N and MFC-7460DN, press Menu, 6, 3. For MFC-7860DW, press Menu, 7, 3.
b Press Stop/Exit.
Routine maintenance A

50
Packing and shipping the machine A
Note• If for any reason you must ship your
machine, carefully repack the machine in the original packaging to avoid any damage during transit. The machine should be adequately insured with the carrier.
• If you are returning your machine to Brother as part of the Exchange Service, pack only the machine. Keep all separate parts, including the drum unit, the toner cartridges, and printed materials to use with your ‘Exchange’ machine.
a Turn off the machine's power switch. Disconnect all the cables, and then unplug the power cord from the AC power outlet. Leave the machine turned off for at least 10 minutes to cool down.
b Open the front cover.
c Remove the drum unit and toner cartridge assembly. Leave the toner cartridge installed in the drum unit.
d Put the protective material (1) in the machine with the "REMOVE" text to the left, as shown in the illustration.
e Put the drum unit and toner cartridge assembly back into the machine.
f Put the elastic band over the handle of the drum unit, as shown in the illustration.
g Close the front cover.
h Put the machine into the bag it originally came in.
(1)
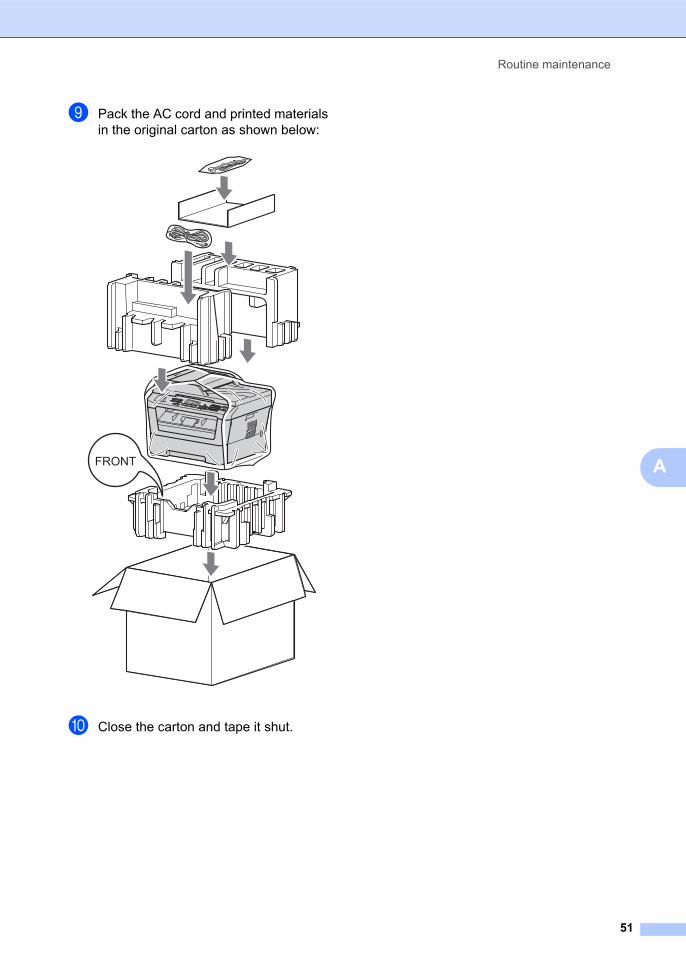
Routine maintenance
51
A
i Pack the AC cord and printed materials in the original carton as shown below:
j Close the carton and tape it shut.
FRONT

52
BThis is a comprehensive list of features and terms that appear in Brother manuals. Availability of these features depends on the model you purchased.
Glossary B
ADF (automatic document feeder)
The document can be placed in the ADF and scanned one page at a time automatically.
Address Book
A pre-programmed number for easy
dialling. You must press (Address Book), then enter the three digit Speed Dial location and press Start to begin the dialling process. An electronic, alphabetical listing of stored One Touch, Speed Dial and Group numbers.
Auto Reduction
Reduces the size of incoming faxes.
Automatic fax transmission
Sending a fax without picking up the handset of the external telephone.
Automatic Redial
A feature that enables your machine to redial the last fax number after five minutes, if the fax did not go through because the line was busy.
Backup Print
Your machine prints a copy of every fax that is received and stored in memory. This is a safety feature so you will not lose messages during a power failure.
Batch Transmission
As a cost saving feature, all delayed faxes to the same fax number will be sent as one transmission.
Beeper Volume
Volume setting for the beep when you press a key or make an error.
Broadcasting
The ability to send the same fax message to more than one location.
BT Call Sign
A subscriber service purchased from the telephone company in U.K. that gives you another phone number on an existing phone line. The Brother machine uses the new number to simulate a dedicated fax line.
Cancel Job
Cancels a programmed print job and clears the machine’s memory.
CNG tones
The special tones (beeps) sent by fax machines during automatic transmission to tell the receiving machine that a fax machine is calling.
Coding method
Method of coding the information contained in the document. All fax machines must use a minimum standard of Modified Huffman (MH). Your machine is capable of greater compression methods, Modified Read (MR), Modified Modified Read (MMR) and JBIG, if the receiving machine has the same capability.
Communication error (or Comm. Error)
An error during fax sending or receiving, usually caused by line noise or static.
Compatibility group
The ability of one fax unit to communicate with another. Compatibility is assured between ITU-T Groups.
Contrast
Setting to compensate for dark or light documents, by making faxes or copies of dark documents lighter and light documents darker.

Glossary
53
B
Delayed Fax
Sends your fax at a specified later time that day.
Dual Access
Your machine can scan outgoing faxes or scheduled jobs into memory at the same time it is sending a fax or receiving or printing an incoming fax.
ECM (Error Correction Mode)
Detects errors during fax transmission and resends the pages of the fax that had an error.
Extension telephone
A telephone on the fax number that is plugged into a separate wall socket.
External phone
A TAD (telephone answering device) or telephone that is connected to your machine.
F/T Ring Time
The length of time that the Brother machine fast/double-rings (when the Receive Mode setting is Fax/Tel) to notify you to pick up a voice call that it answered.
Fax Detect
Enables your machine to respond to CNG tones if you interrupt a fax call by answering it.
Fax Forwarding
Sends a fax received into the memory to another pre-programmed fax number.
Fax Journal
Lists information about the last 200 incoming and outgoing faxes. TX means Transmit. RX means Receive.
Fax Storage
You can store faxes in the memory.
Fax tones
The signals sent by sending and receiving fax machines while communicating information.
Fax/Tel
You can receive faxes and telephone calls. Do not use this mode if you are using a telephone answering device (TAD).
Fine resolution
Resolution is 203 196 dpi. It is used for small print and graphs.
Greyscale
The shades of grey available for copying and faxing photographs.
Group number
A combination of One Touch and Speed Dial numbers that are stored to a One Touch key or in a Speed Dial location for Broadcasting.
Help List
A printout of the complete Menu table that you can use to program your machine when you do not have the User’s Guides with you.
Journal Period
The pre-programmed time period between automatically printed Fax Journal Reports. You can print the Fax Journal on demand without interrupting the cycle.
LCD (liquid crystal display)
The display screen on the machine that shows interactive messages during On-Screen Programming and shows the date and time when the machine is idle.
Manual fax
When you lift the handset of your external telephone so you can hear the receiving fax machine answer before you press Start to begin transmission.
Menu mode
Programming mode for changing your machine’s settings.
54
OCR (optical character recognition)
ScanSoft™ PaperPort™ 12SE with OCR or Presto! PageManager software application converts an image of text to text you can edit.
One Touch
Keys on the machine’s control panel where you can store numbers for easy dialling. You can store a second number on each key if you press Shift and the One Touch key together.
Out of Paper Reception
Receives faxes into the machine’s memory when the machine is out of paper.
Overseas Mode
Makes temporary changes to the fax tones to accommodate noise and static on overseas telephone lines.
Pause
Allows you to place a 2.8 second delay in the dialling sequence while you are dialling using the dial pad or while you are storing One Touch and Speed Dial numbers. Press Redial/Pause as many times as needed for longer pauses.
Polling
The process of a fax machine calling another fax machine to retrieve waiting fax messages.
Pulse
A form of rotary dialling on a telephone line.
Real Time Transmission
When memory is full, you can send faxes in real time.
Remaining Jobs
You can check which programmed fax jobs are waiting in the memory and cancel the jobs individually.
Remote Access Code
Your own four-digit code (– – –l) that allows you to call and access your machine from a remote location.
Remote Activation code
Press this code (l 5 1) when you answer a fax call on an extension or external telephone.
Remote Retrieval Access
The ability to access your machine remotely from a touch tone telephone.
Resolution
The number of vertical and horizontal lines per inch.
Ring Delay
The number of rings before the machine answers in Fax Only and Fax/Tel modes.
Ring Volume
Volume setting for the machine’s ring.
Scanning
The process of sending an electronic image of a paper document into your computer.
Speed Dial
A pre-programmed number for easy
dialling. Press (Address Book), then enter the three-digit Speed Dial location and press Start to begin the dialling process.
Station ID
The stored information that appears on the top of faxed pages. It includes the sender’s name and fax number.
TAD (telephone answering device)
You can connect an external TAD to your machine.
Tel Index List
A listing of names and numbers stored in One Touch and Speed Dial memory, in numerical order.
Temporary settings
You can choose certain options for each fax transmission and copy without changing the default settings.

Glossary
55
B
Tone
A form of dialling on the telephone line used for Touch Tone telephones.
Transmission
The process of sending faxes over the telephone lines from your machine to the receiving fax machine.
User Settings List
A printed report that shows the current settings of the machine.
Xmit Report (Transmission Verification Report)
A listing for each transmission, that shows its date, time and number.

Index
56
CB
Broadcasting ............................................14cancelling ..............................................14setting up Groups for ............................33
C
Cancellingbroadcast in process .............................14fax jobs in memory ................................16fax storage ............................................20jobs awaiting redial ...............................16remote fax options ................................22
Copy2 in 1 ID Copy .......................................47contrast .................................................44Enlarge/Reduce key ..............................41keys .......................................................41N in 1 (page layout) ...............................45Options key ...........................................43quality ....................................................44sort (ADF only) ......................................44temporary settings ................................41using ADF .............................................44using scanner glass ..............................45
Cover page ..............................................16custom comments .................................16for all faxes ............................................17for next fax only .....................................17printed form ...........................................17
D
Deep Sleep mode ......................................2Delayed batch transmission .....................16Dialling
Groups (broadcasting) ..........................14restricting dialling ..................................10
Drum unitchecking (remaining life) .......................49
Dual access .............................................13Duplex copy .............................................48
E
Enlarge/Reduce key .................................41
F
Fax codeschanging ............................................... 23remote access code ............................. 23
Fax forwardingchanging remotely ..........................24, 25programming a number ........................ 20
Fax storage ............................................. 20printing from memory ........................... 27turning off ............................................. 22turning on ............................................. 20
Fax, stand-alonereceiving
Continue Mode .................................... 3fax forwarding .................................... 25fax receive stamp .............................. 26into memory (fax storage) ................. 20polling receive ................................... 28reducing to fit on paper ..................... 26retrieving from a remote site ........23, 25
sending ................................................. 12broadcasting ...................................... 14cancelling from memory .................... 16contrast ............................................. 12delayed batch .................................... 16delayed fax ........................................ 15from memory (dual access) ............... 13manual .............................................. 13overseas ............................................ 15polled transmit ................................... 18real time transmission ....................... 15resolution ........................................... 13
G
Groups for broadcasting .......................... 33
H
HELP ....................................................... 40Help List ............................................... 40

57
C
L
LCD (liquid crystal display)contrast ...................................................4Help List ................................................40
M
Machine informationchecking remaining life of parts ............49page counts ..........................................49
Maintenance, routine ...............................49checking the remaining life of parts ......49
Manualtransmission ..........................................13
Memorystorage ....................................................1
N
N in 1 (page layout) ..................................45
P
Page layout (N in 1) .................................45Paging
programming your pager number .........20Polling
polled transmit ......................................18polling receive .......................................28
Power failure ..............................................1Print
fax from memory ...................................27reports ...................................................40
Q
Qualitycopying .......................................... 43, 44
Quick dialbroadcasting .........................................14
using Groups .....................................14Group dial
setting up Groups for broadcasting ....33
R
Reducingcopies ................................................... 41incoming faxes ..................................... 26
Remote retrieval ...................................... 23access code ......................................... 23commands ............................................ 25getting your faxes ................................. 23
Reports .............................................. 39, 40Fax Journal .................................... 39, 40
journal period .................................... 39Help List ............................................... 40how to print ........................................... 40Network Configuration .......................... 40Tel Index List ........................................ 40Transmission Verification ..................... 39User Settings ........................................ 40
Resolutionfax (standard, fine, superfine, photo) ... 13setting for next fax ................................ 13
Resolution key ......................................... 13Restricted users ........................................ 7
S
Securityrestricting dialling ................................. 10Secure function lock
administrator password ....................... 6Public user mode ................................ 7restricted users .................................... 7
Setting lock ............................................. 9Setting up the password ............................ 5Sleep mode ............................................... 2Sort .......................................................... 44
T
Temporary copy settings ......................... 41Toner Save ................................................ 2Toner Setting (Continue Mode) ................. 3TX Lock ..................................................... 5

These machines are approved for use in the country of purchase only, Local Brother companiesor their dealers will only support machines purchased in their own countries.