Embed Size (px)
Citation preview

PrecisionView AMR 2.0Advanced Material Reporting
User Guide
309218Rev. B

Trademarks
Graco® and PrecisionMix® are registered trademarks of Graco Inc.
PrecisionView™, ProBatch™, and Informer® are trademarks of Graco Inc.
Modbus/TCP™ is a trademark of Schneider Automation.
Acrobat® Reader is a registered trademark of Adobe Systems Inc.
Microsoft® is a registered trademark of the Microsoft Corporation.
Other product names mentioned in this manual may be trademarks. They are used for identification purposes only.
Copyright 2001Graco Inc., P.O. Box 1441, Minneapolis, MN 55440-1441www.Graco.comGraco Inc. is registered to I.S. EN ISO 9001

3
SECTION 1 Introduction
Installation and Setup Overview . . . . . . . . . . . . . . . . . . . . . . . . . . . . . . . . . . 10Conventions Used in this Manual . . . . . . . . . . . . . . . . . . . . . . . . . . . . . . . . . 11
Warnings, Cautions, and Notes . . . . . . . . . . . . . . . . . . . . . . . . . . . . . . . 11References . . . . . . . . . . . . . . . . . . . . . . . . . . . . . . . . . . . . . . . . . . . . . . . 11Menu Selections . . . . . . . . . . . . . . . . . . . . . . . . . . . . . . . . . . . . . . . . . . . 11
For More Information . . . . . . . . . . . . . . . . . . . . . . . . . . . . . . . . . . . . . . . . . 12Technical Support . . . . . . . . . . . . . . . . . . . . . . . . . . . . . . . . . . . . . . . . 12Training Programs . . . . . . . . . . . . . . . . . . . . . . . . . . . . . . . . . . . . . . . . 12Instruction Manuals . . . . . . . . . . . . . . . . . . . . . . . . . . . . . . . . . . . . . . . 13Online Documentation . . . . . . . . . . . . . . . . . . . . . . . . . . . . . . . . . . . . . 13
PrecisionView Software Licensing . . . . . . . . . . . . . . . . . . . . . . . . . . . . . . 14License Levels . . . . . . . . . . . . . . . . . . . . . . . . . . . . . . . . . . . . . . . . . . . 14Demo Mode . . . . . . . . . . . . . . . . . . . . . . . . . . . . . . . . . . . . . . . . . . . . . 15
PrecisionView AMR 2.0 Application . . . . . . . . . . . . . . . . . . . . . . . . . . . . . 16What’s New in PrecisionView AMR 2.0 . . . . . . . . . . . . . . . . . . . . . . . . 17Important Notes for PrecisionMix II Stations . . . . . . . . . . . . . . . . . . . . 18
Updating the Software . . . . . . . . . . . . . . . . . . . . . . . . . . . . . . . . . . . . . . . . 20Removing the Software . . . . . . . . . . . . . . . . . . . . . . . . . . . . . . . . . . . . . . . 20Backup PrecisionView Configuration . . . . . . . . . . . . . . . . . . . . . . . . . . . . . 21
SECTION 2 Software Overview
Starting PrecisionView AMR 2.0 . . . . . . . . . . . . . . . . . . . . . . . . . . . . . . . . 24Technical Support Information . . . . . . . . . . . . . . . . . . . . . . . . . . . . . . 25
Main Application Window . . . . . . . . . . . . . . . . . . . . . . . . . . . . . . . . . . . . . 26Menu Bar and Toolbars . . . . . . . . . . . . . . . . . . . . . . . . . . . . . . . . . . . . 27Status Bar . . . . . . . . . . . . . . . . . . . . . . . . . . . . . . . . . . . . . . . . . . . . . . 30General Application Features . . . . . . . . . . . . . . . . . . . . . . . . . . . . . . . 31
SECTION 3 Configuring Fluids
Units of Measure . . . . . . . . . . . . . . . . . . . . . . . . . . . . . . . . . . . . . . . . . . . . 34Hazardous Air Pollutants (HAP) Table . . . . . . . . . . . . . . . . . . . . . . . . . . . . 35Master Fluid List . . . . . . . . . . . . . . . . . . . . . . . . . . . . . . . . . . . . . . . . . . . . 36
Editing Master Fluid List . . . . . . . . . . . . . . . . . . . . . . . . . . . . . . . . . . . 37VOC Calculation . . . . . . . . . . . . . . . . . . . . . . . . . . . . . . . . . . . . . . . . . 38Configuring HAP Constituents . . . . . . . . . . . . . . . . . . . . . . . . . . . . . . 40
PrecisionMix Recipes Table . . . . . . . . . . . . . . . . . . . . . . . . . . . . . . . . . . . 41Viewing or Editing Recipes . . . . . . . . . . . . . . . . . . . . . . . . . . . . . . . . . 41
309219 PrecisionView AMR 2.0

4
Deleting a Recipe . . . . . . . . . . . . . . . . . . . . . . . . . . . . . . . . . . . . . . . . 43Locking Material and Recipe Configuration . . . . . . . . . . . . . . . . . . . . . . . . 44
SECTION 4 Configuring the Network Overview
Network Overview . . . . . . . . . . . . . . . . . . . . . . . . . . . . . . . . . . . . . . . . . . . 46AMR . . . . . . . . . . . . . . . . . . . . . . . . . . . . . . . . . . . . . . . . . . . . . . . . . . . . . 48
Configuring System Properties . . . . . . . . . . . . . . . . . . . . . . . . . . . . . . 48Networks . . . . . . . . . . . . . . . . . . . . . . . . . . . . . . . . . . . . . . . . . . . . . . . . . . 50
Adding New Network . . . . . . . . . . . . . . . . . . . . . . . . . . . . . . . . . . . . . . 50Configuring Network Communication Properties . . . . . . . . . . . . . . . . 51
Folders . . . . . . . . . . . . . . . . . . . . . . . . . . . . . . . . . . . . . . . . . . . . . . . . . . . 55Adding New Folder . . . . . . . . . . . . . . . . . . . . . . . . . . . . . . . . . . . . . . . 55
Stations . . . . . . . . . . . . . . . . . . . . . . . . . . . . . . . . . . . . . . . . . . . . . . . . . . . 56Adding New Station . . . . . . . . . . . . . . . . . . . . . . . . . . . . . . . . . . . . . . . 56Configuring General Station Properties . . . . . . . . . . . . . . . . . . . . . . . 58Removing a Station . . . . . . . . . . . . . . . . . . . . . . . . . . . . . . . . . . . . . . . 61
Communication Problems . . . . . . . . . . . . . . . . . . . . . . . . . . . . . . . . . . . . . 62Communication Statistics . . . . . . . . . . . . . . . . . . . . . . . . . . . . . . . . . . 63
SECTION 5 Configuring PrecisionMix and ProBatch Station Properties
PrecisionMix Station Properties . . . . . . . . . . . . . . . . . . . . . . . . . . . . . . . . 66Recipes Tab . . . . . . . . . . . . . . . . . . . . . . . . . . . . . . . . . . . . . . . . . . . . 66
ProBatch Synchronization . . . . . . . . . . . . . . . . . . . . . . . . . . . . . . . . . . . . . 68 Synchronizing ProBatch Station and PrecisionView Application . . . . 70Synchronization Troubleshooting . . . . . . . . . . . . . . . . . . . . . . . . . . . . 73
ProBatch Station Properties . . . . . . . . . . . . . . . . . . . . . . . . . . . . . . . . . . . 74System Tab . . . . . . . . . . . . . . . . . . . . . . . . . . . . . . . . . . . . . . . . . . . . . 74Fluids Tab . . . . . . . . . . . . . . . . . . . . . . . . . . . . . . . . . . . . . . . . . . . . . . 76Recipes Tab . . . . . . . . . . . . . . . . . . . . . . . . . . . . . . . . . . . . . . . . . . . . 78Save ProBatch Station Configuration . . . . . . . . . . . . . . . . . . . . . . . . . 81Load ProBatch Station Configuration . . . . . . . . . . . . . . . . . . . . . . . . . 82
SECTION 6 Process Monitoring
Introduction . . . . . . . . . . . . . . . . . . . . . . . . . . . . . . . . . . . . . . . . . . . . . . . . 84Process Monitor . . . . . . . . . . . . . . . . . . . . . . . . . . . . . . . . . . . . . . . . . . . . 85
Total VOC Emissions Graph . . . . . . . . . . . . . . . . . . . . . . . . . . . . . . . . 85Informer Station Process Monitor . . . . . . . . . . . . . . . . . . . . . . . . . . . . 86
5
PrecisionMix Station Process Monitor . . . . . . . . . . . . . . . . . . . . . . . . . 87ProBatch Process Monitor . . . . . . . . . . . . . . . . . . . . . . . . . . . . . . . . . 90
Performance Graphs . . . . . . . . . . . . . . . . . . . . . . . . . . . . . . . . . . . . . . . . . 93Opening Performance Graph Window . . . . . . . . . . . . . . . . . . . . . . . . 93Ratio Performance Graph . . . . . . . . . . . . . . . . . . . . . . . . . . . . . . . . . . 95Flow Performance Graph . . . . . . . . . . . . . . . . . . . . . . . . . . . . . . . . . . 96VOC Performance Graph . . . . . . . . . . . . . . . . . . . . . . . . . . . . . . . . . . 98
Reset Commands . . . . . . . . . . . . . . . . . . . . . . . . . . . . . . . . . . . . . . . . . . . 99PrecisionMix Reset Commands . . . . . . . . . . . . . . . . . . . . . . . . . . . . . 99Informer Station Reset Commands . . . . . . . . . . . . . . . . . . . . . . . . . . 101ProBatch Station Reset Command . . . . . . . . . . . . . . . . . . . . . . . . . . 103
Synchronize Clocks . . . . . . . . . . . . . . . . . . . . . . . . . . . . . . . . . . . . . . . . . 104Totalizer Snapshot . . . . . . . . . . . . . . . . . . . . . . . . . . . . . . . . . . . . . . . . . . 105Alarm and Event Log . . . . . . . . . . . . . . . . . . . . . . . . . . . . . . . . . . . . . . . . 106
Filtering Log Messages by Source . . . . . . . . . . . . . . . . . . . . . . . . . . 107Filtering Log Messages by Time . . . . . . . . . . . . . . . . . . . . . . . . . . . . 108Manually Entering Log Messages . . . . . . . . . . . . . . . . . . . . . . . . . . . 109Customizing the Alarm and Event Log Display . . . . . . . . . . . . . . . . . 110
SECTION 7 Reporting Data
Data Collection . . . . . . . . . . . . . . . . . . . . . . . . . . . . . . . . . . . . . . . . . . . . 112Open Database Connectivity . . . . . . . . . . . . . . . . . . . . . . . . . . . . . . 112
PrecisionView Reports . . . . . . . . . . . . . . . . . . . . . . . . . . . . . . . . . . . . . . 113Manually Generating Reports . . . . . . . . . . . . . . . . . . . . . . . . . . . . . . . . . 114
Custom Material Report . . . . . . . . . . . . . . . . . . . . . . . . . . . . . . . . . . 115Totalizer Snapshot Report . . . . . . . . . . . . . . . . . . . . . . . . . . . . . . . . . 119Alarms and Events Report . . . . . . . . . . . . . . . . . . . . . . . . . . . . . . . . 120Hazardous Air Pollutants Report . . . . . . . . . . . . . . . . . . . . . . . . . . . . 121Setup Information . . . . . . . . . . . . . . . . . . . . . . . . . . . . . . . . . . . . . . . 122ProBatch Fluid List . . . . . . . . . . . . . . . . . . . . . . . . . . . . . . . . . . . . . . 122
Report Preview window . . . . . . . . . . . . . . . . . . . . . . . . . . . . . . . . . . . . . . 123Report Samples . . . . . . . . . . . . . . . . . . . . . . . . . . . . . . . . . . . . . . . . . . . 124
Custom Material Report . . . . . . . . . . . . . . . . . . . . . . . . . . . . . . . . . . 124Totalizer Snapshot Report . . . . . . . . . . . . . . . . . . . . . . . . . . . . . . . . . 126Alarms and Events Report . . . . . . . . . . . . . . . . . . . . . . . . . . . . . . . . 126Hazardous Air Pollutants Report . . . . . . . . . . . . . . . . . . . . . . . . . . . . 127Setup Information Report . . . . . . . . . . . . . . . . . . . . . . . . . . . . . . . . . 128ProBatch Fluid List Report . . . . . . . . . . . . . . . . . . . . . . . . . . . . . . . . 129
Automatically Generated Reports . . . . . . . . . . . . . . . . . . . . . . . . . . . . . . 130
309219 PrecisionView AMR 2.0

6
Archiving Production Data . . . . . . . . . . . . . . . . . . . . . . . . . . . . . . . . . . . . 132Creating an Archive File . . . . . . . . . . . . . . . . . . . . . . . . . . . . . . . . . . 132Restoring an Archive File . . . . . . . . . . . . . . . . . . . . . . . . . . . . . . . . . 133
SECTION 8 Appendices
Appendix A: Database Tables . . . . . . . . . . . . . . . . . . . . . . . . . . . . . . . . . 136Configuration Tables . . . . . . . . . . . . . . . . . . . . . . . . . . . . . . . . . . . . . 137Production Information Tables . . . . . . . . . . . . . . . . . . . . . . . . . . . . . . 148ODBC Example . . . . . . . . . . . . . . . . . . . . . . . . . . . . . . . . . . . . . . . . . 156
Appendix B: Command Line Parameters . . . . . . . . . . . . . . . . . . . . . . . . 158

9
SECTION
1Introduction
309218 PrecisionView AMR 2.0

10 Installation and Setup Overview
Installation and Setup OverviewThe following steps are an overview of the process of installing and configuring the PrecisionView application. Each step is explained in more detail in the procedures on the following pages. Hardware and software installation procedures are in the Preci-sionView AMR 2.0 Installation Guide
Steps1. Select Units of Measure (page 34) and configure the fluids in the following
order:
a. Hazardous Air Pollutants (HAP) Table (page 35)
b. Master Fluid List (page 36)
c. PrecisionMix Recipes Table (page 41)
2. Configure PrecisionView network, folders and stations in Network Overview (page 46).
a. Configure Serial and/or TCP/IP Networks (page 50).
b. Add Stations (page 56) and configure general properties.
c. Group related Stations in Folders (page 55) if desired.
3. Configure PrecisionMix and ProBatch Stations.
PrecisionMix (page 66) ProBatch (page 68)• Link recipes from Recipe List
with PrecisionMix station recipe numbers (page 66).
• Synchronize Clocks (page 104).
• Select Station System Parameters (page 74).
• Configure fluids (page 76).
• Configure recipes (page 78).
• Synchronize configuration of ProBatch station and PrecisionView application. (page 68)
• Synchronize Clocks (page 104).
4. Lock material and recipe configuration (page 44).
5. Backup PrecisionView software configuration (page 21).
Section 1 Introduction
Conventions Used in this Manual 11
Conventions Used in this Manual
Warnings, Cautions, and Notes
References
Numbers and letters in parentheses in the text, such as (A) or (7), refer to reference numbers and letters in the figures.
Wherever the PrecisionMix® name is mentioned, the information per-tains to both the PrecisionMix II 2-K station and the PrecisionMix II 3-K station, unless otherwise specified.
“Station” refers to both:• physical devices (such as an Informer station) connected to the
PrecisionView application• stations you create and configure with the application in the
Network Overview.
Menu Selections
To complete a task using a menu command or submenu, the ➤ symbol is used to show selections. For example, “Select Edit ➤ Master Fluid List.”
The warning symbol alerts you to the possibility of serious injury or death if you do not follow the instructions.
The caution symbol alerts you to the possibility of equipment or prop-erty damage or operation errors if you do not follow the instructions.
The pencil symbol is used to call your attention to additional important or helpful information.
309218 PrecisionView AMR 2.0

12 For More Information
For More Information
Technical Support
In the main PrecisionView application window, click Help About ➤ PrecisionView AMR, then click the Technical Support button. If the Technical Support information has been filled in, the dis-tributor support information should display.
If you need help identifying the Graco authorized distributor closest to you, call: 1-800-367-4023 Toll Free
Training Programs
For information on available training courses, contact your distributor.
If no data is entered into Technical Support information, the dialog box will display each time the application is launched until at least one field of information is entered.
Section 1 Introduction

For More Information 13
Instruction Manuals
Depending on which devices are part of your network, you may need to refer to the following manuals for additional information.
Online Documentation
This instruction manual and the PrecisionView AMR 2.0 Installation Guide are included on the PrecisionView AMR 2.0 CD in the “Manuals” directory (pdf files). You need Acrobat™ Reader to view the manuals. Install Acrobat Reader from the PrecisionView AMR 2.0 CD if it is not already installed on your computer.
The blue text in the online manuals is “hot text”. Clicking on the text will take you to the information referred to. Use the “Go to Previous View” button ➤➤ in Acrobat Reader to return to the previous page in the manual.
Manual No. Description
309102 Informer Package Manual
308916 PrecisionMix II 2-K System Manual
309107 PrecisionMix II 3-K System Manual
309300 ProBatch System Manual
196938 PrecisionView AMR 2.0 Installation Guide
309366 Interface Box Manual
To order additional PrecisionView AMR 2.0 User Guides (this manual), order part number 196936
309218 PrecisionView AMR 2.0

14 PrecisionView Software Licensing
PrecisionView Software Licensing
License Levels
The software is licensed through a hardware license key that plugs into your computer parallel port. One group of licenses (simple) is for use with Informer stations only. The other group of licenses (complex) is for use with any Graco PrecisionView compatible equipment.
The following PrecisionView software licenses are available:
The license level of the hardware key overrides any settings made with the PrecisionView application. To display the license information:
1. Select Help ➤ About PrecisionView AMR 2.0 from the menu.
2. Click the License Information button in the dialog box. License Information shows the number of enabled stations by category and the license type. These values are read-only.
3. Click OK to close the dialog box.
Part No. Type of station(s) Number of stations244107 Simple: Informer only Single station
244108 Five stations
244109 Network - up to 31 stations
243377 Complex: Informer, PrecisionMix II, PrecisionMix II 3K or ProBatch
Single station
243378 Five stations
243379 Network - up to 31 stations
Section 1 Introduction

PrecisionView Software Licensing 15
Demo Mode
When no hardware key is present, the application will function in dem-onstration mode. During the first two hours of demo mode, you are able to commuicate with a single station and test out the functionality of the application.
After the two hour period, the communication between the station and PrecisionView application is terminated. You can still configure the application, regardless of the license status. This allows you to set up the application as desired even if you do not initially have a valid license. When you obtain a valid license key, the application begins functioning with the established configuration.
309218 PrecisionView AMR 2.0

16 PrecisionView AMR 2.0 Application
PrecisionView AMR 2.0 ApplicationThe PrecisionView application provides process monitoring and advanced reporting capabilities for Graco PrecisionView AMR 2.0 compatible proportioning and fluid measurement equipment.
Monitoring capabilities include:
• Remote viewing of the active processes on all networked stations
• Graphical displays of ratio performance, flow performance, and month-to-date volatile organic compound (VOC) emissions
• Text displays of all production information
PrecisionView AMR reporting capabilities include:
• Automatic data collection into Microsoft® Access 2000 database
• Pre-defined reporting of production information, batch and grand totalizer information, complete alarm and event history, volatile organic compound (VOC) emissions, hazardous air pollutant (HAP) usage, and PrecisionView setup information
• Manual and automatic report generation
• Open database connectivity compliance (ODBC)
Section 1 Introduction

PrecisionView AMR 2.0 Application 17
What’s New in PrecisionView AMR 2.0
Multiple device support: added support for Informer, ProBatch, and PrecisionMix II 3-K station types.
Cross-device reporting capabilities: custom material report is available to generate a detailed or summarized history of fluids dis-pensed.
Multiple network support: either serial or TCP/IP networks can be used to connect devices to the PrecisionView application.
Master Fluid List: the Components List in PrecisionView AMR 1.0 is replaced by the Master Fluid List in version 2.0. The main difference is that the Master Fluid List is not divided into different component types, such as components A and B. This means that a fluid can be assigned to any part of a recipe or station configuration.
PrecisionMix stations: • VOC factor can no longer be configured by Recipe volume.
VOCs are calculated by the VOC conversion factor of individual fluid components. There is no “Recipe Step” dialog box for indi-vidual Recipe steps.
• Batch totalizers can be reset for all recipes on a station. Previ-ously, batch totalizers could only be reset for the currently active recipe.
• VOCs can be calculated based on batch totalizers (totalizer snapshot report).
309218 PrecisionView AMR 2.0

18 PrecisionView AMR 2.0 Application
Important Notes for PrecisionMix II Stations
The following information is important in understanding how Precision-View AMR 2.0 logs PrecisionMix jobs to its database and how this affects your data, views and reports.
If a job ends while PrecisionView AMR is not running or otherwise not communicating to the PrecisionMix II station, the job is not logged to the AMR 2.0 database. The PrecisionMix II station does not log the job either, so that job information is lost. Volatile Organic Compound (VOC) and Hazardous Air Pollutant (HAP) calculations depend on the completeness and accuracy of the logged jobs.
In order to accurately track jobs and log them to the database, a com-puter should be dedicated to the PrecisionView application and be run-ning and online with all stations at all times. It is recommended that you plug the computer’s power cord into a UPS and configure it to grace-fully shut down in case of a power outage.
Other principles to remember about PrecisionMix jobs:
• A job is specific to a recipe; if you change recipes, you change jobs.
• A job will not appear in the production detail and summary reports until after the job has ended (i.e. after it has been logged to the database).
• A job on the PrecisionMix station ends (automatically starting a new one) when any one of the following four things happen:
1. PrecisionMix operator zeros the job totalizers on the local Pre-cisionMix user interface.
2. PrecisionMix operator presses the Print button on the Preci-sionMix operator station. This works only for the active recipe.
Section 1 Introduction

PrecisionView AMR 2.0 Application 19
3. PrecisionView AMR operator selects the PrecisionMix station in the Network Overview and clears the job totals. This works only for the active recipe on the currently selected station.
4. PrecisionMix station has the color change option and is config-ured to automatically end the job when a color change is initi-ated. To set this configuration, see the Printer Reports section of your PrecisionMix II instruction manual.
Known Issues
1. PrecisionView AMR does not track solvent usage due to a system purge while the PrecisionMix is in recipe zero. It will track the sol-vent usage due to a color change from a recipe to recipe zero. This is due to the nature of the PrecisionMix II control software, not to PrecisionView AMR, and must be taken into account when tracking solvent usage.
2. On networks with many stations (ten or more), there is a potential to miss alarms that occur on the PrecisionMix stations. Specifically, this happens when an alarm occurs and the PrecisionMix operator quickly clears the alarm. PrecisionView AMR will log only new, active alarms; it does this by repeatedly polling each station on the network for new station information. Due to the large volume of net-work traffic, the time between polls to a given station becomes rela-tively long. If the alarm occurs and is cleared between polls to the station, the alarm is missed and not added to the Alarm and Event Log. The probability of PrecisionView AMR not recording a Preci-sionMix alarm increases proportionately with the number of sta-tions. Similarly, the fewer stations on the network, the faster the network communication will be.
309218 PrecisionView AMR 2.0

20 Updating the Software
Updating the SoftwareContact your Graco distributor to obtain future updates to the Preci-sionView AMR 2.0 software.
Removing the Software
To remove the PrecisionView application from your computer:
1. Select Settings ➤ Control Panel from the Windows Start menu.
2. Double-click Add/Remove Programs.
3. Select PrecisionView AMR 2.0 from the list of programs and click Add/Remove. The program is removed from your PC and no longer appears on the Windows Start menu.
Removing the application does not remove any data files you may have created. However, it is recommended that you backup the appli-cation configuration before removing it. See Backup PrecisionView Configuration, page 21.
Section 1 Introduction
Backup PrecisionView Configuration 21
Backup PrecisionView ConfigurationWhen you are finished configuring the PrecisionView application, it should be backed up. A backup should also be done before removing a station, uninstalling the software, and periodically as part of your sys-tem maintenance.
1. Start Windows Explorer.
2. Move to the directory where PrecisionView software is installed. The default path is C:\Program Files\Graco\PrecisionView AMR 2.
3. Select the PViewAMR2.mdb file (type Microsoft Access Database). You may have to select the file and check the properties to see the full name of the file with the mdb extension.
4. Copy the file to a backup device, such as a tape drive or ZIP drive.
309218 PrecisionView AMR 2.0

22 Backup PrecisionView Configuration
Section 1 Introduction

23
SECTION
2Software Overview
309218 PrecisionView AMR 2.0
24 Starting PrecisionView AMR 2.0
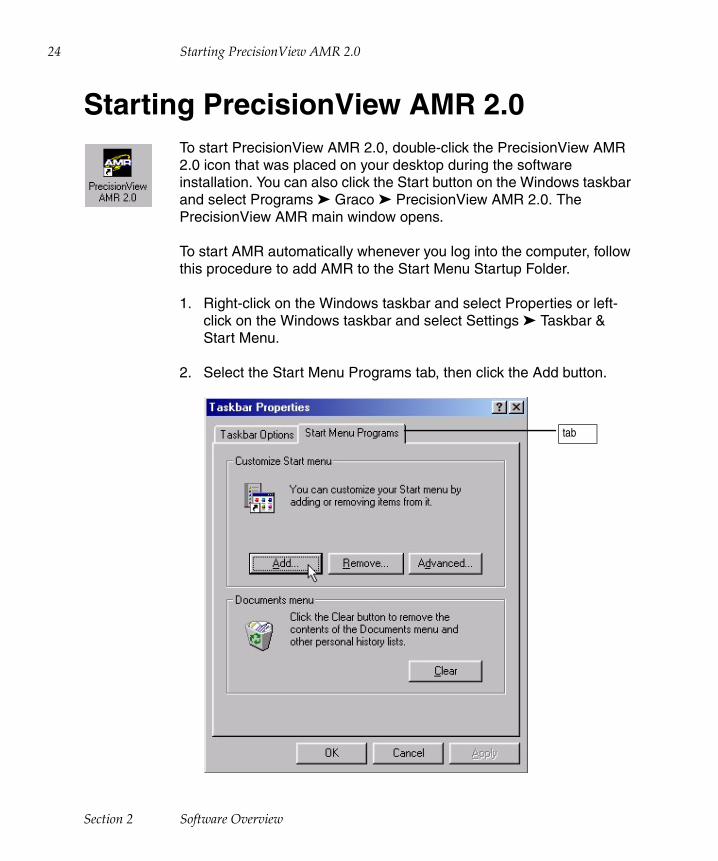
Starting PrecisionView AMR 2.0To start PrecisionView AMR 2.0, double-click the PrecisionView AMR 2.0 icon that was placed on your desktop during the software installation. You can also click the Start button on the Windows taskbar and select Programs ➤ Graco ➤ PrecisionView AMR 2.0. The PrecisionView AMR main window opens.
To start AMR automatically whenever you log into the computer, follow this procedure to add AMR to the Start Menu Startup Folder.
1. Right-click on the Windows taskbar and select Properties or left-click on the Windows taskbar and select Settings ➤ Taskbar & Start Menu.
2. Select the Start Menu Programs tab, then click the Add button.
tab
Section 2 Software Overview

Starting PrecisionView AMR 2.0 25
3. The Create Shortcut dialog box appears. Press the Browse button and go to the location of the PrecisionView application. The default location is C:\Program Files\Graco\PrecisionView AMR 2.
4. Select AMR Client.exe and click Open.
5. In the Create Shortcut dialog box, click Next.
6. The Select Program Folder dialog box appears showing a list of the current program folders in the Start menu. Scroll to and select Start Menu ➤ Programs ➤ StartUp, then click the Next button.
7. Type a shortcut name, such as “PrecisionView AMR 2”, in the text box and click the Finish button.
8. Click OK in the Taskbar Properties dialog box.
9. Click OK in the Taskbar Properties dialog box.
Technical Support Information
When the application starts, it displays the Technical Support dialog box. Enter the Graco distributor contact information into the form for future reference, then click OK. Technical support personnel may ask for this information when providing technical assistance. The informa-tion can be retrieved by selecting Help ➤ About PrecisionView AMR and clicking the Technical Support button.
If you need help identifying the distributor closest to you, call: 1-800-367-4023 Toll Free.
The PrecisionView AMR 2.0 application will only collect production data while the application is running on the PC. Closing the application will stop communication between PC and the networked stations.
If no data is entered into the Technical Support information form, it will display each time the application is launched until at least one field of information is entered.
309218 PrecisionView AMR 2.0

26 Main Application Window
Main Application Window
The main PrecisionView application window consists of three main panes, Network Overview; Process Monitor; and Alarm and Event Log, which are explained in detail in other sections of this guide.
The menu bar, main toolbar, and station toolbar are explained in the following pages.
Menu Bar
Main Toolbar
Station Toolbar
Process Monitor
Alarm & Event Log
Network Overview
Section 2 Software Overview

Main Application Window 27
Menu Bar and Toolbars
The menus and toolbar buttons that are available depend on which object is selected in the Network Overview. Menus and buttons that appear dimmed are unavailable for use.
Menu Bar
The commands on the menu bar are explained in the procedures throughout this manual. The menu bar that appears if a PrecisionMix station is selected is shown above.
Main and Station Toolbars
The toolbar buttons can be used to quickly access configuration screens, graphs, or to carry out commands.
Menu Bar
Menu Bar
Main Toolbar
Station Toolbar
Whenever you pause the mouse pointer over a button, a description of the button appears.
Button Action
Enter a message into the Alarm and Entry Log.
Configure the Master Fluid List.
Configure the PrecisionMix recipes
Configure the Hazardous Air Pollutants (HAP) table.
Configure the properties of the selected object.
309218 PrecisionView AMR 2.0

28 Main Application Window
Preview an existing report. The menu is context sensitive. The example below is the menu if a ProBatch station is selected in Network Overview.
Reset batch and/or maintenance totalizers for one or more online Informer stations.
Station Dependent Actions
PrecisionMix station — Show or hide A:B Ratio graph
PrecisionMix station — Show or hide C:B Ratio graph
PrecisionMix or Informer stations — Show or hide Flow graph.
All stations — Show or hide month-to-date VOC graph.
PrecisionMix station — Reset job.ProBatch station — Reset totals.
PrecisionMix station — Reset batch.
PrecisionMix station — Reset batch for all recipes.
Button Action
Section 2 Software Overview

Main Application Window 29
Informer station — Reset batch.
Informer station — Reset maintenance.
PrecisionMix and ProBatch stations —Synchronize clocks.
All stations — Totalizer snapshot, populates database with a snapshot of selected station.
Button Action
309218 PrecisionView AMR 2.0

30 Main Application Window
Status Bar
The status bar is at the bottom of the Process Monitor. The appear-ance of the status bar varies, depending on which type of station is selected.
When a station is selected in the Network Overview, the PrecisionView application displays:
• Firmware revision number
• ALARM if there is an active alarm
• Communication status or Time-Date Stamp
Communication StatusDisabled — Communication has been disabled for this station.Offline — Communications is enabled but PrecisionView applica-tion is not connected to the station yet.Online — PrecisionView application is connected to the station.Unlicensed — Current hardware key does not permit communica-tions to this station.Wrong Type — Physical device with the same station number as this station is the wrong type of device. For example, device num-ber 5 is a ProBatch station but an Informer station with station num-ber 5 is being added to the Network Overview.
• Station Status — PrecisionMix station onlyAlarm — The station has an active alarm.Purge — The station is purging.Idle — The station is in idle mode.Change — A color change is in process.Dump — Auto-dump is on.
Active Alarm Firmware Revision Time-Date Stamp or Communication Status
Section 2 Software Overview

Main Application Window 31
General Application Features
• Right clicking in any of the main screen areas and in the process graphs will bring up Context Sensitive Submenus.
• The main application window panes and some of the application dialog box areas can be resized vertically and horizontally.
• Inactive buttons and menu commands are dimmed.
• PrecisionMix stations only — Enter Password dialog box appears when an activity changes or impacts a secure station function. Each station may have a unique password, which cannot be changed with the PrecisionView application.
309218 PrecisionView AMR 2.0

32 Main Application Window
Section 2 Software Overview

33
SECTION
3Configuring Fluids
309218 PrecisionView AMR 2.0

34 Units of Measure
Units of MeasureBefore creating the Master Fluid List, select the units of measure.
Volumetric units, both for display and reporting, can be set for Metric (cc and L), United States (oz. and gal.) or Hybrid Units (cc and gal.). You can change the units at any time and both the displays and the reports will automatically change accordingly.
To change the units of measure:
1. Click View ➤ Units of Measure.
2. Click the desired unit of measurement.
Changing volumetric units will cause VOC conversion factors to recal-culate for the new units. For example: if the VOC conversion factor is 0.2 lbs/gal, and units of measure are changed to liters, the VOC con-version factor will read 0.76 lbs/liter.
Section 3 Configuring Fluids

Hazardous Air Pollutants (HAP) Table 35
Hazardous Air Pollutants (HAP) TableThe PrecisionView application can track HAP usage and report the information. First, you need to create a list of hazardous air pollutants that are present in your coatings. This information is usually on the fluid’s MSDS. This information is used later to configure HAP Constitu-ents (Configuring HAP Constituents, page 40).
To configure the HAP Table:
1. Click Edit ➤ Hazardous Air Pollutants from the menu bar or click the HAP Table button.
2. Enter HAP information in the table. Use navigation and editing but-tons in the table to enter or modify data.
HAP button
Navigation and Editing buttons
309218 PrecisionView AMR 2.0
36 Master Fluid List
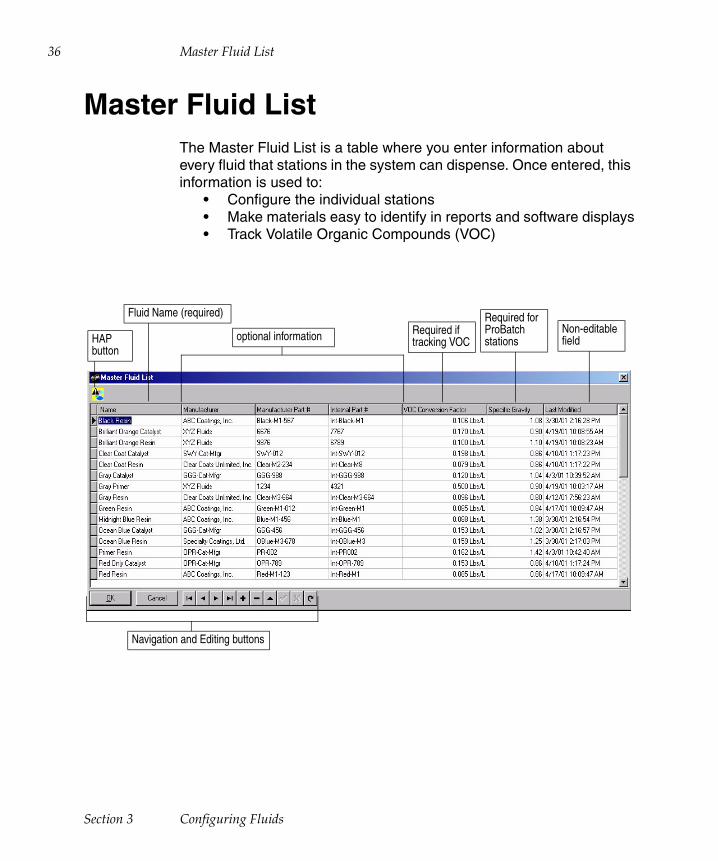
Master Fluid ListThe Master Fluid List is a table where you enter information about every fluid that stations in the system can dispense. Once entered, this information is used to:
• Configure the individual stations• Make materials easy to identify in reports and software displays• Track Volatile Organic Compounds (VOC)
Navigation and Editing buttons
optional information Required if tracking VOC
Required for ProBatch stations
Non-editable field
Fluid Name (required)
HAP button
Section 3 Configuring Fluids

Master Fluid List 37
Editing Master Fluid List
1. Click Configure ➤ Master Fluid List or click on the Master Fluid List button.
2. Enter fluid information in the table. Use the navigation and editing buttons in the table to enter or modify data.
Name: unique fluid name, required for all stations
Manufacturer: fluid manufacturer name
Manufacturer Part #: manufacturer’s fluid part number
Internal Part #: internal fluid part number
VOC Conversion Factor: factor used by PrecisionView application to calculate how much volatile organic compound is contained in a volume of fluid, see VOC Calculation, page 38, for more informa-tion
Specific Gravity: required for ProBatch stations, factor from 0.1-9.98 used to convert volume to mass
Last Modified: PrecisionView application records last time fluid was modified, this field cannot be modified by the user
Navigation and Editing Buttons
Master Fluid List button
Button Action Button Action
Go to first entry Edit an entry
Go to previous entry Apply the edit
Go to next entry Cancel the edit
Go to last entry Refresh the data
Add an entry Save changes and close the dialog box
Delete an entry Cancel changes and close the dialog box
309218 PrecisionView AMR 2.0

38 Master Fluid List
VOC Calculation
Environmental Regulatory Agencies often require plants to report total annual VOC emissions, resulting from the application of materials. Annual VOC emissions are usually reported in tons or kilograms.
Volumetric VOC conversion factors are usually specified on either the Material Safety Data Sheet or the Mixed Material Specification Data Sheet. When entering VOC conversion factors for fluids in the Master Fluid List, it is critical to know which volumetric units of measure have been selected. If you switch between liters and gallons, the conversion factors will also recalculate. Therefore, if you select Metric Display Units, you must enter in a VOC conversion factor in VOC units per liter. If you select English or Hybrid Units, you must enter in a VOC Conver-sion Factor in VOC units per gallon.
VOC emissions are usually monitored on a monthly basis. A Monthly Target Maximum VOC value can be set for each station in the Station Properties dialog box. A log message will appear when the monthly target value is exceeded.
The Actual VOC value for each station, which appears in a VOC graph, is updated any time a job or recipe is completed. The calculated value is based on completed jobs or batches logged in the database, plus the current job fluid usage.
Volumetric units of measure are selected from the View menu. See Units of Measure, page 34. The units of measure for the VOC conver-sion factor are selected in the System Properties dialog box. See Con-figuring System Properties, page 48.
The Actual VOC value cannot be manually reset. The PrecisionView application automatically resets the value to zero on the last day of the month, at the end of the day.
Section 3 Configuring Fluids
Master Fluid List 39
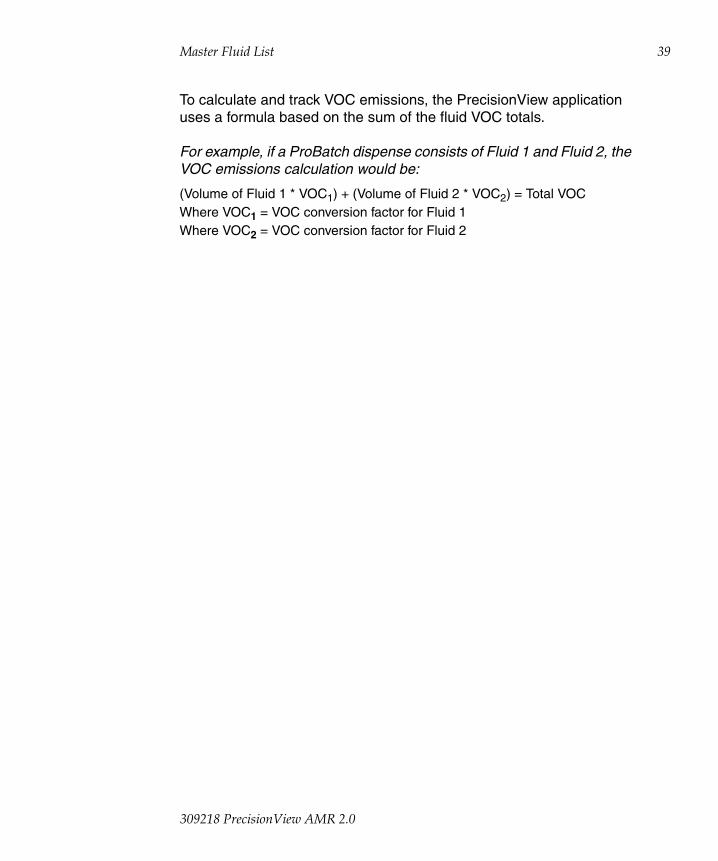
To calculate and track VOC emissions, the PrecisionView application uses a formula based on the sum of the fluid VOC totals.
For example, if a ProBatch dispense consists of Fluid 1 and Fluid 2, the VOC emissions calculation would be:
(Volume of Fluid 1 * VOC1) + (Volume of Fluid 2 * VOC2) = Total VOCWhere VOC1 = VOC conversion factor for Fluid 1Where VOC2 = VOC conversion factor for Fluid 2
309218 PrecisionView AMR 2.0

40 Master Fluid List
Configuring HAP Constituents
1. To open a table of HAP constituents and a pie chart of the compo-sition of the fluid selected in the Master Fluid List, click the HAP button in the upper left corner of the Master Fluid List.
2. Click the HAP list arrow and select a fluid from the list.
3. Click inside the % Composition box and type the HAP percent com-position number, taken from the fluid’s MSDS.
4. Click OK to save changes and close the dialog box.
Only HAPs already configured in the Hazardous Air Pollutants (HAP) Table, page 35, appear in the HAP constituent list.
HAP Constituents button
HAP list button
Navigation and Editing buttons
HAP Table button
Section 3 Configuring Fluids

PrecisionMix Recipes Table 41
PrecisionMix Recipes TableOnce all the necessary information is entered in the Master Fluid List table, you configure a PrecisionMix recipe by selecting the compo-nents, flushing agent, and dump type from lists derived from that table. Each recipe is given a unique name and kept in a global PrecisionMix Recipe table.
Viewing or Editing Recipes
1. Click Configure ➤ PrecisionMix Recipes or click the Recipes but-ton in the toolbar.
2. The PrecisionMix Recipes table appears.
Recipes button
Master Fluid List button
Navigation and Editing buttons
309218 PrecisionView AMR 2.0

42 PrecisionMix Recipes Table
3. Click the Name of the recipe you want to configure and type a name. The name appears on reports and can be used in the Custom Material Report to filter data by recipe name.
.
4. Press the Tab key to go to the next column.
5. Click in the Component box to make the list arrow appear. Click the arrow and select a fluid from the list.
6. Tab to the next column and repeat the process until all the recipe components are defined.
7. Click OK to save your changes and close the Recipes table.
If you have both PrecisionMix and ProBatch stations: If a PrecisionMix station has a “red” recipe and a ProBatch station has a matching “red” recipe, the two recipes should be named exactly the same if you want to filter data by one “red” recipe name.
Recipe NamesComponent box
Fluids list
list arrow
Master Fluid List button
A Recipe designated for a PrecisionMix II 3-K station must have all three component fields (A, B, C) completed. This recipe could also be assigned to a PrecisionMix II 2-K station, which would ignore the entry in the component C field. You cannot clear a fluid designation in a field once a fluid has been selected.
If the fluid you need does not appear in the fluid list or you need to look at the characteristics of the fluid, click on the Master Fluid List button to open the Master Fluid List table.
Section 3 Configuring Fluids

PrecisionMix Recipes Table 43
Deleting a Recipe
1. Click the Name of the recipe you want to delete.
2. Click the delete button.
3. A dialog box appears asking you to confirm the deletion. Press the OK button. If a PrecisionMix station is using the recipe, the record cannot be deleted. Press OK to close the dialog box. Delete the station recipe link as instructed in Deleting a Recipe link, page 67.
Delete button
309218 PrecisionView AMR 2.0
44 Locking Material and Recipe Configuration
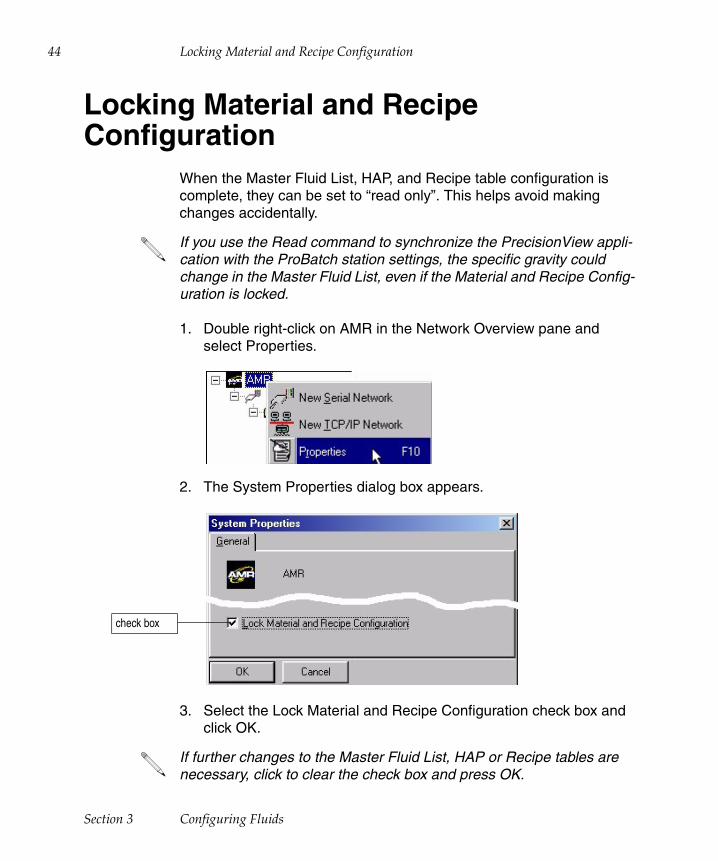
Locking Material and Recipe Configuration
When the Master Fluid List, HAP, and Recipe table configuration is complete, they can be set to “read only”. This helps avoid making changes accidentally.
1. Double right-click on AMR in the Network Overview pane and select Properties.
2. The System Properties dialog box appears.
3. Select the Lock Material and Recipe Configuration check box and click OK.
If you use the Read command to synchronize the PrecisionView appli-cation with the ProBatch station settings, the specific gravity could change in the Master Fluid List, even if the Material and Recipe Config-uration is locked.
check box
If further changes to the Master Fluid List, HAP or Recipe tables are necessary, click to clear the check box and press OK.
Section 3 Configuring Fluids

45
SECTION
4Configuring the Network Overview
309218 PrecisionView AMR 2.0

46 Network Overview
Network OverviewThe Network Overview pane appears on the left side of the Main Appli-cation Window. The networks, folders, and stations you configure appear in a Windows Explorer style directory.
The directories can be expanded or contracted by selecting the + or -. Expanding a network directory shows you the stations that have been setup in that network. Expanding the PrecisionMix station entry will show you the recipes configured for that station.
Many of the application functions are sensitive to which object is selected in the Network Overview. For example, if you are generating the Hazardous Air Pollutant Detail report, only the station(s) contained on or below the object selected in the Network Overview will be included in the report. Clicking the Properties command on the menu or toolbar will display the properties dialog box specifically for the object selected.
In the same way, what appears in the main application window will change according to what is selected in the Network Overview. If a Station is selected, only the alarms and events associated with that station will appear in the Alarms and Events Log. If a Recipe is selected, only the alarms and events associated with that recipe will appear.
The Network name can be customized. Select the Network text and type in the desired name. Station names are changed in their proper-ties dialog box.
Section 4 Configuring the Network Overview

Network Overview 47
The following objects can appear in the Network Overview.
Application: This object always appears in the Network Overview and cannot be deleted. It contains all the Networks, Folders, and Stations setup in the application.
Serial Network: This object represents one serial connection to the PC. Multiple Serial Networks can be added under the Application. A Serial Network can contain Folders and Stations.
TCP/IP Network: This object represents one TCP/IP (ethernet) connec-tion to the computer. Multiple TCP/IP Networks can be added under the Application. A TCP/IP Network can contain Folders and Stations.
Folder: This object represents a logical grouping of Stations, such as stations located in a paint booth or an area of a plant. You can only add a Folder under a Network and it can only contain Stations, not other Folders or Networks. You can drag a Folder from one Network to another Network. However, this is not recommended as doing this causes all Stations contained in the Folder to be moved to the other Network and they will no longer communicate over the original Net-work.
Station: This object represents one of the devices supported by the PrecisionView application. You can only add a Station under a Network or a Folder. You can drag a Station from one Folder or Network to another Folder or Network. However, if doing so causes the Station to change Networks, it will no longer communicate over the original Net-work.
InformerStation
PrecisionMixStation
ProBatchStation
309218 PrecisionView AMR 2.0
48 AMR
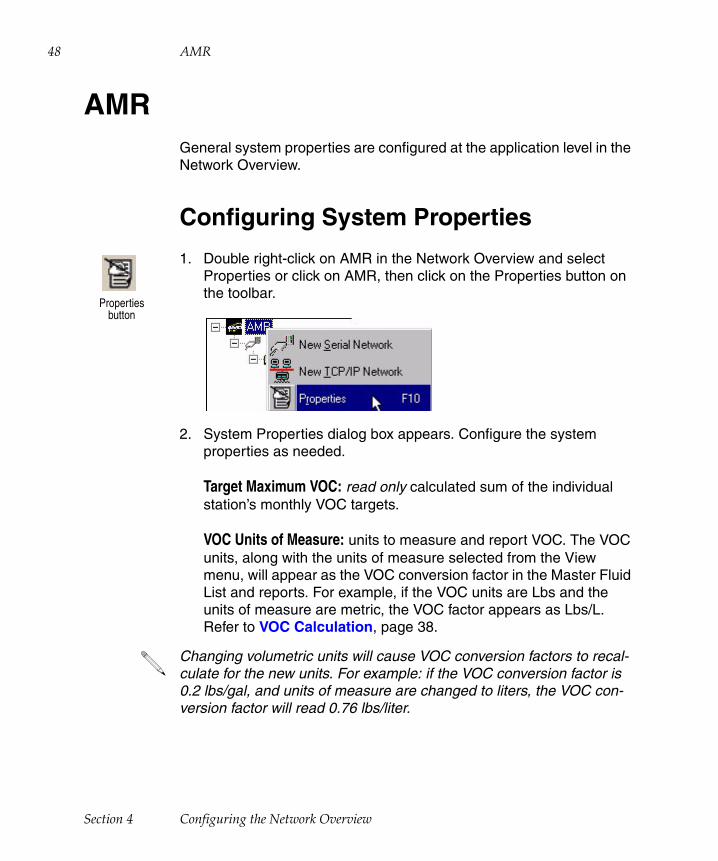
AMRGeneral system properties are configured at the application level in the Network Overview.
Configuring System Properties
1. Double right-click on AMR in the Network Overview and select Properties or click on AMR, then click on the Properties button on the toolbar.
2. System Properties dialog box appears. Configure the system properties as needed.
Target Maximum VOC: read only calculated sum of the individual station’s monthly VOC targets.
VOC Units of Measure: units to measure and report VOC. The VOC units, along with the units of measure selected from the View menu, will appear as the VOC conversion factor in the Master Fluid List and reports. For example, if the VOC units are Lbs and the units of measure are metric, the VOC factor appears as Lbs/L. Refer to VOC Calculation, page 38.
Properties button
Changing volumetric units will cause VOC conversion factors to recal-culate for the new units. For example: if the VOC conversion factor is 0.2 lbs/gal, and units of measure are changed to liters, the VOC con-version factor will read 0.76 lbs/liter.
Section 4 Configuring the Network Overview

AMR 49
Population Interval: how often to take a “snapshot” of production data for each connected station. This setting is relevant only if the AMR database is accessed directly to do custom reporting. Click the Population Interval arrow and select a time interval from the list. Range is from every day at midnight to every ten minutes.
Lock Material and Recipe Configuration: sets the Master Fluid List, HAP, and Recipe tables to “read only” if box is checked. This helps avoid making changes accidentally. Deselect the check box when changes are necessary.
3. Click OK to apply the changes.
309218 PrecisionView AMR 2.0

50 Networks
NetworksA Serial or TCP/IP Network can only be added under the AMR applica-tion. A Network can contain Folders and Stations.
Adding New Network
1. Right-click on the AMR icon in Network Overview.
2. Select either New Serial Network or New TCP/IP Network, depending on which type of network you are configuring.
3. Type a name for the Network and click OK.
AMR icon
Section 4 Configuring the Network Overview

Networks 51
Configuring Network Communication Properties
Serial or TCP/IP network communication is configured in the Commu-nication Properties dialog box for the network selected. You should only need to change the communication settings if there are communi-cation problems. If problems occur, a full hardware diagnostic of the network is recommended.
To configure the Network Communication Properties:
1. Right-click on the Network and select Properties or click on the Properties button on the toolbar.
2. Communication Properties dialog box appears. Change the properties as needed. Refer to the descriptions of the settings under Serial Network Properties (page 52), Serial and TCP/IP Network Response Settings (page 53), and TCP/IP Communications Properties (page 54).
3. If desired, click the Enable check box to enable network communications for all stations on this network, or click the Disable check box to disable network communications for all stations on this network.
4. Click OK to apply the changes.
Properties button
To enable or disable communications for an individual station, you must open the Station properties dialog box for that station.
309218 PrecisionView AMR 2.0
52 Networks
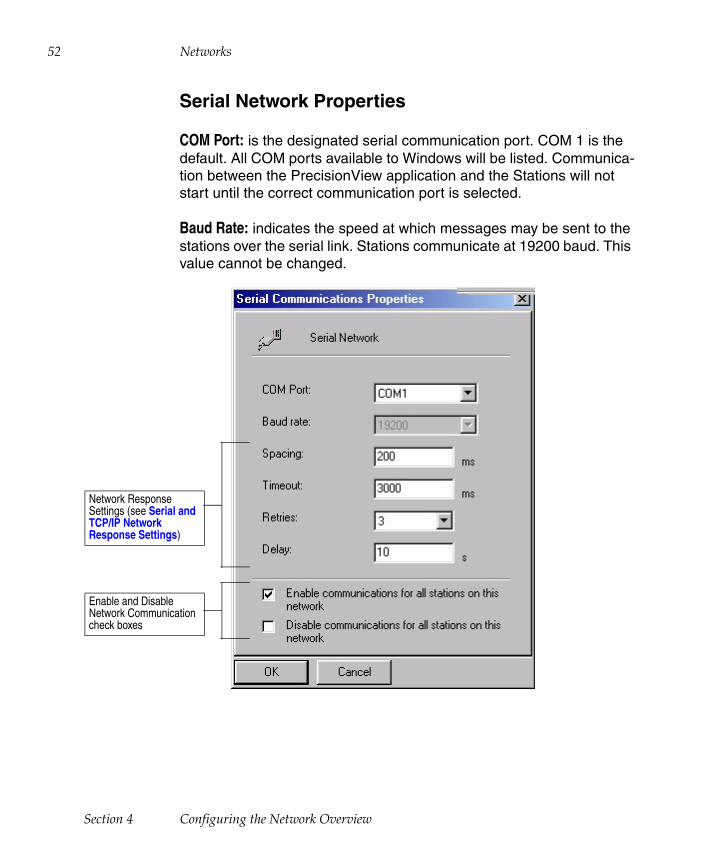
Serial Network Properties
COM Port: is the designated serial communication port. COM 1 is the default. All COM ports available to Windows will be listed. Communica-tion between the PrecisionView application and the Stations will not start until the correct communication port is selected.
Baud Rate: indicates the speed at which messages may be sent to the stations over the serial link. Stations communicate at 19200 baud. This value cannot be changed.
Enable and Disable Network Communication check boxes
Network Response Settings (see Serial and TCP/IP Network Response Settings)
Section 4 Configuring the Network Overview
Networks 53
Serial and TCP/IP Network Response Settings
Spacing: causes the application to delay for the specified number of milliseconds before sending a communication request to a station. The default is 200. Longer cables may require greater spacing times. The lower the spacing value, the faster communication will be. Only increase this setting if the application continuously establishes and then loses communication with stations.
Timeout: indicates how long the application will wait for a response from a station after sending a request. A normal value is 1000-3000 milliseconds (1-3 seconds). Longer timeouts may allow more time for stations to send their replies, but this may also slow down communica-tion with the other devices.
Retries: indicates the number of additional communication attempts that the application will make to get a response from a station. The default is 3.
Delay: indicates the length of time that the application will wait between retries to allow the station time to correct any internal problems. When all the retries have been made the application resets the connection to the station. By default, the application is set for three retries, with delays of five seconds between each retry.
309218 PrecisionView AMR 2.0

54 Networks
TCP/IP Communications Properties
PrecisionView AMR will route messages across a TCP/IP network using either the IP address or host name of the destination (you cannot specify both in the dialog box).
IP Address: A 32-bit numeric address, written as four numbers sepa-rated by periods, that identifies the device on the TCP/IP network.
Host Name: A name identifier of the device on the TCP/IP network. This name is mapped to the device’s IP address.
Port Number: Identifies which port is the endpoint of the TCP/IP con-nection on the device. The default port number is 502.
Enable and Disable Network Communication check boxes
Network Response Settings (see Serial and TCP/IP Network Response Settings)
Section 4 Configuring the Network Overview

Folders 55
FoldersThe purpose of the Folder is to enable you to create logical groups of stations, such as stations located in a certain area of a plant. The fol-lowing are basic rules for creating and locating Folders:
• You can only add a Folder under a Network and it can only contain Stations, not other Folders.
• You can drag a Folder from one Network to another Network. How-ever, doing so causes all Stations contained in the Folder to be moved to the other Network and they will no longer communicate over the original Network.
Adding New Folder
1. Right-click on the Network and select New Folder.
2. Type the new Folder name and click OK.
3. Right-click on the Folder and create the Stations that are part of the grouping. If the Stations are already created, you can drag the Stations to the folder.
309218 PrecisionView AMR 2.0

56 Stations
StationsTo network your equipment and connect it to the PrecisionView AMR application, you need to add Stations and configure their properties. The following are basic rules for adding and locating Stations:
• You can only add a Station under a Network or a Folder.
• You can drag a Station from one Folder or Network to another Folder or Network. However, if doing so causes the Station to change Networks, the Station will no longer communicate over the original Network.
• The Station Name you enter will appear on the Network Overview and on all reports that include the station. Use a short, meaningful name.
Adding New Station
1. Right-click on the Network or Folder where you want to add the Station and select New Station.
Section 4 Configuring the Network Overview

Stations 57
2. Click the arrow and select the Station Type from the list.
3. Type a number in the Station Number text box or use the arrows to increase or decrease the number. The number must match the station number set at the physical station.
4. Click OK to apply the changes.
5. The Station Properties dialog box appears. Follow the procedure Configuring General Station Properties, page 58.
Station Type list
arrow
arrows
A message appears if a Station is already using the Station Number. Click OK and enter the correct station number.
309218 PrecisionView AMR 2.0

58 Stations
Configuring General Station Properties
1. If the Station Properties dialog box is not open, right-click on the station you want to configure and select Properties or click on the station, then click on the Properties button on the toolbar.
2. Click the General tab (PrecisionMix and ProBatch stations only).
Properties button
The dialog box for the Informer Station Properties has a General tab only.
Informer Station Properties dialog box
Informer Station only
General tab
Section 4 Configuring the Network Overview

Stations 59
3. Type a name in the Station Name box. This name displays in the Network Overview and on reports.
4. Select the Enable Station Communication check box to communicate with the device with the same station number. Communication must be enabled to collect data for the station.
5. If desired, type a volume in the Target Maximum VOC box in the Informer Station Properties dialog box. If the actual Volatile Organic Compounds for the station exceed this value within a month, a message will appear in the Alarm and Event Log.
6. If you are configuring an Informer station, continue as instructed in Informer Station - Additional General Properties, page 60. For all other types of stations, click OK to apply the changes and close the dialog box.
The proper hardware and cables must be installed and the physical station must be configured to communicate with the PrecisionView application.
Further instructions on configuring PrecisionMix and ProBatch stations are in Section 5, Configuring PrecisionMix and ProBatch Station Properties.
309218 PrecisionView AMR 2.0

60 Stations
Informer Station - Additional General Properties
1. If desired, select the Enable Remote Totalizer Reset check box to allow execution of Reset Batch and Reset Maintenance commands from the PrecisionView application. If left unchecked, resets can only be made at the physical Informer station.
2. Click the Informer Active Fluid arrow and select a fluid from the list.
3. Click OK to apply the changes and close the dialog box.
arrow
The correct fluid designation is very important. The PrecisionView application uses this information to track the batch history and totalizer snapshot data. If a fluid change is made at the physical Informer station, make sure it is changed in the Informer Station Properties also.
Section 4 Configuring the Network Overview

Stations 61
Removing a Station
1. Backup the station configuration.
2. Select the station in the Network Overview.
3. Click Edit ➤ Delete from the menu bar or right-click on the station and select the Delete command.
Backup the configuration data before deleting a station. When a station is removed, all configuration information (fluid assignments, recipes, etc.) and production history for that station are removed also. Follow the procedure Backup PrecisionView Configuration, page 21.
309218 PrecisionView AMR 2.0

62 Communication Problems
Communication ProblemsWhen communication is enabled between the PrecisionView applica-tion and a station, the application reads the station setup and you should see the following things happen in the main application window:
• “Station connection made” appears in Alarm and Event Log.
• Station information appears in the Process Monitor
• “Offline” changes to “Online” or the time-stamp appears in the status bar.
• Station in the Network Overview goes from dimmed to fully vis-ible.
If communication fails:
• Check that cables are connected properly.
• Make sure the physical station is turned on snf configured prop-erly.
• Check communication settings.
• View Communication Statistics (refer to page 63).
Section 4 Configuring the Network Overview

Communication Problems 63
Communication Statistics
To look at communication statistics, click View ➤ Communication Sta-tistics from the menu bar. The following information displays at the bot-tom of the Network Overview. The data will be for the selected station or for the network if a network is selected.
Sent: requests sent to the stations.
Received: responses received from the stations
Retried: times a request was resent to the stations.
Failed: invalid or incomplete responses received from the stations; may also indicate a COM port failure
Timed Out: times the application times out waiting for a response from the stations.
Click Reset Statistics button to clear the values for the selected station to zero. If a network is selected, all values reset to zero.
309218 PrecisionView AMR 2.0

64 Communication Problems
Section 4 Configuring the Network Overview

SECTION
5Configuring PrecisionMix and ProBatch Station Properties

66 PrecisionMix Station Properties
PrecisionMix Station Properties
Recipes Tab
Follow this procedure to create a link between the recipe numbers assigned at the physical PrecisionMix station and recipes configured with the PrecisionView application.
1. If the PrecisionMix Station Properties dialog box is not open, click on the station, then click on the Properties button on the toolbar.
2. Click the Recipe tab in the PrecisionMix Station Properties dialog box.
3. Select a PrecisionMix station recipe number (1-63).
4. Click the Recipe arrow and select the corresponding PrecisionView Recipe from the list.
5. Click OK to save the changes and close the dialog box.
Properties button
PrecisionMix recipe number (1-63)
Recipe arrow
PrecisionView Recipe list
Click to edit PrecisionMix Recipes
tabs
To edit or view the PrecisionMix Recipes Table, click the Recipe List button.
Section 5 Configuring PrecisionMix and ProBatch Station Properties

PrecisionMix Station Properties 67
Deleting a Recipe link
1. Select in the Recipes tab the recipe link that you want to delete.
2. Select the empty space at the top of the Recipe list.
The recipe number remains in the # column. The recipe link is deleted without affecting the recipes setup in the PrecisionMix Rec-ipes Table.
3. Click OK to confirm the deletion and close the dialog box.
309218 PrecisionView AMR 2.0

68 ProBatch Synchronization
ProBatch SynchronizationSettings entered in the ProBatch Station Properties dialog box have counterparts on the physical ProBatch station and can be read from or written to the station. The settings affect the physical device, the sta-tion created with the PrecisionView application, and the accuracy of reports generated.
Before you begin to configure a ProBatch station, it is important that:
• You understand the Read and Write commands.
• You recognize and know how to correct an out-of-sync condition.
You will most likely use the Synchronization button in the ProBatch Sta-tion Properties dialog box if one of the following conditions exist:
• You have the physical ProBatch station configured and you want to upload (Read) those settings to the PrecisionView application.
• You have the Station properties configured with the PrecisionView application and you want to download (Write) those settings to the physical ProBatch station.
• You changed the ProBatch station settings on either the physical station or in the PrecisionView application and you received an out-of-sync notification.
Section 5 Configuring PrecisionMix and ProBatch Station Properties
ProBatch Synchronization 69
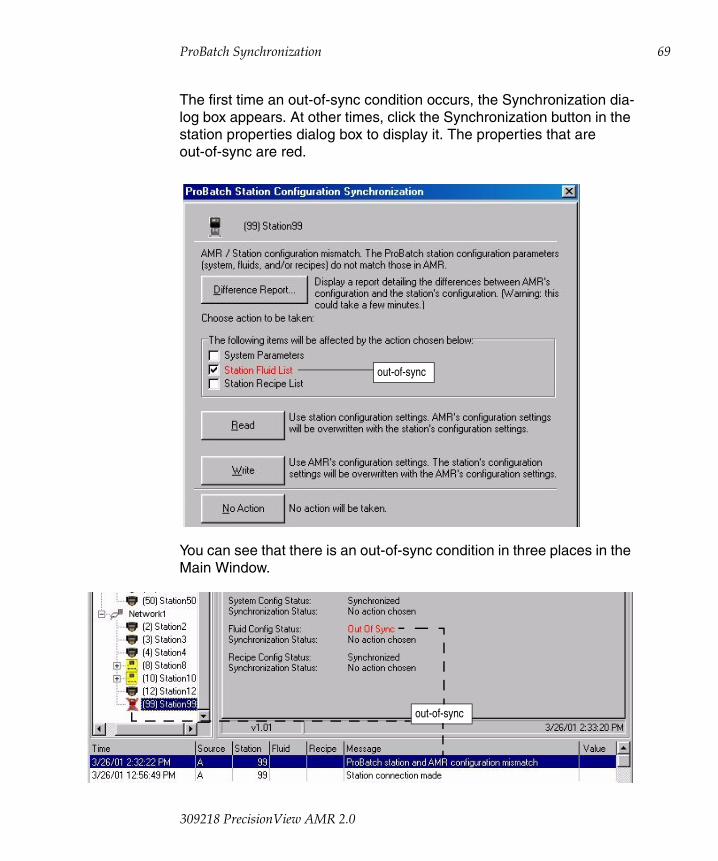
The first time an out-of-sync condition occurs, the Synchronization dia-log box appears. At other times, click the Synchronization button in the station properties dialog box to display it. The properties that are out-of-sync are red.
You can see that there is an out-of-sync condition in three places in the Main Window.
out-of-sync
out-of-sync
309218 PrecisionView AMR 2.0

70 ProBatch Synchronization
The ProBatch out-of-sync icon also appears in the ProBatch Station Properties dialog box.
Synchronizing ProBatch Station and PrecisionView Application
1. If the Synchronization dialog box is not already open, click the Syn-chronization button in the ProBatch Station Properties dialog box.
out-of-sync
The ProBatch out-of-sync icon is dimmed if the station is offline.
Synchronization button
Section 5 Configuring PrecisionMix and ProBatch Station Properties

ProBatch Synchronization 71
2. To view a report of the differences between the PrecisionView application settings and the physical station settings, click on the Difference Report button. A dialog box appears with the approximate time it will take to create the report. Click Yes to run the report.
3. Select the check boxes of the station properties you want synchronized. Only the checked properties will synchronize when you click the Read or Write button.
Check boxes
out-of-sync Station Name
If more than one ProBatch station is on-line and out-of-sync, a check box appears under the No Action button. Selecting the box and clicking the No Action button will close the dialog box without synchronizing and will prevent the Synchronization dialog boxes for the other out-of-sync stations from appearing. If you click the Read or Write but-ton, the check box has no effect.
309218 PrecisionView AMR 2.0

72 ProBatch Synchronization
4. Click on the Read button to overwrite the PrecisionView application settings with the physical station settings and close the dialog box.
Click on the Write button to overwrite the physical station settings with the PrecisionView application settings and close the dialog box.
Click on the No Action button to close the dialog box without syn-chronizing.
If the ProBatch station is dispensing when the Read or Write button is clicked, an error message appears. Wait for the dispense to complete before Reading or Writing settings. Do not start another dispense until the Read or Write command is done executing.
Section 5 Configuring PrecisionMix and ProBatch Station Properties

ProBatch Synchronization 73
Synchronization Troubleshooting
The synchronization status appears in the Process Monitor pane in the Main Window.
Synchronization can fail under the following conditions:
Synchronization status
Status bar
Problem Solution
Communication between the station and the application is interrupted.
Correct the communication problem and retry synchronizing.
Station is dispensing when synchronization is started.
Wait until the dispense is done before syn-chronizing.
A fluid was given a different specific gravity than what is entered on the Master Fluid List when the station’s fluids were configured.
Generate a Difference Report to see which fluid specific gravities are out-of-sync. Manu-ally match the specific gravities by doing one of the following: 1.) Choose a different fluid in the Master Fluid List. 2.) Change the specific gravity at the physical ProBatch station to match the Master Fluid List value. 3.) Change the fluid’s specific gravity in the Master Fluid List.
Use caution when changing the specific gravity of a fluid in the Master Fluid List as this will affect all ProBatch stations using that fluid selec-tion. If a fluid formula changes but the old formula is still being used, it is best to configure a new fluid on the Master Fluid List for the new for-mula.
309218 PrecisionView AMR 2.0

74 ProBatch Station Properties
ProBatch Station PropertiesThe following pages describe how to configure the ProBatch Station Properties with the PrecisionView application. Changes made to the settings may cause an out-of-sync condition that can be corrected by synchronizing the physical station with the application. See ProBatch Synchronization, page 68, for more information.
System Tab
Follow this procedure to configure the ProBatch System.
1. If the ProBatch Station Properties dialog box is not open, click on the station, then click on the Properties button on the toolbar.
2. Click the System tab in the ProBatch Station Properties dialog box.
3. Click the Units arrow and select the units for the ProBatch recipes and dispenses.
Properties button
System tab
Units arrow
Language arrow
Recipe Method arrowStability text box
Section 5 Configuring PrecisionMix and ProBatch Station Properties

ProBatch Station Properties 75
4. Click the Language arrow and select the language to display at the physical ProBatch station.
5. Click in the Stability text box and type a number for stability.
6. Click the Recipe Method arrow and select either “by weight” or “by volume”.
7. Click OK to save the changes and close the dialog box.
If language is changed, the station’s power must be turned off, then on, for the change to take effect.
Stability is the number of grams the ProBatch scale is allowed to fluctu-ate in 1 second and still be considered stable. The default is 5 grams. The smaller the number, the longer it will take the scale to stabilize.
309218 PrecisionView AMR 2.0

76 ProBatch Station Properties
Fluids Tab
Follow this procedure to configure the parameters for each fluid you will use in a recipe. Fluid parameters must be set before the fluid can be used in a recipe.
1. If the ProBatch Station Properties dialog box is not open, click on the station, then click on the Properties button on the toolbar.
2. Click the Fluids tab in the ProBatch Station Properties dialog box.
3. Click the Fluid arrow. Select a fluid from the list to assign to the number (#). The list consists of all fluids in the Master Fluid List except those with a zero value for the specific gravity. When you select a fluid, the following things happen:
• The fluid is associated with the number in the # column and this information is used by the ProBatch station.
Properties button
Fluid numbers 1-6 (in the # column) correspond to the ProBatch fluid valves and are used for automatically dispensed fluids. Fluid numbers 7-99 correspond to manually added fluids.
Fluids tab
Fluids arrow
Section 5 Configuring PrecisionMix and ProBatch Station Properties

ProBatch Station Properties 77
• The specific gravity entered in the Master Fluid List is automati-cally entered in the Specific Gravity column.
• Choosing the empty space at the top of the Fluid list makes the specific gravity 0 and indicates the fluid is not used. You cannot make this selection if the fluid is used in a ProBatch recipe.
4. Press the Tab key or click in the Dispense Tolerance column and type a dispense tolerance number between 1-99.
5. If the fluid number (#) is from 1 to 6, you need to set the minimum and maximum valve pressures. Enter a number between 1-4 in the Min Pres and Max Pres columns.
6. Repeat steps 3-5 for all the fluids you will use in the ProBatch station recipes.
7. Click OK to save the changes and close the dialog box.
Values in the Specific Gravity column can only be changed in the Mas-ter Fluid List dialog box. Both the PrecisionView application and the ProBatch station use this value to convert the fluid mass measurement to volume measurement. It is very important that the value is synchro-nized between the application and the station.
A maximum setting that is too high may cause fluid to splash and cause inconsistent scale readings with light viscosity fluids. Refer to the ProBatch System Manual 309300 for more information about this setting.
309218 PrecisionView AMR 2.0

78 ProBatch Station Properties
Recipes Tab
Follow this procedure to configure the parameters for each recipe you will dispense with the ProBatch station. You can have up to 250 reci-pes.
1. If the ProBatch Station Properties dialog box is not open, click on the station, then click on the Properties button on the toolbar.
2. Click the Recipes tab in the ProBatch Station Properties dialog box.
3. Click in the Recipe Name text box and enter a name to assign to the recipe number (#). The name appears on reports and can be used in the Custom Material Report to filter data by recipe name.
.
You also need to configure recipes for each of the ProBatch station dis-pense valves to load and purge the fluid lines. Follow the procedure Recipes to Load and Purge Fluid, page 80.
Properties button
Fluid arrow
If you have both PrecisionMix and ProBatch stations: If a PrecisionMix station has a “red” recipe and a ProBatch station has a matching “red” recipe, the two recipes should be named exactly the same if you want to filter data by one “red” recipe name.
Section 5 Configuring PrecisionMix and ProBatch Station Properties

ProBatch Station Properties 79
4. There are six possible steps for each recipe. Configure each step as follows:
a. Click the Fluid arrow and select the fluid number (0-99).0 = pause1-6 = automatic valves7-99 = manual fluid add
b. Type the parts (proportion) of the fluid required in relationship to the other fluids in the recipe. If the fluid number is 0 (pause) type the number of minutes (0-99) to pause.
5. Repeat steps 3-4 for all the recipes you will use with the ProBatch station.
6. Configure recipes to load and purge fluid as instructed below.
7. Click OK to save the changes and close the dialog box.
The controller will not accept an invalid fluid number. Make sure all of the fluid parameters were defined in Fluid Setup.
All ProBatch fluids are set to proportion by either weight or volume when configuring the System Tab (refer to page 74).
Both the PrecisionView application and the ProBatch station use the information entered in the Recipes tab. It is important that the values are synchronized between the application and the station.
309218 PrecisionView AMR 2.0

80 ProBatch Station Properties
Recipes to Load and Purge Fluid
Follow this procedure to configure a recipe for each of the ProBatch station dispense valves to use to load and purge the fluid line.
1. Select a group of recipe numbers that you are not planning to use. In this example, the load/purge recipes will start with #51.
2. Configure the load and purge recipe for the first valve to consist of fluid #1 and an amount of 1 part.
3. Configure the load and purge recipe for the second valve to consist of fluid #2 and an amount of 1 part.
4. Continue to configure a load and purge recipe for each of the fluid valves.
Section 5 Configuring PrecisionMix and ProBatch Station Properties

ProBatch Station Properties 81
Save ProBatch Station Configuration
After configuring the ProBatch station properties as desired, you can save the configuration to a file for backup or to load and use to config-ure other ProBatch stations.
1. Click the Save button in the ProBatch Station Properties dialog box.
2. The Save As screen appears.
3. Navigate to the directory where you want to save ProBatch configuration files.
4. Name the file and click the Save button.
Save button
Save button
309218 PrecisionView AMR 2.0

82 ProBatch Station Properties
Load ProBatch Station Configuration
You can load a previously saved ProBatch configuration file to recover settings or use to configure another ProBatch station.
1. Click the Load button in the ProBatch Station Properties dialog box.
2. The Open screen appears.
3. Navigate to the directory where the ProBatch configuration file is located.
4. Click on the desired file and click the Open button. The ProBatch configuration is loaded and the settings appear in the ProBatch Station Properties dialog box.
5. Click OK to save the changes and close the dialog box.
If the PrecisionView application is installed and configured on more than one computer, the configuration files are not interchangeable. You cannot load a configuration file saved on another computer.
Load button
Open button
Section 5 Configuring PrecisionMix and ProBatch Station Properties

83
SECTION
6Process Monitoring
309218 PrecisionView AMR 2.0

84 Introduction
Introduction
This section covers how to use the application to:
• Monitor network and station processes with the Process Monitor
• Monitor the network status with Performance Graphs
• Modify the station(s) or the PrecisionView application with the Reset Commands, Synchronize Clocks Command, and Totalizer Snapshot
• Modify the Alarm and Event Log
Menu bar
Main toolbar
Station tool bar
Process Monitor
Network Overview
Alarm and Event log
Section 6 Process Monitoring

Process Monitor 85
Process MonitorThe application graphically displays the current state of a selected object. This allows users to easily monitor each station on the network.
The content of the Process Monitor changes, depending on which object is selected in the Network Overview.
Total VOC Emissions Graph
When the Network, Folder or AMR object is selected in the Network Overview, the Process Monitor displays a VOC graph showing the total VOC emissions for each of the configured stations on the network. The graph has a green bar for Target VOC values and a red bar for Actual VOC values. The values for the VOC graph cover the past month, from the first day of the month to the present. The PrecisionView application resets the VOC graphs at the at the end of the last day of the month. You cannot manually reset the Actual VOC values.
Stations have to be on-line for their data to display.
309218 PrecisionView AMR 2.0

86 Process Monitor
Informer Station Process Monitor
When an Informer Station is selected in the Network Overview, the fol-lowing Process Monitoring screen appears.
The Informer Station Process Monitor provides information on batch and maintenance totals and flow rates, both numerically and as bar graphs. Data does not appear until the PrecisionView application con-nects to the Informer station.
Station Name
Totals
Flow Rate
Station Status bar
Section 6 Process Monitoring

Process Monitor 87
PrecisionMix Station Process Monitor
The PrecisionMix Station Process Monitor has a Production and Appli-cators monitor. Screens are accessed by selecting the corresponding tab at the top of the Process Monitor.
Production Monitor
The Production monitor displays information about the activity of the selected PrecisionMix Station.
• Operation Mode: An image on the right side of the screen indi-cates the current operation mode of the station.
Station Name
Production tabOperation Mode (Standby shown)
Ratio Information
Dose Volumes
Station Status bar
Job Totals
Spray Mode Purge Mode Standby Mode
309218 PrecisionView AMR 2.0

88 Process Monitor
• Ratio Information: While the system is in Standby or Mix mode, the Production Monitor displays desired and actual mix ratios, as well as ratio tolerance and time-to-system idle. When the station is in Purge mode, the Process Monitor displays purge cycles or purge time remaining.
• Dose volumes: Target and actual dose volumes for components are displayed, along with station integrator size.
• Job Totals: The currently active recipe job totals are displayed for each component, dump type, and flushing agent, as well as the job totals for the mixed material. The flushing agent total is not shown if there is no solvent meter.
Applicators Monitor
Station Name
Applicators tab
Flow rate information
Gun 1 and/or 2 information
Section 6 Process Monitoring

Process Monitor 89
The Applicators monitor displays information about the PrecisionMix station flow rates.
• Component Flow Rates: Flow rates are shown for the Precision-Mix components, both separately and combined.
• Gun Flow Rates: Flow rates are displayed for each gun configured in the station. If flow control is in use, the set point for each gun appears along with the flow rate. Potlife time (total and remaining) appear below the flow rates for each gun.
PrecisionMix Station Recipe Process Monitor
When a recipe is selected in the Network Overview, the Process Moni-tor displays the Batch and Grand Totals for each component in the rec-ipe, as well as the total for the combined components. The flushing agent totals are not shown if there is no solvent meter.
Only the active recipe will show real-time data. Inactive recipes will dis-play the most current totalizer information for Batch and Grand Totals.
Batch and Grand Totalizer information
Station and Recipe Name
309218 PrecisionView AMR 2.0

90 Process Monitor
ProBatch Process Monitor
The ProBatch station Process Monitor has a Status, Last Batch and Totalizers monitor. The screens are accessed by selecting the corre-sponding tab at the top of the Process Monitor.
Status Monitor
The Status monitor displays information about the activity and configu-ration of the selected ProBatch station.
• Station Status: Shows the current recipe selected, batch ID, target and actual dispense, system status (idle, dispensing, or setup mode), and if an alarm is active.
• System Configuration Status: Shows whether the ProBatch sta-tion configuration matches the PrecisionView configuration for that station and what action was taken if they are out-of-sync. If the sta-tion and application are out-of-sync, the ProBatch icon in the Net-work Overview has a red X through it
Station Name
Status tab
Station status
System Configuration status
Section 6 Process Monitoring

Process Monitor 91
Last Batch Monitor
The Last Batch monitor displays information about the last batch dis-pensed. The information in the table can be printed to the Windows default printer by clicking the Print button.
The PrecisionView AMR’s Last Batch and Totalizers screens closely match the Last Totals and All Totals screens on the ProBatch station’s User Interface.
Station Name
Last Batch tab
Last Batch information
Print button
309218 PrecisionView AMR 2.0

92 Process Monitor
Totalizers Monitor
The Totalizers monitor displays resettable totals and grand totals for all the fluids configured for the selected ProBatch station.
You cannot print the Totalizers table from this screen but it appears in the Totalizer Snapshot report, where it can be printed.
Station Name
Totalizers tab
Totals for all configured fluids
Units of Measure
Section 6 Process Monitoring

Performance Graphs 93
Performance GraphsThe performance graphs appear in windows, outside the main applica-tion window. A station must be selected in the Network Overview and the station must be online to view the performance graphs. Which graphs are available depend on the type of station selected.
Opening Performance Graph Window
Select the desired graph from the station (PrecisionMix, ProBatch, or Informer) menu or from the station’s toolbar.
Performance Graphs
Toolbar Button
Performance Graph Name
Available for:
2K 3K
Ratio A:B ✓ ✓
Ratio C:B ✓
Flow ✓ ✓ ✓
VOC ✓ ✓ ✓ ✓
Station Menu
309218 PrecisionView AMR 2.0

94 Performance Graphs
To print a graph:
Right-click on the graph and select the Print command from the menu to print to the default printer.
To change the x-axis time range:
Right click on the graph and choose the desired time range from the menu. Possible ranges are from 30 seconds up to 24 hours. The default setting is five minutes. The X-axis advances every 15 seconds so the current value is always visible.
Section 6 Process Monitoring

Performance Graphs 95
Ratio Performance Graph
PrecisionMix Station
The A:B and C:B (3K only) Ratio performance graphs indicate how well the PrecisionMix station selected in the Network Overview is maintain-ing the component mix ratio for the active recipe.
To read the graph:
• Solid yellow line = Target ratio
• White line = Actual ratio
• Dotted red lines with % = Tolerance range
Upper Tolerance
Actual Ratio
Target Ratio
Lower Tolerance
Actual ratios are only graphed while the PrecisionMix station is mixing. If the system is not mixing, “Not Mixing” will appear next to the Target Ratio.
309218 PrecisionView AMR 2.0

96 Performance Graphs
Flow Performance Graph
The Flow performance graph is available for both the PrecisionMix and Informer stations, however, the function of the graph is different.
PrecisionMix Station
The Flow performance graph indicates how well the PrecisionMix sta-tion is controlling the gun flow rates. Flow control must be active for the graph to have data.
To read the graph:
If flow control is active,
• Solid yellow line = Setpoint of one gun or combined setpoints of two guns
• White line = Total flow rate of two guns
If flow control is not active, the graph displays the stations combined flow output.
Setpoint
Total Flow Rate
Section 6 Process Monitoring

Performance Graphs 97
Informer Station
The Flow performance graph shows the flow rate of the Informer sta-tion.
To read the graph:
• Solid yellow line = Minimum flow rate
• Solid red line = Maximum flow rate
• Blue line = Actual flow rate
Min. Flow Rate
Actual Flow Rate
Max. Flow Rate
309218 PrecisionView AMR 2.0

98 Performance Graphs
VOC Performance Graph
The VOC performance graph provides a month-to-date graph of VOC actual versus target emissions. Actual VOC emissions are updated continuously. The VOC graph is available and performs the same way for all stations.
To read the graph:
• Top green bar = Maximum monthly target quantity of VOC for the station
• Bottom red bar = Actual VOC for jobs completed for the station
VOC conversion factors must be entered in the Master Fluid List to graph VOC performance.
Max. Target VOC
Actual VOC
VOC Units of Measure (set in System Properties)
Section 6 Process Monitoring

Reset Commands 99
Reset CommandsDepending on which station is selected in the Network Overview, sta-tion commands are available to reset certain station totals, synchronize clocks, and take a totalizer snapshot. Because these commands affect the physical station selected, the station must be online to use them.
PrecisionMix Reset Commands
Reset Job
This command resets the active recipe’s job totals of the PrecisionMix station selected in the Network Overview. It also logs the data for com-pleted jobs into the database and logs the reset event into the Alarm and Evens Log.
To reset the PrecisionMix job totals:
1. Click the PrecisionMix Station in the Network Overview.
2. Select PrecisionMix ➤ Reset Job from the menu bar or click the Reset Job button on the PrecisionMix toolbar.
3. If a password is requested, enter the four digits and click OK.
A warning will appear asking you to confirm the reset. Click Yes in the dialog box to confirm and apply the reset.
If a command affects a PrecisionMix station that has a password, the Enter Password dialog box appears. The password must be entered before the command can be executed. Each PrecisionMix station may have a different password.
309218 PrecisionView AMR 2.0

100 Reset Commands
Reset Batch
This command resets batch totals of the active recipe of the Precision-Mix station selected in the Network Overview. It also logs the event in the database and Alarm and Event Log for the station and takes a Totalizer Snapshot.
To reset the PrecisionMix station’s active recipe batch totals:
1. Click the PrecisionMix station in the Network Overview.
2. Select PrecisionMix ➤ Reset Batch from the menu bar or click the Reset Batch button on the station toolbar.
3. If a password is requested, enter the four digits and click OK.
Reset Batch for all Recipes
This command resets batch totals of all recipes configured for the Pre-cisionMix station selected in the Network Overview. It also logs the event in the database and Alarm and Event Log for the station and takes a Totalizer Snapshot.
To reset the PrecisionMix station’s batch totals for all its recipes:
1. Click the PrecisionMix station in the Network Overview.
2. Select PrecisionMix ➤ Reset Batch for all Recipes from the menu bar or click the Reset Batch for all Recipes button on the station toolbar.
3. If a password is requested, enter the four digits and click OK.
Section 6 Process Monitoring

Reset Commands 101
Informer Station Reset Commands
Reset Batch
This command resets the batch totals of the Informer station selected in the Network Overview. It also logs the event and the batch amount in the database, logs the event in the Alarm and Event Log for the station, and takes a Totalizer Snapshot.
To reset the Informer batch totals:
1. Click the Informer station in the Network Overview.
2. Select Informer ➤ Reset Batch from the menu bar or click the Reset Batch button on the station toolbar.
Reset Maintenance
This command resets the maintenance schedule of the Informer sta-tion selected in the Network Overview. It also logs the event in the Alarm and Event Log for the station and takes a Totalizer Snapshot. (This value is not logged to the database.)
To reset the Informer maintenance schedule:
1. Click the Informer station in the Network Overview.
2. Select Informer ➤ Reset Maintenance from the menu bar or click the Reset Maintenance button on the Informer toolbar.
Reset commands are only available for an Informer station if the “Enable Remote Totalizer Reset” check box is selected in the Informer Station Properties dialog box.
309218 PrecisionView AMR 2.0

102 Reset Commands
Reset Informer Totalizers
This command is different than the other reset commands in that it can apply to one or more Informer stations, an Informer station does not need to be selected in the Network Overview, and the command is always available on the menu bar and main toolbar (as long as at least one Informer station is online).
The Reset Informer Totalizers command opens a dialog box, which allows you to select one or more Informer stations from a list of stations currently online and reset their batch and/or maintenance totals. The command also logs the event and the batch amount for each batch totalizer in the database, logs the event in the Alarm and Event Log for the station, and takes a Totalizer Snapshot.
To reset one or more Informer totalizers:
1. Select Tools ➤ Reset Informer Totalizers from the menu bar or click the Reset Informer Totalizers button on the station toolbar.
2. In the dialog box, click the Reset Batch Totals and/or Reset Maintenance Totals check box. Select the station(s) you want to reset from the list.
3. Click OK.
Reset check boxes
List of online Informer stations
To select more than one station, hold down Ctrl or Shift key while clicking.
Section 6 Process Monitoring

Reset Commands 103
ProBatch Station Reset Command
Reset Totals
This command resets the ProBatch resettable totals, which indicate the total amount of each fluid dispensed since the last reset. The Reset Totals command also logs the event in the Alarm and Event Log for the station and takes a Totalizer Snapshot.
To reset the ProBatch totals:
1. Click the ProBatch station in the Network Overview.
2. Select ProBatch ➤ Reset Maintenance from the menu bar or click the Reset Totals button on the ProBatch toolbar.
309218 PrecisionView AMR 2.0

104 Synchronize Clocks
Synchronize ClocksThis command is available for PrecisionMix and ProBatch stations only. The PrecisionView application time stamps all data activities, using the PrecisionView computer clock.
The Synchronize Clock command sends the computer date and time to the selected PrecisionMix or ProBatch Station. If the clocks are not synchronized, the PrecisionView application and the physical station(s) will operate, but the time stamps for the alarm events displayed on the application and station(s) may differ. The Synchronize Clock command must be repeated for each PrecisionMix and ProBatch station on the network.
To synchronize the clocks:
1. Click the PrecisionMix or ProBatch station in the Network Over-view.
2. If a password is requested for a PrecisionMix station, enter the four digits and click OK.
3. Select PrecisionMix or ProBatch ➤ Synchronize Clock or click the Synchronize Clock button on the station toolbar.
The computer, PrecisionView application, and station clocks will synchronize to the computer time.
Your computer may automatically adjust for daylight savings time when it occurs. You will need to synchronize the clocks again as the stations do not automatically make this adjustment.
Section 6 Process Monitoring

Totalizer Snapshot 105
Totalizer Snapshot
The PrecisionView application automatically records totalizer snap-shots (station data) when certain functions occur. See Section 7, Reporting Data, for more information.
You can manually take a totalizer snapshot so the latest station totals are recorded in the database. This is useful If you are accessing the PrecisionView database directly (outside of the PrecisionView applica-tion) to create custom reports. The Totalizer Snapshot command is available for all station types.
To take a totalizer snapshot:
1. Click the station in the Network Overview.
2. Select PrecisionMix, ProBatch, or Informer ➤ Snapshot from the menu bar or click the Totalizer Snapshot button on the station toolbar.
The Totalizer Snapshot command does not affect the physical station.
309218 PrecisionView AMR 2.0

106 Alarm and Event Log
Alarm and Event LogThe Alarm and Event Log appears at the bottom of the main applica-tion window. The log is filtered based on the following conditions:
• The object selected on the Network Overview
If the Application is selected, all alarms are shown.
If a Network, Folder or Station is selected, only alarms pertaining to the station or the stations under the Network or Folder are shown.
• The item(s) checked on the Log ➤ Filter Source list
• The item(s) checked on the Log ➤ Filter Time menu
• The chronological order of the entries, with the most recent event appearing at the top of the list
Whenever an alarm or event occurs, the entries include the following information:
• Date and time of the entry
• Source of the message
A — Alarm/event generated by the PrecisionView AMR applicationU — Log message entered by the userP — PrecisionMix station alarm/eventI — Informer station alarm/eventB — ProBatch station alarm/event
• Station identity
• Fluid identity (if applicable)
• Recipe identity (if applicable)
• Message
• Alarm Value (if applicable)
The Alarm and Event Log displays messages from the past week. To view messages older than one week, click Reports ➤ Alarms and Events.
Section 6 Process Monitoring

Alarm and Event Log 107
Filtering Log Messages by Source
The information the log displays can be changed by filtering the source of the alarm or event messages.
1. Select Log ➤ Filter Source from the menu bar.
2. Clear or add checkmark(s) to determine which alarm or event sources the application displays messages from. By default, all sources are selected.
The following table shows possible sources of an alarm or event mes-sage.
Source Description
A = Application Alarm/event generated by the PrecisionView application
U = User Log message entered by the user
P = PrecisionMix station
PrecisionMix station alarm/event
I = Informer station Informer station alarm/event
B = ProBatch station ProBatch station alarm/event
309218 PrecisionView AMR 2.0

108 Alarm and Event Log
Filtering Log Messages by Time
By default, the log only displays messages for events that have occurred within the last 24 hours (1 d).
To change this time range:
1. Select Log ➤ Filter Time from the menu bar.
2. Choose the desired setting.
The date and time formats displayed are based on the computer’s regional settings. To change the format you will need to modify those settings.
Section 6 Process Monitoring

Alarm and Event Log 109
Manually Entering Log Messages
To manually enter a user-defined log message into the permanent log history:
1. Select Log ➤ Log Message from the menu bar.
2. Enter up to 100 characters and press OK. The message is entered into the log with a source of “U”, along with information on the current selection in the Network Overview window.
309218 PrecisionView AMR 2.0

110 Alarm and Event Log
Customizing the Alarm and Event Log Display
The order and size of the Alarm and Event Log columns can be changed.
Sizing Columns
Moving Columns
1. Select a column line in the top heading section.
2. Drag the line to the desired size.
1. Select inside the column you want to move.
2. Hold the right mouse button down and drag the column to the desired position.
In the example, the Source column was moved in front of the Alarm or Event col-umn.
Section 6 Process Monitoring

111
SECTION
7Reporting Data
309218 PrecisionView AMR 2.0
112 Data Collection
Data CollectionOnce communication is established with the stations, the Precision-View application continuously updates the PrecisionView database (PViewAMR2.mdb) with “snapshot” and event information. The data-base is updated on an event basis, such as when a job completes or the active recipe is changed. This historical information can be filtered and reported on such topics as job production and HAP usage.
In order to prevent the database from growing too large, you can move old data into an archive file to store on another device. If it becomes necessary to recover this data, the PrecisionView application can restore the data from the archive file back into the database. See Archiving Production Data, page 132.
Open Database Connectivity
The PrecisionView AMR 2.0 database (PViewAMR2.mdb) is available to Open Database Connectivity Compliant (ODBC) clients. The ODBC data source name is PViewAMR2_ODBC. Refer to Appendix A: Database Tables, page 136.
Configuration data will not be backed up when archiving; it must be backed up separately. See Backup PrecisionView Configuration, page 21.
Section 7 Reporting Data

PrecisionView Reports 113
PrecisionView ReportsThe PrecisionView application outputs the following reports:
The Custom Material Report outputs information according to the crite-ria selected in the query.
In Predefined Reports, information is output from the PrecisionView database and is reported for the station selected or for the station(s) under the application, network, or folder selected in the Network Over-view pane.
Custom Report
Custom Material This report can be customized with a number of criteria to list in detail or summary a history of fluids dispensed.
Predefined Reports
Totalizer Snapshot Lists the last known fluid resettable totals, batch totals, and grand totals for the station selected or station(s) under the object selected.
Alarms and Events Lists alarms and events, including the associated station, recipe, and value, for the sources selected in the Report Criteria.
Hazardous Air Pollutants
A detail and summary report of HAPs produced is available. Detail report lists all sources of each hazardous air pollutant. Summary report lists total amount of each hazardous air pollutant.
Setup Information Lists breakdown of all mix and waste components and their constituents, hazardous air pollutants, recipes, and stations configured in the PrecisionView application.
ProBatch Fluid List This selection only appears when a ProBatch station is selected or one or more ProBatch stations exist under the selected object in Network Overview. The report displays fluids that are in use (specific gravity is greater than 0) for one or more ProBatch stations.
309218 PrecisionView AMR 2.0

114 Manually Generating Reports
Manually Generating ReportsAll reports can be manually generated by selecting the desired report from the Report menu or Report button.
Except for Setup Information and ProBatch Fluid List reports, you need to select report criteria to designate the report parameters.
-or-
If applying the values set in the Report Criteria dialog box results in no information, the report is blank and the print preview is empty.
Totalizer Snapshot, Alarms and Events, and Hazardous Air Pollutants reports can be generated from the command line while the Precision-View application is running. Refer to Automatically Generated Reports, page 130, and Appendix B: Command Line Parameters, page 158.
Section 7 Reporting Data

Manually Generating Reports 115
Custom Material Report
To create a Custom Material Report:
1. Select Custom Material from the Report menu or Report button.
2. Custom Material Report Query Builder dialog box appears.
3. Type a meaningful name in the Report Title text box.
* indicates Query Builder’s contents changed
309218 PrecisionView AMR 2.0

116 Manually Generating Reports
4. Click to select (check) or clear Generate Detail Report check box.
• If the check box is checked, details about each individual batch/job and the fluids dispensed during those batches/jobs appears on the report. The report may be several pages long.
• If the check box is cleared, a summarized fluid total and VOC total appears on a one page report.
5. Select the Start Time from the date and time lists, or clear the Start Time check box to consider all past history in the database, up to the end time.
6. Select the End Time from the date and time lists, or clear the check box to consider all values up to and including the present.
7. Sort Order allows you to specify how the Detail section of the report will sort. You can select some or all of the fields in the Available Fields list. The order that the fields are selected and appear in the Sort Field, is the order they will appear on the report.
Clearing both Start and End Time check boxes will produce a report that includes all the information in the database.
Section 7 Reporting Data

Manually Generating Reports 117
• To select fields to use for sorting, click a field in the Available Fields list, then click the > button to move it to the Sort Fields list.
• To remove a field from the Sort Fields list, select it and click the < button.
8. Criteria selection allows you to specify criteria to use to limit records included in the report. For example, if 'Filter by Fluids” check box is checked, only fluids selected in the Filter by Fluids list are included in the report. If Filter by Fluids check box is not checked, then fluids are not used as a criteria. If none of the criteria are selected, data for all fluids, recipes, stations, station types, and ProBatch stations will be included in the report.
To select report criteria:
a. Select the check box(es) of the desired criteria.
b. Select all Filter list items that you want included in the report for each criteria selected.
9. Click Generate Report button to generate the report and view it in the Report Preview window.
309218 PrecisionView AMR 2.0

118 Manually Generating Reports
Besides Generate Report, other commands available in the Query Builder include:
• Cancel — Click Cancel button to close the Query Builder without generating a report. A dialog box will appear, asking if you want to save the query configuration. Even if you choose not to save the query, Query Builder will retain its current settings.
• Reset — Click Reset button to reset all Query Builder settings.
• Load — Click Load button to select and open a previously saved Custom Material report configuration from the Open File dialog box.
• Save — Click Save button to save the current Custom Material report configuration from the Open File dialog box. It is useful to Save configurations, to Load at another time, if you frequently gen-erate the same report.
• Display SQL — Click Display SQL button to display the SQL state-ment generated by the PrecisionView application. This statement can be used to retrieve database records for the current Custom Material report.
Section 7 Reporting Data

Manually Generating Reports 119
Totalizer Snapshot Report
To create a Totalizer Snapshot Report:
1. Select Totalizer Snapshot from the Report menu or Report button.
2. Report Criteria dialog box appears.
3. Click the VOC check box to select or deselect showing a VOC column on the report.
4. Click OK to generate the report and view it in the Report Preview window.
The VOCs in the report will be calculated based on the snapshot’s totalizer values, shown in the report’s batch totalizer column. In other reports, the PrecisionMix VOCs are calculated based on jobs; all other device’s VOCs are calculated based on batches.
309218 PrecisionView AMR 2.0

120 Manually Generating Reports
Alarms and Events Report
To create an Alarms and Events Report:
1. Select Alarms and Events from the Report menu or Report button.
2. Report Criteria dialog box appears. Select the Start Time from the date and time lists, or clear the Start Time check box to consider all past history in the database, up to the end time.
3. Select the End Time from the date and time lists, or clear the check box to consider all values up to and including the present.
4. Click the desired Event Sources check boxes to select or deselect the sources to report from.
5. Click OK to generate the report and view it in the Report Preview window.
Section 7 Reporting Data

Manually Generating Reports 121
Hazardous Air Pollutants Report
To create a Hazardous Air Pollutants Report:
1. Select Hazardous Air Pollutants from the Report menu or Report button.
2. Report Criteria dialog box appears. Select the Start Time from the date and time lists, or clear the Start Time check box to consider all past history in the database, up to the end time.
3. Select the End Time from the date and time lists, or clear the check box to consider all values up to and including the present.
4. Click Detail or Summary to select the report scope.
5. Click OK to generate the report and view it in the Report Preview window.
309218 PrecisionView AMR 2.0

122 Manually Generating Reports
Setup Information
To create a Setup Information Report:
Select Setup Information from the Report menu or Report button to generate the report and view it in the Report Preview window.
ProBatch Fluid List
To create a ProBatch Fluid List Report:
Select ProBatch Fluid List from the Report menu or Report button to generate the report and view it in the Report Preview window.
There is no report criteria to complete.
There is no report criteria to complete.
Section 7 Reporting Data

Report Preview window 123
Report Preview window
Generated reports open in the Report Preview window. Sample reports are shown on the following pages. The toolbar in the report preview has the following buttons.
Select Preview from Report menu or toolbar to open the Print Preview window without generating a report. You can use the window to view a previously saved QuickReport file.
Arrows Click Arrow buttons to page through a multiple page report.
Zoom Click Zoom buttons to zoom to fit, 100%, or to width of window.
Printer Setup Click Printer Setup button to change printer settings.
Print Click Print button to send report to default printer.
Save Report Click Save Report button to save to file. Reports may be saved unaltered in custom QuickReport format, which can be reloaded into the Preview window, or as plain text, comma-delimited, HTML, Excel, or RTF to use with other programs.
Load Report Click Load Report button and select QuickReport file to open.
Close window Click Close button to close Report Preview window.
309218 PrecisionView AMR 2.0

124 Report Samples
Report Samples
Custom Material Report
Summary
Section 7 Reporting Data

Report Samples 125
Detail
309218 PrecisionView AMR 2.0

126 Report Samples
Totalizer Snapshot Report
Alarms and Events Report
Section 7 Reporting Data

Report Samples 127
Hazardous Air Pollutants Report
309218 PrecisionView AMR 2.0

128 Report Samples
Setup Information Report
Section 7 Reporting Data

Report Samples 129
ProBatch Fluid List Report
309218 PrecisionView AMR 2.0

130 Automatically Generated Reports
Automatically Generated ReportsExcept for Setup Information and ProBatch Fluid List reports, the reports can be generated from a command line, using the parameters specified in Appendix B. Reports can be scheduled for automatic out-put to either a file or a printer, using Windows Task Scheduler.
To schedule a report with the Windows Task Scheduler:
1. On your Windows desktop or in Windows Explorer, open My Com-puter.
2. Open Scheduled Tasks system folder.
3. Open “Add Scheduled Task”.
4. Scheduled Task Wizard opens and guides you through task setup.
a. Select the PrecisionView AMR 2.0 application from the list of shortcuts. If necessary, click Browse button to find it.
b. Enter a descriptive name for the report and select how often to run it. You may be prompted for further scheduling details.
c. Click the Open Advanced Properties check box. Click Finish.
Section 7 Reporting Data

Automatically Generated Reports 131
d. In the Advanced Properties dialog box, edit the Run text box to include command line parameters for generating the desired report. See Appendix B: Command Line Parameters, page 158, on how to correctly enter the Run information.
.
e. Click OK to apply your changes and close the dialog box.
Run text box
The scheduled task will run even if the PrecisionView application is not currently gathering data. To suspend a scheduled report, clear the Enabled check box in the Advanced Properties dialog box.
309218 PrecisionView AMR 2.0

132 Archiving Production Data
Archiving Production DataAs a backup procedure and to prevent the PrecisionView database from growing too large, the data should periodically (2-4 times/year) be exported to a comma-delimited file and removed from the system. When data is archived, it is physically removed from the database and is not available for viewing in PrecisionView reports. To restore data, follow the instructions for Restoring an Archive File, page 133.
Creating an Archive File
1. In the Network Overview, select the station to archive history for or select the application, network, or folder to archive history for all stations under the selected object.
2. Select File ➤ Archive from the menu bar.
3. In the Archive Criteria dialog, select the Start Time from the date and time lists, or clear the Start Time check box to archive all past history in the database, up to the end time.
4. Select the End Time from the date and time lists, or clear the check box to consider all values up to and including the present.
5. Click OK.
6. Save File dialog box appears. Select the drive/directory to save the file to. Enter a name for the file and click Save button to export the history values to the file and remove the data from the database.
The File Archive command backs up production, snapshot and event information only; it does not backup the PrecisionView configuration information. See Backup PrecisionView Configuration, page 21.
Section 7 Reporting Data

Archiving Production Data 133
Restoring an Archive File
To recover the archived data, choose File ➤ Restore from the menu bar. Select the desired file from the Open File dialog box and click OK.
Once an archive file is restored to the database, be careful not to repeat the command on the same file. The PrecisionView AMR will not warn you if you are duplicating restored data in the database.
309218 PrecisionView AMR 2.0

134 Archiving Production Data
Section 7 Reporting Data

135
SECTION
8Appendices
309218 PrecisionView AMR 2.0

136 Appendix A: Database Tables
Appendix A: Database Tables
The information in Appendix A describes the PrecisionView AMR 2.0 database tables that are available for ODBC client applications.
Name and Description
The database table name appears in the first table row, followed by the table description.
Fields
The rows that follow the name and description describe each field in the table: its name, data type, and a brief description. Data types are standard SQL data types: numeric (LONG or DOUBLE), text (CHAR(size)), temporal (TIMESTAMP), and Boolean (YES/NO).
Data types followed by an asterisk (*) indicate the key field(s) for the table. Where there is more than one key field, the table key is a combi-nation of both fields. Additionally, any data type enclosed in square brackets ([…]) indicates that the field is optional, and may contain NULL if not applicable.
Indexes
The remaining rows describe the indexes that are available for sorting and searching each table. An index name followed by an asterisk (*) indicates the key index for the table. Field names separated by semico-lons (;) indicate that the index is formed based on the combination of the values in both fields. Field Names enclosed in square brackets ([…]) indicate that duplicate entries may exist for that field. Otherwise, every value in the index must be unique.
The PrecisionView AMR 2.0 database name is PViewAMR2.mdb. The ODBC data source name is PViewAMR2_ODBC.
Section 8 Appendices

Appendix A: Database Tables 137
Configuration Tables
The following tables contain information used for configuring the Preci-sionView application. These tables contain information about the Flu-ids, Recipes and Stations, and other settings that the user has configured.
HazardousAirPollutantsThis table lists Hazardous Air Pollutants configured by the user.
Field Type Description
PkID LONG* Unique ID
Name CHAR(50) Fluid name (must be unique)
MaterialManufacturer [CHAR(255)] Manufacturer company name
MaterialManufacturerPart [CHAR(255)] Manufacturer’s part number
MaterialInternalPart [CHAR(255)] Internal part number
Index Field OrderPrimaryKey* PkID Ascending
Name Name Ascending
ComponentsThis table contains the Master Fluid List – the list of ALL fluids configured by the user.
Field Type DescriptionPkID LONG* Unique number
Name CHAR(50) Fluid name
MaterialManufacturer [CHAR(255)] Manufacturer’s company name
MaterialManufacturerPart [CHAR(255)] Manufacturer’s part number
MaterialInternalPart [CHAR(255)] Internal part number
VOCFactor DOUBLE Component VOC conversion factor (VOC/cc)
SpecificGravity DOUBLE Fluid Specific Gravity (only relevant when selected on a Batch Dispense Station)
LastModified TIMESTAMP Time of last modification to component
309218 PrecisionView AMR 2.0

138 Appendix A: Database Tables
ComponentsIndex Field OrderPrimaryKey* PkID Ascending
Name Name Ascending
ComponentHAPConstituentsThis table relates the Fluids in the Components table to the HAPs in the Hazardous Air Pollutants table. It contains information about the HAP composition of those fluids.
Field Type DescriptionComponentPkID LONG* Component ID number (from Components
table)
HazarousAirPollutantPkID LONG* Hazardous air pollutant ID number (from Hazardous Air Pollutants table)
ConstituentComposition DOUBLE Percent composition (0 to 100, i.e. 12.5 = 12.5%)
Index Field OrderPrimaryKey* ComponentPkID;
HazardousAirPollutantPkIDAscending
PrecisionMixRecipesThis table contains all the PrecisionMix Recipes configured by the user.
Field Type Description
PkID LONG* Unique ID
Name CHAR(255) Recipe name (must be unique)
ComponentAPkID LONG Fluid ID number (from Components table)
ComponentBPkID LONG Fluid ID number (from Components table)
ComponentCPkID LONG Fluid ID number (from Components table)
FlushingAgentPkID LONG Fluid ID number (from Components table)
DumpTypePkID LONG Fluid ID number (from Components table)
Index Field Order
PrimaryKey* PkID Ascending
Name Name Ascending
Section 8 Appendices

Appendix A: Database Tables 139
LicenseTypesLists the different requirement types for stations supported by PrecisionView application. This table is a static enumeration table and is not affected by the user’s configuration.
Field Type DescriptionPkID LONG* Unique ID
Name CHAR(255) Descriptive name of License Type
Index Field OrderPrimaryKey* PkID Ascending
StationTypesLists the different devices supported by PrecisionView application. Contents are currently 0 (PrecisionMix II 2-K), 1 (PrecisionMix II 3-K), 2 (Informer), 3 (ProBatch). This table is a static enumeration table and is not affected by the user’s configuration.
Field Type DescriptionPkID LONG* Unique ID
Name CHAR(50) Station type name
LicenseTypePkID LONG License Type ID Number (from License Types table) for the license required by this Station Type
Index Field OrderPrimaryKey* PkID Ascending
NetworkTypesLists the different types of networks supported by the PrecisionView application. Contents are currently 0 (Serial Network), 1 (TCP/IP Network). This table is a static enumeration table and is not affected by the user’s configuration.
Field Type Description
PkID LONG* Unique ID
Name CHAR(50) Network type name
Index Field OrderPrimaryKey* PkID Ascending
309218 PrecisionView AMR 2.0

140 Appendix A: Database Tables
StationsThis table contains all stations configured by the user.
Field Type DescriptionPkID LONG* Unique ID
Name CHAR(50) Descriptive name
StationTypePkID LONG Station Type ID number (from StationTypes table)
StationNumber LONG Station number as configured on the physical device (Currently, this must be unique for ALL stations configured in the application.)
TargetMaximumVOC [DOUBLE] Target maximum daily VOC for station (Must be greater than or less than 0.)
Enabled YES/NO True if communication is enabled
FolderPkID [LONG] Folder ID number (from Folders table) of the Folder that contains this station
NetworkPkID LONG Network ID number (from Networks table) of the Network this station communicates on
Index Field OrderPrimaryKey* PkID Ascending
StationNumber StationNumber Ascending
FoldersThis table contains all folders configured by the user. Folders are used to group stations, but do not affect the operation of the application.
Field Type DescriptionPkID LONG* Unique ID
Name CHAR(50) Descriptive name
NetworkPkID LONG Network ID number (from Networks table) of the Network that contains this folder
Index Field OrderPrimaryKey* PkID Ascending
Section 8 Appendices

Appendix A: Database Tables 141
NetworksThis table contains all Networks configured by the user. A Network determines how all the stations under it will communicate.
Field Type DescriptionPkID LONG* Unique ID
Name CHAR(50) Descriptive name
NetworkTypePkID LONG NetworkType ID number (from Networks Types table) that determines the type of this Network
Index Field Order
PrimaryKey* PkID Ascending
SortOrder NetworkTypePkID; Name Ascending
NetworkSerialSettingsThis table contains the communications settings for all Serial Networks configured by the user. There will be one entry in this table for each entry in the Networks table that is a Serial Network.
Field Type DescriptionNetworkPkID LONG* Network ID number (from Networks table)
PortNumber CHAR(50) Serial communications port (i.e. COM1, COM2, etc)
BaudRate LONG Baud rate to use for the serial port
InterMessageDelayMsec LONG Number of msec to wait between transmitting messages on the serial port
TimeoutMsec LONG Timeout in msec for waiting for responses
Retries LONG Number of retries to allow for waiting for responses
ReconnectDelaySec LONG Number of seconds to wait before attempting to reconnect to stations that have gone offline
Index Field Order
PrimaryKey* PkID Ascending
SortOrder NetworkTypePkID; Name Ascending
309218 PrecisionView AMR 2.0

142 Appendix A: Database Tables
NetworkTCPIPSettingsThis table contains the communications settings for all TCP/IP Networks configured by the user. There will be one entry in this table for each entry in the Networks table that is a TCP/IPNetwork.
Field Type DescriptionNetworkPkID LONG* Network ID number (from Networks table)
TimeoutMsec LONG Timeout in msec for waiting for responses
Retries LONG Number of retries to allow for waiting for responses
ReconnectDelaySec LONG Number of seconds to wait before attempting to reconnect to stations that have gone offline
InterMessageDelayMsec LONG Number of msec to wait between transmitting messages on the serial port
IPAddress CHAR(255) I.P. address or host name of the CoBox that is used on this network
PortNumber LONG TCP/IP port number to use
Index Field OrderPrimaryKey* PkID Ascending
SortOrder NetworkTypePkID; Name Ascending
PrecisionMixStationRecipesIdentifies the recipes loaded on each PrecisionMix station (only applies to PrecisionMix stations). There will always be 63 entries in this table for each PrecisionMix station configured in the application.
Field Type DescriptionStationPkID LONG* Station ID number (from Stations table).
SlotNumber LONG* Recipe “slot” number (1 to 63).
RecipePkID [LONG] Recipe ID number (from PrecisionMixRecipes table). This field will be blank if there is no recipe loaded in this slot.
Index Field Order
PrimaryKey* StationPkID; SlotNumber Ascending
Section 8 Appendices

Appendix A: Database Tables 143
InformerStationActiveFluidIdentifies the current fluid being dispensed by each Informer station (only applies to Informer stations). There will always be 1 entry in this table for each Informer station configured by the user.
Field Type DescriptionStationPkID LONG* Station ID number (from Stations table)
ComponentPkID LONG Component ID number (from Components table)
EnableTotalizerReset YES/NO Specifies whether or not Station Reset functions are permitted
Index Field Order
PrimaryKey* StationPkID Ascending
BatchDispenseStationSystemConfigThis table describes the system configuration of a ProBatch station, as configured by the user. (Only applies to ProBatch stations.) There will always be 1 entry in this table for each ProBatch station configured by the user. There is also a corresponding table named “BatchDispenseStationDeviceSystemConfig”, which holds the system configuration stored on the device. This table is only used for synchronization and will not be affected by the user’s configuration.
Field Type DescriptionStationPkID LONG* Station ID number (from Stations table)
Units LONG Between 0 and 4
Language LONG Between 0 and 4
Stability LONG Seconds (>=0)
RecipeMethod LONG Between 1 and 2
Index Field Order
PrimaryKey* StationPkID; Ascending
309218 PrecisionView AMR 2.0

144 Appendix A: Database Tables
BatchDispenseStationFluidConfigThis table describes the 1-99 possible fluids that can be loaded on a ProBatch station. (Only applies to ProBatch stations.) There will always be 99 entries in this table for each ProBatch station configured by the user. There is also a corresponding table named “BatchDispenseStationDeviceFluidConfig”, which holds the fluid configuration that is stored on the device. This table is only used for synchronization and will not be affected by the user’s configuration.
Field Type DescriptionStationPkID LONG* Station ID number (from Stations table)
FluidSlotNumber LONG* Fluid slot number (1-99)
ComponentPkID LONG Component ID number (from Components table).
DispenseTolerance LONG Percentage (greater than or equal to zero)
MinimumPressureAirSolenoid
[LONG] 0-4
MaximumPressureAirSolenoid
[LONG] 0-4
SpecificGravity LONG Specific Gravity (0-999). Divide by 100 to get the actual specific gravity. A zero in this field means that this fluid is unused on the ProBatch station.
Index Field OrderPrimaryKey* StationPkID; FluidSlotNumber Ascending
Section 8 Appendices

Appendix A: Database Tables 145
BatchDispenseStationRecipeConfigThis table describes the 1-250 possible recipe entries that can be loaded on a ProBatch station. (Only applies to ProBatch stations.) There will always be 250 entries in this table for each ProBatch station configured by the user. There is also a corresponding table named “BatchDispenseStationDeviceRecipeConfig”, which holds the recipe configuration that is stored on the device. This table is only used for synchronization and will not be affected by the user’s configuration.
Field Type Description
StationPkID LONG* Station ID number (from Stations table)
RecipeSlotNumber LONG* Recipe slot number (1 to 250)
RecipeName [CHAR(50)] Name of this recipe
Step1Fluid LONG Fluid number for this step or 0 for pause
Step1Proportion LONG Parts of Fluid to be included for this step or length of pause
Step2Fluid LONG Fluid number for this step or 0 for pause
Step2Proportion LONG Parts of Fluid to be included for this step or length of pause
Step3Fluid LONG Fluid number for this step or 0 for pause
Step3Proportion LONG Parts of Fluid to be included for this step or length of pause
Step4Fluid LONG Fluid number for this step or 0 for pause
Step4Proportion LONG Parts of Fluid to be included for this step or length of pause
Step5Fluid LONG Fluid number for this step or 0 for pause
Step5Proportion LONG Parts of Fluid to be included for this step or length of pause
Step6Fluid LONG Fluid number for this step or 0 for pause
Step6Proportion LONG Parts of Fluid to be included for this step or length of pause
Index Field OrderPrimaryKey* StationPkID; RecipeSlotNumber Ascending
RecipeName StationPkID; RecipeName Ascending
309218 PrecisionView AMR 2.0

146 Appendix A: Database Tables
SettingsThis table holds miscellaneous settings for the PrecisionView application. Items are stored in name/value pairs.
Field Type DescriptionName CHAR(50)* Setting Name (must be unique)
Value CHAR(255) Setting Value
Index Field OrderPrimaryKey* SettingName Ascending
StationSettingsThis table holds miscellaneous setting related to station configured in the application. Items are stored in name/value pairs.
Field Type DescriptionStationPkID LONG* Station ID number (from Stations table)
Name CHAR(50)* Setting Name (must be unique for each station)
Value CHAR(255) Setting Value
Index Field OrderPrimaryKey* StationPkID; Name Ascending
ServerSettingsThis table holds miscellaneous items that need to be persisted by the AMRDataServerModule.exe component of the PrecisionView AMR application. This table does not contain any user-specific settings. Items are stored in name/value pairs.
Field Type Description
Name CHAR(50)* Setting Name (must be unique)
Value CHAR(255) Setting Value
Index Field OrderPrimaryKey* SettingName Ascending
Section 8 Appendices

Appendix A: Database Tables 147
EventSourcesThis table contains the entries that can be used to filter events recorded by PrecisionView application. Contents are currently 0 (PrecisionView AMR application), 1 (User), and 2 (PrecisionMix station), 3 (Informer station), 4 (ProBatch station). This table is a static enumeration table and is not affected by the user’s configuration.
Field Type DescriptionPkID LONG* Unique ID
Name CHAR(50) Event source name
Index Field OrderPrimaryKey* PkID Ascending
EventDescriptionsThis table contains the textual descriptions of all events that can be recorded by PrecisionView application. This table is a static enumeration table and is not affected by the user’s configuration.
Field Type DescriptionPkID LONG* Unique ID
EventSourcePkID LONG Event Source ID Number (from EventSources table)
Description CHAR(50) Textual description of the event.
Index Field OrderPrimaryKey* PkID Ascending
EventType PkID; EventSourcePkID Ascending
SnapshotEntryTypesThis table contains a list of reasons that Totalizer Snapshots will be recorded by the PrecisionView application. This table is a static enumeration table and is not affected by the user’s configuration.
Field Type DescriptionPkID NUMBER* Snapshot entry type ID number.
Name CHAR(50) Snapshot entry type name.
Index Field OrderPrimaryKey* PkID Ascending
309218 PrecisionView AMR 2.0

148 Appendix A: Database Tables
Production Information Tables
The following tables contain run-time information and are populated based on real-time data received by the PrecisionView AMR applica-tion. This information is later used in conjunction with the configuration information to produce meaningful reports.
TotalizerSnapshotsTotalizer snapshots are a frozen record of the fluid or recipe totals on a particular station. This table contains the time and reason for the last Totalizer Snapshot taken for a station. For each entry in this table, there will be corresponding entries in station-specific table(s) to hold the actual totalizer data for that station. There is no history kept for Totalizer Snapshots – only the latest snapshot is kept for each station.
Field Type DescriptionStationPkID LONG* Station ID number (from Stations table)
Time TIMESTAMP Time at which the snapshot was taken
SnapshotEntryTypePkID LONG Snapshot entry type ID number (from SnapshotEntryTypes table). This describes the reason that the Totalizer Snapshot was recorded.
Index Field OrderPrimaryKey* StationPkID Ascending
Chronological Time Ascending
Section 8 Appendices

Appendix A: Database Tables 149
PrecisionMixTotalizerSnapshotDataThis table holds the latest Totalizer data for PrecisionMix stations. Totalizer data for ALL RECIPES configured on each PrecisionMix station is stored.
Field Type Description
StationPkID LONG* Station ID number (from Stations table)
RecipeSlotNumber LONG Recipe slot number (1 to 63) (from PrecisionMixStationRecipes table)
RecipePkID [LONG] Recipe ID (from PrecisionMixRecipes table)
ComponentAPkID [LONG] Component A ID (from Components table)
ComponentABatchTotal DOUBLE Component A batch total (cc)
ComponentAGrandTotal DOUBLE Component A grand total (cc)
ComponentBPkID [LONG] Component B ID (from Components table)
ComponentBBatchTotal DOUBLE Component B batch total (cc)
ComponentBGrandTotal DOUBLE Component B grand total (cc)
ComponentCPkID [LONG] Component C ID (from Components table)
ComponentCBatchTotal DOUBLE Component C batch total (cc)
ComponentCGrandTotal DOUBLE Component C grand total (cc)
FlushingAgentPkID [LONG] Flushing Agent ID (from Components table)
FlushingAgentBatchTotal DOUBLE Flushing Agent batch total (cc)
FlushingAgentGrandTotal DOUBLE Flushing Agent grand total (cc)
DumpPkID [LONG] Dump ID (from Components table)
DumpBatchTotal DOUBLE Dump batch total (cc)
DumpGrandTotal DOUBLE Dump grand total (cc)
Index Field OrderPrimaryKey* StationPkID;
RecipeSlotNumberAscending
ComponentAPkID ComponentAPkID Ascending
ComponentBPkID ComponentBPkID Ascending
309218 PrecisionView AMR 2.0

150 Appendix A: Database Tables
PrecisionMixTotalizerSnapshotDataComponentCPkID ComponentCPkID Ascending
DumpPkID DumpPkID Ascending
FlushingAgentPkID FlushingAgentPkID Ascending
RecipePkID RecipePkID Ascending
InformerTotalizerSnapshotDataThis table holds the latest Totalizer data for Informer stations.
Field Type DescriptionStationPkID LONG* Station ID number (from Stations table)
ComponentPkID LONG* Component ID number (from Components table)
FluidBatchTotal DOUBLE Fluid batch total (cc)
FluidMaintenanceTotal DOUBLE Fluid maintenance total (cc)
FluidGrandTotal DOUBLE Fluid grand total (cc)
Index Field OrderPrimaryKey* StationPkID Ascending
ComponentPkID ComponentPkID Ascending
BatchDispenseTotalizerSnapshotFluidDataThis table holds the latest Totalizer data for ProBatch stations. Totalizer data for ALL FLUIDS in use on each ProBatch station is stored.
Field Type Description
StationPkID LONG* Station ID number (from Stations table)
FluidSlotNumber LONG Fluid Slot Number (1-99)
ComponentPkID [LONG] Component ID number (from Components table)
ResettableTotal DOUBLE Fluid Resettable total (cc)
Grand Total DOUBLE Fluid Grand Total (cc)
Index Field OrderPrimaryKey* StationPkID; FluidSlotNumber Ascending
ComponentPkID ComponentPkID Ascending
Section 8 Appendices

Appendix A: Database Tables 151
BatchesThis is the parent table for all Batches recorded in the database. This table holds the Batch/Job history for all stations in the application. Batch entries are the basis for which VOC, HAP, and Material Reports are calculated. For each entry in this table, there will be child entries in station-specific table(s) to hold batch information specific to that type of station.
Field Type DescriptionPkID LONG* Unique ID for this batch
Time TIMESTAMP Time at which the Batch was started
BatchEndTime TIMESTAMP Time at which the Batch ended
StationPkID LONG Station ID number (from Stations table)
Index Field OrderPrimaryKey* PkID Ascending
StationPkID StationPkID Ascending
Chronological BatchEndTime Ascending
PrecisionMixBatchDataThis is a child table to the Batches table, that holds PrecisionMix station specific data. For each entry in the Batches table there will be one entry in this table if the station is a PrecisionMix.
Field Type DescriptionBatchPkID LONG* Batch ID number (from Batches table)
RecipeComponentType LONG Recipe slot number (1 to 63)
RecipePkID [LONG] Recipe ID (from PrecisionMixRecipes table)
ActualFlowrate [DOUBLE] Average flow rate for job (cc/min)
ActualFlowrateGun1 [DOUBLE] Average flow rate for Gun1 (cc/min)
ActualFlowrateGun2 [DOUBLE] Average flow rate for Gun2 (cc/min)
TargetFlowrate [DOUBLE] Target flow rate for the recipe (cc/min)
TargetFlowrateGun1 [DOUBLE] Target flow rate for Gun1 (cc/min)
TargetFlowrateGun2 [DOUBLE] Target flow rate for Gun2 (cc/min)
Applicators LONG Configured guns (0=No Guns, 1=Gun1, 2=Gun2, 3=Both)
IntegratorSize DOUBLE Station integrator size (cc)
309218 PrecisionView AMR 2.0

152 Appendix A: Database Tables
PrecisionMixBatchDataIndex Field OrderPrimaryKey* BatchPkID Ascending
RecipePkID RecipePkID Ascending
PrecisionMixBatchComponentDataThis is a child table to the Batches table, that holds PrecisionMix station specific data. For each entry in the Batches table, there will be 4-5 entries in this table if the station is a PrecisionMix. There will be 4 entries if the station is a PrecisionMix II 2-K (A, B, Solvent, Dump). There will be 5 entries if the station is a PrecisionMix II 3-K (A, B, C, Solvent, Dump).
Field Type DescriptionBatchPkID LONG* Batch ID number (from Batches table)
RecipeComponentType LONG* Recipe Component Type (0=A 1=B 2=C 20=Solvent 21=Dump)
ComponentPkID [LONG] Component ID number (from Components table)
JobTotal DOUBLE Component job total (cc)
TargetRatio SINGLE Target ratio for this component
TargetTolerance SINGLE Target ratio tolerance for this component
AverageRatio SINGLE Average job ratio for this component
ActualTolerance SINGLE Maximum job ratio deviation for this component
Index Field OrderPrimaryKey* BatchPkID; RecipeComponentType Ascending
ComponentPkID ComponentPkID Ascending
Section 8 Appendices

Appendix A: Database Tables 153
InformerBatchDataThis is a child table to the Batches table that holds Informer station specific data. For each entry in the Batches table there will be one entry in this table if the station is an Informer.
Field Type Description
BatchPkID LONG* Batch ID number (from Batches table)
ActualFlowrate SINGLE Average flow rate for batch (cc/min)
ComponentPkID LONG Component ID number (from Components table)
FluidBatchTotal DOUBLE Fluid batch total (cc)
MinTargetFlowrate SINGLE Minimum target flowrate
MaxTargetFlowrate SINGLE Maximum target flowrate
Index Field OrderPrimaryKey* SnapshotPkID Ascending
BatchDispenseBatchDataThis is a child table to the Batches table, that holds ProBatch station specific data. For each entry in the Batches table there will be one entry in this table if the station is a ProBatch.
Field Type DescriptionBatchPkID LONG* Batch ID number (from Batches”table)
RecipeSlotNumber LONG Recipe slot number (1 to 255). This is the recipe that was used during this batch.
BatchID LONG Operator ID for this batch
Index Field OrderPrimaryKey* BatchPkID Ascending
BatchID BatchID Ascending
309218 PrecisionView AMR 2.0
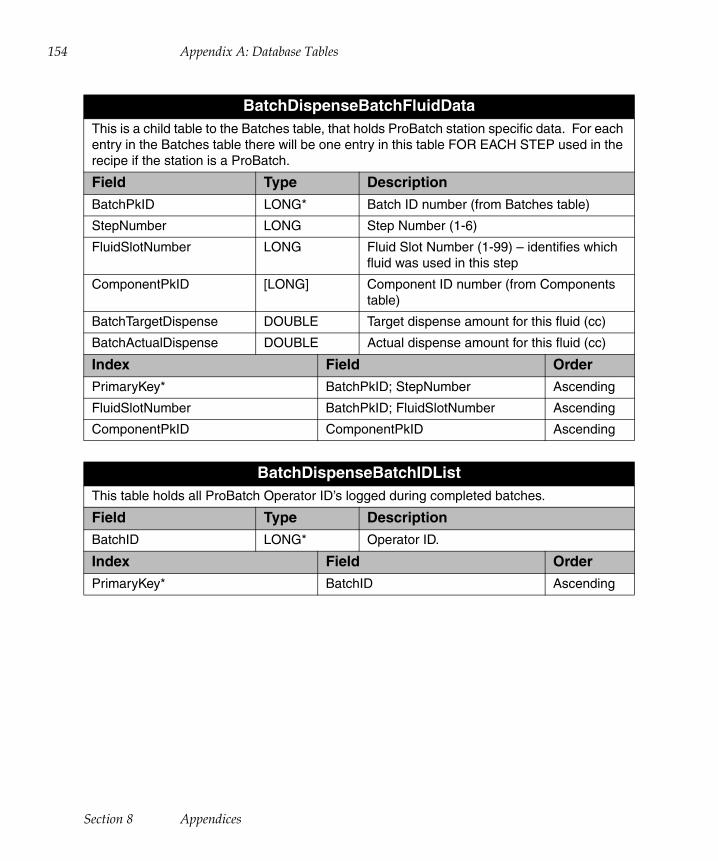
154 Appendix A: Database Tables
BatchDispenseBatchFluidDataThis is a child table to the Batches table, that holds ProBatch station specific data. For each entry in the Batches table there will be one entry in this table FOR EACH STEP used in the recipe if the station is a ProBatch.
Field Type Description
BatchPkID LONG* Batch ID number (from Batches table)
StepNumber LONG Step Number (1-6)
FluidSlotNumber LONG Fluid Slot Number (1-99) – identifies which fluid was used in this step
ComponentPkID [LONG] Component ID number (from Components table)
BatchTargetDispense DOUBLE Target dispense amount for this fluid (cc)
BatchActualDispense DOUBLE Actual dispense amount for this fluid (cc)
Index Field OrderPrimaryKey* BatchPkID; StepNumber Ascending
FluidSlotNumber BatchPkID; FluidSlotNumber Ascending
ComponentPkID ComponentPkID Ascending
BatchDispenseBatchIDListThis table holds all ProBatch Operator ID’s logged during completed batches.
Field Type DescriptionBatchID LONG* Operator ID.
Index Field OrderPrimaryKey* BatchID Ascending
Section 8 Appendices

Appendix A: Database Tables 155
EventsThis table holds all events/alarms recorded by PrecisionView AMR.
Field Type Description
PkID LONG* Unique ID
EventTime TIMESTAMP Time at which the alarm or event occurred
StationPkID [LONG] Station ID number (from Stations table)
RecipeSlotNumber [LONG] Recipe slot number. Can be Null if not applicable.
FluidSlotNumber [LONG] Fluid slot number. Can be Null if not applicable.
EventDescriptionPkID NUMBER Event Description ID Number (from EventDescriptions table).
EventValue [LONG] Event/Alarm value. Can be Null if not applicable.
Index Field OrderPrimaryKey* PkID Ascending
Chronological Time Ascending
StationPkID StationPkID Ascending
EventUserEnteredDescriptionsThis table is a child table to the Events table. If this entry is present, the text in this entry will replace the text description of the event.
Field Type Description
EventPkID LONG* Event ID number (from Events table)
Description CHAR(50) User-entered text for this event
Index Field OrderPrimaryKey* EventPkID Ascending
EventPkID EventPkID Ascending
309218 PrecisionView AMR 2.0

156 Appendix A: Database Tables
ODBC Example
The following information is an example of how you can use Precision-View AMR to gain open access to the AMR production data, collected and maintained in the AMR database. You can use this data to gener-ate custom reports, using another program suited for that purpose. The program used in the following example is Microsoft® Excel.
1. Open a new workbook or worksheet in the Microsoft Excel spread-sheet application.
2. Select Data ➤ Get External Data ➤ Create New Query from the Excel menu bar. A Wizard opens and leads you through the steps to create a query and return the results of the query to the spread-sheet.
3. In the Choose Data Source dialog box, the PViewAMR2_ODBC data source should be listed.
4. Select the PViewAMR2_ODBC data source and click OK. The Query Wizard displays all the tables that make up the Precision-View AMR database. Each of the AMR database table structures is documented in the Production Information Tables, page 148.
5. For this example, select InformerTotalizerSnapshotData. A list of all of the fields or Column Names from the table appears.
6. Select the Column Names of interest from the table and continue to follow the instructions in the dialog box to complete the Query Wiz-ard process.
7. The last page of the Query Wizard will ask you what you want to do next. Select the “Return Data to Microsoft Excel” option and then click the Finish button.
8. In the “Returning External Data to Microsoft Excel” dialog box, choose how to return the data to the Excel spreadsheet, and click OK.
Section 8 Appendices

Appendix A: Database Tables 157
9. The query completes and the relevant production data is retrieved from the PrecisionView AMR database and placed into the selected columns of your spreadsheet.
Once in the spreadsheet, you can perform a variety of sorting func-tions or calculations to supplement the information found in the database alone.
If you want to go one step further to create your own custom report, you can make use of the Tools - Mail Merge feature in Microsoft Word, using the Excel Spreadsheet as the data source.
This example of how to gain open access to the PrecisionView AMR production information, contained in the AMR database, is a small demonstration of the powerful data access capability that Precision-View AMR ODBC compliance offers you.
Information Systems (IS) or Information Technology (IT) professionals are very familiar with ODBC compliant databases. They have the expertise to access this data and integrate it with other Enterprise wide databases or to make use of other third Party ODBC compliant appli-cations to generate custom reports. Graco does not currently offer this type of support.
309218 PrecisionView AMR 2.0

158 Appendix B: Command Line Parameters
Appendix B: Command Line Parameters
Only one PrecisionView interactive process may be started at a time. However, you can generate reports by invoking the PrecisionView AMR 2 executable (AMRClient.exe) with a series of command line parameters. These processes run in the background with no user inter-action and do not affect the normal operation of the PrecisionView application. Refer to Automatically Generated Reports, page 130.
Totalizer Snapshot, Alarms and Events, Hazardous Air Pollutant Detail and Summary Reports
The following command line syntax allows you to generate the Totalizer Snapshot, Alarms and Events, Hazardous Air Pollutant Detail, and Hazardous Air Pollutant Summary reports. Square brackets indicate parameters you can omit. See page 161 for examples.
AMRClient rep type [area [time-span [filename.ext]]]
Parameter Description
AMRClient Executable name. If the program is invoked from a directory other than the one where the executable is installed, this parameter must include the complete path name, as follows.C:\Program Files\Graco\PrecisionView AMR 2.0\AMRClient.exe
rep Causes process to generate report specified by Type parameter.
type Indicates type of report to generate. Possible values are as follows.
Value Description
tot Totalizer Snapshot Report
alm Alarms and Events Report
Hapd Hazardous Air Pollutants Report (Detail)
Haps Hazardous Air Pollutants Report (Summary)
Section 8 Appendices

Appendix B: Command Line Parameters 159
area Use this parameter to specify which stations should be included in the report. This can be a Network name, Folder name or Station number. Use an asterisk (*) to specify all PrecisionView configured stations.
Value Description
n<Network Name>
Specifies Network name. Do not include space between letter ‘n’ and name.
f<Folder Name> Specifies Folder name. Do not include space between letter ‘f’ and name.
s<Station Num-ber>
Specifies station number. Do not include space between letter ‘s’ and station number.
time-span Indicates time range for report. Area parameter must precede this value. Time span is specified with combination of a pair of letters (indicating span type) and a number (indicating span length). For example, value “th12” indicates time range covering last twelve hours. Possible values for span type are as follows.
Value Description
th Hour
td Day
tw Week
tm Month
ty Year
309218 PrecisionView AMR 2.0

160 Appendix B: Command Line Parameters
Custom Material Report
The following command line syntax allows you to generate the Custom Material Report. Square brackets indicate parameters you can omit.
AMRClient cmr inputfilename [outputfilename.ext]
filename.ext Indicates output file location. Time-span parameter must precede this value. If this value is omitted, output is directed to default printer. Enclose file name in quotation marks (“”) if it contains spaces. If file name contains an asterisk (*), that character is replaced with current time in format YYYYMMDDHHMMSS to make the name unique. File name extension indicates type of file to output. Possible values for the file extension are as follows.
Value Description
.qrp QuickReport custom format (default if extension not recognized)
.txt Plain text
.csv Comma-delimited text
.htm HTML document
.xls Excel spreadsheet
.rtf Rich text format (Microsoft Word, WordPad, etc)
Parameter Description
AMRClient Executable name. If the program is invoked from a directory other than the one where the executable is installed, this parameter must include the complete path name, as follows.“C:\Program Files\Graco\PrecisionView AMR\PViewAMR.exe”
Cmr Causes process to generate a Custom Material Report.
Inputfilename Indicates file name of a previously saved Custom Material Report Query definition (has .cmr extension).
Section 8 Appendices

Appendix B: Command Line Parameters 161
outputfilename.ext
Indicates output file location. If this value is omitted, output is directed to default printer. Enclose file name in quotation marks (“”) if it contains spaces. If file name contains an asterisk (*), that character is replaced with current time in format YYYYMMDDHHMMSS to make name unique.File name extension indicates type of file to output. Possible values for file extension are as follows.
Value Description
.qrp QuickReport custom format (default if extension not recognized)
.txt Plain text
.csv Comma-delimited text
.htm HTML document
.xls Excel spreadsheet
.rtf Rich text format (Microsoft Word, WordPad, etc)
If applying the command line parameters results in no information, the nothing is output to the printer or file.
Examples of Command Line Parameters
AMRClient rep tot s2 tw3
Prints totalizer snapshot for station #2. Snapshots older than three weeks are ignored.
AMRClient rep alm s12 tm1 “C:\My Documents\log.txt”
Outputs alarms and events report for station #12 for the past month to a plain text file.
AMRClient rep hapd * ty1 “C:\HAP Reports\hap*.htm”
Outputs hazardous air pollutant detail report for all stations for the past year to an HTML document. Asterisk in the file name is replaced with the current time to make the name unique (i.e. hap19990910133012.htm).
AMRClient rep haps s1 th25 C:\hapsummary.rep
Outputs hazardous air pollutant summary report for station #1 for the past 25 hours to a custom QuickReport file (since extension .rep is not recognized). This file may be opened from the print preview screen and printed at a later time.
309218 PrecisionView AMR 2.0

162 Appendix B: Command Line Parameters
Section 8 Appendices


![Lei Nº 8429 - Lei de Improbidade Administrativa [Arts. 1º - 13]](https://img.dokumen.tips/doc/110x75/55cf976b550346d033918ba5/lei-no-8429-lei-de-improbidade-administrativa-arts-1o-13.jpg)