Embed Size (px)
Citation preview

Manual
Administration Portal

Page 2 of 33
Administration Portal Manual Confidential
Copyright © 2017, Sales Analytics, Inc.
TABLE OF CONTENTS
Table of Contents............................................................................................................. 2
Preface ............................................................................................................................. 4
1 Protect Data Integrity ................................................................................................... 6
1.1 Download Account Assignments ....................................................................................... 6
2 Add Single New User, Assign Accounts, Set SFDC Primary ............................................. 7
2.1 Add a Single New User ....................................................................................................... 8
2.2 Assign Accounts to Single New User ................................................................................ 10
2.3 To Assign the SFDC Primary ............................................................................................. 12
3 Add Multiple New User, Assign Accounts, Set SFDC Primary .......................................... 13
3.1 Prepare the Excel ............................................................................................................. 13
3.2 Add Multiple New Users .................................................................................................. 15
4 Edit a User................................................................................................................. 17
4.1 Edit User Details............................................................................................................... 17
4.2 Edit Country ..................................................................................................................... 18
5 Disable a User ........................................................................................................... 19
5.1 Locate the user who needs disabled ............................................................................... 19
5.2 Click Disable ..................................................................................................................... 19
6 View Assigned Accounts ............................................................................................ 20
6.1 View Assigned Accounts for a Single Users ..................................................................... 20
6.2 View Users Assigned for a Single Account ....................................................................... 21
7 Un-Assign Account(s) from a User .............................................................................. 22
7.1 Un-Assign Account(s) from a User ................................................................................... 22
7.2 Un-Assign Account(s) from a Single User via Excel ......................................................... 23
7.3 Un-Assign Account(s) from Multiple Users via Excel ....................................................... 25
8 Generate Custom Reports ........................................................................................... 27
8.1 Ship History Report .......................................................................................................... 27
8.2 Proposal Master Report ................................................................................................... 28
8.3 Manually Added User Roster ........................................................................................... 29
9 View Release Notes ................................................................................................... 30
10 Trouble Shoot ........................................................................................................... 30
10.1 Accidentally changed SFDC primary ................................................................................ 30

Page 3 of 33
Administration Portal Manual Confidential
Copyright © 2017, Sales Analytics, Inc.
10.2 Activate a Disabled User .................................................................................................. 30
10.3 Reset Passwords .............................................................................................................. 32
10.4 Request Admin Portal Restore ........................................................................................ 32

Page 4 of 33
Administration Portal Manual Confidential
Copyright © 2017, Sales Analytics, Inc.
PREFACE
The Client Admin Portal is the portal that manages users, hierarchy, account assignments, SFDC primary, and
generates special reports.
About This Document
The Client Admin Portal consists of three tabs where the user can modify the information mentioned in the
sentence above:
Manage Users Tab: Lets you add, disable, or edit users, and change the hierarchy level of users.
Manage Account Assignments Tab: Gives you control of the hierarchy assignment to a client account, with the
ability to search, assign, un-assign, as well as re-order hierarchy structure.
Generate Custom Reports: Lets you create custom Ship History Report or Proposal Master Report by Business
Unit (BU).
Intended Audience
This document is intended for select users with administrative privileges who use Safari tools for sales
acceleration.
Getting Help
If you require assistance, click on Sales Analytics Customer Support to request contact with our team.
How to Obtain Access and Password to Safari tools
To gain access, please contact your administrator or Sales Analytics client manager for access to the
appropriate Safari portals (new users require approval). If you are an existing user and need your password,
click on request password for support logging in.
Request Admin Portal Restore
If you have made a critical error in your manual update process, you will need to request a Restore to the Admin
Portal be completed. We save a backup to the Admin Portal every 30 minutes for the previous 96 hours. This
backup saves for 72 hours. Remember, if you request a backup, you will also be forcing Safari portals to be
down and unusable.

Page 5 of 33
Administration Portal Manual Confidential
Copyright © 2017, Sales Analytics, Inc.
1. Open Internet Explorer and go to your Client Admin Portal.
Figure 1
2. On the login page, enter your username and password.
3. Click Login.

Page 6 of 33
Administration Portal Manual Confidential
Copyright © 2017, Sales Analytics, Inc.
1 PROTECT DATA INTEGRITY
If you are making changes to current account assignments, it is vital that you back up the individual
account assignment data prior to making any changes to avoid losing any account assignments for
that user. If you need to request a Admin Portal Roster Restore, it will take down all Safari portals
down for approximately one hour.
1.1 DOWNLOAD ACCOUNT ASSIGNMENTS On the Manage Account Assignments tab, you have the option to Download the Assigned Accounts
for a single user to an excel spreadsheet.
1) Select the Level
2) Select the Account Assignee
3) Click Show Accounts to review the accounts assigned
4) Click Download Accounts to Excel to create a local back up for that one user.
a. Note: You will need to repeat these steps for every active user you are going to
change.
b. Important: You do not have to do this for the NEW users you are adding and
assigning accounts since there is not record of them in the system upon start.

Add Single New User, Assign Accounts, Set SFDC Primary
Page 7 of 33
Administration Portal Manual Confidential
Copyright © 2017, Sales Analytics, Inc.
2 ADD SINGLE NEW USER, ASSIGN ACCOUNTS, SET SFDC PRIMARY
After logging in, the portal opens on the Manage Users Tab of the Administration Portal. The numbered steps
in the following procedures correspond to the numbers in the figures.
Figure 2

Add Single New User, Assign Accounts, Set SFDC Primary
Page 8 of 33
Administration Portal Manual Confidential
Copyright © 2017, Sales Analytics, Inc.
2.1 ADD A SINGLE NEW USER
Make sure you are on the Manage Users tab
2.1.1 Click Add New User button located on the bottom left corner of the page to open the
User Details popup.
A popup will appear to enter the user’s details.
2.1.2 Add the new user details
a. UserName = the username will be their company employee number, which must be
unique.
b. Name = enter the first, then the last name
c. Email = the email must be in the typical format. i.e. [email protected]
d. Territory = This must be unique and in the following format “LastName FirstName Level”
(i.e. John Doe Level1). Notice: If a user has the same territory as another, both users will
be able to see both users’ accounts.

Add Single New User, Assign Accounts, Set SFDC Primary
Page 9 of 33
Administration Portal Manual Confidential
Copyright © 2017, Sales Analytics, Inc.
e. Level = Select the appropriate level. This levels control the amount of access for each
user. It also develops hierarchy in the Safari portals.
f. Sales Role = Select an appropriate role from the dropdown list. If the sales role does not
exist, a new one can be created.
g. Click Save
2.1.3 Assign a Leader to the New User
a. After you have saved the user, click Edit Leader.
b. Select the Level and Leader from The Edit Leader popup
a. Select the Level of the manager from the dropdown list
b. Select the Leader from the dropdown list. Every user level 1 to 5 is required to
have a leader. If you are adding a L1000 or L3000, you do not need a leader
since it is not part of the hierarchy.
c. Click Save to close the Edit Leader popup and save changes.
c. Click Save to close the User Details popup and save changes

Add Single New User, Assign Accounts, Set SFDC Primary
Page 10 of 33
Administration Portal Manual Confidential
Copyright © 2017, Sales Analytics, Inc.
2.2 ASSIGN ACCOUNTS TO SINGLE NEW USER
To assign accounts to the user, navigate to the Manage Account Assignments (located at the top of
the page). Scroll to the bottom of the screen.
2.2.1 To Manage Account Assignments Via Excel Template, click Via Excel
1. The template must be in the following format
a. All data needs to be on the first sheet (tab) in the excel document
b. You must have column Headers
c. List all AMIDs in column A
d. List the Employee ID in column B
2. A popup will appear for you to upload the list, click Import AMID List
3. Click Import AMID List, which will allow you to navigate to the file on your device.
Remember to save and close prior to trying to import the list.

Add Single New User, Assign Accounts, Set SFDC Primary
Page 11 of 33
Administration Portal Manual Confidential
Copyright © 2017, Sales Analytics, Inc.
a. The file name will appear
4. Click Upload to import the list. Task is complete, ‘Upload Finished’ displays.
5. Click Assign to assign the accounts to that user. A message will appear once the accounts
have been assigned.
6. Click OK to close the message window

Add Single New User, Assign Accounts, Set SFDC Primary
Page 12 of 33
Administration Portal Manual Confidential
Copyright © 2017, Sales Analytics, Inc.
2.3 TO ASSIGN THE SFDC PRIMARY
If this user needs to be SFDC primary, select the users level and name from the dropdown lists. You
will need to select Treatment Code A and Yes to SFDC Primary.
2.3.1 Click Show Accounts
1. Select the desired accounts (can be one or multiple)
2.3.2 Click Edit Treatment Code
1. Treatment Code A = full access, will receive all emails with report packages for distributions
2. Treatment Code B = will receive only emails for distributions
3. Treatment Code N = will not receive anything for distributions
2.3.3 SFDC Primary = you will need to click yes or no to make primary.
2.3.4 Click Save

Add Multiple New User, Assign Accounts, Set SFDC Primary
Page 13 of 33
Administration Portal Manual Confidential
Copyright © 2017, Sales Analytics, Inc.
3 ADD MULTIPLE NEW USER, ASSIGN ACCOUNTS, SET SFDC PRIMARY
When adding multiple users, follow the steps below to add users and assign accounts
simultaneously.
3.1 PREPARE THE EXCEL
On the Manage Users tab, click the Add Users Via Excel button. A popup will appear to enter the
user’s details.
If you don’t already have it, download the template by clicking Get Template. This is important to
upload the new users, all of the information needs to be filled out in this order. Note: do not move
or change any of the column headers. Make sure that all fields are entered completely.
Note: There is an ‘Instructions’ tab within the spreadsheet for ease of use.
1. Important Notices:
a. AMID = has to be a unique customer ID. When adding users and assigning accounts
simultaneously, enter the AMID in Column A; then copy the Employee information
for each of the corresponding AMIDs.
b. Employee ID = needs to be unique. Updates will overwrite existing information. If
you create a user with an employee id that is already in use, the new user will
overwrite the old employee ID access.
c. Employee Email = email format needs to be in valid email format:
d. Select the Level – enter only the numerical value
i. Level 1 - Sales Rep
ii. Level 2 - account manager
iii. Level 3 – country
iv. Level 4 - district manager, director
v. Level 6 - Super Regions
vi. Level 7 - WorldWide User
vii. Level 3000

Add Multiple New User, Assign Accounts, Set SFDC Primary
Page 14 of 33
Administration Portal Manual Confidential
Copyright © 2017, Sales Analytics, Inc.
e. Sales Role = you can create new sales roles by simply adding them here. Keep in
mind any typos are going to create new sales roles.
f. Manager ID = every single entry has to have a manager, even when adding a
manager.
g. Treatment Codes
i. Treatment Code A = full access, will receive all emails with report packages
for distributions
ii. Treatment Code B = will receive only emails for distributions
iii. Treatment Code N = will not receive anything for distributions
h. SFDC Primary
i. To make a user SFDC primary, remember when the
1. treatment code is A
2. you must have a unique sales person per sales role.

Add Multiple New User, Assign Accounts, Set SFDC Primary
Page 15 of 33
Administration Portal Manual Confidential
Copyright © 2017, Sales Analytics, Inc.
3.2 ADD MULTIPLE NEW USERS
3.2.1 Click Add Users Via Excel
1. A popup will appear, click Import User List
a. The title of the file you are uploading will be displayed
3.2.2 Click Upload
b. Upload Finished message will display the number of users created and the number
of accounts assigned.
c. Note: you will get a notification of any users that won’t be added and a brief
explanation as to why.
i. # users will be created and assigned to # accounts
ii. No users will be added due to the above issues 1. Username Already Exists. This will prevent users from overwriting
users.
2. AMID not found in system or current data will display whenan
account was not found in the database

Add Multiple New User, Assign Accounts, Set SFDC Primary
Page 16 of 33
Administration Portal Manual Confidential
Copyright © 2017, Sales Analytics, Inc.
3.2.3 Click Create
1. Users were created successfully message will appear.
2. An email will be sent for each of the new users to the email to authorized individuals, which
can be forwarded to the new users.

Edit a User
Page 17 of 33
Administration Portal Manual Confidential
Copyright © 2017, Sales Analytics, Inc.
4 EDIT A USER
To edit a user, navigate to the Manage Users tab (located at the top of the page). Search the
UserName.
4.1 EDIT USER DETAILS
h. UserName = the username will be their company employee number, which must be
unique.
i. Name = enter the first, then the last name
j. Email = the email must be in the typical format. i.e. [email protected]
k. Territory = This must be unique and in the following format “LastName FirstName Level”
(i.e. John Doe Level1). Notice: If a user has the same territory as another, both users will
be able to see both users’ accounts.
l. Level = Select the appropriate level. This levels control the amount of access for each
user. It also develops hierarchy in the Safari portals.
m. Sales Role = Select an appropriate role from the dropdown list. If the sales role does not
exist, a new one can be created.
n. Click Save

Edit a User
Page 18 of 33
Administration Portal Manual Confidential
Copyright © 2017, Sales Analytics, Inc.
4.2 EDIT COUNTRY If a user is a Level 1000 or Level 3000, you are able to edit the country. Once the country is selected
and saved, that will be their settings until someone manually changes it.
1. Click Edit Country to open the popup
2. Select the SuperRegion/Region/SubRegion/Country
3. Make the geography assignments by clicking the checkbox. This will move the geography to
the assigned users.

Disable a User
Page 19 of 33
Administration Portal Manual Confidential
Copyright © 2017, Sales Analytics, Inc.
4. Click Save.
a. A confirmation popup will display. Click OK to close
5. Click Close to close the Edit Country popup
6. Click Save on the User Details popup.
a. A confirmation popup will display. Click OK to close
5 DISABLE A USER
If you need to prevent a user from receiving access to Safari for any reason, you can disable the user
on the Manage Users tab.
5.1 LOCATE THE USER WHO NEEDS DISABLED You can search for the user in the search bar
5.2 CLICK DISABLE This will remove access to all Safari Tools immediately.

View Assigned Accounts
Page 20 of 33
Administration Portal Manual Confidential
Copyright © 2017, Sales Analytics, Inc.
6 VIEW ASSIGNED ACCOUNTS
To view the accounts assignments, navigate to the Manage Account Assignments (located at the top
of the page). Scroll to the bottom of the screen.
6.1 VIEW ASSIGNED ACCOUNTS FOR A SINGLE USERS
6.1.1 Select the new user from the dropdowns at the bottom of the page
1) Select the Level
2) Select the Account Assignee
6.1.2 Click Show Accounts to review the accounts assigned
1) Scroll through the list to view accounts assigned.
6.1.3 Click Download Excel to download a local copy of that user’s current account
assignments.

View Assigned Accounts
Page 21 of 33
Administration Portal Manual Confidential
Copyright © 2017, Sales Analytics, Inc.
6.2 VIEW USERS ASSIGNED FOR A SINGLE ACCOUNT On the Manage Account Assignments tab, you can view who has the account assigned to them.
6.2.1 Search the name of the account using the search field 1) Type the name of the account into the search field
2) Press Enter to display account in the table below
6.2.2 Click Assigned Users
1) Clicking Assigned Users will open a popup to display the users assigned to that account

Un-Assign Account(s) from a User
Page 22 of 33
Administration Portal Manual Confidential
Copyright © 2017, Sales Analytics, Inc.
7 UN-ASSIGN ACCOUNT(S) FROM A USER
On the Manage Account Assignments Tab, you can Un-Assign Accounts to user. You must do each
user individually.
7.1 UN-ASSIGN ACCOUNT(S) FROM A USER You can un-assign as many accounts from the single user as is needed. Remember to view the
accounts assigned, you can download the excel file. Select the user from the dropdowns at the
bottom of the page
1) Select the Level
2) Select the Account Assignee
7.1.1 Click Show Accounts to review the accounts assigned
1) Scroll through the list to view accounts assigned.
2) Search Account List Options
a. Type in the name of the account and press Enter to show only that account.
b. Click Advanced Search to search by super region, region, country, state, city, postal.
7.1.2 Select the Account(s) you want to Un-Assign from that User using the checkbox.
Note: you can select as many accounts as you want to Un-Assign from that User.
Un-Assign Account(s) from a User
Page 23 of 33
Administration Portal Manual Confidential
Copyright © 2017, Sales Analytics, Inc.
7.1.3 Click Un-Assign Accounts
1) A confirmation message will display
7.1.4 Click OK
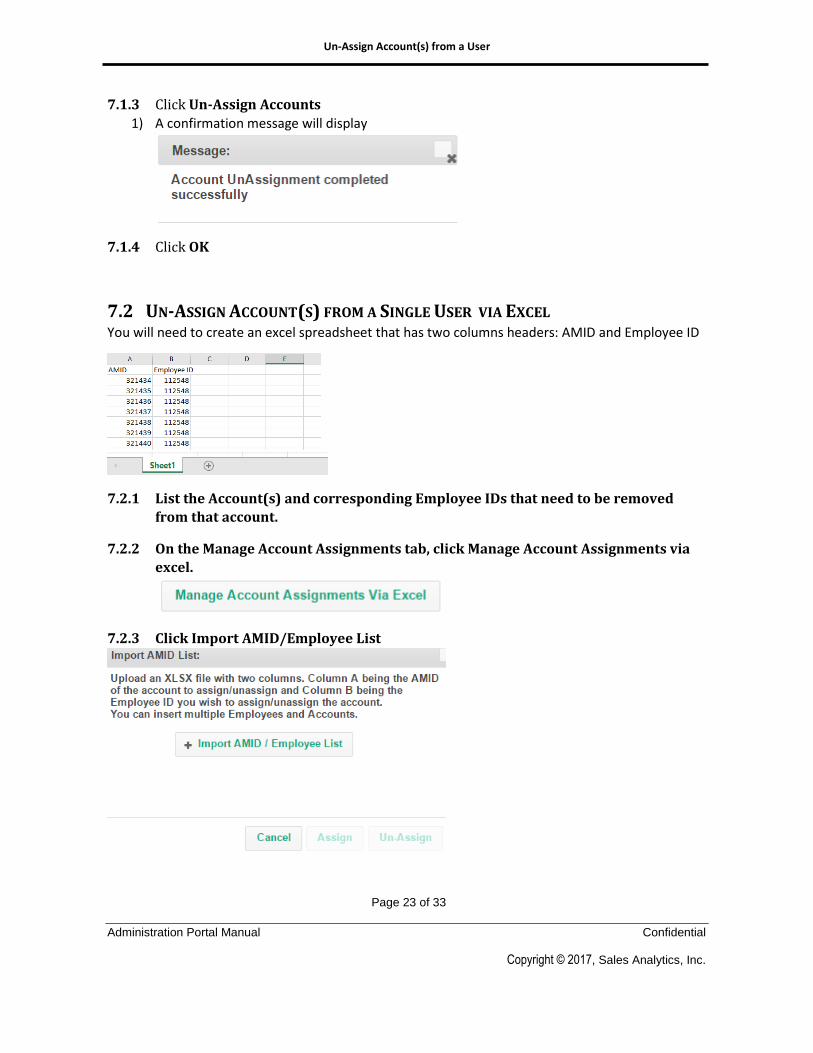
7.2 UN-ASSIGN ACCOUNT(S) FROM A SINGLE USER VIA EXCEL You will need to create an excel spreadsheet that has two columns headers: AMID and Employee ID
7.2.1 List the Account(s) and corresponding Employee IDs that need to be removed
from that account.
7.2.2 On the Manage Account Assignments tab, click Manage Account Assignments via
excel.
7.2.3 Click Import AMID/Employee List

Un-Assign Account(s) from a User
Page 24 of 33
Administration Portal Manual Confidential
Copyright © 2017, Sales Analytics, Inc.
7.2.3.1 Upload the prepared excel file
7.2.3.2 Click Upload after the file name appears
7.2.3.3 You will receive a confirmation message when the upload is finished.
7.2.4 Click Un-Assign
7.2.5 You will receive a confirmation that Account Un-Assignment has completed
successfully

Un-Assign Account(s) from a User
Page 25 of 33
Administration Portal Manual Confidential
Copyright © 2017, Sales Analytics, Inc.
7.3 UN-ASSIGN ACCOUNT(S) FROM MULTIPLE USERS VIA EXCEL You will need to create an excel spreadsheet that has two columns headers: AMID and Employee ID
7.3.1 List the Account(s) and corresponding Employee IDs that need to be removed
from that account.
7.3.2 On the Manage Account Assignments tab, click Manage Account Assignments via
excel.
7.3.3 Click Import AMID/Employee List

Un-Assign Account(s) from a User
Page 26 of 33
Administration Portal Manual Confidential
Copyright © 2017, Sales Analytics, Inc.
7.3.3.1 Upload the prepared excel file
7.3.3.2 Click Upload after the file name appears
7.3.3.3 You will receive a confirmation message when the upload is finished.
7.3.4 Click Un-Assign
7.3.5 You will receive a confirmation that Account Un-Assignment has completed
successfully

Generate Custom Reports
Page 27 of 33
Administration Portal Manual Confidential
Copyright © 2017, Sales Analytics, Inc.
8 GENERATE CUSTOM REPORTS
The Generate Custom Reports lets you generate the Ship History Report or Proposal Master for a selected BU
and custom list of AMIDs. You can name the file using the Report Name or Bug Number field.
You can upload an excel file with a list of the AMIDs you would like to create a report. The excel file must be a
single column with necessary AMIDs.
You can create a report using employee information: first name/last name or ID.
The report will download to your device for you to edit.
8.1 SHIP HISTORY REPORT
1. Select Ship History Report.
2. Selected BU = you will need to select one or multiple BU. If you do not select, it will process
all BUs.
3. Report Name or Bug Number = this is going to the name of the excel file that downloads.
4. File Upload tab = you will need to upload the excel file.
a. Click Upload Amid List

Generate Custom Reports
Page 28 of 33
Administration Portal Manual Confidential
Copyright © 2017, Sales Analytics, Inc.
b. Select the excel file = The excel file must have AMID as a header row. All data must
be in column A (you cannot have data in any other column at all or it will not
process).
c. Click Upload next to the file name
d. Click Create Report
5. The file will download to your device.
6. For security purposes, it is advised that the custom file is uploaded to the company’s secure
shared portal. Once the file is uploaded, create a public link with a secure password. Email
the link with the password to the client.
8.2 PROPOSAL MASTER REPORT
1. Select Proposal Master Report.
2. Selected BU = you will need to select one or multiple BU. If you do not select, it will process
all BUs.
3. Report Name or Bug Number = this is going to the name of the excel file that downloads.

Generate Custom Reports
Page 29 of 33
Administration Portal Manual Confidential
Copyright © 2017, Sales Analytics, Inc.
4. File Upload tab = you will need to upload the excel file.
a. Click Upload Amid List
b. Select the excel file = The excel file must have AMID as a header row. All data must
be in column A (you cannot have data in any other column at all or it will not
process).
c. Click Upload next to the file name
d. Click Create Report
5. The file will download to your device.
6. For security purposes, it is advised that the custom file is uploaded to the company’s secure
shared portal. Once the file is uploaded, create a public link with a secure password. Email
the link with the password to the client.
8.3 MANUALLY ADDED USER ROSTER
1. Select Manually Added User Roster.
2. Click Create Report to download the report to your device

View Release Notes
Page 30 of 33
Administration Portal Manual Confidential
Copyright © 2017, Sales Analytics, Inc.
9 VIEW RELEASE NOTES
Click the three lines next to your name at the top right of the screen to view your profile, change
your password, or log out of the application.
1. Click Release Notes to open the Release Notes popup, which the code updates by version number.
a. Note: the first time you log in after each new code release, a popup will display showing the new releases details
10 TROUBLE SHOOT
10.1 ACCIDENTALLY CHANGED SFDC PRIMARY
10.1.1 Within your hierarchy
Follow the steps to Assign the SFDC Primary
10.1.2 Outside your hierarchy
10.1.2.1 Contact the HPE Manager
10.1.2.2 Request Admin Portal Restore
If you have made a critical error in your manual update process, you will need to request a Restore
to the Admin Portal be completed. We save a backup to the Admin Portal every 30 minutes for the
previous 96 hours. Remember, if you request a backup, you will also be forcing Safari portals to be
down and unusable. File a Support Ticket with Sales Analytics Customer Support to request contact
with our team.
10.2 ACTIVATE A DISABLED USER On the Manage Users tab, you can enable disabled users.

Trouble Shoot
Page 31 of 33
Administration Portal Manual Confidential
Copyright © 2017, Sales Analytics, Inc.
If a user has been accidentally disabled, you can Enable that user again within until a new official
roster has been applied.
10.2.1 CLICK View Disabled checkbox
10.2.2 Review all Disabled Users

Trouble Shoot
Page 32 of 33
Administration Portal Manual Confidential
Copyright © 2017, Sales Analytics, Inc.
10.2.3 CLICK Enable
1) The user will be immediately enabled. You can search the User’s table to confirm.
2) All accounts that were previously assigned to that users will be reassigned automatically.
a. To confirm, navigate to the Manage Account Assignments tab
b. Choose the Level and Account Assignee
c. Click Show Accounts
10.3 RESET PASSWORDS
10.3.1 Reset Password for a Single User
10.3.1.1 Via Admin Portal
On the Manage Users tab, click Reset Password. The user will need their original temporary
password to make that change.
10.3.1.2 Via Safari Portals The users can reset their own passwords on the log in page of the portal by clicking Forget
Password. The user will need their original temporary password to make that change.
10.3.2 All Users
If you need to reset all passwords for all users, you will submit a request with HPE Amplified leaders
10.4 REQUEST ADMIN PORTAL RESTORE
If you have made a critical error in your manual update process, you will need to request a Restore
to the Admin Portal be completed. We save a backup to the Admin Portal every 30 minutes for the
previous 96 hours. This backup saves for 72 hours Remember, if you request a backup, you will also
be forcing Safari portals to be down and unusable.
10.4.1 File a Support Ticket
Click on Sales Analytics Customer Support to request Administration Portal Restore with our team.

Trouble Shoot
Page 33 of 33
Administration Portal Manual Confidential
Copyright © 2017, Sales Analytics, Inc.
Sales Analytics has made a good faith effort to ensure the accuracy of the information in this document and disclaims the implied warranties of merchantability and fitness for a particular purpose and makes no express warranties, except as may be stated in its written agreement with and for its customers.
Sales Analytics shall not be held liable to anyone for any indirect, special or consequential damages due to omissions or errors. The information and specifications in this document are subject to change without notice.
Copyright © 2017. All Rights Reserved.
All trademarks and registered trademarks are the property of their respective owners.
October 3, 2017