Embed Size (px)
Citation preview

AFS
Administration GuideVersion 3.6
GC09-4563-00
���

AFS
Administration GuideVersion 3.6
GC09-4563-00
���
NoteBefore using this information and the product it supports, be sure to read the general information under“Notices” on page 685.
First Edition (April 2000)
This edition applies to:
AFS for AIX, Version 3.6AFS for Digital Unix, Version 3.6AFS for HP-UX, Version 3.6AFS for Linux, Version 3.6AFS for SGI IRIX, Version 3.6AFS for Solaris, Version 3.6
and to all subsequent releases and modifications until otherwise indicated in new editions.
Order publications through your IBM representative or through the IBM branch office serving your locality.
© Copyright International Business Machines Corporation 1989, 2000. All rights reserved.US Government Users Restricted Rights – Use, duplication or disclosure restricted by GSA ADP Schedule Contractwith IBM Corp.

Contents
Figures . . . . . . . . . . . . . xiii
Tables . . . . . . . . . . . . . xv
About This Guide . . . . . . . . . xviiAudience and Purpose . . . . . . . . xviiDocument Organization . . . . . . . xviiHow to Use This Document . . . . . . xviiRelated Documents . . . . . . . . . xviiiTypographical Conventions . . . . . . xix
Chapter 1. An Overview of AFSAdministration . . . . . . . . . . 1A Broad Overview of AFS. . . . . . . 1More Detailed Discussions of Some BasicConcepts . . . . . . . . . . . . 4
Networks . . . . . . . . . . . 4Distributed File Systems . . . . . . 4Servers and Clients . . . . . . . . 5Cells . . . . . . . . . . . . . 6The Uniform Namespace andTransparent Access . . . . . . . . 7Volumes. . . . . . . . . . . . 7Mount Points . . . . . . . . . . 8Replication . . . . . . . . . . . 9Caching and Callbacks . . . . . . . 9
AFS Server Processes and the CacheManager . . . . . . . . . . . . 11
The File Server . . . . . . . . . 12The Basic OverSeer Server . . . . . 12The Authentication Server. . . . . . 13The Protection Server . . . . . . . 14The Volume Server . . . . . . . . 15The Volume Location (VL) Server . . . 15The Update Server . . . . . . . . 15The Backup Server . . . . . . . . 16The Salvager . . . . . . . . . . 17The Network Time Protocol Daemon 17The Cache Manager . . . . . . . . 17
Chapter 2. Issues in Cell Configurationand Administration. . . . . . . . . 19Differences between AFS and UNIX: ASummary . . . . . . . . . . . . 19
Differences in File and DirectoryProtection . . . . . . . . . . . 19Differences in Authentication. . . . . 20Differences in the Semantics of StandardUNIX Commands . . . . . . . . 20The AFS version of the fsck Command 22Creating Hard Links . . . . . . . 22AFS Implements Save on Close . . . . 23Setuid Programs . . . . . . . . . 23
Choosing a Cell Name . . . . . . . . 23How to Set the Cell Name . . . . . 25Why Choosing the Appropriate CellName is Important . . . . . . . . 26
Participating in the AFS Global Namespace 27What the Global Namespace Looks Like 27Making Your Cell Visible to Others. . . 28Making Other Cells Visible in Your Cell 28Granting and Denying Foreign UsersAccess to Your Cell . . . . . . . . 29
Configuring Your AFS Filespace . . . . . 30The Top /afs Level . . . . . . . . 30The Second (Cellname) Level. . . . . 30The Third Level . . . . . . . . . 31
Creating Volumes to SimplifyAdministration . . . . . . . . . . 32
Assigning Volume Names . . . . . . 33Grouping Related Volumes on a Partition 35When to Replicate Volumes . . . . . 35The Default Quota and ACL on a NewVolume . . . . . . . . . . . . 37
Configuring Server Machines. . . . . . 37Replicating the AFS AdministrativeDatabases . . . . . . . . . . . 38AFS Files on the Local Disk . . . . . 39Configuring Partitions to Store AFS Data 39Monitoring, Rebooting and AutomaticProcess Restarts . . . . . . . . . 40
Configuring Client Machines . . . . . . 41Configuring the Local Disk . . . . . 41Enabling Access to Foreign Cells . . . 42Using the @sys Variable in Pathnames 42Setting Server Preferences . . . . . . 43
Configuring AFS User Accounts. . . . . 43Choosing Usernames and Naming OtherAccount Components . . . . . . . 45
© Copyright IBM Corp. 1989, 2000 iii
Grouping Home Directories . . . . . 47Making a Backup Version of UserVolumes Available . . . . . . . . 48Creating Standard Files in New AFSAccounts . . . . . . . . . . . 48
Using AFS Protection Groups . . . . . 49The Three System Groups . . . . . . 50The Two Types of User-Defined Groups 51
Login and Authentication in AFS . . . . 51Identifying AFS Tokens by PAG . . . . 52Using an AFS-modified login Utility 53Using Two-Step Login andAuthentication . . . . . . . . . 55Obtaining, Displaying, and DiscardingTokens . . . . . . . . . . . . 55Setting Default Token Lifetimes for Users 57Changing Passwords . . . . . . . 57Imposing Restrictions on Passwords andAuthentication Attempts . . . . . . 58Support for Kerberos Authentication 58
Security and Authorization in AFS . . . . 59Some Important Security Features . . . 59Three Types of Privilege . . . . . . 60Authorization Checking versusAuthentication . . . . . . . . . 61Improving Security in Your Cell . . . . 61A More Detailed Look at MutualAuthentication . . . . . . . . . 63
Backing Up AFS Data . . . . . . . . 66Backup Volumes . . . . . . . . . 66The AFS Backup System . . . . . . 67
Using UNIX Remote Services in the AFSEnvironment . . . . . . . . . . . 67Accessing AFS through NFS . . . . . . 68
Chapter 3. Administering ServerMachines . . . . . . . . . . . . 69Summary of Instructions . . . . . . . 69Local Disk Files on a Server Machine . . . 70
Binaries in the /usr/afs/bin Directory 70Common Configuration Files in the/usr/afs/etc Directory . . . . . . . 72Local Configuration Files in the/usr/afs/local Directory . . . . . . 74Replicated Database Files in the/usr/afs/db Directory . . . . . . . 76Log Files in the /usr/afs/logs Directory 77Volume Headers on Server Partitions 78
The Four Roles for File Server Machines 79Simple File Server Machines . . . . . 79
Database Server Machines. . . . . . 80Binary Distribution Machines . . . . 81The System Control Machine . . . . . 82To locate database server machines. . . 83To locate the system control machine 83To locate the binary distribution machinefor a system type. . . . . . . . . 83Interpreting the Output from the bosstatus Command . . . . . . . . . 84
Administering Database Server Machines 85Replicating the AFS AdministrativeDatabases . . . . . . . . . . . 85Backing Up and Restoring theAdministrative Databases . . . . . . 90To back up the administrative databases 92To restore an administrative database 93
Installing Server Process Software . . . . 95Installing New Binaries . . . . . . 95To install new server binaries . . . . 96Reverting to the Previous Version ofBinaries . . . . . . . . . . . . 97To revert to the previous version ofbinaries . . . . . . . . . . . . 98Displaying Binary Version Dates . . . 99To display binary version dates . . . . 99Removing Obsolete Binary Files . . . . 99To remove obsolete binaries . . . . . 100Displaying A Binary File’s Build Level 100To display an AFS binary’s build level 100
Maintaining the Server CellServDB File 101Distributing the Server CellServDB File 102To display a cell’s database servermachines . . . . . . . . . . . 103To add a database server machine to theCellServDB file . . . . . . . . . 104To remove a database server machinefrom the CellServDB file . . . . . . 105
Managing Authentication and AuthorizationRequirements . . . . . . . . . . . 106
Authentication versus Authorization 106Controlling Authorization Checking on aServer Machine . . . . . . . . . 107To disable authorization checking on aserver machine . . . . . . . . . 108To enable authorization checking on aserver machine . . . . . . . . . 108Bypassing Mutual Authentication for anIndividual Command . . . . . . . 109To bypass mutual authentication for bos,kas, pts, and vos commands . . . . . 109
iv AFS: Administration Guide

To bypass mutual authentication for fscommands . . . . . . . . . . . 109
Adding or Removing Disks and Partitions 109To add and mount a new disk to houseAFS volumes . . . . . . . . . . 110To unmount and remove a disk housingAFS volumes . . . . . . . . . . 112
Managing Server IP Addresses and VLDBServer Entries . . . . . . . . . . . 113
To create or edit the server NetInfo file 115To create or edit the server NetRestrictfile . . . . . . . . . . . . . 115To display all server entries from theVLDB . . . . . . . . . . . . 115To remove obsolete server entries fromthe VLDB . . . . . . . . . . . 116To change a server machine’s IPaddresses . . . . . . . . . . . 116
Rebooting a Server Machine . . . . . . 118To reboot a file server machine from itsconsole . . . . . . . . . . . . 118To reboot a file server machine remotely 119
Chapter 4. Monitoring and ControllingServer Processes . . . . . . . . . 121Summary of Instructions . . . . . . . 121Brief Descriptions of the AFS ServerProcesses . . . . . . . . . . . . 122
The bosserver Process: the BasicOverSeer Server . . . . . . . . . 122The buserver Process: the Backup Server 123The fs Collection of Processes: the FileServer, Volume Server and Salvager . . 123The kaserver Process: the AuthenticationServer . . . . . . . . . . . . 125The ptserver Process: the ProtectionServer . . . . . . . . . . . . 126The runntp Process . . . . . . . . 126The upserver and upclient Processes: theUpdate Server. . . . . . . . . . 127The vlserver Process: the VolumeLocation Server . . . . . . . . . 128
Controlling and Checking Process Status 128The Information in the BosConfig File 128How the BOS Server Uses theInformation in the BosConfig File . . . 129About Starting and Stopping theDatabase Server Processes. . . . . . 130About Starting and Stopping the UpdateServer . . . . . . . . . . . . 130
Displaying Process Status and Informationfrom the BosConfig File . . . . . . . 131
To display the status of server processesand their BosConfig entries . . . . . 131
Creating and Removing Processes . . . . 134To create and start a new process . . . 134To stop a process and remove it from theBosConfig file . . . . . . . . . . 137
Stopping and Starting ProcessesPermanently . . . . . . . . . . . 138
To stop a process by changing its statusto NotRun . . . . . . . . . . . 138To start processes by changing theirstatus flags to Run . . . . . . . . 139
Stopping and Starting ProcessesTemporarily . . . . . . . . . . . 139
To stop processes temporarily . . . . 140To start all stopped processes that havestatus flag Run in the BosConfig file 141To start specific processes . . . . . . 141
Stopping and Immediately RestartingProcesses . . . . . . . . . . . . 142
To stop and restart all processesincluding the BOS Server . . . . . . 142To stop and immediately restart allprocesses except the BOS Server. . . . 142To stop and immediately restart specificprocesses . . . . . . . . . . . 143
Setting the BOS Server’s Restart Times . . 143To display the BOS Server restart times 144To set the general or binary restart time 144
Displaying Server Process Log Files . . . 145To examine a server process log file . . 146
Chapter 5. Managing Volumes . . . . . 147Summary of Instructions . . . . . . . 147About Volumes . . . . . . . . . . 148
The Three Types of Volumes . . . . . 148How Volumes Improve AFS Efficiency 149Volume Information in the VLDB . . . 150The Information in Volume Headers 151Keeping the VLDB and Volume HeadersSynchronized . . . . . . . . . . 151About Mounting Volumes . . . . . . 151About Volume Names . . . . . . . 152
Creating Read/write Volumes . . . . . 153To create (and mount) a read/writevolume . . . . . . . . . . . . 153
About Clones and Cloning . . . . . . 156
Contents v

Replicating Volumes (Creating Read-onlyVolumes) . . . . . . . . . . . . 157
Using Read-only Volumes Effectively 159Replication Scenarios . . . . . . . 160To replicate a read/write volume (createa read-only volume). . . . . . . . 161
Creating Backup Volumes . . . . . . . 163Backing Up Multiple Volumes at Once 163Automating Creation of Backup Volumes 165Making the Contents of Backup VolumesAvailable to Users . . . . . . . . 165To create and mount a backup volume 166To create multiple backup volumes atonce . . . . . . . . . . . . . 167
Mounting Volumes . . . . . . . . . 169The Rules of Mount Point Traversal . . 169The Three Types of Mount Points . . . 170Creating a mount point in a foreign cell 172To display a mount point . . . . . . 172To create a regular or read/write mountpoint . . . . . . . . . . . . . 173To create a cellular mount point . . . . 174To remove a mount point . . . . . . 176
Displaying Information About Volumes 176Displaying VLDB Entries . . . . . . 177To display VLDB entries . . . . . . 177Displaying Volume Headers . . . . . 179To display volume headers . . . . . 179Displaying One Volume’s VLDB Entryand Volume Header . . . . . . . . 183To display one volume’s VLDB entry andvolume header . . . . . . . . . 183Displaying the Name or Location of theVolume that Contains a File . . . . . 184
Moving Volumes . . . . . . . . . . 186To move a read/write volume . . . . 187
Synchronizing the VLDB and VolumeHeaders . . . . . . . . . . . . . 189
To synchronize the VLDB with volumeheaders . . . . . . . . . . . . 191
Salvaging Volumes . . . . . . . . . 192To salvage volumes . . . . . . . . 195
Setting and Displaying Volume Quota andCurrent Size . . . . . . . . . . . 198
To set quota for a single volume . . . 198To set maximum quota on one or morevolumes. . . . . . . . . . . . 199To display percent quota used . . . . 200To display quota, current size, and otherinformation . . . . . . . . . . 200
To display quota, current size, and morepartition information . . . . . . . 201
Removing Volumes and their Mount Points 202Other Removal Commands . . . . . 203To remove a volume and unmount it 203
Dumping and Restoring Volumes . . . . 205About Dumping Volumes . . . . . . 205To dump a volume . . . . . . . . 207About Restoring Volumes . . . . . . 208To restore a dump into a new volumeand mount it . . . . . . . . . . 209To restore a dump file, overwriting anexisting volume . . . . . . . . . 211
Renaming Volumes . . . . . . . . . 212To rename a volume . . . . . . . 212
Unlocking and Locking VLDB Entries . . . 214To lock a VLDB entry . . . . . . . 214To unlock a single VLDB entry . . . . 215To unlock multiple VLDB entries . . . 215
Chapter 6. Configuring the AFS BackupSystem . . . . . . . . . . . . . 217Summary of Instructions . . . . . . . 217Introduction to Backup System Features 217
Volume Sets and Volume Entries . . . 218Dumps and Dump Sets . . . . . . 218Dump Hierarchies, Dump Levels andExpiration Dates . . . . . . . . . 219Dump Names and Tape Names . . . . 219Tape Labels, Dump Labels, and EOFMarkers . . . . . . . . . . . . 220Tape Coordinator Machines, Port Offsets,and Backup Data Files . . . . . . . 221The Backup Database and Backup ServerProcess . . . . . . . . . . . . 222Interfaces to the Backup System . . . . 223
Overview of Backup System Configuration 223Configuring the tapeconfig File . . . . . 224
To run the fms command on anoncompressing tape device . . . . . 228
Granting Administrative Privilege toBackup Operators . . . . . . . . . 228Configuring Tape Coordinator Machinesand Tape Devices . . . . . . . . . 229
To configure a Tape Coordinator machine 230To configure an additional TapeCoordinator on an existing TapeCoordinator machine . . . . . . . 231To unconfigure a Tape Coordinator. . . 232
vi AFS: Administration Guide

To display the list of configured TapeCoordinators . . . . . . . . . . 232
Defining and Displaying Volume Sets andVolume Entries . . . . . . . . . . 233
To create a volume set . . . . . . . 236To add a volume entry to a volume set 237To display volume sets and volumeentries . . . . . . . . . . . . 238To delete a volume set . . . . . . . 238To delete a volume entry from a volumeset . . . . . . . . . . . . . 239
Defining and Displaying the DumpHierarchy . . . . . . . . . . . . 240
Creating a Tape Recycling Schedule . . 242Archiving Tapes . . . . . . . . . 243Defining Expiration Dates . . . . . . 244To add a dump level to the dumphierarchy . . . . . . . . . . . 245To change a dump level’s expiration date 246To delete a dump level from the dumphierarchy . . . . . . . . . . . 247To display the dump hierarchy . . . . 247
Writing and Reading Tape Labels . . . . 248Recording a Name on the Label . . . . 249Recording a Capacity on the Label . . . 250To label a tape . . . . . . . . . 250To read the label on a tape . . . . . 252
Automating and Increasing the Efficiency ofthe Backup Process . . . . . . . . . 254
Creating a Device Configuration File 255Invoking a Device’s Tape Mounting andUnmounting Routines . . . . . . . 257Eliminating the Search or Prompt for theInitial Tape . . . . . . . . . . . 261Enabling Default Responses to ErrorConditions . . . . . . . . . . . 261Eliminating the AFS Tape Name Check 262Setting the Memory Buffer Size toPromote Tape Streaming . . . . . . 263Dumping Data to a Backup Data File 263To configure a backup data file . . . . 264
Chapter 7. Backing Up and RestoringAFS Data . . . . . . . . . . . . 269Summary of Instructions . . . . . . . 269Using the Backup System’s Interfaces . . . 269
Performing Backup Operations as theLocal Superuser Root or in a Foreign Cell 270Using Interactive and Regular CommandMode . . . . . . . . . . . . 271
To enter interactive mode . . . . . . 272To exit interactive mode . . . . . . 272To display pending or running jobs ininteractive mode . . . . . . . . . 272To cancel operations in interactive mode 275Starting and Stopping the TapeCoordinator Process . . . . . . . . 275To start a Tape Coordinator process . . 276To stop a Tape Coordinator process . . 277To check the status of a TapeCoordinator process . . . . . . . . 277
Backing Up Data . . . . . . . . . . 279Making Backup Operations MoreEfficient . . . . . . . . . . . . 280How Your Configuration ChoicesInfluence the Dump Process . . . . . 284Appending Dumps to an Existing DumpSet . . . . . . . . . . . . . 290Scheduling Dumps . . . . . . . . 293To create a dump . . . . . . . . 293
Displaying Backup Dump Records . . . . 296To display dump records . . . . . . 297To display a volume’s dump history 301To scan the contents of a tape . . . . 302
Restoring and Recovering Data . . . . . 304Making Restore Operations MoreEfficient . . . . . . . . . . . . 305Using the backup volrestore Command 307To restore volumes with the backupvolrestore command. . . . . . . . 308Using the backup diskrestore Command 310To restore a partition with the backupdiskrestore command . . . . . . . 311Using the backup volsetrestoreCommand . . . . . . . . . . . 313To restore a group of volumes with thebackup volsetrestore command . . . . 317
Maintaining the Backup Database . . . . 319Backing Up and Restoring the BackupDatabase . . . . . . . . . . . 319Checking for and Repairing Corruptionin the Backup Database . . . . . . 320To verify the integrity of the BackupDatabase . . . . . . . . . . . 320To repair corruption in the BackupDatabase . . . . . . . . . . . 321Removing Obsolete Records from theBackup Database . . . . . . . . . 323To delete dump records from the BackupDatabase . . . . . . . . . . . 324
Contents vii
Chapter 8. Monitoring and Auditing AFSPerformance . . . . . . . . . . . 327Summary of Instructions . . . . . . . 327Using the scout Program . . . . . . . 327
System Requirements . . . . . . . 328Using the -basename argument toSpecify a Domain Name . . . . . . 328The Layout of the scout Display. . . . 329Highlighting Significant Statistics . . . 331Resizing the scout Display . . . . . 332To start the scout program . . . . . 332To stop the scout program . . . . . 335Example Commands and Displays . . . 335
Using the fstrace Command Suite . . . . 339About the fstrace Command Suite . . . 340Requirements for Using the fstraceCommand Suite . . . . . . . . . 341Using fstrace Commands Effectively 342Activating the Trace Log . . . . . . 342To configure the trace log . . . . . . 343To set the event set . . . . . . . . 343Displaying the State of a Trace Log orEvent Set . . . . . . . . . . . 343To display the state of an event set . . . 343To display the log size . . . . . . . 344Dumping and Clearing the Trace Log 345To dump the contents of a trace log . . 345To clear the contents of a trace log . . . 347Examples of fstrace Commands . . . . 347
Using the afsmonitor Program . . . . . 349Requirements for running the afsmonitorprogram. . . . . . . . . . . . 350The afsmonitor Output Screens . . . . 350The System Overview Screen. . . . . 352The File Servers Screen. . . . . . . 353The Cache Managers Screen . . . . . 355
Configuring the afsmonitor Program . . . 356Writing afsmonitor Statistics to a File . . . 359To start the afsmonitor Program. . . . . 360To stop the afsmonitor program . . . . . 361The xstat Data Collection Facility . . . . 361
The libxstat Libraries . . . . . . . 362Example xstat Commands. . . . . . 363
Auditing AFS Events on AIX File Servers 365Configuring AFS Auditing on AIX FileServers . . . . . . . . . . . . 366To enable AFS auditing. . . . . . . 366To disable AFS auditing . . . . . . 366
Chapter 9. Managing Server EncryptionKeys. . . . . . . . . . . . . . 369Summary of Instructions . . . . . . . 369About Server Encryption Keys . . . . . 369
Keys and Mutual Authentication: AReview . . . . . . . . . . . . 369Maintaining AFS Server Encryption Keys 370
Displaying Server Encryption Keys. . . . 372To display the KeyFile file. . . . . . 372To display the afs key from theAuthentication Database . . . . . . 373
Adding Server Encryption Keys . . . . . 374To add a new server encryption key 375
Removing Server Encryption Keys . . . . 378To remove a key from the KeyFile file 378
Handling Server Encryption KeyEmergencies . . . . . . . . . . . 379
Prevent Mutual Authentication . . . . 380Disable Authorization Checking by Hand 380Work Quickly on Each Machine . . . . 381Work at the Console. . . . . . . . 381Change Individual KeyFile Files. . . . 381Two Component Procedures . . . . . 382To create a new server encryption key inemergencies . . . . . . . . . . 382
Chapter 10. Administering ClientMachines and the Cache Manager . . . 387Summary of Instructions . . . . . . . 387Overview of Cache Manager Customization 388Configuration and Cache-Related Files onthe Local Disk. . . . . . . . . . . 390
Configuration Files in the /usr/vice/etcDirectory . . . . . . . . . . . 391Cache-Related Files . . . . . . . . 393
Determining the Cache Type, Size, andLocation. . . . . . . . . . . . . 393
Choosing the Cache Size . . . . . . 394Displaying and Setting the Cache Sizeand Location . . . . . . . . . . 395To display the cache size set at reboot 395To display the current cache size . . . 396To edit the cacheinfo file . . . . . . 396To change the disk cache size withoutrebooting . . . . . . . . . . . 396To reset the disk cache size to the defaultwithout rebooting . . . . . . . . 397How the Cache Manager Chooses Datato Discard . . . . . . . . . . . 397
viii AFS: Administration Guide
Setting Other Cache Parameters with theafsd program . . . . . . . . . . . 398
Setting Cache Configuration Parameters 398Configuring a Disk Cache . . . . . . 399Controlling Memory CacheConfiguration . . . . . . . . . . 401
Maintaining Knowledge of Database ServerMachines . . . . . . . . . . . . 402
How Clients Use the List of DatabaseServer Machines . . . . . . . . . 403The Format of the CellServDB file . . . 404Maintaining the Client CellServDB File 405To display the /usr/vice/etc/CellServDBfile . . . . . . . . . . . . . 406To display the list of database servermachines in kernel memory . . . . . 406To change the list of a cell’s databaseserver machines in kernel memory . . . 406
Determining if a Client Can Run SetuidPrograms . . . . . . . . . . . . 408
To determine a cell’s setuid status . . . 409To change a cell’s setuid status . . . . 409
Setting the File Server Probe Interval . . . 410To set a client’s file server probe interval 410
Setting a Client Machine’s Cell Membership 410To display a client machine’s cellmembership . . . . . . . . . . 411To set a client machine’s cell membership 411
Forcing the Update of Cached Data . . . 411To flush certain files or directories . . . 412To flush all data from a volume . . . . 413To force the Cache Manager to noticeother volume changes . . . . . . . 413To flush one or more mount points. . . 413
Maintaining Server Preference Ranks . . . 414How the Cache Manager Sets DefaultRanks . . . . . . . . . . . . 414How the Cache Manager Uses PreferenceRanks . . . . . . . . . . . . 415Displaying and Setting Preference Ranks 416To display server preference ranks . . . 417To set server preference ranks . . . . 418
Managing Multihomed Client Machines 419To create or edit the client NetInfo file 420To create or edit the client NetRestrictfile . . . . . . . . . . . . . 421To display the list of addresses fromkernel memory . . . . . . . . . 421To set the list of addresses in kernelmemory . . . . . . . . . . . . 421
Controlling the Display of Warning andInformational Messages . . . . . . . 422
To control the display of warning andstatus messages . . . . . . . . . 422
Displaying and Setting the System TypeName . . . . . . . . . . . . . 423
To display the system type name . . . 423To change the system type name . . . 423
Enabling Asynchronous Writes . . . . . 424To set the default store asynchrony. . . 425To set the store asynchrony for one ormore files . . . . . . . . . . . 425To display the default store asynchrony 426To display the store asynchrony for oneor more files . . . . . . . . . . 426
Chapter 11. Configuring Client Machineswith the package Program . . . . . . 429Summary of Instructions . . . . . . . 429Using the package Program . . . . . . 429
Using Package on File Server Machines 430Package Overview . . . . . . . . . 430
Preparing Prototype Files . . . . . . 430Compiling Prototype Files. . . . . . 431Preparing Clients. . . . . . . . . 431
The package Directory Structure . . . . 431The src directory . . . . . . . . . 432The lib directory . . . . . . . . . 432The etc directory . . . . . . . . . 432
Example Prototype and Library Files . . . 433An Example Prototype File . . . . . 433Example Library File . . . . . . . 434
Package Configuration File InstructionSyntax . . . . . . . . . . . . . 436
Local Files versus Symbolic Links . . . 437Defining a Directory . . . . . . . 438Defining a File . . . . . . . . . 438Defining a Symbolic Link . . . . . . 438Defining a Block Special Device . . . . 439Defining a Character Special Device . . 439Defining a Socket . . . . . . . . 440
Constructing Prototype and Library Files 440To construct a prototype file and itscomponent library files. . . . . . . 440
The Package Makefile File. . . . . . . 441Overview . . . . . . . . . . . 441The CONFIG Section . . . . . . . 441The BASE_LIBS Section . . . . . . 442The MACHINE_LIBS Section. . . . . 443The LIBS Section . . . . . . . . . 443
Contents ix
The .SUFFIXES Section . . . . . . . 443The Makefile Instructions Section . . . 444
Modifying the Makefile . . . . . . . 444Adding a New Prototype File . . . . 444Adding a New System Type . . . . . 445Adding New Library Files . . . . . 445
Compiling Prototype Files. . . . . . . 446To compile prototype files . . . . . . 446
Modifying Client Machines . . . . . . 447To prepare a client machine to run thepackage program. . . . . . . . . 447
Running the package program . . . . . 449To invoke the package program byrebooting . . . . . . . . . . . 449To invoke the package program directly(without rebooting) . . . . . . . . 450
Chapter 12. Creating and Deleting UserAccounts with the uss Command Suite 453Summary of Instructions . . . . . . . 453Overview of the uss Command Suite . . . 453
The Components of an AFS UserAccount . . . . . . . . . . . . 454Privilege Requirements for the ussCommands. . . . . . . . . . . 455Avoiding and Recovering from Errorsand Interrupted Operations . . . . . 455
Creating Local Password File Entries withuss . . . . . . . . . . . . . . 457
Assigning AFS and UNIX UIDs thatMatch . . . . . . . . . . . . 457Specifying Passwords in the LocalPassword File . . . . . . . . . . 458Creating a Common Source PasswordFile . . . . . . . . . . . . . 459
Converting Existing UNIX Accounts withuss . . . . . . . . . . . . . . 461
Making UNIX and AFS UIDs Match 461Setting the Password Field Appropriately 462Moving Local Files into AFS . . . . . 462
Constructing a uss Template File . . . . 463Creating the Three Types of UserAccounts . . . . . . . . . . . 464Using Constants and Variables in theTemplate File . . . . . . . . . . 465Where to Place Template Files . . . . 466Some General Rules for Constructing aTemplate . . . . . . . . . . . 467About Creating Local Disk Directoriesand Files . . . . . . . . . . . 468
Example uss Templates. . . . . . . 468Evenly Distributing User HomeDirectories with the G Instruction . . . 470Creating a Volume with the V Instruction 471Creating a Directory with the DInstruction . . . . . . . . . . . 475Creating a File from a Prototype with theF Instruction . . . . . . . . . . 477Creating One-Line Files with the EInstruction . . . . . . . . . . . 479Creating Links with the L and SInstructions . . . . . . . . . . 481Increasing Account Security with the AInstruction . . . . . . . . . . . 483Executing Commands with the XInstruction . . . . . . . . . . . 485
Creating Individual Accounts with the ussadd Command . . . . . . . . . . 485
To create an AFS account with the ussadd command. . . . . . . . . . 486
Deleting Individual Accounts with the ussdelete Command . . . . . . . . . . 492
To delete an AFS account . . . . . . 493Creating and Deleting Multiple Accountswith the uss bulk Command . . . . . . 496
Constructing a Bulk Input File . . . . 496Example Bulk Input File Instructions 499To create and delete multiple AFS useraccounts . . . . . . . . . . . 500
Chapter 13. Administering User Accounts 505Summary of Instructions . . . . . . . 505The Components of an AFS User Account 506Creating Local Password File Entries . . . 506
Assigning AFS and UNIX UIDs thatMatch . . . . . . . . . . . . 507Specifying Passwords in the LocalPassword File . . . . . . . . . . 508
Converting Existing UNIX Accounts . . . 508Making UNIX and AFS UIDs Match 508Setting the Password Field Appropriately 509Moving Local Files into AFS . . . . . 509
Creating AFS User Accounts . . . . . . 510To create one user account withindividual commands . . . . . . . 511
Improving Password and AuthenticationSecurity . . . . . . . . . . . . . 517
To limit the number of consecutive failedauthentication attempts . . . . . . 520To unlock a locked user account. . . . 521
x AFS: Administration Guide
To set password lifetime . . . . . . 522To prohibit reuse of passwords . . . . 523
Changing AFS Passwords . . . . . . . 524To change an AFS password . . . . . 524
Displaying and Setting the Quota on UserVolumes. . . . . . . . . . . . . 525Changing Usernames . . . . . . . . 525
To change a username . . . . . . . 525Removing a User Account. . . . . . . 529
To remove a user account . . . . . . 529
Chapter 14. Administering the ProtectionDatabase . . . . . . . . . . . . 533Summary of Instructions . . . . . . . 533About the Protection Database . . . . . 533
The System Groups . . . . . . . . 534Displaying Information from the ProtectionDatabase . . . . . . . . . . . . 535
To display a Protection Database entry 536To display group membership . . . . 538To list the groups that a user or groupowns . . . . . . . . . . . . . 539To display all Protection Database entries 540
Creating User and Machine Entries. . . . 541To create machine entries in theProtection Database . . . . . . . . 543
Creating Groups . . . . . . . . . . 544Using Groups Effectively . . . . . . 545To create groups . . . . . . . . . 546To create a self-owned group. . . . . 547Using Prefix-Less Groups . . . . . . 547
Adding and Removing Group Members 548To add users and machines to groups 548To remove users and machines fromgroups . . . . . . . . . . . . 549
Deleting Protection Database Entries . . . 549To delete Protection Database entries 549
Changing a Group’s Owner . . . . . . 550To change a group’s owner . . . . . 551
Changing a Protection Database Entry’sName . . . . . . . . . . . . . 552
To change the name of a machine orgroup entry . . . . . . . . . . 553
Setting Group-Creation Quota . . . . . 553To set group-creation quota . . . . . 553
Setting the Privacy Flags on DatabaseEntries . . . . . . . . . . . . . 554
To set a Protection Database entry’sprivacy flags . . . . . . . . . . 555
Displaying and Setting the AFS UID andGID Counters . . . . . . . . . . . 556
To display the AFS ID counters . . . . 557To set the AFS ID counters . . . . . 557
Chapter 15. Managing Access ControlLists . . . . . . . . . . . . . . 559Summary of Instructions . . . . . . . 559Protecting Data in AFS . . . . . . . . 559
Differences Between UFS and AFS DataProtection . . . . . . . . . . . 559The AFS ACL Permissions. . . . . . 561Using Normal and Negative Permissions 563Using Groups on ACLs . . . . . . 564
Displaying ACLs . . . . . . . . . . 566To display an ACL . . . . . . . . 566
Setting ACL Entries . . . . . . . . . 568To add, remove, or edit normal ACLpermissions . . . . . . . . . . 568To add, remove, or edit negative ACLpermissions . . . . . . . . . . 570
Completely Replacing an ACL . . . . . 571To replace an ACL completely . . . . 571
Copying ACLs Between Directories . . . 572To copy an ACL between directories 572
Removing Obsolete AFS IDs from ACLs 574To clean obsolete AFS IDs from an ACL 574
How AFS Interprets the UNIX Mode Bits 575
Chapter 16. Managing AdministrativePrivilege . . . . . . . . . . . . 577Summary of Instructions . . . . . . . 577An Overview of Administrative Privilege 577
The Reason for Separate Privileges . . . 578Administering the system:administratorsGroup . . . . . . . . . . . . . 578
To display the members of thesystem:administrators group . . . . . 579To add users to thesystem:administrators group . . . . . 579To remove users from thesystem:administrators group . . . . . 579
Granting Privilege for kas Commands: theADMIN Flag . . . . . . . . . . . 580
To check if the ADMIN flag is set . . . 580To set or remove the ADMIN flag . . . 580
Administering the UserList File . . . . . 581To display the users in the UserList file 582To add users to the UserList file. . . . 582To remove users from the UserList file 583
Contents xi
Appendix A. Managing the NFS/AFSTranslator . . . . . . . . . . . . 585Summary of Instructions . . . . . . . 585Overview . . . . . . . . . . . . 585
Enabling Unauthenticated orAuthenticated AFS Access. . . . . . 585Setting the AFSSERVER and AFSCONFEnvironment Variables . . . . . . . 586Delayed Writes for Files Saved on NFSClient Machines . . . . . . . . . 588
Configuring NFS/AFS Translator Machines 589Loading NFS and AFS Kernel Extensions 590Configuring the Translator Machine toAccept AFS Commands . . . . . . 590Controlling Optional Translator Features 590To configure an NFS/AFS translatormachine. . . . . . . . . . . . 592To disable or enable Translatorfunctionality, or set optional features 594
Configuring NFS Client Machines . . . . 594To configure an NFS client machine toaccess AFS . . . . . . . . . . . 596
Configuring User Accounts . . . . . . 597To configure a user account for issuingAFS commands . . . . . . . . . 598
Authenticating on Unsupported NFS ClientMachines . . . . . . . . . . . . 599
To authenticate using the knfs command 600To display tokens using the knfscommand . . . . . . . . . . . 601To discard tokens using the knfscommand . . . . . . . . . . . 601
Appendix B. Using AFS Commands . . . 603AFS Command Syntax . . . . . . . . 603
Command Names . . . . . . . . 603Options . . . . . . . . . . . . 603Arguments . . . . . . . . . . . 604Flags . . . . . . . . . . . . . 604An Example Command . . . . . . 604Rules for Entering AFS Commands. . . 605
Rules for Using Abbreviations andAliases . . . . . . . . . . . . 607Displaying Online Help for AFSCommands. . . . . . . . . . . 609
Appendix C. The afsmonitor ProgramStatistics . . . . . . . . . . . . 611The Cache Manager Statistics . . . . . 611
Performance Statistics Section(PerfStats_section) . . . . . . . . 612Server Up/Down Statistics Section(Server_UpDown_section) . . . . . . 613RPC Operation Measurements Section(RPCop_section) . . . . . . . . . 616Authentication and Replicated FileAccess Section (Auth_Access_section) 633
The File Server Statistics . . . . . . . 633Performance Statistics Section(PerfStats_section) . . . . . . . . 634RPC Operations Section (RPCop_section) 636
Appendix D. AIX Audit Events . . . . . 645Introduction . . . . . . . . . . . 645Audit-Specific Events . . . . . . . . 645Volume Server Events . . . . . . . . 646Backup Server Events . . . . . . . . 649Protection Server Events . . . . . . . 651Authentication Events . . . . . . . . 652File Server and Cache Manager InterfaceEvents . . . . . . . . . . . . . 654BOS Server Events . . . . . . . . . 656Volume Location Server Events . . . . . 658
Index . . . . . . . . . . . . . 659
Notices . . . . . . . . . . . . . 685Trademarks . . . . . . . . . . . 687
Readers’ Comments — We’d Like to Hearfrom You . . . . . . . . . . . . 689
xii AFS: Administration Guide
Figures
1. File Sharing Between the Read/writeSource and a Clone Volume . . . . 157
2. First example scout display . . . . 3363. Second example scout display 3374. Third example scout display . . . . 3385. Fourth example scout display 339
6. The afsmonitor System OverviewScreen. . . . . . . . . . . . 353
7. The afsmonitor File Servers Screen 3548. The afsmonitor File Servers Screen
Shifted One Page to the Right . . . . 3559. The afsmonitor Cache Managers Screen 356
© Copyright IBM Corp. 1989, 2000 xiii

xiv AFS: Administration Guide

Tables
1. Suggested volume prefixes . . . . . 332. Example volume-prefixing scheme 343. Source for values of uss template
variables . . . . . . . . . . . 465
4. Command-line argument sources foruss template variables . . . . . . 486
© Copyright IBM Corp. 1989, 2000 xv

xvi AFS: Administration Guide
About This Guide
This section describes the purpose, organization, and conventions of thisdocument.
Audience and Purpose
This guide describes the concepts and procedures that an AFS®
systemadministrator needs to know. It assumes familiarity with UNIX
®
administration, but no previous knowledge of AFS.
This document describes AFS commands in the context of specific tasks. Thus,it does not describe all commands in detail. Refer to the AFS AdministrationReference for detailed command descriptions.
Document Organization
This document groups AFS administrative tasks into the following conceptualsections:v Concepts and Configuration Issuesv Managing File Server Machinesv Managing Client Machinesv Managing Users and Groups
The individual chapters in each section contain the following:v A chapter overviewv A quick reference list of the tasks and commands described in the chapterv An introduction to concepts that pertain to all of the tasks described in the
chapterv A set of sections devoted to specific tasks. Each section begins with a
discussion of concepts specific to that task, followed by step-by-stepinstructions for performing the task. The instructions are as specific as hasbeen judged practical. If two related procedures differ from one another inimportant details, separate sets of instructions are usually provided.
How to Use This Document
When you need to perform a specific administrative task, follow these steps:
© Copyright IBM Corp. 1989, 2000 xvii

1. Determine if the task concerns file server machines, client machines, orusers and groups. Turn to the appropriate section in this document andthen to the appropriate chapter.
2. Read or review the general introductory material at the beginning of thechapter.
3. Read or review the introductory material concerning the specific task youwish to perform.
4. Follow the step-by-step instructions for the task.5. If necessary, refer to the AFS Administration Reference for more detailed
information about the commands.
Related Documents
The following documents are also included in the AFS documentation set.
AFS Administration Reference
This reference manual details the syntax and effect of each AFS command. Itis intended for the experienced AFS administrator, programmer, or user.
The AFS Administration Reference lists AFS files and commands in alphabeticalorder. The reference page for each command specifies its syntax, including theacceptable aliases and abbreviations. It then describes the command’sfunction, arguments, and output if any. Examples and a list of relatedcommands are provided, as are warnings where appropriate.
This manual complements the AFS Administration Guide: it does not includeprocedural information, but describes commands in more detail than the AFSAdministration Guide.
AFS Quick Beginnings
This guide provides instructions for installing AFS server and client machines.It is assumed that the installer is an experienced UNIX
®
system administrator.
For predictable performance, machines must be installed and configured inaccordance with the instructions in this guide.
AFS Release Notes
This document provides information specific to each release of AFS, such as alist of new features and commands, a list of requirements and limitations, andinstructions for upgrading server and client machines.
xviii AFS: Administration Guide
AFS User Guide
This guide presents the basic concepts and procedures necessary for usingAFS effectively. It assumes that the reader has some experience with UNIX,but does not require familiarity with networking or AFS.
The guide explains how to perform basic functions, including authenticating,changing a password, protecting AFS data, creating groups, andtroubleshooting. It provides illustrative examples for each function anddescribes some of the differences between the UNIX file system and AFS.
Typographical Conventions
This document uses the following typographical conventions:v Command and option names appear in bold type in syntax definitions,
examples, and running text. Names of directories, files, machines, partitions,volumes, and users also appear in bold type.
v Variable information appears in italic type. This includes user-suppliedinformation on command lines and the parts of prompts that differdepending on who issues the command. New terms also appear in italictype.
v Examples of screen output and file contents appear in monospace type.
In addition, the following symbols appear in command syntax definitions,both in the documentation and in AFS online help statements. When issuing acommand, do not type these symbols.v Square brackets [ ] surround optional items.v Angle brackets < > surround user-supplied values in AFS commands.v A superscripted plus sign + follows an argument that accepts more than
one value.v The percent sign % represents the regular command shell prompt. Some
operating systems possibly use a different character for this prompt.v The number sign # represents the command shell prompt for the local
superuser root. Some operating systems possibly use a different characterfor this prompt.
v The pipe symbol | in a command syntax statement separates mutuallyexclusive values for an argument.
For additional information on AFS commands, including a description ofcommand string components, acceptable abbreviations and aliases, and howto get online help for commands, see “Appendix B. Using AFS Commands” onpage 603.
About This Guide xix

xx AFS: Administration Guide
Chapter 1. An Overview of AFS Administration
This chapter provides a broad overview of the concepts and organization ofAFS. It is strongly recommended that anyone involved in administering anAFS cell read this chapter before beginning to issue commands.
A Broad Overview of AFS
This section introduces most of the key terms and concepts necessary for abasic understanding of AFS. For a more detailed discussion, see “MoreDetailed Discussions of Some Basic Concepts” on page 4.
AFS: A Distributed File System
AFS is a distributed file system that enables users to share and access all of thefiles stored in a network of computers as easily as they access the files storedon their local machines. The file system is called distributed for this exactreason: files can reside on many different machines (be distributed acrossthem), but are available to users on every machine.
Servers and Clients
In fact, AFS stores files on a subset of the machines in a network, called fileserver machines. File server machines provide file storage and delivery service,along with other specialized services, to the other subset of machines in thenetwork, the client machines. These machines are called clients because theymake use of the servers’ services while doing their own work. In a standardAFS configuration, clients provide computational power, access to the files inAFS and other ″general purpose″ tools to the users seated at their consoles.There are generally many more client workstations than file server machines.
AFS file server machines run a number of server processes, so called becauseeach provides a distinct specialized service: one handles file requests, anothertracks file location, a third manages security, and so on. To avoid confusion,AFS documentation always refers to server machines and server processes, notsimply to servers. For a more detailed description of the server processes, see“AFS Server Processes and the Cache Manager” on page 11.
Cells
A cell is an administratively independent site running AFS. As a cell’s systemadministrator, you make many decisions about configuring and maintaining
© Copyright IBM Corp. 1989, 2000 1
your cell in the way that best serves its users, without having to consult theadministrators in other cells. For example, you determine how many clientsand servers to have, where to put files, and how to allocate client machines tousers.
Transparent Access and the Uniform Namespace
Although your AFS cell is administratively independent, you probably wantto organize the local collection of files (your filespace or tree) so that users fromother cells can also access the information in it. AFS enables cells to combinetheir local filespaces into a global filespace, and does so in such a way that fileaccess is transparent—users do not need to know anything about a file’slocation in order to access it. All they need to know is the pathname of thefile, which looks the same in every cell. Thus every user at every machinesees the collection of files in the same way, meaning that AFS provides auniform namespace to its users.
Volumes
AFS groups files into volumes, making it possible to distribute files acrossmany machines and yet maintain a uniform namespace. A volume is a unit ofdisk space that functions like a container for a set of related files, keepingthem all together on one partition. Volumes can vary in size, but are (bydefinition) smaller than a partition.
Volumes are important to system administrators and users for several reasons.Their small size makes them easy to move from one partition to another, oreven between machines. The system administrator can maintain maximumefficiency by moving volumes to keep the load balanced evenly. In addition,volumes correspond to directories in the filespace—most cells store thecontents of each user home directory in a separate volume. Thus the completecontents of the directory move together when the volume moves, making iteasy for AFS to keep track of where a file is at a certain time. Volume movesare recorded automatically, so users do not have to keep track of file locations.
Efficiency Boosters: Replication and Caching
AFS incorporates special features on server machines and client machines thathelp make it efficient and reliable.
On server machines, AFS enables administrators to replicate commonly-usedvolumes, such as those containing binaries for popular programs. Replicationmeans putting an identical read-only copy (sometimes called a clone) of avolume on more than one file server machine. The failure of one file servermachine housing the volume does not interrupt users’ work, because the
2 AFS: Administration Guide
volume’s contents are still available from other machines. Replication alsomeans that one machine does not become overburdened with requests for filesfrom a popular volume.
On client machines, AFS uses caching to improve efficiency. When a user on aclient workstation requests a file, the Cache Manager on the client sends arequest for the data to the File Server process running on the proper fileserver machine. The user does not need to know which machine this is; theCache Manager determines file location automatically. The Cache Managerreceives the file from the File Server process and puts it into the cache, an areaof the client machine’s local disk or memory dedicated to temporary filestorage. Caching improves efficiency because the client does not need to senda request across the network every time the user wants the same file. Networktraffic is minimized, and subsequent access to the file is especially fast becausethe file is stored locally. AFS has a way of ensuring that the cached file staysup-to-date, called a callback.
Security: Mutual Authentication and Access Control Lists
Even in a cell where file sharing is especially frequent and widespread, it isnot desirable that every user have equal access to every file. One way AFSprovides adequate security is by requiring that servers and clients prove theiridentities to one another before they exchange information. This procedure,called mutual authentication, requires that both server and client demonstrateknowledge of a ″shared secret″ (like a password) known only to the two ofthem. Mutual authentication guarantees that servers provide information onlyto authorized clients and that clients receive information only from legitimateservers.
Users themselves control another aspect of AFS security, by determining whohas access to the directories they own. For any directory a user owns, he orshe can build an access control list (ACL) that grants or denies access to thecontents of the directory. An access control list pairs specific users withspecific types of access privileges. There are seven separate permissions andup to twenty different people or groups of people can appear on an accesscontrol list.
For a more detailed description of AFS’s mutual authentication procedure, see“A More Detailed Look at Mutual Authentication” on page 63. For furtherdiscussion of ACLs, see “Chapter 15. Managing Access Control Lists” onpage 559.
Chapter 1. An Overview of AFS Administration 3
More Detailed Discussions of Some Basic Concepts
The previous section offered a brief overview of the many concepts that anAFS system administrator needs to understand. The following sectionsexamine some important concepts in more detail. Although not all conceptsare new to an experienced administrator, reading this section helps ensure acommon understanding of term and concepts.
Networks
A network is a collection of interconnected computers able to communicatewith each other and transfer information back and forth.
A networked computing environment contrasts with two types of computingenvironments: mainframe and personal.v A mainframe computing environment is the most traditional. It uses a single
powerful computer (the mainframe) to do the majority of the work in thesystem, both file storage and computation. It serves many users, who accesstheir files and issue commands to the mainframe via terminals, whichgenerally have only enough computing power to accept input from akeyboard and to display data on the screen.
v A personal computing environment is a single small computer that servesone (or, at the most, a few) users. Like a mainframe computer, the singlecomputer stores all the files and performs all computation. Like a terminal,the personal computer provides access to the computer through a keyboardand screen.
A network can connect computers of any kind, but the typical networkrunning AFS connects high-function personal workstations. Each workstationhas some computing power and local disk space, usually more than apersonal computer or terminal, but less than a mainframe. For more about theclasses of machines used in an AFS environment, see “Servers and Clients” onpage 5.
Distributed File Systems
A file system is a collection of files and the facilities (programs and commands)that enable users to access the information in the files. All computingenvironments have file systems. In a mainframe environment, the file systemconsists of all the files on the mainframe’s storage disks, whereas in apersonal computing environment it consists of the files on the computer’slocal disk.
Networked computing environments often use distributed file systems like AFS.A distributed file system takes advantage of the interconnected nature of the
4 AFS: Administration Guide
network by storing files on more than one computer in the network andmaking them accessible to all of them. In other words, the responsibility forfile storage and delivery is ″distributed″ among multiple machines instead ofrelying on only one. Despite the distribution of responsibility, a distributed filesystem like AFS creates the illusion that there is a single filespace.
Servers and Clients
AFS uses a server/client model. In general, a server is a machine, or a processrunning on a machine, that provides specialized services to other machines. Aclient is a machine or process that makes use of a server’s specialized serviceduring the course of its own work, which is often of a more general naturethan the server’s. The functional distinction between clients and server is notalways strict, however—a server can be considered the client of another serverwhose service it is using.
AFS divides the machines on a network into two basic classes, file servermachines and client machines, and assigns different tasks and responsibilities toeach.
File Server Machines
File server machines store the files in the distributed file system, and a serverprocess running on the file server machine delivers and receives files. AFS fileserver machines run a number of server processes. Each process has a specialfunction, such as maintaining databases important to AFS administration,managing security or handling volumes. This modular design enables eachserver process to specialize in one area, and thus perform more efficiently. Fora description of the function of each AFS server process, see “AFS ServerProcesses and the Cache Manager” on page 11.
Not all AFS server machines must run all of the server processes. Someprocesses run on only a few machines because the demand for their servicesis low. Other processes run on only one machine in order to act as asynchronization site. See “The Four Roles for File Server Machines” onpage 79.
Client Machines
The other class of machines are the client machines, which generally workdirectly for users, providing computational power and other general purposetools. Clients also provide users with access to the files stored on the fileserver machines. Clients do not run any special processes per se, but do use amodified kernel that enables them to communicate with the AFS serverprocesses running on the file server machines and to cache files. This
Chapter 1. An Overview of AFS Administration 5
collection of kernel modifications is referred to as the Cache Manager; see “TheCache Manager” on page 17. There are usually many more client machines ina cell than file server machines.
Client and Server Configuration
In the most typical AFS configuration, both file server machines and clientmachines are high-function workstations with disk drives. While thisconfiguration is not required, it does have some advantages.
There are several advantages to using personal workstations as file servermachines. One is that it is easy to expand the network by adding another fileserver machine. It is also easy to increase storage space by adding disks toexisting machines. Using workstations rather than more powerful mainframesmakes it more economical to use multiple file server machines rather thanone. Multiple file server machines provide an increase in system availabilityand reliability if popular files are available on more than one machine.
The advantage of using workstations as clients is that caching on the local diskspeeds the delivery of files to application programs. (For an explanation ofcaching, see “Caching and Callbacks” on page 9.) Diskless machines can accessAFS if they are running NFS® and the NFS/AFS Translator, an optionalcomponent of the AFS distribution.
Cells
A cell is an independently administered site running AFS. In terms ofhardware, it consists of a collection of file server machines and clientmachines defined as belonging to the cell; a machine can only belong to onecell at a time. Users also belong to a cell in the sense of having an account init, but unlike machines can belong to (have an account in) multiple cells. Tosay that a cell is administratively independent means that its administratorsdetermine many details of its configuration without having to consultadministrators in other cells or a central authority. For example, a celladministrator determines how many machines of different types to run, whereto put files in the local tree, how to associate volumes and directories, andhow much space to allocate to each user.
The terms local cell and home cell are equivalent, and refer to the cell in whicha user has initially authenticated during a session, by logging onto a machinethat belongs to that cell. All other cells are referred to as foreign from theuser’s perspective. In other words, throughout a login session, a user isaccessing the filespace through a single Cache Manager—the one on themachine to which he or she initially logged in—whose cell membershipdefines the local cell. All other cells are considered foreign during that login
6 AFS: Administration Guide
session, even if the user authenticates in additional cells or uses the cdcommand to change directories into their file trees.
It is possible to maintain more than one cell at a single geographical location.For instance, separate departments on a university campus or in a corporationcan choose to administer their own cells. It is also possible to have machinesat geographically distant sites belong to the same cell; only limits on thespeed of network communication determine how practical this is.
Despite their independence, AFS cells generally agree to make their localfilespace visible to other AFS cells, so that users in different cells can sharefiles if they choose. If your cell is to participate in the ″global″ AFSnamespace, it must comply with a few basic conventions governing how thelocal filespace is configured and how the addresses of certain file servermachines are advertised to the outside world.
The Uniform Namespace and Transparent Access
One of the features that makes AFS easy to use is that it provides transparentaccess to the files in a cell’s filespace. Users do not have to know which fileserver machine stores a file in order to access it; they simply provide the file’spathname, which AFS automatically translates into a machine location.
In addition to transparent access, AFS also creates a uniform namespace—a file’spathname is identical regardless of which client machine the user is workingon. The cell’s file tree looks the same when viewed from any client becausethe cell’s file server machines store all the files centrally and present them inan identical manner to all clients.
To enable the transparent access and the uniform namespace features, thesystem administrator must follow a few simple conventions in configuringclient machines and file trees. For details, see “Making Other Cells Visible inYour Cell” on page 28.
Volumes
A volume is a conceptual container for a set of related files that keeps them alltogether on one file server machine partition. Volumes can vary in size, butare (by definition) smaller than a partition. Volumes are the mainadministrative unit in AFS, and have several characteristics that makeadministrative tasks easier and help improve overall system performance.v The relatively small size of volumes makes them easy to move from one
partition to another, or even between machines.v You can maintain maximum system efficiency by moving volumes to keep
the load balanced evenly among the different machines. If a partition
Chapter 1. An Overview of AFS Administration 7

becomes full, the small size of individual volumes makes it easy to findenough room on other machines for them.
v Each volume corresponds logically to a directory in the file tree and keepstogether, on a single partition, all the data that makes up the files in thedirectory. By maintaining (for example) a separate volume for each user’shome directory, you keep all of the user’s files together, but separate fromthose of other users. This is an administrative convenience that isimpossible if the partition is the smallest unit of storage.
v The directory/volume correspondence also makes transparent file accesspossible, because it simplifies the process of file location. All files in adirectory reside together in one volume and in order to find a file, a fileserver process need only know the name of the file’s parent directory,information which is included in the file’s pathname. AFS knows how totranslate the directory name into a volume name, and automatically tracksevery volume’s location, even when a volume is moved from machine tomachine. For more about the directory/volume correspondence, see “MountPoints”.
v Volumes increase file availability through replication and backup.v Replication (placing copies of a volume on more than one file server
machine) makes the contents more reliably available; for details, see“Replication” on page 9. Entire sets of volumes can be backed up to tapeand restored to the file system; see “Chapter 6. Configuring the AFS BackupSystem” on page 217 and “Chapter 7. Backing Up and Restoring AFS Data”on page 269. In AFS, backup also refers to recording the state of a volumeat a certain time and then storing it (either on tape or elsewhere in the filesystem) for recovery in the event files in it are accidentally deleted orchanged. See “Creating Backup Volumes” on page 163.
v Volumes are the unit of resource management. A space quota associatedwith each volume sets a limit on the maximum volume size. See “Settingand Displaying Volume Quota and Current Size” on page 198.
Mount Points
The previous section discussed how each volume corresponds logically to adirectory in the file system: the volume keeps together on one partition all thedata in the files residing in the directory. The directory that corresponds to avolume is called its root directory, and the mechanism that associates thedirectory and volume is called a mount point. A mount point is similar to asymbolic link in the file tree that specifies which volume contains the fileskept in a directory. A mount point is not an actual symbolic link; its internalstructure is different.
8 AFS: Administration Guide
Note: You must not create a symbolic link to a file whose name begins withthe number sign (#) or the percent sign (%), because the CacheManager interprets such a link as a mount point to a regular orread/write volume, respectively.
The use of mount points means that many of the elements in an AFS file treethat look and function just like standard UNIX file system directories areactually mount points. In form, a mount point is a one-line file that names thevolume containing the data for files in the directory. When the Cache Manager(see “The Cache Manager” on page 17) encounters a mount point—forexample, in the course of interpreting a pathname—it looks in the volumenamed in the mount point. In the volume the Cache Manager finds an actualUNIX-style directory element—the volume’s root directory—that lists the filescontained in the directory/volume. The next element in the pathname appearsin that list.
A volume is said to be mounted at the point in the file tree where there is amount point pointing to the volume. A volume’s contents are not visible oraccessible unless it is mounted.
Replication
Replication refers to making a copy, or clone, of a source read/write volumeand then placing the copy on one or more additional file server machines in acell. One benefit of replicating a volume is that it increases the availability ofthe contents. If one file server machine housing the volume fails, users canstill access the volume on a different machine. No one machine need becomeoverburdened with requests for a popular file, either, because the file isavailable from several machines.
Replication is not necessarily appropriate for cells with limited disk space, norare all types of volumes equally suitable for replication (replication is mostappropriate for volumes that contain popular files that do not change veryoften). For more details, see “When to Replicate Volumes” on page 35.
Caching and Callbacks
Just as replication increases system availability, caching increases the speedand efficiency of file access in AFS. Each AFS client machine dedicates aportion of its local disk or memory to a cache where it stores data temporarily.Whenever an application program (such as a text editor) running on a clientmachine requests data from an AFS file, the request passes through the CacheManager. The Cache Manager is a portion of the client machine’s kernel thattranslates file requests from local application programs into cross-networkrequests to the File Server process running on the file server machine storing
Chapter 1. An Overview of AFS Administration 9
the file. When the Cache Manager receives the requested data from the FileServer, it stores it in the cache and then passes it on to the applicationprogram.
Caching improves the speed of data delivery to application programs in thefollowing ways:v When the application program repeatedly asks for data from the same file,
it is already on the local disk. The application does not have to wait for theCache Manager to request and receive the data from the File Server.
v Caching data eliminates the need for repeated request and transfer of thesame data, so network traffic is reduced. Thus, initial requests and othertraffic can get through more quickly.
While caching provides many advantages, it also creates the problem ofmaintaining consistency among the many cached copies of a file and thesource version of a file. This problem is solved using a mechanism referred toas a callback.
A callback is a promise by a File Server to a Cache Manager to inform thelatter when a change is made to any of the data delivered by the File Server.Callbacks are used differently based on the type of file delivered by the FileServer:v When a File Server delivers a writable copy of a file (from a read/write
volume) to the Cache Manager, the File Server sends along a callback withthat file. If the source version of the file is changed by another user, the FileServer breaks the callback associated with the cached version of thatfile—indicating to the Cache Manager that it needs to update the cachedcopy.
v When a File Server delivers a file from a read-only volume to the CacheManager, the File Server sends along a callback associated with the entirevolume (so it does not need to send any more callbacks when it deliversadditional files from the volume). Only a single callback is required peraccessed read-only volume because files in a read-only volume can changeonly when a new version of the complete volume is released. All callbacksassociated with the old version of the volume are broken at release time.
The callback mechanism ensures that the Cache Manager always requests themost up-to-date version of a file. However, it does not ensure that the usernecessarily notices the most current version as soon as the Cache Manager hasit. That depends on how often the application program requests additionaldata from the File System or how often it checks with the Cache Manager.
10 AFS: Administration Guide

AFS Server Processes and the Cache Manager
As mentioned in “Servers and Clients” on page 5, AFS file server machinesrun a number of processes, each with a specialized function. One of the mainresponsibilities of a system administrator is to make sure that processes arerunning correctly as much of the time as possible, using the administrativeservices that the server processes provide.
The following list briefly describes the function of each server process and theCache Manager; the following sections then discuss the important features inmore detail.
The File Server, the most fundamental of the servers, delivers data files fromthe file server machine to local workstations as requested, and stores the filesagain when the user saves any changes to the files.
The Basic OverSeer Server (BOS Server) ensures that the other server processeson its server machine are running correctly as much of the time as possible,since a server is useful only if it is available. The BOS Server relieves systemadministrators of much of the responsibility for overseeing system operations.
The Authentication Server helps ensure that communications on the networkare secure. It verifies user identities at login and provides the facilitiesthrough which participants in transactions prove their identities to oneanother (mutually authenticate). It maintains the Authentication Database.
The Protection Server helps users control who has access to their files anddirectories. Users can grant access to several other users at once by puttingthem all in a group entry in the Protection Database maintained by theProtection Server.
The Volume Server performs all types of volume manipulation. It helps theadministrator move volumes from one server machine to another to balancethe workload among the various machines.
The Volume Location Server (VL Server) maintains the Volume LocationDatabase (VLDB), in which it records the location of volumes as they movefrom file server machine to file server machine. This service is the key totransparent file access for users.
The Update Server distributes new versions of AFS server process software andconfiguration information to all file server machines. It is crucial to stablesystem performance that all server machines run the same software.
The Backup Server maintains the Backup Database, in which it storesinformation related to the Backup System. It enables the administrator to back
Chapter 1. An Overview of AFS Administration 11
up data from volumes to tape. The data can then be restored from tape in theevent that it is lost from the file system.
The Salvager is not a server in the sense that others are. It runs only after theFile Server or Volume Server fails; it repairs any inconsistencies caused by thefailure. The system administrator can invoke it directly if necessary.
The Network Time Protocol Daemon (NTPD) is not an AFS server process per se,but plays a vital role nonetheless. It synchronizes the internal clock on a fileserver machine with those on other machines. Synchronized clocks areparticularly important for correct functioning of the AFS distributed databasetechnology (known as Ubik); see “Configuring the Cell for Proper UbikOperation” on page 86. The NTPD is controlled by the runntp process.
The Cache Manager is the one component in this list that resides on AFS clientrather than file server machines. It not a process per se, but rather a part ofthe kernel on AFS client machines that communicates with AFS serverprocesses. Its main responsibilities are to retrieve files for applicationprograms running on the client and to maintain the files in the cache.
The File Server
The File Server is the most fundamental of the AFS server processes and runson each file server machine. It provides the same services across the networkthat the UNIX file system provides on the local disk:v Delivering programs and data files to client workstations as requested and
storing them again when the client workstation finishes with them.v Maintaining the hierarchical directory structure that users create to organize
their files.v Handling requests for copying, moving, creating, and deleting files and
directories.v Keeping track of status information about each file and directory (including
its size and latest modification time).v Making sure that users are authorized to perform the actions they request
on particular files or directories.v Creating symbolic and hard links between files.v Granting advisory locks (corresponding to UNIX locks) on request.
The Basic OverSeer Server
The Basic OverSeer Server (BOS Server) reduces the demands on systemadministrators by constantly monitoring the processes running on its fileserver machine. It can restart failed processes automatically and provides aconvenient interface for administrative tasks.
12 AFS: Administration Guide
The BOS Server runs on every file server machine. Its primary function is tominimize system outages. It alsov Constantly monitors the other server processes (on the local machine) to
make sure they are running correctly.v Automatically restarts failed processes, without contacting a human
operator. When restarting multiple server processes simultaneously, the BOSserver takes interdependencies into account and initiates restarts in thecorrect order.
v Accepts requests from the system administrator. Common reasons tocontact BOS are to verify the status of server processes on file servermachines, install and start new processes, stop processes either temporarilyor permanently, and restart dead processes manually.
v Helps system administrators to manage system configuration information.The BOS server automates the process of adding and changing serverencryption keys, which are important in mutual authentication. The BOSServer also provides a simple interface for modifying two files that containinformation about privileged users and certain special file server machines.For more details about these configuration files, see “CommonConfiguration Files in the /usr/afs/etc Directory” on page 72.
The Authentication Server
The Authentication Server performs two main functions related to networksecurity:v Verifying the identity of users as they log into the system by requiring that
they provide a password. The Authentication Server grants the user a tokenas proof to AFS server processes that the user has authenticated. For moreon tokens, see “Complex Mutual Authentication” on page 64.
v Providing the means through which server and client processes prove theiridentities to each other (mutually authenticate). This helps to create a secureenvironment in which to send cross-network messages.
In fulfilling these duties, the Authentication Server utilizes algorithms andother procedures known as Kerberos (which is why many commands used tocontact the Authentication Server begin with the letter k). This technologywas originally developed by the Massachusetts Institute of Technology’sProject Athena.
The Authentication Server also maintains the Authentication Database, in whichit stores user passwords converted into encryption key form as well as theAFS server encryption key. To learn more about the procedures AFS uses toverify user identity and during mutual authentication, see “A More DetailedLook at Mutual Authentication” on page 63.
Chapter 1. An Overview of AFS Administration 13
The Protection Server
The Protection Server is the key to AFS’s refinement of the normal UNIXmethods for protecting files and directories from unauthorized use. Therefinements include the following:v Defining seven access permissions rather than the standard UNIX file
system’s three. In conjunction with the UNIX mode bits associated witheach file and directory element, AFS associates an access control list (ACL)with each directory. The ACL specifies which users have which of the sevenspecific permissions for the directory and all the files it contains. For adefinition of AFS’s seven access permissions and how users can set them onaccess control lists, see “Chapter 15. Managing Access Control Lists” onpage 559.
v Enabling users to grant permissions to numerous individual users—adifferent combination to each individual if desired. UNIX protectiondistinguishes only between three user or groups: the owner of the file,members of a single specified group, and everyone who can access the localfile system.
v Enabling users to define their own groups of users, recorded in theProtection Database maintained by the Protection Server. The groups thenappear on directories’ access control lists as though they were individuals,which enables the granting of permissions to many users simultaneously.
v Enabling system administrators to create groups containing client machineIP addresses to permit access when it originates from the specified clientmachines. These types of groups are useful when it is necessary to adhereto machine-based licensing restrictions.
The Protection Server’s main duty is to help the File Server determine if auser is authorized to access a file in the requested manner. The ProtectionServer creates a list of all the groups to which the user belongs. The FileServer then compares this list to the ACL associated with the file’s parentdirectory. A user thus acquires access both as an individual and as a memberof any groups.
The Protection Server also maps usernames (the name typed at the loginprompt) to AFS user ID numbers (AFS UIDs). These UIDs are functionallyequivalent to UNIX UIDs, but operate in the domain of AFS rather than in theUNIX file system on a machine’s local disk. This conversion service isessential because the tokens that the Authentication Server grants toauthenticated users are stamped with usernames (to comply with Kerberosstandards). The AFS server processes identify users by AFS UID, not byusername. Before they can understand whom the token represents, they needthe Protection Server to translate the username into an AFS UID. For furtherdiscussion of tokens, see “A More Detailed Look at Mutual Authentication” onpage 63.
14 AFS: Administration Guide
The Volume Server
The Volume Server provides the interface through which you create, delete,move, and replicate volumes, as well as prepare them for archiving to tape orother media (backing up). “Volumes” on page 7 explained the advantagesgained by storing files in volumes. Creating and deleting volumes arenecessary when adding and removing users from the system; volume movesare done for load balancing; and replication enables volume placement onmultiple file server machines (for more on replication, see “Replication” onpage 9).
The Volume Location (VL) Server
The VL Server maintains a complete list of volume locations in the VolumeLocation Database (VLDB). When the Cache Manager (see “The CacheManager” on page 17) begins to fill a file request from an application program,it first contacts the VL Server in order to learn which file server machinecurrently houses the volume containing the file. The Cache Manager thenrequests the file from the File Server process running on that file servermachine.
The VLDB and VL Server make it possible for AFS to take advantage of theincreased system availability gained by using multiple file server machines,because the Cache Manager knows where to find a particular file. Indeed, in acertain sense the VL Server is the keystone of the entire file system—when theinformation in the VLDB is inaccessible, the Cache Manager cannot retrievefiles, even if the File Server processes are working properly. A list of theinformation stored in the VLDB about each volume is provided in “VolumeInformation in the VLDB” on page 150.
The Update Server
The Update Server helps guarantee that all file server machines are running thesame version of a server process. System performance can be inconsistent ifsome machines are running one version of the BOS Server (for example) andother machines were running another version.
To ensure that all machines run the same version of a process, install newsoftware on a single file server machine of each system type, called the binarydistribution machine for that type. The binary distribution machine runs theserver portion of the Update Server, whereas all the other machines of that typerun the client portion of the Update Server. The client portions check frequentlywith the server portion to see if they are running the right version of everyprocess; if not, the client portion retrieves the right version from the binarydistribution machine and installs it locally. The system administrator does not
Chapter 1. An Overview of AFS Administration 15
need to remember to install new software individually on all the file servermachines: the Update Server does it automatically. For more on binarydistribution machines, see “Binary Distribution Machines” on page 81.
In cells that run the United States edition of AFS, the Update Server alsodistributes configuration files that all file server machines need to store ontheir local disks (for a description of the contents and purpose of these files,see “Common Configuration Files in the /usr/afs/etc Directory” on page 72).As with server process software, the need for consistent system performancedemands that all the machines have the same version of these files. With theUnited States edition, the system administrator needs to make changes tothese files on one machine only, the cell’s system control machine, which runs aserver portion of the Update Server. All other machines in the cell run a clientportion that accesses the correct versions of these configuration files from thesystem control machine. Cells running the international edition of AFS do notuse a system control machine to distribute configuration files. For moreinformation, see “The System Control Machine” on page 82.
The Backup Server
The Backup Server maintains the information in the Backup Database. TheBackup Server and the Backup Database enable administrators to back updata from AFS volumes to tape and restore it from tape to the file system ifnecessary. The server and database together are referred to as the BackupSystem.
Administrators initially configure the Backup System by defining sets ofvolumes to be dumped together and the schedule by which the sets are to bedumped. They also install the system’s tape drives and define the drives’ TapeCoordinators, which are the processes that control the tape drives.
Once the Backup System is configured, user and system data can be dumpedfrom volumes to tape. In the event that data is ever lost from the system (forexample, if a system or disk failure causes data to be lost), administrators canrestore the data from tape. If tapes are periodically archived, or saved, datacan also be restored to its state at a specific time. Additionally, becauseBackup System data is difficult to reproduce, the Backup Database itself canbe backed up to tape and restored if it ever becomes corrupted. For moreinformation on configuring and using the Backup System, see “Chapter 6.Configuring the AFS Backup System” on page 217 and “Chapter 7. Backing Upand Restoring AFS Data” on page 269.
16 AFS: Administration Guide
The Salvager
The Salvager differs from other AFS Servers in that it runs only at selectedtimes. The BOS Server invokes the Salvager when the File Server, VolumeServer, or both fail. The Salvager attempts to repair disk corruption that canresult from a failure.
As a system administrator, you can also invoke the Salvager as necessary,even if the File Server or Volume Server has not failed. See “SalvagingVolumes” on page 192.
The Network Time Protocol Daemon
The Network Time Protocol Daemon (NTPD) is not an AFS server process per se,but plays an important role. It helps guarantee that all of the file servermachines agree on the time. The NTPD on one file server machine acts as asynchronization site, generally learning the correct time from a source outsidethe cell. The NTPDs on the other file server machines refer to thesynchronization site to set the internal clocks on their machines.
Keeping clocks synchronized is particularly important to the correct operationof AFS’s distributed database technology, which coordinates the copies of theAuthentication, Backup, Protection, and Volume Location Databases; see“Replicating the AFS Administrative Databases” on page 38. Client machinesalso refer to these clocks for the correct time; therefore, it is less confusing ifall file server machines have the same time. For more technical detail aboutthe NTPD, see “The runntp Process” on page 126.
The Cache Manager
As already mentioned in “Caching and Callbacks” on page 9, the CacheManager is the one component in this section that resides on client machinesrather than on file server machines. It is not technically a stand-alone process,but rather a set of extensions or modifications in the client machine’s kernelthat enable communication with the server processes running on servermachines. Its main duty is to translate file requests (made by applicationprograms on client machines) into remote procedure calls (RPCs) to the FileServer. (The Cache Manager first contacts the VL Server to find out which FileServer currently houses the volume that contains a requested file, asmentioned in “The Volume Location (VL) Server” on page 15). When theCache Manager receives the requested file, it caches it before passing data onto the application program.
The Cache Manager also tracks the state of files in its cache compared to theversion at the File Server by storing the callbacks sent by the File Server.
Chapter 1. An Overview of AFS Administration 17
When the File Server breaks a callback, indicating that a file or volumechanged, the Cache Manager requests a copy of the new version beforeproviding more data to application programs.
18 AFS: Administration Guide
Chapter 2. Issues in Cell Configuration and Administration
This chapter discusses many of the issues to consider when configuring andadministering a cell, and directs you to detailed related information availableelsewhere in this guide. It is assumed you are already familiar with thematerial in “Chapter 1. An Overview of AFS Administration” on page 1.
It is best to read this chapter before installing your cell’s first file servermachine or performing any other administrative task.
Differences between AFS and UNIX: A Summary
AFS behaves like a standard UNIX file system in most respects, while alsomaking file sharing easy within and between cells. This section describessome differences between AFS and the UNIX file system, referring you tomore detailed information as appropriate.
Differences in File and Directory Protection
AFS augments the standard UNIX file protection mechanism in two ways: itassociates an access control list (ACL) with each directory, and it enables usersto define a large number of their own groups, which can be placed on ACLs.
AFS uses ACLs to protect files and directories, rather than relying exclusivelyon the mode bits. This has several implications, which are discussed further inthe indicated sections:v AFS ACLs use seven access permissions rather than the three UNIX mode
bits. See “The AFS ACL Permissions” on page 561.v For directories, AFS ignores the UNIX mode bits. For files, AFS uses only
the first set of mode bits (the owner bits) , and their meaning interacts withpermissions on the directory’s ACL. See “How AFS Interprets the UNIXMode Bits” on page 575.
v A directory’s ACL protects all of the files in a directory in the same manner.To apply a more restrictive set of AFS permissions to certain file, place it indirectory with a different ACL.
v Moving a file to a different directory changes its protection. See “DifferencesBetween UFS and AFS Data Protection” on page 559.
v An ACL can include about 20 entries granting different combinations ofpermissions to different users or groups, rather than only the three UNIXentities represented by the three sets of mode bits. See “Differences BetweenUFS and AFS Data Protection” on page 559.
© Copyright IBM Corp. 1989, 2000 19

v You can designate an AFS file as write-only as in the UNIX file system, bysetting only the w (write) mode bit. You cannot designate an AFS directoryas write-only, because AFS ignores the mode bits on a directory. See “HowAFS Interprets the UNIX Mode Bits” on page 575.
AFS enables users to define the groups of other users. Placing these groups onACLs extends the same permissions to a number of exactly specified users atthe same time, which is much more convenient than placing the individualson the ACLs directly. See “Chapter 14. Administering the Protection Database”on page 533.
There are also system-defined groups, system:anyuser and system:authuser,whose presence on an ACL extends access to a wide range of users at once.See “The System Groups” on page 534 and “Using Groups on ACLs” onpage 564.
Differences in Authentication
Just as the AFS filespace is distinct from each machine’s local file system, AFSauthentication is separate from local login. This has two practical implications,which are discussed further in “Using an AFS-modified login Utility” onpage 53.v To access AFS files, users must both log into the local machine’s UNIX file
system and authenticate with the AFS authentication service. (Logging intothe local UNIX file system is necessary because the AFS filespace isaccessed through the Cache Manager, which resides in the local machine’skernel.)AFS provides a modified login utility for each system type thataccomplishes both local login and AFS authentication in one step, based ona single password. If you choose not to use the AFS-modified login utility,your users must login and authenticate in separate steps, as detailed in theAFS User Guide.
v Passwords are stored in two separate places: the Authentication Databasefor AFS and each machine’s local password file (/etc/passwd or equivalent)for the UNIX file system. A user’s passwords in the two places can differ ifdesired, though the resulting behavior depends on whether and how thecell is using an AFS-modified login utility.
Differences in the Semantics of Standard UNIX Commands
This section summarizes how AFS modifies the functionality of some UNIXcommands.
The chmod commandOnly members of the system:administrators group can use this
20 AFS: Administration Guide
command to turn on the setuid, setgid or sticky mode bits on AFSfiles. For more information, see “Determining if a Client Can RunSetuid Programs” on page 408.
The chown commandOnly members of the system:administrators group can issue thiscommand on AFS files.
The chgrp commandOnly members of the system:administrators can issue this commandon AFS files and directories.
The ftpd daemonThe AFS-modified version of this daemon attempts to authenticateremote issuers of the ftp command with the local AFS authenticationservice. See “Using UNIX Remote Services in the AFS Environment”on page 67.
The groups commandIf the user’s AFS tokens are associated with a process authenticationgroup (PAG), the output of this command sometimes includes twolarge numbers. To learn about PAGs, see “Identifying AFS Tokens byPAG” on page 52.
The inetd daemonThe AFS-modified version of this daemon authenticates remote issuersof the AFS-modified rcp and rsh commands with the local AFSauthentication service. See “Using UNIX Remote Services in the AFSEnvironment” on page 67.
The login utilityAFS-modified login utilities both log the issuer into the local filesystem and authenticate the user with the AFS authentication service.See “Using an AFS-modified login Utility” on page 53.
The ln commandThis command cannot create hard links between files in different AFSdirectories. See “Creating Hard Links” on page 22.
The rcp commandThe AFS-modified version of this command enables the issuer toaccess files on the remote machine as an authenticated AFS user. See“Using UNIX Remote Services in the AFS Environment” on page 67.
The rlogind daemonThe AFS-modified version of this daemon authenticates remote issuersof the rlogin command with the local AFS authentication service. See“Using UNIX Remote Services in the AFS Environment” on page 67.
The AFS distribution for some system types possibly does not includea modified rlogind program. See the AFS Release Notes.
Chapter 2. Issues in Cell Configuration and Administration 21
The remsh or rsh commandThe AFS-modified version of this command enables the issuer toexecute commands on the remote machine as an authenticated AFSuser. See “Using UNIX Remote Services in the AFS Environment” onpage 67.
The AFS version of the fsck Command
Never run the standard UNIX fsck command on an AFS file server machine.It does not understand how the File Server organizes volume data on disk,and so moves all AFS data into the lost+found directory on the partition.
Instead, use the version of the fsck program that is included in the AFSdistribution. The AFS Quick Beginnings explains how to replace thevendor-supplied fsck program with the AFS version as you install each servermachine.
The AFS version functions like the standard fsck program on data stored onboth UFS and AFS partitions. The appearance of a banner like the followingas the fsck program initializes confirms that you are running the correct one:
--- AFS (R) version fsck---
where version is the AFS version. For correct results, it must match the AFSversion of the server binaries in use on the machine.
If you ever accidentally run the standard version of the program, contact AFSProduct Support immediately. It is sometimes possible to recover volume datafrom the lost+found directory.
Creating Hard Links
AFS does not allow hard links (created with the UNIX ln command) betweenfiles that reside in different directories, because in that case it is unclear whichof the directory’s ACLs to associate with the link.
AFS also does not allow hard links to directories, in order to keep the filesystem organized as a tree.
It is possible to create symbolic links (with the UNIX ln -s command) betweenelements in two different AFS directories, or even between an element in AFSand one in a machine’s local UNIX file system. Do not create a symbolic linkto a file whose name begins with either a number sign (#) or a percent sign(%), however. The Cache Manager interprets such links as a mount point to aregular or read/write volume, respectively.
22 AFS: Administration Guide

AFS Implements Save on Close
When an application issues the UNIX close system call on a file, the CacheManager performs a synchronous write of the data to the File Server thatmaintains the central copy of the file. It does not return control to theapplication until the File Server has acknowledged receipt of the data. For thefsync system call, control does not return to the application until the FileServer indicates that it has written the data to non-volatile storage on the fileserver machine.
When an application issues the UNIX write system call, the Cache Managerwrites modifications to the local AFS client cache only. If the local machinecrashes or an application program exits without issuing the close system call,it is possible that the modifications are not recorded in the central copy of thefile maintained by the File Server. The Cache Manager does sometimes writethis type of modified data from the cache to the File Server without receivingthe close or fsync system call, for example if it needs to free cache chunks fornew data. However, it is not generally possible to predict when the CacheManager transfers modified data to the File Server in this way.
The implication is that if an application’s Save option invokes the writesystem call rather than close or fsync, the changes are not necessarily storedpermanently on the File Server machine. Most application programs issue theclose system call for save operations, as well as when they finish handling afile and when they exit.
Setuid Programs
Set the UNIX setuid bit only for the local superuser root; this does not presentan automatic security risk: the local superuser has no special privilege in AFS,but only in the local machine’s UNIX file system and kernel.
Any file can be marked with the setuid bit, but only members of thesystem:administrators group can issue the chown system call or the/etc/chown command.
The fs setcell command determines whether setuid programs that originate ina foreign cell can run on a given client machine. See “Determining if a ClientCan Run Setuid Programs” on page 408.
Choosing a Cell Name
This section explains how to choose a cell name and explains why choosingan appropriate cell name is important.
Chapter 2. Issues in Cell Configuration and Administration 23
Your cell name must distinguish your cell from all others in the AFS globalnamespace. By conventions, the cell name is the second element in any AFSpathname; therefore, a unique cell name guarantees that every AFS pathnameuniquely identifies a file, even if cells use the same directory names at lowerlevels in their local AFS filespace. For example, both the ABC Corporation celland the State University cell can have a home directory for the user pat,because the pathnames are distinct: /afs/abc.com/usr/pat and/afs/stateu.edu/usr/pat.
By convention, cell names follow the ARPA Internet Domain Systemconventions for site names. If you are already an Internet site, then it issimplest to choose your Internet domain name as the cellname.
If you are not an Internet site, it is best to choose a unique Internet-stylename, particularly if you plan to connect to the Internet in the future. AFSProduct Support is available for help in selecting an appropriate name. Thereare a few constraints on AFS cell names:v It can contain as many as 64 characters, but shorter names are better
because the cell name frequently is part of machine and file names. If yourcell name is long, you can reduce pathname length by creating a symboliclink to the complete cell name, at the second level in your file tree. See“The Second (Cellname) Level” on page 30.
v To guarantee it is suitable for different operating system types, the cellname can contain only lowercase characters, numbers, underscores, dashes,and periods. Do not include command shell metacharacters.
v It can include any number of fields, which are conventionally separated byperiods (see the examples below).
v It must end in a suffix that indicates the type of institution it is, or thecountry in which it is situated. The following are some of the standardsuffixes:
.com For businesses and other commercial organizations. Example:abc.com for the ABC Corporation cell.
.edu For educational institutions such as universities. Example:stateu.edu for the State University cell.
.gov For United States government institutions.
.mil For United States military installations.
Other suffixes are available if none of these are appropriate. You can learnabout suffixes by calling the Defense Data Network [Internet] NetworkInformation Center in the United States at (800) 235-3155. The NIC can alsoprovide you with the forms necessary for registering your cell name as anInternet domain name. Registering your name prevents another Internet sitefrom adopting the name later.
24 AFS: Administration Guide

How to Set the Cell Name
The cell name is recorded in two files on the local disk of each file server andclient machine. Among other functions, these files define the machine’s cellmembership and so affect how programs and processes run on the machine;see “Why Choosing the Appropriate Cell Name is Important” on page 26. Theprocedure for setting the cell name is different for the two types of machines.
For file server machines, the two files that record the cell name are the/usr/afs/etc/ThisCell and /usr/afs/etc/CellServDB files. As described moreexplicitly in the AFS Quick Beginnings, you set the cell name in both by issuingthe bos setcellname command on the first file server machine you install inyour cell. It is not usually necessary to issue the command again. If you runthe United States edition of AFS and use the Update Server, it distributes itscopy of the ThisCell and CellServDB files to additional server machines thatyou install. If you use the international edition of AFS, the AFS QuickBeginnings explains how to copy the files manually.
For client machines, the two files that record the cell name are the/usr/vice/etc/ThisCell and /usr/vice/etc/CellServDB files. You create these fileson a per-client basis, either with a text editor or by copying them onto themachine from a central source in AFS. See “Maintaining Knowledge ofDatabase Server Machines” on page 402 for details.
Change the cell name in these files only when you want to transfer themachine to a different cell (it can only belong to one cell at a time). If themachine is a file server, follow the complete set of instructions in the AFSQuick Beginnings for configuring a new cell. If the machine is a client, all youneed to do is change the files appropriately and reboot the machine. The nextsection explains further the negative consequences of changing the name of anexisting cell.
To set the default cell name used by most AFS commands without changingthe local /usr/vice/etc/ThisCell file, set the AFSCELL environment variable inthe command shell. It is worth setting this variable if you need to completesignificant administrative work in a foreign cell.
Note: The fs checkservers and fs mkmount commands do not use theAFSCELL variable. The fs checkservers command always defaults tothe cell named in the ThisCell file, unless the -cell argument is used.The fs mkmount command defaults to the cell in which the parentdirectory of the new mount point resides.
Chapter 2. Issues in Cell Configuration and Administration 25
Why Choosing the Appropriate Cell Name is Important
Take care to select a cell name that is suitable for long-term use. Changing acell name later is complicated. An appropriate cell name is important becauseit is the second element in the pathname of all files in a cell’s file tree. Becauseeach cell name is unique, its presence in an AFS pathname makes thepathname unique in the AFS global namespace, even if multiple cells usesimilar filespace organization at lower levels. For instance, it means that everycell can have a home directory called /afs/cellname/usr/pat without causing aconflict. The presence of the cell name in pathnames also means that users inevery cell use the same pathname to access a file, whether the file resides intheir local cell or in a foreign cell.
Another reason to choose the correct cell name early in the process ofinstalling your cell is that the cell membership defined in each machine’sThisCell file affects the performance of many programs and processes runningon the machine. For instance, AFS commands (fs, kas, pts and voscommands) by default execute in the cell of the machine on which they areissued. The command interpreters check the ThisCell file on the local diskand then contact the database server machines listed in the CellServDB filefor the indicated cell (the bos commands work differently because the issueralways has to name of the machine on which to run the command).
The ThisCell file also determines the cell for which a user receives an AFStoken when he or she logs in to a machine. The cell name also plays a role insecurity. As it converts a user password into an encryption key for storage inthe Authentication Database, the Authentication Server combines thepassword with the cell name found in the ThisCell file. AFS-modified loginutilities use the same algorithm to convert the user’s password into anencryption key before contacting the Authentication Server to obtain a tokenfor the user. (For a description of how AFS’s security system uses encryptionkeys, see “A More Detailed Look at Mutual Authentication” on page 63.)
This method of converting passwords into encryption keys means that thesame password results in different keys in different cells. Even if a user usesthe same password in multiple cells, obtaining a user’s token from one celldoes not enable unauthorized access to the user’s account in another cell.
If you change the cell name, you must change the ThisCell and CellServDBfiles on every server and client machine. Failure to change them all canprevent login, because the encryption keys produced by the login utility donot match the keys stored in the Authentication Database. In addition, manycommands from the AFS suites do not work as expected.
26 AFS: Administration Guide
Participating in the AFS Global Namespace
Participating in the AFS global namespace makes your cell’s local file treevisible to AFS users in foreign cells and makes other cells’ file trees visible toyour local users. It makes file sharing across cells just as easy as sharingwithin a cell. This section outlines the procedures necessary for participatingin the global namespace.v Participation in the global namespace is not mandatory. Some cells use AFS
primarily to facilitate file sharing within the cell, and are not interested inproviding their users with access to foreign cells.
v Making your file tree visible does not mean making it vulnerable. Youcontrol how foreign users access your cell using the same protectionmechanisms that control local users’ access. See “Granting and DenyingForeign Users Access to Your Cell” on page 29.
v The two aspects of participation are independent. A cell can make its filetree visible without allowing its users to see foreign cells’ file trees, or canenable its users to see other file trees without advertising its own.
v You make your cell visible to others by advertising your database servermachines. See “Making Your Cell Visible to Others” on page 28.
v You control access to foreign cells on a per-client machine basis. In otherwords, it is possible to make a foreign cell accessible from one clientmachine in your cell but not another. See “Making Other Cells Visible inYour Cell” on page 28.
What the Global Namespace Looks Like
The AFS global namespace appears the same to all AFS cells that participatein it, because they all agree to follow a small set of conventions inconstructing pathnames.
The first convention is that all AFS pathnames begin with the string /afs toindicate that they belong to the AFS global namespace.
The second convention is that the cell name is the second element in an AFSpathname; it indicates where the file resides (that is, the cell in which a fileserver machine houses the file). As noted, the presence of a cell name inpathnames makes the global namespace possible, because it guarantees thatall AFS pathnames are unique even if cells use the same directory names atlower levels in their AFS filespace.
What appears at the third and lower levels in an AFS pathname depends onhow a cell has chosen to arrange its filespace. There are some suggestedconventional directories at the third level; see “The Third Level” on page 31.
Chapter 2. Issues in Cell Configuration and Administration 27
Making Your Cell Visible to Others
You make your cell visible to others by advertising your cell name anddatabase server machines. Just like client machines in the local cell, the CacheManager on machines in foreign cells use the information to reach your cell’sVolume Location (VL) Servers when they need volume and file locationinformation. Similarly, client-side authentication programs running in foreigncells use the information to contact your cell’s authentication service.
There are two places you can make this information available:v In the global CellServDB file maintained by the AFS Product Support
group. This file lists the name and database server machines of every cellthat has agreed to make this information available to other cells.To add or change your cell’s listing in this file, have the official supportcontact at your site call or write to AFS Product Support. Changes to thefile are frequent enough that AFS Product Support does not announce eachone. It is a good policy to check the file for changes on a regular schedule.
v A file called CellServDB.local in the /afs/cellname/service/etc directory ofyour cell’s filespace. List only your cell’s database server machines.
Update the files whenever you change the identity of your cell’s databaseserver machines. Also update the copies of the CellServDB files on all of yourserver machines (in the /usr/afs/etc directory) and client machines (in the/usr/vice/etc directory). For instructions, see “Maintaining the ServerCellServDB File” on page 101 and “Maintaining Knowledge of DatabaseServer Machines” on page 402.
Once you have advertised your database server machines, it can be difficult tomake your cell invisible again. You can remove the CellServDB.local file andask AFS Product Support to remove your entry from the global CellServDBfile, but other cells probably have an entry for your cell in their localCellServDB files already. To make those entries invalid, you must change thenames or IP addresses of your database server machines.
Your cell does not have to be invisible to be inaccessible, however. To makeyour cell completely inaccessible to foreign users, remove the system:anyusergroup from all ACLs at the top three levels of your filespace; see “Grantingand Denying Foreign Users Access to Your Cell” on page 29.
Making Other Cells Visible in Your Cell
To make a foreign cell’s filespace visible on a client machine in your cell,perform the following three steps:
28 AFS: Administration Guide

1. Mount the cell’s root.cell volume at the second level in your cell’sfilespace just below the /afs directory. Use the fs mkmount command withthe -cell argument as instructed in “To create a cellular mount point” onpage 174.
2. Mount AFS at the /afs directory on the client machine. The afsd program,which initializes the Cache Manager, performs the mount automatically atthe directory named in the first field of the local /usr/vice/etc/cacheinfo fileor by the command’s -mountdir argument. Mounting AFS at an alternatelocation makes it impossible to reach the filespace of any cell that mountsits root.afs and root.cell volumes at the conventional locations. See“Displaying and Setting the Cache Size and Location” on page 395.
3. Create an entry for the cell in the list of database server machines whichthe Cache Manager maintains in kernel memory.The /usr/vice/etc/CellServDB file on every client machine’s local disk liststhe database server machines for the local and foreign cells. The afsdprogram reads the contents of the CellServDB file into kernel memory asit initializes the Cache Manager. You can also use the fs newcell commandto add or alter entries in kernel memory directly between reboots of themachine. See “Maintaining Knowledge of Database Server Machines” onpage 402.
Note that making a foreign cell visible to client machines does not guaranteethat your users can access its filespace. The ACLs in the foreign cell must alsogrant them the necessary permissions.
Granting and Denying Foreign Users Access to Your Cell
Making your cell visible in the AFS global namespace does not take awayyour control over the way in which users from foreign cells access your filetree.
By default, foreign users access your cell as the user anonymous, whichmeans they have only the permissions granted to the system:anyuser groupon each directory’s ACL. Normally these permissions are limited to the l(lookup) and r (read) permissions.
There are two ways to grant wider access to foreign users:v Grant additional permissions to the system:anyuser group on certain ACLs.
Keep in mind, however, that all users can then access that directory in theindicated way (not just specific foreign users you have in mind).
v Create a local authentication account for specific foreign users, by creatingentries in the Protection and Authentication Databases and local passwordfile. It is not possible to place foreign usernames on ACLs, nor toauthenticate in a foreign cell without having an account in it.
Chapter 2. Issues in Cell Configuration and Administration 29

Configuring Your AFS Filespace
This section summarizes the issues to consider when configuring your AFSfilespace. For a discussion of creating volumes that correspond most efficientlyto the filespace’s directory structure, see “Creating Volumes to SimplifyAdministration” on page 32.
Note for Windows users: Windows uses a backslash ( \ ) rather than aforward slash ( / ) to separate the elements in a pathname. The hierarchicalorganization of the filespace is however the same as on a UNIX machine.
AFS pathnames must follow a few conventions so the AFS global namespacelooks the same from any AFS client machine. There are correspondingconventions to follow in building your file tree, not just because pathnamesreflect the structure of a file tree, but also because the AFS Cache Managerexpects a certain configuration.
The Top /afs Level
The first convention is that the top level in your file tree be called the /afsdirectory. If you name it something else, then you must use the -mountdirargument with the afsd program to get Cache Managers to mount AFSproperly. You cannot participate in the AFS global namespace in that case.
The Second (Cellname) Level
The second convention is that just below the /afs directory you placedirectories corresponding to each cell whose file tree is visible and accessiblefrom the local cell. Minimally, there must be a directory for the local cell. Eachsuch directory is a mount point to the indicated cell’s root.cell volume. Forexample, in the ABC Corporation cell, /afs/abc.com is a mount point for thecell’s own root.cell volume and stateu.edu is a mount point for the StateUniversity cell’s root.cell volume. The fs lsmount command displays themount points.
% fs lsmount /afs/abc.com'/afs/abc.com' is a mount point for volume '#root.cell'% fs lsmount /afs/stateu.edu'/afs/stateu.edu' is a mount point for volume '#stateu.edu:root.cell'
To reduce the amount of typing necessary in pathnames, you can create asymbolic link with an abbreviated name to the mount point of each cell yourusers frequently access (particularly the home cell). In the ABC Corporationcell, for instance, /afs/abc is a symbolic link to the /afs/abc.com mount point,as the fs lsmount command reveals.
% fs lsmount /afs/abc'/afs/abc' is a symbolic link, leading to a mount point for volume '#root.cell'
30 AFS: Administration Guide
The Third Level
You can organize the third level of your cell’s file tree any way you wish. Thefollowing list describes directories that appear at this level in the conventionalconfiguration:
commonThis directory contains programs and files needed by users workingon machines of all system types, such as text editors, onlinedocumentation files, and so on. Its /etc subdirectory is a logical placeto keep the central update sources for files used on all of your cell’sclient machines, such as the ThisCell and CellServDB files.
public A directory accessible to anyone who can access your filespace,because its ACL grants the l (lookup) and r (read) permissions to thesystem:anyuser group. It is useful if you want to enable your users tomake selected information available to everyone, but do not want togrant foreign users access to the contents of the usr directory whichhouses user home directories ( and is also at this level). It isconventional to create a subdirectory for each of your cell’s users.
serviceThis directory contains files and subdirectories that help cellscoordinate resource sharing. For a list of the proposed standard filesand subdirectories to create, call or write to AFS Product Support.
As an example, files that other cells expect to find in this directory’setc subdirectory can include the following:v CellServDB.export, a list of database server machines for many
cellsv CellServDB.local, a list of the cell’s own database server machinesv passwd, a copy of the local password file (/etc/passwd or
equivalent) kept on the local disk of the cell’s client machinesv group, a copy of the local groups file (/etc/group or equivalent)
kept on the local disk of the cell’s client machines
sys_typeA separate directory for storing the server and client binaries for eachsystem type you use in the cell. Configuration is simplest if you usethe system type names assigned in the AFS distribution, particularly ifyou wish to use the @sys variable in pathnames (see “Using the @sysVariable in Pathnames” on page 42). The AFS Release Notes lists theconventional name for each supported system type.
Within each such directory, create directories named bin, etc, usr, andso on, to store the programs normally kept in the /bin, /etc and /usrdirectories on a local disk. Then create symbolic links from the localdirectories on client machines into AFS; see “Configuring the Local
Chapter 2. Issues in Cell Configuration and Administration 31
Disk” on page 41. Even if you do not choose to use symbolic links inthis way, it can be convenient to have central copies of system binariesin AFS. If binaries are accidentally removed from a machine, you canrecopy them onto the local disk from AFS rather than having torecover them from tape
usr This directory contains home directories for your local users. Asdiscussed in the previous entry for the public directory, it is oftenpractical to protect this directory so that only locally authenticatedusers can access it. This keeps the contents of your user’s homedirectories as secure as possible.
If your cell is quite large, directory lookup can be slowed if you putall home directories in a single usr directory. For suggestions ondistributing user home directories among multiple groupingdirectories, see “Grouping Home Directories” on page 47.
wsadminThis directory contains prototype, configuration and library files foruse with the package program. See “Chapter 11. Configuring ClientMachines with the package Program” on page 429.
Creating Volumes to Simplify Administration
This section discusses how to create volumes in ways that make administeringyour system easier.
At the top levels of your file tree (at least through the third level), eachdirectory generally corresponds to a separate volume. Some cells alsoconfigure the subdirectories of some third level directories as separatevolumes. Common examples are the /afs/cellname/common and/afs/cellname/usr directories.
You do not have to create a separate volume for every directory level in atree, but the advantage is that each volume tends to be smaller and easier tomove for load balancing. The overhead for a mount point is no greater thanfor a standard directory, nor does the volume structure itself require muchdisk space. Most cells find that below the fourth level in the tree, using aseparate volume for each directory is no longer efficient. For instance, whileeach user’s home directory (at the fourth level in the tree) corresponds to aseparate volume, all of the subdirectories in the home directory normallyreside in the same volume.
Keep in mind that only one volume can be mounted at a given directorylocation in the tree. In contrast, a volume can be mounted at several locations,
32 AFS: Administration Guide

though this is not recommended because it distorts the hierarchical nature ofthe file tree, potentially causing confusion.
Assigning Volume Names
You can name your volumes anything you choose, subject to a fewrestrictions:v Read/write volume names can be up to 22 characters in length. The
maximum length for volume names is 31 characters, and there must beroom to add the .readonly extension on read-only volumes.
v Do not add the .readonly and .backup extensions to volume namesyourself, even if they are appropriate. The Volume Server adds themautomatically as it creates a read-only or backup version of a volume.
v There must be volumes named root.afs and root.cell, mounted respectivelyat the top (/afs) level in the filespace and just below that level, at the cell’sname (for example, at /afs/abc.com in the ABC Corporation cell).Deviating from these names only creates confusion and extra work.Changing the name of the root.afs volume, for instance, means that youmust use the -rootvol argument to the afsd program on every clientmachine, to name the alternate volume.Similarly, changing the root.cell volume name prevents users in foreigncells from accessing your filespace, if the mount point for your cell in theirfilespace refers to the conventional root.cell name. Of course, this is oneway to make your cell invisible to other cells.
It is best to assign volume names that indicate the type of data they contain,and to use similar names for volumes with similar contents. It is also helpfulif the volume name is similar to (or at least has elements in common with) thename of the directory at which it is mounted. Understanding the pattern thenenables you accurately to guess what a volume contains and where it ismounted.
Many cells find that the most effective volume naming scheme puts acommon prefix on the names of all related volumes. Table 1 describes therecommended prefixing scheme.
Table 1. Suggested volume prefixes
Prefix Contents Example Name Example Mount Point
common. popular programs andfiles
common.etc /afs/cellname/common/etc
src. source code src.afs /afs/cellname/src/afs
proj. project data proj.portafs /afs/cellname/proj/portafs
test. testing or othertemporary data
test.smith /afs/cellname/usr/smith/test
Chapter 2. Issues in Cell Configuration and Administration 33
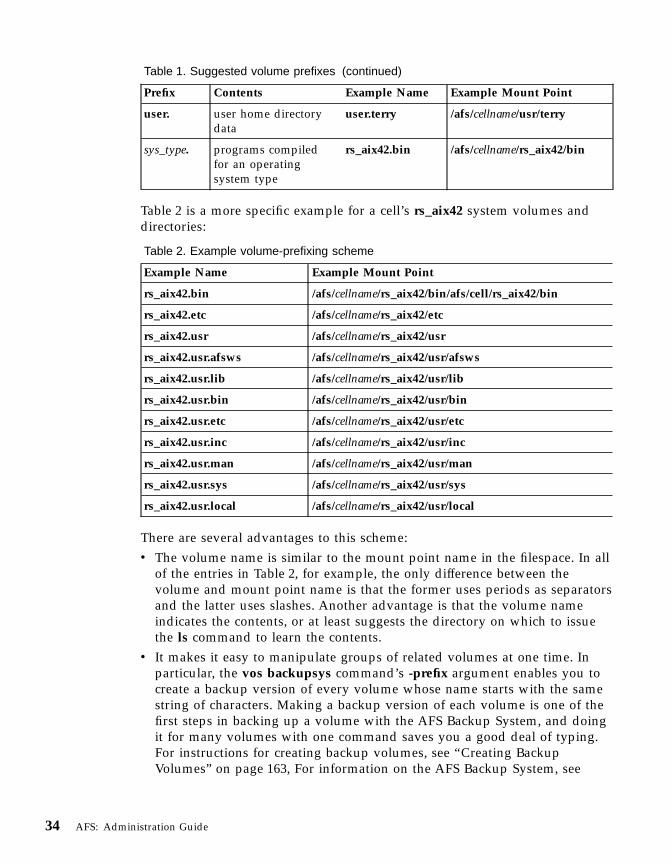
Table 1. Suggested volume prefixes (continued)
Prefix Contents Example Name Example Mount Point
user. user home directorydata
user.terry /afs/cellname/usr/terry
sys_type. programs compiledfor an operatingsystem type
rs_aix42.bin /afs/cellname/rs_aix42/bin
Table 2 is a more specific example for a cell’s rs_aix42 system volumes anddirectories:
Table 2. Example volume-prefixing scheme
Example Name Example Mount Point
rs_aix42.bin /afs/cellname/rs_aix42/bin/afs/cell/rs_aix42/bin
rs_aix42.etc /afs/cellname/rs_aix42/etc
rs_aix42.usr /afs/cellname/rs_aix42/usr
rs_aix42.usr.afsws /afs/cellname/rs_aix42/usr/afsws
rs_aix42.usr.lib /afs/cellname/rs_aix42/usr/lib
rs_aix42.usr.bin /afs/cellname/rs_aix42/usr/bin
rs_aix42.usr.etc /afs/cellname/rs_aix42/usr/etc
rs_aix42.usr.inc /afs/cellname/rs_aix42/usr/inc
rs_aix42.usr.man /afs/cellname/rs_aix42/usr/man
rs_aix42.usr.sys /afs/cellname/rs_aix42/usr/sys
rs_aix42.usr.local /afs/cellname/rs_aix42/usr/local
There are several advantages to this scheme:v The volume name is similar to the mount point name in the filespace. In all
of the entries in Table 2, for example, the only difference between thevolume and mount point name is that the former uses periods as separatorsand the latter uses slashes. Another advantage is that the volume nameindicates the contents, or at least suggests the directory on which to issuethe ls command to learn the contents.
v It makes it easy to manipulate groups of related volumes at one time. Inparticular, the vos backupsys command’s -prefix argument enables you tocreate a backup version of every volume whose name starts with the samestring of characters. Making a backup version of each volume is one of thefirst steps in backing up a volume with the AFS Backup System, and doingit for many volumes with one command saves you a good deal of typing.For instructions for creating backup volumes, see “Creating BackupVolumes” on page 163, For information on the AFS Backup System, see
34 AFS: Administration Guide
“Chapter 6. Configuring the AFS Backup System” on page 217 and“Chapter 7. Backing Up and Restoring AFS Data” on page 269.
v It makes it easy to group related volumes together on a partition. Groupingrelated volumes together has several advantages of its own, discussed in“Grouping Related Volumes on a Partition”.
Grouping Related Volumes on a Partition
If your cell is large enough to make it practical, consider grouping relatedvolumes together on a partition. In general, you need at least three file servermachines for volume grouping to be effective. Grouping has severaladvantages, which are most obvious when the file server machine becomesinaccessible:v If you keep a hardcopy record of the volumes on a partition, you know
which volumes are unavailable. You can keep such a record withoutgrouping related volumes, but a list composed of unrelated volumes ismuch harder to maintain. Note that the record must be on paper, becausethe outage can prevent you from accessing an online copy or from issuingthe vos listvol command, which gives you the same information.
v The effect of an outage is more localized. For example, if all of the binariesfor a given system type are on one partition, then only users of that systemtype are affected. If a partition houses binary volumes from several systemtypes, then an outage can affect more people, particularly if the binariesthat remain available are interdependent with those that are not available.
The advantages of grouping related volumes on a partition do not necessarilyextend to the grouping of all related volumes on one file server machine. Forinstance, it is probably unwise in a cell with two file server machines to putall system volumes on one machine and all user volumes on the other. Anoutage of either machine probably affects everyone.
Admittedly, the need to move volumes for load balancing purposes can limitthe practicality of grouping related volumes. You need to weigh thecomplementary advantages case by case.
When to Replicate Volumes
As discussed in “Replication” on page 9, replication refers to making a copy,or clone, of a read/write source volume and then placing the copy on one ormore additional file server machines. Replicating a volume can increase theavailability of the contents. If one file server machine housing the volumebecomes inaccessible, users can still access the copy of the volume stored on adifferent machine. No one machine is likely to become overburdened withrequests for a popular file, either, because the file is available from severalmachines.
Chapter 2. Issues in Cell Configuration and Administration 35
However, replication is not appropriate for all cells. If a cell does not havemuch disk space, replication can be unduly expensive, because each clone noton the same partition as the read/write source takes up as much disk space asits source volume did at the time the clone was made. Also, if you have onlyone file server machine, replication uses up disk space without increasingavailability.
Replication is also not appropriate for volumes that change frequently. Youmust issue the vos release command every time you need to update aread-only volume to reflect changes in its read/write source.
For both of these reasons, replication is appropriate only for popular volumeswhose contents do not change very often, such as system binaries and othervolumes mounted at the upper levels of your filespace. User volumes usuallyexist only in a read/write version since they change so often.
If you are replicating any volumes, you must replicate the root.afs androot.cell volumes, preferably at two or three sites each (even if your cell onlyhas two or three file server machines). The Cache Manager needs to passthrough the directories corresponding to the root.afs and root.cell volumes asit interprets any pathname. The unavailability of these volumes makes allother volumes unavailable too, even if the file server machines storing theother volumes are still functioning.
Another reason to replicate the root.afs volume is that it can lessen the loadon the File Server machine. The Cache Manager has a bias to access aread-only version of the root.afs volume if it is replicate, which puts theCache Manager onto the read-only path through the AFS filespace. While onthe read-only path, the Cache Manager attempts to access a read-only copy ofreplicated volumes. The File Server needs to track only one callback per CacheManager for all of the data in a read-only volume, rather than the onecallback per file it must track for read/write volumes. Fewer callbackstranslate into a smaller load on the File Server.
If the root.afs volume is not replicated, the Cache Manager follows aread/write path through the filespace, accessing the read/write version ofeach volume. The File Server distributes and tracks a separate callback foreach file in a read/write volume, imposing a greater load on it.
For more on read/write and read-only paths, see “The Rules of Mount PointTraversal” on page 169.
It also makes sense to replicate system binary volumes in many cases, as wellas the volume corresponding to the /afs/cellname/usr directory and thevolumes corresponding to the /afs/cellname/common directory and itssubdirectories.
36 AFS: Administration Guide
It is a good idea to place a replica on the same partition as the read/writesource. In this case, the read-only volume is a clone (like a backup volume): itis a copy of the source volume’s vnode index, rather than a full copy of thevolume contents. Only if the read/write volume moves to another partition orchanges substantially does the read-only volume consume significant diskspace. Read-only volumes kept on other partitions always consume the fullamount of disk space that the read/write source consumed when theread-only volume was created.
The Default Quota and ACL on a New Volume
Every AFS volume has associated with it a quota that limits the amount ofdisk space the volume is allowed to use. To set and change quota, use thecommands described in “Setting and Displaying Volume Quota and CurrentSize” on page 198.
By default, every new volume is assigned a space quota of 5000 KB blocksunless you include the -maxquota argument to the vos create command. Alsoby default, the ACL on the root directory of every new volume grants allpermissions to the members of the system:administrators group. To learn howto change these values when creating an account with individual commands,see “To create one user account with individual commands” on page 511.When using uss commands to create accounts, you can specify alternate ACLand quota values in the template file’s V instruction; see “Creating a Volumewith the V Instruction” on page 471.
Configuring Server Machines
This section discusses some issues to consider when configuring servermachines, which store AFS data, transfer it to client machines on request, andhouse the AFS administrative databases. To learn about client machines, see“Configuring Client Machines” on page 41.
If your cell has more than one AFS server machine, you can configure them toperform specialized functions. A machine can assume one or more of the rolesdescribed in the following list. For more details, see “The Four Roles for FileServer Machines” on page 79.v A simple file server machine runs only the processes that store and deliver
AFS files to client machines. You can run as many simple file servermachines as you need to satisfy your cell’s performance and disk spacerequirements.
v A database server machine runs the four database server processes thatmaintain AFS’s replicated administrative databases: the Authentication,Backup, Protection, and Volume Location (VL) Server processes.
Chapter 2. Issues in Cell Configuration and Administration 37
v A binary distribution machine distributes the AFS server binaries for itssystem type to all other server machines of that system type.
v The single system control machine distributes common server configurationfiles to all other server machines in the cell, in a cell that runs the UnitedStates edition of AFS (cells that use the international edition of AFS mustnot use the system control machine for this purpose). The machineconventionally also serves as the time synchronization source for the cell,adjusting its clock according to a time source outside the cell.
The AFS Quick Beginnings explains how to configure your cell’s first file servermachine to assume all four roles. The AFS Quick Beginnings chapter oninstalling additional server machines also explains how to configure them toperform one or more roles.
Replicating the AFS Administrative Databases
The AFS administrative databases are housed on database server machinesand store information that is crucial for correct cell functioning. Both serverprocesses and Cache Managers access the information frequently:v Every time a Cache Manager fetches a file from a directory that it has not
previously accessed, it must look up the file’s location in the VolumeLocation Database (VLDB).
v Every time a user obtains an AFS token from the Authentication Server, theserver looks up the user’s password in the Authentication Database.
v The first time that a user accesses a volume housed on a specific file servermachine, the File Server contacts the Protection Server for a list of the user’sgroup memberships as recorded in the Protection Database.
v Every time you back up a volume using the AFS Backup System, theBackup Server creates records for it in the Backup Database.
Maintaining your cell is simplest if the first machine has the lowest IP addressof any machine you plan to use as a database server machine. If you laterdecide to use a machine with a lower IP address as a database servermachine, you must update the CellServDB file on all clients beforeintroducing the new machine.
If your cell has more than one server machine, it is best to run more than oneas a database server machine (but more than three are rarely necessary).Replicating the administrative databases in this way yields the same benefitsas replicating volumes: increased availability and reliability. If one databaseserver machine or process stops functioning, the information in the databaseis still available from others. The load of requests for database information isspread across multiple machines, preventing any one from becomingoverloaded.
38 AFS: Administration Guide
Unlike replicated volumes, however, replicated databases do changefrequently. Consistent system performance demands that all copies of thedatabase always be identical, so it is not acceptable to record changes in onlysome of them. To synchronize the copies of a database, the database serverprocesses use AFS’s distributed database technology, Ubik. See “Replicatingthe AFS Administrative Databases” on page 85.
If your cell has only one file server machine, it must also serve as a databaseserver machine. If you cell has two file server machines, it is not alwaysadvantageous to run both as database server machines. If a server, process, ornetwork failure interrupts communications between the database serverprocesses on the two machines, it can become impossible to update theinformation in the database because neither of them can alone elect itself asthe synchronization site.
AFS Files on the Local Disk
It is generally simplest to store the binaries for all AFS server processes in the/usr/afs/bin directory on every file server machine, even if some processes donot actively run on the machine. This makes it easier to reconfigure a machineto fill a new role.
For security reasons, the /usr/afs directory on a file server machine and all ofits subdirectories and files must be owned by the local superuser root andhave only the first w (write) mode bit turned on. Some files even have onlythe first r (read) mode bit turned on (for example, the /usr/afs/etc/KeyFile file,which lists the AFS server encryption keys). Each time the BOS Server starts,it checks that the mode bits on certain files and directories match the expectedvalues. For a list, see the AFS Quick Beginnings section about protectingsensitive AFS directories, or the discussion of the output from the bos statuscommand in “To display the status of server processes and their BosConfigentries” on page 131.
For a description of the contents of all AFS directories on a file servermachine’s local disk, see “Chapter 3. Administering Server Machines” onpage 69.
Configuring Partitions to Store AFS Data
The partitions that house AFS volumes on a file server machine must bemounted at directories named
/vicepindex
Chapter 2. Issues in Cell Configuration and Administration 39

where index is one or two lowercase letters. By convention, the first AFSpartition created is mounted at the /vicepa directory, the second at the /vicepbdirectory, and so on through the /vicepz directory. The names then continuewith /vicepaa through /vicepaz, /vicepba through /vicepbz, and so on, up tothe maximum supported number of server partitions, which is specified in theAFS Release Notes.
Each /vicepx directory must correspond to an entire partition or logicalvolume, and must be a subdirectory of the root directory ( / ). It is notacceptable to configure part of (for example) the /usr partition as an AFSserver partition and mount it on a directory called /usr/vicepa.
Also, do not store non-AFS files on AFS server partitions. The File Server andVolume Server expect to have available all of the space on the partition.Sharing space also creates competition between AFS and the local UNIX filesystem for access to the partition, particularly if the UNIX files are frequentlyused.
Monitoring, Rebooting and Automatic Process Restarts
AFS provides several tools for monitoring the File Server, including the scoutand afsmonitor programs. You can configure them to alert you when certainthreshold values are exceeded, for example when a server partition is morethan 95% full. See “Chapter 8. Monitoring and Auditing AFS Performance” onpage 327.
Rebooting a file server machine requires shutting down the AFS processes andso inevitably causes a service outage. Reboot file server machines asinfrequently as possible. For instructions, see “Rebooting a Server Machine”on page 118.
By default, the BOS Server on each file server machine stops and immediatelyrestarts all AFS server processes on the machine (including itself) once a week,at 4:00 a.m. on Sunday. This reduces the potential for the core leaks that candevelop as any process runs for an extended time.
The BOS Server also checks each morning at 5:00 a.m. for any newly installedbinary files in the /usr/afs/bin directory. It compares the timestamp on eachbinary file to the time at which the corresponding process last restarted. If thetimestamp on the binary is later, the BOS Server restarts the correspondingprocess to start using it.
The default times are in the early morning hours when the outage that resultsfrom restarting a process is likely to disturb the fewest number of people. Youcan display the restart times for each machine with the bos getrestartcommand, and set them with the bos setrestart command. The latter
40 AFS: Administration Guide

command enables you to disable automatic restarts entirely, by setting thetime to never. See “Setting the BOS Server’s Restart Times” on page 143.
Configuring Client Machines
This section summarizes issues to consider as you install and configure clientmachines in your cell.
Configuring the Local Disk
You can often free up significant amounts of local disk space on AFS clientmachines by storing standard UNIX files in AFS and creating symbolic linksto them from the local disk. The @sys pathname variable can be useful inlinks to system-specific files; see “Using the @sys Variable in Pathnames” onpage 42.
There are two types of files that must actually reside on the local disk: bootsequence files needed before the afsd program is invoked, and files that canbe helpful during file server machine outages.
During a reboot, AFS is inaccessible until the afsd program executes andinitializes the Cache Manager. (In the conventional configuration, the AFSinitialization file is included in the machine’s initialization sequence andinvokes the afsd program.) Files needed during reboot prior to that pointmust reside on the local disk. They include the following, but this list is notnecessarily exhaustive.v Standard UNIX utilities including the following or their equivalents:
– Machine initialization files (stored in the /etc or /sbin directory on manysystem types)
– The fstab file– The mount command binary– The umount command binary
v All subdirectories and files in the /usr/vice directory, including thefollowing:– The /usr/vice/cache directory– The /usr/vice/etc/afsd command binary– The /usr/vice/etc/cacheinfo file– The /usr/vice/etc/CellServDB file– The /usr/vice/etc/ThisCell file
For more information on these files, see “Configuration and Cache-RelatedFiles on the Local Disk” on page 390.
Chapter 2. Issues in Cell Configuration and Administration 41

The other type of files and programs to retain on the local disk are those youneed when diagnosing and fixing problems caused by a file server outage,because the outage can make inaccessible the copies stored in AFS. Examplesinclude the binaries for a text editor (such as ed or vi) and for the fs and boscommands. Store copies of AFS command binaries in the /usr/vice/etcdirectory as well as including them in the /usr/afsws directory, which isnormally a link into AFS. Then place the /usr/afsws directory before the/usr/vice/etc directory in users’ PATH environment variable definition. WhenAFS is functioning normally, users access the copy in the /usr/afsws directory,which is more likely to be current than a local copy.
You can automate the configuration of client machine local disks by using thepackage program, which updates the contents of the local disk to match aconfiguration file. See “Chapter 11. Configuring Client Machines with thepackage Program” on page 429.
Enabling Access to Foreign Cells
As detailed in “Making Other Cells Visible in Your Cell” on page 28, youenable the Cache Manager to access a cell’s AFS filespace by storing a list ofthe cell’s database server machines in the local /usr/vice/etc/CellServDB file.The Cache Manager reads the list into kernel memory at reboot for fasterretrieval. You can change the list in kernel memory between reboots by usingthe fs newcell command. It is often practical to store a central version of theCellServDB file in AFS and use the package program periodically to updateeach client’s version with the source copy. See “Maintaining Knowledge ofDatabase Server Machines” on page 402.
Because each client machine maintains its own copy of the CellServDB file,you can in theory enable access to different foreign cells on different clientmachines. This is not usually practical, however, especially if users do notalways work on the same machine.
Using the @sys Variable in Pathnames
When creating symbolic links into AFS on the local disk, it is often practical touse the @sys variable in pathnames. The Cache Manager automaticallysubstitutes the local machine’s AFS system name (CPU/operating systemtype) for the @sys variable. This means you can place the same links onmachines of various system types and still have each machine access thebinaries for its system type. For example, the Cache Manager on a machinerunning AIX 4.2 converts /afs/abc.com/@sys to /afs/abc.com/rs_aix42, whereasa machine running Solaris 7 converts it to /afs/abc.com/sun4x_57.
42 AFS: Administration Guide

If you want to use the @sys variable, it is simplest to use the conventional AFSsystem type names as specified in the AFS Release Notes. The Cache Managerrecords the local machine’s system type name in kernel memory duringinitialization. If you do not use the conventional names, you must use the fssysname command to change the value in kernel memory from its default justafter Cache Manager initialization, on every client machine of the relevantsystem type. The fs sysname command also displays the current value; see“Displaying and Setting the System Type Name” on page 423.
In pathnames in the AFS filespace itself, use the @sys variable carefully andsparingly, because it can lead to unexpected results. It is generally best torestrict its use to only one level in the filespace. The third level is a commonchoice, because that is where many cells store the binaries for differentmachine types.
Multiple instances of the @sys variable in a pathname are especiallydangerous to people who must explicitly change directories (with the cdcommand, for example) into directories that store binaries for system typesother than the machine on which they are working, such as administrators ordevelopers who maintain those directories. After changing directories, it isrecommended that such people verify they are in the desired directory.
Setting Server Preferences
The Cache Manager stores a table of preferences for file server machines inkernel memory. A preference rank pairs a file server machine interface’s IPaddress with an integer in the range from 1 to 65,534. When it needs to accessa file, the Cache Manager compares the ranks for the interfaces of allmachines that house the file, and first attempts to access the file via theinterface with the best rank. As it initializes, the Cache Manager sets defaultranks that bias it to access files via interfaces that are close to it in terms ofnetwork topology. You can adjust the preference ranks to improveperformance if you wish.
The Cache Manager also uses similar preferences for Volume Location (VL)Server machines. Use the fs getserverprefs command to display preferenceranks and the fs setserverprefs command to set them. See “MaintainingServer Preference Ranks” on page 414.
Configuring AFS User Accounts
This section discusses some of the issues to consider when configuring AFSuser accounts. Because AFS is separate from the UNIX file system, a user’sAFS account is separate from her UNIX account.
Chapter 2. Issues in Cell Configuration and Administration 43

The preferred method for creating a user account is with the uss suite ofcommands. With a single command, you can create all the components of oneor many accounts, after you have prepared a template file that guides theaccount creation. See “Chapter 12. Creating and Deleting User Accounts withthe uss Command Suite” on page 453.
Alternatively, you can issue the individual commands that create eachcomponent of an account. For instructions, along with instructions forremoving user accounts and changing user passwords, user volume quotasand usernames, see “Chapter 13. Administering User Accounts” on page 505.
When users leave your system, it is often good policy to remove theiraccounts. Instructions appear in “Deleting Individual Accounts with the ussdelete Command” on page 492 and “Removing a User Account” on page 529.
An AFS user account consists of the following components, which aredescribed in greater detail in “The Components of an AFS User Account” onpage 506.v A Protection Database entryv An Authentication Database entryv A volumev A home directory at which the volume is mountedv Ownership of the home directory and full permissions on its ACLv An entry in the local password file (/etc/passwd or equivalent) of each
machine the user needs to log intov Optionally, standard files and subdirectories that make the account more
useful
By creating some components but not others, you can create accounts atdifferent levels of functionality, using either uss commands as described in“Chapter 12. Creating and Deleting User Accounts with the uss CommandSuite” on page 453 or individual commands as described in “Chapter 13.Administering User Accounts” on page 505. The levels of functionality includethe followingv An authentication-only account enables the user to obtain AFS tokens and so
to access protected AFS data and to issue privileged commands. It consistsonly of entries in the Authentication and Protection Database. This type ofaccount is suitable for administrative accounts and for users from foreigncells who need to access protected data. Local users generally also need avolume and home directory.
v A basic user account includes a volume for the user, in addition toAuthentication and Protection Database entries. The volume is mounted inthe AFS filespace as the user’s home directory, and provides a repository forthe user’s personal files.
44 AFS: Administration Guide
v A full account adds configuration files for basic functions such as logging in,printing, and mail delivery to a basic account, making it more convenientand useful. For a discussion of some useful types of configuration files, see“Creating Standard Files in New AFS Accounts” on page 48.
If your users have UNIX user accounts that predate the introduction of AFS inthe cell, you possibly want to convert them into AFS accounts. There are threemain issues to consider:v Making UNIX and AFS UIDs matchv Setting the password field in the local password file appropriatelyv Moving files from the UNIX file system into AFS
For further discussion, see “Converting Existing UNIX Accounts with uss” onpage 461 or “Converting Existing UNIX Accounts” on page 508.
Choosing Usernames and Naming Other Account Components
This section suggests schemes for choosing usernames, AFS UIDs, uservolume names and mount point names, and also outlines some restrictions onyour choices.
Usernames
AFS imposes very few restrictions on the form of usernames. It is best to keepusernames short, both because many utilities and applications can handleusernames of no more than eight characters and because by convention manycomponents of and AFS account incorporate the name. These include theentries in the Protection and Authentication Databases, the volume, and themount point. Depending on your electronic mail delivery system, theusername can become part of the user’s mailing address. The username is alsothe string that the user types when logging in to a client machine.
Some common choices for usernames are last names, first names, initials, or acombination, with numbers sometimes added. It is also best to avoid usingthe following characters, many of which have special meanings to thecommand shell.v The comma ( , )v The colon ( : ), because AFS reserves it as a field separator in protection
group names; see “The Two Types of User-Defined Groups” on page 51v The semicolon ( ; )v The ″at-sign″ ( @ ); this character is reserved for Internet mailing addressesv Spacesv The newline character
Chapter 2. Issues in Cell Configuration and Administration 45

v The period ( . ); it is conventional to use this character only in the specialusername that an administrator adopts while performing privileged tasks,such as pat.admin
AFS UIDs and UNIX UIDs
AFS associates a unique identification number, the AFS UID, with everyusername, recording the mapping in the user’s Protection Database entry. TheAFS UID functions within AFS much as the UNIX UID does in the local filesystem: the AFS server processes and the Cache Manager use it internally toidentify a user, rather than the username.
Every AFS user also must have a UNIX UID recorded in the local passwordfile (/etc/passwd or equivalent) of each client machine they log onto. Bothadministration and a user’s AFS access are simplest if the AFS UID and UNIXUID match. One important consequence of matching UIDs is that the ownerreported by the ls -l command matches the AFS username.
It is usually best to allow the Protection Server to allocate the AFS UID as itcreates the Protection Database entry. However, both the pts createusercommand and the uss commands that create user accounts enable you toassign AFS UIDs explicitly. This is appropriate in two cases:v You wish to group together the AFS UIDs of related usersv You are converting an existing UNIX account into an AFS account and want
to make the AFS UID match the existing UNIX UID
After the Protection Server initializes for the first time on a cell’s first fileserver machine, it starts assigning AFS UIDs at a default value. To change thedefault before creating any user accounts, or at any time, use the pts setmaxcommand to reset the max user id counter. To display the counter, use the ptslistmax command. See “Displaying and Setting the AFS UID and GIDCounters” on page 556.
AFS reserves one AFS UID, 32766, for the user anonymous. The AFS serverprocesses assign this identity and AFS UID to any user who does not possessa token for the local cell. Do not assign this AFS UID to any other user orhardcode its current value into any programs or a file’s owner field, because itis subject to change in future releases.
User Volume Names
Like any volume name, a user volume’s base (read/write) name cannotexceed 22 characters in length or include the .readonly or .backup extension.See “Creating Volumes to Simplify Administration” on page 32. Byconvention, user volume names have the format user.username. Using the user.
46 AFS: Administration Guide
prefix not only makes it easy to identify the volume’s contents, but also tocreate a backup version of all user volumes by issuing a single vos backupsyscommand.
Mount Point Names
By convention, the mount point for a user’s volume is named after theusername. Many cells follow the convention of mounting user volumes in the/afs/cellname/usr directory, as discussed in “The Third Level” on page 31. Verylarge cells sometimes find that mounting all user volumes in the samedirectory slows directory lookup, however; for suggested alternatives, see thefollowing section.
Grouping Home Directories
Mounting user volumes in the /afs/cellname/usr directory is anAFS-appropriate variation on the standard UNIX practice of putting userhome directories under the /usr subdirectory. However, cells with more than afew hundred users sometimes find that mounting all user volumes in a singledirectory results in slow directory lookup. The solution is to distribute uservolume mount points into several directories; there are a number ofalternative methods to accomplish this.v Distribute user home directories into multiple directories that reflect
organizational divisions, such as academic or corporate departments. Forexample, a company can create group directories called usr/marketing,usr/research, usr/finance. A good feature of this scheme is that knowing auser’s department is enough to find the user’s home directory. Also, itmakes it easy to set the ACL to limit access to members of the departmentonly. A potential drawback arises if departments are of sufficiently unequalsize that users in large departments experience slower lookup than users insmall departments. This scheme is also not appropriate in cells where usersfrequently change between divisions.
v Distribute home directories into alphabetic subdirectories of the usrdirectory (the usr/a subdirectory, the usr/b subdirectory, and so on), basedon the first letter of the username. If the cell is very large, createsubdirectories under each letter that correspond to the second letter in theuser name. This scheme has the same advantages and disadvantages of adepartment-based scheme. Anyone who knows the user’s username canfind the user’s home directory, but users with names that begin withpopular letters sometimes experience slower lookup.
v Distribute home directories randomly but evenly into more than onegrouping directory. One cell that uses this scheme has over twenty suchdirectories called the usr1 directory, the usr2 directory, and so on. Thisscheme is especially appropriate in cells where the other two schemes donot seem feasible. It eliminates the potential problem of differences in
Chapter 2. Issues in Cell Configuration and Administration 47

lookup speed, because all directories are about the same size. Itsdisadvantage is that there is no way to guess which directory a given user’svolume is mounted in, but a solution is to create a symbolic link in theregular usr directory that references the actual mount point. For example, ifuser smith’s volume is mounted at the /afs/bigcell.com/usr17/smithdirectory, then the /afs/bigcell.com/usr/smith directory is a symbolic link tothe ../usr17/smith directory. This way, if someone does not know whichdirectory the user smith is in, he or she can access it through the link calledusr/smith; people who do know the appropriate directory save lookup timeby specifying it.
For instructions on how to implement the various schemes when using theuss program to create user accounts, see “Evenly Distributing User HomeDirectories with the G Instruction” on page 470 and “Creating a Volume withthe V Instruction” on page 471.
Making a Backup Version of User Volumes Available
Mounting the backup version of a user’s volume is a simple way to enableusers themselves to restore data they have accidentally removed or deleted. Itis conventional to mount the backup version at a subdirectory of the user’shome directory (called perhaps the OldFiles subdirectory), but other schemesare possible. Once per day you create a new backup version to capture thechanges made that day, overwriting the previous day’s backup version withthe new one. Users can always retrieve the previous day’s copy of a filewithout your assistance, freeing you to deal with more pressing tasks.
Users sometimes want to delete the mount point to their backup volume,because they erroneously believe that the backup volume’s contents countagainst their quota. Remind them that the backup volume is separate, so theonly space it uses in the user volume is the amount needed for the mountpoint.
For further discussion of backup volumes, see “Backing Up AFS Data” onpage 66 and “Creating Backup Volumes” on page 163.
Creating Standard Files in New AFS Accounts
From your experience as a UNIX administrator, you are probably familiarwith the use of login and shell initialization files (such as the .login and .cshrcfiles) to make an account easier to use.
It is often practical to add some AFS-specific directories to the definition ofthe user’s PATH environment variable, including the following:
48 AFS: Administration Guide

v The path to a bin subdirectory in the user’s home directory for binaries theuser has created (that is, /afs/cellname/usr/ username/bin)
v The /usr/afsws/bin path, which conventionally includes programs like fs,klog, kpasswd, pts, tokens, and unlog
v The /usr/afsws/etc path, if the user is an administrator; it usually houses theAFS command suites that require privilege (the backup, butc, kas, uss, voscommands), the package program, and others
If you are not using an AFS-modified login utility, it can be helpful to users toinvoke the klog command in their .login file so that they obtain AFS tokensas part of logging in. In the following example command sequence, the firstline echoes the string klog to the standard output stream, so that the userunderstands the purpose of the Password: prompt that appears when thesecond line is executed. The -setpag flag associates the new tokens with aprocess authentication group (PAG), which is discussed further in “IdentifyingAFS Tokens by PAG” on page 52.
echo -n "klog "klog -setpag
The following sequence of commands has a similar effect, except that thepagsh command forks a new shell with which the PAG and tokens areassociated.
pagshecho -n "klog "klog
If you use an AFS-modified login utility, this sequence is not necessary,because such utilities both log a user in locally and obtain AFS tokens.
Using AFS Protection Groups
AFS enables users to define their own groups of other users or machines. Thegroups are placed on ACLs to grant the same permissions to many userswithout listing each user individually. For group creation instructions, see“Chapter 14. Administering the Protection Database” on page 533.
Groups have AFS ID numbers, just as users do, but an AFS group ID (GID) isa negative integer whereas a user’s AFS UID is a positive integer. By default,the Protection Server allocates a new group’s AFS GID automatically, butmembers of the system:administrators group can assign a GID when issuingthe pts creategroup command. Before explicitly assigning a GID, it is best toverify that it is not already in use.
Chapter 2. Issues in Cell Configuration and Administration 49

A group cannot belong to another group, but it can own another group oreven itself as long as it (the owning group) has at least one member. Thecurrent owner of a group can transfer ownership of the group to another useror group, even without the new owner’s permission. At that point the formerowner loses administrative control over the group.
By default, each user can create 20 groups. A system administrator canincrease or decrease this group creation quota with the pts setfieldscommand.
Each Protection Database entry (group or user) is protected by a set of fiveprivacy flagswhich limit who can administer the entry and what they can do.The default privacy flags are fairly restrictive, especially for user entries. See“Setting the Privacy Flags on Database Entries” on page 554.
The Three System Groups
As the Protection Server initializes for the first time on a cell’s first databaseserver machine, it automatically creates three group entries: thesystem:anyuser, system:authuser, and system:administrators groups.
The first two system groups are unlike any other groups in the ProtectionDatabase in that they do not have a stable membership:v The system:anyuser group includes everyone who can access a cell’s AFS
filespace: users who have tokens for the local cell, users who have loggedin on a local AFS client machine but not obtained tokens (such as the localsuperuser root), and users who have connected to a local machine fromoutside the cell. Placing the system:anyuser group on an ACL grants accessto the widest possible range of users. It is the only way to extend access tousers from foreign AFS cells that do not have local accounts.
v The system:authuser group includes everyone who has a valid tokenobtained from the cell’s AFS authentication service.
Because the groups do not have a stable membership, the pts membershipcommand produces no output for them. Similarly, they do not appear in thelist of groups to which a user belongs.
The system:administrators group does have a stable membership, consistingof the cell’s privileged administrators. Members of this group can issue anypts command, and are the only ones who can issue several other restrictedcommands (such as the chown command on AFS files). By default, they alsoimplicitly have the a (administer) and l (lookup) permissions on every ACLin the filespace. For information about changing this default, see“Administering the system:administrators Group” on page 578.
50 AFS: Administration Guide
For a discussion of how to use system groups effectively on ACLs, see “UsingGroups on ACLs” on page 564.
The Two Types of User-Defined Groups
All users can create regular groups. A regular group name has two fieldsseparated by a colon, the first of which must indicate the group’s ownership.The Protection Server refuses to create or change the name of a group if theresult does not accurately indicate the ownership.
Members of the system:administrators group can create prefix-less groupswhose names do not have the first field that indicates ownership. Forsuggestions on using the two types of groups effectively, see “Using GroupsEffectively” on page 545.
Login and Authentication in AFS
As explained in “Differences in Authentication” on page 20, AFSauthentication is separate from UNIX authentication because the two filesystems are separate. The separation has two practical implications:v To access AFS files, users must both log into the local file system and
authenticate with the AFS authentication service. (Logging into the local filesystem is necessary because the only way to access the AFS filespace isthrough a Cache Manager, which resides in the local machine’s kernel.)
v Passwords are stored in two separate places: in the Authentication Databasefor AFS and in the each machine’s local password file (the /etc/passwd fileor equivalent) for the local file system.
When a user successfully authenticates, the AFS authentication service passesa token to the user’s Cache Manager. The token is a small collection of datathat certifies that the user has correctly provided the password associated witha particular AFS identity. The Cache Manager presents the token to AFSserver processes along with service requests, as proof that the user is genuine.To learn about the mutual authentication procedure they use to establishidentity, see “A More Detailed Look at Mutual Authentication” on page 63.
The Cache Manager stores tokens in the user’s credential structure in kernelmemory. To distinguish one user’s credential structure from another’s, theCache Manager identifies each one either by the user’s UNIX UID or by aprocess authentication group (PAG), which is an identification numberguaranteed to be unique in the cell. For further discussion, see “IdentifyingAFS Tokens by PAG” on page 52.
Chapter 2. Issues in Cell Configuration and Administration 51

A user can have only one token per cell in each separately identifiedcredential structure. To obtain a second token for the same cell, the user musteither log into a different machine or obtain another credential structure witha different identifier than any existing credential structure, which is mosteasily accomplished by issuing the pagsh command (see “Identifying AFSTokens by PAG”). In a single credential structure, a user can have one tokenfor each of many cells at the same time. As this implies, authentication statuson one machine or PAG is independent of authentication status on anothermachine or PAG, which can be very useful to a user or system administrator.
The AFS distribution includes library files that enable each system type’s loginutility to authenticate users with AFS and log them into the local file systemin one step. If you do not configure an AFS-modified login utility on a clientmachine, its users must issue the klog command to authenticate with AFSafter logging in.
Note: The AFS-modified libraries do not necessarily support all featuresavailable in an operating system’s proprietary login utility. In somecases, it is not possible to support a utility at all. For more informationabout the supported utilities in each AFS version, see the AFS ReleaseNotes.
Identifying AFS Tokens by PAG
As noted, the Cache Manager identifies user credential structures either byUNIX UID or by PAG. Using a PAG is preferable because it guaranteed to beunique: the Cache Manager allocates it based on a counter that incrementswith each use. In contrast, multiple users on a machine can share or assumethe same UNIX UID, which creates potential security problems. The followingare two common such situations:v The local superuser root can always assume any other user’s UNIX UID
simply by issuing the su command, without providing the user’s password.If the credential structure is associated with the user’s UNIX UID, thenassuming the UID means inheriting the AFS tokens.
v Two users working on different NFS client machines can have the sameUNIX UID in their respective local file systems. If they both access the sameNFS/AFS Translator machine, and the Cache Manager there identifies themby their UNIX UID, they become indistinguishable. To eliminate thisproblem, the Cache Manager on a translator machine automaticallygenerates a PAG for each user and uses it, rather than the UNIX UID, to tellusers apart.
Yet another advantage of PAGs over UIDs is that processes spawned by theuser inherit the PAG and so share the token; thus they gain access to AFS as
52 AFS: Administration Guide
the authenticated user. In many environments, for example, printer and otherdaemons run under identities (such as the local superuser root) that the AFSserver processes recognize only as the anonymous user. Unless PAGs areused, such daemons cannot access files for which the system:anyuser groupdoes not have the necessary ACL permissions.
Once a user has a PAG, any new tokens the user obtains are associated withthe PAG. The PAG expires two hours after any associated tokens expire or arediscarded. If the user issues the klog command before the PAG expires, thenew token is associated with the existing PAG (the PAG is said to be recycledin this case).
AFS-modified login utilities automatically generate a PAG, as described in thefollowing section. If you use a standard login utility, your users must issuethe pagsh command before the klog command, or include the lattercommand’s -setpag flag. For instructions, see “Using Two-Step Login andAuthentication” on page 55.
Users can also use either command at any time to create a new PAG. Thedifference between the two commands is that the klog command replaces thePAG associated with the current command shell and tokens. The pagshcommand initializes a new command shell before creating a new PAG. If theuser already had a PAG, any running processes or jobs continue to use thetokens associated with the old PAG whereas any new jobs or processes usethe new PAG and its associated tokens. When you exit the new shell (bypressing <Ctrl-d>, for example), you return to the original PAG and shell. Bydefault, the pagsh command initializes a Bourne shell, but you can includethe -c argument to initialize a C shell (the /bin/csh program on many systemtypes) or Korn shell (the /bin/ksh program) instead.
Using an AFS-modified login Utility
As previously mentioned, an AFS-modified login utility simultaneouslyobtains an AFS token and logs the user into the local file system. This sectionoutlines the login and authentication process and its interaction with the valuein the password field of the local password file.
An AFS-modified login utility performs a sequence of steps similar to thefollowing; details can vary for different operating systems:1. It checks the user’s entry in the local password file (the /etc/passwd file or
equivalent).2. If no entry exists, or if an asterisk ( * ) appears in the entry’s password
field, the login attempt fails. If the entry exists, the attempt proceeds to thenext step.
3. The utility obtains a PAG.
Chapter 2. Issues in Cell Configuration and Administration 53
4. The utility converts the password provided by the user into an encryptionkey and encrypts a packet of data with the key. It sends the packet to theAFS authentication service (the AFS Authentication Server in theconventional configuration).
5. The authentication service decrypts the packet and, depending on thesuccess of the decryption, judges the password to be correct or incorrect.(For more details, see “A More Detailed Look at Mutual Authentication”on page 63.)v If the authentication service judges the password incorrect, the user does
not receive an AFS token. The PAG is retained, ready to be associatedwith any tokens obtained later. The attempt proceeds to Step 6.
v If the authentication service judges the password correct, it issues atoken to the user as proof of AFS authentication. The login utility logsthe user into the local UNIX file system. Some login utilities echo thefollowing banner to the screen to alert the user to authentication withAFS. Step 6 is skipped.
AFS(R) version Login
6. If no AFS token was granted in Step 4, the login utility attempts to log theuser into the local file system, by comparing the password provided to thelocal password file.v If the password is incorrect or any value other than an encrypted
13-character string appears in the password field, the login attempt fails.v If the password is correct, the user is logged into the local file system
only.
As indicated, when you use an AFS-modified login utility, the password fieldin the local password file is no longer the primary gate for access to yoursystem. If the user provides the correct AFS password, then the programnever consults the local password file. However, you can still use thepassword field to control access, in the following way:v To prevent both local login and AFS authentication, place an asterisk ( * ) in
the field. This is useful mainly in emergencies, when you want to prevent acertain user from logging into the machine.
v To prevent login to the local file system if the user does not provide thecorrect AFS password, place a character string of any length other than thestandard thirteen characters in the field. This is appropriate if you want topermit only people with local AFS accounts to login on your machines. Asingle X or other character is the most easily recognizable way to do this.
v To enable a user to log into the local file system even after providing anincorrect AFS password, record a standard UNIX encrypted password inthe field by issuing the standard UNIX password-setting command (passwdor equivalent).
54 AFS: Administration Guide

Systems that use a Pluggable Authentication Module (PAM) for login and AFSauthentication do not necessarily consult the local password file at all, inwhich case they do not use the password field to control authentication andlogin attempts. Instead, instructions in the PAM configuration file (on manysystem types, /etc/pam.conf) fill the same function. See the instructions in theAFS Quick Beginnings for installing AFS-modified login utilities.
Using Two-Step Login and Authentication
In cells that do not use an AFS-modified login utility, users must issueseparate commands to login and authenticate, as detailed in the AFS UserGuide:1. They use the standard login program to login to the local file system,
providing the password listed in the local password file (the /etc/passwdfile or equivalent).
2. They must issue the klog command to authenticate with the AFSauthentication service, including its -setpag flag to associate the newtokens with a process authentication group (PAG).
As mentioned in “Creating Standard Files in New AFS Accounts” on page 48,you can invoke the klog -setpag command in a user’s .login file (orequivalent) so that the user does not have to remember to issue the commandafter logging in. The user still must type a password twice, once at theprompt generated by the login utility and once at the klog command’sprompt. This implies that the two passwords can differ, but it is less confusingif they do not.
Another effect of not using an AFS-modified login utility is that the AFSservers recognize the standard login program as the anonymous user. If thelogin program needs to access any AFS files (such as the .login file in a user’shome directory), then the ACL that protects the file must include an entrygranting the l (lookup) and r (read) permissions to the system:anyuser group.
When you do not use an AFS-modified login utility, an actual (scrambled)password must appear in the local password file for each user. Use the/bin/passwd file to insert or change these passwords. It is simpler if thepassword in the local password file matches the AFS password, but it is notrequired.
Obtaining, Displaying, and Discarding Tokens
Once logged in, a user can obtain a token at any time with the klogcommand. If a valid token already exists, the new one overwrites it. If a PAGalready exists, the new token is associated with it.
Chapter 2. Issues in Cell Configuration and Administration 55

By default, the klog command authenticates the issuer using the identitycurrently logged in to the local file system. To authenticate as a differentidentity, use the -principal argument. To obtain a token for a foreign cell, usethe -cell argument (it can be combined with the -principal argument). See theAFS User Guide and the entry for the klog command in the AFS AdministrationReference.
To discard either all tokens or the token for a particular cell, issue the unlogcommand. The command affects only the tokens associated with the currentcommand shell. See the AFS User Guideand the entry for the unlog commandin the AFS Administration Reference.
To display the tokens associated with the current command shell, issue thetokens command. The following examples illustrate its output in varioussituations.
If the issuer is not authenticated in any cell:% tokensTokens held by the Cache Manager:
--End of list--
The following shows the output for a user with AFS UID 1000 in the ABCCorporation cell:
% tokensTokens held by the Cache Manager:
User's (AFS ID 1000) tokens for [email protected] [Expires Jun 2 10:00]--End of list--
The following shows the output for a user who is authenticated in ABCCorporation cell, the State University cell and the DEF Company cell. Theuser has different AFS UIDs in the three cells. Tokens for the last cell areexpired:
% tokensTokens held by the Cache Manager:
User's (AFS ID 1000) tokens for [email protected] [Expires Jun 2 10:00]User's (AFS ID 4286) tokens for [email protected] [Expires Jun 3 1:34]User's (AFS ID 22) tokens for [email protected] [>>Expired<<]
--End of list--
The Kerberos version of the tokens command (the tokens.krb command), alsoreports information on the ticket-granting ticket, including the ticket’s owner,the ticket-granting service, and the expiration date, as in the followingexample. Also see “Support for Kerberos Authentication” on page 58.
56 AFS: Administration Guide
% tokens.krbTokens held by the Cache Manager:User's (AFS ID 1000) tokens for [email protected] [Expires Jun 2 10:00]User smith's tokens for [email protected] [Expires Jun 2 10:00]
--End of list--
Setting Default Token Lifetimes for Users
The maximum lifetime of a user token is the smallest of the ticket lifetimesrecorded in the following three Authentication Database entries. The kasexamine command reports the lifetime as Max ticket lifetime.Administrators who have the ADMIN flag on their Authentication Databaseentry can use the -lifetime argument to the kas setfields command to set anentry’s ticket lifetime.v The afs entry, which corresponds to the AFS server processes. The default is
100 hours.v The krbtgt.cellname entry, which corresponds to the ticket-granting ticket
used internally in generating the token. The default is 720 hours (30 days).v The entry for the user of the AFS-modified login utility or issuer of the klog
command. The default is 25 hours for user entries created using the AFS 3.1or later version of the Authentication Server, and 100 hours for user entriescreated using the AFS 3.0 version of the Authentication Server. A user canuse the kas examine command to display his or her own AuthenticationDatabase entry.
Note: An AFS-modified login utility always grants a token with a lifetimecalculated from the previously described three values. When issuing theklog command, a user can request a lifetime shorter than the default byusing the -lifetime argument. For further information, see the AFS UserGuide and the klog reference page in the AFS Administration Reference.
Changing Passwords
Regular AFS users can change their own passwords by using either thekpasswd or kas setpassword command. The commands prompt for thecurrent password and then twice for the new password, to screen out typingerrors.
Administrators who have the ADMIN flag on their Authentication Databaseentries can change any user’s password, either by using the kpasswdcommand (which requires knowing the current password) or the kassetpassword command.
If your cell does not use an AFS-modified login utility, remember also tochange the local password, using the operating system’s password-changingcommand. For more instructions on changing passwords, see “Changing AFSPasswords” on page 524.
Chapter 2. Issues in Cell Configuration and Administration 57
Imposing Restrictions on Passwords and Authentication Attempts
You can help to make your cell more secure by imposing restrictions on userpasswords and authentication attempts. To impose the restrictions as youcreate an account, use the A instruction in the uss template file as describedin “Increasing Account Security with the A Instruction” on page 483. To set orchange the values on an existing account, use the kas setfields command asdescribed in “Improving Password and Authentication Security” on page 517.
By default, AFS passwords never expire. Limiting password lifetime can helpimprove security by decreasing the time the password is subject to crackingattempts. You can choose an lifetime from 1 to 254 days after the passwordwas last changed. It automatically applies to each new password as it is set.When the user changes passwords, you can also insist that the new passwordis not similar to any of the 20 passwords previously used.
Unscrupulous users can try to gain access to your AFS cell by guessing anauthorized user’s password. To protect against this type of attack, you canlimit the number of times that a user can consecutively fail to provide thecorrect password. When the limit is exceeded, the authentication servicerefuses further authentication attempts for a specified period of time (thelockout time). To reenable authentication attempts before the lockout timeexpires, an administrator must issue the kas unlock command.
In addition to settings on user’s authentication accounts, you can improvesecurity by automatically checking the quality of new user passwords. Thekpasswd and kas setpassword commands pass the proposed password to aprogram or script called kpwvalid, if it exists. The kpwvalid performs qualitychecks and returns a code to indicate whether the password is acceptable. Youcan create your own program or modified the sample program included inthe AFS distribution. See the kpwvalid reference page in the AFSAdministration Reference.
There are several types of quality checks that can improve password quality.v The password is a minimum lengthv The password is not a wordv The password contains both numbers and letters
Support for Kerberos Authentication
If your site is using standard Kerberos authentication rather than the AFSAuthentication Server, use the modified versions of the klog, pagsh, andtokens commands that support Kerberos authentication. The binaries for themodified version of these commands have the same name as the standardbinaries with the addition of a .krb extension.
58 AFS: Administration Guide
Use either the Kerberos version or the standard command throughout the cell;do not mix the two versions. AFS Product Support can provide instructionson installing the Kerberos version of these four commands. For informationon the differences between the two versions of these commands, see the AFSAdministration Reference.
Security and Authorization in AFS
AFS incorporates several features to ensure that only authorized users gainaccess to data. This section summarizes the most important of them andsuggests methods for improving security in your cell.
Some Important Security Features
ACLs on Directories
Files in AFS are protected by the access control list (ACL) associated withtheir parent directory. The ACL defines which users or groups can access thedata in the directory, and in what way. See “Chapter 15. Managing AccessControl Lists” on page 559.
Mutual Authentication Between Client and Server
When an AFS client and server process communicate, each requires the otherto prove its identity during mutual authentication, which involves theexchange of encrypted information that only valid parties can decrypt andrespond to. For a detailed description of the mutual authentication process,see “A More Detailed Look at Mutual Authentication” on page 63.
AFS server processes mutually authenticate both with one another and withprocesses that represent human users. After mutual authentication iscomplete, the server and client have established an authenticated connection,across which they can communicate repeatedly without having to authenticateagain until the connection expires or one of the parties closes it. Authenticatedconnections have varying lifetimes.
Tokens
In order to access AFS files, users must prove their identities to the AFSauthentication service by providing the correct AFS password. If the passwordis correct, the authentication service sends the user a token as evidence ofauthenticated status. See “Login and Authentication in AFS” on page 51.
Chapter 2. Issues in Cell Configuration and Administration 59
Servers assign the user identity anonymous to users and processes that do nothave a valid token. The anonymous identity has only the access granted tothe system:anyuser group on ACLs.
Authorization Checking
Mutual authentication establishes that two parties communicating with oneanother are actually who they claim to be. For many functions, AFS serverprocesses also check that the client whose identity they have verified is alsoauthorized to make the request. Different requests require different kinds ofprivilege. See “Three Types of Privilege”.
Encrypted Network Communications
The AFS server processes encrypt particularly sensitive information beforesending it back to clients. Even if an unauthorized party is able to eavesdropon an authenticated connection, they cannot decipher encrypted data withoutthe proper key.
The following AFS commands encrypt data because they involve serverencryption keys and passwords:v The bos addkey command, which adds a server encryption key to the
/usr/afs/etc/KeyFile filev The bos listkeys command, which lists the server encryption keys from the
/usr/afs/etc/KeyFile filev The kpasswd command, which changes a password in the Authentication
Databasev Most commands in the kas command suite
In addition, the United States edition of the Update Server encrypts sensitiveinformation (such as the contents of KeyFile) when distributing it. Othercommands in the bos suite and the commands in the fs, pts and vos suites donot encrypt data before transmitting it.
Three Types of Privilege
AFS uses three separate types of privilege for the reasons discussed in “TheReason for Separate Privileges” on page 578.v Membership in the system:administrators group. Members are entitled to
issue any pts command and those fs commands that set volume quota. Bydefault, they also implicitly have the a (administer) and l (lookup)permissions on every ACL in the file tree even if the ACL does not includean entry for them.
v The ADMIN flag on the Authentication Database entry. An administrator withthis flag can issue any kas command.
60 AFS: Administration Guide

v Inclusion in the /usr/afs/etc/UserList file. An administrator whose usernameappears in this file can issue any bos, vos, or backup command (althoughsome backup commands require additional privilege as described in“Granting Administrative Privilege to Backup Operators” on page 228).
Authorization Checking versus Authentication
AFS distinguishes between authentication and authorization checking.Authentication refers to the process of proving identity. Authorization checkingrefers to the process of verifying that an authenticated identity is allowed toperform a certain action.
AFS implements authentication at the level of connections. Each time twoparties establish a new connection, they mutually authenticate. In general,each issue of an AFS command establishes a new connection between AFSserver process and client.
AFS implements authorization checking at the level of server machines. Ifauthorization checking is enabled on a server machine, then all of the serverprocesses running on it provide services only to authorized users. Ifauthorization checking is disabled on a server machine, then all of the serverprocesses perform any action for anyone. Obviously, disabling authorizationchecking is an extreme security exposure. For more information, see“Managing Authentication and Authorization Requirements” on page 106.
Improving Security in Your Cell
You can improve the level of security in your cell by configuring useraccounts, server machines, and system administrator accounts in the indicatedway.
User Accounts
v Use an AFS-modified login utility, or include the -setpag flag to the klogcommand, to associate the credential structure that houses tokens with aPAG rather than a UNIX UID. This prevents users from inheriting someoneelse’s tokens by assuming their UNIX identity. For further discussion, see“Identifying AFS Tokens by PAG” on page 52.
v Encourage users to issue the unlog command to destroy their tokens beforelogging out. This forestalls attempts to access tokens left behind kernelmemory. Consider including the unlog command in every user’s .logout fileor equivalent.
Server Machines
Chapter 2. Issues in Cell Configuration and Administration 61

v Disable authorization checking only in emergencies or for very brief periodsof time. It is best to work at the console of the affected machine during thistime, to prevent anyone else from accessing the machine through thekeyboard.
v Change the AFS server encryption key on a frequent and regular schedule.Make it difficult to guess (a long string including nonalphabetic characters,for instance). Unlike user passwords, the password from which the AFS keyis derived can be longer than eight characters, because it is never usedduring login. The kas setpassword command accepts a password hundredsof characters long. For instructions, see “Chapter 9. Managing ServerEncryption Keys” on page 369.
v As much as possible, limit the number of people who can login at a servermachine’s console or remotely. Imposing this limit is an extra securityprecaution rather than a necessity. The machine cannot serve as an AFSclient in this case.
v Particularly limit access to the local superuser root account on a servermachine. The local superuser root has free access to importantadministrative subdirectories of the /usr/afs directory, as described in “AFSFiles on the Local Disk” on page 39.
v As in any computing environment, server machines must be located in asecured area. Any other security measures are effectively worthless ifunauthorized people can access the computer hardware.
System Administrators
v Limit the number of system administrators in your cell. Limit the use ofsystem administrator accounts on publicly accessible workstations. Suchmachines are not secure, so unscrupulous users can install programs thattry to steal tokens or passwords. If administrators must use publiclyaccessible workstations at times, they must issue the unlog commandbefore leaving the machine.
v Create an administrative account for each administrator separate from thepersonal account, and assign AFS privileges only to the administrativeaccount. The administrators must authenticate to the administrativeaccounts to perform duties that require privilege, which provides a usefulaudit trail as well.
v Administrators must not leave a machine unattended while they have validtokens. Issue the unlog command before leaving.
v Use the -lifetime argument to the kas setfields command to set the tokenlifetime for administrative accounts to a fairly short amount of time. Thedefault lifetime for AFS tokens is 25 hours, but 30 or 60 minutes is possiblya more reasonable lifetime for administrative tokens. The tokens foradministrators who initiate AFS Backup System operations must lastsomewhat longer, because it can take several hours to complete some dump
62 AFS: Administration Guide
operations, depending on the speed of the tape device and the networkconnecting it to the file server machines that house the volumes is itaccessing.
v Limit administrators’ use of the telnet program. It sends unencryptedpasswords across the network. Similarly, limit use of other remote programssuch as rsh and rcp, which send unencrypted tokens across the network.
A More Detailed Look at Mutual Authentication
As in any file system, security is a prime concern in AFS. A file system thatmakes file sharing easy is not useful if it makes file sharing mandatory, soAFS incorporates several features that prevent unauthorized users fromaccessing data. Security in a networked environment is difficult becausealmost all procedures require transmission of information across wires thatalmost anyone can tap into. Also, many machines on networks are powerfulenough that unscrupulous users can monitor transactions or even intercepttransmissions and fake the identity of one of the participants.
The most effective precaution against eavesdropping and information theft orfakery is for servers and clients to accept the claimed identity of the otherparty only with sufficient proof. In other words, the nature of the networkforces all parties on the network to assume that the other party in atransaction is not genuine until proven so. Mutual authentication is the meansthrough which parties prove their genuineness.
Because the measures needed to prevent fakery must be quite sophisticated,the implementation of mutual authentication procedures is complex. Theunderlying concept is simple, however: parties prove their identities bydemonstrating knowledge of a shared secret. A shared secret is a piece ofinformation known only to the parties who are mutually authenticating (theycan sometimes learn it in the first place from a trusted third party or someother source). The party who originates the transaction presents the sharedsecret and refuses to accept the other party as valid until it shows that itknows the secret too.
The most common form of shared secret in AFS transactions is the encryptionkey, also referred to simply as a key. The two parties use their shared key toencrypt the packets of information they send and to decrypt the ones theyreceive. Encryption using keys actually serves two related purposes. First, itprotects messages as they cross the network, preventing anyone who does notknow the key from eavesdropping. Second, ability to encrypt and decryptmessages successfully indicates that the parties are using the key (it is theirshared secret). If they are using different keys, messages remain scrambledand unintelligible after decryption.
Chapter 2. Issues in Cell Configuration and Administration 63
The following sections describe AFS’s mutual authentication procedures inmore detail. Feel free to skip these sections if you are not interested in themutual authentication process.
Simple Mutual Authentication
Simple mutual authentication involves only one encryption key and twoparties, generally a client and server. The client contacts the server by sendinga challenge message encrypted with a key known only to the two of them. Theserver decrypts the message using its key, which is the same as the client’s ifthey really do share the same secret. The server responds to the challenge anduses its key to encrypt its response. The client uses its key to decrypt theserver’s response, and if it is correct, then the client can be sure that the serveris genuine: only someone who knows the same key as the client can decryptthe challenge and answer it correctly. On its side, the server concludes that theclient is genuine because the challenge message made sense when the serverdecrypted it.
AFS uses simple mutual authentication to verify user identities during thefirst part of the login procedure. In that case, the key is based on the user’spassword.
Complex Mutual Authentication
Complex mutual authentication involves three encryption keys and threeparties. All secure AFS transactions (except the first part of the login process)employ complex mutual authentication.
When a client wishes to communicate with a server, it first contacts a thirdparty called a ticket-granter. The ticket-granter and the client mutuallyauthenticate using the simple procedure. When they finish, the ticket-grantergives the client a server ticket (or simply ticket) as proof that it (theticket-granter) has preverified the identity of the client. The ticket-granterencrypts the ticket with the first of the three keys, called the server encryptionkey because it is known only to the ticket-granter and the server the clientwants to contact. The client does not know this key.
The ticket-granter sends several other pieces of information along with theticket. They enable the client to use the ticket effectively despite being unableto decrypt the ticket itself. Along with the ticket, the items constitute a token:v A session key, which is the second encryption key involved in mutual
authentication. The ticket-granter invents the session key at random as theshared secret between client and server. For reasons explained furtherbelow, the ticket-granter also puts a copy of the session key inside theticket. The client and server use the session key to encrypt messages theysend to one another during their transactions. The ticket-granter invents a
64 AFS: Administration Guide

different session key for each connection between a client and a server(there can be several transactions during a single connection).
v The name of the server for which the ticket is valid (and so which serverencryption key encrypts the ticket itself).
v A ticket lifetime indicator. The default lifetime of AFS server tickets is 100hours. If the client wants to contact the server again after the ticket expires,it must contact the ticket-granter to get a new ticket.
The ticket-granter seals the entire token with the third key involved incomplex mutual authentication—the key known only to it (the ticket-granter)and the client. In some cases, this third key is derived from the password ofthe human user whom the client represents.
Now that the client has a valid server ticket, it is ready to contact the server. Itsends the server two things:v The server ticket. This is encrypted with the server encryption key.v Its request message, encrypted with the session key. Encrypting the
message protects it as it crosses the network, since only the server/clientpair for whom the ticket-granter invented the session key know it.
At this point, the server does not know the session key, because theticket-granter just created it. However, the ticket-granter put a copy of thesession key inside the ticket. The server uses the server encryption key todecrypts the ticket and learns the session key. It then uses the session key todecrypt the client’s request message. It generates a response and sends it tothe client. It encrypts the response with the session key to protect it as itcrosses the network.
This step is the heart of mutual authentication between client and server,because it proves to both parties that they know the same secret:v The server concludes that the client is authorized to make a request because
the request message makes sense when the server decrypts it using thesession key. If the client uses a different session key than the one the serverfinds inside the ticket, then the request message remains unintelligible evenafter decryption. The two copies of the session key (the one inside the ticketand the one the client used) can only be the same if they both came fromthe ticket-granter. The client cannot fake knowledge of the session keybecause it cannot look inside the ticket, sealed as it is with the serverencryption key known only to the server and the ticket-granter. The servertrusts the ticket-granter to give tokens only to clients with whom it (theticket-granter) has authenticated, so the server decides the client islegitimate.
Chapter 2. Issues in Cell Configuration and Administration 65

(Note that there is no direct communication between the ticket-granter andthe server, even though their relationship is central to ticket-based mutualauthentication. They interact only indirectly, via the client’s possession of aticket sealed with their shared secret.)
v The client concludes that the server is genuine and trusts the response itgets back from the server, because the response makes sense after the clientdecrypts it using the session key. This indicates that the server encryptedthe response with the same session key as the client knows. The only wayfor the server to learn that matching session key is to decrypt the ticketfirst. The server can only decrypt the ticket because it shares the secret ofthe server encryption key with the ticket-granter. The client trusts theticket-granter to give out tickets only for legitimate servers, so the clientaccepts a server that can decrypt the ticket as genuine, and accepts itsresponse.
Backing Up AFS Data
AFS provides two related facilities that help the administrator back up AFSdata: backup volumes and the AFS Backup System.
Backup Volumes
The first facility is the backup volume, which you create by cloning aread/write volume. The backup volume is read-only and so preserves thestate of the read/write volume at the time the clone is made.
Backup volumes can ease administration if you mount them in the file systemand make their contents available to users. For example, it often makes senseto mount the backup version of each user volume as a subdirectory of theuser’s home directory. A conventional name for this mount point is OldFiles.Create a new version of the backup volume (that is, reclone the read/write)once a day to capture any changes that were made since the previous backup.If a user accidentally removes or changes data, the user can restore it from thebackup volume, rather than having to ask you to restore it.
The AFS User Guide does not mention backup volumes, so regular users donot know about them if you decide not to use them. This implies that if youdo make backup versions of user volumes, you need to tell your users abouthow the backup works and where you have mounted it.
Users are often concerned that the data in a backup volume counts againsttheir volume quota and some of them even want to remove the OldFilesmount point. It does not, because the backup volume is a separate volume.
66 AFS: Administration Guide

The only amount of space it uses in the user’s volume is the amount neededfor the mount point, which is about the same as the amount needed for astandard directory element.
Backup volumes are discussed in detail in “Creating Backup Volumes” onpage 163 .
The AFS Backup System
Backup volumes can reduce restoration requests, but they reside on disk andso do not protect data from loss due to hardware failure. Like any file system,AFS is vulnerable to this sort of data loss.
To protect your cell’s users from permanent loss of data, you are stronglyurged to back up your file system to tape on a regular and frequent schedule.The AFS Backup System is available to ease the administration andperformance of backups. For detailed information about the AFS BackupSystem, see “Chapter 6. Configuring the AFS Backup System” on page 217 and“Chapter 7. Backing Up and Restoring AFS Data” on page 269.
Using UNIX Remote Services in the AFS Environment
The AFS distribution includes modified versions of several standard UNIXcommands, daemons and programs that provide remote services, includingthe following:v The ftpd programv The inetd daemonv The rcp programv The rlogind daemonv The rsh command
These modifications enable the commands to handle AFS authenticationinformation (tokens). This enables issuers to be recognized on the remotemachine as an authenticated AFS user.
Replacing the standard versions of these programs in your file tree with theAFS-modified versions is optional. It is likely that AFS’s transparent accessreduces the need for some of the programs anyway, especially those involvedin transferring files from machine to machine, like the ftpd and rcp programs.
If you decide to use the AFS versions of these commands, be aware thatseveral of them are interdependent. For example, the passing of AFS
Chapter 2. Issues in Cell Configuration and Administration 67

authentication information works correctly with the rcp command only if youare using the AFS version of both the rcp and inetd commands.
The conventional installation location for the modified remote commands arethe /usr/afsws/bin and /usr/afsws/etc directories. To learn more aboutcommands’ functionality, see their reference pages in the AFS AdministrationReference.
Accessing AFS through NFS
Users of NFS client machines can access the AFS filespace by mounting the/afs directory of an AFS client machine that is running the NFS/AFS Translator.This is a particular advantage in cells already running NFS who want toaccess AFS using client machines for which AFS is not available. See“Appendix A. Managing the NFS/AFS Translator” on page 585.
68 AFS: Administration Guide
Chapter 3. Administering Server Machines
This chapter describes how to administer an AFS server machine. It describesthe following configuration information and administrative tasks:v The binary and configuration files that must reside in the subdirectories of
the /usr/afs directory on every server machine’s local disk; see “Local DiskFiles on a Server Machine” on page 70.
v The various roles or functions that an AFS server machine can perform, andhow to determine which machines are taking a role; see “The Four Rolesfor File Server Machines” on page 79.
v How to maintain database server machines; see “Administering DatabaseServer Machines” on page 85.
v How to maintain the list of database server machines in the/usr/afs/etc/CellServDB file; see “Maintaining the Server CellServDB File”on page 101.
v How to control authorization checking on a server machine; see “ManagingAuthentication and Authorization Requirements” on page 106.
v How to install new disks or partitions on a file server machine; see“Adding or Removing Disks and Partitions” on page 109.
v How to change a server machine’s IP addresses and manager VLDB serverentries; see “Managing Server IP Addresses and VLDB Server Entries” onpage 113.
v How to reboot a file server machine; see “Rebooting a Server Machine” onpage 118.
To learn how to install and configure a new server machine, see the AFSQuick Beginnings.
To learn how to administer the server processes themselves, see “Chapter 4.Monitoring and Controlling Server Processes” on page 121.
To learn how to administer volumes, see “Chapter 5. Managing Volumes” onpage 147.
Summary of Instructions
This chapter explains how to perform the following tasks by using theindicated commands:
Install new binaries bos install
© Copyright IBM Corp. 1989, 2000 69
Examine binary check-and-restart time bos getrestartSet binary check-and-restart time bos setrestartExamine compilation dates on binary files bos getdateRestart a process to use new binaries bos restartRevert to old version of binaries bos uninstallRemove obsolete .BAK and .OLD versions bos pruneList partitions on a file server machine vos listpartShutdown AFS server processes bos shutdownList volumes on a partition vos listvldbMove read/write volumes vos moveList a cell’s database server machines bos listhostsAdd a database server machine to server CellServDB file bos addhostRemove a database server machine from server CellServDBfile
bos removehost
Set authorization checking requirements bos setauthPrevent authentication for bos, pts, and vos commands Include -noauth flagPrevent authentication for kas commands Include -noauth flag on
some commands or issuenoauthentication whilein interactive mode
Display all VLDB server entries vos listaddrsRemove a VLDB server entry vos changeaddrReboot a server machine remotely bos exec reboot_command
Local Disk Files on a Server Machine
Several types of files must reside in the subdirectories of the /usr/afs directoryon an AFS server machine’s local disk. They include binaries, configurationfiles, the administrative database files (on database server machines), log files,and volume header files.
Note for Windows users: Some files described in this document possibly donot exist on machines that run a Windows operating system. Also, Windowsuses a backslash ( \ ) rather than a forward slash ( / ) to separate the elementsin a pathname.
Binaries in the /usr/afs/bin Directory
The /usr/afs/bin directory stores the AFS server process and command suitebinaries appropriate for the machine’s system (CPU and operating system)type. If a process has both a server portion and a client portion (as with theUpdate Server) or if it has separate components (as with the fs process), eachcomponent resides in a separate file.
To ensure predictable system performance, all file server machines must runthe same AFS build version of a given process. To maintain consistency easily,
70 AFS: Administration Guide
use the Update Server process to distribute binaries from a binary distributionmachine of each system type, as described further in “Binary DistributionMachines” on page 81.
It is best to keep the binaries for all processes in the /usr/afs/bin directory,even if you do not run the process actively on the machine. It simplifies theprocess of reconfiguring machines (for example, adding database serverfunctionality to an existing file server machine). Similarly, it is best to keep thecommand suite binaries in the directory, even if you do not often issuecommands while working on the server machine. It enables you to issuecommands during recovery from server and machine outages.
The following lists the binary files in the /usr/afs/bin directory that aredirectly related to the AFS server processes or command suites. Other binaries(for example, for the klog command) sometimes appear in this directory on aparticular file server machine’s disk or in an AFS distribution.
backupThe command suite for the AFS Backup System (the binary for theBackup Server is buserver).
bos The command suite for communicating with the Basic OverSeer (BOS)Server (the binary for the BOS Server is bosserver).
bosserverThe binary for the Basic OverSeer (BOS) Server process.
buserverThe binary for the Backup Server process.
fileserverThe binary for the File Server component of the fs process.
kas The command suite for communicating with the Authentication Server(the binary for the Authentication Server is kaserver).
kaserverThe binary for the Authentication Server process.
ntpd The binary for the Network Time Protocol Daemon (NTPD). AFSredistributes this binary and uses the runntp program to configureand initialize the NTPD process.
ntpdc A debugging utility furnished with the ntpd program.
pts The command suite for communicating with the Protection Serverprocess (the binary for the Protection Server is ptserver).
ptserverThe binary for the Protection Server process.
Chapter 3. Administering Server Machines 71
runntpThe binary for the program used to configure NTPD mostappropriately for use with AFS.
salvagerThe binary for the Salvager component of the fs process.
udebugThe binary for a program that reports the status of AFS’s distributeddatabase technology, Ubik.
upclientThe binary for the client portion of the Update Server process.
upserverThe binary for the server portion of the Update Server process.
vlserverThe binary for the Volume Location (VL) Server process.
volserverThe binary for the Volume Server component of the fs process.
vos The command suite for communicating with the Volume and VLServer processes (the binaries for the servers are volserver andvlserver, respectively).
Common Configuration Files in the /usr/afs/etc Directory
The directory /usr/afs/etc on every file server machine’s local disk containsconfiguration files in ASCII and machine-independent binary format. Forpredictable AFS performance throughout a cell, all server machines must havethe same version of each configuration file:v Cells that run the United States edition of AFS conventionally use the
Update Server to distribute a common version of each file from the cell’ssystem control machine to other server machines (for more on the systemcontrol machine, see “The System Control Machine” on page 82). Run theUpdate Server’s server portion on the system control machine, and theclient portion on all other server machines. Update the files on the systemcontrol machine only, except as directed by instructions for dealing withemergencies.
v Cells that run the international edition of AFS must not use the UpdateServer to distribute the contents of the /usr/afs/etc directory. Due to UnitedStates government regulations, the data encryption routines that AFS usesto protect the files in this directory as they cross the network are notavailable to the Update Server in the international edition of AFS. You mustinstead update the files on each server machine individually, taking extracare to issue exactly the same bos command for each machine. Thenecessary data encryption routines are available to the bos commands, so
72 AFS: Administration Guide
information is safe as it crosses the network from the machine where thebos command is issued to the server machines.
Never directly edit any of the files in the /usr/afs/etc directory, except asdirected by instructions for dealing with emergencies. In normalcircumstances, use the appropriate bos commands to change the files. Thefollowing list includes pointers to instructions.
The files in this directory include:
CellServDBAn ASCII file that names the cell’s database server machines, whichrun the Authentication, Backup, Protection, and VL Server processes.You create the initial version of this file by issuing the bossetcellname command while installing your cell’s first server machine.It is very important to update this file when you change the identityof your cell’s database server machines.
The server CellServDB file is not the same as the CellServDB filestored in the /usr/vice/etc directory on client machines. The clientversion lists the database server machines for every AFS cell that youchoose to make accessible from the client machine. The serverCellServDB file lists only the local cell’s database server machines,because server processes never contact processes in other cells.
For instructions on maintaining this file, see “Maintaining the ServerCellServDB File” on page 101.
KeyFileA machine-independent, binary-format file that lists the serverencryption keys the AFS server processes use to encrypt and decrypttickets. The information in this file is the basis for securecommunication in the cell, and so is extremely sensitive. The file isspecially protected so that only privileged users can read or change it.
For instructions on maintaining this file, see “Chapter 9. ManagingServer Encryption Keys” on page 369.
ThisCellAn ASCII file that consists of a single line defining the completeInternet domain-style name of the cell (such as abc.com). You createthis file with the bos setcellname command during the installation ofyour cell’s first file server machine, as instructed in the AFS QuickBeginnings.
Note that changing this file is only one step in changing your cell’sname. For discussion, see “Choosing a Cell Name” on page 23.
UserListAn ASCII file that lists the usernames of the system administrators
Chapter 3. Administering Server Machines 73

authorized to issue privileged bos, vos, and backup commands. Forinstructions on maintaining the file, see “Administering the UserListFile” on page 581.
Local Configuration Files in the /usr/afs/local Directory
The directory /usr/afs/local contains configuration files that are different foreach file server machine in a cell. Thus, they are not updated automaticallyfrom a central source like the files in /usr/afs/bin and /usr/afs/etc directories.The most important file is the BosConfig file; it defines which server processesare to run on that machine.
As with the common configuration files in /usr/afs/etc, you must not editthese files directly. Use commands from the bos command suite whereappropriate; some files never need to be altered.
The files in this directory include the following:
BosConfigThis file lists the server processes to run on the server machine, bydefining which processes the BOS Server monitors and what it does ifthe process fails. It also defines the times at which the BOS Serverautomatically restarts processes for maintenance purposes.
As you create server processes during a file server machine’sinstallation, their entries are defined in this file automatically. The AFSQuick Beginnings outlines the bos commands to use. For a morecomplete description of the file, and instructions for controllingprocess status by editing the file with commands from the bos suite,see “Chapter 4. Monitoring and Controlling Server Processes” onpage 121.
NetInfoThis optional ASCII file lists one or more of the network interfaceaddresses on the server machine. If it exists when the File Serverinitializes, the File Server uses it as the basis for the list of interfacesthat it registers in its Volume Location Database (VLDB) server entry.See “Managing Server IP Addresses and VLDB Server Entries” onpage 113.
NetRestrictThis optional ASCII file lists one or more network interface addresses.If it exists when the File Server initializes, the File Server removes thespecified addresses from the list of interfaces that it registers in itsVLDB server entry. See “Managing Server IP Addresses and VLDBServer Entries” on page 113.
74 AFS: Administration Guide
NoAuthThis zero-length file instructs all AFS server processes running on themachine not to perform authorization checking. Thus, they performany action for any user, even anonymous. This very insecure state isuseful only in rare instances, mainly during the installation of themachine.
The file is created automatically when you start the initial bosserverprocess with the -noauth flag, or issue the bos setauth command toturn off authentication requirements. When you use the bos setauthcommand to turn on authentication, the BOS Server removes this file.For more information, see “Managing Authentication andAuthorization Requirements” on page 106.
SALVAGE.fsThis zero-length file controls how the BOS Server handles a crash ofthe File Server component of the fs process. The BOS Server createsthis file each time it starts or restarts the fs process. If the file ispresent when the File Server crashes, then the BOS Server runs theSalvager before restarting the File Server and Volume Server again.When the File Server exits normally, the BOS Server removes the fileso that the Salvager does not run.
Do not create or remove this file yourself; the BOS Server does soautomatically. If necessary, you can salvage a volume or partition byusing the bos salvage command; see “Salvaging Volumes” onpage 192.
salvage.lockThis file guarantees that only one Salvager process runs on a fileserver machine at a time (the single process can fork multiplesubprocesses to salvage multiple partitions in parallel). As theSalvager initiates (when invoked by the BOS Server or by issue of thebos salvage command), it creates this zero-length file and issues theflock system call on it. It removes the file when it completes thesalvage operation. Because the Salvager must lock the file in order torun, only one Salvager can run at a time.
sysid This file records the network interface addresses that the File Server(fileserver process) registers in its VLDB server entry. When the CacheManager requests volume location information, the Volume Location(VL) Server provides all of the interfaces registered for each servermachine that houses the volume. This enables the Cache Manager tomake use of multiple addresses when accessing AFS data stored on amultihomed file server machine. For further information, see“Managing Server IP Addresses and VLDB Server Entries” onpage 113.
Chapter 3. Administering Server Machines 75

Replicated Database Files in the /usr/afs/db Directory
The directory /usr/afs/db contains two types of files pertaining to the fourreplicated databases in the cell—the Authentication Database, BackupDatabase, Protection Database, and Volume Location Database (VLDB):v A file that contains each database, with a .DB0 extension.v A log file for each database, with a .DBSYS1 extension. The database server
process logs each database operation in this file before performing it. If theoperation is interrupted, the process consults this file to learn how to finishit.
Each database server process (Authentication, Backup, Protection, or VLServer) maintains its own database and log files. The database files are inbinary format, so you must always access or alter them using commands fromthe kas suite (for the Authentication Database), backup suite (for the BackupDatabase), pts suite (for the Protection Database), or vos suite (for the VLDB).
If a cell runs more than one database server machine, each database serverprocess keeps its own copy of its database on its machine’s hard disk.However, it is important that all the copies of a given database are the same.To synchronize them, the database server processes call on AFS’s distributeddatabase technology, Ubik, as described in “Replicating the AFSAdministrative Databases” on page 85.
The files listed here appear in this directory only on database server machines.On non-database server machines, this directory is empty.
bdb.DB0The Backup Database file.
bdb.DBSYS1The Backup Database log file.
kaserver.DB0The Authentication Database file.
kaserver.DBSYS1The Authentication Database log file.
prdb.DB0The Protection Database file.
prdb.DBSYS1The Protection Database log file.
vldb.DB0The Volume Location Database file.
76 AFS: Administration Guide
vldb.DBSYS1The Volume Location Database log file.
Log Files in the /usr/afs/logs Directory
The /usr/afs/logs directory contains log files from various server processes.The files detail interesting events that occur during normal operations. Forinstance, the Volume Server can record volume moves in the VolserLog file.Events are recorded at completion, so the server processes do not use thesefiles to reconstruct failed operations unlike the ones in the /usr/afs/dbdirectory.
The information in log files can be very useful as you evaluate process failuresand other problems. For instance, if you receive a timeout message when youtry to access a volume, checking the FileLog file possibly provides anexplanation, showing that the File Server was unable to attach the volume. Toexamine a log file remotely, use the bos getlog command as described in“Displaying Server Process Log Files” on page 145.
This directory also contains the core image files generated if a process beingmonitored by the BOS Server crashes. The BOS Server attempts to add anextension to the standard core name to indicate which process generated thecore file (for example, naming a core file generated by the Protection Servercore.ptserver). The BOS Server cannot always assign the correct extension iftwo processes fail at about the same time, so it is not guaranteed to be correct.
The directory contains the following files:
AuthLogThe Authentication Server’s log file.
BackupLogThe Backup Server’s log file.
BosLogThe BOS Server’s log file.
FileLogThe File Server’s log file.
SalvageLogThe Salvager’s log file.
VLLogThe Volume Location (VL) Server’s log file.
VolserLogThe Volume Server’s log file.
Chapter 3. Administering Server Machines 77
core.processIf present, a core image file produced as an AFS server process on themachine crashed (probably the process named by process).
Note: To prevent log files from growing unmanageably large, restart theserver processes periodically, particularly the database server processes.To avoid restarting the processes, use the UNIX rm command toremove the file as the process runs; it re-creates it automatically.
Volume Headers on Server Partitions
A partition that houses AFS volumes must be mounted at a subdirectory ofthe machine’s root ( / ) directory (not, for instance under the /usr directory).The file server machine’s file system registry file (/etc/fstab or equivalent)must correctly map the directory name and the partition’s device name. Thedirectory name is of the form /vicepindex, where each index is one or twolowercase letters. By convention, the first AFS partition on a machine ismounted at /vicepa, the second at /vicepb, and so on. If there are more than26 partitions, continue with /vicepaa, /vicepab and so on. The AFS ReleaseNotes specifies the number of supported partitions per server machine.
Do not store non-AFS files on AFS partitions. The File Server and VolumeServer expect to have available all of the space on the partition.
The /vicep directories contain two types of files:
Vvol_ID.volEach such file is a volume header. The vol_ID corresponds to thevolume ID number displayed in the output from the vos examine, voslistvldb, and vos listvol commands.
FORCESALVAGEThis zero-length file triggers the Salvager to salvage the entirepartition. The AFS-modified version of the fsck program creates thisfile if it discovers corruption.
Note: For most system types, it is important never to run the standard fsckprogram provided with the operating system on an AFS file servermachine. It removes all AFS volume data from server partitions becauseit does not recognize their format.
78 AFS: Administration Guide
The Four Roles for File Server Machines
In cells that have more than one server machine, not all server machines haveto perform exactly the same functions. The are four possible roles a machinecan assume, determined by which server processes it is running. A machinecan assume more than one role by running all of the relevant processes. Thefollowing list summarizes the four roles, which are described more completelyin subsequent sections.v A simple file server machine runs only the processes that store and deliver
AFS files to client machines. You can run as many simple file servermachines as you need to satisfy your cell’s performance and disk spacerequirements.
v A database server machine runs the four database server processes thatmaintain AFS’s replicated administrative databases: the Authentication,Backup, Protection, and Volume Location (VL) Server processes.
v A binary distribution machine distributes the AFS server binaries for itssystem type to all other server machines of that system type.
v The single system control machine distributes common server configurationfiles to all other server machines in the cell, in a cell that runs the UnitedStates edition of AFS (cells that use the international edition of AFS mustnot use the system control machine for this purpose). The machineconventionally also serves as the time synchronization source for the cell,adjusting its clock according to a time source outside the cell.
If a cell has a single server machine, it assumes the simple file server anddatabase server roles. The instructions in the AFS Quick Beginnings also haveyou configure it as the system control machine and binary distributionmachine for its system type, but it does not actually perform those functionsuntil you install another server machine.
It is best to keep the binaries for all of the AFS server processes in the/usr/afs/bin directory, even if not all processes are running. You can thenchange which roles a machine assumes simply by starting or stopping theprocesses that define the role.
Simple File Server Machines
A simple file server machine runs only the server processes that store anddeliver AFS files to client machines, monitor process status, and pick upbinaries and configuration files from the cell’s binary distribution and systemcontrol machines.
In general, only cells with more than three server machines need to runsimple file server machines. In cells with three or fewer machines, all of them
Chapter 3. Administering Server Machines 79

are usually database server machines (to benefit from replicating theadministrative databases); see “Database Server Machines”.
The following processes run on a simple file server machine:v The BOS Server (bosserver process)v The fs process, which combines the File Server, Volume Server, and
Salvager processes so that they can coordinate their operations on the datain volumes and avoid the inconsistencies that can result from multiplesimultaneous operations on the same data
v The NTP coordinator (runntp process), which helps keep the machine’sclock synchronized with the clocks on the other server machines in the cell
v A client portion of the Update Server that picks up binary files from thebinary distribution machine of its AFS system type (the upclientbinprocess)
v A client portion of the Update Server that picks up common configurationfiles from the system control machine, in cells running the United Statesedition of AFS (the upclientetc process)
Database Server Machines
A database server machine runs the four processes that maintain the AFSreplicated administrative databases: the Authentication Server, Backup Server,Protection Server, and Volume Location (VL) Server, which maintain theAuthentication Database, Backup Database, Protection Database, and VolumeLocation Database (VLDB), respectively. To review the functions of theseserver processes and their databases, see “AFS Server Processes and the CacheManager” on page 11.
If a cell has more than one server machine, it is best to run more than onedatabase server machine, but more than three are rarely necessary. Replicatingthe databases in this way yields the same benefits as replicating volumes:increased availability and reliability of information. If one database servermachine or process goes down, the information in the database is stillavailable from others. The load of requests for database information is spreadacross multiple machines, preventing any one from becoming overloaded.
Unlike replicated volumes, however, replicated databases do changefrequently. Consistent system performance demands that all copies of thedatabase always be identical, so it is not possible to record changes in onlysome of them. To synchronize the copies of a database, the database serverprocesses use AFS’s distributed database technology, Ubik. See “Replicatingthe AFS Administrative Databases” on page 85.
It is critical that the AFS server processes on every server machine in a cellknow which machines are the database server machines. The database server
80 AFS: Administration Guide
processes in particular must maintain constant contact with their peers inorder to coordinate the copies of the database. The other server processesoften need information from the databases. Every file server machine keeps alist of its cell’s database server machines in its local /usr/afs/etc/CellServDBfile. Cells that use the States edition of AFS can use the system controlmachine to distribute this file (see “The System Control Machine” on page 82).
The following processes define a database server machine:v The Authentication Server (kaserver process)v The Backup Server (buserver process)v The Protection Server (ptserver process)v The VL Server (vlserver process)
Database server machines can also run the processes that define a simple fileserver machine, as listed in “Simple File Server Machines” on page 79. Onedatabase server machine can act as the cell’s system control machine, and anydatabase server machine can serve as the binary distribution machine for itssystem type; see “The System Control Machine” on page 82 and “BinaryDistribution Machines”.
Binary Distribution Machines
A binary distribution machine stores and distributes the binary files for the AFSprocesses and command suites to all other server machines of its system type.Each file server machine keeps its own copy of AFS server process binaries onits local disk, by convention in the /usr/afs/bin directory. For consistentsystem performance, however, all server machines must run the same version(build level) of a process. For instructions for checking a binary’s build level,see “Displaying A Binary File’s Build Level” on page 100. The easiest way tokeep the binaries consistent is to have a binary distribution machine of eachsystem type distribute them to its system-type peers.
The process that defines a binary distribution machine is the server portion ofthe Update Server (upserver process). The client portion of the Update Server(upclientbin process) runs on the other server machines of that system typeand references the binary distribution machine.
Binary distribution machines usually also run the processes that define asimple file server machine, as listed in “Simple File Server Machines” onpage 79. One binary distribution machine can act as the cell’s system controlmachine, and any binary distribution machine can serve as a database servermachine; see “The System Control Machine” on page 82 and “Database ServerMachines” on page 80.
Chapter 3. Administering Server Machines 81

The System Control Machine
In cells that run the United States edition of AFS, the system control machinestores and distributes system configuration files shared by all of the servermachines in the cell. Each file server machine keeps its own copy of theconfiguration files on its local disk, by convention in the /usr/afs/etc directory.For consistent system performance, however, all server machines must use thesame files. The easiest way to keep the files consistent is to have the systemcontrol machine distribute them. You make changes only to the copy storedon the system control machine, as directed by the instructions in thisdocument. The United States edition of AFS is available to cells in the UnitedStates and Canada and to selected institutions in other countries, asdetermined by United States government regulations.
Cells that run the international version of AFS do not use the system controlmachine to distribute system configuration files. Some of the files containinformation that is too sensitive to cross the network unencrypted, and UnitedStates government regulations forbid the export of the necessary encryptionroutines in the form that the Update Server uses. You must instead update theconfiguration files on each file server machine individually. The boscommands that you use to update the files encrypt the information using anexportable form of the encryption routines.
For a list of the configuration files stored in the /usr/afs/etc directory, see“Common Configuration Files in the /usr/afs/etc Directory” on page 72.
The AFS Quick Beginnings configures a cell’s first server machine as the systemcontrol machine. If you wish, you can reassign the role to a different machinethat you install later, but you must then change the client portion of theUpdate Server (upclientetc) process running on all other server machines torefer to the new system control machine.
The following processes define the system control machine:v The server portion of the Update Server (upserver) process, in cells using
the United States edition of AFS. The client portion of the Update Server(upclientetc process) runs on the other server machines and references thesystem control machine.
v The NTP coordinator (runntp process) which points to a time sourceoutside the cell, if the cell uses NTPD to synchronize its clocks. The runntpprocess on other machines reference the system control machine as theirmain time source.
The system control machine can also run the processes that define a simplefile server machine, as listed in “Simple File Server Machines” on page 79. Itcan also server as a database server machine, and by convention acts as the
82 AFS: Administration Guide

binary distribution machine for its system type. A single upserver process candistribute both configuration files and binaries. See “Database ServerMachines” on page 80 and “Binary Distribution Machines” on page 81.
To locate database server machines1. Issue the bos listhosts command.
% bos listhosts <machine name>
The machines listed in the output are the cell’s database server machines.For complete instructions and example output, see “To display a cell’sdatabase server machines” on page 103.
2. (Optional) Issue the bos status command to verify that a machine listed inthe output of the bos listhosts command is actually running the processesthat define it as a database server machine. For complete instructions, see“Displaying Process Status and Information from the BosConfig File” onpage 131.
% bos status <machine name> buserver kaserver ptserver vlserver
If the specified machine is a database server machine, the output from thebos status command includes the following lines:
Instance buserver, currently running normally.Instance kaserver, currently running normally.Instance ptserver, currently running normally.Instance vlserver, currently running normally.
To locate the system control machine1. Issue the bos status command for any server machine. Complete
instructions appear in “Displaying Process Status and Information fromthe BosConfig File” on page 131.
% bos status <machine name> upserver upclientbin upclientetc -long
The output you see depends on the machine you have contacted: a simplefile server machine, the system control machine, or a binary distributionmachine. See “Interpreting the Output from the bos status Command” onpage 84.
To locate the binary distribution machine for a system type1. Issue the bos status command for a file server machine of the system type
you are checking (to determine a machine’s system type, issue the fssysname or sys command as described in “Displaying and Setting theSystem Type Name” on page 423. Complete instructions for the bos statuscommand appear in “Displaying Process Status and Information from theBosConfig File” on page 131.
% bos status <machine name> upserver upclientbin upclientetc -long
Chapter 3. Administering Server Machines 83
The output you see depends on the machine you have contacted: a simplefile server machine, the system control machine, or a binary distributionmachine. See “Interpreting the Output from the bos status Command”.
Interpreting the Output from the bos status Command
Interpreting the output of the bos status command is most straightforward fora simple file server machine. There is no upserver process, so the outputincludes the following message:
bos: failed to get instance info for 'upserver' (no such entity)
A simple file server machine runs the upclientbin process, so the outputincludes a message like the following. It indicates that fs7.abc.com is thebinary distribution machine for this system type.
Instance upclientbin, (type is simple) currently running normally.Process last started at Wed Mar 10 23:37:09 1999 (1 proc start)Command 1 is '/usr/afs/bin/upclient fs7.abc.com -t 60 /usr/afs/bin'
If you run the United States edition of AFS, a simple file server machine alsoruns the upclientetc process, so the output includes a message like thefollowing. It indicates that fs1.abc.com is the system control machine.
Instance upclientetc, (type is simple) currently running normally.Process last started at Mon Mar 22 05:23:49 1999 (1 proc start)Command 1 is '/usr/afs/bin/upclient fs1.abc.com -t 60 /usr/afs/etc'
The Output on the System Control Machine
If you run the United States edition of AFS and have issued the bos statuscommand for the system control machine, the output includes an entry for theupserver process similar to the following:
Instance upserver, (type is simple) currently running normally.Process last started at Mon Mar 22 05:23:54 1999 (1 proc start)Command 1 is '/usr/afs/bin/upserver'
If you are using the default configuration recommended in the AFS QuickBeginnings, the system control machine is also the binary distribution machinefor its system type, and a single upserver process distributes both kinds ofupdates. In that case, the output includes the following messages:
bos: failed to get instance info for 'upclientbin' (no such entity)bos: failed to get instance info for 'upclientetc' (no such entity)
If the system control machine is not a binary distribution machine, the outputincludes an error message for the upclientetc process, but a complete a listingfor the upclientbin process (in this case it refers to the machine fs5.abc.comas the binary distribution machine):
84 AFS: Administration Guide
Instance upclientbin, (type is simple) currently running normally.Process last started at Mon Mar 22 05:23:49 1999 (1 proc start)Command 1 is '/usr/afs/bin/upclient fs5.abc.com -t 60 /usr/afs/bin'bos: failed to get instance info for 'upclientetc' (no such entity)
The Output on a Binary Distribution Machine
If you have issued the bos status command for a binary distribution machine,the output includes an entry for the upserver process similar to the followingand error message for the upclientbin process:
Instance upserver, (type is simple) currently running normally.Process last started at Mon Apr 5 05:23:54 1999 (1 proc start)Command 1 is '/usr/afs/bin/upserver'bos: failed to get instance info for 'upclientbin' (no such entity)
Unless this machine also happens to be the system control machine, amessage like the following references the system control machine (in this case,fs3.abc.com):
Instance upclientetc, (type is simple) currently running normally.Process last started at Mon Apr 5 05:23:49 1999 (1 proc start)Command 1 is '/usr/afs/bin/upclient fs3.abc.com -t 60 /usr/afs/etc'
Administering Database Server Machines
This section explains how to administer database server machines. Forinstallation instructions, see the AFS Quick Beginnings.
Replicating the AFS Administrative Databases
There are several benefits to replicating the AFS administrative databases (theAuthentication, Backup, Protection, and Volume Location Databases), asdiscussed in “Replicating the AFS Administrative Databases” on page 38. Forcorrect cell functioning, the copies of each database must be identical at alltimes. To keep the databases synchronized, AFS uses library of utilities calledUbik. Each database server process runs an associated lightweight Ubikprocess, and client-side programs call Ubik’s client-side subroutines whenthey submit requests to read and change the databases.
Ubik is designed to work with minimal administrator intervention, but thereare several configuration requirements, as detailed in “Configuring the Cellfor Proper Ubik Operation” on page 86. The following brief overview ofUbik’s operation is helpful for understanding the requirements. For moredetails, see “How Ubik Operates Automatically” on page 88.
Ubik is designed to distribute changes made in an AFS administrativedatabase to all copies as quickly as possible. Only one copy of the database,the synchronization site, accepts change requests from clients; the lightweight
Chapter 3. Administering Server Machines 85
Ubik process running there is the Ubik coordinator. To maintain maximumavailability, there is a separate Ubik coordinator for each database, and thesynchronization site for each of the four databases can be on a differentmachine. The synchronization site for a database can also move from machineto machine in response to process, machine, or network outages.
The other copies of a database, and the Ubik processes that maintain them,are termed secondary. The secondary sites do not accept database changesdirectly from client-side programs, but only from the synchronization site.
After the Ubik coordinator records a change in its copy of a database, itimmediately sends the change to the secondary sites. During the briefdistribution period, clients cannot access any of the copies of the database,even for reading. If the coordinator cannot reach a majority of the secondarysites, it halts the distribution and informs the client that the attempted changefailed.
To avoid distribution failures, the Ubik processes maintain constant contact byexchanging time-stamped messages. As long as a majority of the secondarysites respond to the coordinator’s messages, there is a quorum of sites that aresynchronized with the coordinator. If a process, machine, or network outagebreaks the quorum, the Ubik processes attempt to elect a new coordinator inorder to establish a new quorum among the highest possible number of sites.See “A Flexible Coordinator Boosts Availability” on page 90.
Configuring the Cell for Proper Ubik Operation
This section describes how to configure your cell to maintain proper Ubikoperation.v Run all four database server processes—Authentication Server, Backup
Server, Protection Server, and VL Server—on all database server machines.Both the client and server portions of Ubik expect that all the databaseserver machines listed in the CellServDB file are running all of thedatabase server processes. There is no mechanism for indicating that onlysome database server processes are running on a machine.
v Maintain correct information in the /usr/afs/etc/CellServDB file at all times.Ubik consults the /usr/afs/etc/CellServDB file to determine the sites withwhich to establish and maintain a quorum. Incorrect information can resultin unsynchronized databases or election of a coordinator in each of severalsubgroups of machines, because the Ubik processes on various machines donot agree on which machines need to participate in the quorum.If you run the United States version of AFS and use the Update Server, it issimplest to maintain the /usr/afs/etc/CellServDB file on the system controlmachine, which distributes its copy to all other server machines. The AFS
86 AFS: Administration Guide
Quick Beginnings explains how to configure the Update Server. If you runthe international version of AFS, you must update the file on each machineindividually.The only reason to alter the file is when configuring or decommissioning adatabase server machine. Use the appropriate bos commands rather thanediting the file by hand. For instructions, see “Maintaining the ServerCellServDB File” on page 101. The instructions in “Chapter 4. Monitoringand Controlling Server Processes” on page 121 for stopping and startingprocesses remind you to alter the CellServDB file when appropriate, as dothe instructions in the AFS Quick Beginnings for installing ordecommissioning a database server machine.(Client processes and the server processes that do not maintain databasesalso rely on correct information in the CellServDB file for proper operation,but their use of the information does not affect Ubik’s operation. See“Maintaining the Server CellServDB File” on page 101 and “MaintainingKnowledge of Database Server Machines” on page 402.)
v Keep the clocks synchronized on all machines in the cell, especially thedatabase server machines.In the conventional configuration specified in the AFS Quick Beginnings, yourun the runntp process to supervise the local Network Time ProtocolDaemon (NTPD) on every AFS server machine. The NTPD on the systemcontrol machine synchronizes its clock with a reliable source outside the celland broadcasts the time to the NTPDs on the other server machines. Youcan choose to run a different time synchronization protocol if you wish.Keeping clocks synchronized is important because the Ubik processes at adatabase’s sites timestamp the messages which they exchange to maintainconstant contact. Timestamping the messages is necessary because in anetworked environment it is not safe to assume that a message reaches itsdestination instantly. Ubik compares the timestamp on an incomingmessage with the current time. If the difference is too great, it is possiblethat an outage is preventing reliable communication between the Ubik sites,which can possibly result in unsynchronized databases. Ubik considers themessage invalid, which can prompt it to attempt election of a differentcoordinator.Electing a new coordinator is appropriate if a timestamped message isexpired due to actual interruption of communication, but not if a messageappears expired only because the sender and recipient do not share thesame time. For detailed examples of how unsynchronized clocks candestabilize Ubik operation, see “How Ubik Uses Timestamped Messages”on page 88.
Chapter 3. Administering Server Machines 87

How Ubik Operates Automatically
The following Ubik features help keep its maintenance requirements to aminimum:v Ubik’s server and client portions operate automatically.
Each database server process runs a lightweight process to call on theserver portion of the Ubik library. It is common to refer to this lightweightprocess itself as Ubik. Because it is lightweight, the Ubik process does notappear in process listings such as those generated by the UNIX pscommand. Client-side programs that need to read and change the databasesdirectly call the subroutines in the Ubik library’s client portion, rather thanrunning a separate lightweight process. Examples of such programs are theklog command and the commands in the pts suite.
v Ubik tracks database version numbers.As the coordinator records a change to a database, it increments thedatabase’s version number. The version number makes it easy for thecoordinator to determine if a site has the most recent version or not. Theversion number speeds the return to normal functioning after election of anew coordinator or when communication is restored after an outage,because it makes it easy to determine which site has the most currentdatabase and which need to be updated.
v Ubik’s use of timestamped messages guarantees that database copies arealways synchronized during normal operation.Replicating a database to increase data availability is pointless if all copiesof the database are not the same. Inconsistent performance can result ifclients receive different information depending on which copy of thedatabase they access. As previously noted, Ubik sites constantly track thestatus of their peers by exchanging timestamped messages. For a detaileddescription, see “How Ubik Uses Timestamped Messages”.
v The ability to move the coordinator maximizes database availability.Suppose, for example, that in a cell with three database server machines anetwork partition separates the two secondary sites from the coordinator.The coordinator retires because it is no longer in contact with a majority ofthe sites listed in the CellServDB file. The two sites on the other side of thepartition can elect a new coordinator among themselves, and it can thenaccept database changes from clients. If the coordinator cannot move in thisway, the database has to be read-only until the network partition isrepaired. For a detailed description of Ubik’s election procedure, see “AFlexible Coordinator Boosts Availability” on page 90.
How Ubik Uses Timestamped Messages: Ubik synchronizes the copies of adatabase by maintaining constant contact between the synchronization siteand the secondary sites. The Ubik coordinator frequently sends atime-stamped guarantee message to each of the secondary sites. When the
88 AFS: Administration Guide
secondary site receives the message, it concludes that it is in contact with thecoordinator. It considers its copy of the database to be valid until time T,which is usually 60 seconds from the time the coordinator sent the message.In response, the secondary site returns a vote message that acknowledges thecoordinator as valid until a certain time X, which is usually 120 seconds in thefuture.
The coordinator sends guarantee messages more frequently than every Tseconds, so that the expiration periods overlap. There is no danger ofexpiration unless a network partition or other outage actually interruptscommunication. If the guarantee expires, the secondary site’s copy of thedatabase it not necessarily current. Nonetheless, the database server continuesto service client requests. It is considered better for overall cell functioningthat a secondary site remains accessible even if the information it isdistributing is possibly out of date. Most of the AFS administrative databasesdo not change that frequently, in any case, and making a database inaccessiblecauses a timeout for clients that happen to access that copy.
As previously mentioned, Ubik’s use of timestamped messages makes it vitalto synchronize the clocks on database server machines. There are two waysthat skewed clocks can interrupt normal Ubik functioning, depending onwhich clock is ahead of the others.
Suppose, for example, that the Ubik coordinator’s clock is ahead of thesecondary sites: the coordinator’s clock says 9:35:30, but the secondary clockssay 9:31:30. The secondary sites send votes messages that acknowledge thecoordinator as valid until 9:33:30. This is two minutes in the future accordingto the secondary clocks, but is already in the past from the coordinator’sperspective. The coordinator concludes that it no longer has enough supportto remain coordinator and forces election of a new coordinator. Election takesabout three minutes, during which time no copy of the database acceptschanges.
The opposite possibility is that a secondary site’s clock (14:50:00) is ahead ofthe coordinator’s (14:46:30). When the coordinator sends a guarantee messagegood until 14:47:30), it has already expired according to the secondary clock.Believing that it is out of contact with the coordinator, the secondary site stopssending votes for the coordinator and tries get itself elected as coordinator.This is appropriate if the coordinator has actually failed, but is inappropriatewhen there is no actual outage.
The attempt of a single secondary site to get elected as the new coordinatorusually does not affect the performance of the other sites. As long as theirclocks agree with the coordinator’s, they ignore the other secondary site’srequest for votes and continue voting for the current coordinator. However, if
Chapter 3. Administering Server Machines 89
enough of the secondary sites’s clocks get ahead of the coordinator’s, they canforce election of a new coordinator even though the current one is actuallyworking fine.
A Flexible Coordinator Boosts Availability: Ubik uses timestampedmessages to determine when coordinator election is necessary, just as it doesto keep the database copies synchronized. As long as the coordinator receivesvote messages from a majority of the sites (it implicitly votes for itself), it isappropriate for it to continue as coordinator because it is successfullydistributing database changes. A majority is defined as more than 50% of alldatabase sites when there are an odd number of sites; with an even number ofsites, the site with the lowest Internet address has an extra vote for breakingties as necessary.If the coordinator is not receiving sufficient votes, it retiresand the Ubik sites elect a new coordinator. This does not happenspontaneously, but only when the coordinator really fails or stops receiving amajority of the votes. The secondary sites have a built-in bias to continuevoting for an existing coordinator, which prevents undue elections.
The election of the new coordinator is by majority vote. The Ubiksubprocesses have a bias to vote for the site with the lowest Internet address,which helps it gather the necessary majority quicker than if all the sites werecompeting to receive votes themselves. During the election (which normallylasts less than three minutes), clients can read information from the database,but cannot make any changes.
Ubik’s election procedure makes it possible for each database server process’scoordinator to be on a different machine. For example, if the Ubikcoordinators for all four processes start out on machine A and the ProtectionServer on machine A fails for some reason, then a different site (say machineB) must be elected as the new Protection Database Ubik coordinator. MachineB remains the coordinator for the Protection Database even after theProtection Server on machine A is working again. The failure of the ProtectionServer has no effect on the Authentication, Backup, or VL Servers, so theircoordinators remain on machine A.
Backing Up and Restoring the Administrative Databases
The AFS administrative databases store information that is critical for AFSoperation in your cell. If a database becomes corrupted due to a hardwarefailure or other problem on a database server machine, it likely to be difficultand time-consuming to recreate all of the information from scratch. To protectyourself against loss of data, back up the administrative databases to apermanent media, such as tape, on a regular basis. The recommended methodis to use a standard local disk backup utility such as the UNIX tar command.
90 AFS: Administration Guide
When deciding how often to back up a database, consider the amount of datathat you are willing to recreate by hand if it becomes necessary to restore thedatabase from a backup copy. In most cells, the databases differ quite a bit inhow often and how much they change. Changes to the AuthenticationDatabase are probably the least frequent, and consist mostly of changed userpasswords. Protection Database and VLDB changes are probably morefrequent, as users add or delete groups and change group memberships, andas you and other administrators create or move volumes. The number andfrequency of changes is probably greatest in the Backup Database, particularlyif you perform backups every day.
The ease with which you can recapture lost changes also differs for thedifferent databases:v If regular users make a large proportion of the changes to the
Authentication Database and Protection Database in your cell, thenrecovering them possibly requires a large amount of detective work andinterviewing of users, assuming that they can even remember what changesthey made at what time.
v Recovering lost changes to the VLDB is more straightforward, because youcan use the vos syncserv and vos syncvldb commands to correct anydiscrepancies between the VLDB and the actual state of volumes on servermachines. Running these commands can be time-consuming, however.
v The configuration information in the Backup Database (Tape Coordinatorport offsets, volume sets and entries, the dump hierarchy, and so on)probably does not change that often, in which case it is not that hard torecover a few recent changes. In contrast, there are likely to be a largenumber of new dump records resulting from dump operations. You canrecover these records by using the -dbadd argument to the backupscantape command, reading in information from the backup tapesthemselves. This can take a long time and require numerous tape changes,however, depending on how much data you back up in your cell and howyou append dumps. Furthermore, the backup scantape command is subjectto several restrictions. The most basic is that it halts if it finds that anexisting dump record in the database has the same dump ID number as adump on the tape it is scanning. If you want to continue with the scanningoperation, you must locate and remove the existing record from thedatabase. For further discussion, see the backup scantape command’sreference page in the AFS Administration Reference.
These differences between the databases possibly suggest backing up thedatabase at different frequencies, ranging from every few days or weekly forthe Backup Database to every few weeks for the Authentication Database. Onthe other hand, it is probably simpler from a logistical standpoint to backthem all up at the same time (and frequently), particularly if tape
Chapter 3. Administering Server Machines 91

consumption is not a major concern. Also, it is not generally necessary to keepbackup copies of the databases for a long time, so you can recycle the tapesfairly frequently.
To back up the administrative databases1. Log in as the local superuser root on a database server machine that is not
the synchronization site. The machine with the highest IP address isnormally the best choice, since it is least likely to become thesynchronization site in an election.
2. Issue the bos shutdown command to shut down the relevant serverprocess on the local machine. For a complete description of the command,see “To stop processes temporarily” on page 140.For the -instance argument, specify one or more database server processnames (buserver for the Backup Server, kaserver for the AuthenticationServer, ptserver for the Protection Server, or vlserver for the VolumeLocation Server. Include the -localauth flag because you are logged in asthe local superuser root but do not necessarily have administrative tokens.
# bos shutdown <machine name> -instance <instances>+ -localauth [-wait]
3. Use a local disk backup utility, such as the UNIX tar command, to transferone or more database files to tape. If the local database server machinedoes not have a tape device attached, use a remote copy command totransfer the file to a machine with a tape device, then use the tarcommand there.The following command sequence backs up the complete contents of the/usr/afs/db directory
# cd /usr/afs/db# tar cvf tape_device .
To back up individual database files, substitute their names for the periodin the preceding tar command:v bdb.DB0 for the Backup Databasev kaserver.DB0 for the Authentication Databasev prdb.DB0 for the Protection Databasev vldb.DB0 for the VLDB
4. Issue the bos start command to restart the server processes on the localmachine. For a complete description of the command, see “To startprocesses by changing their status flags to Run” on page 139. Provide thesame values for the -instance argument as in Step 2, and the -localauthflag for the same reason.
# bos start <machine name> -instance <server process name>+ -localauth
92 AFS: Administration Guide
To restore an administrative database1. Log in as the local superuser root on each database server machine in the
cell.2. Working on one of the machines, issue the bos shutdown command once
for each database server machine, to shut down the relevant server processon all of them. For a complete description of the command, see “To stopprocesses temporarily” on page 140.For the -instance argument, specify one or more database server processnames (buserver for the Backup Server, kaserver for the AuthenticationServer, ptserver for the Protection Server, or vlserver for the VolumeLocation Server. Include the -localauth flag because you are logged in asthe local superuser root but do not necessarily have administrative tokens.
# bos shutdown <machine name> -instance <instances>+ -localauth [-wait]
3. Remove the database from each database server machine, by issuing thefollowing commands on each one.
# cd /usr/afs/db
For the Backup Database:# rm bdb.DB0# rm bdb.DBSYS1
For the Authentication Database:# rm kaserver.DB0# rm kaserver.DBSYS1
For the Protection Database:# rm prdb.DB0# rm prdb.DBSYS1
For the VLDB:# rm vldb.DB0# rm vldb.DBSYS1
4. Using the local disk backup utility that you used to back up the database,copy the most recently backed-up version of it to the appropriate file onthe database server machine with the lowest IP address. The following isan appropriate tar command if the synchronization site has a tape deviceattached:
# cd /usr/afs/db# tar xvf tape_device database_file
where database_file is one of the following:v bdb.DB0 for the Backup Databasev kaserver.DB0 for the Authentication Databasev prdb.DB0 for the Protection Database
Chapter 3. Administering Server Machines 93
v vldb.DB0 for the VLDB5. Working on one of the machines, issue the bos start command to restart
the server process on each of the database server machines in turn. Startwith the machine with the lowest IP address, which becomes thesynchronization site for the Backup Database. Wait for it to establish itselfas the synchronization site before repeating the command to restart theprocess on the other database server machines. For a complete descriptionof the command, see “To start processes by changing their status flags toRun” on page 139. Provide the same values for the -instance argument asin Step 2 on page 93, and the -localauth flag for the same reason.
# bos start <machine name> -instance <server process name>+ -localauth
6. If the database has changed since you last backed it up, issue theappropriate commands from the instructions in the indicated sections torecreate the information in the restored database. If issuing pts commands,you must first obtain administrative tokens. The backup and voscommands accept the -localauth flag if you are logged in as the localsuperuser root, so you do not need administrative tokens. TheAuthentication Server always performs a separate authentication anyway,so you only need to include the -admin argument if issuing kascommands.v To define or remove volume sets and volume entries in the Backup
Database, see “Defining and Displaying Volume Sets and VolumeEntries” on page 233.
v To edit the dump hierarchy in the Backup Database, see “Defining andDisplaying the Dump Hierarchy” on page 240.
v To define or remove Tape Coordinator port offset entries in the BackupDatabase, see “Configuring Tape Coordinator Machines and TapeDevices” on page 229.
v To restore dump records in the Backup Database, see “To scan thecontents of a tape” on page 302.
v To recreate Authentication Database entries or password changes forusers, see the appropriate section of “Chapter 13. Administering UserAccounts” on page 505.
v To recreate Protection Database entries or group membershipinformation, see the appropriate section of “Chapter 14. Administeringthe Protection Database” on page 533.
v To synchronize the VLDB with volume headers, see “Synchronizing theVLDB and Volume Headers” on page 189.
94 AFS: Administration Guide
Installing Server Process Software
This section explains how to install new server process binaries on file servermachines, how to revert to a previous version if the current version is notworking properly, and how to install new disks to house AFS volumes on afile server machine.
The most frequent reason to replace a server process’s binaries is to upgradeAFS to a new version. In general, installation instructions accompany theupdated software, but this chapter provides an additional reference.
Each AFS server machine must store the server process binaries in a local diskdirectory, called /usr/afs/bin by convention. For predictable systemperformance, it is best that all server machines run the same build level, or atleast the same version, of the server software. For instructions on checkingAFS build level, see “Displaying A Binary File’s Build Level” on page 100.
The Update Server makes it easy to distribute a consistent version of softwareto all server machines. You designate one server machine of each system typeas the binary distribution machine by running the server portion of the UpdateServer (upserver process) on it. All other server machines of that system typerun the client portion of the Update Server (upclientbin process) to retrieveupdated software from the binary distribution machine. The AFS QuickBeginnings explains how to install the appropriate processes. For more onbinary distribution machines, see “Binary Distribution Machines” on page 81.
When you use the Update Server, you install new binaries on binarydistribution machines only. If you install binaries directly on a machine that isrunning the upclientbin process, they are overwritten the next time theprocess compares the contents of the local /usr/afs/bin directory to thecontents on the system control machine, by default within five minutes.
The following instructions explain how to use the appropriate commandsfrom the bos suite to install and uninstall server binaries.
Installing New Binaries
An AFS server process does not automatically switch to a new process binaryfile as soon as it is installed in the /usr/afs/bin directory. The processcontinues to use the previous version of the binary file until it (the process)next restarts. By default, the BOS Server restarts processes for which there arenew binary files every day at 5:00 a.m., as specified in the/usr/afs/local/BosConfig file. To display or change this binary restart time, usethe bos getrestart and bos setrestart commands, as described in “Setting theBOS Server’s Restart Times” on page 143.
Chapter 3. Administering Server Machines 95
You can force the server machine to start using new server process binariesimmediately by issuing the bos restart command as described in thefollowing instructions.
You do not need to restart processes when you install new command suitebinaries. The new binary is invoked automatically the next time a commandfrom the suite is issued.
When you use the bos install command, the BOS Server automatically savesthe current version of a binary file by adding a .BAK extension to its name. Itrenames the current .BAK version, if any, to the .OLD version, if there is no.OLD version already. If there is a current .OLD version, the current .BAKversion must be at least seven days old to replace it.
It is best to store AFS binaries in the /usr/afs/bin directory, because that is theonly directory the BOS Server automatically checks for new binaries. You can,however, use the bos install command’s -dir argument to install non-AFSbinaries into other directories on a server machine’s local disk. See thecommand’s reference page in the AFS Administration Reference for furtherinformation.
To install new server binaries1. Verify that you are listed in the /usr/afs/etc/UserList file. If necessary, issue
the bos listusers command, which is fully described in “To display theusers in the UserList file” on page 582.
% bos listusers <machine name>
2. Verify that the binaries are available in the source directory from whichyou are installing them. If the machine is also an AFS client, you canretrieve the binaries from a central directory in AFS. Otherwise, you canobtain them directly from the AFS distribution media, from a local diskdirectory where you previously installed them, or from a remote machineusing a transfer utility such as the ftp command.
3. Issue the bos install command for the binary distribution machine. (If youhave forgotten which machine is performing that role, see “To locate thebinary distribution machine for a system type” on page 83.)
% bos install <machine name> <files to install>+
where
i Is the shortest acceptable abbreviation of install.
machine nameNames the binary distribution machine.
files to installNames each binary file to install into the local /usr/afs/bin
96 AFS: Administration Guide

directory. Partial pathnames are interpreted relative to the currentworking directory. The last element in each pathname (thefilename itself) matches the name of the file it is replacing, such asbosserver or volserver for server processes, bos or vos forcommands.
Each AFS server process other than the fs process uses a singlebinary file. The fs process uses three binary files: fileserver,volserver, and salvager. Installing a new version of onecomponent does not necessarily mean that you need to replace allthree.
4. Repeat Step 3 on page 96 for each binary distribution machine.5. (Optional) If you want to restart processes to use the new binaries
immediately, wait until the upclientbin process retrieves them from thebinary distribution machine. You can verify the timestamps on binary filesby using the bos getdate command as described in “Displaying BinaryVersion Dates” on page 99. When the binary files are available on eachserver machine, issue the bos restart command, for which completeinstructions appear in “Stopping and Immediately Restarting Processes” onpage 142.If you are working on an AFS client machine, it is a wise precaution tohave a copy of the bos command suite binaries on the local disk beforerestarting server processes. In the conventional configuration, the/usr/afsws/bin directory that houses the bos command binary on clientmachines is a symbolic link into AFS, which conserves local disk space.However, restarting certain processes (particularly the database serverprocesses) can make the AFS filespace inaccessible, particularly if aproblem arises during the restart. Having a local copy of the bos binaryenables you to uninstall or reinstall process binaries or restart processeseven in this case. Use the cp command to copy the bos command binaryfrom the /usr/afsws/bin directory to a local directory such as /tmp.Restarting a process causes a service outage. It is best to perform therestart at times of low system usage if possible.
% bos restart <machine name> <instances>+
Reverting to the Previous Version of Binaries
In rare cases, installing a new binary can cause problems serious enough torequire reverting to the previous version. Just as with installing binaries,consistent system performance requires reverting every server machine backto the same version. Issue the bos uninstall command described here on eachbinary distribution machine.
Chapter 3. Administering Server Machines 97
When you use the bos uninstall command, the BOS Server discards thecurrent version of a binary file and promotes the .BAK version of the file byremoving the extension. It renames the current .OLD version, if any, to .BAK.
If there is no current .BAK version, the bos uninstall command operationfails and generates an error message. If a .OLD version still exists, issue themv command to rename it to .BAK before reissuing the bos uninstallcommand.
Just as when you install new binaries, the server processes do not start usinga reverted version immediately. Presumably you are reverting because thecurrent binaries do not work, so the following instructions have you restartthe relevant processes.
To revert to the previous version of binaries1. Verify that you are listed in the /usr/afs/etc/UserList file. If necessary, issue
the bos listusers command, which is fully described in “To display theusers in the UserList file” on page 582.
% bos listusers <machine name>
2. Verify that the .BAK version of each relevant binary is available in the/usr/afs/bin directory on each binary distribution machine. If necessary,you can use the bos getdate command as described in “Displaying BinaryVersion Dates” on page 99. If necessary, rename the .OLD version to .BAK
3. Issue the bos uninstall command for a binary distribution machine. (Ifyou have forgotten which machine is performing that role, see “To locatethe binary distribution machine for a system type” on page 83.)
% bos uninstall <machine name> <files to uninstall>+
where
u Is the shortest acceptable abbreviation of uninstall.
machine nameNames the binary distribution machine.
files to uninstallNames each binary file in the /usr/afs/bin directory to replace withits .BAK version. The file name alone is sufficient, because the/usr/afs/bin directory is assumed.
4. Repeat Step 3 for each binary distribution machine.5. Wait until the upclientbin process on each server machine retrieves the
reverted from the binary distribution machine. You can verify thetimestamps on binary files by using the bos getdate command asdescribed in “Displaying Binary Version Dates” on page 99. When thebinary files are
98 AFS: Administration Guide

available on each server machine, issue the bos restart command, forwhich complete instructions appear in “Stopping and ImmediatelyRestarting Processes” on page 142.If you are working on an AFS client machine, it is a wise precaution tohave a copy of the bos command suite binaries on the local disk beforerestarting server processes. In the conventional configuration, the/usr/afsws/bin directory that houses the bos command binary on clientmachines is a symbolic link into AFS, which conserves local disk space.However, restarting certain processes (particularly the database serverprocesses) can make the AFS filespace inaccessible, particularly if aproblem arises during the restart. Having a local copy of the bos binaryenables you to uninstall or reinstall process binaries or restart processeseven in this case. Use the cp command to copy the bos command binaryfrom the /usr/afsws/bin directory to a local directory such as /tmp.
% bos restart <machine name> <instances>+
Displaying Binary Version Dates
You can check the compilation dates for all three versions of a binary file inthe /usr/afs/bin directory--the current, .BAK and .OLD versions. This is usefulfor verifying that new binaries have been copied to a file server machine fromits binary distribution machine before restarting a server process to use thenew binaries.
To check dates on binaries in a directory other than /usr/afs/bin, add the -dirargument. See the AFS Administration Reference.
To display binary version dates1. Issue the bos getdate command.
% bos getdate <machine name> <files to check>+
where
getd Is the shortest acceptable abbreviation of getdate.
machine nameName the file server machine for which to display binary dates.
files to checkNames each binary file to display.
Removing Obsolete Binary Files
When processes with new binaries have been running without problems for anumber of days, it is generally safe to remove the .BAK and .OLD versionsfrom the /usr/afs/bin directory, both to reduce clutter and to free space on thefile server machine’s local disk.
Chapter 3. Administering Server Machines 99
You can use the bos prune command’s flags to remove the following types offiles:v To remove files in the /usr/afs/bin directory with a .BAK extension, use the
-bak flag.v To remove files in the /usr/afs/bin directory with a .OLD extension, use the
-old flag.v To remove files in the /usr/afs/logs directory called core, with any
extension, use the -core flag.v To remove all three types of files, use the -all flag.
To remove obsolete binaries1. Verify that you are listed in the /usr/afs/etc/UserList file. If necessary, issue
the bos listusers command, which is fully described in “To display theusers in the UserList file” on page 582.
% bos listusers <machine name>
2. Issue the bos prune command with one or more of its flags.% bos prune <machine name> [-bak] [-old] [-core] [-all]
where
p Is the shortest acceptable abbreviation of prune.
machine nameNames the file server machine on which to remove obsolete files.
-bak Removes all the files with a .BAK extension from the /usr/afs/bindirectory. Do not combine this flag with the -all flag.
-old Removes all the files a .OLD extension from the /usr/afs/bindirectory. Do not combine this flag with the -all flag.
-core Removes all core files from the /usr/afs/logs directory. Do notcombine this flag with the -all flag
-all Combines the effect of the other three flags. Do not combine itwith the other three flags.
Displaying A Binary File’s Build Level
For the most consistent performance on a server machine, and cell-wide, it isbest for all server processes to come from the same AFS distribution. EveryAFS binary includes an ASCII string that specifies its version, or build level. Todisplay it, use the strings and grep commands, which are included in mostUNIX distributions.
To display an AFS binary’s build level1. Change to the directory that houses the binary file . If you are not sure
where the binary resides, issue the which command.
100 AFS: Administration Guide

% which binary_file/bin_dir_path/binary_file% cd bin_dir_path
2. Issue the strings command to extract all ASCII strings from the binary file.Pipe the output to the grep command to locate the relevant line.
% strings ./binary_file | grep Base
The output reports the AFS build level in a format like the following:@(#)Base configuration afsversion build_level
For example, the following string indicates the binary is from AFS 3.6build 3.0:
@(#)Base configuration afs3.6 3.0
Maintaining the Server CellServDB File
Every file server machine maintains a list of its home cell’s database servermachines in the local disk file /usr/afs/etc/CellServDB on its local disk. Bothdatabase server processes and non-database server processes consult the file:v The database server processes (the Authentication, Backup, Protection, and
Volume Location Servers) maintain constant contact with their peers inorder to keep their copies of the replicated administrative databasessynchronized.As detailed in “Replicating the AFS Administrative Databases” on page 85,the database server processes use the Ubik utility to synchronize theinformation in the databases they maintain. The Ubik coordinator at thesynchronization site for each database maintains the single read/write copyof the database and distributes changes to the secondary sites as necessary.It must maintain contact with a majority of the secondary sites to remainthe coordinator, and consults the CellServDB file to learn how many peersit has and on which machines they are running.If the coordinator loses contact with the majority of its peers, they allcooperate to elect a new coordinator by majority vote. During the election,all of the Ubik processes consult the CellServDB file to learn where to sendtheir votes, and what number constitutes a majority.
v The non-database server processes must know which machines are runningthe database server processes in order to retrieve information from thedatabases. For example, the first time that a user accesses an AFS file, theFile Server that houses it contacts the Protection Server to obtain a list ofthe user’s group memberships (the list is called a current protectionsubgroup, or CPS). The File Server uses the CPS as it determines if theaccess control list (ACL) protecting the file grants the required permissionsto the user (for more details, see “About the Protection Database” onpage 533).
Chapter 3. Administering Server Machines 101

The consequences of missing or incorrect information in the CellServDB fileare as follows:v If the file does not list a machine, then it is effectively not a database server
machine even if the database server processes are running. The Ubikcoordinator does not send it database updates or include it in the count thatestablishes a majority. It does not participate in Ubik elections, and sorefuses to distribute database information to any client machines thathappen to contact it (which they can do if their /usr/vice/etc/CellServDBfile lists it). Users of the client machine must wait for a timeout before theycan contact a correctly functioning database server machine.
v If the file lists a machine that is not running the database server processes,the consequences can be serious. The Ubik coordinator cannot send itdatabase updates, but includes it in the count that establishes a majority. Ifvalid secondary sites go down and stop sending their votes to thecoordinator, it can wrongly appear that the coordinator no longer has themajority it needs. The resulting election of a new coordinator causes aservice outage during which information from the database becomesunavailable. Furthermore, the lack of a vote from the incorrectly listed sitecan disturb the election, if it makes the other sites believe that a majority ofsites are not voting for the new coordinator.A more minor consequence is that non-database server processes attempt tocontact the database server processes on the machine. They experience atimeout delay because the processes are not running.
Note that the /usr/afs/etc/CellServDB file on a server machine is not the sameas the /usr/vice/etc/CellServDB file on client machine. The client versionincludes entries for foreign cells as well as the local cell. However, it isimportant to update both versions of the file whenever you change your cell’sdatabase server machines. A server machine that is also a client needs to haveboth files, and you need to update them both. For more information onmaintaining the client version of the CellServDB file, see “MaintainingKnowledge of Database Server Machines” on page 402.
Distributing the Server CellServDB File
To avoid the negative consequences of incorrect information in the/usr/afs/etc/CellServDB file, you must update it on all of your cell’s servermachines every time you add or remove a database server machine. The AFSQuick Beginnings provides complete instructions for installing or removing adatabase server machine and for updating the CellServDB file in that context.This section explains how to distribute the file to your server machines andhow to make other cells aware of the changes if you participate in the AFSglobal name space.
102 AFS: Administration Guide
If you use the United States edition of AFS, use the Update Server todistribute the central copy of the server CellServDB file stored on the cell’ssystem control machine. If you use the international edition of AFS, insteadchange the file on each server machine individually. For further discussion ofthe system control machine and why international cells must not use it forfiles in the /usr/afs/etc directory, see “The System Control Machine” onpage 82. For instructions on configuring the Update Server when using theUnited States version of AFS, see the AFS Quick Beginnings.
To avoid formatting errors that can cause errors, always use the bos addhostand bos removehost commands, rather than editing the file directly. You mustalso restart the database server processes running on the machine, to initiate acoordinator election among the new set of database server machines. This stepis included in the instructions that appear in “To add a database servermachine to the CellServDB file” on page 104 and “To remove a databaseserver machine from the CellServDB file” on page 105. For instructions ondisplaying the contents of the file, see “To display a cell’s database servermachines”.
If you make your cell accessible to foreign users as part of the AFS globalname space, you also need to inform other cells when you change your cell’sdatabase server machines. The AFS Support group maintains a CellServDBfile that lists all cells that participate in the AFS global name space, and canchange your cell’s entry at your request. For further details, see “Making YourCell Visible to Others” on page 28.
Another way to advertise your cell’s database server machines is to maintaina copy of the file at the conventional location in your AFS filespace,/afs/cell_name/service/etc/CellServDB.local. For further discussion, see “TheThird Level” on page 31.
To display a cell’s database server machines1. Issue the bos listhosts command. If you have maintained the file properly,
the output is the same on every server machine, but the machine nameargument enables you to check various machines if you wish.
% bos listhosts <machine name> [<cell name>]
where
listh Is the shortest acceptable abbreviation of listhosts.
machine nameSpecifies the server machine from which to display the/usr/afs/etc/CellServDB file.
cell nameSpecifies the complete Internet domain name of a foreign cell. You
Chapter 3. Administering Server Machines 103
must already know the name of at least one server machine in thecell, to provide as the machine name argument.
The output lists the machines in the order they appear in the CellServDB fileon the specified server machine. It assigns each one a Host index number, asin the following example. There is no implied relationship between the indexand a machine’s IP address, name, or role as Ubik coordinator or secondarysite.
% bos listhosts fs1.abc.comCell name is abc.com
Host 1 is fs1.abc.comHost 2 is fs7.abc.comHost 3 is fs4.abc.com
The output lists machines by name rather than IP address as long as thenaming service (such as the Domain Name Service or local host table) isfunctioning properly. To display IP addresses, login to a server machine as thelocal superuser root and use a text editor or display command, such as the catcommand, to view the /usr/afs/etc/CellServDB file.
To add a database server machine to the CellServDB file1. Verify that you are listed in the /usr/afs/etc/UserList file. If necessary, issue
the bos listusers command, which is fully described in “To display theusers in the UserList file” on page 582.
% bos listusers <machine name>
2. Issue the bos addhost command to add each new database server machineto the CellServDB file. If you use the United States edition of AFS, specifythe system control machine as machine name. (If you have forgotten whichmachine is the system control machine, see “The Output on the SystemControl Machine” on page 84.) If you use the international edition of AFS,repeat the command on each or your cell’s server machines in turn bysubstituting its name for machine name.
% bos addhost <machine name> <host name>+
where
addh Is the shortest acceptable abbreviation of addhost.
machine nameNames the system control machine, if you are using the UnitedStates edition of AFS. If you are using the international edition ofAFS, it names each of your server machines in turn.
host nameSpecifies the fully qualified hostname of each database servermachine to add to the CellServDB file (for example: fs4.abc.com).
104 AFS: Administration Guide

The BOS Server uses the gethostbyname( ) routine to obtain eachmachine’s IP address and records both the name and addressautomatically.
3. Restart the Authentication Server, Backup Server, Protection Server, and VLServer on every database server machine, so that the new set of machinesparticipate in the election of a new Ubik coordinator. The instruction usesthe conventional names for the processes; make the appropriatesubstitution if you use different process names. For complete syntax, see“Stopping and Immediately Restarting Processes” on page 142.Important: Repeat the following command in quick succession on all ofthe database server machines.
% bos restart <machine name> buserver kaserver ptserver vlserver
4. Edit the /usr/vice/etc/CellServDB file on each of your cell’s clientmachines. For instructions, see “Maintaining Knowledge of DatabaseServer Machines” on page 402.
5. If you participate in the AFS global name space, please have one of yourcell’s designated site contacts register the changes you have made with theAFS Product Support group.If you maintain a central copy of your cell’s server CellServDB file in theconventional location (/afs/cell_name/service/etc/CellServDB.local), edit thefile to reflect the change.
To remove a database server machine from the CellServDB file1. Verify that you are listed in the /usr/afs/etc/UserList file. If necessary, issue
the bos listusers command, which is fully described in “To display theusers in the UserList file” on page 582.
% bos listusers <machine name>
2. Issue the bos removehost command to remove each database servermachine from the CellServDB file. If you use the United States edition ofAFS, specify the system control machine as machine name. (If you haveforgotten which machine is the system control machine, see “The Outputon the System Control Machine” on page 84.) If you use the internationaledition of AFS, repeat the command on each or your cell’s server machinesin turn by substituting its name for machine name.
% bos removehost <machine name> <host name>+
where
removehIs the shortest acceptable abbreviation of removehost.
machine nameNames the system control machine, if you are using the UnitedStates edition of AFS. If you are using the international edition ofAFS, it names each of your server machines in turn.
Chapter 3. Administering Server Machines 105

host nameSpecifies the fully qualified hostname of each database servermachine to remove from the CellServDB file (for example:fs4.abc.com).
3. Restart the Authentication Server, Backup Server, Protection Server, and VLServer on every database server machine, so that the new set of machinesparticipate in the election of a new Ubik coordinator. The instruction usesthe conventional names for the processes; make the appropriatesubstitution if you use different process names. For complete syntax, see“Stopping and Immediately Restarting Processes” on page 142.Important: Repeat the following command in quick succession on all ofthe database server machines.
% bos restart <machine name> buserver kaserver ptserver vlserver
4. Edit the /usr/vice/etc/CellServDB file on each of your cell’s clientmachines. For instructions, see “Maintaining Knowledge of DatabaseServer Machines” on page 402.
5. If you participate in the AFS global name space, please have one of yourcell’s designated site contacts register the changes you have made with theAFS Product Support group.If you maintain a central copy of your cell’s server CellServDB file in theconventional location (/afs/cell_name/service/etc/CellServDB.local), edit thefile to reflect the change.
Managing Authentication and Authorization Requirements
This section describes how the AFS server processes guarantee that onlyproperly authorized users perform privileged commands, by checkingauthorization checking and mutually authenticating with their clients. Itexplains how you can control authorization checking requirements on aper-machine or per-cell basis, and how to bypass mutual authentication whenissuing commands.
Authentication versus Authorization
Many AFS commands are privileged in that the AFS server process invoked bythe command performs it only for a properly authorized user. The serverprocess performs the following two tests to determine if someone is properlyauthorized:v In the authentication test, the server process mutually authenticates with the
command interpreter, Cache Manager, or other client process that is actingon behalf of a user or application. The goal of this test is to determine whois issuing the command. The server process verifies that the issuer really iswho he or she claims to be, by examining the server ticket and othercomponents of the issuer’s token. (Secondarily, it allows the client process
106 AFS: Administration Guide
to verify that the server process is genuine.) If the issuer has no token orotherwise fails the test, the server process assigns him or her the identityanonymous, a completely unprivileged user. For a more completedescription of mutual authentication, see “A More Detailed Look at MutualAuthentication” on page 63.Many individual commands enable you to bypass the authentication test byassuming the anonymous identity without even attempting to mutuallyauthenticate. Note, however, that this is futile if the command is privilegedand the server process is still performing the authorization test, because inthat case the process refuses to execute privileged commands for theanonymous user.
v In the authorization test, the server process determines if the issuer isauthorized to use the command by consulting a list of privileged users. Thegoal of this test is to determine what the issuer is allowed to do. Differentserver processes consult different lists of users, as described in “Chapter 16.Managing Administrative Privilege” on page 577. The server process refusesto execute any privileged command for an unauthorized issuer. If acommand has no privilege requirements, the server process skips this stepand executes and immediately.
Note: Never place the anonymous user or the system:anyuser group on aprivilege list; it makes authorization checking meaningless.
You can use the bos setauth command to control whether the serverprocesses on a server machine check for authorization. Other servermachines are not affected. Keep in mind that turning offauthorization checking is a grave security risk, because the serverprocesses on that machine perform any action for any user.
Controlling Authorization Checking on a Server Machine
Disabling authorization checking is a serious breach of security because itmeans that the AFS server processes on a file server machine performs anyaction for any user, even the anonymous user.
The only time it is common to disable authorization checking is wheninstalling a new file server machine (see the AFS Quick Beginnings). It isnecessary then because it is not possible to configure all of the necessarysecurity mechanisms before performing other actions that normally make useof them. For greatest security, work at the console of the machine you areinstalling and enable authorization checking as soon as possible.
During normal operation, the only reason to disable authorization checking isif an error occurs with the server encryption keys, leaving the servers unable
Chapter 3. Administering Server Machines 107

to authenticate users properly. For instructions on handling key-relatedemergencies, see “Handling Server Encryption Key Emergencies” on page 379.
You control authorization checking on each file server machine separately;turning it on or off on one machine does not affect the others. Because clientmachines generally choose a server process at random, it is hard to predictwhat authorization checking conditions prevail for a given command unlessyou make the requirement the same on all machines. To turn authorizationchecking on or off for the entire cell, you must repeat the appropriatecommand on every file server machine.
The server processes constantly monitor the directory /usr/afs/local on theirlocal disks to determine if they need to check for authorization. If the filecalled NoAuth appears in that directory, then the servers do not check forauthorization. When it is not present (the usual case), they performauthorization checking.
Control the presence of the NoAuth file through the BOS Server. When youdisable authorization checking with the bos setauth command (or, duringinstallation, by putting the -noauth flag on the command that starts up theBOS Server), the BOS Server creates the zero-length NoAuth file. When youreenable authorization checking, the BOS Server removes the file.
To disable authorization checking on a server machine1. Verify that you are listed in the /usr/afs/etc/UserList file. If necessary, issue
the bos listusers command, which is fully described in “To display theusers in the UserList file” on page 582.
% bos listusers <machine name>
2. Issue the bos setauth command to disable authorization checking.% bos setauth <machine name> off
where
seta Is the shortest acceptable abbreviation of setauth.
machine nameSpecifies the file server machine on which server processes do notcheck for authorization.
To enable authorization checking on a server machine1. Reenable authorization checking. (No privilege is required because the
machine is not currently checking for authorization.) For detailed syntaxinformation, see the preceding section.
% bos setauth <machine name> on
108 AFS: Administration Guide
Bypassing Mutual Authentication for an Individual Command
Several of the server processes allow any user (not just system administrators)to disable mutual authentication when issuing a command. The server processtreats the issuer as the unauthenticated user anonymous.
The facilities for preventing mutual authentication are provided for use inemergencies (such as the key emergency discussed in “Handling ServerEncryption Key Emergencies” on page 379). During normal circumstances,authorization checking is turned on, making it useless to preventauthentication: the server processes refuse to perform privileged commandsfor the user anonymous.
It can be useful to prevent authentication when authorization checking isturned off. The very act of trying to authenticate can cause problems if theserver cannot understand a particular encryption key, as is likely to happen ina key emergency.
To bypass mutual authentication for bos, kas, pts, and vos commands
Provide the -noauth flag which is available on many of the commands in thesuites. To verify that a command accepts the flag, issue the help command inits suite, or consult the command’s reference page in the AFS AdministrationReference (the reference page also specifies the shortest acceptable abbreviationfor the flag on each command). The suites’ apropos and help commands donot themselves accept the flag.
You can bypass mutual authentication for all kas commands issued during aninteractive session by including the -noauth flag on the kas interactivecommand. If you have already entered interactive mode with an authenticatedidentity, issue the (kas) noauthentication command to assume the anonymousidentity.
To bypass mutual authentication for fs commands
This is not possible, except by issuing the unlog command to discard yourtokens before issuing the fs command.
Adding or Removing Disks and Partitions
AFS makes it very easy to add storage space to your cell, just by adding disksto existing file server machines. This section explains how to install or removea disk used to store AFS volumes. (Another way to add storage space is toinstall additional server machines, as instructed in the AFS Quick Beginnings.)
Chapter 3. Administering Server Machines 109
Both adding and removing a disk cause at least a brief file system outage,because you must restart the fs process to have it recognize the new set ofserver partitions. Some operating systems require that you shut the machineoff before adding or removing a disk, in which case you must shut down allof the AFS server processes first. Otherwise, the AFS-related aspects of addingor removing a disk are not complicated, so the duration of the outagedepends mostly on how long it takes to install or remove the disk itself.
The following instructions for installing a new disk completely prepare it tohouse AFS volumes. You can then use the vos create command to create newvolumes, or the vos move command to move existing ones from otherpartitions. For instructions, see “Creating Read/write Volumes” on page 153and “Moving Volumes” on page 186. The instructions for removing a disk arebasically the reverse of the installation instructions, but include extra stepsthat protect against data loss.
A server machines can house 256 AFS server partitions, each one mounted ata directory with a name of the form /vicepindex, where index is one or twolowercase letters. By convention, the first partition on a machine is mountedat /vicepa, the second at /vicepb, and so on to the twenty-sixth at /vicepz.Additional partitions are mounted at /vicepaa through /vicepaz and so on upto /vicepiv. Using the letters consecutively is not required, but is simpler.
Mount each /vicep directory directly under the local file system’s rootdirectory ( / ), not as a subdirectory of any other directory; for example,/usr/vicepa is not an acceptable location. You must also map the directory tothe partition’s device name in the file server machine’s file systems registryfile (/etc/fstab or equivalent).
These instructions assume that the machine’s AFS initialization file includesthe following command to restart the BOS Server after each reboot. The BOSServer starts the other AFS server processes listed in the local/usr/afs/local/BosConfig file. For information on the bosserver command’soptional arguments, see its reference page in the AFS Administration Reference.
/usr/afs/bin/bosserver &
To add and mount a new disk to house AFS volumes1. Become the local superuser root on the machine, if you are not already, by
issuing the su command.% su rootPassword: root_password
2. Decide how many AFS partitions to divide the new disk into and thenames of the directories at which to mount them (the introduction to thissection describes the naming conventions). To display the names of theexisting server partitions on the machine, issue the vos listpart command.
110 AFS: Administration Guide

Include the -localauth flag because you are logged in as the localsuperuser root but do not necessarily have administrative tokens.
# vos listpart <machine name> -localauth
where
listp Is the shortest acceptable abbreviation of listpart.
machine nameNames the local file server machine.
-localauthConstructs a server ticket using a key from the local/usr/afs/etc/KeyFile file. The bos command interpreter presents itto the BOS Server during mutual authentication.
3. Create each directory at which to mount a partition.# mkdir /vicepx[x]
4. Using a text editor, create an entry in the machine’s file systems registryfile (/etc/fstab or equivalent) for each new disk partition, mapping itsdevice name to the directory you created in the previous step. Refer toexisting entries in the file to learn the proper format, which varies fordifferent operating systems.
5. If the operating system requires that you shut off the machine to install anew disk, issue the bos shutdown command to shut down all AFS serverprocesses other than the BOS Server (it terminates safely when you shutoff the machine). Include the -localauth flag because you are logged in asthe local superuser root but do not necessarily have administrative tokens.For a complete description of the command, see “To stop processestemporarily” on page 140.
# bos shutdown <machine name> -localauth [-wait]
6. If necessary, shut off the machine. Install and format the new diskaccording to the instructions provided by the disk and operating systemvendors. If necessary, edit the disk’s partition table to reflect the changesyou made to the files system registry file in step 4; consult the operatingsystem documentation for instructions.
7. If you shut off the machine down in step 6, turn it on. Otherwise, issue thebos restart command to restart the fs process, forcing it to recognize thenew set of server partitions. Include the -localauth flag because you arelogged in as the local superuser root but do not necessarily haveadministrative tokens. For complete instructions for the bos restartcommand, see “Stopping and Immediately Restarting Processes” onpage 142.
# bos restart <machine name> fs -localauth
Chapter 3. Administering Server Machines 111

8. Issue the bos status command to verify that all server processes arerunning correctly. For more detailed instructions, see “Displaying ProcessStatus and Information from the BosConfig File” on page 131.
# bos status <machine name>
To unmount and remove a disk housing AFS volumes1. Verify that you are listed in the /usr/afs/etc/UserList file. If necessary,
issue the bos listusers command, which is fully described in “To displaythe users in the UserList file” on page 582.
% bos listusers <machine name>
2. Issue the vos listvol command to list the volumes housed on eachpartition of each disk you are about to remove, in preparation forremoving them or moving them to other partitions. For detailedinstructions, see “Displaying Volume Headers” on page 179.
% vos listvol <machine name> [<partition name>]
3. Move any volume you wish to retain in the file system to anotherpartition. You can move only read/write volumes. For more detailedinstructions, and for instructions on moving read-only and backupvolumes, see “Moving Volumes” on page 186.
% vos move <volume name or ID> \<machine name on source> <partition name on source> \<machine name on destination> <partition name on destination>
4. (Optional) If there are any volumes you do not wish to retain, back themup using the vos dump command or the AFS Backup System. See“Dumping and Restoring Volumes” on page 205 or “Backing Up Data” onpage 279, respectively.
5. Become the local superuser root on the machine, if you are not already,by issuing the su command.
% su rootPassword: root_password
6. Issue the umount command, repeating it for each partition on the disk tobe removed.
# cd /# umount /dev/<partition_block_device_name>
7. Using a text editor, remove or comment out each partition’s entry fromthe machine’s file systems registry file (/etc/fstab or equivalent).
8. Remove the /vicep directory associated with each partition.# rmdir /vicepxx
9. If the operating system requires that you shut off the machine to removea disk, issue the bos shutdown command to shut down all AFS serverprocesses other than the BOS Server (it terminates safely when you shutoff the machine). Include the -localauth flag because you are logged in as
112 AFS: Administration Guide

the local superuser root but do not necessarily have administrativetokens. For a complete description of the command, see “To stopprocesses temporarily” on page 140.
# bos shutdown <machine name> -localauth [-wait]
10. If necessary, shut off the machine. Remove the disk according to theinstructions provided by the disk and operating system vendors. Ifnecessary, edit the disk’s partition table to reflect the changes you madeto the files system registry file in step 7 on page 112; consult the operatingsystem documentation for instructions.
11. If you shut off the machine down in step 10, turn it on. Otherwise, issuethe bos restart command to restart the fs process, forcing it to recognizethe new set of server partitions. Include the -localauth flag because youare logged in as the local superuser root but do not necessarily haveadministrative tokens. For complete instructions for the bos restartcommand, see “Stopping and Immediately Restarting Processes” onpage 142.
# bos restart <machine name> fs -localauth
12. Issue the bos status command to verify that all server processes arerunning correctly. For more detailed instructions, see “Displaying ProcessStatus and Information from the BosConfig File” on page 131.
# bos status <machine name>
Managing Server IP Addresses and VLDB Server Entries
The AFS support for multihomed file server machines is largely automatic.The File Server process records the IP addresses of its file server machine’snetwork interfaces in the local /usr/afs/local/sysid file and also registers themin a server entry in the Volume Location Database (VLDB). The sysid file andserver entry are identified by the same unique number, which creates anassociation between them.
When the Cache Manager requests volume location information, the VolumeLocation (VL) Server provides all of the interfaces registered for each servermachine that houses the volume. This enables the Cache Manager to makeuse of multiple addresses when accessing AFS data stored on a multihomedfile server machine.
If you wish, you can control which interfaces the File Server registers in itsVLDB server entry by creating two files in the local /usr/afs/local directory:NetInfo and NetRestrict. Each time the File Server restarts, it builds a list ofthe local machine’s interfaces by reading the NetInfo file, if it exists. If you donot create the file, the File Server uses the list of network interfaces configuredwith the operating system. It then removes from the list any addresses that
Chapter 3. Administering Server Machines 113

appear in the NetRestrict file, if it exists. The File Server records the resultinglist in the sysid file and registers the interfaces in the VLDB server entry thathas the same unique identifier.
On database server machines, the NetInfo and NetRestrict files alsodetermine which interfaces the Ubik database synchronization library useswhen communicating with the database server processes running on otherdatabase server machines.
There is a maximum number of IP addresses in each server entry, asdocumented in the AFS Release Notes. If a multihomed file server machine hasmore interfaces than the maximum, AFS simply ignores the excess ones. It isprobably appropriate for such machines to use the NetInfo and NetRestrictfiles to control which interfaces are registered.
If for some reason the sysid file no longer exists, the File Server creates a newone with a new unique identifier. When the File Server registers the contentsof the new file, the Volume Location (VL) Server normally recognizesautomatically that the new file corresponds to an existing server entry, andoverwrites the existing server entry with the new file contents and identifier.However, it is best not to remove the sysid file if that can be avoided.
Similarly, it is important not to copy the sysid file from one file servermachine to another. If you commonly copy the contents of the /usr/afsdirectory from an existing machine as part of installing a new file servermachine, be sure to remove the sysid file from the /usr/afs/local directory onthe new machine before starting the File Server.
There are certain cases where the VL Server cannot determine whether it isappropriate to overwrite an existing server entry with a new sysid file’scontents and identifier. It then refuses to allow the File Server to register theinterfaces, which prevents the File Server from starting. This can happen if,for example, a new sysid file includes two interfaces that currently areregistered by themselves in separate server entries. In such cases, errormessages in the /usr/afs/log/VLLog file on the VL Server machine and in the/usr/afs/log/FileLog file on the file server machine indicate that you need touse the vos changeaddr command to resolve the problem. Contact the AFSProduct Support group for instructions and assistance.
Except in this type of rare error case, the only appropriate use of the voschangeaddr command is to remove a VLDB server entry completely whenyou remove a file server machine from service. The VLDB can accommodate amaximum number of server entries, as specified in the AFS Release Notes.Removing obsolete entries makes it possible to allocate server entries for newfile server machines as required. See the instructions that follow.
114 AFS: Administration Guide

Do not use the vos changeaddr command to change the list of interfacesregistered in a VLDB server entry. To change a file server machine’s IPaddresses and server entry, see the instructions that follow.
To create or edit the server NetInfo file1. Become the local superuser root on the machine, if you are not already, by
issuing the su command.% su rootPassword: root_password
2. Using a text editor, open the /usr/afs/local/NetInfo file. Place one IPaddress in dotted decimal format (for example, 192.12.107.33) on eachline. The order of entries is not significant.
3. If you want the File Server to start using the revised list immediately, usethe bos restart command to restart the fs process. For instructions, see“Stopping and Immediately Restarting Processes” on page 142.
To create or edit the server NetRestrict file1. Become the local superuser root on the machine, if you are not already, by
issuing the su command.% su rootPassword: root_password
2. Using a text editor, open the /usr/afs/local/NetRestrict file. Place one IPaddress in dotted decimal format on each line. The order of the addressesis not significant. Use the value 255 as a wildcard that represents allpossible addresses in that field. For example, the entry 192.12.105.255indicates that the Cache Manager does not register any of the addresses inthe 192.12.105 subnet.
3. If you want the File Server to start using the revised list immediately, usethe bos restart command to restart the fs process. For instructions, see“Stopping and Immediately Restarting Processes” on page 142.
To display all server entries from the VLDB1. Issue the vos listaddrs command to display all server entries from the
VLDB.% vos listaddrs
where lista is the shortest acceptable abbreviation of listaddrs.
The output displays all server entries from the VLDB, each on its ownline. If a file server machine is multihomed, all of its registered addressesappear on the line. The first one is the one reported as a volume’s site inthe output from the vos examine and vos listvldb commands.
Chapter 3. Administering Server Machines 115

VLDB server entries record IP addresses, and the command interpreter hasthe local name service (either a process like the Domain Name Service or alocal host table) translate them to hostnames before displaying them. If anIP address appears in the output, it is not possible to translate it.
The existence of an entry does not necessarily indicate that the machinethat is still an active file server machine. To remove obsolete server entries,see the following instructions.
To remove obsolete server entries from the VLDB1. Verify that you are listed in the /usr/afs/etc/UserList file. If necessary, issue
the bos listusers command, which is fully described in “To display theusers in the UserList file” on page 582.
% bos listusers <machine name>
2. Issue the vos changeaddr command to remove a server entry from theVLDB.
% vos changeaddr <original IP address> -remove
where
ch Is the shortest acceptable abbreviation of changeaddr.
original IP addressSpecifies one of the IP addresses currently registered for the fileserver machine in the VLDB. Any of a multihomed file servermachine’s addresses are acceptable to identify it.
-removeRemoves the server entry.
To change a server machine’s IP addresses1. Verify that you are listed in the /usr/afs/etc/UserList file. If necessary,
issue the bos listusers command, which is fully described in “To displaythe users in the UserList file” on page 582.
% bos listusers <machine name>
2. If the machine is the system control machine or a binary distributionmachine, and you are also changing its hostname, redefine all relevantupclient processes on other server machines to refer to the newhostname. Use the bos delete and bos create commands as instructed in“Creating and Removing Processes” on page 134.
3. If the machine is a database server machine, edit its entry in the/usr/afs/etc/CellServDB file on every server machine in the cell to list oneof the new IP addresses. If you use the United States edition of AFS, youcan edit the file on the system control machine and wait the requiredtime (by default, five minutes) for the Update Server to distribute thechanged file to all server machines.
116 AFS: Administration Guide

4. If the machine is a database server machine, issue the bos shutdowncommand to stop all server processes. If the machine is also a file server,the volumes on it are inaccessible during this time. For a completedescription of the command, see “To stop processes temporarily” onpage 140 .
% bos shutdown <machine name>
5. Use the utilities provided with the operating system to change one ormore of the machine’s IP addresses.
6. If appropriate, edit the /usr/afs/local/NetInfo file, the/usr/afs/local/NetRestrict file, or both, to reflect the changed addresses.Instructions appear earlier in this section.
7. If the machine is a database server machine, issue the bos restartcommand to restart all server processes on the machine. For completeinstructions for the bos restart command, see “Stopping and ImmediatelyRestarting Processes” on page 142.
% bos restart <machine name> -all
At the same time, issue the bos restart command on all other databaseserver machines in the cell to restart the database server processes only(the Authentication, Backup, Protection, and Volume Location Servers).Issue the commands in quick succession so that all of the database serverprocesses vote in the quorum election.
% bos restart <machine name> kaserver buserver ptserver vlserver
If you are changing IP addresses on every database server machine in thecell, you must also issue the bos restart command on every file servermachine in the cell to restart the fs process.
8. If the machine is not a database server machine, issue the bos restartcommand to restart the fs process (if the machine is a database server,you already restarted the process in the previous step). The File Serverautomatically compiles a new list of interfaces, records them in the/usr/afs/local/sysid file, and registers them in its VLDB server entry.
% bos restart <machine name> fs
9. If the machine is a database server machine, edit its entry in the/usr/vice/etc/CellServDB file on every client machine in the cell to listone of the new IP addresses. Instructions appear in “MaintainingKnowledge of Database Server Machines” on page 402.
10. If there are machine entries in the Protection Database for the machine’sprevious IP addresses, use the pts rename command to change them tothe new addresses. For instructions, see “Changing a Protection DatabaseEntry’s Name” on page 552.
Chapter 3. Administering Server Machines 117
Rebooting a Server Machine
You can reboot a server machine either by typing the appropriate commandsat its console or by issuing the bos exec command on a remote machine.Remote rebooting can be more convenient, because you do not need to leaveyour present location, but you cannot track the progress of the reboot as youcan at the console. Remote rebooting is possible because the server machine’soperating system recognizes the BOS Server, which executes the bos execcommand, as the local superuser root.
Rebooting server machines is part of routine maintenance in some cells, andsome instructions in the AFS documentation include it as a step. It is certainlynot intended to be the standard method for recovering from AFS-relatedproblems, however, but only a last resort when the machine is unresponsiveand you have tried all other reasonable options.
Rebooting causes a service outage. If the machine stores volumes, they are allinaccessible until the reboot completes and the File Server reattaches them. Ifthe machine is a database server machine, information from the databases canbecome unavailable during the reelection of the synchronization site for eachdatabase server process; the VL Server outage generally has the greatestimpact, because the Cache Manager must be able to access the VLDB to fetchAFS data.
By convention, a server machine’s AFS initialization file includes the followingcommand to restart the BOS Server after each reboot. It starts the other AFSserver processes listed in the local /usr/afs/local/BosConfig file. Theseinstructions assume that the initialization file includes the command.
/usr/afs/bin/bosserver &
To reboot a file server machine from its console1. Become the local superuser root on the machine, if you are not already, by
issuing the su command.% su rootPassword: root_password
2. Issue the bos shutdown command to shut down all AFS server processesother than the BOS Server, which terminates safely when you reboot themachine. Include the -localauth flag because you are logged in as the localsuperuser root but do not necessarily have administrative tokens. For acomplete description of the command, see “To stop processes temporarily”on page 140.
# bos shutdown <machine name> -localauth [-wait]
3. Reboot the machine. On many system types, the appropriate command isshutdown, but the appropriate options vary; consult your UNIXadministrator’s guide.
118 AFS: Administration Guide
# shutdown
To reboot a file server machine remotely1. Verify that you are listed in the /usr/afs/etc/UserList file on the machine
you are rebooting. If necessary, issue the bos listusers command, which isfully described in “To display the users in the UserList file” on page 582.
% bos listusers <machine name>
2. Issue the bos shutdown to halt AFS server processes other than the BOSServer, which terminates safely when you turn off the machine. For acomplete description of the command, see “To stop processes temporarily”on page 140.
% bos shutdown <machine name> [-wait]
3. Issue the bos exec command to reboot the machine remotely.% bos exec <machine name> reboot_command
where
machine nameNames the file server machine to reboot.
reboot_commandIs the rebooting command for the machine’s operating system. Theshutdown command is appropriate on many system types, butconsult your operating system documentation.
Chapter 3. Administering Server Machines 119

120 AFS: Administration Guide
Chapter 4. Monitoring and Controlling Server Processes
One of your most important responsibilities as a system administrator isensuring that the processes on file server machines are running correctly. TheBOS Server, which runs on every file server machine, relieves you of much ofthe responsibility by constantly monitoring the other AFS server processes onits machine. It can automatically restart processes that have failed, orderingthe restarts to take interdependencies into account.
Because different file server machines run different combinations of processes,you must define which processes the BOS Server on each file server machineis to monitor (to learn how, see “Controlling and Checking Process Status” onpage 128).
It is sometimes necessary to take direct control of server process status beforeperforming routine maintenance or correcting problems that the BOS Servercannot correct (such as problems with database replication or mutualauthentication). At those times, you control process status through the BOSServer by issuing bos commands.
Summary of Instructions
This chapter explains how to perform the following tasks by using theindicated commands:
Examine process status bos statusExamine information from the BosConfig file file bos status with -long flagCreate a process instance bos createStop a process bos stopStart a stopped process bos startStop a process temporarily bos shutdownStart a temporarily stopped process bos startupStop and immediately restart a process bos restartStop and immediately restart all processes bos restart with -bosserver flagExamine BOS Server’s restart times bos getrestartSet BOS Server’s restart times bos setrestartExamine a log file bos getlogExecute a command remotely bos exec
© Copyright IBM Corp. 1989, 2000 121
Brief Descriptions of the AFS Server Processes
This section briefly describes the different server processes that can run on anAFS server machine. In cells with multiple server machines, not all processesnecessarily run on all machines.
An AFS server process is referred to in one of three ways, depending on thecontext:v The output from the bos status command refers to a process by the name
assigned when the bos create command creates its entry in the/usr/afs/local/BosConfig file. The name can differ from machine to machine,but it is easiest to maintain the cell if you assign the same name on allmachines. The AFS Quick Beginnings and the reference page for the boscreate command list the conventional names. Examples are bosserver,kaserver, and vlserver.
v The process listing produced by the standard ps command generallymatches the process’s binary file. Examples of process binary files are/usr/afs/bin/bosserver, /usr/afs/bin/kaserver, and /usr/afs/bin/vlserver.
v In most contexts, including most references in the documentation, a processis referred to as (for example) the Basic OverSeer (BOS) Server, theAuthentication Server, or the Volume Location Server.
The following sections specify each name for the process as well as some ofthe administrative tasks in which you use the process. For a more generaldescription of the servers, see “AFS Server Processes and the Cache Manager”on page 11.
The bosserver Process: the Basic OverSeer Server
The bosserver process, which runs on every AFS server machine, is the BasicOverSeer (BOS) Server responsible for monitoring the other AFS serverprocesses running on its machine. If a process fails, the BOS Server can restartit automatically, without human intervention. It takes interdependencies intoaccount when restarting a process that has multiple component processes(such as the fs process described in “The fs Collection of Processes: the FileServer, Volume Server and Salvager” on page 123).
Because the BOS Server does not monitor or restart itself, it does not appearin the output from the bos status command. It appears in the ps command’soutput as /usr/afs/bin/bosserver.
As a system administrator, you contact the BOS Server when you issue boscommands to perform the following kinds of tasks.
122 AFS: Administration Guide
v Defining the processes for the BOS Server to monitor by creating entries inthe /usr/afs/local/BosConfig file as described in “Controlling and CheckingProcess Status” on page 128
v Stopping and starting processes on the file server machines according tosubsequent instructions in this chapter
v Defining your cell’s database server machines in the/usr/afs/etc/CellServDB file as described in “Maintaining the ServerCellServDB File” on page 101
v Defining AFS server encryption keys in the /usr/afs/etc/KeyFile file asdescribed in “Chapter 9. Managing Server Encryption Keys” on page 369.
v Granting system administrator privileges with respect to BOS Server,Volume Server, and Backup Server operations, by adding a user to the/usr/afs/etc/UserList file as described in “Administering the UserList File”on page 581
v Setting authorization checking requirements on a server machine asdescribed in “Managing Authentication and Authorization Requirements”on page 106
The buserver Process: the Backup Server
The buserver process, which runs on database server machines, is the BackupServer. It maintains information about Backup System configuration andoperations in the Backup Database.
The process appears as buserver in the bos status command’s output, if theconventional name is assigned. It appears in the ps command’s output as/usr/afs/bin/buserver.
As a system administrator, you contact the Backup Server when you issue anybackup command that manipulates information in the Backup Database,including those that change Backup System configuration information, thatdump data from volumes to permanent storage, or that restore data to AFS.See “Chapter 6. Configuring the AFS Backup System” on page 217 and“Chapter 7. Backing Up and Restoring AFS Data” on page 269.
The fs Collection of Processes: the File Server, Volume Server andSalvager
The fs process, which runs on every file server machine, combines threecomponent processes: File Server, Volume Server and Salvager. The threecomponents perform independent functions, but are controlled as a singleprocess for the following reasons.v They all operate on the same data, namely files and directories stored in
AFS volumes. Combining them as a single process enables them to
Chapter 4. Monitoring and Controlling Server Processes 123

coordinate their actions, never attempting simultaneous operations on thesame data that can possibly corrupt it.
v It enables the BOS Server to stop and restart the processes in the requiredorder. When the File Server fails, the BOS Server stops the Volume Serverand runs the Salvager to correct any corruption that resulted from thefailure. (The Salvager runs only in this special circumstance or when youinvoke it yourself by issuing the bos salvage command as instructed in“Salvaging Volumes” on page 192.) If only the Volume Server fails, the BOSServer can restart it without affecting the File Server or Salvager.
The File Server component handles AFS data at the level of files anddirectories, manipulating file system elements as requested by applicationprograms and the standard operating system commands. Its main duty is todeliver requested files to client machines and store them again on the servermachine when the client is finished. It also maintains status and protectioninformation about each file and directory. It runs continuously during normaloperation.
The Volume Server component handles AFS data at the level of completevolumes rather than files and directories. In response to vos commands, itcreates, removes, moves, dumps and restores entire volumes, among otheractions. It runs continuously during normal operation.
The Salvager component runs only after the failure of one of the other twoprocesses. It checks the file system for internal consistency and repairs anyerrors it finds.
The process appears as fs in the bos status command’s output, if theconventional name is assigned. An auxiliary message reports the status of theFile Server or Salvager component. See “Displaying Process Status andInformation from the BosConfig File” on page 131.
The component processes of the fs process appear individually in the pscommand’s output, as follows. There is no entry for the fs process itself.v /usr/afs/bin/fileserver
v /usr/afs/bin/volserver
v /usr/afs/bin/salvager
The Cache Manager contacts the File Server component on your behalfwhenever you access data or status information in an AFS file or directory orissue file manipulation commands such as the UNIX cp and ls commands.You can contact the File Server directly by issuing fs commands that performthe following functionsv Administering the ACL of any directory in the file system as described in
“Chapter 15. Managing Access Control Lists” on page 559
124 AFS: Administration Guide

v Installing new partitions for housing AFS volumes, in which case you mustrestart the fs process for it to recognize the new partition; for instructions,see “Adding or Removing Disks and Partitions” on page 109
v Creating and deleting volume mount points in the AFS filespace asdescribed in “Mounting Volumes” on page 169
v Setting volume quota and displaying information about the space used andavailable in a volume or partition as described in “Setting and DisplayingVolume Quota and Current Size” on page 198
You contact the Volume Server component when you issue vos commandsthat manipulate volumes in any way—creating, removing, replicating,moving, renaming, converting to different formats, and salvaging. Forinstructions, see “Chapter 5. Managing Volumes” on page 147.
The Salvager normally runs automatically in case of a failure. You can alsostart it with the bos salvage command as described in “Salvaging Volumes”on page 192.
The kaserver Process: the Authentication Server
The kaserver process, which runs on database server machines, is theAuthentication Server responsible for several aspects of AFS security. Itverifies AFS user identity by requiring a password. It maintains all AFS serverencryption keys and user passwords in the Authentication Database. TheAuthentication Server’s Ticket Granting Service (TGS) module creates theshared secrets that AFS client and server processes use when establishingsecure connections.
The process appears as kaserver in the bos status command’s output, if theconventional name is assigned. The ka string stands for KerberosAuthentication, reflecting the fact that AFS’s authentication protocols are basedon Kerberos, which was originally developed at the Massachusetts Institute ofTechnology’s Project Athena.
It appears in the ps command’s output as /usr/afs/bin/kaserver.
As a system administrator, you contact the Authentication Server when youissue kas commands to perform the following kinds of tasks.v Setting a user’s password. Users normally change their own passwords, so
you probably perform this task only creating a new user account asdescribed in “Creating AFS User Accounts” on page 510 and “ChangingAFS Passwords” on page 524.
v Setting the AFS server encryption key in the Authentication Database,which the TGS uses to seal server tickets; see “Chapter 9. Managing ServerEncryption Keys” on page 369.
Chapter 4. Monitoring and Controlling Server Processes 125

v Granting or revoking system administrator privileges with respect to theAuthentication Server as described in “Granting Privilege for kasCommands: the ADMIN Flag” on page 580.
The ptserver Process: the Protection Server
The ptserver process, which runs on database server machines, is theProtection Server. Its main responsibility is maintaining the ProtectionDatabase which contains user, machine, and group entries. The ProtectionServer allocates AFS IDs and maintains the mapping between them andnames. The File Server consults the Protection Server when verifying that auser is authorized to perform a requested action.
The process appears as ptserver in the bos status command’s output, if theconventional name is assigned. It appears in the ps command’s output as/usr/afs/bin/ptserver.
As a system administrator, you contact the Protection Server when you issuepts commands to perform the following kinds of tasks.v Creating a new user, machine, or group entry in the Protection Database as
described in “Chapter 14. Administering the Protection Database” onpage 533
v Adding or removing group members or otherwise manipulating ProtectionDatabase entries as described in “Chapter 14. Administering the ProtectionDatabase” on page 533
v Granting or revoking system administrator privilege by changing themembership of the system:administrators group as described in“Administering the system:administrators Group” on page 578
The runntp Process
The runntp process, which runs on every server machine, is a controllerprogram for the Network Time Protocol Daemon (NTPD), which synchronizesthe hardware clocks on server machines. You need to run the runntp processif you are not already running NTP or another time synchronization protocolon your server machines.
The clocks on database server machines need to be synchronized becauseAFS’s distributed database technology (Ubik) works properly only when theclocks agree within a narrow range of variation (see “Configuring the Cell forProper Ubik Operation” on page 86). The clocks on file server machines needto be correct not only because the File Server sets modification time stamps onfiles, but because in the conventional configuration they serve as the timesource for AFS client machines.
126 AFS: Administration Guide
The process appears as runntp in the bos status command’s output, if theconventional name is assigned. It appears in the output from the ps commandas /usr/afs/bin/runntp. The ps command’s output also includes an entrycalled ntpd; its exact form depends on the arguments you provide to therunntp command.
As a system administrator, you do not contact the NTPD directly once youhave installed it according to the instructions in the AFS Quick Beginnings.
The upserver and upclient Processes: the Update Server
The Update Server has two separate parts, each of which runs on a differenttype of server machine. The upserver process is the server portion of theUpdate Server. Its function depends on which edition of AFS you use:v With both the United States and international editions, it runs on the binary
distribution machine of each system type you use as a server machine,distributing the contents of each one’s /usr/afs/bin directory to the otherserver machines of that type. This guarantees that all machines have thesame version of AFS binaries. (For a list of the binaries, see “Binaries in the/usr/afs/bin Directory” on page 70.)
v In you use the United States edition of AFS, it also runs on the cell’s systemcontrol machine, distributing the contents of its /usr/afs/etc directory to allthe other server machines in order to synchronize the configuration filesstored in that directory. (For a list of the configuration files, see “CommonConfiguration Files in the /usr/afs/etc Directory” on page 72.)
The upclient process is the client portion of the Update Server, and like theserver portion its function depends on the AFS edition in use.v It runs on every server machine that is not a binary distribution machine,
referencing the binary distribution machine of its system type as the sourcefor updates to the binaries in the /usr/afs/bin directory. The conventionalprocess name to assign is upclientbin.
v If you use the United States edition of AFS, another instance of the processruns on every server machine except the system control machine. Itreferences the system control machine as the source for updates to thecommon configuration files in the /usr/afs/etc directory. The conventionalprocess name to assign is upclientetc.
In output from the bos status command, the server portion appears asupserver and the client portions as upclientbin and upclientetc, if theconventional names are assigned. In the output from the ps command, theserver portion appears as /usr/afs/bin/upserver and the client portions as/usr/afs/bin/upclient.
Chapter 4. Monitoring and Controlling Server Processes 127

You do not contact the Update Server directly once you have installed it. Itoperates automatically whenever you use bos commands to change the filesthat it distributes.
The vlserver Process: the Volume Location Server
The vlserver process, which runs on database server machines, is the VolumeLocation (VL) Server that automatically tracks which file server machineshouse each volume, making its location transparent to client applications.
The process appears as vlserver in the bos status command’s output, if theconventional name is assigned. It appears in the ps command’s output as/usr/afs/bin/vlserver.
As a system administrator, you contact the VL Server when you issue any voscommand that changes the status of a volume (it records the status changes inthe VLDB).
Controlling and Checking Process Status
To define the AFS server processes that run on a server machine, use the boscreate command to create entries for them in the local/usr/afs/local/BosConfig file. The BOS Server monitors the processes listed inthe BosConfig file that are marked with the Run status flag, and automaticallyattempts to restart them if they fail. After creating process entries, you useother commands from the bos suite to stop and start processes or change thestatus flag as desired.
Never edit the BosConfig file directly rather than using bos commands.Similarly, it is not a good practice to run server processes without listing themin the BosConfig file, or to stop them using process termination commandssuch as the UNIX kill command.
The Information in the BosConfig File
A process’s entry in the BosConfig file includes the following information:v The process’s name. The recommended conventional names are defined in
both the AFS Quick Beginnings and “Creating and Removing Processes” onpage 134. The name of a simple process usually matches the name of itsbinary file (for example, ptserver for the Protection Server).
v Its type, which is one of the following:
simpleA process that runs independently of any other on the server
128 AFS: Administration Guide
machine. If several simple processes fail at the same time, the BOSServer can restart them in any order. All standard AFS processesexcept the fs process are simple.
fs A process type reserved for the server process for which theconventional name is also fs. This process combines threecomponents: the File Server, the Volume Server, and the Salvager.
cron A process that runs at a defined time rather than continuously.There are no standard processes of this type.
v Its status flag, which tells the BOS Server whether it performs the followingtwo actions with respect to the process:– Start the process during BOS Server initialization– Restart the process if it (the process) fails
The two possible values are Run (which directs the BOS Server to performthese actions) and NotRun (which directs the BOS Server to ignore theprocess). The BOS Server itself never changes the setting of this flag, even ifthe process fails repeatedly. Also, this flag is for internal use only; it doesnot appear in the bos status command’s output.
v Its command parameters, which are the commands that the BOS Serverruns to start the process.– A simple processes has one: the complete pathname to its binary file– The fs process has three: the complete pathnames to each of the three
component processes (/usr/afs/bin/fileserver, /usr/afs/bin/volserver, and/usr/afs/bin/salvager)
– A cron process has two: the first the complete pathname to its binary file,the second the time at which the BOS Server runs it
In addition to process definitions, the BosConfig file also records automaticrestart times for processes that have new binaries, and for all server processesincluding the BOS Server. See “Setting the BOS Server’s Restart Times” onpage 143.
How the BOS Server Uses the Information in the BosConfig File
Whenever the BOS Server starts or restarts, it reads the BosConfig file to learnwhich processes it is to start and monitor. It transfers the information intokernel memory and does not read the BosConfig file again until it nextrestarts. This implies that the BOS Server’s memory state can changeindependently of the BosConfig file. You can, for example, stop a process butleave its status flag in the BosConfig file as Run, or start a process eventhough its status flag in the BosConfig file is NotRun.
Chapter 4. Monitoring and Controlling Server Processes 129

About Starting and Stopping the Database Server Processes
When you start or stop a database server process (Authentication Server,Backup Server, Protection Server, or Volume Location Server) for more than ashort time, you must follow the instructions in the AFS Quick Beginnings forinstalling or removing a database server machine. Here is a summary of thetasks you must perform to preserve correct AFS functioning.v Start or stop all four database server processes on that machine. All AFS
server processes and the Cache Manager processes expect all four databaseserver processes to be running on each machine listed in the CellServDBfile. There is no way to indicate in the file that a machine is running onlysome of the database server processes.
v Add or remove the machine in the /usr/afs/etc/CellServDB file on all servermachines and the /usr/vice/etc/CellServDB file on all client machines.
v Restart the database server processes on the other database server machinesto force an election of a new Ubik coordinator for each one.
About Starting and Stopping the Update Server
In the conventional cell configuration, one server machine of each system typeacts as a binary distribution machine, running the server portion of theUpdate Server (upserver process) to distribute the contents of its /usr/afs/bindirectory. The other server machines of its system type run an instance of theUpdate Server client portion (by convention called upclientbin) thatreferences the binary distribution machine.
If you run the United States edition of AFS, it is conventional for the firstserver machine you install to act as the system control machine, running theserver portion of the Update Server (upserver process) to distribute thecontents of its /usr/afs/etc directory. All other server machines run an instanceof the Update Server client portion (by convention called upclientetc) thatreferences the system control machine.
Note: If you are using the international edition of AFS, do not use the UpdateServer to distribute the contents of the /usr/afs/etc directory (you donot run a system control machine). Ignore all references to the processin this chapter.
It is simplest not to move binary distribution or system control responsibilitiesto a different machine unless you completely decommission a machine that iscurrently serving in one of those roles. Running the Update Server usuallyimposes very little processing load. If you must move the functionality,perform the following related tasks.
130 AFS: Administration Guide
v If you replace the system control machine, you must stop the upclientetcprocess on every other server machine and define a new one that referencesthe new system control machine.
v If you replace a binary distribution machine, you must stop the upclientbinprocess on every other server machine of its system type and define a newone that references the new binary distribution machine (unless you are nolonger running any server machines of that system type).
Displaying Process Status and Information from the BosConfig File
To display the status of the AFS server processes on a server machine, issuethe bos status command. Adding the -long flag displays most of theinformation from each process’s entry in the BosConfig file, including its typeand command parameters. It also displays a warning message if the mode bitson files and subdirectories in the /usr/afs directory do not match the expectedvalues.
To display the status of server processes and their BosConfig entries1. Issue the bos status command.
% bos status <machine name> [<server process name>+] [-long]
where
stat Is the shortest acceptable abbreviation of status.
machine nameSpecifies the file server machine for which to display processstatus.
server process nameNames each process for which to display status, using the nameassigned when its entry was defined with the bos createcommand. Omit this argument to display the status of all serverprocesses.
-long Displays, in addition to status, information from the process’sentry in the BosConfig file: its type, its status flag, its commandparameters, the associated notifier program, and so on.
The output includes an entry for each process and uses one of the followingstrings to indicate the process’s status:v currently running normally indicates that the process is running and its
status flag in the BosConfig file is Run. For cron entries, this messageindicates that the command is still scheduled to run, not necessarily that itis actually running when the bos status command was issued.
Chapter 4. Monitoring and Controlling Server Processes 131
v temporarily enabled indicates that the process is running but that its statusflag in the BosConfig file is NotRun. The most common reason is that asystem administrator has used the bos startup command to start theprocess.
v temporarily disabled indicates that the process is not running even thoughits status flag in the BosConfig file is Run. The most common reasons areeither that a system administrator has used the bos shutdown command tostop the process or that the BOS Server ceased trying to restart the processafter numerous failed attempts. In the latter case, a supplementary messageappears: stopped for too many errors.
v disabled indicates that the process is not running and that its status flag inthe BosConfig file is NotRun. The BOS Server is not monitoring the process.Only a system administrator can set the flag this way; the BOS Server neverdoes.
The output for the fs process always includes a message marked Auxiliarystatus, which can be one of the following:v file server running indicates that the File Server and Volume Server
components of the File Server process are running normally.v salvaging file system indicates that the Salvager is running, which
usually implies that the File Server and Volume Server are temporarilydisabled. The BOS Server restarts them as soon as the Salvager is finished.
The output for a cron process also includes an Auxiliary status message toreport when the command is scheduled to run next; see the example thatfollows.
The output for any process can include the supplementary message has corefile to indicate that at some point the process failed and generated a core filein the /usr/afs/logs directory. In most cases, the BOS Server is able to restartthe process and it is running.
The following example includes a user-defined cron entry called backupusers:% bos status fs3.abc.comInstance kaserver, currently running normally.Instance ptserver, currently running normally.Instance vlserver, has core file, currently running normally.Instance buserver, currently running normally.Instance fs, currently running normally.
Auxiliary status is: file server running.Instance upserver, currently running normally.Instance runntp, currently running normally.Instance backupusers, currently running normally.
Auxiliary status is: run next at Mon Jun 7 02:00:00 1999.
132 AFS: Administration Guide
If you include the -long flag to the bos status command, a process’s entry inthe output includes the following additional information from the BosConfigfile:v The process’s type (simple, fs, or cron).v The day and time the process last started or restarted.v The number of proc starts, which is how many times the BOS Server has
started or restarted the process since it started itself.v The Last exit time when the process (or one of the component processes in
the fs process) last terminated. This line does not appear if the process hasnot terminated since the BOS Server started.
v The Last error exit time when the process (or one of the componentprocesses in the fs process) last failed due to an error. A further explanationsuch as due to shutdown request sometimes appears. This line does notappear if the process has not failed since the BOS Server started.
v Each command that the BOS Server invokes to start the process, asspecified by the -cmd argument to the bos create command.
v The pathname of the notifier program that the BOS Server invokes whenthe process terminates (if any), as specified by the -notifier argument to thebos create command.
In addition, if the BOS Server has found that the mode bits on certain filesand directories under /usr/afs deviate from what it expects, it prints thefollowing warning message:
Bosserver process reports inappropriate access on server directories
The expected protections for the directories and files in the /usr/afs directoryare as follows. A question mark indicates that the BOS Server does not checkthe mode bit. See the AFS Quick Beginnings for more information about settingthe protections on these files and directories.
/usr/afs drwxr?xr-x/usr/afs/backup drwx???---/usr/afs/bin drwxr?xr-x/usr/afs/db drwx???---/usr/afs/etc drwxr?xr-x/usr/afs/etc/KeyFile -rw????---/usr/afs/etc/UserList -rw?????--/usr/afs/local drwx???---/usr/afs/logs drwxr?xr-x
The following illustrates the extended output for the fs process running onthe machine fs3.abc.com:
% bos status fs3.abc.com fs -longInstance fs, (type is fs), currently running normally.
Auxiliary status is file server running
Chapter 4. Monitoring and Controlling Server Processes 133
Process last started at Mon May 3 8:29:19 1999 (3 proc starts)Last exit at Mon May 3 8:29:19 1999Last error exit at Mon May 3 8:29:19 1999, due to shutdown requestCommand 1 is '/usr/afs/bin/fileserver'Command 2 is '/usr/afs/bin/volserver'Command 3 is '/usr/afs/bin/salvager'
Creating and Removing Processes
To start a new AFS server process on a server machine, issue the bos createcommand, which creates an entry in the /usr/afs/local/BosConfig file, sets theprocess’s status flag to Run both in the file and in the BOS Server’s memory,and starts it running immediately. The binary file for the new process mustalready be installed, by convention in the /usr/afs/bin directory (see“Installing New Binaries” on page 95).
To stop a process permanently, first issue the bos stop command, whichchanges the process’s status flag to NotRun in both the BosConfig file and theBOS Server’s memory; it is marked as disabled in the output from the bosstatus command. If desired, issue the bos delete command to remove theprocess’s entry from the BosConfig file; the process no longer appears in thebos status command’s output.
Note: If you are starting or stopping a database server process in the mannerdescribed in this section, follow the complete instructions in the AFSQuick Beginnings for creating or removing a database server machine. Ifyou run one database server process on a given machine, you must runthem all; for more information, see “About Starting and Stopping theDatabase Server Processes” on page 130. Similarly, if you are stoppingthe upserver process on the system control machine or a binarydistribution machine, you must complete the additional tasks describedin “About Starting and Stopping the Update Server” on page 130.
To create and start a new process1. Verify that you are authenticated as a user listed in the
/usr/afs/etc/UserList file. If necessary, issue the bos listusers command,which is fully described in “To display the users in the UserList file” onpage 582.
% bos listusers <machine name>
2. (Optional) Verify that the process’s binaries are installed in the/usr/afs/bin directory on this machine. If necessary, login at the console ortelnet to the machine and list the contents of the /usr/afs/bin directory.
134 AFS: Administration Guide
If the binaries are not present, install them on the binary distributionmachine of the appropriate system type, and wait for the Update Server tocopy them to this machine. For instructions, see “Installing New Binaries”on page 95.
% ls /usr/afs/bin
3. Issue the bos create command to create an entry in the BosConfig file andstart the process.
% bos create <machine name> <server process name> \<server type> <command lines>+ [ -notifier <Notifier program>]
where
cr Is the shortest acceptable abbreviation of create.
machine nameSpecifies the file server machine on which to create the process.
server process nameNames the process to create and start. For simple processes, theconventional value is the name of the process’s binary file. It isbest to use the same name on every server machine that runs theprocess. The following is a list of the conventional names forsimple and fs-type processes (there are no standard cronprocesses).v buserver for the Backup Serverv fs for the process that combines the File Server, Volume Server,
and Salvagerv kaserver for the Authentication Serverv ptserver for the Protection Serverv runntp for the controller process for the Network Time Protocol
Daemonv upclientbin for the client portion of the Update Server that
references the binary distribution machine of this machine’ssystem type
v upclientetc for the client portion of the Update Server thatreferences the system control machine
v vlserver for the Volume Location (VL) Server
server typeDefines the process’s type. Choose one of the following values:v cron for a cron processv fs for the process named fs
v simple for all other processes listed as acceptable values for theserver process name argument
Chapter 4. Monitoring and Controlling Server Processes 135
command linesSpecifies each command the BOS Server runs to start the process.Specify no more than six commands (which can include thecommand’s options, in which case the entire string is surroundedby double quotes); any additional commands are ignored.
For a simple process, provide the complete pathname of theprocess’s binary file on the local disk (for example,/usr/afs/bin/ptserver for the Protection Server). If including any ofthe initialization command’s options, surround the entirecommand in double quotes (″ ″). The upclient process has arequired argument, and the commands for all other processes takeoptional arguments.
For the fs process, provide the complete pathname of the localdisk binary file for each of the component processes: fileserver,volserver, and salvager, in that order. The standard binarydirectory is /usr/afs/bin. If including any of an initializationcommand’s options, surround the entire command in doublequotes (″ ″).
For a cron process, provide two parameters:v The complete local disk pathname of either an executable file or
a command from one of the AFS suites (complete with all of thenecessary arguments). Surround this parameter with doublequotes (″ ″) if it contains spaces.
v A specification of when the BOS Server executes the file orcommand indicated by the first parameter. There are threeacceptable values:– The string now, which directs the BOS Server to execute the
file or command immediately and only once. It is usuallysimpler to issue the command directly or issue the bos execcommand.
– A time of day. The BOS Server executes the file or commanddaily at the indicated time. Separate the hours and minuteswith a colon (hh:MM), and use either 24-hour format, or avalue in the range from 1:00 through 12:59 with the additionof am or pm. For example, both 14:30 and ″2:30 pm″ indicate2:30 in the afternoon. Surround this parameter with doublequotes (″ ″) if it contains a space.
– A day of the week and time of day, separated by a space andsurrounded with double quotes (″ ″). The BOS Serverexecutes the file or command weekly at the indicated dayand time. For the day, provide either the whole name or thefirst three letters, all in lowercase letters (sunday or sun,
136 AFS: Administration Guide

thursday or thu, and so on). For the time, use the sameformat as when specifying the time alone.
-notifierSpecifies the pathname of a program that the BOS Server runswhen the process terminates. For more information on notifierprograms, see the bos create command reference page in the AFSAdministration Reference.
The following example defines and starts the Protection Server on themachine db2.abc.com:
% bos create db2.abc.com ptserver simple /usr/afs/bin/ptserver
The following example defines and starts the fs process on the machinefs6.abc.com.
% bos create fs6.abc.com fs fs /usr/afs/bin/fileserver \/usr/afs/bin/volserver /usr/afs/bin/salvager
The following example defines and starts a cron process called backupuserprocess on the machine fs3.abc.com, scheduling it to run each day at 3:00 a.m.
% bos create fs3.abc.com backupuser cron "/usr/afs/bin/vos backupsys -prefix user -local" 3:00
To stop a process and remove it from the BosConfig file1. Verify that you are authenticated as a user listed in the
/usr/afs/etc/UserList file. If necessary, issue the bos listusers command,which is fully described in “To display the users in the UserList file” onpage 582.
% bos listusers <machine name>
2. Issue the bos stop command to change each process’s status flag in theBosConfig file to NotRun and to stop it. You must issue this command evenfor cron processes that you wish to remove from the BosConfig file, eventhough they do not run continuously. For a detailed description of thiscommand, see “To stop a process by changing its status to NotRun” onpage 138.
% bos stop <machine name> <server process name>+ [-wait]
3. Issue the bos delete command to remove each process from the BosConfigfile.
% bos delete <machine name> <server process name>+
where
Chapter 4. Monitoring and Controlling Server Processes 137

d Is the shortest acceptable abbreviation of delete.
machine nameSpecifies the server machine on which to remove processes fromthe BosConfig file.
server process nameNames each process entry to remove from the BosConfig file.Provide the same names as in Step 2 on page 137.
Stopping and Starting Processes Permanently
To stop a process so that the BOS Server no longer attempts to monitor it,issue the bos stop command. The process’s status flag is set to NotRun in boththe BOS Server’s memory and in the BosConfig file. The process does not runagain until you issue the bos start command, which sets its status flag back toRun in both the BOS Server’s memory and in the BosConfig file. (You can alsouse the bos startup command to start the process again without changing itsstatus flag in the BosConfig file; see “Stopping and Starting ProcessesTemporarily” on page 139.)
There is no entry for the BOS Server in the BosConfig file, so the bos stopand bos start commands do not control it. To stop and immediately restart theBOS Server along with all other processes, use the -bosserver flag to the bosrestart command as described in “Stopping and Immediately RestartingProcesses” on page 142.
Note: If you are starting or stopping a database server process in the mannerdescribed in this section, follow the complete instructions in the AFSQuick Beginnings for creating or removing a database server machine. Ifyou run one database server process on a given machine, you must runthem all; for more information, see “About Starting and Stopping theDatabase Server Processes” on page 130. Similarly, if you are stoppingthe upserver process on the system control machine or a binarydistribution machine, you must complete the additional tasks describedin “About Starting and Stopping the Update Server” on page 130.
To stop a process by changing its status to NotRun1. Verify that you are authenticated as a user listed in the
/usr/afs/etc/UserList file. If necessary, issue the bos listusers command,which is fully described in “To display the users in the UserList file” onpage 582.
% bos listusers <machine name>
2. Issue the bos stop command to stop each process and set its status flag toNotRun in the BosConfig file and the BOS Server’s memory.
138 AFS: Administration Guide

% bos stop <machine name> <server process name>+ [-wait]
where
sto Is the shortest acceptable abbreviation of stop.
machine nameSpecifies the server machine on which to stop the process.
server process nameNames each process to stop, using the name assigned when itsentry was defined with the bos create command.
-wait Delays the return of the command shell prompt until all specifiedprocesses have stopped. If you omit the flag, the prompt returnsalmost immediately, even if all processes are not yet stopped.
To start processes by changing their status flags to Run1. Verify that you are listed in the /usr/afs/etc/UserList file. If necessary, issue
the bos listusers command, which is fully described in “To display theusers in the UserList file” on page 582.
% bos listusers <machine name>
2. Issue the bos start command to change each process’s status flag to Run inboth the BosConfig file and the BOS Server’s memory and to start it.
% bos start <machine name> <server process name>+
where
start Must be typed in full.
machine nameSpecifies the server machine on which to start running eachprocess.
server process nameSpecifies each process to start on machine name. Use the nameassigned to the process at creation.
Stopping and Starting Processes Temporarily
It is sometimes necessary to halt a process temporarily (for example, to makeslight configuration changes or to perform maintenance). The commandsdescribed in this section change a process’s status in the BOS Server’s memoryonly; the effect is immediate and lasts until you change the memory stateagain (or until the BOS Server restarts, at which time it starts the processaccording to its entry in the BosConfig file).
Chapter 4. Monitoring and Controlling Server Processes 139

To stop a process temporarily by changing its status flag in BOS Servermemory to NotRun, use the bos shutdown command. To restart a stoppedprocess by changing its status flag in the BOS Server’s memory to Run, use thebos startup command. The process starts regardless of its status flag in theBosConfig file. You can also use the bos startup command to start allprocesses marked with status flag Run in the BosConfig file, as described inthe following instructions.
Because the bos startup command starts a process without changing it statusflag in the BosConfig file, it is useful for testing a server process withoutenabling it permanently. To stop and start processes by changing their statusflags in the BosConfig file, see “Stopping and Starting Processes Permanently”on page 138; to stop and immediately restart a process, see “Stopping and
Immediately Restarting Processes” on page 142.
Note: Do not temporarily stop a database server process on all machines atonce. Doing so makes the database completely unavailable.
To stop processes temporarily1. Verify that you are listed in the /usr/afs/etc/UserList file. If necessary, issue
the bos listusers command, which is fully described in “To display theusers in the UserList file” on page 582.
% bos listusers <machine name>
2. Issue the bos shutdown command to stop each process by changing itsstatus flag in the BOS Server’s memory to NotRun.
% bos shutdown <machine name> [<instances>+] [-wait]
where
sh Is the shortest acceptable abbreviation of shutdown.
machine nameSpecifies the server machine on which to stop processestemporarily.
instancesSpecifies each process to stop temporarily. Use the name assignedto the process at creation.
-wait Delays the return of the command shell prompt until all specifiedprocesses have actually stopped. If you omit the flag, the promptreturns almost immediately, even if all processes are not yetstopped.
140 AFS: Administration Guide
To start all stopped processes that have status flag Run in the BosConfigfile
1. Verify that you are listed in the /usr/afs/etc/UserList file. If necessary, issuethe bos listusers command, which is fully described in “To display theusers in the UserList file” on page 582.
% bos listusers <machine name>
2. Issue the bos startup command to start each process on a machine thathas status flag Run in the BosConfig file by changing its status flag in theBOS Server’s memory from NotRun to Run.
% bos startup <machine name>
where
startupMust be typed in full.
machine nameSpecifies the server machine on which you wish to start allprocesses that have status flag Run in the BosConfig file.
To start specific processes1. Verify that you are listed in the /usr/afs/etc/UserList file. If necessary, issue
the bos listusers command, which is fully described in “To display theusers in the UserList file” on page 582.
% bos listusers <machine name>
2. Issue the bos startup command to start specific processes by changingtheir status flags in the BOS Server’s memory to Run without changingtheir status flags in the BosConfig file.
% bos startup <machine name> <instances>+
where
startupMust be typed in full.
machine nameNames the server machine on which to start processes.
instancesSpecifies each process to start. Use the name assigned to theprocess at creation.
Chapter 4. Monitoring and Controlling Server Processes 141
Stopping and Immediately Restarting Processes
Although by default the BOS Server checks each day for new installed binaryfiles and restarts the associated processes, it is sometimes desirable to stopand restart processes immediately. The bos restart command provides thisfunctionality, starting a completely new instance of each affected process:v To stop and restart the BOS Server, which then restarts all processes marked
with the Run status flag in the BosConfig file, include the -bosserver flag.v To stop and restart all processes marked with the Run status flag in the
BosConfig file, include the -all flag. The BOS Server does not restartv To stop and restart specific processes regardless of the setting of their status
flags in the BosConfig file, specify the name of each process to restart.
Restarting processes causes a service outage. It is usually best to schedulerestarts for periods of low usage. The BOS Server automatically restarts allprocesses once a week, to reduce the potential for the core leaks that candevelop as any process runs for an extended time; see “Setting the BOSServer’s Restart Times” on page 143.
To stop and restart all processes including the BOS Server1. Verify that you are listed in the /usr/afs/etc/UserList file. If necessary, issue
the bos listusers command, which is fully described in “To display theusers in the UserList file” on page 582.
% bos listusers <machine name>
2. Issue the bos restart command with the -bosserver flag to stop and restartthe BOS Server, which restarts every process marked with status flag Runin the BosConfig file.
% bos restart <machine name> -bosserver
where
res Is the shortest acceptable abbreviation of restart.
machine nameSpecifies the server machine on which to restart all processes.
-bosserverStops the BOS Server and all processes running on the machine. Anew BOS Server instance starts; it then starts new instances of allprocesses marked with status flag Run in the BosConfig file.
To stop and immediately restart all processes except the BOS Server1. Verify that you are listed in the /usr/afs/etc/UserList file. If necessary, issue
the bos listusers command, which is fully described in “To display theusers in the UserList file” on page 582.
142 AFS: Administration Guide

% bos listusers <machine name>
2. Issue the bos restart command with the -all flag to stop and immediatelyrestart every process marked with status flag Run in the BosConfig file.The BOS Server does not restart.
% bos restart <machine name> -all
where
res Is the shortest acceptable abbreviation of restart.
machine nameSpecifies the server machine on which to stop and restartprocesses.
-all Stops and immediately restarts all processes marked with statusflag Run in the BosConfig file.
To stop and immediately restart specific processes1. Verify that you are listed in the /usr/afs/etc/UserList file. If necessary, issue
the bos listusers command, which is fully described in “To display theusers in the UserList file” on page 582.
% bos listusers <machine name>
2. Issue the bos restart command to stop and immediately restart one ormore specified processes, regardless of their status flag setting in theBosConfig file.
% bos restart <machine name> <instances>+
where
res Is the shortest acceptable abbreviation of restart.
machine nameNames the server machine on which to restart the specifiedprocesses.
instancesSpecifies each process to stop and immediately restart. Use thename assigned to the process at creation.
Setting the BOS Server’s Restart Times
The BOS Server by default restarts once a week, and the new instance restartsall processes marked with status flag Run in the local /usr/afs/local/BosConfigfile (this is equivalent to issuing the bos restart command with the -bosserverflag). The default restart time is Sunday at 4:00 a.m. The weekly restart isdesigned to minimize core leaks, which can develop as a process continues to
Chapter 4. Monitoring and Controlling Server Processes 143
allocate virtual memory but does not free it again. When the memory iscompletely exhausted, the machine can no longer function correctly.
The BOS Server also by default checks once a day for any newly installedbinary files. If it finds that the modification time stamp on a process’s binaryfile in the /usr/afs/bin directory is more recent than the time at which theprocess last started, it restarts the process so that a new instance starts usingthe new binary file. The default binary-checking time is 5:00 a.m.
Because restarts can cause outages during which the file system isinaccessible, the default times for restarts are in the early morning whenusage is likely to be lowest. Restarting a database server process on anydatabase server machine usually makes the entire system unavailable toeveryone for a brief time, whereas restarting other types of processesinconveniences only users interacting with that process on that machine. Thelongest outages typically result from restarting the fs process, because the FileServer must reattach all volumes.
The BosConfig file on each file server machine records the two restart times.To display the current setting, issue the bos getrestart command. To reset atime, use the bos setrestart command.
To display the BOS Server restart times1. Issue the bos getrestart command to display the automatic restart times.
% bos getrestart <machine name>
where
getr Is the shortest acceptable abbreviation of getrestart.
machine nameSpecifies the server machine for which to display the restart times.
To set the general or binary restart time1. Verify that you are listed in the /usr/afs/etc/UserList file. If necessary, issue
the bos listusers command, which is fully described in “To display theusers in the UserList file” on page 582.
% bos listusers <machine name>
2. Issue the bos setrestart command with the -general flag to set the generalrestart time or the -newbinary flag to set the binary restart time. Thecommand accepts only one of the flags at a time.
% bos setrestart <machine name> "<time to restart server>" [-general] [-newbinary]
where
setr Is the shortest acceptable abbreviation of setrestart.
144 AFS: Administration Guide
machine nameSpecifies the server machine.
time to restart serverSets when the BOS Server restarts itself (if combined with the-general flag) or any process with a new binary file (if combinedwith the -newbinary flag). Provide one of the following types ofvalues:v The string never, which directs the BOS Server never to perform
the indicated type of restart.v A time of day (the conventional type of value for the binary
restart time). Separate the hours and minutes with a colon(hh:MM), and use either 24-hour format, or a value in the rangefrom 1:00 through 12:59 with the addition of am or pm. Forexample, both 14:30 and ″2:30 pm″ indicate 2:30 in theafternoon. Surround this parameter with double quotes (″ ″) if itcontains a space.
v A day of the week and time of day, separated by a space andsurrounded with double quotes (″ ″). This is the conventionaltype of value for the general restart. For the day, provide eitherthe whole name or the first three letters, all in lowercase letters(sunday or sun, thursday or thu, and so on). For the time, usethe same format as when specifying the time alone.
If desired, precede a time or day and time definition with thestring every or at. These words do not change the meaning, butpossibly make the output of the bos getrestart command easier tounderstand.
Note: If the specified time is within one hour of the current time,the BOS Server does not perform the restart until the nexteligible time (the next day for a time or next week for a dayand time).
-generalSets the general restart time when the BOS Server restarts itself.
-newbinarySets the restart time for processes with new binary files.
Displaying Server Process Log Files
The /usr/afs/logs directory on each file server machine contains log files thatdetail interesting events that occur during normal operation of some AFSserver processes. The self-explanatory information in the log files can help youevaluate process failures and other problems. To display a log file remotely,
Chapter 4. Monitoring and Controlling Server Processes 145
issue the bos getlog command. You can also establish a connection to theserver machine and use a text editor or other file display program (such asthe cat command).
Note: Log files can grow unmanageably large if you do not periodicallyshutdown and restart the database server processes (for example, if youdisable the general restart time). In this case it is a good policyperiodically to issue the UNIX rm command to delete the current logfile. The server process automatically creates a new one as needed.
To examine a server process log file1. Verify that you are listed in the /usr/afs/etc/UserList file. If necessary, issue
the bos listusers command, which is fully described in “To display theusers in the UserList file” on page 582.
% bos listusers <machine name>
2. Issue the bos getlog command to display a log file.% bos getlog <machine name> <log file to examine>
where
getl Is the shortest acceptable abbreviation of getlog.
machine nameSpecifies the server machine from which to display the log file.
log file to examineNames the log file to be displayed. Provide one of the followingfile names to display the indicated log file from the /usr/afs/logsdirectory.v AuthLog for the Authentication Server log filev BackupLog for the Backup Server log filev BosLog for the BOS Server log filev FileLog for the File Server log filev SalvageLog for the Salvager log filev VLLog for the Volume Location (VL) Server log filev VolserLog for the Volume Server log file
You can provide a full or relative pathname to display a file fromanother directory. Relative pathnames are interpreted relative tothe /usr/afs/logs directory.
146 AFS: Administration Guide
Chapter 5. Managing Volumes
This chapter explains how to manage the volumes stored on file servermachines. The volume is the designated unit of administration in AFS, somanaging them is a large part of the administrator’s duties.
Summary of Instructions
This chapter explains how to perform the following tasks by using theindicated commands:
Create read/write volume vos createCreate read-only volume vos addsite and vos releaseCreate backup volume vos backupCreate many backup volumes at once vos backupsysExamine VLDB entry vos listvldbExamine volume header vos listvolExamine both VLDB entry and volume header vos examineDisplay volume’s name fs listquota or fs examineDisplay volume’s ID number fs examine or vos examine or vos
listvolDisplay partition’s size and space available vos partinfoDisplay volume’s location fs whereis or vos examineCreate mount point fs mkmountRemove mount point fs rmmountDisplay mount point fs lsmountMove read/write volume vos moveSynchronize VLDB with volume headers vos syncvldb and vos syncservSet volume quota fs setvol or fs setquotaDisplay volume quota fs quota or fs listquota or fs
examineDisplay volume’s current size fs listquota or fs examineDisplay list of volumes on a machine/partition vos listvolRemove read/write volume vos remove and fs rmmountRemove read-only volume vos removeRemove backup volume vos remove and fs rmmountRemove volume; no VLDB change vos zapRemove read-only site definition vos remsiteRemove VLDB entry; no volume change vos delentryDump volume vos dumpRestore dumped volume vos restoreRename volume vos rename, fs rmmount and fs
mkmount
© Copyright IBM Corp. 1989, 2000 147
Unlock volume vos unlockUnlock multiple volumes vos unlockvldbLock volume vos lock
About Volumes
An AFS volume is a logical unit of disk space that functions like a containerfor the files in an AFS directory, keeping them all together on one partition ofa file server machine. To make a volume’s contents visible in the cell’s file treeand accessible to users, you mount the volume at a directory location in theAFS filespace. The association between the volume and its location in thefilespace is called a mount point, and because of AFS’s internal workings itlooks and acts just like a standard directory element. Users can access andmanipulate a volume’s contents in the same way they access and manipulatethe contents of a standard UNIX directory. For more on the relationshipbetween volumes and directories, see “About Mounting Volumes” onpage 151.
Many of an administrator’s daily activities involve manipulating volumes,since they are the basic storage and administrative unit of AFS. For adiscussion of some of the ways volumes can make your job easier, see “HowVolumes Improve AFS Efficiency” on page 149.
The Three Types of Volumes
There are three types of volumes in AFS, as described in the following list:v The single read/write version of a volume houses the modifiable versions of
the files and directories in that volume. It is often referred to as theread/write source because volumes of the other two types are derived from itby a copying procedure called cloning. For instructions on creatingread/write volumes, see “Creating Read/write Volumes” on page 153.
v A read-only volume is a copy of the read/write source volume and canexist at multiple sites (a site is a particular partition on a particular fileserver machine). Placing the same data at more than one site is calledreplication; see “How Volumes Improve AFS Efficiency” on page 149. As thename suggests, a read-only volume’s contents do not change automaticallyas the read/write source changes, but only when an administrator issuesthe vos release command. For users to have a consistent view of the AFSfilespace, all copies of the read-only volume must match each other andtheir read/write source. All read-only volumes share the same name, whichis derived by adding the .readonly extension to the read/write source’sname. For instructions on creating of read-only volumes, see “ReplicatingVolumes (Creating Read-only Volumes)” on page 157.
148 AFS: Administration Guide

v A backup volume is a clone of the read/write source volume and is stored atthe same site as the source. A backup version is useful because it recordsthe state of the read/write source at a certain time, allowing recovery ofdata that is later mistakenly changed or deleted (for further discussion see“How Volumes Improve AFS Efficiency”). A backup volume’s name isderived by adding the .backup extension to the read/write source’s name.For instructions on creating of backup volumes, see “Creating BackupVolumes” on page 163.
Note: A backup volume is not the same as the backup of a volumetransferred to tape using the AFS Backup System, although making abackup version of a volume is usually a stage in the process ofbacking up the volume to tape. For information on backing up avolume using the AFS Backup System, see “Backing Up Data” onpage 279.
As noted, the three types of volumes are related to one another: read-only andbackup volumes are both derived from a read/write volume through aprocess called cloning. Read-only and backup volumes are exact copies of theread/write source at the time they are created.
How Volumes Improve AFS Efficiency
Volumes make your cell easier to manage and more efficient in the followingthree ways:v Volumes are easy to move between partitions, on the same or different
machines, because they are by definition smaller than a partition. Perhapsthe most common reasons to move volumes are to balance the load amongfile server machines or to take advantage of greater disk capacity on certainmachines. You can move volumes as often as necessary without disruptinguser access to their contents, because the move procedure makes thecontents unavailable for only a few seconds. The automatic tracking ofvolume locations in the Volume Location Database (VLDB) assures thataccess remains transparent. For instructions on moving volumes, see“Moving Volumes” on page 186.
v Volumes are the unit of replication in AFS. Replication refers to creating aread-only clone from the read/write source and distributing of the clone toone or more sites. Replication improves system efficiency because more thanone machine can fill requests for popular files. It also boosts systemreliability by helping to keep data available in the face of machine or serverprocess outage. In general, volumes containing popular applicationprograms and other files that do not change often are the best candidatesfor replication, but you can replicate any read/write volume. See“Replicating Volumes (Creating Read-only Volumes)” on page 157.
Chapter 5. Managing Volumes 149

v Volumes are the unit of backup in AFS, in two senses. You can create abackup volume version to preserves the state of a read/write sourcevolume at a specified time. You can mount the backup version in the AFSfilespace, enabling users to restore data they have accidentally changed ordeleted without administrator assistance, which frees you for moreimportant jobs. If you make a new backup version of user volumes once aday (presumably overwriting the former backup), then users are always beable to retrieve the previous day’s version of a file. For instructions, see“Creating Backup Volumes” on page 163.Backup also refers to using the AFS Backup System to store permanentcopies of volume contents on tape or in a special backup data. See“Chapter 6. Configuring the AFS Backup System” on page 217 and“Chapter 7. Backing Up and Restoring AFS Data” on page 269.
Volume Information in the VLDB
The Volume Location Database (VLDB) includes entries for every volume in acell. Perhaps the most important information in the entry is the volume’slocation, which is key to transparent access to AFS data. When a user opens afile, the Cache Manager consults the Volume Location (VL) Server, whichmaintains the VLDB, for a list of the file server machines that house thevolume containing the file. The Cache Manager then requests the file from theFile Server running on one of the relevant file server machines. The filelocation procedure is invisible to the user, who only needs to know the file’spathname.
The VLDB volume entry for a read/write volume also contains the pertinentinformation about the read-only and backup versions, which do not have theirown VLDB entries. (The rare exception is a read-only volume that has its ownVLDB entry because its read/write source has been removed.) A volume’sVLDB entry records the volume’s name, the unique volume ID number foreach version (read/write, read-only, backup, and releaseClone), a count of thenumber of sites that house a read/write or read-only version, and a list of thesites.
To display the VLDB entry for one or more volumes, use the vos listvldbcommand as described in “To display VLDB entries” on page 177. To displaythe VLDB entry for a single volume along with its volume header, use the vosexamine command as described in “To display one volume’s VLDB entry andvolume header” on page 183. (See the following section for a description ofthe volume header.)
150 AFS: Administration Guide
The Information in Volume Headers
Whereas all versions of a volume share one VLDB entry, each volume on anAFS server partition has its own volume header, a data structure that maps thefiles and directories in the volume to physical memory addresses on thepartition that stores them. The volume header binds the volume’s contentsinto a logical unit without requiring that they be stored in contiguousmemory blocks. The volume header also records the following informationabout the volume, some of it redundant with the VLDB entry: name, volumeID number, type, size, status (online, offline, or busy), space quota, timestampsfor creation date and date of last modification, and number of accesses duringthe current day.
To display the volume headers on one or more partitions, use the vos listvolcommand as described in “To display volume headers” on page 179. Todisplay the VLDB entry for a single volume along with its volume header, usethe vos examine command as described in “To display one volume’s VLDBentry and volume header” on page 183.
Keeping the VLDB and Volume Headers Synchronized
It is vital that the information in the VLDB correspond to the status of theactual volumes on the servers (as recorded in volume headers) as much of thetime as possible. If a volume’s location information in the VLDB is incorrect,the Cache Manager cannot find access its contents. Whenever you issue a voscommand that changes a volume’s status, the Volume Server and VL Servercooperate to keep the volume header and VLDB synchronized. In rare cases,the header and VLDB can diverge, for instance because a vos operation haltsprematurely. For instructions on resynchronizing them, see “Synchronizing theVLDB and Volume Headers” on page 189.
About Mounting Volumes
To make a volume’s contents visible in the cell’s file tree and accessible tousers, you mount the volume at a directory location in the AFS filespace. Theassociation between the volume and its location in the filespace is called amount point. An AFS mount point looks and functions like a regular UNIX filesystem directory, but structurally it is more like a symbolic link that tells theCache Manager the name of the volume associated with the directory. Amount point looks and acts like a directory only because the Cache Managerknows how to interpret it.
Consider the common case where the Cache Manager needs to retrieve a filerequested by an application program. The Cache Manager traverses the file’scomplete pathname, starting at the AFS root (by convention mounted at the
Chapter 5. Managing Volumes 151
/afs directory) and continuing to the file. When the Cache Manager encounters(or crosses) a mount point during the traversal, it reads it to learn the name ofthe volume mounted at that directory location. After obtaining locationinformation about the volume from the Volume Location (VL) Server, theCache Manager fetches the indicated volume and opens its root directory. Theroot directory of a volume lists all the files, subdirectories, and mount pointsthat reside in it. The Cache Manager scans the root directory listing for thenext element in the pathname. It continues down the path, using this methodto interpret any other mount points it encounters, until it reaches the volumethat houses the requested file.
Mount points act as the glue that connects the AFS file space, creating theillusion of a single, seamless file tree even when volumes reside on manydifferent file server machines. A volume’s contents are visible and accessiblewhen the volume is mounted at a directory location, and are not accessible atall if the volume is not mounted.
You can mount a volume at more than one location in the file tree, but this isnot recommended for two reasons. First, it distorts the hierarchical nature ofthe filespace. Second, the Cache Manager can become confused about whichpathname it followed to reach the file (causing unpredictable output from thepwd command, for example). However, if you mount a volume at more thanone directory, the access control list (ACL) associated with the volume’s rootdirectory applies to all of the mount points.
There are several types of mount points, each of which the Cache Managerhandles in a different way and each of which is appropriate for a differentpurpose. See “Mounting Volumes” on page 169.
About Volume Names
A read/write volume’s name can be up to 22 characters in length. TheVolume Server automatically adds the .readonly and .backup extensions toread-only and backup volumes respectively. Do not explicitly add theextensions to volume names, even if they are appropriate.
It is conventional for a volume’s name to indicate the type of data it houses.For example, it is conventional to name all user volumes user.username whereusername is the user’s login name. Similarly, many cells elect to put systembinaries in volumes with names that begin with the system type code. For alist of other naming conventions, see “Creating Volumes to SimplifyAdministration” on page 32.
152 AFS: Administration Guide

Creating Read/write Volumes
A read/write volume is the most basic type of volume, and must exist beforeyou can create read-only or backup versions of it. When you issue the voscreate command to create a read/write volume, the VL Server creates a VLDBentry for it which records the name you specify, assigns a read/write volumeID number, and reserves the next two consecutive volume ID numbers forread-only and backup versions that possibly are to be created later. At thesame time, the Volume Server creates a volume header at the site youdesignate, allocating space on disk to record the name of the volume’s rootdirectory. The name is filled in when you issue the fs mkmount command tomount the volume, and matches the mount point name. The following is alsorecorded in the volume header:v An initial ACL associated with the volume’s root directory. By default it
grants all seven AFS access permissions to the system:administratorsgroup. After you mount the volume, you can use the fs setacl command toadd other entries and to remove or change the entry for thesystem:administrators group. See “Setting ACL Entries” on page 568.
v A space quota, which limits the amount of disk space the read/writeversion of the volume can use on the file server partition. The default is of5000 kilobyte blocks, but you can use the -maxquota argument to the voscreate command to set a different quota.To change the quota after creation, use the fs setquota command asdescribed in “Setting and Displaying Volume Quota and Current Size” onpage 198.
To create (and mount) a read/write volume1. Verify that you are listed in the /usr/afs/etc/UserList file. If necessary, issue
the bos listusers command, which is fully described in “To display theusers in the UserList file” on page 582.
% bos listusers <machine name>
2. Verify that you have the a (administer), i (insert), and l (lookup)permissions on the ACL of the directory where you plan to mount thevolume. If necessary, issue the fs listacl command, which is fullydescribed in “Displaying ACLs” on page 566.
% fs listacl [<dir/file path>]
Members of the system:administrators group always implicitly have the a(administer) and by default also the l (lookup) permission on every ACLand can use the fs setacl command to grant other rights as necessary.
3. Select a site (disk partition on a file server machine) for the new volume.To verify that the site has enough free space to house the volume (now, orif it grows to use its entire quota), issue the vos partinfo command.
Chapter 5. Managing Volumes 153
Note: The partition-related statistics in this command’s output do notalways agree with the corresponding values in the output of thestandard UNIX df command. The statistics reported by thiscommand can be up to five minutes old, because the CacheManager polls the File Server for partition information at thatfrequency. Also, on some operating systems, the df command’sreport of partition size includes reserved space not included in thiscommand’s calculation, and so is likely to be about 10% larger.
% vos partinfo <machine name> [<partition name>]
where
p Is the shortest acceptable abbreviation of partinfo.
machine nameSpecifies the file server machine for which to display partition sizeand usage.
partition nameNames one partition for which to display partition size and usage.If you omit it, the output displays the size and space available forall partitions on the machine.
4. Select a volume name, taking note of the information in “About VolumeNames” on page 152.
5. Issue the vos create command to create the volume.
% vos create <machine name> <partition name> <volume name> \[-maxquota <initial quota (KB)>]
where
cr Is the shortest acceptable abbreviation of create.
machine nameSpecifies the file server machine on which to place the volume.
partition nameSpecifies the disk partition on which to place the volume.
volume nameNames the volume. It can be up to 22 alphanumeric andpunctuation characters in length. Your cell possibly has namingconventions for volumes, such as beginning user volume nameswith the string user and using the period to separate parts of thename.
154 AFS: Administration Guide

-maxquotaSets the volume’s quota, as a number of kilobyte blocks. If youomit this argument, the quota is set to 5000 kilobyte blocks.
6. (Optional) Issue the fs mkmount command to mount the volume in thefilespace. For complete syntax, see “To create a regular or read/writemount point” on page 173.
% fs mkmount <directory> <volume name>
7. (Optional) Issue the fs lsmount command to verify that the mount pointrefers to the correct volume. Complete instructions appear in “To display amount point” on page 172.
% fs lsmount <directory>
8. (Optional) Issue the fs setvol command with the -offlinemsg argument torecord auxiliary information about the volume in its volume header. Forexample, you can record who owns the volume or where you havemounted it in the filespace. To display the information, use the fs examinecommand.
% fs setvol <dir/file path> -offlinemsg <offline message>
where
sv Is an acceptable alias for setvol (and setv the shortest acceptableabbreviation).
dir/file pathNames the mount point of the volume with which to associate themessage. Partial pathnames are interpreted relative to the currentworking directory.
Specify the read/write path to the mount point, to avoid thefailure that results when you attempt to change a read-onlyvolume. By convention, you indicate the read/write path byplacing a period before the cell name at the pathname’s secondlevel (for example, /afs/.abc.com). For further discussion of theconcept of read/write and read-only paths through the filespace,see “The Rules of Mount Point Traversal” on page 169.
-offlinemsgSpecifies up to 128 characters of auxiliary information to record inthe volume header.
Chapter 5. Managing Volumes 155
About Clones and Cloning
To create a backup or read-only volume, the Volume Server begins by cloningthe read/write source volume to create a clone. The Volume Server creates theclone automatically when you issue the vos backup or vos backupsyscommand (for a backup volume) or the vos release command (for a read-onlyvolume). No special action is required on your part.
A clone is not a copy of the data in the read/write source volume, but rathera copy of the read/write volume’s vnode index. The vnode index is a table ofpointers between the files and directories in the volume and the physical diskblocks on the partition where the data resides. From the clone, backup andread-only volumes are created in the following manner:v A read-only volume that occupies the same partition as its read/write
source (also known as a read-only clone), and a backup volume, are createdby attaching a volume header to the clone. These volumes initially consumevery little disk space, because the clone portion (the vnode index) points toexactly the same files as the read/write volume, as illustrated in Figure 1 onpage 157. The file sharing is possible only because the clone is on the samepartition as the read/write source volume. When a file in the read/writevolume is deleted, it is not actually removed from the partition, because thebackup or read-only clone still points to it. Similarly, when a file in theread/write is changed, the entire original file is preserved on disk becausethe clone still points to it, and the read/write volume’s vnode indexchanges to point to newly space for the changed file. When this happens,the backup or read-only volume is said to grow or start occupying actualdisk space.
v A read-only volume that does not occupy the same site as the read/writesource is a copy of the clone and of all of the data in the read/write sourcevolume. It occupies the same amount of disk space as the read/writevolume did at the time the read-only volume was created.
156 AFS: Administration Guide
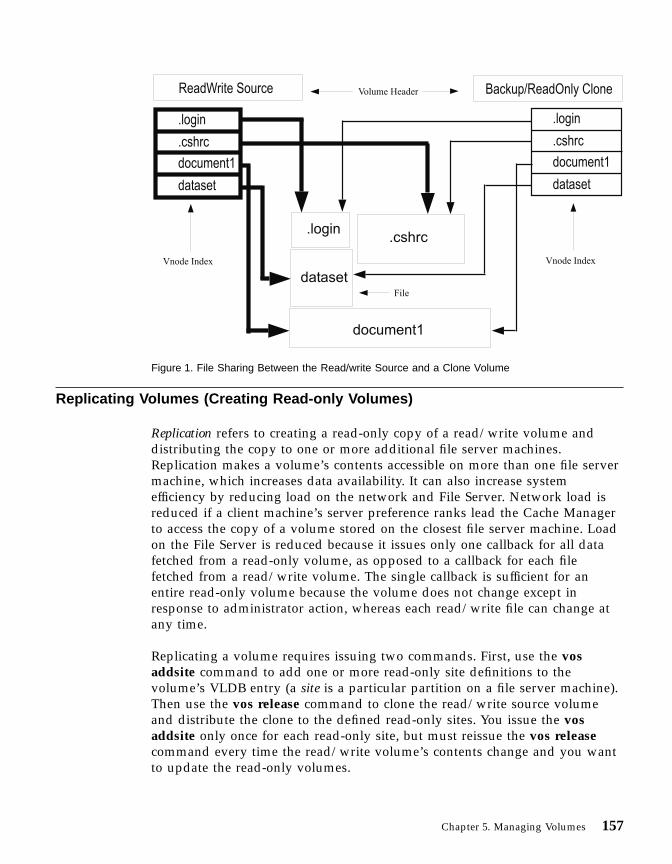
Replicating Volumes (Creating Read-only Volumes)
Replication refers to creating a read-only copy of a read/write volume anddistributing the copy to one or more additional file server machines.Replication makes a volume’s contents accessible on more than one file servermachine, which increases data availability. It can also increase systemefficiency by reducing load on the network and File Server. Network load isreduced if a client machine’s server preference ranks lead the Cache Managerto access the copy of a volume stored on the closest file server machine. Loadon the File Server is reduced because it issues only one callback for all datafetched from a read-only volume, as opposed to a callback for each filefetched from a read/write volume. The single callback is sufficient for anentire read-only volume because the volume does not change except inresponse to administrator action, whereas each read/write file can change atany time.
Replicating a volume requires issuing two commands. First, use the vosaddsite command to add one or more read-only site definitions to thevolume’s VLDB entry (a site is a particular partition on a file server machine).Then use the vos release command to clone the read/write source volumeand distribute the clone to the defined read-only sites. You issue the vosaddsite only once for each read-only site, but must reissue the vos releasecommand every time the read/write volume’s contents change and you wantto update the read-only volumes.
Figure 1. File Sharing Between the Read/write Source and a Clone Volume
Chapter 5. Managing Volumes 157
For users to have a consistent view of the file system, the release of updatedvolume contents to read-only sites must be atomic: either all read-only sitesreceive the new version of the volume, or all sites keep the version theycurrently have. The vos release command is designed to ensure that all copiesof the volume’s read-only version match both the read/write source and eachother. In cases where problems such as machine or server process outagesprevent successful completion of the release operation, AFS uses twomechanisms to alert you.
First, the command interpreter generates an error message on the standarderror stream naming each read-only site that did not receive the new volumeversion. Second, during the release operation the Volume Location (VL) Servermarks site definitions in the VLDB entry with flags (New release and Oldrelease) that indicate whether or not the site has the new volume version. Ifany flags remain after the operation completes, it was not successful. TheCache Manager refuses to access a read-only site marked with the Oldrelease flag, which potentially imposes a greater load on the sites markedwith the New release flag. It is important to investigate and eliminate thecause of the failure and then to issue the vos release command as many timesas necessary to complete the release without errors.
The pattern of site flags remaining in the volume’s VLDB entry after a failedrelease operation can help determine the point at which the operation failed.Use the vos examine or vos listvldb command to display the VLDB entry.The VL Server sets the flags in concert with the Volume Server’s operations, asfollows:1. Before the operation begins, the VL Server sets the New release flag on the
read/write site definition in the VLDB entry and the Old release flag onread-only site definitions (unless the read-only site has been defined sincethe last release operation and has no actual volume, in which case its siteflag remains Not released).
2. If necessary, the Volume Server creates a temporary copy (a clone) of theread/write source called the ReleaseClone (see the following discussion ofwhen the Volume Server does or does not create a new ReleaseClone.) Itassigns the ReleaseClone its own volume ID number, which the VL Serverrecords in the RClone field of the source volume’s VLDB entry.
3. The Volume Server distributes a copy of the ReleaseClone to eachread-only site defined in the VLDB entry. As the site successfully receivesthe new clone, the VL Server sets the site’s flag in the VLDB entry to Newrelease.
4. When all the read-only copies are successfully released, the VL Serverclears all the New release site flags. The ReleaseClone is no longer needed,so the Volume Server deletes it and the VL Server erases its ID from theVLDB entry.
158 AFS: Administration Guide
By default, the Volume Server determines automatically whether or not itneeds to create a new ReleaseClone:v If there are no flags (New release, Old release, or Not released) on site
definitions in the VLDB entry, the previous vos release commandcompleted successfully and all read-only sites currently have the samevolume. The Volume Server infers that the current vos release commandwas issued because the read/write volume has changed. The Volume Servercreates a new ReleaseClone and distributes it to all of the read-only sites.
v If any site definition in the VLDB entry is marked with a flag, either theprevious release operation did not complete successfully or a new read-onlysite was defined since the last release. The Volume Server does not create anew ReleaseClone, instead distributing the existing ReleaseClone to sitesmarked with the Old release or Not released flag. As previously noted,the VL Server marks each VLDB site definition with the New release flag asthe site receives the ReleaseClone, and clears all flags after all sitessuccessfully receive it.
To override the default behavior, forcing the Volume Server to create andrelease a new ReleaseClone to the read-only sites, include the -f flag. This isappropriate if, for example, the data at the read/write site has changed sincethe existing ReleaseClone was created during the previous release operation.
Using Read-only Volumes Effectively
For maximum effectiveness, replicate only volumes that satisfy two criteria:v The volume’s contents are heavily used. Examples include a volume
housing binary files for text editors or other popular application programs,and volumes mounted along heavily traversed directory paths such as thepaths leading to user home directories. It is an inefficient use of disk spaceto replicate volumes for which the demand is low enough that a single FileServer can easily service all requests.
v The volume’s contents change infrequently. As noted, file systemconsistency demands that the contents of read-only volumes must matcheach other and their read/write source at all times. Each time theread/write volume changes, you must issue the vos release command toupdate the read-only volumes. This can become tedious (and easy to forget)if the read/write volume changes frequently.
Explicitly mounting a read-only volume (creating a mount point that names avolume with a .readonly extension) is not generally necessary or appropriate.The Cache Manager has a built-in bias to access the read-only version of areplicated volume whenever possible. As described in more detail in “TheRules of Mount Point Traversal” on page 169, when the Cache Managerencounters a mount point it reads the volume name inside it and contacts theVL Server for a list of the sites that house the volume. In the normal case, if
Chapter 5. Managing Volumes 159
the mount point resides in a read-only volume and names a read/writevolume (one that does not have a .readonly or .backup extension), the CacheManager always attempts to access a read-only copy of the volume. Thusthere is normally no reason to force the Cache Manager to access a read-onlyvolume by mounting it explicitly.
It is a good practice to place a read-only volume at the read/write site, for acouple of reasons. First, the read-only volume at the read/write site requiresonly a small amount of disk space, because it is a clone rather a copy of all ofthe data (see “About Clones and Cloning” on page 156). Only if a largenumber of files are removed or changed in the read/write volume does theread-only copy occupy much disk space. That normally does not happenbecause the appropriate response to changes in a replicated read/writevolume is to reclone it. The other reason to place a read-only volume at theread/write site is that the Cache Manager does not attempt to access theread/write version of a replicated volume if all read-only copies becomeinaccessible. If the file server machine housing the read/write volume is theonly accessible machine, the Cache Manager can access the data only if thereis a read-only copy at the read/write site.
The number of read-only sites to define depends on several factors. Perhapsthe main trade-off is between the level of demand for the volume’s contentsand how much disk space you are willing to use for multiple copies of thevolume. Of course, each prospective read-only site must have enoughavailable space to accommodate the volume. The limit on the number ofread-only copies of a volume is determined by the maximum number of sitedefinitions in a volume’s VLDB entry, which is defined in the AFS ReleaseNotes. The site housing the read/write and backup versions of the volumecounts as one site, and each read-only site counts as an additional site (eventhe read-only site defined on the same file server machine and partition as theread/write site counts as a separate site). Note also that the Volume Serverpermits only one read-only copy of a volume per file server machine.
Replication Scenarios
The instructions in the following section explain how to replicate a volume forwhich no read-only sites are currently defined. However, you can also use theinstructions in other common situations:v If you are releasing a new clone to sites that already exist, you can skip
Step 2 on page 161. It can still be useful to issue the vos examine command,however, to verify that the desired read-only sites are defined.
v If you are adding new read-only sites to existing ones, perform all of thesteps. In Step 3 on page 161, issue the vos addsite command for the newsites only.
160 AFS: Administration Guide

v If you are defining sites but do not want to release a clone to them yet, stopafter Step 3 and continue when you are ready.
v If you are removing one or more sites before releasing a new clone to theremaining sites, follow the instructions for site removal in “RemovingVolumes and their Mount Points” on page 202 and then start with Step 4 onpage 162.
To replicate a read/write volume (create a read-only volume)1. Verify that you are listed in the /usr/afs/etc/UserList file. If necessary, issue
the bos listusers command, which is fully described in “To display theusers in the UserList file” on page 582.
% bos listusers <machine name>
2. Select one or more sites at which to replicate the volume. There areseveral factors to consider:v How many sites are already defined. As previously noted, it is usually
appropriate to define a read-only site at the read/write site. Also, theVolume Server permits only one read-only copy of a volume per fileserver machine. To display the volume’s current sites, issue the vosexamine command, which is described fully in “Displaying OneVolume’s VLDB Entry and Volume Header” on page 183.
% vos examine <volume name or ID>
The final lines of output display the volume’s site definitions from theVLDB.
v Whether your cell dedicates any file server machines to housingread-only volumes only. In general, only very large cells use read-onlyserver machines.
v Whether a site has enough free space to accommodate the volume. Aread-only volume requires the same amount of space as the read/writeversion (unless it is at the read/write site itself). The first line of outputfrom the vos examine command displays the read/write volume’scurrent size in kilobyte blocks, as shown in “Displaying One Volume’sVLDB Entry and Volume Header” on page 183.To display the amount of space available on a file server machine’spartitions, use the vos partinfo command, which is described fully in“Creating Read/write Volumes” on page 153.
% vos partinfo <machine name> [<partition name>]
3. Issue the vos addsite command to define each new read-only site in theVLDB.
Chapter 5. Managing Volumes 161

% vos addsite <machine name> <partition name> <volume name or ID>
where
ad Is the shortest acceptable abbreviation of addsite.
machine nameDefines the file server machine for the new site.
partition nameNames a disk partition on the machine machine name.
volume name or IDIdentifies the read/write volume to be replicated, either by itscomplete name or its volume ID number.
4. (Optional) Verify that the fs process (which incorporates the VolumeServer) is functioning normally on each file server machine where youhave defined a read-only site, and that the vlserver process (the VolumeLocation Server) is functioning correctly on each database server machine.Knowing that they are functioning eliminates two possible sources offailure for the release. Issue the bos status command on each file servermachine housing a read-only site for this volume and on each databaseserver machine. The command is described fully in “Displaying ProcessStatus and Information from the BosConfig File” on page 131.
% bos status <machine name> fs vlserver
5. Issue the vos release command to clone the read/write source volume anddistribute the clone to each read-only site.
% vos release <volume name or ID> [-f]
where
rel Is the shortest acceptable abbreviation of release.
volume name or IDIdentifies the read/write volume to clone, either by its completename or volume ID number. The read-only version is given thesame name with a .readonly extension. All read-only copies sharethe same read-only volume ID number.
-f Creates and releases a brand new clone.6. (Optional) Issue the vos examine command to verify that no site
definition in the VLDB entry is marked with an Old release or New
162 AFS: Administration Guide
release flag. The command is described fully in “Displaying OneVolume’s VLDB Entry and Volume Header” on page 183.
% vos examine <volume name or ID>
If any flags appear in the output from Step 6 on page 162, repeat Steps 4 onpage 162 and 5 on page 162 until the Volume Server does not produce anyerror messages during the release operation and the flags no longer appear.Do not issue the vos release command when you know that the read/writesite or any read-only site is inaccessible due to network, machine or serverprocess outage.
Creating Backup Volumes
A backup volume is a clone that resides at the same site as its read/writesource (to review the concept of cloning, see “About Clones and Cloning” onpage 156). Creating a backup version of a volume has two purposes:v It is by convention the first step when dumping a volume’s contents to tape
with the AFS Backup System. A volume is inaccessible while it is beingdumped, so instead of dumping the read/write volume, you create anddump a backup version. Users do not normally access the backup version,so it is unlikely that the dump will disturb them. For more details, see“Backing Up Data” on page 279.
v It enables users to restore mistakenly deleted or changed data themselves,freeing you for more crucial tasks. The backup version captures the state ofits read/write source at the time the backup is made, and its contentscannot change. Mount the backup version in the filespace so that users canrestore a file to its state at the time you made the backup. See “Making theContents of Backup Volumes Available to Users” on page 165.
Backing Up Multiple Volumes at Once
The vos backupsys command creates a backup version of many read/writevolumes at once. This command is useful when preparing for large-scalebackups to tape using the AFS Backup System.
To clone every read/write volume listed in the VLDB, omit all of thecommand’s options. Otherwise, combine the command’s options to clonevarious groups of volumes. The options use one of two basic criteria to selectvolumes: location (the -server and -partition arguments) or presence in thevolume name of one of a set of specified character strings (the -prefix,-exclude, and -xprefix options).
Chapter 5. Managing Volumes 163
To clone only volumes that reside on one file server machine, include the-server argument. To clone only volumes that reside on one partition, combinethe -server and -partition arguments. The -partition argument can also beused alone to clone volumes that reside on the indicated partition on everyfile server machine. These arguments can be combined with those that selectvolumes based on their names.
Combine the -prefix, -exclude, and -xprefix options (with or without the-server and -partition arguments) in the indicated ways to select volumesbased on character strings contained in their names:v To clone every read/write volume at the specified location whose name
includes one of a set of specified character strings (for example, begins withuser. or includes the string afs), use the -prefix argument or combine the-xprefix and -exclude options.
v To clone every read/write volume at the specified location except thosewhose name includes one of a set of specified character strings, use the-xprefix argument or combine the -prefix and -exclude options.
v To clone every read/write volume at the specified location whose nameincludes one of one of a set of specified character strings, except thosewhose names include one of a different set of specified character strings,combine the -prefix and -xprefix arguments. The command creates a list ofall volumes that match the -prefix argument and then removes from the listthe volumes that match the -xprefix argument. For effective results, thestrings specified by the -xprefix argument must designate a subset of thevolumes specified by the -prefix argument.If the -exclude flag is combined with the -prefix and -xprefix arguments, thecommand creates a list of all volumes that do not match the -prefixargument and then adds to the list any volumes that match the -xprefixargument. As when the -exclude flag is not used, the result is effective onlyif the strings specified by the -xprefix argument designate a subset of thevolumes specified by the -prefix argument.
The -prefix and -xprefix arguments both accept multiple values, which can beused to define disjoint groups of volumes. Each value can be one of twotypes:1. A simple character string, which matches volumes whose name begin with
the string. All characters are interpreted literally (that is, characters thatpotentially have special meaning to the command shell, such as theperiod, have only their literal meaning).
2. A regular expression, which matches volumes whose names contain theexpressions. Place a caret ( | ) at the beginning of the expression, andenclose the entire string in single quotes (’ ’). Explaining regularexpressions is outside the scope of this reference page; see the UNIXmanual page for regexp(5) or (for a brief introduction) “Defining and
164 AFS: Administration Guide
Displaying Volume Sets and Volume Entries” on page 233. As an example,the following expression matches volumes that have the string aixanywhere in their names:
-prefix '|.*aix'
To display a list of the volumes to be cloned, without actually cloning them,include the -dryrun flag. To display a statement that summarizes the criteriabeing used to select volume, include the -verbose flag.
To back up a single volume, use the vos backup command, which employs amore streamlined technique for finding a single volume.
Automating Creation of Backup Volumes
Most cells find that it is best to make a new backup version of relevantvolumes each day. It is best to create the backup versions at a time whenusage is low, because the backup operation causes the read/write volume tobe unavailable momentarily.
You can either issue the necessary the vos backupsys or vos backupcommands at the console or create a cron entry in the BosConfig file on a fileserver machine, which eliminates the need for an administrator to initiate thebackup operation.
The following example command creates a cron process called backupusers inthe /usr/afs/local/BosConfig file on the machine fs3.abc.com. The process runsevery day at 1:00 a.m. to create a backup version of every volume in the cellwhose name starts with the string user. The -localauth flag enables theprocess to invoke the privileged vos backupsys command whileunauthenticated. Note that the -cmd argument specifies a complete pathnamefor the vos binary, because the PATH environment variable for the BOS Server(running as the local superuser root) generally does not include the path toAFS binaries.
% bos create fs3.abc.com backupusers cron \-cmd "/usr/afs/bin/vos backupsys -prefix user -localauth" "1:00"
Making the Contents of Backup Volumes Available to Users
As noted, a backup volume preserves the state of the read/write source at thetime the backup is created. Many cells choose to mount backup volumes sothat users can access and restore data they have accidentally deleted orchanged since the last backup was made, without having to request help fromadministrators. The most sensible place to mount the backup version of a uservolume is at a subdirectory of the user’s home directory. Suitable names for
Chapter 5. Managing Volumes 165
this directory include OldFiles and Backup. The subdirectory looks just likethe user’s own home directory as it was at the time the backup was created,with all files and subdirectories in the same relative positions.
If you do create and mount backup volumes for your users, inform users oftheir existence. The AFS User Guide does not mention backup volumesbecause making them available to users is optional. Explain to users howoften you make a new backup, so they know what they can recover. Remindthem also that the data in their backup volume cannot change; however, theycan use the standard UNIX cp command to copy it into their home volumeand modify it there. Reassure users that the data in their backup volumesdoes not count against their read/write volume quota.
To create and mount a backup volume1. Verify that you are listed in the /usr/afs/etc/UserList file. If necessary, issue
the bos listusers command, which is fully described in “To display theusers in the UserList file” on page 582.
% bos listusers <machine name>
2. Verify that you have the insert (i) and administer (a) permissions on theACL of the directory in which you wish to mount the volume. Ifnecessary, issue the fs listacl command, which is fully described in“Displaying ACLs” on page 566.
% fs listacl [<dir/file path>]
Members of the system:administrators group always implicitly have the a(administer) and by default also the l (lookup) permission on every ACLand can use the fs setacl command to grant other rights as necessary.
3. Issue the vos backup command to create a backup version of a read/writesource volume. The message shown confirms the success of the backupoperation.
% vos backup <volume name or ID>Created backup volume for volume name or ID
where
backupMust be typed in full.
volume name or IDIdentifies the read/write volume to back up, either by its completename or volume ID number. The backup volume has the samename with the addition of the .backup extension. It has its ownvolume ID number.
166 AFS: Administration Guide
4. (Optional) Issue the fs mkmount to mount the backup volume. While thisstep is optional, Cache Managers cannot access the volume’s contents if itis not mounted.
% fs mkmount <directory> <volume name>.backup
where
mk Is the shortest acceptable abbreviation of mkmount.
directoryNames the mount point to create. Do not create a file or directoryof the same name beforehand. Partial pathnames are interpretedrelative to the current working directory. For the backup version ofa user volume, the conventional location is the user’s homedirectory.
volume name.backupIs the full name of the backup volume.
5. (Optional) Issue the fs lsmount command to verify that the mount pointrefers to the correct volume. Complete instructions appear in “To display amount point” on page 172.
% fs lsmount <directory>
To create multiple backup volumes at once1. Verify that you are listed in the /usr/afs/etc/UserList file. If necessary, issue
the bos listusers command, which is fully described in “To display theusers in the UserList file” on page 582.
% bos listusers <machine name>
2. Issue the vos backupsys command to create a backup version of everyread/write volume that shares the same prefix or site. The effects ofcombining the three arguments are described in “Backing Up MultipleVolumes at Once” on page 163.
% vos backupsys [-prefix <common prefix on volume(s)>+] \[-server <machine name>] [-partition <partition name>] \[-exclude] [-xprefix <negative prefix on volume(s)>+][-dryrun] [-verbose]
where
backupsIs the shortest acceptable abbreviation of backupsys.
-prefix Specifies one or more simple character strings or regular
Chapter 5. Managing Volumes 167
expressions of any length; a volume whose name includes thestring is placed on the list of volumes to be cloned. Include fieldseparators (such as periods) if appropriate. This argument can becombined with any combination of the -server, -partition,-exclude, and -xprefix options.
-serverSpecifies the file server machine housing the volumes to backup.Can be combined with any combination of the -prefix, -partition,-exclude, and -xprefix options.
-partitionSpecifies the partition housing the volumes you wish to backup.Can be combined with any combination of the -prefix, -server,-exclude, and -xprefix options.
-excludeIndicates that all volumes except those indicated with the -prefixargument are to be backed up. The -prefix argument must beprovided along with this one. Can also be combined with anycombination of the -prefix, -server, and -partition arguments; orwith both the -prefix and -xprefix arguments, but not with the-xprefix argument alone.
-xprefixSpecifies one or more simple character strings or regularexpressions of any length; a volume whose name does not includethe string is placed on the list of volumes to be cloned. Can becombined with any combination of the -prefix, -server, and-partition arguments; in addition, it can be combined with boththe -prefix and -exclude options, but not with the -exclude flagalone.
-dryrunDisplays on the standard output stream a list of the volumes to becloned, without actually cloning them.
-verboseDisplays on the standard output stream a statement thatsummarizes the criteria being used to select volumes, if combinedwith the -dryrun flag; otherwise, traces the cloning operation foreach volume.
168 AFS: Administration Guide

Mounting Volumes
Mount points make the contents of AFS volumes visible and accessible in theAFS filespace, as described in “About Mounting Volumes” on page 151. Thissection discusses in more detail how the Cache Manager handles mountpoints as it traverses the filespace. It describes the three types of mountpoints, their purposes, and how to distinguish between them, and providesinstructions for creating, removing, and examining mount points.
The Rules of Mount Point Traversal
The Cache Manager observes three basic rules as it traverses the AFS filespaceand encounters mount points:v Rule 1: Access Backup and Read-only Volumes When Specified
When the Cache Manager encounters a mount point that specifies a volumewith either a .readonly or a .backup extension, it accesses that type ofvolume only. If a mount point does not have either a .backup or .readonlyextension, the Cache Manager uses Rules 2 and 3.For example, the Cache Manager never accesses the read/write version of avolume if the mount point names the backup version. If the specifiedversion is inaccessible, the Cache Manager reports an error.
v Rule 2: Follow the Read-only Path When PossibleIf a mount point resides in a read-only volume and the volume that itreferences is replicated, the Cache Manager attempts to access a read-onlycopy of the volume; if the referenced volume is not replicated, the CacheManager accesses the read/write copy. The Cache Manager is thus said toprefer a read-only path through the filespace, accessing read-only volumeswhen they are available.The Cache Manager starts on the read-only path in the first place because italways accesses a read-only copy of the root.afs volume if it exists; thevolume is mounted at the root of a cell’s AFS filespace (named /afs byconvention). That is, if the root.afs volume is replicated, the Cache Managerattempts to access a read-only copy of it rather than the read/write copy.This rule then keeps the Cache Manager on a read-only path as long aseach successive volume is replicated. The implication is that both theroot.afs and root.cell volumes must be replicated for the Cache Manager toaccess replicated volumes mounted below them in the AFS filespace. Thevolumes are conventionally mounted at the /afs and /afs/cellnamedirectories, respectively.
v Rule 3: Once on a Read/write Path, Stay ThereIf a mount point resides in a read/write volume and the volume name doesnot have a .readonly or a .backup extension, the Cache Manager attemptsto access only the a read/write version of the volume. The access attempt
Chapter 5. Managing Volumes 169
fails with an error if the read/write version is inaccessible, even if aread-only version is accessible. In this situation the Cache Manager is saidto be on a read/write path and cannot switch back to the read-only pathunless mount point explicitly names a volume with a .readonly extension.(Cellular mount points are an important exception to this rule, as explainedin the following discussion.
The Three Types of Mount Points
AFS uses three types of mount points, each appropriate for a differentpurpose because of how the Cache Manager handles them.v When the Cache Manager crosses a regular mount point, it obeys all three of
the mount point traversal rules previously described.AFS performs best when the vast majority of mount points in the filespaceare regular, because the mount point traversal rules promote the mostefficient use of both replicated and nonreplicated volumes. Because thereare likely to be multiple read-only copies of a replicated volume, it makessense for the Cache Manager to access one of them rather than the singleread/write version, and the second rule leads it to do so. If a volume is notreplicated, the third rule means that the Cache Manager still accesses theread/write volume when that is the only type available. In other words, aregular mount point does not force the Cache Manager always to accessread-only volumes (it is explicitly not a ″read-only mount point″).To create a regular mount point, use the fs mkmount command asdescribed in “To create a regular or read/write mount point” on page 173.
Note: To enable the Cache Manager to access the read-only version of areplicated volume named by a regular mount point, all volumes thatare mounted above it in the pathname must also be replicated. Thatis the only way the Cache Manager can stay on a read-only path tothe target volume.
v When the Cache Manager crosses a read/write mount point, it attempts toaccess only the volume version named in the mount point. If the volumename is the base (read/write) form, without a .readonly or .backupextension, the Cache Manager accesses the read/write version of thevolume, even if it is replicated. In other words, the Cache Managerdisregards the second mount point traversal rule when crossing aread/write mount point: it switches to the read/write path through thefilespace.It is conventional to create only one read/write mount point in a cell’sfilespace, using it to mount the cell’s root.cell volume just below the AFSfilespace root (by convention, /afs/.cellname). As indicated, it is conventionalto place a period at the start of the read/write mount point’s name (forexample, /afs/.abc.com). The period distinguishes the read/write mountpoint from the regular mount point for the root.cell volume at the same
170 AFS: Administration Guide
level. This is the only case in which it is conventional to create two mountpoints for the same volume. A desirable side effect of this namingconvention for this read/write mount point is that it does not appear in theoutput of the UNIX ls command unless the -a flag is included, essentiallyhiding it from regular users who have no use for it.The existence of a single read/write mount point at this point in thefilespace provides access to the read/write version of every volume whennecessary, because it puts the Cache Manager on a read/write path right atthe top of the filespace. At the same time, the regular mount point for theroot.cell volume puts the Cache Manager on a read-only path most of thetime.Using a read/write mount point for a read-only or backup volume isacceptable, but unnecessary. The first rule of mount point traversal alreadyspecifies that the Cache Manager accesses them if the volume name in aregular mount point has a .readonly or .backup extension.To create a read/write mount point, use the -rw flag on the fs mkmountcommand as described in “To create a regular or read/write mount point”on page 173.
v When the Cache Manager crosses a cellular mount point, it accesses theindicated volume in the specified cell, which is normally a foreign cell. (Ifthe mount point does not name a cell along with the volume, the CacheManager accesses the volume in the cell where the mount point resides.)When crossing a regular cellular mount point, the Cache Managerdisregards the third mount point traversal rule. Instead, it accesses aread-only version of the volume if it is replicated, even if the volume thathouses the mount point is read/write.It is inappropriate to circumvent this behavior by creating a read/writecellular mount point, because traversing the read/write path imposes anunfair load on the foreign cell’s file server machines. The File Server mustissue a callback for each file fetched from the read/write volume, ratherthan single callback required for a read-only volume. In any case, only acell’s own administrators generally need to access the read/write versionsof replicated volumes.It is conventional to create cellular mount points only at the second level ina cell’s filespace, using them to mount foreign cells’ root.cell volumes justbelow the AFS filespace root (by convention, at /afs/foreign_cellname). Themount point enables local users to access the foreign cell’s filespace,assuming they have the necessary permissions on the ACL of the volume’sroot directory and that there is an entry for the foreign cell in each localclient machine’s /usr/vice/etc/CellServDB file, as described in “MaintainingKnowledge of Database Server Machines” on page 402.Creating cellular mount points at other levels in the filespace and mountingforeign volumes other than the root.cell volume is not generally
Chapter 5. Managing Volumes 171
appropriate. It can be confusing to users if the Cache Manager switchesbetween cells at various points in a pathname.To create a regular cellular mount point, use the -cell argument to specifythe cell name, as described in “To create a cellular mount point” onpage 174.
To examine a mount point, use the fs lsmount command as described in “Todisplay a mount point”. The command’s output uses distinct notation toidentify regular, read/write, and cellular mount points. To remove a mountpoint, use the fs rmmount command as described in “To remove a mountpoint” on page 176.
Creating a mount point in a foreign cell
Creating a mount point in a foreign cell’s filespace (as opposed to mounting aforeign volume in the local cell) is basically the same as creating a mountpoint in the local filespace. The differences are that the fs mkmountcommand’s directory argument specifies a pathname in the foreign cell ratherthan the local cell, and you must have the required permissions on the ACL ofthe foreign directory where you are creating the mount point. The fsmkmount command’s -cell argument always specifies the cell in which thevolume resides, not the cell in which to create the mount point.
To display a mount point1. Issue the fs lsmount command.
% fs lsmount <directory>
where
ls Is the shortest acceptable abbreviation of lsmount.
directoryNames the mount point to display.
If the specified directory is a mount point, the output is of the following form:'directory' is a mount point for volume 'volume name'
For a regular mount point, a number sign (#) precedes the volume name string,as in the following example command issued on a client machine in theabc.com cell.
% fs lsmount /afs/abc.com/usr/terry'/afs/abc.com/usr/terry' is a mount point for volume '#user.terry'
172 AFS: Administration Guide

For a read/write mount point, a percent sign (%) precedes the volume namestring, as in the following example command issued on a client machine inthe abc.com cell. The cell’s administrators have followed the convention ofpreceding the read/write mount point’s name with a period.
% fs lsmount /afs/.abc.com'/afs/.abc.com' is a mount point for volume '%root.cell'
For a cellular mount point, a cell name and colon (:) follow the number orpercent sign and precede the volume name string, as in the following examplecommand issued on a client machine in the abc.com cell.
% fs lsmount /afs/ghi.gov'/afs/ghi.gov' is a mount point for volume '#ghi.gov:root.cell'
For a symbolic link to a mount point, the output is of the form shown in thefollowing example command issued on a client machine in the abc.com cell.
% fs lsmount /afs/abc'/afs/abc' is a symbolic link, leading to a mount point for volume '#root.cell'
If the directory is not a mount point or is not in AFS, the output reads asfollows.
'directory' is not a mount point.
If the output is garbled, it is possible that the mount point has becomecorrupted in the local cache. Use the fs flushmount command as described in“To flush one or more mount points” on page 413. This forces the CacheManager to refetch the mount point.
To create a regular or read/write mount point1. Verify that you have the i (insert) and a (administer) permissions on the
ACL of the directory where you are placing the mount point. If necessary,issue the fs listacl command, which is fully described in “DisplayingACLs” on page 566.
% fs listacl [<dir/file path>]
2. Issue the fs mkmount command to create the mount point. Include the-rw flag if creating a read/write mount point.
% fs mkmount <directory> <volume name> [-rw]
Chapter 5. Managing Volumes 173

where
mk Is the shortest acceptable abbreviation for mkmount.
directoryNames the mount point to create. A file or directory with the samename cannot already exist. A partial pathname is interpretedrelative to the current working directory.
Specify the read/write path to the mount point, to avoid thefailure that results when you attempt to create a new mount pointin a read-only volume. By convention, you indicate the read/writepath by placing a period before the cell name at the pathname’ssecond level (for example, /afs/.abc.com). For further discussion ofthe concept of read/write and read-only paths through thefilespace, see “The Rules of Mount Point Traversal” on page 169.
volume nameSpecifies the volume’s full name, including the .backup or.readonly extension for a backup or read-only volume, ifappropriate.
-rw Creates a read/write mount point.
To create a cellular mount point1. Verify that you have the i (insert) and a (administer) permissions on the
ACL of the directory where you are placing the mount point. If necessary,issue the fs listacl command, which is fully described in “DisplayingACLs” on page 566.
% fs listacl [<dir/file path>]
2. If you are mounting one or more foreign cells’ root.cell volume at thesecond level in your filespace and your cell’s root.afs volume is replicated,you must create a temporary mount point for the root.afs volume’sread/write version in a directory on which the ACL grants you the i and apermissions. The following command creates a mount point callednew_cells in your cell’s /afs/.cellname directory (the entry point to theread/write path in your cell).Substitute your cell’s name for cellname.
% cd /afs/.cellname
% fs mkmount new_cells root.afs
% cd new_cells
3. Issue the fs mkmount command with the -cell argument to create acellular mount point. Repeat the command for each cellular mount pointas required.
174 AFS: Administration Guide
% fs mkmount <directory> <volume name> -cell <cell name>
where
mk Is the shortest acceptable abbreviation for mkmount.
directoryNames the mount point to create. A file or directory with the samename cannot already exist. A partial pathname is interpretedrelative to the current working directory. If you are mounting aforeign cell’s root.cell volume, the standard value for thisargument is the cell’s complete Internet domain name.
volume nameSpecifies the volume’s full name, usually root.cell for a cellularmount point.
-cell Specifies the complete Internet domain name of the cell in whichthe volume resides.
4. If you performed the instructions in Step 2 on page 174, issue the vosrelease command to release the new version of the root.afs volume to itsread-only sites. (This command requires that you be listed in your cell’s/usr/afs/etc/UserList file. If necessary, verify by issuing the bos listuserscommand, which is fully described in “To display the users in the UserListfile” on page 582.)Also issue the fs checkvolumes command to force the local CacheManager to access the new replica of the root.afs volume. If desired, youcan also remove the temporary new_cells mount point from the/afs/.cellname directory.
% vos release root.afs
% fs checkvolumes
% cd /afs/.cellname
% fs rmmount new_cells
For your users to access a newly mounted foreign cell, you must alsocreate an entry for it in each client machine’s local/usr/vice/etc/CellServDB file and either reboot the machine or use the fsnewcell command to insert the entry directly into its kernel memory. Seethe instructions in “Maintaining Knowledge of Database Server Machines”on page 402.
Chapter 5. Managing Volumes 175
To remove a mount point1. Verify that you have the d (delete) permission on the ACL of the directory
from which you are removing the mount point. If necessary, issue the fslistacl command, which is fully described in “Displaying ACLs” onpage 566.
% fs listacl [<dir/file path>]
Members of the system:administrators group always implicitly have the a(administer) and by default also the l (lookup) permission on every ACLand can use the fs setacl command to grant other rights as necessary.
2. Issue the fs rmmount command to remove the mount point. The volumestill exists, but its contents are inaccessible if this is the only mount pointfor it.
% fs rmmount <directory>
where
rm Is the shortest acceptable abbreviation of rmmount.
directoryNames the mount point to remove. A partial pathname isinterpreted relative to the current working directory.
Specify the read/write path to the mount point, to avoid thefailure that results when you attempt to delete a mount point froma read-only volume. By convention, you indicate the read/writepath by placing a period before the cell name at the pathname’ssecond level (for example, /afs/.abc.com). For further discussion ofthe concept of read/write and read-only paths through thefilespace, see “The Rules of Mount Point Traversal” on page 169.
Displaying Information About Volumes
This section explains how to display information about volumes. If you knowa volume’s name or volume ID number, there are commands for displaying itsVLDB entry, its volume header, or both. Other commands display the name orlocation of the volume that contains a specified file or directory.
For instructions on displaying a volume’s quota, see “Setting and DisplayingVolume Quota and Current Size” on page 198.
176 AFS: Administration Guide
Displaying VLDB Entries
The vos listvldb command displays the VLDB entry for the volumesindicated by the combination of arguments you provide. The possibilities arelisted here from most to least inclusive:v To display every entry in the VLDB, provide no arguments. It can take a
long time to generate the output, depending on the number of entries.v To display every VLDB entry that mentions a specific file server machine as
the site of a volume, specify the machine’s name with the -server argument.v To display every VLDB entry that mentions a certain partition on any file
server machine as the site of a volume, specify the partition name with the-partition argument.
v To display every VLDB entry that mentions a certain partition on a certainfile server machine as the site of a volume, combine the -server and-partition arguments.
v To display a single VLDB entry, specify a volume name or ID number withthe -name argument.
v To display the VLDB entry only for volumes with locked VLDB entries, usethe -locked flag with any of the site definitions mentioned previously.
To display VLDB entries1. Issue the vos listvldb command.
% vos listvldb [-name <volume name or ID>] [-server <machine name>] \[-partition <partition name>] [-locked]
where
listvl Is the shortest acceptable abbreviation of listvldb.
-name Identifies one volume either by its complete name or volume IDnumber. Do not combine this argument with the -server or-partition arguments.
-serverSpecifies a file server machine. Combine this argument with the-partition argument if desired, but not with the -name argument.
-partitionSpecifies a partition. Combine this argument with the -serverargument if desired, but not with the -name argument.
-lockedDisplays only locked VLDB entries. Combine this flag with any ofthe other options.
Chapter 5. Managing Volumes 177
The VLDB entry for each volume includes the following information:v The base (read/write) volume name. The read-only and backup versions
have the same name with a .readonly and .backup extension, respectively.v The volume ID numbers allocated to the versions of the volume that
actually exist, in fields labeled RWrite for the read/write, ROnly for theread-only, Backup for the backup, and RClone for the ReleaseClone. (If afield does not appear, the corresponding version of the volume does notexist.) The appearance of the RClone field normally indicates that a releaseoperation did not complete successfully; the Old release and New releaseflags often also appear on one or more of the site definition lines describedjust following.
v The number of sites that house a read/write or read-only copy of thevolume, following the string number of sites ->.
v A line for each site that houses a read/write or read-only copy of thevolume, specifying the file server machine, partition, and type of volume(RW for read/write or RO for read-only). If a backup version exists, it isunderstood to share the read/write site. Several flags can appear with a sitedefinition:
Not releasedIndicates that the vos release command has not been issued sincethe vos addsite command was used to define the read-only site.
Old releaseIndicates that a vos release command did not complete successfully,leaving the previous, obsolete version of the volume at this site.
New releaseIndicates that a vos release command did not complete successfully,but that this site did receive the correct new version of the volume.
v If the VLDB entry is locked, the string Volume is currently LOCKED.
For further discussion of the New release and Old release flags, see“Replicating Volumes (Creating Read-only Volumes)” on page 157.
An example of this command and its output for a single volume:
% vos listvldb user.terryuser.terry
RWrite: 50489902 Backup: 50489904number of sites -> 1
server fs3.abc.com partition /vicepc RW Site
178 AFS: Administration Guide

Displaying Volume Headers
The vos listvol command displays the volume header for every volume onone or all partitions on a file server machine. The vos command interpreterobtains the information from the Volume Server on the specified machine. Youcan control the amount of information displayed by including one of the -fast,the -long, or the -extended flags described following the instructions in “Todisplay volume headers”.
To display a single volume’s volume header of one volume only, use the vosexamine command as described in “Displaying One Volume’s VLDB Entryand Volume Header” on page 183.
To display volume headers1. Issue the vos listvol command.
% vos listvol <machine name> [<partition name>] [-fast] [-long] [-extended]
where
listvo Is the shortest acceptable abbreviation of listvol.
machine nameNames the file server machine for which to display volumeheaders. Provide this argument alone or with the partition nameargument.
partition nameNames one partition on the file server machine named by themachine name argument, which must be provided along with thisone.
-fast Displays only the volume ID numbers of relevant volumes. Do notcombine this flag with the -long or -extended flag.
-long Displays more detailed information about each volume. Do notcombine this flag with the -fast or -extended flag.
-extendedDisplays all of the information displayed by the -long flag, plustables of statistics about reads and writes to the files in thevolume. Do not combine this flag with the -fast or -long flag.
The output is ordered alphabetically by volume name and by default providesthe following information on a single line for each volume:v Namev Volume ID number
Chapter 5. Managing Volumes 179
v Type (the flag is RW for read/write, RO for read-only, BK for backup)v Size in kilobytes (1024 equals a megabyte)v Number of files in the volume, if the -extended flag is providedv Status on the file server machine, which is one of the following:
On-lineThe volume is completely accessible to Cache Managers.
Off-lineThe volume is not accessible to Cache Managers, but does not seemto be corrupted. This status appears while a volume is beingdumped, for example.
Off-line**needs salvage**The volume is not accessible to Cache Managers, because it seemsto be corrupted. Use the bos salvage or salvager command torepair the corruption.
If the following message appears instead of the previously listed information,it indicates that a volume is not accessible to Cache Managers or the voscommand interpreter, for example because a clone is being created.
**** Volume volume_ID is busy ****
If the following message appears instead of the previously listed information,it indicates that the File Server is unable to attach the volume, perhapsbecause it is seriously corrupted. The FileLog and VolserLog log files in the/usr/afs/logs directory on the file server machine possibly provide additionalinformation; use the bos getlog command to display them.
**** Could not attach volume volume_ID ****
(For instructions on salvaging a corrupted or unattached volume, see“Salvaging Volumes” on page 192.)
The information about individual volumes is bracketed by summary lines.The first line of output specifies the number of volumes in the listing. The lastline of output summarizes the number of volumes that are online, offline, andbusy, as in the following example:
% vos listvol fs2.abc.com /vicepbTotal number of volumes on server fs2.abc.com \
partition /vicepb : 66sys 1969534847 RW 1582 K On-linesys.backup 1969535105 BK 1582 K On-line
. . . . . .
. . . . . .
180 AFS: Administration Guide

user.pat 1969534536 RW 17518 K On-lineuser.pat.backup 1969534538 BK 17537 K On-lineTotal volumes onLine 66 ; Total volumes offLine 0 ; Total busy 0
Output with the -fast Flag
If you include the -fast flag displays only the volume ID number of eachvolume, arranged in increasing numerical order, as in the following example.The final line (which summarizes the number of on-line, off-line, and busyvolumes) is omitted.
% vos listvol fs3.abc.com /vicepa -fTotal number of volumes on server fs3.abc.com \
partition /vicepa: 375048990250489904
.
.3597032549732810
Output with the -long Flag
When you include the -long flag, , the output for each volume includes all ofthe information in the default listing plus the following. Each item in this listcorresponds to a separate line of output:v The file server machine and partition that house the volume, as determined
by the command interpreter as the command runs, rather than derivedfrom the VLDB or the volume header.
v The volume ID numbers associated with the various versions of thevolume: read/write (RWrite), read-only (ROnly), backup (Backup), andReleaseClone (RClone). One of them matches the volume ID number thatappears on the first line of the volume’s output. If the value in the RWrite,ROnly, or Backup field is 0 (zero), there is no volume of that type. If there iscurrently no ReleaseClone, the RClone field does not appear at all.
v The maximum space quota allotted to the read/write copy of the volume,expressed in kilobyte blocks in the MaxQuota field.
v The date and time the volume was created, in the Creation field. If thevolume has been restored with the backup diskrestore, backup volrestore,or vos restore command, this is the restore time.
v The date and time when the contents of the volume last changed, in theLast Update field. For read-only and backup volumes, it matches thetimestamp in the Creation field.
v The number of times the volume has been accessed for a fetch or storeoperation since the later of the two following times:
Chapter 5. Managing Volumes 181

– 12:00 a.m. on the day the command is issued– The last time the volume changed location
An example of the output when the -long flag is included:
% vos listvol fs2.abc.com b -longTotal number of volumes on server fs2.abc.com
partition /vicepb: 66. . . . . .. . . . . .
user.pat 1969534536 RW 17518 K On-linefs2.abc.com /vicepbRWrite 1969534536 ROnly 0 Backup 1969534538MaxQuota 20000 KCreation Mon Jun 12 09:02:25 1989Last Update Thu Jan 4 17:39:34 19901573 accesses in the past day (i.e., vnode references)
user.pat.backup 1969534538 BK 17537 K On-linefs2.abc.com /vicepbRWrite 1969534536 ROnly 0 Backup 1969534538MaxQuota 20000 KCreation Fri Jan 5 06:37:59 1990Last Update Fri Jan 5 06:37:59 19900 accesses in the past day (i.e., vnode references)
. . . . .
. . . . .Total volumes onLine 66 ; Total volumes offLine 0 ; Total busy 0
Output with the -extended Flag
When you include the -extended flag, the output for each volume includes allof the information reported with the -long flag, plus two tables of statistics:v The table labeled Raw Read/Write Stats table summarizes the number of
times the volume has been accessed for reading or writing.v The table labeled Writes Affecting Authorship table contains information
on writes made to files and directories in the specified volume.
An example of the output when the -extended flag is included:% vos listvol fs3.abc.com a -extendedcommon.bboards 1969535592 RW 23149 K used 9401 files On-line
fs3.abc.com /vicepaRWrite 1969535592 ROnly 0 Backup 1969535594MaxQuota 30000 KCreation Mon Mar 8 14:26:05 1999Last Update Mon Apr 26 09:20:43 199911533 accesses in the past day (i.e., vnode references)
Raw Read/Write Stats|-------------------------------------------|| Same Network | Diff Network |
182 AFS: Administration Guide
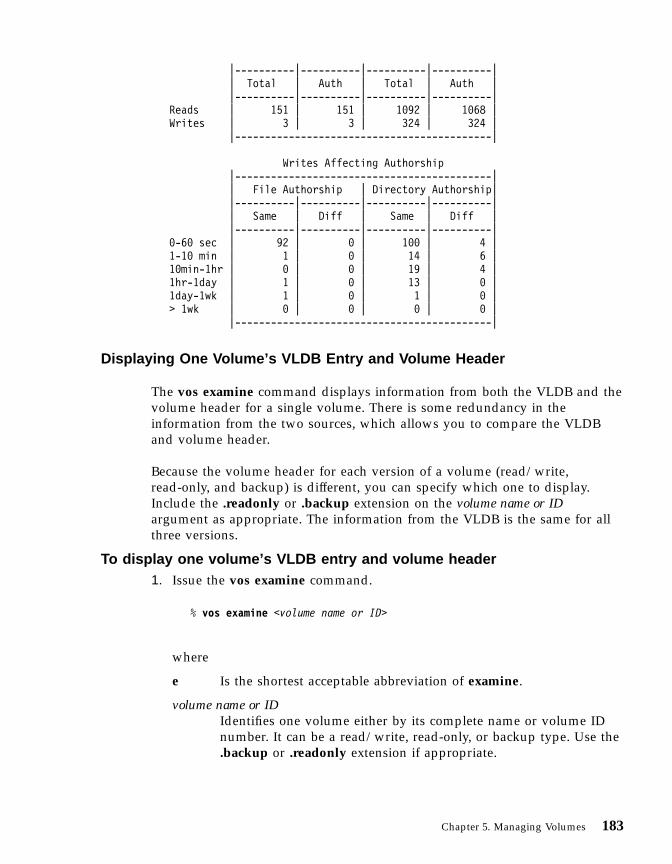
|----------|----------|----------|----------|| Total | Auth | Total | Auth ||----------|----------|----------|----------|
Reads | 151 | 151 | 1092 | 1068 |Writes | 3 | 3 | 324 | 324 |
|-------------------------------------------|
Writes Affecting Authorship|-------------------------------------------|| File Authorship | Directory Authorship||----------|----------|----------|----------|| Same | Diff | Same | Diff ||----------|----------|----------|----------|
0-60 sec | 92 | 0 | 100 | 4 |1-10 min | 1 | 0 | 14 | 6 |10min-1hr | 0 | 0 | 19 | 4 |1hr-1day | 1 | 0 | 13 | 0 |1day-1wk | 1 | 0 | 1 | 0 |> 1wk | 0 | 0 | 0 | 0 |
|-------------------------------------------|
Displaying One Volume’s VLDB Entry and Volume Header
The vos examine command displays information from both the VLDB and thevolume header for a single volume. There is some redundancy in theinformation from the two sources, which allows you to compare the VLDBand volume header.
Because the volume header for each version of a volume (read/write,read-only, and backup) is different, you can specify which one to display.Include the .readonly or .backup extension on the volume name or IDargument as appropriate. The information from the VLDB is the same for allthree versions.
To display one volume’s VLDB entry and volume header1. Issue the vos examine command.
% vos examine <volume name or ID>
where
e Is the shortest acceptable abbreviation of examine.
volume name or IDIdentifies one volume either by its complete name or volume IDnumber. It can be a read/write, read-only, or backup type. Use the.backup or .readonly extension if appropriate.
Chapter 5. Managing Volumes 183
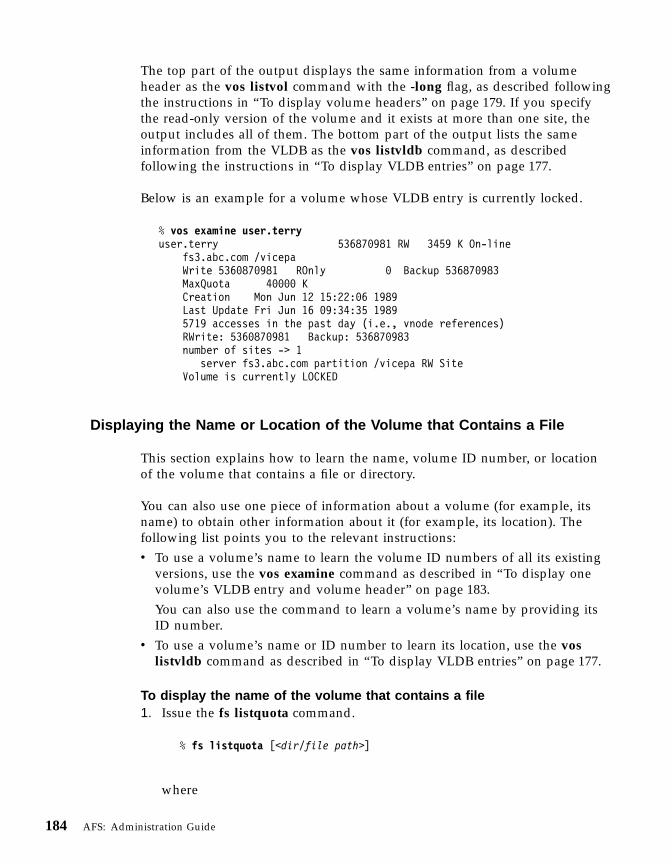
The top part of the output displays the same information from a volumeheader as the vos listvol command with the -long flag, as described followingthe instructions in “To display volume headers” on page 179. If you specifythe read-only version of the volume and it exists at more than one site, theoutput includes all of them. The bottom part of the output lists the sameinformation from the VLDB as the vos listvldb command, as describedfollowing the instructions in “To display VLDB entries” on page 177.
Below is an example for a volume whose VLDB entry is currently locked.
% vos examine user.terryuser.terry 536870981 RW 3459 K On-line
fs3.abc.com /vicepaWrite 5360870981 ROnly 0 Backup 536870983MaxQuota 40000 KCreation Mon Jun 12 15:22:06 1989Last Update Fri Jun 16 09:34:35 19895719 accesses in the past day (i.e., vnode references)RWrite: 5360870981 Backup: 536870983number of sites -> 1
server fs3.abc.com partition /vicepa RW SiteVolume is currently LOCKED
Displaying the Name or Location of the Volume that Contains a File
This section explains how to learn the name, volume ID number, or locationof the volume that contains a file or directory.
You can also use one piece of information about a volume (for example, itsname) to obtain other information about it (for example, its location). Thefollowing list points you to the relevant instructions:v To use a volume’s name to learn the volume ID numbers of all its existing
versions, use the vos examine command as described in “To display onevolume’s VLDB entry and volume header” on page 183.You can also use the command to learn a volume’s name by providing itsID number.
v To use a volume’s name or ID number to learn its location, use the voslistvldb command as described in “To display VLDB entries” on page 177.
To display the name of the volume that contains a file1. Issue the fs listquota command.
% fs listquota [<dir/file path>]
where
184 AFS: Administration Guide
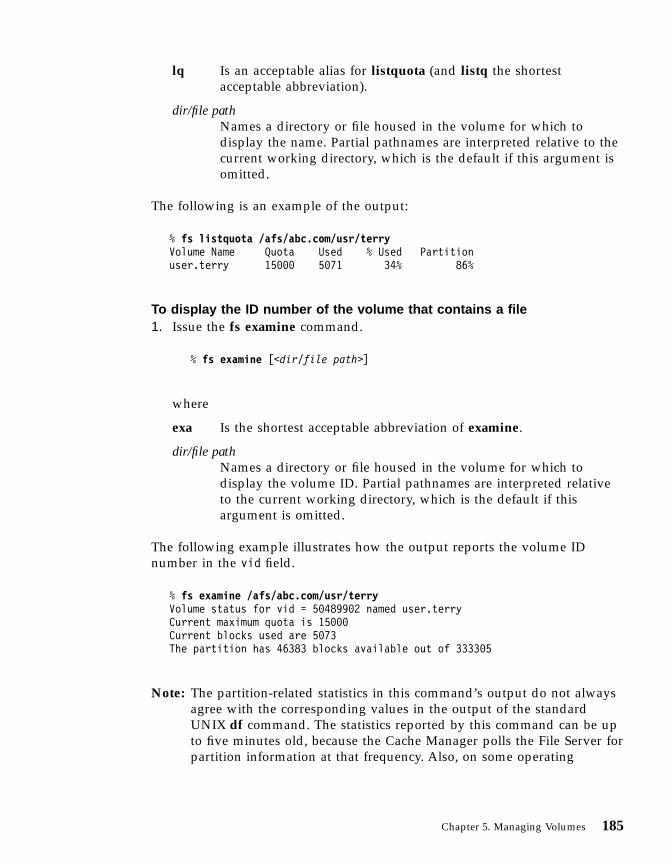
lq Is an acceptable alias for listquota (and listq the shortestacceptable abbreviation).
dir/file pathNames a directory or file housed in the volume for which todisplay the name. Partial pathnames are interpreted relative to thecurrent working directory, which is the default if this argument isomitted.
The following is an example of the output:
% fs listquota /afs/abc.com/usr/terryVolume Name Quota Used % Used Partitionuser.terry 15000 5071 34% 86%
To display the ID number of the volume that contains a file1. Issue the fs examine command.
% fs examine [<dir/file path>]
where
exa Is the shortest acceptable abbreviation of examine.
dir/file pathNames a directory or file housed in the volume for which todisplay the volume ID. Partial pathnames are interpreted relativeto the current working directory, which is the default if thisargument is omitted.
The following example illustrates how the output reports the volume IDnumber in the vid field.
% fs examine /afs/abc.com/usr/terryVolume status for vid = 50489902 named user.terryCurrent maximum quota is 15000Current blocks used are 5073The partition has 46383 blocks available out of 333305
Note: The partition-related statistics in this command’s output do not alwaysagree with the corresponding values in the output of the standardUNIX df command. The statistics reported by this command can be upto five minutes old, because the Cache Manager polls the File Server forpartition information at that frequency. Also, on some operating
Chapter 5. Managing Volumes 185
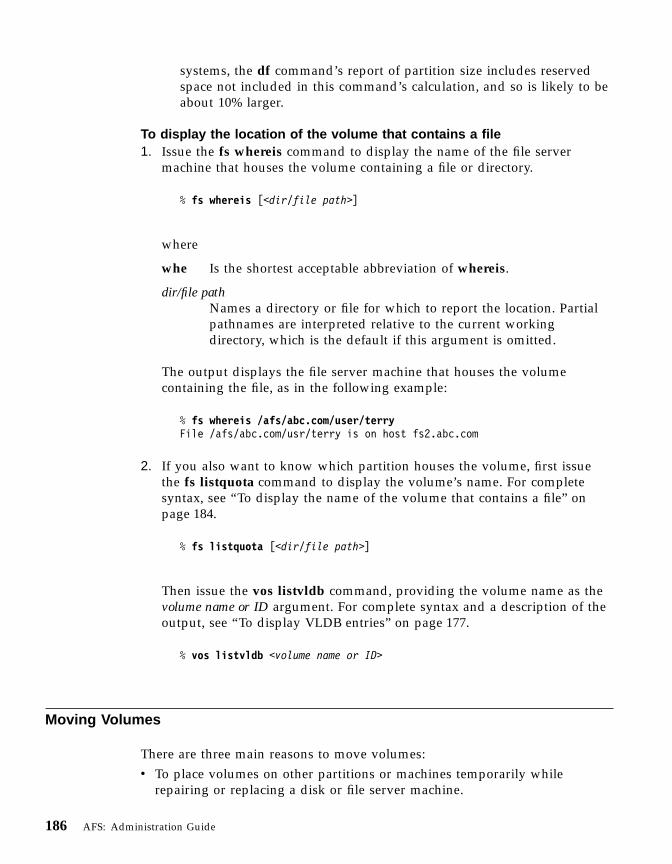
systems, the df command’s report of partition size includes reservedspace not included in this command’s calculation, and so is likely to beabout 10% larger.
To display the location of the volume that contains a file1. Issue the fs whereis command to display the name of the file server
machine that houses the volume containing a file or directory.
% fs whereis [<dir/file path>]
where
whe Is the shortest acceptable abbreviation of whereis.
dir/file pathNames a directory or file for which to report the location. Partialpathnames are interpreted relative to the current workingdirectory, which is the default if this argument is omitted.
The output displays the file server machine that houses the volumecontaining the file, as in the following example:
% fs whereis /afs/abc.com/user/terryFile /afs/abc.com/usr/terry is on host fs2.abc.com
2. If you also want to know which partition houses the volume, first issuethe fs listquota command to display the volume’s name. For completesyntax, see “To display the name of the volume that contains a file” onpage 184.
% fs listquota [<dir/file path>]
Then issue the vos listvldb command, providing the volume name as thevolume name or ID argument. For complete syntax and a description of theoutput, see “To display VLDB entries” on page 177.
% vos listvldb <volume name or ID>
Moving Volumes
There are three main reasons to move volumes:v To place volumes on other partitions or machines temporarily while
repairing or replacing a disk or file server machine.
186 AFS: Administration Guide

v To free space on a partition that is becoming overcrowded. One symptom ofovercrowding is that users cannot to save files even though the relevantvolume is below its quota. The following error message confirms theproblem:
afs: failed to store file (partition full)
You can track available space on AFS server partitions by using the scout orafsmonitor programs described in “Chapter 8. Monitoring and AuditingAFS Performance” on page 327.
v A file server machine is becoming overloaded because it houses many morevolumes than other machines of the same size, or has volumes with morepopular files in them.
To move a read/write volume, use the vos move command as described inthe following instructions. Before attempting to move the volume, the voscommand interpreter verifies that there is enough free space for it on thedestination partition. If not, it does not attempt the move operation and printsthe following message.
vos: no space on target partition destination_part to move volume volume
To move a read-only volume, you actually remove the volume from thecurrent site by issuing the vos remove command as described in “To remove avolume and unmount it” on page 203. Then define a new site and release thevolume to it by issuing the vos addsite and vos release commands asdescribed in “To replicate a read/write volume (create a read-only volume)”on page 161.
A backup volume always resides at the same site as its read/write sourcevolume, so you cannot move a backup volume except as part of moving theread/write source. The vos move command automatically deletes the backupversion when you move a read/write volume. To create a new backupvolume at the new site as soon as the move operation completes, issue thevos backup command as described in “To create and mount a backupvolume” on page 166.
To move a read/write volume1. Verify that you are listed in the /usr/afs/etc/UserList file. If necessary, issue
the bos listusers command, which is fully described in “To display theusers in the UserList file” on page 582.
% bos listusers <machine name>
Chapter 5. Managing Volumes 187
2. Issue the vos move command to move the volume. Type it on a singleline; it appears on multiple lines here only for legibility.
% vos move <volume name or ID> \<machine name on source> <partition name on source > \<machine name on destination> <partition name on destination>
where
m Is the shortest acceptable abbreviation of move.
volume name or IDSpecifies the name or volume ID number of the read/writevolume to move.
machine name on sourceNames the file server machine currently housing the volume.
partition name on sourceNames the partition currently housing the volume.
machine name on destinationNames the file server machine to which to move the volume.
partition name on destinationNames the partition to which to move the volume.
Note: It is best not to halt a vos move operation before it completes,because parts of the volume can be left on both the source anddestination machines. For more information, see the command’sreference page in the AFS Administration Reference.
3. (Optional) Issue the vos listvldb command to confirm the success of themove. Complete instructions appear in “To display VLDB entries” onpage 177.
% vos listvldb <volume name or ID>
4. If a backup version existed at the read/write volume’s previous site, createa new backup at the new site by issuing the vos backup command, whichis fully described in “To create and mount a backup volume” on page 166.
% vos backup <volume name or ID>
188 AFS: Administration Guide

Synchronizing the VLDB and Volume Headers
AFS can provide transparent file access because the Volume Location Database(VLDB) constantly tracks volume locations. When the Cache Manager needs afile, it contacts the Volume Location (VL) Server, which reads the VLDB forthe current location of the volume containing the file. Therefore, the VLDBmust accurately reflect the state of volumes on the file server machines at alltimes. The Volume Server and VL Server automatically update a volume’sVLDB entry when its status changes during a vos operation, by performingthe following series of steps.1. The VL Server locks the VLDB entry. The lock advises other operations not
to manipulate any of the volume versions (read/write, read-only, orbackup), which prevents the inconsistency that can result from multiplesimultaneous operations.
2. The VL Server sets an intention flag in the VLDB entry that indicates thekind of operation to be performed. This flag never appears in VLDBlistings because it is for internal use only. In case the operation terminatesprematurely, this flag tells the Salvager which operation was interrupted.(The Salvager then determines the steps necessary either to complete theoperation or return the volume to a previous consistent state. For moreinformation on salvaging, see “Salvaging Volumes” on page 192.)
3. The Volume Server manipulates the volume. It usually sets the Off-lineflag in the volume header, which makes the volume inaccessible to the FileServer and other Volume Server operations during the manipulation.When the operation completes, the volume is again marked On-line.
4. The VL Server records any changes resulting from the operation in theVLDB entry. Once the operation is complete, it removes the intention flagset in Step 2 and releases the lock set in Step 1.
If a vos operation fails while the Volume Server is manipulating the volume(corresponding to Step 3), the volume can be left in an intermediate state,which is termed corruption. In this case, the Off-line or Off-line**needssalvage** marker usually appears at the end of the first line of output fromthe vos examine command. To repair the corruption, run the Salvager beforeattempting to resynchronize the VLDB and volume headers. For salvaginginstructions, see “Salvaging Volumes” on page 192.
More commonly, an interruption while flags are being set or removed(corresponding to Step 1, Step 2, or Step 4) causes a discrepancy between theVLDB and volume headers. To resynchronize the VLDB and volumes, use thevos syncvldb and vos syncserv commands. To achieve complete VLDBconsistency, it is best to run the vos syncvldb command on all file servermachines in the cell, and then run the vos syncserv command on all fileserver machines in the cell.
Chapter 5. Managing Volumes 189
There are several symptoms that indicate a volume operation failed:v Error messages on the standard error stream or in server process log files
indicate that an operation terminated abnormally. Perhaps you had to haltthe operation before it completed (for instance, by using a signal such asCtrl-c), or a file server machine or server process was not functioning whenthe operation ran. To determine if a machine or process is still notfunctioning, issue the bos status command as described in “DisplayingProcess Status and Information from the BosConfig File” on page 131.
v A subsequent vos operation fails because a previous failure left a VLDBentry locked. Sometimes an error message reports that a volume is locked.To display a list of locked volumes, use the -locked flag on the vos listvldbcommand as described in “Displaying VLDB Entries” on page 177.If the only problem with a volume is that its VLDB entry is locked, youprobably do not need to synchronize the entire VLDB. Instead use the vosunlock or vos unlockvldb command to unlock the entry, as described in“Unlocking and Locking VLDB Entries” on page 214.
v A subsequent vos operation fails because a previous failure left a volumemarked as offline. To check a volume’s current status, check the first line ofoutput from the vos examine command as described in “Displaying OneVolume’s VLDB Entry and Volume Header” on page 183.
The vos syncvldb command corrects the information in the Volume LocationDatabase (VLDB) either about all volumes housed on a file server machine,about the volumes on just one partition, or about a single volume. If checkingabout one or more partitions, the command contacts the Volume Server toobtain a list of the volumes that actually reside on each partition. It thenobtains the VLDB entry for each volume from the VL Server. It changes theVLDB entry as necessary to reflect the state of the volume on the partition.For example, it creates or updates a VLDB entry when it finds a volume forwhich the VLDB entry is missing or incomplete. However, if there is already aVLDB entry that defines a different location for the volume, or there areirreconcilable conflicts with other VLDB entries, it instead writes a messageabout the conflict to the standard error stream. The command never removesvolumes from the file server machine.
When checking a single volume’s VLDB entry, the command alsoautomatically performs the operations invoked by the vos syncserv command:it not only verifies that the VLDB entry is correct for the specified volumetype (read/write, backup, or read-only), but also checks that any relatedvolume types mentioned in the VLDB entry actually exist at the site listed inthe entry.
The vos syncserv command verifies that each volume type (read/write,read-only, and backup) mentioned in a VLDB entry actually exists at the siteindicated in the entry. It checks all VLDB entries that mention a site either on
190 AFS: Administration Guide

any of a file server machine’s partitions or on one partition. Note thatcommand can end up inspecting sites other than on the specified machine orpartition, if there are read-only versions of the volume at sites other than theread/write site.
The command alters any incorrect information in the VLDB, unless there is anirreconcilable conflict with other VLDB entries. In that case, it writes amessage to the standard error stream instead. The command never removesvolumes from their sites.
To synchronize the VLDB with volume headers1. Verify that you are listed in the /usr/afs/etc/UserList file. If necessary, issue
the bos listusers command, which is fully described in “To display theusers in the UserList file” on page 582.
% bos listusers <machine name>
2. Issue the vos syncvldb command to make the VLDB reflect the true stateof all volumes on a machine or partition, or the state of one volume.
Note: To synchronize the VLDB completely, issue the commandrepeatedly, substituting each file server machine in your cell for the-server argument in turn and omitting the -partition and -volumearguments, before proceeding to Step 3 on page 192.
% vos syncvldb -server <machine name> [-partition <partition name>] [-volume <volume name or ID>] [-ver
where
syncv Is the shortest acceptable abbreviation of syncvldb.
-serverNames the file server machine housing the volumes for which toverify VLDB entries. If you are also providing the -volumeargument, this argument must name the machine where thevolume actually resides.
-partitionIdentifies the partition (on the file server machine specified by the-server argument) housing the volumes for which to verify VLDBentries. In general, it is best to omit this argument so that eitherthe VLDB entries for all volumes on a server machine arecorrected (if you do not provide the -volume argument), or so thatyou do not need to guarantee that the partition actually houses thevolume named by the -volume argument.
-volumeSpecifies the name or volume ID number of a single volume forwhich to verify the VLDB entry.
Chapter 5. Managing Volumes 191
-verbose >> fileDirects a detailed trace to the file called file, which can be either inAFS or on the local disk of the machine on which you are issuingthe command. The command often writes a large amount ofoutput to the standard output stream; writing it to a file enablesyou to examine the output more carefully.
3. Issue the vos syncserv command to inspect each volume for which theVLDB lists a version at the specified site.
Note: To synchronize the VLDB completely, issue the commandrepeatedly, substituting each file server machine in your cell for themachine name argument in turn and omitting the partition nameargument.
% vos syncserv <machine name> [<partition name>] [-v >> file]
where
syncs Is the shortest acceptable abbreviation of syncserv.
machine nameNames the file server machine mentioned in each VLDB entry tocheck.
partition nameIdentifies the partition mentioned in each VLDB entry to check. Ifsynchronizing the entire VLDB, omit this argument.
-v >> fileDirects a detailed trace to the file called file, which can be either inAFS or on the local disk of the machine on which you are issuingthe command. The command often writes a large amount ofoutput to the standard output stream; writing it to a file enablesyou to examine the output more carefully.
Salvaging Volumes
An unexpected interruption while the Volume Server or File Server ismanipulating the data in a volume can leave the volume in an intermediatestate (corrupted), rather than just creating a discrepancy between theinformation in the VLDB and volume headers. For example, the failure of theoperation that saves changes to a file (by overwriting old data with new) canleave the old and new data mixed together on the disk.
If an operation halts because the Volume Server or File Server exitsunexpectedly, the BOS Server automatically shuts down all components of thefs process and invokes the Salvager. The Salvager checks for and repairs any
192 AFS: Administration Guide
inconsistencies it can. Sometimes, however, there are symptoms of thefollowing sort, which indicate corruption serious enough to create problemsbut not serious enough to cause the File Server component to fail. In thesecases you can invoke the Salvager yourself by issuing the bos salvagecommand.v Symptom: A file appears in the output of the ls command, but attempts to
access the file fail with messages indicating that it does not exist.Possible cause: The Volume Server or File Server exited in the middle of afile-creation operation, after changing the directory structure, but beforeactually storing data. (Other possible causes are that the ACL on thedirectory does not grant the permissions you need to access the file, orthere is a process, machine, or network outage. Check for these causesbefore assuming the file is corrupted.)Salvager’s solution: Remove the file’s entry from the directory structure.
v Symptom: A volume is marked Off-line in the output from the vosexamine and vos listvol commands, or attempts to access the volume fail.Possible cause: Two files or versions of a file are sharing the same diskblocks because of an interrupted operation. The File Server and VolumeServer normally refuse to attach volumes that exhibit this type ofcorruption, because it can be very dangerous. If the Volume Server or FileServer do attach the volume but are unsure of the status of the affected diskblocks, they sometimes try to write yet more data there. When they cannotperform the write, the data is lost. This effect can cascade, causing loss ofall data on a partition.Salvager’s solution: Delete the data from the corrupted disk blocks inpreference to losing an entire partition.
v Symptom: There is less space available on the partition than you expectbased on the size statistic reported for each volume by the vos listvolcommand.Possible cause: There are orphaned files and directories. An orphanedelement is completely inaccessible because it is not referenced by anydirectory that can act as its parent (is higher in the file tree). An orphanedelement is not counted in the calculation of a volume’s size (or against itsquota), even though it occupies space on the server partition.Salvager’s solution: By default, print a message to the/usr/afs/logs/SalvageLog file reporting how many orphans were found andthe approximate number of kilobytes they are consuming. You can use the-orphans argument to remove or attach orphaned elements instead. See “Tosalvage volumes” on page 195.
When you notice symptoms such as these, use the bos salvage command toinvoke the Salvager before corruption spreads. (Even though it operates onvolumes, the command belongs to the bos suite because the BOS Server mustcoordinate the shutdown and restart of the Volume Server and File Server
Chapter 5. Managing Volumes 193

with the Salvager. It shuts them down before the Salvager starts, andautomatically restarts them when the salvage operation finishes.)
All of the AFS data stored on a file server machine is inaccessible during thesalvage of one or more partitions. If you salvage just one volume, it alone isinaccessible.
When processing one or more partitions, the command restores consistency tocorrupted read/write volumes where possible. For read-only or backupvolumes, it inspects only the volume header:v If the volume header is corrupted, the Salvager removes the volume
completely and records the removal in its log file, /usr/afs/logs/SalvageLog.Issue the vos release or vos backup command to create the read-only orbackup volume again.
v If the volume header is intact, the Salvager skips the volume (does notcheck for corruption in the contents). However, if the File Server noticescorruption as it initializes, it sometimes refuses to attach the volume orbring it online. In this case, it is simplest to remove the volume by issuingthe vos remove or vos zap command. Then issue the vos release or vosbackup command to create it again.
Combine the bos salvage command’s arguments as indicated to salvagedifferent numbers of volumes:v To salvage all volumes on a file server machine, combine the -server
argument and the -all flag.v To salvage all volumes on one partition, combine the -server and -partition
arguments.v To salvage only one read/write volume, combine the -server, -partition,
and -volume arguments. Only that volume is inaccessible to CacheManagers, because the BOS Server does not shutdown the File Server andVolume Server processes during the salvage of a single volume. Do notname a read-only or backup volume with the -volume argument. Instead,remove the volume, using the vos remove or vos zap command. Thencreate a new copy of the volume with the vos release or vos backupcommand.
The Salvager always writes a trace to the /usr/afs/logs/SalvageLog file on thefile server machine where it runs. To record the trace in another file as well(either in AFS or on the local disk of the machine where you issue the bossalvage command), name the file with the -file argument. Or, to display thetrace on the standard output stream as it is written to the/usr/afs/logs/SalvageLog file, include the -showlog flag.
By default, multiple Salvager subprocesses run in parallel: one for eachpartition up to four, and four subprocesses for four or more partitions. To
194 AFS: Administration Guide
increase or decrease the number of subprocesses running in parallel, provide apositive integer value for the -parallel argument.
If there is more than one server partition on a physical disk, the Salvager bydefault salvages them serially to avoid the inefficiency of constantly movingthe disk head from one partition to another. However, this strategy is oftennot ideal if the partitions are configured as logical volumes that span multipledisks. To force the Salvager to salvage logical volumes in parallel, provide thestring all as the value for the -parallel argument. Provide a positive integer tospecify the number of subprocesses to run in parallel (for example, -parallel5all for five subprocesses), or omit the integer to run up to four subprocesses,depending on the number of logical volumes being salvaged.
The Salvager creates temporary files as it runs, by default writing them to thepartition it is salvaging. The number of files can be quite large, and if thepartition is too full to accommodate them, the Salvager terminates withoutcompleting the salvage operation (it always removes the temporary filesbefore exiting). Other Salvager subprocesses running at the same timecontinue until they finish salvaging all other partitions where there is enoughdisk space for temporary files. To complete the interrupted salvage, reissuethe command against the appropriate partitions, adding the -tmpdir argumentto redirect the temporary files to a local disk directory that has enough space.
The -orphans argument controls how the Salvager handles orphaned files anddirectories that it finds on server partitions it is salvaging. An orphanedelement is completely inaccessible because it is not referenced by the vnode ofany directory that can act as its parent (is higher in the filespace). Orphanedobjects occupy space on the server partition, but do not count against thevolume’s quota.
During the salvage, the output of the bos status command reports thefollowing auxiliary status for the fs process:
Salvaging file system
To salvage volumes1. Verify that you are listed in the /usr/afs/etc/UserList file. If necessary, issue
the bos listusers command, which is fully described in “To display theusers in the UserList file” on page 582.
% bos listusers <machine name>
2. Issue the bos salvage command to salvage one or more volumes.
% bos salvage -server <machine name> [-partition <salvage partition>] \[-volume <salvage volume number or volume name>] \[-file salvage log output file] [-all] [-showlog] \
Chapter 5. Managing Volumes 195

[-parallel <# of max parallel partition salvaging>] \[-tmpdir <directory to place tmp files>] \[-orphans <ignore | remove | attach>]
where
-serverNames the file server machine on which to salvage volumes. Thisargument can be combined either with the -all flag, the -partitionargument, or both the -partition and -volume arguments.
-partitionNames a single partition on which to salvage all volumes. The-server argument must be provided along with this one.
-volumeSpecifies the name or volume ID number of one read/writevolume to salvage. Combine this argument with the -server and-partition arguments.
-file Specifies the complete pathname of a file into which to write atrace of the salvage operation, in addition to the/usr/afs/logs/SalvageLog file on the server machine. If the filepathname is local, the trace is written to the specified file on thelocal disk of the machine where the bos salvage command isissued. If the -volume argument is included, the file can be in AFS,though not in the volume being salvaged. Do not combine thisargument with the -showlog flag.
-all Salvages all volumes on all of the partitions on the machinenamed by the -server argument.
-showlogDisplays the trace of the salvage operation on the standard outputstream, as well as writing it to the /usr/afs/logs/SalvageLog file.
-parallelSpecifies the maximum number of Salvager subprocesses to run inparallel. Provide one of three values:v An integer from the range 1 to 32. A value of 1 means that a
single Salvager process salvages the partitions sequentially.v The string all to run up to four Salvager subprocesses in parallel
on partitions formatted as logical volumes that span multiplephysical disks. Use this value only with such logical volumes.
v The string all followed immediately (with no intervening space)by an integer from the range 1 to 32, to run the specified
196 AFS: Administration Guide
number of Salvager subprocesses in parallel on partitionsformatted as logical volumes. Use this value only with suchlogical volumes.
The BOS Server never starts more Salvager subprocesses thanthere are partitions, and always starts only one process to salvagea single volume. If this argument is omitted, up to four Salvagersubprocesses run in parallel.
-tmpdirSpecifies the full pathname of a local disk directory to which theSalvager process writes temporary files as it runs. By default, itwrites them to the partition it is currently salvaging.
-orphansControls how the Salvager handles orphaned files and directories.Choose one of the following three values:
ignore Leaves the orphaned objects on the disk, but prints amessage to the /usr/afs/logs/SalvageLog file reporting howmany orphans were found and the approximate number ofkilobytes they are consuming. This is the default if youomit the -orphans argument.
removeRemoves the orphaned objects, and prints a message to the/usr/afs/logs/SalvageLog file reporting how many orphanswere removed and the approximate number of kilobytesthey were consuming.
attach Attaches the orphaned objects by creating a reference tothem in the vnode of the volume’s root directory. Sinceeach object’s actual name is now lost, the Salvager assignseach one a name of the following form:
_ _ORPHANFILE_ _.index for files_ _ORPHANDIR_ _.index for directories
where index is a two-digit number that uniquely identifieseach object. The orphans are charged against the volume’squota and appear in the output of the ls command issuedagainst the volume’s root directory.
Chapter 5. Managing Volumes 197
Setting and Displaying Volume Quota and Current Size
Every AFS volume has an associated quota which limits the volume’s size. Thedefault quota for a newly created volume is 5,000 kilobyte blocks (slightly lessthat 5 MB). When a volume reaches its quota, the File Server rejects attemptsto create new files or directories in it. If an application is writing data into anexisting file in a full volume, the File Server allows a defined overage (bydefault, 1 MB). (You can use the fileserver command’s -spare or -pctspareargument to change the default overage; see the command’s reference page inthe AFS Administration Reference.)
To set a quota other than 5000 KB as you create a volume, include the-maxquota argument to the vos create command, as described in “CreatingRead/write Volumes” on page 153. To modify an existing volume’s quota,issue either the fs setquota or the fs setvol command as described in thefollowing instructions. Do not set an existing volume’s quota lower than itscurrent size.
In general, smaller volumes are easier to administer than larger ones. If youneed to move volumes, say for load-balancing purposes, it is easier to findenough free space on other partitions for small volumes. Move operationscomplete more quickly for small volumes, reducing the potential for outagesor other errors to interrupt the move. AFS supports a maximum volume size,which can vary for different AFS releases; see the AFS Release Notes for theversion you are using. Also, the size of a partition or logical places anabsolute limit on volume size, because a volume cannot span multiplepartitions or logical volumes.
It is generally safe to overpack partitions by putting more volumes on themthan can actually fit if all the volumes reach their maximum quota. However,only experience determines to what degree overpacking works in your cell. Itdepends on what kind of quota you assign to volumes (particularly uservolumes, which are more likely than system volumes to grow unpredictably)and how much information people generate and store in comparison to theirquota.
There are several commands that display a volume’s quota, as described inthe following instructions. They differ in how much related information theyproduce.
To set quota for a single volume1. Verify that you belong to the system:administrators group. If necessary,
issue the pts membership command, which is fully described in “Todisplay the members of the system:administrators group” on page 579.
198 AFS: Administration Guide
% pts membership system:administrators
2. Issue the fs setquota command to set the volume’s maximum quota.
% fs setquota [<dir/file path>] -max <max quota in kbytes>
where
sq Is an acceptable alias for setquota.
dir/file pathNames a file or directory in the volume for which to set theindicated quota. Partial pathnames are interpreted relative to thecurrent working directory, which is the default if you omit thisargument.
Specify the read/write path to the file or directory, to avoid thefailure that results when you attempt to change a read-onlyvolume. By convention, you indicate the read/write path byplacing a period before the cell name at the pathname’s secondlevel (for example, /afs/.abc.com). For further discussion of theconcept of read/write and read-only paths through the filespace,see “The Rules of Mount Point Traversal” on page 169.
max quota in kbytesSets the volume’s quota, expressed in kilobyte blocks (1024 equalsa megabyte). A value of 0 grants an unlimited quota, but the sizeof the partition imposes an absolute limit. You must include the-max switch if omitting the dir/file path argument (to set the quotaon the volume that houses the current working directory).
To set maximum quota on one or more volumes1. Verify that you belong to the system:administrators group. If necessary,
issue the pts membership command, which is fully described in “Todisplay the members of the system:administrators group” on page 579.
% pts membership system:administrators
2. Issue the fs setvol command to set the quota on one or more volumes.
% fs setvol [<dir/file path>+] -max <disk space quota in 1K units>
where
sv Is an acceptable alias for setvol.
Chapter 5. Managing Volumes 199
dir/file pathNames one file or directory that resides in each volume for whichto set the indicated quota. Partial pathnames are interpretedrelative to the current working directory, which is the default ifyou omit this argument.
disk space quota in 1K unitsSets the maximum quota on each volume, expressed in kilobytesblocks (1024 equals a megabyte). A value of 0 grants an unlimitedquota, but the size of the partition does impose an absolute limit.
To display percent quota used1. Issue the fs quota command.
% fs quota [<dir/file path>+]
where
q Is the shortest acceptable abbreviation of quota.
dir/file pathNames a directory or file in each volume for which to displaypercent quota used. Partial pathnames are interpreted relative tothe current working directory, which is the default if you omit thisargument.
The following example illustrates the output produced by this command:
% fs quota /afs/abc.com/usr/terry34% of quota used.
To display quota, current size, and other information1. Issue the fs listquota command.
% fs listquota [<dir/file path>+]
where
lq Is an alias for listquota.
dir/file pathNames a directory or file in each volume for which to displayquota along with volume name and current space usage. Partialpathnames are interpreted relative to the current workingdirectory, which is the default if you omit this argument.
200 AFS: Administration Guide
As illustrated in the following example, the output reports the volume’sname, its quota and current size (both in kilobyte units), the percent quotaused, and the percentage of space on the volume’s host partition that is used.
% fs listquota /afs/abc.com/usr/terryVolume Name Quota Used % Used Partitionuser.terry 15000 5071 34% 86%
To display quota, current size, and more partition information1. Issue the fs examine command.
% fs examine [<dir/file path>+]
where
exa Is the shortest acceptable abbreviation of examine.
dir/file pathNames a directory or file in each volume for which to displayquota information and information about the host partition. Partialpathnames are interpreted relative to the current workingdirectory, which is the default if you omit this argument.
As illustrated in the following example, the output displays the volume’svolume ID number and name, its quota and current size (both in kilobyteunits), and the free and total number of kilobyte blocks on the volume’s hostpartition.
% fs examine /afs/abc.com/usr/terryVolume status for vid = 50489902 named user.terryCurrent maximum quota is 15000Current blocks used are 5073The partition has 46383 blocks available out of 333305
Note: The partition-related statistics in this command’s output do not alwaysagree with the corresponding values in the output of the standardUNIX df command. The statistics reported by this command can be upto five minutes old, because the Cache Manager polls the File Server forpartition information at that frequency. Also, on some operatingsystems, the df command’s report of partition size includes reservedspace not included in this command’s calculation, and so is likely to beabout 10% larger.
Chapter 5. Managing Volumes 201
Removing Volumes and their Mount Points
To remove a volume from its site and its record from the VLDB, use the vosremove command. Use it to remove any of the three types of volumes; theeffect depends on the type.v If you indicate the read/write volume by specifying the volume’s base
name without a .readonly or .backup extension, the command removesboth the read/write and associated backup volume from the partition thathouses them. You do not need to provide the -server and -partitionarguments, because there can be only one read/write site. The siteinformation is also removed from the VLDB entry, and the site count(reported by the vos examine and vos listvldb commands as number ofsites) decrements by one. The read/write and backup volume ID numbersno longer appear in the output from the vos examine and vos listvldbcommands, but they are preserved internally. Read-only sites, if any, are notaffected, but cannot be changed unless a read/write site is again defined.The entire VLDB entry is removed if there are no read-only sites.If there are no read-only copies left, it is best to remove the volume’s mountpoint to prevent attempts to access the volume’s contents. Do not removethe mount point if copies of the read-only volume remain.
v If you indicate a read-only volume by including the .readonly extension onits name, it is removed from the partition that houses it, and thecorresponding site information is removed from the VLDB entry. The sitecount reported by the vos examine and vos listvldb commands as numberof sites decrements by one for each volume you remove.If there is more than one read-only site, you must include the -serverargument (and optionally -partition argument) to specify the site fromwhich to remove the volume. If there is only one read-only site, the volumename is sufficient; if no read/write volume exists in this case, the entireVLDB entry is removed.It is not generally appropriate to remove the volume’s mount point whenremoving a read-only volume, especially if the read/write version of thevolume still exists. If the read/write version no longer exists, remove themount point as described in Step 5 on page 204 of “To remove a volumeand unmount it” on page 203.
v If you indicate a backup volume by including the .backup extension on itsname, it is removed from the partition that houses it and its siteinformation is removed from the VLDB entry. You do not need to providethe -server and -partition arguments, because there can be only one backupsite. The backup volume ID number no longer appears in the output fromthe vos examine or vos listvldb command, but is preserved internally.In the standard configuration, there is a separate mount point for thebackup version of a user volume. Remember to remove the mount point toprevent attempt to access the nonexistent volume’s contents.
202 AFS: Administration Guide

Other Removal Commands
The vos remove command is almost always the appropriate way to remove avolume, because it automatically removes a volume’s VLDB entry and boththe volume header and all data from the partition. If either the VLDB entry orvolume header does not exist, it is sometimes necessary to use othercommands that remove only the remaining element. Do not use thesecommands in the normal case when both the VLDB entry and the volumeheader exist, because by definition they create discrepancies between them.For details on the commands’ syntax, see their reference pages in the AFSAdministration Reference.
The vos zap command removes a volume from its site by removing thevolume header and volume data for which a VLDB entry no longer exists.You can tell a VLDB entry is missing if the vos listvol command displays thevolume header but the vos examine or vos listvldb command cannot locatethe VLDB entry. You must run this command to correct the discrepancy,because the vos syncvldb and vos syncserv commands never remove volumeheaders.
The vos remsite command removes a read-only site definition from the VLDBwithout affecting the volume on the file server machine. Use this commandwhen you have mistakenly issued the vos addsite command to define aread-only site, but have not yet issued the vos release command to release thevolume to the site. If you have actually released a volume to the site, use thevos remove command instead.
The vos delentry command removes the entire VLDB entry that mentions thevolume you specify. If versions of the volume actually exist on file servermachines, they are not affected. This command is useful if you know forcertain that a volume removal was not recorded in the VLDB (perhaps youused the vos zap command during an emergency), and do not want to takethe time to resynchronize the entire VLDB with the vos syncvldb and vossyncserv commands.
To remove a volume and unmount it1. Verify that you are listed in the /usr/afs/etc/UserList file. If necessary, issue
the bos listusers command, which is fully described in “To display theusers in the UserList file” on page 582.
% bos listusers <machine name>
2. If removing the volume’s mount point, verify that you have the d (delete)permission on its parent directory’s ACL. If necessary, issue the fs listaclcommand, which is fully described in “Displaying ACLs” on page 566.
% fs listacl [<dir/file path>]
Chapter 5. Managing Volumes 203
Members of the system:administrators group always implicitly have the a(administer) and by default also the l (lookup) permission on every ACLand can use the fs setacl command to grant other rights as necessary.
3. (Optional) Dump the volume to a file or to tape, in case you want torestore it later. To copy the volume’s contents to a file, use the vos dumpcommand as instructed in “Dumping and Restoring Volumes” on page 205.You can then copy the file to tape using a third-party backup utility or anarchiving utility such as the UNIX tar command.Alternatively, use the AFS Backup System to create a tape copy. In thiscase, it can be convenient to create a temporary volume set that includesonly the volume of interest. Temporary volume sets are not recorded inthe Backup Database, and so do not clutter database with records forvolume sets that you use only once. For instructions, see “To create adump” on page 293.
4. Issue the vos remove command to remove the volume. If removing aread-only volume from multiple sites, repeat the command for each one.
% vos remove [-server machine name>] [-partition <partition name>] \-id <volume name or ID>
where
remo Is the shortest acceptable abbreviation of remove.
-serverSpecifies the file server machine on which the volume resides. It isnecessary only when the -id argument names a read-only volumethat exists at multiple sites.
-partitionSpecifies the partition on machine name where the volume resides.It is necessary only when the -id argument names a read-onlyvolume that exists at multiple sites. Provide the -server argumentalong with this one.
-id Identifies the volume to remove, either by its complete name orvolume ID number. If identifying a read-only or backup volumeby name, include the appropriate extension (.readonly or .backup).
5. If you are removing the last existing version of the volume, issue the fsrmmount command remove the corresponding mount point. Completeinstructions appear in “To remove a volume and unmount it” on page 203.If you are removing a backup volume that is mounted in the conventionalway (at a subdirectory of its read/write volume’s root directory), thenremoving the source volume’s mount point in this step is sufficient to
204 AFS: Administration Guide
remove the backup volume’s mount point. If you mounted the backup at acompletely separate directory, you need to repeat this step for the backupvolume’s mount point.
% fs rmmount <directory>
6. (Optional) If you created a dump file in Step 3 on page 204, transfer it totape. The preferred method is to use the AFS Backup System, which isdescribed in “Chapter 6. Configuring the AFS Backup System” on page 217and “Chapter 7. Backing Up and Restoring AFS Data” on page 269.
Dumping and Restoring Volumes
Dumping a volume with the vos dump command converts its contents intoASCII format and writes them to the file you specify. The vos restorecommand places a dump file’s contents into a volume after converting theminto the volume format appropriate for the indicated file server machine.
About Dumping Volumes
Dumping a volume can be useful in several situations, including thefollowing:v You want to back it up to tape, perhaps by using a third-party backup
utility. To facilitate this type of backup operation, the vos dump commandcan write to a named pipe. To learn about using the AFS Backup Systeminstead, see “Chapter 6. Configuring the AFS Backup System” on page 217and “Chapter 7. Backing Up and Restoring AFS Data” on page 269.
v You are removing the volume from your cell (perhaps because its owner isleaving your cell). The vos dump command enables you to create a copyfor safekeeping without incurring the overhead of the Backup System. Forcomplete instructions on removing a volume, see “Removing Volumes andtheir Mount Points” on page 202.
v You want to create a copy of the volume for safekeeping on a non-AFSserver partition, perhaps while you move the actual volume to anothermachine or perform maintenance tasks on the partition that houses thevolume.
v You need to replace a corrupted read/write volume. If an uncorruptedread-only or backup version of the volume exists, dump it and restore thedata into the read/write volume, overwriting the corrupted contents.
v You want to copy or transfer the contents of the volume to another cell. Youcannot use the vos move command, because AFS supports volume movesonly between file server machines that belong to the same cell.
Chapter 5. Managing Volumes 205
v You want to have another read/write copy of the volume’s contents. Thesecond volume must have a different name than the original one. If youwant the contents of the two volumes to remain identical, you must updatethem both manually. AFS provides no facility for keeping read/writevolumes synchronized in this way.
v You want a copy of only the files and directories in the volume withmodification time stamps after a certain date. The vos dump command cancreate an incremental dump file as described in Step 3 on page 207 of thefollowing instructions.
You can use the vos dump command to create a full dump, which contains thecomplete contents of the volume at the time you issue the command, or anincremental dump, which contains only those files and directories withmodification timestamps (as displayed by the ls -l command) that are laterthan a date and time you specify. See Step 3 on page 207 of the followinginstructions.
Dumping a volume does not change its VLDB entry or permanently affect itsstatus on the file server machine, but the volume’s contents are inaccessibleduring the dump operation. To avoid interrupting access to the volume, it isgenerally best to dump the volume’s backup version, just after using the vosbackup or vos backupsys command to create a new backup version.
If you do not provide a filename into which to write the dump, the vos dumpcommand directs the output to the standard output stream. You can pipe itdirectly to the vos restore command if you wish.
Because a volume dump file is in ASCII format, you can read its contentsusing a text editor or a command such as the cat command. However, dumpfiles sometimes contain special characters that do not have alphanumericcorrelates, which can cause problems for some display programs.
By default, the vos command interpreter consults the Volume LocationDatabase (VLDB) to learn the volume’s location, so the -server and -partitionarguments are not required. If the -id argument identifies a read-only volumethat resides at multiple sites, then the command dumps the version from justone of them (normally, the one listed first in the volume’s VLDB entry asreported by the vos examine or vos listvldb command). To dump theread-only volume from a particular site, use the -server and -partitionarguments to specify the site. To bypass the VLDB lookup entirely, provide avolume ID number (rather than a volume name) as the value for the -idargument, along with the -server and -partition arguments. This makes itpossible to dump a volume for which there is no VLDB entry.
206 AFS: Administration Guide
To dump a volume1. Verify that you are listed in the /usr/afs/etc/UserList file. If necessary, issue
the bos listusers command, which is fully described in “To display theusers in the UserList file” on page 582.
% bos listusers <machine name>
2. Verify that you have the permissions necessary to create the dump file. Ifplacing it in AFS, you must have the i (insert) permission on the ACL ofthe file’s directory. If necessary, issue the fs listacl command, which isfully described in “Displaying ACLs” on page 566.
% fs listacl [<dir/file path>]
Members of the system:administrators group always implicitly have the a(administer) and by default also the l (lookup) permission on every ACLand can use the fs setacl command to grant other rights as necessary.
3. Issue the vos dump command to dump the volume.
% vos dump -id <volume name or ID> [-time <dump from time>] [-file <arg>] [-server <server>] [-partiti
where
-id Identifies the volume to be dumped by its complete name orvolume ID number. If you want to dump the read-only or backupversion, specify its volume ID number or add the appropriateextension (.readonly or .backup) to the name.
To bypass the normal VLDB lookup of the volume’s location,provide the volume ID number and combine this argument withthe -server and -partition arguments.
-time Specifies whether the dump is full or incremental. Omit thisargument to create a full dump, or provide one of three acceptablevalues:v The value 0 (zero) to create a full dump.v A date in the format mm/dd/yyyy (month, day and year) to create
an incremental dump that includes only files and directorieswith modification timestamps later than midnight (12:00 a.m.)on the indicated date. Valid values for the year range from 1970to 2037; higher values are not valid because the latest possibledate in the standard UNIX representation is in 2038. Thecommand interpreter automatically reduces later dates to themaximum value. An example is 01/13/1999.
v A date and time in the format ″mm/dd/yyyy hh:MM″ to create anincremental dump that includes only files and directories withmodification timestamps later than the specified date and time.The date format is the same as for a date alone. Express the
Chapter 5. Managing Volumes 207

time as hours and minutes (hh:MM) in 24-hour format (forexample, 20:30 is 8:30 p.m.). Surround the entire expression withdouble quotes (″ ″) because it contains a space. An example is″01/13/1999 22:30″.
-file Specifies the pathname of the file to which to write the dump. Thefile can be in AFS, but not in the volume being dumped. A partialpathname is interpreted relative to the current working directory.Omit this argument to direct the dump to the standard outputstream.
-serverSpecifies the file server machine on which the volume resides.Provide the -partition argument along with this one.
-partitionSpecifies the partition on which the volume resides. Provide the-server argument along with this one.
About Restoring Volumes
Although you can dump any of the three types of volumes (read/write,read-only, or backup), you can restore a dump file to the file system only as aread/write volume, using the vos restore command. The commandautomatically translates the dump file’s contents from ASCII back into thevolume format appropriate for the file server machine that stores the restoredversion. As with the vos dump command, you can restore a dump file via anamed pipe, which facilitates interoperation with third-party backup utilities.
You can restore the contents of a dump file in one of two basic ways. In eithercase, you must restore a full dump of the volume before restoring anyincremental dumps. Any incremental dumps that you then restore must havebeen created after the full dump. If there is more than one incremental dump,you must restore them in the order they were created.v You can restore volume data into a brand new volume with a new name
and at a location that you specify. See “To restore a dump into a newvolume and mount it” on page 209.You can assign a volume ID number as you restore the volume, though it isbest to have the Volume Server allocate a volume number automatically.The most common reason for specifying the volume ID is that a volume’sVLDB entry has disappeared for some reason, but you know the formerread/write volume ID number and want to reuse it.
v You can restore volume data into an existing volume (usually the one thatwas previously dumped), overwriting its current contents. This isconvenient if the current contents are corrupted or otherwise incorrect,
208 AFS: Administration Guide

because it allows you to replace them with a coherent version from the pastor from one of the volume’s clones. See “To restore a dump file, overwritingan existing volume” on page 211.Provide the -overwrite argument to preconfirm that you wish to overwritethe volume’s contents, and to specify whether you are restoring a full orincremental dump. If you omit the -overwrite argument, the Volume Servergenerates the following prompt to confirm that you want to overwrite theexisting volume with either a full (f) or incremental (i) dump:
Do you want to do a full/incremental restore or abort? [fia](a):
If you pipe in the dump file via the standard input stream instead of usingthe -file argument to name it, you must include the -overwrite argumentbecause there is nowhere for the Volume Server to display the prompt inthis case.
You can move the volume to a new site as you overwrite it with a fulldump, by using the -server and -partition arguments to specify the newsite. You cannot move the volume when restoring an incremental dump.
The vos restore command sets the restored volume’s creation date in thevolume header to the time of the restore operation, as reported in theCreation field in the output from the vos examine and vos listvol commands.
To restore a dump into a new volume and mount it1. Verify that you are listed in the /usr/afs/etc/UserList file. If necessary, issue
the bos listusers command, which is fully described in “To display theusers in the UserList file” on page 582.
% bos listusers <machine name>
2. Verify that you have permissions needed to read the dump file and tomount the new volume. If the dump file resides in AFS, you need the r(read) permission on the ACL of its directory. You need the i (insert) and a(administer) permissions on the ACL of the directory where you aremounting the new volume. If necessary, issue the fs listacl command,which is fully described in “Displaying ACLs” on page 566.
% fs listacl [<dir/file path>]
Members of the system:administrators group always implicitly have the a(administer) and by default also the l (lookup) permission on every ACLand can use the fs setacl command to grant other rights as necessary.
3. Select a site (disk partition on a file server machine) for the new volume. Ifyour cell groups different types of volumes onto different file servermachines, that can guide your decision. It often makes sense to put the
Chapter 5. Managing Volumes 209
volume on the emptiest partition that meets your other criteria. To displayhow much space is available on a file server machine’s partitions, use thevos partinfo command, which is described fully in “Creating Read/writeVolumes” on page 153.
% vos partinfo <machine name> [<partition name>]
4. Issue the vos restore command to create a new volume and restore thedump file into it. Type it on a single line; it appears on multiple lines hereonly for legibility.
% vos restore <machine name> <partition name> \<name of volume to be restored> \[-file <dump file>] [-id <volume ID>]
where
res Is the shortest acceptable abbreviation of restore.
machine nameNames the file server machine on which to create the new volume.
partition nameNames the partition on which to create the new volume.
name of volume to be restoredNames the new read/write volume, which must not already havea VLDB entry. It can be up to 22 characters in length.
-file Is the dump file to restore. Partial pathnames are interpreted withrespect to the current working directory. Omit this argument ifusing a pipe to read in the dump file from the standard inputstream.
-volumeSpecifies the new volume’s ID number. It is appropriate only ifyou are restoring a volume that no longer exists and want to usethe volume ID number it had previously.
5. Issue the fs mkmount command to mount the new volume, making itscontents accessible. Complete instructions appear in “To create a regular orread/write mount point” on page 173.
% fs mkmount <directory> <volume name>
6. (Optional) Issue the fs lsmount command to verify that the mount pointrefers to the correct volume. Complete instructions appear in “To display amount point” on page 172.
210 AFS: Administration Guide
% fs lsmount <directory>
To restore a dump file, overwriting an existing volume1. Verify that you are listed in the /usr/afs/etc/UserList file. If necessary, issue
the bos listusers command, which is fully described in “To display theusers in the UserList file” on page 582.
% bos listusers <machine name>
2. Verify that you have permissions needed to read the dump file. If itresides in AFS, you need the r (read) permission on the ACL of itsdirectory. If necessary, issue the fs listacl command, which is fullydescribed in “Displaying ACLs” on page 566.
% fs listacl [<dir/file path>]
Members of the system:administrators group always implicitly have the a(administer) and by default also the l (lookup) permission on every ACLand can use the fs setacl command to grant other rights as necessary.
3. Restore the contents of the dump file into a read/write volume,overwriting the current contents. The volume retains its current volume IDnumber. Type it on a single line; it appears on multiple lines here only forlegibility.
% vos restore <machine name> <partition name> \<name of volume to be restored> \[-file <dump file>] \-overwrite <full | incremental>
where
res Is the shortest acceptable abbreviation of restore.
machine nameNames the file server machine where the volume already exists, orthe machine to which to move it. In the latter case, the value forthe -overwrite argument must be full.
partition nameNames the partition where the volume already exists, or thepartition to which to move it. In the latter case, the value for the-overwrite argument must be full.
name of volume to be restoredNames the read/write volume to overwrite with the contents ofthe dump file.
-file Is the dump file to restore. Partial pathnames are interpreted withrespect to the current working directory. Omit this argument if
Chapter 5. Managing Volumes 211
using a pipe to read in the dump file from the standard inputstream; in this case, you must provide the -overwrite argument.
-overwritePreconfirms that you want to overwrite the existing volume andspecifies which type of dump file you are restoring. Provide one ofthe following values:v f or full if restoring a full dump filev i or incremental if restoring an incremental dump file. This
value is not acceptable if you are moving the volume whilerestoring it.
v a to terminate the restore operation4. If the volume is replicated, issue the vos release command to release the
newly restored contents to read-only sites. Complete instructions appear in“Replicating Volumes (Creating Read-only Volumes)” on page 157.
% vos release <volume name or ID>
5. Issue the vos backup command to create a new backup version of thevolume. Complete instructions appear in “Creating Backup Volumes” onpage 163.
% vos backup <volume name or ID>
Renaming Volumes
You can use the vos rename command to rename a volume. For example, it isappropriate to rename a user’s home volume if you use the user.usernameconvention for user volume names and you change the username. (Forcomplete instructions for changing usernames, see “Changing Usernames” onpage 525.)
The vos rename command accepts only read/write volume names, butautomatically changes the names of the associated read-only and backupvolumes. As directed in the following instructions, you need to replace thevolume’s current mount point with a new one that reflects the name change.
To rename a volume1. Verify that you are listed in the /usr/afs/etc/UserList file. If necessary, issue
the bos listusers command, which is fully described in “To display theusers in the UserList file” on page 582.
% bos listusers <machine name>
212 AFS: Administration Guide
2. Verify that you have the a (administer), d (delete), and i (insert) accesspermissions for the directory in which you are replacing the volume’smount point. If necessary, issue the fs listacl command, which is fullydescribed in “Displaying ACLs” on page 566.
% fs listacl [<dir/file path>]
Members of the system:administrators group always implicitly have the a(administer) and by default also the l (lookup) permission on every ACLand can use the fs setacl command to grant other rights as necessary.
3. Issue the vos rename command to rename the volume.
% vos rename <old volume name> <new volume name>
where
ren Is the shortest acceptable abbreviation of rename.
old volume nameIs the current name of a read/write volume.
new volume nameIs the new name for the volume. It cannot be more than 22characters in length.
If there is no Volume Location Database (VLDB) entry for the specifiedcurrent volume name, the command fails with the following errormessage:
vos: Could not find entry for volume old_volume_name.
4. Issue the fs rmmount command to remove the mount point that refers tothe volume’s old name. Complete instructions appear in “To remove amount point” on page 176.
% fs rmmount <directory>
5. Issue the fs mkmount to create a mount point that indicates the volume’snew name. Complete instructions appear in “To create a regular orread/write mount point” on page 173.
% fs mkmount <directory> <volume name> [-rw]
Chapter 5. Managing Volumes 213

Unlocking and Locking VLDB Entries
As detailed in “Synchronizing the VLDB and Volume Headers” on page 189,The Volume Location (VL) Server locks the Volume Location Database (VLDB)entry for a volume before the Volume Server executes any operation on it. Noother operation can affect a volume with a locked VLDB entry, so the lockprevents the inconsistency or corruption that can result from multiplesimultaneous operations on a volume.
To verify that a VLDB entry is locked, issue the vos listvldb command asdescribed in “To display VLDB entries” on page 177. The command has a-locked flag that displays locked entries only. If the VLDB entry is locked, thestring Volume is currently LOCKED appears on the last line of the volume’soutput.
To lock a VLDB entry yourself, use the vos lock command. This is usefulwhen you suspect something is wrong with a volume and you want toprevent any changes to it while you are investigating the problem.
To unlock a locked VLDB entry, issue the vos unlock command, whichunlocks a single VLDB entry, or the vos unlockvldb command, which unlockspotentially many entries. This is useful when a volume operation failsprematurely and leaves a VLDB entry locked, preventing you from acting tocorrect the problems resulting from the failure.
To lock a VLDB entry1. Verify that you are listed in the /usr/afs/etc/UserList file. If necessary, issue
the bos listusers command, which is fully described in “To display theusers in the UserList file” on page 582.
% bos listusers <machine name>
2. Issue the vos lock to lock the entry.
% vos lock <volume name or ID>
where
lo Is the shortest acceptable abbreviation of lock.
volume name or IDIdentifies the volume to be locked, either by its complete name orvolume ID number. It can be any of the three versions of thevolume.
214 AFS: Administration Guide
To unlock a single VLDB entry1. Verify that you are listed in the /usr/afs/etc/UserList file. If necessary, issue
the bos listusers command, which is fully described in “To display theusers in the UserList file” on page 582.
% bos listusers <machine name>
2. Issue the vos unlock command to unlock the entry.% vos unlock <volume name or ID>
where
unlockMust be typed in full.
volume name or IDIdentifies the volume to be unlocked, either by its complete nameor volume ID number. It can be any of the three versions of thevolume.
To unlock multiple VLDB entries1. Verify that you are listed in the /usr/afs/etc/UserList file. If necessary, issue
the bos listusers command, which is fully described in “To display theusers in the UserList file” on page 582.
% bos listusers <machine name>
2. Issue the vos unlockvldb command to unlock the desired entries.
% vos unlockvldb [<machine name>] [<partition name>]
where
unlockvIs the shortest acceptable abbreviation of unlockvldb.
machine nameSpecifies a file server machine. Provide this argument alone tounlock all VLDB entries that mention the machine in a sitedefinition. Omit both this argument and the partition nameargument to unlock all VLDB entries.
partition nameSpecifies a partition. Provide this argument alone to unlock allVLDB entries that mention the partition (on any machine) in a sitedefinition. Omit both this argument and the machine nameargument to unlock all VLDB entries.
Chapter 5. Managing Volumes 215

216 AFS: Administration Guide

Chapter 6. Configuring the AFS Backup System
The AFS Backup System helps you to create backup copies of data from AFSvolumes and to restore data to the file system if it is lost or corrupted. Thischapter explains how to configure the Backup System. For instructions onbacking up and restoring data and displaying dump records, see “Chapter 7.Backing Up and Restoring AFS Data” on page 269.
Summary of Instructions
This chapter explains how to perform the following tasks by using theindicated commands:
Determine tape capacity and filemark size fmsDefine Tape Coordinator entry in Backup Database backup addhostRemove Tape Coordinator entry from Backup Database backup delhostDisplay Tape Coordinator entries from Backup Database backup listhostsCreate volume set backup addvolsetAdd volume entry to volume set backup addvolentryList volume sets and entries backup listvolsetsDelete volume set from Backup Database backup delvolsetDelete volume entry from volume set backup delvolentryDefine dump level backup adddumpChange expiration date on existing dump level backup setexpDelete dump level from dump hierarchy backup deldumpDisplay dump hierarchy backup listdumpsLabel tape backup labeltapeRead label on tape backup readlabel
Introduction to Backup System Features
The AFS Backup System is highly flexible, enabling you to control mostaspects of the backup process, including how often backups are performed,which volumes are backed up, and whether to dump all of the data in avolume or just the data that has changed since the last dump operation. Youcan also take advantage of several features that automate much of the backupprocess.
To administer and use the Backup System most efficiently, it helps to befamiliar with its basic features, which are described in the following sections.
© Copyright IBM Corp. 1989, 2000 217
For pointers to instructions for implementing the features as you configure theBackup System in your cell, see “Overview of Backup System Configuration”on page 223.
Volume Sets and Volume Entries
When you back up AFS data, you specify which data to include in terms ofcomplete volumes rather than individual files. More precisely, you definegroups of volumes called volume sets, each of which includes one or morevolumes that you want to back up in a single operation. You must include avolume in a volume set to back it up, because the command that backs updata (the backup dump command) does not accept individual volume names.
A volume set consists of one or more volume entries, each of which specifieswhich volumes to back up based on their location (file server machine andpartition) and volume name. You can use a wildcard notation to include allvolumes that share a location, a common character string in their names, orboth.
For instructions on creating and removing volume sets and volume entries,see “Defining and Displaying Volume Sets and Volume Entries” on page 233.
Dumps and Dump Sets
A dump is the collection of data that results from backing up a volume set. Afull dump includes all of the data in every volume in the volume set, as itexists at the time of the dump operation. An incremental dump includes onlysome of the data from the volumes in the volume set, namely those files anddirectory structures that have changed since a specified previous dumpoperation was performed. The previous dump is referred to as the incrementaldump’s parent dump, and it can be either a full dump or an incremental dumpitself.
A dump set is a collection of one or more dumps stored together on one ormore tapes. The first dump in the dump set is the initial dump, and anysubsequent dump added onto the end of an existing dump set is an appendeddump. Appending dumps is always optional, but maximizes use of a tape’scapacity. In contrast, creating only initial dumps can result in many partiallyfilled tapes, because an initial dump must always start on a new tape, butdoes not necessarily extend to the end of the tape. Appended dumps do nothave to be related to one another or to the initial dump (they do not have tobe dumps of the same or related volume sets), but well-planned appendingcan reduce the number of times you have to change tapes during a restoreoperation. For example, it can make sense to append incremental dumps of avolume set together in a single dump set.
218 AFS: Administration Guide

All the records for a dump set are indexed together in the Backup Databasebased on the initial dump (for more on the Backup Database, see “The BackupDatabase and Backup Server Process” on page 222). To delete the databaserecord of an appended dump, you must delete the initial dump record, anddoing so deletes the records for all dumps in the dump set. Similarly, youcannot recycle just one tape in a dump set without deleting the databaserecords of all tapes in the dump set.
For instructions on creating an initial dump, see “Backing Up Data” onpage 279, and to learn how to append dumps, see “Appending Dumps to anExisting Dump Set” on page 290.
Dump Hierarchies, Dump Levels and Expiration Dates
A dump hierarchy is a logical structure that defines the relationship betweenfull and incremental dumps; that is, it defines which dump serves as theparent for an incremental dump. Each individual component of a hierarchy isa dump level. When you create a dump by issuing the backup dumpcommand, you specify a volume set name and a dump level name. TheBackup System uses the dump level to determine whether the dump is full orincremental, and if incremental, which dump level to use as the parent.
You can associate an expiration date with a dump level, to define when a dumpcreated at that level expires. The Backup System refuses to overwrite a tapeuntil all dumps in the dump set to which the tape belongs have expired, soassigning expiration dates automatically determines how you recycle tapes.You can define an expiration date either in absolute terms (for example, 13January 2000) or relative terms (for example, 30 days from when the dump iscreated). You can also change the expiration date associated with a dumplevel (but not with an actual dump that has already been created at thatlevel).
For instructions on creating dump hierarchies, assigning expiration dates, andestablishing a tape recycling schedule, see “Defining and Displaying theDump Hierarchy” on page 240.
Dump Names and Tape Names
When you create a dump, the Backup System creates a Backup Databaserecord for it, assigning a name comprising the volume set name and the lastelement in the dump level pathname:
volume_set_name.dump_level_name
Chapter 6. Configuring the AFS Backup System 219
For example, a dump of the volume set user at the dump level /sunday/fridayis called user.friday. The Backup System also assigns a unique dump IDnumber to the dump to distinguish it from other dumps with the same namethat possibly exist.
The Backup System assigns a similar AFS tape name to each tape that containsa dump set, reflecting the volume set and dump level of the dump set’s initialdump, plus a numerical index of the tape’s position in the dump set, and aunique dump ID number:
volume_set_name.dump_level_name.tape_index (dump ID)
For example, the second tape in a dump set whose initial dump is of thevolume set uservol at the dump level /sunday/friday has AFS tape name likeuservol.friday.2 (914382400).
In addition to its AFS tape name, a tape can have an optional permanent namethat you assign. Unlike the AFS tape name, the permanent name does nothave to indicate the volume set and dump level of the initial (or any other)dump, and so does not change depending on the contents of the tape. TheBackup System does not require a certain format for permanent names, so youneed to make sure that each tape’s name is unique. If a tape has a permanentname, the Backup System uses it rather than the AFS tape name whenreferring to the tape in prompts and the output from most backup commands,but still tracks the AFS tape name internally.
Tape Labels, Dump Labels, and EOF Markers
Every tape used in the Backup System has a magnetic label at the beginningthat records the tape’s name, capacity, and other information. You can use thebackup labeltape command to write a label, or the backup dump commandcreates one automatically if you use an unlabeled tape. The label records thefollowing information:v The tape’s permanent name, which you can assign by using the -pname
argument to the backup labeltape command. It can be any string of up to32 characters. If you do not assign a permanent name, the Backup Systemrecords the value <NULL> when you use the backup labeltape command toassign an AFS tape name, or when you use the backup dump command towrite a dump to the tape.
v The tape’s AFS tape name, which can be one of three types of values:– A name that reflects the volume set and dump level of the dump set’s
initial dump and the tape’s place in the sequence of tapes for the dumpset, as described in “Dump Names and Tape Names” on page 219. If thetape does not have a permanent name, you can assign the AFS tapename by using the -name argument to the backup labeltape command.
220 AFS: Administration Guide

– The value <NULL>, which results when you assign a permanent name, orprovide no value for the backup labeltape command’s -name argument.
– No AFS tape name at all, indicating that you have never labeled the tapeor written a dump to it.
If a tape does not already have an actual AFS tape name when you write adump to it, the Backup System constructs and records the appropriate AFStape name. If the tape does have an AFS tape name and you are writing aninitial dump, then the name must correctly reflect the dump’s volume setand dump level.
v The capacity, or size, of the tape, followed by a letter that indicates the unitof measure (k or K for kilobytes, m or M for megabytes, g or G for gigabytes,or t or T for terabytes). The tape’s manufacturer determines the tape’scapacity. For further discussion of how the Backup System uses the value inthe capacity field, see “Configuring the tapeconfig File” on page 224.
For information about labeling tapes, see “Writing and Reading Tape Labels”on page 248.
In addition to the tape label, the Backup System writes a dump label on thetape for every appended dump (the tape label and dump label are the samefor the initial dump). A dump label records the following information:v The name of the tape containing the dumpv The date and time that the dump operation beganv The cell to which the volumes in the dump belongv The dump’s size in kilobytesv The dump’s dump levelv The dump’s dump ID
The Backup System writes a filemark (also called an End-of-File or EOFmarker) between the data from each volume in a dump. The tape device’smanufacturer determines the filemark size, which is typically between 2 KBand 2 MB; in general, the larger the usual capacity of the tapes that the deviceuses, the larger the filemark size. If a dump contains a small amount of datafrom each of a large number of volumes, as incremental dumps often do, thenthe filemark size can significantly affect how much volume data fits on thetape. To enable the Backup System to factor in filemark size as it writes adump, you can record the filemark size in a configuration file; see“Configuring the tapeconfig File” on page 224.
Tape Coordinator Machines, Port Offsets, and Backup Data Files
A Tape Coordinator machine is a machine that drives one or more attached tapedevices used for backup operations. It must run the AFS client software (the
Chapter 6. Configuring the AFS Backup System 221
Cache Manager) but reside in a physically secure location to preventunauthorized access to its console. Before backup operations can run on aTape Coordinator machine, each tape device on the machine must beregistered in the Backup Database, and certain files and directories must existon the machine’s local disk; for instructions, see “To configure a TapeCoordinator machine” on page 230.
Each tape device on a Tape Coordinator machine listens for backup requestson a different UNIX port. You pick the port indirectly by assigning a port offsetnumber to the tape device. The Backup System sets the device’s actual port byadding the port offset to a base port number that it determines internally. Forinstructions on assigning port offset numbers, see “Configuring the tapeconfigFile” on page 224.
For a tape device to perform backup operations, a Backup Tape Coordinator(butc) process dedicated to the device must be running actively on the TapeCoordinator machine. You then direct backup requests to the device’s TapeCoordinator by specifying its port offset number with the -portoffsetargument to the backup command.
In addition to writing backup data to tape, you can direct it to a backup datafile on the local disk of a Tape Coordinator machine. You can then to transferthe data to a data-archiving system, such as a hierarchical storagemanagement (HSM) system, that you use in conjunction with AFS and theBackup System. A backup data file has a port offset like a tape device. Forinstructions on configuring backup data files, see “Dumping Data to a BackupData File” on page 263.
The Backup Database and Backup Server Process
The Backup Database is a replicated administrative database maintained by theBackup Server process on the cell’s database server machines. Like the otherAFS database server processes, the Backup Server uses the Ubik utility tokeep the various copies of the database synchronized (for a discussion ofUbik, see “Replicating the AFS Administrative Databases” on page 38).
The Backup Database records the following information:v The Tape Coordinator machine’s hostname and the port offset number for
each tape device used for backup operationsv The dump hierarchy, which consists of its component dump levels and their
associated expiration datesv The volume sets and their component volume entries
222 AFS: Administration Guide
v A record for each dump, which includes the name of each tape it appearson, a list of the volumes from which data is included, the dump level, theexpiration date, and the dump ID of the initial dump with which the dumpis associated
v A record for each tape that houses dumped data
Interfaces to the Backup System
The backup suite of commands is the administrative interface to the BackupSystem. You can issue the commands in a command shell (or invoke them ina shell script) on any AFS client or server machine from which you can accessthe backup binary. In the conventional configuration, the binary resides on thelocal disk.
The backup command suite provides an interactive mode, in which you canissue multiple commands over a persistent connection to the Backup Serverand the Volume Location (VL) Server. Interactive mode has several convenientfeatures, including the following:v You need to type only the operation code, omitting the initial backup
string.v If you assume another AFS identity or specify a foreign cell as you enter
interactive mode, it applies to all subsequent commands.v You do not need to enclose shell metacharacters in double quotes.v You can track current and pending operations with the (backup) jobs
command, which is available only in this mode.v You can cancel current and pending operations with the (backup) kill
command, which is available only in this mode.
Before issuing a command that requires reading or writing a tape (or backupdata file), you must also open a connection to the Tape Coordinator machinethat is attached to the relevant tape device (or that has the backup data file onits local disk), and issue the butc command to initialize the Tape Coordinatorprocess. The process must continue to run and the connection remain open aslong as you need to use the tape device or file for backup operations.
For further discussion and instructions, see “Using the Backup System’sInterfaces” on page 269.
Overview of Backup System Configuration
Before you can use the Backup System to back up and restore data, you mustconfigure several of its basic components. The indicated sections of thischapter explain how to perform the following configuration tasks:
Chapter 6. Configuring the AFS Backup System 223

v Determining a tape’s capacity and a tape device’s filemark size, andrecording them in the /usr/afs/backup/tapeconfig file (see “Configuring thetapeconfig File”)
v Determining how to grant administrative privilege to backup operators (see“Granting Administrative Privilege to Backup Operators” on page 228)
v Configuring Tape Coordinator machines, tape devices, and backup data files(see “Configuring Tape Coordinator Machines and Tape Devices” onpage 229)
v Defining volume sets and volume entries (see “Defining and DisplayingVolume Sets and Volume Entries” on page 233)
v Defining dump levels to create a dump hierarchy (see “Defining andDisplaying the Dump Hierarchy” on page 240)
v Labeling tapes (see “Writing and Reading Tape Labels” on page 248)v Creating a device configuration file to automate the backup process (see
“Automating and Increasing the Efficiency of the Backup Process” onpage 254)
If you have already configured all of the components required for performinga backup dump or restore operation, you can proceed to the instructions in“Backing Up Data” on page 279 and “Restoring and Recovering Data” onpage 304.
Configuring the tapeconfig File
Several factors interact to determine how much data the Tape Coordinator canfit on a tape:v The tape’s capacity (size), as set by the tape manufacturer.v The tape device’s filemark size, as set by the tape device’s manufacturer.
Recall from “Tape Labels, Dump Labels, and EOF Markers” on page 220that the Tape Coordinator writes a filemark between the data from eachvolume in a dump. If a dump contains a small amount of data from each ofa large number of volumes, as incremental dumps often do, then thefilemark size can significantly affect how much volume data fits on thetape.
v Whether or not you use the tape device’s compression mode.
(The amount of data that can fit in a backup data file is determined byamount of space available on the partition, and the operating system’smaximum file size. The Tape Coordinator does not write filemarks whenwriting to a backup data file. For further information about configuring aTape Coordinator to write to a backup data file, see “Dumping Data to aBackup Data File” on page 263.)
224 AFS: Administration Guide
As the Tape Coordinator (butc) process initializes, it reads the/usr/afs/backup/tapeconfig file on its local disk to learn the tape capacity andfilemark size (for a tape device) or the file size (for a backup data file) to usefor dump operations. When you begin a dump operation, the TapeCoordinator also reads the tape or backup data file’s label to see if you haverecorded a different tape capacity or file size. If you have, the value on thelabel overrides the default value from the tapeconfig file.
As the Tape Coordinator writes data to a tape during a dump operation, ituses the capacity and filemark information to track how much tape it hasused and how much remains before the physical end-of-tape (EOT). Shortlybefore reaching EOT, the Tape Coordinator stops writing and requests a newtape. Similarly, it uses a backup data file’s size to know when it is about toexhaust the space in the file. If the Tape Coordinator reaches the EOTunexpectedly, it recovers by obtaining a new tape and writing to it the entirecontents of the volume it was writing when it reached EOT. The interruptedvolume remains on the first tape, but is never used.
Many tape devices use tapes that can accommodate multiple gigabytes, oreven multiple terabytes, of backup data, especially if you use the device’scompression mode. When writing to such devices and tapes, allowing theTape Coordinator to hit the EOT unexpectedly is generally recommended. Thedevices write data so quickly that it usually does not take much extra time torewrite the interrupted volume on the new tape. Similarly, they compress dataso well that the data abandoned on the first tape from the interrupted volumedoes not constitute a waste of much tape.
When writing to tapes that accommodate a smaller amount of data (say, lessthan two GB), it is better to avoid having the Tape Coordinator hit EOTunexpectedly. AFS supports volumes up to 2 GB in size, so an interruptedvolume can in fact take up most of the tape. For such tapes, recordingaccurate values for tape capacity and filemark size, if possible, helps tomaximize both use of tape and the efficiency of dump operations. Thefollowing discussion of the fields in the tapeconfig file explains how todetermine the appropriate values.
Use a text editor to create an entry in a Tape Coordinator’s tapeconfig file foreach tape device or backup data file that it uses. Each device or file’s entry ison its own line and has the following format:
[capacity filemark_size] device_name port_offset
where
capacitySpecifies the capacity of the tapes used with a tape device, or theamount of data to write into a backup data file. Specify an integer
Chapter 6. Configuring the AFS Backup System 225

value followed by a letter that indicates units, with no interveningspace. The letter k or K indicates kilobytes, m or M indicatesmegabytes, g or G indicates gigabytes, and t or T indicates terabytes.If the units letter is omitted, the default is kilobytes.
To determine the capacity of a tape under two GB in size that you aregoing to use in regular (noncompression) mode, you can either usethe value that the tape’s manufacturer specifies on the tape’spackaging or use the fms command to calculate the capacity, asdescribed later in this section. To avoid having the Tape Coordinatorreach the EOT unexpectedly, it is best to record in the tapeconfig fileor on the label a capacity that is about 10% smaller than the actualcapacity of the tape. To calculate the appropriate value for a smalltape used in compression mode, one method is to multiply the tapecapacity (as recorded by the manufacturer) by the device’scompression ratio.
For tapes that hold multiple gigabytes or terabytes of data, or if usinga tape drive’s compression mode, the recommended configuration isto record a value quite a bit (for instance, two times) larger than themaximum amount you believe can fit on the tape. It is not generallyworthwhile to run the fms command on large tapes, even innoncompression mode. The command definitely does not yieldaccurate results in compression mode. The Tape Coordinator is likelyto reach the EOT unexpectedly, but compression mode fits so muchdata on the tape that the data abandoned from an interrupted volumedoes not represent much of the tape’s capacity.
For a backup data file, record a value slightly smaller than the amountof space available on the partition, and definitely smaller than theoperating system’s maximum file size. It is also best to limit theability of other processes to write to the partition, to prevent themfrom using up the space in the partition.
If this field is empty, the Tape Coordinator uses the maximumacceptable value (2048 GB or 2 TB). Either leave both this field andthe filemark_size field empty, or provide a value in both of them.
filemark_sizeSpecifies the tape device’s filemark size, which usually falls between 2KB and 2 MB. Use the same notation as for the capacity field, but notethat if you omit the units letter, the default unit is bytes rather thankilobytes.
For a tape device in regular (noncompression) mode, you can use thefms command to determine filemark size, or use the value reportedby the device’s manufacturer. To help the Tape Coordinator avoidreaching EOT unexpectedly, increase the value by about 10% whenrecording it in the tapeconfig file.
226 AFS: Administration Guide
The recommended value for a tape device in compression mode is 0(zero). The fms command does not yield accurate results incompression mode, so you cannot use it to determine the filemarksize.
The recommended value for a backup data file is also 0 (zero). TheTape Coordinator does not use filemarks when writing to a file, but avalue must appear in this field nevertheless if there is also a value inthe capacity field.
If this field is empty, the Tape Coordinator uses the value 0 (zero).Either leave both this field and the capacity field empty, or provide avalue in both of them.
device_nameSpecifies the complete pathname of the tape device or backup datafile. The format of tape device names depends on the operatingsystem, but on UNIX systems, device names generally begin with thestring /dev/. For a backup data file, this field defines the completepathname, but for suggestions on how to name a backup data file, see“Dumping Data to a Backup Data File” on page 263.
port_offsetSpecifies the port offset number for a specific tape device or backupdata file. Each tape device listens for backup requests on a differentUNIX port. You pick the port indirectly by recording a value in thisfield. The Backup System sets the device’s actual port by adding theport offset to a base port number that it determines internally.
Legal values are the integers 0 through 58510 (the Backup System cantrack a maximum of 58,511 port offset numbers). Each value must beunique among the cell’s Tape Coordinators, but you do not have toassign port offset numbers sequentially, and you can associate anynumber of them with a single machine or even tape device. Forexample, if you plan to use a device in both compression andnoncompression mode, assign it two different port offsets withappropriate tape capacity and filemark values for the different modes.
Assign port offset 0 (zero) to the Tape Coordinator for the tape deviceor backup data file that you use most often for backup operations;doing so enables you to omit the -portoffset argument from thelargest possible number of backup commands.
The following example tapeconfig file includes entries for two tape devices,/dev/rmt0h and /dev/rmt1h. Each one uses tapes with a capacity of 2 GB andhas a filemark size of 1 MB. Their port offset numbers are 0 and 1.
2g 1m /dev/rmt0h 02G 1M /dev/rmt1h 1
Chapter 6. Configuring the AFS Backup System 227

The fms command reports the capacity of the tape you have inserted and thetape device’s filemark size, both on the standard output stream (stdout) andin its fms.log file, which it writes in the current working directory. Thecommand interpreter must write data to the entire tape, so running thecommand can take from several hours to more than a day, depending on thesize of the tape.
To run the fms command on a noncompressing tape device1. If an fms.log file does not already exist in the current directory, verify that
you can insert and write to files in the current directory. If the log filealready exists, you must be able to write to the file.
2. Insert a tape into the drive. Running the command completely overwritesthe tape, so use a blank tape or one that you want to recycle.
3. Issue the fms command.% fms <tape special file>
where
fms Must be typed in full.
tape special fileSpecifies the tape device’s UNIX device name, such as /dev/rmt0h.
The following example output reports that the tape in the device with devicename /dev/rmt0h has a capacity of 2136604672 bytes (about 2 GB), and thatthe device’s filemark size is 1910205 bytes (close to 2 MB).
% fms /dev/rmt0hwrote block: 130408Finished data capacity test - rewindingwrote 1109 blocks, 1109 file marksFinished file mark testTape capacity is 2136604672 bytesFile marks are 1910205 bytes
Granting Administrative Privilege to Backup Operators
Each person who issues the backup and butc commands in your cell must belisted in the /usr/afs/etc/UserList file on every database server machine thatstores the Backup Database and Volume Location Database (VLDB), and everymachine that houses a volume included in a volume set. By convention, theUserList file is the same on every server machine in the cell; the instructionsin this document assume that your cell is configured in this way. To edit theUserList file, use the bos adduser and bos removeuser commands asdescribed in “Administering the UserList File” on page 581.
In addition to being listed in the UserList file, backup operators who issue thebutc command must be able to write to the files stored in each Tape
228 AFS: Administration Guide
Coordinator machine’s local /usr/afs/backup directory, which are protected byUNIX mode bits. Before configuring your cell’s first Tape Coordinatormachine, decide which local user and group to designate as the owner of thedirectory and the files in it. Among the possible ownership options are thefollowing:v The local superuser root. With this option, the issuer of the butc command
must log onto the local file system as the local superuser root. If the TapeCoordinator is also a server machine, the -localauth flag is used on the butccommand to construct a server ticket from the local /usr/afs/etc/KeyFile file.On non-server machine, the issuer must issue the klog command toauthenticate as an AFS administrator while logged in as root.
v A single AFS administrator. Logging in and authenticating are a single stepif an AFS-modified login utility is used. The administrator is the only userwho can start the Tape Coordinator.
v An administrative account for which several operators know the password.This allows them all to start the Tape Coordinator.
Another option is to define a group in the local group file (/etc/group orequivalent) to which all backup operators belong. Then turn on the w modebit (write permission) in the group mode bits rather than the user mode bitsof the /usr/afs/backup directory and files in it. An advantage over themethods listed previously is that each operator can retain an individualadministrative account for finer granularity in auditing.
For instructions on implementing your choice of protection methods, see“Configuring Tape Coordinator Machines and Tape Devices”.
Configuring Tape Coordinator Machines and Tape Devices
This section explains how to configure a machine as a Tape Coordinatormachine, and how to configure or remove the Tape Coordinator associatedwith a single tape device or backup data file.
Note: When configuring a tape device attached to an AIX system, you mustset the device’s tape block size to 0 (zero) to indicate variable blocksize. If you do not, it is possible that devices attached to machines ofother system types cannot read the tapes made on the AIX system. Usethe AIX smit program to verify or change the value of the tape blocksize for a tape device, as instructed in Sep 3 on page 230.
Chapter 6. Configuring the AFS Backup System 229

To configure a Tape Coordinator machine1. Verify that you are authenticated as a user listed in the
/usr/afs/etc/UserList file. If necessary, issue the bos listusers command,which is fully described in “To display the users in the UserList file” onpage 582.
% bos listusers <machine name>
2. Become the local superuser root on the machine, if you are not already, byissuing the su command.
% su rootPassword: root_password
3. Install one or more tape devices on the Tape Coordinator machineaccording to the manufacturer’s instructions. The Backup System can tracka maximum of 58,511 tape devices or backup data files per cell.If the Tape Coordinator machine is an AIX system, issue the followingcommand to change the tape device’s tape block size to 0 (zero), whichindicates variable block size. Repeat for each tape device.
# chdev -l 'device_name' -a block_size='0'
where device_name is the tape device’s device name (for example,/dev/rmt0h).
4. Verify that the binary files for the backup, butc, and fms commands areavailable on the local disk. If the machine is an AFS client, theconventional location is the /usr/afsws/etc directory.
# ls /usr/afsws/etc
5. Create the /usr/afs directory. (If the Tape Coordinator machine is alsoconfigured as a file server machine, this directory already exists.) Thencreate the /usr/afs/backup directory.
# mkdir /usr/afs# mkdir /usr/afs/backup
6. Use a text editor to create the /usr/afs/backup/tapeconfig file. Include asingle line for each tape device or backup data file, specifying thefollowing information in the indicated order. For syntax details andsuggestions on the values to use in each field, see “Configuring thetapeconfig File” on page 224.v The capacity of tapes to be used in the device, or the size of the backup
data filev The device’s filemark sizev The device’s device name, starting with the string /dev/
v The device’s port offset number7. Decide which user and group are to own the /usr/afs/backup directory
and /usr/afs/backup/tapeconfig file, based on the suggestions in “Granting
230 AFS: Administration Guide

Administrative Privilege to Backup Operators” on page 228. Correct theUNIX mode bits on the directory and file, if necessary.
# chown admin_owner /usr/afs/backup# chown admin_owner /usr/afs/backup/tapeconfig# chgrp admin_group /usr/afs/backup# chgrp admin_group /usr/afs/backup/tapeconfig# chmod 774 /usr/afs/backup# chmod 664 /usr/afs/backup/tapeconfig
8. Issue the backup addhost command to create a Tape Coordinator entry inthe Backup Database. Repeat the command for each Tape Coordinator.
# backup addhost <tape machine name> [<TC port offset>]
where
addh Is the shortest acceptable abbreviation of addhost.
tape machine nameSpecifies the Tape Coordinator machine’s fully qualified hostname.
TC port offsetSpecifies the tape device’s port offset number. Provide the samevalue as you specified for the device in the tapeconfig file. Youmust provide this argument unless the default value of 0 (zero) isappropriate.
To configure an additional Tape Coordinator on an existing TapeCoordinator machine
1. Verify that you are authenticated as a user listed in the/usr/afs/etc/UserList file. If necessary, issue the bos listusers command,which is fully described in “To display the users in the UserList file” onpage 582.
% bos listusers <machine name>
2. Become the local superuser root on the machine, if you are not already, byissuing the su command.
% su rootPassword: root_password
3. Install the tape device on the Tape Coordinator machine according to themanufacturer’s instructions.If the Tape Coordinator machine is an AIX system, issue the followingcommand to change the tape device’s tape block size to 0 (zero), whichindicates variable block size.
# chdev -l 'device_name' -a block_size='0'
4. Choose the port offset number to assign to the tape device. If necessary,use the backup listhosts command to display the port offset numbers thatare already used; for a discussion of the output, see “To display the list ofconfigured Tape Coordinators” on page 232.
Chapter 6. Configuring the AFS Backup System 231
# backup listhosts
where listh is the shortest acceptable abbreviation of listhosts.5. Use a text editor to add one or more entries for the device to the
/usr/afs/backup/tapeconfig file. Specify the following information in theindicated order. For syntax details and suggestions on the values to use ineach field, see “Configuring the tapeconfig File” on page 224.v The capacity of tapes to be used in the device, or the size of the backup
data filev The device’s filemark sizev The device’s device name, starting with the string /dev/
v The device’s port offset number6. Issue the backup addhost command to create an entry in the Backup
Database for the Tape Coordinator. For complete syntax, see Step 8 onpage 231 in “To configure a Tape Coordinator machine” on page 230.
# backup addhost <tape machine name> [<TC port offset>]
To unconfigure a Tape Coordinator1. Verify that you are authenticated as a user listed in the
/usr/afs/etc/UserList file. If necessary, issue the bos listusers command,which is fully described in “To display the users in the UserList file” onpage 582.
% bos listusers <machine name>
2. Using a text editor, remove each of the Tape Coordinator’s entries from the/usr/afs/backup/tapeconfig file.
3. Issue the backup delhost command to delete the Tape Coordinator’sBackup Database entry.
% backup delhost <tape machine name> [<TC port offset>]
where
delh Is the shortest acceptable abbreviation of delhost.
tape machine nameIs the complete Internet host name of the Tape Coordinatormachine.
TC port offsetIs the same port offset number removed from the tapeconfig file.You must provide this argument unless the default value of 0(zero) is appropriate.
To display the list of configured Tape Coordinators1. Issue the backup listhosts command to list the Tape Coordinators and
port offset numbers currently configured in the Backup Database.
232 AFS: Administration Guide
% backup listhosts
where
listh Is the shortest acceptable abbreviation of listhosts.
The output lists each Tape Coordinator machine and the port offset numberscurrently allocated to it in the Backup Database. The appearance of a portoffset number does not imply that the associated Tape Coordinator is actuallyrunning. Machine names appear in the format in which they were specifiedwith the backup addhost command.
The following example output lists the Tape Coordinators currently defined inthe Backup Database of the ABC Corporation cell:
% backup listhostsTape hosts:
Host backup1.abc.com, port offset 0Host backup1.abc.com, port offset 2Host backup2.abc.com, port offset 1Host backup2.abc.com, port offset 3
Defining and Displaying Volume Sets and Volume Entries
The Backup System handles data at the level of volumes rather thanindividual files. You must define groups of volumes called volume sets beforeperforming backup operations, by using the backup addvolset command. Avolume set name can be up to 31 characters long and can include anycharacter other than the period (.), but avoid using metacharacters that havespecial meanings to the shell.
After creating a volume set, use the backup addvolentry command to placeone or more volume entries in it. They define the volumes that belong to it interms of their location (file server machine and partition) and name. Use thecommand’s required -server argument to designate the file server machinethat houses the volumes of interest and its required -partition argument todesignate the partition. Two types of values are acceptable:v The fully qualified hostname of one machine or full name of one partition
(such as /vicepm)v The regular expression .* (period and asterisk), which matches every
machine name or partition name in the VLDB
For the volume name (the required -volume argument), specify a combinationof alphanumeric characters and one or more metacharacters to specify part orall of the volume name with a wildcard. You can use any of the followingmetacharacters in the volume name field:
Chapter 6. Configuring the AFS Backup System 233
. The period matches any single character.
* The asterisk matches zero or more instances of the precedingcharacter. Combine it with any other alphanumeric character ormetacharacter.
[ ] Square brackets around a list of characters match a single instance ofany of the characters, but no other characters; for example, [abc]matches a single a or b or c, but not d or A. You can combine thisexpression with the asterisk.
| The caret, when used as the first character in a square-bracketed set,designates a match with any single character other than the charactersthat follow it; for example, [|a] matches any single character exceptlowercase a. You can combine this expression with the asterisk.
\ A backslash preceding any of the metacharacters in this list makes itmatch its literal value only. For example, the expression \. (backslashand period) matches a single period, \* matches a single asterisk, and\\ matches a single backslash. You can combine such expressionswith the asterisk (for example, \.* matches any number of periods).
Perhaps the most common regular expression is the period followed by anasterisk (.*). This expression matches any string of any length, because theperiod matches any character and the asterisk means any number of thatcharacter. As mentioned, it is the only acceptable regular expression in the fileserver and partition fields of a volume entry. In the volume name field, it canstand alone (in which case it matches every volume listed in the VLDB), orcan combine with alphanumeric characters. For example, the stringuser.*\.backup matches any volume name that begins with the string userand ends with .backup.
Issuing the backup addvolentry command in interactive mode is simplest. Ifyou issue it at the shell prompt, you must surround any string that includes aregular expression with double quotes (″ ″) so that the shell passes themuninterpreted to the backup command interpreter rather than resolving them.
To define various combinations of volumes, provide the following types ofvalues for the backup addvolentry command’s three arguments. The list usesthe notation appropriate for interactive mode; if you issue the command atthe shell prompt instead, place double quotes around any string that includesa regular expression. To create a volume entry that includes:v All volumes listed in the VLDB, use the regular expression .* for all three
arguments (-server .* -partition .* -volume .*)
234 AFS: Administration Guide
v Every volume on a specific file server machine, specify its fully qualifiedhostname as the -server argument and use the regular expression .* for the-partition and -volume arguments (for example: -server fs1.abc.com-partition .* -volume .*)
v All volumes that reside on a partition with the same name on various fileserver machines, specify the complete partition name as the -partitionargument and use the regular expression .* for the -server and -volumearguments (for example: -server .* -partition /vicepd -volume .*)
v Every volume with a common string in its name, use the regular expression.* for the -server and -partition arguments, and provide a combination ofalphanumeric characters and metacharacters as the -volume argument (forexample: -server .* -partition .* -volume .*\.backup includes all volumeswhose names end in the string .backup).
v All volumes on one partition, specify the machine’s fully qualifiedhostname as the -server argument and the full partition name as the-partition argument, and use the regular expression .* for the -volumeargument (for example: -server fs2.abc.com -partition /vicepb -volume .*).
v A single volume, specify its complete name as the -volume argument. Tobypass the potentially time-consuming search through the VLDB formatching entries, you can specify an actual machine and partition name forthe -server and -partition arguments respectively. However, if it is possiblethat you need to move the volume in future, it is best to use the regularexpression .* for the machine and partition name.
As you create volume sets, define groups of volumes you want to dump tothe same tape at the same time (for example, weekly or daily) and in thesame manner (fully or incrementally). In general, a volume set that includesvolumes with similar contents (as indicated by similar names) is more usefulthan one that includes volumes that share a common location, especially ifyou often move volumes for load-balancing or space reasons. Most often,then, it is appropriate to use the regular expression .* (period followed by abackslash) for the -server and -partition arguments to the backupaddvolentry command.
It is generally more efficient to include a limited number of volumes in avolume entry. Dumps of a volume set that includes a large number of volumecan take a long time to complete, increasing the possibility that the operationfails due to a service interruption or outage.
To remove a volume entry from a volume set, use the backup delvolentrycommand. To remove a volume set and all of its component volume entriesfrom the Backup Database, use the backup delvolset command. To displaythe volume entries in a volume set, use the backup listvolsets command.
Chapter 6. Configuring the AFS Backup System 235
By default, a Backup Database record is created for the new volume set.Sometimes it is convenient to create volume sets without recording thempermanently in the Backup Database, for example when using the backupvolsetrestore command to restore a group of volumes that were notnecessarily backed up together (for further discussion, see “Using the backupvolsetrestore Command” on page 313). To create a temporary volume set,include the -temporary flag to the backup addvolset command. A temporaryvolume set exists only during the lifetime of the current interactive session, sothe flag is effective only when used during an interactive session (opened byissuing the backup (interactive) command). You can use the backup delvolsetcommand to delete a temporary volume set before the interactive sessionends, if you wish, but as noted it is automatically deleted when you end thesession. One advantage of temporary volume sets is that the backupaddvolset command, and any backup addvolentry commands subsequentlyused to add volume entries to it, complete more quickly than for regularvolume sets, because you are not creating any Backup Database records.
To create a volume set1. Verify that you are authenticated as a user listed in the
/usr/afs/etc/UserList file. If necessary, issue the bos listusers command,which is fully described in “To display the users in the UserList file” onpage 582.
% bos listusers <machine name>
2. (Optional) Issue the backup command to enter interactive mode. If youare going to define volume entries right away with the backupaddvolentry command, this eliminates the need to surround metacharacterexpressions with double quotes. You must enter interactive mode ifcreating a temporary volume set.
% backup
3. Issue the (backup) addvolset command to create the volume set. You mustthen issue the (backup) addvolentry command to define volume entries init.
backup> addvolset <volume set name> [-temporary]
where
addvolsIs the shortest acceptable abbreviation of addvolset.
volume set nameNames the volume set. The name can include no more than 31characters, cannot include periods, and must be unique within theBackup Database. (A temporary volume set can have the samename as an existing permanent volume set, but this is notrecommended because of the confusion it can cause.)
236 AFS: Administration Guide
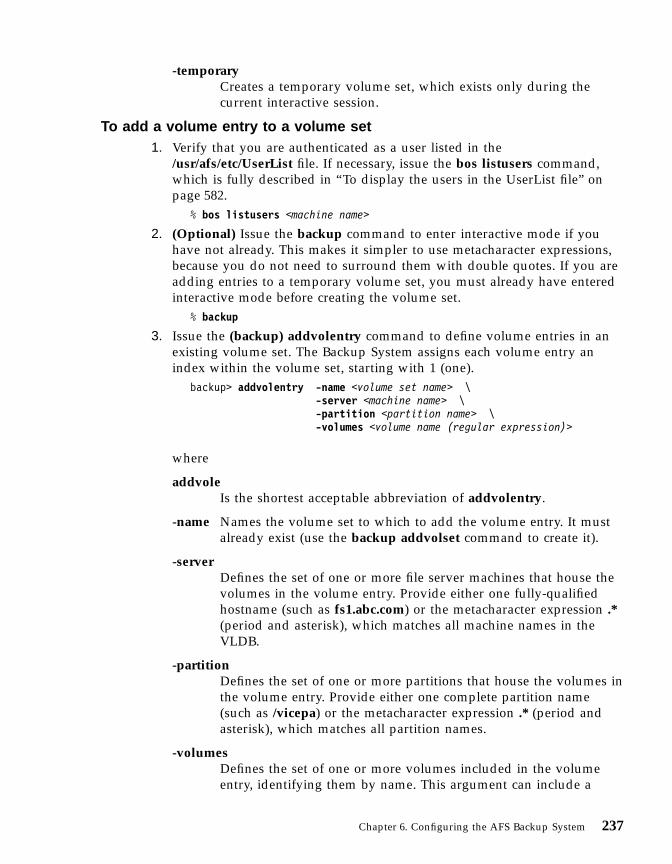
-temporaryCreates a temporary volume set, which exists only during thecurrent interactive session.
To add a volume entry to a volume set1. Verify that you are authenticated as a user listed in the
/usr/afs/etc/UserList file. If necessary, issue the bos listusers command,which is fully described in “To display the users in the UserList file” onpage 582.
% bos listusers <machine name>
2. (Optional) Issue the backup command to enter interactive mode if youhave not already. This makes it simpler to use metacharacter expressions,because you do not need to surround them with double quotes. If you areadding entries to a temporary volume set, you must already have enteredinteractive mode before creating the volume set.
% backup
3. Issue the (backup) addvolentry command to define volume entries in anexisting volume set. The Backup System assigns each volume entry anindex within the volume set, starting with 1 (one).
backup> addvolentry -name <volume set name> \-server <machine name> \-partition <partition name> \-volumes <volume name (regular expression)>
where
addvoleIs the shortest acceptable abbreviation of addvolentry.
-name Names the volume set to which to add the volume entry. It mustalready exist (use the backup addvolset command to create it).
-serverDefines the set of one or more file server machines that house thevolumes in the volume entry. Provide either one fully-qualifiedhostname (such as fs1.abc.com) or the metacharacter expression .*(period and asterisk), which matches all machine names in theVLDB.
-partitionDefines the set of one or more partitions that house the volumes inthe volume entry. Provide either one complete partition name(such as /vicepa) or the metacharacter expression .* (period andasterisk), which matches all partition names.
-volumesDefines the set of one or more volumes included in the volumeentry, identifying them by name. This argument can include a
Chapter 6. Configuring the AFS Backup System 237

combination of alphanumeric characters and one or more of themetacharacter expressions discussed in the introductory materialin this section.
To display volume sets and volume entries1. Issue the backup listvolsets command to display the volume entries in a
specific volume set or all of them. If you are displaying a temporaryvolume set, you must still be in the interactive session in which youcreated it.
% backup listvolsets [<volume set name>]
where
listv Is the shortest acceptable abbreviation of listvolsets.
volume set nameNames the volume set to display. Omit this argument to displayall defined volume sets.
The output from the command uses the wildcard notation used when thevolume entries were created. The string (temporary) marks a temporaryvolume set. The following example displays all three of the volume setsdefined in a cell’s Backup Database, plus a temporary volume setpat+jones created during the current interactive session:
backup> listvVolume set pat+jones (temporary):
Entry 1: server fs1.abc.com, partition /vicepe, volumes: user.pat.backupEntry 2: server fs5.abc.com, partition /viceph, volumes: user.jones.backup
Volume set user:Entry 1: server .*, partition .*, volumes: user.*\.backup
Volume set sun:Entry 1: server .*, partition .*, volumes: sun4x_55\..*Entry 2: server .*, partition .*, volumes: sun4x_56\..*
Volume set rs:Entry 1: server .*, partition .*, volumes: rs_aix42\..*
To delete a volume set1. Verify that you are authenticated as a user listed in the
/usr/afs/etc/UserList file. If necessary, issue the bos listusers command,which is fully described in “To display the users in the UserList file” onpage 582.
% bos listusers <machine name>
2. Issue the backup delvolset command to delete one or more volume setsand all of the component volume entries in them. If you are deleting atemporary volume set, you must still be in the interactive session in whichyou created it.
% backup delvolset <volume set name>+
238 AFS: Administration Guide
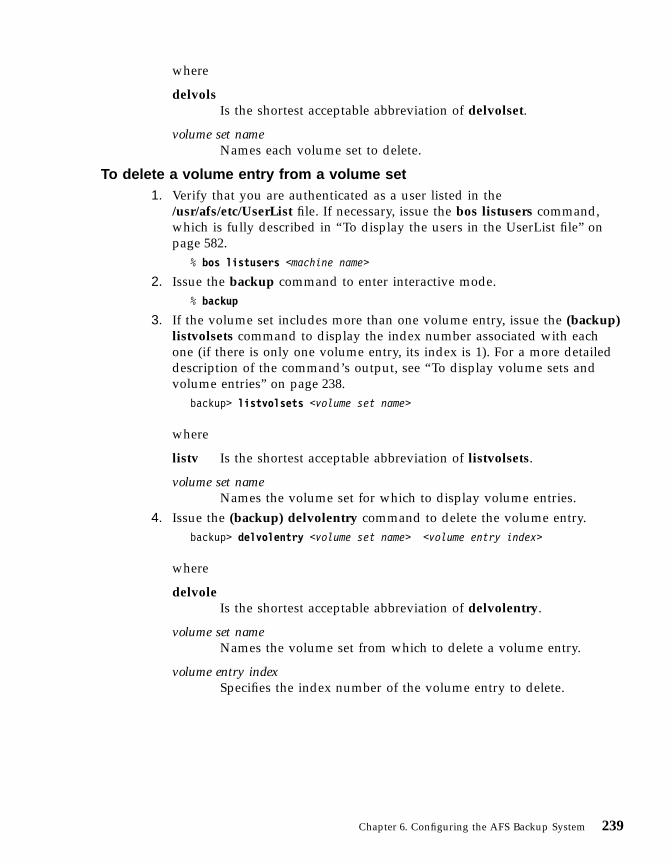
where
delvolsIs the shortest acceptable abbreviation of delvolset.
volume set nameNames each volume set to delete.
To delete a volume entry from a volume set1. Verify that you are authenticated as a user listed in the
/usr/afs/etc/UserList file. If necessary, issue the bos listusers command,which is fully described in “To display the users in the UserList file” onpage 582.
% bos listusers <machine name>
2. Issue the backup command to enter interactive mode.% backup
3. If the volume set includes more than one volume entry, issue the (backup)listvolsets command to display the index number associated with eachone (if there is only one volume entry, its index is 1). For a more detaileddescription of the command’s output, see “To display volume sets andvolume entries” on page 238.
backup> listvolsets <volume set name>
where
listv Is the shortest acceptable abbreviation of listvolsets.
volume set nameNames the volume set for which to display volume entries.
4. Issue the (backup) delvolentry command to delete the volume entry.backup> delvolentry <volume set name> <volume entry index>
where
delvoleIs the shortest acceptable abbreviation of delvolentry.
volume set nameNames the volume set from which to delete a volume entry.
volume entry indexSpecifies the index number of the volume entry to delete.
Chapter 6. Configuring the AFS Backup System 239
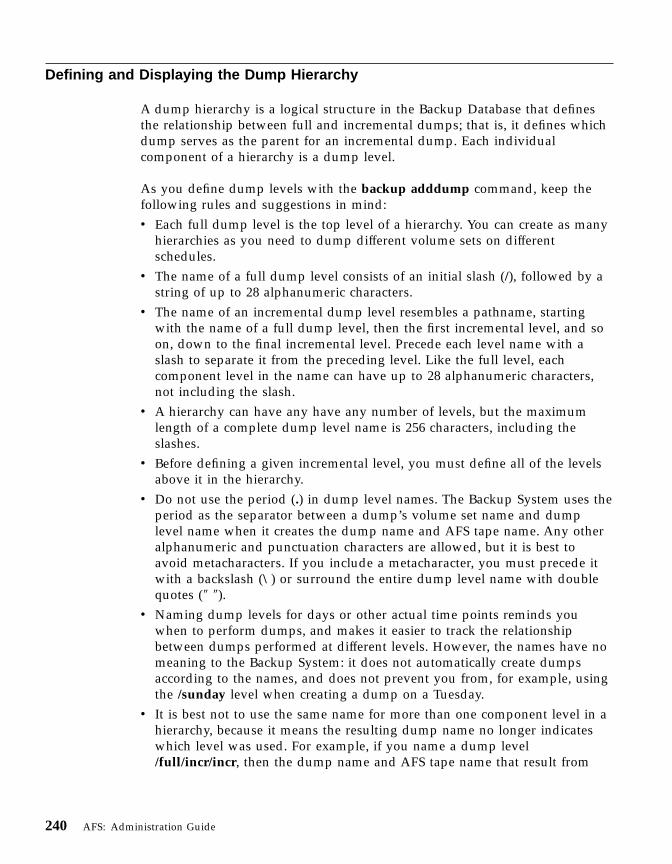
Defining and Displaying the Dump Hierarchy
A dump hierarchy is a logical structure in the Backup Database that definesthe relationship between full and incremental dumps; that is, it defines whichdump serves as the parent for an incremental dump. Each individualcomponent of a hierarchy is a dump level.
As you define dump levels with the backup adddump command, keep thefollowing rules and suggestions in mind:v Each full dump level is the top level of a hierarchy. You can create as many
hierarchies as you need to dump different volume sets on differentschedules.
v The name of a full dump level consists of an initial slash (/), followed by astring of up to 28 alphanumeric characters.
v The name of an incremental dump level resembles a pathname, startingwith the name of a full dump level, then the first incremental level, and soon, down to the final incremental level. Precede each level name with aslash to separate it from the preceding level. Like the full level, eachcomponent level in the name can have up to 28 alphanumeric characters,not including the slash.
v A hierarchy can have any have any number of levels, but the maximumlength of a complete dump level name is 256 characters, including theslashes.
v Before defining a given incremental level, you must define all of the levelsabove it in the hierarchy.
v Do not use the period (.) in dump level names. The Backup System uses theperiod as the separator between a dump’s volume set name and dumplevel name when it creates the dump name and AFS tape name. Any otheralphanumeric and punctuation characters are allowed, but it is best toavoid metacharacters. If you include a metacharacter, you must precede itwith a backslash (\) or surround the entire dump level name with doublequotes (″ ″).
v Naming dump levels for days or other actual time points reminds youwhen to perform dumps, and makes it easier to track the relationshipbetween dumps performed at different levels. However, the names have nomeaning to the Backup System: it does not automatically create dumpsaccording to the names, and does not prevent you from, for example, usingthe /sunday level when creating a dump on a Tuesday.
v It is best not to use the same name for more than one component level in ahierarchy, because it means the resulting dump name no longer indicateswhich level was used. For example, if you name a dump level/full/incr/incr, then the dump name and AFS tape name that result from
240 AFS: Administration Guide
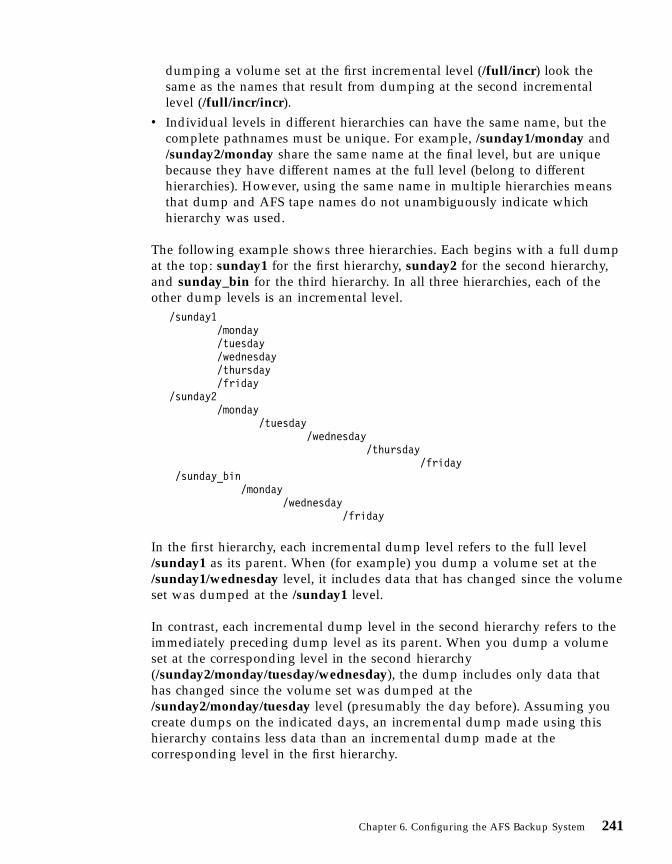
dumping a volume set at the first incremental level (/full/incr) look thesame as the names that result from dumping at the second incrementallevel (/full/incr/incr).
v Individual levels in different hierarchies can have the same name, but thecomplete pathnames must be unique. For example, /sunday1/monday and/sunday2/monday share the same name at the final level, but are uniquebecause they have different names at the full level (belong to differenthierarchies). However, using the same name in multiple hierarchies meansthat dump and AFS tape names do not unambiguously indicate whichhierarchy was used.
The following example shows three hierarchies. Each begins with a full dumpat the top: sunday1 for the first hierarchy, sunday2 for the second hierarchy,and sunday_bin for the third hierarchy. In all three hierarchies, each of theother dump levels is an incremental level.
/sunday1/monday/tuesday/wednesday/thursday/friday
/sunday2/monday
/tuesday/wednesday
/thursday/friday
/sunday_bin/monday
/wednesday/friday
In the first hierarchy, each incremental dump level refers to the full level/sunday1 as its parent. When (for example) you dump a volume set at the/sunday1/wednesday level, it includes data that has changed since the volumeset was dumped at the /sunday1 level.
In contrast, each incremental dump level in the second hierarchy refers to theimmediately preceding dump level as its parent. When you dump a volumeset at the corresponding level in the second hierarchy(/sunday2/monday/tuesday/wednesday), the dump includes only data thathas changed since the volume set was dumped at the/sunday2/monday/tuesday level (presumably the day before). Assuming youcreate dumps on the indicated days, an incremental dump made using thishierarchy contains less data than an incremental dump made at thecorresponding level in the first hierarchy.
Chapter 6. Configuring the AFS Backup System 241
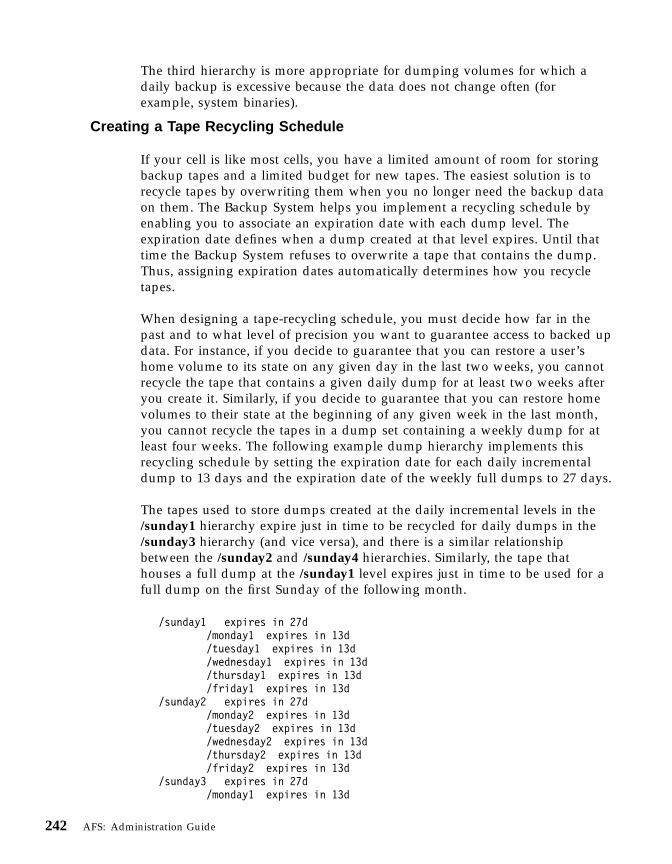
The third hierarchy is more appropriate for dumping volumes for which adaily backup is excessive because the data does not change often (forexample, system binaries).
Creating a Tape Recycling Schedule
If your cell is like most cells, you have a limited amount of room for storingbackup tapes and a limited budget for new tapes. The easiest solution is torecycle tapes by overwriting them when you no longer need the backup dataon them. The Backup System helps you implement a recycling schedule byenabling you to associate an expiration date with each dump level. Theexpiration date defines when a dump created at that level expires. Until thattime the Backup System refuses to overwrite a tape that contains the dump.Thus, assigning expiration dates automatically determines how you recycletapes.
When designing a tape-recycling schedule, you must decide how far in thepast and to what level of precision you want to guarantee access to backed updata. For instance, if you decide to guarantee that you can restore a user’shome volume to its state on any given day in the last two weeks, you cannotrecycle the tape that contains a given daily dump for at least two weeks afteryou create it. Similarly, if you decide to guarantee that you can restore homevolumes to their state at the beginning of any given week in the last month,you cannot recycle the tapes in a dump set containing a weekly dump for atleast four weeks. The following example dump hierarchy implements thisrecycling schedule by setting the expiration date for each daily incrementaldump to 13 days and the expiration date of the weekly full dumps to 27 days.
The tapes used to store dumps created at the daily incremental levels in the/sunday1 hierarchy expire just in time to be recycled for daily dumps in the/sunday3 hierarchy (and vice versa), and there is a similar relationshipbetween the /sunday2 and /sunday4 hierarchies. Similarly, the tape thathouses a full dump at the /sunday1 level expires just in time to be used for afull dump on the first Sunday of the following month.
/sunday1 expires in 27d/monday1 expires in 13d/tuesday1 expires in 13d/wednesday1 expires in 13d/thursday1 expires in 13d/friday1 expires in 13d
/sunday2 expires in 27d/monday2 expires in 13d/tuesday2 expires in 13d/wednesday2 expires in 13d/thursday2 expires in 13d/friday2 expires in 13d
/sunday3 expires in 27d/monday1 expires in 13d
242 AFS: Administration Guide
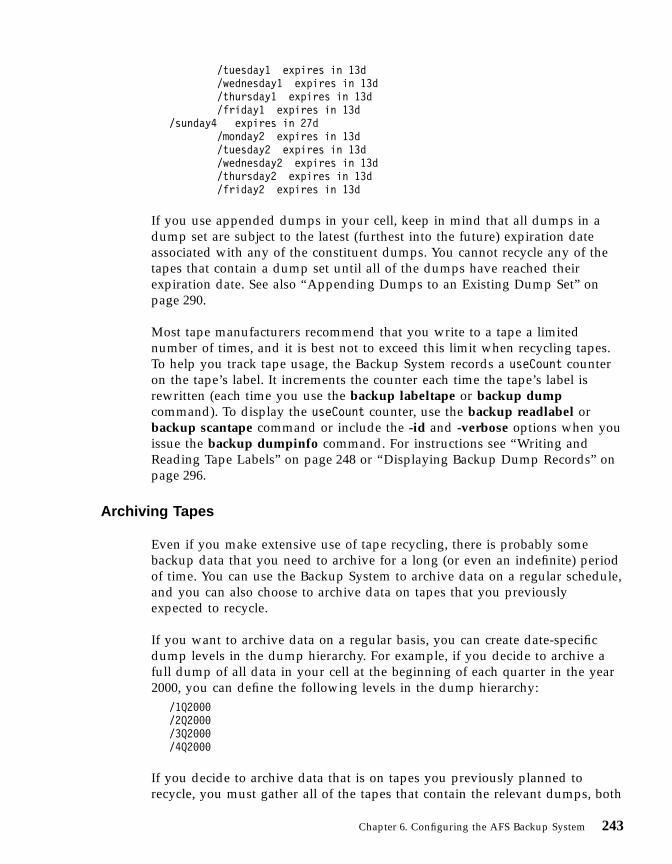
/tuesday1 expires in 13d/wednesday1 expires in 13d/thursday1 expires in 13d/friday1 expires in 13d
/sunday4 expires in 27d/monday2 expires in 13d/tuesday2 expires in 13d/wednesday2 expires in 13d/thursday2 expires in 13d/friday2 expires in 13d
If you use appended dumps in your cell, keep in mind that all dumps in adump set are subject to the latest (furthest into the future) expiration dateassociated with any of the constituent dumps. You cannot recycle any of thetapes that contain a dump set until all of the dumps have reached theirexpiration date. See also “Appending Dumps to an Existing Dump Set” onpage 290.
Most tape manufacturers recommend that you write to a tape a limitednumber of times, and it is best not to exceed this limit when recycling tapes.To help you track tape usage, the Backup System records a useCount counteron the tape’s label. It increments the counter each time the tape’s label isrewritten (each time you use the backup labeltape or backup dumpcommand). To display the useCount counter, use the backup readlabel orbackup scantape command or include the -id and -verbose options when youissue the backup dumpinfo command. For instructions see “Writing andReading Tape Labels” on page 248 or “Displaying Backup Dump Records” onpage 296.
Archiving Tapes
Even if you make extensive use of tape recycling, there is probably somebackup data that you need to archive for a long (or even an indefinite) periodof time. You can use the Backup System to archive data on a regular schedule,and you can also choose to archive data on tapes that you previouslyexpected to recycle.
If you want to archive data on a regular basis, you can create date-specificdump levels in the dump hierarchy. For example, if you decide to archive afull dump of all data in your cell at the beginning of each quarter in the year2000, you can define the following levels in the dump hierarchy:
/1Q2000/2Q2000/3Q2000/4Q2000
If you decide to archive data that is on tapes you previously planned torecycle, you must gather all of the tapes that contain the relevant dumps, both
Chapter 6. Configuring the AFS Backup System 243
full and incremental. To avoid accidental erasure, it is best to set the switch onthe tapes that makes them read-only, before placing them in your archivestorage area. If the tapes also contain a large amount of extraneous data thatyou do not want to archive, you can restore just the relevant data into a newtemporary volume, and back up that volume to the smallest number of tapespossible. One reason to keep a dump set small is to minimize the amount ofirrelevant data in a dump set you end up needing to archive.
If you do not expect to restore archived data to the file system, you canconsider using the backup deletedump command to remove the associateddump records from the Backup Database, which helps keep it to an efficientsize. If you ever need to restore the data, you can use the -dbadd flag to thebackup scantape command to reinsert the dump records into the database.For instructions, see “To scan the contents of a tape” on page 302.
Defining Expiration Dates
To associate an expiration date with a dump level as you create it, use the-expires argument to the backup adddump command. To change an existingdump level’s expiration date, use the -expires argument to the backup setexpcommand. (Note that it is not possible to change the expiration date of anactual dump that has already been created at that level). With bothcommands, you can define an expiration date either in absolute terms (forexample, 13 January 2000) or relative terms (for example, 30 days from whenthe dump is created).v To define an absolute expiration date, provide a value for the -expires
argument with the following format:[at] mm/dd/yyyy [hh:MM]
where mm indicates the month, dd the day, and yyyy the year when thedump expires. Valid values for the year fall in the range 1970 through 2037(the latest possible date that the UNIX time representation can express is inearly 2038). If you provide a time, it must be in 24-hour format with hh thehours and MM the minutes (for example, 21:50 is 9:50 p.m.). If you omit thetime, the default is 00:00 hours (12:00 midnight) on the indicated date.
v To define a relative expiration date, provide a value for the -expiresargument with the following format:
[in] [yearsy] [monthsm] [daysd]
where each of years, months, and days is an integer. Provide at least one ofthem together with the corresponding units letter (y, m, or d respectively),with no intervening space. If you provide more than one of the three, listthem in the indicated order.
244 AFS: Administration Guide

The Backup System calculates a dump’s actual expiration date by addingthe indicated relative value to the start time of the dump operation. Forexample, it assigns an expiration date 1 year, 6 months, and 2 days in thefuture to a dump created at a dump level with associated expiration date in1y 6m 2d.
v To indicate that a dump backed up at the corresponding dump level neverexpires, provide the value NEVER instead of a date and time. To recycletapes that contain dumps created at such a level, you must use the backupreadlabel command to overwrite the tape’s label.
If you omit the -expires argument to the backup adddump command, thenthe expiration date is set to UNIX time zero (00:00 hours on 1 January 1970).The Backup System considers dumps created at such a dump level to expireat their creation time. If no dumps in a dump set have an expiration date,then the Backup System does not impose any restriction on recycling the tapesthat contain the dump set. If you need to prevent premature recycling of thetapes that contain the dump set, you must use a manual tracking system.
To add a dump level to the dump hierarchy1. Verify that you are authenticated as a user listed in the
/usr/afs/etc/UserList file. If necessary, issue the bos listusers command,which is fully described in “To display the users in the UserList file” onpage 582.
% bos listusers <machine name>
2. Optional. Issue the backup command to enter interactive mode.% backup
3. Issue the backup adddump command to define one or more dump levels.If you are defining an incremental level, then all of the parent levels thatprecede it in its pathname must either already exist or precede it on thecommand line.
backup> adddump -dump <dump level name>+ [-expires <expiration date>+]
where
addd Is the shortest acceptable abbreviation of adddump.
-dumpNames each dump level to added. If you specify more than onedump level name, you must include the -dump switch.
Provide the entire pathname of the dump level, preceding eachlevel in the pathname with a slash (/). Each component level canbe up to 28 characters in length, and the pathname can include upto 256 characters including the slashes.
-expiresSets the expiration date associated with each dump level. Specify
Chapter 6. Configuring the AFS Backup System 245

either a relative or absolute expiration date, as described in“Defining Expiration Dates” on page 244, or omit this argument toassign no expiration date to the dump levels.
Note: A plus sign follows this argument in the command’s syntaxstatement because it accepts a multiword value which doesnot need to be enclosed in double quotes or otherdelimiters, not because it accepts multiple dates. Provideonly one date (and optionally, time) definition to beassociated with each dump level specified by the -dumpargument.
To change a dump level’s expiration date1. Verify that you are authenticated as a user listed in the
/usr/afs/etc/UserList file. If necessary, issue the bos listusers command,which is fully described in “To display the users in the UserList file” onpage 582.
% bos listusers <machine name>
2. Optional. Issue the backup command to enter interactive mode.% backup
3. Issue the (backup) setexp command to change the expiration dateassociated with one or more dump levels.
backup> setexp -dump <dump level name>+ [-expires <expiration date>+]
where
se Is the shortest acceptable abbreviation of setexp.
-dumpNames each existing dump level for which to change theexpiration date.
-expiresSets the expiration date associated with each dump level. Specifyeither a relative or absolute expiration date, as described in“Defining Expiration Dates” on page 244; omit this argument toremove the expiration date currently associated with each dumplevel.
Note: A plus sign follows this argument in the command’s syntaxstatement because it accepts a multiword value which doesnot need to be enclosed in double quotes or otherdelimiters, not because it accepts multiple dates. Provideonly one date (and optionally, time) definition to beassociated with each dump level specified by the -dumpargument.
246 AFS: Administration Guide
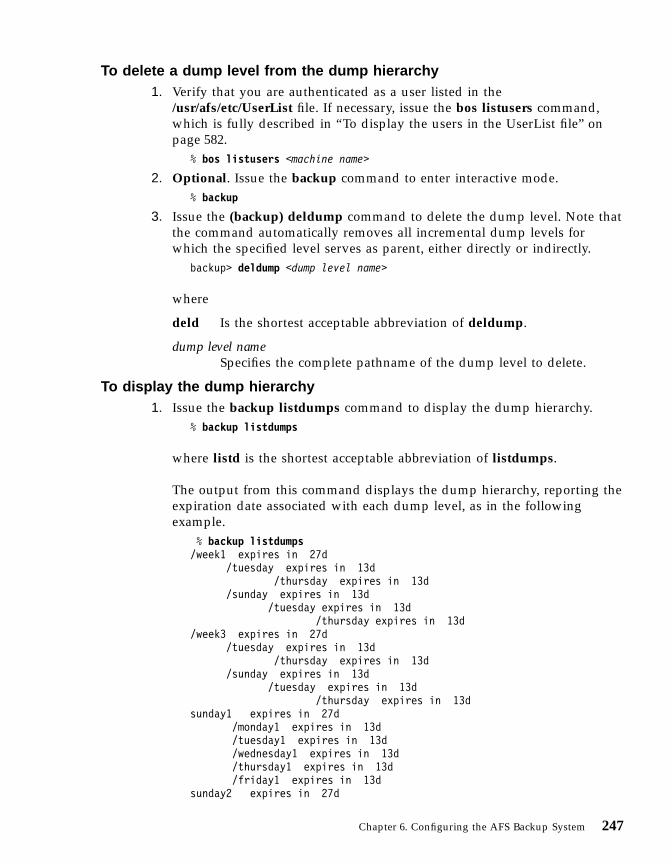
To delete a dump level from the dump hierarchy1. Verify that you are authenticated as a user listed in the
/usr/afs/etc/UserList file. If necessary, issue the bos listusers command,which is fully described in “To display the users in the UserList file” onpage 582.
% bos listusers <machine name>
2. Optional. Issue the backup command to enter interactive mode.% backup
3. Issue the (backup) deldump command to delete the dump level. Note thatthe command automatically removes all incremental dump levels forwhich the specified level serves as parent, either directly or indirectly.
backup> deldump <dump level name>
where
deld Is the shortest acceptable abbreviation of deldump.
dump level nameSpecifies the complete pathname of the dump level to delete.
To display the dump hierarchy1. Issue the backup listdumps command to display the dump hierarchy.
% backup listdumps
where listd is the shortest acceptable abbreviation of listdumps.
The output from this command displays the dump hierarchy, reporting theexpiration date associated with each dump level, as in the followingexample.
% backup listdumps/week1 expires in 27d
/tuesday expires in 13d/thursday expires in 13d
/sunday expires in 13d/tuesday expires in 13d
/thursday expires in 13d/week3 expires in 27d
/tuesday expires in 13d/thursday expires in 13d
/sunday expires in 13d/tuesday expires in 13d
/thursday expires in 13dsunday1 expires in 27d
/monday1 expires in 13d/tuesday1 expires in 13d/wednesday1 expires in 13d/thursday1 expires in 13d/friday1 expires in 13d
sunday2 expires in 27d
Chapter 6. Configuring the AFS Backup System 247

/monday2 expires in 13d/tuesday2 expires in 13d/wednesday2 expires in 13d/thursday2 expires in 13d/friday2 expires in 13d
sunday3 expires in 27d/monday1 expires in 13d/tuesday1 expires in 13d/wednesday1 expires in 13d/thursday1 expires in 13d/friday1 expires in 13d
sunday4 expires in 27d/monday2 expires in 13d/tuesday2 expires in 13d/wednesday2 expires in 13d/thursday2 expires in 13d/friday2 expires in 13d
Writing and Reading Tape Labels
As described in “Dump Names and Tape Names” on page 219 and “TapeLabels, Dump Labels, and EOF Markers” on page 220, you can assign either apermanent name or an AFS tape name to a tape that you use in the BackupSystem. The names are recorded on the tape’s magnetic label, along with anindication of the tape’s capacity (size).
You can assign either a permanent name or an AFS tape name, but not both.In general, assigning permanent names rather than AFS tape names simplifiesthe backup process, because the Backup System does not dictate the format ofpermanent names. If a tape does not have a permanent name, then by defaultthe Backup System accepts only three strictly defined values in the AFS tapename field, and refuses to write a dump to a tape with an inappropriate AFStape name. The acceptable values are a name that matches the volume set anddump level of the initial dump, the value <NULL>, and no value in the field atall.
If a tape has a permanent name, the Backup System does not check the AFStape name, and as part of the dump operation constructs the appropriate AFStape name itself and records it on the label. This means that if you assign apermanent name, the Backup System assigns an AFS tape name itself and thetape has both types of name. In contrast, if a tape has an AFS tape name butnot a permanent name, you cannot assign a permanent name without firsterasing the AFS tape name.
(You can also suppress the Backup System’s check of a tape’s AFS tape name,even it does not have a permanent name, by assigning the value NO to the
248 AFS: Administration Guide
NAME_CHECK instruction in the device configuration file. See “Eliminatingthe AFS Tape Name Check” on page 262.)
Because the Backup System accepts unlabeled tapes, you do not have to labela tape before using it for the first time. After the first use, there are a coupleof cases in which you must relabel a tape in order to write a dump to it:v The tape does not have a permanent name, and the AFS tape name on it
does not match the new initial dump set you want to create (the volume setand dump level names are different, or the index is incorrect).
v You want to recycle a tape before all of the dumps on it have expired. TheBackup System does not overwrite a tape with any unexpired dumps. Keepin mind, though, that if you relabel the tape to making recycling possible,you erase all the dump records for the tape from the Backup Database,which makes it impossible to restore any data from the tape.
Note: Labeling a tape that contains dump data makes it impossible to usethat data in a restore operation, because the labeling operation removesthe dump’s records from the Backup Database. If you want to record apermanent name on a tape label, you must do it before dumping anydata to the tape.
Recording a Name on the Label
To write a permanent name on a tape’s label, include the -pname argument tospecify a string of up to 32 characters. Check that no other tape used with theBackup System in your cell already has the permanent name you areassigning, because the Backup System does not prevent you from assigningthe same name to multiple tapes. The Backup System overwrites the existingAFS tape name, if any, with the value <NULL>. When a tape has a permanentname, the Backup System uses it instead of the AFS tape name in mostprompts and when referring to the tape in output from backup commands.The permanent name persists until you again include the -pname argument tothe backup labeltape command, regardless of the tape’s contents and of howoften you recycle the tape or use the backup labeltape command without the-pname argument.
To write an AFS tape name on the label, provide a value for the -nameargument that matches the volume set name and the final element in thedump level pathname of the initial dump that you plan to write to the tape,and an index that indicates the tape’s place in the sequence of tapes for thedump set. The format is as follows:
volume_set_name.dump_level_name.tape_index
If you omit the -name argument, the Backup System sets the AFS tape nameto <NULL>. The Backup System automatically constructs and records the
Chapter 6. Configuring the AFS Backup System 249
appropriate name when you later write an initial dump to the tape by usingthe backup dump or backup savedb command.
You cannot use the -name argument if the tape already has a permanentname. To erase a tape’s permanent name, provide a null value to the -pnameargument by issuing the following command:
% backup labeltape -pname ""
Recording a Capacity on the Label
To record the tape’s capacity on the label, specify a number of kilobytes as the-size argument. If you omit this argument the first time you label a tape, theBackup System records the default tape capacity associated with the specifiedport offset in the /usr/afs/backup/tapeconfig file on the Tape Coordinatormachine. If the tape’s capacity is different (in particular, larger) than thecapacity recorded in the tapeconfig file, it is best to record a capacity on thelabel before using the tape. Once set, the value in the label’s capacity fieldpersists until you again use the -size argument to the backup labeltapecommand. For a discussion of the appropriate capacity to record for tapes, see“Configuring the tapeconfig File” on page 224.
To read a tape’s label, use the backup readlabel command.
Most tapes also come with an adhesive label you can apply to the exteriorcasing. To help you easily identify a tape, record at least the tape’s permanentand AFS tape names on the adhesive label. Depending on the recyclingscheme you use, it can be useful to record other information, such as thedump ID, dump creation date, and expiration date of each dump you write tothe tape.
To label a tape1. Verify that you are authenticated as a user listed in the
/usr/afs/etc/UserList file. If necessary, issue the bos listusers command,which is fully described in “To display the users in the UserList file” onpage 582.
% bos listusers <machine name>
2. If the Tape Coordinator for the tape device that is to perform the operationis not already running, open a connection to the appropriate TapeCoordinator machine and issue the butc command, for which completeinstructions appear in “To start a Tape Coordinator process” on page 276.
% butc [<port offset>] [-noautoquery]
3. Place the tape in the device.
250 AFS: Administration Guide
4. Optional. Issue the backup command to enter interactive mode, if youwant to label multiple tapes or issue additional commands after labelingthe tape. The interactive prompt appears in the following step.
% backup
5. Issue the (backup) labeltape command to label the tape.backup> labeltape [-name <tape name, defaults to NULL>] \
[-size <tape size in Kbytes, defaults to size in tapeconfig>] \[-portoffset <TC port offset>] [-pname <permanent tape name>]
where
la Is the shortest acceptable abbreviation of labeltape.
-name Specifies the AFS tape name to record on the label. Include thisargument or the -pname argument, but not both. If you omit thisargument, the AFS tape name is set to <NULL>. If you provide it, itmust have the following format.volume_set_name.dump_level_name.tape_index
for the tape to be acceptable for use in a future backup dumpoperation. The volume_set_name must match the volume set nameof the initial dump to be written to the tape, dump_level_name mustmatch the last element of the dump level pathname at which thevolume set is to be dumped, and tape_index must correctly indicatethe tape’s place in the sequence of tapes that house the dump set;indexing begins with the number 1 (one).
-size Specifies the tape capacity to record on the label. If you arelabeling the tape for the first time, you need to include thisargument only if the tape’s capacity differs from the capacityassociated with the specified port offset in the/usr/afs/backup/tapeconfig file on the Tape Coordinator machine.
If you provide a value, it is an integer value followed by a letterthat indicates units, with no intervening space. A unit value of kor K indicates kilobytes, m or M indicates megabytes, and g or Gindicates gigabytes. If you omit the units letter, the default iskilobytes.
-portoffsetSpecifies the port offset number of the Tape Coordinator handlingthe tape or backup data file for this operation. You must providethis argument unless the default value of 0 (zero) is appropriate.
-pnameSpecifies the permanent name to record on the label. It can be upto 32 characters in length, and include any alphanumeric
Chapter 6. Configuring the AFS Backup System 251
characters. Avoid metacharacters that have a special meaning tothe shell, to avoid having to mark them as literal in commandsissued at the shell prompt.
Include this argument or the -name argument, but not both. Whenyou provide this argument, the AFS tape name is set to <NULL>. Ifyou omit this argument, any existing permanent name is retained.
6. If you did not include the -noautoquery flag when you issued the butccommand, or if the device’s device configuration file includes theinstruction AUTOQUERY YES, then the Tape Coordinator prompts you toplace the tape in the device’s drive. You have already done so, but youmust now press <Return> to indicate that the tape is ready for labeling.
To read the label on a tape1. Verify that you are authenticated as a user listed in the
/usr/afs/etc/UserList file. If necessary, issue the bos listusers command,which is fully described in “To display the users in the UserList file” onpage 582.
% bos listusers <machine name>
2. If the Tape Coordinator for the tape device that is to perform the operationis not already running, open a connection to the appropriate TapeCoordinator machine and issue the butc command, for which completeinstructions appear in “To start a Tape Coordinator process” on page 276.
% butc [<port offset>] [-noautoquery]
3. Place the tape in the device.4. Optional. Issue the backup command to enter interactive mode, if you
want to label multiple tapes or issue additional commands after labelingthe tape. The interactive prompt appears in the following step.
% backup
5. Issue the (backup) readlabel command to read the label on the tape.backup> readlabel [<TC port offset>]
where
rea Is the shortest acceptable abbreviation of readlabel.
TC port offsetSpecifies the port offset number of Tape Coordinator handling thetape or backup data file for this operation. You must provide thisargument unless the default value of 0 (zero) is appropriate.
6. If you did not include the -noautoquery flag when you issued the butccommand, or the device’s device configuration file includes the instructionAUTOQUERY YES instruction, then the Tape Coordinator prompts you toplace the tape in the device’s drive. You have already done so, but youmust now press <Return> to indicate that the tape is ready for reading.
252 AFS: Administration Guide

Information from the tape label appears both in the backup commandwindow and in the Tape Coordinator window. The output in the commandwindow has the following format:
Tape read was labelled: tape_name (initial_dump_ID)size: size KBytes
where tape_name is the tape’s permanent name (if it has one) or AFS tapename, initial_dump_ID is the dump ID of the initial dump on the tape, and sizeis the capacity recorded on the label, in kilobytes.
The information in the Tape Coordinator window is more extensive. Thetape’s permanent name appears in the tape name field and its AFS tape namein the AFS tape name field. If either name is undefined, a value of <NULL>appears in the field instead. The capacity recorded on the label appears in thesize field. Other fields in the output report the creation time, dump levelname, and dump ID of the initial dump on the tape (creationTime, dump path,and dump id respectively). The cell field reports the cell in which the dumpoperation was performed, and the useCount field reports the number of timesthe tape has been relabeled, either with the backup labeltape command orduring a dump operation. For further details, see the command’s referencepage in the AFS Administration Reference.
If the tape has no label, or if the drive is empty, the following messageappears at the command shell:
Failed to read tape label.
The following example illustrates the output in the command shell for a tapein the device with port offset 1:
% backup readlabel 1Tape read was labelled: monthly_guest (917860000)
size: 2150000 KBytes
The following output appears in the Tape Coordinator window at the sametime:
Tape label----------tape name = monthly_guestAFS tape name = guests.monthly.3creationTime = Mon Feb 1 04:06:40 1999cell = abc.comsize = 2150000 Kbytesdump path = /monthlydump id = 917860000useCount = 44-- End of tape label --
Chapter 6. Configuring the AFS Backup System 253
Automating and Increasing the Efficiency of the Backup Process
The Backup System includes several optional features to help you automatethe backup process in your cell and make it more efficient. By combiningseveral of the features, you can dump volume data to tape with minimalhuman intervention in most cases. To take advantage of many of the features,you create a device configuration file in the /usr/afs/backup directory for eachtape device that participates in automated operations. For general instructionson creating the device configuration file, see “Creating a Device ConfigurationFile” on page 255. The following list refers you to sections that describe eachfeature in greater detail.v You can use tape stackers and jukeboxes to perform backup operations.
These are tape drives with an attached unit that stores several tapes andcan physically insert and remove them from the tape reader (tape drive)without human intervention, meaning that no operator has to be presenteven for backup operations that require several tapes. To use a stacker orjukebox with the Backup System, include the MOUNT and UNMOUNTinstructions in its device configuration file. See “Invoking a Device’s TapeMounting and Unmounting Routines” on page 257.
v You can suppress the Tape Coordinator’s default prompt for the initial tapethat it needs for a backup operation, again eliminating the need for ahuman operator to be present when a backup operation begins. (You muststill insert the correct tape in the drive at some point before the operationbegins.) To suppress the initial prompt, include the -noautoquery flag onthe butc command, or assign the value NO to the AUTOQUERYinstruction in the device configuration file. See “Eliminating the Search orPrompt for the Initial Tape” on page 261.
v You can suppress the prompts that the Tape Coordinator otherwisegenerates when it encounters several types of errors. When you use thisfeature, the Tape Coordinator instead responds to the errors in a defaultmanner, which generally allows the operation to continue without humanintervention. To suppress prompts about error conditions, assign the valueNO to the ASK instruction in the device configuration file. See “EnablingDefault Responses to Error Conditions” on page 261.
v You can suppress the Backup System’s default verification that the AFS tapename on a tape that has no permanent name matches the name derivedfrom the volume set and dump level names of the initial dump the BackupSystem is writing to the tape. This enables you to recycle a tape withoutfirst relabeling it, as long as all dumps on it are expired. To suppress namechecking, assign the value NO to the NAME_CHECK instruction in thedevice configuration file. See “Eliminating the AFS Tape Name Check” onpage 262.
v You can promote tape streaming (the most efficient way for a tape device tooperate) by setting the size of the memory buffer the Tape Coordinator uses
254 AFS: Administration Guide
when transferring volume data between the file system and the device. Toset the buffer size, include the BUFFERSIZE instruction in the deviceconfiguration file. See “Setting the Memory Buffer Size to Promote TapeStreaming” on page 263.
v You can write dumps to a backup data file on the local disk of the TapeCoordinator machine, rather than to tape. You can then transfer the backupdata file to a data-archiving system, such as a hierarchical storagemanagement (HSM) system, that you use in conjunction with AFS and theBackup System. Writing a dump to a file is usually more efficient thatissuing the equivalent vos dump commands individually. To write dumpsto a file, include the FILE instruction in the device configuration file. See“Dumping Data to a Backup Data File” on page 263.
There are two additional ways to increase backup automation and efficiencythat do not involve the device configuration file:v You can schedule one or more backup dump commands to run at specified
times. This enables you to create backups at times of low system usage,without requiring a human operator to be present. You can schedule asingle dump operation for a future time, or multiple operations to run atvarious future times. See “Scheduling Dumps” on page 293.
v You can append dumps to a tape that already has other dumps on it. Thisenables you to use as much of a tape’s capacity as possible. The appendeddumps do not have be related in any way to one another or to the initialdump on the tape, but grouping dumps appropriately can reduce thenumber of necessary tape changes during a restore operation. To append adump, include the -append argument to the backup dump command. See“Appending Dumps to an Existing Dump Set” on page 290.
Creating a Device Configuration File
To use many of the features that automate backup operations, create aconfiguration file for each tape device in the /usr/afs/backup directory on thelocal disk of the Tape Coordinator machine that drives the device. Thefilename has the following form:
CFG_device_name
where device_name represents the name of the tape device or backup data file(see “Dumping Data to a Backup Data File” on page 263 to learn aboutwriting dumps to a file rather than to tape).
For a tape device, construct the device_name portion of the name by strippingoff the initial /dev/ string with which all UNIX device names conventionally
Chapter 6. Configuring the AFS Backup System 255
begin, and replacing any other slashes in the name with underscores. Forexample, CFG_rmt_4m is the appropriate filename for a device called/dev/rmt/4m.
For a backup data file, construct the device_name portion by stripping off theinitial slash (/) and replacing any other slashes (/) in the name withunderscores. For example, CFG_var_tmp_FILE is the appropriate filename fora backup data file called /var/tmp/FILE.
Creating a device configuration file is optional. If you do not want to takeadvantage of any of the features that the file provides, you do not have tocreate it.
You can include one of each of the following instructions in any order in adevice configuration file. All are optional. Place each instruction on its ownline, but do not include any newline (<Return>) characters within aninstruction.
MOUNT and UNMOUNTIdentify a script of routines for mounting and unmounting tapes in atape stacker or jukebox’s drive as needed. See “Invoking a Device’sTape Mounting and Unmounting Routines” on page 257.
AUTOQUERYControls whether the Tape Coordinator prompts for the first tape itneeds for a backup operation. See “Eliminating the Search or Promptfor the Initial Tape” on page 261.
ASK Controls whether the Tape Coordinator asks you how to respond tocertain error conditions. See “Enabling Default Responses to ErrorConditions” on page 261.
NAME_CHECKControls whether the Tape Coordinator verifies that an AFS tape namematches the initial dump you are writing to the tape. See “Eliminatingthe AFS Tape Name Check” on page 262.
BUFFERSIZESets the size of the memory buffer the Tape Coordinator uses whentransferring data between a tape device and a volume. See “Settingthe Memory Buffer Size to Promote Tape Streaming” on page 263.
FILE Controls whether the Tape Coordinator writes dumps to, and restoresdata from, a tape device or a backup data file. See “Dumping Data toa Backup Data File” on page 263.
256 AFS: Administration Guide

Invoking a Device’s Tape Mounting and Unmounting Routines
A tape stacker or jukebox helps you automate backup operations because itcan switch between multiple tapes during an operation without humanintervention. To take advantage of this feature, include the MOUNT andoptionally UNMOUNT instructions in the device configuration file that youwrite for the stacker or jukebox. The instructions share the same syntax:
MOUNT filenameUNMOUNT filename
where filename is the pathname on the local disk of a script or program youhave written that invokes the routines defined by the device’s manufacturerfor mounting or unmounting a tape in the device’s tape drive. (Forconvenience, the following discussion uses the term script to refers to bothscripts and programs.) The script usually also contains additional logic thathandles error conditions or modifies the script’s behavior depending on whichbackup operation is being performed.
You can refer to different scripts with the MOUNT or UNMOUNTinstructions, or to a single script that invokes both mounting and unmountingroutines. The scripts inherit the local identity and AFS tokens associated withto the issuer of the butc command.
You need to include a MOUNT instruction in the device configuration file forall tape devices, but the need for an UNMOUNT instruction depends on thetape-handling routines that the device’s manufacturer provides. Some devices,usually stackers, have only a single routine for mounting tapes, which alsoautomatically unmounts a tape whose presence prevents insertion of therequired new tape. In this case, an UNMOUNT instruction is not necessary.For devices that have separate mounting and unmounting routines, you mustinclude an UNMOUNT instruction to remove a tape when the TapeCoordinator is finished with it; otherwise, subsequent attempts to run theMOUNT instruction fail with an error.
When the device configuration file includes a MOUNT instruction, you muststock the stacker or jukebox with the necessary tapes before running a backupoperation. Many jukeboxes are able to search for the required tape by readingexternal labels (such as barcodes) on the tapes, but many stackers can onlyswitch between tapes in sequence and sometimes only in one direction. In thelatter case, you must also stock the tapes in the correct order.
To obtain a list of the tapes required for a restore operation so that you canprestock them in the tape device, include the -n flag on the appropriatebackup command (backup diskrestore, backup volrestore, or backupvolsetrestore). For a dump operation, it is generally sufficient to stock thedevice with more tapes than the operation is likely to require. You can
Chapter 6. Configuring the AFS Backup System 257
prelabel the tapes with permanent names or AFS tape names, or not prelabelthem at all. If you prelabel the tapes for a dump operation with AFS tapenames, then it is simplest to load them into the stacker in sequential order bytape index. But it is probably simpler still to prelabel tapes with permanenttape names or use unlabeled tapes, in which case the Backup Systemgenerates and applies the appropriately indexed AFS tape name itself duringthe dump operation.
How the Tape Coordinator Uses the MOUNT and UNMOUNT Instructions
When you issue the butc command to initialize the Tape Coordinator for agiven tape device, the Tape Coordinator looks for the device configuration filecalled /usr/afs/backup/CFG_device_name on its local disk, where device_namehas the format described in “Creating a Device Configuration File” onpage 255. If the file exists and contains a MOUNT instruction, then wheneverthe Tape Coordinator needs a tape, it executes the script named by theinstruction’s filename argument.
If the device configuration file does not exist, or does not include a MOUNTinstruction, then whenever the Tape Coordinator needs a tape, it generates aprompt in its window instructing the operator to insert the necessary tape.The operator must insert the tape and press <Return> before the TapeCoordinator continues the backup operation.
Note, however, that you can modify the Tape Coordinator’s behavior withrespect to the first tape needed for an operation, by setting the AUTOQUERYinstruction in the device configuration file to NO, or including the-noautoquery flag to the butc command. In this case, the Tape Coordinatordoes not execute the MOUNT instruction or prompt for a tape at the start ofan operation, because it expects to find the required first tape in the drive. See“Eliminating the Search or Prompt for the Initial Tape” on page 261.
If there is an UNMOUNT instruction in the device configuration file, thenwhenever the Tape Coordinator closes the tape device, it executes the scriptnamed by the instruction’s filename argument. It executes the script only once,and regardless of whether the close operation on the device succeeded or not.If the device configuration file does not include an UNMOUNT instruction,then the Tape Coordinator takes no action.
The Available Parameters and Required Exit Codes
When the Tape Coordinator executes the MOUNT script, it passes in fiveparameters, ordered as follows. You can use the parameters in your script torefine its response to varying circumstances that can arise during a backupoperation.
258 AFS: Administration Guide
1. The tape device or backup data file’s pathname, as recorded in the/usr/afs/backup/tapeconfig file.
2. The tape operation, which (except for the exceptions noted in thefollowing list) matches the backup command operation code used toinitiate the operation:v appenddump (when a backup dump command includes the -append
flag)v dump (when a backup dump command does not include the -append
flag)v labeltape
v readlabel
v restore (for a backup diskrestore, backup volrestore, or backupvolsetrestore command)
v restoredb
v savedb
v scantape
3. The number of times the Tape Coordinator has attempted to open the tapedevice or backup data file. If the open attempt returns an error, the TapeCoordinator increments this value by one and again invokes the MOUNTinstruction.
4. The tape name. For some operations, the Tape Coordinator passes thestring none, because it does not know the tape name (when running thebackup scantape or backup readlabel, for example), or because the tapedoes not necessarily have a name (when running the backup labeltapecommand, for example).
5. The tape ID recorded in the Backup Database. As with the tape name, theBackup System passes the string none for operations where it does notknow the tape ID or the tape does not necessarily have an ID.
Your MOUNT script must return one of the following exit codes to tell theTape Coordinator whether or not it mounted the tape successfully:v Code 0 (zero) indicates a successful mount, and the Tape Coordinator
continues the backup operation. If the script or program called by theMOUNT instruction does not return this exit code, the Tape Coordinatornever calls the UNMOUNT instruction.
v Code 1 indicates that mount attempt failed. The Tape Coordinatorterminates the backup operation.
v Any other code indicates that the script was unable to access the correcttape. The Tape Coordinator prompts the operator to insert it.
When the Tape Coordinator executes the UNMOUNT script, it passes in twoparameters in the following order.
Chapter 6. Configuring the AFS Backup System 259
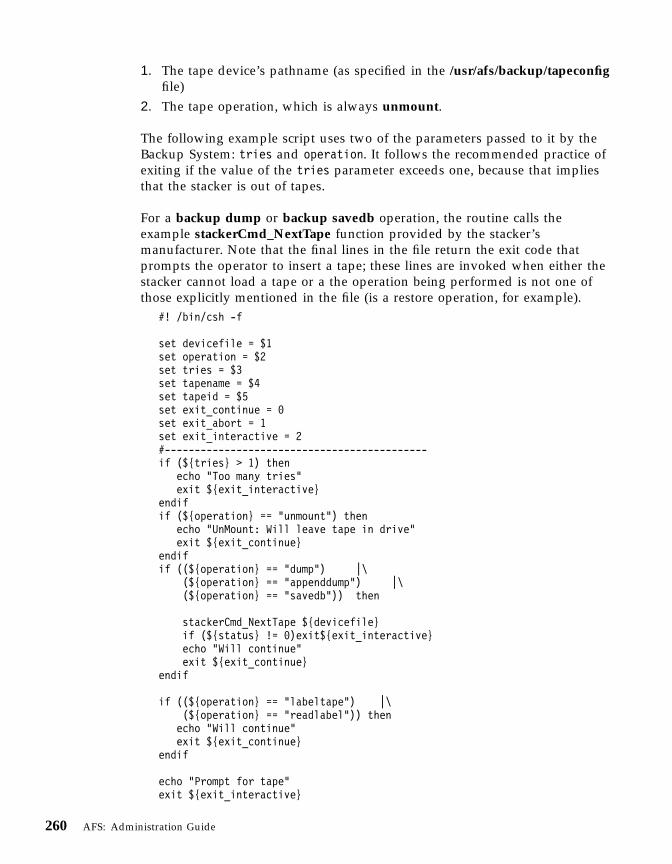
1. The tape device’s pathname (as specified in the /usr/afs/backup/tapeconfigfile)
2. The tape operation, which is always unmount.
The following example script uses two of the parameters passed to it by theBackup System: tries and operation. It follows the recommended practice ofexiting if the value of the tries parameter exceeds one, because that impliesthat the stacker is out of tapes.
For a backup dump or backup savedb operation, the routine calls theexample stackerCmd_NextTape function provided by the stacker’smanufacturer. Note that the final lines in the file return the exit code thatprompts the operator to insert a tape; these lines are invoked when either thestacker cannot load a tape or a the operation being performed is not one ofthose explicitly mentioned in the file (is a restore operation, for example).
#! /bin/csh -f
set devicefile = $1set operation = $2set tries = $3set tapename = $4set tapeid = $5set exit_continue = 0set exit_abort = 1set exit_interactive = 2#--------------------------------------------if (${tries} > 1) then
echo "Too many tries"exit ${exit_interactive}
endifif (${operation} == "unmount") then
echo "UnMount: Will leave tape in drive"exit ${exit_continue}
endifif ((${operation} == "dump") |\
(${operation} == "appenddump") |\(${operation} == "savedb")) then
stackerCmd_NextTape ${devicefile}if (${status} != 0)exit${exit_interactive}echo "Will continue"exit ${exit_continue}
endif
if ((${operation} == "labeltape") |\(${operation} == "readlabel")) thenecho "Will continue"exit ${exit_continue}
endif
echo "Prompt for tape"exit ${exit_interactive}
260 AFS: Administration Guide
Eliminating the Search or Prompt for the Initial Tape
By default, the Tape Coordinator obtains the first tape it needs for a backupoperation by reading the device configuration file for the appropriate tapedevice. If there is a MOUNT instruction in the file, the Tape Coordinatorexecutes the referenced script. If the device configuration file does not exist ordoes not have a MOUNT instruction in it, the Tape Coordinator prompts youto insert the correct tape and press <Return>.
If you know in advance that an operation requires a tape, you can increaseefficiency by placing the required tape in the drive before issuing the backupcommand and telling the Tape Coordinator’s to skip its initial tape-acquisitionsteps. This both enables the operation to begin more quickly and eliminatesthat need for you to be present to insert a tape.
There are two ways to bypass the Tape Coordinator’s initial tape-acquisitionsteps:1. Include the instruction AUTOQUERY NO in the device configuration file2. Include the -noautoquery flag to the butc command
To avoid any error conditions that require operator attention, be sure that thetape you are placing in the drive does not contain any unexpired dumps andis not write protected. If there is no permanent name on the tape’s label andyou are creating an initial dump, make sure that the AFS tape name eithermatches the volume set and dump set names or is <NULL>. Alternatively,suppress the Tape Coordinator’s name verification step by assigning the valueNO to the NAME_CHECK instruction in the device configuration file, asdescribed in “Eliminating the AFS Tape Name Check” on page 262.
Enabling Default Responses to Error Conditions
By default, the Tape Coordinator asks you how to respond when it encounterscertain error conditions. To suppress the prompts and cause the TapeCoordinator to handle the errors in a predetermined manner, include theinstruction ASK NO in the device configuration file. If you assign the valueYES, or omit the ASK instruction completely, the Tape Coordinator promptsyou for direction when it encounters one of the errors.
The following list describes the error conditions and the Tape Coordinator’sresponse to them.v The Backup System is unable to dump a volume while running the backup
dump command. When you assign the value NO, the Tape Coordinatoromits the volume from the dump and continues the operation. When youassign the value YES, it prompts to ask if you want to try to dump the
Chapter 6. Configuring the AFS Backup System 261
volume again immediately, to omit the volume from the dump but continuethe operation, or to terminate the operation.
v The Backup System is unable to restore a volume while running the backupdiskrestore, backup volrestore, or backup volsetrestore command. Whenyou assign the value NO, the Tape Coordinator continues the operation,omitting the problematic volume but restoring the remaining ones. Whenyou assign the value YES, it prompts to ask if you want to omit the volumeand continue the operation, or to terminate the operation.
v The Backup System cannot determine if the dump set includes any moretapes while running the backup scantape command (the command’sreference page in the AFS Administration Reference discusses possible reasonsfor this problem). When you assign the value NO, the Tape Coordinatorproceeds as though there are more tapes and invokes the MOUNT scriptnamed in the device configuration file, or prompts the operator to insert thenext tape. When you assign the value YES, it prompts to ask if there aremore tapes to scan.
v The Backup System determines that the tape contains an unexpired dumpwhile running the backup labeltape command. When you assign the valueNO, it terminates the operation without relabeling the tape. With a YESvalue, the Tape Coordinator prompts to ask if you want to relabel the tapeanyway.
Eliminating the AFS Tape Name Check
If a tape does not have a permanent name and you are writing an initialdump to it, then by default the Backup System verifies that the tape’s AFStape name is acceptable. It accepts three types of values:v A name that reflects the volume set and dump level of the initial dump and
the tape’s place in the sequence of tapes for the dump set, as described in“Dump Names and Tape Names” on page 219. If the tape does not alreadyhave a permanent name, you can assign the AFS tape name by using the-name argument to the backup labeltape command.
v A <NULL> value, which results when you assign a permanent name, orprovide no value for the backup labeltape command’s -name argument.
v No AFS tape name at all, indicating that you have never labeled the tape orwritten a dump to it.
To bypass the name check, include the NAME_CHECK NO instruction in thedevice configuration file. This enables you to recycle a tape without firstrelabeling it, as long as all dumps on it are expired. (If a tape has unexpireddumps on it but you want to recycle it anyway, you must use the backuplabeltape command to relabel it first. For this to work, the ASK NOinstruction cannot appear in the device configuration file.)
262 AFS: Administration Guide

Setting the Memory Buffer Size to Promote Tape Streaming
By default, the Tape Coordinator uses a 16-KB memory buffer during dumpoperations. As it receives volume data from the Volume Server, the TapeCoordinator gathers 16 KB of data in the buffer before transferring the entire16 KB to the tape device. Similarly, during a restore operation the TapeCoordinator by default buffers 32 KB of data from the tape device beforetransferring the entire 32 KB to the Volume Server for restoration into the filesystem. Buffering makes the volume of data flowing to and from a tape devicemore even and so promotes tape streaming, which is the most efficient wayfor a tape device to operate.
In a normal network configuration, the default buffer sizes are usually largeenough to promote tape streaming. If the network between the TapeCoordinator machine and file server machines is slow, it can help to increasethe buffer size.
To determine if altering the buffer size is helpful for your configuration,observe the tape device in operation to see if it is streaming, or consult themanufacturer. To set the buffer size, include the BUFFERSIZE instruction inthe device configuration file. It takes an integer value, and optionally units, inthe following format:
BUFFERSIZE size[{k | K | m | M | g | G}]
where size specifies the amount of memory the Tape Coordinator allocates touse as a buffer during both dump and restore operations. The default unit isbytes, but use k or K to specify kilobytes, m or M for megabytes, and g or Gfor gigabytes. There is no space between the size value and the units letter.
Dumping Data to a Backup Data File
You can write dumps to a backup data file rather than to tape. This is useful if,for example, you want to transfer the data to a data-archiving system, such asa hierarchical storage management (HSM) system, that you use in conjunctionwith AFS and the Backup System. You can restore data from a backup datafile into the file system as well. Using a backup data file is usually moreefficient than issuing the equivalent vos dump and vos restore commandsindividually for multiple volumes.
Writing to a backup data file is simplest if it is on the local disk of the TapeCoordinator machine, but you can also write the file to an NFS-mountedpartition that resides on a remote machine. It is even acceptable to write to afile in AFS, provided that the access control list (ACL) on its parent directorygrants the necessary permissions, but it is somewhat circular to back up AFSdata into AFS itself.
Chapter 6. Configuring the AFS Backup System 263

If the backup data file does not already exist when the Tape Coordinatorattempts to write a dump to it, the Tape Coordinator creates it. For a restoreoperation to succeed, the file must exist and contain volume data previouslywritten to it during a backup dump operation.
When writing to a backup data file, the Tape Coordinator writes data at 16 KBoffsets. If a given block of data (such as the marker that signals the beginningor end of a volume) does not fill the entire 16 KB, the Tape Coordinator stillskips to the next offset before writing the next block. In the output of abackup dumpinfo command issued with the -id option, the value in the Poscolumn is the ordinal of the 16-KB offset at which the volume data begins,and so is not generally only one higher than the position number on theprevious line, as it is for dumps to tape.
Before writing to a backup data file, you need to configure the file as thoughit were a tape device.
Note: A file pathname, rather than a tape device name, must appear in thethird field of the /usr/afs/backup/tapeconfig file when the FILE YESinstruction appears in the device configuration file, and vice versa. Ifthe tapeconfig file instead refers to a tape device, dump operationsappear to succeed but are inoperative. You cannot restore data that youaccidently dumped to a tape device while the FILE instruction was setto YES. In the same way, if the FILE instruction is set to NO, thetapeconfig entry must refer to an actual tape device.
To configure a backup data file1. Verify that you are authenticated as a user listed in the
/usr/afs/etc/UserList file. If necessary, issue the bos listusers command,which is fully described in “To display the users in the UserList file” onpage 582.
% bos listusers <machine name>
2. Become the local superuser root on the machine, if you are not already, byissuing the su command.
% su rootPassword: root_password
3. Optional. Issue the backup command to enter interactive mode.# backup
4. Choose the port offset number to assign to the file. If necessary, displaypreviously assigned port offsets by issuing the (backup) listhostscommand, which is fully described in “To display the list of configuredTape Coordinators” on page 232.
backup> listhosts
264 AFS: Administration Guide

As for a tape device, acceptable values are the integers 0 (zero) through58510 (the Backup System can track a maximum of 58,511 port offsetnumbers). Each port offset must be unique in the cell, but you canassociate any number them with a single Tape Coordinator machine. Youdo not have to assign port offset numbers sequentially.
5. Issue the (backup) addhost command to register the backup data file’sport offset in the Backup Database.
backup> addhost <tape machine name> [<TC port offset>]
where
addh Is the shortest acceptable abbreviation of addhost.
tape machine nameSpecifies the fully qualified hostname of the Tape Coordinatormachine you invoke to write to the backup data file.
TC port offsetSpecifies the file’s port offset number. You must provide thisargument unless the default value of 0 (zero) is appropriate.
6. Using a text editor, create an entry for the backup data file in the local/usr/afs/backup/tapeconfig file, using the standard syntax:
[capacity filemark_size] device_name port_offset
where
capacitySpecifies the amount of space on the partition that houses thebackup data file that you want to make available for the file. Toavoid the complications that arise from filling up the partition, it isbest to provide a value somewhat smaller than the actual amountof space you expect to be available when the dump operationruns, and never larger than the maximum file size allowed by theoperating system.
Specify a numerical value followed by a letter that indicates units,with no intervening space. The letter k or K indicates kilobytes, mor M indicates megabytes, and g or G indicates gigabytes. If youomit the units letter, the default is kilobytes. If you leave this fieldempty, the Tape Coordinator uses the maximum acceptable value(2048 GB or 2 TB). Also leave the filemark_size field empty in thatcase.
filemark_sizeSpecify the value 0 (zero) or leave both this field and the capacityfield empty. In the latter case, the Tape Coordinator also uses thevalue zero.
Chapter 6. Configuring the AFS Backup System 265
device_nameSpecifies the complete pathname of the backup data file. Ratherthan specifying an actual file pathname, however, therecommended configuration is to create a symbolic link in the /devdirectory that points to the actual file pathname, and record thesymbolic link in this field. This configuration provides theseadvantages:v It makes the device_name portion of the CFG_device_name, of the
TE_device_name, and of the TL_device_name filenames as short aspossible. Because the symbolic link is in the /dev directory asthough it is a tape device, you strip off the entire /dev/ prefixwhen forming the filename, instead of just the initial slash (/). If,for example, the symbolic link is called /dev/FILE, the deviceconfiguration file’s name is CFG_FILE, whereas if the actualpathname /var/tmp/FILE appears in the tapeconfig file, theconfiguration file’s name must be CFG_var_tmp_FILE.
v It provides for a more graceful, and potentially automated,recovery if the Tape Coordinator cannot write a complete dumpinto the backup data file (for example, because the partitionhousing the backup data file becomes full). The TapeCoordinator’s reaction to this problem is to invoke the MOUNTscript, or to prompt you if the MOUNT instruction does notappear in the configuration file.– If there is a MOUNT script, you can prepare for this situation
by adding a subroutine to the script that changes thesymbolic link to point to another backup data file on apartition where there is space available.
– If there is no MOUNT instruction, the prompt enables youmanually to change the symbolic link to point to anotherbackup data file and then press <Return> to signal that theTape Coordinator can continue the operation.
If this field names the actual file, there is no way to recoverfrom exhausting the space on the partition. You cannot changethe tapeconfig file in the middle of an operation.
port_offsetSpecifies the port offset number that you chose for the backup datafile.
7. Create the device configuration file CFG_device_name in the TapeCoordinator machine’s /usr/afs/backup directory. Include the FILE YESinstruction in the file.Construct the device_name portion of the name based on the device nameyou recorded in the tapeconfig file in Step 6 on page 265. If, asrecommended, you recorded a symbolic link name, strip off the /dev/
266 AFS: Administration Guide
string and replace any other slashes (/) in the name with underscores (_).For example, CFG_FILE is the appropriate name if the symbolic link is/dev/FILE. If you recorded the name of an actual file, then strip off theinitial slash only and replace any other slashes in the name withunderscores. For a backup data file called /var/tmp/FILE, the appropriatedevice configuration filename is CFG_var_tmp_FILE.
8. If you chose in Step 6 on page 265 to record a symbolic link name in thedevice_name field of the tapeconfig entry, then you must do one of thefollowing:v Use the ln -s command to create the appropriate symbolic link in the
/dev directoryv Write a script that initializes the backup data file in this way, and
include a MOUNT instruction in the device configuration file to invokethe script. An example script appears following these instructions.
You do not need to create the backup data file itself, because the TapeCoordinator does so if the file does not exist when the dump operationbegins.
The following example script illustrates how you can automatically create asymbolic link to the backup data file during the preparation phase for writingto the file. When the Tape Coordinator is executing a backup dump, backuprestore, backup savedb, or backup restoredb operation, the routine invokesthe UNIX ln -s command to create a symbolic link from the backup data filenamed in the tapeconfig file to the actual file to use (this is the recommendedmethod). It uses the values of the tapename and tapeid parameters passed toit by the Backup System when constructing the filename.
The routine makes use of two other parameters as well: tries and operation.The tries parameter tracks how many times the Tape Coordinator hasattempted to access the file. A value greater than one indicates that the TapeCoordinator cannot access it, and the routine returns exit code 2(exit_interactive), which results in a prompt for the operator to load a tape.The operator can use this opportunity to change the name of the backup datafile specified in the tapeconfig file.
#! /bin/csh -fset devicefile = $1set operation = $2set tries = $3set tapename = $4set tapeid = $5set exit_continue = 0set exit_abort = 1set exit_interactive = 2#--------------------------------------------if (${tries} > 1) then
echo "Too many tries"
Chapter 6. Configuring the AFS Backup System 267
exit ${exit_interactive}endifif (${operation} == "labeltape") then
echo "Won't label a tape/file"exit ${exit_abort}
endifif ((${operation} == "dump") |\
(${operation} == "appenddump") |\(${operation} == "restore") |\(${operation} == "savedb") |\(${operation} == "restoredb")) then
/bin/rm -f ${devicefile}/bin/ln -s /hsm/${tapename}_${tapeid} ${devicefile}if (${status} != 0) exit ${exit_abort}
endif
exit ${exit_continue}
268 AFS: Administration Guide

Chapter 7. Backing Up and Restoring AFS Data
The instructions in this chapter explain how to back up and restore AFS dataand to administer the Backup Database. They assume that you have alreadyconfigured all of the Backup System components by following the instructionsin “Chapter 6. Configuring the AFS Backup System” on page 217.
Summary of Instructions
This chapter explains how to perform the following tasks by using theindicated commands:
Enter interactive mode backup (interactive)Leave interactive mode (backup) quitList operations in interactive mode (backup) jobsCancel operation in interactive mode (backup) killStart Tape Coordinator butcStop Tape Coordinator <Ctrl-c>Check status of Tape Coordinator backup statusBack up data backup dumpDisplay dump records backup dumpinfoDisplay volume’s dump history backup volinfoScan contents of tape backup scantapeRestore volume backup volrestoreRestore partition backup diskrestoreRestore group of volumes backup volsetrestoreVerify integrity of Backup Database backup dbverifyRepair corruption in Backup Database backup savedb and
backup restoredbDelete dump set from Backup Database backup deletedump
Using the Backup System’s Interfaces
When performing backup operations, you interact with three Backup Systemcomponents:v You initiate backup operations by issuing commands from the backup
suite. You can issue the commands in a command shell (or invoke them ina shell script) on any AFS client or server machine from which you canaccess the backup binary. In the conventional configuration, the binaryresides in the /usr/afs/bin directory on a server machine and the/usr/afsws/etc directory on a client machine.
© Copyright IBM Corp. 1989, 2000 269
The suite provides an interactive mode, in which you can issue multiplecommands over a persistent connection to the Backup Server and theVolume Location (VL) Server. Interactive mode has several convenientfeatures. For a discussion and instructions, see “Using Interactive andRegular Command Mode” on page 271.Note that some operating systems include a backup command of their own.You must configure machines that run such an operating system to ensurethat you are accessing the desired backup binary.
v Before you perform a backup operation that involves reading or writing toa tape device or backup data file, you must open a dedicated connection tothe appropriate Tape Coordinator machine and start the Tape Coordinator(butc) process that handles the device or file. The butc process mustcontinue to run over the dedicated connection as long as it is executing anoperation or is to be available to execute one. For further discussion andinstructions, see “Starting and Stopping the Tape Coordinator Process” onpage 275.
v The Backup Server (buserver) process must be running on database servermachines, because most backup operations require accessing or changinginformation in the Backup Database. The AFS Quick Beginnings explainshow to configure the Backup Server.
For consistent Backup System performance, the AFS build level of all threebinaries (backup, butc, and buserver) must match. For instructions ondisplaying the build level, see “Displaying A Binary File’s Build Level” onpage 100.
Performing Backup Operations as the Local Superuser Root or in aForeign Cell
By default, the volumes and Backup Database involved in a backup operationmust reside on server machines that belong to the cell named in the/usr/vice/etc/ThisCell files on both the Tape Coordinator machine and themachine where you issue the backup command. Also, to issue most backupcommands you must have AFS tokens for an identity listed in the local cell’s/usr/afs/etc/UserList file (which by convention is the same on every servermachine in a cell). You can, however, perform backup operations on volumesor the Backup Database from a foreign cell, or perform backup operationswhile logged in as the local superuser root rather than as a privileged AFSidentity.
To perform backup operations on volumes that reside in a foreign cell usingmachines from the local cell, you must designate the foreign cell as the cell ofexecution for both the Tape Coordinator and the backup command
270 AFS: Administration Guide
interpreter. Use one of the two following methods. For either method, youmust also have tokens as an administrator listed in the foreign cell’s/usr/afs/etc/UserList file.v Before issuing backup commands and the butc command, set the AFSCELL
environment variable to the foreign cell name in both command shells.v Include the -cell argument to the butc and all backup commands. If you
include the argument on the backup (interactive) command, it applies to allcommands issued during the interactive session.
To perform backup operations without having administrative AFS tokens, youmust log on as the local superuser root on both the Tape Coordinator machineand the machine where you issue backup commands. Both machines must beserver machines, or at least have a /usr/afs/etc/KeyFile file that matches thefile on other server machines. Then include the -localauth argument on boththe butc command and all backup commands (or the backup (interactive)command). The Tape Coordinator and backup command interpreter constructa server ticket using the server encryption key with the highest key versionnumber in the local /usr/afs/etc/KeyFile file, and present it to the BackupServer, Volume Server, and VL Server that belong to the cell named in thelocal /usr/afs/etc/ThisCell file. The ticket never expires.
You cannot combine the -cell and -localauth options on the same command.Also, each one overrides the local cell setting defined by the AFSCELLenvironment variable or the /usr/vice/etc/ThisCell file.
Using Interactive and Regular Command Mode
The backup command suite provides an interactive mode, in which you canissue multiple commands over a persistent connection to the Backup Serverand the VL Server. Interactive mode provides the following features:v The backup> prompt replaces the usual command shell prompt.v You omit the initial backup string from command names. Type only the
operation code and option names.v You cannot issue commands that do not belong to the backup suite.v If you assume an administrative AFS identity or specify a foreign cell as
you enter interactive mode, it applies to all commands issued during theinteractive session. See “Performing Backup Operations as the LocalSuperuser Root or in a Foreign Cell” on page 270.
v You do not need to enclose shell metacharacters in double quotes.
When you initiate a backup operation in interactive mode, the Backup Systemassigns it a job ID number. You can display the list of current and pendingoperations with the (backup) jobs command, for which instructions appear in“To display pending or running jobs in interactive mode” on page 272. (Inboth regular and interactive modes, the Tape Coordinator also assigns a task
Chapter 7. Backing Up and Restoring AFS Data 271

ID number to each operation you initiate with a backup command. You cantrack task ID numbers with the backup status command. See “Starting andStopping the Tape Coordinator Process” on page 275.)
You can cancel an operation in interactive mode with the (backup) killcommand, for which instructions appear in “To cancel operations ininteractive mode” on page 275. However, it is best not to interrupt a dumpoperation because the resulting dump is incomplete, and interrupting a restoreoperation can leave volumes in an inconsistent state, or even completelyremove them from the server machine. For further discussion, see “BackingUp Data” on page 279 and “Restoring and Recovering Data” on page 304.
The (backup) jobs and (backup) kill commands are available only ininteractive mode and there is no equivalent functionality in regular commandmode.
To enter interactive mode1. Verify that you are authenticated as a user listed in the
/usr/afs/etc/UserList file. Entering interactive mode does not itself requireprivilege, but most other backup commands do, and the AFS identity youassume when entering the mode applies to all commands you issue withinit. If necessary, issue the bos listusers command, which is fully describedin “To display the users in the UserList file” on page 582.
% bos listusers <machine name>
2. Issue the backup (interactive) command at the system prompt. Thebackup> prompt appears. You can include either, but not both, of the-localauth and -cell options, as discussed in “Performing BackupOperations as the Local Superuser Root or in a Foreign Cell” on page 270.
% backupbackup>
To exit interactive mode1. Issue the quit command at the backup> prompt. The command shell
prompt reappears when the command succeeds, which it does only ifthere are no jobs pending or currently running. To display and cancelpending or running jobs, follow the instructions in “To display pending orrunning jobs in interactive mode” and “To cancel operations in interactivemode” on page 275.
backup> quit%
To display pending or running jobs in interactive mode1. Issue the jobs command at the backup> prompt.
backup> jobs
272 AFS: Administration Guide
where
j Is the shortest acceptable abbreviation of jobs.
The output always includes the expiration date and time of the tokens thatthe backup command interpreter is using during the current interactivesession, in the following format:
date time: TOKEN EXPIRATION
If the execution date and time specified for a scheduled dump operation islater than date time, then its individual line (as described in the followingparagraphs) appears below this line to indicate that the current tokens willnot be available to it.
If the issuer of the backup command included the -localauth flag whenentering interactive mode, the line instead reads as follows:
: TOKEN NEVER EXPIRES
The entry for a scheduled dump operation has the following format:Job job_ID: timestamp: dump volume_set dump_level
where
job_ID Is a job identification number assigned by the Backup System.
timestampIndicates the date and time the dump operation is to begin, in theformat month/date/year hours:minutes (in 24-hour format)
volume_setIndicates the volume set to dump.
dump_levelIndicates the dump level at which to perform the dump operation.
The line for a pending or running operation of any other type has thefollowing format:
Job job_ID: operation status
where
job_ID Is a job identification number assigned by the Backup System.
operationIdentifies the operation the Tape Coordinator is performing, which isinitiated by the indicated command:
Chapter 7. Backing Up and Restoring AFS Data 273

Dump (dump name)Initiated by the backup dump command. The dump name hasthe following format:
volume_set_name.dump_level_name
RestoreInitiated by the backup diskrestore, backup volrestore, orbackup volsetrestore command.
Labeltape (tape_label)Initiated by the backup labeltape command. The tape_label isthe name specified by the backup labeltape command’s-name or -pname argument.
ScantapeInitiated by the backup scantape command.
SaveDb Initiated by the backup savedb command.
RestoreDbInitiated by the backup restoredb command.
status Indicates the job’s current status in one of the following messages. Ifno message appears, the job is either still pending or has finished.
number Kbytes, volume volume_nameFor a running dump operation, indicates the number ofkilobytes copied to tape or a backup data file so far, and thevolume currently being dumped.
number Kbytes, restore.volumeFor a running restore operation, indicates the number ofkilobytes copied into AFS from a tape or a backup data file sofar.
[abort requested]The (backup) kill command was issued, but the terminationsignal has yet to reach the Tape Coordinator.
[abort sent]The operation is canceled by the (backup) kill command.Once the Backup System removes an operation from thequeue or stops it from running, it no longer appears at all inthe output from the command.
[butc contact lost]The backup command interpreter cannot reach the TapeCoordinator. The message can mean either that the TapeCoordinator handling the operation was terminated or failedwhile the operation was running, or that the connection to theTape Coordinator timed out.
274 AFS: Administration Guide

[done] The Tape Coordinator has finished the operation.
[drive wait]The operation is waiting for the specified tape drive tobecome free.
[operator wait]The Tape Coordinator is waiting for the backup operator toinsert a tape in the drive.
To cancel operations in interactive mode1. Issue the jobs command at the backup> prompt, to learn the job ID
number of the operation you want to cancel. For details, see “To displaypending or running jobs in interactive mode” on page 272.
backup> jobs
2. Issue the (backup) kill command to cancel the operation.backup> kill <job ID or dump set name>
where
k Is the shortest acceptable abbreviation of kill.
job ID or dump set nameSpecifies either the job ID number of the operation to cancel, asreported by the jobs command, or for a dump operation only, thedump name in the format volume_set_name.dump_level_name.
Starting and Stopping the Tape Coordinator Process
Before performing a backup operation that reads from or writes to a tapedevice or backup data file, you must start the Tape Coordinator (butc) processthat handles the drive or file. This section explains how to start, stop, andcheck the status of a Tape Coordinator process. To use these instructions, youmust have already configured the Tape Coordinator machine and created aTape Coordinator entry in the Backup Database, as instructed in “ConfiguringTape Coordinator Machines and Tape Devices” on page 229.
The Tape Coordinator assigns a task ID number to each operation it performs.The number is distinct from the job ID number assigned by the backupcommand interpreter in interactive mode (which is discussed in “UsingInteractive and Regular Command Mode” on page 271). The Tape Coordinatorreports the task ID number in its onscreen trace and in the messages that itwrites to its log and error files. To view the task ID numbers of a TapeCoordinator’s running or pending operations, issue the backup statuscommand.
Chapter 7. Backing Up and Restoring AFS Data 275
To start a Tape Coordinator process1. Verify that you are authenticated as a user listed in the
/usr/afs/etc/UserList file of the cell in which the Tape Coordinator is toaccess volume data and the Backup Database. If necessary, issue the boslistusers command, which is fully described in “To display the users in theUserList file” on page 582.
% bos listusers <machine name>
Alternately, you can log into a file server machine as the local superuserroot in Step 3.
2. Verify that you can write to the Tape Coordinator’s log and error files inthe local /usr/afs/backup directory (the TE_device_name andTL_device_name files). If the log and error files do not already exist, youmust be able to insert and write to files in the /usr/afs/backup directory.
3. Open a connection (using a command such as telnet or rlogin) to the TapeCoordinator machine that drives the tape device, or whose local diskhouses the backup data file. The Tape Coordinator uses a devotedconnection or window that must remain open for the Tape Coordinator toaccept requests and while it is executing them.If you plan to include the -localauth flag to the butc command in the nextstep, log in as the local superuser root.
4. Issue the butc command to start the Tape Coordinator. You can includeeither, but not both, of the -localauth and -cell options, as discussed in“Performing Backup Operations as the Local Superuser Root or in aForeign Cell” on page 270.
% butc [<port offset>] [-debuglevel <trace level>] \[-cell <cellname>] [-noautoquery] [-localauth]
where
butc Must be typed in full.
port offsetSpecifies the Tape Coordinator’s port offset number. You mustprovide this argument unless the default value of 0 (zero) isappropriate.
-debuglevelSpecifies the type of trace messages that the Tape Coordinatorwrites to the standard output stream (stdout). Provide one of thefollowing three values, or omit this argument to display thedefault type of messages (equivalent to setting a value of 0 [zero]):v 0: The Tape Coordinator generates only the minimum number of
messages necessary to communicate with the backup operator,
276 AFS: Administration Guide
including prompts for insertion of additional tapes andmessages that indicate errors or the beginning or completion ofoperations.
v 1: In addition to the messages displayed at level 0, the TapeCoordinator displays the name of each volume being dumpedor restored.
v 2: In addition to the messages displayed at levels 0 and 1, theTape Coordinator displays all of the messages it is also writingto its log file (/usr/afs/backup/TL_device_name).
cellnameNames the cell in which to perform the backup operations (the cellwhere the relevant volumes reside and the Backup Server processis running). If you omit this argument, the Tape Coordinator usesits home cell, as defined in the local /usr/vice/etc/ThisCell file. Donot combine this argument with the -localauth flag.
-noautoqueryDisables the Tape Coordinator’s prompt for the first tape it needsfor each operation. For a description of the advantages andconsequences of including this flag, see “Eliminating the Search orPrompt for the Initial Tape” on page 261.
-localauthConstructs a server ticket using a key from the local/usr/afs/etc/KeyFile file. The butc process presents it to the BackupServer, Volume Server, and VL Server during mutualauthentication. You must be logged into a file server machine asthe local superuser root to include this flag, and cannot combine itwith the -cell argument.
To stop a Tape Coordinator process1. Enter an interrupt signal such as <Ctrl-c> over the dedicated connection to
the Tape Coordinator.
To check the status of a Tape Coordinator process1. Verify that you are authenticated as a user listed in the
/usr/afs/etc/UserList file. If necessary, issue the bos listusers command,which is fully described in “To display the users in the UserList file” onpage 582.
% bos listusers <machine name>
2. Issue the backup status command.% backup status [<TC port offset>]
where
Chapter 7. Backing Up and Restoring AFS Data 277
st Is the shortest acceptable abbreviation of status.
TC port offsetSpecifies the Tape Coordinator’s port offset number. You mustprovide this argument unless the default value of 0 (zero) isappropriate.
The following message indicates that the Tape Coordinator is not currentlyperforming an operation:
Tape coordinator is idle
Otherwise, the output includes a message of the following format for eachrunning or pending operation:
Task task_ID: operation: status
where
task_IDIs a task identification number assigned by the Tape Coordinator. Itbegins with the Tape Coordinator’s port offset number.
operationIdentifies the operation the Tape Coordinator is performing, which isinitiated by the indicated command:v Dump (the backup dump command)v Restore (the backup diskrestore, backup volrestore, or backup
volsetrestore commands)v Labeltape (the backup labeltape command)v Scantape (the backup scantape command)v SaveDb (the backup savedb command)v RestoreDb (the backup restoredb command)
status Indicates the job’s current status in one of the following messages.
number Kbytes transferred, volume volume_nameFor a running dump operation, indicates the number ofkilobytes copied to tape or a backup data file so far, and thevolume currently being dumped.
number Kbytes, restore.volumeFor a running restore operation, indicates the number ofkilobytes copied into AFS from a tape or a backup data file sofar.
[abort requested]The (backup) kill command was issued, but the terminationsignal has yet to reach the Tape Coordinator.
278 AFS: Administration Guide

[abort sent]The operation is canceled by the (backup) kill command.Once the Backup System removes an operation from thequeue or stops it from running, it no longer appears at all inthe output from the command.
[butc contact lost]The backup command interpreter cannot reach the TapeCoordinator. The message can mean either that the TapeCoordinator handling the operation was terminated or failedwhile the operation was running, or that the connection to theTape Coordinator timed out.
[done] The Tape Coordinator has finished the operation.
[drive wait]The operation is waiting for the specified tape drive tobecome free.
[operator wait]The Tape Coordinator is waiting for the backup operator toinsert a tape in the drive.
Backing Up Data
This section explains how to use the backup dump command to back up AFSdata to tape or to a backup data file. The instructions assume that youunderstand Backup System concepts and have already configured the BackupSystem according to the instructions in “Chapter 6. Configuring the AFSBackup System” on page 217. Specifically, you must already have:v Decided whether to dump data to tape or to a backup data file, and
configured the Tape Coordinator machine and Tape Coordinator processappropriately. See “Configuring Tape Coordinator Machines and TapeDevices” on page 229 and “Dumping Data to a Backup Data File” onpage 263.
v Defined a volume set that includes the volumes you want to dumptogether. See “Defining and Displaying Volume Sets and Volume Entries”on page 233.
v Defined the dump level in the dump hierarchy at which you want to dumpthe volume set. If it is an incremental dump level, you must havepreviously created a dump at its parent level. See “Defining and Displayingthe Dump Hierarchy” on page 240.
v Created a device configuration file. Such a file is required for each tapestacker, jukebox device, or backup data file. You can also use it to configurethe Backup System’s automation features. See “Automating and Increasingthe Efficiency of the Backup Process” on page 254.
Chapter 7. Backing Up and Restoring AFS Data 279
The most basic way to perform a dump operation is to create an initial dumpof a single volume set as soon as the appropriate Tape Coordinator isavailable, by providing only the required arguments to the backup dumpcommand. Instructions appear in “To create a dump” on page 293. Thecommand has several optional arguments that you can use to increase theefficiency and flexibility of your backup procedures:v To append a dump to the end of a set of tapes that already contains other
dumps, include the -append argument. Otherwise, the Backup Systemcreates an initial dump. Appending dumps enables you to use a tape’s fullcapacity and has other potentially useful features. For a discussion, see“Appending Dumps to an Existing Dump Set” on page 290.
v To schedule one or more dump operations to run at a future time, includethe -at argument. For a discussion and instructions, see “SchedulingDumps” on page 293.
v To initiate a number of dump operations with a single backup dumpcommand, include the -file argument to name a file in which you havelisted the commands. For a discussion and instructions, see “AppendingDumps to an Existing Dump Set” on page 290 and “Scheduling Dumps” onpage 293.
v To generate a list of the volumes to be included in a dump, withoutactually dumping them, combine the -n flag with the other arguments to beused on the actual command.
Making Backup Operations More Efficient
There are several ways to make dump operations more efficient, less prone toerror, and less disruptive to your users. Several of them also simplify theprocess of restoring data if that becomes necessary.v It is best not to dump the read/write or read-only version of a volume,
because no other users or processes can access a volume while it is beingdumped. Instead, shortly before the dump operation begins, create abackup version of each volume to be dumped, and dump the backupversion. Creating a Backup version usually makes the source volumeunavailable for just a few moments (during which access attempts by otherprocesses are blocked but do not fail). To automate the creation of backupvolumes, you can create a cron process in the /usr/afs/local/BosConfig fileon one or more server machines, setting its start time at a sufficient intervalbefore the dump operation is to begin. Include the -localauth argument tothe vos backup or vos backupsys command to enable it to run withoutadministrative tokens. For instructions, see “To create and start a newprocess” on page 134.
v The volume set, dump level, and Tape Coordinator port offset you specifyon the backup dump command line must be properly defined in theBackup Database. The Backup System checks the database before beginning
280 AFS: Administration Guide
a dump operation and halts the command immediately if any of therequired entities are missing. If necessary, use the indicated commands:– To display volume sets, use the backup listvolsets command as
described in “To display volume sets and volume entries” on page 238.– To display dump levels, use the backup listdumps command as
described in “To display the dump hierarchy” on page 247.– To display port offsets, use the backup listhosts command as described
in “To display the list of configured Tape Coordinators” on page 232.v Ensure that a valid token corresponding to a privileged administrative
identity is available to the Backup System processes both when the backupdump command is issued and when the dump operation actually runs (fora complete description or the necessary privileges, see “GrantingAdministrative Privilege to Backup Operators” on page 228). This is aspecial concern for scheduled dumps. One alternative is to run backupcommands (or the script that invokes them) and the butc command onserver machines, and to include the -localauth argument on the command.In this case, the processes use the key with the highest key version numberin the local /usr/afs/etc/KeyFile file to construct a token that never expires.Otherwise, you must use a method to renew tokens before they expire, orgrant tokens with long lifetimes. In either case, you must protect againstimproper access to the tokens by securing the machines both physically andagainst unauthorized network access. The protection possibly needs to beeven stronger than when a human operator is present during theoperations.
v Record tape capacity and filemark size values that are as accurate aspossible in the Tape Coordinator’s /usr/afs/backup/tapeconfig file and onthe tape’s label. For suggested values and a description of what can happenwhen they are inaccurate, see “Configuring the tapeconfig File” onpage 224.
v If an unattended dump requires multiple tapes, arrange to provide them byproperly configuring a tape stacker or jukebox and writing a tape-mountingscript to be invoked in the device’s CFG_device_name file. For instructions,see “Invoking a Device’s Tape Mounting and Unmounting Routines” onpage 257.
v You can configure any tape device or backup data file’s CFG_device_namefile to take advantage of the Backup System’s automation features. See“Automating and Increasing the Efficiency of the Backup Process” onpage 254.
v When you issue a backup command in regular (noninteractive) mode, thecommand shell prompt does not return until the operation completes. Toavoid having to open additional connections, issue the backup dumpcommand in interactive mode, especially when including the -at argumentto schedule dump operations.
Chapter 7. Backing Up and Restoring AFS Data 281
v An incremental dump proceeds most smoothly if there is a dump created atthe dump level immediately above the level you are using. If the BackupSystem does not find a Backup Database record for a dump created at theimmediate parent level, it looks for a dump created at one level higher inthe hierarchy, continuing up to the full dump level if necessary. It creates anincremental dump at the level one below the lowest valid parent dump thatit finds, or even creates a full dump if that is necessary. This algorithmguarantees that the dump captures all data that has changed since the lastdump, but has a couple of disadvantages. First, the Backup System’s searchthrough the database for a valid parent dump takes extra time. Second, thesubsequent pattern of dumps can be confusing to a human operator whoneeds to restore data from them, because they were not performed at theexpected dump levels.The easiest way to guarantee that a dump exists at the immediate parentlevel is always to perform dump operations on the predetermined schedule.To check that the parent dump exists, you can issue the backup dumpinfocommand (as described in “To display dump records” on page 297) andsearch for it in the output. Alternatively, issue the backup volinfocommand (as described in “To display a volume’s dump history” onpage 301) for a volume that you believe is in the parent dump.
v Always use dump levels from the same hierarchy (levels that aredescendants of the same full level) when dumping a given volume set. Theresult of alternating between levels from different hierarchies can beconfusing when you need to restore data or read dump records. It alsoincreases the chance that changed data is not captured in any dump, or isbacked up redundantly into more than one dump.
v Use permanent tape names rather than AFS tape names. You can makepermanent names more descriptive than is allowed by an AFS tape name’sstrict format, and also bypass the name-checking step that the BackupSystem performs by default when a tape has an AFS tape name only. Youcan also configure the Tape Coordinator always to skip the check, however;for instructions and a description of the acceptable format for AFS tapenames, see “Eliminating the AFS Tape Name Check” on page 262.
v If you write dumps to tape, restore operations are simplest if all of yourtape devices are compatible (can read the same type of tape, at the samecompression ratios, and so on). If you must use incompatible devices, thenat least use compatible devices for all dumps performed at dump levelsthat are at the same depth in their respective hierarchies (compatibledevices for all dumps performed at a full dump level, compatible devicesfor all dumps performed at a level 1 incremental dump level, and so on).The -portoffset argument to the backup diskrestore and backupvolsetrestore commands accepts multiple port offset numbers, but uses thefirst listed port offset when restoring all full dumps, the second port offsetwhen restoring all level 1 dumps, and so on. If you did not use compatible
282 AFS: Administration Guide
tape devices when creating dumps at the same depth in a hierarchy, youmust restore one volume at a time with the backup volrestore command.
v In some cases, it makes sense to use a temporary volume set, which existsonly within the context of the interactive session in which it is created andfor which no record is created in the Backup Database. One suitablesituation is when dumping a volume to tape in preparation for removing itpermanently (perhaps because its owner is leaving the cell). In this case,you can define a volume entry that includes only the volume of interestwithout cluttering up the Backup Database with a volume set record thatyou are using only once.
v Do not perform a dump operation when you know that there are network,machine, or server process problems that can prevent the Backup Systemfrom accessing volumes or the Volume Location Database (VLDB).Although the Backup System automatically makes a number of repeatedattempts to get to an inaccessible volume, the dump operation takes extratime and in some cases stops completely to prompt you for instructions onhow to continue. Furthermore, if the Backup System’s last access attemptfails and the volume is omitted from the dump, you must take extra stepsto have it backed up (namely, the steps described just following for a halteddump operation). For a more complete description of how the BackupSystem makes repeated access attempts, see “How Your ConfigurationChoices Influence the Dump Process” on page 284.
v Review the logs created by the Backup System as soon as possible after adump operation completes, particularly if it ran unattended. They nameany volumes that were not successfully backed up, among other problems.The Backup Server writes to the /usr/afs/logs/BackupLog file on the localdisk of the database server machine, and you can use the bos getlogcommand to read it remotely if you wish; for instructions, see “DisplayingServer Process Log Files” on page 145. The Tape Coordinator writes to twofiles in the local /usr/afs/backup directory on the machine where it isrunning: the TE_device_name file records errors, and the TL_device_name filerecords both trace and error messages.
v Avoid halting a dump operation (for instance, by issuing the (backup) killcommand in interactive mode), both because it introduces the potential forconfusion and because recovering from the interruption requires extraeffort. When a dump operation is interrupted, the volumes that werebacked up before the halt signal is received are complete on the tape or inthe backup data file, and are usable in restore operations. The records in theBackup Database about the volumes’ dump history accurately show whenand at which dump level they were backed up; to display the records, usethe backup volinfo command as described in “To display a volume’s dumphistory” on page 301.However, there is no indication in the dump’s Backup Database record thatvolumes were omitted; to display the record, use the backup dumpinfocommand as described in “To display dump records” on page 297. You
Chapter 7. Backing Up and Restoring AFS Data 283

must choose one of the following methods for dealing with the volumesthat were not backed up before the dump operation halted. (Actually, youmust make the same decision if the dump operation halts for reasonsoutside your control.)– You can take no action, waiting until the next regularly scheduled dump
operation to back them up. At that time, the Backup Systemautomatically dumps them at the appropriate level to guarantee that thedump captures all of the data that changed since the volume was lastdumped. However, you are gambling that restoring the volume is notnecessary before the next dump operation. If restoration is necessary, youcan restore the volume only to its state at the time it was last included ina dump—you have lost all changes made to the volume since that time.
– You can discard the entire dump and run the dump operation again. Todiscard the dump, use the backup labeltape command to relabel thetapes or backup data file, which automatically removes all associatedrecords from the Backup Database. For instructions, see “Writing andReading Tape Labels” on page 248. If a long time has passed since thebackup version of the volumes was created, some of the source volumeshave possibly changed. If that seems likely, reissue the vos backup orvos backupsys command on them before redoing the dump operation.
– You can create a new volume set that includes the missed volumes anddump it at a full dump level (even if you specify an incremental dumplevel, the Backup System uses the full dump level at the top of yourspecified level’s hierarchy, because it has never before backed up thesevolumes as part of the new volume set). The next time you dump theoriginal volume set, the Backup System automatically dumps the missedvolumes at the level one below the level it used the last time it dumpedthe volumes as part of the original volume set.
How Your Configuration Choices Influence the Dump Process
This section provides an overview of the backup process, describing whathappens at each stage both by default and as a result of your configurationchoices, including the configuration instructions you include in thedevice-specific CFG_device_name file. For the sake of clarity, it tracks theprogress of a single backup dump command that creates an initial dump. Fora discussion of the slight differences in the procedure when you append orschedule dumps, see “Appending Dumps to an Existing Dump Set” onpage 290 or “Scheduling Dumps” on page 293.
As a concrete example, the following description traces a dump of the volumeset user at the /weekly/mon/tues/wed dump level. The user volume set hasone volume entry that matches the backup version of all user volumes:
.* .* user.*\.backup
284 AFS: Administration Guide
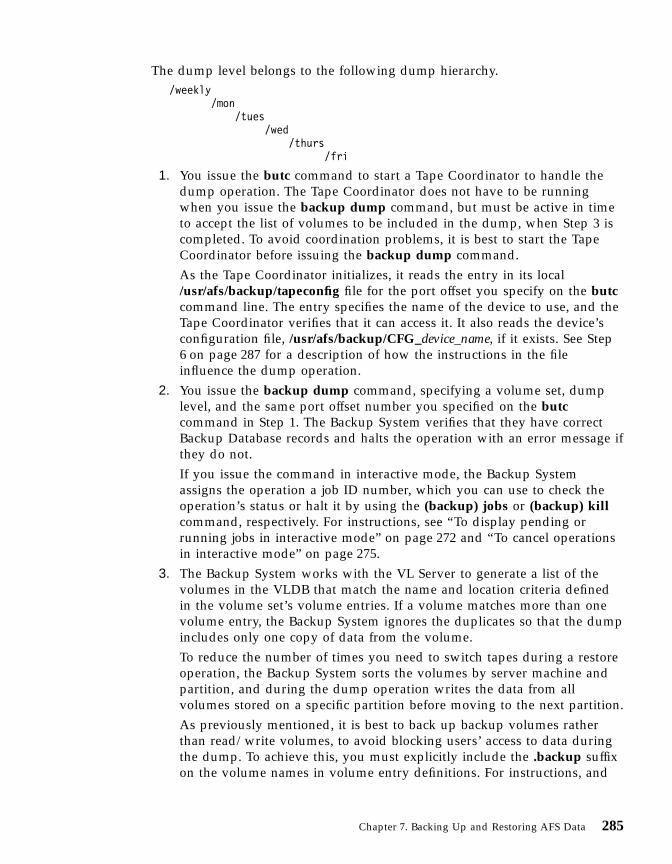
The dump level belongs to the following dump hierarchy./weekly
/mon/tues
/wed/thurs
/fri
1. You issue the butc command to start a Tape Coordinator to handle thedump operation. The Tape Coordinator does not have to be runningwhen you issue the backup dump command, but must be active in timeto accept the list of volumes to be included in the dump, when Step 3 iscompleted. To avoid coordination problems, it is best to start the TapeCoordinator before issuing the backup dump command.As the Tape Coordinator initializes, it reads the entry in its local/usr/afs/backup/tapeconfig file for the port offset you specify on the butccommand line. The entry specifies the name of the device to use, and theTape Coordinator verifies that it can access it. It also reads the device’sconfiguration file, /usr/afs/backup/CFG_device_name, if it exists. See Step6 on page 287 for a description of how the instructions in the fileinfluence the dump operation.
2. You issue the backup dump command, specifying a volume set, dumplevel, and the same port offset number you specified on the butccommand in Step 1. The Backup System verifies that they have correctBackup Database records and halts the operation with an error message ifthey do not.If you issue the command in interactive mode, the Backup Systemassigns the operation a job ID number, which you can use to check theoperation’s status or halt it by using the (backup) jobs or (backup) killcommand, respectively. For instructions, see “To display pending orrunning jobs in interactive mode” on page 272 and “To cancel operationsin interactive mode” on page 275.
3. The Backup System works with the VL Server to generate a list of thevolumes in the VLDB that match the name and location criteria definedin the volume set’s volume entries. If a volume matches more than onevolume entry, the Backup System ignores the duplicates so that the dumpincludes only one copy of data from the volume.To reduce the number of times you need to switch tapes during a restoreoperation, the Backup System sorts the volumes by server machine andpartition, and during the dump operation writes the data from allvolumes stored on a specific partition before moving to the next partition.As previously mentioned, it is best to back up backup volumes ratherthan read/write volumes, to avoid blocking users’ access to data duringthe dump. To achieve this, you must explicitly include the .backup suffixon the volume names in volume entry definitions. For instructions, and
Chapter 7. Backing Up and Restoring AFS Data 285
to learn how to define volume entries that match multiple volumes, see“Defining and Displaying Volume Sets and Volume Entries” on page 233.In the example, suppose that 50 volumes match the user volume setcriteria, including three called user.pat.backup, user.terry.backup, anduser.smith.backup.
4. The Backup System next scans the dump hierarchy for the dump levelyou have specified on the backup dump command line. If it is a fulllevel, then in the current operation the Backup System backs up all of thedata in all of the volumes in the list obtained in Step 3 on page 285.If the dump level is incremental, the Backup System reads each volume’sdump history in the Backup Database to learn which of the parent levelsin its pathname was used when the volume was most recently backed upas part of this volume set. In the usual case, it is the current dump level’simmediate parent level.An incremental dump of a volume includes only the data that changedsince the volume was included in the parent dump. To determine whichdata are eligible, the Backup System uses the concept of a volume’s clonedate. A read/write volume’s clone date is when the Backup System locksthe volume before copying its contents into a dump. A backup volume’sclone date is the completion time of the operation that created it bycloning its read/write source volume (the operation initiated by a vosbackup or vos backupsys command). A read-only volume’s clone date isthe time of the release operation (initiated by the vos release command)that completed most recently before the dump operation.More precisely then, an incremental dump includes only data that have amodification timestamp between the clone date of the volume included inthe parent dump (the parent clone date) and the clone date of the volumeto be included in the current dump (the current clone date).There are some common exceptions to the general rule that a volume’sparent dump is the dump created at the immediate parent level:v The volume did not exist at all at the time of the last dump. In this
case, the Backup System automatically does a full dump of it.v The volume did not match the volume set’s name and location criteria
at the time of the last dump. In this case, the Backup Systemautomatically does a full dump of it, even if it was backed up recently(fully or incrementally) as part of another volume set. This redundancyis an argument for defining volume entries in terms of names ratherthan locations, particularly if you move volumes frequently.
v The volume was not included in the dump at the immediate parentlevel for some reason (perhaps a process, machine, or network accessprevented the Backup System from accessing it). In this case, theBackup System sets the clone date to the time of the last dumpoperation that included the volume. If the volume was not included in
286 AFS: Administration Guide
a dump performed at any of the levels in the current level’s pathname,the Backup System does a full dump of it.
In the example, the current dump level is /weekly/mon/tues/wed. Theuser.pat.backup and user.terry.backup volumes were included in thedump performed yesterday, Tuesday, at the /weekly/mon/tues level. TheBackup System uses as their parent clone date 3:00 a.m. on Tuesday,which is when backup versions of them were created just beforeTuesday’s dump operation. However, Tuesday’s dump did not includethe user.smith.backup volume for some reason. The last time it wasincluded in a dump was Monday, at the /weekly/mon level. The BackupSystem uses a parent clone date of Monday at 2:47 a.m., which is when abackup version of the volume was created just before the dumpoperation on Monday.
5. If performing an incremental dump, the Backup System works with theVolume Server to prepare a list of all of the files in each volume thathave changed (have modification timestamps) between the parent clonedate and the current clone date. The dump includes the completecontents of every such file. If a file has not changed, the dump includesonly a placeholder stub for it. The dump also includes a copy of thecomplete directory structure in the volume, whether or not it haschanged since the previous dump.If none of the data in the volume has changed since the last dump, theBackup System omits the volume completely. It generates the followingmessage in the Tape Coordinator window and log files:
Volume volume_name (volume_ID) not dumped - has not been modifiedsince last dump.
6. The Tape Coordinator prepares to back up the data. If there is aCFG_device_name file, the Tape Coordinator already read it in Step 1 onpage 285. The following list describes how the instructions in the fileguide the Tape Coordinator’s behavior at this point:
FILE If this instruction is set to YES, the Tape Coordinator writes datato a backup data file. The device_name field in the tapeconfig filemust also specify a filename for the dump to work properly. Forfurther discussion and instructions on configuring a backup datafile, see “Dumping Data to a Backup Data File” on page 263.
If it is set to NO or does not appear in the file, the TapeCoordinator writes to a tape device.
MOUNT and UNMOUNTIf there is a MOUNT instruction in the file, each time the TapeCoordinator needs a new tape, it invokes the indicated script orprogram to mount a tape in the device’s tape drive. There mustbe a MOUNT instruction if you want to utilize a tape stacker orjukebox’s ability to switch between tapes automatically. If there is
Chapter 7. Backing Up and Restoring AFS Data 287
no MOUNT instruction, the Tape Coordinator prompts thehuman operator whenever it needs a tape.
The AUTOQUERY instruction, which is described just following,modifies the Tape Coordinator’s tape acquisition procedure forthe first tape it needs in a dump operation.
If there is an UNMOUNT instruction, then the Tape Coordinatorinvokes the indicated script or program whenever it closes thetape device. Not all tape devices have a separate tapeunmounting routine, in which case the UNMOUNT instruction isnot necessary. For more details on both instructions, see“Invoking a Device’s Tape Mounting and Unmounting Routines”on page 257.
AUTOQUERYIf this instruction is set to NO, the Tape Coordinator assumesthat the first tape needed for the dump operation is already inthe tape drive. It does not use its usual tape acquisitionprocedure as described in the preceding discussion of theMOUNT instruction. You can achieve the same effect byincluding the -noautoquery flag to the butc command.
If this instruction is absent or set to YES, the Tape Coordinatoruses its usual tape acquisition procedure even for the first tape.For more details, see “Eliminating the Search or Prompt for theInitial Tape” on page 261.
BUFFERSIZEIf this instruction appears in the file, the Tape Coordinator sets itsbuffer size to the specified value rather than using the defaultbuffer size of 16 KB. For further discussion, see “Setting theMemory Buffer Size to Promote Tape Streaming” on page 263.
If there is no CFG_device_name file, the Tape Coordinator writes data to atape device and prompts the human operator each time it needs a tape(the only exception being the first tape if you include the -noautoqueryflag to the butc command).
7. The Tape Coordinator opens either a tape drive or backup data file at thispoint, as directed by the instructions in the CFG_device_name file(described in Step 6 on page 287). The instructions also determinewhether it invokes a mount script or prompts the operator. In Step 1 onpage 285 the Tape Coordinator read in the device’s capacity and filemarksize from the tapeconfig file. It now reads the same values from the tapeor backup data file’s magnetic label, and overwrites the tapeconfig valuesif there is a difference.If creating an initial dump (as in the current example) and there is nopermanent name on the label, the Tape Coordinator next checks that the
288 AFS: Administration Guide
AFS tape name has one of the three acceptable formats. If not, it rejectsthe tape and you must use the backup labeltape command to write anacceptable name. You can bypass this name-checking step by includingthe NAME_CHECK NO instruction in the CFG_device_name file. Fordiscussion and a list of the acceptable AFS tape name values, see“Eliminating the AFS Tape Name Check” on page 262.
8. For an initial dump, the Tape Coordinator starts writing at the beginningof the tape or backup dump file, overwriting any existing data. Toprevent inappropriate overwriting, the Backup System first checks theBackup Database for any dump records associated with the name(permanent or AFS tape name) on the tape or backup dump file’s label. Itrefuses to write to a backup data file that has unexpired dumps in it, orto a tape that belongs to a dump set with any unexpired dumps. Torecycle a file or tape before all dumps have expired, you must use thebackup labeltape command to relabel it. Doing so removes the BackupDatabase records of all dumps in the file or on all tapes in the dump set,which makes it impossible to restore data from any of the tapes. Formore information on expiration dates, see “Defining Expiration Dates” onpage 244.The Tape Coordinator also checks for two other types of inappropriatetape reuse. The tape cannot already have data on it that belongs to thedump currently being performed, because that implies that the previoustape is still in the drive, or you have mistakenly reinserted it. The TapeCoordinator generates the following message and attempts to obtainanother tape:
Can't overwrite tape containing the dump in progress
The tape cannot contain data from a parent dump of the current(incremental) dump, because overwriting a parent dump makes itimpossible to restore data from the current dump. The Tape Coordinatorgenerates the following message and attempts to obtain another tape:
Can't overwrite the parent dump parent_name (parent_dump_ID)
9. The Tape Coordinator now writes data to the tape or backup data file. Ituses the capacity and filemark size it obtained in Step 7 on page 288 as ittracks how much more space is available, automatically using its tapeacquisition procedure if the dump is not finished when it reaches the endof the tape. For a more detailed description, and a discussion of whathappens if the Tape Coordinator reaches the physical end-of-tapeunexpectedly, see “Configuring the tapeconfig File” on page 224.Similarly, for instructions on configuring a backup data file to optimizerecovery from unexpectedly running out of space, see Step 6 on page 265in the instructions in “Dumping Data to a Backup Data File” on page 263.If the Tape Coordinator cannot access a volume during the dump(perhaps because of a server process, machine, or network outage), itskips the volume and continues dumping all volumes that it can access.
Chapter 7. Backing Up and Restoring AFS Data 289
It generates an error message in the Tape Coordinator window and logfile about the omitted volume. It generates a similar message if itdiscovers that a backup volume has not been recloned since the previousdump operation (that is, that the volume’s current clone date is the sameas its parent clone date):
Volume volume_name (volume_ID) not dumped - has not been re-clonedsince last dump.
After completing a first pass through all of the volumes, it attempts todump each omitted volume again. It first checks to see if the reason thatthe volume was inaccessible during the first pass is that it has beenmoved since the VL Server generated the list of volumes to dump in Step3 on page 285. If so, it dumps the volume from its new site. If the secondattempt to access a volume also fails, the Tape Coordinator it generatesthe following message, prompting you for instruction on how to proceed:
Dump of volume volume_name (volume_ID) failedPlease select action to be taken for this volume.
r - retry, try dumping this volume againo - omit, this volume from this dumpa - abort, the entire dump
To increase the automation of the dump process, you can include theASK NO instruction in the CFG_device_name file to suppress this promptand have the Tape Coordinator automatically omit the volume from thedump.
If you are tracking the dump as it happens, the prompt enables you totake corrective action. If the volume has not been recloned, you can issuethe vos backup command. If the volume is inaccessible, you caninvestigate and attempt to resolve the cause.
10. If the tape or backup data file does not already have an AFS tape name,the Backup System constructs the appropriate one and records it on thelabel and in the Backup Database. It also assigns a dump name and IDnumber to the dump and records them in dump record that it creates inthe Backup Database. For details on tape and dump names, see “DumpNames and Tape Names” on page 219. For instructions on displayingdump records or a volume’s dump history, or scanning the contents of atape, see “Displaying Backup Dump Records” on page 296.
Appending Dumps to an Existing Dump Set
The AFS Backup System enables you to append dumps to the end of the finaltape in a dump set by including the -append flag to the backup dumpcommand. Appending dumps improves Backup System automation andefficiency in several ways:
290 AFS: Administration Guide
v It maximizes use of a tape’s capacity. An initial dump must always start ona new tape, but does not necessarily extend to the end of the final tape inthe dump set. You can fill up the unused tape by appending one or moredumps.
v It can reduce the number of tapes and tape changes needed to complete adump operation. Rather than performing a series of initial dumps first,instead begin with an initial dump and follow it immediately with severalappended dumps. In this way you can write all dumps in the series to thesame tape (assuming the tape is large enough to accommodate them all). If,in contrast, you perform all of the initial dumps first, each must begin on anew tape and you must switch tapes again if you then want to appenddumps.You can either issue the appropriate series of backup dump commands atthe interactive backup> prompt, or record them in a file that you then namewith the -file argument to the backup dump command. Appending dumpsin this way enables you to run multiple unattended backup operations evenwithout a tape stacker or jukebox, if all of the dumps fit on one tape.
v It can reduce the number of tape changes during a restore operation. Forexample, if you append all of the incremental dumps of a volume set totapes in one dump set, then restoring a volume from the volume setrequires a minimum number of tape changes. It is best not to appendincremental dumps to a tape that contains the parent full dump, however:if the tape is lost or damaged, you lose all of the data from the volume.Although it can be efficient to group together appended dumps that arerelated, the Backup System does not require any relationship between theappended dumps on a tape or in a dump set.
When writing an appended dump, the Backup System performs most of thesteps described in “How Your Configuration Choices Influence the DumpProcess” on page 284. Appended dumps do not have to be related to oneanother or the initial dump, so it skips Step 7 on page 288: there is no need tocheck that the AFS tape name reflects the volume set and dump level namesin this case. It also skips Step 8 on page 289. Because it is not overwriting anyexisting data on the tape, it does not need to check the expiration dates ofexisting dumps on the tape or in the file. Then in Step 9 on page 289 the TapeCoordinator scans to the end of the last dump on the tape or in the backupdata file before it begins writing data.
The Backup System imposes the following conditions on appended dumps:v If writing to tape, the Tape Coordinator checks that it is the final one in a
dump set for which there are complete and valid tape and dump records inthe Backup Database. If not, it rejects the tape and requests an acceptableone. If you believe the tape has valid data on it, you can reconstruct the
Chapter 7. Backing Up and Restoring AFS Data 291
Backup Database dump records for it by using the -dbadd argument to thebackup scantape command as instructed in “To scan the contents of a tape”on page 302.
v The most recent dump on the tape or in the backup data file must havecompleted successfully.
v The dump set to which the tape or file belongs must begin with an initialdump that is recorded in the Backup Database. If there are no dumps onthe current tape, then the Backup System treats the dump operation as aninitial dump and imposes the relevant requirements (for example, checksthe AFS tape name if appropriate).
As you append dumps, keep in mind that all of a dump set’s dump and taperecords in the Backup Database are indexed to the initial dump. If you wantto delete an appended dump’s record, you must delete the initial dumprecord, and doing so erases the records of all dumps in the dump set. Withoutthose records, you cannot restore any of the data in the dump set.
Similarly, all of the dumps in a dump set must expire before you can recycle(write a new initial dump to) any of the tapes in a dump set. Do not appenda dump if its expiration date is later than the date on which you want torecycle any of the tapes in its dump set. To recycle a tape before the lastexpiration date, you must delete the initial dump’s record from the BackupDatabase. Either use the backup labeltape command to relabel the tape asinstructed in “To label a tape” on page 250, or use the backup deletedumpcommand to delete the record directly as instructed in “To delete dumprecords from the Backup Database” on page 324.
Although in theory you can append as many dumps as you wish, it generallymakes sense to limit the number of tapes in a dump set (for example, to five),for these reasons:v If an unreadable spot develops on one of the tapes in a dump set, it can
prevent the Tape Coordinator from scanning the tape as part of a backupscantape operation you use to reconstruct Backup Database records. TheTape Coordinator can almost always scan the tape successfully up to thepoint of damage and can usually skip past minor damage. A scanningoperation can start on any tape in a dump set, so damage on one tape doesnot prevent scanning of the others in the dump set. However, you can scanonly the tapes that precede the damaged one in the dump set or the onesthat follow the damaged one, but not both. (For more information on usingtapes to reconstruct the information in the Backup Database, see “To scanthe contents of a tape” on page 302.)An unreadable bad spot can also prevent you from restoring a volumecompletely, because restore operations must begin with the full dump andcontinue with each incremental dump in order. If you cannot restore aspecific dump, you cannot restore any data from later incremental dumps.
292 AFS: Administration Guide
v If you decide in the future to archive one or more dumps, then you mustarchive the entire set of tapes that constitute the dump set, rather than justthe ones that contain the data of interest. This wastes both tape and archivestorage space. For more information on archiving, see “Archiving Tapes” onpage 243.
Scheduling Dumps
By default, the Backup System starts executing a dump operation as soon asyou enter the backup dump command, and the Tape Coordinator beginswriting data as soon as it is not busy and the list of files to write is available.You can, however, schedule a dump operation to begin at a specific later time:v To schedule a single dump operation, include the -at argument to specify its
start time.v To schedule multiple dump operations, list the operations in a file named
by the -file argument and use the -at argument to specify when the backupcommand interpreter reads the file. If you omit the -at argument, thecommand interpreter reads the file immediately, which does not count asscheduling, but does allow you to initiate multiple dump operations in asingle command. Do not combine the -file argument with the -volumeset,-dump, -portoffset, -append, or -n options.For file-formatting instructions, see the description of the -file argument inStep 7 on page 294 of “To create a dump”.
The Backup System performs initial and appended dumps in the samemanner whether they are scheduled or begin running as soon as you issue thebackup dump command. The only difference is that the requirements forsuccessful execution hold both at the time you issue the command and whenthe Backup System actually begins running it. All required Backup Databaseentries for volume sets, dump levels, and port offsets, and all dump and taperecords must exist at both times. Perhaps more importantly, the requiredadministrative tokens must be available at both times. See “Making BackupOperations More Efficient” on page 280.
To create a dump1. Verify that you are authenticated as a user listed in the
/usr/afs/etc/UserList file. If necessary, issue the bos listusers command,which is fully described in “To display the users in the UserList file” onpage 582.
% bos listusers <machine name>
2. If the Tape Coordinator for the tape device that is to perform the operationis not already running, open a connection to the appropriate TapeCoordinator machine and issue the butc command, for which completeinstructions appear in “To start a Tape Coordinator process” on page 276.
Chapter 7. Backing Up and Restoring AFS Data 293
% butc [<port offset>] [-noautoquery]
3. If using a tape device, insert the tape.4. Issue the backup command to enter interactive mode.
% backup
5. Decide which volume set and dump level to use. If necessary, issue thebackup listvolsets and backup listdumps commands to display theexisting volume sets and dump levels. For complete instructions and adescription of the output, see “To display volume sets and volume entries”on page 238 and “To display the dump hierarchy” on page 247.
backup> listvolsets [<volume set name>]backup> listdumps
If you want to use a temporary volume set, you must create it during thecurrent interactive session. This can be useful if you are dumping avolume to tape in preparation for removing it permanently (perhapsbecause its owner is leaving the cell). In this case, you can define a volumeentry that includes only the volume of interest without cluttering up theBackup Database with a volume set record that you are using only once.Complete instructions appear in “Defining and Displaying Volume Setsand Volume Entries” on page 233.
backup> addvolset <volume set name> -temporarybackup> addvolentry -name <volume set name> \
-server <machine name> \-partition <partition name> \-volumes <volume name (regular expression)>
6. If you are creating an initial dump and writing to a tape or backup datafile that does not have a permanent name, its AFS tape name must satisfythe Backup System’s format requirements as described in “Eliminating theAFS Tape Name Check” on page 262. If necessary, use the backupreadlabel command to display the label and the backup labeltapecommand to change the names, as instructed in “Writing and ReadingTape Labels” on page 248. You must also relabel a tape if you want tooverwrite it and it is part of a dump set that includes any unexpireddumps, though this is not recommended. For a discussion of theappropriate way to recycle tapes, see “Creating a Tape RecyclingSchedule” on page 242.
7. Issue the backup dump command to dump the volume set.v To create one initial dump, provide only the volume set name, dump
level name, and port offset (if not zero).v To create one appended dump, add the -append flag.v To schedule a single initial or appended dump, add the -at argument.v To initiate multiple dump operations, record the appropriate commands
in a file and name it with the -file argument. Do not combine thisargument with options other than the -at argument.
294 AFS: Administration Guide
backup> dump <volume set name> <dump level name> [<TC port offset>] \[-at <Date/time to start dump>+] \[-append] [-n] [-file <load file>]
where
dump Must be typed in full.
volume set nameNames the volume set to dump.
dump level nameSpecifies the complete pathname of the dump level at which todump the volume set.
TC port offsetSpecifies the port offset number of the Tape Coordinator processthat is handling the operation. You must provide this argumentunless the default value of 0 (zero) is appropriate.
-at Specifies the date and time in the future at which to run thecommand, or to read the file named by the -file argument. Providea value in the format mm/dd/yyyy [hh:MM], where the month(mm), day (dd), and year (yyyy) are required. Valid values for theyear range from 1970 to 2037; higher values are not valid becausethe latest possible date in the standard UNIX representation is inFebruary 2038. The Backup System automatically reduces any laterdate to the maximum value in 2038.
The hour and minutes (hh:MM) are optional, but if provided mustbe in 24-hour format (for example, the value 14:36 represents 2:36p.m.). If you omit them, the time defaults to midnight (00:00hours).
As an example, the value 04/23/1999 20:20 schedules the commandfor 8:20 p.m. on 23 April 1999.
Note: A plus sign follows this argument in the command’s syntaxstatement because it accepts a multiword value which doesnot need to be enclosed in double quotes or otherdelimiters, not because it accepts multiple dates. Provideonly one date (and optionally, time) definition.
-appendCreates an appended dump by scanning to the end of the datafrom one or more previous dump operations that it finds on thetape or in the backup data file.
-n Displays the names of all volumes to be included in the indicateddump, without actually writing data to tape or the backup data
Chapter 7. Backing Up and Restoring AFS Data 295

file. Combine this flag with the arguments you plan to use on theactual command, but not with the -file argument.
-file Specifies the local disk or AFS pathname of a file containingbackup commands. The Backup System reads the file immediately,or at the time specified by the -at argument if it is provided. Apartial pathname is interpreted relative to the current workingdirectory.
Place each backup dump command on its own line in theindicated file, using the same syntax as for the command line, butwithout the word backup at the start of the line. Each commandmust include the volume set name and dump level name argumentsplus the TC port offset argument if the default value of zero is notappropriate. Commands in the file can also include any of thebackup dump command’s optional arguments, including the -atargument (which must specify a date and time later than the dateand time at which the Backup System reads the file).
8. If you did not include the -noautoquery flag when you issued the butccommand, or if the device’s CFG_device_name configuration file includesthe instruction AUTOQUERY YES, then the Tape Coordinator promptsyou to place the tape in the device’s drive. You have already done so, butyou must now press <Return> to indicate that the tape is ready forlabeling.If more than one tape is required, you must either include the MOUNTinstruction in the CFG_device_name file and stock the correspondingstacker or jukebox with tapes, or remain at the console to respond to theTape Coordinator’s prompts for subsequent tapes.
9. After the dump operation completes, review the Backup System’s log filesto check for errors. Use the bos getlog command as instructed in“Displaying Server Process Log Files” on page 145 to read the/usr/afs/logs/BackupLog file, and a text editor on the Tape Coordinatormachine to read the TE_device_name and TL_device_name files in the local/usr/afs/backup directory.It is also a good idea to record the tape name and dump ID number onthe exterior label of each tape.
Displaying Backup Dump Records
The backup command suite includes three commands for displayinginformation about data you have backed up:v To display information about one or more dump operations, such as the
date it was performed and the number of volumes included, use thebackup dumpinfo command as described in “To display dump records” onpage 297
296 AFS: Administration Guide

page 293. You can display a detailed record of a single dump or morecondensed records for a certain number of dumps, starting with the mostrecent and going back in time. You can specify the number of dumps oraccept the default of 10.
v To display a volume’s dump history, use the backup volinfo command asdescribed in “To display a volume’s dump history” on page 301.
v To display information extracted from a tape or backup data file about thevolumes it includes, use the backup scantape command. To create newdump and tape records in the Backup Database derived from the tape anddump labels, add the -dbadd flag. For instructions, see “To scan thecontents of a tape” on page 302.
To display dump records1. Verify that you are authenticated as a user listed in the
/usr/afs/etc/UserList file. If necessary, issue the bos listusers command,which is fully described in “To display the users in the UserList file” onpage 582.
% bos listusers <machine name>
2. Issue the backup dumpinfo command to list information about dumpsrecorded in the Backup Database.
% backup dumpinfo [-ndumps <no. of dumps>] [-id <dump id>] [-verbose]
where
dump Is the shortest acceptable abbreviation of dumpinfo.
-ndumpsDisplays the Backup Database record for each of the specifiednumber of dumps, starting with the most recent and going back intime. If the database contains fewer dumps than are requested, theoutput includes the records for all existing dumps. Do notcombine this argument with the -id argument or -verbose flag;omit all three options to display the records for the last 10 dumps.
-id Specifies the dump ID number of a single dump for which todisplay the Backup Database record. You must include the -idswitch. Do not combine this option with the -ndumps or -verbosearguments; omit all three arguments to display the records for thelast 10 dumps.
-verboseProvides more detailed information about the dump specified withthe -id argument, which must be provided along with it. Do notcombine this flag with the -ndumps option.
Chapter 7. Backing Up and Restoring AFS Data 297

If the -ndumps argument is provided, the output presents the followinginformation in table form, with a separate line for each dump:
dumpid The dump ID number.
parentidThe dump ID number of the dump’s parent dump. A value of 0 (zero)identifies a full dump.
lv The depth in the dump hierarchy of the dump level used to create thedump. A value of 0 (zero) identifies a full dump, in which case thevalue in the parentid field is also 0. A value of 1 or greater indicatesan incremental dump made at the corresponding level in the dumphierarchy.
createdThe date and time at which the Backup System started the dumpoperation that created the dump.
nt The number of tapes that contain the data in the dump. A value of 0(zero) indicates that the dump operation was terminated or failed. Usethe backup deletedump command to remove such entries.
nvols The number of volumes from which the dump includes data. If avolume spans tapes, it is counted twice. A value of 0 (zero) indicatesthat the dump operation was terminated or failed; the value in the ntfield is also 0 in this case.
dump nameThe dump name in the form
volume_set_name.dump_level_name (initial_dump_ID)
where volume_set_name is the name of the volume set, anddump_level_name is the last element in the dump level pathname atwhich the volume set was dumped.
The initial_dump_ID, if displayed, is the dump ID of the initial dumpin the dump set to which this dump belongs. If there is no value inparentheses, the dump is the initial dump in a dump set that has noappended dumps.
If the -id argument is provided alone, the first line of output begins with thestring Dump and reports information for the entire dump in the followingfields:
id The dump ID number.
level The depth in the dump hierarchy of the dump level used to create the
298 AFS: Administration Guide
dump. A value of 0 (zero) identifies a full dump. A value of 1 (one) orgreater indicates an incremental dump made at the specified level inthe dump hierarchy.
volumesThe number of volumes for which the dump includes data.
createdThe date and time at which the dump operation began.
Following a blank line, the output includes an entry for each tape that housesvolume data from the dump. Following the string Tape, the first two lines ofeach entry report information about that tape in the following fields:
name The tape’s permanent name if it has one, or its AFS tape nameotherwise, and its tape ID number in parentheses.
nVolumesThe number of volumes for which this tape includes dump data.
createdThe date and time at which the Tape Coordinator began writing datato this tape.
Following another blank line, the tape-specific information concludes with atable that includes a line for each volume dump on the tape. The informationappears in columns with the following headings:
Pos The relative position of each volume in this tape or file. On a tape, thecounter begins at position 2 (the tape label occupies position 1), andincrements by one for each volume. For volumes in a backup data file,the position numbers start with 1 and do not usually increment onlyby one, because each is the ordinal of the 16 KB offset in the file atwhich the volume’s data begins. The difference between the positionnumbers therefore indicates how many 16 KB blocks each volume’sdata occupies. For example, if the second volume is at position 5 andthe third volume in the list is at position 9, that means that the dumpof the second volume occupies 64 KB (four 16-KB blocks) of space inthe file.
Clone timeFor a backup or read-only volume, the time at which it was clonedfrom its read/write source. For a Read/Write volume, it is the sameas the dump creation date reported on the first line of the output.
Nbytes The number of bytes of data in the dump of the volume.
Volume The volume name, complete with .backup or .readonly extension ifappropriate.
Chapter 7. Backing Up and Restoring AFS Data 299
If both the -id argument and the -verbose flag are specified, the output isdivided into several sections:v The first section, headed by the underlined string Dump, includes
information about the entire dump. The fields labeled id, level, created,and nVolumes report the same values (though in a different order) as appearon the first line of output when the -id argument is provided by itself.Other fields of potential interest to the backup operator are:
maxTapesThe number of tapes that contain the dump set to which this dumpbelongs.
Start Tape SeqThe ordinal of the tape on which this dump begins in the set oftapes that contain the dump set.
v For each tape that contains data from this dump, there follows a sectionheaded by the underlined string Tape. The fields labeled name, written, andnVolumes report the same values (though in a different order) as appear onthe second and third lines of output when the -id argument is provided byitself. Other fields of potential interest to the backup operator are:
expiresThe date and time when this tape can be recycled, because alldumps it contains have expired.
nMBytes Data and nBytes DataSummed together, these fields represent the total amount ofdumped data actually from volumes (as opposed to labels,filemarks, and other markers).
KBytes Tape UsedThe number of kilobytes of tape (or disk space, for a backup datafile) used to store the dump data. It is generally larger than the sumof the values in the nMBytes Data and nBytes Data fields, because itincludes the space required for the label, file marks and othermarkers, and because the Backup System writes data at 16 KBoffsets, even if the data in a given block doesn’t fill the entire 16KB.
v For each volume on a given tape, there follows a section headed by theunderlined string Volume. The fields labeled name, position, clone, andnBytes report the same values (though in a different order) as appear in thetable that lists the volumes in each tape when the -id argument is providedby itself. Other fields of potential interest to the backup operator are:
id The volume ID.
tape The name of the tape containing this volume data.
300 AFS: Administration Guide

The following example command displays the Backup Database records forthe five most recent dump operations.
% backup dump 5dumpid parentid lv created nt nvols dump name
924424000 0 0 04/18/1999 04:26 1 22 usr.sun (924424000)924685000 924424000 1 04/21/1999 04:56 1 62 usr.wed (924424000)924773000 924424000 1 04/22/1999 05:23 1 46 usr.thu (924424000)924860000 924424000 1 04/23/1999 05:33 1 58 usr.fri (924424000)925033000 0 0 04/25/1999 05:36 2 73 sys.week
To display a volume’s dump history1. Verify that you are authenticated as a user listed in the
/usr/afs/etc/UserList file. If necessary, issue the bos listusers command,which is fully described in “To display the users in the UserList file” onpage 582.
% bos listusers <machine name>
2. Issue the backup volinfo command to display a volume’s dump history.% backup volinfo <volume name>
where
voli Is the shortest acceptable abbreviation of volinfo.
volume nameNames the volume for which to display the dump history. If youdumped the backup or read-only version of the volume, includethe .backup or .readonly extension.
The output includes a line for each Backup Database dump record thatmentions the specified volume, order from most to least recent. The output foreach record appears in a table with six columns:
dumpID The dump ID of the dump that includes the volume.
lvl The depth in the dump hierarchy of the dump level at which thevolume was dumped. A value of 0 indicates a full dump. A value of 1or greater indicates an incremental dump made at the specified depthin the dump hierarchy.
parentidThe dump ID of the dump’s parent dump. A value of 0 indicates afull dump, which has no parent; in this case, the value in the lvlcolumn is also 0.
creation dateThe date and time at which the Backup System started the dumpoperation that created the dump.
Chapter 7. Backing Up and Restoring AFS Data 301
clone dateFor a backup or read-only volume, the time at which it was clonedfrom its read/write source. For a read/write volume, the same as thevalue in the creation date field.
tape nameThe name of the tape containing the dump: either the permanent tapename, or an AFS tape name in the formatvolume_set_name.dump_level_name.tape_index where volume_set_name isthe name of the volume set associated with the initial dump in thedump set of which this tape is a part; dump_level_name is the name ofthe dump level at which the initial dump was backed up; tape_index isthe ordinal of the tape in the dump set. Either type of name can befollowed by a dump ID in parentheses; if it appears, it is the dump IDof the initial dump in the dump set to which this appended dumpbelongs.
The following example shows part of the dump history of the backup volumeuser.smith.backup:
% backup volinfo user.smith.backupDumpID lvl parentID creation date clone date tape name924600000 1 924427600 04/20/1999 05:20 04/20/1999 05:01 user_incr_2 (924514392)924514392 1 924427600 04/19/1999 05:33 04/19/1999 05:08 user_incr_2924427600 0 0 04/18/1999 05:26 04/18/1999 04:58 user_full_6
. . . . . . . .
. . . . . . . .
To scan the contents of a tape
Note: The ability to scan a tape that is corrupted or damaged depends on theextent of the damage and what type of data is corrupted. The BackupSystem can almost always scan the tape successfully up to the point ofdamage. If the damage is minor, the Backup System can usually skipover it and scan the rest of the tape, but more major damage canprevent further scanning. A scanning operation does not have to beginwith the first tape in a dump set, but the Backup System can processtapes only in sequential order after the initial tape provided. Therefore,damage on one tape does not prevent scanning of the others in thedump set, but it is possible to scan either the tapes that precede thedamaged one or the ones that follow it, not both.
If you use the -dbadd flag to scan information into the BackupDatabase and the first tape you provide is not the first tape in thedump set, the following restrictions apply:
302 AFS: Administration Guide
v If the first data on the tape is a continuation of a volume that beginson the previous (unscanned) tape in the dump set, the BackupSystem does not add a record for that volume to the BackupDatabase.
v The Backup System must read the marker that indicates the start ofan appended dump to add database records for the volumes in it. Ifthe first volume on the tape belongs to an appended dump, but isnot immediately preceded by the appended-dump marker, theBackup System does not create a Backup Database record for it orany subsequent volumes that belong to that appended dump.
1. Verify that you are authenticated as a user listed in the/usr/afs/etc/UserList file. If necessary, issue the bos listusers command,which is fully described in “To display the users in the UserList file” onpage 582.
% bos listusers <machine name>
2. If the Tape Coordinator for the tape device that is to perform the operationis not already running, open a connection to the appropriate TapeCoordinator machine and issue the butc command, for which completeinstructions appear in “To start a Tape Coordinator process” on page 276.
% butc [<port offset>] [-noautoquery]
3. If scanning a tape, place it in the drive.4. (Optional) Issue the backup command to enter interactive mode.
% backup
5. Issue the backup scantape command to read the contents of the tape.backup> scantape [-dbadd] [-portoffset <TC port offset>]
where
sc Is the shortest acceptable abbreviation of scantape.
-dbaddConstructs dump and tape records from the tape and dump labelsin the dump and writes them into the Backup Database.
TC port offsetSpecifies the port offset number of the Tape Coordinator processthat is handling the operation. You must provide this argumentunless the default value of 0 (zero) is appropriate.
6. If you did not include the -noautoquery flag when you issued the butccommand, or the device’s CFG_device_name configuration file includes theinstruction AUTOQUERY YES instruction, then the Tape Coordinatorprompts you to place the tape in the device’s drive. You have alreadydone so, but you must now press <Return> to indicate that the tape isready for reading.
Chapter 7. Backing Up and Restoring AFS Data 303
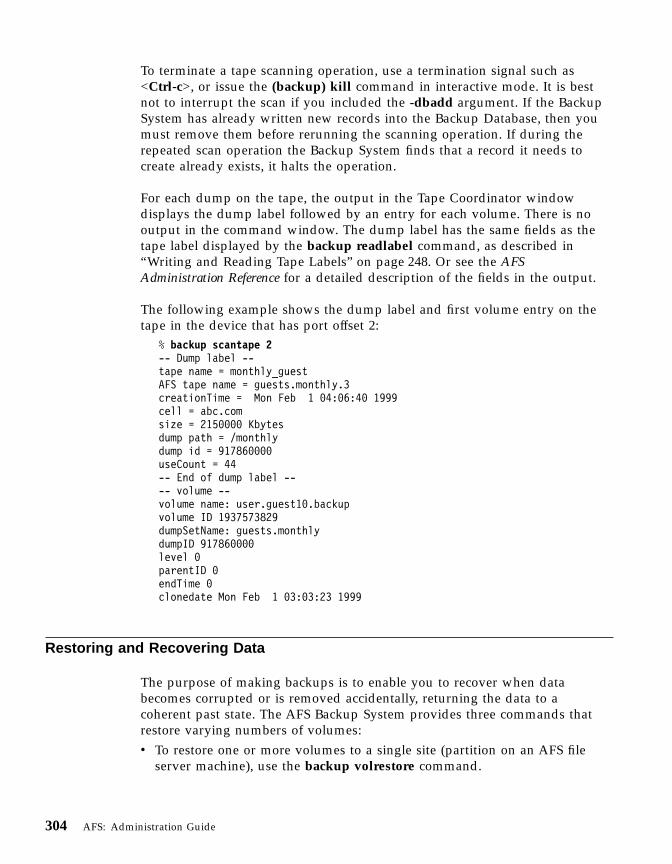
To terminate a tape scanning operation, use a termination signal such as<Ctrl-c>, or issue the (backup) kill command in interactive mode. It is bestnot to interrupt the scan if you included the -dbadd argument. If the BackupSystem has already written new records into the Backup Database, then youmust remove them before rerunning the scanning operation. If during therepeated scan operation the Backup System finds that a record it needs tocreate already exists, it halts the operation.
For each dump on the tape, the output in the Tape Coordinator windowdisplays the dump label followed by an entry for each volume. There is nooutput in the command window. The dump label has the same fields as thetape label displayed by the backup readlabel command, as described in“Writing and Reading Tape Labels” on page 248. Or see the AFSAdministration Reference for a detailed description of the fields in the output.
The following example shows the dump label and first volume entry on thetape in the device that has port offset 2:
% backup scantape 2-- Dump label --tape name = monthly_guestAFS tape name = guests.monthly.3creationTime = Mon Feb 1 04:06:40 1999cell = abc.comsize = 2150000 Kbytesdump path = /monthlydump id = 917860000useCount = 44-- End of dump label ---- volume --volume name: user.guest10.backupvolume ID 1937573829dumpSetName: guests.monthlydumpID 917860000level 0parentID 0endTime 0clonedate Mon Feb 1 03:03:23 1999
Restoring and Recovering Data
The purpose of making backups is to enable you to recover when databecomes corrupted or is removed accidentally, returning the data to acoherent past state. The AFS Backup System provides three commands thatrestore varying numbers of volumes:v To restore one or more volumes to a single site (partition on an AFS file
server machine), use the backup volrestore command.
304 AFS: Administration Guide

v To restore one or more volumes that are defined as a volume set, each to aspecified site, use the backup volsetrestore command.
v To restore an entire partition (that is, all of the volumes that the VLDB listsas resident on it), use the backup diskrestore command.
The commands are suited to different purposes because they vary in thecombinations of features they offer and in the requirements they impose. Todecide which is appropriate for a specific restore operation, see thesubsequent sections of this introduction: “Using the backup volrestoreCommand” on page 307, “Using the backup diskrestore Command” onpage 310, and “Using the backup volsetrestore Command” on page 313.
Making Restore Operations More Efficient
The following comments apply to all types of restore operation:v The Backup System begins by restoring the most recent full dump of a
volume. As it restores subsequent incremental dumps, it alters the data inthe full dump appropriately, essentially repeating the volume’s changehistory. The backup diskrestore and backup volsetrestore commandsalways restore all incremental dumps, bringing a volume to its state at thetime of the most recent incremental dump. You can use the backupvolrestore command to return a volume to its state at a specified time inthe past, by not restoring the data from incremental dumps performed afterthat time.
v The Backup System sets a restored volume’s creation date to the date andtime of the restore operation. The creation date appears in the Creationfield of the output from the vos examine and vos listvol commands.
v When identifying the volumes to restore, it is best to specify the base(read/write) name. In this case, the Backup System searches the BackupDatabase for the most recent dump set that includes data from either theread/write or backup version of the volume, and restores dumps of thatvolume starting with the most recent full dump. If you include the .backupor .readonly extension on the volume name, the Backup System restoresdumps of that version only. If it cannot find data dumped from thatversion, it does not perform the restoration even if another version wasdumped.
v All three restoration commands accept the -n option, which generates a listof the volumes to be restored and the tapes or backup data files thatcontain the necessary dumps, without actually restoring data to AFS serverpartitions. This enables you to gather together the tapes before beginningthe restore operation, even preloading them into a stacker or jukebox if youare using one.
v If you back up AFS data to tape, restoration is simplest if all of your tapedevices are compatible, meaning that they can read the same type of tape,
Chapter 7. Backing Up and Restoring AFS Data 305
at the same compression ratios, and so on. (This suggestion also appears in“Making Backup Operations More Efficient” on page 280, because by thetime you need to restore data it is too late to implement it.) You can stillrestore multiple volumes with a single command even if data was backedup using incompatible devices, because the -portoffset argument to all threerestoration commands accepts multiple values. However, the BackupSystem uses the first port offset listed when restoring the full dump of eachvolume, the next port offset when restoring the level 1 incremental dump ofeach volume, and so on. If you did not use a compatible tape device whencreating the full dump of every volume (and at each incremental level too),you cannot restore multiple volumes with a single command. You must usethe backup volrestore command to restore one volume at a time, or use thebackup volsetrestore command after defining volume sets that groupvolumes according to the tape device used to dump them.
v During a restore operation, the Backup System uses instructions in therelevant CFG_device_name configuration file in much the same way asduring a dump operation, as described in “How Your ConfigurationChoices Influence the Dump Process” on page 284. It uses the MOUNT,UNMOUNT, AUTOQUERY, BUFFERSIZE, and FILE instructions just asfor a dump operation. A difference for the BUFFERSIZE instruction is thatthe default buffer size overridden by the instruction is 32 KB for restoreoperations rather than the 16 KB used for dump operations. The BackupSystem does not use the NAME_CHECK instruction at all during restoreoperations. The ASK instruction controls whether the Backup Systemprompts you if it cannot restore a volume for any reason. If the setting isNO, it skips the problematic volume and restores as many of the othervolumes as possible.
v Do not perform a restore operation when you know that there are network,machine, or server process problems that can prevent the Backup Systemfrom accessing volumes or the VLDB. Although the Backup Systemautomatically makes a number of repeated attempts to restore a volume,the restore operation takes extra time and in some cases stops completely toprompt you for instructions on how to continue.
v Avoid halting a restore operation (for instance by issuing the (backup) killcommand in interactive mode). If a restore operation is interrupted for anyreason, including causes outside your control, reissue the same restorationcommand as soon as is practical; if an outage or other problem caused theoperation to halt, do not continue until the system returns to normal.Any volume that is completely restored when the operation halts is onlineand usable, but very few volumes are likely to be in this state. Whenrestoring multiple volumes at once, the Backup System restores the fulldump of every volume before beginning the level 1 incremental restore forany of them, and so on, completing the restore of every volume at a specificincremental level before beginning to restore data from the next incremental
306 AFS: Administration Guide

level. Unless a volume was dumped at fewer incremental levels than othersbeing restored as part of the same operation, it is unlikely to be complete.It is even more dangerous to interrupt a restore operation if you areoverwriting the current contents of the volume. Depending on how far therestore operation has progressed, it is possible that the volume is in such aninconsistent state that the Backup System removes it entirely. The databeing restored is still available on tape or in the backup data file, but youmust take extra steps to re-create the volume.
Using the backup volrestore Command
The backup volrestore command is most appropriate when you need torestore a few volumes to a single site (partition on a file server machine). Bydefault, it restores the volumes to their state at the time of the most recentdump operation (this is termed a full restore). You can also use the commandto perform a date-specific restore, which restores only the dumps (full andincremental) performed before a specified date and time, leaving the volumein the state it was in at the time of the final relevant incremental dump. Thebackup diskrestore and backup volsetrestore commands can only performfull restores.
You can restore data into a new copy of each volume rather than overwritingthe current version, by including the -extension argument. After mounting thenew volume in the filespace, you can compare the contents of the two anddecide which to keep permanently.
The following list summarizes how to combine the backup volrestorecommand’s arguments to restore a volume in different ways:v To perform a date-specific restore as described just previously, use the -date
argument to specify the date and optionally time. The Backup Systemrestores the most recent full dump and each subsequent incremental dumpfor which the clone date of the volume included in the dump is before theindicated date and time (for a definition of the clone date, see Step 4 onpage 286 in “How Your Configuration Choices Influence the Dump Process”on page 284). You can combine this argument with the -extensionargument to place the date-specific restore in a new volume.
v To move a volume to a new site as you overwrite its contents with therestored data, use the -server and -partition arguments, singly or incombination, to specify the new site rather than the current site. TheBackup System creates a new volume at that site, removes the existingvolume, and updates the site information in the volume’s VLDB entry. Thevolume’s backup version is not removed automatically from the originalsite, if it exists. Use the vos remove command to remove it and the vosbackup command to create a backup version at the new site.
Chapter 7. Backing Up and Restoring AFS Data 307

v To create a new volume to house the restored data, rather than overwritingan existing volume, use the -extension argument. The Backup Systemcreates the new volume on the server and partition named by the -serverand -partition arguments, derives its name by adding the extension to thename specified with the -volume argument, and creates a new VLDB entryfor it. The command does not affect the existing volume in any way.However, if a volume with the specified extension also already exists, thecommand overwrites it. To make the contents of the new volume accessible,use the fs mkmount command to mount it. You can then compare itscontents to those of the existing volume, to see which to retain permanently.
v To restore a volume that no longer exists on an AFS server partition, but forwhich you have backed up data, specify the name of the new volume withthe -volume argument and use the -server and -partition arguments toplace it at the desired site. The Backup System creates a new volume andnew VLDB entry.
To restore volumes with the backup volrestore command1. Verify that you are authenticated as a user listed in the
/usr/afs/etc/UserList file. If necessary, issue the bos listusers command,which is fully described in “To display the users in the UserList file” onpage 582.
% bos listusers <machine name>
2. If the Tape Coordinator for the tape device that is to perform the operationis not already running, open a connection to the appropriate TapeCoordinator machine and issue the butc command, for which completeinstructions appear in “To start a Tape Coordinator process” on page 276.
% butc [<port offset>] [-noautoquery]
Repeat the command for each Tape Coordinator if you are using morethan one tape device.
3. If using a tape device, insert the tape.4. Issue the backup command to enter interactive mode.
% backup
5. Issue the backup volrestore command with the desired arguments.backup> volrestore <destination machine> <destination partition> \
-volume <volume(s) to restore>+ \[-extension <new volume name extension>] \[-date <date from which to restore>] \[-portoffset <TC port offsets>+] [-n]
where
volr Is the shortest acceptable abbreviation of volrestore.
308 AFS: Administration Guide
destination machineNames the file server machine on which to restore each volume. Itdoes not have to be a volume’s current site.
destination partitionNames the partition on which to restore each volume. It does nothave to be a volume’s current site.
-volumeNames each volume to restore. It is best to provide the base(read/write) name, for the reasons discussed in “Making RestoreOperations More Efficient” on page 305.
-extensionCreates a new volume to house the restored data, with a namederived by appending the specified string to each volume namedby the -volume extension. The Backup System preserves thecontents of the existing volume if it still exists. Do not use either ofthe .readonly or .backup extensions, which are reserved. Thecombination of base volume name and extension cannot exceed 22characters in length. If you want a period to separate the extensionfrom the name, specify it as the first character of the string (as in.rst, for example).
-date Specifies a date and optionally time; the restored volume includesdata from dumps performed before the date only. Provide a valuein the format mm/dd/yyyy [hh:MM], where the requiredmm/dd/yyyy portion indicates the month (mm), day (dd), and year(yyyy), and the optional hh:MM portion indicates the hour andminutes in 24-hour format (for example, the value 14:36 represents2:36 p.m.). If omitted, the time defaults to 59 seconds aftermidnight (00:00:59 hours).
Valid values for the year range from 1970 to 2037; higher valuesare not valid because the latest possible date in the standard UNIXrepresentation is in February 2038. The command interpreterautomatically reduces any later date to the maximum value.
Note: A plus sign follows this argument in the command’s syntaxstatement because it accepts a multiword value which doesnot need to be enclosed in double quotes or otherdelimiters, not because it accepts multiple dates. Provideonly one date (and optionally, time) definition.
-portoffsetSpecifies one or more port offset numbers, each corresponding to aTape Coordinator to use in the operation. If there is more than onevalue, the Backup System uses the first one when restoring the fulldump of each volume, the second one when restoring the level 1
Chapter 7. Backing Up and Restoring AFS Data 309
incremental dump of each volume, and so on. It uses the finalvalue in the list when restoring dumps at the corresponding depthin the dump hierarchy and all dumps at lower levels.
Provide this argument unless the default value of 0 (zero) isappropriate for all dumps. If 0 is just one of the values in the list,provide it explicitly in the appropriate order.
-n Displays the list of tapes that contain the dumps required by therestore operation, without actually performing the operation.
6. If you did not include the -noautoquery flag when you issued the butccommand, or the device’s CFG_device_name configuration file includes theinstruction AUTOQUERY YES, then the Tape Coordinator prompts you toplace the tape in the device’s drive. You have already done so, but youmust now press <Return> to indicate that the tape is ready for labeling.If more than one tape is required, you must either include the MOUNTinstruction in the CFG_device_name file and stock the correspondingstacker or jukebox with tapes, or remain at the console to respond to theTape Coordinator’s prompts for subsequent tapes.
7. After the restore operation completes, review the Backup System’s log filesto check for errors. Use the bos getlog command as instructed in“Displaying Server Process Log Files” on page 145 to read the/usr/afs/logs/BackupLog file, and a text editor on the Tape Coordinatormachine to read the TE_device_name and TL_device_name files in the local/usr/afs/backup directory.
Using the backup diskrestore Command
The backup diskrestore command is most appropriate when you need torestore all of the volumes on an AFS server partition, perhaps because ahardware failure has corrupted or destroyed all of the data. The commandperforms a full restore of all of the read/write volumes for which the VLDBlists the specified partition as the current site, using the dumps of either theread/write or backup version of each volume depending on which type wasdumped more recently. (You can restore any backup or read-only volumesthat resided on the partition by using the vos backup and vos releasecommands after the backup diskrestore operation is complete.)
By default, the Backup System restores the volumes to the site they previouslyoccupied. To move the partition contents to a different site, use the -newserverand -newpartition arguments, singly or in combination.
By default, the Backup System overwrites the contents of existing volumeswith the restored data. To create a new volume to house the restored datainstead, use the -extension argument. The Backup System creates the newvolume at the site designated by the -newserver and -newpartition arguments
310 AFS: Administration Guide
if they are used or the -server and -partition arguments otherwise. It derivesthe volume name by adding the extension to the read/write base name listedin the VLDB, and creates a new VLDB entry. The command does not affect theexisting volume in any way. However, if a volume with the specifiedextension also already exists, the command overwrites it.
If a partition seems damaged, be sure not to run the vos syncserv commandbefore the backup diskrestore command. As noted, the Backup Systemrestores volumes according to VLDB site definitions. The vos syncservcommand sometimes removes a volume’s VLDB entry when the corruption onthe partition is so severe that the Volume Server cannot confirm the volume’spresence.
To restore a partition with the backup diskrestore command1. Verify that you are authenticated as a user listed in the
/usr/afs/etc/UserList file. If necessary, issue the bos listusers command,which is fully described in “To display the users in the UserList file” onpage 582.
% bos listusers <machine name>
2. If the Tape Coordinator for the tape device that is to perform the operationis not already running, open a connection to the appropriate TapeCoordinator machine and issue the butc command, for which completeinstructions appear in “To start a Tape Coordinator process” on page 276.
% butc [<port offset>] [-noautoquery]
Repeat the command for each Tape Coordinator if you are using morethan one tape device.
3. If using a tape device, insert the tape.4. Issue the backup command to enter interactive mode.
% backup
5. Issue the backup diskrestore command with the desired arguments.backup> diskrestore <machine to restore> <partition to restore> \
[-portoffset <TC port offset>+] \[-newserver <destination machine>] \[-newpartition <destination partition>] \[-extension <new volume name extension>] [-n]
where
di Is the shortest acceptable abbreviation of diskrestore.
machine to restoreNames the file server machine that the VLDB lists as the site of thevolumes that need to be restored.
Chapter 7. Backing Up and Restoring AFS Data 311
partition to restoreNames the partition that the VLDB lists as the site of the volumesthat need to be restored.
-portoffsetSpecifies one or more port offset numbers, each corresponding to aTape Coordinator to use in the operation. If there is more than onevalue, the Backup System uses the first one when restoring the fulldump of each volume, the second one when restoring the level 1incremental dump of each volume, and so on. It uses the finalvalue in the list when restoring dumps at the corresponding depthin the dump hierarchy and all dumps at lower levels.
Provide this argument unless the default value of 0 (zero) isappropriate for all dumps. If 0 is just one of the values in the list,provide it explicitly in the appropriate order.
-newserverNames an alternate file server machine to which to restore thevolumes. If you omit this argument, the volumes are restored tothe file server machine named by the -server argument.
-newpartitionNames an alternate partition to which to restore the data. If youomit this argument, the volumes are restored to the partitionnamed by the -partition argument.
-extensionCreates a new volume for each volume being restored, to housethe restored data, appending the specified string to the volume’sread/write base name as listed in the VLDB. Any string other than.readonly or .backup is acceptable, but the combination of thebase name and extension cannot exceed 22 characters in length. Touse a period to separate the extension from the name, specify it asthe first character of the string (as in .rst, for example).
-n Displays a list of the tapes necessary to perform the requestedrestore, without actually performing the operation.
6. If you did not include the -noautoquery flag when you issued the butccommand, or the device’s CFG_device_name configuration file includes theinstruction AUTOQUERY YES, then the Tape Coordinator prompts you toplace the tape in the device’s drive. You have already done so, but youmust now press <Return> to indicate that the tape is ready for labeling.If more than one tape is required, you must either include the MOUNTinstruction in the CFG_device_name file and stock the correspondingstacker or jukebox with tapes, or remain at the console to respond to theTape Coordinator’s prompts for subsequent tapes.
312 AFS: Administration Guide
7. After the restore operation completes, review the Backup System’s log filesto check for errors. Use the bos getlog command as instructed in“Displaying Server Process Log Files” on page 145 to read the/usr/afs/logs/BackupLog file, and a text editor on the Tape Coordinatormachine to read the TE_device_name and TL_device_name files in the local/usr/afs/backup directory.
Using the backup volsetrestore Command
The backup volsetrestore command is most appropriate when you need toperform a full restore of several read/write volumes, placing each at aspecified site. You specify the volumes to restore either by naming a volumeset with the -name argument or by listing each volume’s name and restorationsite in a file named by the -file argument, as described in the followingsections.
Because the backup volsetrestore command enables you to restore a largenumber of volumes with a single command, the restore operation canpotentially take hours to complete. One way to reduce the time is to runmultiple instances of the command simultaneously. Either use the -nameargument to specify disjoint volume sets for each command, or the -fileargument to name files that list different volumes. You must have several TapeCoordinators available to read the required tapes. Depending on how thevolumes to be restored were dumped to tape, specifying disjoint volume setscan also reduce the number of tape changes required.
Restoring a Volume Set with the -name Argument
Use the -name argument to restore a group of volumes defined in a volumeset. The Backup System creates a list of the volumes in the VLDB that matchthe server, partition, and volume name criteria defined in the volume set’svolume entries, and for which dumps are available. The volumes do not haveto exist on the server partition as long as the VLDB still lists them (this canhappen when, for instance, a hardware problem destroys the contents of anentire disk).
By default, the Backup System restores, as a read/write volume, each volumethat matches the volume set criteria to the site listed in the VLDB. If a volumeof the matching name exists at that site, its current contents are overwritten.You can instead create a new volume to house the restored data by includingthe -extension argument. The Backup System creates the new volume at theexisting volume’s site, derives its name by adding the extension to theexisting volume’s read/write base name, and creates a new VLDB entry for it.The command does not affect the existing volume in any way. However, if avolume with the specified extension also already exists, the commandoverwrites it. To make the contents of the new volume accessible, use the fs
Chapter 7. Backing Up and Restoring AFS Data 313
mkmount command to mount it. You can then compare its contents to thoseof the existing volume, to see which to retain permanently.
It is not required that the volume set was previously used to back up volumes(was used as the -volumeset option to the backup dump command). It can bedefined especially to match the volumes that need to be restored with thiscommand, and that is usually the better choice. Indeed, a temporary volumeset, created by including the -temporary flag to the backup addvolsetcommand, can be especially useful in this context (instructions appear in“Defining and Displaying Volume Sets and Volume Entries” on page 233). Atemporary volume set is not added to the Backup Database and exists onlyduring the current interactive backup session, which is suitable if the volumeset is needed only to complete the single restore operation initialized by thiscommand.
The reason that a specially defined volume set is probably better is thatvolume sets previously defined for use in dump operations usually match thebackup version of volumes, whereas for a restore operation it is best to definevolume entries that match the base (read/write) name. In this case, theBackup System searches the Backup Database for the newest dump set thatincludes a dump of either the read/write or the backup version of thevolume. If, in contrast, a volume entry explicitly matches the volume’s backupor read-only version, the Backup System uses dumps of that volume versiononly, restoring them to a read/write volume by stripping off the .backup or.readonly extension.
If there are VLDB entries that match the volume set criteria, but for whichthere are no dumps recorded in the Backup Database, the Backup Systemcannot restore them. It generates an error message on the standard errorstream for each one.
Restoring Volumes Listed in a File with the -file Argument
Use the -file argument to specify the name and site of each read/writevolume to restore. Each volume’s entry must appear on its own (unbroken)line in the file, and comply with the following format:
machine partition volume [comments...]
where
machineNames the file server machine to which to restore the volume. Youcan move the volume as you restore it by naming a machine otherthan the current site.
314 AFS: Administration Guide

partitionNames the partition to which to restore the volume. You can move thevolume as you restore it by naming a partition other than the currentsite.
volume Names the volume to restore. Specify the base (read/write) name tohave the Backup System search the Backup Database for the newestdump set that includes a dump of either the read/write or the backupversion of the volume. It restores the dumps of that version of thevolume, starting with the most recent full dump. If, in contrast, youinclude the .backup or .readonly extension, the Backup Systemrestores dumps of that volume version only, but into a read/writevolume without the extension. The base name must match the nameused in Backup Database dump records rather than in the VLDB, ifthey differ, because the Backup System does not consult the VLDBwhen you use the -file argument.
comments...Is any other text. The Backup System ignores any text on each linethat appears after the volume name, so you can use this field forhelpful notes.
Do not use wildcards (for example, .*) in the machine, partition, or volumefields. It is acceptable for multiple lines in the file to name the same volume,but the Backup System processes only the first of them.
By default, the Backup System replaces the existing version of each volumewith the restored data, placing the volume at the site specified in the machineand partition fields. You can instead create a new volume to house the restoredcontents by including the -extension argument. The Backup System creates anew volume at the site named in the machine and partition fields, derives itsname by adding the specified extension to the read/write version of the namein the volume field, and creates a new VLDB entry for it. The command doesnot affect the existing volume in any way. However, if a volume with thespecified extension also already exists, the command overwrites it. To makethe contents of the new volume accessible, use the fs mkmount command tomount it. You can then compare its contents to those of the existing volume,to see which to retain permanently.
If the file includes entries for volumes that have no dumps recorded in theBackup Database, the Backup System cannot restore them. It generates anerror message on the standard error stream for each one.
One way to generate a file to use as input to the -file argument is to issue thecommand with the -name and -n options and direct the output to a file. The
Chapter 7. Backing Up and Restoring AFS Data 315
output includes a line like the following for each volume (shown here on twolines only for legibility reasons); the value comes from the source indicated inthe following list:
machine partition volume_dumped # as volume_restored; \tape_name (tape_ID); pos position_number; date
where
machineNames the file server machine that currently houses the volume, aslisted in the VLDB.
partitionNames the partition that currently houses the volume, as listed in theVLDB.
volume_dumpedSpecifies the version (read/write or backup) of the volume that wasdumped, as listed in the Backup Database.
volume_restoredSpecifies the name under which the Backup System restores thevolume when the -n flag is not included. If you include the -extensionargument with the -name and -n options, then the extension appearson the name in this field (as in user.pat.rst, for example).
tape_nameNames the tape containing the dump of the volume, from the BackupDatabase. If the tape has a permanent name, it appears here;otherwise, it is the AFS tape name.
tape_IDThe tape ID of the tape containing the dump of the volume, from theBackup Database.
position_numberSpecifies the dump’s position on the tape (for example, 31 indicatesthat 30 volume dumps precede the current one on the tape). If thedump was written to a backup data file, this number is the ordinal ofthe 16 KB-offset at which the volume’s data begins.
date The date and time when the volume was dumped.
To make the entries suitable for use with the -file argument, edit them asindicated:v The Backup System uses only the first three fields on each line of the input
file, and so ignores all the fields after the number sign (#). You can removethem if it makes it easier for you to read the file, but that is not necessary.
316 AFS: Administration Guide
v The volume_dumped (third) field of each line in the output file becomes thevolume field in the input file. The Backup System restores data toread/write volumes only, so remove the .backup or .readonly extension ifit appears on the name in the volume_dumped field.
v The output file includes a line for every dump operation in which a specificvolume was included (the full dump and any incremental dumps), but theBackup System only processes the first line in the input file that mentions aspecific volume. You can remove the repeated lines if it makes the file easierfor you to read.
v The machine and partition fields on an output line designate the volume’scurrent site. To move the volume to another location as you restore it,change the values.
To restore a group of volumes with the backup volsetrestore command1. Verify that you are authenticated as a user listed in the
/usr/afs/etc/UserList file. If necessary, issue the bos listusers command,which is fully described in “To display the users in the UserList file” onpage 582.
% bos listusers <machine name>
2. If the Tape Coordinator for the tape device that is to perform the operationis not already running, open a connection to the appropriate TapeCoordinator machine and issue the butc command, for which completeinstructions appear in “To start a Tape Coordinator process” on page 276.
% butc [<port offset>] [-noautoquery]
Repeat the command for each Tape Coordinator if you are using morethan one tape device.
3. If using a tape device, insert the tape.4. Issue the backup command to enter interactive mode.
% backup
5. (Optional) If appropriate, issue the (backup) addvolset command to createa new volume set expressly for this restore operation. Include the-temporary flag if you do not need to add the volume set to the BackupDatabase. Then issue one or more (backup) addvolentry commands tocreate volume entries that include only the volumes to be restored.Complete instructions appear in “Defining and Displaying Volume Setsand Volume Entries” on page 233.
backup> addvolset <volume set name> [-temporary]
backup> addvolentry -name <volume set name> \-server <machine name> \-partition <partition name> \-volumes <volume name (regular expression)>
6. Issue the backup volsetrestore command with the desired arguments.
Chapter 7. Backing Up and Restoring AFS Data 317
backup> volsetrestore [-name <volume set name>] \[-file <file name>] \[-portoffset <TC port offset>+] \[-extension <new volume name extension>] [-n]
where
-name Names a volume set to restore. The Backup System restores all ofthe volumes listed in the VLDB that match the volume set’svolume entries, as described in “Restoring a Volume Set with the-name Argument” on page 313. Provide this argument or the -fileargument, but not both.
-file Specifies the full pathname of a file that lists one or more volumesand the site (file server machine and partition) to which to restoreeach. The input file has the format described in “RestoringVolumes Listed in a File with the -file Argument” on page 314. Useeither this argument or the -name argument, but not both.
-portoffsetSpecifies one or more port offset numbers, each corresponding to aTape Coordinator to use in the operation. If there is more than onevalue, the Backup System uses the first one when restoring the fulldump of each volume, the second one when restoring the level 1incremental dump of each volume, and so on. It uses the finalvalue in the list when restoring dumps at the corresponding depthin the dump hierarchy and all dumps at lower levels.
Provide this argument unless the default value of 0 (zero) isappropriate for all dumps. If 0 is just one of the values in the list,provide it explicitly in the appropriate order.
-extensionCreates a new volume for each volume being restored, to housethe restored data, appending the specified string to the volume’sread/write base name as listed in the VLDB. Any string other than.readonly or .backup is acceptable, but the combination of thebase name and extension cannot exceed 22 characters in length. Touse a period to separate the extension from the name, specify it asthe first character of the string (as in .rst, for example).
-n Displays a list of the volumes to be restored when the flag is notincluded, without actually restoring them. The Output section ofthis reference page details the format of the output. Whencombined with the -name argument, its output is easily edited foruse as input to the -file argument on a subsequent backupvolsetrestore command.
7. If you did not include the -noautoquery flag when you issued the butccommand, or the device’s CFG_device_name configuration file includes the
318 AFS: Administration Guide
instruction AUTOQUERY YES, then the Tape Coordinator prompts you toplace the tape in the device’s drive. You have already done so, but youmust now press <Return> to indicate that the tape is ready for labeling.If more than one tape is required, you must either include the MOUNTinstruction in the CFG_device_name file and stock the correspondingstacker or jukebox with tapes, or remain at the console to respond to theTape Coordinator’s prompts for subsequent tapes.
8. After the restore operation completes, review the Backup System’s log filesto check for errors. Use the bos getlog command as instructed in“Displaying Server Process Log Files” on page 145 to read the/usr/afs/logs/BackupLog file, and a text editor on the Tape Coordinatormachine to read the TE_device_name and TL_device_name files in the local/usr/afs/backup directory.
Maintaining the Backup Database
The Backup Database stores all of the configuration and tracking informationthat the Backup System uses when dumping and restoring data. If a hardwarefailure or other problem on a database server machine corrupts or damagesthe database, it is relatively easy to recreate the configuration information (thedump hierarchy and lists of volume sets and Tape Coordinator port offsetnumbers). However, restoring the dump tracking information (dump records)is more complicated and time-consuming. To protect yourself against loss ofdata, back up the Backup Database itself to tape on a regular schedule.
Another potential concern is that the Backup Database can grow large ratherquickly, because the Backup System keeps very detailed and cross-referencedrecords of dump operations. Backup operations become less efficient if theBackup Server has to navigate through a large number of obsolete records tofind the data it needs. To keep the database to a manageable size, use thebackup deletedump command to delete obsolete records, as described in“Removing Obsolete Records from the Backup Database” on page 323. If youlater find that you have removed records that you still need, you can use thebackup scantape command to read the information from the dump and tapelabels on the corresponding tapes back into the database, as instructed in “Toscan the contents of a tape” on page 302.
Backing Up and Restoring the Backup Database
Because of the importance of the information in the Backup Database, it isbest to back it up to tape or other permanent media on a regular basis. As forthe other AFS, administrative databases, the recommended method is to use a
Chapter 7. Backing Up and Restoring AFS Data 319
utility designed to back up a machine’s local disk, such as the UNIX tarcommand. For instructions, see “Backing Up and Restoring the AdministrativeDatabases” on page 90.
In the rare event that the Backup Database seems damaged or corrupted, youcan use the backup dbverify command to check its status. If it is corrupted,use the backup savedb command to repair some types of damage. Then usethe backup restoredb to return the corrected database to the local disks of thedatabase server machines. For instructions, see “Checking for and RepairingCorruption in the Backup Database”.
Checking for and Repairing Corruption in the Backup Database
In rare cases, the Backup Database can become damaged or corrupted,perhaps because of disk or other hardware errors. Use the backup dbverifycommand to check the integrity of the database. If it is corrupted, the mostefficient way to repair it is to use the backup savedb command to copy thedatabase to tape. The command automatically repairs several types ofcorruption, and you can then use the backup restoredb command to transferthe repaired copy of the database back to the local disks of the databaseserver machines.
The backup savedb command also removes orphan blocks, which are ranges ofmemory that the Backup Server preallocated in the database but cannot use.Orphan blocks do not interfere with database access, but do waste disk space.The backup dbverify command reports the existence of orphan blocks if youinclude the -detail flag.
To verify the integrity of the Backup Database1. Verify that you are authenticated as a user listed in the
/usr/afs/etc/UserList file. If necessary, issue the bos listusers command,which is fully described in “To display the users in the UserList file” onpage 582.
% bos listusers <machine name>
2. Issue the backup dbverify command to check the integrity of the BackupDatabase.
% backup dbverify [-detail]
where
db Is the shortest acceptable abbreviation of dbverify.
-detail Reports the existence of orphan blocks and other informationabout the database, as described on the backup dbverify referencepage in the AFS Administration Reference.
320 AFS: Administration Guide
The output reports one of the following messages:v Database OK indicates that the Backup Database is undamaged.v Database not OK indicates that the Backup Database is damaged. To
recover from the problem, use the instructions in “To repair corruptionin the Backup Database”.
To repair corruption in the Backup Database1. Log in as the local superuser root on each database server machine in the
cell.2. If the Tape Coordinator for the tape device that is to perform the
operation is not already running, open a connection to the appropriateTape Coordinator machine and issue the butc command, for whichcomplete instructions appear in “To start a Tape Coordinator process” onpage 276.
% butc [<port offset>] [-noautoquery]
3. If writing to tape, place a tape in the appropriate device.4. Working on one of the machines, issue the backup command to enter
interactive mode.# backup -localauth
where -localauth constructs a server ticket from the local/usr/afs/etc/KeyFile file. This flag enables you to issue a privilegedcommand while logged in as the local superuser root but without AFSadministrative tokens.
5. Verify that no backup operations are actively running. If necessary, issuethe (backup) status command as described in “To check the status of aTape Coordinator process” on page 277. Repeat for each Tape Coordinatorport offset in turn.
backup> status -portoffset <TC port offset>
6. Issue the (backup) savedb command to repair corruption in the databaseas it is written to tape or a file.
backup> savedb [-portoffset <TC port offset>]
where
sa Is the shortest acceptable abbreviation of savedb.
-portoffsetSpecifies the port offset number of the Tape Coordinator handlingthe tape or backup data file for this operation. You must providethis argument unless the default value of 0 (zero) is appropriate.
7. Exit interactive mode.backup> quit
Chapter 7. Backing Up and Restoring AFS Data 321

8. On each machine in turn, issue the bos shutdown command to shutdown the Backup Server process. Include the -localauth flag because youare logged in as the local superuser root, but do not necessarily haveadministrative tokens. For complete command syntax, see “To stopprocesses temporarily” on page 140.
# /usr/afs/bin/bos shutdown <machine name> buserver -localauth -wait
9. On each machine in turn, issue the following commands to remove theBackup Database.
# cd /usr/afs/db# rm bdb.DB0# rm bdb.DBSYS1
10. On each machine in turn, starting with the machine with the lowest IPaddress, issue the bos start command to restart the Backup Serverprocess, which creates a zero-length copy of the Backup Database as itstarts. For complete command syntax, see “To start processes by changingtheir status flags to Run” on page 139.
# /usr/afs/bin/bos start <machine name> buserver -localauth
11. Working on one of the machines, issue the backup command to enterinteractive mode.
# backup -localauth
where -localauth constructs a server ticket from the local/usr/afs/etc/KeyFile file.
12. Issue the (backup) addhost command to create an entry in the new,empty database for the Tape Coordinator process handling the tape orfile from which you are reading the repaired copy of the database(presumably the process you started in Step 2 on page 321 and whichperformed the backup savedb operation in Step 6 on page 321). Forcomplete syntax, see Step 8 on page 231 in “To configure a TapeCoordinator machine” on page 230.
backup> addhost <tape machine name> [<TC port offset>]
13. Issue the (backup) restoredb command to copy the repaired database tothe database server machines.
backup> restoredb [-portoffset <TC port offset>]
where
res Is the shortest acceptable abbreviation of restoredb.
-portoffsetSpecifies the port offset number of the Tape Coordinator handlingthe tape or backup data file for this operation. You must providethis argument unless the default value of 0 (zero) is appropriate.
14. (Optional) Exit interactive mode if you do not plan to issue anyadditional backup commands.
322 AFS: Administration Guide
backup> quit
15. (Optional) If desired, enter Ctrl-d or another interrupt signal to exit theroot shell on each database server machine. You can also issue the Ctrl-csignal on the Tape Coordinator machine to stop the process.
Removing Obsolete Records from the Backup Database
Whenever you recycle or relabel a tape using the backup dump or backuplabeltape command, the Backup System automatically removes all of thedump records for the dumps contained on the tape and all other tapes in thedump set. However, obsolete records can still accumulate in the BackupDatabase over time. For example, when you discard a backup tape after usingit the maximum number of times recommended by the manufacturer, therecords for dumps on it remain in the database. Similarly, the Backup Systemdoes not automatically remove a dump’s record when the dump reaches itsexpiration date, but only if you then recycle or relabel the tape that containsthe dump. Finally, if a backup operation halts in the middle, the records forany volumes successfully written to tape before the halt remain in thedatabase.
A very large Backup Database can make backup operations less efficientbecause the Backup Server has to navigate through a large number of recordsto find the ones it needs. To remove obsolete records, use the backupdeletedump command. Either identify individual dumps by dump IDnumber, or specify the removal of all dumps created during a certain timeperiod. Keep in mind that you cannot remove the record of an appendeddump except by removing the record of its initial dump, which removes therecords of all associated appended dumps. Removing records of a dumpmakes it impossible to restore data from the corresponding tapes or from anydump that refers to the deleted dump as its parent, directly or indirectly. Thatis, restore operations must begin with the full dump and continue with eachincremental dump in order. If you have removed the records for a specificdump, you cannot restore any data from later incremental dumps.
Another way to truncate the Backup Database is to include the -archiveargument to the backup savedb command. After a copy of the database iswritten to tape or to a backup data file, the Backup Server deletes the dumprecords for all dump operations with timestamps prior to the date and timeyou specify. However, issuing the backup deletedump command with onlythe -to argument is equivalent in effect and is simpler because it does notrequire starting a Tape Coordinator process as the backup savedb commanddoes. For further information on the -archive argument to the backup savedbcommand, see the command’s reference page in the AFS AdministrationReference.
Chapter 7. Backing Up and Restoring AFS Data 323
If you later need to access deleted dump records, and the corresponding tapesstill exist, you can use the -dbadd argument to the backup scantapecommand to scan their contents into the database, as instructed in “To scanthe contents of a tape” on page 302.
To delete dump records from the Backup Database1. Verify that you are authenticated as a user listed in the
/usr/afs/etc/UserList file. If necessary, issue the bos listusers command,which is fully described in “To display the users in the UserList file” onpage 582.
% bos listusers <machine name>
2. (Optional) Issue the backup command to enter interactive mode, if youwant to delete multiple records or issue additional commands. Theinteractive prompt appears in the following step.
% backup
3. (Optional) Issue the backup dumpinfo command to list information fromthe Backup Database that can help you decide which records to delete. Fordetailed instructions, see “To display dump records” on page 297.
backup> dumpinfo [<no. of dumps>] [-id <dump id>] [-verbose]
4. Issue the backup deletedump command to delete one or more dump sets.backup> deletedump [-dumpid <dumpid>+] [-from <date time>] \
[-to <date time>]
where
dele Is the shortest acceptable abbreviation of deletedump.
-dumpidSpecifies the dump ID of each initial dump to delete from theBackup Database. The records for all associated appended dumpsare also deleted. Provide either this argument or the -to (andoptionally, -from) argument.
-from Specifies the beginning of a range of dates; the record for anydump created during the indicated period of time is deleted.
To omit all records before the time indicated with the -toargument, omit this argument. Otherwise provide a value in thefollowing format
mm/dd/yyyy [hh:MM]
where the month (mm), day (dd), and year (yyyy) are required. Youcan omit the hour and minutes (hh:MM) to indicate the default ofmidnight (00:00 hours). If you provide them, use 24-hour format(for example, the value 14:36 represents 2:36 p.m.).
You must provide the -to argument along with this one.
324 AFS: Administration Guide
Note: A plus sign follows this argument in the command’s syntaxstatement because it accepts a multiword value which doesnot need to be enclosed in double quotes or otherdelimiters, not because it accepts multiple dates. Provideonly one date (and optionally, time) definition.
-to Specifies the end of a range of dates; the record of any dumpcreated during the range is deleted from the Backup Database.
To delete all records created after the date you specify with the-from argument, specify the value NOW. To delete every dumprecord in the Backup Database, provide the value NOW and omitthe -from argument. Otherwise, provide a date value in the sameformat as described for the -from argument. Valid values for theyear (yyyy) range from 1970 to 2037; higher values are not validbecause the latest possible date in the standard UNIXrepresentation is in early 2038. The command interpreterautomatically reduces any later date to the maximum value in2038.
If you omit the time portion (hh:MM), it defaults to 59 secondsafter midnight (00:00:59 hours). Similarly, the backup commandinterpreter automatically adds 59 seconds to any time value youprovide. In both cases, adding 59 seconds compensates for howthe Backup Database and backup dumpinfo command representdump creation times in hours and minutes only. For example, theDatabase records a creation timestamp of 20:55 for any dumpoperation that begins between 20:55:00 and 20:55:59. Automaticallyadding 59 seconds to a time thus includes the records for alldumps created during that minute.
Provide either this argument, or the -dumpid argument. Thisargument is required if the -from argument is provided.
Note: A plus sign follows this argument in the command’s syntaxstatement because it accepts a multiword value which doesnot need to be enclosed in double quotes or otherdelimiters, not because it accepts multiple dates. Provideonly one date (and optionally, time) definition.
Chapter 7. Backing Up and Restoring AFS Data 325

326 AFS: Administration Guide
Chapter 8. Monitoring and Auditing AFS Performance
AFS comes with three main monitoring tools:v The scout program, which monitors and gathers statistics on File Server
performance.v The fstrace command suite, which traces Cache Manager operations in
detail.v The afsmonitor program, which monitors and gathers statistics on both the
File Server and the Cache Manager.
AFS also provides a tool for auditing AFS events on file server machinesrunning AIX.
Summary of Instructions
This chapter explains how to perform the following tasks by using theindicated commands:
Initialize the scout program scoutDisplay information about a trace log fstrace lslogDisplay information about an event set fstrace lssetChange the size of a trace log fstrace setlogSet the state of an event set fstrace setsetDump contents of a trace log fstrace dumpClear a trace log fstrace clearInitialize the afsmonitor program afsmonitor
Using the scout Program
The scout program monitors the status of the File Server process running onfile server machines. It periodically collects statistics from a specified set ofFile Server processes, displays them in a graphical format, and alerts you ifany of the statistics exceed a configurable threshold.
More specifically, the scout program includes the following features.v You can monitor, from a single location, the File Server process on any
number of server machines from the local and foreign cells. The number islimited only by the size of the display window, which must be largeenough to display the statistics.
v You can set a threshold for many of the statistics. When the value of astatistic exceeds the threshold, the scout program highlights it (displays it
© Copyright IBM Corp. 1989, 2000 327

in reverse video) to draw your attention to it. If the value goes back underthe threshold, the highlighting is deactivated. You control the thresholds, sohighlighting reflects what you consider to be a noteworthy situation. See“Highlighting Significant Statistics” on page 331.
v The scout program alerts you to File Server process, machine, and networkoutages by highlighting the name of each machine that does not respond toits probe, enabling you to respond more quickly.
v You can set how often the scout program collects statistics from the FileServer processes.
System Requirements
The scout program runs on any AFS client machine that has access to thecurses graphics package, which most UNIX distributions include as astandard utility. It can run on both dumb terminals and under windowingsystems that emulate terminals, but the output looks best on machines thatsupport reverse video and cursor addressing. For best results, set the TERMenvironment variable to the correct terminal type, or one with characteristicssimilar to the actual ones. For machines running AIX, the recommendedTERM setting is vt100, assuming the terminal is similar to that. For otheroperating systems, the wider range of acceptable values includes xterm,xterms, vt100, vt200, and wyse85.
No privilege is required to run the scout program, so any user who can accessthe directory where its binary resides (the /usr/afsws/bin directory in theconventional configuration) can use it. The program’s probes for collectingstatistics do not impose a significant burden on the File Server process, butyou can restrict its use by placing the binary file in a directory with a morerestrictive access control list (ACL).
Multiple instances of the scout program can run on a single client machine,each over its own dedicated connection (in its own window). It must run inthe foreground, so the window in which it runs does not accept further inputexcept for an interrupt signal.
You can also run the scout program on several machines and view its outputon a single machine, by opening telnet connections to the other machinesfrom the central one and initializing the program in each remote window. Inthis case, you can include the -host flag to the scout command to make thename of each remote machine appear in the banner line at the top of thewindow displaying its output. See “The Banner Line” on page 329.
Using the -basename argument to Specify a Domain Name
As previously mentioned, the scout program can monitor the File Serverprocess on any number of file server machines. If all of the machines belong
328 AFS: Administration Guide
to the same cell, then their hostnames probably all have the same domainname suffix, such as abc.com in the ABC Corporation cell. In this case, youcan use the -basename argument to the scout command, which has severaladvantages:v You can omit the domain name suffix as you enter each file server
machine’s name on the command line. The scout program automaticallyappends the domain name to each machine’s name, resulting in afully-qualified hostname. You can omit the domain name suffix even whenyou don’t include the -basename argument, but in that case correctresolution of the name depends on the state of your cell’s naming service atthe time of connection.
v The machine names are more likely to fit in the appropriate column of thedisplay without having to be truncated (for more on truncating names inthe display column, see “The Statistics Display Region” on page 330).
v The domain name appears in the banner line at the top of the displaywindow to indicate the name of the cell you are monitoring.
The Layout of the scout Display
The scout program can display statistics either in a dedicated window or on aplain screen if a windowing environment is not available. For best results, usea window or screen that can print in reverse video and do cursor addressing.
The scout program screen has three main regions: the banner line, the statisticsdisplay region and the probe/message line. This section describes their contents,and graphic examples appear in “Example Commands and Displays” onpage 335.
The Banner Line
By default, the string scout appears in the banner line at the top of thewindow or screen, to indicate that the scout program is running. You candisplay two additional types of information by include the appropriate optionon the command line:v Include the -host flag to display the local machine’s name in the banner
line. This is particularly useful when you are running the scout program onseveral machines but displaying the results on a single machine.For example, the following banner line appears when you run the scoutprogram on the machine client1.abc.com and use the-host flag:
[client1.abc.com] scout
v Include the -basename argument to display the specified cell domain namein the banner line. For further discussion, see “Using the -basenameargument to Specify a Domain Name” on page 328.
Chapter 8. Monitoring and Auditing AFS Performance 329
For example, if you specify a value of abc.com for the -basenameargument, the banner line reads:
scout for abc.com
The Statistics Display Region
The statistics display region occupies most of the window and is divided intosix columns. The following list describes them as they appear from left toright in the window.
Conn Displays the number of RPC connections open between the File Serverprocess and client machines. This number normally equals or exceedsthe number in the fourth Ws column. It can exceed the number in thatcolumn because each user on the machine can have more than oneconnection open at once, and one client machine can handle severalusers.
Fetch Displays the number of fetch-type RPCs (fetch data, fetch access list,and fetch status) that the File Server process has received from clientmachines since it started. It resets to zero when the File Server processrestarts.
Store Displays the number of store-type RPCs (store data, store access list,and store status) that the File Server process has received from clientmachines since it started. It resets to zero when the File Server processrestarts.
Ws Displays the number of client machines (workstations) that havecommunicated with the File Server process within the last 15 minutes(such machines are termed active). This number is likely to be smallerthan the number in the Conn) column because a single client machinecan have several connections open to one File Server process.
[Unlabeled column]Displays the name of the file server machine on which the File Serverprocess is running. It is 12 characters wide. Longer names aretruncated and an asterisk (*) appears as the last character in the name.If all machines have the same domain name suffix, you can use the-basename argument to decrease the need for truncation; see “Usingthe -basename argument to Specify a Domain Name” on page 328.
Disk attnDisplays the number of kilobyte blocks available on up to 26 of thefile server machine’s AFS server (/vicep) partitions. The display foreach partition has the following format:
partition_letter:free_blocks
For example, a:8949 indicates that partition /vicepa has 8,949 KB free.If the window is not wide enough for all partition entries to appear
330 AFS: Administration Guide
on a single line, the scout program automatically stacks the partitionentries into subcolumns within the sixth column.
The label on the Disk attn column indicates the threshold value atwhich entries in the column become highlighted. By default, the scoutprogram highlights a partition that is over 95% full, in which case thelabel is as follows:
Disk attn: > 95% used
For more on this threshold and its effect on highlighting, see“Highlighting Significant Statistics”.
For all columns except the fifth (file server machine name), you can use the-attention argument to set a threshold value above which the scout programhighlights the statistic. By default, only values in the fifth and sixth columnsever become highlighted. For instructions on using the -attention argument,see “Highlighting Significant Statistics”.
The Probe Reporting Line
The bottom line of the display indicates how many times the scout programhas probed the File Server processes for statistics. The statistics gathered inthe latest probe appear in the statistics display region. By default, the scoutprogram probes the File Servers every 60 seconds, but you can use the-frequency argument to specify a different probe frequency.
Highlighting Significant Statistics
To draw your attention to a statistic that currently exceed a threshold value,the scout program displays it in reverse video (highlights it). You can set thethreshold value for most statistics, and so determine which values are worthyof special attention and which are normal.
Highlighting Server Outages
The only column in which you cannot control highlighting is the fifth, whichidentifies the file server machine for which statistics are displayed in the othercolumns. The scout program uses highlighting in this column to indicate thatthe File Server process on a machine fails to respond to its probe, andautomatically blanks out the other columns. Failure to respond to the probecan indicate a File Server process, file server machine, or network outage, sothe highlighting draws your attention to a situation that is probablyinterrupting service to users.
When the File Server process once again responds to the probes, its nameappears normally and statistics reappear in the other columns. If all machine
Chapter 8. Monitoring and Auditing AFS Performance 331
names become highlighted at once, a possible network outage has disruptedthe connection between the file server machines and the client machinerunning the scout program.
Highlighting for Extreme Statistic Values
To set the threshold value for one or more of the five statistics-displayingcolumns, use the -attention argument. The threshold value applies to all FileServer processes you are monitoring (you cannot set different thresholds fordifferent machines). For details, see the syntax description in “To start thescout program”.
It is not possible to change the threshold values for a running scout program.Stop the current program and start a new one. Also, the scout program doesnot retain threshold values across restarts, so you must specify all thresholdsevery time you start the program.
Resizing the scout Display
Do not resize the display window while the scout program is running.Increasing the size does no harm, but the scout program does not necessarilyadjust to the new dimensions. Decreasing the display’s width can disturbcolumn alignment, making the display harder to read. With any type ofresizing, the scout program does not adjust the display in any way until itdisplays the results of the next probe.
To resize the display effectively, stop the scout program, resize the windowand then restart the program. Even in this case, the scout program’s responsedepends on the accuracy of the information it receives from the displayenvironment. Testing during development has shown that the displayenvironment does not reliably provide information about window resizing. Ifyou use the X windowing system, issuing the following sequence ofcommands before starting the scout program (or placing them in the shellinitialization file) sometimes makes it adjust properly to resizing.
% set noglob% eval '/usr/bin/X11/resize'% unset noglob
To start the scout program1. Open a dedicated command shell. If necessary, adjust it to the appropriate
size.2. Issue the scout command to start the program.
332 AFS: Administration Guide
% scout [initcmd] -server <FileServer name(s) to monitor>+ \[-basename <base server name>] \[-frequency <poll frequency, in seconds>] [-host] \[-attention <specify attention (highlighting) level>+] \[-debug <turn debugging output on to the named file>]
where
initcmdIs an optional string that accommodates the command’s use of theAFS command parser. It can be omitted and ignored.
-serverIdentifies each File Server process to monitor, by naming the fileserver machine it is running on. Provide fully-qualified hostnamesunless the -basename argument is used. In that case, specify onlythe initial part of each machine name, omitting the domain namesuffix common to all the machine names.
-basenameSpecifies the domain name suffix common to all of the file servermachines named by the -server argument. For discussion of thisargument’s effects, see “Using the -basename argument to Specifya Domain Name” on page 328.
Do not include the period that separates the domain suffix fromthe initial part of the machine name, but do include any periodsthat occur within the suffix itself. (For example, in the ABCCorporation cell, the proper value is abc.com, not .abc.com.)
-frequencySets the frequency, in seconds, of the scout program’s probes toFile Server processes. Specify an integer greater than 0 (zero). Thedefault is 60 seconds.
-host Displays the name of the machine that is running the scoutprogram in the display window’s banner line. By default, nomachine name is displayed.
-attentionDefines the threshold value at which to highlight one or morestatistics. You can provide the pairs of statistic and threshold inany order, separating each pair and the parts of each pair with oneor more spaces. The following list defines the syntax for eachstatistic.
conn connectionsHighlights the value in the Conn (first) column when thenumber of connections that the File Server has open toclient machines exceeds the connections value. The
Chapter 8. Monitoring and Auditing AFS Performance 333
highlighting deactivates when the value goes back belowthe threshold. There is no default threshold.
fetch fetch_RPCsHighlights the value in the Fetch (second) column whenthe number of fetch RPCs that clients have made to theFile Server process exceeds the fetch_RPCs value. Thehighlighting deactivates only when the File Server processrestarts, at which time the value returns to zero. There isno default threshold.
store store_RPCsHighlights the value in the Store (third) column when thenumber of store RPCs that clients have made to the FileServer process exceeds the store_RPCs value. Thehighlighting deactivates only when the File Server processrestarts, at which time the value returns to zero. There isno default threshold.
ws active_clientsHighlights the value in the Ws (fourth) column when thenumber of active client machines (those that havecontacted the File Server in the last 15 minutes) exceedsthe active_clients value. The highlighting deactivates whenthe value goes back below the threshold. There is nodefault threshold.
disk percent_full % or disk min_blocksHighlights the value for a partition in the Disk attn (sixth)column when either the amount of disk space usedexceeds the percentage indicated by thepercent_full value,or the number of free KB blocks is less than the min_blocksvalue. The highlighting deactivates when the value goesback below the percent_full threshold or above themin_blocks threshold.
The value you specify appears in the header of the sixthcolumn following the string Disk attn. The defaultthreshold is 95% full.
Acceptable values for percent_full are the integers from therange 0 (zero) to 99, and you must include the percentsign to distinguish this statistic from a min_blocks value..
The following example sets the threshold for the Conn column to100, for the Ws column to 50, and for the Disk attn column to 75%.There is no threshold for the Fetch and Store columns.
-attention conn 100 ws 50 disk 75%
334 AFS: Administration Guide
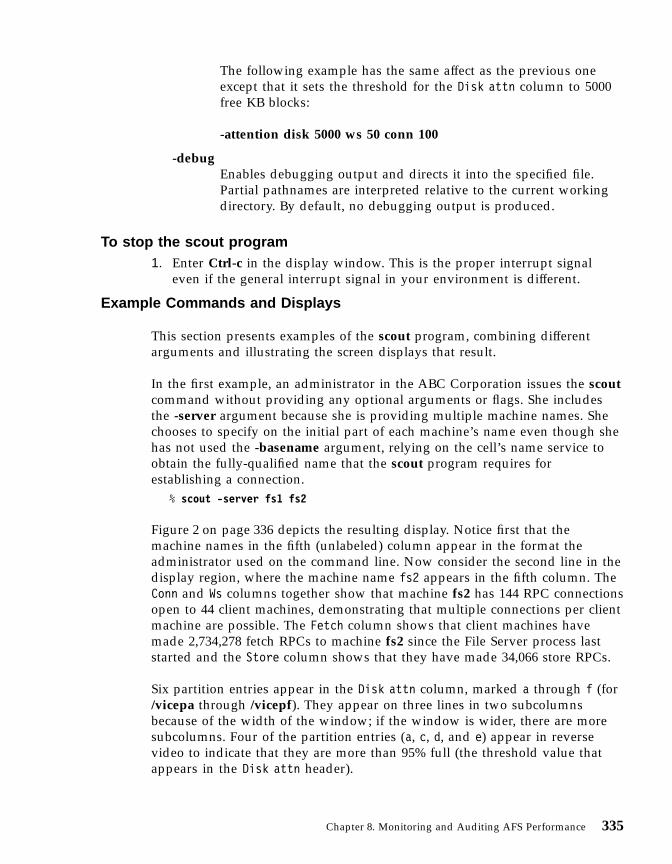
The following example has the same affect as the previous oneexcept that it sets the threshold for the Disk attn column to 5000free KB blocks:
-attention disk 5000 ws 50 conn 100
-debugEnables debugging output and directs it into the specified file.Partial pathnames are interpreted relative to the current workingdirectory. By default, no debugging output is produced.
To stop the scout program1. Enter Ctrl-c in the display window. This is the proper interrupt signal
even if the general interrupt signal in your environment is different.
Example Commands and Displays
This section presents examples of the scout program, combining differentarguments and illustrating the screen displays that result.
In the first example, an administrator in the ABC Corporation issues the scoutcommand without providing any optional arguments or flags. She includesthe -server argument because she is providing multiple machine names. Shechooses to specify on the initial part of each machine’s name even though shehas not used the -basename argument, relying on the cell’s name service toobtain the fully-qualified name that the scout program requires forestablishing a connection.
% scout -server fs1 fs2
Figure 2 on page 336 depicts the resulting display. Notice first that themachine names in the fifth (unlabeled) column appear in the format theadministrator used on the command line. Now consider the second line in thedisplay region, where the machine name fs2 appears in the fifth column. TheConn and Ws columns together show that machine fs2 has 144 RPC connectionsopen to 44 client machines, demonstrating that multiple connections per clientmachine are possible. The Fetch column shows that client machines havemade 2,734,278 fetch RPCs to machine fs2 since the File Server process laststarted and the Store column shows that they have made 34,066 store RPCs.
Six partition entries appear in the Disk attn column, marked a through f (for/vicepa through /vicepf). They appear on three lines in two subcolumnsbecause of the width of the window; if the window is wider, there are moresubcolumns. Four of the partition entries (a, c, d, and e) appear in reversevideo to indicate that they are more than 95% full (the threshold value thatappears in the Disk attn header).
Chapter 8. Monitoring and Auditing AFS Performance 335
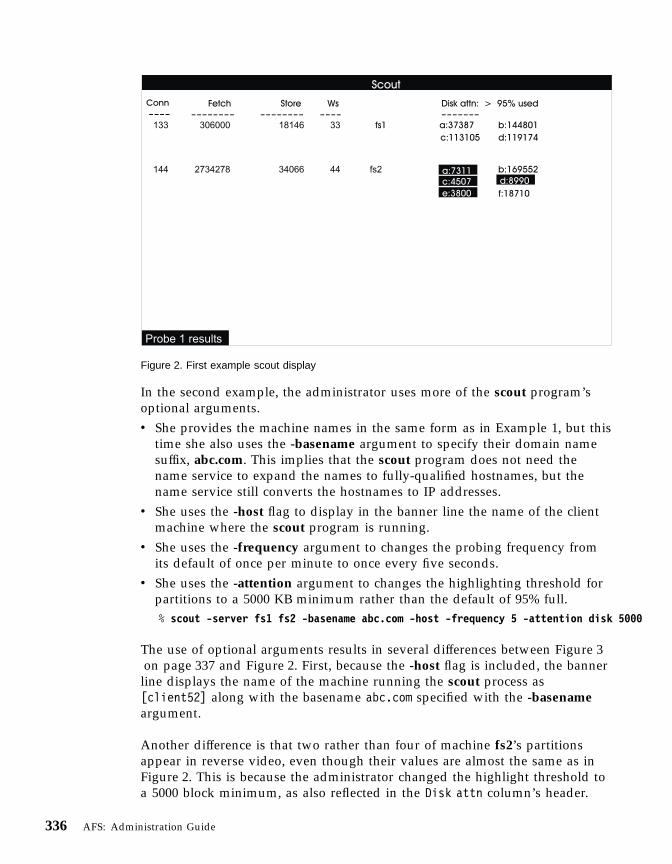
In the second example, the administrator uses more of the scout program’soptional arguments.v She provides the machine names in the same form as in Example 1, but this
time she also uses the -basename argument to specify their domain namesuffix, abc.com. This implies that the scout program does not need thename service to expand the names to fully-qualified hostnames, but thename service still converts the hostnames to IP addresses.
v She uses the -host flag to display in the banner line the name of the clientmachine where the scout program is running.
v She uses the -frequency argument to changes the probing frequency fromits default of once per minute to once every five seconds.
v She uses the -attention argument to changes the highlighting threshold forpartitions to a 5000 KB minimum rather than the default of 95% full.% scout -server fs1 fs2 -basename abc.com -host -frequency 5 -attention disk 5000
The use of optional arguments results in several differences between Figure 3on page 337 and Figure 2. First, because the -host flag is included, the banner
line displays the name of the machine running the scout process as[client52] along with the basename abc.com specified with the -basenameargument.
Another difference is that two rather than four of machine fs2’s partitionsappear in reverse video, even though their values are almost the same as inFigure 2. This is because the administrator changed the highlight threshold toa 5000 block minimum, as also reflected in the Disk attn column’s header.
Figure 2. First example scout display
336 AFS: Administration Guide

And while machine fs2’s partitions /vicepa and /vicepd are still 95% full, theyhave more than 5000 free blocks left; partitions /vicepc and /vicepe arehighlighted because they have fewer than 5000 blocks free.
Note also the result of changing the probe frequency, reflected in the probereporting line at the bottom left corner of the display. Both this example andthe previous one represent a time lapse of one minute after the administratorissues the scout command. In this example, however, the scout program hasprobed the File Server processes 12 times as opposed to once
In Figure 4 on page 338, an administrator in the State University cell monitorsthree of that cell’s file server machines. He uses the -basename argument tospecify the stateu.edu domain name.
% scout -server server2 server3 server4 -basename stateu.edu
Figure 3. Second example scout display
Chapter 8. Monitoring and Auditing AFS Performance 337

Figure 5 on page 339 illustrates three of the scout program’s features. First,you can monitor file server machines from different cells in a single display:fs1.abc.com, server3.stateu.edu, and sv7.def.com. Because the machinesbelong to different cells, it is not possible to provide the -basename argument.
Second, it illustrates how the display must truncate machine names that donot fit in the fifth column, using an asterisk at the end of the name to showthat it is shortened.
Third, it illustrates what happens when the scout process cannot reach a FileServer process, in this case the one on the machine sv7.def.com: it highlightsthe machine name and blanks out the values in the other columns.
Figure 4. Third example scout display
338 AFS: Administration Guide

Using the fstrace Command Suite
This section describes the fstrace commands that system administratorsemploy to trace Cache Manager activity for debugging purposes. It assumesthe reader is familiar with the Cache Manager concepts described in“Chapter 10. Administering Client Machines and the Cache Manager” onpage 387.
The fstrace command suite monitors the internal activity of the CacheManager and enables you to record, or trace, its operations in detail. Theoperations, which are termed events, comprise the cm event set. Examples ofcm events are fetching files and looking up information for a listing of filesand subdirectories using the UNIX ls command.
Following are the fstrace commands and their respective functions:v The fstrace apropos command provides a short description of commands.v The fstrace clear command clears the trace log.v The fstrace dump command dumps the contents of the trace log.v The fstrace help command provides a description and syntax for
commands.v The fstrace lslog command lists information about the trace log.
Figure 5. Fourth example scout display
Chapter 8. Monitoring and Auditing AFS Performance 339

v The fstrace lsset command lists information about the event set.v The fstrace setlog command changes the size of the trace log.v The fstrace setset command sets the state of the event set.
About the fstrace Command Suite
The fstrace command suite replaces and greatly expands the functionalityformerly provided by the fs debug command. Its intended use is to aid indiagnosis of specific Cache Manager problems, such as client machine hangs,cache consistency problems, clock synchronization errors, and failures toaccess a volume or AFS file. Therefore, it is best not to keep fstrace loggingenabled at all times, unlike the logging for AFS server processes.
Most of the messages in the trace log correspond to low-level Cache Manageroperations. It is likely that only personnel familiar with the AFS source codecan interpret them. If you have an AFS source license, you can attempt tointerpret the trace yourself, or work with the AFS Product Support group toresolve the underlying problems. If you do not have an AFS source license, itis probably more efficient to contact the AFS Product Support groupimmediately in case of problems. They can instruct you to activate fstracetracing if appropriate.
The log can grow in size very quickly; this can use valuable disk space if youare writing to a file in the local file space. Additionally, if the size of the logbecomes too large, it can become difficult to parse the results for pertinentinformation.
When AFS tracing is enabled, each time a cm event occurs, a message iswritten to the trace log, cmfx. To diagnose a problem, read the output of thetrace log and analyze the operations executed by the Cache Manager. Thedefault size of the trace log is 60 KB, but you can increase or decrease it.
To use the fstrace command suite, you must first enable tracing and reserve,or allocate, space for the trace log with the fstrace setset command. With thiscommand, you can set the cm event set to one of three states to enable ordisable tracing for the event set and to allocate or deallocate space for thetrace log in the kernel:
active Enables tracing for the event set and allocates space for the trace log.
inactiveTemporarily disables tracing for the event set; however, the event setcontinues to allocate space occupied by the log to which it sends data.
dormantDisables tracing for the event set; furthermore, the event set releasesthe space occupied by the log to which it sends data. When the cm
340 AFS: Administration Guide
event set that sends data to the cmfx trace log is in this state, thespace allocated for that log is freed or deallocated.
Both event sets and trace logs can be designated as persistent, which preventsaccidental resetting of an event set’s state or clearing of a trace log. Thedesignation is made as the kernel is compiled and cannot be changed.
If an event set such as cm is persistent, you can change its state only byincluding the -set argument to the fstrace setset command. (That is, youcannot change its state along with the state of all other event sets by issuingthe fstrace setset command with no arguments.) Similarly, if a trace log suchas cmfx is persistent, you can clear it only by including either the -set or -logargument to the fstrace clear command (you cannot clear it along with allother trace logs by issuing the fstrace clear command with no arguments.)
When a problem occurs, set the cm event set to active using the fstrace setsetcommand. When tracing is enabled on a busy AFS client, the volume ofevents being recorded is significant; therefore, when you are diagnosingproblems, restrict AFS activity as much as possible to minimize the amount ofextraneous tracing in the log. Because tracing can have a negative impact onsystem performance, leave cm tracing in the dormant state when you are notdiagnosing problems.
If a problem is reproducible, clear the cmfx trace log with the fstrace clearcommand and reproduce the problem. If the problem is not easily reproduced,keep the state of the event set active until the problem recurs.
To view the contents of the trace log and analyze the cm events, use thefstrace dump command to copy the content lines of the trace log to standardoutput (stdout) or to a file.
Note: If a particular command or process is causing problems, determine itsprocess id (PID). Search the output of the fstrace dump command forthe PID to find only those lines associated with the problem.
Requirements for Using the fstrace Command Suite
Except for the fstrace help and fstrace apropos commands, which require noprivilege, issuing the fstrace commands requires that the issuer be logged inas the local superuser root on the local client machine. Before issuing anfstrace command, verify that you have the necessary privilege.
The Cache Manager catalog must be in place so that logging can occur. Thefstrace command suite uses the standard UNIX catalog utilities. The default
Chapter 8. Monitoring and Auditing AFS Performance 341
location is /usr/vice/etc/C/afszcm.cat. It can be placed in another directory byplacing the file elsewhere and using the proper NLSPATH and LANGenvironment variables.
Using fstrace Commands Effectively
To use fstrace commands most effectively, configure them as indicated:v Store the fstrace binary in a local disk directory.v When you dump the fstrace log to a file, direct it to one on the local disk.v The trace can grow large in just a few minutes. Before attempting to dump
the log to a local file, verify that you have enough room. Be particularlycareful if you are using disk quotas on partitions in the local file system.
v Attempt to limit Cache Manager activity on the AFS client machine otherthan the problem operation. This reduces the amount of extraneous data inthe trace.
v Activate the fstrace log for the shortest possibly period of time. If possibleactivate the trace immediately before performing the problem operation,deactivate it as soon as the operation completes, and dump the trace log toa file immediately.
v If possible, obtain UNIX process ID (PID) of the command or program thatinitiates the problematic operation. This enables the person analyzing thetrace log to search it for messages associated with the PID.
Activating the Trace Log
To start Cache Manager tracing on an AFS client machine, you must firstconfigurev The cmfx kernel trace log using the fstrace setlog commandv The cm event set using the fstrace setset command
The fstrace setlog command sets the size of the cmfx kernel trace log inkilobytes. The trace log occupies 60 kilobytes of kernel by default. If the tracelog already exists, it is cleared when this command is issued and a new log ofthe given size is created. Otherwise, a new log of the desired size is created.
The fstrace setset command sets the state of the cm kernel event set. The stateof the cm event set determines whether information on the events in thatevent set is logged.
After establishing kernel tracing on the AFS client machine, you can check thestate of the event set and the size of the kernel buffer allocated for the tracelog. To display information about the state of the cm event set, issue thefstrace lsset command. To display information about the cmfx trace log, usethe fstrace lslog command. See the instructions in “Displaying the State of aTrace Log or Event Set” on page 343.
342 AFS: Administration Guide
To configure the trace log1. Become the local superuser root on the machine, if you are not already, by
issuing the su command.% su rootPassword: root_password
2. Issue the fstrace setlog command to set the size of the cmfx kernel tracelog.
# fstrace setlog [-log <log_name>+] -buffersize <1-kilobyte_units>
The following example sets the size of the cmfx trace log to 80 KB.# fstrace setlog cmfx 80
To set the event set1. Become the local superuser root on the machine, if you are not already, by
issuing the su command.% su rootPassword: root_password
2. Issue the fstrace setset command to set the state of event sets.% fstrace setset [-set <set_name>+] [-active] [-inactive] \
[-dormant]
The following example activates the cm event set.# fstrace setset cm -active
Displaying the State of a Trace Log or Event Set
An event set must be in the active state to be included in the trace log. Todisplay an event set’s state, use the fstrace lsset command. To set its state,issue the fstrace setset command as described in “To set the event set”.
To display size and allocation information for the trace log, issue the fstracelslogcommand with the -long argument.
To display the state of an event set1. Become the local superuser root on the machine, if you are not already, by
issuing the su command.% su rootPassword: root_password
2. Issue the fstrace lsset command to display the available event set and itsstate.
# fstrace lsset [-set <set_name>+]
The following example displays the event set and its state on the localmachine.
Chapter 8. Monitoring and Auditing AFS Performance 343
# fstrace lsset cmAvailable sets:cm active
The output from this command lists the event set and its states. The threeevent states for the cm event set are:
active Tracing is enabled.
inactiveTracing is disabled, but space is still allocated for the correspondingtrace log (cmfx).
dormantTracing is disabled, and space is no longer allocated for thecorresponding trace log (cmfx).Disables tracing for the event set.
To display the log size1. Become the local superuser root on the machine, if you are not already, by
issuing the su command.% su rootPassword: root_password
2. Issue the fstrace lslog command to display information about the kerneltrace log.
# fstrace lslog [-set <set_name>+] [-log <log_name>] [-long]
The following example uses the -long flag to display additional informationabout the cmfx trace log.
# fstrace lslog cmfx -longAvailable logs:cmfx : 60 kbytes (allocated)
The output from this command lists information on the trace log. Whenissued without the -long flag, the fstrace lslog command lists only the nameof the log. When issued with the -long flag, the fstrace lslog command liststhe log, the size of the log in kilobytes, and the allocation state of the log.
There are two allocation states for the kernel trace log:
allocatedSpace is reserved for the log in the kernel. This indicates that theevent set that writes to this log is either active (tracing is enabled forthe event set) or inactive (tracing is temporarily disabled for the eventset); however, the event set continues to reserve space occupied by thelog to which it sends data.
unallocatedSpace is not reserved for the log in the kernel. This indicates that the
344 AFS: Administration Guide
event set that writes to this log is dormant (tracing is disabled for theevent set); furthermore, the event set releases the space occupied bythe log to which it sends data.
Dumping and Clearing the Trace Log
After the Cache Manager operation you want to trace is complete, use thefstrace dump command to dump the trace log to the standard output streamor to the file named by the -file argument. Or, to dump the trace logcontinuously, use the -follow argument (combine it with the -file argument ifdesired). To halt continuous dumping, press an interrupt signal such as<Ctrl-c>.
To clear a trace log when you no longer need the data in it, issue the fstraceclear command. (The fstrace setlog command also clears an existing trace logautomatically when you use it to change the log’s size.)
To dump the contents of a trace log1. Become the local superuser root on the machine, if you are not already, by
issuing the su command.% su rootPassword: root_password
2. Issue the fstrace dump command to dump trace logs.# fstrace dump [-set <set_name>+] [-follow <log_name>] \
[-file <output_filename>] \[-sleep <seconds_between_reads>]
At the beginning of the output of each dump is a header specifying the dateand time at which the dump began. The number of logs being dumped is alsodisplayed if the -follow argument is not specified. The header appears asfollows:
AFS Trace Dump --Date: date timeFound n logs.
where date is the starting date of the trace log dump, time is the starting timeof the trace log dump, and n specifies the number of logs found by the fstracedump command.
The following is an example of trace log dump header:AFS Trace Dump --Date: Fri Apr 16 10:44:38 1999Found 1 logs.
The contents of the log follow the header and are comprised of messageswritten to the log from an active event set. The messages written to the logcontain the following three components:
Chapter 8. Monitoring and Auditing AFS Performance 345

v The timestamp associated with the message (number of seconds from anarbitrary start point)
v The process ID or thread ID associated with the messagev The message itself
A trace log message is formatted as follows:time timestamp, pid pid:event message
where timestamp is the number of seconds from an arbitrary start point, pid isthe process ID number of the Cache Manager event, and event message is theCache Manager event which corresponds with a function in the AFS sourcecode.
The following is an example of a dumped trace log message:time 749.641274, pid 3002:Returning code 2 from 19
For the messages in the trace log to be most readable, the Cache Managercatalog file needs to be installed on the local disk of the client machine; theconventional location is /usr/vice/etc/C/afszcm.cat. Log messages that beginwith the string raw op, like the following, indicate that the catalog is notinstalled.
raw op 232c, time 511.916288, pid 0p0:Fri Apr 16 10:36:31 1999
Every 1024 seconds, a current time message is written to each log. Thismessage has the following format:
time timestamp, pid pid: Current time: unix_time
where timestamp is the number of seconds from an arbitrary start point, pid isthe process ID number, and unix_time is the standard time format sinceJanuary 1, 1970.
The current time message can be used to determine the actual time associatedwith each log message. Determine the actual time as follows:1. Locate the log message whose actual time you want to determine.2. Search backward through the dump record until you come to a current
time message.3. If the current time message’s timestamp is smaller than the log message’s
timestamp, subtract the former from the latter. If the current time message’stimestamp is larger than the log message’s timestamp, add 1024 to the latterand subtract the former from the result.
4. Add the resulting number to the current time message’s unix_time todetermine the log message’s actual time.
346 AFS: Administration Guide
Because log data is stored in a finite, circular buffer, some of the data can beoverwritten before being read. If this happens, the following message appearsat the appropriate place in the dump:
Log wrapped; data missing.
Note: If this message appears in the middle of a dump, which can happenunder a heavy work load, it indicates that not all of the log data isbeing written to the log or some data is being overwritten. Increasingthe size of the log with the fstrace setlog command can alleviate thisproblem.
To clear the contents of a trace log1. Become the local superuser root on the machine, if you are not already, by
issuing the su command.% su rootPassword: root_password
2. Issue the fstrace clear command to clear logs by log name or by event set.# fstrace clear [-set <set_name>+] [-log <log_name>+]
The following example clears the cmfx log used by the cm event set on thelocal machine.
# fstrace clear cm
The following example also clears the cmfx log on the local machine.# fstrace clear cmfx
Examples of fstrace Commands
This section contains an extensive example of the use of the fstrace commandsuite, which is useful for gathering a detailed trace of Cache Manager activitywhen you are working with AFS Product Support to diagnose a problem. TheProduct Support representative can guide you in choosing appropriateparameter settings for the trace.
Before starting the kernel trace log, try to isolate the Cache Manager on theAFS client machine that is experiencing the problem accessing the file. Ifnecessary, instruct users to move to another machine so as to minimize theCache Manager activity on this machine. To minimize the amount ofunrelated AFS activity recorded in the trace log, place both the fstrace binaryand the dump file must reside on the local disk, not in AFS. You must belogged in as the local superuser root to issue fstrace commands.
Before starting a kernel trace, issue the fstrace lsset command to check thestate of the cm event set.
# fstrace lsset cm
Chapter 8. Monitoring and Auditing AFS Performance 347

If tracing has not been enabled previously or if tracing has been turned off onthe client machine, the following output is displayed:
Available sets:cm inactive
If tracing has been turned off and kernel memory is not allocated for the tracelog on the client machine, the following output is displayed:
Available sets:cm inactive (dormant)
If the current state of the cm event set is inactive or inactive (dormant),turn on kernel tracing by issuing the fstrace setset command with the -activeflag.
# fstrace setset cm -active
If tracing is enabled currently on the client machine, the following output isdisplayed:
Available sets:cm active
If tracing is enabled currently, you do not need to use the fstrace setsetcommand. Do issue the fstrace clear command to clear the contents of anyexisting trace log, removing prior traces that are not related to the currentproblem.
# fstrace clear cm
After checking on the state of the event set, issue the fstrace lslog commandwith the -long flag to check the current state and size of the kernel trace log .
# fstrace lslog cmfx -long
If tracing has not been enabled previously or the cm event set was set toactive or inactive previously, output similar to the following is displayed:
Available logs:cmfx : 60 kbytes (allocated)
The fstrace tracing utility allocates 60 kilobytes of memory to the trace log bydefault. You can increase or decrease the amount of memory allocated to thekernel trace log by setting it with the fstrace setlog command. The numberspecified with the -buffersize argument represents the number of kilobytesallocated to the kernel trace log. If you increase the size of the kernel trace logto 100 kilobytes, issue the following command.
# fstrace setlog cmfx 100
After ensuring that the kernel trace log is configured for your needs, you canset up a file into which you can dump the kernel trace log. For example,
348 AFS: Administration Guide

create a dump file with the name cmfx.dump.file.1 using the following fstracedump command. Issue the command as a continuous process by adding the-follow and -sleep arguments. Setting the -sleep argument to 10 dumpsoutput from the kernel trace log to the file every 10 seconds.
# fstrace dump -follow cmfx -file cmfx.dump.file.1 -sleep 10AFS Trace Dump -
Date: Fri Apr 16 10:54:57 1999Found 1 logs.time 32.965783, pid 0: Fri Apr 16 10:45:52 1999time 32.965783, pid 33657: Close 0x5c39ed8 flags 0x20time 32.965897, pid 33657: Gn_close vp 0x5c39ed8 flags 0x20 (returns0x0)time 35.159854, pid 10891: Breaking callback for 5bd95e4 states 1024(volume 0)time 35.407081, pid 10891: Breaking callback for 5c0fadc states 1024(volume 0)
. .
. .
. .time 71.440456, pid 33658: Lookup adp 0x5bbdcf0 name g3oCKs fid (7564fb7e:588d240.2ff978a8.6)time 71.440569, pid 33658: Returning code 2 from 19time 71.440619, pid 33658: Gn_lookup vp 0x5bbdcf0 name g3oCKs (returns0x2)time 71.464989, pid 38267: Gn_open vp 0x5bbd000 flags 0x0 (returns 0x0)AFS Trace Dump - Completed
Using the afsmonitor Program
The afsmonitor program enables you to monitor the status and performanceof specified File Server and Cache Manager processes by gathering statisticalinformation. Among its other uses, the afsmonitor program can be used tofine-tune Cache Manager configuration and load balance File Servers.
The afsmonitor program enables you to perform the following tasks.v Monitor any number of File Server and Cache Manager processes on any
number of machines (in both local and foreign cells) from a single location.v Set threshold values for any monitored statistic. When the value of a
statistic exceeds the threshold, the afsmonitor program highlights it to drawyour attention. You can set threshold levels that apply to every machine oronly some.
v Invoke programs or scripts automatically when a statistic exceeds itsthreshold.
Chapter 8. Monitoring and Auditing AFS Performance 349
Requirements for running the afsmonitor program
The following software must be accessible to a machine where the afsmonitorprogram is running:v The AFS xstat libraries, which the afsmonitor program uses to gather datav The curses graphics package, which most UNIX distributions provide as a
standard utility
The afsmonitor screens format successfully both on so-called dumb terminalsand in windowing systems that emulate terminals. For the output to looks itsbest, the display environment needs to support reverse video and cursoraddressing. Set the TERM environment variable to the correct terminal type,or to a value that has characteristics similar to the actual terminal type. Thedisplay window or terminal must be at least 80 columns wide and 12 lineslong.
The afsmonitor program must run in the foreground, and in its own separate,dedicated window or terminal. The window or terminal is unavailable for anyother activity as long as the afsmonitor program is running. Any number ofinstances of the afsmonitor program can run on a single machine, as long aseach instance runs in its own dedicated window or terminal. Note that it cantake up to three minutes to start an additional instance.
No privilege is required to run the afsmonitor program. By convention, it isinstalled in the /usr/afsws/bin directory, and anyone who can access thedirectory can monitor File Servers and Cache Managers. The probes throughwhich the afsmonitor program collects statistics do not constitute a significantburden on the File Server or Cache Manager unless hundreds of people arerunning the program. If you wish to restrict its use, place the binary file in adirectory available only to authorized users.
The afsmonitor Output Screens
The afsmonitor program displays its data on three screens:v System Overview: This screen appears automatically when the afsmonitor
program initializes. It summarizes separately for File Servers and CacheManagers the number of machines being monitored and how many of themhave alerts (statistics that have exceeded their thresholds). It then lists thehostname and number of alerts for each machine being monitored,indicating if appropriate that a process failed to respond to the last probe.
v File Server: This screen displays File Server statistics for each file servermachine being monitored. It highlights statistics that have exceeded theirthresholds, and identifies machines that failed to respond to the last probe.
350 AFS: Administration Guide
v Cache Managers: This screen displays Cache Manager statistics for eachclient machine being monitored. It highlights statistics that have exceededtheir thresholds, and identifies machines that failed to respond to the lastprobe.
Fields at the corners of every screen display the following information:v In the top left corner, the program name and version number.v In the top right corner, the screen name, current and total page numbers,
and current and total column numbers. The page number (for example, p.1 of 3) indicates the index of the current page and the total number of(vertical) pages over which data is displayed. The column number (forexample, c. 1 of 235) indicates the index of the current leftmost columnand the total number of columns in which data appears. (The symbol >>>indicates that there is additional data to the right; the symbol <<< indicatesthat there is additional data to the left.)
v In the bottom left corner, a list of the available commands. Enter the firstletter in the command name to run that command. Only the currentlypossible options appear; for example, if there is only one page of data, thenext and prev commands, which scroll the screen up and downrespectively, do not appear. For descriptions of the commands, see thefollowing section about navigating the display screens.
v In the bottom right corner, the probes field reports how many times theprogram has probed File Servers (fs), Cache Managers (cm), or both. Thecounts for File Servers and Cache Managers can differ. The freq fieldreports how often the program sends probes.
Navigating the afsmonitor Display Screens
As noted, the lower left hand corner of every display screen displays thenames of the commands currently available for moving to alternate screens,which can either be a different type or display more statistics or machines ofthe current type. To execute a command, press the lowercase version of thefirst letter in its name. Some commands also have an uppercase version thathas a somewhat different effect, as indicated in the following list.
cm Switches to the Cache Managers screen. Available only on the SystemOverview and File Servers screens.
fs Switches to the File Servers screen. Available only on the SystemOverview and the Cache Managers screens.
left Scrolls horizontally to the left, to access the data columns situated tothe left of the current set. Available when the <<< symbol appears atthe top left of the screen. Press uppercase L to scroll horizontally allthe way to the left (to display the first set of data columns).
next Scrolls down vertically to the next page of machine names. Available
Chapter 8. Monitoring and Auditing AFS Performance 351
when there are two or more pages of machines and the final page isnot currently displayed. Press uppercase N to scroll to the final page.
oview Switches to the System Overview screen. Available only on the CacheManagers and File Servers screens.
prev Scrolls up vertically to the previous page of machine names. Availablewhen there are two or more pages of machines and the first page isnot currently displayed. Press uppercase N to scroll to the first page.
right Scrolls horizontally to the right, to access the data columns situated tothe right of the current set. This command is available when the >>>symbol appears at the upper right of the screen. Press uppercase R toscroll horizontally all the way to the right (to display the final set ofdata columns).
The System Overview Screen
The System Overview screen appears automatically as the afsmonitor programinitializes. This screen displays the status of as many File Server and CacheManager processes as can fit in the current window; scroll down to accessadditional information.
The information on this screen is split into File Server information on the leftand Cache Manager information on the right. The header for each groupingreports two pieces of information:v The number of machines on which the program is monitoring the indicated
processv The number of alerts and the number of machines affected by them (an
alertmeans that a statistic has exceeded its threshold or a process failed torespond to the last probe)
A list of the machines being monitored follows. If there are any alerts on amachine, the number of them appears in square brackets to the left of thehostname. If a process failed to respond to the last probe, the letters PF (probefailure) appear in square brackets to the left of the hostname.
The following graphic is an example System Overview screen. The afsmonitorprogram is monitoring six File Servers and seven Cache Managers. The FileServer process on host fs1.abc.com and the Cache Manager on hostcli33.abc.com are each marked [ 1] to indicate that one threshold value isexceeded. The [PF] marker on host fs6.abc.com indicates that its File Serverprocess did not respond to the last probe.
352 AFS: Administration Guide

The File Servers Screen
The File Servers screen displays the values collected at the most recentprobe for File Server statistics.
A summary line at the top of the screen (just below the standard programversion and screen title blocks) specifies the number of monitored File Servers,the number of alerts, and the number of machines affected by the alerts.
The first column always displays the hostnames of the machines running themonitored File Servers.
To the right of the hostname column appear as many columns of statistics ascan fit within the current width of the display screen or window; each columnrequires space for 10 characters. The name of the statistic appears at the top ofeach column. If the File Server on a machine did not respond to the mostrecent probe, a pair of dashes (--) appears in each column. If a value exceedsits configured threshold, it is highlighted in reverse video. If a value is toolarge to fit into the allotted column width, it overflows into the next row inthe same column.
For a list of the available File Server statistics, see “Appendix C. Theafsmonitor Program Statistics” on page 611.
Figure 6. The afsmonitor System Overview Screen
Chapter 8. Monitoring and Auditing AFS Performance 353

The following graphic depicts the File Servers screen that follows the SystemOverview Screen example previously discussed; however, one additionalserver probe has been completed. In this example, the File Server process onfs1 has exceeded the configured threshold for the number of performancecalls received (the numPerfCalls statistic), and that field appears in reversevideo. Host fs6 did not respond to Probe 10, so dashes appear in all fields.
Both the File Servers and Cache Managers screen (discussed in the followingsection) can display hundreds of columns of data and are therefore designedto scroll left and right. In the preceding graphic, the screen displays theleftmost screen and the screen title block shows that column 1 of 235 isdisplayed. The appearance of the >>> symbol in the upper right hand cornerof the screen and the right command in the command block indicate thatadditional data is available by scrolling right. (For information on theavailable statistics, see “Appendix C. The afsmonitor Program Statistics” onpage 611.)
If the right command is executed, the screen looks something like thefollowing example. Note that the horizontal scroll symbols now point both tothe left (<<<) and to the right (>>>) and both the left and right commandsappear, indicating that additional data is available by scrolling both left andright.
Figure 7. The afsmonitor File Servers Screen
354 AFS: Administration Guide
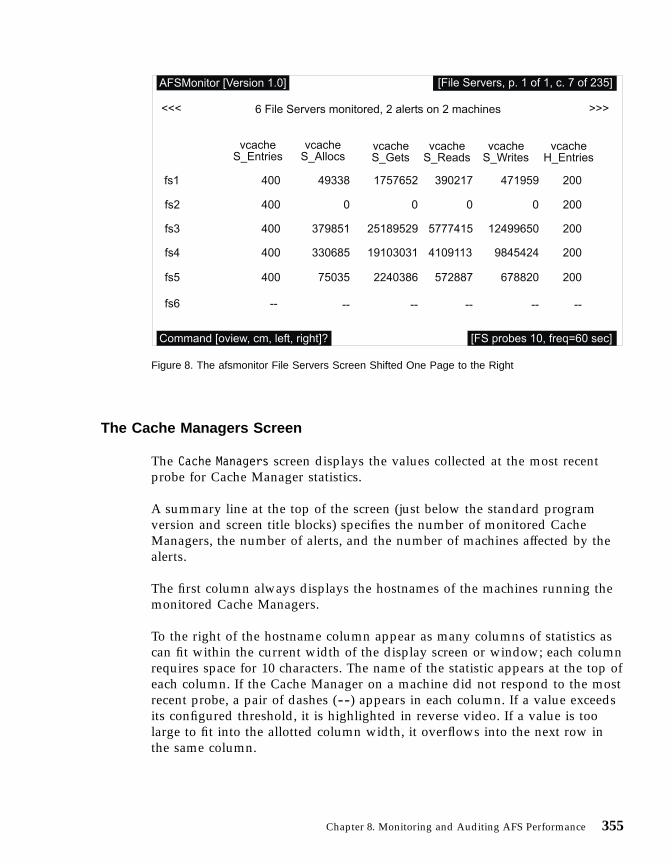
The Cache Managers Screen
The Cache Managers screen displays the values collected at the most recentprobe for Cache Manager statistics.
A summary line at the top of the screen (just below the standard programversion and screen title blocks) specifies the number of monitored CacheManagers, the number of alerts, and the number of machines affected by thealerts.
The first column always displays the hostnames of the machines running themonitored Cache Managers.
To the right of the hostname column appear as many columns of statistics ascan fit within the current width of the display screen or window; each columnrequires space for 10 characters. The name of the statistic appears at the top ofeach column. If the Cache Manager on a machine did not respond to the mostrecent probe, a pair of dashes (--) appears in each column. If a value exceedsits configured threshold, it is highlighted in reverse video. If a value is toolarge to fit into the allotted column width, it overflows into the next row inthe same column.
Figure 8. The afsmonitor File Servers Screen Shifted One Page to the Right
Chapter 8. Monitoring and Auditing AFS Performance 355
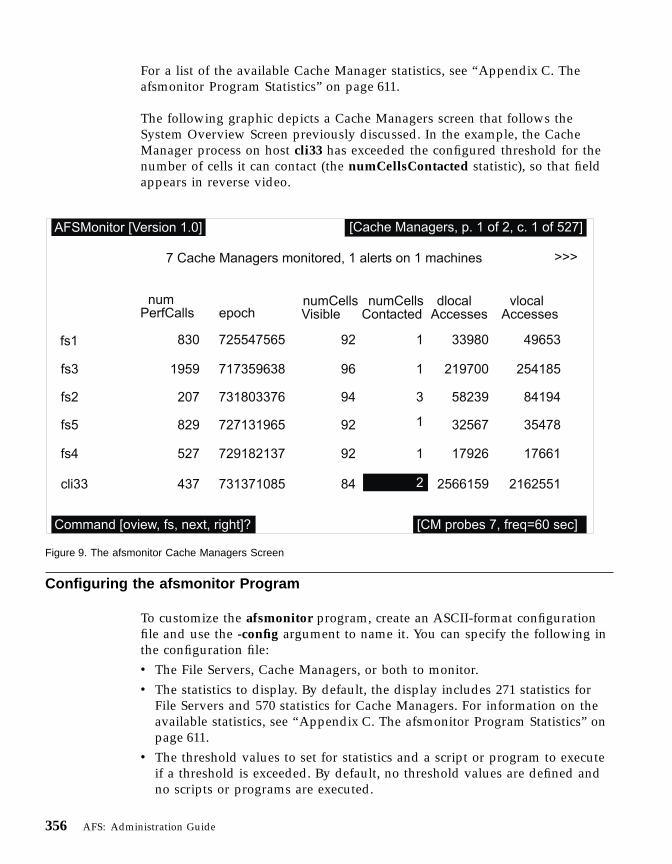
For a list of the available Cache Manager statistics, see “Appendix C. Theafsmonitor Program Statistics” on page 611.
The following graphic depicts a Cache Managers screen that follows theSystem Overview Screen previously discussed. In the example, the CacheManager process on host cli33 has exceeded the configured threshold for thenumber of cells it can contact (the numCellsContacted statistic), so that fieldappears in reverse video.
Configuring the afsmonitor Program
To customize the afsmonitor program, create an ASCII-format configurationfile and use the -config argument to name it. You can specify the following inthe configuration file:v The File Servers, Cache Managers, or both to monitor.v The statistics to display. By default, the display includes 271 statistics for
File Servers and 570 statistics for Cache Managers. For information on theavailable statistics, see “Appendix C. The afsmonitor Program Statistics” onpage 611.
v The threshold values to set for statistics and a script or program to executeif a threshold is exceeded. By default, no threshold values are defined andno scripts or programs are executed.
Figure 9. The afsmonitor Cache Managers Screen
356 AFS: Administration Guide
The following list describes the instructions that can appear in theconfiguration file:
cm host_nameNames a client machine for which to display Cache Manager statistics.The order of cm lines in the file determines the order in which clientmachines appear from top to bottom on the System Overview andCache Managers output screens.
fs host_nameNames a file server machine for which to display File Server statistics.The order of fs lines in the file determines the order in which fileserver machines appear from top to bottom on the System Overviewand File Servers output screens.
thresh fs | cm field_name thresh_val [cmd_to_run] [arg1] . . . [argn]Assigns the threshold value thresh_val to the statistic field_name, foreither a File Server statistic (fs) or a Cache Manager statistic (cm). Theoptional cmd_to_execute field names a binary or script to execute eachtime the value of the statistic changes from being below thresh_val tobeing at or above thresh_val. A change between two values that bothexceed thresh_val does not retrigger the binary or script. The optionalarg1 through argn fields are additional values that the afsmonitorprogram passes as arguments to the cmd_to_execute command. If anyof them include one or more spaces, enclose the entire field in doublequotes.
The parameters fs, cm, field_name, threshold_val, and arg1 through argncorrespond to the values with the same name on the thresh line. Thehost_name parameter identifies the file server or client machine wherethe statistic has crossed the threshold, and the actual_val parameter isthe actual value of field_name that equals or exceeds the thresholdvalue.
Use the thresh line to set either a global threshold, which applies toall file server machines listed on fs lines or client machines listed oncm lines in the configuration file, or a machine-specific threshold,which applies to only one file server or client machine.v To set a global threshold, place the thresh line before any of the fs
or cm lines in the file.v To set a machine-specific threshold, place the thresh line below the
corresponding fs or cm line, and above any other fs or cm lines. Amachine-specific threshold value always overrides thecorresponding global threshold, if set. Do not place a thresh fs linedirectly after a cm line or a thresh cm line directly after a fs line.
show fs | cm field/group/sectionSpecifies which individual statistic, group of statistics, or section of
Chapter 8. Monitoring and Auditing AFS Performance 357

statistics to display on the File Servers screen (fs) or Cache Managersscreen (cm) and the order in which to display them. The appendix ofafsmonitor statistics in the AFS Administration Guide specifies thegroup and section to which each statistic belongs. Include as manyshow lines as necessary to customize the screen display as desired,and place them anywhere in the file. The top-to-bottom order of theshow lines in the configuration file determines the left-to-right orderin which the statistics appear on the corresponding screen.
If there are no show lines in the configuration file, then the screensdisplay all statistics for both Cache Managers and File Servers.Similarly, if there are no show fs lines, the File Servers screendisplays all file server statistics, and if there are no show cm lines, theCache Managers screen displays all client statistics.
# commentsPrecedes a line of text that the afsmonitor program ignores because ofthe initial number (#) sign, which must appear in the very firstcolumn of the line.
For a list of the values that can appear in the field/group/section field of a showinstruction, see “Appendix C. The afsmonitor Program Statistics” on page 611.)
The following example illustrates a possible configuration file:thresh cm dlocalAccesses 1000000thresh cm dremoteAccesses 500000 handleDRemotethresh fs rx_maxRtt_Usec 1000cm client5cm client33cm client14thresh cm dlocalAccesses 2000000thresh cm vcacheMisses 10000cm client2fs fs3fs fs9fs fs5fs fs10show cm numCellsContactedshow cm dlocalAccessesshow cm dremoteAccessesshow cm vcacheMissesshow cm Auth_Stats_group
Since the first three thresh instructions appear before any fs or cminstructions, they set global threshold values:v All Cache Manager process in this file use 1000000 as the threshold for the
dlocalAccesses statistic (except for the machine client2 which uses anoverriding value of 2000000.)
358 AFS: Administration Guide
v All Cache Manager processes in this file use 500000 as the threshold valuefor the dremoteAccesses statistic; if that value is exceeded, the scripthandleDRemote is invoked.
v All File Server processes in this file use 1000 as the threshold value for therx_maxRtt_Usec statistic.
The four cm instructions monitor the Cache Manager on the machines client5,client33, client14, and client2. The first three use all of the global thresholdvalues.
The Cache Manager on client2 uses the global threshold value for thedremoteAccesses statistic, but a different one for the dlocalAccesses statistic.Furthermore, client22 is the only Cache Manager that uses the threshold setfor the vcacheMisses statistic.
The fs instructions monitor the File Server on the machines fs3, fs9, fs5, andfs10. They all use the global threshold for therx_maxRtt_Usec statistic.
Because there are no show fs instructions, the File Servers screen displays allFile Server statistics. The Cache Managers screen displays only the statisticsnamed in show cm instructions, ordering them from left to right. TheAuth_Stats_group includes several statistics, all of which are displayed(curr_PAGs, curr_Records, curr_AuthRecords, curr_UnauthRecords,curr_MaxRecordsInPAG, curr_LongestChain, PAGCreations, TicketUpdates,HWM_PAGS, HWM_Records, HWM_MaxRecordsInPAG, andHWM_LongestChain).
Writing afsmonitor Statistics to a File
All of the statistical information collected and displayed by the afsmonitorprogram can be preserved by writing it to an output file. You can create anoutput file by using the -output argument when you startup the afsmonitorprocess. You can use the output file to track process performance over longperiods of time and to apply post-processing techniques to further analyzesystem trends.
The afsmonitor program output file is a simple ASCII file that records theinformation reported by the File Server and Cache Manager screens. Theoutput file has the following format:
time host_name CM|FS list_of_measured_values
and specifies the time at which the list_of_measured_values were gathered fromthe Cache Manager (CM) or File Server (FS) process housed on host_name. Onthose occasion where probes fail, the value -1 is reported instead of thelist_of_measured_values.
Chapter 8. Monitoring and Auditing AFS Performance 359

This file format provides several advantages:v It can be viewed using a standard editor. If you intend to view this file
frequently, use the -detailed flag with the -output argument. It formats theoutput file in a way that is easier to read.
v It can be passed through filters to extract desired information using thestandard set of UNIX tools.
v It is suitable for long term storage of the afsmonitor program output.
To start the afsmonitor Program
1. Open a separate command shell window or use a dedicated terminal foreach instance of the afsmonitor program. This window or terminal mustbe devoted to the exclusive use of the afsmonitor process because thecommand cannot be run in the background.
2. Initialize the afsmonitor program. The message afsmonitor CollectingStatistics..., followed by the appearance of the System Overviewscreen, confirms a successful start.
% afsmonitor [initcmd] [-config <configuration file>] \[-frequency <poll frequency, in seconds>] \[-output <storage file name>] [-detailed] \[-debug <turn debugging output on to the named file>] \[-fshosts <list of file servers to monitor>+] \[-cmhosts <list of cache managers to monitor>+]
afsmonitor Collecting Statistics...
where
initcmdIs an optional string that accommodates the command’s use of theAFS command parser. It can be omitted and ignored.
-configSpecifies the pathname of an afsmonitor configuration file, whichlists the machines and statistics to monitor. Partial pathnames areinterpreted relative to the current working directory. Provide eitherthis argument or one or both of the -fshosts and -cmhostsarguments. You must use a configuration file to set thresholds orcustomize the screen display. For instructions on creating theconfiguration file, see “Configuring the afsmonitor Program” onpage 356.
-frequencySpecifies how often to probe the File Server and Cache Managerprocesses, as a number of seconds. Acceptable values range from 1and 86400; the default value is 60. This frequency applies to bothFile Server and Cache Manager probes; however, File Server andCache Manager probes are initiated and processed independent of
360 AFS: Administration Guide
each other. The actual interval between probes to a host is theprobe frequency plus the time needed by all hosts to respond tothe probe.
-outputSpecifies the name of an output file to which to write all of thestatistical data. By default, no output file is created. Forinformation on this file, see “Writing afsmonitor Statistics to a File”on page 359.
-detailedFormats the output file named by the -output argument to bemore easily readable. The -output argument must be providedalong with this flag.
-fshostsIdentifies each File Server process to monitor by specifying thehost it is running on. You can identify a host using either itscomplete Internet-style host name or an abbreviation acceptable tothe cell’s naming service. Combine this argument with the-cmhosts if you wish, but not the -config argument.
-cmhostsIdentifies each Cache Manager process to monitor by specifyingthe host it is running on. You can identify a host using either itscomplete Internet-style host name or an abbreviation acceptable tothe cell’s naming service. Combine this argument with the -fshostsif you wish, but not the -config argument.
To stop the afsmonitor program
To exit an afsmonitor program session, Enter the <Ctrl-c> interrupt signal oran uppercase Q.
The xstat Data Collection Facility
The afsmonitor program uses the xstat data collection facility to gather andcalculate the data that it (the afsmonitor program) then uses to perform itsfunction. You can also use the xstat facility to create your own data displayprograms. If you do, keep the following in mind. The File Server considersany program calling its RPC routines to be a Cache Manager; therefore, anyprogram calling the File Server interface directly must export the CacheManager’s callback interface. The calling program must be capable ofemulating the necessary callback state, and it must respond to periodickeep-alive messages from the File Server. In addition, a calling program mustbe able to gather the collected data.
Chapter 8. Monitoring and Auditing AFS Performance 361
The xstat facility consists of two C language libraries available to user-levelapplications:v /usr/afsws/lib/afs/libxstat_fs.a exports calls that gather information from
one or more running File Server processes.v /usr/afsws/lib/afs/libxstat_cm.a exports calls that collect information from
one or more running Cache Managers.
The libraries allow the caller to registerv A set of File Servers or Cache Managers to be examined.v The frequency with which the File Servers or Cache Managers are to be
probed for data.v A user-specified routine to be called each time data is collected.
The libraries handle all of the lightweight processes, callback interactions, andtiming issues associated with the data collection. The user needs only toprocess the data as it arrives.
The libxstat Libraries
The libxstat_fs.a and libxstat_cm.a libraries handle the callback requirementsand other complications associated with the collection of data from FileServers and Cache Managers. The user provides only the means ofaccumulating the desired data. Each xstat library implements three routines:v Initialization (xstat_fs_Init and xstat_cm_Init) arranges the periodic
collection and handling of data.v Immediate probe (xstat_fs_ForceProbeNow and xstat_cm_ForceProbeNow)
forces the immediate collection of data, after which collection returns to itsnormal probe schedule.
v Cleanup (xstat_fs_Cleanup and xstat_cm_Cleanup) terminates allconnections and removes all traces of the data collection from memory.
The File Server and Cache Manager each define data collections that clientscan fetch. A data collection is simply a related set of numbers that can becollected as a unit. For example, the File Server and Cache Manager eachdefine profiling and performance data collections. The profiling collectionsmaintain counts of the number of times internal functions are called withinservers, allowing bottleneck analysis to be performed. The performancecollections record, among other things, internal disk I/O statistics for a FileServer and cache effectiveness figures for a Cache Manager, allowing forperformance analysis.
For a copy of the detailed specification which provides much additional usageinformation about the xstat facility, its libraries, and the routines in thelibraries, contact AFS Product Support.
362 AFS: Administration Guide

Example xstat Commands
AFS comes with two low-level, example commands: xstat_fs_test andxstat_cm_test. The commands allow you to experiment with the xstat facility.They gather information and display the available data collections for a FileServer or Cache Manager. They are intended merely to provide examples ofthe types of data that can be collected via xstat; they are not intended for usein the actual collection of data.
To use the example xstat_fs_test command1. Issue the example xstat_fs_test command to test the routines in the
libxstat_fs.a library and display the data collections associated with theFile Server process. The command executes in the foreground.
% xstat_fs_test [initcmd] \-fsname <File Server name(s) to monitor>+ \-collID <Collection(s) to fetch>+ [-onceonly] \[-frequency <poll frequency, in seconds>] \[-period <data collection time, in minutes>] [-debug]
where
xstat_fs_testMust be typed in full.
initcmdIs an optional string that accommodates the command’s use of theAFS command parser. It can be omitted and ignored.
-fsnameIs the Internet host name of each file server machine on which tomonitor the File Server process.
-collIDSpecifies each data collection to return. The indicated datacollection defines the type and amount of data the command is togather about the File Server. Data is returned in the form of apredefined data structure (refer to the specification documentsreferenced previously for more information about the datastructures).
There are two acceptable values:v 1 reports various internal performance statistics related to the
File Server (for example, vnode cache entries and Rx protocolactivity).
v 2 reports all of the internal performance statistics provided bythe 1 setting, plus some additional, detailed performance figuresabout the File Server (for example, minimum, maximum, and
Chapter 8. Monitoring and Auditing AFS Performance 363
cumulative statistics regarding File Server RPCs, how long theytake to complete, and how many succeed).
-onceonlyDirects the command to gather statistics just one time. Omit thisoption to have the command continue to probe the File Server forstatistics every 30 seconds. If you omit this option, you can use the<Ctrl-c> interrupt signal to halt the command at any time.
-frequencySets the frequency in seconds at which the program initiatesprobes to the File Server. If you omit this argument, the default is30 seconds.
-periodSets how long the utility runs before exiting, as a number ofminutes. If you omit this argument, the default is 10 minutes.
-debugDisplays additional information as the command runs.
To use the example xstat_cm_test command1. Issue the example xstat_cm_test command to test the routines in the
libxstat_cm.a library and display the data collections associated with theCache Manager. The command executes in the foreground.
% xstat_cm_test [initcmd] \-cmname <Cache Manager name(s) to monitor>+ \-collID <Collection(s) to fetch>+ \[-onceonly] [-frequency <poll frequency, in seconds>] \[-period <data collection time, in minutes>] [-debug]
where
xstat_cm_testMust be typed in full.
initcmdIs an optional string that accommodates the command’s use of theAFS command parser. It can be omitted and ignored.
-cmnameIs the host name of each client machine on which to monitor theCache Manager.
-collIDSpecifies each data collection to return. The indicated datacollection defines the type and amount of data the command is togather about the Cache Manager. Data is returned in the form of a
364 AFS: Administration Guide
predefined data structure (refer to the specification documentsreferenced previously for more information about the datastructures).
There are two acceptable values:v 0 provides profiling information about the numbers of times
different internal Cache Manager routines were called since theCache manager was started.
v 1 reports various internal performance statistics related to theCache manager (for example, statistics about how effectively thecache is being used and the quantity of intracell and intercelldata access).
v 2 reports all of the internal performance statistics provided bythe 1 setting, plus some additional, detailed performance figuresabout the Cache Manager (for example, statistics about thenumber of RPCs sent by the Cache Manager and how long theytake to complete; and statistics regarding things such asauthentication, access, and PAG information associated withdata access).
-onceonlyDirects the command to gather statistics just one time. Omit thisoption to have the command continue to probe the Cache Managerfor statistics every 30 seconds. If you omit this option, you can usethe <Ctrl-c> interrupt signal to halt the command at any time.
-frequencySets the frequency in seconds at which the program initiatesprobes to the Cache Manager. If you omit this argument, thedefault is 30 seconds.
-periodSets how long the utility runs before exiting, as a number ofminutes. If you omit this argument, the default is 10 minutes.
-debugDisplays additional information as the command runs.
Auditing AFS Events on AIX File Servers
You can audit AFS events on AIX File Servers using an AFS mechanism thattransfers audit information from AFS to the AIX auditing system. Thefollowing general classes of AFS events can be audited. For a complete list ofspecific AFS audit events, see “Appendix D. AIX Audit Events” on page 645.v Authentication and Identification Eventsv Security Events
Chapter 8. Monitoring and Auditing AFS Performance 365
v Privilege Required Eventsv Object Creation and Deletion Eventsv Attribute Modification Eventsv Process Control Events
Note: This section assumes familiarity with the AIX auditing system. Formore information, see the AIX System Management Guide for the versionof AIX you are using.
Configuring AFS Auditing on AIX File Servers
The directory /usr/afs/local/audit contains three files that contain theinformation needed to configure AIX File Servers to audit AFS events:v The events.sample file contains information on auditable AFS events. The
contents of this file are integrated into the corresponding AIX events file(/etc/security/audit/events).
v The config.sample file defines the six classes of AFS audit events and theevents that make up each class. It also defines the classes of AFS auditevents to audit for the File Server, which runs as the local superuser root.The contents of this file must be integrated into the corresponding AIXconfig file (/etc/security/audit/config).
v The objects.sample file contains a list of information about audited files.You must only audit files in the local file space. The contents of this filemust be integrated into the corresponding AIX objects file(/etc/security/audit/objects).
Once you have properly configured these files to include the AFS-relevantinformation, use the AIX auditing system to start up and shut down theauditing.
To enable AFS auditing1. Create the following string in the file /usr/afs/local/Audit on each File
Server on which you plan to audit AFS events:AFS_AUDIT_AllEvents
2. Issue the bos restart command (with the -all flag) to stop and restart allserver processes on each File Server. For instructions on using thiscommand, see “Stopping and Immediately Restarting Processes” onpage 142.
To disable AFS auditing1. Remove the contents of the file /usr/afs/local/Audit on each File Server for
which you are no longer interested in auditing AFS events.
366 AFS: Administration Guide
2. Issue the bos restart command (with the -all flag) to stop and restart allserver processes on each File Server. For instructions on using thiscommand, see “Stopping and Immediately Restarting Processes” onpage 142.
Chapter 8. Monitoring and Auditing AFS Performance 367

368 AFS: Administration Guide
Chapter 9. Managing Server Encryption Keys
This chapter explains how to maintain your cell’s server encryption keys,which are vital for secure communications in AFS.
Summary of Instructions
This chapter explains how to perform the following tasks by using theindicated commands:
Add a new server encryption key bos addkey and kassetpassword
Inspect key checksums in the Authentication Database kas examineInspect key checksums in the KeyFile bos listkeysRemove an old server encryption key bos removekey
About Server Encryption Keys
An encryption key is a string of octal numbers used to encrypt and decryptpackets of information. In AFS, a server encryption key is the key used toprotect information being transferred between AFS server processes andbetween them and their clients. A server encryption key is essentially apassword for a server process and like a user password is stored in theAuthentication Database.
Maintaining your cell’s server encryption keys properly is the most basic wayto protect the information in your AFS filespace from access by unauthorizedusers.
Keys and Mutual Authentication: A Review
Server encryption keys play a central role in the mutual authenticationbetween client and server processes in AFS. For a more detailed description ofmutual authentication, see “A More Detailed Look at Mutual Authentication”on page 63.
When a client wants to contact an AFS server, it first contacts the TicketGranting Service (TGS) module of the Authentication Server. After verifying theclient’s identity (based indirectly on the password of the human user whomthe client represents), the TGS gives the client a server ticket. This ticket isencrypted with the server’s encryption key. (The TGS also invents a secondencryption key, called the session key, to be used only for a single episode of
© Copyright IBM Corp. 1989, 2000 369

communication between server and client. The server ticket and session key,together with other pieces of information, are collectively referred to as atoken.)
The client cannot read the server ticket or token because it does not know theserver encryption key. However, the client sends it to the AFS server alongwith service requests, because the ticket proves to the AFS server processesthat it has already authenticated with the TGS. AFS servers trust the TGS togrant tickets only to valid clients. The fact that the client possesses a ticketencrypted with the server’s encryption key proves to the server that the clientis valid. On the other hand, the client assumes that only a genuine AFS serverknows the server encryption key needed to decrypt the ticket. The server’sability to decrypt the ticket and understand its contents proves to the clientthat the server is legitimate.
Maintaining AFS Server Encryption Keys
As you maintain your cell’s server encryption keys, keep the following inmind.v Change the key frequently to enhance your cell’s security. Changing the key
at least once a month is strongly recommended.v The AFS server encryption key currently in use is stored in two places.
When you add a new key, you must make changes in both places and makethem in the correct order, as instructed in “Adding Server Encryption Keys”on page 374. Failure to follow the instructions can seriously impair cellfunctioning, as clients and servers become unable to communicate. The twostorage sites for the current server encryption key are the following:1. The file /usr/afs/etc/KeyFile on the local disk of every file server
machine. The file can list more than one key, each with an associatednumerical identifier, the key version number or kvno. A client tokenrecords the key version number of the key used to seal it, and the serverprocess retrieves the appropriate key from this file when the clientpresents the token.
2. The afs entry in the Authentication Database. The current serverencryption key is in the entry’s password field, just like an individualuser’s scrambled password. The Authentication Server’s Ticket GrantingService (TGS) uses this key to encrypt the tokens it gives to clients.There is only a single key in the entry, because the TGS never needs toread existing tokens, but only to generate new ones by using the currentkey.
For instructions on creating the initial afs entry and KeyFile files as youinstall your cell’s first server machine, see the AFS Quick Beginnings.
370 AFS: Administration Guide
v At any specific time, the tokens that the Authentication Server’s TicketGranting Service gives to clients are sealed with only one of the serverencryption keys, namely the one stored in the afs entry in theAuthentication Database.
v When you add a new server encryption key, you cannot immediatelyremove the former key from the /usr/afs/etc/KeyFile file on the local disk ofevery AFS server machine. Any time that you add a new key, it is likelythat some clients still have valid, unexpired tokens sealed with the previouskey. The more frequently you change the server encryption key, the moresuch tickets there are likely to be. To be able to grant service appropriatelyto clients with such tokens, an AFS server process must still be able toaccess the server encryption key used to seal it.You can safely delete an old server encryption key only when it is certainthat no clients have tokens sealed with that key. In general, wait a period oftime at least as long as the maximum token lifetime in your cell. By default,the maximum token lifetime for users is 25 hours (except for users whoseAuthentication Database entries were created by using the 3.0 version ofAFS, for whom the default is 100 hours). You can use the -lifetimeargument to the kas setfields command to change this default.Instructions for removing obsolete keys appear in “Removing ServerEncryption Keys” on page 378.
v You create a new AFS server encryption key in much the same way regularusers change their passwords, by providing a character string that isconverted into an encryption key automatically. See “Adding ServerEncryption Keys” on page 374.
v In addition to using server encryption keys when communicating withclients, the server processes use them to protect communications with otherserver processes. Therefore, all server machines in your cell must have thesame version of the KeyFile file. The easiest way to maintain consistency (ifyou run the United States edition of AFS) is to use the Update Server todistribute the contents of the system control machine’s /usr/afs/etc directoryto all of the other server machines. There are two implications:– You must run the upserver process on the system control machine and
an upclientetc process on all other server machines that references thesystem control machine. The AFS Quick Beginnings explains how toinstall both processes. For instructions on verifying that the UpdateServer processes are running, see “Displaying Process Status andInformation from the BosConfig File” on page 131.
– Change the KeyFile file only on the system control machine (except inthe types of emergencies discussed in “Handling Server Encryption KeyEmergencies” on page 379). Any changes you make on other servermachines are overwritten the next time the upclientetc process retrievesthe contents of the system control machine’s /usr/afs/etc directory. Bydefault, this happens every five minutes.
Chapter 9. Managing Server Encryption Keys 371
If you run the international edition of AFS, do not use the Update Server todistribute the contents of the /usr/afs/etc directory, particularly the KeyFilefile. The data in the file is too sensitive for transfer in unencrypted form,and because of United States government exports regulations theinternational edition of AFS does not include the necessary encryptionroutines in a form that the Update Server can use. You must instead modifythe file on each server machine individually, taking care to enter the samekey on every server machine.
v Never edit the KeyFile directly with a text editor. Instead, always use theappropriate bos commands as instructed in “Adding Server EncryptionKeys” on page 374 and “Removing Server Encryption Keys” on page 378.
Displaying Server Encryption Keys
To display the server encryption keys in the /usr/afs/etc/KeyFile file on anyfile server machine, use the bos listkeys command. Use the kas examinecommand to display the key in the Authentication Database’s afs entry.
By default the commands do not display the actual string of octal digits thatconstitute a key, but rather a checksum, a decimal number derived byencrypting a constant with the key. This prevents unauthorized users fromeasily accessing the actual key, which they can then use to falsify or eavesdropon protected communications. The bos listkeys and kas examine commandsgenerate the same checksum for a given key, so displaying checksums ratherthan actual keys is generally sufficient. If you suspect that the keys differ in away that the checksums are not revealing, then you are probably experiencingauthentication problems throughout your cell. The easiest solution is to createa new server encryption key following the instructions in “Adding ServerEncryption Keys” on page 374 or “Handling Server Encryption KeyEmergencies” on page 379. Another common reason to issue the bos listkeyscommand is to display the key version numbers currently in use, inpreparation for choosing the next one; here, the checksum is sufficient becausethe key itself is irrelevant.
If it is important to display the actual octal digits, include the -showkeyargument to both the bos listkeys and kas examine commands.
To display the KeyFile file1. Verify that you are authenticated as a user listed in the
/usr/afs/etc/UserList file. If necessary, issue the bos listusers command,which is fully described in “To display the users in the UserList file” onpage 582.
% bos listusers <machine name>
372 AFS: Administration Guide

2. Issue the bos listkeys command to display the contents of one machine’s/usr/afs/etc/KeyFile file.
% bos listkeys <machine name> [-showkey]
where
listk Is the shortest acceptable abbreviation of listkeys.
machine nameNames a file server machine. In the normal case, it is acceptable toname any machine, because correct cell functioning requires thatthe KeyFile file be the same on all of them.
-showkeyDisplays the octal digits that constitute each key.
In the following example, the output displays a checksum for each serverencryption key rather than the actual octal digits. The penultimate lineindicates when an administrator last changed the file, and the final lineconfirms that the output is complete.
% bos listkeys fs1.abc.comkey 0 has cksum 972037177key 1 has cksum 2825165022Keys last changed on Wed Jan 13 11:20:29 1999.All done.
To display the afs key from the Authentication Database1. Issue the kas examine command to display the afs entry in the
Authentication Database.The Authentication Server performs its own authentication rather thanaccepting your existing AFS token. By default, it authenticates your local(UNIX) identity, which possibly does not correspond to an AFS-privilegedadministrator. Include the -admin argument to name an identity that hasthe ADMIN flag on its Authentication Database entry. To verify that an entryhas the flag, issue the kas examine command as described in “To check ifthe ADMIN flag is set” on page 580.
% kas examine afs [-showkey] \-admin <admin principal to use for authentication>
Administrator's (admin_user) password: admin_password
where
e Is the shortest acceptable abbreviation of examine.
afs Designates the afs entry.
-showkeyDisplays the octal digits that constitute the key.
Chapter 9. Managing Server Encryption Keys 373

-adminNames an administrative account with the ADMIN flag on itsAuthentication Database entry, such as admin. The passwordprompt echoes it as admin_user. Enter the appropriate password asadmin_password.
In the following example, the admin user displays the afs entry without usingthe -showkey flag. The second line shows the key version number inparentheses and the key’s checksum. The line that begins with the string lastmod reports the date on which the indicated administrator changed the key.There is no necessary relationship between this date and the date reported bythe bos listkeys command, because the latter date changes for any type ofchange to the KeyFile file, not just a key addition. For a description of theother lines in the output from the kas examine command, see its referencepage in the AFS Administration Reference.
% kas examine afs -admin adminAdministrator's (admin) password: admin_passwordUser data for afskey (1) cksum is 2825165022, last cpw: no datepassword will never expire.An unlimited number of unsuccessful authentications is permitted.entry expires on never. Max ticket lifetime 100.00 hours.last mod on Wed Jan 13 11:21:36 1999 by adminpermit password reuse
Adding Server Encryption Keys
As noted, AFS records server encryption keys in two separate places:1. In the file /usr/afs/etc/KeyFile on the local disk of each server machine, for
use by the AFS server processes running on the machine2. In the afs entry in the Authentication Database, for use by the Ticket
Granting Service (TGS) when creating tokens
To ensure that server processes and the TGS share the same AFS serverencryption key, execute all the steps in this section without interruption.
The following instructions include a step in which you restart the databaseserver processes (the Authentication, Backup, Protection, and Volume LocationServer processes) on all database server machines. As a database serverprocess starts, it reads in the server encryption key that has the highest keyversion number in the KeyFile file and uses it to protect the messages that itsends for synchronizing the database and maintaining quorum. It uses thesame key throughout its lifetime, which can be for an extended period, even ifyou remove the key from the KeyFile file. However, if one of the peerdatabase server processes restarts and the others do not, quorum and database
374 AFS: Administration Guide

synchronization break down because the processes are no longer using thesame key: the restarted process is using the key that currently has the highestkey version number, and the other processes are still using the key they readin when they originally started. To avoid this problem, it is safest to restart allof the database server processes when adding a new key.
After adding a new key, you can remove obsolete keys from the KeyFile fileto prevent it from becoming cluttered. However, you must take care not toremove keys that client or server processes are still using. For discussion andinstructions, see “Removing Server Encryption Keys” on page 378.
To add a new server encryption key1. Verify that you are authenticated as a user listed in the
/usr/afs/etc/UserList file. If necessary, issue the bos listusers command,which is fully described in “To display the users in the UserList file” onpage 582.
% bos listusers <machine name>
2. Issue the bos listkeys command to display the key version numbers thatare already in use, as a first step in choosing the key version number forthe new key.
% bos listkeys <machine name>
where
listk Is the shortest acceptable abbreviation of listkeys.
machine nameNames any file server machine.
3. Choose a key version number for the new key, based on the output fromStep 2 and the following requirements:v A key version number must be an integer between 0 (zero) and 255 to
comply with Kerberos standards. It is simplest if you keep your keyversion numbers in sequence by choosing a key version number onegreater than the largest existing one.
v Do not reuse a key version number currently found in the KeyFile file,particularly if it is also the one in the Authentication Database afs entry.Client processes possibly still have tickets sealed with the key thatoriginally had that key version number, but the server processes startusing the new key marked with that key version number. Because thekeys do not match, the server processes refuse requests from clients whohold legitimate tokens.
4. Issue the bos addkey command to create a new AFS server encryption keyin the KeyFile file.If you run the United States edition of AFS and use the Update Server todistribute the contents of the system control machine’s /usr/afs/etc
Chapter 9. Managing Server Encryption Keys 375

directory, substitute the system control machine for the machine nameargument. (If you have forgotten which machine is the system controlmachine, see “To locate the system control machine” on page 83.)If you run the international edition of AFS or do not use the UpdateServer, repeat the bos addkey command, substituting each server machinein your cell for the machine name argument in turn.To avoid visible echoing of the string that corresponds to the new key,omit the -key argument from the command line; instead enter the string atthe prompts that appear when you omit it, as shown in the followingsyntax specification.
% bos addkey -server <machine name> -kvno <key version number>input key: afs_passwordRetype input key: afs_password
where
addk Is the shortest acceptable abbreviation of addkey.
-serverNames the cell’s system control machine if you are using theUpdate Server, or each server machine in turn if you are not.
-kvno Specifies the new key’s key version number as an integer from therange 0 (zero) through 255.
Remember the number. You need to use it again in Step 6 onpage 377 . If you are using the international edition of AFS, be sureto type the same number each time you issue this command.
afs_passwordIs a character string similar to a user password, of any length fromone to about 1,000 characters. To improve security, includenonalphabetic characters and make the string as long as ispractical (you need to type it only in this step and in Step 6 onpage 377). If you are using the international edition of AFS, be sureto type the same string each time you issue this command.
Do not enter an octal string directly. The BOS Server scrambles thecharacter string into an octal string appropriate for use as anencryption key before recording it in the KeyFile file.
5. If you are using the Update Server, wait for a few minutes while theUpdate Server distributes the new KeyFile file to all server machines. Themaximum necessary waiting period is the largest value provided for the -targument to the upclientetc process’s initialization command used on anyof the server machines; the default time is five minutes.To be certain that all machines have the same KeyFile file, issue the boslistkeys command for every file server machine and verify that thechecksum for the new key is the same on all machines.
376 AFS: Administration Guide
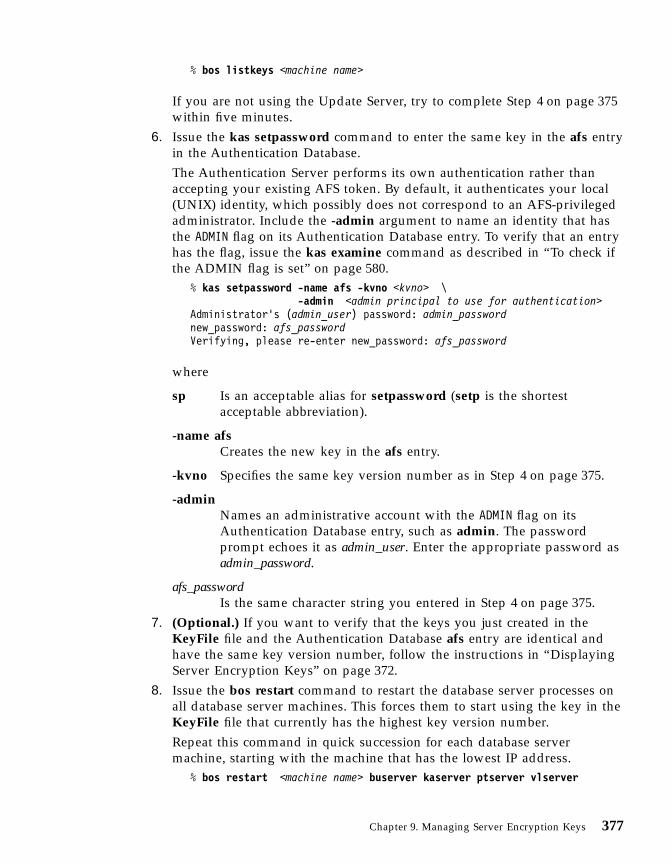
% bos listkeys <machine name>
If you are not using the Update Server, try to complete Step 4 on page 375within five minutes.
6. Issue the kas setpassword command to enter the same key in the afs entryin the Authentication Database.The Authentication Server performs its own authentication rather thanaccepting your existing AFS token. By default, it authenticates your local(UNIX) identity, which possibly does not correspond to an AFS-privilegedadministrator. Include the -admin argument to name an identity that hasthe ADMIN flag on its Authentication Database entry. To verify that an entryhas the flag, issue the kas examine command as described in “To check ifthe ADMIN flag is set” on page 580.
% kas setpassword -name afs -kvno <kvno> \-admin <admin principal to use for authentication>
Administrator's (admin_user) password: admin_passwordnew_password: afs_passwordVerifying, please re-enter new_password: afs_password
where
sp Is an acceptable alias for setpassword (setp is the shortestacceptable abbreviation).
-name afsCreates the new key in the afs entry.
-kvno Specifies the same key version number as in Step 4 on page 375.
-adminNames an administrative account with the ADMIN flag on itsAuthentication Database entry, such as admin. The passwordprompt echoes it as admin_user. Enter the appropriate password asadmin_password.
afs_passwordIs the same character string you entered in Step 4 on page 375.
7. (Optional.) If you want to verify that the keys you just created in theKeyFile file and the Authentication Database afs entry are identical andhave the same key version number, follow the instructions in “DisplayingServer Encryption Keys” on page 372.
8. Issue the bos restart command to restart the database server processes onall database server machines. This forces them to start using the key in theKeyFile file that currently has the highest key version number.Repeat this command in quick succession for each database servermachine, starting with the machine that has the lowest IP address.
% bos restart <machine name> buserver kaserver ptserver vlserver
Chapter 9. Managing Server Encryption Keys 377

where
res Is the shortest acceptable abbreviation of restart.
machine nameNames each database server machine in turn.
buserver kaserver ptserver vlserverDesignates the Backup Server, Authentication Server, ProtectionServer, and Volume Location (VL) Server, respectively.
Removing Server Encryption Keys
You can periodically remove old keys from the /usr/afs/etc/KeyFile file tokeep it to a reasonable size. To avoid disturbing cell functioning, do notremove an old key until all tokens sealed with the key and held by users orclient processes have expired. After adding a new key, wait to remove oldkeys at least as long as the longest token lifetime you use in your cell. ForAuthentication Database user entries created under AFS version 3.1 or higher,the default token lifetime is 25 hours; for entries created under AFS version3.0, it is 100 hours.
There is no command for removing the key from the afs entry in theAuthentication Database, because the key field in that entry must never beempty. Use the kas setpassword command to replace the afs key, but only aspart of the complete procedure detailed in “To add a new server encryptionkey” on page 375.
Never remove from the KeyFile file the key that is currently in the afs entryin the Authentication Database. AFS server processes become unable todecrypt the tickets that clients present to them.
To remove a key from the KeyFile file1. Verify that you are authenticated as a user listed in the
/usr/afs/etc/UserList file. If necessary, issue the bos listusers command,which is fully described in “To display the users in the UserList file” onpage 582.
% bos listusers <machine name>
2. Issue the bos listkeys command to display the key version number ofeach key you want to remove. The output also reveals whether it has beenat least 25 hours since a new key was placed in the KeyFile file. Forcomplete instructions for the bos listkeys command, see “To display theKeyFile file” on page 372.
% bos listkeys <machine name>
378 AFS: Administration Guide
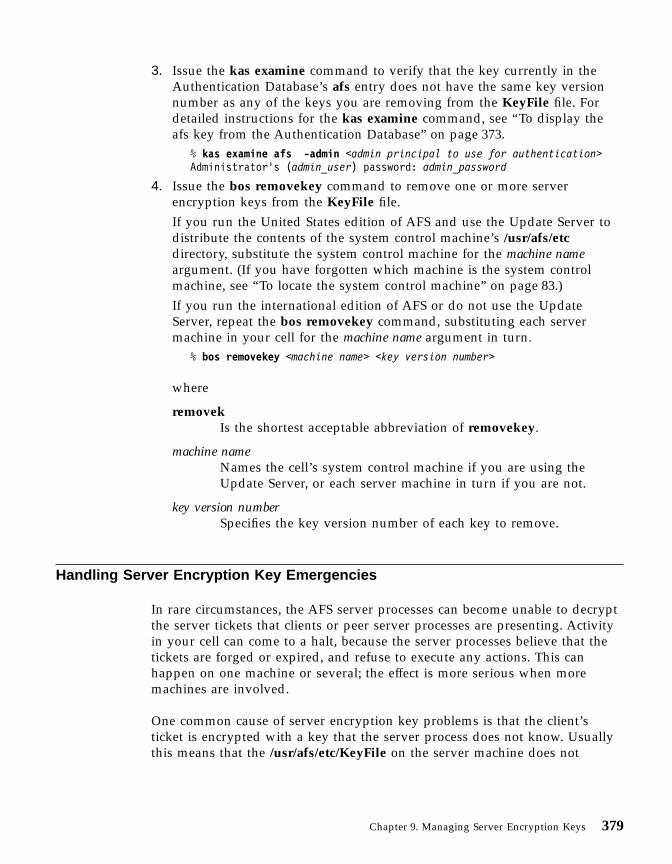
3. Issue the kas examine command to verify that the key currently in theAuthentication Database’s afs entry does not have the same key versionnumber as any of the keys you are removing from the KeyFile file. Fordetailed instructions for the kas examine command, see “To display theafs key from the Authentication Database” on page 373.
% kas examine afs -admin <admin principal to use for authentication>Administrator's (admin_user) password: admin_password
4. Issue the bos removekey command to remove one or more serverencryption keys from the KeyFile file.If you run the United States edition of AFS and use the Update Server todistribute the contents of the system control machine’s /usr/afs/etcdirectory, substitute the system control machine for the machine nameargument. (If you have forgotten which machine is the system controlmachine, see “To locate the system control machine” on page 83.)If you run the international edition of AFS or do not use the UpdateServer, repeat the bos removekey command, substituting each servermachine in your cell for the machine name argument in turn.
% bos removekey <machine name> <key version number>
where
removekIs the shortest acceptable abbreviation of removekey.
machine nameNames the cell’s system control machine if you are using theUpdate Server, or each server machine in turn if you are not.
key version numberSpecifies the key version number of each key to remove.
Handling Server Encryption Key Emergencies
In rare circumstances, the AFS server processes can become unable to decryptthe server tickets that clients or peer server processes are presenting. Activityin your cell can come to a halt, because the server processes believe that thetickets are forged or expired, and refuse to execute any actions. This canhappen on one machine or several; the effect is more serious when moremachines are involved.
One common cause of server encryption key problems is that the client’sticket is encrypted with a key that the server process does not know. Usuallythis means that the /usr/afs/etc/KeyFile on the server machine does not
Chapter 9. Managing Server Encryption Keys 379

include the key in the afs Authentication Database entry, which theAuthentication Server’s Ticket Granting Service (TGS) module is using toencrypt server tickets.
Another possibility is that the KeyFile files on different machines do notcontain the same keys. In this case, communications among server processesthemselves become impossible. For instance, AFS’s replicated databasemechanism (Ubik) breaks down if the instances of a database server processon the different database server machines are not using the same key.
The appearance of the following error message when you direct a boscommand to a file server machine in the local cell is one possible symptom ofserver encryption key mismatch. (Note, however, that you can also get thismessage if you forget to include the -cell argument when directing the boscommand to a file server machine in a foreign cell.)
bos: failed to contact host's bosserver (security object was passed a bad ticket).
The solution to server encryption key emergencies is to put a new AFS serverencryption key in both the Authentication Database and the KeyFile file onevery server machine, so that the TGS and all server processes again share thesame key.
Handling key emergencies requires some unusual actions. The reasons forthese actions are explained in the following sections; the actual proceduresappear in the subsequent instructions.
Prevent Mutual Authentication
It is necessary to prevent the server processes from trying to mutuallyauthenticate with you as you deal with a key emergency, because theypossibly cannot decrypt your token. When you do not mutually authenticate,the server processes assign you the identity anonymous. To prevent mutualauthentication, use the unlog command to discard your tokens and includethe -noauth flag on every command where it is available.
Disable Authorization Checking by Hand
Because the server processes recognize you as the user anonymous when youdo not mutually authenticate, you must turn off authorization checking. Onlywith authorization checking disabled do the server processes allow theanonymous user to perform privileged actions such as key creation.
In an emergency, disable authorization checking by creating the file/usr/afs/local/NoAuth by hand. In normal circumstances, use the bos setauthcommand instead.
380 AFS: Administration Guide

Work Quickly on Each Machine
Disabling authorization checking is a serious security exposure, because serverprocesses on the affected machine perform any action for anyone. Disableauthorization checking only for as long as necessary, completing all steps inan uninterrupted session and as quickly as possible.
Work at the Console
Working at the console of each server machine on which you disableauthorization checking ensures that no one else logs onto the console whileyou are working there. It does not prevent others from connecting to themachine remotely (using the telnet program, for example), which is why it isimportant to work quickly. The only way to ensure complete security is todisable network traffic, which is not a viable option in many environments.You can improve security in general by limiting the number of people whocan connect remotely to your server machines at any time, as recommendedin “Improving Security in Your Cell” on page 61.
Change Individual KeyFile Files
If you use the Update Server to distribute the contents of the /usr/afs/etcdirectory, an emergency is the only time when it is appropriate to change theKeyFile file on individual machines instead. Updating each machine’s file isnecessary because mismatched keys can prevent the system control machine’supserver process from mutually authenticating with upclientetc processes onother server machines, in which case the upserver process refuses to distributeits KeyFile file to them.
Even if it appears that the Update Server is working correctly, the only way toverify that is to change the key on the system control machine and wait thestandard delay period to see if the upclientetc processes retrieve the key.During an emergency, it does not usually make sense to wait the standarddelay period. It is more efficient simply to update the file on each servermachine separately. Also, even if the Update Server can distribute the filecorrectly, other processes can have trouble because of mismatched keys. Thefollowing instructions add the new key file on the system control machinefirst. If the Update Server is working, then it is distributing the same changeas you are making on each server machine individually.
If your cell does not use the Update Server, or uses the international edition ofAFS, you always change keys on server machines individually. The followinginstructions are also appropriate for you.
Chapter 9. Managing Server Encryption Keys 381
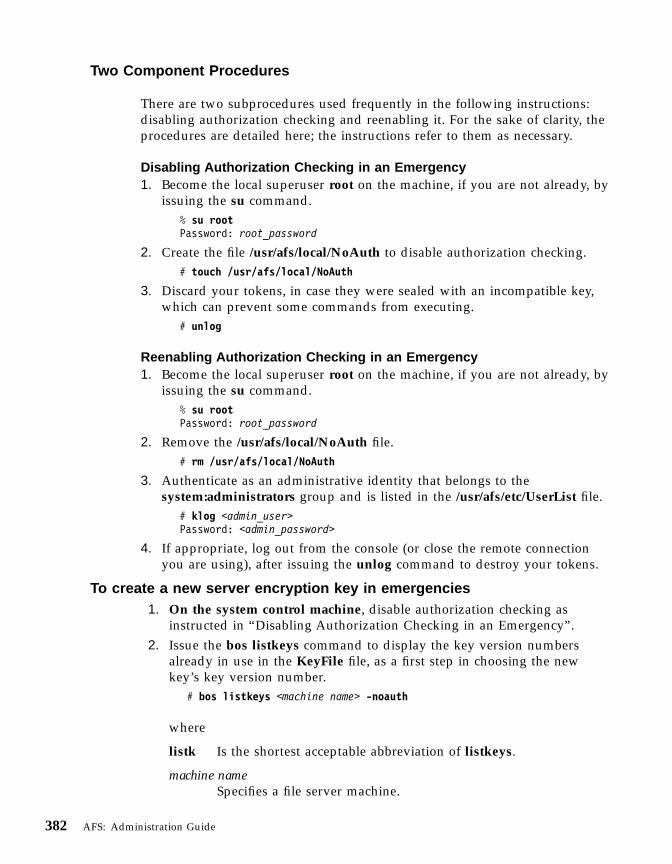
Two Component Procedures
There are two subprocedures used frequently in the following instructions:disabling authorization checking and reenabling it. For the sake of clarity, theprocedures are detailed here; the instructions refer to them as necessary.
Disabling Authorization Checking in an Emergency1. Become the local superuser root on the machine, if you are not already, by
issuing the su command.% su rootPassword: root_password
2. Create the file /usr/afs/local/NoAuth to disable authorization checking.# touch /usr/afs/local/NoAuth
3. Discard your tokens, in case they were sealed with an incompatible key,which can prevent some commands from executing.
# unlog
Reenabling Authorization Checking in an Emergency1. Become the local superuser root on the machine, if you are not already, by
issuing the su command.% su rootPassword: root_password
2. Remove the /usr/afs/local/NoAuth file.# rm /usr/afs/local/NoAuth
3. Authenticate as an administrative identity that belongs to thesystem:administrators group and is listed in the /usr/afs/etc/UserList file.
# klog <admin_user>Password: <admin_password>
4. If appropriate, log out from the console (or close the remote connectionyou are using), after issuing the unlog command to destroy your tokens.
To create a new server encryption key in emergencies1. On the system control machine, disable authorization checking as
instructed in “Disabling Authorization Checking in an Emergency”.2. Issue the bos listkeys command to display the key version numbers
already in use in the KeyFile file, as a first step in choosing the newkey’s key version number.
# bos listkeys <machine name> -noauth
where
listk Is the shortest acceptable abbreviation of listkeys.
machine nameSpecifies a file server machine.
382 AFS: Administration Guide
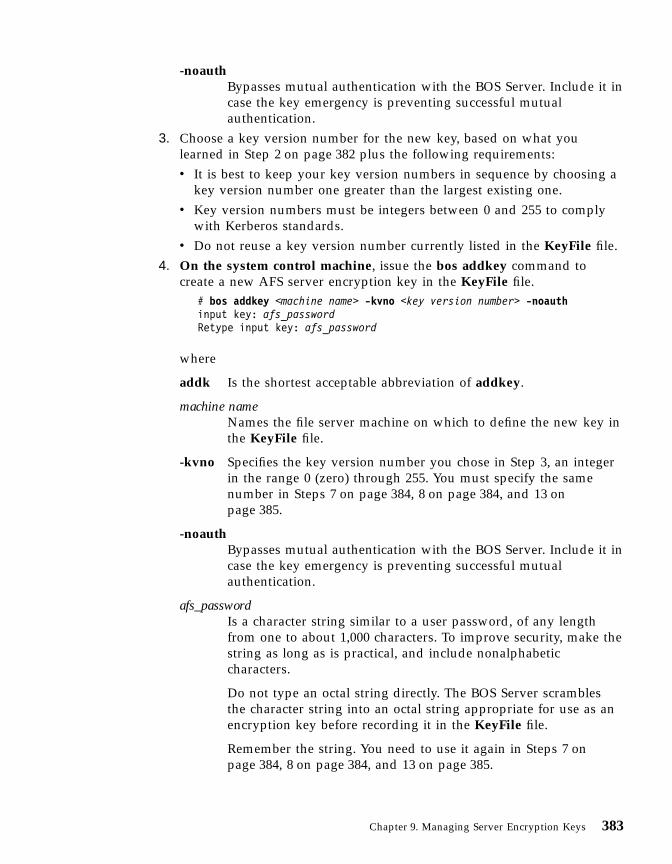
-noauthBypasses mutual authentication with the BOS Server. Include it incase the key emergency is preventing successful mutualauthentication.
3. Choose a key version number for the new key, based on what youlearned in Step 2 on page 382 plus the following requirements:v It is best to keep your key version numbers in sequence by choosing a
key version number one greater than the largest existing one.v Key version numbers must be integers between 0 and 255 to comply
with Kerberos standards.v Do not reuse a key version number currently listed in the KeyFile file.
4. On the system control machine, issue the bos addkey command tocreate a new AFS server encryption key in the KeyFile file.
# bos addkey <machine name> -kvno <key version number> -noauthinput key: afs_passwordRetype input key: afs_password
where
addk Is the shortest acceptable abbreviation of addkey.
machine nameNames the file server machine on which to define the new key inthe KeyFile file.
-kvno Specifies the key version number you chose in Step 3, an integerin the range 0 (zero) through 255. You must specify the samenumber in Steps 7 on page 384, 8 on page 384, and 13 onpage 385.
-noauthBypasses mutual authentication with the BOS Server. Include it incase the key emergency is preventing successful mutualauthentication.
afs_passwordIs a character string similar to a user password, of any lengthfrom one to about 1,000 characters. To improve security, make thestring as long as is practical, and include nonalphabeticcharacters.
Do not type an octal string directly. The BOS Server scramblesthe character string into an octal string appropriate for use as anencryption key before recording it in the KeyFile file.
Remember the string. You need to use it again in Steps 7 onpage 384, 8 on page 384, and 13 on page 385.
Chapter 9. Managing Server Encryption Keys 383
5. On every database server machine in your cell (other than the systemcontrol machine), disable authorization checking as instructed in“Disabling Authorization Checking in an Emergency” on page 382. Donot repeat the procedure on the system control machine, if it is adatabase server machine, because you already disabled authorizationchecking in Step 1 on page 382. (If you need to learn which machines aredatabase server machines, use the bos listhosts command as described in“To locate database server machines” on page 83.)
6. Wait at least 90 seconds after finishing Step 5, to allow each of thedatabase server processes (the Authentication, Backup, Protection andVolume Location Servers) to finish electing a new sync site. Then issuethe udebug command to verify that the election worked properly. Issuethe following commands, substituting each database server machine’sname for server machine in turn. Include the system control machine if itis a database server machine.
# udebug <server machine> buserver# udebug <server machine> kaserver# udebug <server machine> ptserver# udebug <server machine> vlserver
For each process, the output from all of the database server machinesmust agree on which one is the sync site for the process. It is not,however, necessary that the same machine serves as the sync site for eachof the four processes. For each process, the output from only onemachine must include the following string:
I am sync site ...
The output on the other machines instead includes the following lineI am not sync site
and a subsequent line that begins with the string Sync host and specifiesthe IP address of the machine claiming to be the sync site.
If the output does not meet these requirements or seems abnormal inanother way, contact AFS Product Support for assistance.
7. On every database server machine in your cell (other than the systemcontrol machine), issue the bos addkey command described in Step 4 onpage 383. Be sure to use the same values for afs_password and kvno as youused in that step.
8. Issue the kas setpassword command to define the new key in theAuthentication Database’s afs entry. It must match the key you created inStep 4 on page 383 and Step 7.
# kas setpassword -name afs -kvno <key version number> -noauthnew_password: afs_passwordVerifying, please re-enter new_password: afs_password
384 AFS: Administration Guide

where
sp Is an acceptable alias for setpassword (setp is the shortestacceptable abbreviation).
-kvno Is the same key version number you specified in Step 4 onpage 383.
afs_passwordIs the same character string you specified as afs_password in Step4 on page 383. It does not echo visibly.
9. On every database server machine in your cell (including the systemcontrol machine if it is a database server machine), reenable authorizationchecking as instructed in “Reenabling Authorization Checking in anEmergency” on page 382. If the system control machine is not a databaseserver machine, do not perform this procedure until Step 11.
10. Repeat Step 6 on page 384 to verify that each database server process hasproperly elected a sync site after being restarted in Step 9.
11. On the system control machine (if it is not a database server machine),reenable authorization checking as instructed in “ReenablingAuthorization Checking in an Emergency” on page 382. If it is a databaseserver machine, you already performed the procedure in Step 9.
12. On all remaining (simple) file server machines, disable authorizationchecking as instructed in “Disabling Authorization Checking in anEmergency” on page 382.
13. On all remaining (simple) file server machines, issue the bos addkeycommand described in Step 4 on page 383. Be sure to use the same valuesfor afs_password and kvno as you used in that step.
14. On all remaining (simple) file server machines, reenable authorizationchecking as instructed in “Reenabling Authorization Checking in anEmergency” on page 382.
Chapter 9. Managing Server Encryption Keys 385

386 AFS: Administration Guide
Chapter 10. Administering Client Machines and the CacheManager
This chapter describes how to administer an AFS client machine, which is anymachine from which users can access the AFS filespace and communicate withAFS server processes. (A client machine can simultaneously function as anAFS server machine if appropriately configured.) An AFS client machine hasthe following characteristics:v The kernel includes the set of modifications, commonly referred to as the
Cache Manager, that enable access to AFS files and directories. You canconfigure many of the Cache Manager’s features to suit your users’ needs.See “Overview of Cache Manager Customization” on page 388.
v The /usr/vice/etc directory on the local disk stores several configurationfiles. See “Configuration Files in the /usr/vice/etc Directory” on page 391.
v A cache stores temporary copies of data fetched from AFS file servermachines, either in machine memory or on a devoted local disk partition.See “Determining the Cache Type, Size, and Location” on page 393 and“Setting Other Cache Parameters with the afsd program” on page 398.
To learn how to install the client functionality on a machine, see the AFSQuick Beginnings.
Summary of Instructions
This chapter explains how to perform the following tasks by using theindicated commands:
Display cache size set at reboot cat /usr/vice/etc/cacheinfoDisplay current cache size and usage fs getcacheparmsChange disk cache size without rebooting fs setcachesizeInitialize Cache Manager afsdDisplay contents of CellServDB file cat /usr/vice/etc/CellServDBDisplay list of database server machines from kernelmemory
fs listcells
Change list of database server machines in kernelmemory
fs newcell
Check cell’s status regarding setuid fs getcellstatusSet cell’s status regarding setuid fs setcellSet server probe interval fs checkservers -intervalDisplay machine’s cell membership cat /usr/vice/etc/ThisCellChange machine’s cell membership Edit /usr/vice/etc/ThisCell
© Copyright IBM Corp. 1989, 2000 387
Flush cached file/directory fs flushFlush everything cached from a volume fs flushvolumeUpdate volume-to-mount-point mappings fs checkvolumesDisplay Cache Manager’s server preference ranks fs getserverprefsSet Cache Manager’s server preference ranks fs setserverprefsDisplay client machine addresses to register fs getclientaddrsSet client machine addresses to register fs setclientaddrsControl the display of warning and status messages fs messagesDisplay and change machine’s system type fs sysnameEnable asynchronous writes fs storebehind
Overview of Cache Manager Customization
An AFS client machine’s kernel includes a set of modifications, commonlyreferred to as the Cache Manager, that enable access to AFS files and directoriesand communications with AFS server processes. It is common to speak of theCache Manager as a process or program, and in regular usage it appears tofunction like one. When configuring it, though, it is helpful to keep in mindthat this usage is not strictly accurate.
The Cache Manager mainly fetches files on behalf of application programsrunning on the machine. When an application requests an AFS file, the CacheManager contacts the Volume Location (VL) Server to obtain a list of the fileserver machines that house the volume containing the file. The CacheManager then translates the application program’s system call requests intoremote procedure calls (RPCs) to the File Server running on the appropriatemachine. When the File Server delivers the file, the Cache Manager stores it ina local cache before delivering it to the application program.
The File Server delivers a data structure called a callback along with the file.(To be precise, it delivers a callback for each file fetched from a read/writevolume, and a single callback for all data fetched from a read-only volume.) Avalid callback indicates that the Cache Manager’s cached copy of a filematches the central copy maintained by the File Server. If an application onanother AFS client machine changes the central copy, the File Server breaksthe callback, and the Cache Manager must retrieve the new version when anapplication program on its machine next requests data from the file. As longas the callback is unbroken, however, the Cache Manager can continue toprovide the cached version of the file to applications on its machine, whicheliminates unnecessary network traffic.
The indicated sections of this chapter explain how to configure and customizethe following Cache Manager features. All but the first (choosing disk ormemory cache) are optional, because AFS sets suitable defaults for them.
388 AFS: Administration Guide
v disk or memory cache. The AFS Cache Manager can use machine memory forcaching instead of space on the local disk. Deciding which to use is themost basic configuration decision you must make. See “Determining theCache Type, Size, and Location” on page 393.
v cache size. Cache size probably has the most direct influence on clientmachine performance. It determines how often the Cache Manager mustcontact the File Server across the network or discard cached data to makeroom for newly requested files, both of which affect how quickly the CacheManager delivers files to users. See “Determining the Cache Type, Size, andLocation” on page 393.
v cache location. For a disk cache, you can alter the conventional cachedirectory location (/usr/vice/cache) to take advantage of greater spaceavailability on other disks on the machine. A larger cache can result infaster file delivery. See “Determining the Cache Type, Size, and Location”on page 393.
v chunk size and number. The afsd program, which initializes the CacheManager, allows you to control the size and number of chunks into which acache is divided, plus related parameters. Setting these parameters isoptional, because there are reasonable defaults, but it provides precisecontrol. The AFS distribution includes configuration scripts that set CacheManager parameters to values that are reasonable for differentconfigurations and usage patterns. See “Setting Other Cache Parameterswith the afsd program” on page 398.
v knowledge of database server machines. Enable access to a cell’s AFS filespaceand other services by listing the cell’s database server machines in the/usr/vice/etc/CellServDB file on the local disk. See “Maintaining Knowledgeof Database Server Machines” on page 402.
v setuid privilege. You can control whether the Cache Manager allowsprograms from a cell to execute with setuid permission. See “Determining ifa Client Can Run Setuid Programs” on page 408.
v cell membership. Each client belongs to a one cell defined by the local/usr/vice/etc/ThisCell file. Cell membership determines the default cell inwhich the machine’s users are authenticated and in which AFS commandsrun. See “Setting a Client Machine’s Cell Membership” on page 410.
v cached file version. AFS’s system of callbacks normally guarantees that theCache Manager has the most current versions of files and directoriespossible. Nevertheless, you can force the Cache Manager to fetch the mostcurrent version of a file from the File Server if you suspect that the cachecontains an outdated version. See “Forcing the Update of Cached Data” onpage 411.
v File Server and Volume Location Server preferences. The Cache Manager setsnumerical preference ranks for the interfaces on file server machines andVolume Server (VL) machines. The ranks determine which interface theCache Manager first attempts to use when fetching data from a volume orfrom the Volume Location Database (VLDB). The Cache Manager sets
Chapter 10. Administering Client Machines and the Cache Manager 389
default ranks as it initializes, basing them on its network proximity to eachinterface, but you can modify the preference ranks if you wish. See“Maintaining Server Preference Ranks” on page 414.
v interfaces registered with the File Server. If the Cache Manager is multihomed(has multiple interface addresses), you can control which of them itregisters for File Servers to use when they initiate RPCs to the clientmachine. See “Managing Multihomed Client Machines” on page 419.
v display of information messages. By default, the Cache Manager sends basicerror and informational messages to the client machine’s console and tocommand shells. You can disable the messaging. See “Controlling theDisplay of Warning and Informational Messages” on page 422.
v system type. The Cache Manager records the local machine’s AFS systemtype in kernel memory, and substitutes the value for the @sys variable inpathnames. See “Displaying and Setting the System Type Name” onpage 423.
v delayed writes. By default, the Cache Manager writes all data to the FileServer immediately and synchronously when an application program closesa file. You can enable asynchronous writes, either for an individual file, orall files that the Cache Manager handles, and set how much data remains tobe written when the Cache Manager returns control to the closingapplication. See “Enabling Asynchronous Writes” on page 424.
You must make all configuration changes on the client machine itself (at theconsole or over a direct connection such as a telnet connection). You cannotconfigure the Cache Manager remotely. You must be logged in as the localsuperuser root to issue some commands, whereas others require no privilege.All files mentioned in this chapter must actually reside on the local disk ofeach AFS client machine (they cannot, for example, be symbolic links to filesin AFS).
AFS’s package program can simplify other aspects of client machineconfiguration, including those normally set in the machine’s AFS initializationfile. See “Chapter 11. Configuring Client Machines with the package Program”on page 429.
Configuration and Cache-Related Files on the Local Disk
This section briefly describes the client configuration files that must reside inthe local /usr/vice/etc directory on every client machine. If the machine uses adisk cache, there must be a partition devoted to cache files; by convention, itis mounted at the /usr/vice/cache directory.
390 AFS: Administration Guide
Note for Windows users: Some files described in this document possibly donot exist on machines that run a Windows operating system. Also, Windowsuses a backslash ( \ ) rather than a forward slash ( / ) to separate the elementsin a pathname.
Configuration Files in the /usr/vice/etc Directory
The /usr/vice/etc directory on a client machine’s local disk must containcertain configuration files for the Cache Manager to function properly. Theycontrol the most basic aspects of Cache Manager configuration.
If it is important that the client machines in your cell perform uniformly, it ismost efficient to update these files from a central source. The followingdescriptions include pointers to sections that discuss how best to maintain thefiles.
afsd The binary file for the program that initializes the Cache Manager. Itmust run each time the machine reboots in order for the machine toremain an AFS client machine. The program also initializes severaldaemons that improve Cache Manager functioning, such as theprocess that handles callbacks.
cacheinfoA one-line file that sets the cache’s most basic configurationparameters: the local directory at which the Cache Manager mountsthe AFS filespace, the local disk directory to use as the cache, andhow many kilobytes to allocate to the cache.
The AFS Quick Beginnings explains how to create this file as youinstall a client machine. To change the cache size on a machine thatuses a memory cache, edit the file and reboot the machine. On amachine that uses a disk cache, you can change the cache size withoutrebooting by issuing the fs setcachesize command. For instructions,see “Determining the Cache Type, Size, and Location” on page 393.
CellServDBThis ASCII file names the database server machines in the local celland in any foreign cell to which you want to enable access from thismachine. (Database server machines are the machines in a cell thatrun the Authentication, Backup, Protection, and VL Server processes;see “Database Server Machines” on page 80.)
The Cache Manager must be able to reach a cell’s database servermachines to fetch files from its filespace. Incorrect or missinginformation in the CellServDB file can slow or completely blockaccess. It is important to update the file whenever a cell’s databaseserver machines change.
Chapter 10. Administering Client Machines and the Cache Manager 391
As the afsd program initializes the Cache Manager, it loads thecontents of the file into kernel memory. The Cache Manager does notread the file between reboots, so to incorporate changes to the file intokernel memory, you must reboot the machine. Alternatively, you canissue the fs newcell command to insert the changes directly intokernel memory without changing the file. It can also be convenient toupgrade the file from a central source. For instructions, see“Maintaining Knowledge of Database Server Machines” on page 402.
(The CellServDB file on client machines is not the same as the onekept in the /usr/afs/etc directory on server machines, which lists onlythe local cell’s database server machines. For instructions onmaintaining the server CellServDB file, see “Maintaining the ServerCellServDB File” on page 101).
NetInfoThis optional ASCII file lists one or more of the network interfaceaddresses on the client machine. If it exists when the Cache Managerinitializes, the Cache Manager uses it as the basis for the list ofinterfaces that it registers with File Servers. See “ManagingMultihomed Client Machines” on page 419.
NetRestrictThis optional ASCII file lists one or more network interface addresses.If it exists when the Cache Manager initializes, the Cache Managerremoves the specified addresses from the list of interfaces that itregisters with File Servers. See “Managing Multihomed ClientMachines” on page 419.
ThisCellThis ASCII file contains a single line that specifies the completedomain-style name of the cell to which the machine belongs.Examples are abc.com and stateu.edu. This value defines the defaultcell in which the machine’s users become authenticated, and in whichthe command interpreters (for example, the bos command) contactserver processes.
The AFS Quick Beginnings explains how to create this file as youinstall the AFS client functionality. To learn about changing a clientmachine’s cell membership, see “Setting a Client Machine’s CellMembership” on page 410.
In addition to these files, the /usr/vice/etc directory also sometimes containsthe following types of files and subdirectories:v The AFS initialization script, called afs.rc on many system types. In the
conventional configuration specified by the AFS Quick Beginnings, it is asymbolic link to the actual script kept in the same directory as otherinitialization files used by the operating system.
392 AFS: Administration Guide
v A subdirectory that houses AFS kernel library files used by a dynamickernel loading program.
v A subdirectory called C, which houses the Cache Manager catalog filecalled afszcm.cat. The fstrace program uses the catalog file to translateoperation codes into character strings, which makes the message in thetrace log more readable. See “About the fstrace Command Suite” onpage 340.
Cache-Related Files
A client machine that uses a disk cache must have a local disk directorydevoted to the cache. The conventional mount point is /usr/vice/cache, butyou can use another partition that has more available space.
Do not delete or directly modify any of the files in the cache directory. Doingso can cause a kernel panic, from which the only way to recover is to rebootthe machine. By default, only the local superuser root can read the filesdirectly, by virtue of owning them.
A client machine that uses a memory cache keeps all of the information storedin these files in machine memory instead.
CacheItemsA binary-format file in which the Cache Manager tracks the contentsof cache chunks (the V files in the directory, described just following),including the file ID number (fID) and the data version number.
VolumeItemsA binary-format file in which the Cache Manager records the mappingbetween mount points and the volumes from which it has fetcheddata. The Cache Manager uses the information when responding tothe pwd command, among others.
Vn A cache chunk file, which expands to a maximum size (by default, 64KB) to house data fetched from AFS files. The number of Vn files inthe cache depends on the cache size among other factors. The n is theindex assigned to each file; they are numbered sequentially, but theCache Manager does not necessarily use them in order orcontiguously. If an AFS file is larger than the maximum size for Vnfiles, the Cache Manager divides it across multiple Vn files.
Determining the Cache Type, Size, and Location
This section explains how to configure a memory or disk cache, how todisplay and set the size of either type of cache, and how to set the location ofthe cache directory for a disk cache.
Chapter 10. Administering Client Machines and the Cache Manager 393
The Cache Manager uses a disk cache by default, and it is the preferred typeof caching. To configure a memory cache, include the -memcache flag on theafsd command, which is normally invoked in the machine’s AFS initializationfile. If configured to use a memory cache, the Cache Manager does no diskcaching, even if the machine has a disk.
Choosing the Cache Size
Cache size influences the performance of a client machine more directly thanperhaps any other cache parameter. The larger the cache, the faster the CacheManager is likely to deliver files to users. A small cache can impairperformance because it increases the frequency at which the Cache Managermust discard cached data to make room for newly requested data. When anapplication asks for data that has been discarded, the Cache Manager mustrequest it from the File Server, and fetching data across the network is almostalways slower than fetching it from the local disk. The Cache Manager neverdiscards data from a file that has been modified locally but not yet storedback to the File Server. If the cache is very small, the Cache Manager possiblecannot find any data to discard. For more information about the algorithm ituses when discarding cached data, see “How the Cache Manager ChoosesData to Discard” on page 397).
The amount of disk or memory you devote to caching depends on severalfactors. The amount of space available in memory or on the partition housingthe disk cache directory imposes an absolute limit. In addition, you cannotallocate more than 95% of the space available on the cache directory’spartition to a disk cache. The afsd program exits without starting the CacheManager and prints an appropriate message to the standard output stream ifyou violate this restriction. For a memory cache, you must leave enoughmemory for other processes and applications to run. If you try to allocatemore memory than is actually available, the afsd program exits withoutinitializing the Cache Manager and produces the following message on thestandard output stream:
afsd: memCache allocation failure at number KB
where number is how many kilobytes were allocated just before the failure.
Within these hard limits, the factors that determine appropriate cache sizeinclude the number of users working on the machine, the size of the files withwhich they usually work, and (for a memory cache) the number of processesthat usually run on the machine. The higher the demand from these factors,the larger the cache needs to be to maintain good performance.
Disk caches smaller than 10 MB do not generally perform well. Machinesserving multiple users usually perform better with a cache of at least 60 to 70
394 AFS: Administration Guide
MB. The point at which enlarging the cache further does not really improveperformance depends on the factors mentioned previously, and is difficult topredict.
Memory caches smaller than 1 MB are nonfunctional, and the performance ofcaches smaller than 5 MB is usually unsatisfactory. Suitable upper limits aresimilar to those for disk caches but are probably determined more by thedemands on memory from other sources on the machine (number of usersand processes). Machines running only a few processes possibly can use asmaller memory cache.
AFS imposes an absolute limit on cache size in some versions. See the AFSRelease Notes for the version you are using.
Displaying and Setting the Cache Size and Location
The Cache Manager determines how big to make the cache by reading the/usr/vice/etc/cacheinfo file as it initializes. As directed in the AFS QuickBeginnings, you must create the file before running the afsd program. The filealso defines the directory on which to mount AFS (by convention, /afs), andthe local disk directory to use for a cache directory.
To change any of the values in the file, log in as the local superuser root. Youmust reboot the machine to have the new value take effect. For instructions,see “To edit the cacheinfo file” on page 396.
To change the cache size at reboot without editing the cacheinfo file, includethe -blocks argument to the afsd command; see the command’s referencepage in the AFS Administration Reference.
For a disk cache, you can also use the fs setcachesize command to reset thecache size without rebooting. The value you set persists until the next reboot,at which time the cache size returns to the value specified in the cacheinfo fileor by the -blocks argument to the afsd command. For instructions, see “Tochange the disk cache size without rebooting” on page 396.
To display the current cache size and the amount of space the Cache Manageris using at the moment, use the fs getcacheparms command as detailed in “Todisplay the current cache size” on page 396.
To display the cache size set at reboot1. Use a text editor or the cat command to display the contents of the
/usr/vice/etc/cacheinfo file.% cat /usr/vice/etc/cacheinfo
Chapter 10. Administering Client Machines and the Cache Manager 395
To display the current cache size1. Issue the fs getcacheparms command on the client machine.
% fs getcacheparms
where getca is the shortest acceptable abbreviation of getcacheparms.
The output shows the number of kilobyte blocks the Cache Manager isusing as a cache at the moment the command is issued, and the currentsize of the cache. For example:
AFS using 13709 of the cache's available 15000 1K byte blocks.
To edit the cacheinfo file1. Become the local superuser root on the machine, if you are not already, by
issuing the su command.% su rootPassword: root_password
2. Use a text editor to edit the /usr/vice/etc/cacheinfo file, which has threefields, separated by colons:v The first field names the local directory on which to mount the AFS
filespace. The conventional location is /afs.v The second field defines the local disk directory to use for the disk
cache. The conventional location is the /usr/vice/cache directory, but youcan specify an alternate directory if another partition has more spaceavailable. There must always be a value in this field, but the CacheManager ignores it if the machine uses a memory cache.
v The third field defines cache size as a number of kilobyte (1024-byte)blocks.
The following example mounts the AFS filespace at the /afs directory,names /usr/vice/cache as the cache directory, and sets cache size to 50,000KB:
/afs:/usr/vice/cache:50000
To change the disk cache size without rebooting1. Become the local superuser root on the machine, if you are not already, by
issuing the su command.% su rootPassword: root_password
2. Issue the fs setcachesize command to set a new disk cache size.
Note: This command does not work for a memory cache.# fs setcachesize <size in 1K byte blocks (0 => reset)>
where
396 AFS: Administration Guide
setca Is the shortest acceptable abbreviation of setcachesize.
size in 1K byte blocks (0 => reset)Sets the number of kilobyte blocks to be used for the cache.Specify a positive integer (1024 equals 1 MB), or 0 (zero) to resetthe cache size to the value specified in the cacheinfo file.
To reset the disk cache size to the default without rebooting1. Become the local superuser root on the machine, if you are not already, by
issuing the su command.% su rootPassword: root_password
2. Issue the fs setcachesize command to reset the size of the local disk cache(the command does not work for a memory cache). Choose one of the twofollowing options:v To reset the cache size to the value specified in the local cacheinfo file,
specify the value 0 (zero)# fs setcachesize 0
v To reset the cache size to the value set at the last reboot of the machine,include the -reset flag. Unless the -blocks argument was used on theafsd command, this is also the value in the cacheinfo file.
# fs setcachesize -reset
where
setca Is the shortest acceptable abbreviation of setcachesize.
0 Resets the disk cache size to the value in the third field of the/usr/vice/etc/cacheinfo file.
-reset Resets the cache size to the value set at the last reboot.
How the Cache Manager Chooses Data to Discard
When the cache is full and application programs request more data from AFS,the Cache Manager must flush out cache chunks to make room for the data.The Cache Manager considers two factors:1. How recently an application last accessed the data.2. Whether the chunk is dirty. A dirty chunk contains changes to a file that
have not yet been saved back to the permanent copy stored on a fileserver machine.
The Cache Manager first checks the least-recently used chunk. If it is not dirty,the Cache Manager discards the data in that chunk. If the chunk is dirty, theCache Manager moves on to check the next least recently used chunk. Itcontinues in this manner until it has created a sufficient number of emptychunks.
Chapter 10. Administering Client Machines and the Cache Manager 397
Chunks that contain data fetched from a read-only volume are by definitionnever dirty, so the Cache Manager can always discard them. Normally, theCache Manager can also find chunks of data fetched from read/write volumesthat are not dirty, but a small cache makes it difficult to find enough eligibledata. If the Cache Manager cannot find any data to discard, it must returnI/O errors to application programs that request more data from AFS.Application programs usually have a means for notifying the user of sucherrors, but not for revealing their cause.
Setting Other Cache Parameters with the afsd program
There are only three cache configuration parameters you must set: the mountdirectory for AFS, the location of the disk cache directory, and the cache size.They correspond to the three fields in the /usr/vice/etc/cacheinfo file, asdiscussed in “Determining the Cache Type, Size, and Location” on page 393.However, if you want to experiment with fine-tuning cache performance, youcan use the arguments on the afsd command to control several otherparameters. This section discusses a few of these parameters that have themost direct effect on cache performance. To learn more about the afsdcommand’s arguments, see its reference page in the AFS AdministrationReference.
In addition, the AFS initialization script included in the AFS distribution foreach system type includes several variables that set several afsd arguments ina way that is suitable for client machines of different sizes and usage patterns.For instructions on using the script most effectively, see the section onconfiguring the Cache Manager in the AFS Quick Beginnings.
Setting Cache Configuration Parameters
The cache configuration parameters with the most direct effect on cacheperformance include the following:v total cache size. This is the amount of disk space or machine memory
available for caching, as discussed in detail in “Determining the CacheType, Size, and Location” on page 393.
v number of cache chunks. For a disk cache, each chunk is a Vn file in the localcache directory (see “Cache-Related Files” on page 393). For a memorycache, each chunk is a set of contiguous blocks allocated in machinememory.This parameter does not have as much of an effect on cache performance astotal size. However, adjusting it can influence how often the CacheManager must discard cached data to make room for new data. Suppose,for example, that you set the disk cache size to 50 MB and the number of
398 AFS: Administration Guide

chunks (Vn files) to 1,000. If each of the ten users on the machine caches100 AFS files that average 20 KB in size, then all 1,000 chunks are full (achunk can contain data from only one AFS file) but the cache holds onlyabout 20 MB of data. When a user requests more data from the File Server,the Cache Manager must discard cached data to reclaim some chunks, eventhough the cache is filled to less than 50% of its capacity. In such asituation, increasing the number of chunks enables the Cache Manager todiscard data less often.
v chunk size. This parameter determines the maximum amount of data thatcan fit in a chunk. If a cached element is smaller than the chunk size, theremaining space in the chunk is not used (a chunk can hold no more thanone element). If an element cannot fit in a single chunk, it is split across asmany chunks as needed. This parameter also determines how much datathe Cache Manager requests at a time from the File Server (how much dataper fetch RPC, because AFS uses partial file transfer).The main reason to change chunk size is because of its relation to theamount of data fetched per RPC. If your network links are very fast, it canimprove performance to increase chunk size; if the network is especiallyslow, it can make sense to decrease chunk size.
v number of dcache entries in memory. The Cache Manager maintains onedcache entry for each cache chunk, recording a small amount ofinformation, such as the file ID (fID) and version number of the AFS filecorresponding to the chunk.For a disk cache, dcache entries reside in the /usr/vice/cache/CacheItemsfile; a small number are duplicated in machine memory to speed access.For a memory cache, the number of dcache entries equals the number ofcache chunks. For a discussion of the implications of this correspondence,see “Controlling Memory Cache Configuration” on page 401.
For a description of how the Cache Manager determines defaults for numberof chunks, chunk size, and number of dcache entries in a disk cache, see“Configuring a Disk Cache”; for a memory cache, see “Controlling MemoryCache Configuration” on page 401. The instructions also explain how to usethe afsd command’s arguments to override the defaults.
Configuring a Disk Cache
The default number of cache chunks (Vn files) in a disk cache is calculated bythe afsd command to be the greatest of the following:v 100v 1.5 times the result of dividing cache size by chunk size (cachesize/chunksize
* 1.5)v The result of dividing cachesize by 10 MB (cachesize/10240)
Chapter 10. Administering Client Machines and the Cache Manager 399

You can override this value by specifying a positive integer with the -filesargument. Consider increasing this value if more than 75% of the Vn files arealready used soon after the Cache Manager finishes initializing. Considerdecreasing it if only a small percentage of the chunks are used at that point.In any case, never specify a value less than 100, because a smaller value cancause performance problems.
The following example sets the number of Vn files to 2,000:/usr/vice/etc/afsd -files 2000
Note: It is conventional to place the afsd command in a machine’s AFSinitialization file, rather than entering it in a command shell.Furthermore, the values specified in this section are examples only, andare not necessarily suitable for a specific machine.
The default chunk size for a disk cache is 64 KB. In general, the only reason tochange it is to adjust to exceptionally slow or fast networks; see “SettingCache Configuration Parameters” on page 398. You can use the -chunksizeargument to override the default. Chunk size must be a power of 2, soprovide an integer between 0 (zero) and 30 to be used as an exponent of 2.For example, a value of 10 sets chunk size to 1 KB (210 = 1024); a value of 16equals the default for disk caches (216 = 64 KB). Specifying a value of 0 (zero)or greater than 30 returns chunk size to the default. Values less than 10 (1 KB)are not recommended. The following example sets chunk size to 16 KB (214):
/usr/vice/etc/afsd -chunksize 14
For a disk cache, the default number of dcache entries duplicated in memoryis one-half the number of chunks specified with the -files argument, to amaximum of 2,000 entries. You can use the -dcache argument to change thedefault, even exceeding 2,000 if you wish. Duplicating more than half thedcache entries in memory is not usually necessary, but sometimes improvesperformance slightly, because access to memory is faster than access to disk.The following example sets the number to 750:
/usr/vice/etc/afsd -dcache 750
When configuring a disk cache, you can combine the afsd command’sarguments in any way. The main reason for this flexibility is that the settingyou specify for disk cache size (in the cacheinfo file or with the -blocksargument) is an absolute maximum limit. You cannot override it by specifyinghigher values for the -files or -chunksize arguments, alone or in combination.A related reason is that the Cache Manager does not have to reserve a setamount of memory on disk. Vn files (the chunks in a disk cache) are initiallyzero-length, but can expand up to the specified chunk size and shrink again,
400 AFS: Administration Guide
as needed. If you set the number of Vn files to such a large value thatexpanding all of them to the full allowable size exceeds the total cache size,they simply never grow to full size.
Controlling Memory Cache Configuration
Configuring a memory cache differs from configuring a disk cache in that notall combinations of the afsd command’s arguments are allowed. Thislimitation results from the greater interaction between the configurationparameters in a memory cache than a disk cache. If all combinations areallowed, it is possible to set the parameters in an inconsistent way. A list ofthe acceptable and unacceptable combinations follows a discussion of defaultvalues.
The default chunk size for a memory cache is 8 KB. In general, the onlyreason to change it is to adjust to exceptionally slow or fast networks; see“Setting Cache Configuration Parameters” on page 398.
There is no predefined default for number of chunks in a memory cache. TheCache Manager instead calculates the correct number by dividing the totalcache size by the chunk size. Recall that for a memory cache, all dcacheentries must be in memory. This implies that the number of chunks equals thenumber of dcache entries in memory, and that there is no default for numberof dcache entries (like the number of chunks, it is calculated by dividing thetotal size by the chunk size).
The following are acceptable combinations of the afsd command’s argumentswhen configuring a memory cache:v -blocks alone, which overrides the cache size specified in the
/usr/vice/etc/cacheinfo file. The Cache Manager divides the value of thisargument by the default chunk size of eight KB to calculate the number ofchunks and dcache entries. The following example sets cache size to fiveMB (5,120 KB) and the number of chunks to 640 (5,120 divided by 8):
/usr/vice/etc/afsd -memcache -blocks 5120
v -chunksize alone, to override the default of eight KB. The chunk size mustbe a power of two, so provide an integer between 0 (zero) and 30 to beused as an exponent of two. For example, a value of ten sets chunk size to1 KB (210 = 1024); a value of 13 equals the default for memory caches (213 =8 KB). Specifying a value of 0 (zero) or greater than 30 returns the chunksize to the default. Values less than ten (equivalent to 1 KB) are notrecommended. The following example sets the chunk size to four KB (212).Assuming a total cache size of four MB (4,096 KB), the resulting number ofchunks is 1024.
/usr/vice/etc/afsd -memcache -chunksize 12
Chapter 10. Administering Client Machines and the Cache Manager 401

v -blocks and -chunksize together override the defaults for cache size andchunk size. The Cache Manager divides the first by the second to calculatethe number of chunks and dcache entries. For example, the followingexample sets the cache size to six MB (6,144 KB) and chunksize to four KB(212), resulting in 1,536 chunks:
/usr/vice/etc/afsd -memcache -blocks 6144 -chunksize 12
The following arguments or combinations explicitly set the number of chunksand dcache entries. It is best not to use them, because they set the cache sizeindirectly, forcing you to perform a hand calculation to determine the size ofthe cache. Instead, set the -blocks and -chunksize arguments alone or incombination; in those cases, the Cache Manager determines the number ofchunks and dcache entries itself. Because the following combinations are notrecommended, no examples are included.v The -dcache argument alone explicitly sets the number of chunks and
dcache entries. The Cache Manager multiples this value times the defaultchunk size of 8 KB to derive the total cache size (overriding the value in thecacheinfo file).
v The combination of -dcache and -chunksize sets the chunk number andsize. The Cache Manager sets the specified values and multiplies themtogether to obtain total cache size (overriding the value in the cacheinfofile).
Do not use the following arguments for a memory cache:v -files alone. This argument controls the number of Vn files for a disk cache,
but is ignored for a memory cache.v -blocks and -dcache. An error message results, because it is possible to
provide values such that dividing the first (total size) by the second(number of chunks) results in a chunk size that is not a power of two.
Maintaining Knowledge of Database Server Machines
For the users of an AFS client machine to access a cell’s AFS filespace andother services, the Cache Manager and other client-side agents must have anaccurate list of the cell’s database server machines. The affected functionsinclude the following:v Accessing files. The Cache Manager contacts the Volume Location (VL)
Server to learn which file server machine houses the volume containing arequested file or directory. If the Cache Manager cannot contact a cell’s VLServers, it cannot fetch files.
v Authenticating. The klog program and AFS-modified login utilities contactthe Authentication Server to obtain tokens, which the AFS server processesaccept as proof that the user is authenticated.
402 AFS: Administration Guide
v Creating protection groups. The pts command interpreter contacts theProtection Server when users create protection groups or requestinformation from the Protection Database.
v Editing access control lists (ACLs). The fs command interpreter contacts theFile Server that maintains the read/write volume containing a file ordirectory; the location information comes from the VL Server.
To enable a machine’s users to access a cell, you must list the names and IPaddresses of its database server machines in the /usr/vice/etc/CellServDB fileon the machine’s local disk. In addition to the machine’s home cell, you canlist any foreign cells that you want to enable users to access. (To enable accessto a cell’s filespace, you must also mount its root.cell volume in the local AFSfilespace; the conventional location is just under the AFS root directory, /afs.For instructions, see the AFS Quick Beginnings.)
How Clients Use the List of Database Server Machines
As the afsd program runs and initializes the Cache Manager, it reads thecontents of the CellServDB file into kernel memory. The Cache Manager doesnot consult the file again until the machine next reboots. In contrast, thecommand interpreters for the AFS command suites (such as fs and pts) readthe CellServDB file each time they need to contact a database server process.
When a cell’s list of database server machines changes, you must change boththe CellServDB file and the list in kernel memory to preserve consistent clientperformance; some commands probably fail if the two lists of machinesdisagree. One possible method for updating both the CellServDB file andkernel memory is to edit the file and reboot the machine. To avoid needing toreboot, you can instead perform both of the following steps:1. Issue the fs newcell command to alter the list in kernel memory directly,
making the changes available to the Cache Manager.2. Edit the CellServDB file to make the changes available to command
interpreters. For a description of the file’s format, see “The Format of theCellServDB file” on page 404.
The consequences of missing or incorrect information in the CellServDB fileor kernel memory are as follows:v If there is no entry for a cell, the machine’s users cannot access the cell.v If a cell’s entry does not include a database server machine, then the Cache
Manager and command interpreters never attempt to contact the machine.The omission does not prevent access to the cell—as long as theinformation about the other database server machines is correct and theserver processes, machines, and network are functioning correctly—but itcan put an undue burden on the machines that are listed. If all of the listed
Chapter 10. Administering Client Machines and the Cache Manager 403

machines become inaccessible to clients, then the cell becomes inaccessibleeven if the omitted database server machine is functioning correctly.
v If a machine’s name or address is incorrect, or the machine is not actuallyrunning the database server processes, then requests from clients time out.Users can experience lengthy delays because they have to wait the fulltimeout period before the Cache Manager or command interpreter contactsanother database server machine.
The Format of the CellServDB file
When editing the /usr/vice/etc/CellServDB file, you must use the correctformat for cell and machine entries. Each cell has a separate entry. The firstline has the following format:
>cell_name #organization
where cell_name is the cell’s complete Internet domain name (for example,abc.com) and organization is an optional field that follows any number ofspaces and the number sign (#) and can name the organization to which thecell corresponds (for example, the ABC Corporation). After the first line comesa separate line for each database server machine. Each line has the followingformat:
IP_address #machine_name
where IP_address is the machine’s IP address in dotted decimal format (forexample, 192.12.105.3). Following any number of spaces and the number sign(#) is machine_name, the machine’s fully-qualified hostname (for example,db1.abc.com). In this case, the number sign does not indicate a comment:machine_name is a required field.
The order in which the cells appear is not important, but it is convenient toput the client machine’s home cell first. Do not include any blank lines in thefile, not even after the last entry.
The following example shows entries for two cells, each of which has threedatabase server machines:
>abc.com #ABC Corporation (home cell)192.12.105.3 #db1.abc.com192.12.105.4 #db2.abc.com192.12.105.55 #db3.abc.com>stateu.edu #State University cell138.255.68.93 #serverA.stateu.edu138.255.68.72 #serverB.stateu.edu138.255.33.154 #serverC.stateu.edu
404 AFS: Administration Guide

Maintaining the Client CellServDB File
Because a correct entry in the CellServDB file is vital for consistent clientperformance, you must also update the file on each client machine whenevera cell’s list of database server machines changes (for instance, when youfollow the instructions in the AFS Quick Beginnings to add or remove adatabase server machine). To facilitate the client updates, you can use thepackage program, which copies files from a central source in AFS to the localdisk of client machines. It is conventional to invoke the package program in aclient machine’s AFS initialization file so that it runs as the machine reboots,but you can also issue the package command at any time. For instructions,see “Running the package program” on page 449.
If you use the package program, the conventional location for your cell’scentral source CellServDB file is /afs/cell_name/common/etc/CellServDB,where cell_name is your cell name.
Creating a symbolic or hard link from /usr/vice/etc/CellServDB to a centralsource file in AFS is not a viable option. The afsd program reads the file intokernel memory before the Cache Manager is completely initialized and able toaccess AFS.
Because every client machine has its own copy of the CellServDB file, youcan in theory make the set of accessible cells differ on various machines. Inmost cases, however, it is best to maintain consistency between the files on allclient machines in the cell: differences between machines are particularlyconfusing if users commonly use a variety of machines rather than just one.
The AFS Product Support group maintains a central CellServDB file thatincludes all cells that have agreed to make their database server machinesaccess to other AFS cells. It is advisable to check this file periodically forupdated information. See “Making Your Cell Visible to Others” on page 28.
An entry in the local CellServDB is one of the two requirements for accessinga cell. The other is that the cell’s root.cell volume is mounted in the localfilespace, by convention as a subdirectory of the /afs directory. Forinstructions, see “To create a cellular mount point” on page 174.
Note: The /usr/vice/etc/CellServDB file on a client machine is not the same asthe /usr/afs/etc/CellServDB file on the local disk of a file servermachine. The server version lists only the database server machines inthe server machine’s home cell, because server processes never need tocontact foreign cells. It is important to update both types ofCellServDB file on all machines in the cell whenever there is a changeto your cell’s database server machines. For more information about
Chapter 10. Administering Client Machines and the Cache Manager 405
maintaining the server version of the CellServDB file, see “Maintainingthe Server CellServDB File” on page 101.
To display the /usr/vice/etc/CellServDB file1. Use a text editor or the cat command to display the contents of the
/usr/vice/etc/CellServDB file. By default, the mode bits on the file permitanyone to read it.
% cat /usr/vice/etc/CellServDB
To display the list of database server machines in kernel memory1. Issue the fs listcells command.
% fs listcells [&]
where listc is the shortest acceptable abbreviation of listcells.
To have your shell prompt return immediately, include the ampersand (&),which makes the command run in the background. It can take a while togenerate the complete output because the kernel stores database servermachines’ IP addresses only, and the fs command interpreter has the cell’sname resolution service (such as the Domain Name Service or a local hosttable) translate them into hostnames. You can halt the command at anytime by issuing an interrupt signal such as Ctrl-c.
The output includes a single line for each cell, in the following format:Cell cell_name on hosts list_of_hostnames.
The name service sometimes returns hostnames in uppercase letters, and ifit cannot resolve a name at all, it returns its IP address. The followingexample illustrates all three possibilities:
% fs listcells..
Cell abc.com on hosts db1.abc.com db2.abc.com db3.abc.comCell stateu.edu on hosts SERVERA.STATEU.EDU SERVERB.STATEU.EDUSERVERC.STATEU.EDUCell ghi.org on hosts 191.255.64.111 191.255.64.112
.
.
To change the list of a cell’s database server machines in kernel memory1. Become the local superuser root on the machine, if you are not already, by
issuing the su command.% su rootPassword: root_password
2. If you a use a central copy of the CellServDB file as a source for clientmachines, verify that its directory’s ACL grants you the l (lookup), r
406 AFS: Administration Guide

(read), and w (write) permissions. The conventional directory is/afs/cell_name/common/etc. If necessary, issue the fs listacl command,which is fully described in “Displaying ACLs” on page 566.
# fs listacl [<dir/file path>]
3. Issue the fs newcell command to add or change a cell’s entry in kernelmemory. Repeat the command for each cell.
Note: You cannot use this command to remove a cell’s entry completelyfrom kernel memory. In the rare cases when you urgently need toprevent access to a specific cell, you must edit the CellServDB fileand reboot the machine.
# fs newcell <cell name> <primary servers>+ \[-linkedcell <linked cell name>]
where
n Is the shortest acceptable abbreviation of newcell.
cell nameSpecifies the complete Internet domain name of the cell for whichto record a new list of database server machines.
primary serversSpecifies the fully-qualified hostname or IP address indotted-decimal format for each database server machine in the cell.The list you provide completely replaces the existing list.
-linkedcellSpecifies the complete Internet domain name of the AFS cell tolink to a DCE cell for the purposes of DFS fileset location. You canuse this argument if the machine’s AFS users access DFS via theAFS/DFS Migration Toolkit Protocol Translator. For instructions,see the AFS/DFS Migration Toolkit Administration Guide andReference.
4. Add or edit the cell’s entry in the local /usr/vice/etc/CellServDB file, usingone of the following three methods. In each case, be sure to obey theformatting requirements described in “The Format of the CellServDB file”on page 404.v If you maintain a central source version of the CellServDB file and use
the package program, first use a text editor to alter the central copy ofthe file. Then issue the package command to transfer the contents of thefile to the local machine. For complete instructions, see “Running thepackage program” on page 449.
# /etc/package -v -c <name of package file>
v If you maintain a central source CellServDB file but do not use thepackage program, first use a text editor to alter the central copy of the
Chapter 10. Administering Client Machines and the Cache Manager 407
file. Then use a copying command such as the cp command to copy itto the local /usr/vice/etc/CellServDB file.
v If you do not use a central source CellServDB file, edit the localmachine’s /usr/vice/etc/CellServDB file directly.
Determining if a Client Can Run Setuid Programs
A setuid program is one whose binary file has the UNIX setuid mode bitturned on. While a setuid program runs, the user who initialized it assumesthe local identity (UNIX UID) of the binary file’s owner, and so is granted thepermissions in the local file system that pertain to the owner. Most commonly,the issuer’s assumed identity (often referred to as effective UID) is the localsuperuser root.
AFS does not recognize effective UID: if a setuid program accesses AFS filesand directories, it uses the current AFS identity of the user who initialized theprogram, not of the program’s owner. Nevertheless, it can be useful to storesetuid programs in AFS for use on more than one client machine. AFS enablesa client machine’s administrator to determine whether the local CacheManager allows setuid programs to run or not.
By default, the Cache Manager allows programs from its home cell to runwith setuid permission, but denies setuid permission to programs fromforeign cells. A program belongs to the same cell as the file server machinethat houses the volume in which the file resides, as specified in the file servermachine’s /usr/afs/etc/ThisCell file. The Cache Manager determines its ownhome cell by reading the /usr/vice/etc/ThisCell file at initialization.
To change a cell’s setuid status with respect to the local machine, become thelocal superuser root and issue the fs setcell command. To determine a cell’scurrent setuid status, use the fs getcellstatus command.
When you issue the fs setcell command, you directly alter a cell’s setuidstatus as recorded in kernel memory, so rebooting the machine is notnecessary. However, nondefault settings do not persist across reboots of themachine unless you add the appropriate fs setcell command to the machine’sAFS initialization file.
Only members of the system:administrators group can turn on the setuidmode bit on an AFS file or directory. When the setuid mode bit is turned on,the UNIX ls -l command displays the third user mode bit as an s instead ofan x, but for an AFS file or directory, the s appears only if setuid permission isenabled for the cell in which the file resides.
408 AFS: Administration Guide
To determine a cell’s setuid status1. Issue the fs getcellstatus command to check the setuid status of each
desired cell.% fs getcellstatus <cell name>
where
getce Is the shortest acceptable abbreviation of getcellstatus.
cell nameNames each cell for which to report setuid status. Provide thecomplete Internet domain name or a shortened form thatdistinguishes it from the other cells listed in the local/usr/vice/etc/CellServDB file.
The output reports the setuid status of each cell:v the string no setuid allowed indicates that the Cache Manager does not
allow programs from the cell to run with setuid permissionv setuid allowed indicates that the Cache Manager allows programs from the
cell to run with setuid permission
To change a cell’s setuid status1. Become the local superuser root on the machine, if you are not already, by
issuing the su command.% su rootPassword: root_password
2. Issue the fs setcell command to change the setuid status of the cell.# fs setcell <cell name>+ [-suid] [-nosuid]
where
setce Is the shortest acceptable abbreviation of setcell.
cell nameNames each cell for which to change setuid status as specified bythe -suid or -nosuid flag. Provide each cell’s complete Internetdomain name or a shortened form that distinguishes it from theother cells listed in the local /usr/vice/etc/CellServDB file.
-suid Enables programs from each specified cell to execute with setuidpermission. Provide this flag or the -nosuid flag, or omit both todisable setuid permission for each cell.
-nosuidPrevents programs from each specified cell from executing withsetuid permission. Provide this flag or the -suid flag, or omit bothto disable setuid permission for each cell.
Chapter 10. Administering Client Machines and the Cache Manager 409
Setting the File Server Probe Interval
The Cache Manager periodically sends a probe to server machines to verifythat they are still accessible. Specifically, it probes the database servermachines in its cell and those file servers that house data it has cached.
If a server process does not respond to a probe, the client machine assumesthat it is inaccessible. By default, the interval between probes is three minutes,so it can take up to three minutes for a client to recognize that a serverprocess is once again accessible after it was inaccessible.
To adjust the probe interval, include the -interval argument to the fscheckservers command while logged in as the local superuser root. The newinterval setting persists until you again issue the command or reboot themachine, at which time the setting returns to the default. To preserve anondefault setting across reboots, include the appropriate fs checkserverscommand in the machine’s AFS initialization file.
To set a client’s file server probe interval1. Become the local superuser root on the machine, if you are not already, by
issuing the su command.% su rootPassword: root_password
2. Issue the fs checkservers command with the -interval argument.# fs checkservers -interval <seconds between probes>
where
checksIs the shortest acceptable abbreviation of checkservers.
-intervalSpecifies the number of seconds between probes. Provide aninteger value greater than zero.
Setting a Client Machine’s Cell Membership
Each client machine belongs to a particular cell, as named in the/usr/vice/etc/ThisCell on its local disk. The machine’s cell membershipdetermines three defaults important to users of the machine:v The cell for which users of the machine obtain tokens (authenticate) when
they use the login program or issue the klog command. There are twoeffects:– The klog program and AFS-modified login utilities contact an
Authentication Server in the cell named in the ThisCell file.
410 AFS: Administration Guide
– The klog program and AFS-modified login utilities combine the contentsof the ThisCell file with the password that the user provides, generatingan encryption key from the combination. The user’s entry in theAuthentication Database includes an encryption key also generated fromthe combination of password and cell name. If the cell name in theThisCell file is incorrect, users cannot authenticate even if they providethe correct password.
v The cell the Cache Manager considers its local, or home, cell. The CacheManager allows programs from its local cell to run with setuid permission,but not programs from foreign cells, as discussed further in “Determining ifa Client Can Run Setuid Programs” on page 408.
v The default database server machines that are contacted by the AFScommand interpreters running on this machine.
To display a client machine’s cell membership1. Use a text editor or the cat command to display the contents of the
/usr/vice/etc/ThisCell file.% cat /usr/vice/etc/ThisCell
To set a client machine’s cell membership1. Become the local superuser root on the machine, if you are not already, by
issuing the su command.% su rootPassword: root_password
2. Using a text editor, replace the cell name in the /usr/vice/etc/ThisCell file.3. (Optional.) Reboot the machine to enable the Cache Manager to use the
new cell name immediately; the appropriate command depends on themachine’s system type. The klog program, AFS-modified login utilities,and the AFS command interpreters use the new cell name the next timethey are invoked; no reboot is necessary.
# sync
# shutdown
Forcing the Update of Cached Data
AFS’s callback mechanism normally guarantees that the Cache Managerprovides the most current version of a file or directory to the applicationprograms running on its machine. However, you can force the Cache Managerto discard (flush) cached data so that the next time an application programrequests it, the Cache Manager fetches the latest version available at the FileServer.
You can control how many file system elements to flush at a time:
Chapter 10. Administering Client Machines and the Cache Manager 411

v To flush only specific files or directories, use the fs flush command. Thiscommand forces the Cache Manager to discard the data and statusinformation it has cached from the specified files or directories. It does notdiscard information from an application program’s buffer or informationthat has been altered locally (changes made in the cache but not yet savedpermanently to the File Server). However, the next time an applicationrequests the element’s data or status information, the Cache Manager has tocontact the File Server to get it.
v To flush everything cached from a certain volume, use the fs flushvolumecommand. This command works like the fs flush command, but differs intwo ways:– The Cache Manager discards data for all elements in the cache that come
from the same volume as the specified files or directories.– The Cache Manager discards only data, not status information. This
difference has little practical effect, but can lead to different output fromthe ls command when the two different commands are used to flush thesame element.
In addition to callbacks, the Cache Manager has a mechanism for trackingother kinds of possible changes, such as changes in a volume’s location. If avolume moves and the Cache Manager has not accessed any data in it for along time, the Cache Manager’s volume location record can be wrong. Toresynchronize it, use the fs checkvolumes command. When you issue thecommand, the Cache Manager creates a new table of mappings betweenvolume names, ID numbers, and locations. This forces the Cache Manager toreference newly relocated and renamed volumes before it can provide datafrom them.
It is also possible for information about mount points to become corrupted inthe cache. Symptoms of a corrupted mount point included garbled outputfrom the fs lsmount command, and failed attempts to change directory to orlist the contents of a mount point. Use the fs flushmount command to discarda corrupted mount point. The Cache Manager must refetch the mount pointthe next time it crosses it in a pathname. (The Cache Manager periodicallyrefreshes cached mount points, but the only other way to discard themimmediately is to reinitialize the Cache Manager by rebooting the machine.
To flush certain files or directories1. Issue the fs flush command.
% fs flush [<dir/file path>+]
where
flush Must be typed in full.
412 AFS: Administration Guide

dir/file pathNames each file or directory structure to flush from the cache.Omit this argument to flush the current working directory.Flushing a directory structure does not flush any files orsubdirectories cached from it.
To flush all data from a volume1. Issue the fs flushvolume command.
% fs flushvolume [<dir/file path>+]
where
flushv Is the shortest acceptable abbreviation of flushvolume.
dir/file pathNames a file or directory from each volume to flush from thecache. The Cache Manager flushes everything in the cache that ithas fetched from the same volume. Omit this argument to flush allcached data fetched from the volume that contains the currentworking directory.
To force the Cache Manager to notice other volume changes1. Issue the fs checkvolumes command.
% fs checkvolumes
where checkv is the shortest acceptable abbreviation of checkvolumes.
The following command confirms that the command completed successfully:All volumeID/name mappings checked.
To flush one or more mount points1. Issue the fs flushmount command.
% fs flush [<dir/file path>+]
where
flushmIs the shortest acceptable abbreviation of flushmount.
dir/file pathNames each mount point to flush from the cache. Omit thisargument to flush the current working directory. Files orsubdirectories cached from the associated volume are unaffected.
Chapter 10. Administering Client Machines and the Cache Manager 413
Maintaining Server Preference Ranks
As mentioned in the introduction to this chapter, AFS uses client-side datacaching and callbacks to reduce the amount of network traffic in your cell. TheCache Manager also tries to make its use of the network as efficient aspossible by assigning preference ranks to server machines based on theirnetwork proximity to the local machine. The ranks bias the Cache Manager tofetch information from the server machines that are on its own subnetwork ornetwork rather than on other networks, if possible. Reducing the networkdistance that data travels between client and server machine tends to reducenetwork traffic and speed the Cache Manager’s delivery of data toapplications.
The Cache Manager stores two separate sets of preference ranks in kernelmemory. The first set of ranks applies to machines that run the VolumeLocation (VL) Server process, hereafter referred to as VL Server machines. Thesecond set of ranks applies to machines that run the File Server process,hereafter referred to as file server machines. This section explains how theCache Manager sets default ranks, how to use the fs setserverprefs commandto change the defaults or set new ranks, and how to use the fs getserverprefscommand to display the current set of ranks.
How the Cache Manager Sets Default Ranks
As the afsd program initializes the Cache Manager, it assigns a preferencerank of 10,000 to each of the VL Server machines listed in the local/usr/vice/etc/CellServDB file. It then randomizes the ranks by adding aninteger randomly chosen from the range 0 (zero) to 126. It avoids assigningthe same rank to machines in one cell, but it is possible for machines fromdifferent cells to have the same rank. This does not present a problem in use,because the Cache Manager compares the ranks of only one cell’s databaseserver machines at a time. Although AFS supports the use of multihomeddatabase server machines, the Cache Manager only uses the single addresslisted for each database server machine in the local /usr/vice/etc/CellServDBfile. Only Ubik can take advantage of a multihomed database servermachine’s multiple interfaces.
The Cache Manager assigns preference ranks to a file server machine when itobtains the server’s VLDB record from the VL Server, the first time that itaccesses a volume that resides on the machine. If the machine is multihomed,the Cache Manager assigns a distinct rank to each of its interfaces (up to thenumber of interfaces that the VLDB can store for each machine, which isspecified in the AFS Release Notes). The Cache Manager compares theinterface’s IP address to the local machine’s address and applies the followingalgorithm:
414 AFS: Administration Guide

v If the local machine is a file server machine, the base rank for each of itsinterfaces is 5,000.
v If the file server machine interface is on the same subnetwork as the localmachine, its base rank is 20,000.
v If the file server machine interface is on the same network as the localmachine, or is at the distant end of a point-to-point link with the localmachine, its base rank is 30,000.
v If the file server machine interface is on a different network than the localmachine, or the Cache Manager cannot obtain network information about it,its base rank is 40,000.
If the client machine has only one interface, the Cache Manager compares it tothe server interface’s IP address and sets a rank according to the algorithm. Ifthe client machine is multihomed, the Cache Manager compares each of thelocal interface addresses to the server interface, and assigns to the serverinterface the lowest rank that results from comparing it to all of the clientinterfaces.
After assigning a base rank to a file server machine interface, the CacheManager adds to it a number randomly chosen from the range 0 (zero) to 15.As an example, a file server machine interface in the same subnetwork as thelocal machine receives a base rank of 20,000, but the Cache Manager recordsthe actual rank as an integer between 20,000 and 20,015. This process reducesthe number of interfaces that have exactly the same rank. As with VL Servermachine ranks, it is possible for file server machine interfaces from foreigncells to have the same rank as interfaces in the local cell, but this does notpresent a problem. Only the relative ranks of the interfaces that house aspecific volume are relevant, and AFS supports storage of a volume in onlyone cell at a time.
How the Cache Manager Uses Preference Ranks
Each preference rank pairs an interface’s IP address with an integer that canrange from 1 to 65,534. A lower rank (lower number) indicates a strongerpreference. Once set, a rank persists until the machine reboots, or until youuse the fs setserverprefs command to change it.
The Cache Manager uses VL Server machine ranks when it needs to fetchvolume location information from a cell. It compares the ranks for the cell’sVL Server machines and attempts to contact the VL Server process on themachine with the best (lowest integer) rank. If it cannot reach that VL Server,it tries to contact the VL Server with the next best rank, and so on. If all of acell’s VL Server machines are inaccessible, the Cache Manager cannot fetchdata from the cell.
Chapter 10. Administering Client Machines and the Cache Manager 415
Similarly, when the Cache Manager needs to fetch data from a volume, itcompares the ranks for the interfaces of machines that house the volume, andattempts to contact the interface that has the best rank. If it cannot reach thefileserver process via that interface, it tries to contact the interface with thenext best integer rank, and so on. If it cannot reach any of the interfaces formachines that house the volume, it cannot fetch data from the volume.
Displaying and Setting Preference Ranks
To display the file server machine ranks that the Cache Manager is using, usethe fs getserverprefs command. Include the -vlservers flag to display VLServer machine ranks instead. By default, the output appears on the standardoutput stream (stdout), but you can write it to a file instead by including the-file argument.
The Cache Manager stores IP addresses rather than hostnames in its kernellist of ranks, but by default the output identifies interfaces by hostname aftercalling a translation routine that refers to either the cell’s name service (suchas the Domain Name Server) or the local host table. If an IP address appearsin this case, it is because the translation attempt failed. To bypass thetranslation step and display IP addresses rather than hostnames, include the-numeric flag. This can significantly speed up the output.
You can use the fs setserverprefs command to reset an existing preferencerank, or to set the initial rank of a file server machine interface or VL Servermachine for which the Cache Manager has no rank. The ranks you set persistuntil the machine reboots or until you issue the fs setserverprefs commandagain. To make a rank persist across a reboot, place the appropriate fssetserverprefs command in the machine’s AFS initialization file.
As with default ranks, the Cache Manager adds a randomly chosen integer toeach rank range that you assign. For file server machine interfaces, therandomizing number is from the range 0 (zero) to 15; for VL Server machines,it is from the range 0 (zero) to 126. For example, if you assign a rank of 15,000to a file server machine interface, the Cache Manager stores an integerbetween 15,000 to 15,015.
To assign VL Server machine ranks, list them after the -vlserver argument tothe fs setserverprefs command.
To assign file server machine ranks, use or more of the three possiblemethods:1. List them after the -servers argument on the command line.2. Record them in a file and name it with the -file argument. You can easily
generate a file with the proper format by including the -file argument tothe fs getserverprefs command.
416 AFS: Administration Guide
3. Provide them via the standard input stream, by including the -stdin flag.This enables you to feed in values directly from a command or script thatgenerates preferences using an algorithm appropriate for your cell. It mustgenerate them in the proper format, with one or more spaces betweeneach pair and between the two parts of the pair. The AFS distribution doesnot include such a script, so you must write one if you want to use thismethod.
You can combine any of the -servers, -file, and -stdin options on the samecommand line if you wish. If more than one of them specifies a rank for thesame interface, the one assigned with the -servers argument takes precedence.You can also provide the -vlservers argument on the same command line toset VL Server machine ranks at the same time as file server machine ranks.
The fs command interpreter does not verify hostnames or IP addresses, andso willingly stores ranks for hostnames and addresses that don’t actually exist.The Cache Manager never uses such ranks unless the same VLDB record for aserver machine records the same incorrect information.
To display server preference ranks1. Issue the fs getserverprefs command to display the Cache Manager’s
preference ranks for file server machines or VL Server machines.% fs getserverprefs [-file <output to named file>] [-numeric] [-vlservers]
where
gp Is an acceptable alias for getserverprefs (gets is the shortestacceptable abbreviation).
-file Specifies the pathname of the file to which to write the list ofranks. Omit this argument to display the list on the standardoutput stream (stdout).
-numericDisplays the IP address, rather than the hostname, of each rankedmachine interface. Omit this flag to have the addresses translatedinto hostnames, which takes longer.
-vlserversDisplays ranks for VL Server machines rather than file servermachines.
The following example displays file server machine ranks. The -numericflag is not used, so the appearance of an IP address indicates that is notcurrently possible to translate it to a hostname.
% fs gpfs5.abc.com 20000fs1.abc.com 30014
Chapter 10. Administering Client Machines and the Cache Manager 417
server1.stateu.edu 40011fs3.abc.com 20001fs4.abc.com 30001192.12.106.120 40002192.12.106.119 40001
. . . . . . .
To set server preference ranks1. Become the local superuser root on the machine, if you are not already, by
issuing the su command.% su rootPassword: root_password
2. Issue the fs setserverprefs command to set the Cache Manager’spreference ranks for one or more file server machines or VL Servermachines.
# fs setserverprefs [-servers <fileserver names and ranks>+] \[-vlservers <VL server names and ranks>+] \[-file <input from named file>] [-stdin]
where
sp Is an acceptable alias for setserverprefs (sets is the shortestacceptable abbreviation).
-serversSpecifies one or more pairs of file server machine interface andrank. Identify each interface by its fully-qualified hostname or IPaddress in dotted decimal format. Acceptable ranks are theintegers from 1 to 65534. Separate the parts of a pair, and the pairsfrom one another, with one or more spaces.
-vlserversSpecifies one or more pairs of VL Server machine and rank.Identify each machine by its fully-qualified hostname or IP addressin dotted decimal format. Acceptable ranks are the integers from 1to 65534.
-file Specifies the pathname of a file that contains one more pairs of fileserver machine interface and rank. Place each pair on its own linein the file. Use the same format for interfaces and ranks as withthe -servers argument.
-stdin Indicates that pairs of file server machine interface and rank arebeing provided via the standard input stream (stdin). The programor script that generates the pairs must format them in the samemanner as for the -servers argument.
418 AFS: Administration Guide

Managing Multihomed Client Machines
The File Server can choose the interface to which to send a message when itinitiates communication with the Cache Manager on a multihomed clientmachine (one with more than one network interface and IP address). If thatinterface is inaccessible, it automatically switches to an alternate. Thisimproves AFS performance, because it means that the outage of an interfacedoes not interrupt communication between File Server and Cache Manager.
The File Server can choose the client interface when it sends two types ofmessages:v A message to break the callback that the Cache Manager holds on a cached
filev A ping message to check that the Cache Manager is still accessible and
responding; the File Server sends such a message every few minutes
(The File Server does not choose which client interface to respond to whenfilling a Cache Manager’s request for AFS data. In that case, it alwaysresponds to the client interface via which the Cache Manager sent therequest.)
The Cache Manager compiles the list of eligible interfaces on its clientmachine automatically as it initializes, and records them in kernel memory.When the Cache Manager first establishes a connection with the File Server, itsends along the list of interface addresses. The File Server records theaddresses, and uses the one at the top of the list when it needs to break acallback or send a ping to the Cache Manager. If that interface is inaccessible,the File Server simultaneously sends a message to all of the other interfaces inthe list. Whichever interface replies first is the one to which the File Serversends future messages.
You can control which addresses the Cache Manager registers with FileServers by listing them in two files in the /usr/vice/etc directory on the clientmachine’s local disk: NetInfo and NetRestrict. If the NetInfo file exists whenthe Cache Manager initializes, the Cache Manager uses its contents as thebasis for the list of interfaces. Otherwise, the Cache Manager uses the list ofinterfaces configured with the operating system. It then removes from the listany addresses that appear in the /usr/vice/etc/NetRestrict file, if it exists. TheCache Manager records the resulting list in kernel memory.
You can also use the fs setclientaddrs command to change the list ofaddresses stored in the Cache Manager’s kernel memory, without rebootingthe client machine. The list of addresses you provide on the command linecompletely replaces the current list in kernel memory. The changes you makepersist only until the client machine reboots, however. To preserve the revised
Chapter 10. Administering Client Machines and the Cache Manager 419
list across reboots, list the interfaces in the NetInfo file (and if appropriate, theNetRestrict file) in the local /usr/vice/etc directory. (You can also place theappropriate fs setclientaddrs command in the machine’s AFS initializationscript, but that is less efficient: by the time the Cache Manager reads thecommand in the script, it has already compiled a list of interfaces.)
To display the list of addresses that the Cache Manager is currently registeringwith File Servers, use the fs getclientaddrs command.
Keep the following in mind when you change the NetInfo or NetRestrict file,or issue the fs getclientaddrs or fs setclientaddrs commands:v When you issue the fs setclientaddrs command, the revised list of
addresses does not propagate automatically to File Servers with which theCache Manager has already established a connection. They continue to usethe list that the Cache Manager registered with them when it firstestablished a connection. To force previously contacted File Servers to usethe revised list, you must either reboot each file server machine, or rebootthe client machine after changing its NetInfo file, NetRestrict file, or both.
v The fs command interpreter verifies that each of the addresses you specifyon the fs setclientaddrs command line is actually configured with the clientmachine’s operating system. If it is not, the command fails with an errormessage that marks the address as a Nonexistent interface.
v As previously noted, the File Server does not use the registered list ofaddresses when it responds to the Cache Manager’s request for data (asopposed to initiating communication itself). It always attempts to send itsreply to the interface from which the Cache Manager sent the request. If thereply attempt fails, the File Server selects an alternate route for resendingthe reply according to its server machine’s network routing configuration,not the list of addresses registered by the Cache Manager.
v The Cache Manager does not use the list of interfaces when choosing theinterface via which to establish a connection to a File Server.
v The list of addresses that the fs getclientaddrs command displays is notnecessarily the one that a specific File Server is using, if an administratorhas issued the fs setclientaddrs command since the Cache Manager firstcontacted that File Server. It determines only which addresses the CacheManager registers when connecting to File Servers in future.
To create or edit the client NetInfo file1. Become the local superuser root on the machine, if you are not already, by
issuing the su command.% su rootPassword: root_password
2. Using a text editor, open the /usr/vice/etc/NetInfo file. Place one IPaddress in dotted decimal format (for example, 192.12.107.33) on eachline. On the first line, put the address that you want each File Server to
420 AFS: Administration Guide
use initially. The order of the remaining machines does not matter, becauseif an RPC to the first interface fails, the File Server simultaneously sendsRPCs to all of the other interfaces in the list. Whichever interface repliesfirst is the one to which the File Server then sends pings and RPCs tobreak callbacks.
3. If you want the Cache Manager to start using the revised list immediately,either reboot the machine, or use the fs setclientaddrs command to createthe same list of addresses in kernel memory directly.
To create or edit the client NetRestrict file1. Become the local superuser root on the machine, if you are not already, by
issuing the su command.% su rootPassword: root_password
2. Using a text editor, open the /usr/vice/etc/NetRestrict file. Place one IPaddress in dotted decimal format on each line. The order of the addressesis not significant. Use the value 255 as a wildcard that represents allpossible addresses in that field. For example, the entry 192.12.105.255indicates that the Cache Manager does not register any of the addresses inthe 192.12.105 subnet.
3. If you want the Cache Manager to start using the revised list immediately,either reboot the machine, or use the fs setclientaddrs command to set alist of addresses that does not included the prohibited ones.
To display the list of addresses from kernel memory1. Issue the fs getclientaddrs command.
% fs getclientaddrs
where gc is an acceptable alias for getclientaddrs (getcl is the shortestacceptable abbreviation).
The output lists each IP address on its own line, in dotted decimal format.
To set the list of addresses in kernel memory1. Become the local superuser root on the machine, if you are not already, by
issuing the su command.% su rootPassword: root_password
2. Issue the fs setclientaddrs command to replace the list of addressescurrently in kernel memory with a new list.
# fs setclientaddrs [-address <client network interfaces>+]
where
sc Is an acceptable alias for setclientaddrs (setcl is the shortestacceptable abbreviation).
Chapter 10. Administering Client Machines and the Cache Manager 421

-addressSpecifies one or more IP addresses in dotted decimal format(hostnames are not acceptable). Separate each address with one ormore spaces.
Controlling the Display of Warning and Informational Messages
By default, the Cache Manager generates two types of warning andinformational messages:v It sends user messages, which provide user-level status and warning
information, to user screens.v It sends console messages, which provide system-level status and warning
information, to the client machine’s designated console.
You can use the fs messages command to control whether the Cache Managerdisplays either type of message, both types, or neither. It is best not to disablemessages completely, because they provide useful information.
If you want to monitor Cache Manager status and performance more actively,you can use the afsmonitor program to collect an extensive set of statistics (italso gathers File Server statistics). If you experience performance problems,you can use fstrace suite of commands to gather a low-level trace of CacheManager operations, which the AFS Support and Development groups cananalyze to help solve your problem. To learn about both utilities, see“Chapter 8. Monitoring and Auditing AFS Performance” on page 327.
To control the display of warning and status messages1. Become the local superuser root on the machine, if you are not already, by
issuing the su command.% su rootPassword: root_password
2. Issue the fs messages command, using the -show argument to specify thetype of messages to be displayed.
# fs messages -show <user|console|all|none>
where
me Is the shortest acceptable abbreviation of messages.
-show Specifies the types of messages to display. Choose one of thefollowing values:
user Sends user messages to user screens.
consoleSends console messages to the console.
422 AFS: Administration Guide
all Sends user messages to user screens and console messagesto the console (the default if the -show argument isomitted).
none Disables messages completely.
Displaying and Setting the System Type Name
The Cache Manager stores the system type name of the local client machine inkernel memory. It reads in the default value from a hardcoded definition inthe AFS client software.
The Cache Manager uses the system name as a substitute for the @sys variablein AFS pathnames. The variable is useful when creating a symbolic link fromthe local disk to an AFS directory that houses binaries for the client machine’ssystem type. Because the @sys variable automatically steers the CacheManager to the appropriate directory, you can create the same symbolic linkon client machines of different system types. (You can even automate thecreation operation by using the package utility described in “Chapter 11.Configuring Client Machines with the package Program” on page 429.) Thelink also remains valid when you upgrade the machine to a new system type.
Configuration is simplest if you use the system type names that AFS assigns.For a list, see the AFS Release Notes.
To display the system name stored in kernel memory, use the sys or fssysname command. To change the name, add the latter command’s -newsysargument.
To display the system type name1. Issue the fs sysname or sys command.
% fs sysname
% sys
The output of the fs sysname command has the following format:Current sysname is 'system_name'
The sys command displays the system_name string with no other text.
To change the system type name1. Become the local superuser root on the machine, if you are not already, by
issuing the su command.% su rootPassword: root_password
Chapter 10. Administering Client Machines and the Cache Manager 423

2. Issue the fs sysname command, using the -newsys argument to specifythe new name.
# fs sysname <new sysname>
where
sys Is the shortest acceptable abbreviation of sysname.
new sysnameSpecifies the new system type name.
Enabling Asynchronous Writes
By default, the Cache Manager writes all data to the File Server immediatelyand synchronously when an application program closes a file. That is, theclose system call does not return until the Cache Manager has actually writtenall of the cached data from the file back to the File Server. You can enable theCache Manager to write files asynchronously by specifying the number ofkilobytes of a file that can remain to be written to the File Server when theCache Manager returns control to the application.
Enabling asynchronous writes can be helpful to users who commonly workwith very large files, because it usually means that the application appears toperform faster. However, it introduces some complications. It is best not toenable asynchronous writes unless the machine’s users are sophisticatedenough to understand the potential problems and how to avoid them. Thecomplications include the following:v In most cases, the Cache Manager returns control to applications earlier
than it does by default, but it is not guaranteed to do so. Users cannotalways expect faster performance.
v If an asynchronous write fails, there is no way to notify the application,because the close system call has already returned with a code indicatingsuccess.
v Asynchronous writing increases the possibility that the user fails to noticewhen a write operation makes a volume exceed its quota. As always, theportion of the file that exceeds the quota is lost, as indicated by a messagelike the following:
No space left on device
To avoid losing data because of insufficient quota, before closing a file usersmust verify that the volume housing the file has enough free space toaccommodate it.
When you enable asynchronous writes by issuing the fs storebehindcommand, you set the number of kilobytes of a file that can still remain to be
424 AFS: Administration Guide
written to the File Server when the Cache Manager returns control to theapplication program. You can apply the setting either to all files manipulatedby applications running on the machine, or only to certain files:v The setting that applies to all files is called the default store asynchrony for
the machine, and persists until the machine reboots. If, for example, you setthe default store asynchrony to 10 KB, it means that when an applicationcloses a file, the Cache Manager can return control to the application assoon as no more than 10 KB of a file that the application has closed remainto be written to the File Server.
v The setting for an individual file overrides the default store asynchrony andpersists as long as there is an entry for the file in the internal table that theCache Manager uses to track information about files. In general, such anentry persists at least until an application closes the file or exits completely,but the Cache Manager is free to recycle the entry if the file is inactive andit needs to free up slots in the table. To be sure the entry exists in the table,issue the fs storebehind command shortly before closing the file.
To set the default store asynchrony1. Become the local superuser root on the machine, if you are not already, by
issuing the su command.% su rootPassword: root_password
2. Issue the fs storebehind command with the -allfiles argument.# fs storebehind -allfiles <new default (KB)> [-verbose]
where
st Is the shortest acceptable abbreviation of storebehind.
-allfilesSets the number of kilobytes of data that can remain to be writtento the File Server when the Cache Manager returns control to theapplication that closed a file.
-verboseProduces a message that confirms the new setting.
To set the store asynchrony for one or more files1. Verify that you have the w (write) permission on the access control list
(ACL) of each file for which you are setting the store asynchrony, byissuing the fs listacl command, which is described fully in “DisplayingACLs” on page 566.
% fs listacl dir/file path
Alternatively, become the local superuser root on the client machine, if youare not already, by issuing the su command.
Chapter 10. Administering Client Machines and the Cache Manager 425
% su rootPassword: root_password
2. Issue the fs storebehind command with the -kbytes and -files arguments.# fs storebehind -kbytes <asynchrony for specified names> \
-files <specific pathnames>+ \[-verbose]
where
st Is the shortest acceptable abbreviation of storebehind.
-kbytesSets the number of kilobytes of data that can remain to be writtento the File Server when the Cache Manager returns control to theapplication that closed a file named by the -files argument.
-files Specifies each file for which to set a store asynchrony thatoverrides the default. Partial pathnames are interpreted relative tothe current working directory.
-verboseProduces a message that confirms that new setting.
To display the default store asynchrony1. Issue the fs storebehind command with no arguments, or with the
-verbose flag only.% fs storebehind [-verbose]
where
st Is the shortest acceptable abbreviation of storebehind.
-verboseProduces output that reports the default store asynchrony.
To display the store asynchrony for one or more files1. Issue the fs storebehind command with the -files argument only.
% fs storebehind -files <specific pathnames>+
where
st Is the shortest acceptable abbreviation of storebehind.
-files Specifies each file for which to display the store asynchrony.Partial pathnames are interpreted relative to the current workingdirectory.
The output lists each file separately. If a value has previously been set for thespecified files, the output reports the following:
426 AFS: Administration Guide

Will store up to y kbytes of file asynchronously.Default store asynchrony is x kbytes.
If the default store asynchrony applies to a file (because you have not set a-kbytes value for it), the output reports the following:
Will store file according to default.Default store asynchrony is x kbytes.
Chapter 10. Administering Client Machines and the Cache Manager 427

428 AFS: Administration Guide
Chapter 11. Configuring Client Machines with the packageProgram
The package program automates many aspects of the client configurationprocess. With the package program, you can easily configure the local disk ofnumerous clients by defining global configuration files.
Summary of Instructions
This chapter explains how to perform the following tasks by using theindicated commands or instructions in a prototype file:
Configure a client machine’slocal disk
package
Define directory D [update_code] directory owner group mode_bitsDefine file F [update_code] file source_file [owner group mode_bits]Define symbolic link L [update_code] link actual_file [owner group mode_bits]Define block special device B device_name major_device_number
minor_device_number owner group mode_bitsDefine character special device C device_name major_device_number
minor_device_number owner group mode_bitsDefine socket S socket_name [owner group mode_bits]
Using the package Program
The package program uses system-independent prototype files to define astandard disk configuration; a prototype file indicates which files reside on thelocal client disk, which files are links into AFS, etc. The prototype files arethen compiled into configuration files for each different system type.
Not all client machines have the same configuration. If desired, you can createdifferent prototype files for different client functions (print server, regularclient, etc.).
The package program compares the contents of a local client disk with theconfiguration file. If there are any differences, the package program makes thenecessary updates to the local disk by copying the files from AFS onto thedisk. The package program can also be configured to delete files that are notpart of the system configuration or automatically reboot the client whencertain files (such as the dkload file) have been updated.
© Copyright IBM Corp. 1989, 2000 429
The package program does require that you take some time to prepare theprototype files, but it provides the following benefits:v You no longer need to configure each machine individually; the prototype
configuration file applies to all machines.v You can change the configuration of machines simply by changing the
prototype file and rebooting the clients.v Disk organization is uniform across a set of machines.v The configuration files serve as a record of files on the disk and symbolic
links into AFS.
Using Package on File Server Machines
While the package program was designed for use on client machines, it canalso be used to configure a file server machine’s disk. However, if any of thefiles referred to in a configuration file reside in volumes on the file server, thepackage program cannot access the volumes during reboot (and until the FileServer process and Volume Server process start up again).
Since the package program aborts when it cannot access a file, you need toeliminate references to files in AFS that reside in volumes on the file servermachine. Because of these constraints, the remainder of this chapter assumesthe package program is being used for client configurations.
Package Overview
There are three main steps to follow before running the package program:1. Preparing function-specific prototype files (and any included library files).2. Modifying the package Makefile and compiling prototype files into
system-specific configuration files.3. Modifying client machines to run the appropriate package configuration
file automatically.
The following sections summarize these steps.
Preparing Prototype Files
Begin by listing the different functions or roles client machines perform andthe local disk configurations that support those functions. Example rolesinclude a standard client that provides AFS access, a print server that drives aprinter, and a backup machine on which you issue commands from thebackup suite. Create a different prototype file for each role.
A prototype file defines the disk configuration that supports a specific role.Usually, prototype files are function-specific, but system independent;
430 AFS: Administration Guide

system-specific values can be defined using variables and library files. Then,when you modify a variable or library file, the change gets propagated to allappropriate clients when the package program is invoked.
Methods for building flexible prototype files that are easy to maintain arepresented in “Example Prototype and Library Files” on page 433.
Compiling Prototype Files
Prototype files are usually system-independent, but can include ifdefstatements to satisfy the needs of different system types. The prototype filesare compiled to generate operating-system specific versions. Duringcompilation, the package program selects the definitions suitable for eachsystem type and replaces any variables with actual values. These compiled,machine-specific files are called configuration files.
Prototype files are compiled using a standard-type Makefile file, as describedin “The Package Makefile File” on page 441.
Preparing Clients
Once system-specific configuration files exist, the package program is ready torun on the clients. You must first make the package binary available andspecify the correct configuration file.
Modify the clients as described below:1. Create a .package file in the root ( / ) directory of each client’s local disk
that defines the default configuration file.2. Make the package binary (/etc/package) available on the local disk.3. Modify the machine’s initialization file (/etc/rc or equivalent) to include a
call to the package program.
These steps are discussed more completely in “Modifying Client Machines” onpage 447.
The package Directory Structure
This section assumes that the package-related files have been installed in threesubdirectories of the /afs/cellname/wsadmin directory: src, lib and etc, asrecommended in the AFS Quick Beginnings.
Chapter 11. Configuring Client Machines with the package Program 431
These directories contain several sample prototype, library, and configurationfiles, which can help to clarify how the package program works. However,they are not necessarily suitable for use in your cell; you must modify themfor your needs.
The src directory
The src directory contains some sample prototype files (used to build theconfiguration files), the Makefile file used to build them, and the resultingcompiled configuration files.
Prototype files have names of the form function.proto. For example, aminimal.proto file defines the minimum set of library files need to run AFSand astaff.dkload.proto file defines a client configuration that uses the adynamic kernel loading program. Prototype files can also contain definitionsfor system administrative files, such as a hosts.equiv file.
The Makefile file is used to compile the system-independent prototype filesinto system-specific configuration files. To learn how to modify this file foruse in your cell, see “The Package Makefile File” on page 441.
Configuration files are the compiled version of the prototype files and arenamed function.sysname. Configuration files also appear in the etc subdirectory,which the package program accesses when configuring disks.
The lib directory
The lib directory contains many of the example library files referred to inprototype files. For example, the base.generic file is a system-independent filewhich includes a definition of the cell name, system options, and variables;these are used to set the owner, group, and mode_bits fields in the file and thesymbolic link definitions.
The etc directory
The etc directory contains the system-specific configuration files built from theprototype files in the src subdirectory. The package program uses theconfiguration files in the etc directory to configure disks.
Some of the example files include minimal and staff prototype files compiledfor different system types.
432 AFS: Administration Guide

Example Prototype and Library Files
A prototype file is a template that defines the configuration of a client’s localdisk. Prototype files are usually function-specific (for example, a backupmachine, print server, etc.) but system-independent. Prototype files supportthe use of ifdef statements and variables, so you can include system-specificdefinitions. The actual system-specific configuration file is generated when theprototype file is compiled.
The components defined in a prototype file can include the directories, files,symbolic links, block special devices, character special devices and socketsthat need to reside on a client’s local disk in order for it to perform a specificrole, such as a print server or backup machine. Thus, we recommend that youconstruct a unique prototype file for each different client function.
To make the package program more effective and easy to maintain, createprototype files that are modular and generic, instead of specific, by usinglibrary files and variables:v By creating general-purpose library files, you can include the same library
file in many prototype files. Thus, you can make global configurationchanges by modifying a single library file; you do not need to modify eachprototype file.
v Variables enable you to change definitions simply by changing thevariable’s value.
An Example Prototype File
The following is part of an example prototype file that contains the minimumdefinitions necessary to run AFS. A similar file called minimal.proto canreside in your src subdirectory. As recommended, this prototype file referenceslibrary files and does not include actual definitions.
.
.# Package prototype for a minimal configuration.# Base components%include ${wsadmin}/lib/base.generic# Machine-specific components%ifdef rs_aix42%include ${wsadmin}/lib/rs_aix42.readonly%include ${wsadmin}/lib/rs_aix42.AFS%endif rs_aix42%ifdef alpha_dux40%include ${wsadmin}/lib/alpha_dux40.readonly%include ${wsadmin}/lib/alpha_dux40.AFS%endif alpha_dux40%ifdef sun4x_56%include ${wsadmin}/lib/sun4x_56.readonly
Chapter 11. Configuring Client Machines with the package Program 433

%include ${wsadmin}/lib/sun4x_56.AFS%endif sun4x_56
.
.
In the previous example, the first uncommented line includes the/lib/base.generic library file. This library file can contain definitionsappropriate for many prototype files; the base.generic library file can also beincluded in other prototype files, like a staff.proto or backup.proto file. Anexample library file appears in the following section.
Note that system-specific definitions are permitted through the use of ifdefstatements and variables (for example, ${wsadmin} is used to specifypathnames). Thus, the same prototype file can be used to configure a machinerunning AIX 4.2 or Solaris 2.6, even though they require different files,directories, symbolic links and devices.
In the next uncommented lines of this example, the administrator hasconstructed different library files for different system types. Each of these iscompiled into unique configuration files. For instance, the following lines inthis prototype file tell the package program to use the library fileslib/rs_aix42.readonly and lib/rs_aix42.AFS for the configuration file when thevalue rs_aix42 has been declared. (The system-type definition is declared inthe Makefile; see “The Package Makefile File” on page 441.)
%ifdef rs_aix42%include ${wsadmin}/lib/rs_aix42.readonly%include ${wsadmin}/lib/rs_aix42.AFS%endif rs_aix42
Similarly, the following lines tell the package program to use the library fileslib/sun4x_56.readonly and lib/sun4x_56.AFS when the value sun4x_56 hasbeen declared.
%ifdef sun4x_56%include ${wsadmin}/lib/sun4x_56.readonly%include ${wsadmin}/lib/sun4x_56.AFS%endif sun4x_56
Example Library File
The following is part of an example library file for basic configurationdefinitions. A similar file, called base.generic, can reside in your libsubdirectory. Note that configurations are defined using standard ifdefstatements.
.
.## Base package definitions.
434 AFS: Administration Guide

#%ifndef cell%define cell abc.com%endif cell%ifndef sys%include /etc/package.sys%endif sys%define ${name} ${name}%define ${cpu} ${cpu}%define ${sys} ${sys}%define ${dept} ${dept}%define ${hostname} ${hostname}%ifdef rs_aix42% define AIX% define rootlinks%ifndef noafsd% define afsd%endif noafsd%endif rs_aix42
.
.## Some definitions to handle common combinations of owner, group,# and protection fields.#%define rzmode root wheel 600%define usermode root wheel 666%define systemmode root wheel 644%define diskmode root wheel 644%define ptymode root wheel 666%define ttymode root wheel 666
.
.%define aix_rootbin root bin%define aix_rootprintq root printq%define aix_rootstaff root staff%define aix_rootsys root system%define aix_binbin bin bin%define aix_binmail bin mail%define aix_binsys bin system%define aix_addsys adduser system%define aix_romode 444%define aix_loginmode 544%define aix_usermode 666%define aix_systemmode 644%define aix_textmode 644%define aix_rwmode1 660%define aix_allrugw 664
The following example library file uses package-specific syntax to define files,directories, sockets, etc. Each line, called a configuration file instruction, definesa specific component of disk configuration. The proper syntax for theseinstructions is briefly described in “Package Configuration File Instruction
Chapter 11. Configuring Client Machines with the package Program 435
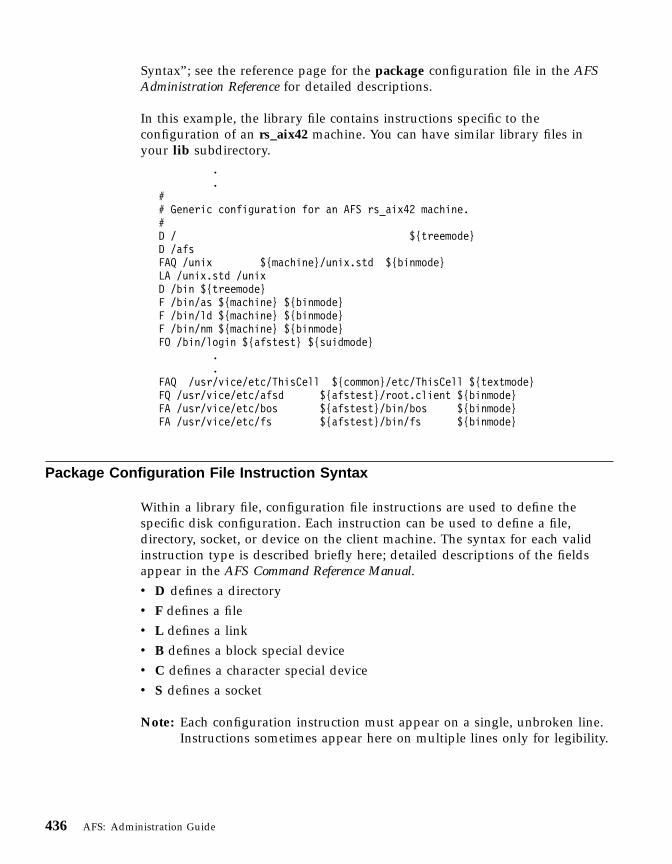
Syntax”; see the reference page for the package configuration file in the AFSAdministration Reference for detailed descriptions.
In this example, the library file contains instructions specific to theconfiguration of an rs_aix42 machine. You can have similar library files inyour lib subdirectory.
.
.## Generic configuration for an AFS rs_aix42 machine.#D / ${treemode}D /afsFAQ /unix ${machine}/unix.std ${binmode}LA /unix.std /unixD /bin ${treemode}F /bin/as ${machine} ${binmode}F /bin/ld ${machine} ${binmode}F /bin/nm ${machine} ${binmode}FO /bin/login ${afstest} ${suidmode}
.
.FAQ /usr/vice/etc/ThisCell ${common}/etc/ThisCell ${textmode}FQ /usr/vice/etc/afsd ${afstest}/root.client ${binmode}FA /usr/vice/etc/bos ${afstest}/bin/bos ${binmode}FA /usr/vice/etc/fs ${afstest}/bin/fs ${binmode}
Package Configuration File Instruction Syntax
Within a library file, configuration file instructions are used to define thespecific disk configuration. Each instruction can be used to define a file,directory, socket, or device on the client machine. The syntax for each validinstruction type is described briefly here; detailed descriptions of the fieldsappear in the AFS Command Reference Manual.v D defines a directoryv F defines a filev L defines a linkv B defines a block special devicev C defines a character special devicev S defines a socket
Note: Each configuration instruction must appear on a single, unbroken line.Instructions sometimes appear here on multiple lines only for legibility.
436 AFS: Administration Guide
The configuration file must be completely correct. If there are anysyntax errors or incorrect values, the package command interpreterexits without executing any instruction.
Local Files versus Symbolic Links
You can take advantage of the AFS by keeping the number of files on thelocal client disk to a minimum; instead, create symbolic links that point intoAFS. This can improve machine performance by allowing more space forcaching and swapping.
Some files, however, must reside on the local disk, as described below. Createthese files in the prototype or library files using the F (file) instruction, not theL (symbolic link) instruction.
The following types of files must reside on the local disk of all AFS clients:v Boot sequence files executed before the afsd program runs.
Until afsd runs and initializes the Cache Manager, AFS is inaccessible fromthe client. Any files that are executed before the afsd program runs mustreside on the local client disk.For example, on a machine that uses a disk cache, the /usr/vice/cachedirectory must exist when you bring up the Cache Manager, so that there isa location to create cache files. The binary files /etc/mount and /etc/umountmust be available on the local disk as the machine boots in order to mountthe /usr/vice/cache directory.In addition, certain UNIX files, such as initialization files (/etc/rc orequivalent) and file system mapping files (/etc/fstab or equivalent), mustreside on the local disk.
v Diagnostic and recovery filesCertain commands can be used to diagnose and recover from problemscaused by a file server outage. It is best to keep copies of the binaries forthese commands on the local disk. For example, store the bos and fsbinaries in the /usr/vice/etc directory on the local disk, as well as in the/usr/afsws directory (which in the conventional configuration is a symboliclink into AFS). Then, set PATH variables so that the /usr/afsws directoryappears before the /usr/vice/etc directory. Thus, even if users cannot accessAFS (for example, due to a file server outage) they can still access copies ofthe bos and fs binaries in the /usr/vice/etc directory on the local disk.
v Files in the /usr/vice directoryThe contents of the /usr/vice directory, including the cache files in the cachesubdirectory and the configuration files in the etc subdirectory, must resideon the local disk. For a description of the files in the directory, see“Configuration and Cache-Related Files on the Local Disk” on page 390.
Chapter 11. Configuring Client Machines with the package Program 437
Defining a Directory
The D instruction defines a directory to be created on the local disk. If asymbolic link, file, or other element on the local disk has the same name, it isreplaced with a directory. If the directory already exists, its owner, group, andmode bits are changed if necessary to conform with the instruction.
Use the following instruction to define a directory:D[update_code] directory owner group mode_bits
The following example defines the /usr directory:D /usr root wheel 755
Defining a File
The F instruction defines a file to be created on the local disk. The source filecan reside in either AFS or the local disk.
If a file of this name already exists, then it is updated with (overwritten by)the source file, unless the I update code is specified. If a symbolic link ordirectory of this name exists, the package program replaces it with the sourcefile.
Note: Some files must reside on the local disk; they cannot be symbolic links.See “Local Files versus Symbolic Links” on page 437.
Use the following instruction to define a file:F[update_code] file source_file [owner group mode_bits]
An example which creates/updates the file /bin/grep on the local disk, using/afs/abc.com/rs_aix42/bin/grep as the source:
F /bin/grep /afs/abc.com/rs_aix42 root wheel 755
In the following example, two update codes are used, and the owner, groupand mode_bits slots are left empty, so that the disk file adopts the source file’svalues for those slots.
FAQ /usr/vice/etc/ThisCell /afs/abc.com/common/etc/ThisCell
Defining a Symbolic Link
The L instruction defines a symbolic link to be created on the local disk. Thesymbolic link can point to the AFS file system or the local disk. If the identicalsymbolic link already exists, the package program does nothing. However, ifan element of the same name exists on the disk as a file or directory, thepackage program replaces the element with a symbolic link.
438 AFS: Administration Guide
Note: Some files must reside on the local disk; they cannot be symbolic links.See “Local Files versus Symbolic Links” on page 437.
Use the following instruction to define a symbolic link:L[update_code] link actual_file [owner group mode_bits]
Note: Do not create a symbolic link to a file whose name begins with thenumber sign (#) or percent sign (%). The Cache Manager interpretssuch a link as a mount point to a regular or Read/Write volume,respectively.
The following example creates a symbolic link from the /etc/ftpd directory onthe local disk to the /afs/abc.com/hp_ux110/etc/ftpd file in AFS. Since theowner, group and mode_bits fields are empty, the symbolic link adopts valuesfor those fields from the actual file:
L /etc/ftpd /afs/abc.com/hp_ux110
This example uses the A update code:LA /etc/printcap /afs/abc.com/common/etc/printcap.remote
root wheel 644
Defining a Block Special Device
The B instruction defines a block special device, which is a device thathandles data in units of multibyte blocks, such as a disk. If a device of thesame name already exists, the package program replaces it with the specifiedblock device.
Use the following instruction to define a block special device (it appears ontwo lines here only for legibility):
B device_name major_device_number minor_device_number \owner group mode_bits
The following example defines a disk called /dev/hd0a to have major andminor device numbers 1 and 0:
B /dev/hd0a 1 0 root wheel 644
Defining a Character Special Device
The C instruction defines a character special device, which is device thathandles data in units of a single character at a time, such as a terminal or tty.If a device of the same name already exists, the package program replaces itwith the specified character device.
Use the following instruction to define a character special device (it appearshere on two lines only for legibility):
Chapter 11. Configuring Client Machines with the package Program 439
C device_name major_device_number minor_device_number \owner group mode_bits
The following example defines the tty called /dev/ttyp5 with major and minordevice numbers 6 and 5:
C /dev/ttyp5 6 5 root wheel 666
Defining a Socket
The S instruction defines a socket, which is communications device for UDPand TCP/IP connections. If a socket of the same name already exists, thepackage program replaces it.
Use the following instruction to define a socket:S socket_name [owner group mode_bits]
The following example defines a socket called /dev/printer:S /dev/printer root wheel 777
Constructing Prototype and Library Files
This section describes the general steps required to create package prototypeand library files. Refer to the previous sections for guidelines, and the files inyour wsadmin directory for examples. The construction of prototype andlibrary files is different for each cell.
To construct a prototype file and its component library files1. Determine where the three package-related subdirectories (src, lib and etc)
reside in your cell’s file tree; the following instructions assume they wereloaded into the /afs/cellname/wsadmin directory, as described in the AFSQuick Beginnings.
2. Decide how many different functions you want client machines in yourcell to perform. We recommend that you construct a separate prototypefile for each function. Common functions include:v Standard workstation: provides users with access to files in AFSv Printer server: drives a printer; can be combined with ″staff″
functionalityv Backup machine: performs backups of AFS volumes to tape by running
the AFS Backup System software3. Determine the minimum functionality needed for all clients (such as AFS
setup) and place these generic definitions in one or more library files.4. For each type of client (printer server, backup machine, and so on), place
all system-independent definitions in one file, and all operating-systemdependent definitions in another file.
440 AFS: Administration Guide

The Package Makefile File
Once you have created the appropriate prototype and library files, you mustcompile the prototype for each system type. The result is a system-specificconfiguration file.
The Makefile file defines the prototype and library files used and the order ofcompilation. We recommend that you create your Makefile file by modifyingthe example provided with the AFS distribution, as described in this section.In the conventional configuration, it is located at/afs/cellname/wsadmin/src/Makefile.
Overview
The following list summarizes the sections in the package Makefile file,identifying each by the header name that begins the section. More detaileddescriptions follow.
CONFIG=Lists all of the configuration files to be created and defines whichprototype files are compiled for which system types. See “TheCONFIG Section”.
BASE_LIBS=Lists the pathnames of all operating-system- and functionindependent library files included in any prototype files. See “TheBASE_LIBS Section” on page 442.
MACHINE_LIBS=Lists the pathnames of all operating-system-specific library filesincluded in any prototype files. See “The MACHINE_LIBS Section” onpage 443.
LIBS= A one-line instruction that defines LIBS as the combination ofBASE_LIBS and MACHINE_LIBS. See “The LIBS Section” on page 443.
.SUFFIXESDefines all of the suffixes that can appear on a prototype orconfiguration file. See “The .SUFFIXES Section” on page 443.
Finally, the Makefile file contains a set of instructions that the packageprogram follows to generate configuration files. It is not generally necessary toalter this section. See “The Makefile Instructions Section” on page 444.
The CONFIG Section
As mentioned, a configuration file is a prototype file that has been compiledfor a specific operating system type. The CONFIG section of the Makefile file
Chapter 11. Configuring Client Machines with the package Program 441
defines the prototype files to compile for each system type. The resultingcompiled file is a system-specific configuration file.
Study the following example taken from the sample Makefile file.Configuration files are defined by specifying the prototype-systemcombination as prototype_file.sysname. Note that it is not necessary to generatea configuration file for each prototype-system type combination.
#Makefile...# (C) Copyright IBM Corporation 1999# Licensed Materials - Property of IBM# All Rights Reserved.#CONFIG = \
staff.rs_aix42 \staff.alpha_dux40 \staff.xdm.alpha_dux40 \staff.sun4x_56 \staff.hp_ux110 \minimal.rs_aix42 \minimal.alpha_dux40 \minimal.hp_ux110 \minimal.sun4x_56
An entry in the CONFIG section has the following format:v The first part of the entry defines the prototype file and is the same as the
prototype file name (without the .proto extension). The second part of theentry indicates the system type for which the prototype file is to becompiled. A complete list of these suffixes is in the .SUFFIXES section of theMakefile file, as described in “The .SUFFIXES Section” on page 443. Thisprototype_file.sysname definition becomes the name of the compiledconfiguration file.For example, staff.rs_aix42 indicates that the staff.proto file is compiled formachines running AIX 4.2. The resulting compiled configuration file iscalled staff.rs_aix42.
v Each configuration file must appear on a separate line.v A backslash must follow the CONFIG= header and every name but the last
one. A backslash must also appear on blank lines.
The BASE_LIBS Section
This section defines the complete pathname of all system- andfunction-independent library files included in any prototype file.(System-specific library files are defined in the MACHINE_LIBS section). Thepathnames can include the ${wsadmin} variable, whose value is supplied onthe make command line.
You must include all of the library files referred to in your prototype files;files included but not used are ignored.
442 AFS: Administration Guide
Study the following example. Note that the all entries (except the last one)must be followed by a backslash.
BASE_LIBS = \${wsadmin}/src/admin \${wsadmin}/lib/devel \${wsadmin}/lib/base.generic
The MACHINE_LIBS Section
This section lists the complete pathname of all operating-system-specificlibrary files included in prototype files. (System- and function-independentlibrary files are defined in the BASE_LIBS section.)
Study the following example. Note that in this example, library files weregrouped by operating-system type. Again, all lines (except the last one) mustbe followed by a backslash, the ${wsadmin} variable is allowed, and filesincluded but not used are ignored.
MACHINE_LIBS = \${wsadmin}/lib/rs_aix42.generic \${wsadmin}/lib/rs_aix42.generic.dev \${wsadmin}/lib/rs_aix42.readonly \${wsadmin}/lib/rs_aix42.readwrite \${wsadmin}/lib/rt_aix42.generic.printer \
\..
${wsadmin}/lib/alpha_dux40.AFS \${wsadmin}/lib/hp_ux110.AFS \${wsadmin}/lib/sun4x_56.AFS \${wsadmin}/lib/rs_aix42.AFS
The LIBS Section
This section contains only one instruction, which indicates that LIBS is definedas the combination of MACHINE_LIBS and BASE_LIBS. Insert a blank line afterthe line to separate this section from the next.
LIBS = ${MACHINE_LIBS} ${BASE_LIBS}
The .SUFFIXES Section
This section lists the valid machine-type suffixes. This list includes systemtypes currently supported for AFS. Unused suffixes are ignored.
.SUFFIXES: .rs_aix42 \.alpha_dux40 \.proto \.sun4x_56 \.i386_linux22 \.hp_ux110
Chapter 11. Configuring Client Machines with the package Program 443
The Makefile Instructions Section
The remainder of the Makefile file controls how the package programgenerates configuration files.
Study the following instructions; it is assumed that you are familiar withprogramming and Makefile concepts.
#The following appear on a single line each in the actual file.proto.rs_aix42: ; mpp -Dwsadmin=${wsadmin} -Dsys=rs_aix42
-Dname=$* $*.proto > [email protected]_dux40: ; mpp -Dwsadmin=${wsadmin} -Dsys=alpha_dux40
-Dname=$* $*.proto > [email protected]_56: ; mpp -Dwsadmin=${wsadmin} -Dsys=sun4x_56
-Dname=$* $*.proto > [email protected]_ux110: ; mpp -Dwsadmin=${wsadmin} -Dsys=hp_ux110
-Dname=$* $*.proto > $@all: ${CONFIG}${CONFIG}: ${LIBS}system: installinstall: ${CONFIG}cp ${CONFIG} ${wsadmin}/etcclean:rm -f ${CONFIG} *.BAK *.CKP
Modifying the Makefile
Modify the package Makefile files when youv Add a new prototype file (function.proto).v Add a new system type.v Add new library files.
The following sections provide brief examples of how to modify the Makefilefile for these reasons.
Adding a New Prototype File
When you create a new prototype file, add the file name and each systemtype for which it is to be built into the CONFIG section of the Makefile file.
For example, to add a function.proto file for alpha_dux40 and hp_ux110, addthe following entries to the CONFIG section:
CONFIG = \...
function.alpha_dux40 \function.hp_ux110 \
...
444 AFS: Administration Guide
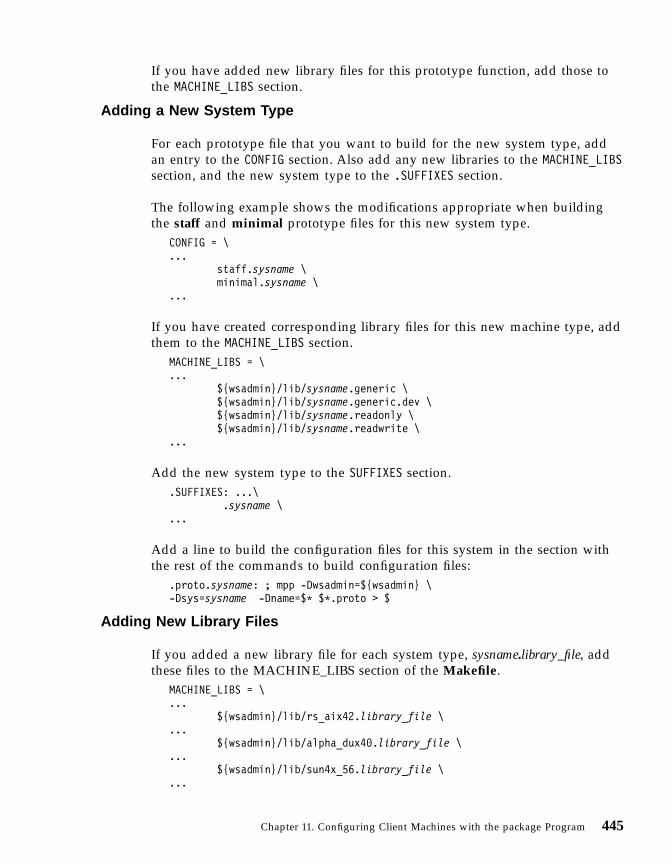
If you have added new library files for this prototype function, add those tothe MACHINE_LIBS section.
Adding a New System Type
For each prototype file that you want to build for the new system type, addan entry to the CONFIG section. Also add any new libraries to the MACHINE_LIBSsection, and the new system type to the .SUFFIXES section.
The following example shows the modifications appropriate when buildingthe staff and minimal prototype files for this new system type.
CONFIG = \...
staff.sysname \minimal.sysname \
...
If you have created corresponding library files for this new machine type, addthem to the MACHINE_LIBS section.
MACHINE_LIBS = \...
${wsadmin}/lib/sysname.generic \${wsadmin}/lib/sysname.generic.dev \${wsadmin}/lib/sysname.readonly \${wsadmin}/lib/sysname.readwrite \
...
Add the new system type to the SUFFIXES section..SUFFIXES: ...\
.sysname \...
Add a line to build the configuration files for this system in the section withthe rest of the commands to build configuration files:
.proto.sysname: ; mpp -Dwsadmin=${wsadmin} \-Dsys=sysname -Dname=$* $*.proto > $
Adding New Library Files
If you added a new library file for each system type, sysname.library_file, addthese files to the MACHINE_LIBS section of the Makefile.
MACHINE_LIBS = \...
${wsadmin}/lib/rs_aix42.library_file \...
${wsadmin}/lib/alpha_dux40.library_file \...
${wsadmin}/lib/sun4x_56.library_file \...
Chapter 11. Configuring Client Machines with the package Program 445
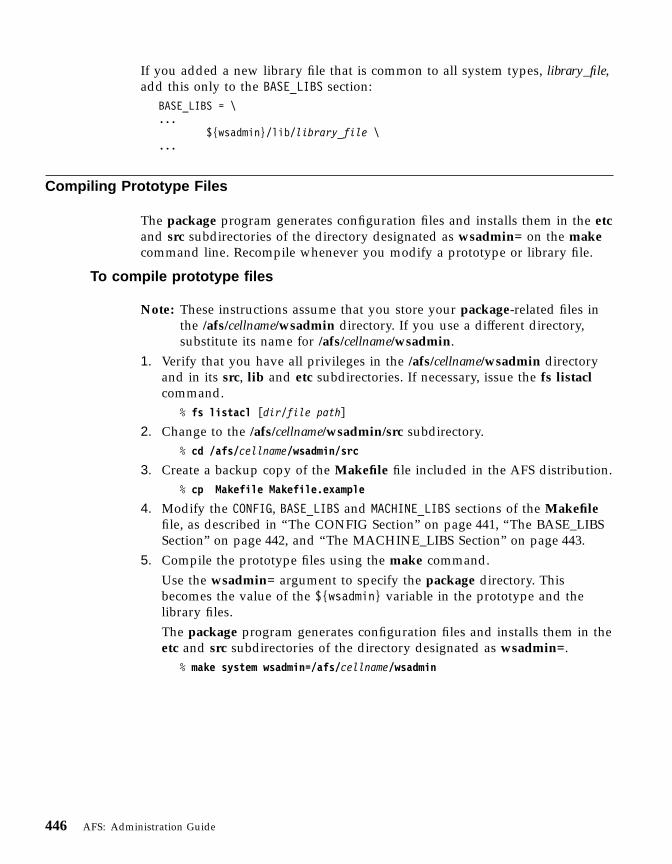
If you added a new library file that is common to all system types, library_file,add this only to the BASE_LIBS section:
BASE_LIBS = \...
${wsadmin}/lib/library_file \...
Compiling Prototype Files
The package program generates configuration files and installs them in the etcand src subdirectories of the directory designated as wsadmin= on the makecommand line. Recompile whenever you modify a prototype or library file.
To compile prototype files
Note: These instructions assume that you store your package-related files inthe /afs/cellname/wsadmin directory. If you use a different directory,substitute its name for /afs/cellname/wsadmin.
1. Verify that you have all privileges in the /afs/cellname/wsadmin directoryand in its src, lib and etc subdirectories. If necessary, issue the fs listaclcommand.
% fs listacl [dir/file path]
2. Change to the /afs/cellname/wsadmin/src subdirectory.% cd /afs/cellname/wsadmin/src
3. Create a backup copy of the Makefile file included in the AFS distribution.% cp Makefile Makefile.example
4. Modify the CONFIG, BASE_LIBS and MACHINE_LIBS sections of the Makefilefile, as described in “The CONFIG Section” on page 441, “The BASE_LIBSSection” on page 442, and “The MACHINE_LIBS Section” on page 443.
5. Compile the prototype files using the make command.Use the wsadmin= argument to specify the package directory. Thisbecomes the value of the ${wsadmin} variable in the prototype and thelibrary files.The package program generates configuration files and installs them in theetc and src subdirectories of the directory designated as wsadmin=.
% make system wsadmin=/afs/cellname/wsadmin
446 AFS: Administration Guide
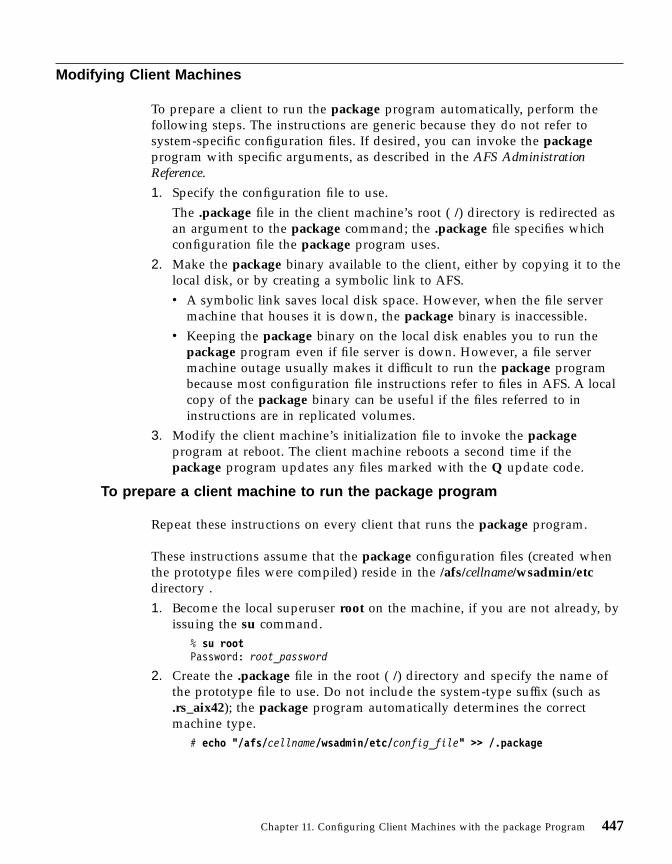
Modifying Client Machines
To prepare a client to run the package program automatically, perform thefollowing steps. The instructions are generic because they do not refer tosystem-specific configuration files. If desired, you can invoke the packageprogram with specific arguments, as described in the AFS AdministrationReference.1. Specify the configuration file to use.
The .package file in the client machine’s root ( /) directory is redirected asan argument to the package command; the .package file specifies whichconfiguration file the package program uses.
2. Make the package binary available to the client, either by copying it to thelocal disk, or by creating a symbolic link to AFS.v A symbolic link saves local disk space. However, when the file server
machine that houses it is down, the package binary is inaccessible.v Keeping the package binary on the local disk enables you to run the
package program even if file server is down. However, a file servermachine outage usually makes it difficult to run the package programbecause most configuration file instructions refer to files in AFS. A localcopy of the package binary can be useful if the files referred to ininstructions are in replicated volumes.
3. Modify the client machine’s initialization file to invoke the packageprogram at reboot. The client machine reboots a second time if thepackage program updates any files marked with the Q update code.
To prepare a client machine to run the package program
Repeat these instructions on every client that runs the package program.
These instructions assume that the package configuration files (created whenthe prototype files were compiled) reside in the /afs/cellname/wsadmin/etcdirectory .1. Become the local superuser root on the machine, if you are not already, by
issuing the su command.% su rootPassword: root_password
2. Create the .package file in the root ( /) directory and specify the name ofthe prototype file to use. Do not include the system-type suffix (such as.rs_aix42); the package program automatically determines the correctmachine type.
# echo "/afs/cellname/wsadmin/etc/config_file" >> /.package
Chapter 11. Configuring Client Machines with the package Program 447
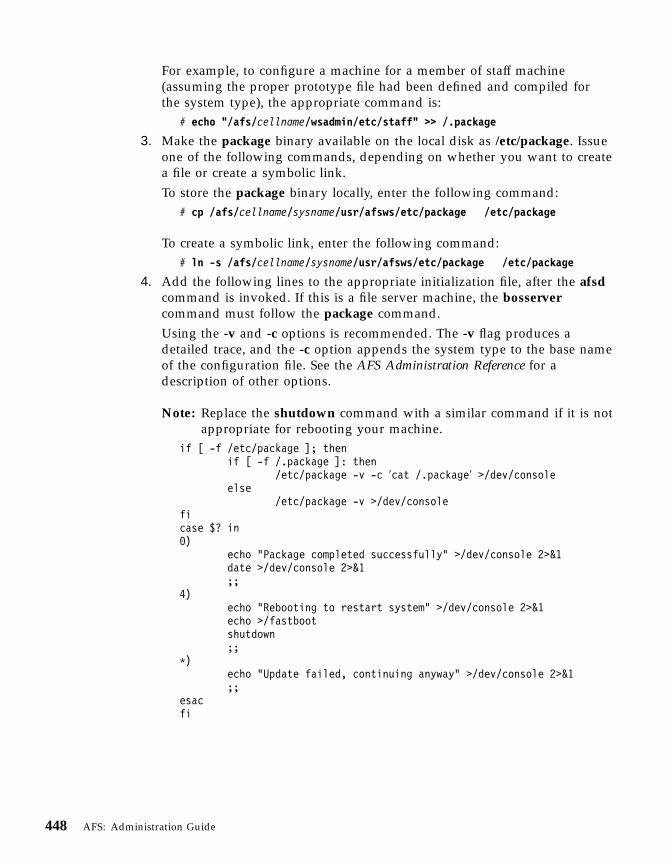
For example, to configure a machine for a member of staff machine(assuming the proper prototype file had been defined and compiled forthe system type), the appropriate command is:
# echo "/afs/cellname/wsadmin/etc/staff" >> /.package
3. Make the package binary available on the local disk as /etc/package. Issueone of the following commands, depending on whether you want to createa file or create a symbolic link.To store the package binary locally, enter the following command:
# cp /afs/cellname/sysname/usr/afsws/etc/package /etc/package
To create a symbolic link, enter the following command:# ln -s /afs/cellname/sysname/usr/afsws/etc/package /etc/package
4. Add the following lines to the appropriate initialization file, after the afsdcommand is invoked. If this is a file server machine, the bosservercommand must follow the package command.Using the -v and -c options is recommended. The -v flag produces adetailed trace, and the -c option appends the system type to the base nameof the configuration file. See the AFS Administration Reference for adescription of other options.
Note: Replace the shutdown command with a similar command if it is notappropriate for rebooting your machine.
if [ -f /etc/package ]; thenif [ -f /.package ]: then
/etc/package -v -c ′cat /.package′ >/dev/consoleelse
/etc/package -v >/dev/consoleficase $? in0)
echo "Package completed successfully" >/dev/console 2>&1date >/dev/console 2>&1;;
4)echo "Rebooting to restart system" >/dev/console 2>&1echo >/fastbootshutdown;;
*)echo "Update failed, continuing anyway" >/dev/console 2>&1;;
esacfi
448 AFS: Administration Guide
Running the package program
After you have created and compiled prototype files and modified clientmachines, you are ready to run the package program. It is probably mostconvenient to run the package program automatically at reboot by invoking itin the machine’s AFS initialization file, but you can also issue the command atthe command shell prompt.
The configuration file must be completely correct. If there are any syntaxerrors or incorrect values, the program exits without executing anyinstruction. To check the configuration file, issue the package command withthe -noaction and -debug flags at the command shell prompt. They display alist of potential problems without actually executing instructions.
The package program follows these general rules. Complete explanations arein “Package Configuration File Instruction Syntax” on page 436.v The package program does not delete any files from the disk unless the R
update code was specified in the prototype file. If the R update code isassociated with the parent directory, the package program removesanything from the local disk directory that is not specified in theconfiguration file.
v Local files are updated only if they are out of date. For each F instruction inthe configuration file, the package program compares the time of the localfile with the indicated source file. If the source file is newer than the local,the file is updated.
v When the initialization file is modified as recommended in “ModifyingClient Machines” on page 447, the package program reboots theworkstation automatically if any files marked with the Q update code areupdated, and if the package program has been invoked from theinitialization file. When a file marked with the Q update code is changed,the package program exits with status code 4, causing a reboot (as directedin the initialization file). Files that require a reboot before changes arerecognized (such as the operating system kernel and/usr/vice/etc/CellServDB files) must be marked with a Q update code in theconfiguration file.
v The package program copies the configuration file it has just used to/etc/package.sysname, where sysname reflects this machine’s system type.The package command interpreter consults this file if you do not provide aconfiguration file name. To be sure that it configures the local disk as youwish, review its contents.
To invoke the package program by rebooting1. Become the local superuser root on the machine, if you are not already, by
issuing the su command.
Chapter 11. Configuring Client Machines with the package Program 449
% su rootPassword: root_password
2. (Recommended) Verify the following:v The /.package file identifies the desired configuration filev The package binary is available as /etc/package
v The initialization file is properly modified to invoke the packageprogram automatically
3. Reboot the machine, using the appropriate command.# shutdown
To invoke the package program directly (without rebooting)1. Become the local superuser root on the machine, if you are not already, by
issuing the su command.% su rootPassword: root_password
2. Verify the following:v The /.package file identifies the desired configuration filev The package binary is available as /etc/package
v The initialization file is properly modified to invoke the packageprogram automatically
3. Issue the package command.# package [initcmd] [-config <base name of configuration file>] \[-fullconfig <full name of configuration file, or stdin for standard input>] \[-overwrite] [-noaction] [-verbose] [-silent] [-rebootfiles]
where
-configSpecifies the full pathname of the configuration file to use, endingin the file’s base name, which omits the suffix that indicates themachine type. The package program knows how to determine amachine’s type, and automatically selects the appropriate versionof the base file name. An example of the proper value for thisargument is staff rather than staff.rs_aix42. You can also have thepackage program refer to /.package to learn the configuration filename by providing the following value:
′cat /.package′
Use either this argument or the -fullconfig argument.
-fullconfigSpecifies the full name of the configuration file to use, completewith the machine-type extension. Examples are staff.rs_aix42 andminimal.hp_ux110 files.
450 AFS: Administration Guide

Another possibility is the string stdin, which indicates that theissuer is providing configuration information via the standardinput stream, either as a piped file or by typing the configurationfile at the keyboard. Press <Ctrl-d> to conclude the input.
Use either this argument or the -config argument.
-overwriteOverwrite elements on the local disk with the source versionindicated in the configuration file, even if the first (owner) w(write) mode bit is turned off on the local disk copy of the file.Files protected by the I update code are not overwritten; see thedefinition for the F instruction.
-noactionDisplays on the standard output stream a trace of potentialproblems in running the command, rather than actually running it.If the -verbose flag is added, the trace also notes the actions thepackage program attempts.
-silent Explicitly invokes the default level of tracing, which includes onlya list of problems encountered while executing the command.
-verboseProduces a detailed trace of the program’s actions on the standardoutput stream. The trace records on the transfer andownership/mode bit setting of each element in the configurationfile.
-rebootfilesPrevents the overwrite of any element marked with the Qupdate-mode code in the configuration file. This effectivelyprevents the machine from rebooting automatically again when thepackage program is invoked from an initialization file.
4. If you think files marked with the Q update code were updated, rebootthe machine. This reboot does not occur automatically.
Chapter 11. Configuring Client Machines with the package Program 451

452 AFS: Administration Guide

Chapter 12. Creating and Deleting User Accounts with theuss Command Suite
The uss command suite helps you create and delete AFS user accountsquickly and easily. You can create a single account with the uss addcommand, delete a single account with the uss delete command, or create anddelete multiple accounts with the uss bulk command.
A single uss add or uss bulk command can create a complete AFS useraccount because the uss command interpreter refers to a template file inwhich you predefine the configuration of many account components. The ussdelete command deletes most of the components of a user account, but doesnot use a template file.
The uss suite also easily incorporates shell scripts or other programs that youwrite to perform parts of account creation and deletion unique to your site. Toinvoke a script or program automatically as a uss command runs, use theappropriate instructions in the template file or bulk input file. Various sectionsof this chapter discuss possible uses for scripts.
Using the uss commands to create and delete accounts is the recommendedmethod because it automates and correctly orders most of the necessary steps.The alternative is to issue a series of separate commands to the various AFSservers, which requires more careful record keeping. For instructions, see“Chapter 13. Administering User Accounts” on page 505.
Summary of Instructions
This chapter explains how to perform the following tasks by using theindicated commands:
Add a single user account uss addDelete a single user account uss deleteAdd and delete multiple accounts uss bulk
Overview of the uss Command Suite
The commands in the uss suite help you to automate the creation anddeletion of AFS user accounts:
© Copyright IBM Corp. 1989, 2000 453
v The uss add command creates all of the components of an account, oneaccount at a time. It consults a template file that defines accountconfiguration.
v The uss delete command deletes the major components of an account, oneaccount at a time. It does not use a template file, so you possibly need toperform additional tasks manually.
v The uss bulk command can create and delete multiple accounts. It refers toa bulk input file that can contain any number of account-creation anddeletion instructions, along with other instructions for further automatingthe process.
The Components of an AFS User Account
An AFS user account can have many components. The only two requiredcomponents are entries in the Protection Database and AuthenticationDatabase, but the other components add functionality and usability. Thefollowing information also appears in a corresponding section of “Chapter 13.Administering User Accounts” on page 505, but is repeated here for yourconvenience.v A Protection Database entry defines the username (the name provided when
authenticating with AFS), and maps it to an AFS user ID (AFS UID), anumber that the AFS servers use internally when referencing users. TheProtection Database also tracks the groups to which the user belongs. Fordetails, see “Chapter 14. Administering the Protection Database” onpage 533.
v An Authentication Database entry records the user’s AFS password in ascrambled form suitable for use as an encryption key.
v A home volume stores all the files in the user’s home directory together on asingle partition of a file server machine. The volume has an associated quotathat limits its size. For a complete discussion of volumes, see “Chapter 5.Managing Volumes” on page 147.
v A mount point makes the contents of the user’s volume visible andaccessible in the AFS filespace, and acts as the user’s home directory. Formore details about mount points, see “About Mounting Volumes” onpage 151.
v Full access permissions on the home directory’s access control list (ACL) andownership of the directory (as displayed by the UNIX ls -ld command)enable the user to manage his or her files. For details on AFS file protection,see “Chapter 15. Managing Access Control Lists” on page 559.
v A local password file entry (in the /etc/passwd file or equivalent) of each AFSclient machine enables the user to log in and access AFS files through theCache Manager. A subsequent section in this chapter further discusses localpassword file entries.
454 AFS: Administration Guide

v Other optional configuration files make the account more convenient to use.Such files help the user log in and log out more easily, receive electronicmail, print, and so on.
Privilege Requirements for the uss Commands
To issue uss commands successfully, you usually need all of the standard AFSadministrative privileges: membership in the system:administrators group,inclusion in the /usr/afs/etc/UserList file on every relevant server machine,and the ADMIN flag on your Authentication Database entry. For details onadministrative privilege, see “Chapter 16. Managing Administrative Privilege”on page 577.
Avoiding and Recovering from Errors and Interrupted Operations
As for any complex operation, there are a number of possible reasons that anaccount-creation or deletion operation can halt before it completes. You caneasily avoid several of the common reasons by making the following checksbefore issuing a uss command:v Verify that you have all of the administrative privileges you need to
complete an operation, as described in “Privilege Requirements for the ussCommands”. The instructions for using the uss add, uss delete, and ussbulk commands include this check as a step.
v Proofread the template and bulk input files for correct syntax andacceptable values. For discussion, see “Constructing a uss Template File” onpage 463 and “Constructing a Bulk Input File” on page 496.
v Do not issue uss commands when you are aware of network, servermachine, or server process outages. Because uss operations affect so manycomponents of AFS, it is unlikely that the command can succeed whenthere are outages.
Another way to avoid errors that halt an operation is to preview the usscommand by combining the -dryrun flag with the other arguments to be usedon the actual command. The uss command interpreter generates a screen traceof the actions to be performed by the actual command, without performingthem.
Using the -dryrun flag reveals many basic errors that can halt an operation,particularly the ones due to incorrect syntax in the command line, templatefile, or bulk input file. It does not catch all possible errors, however, becausethe command interpreter is not actually attempting to perform the actions it istracing. For example, a Volume Server outage does not necessarily halt thevolume creation step when the -dryrun flag is included, because thecommand interpreter is not actually contacting the server; such an outagehalts the actual creation operation.
Chapter 12. Creating and Deleting User Accounts with the uss Command Suite 455

When the uss command interpreter encounters error conditions minor enoughthat they do not require halting the operation, it usually generates a messagethat begins with the string uss: Warning: and describes the action it is takingto avoid halting. For example, if a user’s Protection Database entry alreadyexists, the following message appears on the standard output stream:
uss: Warning: User 'user' already in the protection databaseThe uid for user 'user' is AFS UID
If an error is more serious, the word Warning does not appear in the message,which instead describes why the command interpreter cannot perform therequested action. Not all of these errors cause the uss operation to halt, butthey still require you to take corrective action. For example, attempting tocreate a mount point fails if you lack the necessary permissions on the parentdirectory’s ACL, or if the mount point pathname in the V instruction’smount_point field is malformed. However, this error does not cause thecreation operation to halt until later instructions in the template attempt toinstall subdirectories or files under the nonexistent mount point.
If the command shell prompts returns directly after an error message, then theerror generally was serious enough to halt the operation. When an error haltsaccount creation or deletion, the best way to recover is to find and fix thecause, and then reissue the same uss command.
The following list describes what happens when components of a user’saccount already exist when you reissue an account-creation command (the ussadd command, or the uss bulk command when the bulk input file containsadd instructions):v If the Protection Database entry already exists, a message confirms its
existence and specifies the associated AFS UID.v If the Authentication Database entry already exists, a message confirms its
existence.v If the volume and associated Volume Location Database (VLDB) entry
already exist, a message confirms their existence. However, the usscommand interpreter does alter the volume’s quota, mount point, or ACL ifany of the relevant fields in the template V instruction have changed sincethe command last ran. If the value in the mount_point field has changed, thecommand interpreter creates the new mount point but does not remove anyexisting mount points.
v If any of the fields in the template A instruction have changed, the usscommand interpreter makes the changes without comment.
v If a directory, file, or link defined by a template file D, E, F, L, or Sinstruction already exists, the uss command interpreter replaces the existingelement with one that conforms to the template definition. To control
456 AFS: Administration Guide
whether the uss command interpreter prompts for confirmation that youwish to overwrite a given element, use the -overwrite flag to the uss add oruss bulk command:– If you include the -overwrite flag, the command interpreter
automatically overwrites all elements without asking for confirmation.– If you omit the flag, the command interpreter prompts once for each
account to ask if you want to overwrite all elements associated with it.v The command interpreter always reexecutes X instructions in the template
file. If a command’s result already holds, reissuing it has the same effect asreissuing it outside the context of the uss commands.
The following describes what happens when a uss delete command referencesaccount components that have already been deleted.v If the volume and VLDB entry no longer exist, a message confirms their
absence.v If the Authentication Database entry no longer exists, a message confirms
its absence.
Creating Local Password File Entries with uss
To obtain authenticated access to a cell’s AFS filespace, a user must not onlyhave a valid AFS token, but also an entry in the local password file(/etc/passwd or equivalent) of the AFS client machine. This section discusseswhy it is important for the user’s AFS UID to match to the UNIX UID listedin the local password file, the appropriate value to put in the file’s passwordfield, and outlines a method for creating a single source password file.
For instructions on using the template file’s E instruction to generate localpassword file entries automatically as part of account creation, see “Creating aCommon Source Password File” on page 459.
The following information also appears in a corresponding section of“Chapter 13. Administering User Accounts” on page 505, but is repeated herefor your convenience.
Assigning AFS and UNIX UIDs that Match
A user account is easiest to administer and use if the AFS user ID number(AFS UID) and UNIX UID match. All instructions in the AFS documentationassume that they do.
The most basic reason to make AFS and UNIX UIDs the same is so that theowner name reported by the UNIX ls -l and ls -ld commands makes sense forAFS files and directories. Following standard UNIX practice, the File Server
Chapter 12. Creating and Deleting User Accounts with the uss Command Suite 457

records a number rather than a username in an AFS file or directory’s ownerfield: the owner’s AFS UID. When you issue the ls -l command, it translatesthe UID to a username according to the mapping in the local password file,not the AFS Protection Database. If the AFS and UNIX UIDs do not match,the ls -l command reports an unexpected (and incorrect) owner. The outputcan even vary on different client machines if their local password files mapthe same UNIX UID to different names.
Follow the recommendations in the indicated sections to make AFS and UNIXUIDs match when you are creating accounts for various types of users:v If creating an AFS account for a user who already has a UNIX UID, see
“Converting Existing UNIX Accounts with uss” on page 461.v If some users in your cell have existing UNIX accounts but the user for
whom you are creating an AFS account does not, then it is best to allow theProtection Server to allocate an AFS UID automatically. To avoid overlap ofAFS UIDs with existing UNIX UIDs, set the Protection Database’s max userid counter higher than the largest UNIX UID, using the instructions in“Displaying and Setting the AFS UID and GID Counters” on page 556.
v If none of your users have existing UNIX accounts, allow the ProtectionServer to allocate AFS UIDs automatically, starting either at its default or atthe value you have set for the max user id counter.
Specifying Passwords in the Local Password File
Authenticating with AFS is easiest for your users if you install and configurean AFS-modified login utility, which logs a user into the local file system andobtains an AFS token in one step. In this case, the local password file nolonger controls a user’s ability to login in most circumstances, because theAFS-modified login utility does not consult the local password file if the userprovides the correct AFS password. You can nonetheless use a password fileentry’s password field (usually, the second field) in the following ways tocontrol login and authentication:v To prevent both local login and AFS authentication, place an asterisk ( * ) in
the field. This is useful mainly in emergencies, when you want to prevent acertain user from logging into the machine.
v To prevent login to the local file system if the user does not provide thecorrect AFS password, place a character string of any length other than thestandard thirteen characters in the field. This is appropriate if you want toallow only people with local AFS accounts to log into to your machines. Asingle X or other character is the most easily recognizable way to do this.
v To enable a user to log into the local file system even after providing anincorrect AFS password, record a standard UNIX encrypted password inthe field by issuing the standard UNIX password-setting command (passwdor equivalent).
458 AFS: Administration Guide
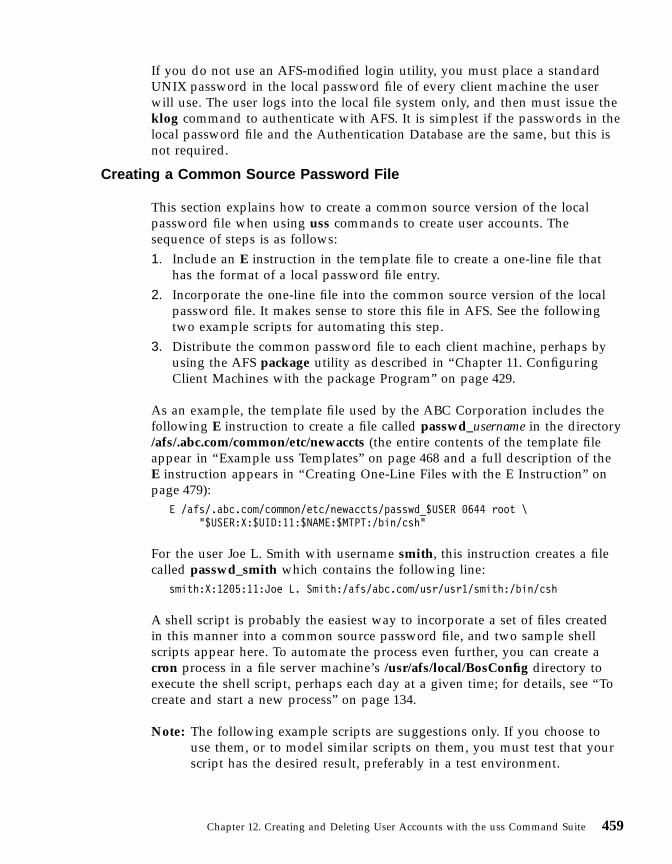
If you do not use an AFS-modified login utility, you must place a standardUNIX password in the local password file of every client machine the userwill use. The user logs into the local file system only, and then must issue theklog command to authenticate with AFS. It is simplest if the passwords in thelocal password file and the Authentication Database are the same, but this isnot required.
Creating a Common Source Password File
This section explains how to create a common source version of the localpassword file when using uss commands to create user accounts. Thesequence of steps is as follows:1. Include an E instruction in the template file to create a one-line file that
has the format of a local password file entry.2. Incorporate the one-line file into the common source version of the local
password file. It makes sense to store this file in AFS. See the followingtwo example scripts for automating this step.
3. Distribute the common password file to each client machine, perhaps byusing the AFS package utility as described in “Chapter 11. ConfiguringClient Machines with the package Program” on page 429.
As an example, the template file used by the ABC Corporation includes thefollowing E instruction to create a file called passwd_username in the directory/afs/.abc.com/common/etc/newaccts (the entire contents of the template fileappear in “Example uss Templates” on page 468 and a full description of theE instruction appears in “Creating One-Line Files with the E Instruction” onpage 479):
E /afs/.abc.com/common/etc/newaccts/passwd_$USER 0644 root \"$USER:X:$UID:11:$NAME:$MTPT:/bin/csh"
For the user Joe L. Smith with username smith, this instruction creates a filecalled passwd_smith which contains the following line:
smith:X:1205:11:Joe L. Smith:/afs/abc.com/usr/usr1/smith:/bin/csh
A shell script is probably the easiest way to incorporate a set of files createdin this manner into a common source password file, and two sample shellscripts appear here. To automate the process even further, you can create acron process in a file server machine’s /usr/afs/local/BosConfig directory toexecute the shell script, perhaps each day at a given time; for details, see “Tocreate and start a new process” on page 134.
Note: The following example scripts are suggestions only. If you choose touse them, or to model similar scripts on them, you must test that yourscript has the desired result, preferably in a test environment.
Chapter 12. Creating and Deleting User Accounts with the uss Command Suite 459
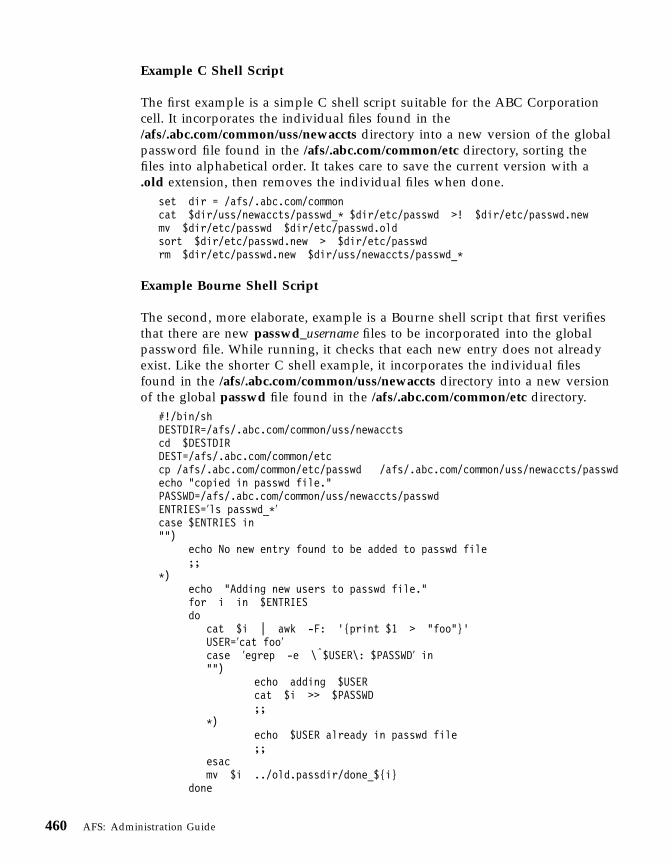
Example C Shell Script
The first example is a simple C shell script suitable for the ABC Corporationcell. It incorporates the individual files found in the/afs/.abc.com/common/uss/newaccts directory into a new version of the globalpassword file found in the /afs/.abc.com/common/etc directory, sorting thefiles into alphabetical order. It takes care to save the current version with a.old extension, then removes the individual files when done.
set dir = /afs/.abc.com/commoncat $dir/uss/newaccts/passwd_* $dir/etc/passwd >! $dir/etc/passwd.newmv $dir/etc/passwd $dir/etc/passwd.oldsort $dir/etc/passwd.new > $dir/etc/passwdrm $dir/etc/passwd.new $dir/uss/newaccts/passwd_*
Example Bourne Shell Script
The second, more elaborate, example is a Bourne shell script that first verifiesthat there are new passwd_username files to be incorporated into the globalpassword file. While running, it checks that each new entry does not alreadyexist. Like the shorter C shell example, it incorporates the individual filesfound in the /afs/.abc.com/common/uss/newaccts directory into a new versionof the global passwd file found in the /afs/.abc.com/common/etc directory.
#!/bin/shDESTDIR=/afs/.abc.com/common/uss/newacctscd $DESTDIRDEST=/afs/.abc.com/common/etccp /afs/.abc.com/common/etc/passwd /afs/.abc.com/common/uss/newaccts/passwdecho "copied in passwd file."PASSWD=/afs/.abc.com/common/uss/newaccts/passwdENTRIES=′ls passwd_*′case $ENTRIES in"")
echo No new entry found to be added to passwd file;;
*)echo "Adding new users to passwd file."for i in $ENTRIESdo
cat $i | awk -F: '{print $1 > "foo"}'USER=′cat foo′case ′egrep -e \|$USER\: $PASSWD′ in"")
echo adding $USERcat $i >> $PASSWD;;
*)echo $USER already in passwd file;;
esacmv $i ../old.passdir/done_${i}
done
460 AFS: Administration Guide
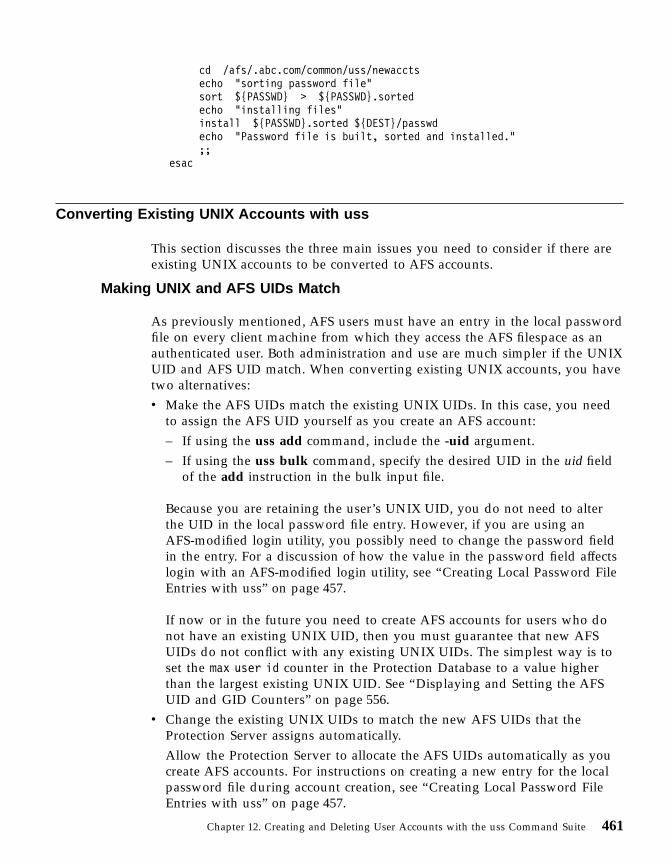
cd /afs/.abc.com/common/uss/newacctsecho "sorting password file"sort ${PASSWD} > ${PASSWD}.sortedecho "installing files"install ${PASSWD}.sorted ${DEST}/passwdecho "Password file is built, sorted and installed.";;
esac
Converting Existing UNIX Accounts with uss
This section discusses the three main issues you need to consider if there areexisting UNIX accounts to be converted to AFS accounts.
Making UNIX and AFS UIDs Match
As previously mentioned, AFS users must have an entry in the local passwordfile on every client machine from which they access the AFS filespace as anauthenticated user. Both administration and use are much simpler if the UNIXUID and AFS UID match. When converting existing UNIX accounts, you havetwo alternatives:v Make the AFS UIDs match the existing UNIX UIDs. In this case, you need
to assign the AFS UID yourself as you create an AFS account:– If using the uss add command, include the -uid argument.– If using the uss bulk command, specify the desired UID in the uid field
of the add instruction in the bulk input file.
Because you are retaining the user’s UNIX UID, you do not need to alterthe UID in the local password file entry. However, if you are using anAFS-modified login utility, you possibly need to change the password fieldin the entry. For a discussion of how the value in the password field affectslogin with an AFS-modified login utility, see “Creating Local Password FileEntries with uss” on page 457.
If now or in the future you need to create AFS accounts for users who donot have an existing UNIX UID, then you must guarantee that new AFSUIDs do not conflict with any existing UNIX UIDs. The simplest way is toset the max user id counter in the Protection Database to a value higherthan the largest existing UNIX UID. See “Displaying and Setting the AFSUID and GID Counters” on page 556.
v Change the existing UNIX UIDs to match the new AFS UIDs that theProtection Server assigns automatically.Allow the Protection Server to allocate the AFS UIDs automatically as youcreate AFS accounts. For instructions on creating a new entry for the localpassword file during account creation, see “Creating Local Password FileEntries with uss” on page 457.
Chapter 12. Creating and Deleting User Accounts with the uss Command Suite 461
There is one drawback to changing the UNIX UID: any files and directoriesthat the user owned in the local file system before becoming an AFS userstill have the former UID in their owner field. If you want the ls -l and ls-ld commands to display the correct owner, you must use the chowncommand to change the value to the user’s new UID, whether you areleaving the file in the local file system or moving it to AFS. See “MovingLocal Files into AFS”.
Setting the Password Field Appropriately
Existing UNIX accounts already have an entry in the local password file,probably with a (scrambled) password in the password field. You possiblyneed to change the value in the field, depending on the type of login utilityyou use:v If the login utility is not modified for use with AFS, the actual password
must appear (in scrambled form) in the password field of the localpassword file entry.
v If the login utility is modified for use with AFS, choose one of theacceptable values, each of which affects the login utility’s behaviordifferently. See “Creating Local Password File Entries with uss” on page 457.
If you choose to place an actual password in a local password file entry, thenyou can define a dummy password when you use a template file E instructionto create the entry, as described in “Creating One-Line Files with the EInstruction” on page 479. Have the user issue the UNIX password-settingcommand (passwd or equivalent) to replace the dummy with an actual secretpassword.
Moving Local Files into AFS
New AFS users with existing UNIX accounts probably already own files anddirectories stored in a machine’s local file system, and it usually makes senseto transfer them into the new home volume. The easiest method is to movethem onto the local disk of an AFS client machine, and then use the UNIX mvcommand to transfer them into the user’s new AFS home directory.
As you move files and directories into AFS, keep in mind that the meaning oftheir mode bits changes. AFS ignores the second and third sets of mode bits(group and other), and does not use the first set (the owner bits) directly, butonly in conjunction with entries on the ACL (for details, see “How AFSInterprets the UNIX Mode Bits” on page 575). Be sure that the ACL protectsthe file or directory at least as securely as the mode bits.
If you have chosen to change a user’s UNIX UID to match a new AFS UID,you must change the ownership of UNIX files and directories as well. Only
462 AFS: Administration Guide
members of the system:administrators group can issue the chown commandon files and directories once they reside in AFS.
Constructing a uss Template File
Creating user accounts with uss commands is generally more convenient thanusing individual commands. You control the account creation process just asclosely, but the uss template file enables you to predefine many aspects ofaccount configuration. Because you construct the template before issuing usscommands, you have time to consider configuration details carefully andcorrect syntax errors. The following list summarizes some further advantagesof using a template:v You do not have to remember the correct order in which to create or delete
account components, or the order of each command’s arguments, whichreduces the likelihood of errors.
v You do not have to type the same information multiple times. Instead, youcan place constants and variables in the template file that enable you totype as little on the command line as possible. See “Using Constants andVariables in the Template File” on page 465.
v You can create different templates for different types of users. Instead ofhaving to remember which components differ for a given user, specify theappropriate template when issuing the uss add or uss bulk command.
v You can create any of the three types of AFS account (authentication-only,basic, or full) by including or omitting certain information in the template,as described in “Creating the Three Types of User Accounts” on page 464.
The following list briefly describes the instructions that can appear in atemplate file and points you to a later section for more details. It lists them inthe order that is usually optimal for correct handling of dependencies betweenthe different types of instruction.
G Defines a directory that is one of a set of parent directories into whichthe uss command interpreter evenly distributes newly created homedirectories. Place the corresponding template file variable, $AUTO, inthe mount_point field of the V instruction. See “Evenly DistributingUser Home Directories with the G Instruction” on page 470 and“Creating a Volume with the V Instruction” on page 471.
V Creates a volume, mounts it as the user’s home directory at aspecified location in the AFS filespace, sets the volume’s quota, anddefines the owner and ACL for the directory. This instruction mustappear in any template that is not empty (zero-length). See “Creatinga Volume with the V Instruction” on page 471.
D Creates a directory, generally a subdirectory of the new home
Chapter 12. Creating and Deleting User Accounts with the uss Command Suite 463
directory, and sets its mode bits, owner, and ACL. See “Creating aDirectory with the D Instruction” on page 475.
F Creates a file by copying a prototype and sets its mode bits andowner. See “Creating a File from a Prototype with the F Instruction”on page 477.
E Creates a single-line file by copying in the contents of the instructionitself, then sets the file’s mode bits and owner. See “Creating One-LineFiles with the E Instruction” on page 479.
L Creates a hard link. See “Creating Links with the L and SInstructions” on page 481.
S Creates a symbolic link. See “Creating Links with the L and SInstructions” on page 481.
A Improves account security by imposing restrictions on passwords andauthentication attempts. See “Increasing Account Security with the AInstruction” on page 483.
X Executes a command. See “Executing Commands with the XInstruction” on page 485.
Creating the Three Types of User Accounts
Using the uss add and uss bulk commands, you can create three types ofaccounts that differ in their levels of functionality. For a description of thetypes, see “Configuring AFS User Accounts” on page 43. The following listexplains how to construct a template for each type:v To create an authentication-only account, create an empty (zero-length)
template file. Such an account has only two components: entries in theAuthentication Database and Protection Database.
v To create a basic account, include a V instruction, and G instructions if youwant to distribute home directories evenly as described in “EvenlyDistributing User Home Directories with the G Instruction” on page 470. Inaddition to Authentication Database and Protection Database entries, thistype of account includes a volume mounted at the home directory withowner and ACL set appropriately.
v To create a full account, include D, E, F, L, and S instructions asappropriate, in addition to the V and G instructions. This type of accountincludes configuration files for basic functions such as logging in, printing,and mail delivery. For a discussion of some useful types of configurationfiles, see “Creating Standard Files in New AFS Accounts” on page 48.
464 AFS: Administration Guide
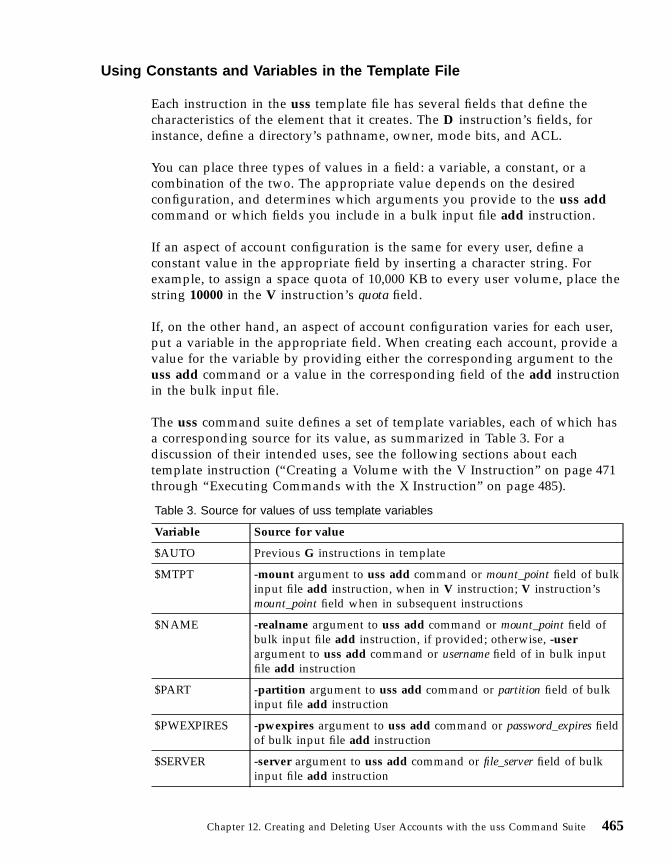
Using Constants and Variables in the Template File
Each instruction in the uss template file has several fields that define thecharacteristics of the element that it creates. The D instruction’s fields, forinstance, define a directory’s pathname, owner, mode bits, and ACL.
You can place three types of values in a field: a variable, a constant, or acombination of the two. The appropriate value depends on the desiredconfiguration, and determines which arguments you provide to the uss addcommand or which fields you include in a bulk input file add instruction.
If an aspect of account configuration is the same for every user, define aconstant value in the appropriate field by inserting a character string. Forexample, to assign a space quota of 10,000 KB to every user volume, place thestring 10000 in the V instruction’s quota field.
If, on the other hand, an aspect of account configuration varies for each user,put a variable in the appropriate field. When creating each account, provide avalue for the variable by providing either the corresponding argument to theuss add command or a value in the corresponding field of the add instructionin the bulk input file.
The uss command suite defines a set of template variables, each of which hasa corresponding source for its value, as summarized in Table 3. For adiscussion of their intended uses, see the following sections about eachtemplate instruction (“Creating a Volume with the V Instruction” on page 471through “Executing Commands with the X Instruction” on page 485).
Table 3. Source for values of uss template variables
Variable Source for value
$AUTO Previous G instructions in template
$MTPT -mount argument to uss add command or mount_point field of bulkinput file add instruction, when in V instruction; V instruction’smount_point field when in subsequent instructions
$NAME -realname argument to uss add command or mount_point field ofbulk input file add instruction, if provided; otherwise, -userargument to uss add command or username field of in bulk inputfile add instruction
$PART -partition argument to uss add command or partition field of bulkinput file add instruction
$PWEXPIRES -pwexpires argument to uss add command or password_expires fieldof bulk input file add instruction
$SERVER -server argument to uss add command or file_server field of bulkinput file add instruction
Chapter 12. Creating and Deleting User Accounts with the uss Command Suite 465
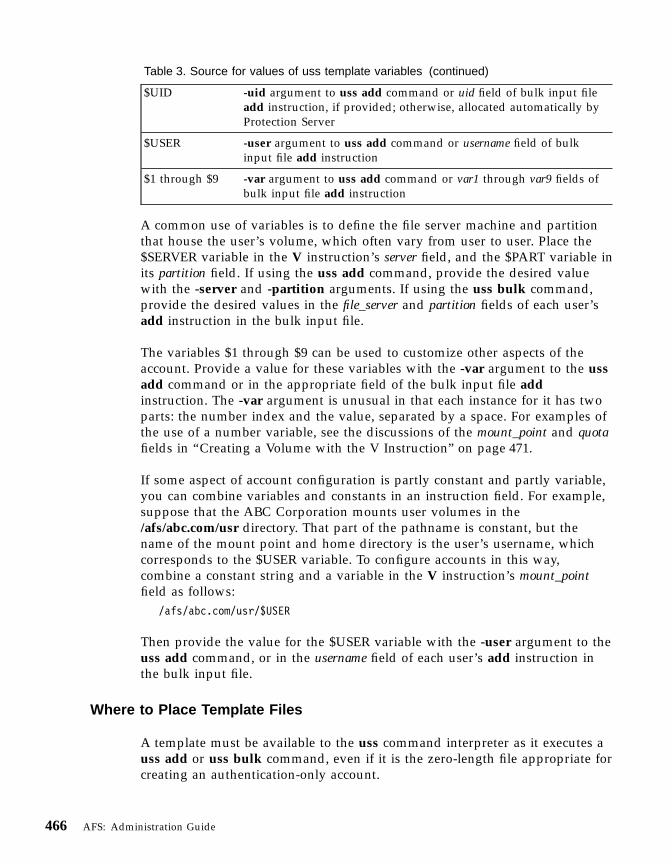
Table 3. Source for values of uss template variables (continued)
$UID -uid argument to uss add command or uid field of bulk input fileadd instruction, if provided; otherwise, allocated automatically byProtection Server
$USER -user argument to uss add command or username field of bulkinput file add instruction
$1 through $9 -var argument to uss add command or var1 through var9 fields ofbulk input file add instruction
A common use of variables is to define the file server machine and partitionthat house the user’s volume, which often vary from user to user. Place the$SERVER variable in the V instruction’s server field, and the $PART variable inits partition field. If using the uss add command, provide the desired valuewith the -server and -partition arguments. If using the uss bulk command,provide the desired values in the file_server and partition fields of each user’sadd instruction in the bulk input file.
The variables $1 through $9 can be used to customize other aspects of theaccount. Provide a value for these variables with the -var argument to the ussadd command or in the appropriate field of the bulk input file addinstruction. The -var argument is unusual in that each instance for it has twoparts: the number index and the value, separated by a space. For examples ofthe use of a number variable, see the discussions of the mount_point and quotafields in “Creating a Volume with the V Instruction” on page 471.
If some aspect of account configuration is partly constant and partly variable,you can combine variables and constants in an instruction field. For example,suppose that the ABC Corporation mounts user volumes in the/afs/abc.com/usr directory. That part of the pathname is constant, but thename of the mount point and home directory is the user’s username, whichcorresponds to the $USER variable. To configure accounts in this way,combine a constant string and a variable in the V instruction’s mount_pointfield as follows:
/afs/abc.com/usr/$USER
Then provide the value for the $USER variable with the -user argument to theuss add command, or in the username field of each user’s add instruction inthe bulk input file.
Where to Place Template Files
A template must be available to the uss command interpreter as it executes auss add or uss bulk command, even if it is the zero-length file appropriate forcreating an authentication-only account.
466 AFS: Administration Guide
If you do not provide the -template argument to the uss add or uss bulkcommand, then the command interpreter searches for a template file calleduss.template in each of the following directories in turn:1. The current working directory2. /afs/cellname/common/uss, where cellname is the local cell3. /etc
To use a template file with a different name or stored in a different directory,include the -template argument to the uss add or uss bulk command. If youprovide a filename only, the command interpreter looks for it in thedirectories listed just previously. If you provide a pathname and filename, itlooks only in the specified directory, interpreting a partial pathname relativeto the current working directory.
Some General Rules for Constructing a Template
This section summarizes some general rules to follow when constructing atemplate file. For each instruction’s syntax definition, see the followingsections (“Evenly Distributing User Home Directories with the G Instruction”on page 470 through “Executing Commands with the X Instruction” on
page 485).v If a variable takes its value from an element elsewhere within the template,
the definition must precede the reference. Putting the instruction lines inthe following order usually results in correct resolution of variables:G V D F E L S A X
v The fields in each instruction must appear in the order specified by theinstruction’s syntax definition, which appear in the following sections abouteach instruction. You cannot omit a field. Separate each field from itsneighbors with one or more spaces.
v When specifying a pathname, provide a full one. Partial pathnames areinterpreted relative to the current working directory (the one in which theuss command is issued), with possibly unintended results.
v Each instruction must appear on a single line in the template file, with anewline character (<Return>) only at the end of the instruction. Someexample instructions appear in this document on more than one line, butthat is only for legibility.
v Provide a value for every variable that appears in the template by includingthe corresponding argument to the uss add command or placing a value inthe corresponding field of the bulk input file add instruction. A missingvalue halts the entire creation operation. If a variable does not appear in thetemplate file, the command interpreter ignores the correspondingcommand-line argument or field in the bulk input file, even if you provideit.
Chapter 12. Creating and Deleting User Accounts with the uss Command Suite 467
v You can use blank lines in the template file to increase its legibility. If youplace comments in the file, begin each comment line with the number sign(#).
About Creating Local Disk Directories and Files
It is possible to use the D, E, and F instructions to create directories or files inthe local file system of the machine on which you are issuing the usscommand, but that usage is not recommended. It introduces two potentialcomplications:v The local file system automatically assigns ownership of a new local disk
directory or file to its creator. Because you are the issuer of the usscommand that is creating the object, it records your current UNIX UID. Ifthat is not appropriate and you want to designate another owner as theobject is created, then you must be logged in as the local superuser root(the local file system allows only the root user to issue the UNIX chowncommand, which the uss command interpreter invokes to change the ownerfrom the default value). You must also use the -admin argument to the ussadd or uss bulk command to authenticate as a privileged AFSadministrator. Only an administrator can create Authentication Databaseand Protection Database entries, which the uss command interpreter alwayscreates as part of a new account.The alternative is to become the local superuser root after the uss operationcompletes, and issue the necessary chown command then. However, thatmakes the account creation process that much less automated.
v Creating a local disk directory always generates an error message becausethe uss command interpreter cannot successfully set a local directory’sACL. The directory is created nevertheless, and a value still must appear inthe D instruction’s ACL field.
The recommended method for configuring a machine’s local disk is to use theAFS package utility instead; see “Chapter 11. Configuring Client Machineswith the package Program” on page 429.
Example uss Templates
This section describes example templates for the basic and full account types(the template for an authentication-only account is empty).
The first example creates a basic account. It contains two G instructions and aV instruction that defines the volume name, file server machine, partition,quota in kilobytes, mount point, home directory owner, and home directoryaccess control list. In the ABC Corporation cell, a suitable template is:
468 AFS: Administration Guide
G /afs/.abc.com/usr1G /afs/.abc.com/usr2V user.$USER $SERVER.abc.com /vicep$PART 5000 $AUTO/$USER $UID \
$USER all staff rl
When issuing the uss add command with this type of template, provide thefollowing arguments:v -user to specify the username for the $USER variablev -server to specify the unique part of the file server machine name for the
$SERVER variablev -partition to specify the unique part of the partition name for the $PART
variable
The Protection Server automatically assigns an AFS UID for the $UIDvariable, and the G instructions provide a value for the $AUTO variable.
The following example template file creates a full account in the ABCCorporation cell. The following sections about each type of instructiondescribe the effect of the examples. Note that the V and E instructions appearon two lines each only for the sake of legibility.
## Specify the available grouping directories#G /afs/.abc.com/usr1G /afs/.abc.com/usr2## Create the user's home volume#V user.$USER $SERVER.abc.com /vicep$PART 5000 /afs/.abc.com/$AUTO/$USER \
$UID $USER all abc:staff rl## Create directories and files for mail#D $MTPT/.MESSAGES 0700 $UID $USER all abc:staff noneD $MTPT/.Outgoing 0700 $UID $USER rlidwk postman rlidwkD $MTPT/Mailbox 0700 $UID $USER all abc:staff none system:anyuser lik## Here are some useful scripts for login etc.#F $MTPT/.Xbiff 0755 $UID /afs/abc.com/admin/user/protoF $MTPT/.Xresources 0644 $UID /afs/abc.com/admin/user/protoF $MTPT/.Xsession 0755 $UID /afs/abc.com/admin/user/protoF $MTPT/.cshrc 0755 $UID /afs/abc.com/admin/user/protoF $MTPT/.login 0755 $UID /afs/abc.com/admin/user/protoF $MTPT/.logout 0755 $UID /afs/abc.com/admin/user/protoF $MTPT/.twmrc 0644 $UID /afs/abc.com/admin/user/protoF $MTPT/preferences 0644 $UID /afs/abc.com/admin/user/proto## Make a passwd entry#E /afs/.abc.com/common/etc/newaccts/passwd_$USER 0644 root \
Chapter 12. Creating and Deleting User Accounts with the uss Command Suite 469
"$USER:X:$UID:11:$NAME:$MTPT:/bin/csh"## Put in the standard password/authentication checks#A $USER 250 noreuse 9 25## Create and mount a public volume for the user#X "create_public_vol $USER $1 $2"## Here we set up the symbolic link to public directory#S /afs/abc.com/public/$USER $MTPT/public
Evenly Distributing User Home Directories with the G Instruction
In cells with thousands of user accounts, it often makes sense to distribute themount points for user volumes into multiple parent directories, becauseplacing them all in one directory noticeably slows down directory lookupwhen a user home directory is accessed. A possible solution is to create parentdirectories that group user home directories alphabetically, or that reflectdivisions like academic or corporate departments. However, in a really largecell, some such groups can still be large enough to slow directory lookup, andusers who belong to those groups are unfairly penalized every time theyaccess their home directory. Another drawback to groupings that reflectworkplace divisions is that you must move mount points when users changedepartmental affiliation.
An alternative is an even distribution of user home directories into multipleparent directories that do not represent workplace divisions. The usscommand suite enables you to define a list of directories by placing a Ginstruction for each one at the top of the template file, and then using the$AUTO variable in the V instruction’s mount_point field. When the usscommand interpreter encounters the $AUTO variable, it substitutes thedirectory named by a G instruction that currently has the fewest entries.(Actually, the $AUTO variable can appear in any field that includes apathname, in any type of instruction. In all cases, the command interpretersubstitutes the directory that currently has the fewest entries.)
The G instruction’s syntax is as follows:G directory
where directory specifies either a complete directory pathname or only thefinal element (the directory itself). The choice determines the appropriatevalue to place in the V instruction’s mount_point field.
Specify the read/write path to each directory, to avoid the failure that resultswhen you attempt to create a new mount point in a read-only volume. By
470 AFS: Administration Guide
convention, you indicate the read/write path by placing a period before thecell name at the pathname’s second level (for example, /afs/.abc.com). Forfurther discussion of the concept of read/write and read-only paths throughthe filespace, see “Mounting Volumes” on page 169.
For example, the ABC Corporation example template for a full account in“Example uss Templates” on page 468 defines two directories:
G /afs/.abc.com/usr1G /afs/.abc.com/usr2
and puts the value $AUTO/$USER in the V instruction’s mount_point field. Analternative with the same result is to define the directories as follows:
G usr1G usr2
and specify a more complete pathname in the V instruction’s mount_pointfield: /afs/.abc.com/$AUTO/$USER.
Creating a Volume with the V Instruction
Unless the template file is empty (zero-length), one and only one Vinstruction must appear in it. (To create other volumes for a user as part of auss account-creation operation, use the X instruction to invoke the vos createcommand or a script that invokes that command along with others, such asthe fs mkmount command. For an example, see “Executing Commands withthe X Instruction” on page 485.)
The V instruction defines the following AFS entities:v A volume and associated VLDB entryv The volume’s site (file server machine and partition)v The volume’s mount point in the AFS filespace, which becomes the user’s
home directoryv The volume’s space quotav The home directory’s owner, usually the new userv The home directory’s ACL, which normally at least grants all permissions
to the user
The following discussion of the fields in a V instruction refers to the examplein the full account template from “Example uss Templates” on page 468 (theinstruction appears here on two lines only for legibility):
V user.$USER $SERVER.abc.com /vicep$PART 5000 \/afs/.abc.com/$AUTO/$USER $UID $USER all abc:staff rl
The V instruction’s syntax is as follows:
Chapter 12. Creating and Deleting User Accounts with the uss Command Suite 471
V volume_name server partition quota mount_point owner ACL
where
V Indicates a volume creation instruction.
volume_nameSpecifies the volume’s name as recorded in the VLDB.
To follow the convention of including the user’s name as part of thevolume name, include the $USER variable in this field. The variabletakes its value from the -user argument to the uss add command orfrom the bulk input file add instruction’s username field.
The ABC Corporation example uses the value user.$USER to assignthe conventional volume name, user.username. When creating anaccount for user smith, for example, you then include -user smith asan argument to the uss add command, or place the value smith in thebulk input file add instruction’s username field.
server Names the file server machine on which to create the new volume. Itis best to provide a fully qualified host name (for example,fs1.abc.com), but an abbreviated form is acceptable if the cell’snaming service is available to resolve it at the time the volume iscreated.
To place different users’ volumes on different file server machines, usethe $SERVER variable in this field, and provide a value for it eitherwith the -server argument to the uss add command or in the serverfield of the bulk input file add instruction. One easy way to specify afully qualified hostname without having to type it completely on thecommand line is to combine a constant and the $SERVER variable.Specifically, the constant specifies the domain-name suffix common toall the file server machines.
In the ABC Corporation example, all of the file server machines in thecell share the abc.com domain name suffix, so the server fieldcombines a variable and constant: $SERVER.abc.com. To place thenew volume on the machine fs1.abc.com, you then include -server fs1as an argument to the uss add command, or place the value fs1 in thebulk input file add instruction’s server field.
partitionSpecifies the partition on which to create the user’s volume; it must beon the file server machine named in the server field. Identify thepartition by its complete name (for example, /vicepa) or use one of theabbreviations listed in “Rules for Using Abbreviations and Aliases” onpage 607.
To place different users’ volumes on different partitions, use the$PART variable in this field, and provide a value for it either with the
472 AFS: Administration Guide
-partition argument to the uss add command or in the partition fieldof the bulk input file add instruction. Because all full partition namesstart with the /vicep string, it is convenient to combine that string as aconstant with the $PART variable.
The ABC Corporation example template combines the constant string/vicep and the $PART variable in this way, as /vicep$PART.
quota Sets the maximum number of kilobyte blocks the volume can occupyon the file server machine’s disk. It must be an integer. If you assignthe same quota to all user volumes, specify a constant value. To assigndifferent quotas to different volumes, place one of the numbervariables ($1 through $9) in this field, and provide a value for it eitherwith the -var argument to the uss add command or in the appropriatefield of the bulk input file add instruction.
The ABC Corporation example grants a 5000 KB initial quota to everynew user.
mount_pointCreates a mount point for the volume, which serves as the volume’sroot directory and the user’s home directory. By convention, userhome directory names include the username, which you can read inby including the $USER variable in this field.
Specify the read/write path to the mount point, to avoid the failurethat results when you attempt to create the new mount point in aread-only volume. By convention, you indicate the read/write path byplacing a period before the cell name at the pathname’s second level(for example, /afs/.abc.com). If you use the $AUTO variable in thisfield, the directories named by each G instruction possibly alreadyindicate the read/write path. For further discussion of the concept ofread/write and read-only paths through the filespace, see “MountingVolumes” on page 169.
If other parts of the mount point name also vary from user to user,you can use the $MTPT variable in this field, and provide a valuewith the uss add command’s -mount argument or in the mount_pointfield of a bulk input file add instruction. Note, however, that when the$MTPT variable appears in subsequent instructions in the template(usually, in D, E, or F instructions), it instead takes as its value thecomplete contents of this field.
Combine constants and variables based on how you have decided togroup home directories together in one or more parent directories.Note that the parent directories must already exist before you run auss add or uss bulk command that references the template.Possibilities for grouping home directories include the following:
Chapter 12. Creating and Deleting User Accounts with the uss Command Suite 473

v Placing all user home directories in a single parent directory; thename /afs/cellname/usr is an AFS-appropriate variation on the UNIX/usr convention. This choice is most appropriate for a cell with asmall number of user accounts. The simplest way to implement thischoice is to combine a constant string and the $USER variable, as in/afs/.abc.com/usr/$USER.
v Distributing home directories evenly into a set of parent directoriesthat do not correspond to workplace divisions. This choice isappropriate in cells with tens of thousands of accounts, where thenumber of home directories is large enough to slow directorylookup significantly if they all reside together in one parentdirectory, but distribution according to workplace divisions is notfeasible.The $AUTO variable is designed to distribute home directoriesevenly in this manner. As explained in “Evenly Distributing UserHome Directories with the G Instruction” on page 470, the usscommand interpreter substitutes the directory that is defined by apreceding G template instruction and that currently has the fewestentries. The example ABC Corporation template illustrates thischoice by using the value /afs/.abc.com/$AUTO/$USER.
v Distributing home directories into multiple directories that reflectdivisions like academic or corporate departments. Perhaps thesimplest way to implement this scheme is to use the $MTPTvariable to represent the department, as in/afs/.ghi.com/usr/$MTPT/$USER. You then provide -user smith and-mount acctg arguments to the uss add command to create themount point /afs/.ghi.com/usr/acctg/smith.
v Distributing home directories into alphabetic subdirectories of usr(usr/a, usr/b and so on), based on the first letter or letters in theusername. The advantage is that knowing the username enablesyou easily to locate a home directory. A potential drawback is thatthe distribution is not likely to be even, and if there are a largenumber of accounts, then slowed directory lookup unfairly affectsusers whose names begins with popular letters.Perhaps the simplest way to implement this scheme is to use the$MTPT variable to represent the letter or letters, as in/afs/.jkl.com/usr/$MTPT/$USER. Then provide the -user smith and-mount s/m arguments to the uss add command to create themount point /afs/.jkl.com/usr/s/m/smith.
owner Specifies the username or UID of the user to be designated the mountpoint’s owner in the output from the UNIX ls -ld command. To followthe standard convention for home directory ownership, use the $UIDvariable in this field, as in the ABC Corporation example template.The Protection Server then automatically assigns an AFS UID unless
474 AFS: Administration Guide
you provide the -uid argument to the uss add command or fill in theuid field in the bulk input file add instruction. (If you are convertingexisting UNIX accounts, see the discussion of additionalconsiderations in “Converting Existing UNIX Accounts with uss” onpage 461.)
ACL Sets the ACL on the new home directory. Provide one or more pairedvalues, each pair consisting of an AFS username or group name andthe desired permissions, in that order (a group name must alreadyexist in the Protection Database to be used). Separate the two parts ofthe pair, and each pair, with a space. For a discussion of the availablepermissions, see “The AFS ACL Permissions” on page 561.
At minimum, grant all permissions to the new user by including thevalue $USER all in this field. The File Server automatically grants allpermissions to the system:administrators group as well. You cannotgrant permissions to the issuer of the uss command, because as thelast step in account creation the uss command interpreterautomatically deletes that user from any ACLs set during the creationprocess.
The ABC Corporation example uses the following value to grant allpermissions to the new user and r (read) and l (lookup) permissionsto the members of the abc:staff group:
$USER all abc:staff rl
Creating a Directory with the D Instruction
Each D instruction in the template file creates a directory; there is no limit onthe number of them in the template. If a D instruction creates a subdirectoryin a new user’s home directory (its intended use), then it must follow the Vinstruction. Creating a directory on the local disk of the machine where theuss command runs is not recommended for the reasons outlined in “AboutCreating Local Disk Directories and Files” on page 468.
The following discussion of the fields in a D instruction refers to one of theexamples in the full account template in “Example uss Templates” onpage 468:
D $MTPT/Mailbox 0700 $UID $USER all abc:staff none system:anyuser lik
The D instruction’s syntax is as follows:D pathname mode_bits owner ACL
where
D Indicates a directory creation instruction.
Chapter 12. Creating and Deleting User Accounts with the uss Command Suite 475

pathnameSpecifies the directory’s full pathname. If it is a subdirectory of theuser’s home directory, it is simplest to use the $MTPT variable tospecify the home directory pathname. When the $MTPT variableappears in a D instruction, it takes its value from the preceding Vinstruction’s mount_point field (this dependency is why a D instructionmust follow the V instruction).
Specify the read/write pathname to the directory, to avoid the failurethat results when you attempt to create a new directory in a read-onlyvolume. By convention, you indicate the read/write path by placing aperiod before the cell name at the pathname’s second level (forexample, /afs/.abc.com). If you use the $MTPT variable in this field,the value in the V instruction’s mount_point field possibly alreadyindicates the read/write path. For further discussion of the concept ofread/write and read-only paths through the filespace, see “MountingVolumes” on page 169.
The ABC Corporation example uses the value $MTPT/Mailbox toplace the Mailbox subdirectory in the user’s home directory.
mode_bitsDefines the directory’s UNIX mode bits. Acceptable values are thestandard three- or four-digit numbers corresponding to a combinationof permissions. Examples: 0755 corresponds to rwxr-xr-x, and 0644 torw-r--r--. The first (owner) x bit must be turned on to enable access toa directory.
The ABC Corporation example uses the value 0700 to set the modebits on the Mailbox subdirectory to rwxr-----.
owner Specifies the username or UID of the user to be designated thedirectory’s owner in the output from the UNIX ls -ld command.
If the directory resides in AFS, place the $UID variable in this field, asin the ABC Corporation example template. The Protection Server thenautomatically assigns an AFS UID unless you provide the -uidargument to the uss add command or fill in the uid field in the bulkinput file add instruction. (If you are converting existing UNIXaccounts, see the discussion of additional considerations in“Converting Existing UNIX Accounts with uss” on page 461.)
If the directory resides on the local disk, it is simplest to specify theusername or UNIX UID under which you are issuing the usscommand. For a discussion of the complications that arise fromdesignating another user, see “About Creating Local Disk Directoriesand Files” on page 468.
ACL Sets the ACL on the new directory. Provide one or more pairedvalues, each pair consisting of an AFS username or group name and
476 AFS: Administration Guide
the desired permissions, in that order (a group name must alreadyexist in the Protection Database to be used). Separate the two parts ofthe pair, and each pair, with a space. For a description of the availablepermissions, see “The AFS ACL Permissions” on page 561.
At minimum, grant all permissions to the new user by including thevalue $USER all. You cannot grant permissions to the issuer of theuss command, because as the last step in account creation the usscommand interpreter automatically deletes that user from any ACLsset during the creation process. An error message always appears ifthe directory is on the local disk, as detailed in “About Creating LocalDisk Directories and Files” on page 468.
The ABC Corporation example uses the following value to grant allpermissions to the new user, no permissions to the members of theabc:staff group, and the l (lookup), i (insert), and k (lock)permissions to the members of the system:anyuser group:
$USER all abc:staff none system:anyuser lik
It grants such extensive permissions to the system:anyuser group toenable any system user (including a mail-delivery daemon) to insertmail into the Mailbox directory. The absence of the r (read)permission prevents members of the system:anyuser group fromreading the mail files.
Creating a File from a Prototype with the F Instruction
Each F instruction in the template file creates a file by copying the contents ofan existing prototype file; there is no limit on the number of them in thetemplate, and each can refer to a different prototype. If an F instructioncreates a file in a new user’s home directory or a subdirectory of it (theintended use), then it must follow the V or D instruction that creates theparent directory. Creating a file on the local disk of the machine where the usscommand runs is not recommended for the reasons detailed in “AboutCreating Local Disk Directories and Files” on page 468.
The E instruction also creates a file, but the two types of instruction havecomplementary advantages. Files created with an E instruction can becustomized for each user, because variables can appear in the field thatspecifies the contents of the file. In contrast, the contents of a file createdusing the F instruction are the same for every user. An E file can be only asingle line, however, whereas an F file can be any length.
The following discussion of the fields in a F instruction refers to one of theexamples in the full account template in “Example uss Templates” onpage 468:
Chapter 12. Creating and Deleting User Accounts with the uss Command Suite 477

F $MTPT/.login 0755 $UID /afs/abc.com/admin/user/proto
The F instruction’s syntax is as follows:F pathname mode_bits owner prototype_file
where
F Indicates a file creation instruction.
pathnameSpecifies the full pathname of the file to create, including the filename.If it resides in the user’s home directory or a subdirectory of it, it issimplest to use the $MTPT variable to specify the home directorypathname. When the $MTPT variable appears in an F instruction, ittakes its value from the preceding V instruction’s mount_point field(this dependency is why an F instruction must follow the Vinstruction).
Specify the read/write path to the file, to avoid the failure that resultswhen you attempt to create a new file in a read-only volume. Byconvention, you indicate the read/write path by placing a periodbefore the cell name at the pathname’s second level (for example,/afs/.abc.com). If you use the $MTPT variable in this field, the value inthe V instruction’s mount_point field possibly already indicates theread/write path. For further discussion of the concept of read/writeand read-only paths through the filespace, see “Mounting Volumes”on page 169.
The ABC Corporation example uses the value $MTPT/.login to placea file called .login in the user’s home directory.
mode_bitsDefines the file’s UNIX mode bits. Acceptable values are the standardthree- or four-digit numbers corresponding to a combination ofpermissions. Examples: 0755 corresponds to rwxr-xr-x, and 0644 torw-r--r--.
The ABC Corporation example uses the value 0755 to set the modebits on the .login file to rwxr-xr-x.
owner Specifies the username or UID of the user to be designated the file’sowner in the output from the UNIX ls -l command.
If the file resides in AFS, place the $UID variable in this field, as inthe ABC Corporation example template. The Protection Server thenautomatically assigns an AFS UID unless you provide the -uidargument to the uss add command or fill in the uid field in the bulkinput file add instruction. (If you are converting existing UNIXaccounts, see the discussion of additional considerations in“Converting Existing UNIX Accounts with uss” on page 461.)
478 AFS: Administration Guide

If the file resides on the local disk, it is simplest to specify theusername or UNIX UID under which you are issuing the usscommand. For a discussion of the complications that arise fromdesignating another user, see “About Creating Local Disk Directoriesand Files” on page 468.
prototype_fileNames the AFS or local directory that houses the prototype file tocopy. The prototype file’s name must match the final element in thepathname field.
The ABC Corporation example references a prototype file called .loginin the directory /afs/abc.com/admin/user/proto.
Creating One-Line Files with the E Instruction
Each E instruction in the template file creates a file by echoing a specifiedsingle line into it; there is no limit on the number of them in the template. Ifan E instruction creates a file in a new user’s home directory or a subdirectoryof it (the intended use), then it must follow the V or D instruction that createsthe parent directory. Creating a file on the local disk of the machine where theuss command runs is not recommended for the reasons detailed in “AboutCreating Local Disk Directories and Files” on page 468.
The F instruction also creates a file, but the two types of instruction havecomplementary advantages. Files created with an E instruction can becustomized for each user, because variables can appear in the field thatspecifies the contents of the file. The command interpreter replaces thevariables with appropriate values before creating the file. In contrast, thecontents of a file created using the F instruction are the same for every user.An E file can be only a single line, however, whereas an F file can be anylength.
The E instruction is particularly suited to creating an entry for the new user inthe cell’s common source password file, which is then copied to clientmachines to serve as the local password file (/etc/passwd or equivalent). Thefollowing discussion of the fields refers to an example of this type of use,from the ABC Corporation’s full account template shown in “Example ussTemplates” on page 468. For further discussion of how to incorporate the filescreated in this way into a common source password file, see “Creating aCommon Source Password File” on page 459.
E /afs/.abc.com/common/etc/newaccts/passwd_$USER 0644 root \"$USER:X:$UID:11:$NAME:$MTPT:/bin/csh"
The E instruction’s syntax is as follows:E pathname mode_bits owner "contents"
Chapter 12. Creating and Deleting User Accounts with the uss Command Suite 479

where
E Indicates a file creation instruction.
pathnameSpecifies the full pathname of the file to create, including the filename.It can include variables. If it resides in the user’s home directory or asubdirectory of it, it is simplest to use the $MTPT variable to specifythe home directory pathname. When the $MTPT variable appears inan E instruction, it takes its value from the preceding V instruction’smount_point field (this dependency is why an E instruction mustfollow the V instruction.)
Specify the read/write path to the file, to avoid the failure that resultswhen you attempt to create a new file in a read-only volume. Byconvention, you indicate the read/write path by placing a periodbefore the cell name at the pathname’s second level (for example,/afs/.abc.com). If you use the $MTPT variable in this field, the value inthe V instruction’s mount_point field possibly already indicates theread/write path. For further discussion of the concept of read/writeand read-only paths through the filespace, see “Mounting Volumes”on page 169.
The ABC Corporation example writes the file created by the Einstruction to /afs/.abc.com/common/etc/newaccts directory, naming itafter the new user:
/afs/.abc.com/common/etc/newaccts/passwd_$USER
mode_bitsDefines the file’s UNIX mode bits. Acceptable values are the standardthree- or four-digit numbers corresponding to a combination ofpermissions. Examples: 0755 corresponds to rwxr-xr-x, and 0644 torw-r--r--.
The ABC Corporation example uses the value 0644 to set the modebits on the passwd_user file to r-xr--r--.
owner Specifies the username or UID of the user to be designated the file’sowner in the output from the UNIX ls -l command.
If the file resides in AFS and is to be owned by the user, place the$UID variable in this field. The Protection Server then automaticallyassigns an AFS UID unless you provide the -uid argument to the ussadd command or fill in the uid field in the bulk input file addinstruction. (If you are converting existing UNIX accounts, see thediscussion of additional considerations in “Converting Existing UNIXAccounts with uss” on page 461.)
If the file resides on the local disk, specify the username or UNIX UIDunder which you are issuing the uss command. For a discussion of
480 AFS: Administration Guide
the complications that arise from designating another user, see “AboutCreating Local Disk Directories and Files” on page 468.
The ABC Corporation example is creating an AFS file intended forincorporation into the common password file, rather than for directuse by the new user. It therefore designates the local superuser root asthe owner of the new file. Designating an alternate owner on an AFSfile does not introduce complications: issuing the chown command onAFS files requires membership in the system:administrators group,but the issuer of the uss command is necessarily authenticated as amember of that group.
contentsSpecifies the one-line character string to write into the new file.Surround it with double quotes if it contains one or more spaces. Itcannot contain the newline character, but can contain any of thestandard variables, which the command interpreter resolves as itcreates the file.
The ABC Corporation example has the following value in the contentsfield, to create a password file entry:
$USER:X:$UID:10:$NAME:$MTPT:/bin/csh
Creating Links with the L and S Instructions
Each L instruction in the template file creates a hard link between two files, asachieved by the standard UNIX ln command. The S instruction creates asymbolic link between two files, as achieved by the standard UNIX ln -scommand. An explanation of links is beyond the scope of this document, butthe basic effect in both cases is to create a second name for an existing file, sothat it can be accessed via either name. Creating a link does not create asecond copy of the file.
There is no limit on the number of L or S instructions in a template file. If thelink is in a new user’s home directory or a subdirectory of it (the intendeduse), then it must follow the V or D instruction that creates the parentdirectory, and the F, E, or X instruction that creates the file being linked to.Creating a file on the local disk of the machine where the uss command runsis not recommended, for the reasons detailed in “About Creating Local DiskDirectories and Files” on page 468.
Note that AFS allows hard links only between files that reside in the samedirectory. This restriction is necessary to eliminate the confusion that resultsfrom associating two potentially different ACLs (those of the two directories)with the same file. Symbolic links are legal between two files that reside indifferent directories and even in different volumes. The ACL on the actual fileapplies to the link as well.
Chapter 12. Creating and Deleting User Accounts with the uss Command Suite 481

You do not set the owner or mode bits on a link created with an L or Sinstruction, as you do for directories or files. The uss command interpreterautomatically records the UNIX UID of the uss command’s issuer as theowner, and sets the mode bits to lrwxrwxrwx (777).
The following discussion of the fields in an L or S instruction refers to anexample in the full account template from “Example uss Templates” onpage 468, namely
S /afs/abc.com/public/$USER $MTPT/public
The L and S instructions’ syntax is as follows:L existing_file linkS existing_file link
where
L Indicates a hard link creation instruction.
S Indicates a symbolic link creation instruction.
existing_fileSpecifies the complete pathname of the existing file. If it resides in theuser’s home directory or a subdirectory of it, it is simplest to use the$MTPT variable to specify the home directory pathname. When the$MTPT variable appears in an L or S instruction, it takes its valuefrom the preceding V instruction’s mount_point field (this dependencyis why the instruction must follow the V instruction).
Do not create a symbolic link to a file whose name begins with thenumber sign (#) or percent sign (%). When the Cache Manager reads asymbolic link whose contents begin with one of those characters, itinterprets it as a regular or read/write mount point, respectively.
The ABC Corporation example creates a link to the publicly readablevolume created and mounted by a preceding X instruction, byspecifying the path to its mount point:
/afs/abc.com/public/$USER
link Specifies the complete pathname of the second name for the file. If itresides in the user’s home directory or a subdirectory of it, it issimplest to use the $MTPT variable to specify the home directorypathname.
Specify the read/write path to the link, to avoid the failure thatresults when you attempt to create a new link in a read-only volume.By convention, you indicate the read/write path by placing a periodbefore the cell name at the pathname’s second level (for example,/afs/.abc.com). If you use the $MTPT variable in this field, the value inthe V instruction’s mount_point field possibly already indicates the
482 AFS: Administration Guide
read/write path. For further discussion of the concept of read/writeand read-only paths through the filespace, see “Mounting Volumes”on page 169.
The ABC Corporation example creates a link called public in theuser’s home directory:
$MTPT/public
Increasing Account Security with the A Instruction
The A instruction in the template file enhances cell security by imposing thefollowing restrictions on users’ password choice and authentication attempts.v Limiting the user’s password lifetime. When the lifetime expires, the user
can no longer use the password to authenticate and must change it.v Prohibiting the reuse of the user’s 20 most-recently used passwords.v Limiting the number of consecutive times that a user can provide an
incorrect password during authentication, and for how long theAuthentication Server refuses further authentication attempts after the limitis exceeded (referred to as an account lockout). For regular user accounts inmost cells, the recommended limit is nine and lockout time is 25 minutes.
The following discussion of the fields in an A instruction refers to theexample in the full account template from “Example uss Templates” onpage 468, which sets a password lifetime of 250 days, prohibits reuse ofpasswords, limits the number of failed authentication attempts to nine, andcreates a lockout time of 25 minutes if the authentication limit is exceeded:
A $USER 250 noreuse 9 25
The A instruction’s syntax is as follows:A username password_lifetime password_reuse failures locktime
where
A Indicates a security enhancing instruction.
usernameNames the Authentication Database entry on which to impose securityrestrictions. Use the $USER variable to read in the username from theuss add command’s -user argument, or from the username field of anadd instruction in the bulk input file. The ABC Corporation exampleuses this value.
password_lifetimeSets the number of days after the user’s password is changed that itremains valid. When the password becomes invalid (expires), the user
Chapter 12. Creating and Deleting User Accounts with the uss Command Suite 483
is unable to authenticate, but has 30 more days in which to issue thekpasswd command to change the password (after that, only anadministrator can change it).
Specify an integer from the range 1 through 254 to specify the numberof days until expiration, the value 0 to indicate that the passwordnever expires, or the value $PWEXPIRES to read in the number ofdays from the uss add or uss bulk command’s -pwexpires argument.If the A instruction does not appear in the template file, by default theuser’s password never expires.
The ABC Corporation example sets a password lifetime of 250 days.
password_reuseDetermines whether or not the user can change his or her password(using the kpasswd or kas setpassword command) to one that issimilar to any of his or her last 20 passwords. The acceptable valuesare reuse to allow reuse and noreuse to prohibit it. If the Ainstruction does not appear in the template file, the default is to allowpassword reuse.
The ABC Corporation example prohibits password reuse.
failures Sets the number of consecutive times the user can provide anincorrect password during authentication (using the klog command ora login utility that grants AFS tokens). When the user exceeds thelimit, the Authentication Server rejects further authentication attemptsfor the amount of time specified in the locktime field.
Specify an integer from the range 1 through 254 to specify the numberof failures permitted, or the value 0 to indicate that there is no limit tothe number of unsuccessful attempts. If the A instruction does notappear in the template file, the default is to allow an unlimitednumber of failures.
The ABC Corporation example sets the limit to nine failed attempts.
locktimeSpecifies how long the Authentication Server refuses authenticationattempts from a user who has exceeded the failure limit set in thefailures field.
Specify a number of hours and minutes (hh:mm) or minutes only(mm), from the range 01 (one minute) through 36:00 (36 hours). TheAuthentication Server automatically reduces any larger value to 36:00and also rounds up any nonzero value to the next highest multiple of8.5 minutes. A value of 0 (zero) sets an infinite lockout time, in whichcase an administrator must always issue the kas unlock command tounlock the account.
484 AFS: Administration Guide
The ABC Corporation example sets the lockout time to 25 minutes,which is rounded up to 25 minutes 30 seconds (the next highestmultiple of 8.5 minutes).
Executing Commands with the X Instruction
The X instruction in the template file executes a command, which can be astandard UNIX command, a shell script or program, or an AFS command. Thecommand string can include standard template variables, and any number ofX instructions can appear in a template file. If an instruction manipulates anelement created by another instruction, it must appear after that instruction.
The following discussion of the field in an X instruction refers to the examplein the full account template from “Example uss Templates” on page 468:
X "create_public_vol $USER $1 $2"
The X instruction’s syntax is as follows:X "command"
where command specifies the command to execute. Surround it with doublequotes if it contains spaces. The command string can contain any of thestandard variables, which the uss command interpreter resolves beforepassing the command on to the appropriate other command interpreter, but itcannot contain newline characters.
The ABC Corporation example invokes a script called create_public_vol,which creates another volume associated with the new user and mounts it ina publicly readable part of the ABC Corporation’s filespace:
"create_public_vol $USER $1 $2"
It uses the $USER variable to read in the username and make it part of boththe volume name and mount point name. The uss command issuer supplies afile server machine name for the $1 variable and a partition name for the $2variable, to specify the site for the new volume.
Creating Individual Accounts with the uss add Command
After you have created a template file, you can create an individual accountby issuing the uss add command (for template creation instructions see“Constructing a uss Template File” on page 463). When you issue thecommand, the uss command interpreter contacts various AFS servers toperform the following actions:
Chapter 12. Creating and Deleting User Accounts with the uss Command Suite 485
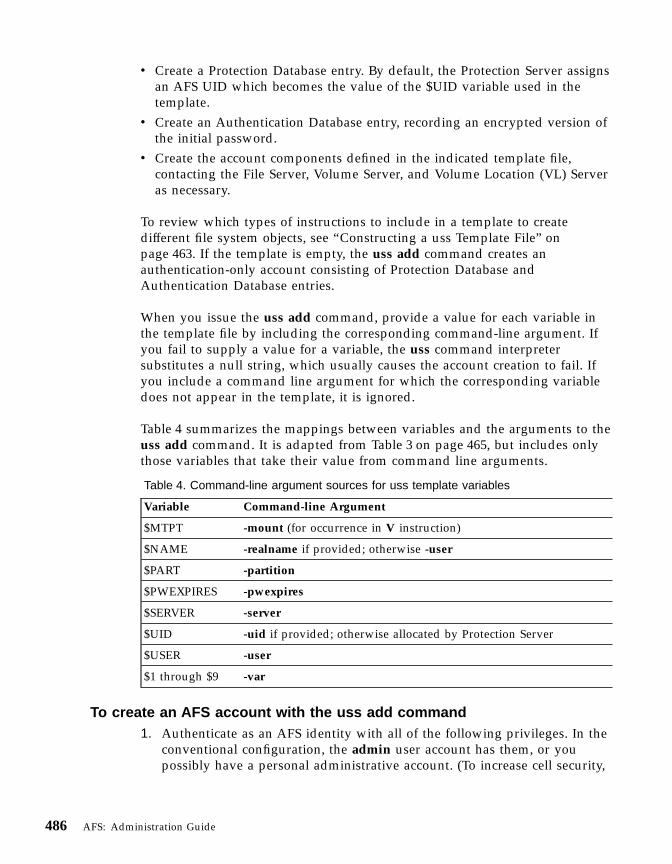
v Create a Protection Database entry. By default, the Protection Server assignsan AFS UID which becomes the value of the $UID variable used in thetemplate.
v Create an Authentication Database entry, recording an encrypted version ofthe initial password.
v Create the account components defined in the indicated template file,contacting the File Server, Volume Server, and Volume Location (VL) Serveras necessary.
To review which types of instructions to include in a template to createdifferent file system objects, see “Constructing a uss Template File” onpage 463. If the template is empty, the uss add command creates anauthentication-only account consisting of Protection Database andAuthentication Database entries.
When you issue the uss add command, provide a value for each variable inthe template file by including the corresponding command-line argument. Ifyou fail to supply a value for a variable, the uss command interpretersubstitutes a null string, which usually causes the account creation to fail. Ifyou include a command line argument for which the corresponding variabledoes not appear in the template, it is ignored.
Table 4 summarizes the mappings between variables and the arguments to theuss add command. It is adapted from Table 3 on page 465, but includes onlythose variables that take their value from command line arguments.
Table 4. Command-line argument sources for uss template variables
Variable Command-line Argument
$MTPT -mount (for occurrence in V instruction)
$NAME -realname if provided; otherwise -user
$PART -partition
$PWEXPIRES -pwexpires
$SERVER -server
$UID -uid if provided; otherwise allocated by Protection Server
$USER -user
$1 through $9 -var
To create an AFS account with the uss add command1. Authenticate as an AFS identity with all of the following privileges. In the
conventional configuration, the admin user account has them, or youpossibly have a personal administrative account. (To increase cell security,
486 AFS: Administration Guide
it is best to create special privileged accounts for use only whileperforming administrative procedures; for further discussion, see “AnOverview of Administrative Privilege” on page 577.) If necessary, issue theklog command to authenticate.
% klog admin_userPassword: admin_password
The following list specifies the necessary privileges and indicates how tocheck that you have them.v Membership in the system:administrators group. If necessary, issue the
pts membership command, which is fully described in “To display themembers of the system:administrators group” on page 579.
% pts membership system:administrators
v Inclusion in the /usr/afs/etc/UserList file. If necessary, issue the boslistusers command, which is fully described in “To display the users inthe UserList file” on page 582.
% bos listusers <machine name>
v The ADMIN flag on the Authentication Database entry. However, theAuthentication Server always prompts you for a password in order toperform its own authentication. The following instructions direct you tospecify the administrative identity on the uss command line itself.
v The i (insert) and l (lookup) permissions on the ACL of the directory inwhich you are mounting the user’s volume. If necessary, issue the fslistacl command, which is fully described in “Displaying ACLs” onpage 566.
% fs listacl [<dir/file path>]
Members of the system:administrators group always implicitly have thea (administer) and by default also the l (lookup) permission on everyACL and can use the fs setacl command to grant other rights asnecessary.
2. (Optional) Log in as the local superuser root. This is necessary only if youare creating new files or directories in the local file system and want todesignate an alternate owner as the object is created. For a discussion ofthe issues involved, see “About Creating Local Disk Directories and Files”on page 468.
3. Verify the location and functionality of the template file you are using. Fora description of where the uss command interpreter expects to find thetemplate, see “Where to Place Template Files” on page 466. You can alwaysprovide an alternate pathname if you wish. Also note the variables used inthe template, to be sure that you provide the corresponding arguments onthe uss command line.
Chapter 12. Creating and Deleting User Accounts with the uss Command Suite 487

4. (Optional) Change to the directory where the template resides. This affectsthe type of pathname you must type in Step 6.
% cd template_directory
5. (Optional) Run the uss add command with the -dryrun flag to previewthe creation of the account. Note any error messages and correct the causebefore reissuing the command without the -dryrun flag. The next stepdescribes the uss add command’s syntax. For more information on the-dryrun flag, see “Avoiding and Recovering from Errors and InterruptedOperations” on page 455.
6. Issue the uss add command to create the account. Enter the command ona single line; it appears here on multiple lines only for legibility.The uss add operation creates an Authentication Database entry. TheAuthentication Server performs its own authentication rather thanaccepting your existing AFS token. By default, it authenticates your local(UNIX) identity, which possibly does not correspond to an AFS-privilegedadministrator. Include the -admin argument to name an identity that hasthe ADMIN flag on its Authentication Database entry. To verify that an entryhas the flag, issue the kas examine command as described in “To check ifthe ADMIN flag is set” on page 580.
% uss add -user <login name> -admin <administrator to authenticate> \[-realname <full name in quotes>] [-pass <initial passwd>] \[-pwexpires <password expires in [0..254] days (0 => never)>] \[-server <FileServer for home volume>] \[-partition <FileServer's disk partition for home volume>] \[-mount <home directory mount point>] \[-uid <uid to assign the user>] \[-template <pathname of template file>] \[-var <auxiliary argument pairs (Numval)>+] [-dryrun] \[-overwrite]
Administrator's (admin_user) password: admin_password
where
ad Is the shortest acceptable abbreviation of add.
-user Names the user’s Authentication Database and Protection Databaseentries. Because it becomes the username (the name under which auser logs in), it must obey the restrictions that many operatingsystems impose on usernames (usually, to contain no more thaneight lowercase letters). Also avoid the following characters: colon(:), semicolon (;), comma (,), at sign (@), space, newline, and theperiod (.), which is conventionally used only in specialadministrative names.
This argument provides the value for the $USER variable in thetemplate file. For suggestions on standardizing usernames, see“Choosing Usernames and Naming Other Account Components”on page 45.
488 AFS: Administration Guide
-adminNames an administrative account that has the ADMIN flag on itsAuthentication Database entry, such as admin. The passwordprompt echoes it as admin_user. Enter the appropriate password asadmin_password.
-realnameSpecifies the user’s actual full name. If it contains spaces orpunctuation, surround it with double quotes. If you do notprovide it, it defaults to the username provided with the -userargument.
This argument provides the value for the $NAME variable in thetemplate file. For information about using this argument andvariable as part of an automated process for creating entries in alocal password file such as /etc/passwd, see “Creating a CommonSource Password File” on page 459.
-pass Specifies the user’s initial password. Although the AFS commandsthat handle passwords accept strings of virtually unlimited length,it is best to use a password of eight characters or less, which is themaximum length that many applications and utilities accept.
Possible choices for initial passwords include the username, astring of digits such as those from a Social Security number, or astandard string such as changeme, which is the default if you donot provide this argument. There is no corresponding variable inthe template file.
Instruct users to change their passwords to a truly secret string assoon as they authenticate with AFS for the first time. The AFS UserGuide explains how to use the kpasswd command to change anAFS password.
-pwexpiresSets the number of days after a user’s password is changed that itremains valid. Provide an integer from the range 1 through 254 tospecify the number of days until expiration, or the value 0 toindicate that the password never expires (the default if you do notprovide this argument). When the password becomes invalid(expires), the user is unable to authenticate, but has 30 more daysin which to issue the kpasswd command to change the password;after that, only an administrator can change it.
This argument provides the value for the $PWEXPIRES variable inthe template file.
-serverNames the file server machine on which to create the new user’shome volume. It is best to provide a fully qualified hostname (for
Chapter 12. Creating and Deleting User Accounts with the uss Command Suite 489
example, fs1.abc.com), but an abbreviated form is acceptableprovided that the cell’s naming service is available to resolve itwhen you issue the uss add command.
This argument provides the value for the $SERVER variable in thetemplate file. To avoid having to type a fully qualified hostnameon the command line, combine the $SERVER variable with aconstant (for example, the cell’s domain name) in the server field ofthe V instruction in the template file. For an example, see“Creating a Volume with the V Instruction” on page 471.
-partitionSpecifies the partition on which to create the user’s home volume;it must be on the file server machine named by the -serverargument. Identify the partition by its complete name (forexample, /vicepa), or use one of the abbreviations listed in “Rulesfor Using Abbreviations and Aliases” on page 607.
This argument provides the value for the $PART variable in thetemplate file.
-mountSpecifies the pathname for the user’s home directory in the cell’sread/write filespace. Partial pathnames are interpreted relative tothe current working directory.
This argument provides the value for the $MTPT variable in thetemplate file, but only when it appears in the V instruction’smount_point field. When the $MTPT variable appears in anysubsequent instructions, it takes its value from the V instruction’smount_point field, rather than directly from this argument. Formore details, and for suggestions about how to use this argumentand the $MTPT variable, see “Creating a Volume with the VInstruction” on page 471.
-uid Specifies a positive integer other than 0 (zero) to assign as theuser’s AFS UID. It is best to omit this argument and allow theProtection Server to assign an AFS UID that is one greater than thecurrent value of the max user id counter. (To display the counter,use the pts listmax command as described in “To display the AFSID counters” on page 557.)
If you have a reason to use this argument (perhaps because theuser already has a UNIX UID), first use the pts examine commandto verify that there is no existing account with the desired AFSUID; if there is, the account creation process terminates with anerror.
This argument provides the value for the $UID variable in thetemplate file.
490 AFS: Administration Guide
-templateSpecifies the pathname of the template file. If you omit thisargument, the command interpreter searches for a template filecalled uss.template in each of the following directories in turn:a. The current working directoryb. /afs/cellname/common/uss, where cellname names the local cellc. /etc
If you specify a filename other than uss.template but without apathname, the command interpreter searches for it in the indicateddirectories. If you provide a full or partial pathname, thecommand interpreter consults the specified file only; it interpretspartial pathnames relative to the current working directory.
If the specified template file is empty (zero-length), the commandcreates Protection and Authentication Database entries only.
To learn how to construct a template file, see “Constructing a ussTemplate File” on page 463.
-var Specifies values for each of the number variables $1 through $9that can appear in the template file. You can use the numbervariables to assign values to variables in the uss template file thatare not part of the standard set.
For each instance of this argument, provide two parts in theindicated order, separated by a space:v The integer from the range 1 through 9 that matches the
variable in the template file. Do not precede it with a dollarsign.
v A string of alphanumeric characters to assign as the value of thevariable.
To learn about suggested uses for the number variables, see thedescription of the V instruction’s quota field in “Creating a Volumewith the V Instruction” on page 471.
-dryrunReports actions that the command interpreter needs to perform torun the command, without actually performing them.
-overwriteOverwrites any directories, files, and links that exist in the filesystem and for which there are definitions in D, E, F, L, or Sinstructions in the template file named by the -template argument.If you omit this flag, the command interpreter prompts you oncefor confirmation that you want to overwrite all such elements.
Chapter 12. Creating and Deleting User Accounts with the uss Command Suite 491
7. If the new user home directory resides in a replicated volume, use the vosrelease command to release the volume, as described in “To replicate aread/write volume (create a read-only volume)” on page 161.
% vos release <volume name or ID>
Note: This step can be necessary even if the home directory’s parentdirectory is not itself a mount point for a replicated volume (and iseasier to overlook in that case). For example, the ABC Corporationtemplate puts the mount points for user volumes in the/afs/abc.com/usr directory. Because that is a regular directory ratherthan a mount point, it resides in the root.cell volume mounted atthe /afs/abc.com directory. That volume is replicated, so afterchanging it by creating a new mount point the administrator mustissue the vos release command.
8. Create an entry for the new user in the local password file (/etc/passwd orequivalent) on each AFS client machine that he or she can log into. Forsuggestions on automating this step, see “Creating a Common SourcePassword File” on page 459.Even if you do not use the automated method, set the user’s UNIX UID tomatch the AFS UID assigned automatically by the Protection Server orassigned with the -uid argument. The new user’s AFS UID appears in thetrace produced by the uss add output, or you can use the pts examinecommand to display it, as described in “To display a Protection Databaseentry” on page 536.
Deleting Individual Accounts with the uss delete Command
The uss delete command deletes an AFS user account according to thearguments you provide on the command line; unlike the uss add command, itdoes not use a template file. When you issue the command, the uss commandinterpreter contacts various AFS servers to perform the following actions:v Remove the mount point for the user’s home volumev Remove the user’s home volume and delete the associated VLDB entry,
unless you include the -savevolume flagv Delete the user’s Authentication Database entryv Delete the user’s Protection Database entry
Before issuing the uss delete command, you can also perform the followingoptional tasks:v Copy the user’s home volume to tape or another permanent medium and
record the username and UID on a reserved list. This information enables
492 AFS: Administration Guide
you to restore the user’s account easily if he or she returns to your cell. Forinformation about using the AFS Backup System to back up volumes, see“Chapter 6. Configuring the AFS Backup System” on page 217 and“Chapter 7. Backing Up and Restoring AFS Data” on page 269.
v If the user has exclusive use of any other volumes (such as a volume forstoring project-related data), make a backup copy of each one and thenremove it and its mount point as instructed in “Removing Volumes andtheir Mount Points” on page 202.
v Use the pts listowned command to display any groups that the user owns;instructions appear in “To list the groups that a user or group owns” onpage 539. Decide whether to use the pts delete command to remove thegroups or the pts chown command to transfer ownership to another user orgroup. Instructions appear in “To delete Protection Database entries” onpage 549 and “To change a group’s owner” on page 551. Alternatively, youcan have the user remove or transfer ownership of the groups beforeleaving. A group that remains in the Protection Database after its owner isremoved is considered orphaned, and only members of thesystem:administrators group can administer it.
You can automate some of these tasks by including exec instructions in thebulk input file and using the uss bulk command to delete the account. See“Creating and Deleting Multiple Accounts with the uss bulk Command” onpage 496 .
To delete an AFS account1. Authenticate as an AFS identity with all of the following privileges. In the
conventional configuration, the admin user account has them, or youpossibly have a personal administrative account. (To increase cell security,it is best to create special privileged accounts for use only whileperforming administrative procedures; for further discussion, see “AnOverview of Administrative Privilege” on page 577.) If necessary, issue theklog command to authenticate.
% klog admin_userPassword: admin_password
The following list specifies the necessary privileges and indicates how tocheck that you have them.v Membership in the system:administrators group. If necessary, issue the
pts membership command, which is fully described in “To display themembers of the system:administrators group” on page 579.
% pts membership system:administrators
Chapter 12. Creating and Deleting User Accounts with the uss Command Suite 493

v Inclusion in the /usr/afs/etc/UserList file. If necessary, issue the boslistusers command, which is fully described in “To display the users inthe UserList file” on page 582.
% bos listusers <machine name>
v The ADMIN flag on the Authentication Database entry. However, theAuthentication Server always prompts you for a password in order toperform its own authentication. The following instructions direct you tospecify the administrative identity on the uss command line itself.
v The d (delete) permission on the ACL of the directory that houses theuser’s home directory. If necessary, issue the fs listacl command, whichis fully described in “Displaying ACLs” on page 566.
% fs listacl [<dir/file path>]
Members of the system:administrators group always implicitly have thea (administer) and by default also the l (lookup) permission on everyACL and can use the fs setacl command to grant other rights asnecessary.
2. Consider and resolve the issues discussed in the introduction to thissection concerning the continued maintenance of a deleted user’s accountinformation, owned groups, and volumes.
3. (Optional) Run the uss delete command with the -dryrun flag to previewthe deletion of the account. Note any error messages and correct the causebefore reissuing the command without the -dryrun flag. The next stepdescribes the uss delete command’s syntax.
4. Issue the uss delete command to delete the account. Enter the commandon a single line; it appears here on multiple lines only for legibility.The delete operation always removes the user’s entry from theAuthentication Database. The Authentication Server performs its ownauthentication rather than accepting your existing AFS token. By default, itauthenticates your local (UNIX) identity, which possibly does notcorrespond to an AFS-privileged administrator. Include the -adminargument to name an identity that has the ADMIN flag on its AuthenticationDatabase entry. To verify that an entry has the flag, issue the kas examinecommand as described in “To check if the ADMIN flag is set” on page 580.
% uss delete -user <login name> \-mountpoint <mountpoint for user's volume> \[-savevolume] -admin <administrator to authenticate> \[-dryrun]
Administrator's (admin_user) password: admin_password
where
d Is the shortest acceptable abbreviation of delete.
-user Names the entry to delete from the Protection and AuthenticationDatabases.
494 AFS: Administration Guide

-mountpointSpecifies the pathname of the mount point to delete (the user’shome directory). Unless the -savevolume argument is included,the volume mounted there is also deleted from the file servermachine where it resides, as is its record from the VLDB. Partialpathnames are interpreted relative to the current workingdirectory.
Specify the read/write path to the mount point, to avoid thefailure that results when you attempt to delete a mount point froma read-only volume. By convention, you indicate the read/writepath by placing a period before the cell name at the pathname’ssecond level (for example, /afs/.abc.com). For further discussion ofthe concept of read/write and read-only paths through thefilespace, see “Mounting Volumes” on page 169.
-savevolumeRetains the user’s volume and VLDB entry.
-adminNames an administrative account that has the ADMIN flag on itsAuthentication Database entry, such as admin. The passwordprompt echoes it as admin_user. Enter the appropriate password asadmin_password.
-dryrunReports actions that the command interpreter needs to perform torun the command, without actually performing them.
5. If the deleted user home directory resided in a replicated volume, use thevos release command to release the volume, as described in “To replicate aread/write volume (create a read-only volume)” on page 161.
% vos release <volume name or ID>
Note: This step can be necessary even if the home directory’s parentdirectory is not itself a mount point for a replicated volume (and iseasier to overlook in that case). For example, the ABC Corporationtemplate puts the mount points for user volumes in the/afs/abc.com/usr directory. Because that is a regular directory ratherthan a mount point, it resides in the root.cell volume mounted atthe /afs/abc.com directory. That volume is replicated, so afterchanging it by deleting a mount point the administrator must issuethe vos release command.
6. Delete the user’s entry from the local password file (/etc/passwd orequivalent) of each client machine. If you use the AFS package utility, it issufficient to remove the entry from the common source version of the file.
Chapter 12. Creating and Deleting User Accounts with the uss Command Suite 495
If you intend to reactivate the user’s account in the future, it is simpler tocomment out the entry or place an asterisk (*) in the password field.
Creating and Deleting Multiple Accounts with the uss bulk Command
The uss bulk command allows you to create and delete many accounts atonce. Before executing the command, you mustv Construct a template if you plan to create any accounts, just as you must
do before running the uss add command. The same template applies to allaccounts created by a single uss bulk command.
v Construct a bulk input file of instructions that create and delete accountsand execute any related commands, as described in “Constructing a BulkInput File”.
Constructing a Bulk Input File
You can include five types of instructions in a bulk input file: add, delete,exec, savevolume, and delvolume. The following sections discuss their uses.
Creating a User Account with the add Instruction
Each add instruction creates a single user account, and so is basically theequivalent of issuing one uss add command. There is no limit to the numberof add instructions in the bulk input file.
As indicated by the following syntax statement, the order of the instruction’sfields matches the order of arguments to the uss add command (though someof the command’s arguments do not have a corresponding field). Like the ussadd command’s arguments, many of the fields provide a value for a variablein the uss template file. Each instruction must be a single line in the file (havea newline character only at its end); it appears on multiple lines here only forlegibility.
add username[:full_name][:initial_password][:password_expires][:file_server][:partition][:mount_point][:uid][:var1][:var2][:var3][:var4][:var5][:var6][:var7][:var8][:var9][:]
For a complete description of the acceptable values in each field, see the ussBulk Input File reference page in the AFS Administration Reference, or thedescription of the corresponding arguments to the uss add command, in “Tocreate an AFS account with the uss add command” on page 486. Following aresome basic notes:v Begin the line with the string add only, not uss add.v Only the first argument, username, is required. It corresponds to the -user
argument to the uss add command.
496 AFS: Administration Guide
v Do not surround the full_name value with double quotes, even though youmust use them around the value for the -realname argument to the uss addcommand.
v If you want to omit a value for an argument, indicate an empty field byusing two colons with nothing between them. Leaving a field empty isacceptable if the corresponding command line argument is optional or if thecorresponding variable does not appear in the template file. For every fieldthat precedes the last one to which you assign an actual value, you musteither provide a value or indicate an empty field. It is acceptable, but notnecessary, to indicate empty fields after the last one in which you assign avalue.
v After the last field, end the line with either a colon and newline character(<Return>), or a newline alone.
v The final nine fields are for assigning values to the number variables ($1through $9), with the fields listed in increasing numerical order. Specify thevalue only, not the variable number.
Deleting a User Account with the delete Instruction
Each delete instruction deletes a single user account, and so is basically theequivalent of issuing one uss delete command. There is no limit to thenumber of delete instructions in the bulk input file.
Like all instructions in the bulk input file, each delete instruction must be asingle line in the file (have a newline character only at its end), even though itcan cover multiple lines on a display screen. The curly braces ({ }) indicatetwo mutually exclusive choices.
delete username:mount_point_path[:{ savevolume | delvolume }][:]
For a complete description of the acceptable values in each field, see the ussBulk Input File reference page in the AFS Administration Reference or thedescription of the corresponding arguments to the uss delete command, in“To delete an AFS account” on page 493. Following are some basic notes:v Begin the line with the string delete only, not uss delete.v The first two arguments, username and mount_point_path, are required. They
correspond to the -user and -mountpoint arguments to the uss deletecommand.
v The third field, which is optional, controls whether the user’s home volumeis removed from the file server where it resides, along with thecorresponding VLDB entry. There are three possible values:– No value treats the volume and VLDB entry according to the prevailing
default, which is established by a preceding savevolume or delvolumeinstruction in the template file. See the following discussion of thoseinstructions to learn how the default is set.
Chapter 12. Creating and Deleting User Accounts with the uss Command Suite 497

– The string savevolume preserves the volume and VLDB entry, overridingthe default.
– The string delvolume removes the volume and VLDB entry, overridingthe default.
v After the last field, end the line with either a colon and newline character(<Return>), or a newline alone.
Running a Command or Script with the exec Instruction
The exec instruction runs the indicated AFS command, compiled program, orUNIX shell script or command. The command processor assumes the AFS andlocal identities of the issuer of the uss bulk command, who must have theprivileges required to run the command.
The instruction’s syntax is as follows:exec command
It is not necessary to surround the command string with double quotes (″ ″) orother delimiters.
Setting the Default Treatment of Volumes with the delvolume andsavevolume Instructions
The savevolume and delvolume instructions set the default treatment ofvolumes referenced by the delete instructions that follow them in the bulkinput file. Their syntax is as follows:
savevolumedelvolume
Both instructions are optional and take no arguments. If neither appears in thebulk input file, then by default all volumes and VLDB entries referenced bydelete instructions are removed. If the savevolume instruction appears in thefile, it prevents the removal of the volume and VLDB entry referenced by allsubsequent delete instructions in the file. The delvolume instruction explicitlyestablishes the default (which is deletion) for subsequent delete instructions.
The effect of either instruction lasts until the end of the bulk input file, oruntil its opposite appears. To override the prevailing default for a particulardelete instruction, put the savevolume or delvolume string in theinstruction’s third field. (You can also use multiple instances of thesavevolume and delvolume instructions to toggle back and forth betweendefault preservation and deletion of volumes.)
498 AFS: Administration Guide

Example Bulk Input File Instructions
To create an authentication-only account, use an add instruction like thefollowing example, which includes only the first (username) argument. Theuser’s real name is set to match the username (anderson) and her initialpassword is set to the string changeme.
add anderson
The following example also creates an authentication-only account, but setsnondefault values for the real name and initial password.
add smith:John Smith:js_pswd
The next two example add instructions require that the administrator of theABC Corporation cell (abc.com) has written a uss template file with thefollowing V instruction in it:
V user.$USER $SERVER.abc.com /vicep$PART 10000 /afs/.abc.com/usr/$3/$USER \$UID $USER all
To create accounts for users named John Smith from the MarketingDepartment and Pat Jones from the Finance Department, the appropriate addinstructions in the bulk input file are as follows:
add smith:John Smith:::fs1:a:::::marketingadd jones:Pat Jones:::fs3:c:::::finance
The new account for Smith consists of Protection and Authentication Databaseentries called smith. His initial password is the default string changeme, andthe Protection Server generates his AFS UID. His home volume, calleduser.smith, has a 10,000 KB quota, resides on partition /vicepa of file servermachine fs1.abc.com, and is mounted at /afs/.abc.com/usr/marketing/smith.The final $UID $USER all part of the V instruction gives him ownership ofhis home directory and all permissions on its ACL. The account for jones issimilar, except that it resides on partition /vicepc of file server machinefs3.abc.com and is mounted at /afs/.abc.com/usr/finance/jones.
Notice that the fields corresponding to mount_point, uid, var1, and var2 areempty (between the values a and marketing on the first example line) becausethe corresponding variables do not appear in the V instruction in the templatefile. The initial_passwd and password_expires fields are also empty.
If you wish, you can specify values or empty fields for all nine numbervariables in an add instruction. In that case, the bulk input file instructions areas follows:
add smith:John Smith:::fs1:a:::::marketing::::::add jones:Pat Jones:::fs3:c:::::finance::::::
Chapter 12. Creating and Deleting User Accounts with the uss Command Suite 499
The following example is a section of a bulk input file with a number ofdelete instructions and a savevolume instruction. Because the first threeinstructions appear before the savevolume instruction and their third field isblank, the corresponding volumes and VLDB entries are removed. The deleteinstruction for user terry follows the savevolume instruction, so her volume isnot removed, but the volume for user johnson is, because the delvolumestring in the third field of the delete instruction overrides the current default.
delete smith:/afs/abc.com/usr/smithdelete pat:/afs/abc.com/usr/patdelete rogers:/afs/abc.com/usr/rogerssavevolumedelete terry:/afs/abc.com/usr/terrydelete johnson:/afs/abc.com/usr/johnson:delvolume
The following example exec instruction is useful as a separator between a setof add instructions and a set of delete instructions. It generates a message onthe standard output stream that informs you of the uss bulk command’sprogress.
exec echo "Additions completed; beginning deletions..."
To create and delete multiple AFS user accounts1. Authenticate as an AFS identity with all of the following privileges. In the
conventional configuration, the admin user account has them, or youpossibly have a personal administrative account. (To increase cell security,it is best to create special privileged accounts for use only whileperforming administrative procedures; for further discussion, see “AnOverview of Administrative Privilege” on page 577.) If necessary, issue theklog command to authenticate.
% klog admin_userPassword: admin_password
The following list specifies the necessary privileges and indicates how tocheck that you have them.v Membership in the system:administrators group. If necessary, issue the
pts membership command, which is fully described in “To display themembers of the system:administrators group” on page 579.
% pts membership system:administrators
v Inclusion in the /usr/afs/etc/UserList file. If necessary, issue the boslistusers command, which is fully described in “To display the users inthe UserList file” on page 582.
% bos listusers <machine name>
v The ADMIN flag on the Authentication Database entry. However, theAuthentication Server always prompts you for a password in order toperform its own authentication. The following instructions direct you tospecify the administrative identity on the uss command line itself.
500 AFS: Administration Guide
v The d (delete), i (insert) and l (lookup) permissions on the ACL of theparent directory for each volume mount point. If necessary, issue the fslistacl command, which is fully described in “Displaying ACLs” onpage 566.
% fs listacl [<dir/file path>]
Members of the system:administrators group always implicitly have thea (administer) and by default also the l (lookup) permission on everyACL and can use the fs setacl command to grant other rights asnecessary.
2. (Optional.) Log in as the local superuser root. This is necessary only if youare creating new files or directories in the local file system and want todesignate an alternate owner as the object is created. For a discussion ofthe issues involved, see “About Creating Local Disk Directories and Files”on page 468.
3. If the bulk input file includes add instructions, verify the location andfunctionality of the template you are using. For a description of where theuss command interpreter expects to find the template, see “Where to PlaceTemplate Files” on page 466. You can always provide an alternatepathname if you wish. Also note which variables appear in the template,to be sure that you provide the corresponding arguments in the addinstruction or on the uss bulk command line.
4. Create a bulk input file that complies with the rules listed in “Constructinga Bulk Input File” on page 496. It is simplest to put the file in the samedirectory as the template file you are using.
5. (Optional.) Change to the directory where the bulk input file and templatefile reside.
% cd template_directory
6. Issue the uss bulk command to create or delete accounts, or both. Enterthe command on a single line; it appears here on multiple lines only forlegibility.The bulk operation always manipulates user entries in the AuthenticationDatabase. The Authentication Server performs its own authenticationrather than accepting your existing AFS token. By default, it authenticatesyour local (UNIX) identity, which possibly does not correspond to anAFS-privileged administrator. Include the -admin argument to name anidentity that has the ADMIN flag on its Authentication Database entry. Toverify that an entry has the flag, issue the kas examine command asdescribed in “To check if the ADMIN flag is set” on page 580.
% uss bulk <bulk input file> \[-template <pathname of template file>] \-admin <administrator to authenticate> \[-dryrun] [-overwrite] \
Chapter 12. Creating and Deleting User Accounts with the uss Command Suite 501

[-pwexpires <password expires in [0..254] days (0 => never)>] \[-pipe]
Administrator's (admin_user) password: admin_password
where
b Is the shortest acceptable abbreviation of bulk.
bulk input fileSpecifies the pathname of the bulk input file. Partial pathnamesare interpreted relative to the current working directory. For adiscussion of the required file format, see “Constructing a BulkInput File” on page 496.
-templateSpecifies the pathname of the template file for any uss addcommands that appear in the bulk input file. Partial pathnamesare interpreted relative to the current working directory. For adiscussion of the required file format, see “Constructing a ussTemplate File” on page 463.
-adminNames an administrative account that has the ADMIN flag on itsAuthentication Database entry, such as the admin account. Thepassword prompt echoes it as admin_user. Enter the appropriatepassword as admin_password.
-dryrunReports actions that the command interpreter needs to perform torun the command, without actually performing them.
-overwriteOverwrites any directories, files and links that exist in the filesystem and for which there are also D, E, F, L, or S instructions inthe template file named by the -template argument. If this flag isomitted, the command interpreter prompts, once for each addinstruction in the bulk input file, for confirmation that it is tooverwrite such elements. Do not include this flag if there are noadd instructions in the bulk input file.
-pwexpiresSets the number of days after a user’s password is changed that itremains valid, for each user named by an add instruction in thebulk input file. Provide an integer from the range 1 through 254 tospecify the number of days until expiration, or the value 0 toindicate that the password never expires (the default).
502 AFS: Administration Guide
When the password becomes invalid (expires), the user is unableto authenticate, but has 30 more days in which to issue thekpasswd command to change the password (after that, only anadministrator can change it).
-pipe Suppresses the Authentication Server’s prompt for the password ofthe issuer or the user named by the -admin argument (theAuthentication Server always separately authenticates the userwho is creating or deleting an entry in the AuthenticationDatabase). Instead, the command interpreter accepts the passwordas piped input from another program, enabling you to run the ussbulk command in unattended batch jobs.
7. If a newly created or deleted user home directory resides in a replicatedvolume, use the vos release command to release the volume, as describedin “To replicate a read/write volume (create a read-only volume)” onpage 161.
% vos release <volume name or ID>
Note: This step can be necessary even if the home directory’s parentdirectory is not itself a mount point for a replicated volume (and iseasier to overlook in that case). For example, the ABC Corporationtemplate puts the mount points for user volumes in the/afs/abc.com/usr directory. Because that is a regular directory ratherthan a mount point, it resides in the root.cell volume mounted atthe /afs/abc.com directory. That volume is replicated, so afterchanging it by creating or deleting a mount point, the administratormust issue the vos release command.
8. If you are creating accounts, create an entry for the new user in the localpassword file (/etc/passwd or equivalent) on each AFS client machine thathe or she can log into. For suggestions on automating this step, see“Creating a Common Source Password File” on page 459.Even if you do not use the automated method, set the user’s UNIX UID tomatch the AFS UID assigned automatically by the Protection Server orassigned with the -uid argument. The new user’s AFS UID appears in thetrace produced by the uss add output or you can use the pts examinecommand to display it, as described in “To display a Protection Databaseentry” on page 536.
9. If you are deleting accounts, delete the user’s entry from the localpassword file (/etc/passwd or equivalent) of each client machine. If youuse the AFS package utility, it is sufficient to remove the entry from thecommon source version of the file. If you intend to reactivate the user’saccount in the future, it is simpler to comment out the entry or place anasterisk (*) in the password field.
Chapter 12. Creating and Deleting User Accounts with the uss Command Suite 503

504 AFS: Administration Guide
Chapter 13. Administering User Accounts
This chapter explains how to create and maintain user accounts in your cell.
The preferred method for creating user accounts is the uss program, whichenables you to create multiple accounts with a single command. See“Chapter 12. Creating and Deleting User Accounts with the uss CommandSuite” on page 453. If you prefer to create each account componentindividually, follow the instructions in “Creating AFS User Accounts” onpage 510.
Summary of Instructions
This chapter explains how to perform the following tasks by using theindicated commands:
Create Protection Database entry pts createuserCreate Authentication Database entry kas createCreate volume vos createMount volume fs mkmountCreate entry on ACL fs setaclExamine Protection Database entry pts examineChange directory ownership /etc/chownLimit failed authentication attempts kas setfields with -attempts and
-locktimeUnlock Authentication Database entry kas unlockSet password lifetime kas setfields with -pwexpiresProhibit password reuse kas setfields with -reuseChange AFS password kas setpasswordList groups owned by user pts listownedRename Protection Database entry pts renameDelete Authentication Database entry kas deleteRename volume vos renameRemove mount point fs rmmountDelete Protection Database entry pts deleteList volume location vos listvldbRemove volume vos remove
© Copyright IBM Corp. 1989, 2000 505
The Components of an AFS User Account
The differences between AFS and the UNIX file system imply that a completeAFS user account is not the same as a UNIX user account. The following listdescribes the components of an AFS account. The same information appearsin a corresponding section of “Chapter 12. Creating and Deleting UserAccounts with the uss Command Suite” on page 453, but is repeated here foryour convenience.v A Protection Database entry defines the username (the name provided when
authenticating with AFS), and maps it to an AFS user ID (AFS UID), anumber that the AFS servers use internally when referencing users. TheProtection Database also tracks the groups to which the user belongs. Fordetails, see “Chapter 14. Administering the Protection Database” onpage 533.
v An Authentication Database entry records the user’s AFS password in ascrambled form suitable for use as an encryption key.
v A home volume stores all the files in the user’s home directory together on asingle partition of a file server machine. The volume has an associated quotathat limits its size. For a complete discussion of volumes, see “Chapter 5.Managing Volumes” on page 147.
v A mount point makes the contents of the user’s volume visible andaccessible in the AFS filespace, and acts as the user’s home directory. Formore details about mount points, see “About Mounting Volumes” onpage 151.
v Full access permissions on the home directory’s access control list (ACL) andownership of the directory (as displayed by the UNIX ls -ld command)enable the user to manage his or her files. For details on AFS file protection,see “Chapter 15. Managing Access Control Lists” on page 559.
v A local password file entry (in the /etc/passwd file or equivalent) of each AFSclient machine enables the user to log in and access AFS files through theCache Manager. A subsequent section in this chapter further discusses localpassword file entries.
v Other optional configuration files make the account more convenient to use.Such files help the user log in and log out more easily, receive electronicmail, print, and so on.
Creating Local Password File Entries
To obtain authenticated access to a cell’s AFS filespace, a user must not onlyhave a valid AFS token, but also an entry in the local password file(/etc/passwd or equivalent) of the machine whose Cache Manager isrepresenting the user. This section discusses why it is important for the user’s
506 AFS: Administration Guide
AFS UID to match to the UNIX UID listed in the local password file, anddescribes the appropriate value to put in the file’s password field.
One reason to use uss commands is that they enable you to generate localpassword file entries automatically as part of account creation. See “Creating aCommon Source Password File” on page 459.
Information similar to the information in this section appears in acorresponding section of “Chapter 12. Creating and Deleting User Accountswith the uss Command Suite” on page 453, but is repeated here for yourconvenience
Assigning AFS and UNIX UIDs that Match
A user account is easiest to administer and use if the AFS user ID number(AFS UID) and UNIX UID match. All instructions in the AFS documentationassume that they do.
The most basic reason to make AFS and UNIX UIDs the same is so that theowner name reported by the UNIX ls -l and ls -ld commands makes sense forAFS files and directories. Following standard UNIX practice, the File Serverrecords a number rather than a username in an AFS file or directory’s ownerfield: the owner’s AFS UID. When you issue the ls -l command, it translatesthe UID to a username according to the mapping in the local password file,not the AFS Protection Database. If the AFS and UNIX UIDs do not match,the ls -l command reports an unexpected (and incorrect) owner. The outputcan even vary on different client machines if their local password files mapthe same UNIX UID to different names.
Follow the recommendations in the indicated sections to make AFS and UNIXUIDs match when creating accounts for various types of users:v If creating an AFS account for a user who already has a UNIX UID, see
“Making UNIX and AFS UIDs Match” on page 508.v If some users in your cell have existing UNIX accounts but the user for
whom you are creating an AFS account does not, then it is best to allow theProtection Server to allocate an AFS UID automatically. To avoid overlap ofAFS UIDs with existing UNIX UIDs, set the Protection Database’s max userid counter higher than the largest UNIX UID, using the instructions in“Displaying and Setting the AFS UID and GID Counters” on page 556.
v If none of your users have existing UNIX accounts, allow the ProtectionServer to allocate AFS UIDs automatically, starting either at its default or atthe value you have set for the max user id counter.
Chapter 13. Administering User Accounts 507

Specifying Passwords in the Local Password File
Authenticating with AFS is easiest for your users if you install and configurean AFS-modified login utility, which logs a user into the local file system andobtains an AFS token in one step. In this case, the local password file nolonger controls a user’s ability to login in most circumstances, because theAFS-modified login utility does not consult the local password file if the userprovides the correct AFS password. You can nonetheless use a password fileentry’s password field (usually, the second field) in the following ways tocontrol login and authentication:v To prevent both local login and AFS authentication, place an asterisk ( * ) in
the field. This is useful mainly in emergencies, when you want to prevent acertain user from logging into the machine.
v To prevent login to the local file system if the user does not provide thecorrect AFS password, place a character string of any length other than thestandard thirteen characters in the field. This is appropriate if you want toallow only people with local AFS accounts to log into to your machines. Asingle X or other character is the most easily recognizable way to do this.
v To enable a user to log into the local file system even after providing anincorrect AFS password, record a standard UNIX encrypted password inthe field by issuing the standard UNIX password-setting command (passwdor equivalent).
If you do not use an AFS-modified login utility, you must place a standardUNIX password in the local password file of every client machine the userwill use. The user logs into the local file system only, and then must issue theklog command to authenticate with AFS. It is simplest if the passwords in thelocal password file and the Authentication Database are the same, but this isnot required.
Converting Existing UNIX Accounts
This section discusses the three main issues you need to consider if your cellhas existing UNIX accounts that you wish to convert to AFS accounts.
Making UNIX and AFS UIDs Match
As previously mentioned, AFS users must have an entry in the local passwordfile on every client machine from which they access the AFS filespace as anauthenticated user. Both administration and use are much simpler if the UNIXUID and AFS UID match. When converting existing UNIX accounts, you havetwo alternatives:v Make the AFS UIDs match the existing UNIX UIDs. In this case, you need
to assign the AFS UID yourself by including the -id argument to the ptscreateuser command as you create the AFS account.
508 AFS: Administration Guide
Because you are retaining the user’s UNIX UID, you do not need to alterthe UID in the local password file entry. However, if you are using anAFS-modified login utility, you possibly need to change the password fieldin the entry. For a discussion of how the value in the password field affectslogin with an AFS-modified login utility, see “Specifying Passwords in theLocal Password File” on page 508.If now or in the future you need to create AFS accounts for users who donot have an existing UNIX UID, then you must guarantee that new AFSUIDs do not conflict with any existing UNIX UIDs. The simplest way is toset the max user id counter in the Protection Database to a value higherthan the largest existing UNIX UID. See “Displaying and Setting the AFSUID and GID Counters” on page 556.
v Change the existing UNIX UIDs to match the new AFS UIDs that theProtection Server assigns automatically.Allow the Protection Server to allocate the AFS UIDs automatically as youcreate AFS accounts. You must then alter the user’s entry in the localpassword file on every client machine to include the new UID.There is one drawback to changing the UNIX UID: any files and directoriesthat the user owned in the local file system before becoming an AFS userstill have the former UID in their owner field. If you want the ls -l and ls-ld commands to display the correct owner, you must use the chowncommand to change the value to the user’s new UID, whether you areleaving the file in the local file system or moving it to AFS. See “MovingLocal Files into AFS”.
Setting the Password Field Appropriately
Existing UNIX accounts already have an entry in the local password file,probably with a (scrambled) password in the password field. You possiblyneed to change the value in the field, depending on the type of login utilityyou use:v If the login utility is not modified for use with AFS, the actual password
must appear (in scrambled form) in the local password file entry.v If the login utility is modified for use with AFS, choose one of the values
discussed in “Specifying Passwords in the Local Password File” onpage 508.
Moving Local Files into AFS
New AFS users with existing UNIX accounts probably already own files anddirectories stored in a machine’s local file system, and it usually makes senseto transfer them into the new home volume. The easiest method is to movethem onto the local disk of an AFS client machine, and then use the UNIX mvcommand to transfer them into the user’s new AFS home directory.
Chapter 13. Administering User Accounts 509
As you move files and directories into AFS, keep in mind that the meaning oftheir mode bits changes. AFS ignores the second and third sets of mode bits(group and other), and does not use the first set (the owner bits) directly, butonly in conjunction with entries on the ACL (for details, see “How AFSInterprets the UNIX Mode Bits” on page 575). Be sure that the ACL protectsthe file or directory at least as securely as the mode bits.
If you have chosen to change a user’s UNIX UID to match a new AFS UID,you must change the ownership of UNIX files and directories as well. Onlymembers of the system:administrators group can issue the chown commandon files and directories once they reside in AFS.
Creating AFS User Accounts
There are two methods for creating user accounts. The preferredmethod—using the uss commands—enables you to create multiple accountswith a single command. It uses a template to define standard values for theaccount components that are the same for each user (such as quota), butprovide differing values for more variable components (such as username).See “Chapter 12. Creating and Deleting User Accounts with the uss CommandSuite” on page 453.
The second method involves issuing a separate command to create eachcomponent of the account. It is best suited to creation of one account at atime, since some of the commands can create only one instance of the relevantcomponent. To review the function of each component, see “The Componentsof an AFS User Account” on page 506.
Use the following instructions to create any of the three types of user account,which differ in their levels of functionality. For a description of the types, see“Configuring AFS User Accounts” on page 43.v To create an authentication-only account, perform Step 1 on page 511
through Step 4 on page 513 and also Step 14 on page 517. This type ofaccount consists only of entries in the Authentication Database andProtection Database.
v To create a basic account, perform Step 1 on page 511 through Step 8 onpage 515 and Step 11 on page 516 through Step 14 on page 517. In additionto Authentication Database and Protection Database entries, this type ofaccount includes a volume mounted at the home directory with owner andACL set appropriately.
v To create a full account, perform all steps in the following instructions. Thistype of account includes configuration files for basic functions such aslogging in, printing, and mail delivery, making it more convenient and
510 AFS: Administration Guide

useful. For a discussion of some useful types of configuration files, see“Creating Standard Files in New AFS Accounts” on page 48.
To create one user account with individual commands1. Decide on the value to assign to each of the following account
components. If you are creating an authentication-only account, you needto pick only a username, AFS UID, and initial password.v The username. By convention, the names of many components of the
user account incorporate this name. For a discussion of restrictions andsuggested naming schemes, see “Choosing Usernames and NamingOther Account Components” on page 45.
v The AFS UID, if you want to assign a specific one. It is generally bestto have the Protection Server allocate one instead, except when you arecreating an AFS account for a user who already has an existing UNIXaccount. In that case, migrating the user’s files into AFS is simplest ifyou set the AFS UID to match the existing UNIX UID. See “ConvertingExisting UNIX Accounts” on page 508.
v The initial password. Advise the user to change this at the first login,using the password changing instructions in the AFS User Guide.
v The name of the user’s home volume. The conventional name isuser.username (for example, user.smith).
v The volume’s site (disk partition on a file server machine). Some cellsdesignate certain machines or partitions for user volumes only, or itpossibly makes sense to place the volume on the emptiest partitionthat meets your other criteria. To display the size and available spaceon a partition, use the vos partinfo command, which is fully describedin “Creating Read/write Volumes” on page 153.
v The name of the user’s home directory (the mount point for the homevolume). The conventional location is a directory (or one of a set ofdirectories) directly under the cell directory, such as /afs/cellname/usr.For suggestions on how to avoid the slowed directory lookup that canresult from having large numbers of user home directories in a singleusr directory, see “Evenly Distributing User Home Directories with theG Instruction” on page 470.
v The volume’s space quota. Include the -maxquota argument to the voscreate command, or accept the default quota of 5000 KB.
v The ACL on the home directory. By default, the ACL on every newvolume grants all seven permissions to the system:administratorsgroup. After volume creation, use the fs setacl command to remove theentry if desired, and to grant all seven permissions to the user.
2. Authenticate as an AFS identity with all of the following privileges. Inthe conventional configuration, the admin user account has them, or youpossibly have a personal administrative account. (To increase cell security,
Chapter 13. Administering User Accounts 511
it is best to create special privileged accounts for use only whileperforming administrative procedures; for further discussion, see “AnOverview of Administrative Privilege” on page 577.) If necessary, issuethe klog command to authenticate.
% klog admin_userPassword: admin_password
The following list specifies the necessary privileges and indicates how tocheck that you have them.v Membership in the system:administrators group. If necessary, issue the
pts membership command, which is fully described in “To display themembers of the system:administrators group” on page 579.
% pts membership system:administrators
v Inclusion in the /usr/afs/etc/UserList file. If necessary, issue the boslistusers command, which is fully described in “To display the users inthe UserList file” on page 582.
% bos listusers <machine name>
v The ADMIN flag on your Authentication Database entry. However, theAuthentication Server performs its own authentication, so in Step 4 onpage 513 you specify an administrative identity on the kas commandline itself.
v The i (insert) and a (administer) permissions on the ACL of thedirectory where you are mounting the user’s volume. If necessary,issue the fs listacl command, which is fully described in “DisplayingACLs” on page 566.
% fs listacl [<dir/file path>]
Members of the system:administrators group always implicitly havethe a (administer) and by default also the l (lookup) permission onevery ACL and can use the fs setacl command to grant other rights asnecessary.
v Knowledge of the password for the local superuser root.3. Issue the pts createuser command to create an entry in the Protection
Database. For a discussion of setting AFS UIDs, see “Assigning AFS andUNIX UIDs that Match” on page 507. If you are converting an existingUNIX account into an AFS account, also see “Converting Existing UNIXAccounts” on page 508.
% pts createuser <user name> [<user id>]
where
cu Is an acceptable alias for createuser (and createu is the shortestacceptable abbreviation).
512 AFS: Administration Guide

user nameSpecifies the user’s username (the character string typed at login).It is best to limit the name to eight or fewer lowercase letters,because many application programs impose that limit. The AFSservers themselves accept names of up to 63 lowercase letters.Also avoid the following characters: colon (:), semicolon (;),comma (,), at sign (@), space, newline, and the period (.), which isconventionally used only in special administrative names.
user id Is optional and appropriate only if the user already has a UNIXUID that the AFS UID must match. If you do not provide thisargument, the Protection Server assigns one automatically basedon the counter described in “Displaying and Setting the AFS UIDand GID Counters” on page 556. If the ID you specify is less than1 (one) or is already in use, an error results.
4. Issue the kas create command to create an entry in the AuthenticationDatabase. To avoid having the user’s temporary initial password echovisibly on the screen, omit the -initial_password argument; instead enterthe password at the prompts that appear when you omit the argument,as shown in the following syntax specification.The Authentication Server performs its own authentication rather thanaccepting your existing AFS token. By default, it authenticates your local(UNIX) identity, which possibly does not correspond to anAFS-privileged administrator. Include the -admin argument to name anidentity that has the ADMIN flag on its Authentication Database entry. Toverify that an entry has the flag, issue the kas examine command asdescribed in “To check if the ADMIN flag is set” on page 580.
% kas create <name of user> \-admin <admin principal to use for authentication>
Administrator's (admin_user) password: admin_passwordinitial_password: initial_passwordVerifying, please re-enter initial_password: initial_password
where
cr Is the shortest acceptable abbreviation for create.
name of userSpecifies the same username as in Step 3 on page 512.
-adminNames an administrative account that has the ADMIN flag on itsAuthentication Database entry, such as admin. The passwordprompt echoes it as admin_user. Enter the appropriate passwordas admin_password.
initial_passwordSpecifies the initial password as a string of eight characters or
Chapter 13. Administering User Accounts 513
less, to comply with the length restriction that some applicationsimpose. Possible choices for an initial password include theusername, a string of digits from a personal identificationnumber such as the Social Security number, or a standard stringsuch as changeme. Instruct the user to change the string to atruly secret password as soon as possible by using the kpasswdcommand as described in the AFS User Guide.
5. Issue the vos create command to create the user’s volume.% vos create <machine name> <partition name> <volume name> \
[-maxquota <initial quota (KB)>]
where
cr Is the shortest acceptable abbreviation of create.
machine nameNames the file server machine on which to place the newvolume.
partition nameNames the partition on which to place the new volume.
volume nameNames the new volume. The name can include up to 22characters. By convention, user volume names have the formuser.username, where username is the name assigned in Step 3 onpage 512 .
-maxquotaSets the volume’s quota, as a number of kilobyte blocks. If youomit this argument, the default is 5000 KB.
6. Issue the fs mkmount command to mount the volume in the filespaceand create the user’s home directory.
% fs mkmount <directory> <volume name>
where
mk Is the shortest acceptable abbreviation for mkmount.
directoryNames the mount point to create. A directory of the same namemust not already exist. Partial pathnames are interpreted relativeto the current working directory. By convention, user homedirectories are mounted in a directory called something like/afs/.cellname/usr, and the home directory name matches theusername assigned in Step 3 on page 512.
Specify the read/write path to the mount point, to avoid thefailure that results when you attempt to create the new mount
514 AFS: Administration Guide
point in a read-only volume. By convention, you indicate theread/write path by placing a period before the cell name at thepathname’s second level (for example, /afs/.abc.com). For furtherdiscussion of the concept of read/write and read-only pathsthrough the filespace, see “The Rules of Mount Point Traversal”on page 169.
volume nameIs the name of the volume created in Step 5 on page 514.
7. (Optional) Issue the fs setvol command with the -offlinemsg argumentto record auxiliary information about the volume in its volume header.For example, you can record who owns the volume or where you havemounted it in the filespace. To display the information, use the fsexamine command.
% fs setvol <dir/file path> -offlinemsg <offline message>
where
sv Is an acceptable alias for setvol (and setv the shortest acceptableabbreviation).
dir/file pathNames the mount point of the volume with which to associatethe message. Partial pathnames are interpreted relative to thecurrent working directory.
Specify the read/write path to the mount point, to avoid thefailure that results when you attempt to change a read-onlyvolume. By convention, you indicate the read/write path byplacing a period before the cell name at the pathname’s secondlevel (for example, /afs/.abc.com). For further discussion of theconcept of read/write and read-only paths through the filespace,see “The Rules of Mount Point Traversal” on page 169.
-offlinemsgSpecifies up to 128 characters of auxiliary information to recordin the volume header.
8. Issue the fs setacl command to set the ACL on the new home directory.At the least, create an entry that grants all permissions to the user, asshown.You can also use the command to edit or remove the entry that the voscreate command automatically places on the ACL for a new volume’sroot directory, which grants all permissions to the system:administratorsgroup. Keep in mind that even if you remove the entry, the members ofthe group by default have implicit a (administer) and by default l(lookup) permissions on every ACL, and can grant themselves otherpermissions as required.
Chapter 13. Administering User Accounts 515
For detailed instructions for the fs setacl command, see “Setting ACLEntries” on page 568.
% fs setacl <directory> -acl <user name> all \[system:administrators desired_permissions]
9. (Optional) Create configuration files and subdirectories in the new homedirectory. Possibilities include .login and .logout files, a shell-initializationfile such as .cshrc, files to help with printing and mail delivery, and soon.If you are converting an existing UNIX account into an AFS account, youpossibly wish to move some files and directories into the user’s new AFShome directory. See “Converting Existing UNIX Accounts” on page 508.
10. (Optional) In the new .login or shell initialization file, define the user’s$PATH environment variable to include the directories where AFSbinaries are kept (for example, the /usr/afsws/bin and /usr/afsws/etcdirectories).
11. In Step 12 and Step 14 on page 517, you must know the user’s AFS UID.If you had the Protection Server assign it in Step 3 on page 512, youprobably do not know it. If necessary, issue the pts examine command todisplay it.
% pts examine <user or group name or id>
where
e Is the shortest acceptable abbreviation of examine.
user or group name or idIs the username that you assigned in Step 3 on page 512.
The first line of the output displays the username and AFS UID. Forfurther discussion and an example of the output, see “DisplayingInformation from the Protection Database” on page 535.
12. Designate the user as the owner of the home directory and any files andsubdirectories created or moved in Step 9. Specify the owner by the AFSUID you learned in Step 11 rather than by username. This is necessaryfor new accounts because the user does not yet have an entry in yourlocal machine’s password file (/etc/passwd or equivalent). If you areconverting an existing UNIX account, an entry possibly already exists,but the UID is possibly incorrect. In that case, specifying a usernamemeans that the corresponding (possibly incorrect) UID is recorded as theowner.Some operating systems allow only the local superuser root to issue thechown command. If necessary, issuing the su command before the chowncommand.
% chown new_owner_ID directory
516 AFS: Administration Guide

where
new_owner_IDIs the user’s AFS UID, which you learned in Step 11 on page 516.
directoryNames the home directory you created in Step 6 on page 514,plus each subdirectory or file you created in Step 9 on page 516.
13. If the new user home directory resides in a replicated volume, use thevos release command to release the volume, as described in “To replicatea read/write volume (create a read-only volume)” on page 161.
% vos release <volume name or ID>
Note: This step can be necessary even if the home directory’s parentdirectory is not itself a mount point for a replicated volume (and iseasier to overlook in that case). Suppose, for example, that theABC Corporation puts the mount points for user volumes in the/afs/abc.com/usr directory. Because that is a regular directoryrather than a mount point, it resides in the root.cell volumemounted at the /afs/abc.com directory. That volume is replicated,so after changing it by creating a new mount point theadministrator must issue the vos release command.
14. Create or modify an entry for the new user in the local password file(/etc/passwd or equivalent) of each machine the user can log onto.Remember to make the UNIX UID the same as the AFS UID you learnedin Step 11 on page 516, and to fill the password field appropriately (forinstructions, see “Specifying Passwords in the Local Password File” onpage 508).If you use the package utility to distribute a common version of thepassword file to all client machines, then you need to make the changeonly in the common version. See “Chapter 11. Configuring ClientMachines with the package Program” on page 429.
Improving Password and Authentication Security
AFS provides several optional features than can help to protect your cell’sfilespace against unauthorized access. The following list summarizes them,and instructions follow.v Limit the number of consecutive failed login attempts.
Chapter 13. Administering User Accounts 517
One of the most common ways for an unauthorized user to access yourfilespace is to guess an authorized user’s password. This method of attackis most dangerous if the attacker can use many login processes in parallelor use the RPC interfaces directly.To protect against this type of attack, use the -attempts argument to the kassetfields command to limit the number of times that a user canconsecutively fail to enter the correct password when using either anAFS-modified login utility or the klog command. When the limit isexceeded, the Authentication Server locks the user’s AuthenticationDatabase entry (disallows authentication attempts) for a period of time thatyou define with the -locktime argument to the kas setfields command. Ifdesired, system administrators can use the kas unlock command to unlockthe entry before the complete lockout time passes.In certain circumstances, the mechanism used to enforce the number offailed authentication attempts can cause a lockout even though the numberof failed attempts is less than the limit set by the -attempts argument.Client-side authentication programs such as klog and an AFS-modifiedlogin utility normally choose an Authentication Server at random for eachauthentication attempt, and in case of a failure are likely to choose adifferent Authentication Server for the next attempt. The AuthenticationServers running on the various database server machines do notcommunicate with each other about how many times a user has failed toprovide the correct password to them. Instead, each Authentication Servermaintains its own separate copy of the auxiliary database filekaserverauxdb (located in the /usr/afs/local directory by default), whichrecords the number of consecutive authentication failures for each useraccount and the time of the most recent failure. This implementation meansthat on average each Authentication Server knows about only a fraction ofthe total number of failed attempts. The only way to avoid allowing morethan the number of attempts set by the -attempts argument is to have eachAuthentication Server allow only some fraction of the total. Morespecifically, if the limit on failed attempts is f, and the number ofAuthentication Servers is S, then each Authentication Server can onlypermit a number of attempts equal to f divided by S (the Ubiksynchronization site for the Authentication Server tracks any remainder,fmodS).Normally, this implementation does not reduce the number of allowedattempts to less than the configured limit (f). If one Authentication Serverrefuses an attempt, the client contacts another instance of the server,continuing until either it successfully authenticates or has contacted all ofthe servers. However, if one or more of the Authentication Server processesis unavailable, the limit is effectively reduced by a percentage equal to thequantity U divided by S, where U is the number of unavailable servers andS is the number normally available.
518 AFS: Administration Guide
To avoid the undesirable consequences of setting a limit on failedauthentication attempts, note the following recommendations:– Do not set the -attempts argument (the limit on failed authentication
attempts) too low. A limit of nine failed attempts is recommended forregular user accounts, to allow three failed attempts per AuthenticationServer in a cell with three database server machines.
– Set fairly short lockout times when including the -locktime argument.Although guessing passwords is a common method of attack, it is not avery sophisticated one. Setting a lockout time can help discourageattackers, but excessively long times are likely to be more of a burden toauthorized users than to potential attackers. A lockout time of 25 minutesis recommended for regular user accounts.
– Do not assign an infinite lockout time on an account (by setting the-locktime argument to 0 [zero]) unless there is a highly compellingreason. Such accounts almost inevitably become locked at some point,because each Authentication Server never resets the account’s failurecounter in its copy of the kaauxdb file (in contrast, when the lockouttime is not infinite, the counter resets after the specified amount of timehas passed since the last failed attempt to that Authentication Server).Furthermore, the only way to unlock an account with an infinite lockouttime is for an administrator to issue the kas unlock command. It isespecially dangerous to set an infinite lockout time on an administrativeaccount; if all administrative accounts become locked, the only way tounlock them is to shut down all instances of the Authentication Serverand remove the kaauxdb file on each.
In summary, the recommended limit on authentication attempts is nine andlockout time 25 minutes.
v Limit password lifetime.The longer a password is in use, the more time an attacker has to try tolearn it. To protect against this type of attack, use the -pwexpires argumentto the kas setfields command to limit how many days a user’s password isvalid. The user becomes unable to authenticate with AFS after the passwordexpires, but has up to 30 days to use the kpasswd command to set a newpassword. After the 30 days pass, only an administrator who has the ADMINflag on the Authentication Database entry can change the password.If you set a password lifetime, many AFS-modified login utilities (but notthe klog command) set the PASSWORD_EXPIRES environment variable tothe number of days remaining until the password expires. A setting of zeromeans that the password expires today. If desired, you can customize yourusers’ login scripts to display the number of days remaining beforeexpiration and even prompt for a password change when a small numberof days remain before expiration.
v Prohibit reuse of passwords.
Chapter 13. Administering User Accounts 519

Forcing users to select new passwords periodically is not effective if theysimply set the new password to the current value. To prevent a user fromsetting a new password to a string similar to any of the last 20 passwords,use the -reuse argument to the kas setfields command.If you prohibit password reuse and the user specifies an excessively similarpassword, the Authentication Server generates the following message toreject it:
Password was not changed because it seems like a reused password
A persistent user can try to bypass this restriction by changing thepassword 20 times in quick succession (or running a script to do so). If youbelieve this is likely to be a problem, you can include the -minhoursargument to the kaserver initialization command (for details, see thecommand’s reference page in the AFS Administration Reference. If the userattempts to change passwords too frequently, the following messageappears.
Password was not changed because you changed it too recently; seeyour systems administrator
v Check the quality of new passwords.You can impose a minimum quality standard on passwords by writing ascript or program called kpwvalid. If the kpwvalid file exists, the kpasswdand kas setpassword command interpreters invoke it to check a newpassword. If the password does not comply with the quality standard, thekpwvalid program returns an appropriate code and the commandinterpreter rejects the password.The kpwvalid file must be executable, must reside in the same AFSdirectory as the kpasswd and kas binaries, and its directory’s ACL mustgrant the w (write) permission only to the system:administrators group.If you choose to write a kpwvalid program, consider imposing standardssuch as the following.– A minimum length– Words found in the dictionary are prohibited– Numbers, punctuation, or both must appear along with letters
The AFS distribution includes an example kpwvalid program. See thekpwvalid reference page in the AFS Administration Reference.
To limit the number of consecutive failed authentication attempts1. Issue the kas setfields command with the -attempts and -locktime
arguments.The Authentication Server performs its own authentication rather thanaccepting your existing AFS token. By default, it authenticates your local(UNIX) identity, which possibly does not correspond to an AFS-privilegedadministrator. Include the -admin argument to name an identity that has
520 AFS: Administration Guide
the ADMIN flag on its Authentication Database entry. To verify that an entryhas the flag, issue the kas examine command as described in “To check ifthe ADMIN flag is set” on page 580.
% kas setfields <name of user> \-admin <admin principal to use for authentication> \-attempts <maximum successive failed login tries ([0..254])> \-locktime <failure penalty [hh:mm or minutes]>
Administrator's (admin_user) password: admin_password
where
name of userNames the Authentication Database entry to edit.
-adminNames an administrative account that has the ADMIN flag on itsAuthentication Database entry, such as the admin account. Thepassword prompt echoes it as admin_user. Enter the appropriatepassword as admin_password.
-attemptsSpecifies the maximum consecutive number of times that a usercan fail to provide the correct password during authentication (viathe klog command or an AFS-modified login utility) before theAuthentication Server refuses further attempts for the amount oftime specified by the -locktime argument. The range of validvalues is 0 (zero) through 254. If you omit this argument or specify0, the Authentication Server allows an unlimited number offailures.
-locktimeSpecifies how long the Authentication Server refusesauthentication attempts after the user exceeds the failure limitspecified by the -attempts argument.
Specify a time in either hours and minutes (hh:mm) or minutesonly (mm), from the range 01 (one minute) through 36:00 (36hours). The kas command interpreter automatically reduces anylarger value to 36:00 and also rounds up each nonzero value to thenext-higher multiple of 8.5 minutes.
It is best not to provide a value of 0 (zero), especially onadministrative accounts, because it sets an infinite lockout time.An administrator must always issue the kas unlock command tounlock such an account.
To unlock a locked user account1. Issue the kas command to enter interactive mode.
Chapter 13. Administering User Accounts 521

The Authentication Server performs its own authentication rather thanaccepting your existing AFS token. By default, it authenticates your local(UNIX) identity, which possibly does not correspond to an AFS-privilegedadministrator. Include the -admin argument to name an identity that hasthe ADMIN flag on its Authentication Database entry. To verify that an entryhas the flag, issue the kas examine command as described in “To check ifthe ADMIN flag is set” on page 580.
% kas -admin <admin principal to use for authentication>Administrator's (admin_user) password: admin_passwordka>
where -admin names an administrative account that has the ADMIN flag onits Authentication Database entry, such as admin. The password promptechoes it as admin_user. Enter the appropriate password as admin_password.
2. Issue the (kas) examine command to verify that the user’s account is infact locked, as indicated by the message shown:
ka> examine <name of user>User is locked until time
3. Issue the (kas) unlock command to unlock the account.ka> unlock <authentication ID>
where
u Is the shortest acceptable abbreviation of unlock.
authentication IDNames the Authentication Database entry to unlock.
To set password lifetime1. Issue the kas setfields command with the -pwexpires argument.
The Authentication Server performs its own authentication rather thanaccepting your existing AFS token. By default, it authenticates your local(UNIX) identity, which possibly does not correspond to an AFS-privilegedadministrator. Include the -admin argument to name an identity that hasthe ADMIN flag on its Authentication Database entry. To verify that an entryhas the flag, issue the kas examine command as described in “To check ifthe ADMIN flag is set” on page 580.
% kas setfields <name of user> \-pwexpires <number days password is valid [0..254])> \-admin <admin principal to use for authentication>
Administrator's (admin_user) password: admin_password
where
name of userSpecifies the Authentication Database entry on which to impose apassword expiration.
522 AFS: Administration Guide
-pwexpiresSets the number of days after the user’s password was lastchanged that it remains valid. Provide an integer from the range 1through 254 to specify the number of days until expiration.
When the password becomes invalid (expires), the user is unableto authenticate, but has 30 more days in which to issue thekpasswd or kas setpassword command to change the password(after that, only an administrator can change it). Note that theclock starts at the time the password was last changed, not whenthe kas setfields command is issued. To avoid retroactiveexpiration, have the user change the password just before issuingthe command.
-adminNames an administrative account that has the ADMIN flag on itsAuthentication Database entry, such as admin. The passwordprompt echoes it as admin_user. Enter the appropriate password asadmin_password.
To prohibit reuse of passwords1. Issue the kas setfields command with the -reuse argument.
The Authentication Server performs its own authentication rather thanaccepting your existing AFS token. By default, it authenticates your local(UNIX) identity, which possibly does not correspond to an AFS-privilegedadministrator. Include the -admin argument to name an identity that hasthe ADMIN flag on its Authentication Database entry. To verify that an entryhas the flag, issue the kas examine command as described in “To check ifthe ADMIN flag is set” on page 580.
% kas setfields <name of user> -reuse < permit password reuse (yes/no)> \-admin <admin principal to use for authentication>
Administrator's (admin_user) password: admin_password
where
name of userNames the Authentication Database entry for which to set thepassword reuse policy.
-reuse Specifies whether the Authentication Server allows reuse ofpasswords similar to any of the user’s last 20 passwords. Specifythe value no to prohibit reuse, or the value yes to reinstate thedefault of allowing password reuse.
-adminNames an administrative account that has the ADMIN flag on itsAuthentication Database entry, such as admin. The passwordprompt echoes it as admin_user. Enter the appropriate password asadmin_password.
Chapter 13. Administering User Accounts 523
Changing AFS Passwords
After setting an initial password during account creation, you normally do notneed to change user passwords, since they can use the kpasswd commandthemselves by following the instructions in the AFS User Guide. In the rareevent that a user forgets the password or otherwise cannot log in, you can usethe kas setpassword command to set a new password.
If entries in the local password file (/etc/passwd or equivalent) have actualscrambled passwords in their password field, remember to change thepassword there also. For further discussion, see “Specifying Passwords in theLocal Password File” on page 508.
To change an AFS password1. Issue the kas setpassword command to change the password. To avoid
having the new password echo visibly on the screen, omit the-new_password argument; instead enter the password at the prompts thatappear when you omit the argument, as shown.The Authentication Server performs its own authentication rather thanaccepting your existing AFS token. By default, it authenticates your local(UNIX) identity, which possibly does not correspond to an AFS-privilegedadministrator. Include the -admin argument to name an identity that hasthe ADMIN flag on its Authentication Database entry. To verify that an entryhas the flag, issue the kas examine command as described in “To check ifthe ADMIN flag is set” on page 580.
% kas setpassword <name of user> \-admin <admin principal to use for authentication>
Administrator's (admin_user) password: admin_passwordnew_password: new_passwordVerifying, please re-enter new_password: new_password
where
sp Is an acceptable alias for setpassword (setp is the shortestacceptable abbreviation).
name of userNames the Authentication Database entry for which to set thepassword.
-adminNames an administrative account that has the ADMIN flag on itsAuthentication Database entry, such as admin. The passwordprompt echoes it as admin_user. Enter the appropriate password asadmin_password.
524 AFS: Administration Guide
new_passwordSpecifies the user’s new password. It is subject to the restrictionsimposed by the kpwvalid program, if you use it.
Displaying and Setting the Quota on User Volumes
User volumes are like all other volumes with respect to quota. Each new AFSvolume has a default quota of 5000 KB, unless you use the -maxquotaargument to the vos create command to set a different quota. You can also useeither of the following commands to change quota at any time:v fs setquota
v fs setvol
You can use any of the three following commands to display a volume’squota:v fs quota
v fs listquota
v fs examine
For instructions, see “Setting and Displaying Volume Quota and Current Size”on page 198.
Changing Usernames
By convention, many components of a user account incorporate the username,including the Protection and Authentication Database entries, the volumename and the home directory name. When changing a username, it is best tomaintain consistency by changing the names of all components, so theprocedure for changing a username has almost as many steps as theprocedure for creating a new user account.
To change a username1. Authenticate as an AFS identity with all of the following privileges. In
the conventional configuration, the admin user account has them, or youpossibly have a personal administrative account. (To increase cell security,it is best to create special privileged accounts for use only whileperforming administrative procedures; for further discussion, see “AnOverview of Administrative Privilege” on page 577.) If necessary, issuethe klog command to authenticate.
% klog admin_userPassword: admin_password
Chapter 13. Administering User Accounts 525
The following list specifies the necessary privileges and indicates how tocheck that you have them.v Membership in the system:administrators group. If necessary, issue the
pts membership command, which is fully described in “To display themembers of the system:administrators group” on page 579.
% pts membership system:administrators
v Inclusion in the /usr/afs/etc/UserList file. If necessary, issue the boslistusers command, which is fully described in “To display the users inthe UserList file” on page 582.
% bos listusers <machine name>
v The ADMIN flag on the Authentication Database entry. However, theAuthentication Server performs its own authentication, so thefollowing instructions direct you to specify an administrative identityon the kas command line itself.
v The a (administer), d (delete), and i (insert) permissions on the ACLof the directory where you are removing the current mount point andcreating a new one. If necessary, issue the fs listacl command, which isfully described in “Displaying ACLs” on page 566.
% fs listacl [<dir/file path>]
Members of the system:administrators group always implicitly havethe a (administer) and by default also the l (lookup) permission onevery ACL and can use the fs setacl command to grant other rights asnecessary.
2. Issue the pts listowned command to display the names of the groups theuser owns. After you change the username in the Protection Database inStep 3, you must issue the pts rename command to change each group’sowner prefix to match the new name, because the Protection Server doesnot automatically make this change. For a complete description of the ptslistowned command, see “Displaying Information from the ProtectionDatabase” on page 535.
% pts listowned <user or group name or id>
3. Issue the pts rename command to change the user’s name in theProtection Database.
% pts rename <old name> <new name>
4. Issue the pts rename command to change the group names you noted inStep 2, so that their owner prefix (the part of the group name before thecolon) accurately reflects the owner’s new name.Repeat the command for each group. Step 3 details its syntax.
% pts rename <old name> <new name>
5. Issue the kas command to enter interactive mode.
526 AFS: Administration Guide

The Authentication Server performs its own authentication rather thanaccepting your existing AFS token. By default, it authenticates your local(UNIX) identity, which possibly does not correspond to anAFS-privileged administrator. Include the -admin argument to name anidentity that has the ADMIN flag on its Authentication Database entry. Toverify that an entry has the flag, issue the kas examine command asdescribed in “To check if the ADMIN flag is set” on page 580.
% kas -admin <admin principal to use for authentication>Administrator's (admin_user) password: admin_passwordka>
where -admin names an administrative account that has the ADMIN flagon its Authentication Database entry, such as admin. The passwordprompt echoes it as admin_user. Enter the appropriate password asadmin_password.
6. Issue the (kas) delete command to delete the user’s existingAuthentication Database entry.
ka> delete <name of user>
where
del Is the shortest acceptable abbreviation for delete, or you can usethe alias rm.
name of userNames the Authentication Database entry to delete.
7. Issue the (kas) create command to create an Authentication Databaseentry for the new username. To avoid having the user’s password echovisibly on the screen, do not include the -initial_password argument;instead enter the password at the prompts that appear in that case, asshown in the following syntax specification.
ka> create <name of user>initial_password: passwordVerifying, please re-enter initial_password: password
where
cr Is the shortest acceptable abbreviation for create.
name of userSpecifies the new username.
passwordSpecifies the password for the new user account. If the user iswilling to tell you his or her current password, you can retain it.Otherwise, provide a string of eight characters or less to complywith the length restriction that some applications impose.Possible choices for an initial password include the username, a
Chapter 13. Administering User Accounts 527

string of digits from a personal identification number such as theSocial Security number, or a standard string such as changeme.Instruct the user to change the string to a truly secret passwordas soon as possible by using the kpasswd command as instructedin the AFS User Guide.
8. Issue the quit command to leave interactive mode.ka> quit
9. Issue the vos rename command to change the name of the user’s volume.For complete syntax, see “To rename a volume” on page 212.
% vos rename <old volume name> <new volume name>
10. Issue the fs rmmount command to remove the existing mount point. Forthe directory argument, specify the read/write path to the mount point, toavoid the failure that results when you attempt to delete a mount pointfrom a read-only volume.
% fs rmmount <directory>
11. Issue the fs mkmount command to create a mount point for the volume’snew name. Specify the read/write path to the mount point for thedirectory argument, as in the previous step. For complete syntax, see Step6 on page 514 in “To create one user account with individual commands”on page 511.
% fs mkmount <directory> <volume name>
12. If the changes you made in Step 10 and Step 11 are to a mount point thatresides in a replicated volume, use the vos release command to releasethe volume, as described in “To replicate a read/write volume (create aread-only volume)” on page 161.
% vos release <volume name or ID>
Note: This step can be necessary even if the home directory’s parentdirectory is not itself a mount point for a replicated volume (and iseasier to overlook in that case). For example, the ABC Corporationtemplate puts the mount points for user volumes in the/afs/abc.com/usr directory. Because that is a regular directoryrather than a mount point, it resides in the root.cell volumemounted at the /afs/abc.com directory. That volume is replicated,so after changing it the administrator must issue the vos releasecommand.
528 AFS: Administration Guide
Removing a User Account
Before removing an account, it is best to make a backup copy of the user’shome volume on a permanent storage medium such as tape. If you need toremove several accounts, it is probably more efficient to use the uss deletecommand instead; see “Deleting Individual Accounts with the uss deleteCommand” on page 492.
To remove a user account1. Authenticate as an AFS identity with all of the following privileges. In
the conventional configuration, the admin user account has them, or youpossibly have a personal administrative account. (To increase cell security,it is best to create special privileged accounts for use only whileperforming administrative procedures; for further discussion, see “AnOverview of Administrative Privilege” on page 577.) If necessary, issuethe klog command to authenticate.
% klog admin_userPassword: admin_password
The following list specifies the necessary privileges and indicates how tocheck that you have them.v Membership in the system:administrators group. If necessary, issue the
pts membership command, which is fully described in “To display themembers of the system:administrators group” on page 579.
% pts membership system:administrators
v Inclusion in the /usr/afs/etc/UserList file. If necessary, issue the boslistusers command, which is fully described in “To display the users inthe UserList file” on page 582.
% bos listusers <machine name>
v The ADMIN flag on the Authentication Database entry. However, theAuthentication Server performs its own authentication, so thefollowing instructions direct you to specify an administrative identityon the kas command line itself.
v The d (delete) permission on the ACL of the directory where you areremoving the user volume’s mount point. If necessary, issue the fslistacl command, which is fully described in “Displaying ACLs” onpage 566.
% fs listacl [<dir/file path>]
Members of the system:administrators group always implicitly havethe a (administer) and by default also the l (lookup) permission onevery ACL and can use the fs setacl command to grant other rights asnecessary.
Chapter 13. Administering User Accounts 529

2. (Optional) If it is possible you need to restore the user’s accountsomeday, note the username and AFS UID, possibly in a file designatedfor that purpose. You can later restore the account with its original AFSUID.
3. (Optional) Copy the contents of the user’s volume to tape. You can usethe vos dump command as described in “Dumping and RestoringVolumes” on page 205 or the AFS Backup System as described in“Backing Up Data” on page 279.
4. (Optional) If you intend to remove groups that the user owns from theProtection Database after removing the user’s entry, issue the ptslistowned command to display them. For complete instructions, see“Displaying Information from the Protection Database” on page 535.
% pts listowned <user or group name or id>
5. (Optional) Issue the pts delete command to remove the groups the userowns. However, if it is likely that other users have placed the groups onthe ACLs of directories they own, it is best not to remove them.
% pts delete <user or group name or id>+
where
del Is the shortest acceptable abbreviation for delete.
user or group name or idSpecifies the name or AFS UID of each group displayed in theoutput from Step 4.
6. Issue the kas delete command to remove the user’s AuthenticationDatabase entry.The Authentication Server performs its own authentication rather thanaccepting your existing AFS token. By default, it authenticates your local(UNIX) identity, which possibly does not correspond to anAFS-privileged administrator. Include the -admin argument to name anidentity that has the ADMIN flag on its Authentication Database entry. Toverify that an entry has the flag, issue the kas examine command asdescribed in “To check if the ADMIN flag is set” on page 580.
% kas delete <name of user> \-admin <admin principal to use for authentication>
Administrator's (admin_user) password: admin_password
where
d Is the shortest acceptable abbreviation for delete.
name of userNames the Authentication Database entry to delete.
-adminNames an administrative account that has the ADMIN flag on its
530 AFS: Administration Guide

Authentication Database entry, such as admin. The passwordprompt echoes it as admin_user. Enter the appropriate passwordas admin_password.
7. Issue the vos listvldb command to display the site of the user’s homevolume in preparation for removing it. By convention, user volumes arenamed user.username.
% vos listvldb <volume name or ID>
where
listvl Is the shortest acceptable abbreviation of listvldb.
volume name or IDSpecifies the volume’s name or volume ID number.
8. Issue the vos remove command to remove the user’s volume. Itautomatically removes the backup version of the volume, if it exists. It isnot conventional to replicate user volumes, so the command usually alsocompletely removes the volume’s entry from the Volume LocationDatabase (VLDB). If there are ReadOnly replicas of the volume, you mustrepeat the vos remove command to remove each one individually.
% vos remove <machine name> <partition name> <volume name or ID>
where
remo Is the shortest acceptable abbreviation of remove.
machine nameNames the file server machine that houses the volume, asspecified in the output from Step 7.
partition nameNames the partition that houses the volume, as specified in theoutput from Step 7.
volume name or IDSpecifies the volume’s name or ID number.
9. Issue the fs rmmount command to remove the volume’s mount point.If you mounted the user’s backup volume as a subdirectory of the homedirectory, then this command is sufficient to unmount the backup versionas well. If you mounted the backup version at an unrelated location inthe filespace, repeat the fs rmmount command for it.
% fs rmmount <directory>
where
rmm Is the shortest acceptable abbreviation of rmmount.
Chapter 13. Administering User Accounts 531
directoryNames the mount point for the volume’s previous name (theformer home directory). Partial pathnames are interpreted relativeto the current working directory.
Specify the read/write path to the mount point, to avoid thefailure that results when you attempt to delete a mount pointfrom a read-only volume. By convention, you indicate theread/write path by placing a period before the cell name at thepathname’s second level (for example, /afs/.abc.com). For furtherdiscussion of the concept of read/write and read-only pathsthrough the filespace, see “Mounting Volumes” on page 169.
10. Issue the pts delete command to remove the user’s Protection Databaseentry. A complete description of this command appears in Step 5 onpage 530.
% pts delete <user or group name or id>
11. If the deleted user home directory resided in a replicated volume, use thevos release command to release the volume, as described in “To replicatea read/write volume (create a read-only volume)” on page 161.
% vos release <volume name or ID>
Note: This step can be necessary even if the home directory’s parentdirectory is not itself a mount point for a replicated volume (and iseasier to overlook in that case). For example, the ABC Corporationtemplate puts the mount points for user volumes in the/afs/abc.com/usr directory. Because that is a regular directoryrather than a mount point, it resides in the root.cell volumemounted at the /afs/abc.com directory. That volume is replicated,so after changing it by deleting a mount point the administratormust issue the vos release command.
532 AFS: Administration Guide

Chapter 14. Administering the Protection Database
This chapter explains how to create and maintain user, machine, and groupentries in the Protection Database.
Summary of Instructions
This chapter explains how to perform the following tasks by using theindicated commands:
Display Protection Database entry pts examineMap user, machine or group name to AFS ID pts examineDisplay entry’s owner or creator pts examineDisplay number of users or machines belonging to group pts examineDisplay number of groups user or machine belongs to pts examineDisplay group-creation quota pts examineDisplay entry’s privacy flags pts examineDisplay members of group, or groups that user or machinebelongs to
pts membership
Display groups that user or group owns pts listownedDisplay all entries in Protection Database pts listentriesCreate machine entry pts createuserCreate group entry pts creategroupAdd users and machines to groups pts adduserRemove users and machines from groups pts removeuserDelete machine or group entry pts deleteChange a group’s owner pts chownChange an entry’s name pts renameSet group creation quota pts setfieldsSet entry’s privacy flags pts setfieldsDisplay AFS ID counters pts listmaxSet AFS ID counters pts setmax
About the Protection Database
The Protection Database stores information about AFS users, client machines,and groups which the File Server process uses to determine whether clientsare authorized to access AFS data.
To obtain authenticated access to an AFS cell, a user must have an entry in thecell’s Protection Database. The first time that a user requests access to the datastored on a file server machine, the File Server on that machine contacts the
© Copyright IBM Corp. 1989, 2000 533

Protection Server to request the user’s current protection subgroup (CPS), whichlists all the groups to which the user belongs. The File Server scans the accesscontrol list (ACL) of the directory that houses the data, looking for groups onthe CPS. It grants access in accordance with the permissions that the ACLextends to those groups or to the user individually. (The File Server stores theCPS and uses it as long as the user has the same tokens. When a user’s groupmembership changes, he or she must reauthenticate for the File Server torecognize the change.)
Only administrators who belong to the cell’s system:administrators group cancreate user entries (the group is itself defined in the Protection Database, asdiscussed in “The System Groups”). Members of the system:administratorsgroup can also create machine entries, which can then be used to controlaccess based on the machine from which the access request originates. Aftercreating a machine entry, add it to a Protection Database group and place thegroup on ACLs (a machine cannot appear on ACLs directly). A machine entrycan represent a single machine or multiple machines with consecutive IPaddresses as specified by a wildcard notation. For instructions, see “CreatingUser and Machine Entries” on page 541. Because all replicas of a volume sharethe same ACL (the one on the volume’s root directory mount point), machineentries enable you to replicate the volume that houses a program’s binary filewhile still complying with a machine-based license agreement as required bythe program’s manufacturer. See “Creating User and Machine Entries” onpage 541.
A group entry is a list of user entries, machine entries, or both (groups cannotbelong to other groups). Putting a group on an ACL is a convenient way toextend or deny access to a set of users without listing them on the ACLindividually. Similarly, adding users to a group automatically grants themaccess to all files and directories for which the associated ACL lists that group.Both administrators and regular users can create groups.
The System Groups
In addition to the groups that users and administrators can create, AFSdefines the following three system groups. The Protection Server creates themautomatically when it builds the first version of a cell’s Protection Database,and always assigns them the same AFS GIDs.
system:anyuserRepresents all users able to access the cell’s filespace from the localand foreign cells, authenticated or not. Its AFS GID is -101. The grouphas no stable membership listed in the Protection Database.Accordingly, the pts examine command displays 0 in its membershipfield, and the pts membership command does not list any membersfor it.
534 AFS: Administration Guide

Placing this group on an ACL is a convenient way to extend access toall users. The File Server automatically places this group on the CPSof any user who requests access to data stored on a file servermachine. (Every unauthenticated user is assigned the identityanonymous and this group is the only entry on the CPS foranonymous.)
system:authuserRepresents all users who are able to access the cell’s filespace from thelocal and foreign cells and who have successfully obtained an AFStoken in the local cell (are authenticated). Its AFS GID is -102. Like thesystem:anyuser group, it has no stable membership listed in theProtection Database. Accordingly, the pts examine command displays0 in its membership field, and the pts membership command does notlist any members for it.
Placing this group on an ACL is therefore a convenient way to extendaccess to all authenticated users. The File Server automatically placesthis group on the CPS of any authenticated user who requests accessto data stored on a file server machine.
system:administratorsRepresents the small number of cell administrators authorized to issueprivileged pts commands and the fs commands that set quota. TheACL on the root directory of every newly created volume grants allpermissions to the group. Even if you remove that entry, the groupimplicitly retains the a (administer), and by default also the l(lookup), permission on every ACL. Its AFS GID is -204. Forinstructions on administering this group, see “Administering thesystem:administrators Group” on page 578.
Displaying Information from the Protection Database
This section describes the commands you can use to display ProtectionDatabase entries and associated information. In addition to name and AFS ID,the Protection Database stores the following information about each user,machine, or group entry.v The entry’s owner, which is the user or group of users who can administer
the entryv The entry’s creator, which serves mostly as an audit trailv A membership count, which indicates how many groups a user or machine
belongs to, or how many members belong to a groupv A set of privacy flags, which control which users can administer or display
information about the entryv A group-creation quota, which defines how many groups a user can create
Chapter 14. Administering the Protection Database 535

v A list of the groups to which a user or machine belongs, or of the users andmachines that belong to a group
v A list of the groups that a user or group owns
To display a Protection Database entry1. Verify that you belong to the system:administrators group, which enables
you to display an entry regardless of the setting of its first (s) privacy flag.By default, any user can display a Protection Database entry. If necessary,issue the pts membership command, which is fully described in “Todisplay the members of the system:administrators group” on page 579.
% pts membership system:administrators
2. Issue the pts examine command to display one or more ProtectionDatabase entries.
% pts examine <user or group name or id>+
where
e Is the shortest acceptable abbreviation of examine (and check is analias).
user or group name or idSpecifies the name or AFS ID of each entry to display. Precede anyAFS GID with a hyphen (-) because it is a negative integer.
The output includes the following fields. Examples follow.
Name Specifies the entry’s name.v For a user, this is the name used when authenticating with AFS and
the name that appears on ACL entries.v For a machine, this is the IP address of a single machine, or a
wildcard notation that represents a group of machines withconsecutive IP addresses, as described in “Creating User andMachine Entries” on page 541.
v For a group, this is the name that appears on ACL entries and inthe list of groups output by the pts membership command. Thenames of regular groups have two parts, separated by a colon (:).The part before the colon indicates the group’s owner, and the partafter is the unique name. A prefix-less group’s name does not havethe owner prefix; only members of the system:administrators groupcan create prefix-less groups. For further discussion of groupnames, see “Creating Groups” on page 544.
id Specifies the entry’s unique AFS identification number. For user andmachine entries, the AFS user ID (AFS UID) is a positive integer; forgroups, the AFS group ID (AFS GID) is a negative integer. AFS UIDs
536 AFS: Administration Guide

and GIDs have the same function as their counterparts in the UNIXfile system, but are used by the AFS servers and the Cache Manageronly.
Normally, the Protection Server assigns an AFS UID or GIDautomatically when you create Protection Database entries. Membersof the system:administrators group can specify an ID if desired. Forfurther discussion, see “Creating User and Machine Entries” onpage 541 and “Creating Groups” on page 544.
owner Names the user or group who owns the entry and therefore canadminister it (for more information about a group owning anothergroup, see “Using Groups Effectively” on page 545). Other userspossibly have administrative privileges, too, depending on the settingof the entry’s privacy flags. For instructions on changing the owner,see “Changing a Group’s Owner” on page 550.
creatorNames the user who created the entry, and serves as an audit trail. Ifthe entry is deleted from the Protection Database, the creator’s groupcreation quota increases by one, even if the creator no longer owns theentry; see “Setting Group-Creation Quota” on page 553.
The value anonymous in this field generally indicates that the entrywas created when the Protection Server was running inno-authentication mode, probably during initial configuration of thecell’s first file server machine. For a description of no-authenticationmode, see “Managing Authentication and AuthorizationRequirements” on page 106.
membershipSpecifies the number of groups to which the user or machine belongs,or the number of users or machines that belong to the group.
flags Specifies who can display or change information in a ProtectionDatabase entry. The five flags, each representing a different capability,always appear in the same order.v For user entries, the default value is S----, which indicates that
anyone can issue the pts examine command on the entry, but onlythe user and members of the system:administrators group canperform any other action.
v For machine entries, the default value is S----, which indicates thatanyone can issue the pts examine command on the entry, but onlymembers of the system:administrators group can perform any otheraction.
v For group entries, the default value is S-M--, which indicates thatanyone can issue the pts examine and pts membership commands
Chapter 14. Administering the Protection Database 537
on the entry, but only the group’s owner and members of thesystem:administrators group can perform any other action.
For a complete description of possible values for the flags, see“Setting the Privacy Flags on Database Entries” on page 554.
group quotaSpecifies how many more groups a user can create in the ProtectionDatabase. The value for a newly created user entry is 20, but membersof the system:administrators group can issue the pts setfieldscommand at any time to change the value; see “SettingGroup-Creation Quota” on page 553.
Group creation quota has no meaning for a machine or group entry:the Protection Server recognizes the issuer of the pts creategroupcommand only as an authenticated user or as the anonymous user,never as a machine or group. The default value for group entries is 0(zero), and there is no reason to change it.
The following examples show the output for a user called pat, a machine withIP address 192.12.108.133 and a group called terry:friends:
% pts examine patName: pat, id: 1020, owner: system:administrators, creator: admin,
membership: 12, flags: S----, group quota: 15.% pts ex 192.12.108.133Name: 192.12.108.133, id: 5151, owner: system:administrators, creator: admin,
membership: 1, flags: S----, group quota: 20.% pts examine terry:friendsName: terry:friends, id: -567, owner: terry, creator: terry,
membership: 12, flags: SOm--, group quota: 0.
To display group membership1. Verify that you belong to the system:administrators group, which enables
you to display an entry’s group membership information regardless of thesetting of its third (m) privacy flag. By default the owner and the user candisplay group membership for a user entry, the owner for a machine entry,and anyone for a group entry. If necessary, issue the pts membershipcommand, which is fully described in “To display the members of thesystem:administrators group” on page 579.
% pts membership system:administrators
2. Issue the pts membership command to display the list of groups to whicha user or machine belongs, or the list of users and machines that belong toa group.
% pts membership <user or group name or id>+
where
538 AFS: Administration Guide

m Is the shortest acceptable abbreviation of membership.
user or group name or idSpecifies the name or AFS UID of each user or machine for whichto list the groups it belongs to, or the name or AFS GID of eachgroup for which to list the members.
For user and machine entries, the output begins with the following string, andthen each group appears on its own line:
Groups user_or_machine (id: AFS_UID) is a member of:
For group entries, the output begins with the following string, and then eachmember appears on its own line:
Members of group (id: AFS_GID) are:
For the system groups system:anyuser and system:authuser, the outputincludes the initial header string only, because these groups do not have astable membership listed in their Protection Database entry. See “The SystemGroups” on page 534.
The following examples show the output for a user called terry and a groupcalled terry:friends:
% pts mem terryGroups terry (id: 5347) is a member of:
pat:friendssalesacctg:general
% pts mem terry:friendsMembers of terry:friends (id: -567) are:
patsmithjohnson
To list the groups that a user or group owns1. Verify that you belong to the system:administrators group, which enables
you to display an entry’s group ownership information regardless of thesetting of its second (o) privacy flag. By default the owner can list thegroups owned by group, and a user the groups he or she owns. Ifnecessary, issue the pts membership command, which is fully described in“To display the members of the system:administrators group” on page 579.
% pts membership system:administrators
2. Issue the pts listowned command to list the groups owned by each useror group.
% pts listowned <user or group name or id>+
Chapter 14. Administering the Protection Database 539

where
listo Is the shortest acceptable abbreviation of listowned.
user or group name or idSpecifies the name or AFS UID of each user, or the name or AFSGID or each group, for which to list the groups owned.
The output begins with the following string, and then each group appears onits own line:
Groups owned by user_or_group (id: AFS_ID) are:
The following examples show the output for a user called terry and a groupcalled terry:friends:
% pts listo terryGroups owned by terry (id: 5347) are:
terry:friendsterry:co-workers
% pts listo terry:friendsGroups owned by terry:friends (id: -567) are:
terry:palsterry:buddies
To display all Protection Database entries1. Verify that you belong to the system:administrators group. If necessary,
issue the pts membership command, which is fully described in “Todisplay the members of the system:administrators group” on page 579.
% pts membership system:administrators
2. Issue the pts listentries command to display all Protection Databaseentries.
% pts listentries [-users] [-groups]
where
liste Is the shortest acceptable abbreviation of listentries.
-users Displays user and machine entries. The same output results if youomit both this flag and the -groups flag.
-groupsDisplays group entries.
The output is a table that includes the following columns. Examples follow.
Name Specifies the entry’s name.
ID Specifies the entry’s AFS identification number. For user and machineentries, the AFS user ID (AFS UID) is a positive integer; for groups,the AFS group ID (AFS GID) is a negative integer.
540 AFS: Administration Guide
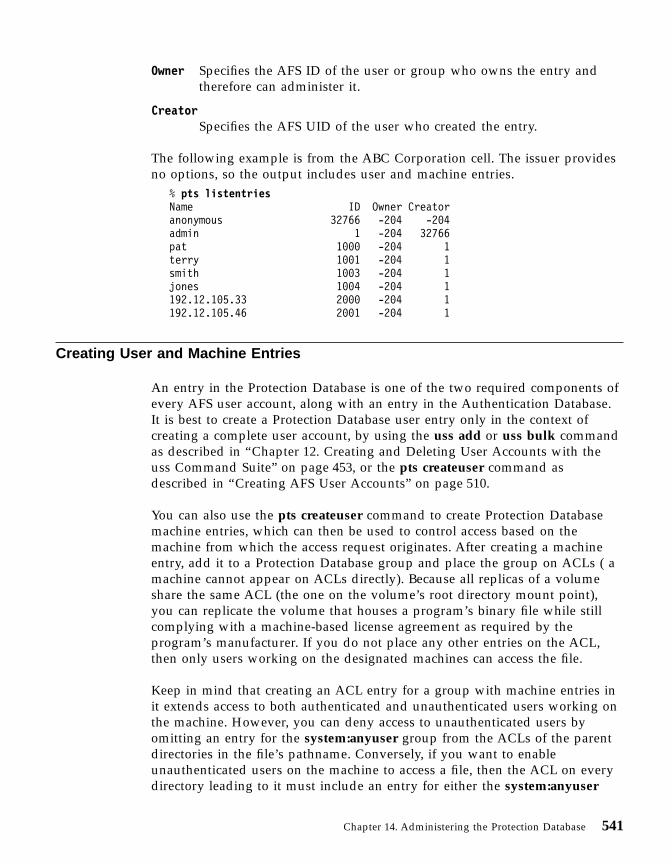
Owner Specifies the AFS ID of the user or group who owns the entry andtherefore can administer it.
CreatorSpecifies the AFS UID of the user who created the entry.
The following example is from the ABC Corporation cell. The issuer providesno options, so the output includes user and machine entries.
% pts listentriesName ID Owner Creatoranonymous 32766 -204 -204admin 1 -204 32766pat 1000 -204 1terry 1001 -204 1smith 1003 -204 1jones 1004 -204 1192.12.105.33 2000 -204 1192.12.105.46 2001 -204 1
Creating User and Machine Entries
An entry in the Protection Database is one of the two required components ofevery AFS user account, along with an entry in the Authentication Database.It is best to create a Protection Database user entry only in the context ofcreating a complete user account, by using the uss add or uss bulk commandas described in “Chapter 12. Creating and Deleting User Accounts with theuss Command Suite” on page 453, or the pts createuser command asdescribed in “Creating AFS User Accounts” on page 510.
You can also use the pts createuser command to create Protection Databasemachine entries, which can then be used to control access based on themachine from which the access request originates. After creating a machineentry, add it to a Protection Database group and place the group on ACLs ( amachine cannot appear on ACLs directly). Because all replicas of a volumeshare the same ACL (the one on the volume’s root directory mount point),you can replicate the volume that houses a program’s binary file while stillcomplying with a machine-based license agreement as required by theprogram’s manufacturer. If you do not place any other entries on the ACL,then only users working on the designated machines can access the file.
Keep in mind that creating an ACL entry for a group with machine entries init extends access to both authenticated and unauthenticated users working onthe machine. However, you can deny access to unauthenticated users byomitting an entry for the system:anyuser group from the ACLs of the parentdirectories in the file’s pathname. Conversely, if you want to enableunauthenticated users on the machine to access a file, then the ACL on everydirectory leading to it must include an entry for either the system:anyuser
Chapter 14. Administering the Protection Database 541
group or a group to which the machine entry belongs. For more informationon the system:anyuser group, see “The System Groups” on page 534.
Because a machine entry can include unauthenticated users, it is best not toadd both machine entries and user entries to the same group. In general, it iseasier to use and administer nonmixed groups. A machine entry can representa single machine, or multiple machines with consecutive IP addresses (that is,all machines on a network or subnet) specified by a wildcard notation. See theinstructions in “To create machine entries in the Protection Database” onpage 543.
By default, the Protection Server assigns the next available AFS UID to a newuser or machine entry. It is best to allow this, especially for machine entries.For user entries, it makes sense to assign an AFS UID only if the user alreadyhas a UNIX UID that the AFS UID needs to match (see “Assigning AFS andUNIX UIDs that Match” on page 507). When automatically allocating an AFSUID, the Protection Server increments the max user id counter by one andassigns the result to the new entry. Use the pts listmax command to displaythe counter, as described in “Displaying and Setting the AFS UID and GIDCounters” on page 556.
Do not reuse the AFS UIDs of users who have left your cell permanently ormachine entries you have removed, even though doing so seems to avoid theapparent waste of IDs. When you remove a user or machine entry from theProtection Database, the fs listacl command displays the AFS UID associatedwith the former entry, rather than the name. If you then assign the AFS UIDto a new user or machine, the new user or machine automatically inheritspermissions that were granted to the previous possessor of the ID. To removeobsolete AFS UIDs from ACLs, use the fs cleanacl command described in“Removing Obsolete AFS IDs from ACLs” on page 574.
In addition to the name and AFS UID, the Protection Server records thefollowing values in the indicated fields of a new user or machine’s entry. Formore information and instructions on displaying an entry, see “To display aProtection Database entry” on page 536.v It sets the owner field to the system:administrators group, indicating that
the group’s members administer the entry.v It sets the creator field to the username of the user who issued the pts
createuser command (or the uss add or uss bulk command).v It sets the membership field to 0 (zero), because the new entry does not yet
belong to any groups.v It sets the flags field to S----; for explanation, see “Setting the Privacy Flags
on Database Entries” on page 554.
542 AFS: Administration Guide
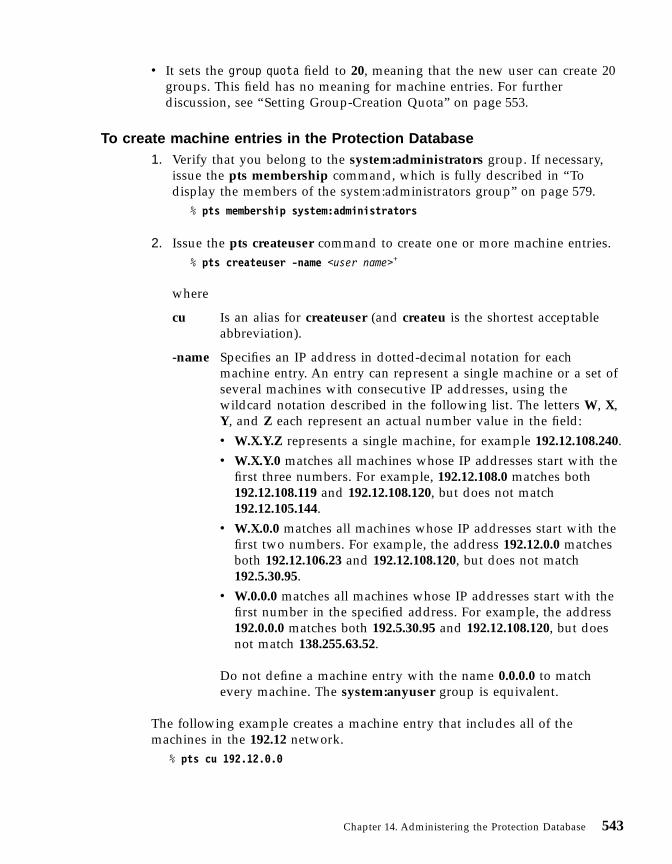
v It sets the group quota field to 20, meaning that the new user can create 20groups. This field has no meaning for machine entries. For furtherdiscussion, see “Setting Group-Creation Quota” on page 553.
To create machine entries in the Protection Database1. Verify that you belong to the system:administrators group. If necessary,
issue the pts membership command, which is fully described in “Todisplay the members of the system:administrators group” on page 579.
% pts membership system:administrators
2. Issue the pts createuser command to create one or more machine entries.% pts createuser -name <user name>+
where
cu Is an alias for createuser (and createu is the shortest acceptableabbreviation).
-name Specifies an IP address in dotted-decimal notation for eachmachine entry. An entry can represent a single machine or a set ofseveral machines with consecutive IP addresses, using thewildcard notation described in the following list. The letters W, X,Y, and Z each represent an actual number value in the field:v W.X.Y.Z represents a single machine, for example 192.12.108.240.v W.X.Y.0 matches all machines whose IP addresses start with the
first three numbers. For example, 192.12.108.0 matches both192.12.108.119 and 192.12.108.120, but does not match192.12.105.144.
v W.X.0.0 matches all machines whose IP addresses start with thefirst two numbers. For example, the address 192.12.0.0 matchesboth 192.12.106.23 and 192.12.108.120, but does not match192.5.30.95.
v W.0.0.0 matches all machines whose IP addresses start with thefirst number in the specified address. For example, the address192.0.0.0 matches both 192.5.30.95 and 192.12.108.120, but doesnot match 138.255.63.52.
Do not define a machine entry with the name 0.0.0.0 to matchevery machine. The system:anyuser group is equivalent.
The following example creates a machine entry that includes all of themachines in the 192.12 network.
% pts cu 192.12.0.0
Chapter 14. Administering the Protection Database 543

Creating Groups
Before you can add members to a group, you must create the group entryitself. The instructions in this section explain how to create both regular andprefix-less groups:v A regular group’s name is preceded by a prefix that indicates who owns the
group, in the following format:owner_name:group_name
Any user can create a regular group. Group names must always be typed infull, so a short group_name that indicates the group’s purpose or itsmembers’ common interest is practical. Groups with names like terry:1 andterry:2 are less useful because their purpose is unclear. For more details onthe required format for regular group names, see the instructions in “Tocreate groups” on page 546.
v A prefix-less group, as its name suggests, has only one field in its name,equivalent to a regular group’s group_name field.Only members of the system:administrators group can create prefix-lessgroups. For a discussion of their purpose, see “Using Prefix-Less Groups”on page 547.
By default, the Protection Server assigns the next available AFS GID to a newgroup entry, and it is best to allow this. When automatically allocating an AFSGID (which is a negative integer), the Protection Server decrements the maxgroup id counter by one and assigns the result to the new group. Use the ptslistmax command to display the counter, as described in “Displaying andSetting the AFS UID and GID Counters” on page 556.
In addition to the name and AFS GID, the Protection Server records thefollowing values in the indicated fields of a new group’s entry. See “Todisplay a Protection Database entry” on page 536.v It sets the owner field to the issuer of the pts creategroup command, or to
the user or group specified by the -owner argument.v It sets the creator field to the username of the user who issued the pts
creategroup command.v It sets the membership field to 0 (zero), because the group currently has no
members.v It sets the flags field to S-M--; for explanation, see “Setting the Privacy
Flags on Database Entries” on page 554.v It sets the group quota field to 0, because this field has no meaning for
group entries.
544 AFS: Administration Guide
Using Groups Effectively
The main reason to create groups is to place them on ACLs, which enablesyou to control access for multiple users without having to list themindividually on the ACL. There are three basic ways to use groups, eachsuited to a different purpose:v Private use: you create a group and place it on the ACL of directories you
own, without necessarily informing the group’s members that they belongto it. Members notice only that they can or cannot access the directory in acertain way. You retain sole administrative control over the group, since youare the owner.The existence of the group and the identity of its members is notnecessarily secret. Other users can use the fs listacl command and see thegroup’s name on a directory’s ACL, or use the pts membership commandto list the groups they themselves belong to. You can set the group’s thirdprivacy flag to limit who can use the pts membership command to list thegroup’s membership, but a member of the system:administrators groupalways can; see “Setting the Privacy Flags on Database Entries” onpage 554.
v Shared use: you inform the group’s members that they belong to the group,but you still remain the sole administrator. For example, the manager of awork group can create a group of all the members in the work group, andencourage them to use it on the ACLs of directories that house informationthey want to share with other members of the group.
Note: If you place a group owned by someone else on your ACLs, thegroup’s owner can change the group’s membership withoutinforming you. Someone new can gain or lose access in a way youdid not intend and without your knowledge.
v Group use: you create a group and then use the pts chown command toassign ownership to a group, either another group or the group itself (thelatter type is a self-owned group). You inform the members of the owninggroup that they all can administer the owned group.The main advantage of designating a group as an owner is that it spreadsresponsibility for administering a group among several people. A singleperson does not have to perform all administrative tasks, and if the originalcreator leaves the group, ownership does not have to be transferred.However, everyone in the owner group can make changes that affect othersnegatively, such as adding or removing people from the groupinappropriately or changing the group’s ownership to themselvesexclusively. These problems can be particularly sensitive in a self-ownedgroup. Using an owner group works best if all the members know and trusteach other; it is probably wise to keep the number of people in an ownergroup small.
Chapter 14. Administering the Protection Database 545
To create groups1. If creating a prefix-less group, verify that you belong to the
system:administrators group. If necessary, issue the pts membershipcommand, which is fully described in “To display the members of thesystem:administrators group” on page 579.
% pts membership system:administrators
2. Issue the pts creategroup command to create each group. All of the groupshave the same owner.
% pts creategroup -name <group name>+ [-owner <owner of the group>]
where
cg Is an alias for creategroup (and createg is the shortest acceptableabbreviation).
-name Names each group to create. The name can include up to 63lowercase letters or numbers, but it is best not to includepunctuation characters, especially those that have a specialmeaning to the shell.
A prefix-less group name cannot include the colon (:), because it isused to separate the two parts of a regular group name:
owner_name:group_name
The Protection Server requires that the owner_name prefix of aregular group name accurately indicate the group’s owner. Bydefault, you are recorded as the owner, and the owner_name mustbe your AFS username. You can include the -owner argument todesignate another AFS user, a regular group, or a prefix-less groupas the owner, providing the required value in the owner_name field:v If the owner is a user, it must be the AFS username.v If the owner is another regular group, it must match the owning
group’s owner_name field. For example, if the owner is the groupterry:associates, the owner field must be terry.
v If the owner is a prefix-less group, it must be the owninggroup’s name.
(For a discussion of why it is useful for a group to own anothergroup, see “Using Groups Effectively” on page 545.)
-ownerIs optional and designates an owner other than the issuer of thecommand. Specify either an AFS username or the name of aregular or prefix-less group that already has at least one member.Do not include this argument if you want to make the group
546 AFS: Administration Guide
self-owned as described in “Using Groups Effectively” on page 545. For instructions, see “To create a self-owned group”.
Do not designate a machine as a group’s owner. Because amachine cannot authenticate, there is no way for a machine toadminister the group.
To create a self-owned group1. Issue the pts creategroup command to create a group. Do not include the
-owner argument, because you must own a group to reassign ownership.For complete instructions, see “To create groups” on page 546.
% pts creategroup <group name>
2. Issue the pts adduser command to add one or more members to the group(a group must already have at least one member before owning anothergroup). For complete instructions, see “Adding and Removing GroupMembers” on page 548.
% pts adduser -user <user name>+ -group <group name>+
3. Issue the pts chown command to assign group ownership to the groupitself. For complete instructions, see “To change a group’s owner” onpage 551.
% pts chown <group name> <new owner>
Using Prefix-Less Groups
Members of the system:administrators group can create prefix-less groups,which are particularly suitable for group use, which is described in “UsingGroups Effectively” on page 545.
Suppose, for example, that the manager of the ABC Corporation’s AccountingDepartment, user smith, creates a group that includes all of the corporation’saccountants and places the group on the ACLs of directories that housedepartmental records. Using a prefix-less group rather than a regular group isappropriate for the following reasons:v The fact that smith created and owns the group is irrelevant, and a regular
group must be called smith:acctg. A prefix-less name like acctg is moreappropriate.
v If another user (say jones) ever replaces smith as manager of theAccounting Department, jones needs to become the new owner of thegroup. If the group is a regular one, its owner_name prefix automaticallychanges to jones, but the change in the owner_name prefix does notpropagate to any regular groups owned by the group. Someone must usethe pts rename command to change each one’s owner_name prefix fromsmith to jones.
Chapter 14. Administering the Protection Database 547
A possible solution is to create an authentication account for a fictional usercalled acctg and make it the owner of regular groups which have acctg astheir owner_name prefix. However, if the acctg account is also used for otherpurposes, then the number of people who need to know user acctg’spassword is possibly larger than the number of people who need toadminister the groups it owns.
A prefix-less group called acctg solves the problem of inappropriate ownernames. The groups that it owns have acctg as their owner_name prefix, whichmore accurately reflects their purpose than having the manager’s name there.Prefix-less groups are also more accountable than dummy authenticationaccounts. Belonging to the group enables individuals to exercise thepermissions granted to the group on ACLs, but users continue to performtasks under their own names rather than under the dummy username. Even ifthe group owns itself, only a finite number of people can administer thegroup entry.
Adding and Removing Group Members
Users and machines can be members of groups; groups cannot belong to othergroups. Newly created groups have no members at all. To add them, use thepts adduser command; to remove them, use the pts removeuser command.
To add users and machines to groups1. Verify that you belong to the system:administrators group, which enables
you to add members to a group regardless of the setting of its fourth (a)privacy flag. By default the group’s owner also has the necessary privilege.If necessary, issue the pts membership command, which is fully describedin “To display the members of the system:administrators group” onpage 579.
% pts membership system:administrators
2. Issue the pts adduser command to add one or more members to one ormore groups.
% pts adduser -user <user name>+ -group <group name>+
where
ad Is the shortest acceptable abbreviation of adduser.
-user Specifies each username or machine IP address to add as amember of each group named by the -group argument. A groupcannot belong to another group.
group nameNames each group to which to add the new members.
548 AFS: Administration Guide

To remove users and machines from groups1. Verify that you belong to the system:administrators group, which enables
you to remove members from a group regardless of the setting of its fifth(r) privacy flag. By default the group’s owner also has the necessaryprivilege. If necessary, issue the pts membership command, which is fullydescribed in “To display the members of the system:administrators group”on page 579.
% pts membership system:administrators
2. Issue the pts removeuser command to remove one or more members fromone or more groups.
% pts removeuser -user <user name>+ -group <group name>+
where
rem Is the shortest acceptable abbreviation of removeuser.
-user Specifies each user or machine IP address to remove from eachgroup named by the -group argument.
-groupNames each group from which to remove members.
Deleting Protection Database Entries
It is best to delete a Protection Database user entry only if you are removingthe complete user account. Use either the uss delete command as described in“Deleting Individual Accounts with the uss delete Command” on page 492, orthe pts delete command as described in “Removing a User Account” onpage 529.
To remove machine and group entries, use the pts delete command asdescribed in this section. The operation has the following results:v When you delete a machine entry, its name (IP address wildcard) is
removed from groups.v When you delete a group entry, its AFS GID appears on ACLs instead of
the name. The group-creation quota of the user who created the groupincreases by one, even if the user no longer owns the group.To remove obsolete AFS IDs from ACLs, use the fs cleanacl command asdescribed in “Removing Obsolete AFS IDs from ACLs” on page 574.
To delete Protection Database entries1. Verify that you belong to the system:administrators group or own the
group you are deleting. If necessary, issue the pts membership command,
Chapter 14. Administering the Protection Database 549
which is fully described in “To display the members of thesystem:administrators group” on page 579.
% pts membership system:administrators
2. Issue the pts delete command to delete one or more entries from theProtection Database.
% pts delete <user or group name or id>+
where
del Is the shortest acceptable abbreviation of delete.
user or group name or idSpecifies the IP address or AFS UID of each machine or the nameor AFS GID or each group to remove.
Changing a Group’s Owner
For user and machine entries, the Protection Server automatically assignsownership to the system:administrators group at creation time, and thiscannot be changed. For group entries, you can change ownership. Thistransfers administrative responsibility for it to another user or group (forinformation on group ownership of other groups, see “Using GroupsEffectively” on page 545).
When you create a regular group, its owner_name prefix must accurately reflectits owner, as described in “To create groups” on page 546:v If the owner is a user, owner_name is the username.v If the owner is a regular group, owner_name is the owning group’s
owner_name prefix.v If the owner is a prefix-less group, owner_name is the owner group’s name.
When you change a regular group’s owner, the Protection Serverautomatically changes its owner_name prefix appropriately. For example, if theuser pat becomes the new owner of the group terry:friends, its nameautomatically changes to pat:friends, both in the Protection Database and onACLs.
However, the Protection Server does not automatically change the owner_nameprefix of any regular groups that the group owns. To continue with theprevious example, suppose that the group terry:friends owns the groupterry:pals. When pat becomes the new owner of terry:friends, the nameterry:pals does not change. To change the owner_name prefix of a regulargroup that is owned by another group (in the example, to change the group’s
550 AFS: Administration Guide
name to pat:pals), use the pts rename command as described in “Changing aProtection Database Entry’s Name” on page 552.
To change a group’s owner1. Verify that you belong to the system:administrators group or own the
group for which you are changing the owner. If necessary, issue the ptsmembership command, which is fully described in “To display themembers of the system:administrators group” on page 579.
% pts membership system:administrators
2. (Optional) If you are changing the group’s owner to another group (or toitself) and want to retain administrative privilege on the owned group,verify that you belong to the new owner group. If necessary, issue the ptsmembership command, which is fully described in “To display groupmembership” on page 538.
% pts membership <user or group name or id>
Use the pts adduser command to add yourself if necessary, as fullydescribed in “To add users and machines to groups” on page 548.
% pts adduser <user name> <group name>
3. Issue the pts chown command to change the group’s owner.% pts chown <group name> <new owner>
where
cho Is the shortest acceptable abbreviation of chown.
group nameSpecifies the current name of the group.
new ownerNames the user or group to become the group’s owner.
4. (Optional) Issue the pts listowned command to display any groups thatthe group owns. As discussed in the introduction to this section, the ptschown command does not automatically change the owner_name prefix ofany regular groups that a group owns.
% pts listowned <user or group name or id>
If you want to change their names to match the new owning group, usethe pts rename command on each one, as described in “To change thename of a machine or group entry” on page 553.
% pts rename <old name> <new name>
Chapter 14. Administering the Protection Database 551

Changing a Protection Database Entry’s Name
To change the name of a Protection Database entry, use the pts renamecommand. It is best to change a user entry’s name only when renaming theentire user account, since so many components of the account (AuthenticationDatabase entry, volume name, home directory mount point, and so on) sharethe name. For instructions, see “Changing Usernames” on page 525. Amachine entry’s name maps to the actual IP address of one or more machine,so changing the entry’s name is appropriate only if the IP addresses havechanged.
It is likely, then, that most often you need to change group names. Thefollowing types of name changes are possible:v Changing a regular group’s name to another regular group name. The most
common reason for this type of change is that you have used the ptschown command to change the owner of the group. That operation doesnot change the owner_name prefix of a regular group owned by the groupwhose name has been changed. Therefore, you must use the pts renamecommand to change it appropriately. For example, when user pat becomesthe owner of the terry:friends group, its name changes automatically topat:friends, but the name of a group it owns, terry:pals, does not change.Use the pts rename command to rename terry:pals to pat:pals. TheProtection Server does not accept changes to the owner_name prefix that donot reflect the true ownership (changing terry:pals to smith:pals is notpossible).You can also use the pts rename command to change the group_nameportion of a regular group name, with or without changing the owner_nameprefix.Both the group’s owner and the members of the system:administratorsgroup can change its name to another regular group name.
v Changing a regular group’s name to a prefix-less name. If you change agroup’s name in this way, you must also use the pts rename command tochange the name of any regular group that the group owns. Only membersof the system:administrators group can make this type of name change.
v Changing a prefix-less name to another prefix-less name. As with othername changes, the owner_name prefix of any regular groups that theprefix-less group owns does not change automatically. You must issue thepts rename command on them to maintain consistency.Both the group’s owner and the members of the system:administratorsgroup can change its name to another prefix-less name.
v Changing a prefix-less name to a regular name. The owner_name prefix onthe new name must accurately reflect the group’s ownership. As with othername changes, the owner_name prefix of any regular groups that the
552 AFS: Administration Guide

prefix-less group owns does not change automatically. You must issue thepts rename command on them to maintain consistency.Only members of the system:administrators group can make this type ofname change.
To change the name of a machine or group entry1. Verify that you belong to the system:administrators group. If necessary,
issue the pts membership command, which is fully described in “Todisplay the members of the system:administrators group” on page 579.
% pts membership system:administrators
2. Issue the pts rename command to change the entry’s name.% pts rename <old name> <new name>
where
ren Is the shortest acceptable abbreviation of rename.
old nameSpecifies the entry’s current name.
new nameSpecifies the new name. If the new name is for a regular group,the owner_name prefix must correctly indicate the owner.
Setting Group-Creation Quota
To prevent abuse of system resources, the Protection Server imposes agroup-creation quota that limits how many more groups a user can create.When a new user entry is created, the quota is set to 20, but members of thesystem:administrators group can use the pts setfields command to increase ordecrease it at any time.
It is pointless to change group-creation quota for machine or group entries. Itis not possible to authenticate as a group or machine and then create groups.
To display the group-creation quota, use the pts examine command to displaya user entry’s group quota field, as described in “To display a ProtectionDatabase entry” on page 536.
To set group-creation quota1. Verify that you belong to the system:administrators group. If necessary,
issue the pts membership command, which is fully described in “Todisplay the members of the system:administrators group” on page 579.
% pts membership system:administrators
Chapter 14. Administering the Protection Database 553

2. Issue the pts setfields command to specify how many more groups each ofone or more users can create.% pts setfields -nameorid <user or group name or id>+ \
-groupquota <set limit on group creation>
where
setf Is the shortest acceptable abbreviation of setfields.
-nameoridSpecifies the name or AFS UID of each user for which to setgroup-creation quota.
-groupquotaDefines how many groups each user can create in addition toexisting groups (in other words, groups that already exist do notcount against the quota). The value you specify overwrites thecurrent value, rather than incrementing it.
Setting the Privacy Flags on Database Entries
Members of the system:administrators group can always display andadminister Protection Database entries in any way, and regular users candisplay and administer their own entries and any group entries they own. Theprivacy flags on a Protection Database entry determine who else can displaycertain information from the entry, and who can add and remove members ina group.
To display the flags, use the pts examine command as described in “Todisplay a Protection Database entry” on page 536. The flags appear in theoutput’s flags field. To set the flags, include the -access argument to the ptssetfields command.
The five flags always appear, and always must be set, in the following order:
s Controls who can issue the pts examine command to display theentry.
o Controls who can issue the pts listowned command to display thegroups that a user or group owns.
m Controls who can issue the pts membership command to display thegroups a user or machine belongs to, or which users or machinesbelong to a group.
a Controls who can issue the pts adduser command to add a user ormachine to a group. It is meaningful only for groups, but a valuemust always be set for it even on user and machine entries.
554 AFS: Administration Guide

r Controls who can issue the pts removeuser command to remove auser or machine from a group. It is meaningful only for groups, but avalue must always be set for it even on user and machine entries.
Each flag can take three possible types of values to enable a different set ofusers to issue the corresponding command:v A hyphen (-) designates the members of the system:administrators group
and the entry’s owner. For user entries, it designates the user in addition.v The lowercase version of the letter applies meaningfully to groups only, and
designates members of the group in addition to the individuals designatedby the hyphen.
v The uppercase version of the letter designates everyone.
For example, the flags SOmar on a group entry indicate that anyone canexamine the group’s entry and display the groups that it owns, and that onlythe group’s members can display, add, or remove its members.
The default privacy flags for user and machine entries are S----, meaning thatanyone can display the entry. The ability to perform any other functions isrestricted to members of the system:administrators group and the entry’sowner (as well as the user for a user entry).
The default privacy flags for group entries are S-M--, meaning that all userscan display the entry and the members of the group, but only the entry ownerand members of the system:administrators group can perform otherfunctions.
To set a Protection Database entry’s privacy flags1. Verify that you belong to the system:administrators group. If necessary,
issue the pts membership command, which is fully described in “Todisplay the members of the system:administrators group” on page 579.
% pts membership system:administrators
2. Issue the pts setfields command to set the privacy flags.% pts setfields <user or group name or id>+ -access <set privacy flags>
where
setf Is the shortest acceptable abbreviation of setfields.
user or group name or idSpecifies the name or AFS UID of each user, the IP address or AFSUID of each machine, or the name or AFS GID of each group forwhich to set the privacy flags.
Chapter 14. Administering the Protection Database 555

-accessSpecifies the set of privacy flags to associate with each entry.Provide a value for each of the five flags, observing the followingconstraints:v Provide a value for all five flags, even though the fourth and
fifth flags are not meaningful for user and machine entries.v For self-owned groups, the hyphen is equivalent to a lowercase
letter, because all the members of a self-owned group own it.v Set the first flag to lowercase s or uppercase S only. For user
and machine entries, the Protection Server interprets thelowercase s as equivalent to the hyphen.
v Set the second flag to the hyphen (-) or uppercase O only. Forgroups, the Protection Server interprets the hyphen asequivalent to lowercase o (that is, members of a group canalways list the groups that it owns).
v Set the third flag to the hyphen (-), lowercase m, or uppercaseM. For user and machine entries, the lowercase m does not havea meaningful interpretation, because they have no members.
v Set the fourth flag to the hyphen (-), lowercase a, or uppercaseA. Although this flag does not have a meaningful interpretationfor user and machine entries (because they have no members), itmust be set, preferably to the hyphen.
v Set the fifth flag to the hyphen (-) or lowercase r only. Althoughthis flag does not have a meaningful interpretation for user andmachine entries (because they have no members), it must be set,preferably to the hyphen.
Displaying and Setting the AFS UID and GID Counters
When you use the pts createuser command to create a user or machine entryin the Protection Database, the Protection Server by default automaticallyallocates an AFS user ID (AFS UID) for it; similarly, it allocates an AFS groupID (AFS GID) for each group entry you create with the pts creategroupcommand. It tracks the next available AFS UID (which is a positive integer)and AFS GID (which is a negative integer) with the max user id and maxgroup id counters, respectively.
Members of the system:administrators group can include the -id argument toeither pts creation command to assign a specific ID to a new user, machine, orgroup. It often makes sense to assign AFS UIDs explicitly when creating AFSaccounts for users with existing UNIX accounts, as discussed in “AssigningAFS and UNIX UIDs that Match” on page 457. It is also useful if you want toestablish ranges of IDs that correspond to departmental affiliations (for
556 AFS: Administration Guide

example, assigning AFS UIDs from 300 to 399 to members of one department,AFS UIDs from 400 to 499 to another department, and so on).
To display the current value of the counters, use the pts listmax command.When you next create a user or machine entry and do not specify its AFSUID, the Protection Server increments the max user id counter by one andassigns that number to the new entry. When you create a new group and donot specify its AFS GID, the Protection Server decrements the max group idcounter by one (makes it more negative), and assigns that number to the newgroup.
You can change the value of either counter, or both, in one of two ways:v Directly, using the pts setmax command.v Indirectly, by using the -id argument to the pts createuser command to
assign an AFS UID that is larger than the max user id counter, or by usingthe -id to the pts creategroup command to assign an AFS GID that is less(more negative) than the max group id counter. In either case, the ProtectionServer changes the counter to the value of the -id argument. The ProtectionServer does not use the IDs between the previous value of the counter andthe new one when allocating IDs automatically, unless you use the ptssetmax command to move the counter back to its old value.If the value you specify with the -id argument is less than the max user idcounter or greater (less negative) than the max group id counter, then thecounter does not change.
To display the AFS ID counters1. Issue the pts listmax command to display the counters.
% pts listmax
where listm is an acceptable abbreviation of listmax.
The following example illustrates the output’s format. In this case, the nextautomatically assigned AFS UID is 5439 and AFS GID is -469.
% pts listmaxMax user id is 5438 and max group id is -468.
To set the AFS ID counters1. Verify that you belong to the system:administrators group. If necessary,
issue the pts membership command, which is fully described in “Todisplay the members of the system:administrators group” on page 579.
% pts membership system:administrators
2. Issue the pts setmax command to set the max user id counter, the maxgroup id counter, or both.
% pts setmax [-group <group max>] [-user <user max>]
Chapter 14. Administering the Protection Database 557
where
setm Is the shortest acceptable abbreviation of setmax.
-groupSpecifies an integer one greater (less negative) than the AFS GIDthat the Protection Server is to assign to the next group entry.Because the value is a negative integer, precede it with a hyphen(-).
-user Specifies an integer one less than the AFS UID that the ProtectionServer is to assign to the next user or machine entry.
558 AFS: Administration Guide

Chapter 15. Managing Access Control Lists
To control access to a directory and all of the files in it, AFS associates anaccess control list (ACL) with it, rather than the mode bits that the UNIX filesystem (UFS) associates with individual files or directories. AFS ACLs providemore refined access control because there are seven access permissions ratherthan UFS’s three, and there is room for approximately 20 user or groupentries on an ACL, rather than just the three UFS entries (owner, group, andother).
Summary of Instructions
This chapter explains how to perform the following tasks by using theindicated commands:
Examine access control list fs listaclEdit ACL’s normal permissions section fs setaclEdit ACL’s negative permissions section fs setacl with -negative flagReplace an ACL fs setacl with -clear flagCopy an ACL fs copyaclRemove obsolete AFS UIDs fs cleanacl
Protecting Data in AFS
This section describes the main differences between the AFS and UFS fileprotection systems, discusses the implications of directory-level protections,and describes the seven access permissions.
Differences Between UFS and AFS Data Protection
The UFS mode bits data protection system and the AFS ACL system differ inthe following ways:v Protection at the file level (UFS) versus the directory level (AFS)
UFS associates a set of nine mode bits with each file element, three (rwx)for each of the element’s owner, owning group, and all other users. Asimilar set of mode bits on the file’s directory applies to the file only in anoblique way.An AFS ACL instead protects all files in a directory in the same way. If acertain file is more sensitive than others, store it in a directory with a morerestrictive ACL.Defining access at the directory level has important consequences:
© Copyright IBM Corp. 1989, 2000 559

– The permissions on a directory’s ACL apply to all of the files in thedirectory. When you move a file to a different directory, you effectivelychange the access permissions that apply to it to those on its newdirectory’s ACL. Changing a directory’s ACL changes the protection onall the files in it.
– When you create a subdirectory, its initial ACL is created as a copy of itsparent directory’s ACL. You can then change the subdirectory’s ACLindependently. However, the parent directory’s ACL continues to controlaccess to the subdirectory in the following way: the parent directory’sACL must grant the l (lookup) permission to a user (or a group the userbelongs to) in order for the user to access the subdirectory at all.In general, then, it is best to assign fairly liberal access permissions tohigh-level directories (including user home directories). In particular, itoften makes sense to grant at least the l permission to thesystem:anyuser or system:authuser group on high-level directories. Forfurther discussion, see “Using Groups on ACLs” on page 564.
v How the mode bits are interpretedMode bits are the only file-protection system in UFS. AFS allows you to setthe UNIX mode bits on a file in addition to the ACL on its directory, but itinterprets them differently. See “How AFS Interprets the UNIX Mode Bits”on page 575.
v Three access permissions (UFS) versus seven (AFS)UFS defines three access permissions in the form of mode bits: r (read), w(write), and x (execute). AFS defines seven permissions, which makesaccess control more precise. For detailed descriptions, see “The AFS ACLPermissions” on page 561.
a (administer)d (delete)i (insert)k (lock)l (lookup)r (read)w (write)
v Three defined users and groups (UFS) versus many (AFS)UFS controls access for one user and two groups by providing a set ofmode bits for each: the user who owns the file or directory, a single definedgroup, and everyone who has an account on the system.AFS, in contrast, allows you to place many entries (individual users orgroups) on an ACL, granting a different set of access permissions to eachone. The number of possible entries is about 20, and depends on how muchspace each entry occupies in the memory allocated for the ACL itself.
560 AFS: Administration Guide
AFS defines two system groups, system:anyuser and system:authuser,which represent all users and all authenticated users, respectively; forfurther discussion, see “Using Groups on ACLs” on page 564. In addition,users can define their own groups in the Protection Database, consisting ofindividual users or machine IP addresses. Users who have the a permissionon an ACL can create entries for the system groups as well as groupsdefined by themselves or other users. For information on defining groups,see “Chapter 14. Administering the Protection Database” on page 533.When a user requests access to a file or directory, the File Server sumstogether all of the permissions that the relevant ACL extends to the userand to groups to which the user belongs. Placing group entries on ACLstherefore can control access for many more users than the ACL canaccommodate as individual entries.
The AFS ACL Permissions
Functionally, the seven standard ACL permissions fall into two groups: onethat applies to the directory itself and one that applies to the files it contains.
The Four Directory Permissions
The four permissions in this group are meaningful with respect to thedirectory itself. For example, the i (insert) permission does not controladdition of data to a file, but rather creation of a new file or subdirectory.
The l (lookup) permissionThis permission functions as something of a gate keeper for access tothe directory and its files, because a user must have it in order toexercise any other permissions. In particular, a user must have thispermission to access anything in the directory’s subdirectories, even ifthe ACL on a subdirectory grants extensive permissions.
This permission enables a user to issue the following commands:v The ls command to list the names of the files and subdirectories in
the directoryv The ls -ld command to obtain complete status information for the
directory element itselfv The fs listacl command to examine the directory’s ACL
This permission does not enable a user to read the contents of a file inthe directory, to issue the ls -l command on a file in the directory, orto issue the fs listacl command with the filename as the -pathargument. Those operations require the r (read) permission which isdescribed in “The Three File Permissions” on page 562.
Chapter 15. Managing Access Control Lists 561

Similarly, this permission does not enable a user to issue the ls, ls -l,ls -ld, or fs listacl commands against a subdirectory of the directory.Those operations require the l permission on the ACL of thesubdirectory itself.
The i (insert) permissionThis permission enables a user to add new files to the directory, eitherby creating or copying, and to create new subdirectories. It does notextend into any subdirectories, which are protected by their ownACLs.
The d (delete) permissionThis permission enables a user to remove files and subdirectories fromthe directory or move them into other directories (assuming that theuser has the i permission on the ACL of the other directories).
The a (administer) permissionThis permission enables a user to change the directory’s ACL.Members of the system:administrators group implicitly have thispermission on every directory (that is, even if that group does notappear on the ACL). Similarly, the owner of a directory implicitly hasthis permission on its ACL and those of all directories below it that heor she owns.
The Three File Permissions
The three permissions in this group are meaningful with respect to files in adirectory, rather than the directory itself or its subdirectories.
The r (read) permissionThis permission enables a user to read the contents of files in thedirectory and to issue the ls -l command to stat the file elements.
The w (write) permissionThis permission enables a user to modify the contents of files in thedirectory and to issue the chmod command to change their UNIXmode bits.
The k (lock) permissionThis permission enables the user to run programs that issue systemcalls to lock files in the directory.
The Eight Auxiliary Permissions
AFS provides eight additional permissions that do not have a definedmeaning, denoted by the uppercase letters A, B, C, D, E, F, G, and H.
You can write application programs that assign a meaning to one or more ofthe permissions, and then place them on ACLs to control file access by those
562 AFS: Administration Guide
programs. For example, you can modify a print program to recognize andinterpret the permissions, and then place them on directories that house filesthat the program accesses. Use the fs listacl and fs setacl commands todisplay and set the auxiliary permissions on ACLs just like the standardseven.
Shorthand Notation for Sets of Permissions
You can combine the seven permissions in any way in an ACL entry, butcertain combinations are more useful than others. Four of the more commoncombinations have corresponding shorthand forms. When using the fs setaclcommand to define ACL entries, you can provide either one or more of theindividual letters that represent the permissions, or one of the followingshorthand forms:
all Represents all seven standard permissions (rlidwka).
none Removes the entry from the ACL, leaving the user or group with nopermissions.
read Represents the r (read) and l (lookup) permissions.
write Represents all permissions except a (administer): rlidwk.
Using Normal and Negative Permissions
ACLs enable you both to grant and to deny access to a directory and the filesin it. To grant access, use the fs setacl command to create an ACL entry thatassociates a set of permissions with a user or group, as described in “SettingACL Entries” on page 568. When you use the fs listacl command to displayan ACL (as described in “Displaying ACLs” on page 566), such entries appearunderneath the following header, which uses the term rights to refer topermissions:
Normal rights
There are two ways to deny access:1. The recommended method is simply to omit an entry for the user or
group from the ACL, or to omit the appropriate permissions from theentry. Use the fs setacl command to remove or edit an existing entry,using the instructions in “To add, remove, or edit normal ACLpermissions” on page 568. In most circumstances, this method is enough toprevent access of certain kinds or by certain users. You must take care,however, not to grant the undesired permissions to any groups to whichsuch users belong.
2. The more explicit method for denying access is to use the -negative flag tothe fs setacl command to create an entry that associates negativepermissions with the user or group; for instructions, see “To add, remove,
Chapter 15. Managing Access Control Lists 563
or edit negative ACL permissions” on page 570. The output from the fslistacl command lists negative entries underneath the following header:
Negative rights
When determining what type of access to grant to a user, the File Serverfirst compiles a set of permissions by examining all of the entries in theNormal rights section of the ACL. It then subtracts any permissionsassociated with the user (or with groups to which the user belongs) on theNegative rights section of the ACL. Therefore, negative permissionsalways cancel out normal permissions.
Using negative permissions reverses the usual semantics of the fs setaclcommand, introducing the potential for confusion. In particular, combiningthe none shorthand and the -negative flag constitutes a double negative:by removing an entry from the Negative rights section of the ACL, youenable a user once again to obtain permissions via entries in the Normalrights section. Combining the all shorthand with the -negative flagexplicitly denies all permissions.
Note also that it is pointless to create an entry in the Negative rightssection if an entry in the Normal rights section grants the deniedpermissions to the system:anyuser group. In this case, users can obtain thepermissions simply by using the unlog command to discard their tokens.When they do so, the File Server recognizes them as the anonymous user,who belongs to the system:anyuser group but does not match the entrieson the Negative rights section of the ACL.
Using Groups on ACLs
As previously mentioned, placing a group entry on an ACL enables you tocontrol access for many users at once. You can grant a new user access tomany files and directories simply by adding the user to a group that appearson the relevant ACLs. You can also create groups of machines, in which caseany user logged on to the machine obtains the access that is granted to thegroup. On directories where they have the a permission on the ACL, users candefine their own groups and can create ACL entries for any groups, not justgroups that they create or own themselves. For instructions on creatinggroups of users or machines, and a discussion of the most effective ways touse different types of groups, see “Chapter 14. Administering the ProtectionDatabase” on page 533.
AFS also defines the following two system groups, which can be very usefulon ACLs because they potentially represent a large group of people. For moreinformation about these groups, see “The System Groups” on page 534.
564 AFS: Administration Guide
system:anyuserIncludes anyone who can access the cell’s file tree, including userswho have logged in as the local superuser root, have connected to alocal machine from somewhere outside the cell, and AFS users whobelong to a foreign cell. This group includes users who do not havetokens that are valid for the local AFS servers; the servers recognizethem as the user anonymous.
Note that creating an ACL entry for this group is the only way toextend access to AFS users from foreign cells, unless you create localauthentication accounts for them.
system:authuserIncludes all users who have a valid AFS token obtained from the localcell’s authentication service.
It is particularly useful to grant the l (lookup) permission to thesystem:anyuser group on the ACL of most directories in the file system,especially at the upper levels. This permission enables users only to learn thenames of files and subdirectories in a directory, but without it they cannottraverse their way through the directories in the path to a target file.
A slightly more restrictive alternative is to grant the l permission to thesystem:authuser group. If that is still not restrictive enough, you can grant thel to specific users or groups, which cannot exceed about 20 in number on agiven ACL.
Another reason to grant certain permissions to the system:anyuser group is toenable the correct operation of processes that provide services such as printingand mail delivery. For example, in addition to the l permission, a printprocess possibly needs the r (read) permission in order to access the contentsof files, and a mail delivery process possibly requires the i (insert) permissionto deliver new pieces of mail.
The ACL on the root directory of every newly created volume grants allpermissions to the system:administrators group. You can remove this entry ifyou wish, but members of the system:administrators group always implicitlyhave the a (administer), and by default also the l, permission on everydirectory’s ACL. The a permission enables them to grant themselves otherpermissions explicitly when necessary. To learn about changing this default setof permissions, see “Administering the system:administrators Group” onpage 578.
Chapter 15. Managing Access Control Lists 565
Displaying ACLs
To display the ACL associated with a file, directory or symbolic link, issue thefs listacl command. The output for a symbolic link displays the ACL thatapplies to its target file or directory, rather than the ACL on the directory thathouses the symbolic link.
Note for AFS/DFS Migration Toolkit users: If the machine on which youissue the fs listacl command is configured to access a DCE cell’s DFS filespacevia the AFS/DFS Migration Toolkit, you can use the command to display theACL on DFS files and directories. To display a DFS directory’s InitialContainer and Initial Object ACL instead of the regular one, include the fslistacl command’s -id or -if flag. For instructions, see the AFS/DFS MigrationToolkit Administration Guide and Reference. The fs command interpreter ignoresthe -id and -if flags if you include them when displaying an AFS ACL.
To display an ACL1. Issue the fs listacl command.
% fs listacl [<dir/file path>+]
where
la Is an acceptable alias for listacl (and lista is the shortest acceptableabbreviation).
dir/file pathNames one or more files or directories for which to display theACL. For files, the output displays the ACL for its directory. If youomit this argument, the output is for the current workingdirectory. Partial pathnames are interpreted relative to the currentworking directory. You can also use the following notation on itsown or as part of a pathname:
. (A single period). Specifies the current working directory.
.. (Two periods). Specifies the current working directory’sparent directory.
* (The asterisk). Specifies each file and subdirectory in thecurrent working directory. The ACL displayed for a file isalways the same as for its directory, but the ACL for eachsubdirectory can differ.
The following error message indicates that you do not have the permissionsneeded to display an ACL. To specify a directory name as the dir/file pathargument, you must have the l (lookup) permission on the ACL. To specify afilename, you must also have the r (read) permission on its directory’s ACL.
fs: You don't have the required access permissions on 'dir/file path'
566 AFS: Administration Guide
Members of the system:administrators group and the directory’s owner (asreported by the ls -ld command) implicitly have the a (administer)permission on every directory’s ACL, and can use the fs setacl command togrant themselves the required permissions; for instructions, see “Setting ACLEntries” on page 568.
The output for each file or directory specified as dir/file path begins with thefollowing header to identify it:
Access list for dir/file path is
The Normal rights header appears on the next line, followed by lines thateach pair a user or group name and a set of permissions. The permissionsappear as the single letters defined in “The AFS ACL Permissions” onpage 561, and always in the order rlidwka. If there are any negativepermissions, the Negative rights header appears next, followed by pairs ofnegative permissions.
The following example displays the ACL on user terry’s home directory in theABC Corporation cell:
% fs la /afs/abc.com/usr/terryAccess list for /afs/abc.com/usr/terry isNormal permissions:
system:authuser rlpat rlwterry rlidwka
Negative permissions:terry:other-dept rljones rl
where pat, terry, and jones are individual users, system:authuser is a systemgroup, and terry:other-dept is a group that terry owns. The list of normalpermissions grants all permissions to terry, the r (read), l (lookup), and w(write) permissions to pat, and the r and l permissions to the members of thesystem:authuser group.
The list of negative permissions denies the r and l permissions to jones andthe members of the terry:other-dept group. These entries effectively preventthem from accessing terry’s home directory in any way, because they cancelout the r and l permissions extended to the system:authuser group, which isthe only entry on the Normal rights section of the ACL that possibly appliesto them.
Chapter 15. Managing Access Control Lists 567

Setting ACL Entries
To add, remove, or edit ACL entries, use the fs setacl command. By default,the command manipulates entries on the normal permissions section of theACL. To manipulate entries on the negative permissions section, include the-negative flag.
You must have the a (administer) permission on an ACL to edit it. The ownerof a directory (as reported by the ls -ld) command and members of thesystem:administrators group always implicitly have it on every ACL. Bydefault, members of the system:administrators group also implicitly have thel (lookup) permission.
Note for AFS/DFS Migration Toolkit users: If the machine on which youissue the fs setacl command is configured to access a DCE cell’s DFS filespacevia the AFS/DFS Migration Toolkit, you can use the command to set the ACLon DFS files and directories. To set a DFS directory’s Initial Container andInitial Object ACL instead of the regular one, include the fs setacl command’s-id or -if flag. For instructions, see the AFS/DFS Migration ToolkitAdministration Guide and Reference. The fs command interpreter ignores the -idand -if flags if you include them when setting an AFS ACL.
To add, remove, or edit normal ACL permissions1. Verify that you have the a (administer) permission on each directory for
which you are editing the ACL. If necessary, issue the fs listacl command,which is fully described in “Displaying ACLs” on page 566.
% fs listacl [<dir/file path>]
2. Issue the fs setacl command to edit entries in the normal permissionssection of the ACL. To remove an entry, specify the none shorthand as thepermissions. If an ACL entry already exists, the permissions you specifycompletely replace those in the existing entry.
% fs setacl -dir <directory>+ -acl <access list entries>+
where
sa Is an acceptable alias for setacl (and seta is the shortest acceptableabbreviation).
-dir Names one or more directories to which to apply the ACL entriesdefined by the -acl argument. Partial pathnames are interpretedrelative to the current working directory.
Specify the read/write path to each directory, to avoid the failurethat results when you attempt to change a read-only volume. Byconvention, you indicate the read/write path by placing a periodbefore the cell name at the pathname’s second level (for example,/afs/.abc.com). For further discussion of the concept of read/write
568 AFS: Administration Guide

and read-only paths through the filespace, see “The Rules ofMount Point Traversal” on page 169.
You can also use the following notation on its own or as part of apathname:
. (A single period). If used by itself, sets the ACL on thecurrent working directory.
.. (Two periods). If used by itself, sets the ACL on thecurrent working directory’s parent directory.
* (The asterisk). Sets the ACL on each of the subdirectoriesin the current working directory. You must precede it withthe -dir switch, since it potentially designates multipledirectories. The fs command interpreter generates thefollowing error message for each file in the directory:
fs: 'filename': Not a directory
If you specify only one directory or file name, you can omit the-dir and -acl switches.
-acl Specifies one or more ACL entries, each of which pairs a user orgroup name and a set of permissions. Separate the pairs, and thetwo parts of each pair, with one or more spaces.
To define the permissions, provide either:v One or more of the letters that represent the standard or
auxiliary permissions (rlidwka and ABCDEFGH), in any orderv One of the four shorthand notations:
– all (equals rlidwka)– none (removes the entry)– read (equals rl)– write (equals rlidwk)
For a more detailed description of the permissions and shorthandnotations, see “The AFS ACL Permissions” on page 561.
On a single command line, you can combine user and groupentries. You can also use individual letters in some pairs and theshorthand notations in other pairs, but cannot combine letters andshorthand notation within a single pair.
Either of the following examples grants user pat the r (read) and l (lookup)permissions on the ACL of the notes subdirectory in the issuer’s homedirectory. They illustrate how it is possible to omit the -dir and -acl switcheswhen you name only one directory.
Chapter 15. Managing Access Control Lists 569
% fs sa x/notes pat rl
% fs sa x/notes pat read
The following example edits the ACL for the current working directory. Itremoves the entry for the system:anyuser group, and adds two entries: onegrants all permissions except a (administer) to the members of theterry:colleagues group and the other grants the r (read) and l (lookup)permissions to the system:authuser group. The command appears on twolines here only for legibility.
% fs sa -dir . -acl system:anyuser none terry:colleagues write \system:authuser rl
To add, remove, or edit negative ACL permissions1. Verify that you have the a (administer) permission on each directory for
which you are editing the ACL. If necessary, issue the fs listacl command,which is fully described in “Displaying ACLs” on page 566.
% fs listacl [<dir/file path>]
2. Issue the fs setacl command with the -negative flag to edit entries in thenegative permissions section of the ACL. To remove an entry, specify thenone shorthand as the permissions. If an ACL entry already exists for auser or group, the permissions you specify completely replace those in theexisting entry.
% fs setacl -dir <directory>+ -acl <access list entries>+ -negative
where
sa Is an acceptable alias for setacl (and seta is the shortest acceptableabbreviation).
-dir Names one or more directories to which to apply the negativeACL entries defined by the -acl argument. Specify the read/writepath to each directory, to avoid the failure that results when youattempt to change a read-only volume. For a detailed descriptionof acceptable values, see “To add, remove, or edit normal ACLpermissions” on page 568.
-acl Specifies one or more ACL entries, each of which pairs a user orgroup name and a set of permissions. Separate the pairs, and thetwo parts of each pair, with one or more spaces. For a detaileddescription of acceptable values, see “To add, remove, or editnormal ACL permissions” on page 568. Keep in mind that theusual meaning of each permission is reversed.
-negativePlaces the entries defined by the -acl argument on the negativepermissions section of the ACL for each directory named by the-dir argument.
570 AFS: Administration Guide
The following example denies user pat the w (write) and d (delete)permissions for the project subdirectory of the current working directory.
% fs sa project pat wd -neg
Completely Replacing an ACL
It is sometimes simplest to clear an ACL completely before defining newpermissions on it, for instance if the mix of normal and negative permissionsmakes it difficult to understand how their interaction affects a user’s access tothe directory. To clear an ACL completely while you define new entries,include the -clear flag on the fs setacl command. When you include this flag,you can create entries on either the normal permissions or the negativepermissions section of the ACL, but not on both at once.
Remember to create an entry that grants appropriate permissions to thedirectory’s owner. The owner implicitly has the a (administer) permissionrequired to replace a deleted entry, but the effects of a missing ACL entry(particularly the lack of the lookup permission) can be so confusing that itbecomes difficult for the owner to realize that the missing entry is causing theproblems.
To replace an ACL completely1. Verify that you have the a (administer) permission on each directory for
which you are editing the ACL. If necessary, issue the fs listacl command,which is fully described in “Displaying ACLs” on page 566.
% fs listacl [<dir/file path>]
2. Issue the fs setacl command with the -clear flag to clear the ACLcompletely before setting either normal or negative permissions. Becauseyou need to grant the owner of the directory all permissions, it is better inmost cases to set normal permissions at this point.
% fs setacl -dir <directory>+ -acl <access list entries>+ -clear \[-negative]
where
sa Is an acceptable alias for setacl (and seta is the shortest acceptableabbreviation).
-dir Names one or more directories to which to apply the negativeACL entries defined by the -acl argument. Specify the read/writepath to each directory, to avoid the failure that results when youattempt to change a read-only volume. For a detailed descriptionof acceptable values, see “To add, remove, or edit normal ACLpermissions” on page 568.
-acl Specifies one or more ACL entries, each of which pairs a user or
Chapter 15. Managing Access Control Lists 571

group name and a set of permissions. Separate the pairs, and thetwo parts of each pair, with one or more spaces. Remember togrant all permissions to the owner of the directory. For a detaileddescription of acceptable values, see “To add, remove, or editnormal ACL permissions” on page 568.
-clear Removes all entries from each ACL before creating the entriesindicated by the -acl argument.
-negativePlaces the entries defined by the -acl argument on the negativepermissions section of each ACL.
Copying ACLs Between Directories
The fs copyacl command copies a source directory’s ACL to one or moredestination directories. It does not affect the source ACL at all, but changeseach destination ACL as follows:v If an entry on the source ACL does not exist on the destination ACL, the
command copies it to the destination ACL.v If an entry on the destination ACL does not also exist on the source ACL,
the command does not remove it unless you include the -clear flag tooverwrite the destination ACL completely.
v If an entry is on both ACLs, the command changes the permissions on thedestination ACL entry to match the source ACL entry.
Note for AFS/DFS Migration Toolkit users: If the machine is configured toenable AFS users to access a DCE cell’s DFS filespace via the AFS/DFSMigration Toolkit, then you can use the fs copyacl command to copy ACLsbetween DFS files and directories also. The command includes -id and -ifflags for altering a DFS directory’s Initial Container and Initial Object ACLs aswell as its regular ACL; see the AFS/DFS Migration Toolkit Administration Guideand Reference. You cannot copy ACLs between AFS and DFS directories,because they use different ACL formats. The fs command interpreter ignoresthe -id and -if flags if you include them when copying AFS ACLs.
To copy an ACL between directories1. Verify that you have the l (lookup) permission on the source ACL and the
a (administer) permission on each destination ACL. To identify the sourcedirectory by naming a file in it, you must also have the r (read) permissionon the source ACL. If necessary, issue the fs listacl command, which isfully described in “Displaying ACLs” on page 566.
% fs listacl [<dir/file path>]
572 AFS: Administration Guide
2. Issue the fs copyacl command to copy a source ACL to the ACL on one ormore destination directories. (The command appears here on two linesonly for legibility.)
% fs copyacl -fromdir <source directory> -todir <destination directory>+ \[-clear]
where
co Is the shortest acceptable abbreviation for copyacl.
-fromdirNames the source directory from which to copy the ACL. Partialpathnames are interpreted relative to the current workingdirectory. If this argument names a file, the ACL is copied from itsdirectory.
-todir Names each destination directory to which to copy the sourceACL. Partial pathnames are interpreted relative to the currentworking directory. Filenames are not acceptable.
Specify the read/write path to each directory, to avoid the failurethat results when you attempt to change a read-only volume. Byconvention, you indicate the read/write path by placing a periodbefore the cell name at the pathname’s second level (for example,/afs/.abc.com). For further discussion of the concept of read/writeand read-only paths through the filespace, see “The Rules ofMount Point Traversal” on page 169.
-clear Completely overwrites each destination directory’s ACL with thesource ACL.
The following example copies the ACL from the current working directory’snotes subdirectory to the plans subdirectory. The issuer does not include the-clear flag, so the entry for user pat remains on the plans directory’s ACLalthough there is no corresponding entry on the notes directory’s ACL.
% fs la notes plansAccess list for notes isNormal permissions:
terry rlidwkasmith rljones rl
Access list for plans isNormal permissions:
terry rlidwkpat rlidwk
% fs copyacl notes plans% fs la notes plansAccess list for notes isNormal permissions:
terry rlidwkasmith rl
Chapter 15. Managing Access Control Lists 573

jones rlAccess list for plans isNormal permissions:
terry rlidwkapat rlidwksmith rljones rl
Removing Obsolete AFS IDs from ACLs
When you remove a user or group entry from the Protection Database, the fslistacl command displays the user’s AFS UID (or group’s AFS GID) in ACLentries, rather than the name. In the following example, user terry has an ACLentry for the group terry:friends (AFS GID -567) on her home directory in theABC Corporation cell, and then removes the group from the ProtectionDatabase.
% fs listacl /afs/abc.com/usr/terryAccess list for /afs/abc.com/usr/terry isNormal permissions:
terry:friends rliksystem:anyuser lterry rlidwka
% pts delete terry:friends% fs listacl /afs/abc.com/usr/terryAccess list for /afs/abc.com/usr/terry isNormal permissions:
-567 rliksystem:anyuser lterry rlidwka
Leaving AFS IDs on ACLs serves no function, because the ID no longercorresponds to an active user or group. Furthermore, if the ID is ever assignedto a new user or group, then the new possessor of the ID gains access that theowner of the directory actually intended for the previous possessor. (ReusingAFS IDs is not recommended precisely for this reason.)
To remove obsolete AFS UIDs from ACLs, use the fs cleanacl command.
To clean obsolete AFS IDs from an ACL1. Verify that you have the a (administer) permission on each directory for
which you are cleaning the ACL. If necessary, issue the fs listaclcommand, which is fully described in “Displaying ACLs” on page 566.
% fs listacl [<dir/file path>]
2. Issue the fs cleanacl command to remove entries for obsolete AFS IDs.% fs cleanacl [<dir/file path>+]
where
574 AFS: Administration Guide
cl Is the shortest acceptable abbreviation of cleanacl.
dir/file pathNames each directory for which to clean the ACL. If this argumentnames a file, its directory’s ACL is cleaned. Omit this argument toclean the current working directory’s ACL.
Specify the read/write path to each directory, to avoid the failurethat results when you attempt to change a read-only volume. Byconvention, you indicate the read/write path by placing a periodbefore the cell name at the pathname’s second level (for example,/afs/.abc.com). For further discussion of the concept of read/writeand read-only paths through the filespace, see “The Rules ofMount Point Traversal” on page 169.
You can also use the following notation on its own or as part of apathname:
. (A single period). If used by itself, cleans the currentworking directory’s ACL.
.. (Two periods). If used by itself, cleans the ACL on thecurrent working directory’s parent directory.
* (The asterisk). Cleans the ACL of each of the subdirectoriesin the current working directory. However, if you use theasterisk and there are obsolete AFS IDs on any directory’sACL, the following error message appears for every file inthe directory:
fs: 'filename': Not a directory
If there are obsolete AFS IDs on a directory, the command interpreter displaysits cleaned ACL under the following header.
Access list for directory is now
If a directory’s ACL has no obsolete AFS IDs on it, the following messageappears for each.
Access list for directory is fine.
How AFS Interprets the UNIX Mode Bits
Although AFS uses ACLs to protect file data rather than the mode bits thatUFS uses, it does not ignore the mode bits entirely. When you issue thechmod command on an AFS file or directory, AFS changes the bitsappropriately. To change a file’s mode bits, you must have the AFS w (write)
Chapter 15. Managing Access Control Lists 575

permission on the ACL of the file’s directory. To change a directory’s modebits, you must have the d (delete), i (insert), and l (lookup) permissions on itsACL.
AFS also uses the UNIX mode bits as follows:v It uses the initial bit to determine the element’s type. This is the bit that
appears first in the output from the ls -l command and shows the hyphen(-) for a file or the letter d for a directory.
v It does not use any of the mode bits on a directory.v For a file, the first (owner) set of bits interacts with the ACL entries that
apply to the file in the following way:– If the first r mode bit is not set, no one (including the owner) can read
the file, no matter what permissions they have on the ACL. If the bit isset, users also need the r (read) and l permissions on the ACL of thefile’s directory to read the file.
– If the first w mode bit is not set, no one (including the owner) canmodify the file. If the w bit is set, users also need the w and lpermissions on the ACL of the file’s directory to modify the file.
– There is no ACL permission directly corresponding to the x mode bit,but to execute a file stored in AFS, the user must also have the r and lpermissions on the ACL of the file’s directory.
576 AFS: Administration Guide
Chapter 16. Managing Administrative Privilege
This chapter explains how to enable system administrators and operators toperform privileged AFS operations.
Summary of Instructions
This chapter explains how to perform the following tasks by using theindicated commands:
Display members of system:administrators group pts membershipAdd user to system:administrators group pts adduserRemove user from system:administrators group pts removeuserDisplay ADMIN flag in Authentication Database entry kas examineSet or remove ADMIN flag on Authentication Database entry kas setfieldsDisplay users in UserList file bos listusersAdd user to UserList file bos adduserRemove user from UserList file bos removeuser
An Overview of Administrative Privilege
A fully privileged AFS system administrator has the following characteristics:v Membership in the cell’s system:administrators group. See “Administering
the system:administrators Group” on page 578.v The ADMIN flag on his or her entry in the cell’s Authentication Database. See
“Granting Privilege for kas Commands: the ADMIN Flag” on page 580.v Inclusion in the file /usr/afs/etc/UserList on the local disk of each AFS
server machine in the cell. See “Administering the UserList File” onpage 581.
This section describes the three privileges and explains why more than oneprivilege is necessary.
Note: Never grant any administrative privilege to the user anonymous, evenwhen a server outage makes it impossible to mutually authenticate. Ifyou grant such privilege, then any user who can access a machine inyour cell can issue privileged commands. The alternative solution is toput the affected server machine into no-authentication mode and usethe -noauth flag available on many commands to prevent mutualauthentication attempts. For further discussion, see “ManagingAuthentication and Authorization Requirements” on page 106.
© Copyright IBM Corp. 1989, 2000 577
The Reason for Separate Privileges
Often, a cell’s administrators require full administrative privileges to performtheir jobs effectively. However, separating the three types of privilege makes itpossible to grant only the minimum set of privileges that a givenadministrator needs to complete his or her work.
The system:administrators group privilege is perhaps the most basic, andmost frequently used during normal operation (when all the servers arerunning normally). When the Protection Database is unavailable due tomachine or server outage, it is not possible to issue commands that requirethis type of privilege.
The ADMIN flag privilege is separate because of the extreme sensitivity of theinformation in the Authentication Database, especially the server encryptionkey in the afs entry. When the Authentication Database is unavailable due tomachine or server outage, it is not possible to issue commands that requirethis type of privilege.
The ability to issue privileged bos and vos command is recorded in the/usr/afs/etc/UserList file on the local disk of each AFS server machine ratherthan in a database, so that in case of serious server or network problemsadministrators can still log onto server machines and use those commandswhile solving the problem.
Administering the system:administrators Group
The first type of AFS administrative privilege is membership . Members of thesystem:administrators group in the Protection Database have the followingprivileges:v Permission to issue all pts commands, which are used to administer the
Protection Database. See “Chapter 14. Administering the ProtectionDatabase” on page 533.
v Permission to issue the fs setvol and fs setquota commands, which set thespace quota on volumes as described in “Setting and Displaying VolumeQuota and Current Size” on page 198.
v Implicit a (administer) and by default l (lookup) permissions on the accesscontrol list (ACL) on every directory in the cell’s AFS filespace. Members ofthe group can use the fs setacl command to grant themselves any otherpermissions they require, as described in “Setting ACL Entries” on page 568.You can change the ACL permissions that the File Server on a given fileserver machine implicitly grants to the members of thesystem:administrators group for the data in volumes that it houses. Whenyou issue the bos create command to create and start the fs process on the
578 AFS: Administration Guide
machine, include the -implicit argument to the fileserver initializationcommand. For syntax details, see the fileserver reference page in the AFSAdministration Reference. You can grant additional permissions, or removethe l permission. However, the File Server always implicitly grants the apermission to members of the group, even if you set the value of the-implicit argument to none.
To display the members of the system:administrators group1. Issue the pts membership command to display the system:administrators
group’s list of members. Any user can issue this command as long as thefirst privacy flag on the system:administrators group’s Protection Databaseentry is not changed from the default value of uppercase S.
% pts membership system:administrators
where m is the shortest acceptable abbreviation of membership.
To add users to the system:administrators group1. Verify that you belong to the system:administrators group. If necessary,
issue the pts membership command, which is fully described in “Todisplay the members of the system:administrators group”.
% pts membership system:administrators
2. Issue the pts adduser group to add one or more users.% pts adduser -user <user name>+ -group system:administrators
where
ad Is the shortest acceptable abbreviation of adduser.
-user Names each user to add to the system:administrators group.
To remove users from the system:administrators group1. Verify that you belong to the system:administrators group. If necessary,
issue the pts membership command, which is fully described in “Todisplay the members of the system:administrators group”.
% pts membership system:administrators
2. Issue the pts removeuser command to remove one or more users.% pts removeuser -user <user name>+ -group system:administrators
where
rem Is the shortest acceptable abbreviation of removeuser.
-user Names each user to remove from the system:administratorsgroup.
Chapter 16. Managing Administrative Privilege 579
Granting Privilege for kas Commands: the ADMIN Flag
Administrators who have the ADMIN flag on their Authentication Databaseentry can issue all kas commands, which enable them to administer theAuthentication Database.
To check if the ADMIN flag is set1. Issue the kas examine command to display an entry from the
Authentication Database.The Authentication Server performs its own authentication rather thanaccepting your existing AFS token. By default, it authenticates your local(UFS) identity, which possibly does not correspond to an AFS-privilegedadministrator. Include the -admin_username argument (here abbreviatedto -admin) to name a user identity that has the ADMIN flag on itsAuthentication Database entry.
% kas examine <name of user> \-admin <admin principal to use for authentication>
Administrator's (admin_user) password: admin_password
where
e Is the shortest acceptable abbreviation of examine.
name of userNames the entry to display.
-adminNames an administrative account with the ADMIN flag on itsAuthentication Database entry, such as the admin account. Thepassword prompt echoes it as admin_user. Enter the appropriatepassword as admin_password.
If the ADMIN flag is turned on, it appears on the first line, as in this example:% kas e terry -admin adminAdministrator's (admin) password: admin_passwordUser data for terry (ADMIN)
key version is 0, etc...
To set or remove the ADMIN flag1. Issue the kas setfields command to turn on the ADMIN flag in an
Authentication Database entry.The Authentication Server performs its own authentication rather thanaccepting your existing AFS token. By default, it authenticates your local(UNIX) identity, which possibly does not correspond to an AFS-privilegedadministrator. Include the -admin argument to name an identity that has
580 AFS: Administration Guide
the ADMIN flag on its Authentication Database entry. To verify that an entryhas the flag, issue the kas examine command as described in “To check ifthe ADMIN flag is set” on page 580.The following command appears on two lines only for legibility.
% kas setfields <name of user> {ADMIN | NOADMIN} \-admin <admin principal to use for authentication>
Administrator's (admin_user) password: admin_password
where
sf Is an alias for setfields (and setf is the shortest acceptableabbreviation).
name of userNames the entry for which to set or remove the ADMIN flag.
ADMIN | NOADMINSets or removes the ADMIN flag, respectively.
-adminNames an administrative account with the ADMIN flag on itsAuthentication Database entry, such as the admin account. Thepassword prompt echoes it as admin_user. Enter the appropriatepassword as admin_password.
Administering the UserList File
Inclusion in the file /usr/afs/etc/UserList on the local disk of each AFS servermachine enables an administrator to issue commands from the indicatedsuites.v The bos commands enable the administrator to manage server processes
and the server configuration files that define the cell’s database servermachines, server encryption keys, and privileged users. See “Chapter 3.Administering Server Machines” on page 69 and “Chapter 4. Monitoringand Controlling Server Processes” on page 121.
v The vos commands enable the administrator to manage volumes and theVolume Location Database (VLDB). See “Chapter 5. Managing Volumes” onpage 147.
v The backup commands enable the administrator to use the AFS BackupSystem to copy data to permanent storage. See “Chapter 6. Configuring theAFS Backup System” on page 217 and “Chapter 7. Backing Up andRestoring AFS Data” on page 269.
Although each AFS server machine maintains a separate copy of the file on itslocal disk, it is conventional to keep all copies the same. It can be confusingfor an administrator to have the privilege on some machines but not others.
Chapter 16. Managing Administrative Privilege 581

If your cell runs the United States edition of AFS and uses the Update Serverto distribute the contents of the system control machine’s /usr/afs/etcdirectory, then edit only the copy of the UserList file stored on the systemcontrol machine. If you have forgotten which machine is the system controlmachine, see “The Four Roles for File Server Machines” on page 79.
If your cell runs the international edition of AFS, or does not use a systemcontrol machine, then you must edit the UserList file on each server machineindividually.
To avoid making formatting errors that can result in performance problems,never edit the UserList file directly. Instead, use the bos adduser or bosremoveuser commands as described in this section.
To display the users in the UserList file1. Issue the bos listusers command to display the contents of the
/usr/afs/etc/UserList file.% bos listusers <machine name>
where
listu Is the shortest acceptable abbreviation of listusers.
machine nameNames an AFS server machine. In the normal case, any machine isacceptable because the file is the same on all of them.
To add users to the UserList file1. Verify you are listed in the /usr/afs/etc/UserList file. If not, you must have
a qualified administrator add you before you can add entries to it yourself.If necessary, issue the bos listusers command, which is fully described in“To display the users in the UserList file”.
% bos listusers <machine name>
2. Issue the bos adduser command to add one or more users to the UserListfile.
% bos adduser <machine name> <user names>+
where
addu Is the shortest acceptable abbreviation of adduser.
machine nameNames the system control machine if you use the Update Server todistribute the contents of the /usr/afs/etc directory (possible only incells running the United States edition of AFS). By default, it cantake up to five minutes for the Update Server to distribute the
582 AFS: Administration Guide

changes, so newly added users must wait that long beforeattempting to issue privileged commands.
If you are running the international edition of AFS, or do not usethe Update Server, repeat the command, substituting the name ofeach AFS server machine for machine name in turn.
user namesSpecifies the username of each administrator to add to theUserList file.
To remove users from the UserList file1. Verify you are listed in the /usr/afs/etc/UserList file. If not, you must have
a qualified administrator add you before you can remove entries from ityourself. If necessary, issue the bos listusers command, which is fullydescribed in “To display the users in the UserList file” on page 582.
% bos listusers <machine name>
2. Issue the bos removeuser command to remove one or more users from theUserList file.
% bos removeuser <machine name> <user names>+
where
removeuIs the shortest acceptable abbreviation of removeuser.
machine nameNames the system control machine if you use the Update Server todistribute the contents of the /usr/afs/etc directory (possible only incells running the United States edition of AFS). By default, it cantake up to five minutes for the Update Server to distribute thechange, so newly removed users can continue to issue privilegedcommands during that time.
If you are running the international edition of AFS, or do not usethe Update Server, repeat the command, substituting the name ofeach AFS server machine for machine name in turn.
user namesSpecifies the username of each administrator to add to theUserList file.
Chapter 16. Managing Administrative Privilege 583

584 AFS: Administration Guide
Appendix A. Managing the NFS/AFS Translator
The NFS®
/AFS®
Translator enables users working on NFS client machines toaccess, create and remove files stored in AFS. This chapter assumes familiaritywith both NFS and AFS.
Summary of Instructions
This chapter explains how to perform the following tasks by using theindicated commands:
Mount directory on translator machine mountExamine value of @sys variable fs sysnameEnable/disable reexport of AFS, set other parameters fs exportafsAssign AFS tokens to user on NFS client machine knfs
Overview
The NFS/AFS Translator enables users on NFS client machines to access theAFS filespace as if they are working on an AFS client machine, whichfacilitates collaboration with other AFS users.
An NFS/AFS translator machine (or simply translator machine) is a machineconfigured as both an AFS client and an NFS server:v Its AFS client functionality enables it to access the AFS filespace. The Cache
Manager requests and caches files from AFS file server machines, and caneven maintain tokens for NFS users, if you have made the configurationchanges that enable NFS users to authenticate with AFS.
v Its NFS server functionality makes it possible for the translator machine toexport the AFS filespace to NFS client machines. When a user on an NFSclient machine mounts the translator machine’s /afs directory (or one of itssubdirectories, if that feature is enabled), access to AFS is immediate andtransparent. The NFS client machine does not need to run any AFSsoftware.
Enabling Unauthenticated or Authenticated AFS Access
By configuring the translation environment appropriately, you can provideeither unauthenticated or authenticated access to AFS from NFS clientmachines. The sections of this chapter on configuring translator machines,NFS client machines, and AFS user accounts explain how to configure thetranslation environment appropriately.
© Copyright IBM Corp. 1989, 2000 585
v If you configure the environment for unauthenticated access, the AFS FileServer considers the NFS users to be the user anonymous. They can accessonly those AFS files and directories for which the access control list (ACL)extends the required permissions to the system:anyuser group. They canissue only those AFS commands that do not require privilege, and thenonly if their NFS client machine is a system type for which AFS binaries areavailable and accessible by the system:anyuser group. Such userspresumably do not have AFS accounts.
v If you configure the environment for authenticated access, you must createentries in the AFS Authentication and Protection Databases for the NFSusers. The authentication procedure they use depends on whether the NFSclient machine is a supported system type (one for which AFS binaries areavailable):– If AFS binaries are available for the NFS client machine, NFS users can
issue the klog command on the NFS client machine. They can access thefilespace and issue AFS commands to the same extent as authenticatedusers working on AFS client machines.
– If AFS binaries are not available for the NFS client machine, NFS usersmust establish a connection with the translator machine (using the telnetutility, for example) and then issue the klog and knfs commands on thetranslator machine to make its Cache Manager use the tokens correctlywhile users work on the NFS client. They can access the AFS filespace asauthenticated users, but cannot issue AFS commands. For instructions,see “Authenticating on Unsupported NFS Client Machines” on page 599.
Setting the AFSSERVER and AFSCONF Environment Variables
If you wish to enable your NFS users to issue AFS commands, you mustdefine the AFSSERVER and AFSCONF environment variables in theircommand shell. This section explains the variables’ function and outlines thevarious methods for setting them.
Issuing AFS commands also requires that the NFS client machine is asupported system type (one for which AFS binaries are available andaccessible). Users working on NFS client machines of unsupported systemtypes can access AFS as authenticated users, but they cannot issue AFScommands. It is not necessary to define the AFSSERVER and AFSCONFvariables for such users. For instructions on using the knfs command toobtain authenticated access on unsupported system types, see “Authenticatingon Unsupported NFS Client Machines” on page 599.
The AFSSERVER Variable
The AFSSERVER variable designates the AFS client machine that performstwo functions for NFS clients:
586 AFS: Administration Guide
v It acts as the NFS client’s remote executor by executing AFS-specific systemcalls on its behalf, such as those invoked by the klog and tokenscommands and by many commands in the AFS suites.
v Its stores the tokens that NFS users obtain when they authenticate withAFS. This implies that the remote executor machine and the translatormachine must be the same if the user needs authenticated access to AFS.
The choice of remote executor most directly affects commands that display orchange Cache Manager configuration, such as the fs getcacheparms, fsgetcellstatus, and fs setcell commands. When issued on an NFS client, thesecommands affect the Cache Manager on the designated remote executormachine. (Note, however, that several such commands require the issuer to belogged into the remote executor’s local file system as the local superuser root.The ability of NFS client users to log in as root is controlled by NFS, not bythe NFS/AFS Translator, so setting the remote executor properly does notnecessarily enable users on the NFS client to issue such commands.)
The choice of remote executor is also relevant for AFS commands that do notconcern Cache Manager configuration but rather have the same result onevery machine, such as the fs commands that display or set ACLs andvolume quota. These commands take an AFS path as one of their arguments.If the Cache Manager on the remote executor machine mounts the AFSfilespace at the /afs directory, as is conventional for AFS clients, then thepathname specified on the NFS client must begin with the string /afs for theCache Manager to understand it. This implies that the remote executor mustbe the NFS client’s primary translator machine (the one whose /afs directoryis mounted at /afs on the NFS client).
The AFSCONF Variable
The AFSCONF environment variable names the directory that houses theThisCell and CellServDB files to use when running AFS commands issuedon the NFS client machine. As on an AFS client, these files determine thedefault cell for command execution.
For predictable performance, it is best that the files in the directory named bythe AFSCONF variable match those in the /usr/vice/etc directory on thetranslator machine. If your cell has an AFS directory that serves as the centralupdate source for files in the /usr/vice/etc directory, it is simplest to set theAFSCONF variable to refer to it. In the conventional configuration, thisdirectory is called /afs/cellname/common/etc.
Setting Values for the Variables
To learn the values of the AFSSERVER and AFSCONF variables, AFScommand interpreters consult the following three sources in sequence:
Appendix A. Managing the NFS/AFS Translator 587
1. The current command shell’s environment variable definitions2. The .AFSSERVER or .AFSCONF file in the issuer’s home directory3. The /.AFSSERVER or /.AFSCONF file in the NFS client machine’s root (/)
directory. If the client machine is diskless, its root directory can reside onan NFS server machine.
(Actually, before consulting these sources, the NFS client looks for theCellServDB and ThisCell files in its own /usr/vice/etc directory. If thedirectory exists, the NFS client does not use the value of the AFSCONFvariable. However, the /usr/vice/etc directory usually exists only on AFSclients, not NFS clients.)
As previously detailed, correct performance generally requires that the remoteexecutor machine be the NFS client’s primary translator machine (the onewhose /afs directory is mounted at the /afs directory on the NFS client). Therequirement holds for all users accessing AFS from the NFS client, so it isusually simplest to create the .AFSSERVER file in the NFS client’s rootdirectory. The main reason to create the file in a user’s home directory or toset the AFSSERVER environment variable in the current command shell is thatthe user needs to switch to a different translator machine, perhaps because theoriginal one has become inaccessible.
Similarly, it generally makes sense to create the .AFSCONF file in the NFSclient’s root directory. Creating it in the user’s home directory or setting theAFSCONF environment variable in the current command shell is usefulmostly when there is a reason to specify a different set of database servermachines for the cell, perhaps in a testing situation.
Delayed Writes for Files Saved on NFS Client Machines
When an application running on an AFS client machine issues the close orfsync system call on a file, the Cache Manager by default performs asynchronous write of the data to the File Server. (For further discussion, see“AFS Implements Save on Close” on page 23 and “Enabling AsynchronousWrites” on page 424.)
To avoid degrading performance for the AFS users working on a translatormachine, AFS does not perform synchronous writes for applications runningon the translator machine’s NFS clients. Instead, one of the Cache Managerdaemons (the maintenance daemon) checks every 60 seconds for chunks in thecache that contain data saved on NFS clients, and writes their contents to theFile Server. This does not guarantee that data saved on NFS clients is writtento the File Server within 60 seconds, but only that the maintenance daemonchecks for and begins the write of data at that interval.
588 AFS: Administration Guide
Furthermore, AFS always ignores the fsync system call as issued on an NFSclient. The call requires an immediate and possibly time-consuming responsefrom the File Server, which potentially causes delays for other AFS clients ofthe File Server. NFS version 3 automatically issues the fsync system calldirectly after the close call, but the Cache Manager ignores it and handles theoperation just like a regular close.
The delayed write mechanism means that there is usually a delay between thetime when an NFS application issues the close or fsync system call on a fileand the time when the changes are recorded at the File Server, which is whenthey become visible to users working on other AFS client machines (eitherdirectly or on its NFS clients). The delay is likely to be longer than for filessaved by users working directly on an AFS client machine.
The exact amount of delay is difficult to predict. The NFS protocol itselfallows a standard delay before saved data must be transferred from the NFSclient to the NFS server (the translator machine). The modified data remainsin the translator machine’s AFS client cache until the maintenance daemon’snext scheduled check for such data, and it takes additional time to transfer thedata to the File Server. The maintenance daemon uses a single thread, so therecan be additional delay if it takes more than 60 seconds to write out all of themodified NFS data. That is, if the maintenance daemon is still writing data atthe time of the next scheduled check, it cannot notice any additional modifieddata until the scheduled time after it completes the long write operation.
The Cache Manager’s response to the write system call is the same whether itis issued on an AFS client machine or on an NFS client of a translatormachine: it records the modifications in the local AFS client cache only.
Configuring NFS/AFS Translator Machines
To act as an NFS/AFS translator machine, a machine must configured asfollows:v It must be an AFS client. Many system types supported as AFS clients can
be translator machines. To learn about possible restrictions in a specificrelease of AFS, see the AFS Release Notes.
v It must be an NFS server. The appropriate number of NFS server daemons(nfsd and others) depends on the anticipated NFS client load.
v It must export the local directory on which the AFS filespace is mounted,/afs by convention.
If users on a translator machine’s NFS clients are to issue AFS commands, thetranslator machine must also meet the requirements discussed in “Configuringthe Translator Machine to Accept AFS Commands” on page 590.
Appendix A. Managing the NFS/AFS Translator 589

Loading NFS and AFS Kernel Extensions
The AFS distribution for system types that can act as NFS/AFS Translatormachines usually includes two versions of the AFS kernel extensions file, onefor machines where the kernel supports NFS server functionality, and one formachines not using NFS (the latter AFS kernel extensions file generally hasthe string nonfs in its name). A translator machine must use the NFS-enabledversion of the AFS extensions file. On some system types, you select theappropriate file by moving it to a certain location, whereas on other systemtypes you set a variable that results in automatic selection of the correct file.See the instructions in the AFS Quick Beginnings for incorporating AFS into thekernel on each system type.
On many system types, NFS is included in the kernel by default, so it is notnecessary to load NFS kernel extensions explicitly. On system types whereyou must load NFS extensions, then in general you must load them beforeloading the AFS kernel extensions. The AFS Quick Beginnings describes how toincorporate the AFS initialization script into a machine’s startup sequence sothat it is ordered correctly with respect to the script that handles NFS.
In addition, the AFS extensions must be loaded into the kernel before the afsdcommand runs. The AFS initialization script included in the AFS distributioncorrectly orders the loading and afsd commands.
Configuring the Translator Machine to Accept AFS Commands
For users working on a translator machine’s NFS clients to issue AFScommands, the -rmtsys flag must be included on the afsd command whichinitializes the translator machine’s Cache Manager. The flag starts anadditional daemon (the remote executor daemon), which executes AFS-specificsystem calls on behalf of NFS clients. For a discussion of the implications ofNFS users issuing AFS commands, see “Setting the AFSSERVER andAFSCONF Environment Variables” on page 586.
The instructions in the AFS Quick Beginnings for configuring the CacheManager explain how to add options such as the -rmtsys flag to the afsdcommand in the AFS initialization script. On many system types, it is simplestto list the flag on the line in the script that defines the OPTIONS variable. Theremote executor daemon does not consume many resources, so it is simplestto add it to the afsd command on every translator machine, even if not allusers on the machine’s NFS clients issue AFS commands.
Controlling Optional Translator Features
After an AFS client machine is configured as a translator machine, it bydefault exports the AFS filespace to NFS clients. You can disable and reenable
590 AFS: Administration Guide

translator functionality by using the fs exportafs command’s -start argument.The command’s other arguments control other aspects of translator behavior.v The -convert argument controls whether the second and third (group and
other) sets of UNIX mode bits on an AFS file or directory being exported toNFS are set to match the first (owner) mode bits. By default, the mode bitsare set to match.Unlike AFS, NFS uses all three sets of mode bits when determining whethera user can read or write a file, even one stored in AFS. Some AFS filespossibly do not have any group and other mode bits turned on, becauseAFS uses only the owner bits in combination with the ACL on the file’sdirectory. If only the owner mode bits are set, NFS allows only the file’sowner of the file to read or write it. Setting the -convert argument to thevalue on enables other users to access the file in the same manner as theowner. Setting the value off preserves the mode bits set on the file as storedin AFS.
v The -uidcheck argument controls whether tokens can be assigned to anNFS user whose local UID on the NFS client machine differs from the localUID associated with the tokens on the translator machine. By default, this ispossible.If you turn on UID checking by setting the value on, then tokens can beassigned only to an NFS user whose local UID matches the local UID of theprocess on the translator machine that is assigning the tokens. Oneconsequence is that there is no point in including the -id argument to theknfs command: the only acceptable value is the local UID of thecommand’s issuer, which is the value used when the -id argument isomitted. Requiring matching UIDs in this way is effective only when usershave the same local UID on the translator machine as on NFS clientmachines. In that case, it guarantees that users assign their tokens only totheir own NFS sessions. For instructions, see “Authenticating onUnsupported NFS Client Machines” on page 599.
Note: Turning on UID checking also prevents users on supported NFSclients from using the klog command to authenticate on the NFSclient directly. They must authenticated and use the knfs commandon the translator machine instead. This is because after the klogcommand interpreter obtains the token on the NFS client, it passes itto the Cache Manager’s remote executor daemon, which makes thesystem call that stores the token in a credential structure on thetranslator machine. The remote executor generally runs as the localsuperuser root, so in most cases its local UID (normally zero) doesnot match the local UID of the user who issued the klog commandon the NFS client machine.
On the other hand, although using the knfs command instead of theklog command is possibly less convenient for users, it eliminates a
Appendix A. Managing the NFS/AFS Translator 591
security exposure: the klog command interpreter passes the tokenacross the network to the remote executor daemon in clear textmode.
If you disable UID checking by assigning the value off , the issuer of theknfs command can assign tokens to a user who has a different local UID onthe NFS client machine, such as the local superuser root. Indeed, more thanone issuer of the knfs command can assign tokens to the same user on theNFS client machine. Each time a different user issues the knfs commandwith the same value for the -id argument, that user’s tokens overwrite theexisting ones. This can result in unpredictable access for the NFS user.
v The -submounts argument controls whether users on the NFS client canmount AFS directories other than the top-level /afs directory. By default, thetranslator does not permit these submounts.Submounts can be useful in a couple of circumstances. If, for example, NFSusers need to access their own AFS home directories only, then creating asubmount to it eliminates the need for them to know or enter the completepath. Similarly, you can use a submount to prevent users from accessingparts of the filespace higher in the AFS hierarchy than the submount.
To configure an NFS/AFS translator machine
The following instructions configure the translator to enable users to issueAFS commands. Omit Step 6 on page 593 if you do not want to enable thisfunctionality.1. Become the local superuser root on the machine, if you are not already, by
issuing the su command.% su rootPassword: root_password
2. Configure the NFS/AFS translator machine as an NFS server, if it is notalready. Follow the instructions provided by your NFS supplier. Theappropriate number of NFS server daemons (such as nfsd) depends on thenumber of potential NFS clients.
3. Configure the NFS/AFS translator machine as an AFS client, if it is notalready. For the most predictable performance, the translator machine’slocal copies of the /usr/vice/etc/CellServDB and /usr/vice/etc/ThisCell filesmust be the same as on other client machines in the cell.
4. Modify the file that controls mounting of directories on the machine byremote NFS clients.v On systems that use the /etc/exports file, edit it to enable export of the
/afs directory to NFS clients. You can list the names of specific NFSclient machines if you want to provide access only to certain users. Fora description of the file’s format, see the NFS manual page forexports(5).
592 AFS: Administration Guide
The following example enables any NFS client machine to mount themachine’s /afs, /usr, and /usr2 directories:
/afs/usr/usr2
v On system types that use the share command, edit the /etc/dfs/dfstabfile or equivalent to include share instructions that enable remotemounts of the /afs directory. Most distributions include the binary as/usr/sbin/share. The following example commands enable remotemounts of the root ( / ) and /afs directories. To verify the correct syntax,consult the manual page for the share command.
share -F nfs -o rw -d "root" /share -F nfs -o rw -d "afs gateway" /afs
5. Edit the machine’s AFS initialization file to invoke the standard UNIXexportfs command after the afsd program runs. On some system types,the modifications you made in Step 4 on page 592 are not enough toenable exporting the AFS filespace via the /afs directory, because theresulting configuration changes are made before the afsd program runsduring machine initialization. Only after the afsd program runs does the/afs directory become the mount point for the entire AFS filespace; before,it is a local directory like any other.
6. Modify the afsd command in the AFS initialization file to include the-rmtsys flag.For system types other than IRIX, the instructions in the AFS QuickBeginnings for configuring the Cache Manager explain how to add the-rmtsys flag, for example by adding it to the line in the script that definesthe value for the OPTIONS variable.On IRIX systems, the AFS initialization script automatically adds the-rmtsys flag if you have activated the afsxnfs configuration variable asinstructed in the AFS Quick Beginnings instructions for incorporating AFSextensions into the kernel. If the variable is not already activated, issue thefollowing command.
# /etc/chkconfig -f afsxnfs on
7. (Optional) Depending on the number of NFS clients you expect thismachine to serve, it can be beneficial to add other arguments to the afsdcommand in the machine’s initialization file, such as the -daemonsargument to set the number of background daemons. See “Chapter 10.Administering Client Machines and the Cache Manager” on page 387 andthe afsd reference page in the AFS Administration Reference.
8. Reboot the machine. On many system types, the appropriate command isshutdown; consult your operating system administrator’s guide.
# shutdown appropriate_options
Appendix A. Managing the NFS/AFS Translator 593
To disable or enable Translator functionality, or set optional features1. Become the local superuser root on the machine, if you are not already, by
issuing the su command.% su rootPassword: root_password
2. Issue the fs exportafs command.# fs exportafs nfs [-start {on | off}} ] [-convert {on | off}]
[-uidcheck {on | off}] [-submounts {on | off}]
-start Disables translator functionality if the value is off or reenables it ifthe value is on. Omit this argument to display the current settingof all parameters set by this command.
-convertControls the setting of the second and third (group and other) setsof UNIX mode bits on AFS files and directories as exported to NFSclients If the value is on, they are set to match the owner modebits. If the value is off, the bits are not changed. If this argument isomitted, the default value is on.
-uidcheckControls whether issuers of the knfs command can specify a valuefor its -id argument that does not match their AFS UID:v If the value is on, the value of the -id argument must match the
issuer’s local UID.v If the value is off, the issuer of the knfs command can use the
-id argument to assign tokens to a user who has a different localUID on the NFS client machine, such as the local superuser root.
If this argument is omitted, the default value is off.
-submountsControls whether the translator services an NFS mount of anydirectory in the AFS filespace other than the top-level /afsdirectory. If the value is on, such submounts are allowed. If thevalue is off, only mounts of the /afs directory are allowed. If thisargument is omitted, the default value is off.
Configuring NFS Client Machines
Any NFS client machine that meets the following requirements can access filesin AFS via the NFS/AFS Translator. It does not need to be configured as anAFS client machine.
594 AFS: Administration Guide
v It must NFS-mount a translator machine’s /afs directory on a local directory,which by convention is also called /afs. The following instructions explainhow to add the mount command to the NFS client machine’s /etc/fstab fileor equivalent.The directory on which an NFS client mounts the translator’s machine’s /afsdirectory can be called something other than /afs. For instance, to make iteasy to switch to another translator machine if the original one becomesinaccessible, you can mount more than one translator machine’s /afsdirectory. Name the mount /afs for the translator machine that younormally use, and use a different name the mount to each alternatetranslator machine.Mounting the AFS filespace on a directory other than /afs introducesanother requirement, however: when issuing a command that takes an AFSpathname argument, you must specify the full pathname, starting with /afs,rather than a relative pathname. Suppose, for example, that a translatormachine’s AFS filespace is mounted at /afs2 on an NFS client machine andyou issue the following command to display the ACL on the currentworking directory, which is in AFS:
% fs listacl .
The fs command interpreter on the NFS client must construct a fullpathname before passing the request to the Cache Manager on thetranslator machine. The AFS filespace is mounted at /afs2, so the fullpathname starts with that string. However, the Cache Manager on thetranslator cannot find a directory called /afs2, because its mount of the AFSfilespace is called /afs. The command fails. To prevent the failure, providethe file’s complete pathname, starting with the string /afs.
v It must run an appropriate number of NFS client biod daemons, whichimprove performance by handling pre-reading and delayed writing. MostNFS vendors recommend running four such daemons, and most NFSinitialization scripts start them automatically. Consult your NFSdocumentation.
To enable users to issue AFS commands, the NFS client machine must also bea supported system type (one for which AFS binaries are available) and ableto access the AFS command binaries. The AFS Release Notes list the supportedsystem types in each release.
In addition, the AFSSERVER and AFSCONF environment variables must beset appropriately, as discussed in “Setting the AFSSERVER and AFSCONFEnvironment Variables” on page 586.
Appendix A. Managing the NFS/AFS Translator 595
To configure an NFS client machine to access AFS
Note: The following instructions enable NFS users to issue AFS commands.Omit Step 5 on page 597 and Step 6 on page 597 if you do not want toenable this functionality.
1. Become the local superuser root on the machine, if you are not already, byissuing the su command.
% su rootPassword: root_password
2. Configure the machine as an NFS client machine, if it is not already.Follow the instructions provided by your NFS vendor. The number of NFSclient (biod) daemons needs to be appropriate for the expected load onthis machine. The usual recommended number is four.
3. Create a directory called /afs on the machine, if one does not already exist,to act as the mount point for the translator machine’s /afs directory. It isacceptable to use other names, but doing so introduces the limitationdiscussed in the introduction to this section.
# mkdir /afs
4. Modify the machine’s file systems registry file (/etc/fstab or equivalent) toinclude a command that mounts a translator machine’s /afs directory. Toverify the correct syntax of the mount command, see the operatingsystem’s mount(5) manual page. The following example includes optionsthat are appropriate on many system types.
mount -o hard,intr,timeo=300 translator_machine:/afs /afs
where
hard Indicates that the NFS client retries NFS requests until the NFSserver (translator machine) responds. When using the translator,file operations possibly take longer than with NFS alone, becausethey must also pass through the AFS Cache Manager. With a softmount, a delayed response from the translator machine can causethe request to abort. Many NFS versions use hard mounts bydefault; if your version does not, it is best to add this option.
intr Enables the user to use a keyboard interrupt signal (such as<Ctrl-c>) to break the mount when the translator machine isinaccessible. Include this option only if the hard option is used, inwhich case the connection does not automatically break off when atranslator machine goes down.
timeo Sets the maximum time (in tenths of seconds) the translator cantake to respond to the NFS client’s request before the clientconsiders the request timed out. With a hard mount, setting thisoption to a high number like 300 reduces the number of error
596 AFS: Administration Guide
messages like the following, which are generated when thetranslator does not respond immediately.
NFS server translator is not responding, still trying
With a soft mount, it reduces the number of actual errors returnedon timed-out requests.
translator_machineSpecifies the fully-qualified hostname of the translator machinewhose /afs directory is to be mounted on the client machine’s /afsdirectory.
Note: To mount the translator machine’s /afs directory onto a directory onthe NFS client other than /afs, substitute the alternate directoryname for the second instance of /afs in the mount command.
5. (Optional) If appropriate, create the /.AFSSERVER file to set theAFSSERVER environment variable for all of the machine’s users. For adiscussion, see “Setting the AFSSERVER and AFSCONF EnvironmentVariables” on page 586. Place a single line in the file, specifying thefully-qualified hostname of the translator machine that is to serve as theremote executor. To enable users to issue commands that handle tokens, itmust be the machine named as translator_machine in Step 4 on page 596.
6. (Optional) If appropriate, create the /.AFSCONF file to set the AFSCONFenvironment variable for all of the machine’s users. For a discussion, see“Setting the AFSSERVER and AFSCONF Environment Variables” onpage 586 . Place a single line in the file, specifying the name of thedirectory where the CellServDB and ThisCell files reside. If you use acentral update source for these files (by convention,/afs/cellname/common/etc), name it here.
Configuring User Accounts
There are no requirements for NFS users to access AFS as unauthenticatedusers. To take advantage of more AFS functionality, however, they must meetthe indicated requirements.v To access AFS as authenticated users, they must of course authenticate with
AFS, which requires an entry in the Protection and AuthenticationDatabases.
v To create and store files, they need the required ACL permissions. If you areproviding a home directory for storage of personal files, it is conventionalto create a dedicated volume and mount it at the user’s home directorylocation in the AFS filespace.
v To issue AFS commands, they must meet several additional requirements:
Appendix A. Managing the NFS/AFS Translator 597
– They must be working on an NFS client machine of a supported systemtype and from which the AFS command binaries are accessible.
– Their command shell must define values for the AFSSERVER andAFSCONF environment variables, as described in “Setting theAFSSERVER and AFSCONF Environment Variables” on page 586. It isoften simplest to define the variables by creating /.AFSSERVER and/.AFSCONF file in the NFS client machine’s root directory, but you canalso either set the variables in each user’s shell initialization file (.cshrcor equivalent), or create files called .AFSSERVER and .AFSCONF ineach user’s home directory.
– They must have an entry in the AFS Protection and AuthenticationDatabases, so that they can authenticate if the command requires AFSprivilege. Other commands instead require assuming the local rootidentity on the translator machine; for further discussion, see “TheAFSSERVER Variable” on page 586.
– Their PATH environment variable must include the pathname to theappropriate AFS binaries. If a user works on NFS client machines ofdifferent system types, include the @sys variable in the pathname ratherthan an actual system type name.
To configure a user account for issuing AFS commands1. Create entries for the user in the Protection and Authentication Databases,
or create a complete AFS account. See the instructions for account creationin “Chapter 12. Creating and Deleting User Accounts with the ussCommand Suite” on page 453 or “Chapter 13. Administering UserAccounts” on page 505.
2. Modify the user’s PATH environment variable to include the pathname ofAFS binaries, such as /afs/cellname/sysname/usr/afsws/bin. If the user workson NFS client machines of different system types, considering replacingthe specific sysname value with the @sys variable. The PATH variable iscommonly defined in a login or shell initialization file (such as the .loginor .cshrc file).
3. (Optional) Set the AFSSERVER and AFSCONF environment variables ifappropriate. This is required if the NFS client machines on which the userworks do not have the /.AFSSERVER and /.AFSCONF files in their rootdirectories, or if you want user-specific values to override those settings.Either define the variables in the user’s login or shell initialization file, orcreate the files .AFSSERVER and .AFSCONF files in the user’s homedirectory.For the AFSSERVER variable, specify the fully-qualified hostname of thetranslator machine that is to serve as the remote executor. For theAFSCONF variable, specify the name of the directory where theCellServDB and ThisCell files reside. If you use a central update sourcefor these files (by convention, /afs/cellname/common/etc), name it here.
598 AFS: Administration Guide
4. If the pathname you defined in Step 2 on page 598 includes the @sysvariable, instruct users to check that their system name is defined correctlybefore they issue AFS commands. They issue the following command:
% fs sysname
Authenticating on Unsupported NFS Client Machines
The knfs command enables users to authenticate with AFS when they areworking on NFS clients of unsupported system types (those for which AFSbinaries are not available). This enables such users to access the AFS file treeto the same extent as any other AFS user. They cannot, however, issue AFScommands, which is possible only on NFS client machines of supportedsystem types.
To authenticate on an unsupported system type, establish a connection to thetranslator machine (using a facility such as telnet), and issue the klogcommand to obtain tokens for all the cells you wish to contact during theupcoming NFS session. Then issue the knfs command, which stores thetokens in a credential structure associated with your NFS session. The CacheManager uses the tokens when performing AFS access requests that originatefrom your NFS session.
More specifically, the credential structure is identified by a processauthentication group (PAG) number associated with a particular local UID ona specific NFS client machine. By default, the NFS UID recorded in thecredential structure is the same as your local UID on the translator machine.You can include the -id argument to specify an alternate NFS UID, unless thetranslator machine’s administrator has used the fs exportafs command’s-uidcheck argument to enable UID checking. In that case, the value of the -idargument must match your local UID on the translator machine (so there isnot point to including the -id argument). Enforcing matching UIDs preventssomeone else from placing their tokens in your credential structure, eitheraccidentally or on purpose. However, it means that your cell’s administratorsmust set your local UID on the NFS client to match your local UID on thetranslator machine. It also makes it impossible to authenticate by issuing theklog command on supported NFS clients, meaning that all NFS users mustuse the knfs command. See “Controlling Optional Translator Features” onpage 590.
After issuing the knfs command, you can begin working on the NFS clientwith authenticated access to AFS. When you are finished working, it is a goodpolicy to destroy your tokens by issuing the knfs command on the translatormachine again, this time with the -unlog flag. This is simpler if you have left
Appendix A. Managing the NFS/AFS Translator 599

the connection to the translator machine open, but you can always establish anew connection if you closed the original one.
If your NFS client machine is a supported system type and you wish to issueAFS commands on it, include the -sysname argument to the knfs command.The remote executor daemon on the translator machine substitutes its valuefor the @sys variable in pathnames when executing AFS commands that youissue on the NFS client machine. If your PATH environment variable uses the@sys variable in the pathnames for directories that house AFS binaries (asrecommended), then setting this argument enables the remote executordaemon to access the AFS binaries appropriate for your NFS client machineeven if its system type differs from the translator machine’s.
If you do not issue the knfs command (or the klog command on the NFSclient machine itself, if it is a supported system type), then you are notauthenticated with AFS. For a description of unauthenticated access, see“Enabling Unauthenticated or Authenticated AFS Access” on page 585.
To authenticate using the knfs command1. Log on to the relevant translator machine, either on the console or
remotely by using a program such as telnet.2. Obtain tokens for every cell you wish to access while working on the NFS
client. AFS-modified login utilities acquire a token for the translatormachine’s local cell by default; use klog command to obtain tokens forother cells if desired.
3. Issue the knfs command to create a credential structure in the translatormachine’s kernel memory for storing the tokens obtained in the previousstep. Include the -id argument to associate the structure with a UID on theNFS client that differs from your local UID on the translator machine. Thisis possible unless the translator machine’s administrator has enabled UIDchecking on the translator machine; see “Controlling Optional TranslatorFeatures” on page 590. If the NFS client machine is a supported systemtype and you wish to issue AFS commands on it, include the -sysnameargument to specify its system type.
% knfs -host <host name> [-id <user ID (decimal)>] [-sysname <host's '@sys' value>]
where
-host Specifies the fully-qualified hostname of the NFS client machine onwhich you are working.
-id Specifies a local UID number on the NFS client machine withwhich to associate the tokens, if different from your local UID onthe translator machine. If this argument is omitted, the tokens areassociated with an NFS UID that matches your local UID on thetranslator machine. In both cases, the NFS client software marks
600 AFS: Administration Guide

your AFS access requests with the NFS UID when it forwardsthem to the Cache Manager on the translator machine.
-sysnameSpecifies the value that the local machine’s remote executordaemon substitutes for the @sys variable in pathnames whenexecuting AFS commands issued on the NFS client machine(which must be a supported system type).
The following error message indicates that the translator machine’sadministrator has enabled UID checking and you have provided a valuethat differs from your local UID on the translator machine.
knfs: Translator in 'passwd sync' mode; remote uid must be the same as local uid
4. Close the connection to the translator machine (if desired) and work onthe NFS client machine.
To display tokens using the knfs command1. Log on to the relevant translator machine, either on the console or
remotely by using a program such as telnet.2. Issue the knfs command with the -tokens flag to display the tokens
associated with either the NFS UID that matches your local UID on thetranslator machine or the NFS UID specified by the -id argument.
% knfs -host <host name> [-id <user ID (decimal)>] -tokens
where
-host Specifies the fully-qualified hostname of the NFS client machine onwhich you are working.
-id Specifies the local UID on the NFS client machine for which todisplay tokens, if different from your local UID on the translatormachine. If this argument is omitted, the tokens are for the NFSUID that matches your local UID on the translator machine.
-tokensDisplays the tokens.
3. Close the connection to the translator machine if desired.
To discard tokens using the knfs command1. If you closed your connection to the translator machine after issuing the
knfs command, reopen it.2. Issue the knfs command with the -unlog flag.
% knfs -host <host name> [-id <user ID (decimal)>] -unlog
where
Appendix A. Managing the NFS/AFS Translator 601

-host Specifies the fully-qualified hostname of the NFS client machineyou are working on.
-id Specifies the local UID number on the NFS client machine forwhich to discard the associated tokens, if different from your localUID on the translator machine. If this argument is omitted, thetokens associated with an NFS UID that matches your local UIDon the translator machine are discarded.
-unlog Discards the tokens.3. If desired, close the connection to the translator machine.
602 AFS: Administration Guide

Appendix B. Using AFS Commands
This section describes the components of AFS commands and how to makeentering commands more efficient by using shortened forms. It has thefollowing sections:
“AFS Command Syntax”“Rules for Entering AFS Commands” on page 605“Rules for Using Abbreviations and Aliases” on page 607“Displaying Online Help for AFS Commands” on page 609
AFS Command Syntax
AFS commands that belong to suites have the following structure:command_suite operation_code -switch <value>[+] [-flag]
Command Names
Together, the command_suite and operation_code make up the commandname.
The command_suite specifies the group of related commands to which thecommand belongs, and indicates which command interpreter and serverprocess perform the command. AFS has several command suites, includingbos, fs, kas, package, pts, scout, uss and vos. Some of these suites have aninteractive mode in which the issuer omits the command_suite portion of thecommand name.
The operation_code tells the command interpreter and server process whichaction to perform. Most command suites include several operation codes. TheAFS Administration Reference describes each operation code in detail, and theAFS Administration Guide describes how to use them in the context ofperforming administrative tasks.
Several AFS commands do not belong to a suite and so their names do nothave a command_suite portion. Their structure is otherwise similar to thecommands in the suites.
Options
The term option refers to both arguments and flags, which are described in thefollowing sections.
© Copyright IBM Corp. 1989, 2000 603

Arguments
One or more arguments can follow the command name. Arguments specifythe entities on which to act while performing the command (for example,which server machine, server process, or file). To minimize the potential forerror, provide a command’s arguments in the order prescribed in its syntaxdefinition.
Each argument has two parts, which appear in the indicated order:v The switch specifies the argument’s type and is preceded by a hyphen ( - ).
For instance, the switch -server usually indicates that the argument names aserver machine. Switches can often be omitted, subject to the rules outlinedin “Conditions for Omitting Switches” on page 605.
v The value names a particular entity of the type specified by the precedingswitch. For example, the proper value for a -server switch is a servermachine name like fs3.abc.com. Unlike switches (which have a requiredform), values vary depending on what the issuer wants to accomplish.Values appear surrounded by angle brackets (< >) in command descriptionsand the online help to show that they are user-supplied variableinformation.
Some arguments accept multiple values, as indicated by trailing plus sign ( + )in the command descriptions and online help. How many of a command’sarguments take multiple values, and their ordering with respect to otherarguments, determine when it is acceptable to omit switches. See “Conditionsfor Omitting Switches” on page 605.
Some commands have optional as well as required arguments; the commanddescriptions and online help show optional arguments in square brackets ([ ]).
Flags
Some commands have one or more flags, which specify the manner in whichthe command interpreter and server process perform the command, or whatkind of output it produces. Flags are preceded by hyphens like switches, butthey take no values. Although the command descriptions and online helpgenerally list a command’s flags after its arguments, there is no prescribedorder for flags. They can appear anywhere on the command line following theoperation code, except in between the parts of an argument. Flags are alwaysoptional.
An Example Command
The following example illustrates the different parts of a command thatbelongs to an AFS command suite.
604 AFS: Administration Guide
% bos getdate -server fs1.abc.com -file ptserver kaserver
wherev bos is the command suite. The BOS Server executes most of the commands
in this suite.v getdate is the operation code. It tells the BOS Server on the specified server
machine (in this case fs1.abc.com) to report the modification dates of binaryfiles in the local /usr/afs/bin directory.
v -server fs1.abc.com is one argument, with -server as the switch andfs1.abc.com as the value. This argument specifies the server machine onwhich BOS Server is to collect and report binary dates.
v -file ptserver kaserver is an argument that takes multiple values. Theswitch is -file and the values are ptserver and kaserver. This argument tellsthe BOS Server to report the modification dates on the files/usr/afs/bin/kaserver and /usr/afs/bin/ptserver.
Rules for Entering AFS Commands
Enter each AFS command on a single line (press <Return> only at the end ofthe command). Some commands in this document appear broken acrossmultiple lines, but that is for legibility only.
Use a space to separate each element on a command line from its neighbors.Spaces rather than commas also separate multiple values of an argument.
In many cases, the issuer of a command can reduce the amount of typingnecessary by using one or both of the following methods:v Omitting switchesv Using accepted abbreviations for operation codes, switches (if they are
included at all), and some types of values
The following sections explain the conditions for omitting or shortening partsof the command line. It is always acceptable to type a command in full, withall of its switches and no abbreviations.
Conditions for Omitting Switches
It is always acceptable to type the switch part of an argument, but in manycases it is not necessary. Specifically, switches can be omitted if the followingconditions are met.v All of the command’s required arguments appear in the order prescribed by
the syntax statementv No switch is provided for any argument
Appendix B. Using AFS Commands 605
v There is only one value for each argument (but note the importantexception discussed in the following paragraph)
Omitting switches is possible only because there is a prescribed order for eachcommand’s arguments. When the issuer does not include switches, thecommand interpreter relies instead on the order of arguments; it assumes thatthe first element after the operation code is the command’s first argument, thenext element is the command’s second argument, and so on. The importantexception is when a command’s final required argument accepts multiplevalues. In this case, the command interpreter assumes that the issuer hascorrectly provided one value for each argument up through the final one, soany additional values at the end belong to the final argument.
The following list describes the rules for omitting switches from the oppositeperspective: an argument’s switch must be provided when any of thefollowing conditions apply.v The command’s arguments do not appear in the prescribed orderv An optional argument is omitted but a subsequent optional argument is
providedv A switch is provided for a preceding argumentv More than one value is supplied for a preceding argument (which must
take multiple values, of course); without a switch on the current argument,the command interpreter assumes that the current argument is anothervalue for the preceding argument
An Example of Omitting Switches
Consider again the example command from “An Example Command” onpage 604.
% bos getdate -server fs1.abc.com -file ptserver kaserver
This command has two required arguments: the server machine name(identified by the -server switch) and binary file name (identified by the -fileswitch). The second argument accepts multiple values. By complying with allthree conditions, the issuer can omit the switches:
% bos getdate fs1.abc.com ptserver kaserver
Because there are no switches, the bos command interpreter relies on theorder of arguments. It assumes that the first element following the operationcode, fs1.abc.com, is the server machine name, and that the next argument,ptserver, is a binary file name. Then, because the command’s second (andlast) argument accepts multiple values, the command interpreter correctlyinterprets kaserver as an additional value for it.
606 AFS: Administration Guide

On the other hand, the following is not acceptable because it violates the firsttwo conditions in “Conditions for Omitting Switches” on page 605: eventhough there is only one value per argument, the arguments do not appear inthe prescribed order, and a switch is provided for one argument but not theother.
% bos getdate ptserver -server fs1.abc.com
Rules for Using Abbreviations and Aliases
This section explains how to abbreviate operation codes, option names, servermachine names, partition names, and cell names. It is not possible toabbreviate other types of values.
Abbreviating Operation Codes
It is acceptable to abbreviate an operation code to the shortest form that stilldistinguishes it from the other operation codes in its suite.
For example, it is acceptable to shorten bos install to bos i because there areno other operation codes in the bos command suite that begin with the letteri. In contrast, there are several bos operation codes that start with the letter s,so the abbreviations must be longer to remain unambiguous:
bos sa for bos salvage
bos seta for bos setauth
bos setc for bos setcellname
bos setr for bos setrestart
bos sh for bos shutdown
bos start for bos start
bos startu for bos startup
bos stat for bos status
bos sto for bos stop
In addition to abbreviations, some operation codes have an alias, a short formthat is not derived by abbreviating the operation code to its shortestunambiguous form. For example, the alias for the fs setacl command is fs sa,whereas the shortest unambiguous abbreviation is fs seta.
There are two usual reasons an operation code has an alias:v Because the command is frequently issued, it is convenient to have a form
shorter than the one derived by abbreviating. The fs setacl command is anexample.
Appendix B. Using AFS Commands 607
v Because the command’s name has changed, but users of previous versionsof AFS know the former name. For example, bos listhosts has the alias bosgetcell, its former name. It is acceptable to abbreviate aliases to theirshortest unambiguous form (for example, bos getcell to bos getc).
Even if an operation code has an alias, it is still acceptable to use the shortestunambiguous form. Thus, the fs setacl command has three acceptable forms:fs setacl (the full form), fs seta (the shortest abbreviation), and fs sa (thealias).
Abbreviating Switches and Flags
It is acceptable to shorten a switch or flag to the shortest form thatdistinguishes it from the other switches and flags for its operation code. It isoften possible to omit switches entirely, subject to the conditions listed in“Conditions for Omitting Switches” on page 605.
Abbreviating Server Machine Names
AFS server machines must have fully-qualified Internet-style host names (forexample, fs1.abc.com), but it is not always necessary to type the full name onthe command line. AFS commands accept unambiguous shortened forms, butdepend on the cell’s name service (such as the Domain Name Service) or alocal host table to resolve a shortened name to the fully-qualified equivalentwhen the command is issued.
Most commands also accept the dotted decimal form of the machine’s IPaddress as an identifier.
Abbreviating Partition Names
Partitions that house AFS volumes must have names of the form /vicepx or/vicepxx, where the variable final portion is one or two lowercase letters. Byconvention, the first server partition created on a file server machine is called/vicepa, the second /vicepb, and so on. The AFS Quick Beginnings explainshow to configure and name a file server machine’s partitions in preparationfor storing AFS volumes on them.
When issuing AFS commands, you can abbreviate a partition name using anyof the following forms:
/vicepa = vicepa = a = 0/vicepb = vicepb = b = 1
After /vicepz (for which the index is 25) comes
608 AFS: Administration Guide
/vicepaa = vicepaa = aa = 26/vicepab = vicepab = ab = 27
and so on through/vicepiv = vicepiv = iv = 255
Abbreviating Cell Names
A cell’s full name usually matches its Internet domain name (such asstateu.edu for the State University or abc.com for ABC Corporation). SomeAFS commands accept unambiguous shortened forms, usually with respect tothe local /usr/vice/etc/CellServDB file but sometimes depending on the abilityof the local name service to resolve the corresponding domain name.
Displaying Online Help for AFS Commands
To display online help for AFS commands that belong to suites, use the helpand apropos operation codes. A -help flag is also available on every almostevery AFS command.
The online help entry for a command consists of two or three lines:v The first line names the command and briefly describes what it doesv If the command has aliases, they appear on the next linev The final line, which begins with the string Usage:, lists the command’s
options in the prescribed order; online help entries use the sametypographical symbols (brackets and so on) as this documentation.
If no operation code is specified, the help operation code displays the firstline (short description) for every operation code in the suite:
% command_suite help
If the issuer specifies one or more operation codes, the help operation codedisplays each command’s complete online entry (short description, alias if any,and syntax):
% command_suite help operation_code+
The -help flag displays a command’s syntax but not the short description oralias:
% command_name -help
Appendix B. Using AFS Commands 609
The apropos operation code displays the short description of any command ina suite whose operation code or short description includes the specifiedkeyword:
% command_suite apropos "<helpstring>"
The following example command displays the complete online help entry forthe fs setacl command:
% fs help setaclfs setacl: set access control listaliases: saUsage: fs setacl -dir <directory>+ -acl <access list entries>+[-clear] [-negative] [-id] [-if] [-help]
To see only the syntax statement, use the -help flag:% fs setacl -helpUsage: fs setacl -dir <directory>+ -acl <access list entries>+[-clear] [-negative] [-id] [-if] [-help]
In the following example, a user wants to display the quota for her homevolume. She knows that the relevant command belongs to the fs suite, butcannot remember the operation code. She uses quota as the keyword:
% fs apropos quotalistquota: list volume quotaquota: show volume quota usagesetquota: set volume quota
The following illustrates the error message that results if no command nameor short description contains the keyword:
% fs apropos "list quota"Sorry, no commands found
610 AFS: Administration Guide
Appendix C. The afsmonitor Program Statistics
This Appendix lists the statistics you can gather with the afsmonitor program,grouping them by category and section, and briefly describing each field,group, and section. For instructions on using the afsmonitor program, see“Chapter 8. Monitoring and Auditing AFS Performance” on page 327
The Cache Manager Statistics
Cache Manager statistics fields are classified into the following sections andgroups:v PerfStats_section – Performance Statistics Section.
– PerfStats_group – Performance Statistics Group.– misc_group – Miscellaneous Group.
v Server_UpDown_section – Server Up/Down Statistics Section.– FS_upDown_SC_group – File Server Up/Down Statistics in Same Cell
Group.– FS_upDown_OC_group – File Server Up/Down Statistics in Other Cells
Group.– VL_upDown_SC_group – VL Server Up/Down Statistics in Same Cell
Group.– VL_upDown_OC_group – VL Server Up/Down Statistics in Other Cells
Group.v RPCop_section – RPC Operation Measurements Section.
– FS_RPCopTimes_group – File Server RPC Operation Timings Group.– FS_RPCopErrors_group – File Server RPC Operation Errors Group.– FS_RPCopBytes_group – File Server RPC Transfer Timings Group.– CM_RPCopTimes_group – Cache Manager RPC Operation Timings
Group.v Auth_Access_section – Authentication and Replicated File Access Section.
– Auth_Stats_group – Authentication Information for Cache ManagerGroup.
– Access_Stats_group – Unreplicated File Access Group.
All Cache Manager variables categorized under these sections and groupsnames are listed below.
© Copyright IBM Corp. 1989, 2000 611

Performance Statistics Section (PerfStats_section)
Performance Statistics Group (PerfStats_group)v dlocalAccesses: Number of data accesses to files within local cell.v vlocalAccesses: Number of stat accesses to files within local cell.v dremoteAccesses: Number of data accesses to files outside of local cell.v vremoteAccesses: Number of stat accesses to files outside of local cell.v cacheNumEntries: Number of cache entries.v cacheBlocksTotal: Number of (1K) blocks configured for cache.v cacheBlocksInUse: Number of cache blocks actively in use.v cacheBlocksOrig: Number of cache blocks at bootup.v cacheMaxDirtyChunks: Maximum number of dirty cache chunks tolerated.v cacheCurrDirtyChunks: Current number of dirty cache chunks.v dcacheHits: Number of data files found in local cache.v vcacheHits: Number of stat entries found in local cache.v dcacheMisses: Number of data files not found in local cache.v vcacheMisses: Number of stat entries not found in local cache.v cacheFlushes: Number of files flushed from cache.v cacheFilesReused: Number of cache files reused.v ProtServerAddr: Address of Protection Server used.v vcacheXAllocs: Additionally allocated vcaches.v bufAlloced: Number of buffers allocated by AFS.v bufHits: Number of pages found on buffer cache.v bufMisses: Number of pages not found on buffer cache.v bufFlushDirty: Number of cached dirty buffers flushed because all were
busy.v LargeBlocksActive: Number of currently used large free pool entries.v LargeBlocksAlloced: Number of allocated large free pool entries.v SmallBlocksActive: Number of currently used small free pool entries.v SmallBlocksAlloced: Number of allocated used small free pool entries.v OutStandingMemUsage: Amount of allocated memory.v OutStandingAllocs: Outstanding osi_allocs (no osi_frees yet).v CallBackAlloced: Number of callback structures allocated.v CallBackFlushes: Number of callback flush operations performed.v srvRecords: Number of servers currently on record.v srvRecordsHWM: Server record high water mark.v srvNumBuckets: Number of server hash chain buckets.
612 AFS: Administration Guide

v srvMaxChainLength: Maximum server hash chain length.v srvMaxChainLengthHWM: Server hash chain high water mark.v sysName_ID: Sysname ID for host hardware.
Miscellaneous Group (misc_group)v numPerfCalls: Number of performance calls received.v epoch: Cache Manager epoch time.v numCellsVisible: Number of cells we know about.v numCellsContacted: Number of cells contacted.
Server Up/Down Statistics Section (Server_UpDown_section)
File Server Up/Down Statistics in Same Cell Group (FS_upDown_SC_group)
Note: The records referred to in this section are the internal records kept by theafsmonitor program to track the processes from which data is being gathered.v fs_sc_numTtlRecords: Number of fileserver records, active or inactive.v fs_sc_numUpRecords: Number of (active) fileserver records currently
marked up.v fs_sc_numDownRecords: Number of (active) fileserver records currently
marked down.v fs_sc_sumOfRecordAges: Sum of fileserver record lifetimes.v fs_sc_ageOfYoungestRecord: Age of youngest fileserver record.v fs_sc_ageOfOldestRecord: Age of oldest fileserver record.v fs_sc_numDowntimeIncidents: Number of (completed) downtime incidents.v fs_sc_numRecordsNeverDown: Number of fileserver records never marked
down.v fs_sc_maxDowntimesInARecord: Maximum downtimes seen by any
fileserver record.v fs_sc_sumOfDowntimes: Sum of all (completed) downtimes, in seconds.v fs_sc_shortestDowntime: Shortest downtime, in seconds.v fs_sc_longestDowntime: Longest downtime, in seconds.v fs_sc_down_0_10_min: Down time incidents: 0-10 minutes.v fs_sc_down_10_30_min: Down time incidents: 10-30 minutes.v fs_sc_down_half_1_hr: Down time incidents: 30-60 minutes.v fs_sc_down_1_2_hr: Down time incidents: 1-2 hours.v fs_sc_down_2_4_hr: Down time incidents: 2-4 hours.v fs_sc_down_4_8_hr: Down time incidents: 4-8 hours.v fs_sc_down_more_8_hr: Down time incidents: more than 8 hours.v fs_sc_downDst_0: Down time incidents: 0 times.
Appendix C. The afsmonitor Program Statistics 613
v fs_sc_downDst_1: Down time incidents: 1 time.v fs_sc_downDst_2_5: Down time incidents: 2-5 times.v fs_sc_downDst_6_10: Down time incidents: 6-10 times.v fs_sc_downDst_10_50: Down time incidents: 10-50 times.v fs_sc_downDst_more_50: Down time incidents: more than 50 times.
File Server Up/Down Statistics in Other Cells Group (FS_upDown_OC_group)v fs_oc_numTtlRecords: Number of fileserver records, active or inactive.v fs_oc_numUpRecords: Number of (active) fileserver records currently
marked up.v fs_oc_numDownRecords: Number of (active) fileserver records currently
marked down.v fs_oc_sumOfRecordAges: Sum of server record lifetimes.v fs_oc_ageOfYoungestRecord: Age of youngest fileserver record.v fs_oc_ageOfOldestRecord: Age of oldest fileserver record.v fs_oc_numDowntimeIncidents: Number of (completed) downtime incidents.v fs_oc_numRecordsNeverDown: Number of fileserver records never marked
down.v fs_oc_maxDowntimesInARecord: Maximum downtimes seen by any
fileserver.v fs_oc_sumOfDowntimes: Sum of all (completed) downtimes, in seconds.v fs_oc_shortestDowntime: Shortest downtime, in seconds.v fs_oc_longestDowntime: Longest downtime, in seconds.v fs_oc_down_0_10_min: Down time incidents: 0-10 minutes.v fs_oc_down_10_30_min: Down time incidents: 10-30 minutes.v fs_oc_down_half_1_hr: Down time incidents: 30-60 minutes.v fs_oc_down_1_2_hr: Down time incidents: 1-2 hours.v fs_oc_down_2_4_hr: Down time incidents: 2-4 hours.v fs_oc_down_4_8_hr: Down time incidents: 4-8 hours.v fs_oc_down_more_8_hr: Down time incidents: more than 8 hours.v fs_oc_downDst_0: Down time incidents: 0 times.v fs_oc_downDst_1: Down time incidents: 1 time.v fs_oc_downDst_2_5: Down time incidents: 2-5 times.v fs_oc_downDst_6_10: Down time incidents: 6-10 times.v fs_oc_downDst_10_50: Down time incidents: 10-50 times.v fs_oc_downDst_more_50: Down time incidents: more than 50 times.
VL Server Up/Down Statistics in Same Cell Group (VL_upDown_SC_group)
614 AFS: Administration Guide
v vl_sc_numTtlRecords: Number of vlserver records, active or inactive.v vl_sc_numUpRecords: Number of (active) vlserver records currently marked
up.v vl_sc_numDownRecords: Number of (active) vlserver records currently
marked down.v vl_sc_sumOfRecordAges: Sum of vlserver record lifetimes.v vl_sc_ageOfYoungestRecord: Age of youngest vlserver record.v vl_sc_ageOfOldestRecord: Age of oldest vlserver record.v vl_sc_numDowntimeIncidents: Number of (completed) downtime incidents.v vl_sc_numRecordsNeverDown: Number of vlserver records never marked
down.v vl_sc_maxDowntimesInARecord: Maximum downtimes seen by any
vlserver record.v vl_sc_sumOfDowntimes: Sum of all (completed) downtimes, in seconds.v vl_sc_shortestDowntime: Shortest downtime, in seconds.v vl_sc_longestDowntime: Longest downtime, in seconds.v vl_sc_down_0_10_min: Down time incidents: 0-10 minutes.v vl_sc_down_10_30_min: Down time incidents: 10-30 minutes.v vl_sc_down_half_1_hr: Down time incidents: 30-60 minutes.v vl_sc_down_1_2_hr: Down time incidents: 1-2 hours.v vl_sc_down_2_4_hr: Down time incidents: 2-4 hours.v vl_sc_down_4_8_hr: Down time incidents: 4-8 hours.v vl_sc_down_more_8_hr: Down time incidents: more than 8 hours.v vl_sc_downDst_0: Down time incidents: 0 times.v vl_sc_downDst_1: Down time incidents: 1 time.v vl_sc_downDst_2_5: Down time incidents: 2-5 times.v vl_sc_downDst_6_10: Down time incidents: 6-10 times.v vl_sc_downDst_10_50: Down time incidents: 10-50 times.v vl_sc_downDst_more_50: Down time incidents: more than 50 times.
VL Server Up/Down Statistics in Other Cells Group (VL_upDown_DC_group)v vl_oc_numTtlRecords: Number of vlserver records, active or inactive.v vl_oc_numUpRecords: Number of (active) vlserver records currently
marked up.v vl_oc_numDownRecords: Number of (active) vlserver records currently
marked down.v vl_oc_sumOfRecordAges: Sum of vlserver record lifetimes.v vl_oc_ageOfYoungestRecord: Age of youngest vlserver record.
Appendix C. The afsmonitor Program Statistics 615
v vl_oc_ageOfOldestRecord: Age of oldest vlserver record.v vl_oc_numDowntimeIncidents: Number of (completed) downtime incidents.v vl_oc_numRecordsNeverDown: Number of vlserver records never marked
down.v vl_oc_maxDowntimesInARecord: Maximum downtimes seen by any
vlserver record.v vl_oc_sumOfDowntimes: Sum of all (completed) downtimes, in seconds.v vl_oc_shortestDowntime: Shortest downtime, in seconds.v vl_oc_longestDowntime: Longest downtime, in seconds.v vl_oc_down_0_10_min: Down time incidents: 0-10 minutes.v vl_oc_down_10_30_min: Down time incidents: 10-30 minutes.v vl_oc_down_half_1_hr: Down time incidents: 30-60 minutes.v vl_oc_down_1_2_hr: Down time incidents: 1-2 hours.v vl_oc_down_2_4_hr: Down time incidents: 2-4 hours.v vl_oc_down_4_8_hr: Down time incidents: 4-8 hours.v vl_oc_down_more_8_hr: Down time incidents: more than 8 hours.v vl_oc_downDst_0: Down time incidents: 0 times.v vl_oc_downDst_1: Down time incidents: 1 time.v vl_oc_downDst_2_5: Down time incidents: 2-5 times.v vl_oc_downDst_6_10: Down time incidents: 6-10 times.v vl_oc_downDst_10_50: Down time incidents: 10-50 times.v vl_oc_downDst_more_50: Down time incidents: more than 50 times.
RPC Operation Measurements Section (RPCop_section)
File Server RPC Operation Timings Group (FS_RPCopTimes_group)v FetchData_ops: Number of FetchData operations executed.v FetchData_ops_ok: Number of successful FetchData operations.v FetchData_sum: Sum of timings for FetchData operations.v FetchData_sqr: Sum of squares of sample timings for FetchData operations.v FetchData_min: Minimum execution time observed for FetchData
operations.v FetchData_max: Maximum execution time observed for FetchData
operations.v FetchACL_ops: Number of FetchACL operations executed.v FetchACL_ops_ok: Number of successful FetchACL operations.v FetchACL_sum: Sum of timings for FetchACL operations.v FetchACL_sqr: Sum of squares of sample timings for FetchACL operations.
616 AFS: Administration Guide
v FetchACL_min: Minimum execution time observed for FetchACLoperations.
v FetchACL_max: Maximum execution time observed for FetchACLoperations.
v FetchStatus_ops: Number of FetchStatus operations executed.v FetchStatus_ops_ok: Number of successful FetchStatus operations.v FetchStatus_sum: Sum of timings for FetchStatus operations.v FetchStatus_sqr: Sum of squares of sample timings for FetchStatus
operations.v FetchStatus_min: Minimum execution time observed for FetchStatus
operations.v FetchStatus_max: Maximum execution time observed for FetchStatus
operations.v StoreData_ops: Number of StoreData operations executed.v StoreData_ops_ok: Number of successful StoreData operations.v StoreData_sum: Sum of timings for StoreData operations.v StoreData_sqr: Sum of squares of sample timings for StoreData operations.v StoreData_min: Minimum execution time observed for StoreData
operations.v StoreData_max: Maximum execution time observed for StoreData
operations.v StoreACL_ops: Number of StoreACL operations executed.v StoreACL_ops_ok: Number of successful StoreACL operation.v StoreACL_sum: Sum of timings for StoreACL operations.v StoreACL_sqr: Sum of squares of sample timings for StoreACL operations.v StoreACL_min: Minimum execution time observed for StoreACL operations.v StoreACL_max: Maximum execution time observed for StoreACL
operations.v StoreStatus_ops: Number of StoreStatus operations executed.v StoreStatus_ops_ok: Number of successful StoreStatus operations.v StoreStatus_sum: Sum of timings for StoreStatus operations.v StoreStatus_sqr: Sum of squares of sample timings for StoreStatus
operations.v StoreStatus_min: Minimum execution time observed for StoreStatus
operations.v StoreStatus_max: Maximum execution time observed for StoreStatus
operations.v RemoveFile_ops: Number of RemoveFile operations executed.v RemoveFile_ops_ok: Number of successful RemoveFile operations.
Appendix C. The afsmonitor Program Statistics 617
v RemoveFile_sum: Sum of timings for RemoveFile operations.v RemoveFile_sqr: Sum of squares of sample timings for RemoveFile
operations.v RemoveFile_min: Minimum execution time observed for RemoveFile
operations.v RemoveFile_max: Maximum execution time observed for RemoveFile
operations.v CreateFile_ops: Number of CreateFile operations executed.v CreateFile_ops_ok: Number of successful CreateFile operations.v CreateFile_sum: Sum of timings for CreateFile operations.v CreateFile_sqr: Sum of squares of sample timings for CreateFile operations.v CreateFile_min: Minimum execution time observed for CreateFile
operations.v CreateFile_max: Maximum execution time observed for CreateFile
operations.v Rename_ops: Number of Rename operations executed.v Rename_ops_ok: Number of successful Rename operations.v Rename_sum: Sum of timings for Rename operations.v Rename_sqr: Sum of squares of sample timings for Rename operations.v Rename_min: Minimum execution time observed for Rename operations.v Rename_max: Maximum execution time observed for Rename operations.v Symlink_ops: Number of Symlink operations executed.v Symlink_ops_ok: Number of successful Symlink operations.v Symlink_sum: Sum of timings for Symlink operations.v Symlink_sqr: Sum of squares of sample timings for Symlink operations.v Symlink_min: Minimum execution time observed for Symlink operations.v Symlink_max: Maximum execution time observed for Symlink operations.v Link_ops: Number of Link operations executed.v Link_ops_ok: Number of successful Link operations.v Link_sum: Sum of timings for Link operations.v Link_sqr: Sum of squares of sample timings for Link operations.v Link_min: Minimum execution time observed for Link operations.v Link_max: Maximum execution time observed for Link operations.v MakeDir_ops: Number of MakeDir operations executed.v MakeDir_ops_ok: Number of successful MakeDir operations.v MakeDir_sum: Sum of timings for MakeDir operations.v MakeDir_sqr: Sum of squares of sample timings for MakeDir operations.v MakeDir_min: Minimum execution time observed for MakeDir operations.
618 AFS: Administration Guide

v MakeDir_max: Maximum execution time observed for MakeDir operations.v RemoveDir_ops: Number of RemoveDir operations executed.v RemoveDir_ops_ok: Number of successful RemoveDir operations.v RemoveDir_sum: Sum of timings for RemoveDir operations.v RemoveDir_sqr: Sum of squares of sample timings for RemoveDir
operations.v RemoveDir_min: Minimum execution time observed for RemoveDir
operations.v RemoveDir_max: Maximum execution time observed for RemoveDir
operations.v SetLock_ops: Number of SetLock operations executed.v SetLock_ops_ok: Number of successful SetLock operations.v SetLock_sum: Sum of timings for SetLock operations.v SetLock_sqr: Sum of squares of sample timings for SetLock operations.v SetLock_min: Minimum execution time observed for SetLock operations.v SetLock_max: Maximum execution time observed for SetLock operations.v ExtendLock_ops: Number of ExtendLock operations executed.v ExtendLock_ops_ok: Number of successful ExtendLock operations.v ExtendLock_sum: Sum of timings for ExtendLock operations.v ExtendLock_sqr: Sum of squares of sample timings for ExtendLock
operations.v ExtendLock_min: Minimum execution time observed for ExtendLock
operations.v ExtendLock_max: Maximum execution time observed for ExtendLock
operations.v ReleaseLock_ops: Number of ReleaseLock operations executed.v ReleaseLock_ops_ok: Number of successful ReleaseLock operations.v ReleaseLock_sum: Sum of timings for ReleaseLock operations.v ReleaseLock_sqr: Sum of squares of sample timings for StoreStatus
operations.v ReleaseLock_min: Minimum execution time observed for ReleaseLock
operations.v ReleaseLock_max: Maximum execution time observed for ReleaseLock
operations.v GetStatistics_ops: Number of GetStatistics operations executed.v GetStatistics_ops_ok: Number of successful GetStatistics operations.v GetStatistics_sum: Sum of timings for GetStatistics operations.v GetStatistics_sqr: Sum of squares of sample timings for GetStatistics
operations.
Appendix C. The afsmonitor Program Statistics 619

v GetStatistics_min: Minimum execution time observed for GetStatisticsoperations.
v GetStatistics_max: Maximum execution time observed for GetStatisticsoperations.
v GiveUpCallbacks_ops: Number of GiveUpCallbacks operations executed.v GiveUpCallbacks_ops_ok: Number of successful GiveUpCallbacks
operations.v GiveUpCallbacks_sum: Sum of timings for GiveUpCallbacks operations.v GiveUpCallbacks_sqr: Sum of squares of sample timings for
GiveUpCallbacks operations.v GiveUpCallbacks_min: Minimum execution time observed for
GiveUpCallbacks operations.v GiveUpCallbacks_max: Maximum execution time observed for
GiveUpCallbacks operations.v GetVolumeInfo_ops: Number of GetVolumeInfo operations executed.v GetVolumeInfo_ops_ok: Number of successful GetVolumeInfo operations.v GetVolumeInfo_sum: Sum of timings for GetVolumeInfo operations.v GetVolumeInfo_sqr: Sum of squares of sample timings for GetVolumeInfo
operations.v GetVolumeInfo_min: Minimum execution time observed for GetVolumeInfo
operations.v GetVolumeInfo_max: Maximum execution time observed for GetVolumeInfo
operations.v GetVolumeStatus_ops: Number of GetVolumeStatus operations executed.v GetVolumeStatus_ops_ok: Number of successful GetVolumeStatus
operations.v GetVolumeStatus_sum: Sum of timings for GetVolumeStatus operations.v GetVolumeStatus_sqr: Sum of squares of sample timings for
GetVolumeStatus operations.v GetVolumeStatus_min: Minimum execution time observed for
GetVolumeStatus operations.v GetVolumeStatus_max: Maximum execution time observed for
GetVolumeStatus operations.v SetVolumeStatus_ops: Number of SetVolumeStatus operations executed.v SetVolumeStatus_ops_ok: Number of successful SetVolumeStatus operations.v SetVolumeStatus_sum: Sum of timings for SetVolumeStatus operations.v SetVolumeStatus_sqr: Sum of squares of sample timings for
SetVolumeStatus operations.v SetVolumeStatus_min: Minimum execution time observed for
SetVolumeStatus operations.
620 AFS: Administration Guide
v SetVolumeStatus_max: Maximum execution time observed forSetVolumeStatus operations.
v GetRootVolume_ops: Number of GetRootVolume operations executed.v GetRootVolume_ops_ok: Number of successful GetRootVolume operations.v GetRootVolume_sum: Sum of timings for GetRootVolume operations.v GetRootVolume_sqr: Sum of squares of sample timings for GetRootVolume
operations.v GetRootVolume_min: Minimum execution time observed for
GetRootVolume operations.v GetRootVolume_max: Maximum execution time observed for
GetRootVolume operations.v CheckToken_ops: Number of CheckToken operations executed.v CheckToken_ops_ok: Number of successful CheckToken operations.v CheckToken_sum: Sum of timings for CheckToken operations.v CheckToken_sqr: Sum of squares of sample timings for CheckToken
operations.v CheckToken_min: Minimum execution time observed for CheckToken
operations.v CheckToken_max: Maximum execution time observed for CheckToken
operations.v GetTime_ops: Number of GetTime operations executed.v GetTime_ops_ok: Number of successful GetTime operations.v GetTime_sum: Sum of timings for GetTime operations.v GetTime_sqr: Sum of squares of sample timings for GetTime operations.v GetTime_min: Minimum execution time observed for GetTime operations.v GetTime_max: Maximum execution time observed for GetTime operations.v NGetVolumeInfo_ops: Number of NGetVolumeInfo operations executed.v NGetVolumeInfo_ops_ok: Number of successful NGetVolumeInfo
operations.v NGetVolumeInfo_sum: Sum of timings for NGetVolumeInfo operations.v NGetVolumeInfo_sqr: Sum of squares of sample timings for
NGetVolumeInfo operations.v NGetVolumeInfo_min: Minimum execution time observed for
NGetVolumeInfo operations.v NGetVolumeInfo_max: Maximum execution time observed for
NGetVolumeInfo operations.v BulkStatus_ops: Number of BulkStatus operations executed.v BulkStatus_ops_ok: Number of successful BulkStatus operations.v BulkStatus_sum: Sum of timings for BulkStatus operations.
Appendix C. The afsmonitor Program Statistics 621
v BulkStatus_sqr: Sum of squares of sample timings for BulkStatusoperations.
v BulkStatus_min: Minimum execution time observed for BulkStatusoperations.
v BulkStatus_max: Maximum execution time observed for BulkStatusoperations.
v XStatsVersion_ops: Number of XStatsVersion operations executed.v XStatsVersion_ops_ok: Number of successful XStatsVersion operations.v XStatsVersion_sum: Sum of timings for XStatsVersion operations.v XStatsVersion_sqr: Sum of squares of sample timings for XStatsVersion
operations.v XStatsVersion_min: Minimum execution time observed for XStatsVersion
operations.v XStatsVersion_max: Maximum execution time observed for XStatsVersion
operations.v GetXStats_ops: Number of GetXStats operations executed.v GetXStats_ops_ok: Number of successful GetXStats operations.v GetXStats_sum: Sum of timings for GetXStats operations.v GetXstats_sqr: Sum of squares of sample timings for GetXStats operations.v GetXStats_min: Minimum execution time observed for GetXStats operations.v GetXStats_max: Maximum execution time observed for GetXStats
operations.
File Server RPC Operation Errors Group (FS_RPCopErrors_group)v FetchData_srv_err: Number of server-down errors during FetchData
operations.v FetchData_net_err: Number of network errors during FetchData operations.v FetchData_prot_err_err: Number of protection violations during FetchData
operations.v FetchData_vol_err: Number of volume related errors during FetchData
operations.v FetchData_busy_err: Number of volume busy conditions during FetchData
operations.v FetchData_other_err: Number of miscellaneous other errors during
FetchData operations.v FetchACL_srv_err: Number of server-down errors during FetchACL
operations.v FetchACL_net_err: Number of network errors during FetchACL operations.v FetchACL_prot_err: Number of protection violations during FetchACL
operations.
622 AFS: Administration Guide

v FetchACL_vol_err: Number of volume related errors during FetchACLoperations.
v FetchACL_busy_err: Number of volume busy conditions encounteredduring FetchACL operations.
v FetchACL_other_err: Number of miscellaneous other errors duringFetchACL operations.
v FetchStatus_srv_err: Number of server-down errors during FetchStatusoperations.
v FetchStatus_net_err: Number of network errors during FetchStatusoperations.
v FetchStatus_prot_err: Number of protection violations during FetchStatusoperations.
v FetchStatus_vol_err: Number of volume related errors during FetchStatusoperations.
v FetchStatus_busy_err: Number of volume busy conditions encounteredduring FetchStatus operations.
v FetchStatus_other_err: Number of miscellaneous other errors duringFetchStatus operations.
v StoreData_srv_err: Number of server-down errors during StoreDataoperations.
v StoreData_net_err: Number of network errors during StoreData operations.v StoreData_prot_err: Number of protection violations during StoreData
operations.v StoreData_vol_err: Number of volume related errors during StoreData
operations.v StoreData_busy_err: Number of volume busy conditions encountered
during StoreData operations.v StoreData_other_err: Number of miscellaneous other errors during
StoreData operations.v StoreACL_srv_err: Number of server-down errors during StoreACL
operations.v StoreACL_net_err: Number of network errors during StoreACL operations.v StoreACL_prot_err: Number of protection violations during StoreACL
operations.v StoreACL_vol_err: Number of volume related errors during StoreACL
operations.v StoreACL_busy_err: Number of volume busy conditions encountered
during StoreACL operations.v StoreACL_other_err: Number of miscellaneous other errors during
StoreACL operations.
Appendix C. The afsmonitor Program Statistics 623

v StoreStatus_srv_err: Number of server-down errors during StoreStatusoperations.
v StoreStatus_net_err: Number of network errors during StoreStatusoperations.
v StoreStatus_prot_err: Number of protection violations during StoreStatusoperations.
v StoreStatus_vol_err: Number of volume related errors during StoreStatusoperations.
v StoreStatus_busy_err: Number of volume busy conditions encounteredduring StoreStatus operations.
v StoreStatus_other_err: Number of miscellaneous other errors duringStoreStatus operations.
v RemoveFile_srv_err: Number of server-down errors during RemoveFileoperations.
v RemoveFile_net_err: Number of network errors during RemoveFileoperations.
v RemoveFile_prot_err: Number of protection violations during RemoveFileoperations.
v RemoveFile_vol_err: Number of volume related errors during RemoveFileoperations.
v RemoveFile_busy_err: Number of volume busy conditions encounteredduring RemoveFile operations.
v RemoveFile_other_err: Number of miscellaneous other errors duringRemoveFile operations.
v CreateFile_srv_err: Number of server-down errors during CreateFileoperations.
v CreateFile_net_err: Number of network errors during CreateFile operations.v CreateFile_prot_err: Number of protection violations during CreateFile
operations.v CreateFile_vol_err: Number of volume related errors during CreateFile
operations.v CreateFile_busy_err: Number of volume busy conditions encountered
during CreateFile operations.v CreateFile_other_err: Number of miscellaneous other errors during
CreateFile operations.v Rename_srv_err: Number of server-down errors during Rename operations.v Rename_net_err: Number of network errors during Rename operations.v Rename_prot_err: Number of protection violations during Rename
operations.v Rename_vol_err: Number of volume related errors during Rename
operations.
624 AFS: Administration Guide
v Rename_busy_err: Number of volume busy conditions encountered duringRename operations.
v Rename_other_err: Number of miscellaneous other errors during Renameoperations.
v Symlink_srv_err: Number of server-down errors during Symlink operations.v Symlink_net_err: Number of network errors during Symlink operations.v Symlink_prot_err: Number of protection violations during Symlink
operations.v Symlink_vol_err: Number of volume related errors during Symlink
operations.v Symlink_busy_err: Number of volume busy conditions encountered during
Symlink operations.v Symlink_other_err: Number of miscellaneous other errors during Symlink
operations.v Link_srv_err: Number of server-down errors during Link operations.v Link_net_err: Number of network errors during Link operations.v Link_prot_err: Number of protection violations during Link operations.v Link_vol_err: Number of volume related errors during Link operations.v Link_busy_err: Number of volume busy conditions encountered during
Link operations.v Link_other_err: Number of miscellaneous other errors during Link
operations.v MakeDir_srv_err: Number of server-down errors during MakeDir
operations.v MakeDir_net_err: Number of network errors during MakeDir operations.v MakeDir_prot_err: Number of protection violations during MakeDir
operations.v MakeDir_vol_err: Number of volume related errors during MakeDir
operations.v MakeDir_busy_err: Number of volume busy conditions encountered during
MakeDir operations.v MakeDir_other_err: Number of miscellaneous other errors during MakeDir
operations.v RemoveDir_srv_err: Number of server-down errors during RemoveDir
operations.v RemoveDir_net_err: Number of network errors during RemoveDir
operations.v RemoveDir_prot_err: Number of protection violations during RemoveDir
operations.
Appendix C. The afsmonitor Program Statistics 625

v RemoveDir_vol_err: Number of volume related errors during RemoveDiroperations.
v RemoveDir_busy_err: Number of volume busy conditions encounteredduring RemoveDir operations.
v RemoveDir_other_err: Number of miscellaneous other errors duringRemoveDir operations.
v SetLock_srv_err: Number of server-down errors during SetLock operations.v SetLock_net_err: Number of network errors during SetLock operations.v SetLock_prot_err: Number of protection violations during SetLock
operations.v SetLock_vol_err: Number of volume related errors during SetLock
operations.v SetLock_busy_err: Number of volume busy conditions encountered during
SetLock operations.v SetLock_other_err: Number of miscellaneous other errors during SetLock
operations.v ExtendLock_srv_err: Number of server-down errors during ExtendLock
operations.v ExtendLock_net_err: Number of network errors during ExtendLock
operations.v ExtendLock_prot_err: Number of protection violations during ExtendLock
operations.v ExtendLock_vol_err: Number of volume related errors during ExtendLock
operations.v ExtendLock_busy_err: Number of volume busy conditions encountered
during ExtendLock operations.v ExtendLock_other_err: Number of miscellaneous other errors during
ExtendLock operations.v ReleaseLock_srv_err: Number of server-down errors during ReleaseLock
operations.v ReleaseLock_net_err: Number of network errors during ReleaseLock
operations.v ReleaseLock_prot_err: Number of protection violations during ReleaseLock
operations.v ReleaseLock_vol_err: Number of volume related errors during ReleaseLock
operations.v ReleaseLock_busy_err: Number of volume busy conditions encountered
during ReleaseLock operations.v ReleaseLock_other_err: Number of miscellaneous other errors during
ReleaseLock operations.
626 AFS: Administration Guide
v GetStatistics_srv_err: Number of server-down errors during GetStatisticsoperations.
v GetStatistics_net_err: Number of network errors during GetStatisticsoperations.
v GetStatistics_prot_err: Number of protection violations during GetStatisticsoperations.
v GetStatistics_vol_err: Number of volume related errors during GetStatisticsoperations.
v GetStatistics_busy_err: Number of volume busy conditions encounteredduring GetStatistics operations.
v GetStatistics_other_err: Number of miscellaneous other errors duringGetStatistics operations.
v GiveUpCallbacks_srv_err: Number of server-down errors duringGiveUpCallbacks operations.
v GiveUpCallbacks_net_err: Number of network errors duringGiveUpCallbacks operations.
v GiveUpCallbacks_prot_err: Number of protection violations duringGiveUpCallbacks operations.
v GiveUpCallbacks_vol_err: Number of volume related errors duringGiveUpCallbacks operations.
v GiveUpCallbacks_busy_err: Number of volume busy conditionsencountered during GiveUpCallbacks operations.
v GiveUpCallbacks_other_err: Number of miscellaneous other errors duringGiveUpCallbacks operations.
v GetVolumeInfo_srv_err: Number of server-down errors duringGetVolumeInfo operations.
v GetVolumeInfo_net_err: Number of network errors during GetVolumeInfooperations.
v GetVolumeInfo_prot_err: Number of protection violations duringGetVolumeInfo operations.
v GetVolumeInfo_vol_err: Number of volume related errors duringGetVolumeInfo operations.
v GetVolumeInfo_busy_err: Number of volume busy conditions encounteredduring GetVolumeInfo operations.
v GetVolumeInfo_other_err: Number of miscellaneous other errors duringGetVolumeInfo operations.
v GetVolumeStatus_srv_err: Number of server-down errors duringGetVolumeStatus operations.
v GetVolumeStatus_net_err: Number of network errors duringGetVolumeStatus operations.
Appendix C. The afsmonitor Program Statistics 627

v GetVolumeStatus_prot_err: Number of protection violations duringGetVolumeStatus operations.
v GetVolumeStatus_vol_err: Number of volume related errors duringGetVolumeStatus operations.
v GetVolumeStatus_busy_err: Number of volume busy conditionsencountered during GetVolumeStatus operations.
v GetVolumeStatus_other_err: Number of miscellaneous other errors duringGetVolumeStatus operations.
v SetVolumeStatus_srv_err : Number of server-down errors duringSetVolumeStatus operations.
v SetVolumeStatus_net_err: Number of network errors duringSetVolumeStatus operations.
v SetVolumeStatus_prot_err: Number of protection violations duringSetVolumeStatus operations.
v SetVolumeStatus_vol_err: Number of volume related errors duringSetVolumeStatus operations.
v SetVolumeStatus_busy_err: Number of volume busy conditions encounteredduring SetVolumeStatus operations.
v SetVolumeStatus_other_err: Number of miscellaneous other errors duringSetVolumeStatus operations.
v GetRootVolume_srv_err: Number of server-down errors duringGetRootVolume operations.
v GetRootVolume_net_err: Number of network errors during GetRootVolumeoperations.
v GetRootVolume_prot_err: Number of protection violations duringGetRootVolume operations.
v GetRootVolume_vol_err: Number of volume related errors duringGetRootVolume operations.
v GetRootVolume_busy_err: Number of volume busy conditions encounteredduring GetRootVolume operations.
v GetRootVolume_other_err: Number of miscellaneous other errors duringGetRootVolume operations.
v CheckToken_srv_err: Number of server-down errors during CheckTokenoperations.
v CheckToken_net_err: Number of network errors during CheckTokenoperations.
v CheckToken_prot_err: Number of protection violations during CheckTokenoperations.
v CheckToken_vol_err: Number of volume related errors during CheckTokenoperations.
628 AFS: Administration Guide

v CheckToken_busy_err: Number of volume busy conditions encounteredduring CheckToken operations.
v CheckToken_other_err: Number of miscellaneous other errors duringCheckToken operations.
v GetTime_srv_err: Number of server-down errors during GetTimeoperations.
v GetTime_net_err: Number of network errors during GetTime operations.v GetTime_prot_err: Number of protection violations during GetTime
operations.v GetTime_vol_err: Number of volume related errors during GetTime
operations.v GetTime_busy_err: Number of volume busy conditions encountered during
GetTime operations.v GetTime_other_err: Number of miscellaneous other errors during GetTime
operations.v NGetVolumeInfo_srv_err: Number of server-down errors during
NGetVolumeInfo operations.v NGetVolumeInfo_net_err: Number of network errors during
NGetVolumeInfo operations.v NGetVolumeInfo_prot_err: Number of protection violations during
NGetVolumeInfo operations.v NGetVolumeInfo_vol_err: Number of volume related errors during
NGetVolumeInfo operations.v NGetVolumeInfo_busy_err: Number of volume busy conditions
encountered during NGetVolumeInfo operations.v NGetVolumeInfo_other_err: Number of miscellaneous other errors during
NGetVolumeInfo operations.v BulkStatus_srv_err: Number of server-down errors during BulkStatus
operations.v BulkStatus_net_err: Number of network errors during BulkStatus
operations.v BulkStatus_prot_err: Number of protection violations during BulkStatus
operations.v BulkStatus_vol_err: Number of volume related errors during BulkStatus
operations.v BulkStatus_busy_err: Number of volume busy conditions encountered
during BulkStatus operations.v BulkStatus_other_err: Number of miscellaneous other errors during
BulkStatus operations.v XStatsVersion_srv_err: Number of server-down errors during XStatsVersion
operations.
Appendix C. The afsmonitor Program Statistics 629
v XStatsVersion_net_err: Number of network errors during XStatsVersionoperations.
v XStatsVersion_prot_err: Number of protection violations duringXStatsVersion operations.
v XStatsVersion_vol_err: Number of volume related errors duringXStatsVersion operations.
v XStatsVersion_busy_err: Number of volume busy conditions encounteredduring XStatsVersion operations.
v XStatsVersion_other_err: Number of miscellaneous other errors duringXStatsVersion operations.
v GetXStats_srv_err: Number of server-down errors during GetXStatsoperations.
v GetXStats_net_err: Number of network errors during GetXStats operations.v GetXStats_prot_err: Number of protection violations during GetXStats
operations.v GetXStats_vol_err: Number of volume related errors during GetXStats
operations.v GetXStats_busy_err: Number of volume busy conditions encountered
during GetXStats operations.v GetXStats_other_err: Number of miscellaneous other errors during
GetXStats operations.
File Server RPC Transfer Timings Group (FS_RPCopBytes_group)v FetchData_xfers: Number of FetchData operations.v FetchData_xfers_ok: Number of successful FetchData operations.v FetchData_xfers_sum: Sum of timing values for FetchData operations.v FetchData_xfers_sqr: Sum of squares of sample timings for FetchData
operations.v FetchData_xfers_min: Minimum transfer time observed for FetchData
operations.v FetchData_xfers_max: Maximum transfer time observed for FetchData
operations.v FetchData_xfers_bytes_sum: Sum of bytes transferred for FetchData
operations.v FetchData_xfers_bytes_min: Minimum byte transfer observed for FetchData
operations.v FetchData_xfers_bytes_max: Maximum byte transfer observed for FetchData
operations.v FetchData_xfers_bucket0: Tally in bucket0 for FetchData operations.v FetchData_xfers_bucket1: Tally in bucket1 for FetchData operations.
630 AFS: Administration Guide
v FetchData_xfers_bucket2: Tally in bucket2 for FetchData operations.v FetchData_xfers_bucket3: Tally in bucket3 for FetchData operations.v FetchData_xfers_bucket4: Tally in bucket4 for FetchData operations.v FetchData_xfers_bucket5: Tally in bucket5 for FetchData operations.v FetchData_xfers_bucket6: Tally in bucket6 for FetchData operations.v FetchData_xfers_bucket7: Tally in bucket7 for FetchData operations.v FetchData_xfers_bucket8: Tally in bucket8 for FetchData operations.v StoreData_xfers: Number of StoreData operations.v StoreData_xfers_ok: Number of successful StoreData operations.v StoreData_xfers_sum: Sum of timing values for StoreData operations.v StoreData_xfers_sqr: Sum of squares of sample timings for StoreData
operations.v StoreData_xfers_min: Minimum transfer time observed for StoreData
operations.v StoreData_xfers_max: Maximum transfer time observed for StoreData
operations.v StoreData_xfers_bytes_sum: Sum of bytes transferred for StoreData
operations.v StoreData_xfers_bytes_min: Minimum byte transfer observed for StoreData
operations.v StoreData_xfers_bytes_max: Maximum byte transfer observed for StoreData
operations.v StoreData_xfers_bucket0: Tally in bucket0 for StoreData operations.v StoreData_xfers_bucket1: Tally in bucket1 for StoreData operations.v StoreData_xfers_bucket2: Tally in bucket2 for StoreData operations.v StoreData_xfers_bucket3: Tally in bucket3 for StoreData operations.v StoreData_xfers_bucket4: Tally in bucket4 for StoreData operations.v StoreData_xfers_bucket5: Tally in bucket5 for StoreData operations.v StoreData_xfers_bucket6: Tally in bucket6 for StoreData operations.v StoreData_xfers_bucket7: Tally in bucket7 for StoreData operations.v StoreData_xfers_bucket8: Tally in bucket8 for StoreData operations.
Cache Manager RPC Operation Timings Group (CM_RPCopTimes_group)v CallBack_ops: Number of CallBack operations executed.v CallBack_ops_ok: Number of successful CallBack operations.v CallBack_ops_sum: Sum of timings for CallBack operations.v CallBack_ops_min: Minimum execution time observed for CallBack
operations.
Appendix C. The afsmonitor Program Statistics 631

v CallBack_ops_max: Maximum execution time observed for CallBackoperations.
v InitCallBackState_ops: Number of InitCallBackState operations executed.v InitCallBackState_ops_ok: Number of successful InitCallBackState
operations.v InitCallBackState_ops_sum: Sum of timings for InitCallBackState operations.v InitCallBackState_ops_min: Minimum execution time observed for
InitCallBackState operations.v InitCallBackState_ops_max: Maximum execution time observed for
InitCallBackState operations.v Probe_ops: Number of Probe operations executed.v Probe_ops_ok: Number of successful Probe operations.v Probe_ops_sum: Sum of timings for Probe operations.v Probe_ops_min: Minimum execution time observed for Probe operations.v Probe_ops_max: Maximum execution time observed for Probe operations.v GetLock_ops: Number of GetLock operations executed.v GetLock_ops_ok: Number of successful GetLock operations.v GetLock_ops_sum: Sum of timings for GetLock operations.v GetLock_ops_min: Minimum execution time observed for GetLock
operations.v GetLock_ops_max: Maximum execution time observed for GetLock
operations.v GetCE_ops: Number of GetCE operations executed.v GetCE_ops_ok: Number of successful GetCE operations.v GetCE_ops_sum: Sum of timings for GetCE operations.v GetCE_ops_min: Minimum execution time observed for GetCE operations.v GetCE_ops_max: Maximum execution time observed for GetCE operations.v XStatsVersion_CM_ops: Number of XStatsVersion operations executed.v XStatsVersion_CM_ops_ok: Number of successful XStatsVersion operations.v XStatsVersion_CM_ops_sum: Sum of timings for XStatsVersion operations.v XStatsVersion_CM_ops_min: Minimum execution time observed for
XStatsVersion operations.v XStatsVersion_CM_ops_max: Maximum execution time observed for
XStatsVersion operations.v GetXStats_CM_ops: Number of GetXStats operations executed.v GetXStats_CM_ops_ok: Number of successful GetXStats operations.v GetXStats_CM_ops_sum: Sum of timings for GetXStats operations.v GetXStats_CM_ops_min: Minimum execution time observed for GetXStats
operations.
632 AFS: Administration Guide

v GetXStats_CM_ops_max: Maximum execution time observed for GetXStatsoperations.
Authentication and Replicated File Access Section (Auth_Access_section)
Authentication Information for Cache Manager Group (Auth_Stats_group)v curr_PAGs: Current number of PAGs.v curr_Records: Current number of records in table.v curr_AuthRecords: Current number of of authenticated records (with valid
ticket).v curr_UnauthRecords: Current number of of unauthenticated records
(without any ticket at all).v curr_MaxRecordsInPAG: Maximum records for a single PAG.v curr_LongestChain: Length of longest current hash chain.v PAGCreations: Number of PAG creations.v TicketUpdates: Number of ticket additions/refreshes.v HWM_PAGS: High water mark – number of PAGs.v HWM_Records: High water mark – number of records.v HWM_MaxRecordsInPAG: High water mark – maximum records for a
single PAG.v HWM_LongestChain: High water mark – longest hash chain.
Unreplicated File Access Group (Access_Stats_group)v unreplicatedRefs: Number of references to unreplicated data.v replicatedRefs: Number of references to replicated data.v numReplicasAccessed: Number of replicas accessed.v maxReplicasPerRef: Maximum number of replicas accessed per reference.v refFirstReplicaOK: Number of references satisfied by 1st replica.
The File Server Statistics
File Server statistics are classified into the following sections and groups:v PerfStats_section: Performance Statistics Section.
– VnodeCache_group: Vnode Cache Group.– Directory_group: Directory Package Group.– Rx_group: Rx Group.– HostModule_group: Host Module Fields Group.– misc_group: Miscellaneous Variables Group.
v RPCop_section: RPC Operations Section.
Appendix C. The afsmonitor Program Statistics 633
– RPCopTimes_group: Individual RPC Operation Timings.– RPCopBytes_group: Byte Information for Certain RPC Operations.
All File Server variables categorized under the above sections and groupsnames are listed below.
Performance Statistics Section (PerfStats_section)
Vnode Cache Group (VnodeCache_group)v vcache_L_Entries: Number of entries in LARGE vnode cache.v vcache_L_Allocs: Number of allocs (large).v vcache_L_Gets: Number of gets (large).v vcache_L_Reads: Number of reads (large).v vcache_L_Writes: Number of writes (large).v vcache_S_Entries: Number of entries in SMALL vnode cache.v vcache_S_Allocs: Number of allocs (small).v vcache_S_Gets: Number of gets (small).v vcache_S_Reads: Number of reads (small).v vcache_S_Writes: Number of writes (small).v vcache_H_Entries: Number of entries in HEADER vnode cache.v vcache_H_Gets: Number of gets (header)v vcache_H_Replacements: Number of replacements (header)
Directory Package Group (Directory_group)v dir_Buffers: Number of buffers in use.v dir_Calls: Number of read calls made.v dir_IOs: I/O operations performed.
Rx Group (Rx_group)v rx_packetRequests: Packet allocation requests.v rx_noPackets_RcvClass: Failed packet requests (receive class).v rx_noPackets_SendClass: Failed packet requests (send class).v rx_noPackets_SpecialClass: Failed packet requests (special class).v rx_socketGreedy: Did SO_GREEDY succeed?v rx_bogusPacketOnRead: Short packets received.v rx_bogusHost: Host address from bogus packets.v rx_noPacketOnRead: Read packets with no packet there.v rx_noPacketBuffersOnRead: Packets dropped due to buffer shortage.v rx_selects: Selects waiting on packet or timeout.
634 AFS: Administration Guide

v rx_sendSelects: Selects forced upon sends.v rx_packetsRead_RcvClass: Packets read (receive class).v rx_packetsRead_SendClass: Packets read (send class).v rx_packetsRead_SpecialClass: Packets read (special class).v rx_dataPacketsRead: Unique data packets read off wire.v rx_ackPacketsRead: ACK packets read.v rx_dupPacketsRead: Duplicate data packets read.v rx_spuriousPacketsRead: Inappropriate packets read.v rx_packetsSent_RcvClass: Packets sent (receive class).v rx_packetsSent_SendClass: Packets sent (send class).v rx_packetsSent_SpecialClass: Packets sent (special class).v rx_ackPacketsSent: ACK packets sent.v rx_pingPacketsSent: Ping packets sent.v rx_abortPacketsSent: Abort packets sent.v rx_busyPacketsSent: Busy packets sent.v rx_dataPacketsSent: Unique data packets sent.v rx_dataPacketsReSent: Retransmissions sent.v rx_dataPacketsPushed: Retransmissions pushed by NACK.v rx_ignoreAckedPacket: Packets with ACKed flag on rxi_Start.v rx_totalRtt_Sec and rx_totalRtt_Usec: Total round trip time (in seconds and
milliseconds).v rx_minRtt_Sec and rx_minRtt_Usec: Minimum round trip time (in seconds
and milliseconds).v rx_maxRtt_Sec and rx_maxRtt_Usec: Maximum round trip time (in seconds
and milliseconds).v rx_nRttSamples: Round trip samples.v rx_nServerConns: Total server connections.v rx_nClientConns: Total client connections.v rx_nPeerStructs: Total peer structures.v rx_nCallStructs: Total call structures.v rx_nFreeCallStructs: Total free call structures.
Host Module Fields Group (HostModule_group)v host_NumHostEntries: Number of host entries.v host_HostBlocks: Blocks in use for hosts.v host_NonDeletedHosts: Non-deleted hosts.v host_HostsInSameNetOrSubnet: Hosts in same subnet as server.v host_HostsInDiffSubnet: Hosts in different subnet than server.
Appendix C. The afsmonitor Program Statistics 635

v host_HostsInDiffNetwork: Hosts in different network than server.v host_NumClients: Number of client entries.v host_ClientBlocks: Blocks in use for clients.
Miscellaneous Variables Group (misc_group)v numPerfCalls: Number of performance calls received.
RPC Operations Section (RPCop_section)
Individual RPC Operation Timings Group (RPCopTimes_group)v epoch: Time when data collection began.v FetchData_ops: Number of FetchData operations executed.v FetchData_ops_ok: Number of successful FetchData operations.v FetchData_sum: Sum of timings for FetchData operations.v FetchData_sqr: Sum of squares of sample timings for FetchData operations.v FetchData_min: Minimum execution time observed for FetchData
operations.v FetchData_max: Maximum execution time observed for FetchData
operations.v FetchACL_ops: Number of FetchACL operations executed.v FetchACL_ops_ok: Number of successful FetchACL operations.v FetchACL_sum: Sum of timings for FetchACL operations.v FetchACL_sqr: Sum of squares of sample timings for FetchACL operations.v FetchACL_min: Minimum execution time observed for FetchACL
operations.v FetchACL_max: Maximum execution time observed for FetchACL
operations.v FetchStatus_ops: Number of FetchStatus operations executed.v FetchStatus_ops_ok: Number of successful FetchStatus operations.v FetchStatus_sum: Sum of timings for FetchStatus operations.v FetchStatus_sqr: Sum of squares of sample timings for FetchStatus
operations.v FetchStatus_min: Minimum execution time observed for FetchStatus
operations.v FetchStatus_max: Maximum execution time observed for FetchStatus
operations.v StoreData_ops: Number of StoreData operations executed.v StoreData_ops_ok: Number of successful StoreData operations.v StoreData_sum: Sum of timings for StoreData operations.v StoreData_sqr: Sum of squares of sample timings for StoreData operations.
636 AFS: Administration Guide

v StoreData_min: Minimum execution time observed for StoreDataoperations.
v StoreData_max: Maximum execution time observed for StoreDataoperations.
v StoreACL_ops: Number of StoreACL operations executed.v StoreACL_ops_ok: Number of successful StoreACL operations.v StoreACL_sum: Sum of timings for StoreACL operations.v StoreACL_sqr: Sum of squares of sample timings for StoreACL operations.v StoreACL_min: Minimum execution time observed for StoreACL operations.v StoreACL_max: Maximum execution time observed for StoreACL
operations.v StoreStatus_ops: Number of StoreStatus operations executed.v StoreStatus_ops_ok: Number of successful StoreStatus operations.v StoreStatus_sum: Sum of timings for StoreStatus operations.v StoreStatus_sqr: Sum of squares of sample timings for StoreStatus
operations.v StoreStatus_min: Minimum execution time observed for StoreStatus
operations.v StoreStatus_max: Maximum execution time observed for StoreStatus
operations.v RemoveFile_ops: Number of RemoveFile operations executed.v RemoveFile_ops_ok: Number of successful RemoveFile operations.v RemoveFile_sum: Sum of timings for RemoveFile operations.v RemoveFile_sqr: Sum of squares of sample timings for RemoveFile
operations.v RemoveFile_min: Minimum execution time observed for RemoveFile
operations.v RemoveFile_max: Maximum execution time observed for RemoveFile
operations.v CreateFile_ops: Number of CreateFile operations executed.v CreateFile_ops_ok: Number of successful CreateFile operations.v CreateFile_sum: Sum of timings for CreateFile operations.v CreateFile_sqr: Sum of squares of sample timings for CreateFile operations.v CreateFile_min: Minimum execution time observed for CreateFile
operations.v CreateFile_max: Maximum execution time observed for CreateFile
operations.v Rename_ops: Number of Rename operations executed.v Rename_ops_ok: Number of successful Rename operations.
Appendix C. The afsmonitor Program Statistics 637

v Rename_sum: Sum of timings for Rename operations.v Rename_sqr: Sum of squares of sample timings for Rename operations.v Rename_min: Minimum execution time observed for Rename operations.v Rename_max: Maximum execution time observed for Rename operations.v Symlink_ops: Number of Symlink operations executed.v Symlink_ops_ok: Number of successful Symlink operations.v Symlink_sum: Sum of timings for Symlink operations.v Symlink_sqr: Sum of squares of sample timings for Symlink operations.v Symlink_min: Minimum execution time observed for Symlink operations.v Symlink_max: Maximum execution time observed for Symlink operations.v Link_ops: Number of Link operations executed.v Link_ops_ok: Number of successful Link operations.v Link_sum: Sum of timings for Link operations.v Link_sqr: Sum of squares of sample timings for Link operations.v Link_min: Minimum execution time observed for Link operations.v Link_max: Maximum execution time observed for Link operations.v MakeDir_ops: Number of MakeDir operations executed.v MakeDir_ops_ok: Number of successful MakeDir operations.v MakeDir_sum: Sum of timings for MakeDir operations.v MakeDir_sqr: Sum of squares of sample timings for MakeDir operations.v MakeDir_min: Minimum execution time observed for MakeDir operations.v MakeDir_max: Maximum execution time observed for MakeDir operations.v RemoveDir_ops: Number of RemoveDir operations executed.v RemoveDir_ops_ok: Number of successful RemoveDir operations.v RemoveDir_sum: Sum of timings for RemoveDir operations.v RemoveDir_sqr: Sum of squares of sample timings for RemoveDir
operations.v RemoveDir_min: Minimum execution time observed for RemoveDir
operations.v RemoveDir_max: Maximum execution time observed for RemoveDir
operations.v SetLock_ops: Number of SetLock operations executed.v SetLock_ops_ok: Number of successful SetLock operations.v SetLock_sum: Sum of timings for SetLock operations.v SetLock_sqr: Sum of squares of sample timings for SetLock operations.v SetLock_min: Minimum execution time observed for SetLock operations.v SetLock_max: Maximum execution time observed for SetLock operations.
638 AFS: Administration Guide

v ExtendLock_ops: Number of ExtendLock operations executed.v ExtendLock_ops_ok: Number of successful ExtendLock operations.v ExtendLock_sum: Sum of timings for ExtendLock operations.v ExtendLock_sqr: Sum of squares of sample timings for ExtendLock
operations.v ExtendLock_min: Minimum execution time observed for ExtendLock
operations.v ExtendLock_max: Maximum execution time observed for ExtendLock
operations.v ReleaseLock_ops: Number of ReleaseLock operations executed.v ReleaseLock_ops_ok: Number of successful ReleaseLock operations.v ReleaseLock_sum: Sum of timings for ReleaseLock operations.v ReleaseLock_sqr: Sum of squares of sample timings for ReleaseLock
operations.v ReleaseLock_min: Minimum execution time observed for ReleaseLock
operations.v ReleaseLock_max: Maximum execution time observed for ReleaseLock
operations.v GetStatistics_ops: Number of GetStatistics operations executed.v GetStatistics_ops_ok: Number of successful GetStatistics operations.v GetStatistics_sum: Sum of timings for GetStatistics operations.v GetStatistics_sqr: Sum of squares of sample timings for GetStatistics
operations.v GetStatistics_min: Minimum execution time observed for GetStatistics
operations.v GetStatistics_max: Maximum execution time observed for GetStatistics
operations.v GiveUpCallbacks_ops: Number of GiveUpCallbacks operations executed.v GiveUpCallbacks_ops_ok: Number of successful GiveUpCallbacks
operations.v GiveUpCallbacks_sum: Sum of timings for GiveUpCallbacks operations.v GiveUpCallbacks_sqr: Sum of squares of sample timings for
GiveUpCallbacks operations.v GiveUpCallbacks_min: Minimum execution time observed for
GiveUpCallbacks operations.v GiveUpCallbacks_max: Maximum execution time observed for
GiveUpCallbacks operations.v GetVolumeInfo_ops: Number of GetVolumeInfo operations executed.v GetVolumeInfo_ops_ok: Number of successful GetVolumeInfo operations.
Appendix C. The afsmonitor Program Statistics 639
v GetVolumeInfo_sum: Sum of timings for GetVolumeInfo operations.v GetVolumeInfo_sqr: Sum of squares of sample timings for GetVolumeInfo
operations.v GetVolumeInfo_min: Minimum execution time observed for GetVolumeInfo
operations.v GetVolumeInfo_max: Maximum execution time observed for GetVolumeInfo
operations.v GetVolumeStatus_ops: Number of GetVolumeStatus operations executed.v GetVolumeStatus_ops_ok: Number of successful GetVolumeStatus
operations.v GetVolumeStatus_sum: Sum of timings for GetVolumeStatus operations.v GetVolumeStatus_sqr: Sum of squares of sample timings for
GetVolumeStatus operations.v GetVolumeStatus_min: Minimum execution time observed for
GetVolumeStatus operations.v GetVolumeStatus_max: Maximum execution time observed for
GetVolumeStatus operations.v SetVolumeStatus_ops: Number of SetVolumeStatus operations executed.v SetVolumeStatus_ops_ok: Number of successful SetVolumeStatus operations.v SetVolumeStatus_sum: Sum of timings for SetVolumeStatus operations.v SetVolumeStatus_sqr: Sum of squares of sample timings for
SetVolumeStatus operations.v SetVolumeStatus_min: Minimum execution time observed for
SetVolumeStatus operations.v SetVolumeStatus_max: Maximum execution time observed for
SetVolumeStatus operations.v GetRootVolume_ops: Number of GetRootVolume operations executed.v GetRootVolume_ops_ok: Number of successful GetRootVolume operations.v GetRootVolume_sum: Sum of timings for GetRootVolume operations.v GetRootVolume_sqr: Sum of squares of sample timings for GetRootVolume
operations.v GetRootVolume_min: Minimum execution time observed for
GetRootVolume operations.v GetRootVolume_max: Maximum execution time observed for
GetRootVolume operations.v CheckToken_ops: Number of CheckToken operations executed.v CheckToken_ops_ok: Number of successful CheckToken operations.v CheckToken_sum: Sum of timings for CheckToken operations.v CheckToken_sqr: Sum of squares of sample timings for CheckToken
operations.
640 AFS: Administration Guide

v CheckToken_min: Minimum execution time observed for CheckTokenoperations.
v CheckToken_max: Maximum execution time observed for CheckTokenoperations.
v GetTime_ops: Number of GetTime operations executed.v GetTime_ops_ok: Number of successful GetTime operations.v GetTime_sum: Sum of timings for GetTime operations.v GetTime_sqr: Sum of squares of sample timings for GetTime operations.v GetTime_min: Minimum execution time observed for GetTime operations.v GetTime_max: Maximum execution time observed for GetTime operations.v NGetVolumeInfo_ops: Number of NGetVolumeInfo operations executed.v NGetVolumeInfo_ops_ok: Number of successful NGetVolumeInfo
operations.v NGetVolumeInfo_sum: Sum of timings for NGetVolumeInfo operations.v NGetVolumeInfo_sqr: Sum of squares of sample timings for
NGetVolumeInfo operations.v NGetVolumeInfo_min: Minimum execution time observed for
NGetVolumeInfo operations.v NGetVolumeInfo_max: Maximum execution time observed for
NGetVolumeInfo operations.v BulkStatus_ops: Number of BulkStatus operations executed.v BulkStatus_ops_ok: Number of successful BulkStatus operations.v BulkStatus_sum: Sum of timings for BulkStatus operations.v BulkStatus_sqr: Sum of squares of sample timings for BulkStatus
operations.v BulkStatus_min: Minimum execution time observed for BulkStatus
operations.v BulkStatus_max: Maximum execution time observed for BulkStatus
operations.v XStatsVersion_ops: Number of XStatsVersion operations executed.v XStatsVersion_ops_ok: Number of successful XStatsVersion operations.v XStatsVersion_sum: Sum of timings for XStatsVersion operations.v XStatsVersion_sqr: Sum of squares of sample timings for XStatsVersion
operations.v XStatsVersion_min: Minimum execution time observed for XStatsVersion
operations.v XStatsVersion_max: Maximum execution time observed for XStatsVersion
operations.v GetXStats_ops: Number of GetXStats operations executed.
Appendix C. The afsmonitor Program Statistics 641
v GetXStats_ops_ok: Number of successful GetXStats operations.v GetXStats_sum: Sum of timings for GetXStats operations.v GetXStats_sqr: Sum of squares of sample timings for GetXStats operations.v GetXStats_min: Minimum execution time observed for GetXStats operations.v GetXStats_max: Maximum execution time observed for GetXStats
operations.
Byte Information for Certain RPC Operations Group (RPCopBytes_group)v FetchData_xfers: Number of FetchData operations.v FetchData_xfers_ok: Number of successful FetchData operations.v FetchData_xfers_sum: Sum of timing values for FetchData operations.v FetchData_xfers_sqr: Sum of squares of sample timings for FetchData
operations.v FetchData_xfers_min: Minimum transfer time observed for FetchData
operations.v FetchData_xfers_max: Maximum transfer time observed for FetchData
operations.v FetchData_xfers_bytes_sum: Sum of bytes transferred for FetchData
operations.v FetchData_xfers_bytes_min: Minimum byte transfer observed for FetchData
operations.v FetchData_xfers_bytes_max: Maximum byte transfer observed for FetchData
operations.v FetchData_xfers_bucket0: Tally in bucket0 for FetchData operations.v FetchData_xfers_bucket1: Tally in bucket1 for FetchData operations.v FetchData_xfers_bucket2: Tally in bucket2 for FetchData operations.v FetchData_xfers_bucket3: Tally in bucket3 for FetchData operations.v FetchData_xfers_bucket4: Tally in bucket4 for FetchData operations.v FetchData_xfers_bucket5: Tally in bucket5 for FetchData operations.v FetchData_xfers_bucket6: Tally in bucket6 for FetchData operations.v FetchData_xfers_bucket7: Tally in bucket7 for FetchData operations.v FetchData_xfers_bucket8: Tally in bucket8 for FetchData operations.v StoreData_xfers: Number of StoreData operations.v StoreData_xfers_ok: Number of successful StoreData operations.v StoreData_xfers_sum: Sum of timing values for StoreData operations.v StoreData_xfers_sqr: Sum of squares of sample timings for StoreData
operations.v StoreData_xfers_min: Minimum transfer time observed for StoreData
operations.
642 AFS: Administration Guide
v StoreData_xfers_max: Maximum transfer time observed for StoreDataoperations.
v StoreData_xfers_bytes_sum: Sum of bytes transferred for StoreDataoperations.
v StoreData_xfers_bytes_min: Minimum byte transfer observed for StoreDataoperations.
v StoreData_xfers_bytes_max: Maximum byte transfer observed for StoreDataoperations.
v StoreData_xfers_bucket0: Tally in bucket0 for StoreData operations.v StoreData_xfers_bucket1: Tally in bucket1 for StoreData operations.v StoreData_xfers_bucket2: Tally in bucket2 for StoreData operations.v StoreData_xfers_bucket3: Tally in bucket3 for StoreData operations.v StoreData_xfers_bucket4: Tally in bucket4 for StoreData operations.v StoreData_xfers_bucket5: Tally in bucket5 for StoreData operations.v StoreData_xfers_bucket6: Tally in bucket6 for StoreData operations.v StoreData_xfers_bucket7: Tally in bucket7 for StoreData operations.v StoreData_xfers_bucket8: Tally in bucket8 for StoreData operations.
Appendix C. The afsmonitor Program Statistics 643

644 AFS: Administration Guide
Appendix D. AIX Audit Events
This Appendix provides a complete listing of the AFS events that can beaudited on AIX file server machines. See Chapter “Chapter 8. Monitoring andAuditing AFS Performance” on page 327 for instructions on auditing AFSevents on AIX file server machines.
Introduction
Below is a list of the AFS events contained in the file/afs/usr/local/audit/events.sample. Each entry contains information on theevent class, the name of the event, the parameters associated with the event,and a description of the event.
Most events have an associated error code that shows the outcome of theevent (since each event is recorded after it occurs), an AFSName (theauthentication identify of the requesting process), and a host ID (from whichthe request originated). Many events follow the RPC server entry calls definedin the AFS Programmer’s Reference Manual.
Events are classed by functionality (this is AIX specific). Some events possiblyfall into one of more of the following classes which are defined by the file/usr/afs/local/config.sample:v A (afsauthent): Authentication and Identification Eventsv S (afssecurity): Security Eventsv P (afsprivilege): Privilege Required Eventsv O (afsobjects): Object Creation and Deletion Eventsv M (afsattributes): Attribute modificationv C (afsprocess): Process Control Events
Audit-Specific Events
Event Class Parameters Description
AFS_Audit_WR None <string> The file ″/usr/afs/Audit″ hasbeen written to (AIX specificevent).
AFS_Aud_On S ECode Auditing is on for this serverprocess (recorded on startupof a server).
© Copyright IBM Corp. 1989, 2000 645

Event Class Parameters Description
AFS_Aud_Off S ECode Auditing is off for this serverprocess (recorded on startupof a server).
AFS_Aud_Unauth S ECode Event Event triggered by anunauthorized user.
Note: The following audit-specific events indicate an error has occurred whilerecording the event. Most events have an AFSName associated withthem and a host ID. If this information cannot be gathered out of theRx structure, one of these events is raised.
Event Class Parameters Description
AFS_Aud_NoCall S ECode Event No rx call structure with thisevent. Cannot get security,AFS ID, or origin of call.
AFS_Aud_NoConn S ECode Event No connection info associatedwith rx call. Cannot getsecurity, AFS ID, or origin ofcall.
AFS_Aud_UnknSec S ECode Event Security of call is unknown(must be authorized orunauthorized caller).
AFS_Aud_NoAFSId S ECode Event No AFS ID/name associatedwith a secure event.
AFS_Aud_NoHost S ECode Event No information about origin(machine) of caller.
AFS_Aud_EINVAL None Event Error in audit event parameter(can’t record the eventparameter).
Volume Server Events
Event Class Parameters Description
AFS_VS_Start P C ECode The volume server hasstarted.
AFS_VS_Finish C ECode The volume server hasfinished. Finish events are raresince the server process isnormally aborted.
646 AFS: Administration Guide

Event Class Parameters Description
AFS_VS_Exit C ECode The volume server has exited.Exit events are rare since theserver process is normallyaborted.
AFS_VS_TransCr None ECode AFSNameHostID Trans VolID
AFSVolTransCreate - Createtransaction for a [volume,partition]
AFS_VS_EndTrn None ECode AFSNameHostID Trans
AFSVolEndTrans - End atransaction.
AFS_VS_CrVol P O ECode AFSNameHostID Trans VolIDVolName TypeParentID
AFSVolCreateVolume - Createa volume (volumeIdvolumeName)
AFS_VS_DelVol P O ECode AFSNameHostID Trans
AFSVolDeleteVolume - Deletea volume.
AFS_VS_NukVol P O ECode AFSNameHostID VolID
AFSVolNukeVolume -Obliterate a volumecompletely (volume ID).
AFS_VS_Dump None ECode AFSNameHostID Trans
AFSVolDump - Dump thecontents of a volume.
AFS_VS_SigRst P M ECode AFSNameHostID VolName
AFSVolSignalRestore - Showintention to callAFSVolRestore.
AFS_VS_Restore P O ECode AFSNameHostID Trans
AFSVolRestore - Recreate avolume from a dump.
AFS_VS_Forward P O ECode AFSNameHostID FromTransHost DestTrans
AFSVolForward - Dump avolume, then restore to agiven server and volume.
AFS_VS_Clone P O ECode AFSNameHostID Trans PurgeNewNameNewTypeNewVolID
AFSVolClone - Clone (andoptionally purge) a volume.
AFS_VS_ReClone P O ECode AFSNameHostID TransCloneVolID
AFSVolReClone - Reclone avolume.
AFS_VS_SetForw P M ECode AFSNameHostID TransNewHost
AFSVolSetForwarding - Setforwarding information for amoved volume.
AFS_VS_GetFlgs None ECode AFSNameHostID Trans
AFSVolGetFlags - Get volumeflags for a transaction.
Appendix D. AIX Audit Events 647

Event Class Parameters Description
AFS_VS_SetFlgs P M ECode AFSNameHostID Trans Flags
AFSVolSetFlags - Set volumeflags for a transaction.
AFS_VS_GetName None ECode AFSNameHostID Trans
AFSVolGetName - Get thevolume name associated witha transaction.
AFS_VS_GetStat None ECode AFSNameHostID Trans
AFSVolGetStatus - Get statusof a transaction/volume.
AFS_VS_SetIdTy P M ECode AFSNameHostID TransVolName TypeParentId CloneIDBackupID
AFSVolSetIdsTypes - Setheader information for avolume.
AFS_VS_SetDate P M ECode AFSNameHostID Trans Date
AFSVolSetDate - Set creationdate in a volume.
AFS_VS_ListPar None ECode AFSNameHostID
AFSVolListPartitions - Returna list of AFS partitions on aserver.
AFS_VS_ParInf None ECode AFSNameHostID PartName
AFSVolPartitionInfo - Getpartition information.
AFS_VS_ListVol None ECode AFSNameHostID
AFSVolListVolumes - Return alist of volumes on a server.
AFS_VS_XLstVol None ECode AFSNameHostID
AFSVolXListVolumes - Returna (detailed) list of volumes ona server.
AFS_VS_Lst1Vol None ECode AFSNameHostID VolID
AFSVolListOneVolume -Return header information fora single volume.
AFS_VS_XLst1Vl None ECode AFSNameHostID VolID
AFSVolXListOneVolume -Return (detailed) headerinformation for a singlevolume.
AFS_VS_GetNVol None ECode AFSNameHostID VolID
AFSVolGetNthVolume - Getvolume header given itsindex.
AFS_VS_Monitor None ECode AFSNameHostID
AFSVolMonitor - Collectserver transaction state.
AFS_VS_SetInfo P O M ECode AFSNameHostID Trans
AFSVolSetInfo - Set volumestatus.
648 AFS: Administration Guide
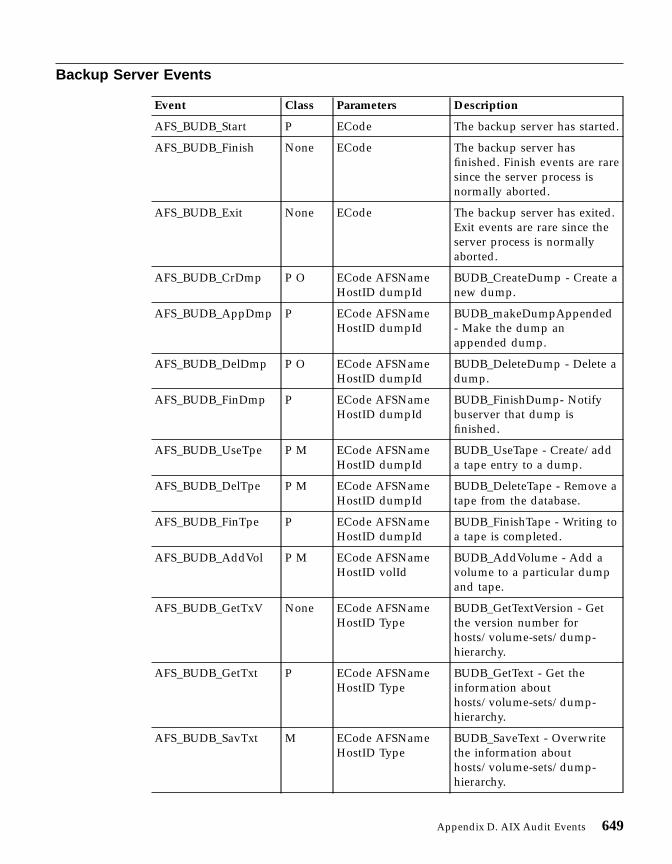
Backup Server Events
Event Class Parameters Description
AFS_BUDB_Start P ECode The backup server has started.
AFS_BUDB_Finish None ECode The backup server hasfinished. Finish events are raresince the server process isnormally aborted.
AFS_BUDB_Exit None ECode The backup server has exited.Exit events are rare since theserver process is normallyaborted.
AFS_BUDB_CrDmp P O ECode AFSNameHostID dumpId
BUDB_CreateDump - Create anew dump.
AFS_BUDB_AppDmp P ECode AFSNameHostID dumpId
BUDB_makeDumpAppended- Make the dump anappended dump.
AFS_BUDB_DelDmp P O ECode AFSNameHostID dumpId
BUDB_DeleteDump - Delete adump.
AFS_BUDB_FinDmp P ECode AFSNameHostID dumpId
BUDB_FinishDump- Notifybuserver that dump isfinished.
AFS_BUDB_UseTpe P M ECode AFSNameHostID dumpId
BUDB_UseTape - Create/adda tape entry to a dump.
AFS_BUDB_DelTpe P M ECode AFSNameHostID dumpId
BUDB_DeleteTape - Remove atape from the database.
AFS_BUDB_FinTpe P ECode AFSNameHostID dumpId
BUDB_FinishTape - Writing toa tape is completed.
AFS_BUDB_AddVol P M ECode AFSNameHostID volId
BUDB_AddVolume - Add avolume to a particular dumpand tape.
AFS_BUDB_GetTxV None ECode AFSNameHostID Type
BUDB_GetTextVersion - Getthe version number forhosts/volume-sets/dump-hierarchy.
AFS_BUDB_GetTxt P ECode AFSNameHostID Type
BUDB_GetText - Get theinformation abouthosts/volume-sets/dump-hierarchy.
AFS_BUDB_SavTxt M ECode AFSNameHostID Type
BUDB_SaveText - Overwritethe information abouthosts/volume-sets/dump-hierarchy.
Appendix D. AIX Audit Events 649
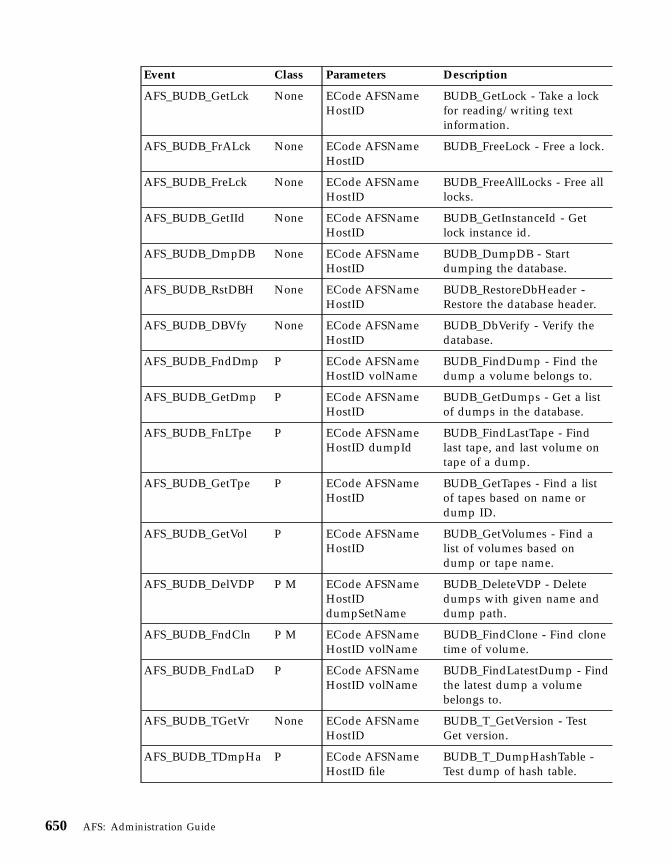
Event Class Parameters Description
AFS_BUDB_GetLck None ECode AFSNameHostID
BUDB_GetLock - Take a lockfor reading/writing textinformation.
AFS_BUDB_FrALck None ECode AFSNameHostID
BUDB_FreeLock - Free a lock.
AFS_BUDB_FreLck None ECode AFSNameHostID
BUDB_FreeAllLocks - Free alllocks.
AFS_BUDB_GetIId None ECode AFSNameHostID
BUDB_GetInstanceId - Getlock instance id.
AFS_BUDB_DmpDB None ECode AFSNameHostID
BUDB_DumpDB - Startdumping the database.
AFS_BUDB_RstDBH None ECode AFSNameHostID
BUDB_RestoreDbHeader -Restore the database header.
AFS_BUDB_DBVfy None ECode AFSNameHostID
BUDB_DbVerify - Verify thedatabase.
AFS_BUDB_FndDmp P ECode AFSNameHostID volName
BUDB_FindDump - Find thedump a volume belongs to.
AFS_BUDB_GetDmp P ECode AFSNameHostID
BUDB_GetDumps - Get a listof dumps in the database.
AFS_BUDB_FnLTpe P ECode AFSNameHostID dumpId
BUDB_FindLastTape - Findlast tape, and last volume ontape of a dump.
AFS_BUDB_GetTpe P ECode AFSNameHostID
BUDB_GetTapes - Find a listof tapes based on name ordump ID.
AFS_BUDB_GetVol P ECode AFSNameHostID
BUDB_GetVolumes - Find alist of volumes based ondump or tape name.
AFS_BUDB_DelVDP P M ECode AFSNameHostIDdumpSetName
BUDB_DeleteVDP - Deletedumps with given name anddump path.
AFS_BUDB_FndCln P M ECode AFSNameHostID volName
BUDB_FindClone - Find clonetime of volume.
AFS_BUDB_FndLaD P ECode AFSNameHostID volName
BUDB_FindLatestDump - Findthe latest dump a volumebelongs to.
AFS_BUDB_TGetVr None ECode AFSNameHostID
BUDB_T_GetVersion - TestGet version.
AFS_BUDB_TDmpHa P ECode AFSNameHostID file
BUDB_T_DumpHashTable -Test dump of hash table.
650 AFS: Administration Guide

Event Class Parameters Description
AFS_BUDB_TDmpDB P ECode AFSNameHostID file
BUDB_T_DumpDatabase -Test dump of database.
Protection Server Events
Event Class Parameters Description
AFS_PTS_Start P ECode The protection server hasstarted.
AFS_PTS_Finish C ECode The protection server hasfinished. Finish events are raresince the server process isnormally aborted.
AFS_PTS_Exit C ECode The protection server hasexited. Exit events are raresince the server process isnormally aborted.
AFS_PTS_NmToId None ECode AFSNameHostID
PR_NameToID - Perform oneor more name-to-IDtranslations.
AFS_PTS_IdToNm None ECode AFSNameHostID GroupId
PR_IDToName - Perform oneor more ID-to-nametranslations.
AFS_PTS_NewEnt None ECode AFSNameHostID GroupIdName OwnerId
PR_NewEntry - Create a PDB(Protection DataBase) entry forthe given name.
AFS_PTS_INewEnt None ECode AFSNameHostID GroupIdName OwnerId
PR_INewEntry - Create a PDBentry for the given name andID.
AFS_PTS_LstEnt None ECode AFSNameHostID GroupId
PR_ListEntry - Get thecontents of a PDB entry basedon its ID.
AFS_PTS_DmpEnt None ECode AFSNameHostID Position
PR_DumpEntry - Get thecontents of a PDB entry basedon its offset.
AFS_PTS_ChgEnt None ECode AFSNameHostID GroupIdNewNameNewOwnerIdNewId
PR_ChangeEntry - Change anexisting PDB entry’s ID, name,owner, or a combination.
AFS_PTS_SetFEnt None ECode AFSNameHostID GroupId
PR_SetFieldsEntry - Changemiscellaneous fields in anexisting PDB entry.
Appendix D. AIX Audit Events 651

Event Class Parameters Description
AFS_PTS_Del None ECode AFSNameHostID GroupId
PR_Delete - Delete an existingPDB entry.
FS_PTS_WheIsIt None ECode AFSNameHostID GroupIdPosition
PR_WhereIsIt - Get the PDBbyte offset of the entry for agiven ID.
AFS_PTS_AdToGrp None ECode AFSNameHostID GroupIdUserId
PR_AddToGroup - Add a userto a group.
AFS_PTS_RmFmGrp None ECode AFSNameHostID GroupIdUserId
PR_RemoveFromGroup -Remove a user from a chosengroup.
AFS_PTS_LstMax None ECode AFSNameHostID
PR_ListMax - Get the largestallocated user and group ID.
AFS_PTS_SetMax None ECode AFSNameHostID GroupIdflag
PR_SetMax - Set the largestallocated user and group ID.
AFS_PTS_LstEle None ECode AFSNameHostID GroupId
PR_ListElements - List all IDsassociated with a user orgroup.
AFS_PTS_GetCPS None ECode AFSNameHostID GroupId
PR_GetCPS - Get the CPS(Current ProtectionSubdomain) for the given ID.
AFS_PTS_GetCPS2 None ECode AFSNameHostID GroupIdHost
PR_GetCPS2 - Get the CPS forthe given id and host.
AFS_PTS_GetHCPS None ECode AFSNameHostID Host
PR_GetHostCPS - Get the CPSfor the given host.
AFS_PTS_LstOwn None ECode AFSNameHostID GroupId
PR_ListOwned - Get all IDsowned by the given ID.
AFS_PTS_IsMemOf None ECode AFSNameHostID UserIdGroupId
PR_IsAMemberOf - Is a givenuser ID a member of aspecified group?
Authentication Events
Event Class Parameters Description
AFS_KAA_ChPswd S ECode AFSNameHostID nameinstance
KAA_ChangePassword -Change password.
652 AFS: Administration Guide

Event Class Parameters Description
AFS_KAA_Auth A S ECode AFSNameHostID nameinstance
KAA_Authenticate -Authenticate to the cell.
AFS_KAA_AuthO S ECode AFSNameHostID nameinstance
KAA_Authenticate_old - Oldstyle authentication.
AFS_KAT_GetTkt A S ECode AFSNameHostID nameinstance
KAT_GetTicket - An attemptwas made to get an AFS ticketfor some principal listed inthe Authentication Database.
AFS_KAT_GetTktO S ECode AFSNameHostID nameinstance
KAT_GetTicket_old - Anattempt was made to get anAFS ticket for some principallisted in the AuthenticationDatabase.
AFS_KAM_CrUser S P ECode AFSNameHostID nameinstance
KAM_CreateUser - Create auser.
AFS_KAM_DelUser S P ECode AFSNameHostID nameinstance
KAM_DeleteUser - Delete auser.
AFS_KAM_SetPswd S ECode AFSNameHostID nameinstance
KAM_SetPassword - Set thepassword for a user.
AFS_KAM_GetPswd S ECode AFSNameHostID name
KAM_GetPassword - Get thepassword of a user.
AFS_KAM_GetEnt S ECode AFSNameHostID nameinstance
KAM_GetEntry - The RPCmade by the kas examinecommand to get one entryfrom the AuthenticationDatabase (by index entry).
AFS_KAM_LstEnt S ECode AFSNameHostID index
KAM_ListEntry - The RPCmade to list one or moreentries in the AuthenticationDatabase.
AFS_KAM_Dbg S ECode AFSNameHostID
KAM_Debug - The RPC thatproduces a debugging tracefor the Authentication Server.
AFS_KAM_SetFld S P ECode AFSNameHostID nameinstance flags datelifetime maxAssoc
KAM_SetFields - The RPCused by the kas setfieldscommand to manipulate theAuthentication Database.
Appendix D. AIX Audit Events 653

Event Class Parameters Description
AFS_KAM_GetStat S ECode AFSNameHostID
KAM_GetStatus - An RPCused to get statistics on theAuthentication Server.
AFS_KAM_GRnKey S ECode AFSNameHostID
KAM_GetRandomKey - AnRPC used to generate arandom encryption key.
AFS_UnlockUser S ECode AFSNameHostID nameinstance
KAM_Unlock - The RPC usedto initiate the kas unlockcommand.
AFS_LockStatus None ECode AFSNameHostID nameinstance
KAM_LockStatus - The RPCused to determine whether auser’s AuthenticationDatabase entry is locked.
AFS_UseOfPriv P ECode AFSNameHostID nameinstance cell
An authorized command wasissued and allowed becausethe user had privilege.
AFS_UnAth S ECode AFSNameHostID nameinstance cell
An authorized command wasissued and allowed becausethe system was running innoauth mode.
AFS_UDPAuth A S ECode nameinstance
An authentication attemptwas made with a Kerberosclient.
AFS_UDPGetTckt A S ECode nameinstance cell nameinstance
An attempt was made to get aKerberos ticket.
AFS_RunNoAuth S ECode Check was made and somerandom server is runningnoauth.
AFS_NoAuthDsbl S P ECode Server is set to run inauthenticated mode.
AFS_NoAuthEnbl S P ECode Server is set to run inunauthenticated mode.
File Server and Cache Manager Interface Events
Event Class Parameters Description
AFS_SRX_FchACL None ECode AFSNameHostID (FID)
RXAFS_FetchACL - Fetch theACL associated with the givenAFS file identifier.
654 AFS: Administration Guide
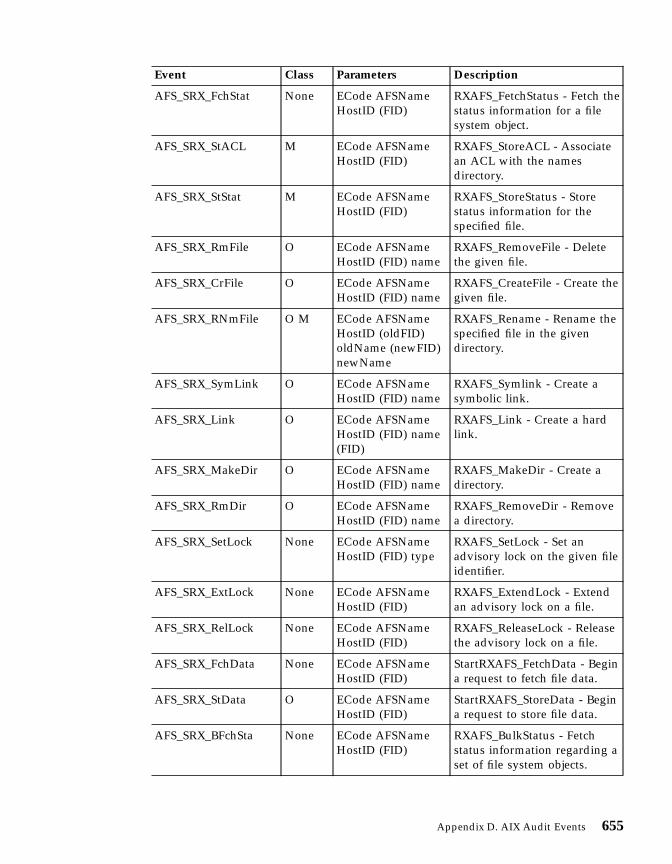
Event Class Parameters Description
AFS_SRX_FchStat None ECode AFSNameHostID (FID)
RXAFS_FetchStatus - Fetch thestatus information for a filesystem object.
AFS_SRX_StACL M ECode AFSNameHostID (FID)
RXAFS_StoreACL - Associatean ACL with the namesdirectory.
AFS_SRX_StStat M ECode AFSNameHostID (FID)
RXAFS_StoreStatus - Storestatus information for thespecified file.
AFS_SRX_RmFile O ECode AFSNameHostID (FID) name
RXAFS_RemoveFile - Deletethe given file.
AFS_SRX_CrFile O ECode AFSNameHostID (FID) name
RXAFS_CreateFile - Create thegiven file.
AFS_SRX_RNmFile O M ECode AFSNameHostID (oldFID)oldName (newFID)newName
RXAFS_Rename - Rename thespecified file in the givendirectory.
AFS_SRX_SymLink O ECode AFSNameHostID (FID) name
RXAFS_Symlink - Create asymbolic link.
AFS_SRX_Link O ECode AFSNameHostID (FID) name(FID)
RXAFS_Link - Create a hardlink.
AFS_SRX_MakeDir O ECode AFSNameHostID (FID) name
RXAFS_MakeDir - Create adirectory.
AFS_SRX_RmDir O ECode AFSNameHostID (FID) name
RXAFS_RemoveDir - Removea directory.
AFS_SRX_SetLock None ECode AFSNameHostID (FID) type
RXAFS_SetLock - Set anadvisory lock on the given fileidentifier.
AFS_SRX_ExtLock None ECode AFSNameHostID (FID)
RXAFS_ExtendLock - Extendan advisory lock on a file.
AFS_SRX_RelLock None ECode AFSNameHostID (FID)
RXAFS_ReleaseLock - Releasethe advisory lock on a file.
AFS_SRX_FchData None ECode AFSNameHostID (FID)
StartRXAFS_FetchData - Begina request to fetch file data.
AFS_SRX_StData O ECode AFSNameHostID (FID)
StartRXAFS_StoreData - Begina request to store file data.
AFS_SRX_BFchSta None ECode AFSNameHostID (FID)
RXAFS_BulkStatus - Fetchstatus information regarding aset of file system objects.
Appendix D. AIX Audit Events 655
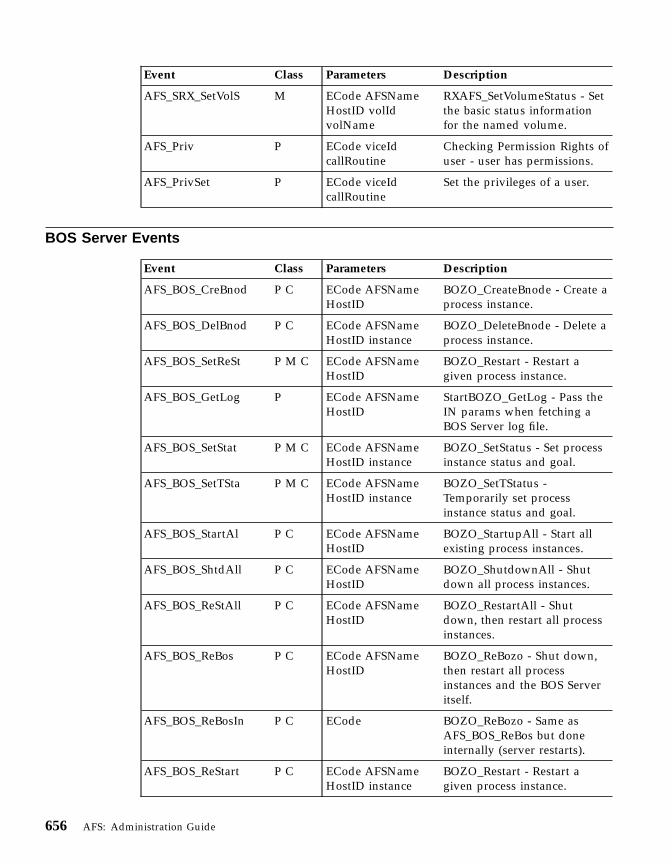
Event Class Parameters Description
AFS_SRX_SetVolS M ECode AFSNameHostID volIdvolName
RXAFS_SetVolumeStatus - Setthe basic status informationfor the named volume.
AFS_Priv P ECode viceIdcallRoutine
Checking Permission Rights ofuser - user has permissions.
AFS_PrivSet P ECode viceIdcallRoutine
Set the privileges of a user.
BOS Server Events
Event Class Parameters Description
AFS_BOS_CreBnod P C ECode AFSNameHostID
BOZO_CreateBnode - Create aprocess instance.
AFS_BOS_DelBnod P C ECode AFSNameHostID instance
BOZO_DeleteBnode - Delete aprocess instance.
AFS_BOS_SetReSt P M C ECode AFSNameHostID
BOZO_Restart - Restart agiven process instance.
AFS_BOS_GetLog P ECode AFSNameHostID
StartBOZO_GetLog - Pass theIN params when fetching aBOS Server log file.
AFS_BOS_SetStat P M C ECode AFSNameHostID instance
BOZO_SetStatus - Set processinstance status and goal.
AFS_BOS_SetTSta P M C ECode AFSNameHostID instance
BOZO_SetTStatus -Temporarily set processinstance status and goal.
AFS_BOS_StartAl P C ECode AFSNameHostID
BOZO_StartupAll - Start allexisting process instances.
AFS_BOS_ShtdAll P C ECode AFSNameHostID
BOZO_ShutdownAll - Shutdown all process instances.
AFS_BOS_ReStAll P C ECode AFSNameHostID
BOZO_RestartAll - Shutdown, then restart all processinstances.
AFS_BOS_ReBos P C ECode AFSNameHostID
BOZO_ReBozo - Shut down,then restart all processinstances and the BOS Serveritself.
AFS_BOS_ReBosIn P C ECode BOZO_ReBozo - Same asAFS_BOS_ReBos but doneinternally (server restarts).
AFS_BOS_ReStart P C ECode AFSNameHostID instance
BOZO_Restart - Restart agiven process instance.
656 AFS: Administration Guide

Event Class Parameters Description
AFS_BOS_WaitAll P C ECode AFSNameHostID
BOZO_WaitAll - Wait until allprocess instances havereached their goals.
AFS_BOS_AddSUsr S P ECode AFSNameHostID
BOZO_AddSUser - Add auser to the UserList.
AFS_BOS_DelSUsr S P ECode AFSNameHostID
BOZO_DeleteSUser - Delete auser from the UserList.
AFS_BOS_LstSUsr None ECode AFSNameHostID
BOZO_ListSUsers - Get thename of the user in the givenposition in the UserList file.
AFS_BOS_LstKey P ECode AFSNameHostID
BOZO_ListKeys - Listinformation about the key at agiven index in the key file.
AFS_BOS_LstKeyU P ECode AFSNameHostID
BOZO_ListKeys - Same asAFS_BOS_LstKey, butunauthorized.
AFS_BOS_AddKey S P ECode AFSNameHostID
BOZO_AddKey - Add a keyto the key file.
AFS_BOS_DelKey S P ECode AFSNameHostID
BOZO_DeleteKey - Delete theentry for an AFS key.
AFS_BOS_SetNoAu S P ECode AFSNameHostID flag
BOZO_SetNoAuthFlag -Enable or disableauthenticated callrequirements.
AFS_BOS_SetCell S P ECode AFSNameHostID name
BOZO_SetCellName - Set thename of the cell to which theBOS Server belongs.
AFS_BOS_AddHst S P ECode AFSNameHostID name
BOZO_AddCellHost - Add anentry to the list of databaseserver hosts.
AFS_BOS_DelHst S P ECode AFSNameHostID name
BOZO_DeleteCellHost - Deletean entry from the list ofdatabase server hosts.
AFS_BOS_Inst P O M ECode AFSNameHostID name
StartBOZO_Install - Pass theIN parameters when installinga server binary.
EndBOZO_Install - Get theOUT parameters wheninstalling a server binary.
Appendix D. AIX Audit Events 657

Event Class Parameters Description
AFS_BOS_UnInst P O M ECode AFSNameHostID name
BOZO_UnInstall - Roll backfrom a server binaryinstallation.
AFS_BOS_PrnLog P O ECode AFSNameHostID
BOZO_Prune - Throw awayold versions of server binariesand core file.
AFS_BOS_Exec P C ECode AFSNameHostID cmd
BOZO_Exec - Execute a shellcommand at the server.
AFS_BOS_DoExec P C ECode exec The bosserver process wasrestarted.
AFS_BOS_StpProc P C ECode cmd An RPC to stop any processcontrolled by the BOS Server.
Volume Location Server Events
Event Class Parameters Description
AFS_VL_CreEnt P M ECode AFSNameHostID name
VL_CreateEntry - Create aVLDB entry.
AFS_VL_DelEnt P M ECode AFSNameHostID volID
VL_DeleteEntry - Delete aVLDB entry.
AFS_VL_GetNVlID None ECode AFSNameHostID
VL_GetNewVolumeId -Generate a new volume ID.
AFS_VL_RepEnt P M ECode AFSNameHostID volID
VL_ReplaceEntry - Replaceentire contents of VLDB entry.
AFS_VL_UpdEnt P M ECode AFSNameHostID volID
VL_UpdateEntry - Updatecontents of VLDB entry.
AFS_VL_SetLck P ECode AFSNameHostID volID
VL_SetLock - Lock VLDBentry.
AFS_VL_RelLck P ECode AFSNameHostID volID
VL_ReleaseLock - UnlockVLDB entry.
658 AFS: Administration Guide

Index
Aa ACL permission 562A instruction
uss template file 483access
control list, see entry: ACL 14count, in volume header 181permissions on ACL (see entries:
permissions on ACL, ACL) 561transparent (AFS feature) 7
ACLadding entries 568auxiliary permissions 562cleaning 574clearing 571compared to UNIX
protection 559copying between directories 572default on new volume 153displaying 566editing entries 568foreign users on 565group entries, usefulness 564normal vs. negative
permissions 563permissions defined 561removing entries 568removing obsolete AFS IDs 574replacing all entries 571setting entries 568setting for directory with
uss 476setting on user home directory
with uss 475shorthand notation for grouping
permissions 563system groups on 564
activeclients statistic from scout
program 330state of fstrace event set 340
addingACL entry
negative permissions 570normal permissions 568
ADMIN flag to AuthenticationDatabase entry 580
CellServDB file (server) entry fordatabase server machine 104
adding (continued)database server machine
to client CellServDB file andkernel memory 406
to server CellServDB file 104disk to file server machine 110members to groups 548read-only site definition in
VLDB 161server encryption key to KeyFile
file 374system:administrators group
members 579UserList file users 582
ADMIN flag in AuthenticationDatabase entry
displaying 580privileges resulting 580setting or removing 580
administer ACL permissionsee entry: a ACL permission 562
administeringclient machine 387server machine 68user accounts 505
administrative databaseabout replicating 85backing up 92restoring 93
administrative privilegethree types 577
AFSauditing events on AIX server
machines 365authentication separate from
UNIX 51differences from UNIX
summarized 19global namespace 26initialization script 392reducing traffic in 10root directory (/afs)
in cell filespace 30on client machine 27
security features 59server encryption key (see entry:
server encryption key) 369server processes used in 11UID see entry: AFS UID 13
afs entry in Authentication Databasedisplaying 373setting server encryption
key 374AFS GID
counter for automatic allocation,displaying and setting 556
definition 536displaying
for all groups in ProtectionDatabase 540
for one group 536removing obsolete from
ACL 574AFS UID
assigningwith pts createuser
command 511with uss 485
counter for automatic allocation,displaying and setting 556
definition 536displaying
for all users and machines inProtection Database 540
for one user or machine 536matching with UNIX UID 457,
506removing obsolete from
ACL 574reserved
anonymous user 45system-defined groups 50
reusing, about 542setting counters for automatic
allocation 557AFSCELL environment variable 270AFSCONF environment variable
(NFS/AFS Translator) 587afsd program 391afsmonitor program
available statistics 611Cache Manager statistics 611command syntax 360creating an output file 359creating configuration files
for 356features summarized 349file server statistics 633
© Copyright IBM Corp. 1989, 2000 659

afsmonitor program (continued)requirements for running 350screen layout 350setting terminal type 350stopping 361
AFSSERVER environment variable(NFS/AFS Translator) 586
afszcm.cat file 393AIX
auditing AFS eventsabout 365list of available events 645
configuring tape device 229all-or-nothing release of read-only
volumes 158all shorthand for ACL
permissions 563anonymous user
AFS UID reserved 45identity assigned to
unauthenticated user 106archiving
tapes in Backup System 243ASK instruction in CFG_device_name
file 261assigning
AFS GID to group 544AFS UID to machine 541AFS UID to user 511AFS UID with uss 457
asynchronyenabling for Cache Manager
write operations 424when AFS files saved on NFS
clients 588at-sys (@sys) variable in
pathnames 42auditing AFS events on AIX server
machines 365authenticated identity
acquiring with klogcommand 55
authenticationAFS compared to UNIX 20AFS separate from UNIX 51compared to authorization
checking 106consequences of multiple
failures 58improving security 517
Authentication Databaseafs entry 370changing username 525
Authentication Database (continued)entry
creating with kas createcommand 511
creating with uss 485deleting with uss 492removing 530
passwordsetting 524
password lifetime, setting 58,522
server encryption keydisplaying 373setting 374
site for AFS server encryptionkey 370
Authentication Serverabout starting and stopping 130as kaserver process 125binary in /usr/afs/bin 71description 13displaying log file 145restarting after adding entry to
server CellServDB file 104restarting after removing entry
from server CellServDBfile 105
runs on database servermachine 80
when to contact 125AuthLog file 77
displaying 145authorization checking
and restarting processes 107compared to authentication 106controlling cell-wide 107defined 106disabling 108enabling 108
automaticprocess restarts by BOS
Server 143update to admin. databases by
Ubik 85automating
creation of backup volumes 165tape mounting and unmounting
by Backup System 257AUTOQUERY instruction in
CFG_device_name file 261auxiliary ACL permissions 562availability of data
interrupted by dumping 205
BB instruction
package configuration file 439backing up
administrative databases 92Backup Database to tape 319data from AFS volumes 279
backup commandsadddump 245addhost 231addvolentry 237addvolset 236binary in /usr/afs/bin 71dbverify 320deldump 247deletedump 324delhost 232delvolentry 239delvolset 238diskrestore 311dump 294dumpinfo 297granting privilege for 581interactive mode
entering 272exiting 272
jobs 272kill 275labeltape 250listdumps 247listhosts 232listvolsets 238quit 272readlabel 252restoredb 322savedb 321scantape 303setexp 246status 277volinfo 301volrestore 308volsetrestore 317
Backup Databaseadministering 319backing up 319described 222dump hierarchy
displaying 247dump ID numbers,
displaying 297dump levels
adding 245deleting 247displaying 247
660 AFS: Administration Guide

Backup Database (continued)dump records
creating as part of dumpoperation 290
displaying 297expiration dates 242
changing 246setting 245
port offset numbersdisplaying 232
restoring 319Tape Coordinator
adding entry 231removing entry 232
verifying integrity 320volume dump history
displaying 301recovering from tapes 302
volume entrycreating 237deleting from volume
set 239displaying 238
volume setcreating 236deleting 238displaying 238
Backup field in volume header 181Backup Server
about starting and stopping 130as buserver process 123binary in /usr/afs/bin 71description 16displaying log file 145restarting after adding entry to
server CellServDB file 104restarting after removing entry
from server CellServDBfile 105
runs on database servermachine 80
when to contact 123Backup System
automating operations 254automating tape mounting and
unmounting 257Backup Database (see entry:
Backup Database) 222Backup Server described 16configuration overview 223data
backing up/dumping 279recovering 304restoring 304
dump (see entry: dump) 218
Backup System (continued)dump hierarchy (see entry: dump
hierarchy) 219dump history
recovering from tapes 302dump ID number
assigning as part of dumpoperation 290
dump ID number (see entry:dump) 219
dump level (see entry: dumphierarchy) 219
dump name (see entry:dump) 219
dump operation, overview 284dump records
deleting 323dump set (see entry: dump
set) 218dumps, full and incremental
defined 279eliminating check for proper tape
name 262eliminating search/prompt for
initial tape 261filemarks (see entry: Tape
Coordinator) 220interactive mode 271
canceling operations 275displaying pending/running
operations 272interfaces 269introduction 217job ID numbers
about 271displaying 272
port offsets (see entry: TapeCoordinator) 221
recycling schedule for tapes 242reducing operator
intervention 254regular expressions 233restores
date-specific 304full 304
restoringbacked up data 304backup data 307data 304
running in foreign cell 270scanning tapes 302suggestions for improving
efficiency 280Tape Coordinator (see entry: Tape
Coordinator) 221
Backup System (continued)tape name (see entry: tapes) 219useCount counter on tape
label 243using default responses to
errors 261volume dump history
recovering from tapes 302volume entry (see entry: volume
entry) 218volume set (see entry: volume
set) 218backup volume
automating creation of 165changing name of 212creating 163creating multiple at once 163defined 149dumping 205ID number in volume
header 181mounting 165moving 187removed by read/write
move 187removed by read/write
removal 202space-saving nature of 156suggested schedule for creation
of 165BackupLog file 77
displaying 145BAK version of binary file
created by bos installcommand 96
removing obsolete 99used by bos uninstall
command 97banner line on the scout program
screen 329basenames in scout program 328bdb.DB0 file 76bdb.DBSYS1 file 76binary distribution machine
defined 81identifying with bos status 83
block special devicecreating with package 439
bos commandsaddhost 104addkey
basic instructions 375when handling key
emergency 383adduser 582
Index 661
bos commands (continued)binary in /usr/afs/bin 71create 134delete 137exec 119getdate 99getlog 146getrestart 144granting privilege for 581install 96listhosts 103listkeys 372listusers 582mutual authentication,
bypassing 109prune 100removehost 105removekey 379removeuser 583restart
excluding BOS Server 142including BOS Server 142selected processes 143with -bosserver flag 142
salvage 195setauth 108setrestart 144shutdown 140start 139startup 141status 131stop 138summary of functions 122uninstall 98
BOS Server
as bosserver process 122binary in /usr/afs/bin 71description 12displaying log file 145maintainer of server process
binaries 95memory state 129monitoring server processes 121restart times, displaying and
setting 143role in reboot of server
machine 118use of BosConfig file 129when to contact 122
BosConfig file 74
changing status flag fromNotRun to Run 139
changing status flag from Run toNotRun 138
BosConfig file 74 (continued)creating server process
entry 134displaying entries 131information 128removing server process
entry 137restart times defined 144
BosLog file 77displaying 145
bosserver(see entry: BOS Server) 71binary in /usr/afs/bin 71
bulk mode in uss 496buserver
(see entry: Backup Server) 71binary in /usr/afs/bin 71
butc command 275
CC instruction
package configuration file 439cache files (client) 393Cache Manager
afsd initialization program 391as interpreter of mount
points 152CellServDB file (client),
using 402collecting data with xstat data
collection facility 361configuring and
customizing 388data cache
displaying size set atreboot 395
data cache sizedisplaying current 396resetting to default value (for
disk cache only) 397setting in cacheinfo file 396setting until next reboot 396
database server processes,contacting 402
described 388displaying
cache size from cacheinfofile 395
enabling asynchrony for writeoperations 424
flushing cache 411functions of 17interfaces registered with File
Server 419messages displayed,
controlling 422
Cache Manager (continued)monitoring performance 327preference ranks for File Server
and VL Server 414setting
cache size in cacheinfofile 395
disk cache location 395home cell 410probe interval for File
Server 410setuid programs 408system type name stored in
kernel memory 423use of NetInfo file 419use of NetRestrict file 419xstat_cm_test example
command 364xstat data collection facility
libraries 361xstat data collections 362xstat example commands 363
cacheinfo file 391displaying contents 395format 396resetting disk cache to size
specified 397setting
cache size 395disk cache location 395
CacheItems file 393caching 9callback 10cell 6
changing list in client kernelmemory 406
filespace configuration issues 30foreign 7granting local access to foreign
users 29local 7making foreign visible to
local 28making local visible to
foreign 27name
at second level in filetree 27, 30
choosing 23setting 24
setting home cell for clientmachine 410
CellServDB file (client)about 391, 402
662 AFS: Administration Guide
CellServDB file (client) (continued)central update source for
clients 405changing 406copied into kernel memory 402correct format 404displaying 406global source from AFS
Support 405maintaining 405updating with or without
package 406CellServDB file (server)
about 73adding database server
machine 104displaying 103effect of wrong information
in 102importance to Ubik
operation 86maintaining 101removing database server
machine 105CellServDB file maintained by AFS
Product Supportas global update source 28
CellServDB.local file 28cellular mount point
see entry: mount point 171CFG_device_name file 255changing
ACL entries 568data cache size specified in
cacheinfo file 395data cache size temporarily 396disk cache location, in cacheinfo
file 395disk cache size to default
value 397group-creation quota 553group ownership to
self-owned 547mount point when renaming
user 528Protection Database entry
name 552owner 550
username 525volume name 212volume name when renaming
user 528character special device
creating with package 439checksum 372
chgrp commandAFS compared to UNIX 21
chmod commandAFS compared to UNIX 20
choosingname
cell 23user 45user volume 46user volume mount point 47
chown commandAFS compared to UNIX 21
clearingall ACL entries 571contents of trace log
(fstrace) 347client
configuring local disk withpackage 429
definition 5machine
definition 5modifying to run package 447
client machine/usr/vice/etc directory 390administering 387cache files 393CellServDB file, displaying 406changing CellServDB file 406changing list of cells in kernel
memory 406configuration files 390configuration issues 41controlling running of setuid
programs 408data cache size
displaying current 396setting in cacheinfo file 396setting until next reboot 396
data cache size set at rebootdisplaying 395
database server machines,displaying knowledge of 406
database server processes,contacting 402
disk cache sizeresetting to default value 397
disk versus memory cache 393displaying
data cache size from cacheinfofile 395
enabling access to foreigncell 42
files required on local disk 41flushing data cache 411
client machine (continued)making foreign cell visible 28messages displayed,
controlling 422monitoring performance 327setting
data cache size in cacheinfofile 395
disk cache location 395home cell 410
setting home cell 24system type name stored in
Cache Manager memory 423client machines statistic from scout
program 330clocks
need to synchronize for Ubik 87clone 9, 156
forcing creation of new 158cloning
defined 156for backup 163for replication 157
close system callfor files saved on AFS client 22for files saved on NFS client 588
cm event set (fstrace) 340cmfx trace log (fstrace) 340collecting
data with xstat data collectionfacility 361
command interpretersCellServDB file (client),
using 402command parameters
in BosConfig file 129command suite
binariesdisplaying time stamp 99installing 95removing obsolete 99uninstalling 97
commandsafsd 391afsmonitor 360backup
to enter interactive mode 272backup adddump 245backup addhost 231backup addvolentry 237backup addvolset 236backup dbverify 320backup deldump 247backup deletedump 324backup delhost 232
Index 663

commands (continued)backup delvolentry 239backup delvolset 238backup diskrestore 311backup dump 294backup dumpinfo 297backup interactive 272backup jobs 272backup kill 275backup labeltape 250backup listdumps 247backup listhosts 232backup listvolsets 238backup quit 272backup readlabel 252backup restoredb 322backup savedb 321backup scantape 303backup setexp 246backup status 277backup volinfo 301backup volrestore 308backup volsetrestore 317bos addhost 104bos addkey 375bos adduser 582bos create 134bos delete 137bos exec 119bos getdate 99bos getlog 146bos getrestart 144bos install 96, 98bos listhosts 103bos listkeys 372bos listusers 582bos prune 100bos removehost 105bos removekey 379bos removeuser 583bos restart
excluding BOS Server 142including BOS Server 142selected processes 143
bos salvage 195bos setauth 108bos setrestart 144bos shutdown 140bos start 139bos startup 141bos status 131bos stop 138butc 275chgrp (AFS compared to
UNIX) 21
commands (continued)chmod (AFS compared to
UNIX) 20chown (AFS compared to
UNIX) 21executing from uss template
file 485fms 228fs checkservers 410fs checkvolumes 413fs cleanacl 574fs copyacl 572fs examine 185, 201fs exportafs 594fs flush 412fs flushmount 413fs flushvolume 413fs getcacheparms 396fs getcellstatus 408fs getclientaddrs 421fs getserverprefs 417fs listacl 566fs listcells 406fs listquota 184, 200fs lsmount 172fs messages 422fs mkmount 155
general instructions 173when changing
username 528when creating user
account 514when mounting backup
volume 167when renaming volume 213when restoring volume 210
fs newcell 407fs quota 200fs rmmount 176, 204, 213, 528,
531fs setacl 568
with -clear flag 571with -negative flag 570
fs setcachesize 396fs setcell 409fs setclientaddrs 421fs setquota 198fs setserverprefs 418fs setvol 199fs storebehind
displaying asynchrony forspecific files 426
displaying defaultasynchrony 426
commands (continued)fs storebehind (continued)
setting asynchrony for specificfiles 425
setting defaultasynchrony 425
fs sysname 423fs whereis 186fsck (AFS compared to
UNIX) 22fsck (AFS version) 22fstrace clear 347fstrace dump 345fstrace lslog 344fstrace lsset 343fstrace setlog 342fstrace setset 343ftp (AFS compared to UNIX) 67ftpd (AFS compared to
UNIX) 21, 67groups (AFS compared to
UNIX) 21inetd (AFS compared to
UNIX) 21, 67kas create 513
when changingusername 527
kas delete 530when changing
username 527kas examine 373
to display ADMIN flag 580kas interactive 109kas setfields 58
limiting failed authenticationattempts 520
prohibiting passwordreuse 523
setting ADMIN flag 580setting password
lifetime 522kas setpassword 57, 377, 524kas unlock 522klog 55klog.krb 58klog with -setpag flag 52knfs 600kpasswd 57, 58ln (AFS compared to UNIX) 21mount 596package 450pagsh 52pagsh.krb 58privileged, defined 106pts adduser 548
664 AFS: Administration Guide
commands (continued)for system:administrators
group 579pts chown 551pts creategroup 546pts createuser
machine entry 543user account 512
pts delete 532, 549pts examine 536pts listentries 540pts listmax 557pts listowned 539pts membership 538
displayingsystem:administratorsgroup 579
pts removeuser 549for system:administrators
group 579pts rename
machine or group name 553username 525
pts setfieldssetting group creation
quota 553setting privacy flags 555
pts setmax 557rcp (AFS compared to
UNIX) 21, 67rlogind (AFS compared to
UNIX) 21, 67rsh (AFS compared to
UNIX) 21, 67scout 332share 593strings 100sys 423tokens 55tokens.krb 58udebug 72umount 112unlog 55uss add 488uss bulk 501uss delete 494vos addsite 161vos backup 166vos backupsys 167vos changeaddr 116vos create
basic instructions 154when creating user
account 514vos delentry 203
commands (continued)vos dump 206vos examine
basic instructions 183vos listaddrs 115vos listpart 110vos listvldb
syntax 177vos listvol
syntax 179vos lock 214vos move
basic instructions 187vos partinfo 153vos release
basic instructions 162vos remove 531
basic instructions 204vos remsite 203vos rename
basic instructions 212when changing
username 528vos restore 209, 211vos syncserv 191vos syncvldb 191vos unlock 215vos unlockvldb 215vos zap 203which 100xstat_cm_test 364xstat_fs_test 363
common configuration files(server) 72
compilationdate of, listing on binary file 99
compilingpackage prototype file 446
configuration fileinstructions for package
program 436see entry: CFG_<device_name>
configuration file 255configuration files
client machine 390package program 431server machine, common 81
configuringafsmonitor program 356Cache Manager 388client machine, issues 41file server machine, issues 37filespace, issues 30local disk of client with
package 429
configuring (continued)trace log (fstrace) 342
Conn statistic from scoutprogram 330
consistency guaranteesadministrative databases 88cached data 10
constantsuss template file 465
contacting processesAuthentication Server 125Backup Server 123BOS Server 122File Server 124NTPD 127Protection Server 126Salvager 125Update Server 127VL Server 128Volume Server 125
controllingauthorization checking for entire
cell 107server machine interfaces
registered in VLDB 113conventions
AFS pathnames 27cell name 23volume names 32, 152
convertingexisting UNIX accounts to AFS
accountswith manual account
creation 508with uss 461
coordinator (Ubik)defined 85election procedure described 90
copyingACL between directories 572
core filesfor server processes 77removing from /usr/afs/logs
directory 99core leak
preventing with scheduledrestarts 143
correspondenceof volumes and directories 8
corruptionsymptoms and types 192
counterProtection Database (max user id,
max group id) 556CPS 533
Index 665
creating
ACL as copy of another 572ACL entry 568ACL entry in negative
permissions section 570Authentication Database entry
with kas createcommand 511
with uss 485backup volume 163cellular mount point 174common local password file with
uss 459directory with uss 475file with uss 477, 479group, self-owned 547link (hard or symbolic) with
uss 481mount point when changing
username 528mount point with uss 473multiple backup volumes at
once 163NetInfo file (client version) 420NetInfo file (server version) 115NetRestrict file (client
version) 421NetRestrict file (server
version) 115PAG with klog or pagsh
command 52Protection Database group
entry 544Protection Database machine
entry 541Protection Database user entry
with pts createusercommand 511
with uss 485read-only volume 157read/write or regular mount
point 173read/write volume 153server encryption key 374server process 134standard files in new user
account 48tape label (Backup System) 248user account
with individualcommands 511
with uss 485user account types with uss 464user accounts in bulk with
uss 496
creating (continued)volume with uss 471
creation daterecorded in volume header 181
creatorProtection Database entry
displaying 536displaying all 540
criteria for replicating volumes 159cron process
creating with bos createcommand 136
cron server processdefining in BosConfig file 134
cron-type server processdefined 129used to automate volume
backup 165current protection subgroup 533curses graphics utility
afsmonitor program 350scout program requirements 328
Dd ACL permission 562D instruction
package configuration file 438uss template file 475
daily restart for new binariesdisplaying and setting time 143
dataavailability interrupted by
dumping 205data cache
changing location of diskcache 395
disk cache sizeresetting to default value 397
disk versus memory 393displaying size specified in
cacheinfo file 395flushing (forcing update) 411size
current, displaying 396recommendations 394set at reboot, displaying 395setting in cacheinfo file 395,
396setting until next reboot 396
Vn file in 393data collection
with xstat data collectionfacility 361
database, distributedsee entry: administrative
database 85database files 76database server machine
addingto client CellServDB file and
kernel memory 406to server CellServDB file 104
CellServDB file (client),displaying 406
CellServDB file (server) entryadding 104removing 105
client knowledge of 402defined 80displaying list in server
CellServDB file 103identifying with bos status 83maintaining 85reason to run three 38removing
from client CellServDB fileand kernel memory 406
from server CellServDBfile 105
use of NetInfo and NetRestrictfiles 113
database server processabout starting and stopping 130need to run all on every database
server machine 86restarting after adding entry to
server CellServDB file 104restarting after removing entry
from server CellServDBfile 105
use of CellServDB file 101databases, distributed 38date
on binary file, listing 99date-specific restores 304default
ACL 153volume quota 153, 198
definingdirectory for even distribution of
accounts with uss 470read-only site in VLDB 161server encryption key 374server encryption key in
Authentication Database 374server process in BosConfig
file 134
666 AFS: Administration Guide

delayed write operationswhen AFS files saved on NFS
clients 588delete ACL permission
see entry: d ACL permission 562deleting
Authentication Database entrywith uss 492
Protection Database user entrywith uss 492
user accounts in bulk withuss 496
user accounts with uss 492denying
file access with negative ACLentry 570
desynchronization of VLDB/volumeheaders
fixing 190symptoms of 189
determiningidentity of:
simple file servermachines 84
identity of binary distributionmachine 83
identity of database servermachines 83
identity of system controlmachine 83
roles taken by servermachine 83
success of replication 158differences
between AFS and UNIX,summarized 19
directories/afs 27, 30/afs/cellname 27, 30/usr/afs/backup 230conventional under
/afs/cell_name 31for grouping user home
directories 47lost+found 22
directories (server)/usr/afs/bin 95
directory/usr/afs/bin on server
machines 70/usr/afs/db on server
machines 76/usr/afs/etc 72/usr/afs/local on server
machines 74
directory (continued)/usr/afs/logs on server
machines 77/usr/vice/cache 393/usr/vice/etc 390/vicep on server machines 78correspondence with volume 8creating with package 438creating with uss 475defining for even distribution of
accounts with uss 470disk cache 393flushing from data cache on
client machine 411overwritten by uss if exists 456root 9
directory/file nametranslating to volume ID
number 185translating to volume
location 186translating to volume name 184
directory-level data protectionimplications 559
disablingauthorization checking 108
discardingtokens 55
diskfile server machine
adding/installing 110removing 112
local (see entry: local disk) 429Disk attn statistic from scout
program 330disk partition
displaying size of single 201grouping related volumes on 35monitoring usage of 330moving volumes to reduce
overcrowding 187display layout in scout program
window 329displaying
ACL entries 566ADMIN flag in Authentication
Database entry 580AFS user id and max group id
counters 557BOS Server’s automatic restart
times 144Cache Manager preference ranks
for file server machines 414CellServDB file (client) 406CellServDB file (server) 103
displaying (continued)client interfaces registered with
File Server 419contents of trace log
(fstrace) 345counters for AFS UID and AFS
GID 557creator of Protection Database
entry 536, 540data cache size
set at reboot 395specified in cacheinfo
file 395data cache size, current 396database server machines in
server CellServDB file 103disk partition size 201entries from BosConfig file 131group-creation quota in
Protection Database entry 536groups owned by a user or
group 539groups to which user or machine
belongs 538KeyFile file 372log files for server processes 145members of group 538membership count in Protection
Database entry 536mount point 172owner of Protection Database
entry 536, 540privacy flags on Protection
Database entry 536Protection Database entries
(all) 540Protection Database entry 536server encryption key from
Authentication Database 373server encryption keys in KeyFile
file 372server entries from VLDB 113server process status 131state of event set (fstrace) 343state of trace log (fstrace) 344system:administrators group
members 579tape label (Backup System) 248time stamp on binary file 99UserList file 582VLDB entry
with volume header 183VLDB entry with volume
header 183VLDB server entries 113
Index 667
displaying (continued)volume header 179
with VLDB entry 183volume header with VLDB
entry 183volume information 176volume quota
percent used 200with volume & partition
info 201with volume size 200
volume’s VLDB entry 177volume size 200, 201
distributed databasesee entry: administrative
database 85distributed databases 38distributed file system 4
security issues 63distribution
of CellServDB file (server) 102of databases 38, 85
dormant (state of fstrace eventset) 340
dumb terminaluse in scout program 328use with afsmonitor 350
dump (Backup System)appended
creating 290appended, defined 218creating Backup Database
record 290defined 218displaying Backup Database
record 297full, defined 218ID number, described 219ID number, displaying 297incremental, defined 218initial, defined 218label, described 220name, described 219parent, defined 218set (see entry: dump set) 218
dump hierarchy (Backup System)creating 240described 219displaying 247dump level
defined 219dump levels
adding 245deleting 247
dump hierarchy (Backup System)(continued)
expiration date on dump leveldescribed 219
expiration dates 242assigning to dump levels 240changing 246setting 245
dump ID number (Backup System)displaying 297
dump ID numbers (BackupSystem) 290
dump levelsdefined 219expiration dates 242
changing 246setting 245
in Backup Databaseadding 245deleting 247displaying 247
dump set (Backup System)creating 279defined 218deleting from Backup
Database 323full dumps 279incremental dumps 279
dumpingBackup Database to tape 319data 279dump ID numbers 290full dumps 279incremental dumps 279trace log contents (fstrace) 345volumes
reasons 205using vos command 206without using AFS Backup
System 205dynamic kernel loader programs
directory for AFS libraryfiles 392
EE instruction
uss template file 479editing
NetInfo file (client version) 420NetInfo file (server version) 115NetRestrict file (client
version) 421NetRestrict file (server
version) 115election of Ubik coordinator 90
emergencyserver encryption keys
mismatched 379enabling authorization
checking 108encrypted network
communication 60entering
kas interactive mode 109entry in VLDB
displaying, with volumeheader 183
for volume 150locking/unlocking 214
environmenttypes compared 4
erasingall ACL entries 571
etc/exports file 592etc/fstab file
(see entry: file systems registryfile) 111
event set (fstrace)cm 340displaying state 343persistence 341setting 343
eventsauditing AFS on AIX server
machines 365examples
library files for package 434prototype files for package 433scout program display 335uss template file 468
executingcommand using uss template
line 485expiration dates 242
absolute 242changing 246relative 242setting 245
FF instruction
package configuration file 438uss template file 477
failureof file storage due to full
partition 187of uss account creation
recovering from 455Fetch statistic from scout
program 330
668 AFS: Administration Guide
filecreating standard ones in new
user account 48creating with package 438creating with uss 477, 479flushing from data cache on
client machine 411overwritten by uss if exists 456required on client machine local
disk 41file extension
.BAK 96
.OLD 96File Server
as part of fs process 124, 129binary in /usr/afs/bin 71client interfaces registered 419collecting data with xstat data
collection facility 361CPS requested from Protection
Server 533description 12displaying log file 145interfaces registered in VLDB
listed in sysid file 75interfaces registered in VLDB
server entry 113monitoring with scout
program 331use of NetInfo file 113use of NetRestrict file 113use of sysid file 113when to contact 124xstat data collection facility
libraries 361xstat data collections 362xstat example commands 363xstat_fs_test example
command 363file server machine 5
Cache Manager preference ranksfor 414
configuration files in/usr/afs/local 74
core files in /usr/afs/logs 77database files in /usr/afs/db 76disk
adding/installing 110removing 112
displaying log files 145installing command and process
binaries 95log files in /usr/afs/logs 77monitoring outages of 331partitions, naming 78
file server machine 5 (continued)rebooting, about 40restoring partitions using Backup
System 304salvaging volumes 192
file server probe intervalsetting for a client machine 410
file storagefailed due to partition
crowding 187file system
defined 4monitoring activity 327salvager (see entry:
Salvager) 124file systems registry file
adding new disk to file servermachine 111
removing disk from file servermachine 112
file treeconventions
for configuring 30third level 31
creating volumes to match toplevel directories 32
FileLog file 77displaying 145
files/usr/afs/etc/KeyFile 370AFS initialization script 392AFS libraries used by dynamic
kernel loader programs 392afsd 391afszcm.cat 393AuthLog 77backup command binary 71BackupLog 77bdb.DB0 76bdb.DBSYS1 76bos command binary 71BosConfig 74, 128BosLog 77bosserver binary 71buserver 71cacheinfo 391CacheItems 393CellServDB (client) 391CellServDB (server) 73, 101CellServDB file (client) 402CellServDB.local 28CFG_<device_name> 255displaying log files 145exports 592file systems registry (fstab) 111
files (continued)FileLog 77fileserver 71fms.log 228FORCESALVAGE 78global CellServDB 28kas command binary 71kaserver binary file 71kaserver.DB0 76kaserver.DBSYS1 76KeyFile 73NetInfo (client version) 392, 420NetInfo (server version) 74NetRestrict (client version) 392,
421NetRestrict (server version) 74NoAuth 74ntpd 71ntpdc 71package Makefile 441prdb.DB0 76prdb.DBSYS1 76pts command binary 71ptserver binary 71runntp 71SALVAGE.fs 75salvage.lock 75SalvageLog 77salvager 72server configuration, in
/usr/afs/etc directory 72sysid 75tapeconfig 224ThisCell (client) 392ThisCell (server) 73udebug 72upclient 72upserver 72UserList 73V.vol_ID.vol 78vldb.DB0 76vldb.DBSYS1 76VLLog 77vlserver 72Vn 393VolserLog 77volserver 72VolumeItems 393vos command binary 72
fileserver
(see entry: File Server) 71binary in /usr/afs/bin 71
flexible synchronization site(Ubik) 90
Index 669
flushingdata cache on client
machine 411fms command 228fms.log file 228FORCESALVAGE file 78foreign cell 7
making local cell visible 27making visible in local cell 28
format of CellServDB file(client) 404
fs commandscheckservers 410checkvolumes 413cleanacl 574copyacl 572examine 185, 201exportafs 594flush 412flushmount 413flushvolume 413getcacheparms 396getcellstatus 408getclientaddrs 421getserverprefs 417granting privilege for 578listacl 566listcells 406listquota 184, 200lsmount 172messages 422mkmount
for read/write volume 155general instructions 173when changing
username 528when creating user
account 514when mounting backup
volume 167when renaming volume 213when restoring volume 210
mutual authentication,bypassing 109
newcell 407quota 200rmmount 176
when changingusername 528
when removing useraccount 531
when removing volume 204when renaming volume 213
setacl 568with -clear flag 571
fs commands (continued)setacl 568 (continued)
with -negative flag 570setcachesize 396setcell 409setclientaddrs 421setquota 198setserverprefs 418setvol 199storebehind
displaying asynchrony forspecific files 426
displaying defaultasynchrony 426
setting asynchrony for specificfiles 425
setting defaultasynchrony 425
sysname 423whereis 186
fs process 123creating 136
fs server processdefining in BosConfig file 134
fs-type server processdefined 129
fsck commandAFS compared to UNIX 22AFS version 22
fstab file(see entry: file systems registry
file) 111fstrace commands
clear 347dump 345example of use 347lslog 344lsset 343privilege requirements 341setlog 342setset 343
fsync system callfor files saved on AFS client 22for files saved on NFS client 588
ftpd commandAFS compared to UNIX 21, 67
full dump 279creating using vos
command 206full restores 304
Gglobal namespace 26granting
file access by setting ACL 568
granting (continued)privilege for backup
commands 581privilege for bos commands 581privilege for fs commands 578privilege for kas commands 580,
581privilege for pts commands 578privilege for vos commands 581
group
ACL entry, usefulness of 564AFS GID 49AFS GID, assigning 544creation quota (see entry:
quota) 536definition 14group use 545groups owned, displaying 539members, adding 548members, displaying 538members, removing 549membership of machine or user,
displaying 538name, assigning 544orphaned, displaying 539owned by user or group,
displaying 539owner
displaying 536displaying for all 540
privacy flags 49privacy flags on Protection
Database entrydisplaying 536setting 554
private use 545Protection Database entry
deleting 549displaying 536displaying all 540name, changing 552
Protection Database entry,creating 544
Protection Database entry,described 533
regular and prefix-less,defined 544
restrictions 49rules for naming 546self-owned, creating 547shared use 545system 534system-defined 50system-defined on ACLs 564using effectively 545
670 AFS: Administration Guide

group use of group 545groups command
AFS compared to UNIX 21
Hhandling
server encryption keyemergency 379
hard linkAFS restrictions on 22creating with uss 481overwritten by uss if exists 456
highlighting statistics in scoutdisplay
setting thresholds 333use of reverse video 331
Ii ACL permission 562identifying
binary distribution machine 83database server machine 83roles taken by server
machine 83simple file server machine 84system control machine 83
inactive (state of fstrace eventset) 340
incremental dumpcreating using vos
command 206creating with Backup
System 279inetd command
AFS compared to UNIX 21, 67initialization script for AFS 392initializing
scout program 332server process 134
insert ACL permissionsee entry: i ACL permission 562
installingdisk on file server machine 110server binaries 95server process binaries, about 95
intention flag in VLDB entry 189interactive mode (Backup System)
entering 272exiting 272features 271operations
cancelingpending/running 275
displayingpending/running 272
interactive mode (kascommands) 109
Internetconventions for cell name 23Network Information Center 24
Jjob ID numbers (Backup
System) 271displaying 272operations
canceling 275
Kk ACL permission 562kas commands
binary in /usr/afs/bin 71create 513
when changingusername 527
deletewhen changing
username 527when removing user
account 530examine
to display ADMIN flag 580examine, to inspect afs key 373granting privilege for 580interactive 109mutual authentication,
bypassing 109setfields 58
limiting failed authenticationattempts 520
prohibiting passwordreuse 523
setting ADMIN flag 580setting password
lifetime 522setpassword 57, 58, 377, 524setpassword , when handling key
emergency 384unlock 522
kaserver.DB0 file 76
kaserver.DBSYS1 file 76
kaserver process
(see entry: AuthenticationServer) 71
binary in /usr/afs/bin 71
Kerberos
support for in AFS 58use of usernames 13
kernel memory (client)CellServDB file, reading
into 402key version number
defined 370KeyFile file
adding server encryptionkey 374
displaying 372function of 73removing server encryption
key 378storage site for server encryption
keys 370klog command 55
limiting failed attempts 517when handling key
emergency 382with -setpag flag 52
klog.krb command 58knfs command 600kpasswd command 57, 58kpwvalid program 58kvno
see entry: key version number 370
Ll ACL permission 561L instruction
package configuration file 438uss template file 481
learningvolume ID
given directory/filename 185
given volume name 184volume location
given directory/filename 186
given volume name/IDnumber 184
volume namegiven directory/file
name 184given volume ID
number 184length restriction on volume
names 152library files in package 433
constructing 440examples 434
libxstat_cm.a library 361data collections 362example command using 363obtaining more information 362
Index 671
libxstat_cm.a library 361(continued)
routines 362xstat_cm_test example
command 364libxstat_fs.a library 361
data collections 362example command using 363obtaining more information 362routines 362xstat_fs_test example
command 363listing
tokens held by issuer 55ln command
AFS compared to UNIX 21local cell 7
granting foreign users accessto 29
making foreign cells visiblein 28
making visible to foreigncells 27
local configuration files (server) 74local disk
configuring on client, usingpackage 429
files required on clientmachine 41
protecting on file servermachine 39
local password filecreating common source version
with uss 459creating entry for AFS user
with manual accountcreation 506
with uss 457setting password in
with manual accountcreation 508
with uss 458when not using AFS-modified
login utility 55when using AFS—modified login
utility 54location
setting for client 395standard for uss template
file 466lock ACL permission
see entry: k ACL permission 562locked VLDB entry
displaying 177unlocking 214
lockingVLDB entry 214
log filesdisplaying 145fms.log 228for replicated databases 76for server processes 77
loginlimiting failed attempts 517
login utilityAFS version 53AFS version’s interaction with
local password file 54lookup ACL permission
see entry: l ACL permission 561lost+found directory 22
Mmachine
adding to group 548AFS UID, assigning 541group memberships
displaying number 536group memberships,
displaying 538privacy flags on Protection
Database entrydisplaying 536setting 554
Protection Database entrydeleting 549displaying 536displaying all 540name, changing 552
Protection Database entry,creating 541
Protection Database entry,described 533
removing from group 549mainframe
computing environment 4maintaining
CellServDB file (client) 405synchrony of VLDB with volume
headers 151majority
defined for Ubik 90Makefile for package 441
modifying 444mapping
AFS ID to group, machine, orusername 536
group name to AFS GID 536machine name to AFS UID 536username to AFS UID 536
max group id counter (ProtectionDatabase)
displaying 557setting 557
max user id counter (ProtectionDatabase)
displaying 557setting 557
maximum volume quota 198MaxQuota field in volume
header 181members
group, adding 548group, displaying 536, 538group, removing 549
membershipsystem groups 534
memory state of BOS Server 129message line in scout program
display 331mode bits (UNIX)
interpretation in AFS 575modifying
clients to run package 447package Makefile 444
monitoringCache Manager
performance 327Cache Manager processes with
afsmonitor 327disk usage with scout
program 330file server processes with
afsmonitor 327file server processes with
scout 327outages with scout program 331server processes 121
mount command 596MOUNT instruction in
CFG_device_name file 257mount point
cellularcreating 174described 171
changing when renaminguser 528
choosing name for uservolume 47
creating cellular 174creating multiple per
volume 152creating read/write or
regular 173creating with uss 473
672 AFS: Administration Guide
mount point (continued)defined 151definition 8displaying 172distinguishing different
types 172flushing from data cache on
client machine 411read/write
creating 173described 170
regularcreating 173described 170
removing 176, 202removing when removing user
account 531mounting
backup volume 165disk on file server machine 110foreign volume in local cell 171read-only volume 159read/write volume 155volume
about 151general instructions 169
movingvolume 186
mutual authentication 63failure due to mismatched
keys 379preventing 109server encryption key’s role 369
Nname
Protection Database entrychanging 552
NAME_CHECK instruction inCFG_device_name file 262
needs salvage status flag in volumeheader 180
negative ACL permissionsdefined 563
NetInfo file (client version) 392, 420NetInfo file (server version) 74
creating/editing 115NetRestrict file (client version) 392,
421NetRestrict file (server version) 74
creating/editing 115network
as computing environment 4defined 4
network (continued)encrypted communication in
AFS 60reducing traffic through
caching 10Network Information Center (for
Internet) 24Network Time Protocol Daemon
(see entry: NTPD) 71New release
status flag on site definition inVLDB entry 178
New release site flag in VLDBas indicator of failed
replication 158NFS/AFS Translator 585
AFSCONF environmentvariable 587
NoAuth file 74creating in emergencies 382
none shorthand for ACLpermissions 563
normal ACL permissionsdefined 563
Not releasedstatus flag on site definition in
VLDB entry 178NotRun status flag in BosConfig file
changing to Run 139defined 129
ntpdbinary in /usr/afs/bin 71
NTPD 71description 17invoked by runntp process 126when to contact 127
ntpdcbinary in /usr/afs/bin 71
number variablesuss template file 466
OOff-line status flag in volume
header 180Old release
status flag on site definition inVLDB entry 178
Old release site flag in VLDBas indicator of failed
replication 158OLD version of binary file
created by bos installcommand 96
removing obsolete 99
OLD version of binary file(continued)
used by bos uninstallcommand 97
OldFiles directoryas mount point for backup
volume 165On-line status flag in volume
header 180orphaned group 539outages
BOS Server role in, 13due to automatic server
restart 144due to server process restart 142due to Ubik election 90monitoring with scout
program 331overcrowding of disk partition
effect on users 187moving volumes to reduce 187
overwritingexisting directories/files/links
with uss 456owner
Protection Database entrychanging 550displaying 536displaying all 540rules for assigning 546
Ppackage
B instruction in configurationfile 439
C instruction in configurationfile 439
compiling prototype files 431,446
configuration fileinstructions 436
configuration files 431constructing prototype and
library files 440D instruction in configuration
file 438defining block special device in
configuration file 439defining character special device
in configuration file 439defining directory in
configuration file 438defining file in configuration
file 438
Index 673

package (continued)defining socket in configuration
file 440defining symbolic link in
configuration file 438directory structure 431example library files 434example prototype files 433F instruction in configuration
file 438L instruction in configuration
file 438library files 433Makefile 441modifying clients to run 447modifying the Makefile 444preparing prototype files 430,
434prototype file 429S instruction in configuration
file 440to update client 406
package command 450package directory 447PAG
creating with klog or pagshcommand 52
pagsh command 52pagsh.krb command 58participation
in AFS global namespace 26partition
housing AFS volumes 78restoring contents using Backup
System 304restoring using Backup System
to a new location 310to the same location 310
salvaging all volumes 192passwd file
see entry: local password file 459password
AFS compared to UNIX 20changing in AFS 57checking quality of 58consequences of multiple failed
authentication attempts 58expiration 58improving security 517lifetime 58local password file 54restricting reuse 58setting in Authentication
Database 524
password (continued)setting in local password file
with manual accountcreation 508
with uss 458permissions on ACL
defined 561persistent fstrace event set or trace
log 341personal
computing environment 4workstation
as typical AFS machine 6possible variations
on replication 160prdb.DB0 file 76prdb.DBSYS1 file 76preferences
setting 418prefix-less group
see entry: group 544preventing
core leaks, with scheduled BOSServer restarts 143
mutual authentication 109previewing
user account creation/deletionwith uss 455
privacy flags on Protection Databaseentry 49
displaying 536setting 554
private use of group 545privilege
granting for backupcommands 581
granting for bos commands 581granting for fs commands 578granting for kas commands 580granting for pts commands 578granting for vos commands 581required for afsmonitor
program 350required for fstrace
commands 341required for scout program 328required for uss commands 455see entry: administrative
privilege 577privileged commands 106process
lightweight Ubik 88status flag in BosConfig file 129
process authentication groupsee entry: PAG 52
processesAuthentication Server, binary in
/usr/afs/bin 71Backup Server, binary in
/usr/afs/bin 71BOS Server, binary in
/usr/afs/bin 71File Server, binary in
/usr/afs/bin 71NTPD, binary in
/usr/afs/bin 71Protection Server, binary in
/usr/afs/bin 71Salvager, binary in
/usr/afs/bin 72Update Server, binaries in
/usr/afs/bin 72VL Server, binary in
/usr/afs/bin 72Volume Server, binary in
/usr/afs/bin 72programs
afsd 391bosserver 71buserver 71fileserver 71kaserver 71ntpd 71ntpdc 71ptserver 71runntp 71salvager 72udebug 72upclient 72upserver 72vlserver 72volserver 72
protectionAFS compared to UNIX 19in AFS 14in UNIX 14
Protection Database 14changing username 525creator of entry
displaying 536displaying for all 540
entry, deleting 549entry name
changing 552group creation quota
displaying 536setting 553
group entry 533displaying 536displaying all 540
674 AFS: Administration Guide
Protection Database 14 (continued)group entry, creating 544ID counters, setting 557machine entry
displaying 536displaying all 540
machine entry, creating 541machine entry, described 533max user id and max group id
counters, displaying andsetting 556
membership countdisplaying 536
owner of entrychanging 551displaying 536displaying for all 540
privacy flagsdisplaying 536setting 554
settingcounters for AFS UIDs 557
user entrycreating with pts createuser
command 511creating with uss 485deleting 532deleting with uss 492displaying 536displaying all 540
user entry, described 533protection of file data
AFS compared to UFSACL 559see also: ACL 559
Protection Serverabout starting and stopping 130as ptserver process 126binary in /usr/afs/bin 71building CPS 533description 14restarting after adding entry to
server CellServDB file 104restarting after removing entry
from server CellServDBfile 105
runs on database servermachine 80
when to contact 126prototype files in package
about 429constructing 440examples 433preparing 430
pts commandsadduser 548
pts commands (continued)for system:administrators
group 579binary in /usr/afs/bin 71chown 551creategroup 546createuser
machine entry 543user account 512
delete 549when removing user
account 532examine 536granting privilege for 578listentries 540listmax 557listowned 539membership 538
displayingsystem:administratorsgroup 579
mutual authentication,bypassing 109
removeuser 549for system:administrators
group 579rename
machine or group name 553username 525
setfieldssetting group creation
quota 553setting privacy flags 555
setmax 557ptserver process
(see entry: Protection Server) 71binary in /usr/afs/bin 71
Qquota
group-creationdisplaying 536setting 553
Rr ACL permission 562RClone field in volume header 181rcp command
AFS compared to UNIX 21, 67read
ACL permission (see entry: r ACLpermission) 562
shorthand for ACLpermissions 563
read-only volumechanging name of 212creating 157
instructions 161defined 148defining site for in VLDB 161dumping 205ID number in volume
header 181mounting 159moving 187need for atomic release 158releasing 162removing
effect of 202selecting site 35
read/write mount pointsee entry: mount point 170
read/write volumechanging name of 212cloning
for backup version 163for replication 157
creating 153defined 148dumping 205ID number in volume
header 181mounting 155moving 187removing
effect of 202instructions 203
replication instructions 161types suitable for
replication 159rebooting
file server machine, limiting 40server machine, instructions 118
recyclinguseCounts of tapes (Backup
System) 243regular expression
Backup System 233regular group
see entry: group 544regular mount point
see entry: mount point 170release
status flags on site definitions inVLDB entry 178
release stage in replication 157ReleaseClone 158
Index 675
ReleaseClone volumeID number in volume
header 181releasing
read-only volume 162read-only volume, forcing new
cloning 158read-only volume, need for
atomicity 158remote services
modifications for AFS 67removing
ACL entry 568ADMIN flag from Authentication
Database entry 580all ACL entries 571core files from /usr/afs/logs 99database server machine
from client CellServDB fileand kernel memory 406
from server CellServDBfile 105
disk from file servermachine 112
group members 549mount point 176, 202
when changingusername 528
mount point when removing useraccount 531
obsolete .BAK and .OLD versionof binaries 99
obsolete AFS IDs from ACL 574Protection Database entry 532,
549server encryption key from
KeyFile file 378server process from BosConfig
file 137system:administrators group
members 579trace log contents (fstrace) 347user account components 529UserList file users 583volume 202volume when removing user
account 531renaming
user account components 525volume 212volume when changing
username 528replacing
all entries on ACL 571replicated database files 76
replicationappropriate volumes 35defined 149definition 9detailed discussion 157determining success of 158forcing creation of new
clone 158need for all-or-nothing
release 158release stage 157role of ReleaseClone 158site definition stage 157suitable types of volumes 159variations possible in 160
requirementsscout program 328
resettingdisk cache size to default
value 397resizing
scout display 332restart time for BOS Server
(automatic)displaying and setting time 143
restart times for BOS Serverabout 40displaying and setting 143setting 143
restartingserver process
except BOS Server 142including BOS Server 142when changing authorization
checking 107server processes 143
restoringadministrative databases 93Backup Database from tape 319data
that no longer exists 307data using Backup System 304existing data
overwriting 307preserving 307
synchrony of VLDB and volumeheaders 190
volumes without using AFSBackup System 208
restrictionson hard links in AFS 22on volume names 33
reverse videouse in scout program
display 331
revertingto old version of server process
and command binaries 97rlogind command
AFS compared to UNIX 21, 67roles for server machine 79
determining 83summary 37
ROnly field in volume header 181root directory 9, 152root superuser
limiting logins 62root volumes (root.afs and
root.cell) 33rsh command
AFS compared to UNIX 21, 67rules
for uss bulk input file 496group names, assigning 546uss template file 467
Run status flag in BosConfig filechanging to NotRun 138defined 129
runntp(see entry: NTPD) 71binary in /usr/afs/bin 71
runntp process 126RWrite field in volume header 181
SS instruction
package configuration file 440uss template file 481
SALVAGE.fs file 75salvage.lock file 75SalvageLog file 77
displaying 145Salvager
(see entry: Salvager) 72as part of fs process 124, 129binary in /usr/afs/bin 72description 17displaying log file 145instructions for invoking 192running before VLDB/volume
header resynchronization 190when to contact 125
salvagingvolumes 192
savingprevious version of server
binaries 96scheduling
creation of backup volumes 165scout program 327
attention levels, setting 333
676 AFS: Administration Guide
scout program 327 (continued)banner line 329basename 328command syntax 332display, resizing 332display layout 329examples (command and
display) 335features summarized 327highlighting in 331monitoring disk usage 330outages, monitoring 331probe reporting line 331requirements 328reverse video 331setting terminal type 328starting 332statistics displayed 330stopping 335
script for AFS initialization 392secondary site (Ubik) 85security
AFS features 59encrypted network
communication 60suggestions for improving 61
self-owned group 545server
definition 5process
definition 5list of AFS 11
server/client model 5server encryption key 64, 73
adding to KeyFile file 374Authentication Database 370changing frequently 370checksum displayed 372defined 63, 369displaying from Authentication
Database 373displaying from KeyFile file 372emergency need to replace 379KeyFile file 370password-like nature 371removing from KeyFile file 378role in mutual
authentication 369setting in Authentication
Database 374server entry in VLDB 113server machine
administering 68binary distribution role 81
server machine (continued)configuration files in
/usr/afs/etc 72configuration issues 37database server role 80determining roles 83first installed 37monitoring 40need for consistent version of
software 95protecting directories on local
disk 39rebooting 118roles for
summary 37roles summarized 79setting home cell 24simple file server role 79system control role 81uninstalling command & process
binaries 97server preference ranks 414server process
binaries (see entry: server processbinaries) 95
bosserver 122buserver 123creating 134creating and starting 134creating ticket (tokens) for 55cron type, defined 129defining in BosConfig file 134different names for 122displaying entry in
BosConfig 131displaying log files 145displaying status 131fs 123fs type, defined 129kaserver 125ptserver 126removing from BosConfig
file 134, 137restarting
except BOS Server 142restarting by restarting BOS
Server 142restarting for changed
binaries 95restarting immediately after
stopping 142restarting specific processes 143runntp 126simple type, defined 128starting 134
server process (continued)starting up 138stopping permanently 134, 137,
138upclient 127upserver 127use of CellServDB file 101vlserver 128
server process binariesdisplaying time stamp 99in /usr/afs/bin 70installing 95removing obsolete 99reverting to old version 97uninstalling 97
server ticket 369session key 64, 369setting
ACL entries 568ACL for directory with uss 476ACL on home directory with
uss 475ADMIN flag in Authentication
Database entry 580AFS UID and AFS GID
counters 557AFS UID counters 557AFS user id and max group id
counters 557BOS Server’s automatic restart
times 144Cache Manager preferences for
file server machines 414cell name 24client interfaces registered with
File Server 419client-to-file-server probe
interval 410counters for AFS UID and AFS
GID 557data cache size in cacheinfo
file 396disk cache location in cacheinfo
file 395event set (fstrace) 343group-creation quota in
Protection Database entry 553home cell for client machine 410password
in AuthenticationDatabase 524
privacy flags on ProtectionDatabase entry 554
server machine interfacesregistered in VLDB 113
Index 677
setting (continued)terminal type for scout 328ThisCell file (client), value
in 410volume quota
on multiple volumes 199on single volume 198
volume quota with uss 473setuid programs 408
restrictions on 23setting mode bits 20
share command 593shared secret 63shared use of group 545shorthand notation
ACL permissions 563simple file server machine 79
identifying with bos status 84simple process
creating with bos createcommand 136
simple server processdefining in BosConfig file 134
simple-type server processdefined 128
sitecount in VLDB 178volume, defined 148
site definition stage inreplication 157
slowed performancepreventing in AFS 10
socketcreating with package 440
stages in volume replication 157starting
database server process,about 130
scout program 332server process 134, 138
statistics display by scoutprogram 330
statusdisplaying for server
process 131status flag
release, on site definitions inVLDB entry 178
status flag for process in BosConfigfile
Run and Not Run, meaningof 129
status flag in BosConfig filechanging NotRun to Run 139changing Run to NotRun 138
status flags in volume header 180stopping
database server process,about 130
server processpermanently 137, 138
server process and immediatelyrestarting 142
Store statistic from scoutprogram 330
strings command 100suitability of volumes for
replication 159symbolic link
at second level of AFSpathname 30
creating with package 438creating with uss 481overwritten by uss if exists 456
symptomsof VLDB/volume header
desynchronization 189volume corruption 192
synchronization site (Ubik)defined 85flexibility 90
synchronycontrolling for Cache Manager
write operations 424when AFS files saved on NFS
clients 588synchrony of VLDB and volume
headersmaintained by VL and Volume
Servers 151restoring 190symptoms of lack of 189
sys (@sys) variable inpathnames 42
sys command 423sysid file 75system:administrators group 534
about 50members
adding 579displaying 579removing 579
privileges resulting 578system:anyuser group 534
about 50using on ACLs 564
system:authuser group 534about 50using on ACLs 564
system control machine 81
system control machine 81(continued)
as distributor of UserListfile 581
CellServDB file, distributing toserver machines 102
identifying with bos status 83source for common KeyFile
file 371system groups
defined 534using on ACLs 564
system outagesdue to automatic server
restart 144due to server process restart 142due to Ubik election 90reducing 13
Ttape (Backup System)
automating mounting andunmounting 257
eliminating check for propername 262
scanning 302
Tape Coordinator (Backup System)
adding to Backup Database 231assigning file ownership 230automating tape mounting and
unmounting 257configuring
AIX system 229machine 229tape device 229
described 221device configuration file
(CFG) 255eliminating check for proper tape
name 262eliminating search/prompt for
initial tape 261filemark
described 220determining size 224
port offset numberassigning 224defined 221displaying 232
processstarting 275
removing from BackupDatabase 232
starting 275
678 AFS: Administration Guide
Tape Coordinator (Backup System)(continued)
statusdisplaying 277
stopping 277task ID numbers 275using default responses to
errors 261tape labels
useCounts of tapes 243tape recycling schedules 242tapeconfig file 224
ownership, assigning 230tapes (Backup System)
archiving 243capacity
determining 224recording on label 248
eliminating search/prompt forinitial 261
labelcreating 248described 220displaying 248
namesassigning 248described 219
task ID numbers (BackupSystem) 275
terminal typesetting for afsmonitor 350setting for scout program 328
TGS 369ThisCell file (client) 392
how used by programs 26setting value in 410
ThisCell file (server) 73thresholds for statistics in scout
displaysetting 333
ticket-granter 64Ticket Granting Service 369tickets
see entry: tokens 55time stamp
on binary file, listing 99tokens
command 55creating for server process 55data in 64discarding with knfs
command 601discarding with unlog
command 55displaying for user 55
tokens (continued)displaying with knfs
command 601one-per-cell rule 51setting default lifetimes for
users 57tokens.krb command 58trace log (fstrace)
clearing contents 347configuring 342displaying state 344dumping 345persistence 341
trace log from (fstrace)cmfx 340
translatingdirectory/file name to volume ID
number 185directory/file name to volume
location 186directory/file name to volume
name 184volume ID number to name 184volume name/ID number to
volume location 184volume name to ID number 184
translatorNFS/AFS 585
transparent access as AFS feature 7turning off authorization
checking 108turning on authorization
checking 108type flag for volume
VLDB entry 178volume header 179
UUbik
automatic updates 85consistency guarantees 88election of coordinator 90failure due to mismatched server
encryption keys 379features summarized 88majority defined 90operation described 85requirements summarized 86server and client portions 88use of CellServDB file 101use of NetInfo and NetRestrict
files 113udebug
binary in /usr/afs/bin 72
UFSfile protection compared to
AFS 559mode bits, interpretation in
AFS 575umount command 112undefined ACL permissions 562uninstalling
server process and commandsuite binaries 97
UNIXdifferences from AFS
summarized 19mode bits, interpretation in
AFS 575UID
functional difference from AFSUID 13
UNIX UIDdifference from AFS UID 536matching with AFS UID 457,
506unlocking
VLDB entry 214unlog command 55
when handling keyemergency 382
UNMOUNT instruction inCFG_device_name file 257
unmountingfile server machine disk 112volume 176, 202
upclient(see entry: Update Server) 72binary in /usr/afs/bin 72
update daterecorded in volume header 181
Update Serverabout starting and stopping 130as upserver and upclient
processes 127binaries in /usr/afs/bin 72CellServDB file (server),
distributing 102client portion 16
for binaries 81for configuration files 82
description 15distributing server configuration
files 72distributor of KeyFile file 371server portion 16
on binary distributionmachine 81
Index 679

Update Server (continued)on system control
machine 82when to contact 127
updatingCellServDB file (client) with or
without package 406upserver
(see entry: Update Server) 72binary in /usr/afs/bin 72
useCount counter on tape label(Backup System) 243
useraccount (see entry: user
account) 454, 485adding to group 548AFS UID, assigning 485, 511group-creation quota
displaying 536setting 553
group membershipsdisplaying number 536
group memberships,displaying 538
groups owned, displaying 539name (see entry: username) 45privacy flags on Protection
Database entrydisplaying 536setting 554
Protection Database entrydeleting 549displaying 536displaying all 540
Protection Database entry,described 533
removing from group 549user account
components 454configuration issues 43converting existing UNIX to AFS
with manual accountcreation 508
with uss 461creating
standard files in 48with individual
commands 511with uss 485
creating/deleting many atonce 496
creating different types withuss 464
creation using usspreviewing 455
user account (continued)deleting with uss 492deletion using uss
previewing 455matching AFS and UNIX
UIDs 457methods for grouping 473removing from system 529suggestions for grouping home
directories 47two methods for creating and
deleting 453uss commands to create/delete
previewing 455UserList file 73
adding users 582displaying 582privileges resulting 581removing users 583
usernameassigning
with pts createusercommand 511
with uss 485changing 525choosing 45part of volume name 46use by Kerberos 13
usr/afs/backup directoryownership, assigning 230
usr/afs/bin/bosserver 122usr/afs/bin directory
removing obsolete .BAK and.OLD files 99
usr/afs/bin directory on servermachines
contents listed 70usr/afs/db directory on server
machinescontents listed 76
usr/afs/etc directory on servermachines
contents listed 72usr/afs/local directory on server
machinescontents listed 74
usr/afs/logs directory on servermachines
contents listed 77usr/vice/cache directory 393usr/vice/etc directory 390uss
accountrecovering from account
creation failure 455
uss (continued)AFS UID, assigning 457command
reissuing, effect of 455hard link, creating 481previewing effect of
command 455symbolic link, creating 481
uss bulk input file
rules for constructing 496
uss commands
ACL, setting for directory 476ACL, setting on home
directory 475add 488
avoiding interruption 455advantages over individual
account-creationcommands 463
bulk 501command, executing with X
instruction 485converting existing UNIX
accounts 461creating/deleting user accounts
in bulk 496creating individual user
account 485delete 494
avoiding interruption 455deleting individual user
account 492directory
creating 475distributing evenly with G
instruction 470file, creating by echoing one
line 479file, creating from prototype 477local password file
creating common sourceversion 459
overwriting existing accountcomponents 456
password/authentication security,setting with A instruction 483
privilege required 455volume
creating with Vinstruction 471
mounting 473setting quota 473
uss template file
A instruction 483
680 AFS: Administration Guide
uss template file (continued)ACL, setting
directory created by Dinstruction 476
user home directory with Vinstruction 475
advantages 463command, executing with X
instruction 485constants 465D instruction 475directory
creating with Dinstruction 475
G instruction for evendistribution 470
E instruction 479examples 468F instruction 477file
creating by echoing oneline 479
creating from prototype 477G instruction 470hard link, creating 481instructions for different account
types 464instructions summarized 463L instruction 481mount point, creating with V
instruction 473number variables 466password/authentication security,
setting with A instruction 483quota on volume, setting with V
instruction 473rules for constructing 467S instruction 481standard locations 466symbolic link, creating 481V instruction 471variables 465volume
creating with Vinstruction 471
X instruction 485zero-length 471
VV.vol_ID.vol file 78variable
AFSCELL 270variables
@sys in pathnames 42in uss template file 465
variations possiblein replication 160
vicep directory on server machinescontents listed 78
VL Serverabout starting and stopping 130as vlserver process 128binary in /usr/afs/bin 72Cache Manager preference ranks
for 414description 15importance to transparent
access 15restarting after adding entry to
server CellServDB file 104restarting after removing entry
from server CellServDBfile 105
role in VLDB/volume headersynchronization 151
runs on database servermachine 80
when to contact 128VLDB 15
defining read-only site in 161displaying entry
with volume header 183displaying volume entry 177intention flag set by VL
Server 189locking/unlocking entry 214release status flags in volume
entry 178server machine interfaces
registeredlisted in sysid file 75
site count for volume 178synchronizing with volume
headers 151, 189volume entry 150volume type flags 178
vldb.DB0 file 76vldb.DBSYS1 file 76VLLog file 77
displaying 145vlserver
(see entry: VL Server) 72binary in /usr/afs/bin 72
Vn file (data cache) 393vnode index 156VolserLog file 77
displaying 145volserver
(see entry: Volume Server) 72binary in /usr/afs/bin 72
volume
as unit ofbackup 8replication 8resource management 8
as unit of backup 150as unit of replication 149automating creation of backup
version 165backing up using Backup
System 279backup (see entry: backup
volume) 163Backup System dump history,
displaying 301benefits for efficiency 149correspondence with directory 8counter in header for number of
accesses 181creating backup version of many
at once 163creating with uss 471Creation date in volume
header 181defined 148definition 7displaying information
about 176dumping without AFS Backup
System 205entry in VLDB 150flushing from data cache on
client machine 411grouping related on same
partition 35header (see entry: volume
header) 151in load balancing 8, 149Last Update date in volume
header 181location (see entry: volume
location) 186mounting 9
about 151more than once 152
moving 186name (see entry: volume
name) 152overwriting contents during
Backup System restore 307preserving contents during
Backup System restore 307quota (see entry: volume
quota) 198
Index 681

volume (continued)read-only (see entry: read-only
volume) 157read/write (see entry: read/write
volume) 153removing
alternate commands 203basic instructions 202when removing user
account 531renaming 212replicating 157restoring
using Backup System 304with vos restore
command 208root (root.afs and root.cell) 33root directory of 9salvaging 192separate for each top level
directory 32site, defined 148size, displaying 200symptoms of corruption 192synchronizing VLDB and volume
header 189type to replicate 35where to place replicated 35
volume entry (Backup System)creating 237defined 218deleting 239displaying 238
volume entry (VLDB)displaying 177
volume headerabout 151displaying
only 179with VLDB entry 183
in /vicep directories 78synchronizing with VLDB 151,
189volume ID number
learningfrom volume name 184
learning from directory/filename 185
translatingto volume location 184to volume name 184
volume locationlearning from directory/file
name 186
volume location (continued)learning from volume name/ID
number 184Volume Location Server
(see entry: VL Server) 72volume name
changingbasic instructions 212when renaming user 528
conventions 152conventions for 32learning
from directory/file name 184from volume ID number 184
restrictions 33translating
to volume ID number 184to volume location 184
two required 33volume quota
default for new volume 153displaying
percent used 200with volume &partition
info 201with volume size 200
recorded in volume header 181setting
on multiple volumes 199on single volume 198with uss 473
Volume Serveras part of fs process 124, 129binary in /usr/afs/bin 72description 15displaying log file 145role in VLDB/volume header
synchronization 151when to contact 125
volume set (Backup System)creating 236defined 218deleting 238deleting volume entry 239displaying 238volume entry (see entry: volume
entry) 218VolumeItems file 393vos commands
addsite 161backup 166backupsys 167binary in /usr/afs/bin 72changeaddr 116
vos commands (continued)create
basic instructions 154when creating user
account 514delentry 203dump 206examine
basic instructions 183to learn volume ID 184to learn volume name 184
granting privilege for 581listaddrs 115listpart 110listvldb
syntax 177to learn volume location 184
listvoloutput with -extended
flag 182output with -fast flag 181output with -long flag 181syntax 179
lock 214move
basic instructions 187when removing file server
machine disk 112mutual authentication,
bypassing 109partinfo 153release
basic instructions 162forcing new cloning with -f
flag 158remove
basic instructions 204when removing user
account 531remsite 203rename
basic instructions 212when changing
username 528restore
to create new volume 209to overwrite volume 211
summary of functions 128syncserv
effect 190syntax 191
syncvldbeffect 190syntax 191
unlock 215
682 AFS: Administration Guide
vos commands (continued)unlockvldb 215zap 203
Ww ACL permission 562
weekly restart of BOS Server(automatic)
about 40displaying and setting time 143
which command 100
window
resizing scout display 332
write
ACL permission (see entry: writeACL permission) 562
operations delayed from NFSclients 588
shorthand for ACLpermissions 563
system call for files saved on AFSclient 22
system call for files saved on NFSclient 588
Ws statistic from scoutprogram 330
XX instruction
uss template file 485
xstat as requirement for runningafsmonitor 350
xstat data collection facility 361
data collections 362example commands 363libxstat_cm.a library 361libxstat_fs.a library 361obtaining more information 362xstat_cm_test example
command 364xstat_fs_test example
command 363
Index 683

684 AFS: Administration Guide

Notices
First Edition (April 2000)
This information was developed for products and services offered in theU.S.A.
IBM may not offer the products, services, or features discussed in thisdocument in other countries. Consult your local IBM representative forinformation on the products and services currently available in your area. Anyreference to an IBM product, program, or service is not intended to state orimply that only that IBM product, program, or service may be used. Anyfunctionally equivalent product, program, or service that does not infringeany IBM intellectual property right may be used instead. However, it is theuser’s responsibility to evaluate and verify the operation of any non-IBMproduct, program, or service.
IBM may have patents or pending patent applications covering subject matterdescribed in this document. The furnishing of this document does not giveyou any license to these patents. You can send license inquiries, in writing, to:
IBM Director of LicensingIBM CorporationNorth Castle DriveArmonk, NY 10504-1785U.S.A.
For license inquiries regarding double-byte (DBCS) information, contact theIBM Intellectual Property Department in your country or send inquiries, inwriting, to:
IBM World Trade Asia Corporation Licensing2-31 Roppongi 3-chome, Minato-kuTokyo 106, Japan
The following paragraph does not apply to the United Kingdom or anycountry where such provisions are inconsistent with local law:
INTERNATIONAL BUSINESS MACHINES CORPORATION PROVIDES THISDOCUMENT “AS IS” WITHOUT WARRANTY OF ANY KIND, EITHEREXPRESS OR IMPLIED, INCLUDING, BUT NOT LIMITED TO, THEIMPLIED WARRANTIES OR CONDITIONS OF NON-INFRINGEMENT,MERCHANTABILITY OR FITNESS FOR A PARTICULAR PURPOSE. Somestates do not allow disclaimer of express or implied warranties in certaintransactions, therefore, this statement may not apply to you.
© Copyright IBM Corp. 1989, 2000 685

This information could include technical inaccuracies or typographical errors.Changes are periodically made to the information herein; these changes willbe incorporated in new editions of the document. IBM may makeimprovements and/or changes in the product(s) and/or the program(s)described in this publication at any time without notice.
Any references in this information to non-IBM Web sites are provided forconvenience only and do not in any manner serve as an endorsement of thoseWeb sites. The materials at those Web sites are not part of the materials forthis IBM product and use of those Web sites is at your own risk.
IBM may use or distribute any of the information you supply in any way itbelieves appropriate without incurring any obligation to you.
Licensees of this program who wish to have information about it for thepurpose of enabling: (i) the exchange of information between independentlycreated programs and other programs (including this one) and (ii) the mutualuse of the information which has been exchanged, should contact:
IBM CorporationATTN: Software Licensing11 Stanwix StreetPittsburgh, PA 15222-1312U.S.A.
Such information may be available, subject to appropriate terms andconditions, including in some cases, payment of a fee.
The licensed program described in this document and all licensed materialavailable for it are provided by IBM under terms of the IBM InternationalProgram License Agreement or any equivalent agreement between us.
Any performance data contained herein was determined in a controlledenvironment. Therefore, the results obtained in other operating environmentsmay vary significantly. Some measurements may have been made ondevelopment-level systems and there is no guarantee that these measurementswill be the same on generally available systems. Furthermore, somemeasurements may have been estimated through extrapolation. Actual resultsmay vary. Users of this document should verify the applicable data for theirspecific environment.
Information concerning non-IBM products was obtained from the suppliers ofthose products, their published announcements or other publicly availablesources. IBM has not tested those products and cannot confirm the accuracyof performance, compatibility or any other claims related to non-IBMproducts. Questions on the capabilities of non-IBM products should beaddressed to the suppliers of those products.
686 AFS: Administration Guide

All statements regarding IBM’s future direction or intent are subject to changeor withdrawal without notice, and represent goals and objectives only.
All IBM prices show are IBM’s suggested retail prices, are current and aresubject to change without notice. Dealer prices may vary.
This information is for planning purposes only. The information herein issubject to change before the products described become available.
This information contains examples of data and reports used in daily businessoperations. To illustrate them as completely as possible, the examples mayinclude the names of individuals, companies, brands, and products. All ofthese names are fictitious and any similarity to the names and addresses usedby an actual business enterprise is entirely coincidental.
If you are viewing this information softcopy, the photographs and colorillustrations may not appear.
Trademarks
The following terms are trademarks of International Business MachineCorporation in the United States, other countries, or both:
AFSAIXAS/400CICSCICS OS/2CICS/400CICS/6000CICS/ESACICS/MVSCICS/VSECICSPlexDB2DCE Encina Lightweight ClientDFSEncinaIBM
IMSMQSeriesMVS/ESAOS/2OS/390OS/400PowerPCRISC System/6000RS/6000S/390TransarcTXSeriesVSE/ESAVTAMVisualAgeWebSphere
Microsoft, Windows, Windows NT, and the Windows logo are trademarks ofMicrosoft Corporation in the United States, other countries or both.
Sun, SunLink, Solaris, SunOS, Java, all Java-based trademarks and logos, NFS,and Sun Microsystems are trademarks or registered trademarks of SunMicrosystems, Inc. in the United States, other countries, or both.
Notices 687
UNIX is a registered trademark in the United States, other countries or bothand is licensed exclusively through X/Open Company Limited.
Other company, product, and service names may be trademarks or servicemarks of others.
688 AFS: Administration Guide
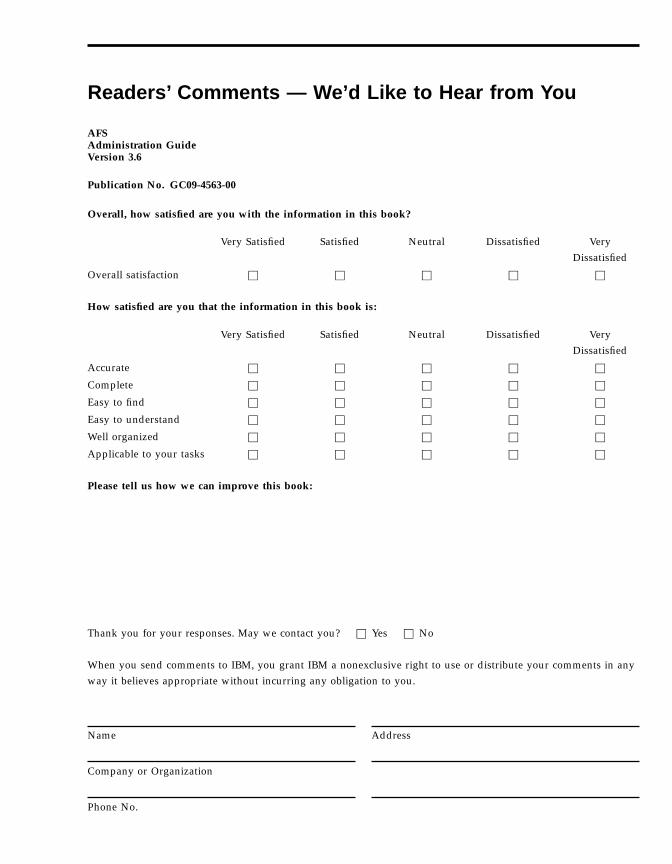
Readers’ Comments — We’d Like to Hear from You
AFSAdministration GuideVersion 3.6
Publication No. GC09-4563-00
Overall, how satisfied are you with the information in this book?
Very Satisfied Satisfied Neutral Dissatisfied VeryDissatisfied
Overall satisfaction h h h h h
How satisfied are you that the information in this book is:
Very Satisfied Satisfied Neutral Dissatisfied VeryDissatisfied
Accurate h h h h h
Complete h h h h h
Easy to find h h h h h
Easy to understand h h h h h
Well organized h h h h h
Applicable to your tasks h h h h h
Please tell us how we can improve this book:
Thank you for your responses. May we contact you? h Yes h No
When you send comments to IBM, you grant IBM a nonexclusive right to use or distribute your comments in anyway it believes appropriate without incurring any obligation to you.
Name Address
Company or Organization
Phone No.
Readers’ Comments — We’d Like to Hear from YouGC09-4563-00
GC09-4563-00
����Cut or FoldAlong Line
Cut or FoldAlong Line
Fold and Tape Please do not staple Fold and Tape
Fold and Tape Please do not staple Fold and Tape
NO POSTAGENECESSARYIF MAILED IN THEUNITED STATES
BUSINESS REPLY MAILFIRST-CLASS MAIL PERMIT NO. 40 ARMONK, NEW YORK
POSTAGE WILL BE PAID BY ADDRESSEE
IBM CorporationATTN: File Systems Documentation Group11 Stanwix StreetPittsburgh, PA15222-1312
_ _ _ _ _ _ _ _ _ _ _ _ _ _ _ _ _ _ _ _ _ _ _ _ _ _ _ _ _ _ _ _ _ _ _ _ _ _ _ _ _ _ _ _ _ _ _ _ _ _ _ _ _ _ _ _ _ _ _ _ _ _ _ _ _ _ _ _ _ _ _ _ _ _
_ _ _ _ _ _ _ _ _ _ _ _ _ _ _ _ _ _ _ _ _ _ _ _ _ _ _ _ _ _ _ _ _ _ _ _ _ _ _ _ _ _ _ _ _ _ _ _ _ _ _ _ _ _ _ _ _ _ _ _ _ _ _ _ _ _ _ _ _ _ _ _ _ _
__
__
__
__
__
__
__
__
__
__
__
__
__
__
__
__
__
__
__
__
__
__
__
__
__
__
__
__
__
__
__
__
__
__
__
__
__
__
__
__
_


����
Program Number:
Printed in the United States of Americaon recycled paper containing 10%recovered post-consumer fiber.
GC09-4563-00

Spine information:
��� AFS Administration Guide Version 3.6 GC09-4563-00


![OPINION OF THE COMMISSION [PUBLIC RECORD VERSION · PDF fileOPINION OF THE COMMISSION [PUBLIC RECORD VERSION] ... wholesale clubs ... Fisher Price * * 3.6 3.6 Tyco 2.7 2.9 3.5 4.8](https://img.dokumen.tips/doc/110x75/5aa25fec7f8b9aa0108d2168/opinion-of-the-commission-public-record-version-of-the-commission-public-record.jpg)