Embed Size (px)
Citation preview

ADFS Operations Guide
Microsoft Corporation
Published: May 2006
Authors: Mary Hillman, Nick Pierson
Editor: Femila Anilkumar
Abstract
This Operations Guide provides administering and troubleshooting information for Active
Directory Federation Services (ADFS) in the Microsoft® Windows Server™ 2003 R2,
Enterprise Edition, and Microsoft Windows Server 2003 R2, Datacenter Edition, operating
systems (for Federation Service, Federation Service Proxy, and ADFS Web Agent
components); and the Microsoft Windows Server 2003 R2, Standard Edition, operating
system (for ADFS Web Agent components).

Information in this document, including URL and other Internet Web site references, is
subject to change without notice. Unless otherwise noted, the example companies,
organizations, products, domain names, e-mail addresses, logos, people, places, and
events depicted herein are fictitious, and no association with any real company,
organization, product, domain name, e-mail address, logo, person, place, or event is
intended or should be inferred. Complying with all applicable copyright laws is the
responsibility of the user. Without limiting the rights under copyright, no part of this
document may be reproduced, stored in or introduced into a retrieval system, or
transmitted in any form or by any means (electronic, mechanical, photocopying,
recording, or otherwise), or for any purpose, without the express written permission of
Microsoft Corporation.
Microsoft may have patents, patent applications, trademarks, copyrights, or other
intellectual property rights covering subject matter in this document. Except as expressly
provided in any written license agreement from Microsoft, the furnishing of this document
does not give you any license to these patents, trademarks, copyrights, or other
intellectual property.
© 2006 Microsoft Corporation. All rights reserved.
Active Directory, Microsoft, MS-DOS, Windows, Windows NT, and Windows Server are
either registered trademarks or trademarks of Microsoft Corporation in the United States
and/or other countries.
The names of actual companies and products mentioned herein may be the trademarks
of their respective owners.
Contents
ADFS Operations Guide ...................................................................................................15 See Also ........................................................................................................................15
Administering Active Directory Federation Services.........................................................15
Introduction to Administering ADFS..................................................................................16 Planning for ADFS Operations ......................................................................................16
Assess Your IT Environment and Establish a Baseline .............................................17 Determine Operational Needs....................................................................................18
When to Use This Guide................................................................................................19 How to Use This Guide..................................................................................................20 Technologies and Terminology Used in This Guide......................................................21 See Also ........................................................................................................................21
Managing ADFS Components ..........................................................................................22 See Also ........................................................................................................................22
Managing the Federation Service .....................................................................................23 See Also ........................................................................................................................23
Managing a Federation Server Farm................................................................................23 See Also ........................................................................................................................24
Implementing a Server Farm of Federation Servers.........................................................24 See Also ........................................................................................................................26
Adding a New Federation Server......................................................................................26 See Also ........................................................................................................................27
Install Prerequisite Applications ........................................................................................28 See Also ........................................................................................................................28
Create a self-signed, code-signing certificate...................................................................29 See Also ........................................................................................................................29
Export the private key portion of a token-signing certificate .............................................29 See Also ........................................................................................................................31
Install the Federation Service on an additional federation server.....................................31

See Also ........................................................................................................................32
Configure event logging on a federation server................................................................32
Removing a Federation Server .........................................................................................33 See Also ........................................................................................................................34
Remove an ADFS component ..........................................................................................34 See Also ........................................................................................................................35
Managing Trust Policy on Federation Servers..................................................................35 See Also ........................................................................................................................36
Change the Federation Service trust policy location ........................................................36
Change the Federation Service URI .................................................................................37
Change the Federation Service endpoint URL .................................................................39 See Also ........................................................................................................................40
Configure the Federation Service default Web pages ......................................................41
Change the primary display name for a trust policy..........................................................42
Change a claims transform module ..................................................................................43 See Also ........................................................................................................................43
Change the token lifetime for a Federation Service..........................................................43 See Also ........................................................................................................................45
Change the trust policy refresh period ..............................................................................45 See Also ........................................................................................................................45
Change the Windows domain trust cache refresh period.................................................46 See Also ........................................................................................................................46
Managing Certificates Used by Federation Servers .........................................................46 See Also ........................................................................................................................48
Managing Token-signing Certificates................................................................................48
Create a self-signed, code-signing certificate...................................................................49 See Also ........................................................................................................................49
View the current token-signing certificate .........................................................................50

Turn CRL checking on or off .............................................................................................50 Script Text......................................................................................................................52
Export the public key portion of a token-signing certificate...............................................54 See Also ........................................................................................................................56
Export the private key portion of a token-signing certificate .............................................56 See Also ........................................................................................................................57
Change the token-signing certificate that a federation server uses..................................57 See Also ........................................................................................................................58
Managing Verification Certificates ....................................................................................58 See Also ........................................................................................................................59
Add a verification certificate to the trust policy..................................................................59 See Also ........................................................................................................................60
Add a verification certificate to an account partner...........................................................60 See Also ........................................................................................................................61
View the current verification certificate .............................................................................61 See Also ........................................................................................................................62
Remove a verification certificate .......................................................................................62
Rolling Over a Token-signing Certificate ..........................................................................63 See Also ........................................................................................................................66
Create a self-signed, code-signing certificate...................................................................66 See Also ........................................................................................................................66
Export the public key portion of a token-signing certificate...............................................67 See Also ........................................................................................................................68
Export the private key portion of a token-signing certificate .............................................68 See Also ........................................................................................................................69
Add a verification certificate to an account partner...........................................................69 See Also ........................................................................................................................70
Change the token-signing certificate that a federation server uses..................................71 See Also ........................................................................................................................72
Remove a verification certificate .......................................................................................72

Managing the Federation Service Proxy (Optional)..........................................................73 See Also ........................................................................................................................73
Managing a Federation Server Proxy Farm......................................................................73 See Also ........................................................................................................................74
Adding a New Federation Server Proxy............................................................................74 See Also ........................................................................................................................75
Install Prerequisite Applications ........................................................................................75 See Also ........................................................................................................................76
Install the Federation Service Proxy on an additional federation server proxy.................76 See Also ........................................................................................................................77
Export the public key portion of a client authentication certificate ....................................77 See Also ........................................................................................................................78
Add a Federation Service Proxy (FSP) certificate to the trust policy................................78 See Also ........................................................................................................................79
Configure event logging on a federation server proxy ......................................................79 See Also ........................................................................................................................81
Removing a Federation Server Proxy...............................................................................81
Remove an ADFS component ..........................................................................................81 See Also ........................................................................................................................82
Remove a Federation Service Proxy (FSP) certificate from the trust policy.....................82
Managing Certificates Used by Federation Server Proxies ..............................................83 See Also ........................................................................................................................84
Managing Client Authentication Certificates .....................................................................84 See Also ........................................................................................................................85
Create a self-signed, code-signing certificate...................................................................85 See Also ........................................................................................................................86
View the current client authentication certificate...............................................................86 See Also ........................................................................................................................86
Export the public key portion of a client authentication certificate ....................................87 See Also ........................................................................................................................88

Add a Federation Service Proxy (FSP) certificate to the trust policy................................88 See Also ........................................................................................................................88
Change the client authentication certificate that a federation server proxy uses .............89
Rolling Over a Client Authentication Certificate................................................................90 See Also ........................................................................................................................91
Create a self-signed, code-signing certificate...................................................................91 See Also ........................................................................................................................92
Export the public key portion of a client authentication certificate ....................................92 See Also ........................................................................................................................93
Add a Federation Service Proxy (FSP) certificate to the trust policy................................93 See Also ........................................................................................................................94
Change the client authentication certificate that a federation server proxy uses .............94
Remove a Federation Service Proxy (FSP) certificate from the trust policy.....................95
Managing ADFS Web Agents and Applications ...............................................................96 See Also ........................................................................................................................96
Adding and Removing ADFS Web Agents .......................................................................96 See Also ........................................................................................................................97
Add an ADFS Web Agent for a claims-aware or Windows NT token-based application..97
Remove an ADFS Web Agent for a claims-aware or Windows NT token-based
application......................................................................................................................98
Adding and Configuring a Windows NT Token-based Application ...................................99 See Also ......................................................................................................................100
Add a new Windows NT token-based application ..........................................................100
Enable or disable a Web application...............................................................................101 See Also ......................................................................................................................102
Set the cookie path for a Windows NT token-based application ....................................102 See Also ......................................................................................................................103
Set the cookie domain for a Windows NT token-based application ...............................103 See Also ......................................................................................................................104

Set the Federation Service URL for a Windows NT token-based application ................104
Set the return URL for a Windows NT token-based application .....................................105 See Also ......................................................................................................................106
Set the application URL for an application......................................................................106 See Also ......................................................................................................................106
Configure event logging for a Windows NT token-based application .............................107
Configure authentication methods for a Web application ...............................................108
Adding and Configuring a Claims-aware Application......................................................109
Add a new claims-aware application...............................................................................110
Enable or disable a Web application...............................................................................111 See Also ......................................................................................................................112
Set the Federation Service URL for a claims-aware application ....................................112
Set the return URL for a claims-aware application .........................................................113 See Also ......................................................................................................................113
Set the application URL for an application......................................................................114 See Also ......................................................................................................................114
Set the cookie path for a claims-aware application ........................................................115 See Also ......................................................................................................................115
Set the cookie domain for a claims-aware application....................................................116 See Also ......................................................................................................................116
Configure event logging for a claims-aware application .................................................117
Configure authentication methods for a Web application ...............................................118
Managing Security for Web Applications ........................................................................119
Configure authentication methods for a Web application ...............................................120
Change the security token protection method for an application....................................122
Change the token lifetime for an application...................................................................123 See Also ......................................................................................................................123
Configure a policy page for a Web site ...........................................................................124

See Also ......................................................................................................................124
Backing Up ADFS Components......................................................................................125 See Also ......................................................................................................................126
Back up ADFS components on a federation server, federation server proxy, or Web
server ...........................................................................................................................127 See Also ......................................................................................................................128
Managing ADFS Partnerships ........................................................................................128 See Also ......................................................................................................................128
Adding a New Account Partner.......................................................................................128 See Also ......................................................................................................................130
Add a new account partner by manually configuring the trust policy..............................130 See Also ......................................................................................................................132
Export an account or resource policy file to a partner organization................................132 See Also ......................................................................................................................134
Add a new account partner by importing an existing policy file ......................................134 See Also ......................................................................................................................136
Adding a New Resource Partner ....................................................................................136 See Also ......................................................................................................................137
Add a new resource partner by manually configuring the trust policy ............................137 See Also ......................................................................................................................139
Export an account or resource policy file to a partner organization................................139 See Also ......................................................................................................................141
Add a new resource partner by importing an existing policy file.....................................141 See Also ......................................................................................................................143
Configuring Windows Trust for Account and Resource Partners ...................................143 See Also ......................................................................................................................144
Configure an account partner to use Windows trust.......................................................144 See Also ......................................................................................................................145
Configure a resource partner to use Windows trust .......................................................145 See Also ......................................................................................................................146

Discontinue Windows trust for an account partner .........................................................146 See Also ......................................................................................................................146
Discontinue Windows trust for a resource partner..........................................................147
Removing ADFS Partners...............................................................................................147
Delete an existing account partner .................................................................................148
Delete an existing resource partner ................................................................................148
Managing Partner Relationships.....................................................................................149 See Also ......................................................................................................................149
Enable enhanced identity privacy ...................................................................................150 See Also ......................................................................................................................151
Export a generic policy file to a partner organization......................................................151 See Also ......................................................................................................................152
Export an account or resource policy file to a partner organization................................152 See Also ......................................................................................................................153
Enable or disable a resource partner..............................................................................154
Enable or disable an account partner .............................................................................154
Change how resource accounts are used for an account partner..................................155 See Also ......................................................................................................................157
Managing Accounts and Account Stores........................................................................157 See Also ......................................................................................................................157
Enable or disable an account store.................................................................................158
Managing Active Directory Account Stores.....................................................................158 See Also ......................................................................................................................159
Add an Active Directory account store............................................................................159 See Also ......................................................................................................................160
Remove an Active Directory account store.....................................................................160
Managing ADAM Account Stores ...................................................................................161 See Also ......................................................................................................................161

Prepare an ADAM instance for use with ADFS ..............................................................162 Enable ADAM User Accounts......................................................................................162 Configure the Federation Server SID ..........................................................................163
Add an ADAM account store...........................................................................................164 See Also ......................................................................................................................165
Change the server name or IP address for an ADAM account store .............................166 See Also ......................................................................................................................166
Change the display name for an ADAM account store...................................................167 See Also ......................................................................................................................167
Change the port number for an ADAM account store.....................................................168 See Also ......................................................................................................................168
Change the search base for an ADAM account store ....................................................169 See Also ......................................................................................................................169
Change the user name attribute for an ADAM account store.........................................170 See Also ......................................................................................................................170
Enable or disable TLS and SSL for an ADAM account store .........................................171 See Also ......................................................................................................................171
Using Multiple Account Stores ........................................................................................172 ADAM Store URI..........................................................................................................172 See Also ......................................................................................................................173
Change account store priority .........................................................................................173
Change the URI for an ADAM account store..................................................................174 See Also ......................................................................................................................174
Managing Claims and Claim Mapping ............................................................................174 See Also ......................................................................................................................175
Exposing Account Store Attributes as Claims ................................................................175 See Also ......................................................................................................................176
Map an organization custom claim to an Active Directory or ADAM user attribute (custom
claim extraction)...........................................................................................................177
Map an organization group claim to an ADAM attribute and value (group claim extraction)
.....................................................................................................................................178

See Also ......................................................................................................................178
Mapping Claims as Part of Application Authorization .....................................................179 See Also ......................................................................................................................180
Map an organization group claim to an Active Directory group (group claim extraction)180 See Also ......................................................................................................................180
Map a resource organization group claim to a resource group ......................................181
Create an incoming group claim mapping ......................................................................182 See Also ......................................................................................................................182
Create an incoming custom claim mapping....................................................................183 See Also ......................................................................................................................184
Create an outgoing group or custom claim mapping ......................................................184 See Also ......................................................................................................................185
Change the organization claim mapping of an outgoing group or custom claim............185
Change the organization claim mapping of an incoming group or custom claim ...........186
Creating, Deleting, and Configuring Claims....................................................................187 See Also ......................................................................................................................188
Create an organization group or custom claim ...............................................................188 See Also ......................................................................................................................189
Delete an organization group or custom claim ...............................................................189
Change the auditing limitation for an organization group or custom claim.....................190
Configure a claims transform module .............................................................................191
Change the domain suffix for an incoming or outgoing e-mail claim ..............................192 See Also ......................................................................................................................193
Enable or disable an organization identity claim for an account or resource partner.....193
Troubleshooting Active Directory Federation Services...................................................194
Verifying Active Directory Federation Services Computer Settings and Connectivity ....195 Verifying Settings to Locate the Point of Failure .........................................................195
Sample Scenario ......................................................................................................195 Verification Steps to Locate the Point of Failure .........................................................196

1. Verify Connectivity and Initial Request from the Client ........................................197 2. Verify Web Server Redirection to the Resource Federation Server ....................197 3. Verify Home Realm Discovery .............................................................................198 4. Verify Client Authentication in the Account Domain.............................................201 5. Verify Account Server Redirection to the Resource Federation Server...............203 6. Verify Resource Server Redirection to the Web Server.......................................203
See Also ......................................................................................................................205
Configuring ADFS Servers for Troubleshooting .............................................................205 Configuration Tasks for Troubleshooting.....................................................................206
Configure ADFS Event Logging ...............................................................................206 Configuring ADFS Servers to Record Auditing of ADFS Events to the Security Log .206
Configure ADFS Debug Logging..............................................................................208 Disable JavaScript....................................................................................................213 Enable ASP.NET Debug Output ..............................................................................214 Configure an ASP.NET Error Page..........................................................................214
Default Event Logs ......................................................................................................215 Default Events for Token-based Applications on a Web Server..............................215 Default Events for Claims-aware Applications on a Web Server.............................216 Default Auditing Events for Token-based Applications on a Federation Server ......217 Default Auditing Events for Claims-aware Applications on a Federation Server .....224


15
ADFS Operations Guide
This Operations Guide provides administering and troubleshooting information for Active
Directory Federation Services (ADFS) in the Microsoft® Windows Server™ 2003 R2,
Enterprise Edition, and Microsoft Windows Server 2003 R2, Datacenter Edition, operating
systems (for Federation Service, Federation Service Proxy, and ADFS Web Agent
components); and the Microsoft Windows Server 2003 R2, Standard Edition, operating
system (for ADFS Web Agent components).
In this guide
Administering Active Directory Federation Services
Troubleshooting Active Directory Federation Services
See Also Overview of ADFS
Active Directory Federation Services (ADFS)
Active Directory Federation Services Design Guide
ADFS Step-by-Step Guide
Administering Active Directory Federation Services
This guide provides administering information for Active Directory Federation Services
(ADFS) in the Microsoft® Windows Server™ 2003 R2, Enterprise Edition, and Microsoft
Windows Server 2003 R2, Datacenter Edition, operating systems (for Federation Service,
Federation Service Proxy, and ADFS Web Agent components); and the Microsoft
Windows Server 2003 R2, Standard Edition, operating system (for ADFS Web Agent
components).
In this guide
Introduction to Administering ADFS
Managing ADFS Components

16
Managing ADFS Partnerships
Managing Accounts and Account Stores
Managing Claims and Claim Mapping
Acknowledgments
Produced by: Microsoft Windows Server User Assistance team
Project Writer: Mary Hillman
Project Editor: Femila Anilkumar
Contributing Writer: Nick Pierson
Technical Reviewers: Derek Del Conte, Vijay Gajjala, Dan Hartop, Ed Johns, Ryan D.
Johnson, Jagadeesh Kalki, Carol Li, Vani Nori, Harini Raghavan, Rahul Shelar
Introduction to Administering ADFS
Active Directory Federation Services (ADFS) is a component in Microsoft® Windows
Server™ 2003 R2 that provides Web single-sign-on (SSO) technologies that allow the
authentication of a user to multiple Web applications over the life of a single online
session. ADFS accomplishes SSO by securely sharing digital identity and entitlement
rights, or claims, across security and enterprise boundaries.
ADFS provides a robust environment that requires few frequent maintenance tasks.
However, in operating a federation environment, you might have to perform certain tasks
on a regular basis and others only as needed. This guide provides information and
instructions for performing such tasks.
Planning for ADFS Operations Operating Active Directory Federation Services (ADFS) consists of tasks and procedures
for updating configurations for ADFS components as well as the installed applications
and Windows components, including Windows Certificate Services, Internet Information
Services (IIS), Active Directory directory service, and Active Directory Application Mode
(ADAM).
When managing ADFS operations, you will need to update configurations for the ADFS
components, including the ADFS servers (including federation servers and federation
server proxies), ADFS Trust Policy, ADFS Web Agents, ADFS partnerships, ADFS
account stores, and ADFS claims.

17
Before you begin, prepare a plan that establishes a baseline operating environment
and addresses operational needs and actions.
To plan your ADFS operations environment, perform the following tasks:
Assess your IT environment and establish a baseline.
Determine your operational needs.
Assess Your IT Environment and Establish a Baseline
Understand the details of the federated Web sites and partners that the ADFS
deployment must support to effectively and securely operate ADFS servers. For
information about planning for specific ADFS scenarios, see the Active Directory
Federation Services Design Guide (http://go.microsoft.com/fwlink/?LinkId=63486).
Review any service specifications that were produced during the planning and
deployment process, along with any service-level requirements defined in service
level agreements between partner IT organizations.
You will need to understand the following environmental conditions and requirements
when you establish your operations baseline and to accommodate growth and
modifications to your IT environment:
Supported partners: When using ADFS, you are usually working with partner
organizations. When establishing identity federation, determine the organizations with
which you want to form a partnership. After a baseline ADFS deployment is in place,
operating with partners involves adding partners, deleting partners, and updating
partner information. Changes to partnerships can be required for a variety of reasons.
For example, your ADFS deployment might require partnership updates if your
partner changes its business significantly, your organization becomes part of a larger
organization or a federation of organizations, or your organization is acquired by a
different company. In any scenario where you are federating identities from multiple
domains, you will need to be aware of the domains (partners) that you are currently
supporting and all additional domains that represent potential partners.
Supported application types: Some ADFS applications require access to operating
system resources, while others are "claims aware." It is important to understand the
type of applications that ADFS will support so that administration requirements can
be formulated.
Logical and physical architectural diagrams or deployment topology: You will need to
know whether ADFS is working in a set of farmed servers or a single server. You
must understand where your network deploys firewalls and proxies. You must also be

18
aware of the location of resources and whether the users are accessing resources
from within your organization or from outside the organization, or both.
Certificate and trust information: You should understand how the certificates in the
environment have been acquired and used. For example, it is important to
understand whether the certificates follow a chain up to a root certification authority
(CA) and how your certificates are obtained so that you can address certificate
renewals. It is important to understand how certificate revocation works in your
environment.
User account management requirements: You must understand how users gain
access to resources in your environment, whether external users have access to
resources in your domain, and whether you have enabled fine-grained control or are
leveraging groups to dictate access control.
Data for these conditions provide a starting point for establishing a baseline for the
operations environment and for setting the proper level of service.
Determine Operational Needs
Performing operations require that tasks are assigned to the appropriate server
administrators on the teams that support the ADFS deployment. The ADFS operations
team must establish processes for managing the following ADFS components and their
related configurations:
Federation Service:
If you find that the federation server or server farm is not meeting scalability,
performance, or reliability requirements, you can add an additional federation
server.
If you want to monitor access or diagnose failures, you can modify certain
logging settings at the federation server.
Many federation server tasks encompass establishing and managing
partnerships, resources, and accounts, as explained later in this topic.
Federation Service Proxy (optional):
If you find that the federation server proxy or server farm is not meeting
scalability, performance, or reliability requirements, you can add an additional
federation server proxy.
You might add a proxy to an existing deployment as part of enabling Internet
access to your existing resources.

19
If the client authentication model changes, you can change the federation
server proxy to handle this authentication model.
Federated application(s):
When you add a new Web application that is protected by ADFS--for example, if
your organization has a new Web site for purchase order management--you will
need to add the application to the ADFS deployment.
When the type of user information that the application requires to make its
decisions changes, you will need to update claims in your ADFS deployment.
When the URL for the application changes, you will need to update URLs in your
ADFS deployment.
Partnerships:
When establishing a new relationship due to acquisitions, mergers, business
contracts, and so on, you will need to add and remove partnerships in your ADFS
deployment.
When changing an existing business relationship, you might need to update
properties in your ADFS partnership.
Accounts:
In federated scenarios where the application is a Windows NT token-based
application, you will need to manage resource groups in the resource partner.
When you establish a new relationship, you will need to add additional accounts
to your account store.
When additional users and groups need access to an existing application, you
will need to add these accounts to your account store.
When to Use This Guide You should use this guide when:
You have ADFS deployed in a test or production environment.
You want to add or remove ADFS components.
You want to make changes to the configuration of ADFS components.
You want to add or remove Web applications that authenticate through ADFS.
This guide assumes a basic understanding of ADFS, how it works, and why your
organization uses it to federate Web applications. You should also have a thorough

20
understanding of how ADFS is deployed and managed in your organization, including
an understanding of the mechanism your organization uses to configure and manage
ADFS settings. To learn about ADFS concepts and scenarios, see the following ADFS
documentation:
Overview of ADFS (http://go.microsoft.com/fwlink/?LinkId=63491)
Active Directory Federation Services (ADFS)
(http://go.microsoft.com/fwlink/?LinkId=57765)
Active Directory Federation Services Design Guide
(http://go.microsoft.com/fwlink/?LinkId=63486)
This guide can be used by organizations that have deployed Microsoft
Windows Server 2003 R2. It includes information that is relevant to different roles within
an IT organization, including IT operations management and administrators. It contains
high-level information that is required to plan an ADFS operations environment. This
information provides management-level knowledge of ADFS and the IT processes
required to operate it.
In addition, this guide contains more detailed procedures that are designed for operators
who have varied levels of expertise and experience. Although the procedures provide
operator guidance from start to finish, operators must have a basic proficiency with the
Microsoft Management Console (MMC) and snap-ins and know how to start
administrative programs and access the command line. If operators are not familiar with
ADFS, it might be necessary for IT planners or IT managers to review the relevant
operations in this guide and provide the operators with parameters or data that must be
entered when the operation is performed.
How to Use This Guide The operations areas are divided into the following types of content:
Tasks pertain to group-related procedures and provide general guidance for
achieving the goals of an objective. In this guide, "Managing ADFS Web Agents and
Applications" is an example of a task.
Procedures provide step-by-step instructions for completing tasks. In this guide, "Add
an ADAM account store" is an example of a procedure topic.
If you are an IT manager who will be delegating tasks to operators within your
organization, you will want to:
Read through the tasks to determine whether you need to install tools before
operators perform the procedures for each task.

21
Before assigning tasks to individual operators, ensure that you have all the tools
installed where operators can use them.
When necessary, create “tear sheets” for each task that operators perform in your
organization. Cut and paste the task and its related procedures into a separate
document, and then either print these documents or store them online, depending on
the preference of your organization.
Technologies and Terminology Used in This Guide Active Directory Federation Services (ADFS) uses terminology from several different
technologies, including certificate services, Internet Information Services (IIS),
Active Directory, Active Directory Application Mode (ADAM), and Web Services (WS*).
For more information about these technologies, see:
Certificate services: Public Key Infrastructure for Windows Server 2003
(http://go.microsoft.com/fwlink/?LinkId=19936) and Public Key Infrastructure
(http://go.microsoft.com/fwlink/?LinkId=54917).
IIS: Windows Server Internet Information Services (IIS)
(http://go.microsoft.com/fwlink/?LinkId=63492).
Active Directory: Active Directory Collection in the Microsoft Windows Server 2003
Technical Reference on (http://go.microsoft.com/fwlink/?LinkId=63494).
ADAM: Active Directory Application Mode Technical Reference
(http://go.microsoft.com/fwlink/?LinkId=63506).
Web Services: Security Specifications (http://go.microsoft.com/fwlink/?LinkId=44191).
For a list of ADFS terms and definitions, see Terminology used in ADFS
(http://go.microsoft.com/fwlink/?LinkId=63507).
See Also Active Directory Federation Services (ADFS)
Overview of ADFS
Active Directory Federation Services Design Guide
ADFS Step-by-Step Guide
Public Key Infrastructure for Windows Server 2003

22
Public Key Infrastructure
Certificate Services Technical Reference
Windows Server Internet Information Services (IIS)
Managing ADFS Components
Active Directory Federation Services (ADFS) has three components:
Federation Service: Functions as a security token service and routes authentication
requests from external user accounts in partner organizations and clients on the
Internet.
Federation Service Proxy: Functions as a proxy for the Federation Service in a
perimeter network. This component is optional in an ADFS deployment.
ADFS Web Agent: Provides authorization (consumes security tokens) and either
allows or denies access to two types of Web applications, as follows:
Claims-aware applications: Makes authorization decisions based on claims.
Windows NT token-based applications: Uses Windows-based authorization
mechanisms.
The following objectives are part of managing ADFS components:
Managing the Federation Service
Managing the Federation Service Proxy (Optional)
Managing ADFS Web Agents and Applications
Backing Up ADFS Components
See Also Understanding ADFS Components
23
Managing the Federation Service
The Federation Service component of Active Directory Federation Services (ADFS)
functions as a security token service. The act of installing the Federation Service
component on a computer makes that computer a federation server.
The following objectives are part of managing the Federation Service:
Managing a Federation Server Farm
Managing Trust Policy on Federation Servers
Managing Certificates Used by Federation Servers
See Also Managing the Federation Service Proxy (Optional)
Managing ADFS Web Agents and Applications
Backing Up ADFS Components
Managing a Federation Server Farm
To provide load-balancing of security services in larger Active Directory Federation
Services (ADFS) deployments, you can install additional federation servers. A Federation
Service must be able to verify tokens issued by all federation servers in that farm. To
accomplish this verification, the Federation Service uses verification certificates.
Therefore, implementing a server farm requires you to configure verification certificates in
the shared trust policy for every token-signing certificate that is in use by any server in
the farm.
The following properties are shared by all federation servers in a server farm:
TrustPolicy.xml file: This file contains the information for a Federation Service. This
file must be accessible to all servers in the server farm, either by location in a shared
directory or by using a file distribution method that ensures the replication of updates,
such as Distributed File System (DFS).
Certificate: Federation servers in the farm can each use a different token-signing
certificate, or they can all use the same certificate. When using the same certificate,
every federation server must have its own local copy of that certificate configured in
the certificate store, with access to the private key.

24
Account store: All servers recognize the same Active Directory domain or Active
Directory Application Mode (ADAM) store for user authentication.
The following tasks for managing a Federation Service server farm are described in this
objective.
Implementing a Server Farm of Federation Servers
Adding a New Federation Server
Removing a Federation Server
See Also Distributed File System (DFS)
Implementing a Server Farm of Federation Servers
You can implement a server farm of servers that are running the Federation Service
component of Active Directory Federation Services (ADFS) by appropriately installing
and configuring token-signing certificates. Use the following options when installing the
certificate and the Federation Service to implement a federation server farm:
During installation of the token-signing certificate for a server, if you select the option
to install the certificate into the local certificate store, the certificate becomes
available during installation of the Federation Service.
During installation of the Federation Service, the Windows Components Wizard
provides options that affect how the token-signing certificate is configured:
Select token-signing certificate: You can use this option to select the installed
token-signing certificate from the local certificate store.
Use an existing trust policy: If you select this option, ADFS automatically adds
the public portion of the selected token-signing certificate to the shared trust
policy of the Federation Service as the verification certificate.
Use the following methods for installing and sharing certificates to implement a federation
server farm:
Use a separate token-signing certificate for each server and generate the respective
verification certificates during Federation Service installation:

25
Install a separate token-signing certificate on each server.
During Federation Service installation, select the installed certificate and the
shared trust policy.
Share both public and private portions of the same certificate by using an image of
the server:
Install a token-signing certificate on one server.
During Federation Service installation, select the installed certificate and the
shared trust policy.
Create an image of this server and use this image to create all additional servers
in the server farm.
Share both public and private portions of the same certificate by importing the
certificate file that is provided by a public certification authority (CA) into the local
certificate store.
Obtain a token-signing certificate from a public CA.
Use physical media to import the certificate into the local certificate store of each
server.
During Federation Service installation, select the CA-provided token-signing
certificate and the shared trust policy file.
Share both public and private portions of the same certificate by exporting the private
key:
Install a single token-signing certificate from an enterprise CA on a server and
export the private key. This method requires that the token-signing certificate was
generated and placed directly into the local certificate store by the enterprise CA
and that private keys were marked as exportable.
Export the private key certificate to a file and protect it accordingly.
Prior to Federation Service installation, import the exported private key certificate
into the local certificate store on each additional server.
During Federation Service installation, select the imported certificate and the
shared trust policy. It is not necessary to export the public key because the trust
policy is shared.
Completion of this task is accomplished during the course of Adding a New Federation
Server.

26
See Also Managing Certificates Used by Federation Servers
Managing Token-signing Certificates
Rolling Over a Token-signing Certificate
Adding a New Federation Server
When you want to add a new federation server to an existing Active Directory Federation
Services (ADFS) deployment, you must configure the server as an application server,
install and configure certificates, and install the Federation Server component of ADFS
according to the method of implementing a server farm that you are using. You can also
set event logging according to server needs.
Task requirements
You need the following to perform the procedures for this task:
Note
If an existing server image is being used to prepare the additional federation
server, procedures in this task are not required. Use your imaging software to
create a new federation server.
An installed Secure Sockets Layer (SSL) certificate. For information about how to
acquire SSL certificates, see Obtaining Server Certificates
(http://go.microsoft.com/fwlink/?LinkId=62479).
If the token-signing certificate is shared among servers in the server farm, an existing
token-signing certificate for the Federation Service.
An existing Federation Service.
The location of the shared Trustpolicy.xml file for the Federation Service.
To complete this task, perform the following procedures:
1. Install Prerequisite Applications.
2. If an existing token-signing certificate private key is shared among the servers in the
server farm, go to step 3.
If a new token-signing certificate is to be installed into the local certificate store on the
new server, install a token-signing certificate on the new server, as follows:

27
If you are using Microsoft Certificate Services as an enterprise certification
authority (CA), obtain a new client authentication certificate. For more information
about obtaining a client authentication certificate, see Submit an advanced
certificate request via the Web to a Windows Server 2003 CA
(http://go.microsoft.com/fwlink/?LinkId=64020). Specify installing the certificate
into the local certificate store.
If you are using a different enterprise CA or a public CA, follow the instructions
provided by the CA.
Alternatively, Create a self-signed, code-signing certificate.
3. Configure the token-signing certificate according to the method of server farm
implementation you are using:
If you installed a separate token-signing certificate into the local certificate store
and are not sharing the private key, no other certificate configuration is required
prior to Federation Service installation.
If you are sharing the public and private portions of the same certificate that has
been provided by a public certification authority (CA), import the certificate to the
local certificate store prior to Federation Service installation. For instructions to
import the certificate, see Import a certificate
(http://go.microsoft.com/fwlink/?linkid=20040).
If you are sharing the public and private portions of the same exportable
certificate that has been provided by an enterprise CA, import the private key into
the local certificate store by performing the following procedures prior to
Federation Service installation:
Export the private key portion of a token-signing certificate.
Import a certificate from the Microsoft Web site
(http://go.microsoft.com/fwlink/?linkid=20040).
4. Install the Federation Service on an additional federation server
5. Configure event logging on a federation server
See Also Implementing a Server Farm of Federation Servers
Removing a Federation Server
Adding a New Federation Server Proxy

28
Install Prerequisite Applications
Active Directory Federation Services (ADFS) requires you to install the following
applications on a computer running Windows Server 2003 R2, Enterprise Edition, so that
the computer can host the Federation Service, Federation Service Proxy, or ADFS Web
Agent components of ADFS:
Internet Information Services (IIS)
Microsoft .NET Framework 2.0
Microsoft ASP.NET (required for claims-aware applications only)
When you add the Application Server Windows component, these three applications are
installed.
Administrative credentials
To complete this procedure, you must be a member of the Server Operators group.
To add the Application Server Windows component
1. Click Start, point to Control Panel, and then click Add or Remove Programs.
2. In Add or Remove Programs, click Add/Remove Windows Components.
3. In the Windows Components Wizard, select the Application Server check
box, and then click Next.
4. On the Completing the Windows Components Wizard page, click Finish.
See Also Install the Federation Service on an additional federation server
Install the Federation Service Proxy on an additional federation server proxy
Adding and Removing ADFS Web Agents

29
Create a self-signed, code-signing certificate
You can use the following procedure to create a self-signed, code-signing certificate that
also creates and installs a private key. To perform this procedure, use the Makecert.exe
utility. Makecert.exe is available in the Microsoft .NET Framework 2.0 Software
Development Kit (SDK) (http://go.microsoft.com/fwlink/?LinkId=62598), which you can
download from the Microsoft Web site.
Administrative credentials
To complete this procedure, you must be a member of the Administrators group on the
local computer.
To create a self-signed, code signing certificate that also creates and installs a private key using a script
Example command:
makecert -r -pe -n "CN=CertForADFS" -b 01/01/2006 -e 01/01/2007 -eku
1.3.6.1.5.5.7.3.3 -ss my -sr localMachine -sky exchange -sp "Microsoft RSA
SChannel Cryptographic Provider" -sy 12 "CertForMe.cer"
Note
Certificate expiration dates should be tracked to make sure that certificates are
replaced before they expire.
See Also Rolling Over a Token-signing Certificate
Rolling Over a Client Authentication Certificate
Export the private key portion of a token-signing certificate
Every federation server in an Active Directory Federation Services (ADFS) server farm
must have access to the private key of the token-signing certificate. If you are
implementing a server farm of federation servers that share a single, exportable private

30
key certificate that is issued by an enterprise certification authority (CA), the private
key portion of the existing token-signing certificate must be exported to make it available
for importing into the certificate store on the new server.
Administrative credentials
To complete this procedure, you must be a member of the Administrators group on the
local computer.
To export the private key of a token-signing certificate
1. Click Start, point to Administrative Tools, and then click Active Directory
Federation Services.
2. Right-click Federation Service, and then click Properties.
3. On the General tab, click View.
4. In the Certificate dialog box, click the Details tab.
5. On the Details tab, click Copy to File.
6. On the Welcome to the Certificate Export Wizard page, click Next.
7. On the Export Private Key page, select Yes, export the private key, and then
click Next.
8. On the Export File Format page, select Personal Information Exchange =
PKCS #12 (.PFX), and then click Next.
9. On the Password page, type and confirm the password that is required to share
the token-signing certificate. You will need this password when you select the
exported token-signing certificate when installing the Federation Service.
10. On the File to Export page, specify the certificate file, and then click Next.
11. On the Completing the Certificate Export Wizard page, click Finish.
12. Validate the success of your export by confirming that the file you specified is
created at the specified location.
Important
So that this certificate can be imported to the local certificate store on the
new server, you must transfer the file to physical media and protect its
security during transport to the new server. It is extremely important to
guard the security of the private key.
13. Import the exported certificate into the certificate store on the new server prior to
installing the Federation Service. For information about how to import the

31
certificate, see Import a certificate (http://go.microsoft.com/fwlink/?linkid=20040).
See Also Implementing a Server Farm of Federation Servers
Install the Federation Service on an additional federation server
When you install an additional federation server in a server farm, you add the Federation
Service component of Active Directory Federation Services (ADFS) and use the trust
policy file that is used by other federation servers in the server farm. A token-signing
certificate must have been installed or imported into the local certificate store. The trust
policy file must also be available on the network.
Administrative credentials
To complete this procedure, you must be a member of the Administrators group on the
local computer.
To install the Federation Service component of ADFS on an additional server
1. Click Start, point to Control Panel, and then click Add or Remove Programs.
2. In Add or Remove Programs, click Add/Remove Windows Components.
3. In the Windows Components Wizard, select the Active Directory Services
check box, and then click Details.
4. In the Active Directory Services dialog box, select the Active Directory
Federation Services (ADFS) check box, and then click Details.
5. In the Active Directory Federation Services (ADFS) dialog box, select the
Federation Service check box, and then click OK. If a message appears stating
that ASP.NET 2.0 was not previously enabled, click Yes to enable it, and then
click OK.
6. In the Active Directory Services dialog box, click OK.
7. In the Windows Components Wizard, click Next.
8. On the Federation Service page, click Select token signing certificate, and
then click Select to select the appropriate token-signing certificate from the local
32
certificate store.
9. In the Select Certificate dialog box, click the exported token-signing certificate,
and then click OK.
10. Under Trust policy, click Use an existing trust policy, and then click Browse.
11. In the Browse dialog box, click the shared TrustPolicy.xml file, and then click
Open.
12. If you are prompted for the location of the installation files, navigate to
R2 Installation Folder\cmpnents\r2, and then click OK.
13. On the Completing the Windows Components Wizard page, click Finish.
See Also Implementing a Server Farm of Federation Servers
Export the private key portion of a token-signing certificate
Configure event logging on a federation server
Servers that are running the Federation Service component of Active Directory
Federation Services (ADFS) log ADFS Federation Service events in the Application event
log. These events report information about the operation of the components of the local
organization and partner organizations that are covered by a trust policy.
Note
ADFS also can log debug information. Debug logs are located in
%systemdrive%\ADFS\logs.
The following types of events are available and enabled by default in ADFS:
Error: Information about a significant problem of which the user should be aware,
usually involving a loss of functionality or data.
Information: Information about a significant, successful operation.
Success audit: Indicates an audited security event that when an audited access
attempt is successful; for example, a successful logon attempt.
33
Detailed success: A success audit event with detailed information about each
token involved in the transaction, including claims information.
Warning: Indicates a problem that is not immediately significant, but that may signify
conditions that could cause future issues.
Failure audit: Indicates a security event that occurs when an audited access attempt
fails; for example, an inbound token was not valid.
Detailed failure: A failure audit event with detailed information about each token
involved in the transaction, including claims information.
You can select the levels that you want to enable and disable.
Note
Audit object access must be turned on for success or failure to allow the
Federation Service to log errors. For more information, see Audit object access
(http://go.microsoft.com/fwlink/?LinkId=62686).
Administrative credentials
To complete this procedure, you must be a member of the Administrators group on the
local computer.
To change the event types that are logged by ADFS
1. Click Start, point to Administrative Tools, and then click Active Directory
Federation Services.
2. Right-click the Trust Policy node, and then click Properties.
3. Scroll to the Event Log tab.
4. Under Event log level, click to select and deselect event log types, and then
click OK.
Removing a Federation Server
When you no longer need a server that is running the Federation Service component of
Active Directory Federation Services (ADFS), perform the following procedures:
Remove the Federation Service ADFS component, as described in Remove an
ADFS component.

34
If you have a federation server farm and the trust policy is shared on the network,
disconnect the mapped network drive for the connection to the shared trust policy
folder.
Delete the token-signing certificate from the certificate store. For information about
how to delete a certificate from a certificate store, see Delete a certificate
(http://go.microsoft.com/fwlink/?LinkId=62715.
If this is the only instance of the Federation Service, do the following:
Notify the partner that this issuer is no longer valid and tell them to remove the
partner node for this Federation Service, as described in Removing ADFS
Partners.
Decommission the Web server and change the authentication for any Web
applications.
See Also Removing a Federation Server Proxy
Removing ADFS Partners
Remove an ADFS component
If you want to remove a server that is running the Federation Service or Federation
Service Proxy component of Active Directory Federation Services (ADFS) from a
Federation Service, use the following procedure to remove the respective ADFS
component.
Administrative credentials
To complete this procedure, you must be a member of the Administrators group on the
local computer.
To remove an ADFS component
1. Click Start, point to Control Panel, and then click Add or Remove Programs.
2. In Add or Remove Programs, click Add/Remove Windows Components.
3. In the Windows Components Wizard, select the Active Directory Services
check box, and then click Details.

35
4. In the Active Directory Services dialog box, select the Active Directory
Federation Services (ADFS) check box, and then click Details.
5. In the Active Directory Federation Services (ADFS) dialog box, clear the
Federation Service check box or the Federation Service Proxy check box, and
then click OK.
6. In the Active Directory Services dialog box, click OK.
7. In the Windows Components Wizard, click Next.
8. On the Completing the Windows Components Wizard page, click Finish.
See Also Remove an ADFS Web Agent for a claims-aware or Windows NT token-based
application
Managing Trust Policy on Federation Servers
The Active Directory Federation Services (ADFS) trust policy file defines the set of
parameters that a Federation Service requires to identify partners, certificates, account
stores, claims, and various properties of these entities that are associated with the
Federation Service.
Task requirements
You need the following to perform the procedures for this task:
Active Directory Federation Services MMC snap-in
TrustPolicy.xml file located in %systemdrive%\ADFS
The following procedures for managing trust policy on federation servers are described in
this task. Use these procedures on an as-needed basis.
Change the Federation Service trust policy location
Change the Federation Service URI
Change the Federation Service endpoint URL
Configure the Federation Service default Web pages
36
Change the primary display name for a trust policy
Change a claims transform module
Change the token lifetime for a Federation Service
Change the trust policy refresh period
Change the Windows domain trust cache refresh period
See Also Managing ADFS Partnerships
Managing Accounts and Account Stores
Managing Claims and Claim Mapping
Managing Certificates Used by Federation Servers
Change the Federation Service trust policy location
The TrustPolicy.xml file contains data that defines a Federation Service in Active
Directory Federation Services (ADFS). By sharing the folder that contains this file, you
make the data available to other federation servers in a federation server farm that
comprises the Federation Service.
If the location of the TrustPolicy.xml file changes, make sure that you update the location
on each server in the Federation server farm.
Perform this procedure on a federation server that hosts the TrustPolicy.xml file you want
to move. After copying the TrustPolicy.xml file to its new location, update the path on
each server in the server farm, and then delete the old TrustPolicy.xml file.
Administrative credentials
To complete this procedure, you must be a member of the Administrators group on the
local computer.
To change the location of the trust policy file
1. Copy the TrustPolicy.xml file from its current location to its new location and
share the folder appropriately. (The default location for TrustPolicy.xml is
37
%systemdrive%\ADFS).
2. Click Start, point to Administrative Tools, and then click Active Directory
Federation Services.
3. Right-click Federation Service, and then click Properties.
4. On the General tab, replace the text in Trust policy file with the new path to the
TrustPolicy.xml file, or click Browse to select it.
5. Confirm the new path in Trust policy file, and then click OK.
6. Repeat steps 2 through 5 on each federation server in the server farm.
7. After successfully reconfiguring each federation server with the new trust policy
location, delete the original trust policy file.
Change the Federation Service URI
In Active Directory Federation Services (ADFS), the Federation Service Uniform
Resource Identifier (URI) uniquely identifies a Federation Service. This URI also identifies
the federation server farm membership of the federation server. URIs are case-sensitive.
In a federated scenario, the URI that is specified in the properties of the Trust Policy node
of a Federation Service also identifies the Federation Service in the properties of the
respective account or resource node in the partner organization. Therefore, if you change
the URI of a partner Federation Service, you must change its value in the corresponding
partner node in the trust policy of the other partner. If the partners are in separate
organizations, you must communicate this change to the administrator who makes these
changes.
URI values must match according to standard URI comparison rules, as described in
Request for Comments (RFC) 3986, "Uniform Resource Identifier (URI): Generic Syntax"
(http://go.microsoft.com/fwlink/?LinkId=65481).
Note
Changes to the Federation Service URI are received by federation servers in the
Federation Service through the shared TrustPolicy.xml file. However, this change
must be made manually in the corresponding Federation Service of the partner
organization. During this time, users who have already signed on using the URI
will have to authenticate again if they return to the same Federation Service,
such as when they try to access another site. The contents of the cookie in the

38
access token, which lasts 10 hours by default, will no longer match the Federation
Service. For this reason, the user will be prompted again for credentials
Perform the following procedure on a federation server in the Federation Service whose
URI you want to change.
Administrative credentials
To complete this procedure, you must be a member of the Administrators group on the
local computer.
To change the Federation Service URI in the Trust Policy properties
1. On the federation server whose Federation Service URI you want to change,
click Start, point to Administrative Tools, and then click Active Directory
Federation Services.
2. Double-click Federation Service, right-click Trust Policy, and then click
Properties.
3. On the General tab, in Federation Service URI, type the new URI, and then
click OK.
The URI value must also be updated in the properties of the corresponding resource or
account partner node in the partner Federation Service.
Administrative credentials
To complete this procedure, you must be a member of the Administrators group on the
local computer.
To change the Federation Service URI in the account partner or resource partner properties
1. Click Start, point to Administrative Tools, and then click Active Directory
Federation Services.
2. Double-click Federation Service, double-click Trust Policy, double-click
Partner Organizations, and then double-click Account Partners if you are
logged on to the resource federation server, or double-click Resource Partners
if you are logged on to the account federation server.
3. Right-click the account or resource partner whose Federation Service URI has
changed, and then click Properties.
4. On the General tab, in Federation Service URI, type the new URI, and then
click OK.

39
Note
This URI must match the URI in the trust policy of the corresponding
partner organization according to standard URI comparison rules.
Change the Federation Service endpoint URL
In Active Directory Federation Services (ADFS), the Federation Service endpoint Uniform
Resource Locator (URL) is the single location, or "public URL," that is used to contact all
federation servers in a server farm. If the public name changes, you must change the
Federation Service endpoint URL.
The Federation Service endpoint URL that is specified in the properties of the Trust
Policy node of one Federation Service also identifies the Federation Service in the
properties of the respective account or resource node in the partner organization. For
example, for the account partner Federation Service in an ADFS deployment that has
both a resource partner and an account partner, the Federation Service endpoint URL
that is specified in the properties of the account partner node on the respective resource
federation server must match the Federation Service endpoint URL in the Trust Policy
properties on the account federation server. Consequently, if you change the endpoint
URL of the Federation Service on the Trust Policy node, an administrator in the partner
organization must also change the Federation Service endpoint URL on the
corresponding account partner node.
If you install the Federation Service Proxy component of ADFS in a perimeter network,
the Federation Service endpoint URL must point to the Federation Service Proxy that
forwards requests to the Federation Service. In this case, the Federation Service
endpoint URL contains the URL of the Federation Service Proxy rather than the partner
Federation Service.
Note
Changes to the Federation Service endpoint URL are received by federation
servers through the shared TrustPolicy.xml file. However, this change must be
made manually in the trust policy of the corresponding partner organizations.
Administrative credentials

40
To complete this procedure, you must be a member of the Administrators group on the
local computer.
To change the Federation Service endpoint URL
1. Click Start, point to Administrative Tools, and then click Active Directory
Federation Services.
2. Double-click Federation Service, right-click Trust Policy, and then click
Properties.
3. On the General tab, in Federation Service endpoint URL, select the domain
portion of the URL, replace the selected text with the new URL, and then click
OK.
Perform the following procedure on the federation server where you are updating the
Federation Service URL on the respective account partner or resource partner after it has
been changed in the trust policy for the home Federation Service.
Administrative credentials
To complete this procedure, you must be a member of the Administrators group on the
local computer.
To change the Federation Service endpoint URL in the account partner or resource partner
1. Click Start, point to Administrative Tools, and then click Active Directory
Federation Services.
2. Double-click Federation Service, double-click Trust Policy, double-click
Partner Organizations, and then double-click Account Partners if you are
logged on to the resource federation server, or double-click Resource Partners
if you are logged on to the account federation server.
3. Right-click the account or resource partner whose Federation Service endpoint
URL has changed, and then click Properties.
4. On the General tab, in Federation Service endpoint URL, select the domain
portion of the URL, replace the selected text with the new endpoint URL, and
then click OK.
See Also Set the application URL for an application

41
Set the return URL for a claims-aware application
Set the return URL for a Windows NT token-based application
Configure the Federation Service default Web pages
When a Web resource is protected by Active Directory Federation Services (ADFS),
three .aspx files specify the default Web pages that are presented before and after
access to the resource:
clientlogon.aspx: This page is presented by the Federation Service or Federation
Service Proxy for collecting credentials from the user. It may be in the form of the
current Windows credentials using Windows Integrated authentication or Basic
authentication, or it might provide for forms-based user name and password entry.
discoverclientrealm.aspx: This page is presented by the resource Federation Service
or Federation Service Proxy when the realm of the client is not known.
signout.aspx: This page is presented by the resource Federation Service or
Federation Service Proxy after the user signs out of the resource Web page.
The default location of these files on federation servers and federation server proxies is
%systemdrive%\ADFS\sts\ls.
You can change the names of these files, but the location of the files must be
%systemdrive%\ADFS\sts\ls or a subdirectory of this location. Use Windows Explorer to
change the file names or locations, and then change their location in the Active Directory
Federation Services snap-in.
Perform this procedure on a federation server or federation server proxy.
Administrative credentials
To complete this procedure, you must be a member of the Administrators group on the
local computer.
To change the Federation Service default Web pages
1. Click Start, point to Administrative Tools, and then click Active Directory
Federation Services.
2. Right-click Federation Service on a federation server, or Federation Service
Proxy on a federation server proxy, and then click Properties.

42
3. On the Web Pages tab, change the names of the files in Client logon page,
Account partner discovery page, or Client logoff page, and then click OK.
4. Validate the effect of the change by performing an action on the Web application.
Verify that you receive the new logon page.
Note
In certain cases (for example, when you are using existing facilities offered by
ADFS and IIS for authentication), you might additionally need to copy IIS settings
related to authentication, as well as the auth directory
(%systemdrive%\ADFS\sts\ls\auth\*) where ADFS stores the different files that
leverage IIS authentication. For example, ...\auth\integrated stores files that are
used for integrated authentication using Windows credentials. Similarly,
...\auth\sslclient stores files that are used for SSL authentication.
Change the primary display name for a trust policy
Each Federation Service in an Active Directory Federation Services (ADFS) deployment
has a primary display name. The discoverclientrealm.aspx page displays these names
during logon so that the user can select the correct account realm for his organization.
Administrative credentials
To complete this procedure, you must be a member of the Administrators group on the
local computer.
To change the primary display name for a trust policy
1. Click Start, point to Administrative Tools, and then click Active Directory
Federation Services.
2. Double-click Federation Service, right-click the Trust Policy node, and then
click Properties.
3. Click the Display Name tab.
4. In Display name for this trust policy, type the new primary display name, and
then click OK.

43
Change a claims transform module
You can configure servers that are running the Federation Service component of Active
Directory Federation Services (ADFS) to use a claims transform module to manage
claims. If you use a claims transform module and you make a change to the class name
that the transform module uses, use the following procedure to make the change in the
trust policy.
Administrative credentials
To complete this procedure, you must be a member of the Administrators group on the
local computer.
To change the claims transform module
1. On the federation server whose transform module you want to change, click
Start, point to Administrative Tools, and then click Active Directory
Federation Services.
2. Double-click Federation Service, right-click Trust Policy, and then click
Properties.
3. In the Trust Policy Properties dialog box, click the right arrow to scroll to the
Transform Module tab, and then click the Transform Module tab.
4. In DLL file, type the path to the dynamic-link library (DLL) file, or click Browse to
select it.
5. In Class name, type the namespace-qualified class name that the transform
module will use, and then click OK.
See Also Configure a claims transform module
Change the token lifetime for a Federation Service
Each server that is running the Federation Service component of Active Directory
Federation Services (ADFS) issues Security Assertion Markup Language (SAML) tokens.
These security tokens are transferred between clients and federation servers within

44
authentication cookies. Authentication cookies can be issued by both the Federation
Service and the ADFS Web Agent.
Note
At the Federation Service, the security token in an authentication cookie holds
the organization claims for the client. For more information about SAML tokens,
see WS-Federation: Passive Requestor Profile
(http://go.microsoft.com/fwlink/?LinkId=64813).
After the Federation Service validates the client once, the authentication cookie is written
to the client. Further authentication takes place through use of the cookie rather than
through repeated authentication of the client credentials. In this way, the authentication
cookie facilitates single sign-on (SSO). The period of time that this authentication cookie
can be used by the client is configurable in the trust policy of the Federation Service as
the "token lifetime."
Note
Authentication cookies are not used by federation server proxies. For more
information about federation server proxies, see Federation Service Proxy
(http://go.microsoft.com/fwlink/?LinkId=62784).
The default value for token lifetime is 600 minutes, or 10 hours. The minimum value is
one minute.
Caution
If you set the token lifetime value too low, the SSO experience of extranet users
is degraded. Users will be forced to authenticate again in a forms-based logon as
soon as the cookie expires. Only internal corporate users who use integrated
authentication will continue to experience single sign-on.
Administrative credentials
To complete this procedure, you must be a member of the Administrators group on the
local computer.
To change the token lifetime for a trust policy
1. Click Start, point to Administrative Tools, and then click Active Directory
Federation Services.
2. Right-click the Trust Policy node, and then click Properties.
3. Scroll to the Advanced tab, and then click the Advanced tab.
4. In Token lifetime (minutes), type or scroll to a new number of minutes, and then

45
click OK.
See Also Change the trust policy refresh period
Change the Windows domain trust cache refresh period
Change the token lifetime for an application
Change the trust policy refresh period
Each Active Directory Federation Services (ADFS) component uses the trust policy
refresh period to determine how often the component checks for changes to the trust
policy, and loads the trust policy if it has changed. The default value for this setting is
60 minutes. The minimum value is five minutes.
Administrative credentials
To complete this procedure, you must be a member of the Administrators group on the
local computer.
To change the trust policy refresh period
1. Click Start, point to Administrative Tools, and then click Active Directory
Federation Services.
2. Right-click Trust Policy, and then click Properties.
3. Scroll to the Advanced tab, and then click the Advanced tab.
4. In Trust policy refresh period (minutes), type or scroll to a new number of
minutes, and then click OK.
See Also Change the token lifetime for a Federation Service
Change the Windows domain trust cache refresh period
46
Change the Windows domain trust cache refresh period
On a server that is running the Federation Service component of Active Directory
Federation Services (ADFS), the refresh period of the Windows domain trust cache
specifies how often the Federation Service refreshes Windows trust information. The
default value is 60 minutes.
Administrative credentials
To complete this procedure, you must be a member of the Administrators group on the
local computer.
To change the refresh period for the Windows domain trust cache
1. Click Start, point to Administrative Tools, and then click Active Directory
Federation Services.
2. Right-click Trust Policy, and then click Properties.
3. Scroll to the Advanced tab, and then click the Advanced tab.
4. In Windows domain trust cache refresh period (minutes), type or scroll to a
new number of minutes, and then click OK.
See Also Change the token lifetime for a Federation Service
Change the trust policy refresh period
Managing Certificates Used by Federation Servers
Servers that are running the Federation Service component of Active Directory
Federation Services (ADFS) are required to use the following types of certificates:
Secure Sockets Layer (SSL) server authentication certificates: Federation servers
use SSL server authentication certificates to secure Web services traffic for
communication with Web clients and federation server proxies. If you use a
standalone certification authority (CA) specifically for your ADFS deployment, you

47
need to manually request, download, and install SSL certificates. These
certificates are requested and installed through the Internet Information Services (IIS)
snap-in. For more information about using SSL certificates, see Configuring Secure
Sockets Layer (http://go.microsoft.com/fwlink/?LinkId=62785) and Obtaining Server
Certificates (http://go.microsoft.com/fwlink/?linkid=62479).
Token-signing certificates: Each federation server uses a token-signing certificate to
digitally sign all security tokens that it produces. A token-signing certificate can be
any certificate that has a digital signature key usage (KU), such as a server
authentication certificate or code-signing certificate. Enhanced key usage (EKU) is
not required for token-signing certificates. For best results, use a certificate other
than the SSL server authentication certificate that you installed on the federation
server. Token-signing certificates are installed differently, depending on the server
farm method, as follows:
For the first server in the Federation Service, a token-signing certificate must be
requested and installed. You can install a token-signing certificate by connecting
to an enterprise CA, a public CA (for example, Verisign), or by creating a self-
signed certificate. For information about installing token-signing certificates when
using Microsoft Certificate Services as your enterprise CA, see Submit an
advanced certificate request via the Web to a Windows Server 2003 CA
(http://go.microsoft.com/fwlink/?linkid=64020). For information about installing a
token-signing certificate from a public CA, contact your public CA. For
information about creating self-signed certificates, see Create a self-signed,
code-signing certificate.
For additional federation servers within a single server farm, you can reuse the
same token-signing certificate by sharing its private key, or you can create a
unique certificate for each server. When multiple certificates are used, each
server in that farm signs tokens with a unique private key. However, you must
configure each server with the public keys from all servers in that farm by adding
public keys for all certificates to the trust policy as verification certificates.
Verification certificates: Verification certificates are the public key portion of the
token-signing certificates of federation servers, and are used to ensure that the
security token was issued by a trusted federation server and that it was not modified.
Each federation server requires a verification certificate for every token-signing
certificate that should be accepted when presented to that federation server,
including its own token-signing certificate. In a federated scenario, verification
certificates are also associated with each account partner to verify tokens that claim
to be issued by that partner’s federation server(s). In farmed scenarios where each
federation server uses a different token-signing certificate, there must be a
verification certificate that corresponds to each of those servers. If all token-signing

48
certificates that are issued to a set of federation servers are issued by the same
CA, you can use the exported public key of that CA certificate for the verification
certificate in the trust policy and for use by partners.
The following tasks for managing certificates on federation servers are described in this
objective.
Managing Token-signing Certificates
Managing Verification Certificates
Rolling Over a Token-signing Certificate
See Also Understanding Certificates Used by ADFS
Public Key Infrastructure for Windows Server 2003
Public Key Infrastructure
Certificate Services Technical Reference
Managing Certificates Used by Federation Server Proxies
Managing Token-signing Certificates
Servers that are running the Federation Service component of Active Directory
Federation Services (ADFS) in an account Federation Service require token-signing
certificates to sign security tokens that the servers produce. You can view and change
the current certificate as needed. You can also manage the certificate revocation list
(CRL) to ensure that only valid certificates are in use in the Federation Service.
Task requirements
You need the following to perform the procedures for this task:
A Federation Service in an account role
A certification authority or the ability to create self-signed certificates
Active Directory Federation Services snap-in
To complete this task, perform the following procedures on an as-needed basis:
Create a self-signed, code-signing certificate
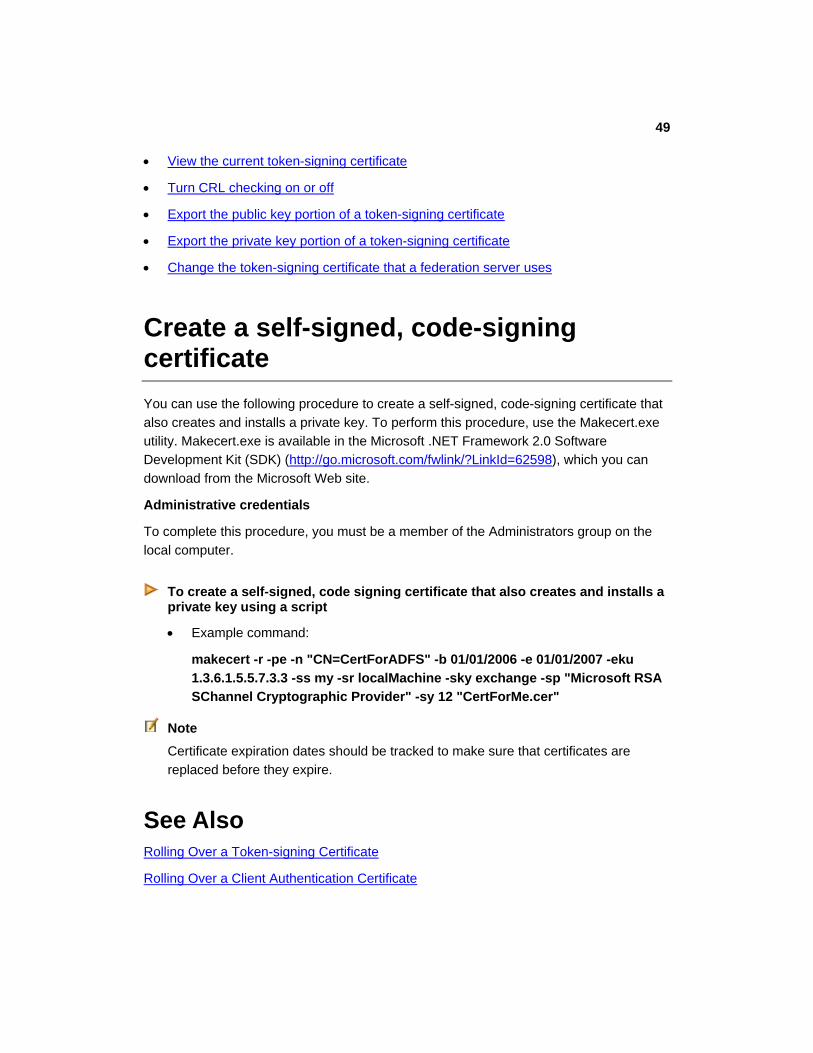
49
View the current token-signing certificate
Turn CRL checking on or off
Export the public key portion of a token-signing certificate
Export the private key portion of a token-signing certificate
Change the token-signing certificate that a federation server uses
Create a self-signed, code-signing certificate
You can use the following procedure to create a self-signed, code-signing certificate that
also creates and installs a private key. To perform this procedure, use the Makecert.exe
utility. Makecert.exe is available in the Microsoft .NET Framework 2.0 Software
Development Kit (SDK) (http://go.microsoft.com/fwlink/?LinkId=62598), which you can
download from the Microsoft Web site.
Administrative credentials
To complete this procedure, you must be a member of the Administrators group on the
local computer.
To create a self-signed, code signing certificate that also creates and installs a private key using a script
Example command:
makecert -r -pe -n "CN=CertForADFS" -b 01/01/2006 -e 01/01/2007 -eku
1.3.6.1.5.5.7.3.3 -ss my -sr localMachine -sky exchange -sp "Microsoft RSA
SChannel Cryptographic Provider" -sy 12 "CertForMe.cer"
Note
Certificate expiration dates should be tracked to make sure that certificates are
replaced before they expire.
See Also Rolling Over a Token-signing Certificate
Rolling Over a Client Authentication Certificate

50
View the current token-signing certificate
Each Active Directory Federation Services (ADFS) federation server uses a token-signing
certificate to digitally sign all security tokens that it produces. You can view the certificate
to check its expiration date, revocation status, and other details.
Administrative credentials
To complete this procedure, you must be a member of the Administrators group on the
local computer.
To view the current token-signing certificate
1. Click Start, point to Administrative Tools, and then click Active Directory
Federation Services.
2. Right-click Federation Service, and then click Properties.
3. On the General tab, under Token-signing certificate, click View.
4. On the General tab in the Certificate property sheet, assess the validity of the
certificate by noting the Valid from and to dates, and whether the certificate has
a private key associated with it, and then click OK twice.
Turn CRL checking on or off
Use this script to turn certificate revocation list (CRL) checking on and off on Active
Directory Federation Services (ADFS) servers.
Caution
This security setting has the potential to compromise the ADFS infrastructure.
It is not a security best practice to turn off CRL checking. However, some organizations
may choose to disable CRL checking or configure it to behave in a certain way.
Note
This script allows you to enable and disable CRL checking on a global basis (with
ADFS scope) only, and not on a per-partner basis.
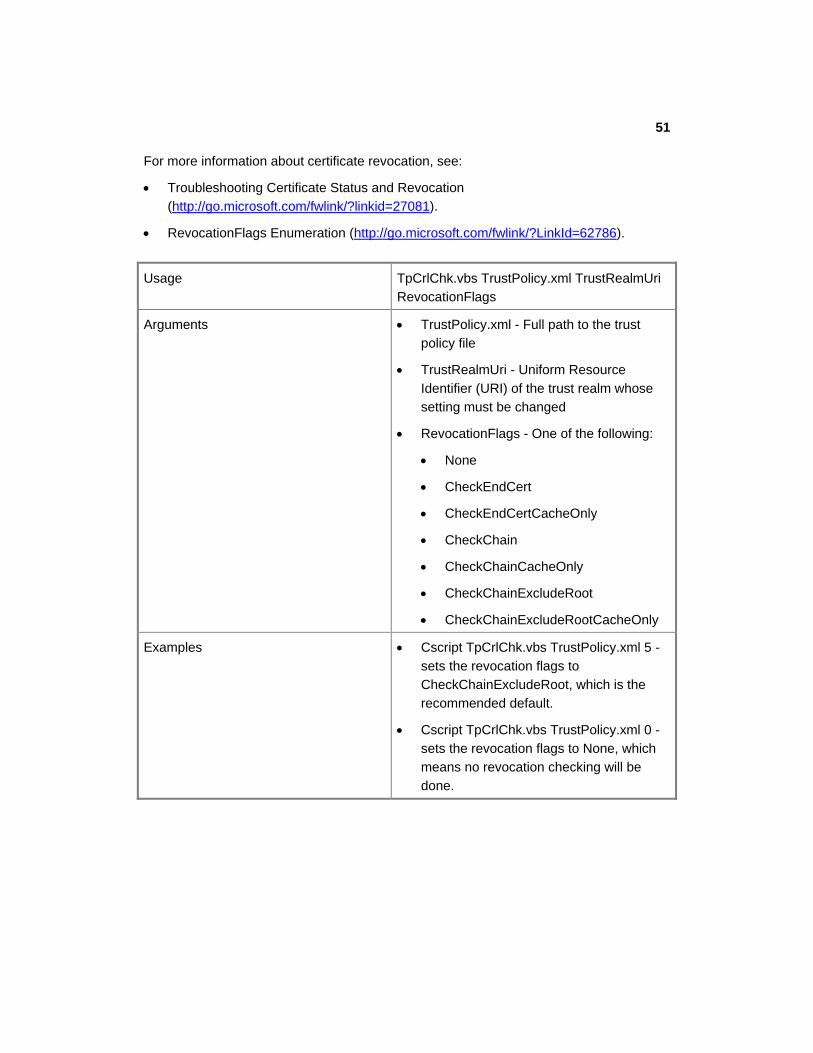
51
For more information about certificate revocation, see:
Troubleshooting Certificate Status and Revocation
(http://go.microsoft.com/fwlink/?linkid=27081).
RevocationFlags Enumeration (http://go.microsoft.com/fwlink/?LinkId=62786).
Usage TpCrlChk.vbs TrustPolicy.xml TrustRealmUri
RevocationFlags
Arguments TrustPolicy.xml - Full path to the trust
policy file
TrustRealmUri - Uniform Resource
Identifier (URI) of the trust realm whose
setting must be changed
RevocationFlags - One of the following:
None
CheckEndCert
CheckEndCertCacheOnly
CheckChain
CheckChainCacheOnly
CheckChainExcludeRoot
CheckChainExcludeRootCacheOnly
Examples Cscript TpCrlChk.vbs TrustPolicy.xml 5 -
sets the revocation flags to
CheckChainExcludeRoot, which is the
recommended default.
Cscript TpCrlChk.vbs TrustPolicy.xml 0 -
sets the revocation flags to None, which
means no revocation checking will be
done.

52
Script Text 'Option Explicit Dim tpf ' Trust policy factory Dim cf ' Claim Factory Dim tpFileName ' Trust policy file name Dim trUri ' TrustRealm Uri Dim revFlagsStr ' RevocationFlags enum in string form Dim tp ' TrustPolicy Dim tr ' TrustedRealm Dim revFlags ' RevocationFlags enum Dim found ' Did we find the realm in the trust policy? '---------------------------------------- ' Echo usage. '---------------------------------------- Sub Usage() WScript.StdErr.WriteLine("Usage:") WScript.StdErr.WriteLine("TpCrlChk.vbs TrustPolicy.xml TrustRealmUri RevocationFlags") WScript.StdErr.WriteLine() WScript.StdErr.WriteLine("Arguments:") WScript.StdErr.WriteLine("TrustPolicy.xml - Full path to the trust policy file") WScript.StdErr.WriteLine("TrustRealmUri - Uri of the trust realm whose setting must be changed") WScript.StdErr.WriteLine("RevocationFlags - One of the following:") WScript.StdErr.WriteLine(" None") WScript.StdErr.WriteLine(" CheckEndCert") WScript.StdErr.WriteLine(" CheckEndCertCacheOnly") WScript.StdErr.WriteLine(" CheckChain") WScript.StdErr.WriteLine(" CheckChainCacheOnly") WScript.StdErr.WriteLine(" CheckChainExcludeRoot") WScript.StdErr.WriteLine(" CheckChainExcludeRootCacheOnly") WScript.Quit End Sub '---------------------------------------- ' Fetch the RevocationFlags enum value. '---------------------------------------- Function GetRevFlags(revFlagsStr) If (revFlagsStr = "None") Then GetRevFlags = 0 ElseIf (revFlagsStr = "CheckEndCert") Then GetRevFlags = 1 ElseIf (revFlagsStr = "CheckEndCertCacheOnly") Then

53
GetRevFlags = 2 ElseIf (revFlagsStr = "CheckChain") Then GetRevFlags = 3 ElseIf (revFlagsStr = "CheckChainCacheOnly") Then GetRevFlags = 4 ElseIf (revFlagsStr = "CheckChainExcludeRoot") Then GetRevFlags = 5 ElseIf (revFlagsStr = "CheckChainExcludeRootCacheOnly") Then GetRevFlags = 6 Else Call Usage() End If End Function '---------------------------------------- ' Get the parameters. '---------------------------------------- Dim ArgObj Set ArgObj = WScript.Arguments If (ArgObj.Count < 3) Then Call Usage() End If tpFileName = ArgObj.Item (0) trUri = ArgObj.Item(1) revFlags = GetRevFlags(ArgObj.Item(2)) '---------------------------------------- ' Do the job. '---------------------------------------- WScript.StdOut.WriteLine("Loading trust policy: " & tpFileName) ' ' Create factories ' Set tpf = CreateObject("System.Web.Security.SingleSignOn.TrustPolicyFactory") Set cf = CreateObject("System.Web.Security.SingleSignOn.ClaimFactory") ' ' Load the TrustPolicy ' Set tp = tpf.Load(tpFileName, 0) ' initialize certs = false ' ' Find the realm and set the revocation flags '

54
found = 0 If (tp.TrustPolicyEntryUri = trUri) Then ' ' Hosted realm attributes ' WScript.StdOut.WriteLine("Changing the setting for this Federation service: " & trUri) found = 1 tp.VerificationMethod.RevocationCheckFlags = revFlags Else ' ' Trusted Realms ' For Each tr in tp.TrustedRealms If (tr.TrustPolicyEntryUri = trUri) Then WScript.StdOut.WriteLine("Changing the setting for this Account partner: " & trUri) found = 1 tr.VerificationMethod.RevocationCheckFlags = revFlags Exit For 'since the Uri is unique End If Next If (found = 0) Then WScript.StdOut.WriteLine("Error: " & trUri & " is neither this Federation Service nor an Account partner.") WScript.Quit End If End If '---------------------------------------- ' Save the TrustPolicy '---------------------------------------- WScript.StdOut.Write("Saving changed trust policy...") tp.Write(tpFileName) WScript.StdOut.WriteLine("done.")
Export the public key portion of a token-signing certificate
A token-signing certificate is used by an Active Directory Federation Services (ADFS)
federation server to digitally sign all security tokens that it produces. Verification
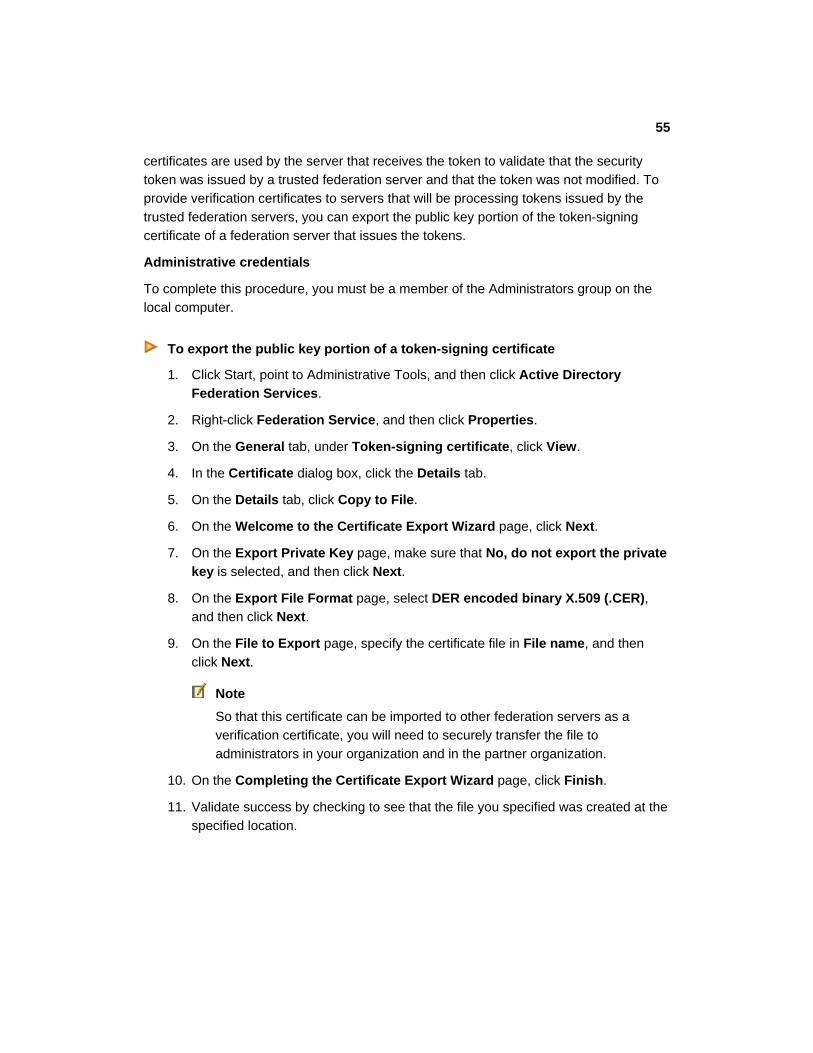
55
certificates are used by the server that receives the token to validate that the security
token was issued by a trusted federation server and that the token was not modified. To
provide verification certificates to servers that will be processing tokens issued by the
trusted federation servers, you can export the public key portion of the token-signing
certificate of a federation server that issues the tokens.
Administrative credentials
To complete this procedure, you must be a member of the Administrators group on the
local computer.
To export the public key portion of a token-signing certificate
1. Click Start, point to Administrative Tools, and then click Active Directory
Federation Services.
2. Right-click Federation Service, and then click Properties.
3. On the General tab, under Token-signing certificate, click View.
4. In the Certificate dialog box, click the Details tab.
5. On the Details tab, click Copy to File.
6. On the Welcome to the Certificate Export Wizard page, click Next.
7. On the Export Private Key page, make sure that No, do not export the private
key is selected, and then click Next.
8. On the Export File Format page, select DER encoded binary X.509 (.CER),
and then click Next.
9. On the File to Export page, specify the certificate file in File name, and then
click Next.
Note
So that this certificate can be imported to other federation servers as a
verification certificate, you will need to securely transfer the file to
administrators in your organization and in the partner organization.
10. On the Completing the Certificate Export Wizard page, click Finish.
11. Validate success by checking to see that the file you specified was created at the
specified location.

56
See Also Rolling Over a Token-signing Certificate
Add a verification certificate to the trust policy
Add a verification certificate to an account partner
Export the private key portion of a token-signing certificate
Every federation server in an Active Directory Federation Services (ADFS) server farm
must have access to the private key of the token-signing certificate. If you are
implementing a server farm of federation servers that share a single, exportable private
key certificate that is issued by an enterprise certification authority (CA), the private key
portion of the existing token-signing certificate must be exported to make it available for
importing into the certificate store on the new server.
Administrative credentials
To complete this procedure, you must be a member of the Administrators group on the
local computer.
To export the private key of a token-signing certificate
1. Click Start, point to Administrative Tools, and then click Active Directory
Federation Services.
2. Right-click Federation Service, and then click Properties.
3. On the General tab, click View.
4. In the Certificate dialog box, click the Details tab.
5. On the Details tab, click Copy to File.
6. On the Welcome to the Certificate Export Wizard page, click Next.
7. On the Export Private Key page, select Yes, export the private key, and then
click Next.
8. On the Export File Format page, select Personal Information Exchange =
PKCS #12 (.PFX), and then click Next.
9. On the Password page, type and confirm the password that is required to share

57
the token-signing certificate. You will need this password when you select the
exported token-signing certificate when installing the Federation Service.
10. On the File to Export page, specify the certificate file, and then click Next.
11. On the Completing the Certificate Export Wizard page, click Finish.
12. Validate the success of your export by confirming that the file you specified is
created at the specified location.
Important
So that this certificate can be imported to the local certificate store on the
new server, you must transfer the file to physical media and protect its
security during transport to the new server. It is extremely important to
guard the security of the private key.
13. Import the exported certificate into the certificate store on the new server prior to
installing the Federation Service. For information about how to import the
certificate, see Import a certificate (http://go.microsoft.com/fwlink/?linkid=20040).
See Also Implementing a Server Farm of Federation Servers
Change the token-signing certificate that a federation server uses
Each Active Directory Federation Services (ADFS) federation server uses a token-signing
certificate to digitally sign all security tokens that it produces. Only one token-signing
certificate can be in effect on a federation server. If you have installed a new token-
signing certificate on a federation server and you want that certificate to be used, you will
need to select that certificate in ADFS.
Perform this procedure on the account or resource federation server whose token-signing
certificate you want to change.
Administrative credentials
To complete this procedure, you must be a member of the Administrators group on the
local computer.

58
To change the token-signing certificate on a federation server
1. Click Start, point to Administrative Tools, and then click Active Directory
Federation Services.
2. Right-click Federation Service, and then click Properties.
3. On the General tab, under Token-signing certificate, click Select.
4. In the Select Certificate dialog box, click the token-signing certificate you want
to use, and then click OK.
5. In the Federation Service Properties dialog box, click OK.
In certain cases, the Federation Service might be running in a different account
and you will be prompted to allow this account to have access to the private key.
Based on your deployment, give access to the private key for this account.
6. In the Federation Server Configuration message box, click Yes to add the new
certificate to the verification certificates in the trust policy.
If you have already added this certificate to the trust policy as the verification
certificate, you will not be prompted to add this new certificate.
7. On the General tab, under Token-signing certificate, click View to check that
the selected certificate is being used.
See Also Rolling Over a Token-signing Certificate
Managing Verification Certificates
Servers that are running the Federation Service component of Active Directory
Federation Services (ADFS) in a resource Federation Service require verification
certificates to validate the security tokens that are produced by any trusted federation
servers, including the same federation server.
In a federated scenario, federation servers in a resource partner also re-sign certificates.
Therefore, federation servers in an account resource partner must also have verification
certificates for certificates that are signed by resource federation servers.
You can add, remove, and view these certificates as needed.
Task requirements

59
You need the following to perform the procedures for this task:
A federated ADFS deployment
Exported token-signing certificate
Active Directory Federation Services snap-in
To complete this task, perform the following procedures on an as-needed basis:
Add a verification certificate to the trust policy
Add a verification certificate to an account partner
View the current verification certificate
Remove a verification certificate
See Also Managing Token-signing Certificates
Rolling Over a Token-signing Certificate
Add a verification certificate to the trust policy
When a token-signing certificate is replaced on a server that is running the Federation
Service component of Active Directory Federation Services (ADFS), the public key
portion of the new token must be added as a verification certificate to federation servers
that receive tokens from that Federation Service.
This procedure is not usually necessary because the verification certificate is added to
the trust policy automatically when you select a token-signing certificate for use by the
server. Use this procedure under the following conditions:
You are restoring an old trust policy from a version that predates the Valid from date
of the token-signing certificated.
You answered "No" to the question of whether to add the verification certificate to the
trust policy in the procedure to Change the token-signing certificate that a federation
server uses.
Administrative credentials

60
To complete the procedure in this topic, you must be a member of the Administrators
group on the local computer.
To add a verification certificate to the trust policy
1. Click Start, point to Administrative Tools, and then click Active Directory
Federation Services.
2. Double-click Federation Service, right-click Trust Policy, and then click
Properties.
3. Click the Verification Certificates tab, and then click Add.
4. In the Browse for Verification Certificate file dialog box, locate the certificate
file that you want to add.
5. Select the certificate file, and then click Open.
6. In the Trust Policy Properties dialog box, click OK.
See Also Change the token-signing certificate that a federation server uses
Add a verification certificate to an account partner
Export the public key portion of a token-signing certificate
Remove a verification certificate
Add a verification certificate to an account partner
When a token-signing certificate is replaced on a server that is running the Federation
Service component of Active Directory Federation Services (ADFS), you must export the
new token to a file and then add the token to the trust policy that is used by federation
servers that receive tokens from that Federation Service. In addition, if the Federation
Service is acting in the account role, the verification certificate must be added to the
account node in the respective resource partner.
After you export the public portion of the token-signing certificate, use the following
procedure to add it as the verification certificate on the account node in the resource
partner.

61
Note
To prevent downtime, do not remove the existing verification certificate until the
new token-signing certificate has been added on the originating federation
server. To prevent the need for re-authentication, wait 10 hours (the default
lifetime for an access token) or until all access tokens have expired.
Administrative credentials
To complete this procedure, you must be a member of the Administrators group on the
local computer.
To add a verification certificate to an account partner
1. Click Start, point to Administrative Tools, and then click Active Directory
Federation Services.
2. Double-click Federation Service, double-click Trust Policy, double-click Partner
Organizations, double-click Account Partners, right-click the account partner, and
then click Properties.
3. Click the Verification Certificates tab, and then click Add.
4. In the Browse for Verification Certificate file dialog box, locate the certificate
file that you want to add.
5. Select the certificate file, and then click Open.
6. In the Trust Policy Properties dialog box, click OK.
See Also Rolling Over a Token-signing Certificate
Add a verification certificate to the trust policy
Export the public key portion of a token-signing certificate
Remove a verification certificate
View the current verification certificate
In Active Directory Federation Services (ADFS), verification certificates are used to verify
that a security token was issued by a valid federation server and that it was not modified.

62
A verification certificate is an exported copy of the token-signing certificate of any
trusted federation server.
Use this procedure to view the certificate when you want to see the information about the
verification certificate that is currently being used by a federation server. For example,
use this procedure if you want to ensure that the certificate is good, view the server that
issued the certificate, or view its date of expiration.
Administrative credentials
To complete this procedure , you must be a member of the Administrators group on the
local computer.
To view a verification certificate
1. On a federation server that hosts the Federation Service for which you want to
view verification certificates, click Start, point to Administrative Tools, and then
click Active Directory Federation Services.
2. Double-click Federation Service, right-click Trust Policy, and then click
Properties.
3. Click the Verification Certificates tab.
4. Click the certificate that you want to view, and then click View.
See Also Rolling Over a Token-signing Certificate
Add a verification certificate to the trust policy
Change the token-signing certificate that a federation server uses
Remove a verification certificate
Remove a verification certificate
After you add a new verification certificate on a server that is running the Federation
Service component of Active Directory Federation Services (ADFS), you must remove
the old verification certificate. Removing an old verification certificate is part of the
prescribed certificate rollover process by which you replace token-signing and verification
certificates in a manner that prevents downtime. Use this procedure in accordance with
the instructions in "Rolling Over a Token-signing Certificate."

63
Administrative credentials
To complete this procedure, you must be a member of the Administrators group on the
local computer.
To remove a verification certificate
1. Click Start, point to Administrative Tools, and then click Active Directory
Federation Services.
2. Remove the certificate as follows:
If you are removing the verification certificate from the trust policy on an
account or resource federation server, double-click Federation Service,
right-click the Trust Policy node, and then click Properties.
If you are removing the verification certificate from the account partner on a
trusting resource federation server, double-click Federation Service, double-
click Trust Policy, double-click Partner Organizations, double-click
Account Partners, right-click the account partner node, and then click
Properties.
3. Click the Verification Certificates tab.
4. Click the certificate that you want to remove, click Remove, and then click OK.
Rolling Over a Token-signing Certificate
When you need to replace a token-signing certificate on a server that is running the
Federation Service component of Active Directory Federation Services (ADFS), either
due to expiration or suspicion of tampering, use the procedures in this task to roll over the
certificate in a manner that eliminates any significant lapse of certificate validity on the
servers.
Configure the public key of every certificate that you replace as a verification certificate
on any other servers in the same federation server farm. This configuration occurs
automatically when you select the token-signing certificate for use on the server. In
addition, if the Federation Service is acting in the account role, the certificate must be
configured as a verification certificate for the account partner by any trusting resource
partners. To accomplish this configuration, you must export the public key of the
certificate to make it available for adding to the account partner.

64
When the same token-signing certificate is shared among multiple servers in a server
farm, the private key of the new token-signing certificate must be exported and then
imported on all other servers in the server farm. If a different token-signing certificate is
installed on each server in the federation server farm, this additional import step is not
required and each server uses a unique private key. The public key is always shared as
the verification certificate through the trust policy.
Task requirements
You need the following to perform the procedures for this task:
If you are using self-signed certificates, you can use the makecert.exe utility, which is
available for download on the Microsoft Web site.
Active Directory Federation Services MMC snap-in.
To complete this task, perform the following procedures:
1. Install a new token-signing certificate, as follows:
If you are using Microsoft Certificate Services as an enterprise certification
authority (CA), obtain a new code signing certificate according to the instructions
in "Submit an advanced certificate request via the Web to a Windows
Server 2003 CA" (http://go.microsoft.com/fwlink/?linkid=64020. Specify installing
the certificate into the local certificate store.
If you are using a different enterprise CA or a public CA, follow the instructions
provided by the CA.
Alternatively, Create a self-signed, code-signing certificate.
2. Configure the private key, if needed, on all servers in a server farm where federation
servers use the same private key, as follows:
If you are implementing a server farm of federation servers that share a single,
exportable private key certificate that is issued by an enterprise certification
authority (CA) directly into the certificate store, first use the procedure Export the
private key portion of a token-signing certificate to make it available for importing
into the local certificate stores of the other servers in the farm. Then, on all other
servers in the farm, import the exported certificate into the local store.
If you are implementing a server farm of federation servers that share a single,
exportable private key certificate that is issued by a public certification authority
(CA), import the certificate into the local certificate store.
For information about how to import the certificate into the certificate store, see
Import a certificate (http://go.microsoft.com/fwlink/?linkid=22763).
65
3. If the server is acting in the account role, do the following:
a. On the federation server for which you obtained a new token-signing certificate in
step 1, use the procedure Export the public key portion of a token-signing
certificate to create a file that can be used as a verification certificate.
b. Provide the exported certificate to the resource partner and instruct the resource
partner to perform the procedure Add a verification certificate to an account
partner to configure the account partner with the new verification certificate.
c. Confirm that the partner organization has added the new verification certificate.
4. Select the new verification certificate to Change the token-signing certificate that a
federation server uses. Newly issued tokens will now use this certificate. This
procedure also adds the verification certificate to the trust policy. Perform this
procedure as follows:
If you are sharing the same token-signing certificate among all servers in the
server farm, perform this procedure on one federation server in the server farm.
If you are using separate token-signing certificates for each server in the server
farm, perform this procedure on each federation server in the server farm.
5. Inform the partner organizations that it is safe to remove the original verification
certificate.
6. On all servers on which you selected the new verification certificate in step 4, remove
verification certificates, as follows:
a. Use the procedure Remove a verification certificate to remove the old verification
certificate from the trust policy.
Note
To prevent the need for users who have already logged on to be
authenticated again,, wait 10 hours (the default lifetime of an access
token for the Federation Service) or until all access tokens have expired
before you remove the existing verification certificate.
b. In the case of a Federation Service in the account role, instruct the resource
partner to remove the old verification certificate from the account partner in the
resource Federation Service. In this case, follow the same procedure but use the
Verification Certificates tab in the account partner node properties instead of
the Trust Policy node properties.
7. Delete the old token-signing certificate from the certificate store. For information
about how to delete a certificate from a certificate store, see Delete a certificate
(http://go.microsoft.com/fwlink/?linkid=62715).

66
See Also Rolling Over a Client Authentication Certificate
Create a self-signed, code-signing certificate
You can use the following procedure to create a self-signed, code-signing certificate that
also creates and installs a private key. To perform this procedure, use the Makecert.exe
utility. Makecert.exe is available in the Microsoft .NET Framework 2.0 Software
Development Kit (SDK) (http://go.microsoft.com/fwlink/?LinkId=62598), which you can
download from the Microsoft Web site.
Administrative credentials
To complete this procedure, you must be a member of the Administrators group on the
local computer.
To create a self-signed, code signing certificate that also creates and installs a private key using a script
Example command:
makecert -r -pe -n "CN=CertForADFS" -b 01/01/2006 -e 01/01/2007 -eku
1.3.6.1.5.5.7.3.3 -ss my -sr localMachine -sky exchange -sp "Microsoft RSA
SChannel Cryptographic Provider" -sy 12 "CertForMe.cer"
Note
Certificate expiration dates should be tracked to make sure that certificates are
replaced before they expire.
See Also Rolling Over a Token-signing Certificate
Rolling Over a Client Authentication Certificate

67
Export the public key portion of a token-signing certificate
A token-signing certificate is used by an Active Directory Federation Services (ADFS)
federation server to digitally sign all security tokens that it produces. Verification
certificates are used by the server that receives the token to validate that the security
token was issued by a trusted federation server and that the token was not modified. To
provide verification certificates to servers that will be processing tokens issued by the
trusted federation servers, you can export the public key portion of the token-signing
certificate of a federation server that issues the tokens.
Administrative credentials
To complete this procedure, you must be a member of the Administrators group on the
local computer.
To export the public key portion of a token-signing certificate
1. Click Start, point to Administrative Tools, and then click Active Directory
Federation Services.
2. Right-click Federation Service, and then click Properties.
3. On the General tab, under Token-signing certificate, click View.
4. In the Certificate dialog box, click the Details tab.
5. On the Details tab, click Copy to File.
6. On the Welcome to the Certificate Export Wizard page, click Next.
7. On the Export Private Key page, make sure that No, do not export the private
key is selected, and then click Next.
8. On the Export File Format page, select DER encoded binary X.509 (.CER),
and then click Next.
9. On the File to Export page, specify the certificate file in File name, and then
click Next.
Note
So that this certificate can be imported to other federation servers as a
verification certificate, you will need to securely transfer the file to
administrators in your organization and in the partner organization.

68
10. On the Completing the Certificate Export Wizard page, click Finish.
11. Validate success by checking to see that the file you specified was created at the
specified location.
See Also Rolling Over a Token-signing Certificate
Add a verification certificate to the trust policy
Add a verification certificate to an account partner
Export the private key portion of a token-signing certificate
Every federation server in an Active Directory Federation Services (ADFS) server farm
must have access to the private key of the token-signing certificate. If you are
implementing a server farm of federation servers that share a single, exportable private
key certificate that is issued by an enterprise certification authority (CA), the private key
portion of the existing token-signing certificate must be exported to make it available for
importing into the certificate store on the new server.
Administrative credentials
To complete this procedure, you must be a member of the Administrators group on the
local computer.
To export the private key of a token-signing certificate
1. Click Start, point to Administrative Tools, and then click Active Directory
Federation Services.
2. Right-click Federation Service, and then click Properties.
3. On the General tab, click View.
4. In the Certificate dialog box, click the Details tab.
5. On the Details tab, click Copy to File.
6. On the Welcome to the Certificate Export Wizard page, click Next.
7. On the Export Private Key page, select Yes, export the private key, and then

69
click Next.
8. On the Export File Format page, select Personal Information Exchange =
PKCS #12 (.PFX), and then click Next.
9. On the Password page, type and confirm the password that is required to share
the token-signing certificate. You will need this password when you select the
exported token-signing certificate when installing the Federation Service.
10. On the File to Export page, specify the certificate file, and then click Next.
11. On the Completing the Certificate Export Wizard page, click Finish.
12. Validate the success of your export by confirming that the file you specified is
created at the specified location.
Important
So that this certificate can be imported to the local certificate store on the
new server, you must transfer the file to physical media and protect its
security during transport to the new server. It is extremely important to
guard the security of the private key.
13. Import the exported certificate into the certificate store on the new server prior to
installing the Federation Service. For information about how to import the
certificate, see Import a certificate (http://go.microsoft.com/fwlink/?linkid=20040).
See Also Implementing a Server Farm of Federation Servers
Add a verification certificate to an account partner
When a token-signing certificate is replaced on a server that is running the Federation
Service component of Active Directory Federation Services (ADFS), you must export the
new token to a file and then add the token to the trust policy that is used by federation
servers that receive tokens from that Federation Service. In addition, if the Federation
Service is acting in the account role, the verification certificate must be added to the
account node in the respective resource partner.

70
After you export the public portion of the token-signing certificate, use the following
procedure to add it as the verification certificate on the account node in the resource
partner.
Note
To prevent downtime, do not remove the existing verification certificate until the
new token-signing certificate has been added on the originating federation
server. To prevent the need for re-authentication, wait 10 hours (the default
lifetime for an access token) or until all access tokens have expired.
Administrative credentials
To complete this procedure, you must be a member of the Administrators group on the
local computer.
To add a verification certificate to an account partner
1. Click Start, point to Administrative Tools, and then click Active Directory
Federation Services.
2. Double-click Federation Service, double-click Trust Policy, double-click Partner
Organizations, double-click Account Partners, right-click the account partner, and
then click Properties.
3. Click the Verification Certificates tab, and then click Add.
4. In the Browse for Verification Certificate file dialog box, locate the certificate
file that you want to add.
5. Select the certificate file, and then click Open.
6. In the Trust Policy Properties dialog box, click OK.
See Also Rolling Over a Token-signing Certificate
Add a verification certificate to the trust policy
Export the public key portion of a token-signing certificate
Remove a verification certificate

71
Change the token-signing certificate that a federation server uses
Each Active Directory Federation Services (ADFS) federation server uses a token-signing
certificate to digitally sign all security tokens that it produces. Only one token-signing
certificate can be in effect on a federation server. If you have installed a new token-
signing certificate on a federation server and you want that certificate to be used, you will
need to select that certificate in ADFS.
Perform this procedure on the account or resource federation server whose token-signing
certificate you want to change.
Administrative credentials
To complete this procedure, you must be a member of the Administrators group on the
local computer.
To change the token-signing certificate on a federation server
1. Click Start, point to Administrative Tools, and then click Active Directory
Federation Services.
2. Right-click Federation Service, and then click Properties.
3. On the General tab, under Token-signing certificate, click Select.
4. In the Select Certificate dialog box, click the token-signing certificate you want
to use, and then click OK.
5. In the Federation Service Properties dialog box, click OK.
In certain cases, the Federation Service might be running in a different account
and you will be prompted to allow this account to have access to the private key.
Based on your deployment, give access to the private key for this account.
6. In the Federation Server Configuration message box, click Yes to add the new
certificate to the verification certificates in the trust policy.
If you have already added this certificate to the trust policy as the verification
certificate, you will not be prompted to add this new certificate.
7. On the General tab, under Token-signing certificate, click View to check that
the selected certificate is being used.

72
See Also Rolling Over a Token-signing Certificate
Remove a verification certificate
After you add a new verification certificate on a server that is running the Federation
Service component of Active Directory Federation Services (ADFS), you must remove
the old verification certificate. Removing an old verification certificate is part of the
prescribed certificate rollover process by which you replace token-signing and verification
certificates in a manner that prevents downtime. Use this procedure in accordance with
the instructions in "Rolling Over a Token-signing Certificate."
Administrative credentials
To complete this procedure, you must be a member of the Administrators group on the
local computer.
To remove a verification certificate
1. Click Start, point to Administrative Tools, and then click Active Directory
Federation Services.
2. Remove the certificate as follows:
If you are removing the verification certificate from the trust policy on an
account or resource federation server, double-click Federation Service,
right-click the Trust Policy node, and then click Properties.
If you are removing the verification certificate from the account partner on a
trusting resource federation server, double-click Federation Service, double-
click Trust Policy, double-click Partner Organizations, double-click
Account Partners, right-click the account partner node, and then click
Properties.
3. Click the Verification Certificates tab.
4. Click the certificate that you want to remove, click Remove, and then click OK.

73
Managing the Federation Service Proxy (Optional)
The Federation Service Proxy component of Active Directory Federation Services
(ADFS) functions as a proxy in a perimeter network (also known as demilitarized zone,
extranet, or screened subnet) for the Federation Service. The Federation Service Proxy
component is not a required component in an ADFS deployment.
The act of installing the Federation Service Proxy component on a computer makes that
computer a federation server proxy. Federation server proxies forward requests to
federation servers that are not accessible from the Internet.
The following tasks for managing the Federation Service Proxy are described in this
objective.
Managing a Federation Server Proxy Farm
Managing Certificates Used by Federation Server Proxies
See Also Managing the Federation Service
Managing ADFS Web Agents and Applications
Backing Up ADFS Components
Managing a Federation Server Proxy Farm
To provide load-balancing of proxy services in larger Active Directory Federation
Services (ADFS) deployments, you can install additional federation server proxies to
create server farms. When multiple federation server proxies are deployed in the same
perimeter network or demilitarized zone, you must configure Federation Service Proxy
(FSP) verification certificates in the trust policy for every Federation Service that is
protected by the Federation Service Proxy. This configuration implements the federation
service proxy farm.
The following tasks for managing a federation server proxy farm are described in this
objective.

74
Adding a New Federation Server Proxy
Removing a Federation Server Proxy
See Also Managing a Federation Server Farm
Adding a New Federation Server Proxy
When you have an existing Active Directory Federation Services (ADFS) deployment and
you want to add a new federation server proxy, you must configure the server as an
application server, install and configure certificates, and then install the Federation Server
Proxy component of ADFS. You can also set event logging according to server needs.
Unlike farmed federation servers, farmed sets of federation server proxies are not
required to share certificate private keys, but must share the certificate public key with the
Federation Service that they protect.
However, you must export the public key from each federation server proxy and add this
key to the shared trust policy of the Federation Service as an FSP verification certificate.
During installation, you configure the federation server proxy with the DNS host name of
the protected Federation Service. This name is added automatically to create the FS
URL, which the federation service proxy uses to communicate with the Federation
Service.
Task requirements
You need the following to perform the procedures for this task:
An installed Secure Sockets Layer (SSL) certificate. For information about how to
acquire SSL certificates, see Obtaining Server Certificates
(http://go.microsoft.com/fwlink/?linkid=62479).
An existing Federation Service.
The Domain Name System (DNS) host name of the Federation Service that this
federation server proxy will protect.
An installed client authentication certificate for the Federation Service Proxy. For
information about installing client authentication certificates when using Microsoft
Certificate Services as your enterprise certification authority (CA), see Submit an

75
advanced certificate request via the Web to a Windows Server 2003 CA
(http://go.microsoft.com/fwlink/?linkid=64020).
To complete this task, perform the following procedures:
1. Install Prerequisite Applications
2. Install the Federation Service Proxy on an additional federation server proxy
3. Export the public key portion of a client authentication certificate
4. Add a Federation Service Proxy (FSP) certificate to the trust policy
5. Configure event logging on a federation server proxy
See Also Rolling Over a Client Authentication Certificate
Install Prerequisite Applications
Active Directory Federation Services (ADFS) requires you to install the following
applications on a computer running Windows Server 2003 R2, Enterprise Edition, so that
the computer can host the Federation Service, Federation Service Proxy, or ADFS Web
Agent components of ADFS:
Internet Information Services (IIS)
Microsoft .NET Framework 2.0
Microsoft ASP.NET (required for claims-aware applications only)
When you add the Application Server Windows component, these three applications are
installed.
Administrative credentials
To complete this procedure, you must be a member of the Server Operators group.
To add the Application Server Windows component
1. Click Start, point to Control Panel, and then click Add or Remove Programs.
2. In Add or Remove Programs, click Add/Remove Windows Components.
3. In the Windows Components Wizard, select the Application Server check

76
box, and then click Next.
4. On the Completing the Windows Components Wizard page, click Finish.
See Also Install the Federation Service on an additional federation server
Install the Federation Service Proxy on an additional federation server proxy
Adding and Removing ADFS Web Agents
Install the Federation Service Proxy on an additional federation server proxy
When you install the Federation Service Proxy component of Active Directory Federation
Services (ADFS) on an additional server in a federation server proxy server farm, you
identify the protected Federation Service by its DNS host name and select the installed
client authentication certificate.
Administrative credentials
To complete this procedure, you must be a member of the Administrators group on the
local computer.
To install the Federation Service Proxy component of ADFS on an additional federation server proxy
1. Click Start, point to Control Panel, and then click Add or Remove Programs.
2. In Add or Remove Programs, click Add/Remove Windows Components.
3. In the Windows Components Wizard, select the Active Directory Services
check box, and then click Details.
4. In the Active Directory Services dialog box, select the Active Directory
Federation Services (ADFS) check box, and then click Details.
5. In the Active Directory Federation Services (ADFS) dialog box, select the
Federation Service Proxy check box, and then click OK. If a message appears
stating that ASP.NET 2.0 was not previously enabled, click Yes to enable it, and
then click OK.
6. In the Active Directory Services dialog box, click OK.

77
7. In the Windows Components Wizard, click Next.
8. On the Federation Service page, click Select client authentication certificate,
and then click Select to select the installed certificate.
9. In the Select Certificate dialog box, click the client authentication certificate, and
then click OK.
10. If you are prompted for the location of the installation files, navigate to
R2 Installation Folder\cmpnents\r2, and then click OK.
11. On the Completing the Windows Components Wizard page, click Finish.
See Also Export the public key portion of a client authentication certificate
Add a Federation Service Proxy (FSP) certificate to the trust policy
Export the public key portion of a client authentication certificate
In Active Directory Federation Services (ADFS), the public portion of the Federation
Service Proxy client authentication certificate must be added to the trust policy on a
federation server so that the Federation Service can authenticate the federation server
proxy. By exporting the public portion of the client authentication certificate, you create a
file that can be imported by a federation server into the trust policy. Use the following
procedure to export the public portion of the Federation Service Proxy client
authentication certificate to a file.
Administrative credentials
To complete this procedure, you must be a member of the Administrators group on the
local computer.
To export the public key portion of the Federation Service Proxy client authentication certificate to a file
1. Click Start, point to Administrative Tools, and then click Active Directory
Federation Services.
2. Right-click Federation Service Proxy, and then click Properties.

78
3. On the General tab, under Token-signing certificate, click View.
4. In the Certificate dialog box, click the Details tab, and then click Copy to File.
5. On the Welcome to the Certificate Export Wizard page, click Next.
6. On the Export Private Key page, ensure that No, do not export the private
key is selected, and then click Next.
7. On the Export File Format page, ensure that DER encoded binary X.509
(.CER) is selected, and then click Next.
8. On the File to Export page, type or browse to the location and file name that you
want to use for the exported certificate, and then click Next.
9. On the Completing the Certificate Export Wizard page, verify that the
information that you provided is accurate, and then click Finish.
10. In the Certificate Export Wizard dialog box, click OK.
11. In the Certificate dialog box, click OK.
12. In the Federation Service Properties dialog box, click OK.
See Also Add a Federation Service Proxy (FSP) certificate to the trust policy
Add a Federation Service Proxy (FSP) certificate to the trust policy
In Active Directory Federation Services (ADFS), the public portion of the federation
server proxy client authentication certificate must be added to the trust policy on a
federation server with which it communicates so that the Federation Service can
authenticate the federation server proxy. Use the following procedure to add the
Federation Service Proxy client authentication certificate from a file that you have
exported.
Perform this procedure on a federation server that hosts the trust policy to which you
want to add a Federation Service Proxy certificate.
Administrative credentials

79
To complete this procedure, you must be a member of the Administrators group on the
local computer.
To add a Federation Service Proxy certificate to the trust policy
1. Click Start, point to Administrative Tools, and then click Active Directory
Federation Services.
2. Right-click Trust Policy, and then click Properties.
3. On the FSP Certificates tab, click Add.
4. In the Browse for Federation Service Proxy Certificate file dialog box,
navigate to the certificate file you want to add, select the certificate file, and then
click Open.
5. In the Trust Policy Properties dialog box, click OK.
See Also Export the public key portion of a client authentication certificate
Configure event logging on a federation server proxy
Active Directory Federation Services (ADFS) federation servers log ADFS Federation
Service events in the Application event log. On a federation server proxy, these events
contain additional information about errors regarding contacting the Federation Service.
In addition, when a federation server proxy is in effect, the Federation Service events
contain information about the proxy certificates that are used.
Use the following procedure to specify the level of events that you want to be logged on a
server that is running ADFS Federation Service Proxy. Event logging for a federation
server proxy is set in the Web.config file. By default, this file is located in
%systemdrive%\ADFS\sts. You can apply the following logging types in the Web.config
file:
DetailedFailure: A failure audit event with detailed information about each token
involved in the transaction, including claims information.
DetailedSuccess: A success audit event with detailed information about each token
involved in the transaction, including claims information.

80
Error: Information about a significant problem of which the user should be aware,
usually involving a loss of functionality or data.
FailureAudit: Indicates a security event that occurs when an audited access attempt
fails; for example, authentication failed.
Info: Information about a significant, successful operation.
SuccessAudit: Indicates an audited security event that when an audited access
attempt is successful; for example, a successful logon attempt.
Warning: Indicates a problem that is not immediately significant, but that may signify
conditions that could cause future issues.
Everything: Enable all logging levels.
Use the following procedure to configure event logging levels on a federation server
proxy.
Perform this procedure on a federation server proxy.
Administrative credentials
To complete this procedure, you must have read-write access to the Web.config file.
To configure event logging for a federation server proxy using the Web.config file
1. In Notepad, open the Web.config file in %systemdrive%\ADFS\sts.
2. Search for <logonserver>.
3. Add the <auditlevel> entry under <logonserver>, as follows:
<auditlevel>Value</auditlevel>
Where Value is one of the following, or the combined values of two or more:
Error = 0x01
Warning = 0x02
Info = 0x04
SuccessAudit = 0x10
FailureAudit = 0x20
DetailedSuccess = 0x40
DetailedFailure = 0x80
Everything = 0xF7

81
4. Save and close the Web.config file.
See Also Configure event logging on a federation server
Configure event logging for a claims-aware application
Configure event logging for a Windows NT token-based application
Removing a Federation Server Proxy
When you no longer need a federation server proxy in an Active Directory Federation
Services (ADFS) deployment, remove ADFS and the client authentication certificate.
To complete this task, perform the following procedures:
Remove the Federation Service Proxy ADFS component, as described in Remove an
ADFS component.
Delete the client authentication certificate from the certificate store. For information
about how to delete a certificate from a certificate store, see Delete a certificate
(http://go.microsoft.com/fwlink/?linkid=62715).
Use the procedure Remove a Federation Service Proxy (FSP) certificate from the
trust policy to remove the corresponding FSP certificate from any Federation Service
trust policy that references it.
Remove an ADFS component
If you want to remove a server that is running the Federation Service or Federation
Service Proxy component of Active Directory Federation Services (ADFS) from a
Federation Service, use the following procedure to remove the respective ADFS
component.
Administrative credentials
To complete this procedure, you must be a member of the Administrators group on the
local computer.

82
To remove an ADFS component
1. Click Start, point to Control Panel, and then click Add or Remove Programs.
2. In Add or Remove Programs, click Add/Remove Windows Components.
3. In the Windows Components Wizard, select the Active Directory Services
check box, and then click Details.
4. In the Active Directory Services dialog box, select the Active Directory
Federation Services (ADFS) check box, and then click Details.
5. In the Active Directory Federation Services (ADFS) dialog box, clear the
Federation Service check box or the Federation Service Proxy check box, and
then click OK.
6. In the Active Directory Services dialog box, click OK.
7. In the Windows Components Wizard, click Next.
8. On the Completing the Windows Components Wizard page, click Finish.
See Also Remove an ADFS Web Agent for a claims-aware or Windows NT token-based
application
Remove a Federation Service Proxy (FSP) certificate from the trust policy
When a new client authentication certificate has been added to a server that is running
the Federation Service Proxy component of Active Directory Federation Services (ADFS),
or when you remove a federation server proxy from a server farm, the public portion of
the client authentication certificate (the FSP certificate) must be removed from the trust
policy of the Federation Service.
Perform the following procedure on a federation server to remove an FSP certificate from
the trust policy.
Administrative credentials
To complete the procedure in this topic, you must be a member of the Administrators
group on the local computer.

83
To remove a Federation Service Proxy authentication certificate
1. Click Start, point to Administrative Tools, and then click Active Directory
Federation Services.
2. Double-click Federation Service, right-click Trust Policy, and then click
Properties.
3. Click the FSP Certificates tab.
4. Click the certificate that you want to remove, and then click Remove, and then
click OK.
Managing Certificates Used by Federation Server Proxies
Servers that are running the Federation Service Proxy component of Active Directory
Federation Services (ADFS) are required to use the following types of certificates:
Secure Sockets Layer (SSL) server authentication certificates: Federation server
proxies use SSL server authentication certificates to secure Web services traffic for
communication with Web clients. Federation server proxies are usually exposed to
computers on the Internet that are not included in your enterprise public key
infrastructure (PKI). For this reason, you should use a server authentication
certificate that is issued by a public (third-party) certification authority (CA) (for
example, Verisign). For more information about using SSL certificates, see
Configuring Secure Sockets Layer (http://go.microsoft.com/fwlink/?linkid=62785) and
Obtaining Server Certificates (http://go.microsoft.com/fwlink/?linkid=62479).
SSL client authentication certificates: Each federation server proxy uses a client
authentication certificate to authenticate to the Federation Service. You can use any
certificate with client authentication extended key usage (EKU) and that chains to a
trusted root CA on the federation server as a client authentication certificate for the
federation server proxy. In addition, you must explicitly add the client authentication
certificate to the trust policy. However, only the federation server proxy stores the
private key that is associated with the federation server proxy client authentication
certificate. You can install a client authentication certificate by connecting to an
enterprise CA or by creating a self-signed certificate.

84
Important
Do not use a certificate that was issued by your enterprise CA for client
authentication of an Active Directory user (especially a domain administrator)
because the private key is stored on the federation server proxy. Storing
such a private key on the federation server proxy allows an administrator or
other successful attacker to assume the identity that the certificate
represents.
For information about installing client authentication certificates when using Microsoft
Certificate Services as your enterprise CA, see "Submit an advanced certificate
request via the Web to a Windows Server 2003 CA"
(http://go.microsoft.com/fwlink/?linkid=64020). For information about creating self-
signed certificates, see Create a self-signed, code-signing certificate.
Task requirements
You need the following to perform the procedures for this task:
Active Directory Federation Services MMC snap-in
The following procedures for managing certificates on federation server proxies are
described in this task. Use these procedures on an as-needed basis.
Managing Client Authentication Certificates
Rolling Over a Client Authentication Certificate
See Also Managing Certificates Used by Federation Servers
Understanding Certificates Used by ADFS
Managing Client Authentication Certificates
Servers that are running the Federation Service Proxy component of Active Directory
Federation Services (ADFS) require Secure Sockets Layer (SSL) client authentication
certificates to authenticate to the Federation Service.
Task requirements
You need the following to perform the procedures for this task:

85
A certification authority or the ability to create self-signed certificates
A server that is running the Federation Service Proxy component of ADFS
Active Directory Federation Services snap-in
To complete this task, perform the following procedures on an as-needed basis:
Create a self-signed, code-signing certificate
View the current client authentication certificate
Export the public key portion of a client authentication certificate
Add a Federation Service Proxy (FSP) certificate to the trust policy
Change the client authentication certificate that a federation server proxy uses
See Also Rolling Over a Client Authentication Certificate
Create a self-signed, code-signing certificate
You can use the following procedure to create a self-signed, code-signing certificate that
also creates and installs a private key. To perform this procedure, use the Makecert.exe
utility. Makecert.exe is available in the Microsoft .NET Framework 2.0 Software
Development Kit (SDK) (http://go.microsoft.com/fwlink/?LinkId=62598), which you can
download from the Microsoft Web site.
Administrative credentials
To complete this procedure, you must be a member of the Administrators group on the
local computer.
To create a self-signed, code signing certificate that also creates and installs a private key using a script
Example command:
makecert -r -pe -n "CN=CertForADFS" -b 01/01/2006 -e 01/01/2007 -eku
1.3.6.1.5.5.7.3.3 -ss my -sr localMachine -sky exchange -sp "Microsoft RSA
SChannel Cryptographic Provider" -sy 12 "CertForMe.cer"

86
Note
Certificate expiration dates should be tracked to make sure that certificates are
replaced before they expire.
See Also Rolling Over a Token-signing Certificate
Rolling Over a Client Authentication Certificate
View the current client authentication certificate
An Active Directory Federation Services (ADFS) federation server proxy requires you to
install a client authentication certificate. You can view the certificate if you want to check
its expiration date, revocation status, and other details.
Administrative credentials
To complete this procedure, you must be a member of the Administrators group on the
local computer.
To view the current Federation Service Proxy client authentication certificate
1. Click Start, point to Administrative Tools, and then click Active Directory
Federation Services.
2. Right-click Federation Service Proxy, and then click Properties.
3. On the General tab, under FSP client authentication certificate, click View.
4. After viewing the certificate, click OK twice.
See Also Change the client authentication certificate that a federation server proxy uses

87
Export the public key portion of a client authentication certificate
In Active Directory Federation Services (ADFS), the public portion of the Federation
Service Proxy client authentication certificate must be added to the trust policy on a
federation server so that the Federation Service can authenticate the federation server
proxy. By exporting the public portion of the client authentication certificate, you create a
file that can be imported by a federation server into the trust policy. Use the following
procedure to export the public portion of the Federation Service Proxy client
authentication certificate to a file.
Administrative credentials
To complete this procedure, you must be a member of the Administrators group on the
local computer.
To export the public key portion of the Federation Service Proxy client authentication certificate to a file
1. Click Start, point to Administrative Tools, and then click Active Directory
Federation Services.
2. Right-click Federation Service Proxy, and then click Properties.
3. On the General tab, under Token-signing certificate, click View.
4. In the Certificate dialog box, click the Details tab, and then click Copy to File.
5. On the Welcome to the Certificate Export Wizard page, click Next.
6. On the Export Private Key page, ensure that No, do not export the private
key is selected, and then click Next.
7. On the Export File Format page, ensure that DER encoded binary X.509
(.CER) is selected, and then click Next.
8. On the File to Export page, type or browse to the location and file name that you
want to use for the exported certificate, and then click Next.
9. On the Completing the Certificate Export Wizard page, verify that the
information that you provided is accurate, and then click Finish.
10. In the Certificate Export Wizard dialog box, click OK.
11. In the Certificate dialog box, click OK.
12. In the Federation Service Properties dialog box, click OK.

88
See Also Add a Federation Service Proxy (FSP) certificate to the trust policy
Add a Federation Service Proxy (FSP) certificate to the trust policy
In Active Directory Federation Services (ADFS), the public portion of the federation
server proxy client authentication certificate must be added to the trust policy on a
federation server with which it communicates so that the Federation Service can
authenticate the federation server proxy. Use the following procedure to add the
Federation Service Proxy client authentication certificate from a file that you have
exported.
Perform this procedure on a federation server that hosts the trust policy to which you
want to add a Federation Service Proxy certificate.
Administrative credentials
To complete this procedure, you must be a member of the Administrators group on the
local computer.
To add a Federation Service Proxy certificate to the trust policy
1. Click Start, point to Administrative Tools, and then click Active Directory
Federation Services.
2. Right-click Trust Policy, and then click Properties.
3. On the FSP Certificates tab, click Add.
4. In the Browse for Federation Service Proxy Certificate file dialog box,
navigate to the certificate file you want to add, select the certificate file, and then
click Open.
5. In the Trust Policy Properties dialog box, click OK.
See Also Export the public key portion of a client authentication certificate

89
Change the client authentication certificate that a federation server proxy uses
In Active Directory Federation Services (ADFS), the federation server proxy uses a client
authentication certificate to communicate securely with the federation server. If you have
installed a new client authentication certificate on a federation server proxy and you want
that certificate to be used, you will need to select that certificate in ADFS.
Administrative credentials
To complete this procedure, you must be a member of the Administrators group on the
local computer.
To change the client authentication certificate on a federation server proxy
1. Click Start, point to Administrative Tools, and then click Active Directory
Federation Services.
2. Right-click Federation Service Proxy, and then click Properties.
3. On the General tab, under FSP client authentication certificate, click Select.
4. In the Select Certificate dialog box, click the client authentication certificate that
you want to use, and then click OK.
5. In the Federation Service Proxy Properties dialog box, click OK.
6. If the certificate is not trusted by any of the trusted toot certification authorities,
after you click OK, a Federation Service message box appears, stating: "The
Federation Service is running as an account that does not have access to the
certificate private key. Do you want to grant permission to this account to read
the private key?" Click Yes so that the certificate is trusted.
7. On the General tab, under Token-signing certificate, click View to check that
the selected certificate is being used.

90
Rolling Over a Client Authentication Certificate
When a client authentication certificate must be replaced on a server that is running the
Federation Service Proxy component of Active Directory Federation Services (ADFS),
use the procedures in this task to roll over the certificate in a manner that eliminates any
significant lapse of certificate validity on the servers.
After a new client authentication certificate is installed on the first federation server proxy,
the public portion of the client authentication certificate must be exported and added to
the trust policy for the Federation Service.
Task requirements
You need the following to perform the procedures for this task:
If you are using self-signed certificates, you can use the makecert.exe utility, which
you can download from http://go.microsoft.com/fwlink/?linkid=63617.
Active Directory Federation Services MMC snap-in.
To complete this task, perform the following procedures:
1. Install a new token-signing certificate, as follows:
a. If you are using Microsoft Certificate Services as an enterprise certification
authority (CA), obtain a new client authentication certificate according to the
instructions in "Submit an advanced certificate request via the Web to a Windows
Server 2003 CA" (http://go.microsoft.com/fwlink/?linkid=64020). Specify installing
the certificate into the local certificate store.
b. If you are using a different enterprise CA or a public CA, follow the instructions
provided by the CA.
c. Alternatively, use the procedure Create a self-signed, code-signing certificate.
2. On the federation server for which you obtained a new client authentication certificate
in step 1, use the procedure Export the public key portion of a client authentication
certificate to create a file that can be used as an FSP verification certificate.
3. Make the exported certificate file available to the Federation Service administrator
who must add it to the trust policy.
4. Instruct the administrator to use the procedure Add a Federation Service Proxy (FSP)
certificate to the trust policy to the trust policy to add the exported certificate to the
trust policy of the Federation Service that this federation server proxy is protecting.

91
5. On a federation server proxy, use the procedure Change the client authentication
certificate that a federation server proxy uses to select the new certificate.
6. To remove the old FSP verification certificate from the Federation Service, inform the
Federation Service administrator to use the procedure Remove a Federation Service
Proxy (FSP) certificate from the trust policy.
7. Delete the old client authentication certificate from the certificate store. For
information about how to delete a certificate from a certificate store, see Delete a
certificate (http://go.microsoft.com/fwlink/?linkid=62715).
See Also Rolling Over a Token-signing Certificate
Create a self-signed, code-signing certificate
You can use the following procedure to create a self-signed, code-signing certificate that
also creates and installs a private key. To perform this procedure, use the Makecert.exe
utility. Makecert.exe is available in the Microsoft .NET Framework 2.0 Software
Development Kit (SDK) (http://go.microsoft.com/fwlink/?LinkId=62598), which you can
download from the Microsoft Web site.
Administrative credentials
To complete this procedure, you must be a member of the Administrators group on the
local computer.
To create a self-signed, code signing certificate that also creates and installs a private key using a script
Example command:
makecert -r -pe -n "CN=CertForADFS" -b 01/01/2006 -e 01/01/2007 -eku
1.3.6.1.5.5.7.3.3 -ss my -sr localMachine -sky exchange -sp "Microsoft RSA
SChannel Cryptographic Provider" -sy 12 "CertForMe.cer"
Note
Certificate expiration dates should be tracked to make sure that certificates are
replaced before they expire.

92
See Also Rolling Over a Token-signing Certificate
Rolling Over a Client Authentication Certificate
Export the public key portion of a client authentication certificate
In Active Directory Federation Services (ADFS), the public portion of the Federation
Service Proxy client authentication certificate must be added to the trust policy on a
federation server so that the Federation Service can authenticate the federation server
proxy. By exporting the public portion of the client authentication certificate, you create a
file that can be imported by a federation server into the trust policy. Use the following
procedure to export the public portion of the Federation Service Proxy client
authentication certificate to a file.
Administrative credentials
To complete this procedure, you must be a member of the Administrators group on the
local computer.
To export the public key portion of the Federation Service Proxy client authentication certificate to a file
1. Click Start, point to Administrative Tools, and then click Active Directory
Federation Services.
2. Right-click Federation Service Proxy, and then click Properties.
3. On the General tab, under Token-signing certificate, click View.
4. In the Certificate dialog box, click the Details tab, and then click Copy to File.
5. On the Welcome to the Certificate Export Wizard page, click Next.
6. On the Export Private Key page, ensure that No, do not export the private
key is selected, and then click Next.
7. On the Export File Format page, ensure that DER encoded binary X.509
(.CER) is selected, and then click Next.
8. On the File to Export page, type or browse to the location and file name that you
want to use for the exported certificate, and then click Next.
93
9. On the Completing the Certificate Export Wizard page, verify that the
information that you provided is accurate, and then click Finish.
10. In the Certificate Export Wizard dialog box, click OK.
11. In the Certificate dialog box, click OK.
12. In the Federation Service Properties dialog box, click OK.
See Also Add a Federation Service Proxy (FSP) certificate to the trust policy
Add a Federation Service Proxy (FSP) certificate to the trust policy
In Active Directory Federation Services (ADFS), the public portion of the federation
server proxy client authentication certificate must be added to the trust policy on a
federation server with which it communicates so that the Federation Service can
authenticate the federation server proxy. Use the following procedure to add the
Federation Service Proxy client authentication certificate from a file that you have
exported.
Perform this procedure on a federation server that hosts the trust policy to which you
want to add a Federation Service Proxy certificate.
Administrative credentials
To complete this procedure, you must be a member of the Administrators group on the
local computer.
To add a Federation Service Proxy certificate to the trust policy
1. Click Start, point to Administrative Tools, and then click Active Directory
Federation Services.
2. Right-click Trust Policy, and then click Properties.
3. On the FSP Certificates tab, click Add.
4. In the Browse for Federation Service Proxy Certificate file dialog box,
navigate to the certificate file you want to add, select the certificate file, and then
click Open.

94
5. In the Trust Policy Properties dialog box, click OK.
See Also Export the public key portion of a client authentication certificate
Change the client authentication certificate that a federation server proxy uses
In Active Directory Federation Services (ADFS), the federation server proxy uses a client
authentication certificate to communicate securely with the federation server. If you have
installed a new client authentication certificate on a federation server proxy and you want
that certificate to be used, you will need to select that certificate in ADFS.
Administrative credentials
To complete this procedure, you must be a member of the Administrators group on the
local computer.
To change the client authentication certificate on a federation server proxy
1. Click Start, point to Administrative Tools, and then click Active Directory
Federation Services.
2. Right-click Federation Service Proxy, and then click Properties.
3. On the General tab, under FSP client authentication certificate, click Select.
4. In the Select Certificate dialog box, click the client authentication certificate that
you want to use, and then click OK.
5. In the Federation Service Proxy Properties dialog box, click OK.
6. If the certificate is not trusted by any of the trusted toot certification authorities,
after you click OK, a Federation Service message box appears, stating: "The
Federation Service is running as an account that does not have access to the
certificate private key. Do you want to grant permission to this account to read
the private key?" Click Yes so that the certificate is trusted.
7. On the General tab, under Token-signing certificate, click View to check that

95
the selected certificate is being used.
Remove a Federation Service Proxy (FSP) certificate from the trust policy
When a new client authentication certificate has been added to a server that is running
the Federation Service Proxy component of Active Directory Federation Services (ADFS),
or when you remove a federation server proxy from a server farm, the public portion of
the client authentication certificate (the FSP certificate) must be removed from the trust
policy of the Federation Service.
Perform the following procedure on a federation server to remove an FSP certificate from
the trust policy.
Administrative credentials
To complete the procedure in this topic, you must be a member of the Administrators
group on the local computer.
To remove a Federation Service Proxy authentication certificate
1. Click Start, point to Administrative Tools, and then click Active Directory
Federation Services.
2. Double-click Federation Service, right-click Trust Policy, and then click
Properties.
3. Click the FSP Certificates tab.
4. Click the certificate that you want to remove, and then click Remove, and then
click OK.

96
Managing ADFS Web Agents and Applications
ADFS Web Agents are Active Directory Federation Services (ADFS) components that
consume security tokens and either allow or deny a user access to a Web application.
ADFS Web Agents are available for two types of Web applications:
ADFS Web Agent for Windows NT token-based applications: Internet Information
Services (IIS) applications that use traditional Windows native authorization
mechanisms. This type of application does not use ADFS claims.
ADFS Web Agent for claims-aware applications: Applications that have been written
to use ADFS claims for authorization.
The following tasks for managing ADFS Web Agents and applications are described in
this objective.
Adding and Removing ADFS Web Agents
Adding and Configuring a Windows NT Token-based Application
Adding and Configuring a Claims-aware Application
Managing Security for Web Applications
See Also Controlling Access to Web-based Applications
Adding and Removing ADFS Web Agents
You can add and remove Active Directory Federation Services (ADFS) Web Agents on
servers that are running Internet Information Services (IIS).
Task requirements
You need the following to perform the procedures of this task:
To add the ADFS Web Agent for Windows NT token-based application, the Web
server must have a Secure Sockets Layer (SSL) server authentication certificate
installed.
The following procedures are provided in this task:

97
Add an ADFS Web Agent for a claims-aware or Windows NT token-based
application
Remove an ADFS Web Agent for a claims-aware or Windows NT token-based
application
See Also Adding and Configuring a Windows NT Token-based Application
Adding and Configuring a Claims-aware Application
Add an ADFS Web Agent for a claims-aware or Windows NT token-based application
You can add an Active Directory Federation Services (ADFS) Web Agent to a Web
server to include the server in a resource Federation Service. Use the same procedure to
add the ADFS Web Agent for Windows NT token-based applications and the ADFS Web
Agent for claims-aware applications.
Administrative credentials
To complete this procedure, you must be a member of the Administrators group on the
local computer.
To add an ADFS Web Agent to a Web server
1. Click Start, point to Control Panel, and then click Add or Remove Programs.
2. In Add or Remove Programs, click Add/Remove Windows Components.
3. In the Windows Components Wizard, select the Active Directory Services
check box, and then click Details.
4. In the Active Directory Services dialog box, select the Active Directory
Federation Services (ADFS) check box, and then click Details.
5. In the Active Directory Federation Services (ADFS) dialog box, click ADFS
Web Agents, and then click Details.
6. In the ADFS Web Agents dialog box, select Web Agent subcomponents as

98
follows, and then click OK:
To add ADFS Web Agent support for applications that can process ADFS
claims directly for authorization, select the Claims-aware applications
check box.
To add ADFS Web Agent support for applications that require Windows
native authorization mechanisms (do not directly consume ADFS claims),
select the Windows NT token-based applications check box.
Note
If your Web server will host only claims-aware applications, do not
select the Windows NT token–based applications check box.
7. In the Active Directory Federation Services (ADFS) dialog box, click OK.
8. In the Active Directory Services dialog box, click OK.
9. In the Windows Components Wizard, click Next.
10. If you are prompted for the location of installation files, navigate to R2 installation
files\cmpnents\r2, and then click OK.
11. On the Completing the Windows Components Wizard page, click Finish.
Remove an ADFS Web Agent for a claims-aware or Windows NT token-based application
If you no longer want to use Active Directory Federation Services (ADFS) for
authenticating and authorizing a Windows NT token-based application or claims-aware
application, or both, you can remove one or both ADFS Web Agents from a Web server.
Administrative credentials
To complete this procedure, you must be a member of the Administrators group on the
local computer.
To remove an ADFS Web Agent
1. Click Start, point to Control Panel, and then click Add or Remove Programs.
99
2. In Add or Remove Programs, click Add/Remove Windows Components.
3. In the Windows Components Wizard, select the Active Directory Services
check box, and then click Details.
4. In the Active Directory Services dialog box, select the Active Directory
Federation Services (ADFS) check box, and then click Details.
5. In the Active Directory Federation Services (ADFS) dialog box, click ADFS
Web Agents, and then click Details.
6. In the ADFS Web Agents dialog box, clear the Web Agent subcomponent check
box for the Web agent subcomponent or subcomponents that you want to
remove, and then click OK.
7. In the Active Directory Federation Services (ADFS) dialog box, click OK.
8. In the Active Directory Services dialog box, click OK, and then, in the
Windows Components Wizard, click Next.
9. On the Completing the Windows Components Wizard page, click Finish.
Adding and Configuring a Windows NT Token-based Application
If you have applications that use the Active Directory Federation Services (ADFS) Web
Agent for Windows NT token-based applications for authorization, you can configure
them in Internet Information Services (IIS) Manager. Use the ADFS Web Agent tab in the
properties pages for the following IIS nodes:
Web Sites node: Use this node to configure the Federation Service URL. Clients are
directed to the Federation Service URL when they contact the associated Federation
Service.
SiteName nodes and virtual directories: Use this node to enable the ADFS Web
agent for Windows NT token-based applications and to configure cookies and the
Return URL. The Return URL directs clients to the application page after successful
authentication.
Task requirements
You need the following to perform the procedures for this task:

100
Active Directory Federation Services MMC snap-in
Internet Information Services (IIS) Manager MMC snap-in
Regedit.exe
To complete this task, perform the following procedures:
1. Add a new Windows NT token-based application
2. Enable or disable a Web application
3. Set the cookie path for a Windows NT token-based application
4. Set the cookie domain for a Windows NT token-based application
5. Set the Federation Service URL for a Windows NT token-based application
6. Set the return URL for a Windows NT token-based application
7. Configure event logging for a Windows NT token-based application
8. Configure authentication methods for a Web application
See Also Adding and Configuring a Claims-aware Application
Add a new Windows NT token-based application
When your Active Directory Federation Services (ADFS) Web site hosts a Windows NT
token-based application, you add the application in the Active Directory Federation
Services snap-in so that you can specify application properties for the Federation
Service. Perform this procedure on a federation server in the resource partner.
Administrative credentials
To complete this procedure, you must be a member of the Administrators group on the
local computer.
To add a Windows NT token-based application
1. Click Start, point to Administrative Tools, and then click Active Directory
Federation Services.

101
2. Double-click Federation Service, double-click Trust Policy, double-click My
Organization, right-click Applications, point to New, and then click
Application.
3. On the Welcome to the Add Application Wizard page, click Next.
4. On the Application Type page, click Windows NT token–based application,
and then click Next.
5. On the Application Details page, in Application display name, type the name
of the application.
6. In Application URL, type the URL for your application — for example,
https://www.treyresearch.net/ApplicationName/ — and then click Next.
7. On the Accepted Identity Claim page, click one of the following identity claim
types, based on the needs of your application, and then click Next:
User principal name (UPN)
8. On the Enable this Application page, ensure that the Enable this application
check box is selected, and then click Next.
9. On the Completing the Add Application Wizard page, click Finish.
Enable or disable a Web application
Web applications are enabled by default when you create them in the Active Directory
Federation Services (ADFS) snap-in. You can disable an application if it is currently
enabled. If you disable an application, access to the application is prevented.
Administrative credentials
To complete this procedure, you must be a member of the Administrators group on the
local computer.
To enable or disable a Web application
1. Click Start, point to Administrative Tools, and then click Active Directory
Federation Services.
2. Double-click Federation Service, double-click Trust Policy, double-click My
102
Organization, and then double-click Applications.
3. Right-click the application you want to enable or disable and do one of the
following:
If the application is disabled and you want to enable it, click Enable.
If the application is enabled and you want to disable it, click Disable.
Note
You can also perform this procedure by right-clicking the application,
clicking Properties, and then selecting or clearing the Enabled check
box.
See Also Configure authentication methods for a Web application
Set the cookie path for a Windows NT token-based application
The cookie path specifies the location within an Internet Information Services (IIS) Web
site virtual directory for which cookies will be sent in response to an application request
by an Active Directory Federation Service (ADFS) client. If no cookie path is set, the
default path points to a location that depends on whether a cookie domain is set, as
follows:
Cookie domain is set: The path continues from / below the domain that applies for the
requested address on the basis of the cookie domain.
No cookie domain is set: The path continues from / below the domain specified in the
Federation Service Uniform Resource Identifier (URI).
If you specify a cookie path (for example, /test01), the cookie is sent for requests under
that path (for example, /test01, /test01/index.html, /test01/test05/, and so on).
The cookie path setting is configured in the ADFS Web Agent for an application. For a
Windows NT token-based application, configure the ADFS Web Agent in IIS.
Perform this procedure on a Web server in the resource Federation Service.
Administrative credentials

103
To complete this procedure, you must be a member of the Administrators group on
the local computer.
To set the cookie path for a Windows NT token-based application
1. Click Start, point to Administrative Tools, and then click Internet Information
Services (IIS) Manager.
2. Double-click YourComputerName (local computer), and then double-click Web
Sites.
3. Right-click your Web site, and then click Properties.
4. On the ADFS Web Agent tab, in Cookie path, change the path as needed, and
then click OK.
See Also Set the cookie domain for a Windows NT token-based application
Set the cookie domain for a Windows NT token-based application
You can use the cookie domain setting to share an application at a higher level than the
domain level that is specified in the Federation Service Uniform Resource Identifier (URI).
In this way, you can expand the scope of requests for which a cookie will be sent.
If you do not configure a cookie domain, cookies are sent only for requests where the
domain that is specified matches the domain in the Federation Service Uniform Resource
Identifier (URI). For example, if no cookie domain is set and the domain in the Federation
Service URI is Sales.Adatum.com, cookies are sent for only requests where the request
URL matches Sales.Adatum.com. However, if you set Adatum.com as the cookie
domain, cookies are sent for Sales.Adatum.com plus requests for any other domain with
the suffix Adatum.com. For example, cookies are also sent for Northwest.Adatum.com.
The cookie domain setting is configured in the ADFS Web Agent for an application. For a
Windows NT token-based application, configure the ADFS Web Agent in Internet
Information Services (IIS).
Administrative credentials

104
To complete this procedure, you must be a member of the Administrators group on
the local computer.
To set the cookie domain for a Windows NT token-based application
1. Click Start, point to Administrative Tools, and then click Internet Information
Services (IIS) Manager.
2. Double-click YourComputerName (local computer), and then double-click Web
Sites.
3. Right-click your Web site, and then click Properties.
4. On the ADFS Web Agent tab, in Cookie domain, change the domain as
needed, and then click OK.
See Also Set the cookie path for a Windows NT token-based application
Set the Federation Service URL for a Windows NT token-based application
The Federation Service Uniform Resource Locator (URL) in Active Directory Federation
Services (ADFS) defines the URL that is used for all Web sites and Web applications on
a Web server where an ADFS Web Agent is enabled. If the Federation Service URL for a
Web server that hosts a Windows NT token-based application changes, you must update
the ADFS Web Agent in Internet Information Services (IIS).
Perform this procedure on a Web server in the resource Federation Service.
Administrative credentials
To complete this procedure, you must be a member of the Administrators group on the
local computer.
To set the Federation Service URL for a Windows NT token-based application
1. Click Start, point to Administrative Tools, and then click Internet Information
Services (IIS) Manager.
2. Double-click YourComputerName (local computer), right-click Web Sites, and

105
then click Properties.
3. On the ADFS Web Agent tab, in Federation Service URL, change the URL as
needed, and then click OK.
Set the return URL for a Windows NT token-based application
The return Uniform Resource Locator (URL) in Active Directory Federation Services
(ADFS) is configured on the ADFS Web Agent on a Web server to reflect the URL that
opens a requested Web application. If this URL changes for a Windows NT token-based
application, you must change its value in Internet Information Services (IIS).
The return URL must match the application URL that you configure in the properties of
the application in the resource Federation Service. Therefore, if you change one, you
must change the other.
Perform this procedure on an ADFS Web server.
Administrative credentials
To complete this procedure, you must be a member of the Administrators group on the
local computer.
To set the return URL for a Windows NT token-based application
1. Click Start, point to Administrative Tools, and then click Internet Information
Services (IIS) Manager.
2. In the console tree, double-click WebServerName (local computer), double-click
Web Sites, right-click any application or site (typically, the Default Web Site),
and then click Properties.
3. On the ADFS Web Agent tab, in Return URL (Uniform Resource Locator),
type the URL for the application, and then click OK.
4. If you have not already done so, change the application URL to match the new
value of the return URL.

106
See Also Set the application URL for an application
Set the application URL for an application
The application Uniform Resource Locator (URL) provides the path to the Web
application in an Active Directory Federation Services (ADFS) deployment. If the location
of the Web application changes, you must change this URL to reflect the new location.
The application URL must match the return URL that you configure in the ADFS Web
Agent. Therefore, if you change one, you must change the other.
Perform the following procedure on a resource federation server.
Administrative credentials
To complete this procedure, you must be a member of the Administrators group on the
local computer.
ToTo change the application URL
1. Click Start, point to Administrative Tools, and then click Active Directory
Federation Services.
2. Double-click Federation Service, double-click Trust Policy, double-click My
Organization, and then double-click Applications.
3. Right-click the application whose URL you want to change, and then click
Properties.
4. On the General tab, in Application URL, select the portion of the URL that you
want to change, type the new value, and then click OK.
5. If you have not already done so, change the return URL to match the new value
of the application URL, using the appropriate procedure for the application type.
See Also Set the return URL for a Windows NT token-based application
Set the return URL for a claims-aware application

107
Configure event logging for a Windows NT token-based application
On a Web server that is running Active Directory Federation Services (ADFS) Web Agent
for Windows NT token-based applications, you can configure the types of events that you
want to be logged for Windows NT token-based applications.
Note
Event logging is enabled differently for Windows NT token-based applications
and claims-aware applications.
Use the following procedure to specify the types of events that you want to be logged for
Windows NT token-based applications in the Application event log on the Web server.
Event logging for Windows NT token-based applications is set in the registry of the Web
server.
Caution
Incorrectly editing the registry may severely damage your system. Before making
changes to the registry, back up any valued data on the computer.
Administrative credentials
To complete this procedure, you must be a member of the Administrators group on the
local computer.
To configure event logging for Windows NT token-based applications
1. Open Regedit.
2. Navigate to:
HKEY_LOCAL_MACHINE\SYSTEM\CurrentControlSet\Services\ifssvc\
Parameters
3. Right-click Parameters, click New, and then click DWORD Value.
4. In the new value file name box, type the following, and then press Enter:
ADFSEvent
5. Double-click the new entry and then, in Value data, provide a value for one of
the following levels, or add values to configure multiple levels, and then click OK:
Warning: 0x01

108
Information: 0x02
Success: 0x04
Failure: 0x08
Configure authentication methods for a Web application
By default, a Web application that you configure in Active Directory Federation Services
(ADFS) accepts any of the following authentication methods:
Windows integrated authentication: A secure form of authentication (formerly called
NTLM, and also referred to as Windows NT Challenge/Response authentication)
because the user name and password are hashed before being sent across the
network.
User name and password authentication: Also called Basic authentication, a widely
used, industry-standard method for collecting user name and password information
that transmits user names and passwords across the network in an unencrypted
form.
Certificate or SSL/TLS client authentication: A form of digital identification for your
server, and for clients that are requesting information from your server. Their function
is similar to that of a passport, or other official identity card, which identifies the
person carrying it. Certificates are part of the Secure Sockets Layer (SSL) features of
Internet Information Services (IIS) that establish a secure connection over which
sensitive information can be sent.
If you want to change to a specific authentication method or methods, you can select one
or more methods that will apply to users of the application.
You can also allow all possible authentication methods, in addition to those listed above,
by clearing all selections.
Perform this procedure on a resource federation server.
Administrative credentials
To complete this procedure, you must be a member of the Administrators group on the
local computer.

109
To configure authentication methods for a Web application
1. Click Start, point to Administrative Tools, and then click Active Directory
Federation Services.
2. Double-click Federation Service, double-click Trust Policy, double-click My
Organization, double-click Applications, right-click the application whose
authentication methods you want to change, and then click Properties.
3. On the Authentication Methods tab, to select from the available authentication
methods, do one of the following:
To allow any of the three methods in the list, select the Any check box.
To allow one or more of the available authentication methods, clear the Any
check box and select one or more of the available methods.
4. To allow all possible authentication methods, do one of the following:
If the Any check box is selected, clear it and do not select any other method.
If the Any check box is not selected, clear any methods that are selected.
5. When you have finished selecting authentication methods, click OK.
Adding and Configuring a Claims-aware Application
You can configure the Active Directory Federation Services (ADFS) Web Agent for
claims-aware applications by using the Web.config file in the Web application directory
(typically \Inetpub\wwwroot\virtualDirectoryName) on the Web server.
Task requirements
You need the following to perform the procedures for this task:
You must have access to trust policy properties for the resource Federation Service.
You must have access to the Web.config file for the Web application.
Active Directory Federation Services MMC snap-in
Internet Information Services (IIS) Manager MMC snap-in
Notepad or other text editor

110
To complete this task, perform the following procedures:
Add a new claims-aware application
Enable or disable a Web application
Set the cookie path for a claims-aware application
Set the cookie domain for a claims-aware application
Set the Federation Service URL for a claims-aware application
Set the return URL for a claims-aware application
Set the application URL for an application
Configure event logging for a claims-aware application
Configure authentication methods for a Web application
Add a new claims-aware application
In Active Directory Federation Services (ADFS), when your Web site hosts a claims-
aware application, you add the application in the Active Directory Federation Services
snap-in so that you can specify application properties for the Federation Service.
Perform this procedure on a resource federation server.
Administrative credentials
To complete this procedure, you must be a member of the Administrators group on the
local computer.
To add a claims-aware application
1. Click Start, point to Administrative Tools, and then click Active Directory
Federation Services.
2. Double-click Federation Service, double-click Trust Policy, double-click My
Organization, right-click Applications, point to New, and then click
Application.
3. On the Welcome to the Add Application Wizard page, click Next.
4. On the Application Type page, click Claims-aware application, and then click
Next.
5. On the Application Details page, in Application display name type the name

111
of the application.
6. In Application URL, type the Uniform Resource Locator (URL) for your
application — for example, https://www.treyresearch.net/ApplicationName/ —
and then click Next.
7. On the Accepted Identity Claims page, select the check boxes for the claim
types that will be recognized by your claims-aware application, and then click
Next.
8. On the Enable this Application page, ensure that the Enable this application
check box is selected, and then click Next.
9. On the Completing the Add Application Wizard page, click Finish.
Enable or disable a Web application
Web applications are enabled by default when you create them in the Active Directory
Federation Services (ADFS) snap-in. You can disable an application if it is currently
enabled. If you disable an application, access to the application is prevented.
Administrative credentials
To complete this procedure, you must be a member of the Administrators group on the
local computer.
To enable or disable a Web application
1. Click Start, point to Administrative Tools, and then click Active Directory
Federation Services.
2. Double-click Federation Service, double-click Trust Policy, double-click My
Organization, and then double-click Applications.
3. Right-click the application you want to enable or disable and do one of the
following:
If the application is disabled and you want to enable it, click Enable.
If the application is enabled and you want to disable it, click Disable.
Note
You can also perform this procedure by right-clicking the application,
112
clicking Properties, and then selecting or clearing the Enabled check
box.
See Also Configure authentication methods for a Web application
Set the Federation Service URL for a claims-aware application
The Federation Service Uniform Resource Locator (URL) in Active Directory Federation
Services (ADFS) defines the URL that is used for all Web sites and Web applications on
a federation Web server where the ADFS Web Agent is enabled. If the Federation
Service URL for a Web server that hosts a claims-aware application changes, you must
update the ADFS Web Agent by editing the Web.config file for the application.
Administrative credentials
To complete this procedure, you must have read-write access to the Web.config file.
To set the Federation Service URL for a claims-aware application using the Web.config file
1. In Notepad or other text editor, open the Web.config file that is in the Web
application directory (typically \Inetpub\wwwroot\ApplicationName) on the Web
server.
2. Search for <fs>.
3. In the current entry (for example,
https://adfsresource.trey.net/adfs/fs/federationserverservice.asmx), select the
domain name portion of the URL, and then replace the name with a different fully
qualified domain name.
4. Save and close the Web.config file.

113
Set the return URL for a claims-aware application
The return Uniform Resource Locator (URL) in Active Directory Federation Services
(ADFS) that you configure in the ADFS Web Agent on a Web server reflects the URL that
opens a requested Web application. If this URL changes for a claims-aware application,
you must change its value in the Web.config file.
The return URL must match the application URL that you configure in the properties of
the application in the resource Federation Service. Therefore, if you change one, you
must change the other.
Administrative credentials
To complete this procedure, you must have read-write access to the Web.config file.
To set the return URL for a claims-aware application using the Web.config file
1. In Notepad or other text editor, open the Web.config file that is in the Web
application directory (typically \Inetpub\wwwroot\ApplicationName) on the Web
server.
2. Search for <returnurl>.
3. In the current entry, select the portion of the URL that is changing, and then type
the new value.
4. Save and close the Web.config file.
5. If you have not already done so, change the application URL to match the new
value of the return URL.
See Also Set the application URL for an application

114
Set the application URL for an application
The application Uniform Resource Locator (URL) provides the path to the Web
application in an Active Directory Federation Services (ADFS) deployment. If the location
of the Web application changes, you must change this URL to reflect the new location.
The application URL must match the return URL that you configure in the ADFS Web
Agent. Therefore, if you change one, you must change the other.
Perform the following procedure on a resource federation server.
Administrative credentials
To complete this procedure, you must be a member of the Administrators group on the
local computer.
ToTo change the application URL
1. Click Start, point to Administrative Tools, and then click Active Directory
Federation Services.
2. Double-click Federation Service, double-click Trust Policy, double-click My
Organization, and then double-click Applications.
3. Right-click the application whose URL you want to change, and then click
Properties.
4. On the General tab, in Application URL, select the portion of the URL that you
want to change, type the new value, and then click OK.
5. If you have not already done so, change the return URL to match the new value
of the application URL, using the appropriate procedure for the application type.
See Also Set the return URL for a Windows NT token-based application
Set the return URL for a claims-aware application

115
Set the cookie path for a claims-aware application
The cookie path specifies the location within an Internet Information Services (IIS) Web
site virtual directory for which cookies will be sent in response to an application request
by an Active Directory Federation Service (ADFS) client. If no cookie path is set, the path
defaults to a location that depends on whether a cookie domain is set, as follows:
Cookie domain is set: / below the domain that applies for the requested address on
the basis of the cookie domain.
No cookie domain is set: / below the domain specified in the Federation Service
Uniform Resource Identifier (URI).
If you specify a cookie path (for example, /test01), the cookie is sent for requests under
that path (for example, /test01, /test01/index.html, /test01/test05/, and so on).
The cookie path setting is configured in the ADFS Web Agent for an application. For a
claims-aware application, configure the ADFS Web Agent in the Web.config file.
Administrative credentials
To complete this procedure, you must have read-write access to the Web.config file.
To set the cookie path for a claims-aware application using the Web.config file
1. In Notepad or other text editor, open the Web.config file that is in the Web
application directory (typically \Inetpub\wwwroot\ApplicationName) on the Web
server.
2. Search for the opening tag string <cookies.
3. In the current entry for <path>, select the existing path and replace it by typing
the new path. If the path entry does not exist, type a new one (for example:
<path>https://).
4. Save and close the Web.config file.
See Also Set the cookie domain for a claims-aware application

116
Set the cookie domain for a claims-aware application
On a Web server that is running the Active Directory Federation Services (ADFS) Web
Agent for claims-aware applications, you can use the cookie domain setting to share an
application at a higher level than the domain level that is specified in the Federation
Service Uniform Resource Identifier (URI). In this way, you can expand the scope of
requests for which a cookie will be sent.
If you do not configure a cookie domain, cookies are sent for only requests where the
domain that is specified matches the domain in the Federation Service Uniform Resource
Identifier (URI). For example, if no cookie domain is set and the domain in the Federation
Service URI is Sales.Adatum.com, cookies are sent for only requests where the request
URL matches Sales.Adatum.com. However, if you set Adatum.com as the cookie
domain, cookies are sent for Sales.Adatum.com plus requests for any other domain with
the suffix Adatum.com. For example, cookies are also sent for Northwest.Adatum.com.
The cookie domain setting is configured in the ADFS Web Agent for an application. For a
claims-aware application, configure the ADFS Web Agent in the Web.config file.
Administrative credentials
To complete this procedure, you must have read-write access to the Web.config file.
To set the cookie domain for a claims-aware application using the Web.config file
1. In Notepad or other text editor, open the Web.config file that is in the Web
application directory (typically \Inetpub\wwwroot\ApplicationName) on the Web
server.
2. Search for the opening tag string <cookies.
3. In the current entry for <domain>, select the existing domain and replace it by
typing the new domain name. If the <domain> entry does not exist, add the entry
within the <cookies> tag, as follows:
<domain>DNSDomainName</domain>
4. Save and close the Web.config file.
See Also Set the cookie path for a claims-aware application
117
Configure event logging for a claims-aware application
Use the following procedure to specify the level of events that you want to be logged for
claims-aware applications in the Application event log on the Web server that is protected
by Active Directory Federation Services (ADFS).You set event logging for claims-aware
applications in the Web.config file for the application.
You can apply the following logging in the Web.config file:
DetailedFailure: A failure audit event that provides detailed information about each
token involved in the transaction, including claims information.
DetailedSuccess: A success audit event that provides detailed information about
each token involved in the transaction, including claims information.
Error: Provides information about a significant problem of which the user should be
aware, usually involving a loss of functionality or data.
FailureAudit: Indicates a security event that occurs when an audited access attempt
fails; for example, a failed attempt to open a file.
Info: Provides information about a significant, successful operation.
SuccessAudit: Indicates an audited security event that when an audited access
attempt is successful; for example, a successful logon attempt.
Warning: Indicates a problem that is not immediately significant, but that may signify
conditions that could cause future issues.
Everything: Enables all logging levels.
Administrative credentials
To complete this procedure, you must have read-write access to the Web.config file.
To configure event logging for claims-aware applications
1. In Notepad, open the Web.config file in the directory that stores the claims-aware
application.
2. Search the file for <websso>.
3. Add or change the <auditlevel> entry under <websso>, as follows:
<auditlevel>Value</auditlevel>
Where Value is one of the following, or the combined hexadecimal values of two
118
or more:
Error = 0x01
Warning = 0x02
Info = 0x04
SuccessAudit = 0x10
FailureAudit = 0x20
DetailedSuccess = 0x40
DetailedFailure = 0x80
Everything = 0xF7
4. Save and close the Web.config file.
Configure authentication methods for a Web application
By default, a Web application that you configure in Active Directory Federation Services
(ADFS) accepts any of the following authentication methods:
Windows integrated authentication: A secure form of authentication (formerly called
NTLM, and also referred to as Windows NT Challenge/Response authentication)
because the user name and password are hashed before being sent across the
network.
User name and password authentication: Also called Basic authentication, a widely
used, industry-standard method for collecting user name and password information
that transmits user names and passwords across the network in an unencrypted
form.
Certificate or SSL/TLS client authentication: A form of digital identification for your
server, and for clients that are requesting information from your server. Their function
is similar to that of a passport, or other official identity card, which identifies the
person carrying it. Certificates are part of the Secure Sockets Layer (SSL) features of
Internet Information Services (IIS) that establish a secure connection over which
sensitive information can be sent.

119
If you want to change to a specific authentication method or methods, you can select
one or more methods that will apply to users of the application.
You can also allow all possible authentication methods, in addition to those listed above,
by clearing all selections.
Perform this procedure on a resource federation server.
Administrative credentials
To complete this procedure, you must be a member of the Administrators group on the
local computer.
To configure authentication methods for a Web application
1. Click Start, point to Administrative Tools, and then click Active Directory
Federation Services.
2. Double-click Federation Service, double-click Trust Policy, double-click My
Organization, double-click Applications, right-click the application whose
authentication methods you want to change, and then click Properties.
3. On the Authentication Methods tab, to select from the available authentication
methods, do one of the following:
To allow any of the three methods in the list, select the Any check box.
To allow one or more of the available authentication methods, clear the Any
check box and select one or more of the available methods.
4. To allow all possible authentication methods, do one of the following:
If the Any check box is selected, clear it and do not select any other method.
If the Any check box is not selected, clear any methods that are selected.
5. When you have finished selecting authentication methods, click OK.
Managing Security for Web Applications
You can use a common set of procedures to manage security for Web applications that
are protected by Active Directory Federation Services (ADFS) Web Agents for both
Windows NT token-based applications and claims-aware applications.
Task requirements

120
You need the following to perform the procedures for this task:
You must have the following information about how to control access to the
application:
The appropriate authentication methods.
The security token protection methods.
The appropriate security token lifetime.
Active Directory Federation Services (ADFS) MMC snap-in.
The Web.config file located in %systemdrive%\ADFS\sts on a federation server.
To complete this task, perform the following procedures on an as-needed basis:
Configure authentication methods for a Web application
Change the security token protection method for an application
Change the token lifetime for an application
Configure a policy page for a Web site
Configure authentication methods for a Web application
By default, a Web application that you configure in Active Directory Federation Services
(ADFS) accepts any of the following authentication methods:
Windows integrated authentication: A secure form of authentication (formerly called
NTLM, and also referred to as Windows NT Challenge/Response authentication)
because the user name and password are hashed before being sent across the
network.
User name and password authentication: Also called Basic authentication, a widely
used, industry-standard method for collecting user name and password information
that transmits user names and passwords across the network in an unencrypted
form.
Certificate or SSL/TLS client authentication: A form of digital identification for your
server, and for clients that are requesting information from your server. Their function
is similar to that of a passport, or other official identity card, which identifies the
person carrying it. Certificates are part of the Secure Sockets Layer (SSL) features of

121
Internet Information Services (IIS) that establish a secure connection over which
sensitive information can be sent.
If you want to change to a specific authentication method or methods, you can select one
or more methods that will apply to users of the application.
You can also allow all possible authentication methods, in addition to those listed above,
by clearing all selections.
Perform this procedure on a resource federation server.
Administrative credentials
To complete this procedure, you must be a member of the Administrators group on the
local computer.
To configure authentication methods for a Web application
1. Click Start, point to Administrative Tools, and then click Active Directory
Federation Services.
2. Double-click Federation Service, double-click Trust Policy, double-click My
Organization, double-click Applications, right-click the application whose
authentication methods you want to change, and then click Properties.
3. On the Authentication Methods tab, to select from the available authentication
methods, do one of the following:
To allow any of the three methods in the list, select the Any check box.
To allow one or more of the available authentication methods, clear the Any
check box and select one or more of the available methods.
4. To allow all possible authentication methods, do one of the following:
If the Any check box is selected, clear it and do not select any other method.
If the Any check box is not selected, clear any methods that are selected.
5. When you have finished selecting authentication methods, click OK.

122
Change the security token protection method for an application
Security tokens received by Active Directory Federation Services (ADFS) federation
servers are protected during transit using one of two methods:
Public Key Infrastructure (PKI): A PKI is implemented as a hierarchy of certification
authorities that verify identities. When a PKI is in place, a signature is embedded into
the token that protects it from tampering.
Domain service account: A domain service account, identified by a service principal
name (SPN), runs under an account that is trusted for delegation and can
impersonate a client to gain access to resources. By default, this account is the IIS
application pool identity that hosts a claims-aware application, and the identity of the
ADFS Web Agent Authentication Service that hosts a Windows NT token-based
application. When a token is transferred in a domain service account with this setting,
the token contains a binary Kerberos V5 signature for the configured SPN. This
signature protects the token from tampering.
Use the following procedure to change the security token protection method on a
resource federation server.
Administrative credentials
To complete this procedure, you must be a member of the Administrators group on the
local computer.
To change the security token protection method for an application
1. Click Start, point to Administrative Tools, and then click Active Directory
Federation Services.
2. Double-click Trust Policy, double-click My Organization, and then double-click
Applications.
3. Right-click the application whose security token protection method you want to
change, and then click Properties.
4. On the General tab, under Security token protection method, do one of the
following, and then click OK:
If your deployment uses certificates that are issued by a certification authority
(CA), select Public Key Infrastucture (PKI).
If your deployment does not use certificates issues by a CA, select Domain

123
service account and then, in service principal name (SPN) of service
account, type the SPN of the account.
Change the token lifetime for an application
The token lifetime for an Active Directory Federation Services (ADFS) Web application
indicates the time during which the security token contained in an ADFS authentication
cookie remains in effect for the application. You can change this value in the application
properties.
Perform this procedure on a resource federation server.
Administrative credentials
To complete this procedure, you must be a member of the Administrators group on the
local computer.
To change the token lifetime for an application
1. Click Start, point to Administrative Tools, and then click Active Directory
Federation Services.
2. Double-click Trust Policy, double-click My Organization, and then double-click
Applications.
3. Right-click the application whose token lifetime you want to change, and then
click Properties.
4. On the Advanced tab, in the Token lifetime (minutes) box, type or scroll to a
new number of minutes, and then click OK.
See Also Change the token lifetime for a Federation Service

124
Configure a policy page for a Web site
In a Web site that is protected by Active Directory Federation Services (ADFS), you can
configure a policy page that will be provided to users who request a token for some or all
resource partners. The policy page notifies the user of special protections that are in
place. To configure the policy page, use the sample policy.aspx file in
%systemdrive%\ADFS\SampleFiles to create an .aspx page that contains the appropriate
text, and then use the following procedure to configure the Web.config file to open the
page during logon.
Perform this procedure on an account federation server or account federation server
proxy.
Administrative credentials
To complete this procedure, you must have read-write access to the Web.config file.
To configure a policy page using the Web.config file
1. Use Notepad or other text editor to open the Web.config file that is located in
%systemdrive%\ADFS\sts on the federation server.
2. Search for <forms> under <logonserver>.
3. Add or change the <policy> entry under <forms>, as follows:
<policy>PathToPolicyFileName.aspx</policy>
4. Save and close the Web.config file.
Note
This setting takes effect immediately for all users that subsequently reach the
account Federation Service. However, users who already have a token and do
not return to the Federation Service until that token expires are not affected.
See Also Enable enhanced identity privacy

125
Backing Up ADFS Components
Backing up Active Directory Federation Services (ADFS) components to preserve a
snapshot of ADFS state is critical for ensuring a recovery option in the event of lost data
or hardware failure.
ADFS state is maintained in the following places:
TrustPolicy.xml file. The default location is %systemdrive%\adfs\sts.
Web.config and other files under %systemdrive%\ADFS\..., especially any
customized Web pages (%systemdrive%\ADFS\sts\ls).
IIS metabase files (MetaBase.xml and MBSchema.xml) in
%systemroot%\System32\Inetsrv (included in system state backup).
Windows registry (included in system state backup).
Custom transform module (.dll) or files related to the custom transform module.
Always back up system state on any federation server, federation server proxy, or Web
server that you are backing up. System state contains the following components:
System startup (boot) files. These files are required for Windows Server 2003 to start.
System registry.
IIS settings.
Class registration database of component services. The Component Object Model
(COM) is a binary standard for writing component software in a distributed systems
environment.
Windows Clustering or Certificate Services, if installed.
Use the following table to identify components to back up on servers that are running
ADFS components.

126
ADFS Component Running on Server Files and Components to Back Up
Federation Service TrustPolicy.xml file
Web.config and other files under
%systemdrive%E\ADFS\...
System state
Custom transform module (.dll) and
related files, if any
Federation Service Proxy Web.config and other files under
%systemdrive%\ADFS\...
System state
ADFS Web Agent %systemdrive%\ADFS\...
System state
Note
For a claims-aware application, ADFS settings are contained in the Web.config
file. For a Windows NT token-based application, ADFS settings are contained in
the IIS metabase files.
Task requirements
You need the following to perform the procedures for this task:
Backup software
To complete this task, perform the following procedures:
Back up ADFS components on a federation server, federation server proxy, or Web
server
See Also Administering Active Directory Backup and Restore

127
Back up ADFS components on a federation server, federation server proxy, or Web server
This procedure provides instructions for using Ntbackup.exe to create a backup for Active
Directory Federation Services (ADFS) components on federation servers, federation
server proxies, and Web servers that are running the ADFS Web Agent. Ntbackup is
available on all servers that are running Windows Server 2003. However, you can use
any backup software to back up the components identified in Backing Up ADFS
Components.
Administrative credentials
To complete this procedure, you must be a member of the Backup Operators group on
the local computer.
To back up ADFS components
1. To start the Windows Server 2003 backup utility, click Start, click Run, type
ntbackup, and then click OK.
Note
This procedure provides steps for backing up in Wizard Mode. By
default, the Always Start in Wizard Mode check box is selected in the
Backup or Restore Wizard. If the Welcome to the Backup Utility
Advanced Mode page appears, click Wizard Mode to open the Backup
or Restore Wizard.
2. On the Welcome to the Backup or Restore Wizard page, click Next.
3. On the Backup or Restore page, click Back up files and settings, and then
click Next.
4. On the What to Back Up page, click Let me choose what to back up, and then
click Next.
5. On the Items to Back Up page, double-click My Computer.
6. In the expanded list below My Computer, expand Local Disk (DRIVE:) and
make selections by placing check marks in the boxes for each directory that you
want to back up, according to the ADFS component that is running on the server
(see the table in Backing Up ADFS Components).

128
7. In the list below My Computer, place a check mark in the System State box,
and then click Next.
8. On the Backup Type, Destination, and Name page, browse to select a location
to save the backup, and type a name for the backup.
9. On the Completing the Backup or Restore Wizard page, click Finish.
See Also Backing Up ADFS Components
Managing ADFS Partnerships
When an Active Directory Federation Services (ADFS) deployment supports a Web
resource that must be accessed by other organizations across the Internet, you must
manage the partnership between your organization and a partner organization. You can
add and remove partners and configure the properties that allow users in the account
partner to access resources and that allow the resource Web applications to
appropriately recognize, authenticate, and authorize those users.
The following tasks for managing ADFS partnerships are described in this objective:
Adding a New Account Partner
Adding a New Resource Partner
Configuring Windows Trust for Account and Resource Partners
Removing ADFS Partners
See Also Partner organizations
Adding a New Account Partner
You can use the New Account Partner wizard to add an account partner to the resource
Federation Service in Active Directory Federation Services (ADFS). This wizard allows
you to create an account partner that requires manual configuration of the trust policy or

129
imports an existing policy file that is provided (exported) by an existing federation
server in the account partner, as follows:
Manually configure the trust policy: If the corresponding account partner organization
has not installed ADFS yet or does not plan to provide you with an exported policy
file, create the account partner to use the values that you provide. To do so, you must
have the following information about the account partner Federation Service:
Display name: The name of the account partner Federation Service. This name
appears in the list of realms that is presented to clients that request access to a
Web site that is protected by ADFS authentication and authorization.
Federation Service Uniform Resource Identifier (URI): Uniquely identifies the
Federation Service, and identifies this server as a member of the account
Federation Service, in the form urn:federation:OrganizationName.
Federation Service endpoint Uniform Resource Locator (URL): The URL that will
be used by clients to access a Web server in this Federation Service, in the form
https://FullyQualifiedDomainName/adfs/ls/. If a federation server proxy is
installed, the fully qualified domain name should be the host name of the
federation server proxy. If no federation server proxy is installed, the fully
qualified domain name should be the name you are using to represent federation
servers in the account Federation Service.
Import a trust policy file: When you import a policy file when creating an account
partner, the properties of the new account partner are automatically entered in the
trust policy by the New Account Partner wizard. This information is derived from the
account Federation Service trust policy file, thereby eliminating configuration errors.
To import a policy file, the account partner must have exported its generic policy file
or partner policy file and provided you with the file or its shared location.
Task requirements
You need the following to perform the procedures for this task:
Active Directory Federation Services snap-in running on a federation server.
To complete this task, perform the following procedures, as needed:
Add a new account partner by manually configuring the trust policy
Export an account or resource policy file to a partner organization
Add a new account partner by importing an existing policy file

130
See Also Adding a New Resource Partner
Add a new account partner by manually configuring the trust policy
To add a new account partner in Active Directory Federation Services (ADFS) and
manually configure the trust policy, perform the following procedure on a resource
federation server.
Administrative credentials
To complete this procedure, you must be a member of the Administrators group on the
local computer.
To add an account partner and manually configure the trust policy
1. Click Start, point to Administrative Tools, and then click Active Directory
Federation Services.
2. In the console tree, double-click Federation Service, Trust Policy, and Partner
Organizations.
3. Right-click Account Partners, point to New, and then click Account Partner.
4. On the Welcome to the Add Account Partner Wizard page, click Next.
5. On the Import Policy File page, click No, and then click Next.
6. On the Account Partner Details page, do the following, and then click Next
In Display name, type the display name of the account partner.
In Federation Service URI, type the URI of the account partner Federation
Service.
In Federation Service endpoint URL, type the endpoint URL as follows:
With Federation Service Proxy: If the Federation Service Proxy is installed
on servers in a perimeter network of the account domain, use the fully
qualified domain name of any federation server proxy.
Without Federation Service Proxy: If your deployment does not use
federation server proxies, use the fully qualified domain name of the account

131
partner Federation Service.
7. On the Account Partner Verification Certificate page, type the path to the
verification certificate, or browse to it, and then click Next.
8. On the Federation Scenario page, do one of the following, and then click Next:
If you are establishing a federated trust with another organization or you do
not want to use an existing forest trust, click Federated Web SSO, and then
go to step 10.
If you are establishing a federated trust within the same organization when
both sides already share a forest trust, click Federated Web SSO with
Forest Trust.
9. On the Federated Web SSO with Forest Trust page, do one of the following,
and then click Next:
To accept users in all domains that are trusted by the account partner, click
All Active Directory domains and forests. Any user that can authenticate
to the account partner will be accepted.
To accept user accounts that are located in some of the domains that are
trusted by the account partner, click The following Active Directory
domains and forests. Then, in New, trusted Active Directory domain or
forest, type the name of a domain or forest, and then click Add. Only users
from the specified domains will be accepted.
10. On the Account Partner Identity Claims page, select one or more identity
claims to share with the resource partner, and then click Next:
If the resource partner requires user principal name (UPN) claims to make
authorization decisions, select the UPN Claim check box.
Important
When UPN claims or e-mail claims are used to make authorization
decisions, it is essential that each account partner use a unique UPN
suffix or e-mail suffix. If two account partners use the same UPN suffix or
e-mail suffix, it may not be possible to uniquely identify users. This
condition might allow a user from one account partner to receive the
permissions that are intended for a user in another account partner. This
condition might also introduce a significant security weakness because
an administrator could intentionally create user accounts to impersonate
users from one of your other account partners.
Note

132
If you selected the Federated Web SSO with Forest Trust scenario, the
UPN Claim option is selected and not configurable because UPN claims
are required for this scenario.
If the resource partner requires e-mail claims to make authorization
decisions, select the E-mail Claim check box.
If the resource partner requires common name claims to make authorization
decisions, select the Common Name Claim check box.
11. If you selected UPN Claim as an identity claim, on the Accepted UPN Suffixes
page, click All UPN suffixes (this option is available only if you selected the
Federation Web SSO with Forest Trust option), or type the accepted suffix,
click Add, and then click Next.
12. If you selected E-mail Claim as an identity claim, on the Accepted E-mail
Suffixes page, click All E-mail suffixes (this option is available only if you
selected the Federation Web SSO with Forest Trust option), or type the
accepted suffix, click Add, and then click Next.
Note
Common name claims require no additional information.
13. On the Enable this Account Partner page, if you do not want to enable the
account partner now, clear the Enable this account partner check box, and
then click Next.
14. To add the new account partner and close the wizard, click Finish.
See Also Change the Federation Service endpoint URL
View the current verification certificate
Export an account or resource policy file to a partner organization
If you have created an Active Directory Federation Services (ADFS) resource or account
partner in your side of a federated partnership, you can export a trust policy file that has
information about both your Federation Service and the Federation Service of the

133
respective account or resource partner Federation Service. The policy file contains
the following information that the prospective partner can use to configure its Federation
Service trust policy:
Resource Display Name
Resource URI
Resource Federation Server Proxy URL
Account Display Name
Account URI
Account Federation Server Proxy URL
Account Verification Certificate
For example, if you are a resource partner, you can export your partner policy file and
provide it to the account partner organization. When the account partner adds a resource
partner for your organization and selects the option to import your policy file, the Add
Resource Partner wizard uses the imported file to automatically update the trust policy
with the correct information for both organizations.
Perform this procedure on a federation server that hosts the account or resource partner
that represents the Federation Service whose policy file you are exporting. The Export
Policy command in the Active Directory Federation Services snap-in creates the file with
the name and location that you provide.
Administrative credentials
To complete this procedure, you must be a member of the Administrators group on the
local computer.
To export an account or resource policy file
1. Click Start, point to Administrative Tools, and then click Active Directory
Federation Services.
2. Double-click Trust Policy, double-click Partner Organizations, and then
double-click Account Partners or Resource Partners, depending on the
federation server role.
3. Right-click the account or resource partner, and then click Export Policy.
4. In the Export Partner Policy dialog box box, click Browse to browse to the
location for the partner policy file (or type the path and file name in Policy file
Location, and then click OK).

134
5. In the Save As dialog box, click Save and then click OK.
6. Notify the partner organization and make the exported file available to the partner
organization.
See Also Export a generic policy file to a partner organization
Add a new account partner by importing an existing policy file
If you have received an exported Active Directory Federation Services (ADFS) trust
policy file from the account partner organization, perform the following procedure on a
resource federation server to automatically configure the new account partner by
importing the policy file.
Administrative credentials
To complete this procedure, you must be a member of the Administrators group on the
local computer.
To add an account partner by importing a policy file
1. Click Start, point to Administrative Tools, and then click Active Directory
Federation Services.
2. In the console tree, double-click Federation Service, double-click Trust Policy,
and then double-click Partner Organizations.
3. Right-click Account Partners, point to New, and then click Account Partner.
4. On the Welcome to the Add Account Partner Wizard page, click Next.
5. On the Import Policy File page, click Yes. In Partner interoperability policy
file, type or browse to the policy file you want to import, and then click Open.
6. On the Federation Scenario page, do one of the following, and then click Next:
If you are establishing a federated trust with another organization or you do
not want to use an existing forest trust, click Federated Web SSO, and then
go to step 8.

135
If you are establishing a federated trust within the same organization when
both sides already share a forest trust, click Federated Web SSO with
Forest Trust.
7. On the Federated Web SSO with Forest Trust page, do one of the following,
and then click Next:
To accept users in all domains that are trusted by the account partner, click
All Active Directory domains and forests. Any user that can authenticate
to the account partner will be accepted.
To accept user accounts that are located in some of the domains that are
trusted by the account partner, click The following Active Directory
domains and forests. Then, in New, trusted Active Directory domain or
forest, type the name of a domain or forest, and then click Add. Only users
from the specified domains will be accepted. If you need to remove a domain
or forest, click Remove.
8. On the Account Partner Identity Claims page, select one or more identity
claims to share with the resource partner, and then click Next:
If the resource partner requires user principal name (UPN) claims to make
authorization decisions, select the UPN Claim check box.
Important
When UPN claims or e-mail claims are used to make authorization
decisions, it is essential that each account partner use a unique UPN
suffix or e-mail suffix. If two account partners use the same UPN suffix or
e-mail suffix, it may not be possible to uniquely identify users. This
condition might allow a user from one account partner to receive the
permissions that are intended for a user in another account partner. This
condition might also introduce a significant security weakness because
an administrator could intentionally create user accounts to impersonate
users from one of your other account partners.
Note
If you selected the Federated Web SSO with Forest Trust scenario, the
UPN Claim option is selected and not configurable because UPN claims
are required for this scenario.
If the resource partner requires e-mail claims to make authorization
decisions, select the E-mail Claim check box.
If the resource partner requires common name claims to make authorization

136
decisions, select the Common Name Claim check box.
9. If you selected UPN Claim as an identity claim, on the Accepted UPN Suffixes
page, click All UPN suffixes (this option is available only if you selected the
Federation Web SSO with Forest Trust option), or type the accepted suffix,
click Add, and then click Next.
10. If you selected E-mail Claim as an identity claim, on the Accepted E-mail
Suffixes page, click All E-mail suffixes (this option is available only if you
selected the Federation Web SSO with Forest Trust option), or type the
accepted suffix, click Add, and then click Next.
Note
Common name claims require no additional information.
11. On the Enable this Account Partner page, if you do not want to enable the
account partner now, clear the Enable this account partner check box, and
then click Next.
12. To add the new account partner and close the wizard, click Finish.
See Also Export an account or resource policy file to a partner organization
Add a new account partner by manually configuring the trust policy
Adding a New Resource Partner
You can use the New Resource Partner wizard to add a resource partner to the account
Federation Service. This wizard allows you to create a resource partner that requires
manual configuration of the trust policy or imports an existing policy file that is provided
(exported) by an existing federation server, as follows:
Manually configure the trust policy: If the corresponding resource partner
organization does not plan to provide you with an exported policy file, create the
resource partner to use the values that you provide. To do so, you must have the
following information about the resource partner:
Display name: The name the resource partner uses to identify itself.

137
Federation Service Uniform Resource Identifier (URI): Uniquely identifies the
Federation Service, and identifies this server as a member of the account
Federation Service, in the form urn:federation:OrganizationName.
Federation Service endpoint Uniform Resource Locator (URL): The URL that will
be used by clients to access a server in this Federation Service, in the form
https://FullyQualifiedDomainName/adfs/ls/
Import a policy file: When you import a policy file during resource partner creation,
the properties of the new resource partner are automatically entered in the trust
policy by the New Resource Partner wizard according to the information in the
resource policy file, thereby eliminating configuration errors. To import a policy file,
the resource partner must have exported its generic policy file or partner policy file
and provided you with the file or its shared location.
Task requirements
You need the following to perform the procedures for this task:
Active Directory Federation Services snap-in running on a federation server.
To complete this task, perform one of the following procedures:
Add a new resource partner by manually configuring the trust policy
Add a new resource partner by importing an existing policy file
See Also Adding a New Account Partner
Add a new resource partner by manually configuring the trust policy
To add a new resource partner in Active Directory Federation Services (ADFS) and
manually configure the trust policy, perform the following procedure on an account
federation server.
Administrative credentials
To complete this procedure, you must be a member of the Administrators group on the
local computer.
138
To add a resource partner and manually configure the trust policy
1. Click Start, point to Administrative Tools, and then click Active Directory
Federation Services.
2. In the console tree, double-click Federation Service, Trust Policy, and Partner
Organizations.
3. In the console tree, right-click Resource Partners, point to New, and then click
Resource Partner.
4. On the Welcome to the Add Resource Partner Wizard page, click Next.
5. On the Import Policy File page, ensure that No is selected, and then click Next.
6. On the Resource Partner Details page, do the following, and then click Next:
In Display name, type the display name of the resource partner.
In Federation Service URI, type the URI for the resource partner Federation
Service.
In Federation Service endpoint URL, type the endpoint URL of the
resource partner Federation Service.
7. On the Federation Scenario page, do one of the following, and then click Next:
If you are establishing a federated trust with another organization or you do
not want to use an existing forest trust, click Federated Web SSO.
If you are establishing a federated trust within the same organization when
both sides already share a forest trust, click Federated Web SSO with
Forest Trust.
8. On the Resource Partner Identity Claims page, select one or more identity
claims to share with the resource partner, and then click Next:
If the resource partner requires user principal name (UPN) claims to make
authorization decisions, select the UPN Claim check box.
Note
If you selected the Federated Web SSO with Forest Trust scenario, the
UPN Claim option is selected and not configurable because UPN claims
are required for this scenario.
If the resource partner requires e-mail claims to make authorization
decisions, select the E-mail Claim check box.
If the resource partner requires common name claims to make authorization

139
decisions, select the Common Name Claim check box.
9. If you selected UPN Claim as an identity claim, on the Select UPN Suffix page,
do one of the following, and then click Next:
To pass all UPN suffixes through without replacing them, click Pass all UPN
suffixes through unchanged.
To replace all UPN suffixes with a different suffix, click Replace all UPN
suffixes with the following, and then type the suffix that you want to use to
replace all UPN suffixes.
10. If you selected E-mail Claim as an identity claim, on the Select E-mail Suffix
page, do one of the following, and then click Next:
To pass all e-mail suffixes without replacing them, click Pass all E-mail
suffixes through unchanged.
To replace all e-mail suffixes with a different suffix, click Replace all E-mail
suffixes with, and then type the suffix that you want to use to replace all e-
mail suffixes.
Note
Common name claims require no additional information.
11. On the Enable this Resource Partner page, if you do not want to enable the
resource partner now, clear the Enable this resource partner check box, and
then click Next.
12. To add the new resource partner and close the wizard, click Finish.
See Also Add a new resource partner by importing an existing policy file
Export an account or resource policy file to a partner organization
If you have created an Active Directory Federation Services (ADFS) resource or account
partner in your side of a federated partnership, you can export a trust policy file that has
information about both your Federation Service and the Federation Service of the
respective account or resource partner Federation Service. The policy file contains the

140
following information that the prospective partner can use to configure its Federation
Service trust policy:
Resource Display Name
Resource URI
Resource Federation Server Proxy URL
Account Display Name
Account URI
Account Federation Server Proxy URL
Account Verification Certificate
For example, if you are a resource partner, you can export your partner policy file and
provide it to the account partner organization. When the account partner adds a resource
partner for your organization and selects the option to import your policy file, the Add
Resource Partner wizard uses the imported file to automatically update the trust policy
with the correct information for both organizations.
Perform this procedure on a federation server that hosts the account or resource partner
that represents the Federation Service whose policy file you are exporting. The Export
Policy command in the Active Directory Federation Services snap-in creates the file with
the name and location that you provide.
Administrative credentials
To complete this procedure, you must be a member of the Administrators group on the
local computer.
To export an account or resource policy file
1. Click Start, point to Administrative Tools, and then click Active Directory
Federation Services.
2. Double-click Trust Policy, double-click Partner Organizations, and then
double-click Account Partners or Resource Partners, depending on the
federation server role.
3. Right-click the account or resource partner, and then click Export Policy.
4. In the Export Partner Policy dialog box box, click Browse to browse to the
location for the partner policy file (or type the path and file name in Policy file
Location, and then click OK).
5. In the Save As dialog box, click Save and then click OK.

141
6. Notify the partner organization and make the exported file available to the partner
organization.
See Also Export a generic policy file to a partner organization
Add a new resource partner by importing an existing policy file
If you have received a policy file from your resource partner organization that you can
import, perform the following procedure on the account federation server on which you
are creating the new resource partner.
Administrative credentials
To complete this procedure, you must be a member of the Administrators group on the
local computer.
To add a resource partner by importing a policy file
1. Click Start, point to Administrative Tools, and then click Active Directory
Federation Services.
2. In the console tree, double-click Federation Service, Trust Policy, and Partner
Organizations.
3. Right-click Resource Partners, point to New, and then click Resource Partner.
4. On the Welcome to the Add Resource Partner Wizard page, click Next.
5. On the Import Policy File page, do the following, and then click Next:
Click Yes.
In Partner interoperability policy file, browse to or type the location of the
resource partner policy file.
6. On the Federation Scenario page, do one of the following, and then click Next:
If you are establishing a federated trust with another organization or you do
not want to use an existing forest trust, click Federated Web SSO.
If you are establishing a federated trust within the same organization when

142
both sides already share a forest trust, click Federated Web SSO with
Forest Trust.
7. On the Resource Partner Identity Claims page, select one or more identity
claims that the account partner will provide to the resource partner, and then click
Next:
If the resource partner requires UPN claims to make authorization decisions,
select the UPN Claim check box.
Note
If you selected the Federated Web SSO with Forest Trust scenario, the
UPN Claim option is selected and not configurable because UPN claims
are required for this scenario.
If the resource partner requires e-mail claims to make authorization
decisions, select the E-mail Claim check box.
If the resource partner requires common name claims to make authorization
decisions, select the Common Name Claim check box.
8. If you selected UPN Claim as an identity claim, on the Select UPN Suffix page,
select one of the following, and then click Next.
To pass all UPN suffixes through without replacing them, click Pass all UPN
suffixes through unchanged.
To replace all UPN suffixes with a different suffix, click Replace all UPN
domain suffixes with the following, type the suffix that you want to use to
replace all UPN suffixes, and then click Add.
9. If you selected E-mail Claim as an identity claim, on the Select E-mail Suffix
page, do one of the following, and then click Next:
To pass all e-mail suffixes without replacing them, click Pass all e-mail
suffixes through unchanged.
To replace all UPN suffixes with a different suffix, click Replace all E-mail
suffixes with, and then type the suffix that you want to use to replace all e-
mail suffixes.
Note
Common name claims require no additional information.
10. On the Enable this Resource Partner page, if you do not want to enable the
resource partner now, clear the Enable this resource partner check box, and
143
then click Next.
11. To add the new resource partner and close the wizard, click Finish.
See Also Export an account or resource policy file to a partner organization
Add a new resource partner by manually configuring the trust policy
Configuring Windows Trust for Account and Resource Partners
An Active Directory Federation Services (ADFS) deployment in a federated scenario can
be configured with or without a Windows trust relationship. In a Federated Web single
sign-on (SSO) scenario, a federation trust is created between the two partners, but a
Windows trust relationship, if one exists between the two partners, is not used. In a
Federated Web SSO with Forest Trust scenario, an organization that has a Windows
trust relationship between the two Active Directory forests (the resource forest trusts the
account forest) configures ADFS partners to use the Windows trust relationship.
The Windows trust between the forests of the two partners (either a forest trust between
two Windows Server 2003 forests or an external trust between Windows Server 2003 or
Windows 2000 Server domains in each forest) must be enabled for ADFS by both the
resource partner and the account partner. The account partner must be configured to
select the domains that are to be included in the trust relationship. For example, if a
Windows Server 2003 forest trust is in place from the resource partner forest to the
account partner forest, the trust is transitive to all domains in the trusted account forest. If
users in only some domains in the account forest are to be granted access to resources
in the resource forest, you can specify only those domains. Otherwise, you can allow all
trusted domains (all domains in the account forest and any forest that is trusted by the
account forest) to be granted access.
You must also configure the resource partner in the account Federation Service.
Task requirements
You need the following to perform the procedures for this task:
A Windows trust between the two partners (two Windows Server 2003 forests or an
external trust between Windows Server 2003 or Windows 2000 Server domains in

144
each forest), where the resource forest or domain has a trust relationship with the
account forest or domain.
A federation server in each partner organization.
The Active Directory Federation Services snap-in.
This task provides procedures to begin using or discontinue Windows trust in both
partners:
Configure an account partner to use Windows trust
Configure a resource partner to use Windows trust
Discontinue Windows trust for an account partner
Discontinue Windows trust for a resource partner
See Also Administering Domain and Forest Trusts
Configure an account partner to use Windows trust
Use this procedure to enable Windows trust for the account partner in an Active Directory
Federation Services (ADFS) Federated Web SSO with Forest Trust scenario.
Perform this procedure on a resource federation server.
Administrative credentials
To complete this procedure, you must be a member of the Administrators group on the
local computer.
To configure an account partner to use Windows trust
1. Click Start, point to Administrative Tools, and then click Active Directory
Federation Services.
2. Double-click Federation Service, double-click Trust Policy, double-click
Partner Organizations, and then double-click Account Partners.
3. Right-click the account partner that you want to configure to use Windows trust,
and then click Properties.
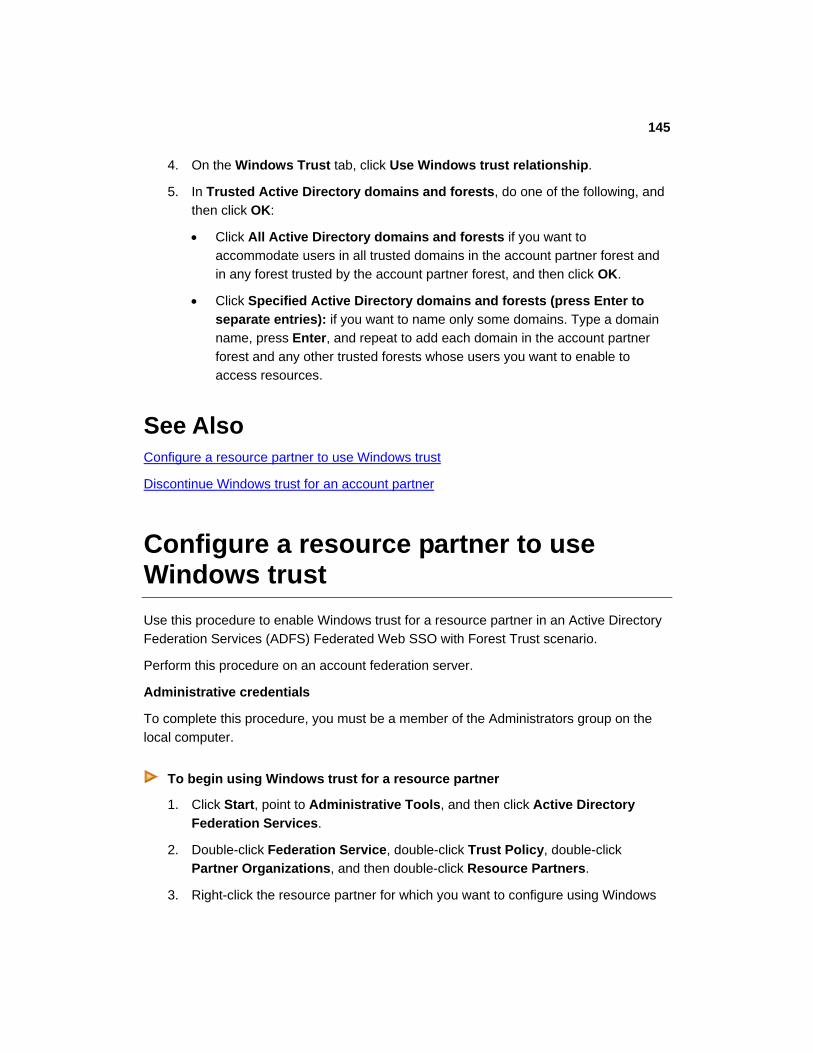
145
4. On the Windows Trust tab, click Use Windows trust relationship.
5. In Trusted Active Directory domains and forests, do one of the following, and
then click OK:
Click All Active Directory domains and forests if you want to
accommodate users in all trusted domains in the account partner forest and
in any forest trusted by the account partner forest, and then click OK.
Click Specified Active Directory domains and forests (press Enter to
separate entries): if you want to name only some domains. Type a domain
name, press Enter, and repeat to add each domain in the account partner
forest and any other trusted forests whose users you want to enable to
access resources.
See Also Configure a resource partner to use Windows trust
Discontinue Windows trust for an account partner
Configure a resource partner to use Windows trust
Use this procedure to enable Windows trust for a resource partner in an Active Directory
Federation Services (ADFS) Federated Web SSO with Forest Trust scenario.
Perform this procedure on an account federation server.
Administrative credentials
To complete this procedure, you must be a member of the Administrators group on the
local computer.
To begin using Windows trust for a resource partner
1. Click Start, point to Administrative Tools, and then click Active Directory
Federation Services.
2. Double-click Federation Service, double-click Trust Policy, double-click
Partner Organizations, and then double-click Resource Partners.
3. Right-click the resource partner for which you want to configure using Windows

146
trust, and then click Properties.
4. On the General tab, click Use Windows trust relationship for this partner,
and then click OK.
See Also Configure an account partner to use Windows trust
Discontinue Windows trust for a resource partner
Discontinue Windows trust for an account partner
If you want to stop using Windows trust for an account partner in an Active Directory
Federation Services (ADFS) scenario, you can configure the account partner to not use
the Windows trust relationship.
Perform this procedure on a resource federation server.
Administrative credentials
To complete this procedure, you must be a member of the Administrators group on the
local computer.
To discontinue using Windows trust for an account partner
1. Click Start, point to Administrative Tools, and then click Active Directory
Federation Services.
2. Double-click Federation Service, double-click Trust Policy, double-click
Partner Organizations, and then double-click Account Partners.
3. Right-click the account partner for which you want to stop using Windows trust,
and then click Properties.
4. On the Windows Trust tab, clear the Use Windows trust relationship check
box, and then click OK.
See Also Configure an account partner to use Windows trust

147
Discontinue Windows trust for a resource partner
If you want to stop using Windows trust for a resource partner, you can configure the
resource partner to not use the Windows trust relationship.
Perform this procedure on an account federation server.
Administrative credentials
To complete this procedure, you must be a member of the Administrators group on the
local computer.
To discontinue using Windows trust for a resource partner
1. Click Start, point to Administrative Tools, and then click Active Directory
Federation Services.
2. Double-click Federation Service, double-click Trust Policy, double-click
Partner Organizations, and then double-click Resource Partners.
3. Right-click the resource partner for which you want to stop using Windows trust,
and then click Properties.
4. On the General tab, clear the Use Windows trust relationship for this partner
check box, and then click OK.
Removing ADFS Partners
A resource partner in an Active Directory Federation Services (ADFS) deployment can
have more than one account partner, and vice versa. When a partner organization is to
be removed from the federation, you must remove the partner node in the trust policy on
the other side of the ADFS partnership. The partner that is being removed from the
federation must remove its federation servers and federation server proxies, as well. For
information about removing servers that are running ADFS components, see Managing
ADFS Components.
Task requirements
You need the following tool to perform the procedures for this task:

148
Active Directory Federation Services MMC snap-in
To complete this task, perform the following procedures:
Delete an existing account partner
Delete an existing resource partner
Managing ADFS Components
Delete an existing account partner
Use this procedure to delete the account partner node for an account partner that is no
longer a member of your Active Directory Federation Services (ADFS) deployment.
Perform this procedure on a federation server in the resource Federation Service.
Administrative credentials
To complete this procedure, you must be a member of the Administrators group on the
local computer.
To delete an account partner
1. Click Start, point to Administrative Tools, and then click Active Directory
Federation Services.
2. Double-click Federation Service, double-click Trust Policy, double-click
Partner Organizations, and then double-click Account Partners.
3. Right-click the account partner you want to delete, and then click Delete.
4. In the Delete Account Partner dialog box, click Yes to confirm the deletion.
Delete an existing resource partner
Use this procedure to delete the resource partner node for a resource partner that is no
longer a member of an Active Directory Federation Services (ADFS) deployment.
Perform this procedure on a federation server in the account Federation Service.
Administrative credentials

149
To complete this procedure, you must be a member of the Administrators group on
the local computer.
To delete a resource partner
1. Click Start, point to Administrative Tools, and then click Active Directory
Federation Services.
2. Double-click Federation Service, double-click Trust Policy, double-click
Partner Organizations, and then double-click Resource Partners.
3. Right-click the resource partner you want to delete, and then click Delete.
4. In the Delete Resource Partner dialog box, click Yes to confirm the deletion.
Managing Partner Relationships
In an Active Directory Federation Services (ADFS) partnership, you can manage privacy
aspects of the partner experience, export your trust policy for a partner, and manage
resource (impersonation) accounts. You can also enable or disable a partner when you
need to temporarily suspend the partnership.
Task requirements
You need the following to perform the procedures for this task:
Active Directory Federation Services MMC snap-in.
To complete this task, perform the following procedures on an as-needed basis:
Enable enhanced identity privacy
Export a generic policy file to a partner organization
Export an account or resource policy file to a partner organization
Enable or disable a resource partner
Enable or disable an account partner
Change how resource accounts are used for an account partnerr
See Also Partner organizations

150
Enable enhanced identity privacy
Enhanced identity privacy is an optional setting that can be configured on a resource
partner in the account Federation Service in an Active Directory Federation Services
(ADFS) deployment. This setting hashes the user-name portion of outgoing user principal
name (UPN) claims and e-mail claims. It substitutes the common name with a random
value.
If the Enable enhanced identity privacy setting is turned on in ADFS, the resource
partner will not be able to correlate identity claims to personally identifiable user
information.
The enhanced identity privacy setting affects the information that is sent in identity
claims, based on the claim type that is being used to transfer the user identity, as follows:
Uniform principal name (UPN) and e-mail claim types: The user component of the
UPN and e-mail name is hashed, replacing the user component in the identity claim
of the security token. In this way, each resource partner can uniquely identify each
user without revealing their true identity.
Common name claim types: The common name identity claim is populated with a
randomly generated globally unique identifier (GUID), ensuring that the identity claim
is unique per session with the resource partner, and that multiple sessions by the
same user cannot be tracked.
Select this setting if you want to:
Prevent collusion between partners in correlating identity claims to personally
identifiable user information.
Prevent simple dictionary attacks against the user-name hash.
For more information about the effects of enhanced identity privacy, see "Partner
organizations" in Active Directory Federation Services online Help.
Perform this procedure on an account federation server.
Administrative credentials
To complete this procedure, you must be a member of the Administrators group on the
local computer.
To enable enhanced identity privacy on a resource partner
1. Click Start, point to Administrative Tools, and then click Active Directory
Federation Services.

151
2. Double-click Federation Service, double-click Trust Policy, double-click
Partner Organizations, and then double-click Resource Partners.
3. Right-click the resource partner that will begin using enhanced identity privacy,
and then click Properties.
4. On the General tab, click Enable enhanced identity privacy, and then click
OK.
See Also Configure a policy page for a Web site
Export a generic policy file to a partner organization
To begin an Active Directory Federation Services (ADFS) federated partnership with
another organization, prior to adding resource and account partners, you can export a
generic policy file that the other organization can use to configure your organization as
either its account or resource partner. For example, if you are administering a resource
organization, you can export a generic policy file that the account organization can use to
configure your organization as its resource partner in ADFS. You must make the file
available to the partner organization, which can then import the file.
The exported generic policy file contains the following information:
Your organization's display name
Federation Service endpoint URL
Federation Service URI
Verification certificate (for an exported account partner only)
When the partner organization imports this policy file when adding a resource or account
partner that represents your organization, the wizard (Add Resource Partner Wizard or
Add Account Partner Wizard) automatically configures the new partner with the correct
information for your organization, eliminating the possibility of mistyping the various
required identifiers.
Perform this procedure on a federation server that hosts the policy file you want to share
with another organization that will become a partner in a federated partnership. The

152
Export Policy command in the Active Directory Federation Services snap-in creates
the file with the name and location that you provide.
Administrative credentials
To complete this procedure, you must be a member of the Administrators group on the
local computer.
To export a generic policy file
1. Click Start, point to Administrative Tools, and then click Active Directory
Federation Services.
2. Right-click Trust Policy, and then click Export Policy.
3. In the Export Generic Partner Policy dialog box, click Browse to browse to the
location for the generic policy file (or type the path and file name in Policy file
Location, and then click OK).
4. In the Save As dialog box, in File name, type a name for the generic trust policy
file, click Save, and then click OK.
5. Make the exported file available to the partner organization.
See Also Export an account or resource policy file to a partner organization
Export an account or resource policy file to a partner organization
If you have created an Active Directory Federation Services (ADFS) resource or account
partner in your side of a federated partnership, you can export a trust policy file that has
information about both your Federation Service and the Federation Service of the
respective account or resource partner Federation Service. The policy file contains the
following information that the prospective partner can use to configure its Federation
Service trust policy:
Resource Display Name
Resource URI
Resource Federation Server Proxy URL

153
Account Display Name
Account URI
Account Federation Server Proxy URL
Account Verification Certificate
For example, if you are a resource partner, you can export your partner policy file and
provide it to the account partner organization. When the account partner adds a resource
partner for your organization and selects the option to import your policy file, the Add
Resource Partner wizard uses the imported file to automatically update the trust policy
with the correct information for both organizations.
Perform this procedure on a federation server that hosts the account or resource partner
that represents the Federation Service whose policy file you are exporting. The Export
Policy command in the Active Directory Federation Services snap-in creates the file with
the name and location that you provide.
Administrative credentials
To complete this procedure, you must be a member of the Administrators group on the
local computer.
To export an account or resource policy file
1. Click Start, point to Administrative Tools, and then click Active Directory
Federation Services.
2. Double-click Trust Policy, double-click Partner Organizations, and then
double-click Account Partners or Resource Partners, depending on the
federation server role.
3. Right-click the account or resource partner, and then click Export Policy.
4. In the Export Partner Policy dialog box box, click Browse to browse to the
location for the partner policy file (or type the path and file name in Policy file
Location, and then click OK).
5. In the Save As dialog box, click Save and then click OK.
6. Notify the partner organization and make the exported file available to the partner
organization.
See Also Export a generic policy file to a partner organization

154
Enable or disable a resource partner
Active Directory Federation Services (ADFS) resource partners are enabled by default
when you create them in the Active Directory Federation Services snap-in. If a resource
partner is currently enabled, you can disable it. If a resource partner is currently disabled,
you can enable it.
Perform this procedure on an account federation server.
Administrative credentials
To complete this procedure, you must be a member of the Administrators group on the
local computer.
ToTo enable or disable a resource partner
1. Click Start, point to Administrative Tools, and then click Active Directory
Federation Services.
2. Double-click Federation Service, double-click Trust Policy, double-click
Partner Organizations, and then double-click Resource Partners.
3. Right-click the resource partner you want to enable or disable and do one of the
following:
If the resource partner is disabled and you want to enable it, click Enable.
If the resource partner is enabled and you want to disable it, click Disable.
Note
You can also perform this procedure by right-clicking the resource
partner, clicking Properties, and then selecting or clearing the Enable
this partner check box.
Enable or disable an account partner
Active Directory Federation Services (ADFS) account partners are enabled by default
when you create them in the Active Directory Federation Services snap-in. If an account
partner is currently enabled, you can disable it. If an account partner is currently disabled,
you can enable it.

155
Perform this procedure on a resource federation server.
Administrative credentials
To complete this procedure, you must be a member of the Administrators group on the
local computer.
ToTo enable or disable an account partner
1. Click Start, point to Administrative Tools, and then click Active Directory
Federation Services.
2. Double-click Federation Service, double-click Trust Policy, double-click
Partner Organizations, and then double-click Account Partners.
3. Right-click the account partner you want to enable or disable and do one of the
following:
If the account partner is disabled and you want to enable it, click Enable.
If the account partner is enabled and you want to disable it, click Disable.
Note
You can also perform this procedure by right-clicking the account
partner, clicking Properties, and then selecting or clearing the Enable
this partner check box.
Change how resource accounts are used for an account partner
In Active Directory Federation Services (ADFS), the resource Federation Service can
store resource accounts in Active Directory that impersonate users from the account
partner organization. These accounts can be used to facilitate access to resources,
depending on how resource account use is configured for the account partner.
Resource accounts are not required for account organization users when the resource
organization creates special resource group accounts in Active Directory and maps
incoming claims to these resource groups. If resource accounts are used, ADFS must be
configured to search for these accounts in Active Directory. If resource accounts are not
used, this search can be bypassed.

156
You can configure ADFS on the account partner to use (search for) or not use
resource accounts, as follows:
Always use resource accounts because resource accounts exist for all users and
resource groups are not mapped to claims.
Always use resource accounts because they exist for some users, but after searching
for resource accounts, also accept resource groups that are mapped to claims in the
token.
Always use resource accounts, but only after processing resource groups that are
mapped in incoming claims.
Always use resource groups exclusively because no resource accounts exist for the
account partner.
The default condition for using resource groups is that some resource accounts exist and
will be searched in Active Directory, but priority is given to resource groups that are
mapped in the incoming claims.
Note
For more detailed information about how resource accounts are used, and for
instructions to configure a resource group, click Help in the Resource Accounts
tab in the account partner properties page.
Perform this procedure on a resource federation server.
Administrative credentials
To complete this procedure, you must be a member of the Administrators group on the
local computer.
To change how resource accounts are used for an account partner
1. Click Start, point to Administrative Tools, and then click Active Directory
Federation Services.
2. Double-click Federation Service, double-click Trust Policy, double-click
Partner Organizations, and then double-click Account Partners.
3. Right-click the account partner whose resource account use you want to change.
4. Scroll to the Resource Accounts tab.
5. Select one of the following options for using resource accounts for this account
partner, and then click OK:
Resource accounts exist for all users (resource group claim mappings are

157
not checked).
Resource accounts exist for some users (prefer resource account) (first
check for resource accounts, then process resource groups in tokens)
Resource accounts exist for some users (prefer groups in token) (first
process resource groups in tokens, then check for resource accounts)
No resource accounts exist for this account partner (check only for
resource groups in tokens)
See Also Map a resource organization group claim to a resource group
Managing Accounts and Account Stores
Active Directory Federation Services (ADFS) uses account stores to log on users and
extract security claims for those users. You can configure multiple account stores for a
single Federation Service and define their priority. The Federation Service uses
Lightweight Directory Access Protocol (LDAP) to communicate with account stores.
ADFS supports two types of account stores: Active Directory account stores and Active
Directory Application Mode (ADAM) account stores. Only one Active Directory account
store can be used for an ADFS deployment. However, you can use multiple ADAM
account stores.
Enabling and disabling an account store is the same procedure for both types of account
stores.
Enable or disable an account store
The following tasks for managing account stores are described in this objective.
Managing Active Directory Account Stores
Managing ADAM Account Stores
Using Multiple Account Stores
See Also Account Stores

158
Enable or disable an account store
If an account store needs to be taken offline temporarily, you can disable the store in
Active Directory Federation Service (ADFS) to stop authentication requests by federation
servers. If you have disabled an account store in ADFS and you want to enable it, you
can use the same procedure to enable the store.
Perform this procedure on an account federation server.
Administrative credentials
To complete this procedure, you must be a member of the Administrators group on the
local computer.
To enable or disable an account store
1. Click Start, point to Administrative Tools, and then click Active Directory
Federation Services.
2. Double-click Federation Service, double-click Trust Policy, double-click My
Organization, and then double-click Account Stores.
3. Right-click the account store you want to enable or disable and do one of the
following:
If the account store is disabled and you want to enable it, click Enable.
If the account store is enabled and you want to disable it, click Disable.
Note
You can also perform this procedure by right-clicking the account store,
clicking Properties, and then selecting or clearing the Enable this
account store check box.
Managing Active Directory Account Stores
Active Directory Federation Services (ADFS) is tightly integrated with Active Directory.
ADFS retrieves user attributes and authenticates users against Active Directory. ADFS

159
also uses Windows Integrated Authentication and security tokens that Active
Directory creates.
Management of the Active Directory account store is limited to adding, removing, and
enabling or disabling the account store.
Task requirements
You need the following tool to perform the procedures for this task:
Active Directory Federation Services MMC snap-in.
To complete this task, perform the following procedures on an as-needed basis:
Add an Active Directory account store
Remove an Active Directory account store
Enable or disable an account store
See Also Account Stores
Add an Active Directory account store
If user and computer accounts that require access to a resource that is protected by
Active Directory Federation Services (ADFS) are stored in Active Directory, you must add
Active Directory as an account store on a federation server in the Federation Service that
authenticates the accounts.
An Active Directory forest can have only one Active Directory instance. Therefore, you
can add only one Active Directory store for the respective Federation Service.
Administrative credentials
To complete this procedure, you must be a member of the Administrators group on the
local computer.
To create an Active Directory account store
1. Click Start, point to Administrative Tools, and then click Active Directory
Federation Services.
2. Double-click Federation Service, double-click Trust Policy, double-click My

160
Organization, right-click Account Stores, point to New, and then click Account
Store.
3. On the Welcome to the Add Account Store Wizard page, click Next.
4. On the Account Store Type page, ensure that Active Directory is selected, and
then click Next.
5. On the Enable this Account Store page, ensure that the Enable this account
store check box is selected, and then click Next.
6. On the Completing the Add Account Store Wizard page, click Finish.
See Also Add an ADAM account store
Remove an Active Directory account store
Use this procedure to delete the Active Directory account store node for an Active
Directory Federation Services (ADFS) Federation Service that no longer uses an Active
Directory account store.
Administrative credentials
To complete this procedure, you must be a member of the Administrators group on the
local computer.
To delete the Active Directory account store node
1. Click Start, point to Administrative Tools, and then click Active Directory
Federation Services.
2. Double-click Federation Service, double-click Trust Policy, double-click My
Organization, and then double-click Account Stores.
3. Right-click Active Directory, and then click Delete.
4. In the Delete Account Store dialog box, click Yes to confirm the deletion.

161
Managing ADAM Account Stores
Active Directory Application Mode (ADAM) provides data storage and retrieval for
directory-enabled applications, without the dependencies that are required for Active
Directory. A Federation Service can use multiple ADAM account stores when they are
needed to accommodate sets of users for different applications. To differentiate between
ADAM stores, the Federation Service assigns a unique value to each ADAM store in the
trust policy, in the form of the uniform resource identifier (URI).
Task requirements
You need the following to perform the procedures for this task:
An ADAM instance
ADAM ADSI Edit
Ldp, a Windows Server 2003 Support Tool, available in the SUPPORT\TOOLS folder
on the Windows Server 2003 operating system CD.
Active Directory Federation Services MMC snap-in
To complete this task, perform the following procedures on an as-needed basis:
Prepare an ADAM instance for use with ADFS
Add an ADAM account store
Change the server name or IP address for an ADAM account store
Change the display name for an ADAM account store
Change the port number for an ADAM account store
Change the search base for an ADAM account store
Change the user name attribute for an ADAM account store
Enable or disable TLS and SSL for an ADAM account store
See Also Account Stores

162
Prepare an ADAM instance for use with ADFS
Before you can use an Active Directory Application Mode (ADAM) instance as an account
store in your Active Directory Federation Services (ADFS) deployment, you must perform
two preliminary procedures:
Set an attribute to enable user accounts
Configure the member attribute with the federation server security identifier (SID) to
enable federation servers to search the ADAM store
Enable ADAM User Accounts On ADAM instances running on Windows Server 2003, where local or domain password
policy restrictions are in effect, the ADAM user account is disabled by default. Before you
can enable the user account, you must set a password that meets the password policy
restrictions that are in effect. This rule does not apply to ADAM instances running on
Windows XP Professional.
To enable user accounts, set the msDS-UserAccountDisabled attribute value to False.
Be sure that the user account has been configured with a userPassword attribute value
that meets policy requirements.
Use the following procedure to enable a user account in the ADAM account store.
Administrative credentials
To complete this procedure, you must be a member of the Administrators group on the
local computer.
To enable an ADAM user account
1. Open ADAM ADSI Edit and connect to the ADAM instance.
2. Right-click an ADAM user, and then click Properties.
3. In the Attribute column, click msDS-UserAccountDisabled, and then click Edit.
4. Click False, and then click OK twice.
If an ADAM-ADSIEdit message appears stating that the password cannot be
updated because the value does not meet requirements for the domain, right-
click the user account and click Reset Password. Then repeat this procedure.

163
Configure the Federation Server SID To enable federation servers to search the ADAM account store, you need to add the
machine account SID of the account federation server to the member attribute in the
Readers role of the ADAM instance.
Use the following procedures to prepare ADAM for searches by federation servers.
Obtain the machine account SID of the federation server
Add the SID to the member attribute in ADAM
Administrative credentials
To complete this procedure, you must be a member of the Domain Users group in the
Active Directory domain of the federation server.
To obtain the SID of the federation server
1. Open Ldp and connect and bind to the Active Directory domain to which the
federation server is joined.
2. On the View menu, click Tree.
3. Expand the tree to locate the computer object of the federation server.
4. Double-click the computer object and view the properties in the results pane.
5. Make a note of the value in 1>objectSid.
Perform the next procedure to add the SID you obtained to the member attribute in
ADAM.
Administrative credentials
To complete this procedure, you must be a member of the Administrators group on the
local computer.
To add the federation server SID to the member attribute for an ADAM instance
1. In Ldp, connect and bind to the ADAM instance.
2. On the View menu, click Tree.
3. Double-click the ADAM instance and then double click the CN=Roles container.
4. Right-click the CN=Readers container, and then click Modify.
5. In Attribute, type member.
6. In Values, type the SID value as follows, and then click Enter:
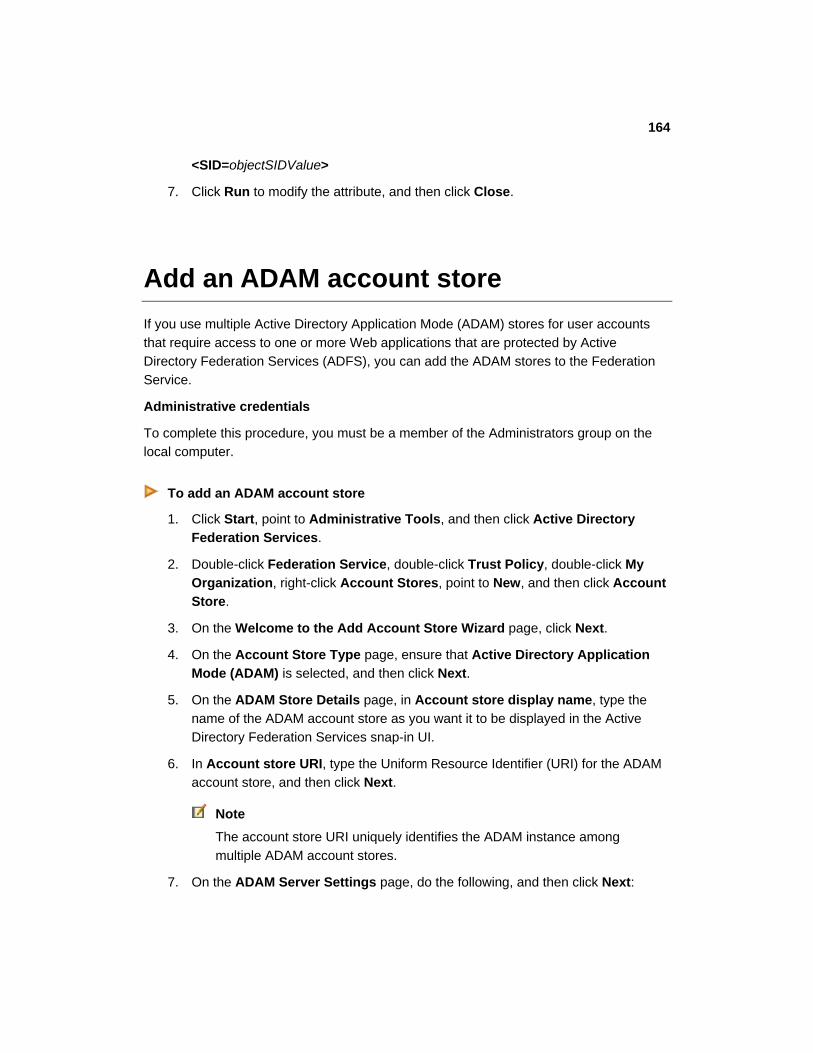
164
<SID=objectSIDValue>
7. Click Run to modify the attribute, and then click Close.
Add an ADAM account store
If you use multiple Active Directory Application Mode (ADAM) stores for user accounts
that require access to one or more Web applications that are protected by Active
Directory Federation Services (ADFS), you can add the ADAM stores to the Federation
Service.
Administrative credentials
To complete this procedure, you must be a member of the Administrators group on the
local computer.
To add an ADAM account store
1. Click Start, point to Administrative Tools, and then click Active Directory
Federation Services.
2. Double-click Federation Service, double-click Trust Policy, double-click My
Organization, right-click Account Stores, point to New, and then click Account
Store.
3. On the Welcome to the Add Account Store Wizard page, click Next.
4. On the Account Store Type page, ensure that Active Directory Application
Mode (ADAM) is selected, and then click Next.
5. On the ADAM Store Details page, in Account store display name, type the
name of the ADAM account store as you want it to be displayed in the Active
Directory Federation Services snap-in UI.
6. In Account store URI, type the Uniform Resource Identifier (URI) for the ADAM
account store, and then click Next.
Note
The account store URI uniquely identifies the ADAM instance among
multiple ADAM account stores.
7. On the ADAM Server Settings page, do the following, and then click Next:
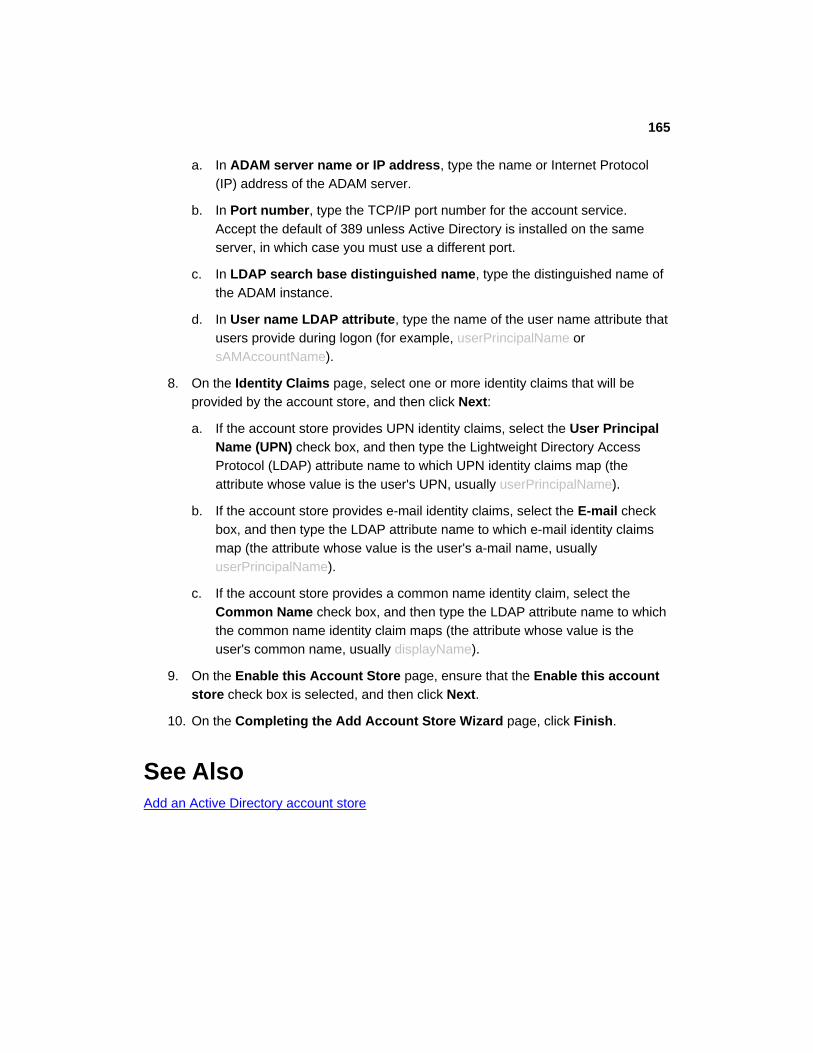
165
a. In ADAM server name or IP address, type the name or Internet Protocol
(IP) address of the ADAM server.
b. In Port number, type the TCP/IP port number for the account service.
Accept the default of 389 unless Active Directory is installed on the same
server, in which case you must use a different port.
c. In LDAP search base distinguished name, type the distinguished name of
the ADAM instance.
d. In User name LDAP attribute, type the name of the user name attribute that
users provide during logon (for example, userPrincipalName or
sAMAccountName).
8. On the Identity Claims page, select one or more identity claims that will be
provided by the account store, and then click Next:
a. If the account store provides UPN identity claims, select the User Principal
Name (UPN) check box, and then type the Lightweight Directory Access
Protocol (LDAP) attribute name to which UPN identity claims map (the
attribute whose value is the user's UPN, usually userPrincipalName).
b. If the account store provides e-mail identity claims, select the E-mail check
box, and then type the LDAP attribute name to which e-mail identity claims
map (the attribute whose value is the user's a-mail name, usually
userPrincipalName).
c. If the account store provides a common name identity claim, select the
Common Name check box, and then type the LDAP attribute name to which
the common name identity claim maps (the attribute whose value is the
user's common name, usually displayName).
9. On the Enable this Account Store page, ensure that the Enable this account
store check box is selected, and then click Next.
10. On the Completing the Add Account Store Wizard page, click Finish.
See Also Add an Active Directory account store

166
Change the server name or IP address for an ADAM account store
If the name or IP address of the server that hosts an Active Directory Application Mode
(ADAM) instance changes, you must change the corresponding server setting in the
properties of the ADAM account store in Active Directory Federation Services (ADFS).
Administrative credentials
To complete this procedure, you must be a member of the Administrators group on the
local computer.
To change the server name or IP address for an ADAM account store
1. Click Start, point to Administrative Tools, and then click Active Directory
Federation Services.
2. Double-click Federation Service, double-click Trust Policy, double-click My
Organization, and then double-click Account Stores.
3. Right-click the ADAM account store whose server name or IP address you want
to change, and then click Properties.
4. On the Settings tab, in Server name or IP address, replace the existing server
name or IP address with the new value, and then click OK.
See Also Change the port number for an ADAM account store
Change the search base for an ADAM account store
Change the user name attribute for an ADAM account store
Enable or disable TLS and SSL for an ADAM account store
Change the URI for an ADAM account store
Change the display name for an ADAM account store

167
Change the display name for an ADAM account store
The ADAM display name identifies the ADAM store to the user during logon. You can
change this name in Active Directory Federation Services (ADFS), if needed.
Administrative credentials
To complete this procedure, you must be a member of the Administrators group on the
local computer.
To change the URI for an ADAM account store
1. Click Start, point to Administrative Tools, and then click Active Directory
Federation Services.
2. Double-click Federation Service, double-click Trust Policy, double-click My
Organization, and then double-click Account Stores.
3. Right-click the ADAM account store whose display name you want to change,
and then click Properties.
4. On the General tab, in Display name, type the new display name, and then click
OK.
See Also Change the URI for an ADAM account store
Change the server name or IP address for an ADAM account store
Change the port number for an ADAM account store
Change the search base for an ADAM account store
Change the user name attribute for an ADAM account store
Enable or disable TLS and SSL for an ADAM account store

168
Change the port number for an ADAM account store
If the communication port that is used by an Active Directory Application Mode (ADAM)
instance changes on the host server, you must change the corresponding server setting
in the properties of the ADAM account store in Active Directory Federation Services
(ADFS). The default port for Lightweight Directory Access Protocol (LDAP) traffic is 389,
and ADAM uses this port if a different port is not specified. However, if Active Directory is
subsequently installed on the server that hosts the ADAM store, the ADAM port conflicts
with the Active Directory port and must be changed for ADAM.
Administrative credentials
To complete this procedure, you must be a member of the Administrators group on the
local computer.
To change the port number for an ADAM account store
1. Click Start, point to Administrative Tools, and then click Active Directory
Federation Services.
2. Double-click Federation Service, double-click Trust Policy, double-click My
Organization, and then double-click Account Stores.
3. Right-click the ADAM account store whose port number you want to change, and
then click Properties.
4. On the Settings tab, in Port number, replace the existing port number with the
new value, and then click OK.
See Also Change the server name or IP address for an ADAM account store
Change the search base for an ADAM account store
Change the user name attribute for an ADAM account store
Enable or disable TLS and SSL for an ADAM account store
Change the display name for an ADAM account store
Change the URI for an ADAM account store

169
Change the search base for an ADAM account store
An Active Directory Application Mode (ADAM) store is discovered through a Lightweight
Directory Access Protocol (LDAP) search. The search base for an ADAM account store
specifies the top node from which the LDAP search for the ADAM instance is to be
performed. Typically, the search base is the top node in the directory tree. However, if
you want to reduce the search time, you can specify a more restricted path. For example,
the search base distinguished name DC=Adatum,DC=com begins searching at Adatum
and searches all domains in the path that contains Adatum.com. If the ADAM instance is
located on a server in DomainB.DomainA.Adatum.com, you can avoid searching through
Adatum and DomainA by specifying the search base of
DC=DomainB,DC=DomainA,DC=Adatum.com.
Administrative credentials
To complete this procedure, you must be a member of the Administrators group on the
local computer.
To change the search base for an ADAM account store
1. Click Start, point to Administrative Tools, and then click Active Directory
Federation Services.
2. Double-click Federation Service, double-click Trust Policy, double-click My
Organization, and then double-click Account Stores.
3. Right-click the ADAM account store whose search base you want to change, and
then click Properties.
4. On the Settings tab, in Search base Distinguished Name (DN), replace the
existing distinguished name with the new value, and then click OK.
See Also Change the server name or IP address for an ADAM account store
Change the port number for an ADAM account store
Change the user name attribute for an ADAM account store
Enable or disable TLS and SSL for an ADAM account store
Change the display name for an ADAM account store
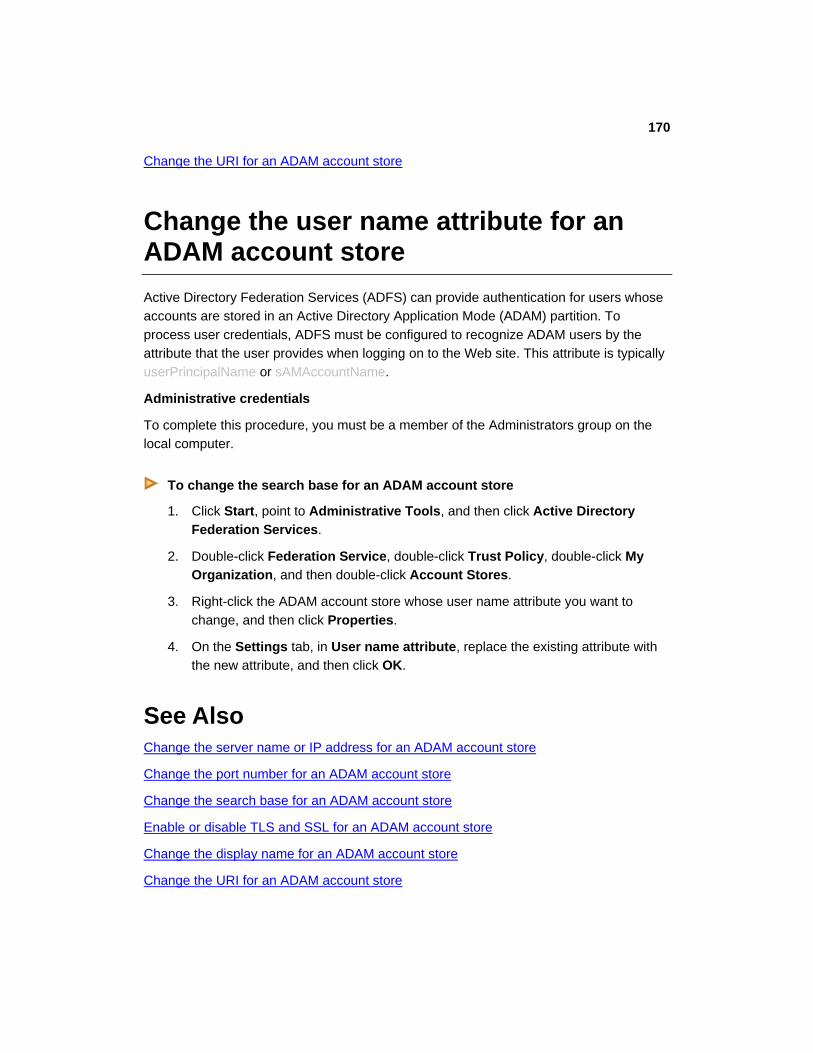
170
Change the URI for an ADAM account store
Change the user name attribute for an ADAM account store
Active Directory Federation Services (ADFS) can provide authentication for users whose
accounts are stored in an Active Directory Application Mode (ADAM) partition. To
process user credentials, ADFS must be configured to recognize ADAM users by the
attribute that the user provides when logging on to the Web site. This attribute is typically
userPrincipalName or sAMAccountName.
Administrative credentials
To complete this procedure, you must be a member of the Administrators group on the
local computer.
To change the search base for an ADAM account store
1. Click Start, point to Administrative Tools, and then click Active Directory
Federation Services.
2. Double-click Federation Service, double-click Trust Policy, double-click My
Organization, and then double-click Account Stores.
3. Right-click the ADAM account store whose user name attribute you want to
change, and then click Properties.
4. On the Settings tab, in User name attribute, replace the existing attribute with
the new attribute, and then click OK.
See Also Change the server name or IP address for an ADAM account store
Change the port number for an ADAM account store
Change the search base for an ADAM account store
Enable or disable TLS and SSL for an ADAM account store
Change the display name for an ADAM account store
Change the URI for an ADAM account store

171
Enable or disable TLS and SSL for an ADAM account store
By default, Transport Layer Security (TLS) and Secure Sockets Layer (SSL) protocols
are not enabled for Active Directory Application Mode (ADAM) account stores in Active
Directory Federation Services (ADFS). You can enable or disable these protocols as
needed.
Administrative credentials
To complete this procedure, you must be a member of the Administrators group on the
local computer.
To enable or disable TLS/SSL protocols for an ADAM account store
1. Click Start, point to Administrative Tools, and then click Active Directory
Federation Services.
2. Double-click Federation Service, double-click Trust Policy, double-click My
Organization, and then double-click Account Stores.
3. Right-click the ADAM account store whose search base you want to change, and
then click Properties.
4. On the Settings tab, enable or disable TLS/SSL as follows, and then click OK:
If the Enable Transport Layer Security (TLS) and Secure Sockets Layer
(SSL) protocols check box is cleared (disabled) and you want to enable it,
select the check box.
If the Enable Transport Layer Security (TLS) and Secure Sockets Layer
(SSL) protocols check box is selected (enabled) and you want to disable it,
clear the check box.
See Also Change the server name or IP address for an ADAM account store
Change the port number for an ADAM account store
Change the search base for an ADAM account store
Change the user name attribute for an ADAM account store
Change the display name for an ADAM account store

172
Change the URI for an ADAM account store
Using Multiple Account Stores
If you have multiple Active Directory Application Mode (ADAM) account stores that use
Web applications that are protected by Active Directory Federation Services (ADFS), you
must configure each ADAM store in the Federation Service with a unique uniform
resource identifier (URI). In addition, you can set a priority for connecting to each store.
ADAM Store URI Account stores are identified in Active Directory Federation Services (ADFS) by a
Uniform Resource Identifier (URI). The account store URI is different from the Federation
Service URI.
The URI for an Active Directory account store is always the same
(urn:federation:activedirectory) because a forest has only one Active Directory store; this
URI is provided automatically by the system. However, you can have multiple instances
of Active Directory Application Mode (ADAM) account stores in a Federation Service. To
uniquely identify ADAM stores within the trust policy, each ADAM store requires a unique
URI. The URI can use a Uniform Resource Locator (URL) format, such as
ldap//:ADAMInstanceName, or a Uniform Resource Name (URN), such as
urn:federation:ADAMInstanceName. ADFS does not impose or check the URI format;
however, ADFS does check for uniqueness.
When you use the exact ADAM instance name in the URI, ADFS searches that store first.
If the URI does not contain the ADAM instance name, ADFS searches all ADAM stores
until it finds a match for the user. Therefore, although ADFS accepts the ADAM account
store URI as long as it is unique, you can improve efficiency of the ADAM search by
including the exact ADAM instance name in the URI.
Task requirements
You need the following to perform the procedures for this task:
Active Directory Federation Services MMC snap-in
To complete this task, perform the following procedures on an as-needed basis:
Change account store priority
Change the URI for an ADAM account store

173
See Also Account Stores
Change account store priority
If you have more than one account store in a Federation Service, you can determine the
order in which Active Directory Federation Services (ADFS) contacts the stores when it
authenticates users. If most users are stored in one of the stores, you can set that store
to have a higher priority than other stores.
Administrative credentials
To complete this procedure, you must be a member of the Administrators group on the
local computer.
To change the priority of an account store
1. Click Start, point to Administrative Tools, and then click Active Directory
Federation Services.
2. Double-click Federation Service, double-click Trust Policy, and then double-
click My Organization.
3. Right-click Account Stores, and then click Store Priority.
4. In the Account Store Prioritization dialog box, click the store in the list that you
want to move to the top of the list, and then click the Up button repeatedly until
that store is at the top of the list.
5. If you want to reposition any other stores in the list, select each store and use the
Up and Down buttons as needed.
6. When all stores are in the correct priority order, click OK.

174
Change the URI for an ADAM account store
Active Directory Federation Services (ADFS) identifies account stores with a Uniform
Resource Identifier (URI). You can change the URI in the account store properties.
Administrative credentials
To complete this procedure, you must be a member of the Administrators group on the
local computer.
To change the URI for an ADAM account store
1. Click Start, point to Administrative Tools, and then click Active Directory
Federation Services.
2. Double-click Federation Service, double-click Trust Policy, double-click My
Organization, and then double-click Account Stores.
3. Right-click the ADAM account store whose URI you want to change, and then
click Properties.
4. On the General tab, in URI, type the new URI, and then click OK.
See Also Change the display name for an ADAM account store
Change the server name or IP address for an ADAM account store
Change the port number for an ADAM account store
Change the search base for an ADAM account store
Change the user name attribute for an ADAM account store
Enable or disable TLS and SSL for an ADAM account store
Managing Claims and Claim Mapping
In an Active Directory Federation Services (ADFS) deployment, claims are statements
about users that are carried within security tokens and are used by Web applications to

175
make authorization decisions. Claims originate from either an account store or an
account partner.
When administering an account store in a Federation Service, you perform the following
claim management procedures:
Create a claim that represents a user or group of users from your organization.
Extract the claim to map it to a local security account (either a group or user) in your
directory service.
Map the claim to an outgoing identity that you name to appropriately represent the
type of users in the claim. During a request for access to a resource, ADFS sends
this claim to the resource Federation Service in a security token.
When administering an account partner in a resource Federation Service, you perform
the following management procedures:
1. Create a claim for your organization.
2. Map an incoming claim (the name of which has been communicated to you by the
account Federation Service) to your local organization claim. This claim is used by
the Web server to make authorization decisions about the user or users represented
by the claim.
The following tasks for managing claims are described in this objective.
Exposing Account Store Attributes as Claims
Mapping Claims as Part of Application Authorization
Creating, Deleting, and Configuring Claims
See Also Understanding Claims
Exposing Account Store Attributes as Claims
Active Directory Federation Services (ADFS) uses claims to provide specific information
about users to a Web application. Claims are populated with information (attributes) from
the account store that hosts the user account. For example, a claim might extract the
user's name, identity, key, group, privilege, or capability. The claim is passed in the

176
security token, which the Web server uses to make authorization decisions for access
to the requested application.
An organization group claim, when used with an Active Directory Application Mode store,
requires mapping the claim to an ADAM attribute.
An organization custom claim maps the claim to an attribute when used with either an
ADAM store or an Active Directory store.
Task requirements
You must meet the following conditions to perform the procedures for this task:
ADFS must be installed to create at least one federation server in your forest or
realm.
The Active Directory Federation Services MMC snap-in must be running on the
federation server.
Active Directory or Active Directory Application Mode (ADAM) must be available in
the ADFS forest or realm.
You must have a plan for creating claims and mapping them to the appropriate
attributes of a user account in ADAM if you are managing an account Federation
Service, or to a set of organization claims if you are managing a resource Federation
Service.
To complete this task, perform the following procedures on an as-needed basis:
Map an organization group claim to an ADAM attribute and value (group claim
extraction)
Map an organization custom claim to an Active Directory or ADAM user attribute
(custom claim extraction)
See Also Understanding Claims
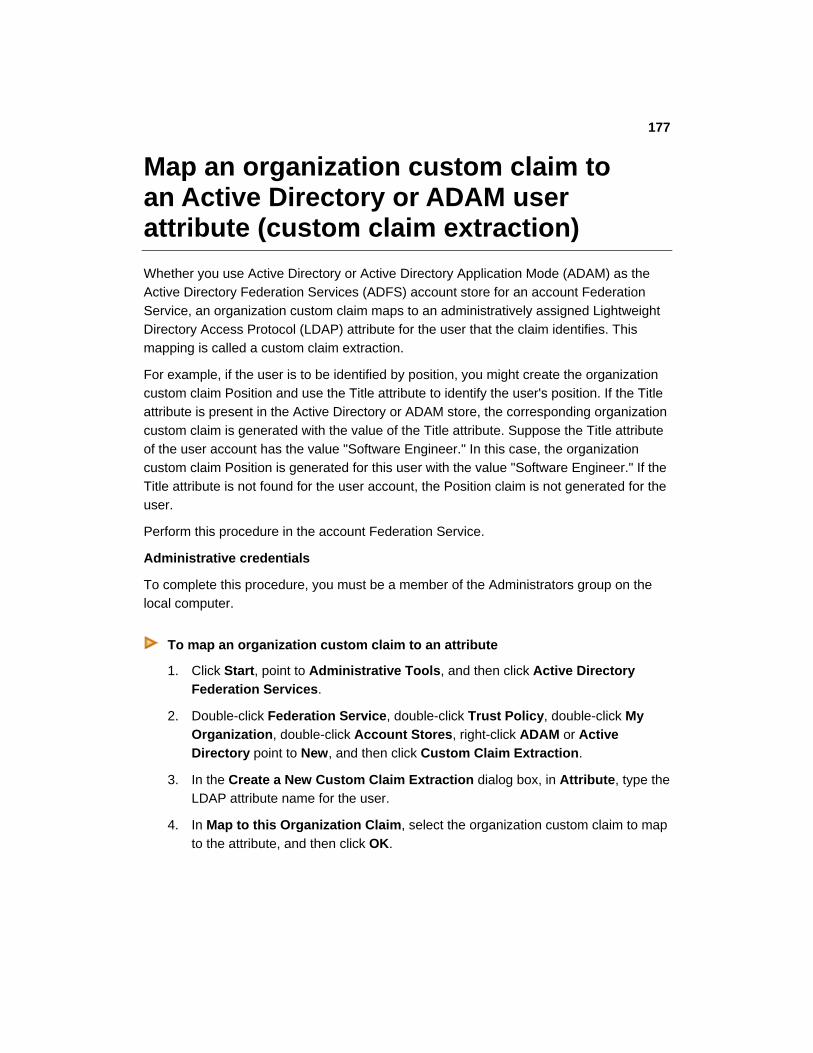
177
Map an organization custom claim to an Active Directory or ADAM user attribute (custom claim extraction)
Whether you use Active Directory or Active Directory Application Mode (ADAM) as the
Active Directory Federation Services (ADFS) account store for an account Federation
Service, an organization custom claim maps to an administratively assigned Lightweight
Directory Access Protocol (LDAP) attribute for the user that the claim identifies. This
mapping is called a custom claim extraction.
For example, if the user is to be identified by position, you might create the organization
custom claim Position and use the Title attribute to identify the user's position. If the Title
attribute is present in the Active Directory or ADAM store, the corresponding organization
custom claim is generated with the value of the Title attribute. Suppose the Title attribute
of the user account has the value "Software Engineer." In this case, the organization
custom claim Position is generated for this user with the value "Software Engineer." If the
Title attribute is not found for the user account, the Position claim is not generated for the
user.
Perform this procedure in the account Federation Service.
Administrative credentials
To complete this procedure, you must be a member of the Administrators group on the
local computer.
To map an organization custom claim to an attribute
1. Click Start, point to Administrative Tools, and then click Active Directory
Federation Services.
2. Double-click Federation Service, double-click Trust Policy, double-click My
Organization, double-click Account Stores, right-click ADAM or Active
Directory point to New, and then click Custom Claim Extraction.
3. In the Create a New Custom Claim Extraction dialog box, in Attribute, type the
LDAP attribute name for the user.
4. In Map to this Organization Claim, select the organization custom claim to map
to the attribute, and then click OK.

178
Map an organization group claim to an ADAM attribute and value (group claim extraction)
When you use Active Directory Application Mode (ADAM) as the Active Directory
Federation Services (ADFS) account store for a Federation Service, a organization group
claim maps to a Lightweight Directory Access Protocol (LDAP) attribute and value of the
user account in ADAM. This mapping is called a group claim extraction. For example,
suppose the organization group claim Manager is mapped to the ADAM user account
attribute memberOf and the value
CN=ADAMTestGroup,CN=Users,DC=adatum,DC=com. In this case, if the ADAM store
user account for the logged-on user has the memberOf attribute and that attribute has a
value of “CN=ADAMTestGroup,CN=Users,DC=adatum,DC=com,” the organization group
claim Manager is generated for the user. If both the memberOf attribute and the
corresponding value specified in the group claim extraction are not present on the user
account, the organization group claim is not generated.
Administrative credentials
To complete this procedure, you must be a member of the Administrators group on the
local computer.
To map an organization group claim to an ADAM attribute
1. Click Start, point to Administrative Tools, and then click Active Directory
Federation Services.
2. Double-click Federation Service, double-click Trust Policy, double-click My
Organization, double-click Account Stores, right-click ADAM, point to New,
and then click Group Claim Extraction.
3. In the Create a New Group Claim Extraction dialog box, in Attribute and
Value, type the LDAP attribute and its value, respectively.
4. In Map to this Organization Claim, select the organization group claim to map
to the ADAM attribute and value, and then click OK.
See Also Map an organization group claim to an Active Directory group (group claim extraction)

179
Map an organization custom claim to an Active Directory or ADAM user attribute
(custom claim extraction)
Mapping Claims as Part of Application Authorization
Claims that are used by Active Directory Federation Services (ADFS) make it possible for
an application in one organization to recognize and authorize users from a different
organization or from the Internet. By creating claims to represent users in the account
organization, and mapping them to a group that is recognized by the resource, you can
enable authorization of users for applications that are protected by ADFS in a federated
scenario.
Task requirements
You must meet the following conditions to perform the procedures for this task:
ADFS must be installed to create at least one federation server in your forest or
realm.
The Active Directory Federation Services snap-in must be running on the federation
server.
Active Directory or Active Directory Application Mode (ADAM) must be available in
the account forest or realm.
You must have a plan for creating claims and mapping them to the appropriate users
and groups if you are managing an account Federation Service, or to a set of local
claims if you are managing a resource Federation Service.
To complete this task, perform the following procedures on an as-needed basis:
Map an organization group claim to an Active Directory group (group claim
extraction)
Map a resource organization group claim to a resource group
Create an incoming group claim mapping
Create an incoming custom claim mapping
Create an outgoing group or custom claim mapping
Change the organization claim mapping of an outgoing group or custom claim
Change the organization claim mapping of an incoming group or custom claim

180
See Also Understanding Claims
Map an organization group claim to an Active Directory group (group claim extraction)
When you use Active Directory as the Active Directory Federation Services (ADFS)
account store for an account Federation Service, you map an organization group claim to
a security group in Active Directory. This mapping is called a group claim extraction.
Perform this procedure in the account Federation Service.
Administrative credentials
To complete this procedure, you must be a member of the Administrators group on the
local computer.
To map a group claim to an Active Directory group
1. Click Start, point to Administrative Tools, and then click Active Directory
Federation Services.
2. Double-click Federation Service, double-click Trust Policy, double-click My
Organization, double-click Account Stores, right-click Active Directory, point
to New, and then click Group Claim Extraction.
3. In the Create a New Group Claim Extraction dialog box, click Add, and then
select the Active Directory security group that you want to map to a group claim.
4. In Map to this Organization Claim, select the group claim to map to the
Active Directory security group, and then click OK.
See Also Map an organization group claim to an ADAM attribute and value (group claim extraction)
Map an organization custom claim to an Active Directory or ADAM user attribute (custom
claim extraction)

181
Map a resource organization group claim to a resource group
In an Active Directory Federation Services (ADFS) resource Federation Service that does
not use a Windows forest trust to trust accounts from the respective account Federation
Service, organization group claims that are used to access Windows NT token-based
applications must be mapped to a local resource group so that Windows integrated
authentication succeeds. Therefore, you must create a group in Active Directory in the
resource organization that will represent the users who must access the resource but do
not have accounts in the resource domain. After you create the organization group claim,
map the claim to the group that you have created in the resource organization's Active
Directory.
Note
This procedure is not required if the resource forest trusts the account forest and
Windows trust is configured in the account Federation Service.
Perform this procedure on a resource federation server.
Administrative credentials
To complete this procedure, you must be a member of the Administrators group on the
local computer.
To map an organization group claim to a resource group
1. Click Start, point to Administrative Tools, and then click Active Directory
Federation Services.
2. Double-click Federation Service, double-click Trust Policy, double-click My
Organization, and then click Organization Claims.
3. In the details pane, right-click the organization group claim that requires mapping
to a local group, click Properties, and then click the Resource Group tab.
4. Select the Map this claim to the following local resource group check box,
and then click the … button.
5. In Enter the object name to select, type the name of the resource group that
you want to map to the group claim, and then click OK.
6. In the Group Claim Properties dialog box, click OK.

182
Create an incoming group claim mapping
In Active Directory Federation Services (ADFS), incoming group claim mappings are
used in the resource Federation Service to transform group claims that are sent by an
account partner into organization claims that can be used by the resource partner to
make authorization decisions.
For example, an account partner might send a security token for a user that contains the
group claim SalesReps. Because the resource partner cannot make authorization
decisions based on the account user's membership in the SalesReps group, an incoming
group claim mapping is used to map the incoming group claim that is named SalesReps
in the account Federation Service to the organization group claim that is named
Purchasers in the resource Federation Service. The resource itself provides access to
the local security group to which the Purchasers claim is mapped.
Perform this procedure on a resource federation server. To perform this procedure, you
must have created an organization group claim to which you can map the incoming claim.
Administrative credentials
To complete this procedure, you must be a member of the Administrators group on the
local computer.
To create an incoming group claim mapping
1. Click Start, point to Administrative Tools, and then click Active Directory
Federation Services.
2. Double-click Federation Service, double-click Trust Policy, double-click
Partner Organizations, double-click Account Partners, right-click your account
partner, point to New, and then click Incoming Group Claim Mapping.
3. In the Create a New Incoming Group Claim Mapping dialog box, in Incoming
group claim name, type the name of the group claim that your account partner
sends to you.
4. In Organization group claim, select the group claim that you will use in your
organization to map the incoming group claim to, and then click OK.
See Also Create an organization group or custom claim
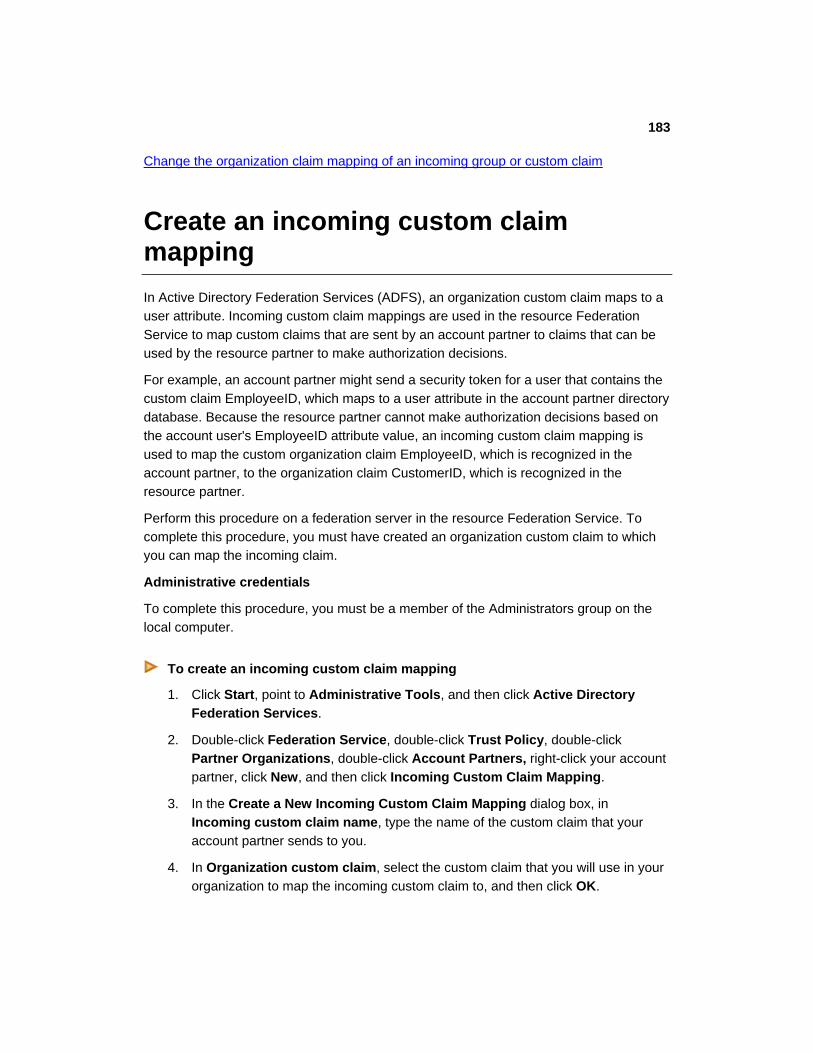
183
Change the organization claim mapping of an incoming group or custom claim
Create an incoming custom claim mapping
In Active Directory Federation Services (ADFS), an organization custom claim maps to a
user attribute. Incoming custom claim mappings are used in the resource Federation
Service to map custom claims that are sent by an account partner to claims that can be
used by the resource partner to make authorization decisions.
For example, an account partner might send a security token for a user that contains the
custom claim EmployeeID, which maps to a user attribute in the account partner directory
database. Because the resource partner cannot make authorization decisions based on
the account user's EmployeeID attribute value, an incoming custom claim mapping is
used to map the custom organization claim EmployeeID, which is recognized in the
account partner, to the organization claim CustomerID, which is recognized in the
resource partner.
Perform this procedure on a federation server in the resource Federation Service. To
complete this procedure, you must have created an organization custom claim to which
you can map the incoming claim.
Administrative credentials
To complete this procedure, you must be a member of the Administrators group on the
local computer.
To create an incoming custom claim mapping
1. Click Start, point to Administrative Tools, and then click Active Directory
Federation Services.
2. Double-click Federation Service, double-click Trust Policy, double-click
Partner Organizations, double-click Account Partners, right-click your account
partner, click New, and then click Incoming Custom Claim Mapping.
3. In the Create a New Incoming Custom Claim Mapping dialog box, in
Incoming custom claim name, type the name of the custom claim that your
account partner sends to you.
4. In Organization custom claim, select the custom claim that you will use in your
organization to map the incoming custom claim to, and then click OK.
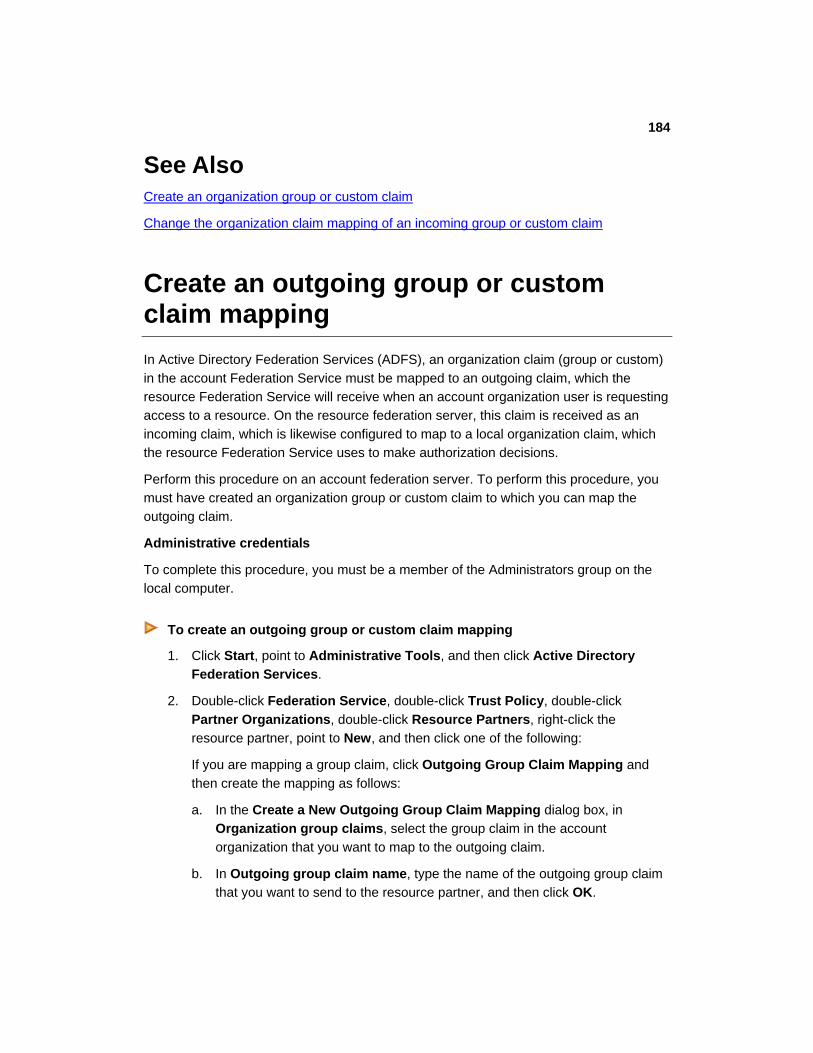
184
See Also Create an organization group or custom claim
Change the organization claim mapping of an incoming group or custom claim
Create an outgoing group or custom claim mapping
In Active Directory Federation Services (ADFS), an organization claim (group or custom)
in the account Federation Service must be mapped to an outgoing claim, which the
resource Federation Service will receive when an account organization user is requesting
access to a resource. On the resource federation server, this claim is received as an
incoming claim, which is likewise configured to map to a local organization claim, which
the resource Federation Service uses to make authorization decisions.
Perform this procedure on an account federation server. To perform this procedure, you
must have created an organization group or custom claim to which you can map the
outgoing claim.
Administrative credentials
To complete this procedure, you must be a member of the Administrators group on the
local computer.
To create an outgoing group or custom claim mapping
1. Click Start, point to Administrative Tools, and then click Active Directory
Federation Services.
2. Double-click Federation Service, double-click Trust Policy, double-click
Partner Organizations, double-click Resource Partners, right-click the
resource partner, point to New, and then click one of the following:
If you are mapping a group claim, click Outgoing Group Claim Mapping and
then create the mapping as follows:
a. In the Create a New Outgoing Group Claim Mapping dialog box, in
Organization group claims, select the group claim in the account
organization that you want to map to the outgoing claim.
b. In Outgoing group claim name, type the name of the outgoing group claim
that you want to send to the resource partner, and then click OK.

185
If you are mapping a custom claim, click Outgoing Custom Claim Mapping and
then create the mapping as follows:
a. In the Create a New Outgoing Custom Claim Mapping dialog box, in
Organization custom claims, select the custom claim in the account
organization that you want to map to the outgoing claim.
b. In Outgoing custom claim name, type the name of the outgoing custom
claim that you want to send to the resource partner, and then click OK.
See Also Create an organization group or custom claim
Change the organization claim mapping of an outgoing group or custom claim
Change the organization claim mapping of an outgoing group or custom claim
In Active Directory Federation Services (ADFS), when you create an organization group
claim or organization custom claim in an account Federation Service, you map it to an
outgoing claim that is sent to the resource Federation Service. If you subsequently
replace the organization claim with a different claim or want to use a different
organization claim for the group or user identified in the claim, you can change the
mapping of the existing outgoing claim to the new organization custom or group claim.
You can also rename the outgoing custom or group claim.
Perform this procedure in the account Federation Service.
Administrative credentials
To complete this procedure, you must be a member of the Administrators group on the
local computer.
To change the organization claim mapping of an outgoing group or custom claim
1. Click Start, point to Administrative Tools, and then click Active Directory
Federation Services.
2. Double-click Federation Service, double-click Trust Policy, double-click
Partner Organizations, double-click Resource Partners, and then click the

186
resource partner whose organization claim mapping you want to change.
3. In the details pane, right-click the organization group or custom claim whose
outgoing claim mapping you want to change, and then click Properties.
4. On the General tab, in Organization group claims or Organization custom
claims, select the new organization group or custom claim that you want to map
to the outgoing group or custom claim.
5. In Outgoing group claim name or Outgoing custom claim name, change the
name, if needed, and then click OK.
Change the organization claim mapping of an incoming group or custom claim
In Active Directory Federation Services (ADFS), when you create an organization group
claim or organization custom claim in a resource Federation Service, you map it to an
incoming claim that is sent from the account Federation Service. If you subsequently
replace the organization claim with a different claim or want to use a different
organization claim for the group or user identified in the claim, you can change the
mapping of the existing incoming claim to the new organization custom or group claim.
You can also rename the incoming custom or group claim.
Perform this procedure in the resource Federation Service.
Administrative credentials
To complete this procedure, you must be a member of the Administrators group on the
local computer.
To change the organization claim mapping of an incoming group or custom claim
1. Click Start, point to Administrative Tools, and then click Active Directory
Federation Services.
2. Double-click Federation Service, double-click Trust Policy, double-click
Partner Organizations, double-click Account Partners, and then click the
account partner whose organization claim mapping you want to change.
3. In the details pane, right-click the incoming claim whose claim mapping you want
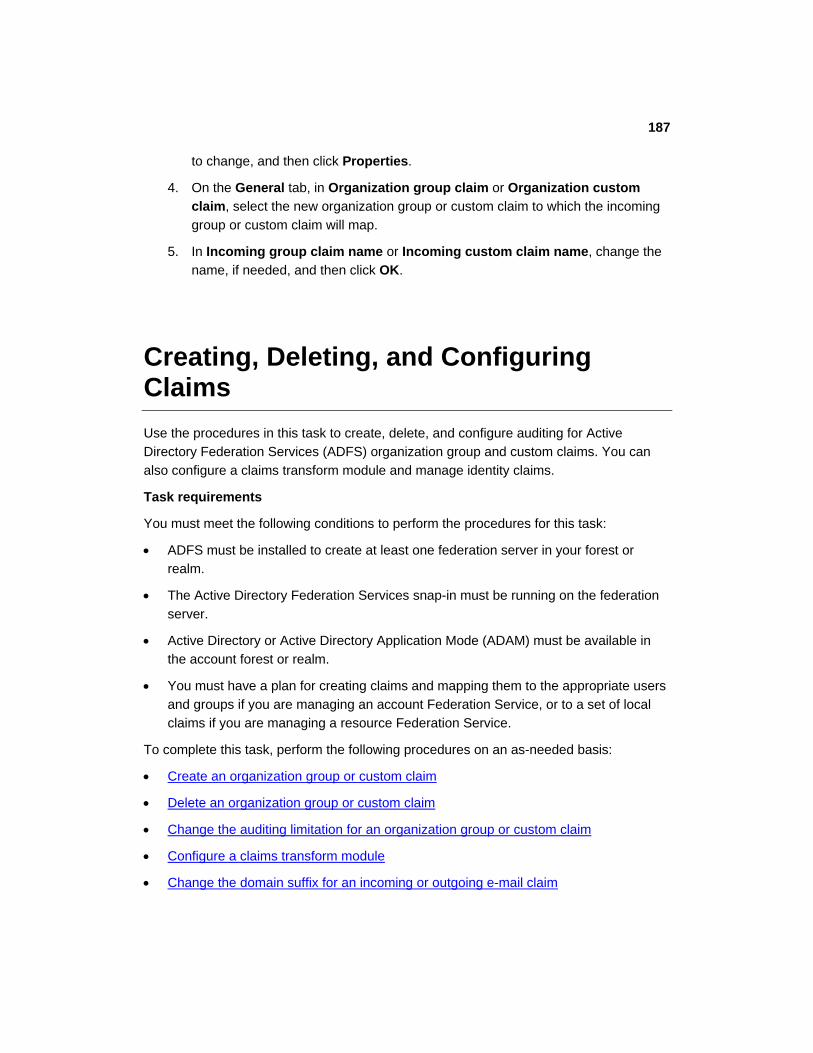
187
to change, and then click Properties.
4. On the General tab, in Organization group claim or Organization custom
claim, select the new organization group or custom claim to which the incoming
group or custom claim will map.
5. In Incoming group claim name or Incoming custom claim name, change the
name, if needed, and then click OK.
Creating, Deleting, and Configuring Claims
Use the procedures in this task to create, delete, and configure auditing for Active
Directory Federation Services (ADFS) organization group and custom claims. You can
also configure a claims transform module and manage identity claims.
Task requirements
You must meet the following conditions to perform the procedures for this task:
ADFS must be installed to create at least one federation server in your forest or
realm.
The Active Directory Federation Services snap-in must be running on the federation
server.
Active Directory or Active Directory Application Mode (ADAM) must be available in
the account forest or realm.
You must have a plan for creating claims and mapping them to the appropriate users
and groups if you are managing an account Federation Service, or to a set of local
claims if you are managing a resource Federation Service.
To complete this task, perform the following procedures on an as-needed basis:
Create an organization group or custom claim
Delete an organization group or custom claim
Change the auditing limitation for an organization group or custom claim
Configure a claims transform module
Change the domain suffix for an incoming or outgoing e-mail claim

188
Enable or disable an organization identity claim for an account or resource
partner
See Also Understanding Claims
Create an organization group or custom claim
In Active Directory Federation Services (ADFS), an organization group claim is used by
the Federation Service to make authorization decisions on the basis of a user's
membership in a group or role. An organization custom claim is used by the Federation
Service to provide custom information about a user, such as an employee identification
number. Custom and group claims are created in the same way.
Administrators in the account Federation Service create organization group and custom
claims to represent account users. Administrators in the resource Federation Service
create corresponding organization group and custom claims to represent groups and
users that can be recognized as resource users in the resource Federation Service.
Because outgoing claims in the account Federation Service map to incoming claims in
the resource Federation Service, the resource Federation Service is able to accept the
credentials provided by the account Federation Service.
Administrative credentials
To complete this procedure, you must be a member of the Administrators group on the
local computer.
To create an organization group or custom claim
1. Click Start, point to Administrative Tools, and then click Active Directory
Federation Services.
2. Double-click Federation Service, double-click Trust Policy, double-click My
Organization, right-click Organization Claims, point to New, and then click
Organization Claim.
3. In the Create a New Organization Claim dialog box, in Claim name, type a
unique name that identifies the group or role for a group claim, or the name of a
custom claim.

189
Note
You can create a group claim and a custom claim with the same name.
4. If you want to limit the auditing of the claim to the claim name and omit the value,
select the Limit the auditing of this claim check box.
5. For Specify the claim type, click Group claim or Custom claim, and then click
OK.
See Also Create an incoming group claim mapping
Create an incoming custom claim mapping
Create an outgoing group or custom claim mapping
Delete an organization group or custom claim
If a group or user no longer requires access to a resource that is protected by Active
Directory Federation Services (ADFS), you can delete the organization group claim or
custom claim that represents the group or user to reduce management overhead.
For example, an account partner might have provided a group claim or custom claim to
represent a capability of a group or role. If this condition changes and the group claim or
custom claim is no longer valid in the resource domain, you can delete the group claim.
At the account partner, a group that existed before might no longer be valid. In this case,
the corresponding group claim can be removed.
If a partner has been deleted and any claims are specific to the deleted partner, you can
delete these claims as well.
Perform this procedure on a federation server in your organization.
Administrative credentials
To complete this procedure, you must be a member of the Administrators group on the
local computer.

190
To delete an organization group or custom claim
1. Click Start, point to Administrative Tools, and then click Active Directory
Federation Services.
2. Double-click Federation Service, double-click Trust Policy, double-click My
Organization, and then click Organization Claims.
3. In the details pane, right-click the claim to be deleted, and then click Delete.
4. In the Delete group claim message box, click Yes to confirm the deletion.
Change the auditing limitation for an organization group or custom claim
Active Directory Federation Services (ADFS) uses claims to transfer user information that
is used for authorization in the resource Federation Service. By default, auditing of an
organization group or custom claim is not limited, which means that both the claim name
and its value are audited, or shared, when the claim is produced or mapped. If you limit
the auditing of an organization group or custom claim, the ADFS audit logs indicate only
the name of the claim; the value of the claim is omitted. Omitting the value protects the
privacy of sensitive data, such as the groups to which a user belongs.
Administrative credentials
To complete this procedure, you must be a member of the Administrators group on the
local computer.
To change the auditing limitation on an organization group or custom claim
1. Click Start, point to Administrative Tools, and then click Active Directory
Federation Services.
2. Double-click Federation Service, double-click Trust Policy, double-click My
Organization, and then click Organization Claims.
3. In the details pane, right-click the organization group or custom claim whose
auditing you want to change, and then click Properties.
4. Click to select or clear the Limit the auditing of this claim check box to change
the existing setting.

191
Configure a claims transform module
A claims transform module is custom code that manipulates corporate (organization),
input (incoming), and output (outgoing) claims. Typically, transform modules use the
corporate and input claims to produce additional output claims. However, the claim
transform module can enumerate, add, delete, and modify claims in any of the claim sets.
Store the claims transform module in %systemdrive%\adfs\sts\bin. This location provides
the following advantages:
ASP.NET keeps a shadow copy of the DLL, allowing it to be replaced without
stopping the Federation Service, thereby preventing downtime.
File security is inherited from the \adfs\sts directory.
The module can be backed up along with all other ADFS files.
After the transform module has been deployed to the federation server, perform this
procedure on the account or resource federation server that is configured with the trust
policy whose claims transform module you are configuring.
Administrative credentials
To complete this procedure, you must be a member of the Administrators group on the
local computer.
To configure a claims transform module
1. Click Start, point to Administrative Tools, and then click Active Directory
Federation Services.
2. Double-click Federation Service, right-click the Trust Policy node, and then
click Properties.
3. On the Transform Module tab, configure the DLL file and class name for the
module as follows:
a. DLL file: Click Browse to navigate to the dynamic-link library (DLL) that
implements the claim transform module, and then click Open.
Note
This DLL must be a managed-code assembly.

192
b. Class name: Type the namespace-qualified class name that implements the
claim transform interface (IClaimTransform defined in
System.Web.Security.SingleSignOn.ClaimTransforms.dll): The namespace
qualified name should be of the format namespace.classname.
4. Click OK to save the configuration.
Change the domain suffix for an incoming or outgoing e-mail claim
In Active Directory Federation Services (ADFS), an e-mail identity claim is an
organization identity claim that is created when you create an account or resource
partner. The e-mail identity claim is automatically mapped to the outgoing (from the
account Federation Service) and incoming (to the resource Federation Service) e-mail
claim. In the account Federation Service, you specify whether all domain suffixes can be
sent to the resource Federation Service, or whether you will replace all domain suffixes
with a specific domain suffix. In the resource Federation Service, you can specify the
domain suffixes that the resource Federation Service will accept or, if your partnership
does not extend across the Internet, you can accept all domain suffixes.
Note
To manage the properties of an identity claim, the claim must first be enabled.
Administrative credentials
To complete these procedures, you must be a member of the Administrators group on
the local computer.
To change the domain suffix for an outgoing e-mail identity claim in the account Federation Service
1. Click Start, point to Administrative Tools, and then click Active Directory
Federation Services.
2. Double-click Federation Service, double-click Trust Policy, double-click
Partner Organizations, double-click Resource Partners, and then click the
resource partner whose e-mail claim you want to manage.
3. In the details pane, right-click the e-mail identity claim, and then click Properties.

193
4. Under Settings, select Replace all domain suffixes with if it is not selected.
5. In Specify the new suffix, type the domain name suffix, and then click OK.
To change the domain suffixes for an incoming e-mail identity claim in the resource Federation Service
1. Click Start, point to Administrative Tools, and then click Active Directory
Federation Services.
2. Double-click Federation Service, double-click Trust Policy, double-click
Partner Organizations, double-click Account Partners, and then click the
account partner whose e-mail claim you want to manage.
3. In the details pane, right-click the e-mail identity claim, and then click Properties.
4. Under Settings, select Accept some domain suffixes if it is not selected.
5. In Accepted domains (press Enter to separate entries), type the domain
name suffix or suffixes, and then click OK.
See Also Enable or disable an organization identity claim for an account or resource partner
Enable or disable an organization identity claim for an account or resource partner
In Active Directory Federation Services (ADFS), organization identity claims are created
when you create an account or resource partner. They are incoming claims on the
resource partner and outgoing claims on the account partner. Identity claims are not
enabled unless you specify the identity type (UPN, e-mail, or common name) when you
create the partner. You can enable or disable organization identity claims after the
partner is created.
Administrative credentials
To complete this procedure, you must be a member of the Administrators group on the
local computer.
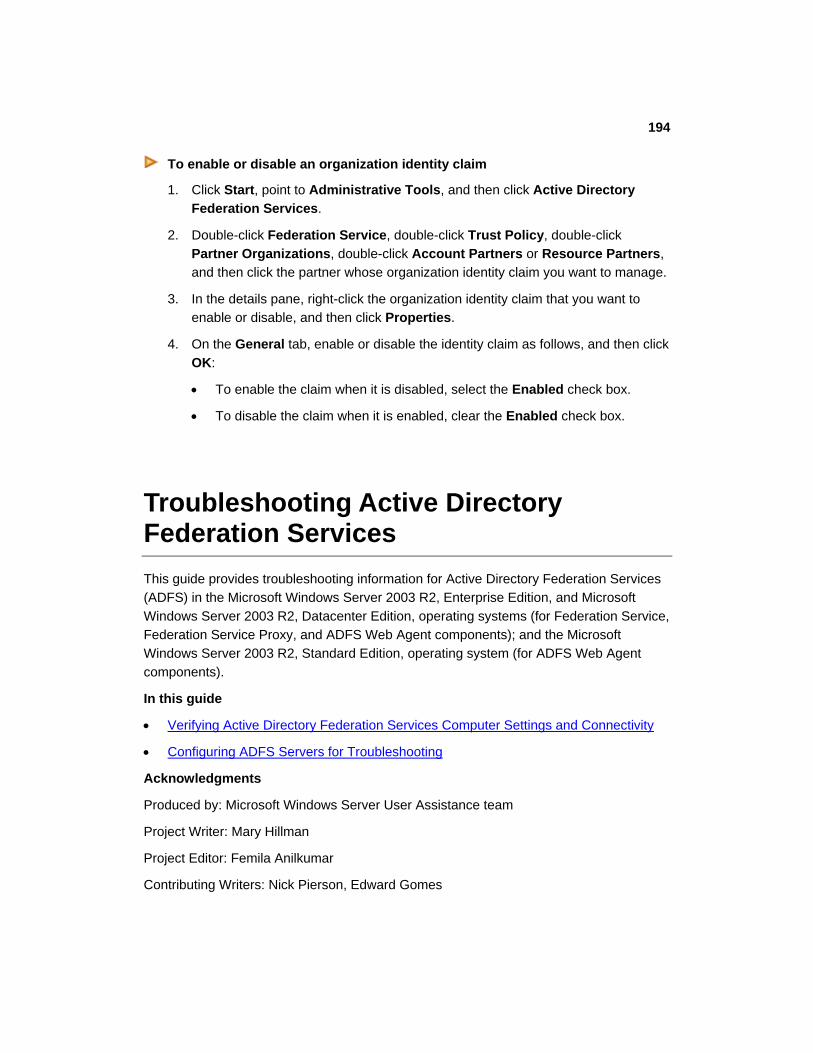
194
To enable or disable an organization identity claim
1. Click Start, point to Administrative Tools, and then click Active Directory
Federation Services.
2. Double-click Federation Service, double-click Trust Policy, double-click
Partner Organizations, double-click Account Partners or Resource Partners,
and then click the partner whose organization identity claim you want to manage.
3. In the details pane, right-click the organization identity claim that you want to
enable or disable, and then click Properties.
4. On the General tab, enable or disable the identity claim as follows, and then click
OK:
To enable the claim when it is disabled, select the Enabled check box.
To disable the claim when it is enabled, clear the Enabled check box.
Troubleshooting Active Directory Federation Services
This guide provides troubleshooting information for Active Directory Federation Services
(ADFS) in the Microsoft Windows Server 2003 R2, Enterprise Edition, and Microsoft
Windows Server 2003 R2, Datacenter Edition, operating systems (for Federation Service,
Federation Service Proxy, and ADFS Web Agent components); and the Microsoft
Windows Server 2003 R2, Standard Edition, operating system (for ADFS Web Agent
components).
In this guide
Verifying Active Directory Federation Services Computer Settings and Connectivity
Configuring ADFS Servers for Troubleshooting
Acknowledgments
Produced by: Microsoft Windows Server User Assistance team
Project Writer: Mary Hillman
Project Editor: Femila Anilkumar
Contributing Writers: Nick Pierson, Edward Gomes

195
Technical Reviewers: Derek Del Conte, Vijay Gajjala, Dan Hartop, Ryan D. Johnson,
Jagadeesh Kalki, Carol Li, Harini Raghavan, Vani Nori
Verifying Active Directory Federation Services Computer Settings and Connectivity
Before you begin troubleshooting, you must isolate the location of the problem by
performing preliminary tests to verify that your federation servers, Web servers, and client
computers are communicating and that Active Directory Federation Services (ADFS) is
set up and running properly.
Verifying Settings to Locate the Point of Failure ADFS components are deployed among several servers, each of which requires settings
that affect various server-server and client-server interactions. The best way to effectively
troubleshoot and solve a problem is to find the exact location of failure between ADFS
components.
To help you better understand how to locate the point of failure, the following sample
scenario is provided.
Sample Scenario
Using this sample diagram of a client requesting access to an ADFS-protected
application in a Federated Web with Single Sign-on (SSO) scenario, you can easily
distinguish how ADFS servers enumerate connections. This information is meant to
assist you in determining which connection point might be causing the failure. If you are
already familiar with the location of the failure in your environment, skip to the section
where you suspect the failure is occurring. By testing for success at each step, you can
better determine where the problem lies.
For more details and instructions for implementing this sample Federated Web SSO
scenario, see the ADFS Step-by-Step Guide
(http://go.microsoft.com/fwlink/?linkid=63445).

196
Sample Scenario
Note
To improve user experience, always obtain Secure Sockets Layer (SSL)
certificates for any external (Internet-facing) computers from a well-known third-
party certification authority (CA). Because well-known third-party CAs are already
trusted by the client browser, the user does not receive prompts that the browser
does not trust the root CA certificate.
Verification Steps to Locate the Point of Failure Each topic below corresponds to a number in the preceding diagram and provides
information and step-by-step procedures to help eliminate the error that is causing the
failure.
1. Verify Connectivity and Initial Request from the Client
2. Verify Web Server Redirection to the Resource Federation Server
3. Verify Home Realm Discovery
4. Verify Client Authentication in the Account Domain
5. Verify Account Server Redirection to the Resource Federation Server
6. Verify Resource Server Redirection to the Web Server

197
1. Verify Connectivity and Initial Request from the Client
In this step, you verify that the ADFS client can reach the Web site on the Web server
before the client has received any previous token.
When you enter the uniform resource locator (URL) of the Web application in the client
browser for the first time, the client sends an initial GET request to the ADFS Web server.
The ADFS Web server does not allow the client access to the requested page at this
point because the client does not have an authentication token to present to the Web
server at that point. If the ADFS client fails to receive access to the page, you get an error
and the URL in the browser indicates the point of failure. Common errors might be
Domain Name System (DNS) failures and 401 access denied errors.
Make sure you have good connectivity and name resolution between the account and
resource domains. Clients coming from the Internet should be able to locate domain
controllers.
Domain controllers, federation servers, Web servers, and clients need to be able to
locate each other by a fully qualified domain name (FQDN). Ping by IP address and
FQDN, and use Nslookup.exe to test DNS connectivity. In addition, to make sure that all
the necessary ports are open, you can download PortqryUI.exe from the Microsoft Web
site (http://go.microsoft.com/fwlink/?LinkId=64729
Use the following tests to verify connectivity from the client:
Test a TCP/IP configuration by using the ping command
(http://go.microsoft.com/fwlink/?LinkId=64765)
Verify DNS server responsiveness using the nslookup command
(http://go.microsoft.com/fwlink/?LinkId=64766)
If DNS resolution appears to be the connectivity problem, see Troubleshooting Domain
Name System (http://go.microsoft.com/fwlink/?LinkId=62177). You should also check the
Web server to verify that the ASP.NET v2.0.50727 extension is set to Allowed using the
Internet Information Services (IIS) Manager snap-in. The typical symptom that occurs
when this extension is set to Prohibited is a Page cannot be displayed error in the
browser.
2. Verify Web Server Redirection to the Resource Federation Server
In this step, verify that the redirect of the ADFS client to the resource federation server is
occurring properly and that the client can reach the Federation Service endpoint URL.
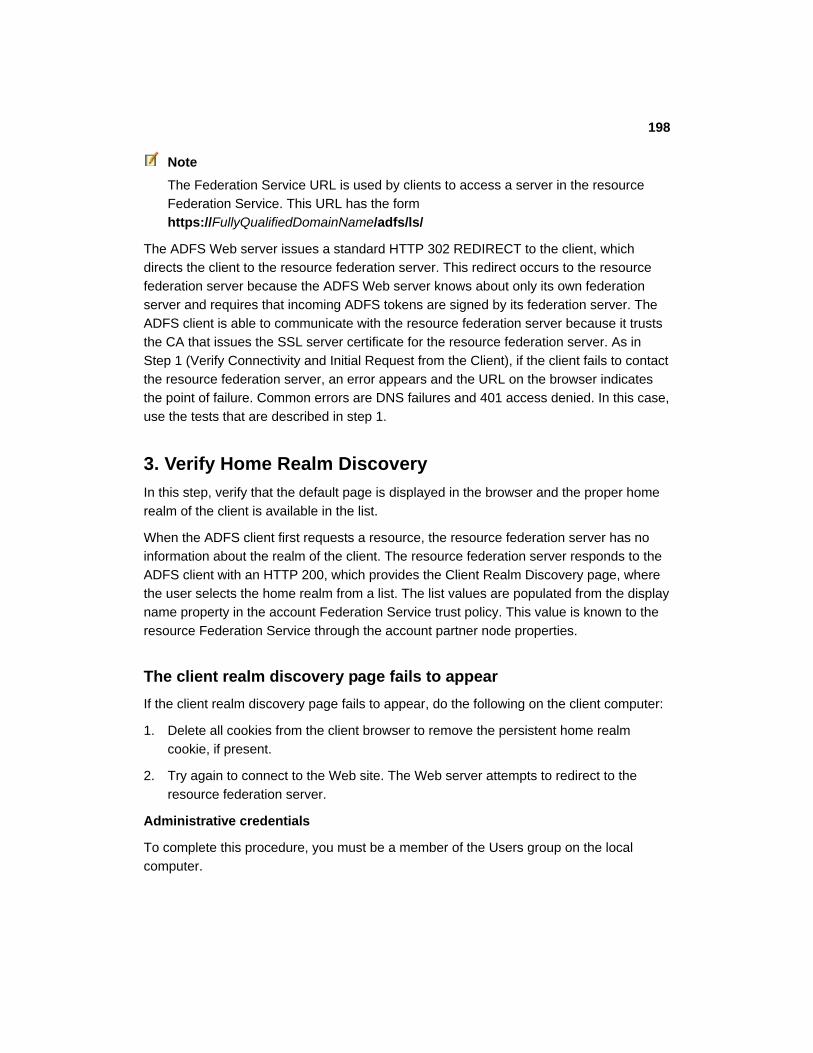
198
Note
The Federation Service URL is used by clients to access a server in the resource
Federation Service. This URL has the form
https://FullyQualifiedDomainName/adfs/ls/
The ADFS Web server issues a standard HTTP 302 REDIRECT to the client, which
directs the client to the resource federation server. This redirect occurs to the resource
federation server because the ADFS Web server knows about only its own federation
server and requires that incoming ADFS tokens are signed by its federation server. The
ADFS client is able to communicate with the resource federation server because it trusts
the CA that issues the SSL server certificate for the resource federation server. As in
Step 1 (Verify Connectivity and Initial Request from the Client), if the client fails to contact
the resource federation server, an error appears and the URL on the browser indicates
the point of failure. Common errors are DNS failures and 401 access denied. In this case,
use the tests that are described in step 1.
3. Verify Home Realm Discovery
In this step, verify that the default page is displayed in the browser and the proper home
realm of the client is available in the list.
When the ADFS client first requests a resource, the resource federation server has no
information about the realm of the client. The resource federation server responds to the
ADFS client with an HTTP 200, which provides the Client Realm Discovery page, where
the user selects the home realm from a list. The list values are populated from the display
name property in the account Federation Service trust policy. This value is known to the
resource Federation Service through the account partner node properties.
The client realm discovery page fails to appear
If the client realm discovery page fails to appear, do the following on the client computer:
1. Delete all cookies from the client browser to remove the persistent home realm
cookie, if present.
2. Try again to connect to the Web site. The Web server attempts to redirect to the
resource federation server.
Administrative credentials
To complete this procedure, you must be a member of the Users group on the local
computer.

199
To delete all cookies in Internet Explorer
1. In Internet Explorer, on the Tools menu, click Internet Options.
2. On the General tab, click Delete Cookies.
3. In the Delete Cookies dialog box, click OK.
4. In the Internet Options dialog box, click OK.
Deleting cookies does not solve the problem
If the ADFS client still fails to receive access to the realm discovery page, the problem is
with the resource Federation Service because this redirection is the final step before the
client is sent to the account Federation Service.
In this case, do the following:
1. Look at the URL in the Web browser of the client to determine whether the failure is
occurring on the Web server or on the resource federation server.
2. If the URL still shows the Web server address and nothing further, you can assume
that the issue is on the Web server. In this case, go to the next step.
3. Look at the Application log on the Web server to see what errors are logged. Review
the User Action section of the event and take proper troubleshooting steps according
to any errors. If these steps do not solve the problem, go to the next step.
4. Use the following procedure to confirm that the Web server can communicate with
the Federation Service on the resource federation server.
Administrative credentials
To complete this procedure, you must be a member of the Administrators group on
the local computer.
To check the Federation Service URL
1. On the ADFS Web server, open Internet Information Services (IIS) Manager,
right-click Web Sites, and then click Properties.
2. On the ADFS Web Agent tab, copy the Federation Service URL.
3. Paste the URL into the browser address line, and then press Enter.
If the URL resolves properly, a Federation Service Web page appears that lists supported
operations for the service.

200
Note
You might be prompted for a client authentication certificate, which is standard
behavior.
The Federation Service URL does not resolve
If the URL does not resolve, assuming you have verified name resolution and
connectivity, the error is most likely a typing error in the Federation Service URL on the
Web server. Use the following procedure to check for potential typing errors for the
Windows NT token-based Web agent.
To check the Federation Service URL of the Windows NT token-based Web agent
1. On the ADFS Web server, open Internet Information Services (IIS) Manager,
right-click Web Sites, and then click Properties.
2. On the ADFS Web Agent tab, check that the URL specified in the Federation
Service URL field is typed correctly.
Use the following procedure to check for potential typing errors in the web.config file that
is associated with the claims-aware application.
To check the Federation Service URL in the web.config file
1. Using Notepad, edit the web.config file associated with your claims-aware application.
2. Find the Federation Service URL value in the web.config file by locating the
<fs>FederationServiceURLValue</fs> entry. Check that the value and format specified
in FederationServiceURLValue is typed correctly. An example of the Federation Service
URL located in the web.config file used in the ADFS Step-by-Step guide is
<fs>https://adfsresource.treyresearch.net/adfs/fs/federationserverservice.asmx</fs>.
Confirm that Web service extensions are configured properly
Confirm that ASP.NET v2.0.50727 (for claims-aware applications) and/or the ADFS Web
Component Extension (for Windows NT token-based applications) are set to Allowed
in the Internet Information Services (IIS) Manager snap-in on the ADFS Web server.
When the ADFS client successfully reaches the home realm discovery page and selects
its domain, the ADFS client submits a POST back to the resource federation server that
includes the home realm. In response, the resource federation server issues a 302

201
redirect to the ADFS client so that the client can be authenticated for its domain and
receive the appropriate claims from the account federation server.
4. Verify Client Authentication in the Account Domain
If the address in the ADFS client browser indicates failure of client redirection from the
resource federation server back to the account federation server, the client cannot be
authenticated by a domain controller in the account forest. In this case, check the
following:
The value of the Federation Service endpoint URL that is configured on the account
partner node in the resource Federation Service trust policy is the same value as the
Federation Service endpoint URL that is configured on the Trust Policy node in the
account Federation Service. These values must match.
Whether or not the user account is configured to use the Smart card is required for
interactive logon option in the account properties. If this option is enabled for a user
account that is attempting to access an ADFS-enabled Web application,
authentication to that application will not be successful.
Disable Java Scripting
JavaScript is used to automatically redirect the client to various points, including posting
tokens. When JavaScript is disabled, the automatic redirect will be prevented and a
submit button will be displayed instead. This button allows the client to walk through each
step more easily as part of troubleshooting the configuration.
Administrative credentials
To complete this procedure, you must be a member of the Users group on the local
computer.
To disable JavaScript in Internet Explorer
1. Open Internet Explorer.
2. On the Tools menu, click Internet Options.
3. On the Security tab, click Custom Level.
4. Scroll to the Scripting category.
5. Under Active scripting, click Disable, and then click OK twice.

202
Check the Federation Service endpoint URL
Use the following procedures to check the value of the Federation Service endpoint URL
on the Trust Policy node in the account Federation Service against the value on the
account partner node in the resource Federation Service.
Administrative credentials
To complete these procedures, you must be a member of the Administrators group on
the local computer.
To check the Federation Service endpoint URL in the account Federation Service
1. Click Start, point to Administrative Tools, and then click Active Directory
Federation Services.
2. Double-click Federation Service, right-click the Trust Policy node, and then
click Properties.
3. On the General tab, check the value in the Federation Service endpoint URL
box. If you need to change the value, select the domain portion of the URL,
replace the selected text with the new URL, and then click OK.
Use the following procedure to check the Federation Service endpoint URL on the
account partner node in the resource Federation Service.
To check the Federation Service endpoint URL in the resource Federation Service
1. Click Start, point to Administrative Tools, and then click Active Directory
Federation Services.
2. Double-click Federation Service, double-click Trust Policy, double-click
Partner Organizations, and then double-click Account Partners if you are
logged on to the resource federation server, or Resource Partners if you are
logged on to the account federation server.
3. Right-click the account or resource partner whose Federation Service endpoint
URL has changed, and then click Properties.
4. On the General tab, check the value in the Federation Service endpoint URL
box. If you need to change the value, select the domain portion of the URL,
replace the selected text with the new URL, and then click OK.

203
5. Verify Account Server Redirection to the Resource Federation Server
After the client is authenticated and the account federation server receives authorization
information from the domain controller, the account federation server builds the SAML
token with the claims for the user, writes the cookie to the ADFS client. The account
federation server then issues a POST REDIRECT with the SAML token and the redirect
URL of the resource federation server. The account federation server signs the SAML
token with its token-signing certificate. The resource federation server must have been
configured with a verification certificate from the account federation server. The
verification certificate contains the public key portion of the token-signing certificate of the
account federation server. The resource federation server requires this certificate to verify
that the account federation server sent the token.
If the verification certificate from the account federation server is not installed on the
resource federation server, token validation fails. Use the following procedure to check
for the existence of the verification certificate on the resource federation server.
View the current verification certificate
The verification certificate is invalid
If the verification certificate is present but has expired, follow the steps to roll over the
verification certificate.
Rolling Over a Token-signing Certificate
The verification certificate is missing
If the verification certificate is not present, use the following procedure to first export the
public portion of the token-signing certificate on the account federation server, and then
you will need to import it into the certificate store on the resource federation server.
Export the public key portion of a token-signing certificate
6. Verify Resource Server Redirection to the Web Server
After receiving the token from the account federation server, the following events occur:
1. Resource federation server maps the incoming claims in the token to the appropriate
claims for the ADFS Web server, and then issues a token for the ADFS Web server.

204
2. The resource federation server writes the cookie to the ADFS client and provides
the token for the ADFS Web server to the client, along with the URL for the ADFS
Web server. This information is provided to the client in the form of a POST
REDIRECT.
3. The resource federation server signs the token with its own token-signing certificate.
The ADFS Web server uses the public key to verify that the token is signed by the
resource federation server. The ADFS Web obtains the public key by making a call to
the resource federation server. By using this public key, the ADFS Web server can
verify that the token is signed by the resource federation server. The ADFS Web
server then allows the appropriate access to the client.
If redirection to the ADFS Web server fails, the page fails to appear. Causes for failure
can include:
The application URL in the trust policy does not match the return URL specified in the
ADFS Web Agent tab on the Web server hosting the application.
The endpoint URL is incorrect for a federation server or federation server proxy
The application URL does not match the return URL
If the page fails to appear with an error such as “Server Error in ‘/adfs’ Application,” use
the following procedures to check that the application URL in the properties of the
application node on the resource federation server matches the return URL in the ADFS
Web Agent tab on the application Web site.
1. Set the return URL for a Windows NT token-based application
2. Set the return URL for a claims-aware application
3. Set the application URL for an application
You can also check the security and application logs in Event Viewer on the resource
federation server and ADFS Web server for warnings and errors that provide problem-
specific information.
The endpoint URL is incorrect for a federation server proxy
If a federation server proxy is in place in a perimeter network in the adatum.com domain,
both the resource federation server in Treyresearch.net and the account federation
server in Adatum.com must be configured with the location of the federation server proxy.
If you use a federation server proxy in the account domain, check the endpoint URL on
both the account partner node and resource partner node on the respective federation
servers. If the URL does not point to the federation server proxy, change its value. Use

205
the procedure "To change the Federation Service endpoint URL" in the following
procedure:
Change the Federation Service endpoint URL
The client authentication certificate for the federation server proxy is not configured
You must ensure that an SSL certificate and a client authentication certificate is installed
on each server that is running the federation server proxy component. The public key
portion of the client authentication certificate must be present on the account federation
server and the resource federation server. If you have more than one federation server
proxy, the same SSL and client authentication certificate can be shared among all
federation server proxies. Alternately, you can obtain a separate SSL and client
authentication certificate for each federation server proxy, export each certificate to a file,
and import all of them to the Federation Service trust policy.
Note
When certificates are shared among servers in the same role, you export both
the public and private portions of the certificates.
In the account Federation Service, if the client is internal, the client goes directly to the
account federation server and the steps, as illustrated in the sample Federated Web SSO
diagram, occur. If the client requests access remotely from the Internet, the client is
redirected to the federation server proxy.
Use the following information and procedures for configuring the client authentication
certificate and installing its public key on the federation servers.
Managing Client Authentication Certificates
See Also Configuring ADFS Servers for Troubleshooting
Configuring ADFS Servers for Troubleshooting
Provides information and procedures for configuring settings that aid problem-solving on
Active Directory Federation Services (ADFS) servers.

206
Configuration Tasks for Troubleshooting Before you use advanced troubleshooting techniques to identify and solve ADFS
problems, configure your computer for troubleshooting.
To configure your computer for troubleshooting, perform the following tasks:
Configure ADFS Event Logging
Configure ADFS Debug Logging
Disable JavaScript
Enable ASP.NET Debug Output
Configure an ASP.NET Error Page
Configure ADFS Event Logging
You can configure event logging on federation servers, federation server proxies, and
Web servers. ADFS events are logged in the Application event log and the Security event
log.
Important
You must turn on audit object access at each of the federation servers, for
ADFS-related audits to appear in the Security log. This will allow the Federation
Service to log either success or failure errors. For more information about how to
turn on audit object access, see Audit object access
(http://go.microsoft.com/fwlink/?LinkId=62686).
Configuring ADFS Servers to Record Auditing of ADFS Events to the Security Log All ADFS-related audits that are made specifically to the security log are considered by
the system to be object access–type audits, which by default are ignored by the system.
For this reason, to ensure that ADFS-related audits (specifically Success Audits and
Failure Audits) appear in the Security log, you need to manually configure the Local
Security Policy, using the procedure below. You must apply the steps in this procedure to
all of the ADFS servers (federation servers, federation server proxies, and Web servers
hosting the ADFS Web Agent) before enabling success or failure auditing in the Trust
Policy properties of the ADFS snap-in. This will allow the Federation Service to log either
success or failure errors.

207
This procedure has no effect on the events that ADFS writes to the application log.
To configure the Windows Security Log to support auditing of ADFS events
1. Click Start, point to Administrative Tools, and then click Local Security
Policy.
2. Double-click Local Policies, and then click Audit Policy.
3. In the details pane, double-click Audit object access.
4. On the Audit object access Properties page, select either Success or Failure,
or both, and then click OK.
5. Close the Local Security Settings snap-in.
6. At a command prompt, type gpupdate /force and then press ENTER to
immediately refresh the local policy.
Configure event logging for a federation server
Use the following procedure to specify the types of events that you want to be logged on
a server that is running the Active Directory Federation Service:
Configure event logging on a federation server
Configure event logging for a federation server proxy
Use the following procedure to specify the types of events that you want to be logged on
a server that is running the ADFS Federation Service Proxy:
Configure event logging on a federation server proxy
Configure event logging on a Web server
Events logged on Web servers that are running an ADFS Web Agent are configured
according to the application type that the agent supports. Event logging is configured
differently for Windows NT token-based applications and claims-aware applications:
Windows NT token-based applications: On Web servers that are running the ADFS
Web Agent for Windows NT token-based applications, event logging for these
applications is set in the registry on the Web server. Use the following procedure to
specify the types of events that you want to be logged for Windows NT token-based
applications on the Web server:
Configure event logging for a Windows NT token-based application

208
Claims-aware applications: On Web servers that are running the ADFS Web
Agent for claims-aware applications, event logging for these applications is set in the
Web.config file for the application. Use the following procedure to specify the types of
events that you want to be logged for claims-aware applications on the Web server:
Configure event logging for a claims-aware application
Configure ADFS Debug Logging
Event logs are generally descriptive, intended to help you understand what is happening.
However, the default events do not always provide the level of detail that is needed for
effective troubleshooting. In this case, configure ADFS debug logging.
ADFS provides several levels of debug information that are available for troubleshooting
ADFS problems. Use the procedures in this section for enabling debug logging and
setting appropriate debug logging levels on federation servers, federation proxy servers,
and Web servers that are running ADFS Web Agents.
Note
Debug logging consumes space and resources on the computer. Enabling debug
logging is recommended only if you are troubleshooting a problem and need
more information than is provided in events. Otherwise, do not enable debug
logging.
The debug log file is located in %systemdrive%\ADFS\logs.
Debug log filename format
If debug logging is enabled on a federation server, the log filename in the C:\ADFS\logs
directory has the following format:
adfsyyyymmdd-hhmmss.log
In the name of the file, the number following "adfs" represents the date of the log and the
number following the dash (-) represents the beginning time of the log.
Debug log tags
Depending on the level of debug logging you enable, you will see the following tags in
debug logs:
[INFO] - Displays information about events, such as redirects with protocol Uniform
Resource Locators (URLs), token validations, or claim mappings.

209
[VERBOSE] - Displays information about events, such as sign-in requests,
responses, token contents, Web method calls, and security identifier (SID) information.
[ERROR] - Displays events for significant problems in the debug log.
[WARNING] - Displays events, which are not necessarily significant but that may cause
future problems.
[EVENTLOG] - Displays all ADFS events.
Although all information in the log file could be useful, you can look at the lines that are
tagged [ERROR] and [WARNING] first to quickly assess the problem.
For example, the following section of a debug log file shows that certificate chain
validation is failing.
----------------
2005-11-09T19:46:47 [INFO] Requesting token for https://adfsweb.treyresearch.net/
from FS using inbound token.
2005-11-09T19:46:47 [VERBOSE] Parse: Token NOT found in cache
2005-11-09T19:46:47 [VERBOSE] SAML: effectivetime = 11/09/2005 19:46:53
expirationtime = 11/09/2005 20:46:53
2005-11-09T19:46:50 [WARNING] VerifyCertChain: Cert chain did not verify - error
code was 0x80092013
2005-11-09T19:46:50 [ERROR] KeyInfo processing failed because the trusted
certificate does not have a a valid certificate chain. Thumbprint =
BAF02C45AF23389CC7FEC615615056021E107C3E
2005-11-09T19:46:50 [WARNING] Failing signature verification because the KeyInfo
section failed to produce a key.
2005-11-09T19:46:50 [WARNING] SAML token signature was not valid: AssertionID =
_cbe6e3ca-fb90-4a93-a789-b925856163d0
2005-11-09T19:46:50 [VERBOSE] Processing FS response: policy version is a9d515c1-
6965-4aa7-a78e-3cfc77f0dd2a - 16
2005-11-09T19:46:50 [INFO] Token issuance request to FS failed: ValidationFailure
2005-11-09T19:53:14 [VERBOSE] Processing HTTP GET:
https://adfsresource.treyresearch.net/adfs/ls/?wa=wsignin1.0&wreply=https://ADFSWe
b.TREYRESEARCH.NET/&wct=2005-11-
09T19:53:13Z&wctx=https://adfsweb.treyresearch.net/default.aspx
2005-11-09T19:53:14 [VERBOSE] Received SignIn Request.

210
2005-11-09T19:53:14 [VERBOSE] HOMEREALM: Realm could not be determined.
2005-11-09T19:53:14 [INFO] Received signin request via query string.
2005-11-09T19:53:14 [VERBOSE] Sign In Request Dump
--------------------
As you can see in the log text, even the thumbprint of the certificate is provided.
You can run the following command against the .cer file of the certificate to get more
information about the failure.
certutil –v –urlfetch -verify CertFileName.cer
Set ADFS debug levels on federation servers
On federation account, resource, and proxy servers, you can use the Windows UI to
enable debug logging and set levels to increase the detail of feedback in the logs.
Perform the following procedure on an account or resource federation server or
federation proxy server.
Administrative credentials
To complete this procedure, you must be a member of the Administrators group on the
local computer.
To set ADFS debug levels on federation servers and federation proxy servers
1. Click Start, point to Administrative Tools, and then click Active Directory
Federation Services.
2. Right-click Federation Service or Federation Service Proxy, and then click
Properties.
3. On the Troubleshooting tab, select debug levels as appropriate, and then click
OK.
Note
To see descriptions for each debug level, click Help on the
Troubleshooting tab.
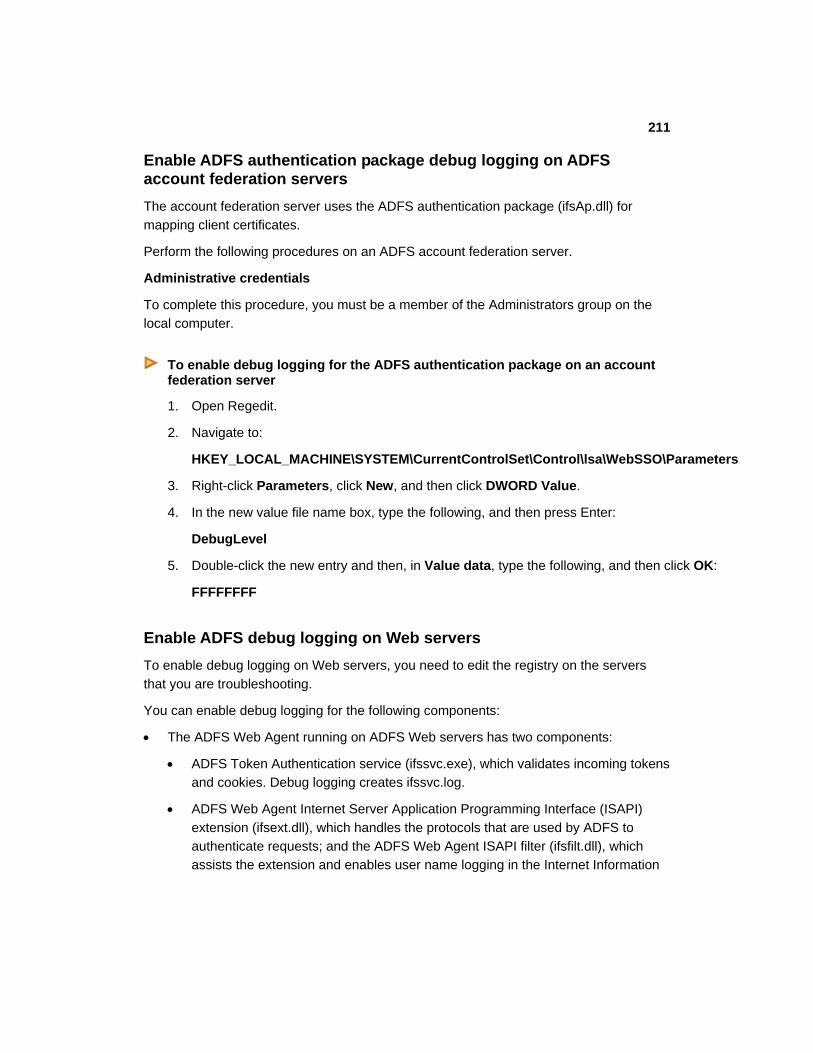
211
Enable ADFS authentication package debug logging on ADFS account federation servers
The account federation server uses the ADFS authentication package (ifsAp.dll) for
mapping client certificates.
Perform the following procedures on an ADFS account federation server.
Administrative credentials
To complete this procedure, you must be a member of the Administrators group on the
local computer.
To enable debug logging for the ADFS authentication package on an account federation server
1. Open Regedit.
2. Navigate to:
HKEY_LOCAL_MACHINE\SYSTEM\CurrentControlSet\Control\lsa\WebSSO\Parameters
3. Right-click Parameters, click New, and then click DWORD Value.
4. In the new value file name box, type the following, and then press Enter:
DebugLevel
5. Double-click the new entry and then, in Value data, type the following, and then click OK:
FFFFFFFF
Enable ADFS debug logging on Web servers
To enable debug logging on Web servers, you need to edit the registry on the servers
that you are troubleshooting.
You can enable debug logging for the following components:
The ADFS Web Agent running on ADFS Web servers has two components:
ADFS Token Authentication service (ifssvc.exe), which validates incoming tokens
and cookies. Debug logging creates ifssvc.log.
ADFS Web Agent Internet Server Application Programming Interface (ISAPI)
extension (ifsext.dll), which handles the protocols that are used by ADFS to
authenticate requests; and the ADFS Web Agent ISAPI filter (ifsfilt.dll), which
assists the extension and enables user name logging in the Internet Information

212
Services (IIS) log files. Debug logging creates the ifsext_StsAppPool1.log
and ifsfilt_StsAppPool1.log, respectively in the %systemdrive%\ADFS\Logs
directory.
In addition, the ADFS Web Agent authentication package (ifsAp.dll) is used by
Windows NT token-based applications for generating tokens when Service-for-User
(S4U) is not available. Debug logging creates ifsap.log.
You can enable debug logging for each of these components in the registry on ADFS
Web servers.
Administrative credentials
To complete these procedures, you must be a member of the Administrators group on
the local computer.
To enable debug logging for the ADFS Token Authentication service
1. Open Regedit.
2. Navigate to:
HKEY_LOCAL_MACHINE\SYSTEM\CurrentControlSet\Services\ifssvc\Parameters
3. Right-click Parameters, click New, and then click DWORD Value.
4. In the new value file name box, type the following, and then press Enter:
DebugPrintLevel
5. Double-click the new entry and then, in Value data, type the following, and then click
OK:
FFFFFFFF
To enable debug logging for the ADFS ISAPI extension and filter
1. Open Regedit.
2. Navigate to:
HKEY_LOCAL_MACHINE\SOFTWARE\Microsoft\ADFS\WebServerAgent
3. Right-click WebServerAgent, click New, and then click DWORD Value.
4. In the new value file name box, type the following, and then press Enter:
DebugPrintLevel
5. Double-click the new entry and then, in Value data, type the following, and then
click OK:

213
FFFFFFFF
To enable debug logging for the ADFS Web Agent authentication package (for Windows NT token-based applications)
1. Open Regedit.
2. Navigate to:
HKEY_LOCAL_MACHINE_SYSTEM\CurrentControlSet\Lsa\WebSso\
Parameters
3. Right-click Parameters, click New, and then click DWORD Value.
4. In the new value file name box, type the following, and then press Enter:
DebugLevel
5. Double-click the new entry and then, in Value data, type the following, and then
click OK:
FFFFFFFF
Disable JavaScript
JavaScript is used to automatically redirect the client to various points, including posting
tokens. When JavaScript is disabled, the automatic redirect is prevented and a submit
button is displayed instead. This button allows the client to walk through each step more
easily as part of troubleshooting the configuration.
Administrative credentials
To complete this procedure, you must be a member of the Users group on the local
computer.
Disable JavaScript in Internet Explorer
1. Open Internet Explorer.
2. On the Tools menu, click Internet Options.
3. On the Security tab, click Custom Level.
4. Scroll to the Scripting category.
5. Under Active scripting, click Disable, and then click OK twice.

214
Enable ASP.NET Debug Output
You can generate debug output for ASP.NET files by configuring the Web.config file on
the computer.
Note
Generating debug output for ASP.Net files enable clients to view server state
information that could be misused by malicious users.
Administrative credentials
To complete this procedure, you must be a member of the Administrators group on the
local computer.
To enable ASP.NET debug output
1. In Notepad, open the Web.config file in SYSTEMDRIVE\ADFS\sts.
2. Search for <system.web>.
3. Add the <compilation debug> entry under <system.web>, as follows:
<compilation debug="true" />
4. Save and close the Web.config file.
Configure an ASP.NET Error Page
You can configure an error page to display when ASP.NET errors prohibit the opening of
a page. Use the Web.config file to configure this error page.
Administrative credentials
To complete this procedure, you must be a member of the Administrators group on the
local computer.
To configure an ASP.NET error page
1. In Notepad, open the Web.config file in SYSTEMDRIVE\ADFS\sts.
2. Search for <system.web>.
3. Add the following entries under <system.web>:
<customErrors mode="Off" defaultRedirect="Errors.aspx">
<error statusCode="404" redirect="PageNotFound.aspx" />
</customErrors>

215
4. Save and close the Web.config file.
Default Event Logs By default, some events are logged by ADFS components in Event Viewer. The following
categories of default events provide information about successful operations that are
logged in the event logs and for which you will see events in Event Viewer.
Default Events for Token-based Applications on a Web Server
Default Events for Claims-aware Applications on a Web Server
Default Auditing Events for Token-based Applications on a Federation Server
Default Auditing Events for Claims-aware Applications on a Federation Server
Default Events for Token-based Applications on a Web Server
The following types of events appear when an ADFS client successfully receives access
to the requested application Web page. These events occur in an environment similar to
the sample scenario presented in Verifying Active Directory Federation Services
Computer Settings and Connectivity.
If a Web server that is running an ADFS Web Agent is able to retrieve trust information
successfully from the Federation Service, the following event is generated in the
Application log on the Web server:
Event Type:Information Event Source:ADFS ISAPI Extension Event Category:None Event ID:101 Date:11/10/2005 Time:10:45:23 AM User:N/A Computer:ADFSWEB Description: The ADFS Web Agent for Windows NT token-based applications successfully retrieved trust information from the Federation Service.
The following event appears in the Security log on the ADFS Web server:
Event Type:Success Audit Event Source:Security
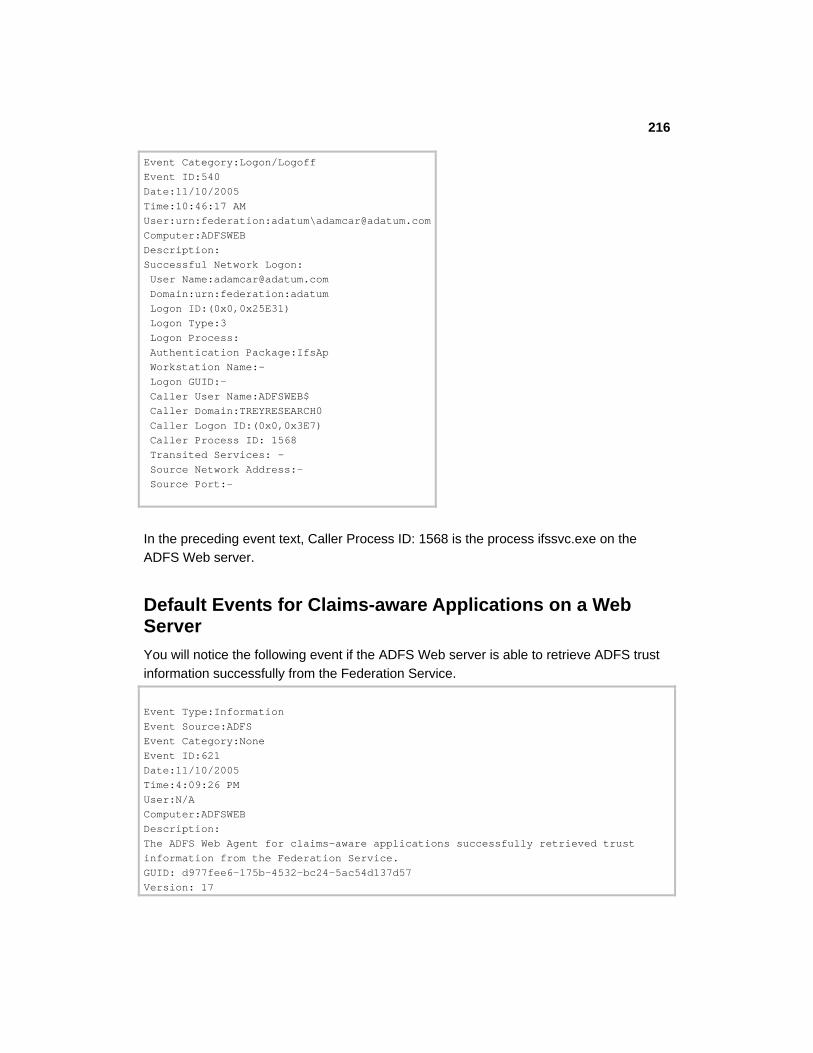
216
Event Category:Logon/Logoff Event ID:540 Date:11/10/2005 Time:10:46:17 AM User:urn:federation:adatum\[email protected]:ADFSWEB Description: Successful Network Logon: User Name:[email protected] Domain:urn:federation:adatum Logon ID:(0x0,0x25E31) Logon Type:3 Logon Process: Authentication Package:IfsAp Workstation Name:- Logon GUID:- Caller User Name:ADFSWEB$ Caller Domain:TREYRESEARCH0 Caller Logon ID:(0x0,0x3E7) Caller Process ID: 1568 Transited Services: - Source Network Address:- Source Port:-
In the preceding event text, Caller Process ID: 1568 is the process ifssvc.exe on the
ADFS Web server.
Default Events for Claims-aware Applications on a Web Server
You will notice the following event if the ADFS Web server is able to retrieve ADFS trust
information successfully from the Federation Service.
Event Type:Information Event Source:ADFS Event Category:None Event ID:621 Date:11/10/2005 Time:4:09:26 PM User:N/A Computer:ADFSWEB Description: The ADFS Web Agent for claims-aware applications successfully retrieved trust information from the Federation Service. GUID: d977fee6-175b-4532-bc24-5ac54d137d57 Version: 17

217
Federation Service Uniform Resource Locator (URL): https://adfsresource.treyresearch.net/adfs/fs/federationserverservice.asmx Federation Service Uniform Resource Identifier (URI): urn:federation:treyresearch Federation Service Endpoint URL: https://adfsresource.treyresearch.net/adfs/ls/ Federation Service Domain Account: TREYRESEARCH0\ADFSRESOURCE$
You will also see the following event below in the Security log.
Event Type:Success Audit Event Source:ADFS ASP.NET Module Auditor Event Category:Object Access Event ID:560 Date:11/10/2005 Time:4:10:11 PM User:NT AUTHORITY\NETWORK SERVICE Computer:ADFSWEB Description: The client presented a valid inbound token as evidence. Token ID: _ad5a3694-860d-4063-95a3-3b0163fad3ca Identity: [email protected]
Default Auditing Events for Token-based Applications on a Federation Server
Federation servers in the account and the resource domains log similar events in the
security log if object access auditing is turned on. These events provide details about
claims, including the time that the claim was presented and the requested user.
Default auditing events for a token-based application on an account federation server
The following default auditing events are logged in the Security log on the account
federation server:
Event ID 500: Indicates that a token request was received by adfsaccount.
Event ID 510: Contains details of the resource token that was issued by adfsaccount.
Event ID 520: Contains details of the logon accelerator token that was issued by
adfsaccount.
Event ID 550: Contains the list of claims that were retrieved from the account store.

218
The following sample events are generated on the federation server named
adfsaccount.adatum.com, in an ADFS deployment similar to that described in Verifying
Active Directory Federation Services Computer Settings and Connectivity.
Event ID 500:
Event Type:Success Audit Event Source:ADFS Federation Service Auditor Event Category:Object Access Event ID:500 Date:11/10/2005 Time:4:10:13 PM User:NT AUTHORITY\SYSTEM Computer:ADFSACCOUNT Description: Transaction ID: {c727f983-de98-4c88-947c-06d5f914659a} A token request was received directly by the Federation Service. The request for target 'urn:federation:treyresearch' was approved, and one or more tokens were issued. Target URI: urn:federation:treyresearch A resource token was issued. Depending on the audit policy, further details of this token may be written to a 510 event with the same transaction ID. Token ID: _952de51d-e827-41db-8332-1afa84aa51d2 Identity: [email protected] A logon accelerator was issued. Depending on the audit policy, further details of this token may be written to a 520 event with the same transaction ID. Token ID: _b17a22ce-96af-4a59-a885-c1252872c6ea Identity: The client did not present a logon accelerator token as evidence. The client presented valid credentials. Depending on the audit policy, the list of generated claims may be written to a 550 event with the same transaction ID. Authentication method: Windows integrated authentication Username: ADATUM0\adamcar
Event ID 510:
Event Type:Success Audit Event Source:ADFS Federation Service Auditor Event Category:Object Access Event ID:510 Date:11/10/2005 Time:4:10:13 PM User:NT AUTHORITY\SYSTEM Computer:ADFSACCOUNT Description:
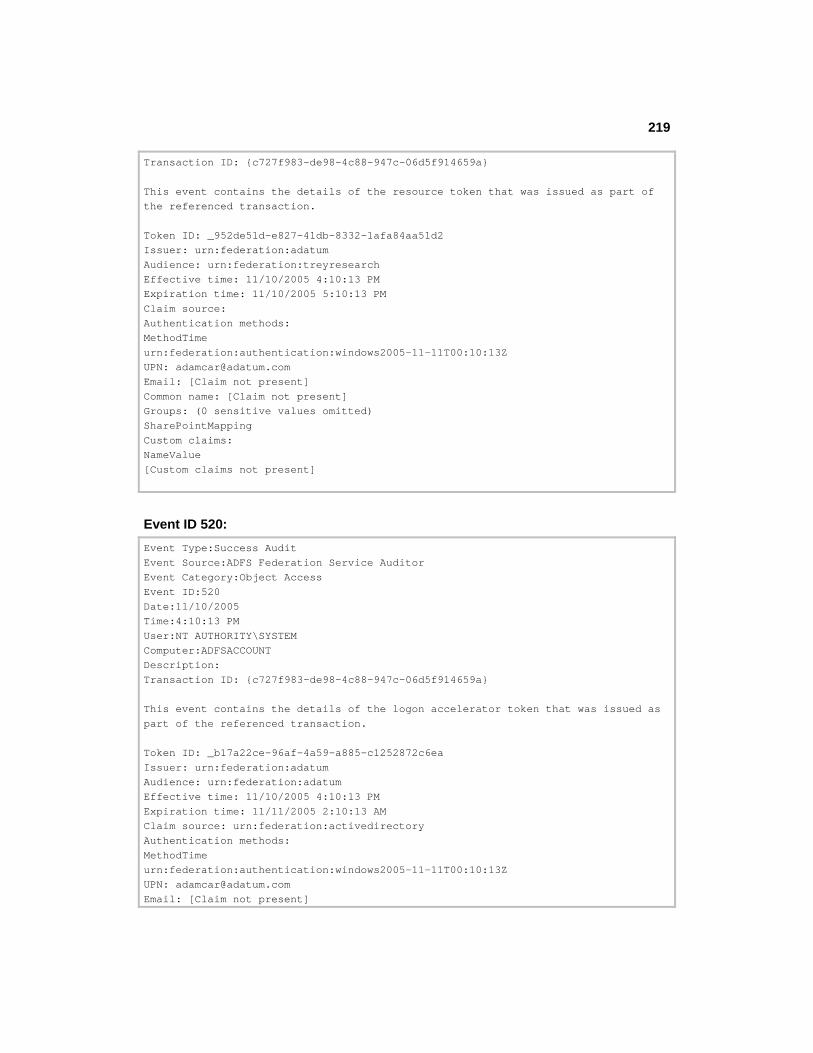
219
Transaction ID: {c727f983-de98-4c88-947c-06d5f914659a} This event contains the details of the resource token that was issued as part of the referenced transaction. Token ID: _952de51d-e827-41db-8332-1afa84aa51d2 Issuer: urn:federation:adatum Audience: urn:federation:treyresearch Effective time: 11/10/2005 4:10:13 PM Expiration time: 11/10/2005 5:10:13 PM Claim source: Authentication methods: MethodTime urn:federation:authentication:windows2005-11-11T00:10:13Z UPN: [email protected] Email: [Claim not present] Common name: [Claim not present] Groups: (0 sensitive values omitted) SharePointMapping Custom claims: NameValue [Custom claims not present]
Event ID 520:
Event Type:Success Audit Event Source:ADFS Federation Service Auditor Event Category:Object Access Event ID:520 Date:11/10/2005 Time:4:10:13 PM User:NT AUTHORITY\SYSTEM Computer:ADFSACCOUNT Description: Transaction ID: {c727f983-de98-4c88-947c-06d5f914659a} This event contains the details of the logon accelerator token that was issued as part of the referenced transaction. Token ID: _b17a22ce-96af-4a59-a885-c1252872c6ea Issuer: urn:federation:adatum Audience: urn:federation:adatum Effective time: 11/10/2005 4:10:13 PM Expiration time: 11/11/2005 2:10:13 AM Claim source: urn:federation:activedirectory Authentication methods: MethodTime urn:federation:authentication:windows2005-11-11T00:10:13Z UPN: [email protected] Email: [Claim not present]

220
Common name: [Claim not present] Groups: (0 sensitive values omitted) Trey SharePoint Claim Custom claims: NameValue [Custom claims not present]
Event ID 550:
Event Type:Success Audit Event Source:ADFS Federation Service Auditor Event Category:Object Access Event ID:550 Date:11/10/2005 Time:4:10:13 PM User:NT AUTHORITY\SYSTEM Computer:ADFSACCOUNT Description: Transaction ID: {c727f983-de98-4c88-947c-06d5f914659a} This event contains the list of claims that were retrieved from the account store as part of the referenced transaction. UPN: [email protected] Email: [Claim not present] Common name: [Claim not present] Groups: (0 sensitive values omitted) Trey SharePoint Claim Custom claims: NameValue [Custom claims not present]
Default auditing events for a token-based application on a resource federation server
The following default auditing events are logged on the resource federation server:
Event ID 500: Indicates that a token request was received by adfsresource.
Event ID 510: Contains the details of the resource token that was issued by
adfsresource.
Event ID 520: Contains the details of the logon accelerator token that was issued by
adfsresource.
Event ID 540: Contains the details of the token that was presented by the client.

221
The following sample events are generated on the federation server named
adfsresource.treyresearch.net, in an ADFS deployment similar to that described in
Verifying Active Directory Federation Services Computer Settings and Connectivity.
Event ID 500:
Event Type:Success Audit Event Source:ADFS Federation Service Auditor Event Category:Object Access Event ID:500 Date:11/10/2005 Time:4:10:12 PM User:NT AUTHORITY\SYSTEM Computer:ADFSRESOURCE Description: Transaction ID: {fb4e7da3-ca0b-43ca-a0c0-42a333ce0d80} A token request was received directly by the Federation Service. The request for target 'https://adfsweb.treyresearch.net:8081/sampleapp/' was approved, and one or more tokens were issued. Target URI: https://adfsweb.treyresearch.net:8081/sampleapp/ A resource token was issued. Depending on the audit policy, further details of this token may be written to a 510 event with the same transaction ID. Token ID: _ad5a3694-860d-4063-95a3-3b0163fad3ca Identity: [email protected] A logon accelerator was issued. Depending on the audit policy, further details of this token may be written to a 520 event with the same transaction ID. Token ID: _ea256664-ac66-4560-9a4f-97a26bf21fa0 Identity: The client did not present a logon accelerator token as evidence. The client presented a valid inbound token as evidence. Depending on the audit policy, further details of this token may be written to a 540 event with the same transaction ID. Token issuer: urn:federation:adatum Token ID: _952de51d-e827-41db-8332-1afa84aa51d2 Identity: [email protected] For more information, see Help and Support Center at http://go.microsoft.com/fwlink/events.asp.
Event ID 510:
Event Type:Success Audit Event Source:ADFS Federation Service Auditor Event Category:Object Access Event ID:510

222
Date:11/10/2005 Time:4:10:12 PM User:NT AUTHORITY\SYSTEM Computer:ADFSRESOURCE Description: Transaction ID: {fb4e7da3-ca0b-43ca-a0c0-42a333ce0d80} This event contains the details of the resource token that was issued as part of the referenced transaction. Token ID: _ad5a3694-860d-4063-95a3-3b0163fad3ca Issuer: urn:federation:treyresearch Audience: https://adfsweb.treyresearch.net:8081/sampleapp/ Effective time: 11/10/2005 4:10:12 PM Expiration time: 11/10/2005 5:10:12 PM Claim source: urn:federation:adatum Authentication methods: MethodTime urn:federation:authentication:windows2005-11-11T00:10:13Z UPN: [email protected] Email: [Claim not present] Common name: [Claim not present] Groups: (0 sensitive values omitted) [Groups not present] Custom claims: NameValue [Custom claims not present] For more information, see Help and Support Center at http://go.microsoft.com/fwlink/events.asp.
Event ID 520:
Event Type:Success Audit Event Source:ADFS Federation Service Auditor Event Category:Object Access Event ID:520 Date:11/10/2005 Time:4:10:12 PM User:NT AUTHORITY\SYSTEM Computer:ADFSRESOURCE Description: Transaction ID: {fb4e7da3-ca0b-43ca-a0c0-42a333ce0d80} This event contains the details of the logon accelerator token that was issued as part of the referenced transaction. Token ID: _ea256664-ac66-4560-9a4f-97a26bf21fa0 Issuer: urn:federation:treyresearch Audience: urn:federation:treyresearch

223
Effective time: 11/10/2005 4:10:12 PM Expiration time: 11/11/2005 2:10:12 AM Claim source: urn:federation:adatum Authentication methods: MethodTime urn:federation:authentication:windows2005-11-11T00:10:13Z UPN: [email protected] Email: [Claim not present] Common name: [Claim not present] Groups: (0 sensitive values omitted) Adatum Share Point Claim Custom claims: NameValue [Custom claims not present] For more information, see Help and Support Center at http://go.microsoft.com/fwlink/events.asp.
Event ID 540:
Event Type:Success Audit Event Source:ADFS Federation Service Auditor Event Category:Object Access Event ID:540 Date:11/10/2005 Time:4:10:12 PM User:NT AUTHORITY\SYSTEM Computer:ADFSRESOURCE Description: Transaction ID: {fb4e7da3-ca0b-43ca-a0c0-42a333ce0d80} This event contains the details of the token that was presented by the client as part of the referenced transaction. Token ID: _952de51d-e827-41db-8332-1afa84aa51d2 Issuer: urn:federation:adatum Audience: urn:federation:treyresearch Effective time: 11/10/2005 4:10:13 PM Expiration time: 11/10/2005 5:10:13 PM Claim source: Authentication methods: MethodTime urn:federation:authentication:windows2005-11-11T00:10:13Z UPN: [email protected] Email: [Claim not present] Common name: [Claim not present] Groups: (0 sensitive values omitted) SharePointMapping Custom claims: NameValue

224
[Custom claims not present]
Default Auditing Events for Claims-aware Applications on a Federation Server
A claims-aware application generates events that are similar to the events that are
generated by a token-based application.