Embed Size (px)
Citation preview

Crystal Surround Air Track (Active Speaker System)
user manual
imagine the possibilitiesThank you for purchasing this Samsung product.
To receive more complete service, please register your product at
www.samsung.com/register
HW-C450HW-C451

�
featuresActive Speaker SystemThis unit features an Active Speaker System that provides high sound quality in a single slim unit.This unit does not require any satellite loudspeakers or speaker cabling, which are normally associated with conventional surround sound systems.
Multi-function Remote ControlThe supplied remote control can be used to control the TV connected to this unit.
The remote control has a TV hotkey that enables you to perform various operations with the simple press of a button. You can adjust the volume, change the channel or customize the navigation menu of the TV using this Multi-function Remote Control.
Special Sound Field modeYou can select from 7 different sound field modes (NEWS, DRAMA, SPORTS, GAME, CINEMA, MUSIC and PASS (Original Sound)) depending on the type of content you want to enjoy.
Compatibility with various audio TechnologiesThis unit employs decoders compatible with Dolby Digital, DTS (Digital Theater Systems) and SFE (Sound Field Effect).
− DolbyDigital
This is the standard audio signal format used on DVDs and other purely digital media. This surround technology delivers high-quality digital audio of up to 5.1 discrete channels to produce a directional and more realistic effect.
− DTS(DigitalTheaterSystems)
DTS provides a discrete 5.1 CH digital audio signal for both music and movie contents and uses less compression than Dolby Digital for richer sound.
− SFE(SoundFieldEffect)Using32bitAudioDigitalSignalProcessing
Provides more realistic surround sound with normal stereo audio sources.
Wireless SubwooferSamsung’s wireless module does away with cables running between the main unit and the subwoofer. Instead, the subwoofer connects to a compact wireless module that communicates with the main unit.
�
En
G
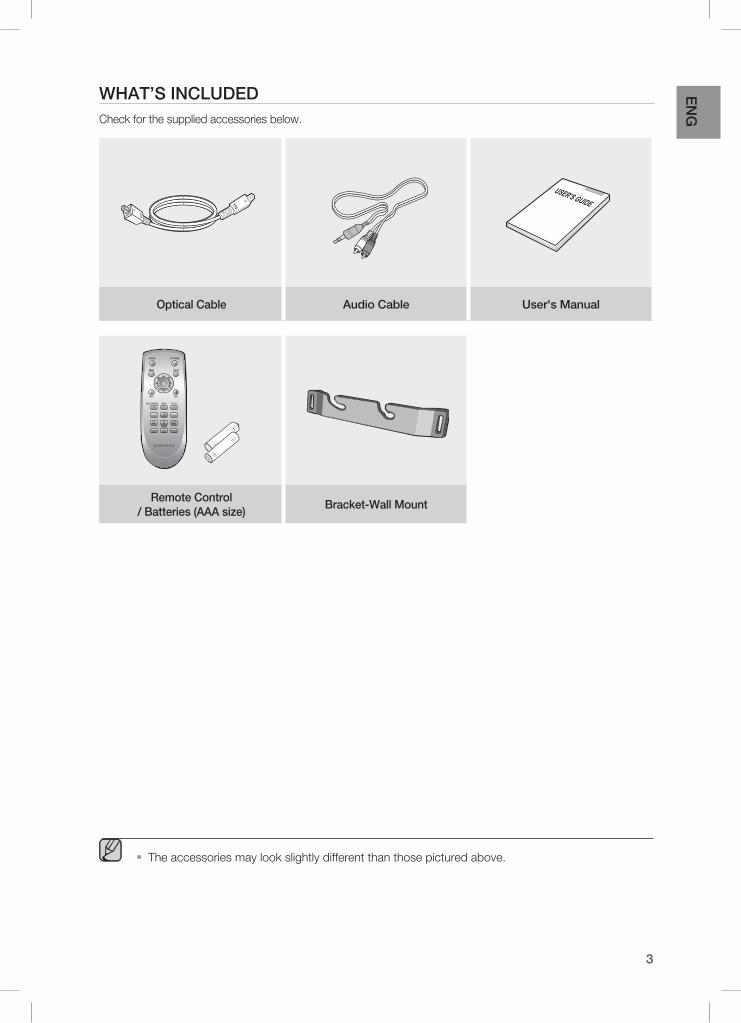
WHAT’SinclUDEDCheck for the supplied accessories below.
Opticalcable Audiocable User'sManual
POWER TV POWER
VOL/CONTROL TV CH
AV SYNCDRC
MUTE
S.VOL
O/A INPUT
S/WLEVEL
AUTOPOWER
MENU
EXIT
TOOLS
INFO
SOUNDMODE
DIMMER
Remotecontrol/Batteries(AAAsize)
Bracket-WallMount
The accessories may look slightly different than those pictured above.▪
�
safety informationSAFETyWARninGS
TO REDUCE THE RISK OF ELECTRIC SHOCK, DO NOT REMOVE THE COVER(OR BACK).
NO USER-SERVICEABLE PARTS ARE INSIDE. REFER SERVICING TO QUALIFIED SERVICE PERSONNEL.
CAUTIONRiSKOFElEcTRicSHOcK
DOnOTOPEn
This symbol indicates “dangerous voltage” inside the product that presents a risk of electric shock or personal injury.
This symbol indicates important instructions accompanying the product.
WARninG : To reduce the risk of fire or electric shock, do not expose this appliance to rain or moisture.
cAUTiOn : TO PREVENT ELECTRIC SHOCK, MATCH WIDE BLADE OF PLUG TO WIDE SLOT, FULLY INSERT.• This apparatus shall always be connected to a AC outlet with a protective grounding connection.• To disconnect the apparatus from the mains, the plug must be pulled out from the mains socket, therefore the mains plug shall be readily operable.
cAUTiOn• Apparatus shall not be exposed to dripping or splashing and no objects filled with liquids, such as vases, shall be placed on the apparatus. • The Mains plug is used as a disconnect device and shall stay readily operable at any time.

5
En
G
PREcAUTiOnS
Ensure that the AC power supply in your house complies with the identification sticker located on the back of your product. Install your product horizontally, on a suitable base (furniture), with enough space around it for ventilation (3~4 inches). Make sure the ventilation slots are not covered. Do not place the unit on amplifiers or other equipment which may become hot. This unit is designed for continuous use. In order to disconnect the unit completely from the power supply, remove the main plug from the wall outlet, especially when left unused for a long period of time.
During thunderstorms, disconnect the AC main plug from the wall outlet. Voltage peaks due to lightning could damage the unit.
Protect the product from moisture (i.e. vases) , and excess heat (e.g.fireplace) or equipment creating strong magnetic or electric fields Disconnect the power cable from the AC supply if the unit malfunctions. Your product is not intended for industrial use. Use of this product is for personal use only.
Condensation may occur if your product or disc has been stored in cold temperatures. If transporting the unit during the winter, wait approximately 2 hours until the unit has reached room temperature before using.
Do not expose the unit to direct sunlight or other heat sources.This could lead to overheating and malfunction of the unit.
The batteries used with this product contain chemicals that are harmful to the environment. Do not dispose of batteries in the general household trash.
The batteries used with this product contain chemicals that are harmful to
Phones
3.9 inch 3.9 inch
2.7 inch
3.9 inch

�
contentsFeATuReS
22 Features3 What’sincluded
SAFeTy inFoRMATion
44 Safetywarnings5 Precautions
geTTing STARTed
77 Beforereadingtheuser’smanual
deSCRipTionS
88 Frontpanel9 Rearpanel
ReMoTe ConTRol
1010 Touroftheremotecontrol
ConneCTionS
1111 Installingthewallmount12 Connectingthewirelesssubwoofer13 ConnectingtheCrystalSurroundAirTrack
TRoubleShooTing
1717 Troubleshooting
Appendix
1818 Specifications
FunCTionS
1414 Basicfunctions14 Advancedfunctions16 Softwareupgrade

�
En
G●
GE
TT
inG
ST
AR
TE
D
BEFOREREADinGTHEUSER’SMAnUAlMake sure to check the following terms before reading the user manual.
iconsthatwillbeusedinmanual
icon Term Definition
cautionThis involves a case where a function does not operate or settings may be canceled.
note This involves tips or instructions on the page that help each function operate.
Abouttheuseofthisuser’smanual
Be sure to be familiar with Safety Instructions before using this product. ( See page 4 )
If a problem occurs, check the Troubleshooting. ( See page 17 )
copyright
©2010 Samsung Electronics Co.,Ltd.
All rights reserved; no part or whole of this user’s manual may be reproduced or copied without the prior written permission of Samsung Electronics Co.,Ltd.
1)
2)
getting started

�
descriptionsFROnTPAnEl
DiSPlAy Displays the current mode.
POWERBUTTOn Turns the Crystal Surround Air Track on and off.
VOlUME+/- Controls the volume level.
SOUnDFiElDMODE
Selects the sound field mode.(NEWS, DRAMA, SPORTS, GAME, CINEMA, MUSIC and PASS(Original Sound))
inPUTMODE Selects the Optical or Audio input.
When you turn on the power of this unit, there will be a 4 to 5 second delay before it can reproduce sound.
▪
���51

�
En
G●
DE
Sc
RiP
TiO
n
REARPAnEl
USBPORT You can update this unit through the USB port.
POWERSUPPlycABlE
Plug the power supply cable into the AC wall outlet.
AUDiOinJAcK Connect to the analog output of an external device.
OPTicAlDiGiTAlin1,2
Connect to the digital (optical) output of an external device.
When disconnecting the power cable from the wall outlet, hold the plug. Do not pull the cable.
Do not connect this unit or other components to the main power until all connections between components are complete.
▪
▪
ONLY FOR UPDATE
1
�
�
�

10
remote controlTOUROFTHEREMOTEcOnTROl
The remote control can operate TVs made by SAMSUNG only.
Depending on the TV you are using, you may not be able to operate your TV with this remote control. In this case, operate the TV using the TV's remote control.
▪▪
installing batteries in the Remote Control
1. Lift the cover at the back of the remote control upward as shown.
2. Install two AAA size batteries. Make sure to match the “+” and “–” ends of the batteries with the diagram inside the compartment.
3. Replace the cover. Assuming typical TV usage, the batteries last for about one year.
operation Range of the Remote ControlThe remote control can be used up to approximately 23 feet (7 meters) in a straight line. It can also be operated at a horizontal angle of up to 30° from the remote control sensor.
poWeR buTTonTurns the Crystal Surround Air Track on and off.
AdJuST The TV nAVigATion MenuAdjusts and selects an item of the navigation menu on your Samsung TV.
Vol/ConTRolAdjusts the volume level of the unit.
o/A inpuTSelects the Digital (Optical) or the Audio input.
SMART VoluMeRegulate and stabilize the volume level against a drastic volume change.
TV poWeR buTTonTurns your Samsung TV on and off.
Sound ModeSelects the sound field mode.(NEWS, DRAMA, SPORTS, GAME, CINEMA, MUSIC and PASS(Original Sound))
TV ChAnnelSwitches between the available TV channels.
MuTeMutes the sound from the unit. Press again to restore the sound to the previous volume level.
AuTo poWeR linKSynchronizes to turn the unit on with the optical signal from the TV.
POWER TV POWER
VOL/CONTROL TV CH
AV SYNCDRC
MUTE
S.VOL
O/A INPUT
S/WLEVEL
AUTOPOWER
MENU
EXIT
TOOLS
INFO
SOUNDMODE
DIMMER
S/W leVelAdjusts the Subwoofer level.
dRC/diMMeRYou can use this function to enjoy Dolby Digital sound when watching movies at low volume at night (Standard, MAX, MIN).You can control the brightness of the Display.
AV SynCUsed to help sync video to audio when connected to a digital TV.

11
En
G●
cO
nn
Ec
TiO
nS
inSTAllinGTHEWAllMOUnTYou can use the wall mount bracket to mount this unit on a wall.
Do not hang onto the installed unit and avoid any impact to the unit.Secure the unit firmly to the wall so that it does not fall off. If the unit falls off, it may result in an injury or damage to the product.When the unit is installed on a wall, please make sure that a child does not pull any of connecting cables, as it may cause it to fall.For the optimal performance in a wall mount installation, keep the speaker system at least 2 inches (5 cm) distant from the TV.
▪▪
▪
▪
�. Then, fit the unit into the corresponding slots of the wall mount bracket. For secure installation, make sure the mounting studs slide firmly down into the bottom of the slots.
1. Place the wall mount bracket on a wall surface and then secure it with two screws (not supplied).
�. This is the completion of the suggested wall mount installation.
connections
installation precautionsDo not install on a place other than vertical wall.For the installation, avoid high temperature or humidity, or wall that cannot sustain the weight of the set.Check the strength of the wall. If the strength of the wall is insufficient for the product installation, make sure to reinforce the wall before the installation.Check the material of the wall. If the wall is made of plaster board, marble, or iron board, purchase and use the appropriate fixing screws.Cables connecting to external devices are to be connected to the set before installing.Be sure to turn off and unplug the unit before installation. Otherwise, it may cause electric shock.
•••
•
••
1 �
� inches (5 cm) or more

1�
POWER TV POWER
VOL/CONTROL TV CH
AV SYNCDRC
MUTE
S.VOL
O/A INPUT
S/WLEVEL
AUTOPOWER
MENU
EXIT
TOOLS
INFO
SOUNDMODE
DIMMER
POWER TV POWER
VOL/CONTROL TV CH
AV SYNCDRC
MUTE
S.VOL
O/A INPUT
S/WLEVEL
AUTOPOWER
MENU
EXIT
TOOLS
INFO
SOUNDMODE
DIMMER
cOnnEcTinGTHEWiRElESSSUBWOOFERThe Subwoofer's linking ID is preset at the factory and the main unit and sub should link (connect wirelessly) automatically when main unit is turned on. If the link indicator does not light when main unit and subwoofer are turned on, please set the ID by following the process below.
Before moving or installing the product, be sure to turn off the power and disconnect the power cord.If the main unit is powered off, the wireless subwoofer will be in the standby mode and the STANDBY LED on the upper side will come on after 30 seconds Link indicator(Blue LED) blinking.If you use a device such as a microwave oven, wireless LAN Card, Bluetooth equipment, or any other device that uses the same frequency (2.4GHz or 5.8GHz) near the system, some sound interruption may be heard due to interference.The transmission distance of the wireless signal between the main unit and sub is about 33 ft., but may vary depending on your operating environment. If a steel-concrete or metallic wall is between the main unit and the wireless subwoofer, the system may not operate at all, because the wireless signal cannot penetrate metal.If the main unit doesn't make wireless connection, follow steps 1-4 above to retry the connection between the main unit and wireless subwoofer.
The wireless receiving antenna is built into the wireless subwoofer. Keep the unit away from water and moisture.For optimal listening performance, make sure that the area around the wireless subwoofer location is clear of any obstructions.
▪
▪
▪
▪
▪
▪
▪
1. Plug the power cords of the main unit and subwoofer into an AC power supply.
�. Press the id SeT button on the back of the subwoofer with a small, pointed object for 5 seconds.
The STANDBY indicator is turned off and the LINK indicator (Blue LED) blinks quickly.•
STANDBY
LINK
�. While the main unit is powered off (STANDBY mode), press MuTe on the remote control for 5 seconds.
�. The Power Indicator on the main unit lights off and on, then returns to STAndby mode.
The main unit and the subwoofer are now linked (connected).The Link indicator (blue LED) on the subwoofer is turned on.You can enjoy better sound from the wireless subwoofer by selecting the sound field mode. ( See page 15 )
•••

1�
En
G●
cO
nn
Ec
TiO
nS
cOnnEcTinGTHEcRySTAlSURROUnDAiRTRAcKThis section explains two ways (digital and analog) of connecting the unit to the TV.
This unit is equipped with two optical digital jacks and one audio analog jack for connecting a TV.
Audio inConnect AUDIO IN on the main unit to the AUDIO OUT of the TV. Be sure to match connector colors.
oR,
opTiCAl digiTAl in 1,�Connect the Digital Input on the main unit to the OPTICAL OUT of the TV or Source Device.
Do not connect the power cord of this product or your TV to the wall outlet until all connections between components are complete.Before moving or installing this product, be sure to turn off the power and disconnect the power cord.You can connect this unit to other external components. (such as DVD player, Set-Top Box etc.)Only one optical cable is supplied.If you select 'ANALOG' without connecting the Audio Cable, the set is turned off automatically after 20 minutes.
▪
▪
▪
▪▪
ONLY FOR UPDATE
AUDIO IN
AUDIO OUT
L
R
OPTICAL OUT
Red
White
OPTICAL DIGITAL IN 1,2
OPTICAL OUT
Audiocable(supplied)
Opticalcable(supplied)
or
Opticalcable(supplied)
or
BD/DVDplayer/Set-topbox/Gameconsole

1�
Turning the power on/off
1. Touch poWeR ( ) on the front panel. OR, Press poWeR on the remote control to turn on the power.
�. Touch poWeR ( ) on the front panel. OR, Press poWeR on the remote control again to turn off the power.
Adjusting the volume
Touch VoluMe +/– on the front panel.
OR,
Press VoluMe +/– on the remote control to increase or decrease the volume level.
The numeric value of the volume level appears in the front panel display.
The volume level increases or decreases when you press VOLUME +/–.
If you want to enjoy the sound only from the Crystal Surround Air Track, you must turn off the TV's speakers in the Audio Setup menu of your TV. Refer to the owner's manual supplied with your TV.
•
▪▪
functions
Muting the sound
This is useful when answering a doorbell or telephone call.
1. Press MuTe ( ) on the remote control to mute the sound.
�. Press MuTe on the remote control again (or press VoluMe +/–) to restore the sound.
Selecting the input mode
You can select either Optical Digital in or Audio input. Press o/A inpuT on the remote control or touch inpuT Mode on the front panel repeatedly to select the Optical Digital in or Audio input.
inputmode Display
OpticalDigitalin
PcM PCM
DOlBy D.D
DTS DTS
Audioinput ANALOG
AdVAnCed FunCTionS
bASiC FunCTionS
POWER TV POWER
VOL/CONTROL TV CH
AV SYNCDRC
MUTE
S.VOL
O/A INPUT
S/WLEVEL
AUTOPOWER
MENU
EXIT
TOOLS
INFO
SOUNDMODE
DIMMER
POWER TV POWER
VOL/CONTROL TV CH
AV SYNCDRC
MUTE
S.VOL
O/A INPUT
S/WLEVEL
AUTOPOWER
MENU
EXIT
TOOLS
INFO
SOUNDMODE
DIMMERPOWER TV POWER
VOL/CONTROL TV CH
AV SYNCDRC
MUTE
S.VOL
O/A INPUT
S/WLEVEL
AUTOPOWER
MENU
EXIT
TOOLS
INFO
SOUNDMODE
DIMMER
POWER TV POWER
VOL/CONTROL TV CH
AV SYNCDRC
MUTE
S.VOL
O/A INPUT
S/WLEVEL
AUTOPOWER
MENU
EXIT
TOOLS
INFO
SOUNDMODE
DIMMER
POWER TV POWER
VOL/CONTROL TV CH
AV SYNCDRC
MUTE
S.VOL
O/A INPUT
S/WLEVEL
AUTOPOWER
MENU
EXIT
TOOLS
INFO
SOUNDMODE
DIMMER
POWER TV POWER
VOL/CONTROL TV CH
AV SYNCDRC
MUTE
S.VOL
O/A INPUT
S/WLEVEL
AUTOPOWER
MENU
EXIT
TOOLS
INFO
SOUNDMODE
DIMMER
15
En
G●
FU
nc
TiO
nS
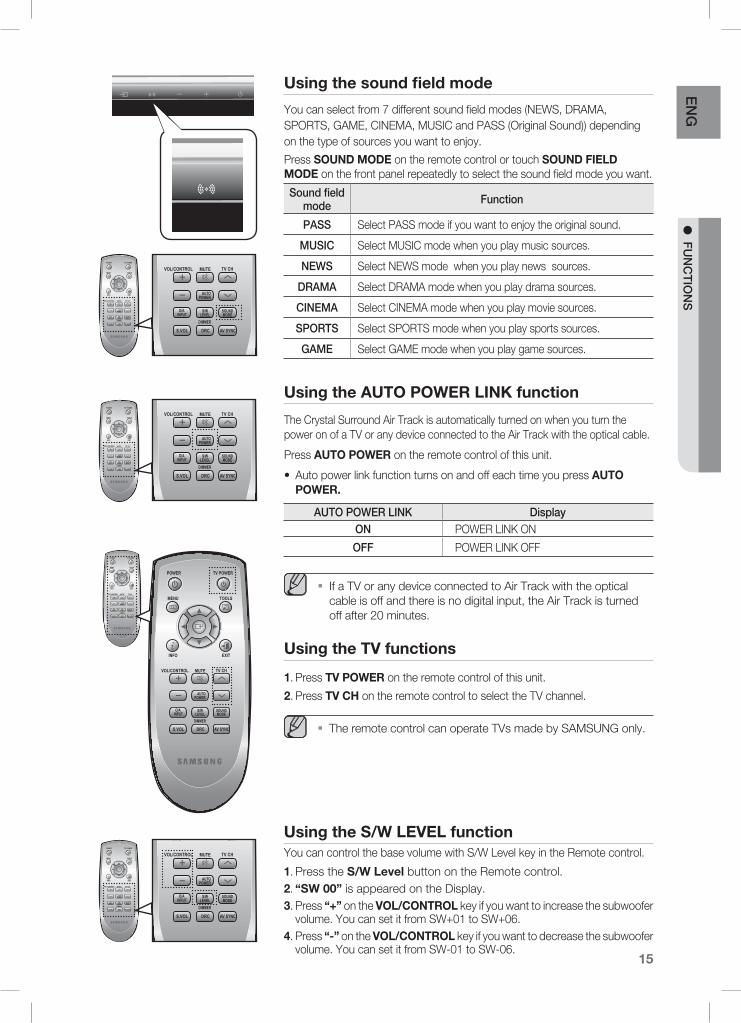
using the sound field mode
You can select from 7 different sound field modes (NEWS, DRAMA, SPORTS, GAME, CINEMA, MUSIC and PASS (Original Sound)) depending on the type of sources you want to enjoy.
Press Sound Mode on the remote control or touch Sound Field Mode on the front panel repeatedly to select the sound field mode you want.
Soundfieldmode Function
PASS Select PASS mode if you want to enjoy the original sound.
MUSic Select MUSIC mode when you play music sources.
nEWS Select NEWS mode when you play news sources.
DRAMA Select DRAMA mode when you play drama sources.
cinEMA Select CINEMA mode when you play movie sources.
SPORTS Select SPORTS mode when you play sports sources.
GAME Select GAME mode when you play game sources.
using the AuTo poWeR linK function
The Crystal Surround Air Track is automatically turned on when you turn the power on of a TV or any device connected to the Air Track with the optical cable.
Press AuTo poWeR on the remote control of this unit.
Auto power link function turns on and off each time you press AuTo poWeR.
AUTOPOWERlinK DisplayOn POWER LINK ON
OFF POWER LINK OFF
If a TV or any device connected to Air Track with the optical cable is off and there is no digital input, the Air Track is turned off after 20 minutes.
using the TV functions
1. Press TV poWeR on the remote control of this unit.
�. Press TV Ch on the remote control to select the TV channel.
The remote control can operate TVs made by SAMSUNG only.
•
▪
▪
POWER TV POWER
VOL/CONTROL TV CH
AV SYNCDRC
MUTE
S.VOL
O/A INPUT
S/WLEVEL
AUTOPOWER
MENU
EXIT
TOOLS
INFO
SOUNDMODE
DIMMER
POWER TV POWER
VOL/CONTROL TV CH
AV SYNCDRC
MUTE
S.VOL
O/A INPUT
S/WLEVEL
AUTOPOWER
MENU
EXIT
TOOLS
INFO
SOUNDMODE
DIMMER
POWER TV POWER
VOL/CONTROL TV CH
AV SYNCDRC
MUTE
S.VOL
O/A INPUT
S/WLEVEL
AUTOPOWER
MENU
EXIT
TOOLS
INFO
SOUNDMODE
DIMMER
POWER TV POWER
VOL/CONTROL TV CH
AV SYNCDRC
MUTE
S.VOL
O/A INPUT
S/WLEVEL
AUTOPOWER
MENU
EXIT
TOOLS
INFO
SOUNDMODE
DIMMER
POWER TV POWER
VOL/CONTROL TV CH
AV SYNCDRC
MUTE
S.VOL
O/A INPUT
S/WLEVEL
AUTOPOWER
MENU
EXIT
TOOLS
INFO
SOUNDMODE
DIMMER
POWER TV POWER
VOL/CONTROL TV CH
AV SYNCDRC
MUTE
S.VOL
O/A INPUT
S/WLEVEL
AUTOPOWER
MENU
EXIT
TOOLS
INFO
SOUNDMODE
DIMMER
POWER TV POWER
VOL/CONTROL TV CH
AV SYNCDRC
MUTE
S.VOL
O/A INPUT
S/WLEVEL
AUTOPOWER
MENU
EXIT
TOOLS
INFO
SOUNDMODE
DIMMER
POWER TV POWER
VOL/CONTROL TV CH
AV SYNCDRC
MUTE
S.VOL
O/A INPUT
S/WLEVEL
AUTOPOWER
MENU
EXIT
TOOLS
INFO
SOUNDMODE
DIMMER
using the S/W leVel functionYou can control the base volume with S/W Level key in the Remote control.
1. Press the S/W level button on the Remote control.�. “SW 00” is appeared on the Display.�. Press “+” on the Vol/ConTRol key if you want to increase the subwoofer
volume. You can set it from SW+01 to SW+06. �. Press “-” on the Vol/ConTRol key if you want to decrease the subwoofer
volume. You can set it from SW-01 to SW-06.

1�
using the AV SynC functionVideo may look slower than the audio if it is connected with digital TV.If this occurs, adjust the audio delay time to match the video.
Press AV SynC on the remote control of this unit repeatedly .
You can use + , - button to set the audio delay time between 0 ms and 300 ms.
using the dRC functionThis feature balances the range between the loudest and quietest sounds. You can use this function to enjoy Dolby Digital sound when watching movies at low volume at night.
Press dRC on the remote control of this unit.
Each time the button is pressed, the selection changes as follows : DRC MIN ➡ DRC STANDARD ➡ DRC MAX
using the diMMeR functionPress Dimmer to control the brightness of the Display.
If you press and hold the dRC(diMMeR) button for over 4seconds, the Display is dimmed and the message "diMMeR leVel 1" is appears on the Display. If the button is pressed and held again, the Display is brightened and the message "diMMeR leVel �" appears on the Display.
using the S.Vol functionThis will regulate and stabilize the volume level against a drastic volume change in case of a channel change or scene transition.
Press S.Vol on the remote control of this unit.
Each time the button is pressed, the selection changes as follows : S.VOL ON ➡ S.VOL OFF
•
•
•
POWER TV POWER
VOL/CONTROL TV CH
AV SYNCDRC
MUTE
S.VOL
O/A INPUT
S/WLEVEL
AUTOPOWER
MENU
EXIT
TOOLS
INFO
SOUNDMODE
DIMMER
POWER TV POWER
VOL/CONTROL TV CH
AV SYNCDRC
MUTE
S.VOL
O/A INPUT
S/WLEVEL
AUTOPOWER
MENU
EXIT
TOOLS
INFO
SOUNDMODE
DIMMER
POWER TV POWER
VOL/CONTROL TV CH
AV SYNCDRC
MUTE
S.VOL
O/A INPUT
S/WLEVEL
AUTOPOWER
MENU
EXIT
TOOLS
INFO
SOUNDMODE
DIMMER
POWER TV POWER
VOL/CONTROL TV CH
AV SYNCDRC
MUTE
S.VOL
O/A INPUT
S/WLEVEL
AUTOPOWER
MENU
EXIT
TOOLS
INFO
SOUNDMODE
DIMMER
POWER TV POWER
VOL/CONTROL TV CH
AV SYNCDRC
MUTE
S.VOL
O/A INPUT
S/WLEVEL
AUTOPOWER
MENU
EXIT
TOOLS
INFO
SOUNDMODE
DIMMER
POWER TV POWER
VOL/CONTROL TV CH
AV SYNCDRC
MUTE
S.VOL
O/A INPUT
S/WLEVEL
AUTOPOWER
MENU
EXIT
TOOLS
INFO
SOUNDMODE
DIMMER
SOFTWAREUPGRADE
Samsung may offer upgrades for the Crystal Surround Air Track's system's firmware in the future.Please visit Samsung.com or contact the Samsung call center to receive information about downloading upgrades and using a USB drive. Upgrades will be possible by connecting a USB drive to the USB port located on your Air Track.
Insert a USB drive containing the firmware upgrade into the USB port on the back of the main unit.Please be careful to not disconnect the power or remove the USB drive while upgrades are being applied. The main unit will turn off automatically after completing the fi rmware upgrade. When software is upgraded, settings you have made will return to their default (factory) settings. We recommend you write down your settings so that you can easily reset them after the upgrade.If you fail to upgrade the firnware, we recommend formatting the USB data in FAT16 and trying again.For upgrading purposes, do not format USB data in NTFS because it is not a supported file system.Depending on the manufacturer, the USB may not be supported.
▪▪
▪▪▪
ONLY FOR UPDATE
ONLY FOR UPDATE

1�
En
G●
TR
OU
BlE
SH
OO
Tin
G
Before requesting service, please check the following.
Symptom check Remedy
Theunitwillnotturnon. • Is the power cord plugged into the outlet?
• Connect the power plug to the outlet.
Afunctiondoesnotworkwhenthebuttonispressed.
• Is there static electricity in the air?
• Disconnect the power plug and connect it again.
Soundisnotproduced. • Is the unit properly connected to your TV?
• Is the Mute function on?
• Is the volume set to minimum?
• Connect it correctly.
• Press the Mute button to cancel the function.
• Adjust the volume.
PicturedoesnotappearonaTVwhenthefunctionisselected.
• Is the TV connected properly?
• Connect it correctly.
Remotecontroldoesnotwork. • Are the batteries drained?
• Is the distance between remote control and main unit too far?
• Replace with new batteries.
• Operate at a close distance.
Thesoundfromtheleft/rightchannelsisreversed.
• Are the left/right audio output cables from the TV connected properly?
• Check the left/right channel and connect it/them correctly.
troubleshooting
1�
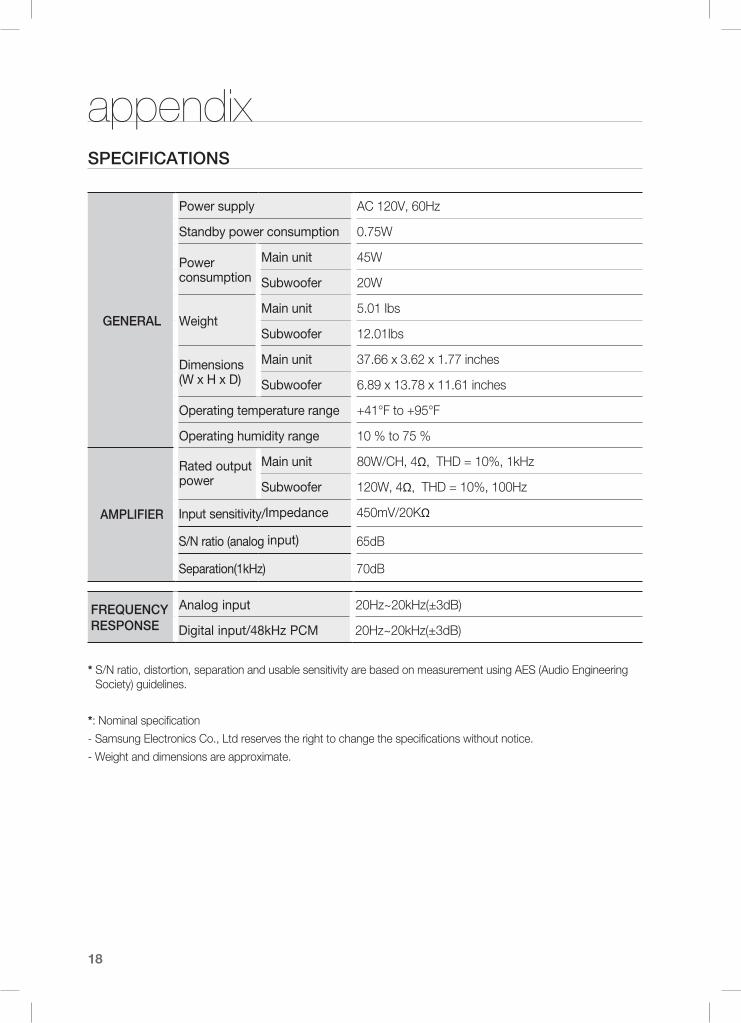
SPEciFicATiOnS
GEnERAl
Powersupply AC 120V, 60Hz
Standbypowerconsumption 0.75W
Powerconsumption
Mainunit 45W
Subwoofer 20W
WeightMainunit 5.01 Ibs
Subwoofer 12.01Ibs
Dimensions(WxHxD)
Mainunit 37.66 x 3.62 x 1.77 inches
Subwoofer 6.89 x 13.78 x 11.61 inches
Operatingtemperaturerange +41°F to +95°F
Operatinghumidityrange 10 % to 75 %
AMPliFiER
Ratedoutputpower
Mainunit 80W/CH, 4Ω, THD = 10%, 1kHz
Subwoofer 120W, 4Ω, THD = 10%, 100Hz
Inputsensitivity/Impedance 450mV/20KΩ
S/Nratio(analoginput) 65dB
Separation(1kHz) 70dB
FREQUEncyRESPOnSE
Analoginput 20Hz~20kHz(±3dB)
Digitalinput/48kHzPCM 20Hz~20kHz(±3dB)
* S/N ratio, distortion, separation and usable sensitivity are based on measurement using AES (Audio Engineering Society) guidelines.
*: Nominal specification
- Samsung Electronics Co., Ltd reserves the right to change the specifications without notice.
- Weight and dimensions are approximate.
appendix

LIMITED WARRANTY TO ORIGINAL PURCHASER
Samsung Electronics Canada Inc.(SECA), warrants that this product is free from defective material and workmanship.
SECA further warrants that if this product falls to operate properly within the specified warranty period and the failure is due to improper workmanship or defective materials, SECA will repair or replace the product at its option.
All warranty repairs must be performed by a SECA Authorized Service Center. (The name andaddress of the location nearest you can be obtained by calling toll free: 1- 800- SAMSUNG)
On carry-in models, transportation to and from the service center is the customer’s responsibility.
The original dated sales receipt must be retained by the customer and is the only acceptable proof of purchase. It must be presented to the authorized service center at the time service is requested.
This warranty does not cover damage due to accident, fire, flood and/ or other acts of God; misuse,incorrect line voltage, improper installation, improper or unauthorized repairs, commercial use ordamage that occurs in shipping. Exterior and interior finish, lamps, glass are not covered under thiswarranty. Customer adjustments which are explained in the instruction manual are not coveredunder the terms of this warranty. This warranty will automatically be voided for any unit found with amissing or altered serial number. This warranty is valid only on products purchased and used inCanada.
HEADQUARTERSSAMSUNG ELECTRONICS CANADA INC.,
CUSTOMER SERVICE55 STANDISH COURT MISSISSAUGA, ONTARIO L5R 4B2 CANADA
FABRIQUE EN CORÉE1-800-SAMSUNG (1-800-7267864)
www.SAMSUNG.COM/CA
LABOR
One year (Carry- in)PARTS
One year
EXCLUSIONS (WHAT IS NOT COVERED)

Contact SAMSung WoRld Wide If you have any questions or comments relating to Samsung products, please contact the SAMSUNG customer care center.
Area Contact Center Web Site` North AmericaCanada 1-800-SAMSUNG (726-7864) www.samsung.comMexico 01-800-SAMSUNG (726-7864) www.samsung.comU.S.A 1-800-SAMSUNG (726-7864) www.samsung.com` Latin AmericaArgentine 0800-333-3733 www.samsung.comBrazil 0800-124-421 4004-0000 www.samsung.comChile 800-SAMSUNG (726-7864) www.samsung.comNicaragua 00-1800-5077267 www.samsung.comHonduras 800-7919267 www.samsung.comCosta Rica 0-800-507-7267 www.samsung.comEcuador 1-800-10-7267 www.samsung.comEl Salvador 800-6225 www.samsung.comGuatemala 1-800-299-0013 www.samsung.comJamaica 1-800-234-7267 www.samsung.comPanama 800-7267 www.samsung.comPuerto Rico 1-800-682-3180 www.samsung.comRep. Dominica 1-800-751-2676 www.samsung.comTrinidad & Tobago 1-800-SAMSUNG (726-7864) www.samsung.comVenezuela 0-800-100-5303 www.samsung.comColombia 01-8000112112 www.samsung.com` Europe
Austria 0810 - SAMSUNG (7267864, € 0.07/min) www.samsung.com
Belgium 02-201-24-18
www.samsung.com/ be (Dutch) www.samsung.com/ be_fr (French)
Czech 800 - SAMSUNG (800-726786) www.samsung.comDenmark 70 70 19 70 www.samsung.comFinland 030 - 6227 515 www.samsung.comFrance 01 48 63 00 00 www.samsung.com
Germany 01805 - SAMSUNG (726-7864 € 0,14/Min) www.samsung.com
Hungary 06-80-SAMSUNG (726-7864) www.samsung.comItalia 800-SAMSUNG (726-7864) www.samsung.comLuxemburg 261 03 710 www.samsung.com
Netherlands 0900-SAMSUNG (0900-7267864) (€ 0,10/Min) www.samsung.com
Norway 815-56 480 www.samsung.com
Poland 0 801 1SAMSUNG (172678) 022-607-93-33 www.samsung.com
Portugal 80820-SAMSUNG (726-7864) www.samsung.comSlovakia 0800-SAMSUNG (726-7864) www.samsung.com
Spain 902 - 1 - SAMSUNG (902 172 678) www.samsung.com
Sweden 0771 726 7864 (SAMSUNG) www.samsung.comU.k 0845 SAMSUNG (7267864) www.samsung.comEire 0818 717100 www.samsung.com
Area Contact Center Web Site
Switzerland 0848 - SAMSUNG (7267864, CHF 0.08/min)
www.samsung.com/ch www.samsung.com/ ch_fr/ (French)
Lithuania 8-800-77777 www.samsung.comLatvia 8000-7267 www.samsung.comEstonia 800-7267 www.samsung.com` CISRussia 8-800-555-55-55 www.samsung.comGeorgia 8-800-555-555Armenia 0-800-05-555Azerbaijan 088-55-55-555kazakhstan 8-10-800-500-55-500Uzbekistan 8-10-800-500-55-500 www.samsung.comkyrgyzstan 00-800-500-55-500 www.samsung.comTadjikistan 8-10-800-500-55-500 www.samsung.com
Ukraine 0-800-502-000www.samsung.ua www.samsung.com/ ua_ru
Belarus 810-800-500-55-500Moldova 00-800-500-55-500` Asia PacificAustralia 1300 362 603 www.samsung.comNew Zealand 0800 SAMSUNG (0800 726 786) www.samsung.com
China 400-810-5858 010-6475 1880 www.samsung.com
Hong kong (852) 3698-4698
www.samsung.com/ hk www.samsung.com/ hk_en/
India
3030 8282 1800 110011 1800 3000 8282 1800 266 8282
www.samsung.com
Indonesia 0800-112-8888 021-5699-7777 www.samsung.com
Japan 0120-327-527 www.samsung.comMalaysia 1800-88-9999 www.samsung.com
Philippines
1-800-10-SAMSUNG (726-7864) 1-800-3-SAMSUNG (726-7864) 1-800-8-SAMSUNG (726-7864) 02-5805777
www.samsung.com
Singapore 1800-SAMSUNG (726-7864) www.samsung.com
Thailand 1800-29-3232 02-689-3232 www.samsung.com
Taiwan 0800-329-999 www.samsung.comVietnam 1 800 588 889 www.samsung.com` Middle East & AfricaTurkey 444 77 11 www.samsung.comSouth Africa 0860-SAMSUNG (726-7864) www.samsung.comU.A.E 800-SAMSUNG (726-7864) www.samsung.comBahrain 8000-4726Jordan 800-22273

AH68-02273S