Embed Size (px)
Citation preview

Training Guide
Accounts Payable Training Mover’s Suite users training on the Accounts Payable functionality within Microsoft Dynamics GP

Accounts Payable Training
Mover’s Suite Software, LLC 2
Accounts Payable Training Version 3.7 (Fall 2008)
Copyright
Copyright © 1997-2009 by Mover’s Suite Software, LLC. All rights reserved.
Trademarks
Mover’s Suite is a trademark of Mover's Suite Software, LLC.
Microsoft and Microsoft Windows are registered trademarks of Microsoft Corporation.
All other product names used are trademarks of their respective owners.
Notice
The material in this document is for information only and is subject to change without notice.
While reasonable efforts have been made in the preparation of this document to assure its accuracy, Mover’s Suite Software LLC assumes no liability resulting from errors or omissions in this document, or from the use of the information contained herein.
Mover’s Suite Software, LLC reserves the right to make changes in the product design without reservation and without notification to any person or entity.
Edition
Fall 2008
Copyright © 1997-2009 by Mover’s Suite Software, LLC. All rights reserved.
Printing Information
Printed in the United States.
Technical Support
If at any time you experience problems with Mover’s Suite Software, we encourage you to contact us as follows:
Toll free: 1.866.750.7255 Phone: 1.970.256.1616
Fax: 1.970.256.1650 Website: www.moverssuite.com Support: support.moverssuite.com

Accounts Payable Training
Mover’s Suite Software, LLC 3
Table of Contents
ACCOUNTS PAYABLE TRAINING 4
APPLY PAYABLES DOCUMENT 4
CHECKING DISTRIBUTIONS IN ACCOUNTS PAYABLE 5
CHECKING VENDOR TOTALS FOR YEAR END 8
EDIT CHECK BATCH 12
EDIT PAYABLES CHECK 14
MSS IMPORT 19
PAYABLES TRANSACTION ENTRY 22
POST PAYABLES CHECKS WINDOW 27
PRINT CHECK & REMITTANCE 28
PROCESSING DRIVER CHECKS 32
PROCESSING COMMISSION CHECKS 34
SELECT CHECKS PROCESS 41 Edit Check Batch 45 Print Check 49 Printing Remittances 50 Post Payables Checks Window 52
SMARTLIST FOR 1099 VENDORS AND TRANSACTIONS 54 To see what Vendors are setup as 1099 58 To see what Vendors are setup as 1099 with YTD on amounts 59
TO FIND A CHECK NUMBER PAID TO A VENDOR 61
TO FIND A VOUCHER NUMBER IN ACCOUNT PAYABLES 62
TO PRINT AN EDIT TRANSACTION LIST 65
VENDOR CARD SETUP 67

Accounts Payable Training
Mover’s Suite Software, LLC 4
Accounts Payable Training Click icon to open this entire document in Adobe Portable Document Image (PDF) format.
Apply Payables Document If there has been a manual check entered into Great Plains, or a check was created without an invoice, the check will need to be applied to an invoice. The invoice must be entered into the system prior to this step. This can also be used on Credit Memo’s to adjust for returns and adjustments. Once an invoice has been applied to a payment/credit memo, both items will move to a status of history in the system, if fully applied. This is the finalization of the process.
To apply a payables document, go to: Transactions> Purchasing> Apply Payables Documents Enter the Vendor ID for the payment that is to be applied. In the dropdown for the Document Type, select payment, or credit memo. Click on the right arrow, directly above the field for document type, to find the document that is not yet applied. Make sure the apply date is correct. The invoices that are available to be applied to a document will display in the lower Apply to Document area. There is a checkbox on the left. If the invoice is to be applied, check the box.

Accounts Payable Training
Mover’s Suite Software, LLC 5
The original amount (displayed about the middle of the window) will show and the unapplied amount should change to “0.00”, if the invoices clear the amount of the payment/credit memo.
Checking Distributions in Accounts Payable To check the distributions on a Payables document, go to Inquiry> Purchasing > Transaction by Vendor Enter the VendorID. Find the document that the distribtuions are needed for. Click on the line to higlight. Click on Document Number above to open the Zoom Window.
The Payables Zoom window will open. The window will be dififerent for payment and for invoice. Both windows will have the apply and Distribution Buttons. Click on Distribution.

Accounts Payable Training
Mover’s Suite Software, LLC 6
The Payables Distribution Zoom will display the distributions for the transaction. Click on the Blue chevron down to see the account descriptions. Click on the one up to bring back to a single line per account.

Accounts Payable Training
Mover’s Suite Software, LLC 7

Accounts Payable Training
Mover’s Suite Software, LLC 8
Checking Vendor Totals for Year End There are 3 reports you can run, if the 1099 flag was (or wasn’t) set. These can help you verify the 1099 totals you should report for the drivers and sales persons. Run the Historical Trial Balance in Purchasing
Reports> Purchasing> Trial Balance In the dropdown select Historical
Make a title in the Option. Leave Branch as all. Select a Range, Vendor Class – enter the class the drivers or sales persons are part of. Click insert.

Accounts Payable Training
Mover’s Suite Software, LLC 9
Select a Range, Date. From 1/1/07 to 12/31/07. Destination set to print where the report needs to print. Click Print. Run the Summary
To see a summary, go to Cards> Purchasing> Summary
Enter the Vendor ID. Tab. The screen will populate with amounts in summary. Click on Yearly for totals, including anything that has been recorded as a 1099. Make sure the year is right. Click calculate, if it wasn’t correct.

Accounts Payable Training
Mover’s Suite Software, LLC 10
Historical Commission Statement In Movers Suite, go to Accounting Tools> Commission Statement Under Tools on the window, select Build Historical Statement
Enter the parameters and click Build Statement. The Summary for the year will display. The detail for each order will be below the summary.

Accounts Payable Training
Mover’s Suite Software, LLC 11

Accounts Payable Training
Mover’s Suite Software, LLC 12
Edit Check Batch
The Edit Check batch window shows the invoices have been selected to be paid based on the parameters that were entered on the Select Payables Checks Window. Click on the Edit Check Batch button to open the window. It can also be used to build a batch without using Select Checks.
When using Select Checks, the items that are selected have a check mark next to the Vendor ID, on the left side of the screen. When there is a check mark, the Total Amount Paid Column will have a dollar amount. This gives a quick view of the total amount to be paid. To see detail on the invoices being paid, click on the Vendor number and look to the window on the right. It will show Voucher number, amount remaining and amount paid.
Selecting Invoices - When looking at the Window that shows the invoices (on the right part of the screen), items can be unchecked that are not to be paid. If the invoices are removed, the amount paid on the vendor will change in the display. ***The distribution for the check will not update the amounts. This will need to be changed by going into Edit Check and fixing the distribution****** Credit Memos - Placing a checkmark on the vendor will cause the credit memos to auto apply to the invoices. If the vendor was checked during the select check process, uncheck and the credit memos will unapply. Highlight the vendor number. The box to the left will “ghost”. Then click on the items on the right that are to be paid. No credit memos will be applied.

Accounts Payable Training
Mover’s Suite Software, LLC 13
To see more detail on the Invoice, click on the Amount in blue. A window will open showing credit memos (CRM) and the payment (PMT) that will be made with this batch.
Click OK to close the window. If the window is closed or OK is clicked on the Edit Batch Window, go back to Transactions> Purchasing> Select Checks to use Select Checks.

Accounts Payable Training
Mover’s Suite Software, LLC 14
Edit Payables Check
To pay one vendor, a partial payment on a vendor, or to pay an amount without an invoice, use Edit Check.
To get to Edit Check, Transactions> Purchasing> Edit Check
Each check will need to be part of a batch. Type in the Batch ID and tab. There will be a prompt to add the batch. Click on Add.
Accounts Payable Training
Mover’s Suite Software, LLC 15
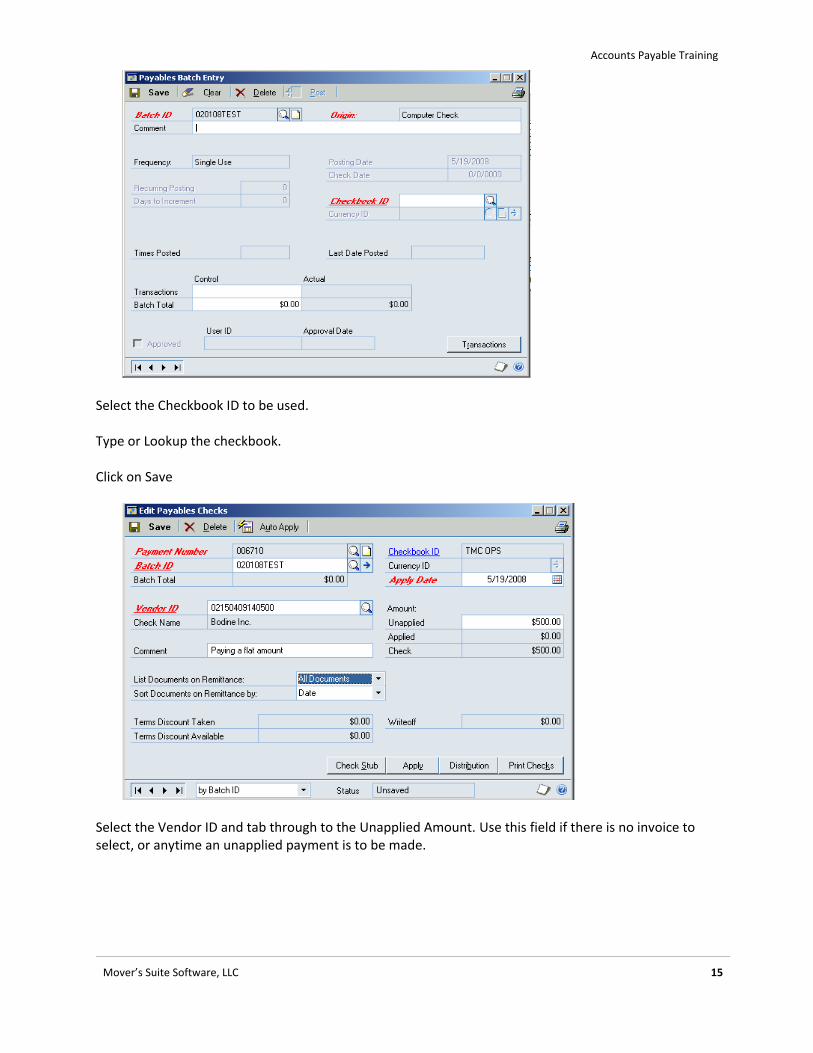
Select the Checkbook ID to be used. Type or Lookup the checkbook. Click on Save
Select the Vendor ID and tab through to the Unapplied Amount. Use this field if there is no invoice to select, or anytime an unapplied payment is to be made.

Accounts Payable Training
Mover’s Suite Software, LLC 16
If there is an invoice, click on apply and the Apply Payables Documents Window opens. Select the invoice. If only paying a partial amount on an invoice, click on the zero on the right of the invoice amount. Type in the amount to be paid. Click tab. This will set the amount. Click OK.
The window will close and an amount will display in the Applied field (see above). The Check Amount will also be completed. Click on Distribution to be sure that the accounts have defaulted through. Click OK.

Accounts Payable Training
Mover’s Suite Software, LLC 17
Click on Save, if there are more vendors to enter on the Batch, or click on Print Checks. There will be a window asking if changes should be saved. Click on Save.
The Print Payables Checks window opens. Verify the Check Number, Date and Check format. Click on Print.
Select the Destination. Click OK.

Accounts Payable Training
Mover’s Suite Software, LLC 18
When the check has printed, leave the Process as Post Checks. Click on Process. The checks will post and a journal will print.

Accounts Payable Training
Mover’s Suite Software, LLC 19
MSS Import To import new MS transactions into Great Plains, we use the MSS Import. Tools > Utilities > Sales > MSS Import
or
Tools >Utilities > Purchasing > MSS Import
Either path accesses the same window.

Accounts Payable Training
Mover’s Suite Software, LLC 20
Accept the defaults, as you will normally not need to run imports separately. Click the Process button. Report Destination window will open. Select where you want it to print. The MSS Import Register will print and transactions will be imported into Great Plains. Transactions with errors will not import until errors are resolved. Common errors are:
Customer On Hold
Customer Not found
GL account does not exist
Vendor Missing or Inactive
After MSS transactions are imported into Great Plains, a Great Plains user will post the transactions, usually from the Master Posting window. This is frequently the accounting manager. Not all users will have access to this window. Tools > Routines > Master Posting

Accounts Payable Training
Mover’s Suite Software, LLC 21
Mark appropriate batches, and Post. The Batches will start with RM-######-####, PM-######-####, GL-######-#### and CR-######-####. Be careful - DO NOT MARK ALL BATCHES!! There could be recurring batches that will post if Mark All and Post were selected.

Accounts Payable Training
Mover’s Suite Software, LLC 22
Payables Transaction Entry To enter a payables transaction, go to: Transactions> Purchasing> Transaction Entry
The Payables Transaction Entry Form will open.
The Voucher number will be assigned through Dynamics GP.
The entry will start with the Document Type. Select from the dropdown. Only Invoice and Credit Memo are used. Click Tab to move. Fill in the Description. Tab.

Accounts Payable Training
Mover’s Suite Software, LLC 23
Lookup/Enter the MSS Order Number, if it applies. To Lookup, click on the magnifying glass. Tab. Enter the Branch Code. This is required. Type in or Lookup. Tab. Enter the Batch ID.
Batch ID’s must be entered. There is no Transaction Posting, only Batch Posting. If this is the first transaction entry for the batch, a window will open with “Do you want to add this batch?” Click Add.
Enter a comment.
Select the Checkbook ID. Click Save. Tab off of the Batch ID field.

Accounts Payable Training
Mover’s Suite Software, LLC 24
Enter the Doc. Date. This will be the date of the invoice, or the date due, depending on how Payablesare handled in the organization. This will be considered the Date for the calculation of the payment terms for Dynamics GP. Tab. Enter the Vendor ID. Lookup can be used on this field. Click on the magnifying glass. Once in the window, place the mouse over the Vendor Name and click on it. This changes the search criteria to Name. Tab.
The Vendor name, Address ID, Remit-To ID and Payment terms will default in from the Vendor Card. Tab through to the Document Number.
Enter the Document Number. (Required field) This can be the invoice number, reference number, etc. Tab.
Enter the P.O. Number if it is available. Tab. Tab through Shipping Method and Tax Schedule ID. Enter the amount in Purchases field. Tab. Click the Distributions Button. The Purchasing (Accounts Payable) account will default in on the PURCH line. You will enter thePayables Expense account on the PAY line. Click OK. Click Save.

Accounts Payable Training
Mover’s Suite Software, LLC 25
Parts of the Payables Transaction Entry Form
Voucher Number – (Required field) Automatically assigned by Dynamics GP Document Type – Dropdown with 5 options (Invoice, Finance Charge, Misc Charge, Return, Credit Memo) Description – Complete as needed MSS Order Number - If it applies to a Vendor MSS Branch – (Required field) Enter the Branch Code ID or use the magnifying glass to look-up Vendor ID - (Required field) Enter the Vendor ID or use the magnifying glass to look-up Batch ID – (Required field) Enter the Batch ID
If this is the first transaction in a batch, you will be prompted for more information. The format is 6 digit date with the initials of the user. E.g 101007MJ This makes it easier to search for reports later with Batch ID’s being date. Document Number – (Required field) This is the number of the Payables invoice.
Purchases – The Invoice Amount
Note : If the Credit Memo was selected in the dropdown, this field changes to Credit Memo.

Accounts Payable Training
Mover’s Suite Software, LLC 26
Apply Button – Use this if there is already a payment made in the system and you want to apply the invoice to it. DON’T EVER APPLY ON DRIVERS OR SALESPEOPLE!! Distributions Button – Use this to select the Payables account and the expense account the invoice/credit memo is to be charged to. Payables Transaction Entry Distribution PAY line will default in by the Branch selected. This account number is tied to the branch and company the branch is part of. PURCH line is where the Payables Expense account is entered. The account can be entered directly, or use the magnifying glass to lookup. The item circled in red is the Show Details buttons. If clicked, it will expand to show the name of the account and other details.

Accounts Payable Training
Mover’s Suite Software, LLC 27
Post Payables Checks Window The final step after printing the Payables Checks is to Post them. If the Posting date is different than the Check date, change it before Posting. In the Process field, a dropdown, there are 4 options: Post Checks, Print Stub Alignment, Reprint Checks, and Void Checks.
Select Post Checks and Click the Process Button on the lower right, if your checks have printed correctly and you are ready to post.
Select the Reprint Checks, if the checks did not print correctly. This will void all of the check numbers already printed in Great Plains and reissue the checks with new numbers. Enter the Starting Check Number in the field in the lower left. Click the Process Button. Select Void Checks, if the batch is entirely wrong. Process finalizes the Voids.

Accounts Payable Training
Mover’s Suite Software, LLC 28
Print Check & Remittance There are four ways to print checks – from the Print Checks button on the Select Checks window, Print Checks on the Edit Payables Checks, Print Checks on the bottom of the Edit Check Bath window or Transactions> Purchasing> Print Checks. Any of these will display the Print Payables Checks window.
Enter your starting check number, if it is different than the default . Confirm the date you want the check to print with. Check the Separate Remittance, if you want Remittance Statements. Verify the Sort Checks By Order.
Verify the Check Format. Stub/Stub/Check and Stub Top/Bottom – (Graphical or Text) are the supported formats.
Click Print in the top left corner . The printer in the top right corner gives you the Check Edit List.

Accounts Payable Training
Mover’s Suite Software, LLC 29
Printing Remittances When the checks are printed, if there are more than 12 lines, or if there will be no checks printed, a remittance paper will print. The Post Payables Checks window will open, click on Process.
Please note: If the checks need to be reprinted, that must be done before clicking on Post Checks and Process. Once Post Checks is started for the Remittance, the only option will be to void all checks by manual process. This is discussed more on the next section Post Payables Checks Window.
Process Payables Checks Window will display, click on the radio button next to Remittance Form. Click Process. The Remittances will print and the window will open again.
The second time the window opens, click on the radio button next to Post. Click on Process. The batch will now post and if the system is setup to print the posting journals, they will print once the posting is done.
Accounts Payable Training
Mover’s Suite Software, LLC 30
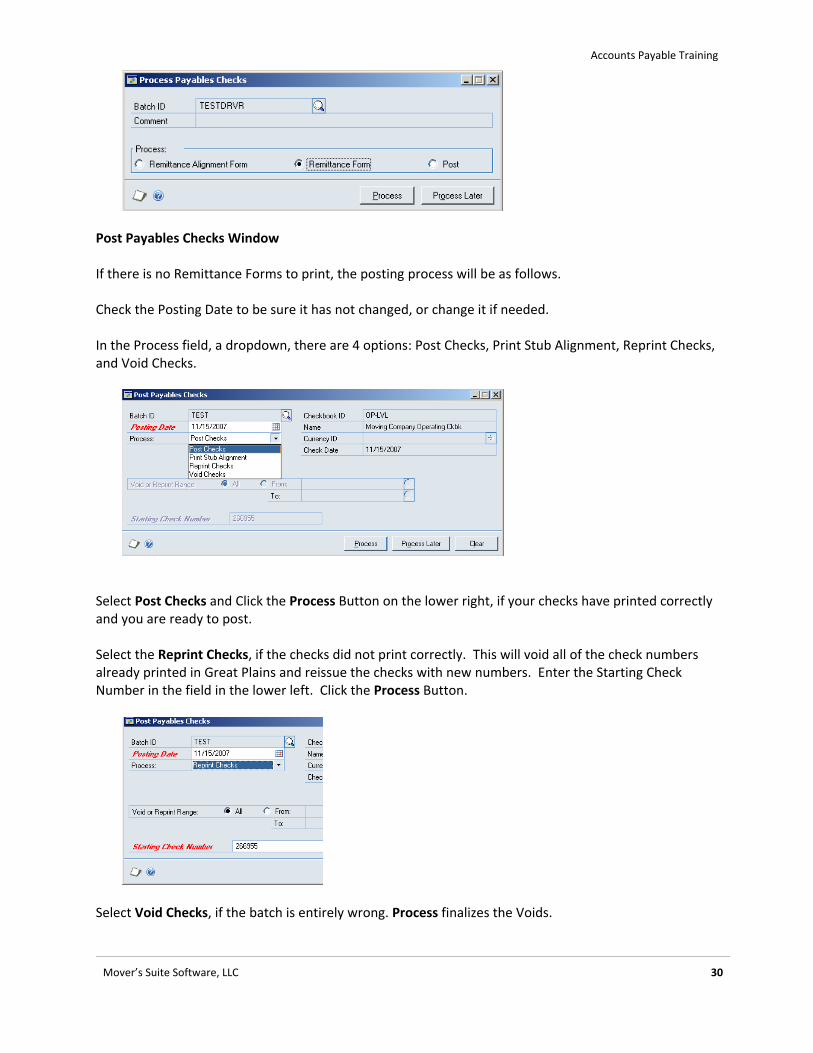
Post Payables Checks Window If there is no Remittance Forms to print, the posting process will be as follows. Check the Posting Date to be sure it has not changed, or change it if needed. In the Process field, a dropdown, there are 4 options: Post Checks, Print Stub Alignment, Reprint Checks, and Void Checks.
Select Post Checks and Click the Process Button on the lower right, if your checks have printed correctly and you are ready to post. Select the Reprint Checks, if the checks did not print correctly. This will void all of the check numbers already printed in Great Plains and reissue the checks with new numbers. Enter the Starting Check Number in the field in the lower left. Click the Process Button.
Select Void Checks, if the batch is entirely wrong. Process finalizes the Voids.

Accounts Payable Training
Mover’s Suite Software, LLC 31
With the Reprint and Void, a range can be selected, if only part of the Batch printed incorrectly. Use Process Later, if checks will be reviewed before being sent. You can still Reprint or Void if needed. Go to Transactions> Purchasing> Post Checks to get to the Post Payables Checks.

Accounts Payable Training
Mover’s Suite Software, LLC 32
Processing driver checks
Select Checks Edit Check Batch Edit Check 1 Edit Check 2
Run Commission Statements in MSS
Run Commission Statements in MSS
Build each check by hand into a batch, Edit Check
Build each check by hand into a batch, Edit Check
Build checks in Select Checks Process
Build checks in Edit Check Batch
Pick invoices to pay and credit memos
Review amount want to pay each driver
Review that amounts match MSS
Review that amounts match MSS
Review amount want to pay each driver
Print checks
Print checks Print checks Print checks
Finalize the Commission Statements in MSS
Finalize the Commission Statements in MSS
Transactions cleared in GP, MSS statements need to be settled to create Balance Forwards
Transactions are not cleared in GP or MSS. Apply process will need to be done manually, for each driver. Credit memos will need to be applied manually.
GP & MSS are cleared and balance forwards completed
GP & MSS are cleared and balance forwards completed
Commission statements will need to be ran to clear MSS and create Balance Forwards
Time : 30 – 60 minutes in total
Time: 60- 90 minutes in total
Time: 15 minutes per driver
Time: 2-3 minutes per driver to cut checks. 30 minutes per driver to apply records.
Advantages:
Faster. Automatically applies all invoices and credit memos. Can control date ranges and vendor classes paid.
Advantages:
Faster. Can automatically apply credit memos.
Advantages:
Can create single check with all doc’s related.
Advantages:
Can create check “on demand”.
Disadvantages:
All cash/vanline statements must be processed for
Disadvantages:
Can’t control dates ranges. Manually have to remove any items
Disadvantages:
All cash/vanline statements must be processed for
Disadvantages:
Can not apply credit memos/invoices/payments until vanline statements are processed. Everything

Accounts Payable Training
Mover’s Suite Software, LLC 33
commissions to show. outside of dates.
All cash/vanline statements must be processed for commissions to show.
commissions to show. is manual.

Accounts Payable Training
Mover’s Suite Software, LLC 34
Processing Commission Checks Introduction The process of running checks for people receiving commissions should be done quickly, as errors can occur in statements, if not. Movers Suite and Great Plains applications are used to process the final check to the person receiving the commissions. Depending on how the person is paid (live check, ACH/Wire/CommData, or sent to payroll), will determine the checkbook used later in this document. IMPORTANT!!!!! Once a check/invoice (real or clearing) has been issued in Great Plains and the Statement has been Finalized in Movers Suite, DO NOT void the check/invoice. It will not show on the statement correctly and the balance forwards will not adjust. Please see the document on handling commission statement voids/adjustments. To start the process, login to MoversSuite and click on Accounting Tools > Commissions Statement Management
Select the vendor class from the dropdown. Examples are listed below, but may be different for different company setups. Also select the Due Date from the Calendar dropdown. Click on Create New Statement.
View Reports window will open. To view each person click on the name on the left and highlight. Their statement will show on the right in detail.

Accounts Payable Training
Mover’s Suite Software, LLC 35
Click on the green “Commission Statement Summary” (upper right hand corner of the report), it will take you to a summary of the commissioned people.
This is the summary to use when comparing payment numbers in Great Plains. In Great Plains go to Transactions> Purchasing> Select Checks and the window will open.

Accounts Payable Training
Mover’s Suite Software, LLC 36
Type in your Batch ID. Use the 6 digit date, with user initial format.
A window prompting to add this batch will open. Click Add.
Here is where the checkbook that will be used for the check run is entered. Be sure to follow the practice of the company. Type in or look up with the magnifying glass. Click Save.
A “real” check is normally generated from the operating checkbook. For checks that are more for clearing the commissionable persons account, use the clearing or dummy checkbooks.

Accounts Payable Training
Mover’s Suite Software, LLC 37
Move to the Select Vendor by dropdown box. Select Class ID. Click the radio button next to From. Use the look up and select the class id for the commissionable people. Make this the To: also.
Enter the Due Date for cutoff to match the Commission Statement Date. The Select checks screen should look something similar to this one. Click on the Build Batch button, upper top left corner. Then wait!!!!! Until the amount shows in the Batch Total field, the process has not completed. If the process is not complete and other buttons are clicked, the batch can build in error and accidently pull all checks.
When the amount is in the field, click on the printer icon in the top Right corner for review.

Accounts Payable Training
Mover’s Suite Software, LLC 38
If any changes need to be made, click on the Edit Check Batch button.
In the Edit Check Batch window, the vendors and the invoices associated to the check can be edited for payment. This should not need to be done for most of the commissionable people, this is done more on regular vendors. Use the check boxes next to the Vendor ID to add/remove a vendro entirely. Use the check boxes next to the voucher number to remove the individual invoices.
From either the Select Checks window, or the Edit Checks Window, checks can be printed. Click the print checks button.

Accounts Payable Training
Mover’s Suite Software, LLC 39
Input the check number, if it should be different then displayed. If checks were ran on a clearing account checkbook, then let the number default into the field. Click Print. The Post Payables Checks window will open. In the dropdown there are four options. Post, Print Stub Alignment, Reprint and Void. If the check printed correctly, or ran without errors, select the Post Checks. Click on Process. The checks will Post and you can select to pritn to screen or print out the Posting report. For the other options and more details on the Select Checks Process, please review the Select Checks Document.
Commission Checks are now done in Great Plains. To finish the checks, the Commmission Statements will need to be finalized in Movers Suite. Go back into Movers Suite and the Commission Statement Management. Find the statement that checks were just printed for. Highlight the Statement and click on Finalize.

Accounts Payable Training
Mover’s Suite Software, LLC 40
When the Statement is is Finalized, there will be a checkmark in the box on the right of the date and the Finalze button will be greyed out. Commissions are done.

Accounts Payable Training
Mover’s Suite Software, LLC 41
Select Checks Process The select checks method of processing and printing payables checks is a functional and efficient way of handling large check runs, running checks by vendor class, or by date due. Combinations of the criteria can be done as well. To start the Select Checks processing, go to: Transactions> Purchasing> Select Checks
The Select Payables Checks window will appear. Enter a Batch Id. The Add a batch window will appear, click Add.
The Payables Batch Entry window will open. At a minimum, you will need to enter the Batch ID and select the Checkbook Id. This will control which checkbook you issue the payables checks out of. You are not able to select more than one account. You will have to open another Batch to process checks on another checkbook.

Accounts Payable Training
Mover’s Suite Software, LLC 42
Click on Save and you will be returned to the Select Payables Checks Screen. There are several areas of the Select Payables that you can set parameters on to limit the number of checks that will be built for your check run. You can use as many of them as you would like, or use the defaults and get everything!
Select your Vendor by and then All or From (enter range). Select Document by and All or From (enter range). Select Branch, All or Individual. The magnifying glass will appear for Individual. Click on this and select branch.

Accounts Payable Training
Mover’s Suite Software, LLC 43
Due Date Cutoff: None or Due Date. Due date is the Doc Date you put on the invoice when it was entered, plus any days based on payment terms. It will pull all documents up to that date. One check per : Vendor or Invoice. Most people leave it as Vendor. In the Automatically Apply Existing Unapplied Box: Be careful here. If you leave the payments, credit memos and returns marked. It will automatically apply these documents to any and all invoices it can for that vendor. The Apply Credits Beyond Due Date, Take Non-Qualifying Discounts, and Pay Only Minimum – tend to be selections most of users do not use. If you should want to or need to use them, please check them accordingly. Apply Date is for the Discounts. Remittance: This area allows you to show what is on a Remittance or check stub.
Print Previously Applied Documents: If you select this option, previously applied documents, such as payments, credit memos, etc., will print on the Remittance Statement. If you have used the Due Date cutoff, you can also select it in the Remittance window to show the documents previously applied that should print on the Remittance, prior to the Due Date. After you have made your selections, you will need to build the batch. Click on the Build Batch, in the upper left corner.

Accounts Payable Training
Mover’s Suite Software, LLC 44
Once you click the Build Batch, the top corner will change to Add Batch. The Batch total will still be $0.00, until it is finished processing. Then the Batch Total field will populate with a number.
You have three choices of what to do now that the Batch is built. Print, Edit Check or Edit Check Batch. This is at the lower left of the Select Payables Check Screen.
Before you do any editing or printing, run the Computer Check Edit List Report. Click on the printer in the top right hand corner.
Print to screen if you wish to review, or to printer for a final copy for your records. Click in the white box to select the destination. Click OK.
Accounts Payable Training
Mover’s Suite Software, LLC 45
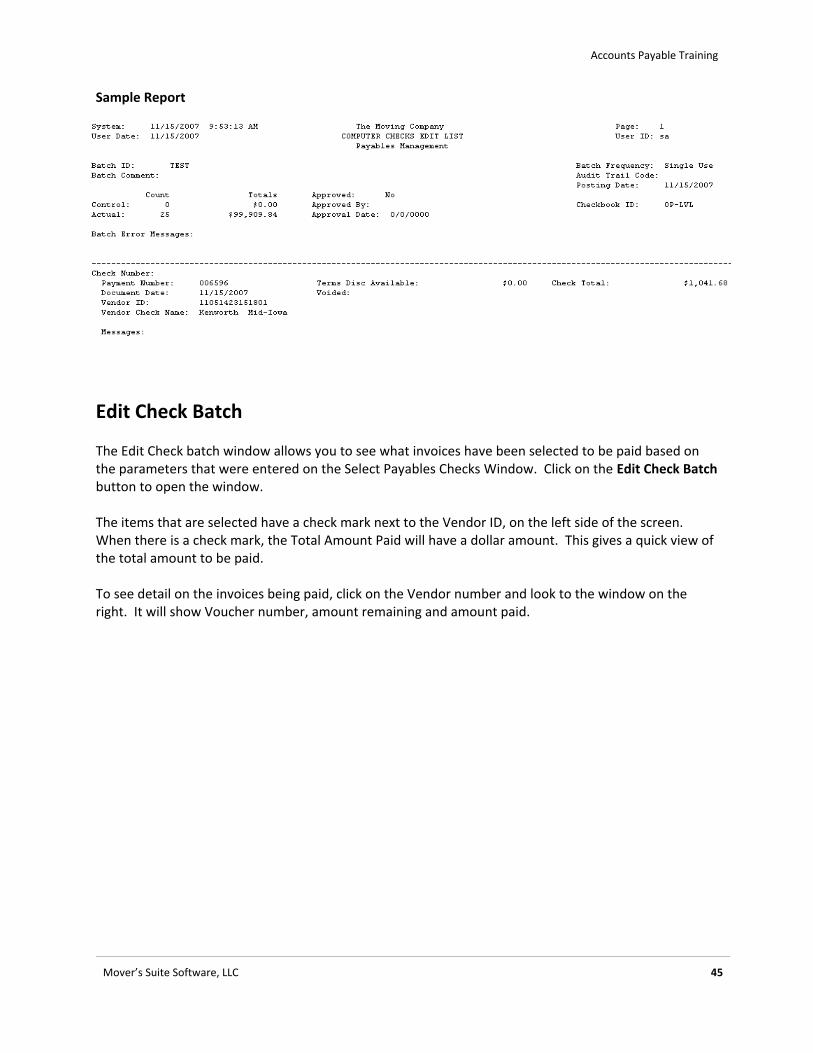
Sample Report
Edit Check Batch The Edit Check batch window allows you to see what invoices have been selected to be paid based on the parameters that were entered on the Select Payables Checks Window. Click on the Edit Check Batch button to open the window.
The items that are selected have a check mark next to the Vendor ID, on the left side of the screen. When there is a check mark, the Total Amount Paid will have a dollar amount. This gives a quick view of the total amount to be paid.
To see detail on the invoices being paid, click on the Vendor number and look to the window on the right. It will show Voucher number, amount remaining and amount paid.

Accounts Payable Training
Mover’s Suite Software, LLC 46
When looking at the Window that shows the Invoices, you can uncheck items that you don’t wish to pay. The icon here helps to quickly identify what documents have credit memos applied to them.
To see more detail on the Invoice, click on the Amount in blue. A window will open showing credit memos (CRM) and the payment (PMT) that will be made with this batch.

Accounts Payable Training
Mover’s Suite Software, LLC 47
Click OK to close the window. If you close or click OK on the Edit Batch Window, you will need to go back to Transactions> Purchasing> Select Checks to use Select Checks. Edit Payables Checks To Edit an individual check, click on the Edit Check button, either on the Select Checks or the Edit Check Batch window. The Edit Payables Checks window opens. Verify that the correct batch is displayed.

Accounts Payable Training
Mover’s Suite Software, LLC 48
Select the vendor that you want to edit. Use the VCR buttons on the lower left. To pay more than the invoices show, click on the Unapplied field under Amount:. Enter the amount to pay. The Applied Amount will not change, but the Check amount will increase. If you want a comment for the vendor’s check, enter it in the Comment field. The Distribution Button just lets you verify the distributions already entered on the Purchasing Invoice. Click on Check Stub, in the lower right, to see what will print on the stub.
Click OK to close.

Accounts Payable Training
Mover’s Suite Software, LLC 49
Click on the Apply Button to make changes to the amounts paid. Verify the Vendor ID and the Document No. If you only want to pay $550.00 of an Invoice, click on the Apply Amount (end of line). Type in the amount to pay. The number to the left (Amount Remaining) will change from $0.00 to the new Amount Remaining.
Click OK to close and Save.
Print Check There are four ways to print checks – from the Print Checks button on the Select Checks window, Print Checks on the Edit Payables Checks, Print Checks on the bottom of the Edit Check Bath window or Transactions> Purchasing> Print Checks. Any of these will display the Print Payables Checks window.

Accounts Payable Training
Mover’s Suite Software, LLC 50
Enter your starting check number, if it is different than the default . Confirm the date you want the check to print with. Check the Separate Remittance, if you want Remittance Statements. Verify the Sort Checks By Order.
Verify the Check Format. Stub/Stub/Check and Stub Top/Bottom – (Graphical or Text) are the supported formats.
Click Print in the top left corner . The printer in the top right corner gives you the Check Edit List.
Printing Remittances When the checks are printed, if there are more than 12 lines, or if there will be no checks printed, a remittance paper will print. The Post Payables Checks window will open, click on Process.

Accounts Payable Training
Mover’s Suite Software, LLC 51
Please note: If the checks need to be reprinted, that must be done before clicking on Post Checks and Process. Once Post Checks is started for the Remittance, the only option will be to void all checks by manual process. This is discussed more on the next section Post Payables Checks Window.
Process Payables Checks Window will display, click on the radio button next to Remittance Form. Click Process. The Remittances will print and the window will open again.
The second time the window opens, click on the radio button next to Post. Click on Process. The batch will now post and if the system is setup to print the posting journals, they will print once the posting is done.

Accounts Payable Training
Mover’s Suite Software, LLC 52
Post Payables Checks Window If there is no Remittance Forms to print, the posting process will be as follows. Check the Posting Date to be sure it has not changed, or change it if needed.
In the Process field, a dropdown, there are 4 options: Post Checks, Print Stub Alignment, Reprint Checks, and Void Checks.
Select Post Checks and Click the Process Button on the lower right, if your checks have printed correctly and you are ready to post. Select the Reprint Checks, if the checks did not print correctly. This will void all of the check numbers already printed in Great Plains and reissue the checks with new numbers. Enter the Starting Check Number in the field in the lower left. Click the Process Button.
Select Void Checks, if the batch is entirely wrong. Process finalizes the Voids.
With the Reprint and Void, a range can be selected, if only part of the Batch printed incorrectly. Use Process Later, if checks will be reviewed before being sent. You can still Reprint or Void if needed. Go to Transactions> Purchasing> Post Checks to get to the Post Payables Checks.

Accounts Payable Training
Mover’s Suite Software, LLC 53

Accounts Payable Training
Mover’s Suite Software, LLC 54
SmartList for 1099 Vendors and Transactions SmartList is a querying tool of Dynamics GP. The results of the query can be exported to Excel, Word or printed for use. Also the items that display from the query can be double-clicked on and Dynamics GP will open the window in the series that holds the information. To build a SmartList for finding 1099 transactions and 1099 Vendors, start by opening SmartList. It is a lightbulb icon under Reports on the menu bar. Click on this.
Once open, SmartList will display folders on the left side of the window. The right side is used for displaying the results. Find the Payables Transactions folder and click on the plus sign next to the folder. The expanded folder will display the contents and there should be a “*” and other queries with titles and “*”. Any prebuilt query in Dynamics GP will have a“*”. Click on the “*” to run the query. This query will display results on the right side of the window. This window will need to be modified to show the 1099 amounts.
At the top of the SmartList is a menu. Click on the Columns. This will allow the query to have information added or removed. The Change Column Display window will open.
Click on the Add button in the lower left.

Accounts Payable Training
Mover’s Suite Software, LLC 55
Another window will open, this is the Columns that are available by the series that is being worked in. Under the “Find Next “ button, click on the White down arrow to display the All Columns. The first field name is 1099 Amount. Highlight this and click on OK.
The Change Column Display Window will now show the 1099 Amount. Click OK.

Accounts Payable Training
Mover’s Suite Software, LLC 56
The Results window will refresh and display the new column.
To save this query, click on the Favorites on the SmartList Menu. It is a Blue Folder with a yellow star.
Give the query a name, click on Add. The dropdown will give you two choices – Add Favorite or Add Favorite and a Reminder. Use the Add Favorite.

Accounts Payable Training
Mover’s Suite Software, LLC 57
The new query will display under the Payables Transaction Folder. To find a specific Vendors Transactions, click on Search.
In the Search Payables Transaction window, click on the magnifying glass to bring up the Vendor ID. Leave filter as “is equal to” and type in the vendor id. Click OK in the lower right. Up to four search definitions can be added to the query.
The query will display just the records based on the search criteria.

Accounts Payable Training
Mover’s Suite Software, LLC 58
To see what Vendors are setup as 1099 Use SmartList and click on the Vendors Folder. Open the folder and select the prebuilt “1099 Vendors*” query.
The results will show the Vendor ID, Vendor Name and 1099 type. Clicking on the Vendor Name will change the display to show vendors by Alphabetical order.

Accounts Payable Training
Mover’s Suite Software, LLC 59
The search can be used to further restrict the results, if needed.
To see what Vendors are setup as 1099 with YTD on amounts Open the 1099 Vendors* query. Click on Columns, in the menu bar. Click “Add”.
On the Columns window highlight and click on “1099 Amount YTD”. Click “OK”.
The results window will now display the 1099 YTD Amount column.

Accounts Payable Training
Mover’s Suite Software, LLC 60
Click on Favorites, blue folder with a yellow star.
Give the query a name. Click on Add, use the “Add Favorite”.
The query will now show under the Vendors folder in SmartList.

Accounts Payable Training
Mover’s Suite Software, LLC 61
To find a check number paid to a Vendor Inquiry>Purchasing>Transaction by Vendor
Enter the Vendor number, or search for it using the magnifying glass. Locate the transaction being researched. Click on that line (anywhere). Then click on the Document Number above to drill down.
The Payables Payments Zoom will open. The document number is the check number.

Accounts Payable Training
Mover’s Suite Software, LLC 62
To find a Voucher Number in Account Payables To find a voucher number in Great Plains Accounts payables, SmartList will be the only way to search for this number. To access SmartList, click on the Yellow Light Bulb that is displayed below the Reports Menu in the header. Click on the plus sign next to the Payables Transactions folder. Click on the asterisk. Once the report generates, click on the button for Columns. (Top left corner of SmartList)
When the window opens, click on Add. Search for the Voucher Number. If it is not in the dropdown list. Click on the white down arrow and select the All Columns. Select the Voucher Number. Click OK on the columns window. Click OK on the change column display window. The Smart list will change the display.

Accounts Payable Training
Mover’s Suite Software, LLC 63
The SmartList will display all vouchers in the system for Payables. If there is the need to look at one vendor, particular date, etc., use the Search button in the top left corner and restrict the criteria.
Save the new list as a Favorite. Click on Favorite and the window will open. Name the list and click on Add, dropdown to favorite. The list will be added to the Payables Transactions Folder.

Accounts Payable Training
Mover’s Suite Software, LLC 64

Accounts Payable Training
Mover’s Suite Software, LLC 65
To Print an Edit Transaction List A Edit Transaction List can be printed for any Batches in Dynamics GP. The same steps will be used for Payables, Receivables, and General Journals. Open the Batch window for the series and find the Batch that is to be reviewed. Once displayed on the Batch Entry window, click on the printer in the top right corner.
The Report Destination window should open. If it does not, contact the Company’s IT or person in charge of GP security. Place a check in the box for Screen. Click OK.

Accounts Payable Training
Mover’s Suite Software, LLC 66
The Journal will display on the screen. To print to printer, click on the printer in the top left. This will send it to the printer. Review the errors.
Accounts Payable Training
Mover’s Suite Software, LLC 67
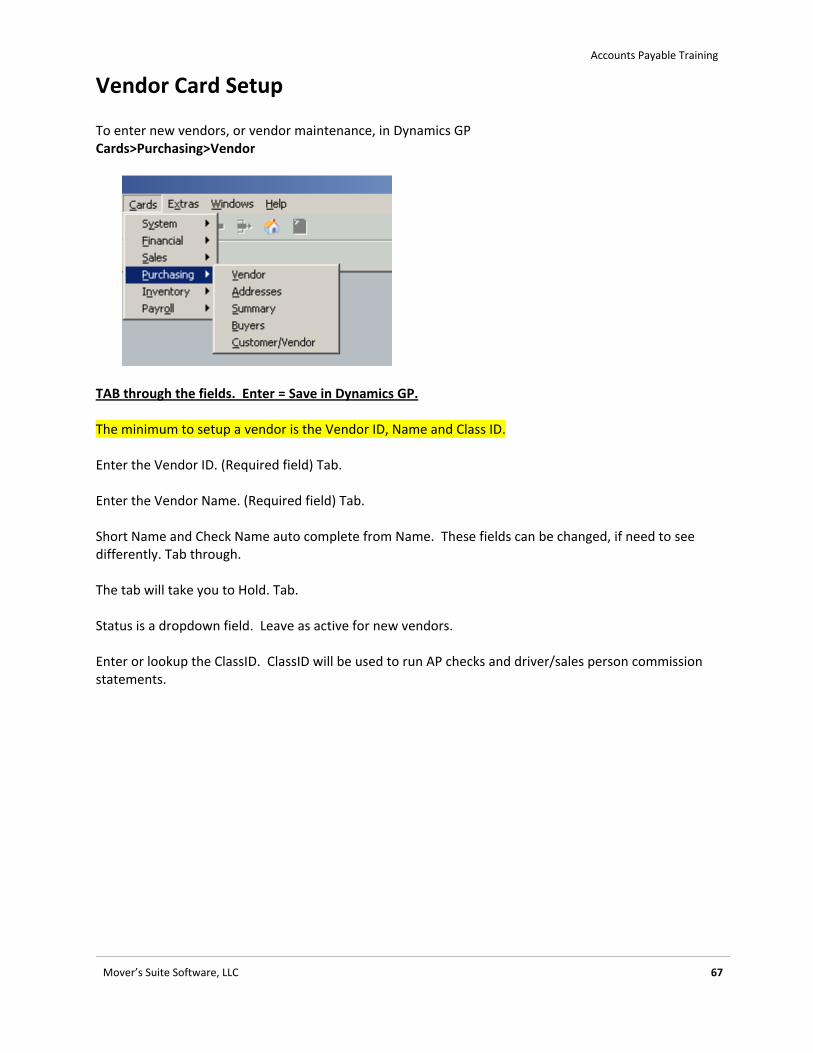
Vendor Card Setup To enter new vendors, or vendor maintenance, in Dynamics GP Cards>Purchasing>Vendor
TAB through the fields. Enter = Save in Dynamics GP. The minimum to setup a vendor is the Vendor ID, Name and Class ID. Enter the Vendor ID. (Required field) Tab. Enter the Vendor Name. (Required field) Tab. Short Name and Check Name auto complete from Name. These fields can be changed, if need to see differently. Tab through. The tab will take you to Hold. Tab. Status is a dropdown field. Leave as active for new vendors. Enter or lookup the ClassID. ClassID will be used to run AP checks and driver/sales person commission statements.

Accounts Payable Training
Mover’s Suite Software, LLC 68
Address ID is PRIMARY for new vendors. Tab. Enter Contact, Address, City, State, ZIP. Tab to Phone 1. Enter Phone 1. Tab Tax Schedule, Shipping Method and UPS Zones are not used. Enter Address IDs (Purchase, Remit To, Ship From) if there are alternate addresses for them. Enter Vendor Account and Comment fields, if wanted/needed. If you want to default in accounts for the expenses, click on the accounts button. On the line for purchases, enter the expense account. If you want more then one line, click on the ellipses(…) and enter all of the breakouts for the expenses. Click Ok when done.

Accounts Payable Training
Mover’s Suite Software, LLC 69
On the main vendor card, click on the Option button. Be sure the credit limit is unlimited. This does not control anything but the importing into Great Plains. It will not show through to Movers Suite. Be sure to mark the vendor as a 1099 vendor, if they will be receiving a 1099 for commissionable earnings. This is a dropdown next to Tax Type.

Accounts Payable Training
Mover’s Suite Software, LLC 70
Click on OK. On the main vendor card, click save.