Embed Size (px)
Citation preview

Absolute
Beginner’s
Guide
to
Adobe® Photoshop®
Elements 2
800 East 96th Street,Indianapolis, Indiana 46240
Lisa Lee
00 8311 FM 1/15/03 2:19 PM Page i
Absolute Beginner’s Guide to Adobe®
Photoshop® Elements 2Copyright ©2003 by Que Publishing
All rights reserved. No part of this book shall be reproduced, stored in aretrieval system, or transmitted by any means, electronic, mechanical, pho-tocopying, recording, or otherwise, without written permission from thepublisher. No patent liability is assumed with respect to the use of theinformation contained herein. Although every precaution has been takenin the preparation of this book, the publisher and author assume noresponsibility for errors or omissions. Nor is any liability assumed for dam-ages resulting from the use of the information contained herein.
International Standard Book Number: 0-7897-2831-1
Library of Congress Catalog Card Number: 2002110926
Printed in the United States of America
First Printing: October 2002
05 04 03 4 3 2
TrademarksAll terms mentioned in this book that are known to be trademarks or ser-vice marks have been appropriately capitalized. Que Publishing cannotattest to the accuracy of this information. Use of a term in this bookshould not be regarded as affecting the validity of any trademark or ser-vice mark.
Adobe is a registered trademark of Adobe Systems, Incorporated.
Photoshop is a registered trademark of Adobe Systems, Incorporated.
Warning and DisclaimerEvery effort has been made to make this book as complete and as accu-rate as possible, but no warranty or fitness is implied. The information pro-vided is on an “as is” basis. The author and the publisher shall haveneither liability nor responsibility to any person or entity with respect toany loss or damages arising from the information contained in this book.
Associate PublisherGreg Wiegand
Executive EditorCandy Hall
Acquisitions EditorCandy Hall
DevelopmentEditorLaura Norman
Managing EditorThomas F. Hayes
Project EditorTonya Simpson
Copy EditorCheri Clark
IndexerRebecca Salerno
ProofreaderKellie Cotner
Technical EditorRima Regas
Team CoordinatorCindy Teeters
Interior DesignerAnne Jones
Cover DesignerAnne Jones
Page LayoutJulie Parks
00 8311 FM 1/15/03 2:19 PM Page ii
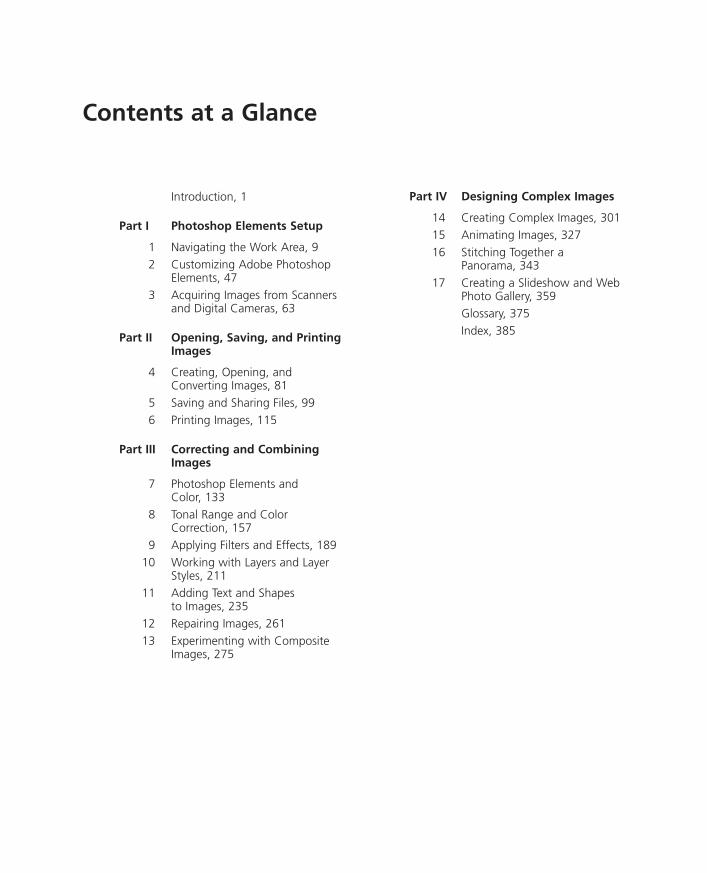
Contents at a Glance
Introduction, 1
Part I Photoshop Elements Setup
1 Navigating the Work Area, 92 Customizing Adobe Photoshop
Elements, 473 Acquiring Images from Scanners
and Digital Cameras, 63
Part II Opening, Saving, and PrintingImages
4 Creating, Opening, andConverting Images, 81
5 Saving and Sharing Files, 996 Printing Images, 115
Part III Correcting and CombiningImages
7 Photoshop Elements and Color, 133
8 Tonal Range and Color Correction, 157
9 Applying Filters and Effects, 18910 Working with Layers and Layer
Styles, 21111 Adding Text and Shapes
to Images, 23512 Repairing Images, 26113 Experimenting with Composite
Images, 275
Part IV Designing Complex Images
14 Creating Complex Images, 30115 Animating Images, 32716 Stitching Together a
Panorama, 34317 Creating a Slideshow and Web
Photo Gallery, 359Glossary, 375Index, 385
00 8311 FM 1/15/03 2:19 PM Page iii

00 8311 FM 1/15/03 2:19 PM Page iv
Table of Contents
Introduction 1
About Absolute Beginner’s Guide to AdobePhotoshop Elements 2 1
Whom This Book Is For 2
What’s New in Version 2? 2
How to Use This Book 3
The Contents of This Book 5Part I—Photoshop Elements Setup 5Part II—Opening, Saving, and PrintingImages 5Part III—Correcting and Combining Images 6Part IV—Designing Complex Images 6
I Photoshop Elements Setup
1 Navigating the Work Area 9
Comparing the Macintosh and WindowsWork Areas 10
Getting Familiar with the Welcome Window 10
Creating a New File 11Browsing Files 12Connecting to a Camera or Scanner 13Accessing Common Issues 15Viewing Tutorials 15
Introducing the Work Area 15Using the Shortcuts and Options Bars 17Introducing the Toolbox 19Choosing Pixels with Selection Tools 21Working with an Image in the ImageWindow 22Different Ways to Apply the Clone StampTool 27
Working with Palettes 27Introducing Palettes 28Using the Info, Undo History, andNavigator Palettes 30Customizing Images with the How To,Filters, and Effects Palettes 31Viewing Objects in the Layers Palette 32
A Closer Look at the Image Window 33Viewing Color Mode and Image SizeInformation 33Working with the Image Window 34
Navigating Menu Commands 35Introducing File Menu Commands 35Exploring Edit Menu Commands 38Image Menu Commands 39Adjusting Images with the Enhance MenuCommands 39Layer Menu Commands 40Using the Select Menu Commands 41Adding Effects from the Filter Menu 42Customizing Output with the View MenuCommands 43Opening and Closing Palettes with theWindow Command 44In this chapter 47
2 Customizing Adobe Photoshop Elements 47
Adjusting Color-Management Settings 48Operating System Color Settings 49Choosing a Color Profile 50
Choosing Settings in the Preset Manager 51Selecting Brushes in the Preset Manager 52Choosing Swatches in the Preset Manager 52
00 8311 FM 1/15/03 2:19 PM Page v

vi ABSOLUTE BEGINNER’S GUIDE TO ADOBE PHOTOSHOP ELEMENTS 2
Selecting Gradients in the Preset Manager 53Choosing Patterns in the Preset Manager 54
Personalizing Your Preferences 55General Preferences 55Preferences for Saving Files 56Customizing Display and Cursors 56Adjusting Transparency Settings 58Units & Rulers Preferences 58Personalizing Grid Settings 59Setting Plug-Ins and Scratch DiskPreferences 59Memory and Image Cache Preferences 61In this chapter 63
3 Acquiring Images from Scanners andDigital Cameras 63
Installing Plug-In Files 64Installing Plug-In Software 64Accessing a New Plug-In in PhotoshopElements 65
Adjusting Scanner Settings 66Choosing a Resolution 67Adjusting the Color Depth and Scan Area 68Previewing and Setting Up for the Scan 69
Scanning Different Kinds of Images 71
Scanning the Final Image 72Checking Image Quality 72
Accessing Images on the Camera 73Setting Up the Software 73Downloading Images to Your Computer 74
Saving Images 75Viewing the File Format 76
Selecting Devices 77
II Opening, Saving, and Printing Images
4 Creating, Opening, and ConvertingImages 81
Creating a New Document 82Understanding the New Dialog Box 83Demystifying Resolution and Image Size 84Customizing the Canvas Size 85
Document Settings for Print 86
Document Settings for Web Images 87
Opening and Browsing Image Files 89Working with Scanned Images 90Opening Images Created by a DigitalCamera 91Resizing an Image 93
Converting Image Information 95Opening an Image in a Different FileFormat 95Changing an Image to a Different ColorMode 95Converting a File for Print Output 96Converting PDF Files 97In this chapter 99
5 Saving and Sharing Files 99
What’s All the Fuss? 100Using the Save Command 100
Saving a File for Any Occasion 102Supported File Formats 103Choosing a File Format 105
00 8311 FM 1/15/03 2:19 PM Page vi

CONTENTS vii
Optimizing Images 106Optimizing for the Web 106Comparing Web File Formats 109Optimizing a TIFF Image File 110
Sharing Files Electronically 111Sending an Image in Email 112Using FTP Programs 113Logging In and Uploading Files 114In this chapter 115
6 Printing Images 115
Printing Digital Images 116Printing Images from a Digital Camera 119Creating a Contact Sheet 120Printing a Fax 121Getting a Photo Printed 122Printing More Than One Copy of an Image 123Preparing an Image for a Photo Printer 124
Considerations for Printing Images with Text 125
Improving Printer Output 126Customizing Color Management Settings 127Adjusting Page and Printer Settings 127
Troubleshooting Printing Problems 128
III Correcting and Combining Images
7 Photoshop Elements and Color 133
Color Theory 133Primary Colors 134Light and Color 135
Computers and Color 135Introducing Color Space and ColorManagement 136
Calibrating Your Monitor 140Choosing a Color Mode 143
Color and Photoshop Elements 144Using the Color Picker 144Changing Colors with the SwatchesPalette 146
Photoshop Elements Color-Correction Tools 147
Hue and Saturation 148Brightness and Contrast 150Adjusting Tonal Range Using the LevelsCommand 151
Color and Composite Images 152
8 Tonal Range and Color Correction 157
Introducing Selection Tools 158Applying the Rectangular Marquee Tool 160Applying the Magic Wand Tool 161Applying the Magnetic Lasso Tool 161Applying the Selection Brush 162
Correcting Tonal Range 162Balancing Foreground Light with Fill Flash 163Bringing Out the Background withBacklighting 165
Using the Histogram with Tonal Range Tools 166
Tonal Range and the Histogram 166Adjusting Tonal Range with the Levels Tool 169
Changing Colors with Color Effect Tools 172Equalizing an Image 172Changing an Image with Gradient Maps 173Inverting Colors 173Posterizing Colors 174Adjusting Threshold 174
00 8311 FM 1/15/03 2:19 PM Page vii

viii ABSOLUTE BEGINNER’S GUIDE TO ADOBE PHOTOSHOP ELEMENTS 2
Replacing Colors 175Preparing the Image 175Replacing Colors 176Correcting Color Cast 177Removing Color from an Image 178
Introducing Color-Correction Tools 179Adjusting Hue and Saturation Settings 180Customizing Channel Hue and Saturation 181Correcting Colors with the Red-Eye BrushTool 182
Color-Correction Variations 184Grayscale Variations Options 184Color Variations Options 185Warming Up an Image with Midtones 186Modifying Saturation Variations 187
9 Applying Filters and Effects 189
Previewing Filters and Effects 190Introducing Filters 190Introducing Effects 194Different Ways to Apply Filters and Effects 195
Introducing Blur Filters 196
Introducing Filter Effects with Toolbox Tools 197
Variations with Blur Filters 198Using the Blur Filter to Emphasize Part ofan Image 198Polishing the Final Image with the UnsharpMask 200
Applying Artistic Filters 201Applying an Artistic Filter to a Selection 201Applying the Accented Edges Filter 201Applying the Conté Crayon Filter 204
Combining Filters in an Image 204Applying Halftone Filters 205
Exploring Effects 205Applying Effects 205In this chapter 211
10 Working with Layers and Layer Styles 211
Introducing the Layers Palette 212Layers Palette Menu Options 214Introducing Blending Modes 216Modifying a Layer with Layer Styles 218Renaming a Layer 221
Introducing Fill Layers 221Adding a Solid Color Fill Layer 221Gradient Fill Layers 223Modifying a Gradient 224Pattern Fill Layers 225
Introducing Adjustment Layers 226Making Changes with a Levels AdjustmentLayer 227Blending Composites 228
Correcting Images with Layers 230
Merging Layers 232Flattening Layers 232In this chapter 235
11 Adding Text and Shapes to Images 235
Introducing the Type Tool 236Modifying Type 239Warping Type 241
Adding Graphics to an Image 244Introducing Brush Tools 244Introducing Shape Tools 247
00 8311 FM 1/15/03 2:19 PM Page viii

CONTENTS ix
Variations—Creating Signs with Drawing andPainting Tools 249
Designing Bitmap and Vector Graphics 252Drawing Bitmap Graphics 253
Creating Transparent Text 254
Modifying Custom Shapes 255Merging Completed Layers 257Applying Effects with the ImpressionistBrush 258Previewing the Final Image 259
12 Repairing Images 261
Repairing Folds and Tears 262Eliminating Wrinkles and Torn Areas 263Removing Aged Color, Dust, and Stains 265
Fine-Tuning the Image 267Comparing Images 268
Rebuilding a Damaged Photo 269Sorting Out Tasks by Layer 269Removing Scratches and Dirt 270Replacing Missing Pieces of the Image 271Creating the Final Image 272
13 Experimenting with Composite Images 275
Creating Composite Images 276Choosing Images 277Applying Selection Tools 278Feathering the Selection 279Copying and Pasting the Image 281Variations—Pasting Images 283Putting Two Subjects Together 286Saving the Final Image 289
Creating Special Effects with CompositeImages 290
Choosing the First Image 291Transforming the Composite Image 292
Working with Multiple Composite Images 293
Stacking Up Composite Images 294Rotating Images 295Composing a New Photo 296
IV Designing Complex Images
14 Creating Complex Images 301
Melting Images with the Liquify Filter 302Applying Liquify Tools 302Reverse Effects with the Reconstruct Tool 305
Pasting an Image into Text 306Creating Text to Fill with an Image 306Selecting the Image for the Text 308
Adding a Reflection to an Image 310Creating the Reflected Image 314Composing the Final Image 314
Lighten and Remove Shadows 315Cleaning Up Shadows with Layers 317Neutralizing Pixels with the Dodge andBurn Tools 318
Adding a Light Source 320Choosing the Right Light 321Applying Another Light Source 323Viewing the Final Image 323Applying Texture Channels 324
15 Animating Images 327
Creating the First Frame 328Composing with Composite Images 328Finalizing the First Frame 329It’s All in the Layers 330Creating an Animated GIF 331
00 8311 FM 1/15/03 2:19 PM Page ix

x ABSOLUTE BEGINNER’S GUIDE TO ADOBE PHOTOSHOP ELEMENTS 2
Adjusting Playback Settings 333Previewing the Animation 334
Variations—Animating People 334Creating the First Frame 335Creating the In-Between Frames 337Merging Layers 339Finalizing Tweaks and Previewing theAnimation 340
16 Stitching Together a Panorama 343
Shooting and Choosing Images 344Photo Composition for Panoramas 344
Introducing Photomerge 347
Arranging Images in the Panorama 348Selecting Panorama Images 349Adding Perspective 352Publishing the Panorama 353Cleaning Up the Final Image 354
Variations—Working with Different PhotoElements 355
17 Creating a Slideshow and Web PhotoGallery 359
Creating a Slideshow 360
Creating a Photo Gallery 361Creating a Frame-Based Gallery 362Setting Gallery Options 364
Creating a Simple Gallery 365
Making a Table Gallery 366Customizing Thumbnail Settings 367Navigating the Gallery 368Relative and Absolute Paths 369
Working with the Photo Gallery HTMLFiles 370
Viewing the Photo Gallery’s HTML SourceCode 370Modifying the Gallery with a Web Editor 371HTML Tags 372HTML for Nonframes Browsers 374
Glossary 375
Index 385
00 8311 FM 1/15/03 2:19 PM Page x
About the AuthorLisa Lee is the author of several best-selling computer books on topics ranging fromMacintosh computers to Adobe Photoshop and Photoshop Elements. She also haswritten more than 1,000 tutorials about all kinds of consumer hardware products,operating systems, and applications.
When she’s not writing, she is an amateur photographer and artist. Visit her Website at www.flatfishfactory.com to check out her latest projects.
DedicationThis book is dedicated to Mike Neil.
AcknowledgmentsThis book would not be possible without the fabulous Photoshop Elements team atAdobe. Thanks to all who worked on Photoshop Elements 2 to make it even betterthan version 1.0.
Thanks to all of my fellow photographers who contributed to this book. SairamSuresh, Bobby Joe, Neal Tucker, Kieca Mahoney, and especially Julie Ann Lee: Youare all great photographers. Thanks for giving me permission to use your photos inmy book!
Thank you, Mom, for trusting me with so many of your sacred photos. And, specialthanks to Marta Justak for being such a supportive, invaluable agent and friend.
A big thank you to the wonderful team at Que Publishing for being so helpful, andfor helping me put together such a great book. Thanks to Candy Hall for asking meto write this book. Special thanks to Laura Norman for being such an expert editorand manager of this book’s layout and design, and Tyler and Rima Regas for theirmuch-appreciated technical expertise. Finally, thanks to all the teams at Que whohelped put this book together and make it out into the world.
00 8311 FM 1/15/03 2:19 PM Page xi
xii ABSOLUTE BEGINNER’S GUIDE TO ADOBE PHOTOSHOP ELEMENTS 2
We Want to Hear from You!As the reader of this book, you are our most important critic and commentator. Wevalue your opinion and want to know what we’re doing right, what we could do bet-ter, what areas you’d like to see us publish in, and any other words of wisdom you’rewilling to pass our way.
As an associate publisher for Que, I welcome your comments. You can email or writeme directly to let me know what you did or didn’t like about this book—as well aswhat we can do to make our books better.
Please note that I cannot help you with technical problems related to the topic ofthis book. We do have a User Services group, however, where I will forward specifictechnical questions related to the book.
When you write, please be sure to include this book’s title and author as well as yourname, email address, and phone number. I will carefully review your comments andshare them with the author and editors who worked on the book.
Email: [email protected]
Mail: Greg WiegandQue Publishing800 East 96th StreetIndianapolis, IN 46240 USA
For more information about this book or another Que title, visit our Web site atwww.quepublishing.com. Type the ISBN (excluding hyphens) or the title of a book in theSearch field to find the page you’re looking for.
00 8311 FM 1/15/03 2:19 PM Page xii
IntroductionPhotoshop Elements is Adobe’s replacement for Photoshop LE, which was commonlybundled with scanners, cameras, and computers. Adobe introduced PhotoshopElements 1 in the spring of 2001, and it has been a huge success. Version 2, which isthe latest release, has full support for Mac OS X and Windows XP, plus revisions tomany of the cool features in Photoshop Elements 1. Although Photoshop Elements 2doesn’t have all the features you’ll find in Photoshop, it does contain a few thingsyou won’t find in Photoshop, such as a shortcuts toolbar, Red Eye Brush Tool, theQuick Fix window, Selection Brush, Send to Email shortcut, Save As PDF shortcut,and the Photomerge Wizard. There are also tools such as Adjust Backlighting andFill Flash that enable you to darken or lighten midtones in an image, and the auto-matic color-correction command. What’s most important, Photoshop Elementsenables you to apply many of the same top-notch photo-editing techniques thatmake Photoshop so popular.
About Absolute Beginner’s Guide to AdobePhotoshop Elements 2
Digital imaging has evolved from simple bitmap graphics, such as the first iconsused with Macintosh computers, to full-blown, full-color, high-resolution, still-frameand digital video editing. Since those early days of black-and-white bit flipping,high-cost scanners and digital cameras have plummeted in price while exponen-tially improving in image quality, performance, and features. Today, people can usedigital cameras to instantly share exciting, fresh images on printed paper or on theWeb, or convert old, damaged photos into digital data using a flatbed or film scan-ner. Photoshop Elements enables you to correct colors, repair and enhance images,and share the results. For example, you can put together an old yearbook online ordigitize your family tree without having to worry about dirt, dust, and aging affect-ing your digital images.
I can’t believe how many years I’ve been learning about digital images and tryingto improve my digital-imaging editing skills. First, I spent years experimenting withblack-and-white and color photography. Years ago, I remember how disappointed Iwas when I took my first 640×480 digital pictures with Apple’s QuickTime camera.Today, I have a three-megapixel camera, and I take only digital pictures.
The point I want to make is that working with digital images is much easier andaffordable today than it ever was. Programs such as Photoshop Elements make iteasy to learn to work with digital images and produce satisfying results. However,
01 8311 INTRO 1/15/03 2:32 PM Page 1

easy doesn’t necessarily mean fast. Photoshop Elements provides the tools thatenable you to spend a lot of quality time perfecting an image and experimentingwith images, new and old.
Photoshop Elements is both an easy-to-use and a sophisticated application. You cantry a quick fix on an image, as well as perform some heavy-duty image editing,beginning with hours of experimentation, which extends into days of fine-tuning.Keeping this range of tasks in mind, I’ve designed this book for those who haveopened their first scanner or digital camera and have little experience working withdigital images. Or, if you already have a scanner or digital camera, and haveupgraded to Photoshop Elements from another application, you’ll learn how to usecombinations of tools to improve or create new digital images.
Whom This Book Is ForMy hope is that you, the reader, can sit down and start doing something withPhotoshop Elements by first understanding some of the basic concepts of digitalimaging, and then following a set of steps, or a variation on a set of steps, in thisbook. I’d also like to think the examples in this book will inspire you to extend yourcreativity. I try to write books that teach some useful skills, produce tangible results,and show you that computers can do great things if you take the time to explorewhat’s possible.
Like Photoshop Elements, this book isn’t for the complete novice—someone just sit-ting down with his or her very first computer. If you’re familiar with a Windows orMacintosh computer and new to Photoshop Elements or digital photography, thisbook is for you. If you’re new to Photoshop Elements or version 2.0, this book canshow you how to perform many of those swanky Photoshop techniques withPhotoshop Elements 2.
What’s New in Version 2?Photoshop Elements 2 improves upon many of the cool features that were in the firstversion. The Web Photo Gallery has several new Web page layouts and options,Photomerge enables you to create more dynamic panoramas, and the File Browser iseven easier to use. Following is a brief list of features that changed in PhotoshopElements 2:
■ The Quick Start window has been redesigned and is called the Welcomewindow.
■ The shortcuts bar has been redesigned with new buttons, such as the Attachto Email, Browse, and Quick Fix buttons, and the Search text box.
2 ABSOLUTE BEGINNER’S GUIDE TO ADOBE PHOTOSHOP ELEMENTS 2
01 8311 INTRO 1/15/03 2:32 PM Page 2

■ The Selection Brush Tool is new, and some of the tools in the Toolbox havebeen relocated. Color buttons are new to each of the shortcut and optionsbuttons, and the Toolbox tools too! Move the cursor over each button to seeeach icon in color.
■ There are more shapes, layer styles, and recipes, and improved tutorials.
■ The Variations dialog box has been dubbed the Color Variations dialog box,and has a whole new look.
■ The Recipes palette has been renamed the How To palette, and the Historypalette is called the Undo History palette.
■ The Auto Color Correction, Quick Fix, and Selection Brush tools are a few ofthe new features that appear in 2.0.
■ JPEG 2000 is a new file format you can use to create customized JPEG files.You can open and edit JPEG 2000 files only with Photoshop Elements 2.
How to Use This BookI had two goals in mind when I put this book together. Because this book is aboutPhotoshop Elements, my first goal was to introduce you to the digital-imaging fea-tures in the program. The examples and steps in this book are just some of themany ways you can work with digital images. My second goal was to introduce youto working with digital images. This involves using a small combination of tools,observation skills, and a little creativity. With a little luck, my examples will helpyou design and create your own pictures that you can share with others.
This book is divided into four parts. The first two parts show you how to get imagesinto and out of Photoshop Elements 2. These are basic skills that you might alreadybe familiar with if you’ve used other graphics applications. The latter two partsmake up the larger portion of the book. They show you how to do some basic, sim-ple tasks, and grow on those skills to perform more complicated, advanced tasks.You can read this book from cover to cover, use it as a reference, or go to any partic-ular chapter you like.
Except for the system requirements and installation sections, all the screenshots cre-ated for this book were created with Windows XP Pro and Photoshop Elements 2. TheMacintosh and Windows versions of Photoshop Elements 2 are similar, so Mac usersshould be able to follow along. Tool shortcuts and menu command shortcuts areincluded for both Windows and Mac. Macintosh keyboard keys and shortcuts appearas (Command-C), and Windows keyboard keys and shortcuts appear as [Ctrl+C].
INTRODUCTION 3
01 8311 INTRO 1/15/03 2:32 PM Page 3
You’ll find tips, notes, cautions, and sidebars throughout this book. Each contains adifferent kind of helpful hints. Some chapters also contain variations on a set ofsteps, which take a particular skill, such as color correcting, and show you how toadjust the exposure and hot spots in an image in addition to how to fine-tunebrightness and contrast settings for an image.
4 ABSOLUTE BEGINNER’S GUIDE TO ADOBE PHOTOSHOP ELEMENTS 2
tipTips highlight something
new, something cool, some-thing helpful, and somethingtrue.
Notes point out arelated tidbit of informa-
tion about a chapter topic.
Cautions warn you aboutpotential pitfalls or tellyou ways to troubleshoota potential problem.
YOUR MILEAGE CAN VARYIn a perfect world, this book would be all things to all Photoshop Elements owners. I real-ize, however, that I’ll fall short explaining a technical doodad, or skimp on coverage aboutfilter effects. Hey, if you want to see what all the filters look like in Photoshop Elements,open the Filters palette and choose All from the drop-down menu. You won’t find out howto use every single one in this book! Because I’m cutting to the chase, I might as well tellyou that there’s no coverage of how to create Jackson Pollack–style brushes, or how to cre-ate the perfect collage or montage.
Also, sidebars point out some interesting factoids that are related to the local chapter topic.
01 8311 INTRO 1/15/03 2:32 PM Page 4

The Contents of This BookAbsolute Beginner’s Guide to Adobe Photoshop Elements 2 takes you from simple tasks tocomplex ones. The book begins by taking you through some of the more elementaryfeatures, such as understanding the work area, and some simple tasks such as resiz-ing or auto-correcting the tonal range of an image. It then gradually introduces youto using combinations of tools to correct, repair, and combine digital images intoanimation or panoramic photos.
Most of the book focuses on building on fundamental techniques for improving, cor-recting, combining, or creating great-looking digital pictures. Each part of this bookintroduces you to a different digital-imaging element of the program, from scanningand printing images to color correction and animation.
Part I—Photoshop Elements SetupIt doesn’t take a rocket scientist to set up Photoshop Elements. In fact, you can skipto Part II if you aren’t interested in how the work area is laid out, or how differenttools and windows are related to one another in the work area. If you do want tocustomize a preference or turn off a setting, you can always come back and revisitthese chapters.
Chapter 1—Familiarize yourself with all the tools, menus, and windows in the workarea.
Chapter 2—Find out how to customize the color, tool, and program settings.
Chapter 3—Learn how to connect, view, and download images from a digital cam-era or scanner.
Part II—Opening, Saving, and Printing ImagesFor those of you who take photos that look great as is, you can learn how to view,save, and print them in Photoshop Elements. I’ve also thrown in some simple tweak-ing tasks, so you can quickly straighten or automatically correct an image.
Chapter 4—Open sesame, or Open As sesame. Find out how to open and convertimage files. Image modes and resolution for printers, monitors, scanners, and cam-eras are also explained.
Chapter 5—Explore the exciting world of file formats and learn how to optimizeand save the right file for printing or for the Web. Also, find out how to uploadimages to a Web server.
Chapter 6—Get the scoop on how to print images with grayscale or color printers.Print a folder of files to a contact sheet using the built-in Automate command. Also,learn how to create picture packages showing one picture multiple times in differentsizes, all on the same page.
INTRODUCTION 5
01 8311 INTRO 1/15/03 2:32 PM Page 5

Part III—Correcting and Combining ImagesStart taking a walk on the wild side of digital imaging. Take a scanned or camera-captured image and learn how to work with color. You also learn how to fix numer-ous kinds of color-related problems using the arsenal of tools in the Toolbox andmenus.
Chapter 7—Take a short course and learn how to interpret all the colors in front ofyour eyes. Work with the palettes that enable you to control color for any openimage.
Chapter 8—Jump into a slew of color-correction techniques, and consider a fewvariations that can help bring an old photo alive.
Chapter 9—Experiment with filters and effects to enhance digital pictures. Learnhow to hide things you don’t want to see, and bring out objects or areas in a picture.
Chapter 10—Combine, remove, and perform advanced correction techniques bytaking full advantage of layers, copy and paste commands, and the Clipboard.
Chapter 11—Add a title, or enhance text by putting an image inside each charac-ter. Use the shape and drawing tools to make your mark on an image.
Chapter 12—Repair old photos scanned in from negatives or damaged photopaper.
Chapter 13—Create complex pictures and recipes that can help you experimentwith any previous set of tasks to pump up an image.
Part IV—Designing Complex ImagesAfter you’ve primed and polished your images, you can go the distance and learnmore advanced tasks, such as animating your images or creating a Web photogallery.
Chapter 14—Put together two or more images to create complex images.
Chapter 15—Learn to create animation, or more precisely, an animated GIF.
Chapter 16—Stitch together two or more pictures and create a panorama.Photoshop Elements has a built-in tool, the Photo Merge Wizard, that magicallycombines similar photos to create a panorama.
Chapter 17—Create a slideshow and Web photo gallery out of any folder full ofimages. Photoshop Elements can generate HTML and JavaScript code, as well asresize your image files.
Glossary—You’ll find definitions for most of the acronyms and Photoshop Elementsterms used in this book in the glossary.
6 ABSOLUTE BEGINNER’S GUIDE TO ADOBE PHOTOSHOP ELEMENTS 2
01 8311 INTRO 1/15/03 2:32 PM Page 6

Photoshop
Elements Setup
iPART
Navigating the Work Area . . . . . . . . . . . . . . . . . .9
Customizing Adobe Photoshop Elements . . . . .47
Acquiring Images from Scanners and Digital Cameras . . . . . . . . . . . . . . . . . . . . . . . .63
02 8311 PT 1 1/15/03 2:30 PM Page 7

02 8311 PT 1 1/15/03 2:30 PM Page 8

In this chapter
• Comparing the Macintosh and WindowsWork Areas
• Getting Familiar with the Welcome Window
• Introducing the Work Area
• Working with Palettes
• A Closer Look at the Image Window
• Navigating Menu Commands
1
Navigating the
Work Area
The Welcome window, menu bar, tools, palettes, image window, short-
cuts bar, and options bar compose the work area. Each brings a unique
set of features to Photoshop Elements. As you work with different
image files, you will find that there are several workflow processes you
can follow. Before taking a look at how you want to use Photoshop
Elements to explore these workflow processes, you’ll take a tour of the
work area. Workflow processes are covered in more detail in Parts III and
IV of this book.
You’ll also learn how to open and save an image file—two tasks you’ll
find yourself doing almost every time you use Photoshop Elements. You
can open an image to determine its dimensions, to combine it with
other images, or to simply view or print it. Of course, you also can
modify any image using the Toolbox or palette tools. Finally, you might
want to save the image in one or more image file formats so that you
can preserve a work in progress or publish the image on a Web site or
print it.
03 8311 CH01 1/15/03 2:33 PM Page 9
Comparing the Macintosh and WindowsWork Areas
The Mac and Windows versions of Photoshop Elements have more in common thanyou’d think. Virtually all the Toolbox tools, shortcuts, options, and palettes are iden-tical, except for one or two check boxes and options that are specific to Mac andWindows. To help you distinguish the differences as you read through this book, I’venoted which menu commands, dialog boxes, and controls are available for eitherMac or Windows.
The differences between the Mac and Windows versions are largely due to the differ-ences between these two operating systems. Windows programs open with a largewindow connected to the menu bar. You can resize the work area by resizing thisbackground window. If you close this window, Photoshop Elements exits to the desk-top. The status bar and image information are located at the bottom of the workarea. On a Mac, the work area is shared with the desktop. Document informationand status bar information are located at the bottom of the active image window.
In addition to the three-dimensional buttons and beautifully designed windows, win-dow controls, shortcut menus, menu bars, and other user interface elements, you’llfind that the menus on Mac OS X are organized differently than those on Mac OS 9and Windows. For example, there’s a Photoshop Elements menu in Mac OS X.The About Photoshop Elements, Color Settings, Preferences, Hide/ShowPhotoshop Elements, and Quit commands are stored in the Photoshop Elementsmenu. Some of the menu commands, such as the Window, Images, Bring All toFront command, are available only on Mac OS X. Others, such as the Window,Status Bar command, are available only on Windows.
Like Mac OS 9, Mac OS X has an Apple menu, although the menu commands differbetween Mac OS 9 and Mac OS X. The Start menu in Windows is similar to theApple menu in Mac OS. Aside from the differences between operating systems, notmany things are different between the Mac and Windows versions of PhotoshopElements. If you’re familiar with Mac OS or Windows, you should have no problemsusing either one to get stuff done with Photoshop Elements.
Getting Familiar with the Welcome WindowWhen you start Photoshop Elements, the Welcome window will appear in the middleof the work area. You can open it by choosing Welcome from the Window menu.There are six buttons you can choose from; each enables you to jump to a palettewindow, perform a menu command, or exit the Welcome window. The following listexplains each button in the Welcome window (see Figure 1.1):
■ New File—Create and open a new document window and choose the dimensions, resolution, and color mode of the document. The Preset Sizes
10 ABSOLUTE BEGINNER’S GUIDE TO ADOBE PHOTOSHOP ELEMENTS 2
03 8311 CH01 1/15/03 2:33 PM Page 10
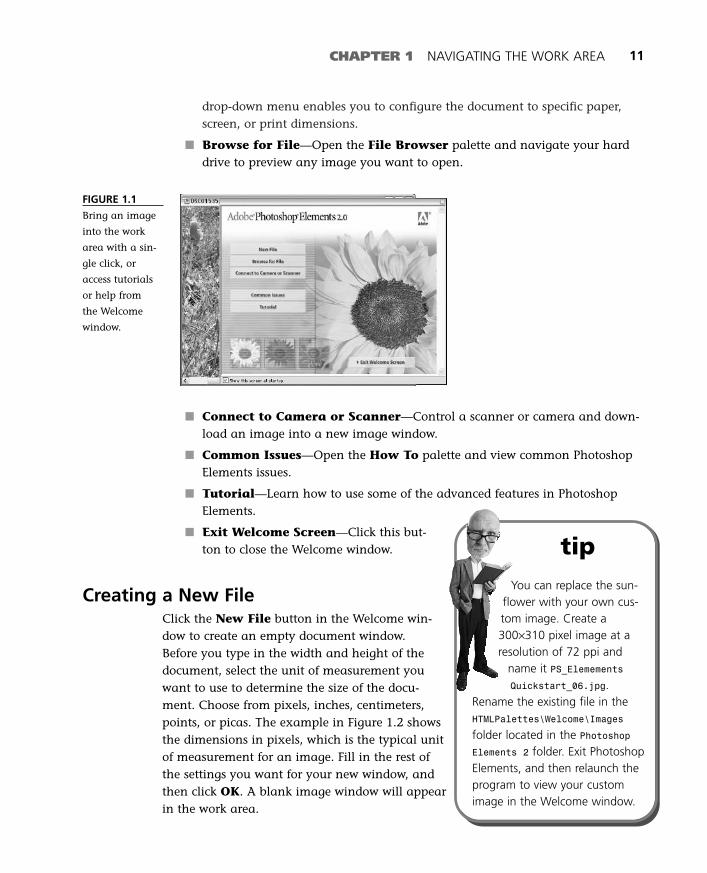
drop-down menu enables you to configure the document to specific paper,screen, or print dimensions.
■ Browse for File—Open the File Browser palette and navigate your harddrive to preview any image you want to open.
CHAPTER 1 NAVIGATING THE WORK AREA 11
■ Connect to Camera or Scanner—Control a scanner or camera and down-load an image into a new image window.
■ Common Issues—Open the How To palette and view common PhotoshopElements issues.
■ Tutorial—Learn how to use some of the advanced features in PhotoshopElements.
■ Exit Welcome Screen—Click this but-ton to close the Welcome window.
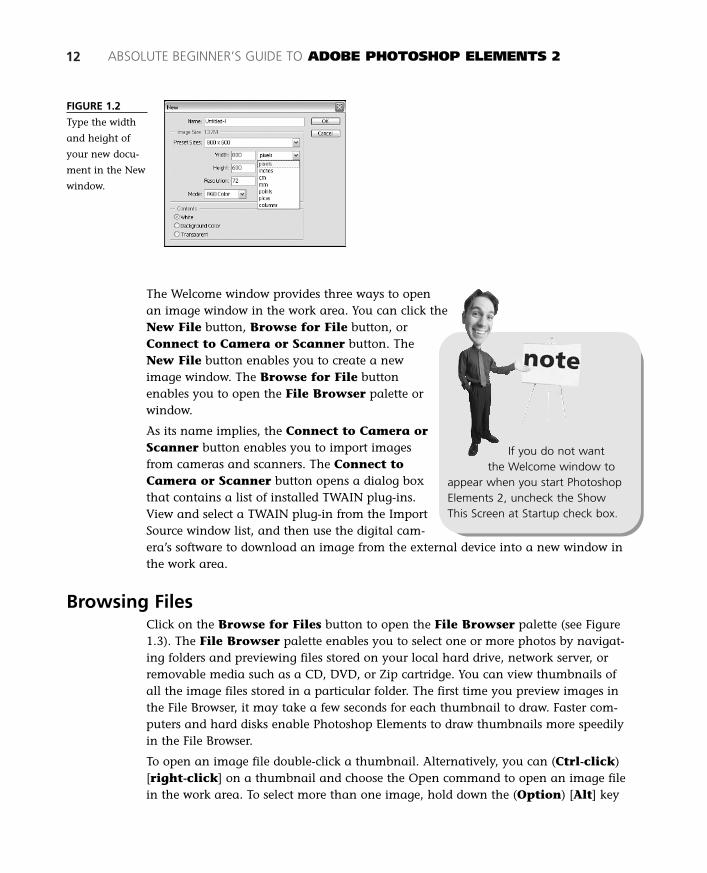
Creating a New FileClick the New File button in the Welcome win-dow to create an empty document window.Before you type in the width and height of thedocument, select the unit of measurement youwant to use to determine the size of the docu-ment. Choose from pixels, inches, centimeters,points, or picas. The example in Figure 1.2 showsthe dimensions in pixels, which is the typical unitof measurement for an image. Fill in the rest ofthe settings you want for your new window, andthen click OK. A blank image window will appearin the work area.
tipYou can replace the sun-
flower with your own cus-tom image. Create a300×310 pixel image at aresolution of 72 ppi and
name it PS_ElemementsQuickstart_06.jpg.
Rename the existing file in theHTMLPalettes\Welcome\Images
folder located in the PhotoshopElements 2 folder. Exit PhotoshopElements, and then relaunch theprogram to view your customimage in the Welcome window.
FIGURE 1.1
Bring an image
into the work
area with a sin-
gle click, or
access tutorials
or help from
the Welcome
window.
03 8311 CH01 1/15/03 2:33 PM Page 11
12 ABSOLUTE BEGINNER’S GUIDE TO ADOBE PHOTOSHOP ELEMENTS 2
FIGURE 1.2
Type the width
and height of
your new docu-
ment in the New
window.
The Welcome window provides three ways to openan image window in the work area. You can click theNew File button, Browse for File button, orConnect to Camera or Scanner button. TheNew File button enables you to create a newimage window. The Browse for File buttonenables you to open the File Browser palette orwindow.
As its name implies, the Connect to Camera orScanner button enables you to import imagesfrom cameras and scanners. The Connect toCamera or Scanner button opens a dialog boxthat contains a list of installed TWAIN plug-ins.View and select a TWAIN plug-in from the ImportSource window list, and then use the digital cam-era’s software to download an image from the external device into a new window inthe work area.
Browsing FilesClick on the Browse for Files button to open the File Browser palette (see Figure1.3). The File Browser palette enables you to select one or more photos by navigat-ing folders and previewing files stored on your local hard drive, network server, orremovable media such as a CD, DVD, or Zip cartridge. You can view thumbnails ofall the image files stored in a particular folder. The first time you preview images inthe File Browser, it may take a few seconds for each thumbnail to draw. Faster com-puters and hard disks enable Photoshop Elements to draw thumbnails more speedilyin the File Browser.
To open an image file double-click a thumbnail. Alternatively, you can (Ctrl-click)[right-click] on a thumbnail and choose the Open command to open an image filein the work area. To select more than one image, hold down the (Option) [Alt] key
If you do not wantthe Welcome window to
appear when you start PhotoshopElements 2, uncheck the ShowThis Screen at Startup check box.
03 8311 CH01 1/15/03 2:33 PM Page 12
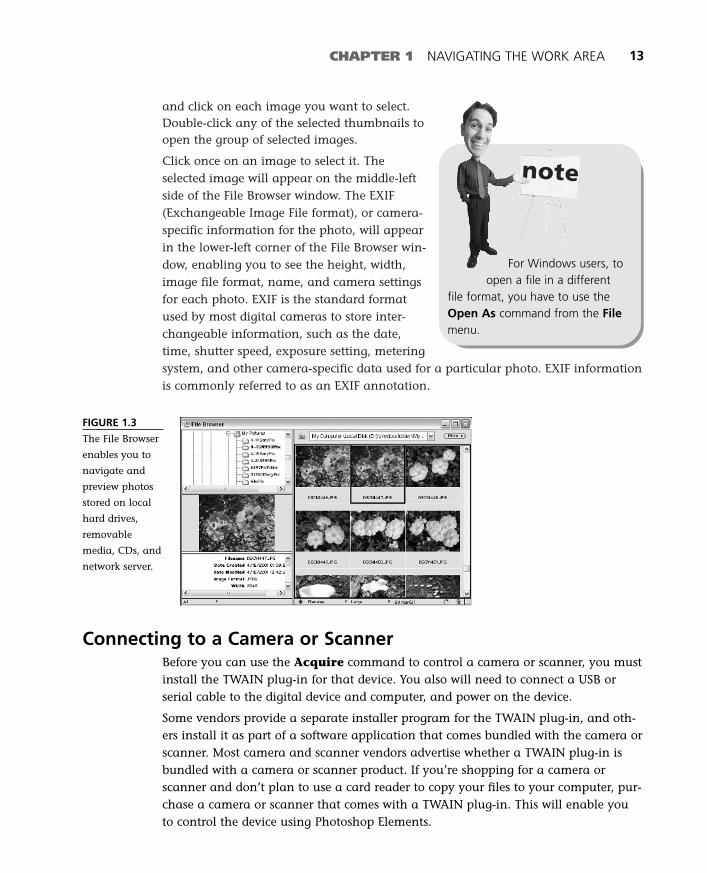
and click on each image you want to select.Double-click any of the selected thumbnails toopen the group of selected images.
Click once on an image to select it. Theselected image will appear on the middle-leftside of the File Browser window. The EXIF(Exchangeable Image File format), or camera-specific information for the photo, will appearin the lower-left corner of the File Browser win-dow, enabling you to see the height, width,image file format, name, and camera settingsfor each photo. EXIF is the standard formatused by most digital cameras to store inter-changeable information, such as the date,time, shutter speed, exposure setting, meteringsystem, and other camera-specific data used for a particular photo. EXIF informationis commonly referred to as an EXIF annotation.
CHAPTER 1 NAVIGATING THE WORK AREA 13
For Windows users, toopen a file in a different
file format, you have to use theOpen As command from the Filemenu.
FIGURE 1.3
The File Browser
enables you to
navigate and
preview photos
stored on local
hard drives,
removable
media, CDs, and
network server.
Connecting to a Camera or ScannerBefore you can use the Acquire command to control a camera or scanner, you mustinstall the TWAIN plug-in for that device. You also will need to connect a USB orserial cable to the digital device and computer, and power on the device.
Some vendors provide a separate installer program for the TWAIN plug-in, and oth-ers install it as part of a software application that comes bundled with the camera orscanner. Most camera and scanner vendors advertise whether a TWAIN plug-in isbundled with a camera or scanner product. If you’re shopping for a camera or scanner and don’t plan to use a card reader to copy your files to your computer, pur-chase a camera or scanner that comes with a TWAIN plug-in. This will enable youto control the device using Photoshop Elements.
03 8311 CH01 1/15/03 2:33 PM Page 13

Click the Connect to Camera or Scanner button in the Welcome window toaccess any connected devices, as shown in Figure 1.4. The Select Import Source win-dow will open. A list of TWAIN plug-in files installed on your hard drive will appearin the window list. Choose a device from the Select Import Source window, and bringan image directly into the work area.
14 ABSOLUTE BEGINNER’S GUIDE TO ADOBE PHOTOSHOP ELEMENTS 2
FIGURE 1.4
A list of TWAIN
plug-ins appears
in the Select
Import Source
window if you
click the Acquire
button in
the Welcome
window.
The software that opens from the Select ImportSource dialog box is the software created specificallyfor a particular model of a digital camera or scan-ner. Select the images you want to view or savefrom the device’s software window. Then down-load them to your hard drive.
The rate at which an image is acquired dependson what kind of cable is used to connect the cam-era or scanner to the computer. Most of the newercameras and scanners have a USB connector,which supports a faster data transfer rate than itspredecessor, the serial port. Some of the higher-end scanners, in the $1,000 price range, also havea FireWire (officially called IEEE 1394) port avail-able for connecting to a computer. FireWire portscan support the faster data transfer rates betweena digital device and a computer. If the computerdoes not have a USB port, you will need to down-load images over the serial port. Most digitalcameras will include a USB-to-serial adaptercable. However, newer cameras tend to supportonly USB connections. If you own a computer thatdoesn’t have a USB port, you can easily and
It’s okay if the camerabatteries run out of juice
while you’re copying images toyour computer. The image fileswill remain on the camera’s stor-age card whether batteries are inor out of the camera. If you don’twant to repeatedly download filesor have your download sessioninterrupted due to a shortage ofbatteries, put a fresh set of bat-teries into the camera or use anA/C adapter specifically made foryour camera.
03 8311 CH01 1/15/03 2:33 PM Page 14

inexpensively add USB to your system by purchasing a serial-to-USB or PC cardadapter peripheral.
Accessing Common IssuesThe Common Issues button opens the common issues information in the How Topalette. Each issue appears as a link. Click on a link to view more information abouteach issue (see Figure 1.5). Click on the drop-down menu in the How To palette andchoose Download New Adobe Recipes to connect to Adobe’s Web site andupdate the list of common issues in the How To palette.
CHAPTER 1 NAVIGATING THE WORK AREA 15
FIGURE 1.5
Access the How
To information
on common
issues by clicking
the Common
Issues button in
the Welcome
window.
Viewing TutorialsClick the Tutorial button to learn how to use some of the more advanced features (seeFigure 1.6). You can, for example, walk through some basic step-by-step examples in abrowser application that show you how to use layers, create a multi-picture panorama,or produce an animation. You also can jump to Adobe’s Web site and view moreonline tutorials there. Of course, this book contains all that and more, so read on!
Introducing the Work AreaSome of the first things you’ll notice are the menu bar, shortcuts, and options barslocated at the top of the work area. The menu bar itself contains a healthy total of10 menus. Located directly below the menu bar is the shortcuts bar, which holds(you guessed it) shortcuts to tasks such as printing, browsing, saving, and going toAdobe Online. Just below the shortcuts bar, you’ll find the options bar. The optionsbar’s contents change depending on which tool is selected in the Toolbox.
03 8311 CH01 1/15/03 2:33 PM Page 15
Over to the left of the work area, you’ll find the indispensable Toolbox. If you’veseen Photoshop or other graphics applications, the tool buttons might look familiarto you. You’ll find selection, drawing, editing, and color-selection tools in theToolbox. You can apply these tools to any image window.
Another thing you might notice are the float-ing window palettes. A palette is a type ofwindow that you can drag around and com-bine with other palettes, but that won’t getlost in a crowd of windows. A palette isalways in front of all the other image win-dows in the work area. The palette well (onthe right end of the shortcuts bar) houses allthe palettes when they aren’t in use. To use apalette, you can choose the palette namefrom the Window menu, or click its tab anddrag it from the palette well onto the workarea (see Figure 1.7).
The status bar is located at the bottom of the work area if you’re running Windows.On a Mac, the status bar information appears at the bottom of each image window.The status bar displays information about the image window, such as how muchdisk space it’s occupying or its dimensions. You can customize the status bar to showone of the following data items: document dimensions, document sizes, documentprofile, scratch size, efficiency, timing, and current tool. If you’re running Windows,you can view help text for the selected tool in the right portion of the status bar. Thenext section explores the tools in the shortcuts and options bars.
16 ABSOLUTE BEGINNER’S GUIDE TO ADOBE PHOTOSHOP ELEMENTS 2
FIGURE 1.6
A few advanced
tutorials are
installed with
Photoshop
Elements. Click
the Tutorial
button to view
the tutorials in a
browser
application.
tipMove the Hints palette to
the lower-right corner of thework area. By default itopens in the upper-right cor-ner, which makes it disappear
when you select a tab inthe palette well.
03 8311 CH01 1/15/03 2:33 PM Page 16

CHAPTER 1 NAVIGATING THE WORK AREA 17
Using the Shortcuts and Options BarsThe shortcuts bar brings some of the most frequentlyselected menu commands to the work area. You canquickly open, save, or print a document with a sin-gle mouse click instead of having to click andselect a menu command or learn a keyboardshortcut. You can also open the Quick Fix, ColorVariations dialog box or send a photo in email.
Shortcuts not only help you save time, but alsoare smart! Each shortcut button becomes selec-table only when certain conditions are met. Forexample, most shortcuts require an open imagewindow.
Each shortcut button has two states, active andinactive. For example, if you haven’t made anychanges to an image in the image window, theSave shortcut button will appear grayed out inthe shortcuts bar and will not be selectable.Similarly, if you haven’t modified an image file,the Step Forward shortcut will be unselectable.
You can close apalette by clicking in its
Close box. The x button in eachpalette and image window repre-sents the Close box if you’re run-ning Windows or Mac OS X. MacOS 9 users can click the leftsquare in the title bar of thepalette or image window.
Options bar
Tools
Image window
File Browserwindow
Palette well
Welcome window Palettes
Shortcuts barMenu bar
FIGURE 1.7
The palette well
resides in the
shortcuts bar
alongside the
shortcut icons.
03 8311 CH01 1/15/03 2:33 PM Page 17
18 ABSOLUTE BEGINNER’S GUIDE TO ADOBE PHOTOSHOP ELEMENTS 2
HOW TO SHOW AND HIDE PALETTESYou can hide or show the shortcuts and options bars, as well as the tools and palettes bychoosing the Shortcuts or Options command from the Window menu. ChooseWindow, Tools if you want to show or hide the Toolbox. A check will appear beside eachWindow menu item that is visible onscreen.
If you press the Tab button once, you can hide all palettes, plus the Toolbox, shortcuts bar,and options bar. Press the Tab button once more, and presto—they’re back!
The following list (starting from the left side of the shortcuts bar) gives you a briefdescription of each button and its function:
■ Adobe.com—Click this button to visit Adobe’s Web site. You will needto click the links to locate and view the latest information available
about Photoshop Elements, including information about software updatesand third-party plug-in information.
■ New Document—Open a new document window by clicking thisshortcut button.
■ Open Document—Navigate your hard drive and select an existingimage file to open in the work area.
■ Browse—Open the File Browser window to navigate images on yourhard drive or network and select the file you want to open.
■ Import—Open the Select Import Source dialog box and select a scan-ner, camera, or video clip to import an image into the work area.
■ Save Document—If you’ve made any changes to an image file, clickthis shortcut button to save your changes.
■ Save for Web—The Save for Web window enables you to customize afile you want to save for the Web. Select a Web file format for an
image, and preview settings in the Save for Web window by clicking thisbutton.
■ Save As PDF—Enables you to save an image as an encoded ZIP orJPEG file. You can use the Adobe Acrobat browser plug-in or another
graphics program to view PDF files on a Windows or Macintosh computer.
■ Attach to Email—Opens the Attach to Email dialog box. Auto-con-vert an image to a 1,200×900-pixel (6×8-inch) image or send it as is.
After you choose an email option, Photoshop Elements creates a new emailmessage and attaches the photo. All you need to do is add a list of recipients,type a message, and send it off to the Internet.
■ Online Services—Opens the Online Services Assistant dialog box. Youcan download new recipes and other Photoshop Elements files from
Adobe’s Web site using the Online Services Assistant.
03 8311 CH01 1/15/03 2:33 PM Page 18
CHAPTER 1 NAVIGATING THE WORK AREA 19
■ Print Document—When you’re ready to print your image, click thisshortcut button to send the image file to a color or black-and-white
printer.
■ Print Preview Document—Preview a document before sending it tothe printer by clicking the Print Preview shortcut button.
■ Step Backward/Step Forward—Clicking one of these buttonsmoves you backward or forward through tasks performed on the
document, logged in the History palette.
■ Quick Fix—Opens the Quick Fix dialog box. Correct colors, adjustbrightness/contrast, and modify focus and rotation of the image using
the options in the Quick Fix dialog box.
■ Color Variations—The Color Variations window enables you to pre-view and modify red, green, blue, and saturation color changes to the
active image window.
■ Search—Type one or more words into the Searchtext box to let Photoshop Elements find How To,
Help, and Tutorial information on a particular topic. Any matching resultswill appear in the Search Results palette.
■ Help Contents—Clicking the Help button opens a browser windowand brings up the HTML-based Help contents for Photoshop Elements.
SEPARATED AT BIRTH?The options bar works right alongside each tool located in the Toolbox. That is, the but-tons, text boxes, drop-down menus, and check boxes in the options bar change dependingon which tool is selected. After a tool is selected, you can adjust any available settings fromthe options bar. Click in a text box, click and drag a slider control, or select an item from adrop-down menu list to customize the selected tool.
Introducing the ToolboxThe Toolbox contains two vertical columns of tools. Although this window opens bydefault on the left side of the work area, you can drag and drop it anywhere on yourdesktop. If you have two monitors connected to your computer, you can place theToolbox on one monitor and the image window on the other screen. You can chooseTools from the Window menu if you want to hide or show tools in the work area.
Before you start clicking away on those tools, remember that only one tool at a timecan be applied to an image window. Also, some tools, such as the Dodge, Burn, andClone Stamp tools, require an image to be in RGB mode before you can use them.Other tools, such as the Clone Stamp and Selection Brush tools, work with special
03 8311 CH01 1/15/03 2:33 PM Page 19
20 ABSOLUTE BEGINNER’S GUIDE TO ADOBE PHOTOSHOP ELEMENTS 2
keys, such as the Alt (Option) or Caps Lock keys, to enable a feature in the tool. Theforeground and background colors, shown at the bottom of the Toolbox, can alsoaffect the way the tool can be applied to an image. Most tools, except for the EraserTool, apply the foreground color to the image window.
A total of 40 tools are available in the Toolbox, but you can see only 24 of them.Why? Well, some tools are hidden in the Toolbox. Simply click and hold down themouse over the desired tool to view its hidden alternatives. A small arrow appears inthe lower-right corner of the tool if any hidden tools share that space.
For example, the Rectangle Marquee Tool, located in the upper-left corner of theToolbox, shares its space in the Toolbox with the Elliptical Marquee Tool. Whenyou’re using the Rectangle Marquee Tool, the Elliptical Marquee Tool remains hid-den in the Toolbox.
Fortunately, each tool in the Toolbox has a shortcut key. Quickly select a tool bypressing a key on the keyboard. You don’t have to hunt for an icon and then clickthe tool’s icon every time you want to pick a new tool. If more than one tool sharesa shortcut, you can hold down the Shift key and then press the shortcut key to cyclethrough each tool that shares the same keyboard shortcut. For example, if you wantto select the Rectangular Marquee Tool, press the letter M on the keyboard. If youwant to choose the Elliptical Marquee Tool, hold down the Shift key and press Magain. The icon in the Toolbox will change as you cycle through each tool thatshares a particular keyboard shortcut.
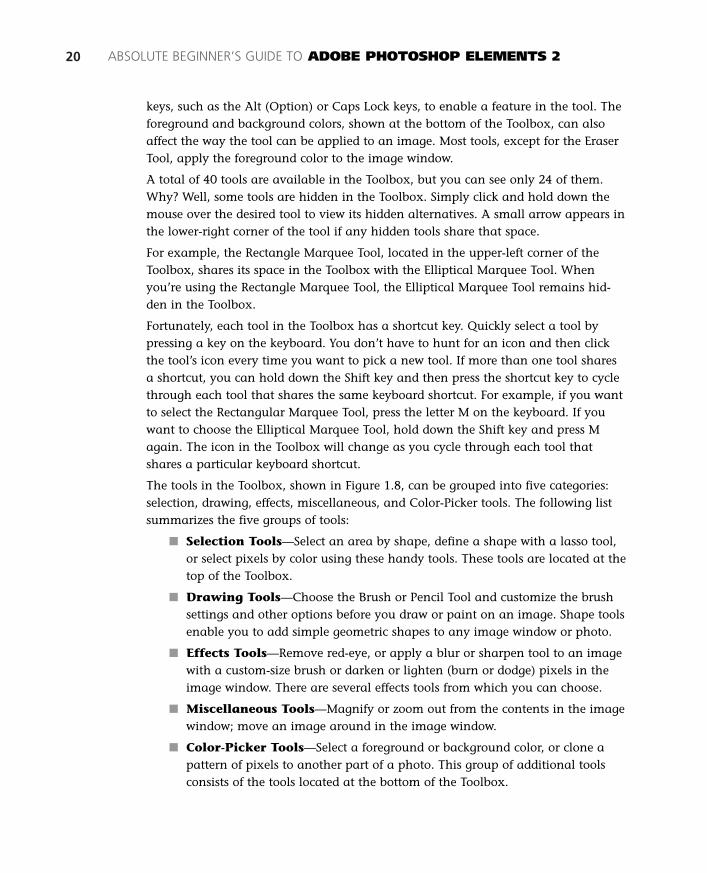
The tools in the Toolbox, shown in Figure 1.8, can be grouped into five categories:selection, drawing, effects, miscellaneous, and Color-Picker tools. The following listsummarizes the five groups of tools:
■ Selection Tools—Select an area by shape, define a shape with a lasso tool,or select pixels by color using these handy tools. These tools are located at thetop of the Toolbox.
■ Drawing Tools—Choose the Brush or Pencil Tool and customize the brushsettings and other options before you draw or paint on an image. Shape toolsenable you to add simple geometric shapes to any image window or photo.
■ Effects Tools—Remove red-eye, or apply a blur or sharpen tool to an imagewith a custom-size brush or darken or lighten (burn or dodge) pixels in theimage window. There are several effects tools from which you can choose.
■ Miscellaneous Tools—Magnify or zoom out from the contents in the imagewindow; move an image around in the image window.
■ Color-Picker Tools—Select a foreground or background color, or clone apattern of pixels to another part of a photo. This group of additional toolsconsists of the tools located at the bottom of the Toolbox.
03 8311 CH01 1/15/03 2:33 PM Page 20

CHAPTER 1 NAVIGATING THE WORK AREA 21
Choosing Pixels with Selection ToolsSelection tools enable you to choose all the pixels in an image, or one or two pixels.Six kinds of selection tools are available. Each one can help you quickly select all orpart of the pixels in a layer of the image window. After pixels are selected, you canedit them by applying a menu command, tonal range, color correction, or filter toolto the selected pixels.
NO TOOL IS AN ISLANDAfter you select a tool, take a peek at the options bar, located just below the shortcuts barbelow the menu bar. Some tools have more options than others. But these options, whichalso can be viewed from the Preset Manager window, enable you to customize the way atool works.
But wait, there’s more! You can find out more about a tool from the Hints palette. TheHints palette automatically opens in the upper-right corner of the work area when you firststart Photoshop Elements. If you want to manually open or close it, choose Show Hintsfrom the Window menu, or select the Hints tab from the palette well located in the short-cuts bar.
The following list explains what each selection tool can do (see Figure 1.8):
■ Marquee Tool (M)—Select an area in a rectangle or circularshape with this tool. The Elliptical Marquee Tool shares this
space in the Toolbox.
Go to Adobe Online
Selection Brush Tool (A)
Move Tool (V)Magic Wand Tool (W)Crop Tool (C)
Gradient Tool (G)Pencil Tool (N)Red Eye Brush Tool (Y)Sharpen Tool (P)Smudge Tool (F)Burn Tool (J)
Eyedropper Tool(I)Zoom Tool (Z)Switch Foreground and Background Colors (X)
Set Background Color
Paint Bucket Tool (K)
Blur Tool (R)Sponge Tool (Q)Dodge Tool (O)
Hand Tool (H)Set Foreground
Color
Set Current Colors toBlack and White (D)
FIGURE 1.8
Forty tools are
stored in the
Toolbox. Click
an icon to select
a tool.
03 8311 CH01 1/15/03 2:33 PM Page 21

■ Move Tool (V)—Click and dragone or more image objects in the
image window with this frequently usedtool.
■ Lasso Tool (L)—ThePolygonal and
Magnetic Lasso tools enable you to clickaround the shape or color of an objectyou want to select in the image window.
■ Magic Wand Tool (W)—Click ona color with this tool to select all
touching pixels of that color in an imagewindow.
■ Selection Brush Tool (A)—Usethis brush to select pixels or add or
remove pixels from a selection. You canuse either a rubylith (red mask) or marchingants (selection) mode to view the selected area created by this brush.
■ Crop Tool (C)—Select part of an image by applying the Crop Tool toan image file. The Crop Tool enables you to select a rectangular area of
an image and removes any image area outside the cropped area.
Working with an Image in the Image WindowBefore you can use the selection tools, you’ll need to create a new image window oropen an image file. When an image window is open, you can pick a tool from theToolbox and experiment with selecting, drawing, or editing images. The drawingand shape tools enable you to work with vector and bitmap graphics and combinethem with an image.
What are vector and bitmap images? Vector images are mathematically calculatedgraphics such as shapes, or line art–type images created by programs such as AdobeIllustrator. Vector images can be resized without losing image clarity. The mathemat-ical algorithm works with a rasterizer to draw the vector graphics onscreen or onpaper. On the other hand, bitmap images, including digital photos, consist ofgroups, or matrices, of pixels. Bitmap images are not easily scaled up in size. Forexample, if you try to enlarge a bitmap image, you’ll start to see squarish chunks ofcolors appear. This is called pixelation. In contrast, vector graphics are more adept atrising to this occasion.
Of all the tools in the Toolbox, drawing tools offer you the most freedom to be cre-ative (see Figure 1.9). In addition to using the Brush, Shape, and Pencil tools, you
22 ABSOLUTE BEGINNER’S GUIDE TO ADOBE PHOTOSHOP ELEMENTS 2
tipBeside each tool name is
the command-key shortcutyou can use to quickly selectthat tool from the Toolbox. Toview a tool’s name and short-
cut, place the cursor over atool button. Let it hover
over the tool for a few seconds.The tool tip will appear, and theshortcut letter will appear to theright of the tool’s name. Press the shortcut key to select a tool.
03 8311 CH01 1/15/03 2:33 PM Page 22

CHAPTER 1 NAVIGATING THE WORK AREA 23
can add text, apply a gradient (a range of two or more colors that blend together),use a layer style, or blend layers of images together with the Photoshop Elementstools.
Clone Stamp tool
FIGURE 1.9
A tool tip for
each tool
appears in the
Hints palette, or
if you hover the
cursor over a
tool button.
The following list provides a brief description of each of the drawing tools:
■ Shape Tool (U)—Add a vectorgraphic to an image using one
of six shape tools: Rectangle, Rounded Rectangle, Ellipse, Polygon, Line, orCustom Shape. Or modify a shape with the Shape Selection Tool.
■ Type Tool (T)—Text objects are a special kind ofvector graphic. You can continue to modify text
after you add it to a document by selecting the Horizontal or Vertical Texttools, and then selecting the text you want to modify from the image win-dow. After you convert the text into a bitmap, though, you won’t be able touse the Type Tool to modify the bitmap text. The Type Mask tools enable youto add text directly to an image layer. Horizontal and Vertical Type generatesbitmap text, which is not editable. After you add it to an image, you can’tchange it, but you can always Undo.
■ Paint Bucket Tool (K)—Fill anarea with a solid color using the
foreground color from the color well com-bined with the Paint Bucket Tool.
■ Gradient Tool (G)—A gradientconsists of two colors in which one
fades gently into the other from one endof the selected area to the opposite end.You can use the Gradient Tool to create avirtual sunset, focused lighting, or other
tipTo find out more about
how to add text and graph-ics to an image, see Chapter11, “Adding Text and Shapesto Images.”
03 8311 CH01 1/15/03 2:33 PM Page 23

24 ABSOLUTE BEGINNER’S GUIDE TO ADOBE PHOTOSHOP ELEMENTS 2
effects by placing a gradient over the Fill area of a shape or graphic in theimage window.
■ Brush Tool (B)—Experiment with different brush sizes, tips,and colors with either the paint brush or the Impressionist brush.
You can choose a custom brush tip for this tool from the options bar. TheImpressionist brush enables you to paint with stylized brush strokes. You cancustomize the brush, blending mode, opacity, style, fidelity, area, and spacingof the tool in the options bar.
■ Pencil Tool (P)—If you don’t need a straight line, or want to replaceone colored pixel with a new color, try using this tool.
■ Eraser Tool (E)—This shares its space with theBackground Eraser and the Magic Eraser. The Eraser Tool
can be applied to a single layer or across all layers in the image window. TheBackground Eraser can remove the contents in the background layer of theimage. The Magic Eraser replaces the color you click with the foregroundcolor in the image window.
■ Red-Eye Brush Tool (Y)—Click and drag this tool over a photo ofsomeone with red-eye, and wipe the red away!
Except for the Shape and Type tools most tools in the Toolbox are bitmap tools. TheShape and Type tools create vector graphics, meaning you can dramatically shrinkor grow the image without losing the clarity and crispness of the graphic. Bitmapscan be reduced in size. The number of pixels in a bitmap is fixed. As you increasethe size of the bitmap, the pixels grow in size, but the clarity of the image doesn’tscale, resulting in a pixelated or blocky-looking graphic. Figure 1.10 shows a ShapeTool placed over the bitmap image in the image window. As you draw or add graph-ics to an image, a new layer is created for each graphic object in the Layers palette.You can combine vector and bitmap graphics into the same image file.
Vector graphicShape tool
FIGURE 1.10
Add a vector
graphic object to
an image file by
applying a
shape tool to the
image window.
03 8311 CH01 1/15/03 2:33 PM Page 24

CHAPTER 1 NAVIGATING THE WORK AREA 25
VECTOR AND BITMAP GRAPHICSVector and bitmap graphics are equally easy to work with. However, vector graphics aremathematically calculated whereas bitmaps are made up of static pixels. You can applysophisticated tonal range and color tools, as well as filters and effects to bitmap graphics inPhotoshop Elements. Vector graphics enable you to format various font options. For exam-ple, you can customize the font family, font size, and font style as often as you like. Textand shape objects are vector objects in Photoshop Elements. Although there are no limitsto the size of a bitmap or vector graphic, vector graphics tend to create smaller-size imagefiles. Why do vector graphics generate smaller files? Vector graphics are created with amathematical algorithm, enabling a program to store less information to generate the finalgraphic, whereas bitmap fonts are stored pixel by pixel.
Several effect-related tools are also located in the Toolbox. Some of these tools, suchas the Blur and Sharpen tools, can also be found in the Filter menu. The Red-EyeBrush Tool is one of the new, cool features in Photoshop Elements. The effect-relatedtools are as listed here:
■ Blur Tool (R)—Add a localized blur effect to a particular set of pixelsby applying this tool to an area of pixels.
■ Sharpen Tool (P)—Like its big brother the Sharpen filter, this toolcompares like-minded pixels and changes their color to try to create
the illusion of a sharper, crisper image.
■ Sponge Tool (Q)—With the rightcolor and blending setting, this tool
can act like a wet sponge. Click a color,and then drag this tool over a differentcolor to sponge the first color onto thenext one.
■ Smudge Tool (F)—Click and dragthis tool to smudge colors in an
image layer. Some of the pixels below theoriginal position of the tool will remain,whereas others move along with thebrush to create a smear, or smudge effect.
■ Dodge Tool (O)—Lighten the shad-ows, midtones, or highlights of an
image using these handy tools.
■ Burn Tool (J)—Darken the shad-ows, midtones, or highlights of an
image using these handy tools.
tipAs you work on an image,
it’s possible to lose sight ofyour original goal for theimage. If you want to undoor go back to a previous
state of the image (as longas you don’t close the
image file), you can open theHistory palette and select a previ-ous state of the document andjump back in time. Scroll andzoom changes are not saved inthe History palette.
03 8311 CH01 1/15/03 2:33 PM Page 25
26 ABSOLUTE BEGINNER’S GUIDE TO ADOBE PHOTOSHOP ELEMENTS 2
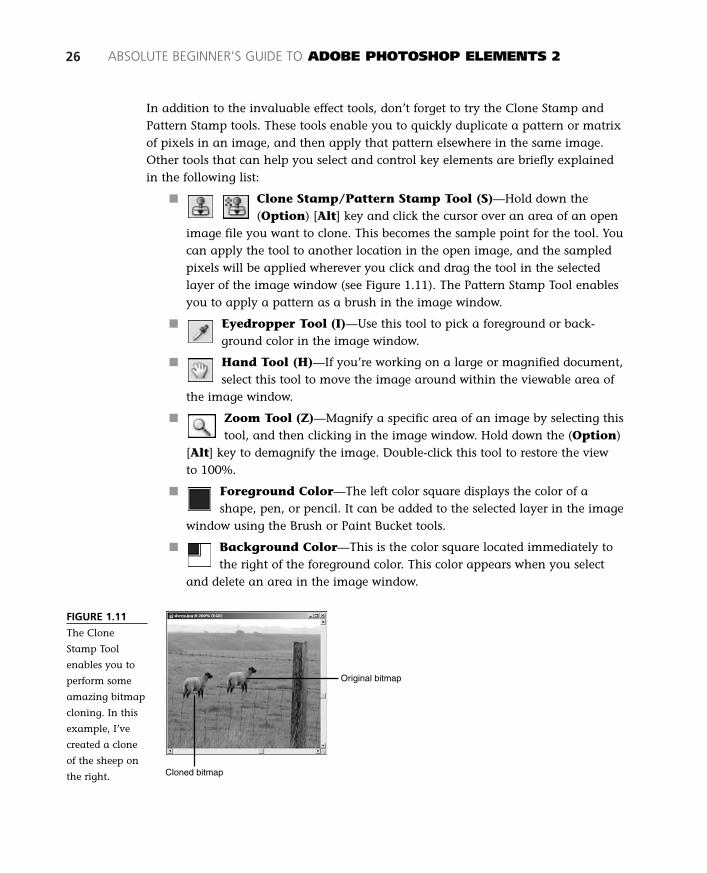
In addition to the invaluable effect tools, don’t forget to try the Clone Stamp andPattern Stamp tools. These tools enable you to quickly duplicate a pattern or matrixof pixels in an image, and then apply that pattern elsewhere in the same image.Other tools that can help you select and control key elements are briefly explainedin the following list:
■ Clone Stamp/Pattern Stamp Tool (S)—Hold down the(Option) [Alt] key and click the cursor over an area of an open
image file you want to clone. This becomes the sample point for the tool. Youcan apply the tool to another location in the open image, and the sampledpixels will be applied wherever you click and drag the tool in the selectedlayer of the image window (see Figure 1.11). The Pattern Stamp Tool enablesyou to apply a pattern as a brush in the image window.
■ Eyedropper Tool (I)—Use this tool to pick a foreground or back-ground color in the image window.
■ Hand Tool (H)—If you’re working on a large or magnified document,select this tool to move the image around within the viewable area of
the image window.
■ Zoom Tool (Z)—Magnify a specific area of an image by selecting thistool, and then clicking in the image window. Hold down the (Option)
[Alt] key to demagnify the image. Double-click this tool to restore the viewto 100%.
■ Foreground Color—The left color square displays the color of ashape, pen, or pencil. It can be added to the selected layer in the image
window using the Brush or Paint Bucket tools.
■ Background Color—This is the color square located immediately tothe right of the foreground color. This color appears when you select
and delete an area in the image window.
Cloned bitmap
Original bitmap
FIGURE 1.11
The Clone
Stamp Tool
enables you to
perform some
amazing bitmap
cloning. In this
example, I’ve
created a clone
of the sheep on
the right.
03 8311 CH01 1/15/03 2:33 PM Page 26

CHAPTER 1 NAVIGATING THE WORK AREA 27
Different Ways to Apply the Clone Stamp ToolSome of the tools in the Toolbox can sample pixels across all layers. Although mostof the examples in this book apply the Clone Stamp Tool across layers, you can dothe same with the Magic Wand, Smudge, Blur, and Sharpen tools. The following listdescribes the Clone Stamp Tool settings available in the options bar:
■ Brush Settings—Click the brush stroke to open a drop-down menu. Choosea new brush size or stroke, or customize and save your own brushes.
■ Blending Mode—Choose the blending mode to be applied when the CloneStamp Tool applies the sampled pixels. See Chapter 10 to find out moreabout blending modes.
■ Opacity—Set the transparency level of the applied pixels for the CloneStamp Tool. Lower values add more transparency.
■ Alignment—Apply the entire sampled area once to the target area. Whenthe mouse is released, any other areas you choose to apply the tool to are rel-ative to the first area where you applied the tool. Uncheck this option if youwant to apply a particular sampled area multiple times to different images.
■ Use All Layers—Check this option if you want to sample pixels from acrosslayers in the image window. But apply the Clone Stamp Tool only to a correc-tion layer.
THE PATTERN STAMP TOOLThe Pattern Stamp Tool is located with the Clone Stamp Tool in the Toolbox. You can applya pattern, selectable from the options bar, to the image window with the Pattern StampTool. As with the Clone Stamp Tool, you can choose a custom brush size, and adjust theblending mode and opacity settings for the Pattern Stamp Tool.
Working with PalettesTucked away in the palette well are 11 palettes. Each palette has a unique tab, andeach tab can be pulled away from the palette well and opened into a standalonepalette window in the work area. To activate a palette, click its tab. When a palettewindow is closed, its tab will reappear in the palette well. If a palette window is openin the work area, you can view or use it as you like. You can also drag and droppalettes one on top of another to create shared palette windows.
03 8311 CH01 1/15/03 2:33 PM Page 27

28 ABSOLUTE BEGINNER’S GUIDE TO ADOBE PHOTOSHOP ELEMENTS 2
FIGURE 1.12
The File Browser
enables you to
preview photos
and double-click
a thumbnail
image to open
a file.
GROUPING AND UNGROUPING PALETTESIf you like a particular combination of palettes, you can click and drag each one onto a sin-gle palette window to group them together. Each palette window can host additionalpalettes if you drag and drop one palette window over another. Similarly, you can separategrouped palettes by dragging a palette tab away from its shared window.
The following sections explore the palette windows you’ll find in the work area.You’ll find out more about how to use a palette as you read through the rest of thisbook and work through the sample exercises.
Introducing PalettesYou can access each palette from the Window menu or from the palette well. Eachpalette performs a specific function. For example, the File Browser palette enablesyou to preview, select, and open an image file. The Hints and How To palettes con-tain helpful information about the tools in the Toolbox and how to use them to cor-rect color and apply effects to an image.
Palettes also share some common features. For example, the More menu button islocated in the upper-right corner of each palette. A right-arrow icon appears in thetab of a palette located in the palette well, or as the More button icon in the float-ing palette window. Click the More button to view unique menu commands foreach palette. Some palette windows, such as the Layers, Filters, and Swatchespalettes, also have a small set of icon buttons located at the bottom. You can clickeach button to change the view of the contents in the palette or to perform a specialcommand.
Palette windows are designed to make it easier for you to access features inPhotoshop Elements. For example, the File Browser window enables you to view athumbnail image of a previously viewed file. Simply double-click an image to openit in the work area (see Figure 1.12).
03 8311 CH01 1/15/03 2:33 PM Page 28

CHAPTER 1 NAVIGATING THE WORK AREA 29
TAKE A PEEK AT THE PALETTE MENUIf you see a right-arrow icon in a palette’s tab, this means that the palette contains a drop-down More menu. Click the arrow icon to view the More menu list. Items in the menu listcan vary from palette to palette.
The following list introduces you to each of the palette windows in PhotoshopElements:
■ File Browser—View and open an image file stored on any local or networkeddrive on your computer. You can use this palette to navigate the image filesstored on a hard drive or CD-ROM.
■ Navigator—You can adjust the view of the image as it appears in the imagewindow. Click and drag the red rectangle in this palette window to pan to dif-ferent areas of an image.
■ Info—View X and Y coordinates for your cursor as it hovers over any area inthe image, or view the color information below the cursor.
■ Hints—Read all about any tool you select from the Toolbox or any palette inthe palette well. This palette is a floating dictionary!
■ How To—Learn how to apply one or more tools in Photoshop Elements by fol-lowing the steps in this palette window. Choose a set of recipes from the drop-down menu, and then click a link to view the set of steps for a particular task.
■ Undo History—As you apply tools, menu commands, or changes from apalette to an image, each task is logged as an entry in the History palette.Click an entry to revert the document to a previous state.
■ Swatches—Store groups of colors in custom palettes in this handy palette win-dow (see Figure 1.13). You can pick a color from an existing color palette oradd your own custom colors to a color palette.
FIGURE 1.13
Create and
experiment with
custom colors
using the
Swatches palette.
■ Layers—The Layers palette enables you to view each image object, hidden orshowing in the image window. Layers enable you to modify images in separatelayers, preserving the original image until you’re ready to flatten and optimizethe final image. You can add, view, or remove layers using the buttons at thebottom of the palette.
03 8311 CH01 1/15/03 2:33 PM Page 29
30 ABSOLUTE BEGINNER’S GUIDE TO ADOBE PHOTOSHOP ELEMENTS 2
The Info palette enables you to view location and color information in the imagewindow. If you want to pinpoint the location of a particular pixel or create an exactmatch for a color, you can use the Eyedropper Tool, combined with the Info palette,to get the job done! Click the tab for the Info palette, and then select the EyedropperTool from the Toolbox. Move the Eyedropper Tool over the active image window. Thecursor location and RGB and hexadecimal color information update as you movethe cursor around the image window.
Most tasks you perform in Photoshop Elements are stored as states in the UndoHistory palette. The Undo History palette records the tasks you perform only while
FIGURE 1.14
View document
information in
the Info,
Navigator, and
Undo History
palettes.
■ Layer Styles—Customize the way a selected object looks by choosing a layerstyle. You can apply layer styles to bitmap or vector graphics.
■ Filters—Preview or apply filters to the selected area of an image by clickinga button in this palette window.
■ Effects—Preview or apply an effect from this palette.
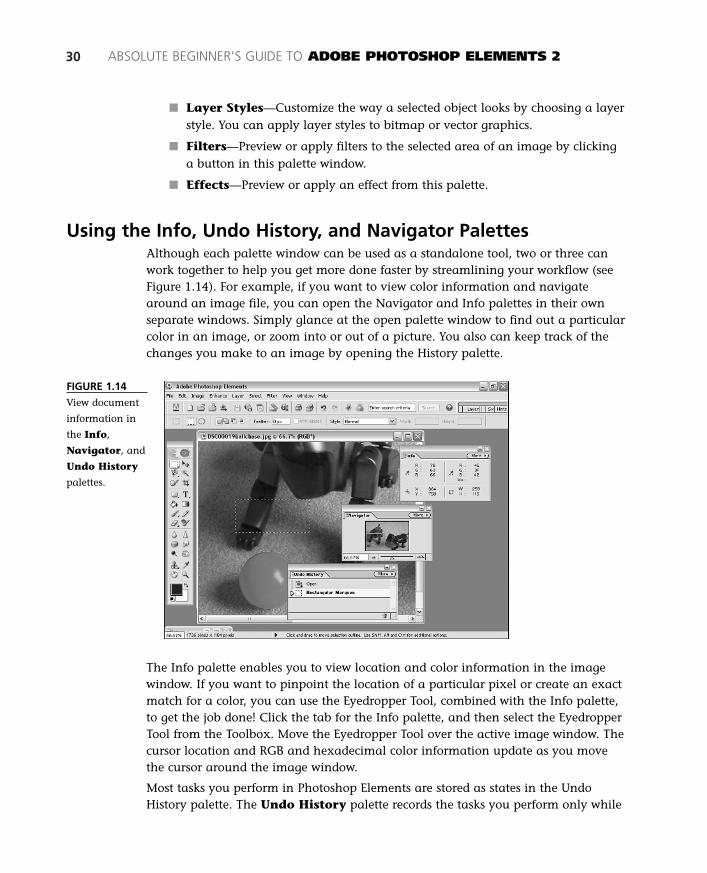
Using the Info, Undo History, and Navigator PalettesAlthough each palette window can be used as a standalone tool, two or three canwork together to help you get more done faster by streamlining your workflow (seeFigure 1.14). For example, if you want to view color information and navigatearound an image file, you can open the Navigator and Info palettes in their ownseparate windows. Simply glance at the open palette window to find out a particularcolor in an image, or zoom into or out of a picture. You also can keep track of thechanges you make to an image by opening the History palette.
03 8311 CH01 1/15/03 2:33 PM Page 30
CHAPTER 1 NAVIGATING THE WORK AREA 31
it’s open in the work area. If you choose a differ-ent image window, or save or close the file, andthen reopen it, Photoshop Elements will clear allhistory states. You can click an item in the UndoHistory palette’s window list to revert the imagewindow to a previous state. You also can dragand drop a history state over the image windowto revert the image to a previous state.
The Navigator palette enables you to changethe view of the open image. A thumbnail imageof the open document appears in theNavigation palette. You can drag the slidercontrol to zoom into or away from the contents ofthe image window, or you can type a numberinto the View text box to change the view in theimage window. A red rectangle marks the currentview in the palette. You can click and drag therectangle to pan to a new location of the imagein the image window.
EVERY STEP YOU TAKEThe Undo History, Info, and Navigator palettes enable you to find out precisely whatyou’re looking at (in terms of color, document history, and magnification level) in the imagewindow.
Customizing Images with the How To, Filters, and Effects Palettes
Filters and effects enable you to customize an image. You can preview each filter oreffect from the palette window (see Figure 1.15). A filter or an effect can be appliedonce, or multiple times, to the same image. You also can apply more than one filteror effect to any image. The image window must be in RGB mode before you apply afilter or an effect.
A filter is less complex than an effect. Fifteen groups of filters are installed withPhotoshop Elements. Each filter has a unique way of changing an image. Effects, onthe other hand, are made up of several filters and a few other items. Four groups ofeffects are available in the Effects palette. Drag and drop a filter or an effect ontothe image window to watch it go.
If you want to follow step-by-step instructions to use a particular tool or command,open the How To palette. The How To palette contains groups of recipes that canshow you, for example, how to apply the Red-Eye Brush Tool, correct color, retouchphotos, and create Web graphics.
tipYou can combine two or
more palettes into a singlepalette window. Click thetab of a palette and drag anddrop it over the tab area of a
second palette window ifyou want both palettes to
share the same window.
Drag and drop the second palettetoward the bottom of a palettewindow if you want to stack twopalette windows one above theother in the work area.
03 8311 CH01 1/15/03 2:33 PM Page 31
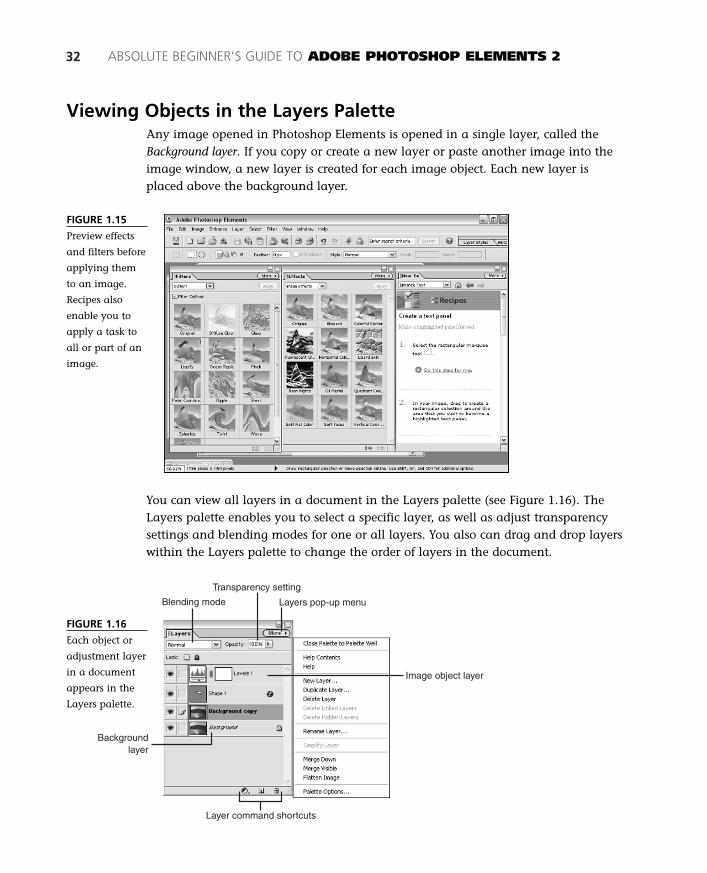
32 ABSOLUTE BEGINNER’S GUIDE TO ADOBE PHOTOSHOP ELEMENTS 2
Image object layer
Layer command shortcuts
Backgroundlayer
Layers pop-up menu
Transparency setting
Blending mode
FIGURE 1.16
Each object or
adjustment layer
in a document
appears in the
Layers palette.
Viewing Objects in the Layers PaletteAny image opened in Photoshop Elements is opened in a single layer, called theBackground layer. If you copy or create a new layer or paste another image into theimage window, a new layer is created for each image object. Each new layer isplaced above the background layer.
FIGURE 1.15
Preview effects
and filters before
applying them
to an image.
Recipes also
enable you to
apply a task to
all or part of an
image.
You can view all layers in a document in the Layers palette (see Figure 1.16). TheLayers palette enables you to select a specific layer, as well as adjust transparencysettings and blending modes for one or all layers. You also can drag and drop layerswithin the Layers palette to change the order of layers in the document.
03 8311 CH01 1/15/03 2:33 PM Page 32

CHAPTER 1 NAVIGATING THE WORK AREA 33
A Closer Look at the Image WindowYou might have noticed that the image window is the center of attention in the workarea. But it’s pretty obvious that you can’t do much with Photoshop Elements if youdon’t have an image file open. In addition to presenting the bitmap, text, or vectorgraphics, the image window can also display some general information about theimage file (see Figure 1.17). Each image window can also sport standard scroll andsize controls enabling you to resize or view any part of the image.
FIGURE 1.17
You can view
some general
information
about each
image file open
in the work area.
The filename
and color mode
of the image
window appear
in the title bar.
The document
size of the active
window appears
on the left side
of the status bar.
Viewing Color Mode and Image Size InformationThe image window displays the size of the openimage, as well as its image mode. PhotoshopElements supports four image modes: RGB,grayscale, indexed color, and bitmap. Each imagemode has its own way of managing the colorinformation for the open image. In most cases, ascanned image, or an image from a digital cam-era, is created as an RGB image and opened inRGB image mode in Photoshop Elements.
When you open an image file, PhotoshopElements changes the document view (alsoknown as the magnification level) so that you canview the entire image in the work area. Theactual width and height of the image, in pixelsand inches, can be viewed by holding down the
To find out moreabout color modes, see
Chapter 7, “Photoshop Elementsand Color.”
03 8311 CH01 1/15/03 2:33 PM Page 33
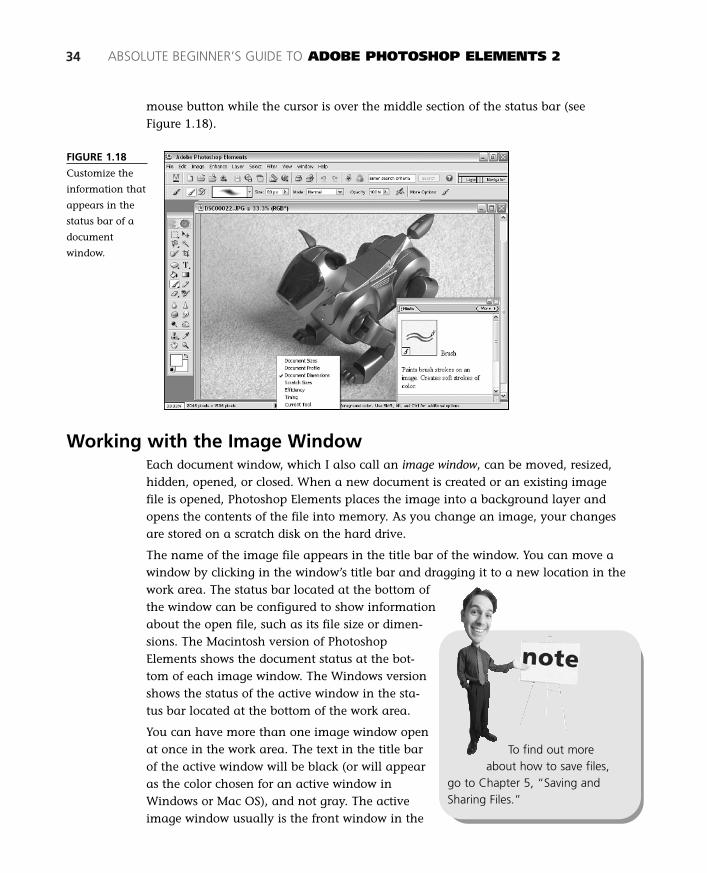
34 ABSOLUTE BEGINNER’S GUIDE TO ADOBE PHOTOSHOP ELEMENTS 2
FIGURE 1.18
Customize the
information that
appears in the
status bar of a
document
window.
Working with the Image WindowEach document window, which I also call an image window, can be moved, resized,hidden, opened, or closed. When a new document is created or an existing imagefile is opened, Photoshop Elements places the image into a background layer andopens the contents of the file into memory. As you change an image, your changesare stored on a scratch disk on the hard drive.
The name of the image file appears in the title bar of the window. You can move awindow by clicking in the window’s title bar and dragging it to a new location in thework area. The status bar located at the bottom ofthe window can be configured to show informationabout the open file, such as its file size or dimen-sions. The Macintosh version of PhotoshopElements shows the document status at the bot-tom of each image window. The Windows versionshows the status of the active window in the sta-tus bar located at the bottom of the work area.
You can have more than one image window openat once in the work area. The text in the title barof the active window will be black (or will appearas the color chosen for an active window inWindows or Mac OS), and not gray. The activeimage window usually is the front window in the
mouse button while the cursor is over the middle section of the status bar (see Figure 1.18).
To find out moreabout how to save files,
go to Chapter 5, “Saving andSharing Files.”
03 8311 CH01 1/15/03 2:33 PM Page 34
work area. You can apply tools and commands only to the active image window.Any windows open behind or beside the active window are—you guessed it—inac-tive. If you don’t plan to work with an inactive window, you might want to close itto free up memory.
If you modify the image, Photoshop Elements will ask whether you want to save thechanges to the file on your hard drive when you close the image window or exitPhotoshop Elements. If you want to preserve any layer information or customPhotoshop settings and pick up where you left off when you next work with thisimage file, you can save the file as a Photoshop file. You also can save the image filein one of many commonly used graphics file formats for Web or print.
Navigating Menu CommandsThe menu bar consists of 10 menus in the work area. Each menu in the menu barrepresents a group of commands that can enable you to apply a specific graphicstool to all or part of an image. For example, the Filters menu contains groups of fil-ters and effects that, when applied to an image, can create cool-looking effects. Thefollowing sections give you an overview of each menu command in PhotoshopElements.
Introducing File Menu CommandsSome of the menu commands, such as New, Open, and (Quit) [Exit] will be famil-iar to you if you’ve used other Windows or Mac OS applications. PhotoshopElements has an extended set of commands in itsFile menu, more so than most applications. Forexample, you can optimize an image for the Webby choosing the Save for Web command, or pre-view an image by choosing the Print Previewcommand. The following list introduces you toeach command that resides in the File menu:
■ New—Opens the New document window,enabling you to define the exact dimen-sions, image mode, and resolution.
■ New from Clipboard—Pastes the con-tents of the Clipboard into a new imagewindow. Use the Edit, Copy command inPhotoshop Elements or another program toplace text or graphics in the Clipboard.Choose File, New from Clipboard to pastethe Clipboard contents into a new, custom-tailored image window.
CHAPTER 1 NAVIGATING THE WORK AREA 35
Mac OS X folks willhave two additional
menus (aren’t you lucky!): Appleand Photoshop Elements.However, with a few exceptions,the Mac and the Windows ver-sions have almost identical menucommands.
03 8311 CH01 1/15/03 2:34 PM Page 35
36 ABSOLUTE BEGINNER’S GUIDE TO ADOBE PHOTOSHOP ELEMENTS 2
■ Open/Open As—Opens an image file. The Open As command enables youto convert an image file into a supported Photoshop Elements file format. Fora complete list of supported file formats, see Chapter 4, “Creating, Opening,and Converting Images.”
OPEN SESAMEThere are a few more ways you can open an image file in the work area. You can use theCopy command in Photoshop Elements or another application to move a file to theClipboard and then paste it into a new image window.
You also can choose the Open Recent command from the File menu. A list of previouslyopened files will appear in the menu list. Click on a file to open it.
If you want to create a panorama, choose the Photomerge command from the File menu.To find out how to create a panorama, go to Chapter 16, “Stitching Together aPanorama.”
■ Browse—Opens the File Browser palette orFile Browser window (if the palette is detachedfrom the palette well).
■ Open Recent—Brings up a submenu con-taining the 10 most recently opened imagefiles.
■ Create Photomerge—Opens thePhotomerge window that enables you tocreate horizontal or vertical panoramas.
■ Close—Closes the active, open window.
■ Close All—Closes all open windows.
■ Save—Saves the active image window. Ifthis command is used on a new imagewindow, the Save dialog box will appear,enabling you to name the image, navigateto the folder where you want to save the file,and choose a file format.
■ Save/Save As—Use this command, and use it often, to save a nativePhotoshop file or any other supported file format. For a complete list of sup-ported file formats, see Chapter 5, “Saving and Sharing Files.” The Save Ascommand enables you to choose a new name and file format for the file youwant to save.
■ Save for Web—Optimize an image for the Web by opening the Save forWeb window. You can save a GIF, JPEG, PNG-8, PNG-24, or animated GIFfrom this window.
If you’re eager to playwith digital images and
don’t want to get familiar with allthe menu commands inPhotoshop Elements, skip aheadto the next chapter, or to Part IIIof this book.
03 8311 CH01 1/15/03 2:34 PM Page 36
■ Revert—Removes any changes made to the document, returning it to itsoriginal contents when it was first opened. This tool can revert the documentto only its last-saved state.
■ Attach to Email—Opens a dialog box enabling you to resize or send theimage as is to your default email program.
■ Create Web Photo Gallery—Opens the Web Photo Gallery dialog box.Select the layout and photos you want to use to create a photo gallery youcan view on CD-ROM or on your Web site.
■ Online Services—Enables you to update Photoshop Elements and get thelatest bug fixes and software changes.
■ Place—Enables you to place an imported PDF, Illustrator, or EPS file, or animage stored in the Clipboard, into a specific place in the image window.
■ Import—Select this command to control a scanner or camera device thatworks with installed TWAIN software. A list of installed TWAIN plug-ins canbe found in the Import menu.
■ Export—Save an image file using the Export menu command. You caninstall plug-in files that enable you to export an image file to a custom fileformat.
■ Batch Processing—Opens the Batch window that enables you to resize,rename, or convert one or more image files automatically.
■ Automation Tools—Choose from creating an automated contact sheet, pic-ture package, or Web photo gallery, or run a simple automated task, such asresizing photos on a batch of image files.
■ File Info—Add caption, copyright, URL, and EXIF information to a docu-ment. EXIF information displays camera, scanner, or other device-specificinformation related to the image file.
■ Print Preview/Print—Print commands enable you to preview the pagelayout, configure the way the document will print, and then send the imageto the printer as a print job. For best results, check the Scale to Fit Mediacheck box to retain high-resolution image quality and print the image to anyheight and width. Preview the image in the left window pane.
■ Page Setup—Enables you to choose portrait or landscape orientation for theopen image file and select the paper size and scale of the active imagewindow.
■ Print Layouts—Choose a picture package if you want to print a photo atdifferent sizes on a single sheet of paper. Select Contact Sheet to printthumbnail images of images stored on your hard drive.
■ (Quit) [Exit]—Terminates the Photoshop Elements application. This com-mand is located in the Photoshop Elements menu in Mac OS X.
CHAPTER 1 NAVIGATING THE WORK AREA 37
03 8311 CH01 1/15/03 2:34 PM Page 37

38 ABSOLUTE BEGINNER’S GUIDE TO ADOBE PHOTOSHOP ELEMENTS 2
Exploring Edit Menu CommandsCommands in the Edit menu might seem even more familiar to you if you’re a bigcut, copy, and paste user. If these commands don’t ring a bell, don’t worry; you’lllearn how to use them soon enough! The following list summarizes what each ofthese handy commands can do:
■ Undo/Redo/Can’t Undo—Select this command once to reverse the previ-ous task or command performed on the image window. You can performmultiple undo commands. Set the number of undo tasks from the GeneralPreferences window.
■ Step Forward/Backward—Redo the previously undone task by choosingStep Forward. Undo the previous task by choosing Step Backward.
■ Cut—Removes the selected area from the image window and puts it into theClipboard. The Clipboard is a part of the Windows and Mac operating systemused to store temporary data.
■ Copy/Copy Merged—Creates a copy of the selected area in the image win-dow and places it in the Clipboard. Copy Merged enables you to copy all thelayers in the selected area.
■ Paste/Paste Into—Places the image stored in the Clipboard into a newlayer in the image window. The Paste Into command places the image fromthe Clipboard into a selected area in the image window.
■ Clear—Deletes the selected image and its layer from the image window.However, you can revert the document by opening the History palette or bychoosing the Undo command from the Edit menu.
■ Fill/Stroke—The Fill command enables you to adjust content and blendingsettings for the fill or color after you’ve applied a tool to an image. TheStroke command enables you to customize a stroke after it has been appliedto an image.
■ Define Brush/Pattern—These commands enable you to select a cus-tomized brush stroke or pattern and save it as a custom brush or pattern.
■ Purge—Clear the Undo, Clipboard, Histories, or all three types of settingsfrom the Purge command’s submenu.
■ Color Settings/Preset Manager/Preferences—Customize the color man-agement, tools, and your work preferences by choosing these menu com-mands. To find out more about how to use these valuable features, go toChapter 2, “Customizing Adobe Photoshop Elements.” These commands arelocated in the Photoshop Elements menu in Mac OS X.
03 8311 CH01 1/15/03 2:34 PM Page 38

CHAPTER 1 NAVIGATING THE WORK AREA 39
Image Menu CommandsPerform the equivalent of a facelift or liposuction with one or more of the com-mands you’ll find in the Image menu. Go to Chapter 8, “Tonal Range and ColorCorrection,” to find out how to use the Image menu commands with your images.Each selection in the Image menu list contains a short list of mission-critical toolsthat can make your images look marvelous!
The following list provides a brief explanation of what each menu item can do:
■ Duplicate Image—Creates an exact copy of the selected image object.
■ Rotate—Flip or turn an image on its side by choosing one of the commandsfrom this menu.
■ Transform—Skew or distort an image, or change a selected image’s perspec-tive. Choose the Free Transform command to apply the Skew, Distort, orPerspective effects in tandem.
■ Crop—Use this tool to define new boundaries for the open image and reduceits dimensions.
■ Resize—Adjust the image or canvas size of an image by choosing the ImageSize or Canvas Size commands from this menu. Choose Scale to adjust thesize of the selected area in the image window. Or choose Reveal All to showany hidden images stored in the Layers palette.
■ Adjustments—Choose one of the commands in this menu to reduce thenumber of pixels in an image by defining a reduced set of colors to apply tothe open image.
■ Histogram—Enables you to view the distribution of darker and lighter pix-els (shadows and highlights) for each or all color channels in the openimage. An RGB image contains red, green, and blue channels. You can vieweach channel separately or view all three at once in the Histogram dialogbox.
■ Mode—Change the number of colors available to an image. Choose fromRGB, Grayscale, Bitmap, or Indexed Color modes.
Adjusting Images with the Enhance Menu CommandsImage is everything in Photoshop Elements. Even if your image looks great, you canuse the tools in the Enhance menu to make it look even better. It’s sort of the equiva-lent of adding makeup to a facelift. After all, the devil is in the details, right?
The following list contains a brief description of each menu item in the Enhancemenu:
03 8311 CH01 1/15/03 2:34 PM Page 39

40 ABSOLUTE BEGINNER’S GUIDE TO ADOBE PHOTOSHOP ELEMENTS 2
■ Quick Fix—Opens the Quick Fix dialog box. Access the brightness/contrast,color correction, focus, and rotate tools.
■ Auto Levels—Photoshop Elements will automatically correct the tonal rangeof colors in an image when this option is selected. Sometimes, this featurecan save you time by quickly correcting colors rather than your having to doit manually.
■ Auto Contrast—Automatically correct the contrast levels in an image withthis command.
■ Auto Color Correction—Automatically correct color in an image set toRGB image mode.
■ Adjust Lighting—The Fill Flash and Adjust Backlighting commandsare located in the Adjust Lighting submenu.
■ Fill Flash—Brighten shadowed areas of an image with this command. It islocated in the Adjust Lighting submenu.
■ Adjust Backlighting—Manually adjust washed-out colors in the back-ground of an image using this feature. It is located in the Adjust Lightingsubmenu.
■ Adjust Color—Open the Color Cast, Hue/Saturation, Remove Color, or ColorVariations tools from this menu. Use the Hue, Saturation, and Lightness dia-log box to adjust RGB or CYK colors in an image. Replace or remove colorsusing the Color menu commands.
■ Color Variations—The Variations window enables you to experiment withcolor adjustment. You can make changes to Shadows, Midtones, Highlights,and Saturation, and view the results as you manually adjust colors. Thismenu command is located in the Adjust Color submenu.
■ Adjust Brightness/Contrast—Manually adjust the brightness and contrastlevels of an image with this command. The submenu options in this menucommand open the Brightness/Contrast dialog box or Levels dialog box formaking the adjustments.
Layer Menu CommandsLayers enable you to organize, combine, and edit images in a document. Althoughyou can use the Layers palette to adjust many of the layers settings, there are manymore commands in the Layers menu and Layers palette. The following list summa-rizes the Layer menu commands:
■ New—Create one of four possible kinds of new layers.
■ Duplicate Layer—Create a copy of a layer by selecting a layer, and thenchoosing this menu command.
03 8311 CH01 1/15/03 2:34 PM Page 40
CHAPTER 1 NAVIGATING THE WORK AREA 41
■ Delete Layer—Remove a layer from a document.
■ Rename Layer—Give each layer a unique name so you can easily find eachgraphic element in an image window. You also can double-click a layer toopen the Layer Properties window. Then, type in a new name for the selectedlayer.
■ Layer Style—Apply or modify a layer style by choosing one of the com-mands in this submenu.
■ New Fill Layer—Add a solid-color, gradient, or pattern layer to a document.
■ New Adjustment Layer—Experiment with Levels, Brightness/Contrast,Hue/Saturation, Gradient Map, Invert, Threshold, and Posterize settings toadjust the tonal ranges of an image.
■ Layer Content Options—The Change Layer Content and Layer Contentcommands enable you to modify adjustment or fill layers that exist in theLayers palette.
■ Type—Format a text layer in a document by choosing one of the commandsin this menu. The Warp Text command enables you to create some cool-looking text effects.
■ Simplify Layer—Some layers can contain more than one element. Choosethis command to merge complex layers into a simple, single-object layer.
■ Group with Previous/Ungroup—Keep layers together or apart by choos-ing one of these two commands.
■ Arrange—Change the order of the selected layer in the Layers palette. TheBackground layer cannot be moved, although any other layer can be movedfreely.
■ Merge Layers—Merge all layers below the selected layer in the Layerspalette.
■ Merge Visible—Combine all layers marked with the eye icon into a singlelayer. Invisible layers will remain unchanged.
■ Flatten Image—Merge all layers in a document into a single layer.
Using the Select Menu CommandsBefore you can view or edit part of an image, you’ll need to select it. The selectioncommands enable you to easily shrink, grow, reverse, or smooth the edge pixels of aselection in the active image window. The following list provides a brief summary ofthe Selection menu commands:
■ All—Select everything in the active image window.
■ Deselect—Deselect everything in the active image window.
03 8311 CH01 1/15/03 2:34 PM Page 41
■ Reselect—Well, you get the picture by now. This command reselects the pre-viously selected image.
■ Inverse—Select all parts of the image except for the currently selected area.
■ Feather—Blend the edges of the selected image object into the pixels sur-rounding the selected area.
■ Modify—Adjust the border, or expand, smooth, or contract a selected area ofan image.
■ Grow—Extend the edges of the selected area.
■ Similar—Change the pixels of the edges of the selected area to be more likethe color of the surrounding pixels.
■ Load/Save/Delete Selection—Choose the Save Selection command tostore a selection. Deselect the selection and apply any other tools or com-mands to the image window. Select the Load Selection command to reselectthe saved selection. You can choose from a list of saved selections. Use theDelete Selection command to remove a selection from the Selection drop-down menu.
Adding Effects from the Filter MenuWow! Have you ever seen so many menu options in a menu list? The Filter menustores all the plug-in files installed with Photoshop Elements. Plug-in files can beused to extend the capabilities of Photoshop Elements. Select an image layer in theLayers palette, and then choose one of the many commands in the Filter menu tostylize an image. The following list provides a brief overview of each group of filtersand effects installed with Photoshop Elements:
■ Repeat Last Effect—The previously selected filter or effect will appear atthe top of the Filter menu. Press (Command-F) [Ctrl+F] to reapply the filteror effect to the selected area of the document.
■ Artistic—Apply neon glow, colored pencil, smudge stick, rough pastels, andother artistic stroke effects to an image.
■ Blur—These filters smooth out pixels by averaging the color of pixels locatedbeside hard edges, lines, or shaded areas.
■ Brush Strokes—Apply another variation of brush strokes to an image, simi-lar to the artistic effects.
■ Distort—Each distort effect takes a shape, such as a sphere, and applies aspecific effect, such as pinch, ripple, or shear, combined with the shape to dis-tort an image. One of the more powerful tools in Photoshop Elements, theLiquify Tool, is located in the Distort menu.
42 ABSOLUTE BEGINNER’S GUIDE TO ADOBE PHOTOSHOP ELEMENTS 2
03 8311 CH01 1/15/03 2:34 PM Page 42

■ Noise—Add pixels to an image to reduce the clarity of an image. This filtercan be used to minimize sharp color or tonal contrasts in an image.
■ Pixelate—Group pixels to a specific shape or size to create a unique effect.
■ Render—Add a lens flare, lighting effect, or 3D effect to an image by apply-ing a render effect.
■ Sharpen—Sharpen filters work in contrast to Blur filters, increasing the con-trast of nearby pixels to bring out an image.
■ Sketch—Apply a texture or stroke to an image to enhance it. Works simi-larly to the Artistic and Brush Stroke filters.
■ Stylize—Apply a painted effect to an image with options such as Emboss,Diffuse, Solarize, Glowing Edges, Trace Contour, or Wind filter.
■ Texture—Intensify the depth or substance of an image by applying selec-tions such as Grain, Patchwork, Stained Glass, or Texturizer filters to animage.
■ Video—De-interlace or change an image to NTSC colors with video filters.
■ Other—Create your own filter effects by choosing the Custom filter, or chooseDitherBox, High Pass, Maximum, Minimum, or Offset filter to apply a coloradjustment filter to an image.
■ Digimarc—Image files can be saved with a unique identification, or water-mark. This filter enables you to search for a digimarc watermark in animage.
Customizing Output with the View Menu CommandsView commands enable you to change the way an image appears in the image win-dow. As you work with an image, you might need to magnify part of it, zoom out, ormeasure a certain area. The commands in the View menu enable you to do justthat. The following list describes each menu option and its use:
■ New View—Opens a second, duplicate window of the image in the activewindow.
■ Zoom In—Magnifies the image in the image window.
■ Zoom Out—Reduces the size of the image in the image window.
■ Fit on Screen—Adjusts the size so that the full image fits in the imagewindow.
■ Actual Pixels—Changes the view to 100%, or the unaltered view of theimage in the image window.
■ Print Size—Defines the printed dimensions of the image file. Changes theimage in the image window to the way it will appear if printed.
CHAPTER 1 NAVIGATING THE WORK AREA 43
03 8311 CH01 1/15/03 2:34 PM Page 43
■ Selection—Enables you to view or not view a dash-line marquee when aselection tool is applied to the image window.
■ Rulers—Shows or hides a horizontal and vertical ruler on the image window.
■ Grid—Adds or removes a grid in the image window.
■ Annotations—If an image contains annotation data, you can view or hidethis information by selecting this command.
■ Snap To Grid—Helps align an object being placed in the image to the near-est grid cell.
Opening and Closing Palettes with the Window CommandPhotoshop Elements enables you to work with more than one image file at a time.Windows folks can use the commands in the Window menu to help organize allthe open documents in the work area. Each palette window also can be selectedfrom the Window menu. The following list contains a brief description of the com-mands in the Window menu. The palette commands are not included in this list;you’ll find these commands in the previous section.
■ Images—A list of any open image windows appears in this menu, alongwith the following menu commands.
■ Cascade—Overlaps each window from the left corner of the work areatoward the right. This menu item is available only in the Windows version ofPhotoshop Elements.
■ Arrange Icons—A Windows-only menu option. This command aligns anyminimized windows along the lower-left corner of the work area.
■ Close All—Another Windows-only menu command. This one closes all openimage windows.
■ Tile—Resizes each open window so that you can view each open image inthe work area. This menu item is available only in the Windows version ofPhotoshop Elements.
■ Minimize—Reduces the size of the active window to a small title bar andrelocates it to the bottom-left corner of the work area. (Command-M)[Ctrl+M] is the shortcut key for this menu command.
■ Bring All to Front—Sorry Windows folks, this menu command is only inthe Mac version of Photoshop Elements. It brings the selected window to theforeground.
■ Show/Hide Tools—Shows or hides the Toolbox.
■ Show/Hide Options—Shows or hides the options bar.
■ Show/Hide Shortcuts—Shows or hides the shortcuts bar.
44 ABSOLUTE BEGINNER’S GUIDE TO ADOBE PHOTOSHOP ELEMENTS 2
03 8311 CH01 1/15/03 2:34 PM Page 44

CHAPTER 1 NAVIGATING THE WORK AREA 45
■ Show/Hide Welcome—Opens or closes the Quick Start window.
■ Show/Hide Search Results—Shows or hides the Search Results palette.
■ Reset Palette Locations—Returns the palette windows to their originallocations in the work area.
03 8311 CH01 1/15/03 2:34 PM Page 45

03 8311 CH01 1/15/03 2:34 PM Page 46

In this chapter
• Adjusting Color-Management Settings
• Choosing Settings in the Preset Manager
• Personalizing Your Preferences
2
Customizing Adobe
Photoshop Elements
Using just the default settings in Photoshop Elements will enable you to
perform all kinds of digital magic on your photos. As you become more
familiar with the way the tools and features work, you might want to
customize some of the settings. For starters, you can customize the way
an image file is opened or saved, or choose whether the cursor matches
the brush size or remains constant regardless of how many pixels a tool
applies to an image.
Photoshop Elements has three general groups of customizable settings.
The first group, color settings, enables you to choose the type of color
management used with every image. The second group, the Preset
Manager, enables you to create and choose custom brush, gradient, and
pattern-related settings. And last but not least, the Preferences dialog
box enables you to customize eight windows of user preference settings.
04 8311 CH02 1/15/03 2:31 PM Page 47
Adjusting Color-Management SettingsSomehow, a term involving color combined with management just doesn’t sit wellwith me. When I think of color, I think of red, blue, and yellow. When I think ofmanagement, I think of a business, desks, payroll, a water cooler, phones, and aphotocopier.
If you think about how a computer manages color, and compare that to the way amonitor, printer, camera, or scanner manages color, it might seem as though eachdevice is running its own color-management business. For example, if you pick acertain green color on your computer monitor, it might look light blue when youprint it to your color printer. Similarly, if you take a picture of a red apple with acamera, it might appear red on your computer screen, but greener when you print toa color printer. The accuracy of color between your computer monitor and printer alldepends on how you calibrate the color software for your computer’s monitor andprinter. On the other hand, if you don’t use color management, you risk losing someof the color information in an image. With digital images, each color is stored as anumber. Color profiles enable a computer and peripheral devices to translate a colorvalue from one color space, such as RGB (red, green, and blue), into another colorspace, such as HSB (hue, saturation, and brightness) or CMYK (cyan, magenta, yel-low, and black).
The following sections explain how color-management settings work in PhotoshopElements. If you’re not sure which setting to choose, choose the default setting: NoColor Management. Even though you choose the No Color Managementoption, Photoshop Elements will assign a color profile to each image file you open.As you edit and save the image file, Photoshop Elements will use the color profile tomanage color. The color profile Photoshop Elements assigns to the image will nodoubt be different from the color profile used by the scanner or camera to generatethe original colors.
BACK UP ORIGINAL IMAGESBefore you get all excited about working with color images and start modifying an imagewith Photoshop Elements, make a copy of that file onto your hard drive. If you plan tomake several modifications to an image file, it’s helpful to keep a backup of the originalnearby on your local hard drive.
However, the best method for backing up a file is to copy it to an external drive, such as aZip disk or CD-R media, or to a tape backup drive connected to your computer over a net-work. If the hard drive stops working, you can always install Photoshop Elements on a newcomputer, restore your backup files, and continue working on your image files. Afteryou’ve created a copy of the original image file, you can make all the changes you likewithout worrying about making an irreversible mistake. If you make a mistake, you canalways start over with the original.
48 ABSOLUTE BEGINNER’S GUIDE TO ADOBE PHOTOSHOP ELEMENTS 2
04 8311 CH02 1/15/03 2:31 PM Page 48
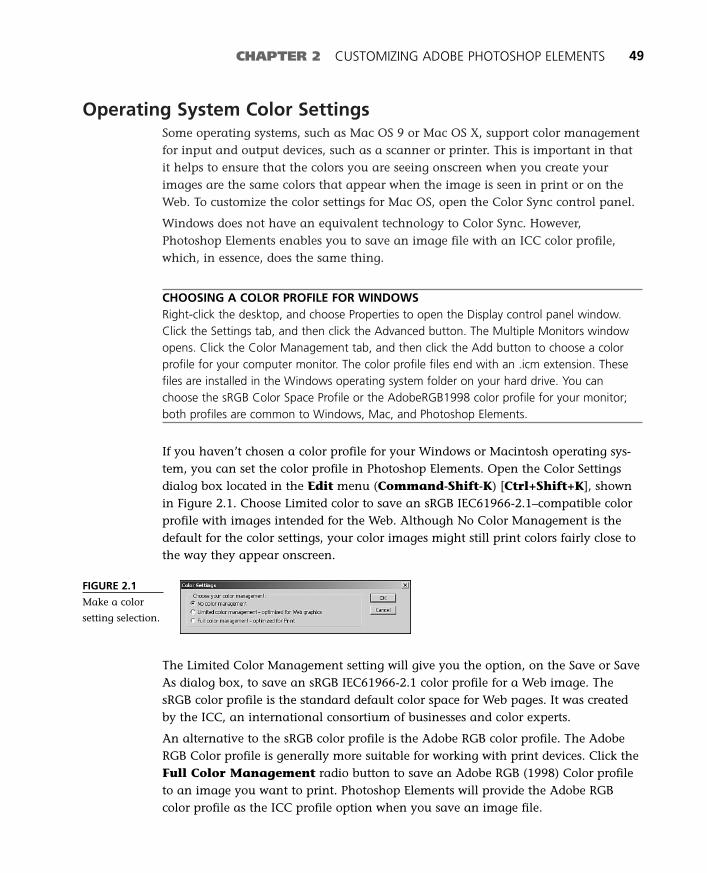
Operating System Color SettingsSome operating systems, such as Mac OS 9 or Mac OS X, support color managementfor input and output devices, such as a scanner or printer. This is important in thatit helps to ensure that the colors you are seeing onscreen when you create yourimages are the same colors that appear when the image is seen in print or on theWeb. To customize the color settings for Mac OS, open the Color Sync control panel.
Windows does not have an equivalent technology to Color Sync. However,Photoshop Elements enables you to save an image file with an ICC color profile,which, in essence, does the same thing.
CHOOSING A COLOR PROFILE FOR WINDOWSRight-click the desktop, and choose Properties to open the Display control panel window.Click the Settings tab, and then click the Advanced button. The Multiple Monitors windowopens. Click the Color Management tab, and then click the Add button to choose a colorprofile for your computer monitor. The color profile files end with an .icm extension. Thesefiles are installed in the Windows operating system folder on your hard drive. You canchoose the sRGB Color Space Profile or the AdobeRGB1998 color profile for your monitor;both profiles are common to Windows, Mac, and Photoshop Elements.
If you haven’t chosen a color profile for your Windows or Macintosh operating sys-tem, you can set the color profile in Photoshop Elements. Open the Color Settingsdialog box located in the Edit menu (Command-Shift-K) [Ctrl+Shift+K], shownin Figure 2.1. Choose Limited color to save an sRGB IEC61966-2.1–compatible colorprofile with images intended for the Web. Although No Color Management is thedefault for the color settings, your color images might still print colors fairly close tothe way they appear onscreen.
CHAPTER 2 CUSTOMIZING ADOBE PHOTOSHOP ELEMENTS 49
FIGURE 2.1
Make a color
setting selection.
The Limited Color Management setting will give you the option, on the Save or SaveAs dialog box, to save an sRGB IEC61966-2.1 color profile for a Web image. ThesRGB color profile is the standard default color space for Web pages. It was createdby the ICC, an international consortium of businesses and color experts.
An alternative to the sRGB color profile is the Adobe RGB color profile. The AdobeRGB Color profile is generally more suitable for working with print devices. Click theFull Color Management radio button to save an Adobe RGB (1998) Color profileto an image you want to print. Photoshop Elements will provide the Adobe RGBcolor profile as the ICC profile option when you save an image file.
04 8311 CH02 1/15/03 2:31 PM Page 49

In addition to choosing a color management set-ting for Photoshop Elements, you can customizethe operating system settings on your computermonitor so that you can view as many colors asyou like. The maximum number of colors youcan view on your monitor is limited by theamount of video memory installed on the moni-tor or on your computer. To adjust the number ofcolors viewable on your computer, open theDisplay Settings control panel if you’re usingWindows, or open the Monitors (or Monitors &Sound) control panel if you’re using a Mac.Choose a minimum of thousands (16-bit) or mil-lions (24-bit) of colors.
The size of your desktop affects how much of an image file you can view. Choose aminimum desktop size of 800×600 pixels. Depending on the average size of theimage you’ll be working on (the average two-megapixel camera creates a 1024-×768-pixel image file), choose a desktop size that displays the most colors. This pro-vides the best processor performance in addition to a healthy dose of desktop realestate.
WHAT’S THE SIZE OF YOUR DESKTOP?The desktop size represents the number of pixels that you can view on your computermonitor. However, the larger the desktop size, the smaller each pixel will become. Theresult? Eyestrain.
In a nutshell, it’s tough to work with large image files on a small computer monitor’s desk-top (for example, 13- or 15-inch monitors). Although you might be able to view the fullcolor spectrum on any size monitor, smaller monitors limit how much of the image you canview and access.
If working with small pixels or squinting your eyes appeals to you, choose a larger desktopsize for your computer screen. I use a 1,600×1,200-pixel desktop on a 17-inch monitorwith one of my Windows computers.
Choosing a Color ProfilePhotoshop Elements can work with a wide range of color profiles. Some digital cam-era software may install custom color management software onto your computer. AKodak digital camera may install Kodak’s CMS (color management system).Windows computers can work with more than one color management system. Toselect the color profile for your computer, open the Properties window for the MyComputer icon. Click the Settings tab, and click the Advanced button to access
50 ABSOLUTE BEGINNER’S GUIDE TO ADOBE PHOTOSHOP ELEMENTS 2
tipICC is an acronym for the
International ColorConsortium, which definesstandards for consistent coloracross output devices. Find
out more about the sRGBcolor space by visiting
http://www.w3.org/Graphics/
Color/sRGB.html.
04 8311 CH02 1/15/03 2:31 PM Page 50

the color profile configurations settings for thegraphics card installed on your computer. You canalso use a color calibration program installed onyour computer to select a color profile and cali-brate the color settings for your computer moni-tor. To find out how to calibrate your monitorwith Adobe’s Gamma control panel, go toChapter 7, “Photoshop Elements and Color.”
Choosing Settings in the PresetManager
Customize settings for brushes, swatches, gradi-ents, and patterns from the Preset Manager win-dow. Choose Preset Manager from the Editmenu to open the Preset Manager window. ThePreset Type drop-down menu contains Brushes,Swatches, Gradients, and Patterns. Each of thesemenu options changes the available settings thatappear in the Preset Manager window.
The More button is located in the upper-rightcorner of the Preset Manager dialog box. Clickthis button to view a drop-down menu for eachPreset. You can change the window list view, loadanother group of settings into the window list, orchoose a custom command specific to each pre-set. The Load and Save Set buttons enable youto save and open custom settings so you canreuse your presets with other documents or sharethem with other Photoshop Elements users.
Each set of brushes, gradients, swatches, or pat-terns is stored in a folder located in the Presetsfolder of the Adobe Photoshop Elements folderon your hard drive. For example, each set ofbrushes is stored in a separate file in thePresets\Brushes folder. To create a new set ofbrushes, patterns, gradients, or swatches, select one of the items in the window list,and then click the Save Set button. Type a name for the file, and save the file to yourhard drive. Brushes are saved as .abr files, patterns as .pat files, gradients as .grdfiles, and swatches as .aco files. When the file is placed in the corresponding Brushes,
CHAPTER 2 CUSTOMIZING ADOBE PHOTOSHOP ELEMENTS 51
If Limited ColorManagement is selected in
the Color Settings window,Photoshop Elements will attach ansRGB IEC61966-2.1 color profileto the image being saved. sRGBIEC61966-2.1 will appear besidethe ICC Profile check box name inthe Save As dialog box. If youopen this image file in anothergraphics application, it will becapable of producing a moreaccurate set of colors than if thecolor profile had not been savedwith the file.
tipPress (Command) [Ctrl] 1,
2, 3, or 4 to go directly tothe Brushes, Swatches,Gradients, or Patterns Presetwindow in the Preset
Manager window.
04 8311 CH02 1/15/03 2:31 PM Page 51
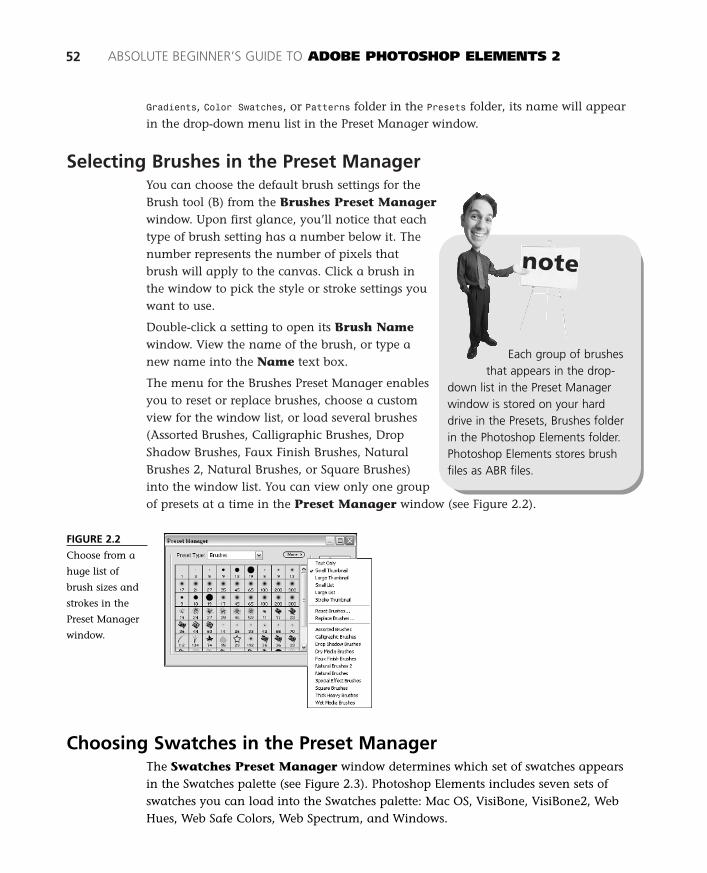
Gradients, Color Swatches, or Patterns folder in the Presets folder, its name will appearin the drop-down menu list in the Preset Manager window.
Selecting Brushes in the Preset ManagerYou can choose the default brush settings for theBrush tool (B) from the Brushes Preset Managerwindow. Upon first glance, you’ll notice that eachtype of brush setting has a number below it. Thenumber represents the number of pixels thatbrush will apply to the canvas. Click a brush inthe window to pick the style or stroke settings youwant to use.
Double-click a setting to open its Brush Namewindow. View the name of the brush, or type anew name into the Name text box.
The menu for the Brushes Preset Manager enablesyou to reset or replace brushes, choose a customview for the window list, or load several brushes(Assorted Brushes, Calligraphic Brushes, DropShadow Brushes, Faux Finish Brushes, NaturalBrushes 2, Natural Brushes, or Square Brushes)into the window list. You can view only one groupof presets at a time in the Preset Manager window (see Figure 2.2).
52 ABSOLUTE BEGINNER’S GUIDE TO ADOBE PHOTOSHOP ELEMENTS 2
Each group of brushesthat appears in the drop-
down list in the Preset Managerwindow is stored on your harddrive in the Presets, Brushes folderin the Photoshop Elements folder.Photoshop Elements stores brushfiles as ABR files.
FIGURE 2.2
Choose from a
huge list of
brush sizes and
strokes in the
Preset Manager
window.
Choosing Swatches in the Preset ManagerThe Swatches Preset Manager window determines which set of swatches appearsin the Swatches palette (see Figure 2.3). Photoshop Elements includes seven sets ofswatches you can load into the Swatches palette: Mac OS, VisiBone, VisiBone2, WebHues, Web Safe Colors, Web Spectrum, and Windows.
04 8311 CH02 1/15/03 2:31 PM Page 52

Click the arrow button to view each swatch set, andselect an item from the menu list to change theswatch set in the Preset Manager window. Eachswatch set represents a group of colors stored in afile in the Color Swatches folder, located in thePresets folder. Click the Save Set button to createyour own swatch set and save it as a file on yourhard drive. Click the Load button to select aswatch set file stored on your hard drive.
To view the hexadecimal value of a color, click acolor square in the Swatches window. The tooltip for the color contains the hexadecimal valueof the color. You also can double-click a color toview its hexadecimal value.
The drop-down menu for the Swatches containstwo view options, Small Thumbnail and SmallList. You also can reset or replace swatches fromthe drop-down menu.
Selecting Gradients in the Preset ManagerA gradient consists of two or more colors that gradually blend into each other. WhenGradients is selected as the Preset Type, each square in the window contains a gradi-ent map (see Figure 2.4). When you select the Gradient tool (G) from the Toolbox,you can assign a gradient map to the selected area in the image window. You canchoose the default gradient maps that appear in the options bar settings from theGradients Preset Manager window.
Each group of brushes that appears in the drop-down list in the Preset Manager win-dow is stored on your hard drive in the Presets\Gradients folder in the PhotoshopElements 2 folder. Photoshop Elements stores groups of gradients in GRD files. Choosethe Save Set button in the Preset Manager window to create a custom group of gradients.
CHAPTER 2 CUSTOMIZING ADOBE PHOTOSHOP ELEMENTS 53
FIGURE 2.3
Choose a group
of colors to work
with from the
Swatches Preset
Manager
window.
Remember the swatchset you’ve selected in the
Swatches Preset Manager win-dow. The name of the currentswatch set will not appear in theSwatches Preset Manager win-dow or the Swatches palettewindow.
04 8311 CH02 1/15/03 2:31 PM Page 53
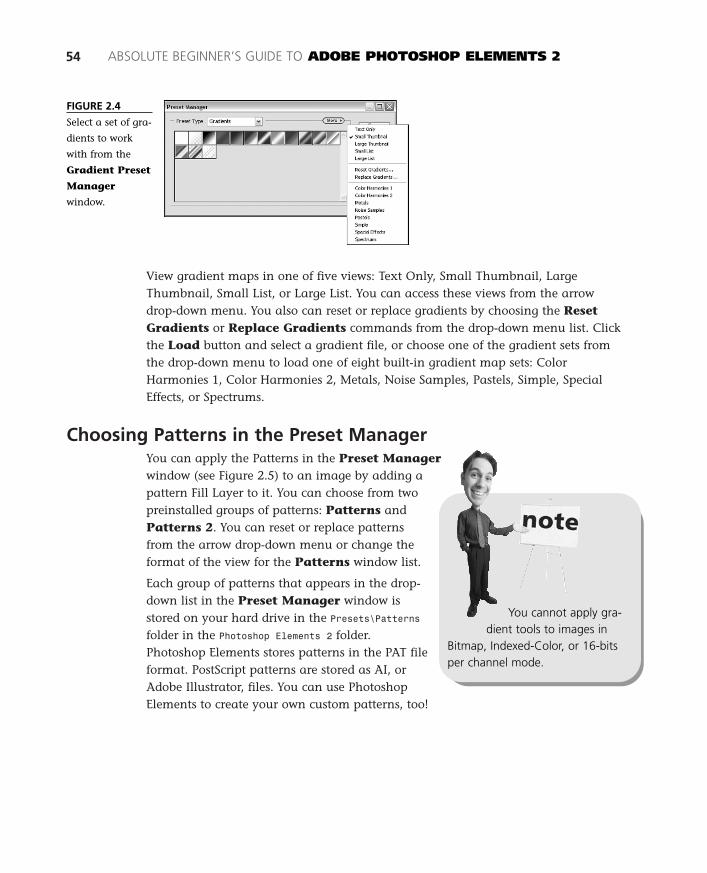
View gradient maps in one of five views: Text Only, Small Thumbnail, LargeThumbnail, Small List, or Large List. You can access these views from the arrowdrop-down menu. You also can reset or replace gradients by choosing the ResetGradients or Replace Gradients commands from the drop-down menu list. Clickthe Load button and select a gradient file, or choose one of the gradient sets fromthe drop-down menu to load one of eight built-in gradient map sets: ColorHarmonies 1, Color Harmonies 2, Metals, Noise Samples, Pastels, Simple, SpecialEffects, or Spectrums.
Choosing Patterns in the Preset ManagerYou can apply the Patterns in the Preset Managerwindow (see Figure 2.5) to an image by adding apattern Fill Layer to it. You can choose from twopreinstalled groups of patterns: Patterns andPatterns 2. You can reset or replace patternsfrom the arrow drop-down menu or change theformat of the view for the Patterns window list.
Each group of patterns that appears in the drop-down list in the Preset Manager window isstored on your hard drive in the Presets\Patternsfolder in the Photoshop Elements 2 folder.Photoshop Elements stores patterns in the PAT fileformat. PostScript patterns are stored as AI, orAdobe Illustrator, files. You can use PhotoshopElements to create your own custom patterns, too!
54 ABSOLUTE BEGINNER’S GUIDE TO ADOBE PHOTOSHOP ELEMENTS 2
FIGURE 2.4
Select a set of gra-
dients to work
with from the
Gradient Preset
Manager
window.
You cannot apply gra-dient tools to images in
Bitmap, Indexed-Color, or 16-bitsper channel mode.
04 8311 CH02 1/15/03 2:31 PM Page 54
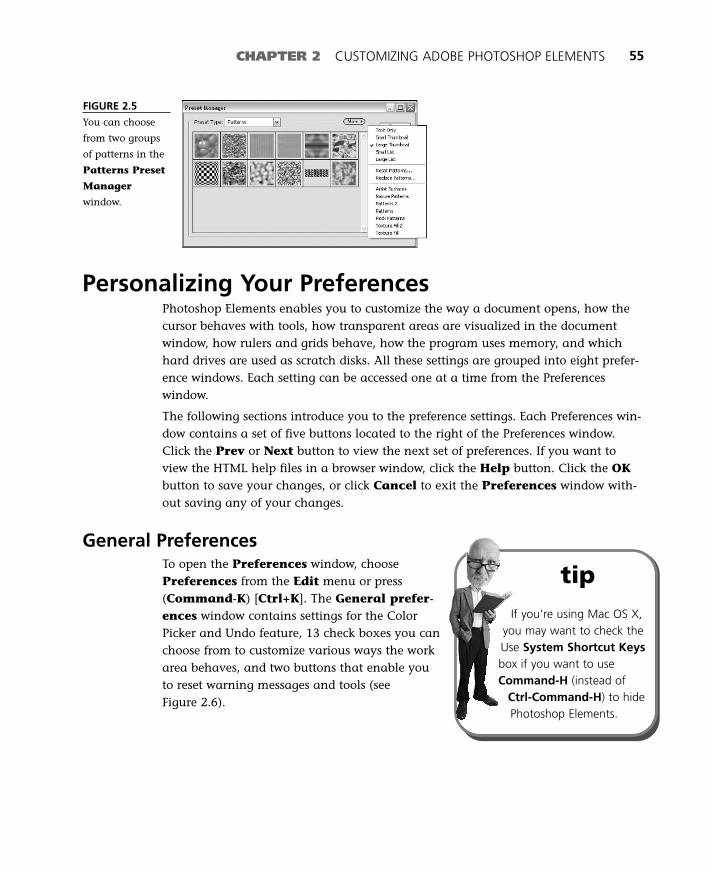
CHAPTER 2 CUSTOMIZING ADOBE PHOTOSHOP ELEMENTS 55
FIGURE 2.5
You can choose
from two groups
of patterns in the
Patterns Preset
Manager
window.
Personalizing Your PreferencesPhotoshop Elements enables you to customize the way a document opens, how thecursor behaves with tools, how transparent areas are visualized in the documentwindow, how rulers and grids behave, how the program uses memory, and whichhard drives are used as scratch disks. All these settings are grouped into eight prefer-ence windows. Each setting can be accessed one at a time from the Preferenceswindow.
The following sections introduce you to the preference settings. Each Preferences win-dow contains a set of five buttons located to the right of the Preferences window.Click the Prev or Next button to view the next set of preferences. If you want toview the HTML help files in a browser window, click the Help button. Click the OKbutton to save your changes, or click Cancel to exit the Preferences window with-out saving any of your changes.
General PreferencesTo open the Preferences window, choosePreferences from the Edit menu or press(Command-K) [Ctrl+K]. The General prefer-ences window contains settings for the ColorPicker and Undo feature, 13 check boxes you canchoose from to customize various ways the workarea behaves, and two buttons that enable youto reset warning messages and tools (seeFigure 2.6).
tipIf you’re using Mac OS X,
you may want to check theUse System Shortcut Keysbox if you want to useCommand-H (instead of
Ctrl-Command-H) to hidePhotoshop Elements.
04 8311 CH02 1/15/03 2:31 PM Page 55
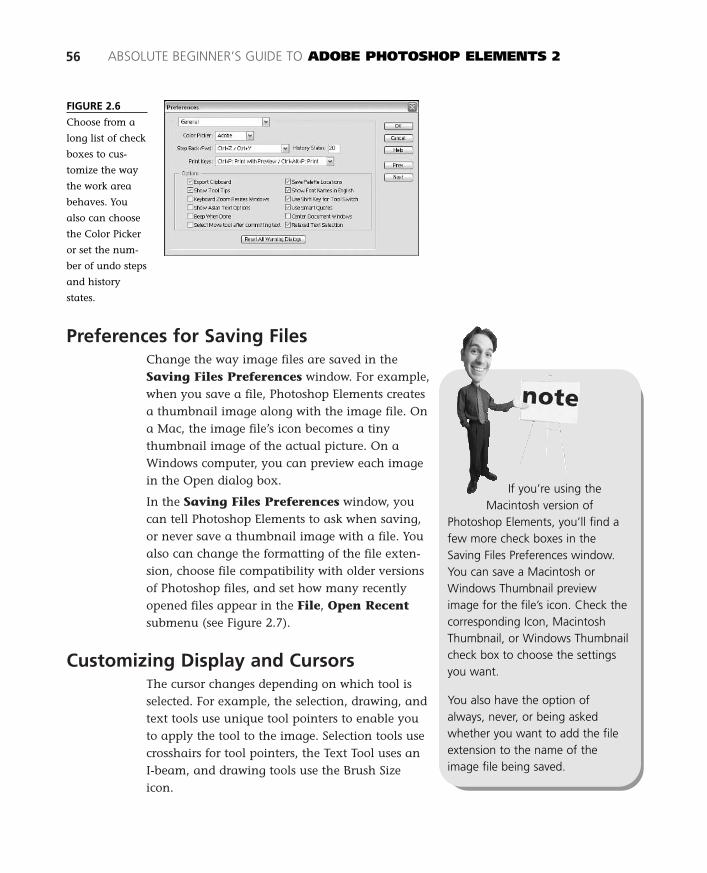
Preferences for Saving FilesChange the way image files are saved in theSaving Files Preferences window. For example,when you save a file, Photoshop Elements createsa thumbnail image along with the image file. Ona Mac, the image file’s icon becomes a tinythumbnail image of the actual picture. On aWindows computer, you can preview each imagein the Open dialog box.
In the Saving Files Preferences window, youcan tell Photoshop Elements to ask when saving,or never save a thumbnail image with a file. Youalso can change the formatting of the file exten-sion, choose file compatibility with older versionsof Photoshop files, and set how many recentlyopened files appear in the File, Open Recentsubmenu (see Figure 2.7).
Customizing Display and CursorsThe cursor changes depending on which tool isselected. For example, the selection, drawing, andtext tools use unique tool pointers to enable youto apply the tool to the image. Selection tools usecrosshairs for tool pointers, the Text Tool uses anI-beam, and drawing tools use the Brush Sizeicon.
56 ABSOLUTE BEGINNER’S GUIDE TO ADOBE PHOTOSHOP ELEMENTS 2
If you’re using theMacintosh version of
Photoshop Elements, you’ll find afew more check boxes in theSaving Files Preferences window.You can save a Macintosh orWindows Thumbnail previewimage for the file’s icon. Check thecorresponding Icon, MacintoshThumbnail, or Windows Thumbnailcheck box to choose the settingsyou want.
You also have the option ofalways, never, or being askedwhether you want to add the fileextension to the name of theimage file being saved.
FIGURE 2.6
Choose from a
long list of check
boxes to cus-
tomize the way
the work area
behaves. You
also can choose
the Color Picker
or set the num-
ber of undo steps
and history
states.
04 8311 CH02 1/15/03 2:31 PM Page 56
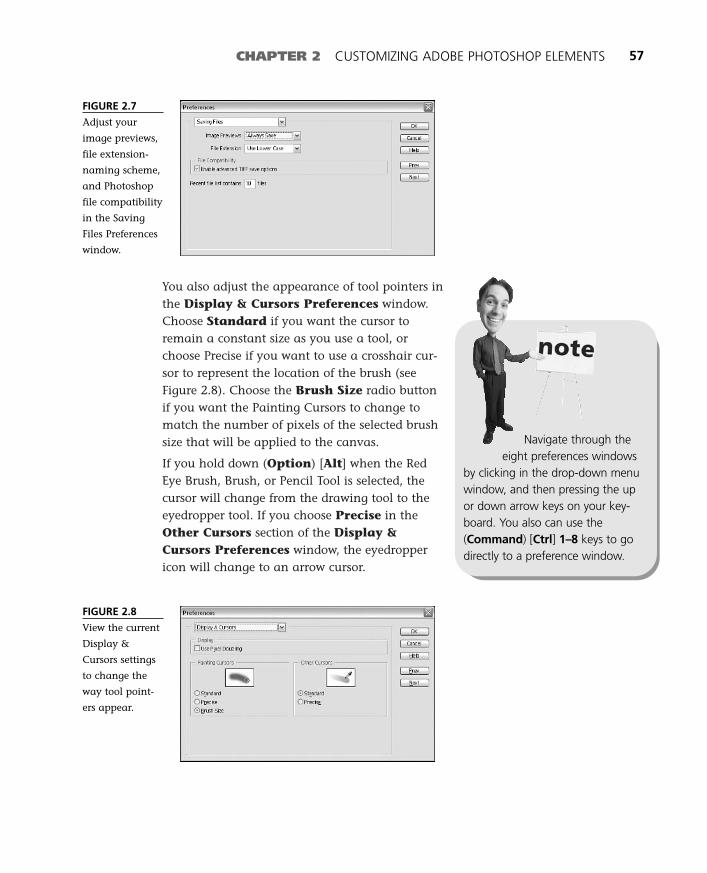
You also adjust the appearance of tool pointers inthe Display & Cursors Preferences window.Choose Standard if you want the cursor toremain a constant size as you use a tool, orchoose Precise if you want to use a crosshair cur-sor to represent the location of the brush (seeFigure 2.8). Choose the Brush Size radio buttonif you want the Painting Cursors to change tomatch the number of pixels of the selected brushsize that will be applied to the canvas.
If you hold down (Option) [Alt] when the RedEye Brush, Brush, or Pencil Tool is selected, thecursor will change from the drawing tool to theeyedropper tool. If you choose Precise in theOther Cursors section of the Display &Cursors Preferences window, the eyedroppericon will change to an arrow cursor.
CHAPTER 2 CUSTOMIZING ADOBE PHOTOSHOP ELEMENTS 57
FIGURE 2.7
Adjust your
image previews,
file extension-
naming scheme,
and Photoshop
file compatibility
in the Saving
Files Preferences
window.
Navigate through theeight preferences windows
by clicking in the drop-down menuwindow, and then pressing the upor down arrow keys on your key-board. You also can use the(Command) [Ctrl] 1–8 keys to godirectly to a preference window.
FIGURE 2.8
View the current
Display &
Cursors settings
to change the
way tool point-
ers appear.
04 8311 CH02 1/15/03 2:31 PM Page 57

Adjusting Transparency SettingsTransparency represents the absence of color inan image—typically the background layer. Youcan adjust the transparency of an image layerby increasing or decreasing its opacity valuefrom the Layers palette. A value of zero rendersa transparent (or invisible) image. PhotoshopElements uses a default gray-and-white check-ered pattern to represent transparency. You can customize the grid size and colors in theTransparency Preferences window (see Figure 2.9). Choose from a small, medium, or large grid, or change the grid colors asyou like. Preview the transparency pattern in the square on the right.
58 ABSOLUTE BEGINNER’S GUIDE TO ADOBE PHOTOSHOP ELEMENTS 2
tipPress the Caps Lock key to
switch between standardand precise cursors if you’reusing a selection, drawing, ortext tool from the Toolbox.
FIGURE 2.9
Edit the default
gray-and-white
transparency
pattern to suit
your needs.
Units & Rulers PreferencesYou can adjust the units of the ruler in the Units & Rulers Preferences window (seeFigure 2.10). Choose the measurement and type formats for the units of a ruler, oradjust preset resolutions for Print and screen. If you’ve added columns to a docu-ment, you can adjust the width and gutter sizes of the columns in this preferenceswindow, too. Choose View, Rulers to add rulers to an image window. You can openthe Units & Rulers Preferences window and preview your changes in the activeimage window.
PICAS, POINTS, AND POSTSCRIPTType size can be measured in picas or points. A point is approximately 1/72 of an image ina 72 pixel-per-inch (ppi) image. 72-point text in a 72dpi image appears as a 1-inch-tallimage. A pica is approximately 12 points in a 72ppi image.
The Point/Pica size option in the Units & Rulers Preferences window enables you tochoose the point size definition for printing. If you’re printing to a PostScript printer,choose PostScript (72 points per inch) in the Units & Rulers Preferences window. Ifyou’re not printing to a PostScript printer, choose traditional (72.27 points per inch).
04 8311 CH02 1/15/03 2:31 PM Page 58

CHAPTER 2 CUSTOMIZING ADOBE PHOTOSHOP ELEMENTS 59
FIGURE 2.10
You can cus-
tomize the
rulers, column
size, and
point/pica size
in the Units &
Rulers
Preferences
window.
Personalizing Grid SettingsEach window can show or hide a grid to help you align your objects. You can viewthe grid by choosing Show Grid from the View menu. To have your images snapto the grid, choose Snap from the View menu. Customize the color, style, gridlines,and subdivisions of the grid in the Grid Preferences window (see Figure 2.11).Click each drop-down menu to view or choose new settings.
FIGURE 2.11
Create a custom
grid if you need
to align images
to create a cus-
tom document,
such as a con-
tact sheet.
Setting Plug-Ins and Scratch Disk PreferencesAdobe designed the plug-in file format as a way to extend the capabilities ofPhotoshop Elements. There is a Plug-Ins folder located in the Photoshop Elements 2folder on your hard drive. Any plug-in files located in the Plug-Ins folder will appearin the Filter menu, Filters palette, or in the File, Import menu. If you take acloser look at the Plug-Ins folder, you’ll notice that plug-in files are grouped intofolders. The TWAIN plug-ins, which are explained in more detail in Chapter 3,“Acquiring Images from Scanners and Digital Cameras,” are stored in theImport/Export folder of the Plug-Ins folder. If you click the File, Import menu, you’llsee each TWAIN plug-in file in the Import menu list.
04 8311 CH02 1/15/03 2:31 PM Page 59
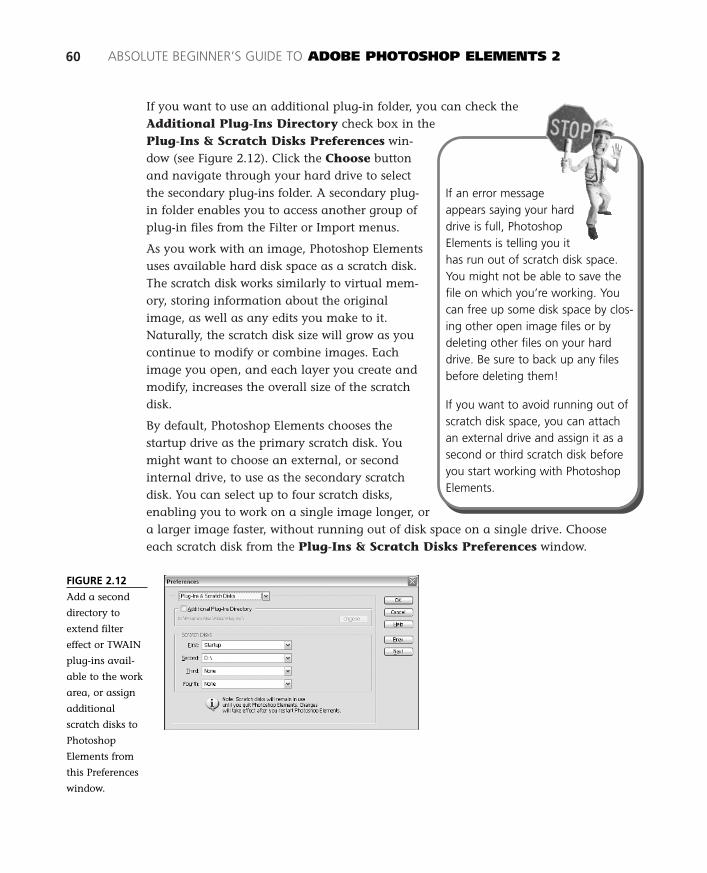
If you want to use an additional plug-in folder, you can check theAdditional Plug-Ins Directory check box in thePlug-Ins & Scratch Disks Preferences win-dow (see Figure 2.12). Click the Choose buttonand navigate through your hard drive to selectthe secondary plug-ins folder. A secondary plug-in folder enables you to access another group ofplug-in files from the Filter or Import menus.
As you work with an image, Photoshop Elementsuses available hard disk space as a scratch disk.The scratch disk works similarly to virtual mem-ory, storing information about the originalimage, as well as any edits you make to it.Naturally, the scratch disk size will grow as youcontinue to modify or combine images. Eachimage you open, and each layer you create andmodify, increases the overall size of the scratchdisk.
By default, Photoshop Elements chooses thestartup drive as the primary scratch disk. Youmight want to choose an external, or secondinternal drive, to use as the secondary scratchdisk. You can select up to four scratch disks,enabling you to work on a single image longer, ora larger image faster, without running out of disk space on a single drive. Chooseeach scratch disk from the Plug-Ins & Scratch Disks Preferences window.
60 ABSOLUTE BEGINNER’S GUIDE TO ADOBE PHOTOSHOP ELEMENTS 2
FIGURE 2.12
Add a second
directory to
extend filter
effect or TWAIN
plug-ins avail-
able to the work
area, or assign
additional
scratch disks to
Photoshop
Elements from
this Preferences
window.
If an error messageappears saying your harddrive is full, PhotoshopElements is telling you ithas run out of scratch disk space.You might not be able to save thefile on which you’re working. Youcan free up some disk space by clos-ing other open image files or bydeleting other files on your harddrive. Be sure to back up any filesbefore deleting them!
If you want to avoid running out ofscratch disk space, you can attachan external drive and assign it as asecond or third scratch disk beforeyou start working with PhotoshopElements.
04 8311 CH02 1/15/03 2:31 PM Page 60
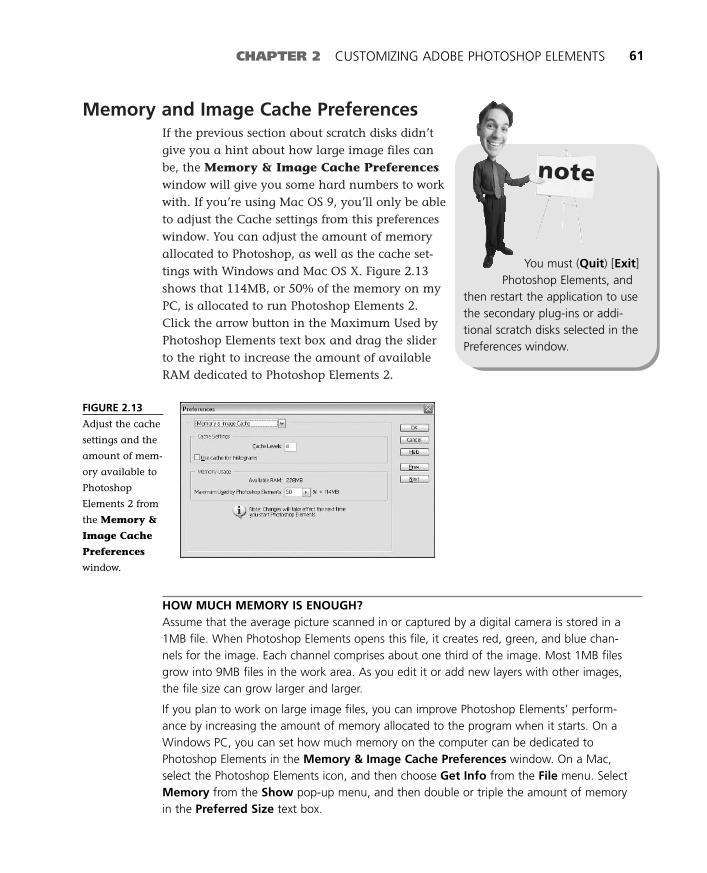
Memory and Image Cache PreferencesIf the previous section about scratch disks didn’tgive you a hint about how large image files canbe, the Memory & Image Cache Preferenceswindow will give you some hard numbers to workwith. If you’re using Mac OS 9, you’ll only be ableto adjust the Cache settings from this preferenceswindow. You can adjust the amount of memoryallocated to Photoshop, as well as the cache set-tings with Windows and Mac OS X. Figure 2.13shows that 114MB, or 50% of the memory on myPC, is allocated to run Photoshop Elements 2.Click the arrow button in the Maximum Used byPhotoshop Elements text box and drag the sliderto the right to increase the amount of availableRAM dedicated to Photoshop Elements 2.
CHAPTER 2 CUSTOMIZING ADOBE PHOTOSHOP ELEMENTS 61
FIGURE 2.13
Adjust the cache
settings and the
amount of mem-
ory available to
Photoshop
Elements 2 from
the Memory &
Image Cache
Preferences
window.
HOW MUCH MEMORY IS ENOUGH?Assume that the average picture scanned in or captured by a digital camera is stored in a1MB file. When Photoshop Elements opens this file, it creates red, green, and blue chan-nels for the image. Each channel comprises about one third of the image. Most 1MB filesgrow into 9MB files in the work area. As you edit it or add new layers with other images,the file size can grow larger and larger.
If you plan to work on large image files, you can improve Photoshop Elements’ perform-ance by increasing the amount of memory allocated to the program when it starts. On aWindows PC, you can set how much memory on the computer can be dedicated toPhotoshop Elements in the Memory & Image Cache Preferences window. On a Mac,select the Photoshop Elements icon, and then choose Get Info from the File menu. SelectMemory from the Show pop-up menu, and then double or triple the amount of memoryin the Preferred Size text box.
You must (Quit) [Exit]Photoshop Elements, and
then restart the application to usethe secondary plug-ins or addi-tional scratch disks selected in thePreferences window.
04 8311 CH02 1/15/03 2:31 PM Page 61
If you’re still wondering how much memory is enough, remember that you can never haveenough memory installed on your computer. However, a ballpark estimate is to double theamount of memory you’ll think you’ll need and buy as much memory as you can afford.
Photoshop Elements creates a cache to store frequently used data, such as a his-togram. See Chapter 8, “Tonal Range and Color Correction,” for an explanationabout histograms. Each time you need to view an item stored in the cache,Photoshop Elements displays the cached information instead of recalculating thedata each time you open a histogram window or access a frequently used imagelayer. By using the cache, Photoshop Elements can perform tasks faster, which is agood thing.
62 ABSOLUTE BEGINNER’S GUIDE TO ADOBE PHOTOSHOP ELEMENTS 2
04 8311 CH02 1/15/03 2:31 PM Page 62

In this chapter
• Installing Plug-In Files
• Adjusting Scanner Settings
• Scanning Different Kinds of Images
• Scanning the Final Image
• Accessing Images on the Camera
• Saving Images
• Selecting Devices
3
Acquiring Images from
Scanners and Digital
Cameras
Photoshop Elements enables you to import images from a scanner or
digital camera. Install software, connect a cable, and power on a scan-
ner or camera to enable Photoshop Elements to acquire photos. After
you have it all set up, you’re free to download as many photos as you
like. Available memory, processor speed, and disk space are the only lim-
its to how many photos you can bring into your computer! This chap-
ter shows you how to get a scanner or digital camera up and running
with Photoshop Elements.
05 8311 CH03 1/15/03 2:22 PM Page 63

Installing Plug-In FilesTo bring your images into Photoshop Elements from a scanner or digital camera,you’ll need to install a TWAIN plug-in. All plug-in files are located in the Plug-Insfolder, in the Photoshop Elements 2 folder. The (Import/Export) [Import-Export]folder is where TWAIN plug-ins are stored. TWAIN plug-ins enable you to acquireimages from the File, Import menu or Welcome window into the work area.
The following sections show you how to install a TWAIN plug-in for an HP scannerdevice. However, these steps are similar for installing any TWAIN plug-in withPhotoshop Elements.
Installing Plug-In SoftwareIf you’re using Windows 98 Special Edition, Windows 2000, or Windows XP, plugyour scanner or camera into your computer’s parallel, serial, USB, or FireWire port.Windows will notice that a new device is connected to the computer and open theFound New Hardware Wizard (see Figure 3.1). Insert the CD for the scanner or cam-era into the CD-ROM drive, and then click the Next button. Mac OS 9 and Mac OS Xusers can install the TWAIN plug-in software by running the Mac software installerprogram, or by placing the TWAIN plug-in file in the Plug-Ins, (Import/Export)[Import-Export] folder, in the Adobe Photoshop Elements folder.
64 ABSOLUTE BEGINNER’S GUIDE TO ADOBE PHOTOSHOP ELEMENTS 2
FIGURE 3.1
When you first
connect a scan-
ner or camera to
your computer,
Windows will try
to install soft-
ware for the new
hardware.
For Windows users, here are the steps for using the New Hardware Wizard to installsoftware drivers for a scanner or camera:
1. There are two screens in the wizard that ask you how you want Windows tolocate the driver software for the new device. Choose the radio button thatsearches for a suitable driver for the device in the Install Device Driverswindow.
2. Click the Next button, and then check the CD-ROM Drive check box in theLocate Driver Files window. Be sure you have the CD-ROM from yourhardware (scanner or camera) in the drive.
05 8311 CH03 1/15/03 2:22 PM Page 64

3. Click the Next button, and Windows searches the CD-ROM for the softwaredriver. If a TWAIN plug-in file is on the CD, Windows installs both the driverand the TWAIN plug-in file (see Figure 3.2).
CHAPTER 3 ACQUIRING IMAGES FROM SCANNERS AND DIGITAL CAMERAS 65
FIGURE 3.2
If Windows can
locate a driver
for the device, it
will install the
driver.
4. If Windows installs the files successfully, you’ll see the Completing the FoundNew Hardware Wizard window. Click the Finish button to exit the wizard.
Accessing a New Plug-In in Photoshop ElementsPhotoshop Elements scans the Plug-Ins folder only when the application starts. Youmust (Quit) [Exit] Photoshop Elements before you can use a newly installed TWAINplug-in file. Click on the File, Import menu to view the list of installed plug-in files.
Before choosing a plug-in, power on the scanner or camera, and then connect thedevice to the computer. If you haven’t already done so, start Photoshop Elements. Toaccess any of the TWAIN plug-in files, choose File, Import. A submenu containinga list of devices appears, as shown in Figure 3.3. Select one of the TWAIN plug-infiles from the Import menu list. The TWAIN plug-in opens a device-specific windowin the Photoshop Elements work area. Use the device software to preview and down-load images into the work area.
TROUBLESHOOTING CONNECTIONSNot all cameras and scanners come bundled with TWAIN plug-in files. If your device doesnot have a TWAIN plug-in file, you’ll need to use the software that comes with the deviceto create an image on your computer. In either case, visit the vendor’s Web site to seewhether a TWAIN plug-in is available for your scanner or digital camera. Mac OS X andWindows XP include some software that may enable a camera or scanner to downloadimages to the computer. Mac OS X users can use iPhoto to see whether the camera orscanner can be recognized by Mac OS X. Plug the USB, FireWire, or serial cable into theWindows XP computer to see whether Windows is able to recognize the device. Save theimages as JPEG or TIFF files so that you can open them in Photoshop Elements.
05 8311 CH03 1/15/03 2:22 PM Page 65

66 ABSOLUTE BEGINNER’S GUIDE TO ADOBE PHOTOSHOP ELEMENTS 2
FIGURE 3.3
Choose Import
from the File
menu to view a
list of installed
TWAIN plug-in
files.
Adjusting Scanner SettingsScanner software has many options that enable you to determine how much imageinformation is downloaded to your computer. To access all the software options, pre-view and scan a photo into your computer. This section will show you how to choosea resolution for scanning photos into Photoshop Elements.
If you’re using a flatbed scanner, place a photo or a piece of paper with text orgraphics face down on the glass surface of the scanner. If you’re using another typeof scanner, insert a scannable document into the scanner device. Some scanners,such as the Epson 640U, automatically scan and choose the settings for you. The HPPhoto Smart scanner starts scanning when you insert a photo, filmstrip, or slide (seeFigure 3.4). Other scanners require you to click a button in the work area to startthe scan.
FIGURE 3.4
Create a preview
scan to get a
rough idea of
how the scanner
software sees the
scanned photo.
05 8311 CH03 1/15/03 2:22 PM Page 66
WHAT IS THE BEST RESOLUTION FOR SCANNING?Most scanners are capable of scanning within a limited range of resolutions. Assuming youhave a more recent scanner capable of scanning up to 2400 dpi, try scanning an image at600 dpi. Then compare that scan to the same image scanned at 720, 1200, or 2400 dpi.Usually the higher dpi setting will produce the sharpest scanned image. Save the highest-quality image to your hard drive.
If you cannot see a difference between the resulting images, save each one to your harddrive. Then compare the file size of each scan. Use the Zoom tool to determine how muchmore image information is added to the higher-resolution images. If the 600 dpi scan looksgreat and creates the smallest file size of the scanned image, you might want to considerworking with this setting when you scan other images.
Choosing a ResolutionIf you want to scan several images into the computer with the same resolution set-ting, you can choose the resolution and scanner settings for one photo and scan therest without making any changes. However, if you have a diverse set of colors, or oldand new photos, you might want to set aside a big chunk of time if you want to getthe best results for each scanned image.
Consider the following issues when trying to set the optimal resolution for scannedimages:
■ What kind of image are you trying to scan? Consider the size of the image,and decide which resolution would be able to capture the most detail withoutcreating an unusually large file.
■ How many colors does the image have? If you’re scanning a color image, youmight need to configure the scanner software to capture thousands of colorsinstead of 256. On the other hand, you can see what happens if you scan ina color image as a grayscale or black-and-white image.
■ What is the highest non-interpolated resolution supported by the scanner?Some scanners work with bundled software to capture higher resolutions thanthe scanner hardware is capable of creating. You might want to compare thesoftware-enhanced, high-resolution scans with the same image scanned at alower resolution without the aid of the software interpolator.
■ Does the computer have any display limitations that might limit your abilityto view beyond a certain resolution? You might need to change your com-puter monitor’s settings to display more colors if you want to see as much ofthe scanner output as possible. The computer’s performance can slow down ifyou set it to display 24-bit color, compared to 256, or 16-bit color. The morecolors the monitor has to display, the more processing power is required fromthe computer.
CHAPTER 3 ACQUIRING IMAGES FROM SCANNERS AND DIGITAL CAMERAS 67
05 8311 CH03 1/15/03 2:22 PM Page 67
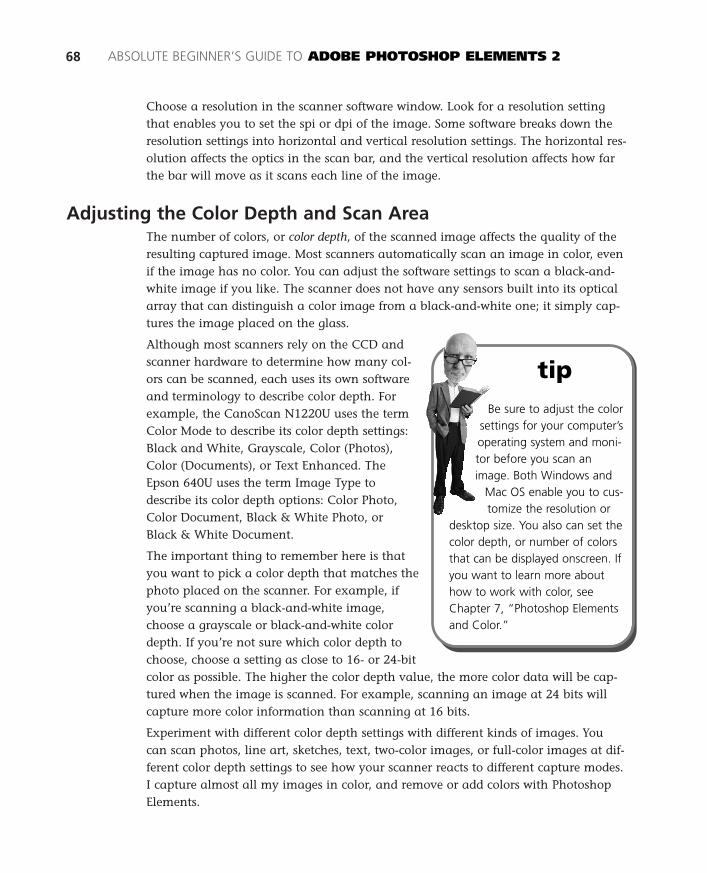
Choose a resolution in the scanner software window. Look for a resolution settingthat enables you to set the spi or dpi of the image. Some software breaks down theresolution settings into horizontal and vertical resolution settings. The horizontal res-olution affects the optics in the scan bar, and the vertical resolution affects how farthe bar will move as it scans each line of the image.
Adjusting the Color Depth and Scan AreaThe number of colors, or color depth, of the scanned image affects the quality of theresulting captured image. Most scanners automatically scan an image in color, evenif the image has no color. You can adjust the software settings to scan a black-and-white image if you like. The scanner does not have any sensors built into its opticalarray that can distinguish a color image from a black-and-white one; it simply cap-tures the image placed on the glass.
Although most scanners rely on the CCD andscanner hardware to determine how many col-ors can be scanned, each uses its own softwareand terminology to describe color depth. Forexample, the CanoScan N1220U uses the termColor Mode to describe its color depth settings:Black and White, Grayscale, Color (Photos),Color (Documents), or Text Enhanced. TheEpson 640U uses the term Image Type todescribe its color depth options: Color Photo,Color Document, Black & White Photo, orBlack & White Document.
The important thing to remember here is thatyou want to pick a color depth that matches thephoto placed on the scanner. For example, ifyou’re scanning a black-and-white image,choose a grayscale or black-and-white colordepth. If you’re not sure which color depth tochoose, choose a setting as close to 16- or 24-bitcolor as possible. The higher the color depth value, the more color data will be cap-tured when the image is scanned. For example, scanning an image at 24 bits willcapture more color information than scanning at 16 bits.
Experiment with different color depth settings with different kinds of images. Youcan scan photos, line art, sketches, text, two-color images, or full-color images at dif-ferent color depth settings to see how your scanner reacts to different capture modes.I capture almost all my images in color, and remove or add colors with PhotoshopElements.
68 ABSOLUTE BEGINNER’S GUIDE TO ADOBE PHOTOSHOP ELEMENTS 2
tipBe sure to adjust the color
settings for your computer’soperating system and moni-tor before you scan animage. Both Windows and
Mac OS enable you to cus-tomize the resolution or
desktop size. You also can set thecolor depth, or number of colorsthat can be displayed onscreen. Ifyou want to learn more abouthow to work with color, seeChapter 7, “Photoshop Elementsand Color.”
05 8311 CH03 1/15/03 2:22 PM Page 68
The resolution setting also affects how the image will be scanned. The higher the res-olution, the more color information the scanner will try to capture. If you’re not sureat what resolution to start scanning an image, choose 600 dpi. Scan and save theimage, and then change the resolution to 1200 or 2400 dpi and save this secondimage. Open each image and place them side-by-side on your desktop. If you can-not see any improvement in the 1200 or 2400 dpi image, you might want to con-tinue to scan additional images at 600 dpi. However, if you plan to edit images, thehigher resolution scan will enable you to do more precise image editing than animage scanned at a lower resolution.
COMPARING SPI TO PPIScanners capture images using the measurement of samples per inch (spi). However, yourcomputer monitor displays an image in pixels, or 72 pixels per inch. You might wonderwhether a sample and a pixel are the same size.
Sadly, the answer is no, they are not the same size. In fact, there isn’t an easy way to com-pare the quality of a scanned image to an image viewed on your computer monitor. Thefinal results depend on the output of your printer, the settings and capabilities of your com-puter monitor, and your ability to choose the software settings that create the best possibleimages.
Previewing and Setting Up for the ScanTo create a preview of an image, before you actually scan it into your computer,click the Preview Scan or Preview button in the scanner software window. Don’tbe surprised if your scanner does not have a preview option available. If the scannersoftware doesn’t support a preview mode, click the Scan button and wait for theimage to be scanned into the work area.
Some scanner applications, such as the Epson 640U, enable you to let the scannerdo all the thinking for you with a full-service auto-scan feature. You might need toturn or flip the image on the scanner bed if you want to straighten the scannedimage. If you want to avoid creating unnecessary scans, check to see whether thescanner you are planning to buy includes a preview option in its software package.
After you have created the preview scan, you can apply the selection tools to choosethe specific area you want to scan into the work area (see Figure 3.5). Reducing thearea being scanned reduces the amount of time you must wait for the scanner tocomplete its job.
CHAPTER 3 ACQUIRING IMAGES FROM SCANNERS AND DIGITAL CAMERAS 69
05 8311 CH03 1/15/03 2:22 PM Page 69

Photoshop Elements opens scanned images in RGB mode, enabling you to work withred, green, and blue color information. You can apply any menu command or toolto any part of an image in RGB mode. To find out more about the image modes inPhotoshop Elements, go to Chapter 7.
70 ABSOLUTE BEGINNER’S GUIDE TO ADOBE PHOTOSHOP ELEMENTS 2
Selection tool
Scan button
Resolution settings
Marquee
After the scanned image is captured and viewable in the work area (see Figure 3.6),you can save it to your hard drive. Choose Save from the File menu, and then typea name for the image file and save it to your hard drive. Now you can experimentwith the image by applying one of the tools in the Toolbox, or add a new layer tothe image file if you don’t want to make any permanent changes to the originalimage.
FIGURE 3.5
If the scanner
software pro-
vides tools, you
can select the
area you want
to scan.
FIGURE 3.6
The resulting file
contains the
image you
selected in the
scanner software
window.
05 8311 CH03 1/15/03 2:22 PM Page 70
CHAPTER 3 ACQUIRING IMAGES FROM SCANNERS AND DIGITAL CAMERAS 71
SHOULDN’T THIS LOOK PRETTIER?Scanners might be able to create luscious 36-bit and 48-bit color images, but most moni-tors are capable of displaying 24-bit color, or millions of colors. You might not be able tosee the additional colors captured by the scanner, but Photoshop Elements enables you towork with all the color information captured by the scanner. You will see the differencewhen you edit or print the image.
Scanning Different Kinds of ImagesFilm, slides, color photos, or old monochrome photos all can bescanned into Photoshop Elements. After you scan a few images,you might start to notice something they allhave in common: dust. You might need to gen-tly dust the surface of the print or negative, aswell as the glass surface on the scanner, beforeplacing and scanning the image. Try to avoidusing your hands, cloth, or tissue to removedust from the surface of the scanner. For bestresults, hold a can of compressed air about 6 to10 inches from the glass and use the cannedair to clear the surface of the scanner.
Choose the scanner settings you want to applyto the scanned image. Then preview the imagein Photoshop Elements. If the image is slightly crooked, you can try to straighten itin the scanner. However, you also can use Photoshop Elements to vertically orhorizontally correct an image’s alignment.
If you’re working with a damaged, bent, or warped photo, try to flatten the imageby placing it in a plastic jacket or folder. A flat image is optimal for scanning. Itencourages the scanner to produce consistent, accurate colors throughout the cap-tured image. Don’t hesitate to run several preview scans, and try to scan the bestpossible image you can.
If you don’t want to worry about adding glare to the scan by adding the plasticlayer to the image, scan a test image to see how the scanner captures the damagedareas of the photo (see Figure 3.7). Then add the plastic cover to see whether youcan identify any differences between the two preview images.
Experiment with scanning at different resolutions and with different color orgrayscale settings. If you want to simulate creating a color image, try scanning animage in grayscale. Then hand-tint the image in Photoshop Elements by adding red,blue, and green adjustment layers to create a custom color image.
As you scan images, trynot to touch the glass ona flatbed scanner withyour hand or fingers. Theoil from your hand or fingertips canleave marks on the glass that will bescanned in along with your images.
05 8311 CH03 1/15/03 2:22 PM Page 71

Scanning the Final ImageAdjust the photo and the scanner settings until you’re satisfied with the scanner out-put. Then, click the Scan button to bring the image into Photoshop Elements. Forbest results, use a photo scanner to convert a color negative into a full-color, non-negative–looking image.
The scanner software will bring the image into the work area in a new documentwindow. If you’re scanning a negative, the image might be difficult to recognize atfirst (see Figure 3.8). When the image is in the work area, you can save it as a file orapply a tool or command. For example, you can open the Quick Fix dialog box,apply a filter, or resize the image.
72 ABSOLUTE BEGINNER’S GUIDE TO ADOBE PHOTOSHOP ELEMENTS 2
FIGURE 3.7
A test scan can
help you opti-
mize settings if
you’re scanning
worn or dam-
aged photos.
FIGURE 3.8
Scan a negative
into Photoshop
Elements and
convert it into a
black-and-white
or color photo.
Checking Image QualityThe size of the scanned image will vary depending on the size and quality of theoriginal image, as well as the scanner settings selected in the scanner driver soft-ware. Use the Zoom tool to magnify the digital image to compare it to the original.
05 8311 CH03 1/15/03 2:22 PM Page 72
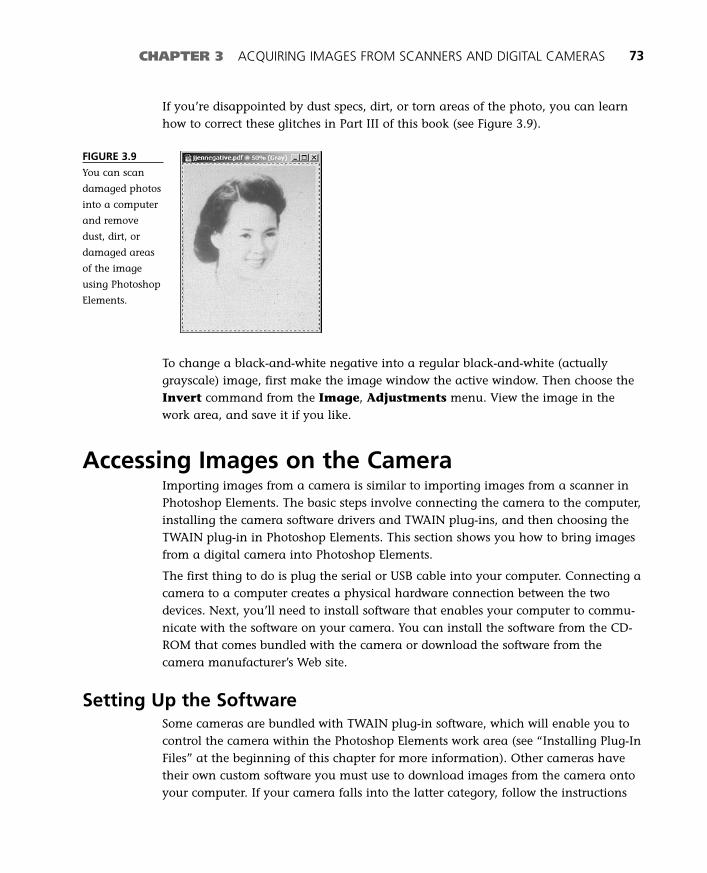
CHAPTER 3 ACQUIRING IMAGES FROM SCANNERS AND DIGITAL CAMERAS 73
If you’re disappointed by dust specs, dirt, or torn areas of the photo, you can learnhow to correct these glitches in Part III of this book (see Figure 3.9).
FIGURE 3.9
You can scan
damaged photos
into a computer
and remove
dust, dirt, or
damaged areas
of the image
using Photoshop
Elements.
To change a black-and-white negative into a regular black-and-white (actuallygrayscale) image, first make the image window the active window. Then choose theInvert command from the Image, Adjustments menu. View the image in thework area, and save it if you like.
Accessing Images on the CameraImporting images from a camera is similar to importing images from a scanner inPhotoshop Elements. The basic steps involve connecting the camera to the computer,installing the camera software drivers and TWAIN plug-ins, and then choosing theTWAIN plug-in in Photoshop Elements. This section shows you how to bring imagesfrom a digital camera into Photoshop Elements.
The first thing to do is plug the serial or USB cable into your computer. Connecting acamera to a computer creates a physical hardware connection between the twodevices. Next, you’ll need to install software that enables your computer to commu-nicate with the software on your camera. You can install the software from the CD-ROM that comes bundled with the camera or download the software from thecamera manufacturer’s Web site.
Setting Up the SoftwareSome cameras are bundled with TWAIN plug-in software, which will enable you tocontrol the camera within the Photoshop Elements work area (see “Installing Plug-InFiles” at the beginning of this chapter for more information). Other cameras havetheir own custom software you must use to download images from the camera ontoyour computer. If your camera falls into the latter category, follow the instructions
05 8311 CH03 1/15/03 2:22 PM Page 73
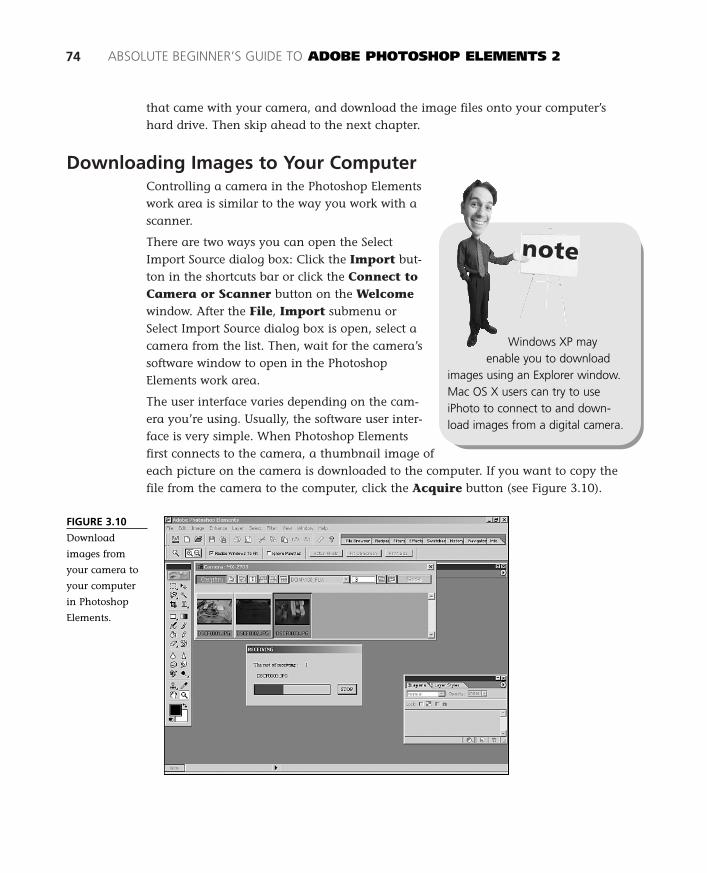
that came with your camera, and download the image files onto your computer’shard drive. Then skip ahead to the next chapter.
Downloading Images to Your ComputerControlling a camera in the Photoshop Elementswork area is similar to the way you work with ascanner.
There are two ways you can open the SelectImport Source dialog box: Click the Import but-ton in the shortcuts bar or click the Connect toCamera or Scanner button on the Welcomewindow. After the File, Import submenu orSelect Import Source dialog box is open, select acamera from the list. Then, wait for the camera’ssoftware window to open in the PhotoshopElements work area.
The user interface varies depending on the cam-era you’re using. Usually, the software user inter-face is very simple. When Photoshop Elementsfirst connects to the camera, a thumbnail image ofeach picture on the camera is downloaded to the computer. If you want to copy thefile from the camera to the computer, click the Acquire button (see Figure 3.10).
74 ABSOLUTE BEGINNER’S GUIDE TO ADOBE PHOTOSHOP ELEMENTS 2
Windows XP mayenable you to download
images using an Explorer window.Mac OS X users can try to useiPhoto to connect to and down-load images from a digital camera.
FIGURE 3.10
Download
images from
your camera to
your computer
in Photoshop
Elements.
05 8311 CH03 1/15/03 2:22 PM Page 74

CHAPTER 3 ACQUIRING IMAGES FROM SCANNERS AND DIGITAL CAMERAS 75
You might find that downloading images over a cable takes more time than you’dlike. It will also drain your camera’s batteries. If you want to copy all the files fromthe storage card in your camera directly onto your computer’s hard drive, withoutviewing any of the files, you can insert the storage card into a media reader or PCCard adapter. If you’re using a media card reader, you’ll need to install additionalsoftware on your desktop computer so that it can recognize the USB device.
If you’re using a PC Card adapter, you probably won’t need to install any additionalsoftware to view or copy files from the storage card to your computer. However, somePC Card adapters require you to install software to work with a particular version ofWindows or Mac OS. Windows 98, 2000, and XP, as well as Mac OS 9 and X, allhave built-in support for reading files from CompactFlash, SmartMedia, and SonyMemory Stick storage cards (see Figure 3.11).
CompactFlashCard
PC Card Slot
PC Card adapter
MemoryStick slot
FIGURE 3.11
Insert the media
card from the
camera into a
PC Card adapter
to quickly access
your image files.
Saving ImagesAfter you’ve downloaded an image from a camera to your computer, it’s a good ideato save a copy of the original image to your hard drive before you start modifyingthe image. After a file is saved, you can experiment with color correction or filtereffects without having to worry about losing or damaging the original.
To save a file, make the file the active window in the work area. Choose Save fromthe File menu. Then type a name into the Save dialog box. Click on the Formatdrop-down menu and choose JPEG. Navigate to a folder location on your hard drivein the Save dialog box. Finally, click the Save button to save the image. PhotoshopElements will create a new image file on your hard drive.
05 8311 CH03 1/15/03 2:22 PM Page 75

76 ABSOLUTE BEGINNER’S GUIDE TO ADOBE PHOTOSHOP ELEMENTS 2
Viewing the File FormatIf you want to view an image on a camera withoutdownloading it to your hard drive, you can usethe File Browser in Photoshop Elements or the cus-tom software that is bundled with the camera topreview thumbnails. Figure 3.12 shows the photoviewer application, Visual Flow, that opens whenyou insert a Memory Stick into a Sony computer.Each image scrolls up the photo view window asyou move your cursor in the main window. Clickon a picture to view it in more detail.
If you don’t want to use an application to accessimage files, you can use Explorer (Windows) orthe Finder (Mac OS) to preview or copy files toyour computer. Figure 3.13 shows each image onthe Memory Stick card. The camera gives eachimage a unique filename, along with the .jpg fileextension. Simply copy the files from the MemoryStick onto your computer. Then you can usePhotoshop Elements to view or modify them asyou like.
Not sure which file for-mat to use when saving your
file? Choose the JPEG file format,with the highest level of imagepreservation (in Photoshop Elements,choose Maximum, or 12).
To find out more about savingfiles, as well as PhotoshopElements–supported file formats,see Chapter 5, “Saving andSharing Files.”
FIGURE 3.12
When you insert
a Memory Stick
into a Sony
VAIO laptop,
you can navi-
gate through
thumbnail
images of the
files stored on
the card. PC
Card and USB
Memory Stick
readers are also
available for
Mac and
Windows
computers.
05 8311 CH03 1/15/03 2:22 PM Page 76
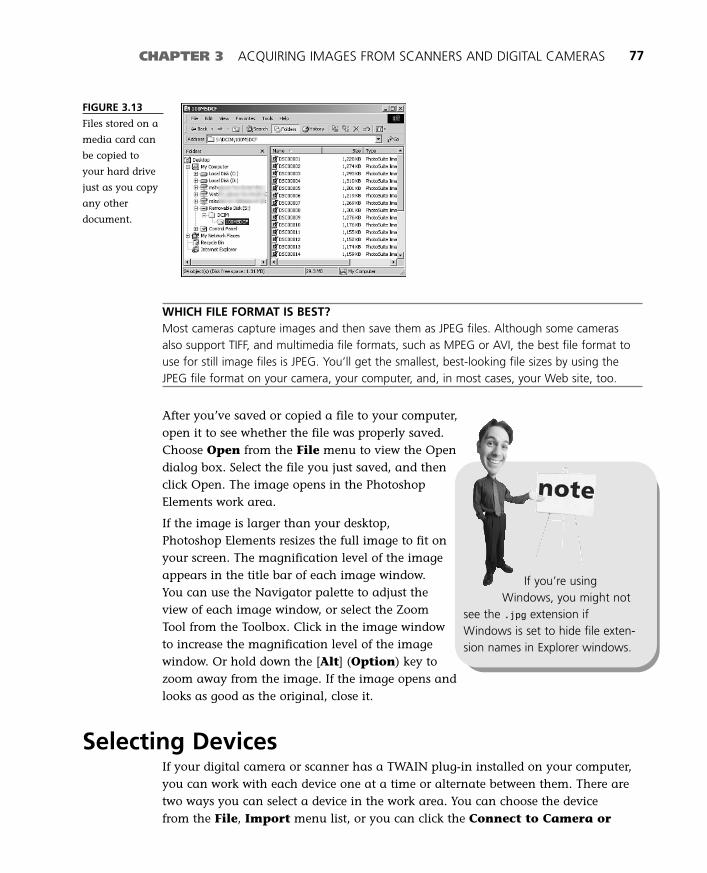
WHICH FILE FORMAT IS BEST?Most cameras capture images and then save them as JPEG files. Although some camerasalso support TIFF, and multimedia file formats, such as MPEG or AVI, the best file format touse for still image files is JPEG. You’ll get the smallest, best-looking file sizes by using theJPEG file format on your camera, your computer, and, in most cases, your Web site, too.
After you’ve saved or copied a file to your computer,open it to see whether the file was properly saved.Choose Open from the File menu to view the Opendialog box. Select the file you just saved, and thenclick Open. The image opens in the PhotoshopElements work area.
If the image is larger than your desktop,Photoshop Elements resizes the full image to fit onyour screen. The magnification level of the imageappears in the title bar of each image window.You can use the Navigator palette to adjust theview of each image window, or select the ZoomTool from the Toolbox. Click in the image windowto increase the magnification level of the imagewindow. Or hold down the [Alt] (Option) key tozoom away from the image. If the image opens andlooks as good as the original, close it.
Selecting DevicesIf your digital camera or scanner has a TWAIN plug-in installed on your computer,you can work with each device one at a time or alternate between them. There aretwo ways you can select a device in the work area. You can choose the device from the File, Import menu list, or you can click the Connect to Camera or
CHAPTER 3 ACQUIRING IMAGES FROM SCANNERS AND DIGITAL CAMERAS 77
FIGURE 3.13
Files stored on a
media card can
be copied to
your hard drive
just as you copy
any other
document.
If you’re usingWindows, you might not
see the .jpg extension ifWindows is set to hide file exten-sion names in Explorer windows.
05 8311 CH03 1/15/03 2:22 PM Page 77

Be sure the device is connected to your computer before selecting it in the SelectImport Source dialog box. If the software cannot locate the device, it asks you toconnect the device. You’ll need to reselect the camera from the Import submenu toreestablish a connection with the camera.
If the software is able to locate your camera or scanner, you can preview the imagesin the work area. The preview image is usually much larger than the image shownin the software window. If you want to scan or download several images, it mighttake a while.
You can view additional information about an image, or about the camera or scan-ner device, if the device software provides these options. Figure 3.15 shows an infor-mation window from Fuji’s MX 2700 digital camera software. This information isalso accessible in Photoshop Elements. Choose File, File Info to open the File Infodialog box. Select the EXIF option in the Section drop-down menu to view imagedescription information for the active image window in the work area.
78 ABSOLUTE BEGINNER’S GUIDE TO ADOBE PHOTOSHOP ELEMENTS 2
FIGURE 3.14
Select a device.
Scanner button in the Welcome window. The Select Import Source dialog boxopens only if you click the Connect to Camera or Scanner button or the Importbutton located in the shortcuts bar. You can access the TWAIN plug-in–related soft-ware of each scanner or camera from the Select Import Source dialog box (see Figure3.14), or from the File, Import menu list. After you select a device, you can’t per-form any other tasks in Photoshop Elements. You must exit the camera’s softwarewindow before you can access any other features in the work area.
FIGURE 3.15
Different cam-
eras offer differ-
ent software
features. The
Fuji camera soft-
ware enables
you to view
camera informa-
tion in
Photoshop
Elements.
05 8311 CH03 1/15/03 2:22 PM Page 78
Opening, Saving,
and Printing
Images
iiPART
Creating, Opening, and Converting Images . . .81
Saving and Sharing Files . . . . . . . . . . . . . . . . . .99
Printing Images . . . . . . . . . . . . . . . . . . . . . . . .115
06 8311 PT 2 1/15/03 2:25 PM Page 79

06 8311 PT 2 1/15/03 2:25 PM Page 80

In this chapter
• Creating a New Document
• Document Settings for Print
• Document Settings for Web Images
• Opening and Browsing Image Files
• Converting Image Information
4
Creating, Opening, and
Converting Images
If there’s anything an image absolutely has to have in Photoshop Elements, it’s a
window. Photoshop Elements creates a new image window whenever you open an
image file or create a new one from scratch. A new or modified image window rep-
resents an unsaved document: a potential file that can be stored on your hard drive.
You can open more than one image window if you want to work on more than one
image at the same time or compare variations of the same image side by side. You
can also duplicate an image window if you want to view the same image in different
windows at different magnification levels.
Opening an image window and creating new files are the first things to learn if you
want to be an image wizard. Adobe created the Welcome window to enable you to
create a new file or open an existing one with a single click. You can open an image
window in four ways: create a new file, paste an image from the Clipboard, browse
and open existing images, or import an image by connecting to a scanner or camera.
The Welcome window enables you to open the New, File Browser, or Select Import
Source dialog boxes by clicking on the New File, Browse for File, or Connect to
Camera or Scanner buttons. This chapter shows you several ways you can create new
documents and open image files.
07 8311 CH04 1/15/03 2:32 PM Page 81

Creating a New DocumentThe image window is the heart of image editing in Photoshop Elements. Photoshop
Elements enables you to set the specific width, height, and resolution of each image
window. The width and height settings in the New dialog box define the size of the
canvas area of the image file. You can grow or shrink the window regardless of the
size of the canvas. However, more memory and scratch disk space will be required as
the canvas area, resolution, and number of image layers increase.
You can use File menu commands and shortcut buttons as well as the buttons in
the Welcome window to create a new image window. If you want to create a new
image window, choose File, New (Command-N) [Ctrl+N] or click the New button
in the shortcuts bar. The New dialog box will open. You can manually choose a pre-
set size, such as 8×10 or 640×480, or type the width and height of the new window,
as well as setting the resolution of the window, image mode, and canvas color.
If you want to create a new window that matches the dimensions of a specific image
or other graphic, you can use the File, New from Clipboard command to transfer
the image from the Clipboard. When you do so, Photoshop Elements will automati-
cally set the width and height values in the New dialog box to match the contents of
the Clipboard (see Figure 4.1) and place the copied image into a new window.
82 ABSOLUTE BEGINNER’S GUIDE TO ADOBE PHOTOSHOP ELEMENTS 2
FIGURE 4.1
Choose a preset
size or type a
number to set
the width and
height. Choose
an image mode,
resolution, and
contents for your
new image
window.
Located at the bottom of the New dialog box are three radio buttons that enable you
to choose the content for the new window. You can set the color of the canvas in the
background layer of the document, or choose transparent if you don’t want a back-
ground added to the window. If you choose White, Photoshop Elements creates a
background layer filled with pure white. Choose Transparent if you want to create
a completely empty image window. You’ll see a gray-and-white checkerboard pattern
in the new window. This pattern represents transparent areas in the image window.
07 8311 CH04 1/15/03 2:32 PM Page 82

If you choose the Background Color radio button, the background layer of thenew window will become the color displayed in the background swatch in theToolbox. If you’re working with graphics intended for Web pages, you can set thebackground color to match the background color of a Web page. This can help youcoordinate the colors of other images you create in the image window with the col-ors used on a Web page.
ART DIRECTORS TOOLKIT X 2.2Mac OS X users can use the Art Directors Toolkit toconvert fractions to decimals, inches to centimeters,or points to picas. This handy utility program canalso help you estimate the file size, based on printsize, of an RGB, grayscale, or bitmap image. It canalso compare font point sizes to inches, centimeters,points, or picas, and help you visualize columns for apage layout. Run, don’t walk, to this tool to esti-mate page layout, file size, and resolution settingsfor an image file you want to create in PhotoshopElements.
By default, Photoshop Elements creates a docu-ment in RGB color mode. Almost all the examplesin this book require an image to be in RGB mode,which supports millions of colors. Also, most ofthe tools and commands in Photoshop Elementswon’t work unless the image is in RGB mode. Theother color modes—Grayscale, Indexed Color, andBitmap—support 256 or fewer shades of color.
Understanding the New Dialog BoxThere are several settings you can customize in the New dialog box (see Figure 4.1).To create a new document, you need to review and input preset sizes or manuallytype the width and height, resolution, mode, and content settings in the New dialogbox. The following list contains a brief description of each text box, drop-downmenu, and radio button available in the New dialog box:
■ Filename—Enter the name of the new document in the Name text box.
■ Image Size—View the file size and set the width and height of the canvasarea, not the image, in the New dialog box. Documents can be created inpixels, inches, centimeters, millimeters, points, picas, and columns.
CHAPTER 4 CREATING, OPENING, AND CONVERTING IMAGES 83
You can remove thebackground layer by first
converting it to a regular layer,and then deleting the unlockedlayer. To do so, double-click onthe background layer, and thenclick OK in the New Layer win-dow. The locked background layerwill become a regular layer. Selectthe new layer in the Layerspalette, and then click the Trashbutton located at the bottom ofthe Layers palette. The selectedlayer will be deleted from theimage window.
07 8311 CH04 1/15/03 2:32 PM Page 83
■ Preset Sizes—Choose a preconfigured width and height for the documentyou want to create, such as Letter, 5×7, 800×600, A3, or 740×540 Std. NTSC 601.
■ Resolution—Enter the pixels per inch forthe image window. You can also set thisto pixels per centimeter. Note that 300dpi is the standard resolution for aprinted image, and 72 dpi is the standardresolution for a Web-ready image.
■ Mode—Choose the image mode for thenew document. Select RGB Color, Bitmap(black and white), or Grayscale (256shades of gray).
■ Contents—Choose a color or no color(Transparent) for the background layer ofthe new window.
Demystifying Resolution and Image SizeMany of the settings in the New dialog box are also available in the Image, Resize,Image Size dialog box. Determining the width and height of the canvas is fairlystraightforward, especially when you use the File, New from Clipboard com-mand. The more complex settings to consider when creating a new window are theresolution and image size settings.
There’s more than one definition for both of these terms. Resolution can be used todescribe the dimensions of an image, the scale of measurement for an image, or thesize of a computer desktop. Image size can refer to the size of the document in mem-ory, the size of the file in pixels, or the size of the file on the hard disk. The followingsections contain brief descriptions of each of these definitions of resolution andimage size.
What Is Resolution?The following list summarizes the three most commonly confused uses of the termresolution:
■ Dimensions of the image—The actual number of pixels wide and tall ofan image. The dimensions of the image can be larger or smaller than thecanvas area of the image window.
■ Number of pixels per inch—Some monitors display images at 96 dots perinch (dpi). Older Macintosh monitors have a resolution of 72 dpi. Photoshop
84 ABSOLUTE BEGINNER’S GUIDE TO ADOBE PHOTOSHOP ELEMENTS 2
tipNeed to download an
image from a camera orscanner? To find out how tobring images into a newimage window from a scan-
ner or camera, go toChapter 3, “Acquiring
Images from Scanners and DigitalCameras.”
07 8311 CH04 1/15/03 2:32 PM Page 84

Elements uses the measurement of pixels per inch to represent the number ofpixels displayed for each inch of a computer monitor. Scanned images maybe set to 300, 600, or higher ppi.
■ Resolution of the display—Set the size of your computer’s desktop areafrom the (Display) [Monitors] Control Panel window. The resolution ofyour desktop, combined with the actual size of your display screen, deter-mines how much of the image you can view on your computer monitor.
What Is Image Size?The following list explains three definitions of image size:
■ Document size—The canvas area of the image window.
■ Pixel size—The actual number of pixels wide and tall of an image.
■ File size—The size of the image file on the hard drive.
Customizing the Canvas SizeEach document you create in Photoshop Elementscan have a canvas. When you open an existingimage file, the canvas area matches the widthand height of the image being opened. If a colorcanvas was created with the document, a separatelayer will appear in the Layers palette. If thecanvas is transparent, represented by a gray-and-white checkered pattern indicating the absence ofcolor, no additional layers will appear in theLayers palette.
You can view the size of the canvas by choosingthe Canvas Size command from the Image,Resize menu. The Canvas Size dialog box willopen. The current file size appears at the top ofthe window, followed by its width and height. Youcan type a width and height into the text boxes.If you want the canvas to grow in a particulardirection, click on one of the Anchor buttons toindicate where the existing canvas will be locatedin relation to the new area.
When you resize or create a new image window, the width and height settings definethe canvas area in addition to the dimensions of the window and image. The canvasrepresents the printable or publishable area of the image window. The followingdescribes each setting in the Canvas Size dialog box:
CHAPTER 4 CREATING, OPENING, AND CONVERTING IMAGES 85
Increasing the size ofthe canvas will not affect
the size of any images in theimage window. However, if youdecrease the size of the canvas,Photoshop Elements will removeany areas of the image that arenot located on the smaller-sizedcanvas.
07 8311 CH04 1/15/03 2:32 PM Page 85

■ New Size—The new file size is calculated based on the new width and heightvalues you enter into the text boxes.
■ Width and Height—Enter a new value into the text box. Choose from per-cent, pixels, inches, centimeters, points, picas, or columns for the canvasmeasurement.
■ Anchor—Determines the location and direction of the new canvas area.Click on a square to choose where the current document will reside when thecanvas area is extended.
Document Settings for PrintAlthough the width and height settings determine the dimensions of an image file,the resolution setting in the New dialog box ultimately has the biggest impact onhow the image will appear onscreen and in print. Printers use the measurement ofdots per inch (dpi). “Dots” refers to the way the printer places ink or toner powderonto a page to re-create the image being sent from your computer. To print a docu-ment, first you must view it on a computer screen. However, computer monitors usethe pixel as their most basic form of measurement. Dots and pixels have no com-mon ancestor, although Photoshop Elements makes it relatively easy to convert animage intended for print into an image targeted for the Web.
Computer monitors use the measurement of pixels per inch (ppi). The size of a pixel isdifferent from the size of the dots referenced by printers. Digital cameras usemegapixels, a combination of the total number of horizontal and vertical pixels cap-tured, to determine resolution. However, when you open an image created by a digi-tal camera, the resolution will be set to 72 pixels per inch—the same settings as acomputer screen. In the next section, I’ll say more about why digital cameras andpublishing to the Web are much more straightforward than printing digital images.
Scanners, on the other hand, use samples per inch to measure the data captured bythe 600 to 1200 sensors located on the scanner’s scan bar (below the glass on aflatbed scanner). The data captured by the sensors is combined with the vertical dis-tance between each line of captured data. For example, you can create an imagethat’s scanned into your computer with a resolution of 1200 dpi.
After you’ve scanned an image into the work area, you can click on the status bar inthe work area to view the image’s information (see Figure 4.2). Click the middle-leftarea of the status bar, located at the bottom of the work area (or bottom of the win-dow for Mac users). A pop-up window will appear displaying the dimensions of theimage, as well as its image mode and resolution. Clicking on the status bar is a nice,quick way to determine the size and resolution of the image you’re modifying.
86 ABSOLUTE BEGINNER’S GUIDE TO ADOBE PHOTOSHOP ELEMENTS 2
07 8311 CH04 1/15/03 2:32 PM Page 86

IMAGE AND PRINT SIZESIf you plan to share a scanned image on the Web, you can modify the scanned image at ahigh resolution, such as 600 dpi, and then resize it to 72 or 96 dpi (see Figure 4.3). Theprint dimensions of the document will not change, although the size of the image windowmight shrink quite a bit. Double-click on the Zoom Tool (Z) in the Toolbox to resize theimage to a 100% view.
CHAPTER 4 CREATING, OPENING, AND CONVERTING IMAGES 87
FIGURE 4.2
Click on the sta-
tus bar to view
the current
image’s
information.
FIGURE 4.3
Resize an image
by changing the
resolution in the
Image Size dia-
log box. The
image on the
right is 72 dpi,
whereas the
image on the left
was scanned in
at 2400 dpi.
Document Settings for Web ImagesIf you’re creating a new document for use on the Web, consider the width andheight of the Web page for which you are designing the image or graphics. Mostimages for Web pages are created at 72 or 96 dpi, because the Web visitors can viewWeb pages at these resolutions on their monitors—regardless of whether the image isactually a higher dpi in its electronic format.
07 8311 CH04 1/15/03 2:32 PM Page 87

The dimensions of the image file will affect theoverall size of the Web page. You are also limitedby the connection speed of the Web visitor; thelarger the image, the longer the download timefor the Web page. Web pages should containsmaller, rather than larger, image files, enablingyour Web visitors to experience your Web graph-ics without waiting too long for them to down-load. Find out more about how to optimize Webgraphics in Chapter 5, “Saving and SharingFiles.”
Consider the following issues when creating a new document for use on the Web:
■ Create an image file that fits within the desktop area of the Web page. I usu-ally save my images as 640×480 files (see Figure 4.4), expecting visitors to myWeb site to have at minimum an 800×600 pixel desktop. If a visitor arrives atyour Web site and has only a 640×480 desk-top, they will be able to see only part of yourWeb page onscreen at once. They will haveto scroll around the browser window toview the full 640×480 image. If you wanteach visitor to view the full size of eachphotograph, consider creating a smallerthumbnail image for each larger image.
■ A resolution setting of 72 dpi will work finefor Web graphics. In most cases, you don’thave to adjust the resolution of yourimages captured with your digital camerato put them on a Web page.
■ Set the background color of the documentwindow to be colored or transparent. Formost images, you’re better off choosing atransparent background for a new imagewindow. Alternatively, you could choose abackground color for the canvas if youwant to create graphics that blend in withthe Web page.
88 ABSOLUTE BEGINNER’S GUIDE TO ADOBE PHOTOSHOP ELEMENTS 2
You can usePhotoshop Elements to
create great-looking images forthe Web. However, you’ll need atext editor to create the Webpage. Web pages use HTML(Hypertext Markup Language) toformat text and embed images inthe HTML file. To share yourimages on a Web site, you willupload the image file and theHTML file onto your Web server.
tipIf you need to measure the
dimensions of a particulargraphic object, open the Infopalette. Move the cursor overthe image to view its height
or width.
07 8311 CH04 1/15/03 2:32 PM Page 88
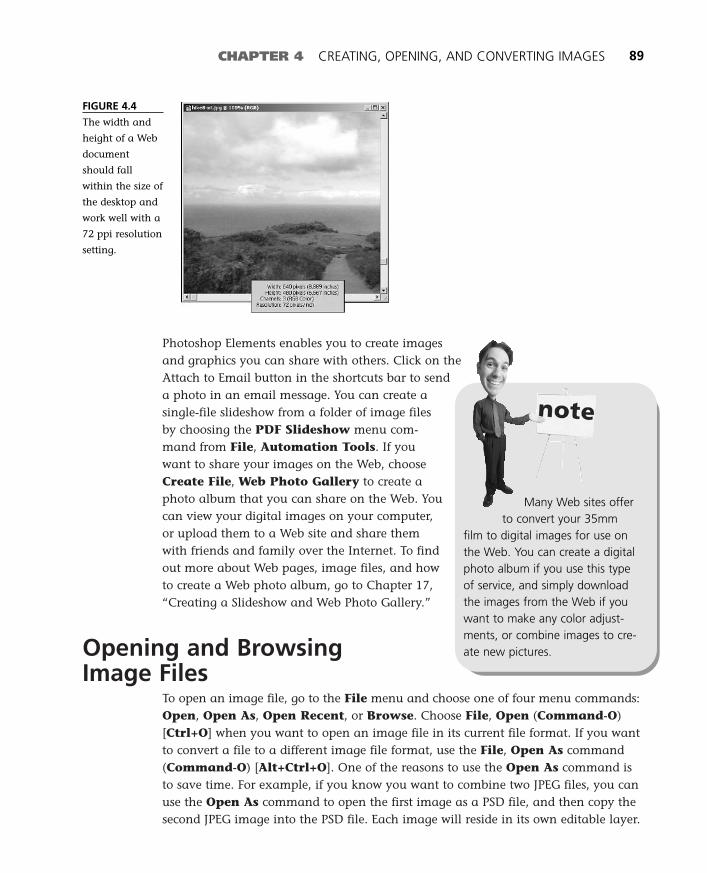
Photoshop Elements enables you to create imagesand graphics you can share with others. Click on theAttach to Email button in the shortcuts bar to senda photo in an email message. You can create asingle-file slideshow from a folder of image filesby choosing the PDF Slideshow menu com-mand from File, Automation Tools. If youwant to share your images on the Web, chooseCreate File, Web Photo Gallery to create aphoto album that you can share on the Web. Youcan view your digital images on your computer,or upload them to a Web site and share themwith friends and family over the Internet. To findout more about Web pages, image files, and howto create a Web photo album, go to Chapter 17,“Creating a Slideshow and Web Photo Gallery.”
Opening and Browsing Image Files
To open an image file, go to the File menu and choose one of four menu commands:Open, Open As, Open Recent, or Browse. Choose File, Open (Command-O)[Ctrl+O] when you want to open an image file in its current file format. If you wantto convert a file to a different image file format, use the File, Open As command(Command-O) [Alt+Ctrl+O]. One of the reasons to use the Open As command isto save time. For example, if you know you want to combine two JPEG files, you canuse the Open As command to open the first image as a PSD file, and then copy thesecond JPEG image into the PSD file. Each image will reside in its own editable layer.
CHAPTER 4 CREATING, OPENING, AND CONVERTING IMAGES 89
FIGURE 4.4
The width and
height of a Web
document
should fall
within the size of
the desktop and
work well with a
72 ppi resolution
setting.
Many Web sites offerto convert your 35mm
film to digital images for use onthe Web. You can create a digitalphoto album if you use this typeof service, and simply downloadthe images from the Web if youwant to make any color adjust-ments, or combine images to cre-ate new pictures.
07 8311 CH04 1/15/03 2:32 PM Page 89
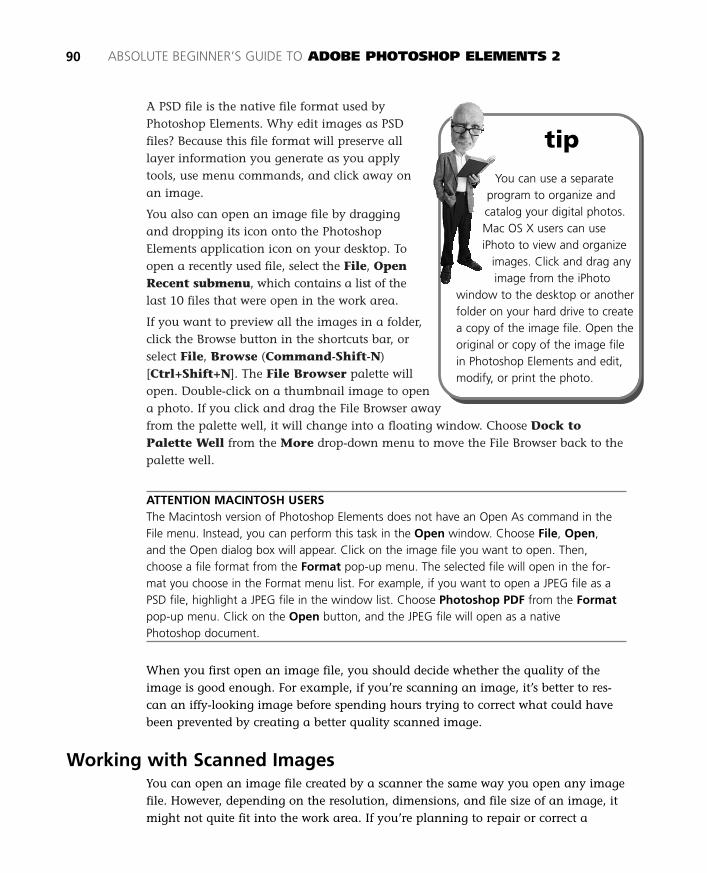
A PSD file is the native file format used byPhotoshop Elements. Why edit images as PSDfiles? Because this file format will preserve alllayer information you generate as you applytools, use menu commands, and click away onan image.
You also can open an image file by draggingand dropping its icon onto the PhotoshopElements application icon on your desktop. Toopen a recently used file, select the File, OpenRecent submenu, which contains a list of thelast 10 files that were open in the work area.
If you want to preview all the images in a folder,click the Browse button in the shortcuts bar, orselect File, Browse (Command-Shift-N)[Ctrl+Shift+N]. The File Browser palette willopen. Double-click on a thumbnail image to opena photo. If you click and drag the File Browser awayfrom the palette well, it will change into a floating window. Choose Dock toPalette Well from the More drop-down menu to move the File Browser back to thepalette well.
ATTENTION MACINTOSH USERSThe Macintosh version of Photoshop Elements does not have an Open As command in theFile menu. Instead, you can perform this task in the Open window. Choose File, Open,and the Open dialog box will appear. Click on the image file you want to open. Then,choose a file format from the Format pop-up menu. The selected file will open in the for-mat you choose in the Format menu list. For example, if you want to open a JPEG file as aPSD file, highlight a JPEG file in the window list. Choose Photoshop PDF from the Formatpop-up menu. Click on the Open button, and the JPEG file will open as a nativePhotoshop document.
When you first open an image file, you should decide whether the quality of theimage is good enough. For example, if you’re scanning an image, it’s better to res-can an iffy-looking image before spending hours trying to correct what could havebeen prevented by creating a better quality scanned image.
Working with Scanned ImagesYou can open an image file created by a scanner the same way you open any imagefile. However, depending on the resolution, dimensions, and file size of an image, itmight not quite fit into the work area. If you’re planning to repair or correct a
90 ABSOLUTE BEGINNER’S GUIDE TO ADOBE PHOTOSHOP ELEMENTS 2
tipYou can use a separate
program to organize andcatalog your digital photos.Mac OS X users can useiPhoto to view and organize
images. Click and drag anyimage from the iPhoto
window to the desktop or anotherfolder on your hard drive to createa copy of the image file. Open theoriginal or copy of the image filein Photoshop Elements and edit,modify, or print the photo.
07 8311 CH04 1/15/03 2:32 PM Page 90
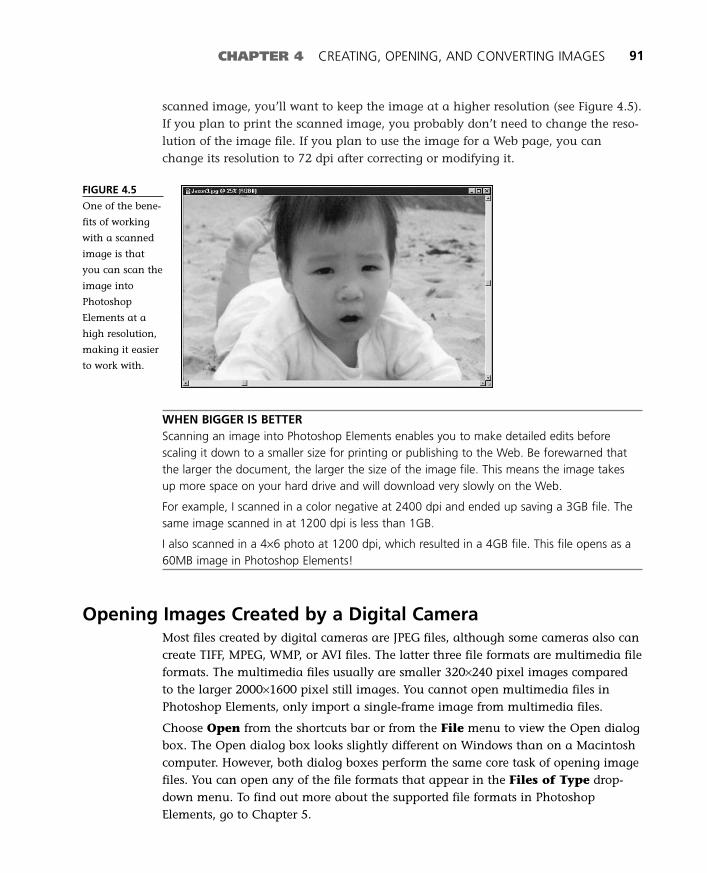
scanned image, you’ll want to keep the image at a higher resolution (see Figure 4.5).If you plan to print the scanned image, you probably don’t need to change the reso-lution of the image file. If you plan to use the image for a Web page, you canchange its resolution to 72 dpi after correcting or modifying it.
CHAPTER 4 CREATING, OPENING, AND CONVERTING IMAGES 91
WHEN BIGGER IS BETTERScanning an image into Photoshop Elements enables you to make detailed edits beforescaling it down to a smaller size for printing or publishing to the Web. Be forewarned thatthe larger the document, the larger the size of the image file. This means the image takesup more space on your hard drive and will download very slowly on the Web.
For example, I scanned in a color negative at 2400 dpi and ended up saving a 3GB file. Thesame image scanned in at 1200 dpi is less than 1GB.
I also scanned in a 4×6 photo at 1200 dpi, which resulted in a 4GB file. This file opens as a60MB image in Photoshop Elements!
Opening Images Created by a Digital CameraMost files created by digital cameras are JPEG files, although some cameras also cancreate TIFF, MPEG, WMP, or AVI files. The latter three file formats are multimedia fileformats. The multimedia files usually are smaller 320×240 pixel images comparedto the larger 2000×1600 pixel still images. You cannot open multimedia files inPhotoshop Elements, only import a single-frame image from multimedia files.
Choose Open from the shortcuts bar or from the File menu to view the Open dialogbox. The Open dialog box looks slightly different on Windows than on a Macintoshcomputer. However, both dialog boxes perform the same core task of opening imagefiles. You can open any of the file formats that appear in the Files of Type drop-down menu. To find out more about the supported file formats in PhotoshopElements, go to Chapter 5.
FIGURE 4.5
One of the bene-
fits of working
with a scanned
image is that
you can scan the
image into
Photoshop
Elements at a
high resolution,
making it easier
to work with.
07 8311 CH04 1/15/03 2:32 PM Page 91

The Windows Open dialog box enables you topreview some JPEG files if a thumbnail is storedalong with the full-size image (see Figure 4.6).The file size appears below the thumbnailimage. Sorry, Mac users, you can preview imagesas a thumbnail icon on your desktop, but not inthe Open dialog box.
If your camera can capture one-, two-, or three-megapixel images, you can open them withPhotoshop Elements. When you open amegapixel image, it might seem as though yourdesktop is a little too small to display the full-sizeimage. This is a good thing, because it’s better to have a larger image than asmaller one, especially when you want to edit the image. Photoshop Elements willadjust the magnification level of the image so that you can view the entire image inthe work area. You can view the file size, resolution, width, or height of an image byclicking on the status bar of the open image in the Photoshop Elements work area.
92 ABSOLUTE BEGINNER’S GUIDE TO ADOBE PHOTOSHOP ELEMENTS 2
tipIf you want to open more
than one image at a time,hold down the Shift or Ctrlkeys and click on more thanone file in the Open dialog
box or the File Browserpalette window.
FIGURE 4.6
The Open dialog
box enables you
to view one or
all image file
formats sup-
ported by
Photoshop
Elements.
If you want to reduce the dimensions of the digital image, choose Image Size fromthe Image, Resize menu. Enter a smaller number into the width and height textboxes. By default, the link icon that appears to the right of these text boxes willmaintain the original proportions of the image file. You can type in a new numberfor the width of the document, and Photoshop Elements will automatically calculatethe new height of the image.
07 8311 CH04 1/15/03 2:32 PM Page 92

CHAPTER 4 CREATING, OPENING, AND CONVERTING IMAGES 93
IMPORTING VERSUS OPENINGImporting enables you to select specific settings for an image file being opened in the workarea. For example, TWAIN plug-ins enable you to run device-specific (such as scanners ordigital cameras) software in the Photoshop Elements work area, allowing you to customizean image with the device before opening it in the work area. Similarly, you can use the PDFImage command to import each image from a PDF (Portable Document Format) file. If youopened the PDF file with the Open command, the entire document will open in the imagewindow. To find out more about the PDF file format, see Chapter 5. To find out how toimport images from a scanner or camera, go to Chapter 3.
Resizing an ImagePhotoshop Elements opens a photo in its original dimensions, although it may auto-matically change the view so you can see the entire image in the work area. You canchange the view of the image displayed in the image window to zoom in or awayfrom the image. If you want to permanently resize the image (see Figure 4.7),change the width and height values in the Image Size dialog box. The term resize isintended to describe only the actual width and height dimensions of the image, notits file size or view setting.
FIGURE 4.7
You must resize
a three-
megapixel
image to view it
in a browser
window.
Choose the Zoom Tool (magnifying-glass icon) to zoom into or out of an image win-dow. This tool enables you to change the view of the image without affecting theimage itself. Click on the image to enlarge it, or hold down the (Option) [Alt] keyand click to reduce or zoom away from the image.
You also can use the Navigator palette or choose a Zoom command from theView menu to set the magnification level of the viewable image in the documentwindow. Click and drag the red rectangle to pan around the image window from theNavigator palette. The magnification level of the image appears in the lower-leftcorner of the Navigator palette and the work area (or image window for Macs). Italso appears in the title bar of the image window.
07 8311 CH04 1/15/03 2:32 PM Page 93

94 ABSOLUTE BEGINNER’S GUIDE TO ADOBE PHOTOSHOP ELEMENTS 2
If you want to change the width or height of theimage, choose Image Size from the Image,Resize menu. The Image Size window opens.This window is divided into four general areas:pixel dimension, document size, check boxes,and buttons. On the right, the OK, Cancel,Help, and Auto buttons enable you to create anew window or exit the Image Size dialog box.You can adjust the Pixel Dimensions orDocument Size, or choose a different method forPhotoshop Elements to use to resample the resizedimage. The following list contains a brief descrip-tion of each area of settings in the Image Size window:
■ Pixel Dimensions—View the current dimensions of the image here. Enter anew width or height into the text boxes. The default behavior is to constrainthe settings so that the proportions of the original image are preserved.
■ Document Size—The Width and Height values indicate the actual printedsize of the file. The default setting is in inches, and the width and height areconstrained to preserve the original dimensions of the image.
■ Resolution—This box shows the number of pixels per inch in the image.You can enter a new value into this text box to change the resolution of animage without changing the document size. Use 72 ppi for images you wantto share on the Web or in email, 300 ppi or higher for printing images.
■ Constrain Proportions—If this box is checked, the original proportion ofthe width to the height is preserved when you enter any new value in theImage Size dialog box.
■ Resample Image—Choose the interpolation method you want PhotoshopElements to use on a resized image (see Figure 4.8). The interpolation methodapplies an algorithm to retain as much of the original image as possible.
tipClick the Auto button if
you’d like PhotoshopElements to automaticallyresize the image based onthe resolution of the screen
and the quality of theimage.
FIGURE 4.8
A resized image
will be resam-
pled using the
interpolation
method selected
from the
Resample Image
drop-down
menu.
07 8311 CH04 1/15/03 2:32 PM Page 94

Converting Image InformationYou might need to modify your images for several reasons. You might want tochange the file type so that it matches another image with which you are going tocombine it. After you open an image, you might find that you need to change theresolution, image mode, or size in order for it to fit your intended purpose. Whateverthe reason, Photoshop Elements makes it fairly painless to accomplish just aboutany type of change you need to make.
Opening an Image in a Different File FormatWhen you open an image file using the (Open) [Open As] dialog box, you can con-vert it to a different file format (see Figure 4.9). When it’s open, you can change itsimage mode or dimensions to more closely match the settings of another image file.For example, if you want to take a scanned image and combine it with an imagecreated with a digital camera, you might need to work with the resolution andimage sizes to scale both images until they match. Using the Image Size dialog boxto adjust the settings, you can experiment with copying and pasting an image usingdifferent resolutions in multiple image windows. Then, pick the images you want tocombine, and paste them into a single image window.
CHAPTER 4 CREATING, OPENING, AND CONVERTING IMAGES 95
FIGURE 4.9
The (Open)
[Open As] com-
mand enables
you to convert a
file to a specific
file format when
you open it.
Changing an Image to a Different Color ModeThe mode of an image determines the number of colors that can be used to displaythe image. Photoshop Elements enables you to work with an image in four imagemodes: RGB Color, Grayscale, Bitmap, and Indexed color. Most images will open inRGB Color mode. The following list matches up image modes with image files:
■ Color photo—RGB Color
■ Optimized color photo—Indexed Color
07 8311 CH04 1/15/03 2:32 PM Page 95

■ Black-and-white or monochrome image—Grayscale
■ Line art—Bitmap
Converting a File for Print OutputPrinting a digital image can be either a pleasantor a frustrating experience. More precisely, it isa pleasant experience when you print animage that matches what you created on yourcomputer screen. And it’s frustrating when theprinted image does not meet your expecta-tions.
If the image originates from a digital camera,it was most likely created at a resolution of 72dpi. You can adjust the width and height of theprinted size of the image without changing itsresolution to make the image match thedimensions of the paper on which it will beprinted. Photoshop Elements will use an inter-polation algorithm to resize the original sothat it will retain as much color informationand image detail when it is printed at 300,600, or 1440 dpi. Interpolation uses a best-guess method to estimate how to adjust colorsin the resized image to match its original.However, it’s not capable of creating an exactmatch of the original because pixels will beeither added or lost when the image size changes.
If you’ve scanned an image, you might have captured a 300 or 600 dpi or higherresolution image. Save the file as a TIFF or JPEG file format to retain the image sizeand quality. If you print this image to a 600 dpi printer, it will print with a muchhigher quality than a resized digital picture because the original image consists ofmore dots packed into each inch of paper (see Figure 4.10).
CHOOSING A WEB FILE FORMATOne of the great things about the Web is that you can easily download images from a Webpage onto your hard drive. If you have access to a Web server, you can store a backup copyof your images on the Web, and easily download an original if you lose or remove it fromyour hard drive. Most images on the Web are stored as JPEG or GIF files. However, somebrowsers can display the PNG file format, too.
96 ABSOLUTE BEGINNER’S GUIDE TO ADOBE PHOTOSHOP ELEMENTS 2
When you resize animage for the Web,
Photoshop Elements uses theinterpolation algorithm selected inthe Resample Image option in theImage Size dialog box to deter-mine which pixels to change.Bicubic interpolation, which is thedefault setting, usually offers thebest and fastest method ofresampling an image. However,you also can choose a bilinear ornearest neighbor algorithm whenshrinking or growing an image.
07 8311 CH04 1/15/03 2:32 PM Page 96

CHAPTER 4 CREATING, OPENING, AND CONVERTING IMAGES 97
Converting PDF FilesYou can convert the images stored in a multi-pagePDF document, such as a PDF slideshow, into sep-arate PSD (Photoshop) files. This command cancome in handy if you want to share or edit aphoto stored in a PDF file. You can also save theconverted image in another file format, such as aJPEG or GIF, instead of as a Photoshop (PSD) file.
The following steps show you how to convert aphoto from a PDF file into a Photoshop file:
1. Choose Multi-Page PDF to PSD fromthe File, Automation Tools menu. TheConvert Multi-Page PDF to PSD dialog boxwill open.
2. Click Choose to select the PDF file. Set thenumber of pages you want to convert toPSD files.
3. Choose a resolution for the resultingimages, and assign a common base nameto each file.
4. Click the Choose button located at thebottom of the dialog box to select the desti-nation folder for the PSD files.
FIGURE 4.10
Both of these
images are 72
ppi. The image
on the left was
scanned, and
the one on the
right was taken
with a digital
camera.
When working withscanned images or images
taken with a digital camera, it isnecessary to preserve the originalJPEG or TIFF image. Saving theoriginal file enables you to archivethe original state of the captureddata so that you can easily goback to the original state if youfind that the edits you are makingdon’t achieve the result you want.As you work on an image, youmight find that an image you cap-tured can be more easily edited ifyou change some of the scanneror camera settings and bring theimage back into PhotoshopElements again.
07 8311 CH04 1/15/03 2:32 PM Page 97

5. If the document contains text, or objects that Photoshop Elements won’t rec-ognize, check the Suppress Warnings check box—this will ignore anywarnings that may otherwise stop the conversion process from completing.
6. Click OK, and Photoshop Elements will convert the images in the PDF fileinto PSD files.
98 ABSOLUTE BEGINNER’S GUIDE TO ADOBE PHOTOSHOP ELEMENTS 2
07 8311 CH04 1/15/03 2:32 PM Page 98
In this chapter
• What’s All the Fuss?
• Saving a File for Any Occasion
• Optimizing Images
• Sharing Files Electronically
5
Saving and Sharing
Files
The best thing about working with digital images is that you can pre-
serve all the detail of an image as a file, and copy or back that file up
as many times as you like. The quality of the digital image won’t degen-
erate as the file is opened, copied, or closed, or while it is just biding its
time on your computer’s hard drive.
Saving a file also means you can share it with others. You can send an
image file in an email or publish it on a Web page. This chapter shows
you all the ins and outs of saving files, whether you want to print them
or share them on the Web.
08 8311 CH05 1/15/03 2:30 PM Page 99
What’s All the Fuss?What can be so difficult about choosing the Save command from the File menu tosave a file? Well, certain file formats retain image data better than others. For exam-ple, a JPEG file stored at a high compression rate will save a portion of the originalimage. A high compression rate usually results in a lower quality image, comparedto the original image. However, if you choose the minimum compression rate, thequality of the image will be preserved; all the original image data will be stored inthe compressed file.
When you save an image, you want to preserve all the image data so that you canedit the image with as much image and color data as possible. After you’ve createdthe final image, you can save a separate copy of the same image containing fewercolors, or only a portion of the original image. What I’m describing here is the gen-eral workflow for preparing digital camera images for printing or for posting on aWeb page.
Using the Save CommandIf you’re working with a new document, the firsttime you choose the Save command and assignit a name, the Save As window will appear. Ifyou’ve already chosen a file format for yourimage file, or are saving the same file as yougradually make changes, use the Save command.The Save command, located in the File menu,replaces the existing file with all the new infor-mation of the current image file, using the samefile format. If you want to choose a different fileformat for an image, use the Save As command—it’s chock-full of file-saving options (seeFigure 5.1).
CHOOSING THE COLOR OF THE CANVASIf the Background Color radio button is selected in the New dialog box, the color thatappears in the background color square located in the Toolbox will be used as the back-ground color for a new window. If the Web page you’re working with uses a solid colorbackground, you can work with images or graphics with the same color background. Thiscan help you adjust transparency settings for each graphic object, and also choose colorsthat blend well with the background color of the page. To find out more about how to cre-ate a new document, go to Chapter 4, “Creating, Opening, and Converting Images.”
100 ABSOLUTE BEGINNER’S GUIDE TO ADOBE PHOTOSHOP ELEMENTS 2
Heed these words of wis-dom: Save, and saveoften. You can edit theimages, undo a change,or copy and paste other images intomultiple documents without eversaving them. But there’s nothingmore memorable than watchingyour computer crash after you’vespent hours of work developing animage.
08 8311 CH05 1/15/03 2:30 PM Page 100
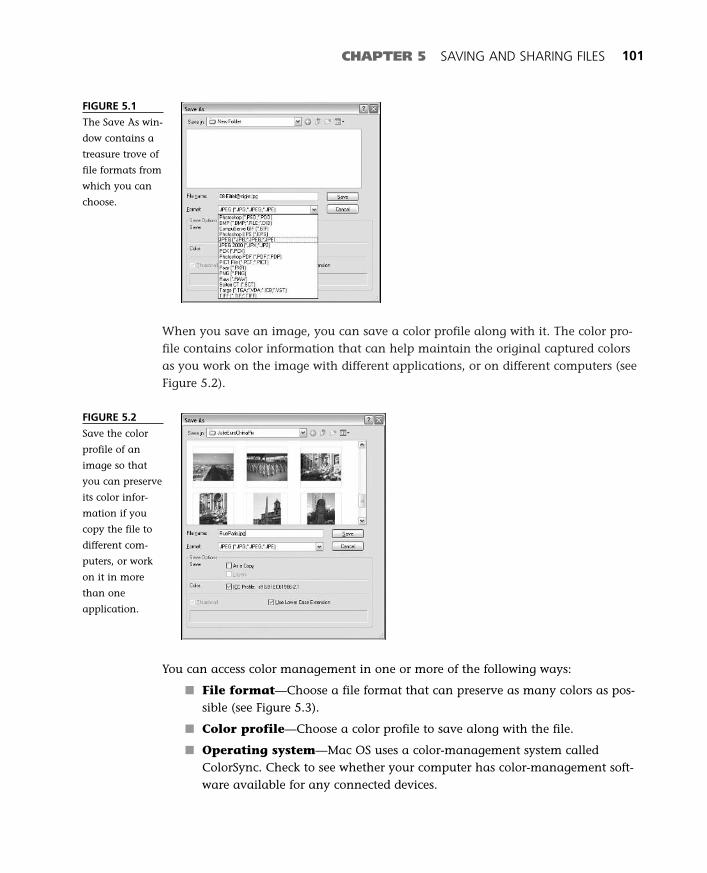
When you save an image, you can save a color profile along with it. The color pro-file contains color information that can help maintain the original captured colorsas you work on the image with different applications, or on different computers (seeFigure 5.2).
CHAPTER 5 SAVING AND SHARING FILES 101
FIGURE 5.1
The Save As win-
dow contains a
treasure trove of
file formats from
which you can
choose.
FIGURE 5.2
Save the color
profile of an
image so that
you can preserve
its color infor-
mation if you
copy the file to
different com-
puters, or work
on it in more
than one
application.
You can access color management in one or more of the following ways:
■ File format—Choose a file format that can preserve as many colors as pos-sible (see Figure 5.3).
■ Color profile—Choose a color profile to save along with the file.
■ Operating system—Mac OS uses a color-management system calledColorSync. Check to see whether your computer has color-management soft-ware available for any connected devices.
08 8311 CH05 1/15/03 2:30 PM Page 101

102 ABSOLUTE BEGINNER’S GUIDE TO ADOBE PHOTOSHOP ELEMENTS 2
FIGURE 5.3
Some file for-
mats, such as
JPEG and TIFF,
have several file
settings that
enable you to
control how
much of the
image data is
saved to the file.
The options you choose when saving a file can affect how much data is saved. Somefile formats, such as the JPEG format, shown in Figure 5.3, support compression,which reduces the file size of an image. You can adjust the compression optionswhen you first save an image. A format options window will appear for a JPEG, GIF,or TIFF image after you click the Save button in the Save window. Although it’s notthe case for all file formats, more compression usu-ally means that more image data is removed whenthe file is saved. Basically, the smaller the image, theless image data it contains.
If you’re not sure which settings to use for a par-ticular file format, your best bet is to use as littlecompression as possible. For example, if you’resaving a JPEG file, choose an image quality set-ting of 12. TIFF images can also be saved with orwithout compression. However, some compressionformats, such as LZW compression, might notwork with different graphics editors or imageviewer applications. Shareware programs areavailable that can view LZW-compressed TIFFfiles. You can use GraphiConverter or Preview forMacintosh computers or IrfanView for Windows.
Saving a File for Any OccasionPhotoshop Elements supports a long list of file formats. Although you can use any ofthese file formats to save your image, Photoshop Elements’ native PSD is the onlyfile format that enables you to continue editing multilayered images time and timeagain. A PSD file can store any layers or other Photoshop Elements–specific settings.Other file formats will only be able to save a single, flat layer as an image file.
Color managementenables different output
devices to translate color informa-tion to preserve color accuracy. Tofind out more about color man-agement, go to Chapter 7,“Photoshop Elements and Color.”
08 8311 CH05 1/15/03 2:30 PM Page 102

Flattening an image makes it much more difficult to edit later. It’s better to preservethe layers of an image whenever possible, until you are positive you will no longerneed to edit the file.
Supported File FormatsThe following list contains all the possible file formats Photoshop Elements can openand save:
■ BMP—The bitmap image file format used most frequently with Windowscomputers. This is the default format used when you create a screen capturein Windows.
■ PCX—Another graphics file format used by many Windows and Macintoshgraphics applications.
■ PICT—The default file format used by Mac OS 9.x to store screen shots. (MacOS X captures screen shots as TIFF files.) PICT also is referred to as a .PCT fileor PICT Resource. A PICT Resource is a type of image stored in a Mac file.
■ Photo CD—A file format created for image files stored on Kodak’s Photo CD-ROMs. If you shoot a roll of 35mm film, many stores can create a Photo CDof that roll of film so that you can open the images on your computer. ThePhoto CD contains several sets of the 35mm images. Each set contains theimages stored at different resolutions, such as 640×480 pixels or 1024×768pixels. Photoshop Elements enables you to import Photo CD images into thework area. Photoshop Elements cannot save files in PCD format.
■ GIF—Graphics Interchange Format. GIF images use LSW compression com-bined with a transparency layer and a color table to store an image. ChooseCompuServe GIF to save an image as a GIF file.
■ JPEG—Joint Photographic Experts Group. This format supports the widestrange of colors of all the image file formats. It also offers file compression,but no transparency support. Also, the more compression you apply to aJPEG file, the more image data is lost.
■ JPEG 2000—Joint Photographic Experts Group 2000. A new file format inPhotoshop Elements 2. This file format enables you to adjust the amount ofcompression used in the JPEG file and choose from three different types ofoptimization. You can also adjust the quality of the image as well as its sizeand amount of compression applied to it. Most browsers do recognize this fileformat because it is different from a standard JPEG file. This is a file formatunique to Photoshop Elements version 2.0.
■ PNG—Portable Network Graphics. An alternative to GIF or JPEG image for-mats. The latest versions of Internet Explorer and Netscape Navigator candisplay PNG files. This file format was designed to replace the GIF file format;however, it does not support animation.
CHAPTER 5 SAVING AND SHARING FILES 103
08 8311 CH05 1/15/03 2:30 PM Page 103
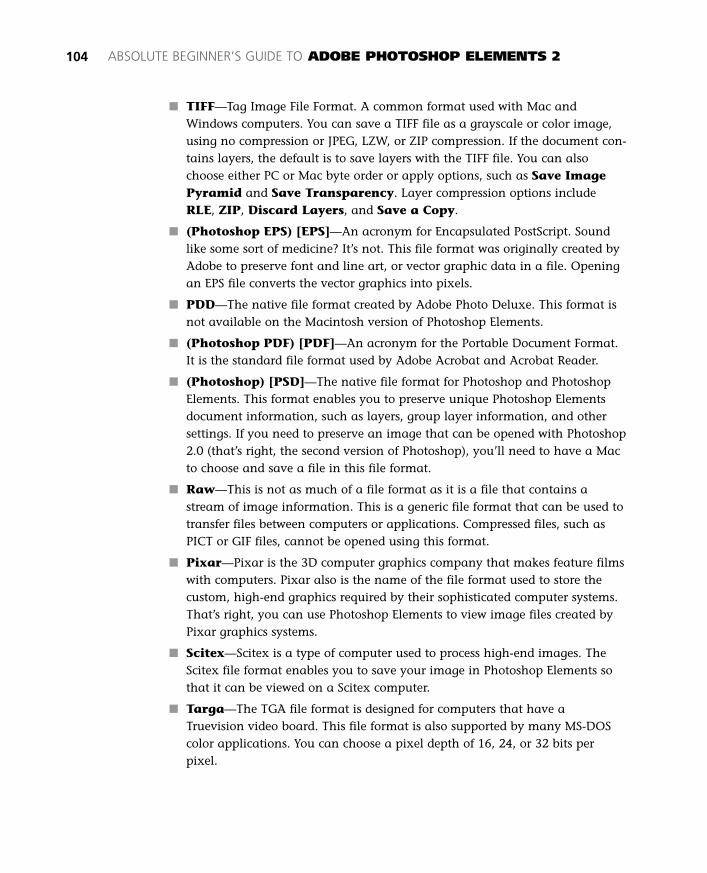
■ TIFF—Tag Image File Format. A common format used with Mac andWindows computers. You can save a TIFF file as a grayscale or color image,using no compression or JPEG, LZW, or ZIP compression. If the document con-tains layers, the default is to save layers with the TIFF file. You can alsochoose either PC or Mac byte order or apply options, such as Save ImagePyramid and Save Transparency. Layer compression options includeRLE, ZIP, Discard Layers, and Save a Copy.
■ (Photoshop EPS) [EPS]—An acronym for Encapsulated PostScript. Soundlike some sort of medicine? It’s not. This file format was originally created byAdobe to preserve font and line art, or vector graphic data in a file. Openingan EPS file converts the vector graphics into pixels.
■ PDD—The native file format created by Adobe Photo Deluxe. This format isnot available on the Macintosh version of Photoshop Elements.
■ (Photoshop PDF) [PDF]—An acronym for the Portable Document Format.It is the standard file format used by Adobe Acrobat and Acrobat Reader.
■ (Photoshop) [PSD]—The native file format for Photoshop and PhotoshopElements. This format enables you to preserve unique Photoshop Elementsdocument information, such as layers, group layer information, and othersettings. If you need to preserve an image that can be opened with Photoshop2.0 (that’s right, the second version of Photoshop), you’ll need to have a Macto choose and save a file in this file format.
■ Raw—This is not as much of a file format as it is a file that contains astream of image information. This is a generic file format that can be used totransfer files between computers or applications. Compressed files, such asPICT or GIF files, cannot be opened using this format.
■ Pixar—Pixar is the 3D computer graphics company that makes feature filmswith computers. Pixar also is the name of the file format used to store thecustom, high-end graphics required by their sophisticated computer systems.That’s right, you can use Photoshop Elements to view image files created byPixar graphics systems.
■ Scitex—Scitex is a type of computer used to process high-end images. TheScitex file format enables you to save your image in Photoshop Elements sothat it can be viewed on a Scitex computer.
■ Targa—The TGA file format is designed for computers that have aTruevision video board. This file format is also supported by many MS-DOScolor applications. You can choose a pixel depth of 16, 24, or 32 bits perpixel.
104 ABSOLUTE BEGINNER’S GUIDE TO ADOBE PHOTOSHOP ELEMENTS 2
08 8311 CH05 1/15/03 2:30 PM Page 104
Choosing a File FormatThere are so many different formats from which to choose that it can be difficult todecide which one to use. Your best bet will be to use a format that can be viewed ona Windows or Macintosh computer, regardless of whether that computer hasPhotoshop Elements installed. JPEG probably will be the best file format to save yourdigital images. It works well for both print and the Web.
Although there might be a few exceptions, most old and new computers will have abrowser application already installed. Internet Explorer and Netscape Navigator arethe most popular Web browsers currently in use. Plus, they’re both free. You can visitMicrosoft’s Web site (www.microsoft.com) or Netscape’s Web site (www.netscape.com) todownload the software and install it on your computer.
The following file formats can be viewed in a browser, and are the most commonlychosen file formats for saving graphics and digital images for the Web or forprinting:
■ GIF—Graphics Interchange Format. Choose this format if your image haslarge areas of similar or solid color, or if you’re creating a Web graphic, suchas a button or menu graphic. This format supports transparency. Your imagecan be edited into an animation if the file is saved as an animated GIF in theSave for Web window.
■ JPEG—Joint Photographic Experts Group. This format saves images of anysize. However, this format won’t save any transparency settings along withthe image. Use this format to save scanned or digital images for the Web orprint.
■ PNG—Portable Network Graphics. Although not as commonly used as JPEGor GIF, this file format is supported by most browsers. It can create smaller filesizes and more colors than GIF. This file format supports transparency butdoes not support animation.
■ TIFF—Tag Image File Format. The optimal file format for publishing. Choosethis format if you want to submit an image to a book publisher, or for otherprofessional-quality print jobs. You might need to install the QuickTime plug-in for your browser to view a TIFF file.
FILE INFORMATIONYou can add copyright and caption information when you save an image. Choose File, FileInfo, and then choose either Caption, Copyright & URL, or EXIF from the Section drop-down menu. Type any caption information into the Caption window (see Figure 5.4). Youcan add the copyright notice or URL for the image into the Copyright & URL section ofthe Caption window.
CHAPTER 5 SAVING AND SHARING FILES 105
08 8311 CH05 1/15/03 2:30 PM Page 105

Click the Section drop-down menu, and select EXIF to view any custom information savedalong with the image by the digital camera. Some digital cameras store date, time, resolu-tion in ppi, and exposure settings along with each image file. To find out more about EXIFannotations, read the documentation for your digital camera.
106 ABSOLUTE BEGINNER’S GUIDE TO ADOBE PHOTOSHOP ELEMENTS 2
FIGURE 5.4
Choose File
Info from the
File menu to
view or add
copyright infor-
mation to an
image file.
Choose the
Copyrighted
Work option
and add a copy-
right notice to
your photos.
Optimizing ImagesDepending on how you want to share your images, you might need to optimize animage before you print it or save it for the Web. For example, if you’re working witha group of people, you might want to share your photos as-is without making anychanges so that the team can decide how to proceed with each image. On the otherhand, if you want to create custom images, correct portrait photos, or repair an oldphoto, you’ll probably want to polish—or optimize—an image before you print it orshare it on the Web.
Optimizing for the WebOptimizing an image can involve several processes. The goal of optimizing an imageis to minimize the file size of the image without sacrificing the quality of the image(see Figure 5.5). You can optimize an image based on a fixed file size, or enhancethe quality of an image by choosing the best combination of settings for a particularfile format. Photoshop Elements provides both kinds of tools that enable you to pre-view Web settings before you save the file.
08 8311 CH05 1/15/03 2:30 PM Page 106
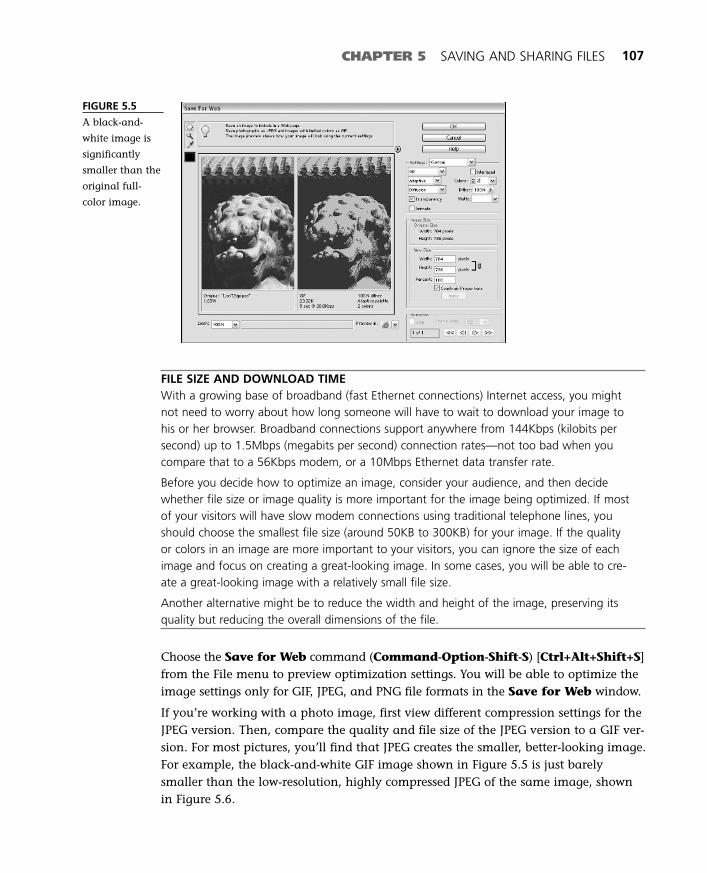
CHAPTER 5 SAVING AND SHARING FILES 107
FIGURE 5.5
A black-and-
white image is
significantly
smaller than the
original full-
color image.
FILE SIZE AND DOWNLOAD TIMEWith a growing base of broadband (fast Ethernet connections) Internet access, you mightnot need to worry about how long someone will have to wait to download your image tohis or her browser. Broadband connections support anywhere from 144Kbps (kilobits persecond) up to 1.5Mbps (megabits per second) connection rates—not too bad when youcompare that to a 56Kbps modem, or a 10Mbps Ethernet data transfer rate.
Before you decide how to optimize an image, consider your audience, and then decidewhether file size or image quality is more important for the image being optimized. If mostof your visitors will have slow modem connections using traditional telephone lines, youshould choose the smallest file size (around 50KB to 300KB) for your image. If the quality or colors in an image are more important to your visitors, you can ignore the size of eachimage and focus on creating a great-looking image. In some cases, you will be able to cre-ate a great-looking image with a relatively small file size.
Another alternative might be to reduce the width and height of the image, preserving itsquality but reducing the overall dimensions of the file.
Choose the Save for Web command (Command-Option-Shift-S) [Ctrl+Alt+Shift+S]from the File menu to preview optimization settings. You will be able to optimize theimage settings only for GIF, JPEG, and PNG file formats in the Save for Web window.
If you’re working with a photo image, first view different compression settings for theJPEG version. Then, compare the quality and file size of the JPEG version to a GIF ver-sion. For most pictures, you’ll find that JPEG creates the smaller, better-looking image.For example, the black-and-white GIF image shown in Figure 5.5 is just barelysmaller than the low-resolution, highly compressed JPEG of the same image, shownin Figure 5.6.
08 8311 CH05 1/15/03 2:30 PM Page 107

If you want to create an image that blends inwith the background color of a Web page, selectthe GIF format. The file size will be a little largerthan the JPEG file, but if you don’t think yourWeb page visitors will mind waiting a few moreseconds for the GIF, save the image as a GIF.Figure 5.7 shows the previously shown JPEG file,this time as a GIF file. The GIF version has 128colors, versus 2 colors as shown in Figure 5.5.
WHY SAVE A PHOTO AS A GIF?In most instances, you will save a photo as a JPEGfile. However, if you want to add transparency to animage, you need to use the GIF file format.
The GIF file format also supports animation. To convertthe layers of a file into frames of animation, chooseSave for Web from the File menu. The Save forWeb window will open. Choose one of the GIF itemsfrom the Settings drop-down menu, and then checkthe Animate check box. To find out more about howto create animation with Photoshop Elements, go toChapter 15, “Animating Images.”
108 ABSOLUTE BEGINNER’S GUIDE TO ADOBE PHOTOSHOP ELEMENTS 2
tipIf you want Photoshop
Elements to remember yoursettings in the Save for Webwindow, open the Save forWeb window, and then hold
down the (Option) [Alt]key. The OK and Cancel
buttons will change to Rememberand Reset. Click the Rememberbutton if you want to save thesettings in the window. Click theReset button to revert to the rec-ommended settings of PhotoshopElements. The remembered settingswill become the default settingsthe next time you open the SaveFor Web window, regardless ofthe image file you have open.
FIGURE 5.6
A low-resolution
JPEG file isn’t
much larger
than the black-
and-white
image, yet has
much more
image detail and
color.
08 8311 CH05 1/15/03 2:30 PM Page 108

CHAPTER 5 SAVING AND SHARING FILES 109
FIGURE 5.7
Increasing the
number of colors
in the GIF file
also increases
the file size and
download time
of the image.
Comparing Web File FormatsThere are actually three image file formats you should compare before picking oneto save your file. PNG is an acronym for the Portable Network Graphics file format.Its biggest strength is that it can support more colors than GIF. Otherwise, it providesdecent file compression compared to GIF. But JPEG tends to turn out the best image-quality-to-image-compression ratio. Figure 5.8 shows the image quality of a PNG-8file. Compare the image quality and file size, as well as the download time with theJPEG and GIF files.
FIGURE 5.8
The same file
saved as a PNG-
8 file is slightly
smaller than the
GIF image with
128 colors.
08 8311 CH05 1/15/03 2:30 PM Page 109

110 ABSOLUTE BEGINNER’S GUIDE TO ADOBE PHOTOSHOP ELEMENTS 2
Consider these issues before saving a file for the Web:
■ Compare the optimized Web file format tothe original. How close is the picture qual-ity of the optimized image to the original?
■ Compare the file size of the original imageto that of another file format. You canopen the Save for Web window and com-pare a GIF, JPEG, or PNG file format to theoriginal. You also can limit the number ofcolors available for any of these three fileformats to try to reduce the file size of theimage. How much smaller is the optimizedfile? If you don’t see much of a difference,consider saving the original file as a JPEGand posting that to the Web.
■ Consider the download times for differentoptimized images. If the higher-quality,optimized file can download in less than30 seconds, or a time that you consider acceptable, save the image andupload it to a Web site. If download time is not an issue for your Web visitors,you won’t have to worry about file compression or loss of image quality.
Optimizing a TIFF Image FileAlthough you won’t find the Tagged Image File Format (TIFF) as a format option inthe Save for Web window, this file format is recognized by most graphics applica-tions that run on Mac OS and Windows. A common file format ensures that theimage quality will look the same on any computer or application that opens it.However, TIFF files are formatted a little differently for a PC and a Mac. Fortunately,Photoshop Elements enables you to open and save a TIFF image in either format.
You can save a TIFF image with or without layers and compression. If you want tosave a master TIFF image, preserve layers; otherwise, remove them to create thesmallest possible file. You can choose from three compression formats, and choosebetween a Mac or PC byte order for the saved image. When a TIFF file is compressed,the quality of the image is preserved. If that’s not enough, you also can save trans-parency settings in a TIFF file.
Choose Save As from the File menu. If you want to save an open image as a TIFFfile, select TIFF from the Format drop-down menu. Type a name for the file, andthen click the Save button. The TIFF Options window opens. You will be able tochoose compression options in this window if the Enable Advanced TIFF Saveoption is checked in the Saving Files Preferences window.
The PNG file formatdoes not support anima-
tion. It was originally intended tobe a patent-free replacement forthe GIF format. However, if youwant to create animation for theWeb, only the GIF format is capa-ble of creating a single file con-taining animation.
08 8311 CH05 1/15/03 2:30 PM Page 110

Click the IBM PC or Macintosh radio button to select the byte order of the TIFF file.The file will be formatted in a slightly different way depending on whether youchoose IBM PC or Macintosh. The difference between Power PC and Intel processorsapparently has some effect on the way TIFF files are processed. The good news isthat most publishing applications, such as QuarkXPress and InDesign, can workwith either TIFF format.
If the advanced TIFF option is selected in the Saving Files Preferences window,you will be able to choose from LZW, JPEG, or ZIP compression formats. Older TIFF-viewing applications will not be able to open JPEG- or ZIP-compressed TIFF files. Youcan use Adobe InDesign to work with these newer TIFF compression formats. LZWcompression is the more common compression format applied to TIFF images.
WHEN TO EXPORT A FILEAlthough there aren’t any Export options installed, you can still export an image fromPhotoshop Elements. Like importing, exporting enables you to save an image in a specificfile format, such as GIF89a, which is a variation of the GIF file format, or CompuServe GIF.
You can install an export plug-in with Photoshop Elements by placing the plug-in file in the(Import/Export) [Import-Export] folder, located in the Plug-ins folder of the PhotoshopElements folder. Unfortunately, there aren’t any export plug-ins installed with PhotoshopElements, so I can’t demonstrate the finer points of exporting. In case you’re still wonder-ing whether to export or save, it’s always best to save, and save often. However, if youneed to save a file in a specific format that’s available only as a plug-in, it’s better to export.
Sharing Files ElectronicallyWhen you save a file, you can copy that file to a file server, send it in an email, orprint it. If you print your image, it’s easy to show that printed picture to your friendsand neighbors, or mail it to someone. Another way you can share the image is topost it on a Web site or send it attached to an email message. Email and Web sitesare both great ways to share images immediately without sacrificing too many trees.Of course, your friends, family, and neighbors must have a computer to get to yourWeb page, too.
Before you can share files on the Web, you’ll need the following items:
■ An account on a Web server. You might have received a free Web site withyour Internet service provider (ISP) when you signed up for Internet access. Ifyou are a Mac OS X user, you have space available through iTools.
■ Enough disk space to store the image files you want to share. This is probablythe toughest issue to work around—especially if your Internet service providercan provide only 5MB or 10MB of disk space per Web site.
CHAPTER 5 SAVING AND SHARING FILES 111
08 8311 CH05 1/15/03 2:30 PM Page 111

■ Software to connect to the Web server. Most Web servers support the FileTransfer Protocol (FTP). You can upload or download image files to a Webserver using an FTP application.
Sending an Image in EmailIf you don’t have access to a Web server that can accommodate all the images youwant to share, you can use the Attach to Email button in the shortcuts bar andemail files to others. You can use a browser or a dedicated email program to send orreceive email. Yahoo! and Hotmail are a coupleof the most popular Web sites that provide emailservices free. You can also download free emailprograms from Microsoft’s or Netscape’s Websites. Microsoft’s email application for Windowsis Outlook or Outlook Express. Entourage is thelatest email application available for Macs,although Outlook Express is also quite popular.
To send an image file with an email message,click on the Attach to Email shortcuts button.Choose Convert if you want to resize the imageto roughly 12×9 inches. If the dimensions of animage are smaller than that, or if you don’t wantto resize the photo, choose Send As Is. PhotoshopElements will create a new email message andattach the photo.
You can manually add any image file as an attachment to an email message, too. Ifyou’re using a browser to send email, log in to your email account, and then createor compose an email message. Click the Attachments button or link in the browserwindow. Navigate your hard drive and select the image file you want to attach tothe email message. Type your message into the email, and then click the Sendbutton.
If you’re using Outlook or Outlook Express, click the New button in the toolbar tocreate a new email message. Click the Attachments button in the toolbar, orchoose the Attachments command from the Insert menu. Then navigate to yourhard drive and select the image file you want to attach to the email. Figure 5.9shows an image attached to an email message in Outlook Express. After the imageis attached, click the Send button, and away it will go!
EMAIL ATTACHMENTS AND FILE COMPRESSIONTo help email attachments download faster, you might want to compress a file before yousend it. For example, most computers can open files compressed in either a Zip or a StuffIt
112 ABSOLUTE BEGINNER’S GUIDE TO ADOBE PHOTOSHOP ELEMENTS 2
tipYou can use the Save for
Web window to estimatehow long it might takesomeone to download animage attached to an email
message. Choose Save forWeb from the File menu
to open the Save for Web win-dow. Then compare the downloadtimes for different JPEG compres-sion formats.
08 8311 CH05 1/15/03 2:30 PM Page 112
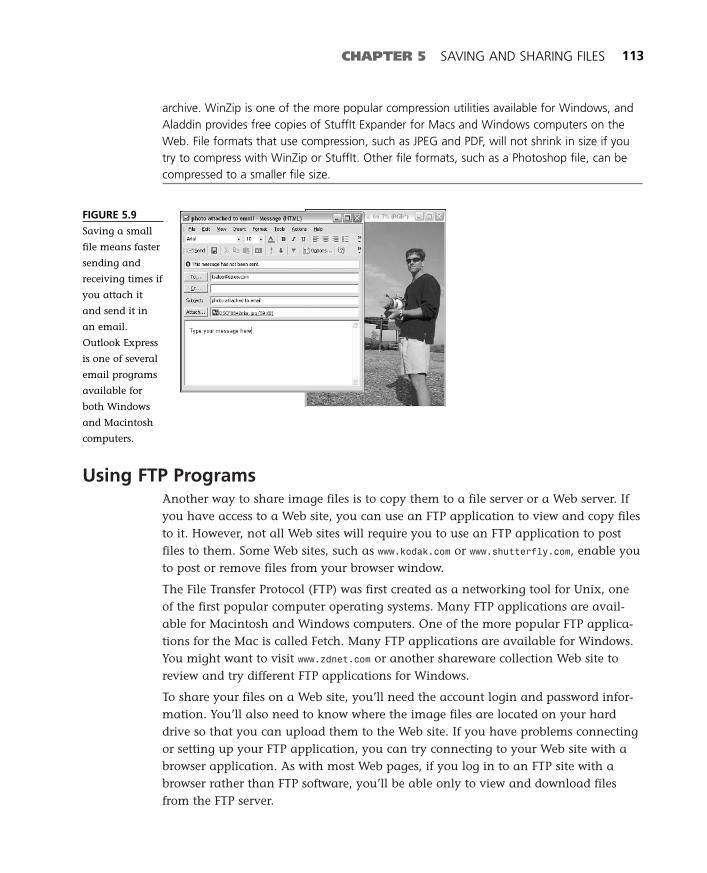
Using FTP ProgramsAnother way to share image files is to copy them to a file server or a Web server. Ifyou have access to a Web site, you can use an FTP application to view and copy filesto it. However, not all Web sites will require you to use an FTP application to postfiles to them. Some Web sites, such as www.kodak.com or www.shutterfly.com, enable youto post or remove files from your browser window.
The File Transfer Protocol (FTP) was first created as a networking tool for Unix, oneof the first popular computer operating systems. Many FTP applications are avail-able for Macintosh and Windows computers. One of the more popular FTP applica-tions for the Mac is called Fetch. Many FTP applications are available for Windows.You might want to visit www.zdnet.com or another shareware collection Web site toreview and try different FTP applications for Windows.
To share your files on a Web site, you’ll need the account login and password infor-mation. You’ll also need to know where the image files are located on your harddrive so that you can upload them to the Web site. If you have problems connectingor setting up your FTP application, you can try connecting to your Web site with abrowser application. As with most Web pages, if you log in to an FTP site with abrowser rather than FTP software, you’ll be able only to view and download filesfrom the FTP server.
CHAPTER 5 SAVING AND SHARING FILES 113
FIGURE 5.9
Saving a small
file means faster
sending and
receiving times if
you attach it
and send it in
an email.
Outlook Express
is one of several
email programs
available for
both Windows
and Macintosh
computers.
archive. WinZip is one of the more popular compression utilities available for Windows, andAladdin provides free copies of StuffIt Expander for Macs and Windows computers on theWeb. File formats that use compression, such as JPEG and PDF, will not shrink in size if youtry to compress with WinZip or StuffIt. Other file formats, such as a Photoshop file, can becompressed to a smaller file size.
08 8311 CH05 1/15/03 2:30 PM Page 113

Logging In and Uploading FilesUploading files is the network term for copying files from a computer to a server. Startyour FTP application, and then log in to your Web site. The interface will vary fromone FTP program to the next. In general, you will be able to navigate the FTP serverby clicking or double-clicking a folder in the FTP application’s main window. MostFTP programs use the Put command to enable you tocopy an image to the FTP server. Choose the Getcommand if you want to download a file from theFTP server to your local hard drive.
Figure 5.10 shows the application WS_FTP LE pro-gram. You can navigate to the files you want toupload in the local area of the FTP software. Ifyou want to copy files to the FTP server, navigateto your Web server directory in the remote area ofyour software, and create a folder for your imagefiles. Click on the file you want to copy from theLocal System window list, and click the right-arrow button to copy it from your computer to theWeb server. After the images have been copied tothe server, type the URL (Universal ResourceLocator), also known as Web address, such aswww.flatfishfactory.com, in the browser window toview or download your image files. If you canopen the downloaded image on your computer,you’re ready to share the URL with friends andfamily.
114 ABSOLUTE BEGINNER’S GUIDE TO ADOBE PHOTOSHOP ELEMENTS 2
If you’re a Mac user,Apple’s iTools Web site
enables you to upload your filesusing iDisk, and share your pho-tos online. You can use iPhoto topublish your photos as a hard-cover book. AOL also providessimilar features in version 7 of itsonline software.
FIGURE 5.10
Copy a file from
your computer
to a Web server
to share it with
other Web
surfers.
08 8311 CH05 1/15/03 2:30 PM Page 114
In this chapter
• Printing Digital Images
• Considerations for Printing Images with Text
• Improving Printer Output
• Troubleshooting Printing Problems
6
Printing Images
If you have a color photo printer connected to your computer, you can
use Photoshop Elements to print your photos. Photoshop Elements
enables you to print photos straight to the printer, or lay out photos in
a picture package or contact sheet. The Print Preview dialog box makes
it super easy to scale a photo to fit on any size sheet of paper or assign
a color profile for a print job. There are many options to choose from if
you want to print a folder of photos as thumbnails onto a contact sheet
or create a picture package.
Adobe enhanced the picture package dialog box in version 2. You can
lay out a single photo in different sizes on a sheet of paper, or combine
multiple photos into a picture package. This is great if you want to opti-
mize the number of photos printed onto a page of premium glossy
photo paper.
09 8311 CH06 1/15/03 2:21 PM Page 115

Printing Digital ImagesPrinting is printing—there’s not a whole lot more to do other than click the Printbutton, right? Not necessarily. For example, when printing scanned images, youmight need to do a little more preparation, especially if you scanned the white bor-ders of a photo or captured the edges of a film negative along with the picture. Evenif you’ve already performed some of these tasks before scanning the image, youmight want to make additional adjustments to fit the image on the paper.
If you scanned a slightly larger area of an imagethan you need to print, you can use the Crop Tool(C) to remove the outer edges of the scannedimage. Choose the Crop Tool from the Toolboxand click and drag the cursor around the area ofthe image you want to print. Then press the(Return) [Enter] key to resize the image.
Now that you have defined the image you wantto print, you can see what the image’s resolutionis. Click the status bar to view the resolution ofthe active window. If the image is set to 72ppi,you will see 72 pixels/inch in the status bar. Next,click the status bar again and look at the heightand width of the image. The printed size of theimage will appear beside the height and widthvalues in the status pop-up window. If the printedsize is smaller than the paper size on which youwant to print, you might have a tough time try-ing to grow the dimensions of the image withoutharming the quality of the image.
Scaling a large image to a smaller size usually brings pleasant results. Taking alarge image and making it smaller usually will improve the sharpness of an image,whereas resizing a smaller image to a larger one tends to expose blurriness or causepixelation. If you choose to print an image that appears too small, consider keepingit at its original size. Don’t enlarge it unless you don’t mind viewing a photo thatmay contain squarish blocks, also known as pixelation. Table 6.1 shows how differ-ent image sizes at 72ppi match up with paper sizes. The Image and maximumpaper size dimensions are displayed in width×height.
116 ABSOLUTE BEGINNER’S GUIDE TO ADOBE PHOTOSHOP ELEMENTS 2
Photoshop Elementswill print any image that
appears in the image window. Ifyou want to print the contents ofa single layer, hide all other layersin the Layers palette and showthe layer you want to print. Thislayer should be visible in theimage window. Click the Printbutton in the toolbar to print theimage layer.
09 8311 CH06 1/15/03 2:21 PM Page 116

Table 6.1 Comparing Image Size to Print Size at 72ppiImage Size Maximum Paper Size
360×504 pixels 5×7 inches
640×480 pixels 8.89×6.67 inches
587×729 pixels 8×10 inches
800×600 pixels 11.11×8.33 inches
792×1,008 pixels 11×14 inches
1,024×768 pixels 14.22×10.667 inches
1,280×960 pixels 17.78×13.33 inches
2,048×1,536 pixels 28.44×21.33 inches
2,400×1,800 pixels 33×25 inches
2,560×1,900 pixels 35.56×26.67 inches
GETTING THE BEST PRINTAfter you print a photo, compare it with the samephoto open in Photoshop Elements and considerthe following:
• Sharpness of the image—Are the brightnessand contrast in the original image preserved?You may want to check the printer’s color orprint head calibration and ink levels (if theprinter uses ink cartridges) and see whetheradjusting these printer components improvesthe quality of the printed photo.
• Paper—Is the paper on which the image isprinted capable of holding the color overtime? Does the ink saturate the paper to thepoint of affecting the image quality? Considerusing premium photo or premium glossyphoto paper and comparing the color andprint quality to the same photo printed on reg-ular paper.
• Consistency—Can you print different imageswith the same printer without having to con-stantly change or tweak printer software set-tings? If the print quality varies dramatically from page to page, recalibrate the printerand check to see whether the ink cartridges need to be replaced. Listen for any oddnoises and look for any paper jams or other things like dust that might block the pathof the paper, and clean or repair the printer if necessary.
CHAPTER 6 PRINTING IMAGES 117
Photoshop Elementsdoes not support CMYKcolor mode, only RGB,Indexed Color, Grayscale,and Bitmap color modes. You canprint an RGB image to a grayscaleor color printer. For best results,save the image with the Full ColorManagement color profile. Then,customize the print settings in thePrint Preview dialog box, whichyou’ll learn more about if you con-tinue reading this chapter. To findout more about color management,go to Chapter 7, “PhotoshopElements and Color.”
09 8311 CH06 1/15/03 2:21 PM Page 117

If you’ve opened an image that was scanned in ata resolution higher than 72ppi, you can scale itdown in size to match the paper size on whichyou want to print. For example, if you scannedan image at 600ppi, you can either use the PrintPreview window or the Image Size window toresize the image. Choose Print Preview if youdo not want to alter the dimensions of the file toprint the image. Otherwise, type new height andwidth values into the Document Size text boxesin the Image Size window if you want to resizethe image.
If you want Photoshop Elements to scale the imageto fit onto a specific paper size, perform the follow-ing steps. For best results, use a high-resolutionimage (such as a three- to five-megapixel image)and use the Scale to Fit Media check box to print toa 5×7 or 8×10 sheet of paper.
1. Choose File, Print Preview or press (Command-P) [Ctrl+P], or(Command-Option-P) [Ctrl+Alt+P] to open the Print Preview dialog box.
2. Check Scale to Fit Media. Type the height and width of the paper on whichyou want to print into the text boxes in the Print Preview dialog box.
3. Click OK to save your changes, or click the Print button to print the image.
If you want to permanently change the size of the image, perform the following steps:
1. Choose Image Size from the Image, Resize menu.
2. Change the resolution to match the resolution of your printer. Type a numberinto the Resolution text box—somewhere between 300ppi and 600ppi, or atleast 170ppi.
3. Type the height and width of the paper size into the Document Size text boxes.
4. Click OK in the Image Size window.
5. Click the status bar for the resized image. The new dimensions should appearin the status bar pop-up window.
6. Click the Print button in the toolbar to send the image to the printer.
When your images are ready to print, you can set up the printer software. On a Mac,you can select the printer from the Chooser, located in the Apple menu. ChoosePage Setup from the File menu. The Page Setup window will open. Click[Properties] (Options) button in the Page Setup dialog box to open the propertieswindow of your printer, and choose the settings you want to use. For example, selectthe type of paper, resolution, and whether you want to print in color or grayscale
118 ABSOLUTE BEGINNER’S GUIDE TO ADOBE PHOTOSHOP ELEMENTS 2
tipPixelation is a squarish,
blocky appearance thatoccurs when an image lacksenough color or image datato fill in those rough areas
realistically. When an imageis enlarged, the pixels from
the original image are simply mul-tiplied to fill in the new areas ofthe image. A pixelated image hasthe overall appearance of a low-resolution bitmap image.
09 8311 CH06 1/15/03 2:21 PM Page 118

(see Figure 6.1). You also can configure your computer to handle print jobs in theforeground, one at a time, or spooled in the background.
CHAPTER 6 PRINTING IMAGES 119
FIGURE 6.1
Print higher-
quality images
by choosing a
different mode
for the printer.
BACKGROUND PRINTINGBackground printing enables you to send more than one print job to a printer simultane-ously (see Figure 6.2). This can be helpful if you don’t want to wait for each page to print.Windows and Macintosh computers have background printing built into the operating sys-tem. On a Mac, you can activate background printing from the Chooser. On a Windowscomputer, you can activate background printing from the printer’s properties window fromthe Print Manager.
FIGURE 6.2
Set up the
printer software
to spool multiple
print jobs.
Printing Images from a Digital CameraIf you think about this in simple terms, your images either fit on the sheet of paperto which you want to print them, or they don’t. A good example of an image that
09 8311 CH06 1/15/03 2:21 PM Page 119
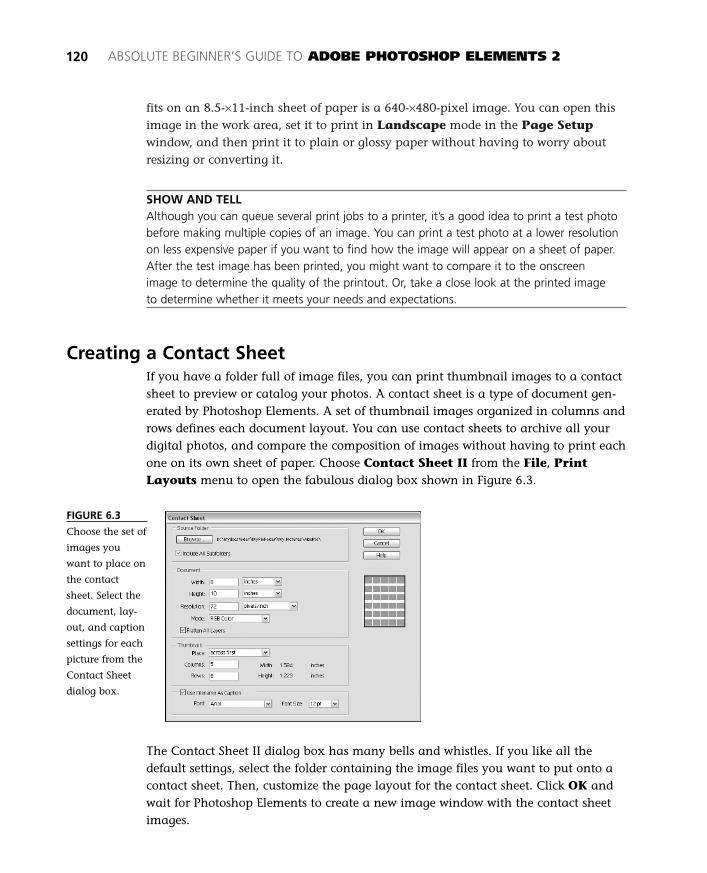
fits on an 8.5-×11-inch sheet of paper is a 640-×480-pixel image. You can open thisimage in the work area, set it to print in Landscape mode in the Page Setupwindow, and then print it to plain or glossy paper without having to worry aboutresizing or converting it.
SHOW AND TELLAlthough you can queue several print jobs to a printer, it’s a good idea to print a test photobefore making multiple copies of an image. You can print a test photo at a lower resolutionon less expensive paper if you want to find how the image will appear on a sheet of paper.After the test image has been printed, you might want to compare it to the onscreenimage to determine the quality of the printout. Or, take a close look at the printed imageto determine whether it meets your needs and expectations.
Creating a Contact SheetIf you have a folder full of image files, you can print thumbnail images to a contactsheet to preview or catalog your photos. A contact sheet is a type of document gen-erated by Photoshop Elements. A set of thumbnail images organized in columns androws defines each document layout. You can use contact sheets to archive all yourdigital photos, and compare the composition of images without having to print eachone on its own sheet of paper. Choose Contact Sheet II from the File, PrintLayouts menu to open the fabulous dialog box shown in Figure 6.3.
120 ABSOLUTE BEGINNER’S GUIDE TO ADOBE PHOTOSHOP ELEMENTS 2
FIGURE 6.3
Choose the set of
images you
want to place on
the contact
sheet. Select the
document, lay-
out, and caption
settings for each
picture from the
Contact Sheet
dialog box.
The Contact Sheet II dialog box has many bells and whistles. If you like all thedefault settings, select the folder containing the image files you want to put onto acontact sheet. Then, customize the page layout for the contact sheet. Click OK andwait for Photoshop Elements to create a new image window with the contact sheetimages.
09 8311 CH06 1/15/03 2:21 PM Page 120

You can customize the size of the document, aswell as the resolution and image mode of thepictures you want to print on the contact sheetby selecting a new value in the correspondingfield in the Document area of the dialog box. Forexample, choose Grayscale from the Modedrop-down menu if you want to print all theimages in Grayscale mode.
Several settings enable you to customize the lay-out of the contact sheet, too. On the right side ofthe Contact Sheet dialog box, you can previewthe number of columns and rows selected in theThumbnails text boxes that compose the layout.As you change the number of columns or rows for the contact sheet, preview theexact size of each thumbnail. Check the Use Filename As Caption check box toprint the name of each file below each thumbnail image (see Figure 6.4).Unchecking this check box will enlarge each image to 1.8×1.8 inches.
When you click OK, Photoshop Elements runs a batch script that resizes each imageto the settings you requested. The contact sheet, shown in Figure 6.4, will appear ina new document window, which you can save and print as you like. Choose File,Print to send the contact sheet to a printer.
CHAPTER 6 PRINTING IMAGES 121
tipYou can use a contact
sheet to catalog image filessaved to CD-ROM or remov-able media. Write the nameof the Zip cartridge or CD-
ROM on the contact sheetto enable you to quickly
locate an image file.
FIGURE 6.4
You can catalog
your images
visually by print-
ing them to con-
tact sheets.
Printing a FaxAlthough you probably won’t find yourself faxing many images, PhotoshopElements won’t hold you back. You can send your images to a fax instead of to aprinter. On a Mac, open the Chooser and select the icon for the Fax software. On aWindows computer, choose Fax from the Name drop-down menu in the PageSetup window (File, Page Setup). When you choose the Print command, the
09 8311 CH06 1/15/03 2:21 PM Page 121
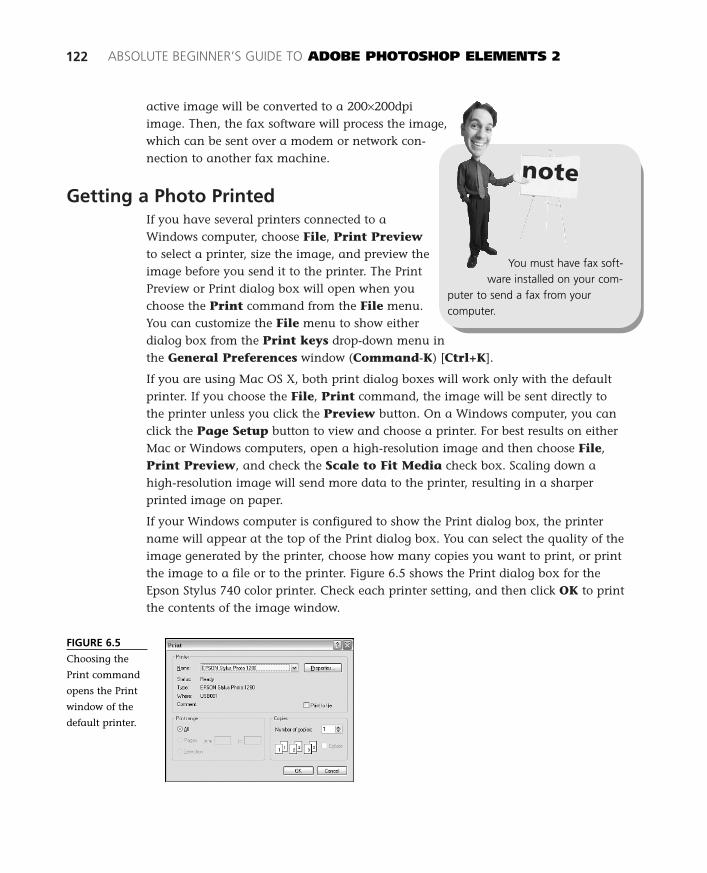
active image will be converted to a 200×200dpiimage. Then, the fax software will process the image,which can be sent over a modem or network con-nection to another fax machine.
Getting a Photo PrintedIf you have several printers connected to aWindows computer, choose File, Print Previewto select a printer, size the image, and preview theimage before you send it to the printer. The PrintPreview or Print dialog box will open when youchoose the Print command from the File menu.You can customize the File menu to show eitherdialog box from the Print keys drop-down menu inthe General Preferences window (Command-K) [Ctrl+K].
If you are using Mac OS X, both print dialog boxes will work only with the defaultprinter. If you choose the File, Print command, the image will be sent directly tothe printer unless you click the Preview button. On a Windows computer, you canclick the Page Setup button to view and choose a printer. For best results on eitherMac or Windows computers, open a high-resolution image and then choose File,Print Preview, and check the Scale to Fit Media check box. Scaling down ahigh-resolution image will send more data to the printer, resulting in a sharperprinted image on paper.
If your Windows computer is configured to show the Print dialog box, the printername will appear at the top of the Print dialog box. You can select the quality of theimage generated by the printer, choose how many copies you want to print, or printthe image to a file or to the printer. Figure 6.5 shows the Print dialog box for theEpson Stylus 740 color printer. Check each printer setting, and then click OK to printthe contents of the image window.
122 ABSOLUTE BEGINNER’S GUIDE TO ADOBE PHOTOSHOP ELEMENTS 2
You must have fax soft-ware installed on your com-
puter to send a fax from yourcomputer.
FIGURE 6.5
Choosing the
Print command
opens the Print
window of the
default printer.
09 8311 CH06 1/15/03 2:21 PM Page 122

CHAPTER 6 PRINTING IMAGES 123
Printing More Than One Copy of an ImageAspire to be a portrait photographer by printing multiple copies of an image on asingle page. Choose from 20 layouts and 10 picture size combinations. To puttogether a picture package, choose Picture Package from the File, Print Layoutsmenu. The Picture Package dialog box will open, as shown in Figure 6.6. Select thefile with which you want to work, and then pick a layout, or change the resolutionor mode of the image.
Choose the frontmost image window, or select afile by clicking on the Use drop-down menu.Choose the paper size from the Page Size drop-down menu (make sure it matches the paper sizein your printer). Then choose a layout from theLayout drop-down menu. When you’re ready tocreate a document with the picture package set-tings, click OK.
Photoshop Elements creates a picture packageusing a script to resize the selected image andapply any settings you chose in the PicturePackage dialog box. Wait for the image to beprocessed. When the script completes, the picturelayout will appear in a new document window, asshown in Figure 6.7. Now you can save or printthe picture package.
FIGURE 6.6
Select the docu-
ment layout and
labeling options
for a photo from
the Picture
Package dialog
box.
tipIf you want to use the same
picture package with morethan one photo, choosePicture Package from the File,Print Layouts menu. Click on
the Use drop-down menuand choose Folder. Click
Choose to select the photos youwant to include in the picture pack-age. Click OK to print the multi-photo picture package. You can alsocopy and paste different photos fromvarious picture packages to createyour own custom picture package.
09 8311 CH06 1/15/03 2:21 PM Page 123
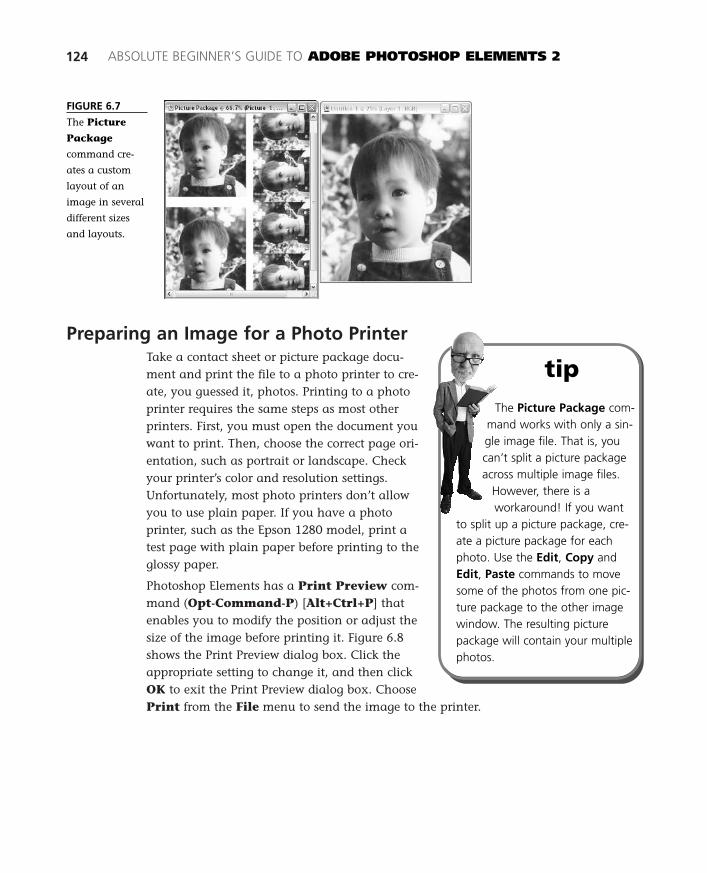
Preparing an Image for a Photo PrinterTake a contact sheet or picture package docu-ment and print the file to a photo printer to cre-ate, you guessed it, photos. Printing to a photoprinter requires the same steps as most otherprinters. First, you must open the document youwant to print. Then, choose the correct page ori-entation, such as portrait or landscape. Checkyour printer’s color and resolution settings.Unfortunately, most photo printers don’t allowyou to use plain paper. If you have a photoprinter, such as the Epson 1280 model, print atest page with plain paper before printing to theglossy paper.
Photoshop Elements has a Print Preview com-mand (Opt-Command-P) [Alt+Ctrl+P] thatenables you to modify the position or adjust thesize of the image before printing it. Figure 6.8shows the Print Preview dialog box. Click theappropriate setting to change it, and then clickOK to exit the Print Preview dialog box. ChoosePrint from the File menu to send the image to the printer.
124 ABSOLUTE BEGINNER’S GUIDE TO ADOBE PHOTOSHOP ELEMENTS 2
FIGURE 6.7
The Picture
Package
command cre-
ates a custom
layout of an
image in several
different sizes
and layouts.
tipThe Picture Package com-
mand works with only a sin-gle image file. That is, youcan’t split a picture packageacross multiple image files.
However, there is aworkaround! If you want
to split up a picture package, cre-ate a picture package for eachphoto. Use the Edit, Copy andEdit, Paste commands to movesome of the photos from one pic-ture package to the other imagewindow. The resulting picturepackage will contain your multiplephotos.
09 8311 CH06 1/15/03 2:21 PM Page 124
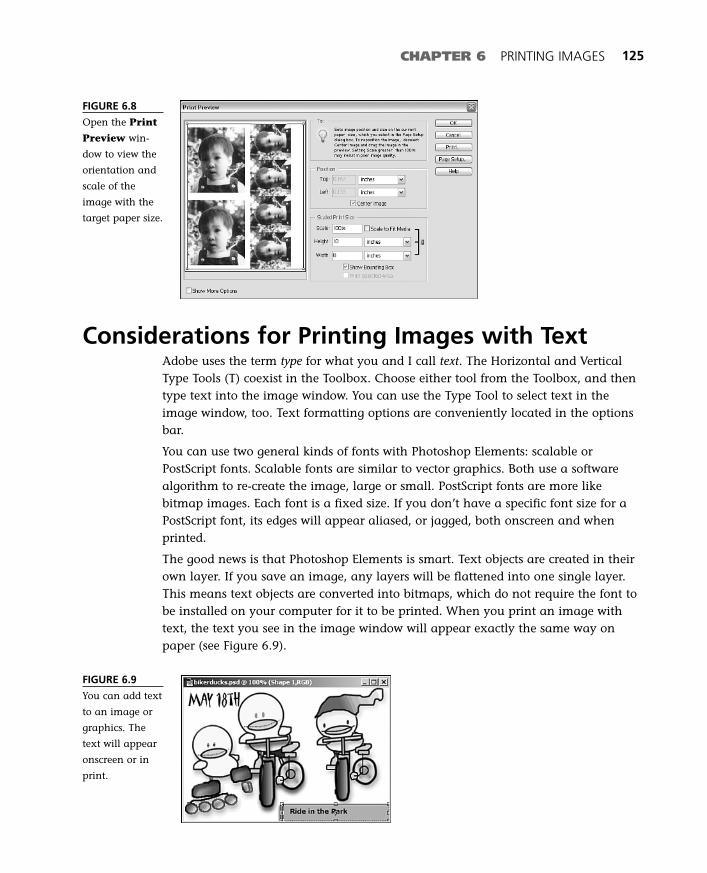
CHAPTER 6 PRINTING IMAGES 125
Considerations for Printing Images with TextAdobe uses the term type for what you and I call text. The Horizontal and VerticalType Tools (T) coexist in the Toolbox. Choose either tool from the Toolbox, and thentype text into the image window. You can use the Type Tool to select text in theimage window, too. Text formatting options are conveniently located in the optionsbar.
You can use two general kinds of fonts with Photoshop Elements: scalable orPostScript fonts. Scalable fonts are similar to vector graphics. Both use a softwarealgorithm to re-create the image, large or small. PostScript fonts are more likebitmap images. Each font is a fixed size. If you don’t have a specific font size for aPostScript font, its edges will appear aliased, or jagged, both onscreen and whenprinted.
The good news is that Photoshop Elements is smart. Text objects are created in theirown layer. If you save an image, any layers will be flattened into one single layer.This means text objects are converted into bitmaps, which do not require the font tobe installed on your computer for it to be printed. When you print an image withtext, the text you see in the image window will appear exactly the same way onpaper (see Figure 6.9).
FIGURE 6.8
Open the Print
Preview win-
dow to view the
orientation and
scale of the
image with the
target paper size.
FIGURE 6.9
You can add text
to an image or
graphics. The
text will appear
onscreen or in
print.
09 8311 CH06 1/15/03 2:21 PM Page 125

Improving Printer OutputAfter you become familiar with the way a printer converts screen color on your com-puter into printed color, you probably will be able to print images faster and moreaccurately. Be sure to keep plenty of extra ink or toner cartridges nearby if you wantto print different kinds of images or want to improve your images.
If you’re looking for an easy way to improve printer output, look no further thanyour printer’s [Properties] (Print) dialog box. If you’re using Windows 2000, click theStart button, and then select the Printers menu item. The Printers window will open.Right-click the printer icon and choose Properties to open the Properties dialog boxfor your printer, and then try to locate the print quality settings. Print-quality set-tings for the Epson Stylus 1280 photo printer are shown in Figure 6.10. Higher-resolution settings for the printer (without changing the resolution of the image) willresult in higher-quality printouts. Click OK to save your changes. Then print a testimage to see whether you notice a difference. Compare a 600dpi-printed image witha 720ppi image.
126 ABSOLUTE BEGINNER’S GUIDE TO ADOBE PHOTOSHOP ELEMENTS 2
FIGURE 6.10
Select a higher
dpi to improve
the quality of
the printed
image.
If you’re using a Macintosh computer, first set up the printer for your computer.Open the Chooser application, and click the printer icon in the Chooser window.You might have to set up the printer if this is the first time you’ve printed to it. Youmight want to print a test page to make sure it is properly connected to your Mac.Next, go to Photoshop Elements and open an image you want to print. Then, selectthe Print command from the File menu. The Print dialog box will open. Look forthe printer-quality settings for the selected printer. Adjust the printer settings, andprint a test page at a lower and higher dpi setting. Compare the printer output andsave or note the printer output settings for the printer.
09 8311 CH06 1/15/03 2:21 PM Page 126

CHAPTER 6 PRINTING IMAGES 127
Customizing Color Management SettingsPhotoshop Elements enables you to save a colorprofile with an image when you save it to yourhard drive. You can choose Limited color manage-ment if you want to attach a color profile forimage files saved for the Web. Choose Full colormanagement if you want to save a color profilefor an image you want to print.
You also can customize the color managementsettings for a printer from the Print Previewwindow. First, open the Print Preview dialog boxby choosing Print Preview from the File menu.Check the Show More Options check box.Then, choose Color Management from the firstdrop-down menu. The Source Space and PrintSpace options will appear at the bottom of thePrint Preview window. Click the Profile drop-down menu to view a list of profiles for theprinter. Choose Same As Source if you want theprinter to use the color profile to determine thecolors of the printed image. Choose Print Color Management (or PostScriptColor Management if you’re printing to a PostScript printer) if you want to usethe print driver to manage color conversions. Otherwise, choose one of the prede-fined color profiles from the menu list.
If you choose one of the color profiles from the Profile menu list, the Intent drop-down menu will become active. Choose a rendering intent to determine how colorsare converted to the selected profile. Choose one of the following intents:Perceptual, Saturation, Relative Colorimetric, or Absolute Colorimetric.Perceptual preserves the visual relationship between colors based on the way thehuman eye perceives natural color. Saturation intent favors vivid colors over coloraccuracy. Absolute Colorimetric preserves color accuracy over and above preservingrelationships between colors. Relative Colorimetric compares the white point of thecolor source to the white point of the destination color space and remaps all colorsbased on the new value of the white point.
Adjusting Page and Printer SettingsMany of the newer photo and color printers have the option to print the image sothat it covers the full sheet of paper. That’s right, no borders, just a page full of ink.Choose File, Page Setup to select the printer you want to use. Then, click the[Properties] (Options) button to view the printing options. The software options
You might not needto use a color profile to
preserve color accuracy for aprinted image. Print a test imageto a color printer and compare itto the onscreen image. If theprinted colors meet your expecta-tions for matching the screen col-ors of the image, you won’t haveto worry about color manage-ment issues.
09 8311 CH06 1/15/03 2:21 PM Page 127
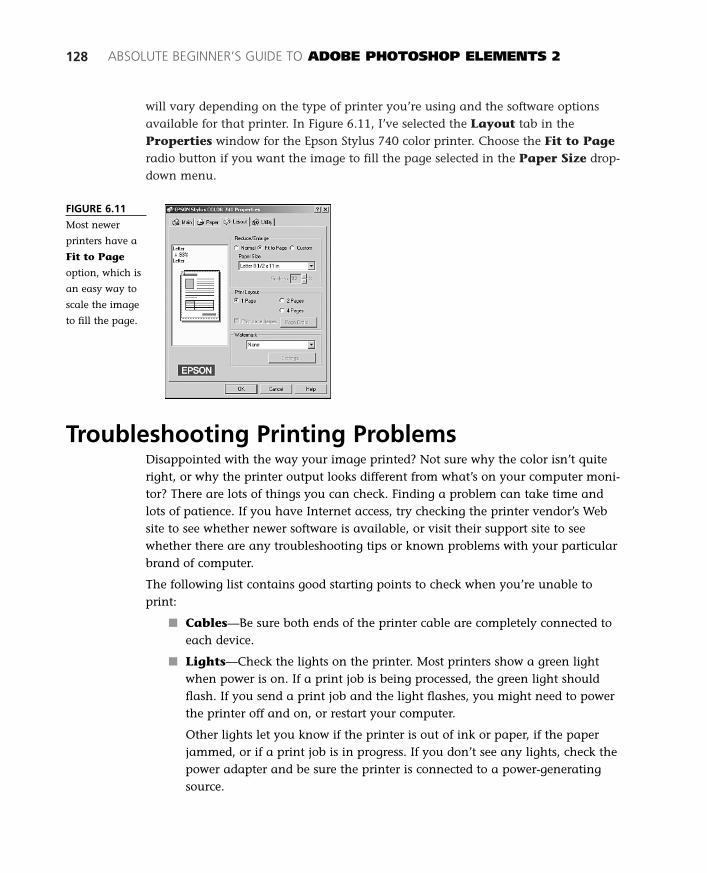
will vary depending on the type of printer you’re using and the software optionsavailable for that printer. In Figure 6.11, I’ve selected the Layout tab in theProperties window for the Epson Stylus 740 color printer. Choose the Fit to Pageradio button if you want the image to fill the page selected in the Paper Size drop-down menu.
128 ABSOLUTE BEGINNER’S GUIDE TO ADOBE PHOTOSHOP ELEMENTS 2
FIGURE 6.11
Most newer
printers have a
Fit to Page
option, which is
an easy way to
scale the image
to fill the page.
Troubleshooting Printing ProblemsDisappointed with the way your image printed? Not sure why the color isn’t quiteright, or why the printer output looks different from what’s on your computer moni-tor? There are lots of things you can check. Finding a problem can take time andlots of patience. If you have Internet access, try checking the printer vendor’s Website to see whether newer software is available, or visit their support site to seewhether there are any troubleshooting tips or known problems with your particularbrand of computer.
The following list contains good starting points to check when you’re unable toprint:
■ Cables—Be sure both ends of the printer cable are completely connected toeach device.
■ Lights—Check the lights on the printer. Most printers show a green lightwhen power is on. If a print job is being processed, the green light shouldflash. If you send a print job and the light flashes, you might need to powerthe printer off and on, or restart your computer.
Other lights let you know if the printer is out of ink or paper, if the paperjammed, or if a print job is in progress. If you don’t see any lights, check thepower adapter and be sure the printer is connected to a power-generatingsource.
09 8311 CH06 1/15/03 2:21 PM Page 128
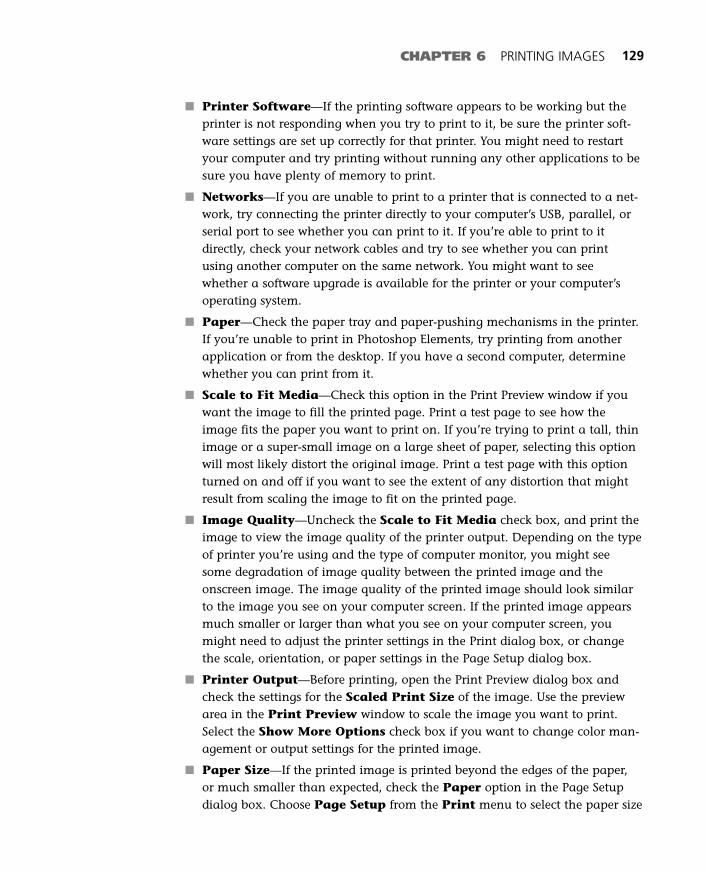
CHAPTER 6 PRINTING IMAGES 129
■ Printer Software—If the printing software appears to be working but theprinter is not responding when you try to print to it, be sure the printer soft-ware settings are set up correctly for that printer. You might need to restartyour computer and try printing without running any other applications to besure you have plenty of memory to print.
■ Networks—If you are unable to print to a printer that is connected to a net-work, try connecting the printer directly to your computer’s USB, parallel, orserial port to see whether you can print to it. If you’re able to print to itdirectly, check your network cables and try to see whether you can printusing another computer on the same network. You might want to seewhether a software upgrade is available for the printer or your computer’soperating system.
■ Paper—Check the paper tray and paper-pushing mechanisms in the printer.If you’re unable to print in Photoshop Elements, try printing from anotherapplication or from the desktop. If you have a second computer, determinewhether you can print from it.
■ Scale to Fit Media—Check this option in the Print Preview window if youwant the image to fill the printed page. Print a test page to see how theimage fits the paper you want to print on. If you’re trying to print a tall, thinimage or a super-small image on a large sheet of paper, selecting this optionwill most likely distort the original image. Print a test page with this optionturned on and off if you want to see the extent of any distortion that mightresult from scaling the image to fit on the printed page.
■ Image Quality—Uncheck the Scale to Fit Media check box, and print theimage to view the image quality of the printer output. Depending on the typeof printer you’re using and the type of computer monitor, you might seesome degradation of image quality between the printed image and theonscreen image. The image quality of the printed image should look similarto the image you see on your computer screen. If the printed image appearsmuch smaller or larger than what you see on your computer screen, youmight need to adjust the printer settings in the Print dialog box, or changethe scale, orientation, or paper settings in the Page Setup dialog box.
■ Printer Output—Before printing, open the Print Preview dialog box andcheck the settings for the Scaled Print Size of the image. Use the previewarea in the Print Preview window to scale the image you want to print.Select the Show More Options check box if you want to change color man-agement or output settings for the printed image.
■ Paper Size—If the printed image is printed beyond the edges of the paper,or much smaller than expected, check the Paper option in the Page Setupdialog box. Choose Page Setup from the Print menu to select the paper size
09 8311 CH06 1/15/03 2:21 PM Page 129
on which you want to print. If you’re printing to an 8.5-×11-inch sheet ofpaper, choose letter for the paper size. If the printed image seems mismatchedwith the paper, check to see whether envelope, legal, or a different paper sizeis selected, and then choose the correct paper type for your print job. Also,check to see whether the Scale to Fit Media option is checked in the PrintPreview window.
130 ABSOLUTE BEGINNER’S GUIDE TO ADOBE PHOTOSHOP ELEMENTS 2
09 8311 CH06 1/15/03 2:21 PM Page 130

Correcting and
Combining Images
iiiPART
Photoshop Elements and Color . . . . . . . . . . . .133
Tonal Range and Color Correction . . . . . . . . . .157
Applying Filters and Effects . . . . . . . . . . . . . . .189
Working with Layers and Layer Styles . . . . . . .211
Adding Text and Shapes to Images . . . . . . . . .235
Repairing Images . . . . . . . . . . . . . . . . . . . . . . .261
Experimenting with Composite Images . . . . . .275
10 8311 PT 3 1/15/03 2:25 PM Page 131

10 8311 PT 3 1/15/03 2:25 PM Page 132

In this chapter
• Color Theory
• Computers and Color
• Color and Photoshop Elements
• Photoshop Elements Color-Correction Tools
• Color and Composite Images
7
Photoshop Elements
and Color
Whether you’re working with grayscale or color images, Photoshop
Elements enables you to work with both types of color modes. Before
you start working with color, it’s best to explore how color works out-
side and inside a computer. This chapter begins with a discussion of
color theory, and then explains how computers and other output
devices, such as printers, use numbers and color management technol-
ogy to create colors.
Color TheoryThis section reviews several color concepts that are essentialto understanding how color correction works in PhotoshopElements. What exactly is color? First, color is what we per-ceive when light is refracted off or through different objects.Long, medium, and short wavelengths of light trigger red,green, or blue color recognition in our eyes. Our eyes convertlight into neural data, which is interpreted by our brain.
11 8311 CH07 1/15/03 2:20 PM Page 133
Colors also can be mixed together. Blue and yellow make green, and red and bluemake purple. However, you cannot create the three primary colors—red, yellow, andblue—by mixing other colors together. The three primary colors can be mixedtogether in different proportions to create the full spectrum of colors.
Representing color on a computer involves creating a numeric representation foreach of the primary colors, and every combination of those colors, on a computermonitor. You can define color on a computer in several ways. Each method is referredto as a color space. For example, RGB is the name for the red, green, and blue colorspace used in Photoshop Elements.
COLOR AND THE TRISTIMULUS COLOR MODELIn 1931, color scientists got together and developed a scientific model that defines color—CIE, Commission Internationale de l’Eclairage, or the International Commission on Illumin-ation (www.cie.co.at/cie). They designed the tristimulus color model, which assigns hueangle, saturation, and value (or brightness) to define a color. Using this model, color can be mapped to an x, y, or z axis.
Primary ColorsRed, yellow, and blue are the three primary colors from which all other colors aremade. Red, yellow, and blue cannot be created by mixing any other two colorstogether. White and black are colors, too, but they represent the maximum and min-imum amount of reflectivity of all three colors combined. White absorbs no color andreflects all the light to our eyes, whereas black absorbs all the colors of the rainbow,so no light reaches our eyes. You can mix white with red to lighten the initial redcolor. Alternatively, you can mix black with red to darken the red.
In the real world, it’s rare to find a pure red, yellow, or blue color. Many external fac-tors affect the way we perceive color. The biggest factor is the medium that createdthe color. For example, a book probably will display different red, yellow, and bluecolors than a blue ink pen, or than the blue color on a television or a computerscreen. Computers, printers, scanners, and cameras each have their own way of iden-tifying and reproducing color.
Despite the existence of primary colors, your chances of finding true red, yellow, orblue are slim to none. The more realistic approach is to use computers, scanners,printers, and cameras that support color models that can be converted from onedevice to the next, preserving as much of the original color as possible.
Viewing colors on the color wheel can help you understand different relationshipsbetween colors. Secondary colors are purple, green, and orange, the colors resulting frommixing red and blue, blue and yellow, or yellow and red. Tertiary colors are mixtures ofsecondary and primary colors, such as yellow-orange, yellow-green, blue-purple, or red-purple. Colors located on opposing sides of the color wheel are complementary colors.
134 ABSOLUTE BEGINNER’S GUIDE TO ADOBE PHOTOSHOP ELEMENTS 2
11 8311 CH07 1/15/03 2:20 PM Page 134
In the physical world, the color of an object is defined by the way the object reflectsand absorbs light. On a computer, you can choose a color arbitrarily from the ColorPicker window, or use the color wheel to pick a primary, complementary, or tertiarycolor that you want to use in an image.
Light and ColorColor perception is the result of the way light isreflected off or through other surfaces. For exam-ple, when you look at a red ball, the ball absorbsall the color of the light except red, and reflects itsown color, red, which is the color you see. Themore light the ball is exposed to, the more coloryou’ll see on the ball. However, there are limits; ifyou shine too much light on the ball, the lightwill bounce off it, hiding the red color and reflect-ing the light instead of the color. If you view theball looking through glass, light will reflect off theball in a different manner, and the red will be aslightly different hue when viewed through glassthan when viewed without glass.
Natural and artificial light can affect the appear-ance of a color. This is most obvious when you takea digital picture during the day in natural light, and then take a picture in the eveningindoors. Tungsten and fluorescent light bulbs cast a unique shade of light. Tungstenbulbs usually cast a yellow-orangish hue. Fluorescent bulbs, besides having an annoyinglow-pitched hum, cast a greenish-yellowish hue. Hues cast by artificial light can be com-pounded if you use a flash or have another device, such as a television, in the picture.
When working with digital images, think about where the light source is originatingfrom in the picture. Are there multiple light sources? Is the light bouncing offanother object or color? Is the light passing through a window?
Next, try to determine the colors in the picture. Does the light wash out colors in thepicture? Is the picture overexposed? Is there too little light? Experimenting with lightand color in an image can be a time-consuming task. Consider saving multiplecopies of an image as you’re working on it so that you can experiment with differentcombinations of colors and lighting.
Computers and ColorMaking a computer display what you see with your eyes is not an easy task. Severalkinds of color spaces have been created as the result of different color scientists get-ting together to solve this task: How do you turn colors into numbers?
CHAPTER 7 PHOTOSHOP ELEMENTS AND COLOR 135
Hue and saturationdefine the purity of a color.
Hue defines the specific attributesor intensity of a color.
Saturation defines a color in theabsence of white, using differencesin gray values to adjust the satura-tion level of a color. A highly satu-rated color contains very little white.
11 8311 CH07 1/15/03 2:20 PM Page 135
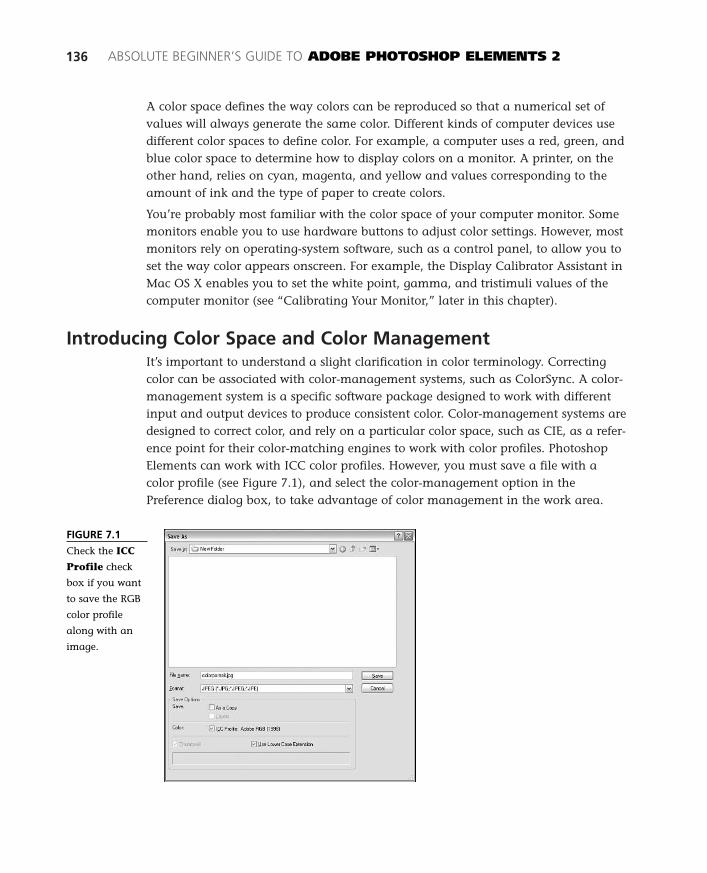
A color space defines the way colors can be reproduced so that a numerical set ofvalues will always generate the same color. Different kinds of computer devices usedifferent color spaces to define color. For example, a computer uses a red, green, andblue color space to determine how to display colors on a monitor. A printer, on theother hand, relies on cyan, magenta, and yellow and values corresponding to theamount of ink and the type of paper to create colors.
You’re probably most familiar with the color space of your computer monitor. Somemonitors enable you to use hardware buttons to adjust color settings. However, mostmonitors rely on operating-system software, such as a control panel, to allow you toset the way color appears onscreen. For example, the Display Calibrator Assistant inMac OS X enables you to set the white point, gamma, and tristimuli values of thecomputer monitor (see “Calibrating Your Monitor,” later in this chapter).
Introducing Color Space and Color ManagementIt’s important to understand a slight clarification in color terminology. Correctingcolor can be associated with color-management systems, such as ColorSync. A color-management system is a specific software package designed to work with differentinput and output devices to produce consistent color. Color-management systems aredesigned to correct color, and rely on a particular color space, such as CIE, as a refer-ence point for their color-matching engines to work with color profiles. PhotoshopElements can work with ICC color profiles. However, you must save a file with acolor profile (see Figure 7.1), and select the color-management option in thePreference dialog box, to take advantage of color management in the work area.
136 ABSOLUTE BEGINNER’S GUIDE TO ADOBE PHOTOSHOP ELEMENTS 2
FIGURE 7.1
Check the ICC
Profile check
box if you want
to save the RGB
color profile
along with an
image.
11 8311 CH07 1/15/03 2:20 PM Page 136
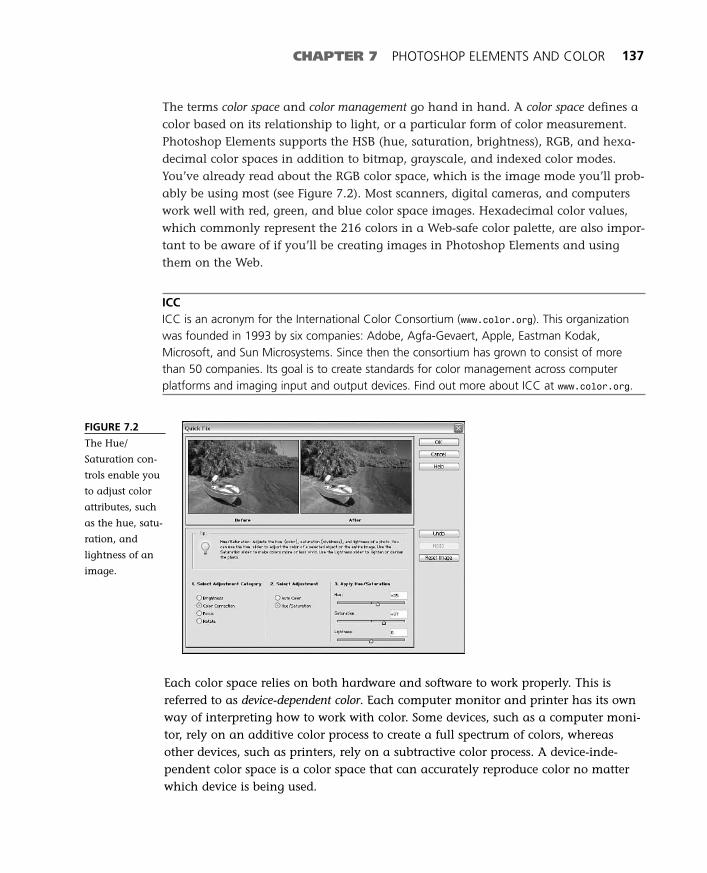
The terms color space and color management go hand in hand. A color space defines acolor based on its relationship to light, or a particular form of color measurement.Photoshop Elements supports the HSB (hue, saturation, brightness), RGB, and hexa-decimal color spaces in addition to bitmap, grayscale, and indexed color modes.You’ve already read about the RGB color space, which is the image mode you’ll prob-ably be using most (see Figure 7.2). Most scanners, digital cameras, and computerswork well with red, green, and blue color space images. Hexadecimal color values,which commonly represent the 216 colors in a Web-safe color palette, are also impor-tant to be aware of if you’ll be creating images in Photoshop Elements and usingthem on the Web.
ICCICC is an acronym for the International Color Consortium (www.color.org). This organizationwas founded in 1993 by six companies: Adobe, Agfa-Gevaert, Apple, Eastman Kodak,Microsoft, and Sun Microsystems. Since then the consortium has grown to consist of morethan 50 companies. Its goal is to create standards for color management across computerplatforms and imaging input and output devices. Find out more about ICC at www.color.org.
CHAPTER 7 PHOTOSHOP ELEMENTS AND COLOR 137
FIGURE 7.2
The Hue/
Saturation con-
trols enable you
to adjust color
attributes, such
as the hue, satu-
ration, and
lightness of an
image.
Each color space relies on both hardware and software to work properly. This isreferred to as device-dependent color. Each computer monitor and printer has its ownway of interpreting how to work with color. Some devices, such as a computer moni-tor, rely on an additive color process to create a full spectrum of colors, whereasother devices, such as printers, rely on a subtractive color process. A device-inde-pendent color space is a color space that can accurately reproduce color no matterwhich device is being used.
11 8311 CH07 1/15/03 2:20 PM Page 137
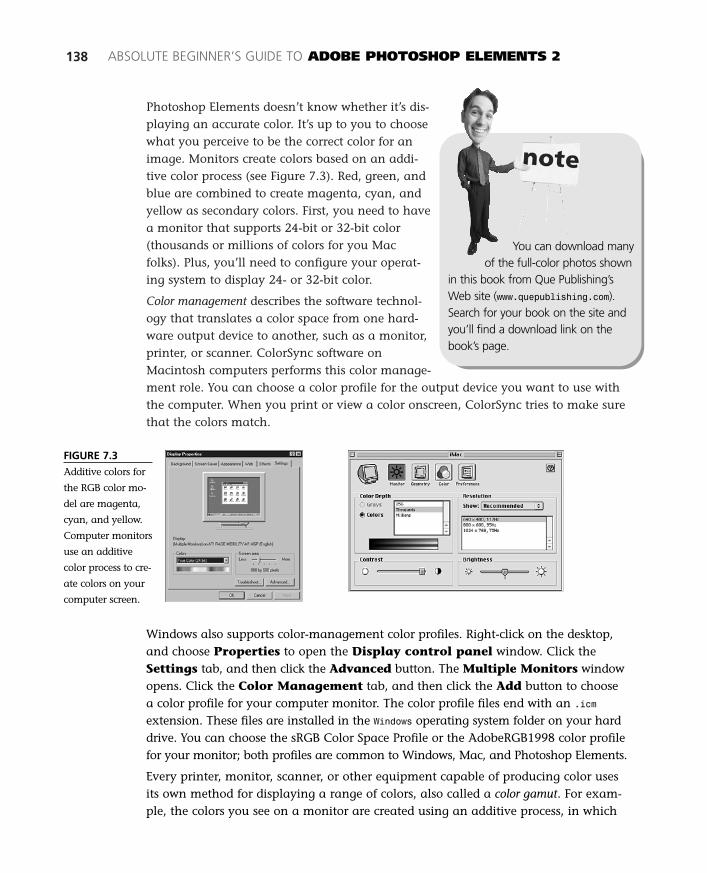
Photoshop Elements doesn’t know whether it’s dis-playing an accurate color. It’s up to you to choosewhat you perceive to be the correct color for animage. Monitors create colors based on an addi-tive color process (see Figure 7.3). Red, green, andblue are combined to create magenta, cyan, andyellow as secondary colors. First, you need to havea monitor that supports 24-bit or 32-bit color(thousands or millions of colors for you Macfolks). Plus, you’ll need to configure your operat-ing system to display 24- or 32-bit color.
Color management describes the software technol-ogy that translates a color space from one hard-ware output device to another, such as a monitor,printer, or scanner. ColorSync software onMacintosh computers performs this color manage-ment role. You can choose a color profile for the output device you want to use withthe computer. When you print or view a color onscreen, ColorSync tries to make surethat the colors match.
138 ABSOLUTE BEGINNER’S GUIDE TO ADOBE PHOTOSHOP ELEMENTS 2
You can download manyof the full-color photos shown
in this book from Que Publishing’sWeb site (www.quepublishing.com).Search for your book on the site andyou’ll find a download link on thebook’s page.
FIGURE 7.3
Additive colors for
the RGB color mo-
del are magenta,
cyan, and yellow.
Computer monitors
use an additive
color process to cre-
ate colors on your
computer screen.
Windows also supports color-management color profiles. Right-click on the desktop,and choose Properties to open the Display control panel window. Click theSettings tab, and then click the Advanced button. The Multiple Monitors windowopens. Click the Color Management tab, and then click the Add button to choosea color profile for your computer monitor. The color profile files end with an .icmextension. These files are installed in the Windows operating system folder on your harddrive. You can choose the sRGB Color Space Profile or the AdobeRGB1998 color profilefor your monitor; both profiles are common to Windows, Mac, and Photoshop Elements.
Every printer, monitor, scanner, or other equipment capable of producing color usesits own method for displaying a range of colors, also called a color gamut. For exam-ple, the colors you see on a monitor are created using an additive process, in which
11 8311 CH07 1/15/03 2:20 PM Page 138
the phosphors in the monitor tube are excited byred, green, or blue colors. On the other hand, print-ers use a subtractive method based on cyan,magenta, and yellow to create colors. Color repre-sentation also varies among different monitormanufacturers. For instance, the colors on a Sonymonitor look slightly brighter or bluer than thesame colors on an Apple monitor.
In the worst-case scenario, you might be creatingan image with an orange color. At least your com-puter monitor shows the color orange in the pic-ture. When you send that image to a color printer,the printer might need to mix yellow and cyan inkto create orange. The application displaying theimage onscreen tells your computer that it needs thecolor orange. The computer sends this information to the printer. The printer gets themessage for orange and tries to create that color. Here’s how the exchange might go:
Application: Hey, I need some orange here!
Computer: Printer, make some orange, okay?
Printer: What’s orange? Okay, let me mix some ink.
Printer: Okay, I’m printing orange.
Computer to the Application: Hey, the printer made orange.
Application: Okie dokie!
You: This isn’t orange, it’s pink ink covered with yellow ink!
GAMMA AND WEB COLORSRecall that gamma affects the brightness of the image on a computer monitor. AlthoughWindows and Macintosh computers share the same Web browser color palette, each com-puter system processes gamma using different hardware technologies.
The difference in gamma between Windows and Mac computers is most obvious whenchoosing colors for a Web page. A solid orange color created on a Windows computermight appear to have more red on a Mac.
The difference in gamma occurs because each computer system manages color differently.To compensate for the differences in gamma, try choosing colors that look more similar onboth computer platforms.
To help hardware devices transform color more accurately from one device toanother, the International Color Consortium (ICC) was formed in 1993. The ICCcommittee defined a workflow for color data to be translated from one device toanother. This information was stored in a file, called a color profile.
CHAPTER 7 PHOTOSHOP ELEMENTS AND COLOR 139
Selecting a color profilein the operating system will
override any color management set-tings selected in the Color Settingsdialog box in Photoshop Elements.
11 8311 CH07 1/15/03 2:20 PM Page 139
An application that follows the ICC standards, such as Photoshop Elements, canstore a color profile along with an image file. Before a printer uses its own color-management system to put ink on paper, it will load the color profile data (if yousaved it with the image). The color profile contains the definition for the actual colordata in the image.
If you have selected a ColorSync or color profile for Mac OS or Windows, you can skipthis paragraph. If you haven’t chosen a color profile for your Windows or Macintoshoperating system, you can set the color profile in Photoshop Elements. Open theColor Settings dialog box with (Command-Shift-K) [Ctrl+Shift+K]. ChooseLimited Color to save an SRGB IEC61966-2.1–compatible color profile with imagesintended for the Web. If Full Color Management is selected, the Adobe RGB ColorProfile will generate a color profile for the image. For either color managementoption, choose File, Save As. Check the (Embed Color Profile) [ICC ColorProfile] check box in the Save As window and Photoshop Elements will generateICC color definitions when the image file is saved to disk.
DEVICES AND COLOR MANAGEMENTMost printers use the CMYK color model to print an image. Some devices enable you tomodify CMYK settings from your computer. Other devices have a translation system builtinto them. For instance, some standalone photo printers allow you to insert aCompactFlash or SmartMedia card directly into the printer, adjust the image, and printwithout using a computer. To print more accurate color, many printers include softwarethat can translate an RGB image into a CMYK image. Printers that have this capability canproduce printed images that match the colors of the onscreen image.
Calibrating Your MonitorYou need to calibrate your computer monitor in order to take full advantage of colormanagement. Calibrating a monitor involves adjusting several video settings:brightness and contrast, gamma, phosphors, and white point. The settings youchoose in the calibration software determine how other color spaces appear on yourmonitor, and, more important, how colors are translated to output devices.
If you have a Windows computer, you can use Adobe’s Gamma control panel to cal-ibrate your monitor. If you have Mac OS X, use the Display Calibrator application tocalibrate your monitor. As an alternative, you can use a desktop colorimeter or spec-trophotometer to measure and set its white point. There are also may third-partysoftware products from companies such as Kodak that enable you to calibrate coloron your Mac or Windows computer.
Photoshop Elements installs the Adobe Gamma control panel in the Control Panelfolder on your hard drive. On a Windows 98 or NT computer, click on the Startmenu, choose Settings, Control Panel, and then select Adobe Gamma from the
140 ABSOLUTE BEGINNER’S GUIDE TO ADOBE PHOTOSHOP ELEMENTS 2
11 8311 CH07 1/15/03 2:20 PM Page 140

Control Panel list. If you’re using Windows XP, click on the Start menu, chooseControl Panel, and then select Adobe Gamma. Mac OS X folks can open theDisplay Calibrator program from the Applications, Utilities folder.
BEFORE CALIBRATING YOUR MONITOR…To get the best calibration results, perform some of the following suggestions before chang-ing any of your monitor’s settings:
• Leave the monitor on for at least 30 minutes.
• Set the monitor to display at least thousands (16-bit) of colors.
• Set your desktop picture or pattern to a neutral color, such as a solid gray color.
The following list provides a brief explanation of the settings you need to adjust inorder to calibrate your monitor and summarizes the settings available in the AdobeGamma control panel. The Adobe Gamma control panel has two modes: manualand wizard modes. If you’re not sure which settings to choose, use the wizard to helpyou choose the correct settings for your system.
■ Brightness/Contrast—The Brightness and Contrast window for theAdobe Gamma control panel appears as a bar if you are adjusting settingsmanually, or as a black square surrounded by a white border. You can adjustthe brightness and contrast settings of your computer monitor by changingthe hardware or software settings. The controls will vary depending on thetype of monitor and operating system installed with your computer.
If you’re using a Mac, you can adjust the monitor’s brightness and contrastsetting from the Monitors control panel. The brightness settings for a PC mightbe located directly on the computer monitor, or you might be able to open acontrol panel window or press the keyboard controls for brightness or contraston the keyboard. Place the Mac or Windows control panel window beside theAdobe Gamma control panel window on your desktop. Set the monitor’s con-trast setting to its highest value, and then change the Brightness setting in the(Monitors) [Display] window so that the black square or bar in the AdobeGamma control panel is as dark as it can be while keeping the brightness ofthe white bar as white as it can be.
■ Phosphors—Monitors use phosphors to emit light and create the colors youcan see onscreen. The red, green, and blue phosphors that create colors on yourcomputer screen vary from one manufacturer to another. Select the phosphorsfor your monitor from the Phosphors drop-down menu. Select EBU/ITU, HDTV(CCIR 709), NTSC (1953), P22-EBU, SMPTE-C (CCIR 501-1), or Trinitron,or create a custom phosphor setting. For most computer displays, Trinitron isthe best setting. If you’re using the Adobe Gamma (Assistant) [Wizard], it willchoose a phosphor setting based on the color profile selected in the first step.
CHAPTER 7 PHOTOSHOP ELEMENTS AND COLOR 141
11 8311 CH07 1/15/03 2:20 PM Page 141

■ Gamma—Gamma settings define the bright-ness of the midtones on your monitor. Pick theWindows Default gamma setting (2.2) ifyou’re using a PC, or the MacintoshDefault (1.8) if you’re using a Macintoshcomputer. Move the slider control belowthe square in the Gamma section of theAdobe Gamma window to select a customgamma setting. Calibrate your monitorwith a single gamma setting or view, orcreate custom gamma settings for red,green, and blue by deselecting the ViewSingle Gamma Only check box.
■ White Point—There are two settings forcalibrating the white point on your moni-tor. This will affect how color is translatedfor other output devices. First, choose awarm or cool white setting for the monitor’swhite point. 5000K is the equivalent of awhite page. 6500K is the default white pointfor Windows. 9300K is the default white pointfor Macintosh computers. Next, choose anadjusted white point value that you mightwant to work with.
Lower values generate warmer, or yellow-ish, lighting. Colors might appear a littlericher, or fuller, in low, or warmer, settings.As the value increases, the white point iscooler, or whiter. Cooler settings can reducethe range of visible colors in an image. Theunit for measuring white point is in degreesKelvin. Kelvin is a scale used to measurethe color temperature, or the amount ofcolor in a light source. Choose from 5000K(warm white), 5500K, 6500K, 7500K,9300K, or a custom white point setting.
Some operating systems have calibration softwaresettings enabling you to set the white point for themonitor. Figure 7.4 shows the white point settingsin Mac OS X for an iMac monitor. Click on aradio button to select the white point of the
142 ABSOLUTE BEGINNER’S GUIDE TO ADOBE PHOTOSHOP ELEMENTS 2
Gamma defines themathematical formula that
represents the relationship betweeninput and output. Windows andMac computers use differentgamma processes to display color.In Photoshop Elements, the mid-tone region in the histogram is syn-onymous with the term gamma.
A color system madeof three colors—such as
RGB or CMY—is called a tristimu-lus. The white point is an achro-matic value, meaning that it iscolorless, and results when all threetristimuli are equal. Setting thewhite point defines the way othercolors will be presented on thecomputer monitor. It also affectshow accurately colors are trans-lated from input devices, such as ascanner or camera, or to outputdevices, such as a printer.
11 8311 CH07 1/15/03 2:20 PM Page 142
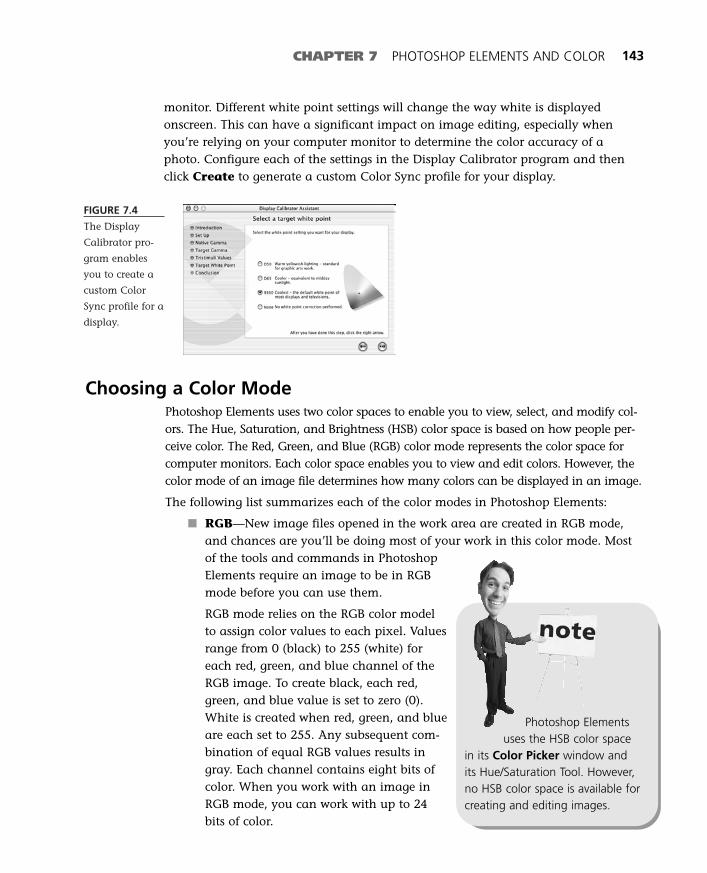
FIGURE 7.4
The Display
Calibrator pro-
gram enables
you to create a
custom Color
Sync profile for a
display.
CHAPTER 7 PHOTOSHOP ELEMENTS AND COLOR 143
Choosing a Color ModePhotoshop Elements uses two color spaces to enable you to view, select, and modify col-ors. The Hue, Saturation, and Brightness (HSB) color space is based on how people per-ceive color. The Red, Green, and Blue (RGB) color mode represents the color space forcomputer monitors. Each color space enables you to view and edit colors. However, thecolor mode of an image file determines how many colors can be displayed in an image.
The following list summarizes each of the color modes in Photoshop Elements:
■ RGB—New image files opened in the work area are created in RGB mode,and chances are you’ll be doing most of your work in this color mode. Mostof the tools and commands in PhotoshopElements require an image to be in RGBmode before you can use them.
RGB mode relies on the RGB color modelto assign color values to each pixel. Valuesrange from 0 (black) to 255 (white) foreach red, green, and blue channel of theRGB image. To create black, each red,green, and blue value is set to zero (0).White is created when red, green, and blueare each set to 255. Any subsequent com-bination of equal RGB values results ingray. Each channel contains eight bits ofcolor. When you work with an image inRGB mode, you can work with up to 24bits of color.
monitor. Different white point settings will change the way white is displayedonscreen. This can have a significant impact on image editing, especially whenyou’re relying on your computer monitor to determine the color accuracy of aphoto. Configure each of the settings in the Display Calibrator program and thenclick Create to generate a custom Color Sync profile for your display.
Photoshop Elementsuses the HSB color space
in its Color Picker window andits Hue/Saturation Tool. However,no HSB color space is available forcreating and editing images.
11 8311 CH07 1/15/03 2:20 PM Page 143
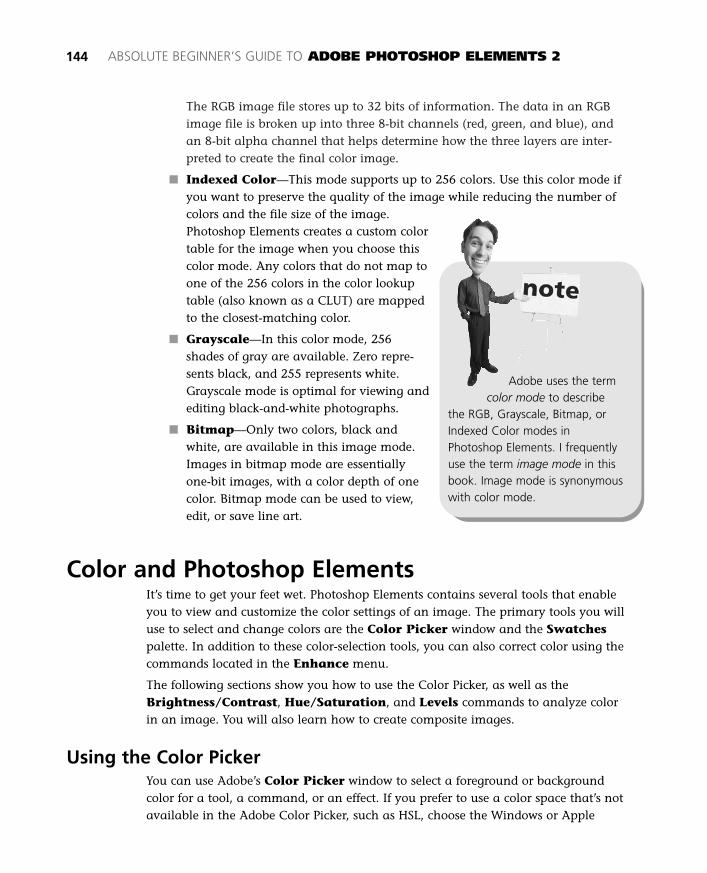
The RGB image file stores up to 32 bits of information. The data in an RGBimage file is broken up into three 8-bit channels (red, green, and blue), andan 8-bit alpha channel that helps determine how the three layers are inter-preted to create the final color image.
■ Indexed Color—This mode supports up to 256 colors. Use this color mode ifyou want to preserve the quality of the image while reducing the number ofcolors and the file size of the image.Photoshop Elements creates a custom colortable for the image when you choose thiscolor mode. Any colors that do not map toone of the 256 colors in the color lookuptable (also known as a CLUT) are mappedto the closest-matching color.
■ Grayscale—In this color mode, 256shades of gray are available. Zero repre-sents black, and 255 represents white.Grayscale mode is optimal for viewing andediting black-and-white photographs.
■ Bitmap—Only two colors, black andwhite, are available in this image mode.Images in bitmap mode are essentiallyone-bit images, with a color depth of onecolor. Bitmap mode can be used to view,edit, or save line art.
Color and Photoshop ElementsIt’s time to get your feet wet. Photoshop Elements contains several tools that enableyou to view and customize the color settings of an image. The primary tools you willuse to select and change colors are the Color Picker window and the Swatchespalette. In addition to these color-selection tools, you can also correct color using thecommands located in the Enhance menu.
The following sections show you how to use the Color Picker, as well as theBrightness/Contrast, Hue/Saturation, and Levels commands to analyze colorin an image. You will also learn how to create composite images.
Using the Color PickerYou can use Adobe’s Color Picker window to select a foreground or backgroundcolor for a tool, a command, or an effect. If you prefer to use a color space that’s notavailable in the Adobe Color Picker, such as HSL, choose the Windows or Apple
144 ABSOLUTE BEGINNER’S GUIDE TO ADOBE PHOTOSHOP ELEMENTS 2
Adobe uses the termcolor mode to describe
the RGB, Grayscale, Bitmap, orIndexed Color modes inPhotoshop Elements. I frequentlyuse the term image mode in thisbook. Image mode is synonymouswith color mode.
11 8311 CH07 1/15/03 2:20 PM Page 144
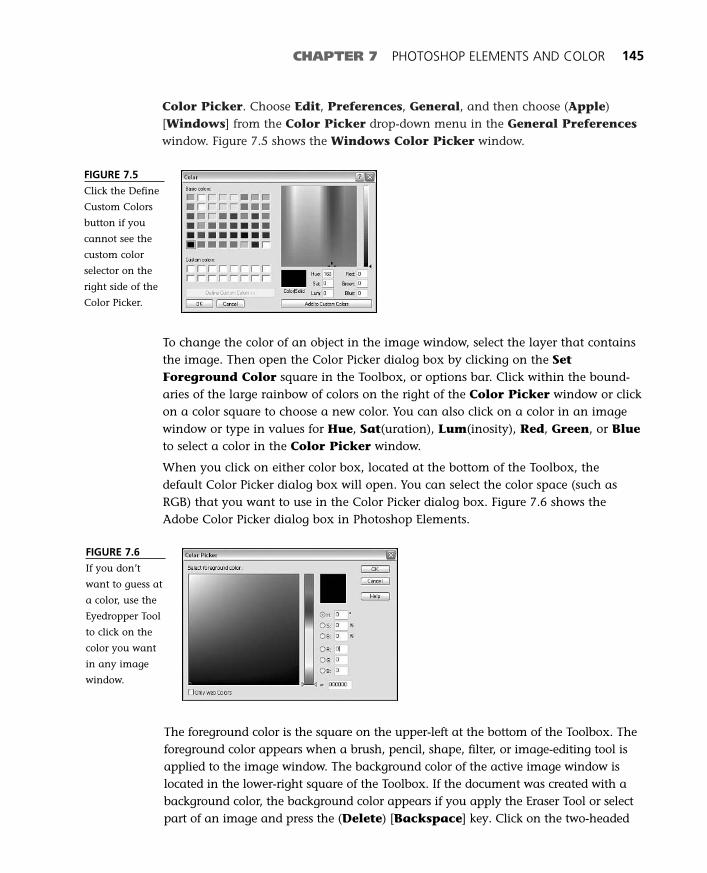
Color Picker. Choose Edit, Preferences, General, and then choose (Apple)[Windows] from the Color Picker drop-down menu in the General Preferenceswindow. Figure 7.5 shows the Windows Color Picker window.
CHAPTER 7 PHOTOSHOP ELEMENTS AND COLOR 145
FIGURE 7.5
Click the Define
Custom Colors
button if you
cannot see the
custom color
selector on the
right side of the
Color Picker.
FIGURE 7.6
If you don’t
want to guess at
a color, use the
Eyedropper Tool
to click on the
color you want
in any image
window.
To change the color of an object in the image window, select the layer that containsthe image. Then open the Color Picker dialog box by clicking on the SetForeground Color square in the Toolbox, or options bar. Click within the bound-aries of the large rainbow of colors on the right of the Color Picker window or clickon a color square to choose a new color. You can also click on a color in an imagewindow or type in values for Hue, Sat(uration), Lum(inosity), Red, Green, or Blueto select a color in the Color Picker window.
When you click on either color box, located at the bottom of the Toolbox, thedefault Color Picker dialog box will open. You can select the color space (such asRGB) that you want to use in the Color Picker dialog box. Figure 7.6 shows theAdobe Color Picker dialog box in Photoshop Elements.
The foreground color is the square on the upper-left at the bottom of the Toolbox. Theforeground color appears when a brush, pencil, shape, filter, or image-editing tool isapplied to the image window. The background color of the active image window islocated in the lower-right square of the Toolbox. If the document was created with abackground color, the background color appears if you apply the Eraser Tool or selectpart of an image and press the (Delete) [Backspace] key. Click on the two-headed
11 8311 CH07 1/15/03 2:20 PM Page 145
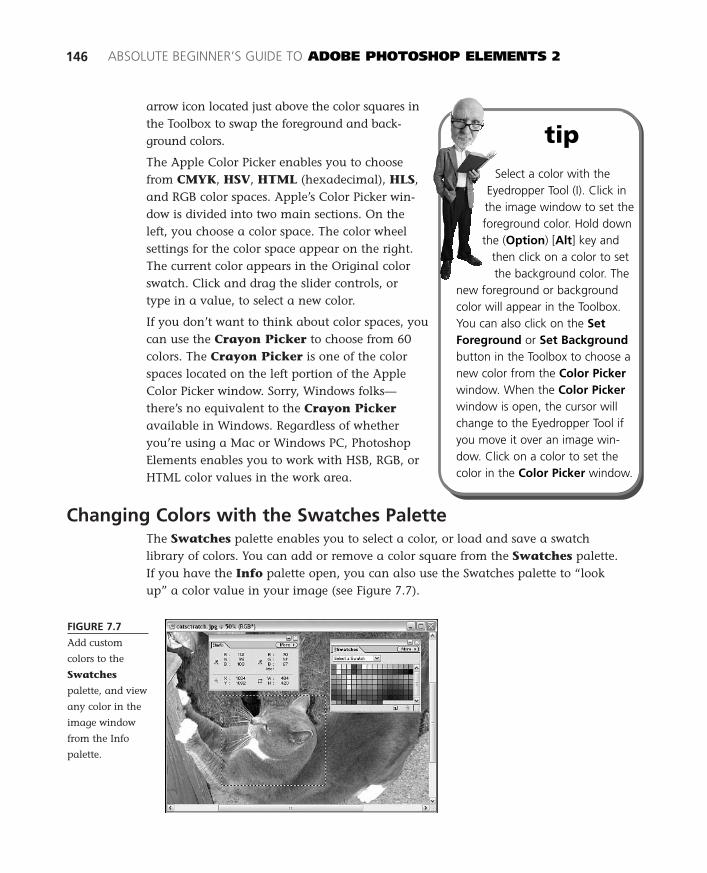
FIGURE 7.7
Add custom
colors to the
Swatches
palette, and view
any color in the
image window
from the Info
palette.
arrow icon located just above the color squares inthe Toolbox to swap the foreground and back-ground colors.
The Apple Color Picker enables you to choosefrom CMYK, HSV, HTML (hexadecimal), HLS,and RGB color spaces. Apple’s Color Picker win-dow is divided into two main sections. On theleft, you choose a color space. The color wheelsettings for the color space appear on the right.The current color appears in the Original colorswatch. Click and drag the slider controls, ortype in a value, to select a new color.
If you don’t want to think about color spaces, youcan use the Crayon Picker to choose from 60colors. The Crayon Picker is one of the colorspaces located on the left portion of the AppleColor Picker window. Sorry, Windows folks—there’s no equivalent to the Crayon Pickeravailable in Windows. Regardless of whetheryou’re using a Mac or Windows PC, PhotoshopElements enables you to work with HSB, RGB, orHTML color values in the work area.
Changing Colors with the Swatches PaletteThe Swatches palette enables you to select a color, or load and save a swatchlibrary of colors. You can add or remove a color square from the Swatches palette.If you have the Info palette open, you can also use the Swatches palette to “lookup” a color value in your image (see Figure 7.7).
146 ABSOLUTE BEGINNER’S GUIDE TO ADOBE PHOTOSHOP ELEMENTS 2
tipSelect a color with the
Eyedropper Tool (I). Click inthe image window to set theforeground color. Hold downthe (Option) [Alt] key and
then click on a color to setthe background color. The
new foreground or backgroundcolor will appear in the Toolbox.You can also click on the SetForeground or Set Backgroundbutton in the Toolbox to choose anew color from the Color Pickerwindow. When the Color Pickerwindow is open, the cursor willchange to the Eyedropper Tool ifyou move it over an image win-dow. Click on a color to set thecolor in the Color Picker window.
11 8311 CH07 1/15/03 2:20 PM Page 146

CHAPTER 7 PHOTOSHOP ELEMENTS AND COLOR 147
By default, 116 colors appear in the Swatches palette. You can load new swatchlibraries by clicking on the arrow drop-down menu and choosing from the Mac OS,VisiBone, VisiBone2, Web Hues, Web Safe Colors, Web Spectrum, andWindows color palettes. Although your monitor might be set to display thousandsor millions (16-bit or 24-bit color) of colors, the Swatches palette will usually notcontain more than 256 colors.
You can use the Swatches palette to store particular colors from an image file, inaddition to any Web-safe or OS-specific colors. Or you can create a custom palettefor a series of color images. This can be helpful when you are creating an imageusing a specific set of colors, such as for a logo or Web site.
To add a color to the Swatches palette, do the following:
1. Click on the Eyedropper Tool in the Toolbox.
2. In one of the image windows, click on the color you want to add.
3. Click below the last row of color squares in the Swatches palette. When youplace the cursor below the bottom row of color squares in the Swatchespalette, its icon will change from an eyedropper to a Paint Bucket icon. Afteryou click, the Color Swatch Name window appears.
4. Type in a name for the color square, and then click OK. The new color squarewill appear at the bottom of the Swatches palette.
To remove a color, click and drag the color to the Trash icon located in the lower-right corner of the Swatches palette.
CHOOSING A WEB-SAFE COLORA Web-safe color palette consists of 216 colors. These colors are the common colorsWindows, Mac, and Linux computers share out of a total system color palette of 256 colors.If you choose a color on a Mac that isn’t one of the 216 Web-safe colors, another computerplatform might not have that color. If this is the case, the browser or operating system willconvert the missing color to what it thinks is the closest matching color available.
Photoshop Elements Color-Correction ToolsThe manual process of color correction in a digital photo is what most of this book isabout. The complexity of a project depends on the quality and clarity of the originalimage. Photoshop Elements has a couple of tools that offer a quick-fix solution forcertain kinds of pictures. However, although the automatic level and contrast tools canwork great with some images, they might not be helpful with other images. Try outthe Auto Levels or Auto Contrast commands to see whether they improve theimage. If you like the change, save the image. Otherwise, you can choose Undo fromthe Edit menu to undo the automatic changes and make the improvements yourself.
11 8311 CH07 1/15/03 2:20 PM Page 147
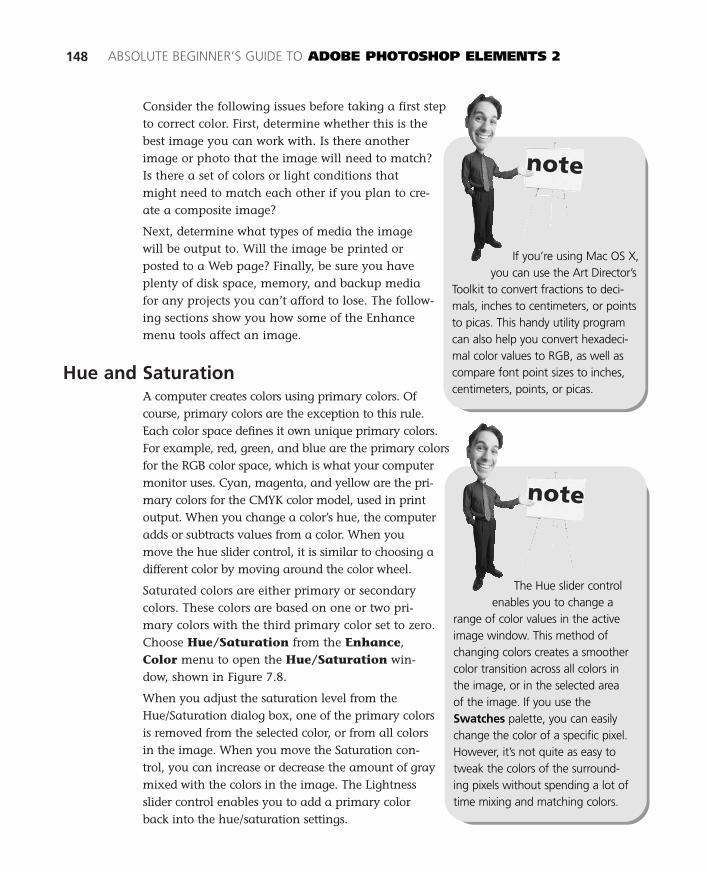
Consider the following issues before taking a first stepto correct color. First, determine whether this is thebest image you can work with. Is there anotherimage or photo that the image will need to match?Is there a set of colors or light conditions thatmight need to match each other if you plan to cre-ate a composite image?
Next, determine what types of media the imagewill be output to. Will the image be printed orposted to a Web page? Finally, be sure you haveplenty of disk space, memory, and backup mediafor any projects you can’t afford to lose. The follow-ing sections show you how some of the Enhancemenu tools affect an image.
Hue and SaturationA computer creates colors using primary colors. Ofcourse, primary colors are the exception to this rule.Each color space defines it own unique primary colors.For example, red, green, and blue are the primary colorsfor the RGB color space, which is what your computermonitor uses. Cyan, magenta, and yellow are the pri-mary colors for the CMYK color model, used in printoutput. When you change a color’s hue, the computeradds or subtracts values from a color. When youmove the hue slider control, it is similar to choosing adifferent color by moving around the color wheel.
Saturated colors are either primary or secondarycolors. These colors are based on one or two pri-mary colors with the third primary color set to zero.Choose Hue/Saturation from the Enhance,Color menu to open the Hue/Saturation win-dow, shown in Figure 7.8.
When you adjust the saturation level from theHue/Saturation dialog box, one of the primary colorsis removed from the selected color, or from all colorsin the image. When you move the Saturation con-trol, you can increase or decrease the amount of graymixed with the colors in the image. The Lightnessslider control enables you to add a primary colorback into the hue/saturation settings.
148 ABSOLUTE BEGINNER’S GUIDE TO ADOBE PHOTOSHOP ELEMENTS 2
If you’re using Mac OS X,you can use the Art Director’s
Toolkit to convert fractions to deci-mals, inches to centimeters, or pointsto picas. This handy utility programcan also help you convert hexadeci-mal color values to RGB, as well ascompare font point sizes to inches,centimeters, points, or picas.
The Hue slider controlenables you to change a
range of color values in the activeimage window. This method ofchanging colors creates a smoothercolor transition across all colors inthe image, or in the selected areaof the image. If you use theSwatches palette, you can easilychange the color of a specific pixel.However, it’s not quite as easy totweak the colors of the surround-ing pixels without spending a lot oftime mixing and matching colors.
11 8311 CH07 1/15/03 2:20 PM Page 148

Color correction is usually a tedious task. Don’t besurprised to find yourself experimenting with theHue/Saturation command to correct colors, orchange a color just to compare the results toanother color-correction tool in PhotoshopElements. The following list describes situationsin which you might want to use theHue/Saturation command:
■ Color—If you want to adjust a color inpart of an image, you can use a selectiontool to highlight the pixels you want tomodify. Then open the Hue/Saturationcommand from the Enhance, Colormenu (Command-U) [Ctrl+U] and slowlymove the Hue control slider. If thePreview check box has been selected, youcan watch the color of the selected pixelschange as you move the slider.
■ Color Purity—The Saturation control in the Hue/Saturation dialog boxenables you to set the amount of gray level or chroma in a color. You mightwant to adjust this setting if a portion of an image needs a little less gray,and a little more color, than the rest of the image. You can adjust the satura-tion level of a specific color channel in an image, or of all the channels.
■ Color Brightness—The Lightness slider control enables you to remove oradd light to all or part of an image. This setting can help lighten or darkencolors in an image, or help create more even lighting in part of an image.
CHAPTER 7 PHOTOSHOP ELEMENTS AND COLOR 149
FIGURE 7.8
Adjust the mix-
ture of colors
using the Master
set of colors in the
Hue/Saturation
window. Or mod-
ify a specific range
of colors by choos-
ing one of the
options in the Edit
drop-down menu.
Color images consistof luminosity (light) and
chrominance (gray level). Byadjusting these levels in theHue/Saturation window, youcan change the brightness andintensity of a particular color orrange of colors.
11 8311 CH07 1/15/03 2:20 PM Page 149

For broad, general adjustments to tonal range, use the Brightness/Contrast settingsin the Quick Fix or Brightness/Contrast dialog box. For more precise adjustments tocontrast or tonal range distribution, use the Levels dialog box. The Levels commandenables you to more precisely modify the tonal range of pixels in an image. ChooseLevels from the Enhance, Brightness/Contrast menu to open the Levels dialogbox, or press (Command-L) [Ctrl+L]. Find out more about the Levels tool and cus-tomizing tonal range settings in the next chapter.
You can increase the shadows and highlights in an image by increasing the value ofthe Contrast slider control. Decreasing the contrast setting lowers the values of theshadows and highlights in the image.
Brightness and ContrastThe Brightness control enables you to increase or decrease the amount of light in animage, whereas the Contrast control enables you to increase or decrease the amountof dark and light pixels in an image. Choose Brightness/Contrast from theEnhance menu. This dialog box enables you to increase or decrease the overalltonal range of an image. Each slider control has a zero value at the midpoint of theslider, going from –100 to 100, or a range of 200 settings. Check the Preview checkbox to preview your changes in the image window. This tool provides a more gen-eral way to adjust the tonal range of an image.
The Brightness/Contrast settings in the Quick Fix dialog box are shown in Figure 7.9.Both the Brightness/Contrast dialog box and the Brightness/Contrast settings in theQuick Fix dialog box consist of one slider control to enable you to adjust the fullrange of brightness in a photo (see Figure 7.9). A higher brightness value increasesthe highlights in the image. A lower brightness value decreases the highlights, andincreases the shadows in the image.
150 ABSOLUTE BEGINNER’S GUIDE TO ADOBE PHOTOSHOP ELEMENTS 2
FIGURE 7.9
The Brightness/
Contrast controls
enable you to
adjust the ratio
of dark and light
pixels, as well as
the amount of
light exposed to
the colors in an
image.
11 8311 CH07 1/15/03 2:20 PM Page 150
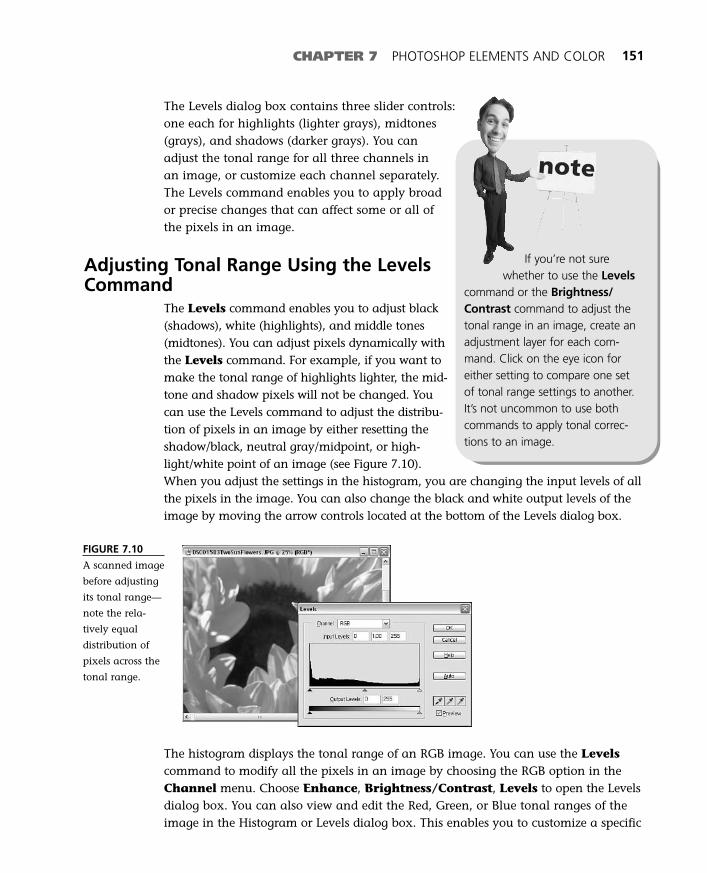
CHAPTER 7 PHOTOSHOP ELEMENTS AND COLOR 151
The Levels dialog box contains three slider controls:one each for highlights (lighter grays), midtones(grays), and shadows (darker grays). You canadjust the tonal range for all three channels inan image, or customize each channel separately.The Levels command enables you to apply broador precise changes that can affect some or all ofthe pixels in an image.
Adjusting Tonal Range Using the LevelsCommand
The Levels command enables you to adjust black(shadows), white (highlights), and middle tones(midtones). You can adjust pixels dynamically withthe Levels command. For example, if you want tomake the tonal range of highlights lighter, the mid-tone and shadow pixels will not be changed. Youcan use the Levels command to adjust the distribu-tion of pixels in an image by either resetting theshadow/black, neutral gray/midpoint, or high-light/white point of an image (see Figure 7.10).When you adjust the settings in the histogram, you are changing the input levels of allthe pixels in the image. You can also change the black and white output levels of theimage by moving the arrow controls located at the bottom of the Levels dialog box.
If you’re not surewhether to use the Levels
command or the Brightness/Contrast command to adjust thetonal range in an image, create anadjustment layer for each com-mand. Click on the eye icon foreither setting to compare one setof tonal range settings to another.It’s not uncommon to use bothcommands to apply tonal correc-tions to an image.
FIGURE 7.10
A scanned image
before adjusting
its tonal range—
note the rela-
tively equal
distribution of
pixels across the
tonal range.
The histogram displays the tonal range of an RGB image. You can use the Levelscommand to modify all the pixels in an image by choosing the RGB option in theChannel menu. Choose Enhance, Brightness/Contrast, Levels to open the Levelsdialog box. You can also view and edit the Red, Green, or Blue tonal ranges of theimage in the Histogram or Levels dialog box. This enables you to customize a specific
11 8311 CH07 1/15/03 2:20 PM Page 151

You can use the Levels dialog box to do more inten-sive tonal range correction, too. The three eyedrop-pers located in the lower-right corner of the Levelsdialog box enable you to set custom black, gray,or white points for the image. The eyedroppertools will reset the input settings in the Levels dia-log box. The eyedropper tools are not designed tomake tonal corrections. You can use them to makesmall adjustments to correct the targeting ofblack, white, and grays in the image.
You can use the Levels eyedropper tools in twoways. First, you can choose an arbitrary colorfrom the Color Picker window. Double-click onthe eyedropper tool for which you want to set atarget color, and then choose a color from theColor Picker window. Second, you can selectone of the eyedropper tools from the Levels dialogbox and then click in the image window to selectthe new black, gray, or white point for the image.
Color and Composite ImagesYou can apply any of the color or tonal correctioncommands to a single image, or to a combinationof images. When you copy and paste one imageinto another, you create a composite image. Theconnecting edges of the composite image might not
152 ABSOLUTE BEGINNER’S GUIDE TO ADOBE PHOTOSHOP ELEMENTS 2
set of pixels in an image, reducing potential image data loss that can result frommaking broader tonal corrections with all three channels. If you’ve opened agrayscale image, a single window containing the distribution of grays will appear inthe Levels dialog box (see Figure 7.11).
A histogram is a visualrepresentation of the num-
ber of pixels distributed in an image.Darker shades of pixels are locatedon the left side of the histogram,and lighter pixels on the right. Blackvertical bars in the histogram indi-cate how many pixels share a com-mon gray value in the image. Viewa histogram of an indexed color,RGB, or grayscale image. ChooseHistogram from the Image menuto open the Histogram window. Tofind out more about how to readthe data in the Histogram window,see Chapter 8.
FIGURE 7.11
Changing the
levels of the
highlights and
midtone can
make the range
of shadows in
the photo stand
out.
11 8311 CH07 1/15/03 2:20 PM Page 152

CHAPTER 7 PHOTOSHOP ELEMENTS AND COLOR 153
blend in with the composite colors in the back-ground image. Color mismatches and roughedges in composite images can result in a finalimage that lacks realism.
FEATHERING SELECTIONSBlur the edges of a selected image before copying it.First, choose a selection tool and highlight an area ofpixels in the image window. Then, choose theFeather command from the Select menu to featherthe edges of the copied image to allow for betterblending between the images.
The Feather command enables you to blend the colorof the pixels located at the edge of the selected area.When you choose the Feather command, the FeatherSelection dialog box opens. Type a number into the textbox to adjust the number of pixels you want to blend with the edge pixels. The higher thenumber, the more pixels will be blurred at the edges of the selected image. Three to fivepixels is a good value to apply with the Feature command. You can increase or decreasethe number of pixels that will be feathered until you create the effect that works best withthe image you’re working with. Click OK to apply the command to the selected area. Youshould be able to see a slight blur at the edge of the selected image.
Choose the Copy command, and then paste the image into another image window. Thepasted, feathered image should blend into the background image.
Figure 7.12 shows two images that have been addedto a third image window. To create this image, Iused the Magnetic Lasso Tool to select eachimage. Then I used the Copy and Paste com-mands to move the selected image to the middlewindow. Notice how the edges of the cat imageare slightly blurred around the edges. TheFeather command was not applied to the rabbit.
When you paste an image into an active docu-ment window, Photoshop Elements converts thecolor mode of the pasted image into the imagemode of the active image window. To preserve allthe color information of a composite image, openan image in RGB color mode, or create a new doc-ument window and choose RGB Color from theImage, Mode menu. RGB color mode supports upto 16.7 million colors. The 32 bits of information in
tipIf you want to apply the
Levels command withoutaltering any pixels in theoriginal image, add a Levelsadjustment layer. You can
apply all the same greattools in the Levels dialog
box in an adjustment layer exceptthat the changes are stored in aseparate layer until you’re ready tomerge them into the final image.
Each time you apply anyof the image-editingtools, you can changeand delete a large num-ber of pixels from the originalimage. As you apply multiple toolsto an image, more and more data islost. In contrast, if you createadjustment layers, and merge themtogether at the same time, you’lllose less image data than whenapplying each tool one by one.
11 8311 CH07 1/15/03 2:20 PM Page 153

FIGURE 7.12
Copy and paste
images to create
a composite. The
Feather com-
mand was
applied to the
cat, but not to
the rabbit.
154 ABSOLUTE BEGINNER’S GUIDE TO ADOBE PHOTOSHOP ELEMENTS 2
Correcting the color between the two images mightbe an issue if you’re combining images taken underdifferent lighting conditions. For example, an imagecaptured in daylight might not seem realistic ifcombined with another captured in low light. Youcan try to correct the highlights, midtones, orshadows of both images by adding an adjustmentlayer and applying it across layers in the imagewindow. You also can apply the Fill Flash,Adjust Backlighting, Brightness/Contrast,or Hue/Saturation tools to an image before orafter combining it with a second image. For bestresults, try to choose images that share similarlighting and image clarity. The greater the differ-ences between the images, the more time you’llprobably be spending trying to correct colors.
Another way to combine images is to select partof the background image and paste anotherimage into it. Instead of choosing the standardPaste menu command, you can use a selectiontool to highlight part of the image in the imagewindow, and then choose the Paste Into command
an RGB image are broken up into three 8-bit channels (red, green, and blue), and an8-bit alpha channel that helps determine how the three layers are interpreted to cre-ate the final color image. It’s okay to paste an image in Indexed Color, Grayscale, orBitmap color modes into an image window in RGB mode. The composite image willretain its resolution and color data.
You can apply color cor-rection to RGB images using
blending modes on multiple layers ofthe same image. For example, youcan lighten the colors in a photo byapplying the Color Dodge blendingmode to a copy of the backgroundlayer that contains a photo. You canchange the hue and saturation set-tings to a duplicate layer of an imageand use the hue, saturation, or colorblending modes to change the colorcast of an image without changingany of the pixels in the original image.
11 8311 CH07 1/15/03 2:20 PM Page 154

from the Edit menu to create a masked composite image. Many of the same colormatching and lighting issues apply to masked images. Be prepared to spend timecorrecting and blending colors to try to make the composite image appear morerealistic.
A mask can also be used to isolate a particular areaof an image where you might want to delete,replace, or correct the color. If you’ve pasted animage into the image window, you can(Command-click) [Ctrl+click] the compositeimage layer in the Layers palette. The image inthe selected layer will automatically becomeselected. You can apply color correction tools tothe selected image without affecting other imagesin the active image window.
A new layer is created for each new image pastedinto the active image window. You can use theMove Tool to place the composite image in theimage window, or apply the Erase Tool to deleteany areas of the composite image that might notfit with the background image. You can use theEraser, Magic Eraser, or Background Eraser toolsto clean up a composite image or remove colorfrom an area of the image.
Select the Eraser Tool (E) from the Toolbox. Clickand drag it over an image to remove pixels fromthe image, and create transparent areas in thecomposite image, or across all layers in theimage. A transparent color is actually an absenceof color. Transparency is represented by a gray-and-white checkerboard pattern in the imagewindow. If you see this pattern, no color willappear in the final printed or Web-publishedimage. To find out more about the Eraser Tool, goto Chapter 11, “Adding Text and Shapes toImages.”
CHAPTER 7 PHOTOSHOP ELEMENTS AND COLOR 155
A mask is a term usedto describe a selected area
of pixels in an image. A mask pro-tects the unselected areas of animage from being edited, whileenabling you to modify theselected area with commands andtools. You can create a simplemask by applying a selection toolto an image in the image window.When you apply the selection tool,the selected area is bordered witha flashing dashed line, or mar-quee. You can modify the pixelswithin the marquee. However, thepixels located outside the marqueecannot be edited.
Using selection tools to createmasks is explained in more detailin Chapter 8.
11 8311 CH07 1/15/03 2:20 PM Page 155

11 8311 CH07 1/15/03 2:20 PM Page 156

In this chapter
• Introducing Selection Tools
• Correcting Tonal Range
• Using the Histogram with Tonal Range Tools
• Changing Colors with Color Effect Tools
• Replacing Colors
• Introducing Color-Correction Tools
• Color-Correction Variations
8
Tonal Range and Color
CorrectionPhotoshop Elements provides several color correction tools that enable you to per-form an automatic color correction; experiment with quick fixes; or replace, adjust,brighten, darken, or remove color manually from an RGB image. Some tools, suchas the Levels, Quick Fix and Brightness/Contrast tools, enable you to remap thedark and light pixels in an image. Grayscale and color images are created using arange of black, gray, and white pixels. These tools use the terms shadows, mid-tones, and highlights to define the range of dark to light colors.
The sections in this chapter show you how to use selection tools to choose pixels byshape, size, or color. You will find out how to use the histogram, which shows youhow pixels are distributed in an image. The selection tools and histogram enableyou to perform precise tonal range and color correction changes. You also will learnhow to modify the tonal distribution of pixels using the Fill Flash, AdjustBacklighting, Levels, Brightness/Contrast, and other tools located in the Image andEnhance menus. These tools enable you to make darker areas lighter, or to add con-trast to lighter areas of an image.
Several color-correction tools are also available in the Enhance menu. TheHue/Saturation, Color Cast, Replace Color, and Remove Color Tools enable you tocustomize the entire contents of the image window or focus on a specific selec-tion of pixels. You can use a combination of tonal range and color-correction toolsto make a blue sky bluer, remove red-eye, or correct brownish or greenish hues inscanned images of old photos.
12 8311 CH08 1/15/03 2:18 PM Page 157
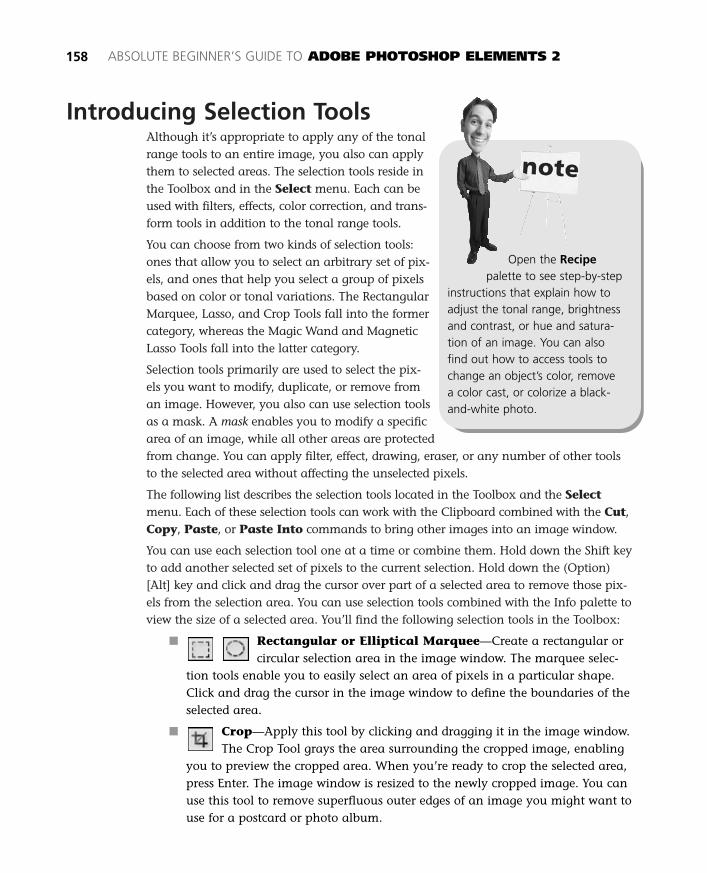
Introducing Selection ToolsAlthough it’s appropriate to apply any of the tonalrange tools to an entire image, you also can applythem to selected areas. The selection tools reside inthe Toolbox and in the Select menu. Each can beused with filters, effects, color correction, and trans-form tools in addition to the tonal range tools.
You can choose from two kinds of selection tools:ones that allow you to select an arbitrary set of pix-els, and ones that help you select a group of pixelsbased on color or tonal variations. The RectangularMarquee, Lasso, and Crop Tools fall into the formercategory, whereas the Magic Wand and MagneticLasso Tools fall into the latter category.
Selection tools primarily are used to select the pix-els you want to modify, duplicate, or remove froman image. However, you also can use selection toolsas a mask. A mask enables you to modify a specificarea of an image, while all other areas are protectedfrom change. You can apply filter, effect, drawing, eraser, or any number of other toolsto the selected area without affecting the unselected pixels.
The following list describes the selection tools located in the Toolbox and the Selectmenu. Each of these selection tools can work with the Clipboard combined with the Cut,Copy, Paste, or Paste Into commands to bring other images into an image window.
You can use each selection tool one at a time or combine them. Hold down the Shift keyto add another selected set of pixels to the current selection. Hold down the (Option)[Alt] key and click and drag the cursor over part of a selected area to remove those pix-els from the selection area. You can use selection tools combined with the Info palette toview the size of a selected area. You’ll find the following selection tools in the Toolbox:
■ Rectangular or Elliptical Marquee—Create a rectangular orcircular selection area in the image window. The marquee selec-
tion tools enable you to easily select an area of pixels in a particular shape.Click and drag the cursor in the image window to define the boundaries of theselected area.
■ Crop—Apply this tool by clicking and dragging it in the image window.The Crop Tool grays the area surrounding the cropped image, enabling
you to preview the cropped area. When you’re ready to crop the selected area,press Enter. The image window is resized to the newly cropped image. You canuse this tool to remove superfluous outer edges of an image you might want touse for a postcard or photo album.
158 ABSOLUTE BEGINNER’S GUIDE TO ADOBE PHOTOSHOP ELEMENTS 2
Open the Recipepalette to see step-by-step
instructions that explain how toadjust the tonal range, brightnessand contrast, or hue and satura-tion of an image. You can alsofind out how to access tools tochange an object’s color, removea color cast, or colorize a black-and-white photo.
12 8311 CH08 1/15/03 2:18 PM Page 158

■ Magic Wand—Select, add, or subtract a range of colors with this mag-ical selection tool. Click on a color in the image window to select all
immediate occurrences of that color. Hold down the Shift key and click toadd any other pixels to the selected area. Hold down the (Option) [Alt] keyand click on a color to remove it from the selection. This tool is great forselecting or deselecting a range of colors you want to correct or replace. Youcan easily add or remove colors in different locations from the selection area.
■ Selection Brush—Select pixels using a brush tool. View the selected areasin rubylith (unselected areas will appear with a red colored hue) or sur-
rounded by marching ants. Adjust the brush’s Size, Mode, and Hardness options.
■ Lasso, Polygonal Lasso, or Magnetic Lasso—TheLasso and Polygonal Lasso tools enable you customize the
shape of the selection area. Use this type of selection tool to choose odd-shaped areas, or to select pixels that you aren’t able to select with theMarquee or Magic Wand. Click and drag the Lasso Tool to define the selectionarea. The Polygonal Lasso Tool enables you to click to define each side of aselection. Click on the first point again to close the selection area.
The Magnetic Lasso Tool is the smartest selection tool of them all. It will try to auto-matically select pixels based on previous clicks and pixel color information. Click inthe image window to define the starting point of the pixels you want to select. Movethe cursor around the image you want to select, and the Magnetic Lasso createsselection points. Unlike with the other lasso tools, you don’t need to click to createeach point of the selection area. As you move the cursor around, new selection pointsmagically appear along the edge of the image based on previously created selectionpoints. If you don’t want a particular point, press the Backspace key once or severaltimes to remove each successive point. Click to add a new point to the selection.Double-click or click on the first selection point to close the selection area.
Selection commands in the Select menu include the following:
■ All—Select all pixels in the image window by choosing this command. Youcan use this command to select or deselect all pixels in a layer.
■ Deselect or Reselect—After you’ve applied one of the selection tools, youmight notice the marching ants or rubylith remain in the image window afteryou click outside the selected area. To remove the selection marquee from theimage window, choose the Deselect command from the Select menu. Alterna-tively, you can press (Command-D) [Ctrl+D] or else (Ctrl-click)[Right+click] in the image window and choose the Deselect command. Ifyou’ve deselected a selection, press (Command-Shift-D) [Ctrl+Shift+D] toreselect it, or (Command-click) [Ctrl+click] on the layer in the Layerspalette. You can also (Ctrl-click) [Right+click] in the image window andchoose the Reselect command from the shortcut menu.
CHAPTER 8 TONAL RANGE AND COLOR CORRECTION 159
12 8311 CH08 1/15/03 2:18 PM Page 159

■ Inverse—Use this command to deselect aselection of pixels in the image windowand instead select all the other pixels inthe image window.
■ Feather—Feathering helps reduce hardedges on images that are copied andpasted from one layer or image windowto another by blurring the pixels on theperimeter of the selection. The Feathercommand can improve the way compos-ite images blend together in an image.You can modify the Marquee and Lassotools to automatically feather the edges ofthe selected area by typing a value in theFeather text box, which is located in theselection tool’s options bar. To find out more about how to apply the Feathercommand, go to Chapter 13, “Experimenting with Composite Images.”
■ Modify—Four menu commands are stored in the Modify menu: Border,Smooth, Expand, and Contract. Each one adjusts the size and appearanceof the selected area of pixels. Use one of these commands if you already havecreated a selection area but need to expand or contract the selection. Thesecommands can be useful for creating photo-based animation.
■ Grow or Shrink—These commands enable you to select pixels that share asimilar color to those in the initial selection marquee. These commands worksimilarly to the Magic Wand Tool, selecting pixels by color value and notonly by physical proximity.
■ Save/Load/Delete Selection—These commands enable you to save aselected area of an image as a separate loadable or delete-able component.
Applying the Rectangular Marquee ToolThe Rectangular and Elliptical Marquee tools are shape selection tools. Applyingthese selection tools to the image window is nearly identical to applying any of theshape tools—except, of course, you’re using these tools to select pixels, not add themto the canvas. The marquee selection tools select an area of pixels in any rectangu-lar or elliptical shape you want.
To select the Rectangular or Elliptical Marquee Tool, click its button in the Toolbox orpress (M) [Shift+M] to toggle between the tools. The corresponding tool settings willappear in the options bar.
Hold down the mouse button and drag the cursor in the image window. A marquee(a broken white line, also called “marching ants,” that appears in the image window)
160 ABSOLUTE BEGINNER’S GUIDE TO ADOBE PHOTOSHOP ELEMENTS 2
tipHold down the
(Command) [Ctrl] key andclick on a layer containing animage object. This key com-bination automatically selects
the image object in a layer.This is a great shortcut to
use if you want to select an odd-shaped image that resides in itsown layer in the Layers palette.
12 8311 CH08 1/15/03 2:18 PM Page 160

marks the boundary of the selected pixels. Themarquee that appears when you select pixels inthe image window looks similar to the tool’s iconin the Toolbox. It also represents the selected pix-els in the active layer in the Layers palette. Thepixels will remain selected until you eitherchoose and apply the selection tool again orpress (Command-D) [Ctrl+D] to deselect the selection.
After you’ve selected a group of pixels, you candelete the selection, copy it to another imagewindow, apply an effect to the selection, or makeother changes that apply only to the selected pix-els. If you have a problem copying text from theimage window, be sure you have the correct layerselected in the Layers palette.
Applying the Magic Wand ToolThe icon for the Magic Wand shows a wandtopped with a highlighted pixel. You can use theMagic Wand Tool to select a particular range ofcolors in an image. You can click on a color inthe image window to select all pixels within itsimmediate proximity that share the selectedcolor. The Magic Wand Tool works great if youwant to select and change colors across differentlayers. You can use it to pick colors that need tobe corrected, deleted, or merged with another image.
Applying the Magnetic Lasso ToolMy favorite selection tool is the Magnetic Lasso Tool. The Rectangular Marquee Toolcomes in as a close second. The Magnetic Lasso Tool is a lasso selection tool withsmarts. It tries to determine which set of pixels you’re trying to select based on thepixels that are not being selected in the image window.
To select pixels with this tool, first you must click in the image window. The first clickcreates an anchor point in the image. A single-pixel line appears as you move thecursor away from the anchor point. If you hold the cursor over the edge of the pixelsyou want to select, the Magnetic Lasso Tool creates additional anchor points auto-matically, although you can create each one manually, if you like. You don’t need toclick to define the selection area. To close the selection area, click on the first anchorpoint or double-click in the image window.
CHAPTER 8 TONAL RANGE AND COLOR CORRECTION 161
tipYou can use the selection
tools and the Paste Intocommand to merge animage stored in theClipboard into a selected
image in the image win-dow. First, open two
images in the work area. Apply aselection tool to the first image.This selected area is where thesecond image will be pasted.Apply a selection tool to the sec-ond image. Choose the Copycommand from the Edit menu.The selected image will be movedto the Clipboard. In the firstimage, click on the layer with theactive selection (where you wantto add the image).
Choose the Paste Into commandlocated in the Edit menu. The sec-ond image is added to the layer inthe first image.
12 8311 CH08 1/15/03 2:18 PM Page 161
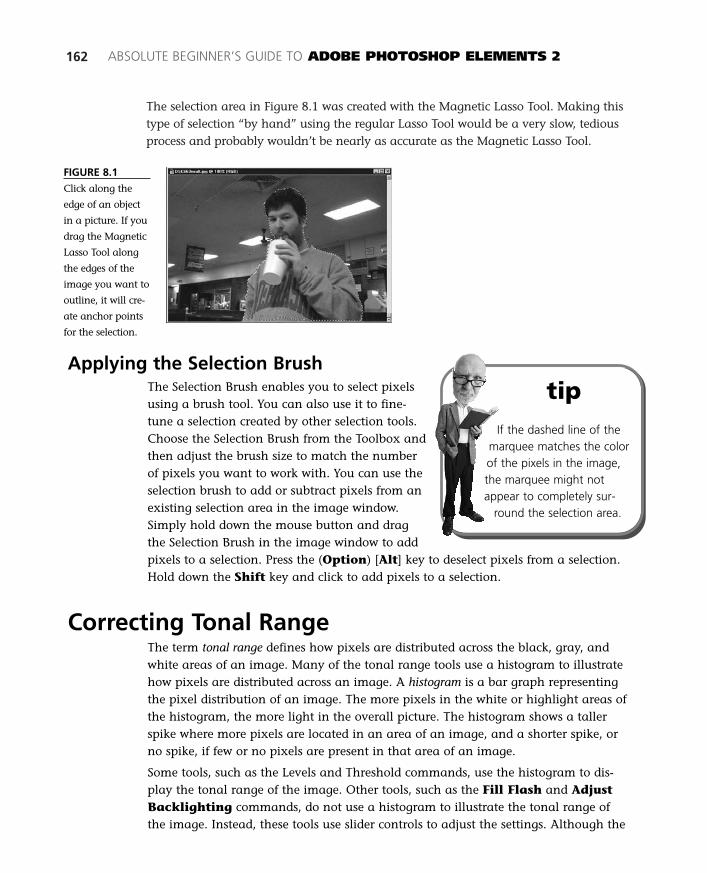
The selection area in Figure 8.1 was created with the Magnetic Lasso Tool. Making thistype of selection “by hand” using the regular Lasso Tool would be a very slow, tediousprocess and probably wouldn’t be nearly as accurate as the Magnetic Lasso Tool.
162 ABSOLUTE BEGINNER’S GUIDE TO ADOBE PHOTOSHOP ELEMENTS 2
FIGURE 8.1
Click along the
edge of an object
in a picture. If you
drag the Magnetic
Lasso Tool along
the edges of the
image you want to
outline, it will cre-
ate anchor points
for the selection.
Applying the Selection BrushThe Selection Brush enables you to select pixelsusing a brush tool. You can also use it to fine-tune a selection created by other selection tools.Choose the Selection Brush from the Toolbox andthen adjust the brush size to match the numberof pixels you want to work with. You can use theselection brush to add or subtract pixels from anexisting selection area in the image window.Simply hold down the mouse button and dragthe Selection Brush in the image window to addpixels to a selection. Press the (Option) [Alt] key to deselect pixels from a selection.Hold down the Shift key and click to add pixels to a selection.
Correcting Tonal RangeThe term tonal range defines how pixels are distributed across the black, gray, andwhite areas of an image. Many of the tonal range tools use a histogram to illustratehow pixels are distributed across an image. A histogram is a bar graph representingthe pixel distribution of an image. The more pixels in the white or highlight areas ofthe histogram, the more light in the overall picture. The histogram shows a tallerspike where more pixels are located in an area of an image, and a shorter spike, orno spike, if few or no pixels are present in that area of an image.
Some tools, such as the Levels and Threshold commands, use the histogram to dis-play the tonal range of the image. Other tools, such as the Fill Flash and AdjustBacklighting commands, do not use a histogram to illustrate the tonal range ofthe image. Instead, these tools use slider controls to adjust the settings. Although the
tipIf the dashed line of the
marquee matches the colorof the pixels in the image,the marquee might notappear to completely sur-
round the selection area.
12 8311 CH08 1/15/03 2:18 PM Page 162
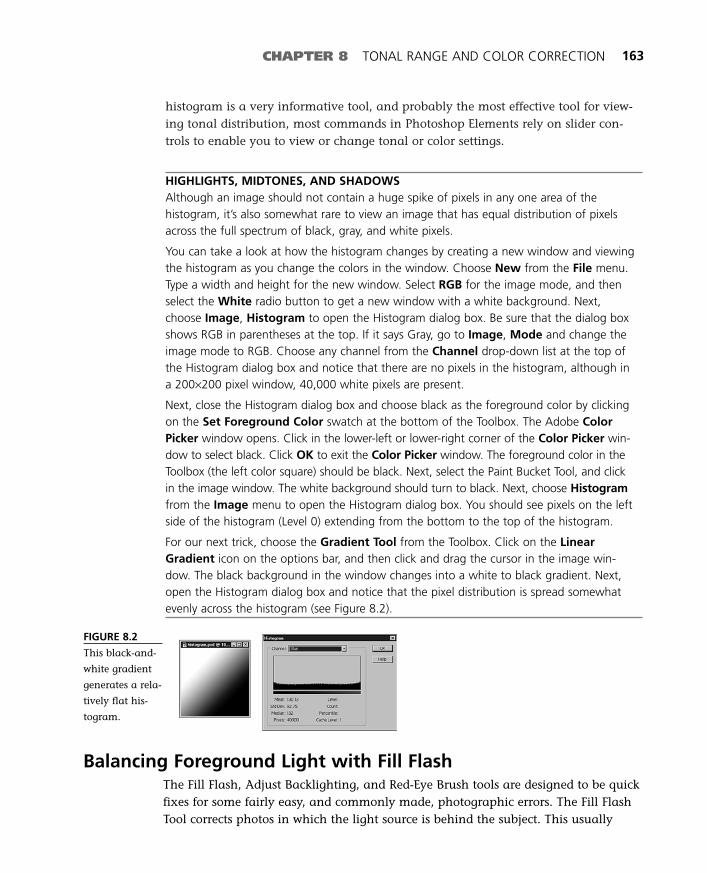
histogram is a very informative tool, and probably the most effective tool for view-ing tonal distribution, most commands in Photoshop Elements rely on slider con-trols to enable you to view or change tonal or color settings.
HIGHLIGHTS, MIDTONES, AND SHADOWSAlthough an image should not contain a huge spike of pixels in any one area of thehistogram, it’s also somewhat rare to view an image that has equal distribution of pixelsacross the full spectrum of black, gray, and white pixels.
You can take a look at how the histogram changes by creating a new window and viewingthe histogram as you change the colors in the window. Choose New from the File menu.Type a width and height for the new window. Select RGB for the image mode, and thenselect the White radio button to get a new window with a white background. Next,choose Image, Histogram to open the Histogram dialog box. Be sure that the dialog boxshows RGB in parentheses at the top. If it says Gray, go to Image, Mode and change theimage mode to RGB. Choose any channel from the Channel drop-down list at the top ofthe Histogram dialog box and notice that there are no pixels in the histogram, although ina 200×200 pixel window, 40,000 white pixels are present.
Next, close the Histogram dialog box and choose black as the foreground color by clickingon the Set Foreground Color swatch at the bottom of the Toolbox. The Adobe ColorPicker window opens. Click in the lower-left or lower-right corner of the Color Picker win-dow to select black. Click OK to exit the Color Picker window. The foreground color in theToolbox (the left color square) should be black. Next, select the Paint Bucket Tool, and clickin the image window. The white background should turn to black. Next, choose Histogramfrom the Image menu to open the Histogram dialog box. You should see pixels on the leftside of the histogram (Level 0) extending from the bottom to the top of the histogram.
For our next trick, choose the Gradient Tool from the Toolbox. Click on the LinearGradient icon on the options bar, and then click and drag the cursor in the image win-dow. The black background in the window changes into a white to black gradient. Next,open the Histogram dialog box and notice that the pixel distribution is spread somewhatevenly across the histogram (see Figure 8.2).
CHAPTER 8 TONAL RANGE AND COLOR CORRECTION 163
FIGURE 8.2
This black-and-
white gradient
generates a rela-
tively flat his-
togram.
Balancing Foreground Light with Fill FlashThe Fill Flash, Adjust Backlighting, and Red-Eye Brush tools are designed to be quickfixes for some fairly easy, and commonly made, photographic errors. The Fill FlashTool corrects photos in which the light source is behind the subject. This usually
12 8311 CH08 1/15/03 2:18 PM Page 163

creates a dark foreground. The Fill Flash Tool lightensshadows in an image.
To apply the Fill Flash Tool, do the following:
1. Open an image file.
2. Choose Fill Flash from the Enhance,Adjust Lighting menu. The Fill Flashdialog box will open.
3. Click and drag the Lighter arrow slider tothe right if you want to lighten the shad-ows in the image. The Fill Flash value canbe adjusted to a value between 0 and 100.
4. Click and drag the Saturation slider controlto the left or right to decrease or increasethe saturation of colors in the image. Youcan choose a saturation setting between–100 and 100. Check the Preview checkbox if you want to see your changesapplied to the image window before clos-ing the Fill Flash dialog box.
5. Click OK to save your changes. View thechanges in the image window.
The Lighter value will be set to zero the next timeyou open the Fill Flash dialog box.
Figure 8.3 shows the original picture in which the foreground images are covered inshadows. Figure 8.4 shows the same image after the Fill Flash Tool has been applied to it.Notice that the foreground images, such as the chairs on the left, are more recognizable.The brighter images in the center and background area of the picture are also lighter.
164 ABSOLUTE BEGINNER’S GUIDE TO ADOBE PHOTOSHOP ELEMENTS 2
Brightness is a sepa-rate attribute that can
affect how we perceive color. Theintensity of light on a color affectshow brilliant or dull a colorappears. Before modifying animage, note the differences in theway your monitor displays lightand compare it to the originalphotograph, or to a referenceimage. Also, keep in mind thatsome monitors display all threecolors equally well, whereas othermonitors aren’t as efficient at dis-playing colors equally well.
FIGURE 8.3
The foreground
images are
much darker
than the back-
ground images
in this picture.
The camera
focused on the
background
light as the
white point for
this picture.
12 8311 CH08 1/15/03 2:18 PM Page 164

FIGURE 8.4
Lightening the
foreground
image with the
Fill Flash Tool
also lightens
parts of the
image’s back-
ground.
CHAPTER 8 TONAL RANGE AND COLOR CORRECTION 165
Bringing Out the Background with BacklightingAnother common flaw a camera can make when taking photographs is makingthe background area of the image too bright. You can darken the tonal range ofan image by applying the Adjust Backlighting Tool. As with other tonal rangetools, you can apply the Adjust Backlighting Tool to the entire image or to aselected area.
MONITOR SETTINGS, COLORS, AND TONAL RANGEAlthough most monitors can display only 24 bits of color, most scanners can capturemore data, in some cases up to or more than 48 bits of color. Even though you cannotsee these additional colors on your computer screen, when you modify the tonal rangeor adjust color hues or brightness or contrast settings, the additional color informationcan bring out additional colors or details in the image. Keep in mind that you’ll get thebest results working with an image originally created with the highest resolution andsharpest, fullest color. Tonal range and color corrections are less effective with low-reso-lution images.
Choose Adjust Backlighting from the Enhance, Adjust Lighting menu to openthe Adjust Backlighting dialog box. Figure 8.5 shows the image before the AdjustBacklighting Tool has been applied to it. In this image the sky is a little too bright.Figure 8.6 previews the same image with the Adjust Backlighting setting applied toit. Adjust the slider control and choose a value between 0 and 100. Then click OK tosave your changes. View the modified image in the image window.
12 8311 CH08 1/15/03 2:18 PM Page 165
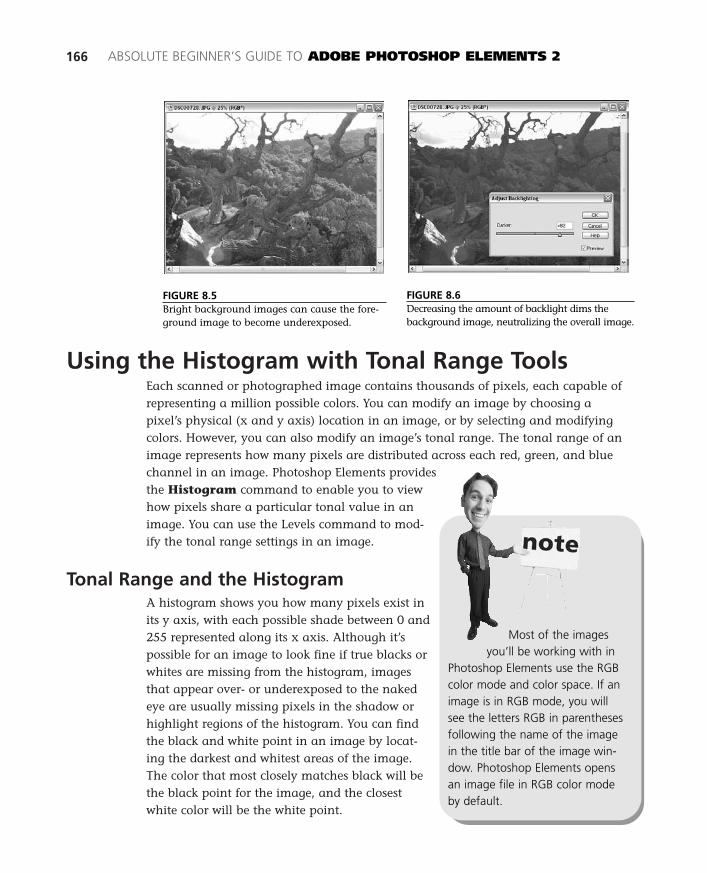
Using the Histogram with Tonal Range ToolsEach scanned or photographed image contains thousands of pixels, each capable ofrepresenting a million possible colors. You can modify an image by choosing apixel’s physical (x and y axis) location in an image, or by selecting and modifyingcolors. However, you can also modify an image’s tonal range. The tonal range of animage represents how many pixels are distributed across each red, green, and bluechannel in an image. Photoshop Elements providesthe Histogram command to enable you to viewhow pixels share a particular tonal value in animage. You can use the Levels command to mod-ify the tonal range settings in an image.
Tonal Range and the HistogramA histogram shows you how many pixels exist inits y axis, with each possible shade between 0 and255 represented along its x axis. Although it’spossible for an image to look fine if true blacks orwhites are missing from the histogram, imagesthat appear over- or underexposed to the nakedeye are usually missing pixels in the shadow orhighlight regions of the histogram. You can findthe black and white point in an image by locat-ing the darkest and whitest areas of the image.The color that most closely matches black will bethe black point for the image, and the closestwhite color will be the white point.
166 ABSOLUTE BEGINNER’S GUIDE TO ADOBE PHOTOSHOP ELEMENTS 2
FIGURE 8.5Bright background images can cause the fore-ground image to become underexposed.
FIGURE 8.6Decreasing the amount of backlight dims thebackground image, neutralizing the overall image.
Most of the imagesyou’ll be working with in
Photoshop Elements use the RGBcolor mode and color space. If animage is in RGB mode, you willsee the letters RGB in parenthesesfollowing the name of the imagein the title bar of the image win-dow. Photoshop Elements opensan image file in RGB color modeby default.
12 8311 CH08 1/15/03 2:18 PM Page 166
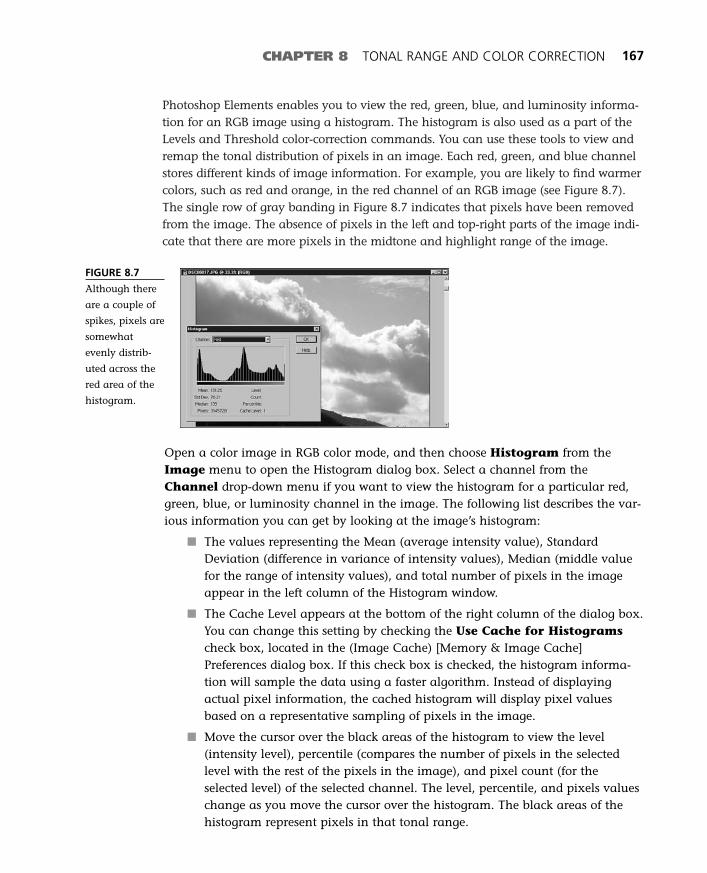
Photoshop Elements enables you to view the red, green, blue, and luminosity informa-tion for an RGB image using a histogram. The histogram is also used as a part of theLevels and Threshold color-correction commands. You can use these tools to view andremap the tonal distribution of pixels in an image. Each red, green, and blue channelstores different kinds of image information. For example, you are likely to find warmercolors, such as red and orange, in the red channel of an RGB image (see Figure 8.7).The single row of gray banding in Figure 8.7 indicates that pixels have been removedfrom the image. The absence of pixels in the left and top-right parts of the image indi-cate that there are more pixels in the midtone and highlight range of the image.
CHAPTER 8 TONAL RANGE AND COLOR CORRECTION 167
FIGURE 8.7
Although there
are a couple of
spikes, pixels are
somewhat
evenly distrib-
uted across the
red area of the
histogram.
Open a color image in RGB color mode, and then choose Histogram from theImage menu to open the Histogram dialog box. Select a channel from theChannel drop-down menu if you want to view the histogram for a particular red,green, blue, or luminosity channel in the image. The following list describes the var-ious information you can get by looking at the image’s histogram:
■ The values representing the Mean (average intensity value), StandardDeviation (difference in variance of intensity values), Median (middle valuefor the range of intensity values), and total number of pixels in the imageappear in the left column of the Histogram window.
■ The Cache Level appears at the bottom of the right column of the dialog box.You can change this setting by checking the Use Cache for Histogramscheck box, located in the (Image Cache) [Memory & Image Cache]Preferences dialog box. If this check box is checked, the histogram informa-tion will sample the data using a faster algorithm. Instead of displayingactual pixel information, the cached histogram will display pixel valuesbased on a representative sampling of pixels in the image.
■ Move the cursor over the black areas of the histogram to view the level(intensity level), percentile (compares the number of pixels in the selectedlevel with the rest of the pixels in the image), and pixel count (for theselected level) of the selected channel. The level, percentile, and pixels valueschange as you move the cursor over the histogram. The black areas of thehistogram represent pixels in that tonal range.
12 8311 CH08 1/15/03 2:18 PM Page 167

Pixels that characterize the sharpness of an image,as well as pixels that contain contrast, tend to bestored in the green channel (see Figure 8.8). In ahistogram, more pixels in a particular tonalrange appear as a higher bar in the histogramwindow. Areas with more pixels represent thedarker areas of the histogram. Areas of the his-togram containing no pixels signify that no dataexists for that tonal range in the image. Click anddrag the cursor in the histogram if you want toview Count and Percentile data.
The blue channel tends to store blurrier, garbageaspects of an image (see Figure 8.9). Because theblurrier, distorted artifacts in an image tend toreside in the blue channel of an image, you mightbe able to more easily identify an area of animage that needs more work by viewing the contentsof the blue channel in the image window. You maywant to identify where most of the pixels are distrib-uted in the image when you view the pixel distri-bution of the blue channel in the histogram.Cleaning up or removing blurry elements in animage may improve the overall picture.
Although the RGB channels combine to make a24-bit image, a digital image actually consists of32 bits of data. The remaining 8 bits of informa-tion define luminosity, or the tonal distribution oflight in an image (see Figure 8.10). You can viewthe luminosity levels of an image in theHistogram dialog box. Zero represents black, and255 represents white. The luminosity histogramrepresents the tonal range distribution of the pix-els in an image as if it were in grayscale mode.When you modify colors or tonal ranges in anRGB image, the luminosity of the image alsochanges. You can use the luminosity histogram tosee how many pixels are distributed in the shad-ows and highlights of an image and determinewhether any true black or white image dataexists. Luminosity is visible only in a color image.
168 ABSOLUTE BEGINNER’S GUIDE TO ADOBE PHOTOSHOP ELEMENTS 2
If you’re working witha grayscale image, the his-
togram window will display thetonal range for the gray channel:254 shades of gray, plus whiteand black. The gray channel is theonly channel in a grayscale image.
If you see regularintervals of missing pixels
in the histogram window, this usu-ally indicates that the image hasbeen modified. Each time a tool,such as the Brightness/ContrastTool, modifies an image, pixels areremoved linearly from the image.For example, apply the AutoLevels or Auto Contrast com-mands to an image. Then openthe histogram window. The band-ing that appears in the red, green,and blue histograms confirms thatpixels have been removed fromthe image.
12 8311 CH08 1/15/03 2:18 PM Page 168
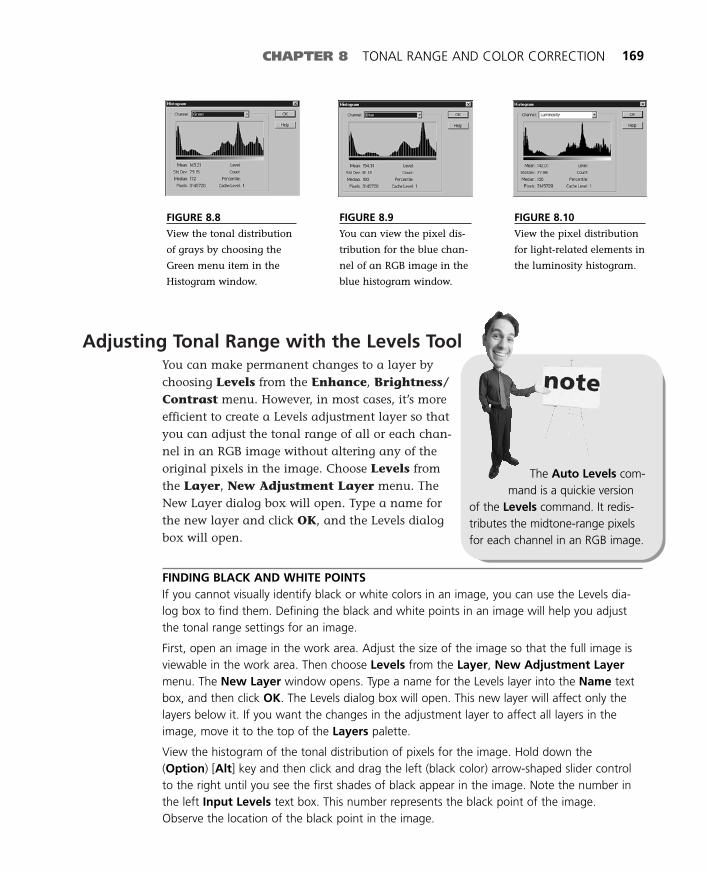
Adjusting Tonal Range with the Levels ToolYou can make permanent changes to a layer bychoosing Levels from the Enhance, Brightness/Contrast menu. However, in most cases, it’s moreefficient to create a Levels adjustment layer so thatyou can adjust the tonal range of all or each chan-nel in an RGB image without altering any of theoriginal pixels in the image. Choose Levels fromthe Layer, New Adjustment Layer menu. TheNew Layer dialog box will open. Type a name forthe new layer and click OK, and the Levels dialogbox will open.
FINDING BLACK AND WHITE POINTSIf you cannot visually identify black or white colors in an image, you can use the Levels dia-log box to find them. Defining the black and white points in an image will help you adjustthe tonal range settings for an image.
First, open an image in the work area. Adjust the size of the image so that the full image isviewable in the work area. Then choose Levels from the Layer, New Adjustment Layermenu. The New Layer window opens. Type a name for the Levels layer into the Name textbox, and then click OK. The Levels dialog box will open. This new layer will affect only thelayers below it. If you want the changes in the adjustment layer to affect all layers in theimage, move it to the top of the Layers palette.
View the histogram of the tonal distribution of pixels for the image. Hold down the(Option) [Alt] key and then click and drag the left (black color) arrow-shaped slider controlto the right until you see the first shades of black appear in the image. Note the number inthe left Input Levels text box. This number represents the black point of the image.Observe the location of the black point in the image.
CHAPTER 8 TONAL RANGE AND COLOR CORRECTION 169
FIGURE 8.8
View the tonal distribution
of grays by choosing the
Green menu item in the
Histogram window.
FIGURE 8.9
You can view the pixel dis-
tribution for the blue chan-
nel of an RGB image in the
blue histogram window.
FIGURE 8.10
View the pixel distribution
for light-related elements in
the luminosity histogram.
The Auto Levels com-mand is a quickie version
of the Levels command. It redis-tributes the midtone-range pixelsfor each channel in an RGB image.
12 8311 CH08 1/15/03 2:18 PM Page 169
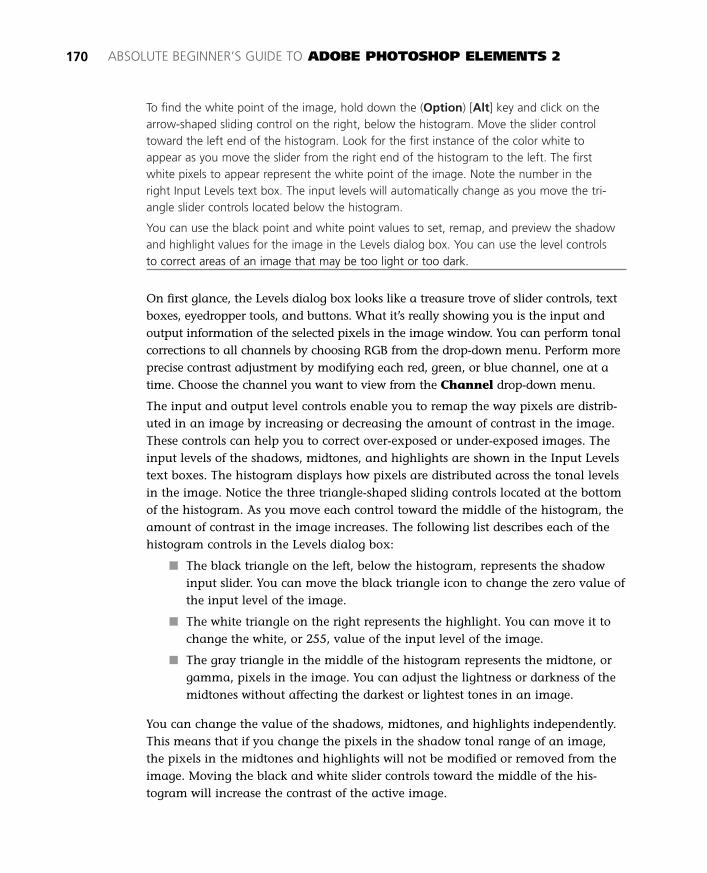
To find the white point of the image, hold down the (Option) [Alt] key and click on thearrow-shaped sliding control on the right, below the histogram. Move the slider controltoward the left end of the histogram. Look for the first instance of the color white toappear as you move the slider from the right end of the histogram to the left. The firstwhite pixels to appear represent the white point of the image. Note the number in theright Input Levels text box. The input levels will automatically change as you move the tri-angle slider controls located below the histogram.
You can use the black point and white point values to set, remap, and preview the shadowand highlight values for the image in the Levels dialog box. You can use the level controlsto correct areas of an image that may be too light or too dark.
On first glance, the Levels dialog box looks like a treasure trove of slider controls, textboxes, eyedropper tools, and buttons. What it’s really showing you is the input andoutput information of the selected pixels in the image window. You can perform tonalcorrections to all channels by choosing RGB from the drop-down menu. Perform moreprecise contrast adjustment by modifying each red, green, or blue channel, one at atime. Choose the channel you want to view from the Channel drop-down menu.
The input and output level controls enable you to remap the way pixels are distrib-uted in an image by increasing or decreasing the amount of contrast in the image.These controls can help you to correct over-exposed or under-exposed images. Theinput levels of the shadows, midtones, and highlights are shown in the Input Levelstext boxes. The histogram displays how pixels are distributed across the tonal levelsin the image. Notice the three triangle-shaped sliding controls located at the bottomof the histogram. As you move each control toward the middle of the histogram, theamount of contrast in the image increases. The following list describes each of thehistogram controls in the Levels dialog box:
■ The black triangle on the left, below the histogram, represents the shadowinput slider. You can move the black triangle icon to change the zero value ofthe input level of the image.
■ The white triangle on the right represents the highlight. You can move it tochange the white, or 255, value of the input level of the image.
■ The gray triangle in the middle of the histogram represents the midtone, orgamma, pixels in the image. You can adjust the lightness or darkness of themidtones without affecting the darkest or lightest tones in an image.
You can change the value of the shadows, midtones, and highlights independently.This means that if you change the pixels in the shadow tonal range of an image,the pixels in the midtones and highlights will not be modified or removed from theimage. Moving the black and white slider controls toward the middle of the his-togram will increase the contrast of the active image.
170 ABSOLUTE BEGINNER’S GUIDE TO ADOBE PHOTOSHOP ELEMENTS 2
12 8311 CH08 1/15/03 2:18 PM Page 170
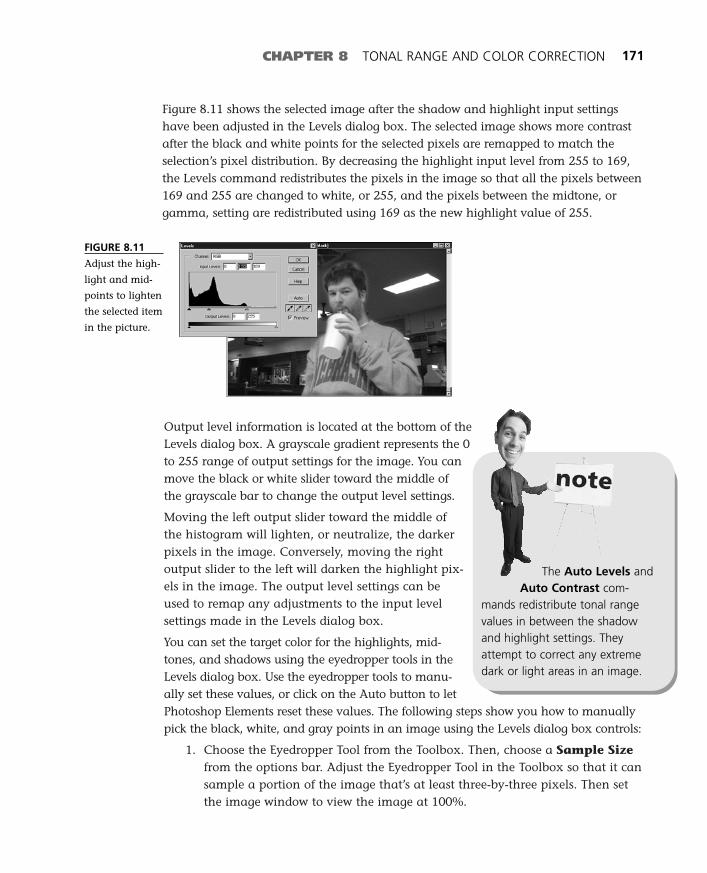
Output level information is located at the bottom of theLevels dialog box. A grayscale gradient represents the 0to 255 range of output settings for the image. You canmove the black or white slider toward the middle ofthe grayscale bar to change the output level settings.
Moving the left output slider toward the middle ofthe histogram will lighten, or neutralize, the darkerpixels in the image. Conversely, moving the rightoutput slider to the left will darken the highlight pix-els in the image. The output level settings can beused to remap any adjustments to the input levelsettings made in the Levels dialog box.
You can set the target color for the highlights, mid-tones, and shadows using the eyedropper tools in theLevels dialog box. Use the eyedropper tools to manu-ally set these values, or click on the Auto button to letPhotoshop Elements reset these values. The following steps show you how to manuallypick the black, white, and gray points in an image using the Levels dialog box controls:
1. Choose the Eyedropper Tool from the Toolbox. Then, choose a Sample Sizefrom the options bar. Adjust the Eyedropper Tool in the Toolbox so that it cansample a portion of the image that’s at least three-by-three pixels. Then setthe image window to view the image at 100%.
Figure 8.11 shows the selected image after the shadow and highlight input settingshave been adjusted in the Levels dialog box. The selected image shows more contrastafter the black and white points for the selected pixels are remapped to match theselection’s pixel distribution. By decreasing the highlight input level from 255 to 169,the Levels command redistributes the pixels in the image so that all the pixels between169 and 255 are changed to white, or 255, and the pixels between the midtone, orgamma, setting are redistributed using 169 as the new highlight value of 255.
CHAPTER 8 TONAL RANGE AND COLOR CORRECTION 171
FIGURE 8.11
Adjust the high-
light and mid-
points to lighten
the selected item
in the picture.
The Auto Levels andAuto Contrast com-
mands redistribute tonal rangevalues in between the shadowand highlight settings. Theyattempt to correct any extremedark or light areas in an image.
12 8311 CH08 1/15/03 2:18 PM Page 171

2. Open the Info palette in the work area. Then open the Levels dialog box.Move the Eyedropper Tool around the image and try to identify x and y coordi-nates in the image that are good examples of highlights, midtones, and shad-ows in the image window. Note the RGB color values for the image areas youwant to use to sample highlight, midtones, and shadow values for the image.
3. Double-click on the Set White Point eyedropper button in the Levels dialogbox. The Color Picker window will open. Input the color values you want touse for the highlight color. For an RGB image, a good highlight color mightconsist of the RGB values of 244, 244, and 244.
4. Double-click on the Set Gray Point eyedropper button in the Levels dialogbox. The Color Picker window will open. Type in the value for the midpointcolor you want to use. Enter equal values for red, green, and blue to set themidtone values for an RGB image.
5. Follow the steps for setting the white and gray points, this time using the SetBlack Point eyedropper button. Some sample RGB values for shadowsmight be 10, 10, and 10.
Changing Colors with Color Effect ToolsIf you explore the Image menu, you’ll find several commands in the Image,Adjustments menu. The Equalize, Gradient Map, Invert, Posterize, andThreshold commands each have a unique way of changing the brightness andcolor values in an image. These commands are most commonly used to createimage effects, but occasionally they can help correct color in an image. Each of theexamples in this section uses the image shown in Figure 8.12.
172 ABSOLUTE BEGINNER’S GUIDE TO ADOBE PHOTOSHOP ELEMENTS 2
FIGURE 8.12
This purple orchid
may have too
much detail for
some print media.
Experiment with
some of the tonal
range tools to sim-
plify the image.
Equalizing an ImageAdjust the brightness of an image using the Equalize command. This commanduses the lightest and darkest levels in an image to define the white and black pointsof the image. All the in-between values are evenly distributed so that the brightnessvalues of the overall image are, well, equalized. Figure 8.13 shows the results ofapplying the Equalize command to the image window.
12 8311 CH08 1/15/03 2:18 PM Page 172
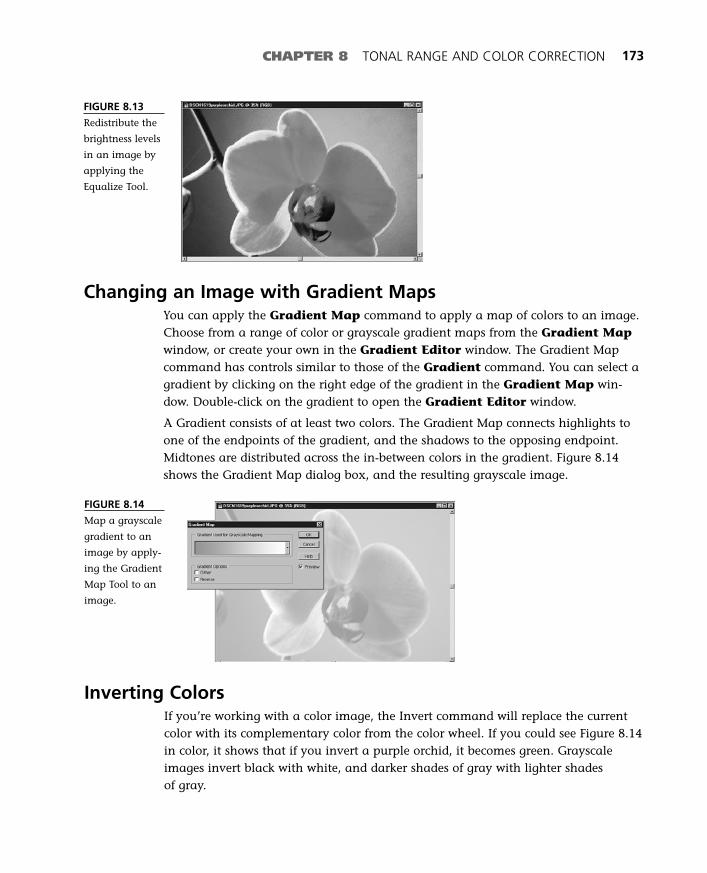
CHAPTER 8 TONAL RANGE AND COLOR CORRECTION 173
FIGURE 8.13
Redistribute the
brightness levels
in an image by
applying the
Equalize Tool.
Changing an Image with Gradient MapsYou can apply the Gradient Map command to apply a map of colors to an image.Choose from a range of color or grayscale gradient maps from the Gradient Mapwindow, or create your own in the Gradient Editor window. The Gradient Mapcommand has controls similar to those of the Gradient command. You can select agradient by clicking on the right edge of the gradient in the Gradient Map win-dow. Double-click on the gradient to open the Gradient Editor window.
A Gradient consists of at least two colors. The Gradient Map connects highlights toone of the endpoints of the gradient, and the shadows to the opposing endpoint.Midtones are distributed across the in-between colors in the gradient. Figure 8.14shows the Gradient Map dialog box, and the resulting grayscale image.
FIGURE 8.14
Map a grayscale
gradient to an
image by apply-
ing the Gradient
Map Tool to an
image.
Inverting ColorsIf you’re working with a color image, the Invert command will replace the currentcolor with its complementary color from the color wheel. If you could see Figure 8.14in color, it shows that if you invert a purple orchid, it becomes green. Grayscaleimages invert black with white, and darker shades of gray with lighter shadesof gray.
12 8311 CH08 1/15/03 2:18 PM Page 173

174 ABSOLUTE BEGINNER’S GUIDE TO ADOBE PHOTOSHOP ELEMENTS 2
Posterizing ColorsThe Posterize command enables you to reduce the number of colors in an image.The command remaps the image data in each channel of an RGB image to thenumber of levels of brightness input into the Posterize window. For example, if youdefine four levels for the image, 12 total colors—four each for red, green, and blue—will be used to create the posterized image. The resulting image probably will lackthe clarity of the original. However, the hue and saturation settings are preserved.
Choose the Posterize command from the Image, Adjustments menu. The Posterizedialog box, shown in Figure 8.15, will open. Type a number into the Levels text box.This number represents the number of brightness levels, also called the tonal levels, ofthe resulting image. The number you type into the Levels text box is applied to eachchannel in the image to determine the total number of colors used in the final image.
FIGURE 8.15
Set the number of
brightness levels
with the Posterize
Tool. This com-
mand remaps col-
ors to the closest
matching level, or
reduces the num-
ber of gray levels in
a grayscale image.
The Posterize command can help simplify an image for low-resolution printing.For example, if you have to print an image with a limited number of colors, you canexperiment with different values in the Posterize dialog box until you find the rightcombination of colors that best matches the resolution of the printer.
Adjusting ThresholdThe Threshold command remaps colors to black and white in an image. Colorsthat are lighter than the threshold setting change to white, and those that aredarker change to black. That’s probably why this command is great for finding theblack-and-white points in an image. The histogram in the Threshold dialog box dis-plays the pixel distribution of 255 grayscale shades in the overall image. The arrowcontrol located at the bottom of the Threshold dialog box, shown in Figure 8.16,determines which pixels are changed to black or white. The numeric value for theThreshold appears in the text box at the top of the window.
12 8311 CH08 1/15/03 2:18 PM Page 174
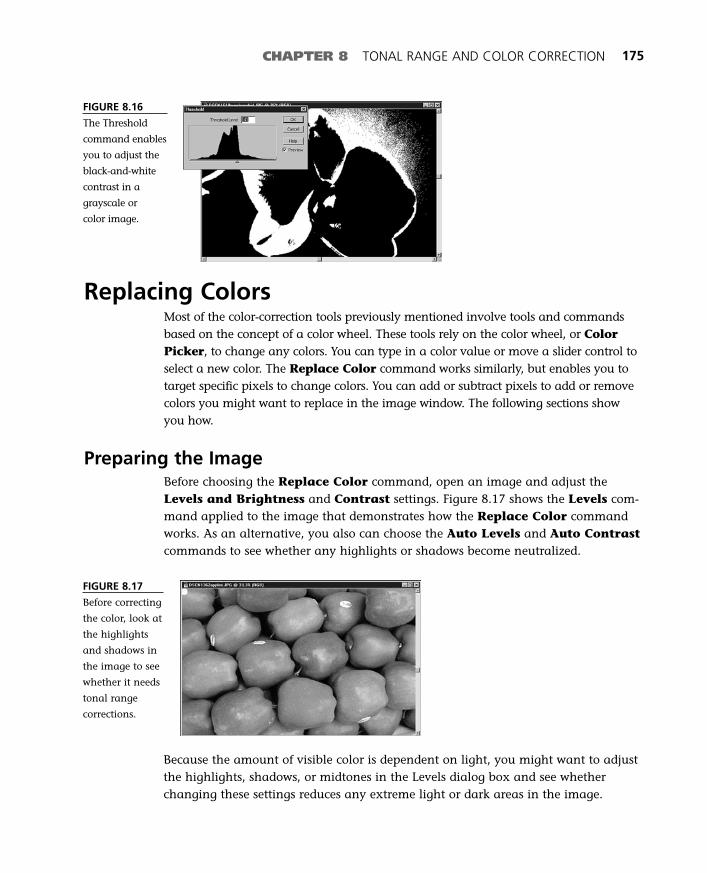
CHAPTER 8 TONAL RANGE AND COLOR CORRECTION 175
FIGURE 8.16
The Threshold
command enables
you to adjust the
black-and-white
contrast in a
grayscale or
color image.
Replacing ColorsMost of the color-correction tools previously mentioned involve tools and commandsbased on the concept of a color wheel. These tools rely on the color wheel, or ColorPicker, to change any colors. You can type in a color value or move a slider control toselect a new color. The Replace Color command works similarly, but enables you totarget specific pixels to change colors. You can add or subtract pixels to add or removecolors you might want to replace in the image window. The following sections showyou how.
Preparing the ImageBefore choosing the Replace Color command, open an image and adjust theLevels and Brightness and Contrast settings. Figure 8.17 shows the Levels com-mand applied to the image that demonstrates how the Replace Color commandworks. As an alternative, you also can choose the Auto Levels and Auto Contrastcommands to see whether any highlights or shadows become neutralized.
FIGURE 8.17
Before correcting
the color, look at
the highlights
and shadows in
the image to see
whether it needs
tonal range
corrections.
Because the amount of visible color is dependent on light, you might want to adjustthe highlights, shadows, or midtones in the Levels dialog box and see whetherchanging these settings reduces any extreme light or dark areas in the image.
12 8311 CH08 1/15/03 2:18 PM Page 175
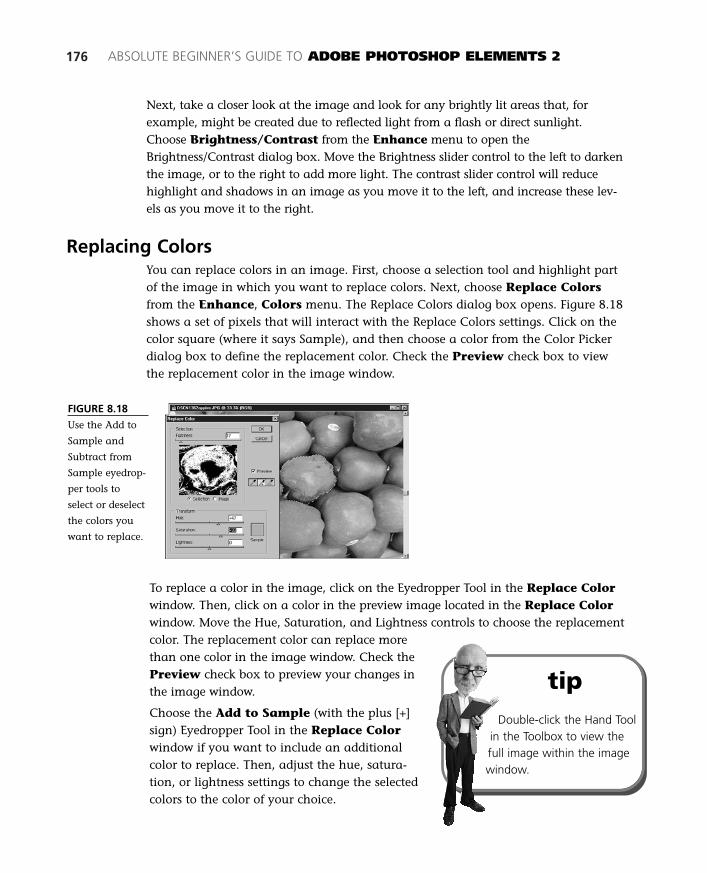
176 ABSOLUTE BEGINNER’S GUIDE TO ADOBE PHOTOSHOP ELEMENTS 2
Next, take a closer look at the image and look for any brightly lit areas that, forexample, might be created due to reflected light from a flash or direct sunlight.Choose Brightness/Contrast from the Enhance menu to open theBrightness/Contrast dialog box. Move the Brightness slider control to the left to darkenthe image, or to the right to add more light. The contrast slider control will reducehighlight and shadows in an image as you move it to the left, and increase these lev-els as you move it to the right.
Replacing ColorsYou can replace colors in an image. First, choose a selection tool and highlight partof the image in which you want to replace colors. Next, choose Replace Colorsfrom the Enhance, Colors menu. The Replace Colors dialog box opens. Figure 8.18shows a set of pixels that will interact with the Replace Colors settings. Click on thecolor square (where it says Sample), and then choose a color from the Color Pickerdialog box to define the replacement color. Check the Preview check box to viewthe replacement color in the image window.
FIGURE 8.18
Use the Add to
Sample and
Subtract from
Sample eyedrop-
per tools to
select or deselect
the colors you
want to replace.
To replace a color in the image, click on the Eyedropper Tool in the Replace Colorwindow. Then, click on a color in the preview image located in the Replace Colorwindow. Move the Hue, Saturation, and Lightness controls to choose the replacementcolor. The replacement color can replace morethan one color in the image window. Check thePreview check box to preview your changes inthe image window.
Choose the Add to Sample (with the plus [+]sign) Eyedropper Tool in the Replace Colorwindow if you want to include an additionalcolor to replace. Then, adjust the hue, satura-tion, or lightness settings to change the selectedcolors to the color of your choice.
tipDouble-click the Hand Tool
in the Toolbox to view thefull image within the imagewindow.
12 8311 CH08 1/15/03 2:18 PM Page 176

CHAPTER 8 TONAL RANGE AND COLOR CORRECTION 177
If you select a color you don’t want to include, choose the Subtract from SampleEyedropper (the eyedropper tool with the [-] sign), and then click on the color youwant to remove from the image window. Figure 8.18 shows how the colors in the image window are replaced after using the eyedropper tools to define which col-ors should be replaced. After you have replaced the colors in the image, chooseDeselect from the Select menu, and then save the image to your hard drive.
REPLACE COLOR OPTIONSAfter previewing the replacement color, you can click and drag the slider controls tochange the hue, saturation, and lightness to choose the replacement color. Click and dragthe Fuzziness slider to experiment with how the replacement color integrates with theother colors in the image window. The Fuzziness slider affects the range of colors that willbe included in the color mask in the image. The higher the fuzziness value, the smootherthe edges of the mask will become when the color change is applied to the image.
You can use the Eyedropper Tool or the Add to Sample (eyedropper-plus) Tool to select thecolors you want to include in the color mask. Or choose the Remove from Sample (eye-dropper-minus) Tool to deselect colors you do not want to include in the color mask. Tofind out more about masks, go to the first section of this chapter, “Introducing SelectionTools.”
Correcting Color CastThe Color Cast command is another color correction command located in theEnhance, Color menu. If you’ve scanned a photo that has an all-over color tint,you can use the Color Cast command to correct it. The Color Cast commanduses an eyedropper tool to enable you to choose the gray, white, and black colorsin an image. The Color Cast Correction dialog box appears as shown in Figure8.19. The tough part is trying to determine which colors to use to define white,gray, and black.
FIGURE 8.19
Click on a gray,
white, and black
area of an
image to adjust
the color cast.
12 8311 CH08 1/15/03 2:18 PM Page 177
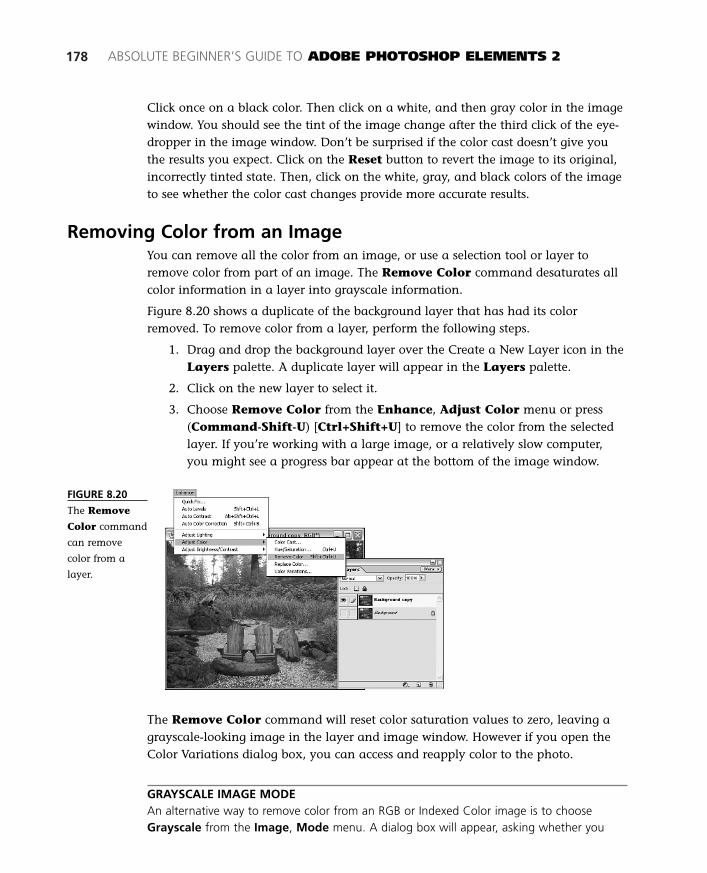
178 ABSOLUTE BEGINNER’S GUIDE TO ADOBE PHOTOSHOP ELEMENTS 2
Click once on a black color. Then click on a white, and then gray color in the imagewindow. You should see the tint of the image change after the third click of the eye-dropper in the image window. Don’t be surprised if the color cast doesn’t give youthe results you expect. Click on the Reset button to revert the image to its original,incorrectly tinted state. Then, click on the white, gray, and black colors of the imageto see whether the color cast changes provide more accurate results.
Removing Color from an ImageYou can remove all the color from an image, or use a selection tool or layer toremove color from part of an image. The Remove Color command desaturates allcolor information in a layer into grayscale information.
Figure 8.20 shows a duplicate of the background layer that has had its colorremoved. To remove color from a layer, perform the following steps.
1. Drag and drop the background layer over the Create a New Layer icon in theLayers palette. A duplicate layer will appear in the Layers palette.
2. Click on the new layer to select it.
3. Choose Remove Color from the Enhance, Adjust Color menu or press(Command-Shift-U) [Ctrl+Shift+U] to remove the color from the selectedlayer. If you’re working with a large image, or a relatively slow computer,you might see a progress bar appear at the bottom of the image window.
FIGURE 8.20
The Remove
Color command
can remove
color from a
layer.
The Remove Color command will reset color saturation values to zero, leaving agrayscale-looking image in the layer and image window. However if you open theColor Variations dialog box, you can access and reapply color to the photo.
GRAYSCALE IMAGE MODEAn alternative way to remove color from an RGB or Indexed Color image is to chooseGrayscale from the Image, Mode menu. A dialog box will appear, asking whether you
12 8311 CH08 1/15/03 2:18 PM Page 178
CHAPTER 8 TONAL RANGE AND COLOR CORRECTION 179
want to discard color information. Click OK to removethe color, or choose Cancel if you do not want toremove it.
Changing the color mode from color to grayscale willremove all color information from the image. Don’tworry; as long as you don’t close the image window,you can press (Command-Z) [Ctrl+Z] to undo the colorremoval. If you close the image window and save theimage file, you cannot restore any color information.
Introducing Color-Correction ToolsThe color correction tools located in the Toolbox aregreat for applying color correction to a specific,detailed set of pixels in an image. Use the Zoom Tool tomagnify an area of the image you want to work on with the Red-Eye Brush, Dodge, orBurn tools. The Quick Fix, Color Variations, and Hue/Saturation commandsenable you to access color correction tools that are great for wider scale changes.
The Red-Eye Brush Tool is probably the most obvious color-correction tool in theToolbox. Of course, the Eyedropper, Paint Bucket, and Eraser tools can also technicallybe grouped with color-correction tools. However, these tools are explained in more detailin the preceding chapter. Most of the color-correction tools are found on the shortcutsbar and the Enhance, Adjust Color menu. The Color Cast, Hue/Saturation,Replace Color, and Remove Color commands enable you to correct your colors.The Quick Fix and Color Variations commands are perhaps the most versatilecolor-correction tools. You can use the Quick Fix Tool to correct brightness/contrast, fixcolor, or apply focus and blur. The Color Variations dialog box enables you to adjustred, green, and blue hues for a photo’s highlights, midtones, and shadows, and satu-ration. The following list summarizes what each of these color-correction tools can do:
■ Red-Eye Brush—Use this tool to remove red-eye from photos. Select atarget and replacement color for this tool from the options bar. The tar-
get color will be the red-eye in the image, and the replacement color will bethe natural eye color for the photo subject. Choose a brush size and apply itto the red-eye pixels in the image window to apply the correct color to theimage. You can also use this tool to replace one color with another.
■ Dodge—The icon for this tool looks like a lollipop. Use the settings inthe options bar to work with highlight, midtone, or shadow tones of an
image. Applying this tool to pixels will lighten their tone.
■ Burn—Located with the Dodge Tool in the Toolbox, this tool willdarken the highlight, midtone, or shadow tones of the pixels in an
image. The hand icon for this tool appears to be pinching something.
tipAnother way to change a
color image to black andwhite is to add a gradientmap. Click on the CreateNew Fill or Adjustment
Layer icon in the Layerspalette and choose
Gradient Map. The default set-ting will add a black-and-whitegradient map to the image.
12 8311 CH08 1/15/03 2:18 PM Page 179
180 ABSOLUTE BEGINNER’S GUIDE TO ADOBE PHOTOSHOP ELEMENTS 2
■ Quick Fix—Preview and apply color, brightness/contrast, focus, andblur corrections from the Quick Fix dialog box.
■ Color Variations—Open the Variations dialog box to preview colorcorrection options for the active image window. Click on a thumbnail
image to change the highlights, midtones, shadows, and saturation of colorin an image. Compare the original with the current, modified image anddecide whether you want to keep the changes made to the image.
■ Hue/Saturation—Adjust the color, gray level mixture with color, and light-ness values by moving the slider controls in the Hue/Saturation dialog box.
■ Replace Color—Select one or more colors to replace in an image windowby choosing this command. Use the Eyedropper Tool to define the initialcolor to be replaced, and then modify your settings with the plus and minuseyedropper tools. Change the Hue, Saturation, and Lightness settings for theimage to define the replacement color for the active image area.
■ Remove Color—Desaturates (minimizes color saturation levels) a colorphoto, although it appears to perform the same feat as choosing Grayscalefrom the Image, Mode menu. All color information remains in a layerdespite the abundance of grays.
■ Color Cast—Change the black, white, and gray points of an image by click-ing in gray, white, and black areas in an image. This tool enables you toremap the way colors are mapped to an image based on the colors you wantto use to define black, white, or gray.
Adjusting Hue and Saturation SettingsThe Hue, Saturation, and Brightness (HSB) or Hue, Lightness, and Saturation (HLS)color model uses three settings to define color. Hue represents one of 360 possiblecolors on a color wheel. The lightness, or brightness, level can be a value between0%, or black, and 100%, which is white, or full illumination. The saturation levelalso ranges from 0% to 100%, with 0% representing the full gray, or midtones, of acolor, and 100% representing the full nongray-containing color value.
You can customize the hue, saturation, and lightness of an image to intensify the colorof an image (see Figure 8.21). Choose the Hue/Saturation command from theEnhance, Colors menu. The Hue/Saturation dialog box, shown in Figure 8.22, con-tains a slider control for hue, saturation, and lightness settings for all channels com-bined in an RGB image, or each individual channel in an image.
The Hue settings, shown in Figure 8.22, can change a green color into blue or turnorange to red. The Hue slider control represents the full spectrum of colors on thecolor wheel. You can change the color values in the image window by moving the slider control to the left or right. Click and drag the slider control and preview
12 8311 CH08 1/15/03 2:18 PM Page 180

CHAPTER 8 TONAL RANGE AND COLOR CORRECTION 181
the colors in the image window. Wait until the colors in the image change tomatch another photo, or until the colors look accurate to your eyes.
FIGURE 8.21
This image contains reds, greens, and blues with
both strong highlights and strong shadows.
FIGURE 8.22
Use the master settings in the Hue/Saturation
window to adjust the colors in the image window.
The Saturation and Lightness controls work similarly to the Hue control. Drag theslider control to change the setting. As you move the Saturation control to the left,the image should become grayer. As you move it to the right, the colors in theimage should stand out, as any shades of gray dissipate. If you want to correct animage by bringing out the blue color in a sky, or a red color in a dress, select theitem you want to work with in the image window. Then move the Saturation sliderto the right to see whether the corrected colormeets your needs.
The Lightness control adjusts the shadows andhighlights in the image. Zero is the center-pointvalue for this setting. Moving the slider controlto the left darkens the image, whereas moving itto the right brightens it.
Customizing Channel Hue andSaturation
You can also adjust the color ranges for red,green, blue, cyan, yellow, and magenta. Noticethe two color bars located at the bottom of theHue/Saturation window. Choose one of the col-ors from the Edit drop-down menu to view thecolor range. Figure 8.23 shows a modified redcolor range.
tipAn alternative to choosing
Hue/Saturation from theEnhance/Color menu is tocreate an adjustment layer.Choose Hue/Saturation
from the Layer, NewAdjustment Layer
menu to add a modifiableHue/Saturation layer to the image.You can hide or show theHue/Saturation settings by clickingon the eye icon for this adjust-ment layer in the Layers palette.
12 8311 CH08 1/15/03 2:18 PM Page 181

182 ABSOLUTE BEGINNER’S GUIDE TO ADOBE PHOTOSHOP ELEMENTS 2
FIGURE 8.23
Customize the
range and falloff
settings for a
color in the
Hue/Saturation
window.
The range of the adjustment slider representstwo settings for the selected color, as shown inFigure 8.18. The middle area of the slider repre-sents the range of the color. The areas to the leftand right of the middle represent the falloffrange for that color. Although it’s not likelyyou’ll use this method to correct a color, youmight want to experiment with these settings tosee how color changes when the hue or satura-tion color ranges are changed.
Correcting Colors with the Red-Eye Brush Tool
Most digital cameras automatically activate aflash if the light levels are too low. If you’re takinga picture of a person or pet, the brightness of theflash may bounce off the back of the person’s eyebefore their eyes can adjust to the bright light. Thiscauses the familiar red-eye you often see in photos.
Most digital cameras have a flash that reduces red-eye. These flashes actually flashtwice or several times before capturing a photo. The flashes are brief, allowing theeye’s iris to contract with each subsequent, brighter flash.
You can apply the Red-Eye Brush Tool to scanned photos or digital pictures to takecare of any red-eye problems. The Red-Eye Brush Tool enables you to select the colorsyou want to replace, and then apply the brush to the red areas of the eye. Figure8.24 shows how red-eye can add a spooky look to a photographed subject’s eyes.
tipHold down the
(Command) [Ctrl] key, andthen click and drag the cur-sor to the left or right in thecolor bar area of the color
bars in the Hue/Saturationwindow. The cursor will
change from an arrow to a handicon when you click on eithercolor bar in the Hue/Saturationwindow. The colors will scroll offthe right and reappear on the leftend of the color bar. You can usethis shortcut to change the colorthat appears in the middle of thecolor bar.
12 8311 CH08 1/15/03 2:18 PM Page 182

CHAPTER 8 TONAL RANGE AND COLOR CORRECTION 183
FIGURE 8.24
Red-eye occurs
when the flash
bounces off the
retinas before the
eyes can adjust to
the brightness of
the flash.
You can use the Red-Eye Brush Tool to removered-eye, or to change one color in a photo toanother. For example, you can change someone’seye color from brown to blue. The following stepsshow you how to correct red-eye by applying theRed-Eye Brush Tool:
1. Open an image in the work area, andthen select the Red-Eye Brush Tool fromthe Toolbox.
2. Click in the options bar, shown in Figure8.25, to select a brush size. I recommendusing a soft-edge brush, not a hard-edge one.
tipChoose Image, Duplicate
Image to create a copy ofan image window. This cancome in handy if you want tozoom into one image win-
dow to fine-tune a photoand view the same image
zoomed out to fit onscreen in theduplicate image window.
FIGURE 8.25
Choose a replace-
ment color and
apply the Red-
Eye Brush Tool to
change the red
color.
3. Select First Click from the Sampling drop-down menu (it’s selected by default).Choose the color you want to remove by clicking in the red color of the eye inthe image window. The target color appears on the right end of the options bar.
4. Choose a replacement color by clicking in the eye. You also can choose a dif-ferent brush size from the options bar. Click on the Brush drop-down menuto view a list of brush options. You can load a new set of brushes by clickingon the right-arrow button located on the right side of the Brush optiondrop-down window. The number below each brush size indicates the numberof pixels in that brush tip.
In the default set of brushes, the first row of brush sizes includes hard-edgebrushes. These brushes will create a solid-color pixel edge when applied to theimage window. The brush sizes in the second row are soft-edge brushes. The
12 8311 CH08 1/15/03 2:19 PM Page 183

184 ABSOLUTE BEGINNER’S GUIDE TO ADOBE PHOTOSHOP ELEMENTS 2
pixels on the edges of the soft-edge brushes will blend in with the colors of thesurrounding pixels. Soft-edge brushes produce great results with the Red-EyeBrush and Clone Stamp tools. Choose a brush size that’s about half to two-thirds the size of the eye. Select a smaller brush if you want to make fine-tuned changes. Use a larger brush if you want to make fewer brush strokes.
The tolerance setting, located in the options bar, enables you to define therange of the target color that’s applied to the replacement color. A higher valuereplaces a wider range of colors. A lower value affects a limited range of colors.
The Sampling drop-down menu, located in the options bar, consists of twooptions: First Click and Current Color. The default setting is First Click.Simply click on the red-eye color in the image window to pick the target color.Choose Current Color if you want to select a custom target color. Click onthe Current color square in the options bar to select a new target color.
5. Click once on the red color in the eye, and then drag the cursor over the redcolor in the eye area of the image window to replace any colors that matchthe red target color with the replacement color.
If you don’t like the results, choose the Undo command from the Edit menu, or clickon a previous action in the History palette to revert the document to a state beforethe Red-Eye Tool was applied to the image.
Color-Correction VariationsThe color variations tools enable you to preview,point, and click to perform a color correction.You can adjust how much of a color change youwant to apply to a photo and view thumbnailsof each red, green, and blue change. Simply clickon a thumbnail to change the color. A differentset of options is available for grayscale images.However, both options enable you to previewand make changes without altering the originalphoto. The following sections show you how tocorrect color using the tools in the ColorVariations dialog box.
Grayscale Variations OptionsAlthough you’ll probably want to work with a color photo, you can work with asmaller group of settings in the Color Variations dialog box with a grayscale photo.You can either open a photo that’s been saved in Grayscale mode, or choose
tipYou can change a layer
from color to grayscale byselecting a layer and choosingthe Remove Color commandfrom the Enhance, Adjust
Color menu. Hide the colorlayers, and select the
grayscale layer. Choose ColorVariations from the shortcuts barto apply color variation settings tothe grayscale layer. You can addcolor to the grayscale layer becausethe image remains in RGB mode!
12 8311 CH08 1/15/03 2:19 PM Page 184
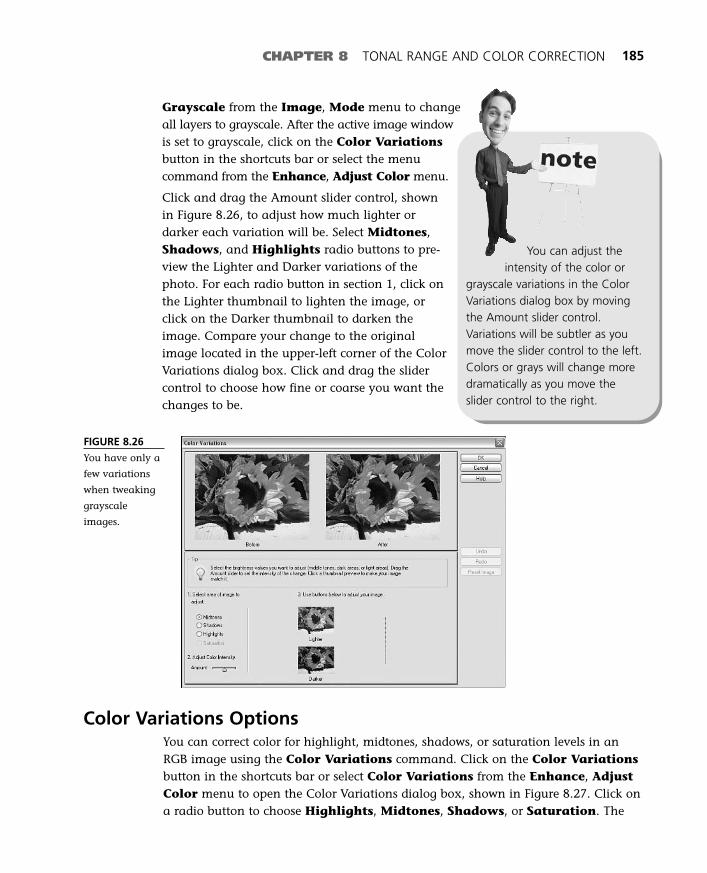
CHAPTER 8 TONAL RANGE AND COLOR CORRECTION 185
Grayscale from the Image, Mode menu to changeall layers to grayscale. After the active image windowis set to grayscale, click on the Color Variationsbutton in the shortcuts bar or select the menucommand from the Enhance, Adjust Color menu.
Click and drag the Amount slider control, shownin Figure 8.26, to adjust how much lighter ordarker each variation will be. Select Midtones,Shadows, and Highlights radio buttons to pre-view the Lighter and Darker variations of thephoto. For each radio button in section 1, click onthe Lighter thumbnail to lighten the image, orclick on the Darker thumbnail to darken theimage. Compare your change to the originalimage located in the upper-left corner of the ColorVariations dialog box. Click and drag the slidercontrol to choose how fine or coarse you want thechanges to be.
You can adjust theintensity of the color or
grayscale variations in the ColorVariations dialog box by movingthe Amount slider control.Variations will be subtler as youmove the slider control to the left.Colors or grays will change moredramatically as you move theslider control to the right.
FIGURE 8.26
You have only a
few variations
when tweaking
grayscale
images.
Color Variations OptionsYou can correct color for highlight, midtones, shadows, or saturation levels in anRGB image using the Color Variations command. Click on the Color Variationsbutton in the shortcuts bar or select Color Variations from the Enhance, AdjustColor menu to open the Color Variations dialog box, shown in Figure 8.27. Click ona radio button to choose Highlights, Midtones, Shadows, or Saturation. The
12 8311 CH08 1/15/03 2:19 PM Page 185

186 ABSOLUTE BEGINNER’S GUIDE TO ADOBE PHOTOSHOP ELEMENTS 2
FIGURE 8.27
You can adjust
tonal range and
color settings by
clicking in a
thumbnail set-
ting in the Color
Variations dialog
box.
On the right side of the Color Variations dialog box are several buttons. At the top,click OK to save your changes, Cancel to exit without saving, or Help to viewAdobe’s HTML help pages. After you apply one or several color changes, click Undoto remove the previous change. Click Redo to reapply it. Choose Reset Image toremove all changes.
Warming Up an Image with MidtonesHighlights, midtones, and shadows thumbnails enable you to preview the image ifred, green, or blue hues were applied to it, as shown in Figure 8.28. Click on athumbnail image to change the color of the original image. Compare the change inthe After thumbnail, located at the top-right of the window, to the Before thumbnail.Click and drag the Amount slider control to increase or decrease the amount of colorapplied to each of the thumbnail images.
On the bottom of the Color Variations dialog box, you can click on the Lighter thumb-nail if you want to increase the brightness of the image. Alternatively, you can click onthe Darker thumbnail image if you want to decrease the brightness of the image.
In Figure 8.29, I clicked on the Increase Red and then the Increase Blue thumb-nails to add warmer colors to the image. You can click on any combination ofthumbnails until you get the desired After image you want to keep. Click OK to saveyour changes.
Midtones radio button is selected by default. Next, click on one of the thumbnailimages to increase or decrease the amount of red, green, or blue in the photo. Clickon the Lighten or Darken thumbnail to increase or decrease the brightness level.Compare the changes by viewing the Before and After thumbnails.
12 8311 CH08 1/15/03 2:19 PM Page 186
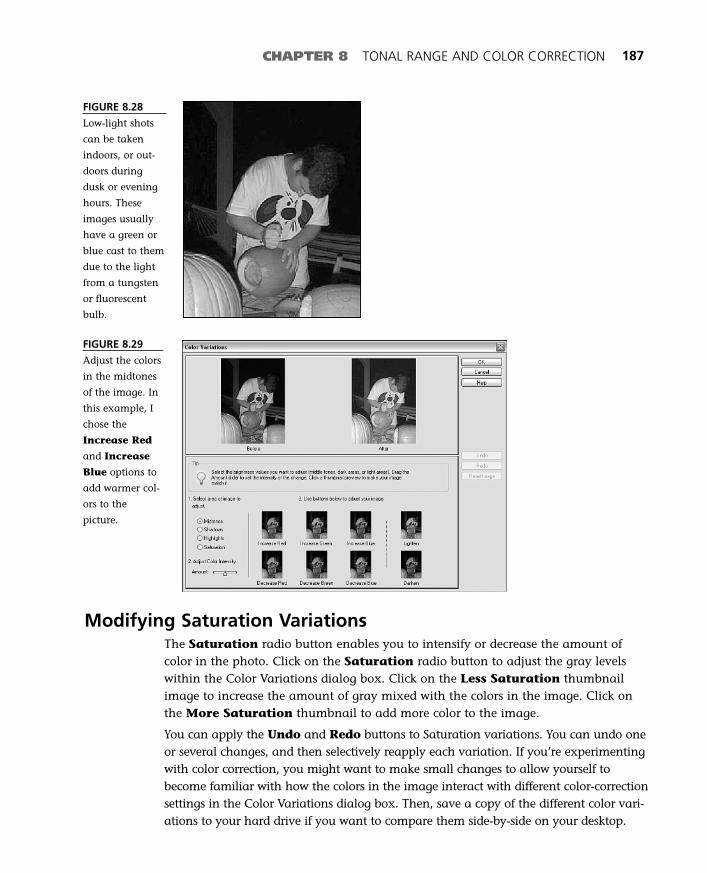
CHAPTER 8 TONAL RANGE AND COLOR CORRECTION 187
FIGURE 8.28
Low-light shots
can be taken
indoors, or out-
doors during
dusk or evening
hours. These
images usually
have a green or
blue cast to them
due to the light
from a tungsten
or fluorescent
bulb.
FIGURE 8.29
Adjust the colors
in the midtones
of the image. In
this example, I
chose the
Increase Red
and Increase
Blue options to
add warmer col-
ors to the
picture.
Modifying Saturation VariationsThe Saturation radio button enables you to intensify or decrease the amount ofcolor in the photo. Click on the Saturation radio button to adjust the gray levelswithin the Color Variations dialog box. Click on the Less Saturation thumbnailimage to increase the amount of gray mixed with the colors in the image. Click onthe More Saturation thumbnail to add more color to the image.
You can apply the Undo and Redo buttons to Saturation variations. You can undo oneor several changes, and then selectively reapply each variation. If you’re experimentingwith color correction, you might want to make small changes to allow yourself tobecome familiar with how the colors in the image interact with different color-correctionsettings in the Color Variations dialog box. Then, save a copy of the different color vari-ations to your hard drive if you want to compare them side-by-side on your desktop.
12 8311 CH08 1/15/03 2:19 PM Page 187

12 8311 CH08 1/15/03 2:19 PM Page 188
In this chapter
• Previewing Filters and Effects
• Introducing Blur Filters
• Introducing Filter Effects with Toolbox Tools
• Variations with Blur Filters
• Applying Artistic Filters
• Exploring Effects
9
Applying Filters and
Effects
Applying a filter or an effect to an RGB or Grayscale image is as easy as
dragging and dropping the filter or effect into an image window. Filters
and effects enable you to correct, deconstruct, or apply an artistic pat-
tern to an image. You can view or choose filters from the Filter menu.
Better yet, you can preview each filter and effect from the Filters or
Effects palettes.
13 8311 CH09 1/15/03 2:26 PM Page 189

Previewing Filters and EffectsThe Filters and Effects palettes enable you to view available filters or effects in Listor Thumbnail view (see Figure 9.1). The Thumbnail View and List View buttonsare located at the bottom of each palette. Each thumbnail image represents how theimage might look if you apply that filter or effect to it. In List view, you can previewa filter in the palette if you click its name. The thumbnail image can be viewed forthe original and the selected filter or effect in List view.
190 ABSOLUTE BEGINNER’S GUIDE TO ADOBE PHOTOSHOP ELEMENTS 2
FIGURE 9.1
Click one of the
view icons in the
Filters or
Effects palettes
to view filters or
effects in List or
Thumbnail view.
Thumbnail view enables you to see how each filter would be applied to a sampleimage. The name of each filter or effect appears below each thumbnail, and an orig-inal thumbnail appears in the top corner of the palette. Filters can be organized inthe palette windows as they appear in the Filter menu, or you can view all of themat once in the palette window. You can view or choose a group of filters or effectsfrom the drop-down menu list, located at the top of the palette window. Choose Allto view all groups in the palette window.
Introducing FiltersFilters enable you to apply special effects to images. For a filter to work, there mustbe a visible image in the image window, or the equivalent of an active layer in theLayers palette. The image must also be in RGB or Grayscale mode before you canapply a filter. You can preview or apply a filter from the Filter menu or Filterspalette (see Figure 9.2). Some filters analyze the pixel color or tonal range of animage to manipulate the appearance of the image, whereas other filters apply anarbitrary change based on the proximity of each pixel in the image.
A dialog box might open when you choose a filter command from the Filter menuor Filters palette, enabling you to customize settings for that filter. The Filter dialogbox contains a thumbnail-size preview window, enabling you to view the filter’seffect on the image before you actually apply the selected settings. You must view oradjust these settings and choose OK before the filter can be applied to the image.After a filter has been applied to an image, that filter command becomes selectablefrom the top of the Filter menu, or by a press of (Command-F) [Ctrl+F].
13 8311 CH09 1/15/03 2:26 PM Page 190
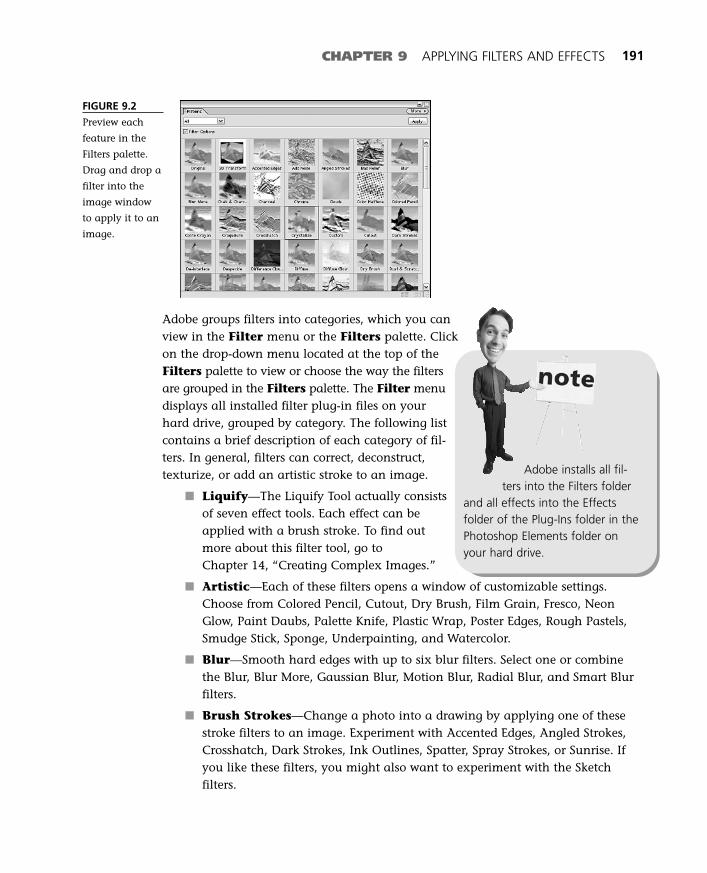
CHAPTER 9 APPLYING FILTERS AND EFFECTS 191
FIGURE 9.2
Preview each
feature in the
Filters palette.
Drag and drop a
filter into the
image window
to apply it to an
image.
Adobe groups filters into categories, which you canview in the Filter menu or the Filters palette. Clickon the drop-down menu located at the top of theFilters palette to view or choose the way the filtersare grouped in the Filters palette. The Filter menudisplays all installed filter plug-in files on yourhard drive, grouped by category. The following listcontains a brief description of each category of fil-ters. In general, filters can correct, deconstruct,texturize, or add an artistic stroke to an image.
■ Liquify—The Liquify Tool actually consistsof seven effect tools. Each effect can beapplied with a brush stroke. To find outmore about this filter tool, go to Chapter 14, “Creating Complex Images.”
■ Artistic—Each of these filters opens a window of customizable settings.Choose from Colored Pencil, Cutout, Dry Brush, Film Grain, Fresco, NeonGlow, Paint Daubs, Palette Knife, Plastic Wrap, Poster Edges, Rough Pastels,Smudge Stick, Sponge, Underpainting, and Watercolor.
■ Blur—Smooth hard edges with up to six blur filters. Select one or combinethe Blur, Blur More, Gaussian Blur, Motion Blur, Radial Blur, and Smart Blurfilters.
■ Brush Strokes—Change a photo into a drawing by applying one of thesestroke filters to an image. Experiment with Accented Edges, Angled Strokes,Crosshatch, Dark Strokes, Ink Outlines, Spatter, Spray Strokes, or Sunrise. Ifyou like these filters, you might also want to experiment with the Sketchfilters.
Adobe installs all fil-ters into the Filters folder
and all effects into the Effectsfolder of the Plug-Ins folder in thePhotoshop Elements folder onyour hard drive.
13 8311 CH09 1/15/03 2:26 PM Page 191
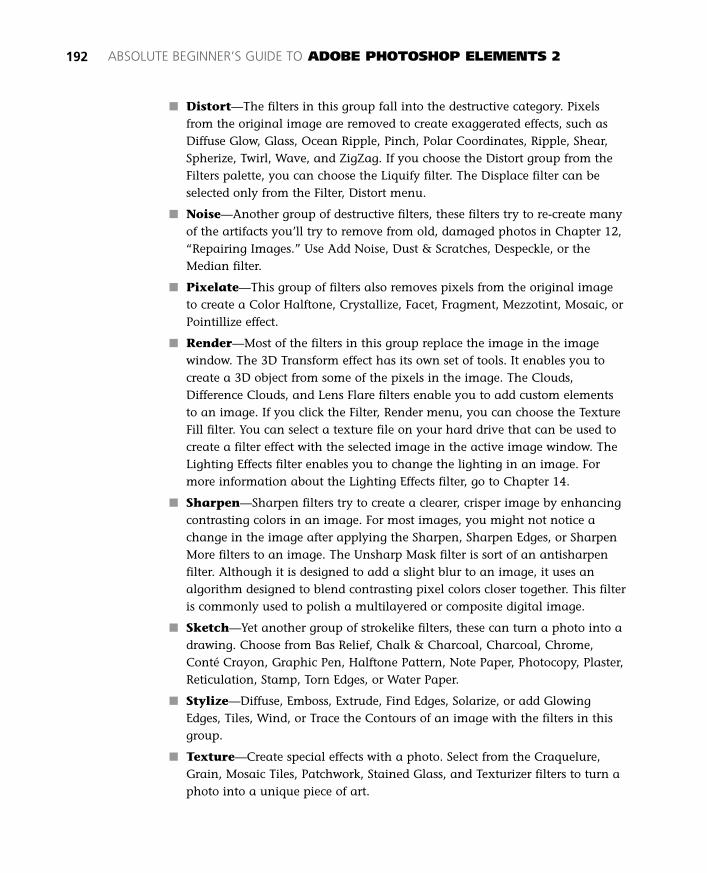
■ Distort—The filters in this group fall into the destructive category. Pixelsfrom the original image are removed to create exaggerated effects, such asDiffuse Glow, Glass, Ocean Ripple, Pinch, Polar Coordinates, Ripple, Shear,Spherize, Twirl, Wave, and ZigZag. If you choose the Distort group from theFilters palette, you can choose the Liquify filter. The Displace filter can beselected only from the Filter, Distort menu.
■ Noise—Another group of destructive filters, these filters try to re-create manyof the artifacts you’ll try to remove from old, damaged photos in Chapter 12,“Repairing Images.” Use Add Noise, Dust & Scratches, Despeckle, or theMedian filter.
■ Pixelate—This group of filters also removes pixels from the original imageto create a Color Halftone, Crystallize, Facet, Fragment, Mezzotint, Mosaic, orPointillize effect.
■ Render—Most of the filters in this group replace the image in the imagewindow. The 3D Transform effect has its own set of tools. It enables you tocreate a 3D object from some of the pixels in the image. The Clouds,Difference Clouds, and Lens Flare filters enable you to add custom elementsto an image. If you click the Filter, Render menu, you can choose the TextureFill filter. You can select a texture file on your hard drive that can be used tocreate a filter effect with the selected image in the active image window. TheLighting Effects filter enables you to change the lighting in an image. Formore information about the Lighting Effects filter, go to Chapter 14.
■ Sharpen—Sharpen filters try to create a clearer, crisper image by enhancingcontrasting colors in an image. For most images, you might not notice achange in the image after applying the Sharpen, Sharpen Edges, or SharpenMore filters to an image. The Unsharp Mask filter is sort of an antisharpenfilter. Although it is designed to add a slight blur to an image, it uses analgorithm designed to blend contrasting pixel colors closer together. This filteris commonly used to polish a multilayered or composite digital image.
■ Sketch—Yet another group of strokelike filters, these can turn a photo into adrawing. Choose from Bas Relief, Chalk & Charcoal, Charcoal, Chrome,Conté Crayon, Graphic Pen, Halftone Pattern, Note Paper, Photocopy, Plaster,Reticulation, Stamp, Torn Edges, or Water Paper.
■ Stylize—Diffuse, Emboss, Extrude, Find Edges, Solarize, or add GlowingEdges, Tiles, Wind, or Trace the Contours of an image with the filters in thisgroup.
■ Texture—Create special effects with a photo. Select from the Craquelure,Grain, Mosaic Tiles, Patchwork, Stained Glass, and Texturizer filters to turn aphoto into a unique piece of art.
192 ABSOLUTE BEGINNER’S GUIDE TO ADOBE PHOTOSHOP ELEMENTS 2
13 8311 CH09 1/15/03 2:26 PM Page 192

■ Video—The De-Interlace and NTSCColors filters can convert the colors in animage for use with a television. Televisionbroadcasts each successive image usingodd and even horizontal lines of the tele-vision screen. The De-Interlace filter canreplace missing lines of an image cap-tured from video. The NTSC filter adjuststhe colors in an image to match a set ofcolors that are acceptable for televisionbroadcast. This set of colors is designed toprevent oversaturated colors from bleed-ing into television scan lines.
■ Other—Although the Dither Box, HighPass, Maximum, Minimum, and Offset fil-ters are located in this menu, any third-party filters will also share this menu space.
■ Digimarc—Choose the Read Watermark filter to check an image for thepresence of a watermark. Watermarks are sometimes used to copyright animage. This filter is available only in the Filter menu.
You can adjust the size of the Filters palette by clicking and dragging the lower-right corner of the palette window. If the palette is in thumbnail view, the number ofviewable thumbnail images will increase or decrease to match the size of the palettewindow. The scroll controls along the right side of the window enable you to view orselect any filter in the palette.
APPLYING MULTIPLE FILTERSYou can apply a filter more than once to an image. However, each filter alters the originalpixels in an image. It is difficult to predict the resulting image after several filters have beenapplied to an image. The preview window can help you visualize how the current filter willchange the image.
When you place the cursor over the Preview area of the filter window, the cursor icon willchange from an arrow to a hand. You can click and drag the cursor to move the viewablearea of the image that appears in the preview window. Click on the minus (–) button tozoom out from the image. Or click on the plus (+) button to zoom into the image in thepreview window.
If you’re experimenting, you can use the Undo command to view the image before andafter applying a filter.
CHAPTER 9 APPLYING FILTERS AND EFFECTS 193
tipYou can install third-party
Photoshop plug-ins and usethem with PhotoshopElements. Installing filterplug-ins is similar to installing
TWAIN plug-ins forPhotoshop Elements. To
find out more about how to installplug-in files, go to Chapter 3,“Acquiring Images from Scannersand Digital Cameras.”
13 8311 CH09 1/15/03 2:26 PM Page 193
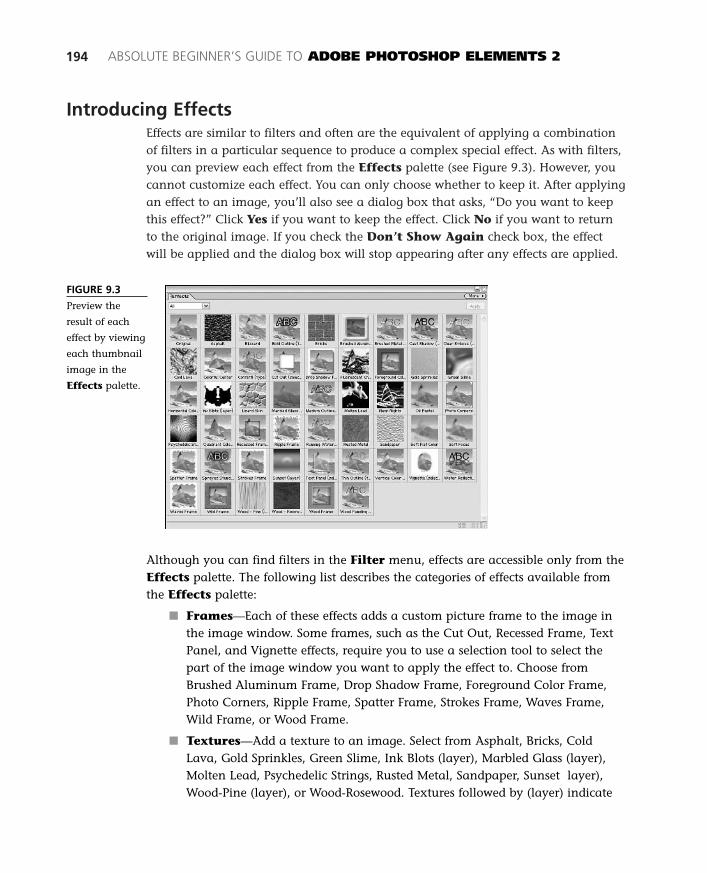
Introducing EffectsEffects are similar to filters and often are the equivalent of applying a combinationof filters in a particular sequence to produce a complex special effect. As with filters,you can preview each effect from the Effects palette (see Figure 9.3). However, youcannot customize each effect. You can only choose whether to keep it. After applyingan effect to an image, you’ll also see a dialog box that asks, “Do you want to keepthis effect?” Click Yes if you want to keep the effect. Click No if you want to returnto the original image. If you check the Don’t Show Again check box, the effectwill be applied and the dialog box will stop appearing after any effects are applied.
194 ABSOLUTE BEGINNER’S GUIDE TO ADOBE PHOTOSHOP ELEMENTS 2
FIGURE 9.3
Preview the
result of each
effect by viewing
each thumbnail
image in the
Effects palette.
Although you can find filters in the Filter menu, effects are accessible only from theEffects palette. The following list describes the categories of effects available fromthe Effects palette:
■ Frames—Each of these effects adds a custom picture frame to the image inthe image window. Some frames, such as the Cut Out, Recessed Frame, TextPanel, and Vignette effects, require you to use a selection tool to select thepart of the image window you want to apply the effect to. Choose fromBrushed Aluminum Frame, Drop Shadow Frame, Foreground Color Frame,Photo Corners, Ripple Frame, Spatter Frame, Strokes Frame, Waves Frame,Wild Frame, or Wood Frame.
■ Textures—Add a texture to an image. Select from Asphalt, Bricks, ColdLava, Gold Sprinkles, Green Slime, Ink Blots (layer), Marbled Glass (layer),Molten Lead, Psychedelic Strings, Rusted Metal, Sandpaper, Sunset layer),Wood-Pine (layer), or Wood-Rosewood. Textures followed by (layer) indicate
13 8311 CH09 1/15/03 2:26 PM Page 194
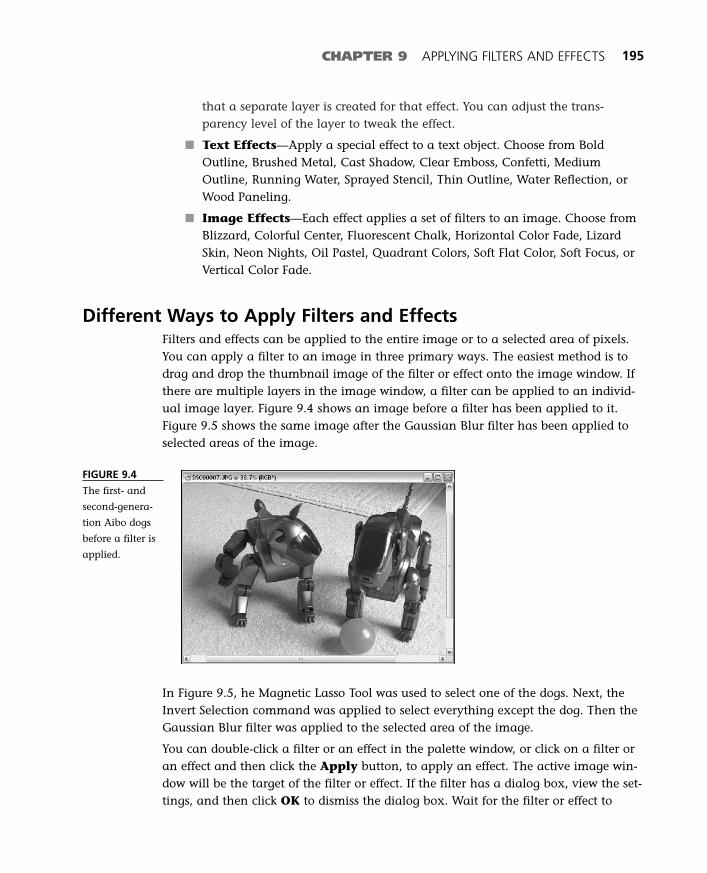
that a separate layer is created for that effect. You can adjust the trans-parency level of the layer to tweak the effect.
■ Text Effects—Apply a special effect to a text object. Choose from BoldOutline, Brushed Metal, Cast Shadow, Clear Emboss, Confetti, MediumOutline, Running Water, Sprayed Stencil, Thin Outline, Water Reflection, orWood Paneling.
■ Image Effects—Each effect applies a set of filters to an image. Choose fromBlizzard, Colorful Center, Fluorescent Chalk, Horizontal Color Fade, LizardSkin, Neon Nights, Oil Pastel, Quadrant Colors, Soft Flat Color, Soft Focus, orVertical Color Fade.
Different Ways to Apply Filters and EffectsFilters and effects can be applied to the entire image or to a selected area of pixels.You can apply a filter to an image in three primary ways. The easiest method is todrag and drop the thumbnail image of the filter or effect onto the image window. Ifthere are multiple layers in the image window, a filter can be applied to an individ-ual image layer. Figure 9.4 shows an image before a filter has been applied to it.Figure 9.5 shows the same image after the Gaussian Blur filter has been applied toselected areas of the image.
CHAPTER 9 APPLYING FILTERS AND EFFECTS 195
FIGURE 9.4
The first- and
second-genera-
tion Aibo dogs
before a filter is
applied.
In Figure 9.5, he Magnetic Lasso Tool was used to select one of the dogs. Next, theInvert Selection command was applied to select everything except the dog. Then theGaussian Blur filter was applied to the selected area of the image.
You can double-click a filter or an effect in the palette window, or click on a filter oran effect and then click the Apply button, to apply an effect. The active image win-dow will be the target of the filter or effect. If the filter has a dialog box, view the set-tings, and then click OK to dismiss the dialog box. Wait for the filter or effect to
13 8311 CH09 1/15/03 2:26 PM Page 195
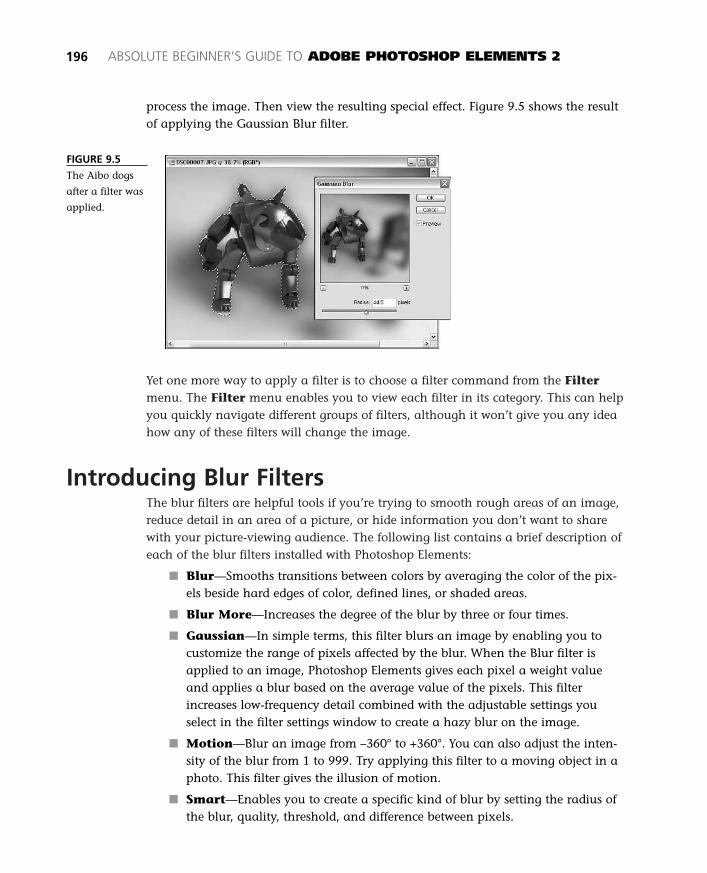
Yet one more way to apply a filter is to choose a filter command from the Filtermenu. The Filter menu enables you to view each filter in its category. This can helpyou quickly navigate different groups of filters, although it won’t give you any ideahow any of these filters will change the image.
Introducing Blur FiltersThe blur filters are helpful tools if you’re trying to smooth rough areas of an image,reduce detail in an area of a picture, or hide information you don’t want to sharewith your picture-viewing audience. The following list contains a brief description ofeach of the blur filters installed with Photoshop Elements:
■ Blur—Smooths transitions between colors by averaging the color of the pix-els beside hard edges of color, defined lines, or shaded areas.
■ Blur More—Increases the degree of the blur by three or four times.
■ Gaussian—In simple terms, this filter blurs an image by enabling you tocustomize the range of pixels affected by the blur. When the Blur filter isapplied to an image, Photoshop Elements gives each pixel a weight valueand applies a blur based on the average value of the pixels. This filterincreases low-frequency detail combined with the adjustable settings youselect in the filter settings window to create a hazy blur on the image.
■ Motion—Blur an image from –360° to +360°. You can also adjust the inten-sity of the blur from 1 to 999. Try applying this filter to a moving object in aphoto. This filter gives the illusion of motion.
■ Smart—Enables you to create a specific kind of blur by setting the radius ofthe blur, quality, threshold, and difference between pixels.
process the image. Then view the resulting special effect. Figure 9.5 shows the resultof applying the Gaussian Blur filter.
196 ABSOLUTE BEGINNER’S GUIDE TO ADOBE PHOTOSHOP ELEMENTS 2
FIGURE 9.5
The Aibo dogs
after a filter was
applied.
13 8311 CH09 1/15/03 2:26 PM Page 196
CHAPTER 9 APPLYING FILTERS AND EFFECTS 197
■ Radial—Creates a circular directional blur. Adjust the radius and number ofpixels to be blurred with the Radial Blur settings. Create spin or zoom, orspecify a degree of radial blur with the radial blur filter.
Introducing Filter Effects with Toolbox ToolsIn addition to the Filter menu and the Filters and Effects palettes, you can applya few filters as Toolbox tools. Being able to apply a filter as a tool enables you tofocus on an area that might be difficult to select and then experiment with smudg-ing, saturating, blurring, or sharpening it. Like menu or palette-based filters andeffects, these Toolbox tools can be applied only if an image is in RGB or Grayscalecolor mode. The following list contains a brief description of the filter tools availablein the Toolbox:
■ Smudge—The Smudge Tool enables you to smear selected pixels in thedirection of your brush stroke. You can customize the brush size, blend-
ing mode, pressure, and brush dynamics from the options bar. This tool canbe applied across all layers of an image or to a single layer. Check theFinger Painting check box if you want to paint with the foreground color.
■ Sponge—Choose desaturate or saturate blending mode, or a custombrush size, pressure, or brush dynamics for the tool from its options bar.
Apply the Sponge Tool to adjust the saturation level of the pixels in animage.
■ Impressionist Brush—This tool is co-located in the Toolbox with theBrush Tool (B). Select a brush size and adjust its settings in the options
panel. Applying this brush to an image will enlarge, blur, and mix the pixelsas you move the brush around.
■ Blur—Apply the Blur filter to an image using a preset brush size cho-sen in the options bar. This is a great alternative if you don’t want to
use a selection tool combined with a filter command to change a small areaof an image. You can adjust the brush size, blending mode, pressure, andbrush dynamics from the options bar. Check the Use All Layers check box ifyou want to apply the Blur Tool across all layers of the active image window.Uncheck this check box if you want to apply it to the selected layer in theLayers palette.
■ Sharpen—Choose this tool to intensify the colors wherever you applythis filter using a particular brush size chosen from the options bar.
This is a handy tool if you’re curious to see whether the Sharpen filter willhave any impact on sharpening a slightly blurry area of an image. As withthe Blur Tool, you can adjust the brush size, blending mode, pressure, affectedlayers, or brush dynamics from the options bar.
13 8311 CH09 1/15/03 2:26 PM Page 197
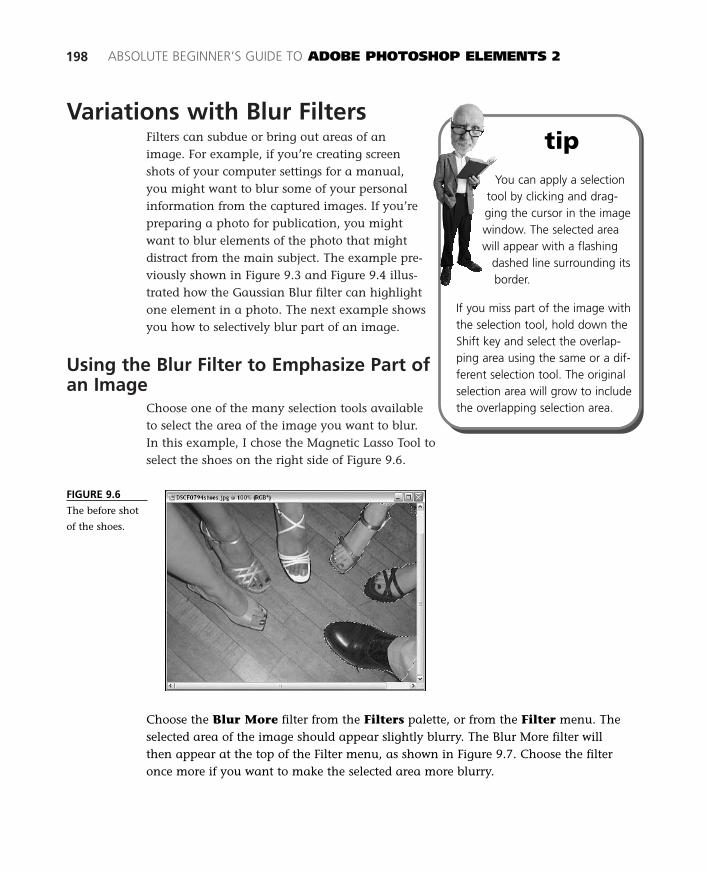
Variations with Blur FiltersFilters can subdue or bring out areas of animage. For example, if you’re creating screenshots of your computer settings for a manual,you might want to blur some of your personalinformation from the captured images. If you’repreparing a photo for publication, you mightwant to blur elements of the photo that mightdistract from the main subject. The example pre-viously shown in Figure 9.3 and Figure 9.4 illus-trated how the Gaussian Blur filter can highlightone element in a photo. The next example showsyou how to selectively blur part of an image.
Using the Blur Filter to Emphasize Part ofan Image
Choose one of the many selection tools availableto select the area of the image you want to blur.In this example, I chose the Magnetic Lasso Tool toselect the shoes on the right side of Figure 9.6.
198 ABSOLUTE BEGINNER’S GUIDE TO ADOBE PHOTOSHOP ELEMENTS 2
tipYou can apply a selection
tool by clicking and drag-ging the cursor in the imagewindow. The selected areawill appear with a flashing
dashed line surrounding itsborder.
If you miss part of the image withthe selection tool, hold down theShift key and select the overlap-ping area using the same or a dif-ferent selection tool. The originalselection area will grow to includethe overlapping selection area.
FIGURE 9.6
The before shot
of the shoes.
Choose the Blur More filter from the Filters palette, or from the Filter menu. Theselected area of the image should appear slightly blurry. The Blur More filter willthen appear at the top of the Filter menu, as shown in Figure 9.7. Choose the filteronce more if you want to make the selected area more blurry.
13 8311 CH09 1/15/03 2:26 PM Page 198

You can apply more than one kind of Blur filter to the selected area to create blurspecial effects. The Gaussian, Motion (see Figure 9.8), and Radial filters enable youto create directional blurs, which can make the original image pattern unrecogniz-able. Blurring part of an image can hide sensitive information, such as a licensenumber or password, without taking away too much from the bigger picture youwant to share with your Web viewers or readers.
CHAPTER 9 APPLYING FILTERS AND EFFECTS 199
FIGURE 9.7
When a filter is
applied to the
image window,
it appears at the
top of the Filter
menu.
FIGURE 9.8
A motion blur
applied to the
selected area of
the image
makes the rest of
the shoes in the
picture stand
out—no pun
intended.
SHARPEN FILTERSIf you’re impressed with the Blur filters, you might think the Sharpen filters can correct ablurry photo. Unfortunately, it’s easier to blur an image than it is to sharpen it. The Sharpenfilters interpret the pixels in an image and try to increase the amount of color based on thelocal neighborhood of pixels. Depending on how blurry the original image is, the Sharpenfilters might not be able to improve the clarity of an image. They’re actually more likely to
13 8311 CH09 1/15/03 2:26 PM Page 199
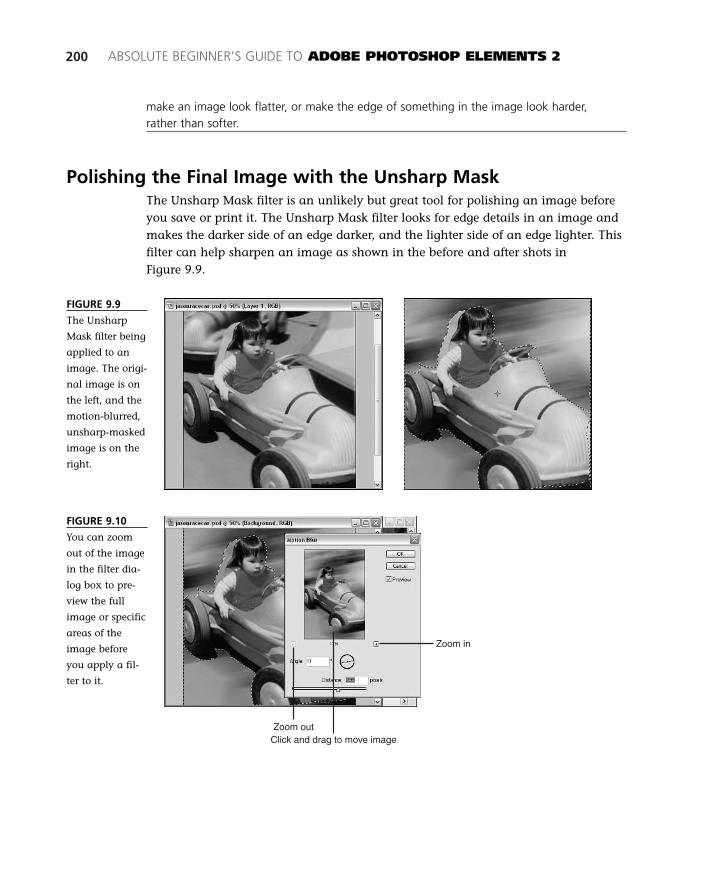
200 ABSOLUTE BEGINNER’S GUIDE TO ADOBE PHOTOSHOP ELEMENTS 2
make an image look flatter, or make the edge of something in the image look harder,rather than softer.
Polishing the Final Image with the Unsharp MaskThe Unsharp Mask filter is an unlikely but great tool for polishing an image beforeyou save or print it. The Unsharp Mask filter looks for edge details in an image andmakes the darker side of an edge darker, and the lighter side of an edge lighter. Thisfilter can help sharpen an image as shown in the before and after shots inFigure 9.9.
FIGURE 9.9
The Unsharp
Mask filter being
applied to an
image. The origi-
nal image is on
the left, and the
motion-blurred,
unsharp-masked
image is on the
right.
FIGURE 9.10
You can zoom
out of the image
in the filter dia-
log box to pre-
view the full
image or specific
areas of the
image before
you apply a fil-
ter to it.
Click and drag to move image
Zoom in
Zoom out
13 8311 CH09 1/15/03 2:26 PM Page 200

Applying Artistic FiltersAlthough you’ll find 15 groups of filters in the Filter menu, there are two generalgroups of filters: those that enhance (or degrade) an image, and those that applysome sort of effect, such as a brush stroke or stained-glass window effect. The blurand sharpen filters are image-enhancing filters. This section explores some of themore artsy filters.
Applying an Artistic Filter to a SelectionThe artistic filters in Photoshop Elements enable you to apply fine-art or paint-related enhancements to all or part of an image. For example, you can apply theDry Brush filter to change a photo into an image painted with a dry brush.Similarly, the watercolor artistic filter can help you visualize how an image mightlook if you painted it with watercolor paint. The Sketch and Brush Strokes filters cancreate paintlike filter effects similar to those in the Artistic group of filters.
You can apply an Artistic filter to an entire image or to a selected area of an image.If you choose a selected area, you can make part of an image stand out. For exam-ple, if a picture of flowers had one flower with the Colored Pencil filter applied to it,the colored-pencil flower would stand out from the others.
Conversely, you can apply a filter to everything except the selected item to make itstand out. First, use one of the selection tools to highlight an area of the image, suchas the flower shown in Figure 9.11. You also can apply the Select, Inverse commandto deselect the flower and select all the other pixels in the image. This commandcomes in handy when you want to apply the filter to everything in a picture exceptfor a particular area of the image, or, as you’ll discover in this chapter, when youwant to apply more than one filter to different areas of an image. Figure 9.12 showsthe same image after the Colored Pencil filter has been applied.
Applying the Accented Edges FilterThe Accented Edges filter is located in the Brush Stroke submenu of the Filtermenu. This filter intensifies the edge colors in an image. You can increase the slidercontrol, shown in Figure 9.13, to brighten the edge colors in the image to resemblewhite chalk. Lower Edge Brightness values darken the edge colors to resemble black ink.
CHAPTER 9 APPLYING FILTERS AND EFFECTS 201
13 8311 CH09 1/15/03 2:26 PM Page 201
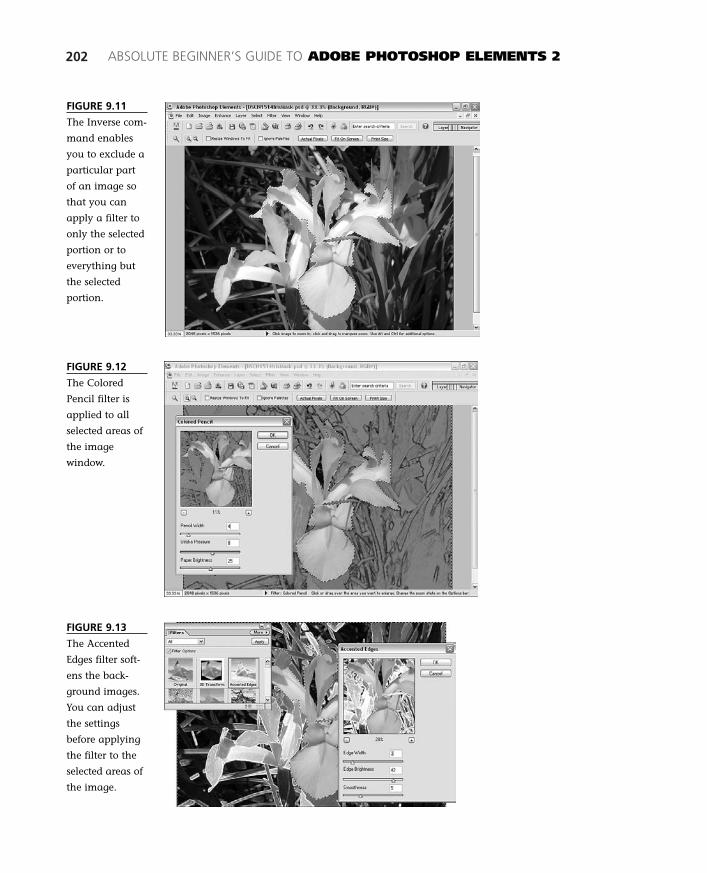
202 ABSOLUTE BEGINNER’S GUIDE TO ADOBE PHOTOSHOP ELEMENTS 2
FIGURE 9.11
The Inverse com-
mand enables
you to exclude a
particular part
of an image so
that you can
apply a filter to
only the selected
portion or to
everything but
the selected
portion.
FIGURE 9.12
The Colored
Pencil filter is
applied to all
selected areas of
the image
window.
FIGURE 9.13
The Accented
Edges filter soft-
ens the back-
ground images.
You can adjust
the settings
before applying
the filter to the
selected areas of
the image.
13 8311 CH09 1/15/03 2:26 PM Page 202

CHAPTER 9 APPLYING FILTERS AND EFFECTS 203
The Edge Width slider control enables you to determine how many pixels to use todefine the edges in the image. This value is used with the Edge Brightness value tocreate the accented effect. Increasing the Smoothness value improves the smoothnessof the color transitions between the original image and the accented edges. Click theOK button to apply the filter settings to the image. The resulting image is shown inFigure 9.14.
FIGURE 9.14
The realistic-
looking flower
stands out
because the
Accented Edges
filter was
applied to the
rest of the
flowers in this
picture.
ARTISTIC FILTER VARIATIONSYou can see how filters interact with different kinds of images by applying different filtersto the same image. Figure 9.15, for example, shows the previous picture of the irises with aWater Paper filter. The Water Paper filter belongs to the Sketch family of filters. It adds apattern to the image so that the image appears to be printed on a wet, thick-fiber type ofpaper.
FIGURE 9.15
The Water Paper
filter blends
chunks of pixels
together to cre-
ate the illusion
that the image is
printed on wet,
fibrous paper.
13 8311 CH09 1/15/03 2:26 PM Page 203
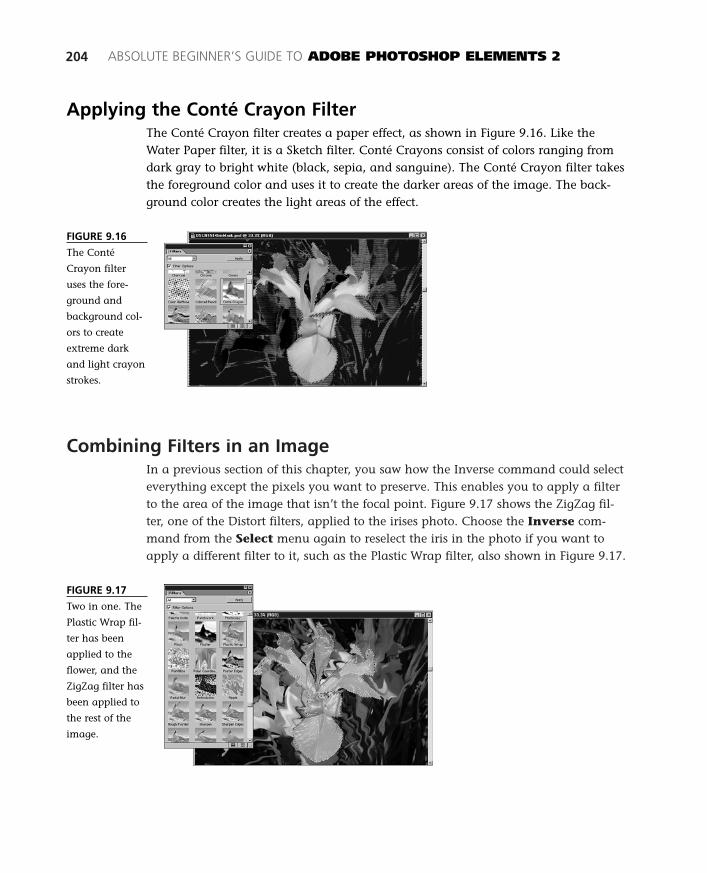
Combining Filters in an ImageIn a previous section of this chapter, you saw how the Inverse command could selecteverything except the pixels you want to preserve. This enables you to apply a filterto the area of the image that isn’t the focal point. Figure 9.17 shows the ZigZag fil-ter, one of the Distort filters, applied to the irises photo. Choose the Inverse com-mand from the Select menu again to reselect the iris in the photo if you want toapply a different filter to it, such as the Plastic Wrap filter, also shown in Figure 9.17.
204 ABSOLUTE BEGINNER’S GUIDE TO ADOBE PHOTOSHOP ELEMENTS 2
Applying the Conté Crayon FilterThe Conté Crayon filter creates a paper effect, as shown in Figure 9.16. Like theWater Paper filter, it is a Sketch filter. Conté Crayons consist of colors ranging fromdark gray to bright white (black, sepia, and sanguine). The Conté Crayon filter takesthe foreground color and uses it to create the darker areas of the image. The back-ground color creates the light areas of the effect.
FIGURE 9.16
The Conté
Crayon filter
uses the fore-
ground and
background col-
ors to create
extreme dark
and light crayon
strokes.
FIGURE 9.17
Two in one. The
Plastic Wrap fil-
ter has been
applied to the
flower, and the
ZigZag filter has
been applied to
the rest of the
image.
13 8311 CH09 1/15/03 2:26 PM Page 204

CHAPTER 9 APPLYING FILTERS AND EFFECTS 205
Applying Halftone FiltersThere are two halftone filters from which you can choose in Photoshop Elements:Color Halftone (choose Filter, Pixelate, Color Halftone) and Halftone Pattern(choose Filter, Sketch, Halftone Pattern). Both reduce the number of pixels inthe image by breaking an image into rectangles and replacing each with a line, cir-cle, or dot to simulate a halftone screen used in printing. The tonal range is pre-served in the image, as shown in Figure 9.18, keeping the picture recognizable.However, a distinctive pattern is added to the image.
FIGURE 9.18
The Halftone
Pattern filter
reduces the reso-
lution of an
image without
affecting the
range of tones.
Exploring EffectsEffects can consist of adding a particular kind of gradient layer, or a combination offilters, to an image. Effect categories are Frames, Textures, Text Effects, and ImageEffects. To apply these effects, the image must be in RGB or Grayscale mode andunlocked in the Layers palette. For some effects, a specific object must be in theimage window, such as text for use with the Text Effects. Some other effects canrequire you to flatten all layers in an image so that the effect can be applied to allimage elements.
Applying EffectsThere are three ways you can apply effects to an image: double-click an effect, dragand drop one from the Effects palette into an image window, or click a thumbnailand then click the Apply button. Watch the progress bar at the bottom of the imagewindow as the effect is applied to an image. Figure 9.19 shows the result of applyingthe Lizard Skin effect to an image.
13 8311 CH09 1/15/03 2:26 PM Page 205

206 ABSOLUTE BEGINNER’S GUIDE TO ADOBE PHOTOSHOP ELEMENTS 2
Most of the Image Effects apply Artistic filters to an image. There might be one ortwo destructive effects, such as Blizzard and Fluorescent Chalk. However, most pro-duce visually interesting effects, like the Soft Flat Color effect shown in Figure 9.20.Unlike with most filters, you cannot adjust settings for effects. If you like the previewimage in the thumbnail, drag and drop the effect onto an image to see whether youlike the resulting image.
FIGURE 9.19
Drag and drop
the Lizard Skin
thumbnail onto
an image to
apply this effect.
FIGURE 9.20
Another Image
Effect, Soft Flat
Color, makes
this image look
as if it were
painted.
Applying Texture EffectsMost Texture Effects add a new layer to an image. When the effect is first applied,the new layer will cover the entire image window, blocking the background image.To combine the texture with a background image, you must decrease the opacityvalue for the texture effect layer. Select the texture effect from the Layers palette, andthen type in a value less than 100, such as 60, in the Opacity text box. Figure 9.21shows how the Sunset effect adds a gradient layer to the image. Notice that the tex-ture effect is selected, and it has an Opacity setting of 56% in the Layers palette.
Applying Text EffectsSeveral effects can be applied only to text objects. The Water Reflection text effectappears on the text object in Figure 9.22. Before you can apply a text effect, youmust first use the Horizontal or Vertical Type tool to add text to the image window.
13 8311 CH09 1/15/03 2:26 PM Page 206

CHAPTER 9 APPLYING FILTERS AND EFFECTS 207
The Quadrant Color effect adds four big, light-colored squares to an image: red,green, blue, and brown. Figure 9.22 shows the Water Reflection text effect combinedwith the Quadrant Color effect. If you want to view the color image, visit QuePublishing’s Web site at www.quepublishing.com.
Selected layer
Blending mode
Sunset effectEffect applied to the image window
Opacity text boxLayers palette
FIGURE 9.21
The Gradient Fill
is a texture effect
that adds a gra-
dient fill layer to
an image.
FIGURE 9.22
Apply a text
effect to a text
object. The
Water Reflection
text effect was
applied to the
Statue text in
this image.
You can use the Move Tool to select the text object from the image window or theLayers palette. Then, apply a text effect to the text object. Choose Text Effects fromthe Effects palette if you want to view only the text effects in the palette. A texteffect changes only the text layer in the image window.
13 8311 CH09 1/15/03 2:26 PM Page 207
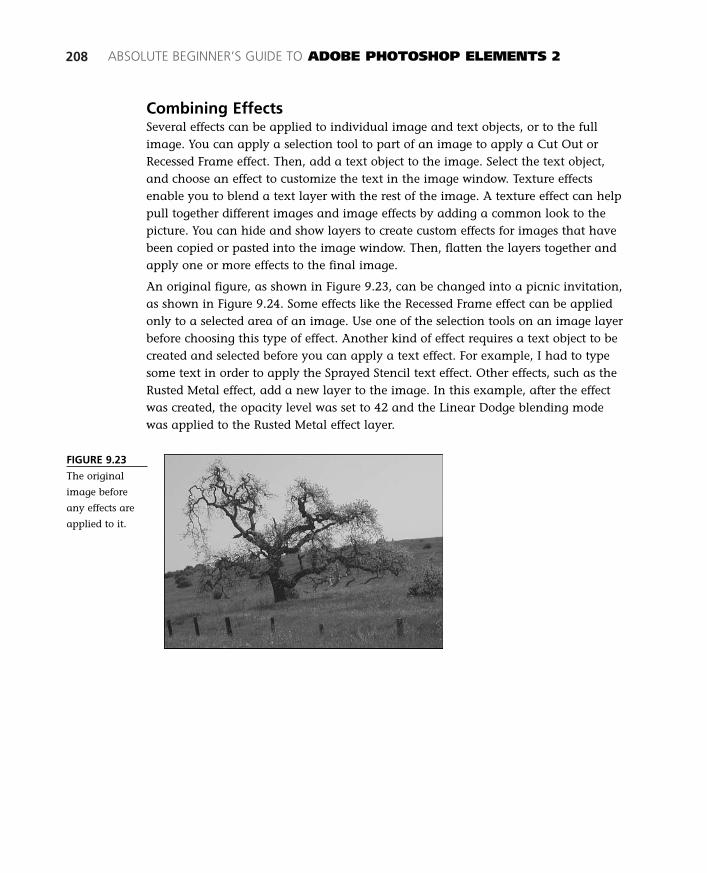
208 ABSOLUTE BEGINNER’S GUIDE TO ADOBE PHOTOSHOP ELEMENTS 2
Combining EffectsSeveral effects can be applied to individual image and text objects, or to the fullimage. You can apply a selection tool to part of an image to apply a Cut Out orRecessed Frame effect. Then, add a text object to the image. Select the text object,and choose an effect to customize the text in the image window. Texture effectsenable you to blend a text layer with the rest of the image. A texture effect can helppull together different images and image effects by adding a common look to thepicture. You can hide and show layers to create custom effects for images that havebeen copied or pasted into the image window. Then, flatten the layers together andapply one or more effects to the final image.
An original figure, as shown in Figure 9.23, can be changed into a picnic invitation,as shown in Figure 9.24. Some effects like the Recessed Frame effect can be appliedonly to a selected area of an image. Use one of the selection tools on an image layerbefore choosing this type of effect. Another kind of effect requires a text object to becreated and selected before you can apply a text effect. For example, I had to typesome text in order to apply the Sprayed Stencil text effect. Other effects, such as theRusted Metal effect, add a new layer to the image. In this example, after the effectwas created, the opacity level was set to 42 and the Linear Dodge blending modewas applied to the Rusted Metal effect layer.
FIGURE 9.23
The original
image before
any effects are
applied to it.
13 8311 CH09 1/15/03 2:26 PM Page 208
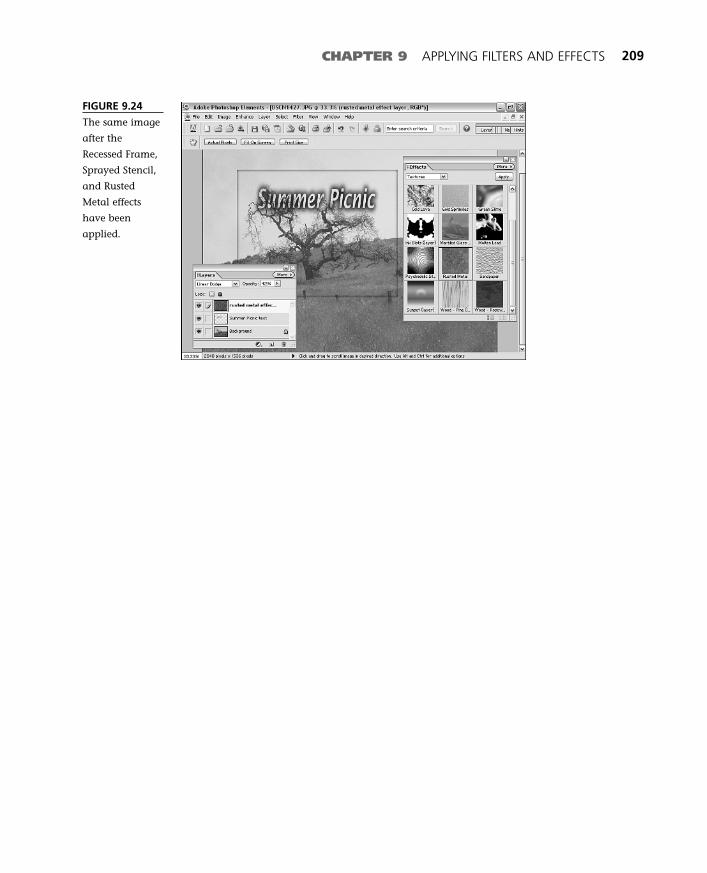
CHAPTER 9 APPLYING FILTERS AND EFFECTS 209
FIGURE 9.24
The same image
after the
Recessed Frame,
Sprayed Stencil,
and Rusted
Metal effects
have been
applied.
13 8311 CH09 1/15/03 2:26 PM Page 209

13 8311 CH09 1/15/03 2:26 PM Page 210
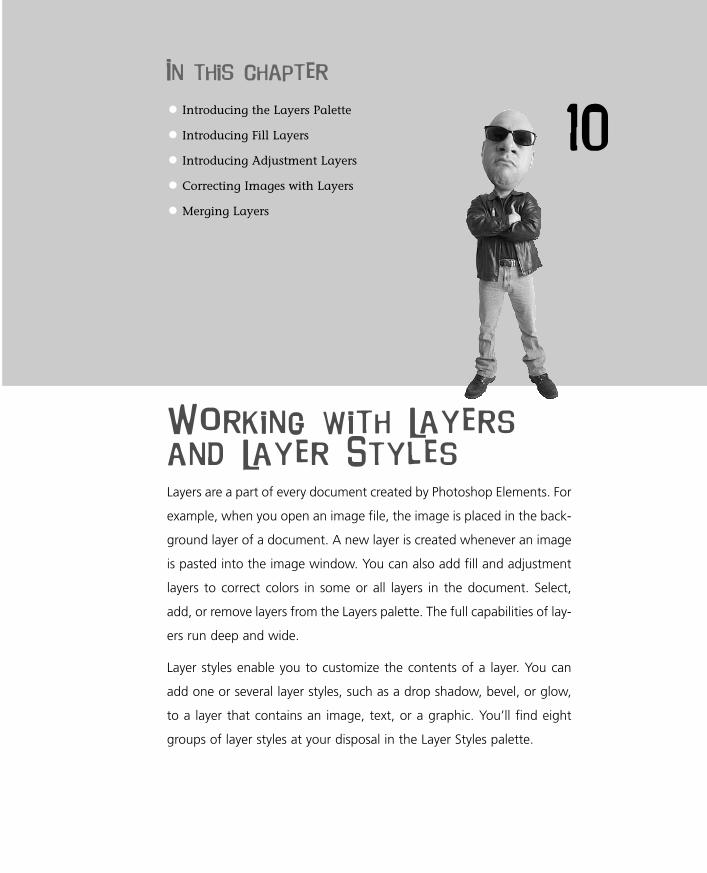
In this chapter
• Introducing the Layers Palette
• Introducing Fill Layers
• Introducing Adjustment Layers
• Correcting Images with Layers
• Merging Layers
10
Working with Layers
and Layer Styles
Layers are a part of every document created by Photoshop Elements. For
example, when you open an image file, the image is placed in the back-
ground layer of a document. A new layer is created whenever an image
is pasted into the image window. You can also add fill and adjustment
layers to correct colors in some or all layers in the document. Select,
add, or remove layers from the Layers palette. The full capabilities of lay-
ers run deep and wide.
Layer styles enable you to customize the contents of a layer. You can
add one or several layer styles, such as a drop shadow, bevel, or glow,
to a layer that contains an image, text, or a graphic. You’ll find eight
groups of layer styles at your disposal in the Layer Styles palette.
14 8311 CH10 1/15/03 2:36 PM Page 211

Introducing the Layers PaletteIf you’re working with a photo, the first layer you’ll see in the Layers palette is theBackground layer. As you add shapes, add text, or copy and paste in the image win-dow, new layers are added above the Background layer. Layers can be empty or cancontain specific elements, such as an adjustment or fill layer. A layer can consist oftext, vector graphic (shape), or bitmap (image, text, or graphic).
You can create, copy, move, or delete a layer in the Layers palette. Add fill oradjustment layers and position these layers to apply them to all or some of the otherlayers. The image window updates automatically as you make changes to the Layerspalette.
Using layers makes it quick and easy to make changes or improvements to animage or text without affecting any other layers. Adding layers to an image windowis like creating a stack of transparent pages, each with different colors, shapes,graphics, text, or effects. If at any point you don’t want to use a particular layer, youcan remove, change, or hide it without affecting any other layers in the image.
Layers also enable you to apply isolated changes to an image, such as image repairand color correction, without touching the original. You can make different correc-tions on various layers and hide and show them one at a time to see which combi-nation provides the desired result. As you work on an image, or are ready to finalizeit, you can merge the layers, thereby converting any text or vector graphics intobitmap graphics.
Each layer has a unique group of settings. By default, each layer has a blendingmode, opacity, lock, and lock transparency setting. Select the Layers palette fromthe palette well in the work area to view any layers corresponding to the activeimage window. Click in the left column next to the layer to show or hide the con-tents of that layer in the image window. You can click on a layer in the Layerspalette to select the contents of that layer.
Three shortcut buttons are located at the bottom of the Layers palette. These smallbuttons enable you to add a new fill or adjustment layer, create a new empty orduplicate layer, or delete the selected layer. You can drag a layer over the Create aNew Layer button to create a copy of that layer. Drag and drop a layer over theTrash button to delete it.
If all this information about layers seems a bit overwhelming, it might be easier tounderstand all the possible kinds of layers by taking a peek at a file that’s alreadychock-full of them. Figure 10.1 deconstructs each item in the Layers palette.
Each layer acts as a separate, transparent sheet, enabling you to combine imagesinto the image window while keeping them separate. The order of layers in theLayers palette matches the order in which each layer is applied to the image win-dow. The topmost layer affects all layers below it. You can click and drag a layer andplace it above another layer in the Layers palette to make a layer visible in theimage window. Move the selected layer below another if you want to exclude any fillor adjustment settings from affecting the layers above it. Conversely, you can movea layer below another if you want the layer above it to be the more visible layer.
212 ABSOLUTE BEGINNER’S GUIDE TO ADOBE PHOTOSHOP ELEMENTS 2
14 8311 CH10 1/15/03 2:36 PM Page 212

You can choose from any of the commands in the Layer, Arrange menu. TheArrange menu consists of the following commands:
■ Bring to Front—Moves the layer to the top of the Layers palette.
■ Bring Forward—Moves a layer up in the list of layers in the Layers palette.
■ Send Backward—Moves a layer down inthe list of layers in the Layers palette.
■ Send to Back—Moves a layer to the bottomof the list, right above the backgroundlayer.
Click, drag and drop a layer to move it to a newlocation in the Layers palette. You can press(Command) [Ctrl] plus the left or right bracket([]) to move a layer up or down a notch in theLayers palette. Press (Command-Shift)[Ctrl+Shift] plus the left or right bracket to bringa layer to the back or front of the image window.The background layer is locked at the bottom ofthe Layers palette (see Figure 10.2). Double-clickthe Background layer to convert it into a regularlayer.
CHAPTER 10 WORKING WITH LAYERS AND LAYER STYLES 213
Background layer
Blending modeOpacity
Hide or show layer
Layer statusText layersImage layers
Fill layer
Layer style
Create a new fill or adjustment layer menu
Create a new or duplicate layer
Delete layer
Layers palette menu
Minimize palette
Close palette
Resize palette
Layer Lock
Lock TransparentPixels
FIGURE 10.1
You can select
any layer from
the Layers
palette. Here you
can create,
delete, or modify
a layer with a
layer style.
You must have atleast two editable layers in
the Layers palette before you canaccess the Layer, Arrange menucommands.
14 8311 CH10 1/15/03 2:36 PM Page 213
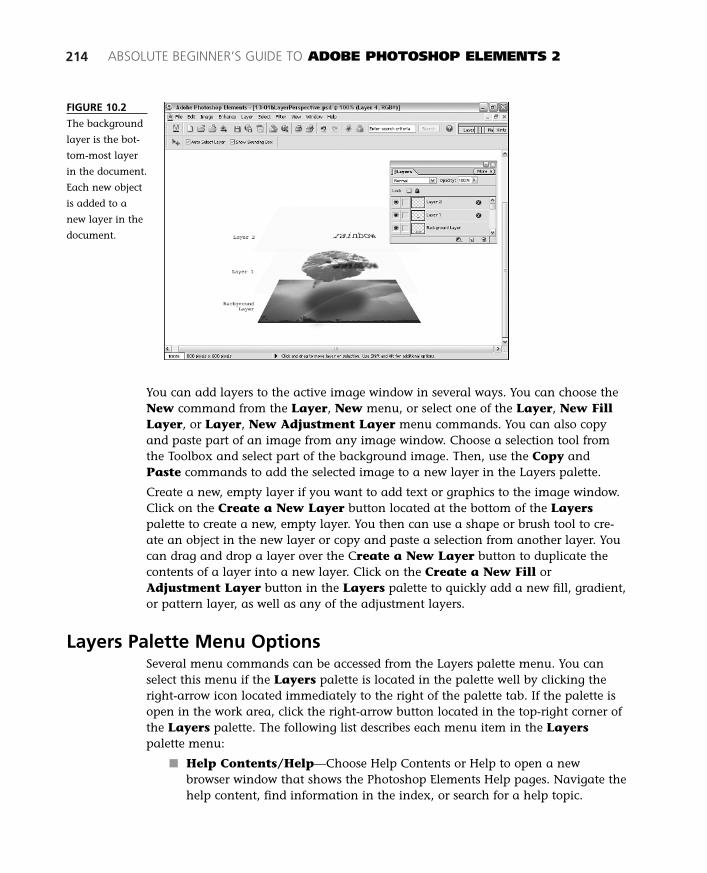
214 ABSOLUTE BEGINNER’S GUIDE TO ADOBE PHOTOSHOP ELEMENTS 2
FIGURE 10.2
The background
layer is the bot-
tom-most layer
in the document.
Each new object
is added to a
new layer in the
document.
You can add layers to the active image window in several ways. You can choose theNew command from the Layer, New menu, or select one of the Layer, New FillLayer, or Layer, New Adjustment Layer menu commands. You can also copyand paste part of an image from any image window. Choose a selection tool fromthe Toolbox and select part of the background image. Then, use the Copy andPaste commands to add the selected image to a new layer in the Layers palette.
Create a new, empty layer if you want to add text or graphics to the image window.Click on the Create a New Layer button located at the bottom of the Layerspalette to create a new, empty layer. You then can use a shape or brush tool to cre-ate an object in the new layer or copy and paste a selection from another layer. Youcan drag and drop a layer over the Create a New Layer button to duplicate thecontents of a layer into a new layer. Click on the Create a New Fill orAdjustment Layer button in the Layers palette to quickly add a new fill, gradient,or pattern layer, as well as any of the adjustment layers.
Layers Palette Menu OptionsSeveral menu commands can be accessed from the Layers palette menu. You canselect this menu if the Layers palette is located in the palette well by clicking theright-arrow icon located immediately to the right of the palette tab. If the palette isopen in the work area, click the right-arrow button located in the top-right corner ofthe Layers palette. The following list describes each menu item in the Layerspalette menu:
■ Help Contents/Help—Choose Help Contents or Help to open a newbrowser window that shows the Photoshop Elements Help pages. Navigate thehelp content, find information in the index, or search for a help topic.
14 8311 CH10 1/15/03 2:36 PM Page 214
■ New Layer—Select this command to create a new layer in the Layerspalette.
■ Duplicate Layer—Duplicate a layer that contains a bitmap or vectorgraphic object, such as images, text, or shapes.
■ Delete Layer—Remove a layer from the Layers palette.
■ Delete Linked Layers—Remove all layers containing a link from the Layerspalette.
■ Delete Hidden Layers—Remove all hidden layers from the Layers palette.
■ Rename Layer—Select an editable layer to choose this menu item from themenu. The Layer Properties dialog box opens. Type a new name for the layerinto the text box, and then click OK to save the new name to the Layerspalette.
■ Simplify Layer—Choose a shape tool from the Toolbox and add a shape tothe image window. Select the shape layer from the Layers palette, and thenchoose Simplify Layer from the menu to combine the shape object with itslinked color. The two thumbnails will mergeinto a single thumbnail image, and the vectorshape will become a bitmap. You can applythe Paint Bucket Tool to the simplifiedshape if you want to change its color.
■ Merge Down—Click on one of the middlelayers in the Layers palette. Choose theMerge Down command to combine theselected layer with the one directly belowit. Any layers above the selected layer willremain in the Layers palette.
■ Merge Visible—Click on the left box foreach layer to show or hide the layers youwant to merge. Choose the Merge Visiblecommand to merge all visible layers in theLayers palette. Hidden layers will not bemerged and will remain in the Layerspalette after the visible layers have beenmerged.
■ Flatten Image—Select the FlattenImage command to merge all visible lay-ers into a single layer in the Layerspalette. Hidden layers will be permanentlyremoved from the Layers palette.
■ Palette Options—Choose PaletteOptions from the menu to open the Layers
CHAPTER 10 WORKING WITH LAYERS AND LAYER STYLES 215
You can lock all set-tings in a layer by check-
ing the Lock check box for theselected layer in the Layerspalette. Check the TransparencyLock check box if you do notwant any pixels added to thetransparent areas of an image. Alock icon will appear to the rightof the layer name if either lock isapplied to a layer. Uncheck theLock check box to unlock a layer.Double-click the background layerto convert it to an editable layer.
14 8311 CH10 1/15/03 2:36 PM Page 215
Palette Options dialog box. You can select from three thumbnail image sizes,or click on the None radio button if you don’t want to see a thumbnailimage in each layer. Click OK to save your changes.
■ Close Palette to Palette Well—If this menu option is not checked, whenclosed, the Layers palette will not appear in the palette well. Almost all thecommands accessible from the Layers palette are also available in theLayer menu.
Introducing Blending ModesA blending mode enables you to mix the color of the selected layer with the colors ofthe images in the layer directly below it. You might want to apply a blending modeto a layer if you want its colors to blend in with the colors or content in the layerbelow it. Choose one of 17 blending modes for any layer. Normal is the defaultblending mode for any newly created layer. The following list briefly defines eachblending mode used in RGB images. The selected layer refers to the base, or originalcolors, whereas the term blending color refers to the colors in the layer directly belowthe selected layer. Blending and base colors are required in order to create the result-ing color produced by choosing a particular blending mode.
■ Normal—No blending is applied to pixels in this default mode. Colors arerepresented as-is. Referred to as Threshold mode if you’re working with abitmap or Indexed Color image.
■ Dissolve—Pixel colors are randomly replaced with the base or blend color,using the opacity of any pixel in the image to set the color of the dissolvedpixels. Try this blending mode with layers containing large Airbrush or Brushstroke graphics.
■ Darken—Picks the darker of the base or blend color after checking eachchannel and replaces pixels lighter than the blend color.
■ Multiply—Multiplies the base color of each channel with the blend color.The result is similar to applying overlapping strokes of a felt tip pen, whichdarkens the original color.
■ Color Burn—Darkens the base color after checking each channel of the RGBimage and reflects the blend color. Blending with white produces no change.
■ Linear Burn—Darkens the base color, decreasing the brightness to reflectthe blend color.
■ Lighten—Chooses the lighter of the base or blend color after checking eachchannel color and replaces pixels that are darker than the blend color.
■ Screen—Multiplies the opposite of the blend and base colors to create theresulting color, which is usually lighter than either of the original colors.
■ Color Dodge—Lightens the base color after checking each channel in theRGB image and reflects the blend color. Blending with black produces nochange.
216 ABSOLUTE BEGINNER’S GUIDE TO ADOBE PHOTOSHOP ELEMENTS 2
14 8311 CH10 1/15/03 2:36 PM Page 216

■ Linear Dodge—Lightens the base color and increases the brightness toreflect the blend color.
■ Overlay—Preserves the lightness or darkness of the base color and multipliesor screens it before mixing it with the blend color.
■ Soft Light—Darkens or lightens the base color depending on whether theblend color is lighter or darker than 50% gray. The result is lightened, whichis similar to applying the Dodge Tool, if the blend color is lighter than 50%,or darkened, which is similar to using the Burn Tool, if it’s 50% darker thanthe blend pixels.
■ Hard Light—Screens or multiplies the base color depending on whether theblend color is lighter or darker than 50% gray. If the blend color is lighterthan 50%, the result is a lighter color. Otherwise, the result is darker if theblend color is also darker than 50%. The resulting effect, if darkened, addsshadows to an image.
■ Vivid Light—Increases or decreases contrast in order to lighten (dodge) ordarken (burn) colors if the blend color is lighter or darker than 50% gray.
■ Linear Light—Increases or decreases the brightness to lighten or darken col-ors based on whether the blend color is lighter or darker than 50% gray.
■ Pin Light—Takes the blend color and determines whether to replace colorsbased on whether the blend color is lighter or darker than 50% gray. Darkerpixels are replaced if the blend color is lighter than 50% gray. Lighter pixelsare replaced if the blend color is darker than 50% gray.
■ Difference—Subtracts the blend from the base color if the base color isdarker than the blend color. The brighter of the two colors is subtracted fromthe other. Blending with black produces no change, whereas blending withwhite inverts the base color values.
■ Exclusion—A lower-contrast color (compared to the preceding Differenceblending mode) is created. This blending mode adds the blend or base colordepending on the brightness values of the colors in each RGB channel.
■ Hue—Combines the saturation and luminance of the base color and the hueof the blend color to produce the resulting color.
■ Saturation—Combines the hue and luminance of the base color with thesaturation of the blend color to produce the resulting color. The blend colormust contain gray to produce a different color.
■ Color—Mixes the luminance of the base color with the hue and saturation ofthe blend color to produce the resulting color. Can be used to colorizegrayscale images or add tinted color to images.
■ Luminosity—Creates a resulting color by mixing the hue and saturation ofthe base color with the luminance of the blend color, creating the oppositeeffect of the Color blending mode.
CHAPTER 10 WORKING WITH LAYERS AND LAYER STYLES 217
14 8311 CH10 1/15/03 2:36 PM Page 217

You can also simplify and combine layers as you complete all or part of an image.The Simplify Layer command enables you to combine linked components of a layer.You might apply this command to a fill or adjustment layer as you finalize eachlayer setting for an image.
When you create a fill or adjustment layer, a multi-part layer is created in theLayers palette. The linked color and shape elements enable you to easily change thecolor of the fill layer, or unlink the shape from the fill component. Choose theSimplify Layer command from the Layer menu if you want to merge the partsinto a single bitmap layer. You will no longer be able to modify the fill or adjust-ment layer after it has been simplified.
CONVERT THE BACKGROUND LAYER INTO LAYER 0If you want to modify or move the background layer up in the Layers palette, you canchange it to a nonlocked, regular layer. Double-click on the background layer to open theLayer Properties dialog box. If you want to, you can type a new name for the layer.Photoshop Elements changes its name from the background layer to layer 0.
The background layer is a locked layer, but layer 0 is not locked and is fully editable just likeany other layer in the Layers palette.
Modifying a Layer with Layer StylesPump up the content in a layer by applying one or more layer styles to it. Layerstyles enable you to quickly add one or several effects to a layer that contains text orgraphics. Choose from eight installed groups of layer styles. Each layer style modifiesany previous layer styles applied to the selected image layer. The order in which youapply a series of layer styles affects the final look of the layer contents. Several layerstyle settings were used to create the yellow button shown in Figure 10.3:
■ Wow-Neon Yellow Off—Drop Shadow is zero.
■ Simple Inner Bevel—Bevel Size is 18 pixels. Bevel Direction is Up.
■ Simple Outer Glow—Outer Glow size is 104 pixels.
■ Simple Inner Glow—Inner Glow Size is 216 pixels.
■ Use Global Light—Unchecked.
You can view and choose layer styles from the Layer Styles palette. As with theFilters and Effects palettes, you can preview thumbnail images of each layer stylein the Layer Styles palette. Open the Layer Styles palette, select a set of styles fromthe drop-down menu, and click any one to add a drop shadow or a bevel layer styleto a shape or image object in the active image window. You can add as many layerstyles to a layer as you like. The following list briefly describes each set available inthe Layer Styles palette:
218 ABSOLUTE BEGINNER’S GUIDE TO ADOBE PHOTOSHOP ELEMENTS 2
14 8311 CH10 1/15/03 2:36 PM Page 218
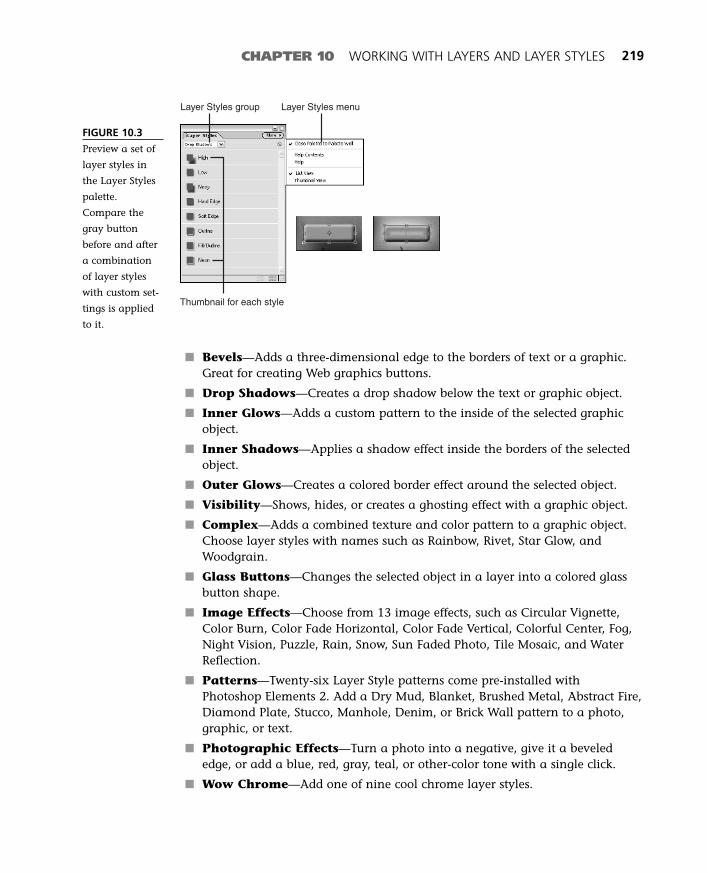
CHAPTER 10 WORKING WITH LAYERS AND LAYER STYLES 219
FIGURE 10.3
Preview a set of
layer styles in
the Layer Styles
palette.
Compare the
gray button
before and after
a combination
of layer styles
with custom set-
tings is applied
to it.
Layer Styles group Layer Styles menu
Thumbnail for each style
■ Bevels—Adds a three-dimensional edge to the borders of text or a graphic.Great for creating Web graphics buttons.
■ Drop Shadows—Creates a drop shadow below the text or graphic object.
■ Inner Glows—Adds a custom pattern to the inside of the selected graphicobject.
■ Inner Shadows—Applies a shadow effect inside the borders of the selectedobject.
■ Outer Glows—Creates a colored border effect around the selected object.
■ Visibility—Shows, hides, or creates a ghosting effect with a graphic object.
■ Complex—Adds a combined texture and color pattern to a graphic object.Choose layer styles with names such as Rainbow, Rivet, Star Glow, andWoodgrain.
■ Glass Buttons—Changes the selected object in a layer into a colored glassbutton shape.
■ Image Effects—Choose from 13 image effects, such as Circular Vignette,Color Burn, Color Fade Horizontal, Color Fade Vertical, Colorful Center, Fog,Night Vision, Puzzle, Rain, Snow, Sun Faded Photo, Tile Mosaic, and WaterReflection.
■ Patterns—Twenty-six Layer Style patterns come pre-installed withPhotoshop Elements 2. Add a Dry Mud, Blanket, Brushed Metal, Abstract Fire,Diamond Plate, Stucco, Manhole, Denim, or Brick Wall pattern to a photo,graphic, or text.
■ Photographic Effects—Turn a photo into a negative, give it a bevelededge, or add a blue, red, gray, teal, or other-color tone with a single click.
■ Wow Chrome—Add one of nine cool chrome layer styles.
14 8311 CH10 1/15/03 2:36 PM Page 219

■ Wow Neon—Choose from three styles of red,orange, blue, purple, green, and yellow neoncolors and of course, black.
■ Wow Plastic—Adds a cool plastic look toshapes and bitmaps.
Be sure you have more than one layer of imagesto work with in the image window. If this is yourfirst time experimenting with layer styles, youmight want to use the shape tools in the Toolboxto create a few graphic objects in an empty, newdocument window so that you can more easily seeeach layer style as you apply it to an object. Youalso might want to select a light foreground colorfor the graphic object. Black, for example, mightmake it difficult for you to see a bevel style that’sbeen added to an object. To apply the layer styleto your image, do the following:
1. Choose the Move Tool from the Toolbox.Click on the object you want the styleapplied to. You also can hold down theShift key and click on several objects if youwant to select a group of objects.
2. Choose a set of layer styles from the LayerStyles palette pop-up menu.
3. Click on the desired layer style to apply itto the selection in the image window. Youalso can drag and drop the layer styleonto the image window. You will see an ficon appear in the selected layer if a layerstyle has been applied to it.
4. Apply additional layer styles as needed toget the desired result. Each additionalstyle modifies any previous styles.
In addition to applying layer styles to your selec-tions, most of the style sets have certain settingsyou can fine-tune to get exactly the effect youwant. Double-click on the f icon in a layer thatcontains a layer style to open the Style Settingsdialog box, shown in Figure 10.4. You also canchoose Style Settings from the Layer, Layer Stylemenu. Each of the slider control settings becomesactive if a layer style from the corresponding layerstyle group is applied to a layer.
220 ABSOLUTE BEGINNER’S GUIDE TO ADOBE PHOTOSHOP ELEMENTS 2
You can undo eachlayer style by choosing
Undo from the Edit menu, or bypressing (Command-Z) [Ctrl+Z].To remove all layer styles from anobject, select the object in theimage window or Layers palette,and then click on the Clear Styleicon located in the upper-rightcorner of the Layer Styles
tipYou can adjust some of
the layer style options fromthe Style Settings dialog box.Double-click the f iconlocated on the right side of a
layer in the Layers paletteto open the Style Settings
dialog box.
If you applied a drop shadow,bevel, or glow layer style to anobject, the corresponding slidercontrol(s) will be selectable in theStyle Settings dialog box.
14 8311 CH10 1/15/03 2:36 PM Page 220
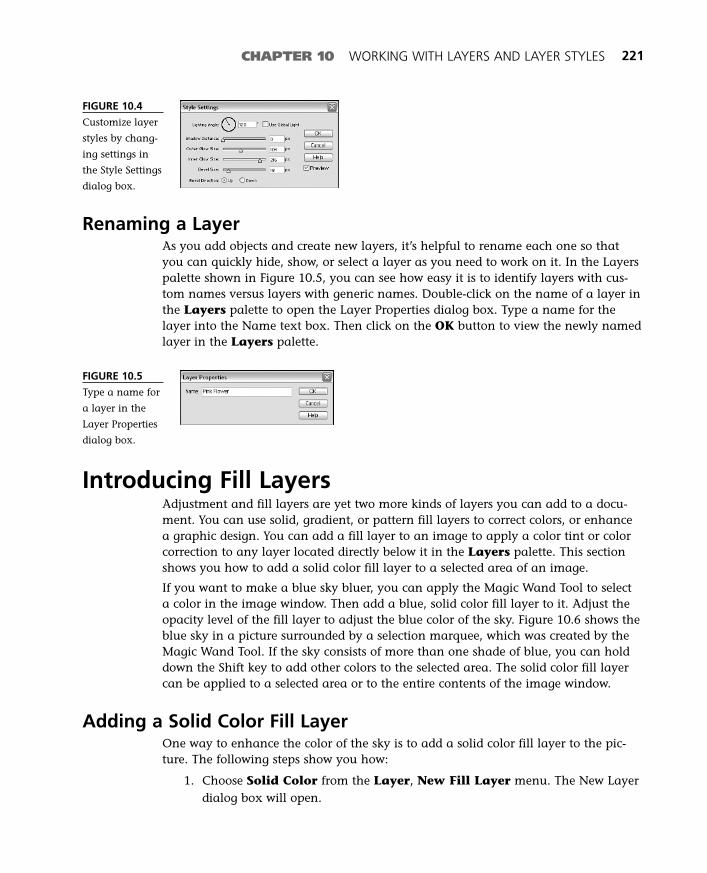
CHAPTER 10 WORKING WITH LAYERS AND LAYER STYLES 221
Renaming a LayerAs you add objects and create new layers, it’s helpful to rename each one so thatyou can quickly hide, show, or select a layer as you need to work on it. In the Layerspalette shown in Figure 10.5, you can see how easy it is to identify layers with cus-tom names versus layers with generic names. Double-click on the name of a layer inthe Layers palette to open the Layer Properties dialog box. Type a name for thelayer into the Name text box. Then click on the OK button to view the newly namedlayer in the Layers palette.
FIGURE 10.4
Customize layer
styles by chang-
ing settings in
the Style Settings
dialog box.
FIGURE 10.5
Type a name for
a layer in the
Layer Properties
dialog box.
Introducing Fill LayersAdjustment and fill layers are yet two more kinds of layers you can add to a docu-ment. You can use solid, gradient, or pattern fill layers to correct colors, or enhancea graphic design. You can add a fill layer to an image to apply a color tint or colorcorrection to any layer located directly below it in the Layers palette. This sectionshows you how to add a solid color fill layer to a selected area of an image.
If you want to make a blue sky bluer, you can apply the Magic Wand Tool to selecta color in the image window. Then add a blue, solid color fill layer to it. Adjust theopacity level of the fill layer to adjust the blue color of the sky. Figure 10.6 shows theblue sky in a picture surrounded by a selection marquee, which was created by theMagic Wand Tool. If the sky consists of more than one shade of blue, you can holddown the Shift key to add other colors to the selected area. The solid color fill layercan be applied to a selected area or to the entire contents of the image window.
Adding a Solid Color Fill LayerOne way to enhance the color of the sky is to add a solid color fill layer to the pic-ture. The following steps show you how:
1. Choose Solid Color from the Layer, New Fill Layer menu. The New Layerdialog box will open.
14 8311 CH10 1/15/03 2:36 PM Page 221

2. Type in a name for the fill layer and choose any custom settings you want touse (see Figure 10.7). Then click OK.
222 ABSOLUTE BEGINNER’S GUIDE TO ADOBE PHOTOSHOP ELEMENTS 2
FIGURE 10.6
The Magic Wand
Tool can help
select a particu-
lar color in the
image window
with a single
click.
FIGURE 10.7
Type a name for
the new fill
layer, and then
choose the
blending mode
and opacity set-
tings for the new
fill layer.
3. Next, the Color Picker dialog box will open. Pick a color for the fill layer.Then click OK.
A new fill layer will appear in the Layers palette. The contents of the image win-dow will also change to show the color of the fill layer you just selected (see Figure10.8). Reduce the opacity setting for the solid color fill layer to blend the fill layercolor with the layers located directly below it in the Layers palette.
Click on the fill layer in the Layers palette. Then click on the Opacity slider controland decrease the value in the text box. As the fill layer becomes transparent, you’llbe able to see the graphics in the layers below the selected fill layer.
14 8311 CH10 1/15/03 2:36 PM Page 222
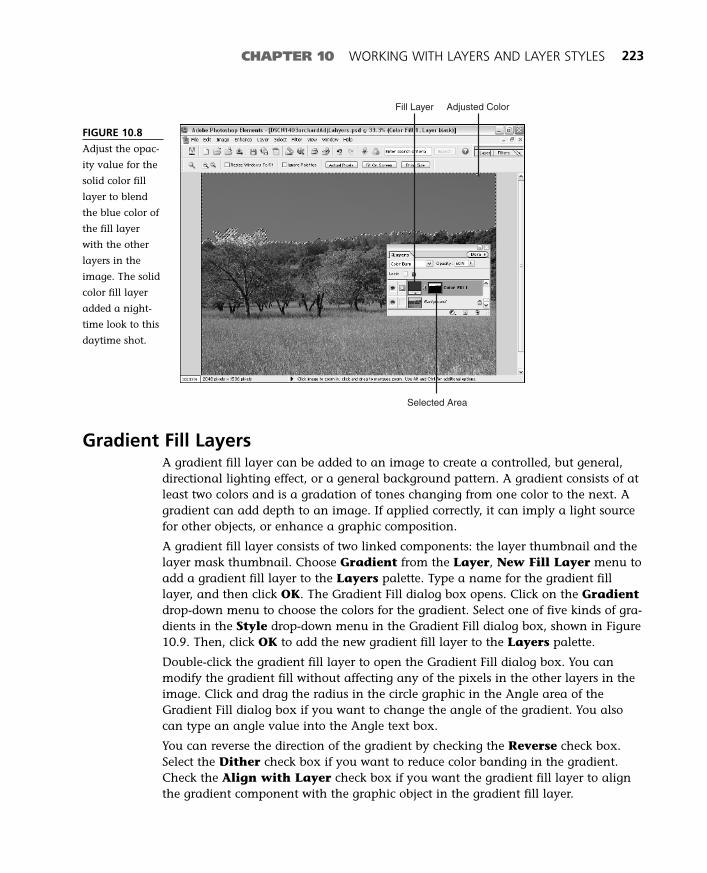
CHAPTER 10 WORKING WITH LAYERS AND LAYER STYLES 223
FIGURE 10.8
Adjust the opac-
ity value for the
solid color fill
layer to blend
the blue color of
the fill layer
with the other
layers in the
image. The solid
color fill layer
added a night-
time look to this
daytime shot.
Fill Layer
Selected Area
Adjusted Color
Gradient Fill LayersA gradient fill layer can be added to an image to create a controlled, but general,directional lighting effect, or a general background pattern. A gradient consists of atleast two colors and is a gradation of tones changing from one color to the next. Agradient can add depth to an image. If applied correctly, it can imply a light sourcefor other objects, or enhance a graphic composition.
A gradient fill layer consists of two linked components: the layer thumbnail and thelayer mask thumbnail. Choose Gradient from the Layer, New Fill Layer menu toadd a gradient fill layer to the Layers palette. Type a name for the gradient filllayer, and then click OK. The Gradient Fill dialog box opens. Click on the Gradientdrop-down menu to choose the colors for the gradient. Select one of five kinds of gra-dients in the Style drop-down menu in the Gradient Fill dialog box, shown in Figure10.9. Then, click OK to add the new gradient fill layer to the Layers palette.
Double-click the gradient fill layer to open the Gradient Fill dialog box. You canmodify the gradient fill without affecting any of the pixels in the other layers in theimage. Click and drag the radius in the circle graphic in the Angle area of theGradient Fill dialog box if you want to change the angle of the gradient. You alsocan type an angle value into the Angle text box.
You can reverse the direction of the gradient by checking the Reverse check box.Select the Dither check box if you want to reduce color banding in the gradient.Check the Align with Layer check box if you want the gradient fill layer to alignthe gradient component with the graphic object in the gradient fill layer.
14 8311 CH10 1/15/03 2:36 PM Page 223
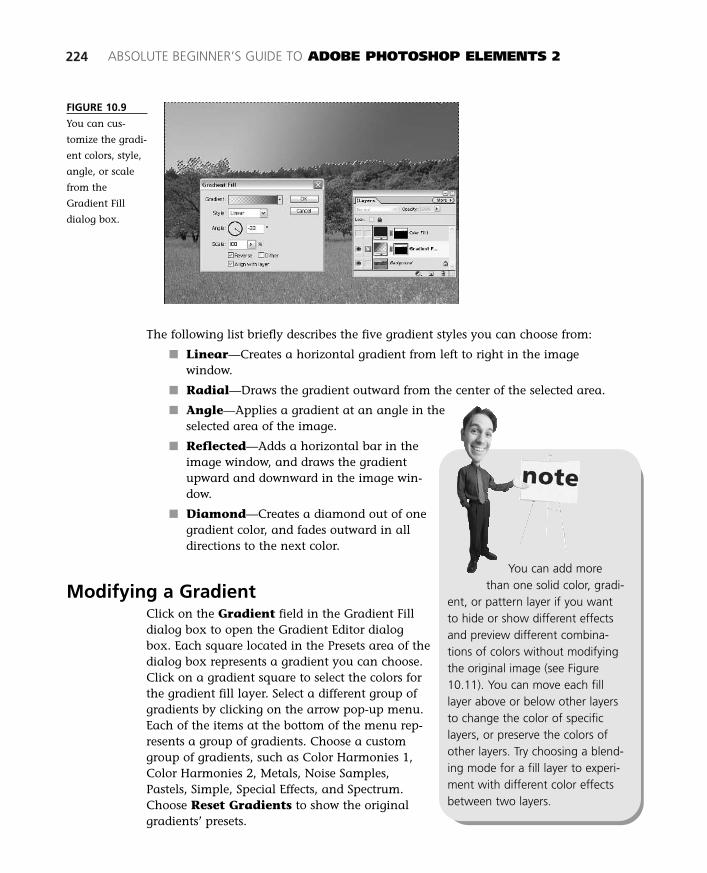
224 ABSOLUTE BEGINNER’S GUIDE TO ADOBE PHOTOSHOP ELEMENTS 2
The following list briefly describes the five gradient styles you can choose from:
■ Linear—Creates a horizontal gradient from left to right in the imagewindow.
■ Radial—Draws the gradient outward from the center of the selected area.
■ Angle—Applies a gradient at an angle in theselected area of the image.
■ Reflected—Adds a horizontal bar in theimage window, and draws the gradientupward and downward in the image win-dow.
■ Diamond—Creates a diamond out of onegradient color, and fades outward in alldirections to the next color.
Modifying a GradientClick on the Gradient field in the Gradient Filldialog box to open the Gradient Editor dialogbox. Each square located in the Presets area of thedialog box represents a gradient you can choose.Click on a gradient square to select the colors forthe gradient fill layer. Select a different group ofgradients by clicking on the arrow pop-up menu.Each of the items at the bottom of the menu rep-resents a group of gradients. Choose a customgroup of gradients, such as Color Harmonies 1,Color Harmonies 2, Metals, Noise Samples,Pastels, Simple, Special Effects, and Spectrum.Choose Reset Gradients to show the originalgradients’ presets.
FIGURE 10.9
You can cus-
tomize the gradi-
ent colors, style,
angle, or scale
from the
Gradient Fill
dialog box.
You can add morethan one solid color, gradi-
ent, or pattern layer if you wantto hide or show different effectsand preview different combina-tions of colors without modifyingthe original image (see Figure10.11). You can move each filllayer above or below other layersto change the color of specificlayers, or preserve the colors ofother layers. Try choosing a blend-ing mode for a fill layer to experi-ment with different color effectsbetween two layers.
14 8311 CH10 1/15/03 2:36 PM Page 224

CHAPTER 10 WORKING WITH LAYERS AND LAYER STYLES 225
Type a name for the gradient into the Name text box. Click on the New button toadd the gradient settings to the Preset area of the Gradient Editor dialog box. Chooseeither Solid or Noise from the Gradient Type drop-down menu. Choose a percent-age value from the Smoothness drop-down menu; a lower value produces a coarserblend of gradient colors.
The selected gradient’s colors appear at the bottom of the Gradient Editor dialog box(see Figure 10.10). Click below the gradient bar to add a new color to the gradient.Click and drag the color slider control to customize each color in the gradient. Clickin the Color box to choose a different color for the gradient. Click on the arrow onthe right side of the Color box to access the Color drop-down menu, and select theForeground, Background, or User Color. Click on one of the square controlslocated above the gradient bar, and customize the Opacity setting for that locationof the gradient. Move the square along the gradient bar to change the location ofthat part of the gradient, or type a different percentage value into the Location textbox. Move the diamond-shaped control in the center of the gradient bar to cus-tomize the Color Midpoint of the gradient. Click OK to save your changes andreturn to the Gradient Fill dialog box.
FIGURE 10.10
Pick a different
gradient or cus-
tomize your gra-
dient colors in
the Gradient
Editor dialog
box.
Pattern Fill LayersYou can create an adjustment fill layer that contains a pattern, too. ChoosePatterns from the Layer, New Fill Layer menu. Type a name for the pattern filllayer, and then click OK. The Pattern Fill dialog box appears. Here you can choose apattern from the Pattern drop-down menu. You can adjust the scale of the patternfile by choosing a percentage from the Scale drop-down list. You can choose fromtwo groups of patterns.
Check the Link with Layer check box if you want the pattern to move along withthe fill layer. Press the Snap to Origin button if you want to set the position of thepattern to match the grid or ruler settings for the image window. Finally, you can saveyour pattern settings by clicking on the New Document icon (white rectangle icon).Click on the OK button to add the pattern fill layer to the active image window.
14 8311 CH10 1/15/03 2:36 PM Page 225

226 ABSOLUTE BEGINNER’S GUIDE TO ADOBE PHOTOSHOP ELEMENTS 2
FIGURE 10.11
Add more than
one gradient fill
layer to experi-
ment with color
changes in the
image window.
Modify a fill
layer by remov-
ing the link
between the fill
and graphic
components in a
layer.
Introducing Adjustment LayersAdjustment layers are similar to fill layers inthat both create modifiable layers in the Layerspalette. Adjustment layers enable you to cus-tomize Levels, Brightness/Contrast,Hue/Saturation, Gradient Map, Invert,Threshold, or Posterize effects with an image inRGB mode without sacrificing any of the originalpixels in the image window.
If you plan to combine two images with dis-parate lighting, you can use adjustment layersto correct the color difference between the twoimages instead of using the same tonal rangetools available in the Enhance menu. The tonalrange tools permanently remove or remap thepixels of the original image. Using an adjustmentlayer enables you to experiment with tonal andcolor corrections without having to worry aboutdegrading the quality of the image. Figure 10.12shows a sample base image to which to applyadjustment layers. Figure 10.13 shows the second-ary image, selected with the Magnetic Lasso Toolbefore it is placed into Figure 10.12.
The selected image in Figure 10.13 was copied to the Clipboard and then pasted intothe background image shown in Figure 10.12. The pasted image appears in its ownnew layer in the Layers palette. You can click and drag the corner handles of thepasted image to scale it to fit with the background image. Choose the Move Toolfrom the Toolbox and place the pasted image in the image window.
tipYou can convert a photo,
graphic, or text into a pat-tern. Open and resize theimage and make it the activeimage window. Chose
Define Pattern from theEdit menu. The Pattern
Name dialog box will open. Type aname for your pattern, and clickOK. Open another image windowand add choose Pattern from theLayer, New Fill Layer menu.Choose your custom pattern fromthe drop-down menu in thePattern Fill dialog box. Your pat-tern will appear in the imagewindow.
14 8311 CH10 1/15/03 2:36 PM Page 226

CHAPTER 10 WORKING WITH LAYERS AND LAYER STYLES 227
FIGURE 10.12
Open an image
file that needs
tonal range
corrections.
FIGURE 10.13
Select and copy
the second
image you want
to combine with
the first image.
The Magnetic
Lasso Tool mar-
quee surrounds
the selection.
The bounding
box appears if
you select the
marquee object
with the Move
Tool.
Making Changes with a Levels Adjustment LayerFor this example, the image needs help with a level adjustment to correct the tonalranges and to bring out the detail in the image. Choose the Levels command fromthe Layer, New Adjustment Layer menu. The Levels dialog box shown in Figure10.14 will open. Click and drag the slider controls to adjust the highlight, midtones,and shadow settings for the RGB image. Then preview the changes in the imagewindow. Like any other layer, an adjustment layer will affect only the layers below itin the Layers palette. If you want an adjustment layer to affect all layers in theimage, move the adjustment layer to the top of the Layers palette. Similarly, you canexclude layers from the adjustment layer by moving them up, positioned above theadjustment layer.
14 8311 CH10 1/15/03 2:36 PM Page 227
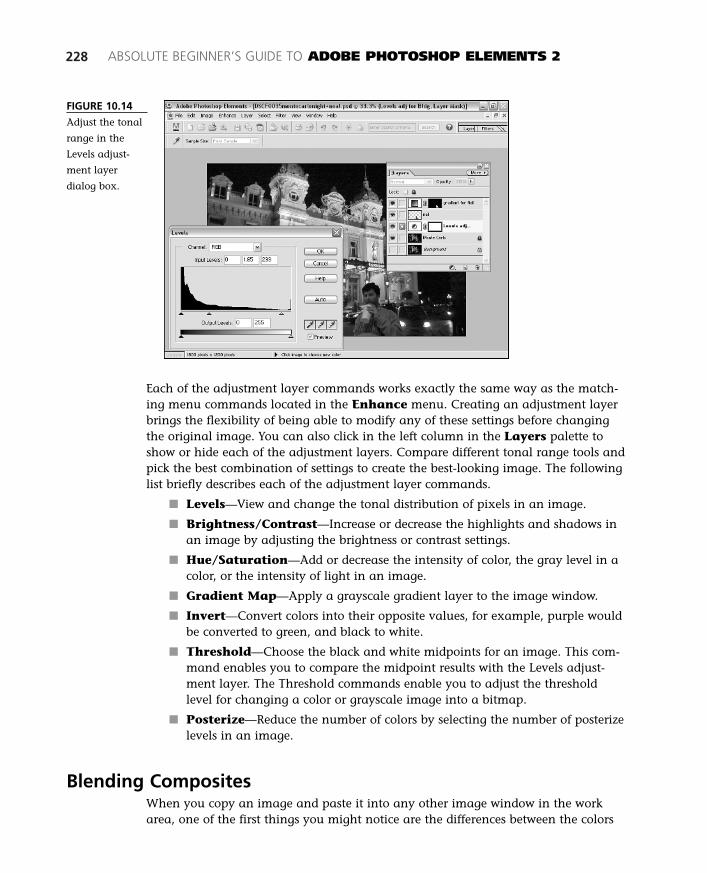
228 ABSOLUTE BEGINNER’S GUIDE TO ADOBE PHOTOSHOP ELEMENTS 2
FIGURE 10.14
Adjust the tonal
range in the
Levels adjust-
ment layer
dialog box.
Each of the adjustment layer commands works exactly the same way as the match-ing menu commands located in the Enhance menu. Creating an adjustment layerbrings the flexibility of being able to modify any of these settings before changingthe original image. You can also click in the left column in the Layers palette toshow or hide each of the adjustment layers. Compare different tonal range tools andpick the best combination of settings to create the best-looking image. The followinglist briefly describes each of the adjustment layer commands.
■ Levels—View and change the tonal distribution of pixels in an image.
■ Brightness/Contrast—Increase or decrease the highlights and shadows inan image by adjusting the brightness or contrast settings.
■ Hue/Saturation—Add or decrease the intensity of color, the gray level in acolor, or the intensity of light in an image.
■ Gradient Map—Apply a grayscale gradient layer to the image window.
■ Invert—Convert colors into their opposite values, for example, purple wouldbe converted to green, and black to white.
■ Threshold—Choose the black and white midpoints for an image. This com-mand enables you to compare the midpoint results with the Levels adjust-ment layer. The Threshold commands enable you to adjust the thresholdlevel for changing a color or grayscale image into a bitmap.
■ Posterize—Reduce the number of colors by selecting the number of posterizelevels in an image.
Blending CompositesWhen you copy an image and paste it into any other image window in the workarea, one of the first things you might notice are the differences between the colors
14 8311 CH10 1/15/03 2:36 PM Page 228

of the two images. You can use the Move Tool toadjust the scale and location of the compositeimage. However, because each image can haveunique color and light characteristics, it wouldbe difficult to apply a levels or color correctioncommand to change both images at the sametime. Fortunately, you can add a fill or adjust-ment layer to correct any subtle color differencesbetween the two images.
When an image is pasted into an image win-dow, Photoshop Elements creates a transparentlayer containing the pasted or composite image.You can ignore the transparent areas in theimage layer by holding down the (Command)[Ctrl] key while selecting the layer. The imagewill be surrounded by a selection marquee.Alternatively, you can select the layer and click on the Transparency Lock icon toprevent any of the transparent areas from being modified in that image layer.
Now, if you add a new fill or adjustment layer, it will be applied only to the selectedarea in the image window. Figure 10.15 shows the before and after image of addinga gradient fill layer to the secondary image. The gradient fill layer contains a few ofthe colors in the background image. In this particular example, the pasted imagewas taken under fluorescent light.
CHAPTER 10 WORKING WITH LAYERS AND LAYER STYLES 229
tipMost of the adjustment
layers can quickly be modi-fied if you double-click onthe adjustment layer fromthe Layers palette. You can
also click on a layer andthen choose the Layer
Content Options command fromthe Layer menu to modify anadjustment layer.
FIGURE 10.15
Select the object
in a graphic
layer by holding
down the
(Command)
[Ctrl] key and
clicking on the
layer. Then
choose the fill or
adjustment layer
you want to
apply to the
selected layer.
Adding the gradient fill layer, and reducing the opacity level of the gradient, enablesthe image to share some of the same colors of the background image, creating avery subtle color blending effect in the composite image. Figure 10.16 shows finalblending mode and opacity settings for the gradient fill layer.
14 8311 CH10 1/15/03 2:36 PM Page 229
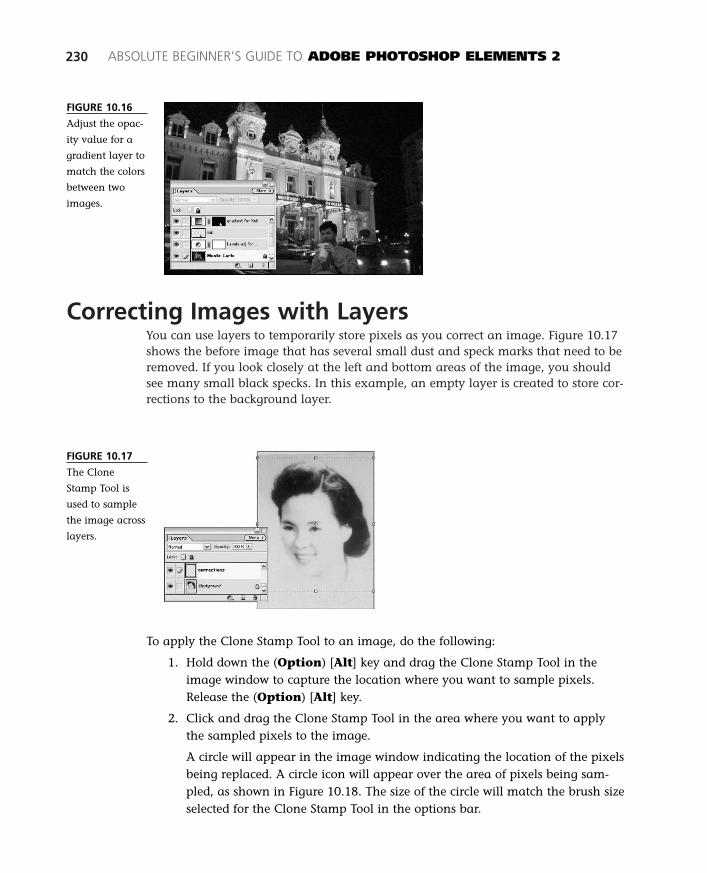
Correcting Images with LayersYou can use layers to temporarily store pixels as you correct an image. Figure 10.17shows the before image that has several small dust and speck marks that need to beremoved. If you look closely at the left and bottom areas of the image, you shouldsee many small black specks. In this example, an empty layer is created to store cor-rections to the background layer.
230 ABSOLUTE BEGINNER’S GUIDE TO ADOBE PHOTOSHOP ELEMENTS 2
FIGURE 10.16
Adjust the opac-
ity value for a
gradient layer to
match the colors
between two
images.
FIGURE 10.17
The Clone
Stamp Tool is
used to sample
the image across
layers.
To apply the Clone Stamp Tool to an image, do the following:
1. Hold down the (Option) [Alt] key and drag the Clone Stamp Tool in theimage window to capture the location where you want to sample pixels.Release the (Option) [Alt] key.
2. Click and drag the Clone Stamp Tool in the area where you want to applythe sampled pixels to the image.
A circle will appear in the image window indicating the location of the pixelsbeing replaced. A circle icon will appear over the area of pixels being sam-pled, as shown in Figure 10.18. The size of the circle will match the brush sizeselected for the Clone Stamp Tool in the options bar.
14 8311 CH10 1/15/03 2:36 PM Page 230

CHAPTER 10 WORKING WITH LAYERS AND LAYER STYLES 231
3. Click on the correction layer in the Layers palette. Sample and apply theClone Stamp Tool in small areas of the image window until the dust andspecks are cleared away from the image window as shown in Figure 10.19.
FIGURE 10.18
Zoom into the
image and
apply the Clone
Stamp Tool to
remove dirt or
dust from the
photo.
Clone Stamp Tool Sampled area
Applied area
FIGURE 10.19
Choose the
Overlay blend-
ing mode to pre-
view your
corrections over
the original
photo.
14 8311 CH10 1/15/03 2:36 PM Page 231
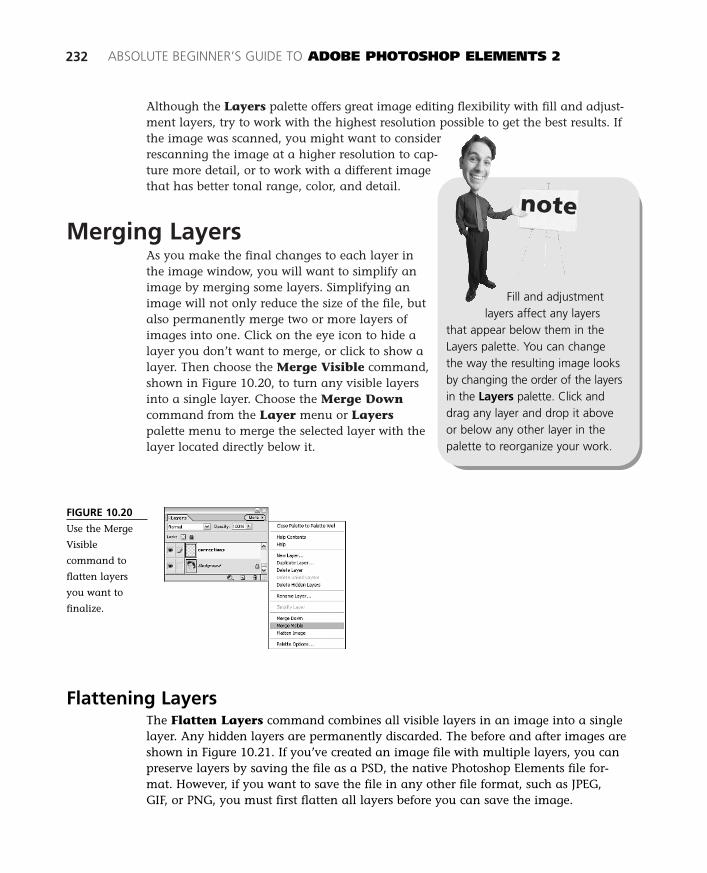
Although the Layers palette offers great image editing flexibility with fill and adjust-ment layers, try to work with the highest resolution possible to get the best results. Ifthe image was scanned, you might want to considerrescanning the image at a higher resolution to cap-ture more detail, or to work with a different imagethat has better tonal range, color, and detail.
Merging LayersAs you make the final changes to each layer inthe image window, you will want to simplify animage by merging some layers. Simplifying animage will not only reduce the size of the file, butalso permanently merge two or more layers ofimages into one. Click on the eye icon to hide alayer you don’t want to merge, or click to show alayer. Then choose the Merge Visible command,shown in Figure 10.20, to turn any visible layersinto a single layer. Choose the Merge Downcommand from the Layer menu or Layerspalette menu to merge the selected layer with thelayer located directly below it.
232 ABSOLUTE BEGINNER’S GUIDE TO ADOBE PHOTOSHOP ELEMENTS 2
Fill and adjustmentlayers affect any layers
that appear below them in theLayers palette. You can changethe way the resulting image looksby changing the order of the layersin the Layers palette. Click anddrag any layer and drop it aboveor below any other layer in thepalette to reorganize your work.
FIGURE 10.20
Use the Merge
Visible
command to
flatten layers
you want to
finalize.
Flattening LayersThe Flatten Layers command combines all visible layers in an image into a singlelayer. Any hidden layers are permanently discarded. The before and after images areshown in Figure 10.21. If you’ve created an image file with multiple layers, you canpreserve layers by saving the file as a PSD, the native Photoshop Elements file for-mat. However, if you want to save the file in any other file format, such as JPEG,GIF, or PNG, you must first flatten all layers before you can save the image.
14 8311 CH10 1/15/03 2:36 PM Page 232
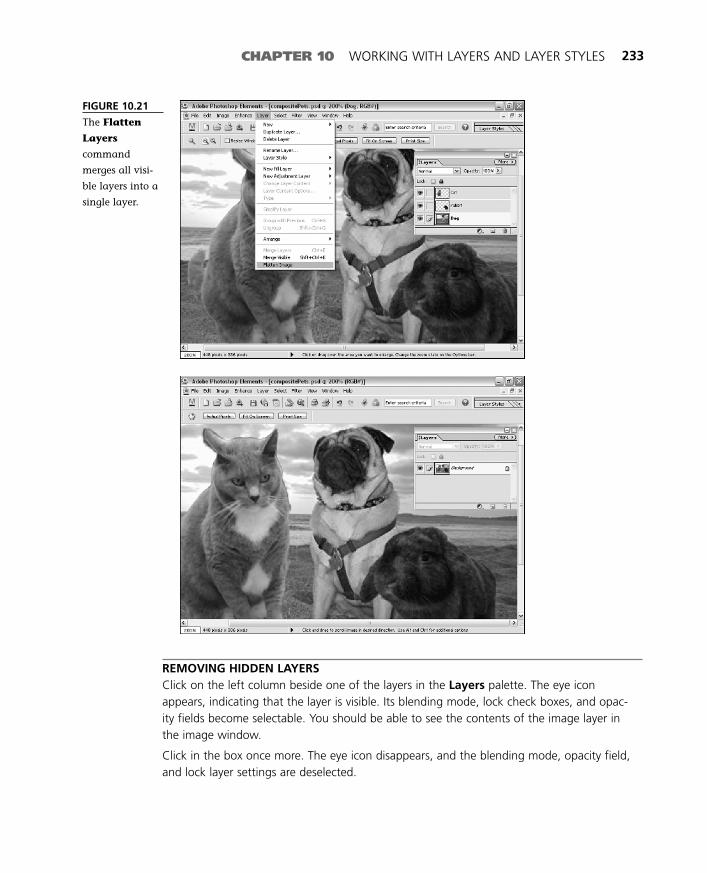
CHAPTER 10 WORKING WITH LAYERS AND LAYER STYLES 233
FIGURE 10.21
The Flatten
Layers
command
merges all visi-
ble layers into a
single layer.
REMOVING HIDDEN LAYERSClick on the left column beside one of the layers in the Layers palette. The eye iconappears, indicating that the layer is visible. Its blending mode, lock check boxes, and opac-ity fields become selectable. You should be able to see the contents of the image layer inthe image window.
Click in the box once more. The eye icon disappears, and the blending mode, opacity field,and lock layer settings are deselected.
14 8311 CH10 1/15/03 2:37 PM Page 233

Choose Merge Layers. All visible layers will be merged into a single layer. If any layers arehidden in the Layers palette, they will be permanently discarded from the image file whenthe Flatten Layers command is executed.
If you accidentally select this command beforeclosing the image window, you can chooseUndo from the Edit menu to restore any layers.Alternatively, you can open the History paletteand click on a previous state to revert the docu-ment and show any layers you want to preserve.
234 ABSOLUTE BEGINNER’S GUIDE TO ADOBE PHOTOSHOP ELEMENTS 2
tipTo preserve a layer in a file,
hide a layer in the Layerspalette, and then choose theMerge Visible commandfrom the Layer menu. Only
images appearing in theimage window will be
combined into a single layer. Youcan use the Hide Layer commandto preserve changes you’re notquite ready to save along with therest of the image.
14 8311 CH10 1/15/03 2:37 PM Page 234

In this chapter
• Introducing the Type Tool
• Adding Graphics to an Image
• Variations—Creating Signs with Drawing andPainting Tools
• Creating Transparent Text
• Modifying Custom Shapes
11
Adding Text and Shapes
to Images
To most people, the terms photos, images, and graphics seem synony-
mous. However, some people use the term graphics to refer to text or
hand-drawn vector or bitmap graphics. Photos created with a camera
or scanner are considered images, not graphics. Whatever term you
might prefer, Photoshop Elements enables you to create, edit, and
delete graphics, images, and photos.
This chapter shows you how to create fabulous-looking horizontal and
vertical text and create stunning text-shaped masks using the Horizontal
or Vertical Type and Type Mask tools with, of course, your favorite
photo. You’ll also find out how to format text and create special effects
with the Warp Text Tool. And you’ll learn how to create and modify
graphics with the Pencil, Brush, and Shape tools.
15 8311 CH11 1/15/03 3:11 PM Page 235
Introducing the Type ToolAdobe uses the term type to describe what you and I call text. Type refers to a set ofalpha, numeric, and symbolic characters that can be defined as a typeface, which issynonymous with the term font family, or font. The most commonly used formats fortypefaces are PostScript and TrueType.
Photoshop Elements enables you to enter text horizontally or vertically in an imagewindow. You can also create a type mask with the Horizontal and Vertical TypeMask tools. All four Type tools share one location in the Toolbox. You can press theletter T to select this tool, or hold down the Shift key and press T to cycle througheach Type tool. You can also use the mouse to select any of the Type tools from theToolbox.
Type tools create vector graphics—each character of text is drawn with a mathemati-cal algorithm. The Type tools enable you to format text as vector graphics. You cancustomize the font family, font style, and font size, as well as choose from a small setof layout options and one or two special effects. I refer to these tools using the gen-eral term Type Tool or Type Mask Tool. You can use any of these tools to add text to aphoto. You can convert vector type into a bitmap by choosing Simplify Layer fromthe Layer menu. This command rasterizes the vector into a bitmap. If you want toapply a filter or an effect to text, you must first simplify or rasterize the vector textinto bitmap.
The Horizontal and Vertical Type Mask Tools enable you to create a text-shapedmask on an image layer. The marching ants or a rubylith color that borders a selec-tion area defines the Type mask. The pixels within the marching ants or pixels thatare not covered by the rubylith color can be modified, but the ones outside themarching ants cannot. To create a Horizontal or Vertical Type Mask, perform the fol-lowing steps:
1. Choose the Vertical Type Mask Tool from the Toolbox. Select a font family,style, and size from the options bar.
2. Click in the image window and type one or two letters on the keyboard.Marching ants should appear around each letter thatVertical Type Mask Toolsappears in the image window.
3. Click on the check button in the options bar to complete the mask. Then clickon a selection such as the Rectangular Marquee Tool. If you like the selectionthe way it is, copy and paste it to place the masked text-shaped image into anew layer.
4. Use the Move tool if you want to transform, rotate, or move the mask in theimage window. Select one of the selection tools, such as the Rectangular
236 ABSOLUTE BEGINNER’S GUIDE TO ADOBE PHOTOSHOP ELEMENTS 2
15 8311 CH11 1/15/03 3:11 PM Page 236
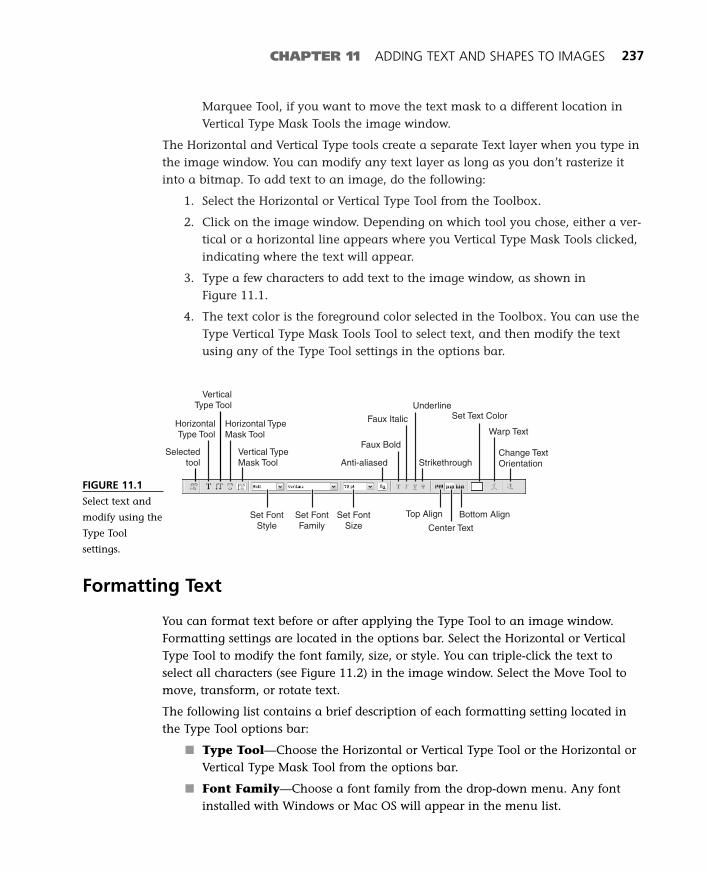
Marquee Tool, if you want to move the text mask to a different location inVertical Type Mask Tools the image window.
The Horizontal and Vertical Type tools create a separate Text layer when you type inthe image window. You can modify any text layer as long as you don’t rasterize itinto a bitmap. To add text to an image, do the following:
1. Select the Horizontal or Vertical Type Tool from the Toolbox.
2. Click on the image window. Depending on which tool you chose, either a ver-tical or a horizontal line appears where you Vertical Type Mask Tools clicked,indicating where the text will appear.
3. Type a few characters to add text to the image window, as shown inFigure 11.1.
4. The text color is the foreground color selected in the Toolbox. You can use theType Vertical Type Mask Tools Tool to select text, and then modify the textusing any of the Type Tool settings in the options bar.
CHAPTER 11 ADDING TEXT AND SHAPES TO IMAGES 237
Selected tool
Horizontal Type Tool
VerticalType Tool
Horizontal TypeMask Tool
Vertical TypeMask Tool
Set FontStyle
Set Font Family
Set Font Size
Anti-aliased
Faux Bold
Faux Italic
Strikethrough
Underline
Top Align
Center Text
Bottom Align
Set Text Color
Warp Text
Change Text Orientation
FIGURE 11.1
Select text and
modify using the
Type Tool
settings.
Formatting Text
You can format text before or after applying the Type Tool to an image window.Formatting settings are located in the options bar. Select the Horizontal or VerticalType Tool to modify the font family, size, or style. You can triple-click the text toselect all characters (see Figure 11.2) in the image window. Select the Move Tool tomove, transform, or rotate text.
The following list contains a brief description of each formatting setting located inthe Type Tool options bar:
■ Type Tool—Choose the Horizontal or Vertical Type Tool or the Horizontal orVertical Type Mask Tool from the options bar.
■ Font Family—Choose a font family from the drop-down menu. Any fontinstalled with Windows or Mac OS will appear in the menu list.
15 8311 CH11 1/15/03 3:11 PM Page 237

238 ABSOLUTE BEGINNER’S GUIDE TO ADOBE PHOTOSHOP ELEMENTS 2
FIGURE 11.2
Choose a font
style from the
drop-down
menu in the
Type Tool’s
options bar.
■ Font Size—Font sizes appear in points. Smaller numbers represent a smallersize font; larger numbers represent larger fonts. You can also use theTransform and Move tools to enlarge text beyond the numbers in the menulist.
■ Font Style—Add a bold, italicized, or bold italicized font style to a font,or remove styles by choosing Regular. The font style menu is shown inFigure 11.2.
■ Anti-aliased—Smooth the edges of a font by checking this check box.
■ Faux Bold and Faux Italic—If a font family doesn’t have a bold or italicdesign, Photoshop Elements can create these font styles.
■ Underline, Strikethrough—Add orremove underline or strikethrough stylesto the selected type characters.
■ Align Text—Align the text object to theleft, center, or right of its location in theimage window.
■ Text Color—Click in this magical squareto select the color for any of the Typetools.
■ Warp Text Tool—Add special effects tothe text by choosing or customizing set-tings in the Warp Text dialog box.
■ Text Orientation—Draw the text hori-zontally or vertically in the image window.
tipYou can measure text by
choosing View, Rulers(Command-R) [Ctrl+R].Double-click a ruler to openthe Units & Rulers prefer-
ences dialog box. (Ctrl-click) [Right+click] to
change the measurement value ofthe rulers.
15 8311 CH11 1/15/03 3:11 PM Page 238
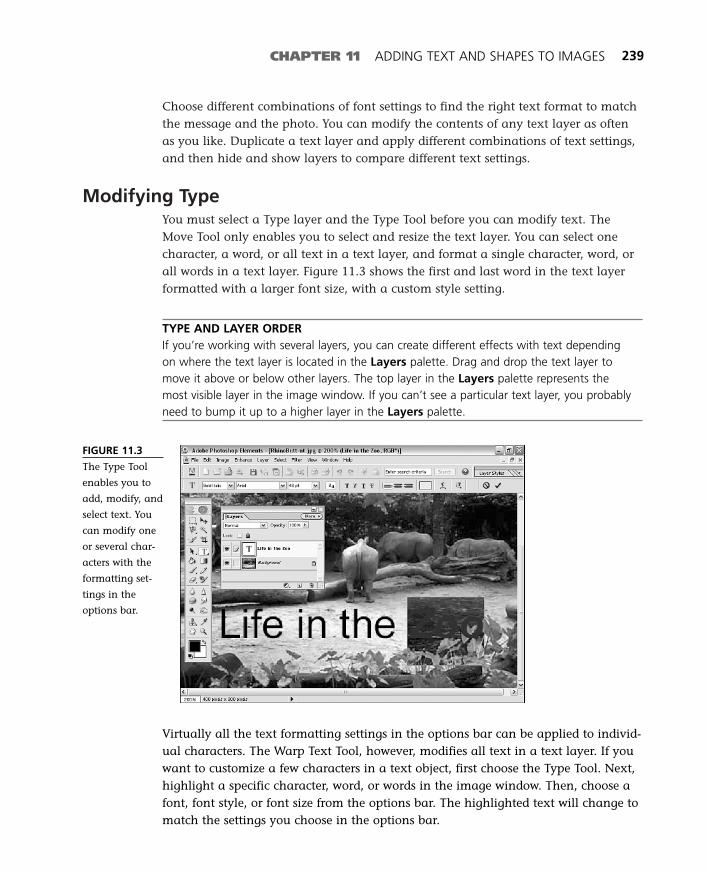
Choose different combinations of font settings to find the right text format to matchthe message and the photo. You can modify the contents of any text layer as oftenas you like. Duplicate a text layer and apply different combinations of text settings,and then hide and show layers to compare different text settings.
Modifying TypeYou must select a Type layer and the Type Tool before you can modify text. TheMove Tool only enables you to select and resize the text layer. You can select onecharacter, a word, or all text in a text layer, and format a single character, word, orall words in a text layer. Figure 11.3 shows the first and last word in the text layerformatted with a larger font size, with a custom style setting.
TYPE AND LAYER ORDERIf you’re working with several layers, you can create different effects with text dependingon where the text layer is located in the Layers palette. Drag and drop the text layer tomove it above or below other layers. The top layer in the Layers palette represents themost visible layer in the image window. If you can’t see a particular text layer, you probablyneed to bump it up to a higher layer in the Layers palette.
CHAPTER 11 ADDING TEXT AND SHAPES TO IMAGES 239
FIGURE 11.3
The Type Tool
enables you to
add, modify, and
select text. You
can modify one
or several char-
acters with the
formatting set-
tings in the
options bar.
Virtually all the text formatting settings in the options bar can be applied to individ-ual characters. The Warp Text Tool, however, modifies all text in a text layer. If youwant to customize a few characters in a text object, first choose the Type Tool. Next,highlight a specific character, word, or words in the image window. Then, choose afont, font style, or font size from the options bar. The highlighted text will change tomatch the settings you choose in the options bar.
15 8311 CH11 1/15/03 3:11 PM Page 239
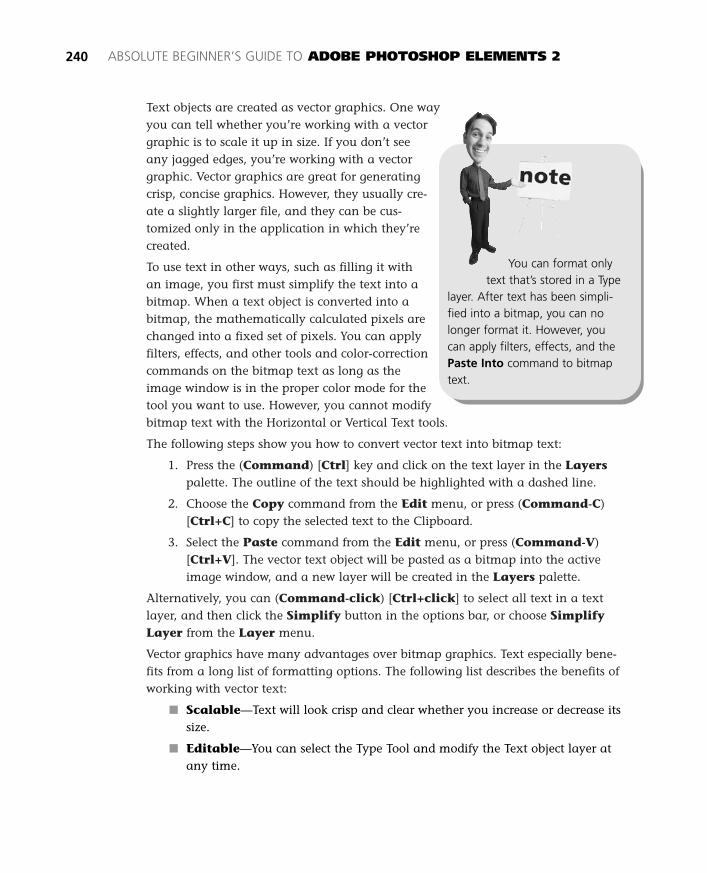
Text objects are created as vector graphics. One wayyou can tell whether you’re working with a vectorgraphic is to scale it up in size. If you don’t seeany jagged edges, you’re working with a vectorgraphic. Vector graphics are great for generatingcrisp, concise graphics. However, they usually cre-ate a slightly larger file, and they can be cus-tomized only in the application in which they’recreated.
To use text in other ways, such as filling it withan image, you first must simplify the text into abitmap. When a text object is converted into abitmap, the mathematically calculated pixels arechanged into a fixed set of pixels. You can applyfilters, effects, and other tools and color-correctioncommands on the bitmap text as long as theimage window is in the proper color mode for thetool you want to use. However, you cannot modifybitmap text with the Horizontal or Vertical Text tools.
The following steps show you how to convert vector text into bitmap text:
1. Press the (Command) [Ctrl] key and click on the text layer in the Layerspalette. The outline of the text should be highlighted with a dashed line.
2. Choose the Copy command from the Edit menu, or press (Command-C)[Ctrl+C] to copy the selected text to the Clipboard.
3. Select the Paste command from the Edit menu, or press (Command-V)[Ctrl+V]. The vector text object will be pasted as a bitmap into the activeimage window, and a new layer will be created in the Layers palette.
Alternatively, you can (Command-click) [Ctrl+click] to select all text in a textlayer, and then click the Simplify button in the options bar, or choose SimplifyLayer from the Layer menu.
Vector graphics have many advantages over bitmap graphics. Text especially bene-fits from a long list of formatting options. The following list describes the benefits ofworking with vector text:
■ Scalable—Text will look crisp and clear whether you increase or decrease itssize.
■ Editable—You can select the Type Tool and modify the Text object layer atany time.
240 ABSOLUTE BEGINNER’S GUIDE TO ADOBE PHOTOSHOP ELEMENTS 2
You can format onlytext that’s stored in a Type
layer. After text has been simpli-fied into a bitmap, you can nolonger format it. However, youcan apply filters, effects, and thePaste Into command to bitmaptext.
15 8311 CH11 1/15/03 3:11 PM Page 240
■ Filters and effects—You can drag anddrop a filter or an effect onto the textobject to blur, sharpen, or texturize it, orgive it an artistic look. When a filter oran effect is applied to a text object, thattext is permanently converted into abitmap.
■ Layer Styles—You can drag and drop alayer style onto a text object to give it athree-dimensional look, or to add otherspiffy effects. Layer styles can turn two-dimensional text into professional-look-ing, Web-ready graphics. If you drag anddrop a layer style onto a text object, thetext is converted into a bitmap graphic.
BITMAP TEXT AND THE PASTE INTO COMMANDConvert a vector text object, which is the default state of a text object, into a bitmap bycopying and pasting the vector text into the image window. First (Command-click)[Ctrl+click] on the text layer to select each character in the text layer. The highlight shouldsurround each letter in the text layer. Then choose Copy from the Edit menu, or press(Command-C) [Ctrl+C] to copy the image to the Clipboard. Then choose the Paste com-mand from the Edit menu to create a new layer containing the bitmap text.
The letter T will appear as the thumbnail image for a vector text layer, regardless of the textin the layer. A tiny image of the bitmap text object will appear as the thumbnail image fora bitmap text layer. After you create the bitmap text layer, you might want to hide the vec-tor text layer so that only the bitmap text appears in the image window. Click in the leftbox beside the vector layer. The eye icon should disappear from the box, indicating that thelayer is hidden from the image window.
After you’ve converted the text object to a bitmap, you can copy an image onto theClipboard. Open a new image file, and then use a selection tool to select all or part of theimage in the image window. Then choose the Copy command from the Edit menu, orpress (Command-C) [Ctrl+C] to copy the selected image to the Clipboard.
Next, select the bitmap text by (Command-clicking) [Ctrl+clicking] on the bitmap textlayer in the Layers palette. Then choose the Paste Into command from the Edit menu topaste the image from the Clipboard into the bitmap text object. The image will appear ineach character of the selected text object.
CHAPTER 11 ADDING TEXT AND SHAPES TO IMAGES 241
tipDrag and drop a Bevel
layer style onto a text objectto give it a three-dimensionallook. When a layer style isadded to a layer, an f icon
appears on the right side ofthe layer. Double-click on
the f icon in the text layer to cus-tomize the bevel settings in theStyle Settings dialog box.
15 8311 CH11 1/15/03 3:11 PM Page 241
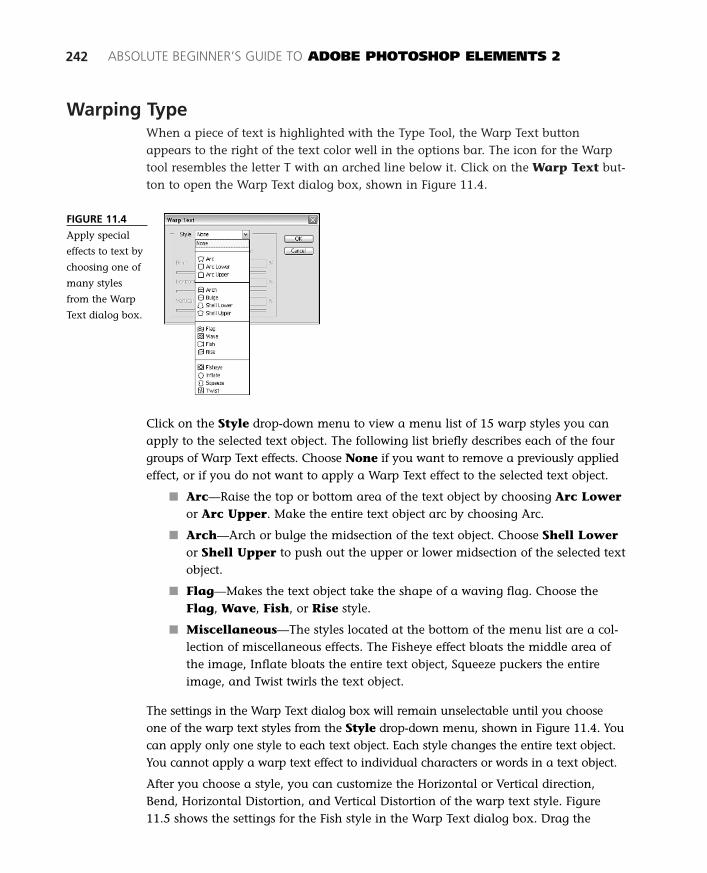
Warping TypeWhen a piece of text is highlighted with the Type Tool, the Warp Text buttonappears to the right of the text color well in the options bar. The icon for the Warptool resembles the letter T with an arched line below it. Click on the Warp Text but-ton to open the Warp Text dialog box, shown in Figure 11.4.
242 ABSOLUTE BEGINNER’S GUIDE TO ADOBE PHOTOSHOP ELEMENTS 2
FIGURE 11.4
Apply special
effects to text by
choosing one of
many styles
from the Warp
Text dialog box.
Click on the Style drop-down menu to view a menu list of 15 warp styles you canapply to the selected text object. The following list briefly describes each of the fourgroups of Warp Text effects. Choose None if you want to remove a previously appliedeffect, or if you do not want to apply a Warp Text effect to the selected text object.
■ Arc—Raise the top or bottom area of the text object by choosing Arc Loweror Arc Upper. Make the entire text object arc by choosing Arc.
■ Arch—Arch or bulge the midsection of the text object. Choose Shell Loweror Shell Upper to push out the upper or lower midsection of the selected textobject.
■ Flag—Makes the text object take the shape of a waving flag. Choose theFlag, Wave, Fish, or Rise style.
■ Miscellaneous—The styles located at the bottom of the menu list are a col-lection of miscellaneous effects. The Fisheye effect bloats the middle area ofthe image, Inflate bloats the entire text object, Squeeze puckers the entireimage, and Twist twirls the text object.
The settings in the Warp Text dialog box will remain unselectable until you chooseone of the warp text styles from the Style drop-down menu, shown in Figure 11.4. Youcan apply only one style to each text object. Each style changes the entire text object.You cannot apply a warp text effect to individual characters or words in a text object.
After you choose a style, you can customize the Horizontal or Vertical direction,Bend, Horizontal Distortion, and Vertical Distortion of the warp text style. Figure11.5 shows the settings for the Fish style in the Warp Text dialog box. Drag the
15 8311 CH11 1/15/03 3:11 PM Page 242
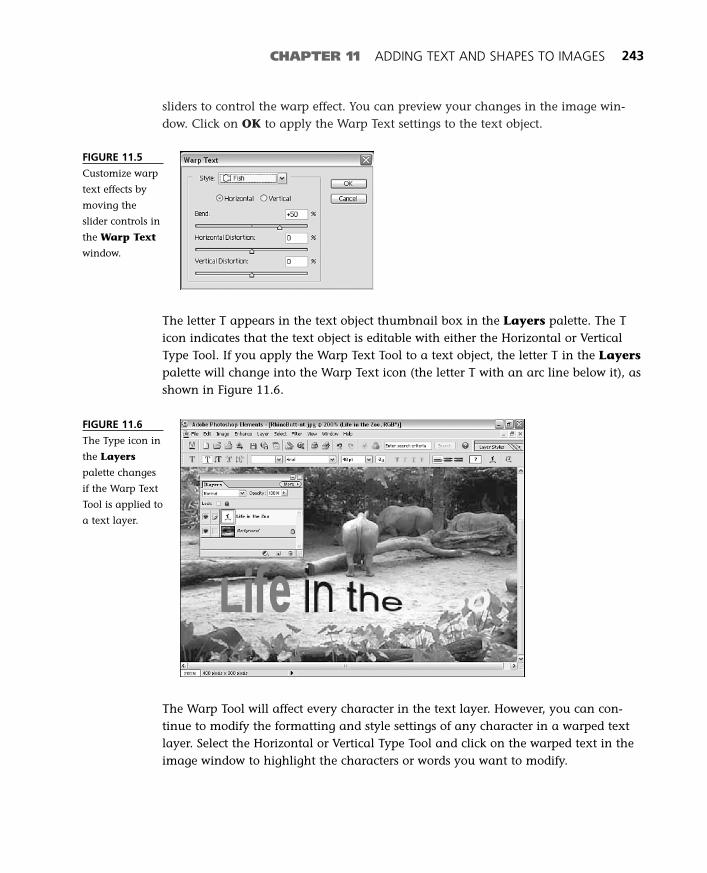
sliders to control the warp effect. You can preview your changes in the image win-dow. Click on OK to apply the Warp Text settings to the text object.
CHAPTER 11 ADDING TEXT AND SHAPES TO IMAGES 243
FIGURE 11.5
Customize warp
text effects by
moving the
slider controls in
the Warp Text
window.
The letter T appears in the text object thumbnail box in the Layers palette. The Ticon indicates that the text object is editable with either the Horizontal or VerticalType Tool. If you apply the Warp Text Tool to a text object, the letter T in the Layerspalette will change into the Warp Text icon (the letter T with an arc line below it), asshown in Figure 11.6.
FIGURE 11.6
The Type icon in
the Layers
palette changes
if the Warp Text
Tool is applied to
a text layer.
The Warp Tool will affect every character in the text layer. However, you can con-tinue to modify the formatting and style settings of any character in a warped textlayer. Select the Horizontal or Vertical Type Tool and click on the warped text in theimage window to highlight the characters or words you want to modify.
15 8311 CH11 1/15/03 3:11 PM Page 243

244 ABSOLUTE BEGINNER’S GUIDE TO ADOBE PHOTOSHOP ELEMENTS 2
Adding Graphics to an ImageIn addition to all the fabulous bitmap-editing tools, Photoshop Elements enables youto create custom graphics with brush and shape tools. Brush tools, such as the Brushand Airbrush tools, enable you to apply a custom brush type, size, and customizeoptions, such as spacing, color jitter, hardness, scatter, roundness, and angle, andalso toggle tablet support. The shape tools enable you to add vector-based geometricshapes to the image window.
Introducing Brush ToolsThe Brush, Impressionist Brush, and Pencil tools are the three kinds of brush toolsavailable in the Toolbox (see Figure 11.7). Each of these tools enables you to drawfreeform in the image window. Click on a tool to view its option settings on theoptions bar. The Brush and Pencil have custom brush settings, blending modes, andopacity settings. The Airbrush is available as a custom setting on the Brush Tooloptions bar. The Sponge, Smudge, Dodge, and Burn tools have brush, blendingmode, and pressure settings, but no opacity setting, in the options bar. Click anddrag the cursor in the image window to apply the foreground color to the selectedlayer in the Layers palette.
FIGURE 11.7
Each brush tool
applies color in
a slightly differ-
ent way.
ImpressionistBrush Tool
Dodge Tool
Smudge Tool
SpongeTool
PencilTool
AirbrushBrush Tool
BurnTool
15 8311 CH11 1/15/03 3:11 PM Page 244

CHAPTER 11 ADDING TEXT AND SHAPES TO IMAGES 245
The Brush Tool has a wide selection of brushes available. Experiment with differentbrush sizes in addition to different types of brushes, such as hard-edge and soft-edgebrushes. The following list summarizes how each of the paint tools and the EraserTool work:
■ Impressionist Brush—Blend pixels using Style, Area, and Tolerance brushoptions to customize the impressionist effect in this tool. Choose from 10styles. Type the number of pixels you want the brush to affect, and set the tol-erance to determine the range of colors.
■ Airbrush—A spray effect is created with this paint tool. The longer you leavethis tool over the image window, the darker the foreground color will becomein the image window. Click the Airbrush button and adjust the Color Jitterand Scatter settings in the More Options drop-down menu in the Brush Tooloptions bar to bring the Airbrush to life.
■ Brush—Creates a pressure-sensitive stroke of color to the selected layer. Setspacing to 25% and roundness to 100% (all other settings to zero in the MoreOptions drop-down window) to create a standard brush stroke. Choose a soft-edge brush.
■ Pencil—Creates a hard-edge, single-pixelstroke by default. Choose from a full rangeof brush types and sizes.
■ Eraser—Applies the background color tothe image window. The Magic Eraserdeletes the first color you click on in theimage window. You also can use the MagicErase Tool to change pixels to the back-ground color, erase to transparency, orerase contiguous or all similar pixels in alayer. The Background Eraser removes allcolor from the layer or layers.
Each paint tool has several settings you can cus-tomize in the options bar. Select one of the painttools from the Toolbox. Then view each of the set-tings in the options bar. The following list brieflydescribes each paint tool setting:
■ Brush—Choose a brush size and stylefrom the drop-down menu. The numberbelow each brush indicates the number ofpixels that are in that brush tip. You cancustomize the hardness, angle, spacing,
Although you can’tdraw or paint with the
Eraser Tool like you can with theBrush, Pencil, or Airbrush tools,you can use the Eraser Tool toremove any strokes created by thebrush and drawing tools. In fact,you can customize the mode ofthe Eraser Tool to match the set-tings in the Brush, Airbrush, orPencil tools by choosing one ofthese tools from the Eraser Tool’sMode drop-down menu, locatedin the options bar.
15 8311 CH11 1/15/03 3:11 PM Page 245
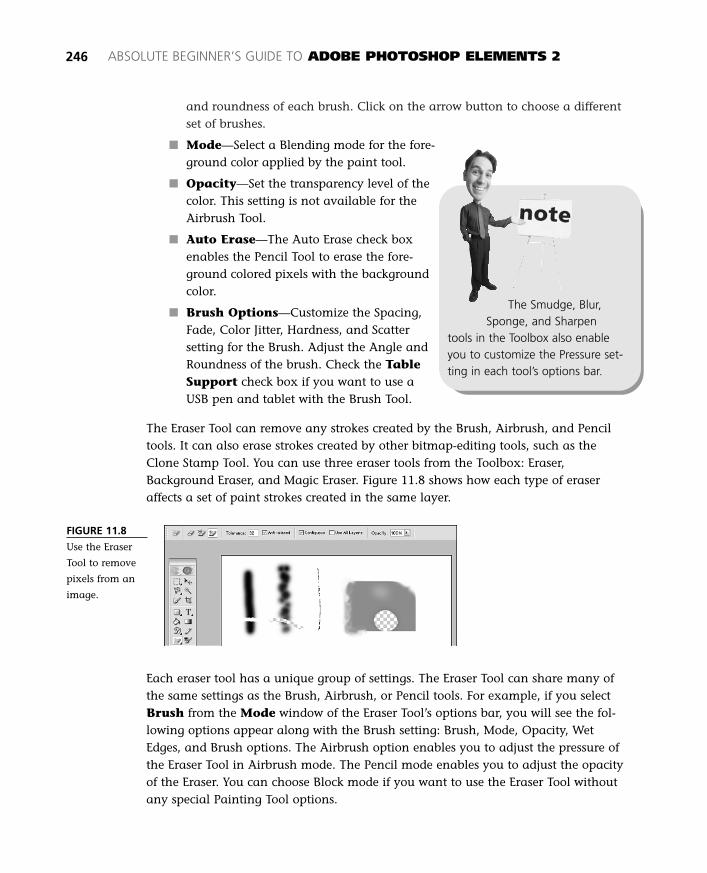
and roundness of each brush. Click on the arrow button to choose a differentset of brushes.
■ Mode—Select a Blending mode for the fore-ground color applied by the paint tool.
■ Opacity—Set the transparency level of thecolor. This setting is not available for theAirbrush Tool.
■ Auto Erase—The Auto Erase check boxenables the Pencil Tool to erase the fore-ground colored pixels with the backgroundcolor.
■ Brush Options—Customize the Spacing,Fade, Color Jitter, Hardness, and Scattersetting for the Brush. Adjust the Angle andRoundness of the brush. Check the TableSupport check box if you want to use aUSB pen and tablet with the Brush Tool.
The Eraser Tool can remove any strokes created by the Brush, Airbrush, and Penciltools. It can also erase strokes created by other bitmap-editing tools, such as theClone Stamp Tool. You can use three eraser tools from the Toolbox: Eraser,Background Eraser, and Magic Eraser. Figure 11.8 shows how each type of eraseraffects a set of paint strokes created in the same layer.
246 ABSOLUTE BEGINNER’S GUIDE TO ADOBE PHOTOSHOP ELEMENTS 2
The Smudge, Blur,Sponge, and Sharpen
tools in the Toolbox also enableyou to customize the Pressure set-ting in each tool’s options bar.
FIGURE 11.8
Use the Eraser
Tool to remove
pixels from an
image.
Each eraser tool has a unique group of settings. The Eraser Tool can share many ofthe same settings as the Brush, Airbrush, or Pencil tools. For example, if you selectBrush from the Mode window of the Eraser Tool’s options bar, you will see the fol-lowing options appear along with the Brush setting: Brush, Mode, Opacity, WetEdges, and Brush options. The Airbrush option enables you to adjust the pressure ofthe Eraser Tool in Airbrush mode. The Pencil mode enables you to adjust the opacityof the Eraser. You can choose Block mode if you want to use the Eraser Tool withoutany special Painting Tool options.
15 8311 CH11 1/15/03 3:11 PM Page 246

CHAPTER 11 ADDING TEXT AND SHAPES TO IMAGES 247
The following list briefly describes each of the settings of the Background Eraser Tool:
■ Brush—Select a brush size from the drop-down menu.
■ Limits—Choose either Discontiguous to erase the sampled color only, orContiguous to erase connected areas of sampled color.
■ Tolerance—Drag the slider control or type a value into the text box toadjust how much color is erased from the path of the tool.
■ Brush Options—Set the Size and Tolerance settings for the selected brush.
The following list briefly describes the Magic Eraser Tool’s settings:
■ Tolerance—Enables you to customize the amount of color removed from theselected layer.
■ Anti-aliased—Smoothes the edges of the erased colors.
■ Contiguous—Erases only pixels similar to the color you initially sample.
■ Use All Layers—Deletes colors and pixels across layers in the image win-dow.
■ Opacity—Enables you to set the transparency level of the erased color, bymoving the slider control or by typing in a value into the Opacity text box.
BITMAP VERSUS VECTOR GRAPHICSPaint tools create bitmap patterns of color in a layer. These images will not scale well ifincreased in size. If you plan to use a paint tool, try to draw the image to scale, or largerthan the actual size you need.
Drawing tools, on the other hand, create vector graphics. Vector graphics use a mathemati-cal algorithm to retain their original shape if increased or decreased in size. If you want tocreate dynamic graphics, use the drawing tools, such as the shape tools, to create yourgraphics.
Introducing Shape ToolsShape tools enable you to create a precise shape, whereas brush tools enable you todraw freeform lines. You’ll find seven shape tools sharing one location in theToolbox. You can select any shape tool from the options bar, regardless of which oneis selected in the Toolbox.
You can create rectangles, circles, lines, and custom shapes with the shape tools, asshown in Figure 11.9. Each shape tool creates a shape layer in the Layers palette.Select a shape layer to select a shape in the image window and apply a layer style.Simplify a shape into a bitmap to apply a filter or an effect.
15 8311 CH11 1/15/03 3:11 PM Page 247
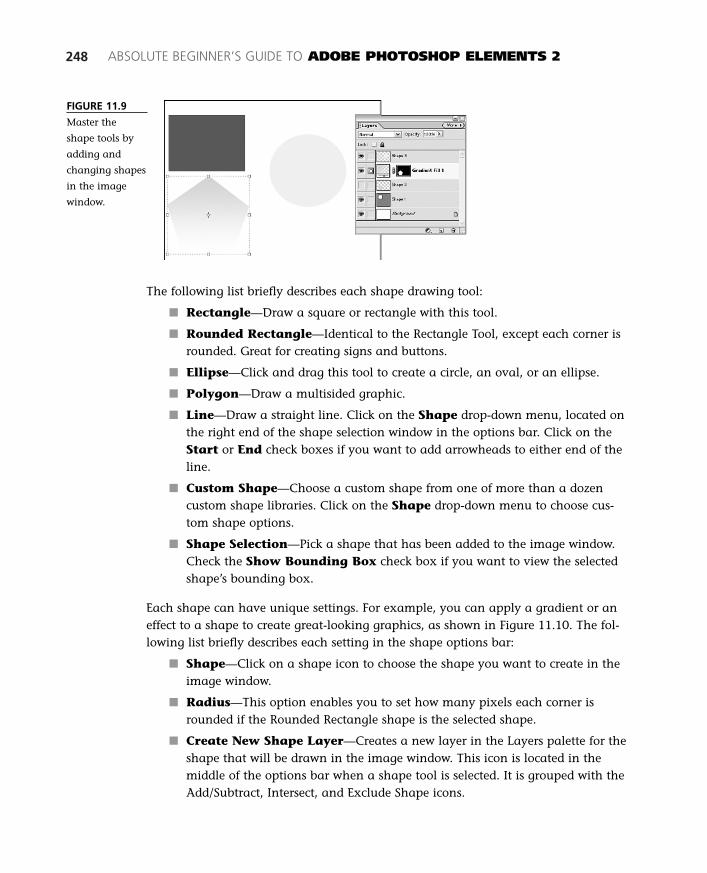
248 ABSOLUTE BEGINNER’S GUIDE TO ADOBE PHOTOSHOP ELEMENTS 2
FIGURE 11.9
Master the
shape tools by
adding and
changing shapes
in the image
window.
The following list briefly describes each shape drawing tool:
■ Rectangle—Draw a square or rectangle with this tool.
■ Rounded Rectangle—Identical to the Rectangle Tool, except each corner isrounded. Great for creating signs and buttons.
■ Ellipse—Click and drag this tool to create a circle, an oval, or an ellipse.
■ Polygon—Draw a multisided graphic.
■ Line—Draw a straight line. Click on the Shape drop-down menu, located onthe right end of the shape selection window in the options bar. Click on theStart or End check boxes if you want to add arrowheads to either end of theline.
■ Custom Shape—Choose a custom shape from one of more than a dozencustom shape libraries. Click on the Shape drop-down menu to choose cus-tom shape options.
■ Shape Selection—Pick a shape that has been added to the image window.Check the Show Bounding Box check box if you want to view the selectedshape’s bounding box.
Each shape can have unique settings. For example, you can apply a gradient or aneffect to a shape to create great-looking graphics, as shown in Figure 11.10. The fol-lowing list briefly describes each setting in the shape options bar:
■ Shape—Click on a shape icon to choose the shape you want to create in theimage window.
■ Radius—This option enables you to set how many pixels each corner isrounded if the Rounded Rectangle shape is the selected shape.
■ Create New Shape Layer—Creates a new layer in the Layers palette for theshape that will be drawn in the image window. This icon is located in themiddle of the options bar when a shape tool is selected. It is grouped with theAdd/Subtract, Intersect, and Exclude Shape icons.
15 8311 CH11 1/15/03 3:11 PM Page 248

CHAPTER 11 ADDING TEXT AND SHAPES TO IMAGES 249
FIGURE 11.10
Simplify a shape
and then apply
layer styles, fil-
ters, or effects to
create custom
graphics.
Bevel Twirl Filter
Drop Shadow
Gradient Fill Pattern Layer Style
■ Add/Subtract from Shape—Choose the Add setting to add a new shapeto an existing shape. Or use the Subtract setting to subtract a shape froman existing shape in the image window.
■ Intersect Shape Areas—Preserves the overlapped area of two overlappingshapes.
■ Exclude Overlapping Shape Areas—Preserves the non-overlapping areaof two overlapping shapes.
■ Layer Style—Add a Bevel, Drop Shadow, Glow, or other effect to the shapeby choosing a layer style from the drop-down menu.
■ Color—Select a color for the shape or line.
■ Simplify—Merge the color and shape components in a shape layer into onecomponent. This button converts a vector graphic into a bitmap graphic.
Variations—Creating Signs with Drawing andPainting Tools
You can enhance your photos by combining painting and drawing tools to designcustom graphics. For example, you can use the paint tools to add graffiti to the wallor sidewalk of the storefront shown in Figure 11.11. In this example, two kinds ofsigns will be created with shape and text tools.
15 8311 CH11 1/15/03 3:11 PM Page 249

250 ABSOLUTE BEGINNER’S GUIDE TO ADOBE PHOTOSHOP ELEMENTS 2
FIGURE 11.11
The storefront
before graphics
are added.
You can combine shape tools and layer styles to create a three-dimensional sign, asshown in Figure 11.12. Or you can create a text object and change the Opacity,Blending mode, and Layer Style settings to create a sign.
FIGURE 11.12
The same photo
after two shapes
and layer styles
are added to it.
To create a sign using the drawing and painting tools, do the following:
1. Select the Rounded Rectangle shape to create the sign. A separate layer willbe created in the Layers palette for the rounded rectangle. You can change itscolor or shape by selecting either component in the Shape 1 layer.
2. Next, choose a custom shape to place in the center of the sign (see Figure11.13). In this example, I chose a symbol shape from the People library. Youcan choose a library from the drop-down menu located in the Shape windowof the Symbol Shape Tool options bar. Use the Move Tool to place the cus-tom shape on the rounded rectangle.
3. Place the cursor between the two shape layers in the Layers palette.
4. Hold down the (Option) [Alt] key. The cursor icon changes from an arrow toa small arrow with two overlapping circles. Click on the line between the twolayers. Then release the (Option) [Alt] key. A down-pointing arrow, as shownin Figure 11.14, will appear in the top layer, indicating that the two layersare grouped together. You can group two layers together to preserve theirorder in the Layers palette.
15 8311 CH11 1/15/03 3:11 PM Page 250
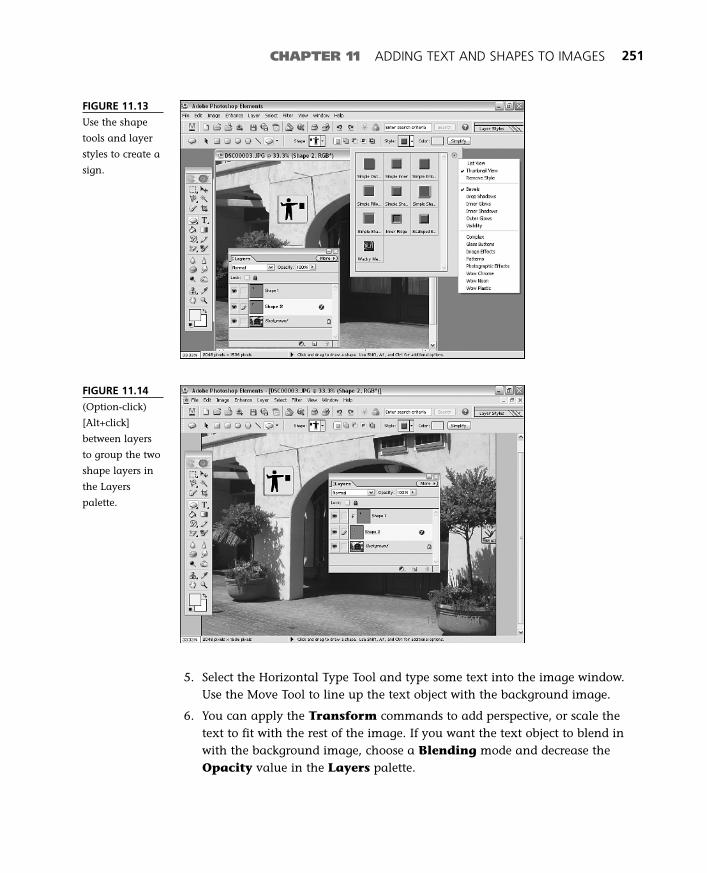
CHAPTER 11 ADDING TEXT AND SHAPES TO IMAGES 251
5. Select the Horizontal Type Tool and type some text into the image window.Use the Move Tool to line up the text object with the background image.
6. You can apply the Transform commands to add perspective, or scale thetext to fit with the rest of the image. If you want the text object to blend inwith the background image, choose a Blending mode and decrease theOpacity value in the Layers palette.
FIGURE 11.13
Use the shape
tools and layer
styles to create a
sign.
FIGURE 11.14
(Option-click)
[Alt+click]
between layers
to group the two
shape layers in
the Layers
palette.
15 8311 CH11 1/15/03 3:11 PM Page 251

LINKING IS NOT GROUPINGGrouping two layers together is different from linking layers together. Linking two or morelayers together preserves the location of each object relative to the others in the imagewindow. Whenever you move the primary object in the link, all other linked objects willadjust to the new location.
You can link together two or more layers in the Layers palette. First, select the layer towhich you want to link other layers. Then, click in the right check box beside a second orthird layer to link those layers to the selected layer.
When you select a custom shape, a Shape selection window appears in the optionsbar. Click on the shape window to view its drop-down menu. You can choose fromfive views to navigate through the 14 custom shape libraries. The following listbriefly describes each view:
■ Text Only—Lists each shape without anyvisual aids.
■ Small Thumbnail—Probably the idealview for custom shapes. Enables you toview all images in a library without scrolling.
■ Large Thumbnail—Doubles the size ofthe small thumbnail images.
■ Small List—Organizes the library itemsin list view with a small icon in the leftside of each item name.
■ Large List—Same as the small list, exceptit uses larger icons.
Designing Bitmap and Vector GraphicsBecause most of the tools in Photoshop Elementsare bitmap tools, you won’t be creating vectorgraphics unless you’re working with the type orshape tools. Nevertheless, you can combinebitmap and vector graphics in the same file orimage window.
Combining these two kinds of graphics isn’t reallythe big issue. The big concern is usually whether youshould create a graphic as a bitmap or a vector graphic. As mentioned previously,vector graphics are great because they keep their sharpness whether you grow orshrink them. However, bitmap graphics are made up of a fixed set of pixels.
252 ABSOLUTE BEGINNER’S GUIDE TO ADOBE PHOTOSHOP ELEMENTS 2
When two or morelayers are grouped
together, the bottom layer definesthe boundary of any layers thatare a part of the group. The nameof the bottom layer of the groupwill become underlined in theLayers palette. You can ungrouptwo layers by holding down the(Option) [Alt] key and clicking onthe group icon (two overlappingcircles), which is located betweenthe two grouped layers in theLayers palette.
15 8311 CH11 1/15/03 3:11 PM Page 252
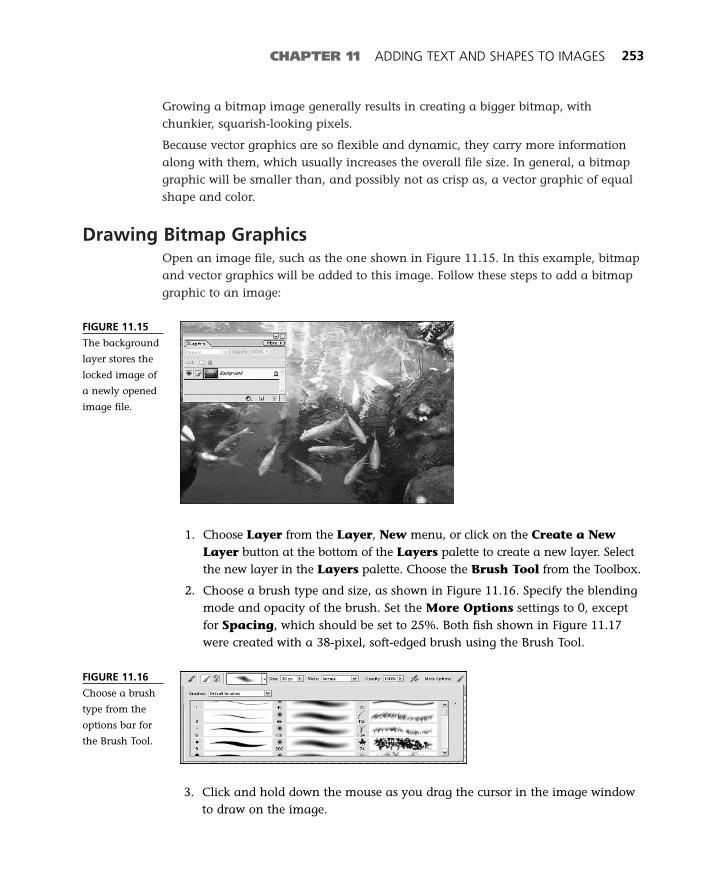
Growing a bitmap image generally results in creating a bigger bitmap, withchunkier, squarish-looking pixels.
Because vector graphics are so flexible and dynamic, they carry more informationalong with them, which usually increases the overall file size. In general, a bitmapgraphic will be smaller than, and possibly not as crisp as, a vector graphic of equalshape and color.
Drawing Bitmap GraphicsOpen an image file, such as the one shown in Figure 11.15. In this example, bitmapand vector graphics will be added to this image. Follow these steps to add a bitmapgraphic to an image:
CHAPTER 11 ADDING TEXT AND SHAPES TO IMAGES 253
FIGURE 11.15
The background
layer stores the
locked image of
a newly opened
image file.
FIGURE 11.16
Choose a brush
type from the
options bar for
the Brush Tool.
1. Choose Layer from the Layer, New menu, or click on the Create a NewLayer button at the bottom of the Layers palette to create a new layer. Selectthe new layer in the Layers palette. Choose the Brush Tool from the Toolbox.
2. Choose a brush type and size, as shown in Figure 11.16. Specify the blendingmode and opacity of the brush. Set the More Options settings to 0, exceptfor Spacing, which should be set to 25%. Both fish shown in Figure 11.17were created with a 38-pixel, soft-edged brush using the Brush Tool.
3. Click and hold down the mouse as you drag the cursor in the image windowto draw on the image.
15 8311 CH11 1/15/03 3:11 PM Page 253
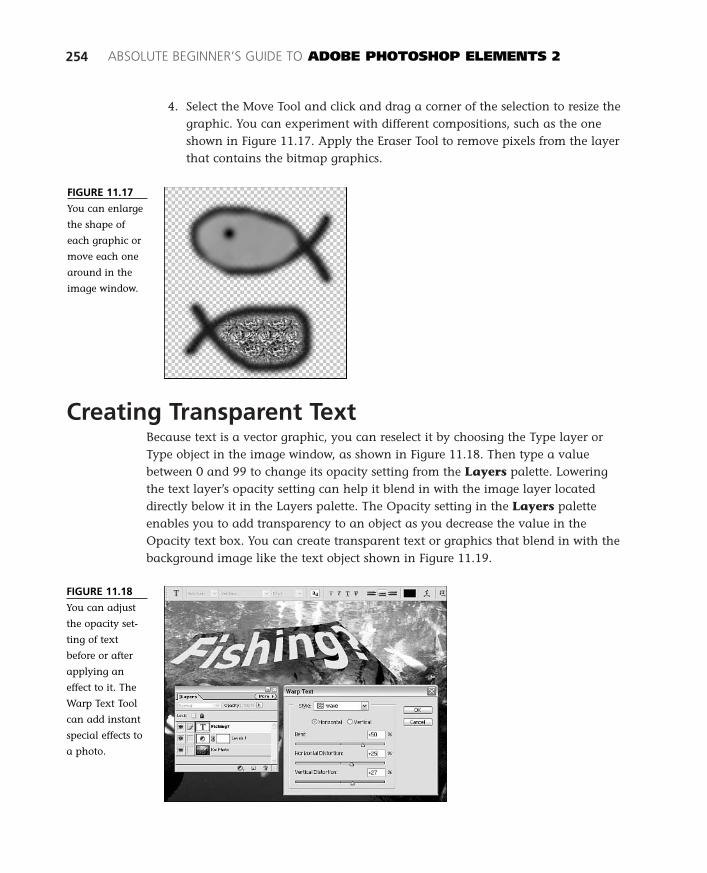
Creating Transparent TextBecause text is a vector graphic, you can reselect it by choosing the Type layer orType object in the image window, as shown in Figure 11.18. Then type a valuebetween 0 and 99 to change its opacity setting from the Layers palette. Loweringthe text layer’s opacity setting can help it blend in with the image layer locateddirectly below it in the Layers palette. The Opacity setting in the Layers paletteenables you to add transparency to an object as you decrease the value in theOpacity text box. You can create transparent text or graphics that blend in with thebackground image like the text object shown in Figure 11.19.
4. Select the Move Tool and click and drag a corner of the selection to resize thegraphic. You can experiment with different compositions, such as the oneshown in Figure 11.17. Apply the Eraser Tool to remove pixels from the layerthat contains the bitmap graphics.
254 ABSOLUTE BEGINNER’S GUIDE TO ADOBE PHOTOSHOP ELEMENTS 2
FIGURE 11.17
You can enlarge
the shape of
each graphic or
move each one
around in the
image window.
FIGURE 11.18
You can adjust
the opacity set-
ting of text
before or after
applying an
effect to it. The
Warp Text Tool
can add instant
special effects to
a photo.
15 8311 CH11 1/15/03 3:11 PM Page 254

CHAPTER 11 ADDING TEXT AND SHAPES TO IMAGES 255
FIGURE 11.19
Decrease the
opacity level of
the image to
increase its
transparency
with the back-
ground image.
The following steps show you how to add text to an image, apply the Warp Tool,and then adjust the text object’s opacity settings (shown in Figure 11.18):
1. First, select the Text Tool and type some text into the image window.
2. Click on the tools in the options bar to format the text. Click the Warp Textbutton to open the Warp Text window.
3. Choose a warp style and adjust the warp text effect.
4. Click on OK to save your changes.
5. Select the text layer in the Layers palette. Click on the drop-down arrow tomove the slider control for the Opacity setting.
6. Set the opacity to roughly 50% to 70%, as shown in Figure 11.19. The back-ground should show through the solid regions of the text.
You can place the text anywhere in the image window. Use the Move Tool to selectand move the text object. Place it over a part of the background image that mightshow a pattern or an object through the letters of text.
Modifying Custom ShapesShapes are also vector graphics. You can choose a shape tool from the Toolbox toadd a simple geometric shape to a photo. When you apply the shape tool—or anyother vector graphic tool—to the image window, Photoshop Elements creates a newlayer to store the new graphics. This new layer is usually created above the selectedor active layer in the Layers palette, enabling you to overlap the graphic with thepicture.
15 8311 CH11 1/15/03 3:11 PM Page 255

If shape tools don’t do the trick for you, try adding text or applying a brush to aphoto. You may be able to create a cool-looking graphic by applying the brush toolsfreehand or combining bitmap text with graphics. Text layers can be combined withor overlap graphics layers. Organize the order in which text and graphic objectsappear in the image window by changing their order in the Layers palette. Forinstance, you can place a particular text or graphic in front of or behind otherobjects by placing it above or below other layers in the Layers palette.
To add a drop shadow or reflection to a text object, select the layer you want to copyand drop it over the Create New Layer icon in the Layers palette. PhotoshopElements will create a new layer containing the contents of the original layer. Thefollowing steps show you how to add a new shape to an image window:
1. Select the Shape Tool from the Toolbox.
2. Click on the custom shape in the options bar.
3. Click on the Shape drop-down menu to view the shapes loaded from the cur-rently selected library, as shown in Figure 11.20.
4. Click on the right-arrow button in the drop-down menu to view or select adifferent shape library. In this example, I chose a fish from the Animalslibrary.
256 ABSOLUTE BEGINNER’S GUIDE TO ADOBE PHOTOSHOP ELEMENTS 2
FIGURE 11.20
Choose a custom
shape from the
built-in library
of shapes.
To add a color or layer style to the custom shape, perform the following steps:
1. After the shape is added to the image window, the Add, Subtract, Intersect,and Exclude icons will become selectable beside the Layer Style drop-downmenu in the options bar.
2. Click on the Layer Style menu button, shown in Figure 11.20, to view andselect a layer style. You can drag and drop the layer style onto any object inthe image window to enhance the target object.
3. Click on the right-arrow menu, also shown in Figure 11.21, to choose a differ-ent layer style library. Choose Remove Style from the drop-down menu toremove all styles from the shape layer.
You can change the color of the custom shape by clicking on the Color swatch inthe options bar. The Color Picker window will open. Choose a color for the graphicin the Color Picker window, and then click OK. The new color will appear in theleft thumbnail beside the shape thumbnail in the shape layer of the Layers palette.
15 8311 CH11 1/15/03 3:11 PM Page 256

You can change the shape color as often as you like, as long as you do not simplifythe shape layer.
CHAPTER 11 ADDING TEXT AND SHAPES TO IMAGES 257
FIGURE 11.21
Access any layer
style from the
Style drop-down
menu. Drag and
drop a layer
style onto the
custom shape.
The Transform commands enable you to grow, shrink, skew, distort, apply perspec-tive, and rotate a shape in the image window. Click on the Image, Transformmenu to view the Transform commands. You can also press (Command-T) [Ctrl+T]to enable the Free Transform command for the selected layer.
If you want to experiment with the Transform commands, create a copy of a customshape. Select the shape layer of the graphic, and then drag and drop it over theCreate a New Layer icon in the Layers palette. The copied layer will appear in theLayers palette, and the copied shape will appear over the selected shape in theimage window. Select the Move Tool to move it to a new location in the imagewindow.
Select the Move Tool and drag the copy of the shape to a new location in the imagewindow. Select a custom layer style and color for the shape. In this example, Ireduced the size of the copied shape, and then flipped it horizontally, as shown inFigure 11.22. If you want to permanently keep the shape settings and prevent theshape from being edited, select it, and then choose Simplify Layer from the Layermenu. The color and shape thumbnails will merge into a single thumbnail image.
Merging Completed LayersAs you put together different graphics and images, you might want to merge somelayers together to make those changes permanent. You can combine two or morelayers by hiding all layers except for the ones you want to merge. Then choose the
15 8311 CH11 1/15/03 3:11 PM Page 257

Merge Visible command from the Layer menu. Photoshop Elements will convertthe layers that appear in the image window into a single layer in the Layers palette.
258 ABSOLUTE BEGINNER’S GUIDE TO ADOBE PHOTOSHOP ELEMENTS 2
FIGURE 11.22
Click the
Simplify button
in the options
bar to combine
layer styles and
linked elements
in a layer.
If you want to make the shape part of the background image, first show the two lay-ers in the Layers palette. Then choose the Merge Visible command from the Layermenu. You can also press (Shift-Command-E) [Shift+Ctrl+E] to merge any visibleimages in the image window. The two layers will be merged into a single layer.
Applying Effects with the Impressionist BrushIf you want to apply an impressionist effect to a specific graphic, or to an area of abitmap image, you can merge two layers, and then choose the ImpressionistBrush, shown in Figure 11.23, to paint with stylized strokes. The Impressionist Brushapplies a unique look by blending the colors of a particular layer together. Choose alarge brush size and select a layer that contains a photo. Apply the tool to the imagewindow to see how it affects the pixels in the photo.
You can adjust the brush settings to experiment with different kinds of impressionisteffects and different types of images. Select the Impressionist Brush from theToolbox to view its settings in the options bar. The brush settings are located on theleft side of the options bar. If you’re working with an image that consists of morethan one layer, select the layer to which you want to apply this tool from theLayers palette. Then click and drag the brush over the image window to texturizethe pixels in the image window.
15 8311 CH11 1/15/03 3:11 PM Page 258

CHAPTER 11 ADDING TEXT AND SHAPES TO IMAGES 259
FIGURE 11.23
You can use the
Impressionist
Brush to blend a
bitmap graphic
with pixels from
the same image
layer. The
Impressionist
Brush was
applied to the
bottom half of
the fish graphic.
In addition to the Mode and Opacity settings, which are also available with theBrush and Airbrush tools, there are several other settings you can customize whenusing the Impressionist Brush. The following list briefly describes each setting:
■ Brush—Pick a brush tip for the Impressionist Brush.
■ Mode—Select a blending mode from the drop-down menu.
■ Style—Control the shape of the painted strokes. Choose a Tight Short, TightMedium, Tight Long, Loose Medium, Loose Long, Dab, Tight Curl, Tight CurlLong, Loose Curl, or Loose Curl Long style from the menu list.
■ Fidelity—Decide how much the paint color changes between the new andold colors in the image window. A lower percent adds more color to theresulting stroke.
■ Area—Type the number of pixels you want the brush to affect.
■ Spacing—Enter a percentage to restrict the way the paint stroke is applied. Alower value enables you to paint anywhere in the image window. A highervalue limits the colors the brush can change.
■ Brush Options—Adjust the size and opacity settings of the brush stroke.
Previewing the Final ImageShow each layer in the image window and view the final image before saving it forthe Web or printing it. If you are going to use the image on the Web or send it viaemail, you can optimize the final image by choosing Flattπen Image from theLayer menu. Then adjust the color palette in the Save for Web dialog box to a Web-safe palette, or just convert the image to Indexed Color mode. With the exception of
15 8311 CH11 1/15/03 3:11 PM Page 259

Photoshop native and TIFF formats, most file formats will automatically flatten alllayers into one in order to create the final image. Figure 11.24 shows the final textand graphics photo. If you have the hard drive space available, save a copy of theimage as a PSD file to preserve its layer information.
260 ABSOLUTE BEGINNER’S GUIDE TO ADOBE PHOTOSHOP ELEMENTS 2
FIGURE 11.24
The final photo.
Save a copy of
the photo as a
PSD file to pre-
serve its layer
information.
15 8311 CH11 1/15/03 3:11 PM Page 260
In this chapter
• Repairing Folds and Tears
• Fine-Tuning the Image
• Rebuilding a Damaged Photo
12
Repairing Images
Restoring damaged photos is a challenge that usually requires lots of
patience, skill, and time. It’s no picnic trying to re-create missing por-
tions of an image, or trying to determine the original colors of a worn,
faded photo. However, the reward can be extraordinarily worthwhile in
sentimental value alone. Repairing a worn or torn image helps preserve
the look and feel of earlier photography, as well as family history and
heritage.
16 8311 CH12 1/15/03 2:22 PM Page 261
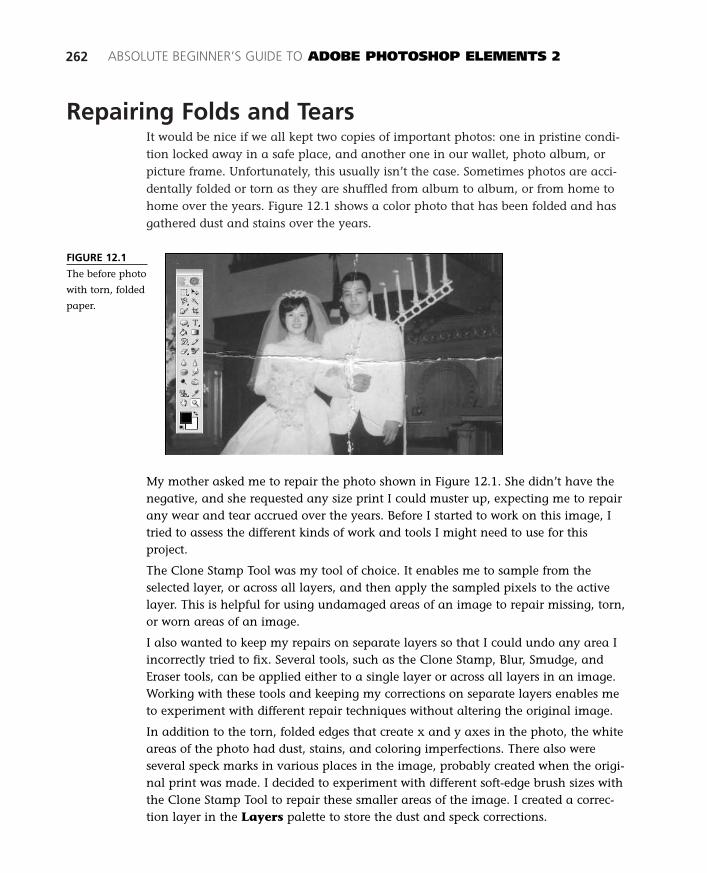
Repairing Folds and TearsIt would be nice if we all kept two copies of important photos: one in pristine condi-tion locked away in a safe place, and another one in our wallet, photo album, orpicture frame. Unfortunately, this usually isn’t the case. Sometimes photos are acci-dentally folded or torn as they are shuffled from album to album, or from home tohome over the years. Figure 12.1 shows a color photo that has been folded and hasgathered dust and stains over the years.
262 ABSOLUTE BEGINNER’S GUIDE TO ADOBE PHOTOSHOP ELEMENTS 2
FIGURE 12.1
The before photo
with torn, folded
paper.
My mother asked me to repair the photo shown in Figure 12.1. She didn’t have thenegative, and she requested any size print I could muster up, expecting me to repairany wear and tear accrued over the years. Before I started to work on this image, Itried to assess the different kinds of work and tools I might need to use for thisproject.
The Clone Stamp Tool was my tool of choice. It enables me to sample from theselected layer, or across all layers, and then apply the sampled pixels to the activelayer. This is helpful for using undamaged areas of an image to repair missing, torn,or worn areas of an image.
I also wanted to keep my repairs on separate layers so that I could undo any area Iincorrectly tried to fix. Several tools, such as the Clone Stamp, Blur, Smudge, andEraser tools, can be applied either to a single layer or across all layers in an image.Working with these tools and keeping my corrections on separate layers enables meto experiment with different repair techniques without altering the original image.
In addition to the torn, folded edges that create x and y axes in the photo, the whiteareas of the photo had dust, stains, and coloring imperfections. There also wereseveral speck marks in various places in the image, probably created when the origi-nal print was made. I decided to experiment with different soft-edge brush sizes withthe Clone Stamp Tool to repair these smaller areas of the image. I created a correc-tion layer in the Layers palette to store the dust and speck corrections.
16 8311 CH12 1/15/03 2:22 PM Page 262
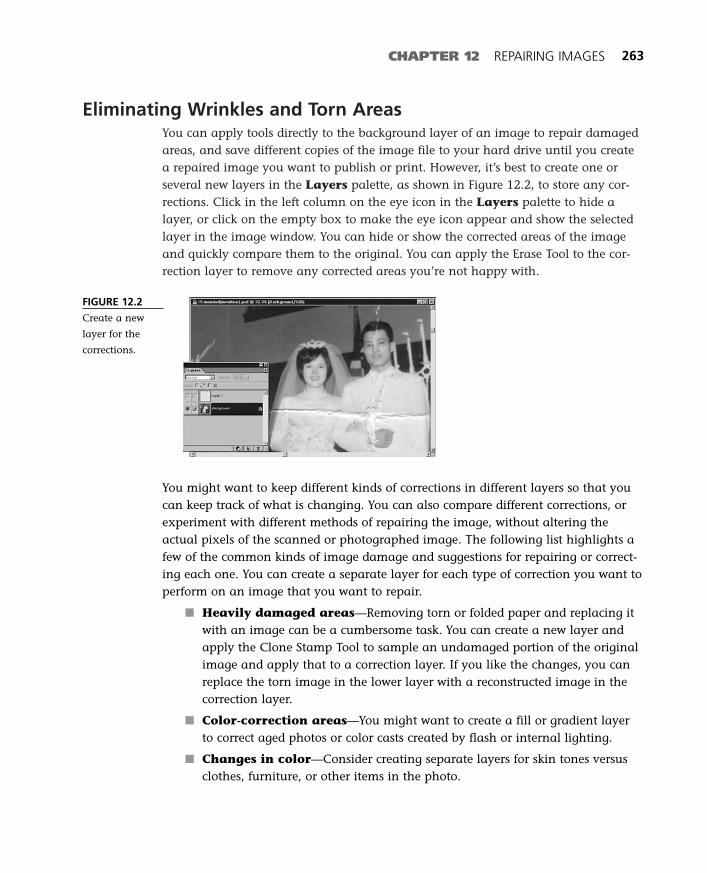
Eliminating Wrinkles and Torn AreasYou can apply tools directly to the background layer of an image to repair damagedareas, and save different copies of the image file to your hard drive until you createa repaired image you want to publish or print. However, it’s best to create one orseveral new layers in the Layers palette, as shown in Figure 12.2, to store any cor-rections. Click in the left column on the eye icon in the Layers palette to hide alayer, or click on the empty box to make the eye icon appear and show the selectedlayer in the image window. You can hide or show the corrected areas of the imageand quickly compare them to the original. You can apply the Erase Tool to the cor-rection layer to remove any corrected areas you’re not happy with.
CHAPTER 12 REPAIRING IMAGES 263
You might want to keep different kinds of corrections in different layers so that youcan keep track of what is changing. You can also compare different corrections, orexperiment with different methods of repairing the image, without altering theactual pixels of the scanned or photographed image. The following list highlights afew of the common kinds of image damage and suggestions for repairing or correct-ing each one. You can create a separate layer for each type of correction you want toperform on an image that you want to repair.
■ Heavily damaged areas—Removing torn or folded paper and replacing itwith an image can be a cumbersome task. You can create a new layer andapply the Clone Stamp Tool to sample an undamaged portion of the originalimage and apply that to a correction layer. If you like the changes, you canreplace the torn image in the lower layer with a reconstructed image in thecorrection layer.
■ Color-correction areas—You might want to create a fill or gradient layerto correct aged photos or color casts created by flash or internal lighting.
■ Changes in color—Consider creating separate layers for skin tones versusclothes, furniture, or other items in the photo.
FIGURE 12.2
Create a new
layer for the
corrections.
16 8311 CH12 1/15/03 2:22 PM Page 263

■ Dust and specks—Sometimes it’s difficult to discern a dust spec from actualimage details. Keeping these corrections on a separate layer can help restoredetailed elements in an image.
■ Mold and stains—Tiny areas of color distortion might be difficult to correct.You can adjust the brush size of the Clone Stamp, Smudge, or Blur tools to tryto remove small sets of pixels that need to be repaired.
You can repair an image with the image window set to any view. However, in mostcases, it will be easier to repair an image if you use the Zoom Tool to magnify thearea on which you want to work. Click on the Zoom Tool, and click on the areayou want to magnify. Press the (Option) [Alt] key and click on the image if youwant to zoom out from the image. You also can set the image window view to 200%or 300%. Click in the text box located in the lower-left corner of the (image window)[work area] and type 200 or 300, or choose the Zoom In command from the Viewmenu until the text box shows 200 or 300, or type in any other number to increasethe magnification of the photo. Adjust the view so that you can see all or part of theimage you want to repair in the active image window.
When you’re ready to begin repairing the image, select the layer in which you wantto store the corrected pixels. Then, magnify the image in the image window. Figure12.3 shows the torn area of the image before and after the Clone Stamp Tool hasbeen applied to the image. If you select the Clone Stamp Tool from the Toolbox,check the Use All Layers check box. This setting enables you to sample pixels fromany layers located below the active layer in the Layers palette. Select the correctionlayer from the Layers palette. Then, sample and apply the Clone Stamp Tool in theimage window, and repair areas close to the damaged area without altering theoriginal image.
264 ABSOLUTE BEGINNER’S GUIDE TO ADOBE PHOTOSHOP ELEMENTS 2
FIGURE 12.3
Create a new
layer for differ-
ent repair areas
of the image.
Compare the
image before
and after apply-
ing corrections
by hiding and
showing the cor-
rection layer in
the Layers
palette.
16 8311 CH12 1/15/03 2:22 PM Page 264

CHAPTER 12 REPAIRING IMAGES 265
Removing Aged Color, Dust, and StainsAlthough you can remove dust and stains before or after repairing an image, youmight find that it is easier to make small corrections to an image after fixing thebigger problems. For example, Figure 12.5 shows how it is a little easier to identifythe stains and dust after the folds and tears have been removed.
Again, you can apply the Clone Stamp Tool to remove dust, stains, or discolorationin an image. Use the following steps to correct a damaged image:
1. Click on the Clone Stamp Tool in the Toolbox, and then choose a soft-edge brush from the options bar. Be sure to use a brush size that roughly cov-ers part of the size of each stain. Also, check the Use All Layers check box.This setting enables you to sample pixels in any layer below the selectedlayer. Then, apply the sample pixels to only the selected layer.
Keep these issues in mind when making image repairs with the Clone Stamp Tool:
■ Choose a brush with a soft edge so that the edges of the brush strokes blendinto the surrounding pixels.
■ Pick a brush size that covers part of the torn area of the image. You can com-pare the torn area with the repaired pixels in the image. If the repair lookslike it matches the rest of the image, you might want to repair the remainingtorn area, or resample pixels close to each area of the torn image beforeapplying the replacement pixels. Don’t try to use a brush that’s too large ortoo small to repair damaged areas in the image.
■ Try to avoid sampling discolored or shaded areas of the image. If you sampledamaged or worn areas of the image, they will be applied to the correctionlayer in other areas of the image. If you can’t avoid sampling part of thedamaged image, try choosing a smaller brush and reconstructing smallerportions of the damaged area.
■ Avoid creating long strokes. Make a few small corrections, and then zoom outto a wide view to see whether the corrections match the surrounding image,as shown in Figure 12.4.
FIGURE 12.4
Zoom out to
view the
repaired portion
of the image
and compare it
to the rest of the
photo.
16 8311 CH12 1/15/03 2:22 PM Page 265
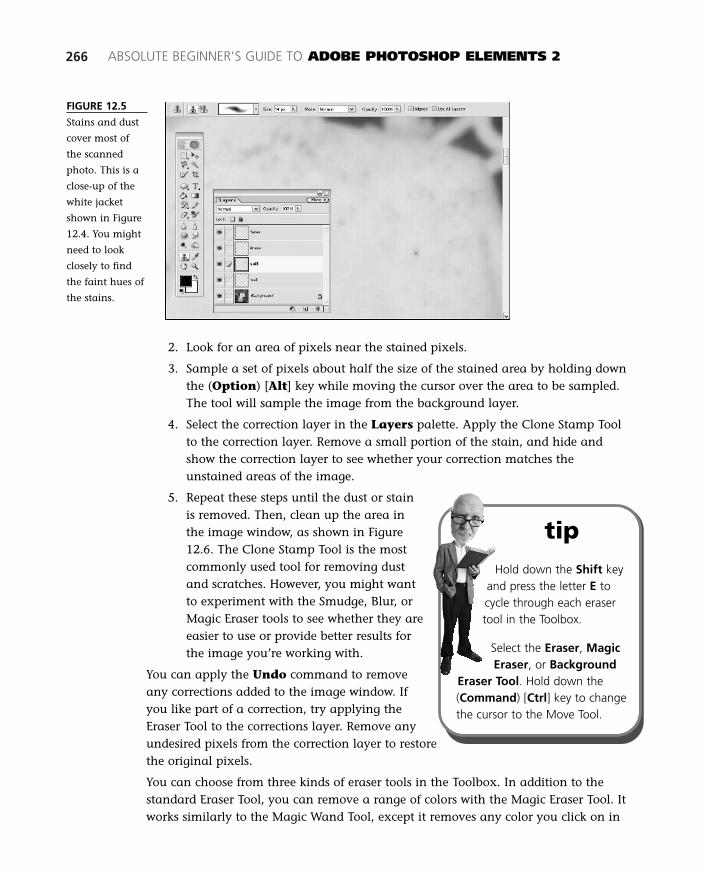
266 ABSOLUTE BEGINNER’S GUIDE TO ADOBE PHOTOSHOP ELEMENTS 2
FIGURE 12.5
Stains and dust
cover most of
the scanned
photo. This is a
close-up of the
white jacket
shown in Figure
12.4. You might
need to look
closely to find
the faint hues of
the stains.
2. Look for an area of pixels near the stained pixels.
3. Sample a set of pixels about half the size of the stained area by holding downthe (Option) [Alt] key while moving the cursor over the area to be sampled.The tool will sample the image from the background layer.
4. Select the correction layer in the Layers palette. Apply the Clone Stamp Toolto the correction layer. Remove a small portion of the stain, and hide andshow the correction layer to see whether your correction matches theunstained areas of the image.
5. Repeat these steps until the dust or stainis removed. Then, clean up the area inthe image window, as shown in Figure12.6. The Clone Stamp Tool is the mostcommonly used tool for removing dustand scratches. However, you might wantto experiment with the Smudge, Blur, orMagic Eraser tools to see whether they areeasier to use or provide better results forthe image you’re working with.
You can apply the Undo command to removeany corrections added to the image window. Ifyou like part of a correction, try applying theEraser Tool to the corrections layer. Remove anyundesired pixels from the correction layer to restorethe original pixels.
You can choose from three kinds of eraser tools in the Toolbox. In addition to thestandard Eraser Tool, you can remove a range of colors with the Magic Eraser Tool. Itworks similarly to the Magic Wand Tool, except it removes any color you click on in
tipHold down the Shift key
and press the letter E tocycle through each erasertool in the Toolbox.
Select the Eraser, MagicEraser, or Background
Eraser Tool. Hold down the(Command) [Ctrl] key to changethe cursor to the Move Tool.
16 8311 CH12 1/15/03 2:22 PM Page 266
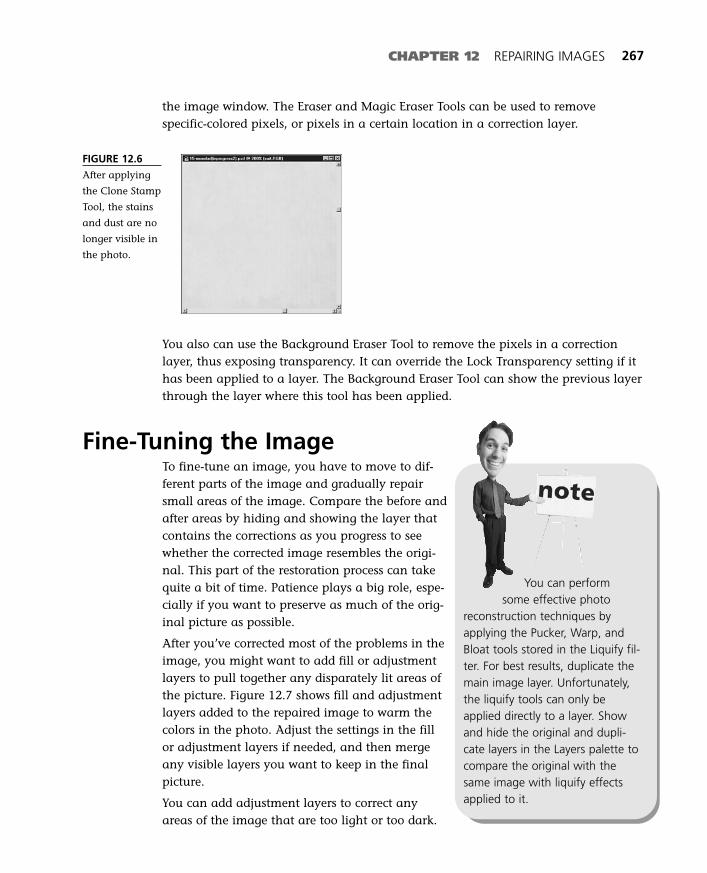
CHAPTER 12 REPAIRING IMAGES 267
the image window. The Eraser and Magic Eraser Tools can be used to removespecific-colored pixels, or pixels in a certain location in a correction layer.
You also can use the Background Eraser Tool to remove the pixels in a correctionlayer, thus exposing transparency. It can override the Lock Transparency setting if ithas been applied to a layer. The Background Eraser Tool can show the previous layerthrough the layer where this tool has been applied.
Fine-Tuning the ImageTo fine-tune an image, you have to move to dif-ferent parts of the image and gradually repairsmall areas of the image. Compare the before andafter areas by hiding and showing the layer thatcontains the corrections as you progress to seewhether the corrected image resembles the origi-nal. This part of the restoration process can takequite a bit of time. Patience plays a big role, espe-cially if you want to preserve as much of the orig-inal picture as possible.
After you’ve corrected most of the problems in theimage, you might want to add fill or adjustmentlayers to pull together any disparately lit areas ofthe picture. Figure 12.7 shows fill and adjustmentlayers added to the repaired image to warm thecolors in the photo. Adjust the settings in the fillor adjustment layers if needed, and then mergeany visible layers you want to keep in the finalpicture.
You can add adjustment layers to correct anyareas of the image that are too light or too dark.
FIGURE 12.6
After applying
the Clone Stamp
Tool, the stains
and dust are no
longer visible in
the photo.
You can performsome effective photo
reconstruction techniques byapplying the Pucker, Warp, andBloat tools stored in the Liquify fil-ter. For best results, duplicate themain image layer. Unfortunately,the liquify tools can only beapplied directly to a layer. Showand hide the original and dupli-cate layers in the Layers palette tocompare the original with thesame image with liquify effectsapplied to it.
16 8311 CH12 1/15/03 2:22 PM Page 267

Apply a fill layer and adjust its opacity level to add color to the image. You can cre-ate adjustment or fill layers for a selected area of the image, and then merge thecorrection layer and the fill or adjustment layer to make those changes permanent.
268 ABSOLUTE BEGINNER’S GUIDE TO ADOBE PHOTOSHOP ELEMENTS 2
FIGURE 12.7
Merge layers
together as cor-
rections are
made. Apply
adjustment and
gradient fill lay-
ers to pull the
final image
together.
Comparing ImagesBefore saving the final image, compare it to the original, damaged photo. Youmight want to keep one or two visual defects in the digitally retouched photo if youwant to preserve the look and feel of the original photo. Figure 12.8 shows the final,flattened image.
FIGURE 12.8
After you’ve
repaired folds,
tears, and stains,
the image
should resemble
the original.
If you want to post the image to a Web site, you can resize it after the layers havebeen flattened into a JPEG file. You might want to choose the Save for Web com-mand from the File menu to optimize the file size of the Web file. However, if youwant to print the image, it’s best not to remove any pixel information byshrinking it.
Save the final image to your hard drive. Compare the original, damaged photo withthe restored photo by zooming into both images. In Figure 12.9, notice that the orig-inal image has a little more detail than the restored image. However, it is difficult totell where the damaged areas were upon examining the restored image.
16 8311 CH12 1/15/03 2:22 PM Page 268
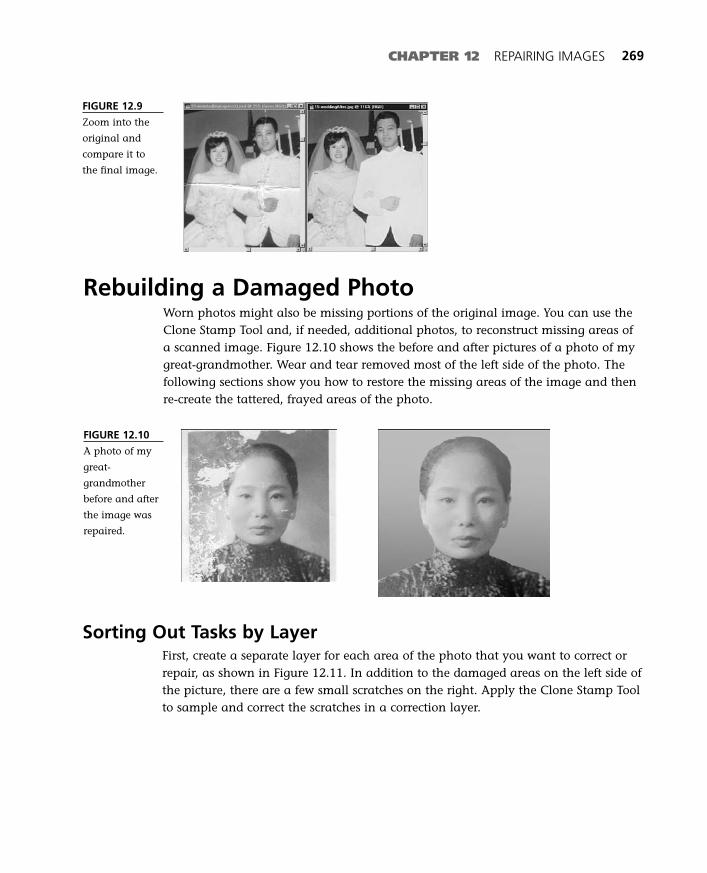
CHAPTER 12 REPAIRING IMAGES 269
FIGURE 12.9
Zoom into the
original and
compare it to
the final image.
Rebuilding a Damaged PhotoWorn photos might also be missing portions of the original image. You can use theClone Stamp Tool and, if needed, additional photos, to reconstruct missing areas ofa scanned image. Figure 12.10 shows the before and after pictures of a photo of mygreat-grandmother. Wear and tear removed most of the left side of the photo. Thefollowing sections show you how to restore the missing areas of the image and thenre-create the tattered, frayed areas of the photo.
FIGURE 12.10
A photo of my
great-
grandmother
before and after
the image was
repaired.
Sorting Out Tasks by LayerFirst, create a separate layer for each area of the photo that you want to correct orrepair, as shown in Figure 12.11. In addition to the damaged areas on the left side ofthe picture, there are a few small scratches on the right. Apply the Clone Stamp Toolto sample and correct the scratches in a correction layer.
16 8311 CH12 1/15/03 2:22 PM Page 269
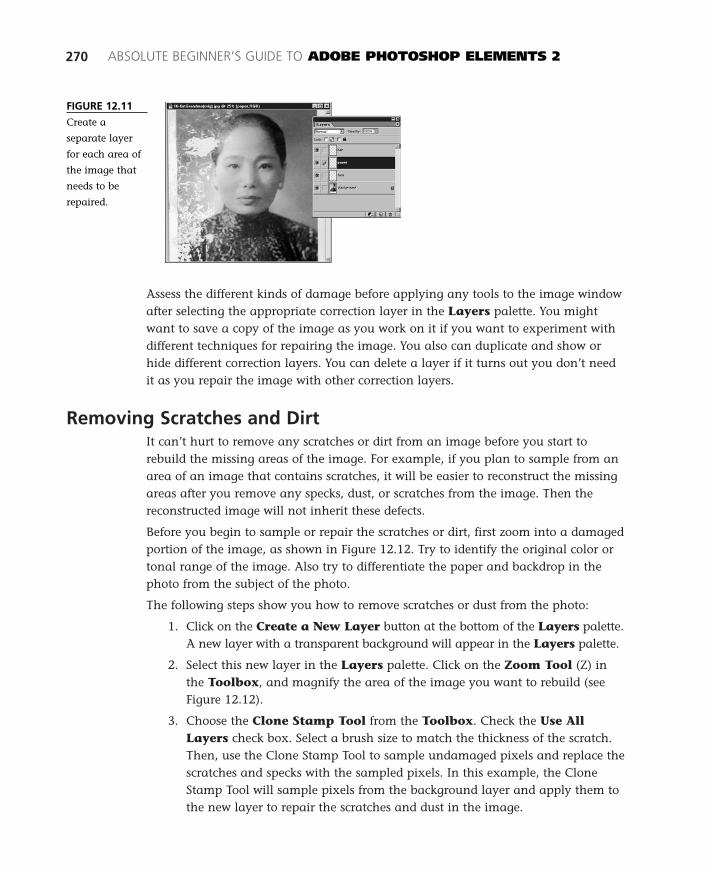
Assess the different kinds of damage before applying any tools to the image windowafter selecting the appropriate correction layer in the Layers palette. You mightwant to save a copy of the image as you work on it if you want to experiment withdifferent techniques for repairing the image. You also can duplicate and show orhide different correction layers. You can delete a layer if it turns out you don’t needit as you repair the image with other correction layers.
Removing Scratches and DirtIt can’t hurt to remove any scratches or dirt from an image before you start torebuild the missing areas of the image. For example, if you plan to sample from anarea of an image that contains scratches, it will be easier to reconstruct the missingareas after you remove any specks, dust, or scratches from the image. Then thereconstructed image will not inherit these defects.
Before you begin to sample or repair the scratches or dirt, first zoom into a damagedportion of the image, as shown in Figure 12.12. Try to identify the original color ortonal range of the image. Also try to differentiate the paper and backdrop in thephoto from the subject of the photo.
The following steps show you how to remove scratches or dust from the photo:
1. Click on the Create a New Layer button at the bottom of the Layers palette.A new layer with a transparent background will appear in the Layers palette.
2. Select this new layer in the Layers palette. Click on the Zoom Tool (Z) inthe Toolbox, and magnify the area of the image you want to rebuild (seeFigure 12.12).
3. Choose the Clone Stamp Tool from the Toolbox. Check the Use AllLayers check box. Select a brush size to match the thickness of the scratch.Then, use the Clone Stamp Tool to sample undamaged pixels and replace thescratches and specks with the sampled pixels. In this example, the CloneStamp Tool will sample pixels from the background layer and apply them tothe new layer to repair the scratches and dust in the image.
270 ABSOLUTE BEGINNER’S GUIDE TO ADOBE PHOTOSHOP ELEMENTS 2
FIGURE 12.11
Create a
separate layer
for each area of
the image that
needs to be
repaired.
16 8311 CH12 1/15/03 2:22 PM Page 270

Replacing Missing Pieces of the ImageThere are a couple of different ways you can replace a missing piece of an image.One way is to sample small portions from the existing image and reconstruct themissing area. The second way is to copy and paste part of an image from a differentimage file. This second method works well for replacing unique images, or imagesthat are missing larger portions of an image. The first method is effective for recon-structing images missing small sections of an image.
The general process for replacing a missing portion of an area is fairly straightfor-ward. First, select a correction layer in the Layers palette. Then, apply a tool, such asthe Clone Stamp Tool, to the image window. Check the Use All Layers check box,and then sample a whole, undamaged area in the image. Apply the Clone StampTool to fill in a missing chunk of the image with the sampled pixels. Zoom out to seewhether the repaired area visually matches the rest of the picture.
Repeat these steps until the missing areas of the image are reconstructed. Try to useother photos of the subject to restore hairstyle or clothing patterns, if you have them.Figure 12.13 shows the repaired image after a tedious application of the CloneStamp Tool.
CHAPTER 12 REPAIRING IMAGES 271
FIGURE 12.12
Zoom into the
image and try to
identify as much
detail from the
original photo
as possible.
FIGURE 12.13
Use the Clone
Stamp Tool to
reconstruct miss-
ing areas of the
image.
16 8311 CH12 1/15/03 2:22 PM Page 271

Creating the Final ImageIf the area of the photo behind the photo subject is seriously damaged, it might beeasier to reconstruct as much of the subject as possible. Move the subject to a newimage window. Then create a new backdrop by adding fill layers.
The following steps show you how to move the subject in the damaged photo to anew image window:
1. Use a selection tool, such as the Magic Wand Tool, to select the subject in thedamaged photo. You also can press the (Command) [Ctrl] key while clickingon the layer containing the image you want to select to highlight the image.Then, choose the Copy command from the Edit menu.
2. Choose New from the File menu and create a new document. PhotoshopElements will automatically input the width and height of the image into theNew dialog box. Select a transparent background for the new window.
3. Choose Paste from the Edit menu to add the selected image into the newimage window (see Figure 12.14).
272 ABSOLUTE BEGINNER’S GUIDE TO ADOBE PHOTOSHOP ELEMENTS 2
FIGURE 12.14
Copy the
selected image
and paste it into
a new image
window. The
gray-and-white
grid indicates
that the back-
ground is
transparent.
4. Choose Gradient from the Layer, New Fill Layer menu. Type a name forthe gradient layer, and then click OK. Click on the gradient in the GradientFill window. The Gradient Editor window opens.
5. Click in each square slider control located below the gradient bar in theGradient Editor window. Click in the Color box to choose a new color forthe gradient. Then, click OK in the Gradient Editor. You might want toadjust the angle of the gradient to match the angle of the light source in theimage window. Click OK in the Gradient Fill window to add the GradientFill Layer to the image window.
16 8311 CH12 1/15/03 2:22 PM Page 272
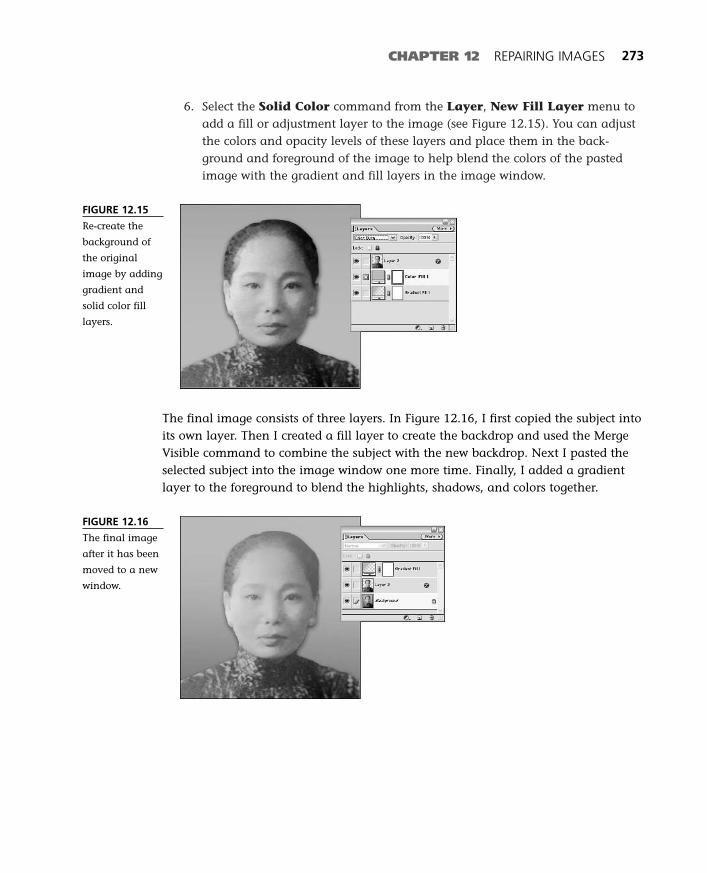
6. Select the Solid Color command from the Layer, New Fill Layer menu toadd a fill or adjustment layer to the image (see Figure 12.15). You can adjustthe colors and opacity levels of these layers and place them in the back-ground and foreground of the image to help blend the colors of the pastedimage with the gradient and fill layers in the image window.
CHAPTER 12 REPAIRING IMAGES 273
FIGURE 12.15
Re-create the
background of
the original
image by adding
gradient and
solid color fill
layers.
The final image consists of three layers. In Figure 12.16, I first copied the subject intoits own layer. Then I created a fill layer to create the backdrop and used the MergeVisible command to combine the subject with the new backdrop. Next I pasted theselected subject into the image window one more time. Finally, I added a gradientlayer to the foreground to blend the highlights, shadows, and colors together.
FIGURE 12.16
The final image
after it has been
moved to a new
window.
16 8311 CH12 1/15/03 2:22 PM Page 273

16 8311 CH12 1/15/03 2:22 PM Page 274
In this chapter
• Creating Composite Images
• Creating Special Effects with Composite Images
• Working with Multiple Composite Images
13
Experimenting with
Composite Images
A composite image is created when one or more images are placed
overlapping and blended together in the same image window to create
a unique composition. Photoshop Elements enables you to combine
multiple images into a single document. Each image you paste into the
image window is placed into its own new layer, above the background
layer in the document. You can use Photoshop Elements to blend pixels
between any two layers, or apply tools to blend the edge pixels of one
image with another image to make the final picture appear realistic.
This chapter introduces you to a few basic techniques you can use to
create composite images.
17 8311 CH13 1/15/03 2:28 PM Page 275
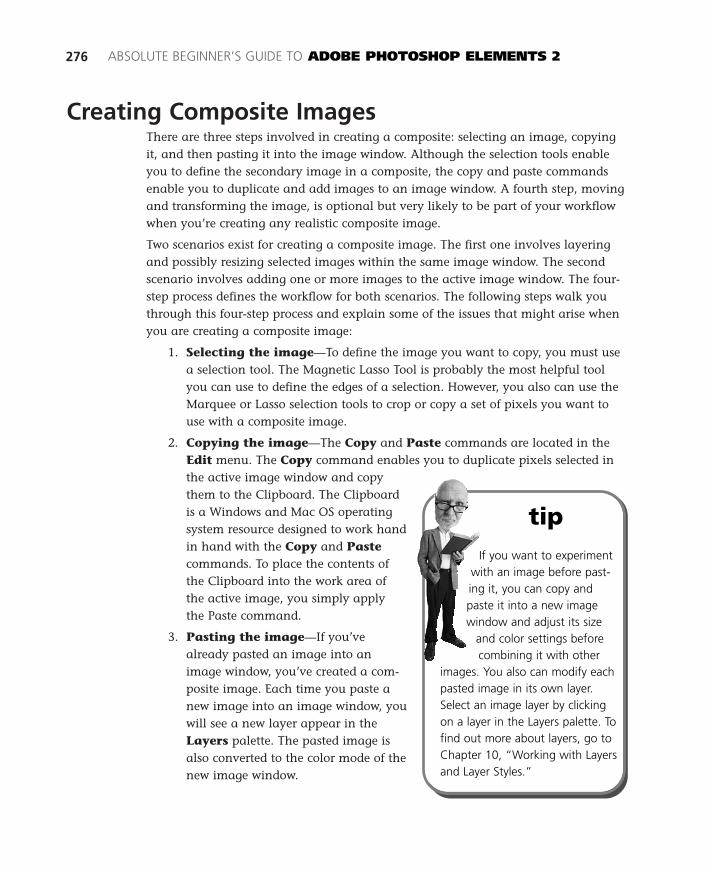
Creating Composite ImagesThere are three steps involved in creating a composite: selecting an image, copyingit, and then pasting it into the image window. Although the selection tools enableyou to define the secondary image in a composite, the copy and paste commandsenable you to duplicate and add images to an image window. A fourth step, movingand transforming the image, is optional but very likely to be part of your workflowwhen you’re creating any realistic composite image.
Two scenarios exist for creating a composite image. The first one involves layeringand possibly resizing selected images within the same image window. The secondscenario involves adding one or more images to the active image window. The four-step process defines the workflow for both scenarios. The following steps walk youthrough this four-step process and explain some of the issues that might arise whenyou are creating a composite image:
1. Selecting the image—To define the image you want to copy, you must usea selection tool. The Magnetic Lasso Tool is probably the most helpful toolyou can use to define the edges of a selection. However, you also can use theMarquee or Lasso selection tools to crop or copy a set of pixels you want touse with a composite image.
2. Copying the image—The Copy and Paste commands are located in theEdit menu. The Copy command enables you to duplicate pixels selected inthe active image window and copythem to the Clipboard. The Clipboardis a Windows and Mac OS operatingsystem resource designed to work handin hand with the Copy and Pastecommands. To place the contents ofthe Clipboard into the work area of the active image, you simply apply the Paste command.
3. Pasting the image—If you’vealready pasted an image into animage window, you’ve created a com-posite image. Each time you paste anew image into an image window, youwill see a new layer appear in theLayers palette. The pasted image isalso converted to the color mode of thenew image window.
276 ABSOLUTE BEGINNER’S GUIDE TO ADOBE PHOTOSHOP ELEMENTS 2
tipIf you want to experiment
with an image before past-ing it, you can copy andpaste it into a new imagewindow and adjust its size
and color settings beforecombining it with other
images. You also can modify eachpasted image in its own layer.Select an image layer by clickingon a layer in the Layers palette. Tofind out more about layers, go toChapter 10, “Working with Layersand Layer Styles.”
17 8311 CH13 1/15/03 2:28 PM Page 276
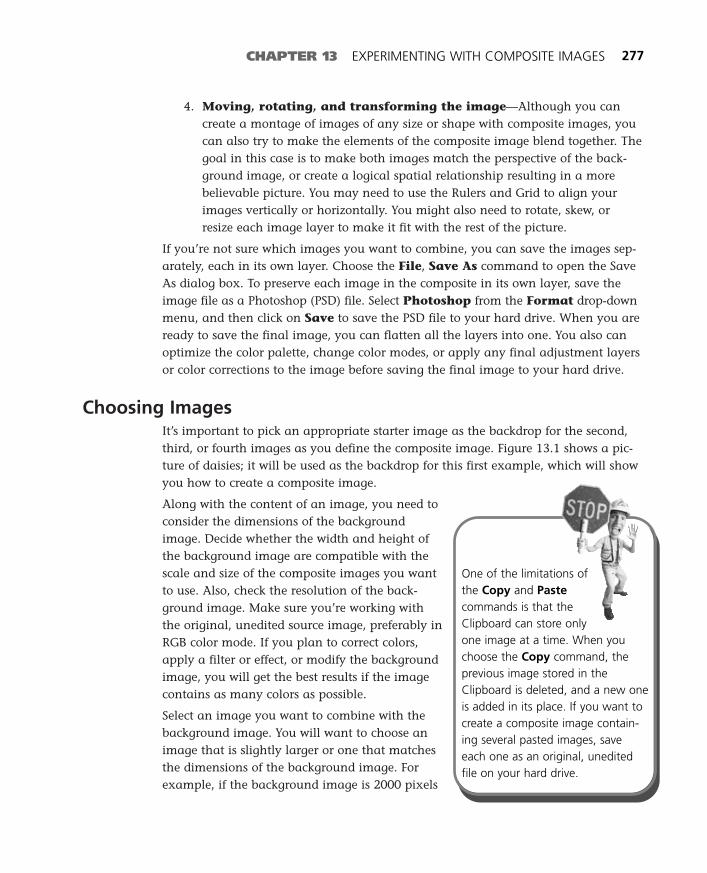
4. Moving, rotating, and transforming the image—Although you cancreate a montage of images of any size or shape with composite images, youcan also try to make the elements of the composite image blend together. Thegoal in this case is to make both images match the perspective of the back-ground image, or create a logical spatial relationship resulting in a morebelievable picture. You may need to use the Rulers and Grid to align yourimages vertically or horizontally. You might also need to rotate, skew, orresize each image layer to make it fit with the rest of the picture.
If you’re not sure which images you want to combine, you can save the images sep-arately, each in its own layer. Choose the File, Save As command to open the SaveAs dialog box. To preserve each image in the composite in its own layer, save theimage file as a Photoshop (PSD) file. Select Photoshop from the Format drop-downmenu, and then click on Save to save the PSD file to your hard drive. When you areready to save the final image, you can flatten all the layers into one. You also canoptimize the color palette, change color modes, or apply any final adjustment layersor color corrections to the image before saving the final image to your hard drive.
Choosing ImagesIt’s important to pick an appropriate starter image as the backdrop for the second,third, or fourth images as you define the composite image. Figure 13.1 shows a pic-ture of daisies; it will be used as the backdrop for this first example, which will showyou how to create a composite image.
Along with the content of an image, you need toconsider the dimensions of the backgroundimage. Decide whether the width and height ofthe background image are compatible with thescale and size of the composite images you wantto use. Also, check the resolution of the back-ground image. Make sure you’re working withthe original, unedited source image, preferably inRGB color mode. If you plan to correct colors,apply a filter or effect, or modify the backgroundimage, you will get the best results if the imagecontains as many colors as possible.
Select an image you want to combine with thebackground image. You will want to choose animage that is slightly larger or one that matchesthe dimensions of the background image. Forexample, if the background image is 2000 pixels
CHAPTER 13 EXPERIMENTING WITH COMPOSITE IMAGES 277
One of the limitations ofthe Copy and Pastecommands is that theClipboard can store onlyone image at a time. When youchoose the Copy command, theprevious image stored in theClipboard is deleted, and a new oneis added in its place. If you want tocreate a composite image contain-ing several pasted images, saveeach one as an original, uneditedfile on your hard drive.
17 8311 CH13 1/15/03 2:28 PM Page 277

wide and 1500 pixels tall, choose a composite image that was also created at thatsize. Smaller images can also be added to the background image; however, if thesmaller image needs to be resized into a larger, rather than smaller scale, its resolu-tion will degrade, resulting in a pixilated image that won’t match the higher-resolu-tion background image.
278 ABSOLUTE BEGINNER’S GUIDE TO ADOBE PHOTOSHOP ELEMENTS 2
FIGURE 13.1
The backdrop
image has the
proper dimen-
sions and resolu-
tion for the
images that will
be placed here.
Before
Although each image you add to the background image defines the composition,the backdrop image can make or break a composite image. Figure 13.2 shows a pairof daffodils added to the foreground of the first image. Notice that the edges of thedaffodils are soft so that they blend into the background image.
FIGURE 13.2
Adding daffodils
into the back-
drop photo
results in a com-
posite image.
After
Applying Selection ToolsOpen an image file that contains the backdrop image you want to use to create thecomposite. Then, choose a selection tool from the Toolbox. Use it to highlight theimage you want to paste into the background image (see Figure 13.3). You cansoften the edges of the selected image with features such as the Feather commandand the Blur Tool before moving it to another image window. You also can apply a
17 8311 CH13 1/15/03 2:28 PM Page 278

filter or an effect to the selected image, or rotate or transform the image before copy-ing it to the Clipboard.
CHAPTER 13 EXPERIMENTING WITH COMPOSITE IMAGES 279
FIGURE 13.3
The daffodils
selected in this
photo can be
pasted into the
image of the
daisies.
The selected area in the image window behaveslike a mask. The pixels located inside the mar-quee are editable. Pixels outside the selected areaare not affected by any tools, filters, effects, orcommands. After the selected area is defined,you can add adjustment or fill layers to a docu-ment. You might want to copy and paste theimage into a new document window, as shownin Figure 13.4, if you want to store the selectedimage as a file on your hard drive.
Feathering the SelectionWhile the image is selected, you can apply theFeather command to soften its edges before copy-ing it. Choose one of the selection tools to definethe image you want to copy or move to anotherimage window. Figure 13.5 shows the dashed lineof the Magnetic Lasso Tool surrounding theselected image.
tipYou can copy an image
from one layer into theselection area of a differentlayer to create a mask. Firstclick on a layer in the Layers
palette. Use a selection toolto outline the border of
the image you want to copy.Choose the Copy command fromthe Edit menu, and then selectthe Paste Into command. Thehighlighted image in the selectedlayer acts as a mask to the pastedimage.
FIGURE 13.4
Use a selection
tool to select
part of an
image. Then
copy and paste
the selected
image into a
new document
window.
17 8311 CH13 1/15/03 2:28 PM Page 279

280 ABSOLUTE BEGINNER’S GUIDE TO ADOBE PHOTOSHOP ELEMENTS 2
IGURE 13.5
The Magnetic
Lasso Tool was
used to select the
daffodils.
Next, choose the Feather command from the Select menu or press (Option-Command-D) [Alt+Ctrl+D]. The Feather Selection dialog box will open (see Figure13.6). Type a value between 1 and 9999 into the Feather Radius text box. If youwant to create a subtle pixel feather effect, type 3 or 5 into the text box. Type alarger number, such as 12 or 15, if you want to create a more dramatic featheringeffect. Click on OK to apply the effect to the selected area.
FIGURE 13.6
The Feather
Selection dialog
box enables you
to determine
how many pix-
els are blended
along the edges
of the area of
selected pixels.
COLOR MODES AND COMPOSITE IMAGESPhotoshop Elements supports four color modes: Bitmap, Grayscale, Indexed Color, andRGB. When you paste an image created in one color mode into another window that usesa different color mode, Photoshop Elements will convert the first image into the colormode of the target window.
RGB color mode was used to create all the images for this book. This default color modesupports the largest number of colors. If you’re working with Grayscale or Indexed Color,based on a 256-color palette, you might want to convert the color mode of the compositeimage before pasting it into the target window. When you convert an image made up ofhundreds of colors into two colors—for example, if you convert an RGB or Indexed Colorimage into a bitmap—you might not recognize the image as a bitmap. A bitmap consistsonly of black and white colors. A color image may turn into splotches of unrecognizableblack and white patterns after you convert it to a bitmap.
17 8311 CH13 1/15/03 2:28 PM Page 280

On the other hand, when you convert a bitmap image into a higher-resolution color mode,the original image will be preserved. Because black and white are part of all the other colormodes, Photoshop Elements does not need to convert them when the bitmap’s color modechanges. To find out more about color modes, see Chapter 4, “Creating, Opening, andConverting Images.”
Copying and Pasting the ImageCheck the color mode of the image window containing the selected image beforecopying it. If you are planning to create composite images in Grayscale, Bitmap, orIndexed Color mode, you might want to change the color mode of an RGB imagewindow to match the smaller-sized color palette of the target image. On the otherhand, if you have converted an RGB image to Grayscale or Indexed Color mode, youmight want to reopen and reselect the image in RGB mode so that you can copy asmuch color information as possible to the Clipboard.
When you paste an image into an image window, Photoshop Elements converts it tothe color mode of the target image window. If the target window has a higher colordepth than the image pasted into it, the color depth of the composite image will bepreserved. However, if the target window has a lower color resolution than thepasted image, Photoshop Elements will remove color information from the compos-ite image before adding it to the target window.
The following list describes the kinds of images and the color modes you can usewith them to compose a composite image:
■ Line art—You can work with vector graphics and Encapsulated PostScriptfiles (EPS) in Photoshop Elements. This type of graphic image includes lineart, shapes, and other black-and-white graphics, including text, with thecolor mode set to Bitmap. You can create composite images solely frombitmap images, or you can start from a bitmap image and then change thecolor mode of the document to RGB or Indexed Color if you want to add colorcomposite images to it. For example, if the background image was created inBitmap mode, you can change the color mode of the image window to RGB.Then you can paste Grayscale, Indexed Color, or RGB images into new layerswithout affecting the black-and-white background image.
■ Black-and-white photos—You can work with black-and-white photo-graphs in Grayscale color mode. You can combine two or more black-and-white photos, and view the composite image with a fixed palette of 256shades of gray. This can help you pinpoint black and white levels in eachimage layer, and help maintain continuity across images in the final, flat-tened picture.
CHAPTER 13 EXPERIMENTING WITH COMPOSITE IMAGES 281
17 8311 CH13 1/15/03 2:28 PM Page 281

■ Color images—If any of the images you want to use in the composite con-tains color, change the color mode of the image window to RGB color mode.Choose RGB color from the Image, Mode menu. RGB color mode supportsmillions of colors and can help preserve the sharpness and quality of eachimage as you scale, rotate, or flip it in the image window.
■ Color graphics—Color graphics is a term that can refer to different kinds ofgraphics. The first kind of color graphic is a color image captured by a cam-era. The other is a color drawing or painting. In some cases, you might notbe able to work with the original, full-color image that contains the RGBcolor information. If you plan to combine color graphics that contain 256 orfewer colors, you can work with these composite images in Indexed Colormode. However, Indexed Color mode restricts the maximum number of colorsyou can work with to 256. For best results, work in RGB mode until you final-ize the location of each composite image and the order of each compositeimage layer. Then flatten the image into a single layer before converting it toIndexed Color mode.
CAN’T PASTE?If you cannot paste an image into an image window, check your computer to see whetherit is running low on memory. Click on the Applications menu if you’re running Mac OS, ortake a peek at the taskbar in Windows. If you have several applications open, save any filesyou have open, and then (Quit) [Exit] as many as you can to make more memory availablefor Windows or Mac OS.
The Clipboard can store a fairly large-sized image. However, the amount of memory avail-able depends on how many other applications are running on the computer, and howmuch memory is available to the operating system. If Photoshop Elements cannot save animage to the Clipboard on Windows or Mac OS, you might need to (Quit) [Exit] one ormore applications, or restart the computer.
You can view the contents of the Clipboard on a Mac by choosing Show Clipboard fromthe Edit menu in the Finder. If the copied image does not appear in the Clipboard win-dow, or if no image can be pasted into the image window, the Copy command was notable to copy the selection into the Clipboard. You can clear the Clipboard by choosingPurge, Clipboard from the Edit menu.
You must use several commands to copy an image into the same window or movean image from one image window to another. Before copying or pasting an image,click on the source and target image’s status bar to check the color mode of theimage. The following list reviews the copy and paste commands available inPhotoshop Elements:
282 ABSOLUTE BEGINNER’S GUIDE TO ADOBE PHOTOSHOP ELEMENTS 2
17 8311 CH13 1/15/03 2:28 PM Page 282

■ Copy—Creates a copy of the selected image and puts it in the Clipboard.
■ Cut—Moves the selected image to the Clipboard, and deletes the originalfrom the active image window.
■ Copy Merged—Copies the contents of all layers of the selected area in theimage window.
■ Paste—Moves the image from the Clipboard to the active image window,creating a new layer for the image in the Layers palette.
■ Paste Into—Enables you to paste an image from the Clipboard into theselected layer of the active image window instead of pasting it into a newlayer. For example, you can use this command to paste an image intoanother selected image, such as a bitmap text or graphic object.
■ Duplicate Image—Creates a new image window containing the contents ofthe previously active window. This command can help you view the sameimage at different magnification levels, or show and hide different layers indifferent windows.
Before you can paste an image, you must firstselect the image you want to copy. Then choosethe Copy command from the Edit menu, or press(Command-C) [Ctrl+C] to copy the selected areato the Clipboard. Next, click on the image win-dow where you want to add the selected image.This can be the same window you already haveopen, or another image window. Then choose thePaste command from the Edit menu or press(Command-P) [Ctrl+P]. The selected image willappear in the active image window. It is added tothe document in a new, transparent layer. Selectthe Move Tool and click on the new layer in theLayers palette. Click and drag the image in theselected layer to move it to a new location in theimage window.
Variations—Pasting ImagesBecause Photoshop Elements creates a new layerfor each image you paste into the image window,anything you paste into an image windowbecomes a composite image. You might havenoticed that there are two Paste commands in theEdit menu. The Paste command enables you to
CHAPTER 13 EXPERIMENTING WITH COMPOSITE IMAGES 283
The Composites recipeis located in the Add
Elements group of recipes. Selectthe Add Elements group from thedrop-down menu in the Recipespalette. Then, choose theComposites recipe to find outmore about how to use selectiontools, menu commands, and trans-form commands to work withcomposite images.
You can also follow recipes tofind out how to remove orreplace a background layer bychoosing one of these topics inthe Recipes palette.
17 8311 CH13 1/15/03 2:28 PM Page 283

add a new image to a new layer in the active image window. The Paste Into com-mand enables you to add an image into an existing, unlocked layer. If you choosethe Paste Into command, the selected image in the target layer becomes a maskfor the pasted image. The pasted image will appear only within the boundary of theselected image, despite the fact that it might be taller or wider than the selectedimage.
You can apply the copy and paste commands to duplicate all or part of an imagewithin the same image window. For example, you can enlarge or shrink a particularobject in the image window, and then paste a second image behind it. The followingsections show you how you can make the subject of a photo stand out from thebackground.
Follow the same four steps introduced in the beginning of this chapter. This time,however, you copy and paste part of the background image to place the compositeimage within the target image. First, use a selection tool to highlight the subject ofthe photo, as shown in Figure 13.7. Then, copy and paste the selected image into thesame image window.
284 ABSOLUTE BEGINNER’S GUIDE TO ADOBE PHOTOSHOP ELEMENTS 2
FIGURE 13.7
Place an image
behind the
flower by select-
ing, copying,
and pasting the
flower into its
own layer.
After you paste an image into an image window, a new layer containing theselected area will appear in the Layers palette, as shown in Figure 13.8. If you’repasting the selected area into the image window from which it originated, the imagewindow will look the same before and after the image is pasted. However, you canview the copied image in its new layer from the Layers palette.
Next, open the image you want to paste behind the duplicate composite image inthe target image window. Figure 13.9 shows two yellow poppies that have beenhighlighted with a selection tool. Select the portion of the image you want to pasteinto the target image window. Then, choose the Copy command from the Editmenu, or press (Command-C) [Ctrl+C] to copy the selected image to the Clipboard.
17 8311 CH13 1/15/03 2:28 PM Page 284

CHAPTER 13 EXPERIMENTING WITH COMPOSITE IMAGES 285
FIGURE 13.8
The image
remains the
same. However,
you can see that
the flower now is
on its own layer
in the Layers
palette.
FIGURE 13.9
Select the image
you want to add
to the first. Then
add it using the
Paste command.
Click on the target image window. In this example, it’s the image window thatalready contains the composite image of the closed poppy. Then choose the Pastecommand from the Edit menu. The selected image will appear in the image win-dow (see Figure 13.9). You can use the Move Tool to change the location of theselected image in the image window. If you want the second composite image toappear behind the first one, you might have to adjust the order of the image layersin the Layers palette. In this example, the layer containing the two poppies is sand-wiched between the composite image of the closed poppy and the backgroundimage (see Figure 13.10).
17 8311 CH13 1/15/03 2:28 PM Page 285
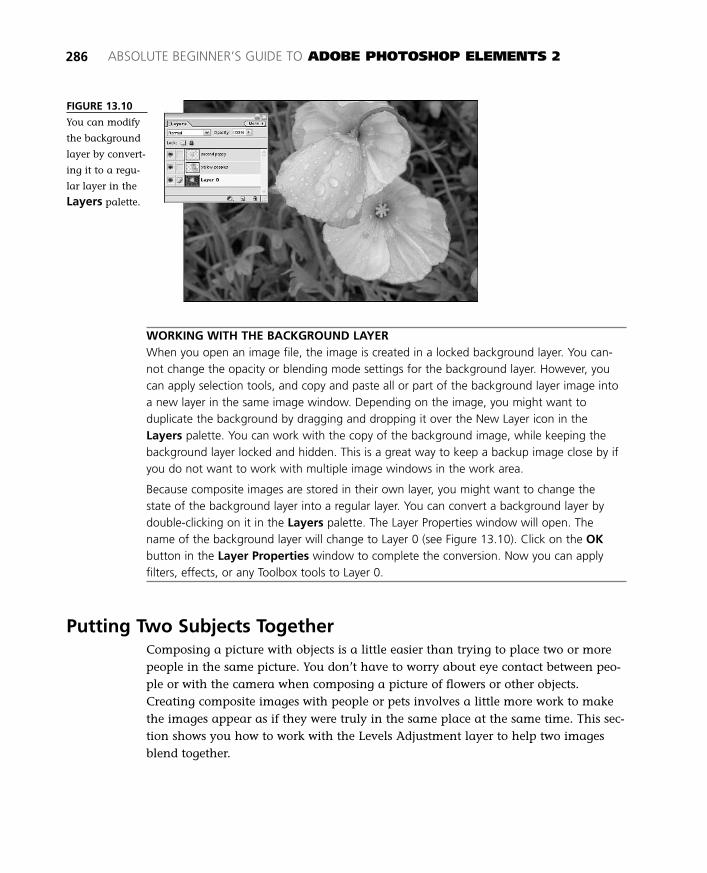
WORKING WITH THE BACKGROUND LAYERWhen you open an image file, the image is created in a locked background layer. You can-not change the opacity or blending mode settings for the background layer. However, youcan apply selection tools, and copy and paste all or part of the background layer image intoa new layer in the same image window. Depending on the image, you might want toduplicate the background by dragging and dropping it over the New Layer icon in theLayers palette. You can work with the copy of the background image, while keeping thebackground layer locked and hidden. This is a great way to keep a backup image close by ifyou do not want to work with multiple image windows in the work area.
Because composite images are stored in their own layer, you might want to change thestate of the background layer into a regular layer. You can convert a background layer bydouble-clicking on it in the Layers palette. The Layer Properties window will open. Thename of the background layer will change to Layer 0 (see Figure 13.10). Click on the OKbutton in the Layer Properties window to complete the conversion. Now you can applyfilters, effects, or any Toolbox tools to Layer 0.
Putting Two Subjects TogetherComposing a picture with objects is a little easier than trying to place two or morepeople in the same picture. You don’t have to worry about eye contact between peo-ple or with the camera when composing a picture of flowers or other objects.Creating composite images with people or pets involves a little more work to makethe images appear as if they were truly in the same place at the same time. This sec-tion shows you how to work with the Levels Adjustment layer to help two imagesblend together.
286 ABSOLUTE BEGINNER’S GUIDE TO ADOBE PHOTOSHOP ELEMENTS 2
FIGURE 13.10
You can modify
the background
layer by convert-
ing it to a regu-
lar layer in the
Layers palette.
17 8311 CH13 1/15/03 2:28 PM Page 286
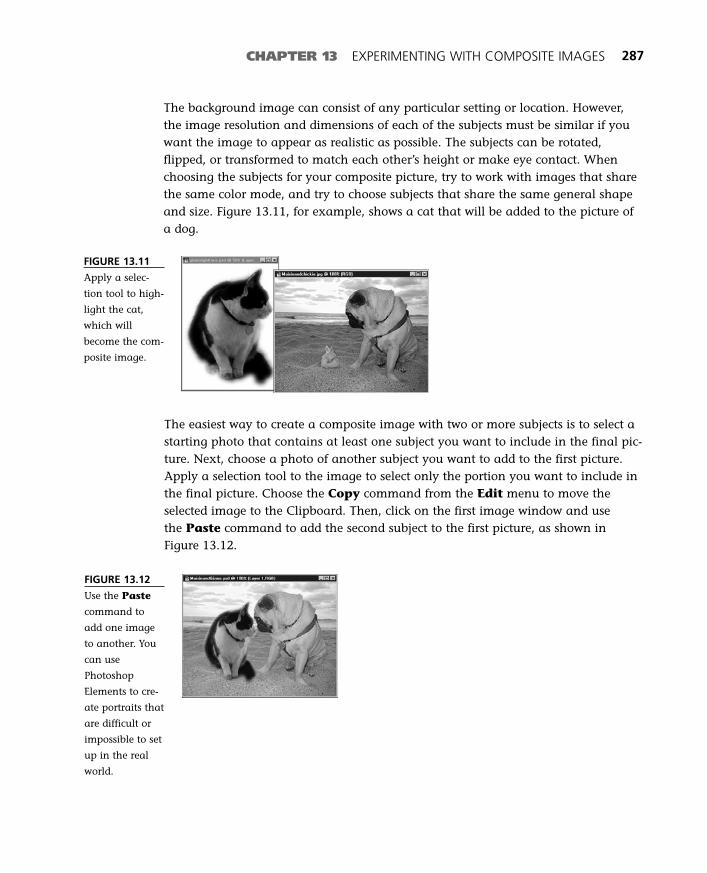
CHAPTER 13 EXPERIMENTING WITH COMPOSITE IMAGES 287
The background image can consist of any particular setting or location. However,the image resolution and dimensions of each of the subjects must be similar if youwant the image to appear as realistic as possible. The subjects can be rotated,flipped, or transformed to match each other’s height or make eye contact. Whenchoosing the subjects for your composite picture, try to work with images that sharethe same color mode, and try to choose subjects that share the same general shapeand size. Figure 13.11, for example, shows a cat that will be added to the picture ofa dog.
FIGURE 13.11
Apply a selec-
tion tool to high-
light the cat,
which will
become the com-
posite image.
The easiest way to create a composite image with two or more subjects is to select astarting photo that contains at least one subject you want to include in the final pic-ture. Next, choose a photo of another subject you want to add to the first picture.Apply a selection tool to the image to select only the portion you want to include inthe final picture. Choose the Copy command from the Edit menu to move theselected image to the Clipboard. Then, click on the first image window and usethe Paste command to add the second subject to the first picture, as shown inFigure 13.12.
FIGURE 13.12
Use the Paste
command to
add one image
to another. You
can use
Photoshop
Elements to cre-
ate portraits that
are difficult or
impossible to set
up in the real
world.
17 8311 CH13 1/15/03 2:28 PM Page 287
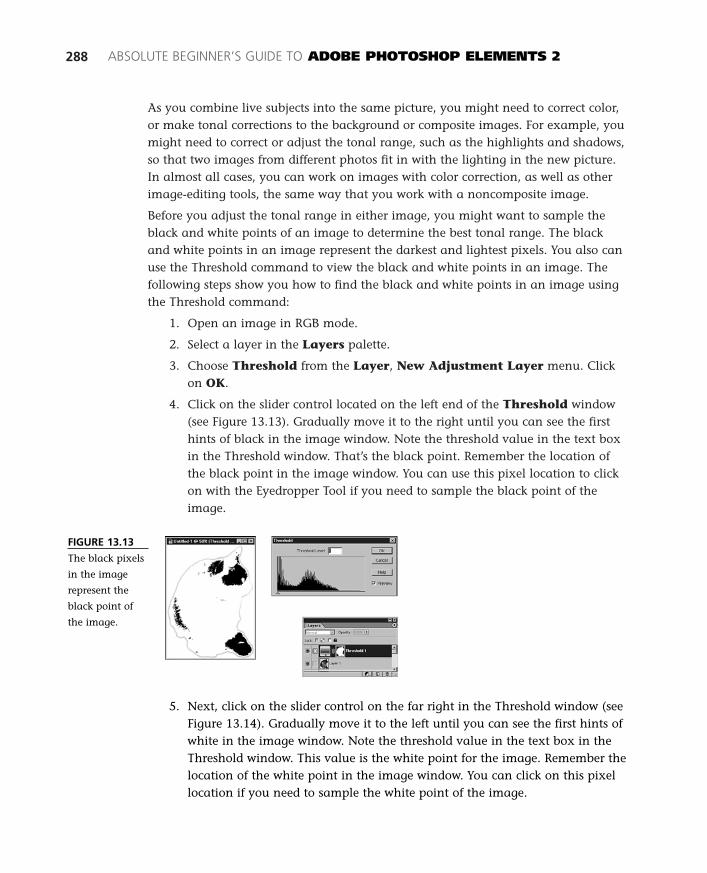
As you combine live subjects into the same picture, you might need to correct color,or make tonal corrections to the background or composite images. For example, youmight need to correct or adjust the tonal range, such as the highlights and shadows,so that two images from different photos fit in with the lighting in the new picture.In almost all cases, you can work on images with color correction, as well as otherimage-editing tools, the same way that you work with a noncomposite image.
Before you adjust the tonal range in either image, you might want to sample theblack and white points of an image to determine the best tonal range. The blackand white points in an image represent the darkest and lightest pixels. You also canuse the Threshold command to view the black and white points in an image. Thefollowing steps show you how to find the black and white points in an image usingthe Threshold command:
1. Open an image in RGB mode.
2. Select a layer in the Layers palette.
3. Choose Threshold from the Layer, New Adjustment Layer menu. Clickon OK.
4. Click on the slider control located on the left end of the Threshold window(see Figure 13.13). Gradually move it to the right until you can see the firsthints of black in the image window. Note the threshold value in the text boxin the Threshold window. That’s the black point. Remember the location ofthe black point in the image window. You can use this pixel location to clickon with the Eyedropper Tool if you need to sample the black point of theimage.
288 ABSOLUTE BEGINNER’S GUIDE TO ADOBE PHOTOSHOP ELEMENTS 2
FIGURE 13.13
The black pixels
in the image
represent the
black point of
the image.
5. Next, click on the slider control on the far right in the Threshold window (seeFigure 13.14). Gradually move it to the left until you can see the first hints ofwhite in the image window. Note the threshold value in the text box in theThreshold window. This value is the white point for the image. Remember thelocation of the white point in the image window. You can click on this pixellocation if you need to sample the white point of the image.
17 8311 CH13 1/15/03 2:28 PM Page 288
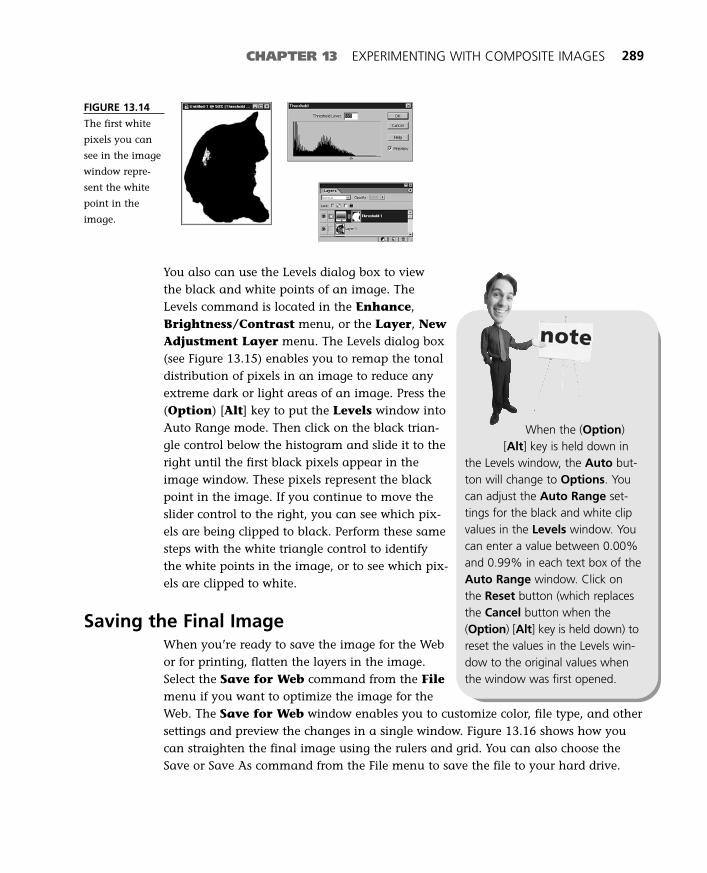
CHAPTER 13 EXPERIMENTING WITH COMPOSITE IMAGES 289
FIGURE 13.14
The first white
pixels you can
see in the image
window repre-
sent the white
point in the
image.
You also can use the Levels dialog box to view the black and white points of an image. The Levels command is located in the Enhance,Brightness/Contrast menu, or the Layer, NewAdjustment Layer menu. The Levels dialog box(see Figure 13.15) enables you to remap the tonaldistribution of pixels in an image to reduce anyextreme dark or light areas of an image. Press the(Option) [Alt] key to put the Levels window intoAuto Range mode. Then click on the black trian-gle control below the histogram and slide it to theright until the first black pixels appear in theimage window. These pixels represent the blackpoint in the image. If you continue to move theslider control to the right, you can see which pix-els are being clipped to black. Perform these samesteps with the white triangle control to identifythe white points in the image, or to see which pix-els are clipped to white.
Saving the Final ImageWhen you’re ready to save the image for the Webor for printing, flatten the layers in the image.Select the Save for Web command from the Filemenu if you want to optimize the image for theWeb. The Save for Web window enables you to customize color, file type, and othersettings and preview the changes in a single window. Figure 13.16 shows how youcan straighten the final image using the rulers and grid. You can also choose theSave or Save As command from the File menu to save the file to your hard drive.
When the (Option)[Alt] key is held down in
the Levels window, the Auto but-ton will change to Options. Youcan adjust the Auto Range set-tings for the black and white clipvalues in the Levels window. Youcan enter a value between 0.00%and 0.99% in each text box of theAuto Range window. Click on the Reset button (which replacesthe Cancel button when the(Option) [Alt] key is held down) toreset the values in the Levels win-dow to the original values whenthe window was first opened.
17 8311 CH13 1/15/03 2:28 PM Page 289
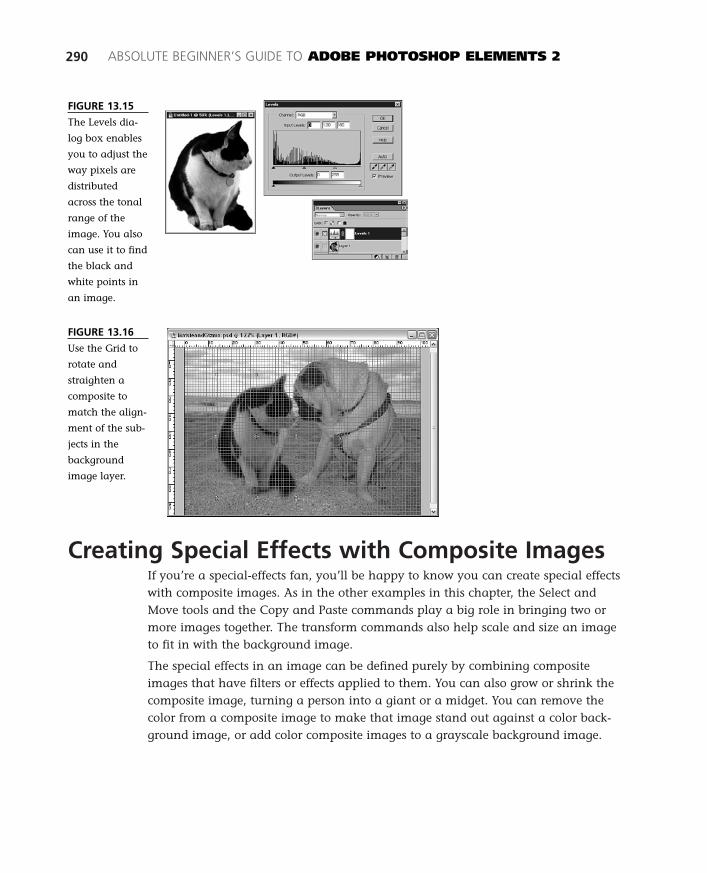
Creating Special Effects with Composite ImagesIf you’re a special-effects fan, you’ll be happy to know you can create special effectswith composite images. As in the other examples in this chapter, the Select andMove tools and the Copy and Paste commands play a big role in bringing two ormore images together. The transform commands also help scale and size an imageto fit in with the background image.
The special effects in an image can be defined purely by combining compositeimages that have filters or effects applied to them. You can also grow or shrink thecomposite image, turning a person into a giant or a midget. You can remove thecolor from a composite image to make that image stand out against a color back-ground image, or add color composite images to a grayscale background image.
290 ABSOLUTE BEGINNER’S GUIDE TO ADOBE PHOTOSHOP ELEMENTS 2
FIGURE 13.15
The Levels dia-
log box enables
you to adjust the
way pixels are
distributed
across the tonal
range of the
image. You also
can use it to find
the black and
white points in
an image.
FIGURE 13.16
Use the Grid to
rotate and
straighten a
composite to
match the align-
ment of the sub-
jects in the
background
image layer.
17 8311 CH13 1/15/03 2:28 PM Page 290

CHAPTER 13 EXPERIMENTING WITH COMPOSITE IMAGES 291
Choosing the First ImageOne of the first things you’ll need to decide is what kind of effect you want to create.This will help you pick the images you will use to create the composite image. Ifyou’re not sure where to start, pick the background image first. Figure 13.17 shows aclose-up picture of a flower. Looking at this photo, you might not expect a specialeffect to be the first vision to pop into your head.
FIGURE 13.17
The original
image, before
any changes are
made.
Because the flower takes up most of this photo, I added a relatively tiny person tocreate a giant flower effect. Take a look at the dimensions of each image you wantto use before combining them. The flower is a 3-megapixel image, and the image ofthe person is a 640×480-pixel image. Both images are in millions of colors, and thetarget image window is set to RGB color mode. The dimensions and resolutions ofboth images enable them to come together nicely to create a composite image.
Figure 13.18 shows the completed image. The Move Tool and the transform com-mands are used to modify the composite image so that it fits in with the rest of thepicture.
FIGURE 13.18
The same image
after a compos-
ite has been
added. The size
of this flower
makes the man
at the top seem
very tiny.
17 8311 CH13 1/15/03 2:28 PM Page 291

292 ABSOLUTE BEGINNER’S GUIDE TO ADOBE PHOTOSHOP ELEMENTS 2
Transforming the Composite ImageThere are many ways to transform an image inPhotoshop Elements. You can resize it, rotate it,skew it, change its perspective, or flip it horizon-tally or vertically. To apply a transform com-mand, you must first select the image.
Pick a selection tool from the Toolbox and use itto highlight the composite image you want topaste into the target image window. TheMagnetic Lasso Tool was used to select the imageshown in Figure 13.19. When the image isselected, you can choose the Feather commandto soften the edges of the selected image, or applya filter, an effect, or a layer style to it. You alsocan apply the Rotate or Transform commands(from the Image menu) to the selected image.However, it’s easier to modify the selected image ifyou have the background image in the target win-dow behind it.
tipIf you want a composite
image to appear semi-trans-parent, like a ghost, you canlower the opacity value ofthe composite image in the
Layers palette. Select thelayer that contains the
composite image in the Layerspalette. Then type a lower value,such as 60 or 70, into the Opacitytext box. The lower the value youtype, the more transparent theimage will appear.
FIGURE 13.19
Select the com-
posite image
and copy it to
the Clipboard.
SCALING OBJECTS WITH THE TRANSFORM COMMANDSTransform commands enable you to skew, distort, and apply perspective to an image. Youcan also grow or shrink the size of an image object.
You can press (Command-T) [Ctrl+T] to activate the Free Transform command. Mostobjects go into Free Transform mode when you select them with the Move Tool.
Transform commands are particularly helpful for scaling images that are pasted from oneimage window into another. You can shrink a large image so that it fits with the scale ofthe objects in the background layer of an image.
17 8311 CH13 1/15/03 2:28 PM Page 292

CHAPTER 13 EXPERIMENTING WITH COMPOSITE IMAGES 293
When you’re ready to move the selected image to the other image window, choosethe Copy command from the Edit menu or press (Command-C) [Ctrl+C]. Theselected image will be copied to the Clipboard. Next, click on the target image win-dow, which is the image window with the background image. Then choose the Pastecommand from the Edit menu, or press (Command-P) [Ctrl+P]. The selectedimage will appear in the active image window, as shown in Figure 13.20.
FIGURE 13.20
Paste the
selected image
on the left into
the target image
window. Use the
transform com-
mands to size
the image. Then
use the Move
Tool to compose
the new picture.
Working with Multiple Composite ImagesCreating an image consisting of two or more composite images is pretty similar toputting together a single composite image. The only real difference is that there aremore images to coordinate in the final composition. Figure 13.21 shows the back-ground image that’s used to create the multi-image composite image in this section.
Figure 13.22 shows the photo before any changes were made. I’ve added two photosof flowers and a beach sunset to it to create a new photo. Each composite imageoriginated from a different photo, taken at different times at different locations withdifferent cameras.
FIGURE 13.21
The golden gate
bridge photo
before changes.
It has a lot of
empty blue sky.
17 8311 CH13 1/15/03 2:29 PM Page 293
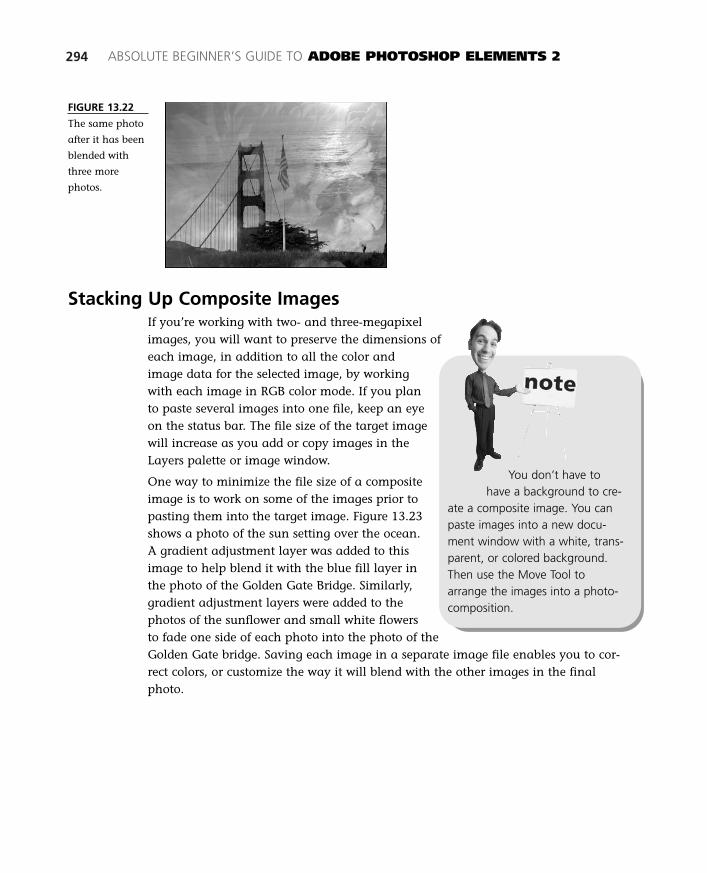
294 ABSOLUTE BEGINNER’S GUIDE TO ADOBE PHOTOSHOP ELEMENTS 2
FIGURE 13.22
The same photo
after it has been
blended with
three more
photos.
Stacking Up Composite ImagesIf you’re working with two- and three-megapixelimages, you will want to preserve the dimensions ofeach image, in addition to all the color andimage data for the selected image, by workingwith each image in RGB color mode. If you planto paste several images into one file, keep an eyeon the status bar. The file size of the target imagewill increase as you add or copy images in theLayers palette or image window.
One way to minimize the file size of a compositeimage is to work on some of the images prior topasting them into the target image. Figure 13.23shows a photo of the sun setting over the ocean.A gradient adjustment layer was added to thisimage to help blend it with the blue fill layer inthe photo of the Golden Gate Bridge. Similarly,gradient adjustment layers were added to thephotos of the sunflower and small white flowersto fade one side of each photo into the photo of theGolden Gate bridge. Saving each image in a separate image file enables you to cor-rect colors, or customize the way it will blend with the other images in the finalphoto.
You don’t have tohave a background to cre-
ate a composite image. You canpaste images into a new docu-ment window with a white, trans-parent, or colored background.Then use the Move Tool toarrange the images into a photo-composition.
17 8311 CH13 1/15/03 2:29 PM Page 294
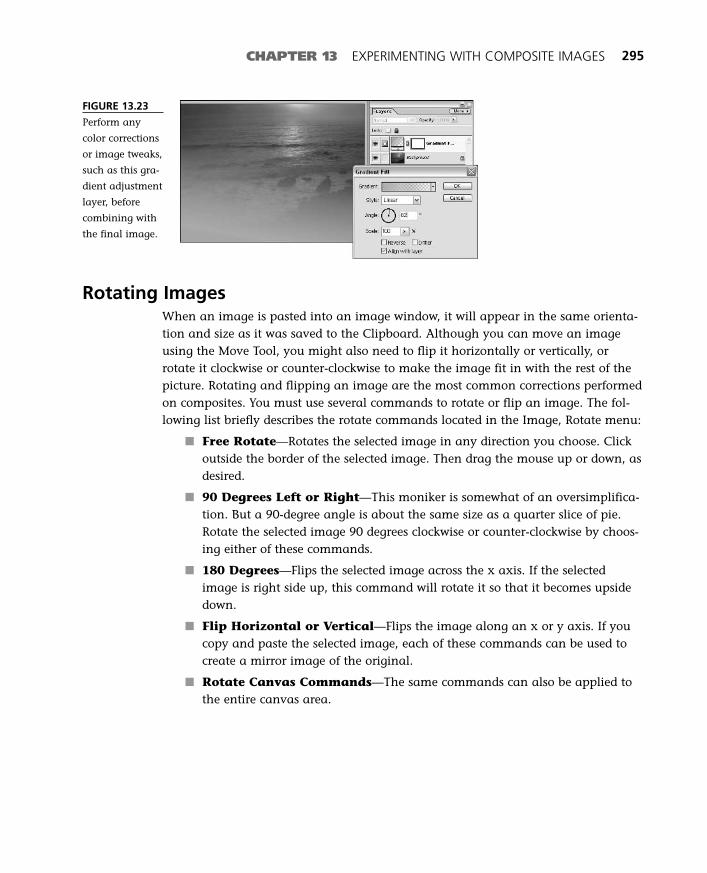
CHAPTER 13 EXPERIMENTING WITH COMPOSITE IMAGES 295
FIGURE 13.23
Perform any
color corrections
or image tweaks,
such as this gra-
dient adjustment
layer, before
combining with
the final image.
Rotating ImagesWhen an image is pasted into an image window, it will appear in the same orienta-tion and size as it was saved to the Clipboard. Although you can move an imageusing the Move Tool, you might also need to flip it horizontally or vertically, orrotate it clockwise or counter-clockwise to make the image fit in with the rest of thepicture. Rotating and flipping an image are the most common corrections performedon composites. You must use several commands to rotate or flip an image. The fol-lowing list briefly describes the rotate commands located in the Image, Rotate menu:
■ Free Rotate—Rotates the selected image in any direction you choose. Clickoutside the border of the selected image. Then drag the mouse up or down, asdesired.
■ 90 Degrees Left or Right—This moniker is somewhat of an oversimplifica-tion. But a 90-degree angle is about the same size as a quarter slice of pie.Rotate the selected image 90 degrees clockwise or counter-clockwise by choos-ing either of these commands.
■ 180 Degrees—Flips the selected image across the x axis. If the selectedimage is right side up, this command will rotate it so that it becomes upsidedown.
■ Flip Horizontal or Vertical—Flips the image along an x or y axis. If youcopy and paste the selected image, each of these commands can be used tocreate a mirror image of the original.
■ Rotate Canvas Commands—The same commands can also be applied tothe entire canvas area.
17 8311 CH13 1/15/03 2:29 PM Page 295

296 ABSOLUTE BEGINNER’S GUIDE TO ADOBE PHOTOSHOP ELEMENTS 2
ROTATING AND RESIZING SELECTED IMAGE OBJECTSYou can freely rotate a pasted image using the Move Tool. First use a selection tool toselect a portion of the background image in the window. Then copy and paste the selectedarea in the same image window. Select the new layer in the Layers palette. If you placethe cursor beside the selected image, the cursor will change from an arrow to the rotatecursor (a double-headed arrow icon turned 90 degrees). Click beside the highlightedboundary (marked by a dashed line) and drag the mouse to rotate the selected image. Youcan grow or shrink the image by clicking and dragging any of the square handle boxeslocated on the boundary of the selected image.
Composing a New PhotoEach image added to a picture can either do nothing for the original or completelychange the tone. Combining digital images into a composite can be extremely easy,if the source images are similar and are taken with similar cameras. Combiningimages that have more differences than similarities, such as combining a black-and-white image with a color one, can be a tedious task. Photoshop Elements enablesyou to work with any kind of image. However, the amount of time you’ll spend fine-tuning the final composition will vary depending on what you’re trying to accom-plish, and the quality of the photo resources you have available to work with.
The composite image shown in Figure 13.24 shows how images taken with differentcameras can be blended together with gradients or opacity value changes to create acomplete, unique picture. When you combine images from a diverse set of sourceimages, you likely will spend more time adjusting each image’s perspective andscale using the transform commands. The Move Tool is another indispensable tool tochange or tweak the location of each image. Try experimenting with the order ofeach of the image layers in the Layers palette. For example, you can make oneimage appear in front of another by dragging its layer above the other layer in theLayers palette.
FIGURE 13.24
Paste the selec-
tion into the
active image
window. Use the
Move Tool to
arrange the
image and
compose a new
picture.
17 8311 CH13 1/15/03 2:29 PM Page 296
CHAPTER 13 EXPERIMENTING WITH COMPOSITE IMAGES 297
LAYERS AND BLENDING MODESAnother way you can blend composite images is by choosing a different blending mode forthe image that resides in the topmost layer in the Layers palette. You can change the orderof layers by clicking and dragging them in the Layers palette. Blending modes affect theway pixels interact with the image layer directly below it. The colors in the top layer arecombined with the color in the layer directly below it to create a new, result color. To findout more about how to apply a blending mode to a layer, go to Chapter 10.
Finally, preserve the composite image and all the layer information and settings inyour image file by first saving it as a native Photoshop file (*.PSD). The Photoshop,or PSD, file format preserves each layer in the image file. This enables you to con-tinue editing each composite image at any time.
Flatten the layers to create the final image. Remember that after you flatten animage, it will be difficult to edit it as freely as you did when each composite imagewas in its own layer. Before you save the final image-flattened file on your harddrive, you can experiment with different optimization settings if you want to reducethe overall file size of the image. After the final file is saved, you might want to addcopyright, source filenames, or photographer information into the image’s File Infowindow.
17 8311 CH13 1/15/03 2:29 PM Page 297

17 8311 CH13 1/15/03 2:29 PM Page 298
Designing Complex
Images
ivPART
Creating Complex Images . . . . . . . . . . . . . . . .301
Animating Images . . . . . . . . . . . . . . . . . . . . . .327
Stitching Together a Panorama . . . . . . . . . . . .343
Creating a Slideshow and Web Photo Gallery . . . . . . . . . . . . . . . . . . . .359
Glossary . . . . . . . . . . . . . . . . . . . . . . . . . . . . . .375
18 8311 PT 4 1/15/03 2:17 PM Page 299

18 8311 PT 4 1/15/03 2:17 PM Page 300
In this chapter
• Melting Images with the Liquify Filter
• Pasting an Image into Text
• Adding a Reflection to an Image
• Lighten and Remove Shadows
• Adding a Light Source
14
Creating Complex
Images
Effects, reflections, light, and shadow are some of the key elements that
might not necessarily jump out at you in every photo, but definitely can
make or break a picture. Some effects can improve the original compo-
sition, whereas others enable you to create entirely new ones. This
chapter introduces the Liquify and Paste Into commands and teaches
you how to create some cool effects. You also learn how to add a reflec-
tion or light source to an image, as well as remove shadows from an
image.
19 8311 CH14 1/15/03 2:23 PM Page 301

Melting Images with the Liquify FilterThe Liquify filter consists of nine tools: Warp, Turbulence, Twirl Clockwise, TwirlCounterclockwise, Pucker, Bloat, Shift Pixels, Reflect, and Reconstruct. You can usethese tools to perform small magical tweaks, or completely distort the pixels in aphoto. The Reconstruct Tool enables you to undo any of the wacky effects created bythe other tools in case you want to recall or switch back to the original image.
Open any image in RGB mode and choose the Liquify command from the Filter,Distort menu to access and apply the wondrous effects in the Liquify dialog box. Ifyou are working with an image that contains more than one layer, you can applythe Liquify tools to a particular layer. If you want to apply this tool to all layers,you’ll need to choose the Flatten Image command from the Layer menu to mergeall layers into one first. Then, open the Liquify filter window and apply any of thetools to the image.
Applying Liquify ToolsTo open the Liquify dialog box, choose Liquify from the Filters palette, or from theFilter, Distort menu. Click on a tool to select it. You can choose from the TwirlCounterclockwise, Twirl Clockwise, Pucker, Bloat, Turbulence, Shift, or Reflectiontools located in the upper-left corner of the Liquify dialog box, as shown in Figure14.1. In most cases, the secret to applying the Liquify tools is choosing the rightbrush size. Adjust the Brush Size to match 25% to 80% of the area of the image youwant to change using the selected tool.
To apply any of the Liquify tools, click and hold down the mouse and/or drag themouse on the image. Because each tool has a slightly different behavior, you’ll dis-cover that some tools work best when dragged over the image, and others createcool effects if you just click and hold down the mouse.
To apply the Warp Tool, click and drag the cursor over the image. The pixels willmove in the direction of the brush. You can create high-quality image correction (forexample, enlarge eyes, shrink a nose) with the Pucker or Bloat tools. Click and holddown the mouse to see the image pucker or bloat. Hold the mouse down briefly tomake a subtle change to the image. Dragging the mouse around will distort theoriginal image beyond recognition and is not what you want to do if you want thephoto to look more realistic.
Press a letter on the keyboard, such as P for Pucker or B for Bloat, to quickly changebetween tools. Click Revert to remove any recent liquify effects applied to theimage. The Reconstruct Tool enables you to reverse the effects created by the otherLiquify tools.
302 ABSOLUTE BEGINNER’S GUIDE TO ADOBE PHOTOSHOP ELEMENTS 2
19 8311 CH14 1/15/03 2:23 PM Page 302

The following list briefly describes each tool in the Liquify dialog box:
■ Warp—Melts pixels in the direction in which the cursor moves.
■ Turbulence—Adds noise to the pixels directly below the cursor.
■ Twirl Counterclockwise—Moves pixels downward and around in acounterclockwise direction.
■ Twirl Clockwise—Pushes pixels downward and around in a clockwisedirection.
■ Pucker—Bends the pixels toward the center of the brush.
■ Bloat—Pushes pixels from the center of the brush outward.
■ Shift—Moves pixels perpendicular to the direction the cursor moves.
■ Reflection—Copies pixels below the brush location in the image to thebrush area. You can apply this tool by clicking and dragging the cursor onthe image. The set of pixels below the brush will be reflected. If you (Option-Drag) [Alt+Drag] the pixels located above, the brush will be reflected in theopposite direction of the cursor movement. You can overlap strokes to createa reflection effect.
■ Reconstruct—Restores pixels to the original location when the Liquify dia-log box is open. You also can press the (Option) [Alt] button to change the
CHAPTER 14 CREATING COMPLEX IMAGES 303
Warp tool (W)
Turbulence tool (A)
Twirl Clockwise tool (R)
Twirl Counter Clockwise tool (L)
Pucker tool (P)
Bloat tool (B)
Shift tool (S)
Reflection tool (M)
Reconstruct tool (E)
Zoom tool (Z)
Hand tool (H)
FIGURE 14.1
Choose from
eight Liquify
tools in the
Liquify dialog
box. You also
can apply the
Reconstruct Tool
to undo any
liquified areas of
the image, and
can adjust the
view using the
Zoom and Hand
tools.
19 8311 CH14 1/15/03 2:23 PM Page 303

Cancel button into the Reset button. Click on the Reset button to removeany of the tools that have been applied to the image in the Liquify dialogbox. The Revert button performs a similar task. If you apply one of theLiquify tools to the image, the Revert button becomes active. Click on theRevert button to restore the image to its original state when the Liquify dia-log box opened the image for the current session.
The key to using each tool is to customize the brush size. Type a value into the BrushSize text box, or click on the arrow and use the slider to set the brush size on theLiquify Tools. The larger the number, the larger the brush. Figure 14.2 shows howthe Warp Tool enables you to push pixels around with a 97 pixel-size brush. Applyshort strokes to the subject’s jaw line, eyes, and brow line to adjust the shape of thesubject. The effect is subtle, but I moved the eye slightly to the left using the WarpTool, stretched the edges of the right eye, and applied the Pucker Tool to reduce theoverall size of the eye.
304 ABSOLUTE BEGINNER’S GUIDE TO ADOBE PHOTOSHOP ELEMENTS 2
FIGURE 14.2
Reshape the
pug’s brow line
by applying
short strokes
with the Warp
Tool.
Brush Size
Brush Pressure
Turbulent Jitter
Stylus Pressure
You can also adjust the brush pressure, the turbulence jitter, and, if you are using apen tablet, the stylus pressure. The number you type in the Brush Pressure text boxwill determine how quickly the selected Liquify Tool applies the effect to the image.The number in the Turbulence Jitter text box enables you to add distortion as youapply the brush for each tool.
You can apply one tool to create an effect, or combine tools in any order to createelaborate effects. Figure 14.3 shows the image after the Warp, Bloat, Pucker, and
19 8311 CH14 1/15/03 2:23 PM Page 304
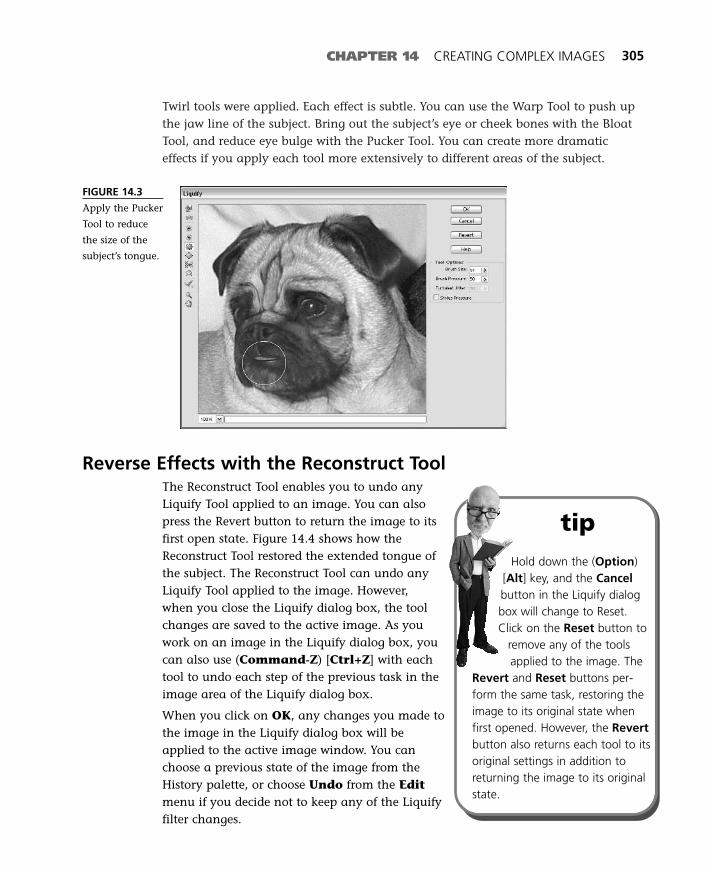
Twirl tools were applied. Each effect is subtle. You can use the Warp Tool to push upthe jaw line of the subject. Bring out the subject’s eye or cheek bones with the BloatTool, and reduce eye bulge with the Pucker Tool. You can create more dramaticeffects if you apply each tool more extensively to different areas of the subject.
CHAPTER 14 CREATING COMPLEX IMAGES 305
FIGURE 14.3
Apply the Pucker
Tool to reduce
the size of the
subject’s tongue.
Reverse Effects with the Reconstruct ToolThe Reconstruct Tool enables you to undo anyLiquify Tool applied to an image. You can alsopress the Revert button to return the image to itsfirst open state. Figure 14.4 shows how theReconstruct Tool restored the extended tongue ofthe subject. The Reconstruct Tool can undo anyLiquify Tool applied to the image. However,when you close the Liquify dialog box, the toolchanges are saved to the active image. As youwork on an image in the Liquify dialog box, youcan also use (Command-Z) [Ctrl+Z] with eachtool to undo each step of the previous task in theimage area of the Liquify dialog box.
When you click on OK, any changes you made tothe image in the Liquify dialog box will beapplied to the active image window. You canchoose a previous state of the image from theHistory palette, or choose Undo from the Editmenu if you decide not to keep any of the Liquifyfilter changes.
tipHold down the (Option)
[Alt] key, and the Cancelbutton in the Liquify dialogbox will change to Reset.Click on the Reset button to
remove any of the toolsapplied to the image. The
Revert and Reset buttons per-form the same task, restoring theimage to its original state whenfirst opened. However, the Revertbutton also returns each tool to itsoriginal settings in addition toreturning the image to its originalstate.
19 8311 CH14 1/15/03 2:23 PM Page 305

Pasting an Image into TextThe Liquify filter provides a set of tools that enableyou to create great-looking, sophisticated specialeffects. Another way of creating a special effect isto paste an image into text. You can do this bychoosing the Paste Into command after apply-ing the selection tools and the Copy command toan image. Unlike the Liquify filter, the PasteInto command involves following a set of steps tocreate the resulting special effect.
The Paste Into command pastes a bitmap fromthe Clipboard into a selected object in the imagewindow. The bitmap image can be added to aselected set of pixels in an existing layer in theLayers palette. The following example shows youhow to fill an image into text using the PasteInto command.
Creating Text to Fill with an ImageThe Horizontal and Vertical Type tools enable youto add text to a layer in the active image window.Click on the Horizontal or Vertical Type Tool inthe Toolbox, and then click in the image window.
306 ABSOLUTE BEGINNER’S GUIDE TO ADOBE PHOTOSHOP ELEMENTS 2
FIGURE 14.4
Undo any of the
other tools by
applying the
Reconstruct Tool.
You might need toincrease the size of the
text object if you want to seemore of the image that is pastedinto the text. Click on the layercontaining the text object fromthe Layers palette. Then, select the Move Tool from theToolbox. The grow handles willappear on the borders of the textobject. Click and drag the cornerhandles away from the center ofthe text object to grow the size of the text object.
19 8311 CH14 1/15/03 2:23 PM Page 306
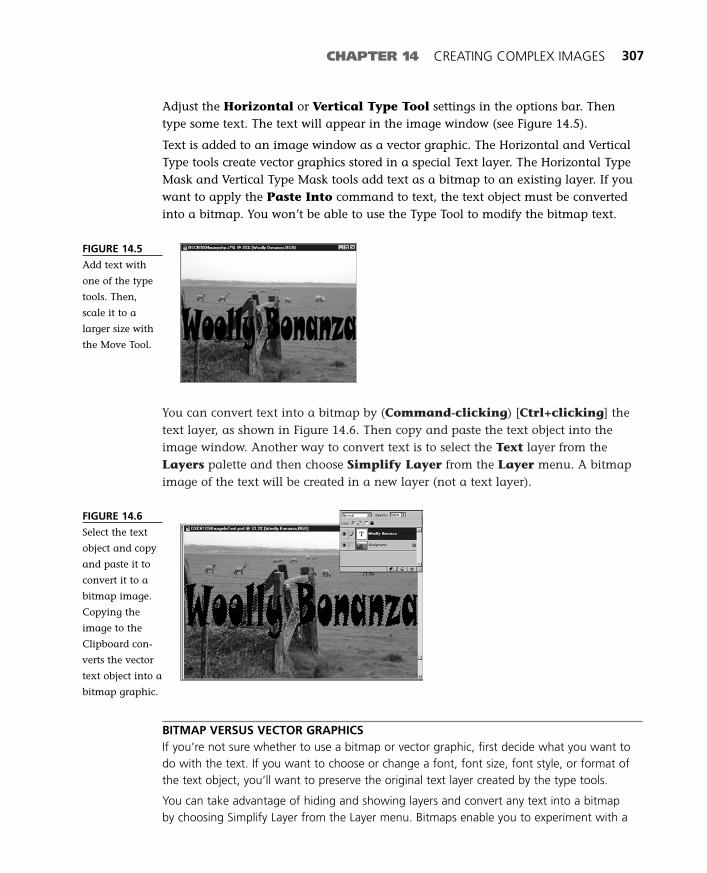
You can convert text into a bitmap by (Command-clicking) [Ctrl+clicking] thetext layer, as shown in Figure 14.6. Then copy and paste the text object into theimage window. Another way to convert text is to select the Text layer from theLayers palette and then choose Simplify Layer from the Layer menu. A bitmapimage of the text will be created in a new layer (not a text layer).
CHAPTER 14 CREATING COMPLEX IMAGES 307
FIGURE 14.5
Add text with
one of the type
tools. Then,
scale it to a
larger size with
the Move Tool.
FIGURE 14.6
Select the text
object and copy
and paste it to
convert it to a
bitmap image.
Copying the
image to the
Clipboard con-
verts the vector
text object into a
bitmap graphic.
Adjust the Horizontal or Vertical Type Tool settings in the options bar. Thentype some text. The text will appear in the image window (see Figure 14.5).
Text is added to an image window as a vector graphic. The Horizontal and VerticalType tools create vector graphics stored in a special Text layer. The Horizontal TypeMask and Vertical Type Mask tools add text as a bitmap to an existing layer. If youwant to apply the Paste Into command to text, the text object must be convertedinto a bitmap. You won’t be able to use the Type Tool to modify the bitmap text.
BITMAP VERSUS VECTOR GRAPHICSIf you’re not sure whether to use a bitmap or vector graphic, first decide what you want todo with the text. If you want to choose or change a font, font size, font style, or format ofthe text object, you’ll want to preserve the original text layer created by the type tools.
You can take advantage of hiding and showing layers and convert any text into a bitmapby choosing Simplify Layer from the Layer menu. Bitmaps enable you to experiment with a
19 8311 CH14 1/15/03 2:23 PM Page 307
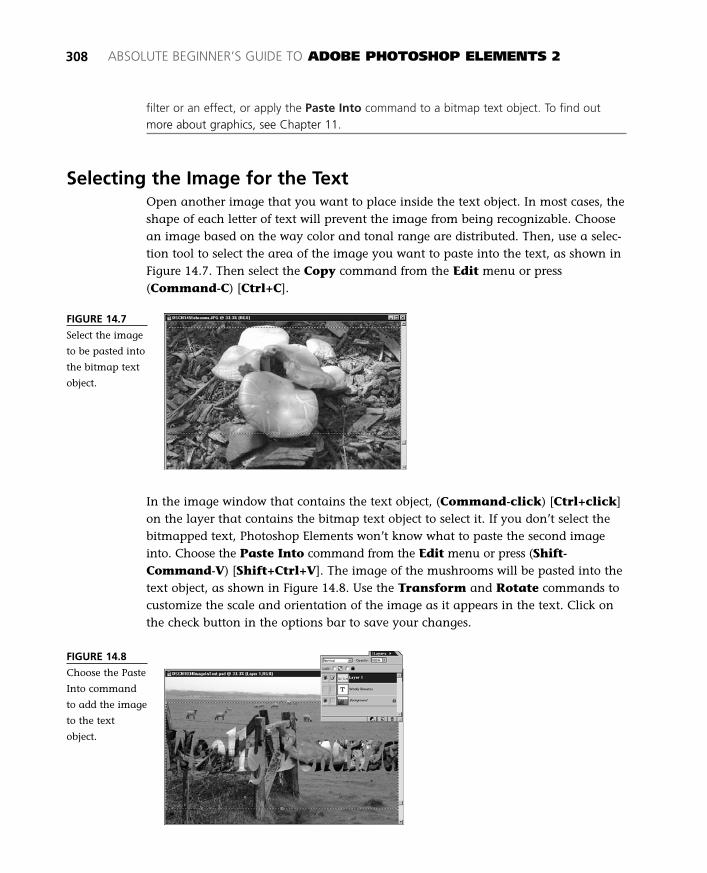
filter or an effect, or apply the Paste Into command to a bitmap text object. To find outmore about graphics, see Chapter 11.
Selecting the Image for the TextOpen another image that you want to place inside the text object. In most cases, theshape of each letter of text will prevent the image from being recognizable. Choosean image based on the way color and tonal range are distributed. Then, use a selec-tion tool to select the area of the image you want to paste into the text, as shown inFigure 14.7. Then select the Copy command from the Edit menu or press(Command-C) [Ctrl+C].
308 ABSOLUTE BEGINNER’S GUIDE TO ADOBE PHOTOSHOP ELEMENTS 2
FIGURE 14.7
Select the image
to be pasted into
the bitmap text
object.
FIGURE 14.8
Choose the Paste
Into command
to add the image
to the text
object.
In the image window that contains the text object, (Command-click) [Ctrl+click]on the layer that contains the bitmap text object to select it. If you don’t select thebitmapped text, Photoshop Elements won’t know what to paste the second imageinto. Choose the Paste Into command from the Edit menu or press (Shift-Command-V) [Shift+Ctrl+V]. The image of the mushrooms will be pasted into thetext object, as shown in Figure 14.8. Use the Transform and Rotate commands tocustomize the scale and orientation of the image as it appears in the text. Click onthe check button in the options bar to save your changes.
19 8311 CH14 1/15/03 2:23 PM Page 308
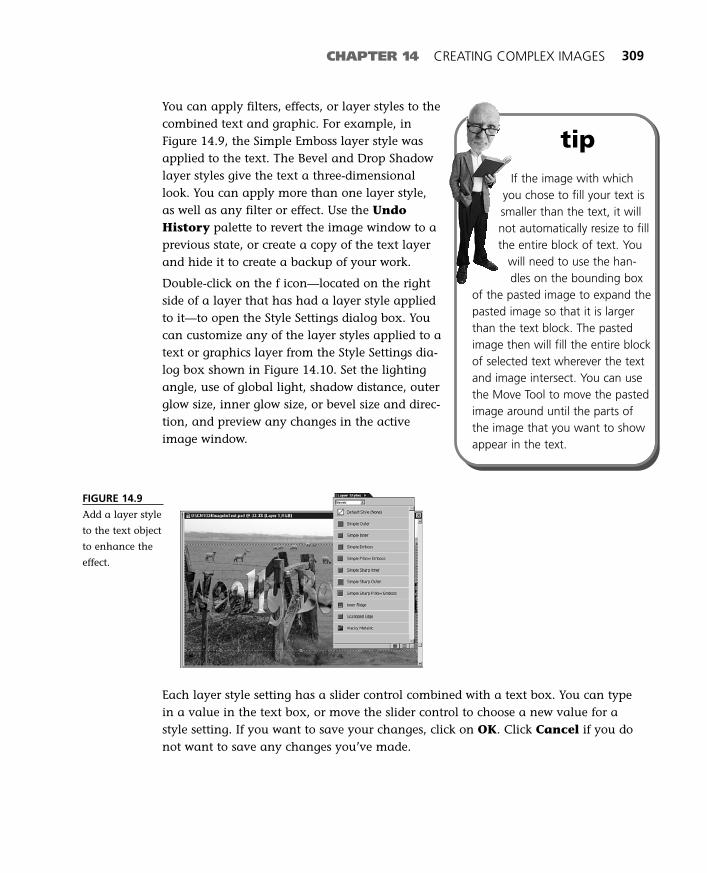
CHAPTER 14 CREATING COMPLEX IMAGES 309
You can apply filters, effects, or layer styles to thecombined text and graphic. For example, inFigure 14.9, the Simple Emboss layer style wasapplied to the text. The Bevel and Drop Shadowlayer styles give the text a three-dimensionallook. You can apply more than one layer style,as well as any filter or effect. Use the UndoHistory palette to revert the image window to aprevious state, or create a copy of the text layerand hide it to create a backup of your work.
Double-click on the f icon—located on the rightside of a layer that has had a layer style appliedto it—to open the Style Settings dialog box. Youcan customize any of the layer styles applied to atext or graphics layer from the Style Settings dia-log box shown in Figure 14.10. Set the lightingangle, use of global light, shadow distance, outerglow size, inner glow size, or bevel size and direc-tion, and preview any changes in the activeimage window.
tipIf the image with which
you chose to fill your text issmaller than the text, it willnot automatically resize to fillthe entire block of text. You
will need to use the han-dles on the bounding box
of the pasted image to expand thepasted image so that it is largerthan the text block. The pastedimage then will fill the entire blockof selected text wherever the textand image intersect. You can usethe Move Tool to move the pastedimage around until the parts ofthe image that you want to showappear in the text.
FIGURE 14.9
Add a layer style
to the text object
to enhance the
effect.
Each layer style setting has a slider control combined with a text box. You can typein a value in the text box, or move the slider control to choose a new value for astyle setting. If you want to save your changes, click on OK. Click Cancel if you donot want to save any changes you’ve made.
19 8311 CH14 1/15/03 2:23 PM Page 309

You also can adjust the tonal range and color settings of the bitmap text. Select thetext by (Command-clicking) [Ctrl+clicking] in its layer. Then add an adjustmentor fill layer specifically for the size and shape of the selected text. Experiment withdifferent settings until you find the right combination. The final image appears inFigure 14.11.
310 ABSOLUTE BEGINNER’S GUIDE TO ADOBE PHOTOSHOP ELEMENTS 2
FIGURE 14.11
The image in the
text object is
barely recogniz-
able in the final
picture.
FIGURE 14.10
Customize the
layer style set-
tings in the Style
Settings dialog
box.
Adding a Reflection to an ImageReflections, lighting, and shadows are some of the elements that make photos seemreal. For example, if you see a reflection of an image on the surface of a wall, youmight think the wall is made of glass or is a mirror. You can use the Copy and Pastetools, combined with the Rotate and Transform commands, as well as the layerblending and opacity settings, to create custom reflections in an image.
For this example, a composite image is added to a background image. Then a reflec-tion of the composite image is added to give the photo a 3-D effect. Figure 14.12shows how the Magnetic Lasso Tool selects an Aibo dog, which is to be copied andpasted into a picture of a sunset.
19 8311 CH14 1/15/03 2:23 PM Page 310

CHAPTER 14 CREATING COMPLEX IMAGES 311
FIGURE 14.12
Select the com-
posite image for
the picture you
want to create.
You might need to scale the pasted image so thatit matches the dimensions of the backgroundimage. The new image is pasted into its own newlayer. If you see the small square handles shownin Figure 14.13, you can click on one of thesehandles to grow or shrink an image. Click on oneof the handles on the border of the pasted imageand drag it to resize the image. The border of thetransform box won’t always cover the borders ofthe composite image. Click on the Move Tool,and move the image to a new location in theimage window.
Bitmap graphics don’tretain their image qualityif you try to make themlarger. PhotoshopElements will interpolate the pixelsto create the larger image. It doesthis by creating more pixels for eachexisting color, creating a squarish-looking, blocky image, also referredto as pixelation.
FIGURE 14.13
Scale the com-
posite image to
fit with the back-
ground image.
Although an image can be transformed when you first paste it into the image win-dow, you can apply the Transform commands in several other ways. The following
19 8311 CH14 1/15/03 2:23 PM Page 311
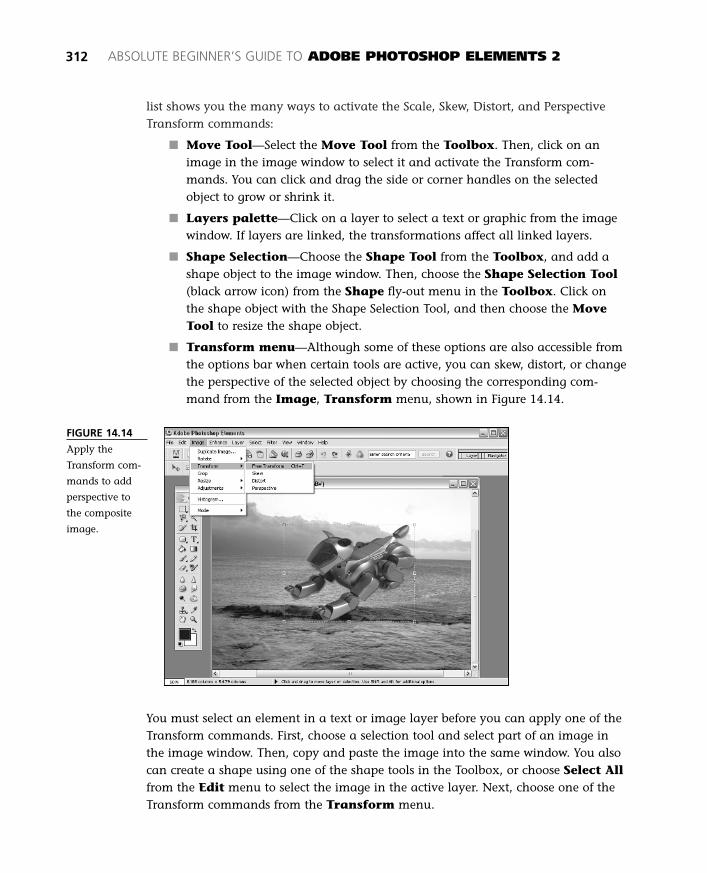
list shows you the many ways to activate the Scale, Skew, Distort, and PerspectiveTransform commands:
■ Move Tool—Select the Move Tool from the Toolbox. Then, click on animage in the image window to select it and activate the Transform com-mands. You can click and drag the side or corner handles on the selectedobject to grow or shrink it.
■ Layers palette—Click on a layer to select a text or graphic from the imagewindow. If layers are linked, the transformations affect all linked layers.
■ Shape Selection—Choose the Shape Tool from the Toolbox, and add ashape object to the image window. Then, choose the Shape Selection Tool(black arrow icon) from the Shape fly-out menu in the Toolbox. Click onthe shape object with the Shape Selection Tool, and then choose the MoveTool to resize the shape object.
■ Transform menu—Although some of these options are also accessible fromthe options bar when certain tools are active, you can skew, distort, or changethe perspective of the selected object by choosing the corresponding com-mand from the Image, Transform menu, shown in Figure 14.14.
312 ABSOLUTE BEGINNER’S GUIDE TO ADOBE PHOTOSHOP ELEMENTS 2
FIGURE 14.14
Apply the
Transform com-
mands to add
perspective to
the composite
image.
You must select an element in a text or image layer before you can apply one of theTransform commands. First, choose a selection tool and select part of an image inthe image window. Then, copy and paste the image into the same window. You alsocan create a shape using one of the shape tools in the Toolbox, or choose Select Allfrom the Edit menu to select the image in the active layer. Next, choose one of theTransform commands from the Transform menu.
19 8311 CH14 1/15/03 2:23 PM Page 312

CHAPTER 14 CREATING COMPLEX IMAGES 313
When you select Free Transform, Skew, Distort, or Scale from the Image, Transformmenu, several settings appear in the options bar. Choose from the buttons in themiddle of the bar to rotate, scale, or skew the selected object. You can use any com-bination of Transform commands before saving the final transformed object.
On the far-left side of the options bar is a rectangle shape with a square on each cor-ner and midpoint of each line, plus a square at its center. Click on one of thesesquares to set the center point of the selected object. Experiment with different centerpoints combined with different Rotate commands.
Width, Height, and Rotate text boxes are also present in the options bar. You cantype a new size or angle for the selected object into each text box, or click and dragthe handles of the bounding box in the image window to change the size of theobject. Click on the link icon if you want to preserve proportional relationshipsbetween the width and height of the object whenever a new value is typed into thewidth or height text box.
The following list briefly describes how each of the Transform commands works:
■ Free Transform—Rotates the image clockwise or counterclockwise, or growsor shrinks the selected object.
■ Skew—Extends or contracts one side or corner while preserving the propor-tions of the object. Creates a slanting effect.
■ Distort—Collapses or expands a side or corner of the selected object.Stretches or squishes part of an image.
■ Perspective—Grows or shrinks any side of an object to apply perspective tothe bounding box.
After you’ve transformed and shaped the image, you can move it to a new locationin the image window to create your composition. Identify a light source in the back-ground image, and try to decide where the reflection of the composite image shouldbe located. You might also want to make any tonal or color corrections to the com-posite or background image.
PERSERVING PROPORTIONSWhen you apply a Transform command to an image object, you can preserve the originalwidth and height relationship of the image by holding down the (Option) [Alt] key. Or,activate (the Link button will be in the down state) the Link icon in the options bar whileresizing the corner handle of the object. Preserving the original proportions of the imageenables you to limit the amount of distortion to the original image as you grow or shrink it.
If you do not want to preserve the object’s original proportions, you can deactivate the Linkbutton in the options bar or click and drag the corner handle to choose any combination ofwidth or height for the object. This setting enables you to easily distort the dimensions ofthe selected image.
19 8311 CH14 1/15/03 2:23 PM Page 313

Creating the Reflected ImageThe key to creating the reflection of the compositeimage is the Opacity setting in the Layerspalette. Many of the skills you mastered whileusing the Transform and Rotate commandscan also be used to create the reflected image. Tocreate the reflection of the composite image, fol-low these steps:
1. (Command-click) [Ctrl+click] the com-posite layer, and then copy and paste theimage into the image window. A new layerwill be created with the copied image.
2. Use the Move Tool to select the copiedimage. Then choose Flip Vertical (or FlipHorizontal) from the Image, Rotatemenu.
3. Select the layer containing the reflection,and decrease the Opacity setting from theLayers palette, as shown in Figure 14.15.
314 ABSOLUTE BEGINNER’S GUIDE TO ADOBE PHOTOSHOP ELEMENTS 2
Composing the Final ImageIf the background image does not contain an obvious light source, move the com-posite image and its reflection to different locations in the image to see which posi-tions fit best with the light and shadows in the background image (see Figure 14.16).You might also want to experiment with different opacity settings for the reflection.
FIGURE 14.15
Create a copy of
the composite
image and then
paste and flip it
vertically.
Decrease the
Opacity value to
create the
reflected image.
Composite image
Copy of composite image
To remove the reflec-tion, in the Layers palette,
click on the eye icon beside thelayer that contains the reflectedimage. The reflected image willnot appear in the image window.Click on the left column box oncemore to show the reflection. Theeye icon will appear beside anylayer that appears in the imagewindow.
19 8311 CH14 1/15/03 2:23 PM Page 314

CHAPTER 14 CREATING COMPLEX IMAGES 315
You also can add a solid or gradient fill layer to the overall image to bring the com-posite and background images together. For example, if the background image con-tains a sunrise or sunset, you might want to consider adding an orange fill orgradient so that the composite image shares hues similar to those of the backgroundimage, as was done in Figure 14.18.
Lighten and Remove ShadowsAnother conundrum of working with digital pictures is how to add more detail todark, shadowy images. Starting with a two- or three-megapixel image can make abig difference. The more image data in the image file, the higher the likelihood youcan lighten the image, although the tonal and color information won’t match therest of the lighter areas of the picture.
FIGURE 14.16
Move the reflec-
tion around in
the image to see
how it matches
up with the pri-
mary composite
image.
FIGURE 14.17
This figure
shows the
reflected image
after the
Transform com-
mands have
been applied
to it.
After you’ve finalized the placement of the composite image and its reflection, asshown in Figure 14.17, you can create one more copy of the composite image for useas the composite image’s shadow. As with the reflection, you can use the Transformand Rotate commands to create the shadow. With the shadow, though, you can adda Gradient Fill layer to darken the resulting image and fade it into the backgroundimage.
19 8311 CH14 1/15/03 2:23 PM Page 315
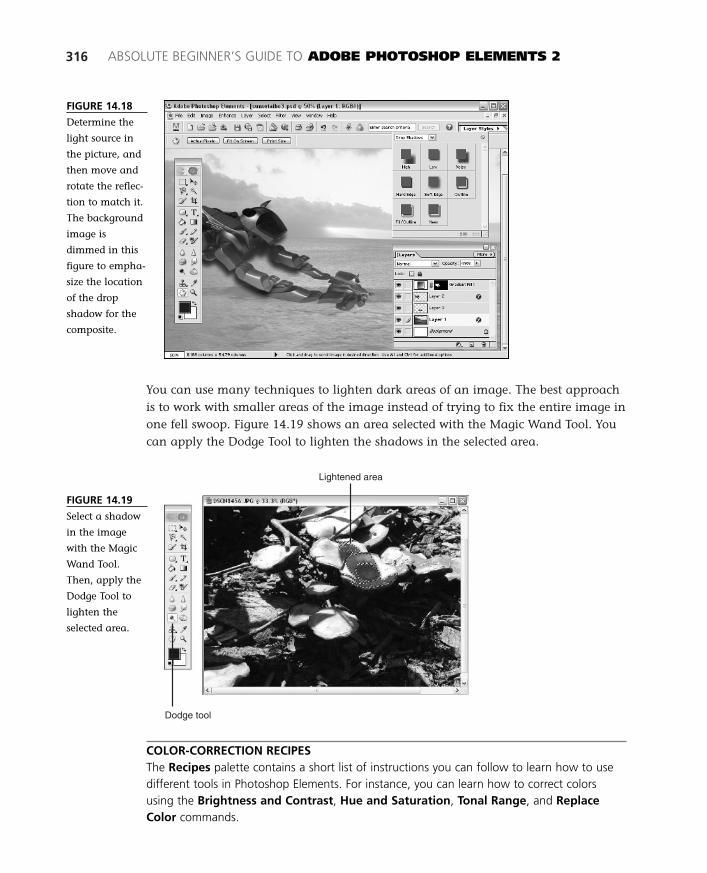
You can use many techniques to lighten dark areas of an image. The best approachis to work with smaller areas of the image instead of trying to fix the entire image inone fell swoop. Figure 14.19 shows an area selected with the Magic Wand Tool. Youcan apply the Dodge Tool to lighten the shadows in the selected area.
316 ABSOLUTE BEGINNER’S GUIDE TO ADOBE PHOTOSHOP ELEMENTS 2
FIGURE 14.18
Determine the
light source in
the picture, and
then move and
rotate the reflec-
tion to match it.
The background
image is
dimmed in this
figure to empha-
size the location
of the drop
shadow for the
composite.
Dodge tool
Lightened area
FIGURE 14.19
Select a shadow
in the image
with the Magic
Wand Tool.
Then, apply the
Dodge Tool to
lighten the
selected area.
COLOR-CORRECTION RECIPESThe Recipes palette contains a short list of instructions you can follow to learn how to usedifferent tools in Photoshop Elements. For instance, you can learn how to correct colorsusing the Brightness and Contrast, Hue and Saturation, Tonal Range, and ReplaceColor commands.
19 8311 CH14 1/15/03 2:23 PM Page 316
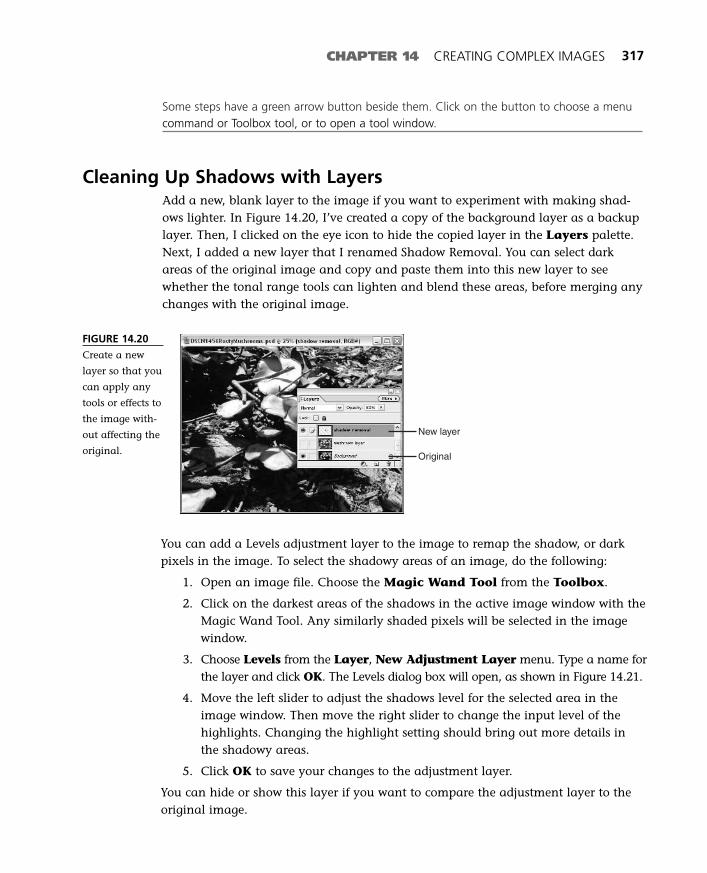
Some steps have a green arrow button beside them. Click on the button to choose a menucommand or Toolbox tool, or to open a tool window.
Cleaning Up Shadows with LayersAdd a new, blank layer to the image if you want to experiment with making shad-ows lighter. In Figure 14.20, I’ve created a copy of the background layer as a backuplayer. Then, I clicked on the eye icon to hide the copied layer in the Layers palette.Next, I added a new layer that I renamed Shadow Removal. You can select darkareas of the original image and copy and paste them into this new layer to seewhether the tonal range tools can lighten and blend these areas, before merging anychanges with the original image.
CHAPTER 14 CREATING COMPLEX IMAGES 317
FIGURE 14.20
Create a new
layer so that you
can apply any
tools or effects to
the image with-
out affecting the
original.
New layer
Original
You can add a Levels adjustment layer to the image to remap the shadow, or darkpixels in the image. To select the shadowy areas of an image, do the following:
1. Open an image file. Choose the Magic Wand Tool from the Toolbox.
2. Click on the darkest areas of the shadows in the active image window with theMagic Wand Tool. Any similarly shaded pixels will be selected in the imagewindow.
3. Choose Levels from the Layer, New Adjustment Layer menu. Type a name forthe layer and click OK. The Levels dialog box will open, as shown in Figure 14.21.
4. Move the left slider to adjust the shadows level for the selected area in theimage window. Then move the right slider to change the input level of thehighlights. Changing the highlight setting should bring out more details inthe shadowy areas.
5. Click OK to save your changes to the adjustment layer.
You can hide or show this layer if you want to compare the adjustment layer to theoriginal image.
19 8311 CH14 1/15/03 2:23 PM Page 317

318 ABSOLUTE BEGINNER’S GUIDE TO ADOBE PHOTOSHOP ELEMENTS 2
FIGURE 14.21
Select darker
pixels with the
Magic Wand
Tool, and then
adjust their visi-
bility with the
Levels Tool.
The lightened area of the selection might appear slightly off-color from the rest ofthe image. Choose Hue/Saturation from the Layer, New Adjustment Layermenu. The Hue/Saturation dialog box will open, as shown in Figure 14.22. Move theHue slider control to adjust the color of the selected image area. The Saturation con-trol will add or remove gray levels from the selected image area. Increase or decreasethe amount of light in the selection by moving the Lightness slider control. If you’reable to match the colors in the selected area with the rest of the image, click OK andsave your changes to the adjustment layer. Otherwise, click Cancel.
FIGURE 14.22
Try to match the
color of the
lightened pixels
with the
Hue/Saturation
command.
Neutralizing Pixels with the Dodge and Burn ToolsIf you still have an active selection, deselect it by pressing (Command-D) [Ctrl+D].Then take a look at the whole image. Compare the lightened areas of the image tothe unchanged areas. You might find that parts of the image are a little too lightcompared to the rest of the picture.
19 8311 CH14 1/15/03 2:23 PM Page 318

CHAPTER 14 CREATING COMPLEX IMAGES 319
You can use the Burn Tool from the Toolbox to darken pixels in the image window,as shown in Figure 14.23. The mushroom caps in this figure have been darkened tobetter match the overall tone of the image. When using the Burn or Dodge tools todarken or lighten pixels in an image, you’ll want to use the Size, Range, andExposure settings from the options bar. Select a brush size that generally matchesthe area of the image you want to correct. In Figure 14.23, I chose a soft edge brushsize of 65 pixels.
FIGURE 14.23
Darken pixels
that stand out
by using the
Burn Tool.
Burn tool
Darkened pixels
You can choose to darken the highlights, mid-tones, or shadows in the image window usingthe Range menu. Choose Highlights if youwant to darken the brighter areas of the image.The Exposure slider control enables you to set apercentage (a value between 1 and 100) of howmuch the Burn or Dodge Tool affects the pixelsin the image window. A lower value creates amore transparent effect. A higher value enablesthe Burn or Dodge Tool to function more like abrush with paint, having a stronger effect onany pixels touched by the tool.
The Dodge Tool lightens highlights, midtones,and shadows in an image. The Dodge Tool createsthe opposite effect of the Burn Tool. You canlighten any dark areas in the image by clickingand dragging the Dodge Tool in the image win-dow, as shown in Figure 14.24.
tipPress the Tab key to hide
the toolbars and palettewindows from the workarea. Only the image windowwill remain visible. Press Tab
once more to show thetoolbars and palette
windows.
Press the Shift+Tab keys to hideonly the palette windows. PressShift+Tab a second time to showthe palette windows.
19 8311 CH14 1/15/03 2:24 PM Page 319
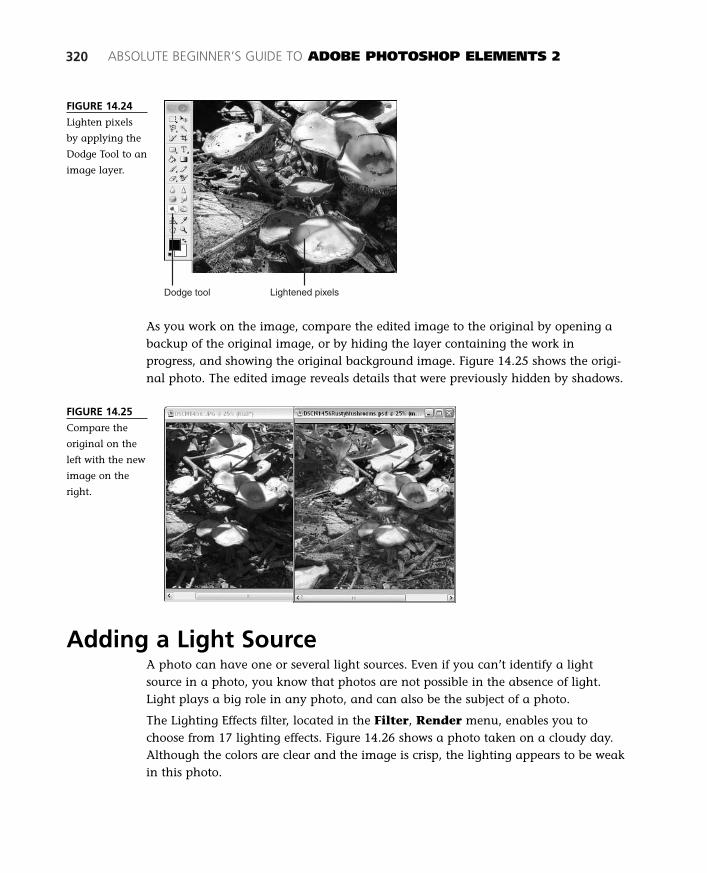
320 ABSOLUTE BEGINNER’S GUIDE TO ADOBE PHOTOSHOP ELEMENTS 2
FIGURE 14.24
Lighten pixels
by applying the
Dodge Tool to an
image layer.
Dodge tool Lightened pixels
As you work on the image, compare the edited image to the original by opening abackup of the original image, or by hiding the layer containing the work inprogress, and showing the original background image. Figure 14.25 shows the origi-nal photo. The edited image reveals details that were previously hidden by shadows.
Adding a Light SourceA photo can have one or several light sources. Even if you can’t identify a lightsource in a photo, you know that photos are not possible in the absence of light.Light plays a big role in any photo, and can also be the subject of a photo.
The Lighting Effects filter, located in the Filter, Render menu, enables you tochoose from 17 lighting effects. Figure 14.26 shows a photo taken on a cloudy day.Although the colors are clear and the image is crisp, the lighting appears to be weakin this photo.
FIGURE 14.25
Compare the
original on the
left with the new
image on the
right.
19 8311 CH14 1/15/03 2:24 PM Page 320

CHAPTER 14 CREATING COMPLEX IMAGES 321
FIGURE 14.26
Start with a
photo that lacks
an identifiable
light source.
Choosing the Right LightOpen the Lighting Effects dialog box by choosingLighting Effects from the Filter, Rendermenu. Several settings appear on the right side ofthe Lighting Effects dialog box, and a previewpane is located on the left side. Choose a lightsource from the Style drop-down menu, locatedat the top of the Lighting Effects dialog box.
Omni is the light type shown in Figure 14.27.Choose one of three different lights from theLight Type drop-down menu. SelectDirectional, Omni, or Spotlight. You can turnthe light on or off by checking or unchecking theOn check box. Click and drag the slider controlsto adjust the Intensity and Focus of the type oflight.
Customize the properties of the light by adjustingthe settings for the Gloss, Material, Exposure, andAmbience slider controls.
Choose a light style from the Style drop-downmenu to customize the light type for your photo.Figure 14.28 shows some of the lighting styles available. I’ve selected the ParallelDirectional light as a secondary light type for this photo.
The amount of lightexposed to an object
affects the amount of visiblecolor. If you’re adding light to aphoto, check the resulting colorsin the photo to see whether theyare accurately rendered based onthe position of the light source.Also check to see whether shad-ows or reflections need to beadded to supplement the existinglight.
19 8311 CH14 1/15/03 2:24 PM Page 321

322 ABSOLUTE BEGINNER’S GUIDE TO ADOBE PHOTOSHOP ELEMENTS 2
FIGURE 14.27
Preview the ren-
dered light effect
in the preview
window.
DUPLICATE A LIGHTHold down the (Option) [Alt] key in the previewarea of the Lighting Effects window. Then click onthe center, white circle in the light source and drag itto a new location in the preview window. Releasethe mouse to add the new light source to theimage.
A white circle will appear in the preview pane, indi-cating where the first light source is positioned. Addas many light sources as you like to the image.
Click on the Save button if you want to save thecustomized settings for the light. Type a name forthe light settings, and then click on OK. The newlight should appear in the Styles list in the LightingEffects window.
The two squareslocated on the right side
of the Lighting Effects windoware color squares. Click in asquare to assign a color to theLight Type or Properties settingsin the Lighting Effects window.
FIGURE 14.28
Pick a lighting
effect from the
Style drop-down
menu.
19 8311 CH14 1/15/03 2:24 PM Page 322
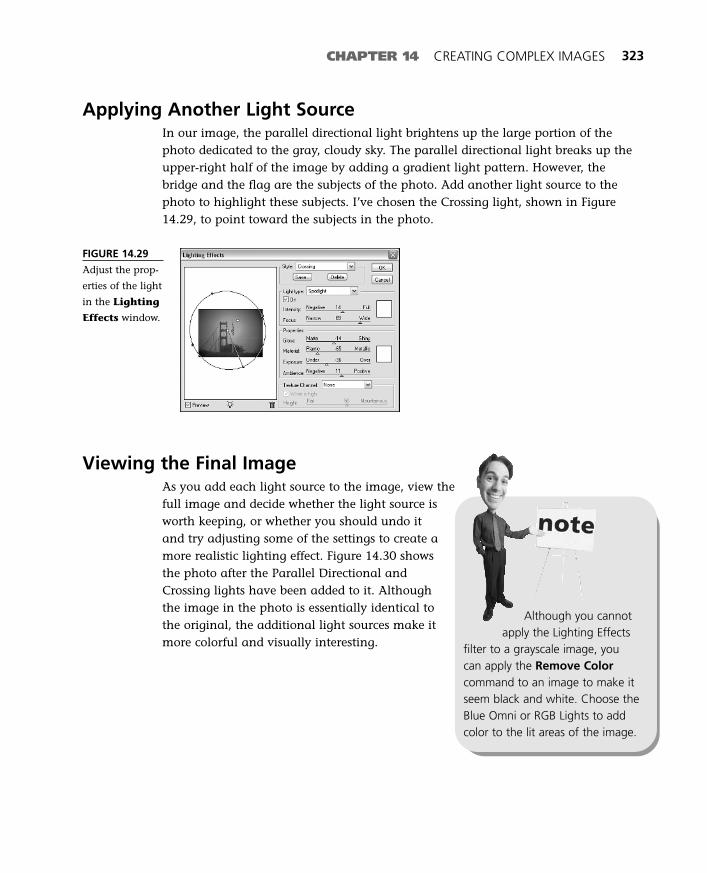
CHAPTER 14 CREATING COMPLEX IMAGES 323
Applying Another Light SourceIn our image, the parallel directional light brightens up the large portion of thephoto dedicated to the gray, cloudy sky. The parallel directional light breaks up theupper-right half of the image by adding a gradient light pattern. However, thebridge and the flag are the subjects of the photo. Add another light source to thephoto to highlight these subjects. I’ve chosen the Crossing light, shown in Figure14.29, to point toward the subjects in the photo.
Viewing the Final ImageAs you add each light source to the image, view thefull image and decide whether the light source isworth keeping, or whether you should undo itand try adjusting some of the settings to create amore realistic lighting effect. Figure 14.30 showsthe photo after the Parallel Directional andCrossing lights have been added to it. Althoughthe image in the photo is essentially identical tothe original, the additional light sources make itmore colorful and visually interesting.
FIGURE 14.29
Adjust the prop-
erties of the light
in the Lighting
Effects window.
Although you cannotapply the Lighting Effects
filter to a grayscale image, youcan apply the Remove Colorcommand to an image to make itseem black and white. Choose theBlue Omni or RGB Lights to addcolor to the lit areas of the image.
19 8311 CH14 1/15/03 2:24 PM Page 323
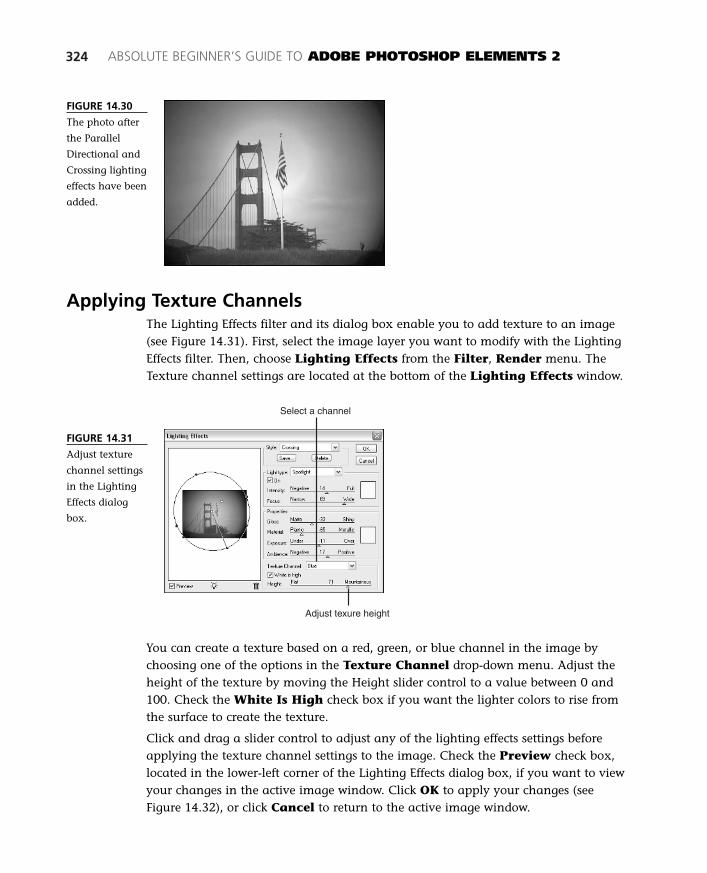
324 ABSOLUTE BEGINNER’S GUIDE TO ADOBE PHOTOSHOP ELEMENTS 2
FIGURE 14.31
Adjust texture
channel settings
in the Lighting
Effects dialog
box.
Select a channel
Adjust texure height
You can create a texture based on a red, green, or blue channel in the image bychoosing one of the options in the Texture Channel drop-down menu. Adjust theheight of the texture by moving the Height slider control to a value between 0 and100. Check the White Is High check box if you want the lighter colors to rise fromthe surface to create the texture.
Click and drag a slider control to adjust any of the lighting effects settings beforeapplying the texture channel settings to the image. Check the Preview check box,located in the lower-left corner of the Lighting Effects dialog box, if you want to viewyour changes in the active image window. Click OK to apply your changes (seeFigure 14.32), or click Cancel to return to the active image window.
Applying Texture ChannelsThe Lighting Effects filter and its dialog box enable you to add texture to an image(see Figure 14.31). First, select the image layer you want to modify with the LightingEffects filter. Then, choose Lighting Effects from the Filter, Render menu. TheTexture channel settings are located at the bottom of the Lighting Effects window.
FIGURE 14.30
The photo after
the Parallel
Directional and
Crossing lighting
effects have been
added.
19 8311 CH14 1/15/03 2:24 PM Page 324
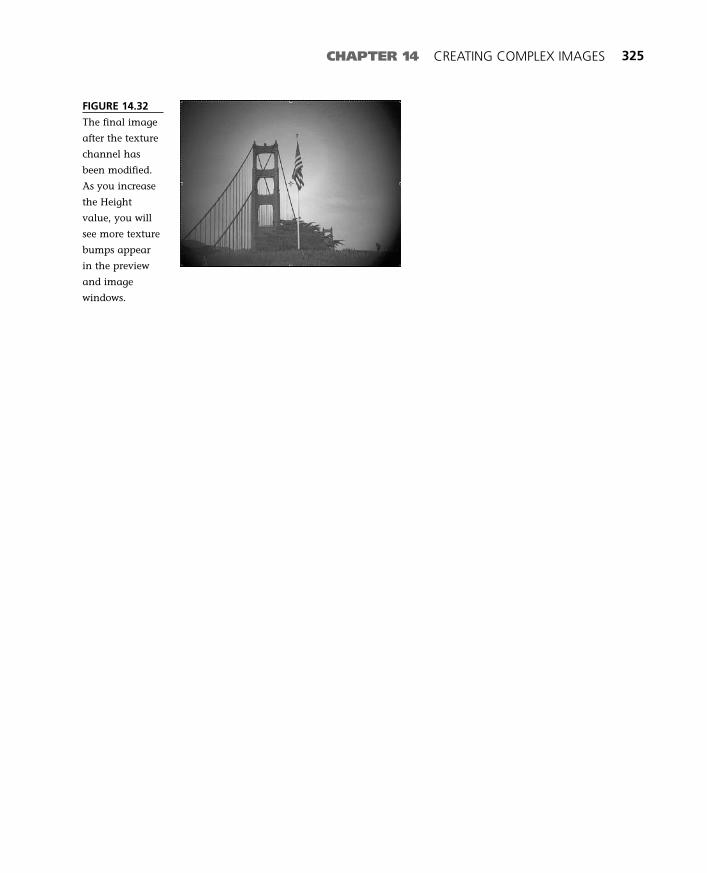
CHAPTER 14 CREATING COMPLEX IMAGES 325
FIGURE 14.32
The final image
after the texture
channel has
been modified.
As you increase
the Height
value, you will
see more texture
bumps appear
in the preview
and image
windows.
19 8311 CH14 1/15/03 2:24 PM Page 325

19 8311 CH14 1/15/03 2:24 PM Page 326
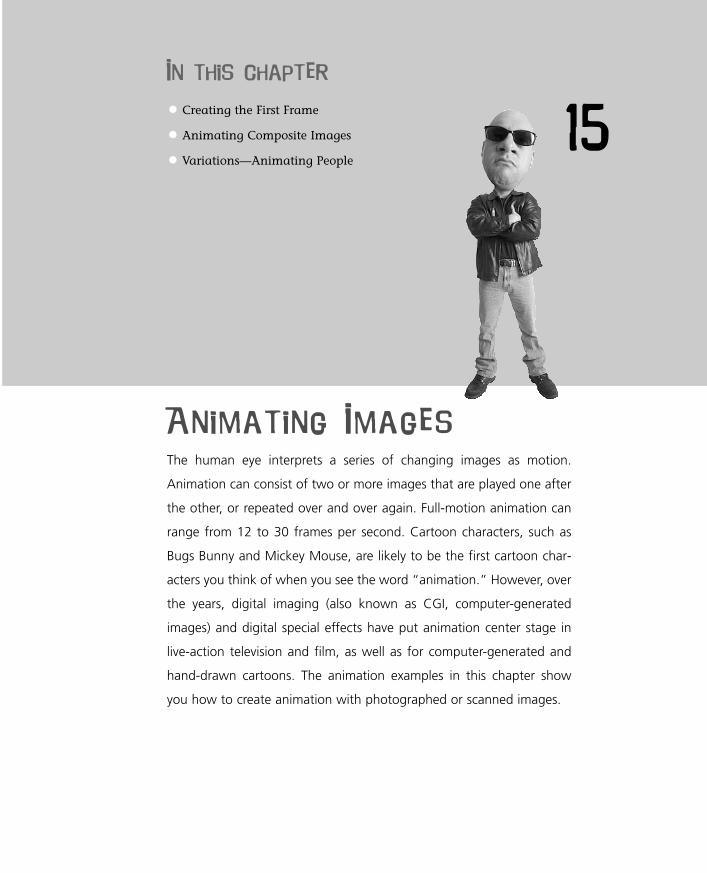
In this chapter
• Creating the First Frame
• Animating Composite Images
• Variations—Animating People
15
Animating Images
The human eye interprets a series of changing images as motion.
Animation can consist of two or more images that are played one after
the other, or repeated over and over again. Full-motion animation can
range from 12 to 30 frames per second. Cartoon characters, such as
Bugs Bunny and Mickey Mouse, are likely to be the first cartoon char-
acters you think of when you see the word “animation.” However, over
the years, digital imaging (also known as CGI, computer-generated
images) and digital special effects have put animation center stage in
live-action television and film, as well as for computer-generated and
hand-drawn cartoons. The animation examples in this chapter show
you how to create animation with photographed or scanned images.
20 8311 CH15 1/15/03 2:27 PM Page 327

Creating the First FrameThe first frame will contain a subject and a background. The background image canalso be animated, and could be a separate photo. You will want to identify some-thing that can be the subject of your animation for the first frame. You can then cre-ate additional key frames of animation from the first one.
Some images naturally hint at motion by the way the characters are positioned. Tryto find a photo containing several discrete objects. It’s easier to animate a small, rec-ognizable object, rather than to try to animate something abstract, such as colors orshadows.
Next, decide how many frames of animation you want to create. If you want to cre-ate real-time motion, the frame rate can range from 18 to 32 frames per second(fps), although you really need 24 or more frames per second if you want to createquality animation. Depending on the size of each frame of animation, this can cre-ate a gigantic animation file.
For example, if one frame of animation contains a 1-megapixel image(approximately 500×700 pixels in a 1MB file), three frames will grow to be approxi-mately 2MB to 3MB. You can reduce the overall size of the animation by reducing a2000×1500 pixel image to a 640×480 pixel image. The best way to keep the file sizesmall is to design an efficient animation. Keep an eye on the file size as you work onyour animation.
Composing with Composite ImagesIf you’re creating an animation that will share the same background image acrossframes, you’ll probably be copying and pasting other images into each frame to cre-ate the animation. When you paste one or more images into the image window,each is added to the document as a new layer. Because the pasted image is placedon a layer above the background image, the resulting image is referred to as a com-posite. You can paste as many images as you like into the image window. Figure15.1 shows two Aibo dogs copied from separate image windows into the backgroundphoto for the animation.
328 ABSOLUTE BEGINNER’S GUIDE TO ADOBE PHOTOSHOP ELEMENTS 2
FIGURE 15.1
Combine a
photo with
composite
images to create
an interesting
animation.
20 8311 CH15 1/15/03 2:27 PM Page 328

CHAPTER 15 ANIMATING IMAGES 329
Use the Move Tool to place each image in the imagewindow and compose the first frame of animation.As you put together the animation, try to decidehow you want to light and frame the subjects inthe animation. Try to think of a message, or givethe animation some sort of theme. The followinglist describes important elements for you to con-sider when putting together an animation:
■ Lighting—The central subject of a photoshould be well-lit, crisp, and free of shadows.
■ Scale—Larger images usually are per-ceived as closer to the viewer. Images thatare smaller give the illusion of being far-ther away.
■ Perspective—Exaggerating the back-ground image or any props in a photo candistract the person from viewing the actualsubject of a photo. Keeping the subjectsomewhere in the foreground of the photoin perspective with the background imagescan make animation easier to follow.
■ Shadows—First, it’s easiest to animateframes of animation if most of each frame iscompletely black or white. Regardless, keepan eye on how the shadows fall in eachframe. Shadows and light give animationa three-dimensional look but are harder toanimate.
■ Number of frames—Adding moreframes to an animation enables you tocreate smoother, more believable motion.Another way to simulate smoother motionis to add blur to one or more frames of theanimation.
Finalizing the First FrameCopy and paste as many images as you need inorder to create the first frame of animation. In theLayers palette hide any layers of images you
Multiply the size ofthe initial image in the
first frame of animation by thenumber of frames you want tocreate to determine how large thefile will be when you’re finished.The more frames, or layers in thiscase, the larger the resulting filewill be. Be sure you have plentyof hard drive space and memoryavailable.
Save your finished ani-mation, or one in
progress, as a PSD file to preservethe layer information. Each layerrepresents a frame of animationin a Photoshop (PSD) file. Savingin other file formats will flattenthe image into a single layer.
20 8311 CH15 1/15/03 2:27 PM Page 329
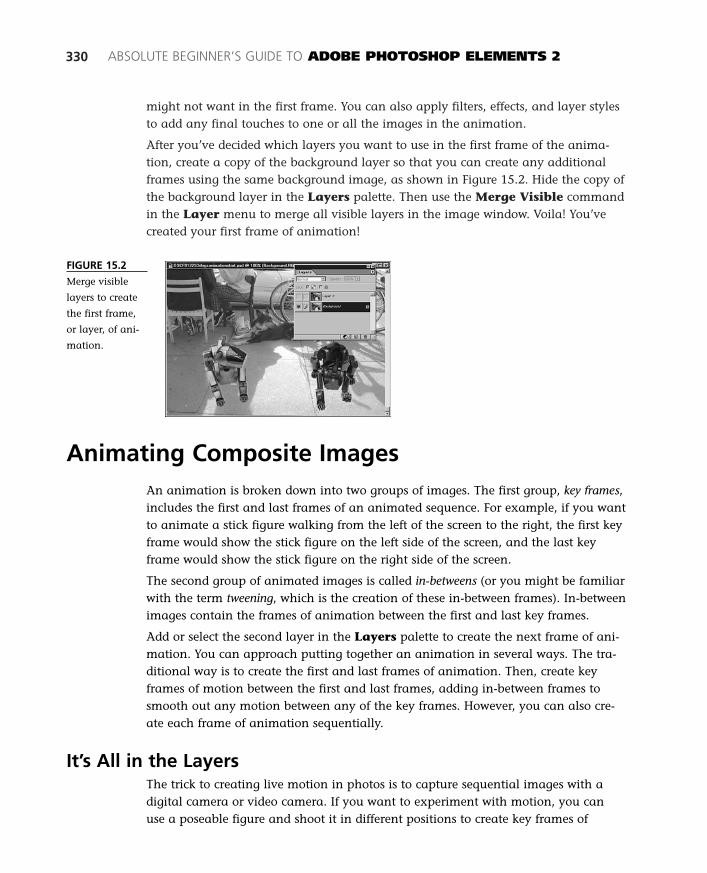
might not want in the first frame. You can also apply filters, effects, and layer stylesto add any final touches to one or all the images in the animation.
After you’ve decided which layers you want to use in the first frame of the anima-tion, create a copy of the background layer so that you can create any additionalframes using the same background image, as shown in Figure 15.2. Hide the copy ofthe background layer in the Layers palette. Then use the Merge Visible commandin the Layer menu to merge all visible layers in the image window. Voila! You’vecreated your first frame of animation!
330 ABSOLUTE BEGINNER’S GUIDE TO ADOBE PHOTOSHOP ELEMENTS 2
FIGURE 15.2
Merge visible
layers to create
the first frame,
or layer, of ani-
mation.
Animating Composite ImagesAn animation is broken down into two groups of images. The first group, key frames,includes the first and last frames of an animated sequence. For example, if you wantto animate a stick figure walking from the left of the screen to the right, the first keyframe would show the stick figure on the left side of the screen, and the last keyframe would show the stick figure on the right side of the screen.
The second group of animated images is called in-betweens (or you might be familiarwith the term tweening, which is the creation of these in-between frames). In-betweenimages contain the frames of animation between the first and last key frames.
Add or select the second layer in the Layers palette to create the next frame of ani-mation. You can approach putting together an animation in several ways. The tra-ditional way is to create the first and last frames of animation. Then, create keyframes of motion between the first and last frames, adding in-between frames tosmooth out any motion between any of the key frames. However, you can also cre-ate each frame of animation sequentially.
It’s All in the LayersThe trick to creating live motion in photos is to capture sequential images with adigital camera or video camera. If you want to experiment with motion, you can use a poseable figure and shoot it in different positions to create key frames of
20 8311 CH15 1/15/03 2:27 PM Page 330

animation. Figure 15.3 shows two Aibo dogsplaced in slightly different positions in the firstand second layers of the animation.
These images were copied and pasted into thesecond layer of the document. Then the MergeVisible command was applied to the imagesneeded for the second frame of animation. Youcan hide and show the first and second layers toplay back the animation.
Copy and paste another set of composite imagesto create any additional frames of animation. Inthis example, two frames, or layers, are used tocreate a simple animation. Hide and show layersto make sure each object lines up with the previ-ous object in the first and second layers of theanimation. Then make each layer of the thirdframe visible. Choose Merge Visible to createthe third layer in the Layers palette. Now you’reready to turn the animation into a full-fledgedanimated GIF file.
CHAPTER 15 ANIMATING IMAGES 331
tipYou can decrease the
opacity setting on a visiblelayer if you want to see howone layer of images overlapswith the previous layer, as
shown later in Figure 15.8.This is similar to a tech-
nique used in animation calledonion skinning, in which transpar-ent sheets of paper hold eachframe of the animation. Thesesheets enable the artist to seethrough each “frame” and makethe slight adjustments from onepage to the next that result in theanimation you see when theframes are played in succession.
FIGURE 15.3
Hide and Show
previous layers
to place the
composite
images into the
next frames of
animation.
Creating an Animated GIFAn animated GIF is the file format used to store several frames of animation. It’spopular because Internet Explorer and Netscape Navigator support this file formatby default. You don’t need to install a plug-in file to play an animated GIF in abrowser window.
20 8311 CH15 1/15/03 2:27 PM Page 331
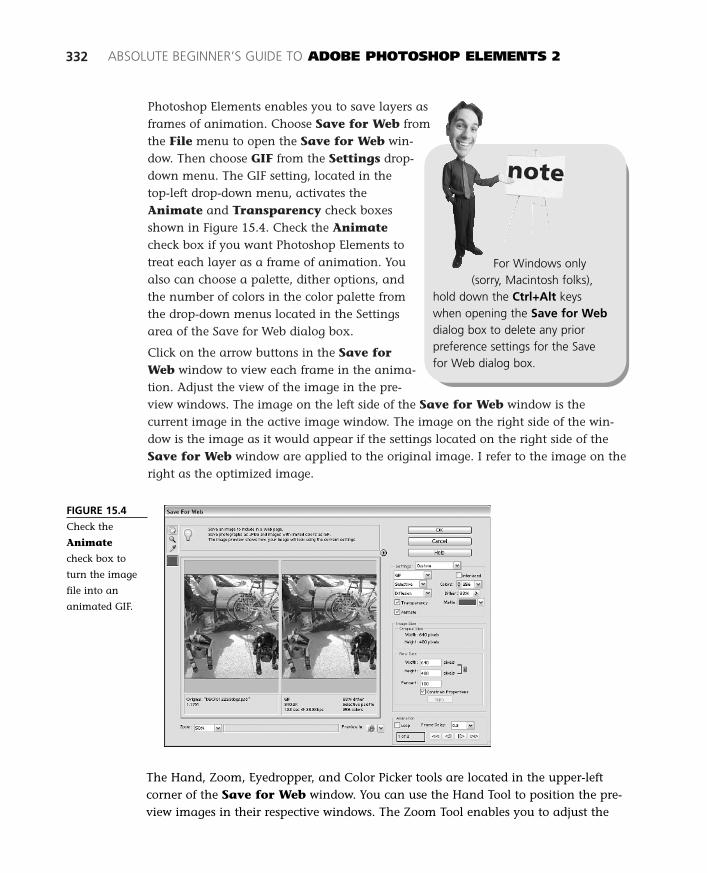
Photoshop Elements enables you to save layers asframes of animation. Choose Save for Web fromthe File menu to open the Save for Web win-dow. Then choose GIF from the Settings drop-down menu. The GIF setting, located in thetop-left drop-down menu, activates theAnimate and Transparency check boxesshown in Figure 15.4. Check the Animatecheck box if you want Photoshop Elements totreat each layer as a frame of animation. Youalso can choose a palette, dither options, andthe number of colors in the color palette fromthe drop-down menus located in the Settingsarea of the Save for Web dialog box.
Click on the arrow buttons in the Save forWeb window to view each frame in the anima-tion. Adjust the view of the image in the pre-view windows. The image on the left side of the Save for Web window is thecurrent image in the active image window. The image on the right side of the win-dow is the image as it would appear if the settings located on the right side of theSave for Web window are applied to the original image. I refer to the image on theright as the optimized image.
332 ABSOLUTE BEGINNER’S GUIDE TO ADOBE PHOTOSHOP ELEMENTS 2
FIGURE 15.4
Check the
Animate
check box to
turn the image
file into an
animated GIF.
For Windows only(sorry, Macintosh folks),
hold down the Ctrl+Alt keyswhen opening the Save for Webdialog box to delete any priorpreference settings for the Savefor Web dialog box.
The Hand, Zoom, Eyedropper, and Color Picker tools are located in the upper-leftcorner of the Save for Web window. You can use the Hand Tool to position the pre-view images in their respective windows. The Zoom Tool enables you to adjust the
20 8311 CH15 1/15/03 2:27 PM Page 332
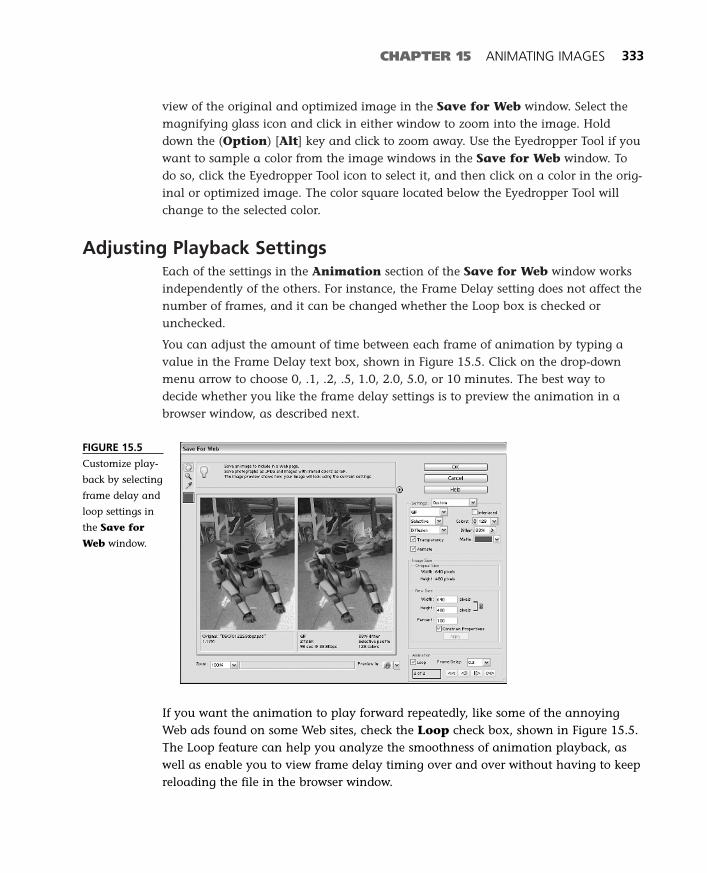
view of the original and optimized image in the Save for Web window. Select themagnifying glass icon and click in either window to zoom into the image. Holddown the (Option) [Alt] key and click to zoom away. Use the Eyedropper Tool if youwant to sample a color from the image windows in the Save for Web window. Todo so, click the Eyedropper Tool icon to select it, and then click on a color in the orig-inal or optimized image. The color square located below the Eyedropper Tool willchange to the selected color.
Adjusting Playback SettingsEach of the settings in the Animation section of the Save for Web window worksindependently of the others. For instance, the Frame Delay setting does not affect thenumber of frames, and it can be changed whether the Loop box is checked orunchecked.
You can adjust the amount of time between each frame of animation by typing avalue in the Frame Delay text box, shown in Figure 15.5. Click on the drop-downmenu arrow to choose 0, .1, .2, .5, 1.0, 2.0, 5.0, or 10 minutes. The best way todecide whether you like the frame delay settings is to preview the animation in abrowser window, as described next.
CHAPTER 15 ANIMATING IMAGES 333
FIGURE 15.5
Customize play-
back by selecting
frame delay and
loop settings in
the Save for
Web window.
If you want the animation to play forward repeatedly, like some of the annoyingWeb ads found on some Web sites, check the Loop check box, shown in Figure 15.5.The Loop feature can help you analyze the smoothness of animation playback, aswell as enable you to view frame delay timing over and over without having to keepreloading the file in the browser window.
20 8311 CH15 1/15/03 2:27 PM Page 333

Watch each animated character in the browser win-dow and make sure that each character appearsaccording to the settings you made in the imagewindow. Click on the Back button or Close boxto exit the browser window and return to thePhotoshop Elements work area. If you want topublish the animation as a file, click on OK andthen type a name for the file to save it to yourhard drive. Otherwise, click on Cancel to return tothe work area. Don’t forget to save the animationas a PSD file to preserve the layers of animation.
Variations—Animating PeopleThe human body is one of the more difficultthings to animate. In addition to the myriadlighting and shadow effects you must pay atten-tion to, there are also just as many issues relatedto motion of the body, arms, legs, head, hair, face,and clothes. The detail needed to animate human-like subjects leads to the problemof size—image file size, animation playback speed, and memory.
334 ABSOLUTE BEGINNER’S GUIDE TO ADOBE PHOTOSHOP ELEMENTS 2
Previewing the AnimationChoose the settings you want for your animation. Then click on the Preview In drop-down menu to select a browser. The icon for the browser will appear in the PreviewIn menu. Click on the browser icon to preview the animation in a browser window.Photoshop Elements will generate the animated GIF file, along with some HTMLcode, and open a browser window with the animation, as shown in Figure 15.6.
FIGURE 15.6
Click on the
browser button
in the Save for
Web window to
preview the ani-
mation in a
browser.
If the browser youwant to use does not
appear in the Preview In drop-down menu in the Save for Webdialog box, choose Other fromthe menu list. Then, navigate toyour hard drive and open thebrowser application of yourchoice.
20 8311 CH15 1/15/03 2:27 PM Page 334

CHAPTER 15 ANIMATING IMAGES 335
Creating the First FrameAlthough you can create a computer-generated background using the animatedperson as a composite image, this example shows you how to animate a person inan existing photo, shown in Figure 15.7. In fact, no composites are used in thisexample.
Perform the following steps to create the first frame of the animation:
1. Open the image file. Click and drag the background layer in the Layerspalette and drop it over the Create a New Layer button.
2. Rename the duplicate layer so that you can identify it as the first frame ofanimation. Keep a master copy of the image around so that you can use it tomake additional frames of animation. Hide this master layer so that you canview your work in progress in the image window.
3. Apply the Magnetic Selection Tool and select the subject in the first frame.
4. Copy and paste the selection. The subject is now in a separate layer. Hide thecopied layer.
5. Remove the subject from the first frame layer. You should see the gray-and-white checkerboard pattern where the selection was removed. The first frameof animation is divided into two layers, one with the subject, the other withthe background.
Next, perform the following steps to create the second and third frames of the back-ground photo from the first frame of animation:
1. Click and drag the layer you want to use for the first frame over the Create aNew Layer button to duplicate the first layer.
2. Repeat a second time to create the third frame of animation. New layers willappear in the Layers palette.
3. Rename these layers to reflect the second and third frames of the animation,as shown in Figure 15.8.
FIGURE 15.7
Add layers to a
picture to turn a
still picture into
an animation.
20 8311 CH15 1/15/03 2:27 PM Page 335
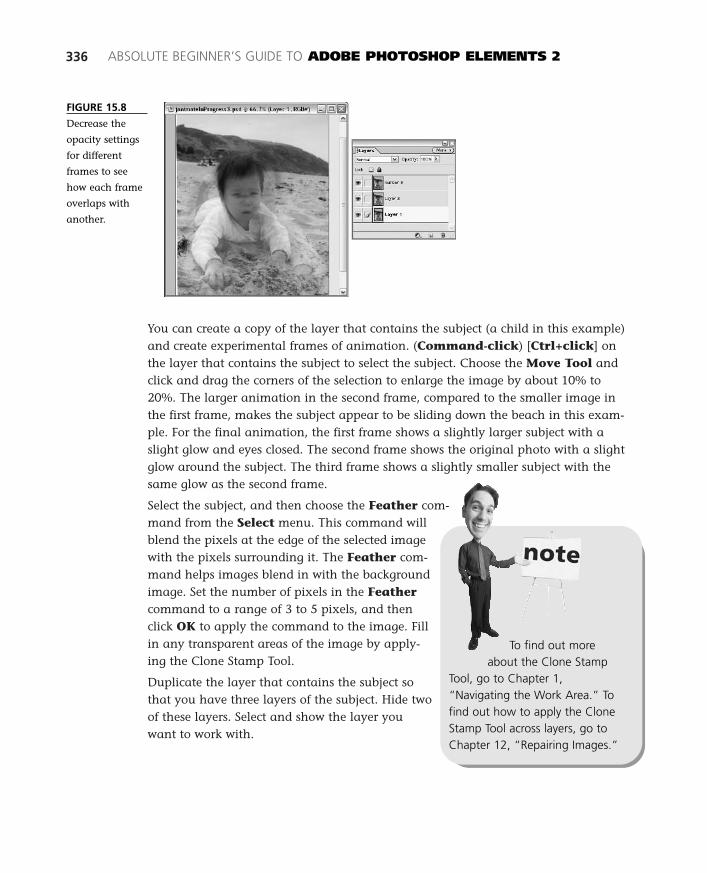
You can create a copy of the layer that contains the subject (a child in this example)and create experimental frames of animation. (Command-click) [Ctrl+click] onthe layer that contains the subject to select the subject. Choose the Move Tool andclick and drag the corners of the selection to enlarge the image by about 10% to20%. The larger animation in the second frame, compared to the smaller image inthe first frame, makes the subject appear to be sliding down the beach in this exam-ple. For the final animation, the first frame shows a slightly larger subject with aslight glow and eyes closed. The second frame shows the original photo with a slightglow around the subject. The third frame shows a slightly smaller subject with thesame glow as the second frame.
Select the subject, and then choose the Feather com-mand from the Select menu. This command willblend the pixels at the edge of the selected imagewith the pixels surrounding it. The Feather com-mand helps images blend in with the backgroundimage. Set the number of pixels in the Feathercommand to a range of 3 to 5 pixels, and thenclick OK to apply the command to the image. Fillin any transparent areas of the image by apply-ing the Clone Stamp Tool.
Duplicate the layer that contains the subject sothat you have three layers of the subject. Hide twoof these layers. Select and show the layer youwant to work with.
336 ABSOLUTE BEGINNER’S GUIDE TO ADOBE PHOTOSHOP ELEMENTS 2
FIGURE 15.8
Decrease the
opacity settings
for different
frames to see
how each frame
overlaps with
another.
To find out moreabout the Clone Stamp
Tool, go to Chapter 1,“Navigating the Work Area.” Tofind out how to apply the CloneStamp Tool across layers, go toChapter 12, “Repairing Images.”
20 8311 CH15 1/15/03 2:27 PM Page 336

CHAPTER 15 ANIMATING IMAGES 337
To add a glow around the subject, perform the following steps:
1. (Command-click) [Ctrl+click] on the subject to select it.
2. Click on a layer that contains the background image and then choose theExpand command from the Select, Modify menu.
3. Type 4 in the text box, as shown in Figure 15.9, and then click OK. The selec-tion area that used to represent the missing subject is now four pixels widerthan it used to be.
4. Move the layer that contains the subject above the layer that contains thebackground in the Layers palette.
5. To optimize your workflow, keep layers that compose a single frame of ani-mation organized close to each other in the Layers palette.
FIGURE 15.9
Create special
effects by
expanding and
contracting the
selection area of
each frame of
animation.
Creating the In-Between FramesIn-between frames transition the animation from one key frame to the next keyframe. Full-motion animation can contain anywhere from 10 to 28 frames of in-betweens. In this example, only one in-between frame is needed. Follow these stepsto create the in-between frame of the animation:
1. Click on the second frame of the animation. This frame will actually be alayer located in the Layers palette. This layer represents a layer that will beused to create a frame of animation. Use a selection tool to highlight thesubject in the second layer, or (Command-click) [Ctrl+click] to select thesubject.
2. Select the Move Tool to scale the image so that it is slightly smaller than thesubject in the first frame, but larger than the one in the third frame. You canexperiment with the size of the subject in the second frame by pasting it intoa new layer and adjusting its size.
20 8311 CH15 1/15/03 2:28 PM Page 337
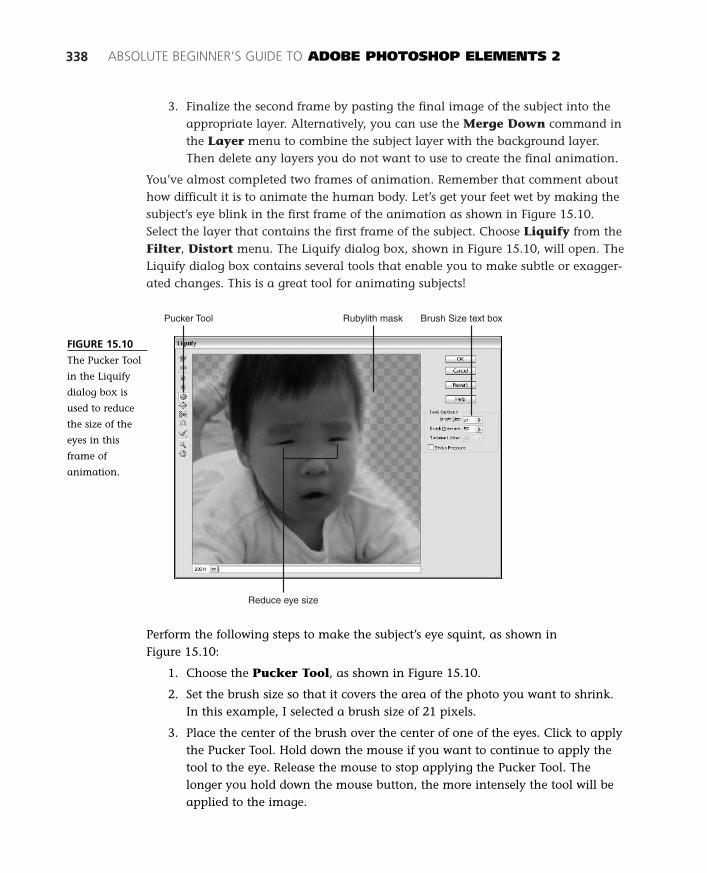
3. Finalize the second frame by pasting the final image of the subject into theappropriate layer. Alternatively, you can use the Merge Down command inthe Layer menu to combine the subject layer with the background layer.Then delete any layers you do not want to use to create the final animation.
You’ve almost completed two frames of animation. Remember that comment abouthow difficult it is to animate the human body. Let’s get your feet wet by making thesubject’s eye blink in the first frame of the animation as shown in Figure 15.10.Select the layer that contains the first frame of the subject. Choose Liquify from theFilter, Distort menu. The Liquify dialog box, shown in Figure 15.10, will open. TheLiquify dialog box contains several tools that enable you to make subtle or exagger-ated changes. This is a great tool for animating subjects!
338 ABSOLUTE BEGINNER’S GUIDE TO ADOBE PHOTOSHOP ELEMENTS 2
FIGURE 15.10
The Pucker Tool
in the Liquify
dialog box is
used to reduce
the size of the
eyes in this
frame of
animation.
Pucker Tool Rubylith mask Brush Size text box
Reduce eye size
Perform the following steps to make the subject’s eye squint, as shown inFigure 15.10:
1. Choose the Pucker Tool, as shown in Figure 15.10.
2. Set the brush size so that it covers the area of the photo you want to shrink.In this example, I selected a brush size of 21 pixels.
3. Place the center of the brush over the center of one of the eyes. Click to applythe Pucker Tool. Hold down the mouse if you want to continue to apply thetool to the eye. Release the mouse to stop applying the Pucker Tool. Thelonger you hold down the mouse button, the more intensely the tool will beapplied to the image.
20 8311 CH15 1/15/03 2:28 PM Page 338

CHAPTER 15 ANIMATING IMAGES 339
4. Apply the Pucker Tool to both eyes until the eyes appear closed (see Figure15.10). Then click OK to save your changes.
MAKE A SLIDESHOWIf you want to be a little less ambitious, you can use the animation feature in PhotoshopElements to create a simple slideshow. Simply copy and paste each image into the imagewindow so that each image is added into its own layer in the Layers palette. You can hidethe layers if you want to be sure that a specific image has indeed been added to a docu-ment. To turn a set of layers into a slideshow, set a longer frame delay in the Save for Webwindow, which is explained in more detail at the end of this chapter.
Merging LayersView each frame of the animation by hiding and showing each layer in the Layerspalette. For example, if you want to view the first frame of animation, show only thebeach, child (subject), and effect layer in the Layers palette. Move layers that willbe used together to make up one frame of animation above or below each other inthe Layers palette, as shown in Figure 15.11.
FIGURE 15.11
Organize each
element of a
frame of anima-
tion in the
Layers palette.
Use the Merge
Down command
to combine these
elements into a
single layer.
When you’re ready to finalize each form of animation, merge the corresponding lay-ers together. The eye icon should appear beside each layer in the first frame of ani-mation. Select Layer 2 blink, as shown in Figure 15.12, and then choose theMerge Down command from the Layers palette drop-down menu. Layer 2 blinkwill merge with Layer 1. Repeat this process with the second and third frames of theanimation.
20 8311 CH15 1/15/03 2:28 PM Page 339

340 ABSOLUTE BEGINNER’S GUIDE TO ADOBE PHOTOSHOP ELEMENTS 2
FIGURE 15.12
The Twirl tools
can be applied
to animate the
arms as shown
here.
Finalizing Tweaks and Previewing the AnimationOpen the Save for Web dialog box to make any final optimizations or changes tothe animation file. Many of the settings chosen in the animation created earlier inthis chapter have also been selected in this example, as shown in Figure 15.13.Choose GIF and select the Animated check box to access the animation settings forthe active image window.
FIGURE 15.13
Adjust the loop
and frame delay
settings in the
Save for Web
window.
Convert layers to animation
Adjust theimage size
Set repeat loop
Set frame delay
20 8311 CH15 1/15/03 2:28 PM Page 340

CHAPTER 15 ANIMATING IMAGES 341
If you like the animation as it appears in the browser window, close the browser win-dow and then click OK in the Save for Web window. Otherwise, go back to the fileand change the Frame Delay setting, or experiment with a different GIF palettesetting before saving the final file. After the file has been saved, you can upload it toa Web server and share the URL for the animated GIF file with your friends andfamily.
There are several default settings for the animated GIF image file. PhotoshopElements will select the optimal color palette and dither settings for the animation. Ifthere are any transparent areas of the image, check the Transparency check box ifyou want them to remain transparent in the final image. The animation will loopindefinitely, and each frame has a delay of 20 seconds.
Before saving the file to your hard drive, preview it in a browser window. The ani-mation should play back the same way in Internet Explorer 5 and NetscapeNavigator 4.7. Click on the browser icon in the Preview In menu to preview theanimation in a browser window, as shown in Figure 15.14.
FIGURE 15.14
Preview the final
animation in a
browser window
before saving
the final ani-
mated GIF file.
20 8311 CH15 1/15/03 2:28 PM Page 341

20 8311 CH15 1/15/03 2:28 PM Page 342

In this chapter
• Shooting and Choosing Images
• Introducing Photomerge
• Arranging Images in the Panorama
• Variations—Working with Different Photo Elements
16
Stitching Together
a Panorama
Ever want to capture all the colors of a beautiful sunset along with the
color reflecting across the local hillsides and plains? This can be an
expensive task to perform with even a traditional 35mm camera. First
you would have to shoot each picture of the panorama, and then you’d
have to print the pictures and lay them out to identify the overlapping
areas.
This more expensive process can involve splicing together the negatives,
or exposing separate negatives to a large-sized sheet of photography
paper. The inexpensive way to create a panorama is to mount the
images to a piece of cardboard, or align them in a picture frame.
21 8311 CH16 1/15/03 2:37 PM Page 343
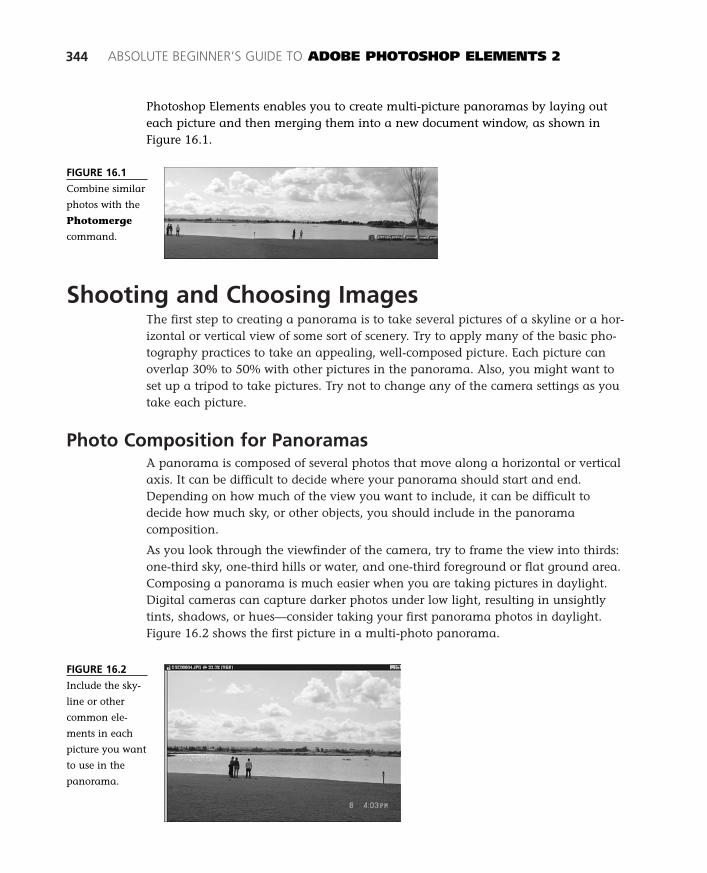
Shooting and Choosing ImagesThe first step to creating a panorama is to take several pictures of a skyline or a hor-izontal or vertical view of some sort of scenery. Try to apply many of the basic pho-tography practices to take an appealing, well-composed picture. Each picture canoverlap 30% to 50% with other pictures in the panorama. Also, you might want toset up a tripod to take pictures. Try not to change any of the camera settings as youtake each picture.
Photo Composition for PanoramasA panorama is composed of several photos that move along a horizontal or verticalaxis. It can be difficult to decide where your panorama should start and end.Depending on how much of the view you want to include, it can be difficult todecide how much sky, or other objects, you should include in the panoramacomposition.
As you look through the viewfinder of the camera, try to frame the view into thirds:one-third sky, one-third hills or water, and one-third foreground or flat ground area.Composing a panorama is much easier when you are taking pictures in daylight.Digital cameras can capture darker photos under low light, resulting in unsightlytints, shadows, or hues—consider taking your first panorama photos in daylight.Figure 16.2 shows the first picture in a multi-photo panorama.
344 ABSOLUTE BEGINNER’S GUIDE TO ADOBE PHOTOSHOP ELEMENTS 2
FIGURE 16.1
Combine similar
photos with the
Photomerge
command.
Photoshop Elements enables you to create multi-picture panoramas by laying outeach picture and then merging them into a new document window, as shown inFigure 16.1.
FIGURE 16.2
Include the sky-
line or other
common ele-
ments in each
picture you want
to use in the
panorama.
21 8311 CH16 1/15/03 2:37 PM Page 344

CHAPTER 16 STITCHING TOGETHER A PANORAMA 345
A tripod can help you maintain consistency in eachpicture you take for the panorama, although all thepanoramas created in this chapter were shot byhand, without the aid of a tripod. However, you’llnotice that the overall horizontal area of thepanorama is slightly smaller because of fluctua-tion in overlapping areas across pictures. When Itook the picture shown in Figure 16.3, I tried mybest not to change the position of my arms and ofthe camera, overlapping part of the picture inFigure 16.2 so that I could match similar elementsin both pictures.
Each photo you add to the panorama willincrease the file size of the final image. However,be sure to capture each photo at the highest possi-ble resolution so that you have as much imageinformation to work with as possible. Adobe rec-ommends using image files that are twomegapixels in size. The images used to create theexamples in this chapter were all three-megapixelimages. If you want to reduce the size of the imagesfor the panorama, you can choose 12.5%, 25%, 50%, or 75% from the Image SizeReduction drop-down menu located in the Photomerge dialog box.
The number of files,combined with the width
and height of each image file, canhelp you estimate the finaldimensions of the panorama. Ifyou want to reduce the resultingimage, you can do so by choosinga menu item from the Image SizeReduction drop-down menu.Don’t forget that the pictures willoverlap about 30% to 50%, too.
For example, Figure 16.4 contains a person moving along the horizon. Because eachphoto is a high-resolution three-megapixel image, I can use the Clone Stamp Tool toremove whatever I don’t want to appear in the final panorama. If I make the imagesmaller, thus removing image data, the edits to the image might not be as easyto make.
Clouds
Sign
FIGURE 16.3
Include some
overlapping
areas across
photos.
21 8311 CH16 1/15/03 2:37 PM Page 345
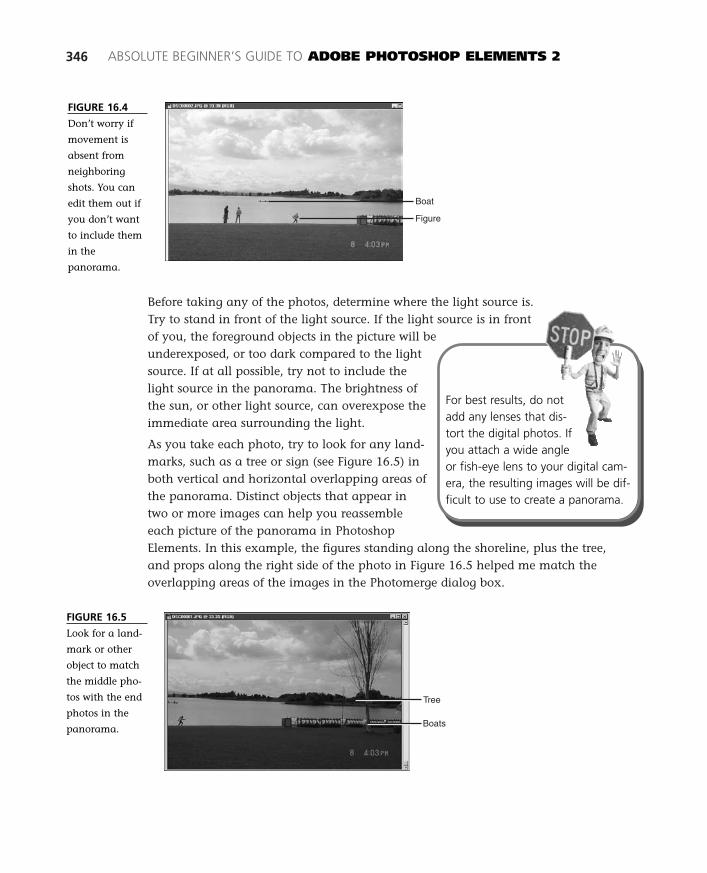
Before taking any of the photos, determine where the light source is.Try to stand in front of the light source. If the light source is in frontof you, the foreground objects in the picture will beunderexposed, or too dark compared to the lightsource. If at all possible, try not to include thelight source in the panorama. The brightness ofthe sun, or other light source, can overexpose theimmediate area surrounding the light.
As you take each photo, try to look for any land-marks, such as a tree or sign (see Figure 16.5) inboth vertical and horizontal overlapping areas ofthe panorama. Distinct objects that appear intwo or more images can help you reassembleeach picture of the panorama in PhotoshopElements. In this example, the figures standing along the shoreline, plus the tree,and props along the right side of the photo in Figure 16.5 helped me match theoverlapping areas of the images in the Photomerge dialog box.
346 ABSOLUTE BEGINNER’S GUIDE TO ADOBE PHOTOSHOP ELEMENTS 2
Figure
Boat
FIGURE 16.5
Look for a land-
mark or other
object to match
the middle pho-
tos with the end
photos in the
panorama. Boats
Tree
FIGURE 16.4
Don’t worry if
movement is
absent from
neighboring
shots. You can
edit them out if
you don’t want
to include them
in the
panorama.
For best results, do notadd any lenses that dis-tort the digital photos. Ifyou attach a wide angleor fish-eye lens to your digital cam-era, the resulting images will be dif-ficult to use to create a panorama.
21 8311 CH16 1/15/03 2:38 PM Page 346

CHAPTER 16 STITCHING TOGETHER A PANORAMA 347
After you’ve taken the first set of panorama pic-tures, you might want to change the zoom set-tings or, if your camera has manual options,adjust the shutter speed or aperture settings. Youmight want to wait for the lighting to change.Then take another set of panorama pictures. Youcan use a second or third set of pictures to createand choose the best-looking panorama. Copythe pictures you want to use from your digitalcamera to your computer’s hard drive.
Before creating the panorama, you can usePhotoshop Elements to correct any color differ-ences between the pictures, or to clean up anyobjects you don’t want to appear in the finalimage. However, you can also edit the image afterthe panorama has been created.
Introducing PhotomergeThe wonderful panorama-making feature in Photoshop Elements is calledPhotomerge. The Photomerge command is tucked away in the File menu.Photomerge enables you to arrange two or more photos horizontally or vertically tocreate a single image file panorama.
Choose the Photomerge command from the File menu to open the Photomergedialog box. There are two main Photomerge dialog boxes. The first one, shown inFigure 16.6, enables you to select files and allow Photoshop Elements to take a firstcrack at automatically arranging your photos into a panorama. The second dialogbox, shown later in Figure 16.8, enables you to compose and generate thepanorama.
tipThe optimal number of
photos in a panoramadepends on how much ofthe view you want to show,and how many pictures
you’ve taken. If you’re try-ing to determine how
many photos to take, experimentwith creating panoramas usinganywhere from two to eightphotos.
FIGURE 16.6
Select the image
files you want to
use for the
panorama from
the Photomerge
dialog box.
21 8311 CH16 1/15/03 2:38 PM Page 347

There are five buttons in the Photomerge dialog box:Browse, Remove, OK, Cancel, and Help. TheBrowse button enables you to choose each photoyou want to include in your panorama.Conversely, the Remove button enables you todelete any file you don’t want to include in thepanorama. Click the Help button to view thepanorama help information. You can click Cancelat any time to exit the Photomerge dialog box.After you’ve selected all the source files, click OK.
Arranging Images in thePanorama
After you’ve added the files you want to use to thePhotomerge dialog, click OK and wait forPhotoshop Elements to arrange the photos into a
348 ABSOLUTE BEGINNER’S GUIDE TO ADOBE PHOTOSHOP ELEMENTS 2
By default, any image files that are already open in the work area will appear in thePhotomerge dialog box. If you don’t want to include these photos in the panorama,select each one and click Remove. If the photos you want to include in thepanorama are not already open, press the Browse button in the Photomerge dialogbox. The Open dialog box will appear.
To easily locate each image you want to include in the panorama, store all the filesin the same folder on your hard drive. You can hold down the Shift or (Command)[Ctrl] key and click on more than one file in the Open window to add multiple filesto the Photomerge dialog box list, as shown in Figure 16.7. If you’re not sure whichphotos you want to use, choose more, rather than fewer, files. You can alwaysremove a photo from the final panorama in the second Photomerge dialog box.
FIGURE 16.7
Select multiple
images in the
Open window.
Photoshop Elementswill not resize any of the
photos in the panorama. For bestresults, select photos taken at thesame resolution to create thepanorama. Save the originalpanorama and then reduce its size,or apply filters, effects, and so on.
21 8311 CH16 1/15/03 2:38 PM Page 348
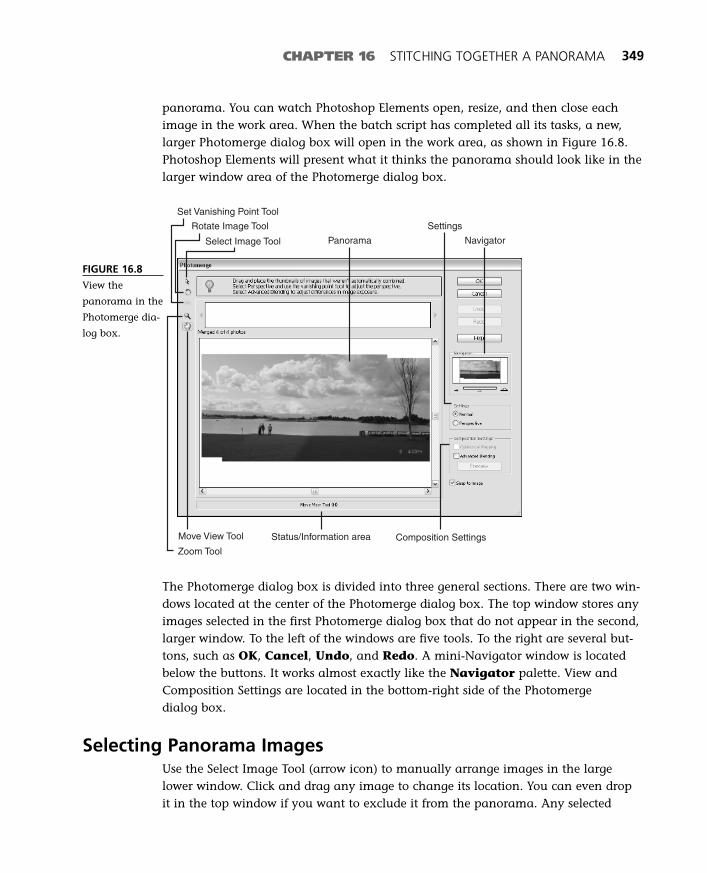
CHAPTER 16 STITCHING TOGETHER A PANORAMA 349
The Photomerge dialog box is divided into three general sections. There are two win-dows located at the center of the Photomerge dialog box. The top window stores anyimages selected in the first Photomerge dialog box that do not appear in the second,larger window. To the left of the windows are five tools. To the right are several but-tons, such as OK, Cancel, Undo, and Redo. A mini-Navigator window is locatedbelow the buttons. It works almost exactly like the Navigator palette. View andComposition Settings are located in the bottom-right side of the Photomergedialog box.
Selecting Panorama ImagesUse the Select Image Tool (arrow icon) to manually arrange images in the largelower window. Click and drag any image to change its location. You can even dropit in the top window if you want to exclude it from the panorama. Any selected
FIGURE 16.8
View the
panorama in the
Photomerge dia-
log box.
Select Image Tool
Rotate Image Tool
Set Vanishing Point Tool
Move View Tool
Zoom Tool
Panorama Navigator
Settings
Composition SettingsStatus/Information area
panorama. You can watch Photoshop Elements open, resize, and then close eachimage in the work area. When the batch script has completed all its tasks, a new,larger Photomerge dialog box will open in the work area, as shown in Figure 16.8.Photoshop Elements will present what it thinks the panorama should look like in thelarger window area of the Photomerge dialog box.
21 8311 CH16 1/15/03 2:38 PM Page 349
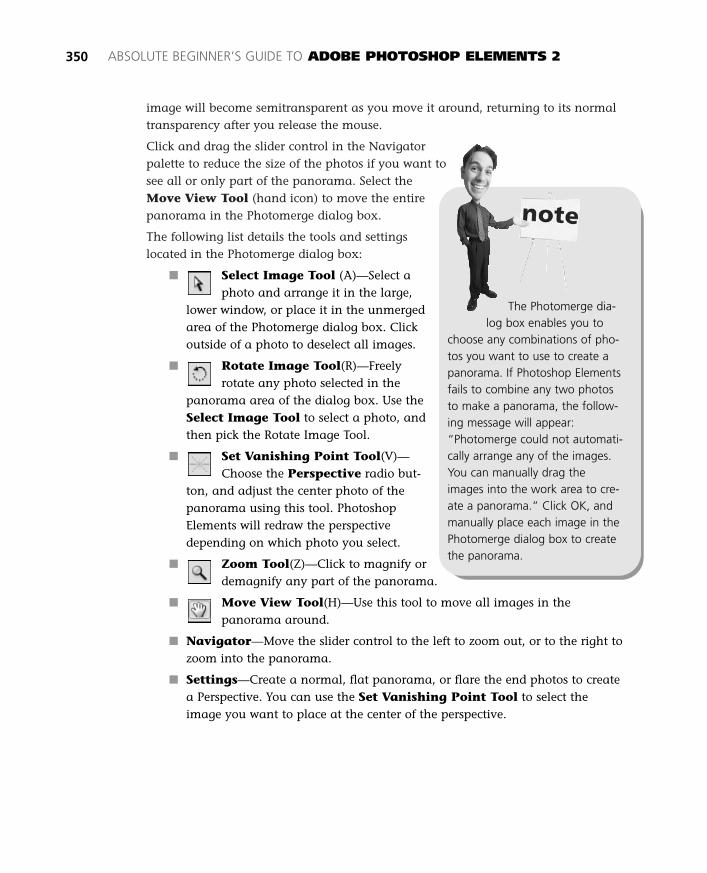
image will become semitransparent as you move it around, returning to its normaltransparency after you release the mouse.
Click and drag the slider control in the Navigatorpalette to reduce the size of the photos if you want tosee all or only part of the panorama. Select theMove View Tool (hand icon) to move the entirepanorama in the Photomerge dialog box.
The following list details the tools and settingslocated in the Photomerge dialog box:
■ Select Image Tool (A)—Select aphoto and arrange it in the large,
lower window, or place it in the unmergedarea of the Photomerge dialog box. Clickoutside of a photo to deselect all images.
■ Rotate Image Tool(R)—Freelyrotate any photo selected in the
panorama area of the dialog box. Use theSelect Image Tool to select a photo, andthen pick the Rotate Image Tool.
■ Set Vanishing Point Tool(V)—Choose the Perspective radio but-
ton, and adjust the center photo of thepanorama using this tool. PhotoshopElements will redraw the perspectivedepending on which photo you select.
■ Zoom Tool(Z)—Click to magnify ordemagnify any part of the panorama.
■ Move View Tool(H)—Use this tool to move all images in thepanorama around.
■ Navigator—Move the slider control to the left to zoom out, or to the right tozoom into the panorama.
■ Settings—Create a normal, flat panorama, or flare the end photos to createa Perspective. You can use the Set Vanishing Point Tool to select theimage you want to place at the center of the perspective.
350 ABSOLUTE BEGINNER’S GUIDE TO ADOBE PHOTOSHOP ELEMENTS 2
The Photomerge dia-log box enables you to
choose any combinations of pho-tos you want to use to create apanorama. If Photoshop Elementsfails to combine any two photosto make a panorama, the follow-ing message will appear:“Photomerge could not automati-cally arrange any of the images.You can manually drag theimages into the work area to cre-ate a panorama.” Click OK, andmanually place each image in thePhotomerge dialog box to createthe panorama.
21 8311 CH16 1/15/03 2:38 PM Page 350
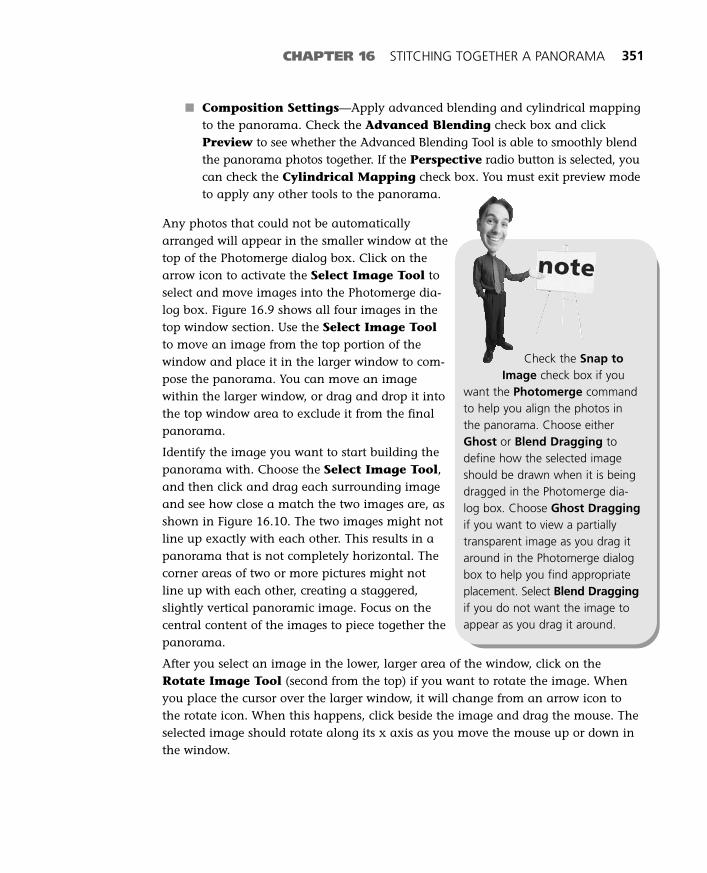
CHAPTER 16 STITCHING TOGETHER A PANORAMA 351
■ Composition Settings—Apply advanced blending and cylindrical mappingto the panorama. Check the Advanced Blending check box and clickPreview to see whether the Advanced Blending Tool is able to smoothly blendthe panorama photos together. If the Perspective radio button is selected, youcan check the Cylindrical Mapping check box. You must exit preview modeto apply any other tools to the panorama.
Any photos that could not be automaticallyarranged will appear in the smaller window at thetop of the Photomerge dialog box. Click on thearrow icon to activate the Select Image Tool toselect and move images into the Photomerge dia-log box. Figure 16.9 shows all four images in thetop window section. Use the Select Image Toolto move an image from the top portion of thewindow and place it in the larger window to com-pose the panorama. You can move an imagewithin the larger window, or drag and drop it intothe top window area to exclude it from the finalpanorama.
Identify the image you want to start building thepanorama with. Choose the Select Image Tool,and then click and drag each surrounding imageand see how close a match the two images are, asshown in Figure 16.10. The two images might notline up exactly with each other. This results in apanorama that is not completely horizontal. Thecorner areas of two or more pictures might notline up with each other, creating a staggered,slightly vertical panoramic image. Focus on thecentral content of the images to piece together thepanorama.
After you select an image in the lower, larger area of the window, click on theRotate Image Tool (second from the top) if you want to rotate the image. Whenyou place the cursor over the larger window, it will change from an arrow icon tothe rotate icon. When this happens, click beside the image and drag the mouse. Theselected image should rotate along its x axis as you move the mouse up or down inthe window.
Check the Snap toImage check box if you
want the Photomerge commandto help you align the photos inthe panorama. Choose eitherGhost or Blend Dragging todefine how the selected imageshould be drawn when it is beingdragged in the Photomerge dia-log box. Choose Ghost Draggingif you want to view a partiallytransparent image as you drag itaround in the Photomerge dialogbox to help you find appropriateplacement. Select Blend Draggingif you do not want the image toappear as you drag it around.
21 8311 CH16 1/15/03 2:38 PM Page 351
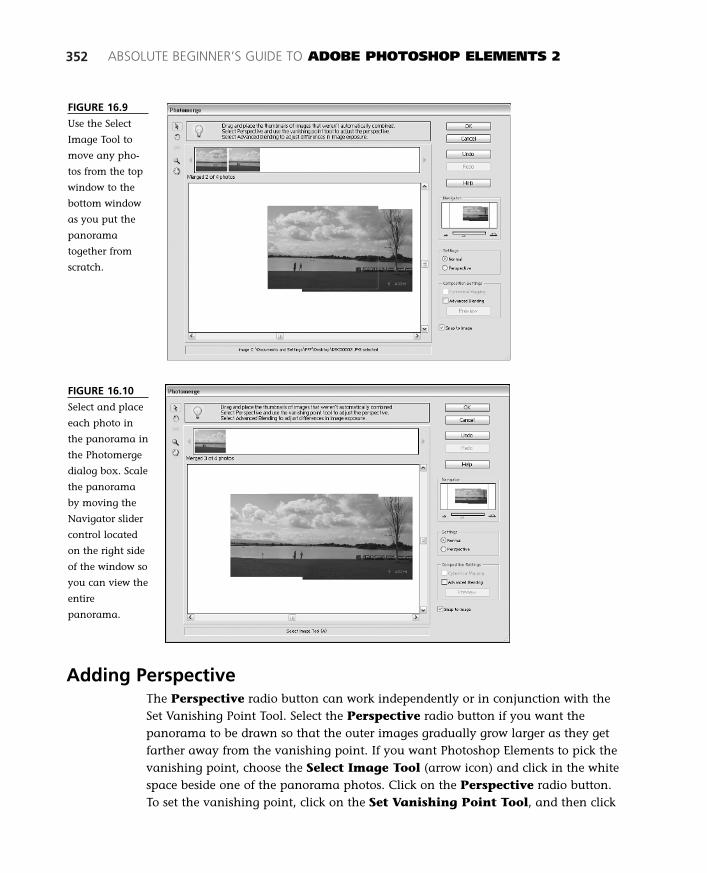
352 ABSOLUTE BEGINNER’S GUIDE TO ADOBE PHOTOSHOP ELEMENTS 2
FIGURE 16.9
Use the Select
Image Tool to
move any pho-
tos from the top
window to the
bottom window
as you put the
panorama
together from
scratch.
FIGURE 16.10
Select and place
each photo in
the panorama in
the Photomerge
dialog box. Scale
the panorama
by moving the
Navigator slider
control located
on the right side
of the window so
you can view the
entire
panorama.
Adding PerspectiveThe Perspective radio button can work independently or in conjunction with theSet Vanishing Point Tool. Select the Perspective radio button if you want thepanorama to be drawn so that the outer images gradually grow larger as they getfarther away from the vanishing point. If you want Photoshop Elements to pick thevanishing point, choose the Select Image Tool (arrow icon) and click in the whitespace beside one of the panorama photos. Click on the Perspective radio button.To set the vanishing point, click on the Set Vanishing Point Tool, and then click
21 8311 CH16 1/15/03 2:38 PM Page 352
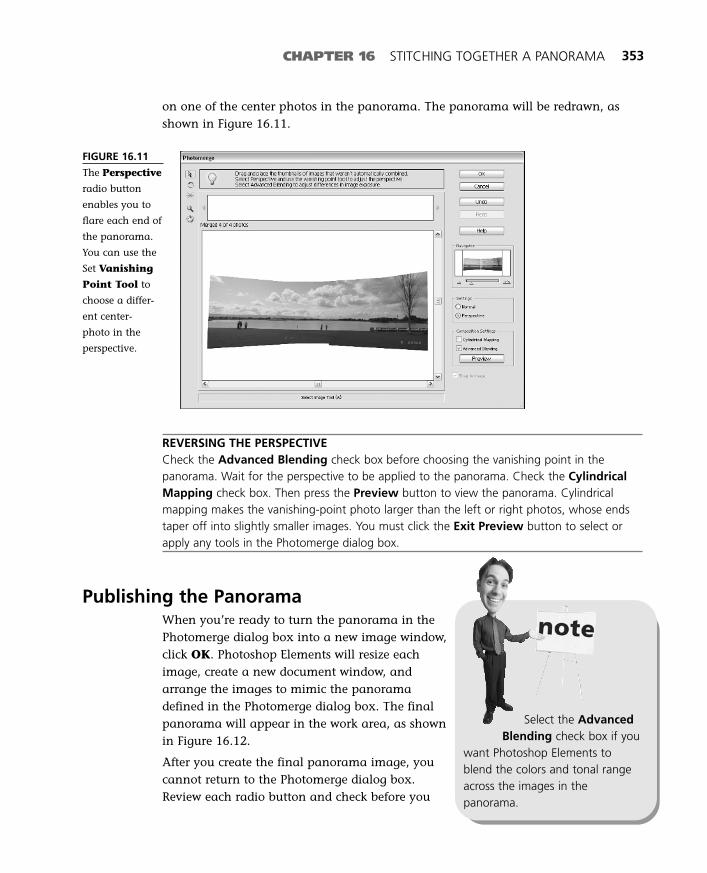
CHAPTER 16 STITCHING TOGETHER A PANORAMA 353
on one of the center photos in the panorama. The panorama will be redrawn, asshown in Figure 16.11.
FIGURE 16.11
The Perspective
radio button
enables you to
flare each end of
the panorama.
You can use the
Set Vanishing
Point Tool to
choose a differ-
ent center-
photo in the
perspective.
REVERSING THE PERSPECTIVECheck the Advanced Blending check box before choosing the vanishing point in thepanorama. Wait for the perspective to be applied to the panorama. Check the CylindricalMapping check box. Then press the Preview button to view the panorama. Cylindricalmapping makes the vanishing-point photo larger than the left or right photos, whose endstaper off into slightly smaller images. You must click the Exit Preview button to select orapply any tools in the Photomerge dialog box.
Publishing the PanoramaWhen you’re ready to turn the panorama in thePhotomerge dialog box into a new image window,click OK. Photoshop Elements will resize eachimage, create a new document window, andarrange the images to mimic the panoramadefined in the Photomerge dialog box. The finalpanorama will appear in the work area, as shownin Figure 16.12.
After you create the final panorama image, youcannot return to the Photomerge dialog box.Review each radio button and check before you
Select the AdvancedBlending check box if you
want Photoshop Elements toblend the colors and tonal rangeacross the images in thepanorama.
21 8311 CH16 1/15/03 2:38 PM Page 353
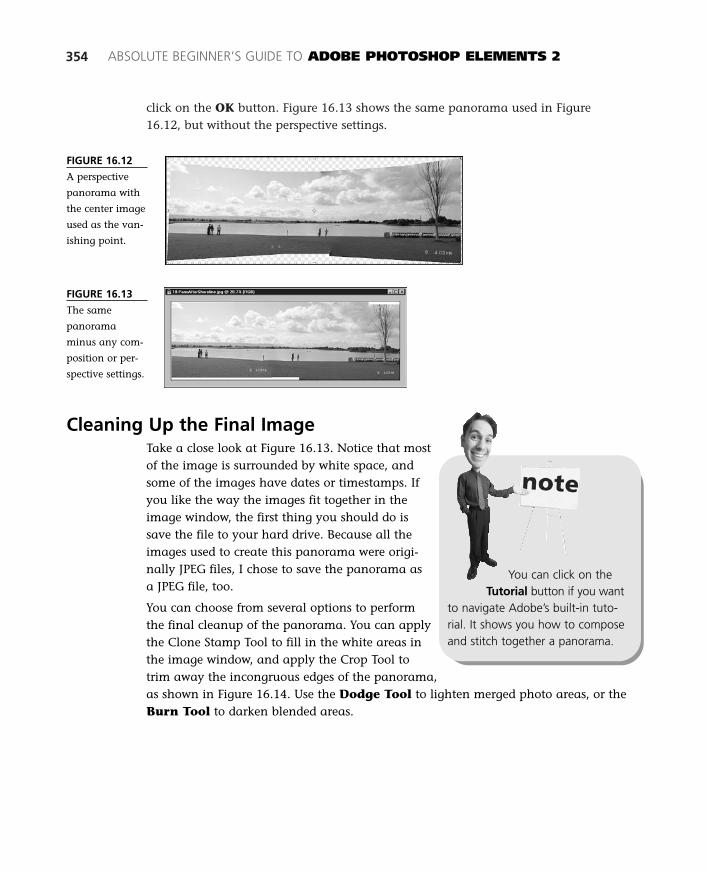
click on the OK button. Figure 16.13 shows the same panorama used in Figure16.12, but without the perspective settings.
354 ABSOLUTE BEGINNER’S GUIDE TO ADOBE PHOTOSHOP ELEMENTS 2
FIGURE 16.12
A perspective
panorama with
the center image
used as the van-
ishing point.
FIGURE 16.13
The same
panorama
minus any com-
position or per-
spective settings.
Cleaning Up the Final ImageTake a close look at Figure 16.13. Notice that mostof the image is surrounded by white space, andsome of the images have dates or timestamps. Ifyou like the way the images fit together in theimage window, the first thing you should do issave the file to your hard drive. Because all theimages used to create this panorama were origi-nally JPEG files, I chose to save the panorama asa JPEG file, too.
You can choose from several options to performthe final cleanup of the panorama. You can applythe Clone Stamp Tool to fill in the white areas inthe image window, and apply the Crop Tool totrim away the incongruous edges of the panorama,as shown in Figure 16.14. Use the Dodge Tool to lighten merged photo areas, or theBurn Tool to darken blended areas.
You can click on theTutorial button if you want
to navigate Adobe’s built-in tuto-rial. It shows you how to composeand stitch together a panorama.
21 8311 CH16 1/15/03 2:38 PM Page 354

CHAPTER 16 STITCHING TOGETHER A PANORAMA 355
Cleaning up the image also involves removing any visual glitches or unwantedgraphics. For example, the digital timestamp from the camera was removed with a21-pixel, soft edge Clone Stamp Tool. You can also remove any people, or othersmall objects, from the image depending on what you want the panorama to focuson. Sometimes having a person in an image reveals the true scale of the panorama.
Variations—Working with Different PhotoElements
You can create a wide range of landscapes—from scenic hillsides or lakes, to urbancityscapes or skylines. Panoramas can contain vertically overlapping images, too.Figure 16.15 shows a pastoral hillside near Page Mill Road in Palo Alto, California. Itried to capture the dramatic cloud cover in addition to the green hillsides when Itook these photos.
FIGURE 16.15
Although a
group of images
might be a great
fit logistically,
tonal range dif-
ferences can be
difficult to cor-
rect after the
panorama has
been created.
FIGURE 16.14
Apply the Crop
Tool to trim the
edges of the
incongruous
areas of the
panorama.
Color and tonal corrections are particularly difficult to perform on panoramaimages because it is difficult to know which areas of an image will overlap. Forexample, the top-middle portion of the panorama in Figure 16.15 is the result of twoslightly lighter and darker images overlapping, resulting in a visual glitch in theimage. Try correcting this tonal difference with the Dodge or Burn tools to lighten or
21 8311 CH16 1/15/03 2:38 PM Page 355
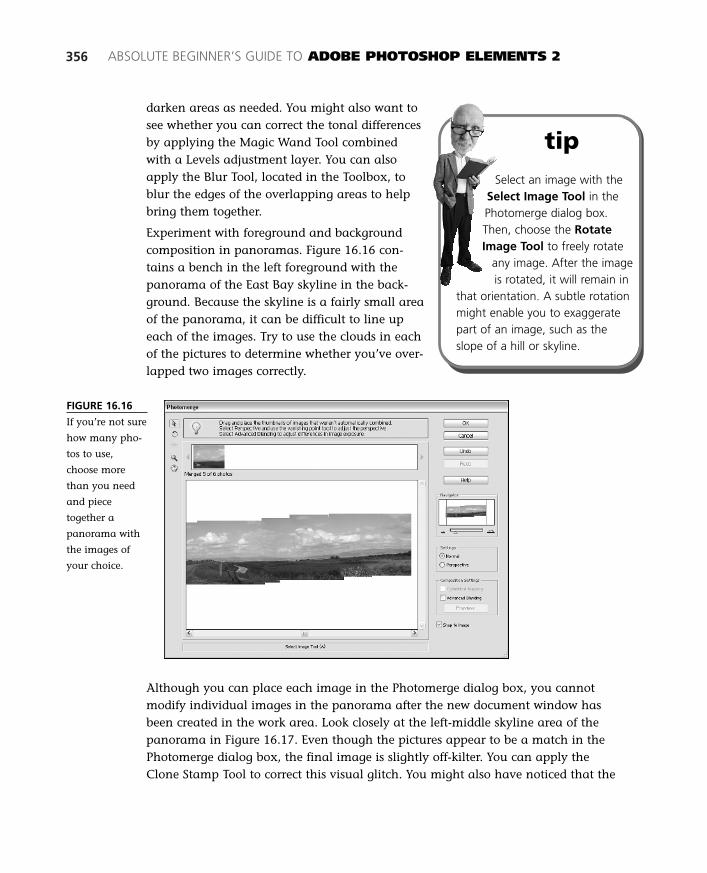
356 ABSOLUTE BEGINNER’S GUIDE TO ADOBE PHOTOSHOP ELEMENTS 2
darken areas as needed. You might also want tosee whether you can correct the tonal differencesby applying the Magic Wand Tool combinedwith a Levels adjustment layer. You can alsoapply the Blur Tool, located in the Toolbox, toblur the edges of the overlapping areas to helpbring them together.
Experiment with foreground and backgroundcomposition in panoramas. Figure 16.16 con-tains a bench in the left foreground with thepanorama of the East Bay skyline in the back-ground. Because the skyline is a fairly small areaof the panorama, it can be difficult to line upeach of the images. Try to use the clouds in eachof the pictures to determine whether you’ve over-lapped two images correctly.
tipSelect an image with the
Select Image Tool in thePhotomerge dialog box.Then, choose the RotateImage Tool to freely rotate
any image. After the imageis rotated, it will remain in
that orientation. A subtle rotationmight enable you to exaggeratepart of an image, such as theslope of a hill or skyline.
FIGURE 16.16
If you’re not sure
how many pho-
tos to use,
choose more
than you need
and piece
together a
panorama with
the images of
your choice.
Although you can place each image in the Photomerge dialog box, you cannotmodify individual images in the panorama after the new document window hasbeen created in the work area. Look closely at the left-middle skyline area of thepanorama in Figure 16.17. Even though the pictures appear to be a match in thePhotomerge dialog box, the final image is slightly off-kilter. You can apply the Clone Stamp Tool to correct this visual glitch. You might also have noticed that the
21 8311 CH16 1/15/03 2:38 PM Page 356
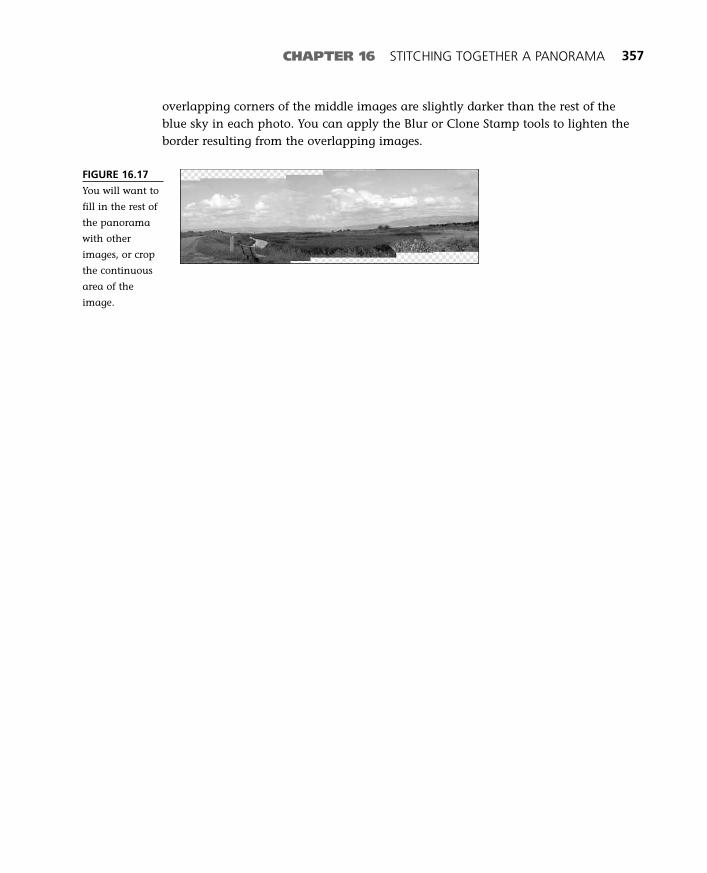
CHAPTER 16 STITCHING TOGETHER A PANORAMA 357
overlapping corners of the middle images are slightly darker than the rest of theblue sky in each photo. You can apply the Blur or Clone Stamp tools to lighten theborder resulting from the overlapping images.
FIGURE 16.17
You will want to
fill in the rest of
the panorama
with other
images, or crop
the continuous
area of the
image.
21 8311 CH16 1/15/03 2:38 PM Page 357

21 8311 CH16 1/15/03 2:38 PM Page 358
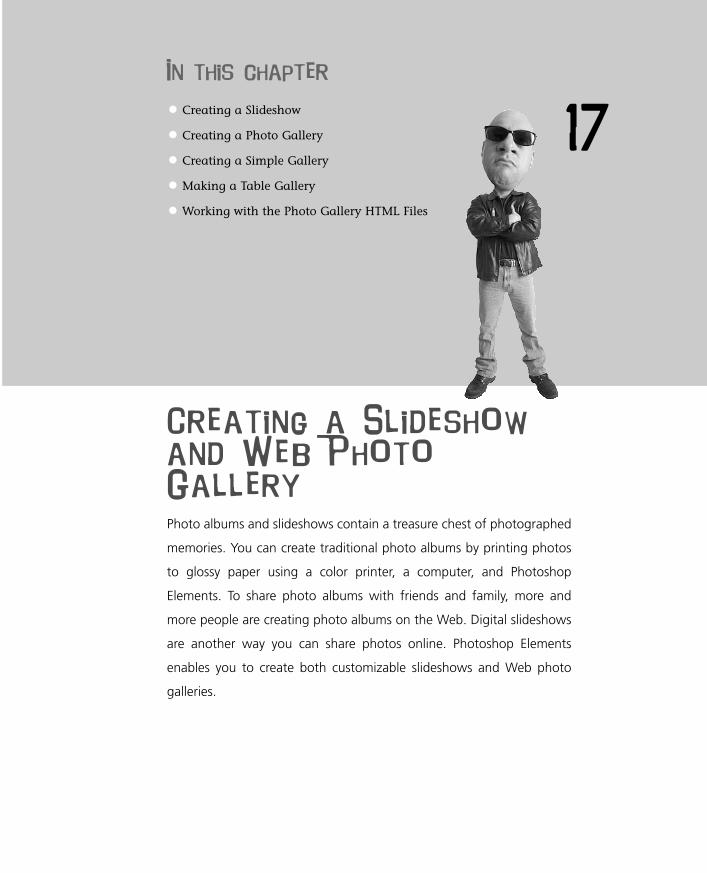
In this chapter
• Creating a Slideshow
• Creating a Photo Gallery
• Creating a Simple Gallery
• Making a Table Gallery
• Working with the Photo Gallery HTML Files
17
Creating a Slideshow
and Web Photo
Gallery
Photo albums and slideshows contain a treasure chest of photographed
memories. You can create traditional photo albums by printing photos
to glossy paper using a color printer, a computer, and Photoshop
Elements. To share photo albums with friends and family, more and
more people are creating photo albums on the Web. Digital slideshows
are another way you can share photos online. Photoshop Elements
enables you to create both customizable slideshows and Web photo
galleries.
22 8311 CH17 1/15/03 2:35 PM Page 359
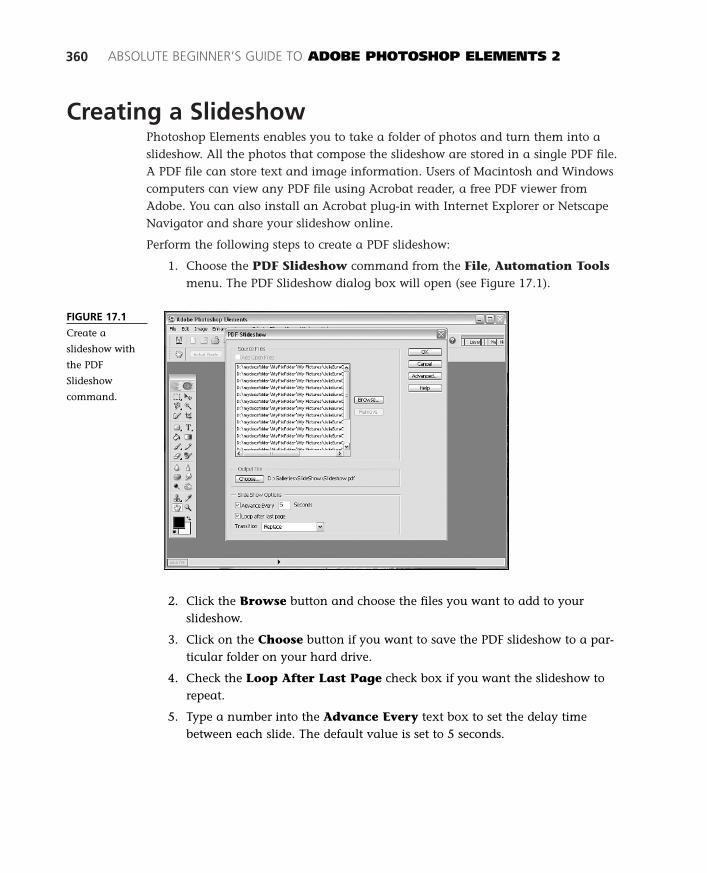
Creating a SlideshowPhotoshop Elements enables you to take a folder of photos and turn them into aslideshow. All the photos that compose the slideshow are stored in a single PDF file.A PDF file can store text and image information. Users of Macintosh and Windowscomputers can view any PDF file using Acrobat reader, a free PDF viewer fromAdobe. You can also install an Acrobat plug-in with Internet Explorer or NetscapeNavigator and share your slideshow online.
Perform the following steps to create a PDF slideshow:
1. Choose the PDF Slideshow command from the File, Automation Toolsmenu. The PDF Slideshow dialog box will open (see Figure 17.1).
360 ABSOLUTE BEGINNER’S GUIDE TO ADOBE PHOTOSHOP ELEMENTS 2
FIGURE 17.1
Create a
slideshow with
the PDF
Slideshow
command.
2. Click the Browse button and choose the files you want to add to yourslideshow.
3. Click on the Choose button if you want to save the PDF slideshow to a par-ticular folder on your hard drive.
4. Check the Loop After Last Page check box if you want the slideshow torepeat.
5. Type a number into the Advance Every text box to set the delay timebetween each slide. The default value is set to 5 seconds.
22 8311 CH17 1/15/03 2:35 PM Page 360
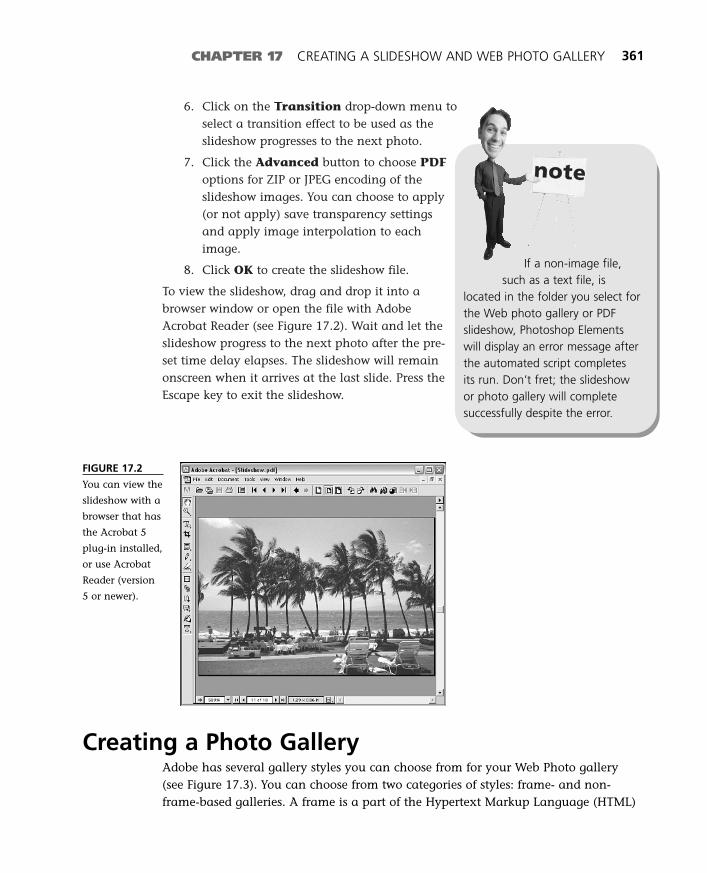
6. Click on the Transition drop-down menu toselect a transition effect to be used as theslideshow progresses to the next photo.
7. Click the Advanced button to choose PDFoptions for ZIP or JPEG encoding of theslideshow images. You can choose to apply(or not apply) save transparency settingsand apply image interpolation to eachimage.
8. Click OK to create the slideshow file.
To view the slideshow, drag and drop it into abrowser window or open the file with AdobeAcrobat Reader (see Figure 17.2). Wait and let theslideshow progress to the next photo after the pre-set time delay elapses. The slideshow will remainonscreen when it arrives at the last slide. Press theEscape key to exit the slideshow.
CHAPTER 17 CREATING A SLIDESHOW AND WEB PHOTO GALLERY 361
FIGURE 17.2
You can view the
slideshow with a
browser that has
the Acrobat 5
plug-in installed,
or use Acrobat
Reader (version
5 or newer).
If a non-image file,such as a text file, is
located in the folder you select forthe Web photo gallery or PDFslideshow, Photoshop Elementswill display an error message afterthe automated script completesits run. Don’t fret; the slideshowor photo gallery will completesuccessfully despite the error.
Creating a Photo GalleryAdobe has several gallery styles you can choose from for your Web Photo gallery(see Figure 17.3). You can choose from two categories of styles: frame- and non-frame-based galleries. A frame is a part of the Hypertext Markup Language (HTML)
22 8311 CH17 1/15/03 2:35 PM Page 361
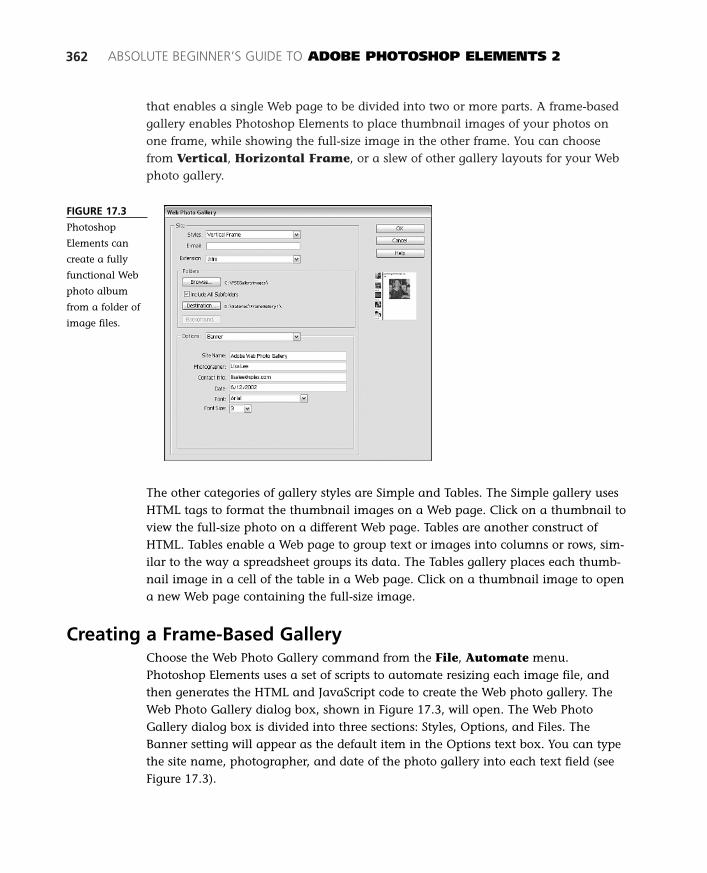
that enables a single Web page to be divided into two or more parts. A frame-basedgallery enables Photoshop Elements to place thumbnail images of your photos onone frame, while showing the full-size image in the other frame. You can choosefrom Vertical, Horizontal Frame, or a slew of other gallery layouts for your Webphoto gallery.
362 ABSOLUTE BEGINNER’S GUIDE TO ADOBE PHOTOSHOP ELEMENTS 2
FIGURE 17.3
Photoshop
Elements can
create a fully
functional Web
photo album
from a folder of
image files.
The other categories of gallery styles are Simple and Tables. The Simple gallery usesHTML tags to format the thumbnail images on a Web page. Click on a thumbnail toview the full-size photo on a different Web page. Tables are another construct ofHTML. Tables enable a Web page to group text or images into columns or rows, sim-ilar to the way a spreadsheet groups its data. The Tables gallery places each thumb-nail image in a cell of the table in a Web page. Click on a thumbnail image to opena new Web page containing the full-size image.
Creating a Frame-Based GalleryChoose the Web Photo Gallery command from the File, Automate menu.Photoshop Elements uses a set of scripts to automate resizing each image file, andthen generates the HTML and JavaScript code to create the Web photo gallery. TheWeb Photo Gallery dialog box, shown in Figure 17.3, will open. The Web PhotoGallery dialog box is divided into three sections: Styles, Options, and Files. TheBanner setting will appear as the default item in the Options text box. You can typethe site name, photographer, and date of the photo gallery into each text field (see Figure 17.3).
22 8311 CH17 1/15/03 2:35 PM Page 362

The Styles drop-down menu contains all 15 gallerystyles available for the Web Photo Gallery. Theselected style determines how the final gallery isformatted. Preview the layout in the right columnof the Web Photo Gallery dialog box. The follow-ing list describes each gallery style you can createwith the Web Photo Gallery command:
■ Horizontal Dark or HorizontalFrame—Places the full-size image at thetop of the Web page, and a thumbnailalong the bottom of the page.
■ Vertical Frame—Splits the Web page ver-tically. The thumbnail images are locatedon the left side of the page, and the full-size image is on the right.
■ Custom Galleries—Choose from AntiquePaper, Bears, Lace, Museum, Office, Space,Spotlight, Theater, Vacation, and Wetthemes for your photo gallery. Previeweach one in the right side of the Web PhotoGallery dialog box.
■ Simple—Creates a Web page consisting ofa specified number of columns and rows ofthumbnail images. Click on a thumbnail image to go to another Web pageto view the full-size image.
■ Table—Each thumbnail image is placed in a table, which can be customizedwith an HTML editor program. Click on a thumbnail image to go to anotherWeb page to view the full-size image.
Click the (Choose) [Browse] and Destination buttons located in the middle of theWeb Photo Gallery dialog box to choose the source and destination folders for yourgallery. The source directory contains the files you want to include in the photogallery. The destination directory contains the Web photo gallery files created byPhotoshop Elements. If you have several directories of files—for example, folderscontaining other folders of image files—check the Include All Subfolders checkbox if you want Photoshop Elements to add all folders in the selected folder to theWeb gallery.
CHAPTER 17 CREATING A SLIDESHOW AND WEB PHOTO GALLERY 363
Many Web sites,including www.yahoo.com
and www.msn.com
(http://photos.msn.com), enableyou to create and upload digitalphotos if you create an accounton the Web site. Other Web sites,such as www.kodak.com andwww.shutterfly.com, also provideWeb photo-album services, plusadditional services, such as con-verting printed photos into digitalfiles, or printing your digital pic-tures onto glossy photo paper.
22 8311 CH17 1/15/03 2:35 PM Page 363
IMAGE SIZES AND DOWNLOAD TIMESYou can customize the size of each full-size photo and thumbnail for each Web photogallery you create. If you’re not worried about the amount of time it will take for your Website visitors to download images from your Web site, feel free to select the full width of theimage in the Web Gallery dialog box (see Figure 17.3). If you are concerned about theamount of time it might take for your Web site visitors to download the images in yourWeb photo gallery, choose a smaller image size, such as 300 pixels wide for the full-sizeimage and 100 pixels wide for the thumbnail images.
Setting Gallery OptionsThe Options drop-down menu enables you to customize each photo gallery. Youcan review each set of options by choosing each menu item from the Options drop-down menu. Customize settings for the banner, gallery images, gallery thumbnails,custom colors, and security. Simply select each menu option, and configure eachdrop-down menu or text box.
If you’re not sure whether you should customize the numbers of rows or columns ina gallery, leave the default settings untouched and create a photo gallery. TheVertical Frame gallery is shown in Figure 17.3, as are the settings for the Banneroption. Type the name of the photo gallery, photographer, contact info, and date,and set the font family and font size.
Notice that the thumbnail images are not exactly the same size. Photos taken inportrait mode are not turned on their side. Similarly, vertical photos that remain inlandscape mode are not automatically turned right side up.
The following list summarizes each of the menu settings available in the Optionsmenu:
■ Banner—Type in the site name, photogra-pher, date, and font settings for the gallery.This information is added to every page ofthe gallery.
■ Gallery Images—Choose the border size,image size, and JPEG image quality for thefull-size image that will appear in thephoto gallery.
■ Gallery Thumbnails—Select a caption,font, font size, image size, and number ofrows and columns for the thumbnailimages (if you’re creating a Simple or Tablegallery). You can also change the bordersize of each thumbnail.
364 ABSOLUTE BEGINNER’S GUIDE TO ADOBE PHOTOSHOP ELEMENTS 2
If the photos werescanned in at 300 ppi, or
a different resolution, the batchscript will convert the resolutionof each image to 72 ppi.
22 8311 CH17 1/15/03 2:35 PM Page 364

■ Custom Colors—Modify the HTML color settings of the background, ban-ners, text, links, active links, and visited links for each Web page in thegallery.
■ Security—Customize a copyright notice, or add the filename, a caption, atitle, or credits to each photo in the gallery.
You can navigate the Web gallery in two ways: view and click thumbnails, or selecta thumbnail to view a larger photo. Some Web galleries include navigational arrowbuttons that enable you to move from one page of thumbnails to another. Frame-based galleries, like the Horizontal Frame gallery shown in Figure 17.4, enable youto click on a thumbnail to change the full-size image in the larger frame in thebrowser window. The Simple gallery, shown in Figure 17.4, enables you to click on athumbnail to view the larger photo. Click an arrow button to navigate through eachpage of thumbnails.
CHAPTER 17 CREATING A SLIDESHOW AND WEB PHOTO GALLERY 365
FIGURE 17.4
Click on a
thumbnail
image at the
bottom of the
browser window
to make a
larger-size image
appear in the
top frame.
Creating a Simple GalleryThe Simple gallery style enables you to navigate pages of thumbnail images byclicking on arrow buttons. Click on a thumbnail image to view the full-size image.The Simple gallery Web page layout, shown on the right side of Figure 17.5, does notuse any fancy HTML elements such as frames or tables to create the gallery layout,just straight, simple-as-can-be HTML tags. This gallery format works with anybrowser program.
22 8311 CH17 1/15/03 2:35 PM Page 365
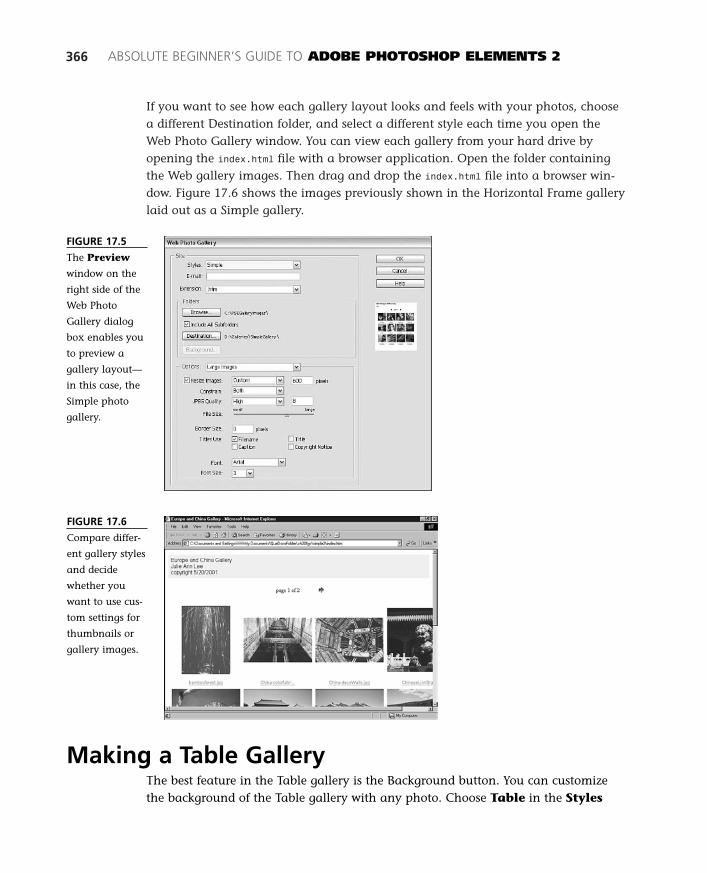
If you want to see how each gallery layout looks and feels with your photos, choosea different Destination folder, and select a different style each time you open theWeb Photo Gallery window. You can view each gallery from your hard drive byopening the index.html file with a browser application. Open the folder containingthe Web gallery images. Then drag and drop the index.html file into a browser win-dow. Figure 17.6 shows the images previously shown in the Horizontal Frame gallerylaid out as a Simple gallery.
366 ABSOLUTE BEGINNER’S GUIDE TO ADOBE PHOTOSHOP ELEMENTS 2
FIGURE 17.5
The Preview
window on the
right side of the
Web Photo
Gallery dialog
box enables you
to preview a
gallery layout—
in this case, the
Simple photo
gallery.
FIGURE 17.6
Compare differ-
ent gallery styles
and decide
whether you
want to use cus-
tom settings for
thumbnails or
gallery images.
Making a Table GalleryThe best feature in the Table gallery is the Background button. You can customizethe background of the Table gallery with any photo. Choose Table in the Styles
22 8311 CH17 1/15/03 2:35 PM Page 366
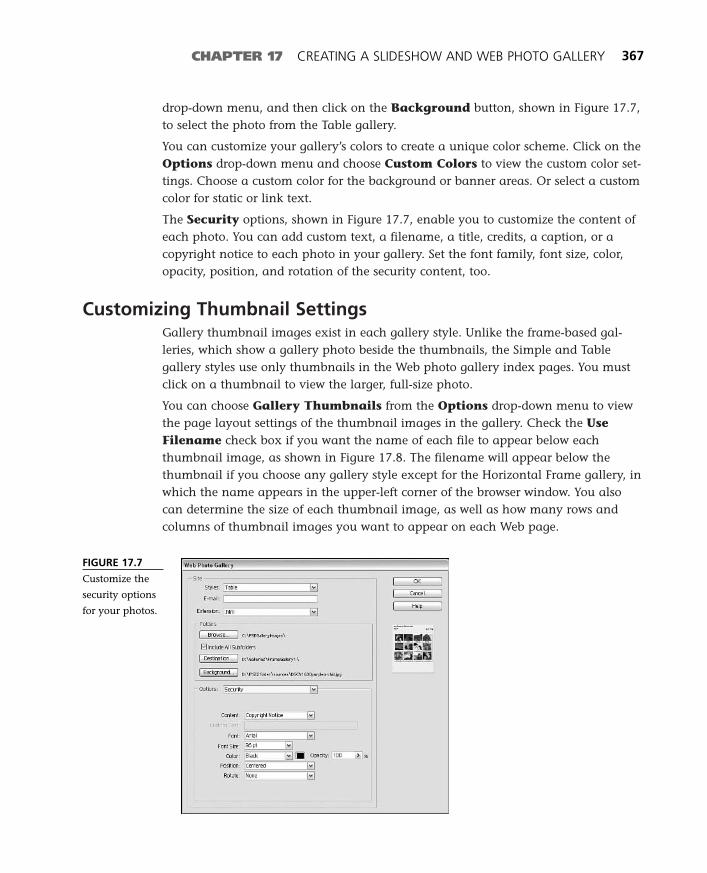
drop-down menu, and then click on the Background button, shown in Figure 17.7,to select the photo from the Table gallery.
You can customize your gallery’s colors to create a unique color scheme. Click on theOptions drop-down menu and choose Custom Colors to view the custom color set-tings. Choose a custom color for the background or banner areas. Or select a customcolor for static or link text.
The Security options, shown in Figure 17.7, enable you to customize the content ofeach photo. You can add custom text, a filename, a title, credits, a caption, or acopyright notice to each photo in your gallery. Set the font family, font size, color,opacity, position, and rotation of the security content, too.
Customizing Thumbnail SettingsGallery thumbnail images exist in each gallery style. Unlike the frame-based gal-leries, which show a gallery photo beside the thumbnails, the Simple and Tablegallery styles use only thumbnails in the Web photo gallery index pages. You mustclick on a thumbnail to view the larger, full-size photo.
You can choose Gallery Thumbnails from the Options drop-down menu to viewthe page layout settings of the thumbnail images in the gallery. Check the UseFilename check box if you want the name of each file to appear below eachthumbnail image, as shown in Figure 17.8. The filename will appear below thethumbnail if you choose any gallery style except for the Horizontal Frame gallery, inwhich the name appears in the upper-left corner of the browser window. You alsocan determine the size of each thumbnail image, as well as how many rows andcolumns of thumbnail images you want to appear on each Web page.
CHAPTER 17 CREATING A SLIDESHOW AND WEB PHOTO GALLERY 367
FIGURE 17.7
Customize the
security options
for your photos.
22 8311 CH17 1/15/03 2:35 PM Page 367
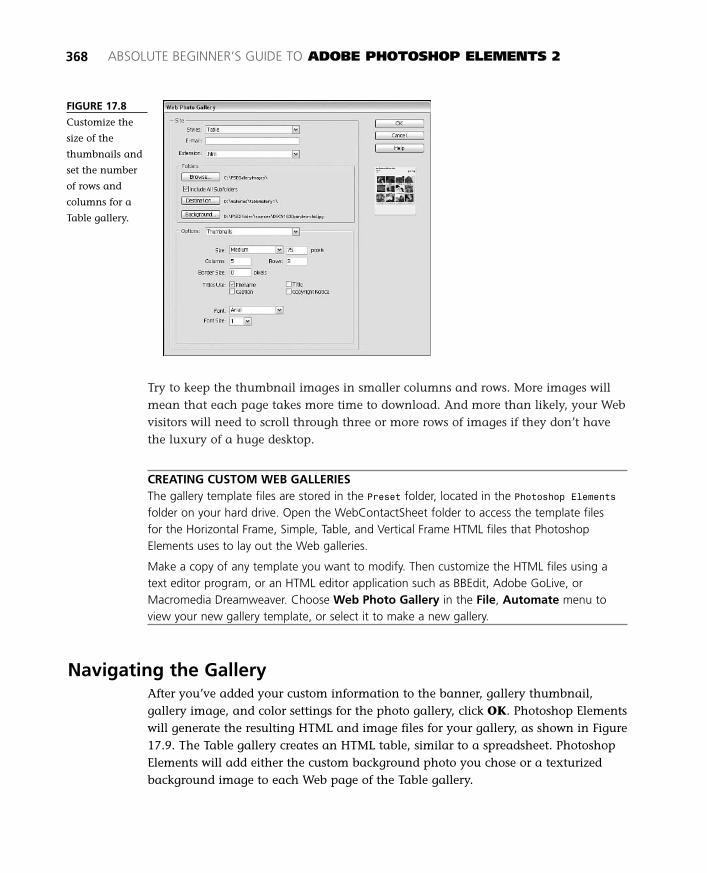
Try to keep the thumbnail images in smaller columns and rows. More images willmean that each page takes more time to download. And more than likely, your Webvisitors will need to scroll through three or more rows of images if they don’t havethe luxury of a huge desktop.
CREATING CUSTOM WEB GALLERIESThe gallery template files are stored in the Preset folder, located in the Photoshop Elementsfolder on your hard drive. Open the WebContactSheet folder to access the template filesfor the Horizontal Frame, Simple, Table, and Vertical Frame HTML files that PhotoshopElements uses to lay out the Web galleries.
Make a copy of any template you want to modify. Then customize the HTML files using atext editor program, or an HTML editor application such as BBEdit, Adobe GoLive, orMacromedia Dreamweaver. Choose Web Photo Gallery in the File, Automate menu toview your new gallery template, or select it to make a new gallery.
Navigating the GalleryAfter you’ve added your custom information to the banner, gallery thumbnail,gallery image, and color settings for the photo gallery, click OK. Photoshop Elementswill generate the resulting HTML and image files for your gallery, as shown in Figure17.9. The Table gallery creates an HTML table, similar to a spreadsheet. PhotoshopElements will add either the custom background photo you chose or a texturizedbackground image to each Web page of the Table gallery.
368 ABSOLUTE BEGINNER’S GUIDE TO ADOBE PHOTOSHOP ELEMENTS 2
FIGURE 17.8
Customize the
size of the
thumbnails and
set the number
of rows and
columns for a
Table gallery.
22 8311 CH17 1/15/03 2:35 PM Page 368
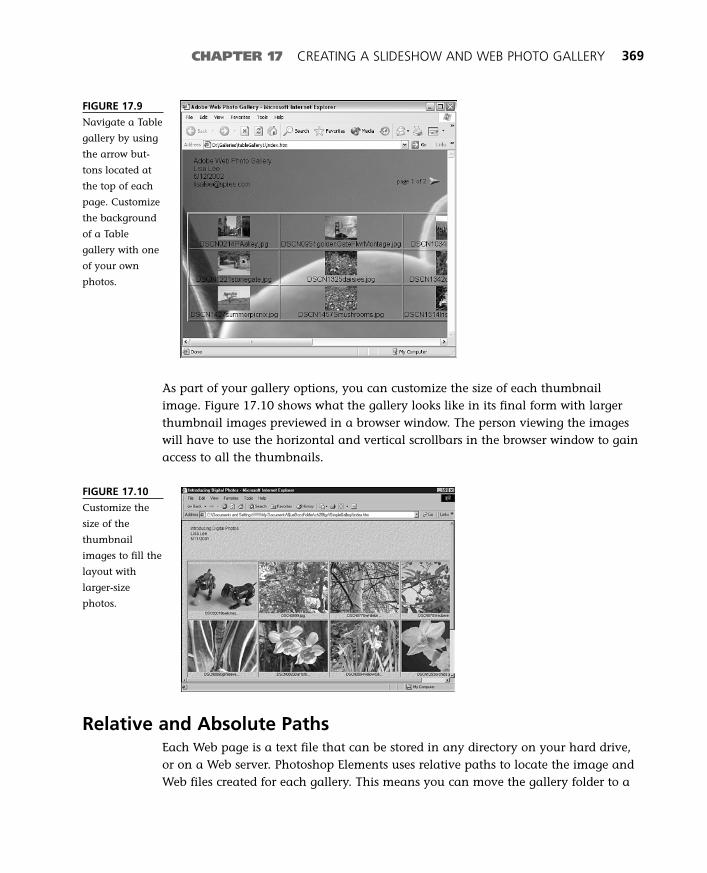
CHAPTER 17 CREATING A SLIDESHOW AND WEB PHOTO GALLERY 369
FIGURE 17.9
Navigate a Table
gallery by using
the arrow but-
tons located at
the top of each
page. Customize
the background
of a Table
gallery with one
of your own
photos.
As part of your gallery options, you can customize the size of each thumbnailimage. Figure 17.10 shows what the gallery looks like in its final form with largerthumbnail images previewed in a browser window. The person viewing the imageswill have to use the horizontal and vertical scrollbars in the browser window to gainaccess to all the thumbnails.
FIGURE 17.10
Customize the
size of the
thumbnail
images to fill the
layout with
larger-size
photos.
Relative and Absolute PathsEach Web page is a text file that can be stored in any directory on your hard drive,or on a Web server. Photoshop Elements uses relative paths to locate the image andWeb files created for each gallery. This means you can move the gallery folder to a
22 8311 CH17 1/15/03 2:35 PM Page 369

370 ABSOLUTE BEGINNER’S GUIDE TO ADOBE PHOTOSHOP ELEMENTS 2
Web server or any directory on your hard drive, and each link will work. Each pic-ture will appear in the browser window when you load any of the HTML files in abrowser window. A relative path might look like this: \images\GreatWall.jpg.
One thing to avoid using is an absolute path. An absolute path includes an exactdirectory path to each Web page, link, or image. An absolute path might look likethis: C:\ProgramFiles\MyWebGallery\Images\GreatWall.jpg. If you move the gallery out ofthe ProgramFiles folder, this link no longer will be able to locate GreatWall.jpg. Thelesson here is to use relative paths whenever possible.
Working with the Photo Gallery HTML FilesPhotoshop Elements creates each Web gallery by processing each image in thesource directory and creating full-size and thumbnail images. Then, it generatesHTML code for each Web page in the photo gallery. As mentioned earlier in thischapter, HTML is an acronym for Hypertext Markup Language, the language thatenables a browser to view a Web page. When you create a Web photo gallery,Photoshop Elements creates several folders on your hard drive. The images folder con-tains the full-size images for the gallery. The thumbnails folder stores all the thumb-nail images, and all the HTML files for the gallery are located in the pages folder.
You can view the HTML code for one of the Web pages in the gallery in one of twoways. One way is to drag and drop the HTML file into a browser window to view anHTML file as it will appear in a browser window of any Windows or Mac desktop.This enables you to view the file located on your hard drive. The other method is topost the file on a Web server and visit the Web site. In both cases, you can choosethe Source command from the View menu to take a closer look at each Web pagein your photo gallery. Although you don’t need to have an understanding of HTMLto create a Web photo gallery, the following sections provide a brief overview of theHTML code that is used to create the Web photo galleries in Photoshop Elements.
Viewing the Photo Gallery’s HTML Source CodeWhile viewing the Web photo gallery in the browser, you can take a look at theHTML source code for the Web page. The HTML source code enables you to view thetags and URLs for each image and file in the gallery, which can be helpful if youwant to troubleshoot any problems navigating the gallery images. If you’re usingInternet Explorer, choose the Source command from the View menu, or press(Command-E) [Ctrl+E]. If you’re using Netscape Navigator, choose Source fromthe View menu. A window will open containing the HTML code, as shown inFigure 17.11.
22 8311 CH17 1/15/03 2:35 PM Page 370
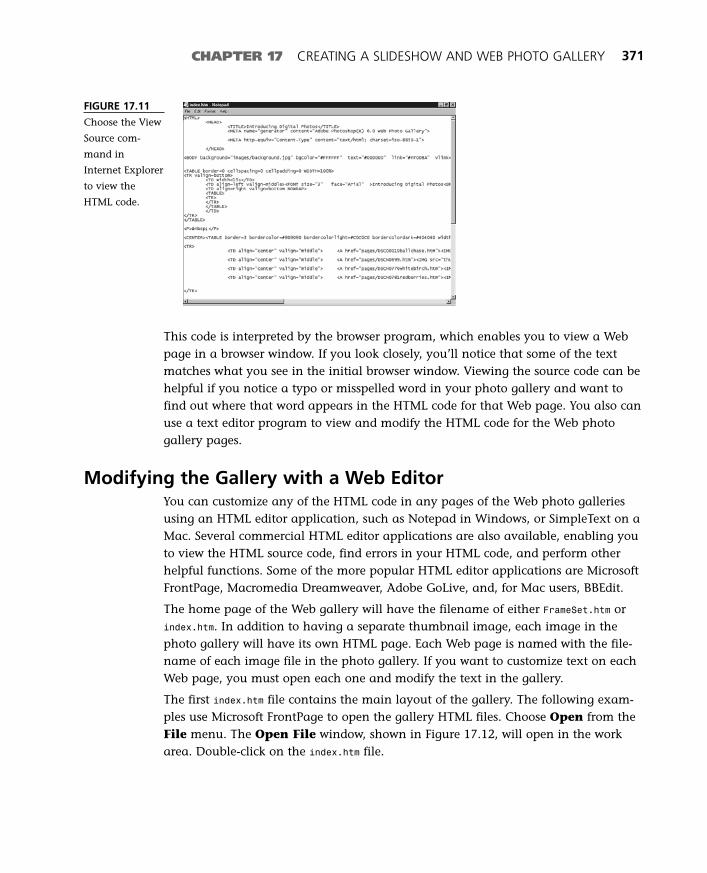
CHAPTER 17 CREATING A SLIDESHOW AND WEB PHOTO GALLERY 371
This code is interpreted by the browser program, which enables you to view a Webpage in a browser window. If you look closely, you’ll notice that some of the textmatches what you see in the initial browser window. Viewing the source code can behelpful if you notice a typo or misspelled word in your photo gallery and want tofind out where that word appears in the HTML code for that Web page. You also canuse a text editor program to view and modify the HTML code for the Web photogallery pages.
Modifying the Gallery with a Web EditorYou can customize any of the HTML code in any pages of the Web photo galleriesusing an HTML editor application, such as Notepad in Windows, or SimpleText on aMac. Several commercial HTML editor applications are also available, enabling youto view the HTML source code, find errors in your HTML code, and perform otherhelpful functions. Some of the more popular HTML editor applications are MicrosoftFrontPage, Macromedia Dreamweaver, Adobe GoLive, and, for Mac users, BBEdit.
The home page of the Web gallery will have the filename of either FrameSet.htm orindex.htm. In addition to having a separate thumbnail image, each image in thephoto gallery will have its own HTML page. Each Web page is named with the file-name of each image file in the photo gallery. If you want to customize text on eachWeb page, you must open each one and modify the text in the gallery.
The first index.htm file contains the main layout of the gallery. The following exam-ples use Microsoft FrontPage to open the gallery HTML files. Choose Open from theFile menu. The Open File window, shown in Figure 17.12, will open in the workarea. Double-click on the index.htm file.
FIGURE 17.11
Choose the View
Source com-
mand in
Internet Explorer
to view the
HTML code.
22 8311 CH17 1/15/03 2:35 PM Page 371

Although you can customize some of the text that appears in each page from theBanner Options settings in the Web Photo Gallery dialog box, you can add otherkinds of information using a text editor. The following list outlines some of the ele-ments you might want to add to each gallery Web page:
■ Titles—The site name of the Banner Options page appears as the title oneach Web page of the photo gallery.
■ Copyright—You can type copyright information into the Photographer orDate fields in the Banner Options settings in the Web Photo Gallery dialogbox. You also can customize each image with the Horizontal or Vertical TypeTool, and add copyright information to each image before you create thephoto gallery.
■ Captions—Photoshop Elements can add the filename for each thumbnailimage as the caption. Check the Use Filename check box in the GalleryThumbnails Options page in the Web Photo Gallery dialog box if you wantto add this information to each file in the photo gallery. You can modify thename of an image by changing its name in index.htm and changing the file-name for the HTML file for that image in the Pages folder of the photo gallery.
■ Links—Photoshop Elements creates a link for each image in the photogallery and places it in the index.htm or FrameSet.htm file. If you change thename of an HTML file in the photo gallery, be sure to change the filename inthe link in the index HTML page, too.
HTML TagsThe index.htm file opens in the FrontPage work area. HTML uses language elementsreferred to as tags to define how the text appears in the browser. Each tag, such as<HTML>, begins and ends with a bracket (see Figure 17.13). The text following this tag
372 ABSOLUTE BEGINNER’S GUIDE TO ADOBE PHOTOSHOP ELEMENTS 2
FIGURE 17.12
Open the
index.htm file to
modify the main
page of the
Table gallery.
22 8311 CH17 1/15/03 2:35 PM Page 372

CHAPTER 17 CREATING A SLIDESHOW AND WEB PHOTO GALLERY 373
follows the language syntax associated with the <HTML> tag. Each tag also has a clos-ing tag, noted by the forward slash (/). If you scroll to the bottom of the index.htmfile, you’ll find a </HTML> end tag.
FIGURE 17.13
The index.htm
page open in
FrontPage.
The HTML language has changed over the years.The World Wide Web Consortium (W3C) was createdin 1994 and is responsible for defining new addi-tions to HTML, such as XML. It currently hasmore than 500 member organizations, 50 teammembers, and an advisory board. However, eachbrowser can implement HTML, as well as anyother Web language, such as JavaScript, as theylike. Keep this in mind if you notice that yourWeb photo gallery appears with a slightly differ-ent layout in one browser program, but notanother.
There are many tags you can use to put togetheran HTML Web page. Photoshop Elements usesonly a subset of HTML tags to create the Webphoto galleries. The following list reviews some ofthe HTML tags used to create the Web photo galleries:
■ Page-related tags—Such as <HEAD>, <BODY>, <TITLE>
■ Formatting tags—Such as <CENTER>, <P>, <bgcolor=”#FFFFFF”>
■ Table-related tags—Such as <TABLE border=0 cellspacing=0 cellpadding=0WIDTH=100%>, <TR>, <TD>
To find out moreabout HTML and Web-
related languages, visitwww.w3.org, www.htmlcompendium.org, www.webmonkey.com, orwww.webreview.com.
22 8311 CH17 1/15/03 2:35 PM Page 373
■ Frame-related tags—Such as <FRAMESET frameborder=1 rows=”80%,20%”>
■ Link-related tags—Such as <A href=”index_2.htm”>
■ Tags for images—Such as <IMG src=”images/next.gif” height=”30” width=”30”border=”0” alt=Next>
HTML for Nonframes BrowsersPhotoshop Elements shows an error message when you try to view a gallery madewith frames using an older version of Internet Explorer or Netscape Navigator(which do not support frames). Open the FrameSet.htm file to view the frame-relatedcode. The following code appears at the bottom of the page:<NOFRAMES>
<BODY>
Viewing this page requires a browser capable of displaying frames.
</BODY>
</NOFRAMES>
If someone visits your Web site using a browser that cannot display frames, the mes-sage located between the <BODY> tags tells the viewer that this page requires abrowser that can display frames.
374 ABSOLUTE BEGINNER’S GUIDE TO ADOBE PHOTOSHOP ELEMENTS 2
22 8311 CH17 1/15/03 2:35 PM Page 374
Aadjustment layer A special kind of layeryou can add to an image that enables you toadjust the levels, brightness/contrast, hue/sat-uration, gradient, invert, threshold, or poster-ize commands without altering the imagelayers located below the adjustment layer inthe Layers palette.
alpha channel An alpha channel repre-sents the fourth channel that composes a 32-bit graphic image. It contains 256 shades ofpixel data reserved for storing transparencydata, but it is also responsible for defininghow the pixels in each eight-bit red, green,and blue channel are overlapped with eachother to create the resulting full-color image.
analog-to-digital converter (ADC) Adevice containing one or more chips that con-verts analog data into digital data. For exam-ple, a Charge Coupled Device (CCD) convertslight information into digital image informa-tion. CCDs are used in scanners and digitalcameras.
animation Two or more images that playback and forth to create the illusion ofmotion. Photoshop Elements enables you touse layers to create an animated GIF, a com-monly used file format for animation filesviewable on Web pages.
Glossary
anti-alias A software option that enablesthe program to smooth out the edge pixels inan image, blending them with the back-ground color.
aperture In a digital camera, the aperturesetting determines the amount of lightexposed to the CCD. Increasing the aperturecan affect the depth of focus on the camera.
Automation Tools Two automated com-mands are stored in the File, AutomationTools menu. These commands use scripts toautomatically create a PDF slideshow or con-vert a multi-page PDF to a Photoshop (PSD)file.
Bbackground color The color of the back-ground of the image window in the PhotoshopElements workspace. It also can be the back-ground color of a Web page.
background layer The bottom layer of animage file, or the bottom layer in the Layerspalette. See also layer.
bitmap graphics A matrix of pixels thatform an image. Digital pictures are created asbitmap graphics. Most of the tools inPhotoshop Elements enable you to work withbitmap graphics. See also vector graphics.
23 8311 GLOSS 1/15/03 2:37 PM Page 375

BMP A standard bitmap file format sup-ported by Photoshop Elements, and more com-monly created and used with PC computers.
brightness The luminance of a color acrosspixels in an image.
browser An application that can readHypertext Markup Language (HTML)documents.
Brush Tool A drawing tool selectable fromthe Toolbox. Can be used to define themasked or unmasked areas of a channel,layer, or quick mask.
Burn Tool A tool that resides with theDodge Tool in the Toolbox. It can darken pix-els in the image window.
button A graphic element used in applica-tions to enable users to perform specificactions, such as to accept changes or to bringup a new dialog box. If clicked, a button indi-cates a transition to a unique set of informa-tion in the same or different window, toolbar,or dialog box.
Ccalibration The process of configuring onedevice, such as a monitor, to match certainsettings. These can be color settings, a prede-fined set of values, or the values of a seconddevice, such as a printer or scanner. You canuse the Adobe Gamma control panel to cali-brate your computer monitor.
canvas Actual work area of an image file.Non-canvas areas of an image window aremarked with a gray color.
cast A light shade of a color, usually createdby a reflection of a brighter color in an image.
376 ABSOLUTE BEGINNER’S GUIDE TO ADOBE PHOTOSHOP ELEMENTS 2
CCD An acronym for Charge CoupledDevice. CCDs are used with most popular digi-tal cameras and scanners. A CCD is a devicethe size of a microchip. It contains a group oflight-sensitive components that translate lightinto digital data, which is in turn processedand stored as a file on a camera’s storage cardor sent from a scanner to a computer.
channel In an RGB image, a channel con-sists of eight bits of red, green, or blue imageinformation. Each channel contains a set ofpixels that can range in value from 0 to 256.You can view the pixel distribution for eachchannel from the Histogram or Levels window.
check box A graphic element used in anapplication which, when checked, indicatesthat a particular feature is active. If it isunchecked, the feature is not active.
chroma Synonymous with saturation colorlevels.
CIS An acronym for Contact Image Sensor.A low-cost image sensor used in somescanners.
Clipboard An area of memory managed bythe operating system that stores cut or copieddata from an application. Images stored inthe Clipboard can be pasted into an imagewindow.
Clone Stamp Tool A tool located in theToolbox that enables you to copy part of abitmap image and apply it elsewhere in theimage window.
CMOS An acronym for ComplementaryMetal Oxide Semiconductor: a method forbuilding low-power chips. CMOS chips areused by some digital cameras and scanners tocapture light information. Palm handhelds
23 8311 GLOSS 1/15/03 2:37 PM Page 376
GLOSSARY 377
and cell phones are a couple of examples ofhandheld devices that use CMOS-driven digi-tal cameras.
CMYK An acronym used to express Cyan,Magenta, Yellow, and Black color values. Eachcolor component has a value between 0 and255. Some applications and printers do notuse the black channel of a CMYK image file.Photoshop Elements does not support openingor converting images to CMYK. It supportsRGB, Grayscale, Indexed Color, and Bitmapimage modes.
Color Management The color model thatPhotoshop Elements uses that enables you toview, modify, and save photos. You can assigna specific color profile to define the colormodel, or color management system used byPhotoshop Elements or for Windows or MacOS color management.
Color Picker A window containing apalette of colors. Select a color to work withfrom the Color Picker window. Click on a fore-ground or background color in the Toolbox toopen the Color Picker window. You also canchoose to use the Adobe or Windows or MacOS Color Picker window, from the GeneralPreferences window.
color space A general term used to definea particular method for determining color ona computer. For example, RGB is the name forthe red, green, and blue color space. Hue,Saturation, and Brightness (HSB) is anothercolor space supported by Photoshop Elements.
ColorSync Apple’s name for its color man-agement software installed with Mac OS 9and Mac OS X. Choose ColorSync from theApple, Control Panels menu to assign a colorprofile for your computer monitor.
composite An image created by combiningmultiple images. For example, if you pasteone photo into an image window, the pastedimage is placed in a new layer located abovethe image in the existing layer below it. Theresulting single image is called a composite.
contrast The difference between light anddark pixel values in an image or object.
convert Usually refers to changing the fileformat of an image from one format toanother.
crop A tool that enables you to retain thesubject of a photo, but remove unselectedimage areas.
Ddigital camera A consumer electronicdevice, similar to a traditional analog camera,that can capture digital images and storethem on a removable card.
Dodge Tool A tool that resides with theBurn Tool in the Toolbox. It can lighten pixelsin the image window.
download To copy a file from another com-puter on a network or from the Internet toyour computer’s hard drive. For example, ifyou want to edit your Web pages, you can login to your Web site and download a file toyour computer using a network connection.
dpi An acronym for dots per inch, a meas-urement used to define screen and printer res-olution.
Eedit To change, adjust, or reorganize text orimage objects.
23 8311 GLOSS 1/15/03 2:37 PM Page 377

editor An application or feature in anapplication that edits text or graphics.
effect One or more ways to enhance theway an image appears in the image window.Most effects consist of a combination of filtersthat are applied to all or part of the activeimage window. Some effects can be added as aseparate layer, while others are applieddirectly to the selected image layer.
eraser This tool erases pixels from animage. Photoshop Elements has three kinds oferasers: Eraser, Background Eraser, and theMagic Eraser Tools.
export A command used to convert theactive image window into a special file for-mat. Export file formats are defined by a plug-in file. Photoshop Elements plug-in files areinstalled in the Import/Export folder located inthe Plug-ins folder in the Photoshop Elementsapplication folder.
Eyedropper A tool that can capture a colorfrom an image and be used as the foregroundor background color in the Toolbox.
Ff-stop Also referred to as shutter speed. Asetting on a digital camera that can affect thesimulated shutter speed. This impacts howlong the CCD will be exposed to light.
file format A generic term for describingthe way a file is saved. GIF, PSD, JPEG, andPNG are examples of graphic file formats.
filter Photoshop Elements includes image-editing filters that adjust contrast, brightness,and other types of filters to improve yourimages. You can view filters in the Filterspalette or the Filter menu.
378 ABSOLUTE BEGINNER’S GUIDE TO ADOBE PHOTOSHOP ELEMENTS 2
font A character set of a specific typeface,type style, and type size. Some fonts areinstalled with the operating system on yourcomputer.
foreground color The upper-left color inthe color well in the Toolbox. If the Pen,Pencil, Paintbrush, or other drawing tool isselected, the foreground color is used with theselected tool.
frames A feature of HTML that can be usedto divide a Web page, enabling you to viewand navigate more than one page in abrowser window. Photoshop Elements enablesyou to create a Web photo album containingframes.
FTP File Transfer Protocol. You can use abrowser application to download files from anFTP site. An FTP application enables you toupload or download files to the Web or net-work server that has an FTP server.
Ggamma Also known as the gamma correc-tion setting. Not synonymous with Grandma.You can adjust the gamma setting for yourmonitor from the Adobe Gamma controlpanel. In the Levels window, gamma is syn-onymous with midtones.
GIF Pronounced “gif,” (with a hard “g”) theGraphics Interchange Format is one of the twomost common graphic file formats used onthe Web. The GIF format is most effective atcompressing solid-color images and imageswith areas of repetitive color. In addition tosupporting background transparency (which isgreat for animation), up to 256 colors can rep-resent a GIF image. Best used with illustra-tions, text, and line art.
23 8311 GLOSS 1/15/03 2:37 PM Page 378

GLOSSARY 379
gradient A progression of colors that grad-ually blend or fade into each other. Create agradient within an object or across frames andlayers.
grayscale Represents a percentage of blackwhere 0 is white and 100 is black and inter-mediate colors are shades of gray.
Hhalo An off-colored ring of pixels thatappears around borders of a graphic. Mostnoticeable around the edges of a mask.
hard disk A hardware component com-monly used in computers to store files andfolders of data.
hexadecimal A term to express red, green,and blue color values. Each component valueis represented by a hexadecimal value, suchas FF-FF-FF for white.
highlight color The color used as a visualinterface to identify selected text or graphics.
hints Similar to tool tips. Hints are locatedin the Hints palette. Click on a tool in theToolbox to view its tool information in theHints palette. The text in the Hints palette ismore informative than the word or words thatappear in the tool tips.
How To palette A window containing agroup of instructions for a single task or groupof tasks that can be applied to an image, aselection object, or a layer.
HTML An acronym for Hypertext MarkupLanguage, which is the language used to cre-ate Web pages. Photoshop Elements generatesHTML code to create Web photo gallery files.
hue/saturation Hue is an adjustablerange of colors from 0 to 360, or plus or minus
180. Saturation values encapsulate colorintensity within a range of 0 to plus orminus 100.
IICC Profile The color profile you can savealong with a color photo in the Save or SaveAs dialog box in Photoshop Elements.
image A bitmapped matrix of pixels thatrepresent a picture.
Image Mode Located in the Image, Modemenu, enables you to set the number of colorsyou can work with in the image document toRGB (full color), Indexed Color (a fixed set ofcolors), Grayscale (256 shades of gray), orBitmap (two colors.
Import The command used to acquire animage from a scanner or digital camera. Itcan also be used to convert a nonsupporteddocument into Photoshop Elements.
Impressionist Brush Tool One of thedrawing tools in Photoshop Elements.Combines pixel colors with the Brush Presetand size settings. As it is applied to an image,it creates and smoothens and blends the colorsin an impressionist-like painting style.
Indexed Color One of the color modes sup-ported by Photoshop Elements. This colormode uses an indexing algorithm to reducethe number of colors in the image and alsoreduce its file size. Indexed Color modeenables you to work with up to 256 colors inan image.
Info palette Displays the location, size,and colors of a particular object in the imagewindow.
23 8311 GLOSS 1/15/03 2:37 PM Page 379
interpolation The process for calculatingcolor when pixels are added to or removedfrom an image during transformations.Bicubic interpolation creates the best resultsbut is usually the slowest method of interpola-tion. Photoshop Elements also enables you toapply nearest neighbor and bilinear interpola-tion processes. Choose the Image Size com-mand from the Image, Resize menu to selectan interpolation method for an image.
JJavaScript A scripting language created byNetscape. The Web photo gallery inPhotoshop Elements uses JavaScript to movefrom photo to photo as you click on eachimage, or view a slideshow.
JPEG Created by the Joint PhotographicExperts Group, JPEG is a popular graphic fileformat used on the Web. The JPEG file formatpreserves broad color ranges and subtleties inbrightness and image tones and supports upto millions (24 bits) of colors. JPEG uses a lossycompression format that can remove some ofthe image data when a file is compressed. Bestused with images and photographs. See alsoPNG and GIF.
JPEG 2000 A new file format supported byPhotoshop Elements 2. The JPEG 2000 formatenables you to adjust the compression leveland image quality of the JPEG image, sort of acustomized JPEG file format.
LLasso A selection tool that enables you toselect a freeform set of pixels. PhotoshopElements has three kinds of Lasso tools: Lasso,Polygonal Lasso, and Magnetic Lasso.
380 ABSOLUTE BEGINNER’S GUIDE TO ADOBE PHOTOSHOP ELEMENTS 2
layer A particular plane in a documentwindow that enables you to store simple orcomplex graphics. You can rearrange, add,remove, show, hide, and lock a layer inPhotoshop Elements. You can work with onlyone layer at a time in Photoshop Elements.
layer styles A collection of effects that canbe applied to a selected object in the imagewindow. Layer styles are located in the LayerStyles palette.
lossy compression An image file compres-sion format used to compress a JPEG image.Lossless JPEG compression preserves the origi-nal image, without losing any image data.Lossy compression can lose image data whencompressing a file. Photoshop Elements letsyou choose between 12 levels of JPEG compres-sion. The lower the level you choose to savethe JPEG image, the more image data is lostdue to compression. The image will not loseany additional data each successive time yousave a JPEG image at the same compressionlevel.
Mmarquee Rectangular or elliptical tool thatenables you to select an area of pixels in animage.
mask A selected area of pixels that can bemodified with a tool or menu command. Thepixels outside the selected area cannot bemodified with tools or commands.
megabyte Abbreviated MB. Equivalent to amillion bytes, or more exactly, 1,048,576bytes.
megapixel A million pixels. A measure-ment used by digital camera manufacturers tomeasure the total number of pixels captured
23 8311 GLOSS 1/15/03 2:37 PM Page 380
GLOSSARY 381
by a camera. Most of today’s cameras cancapture 2- or 3-megapixel images.
memory Also known as RAM. Refers to theamount of physical memory (in chips)installed on your computer. Virtual memory isthe amount of memory or hard disk spaceallocated for use by the operating system andapplications on a computer. As you use thesoftware on your computer, data is swappedfrom the hard drive into memory, and datastored in the physical memory chips isswapped to the hard drive.
Photoshop Elements creates a scratch diskwith its own form of virtual memory to storeimage information on the hard drive as youmodify an image in the work area. Memory,in regard to an application such as PhotoshopElements, represents the amount of spacerequired for an application to run its routinesand functions.
menu A user-interface element originatingfrom the operating system and containingcommands for an application.
Oopacity The degree of transparency appliedby a blending mode onto an object.
optimize To reduce the size or image qual-ity of a document in order to decrease theloading time of a Web page.
options bar Contains additional settingsand tools in the Toolbox. It is located at thetop of the Photoshop Elements work area.
PPaint Bucket Tool A fill tool selectablefrom the Toolbox. Works with the foreground
color in the color well to fill a selected objectwith a particular color.
palette Similar to the term floating palette;synonymous with panel. A window containinga set of tools and icons. Some palettes alsocontain a custom menu.
palette well Located in the toolbar, this isthe storage place for all palette windows.
PDF An acronym for Portable DocumentFormat. A file format capable of preservingtext and image information that can beviewed with a PDF viewer application such asAdobe Acrobat.
Pencil Tool A drawing tool located in theToolbox. Used to draw with a single pixel ofcolor in the image window.
Photomerge A menu command located inthe File menu that enables you to create hori-zontal or vertical panoramas.
pica A format of measurement of approxi-mately 1/6 of an inch. Originated with thetypewriter, where 10 characters were roughlyequivalent to a horizontal inch, or six lines oftype for a vertical inch. You can create a newdocument with the width and height in picas.
pixel An atomic element of color; pixels canbe grouped together to form a picture orimage.
pixels per inch (ppi) A measurement of amonitor’s screen resolution. This is usually setto 72 ppi. For this reason, images created forthe Web use the resolution of 72 ppi.
plug-in A special type of file that can beplaced in a folder on your hard drive. Eachplug-in file extends the features available inPhotoshop Elements. If the plug-in preferencesare configured correctly, all plug-ins willappear in the Filter menu.
23 8311 GLOSS 1/15/03 2:37 PM Page 381
PNG The Portable Network Graphic is anewer graphic file format growing in popular-ity on the Web. Effectively compresses solid-color images and preserves details. The PNGformat might require a plug-in to be added toa browser, but it can support up to 32 bits ofcolor, in addition to transparency and alphachannels. It uses a lossless form of compres-sion. It is best used for creating high-colorgraphics with complex live transparency, andgeneral low-color graphics. See also PSD, GIF,JPEG, and lossy compression.
preferences Application and document-specific settings you can customize to increaseyour productivity within Photoshop Elements.
process A set of steps that, when followed,complete a task.
processor The central processing unit of acomputer. A faster processor will displaygraphics more quickly than a slower processor.
PSD The native file format of PhotoshopElements. Preserve layers, layer sets, channels,and masks by saving them in a PhotoshopElements file. The Windows version ofPhotoshop Elements shows this file format inthe Save As window as Photoshop (*.PSD or*.PDD). The Macintosh version shows this fileformat as Photoshop.
QQuickTime Apple’s technology for storingand playing back still frame, audio, and videoon Macintosh and Windows computers.Photoshop Elements 2 enables you to importone frame of video into a new image window.
382 ABSOLUTE BEGINNER’S GUIDE TO ADOBE PHOTOSHOP ELEMENTS 2
Rradio button A user-interface elementfound in applications and Web pages that hasan on or off state.
RAM See memory.
rasterize The process of converting a vectorgraphic, such as text, into a bitmap so that itcan be displayed onscreen or printed.
Recipe See How To palette.
Red Eye Brush Tool An exclusivePhotoshop Elements tool. You can use it toreplace colors in the active image window. Theletter Y on the keyboard is the shortcut keyyou can press to quickly access this tool.
resolution The number of horizontal andvertical pixels that make up a screen ofinformation.
RGB Red, green, and blue values used toexpress a color. Each value is within a rangeof 0 to 255.
Ssamples per inch (spi) A measurementused by scanner devices to measure the resolu-tion of captured images. Samples per inchcombines the number of sensors (600 to 1200)on the scan bar located below the glass sur-face with the amount of vertical distance thebar moves for each scanned line.
Save A command used to convert an imagestored in memory into a file on the hard drive.
scale A term used to indicate the size—larger or smaller—of an original object orimage.
scanner A computer peripheral that usu-ally connects to the USB port. A scanner can
23 8311 GLOSS 1/15/03 2:37 PM Page 382

GLOSSARY 383
be powered by the USB port, or powered by anexternal power source. Images are capturedline by line and converted into digital data,viewable on your computer screen. Today’sscanners can capture 24- or 36-bit imagesranging from 600 dpi to 2400 dpi, or higherresolutions.
Selection Brush A new selection tool inPhotoshop Elements 2. This tool enables youto select pixels using a custom brush style andsize. You can view the selected area using thetraditional marching ants graphic, or usingthe red hue to mark uneditable areas of theimage window.
Send Via Email A button located on theshortcuts bar or File menu that enables you toresize a photo and send it to a friend using anemail program installed on your computer.
shortcuts bar The toolbar located belowthe menu bar. Click on a shortcut icon toquickly access a command, such as the Save,Copy, Paste, or Print commands.
shutter speed A setting on a digital cam-era that can affect the simulated shutterspeed. This impacts how long the CCD isexposed to light. Synonymous with f-stop.
swatch Not a watch by any means. Aswatch is a single square of color stored in theSwatches palette. The Swatches palette enablesyou to select, add, or remove a single color, orchange to a particular group of colors for theactive image.
Ttext Also referred to as type. Alphabetic,non-alphabetic, and numeric characters thatmake up a font. Use the Horizontal or VerticalType Tool to add text to an image window.
Create a mask in the shape of text with theHorizontal and Vertical Type Mask tools.
tonal range—A term used to describe arange of shadows, midtones, and highlightsthat define the pixel distribution of an image.You can adjust the tonal range of an imagefrom the Levels dialog box. You can use tonalrange settings to correct contrast, changebrightness levels, identify and change theblack and white points of a photo, and so on.
Transform A set of commands that enableyou to scale, rotate, flip, distort, or skew all orpart of an image in the image window.
TWAIN A special kind of plug-in file thatenables Photoshop Elements to communicatewith a scanner or digital camera. Each devicecan have its own specific TWAIN plug-in fileinstalled onto a computer. Any installedTWAIN plug-ins are accessible from the File,Import menu or from the Connect to Cameraor Scanner button in the Welcome Window.The Select Import Source dialog box opens anddisplays a list of TWAIN plug-ins if you clickthe Connect to Camera or Scanner button.
UUndo A menu command that enables youto reverse a previous command in the imagewindow. Set the number of undo levels in theGeneral Preferences window.
Undo History palette Stores a list of statesas you work on image files in PhotoshopElements. Each state is a command that hasbeen performed or a tool that has beenapplied to a Photoshop Elements document.The Undo History palette does not store zoomor view changes, or the scroll location of theimage window.
23 8311 GLOSS 1/15/03 2:37 PM Page 383

upload The process of copying a local fileor folder to another computer.
URL An acronym for Uniform ResourceLocator. Type a URL (such as http://www.adobe.com) into a browser window to go to a Web siteor Web page on the Internet.
Vvector graphics A type of graphic com-posed of paths and points. Vector graphics usean algorithm to retain crisp, high-resolutionversions of an image if scaled larger orsmaller than the original size. You can use theShape and Type tools to create vector graph-ics. Use the Simplify Layer command to con-vert vector graphics into a bitmap.
WWeb Also referred to as the World WideWeb. A group of computers running Webserver software connected to an extended net-work around the world.
Welcome window The menu window thatopens when you first start PhotoshopElements. Open a file, acquire or paste animage, or access the help or tutorial files byclicking on an image in the Quick Startwindow.
Windows Media Player Microsoft’s tech-nology for viewing still-frame photography, orplaying back audio or video on a Windowscomputer. Photoshop Elements 2 enables youto import one frame of a Windows MediaPlayer video file into a new image window inthe work area.
384 ABSOLUTE BEGINNER’S GUIDE TO ADOBE PHOTOSHOP ELEMENTS 2
ZZoom Tool A tool that enables you to mag-nify the contents of the image window. Usewith the Hand Tool (H) to move the pagewhile it is magnified. Press the Z key as ashortcut to select the Zoom Tool from theToolbox. Press the (Command) [Ctrl] plus orminus key combos to zoom into and out of animage in the image window.
23 8311 GLOSS 1/15/03 2:37 PM Page 384

Symbols3D text, 241
Aaccessin plug-ins, 65-66
Actual Pixels command (View menu), 43
adapters, 14
adding layers, 214
Adjust Backlighting command (Enhancemenu), 40
Adjust Backlighting tool, 165-166
Adjust Brightness/Contrast command(Enhance menu), 40
Adjust Color command (Enhance menu),40
Adjust Lighting command (Enhancemenu), 40
adjustment layers, 221, 226-229
Adjustments command (Image menu), 39
Adobe Gamma control panel, 140
Adobe.com button, 18
AdobeRGB1998 color profile, 49
Airbrush tool, 245-246
aligningimages in a panorama, 351objects on a grid, 59text, 238
All command (Select menu), 41, 159
animationsanimated GIFs, 108, 331-333composite images, 328, 330-331creating, 329-330file size, 329frames, 328-330GIFs, 108, 331-333glow effects, 337in-betweens, 330key frames, 330layers, 330-331lighting, 329onion skinning, 331people, 334-341perspective, 329playback settings, 333previewing, 334saving as a PSD file, 329scale, 329shadows, 329slideshows, 339tweening, 330
Annotations command (View menu), 44
anti-aliasing text, 238
Index
24 8311 Index 1/15/03 2:25 PM Page 385
386 APPLYING
applyingeffects, 189, 195-196, 205-207filters, 189-190, 193, 195-196
Arrange command (Layer menu), 41
Arrange Icons command (Window menu),44
arrangingimages in panoramas, 348-350layers, 213
Art Director’s Toolkit, 83, 148
Artistic command (Filter menu), 42
Artistic filters, 191, 201-204
Attach to Email button, 18
Attach to Email command (File menu), 37
attachments (email), 112-113
Auto Color Correction command (Enhancemenu), 40
Auto Contrast command (Enhance menu),40
Auto Levels command (Enhance menu),40
Automation Tools command (File menu),37
Automation Tools, PDF Slideshow com-mand (File menu), 360
Bbackground color of canvas, 100
Background Color tool, 26
Background Eraser tool, 24, 247
background images, 11
Background layer, 83, 212-214, 286
background printing, 119
backups, 48
Batch Processing command (File menu),37
beveling text, 241
Bitmap color mode, 117
bitmap imagesBMP file format, 103creating, 252-254definition, 22differences from vector images, 25drawing, 253-254pixelation, 22, 118quality, 311tools, 24
bitmap text, 240-241
blendingcolors, 153, 216-218, 353composite images, 228-230, 297
blending modes, 216-218
Bloat tool, 302-303
Blur command (Filter menu), 42
Blur filters, 191, 196-199
Blur tool, 25
BMP file format, 103
brightness, 149-151, 164, 172-173
Bring All to Front command (Windowmenu), 44
Browse button, 18
Browse command (File menu), 36
Browse for Files button, 11-13
browser-safe color palette, 147
browsing files, 11-13
Brush Size button, 57
Brush Strokes command (Filter menu), 42
Brush Strokes filters, 191, 201-203
Brush tool, 244-246
24 8311 Index 1/15/03 2:25 PM Page 386

COLOR MODES 387
How can we make this index more useful? Email us at [email protected]
brushes, 52
Burn tool, 25, 179, 319
buttonsAdobe.com, 18Attach to Email, 18Browse, 18Browse for Files, 11-13Brush Size, 57Color Variations, 19Common Issues, 11, 15Connect to Camera or Scanner, 11-12Exit Welcome Screen, 11Help Contents, 19Import, 18New Document, 18New File, 10-12Online Services, 18Open Document, 18Print Document, 19Print Preview Document, 19Quick Fix, 19Save As PDF, 18Save Document, 18Save for Web, 18Search, 19Step Backward/Step Forward, 19Tutorial, 11, 15
Ccablibrating monitors, 140-143
Cache settings (Macintosh), 61
caches, 62
cameras. See digital cameras
canvasbackground color, 100customizing, 85-86measurements, 84-86resizing, 85-86
Canvas Size dialog box, 85-86
captions, 105-106, 372
Cascade command (Window menu), 44
Change Layer Content command (Layermenu), 41
changing colors, 172
chrominance (gray level) and colors, 149
CIE (Commission InternationaleL’Eclairage), 134
Clear command (Edit menu), 38
Clipboard, 277, 282
Clone Stamp tool, 26-27, 265
Close All command (Window menu), 44
Close command (File menu), 36
closing palettes, 17
CMYK color mode, 117
Color Cast Correction dialog box, 177
color correctionhue, 180-182midtones, 186-187overview, 157Recipe palette, 158red eye, 182-184saturation, 180-182, 187variations, 184-186
color depth of scanners, 68-69
color managementadjusting settings, 48ICC standards, 50printer settings, 127operating system color settings, 49-50
color modesBitmap color mode, 117CMYK color mode, 117composite images, 280-282Grayscale color mode, 117
24 8311 Index 1/15/03 2:25 PM Page 387
388 COLOR MODES
Indexed Color color mode, 117RGB color mode, 117selecting, 95-96supported types, 117switching, 95-96
Color Picker, 144-146
Color Picker dialog box, 145
color profilesAdobeRGB1998 color profile, 49choosing, 49-51saving, 49, 51sRGB Color Space Profile, 49sRGB IEC61966-2.1 color profile, 51Web graphics, 49
Color Settings command (Edit menu), 38,49
Color Settings dialog box, 139
Color Sync control panel (Macintosh), 49
color theory, 133-135
Color Variations button, 19
Color Variations command (Enhancemenu), 40
Color-Picker tools, 20
colorsaccuracy, 138background colors
canvas, 100Web graphics, 88
blending, 153, 216-218, 353brightness, 149-151, 164, 172-173changing, 172chroma, 149chrominance (gray level), 149color management, 49, 137-139color modes
bitmap color mode, 144choosing, 143-144grayscale color mode, 144
HSB color mode, 143image modes, 144indexed color mode, 144RGB color mode, 143
Color Picker, 144-146color spaces, 136-137color theory, 134color-management settings, 48-50color-management systems
color profiles, 49, 138-139how they work, 136standards, 137
composite images, 152-155contrast, 150-151correcting, 136, 147-153, 316-317deleting, 178-180device-dependent color, 137gamma, 139gamut, 138gradient maps, 173gradients
editing, 224-226fill layers, 223-225
hue, 135, 148-149Hue, Lightness, and Saturation (HLS) color
model, 180Hue, Saturation, Brightness (HSB) color
model, 180inverting, 173layers, 221-225light, 135, 321, 323luminosity (light), 149mapping, 173mixing, 134models
CMYK color model, 140RGB color model, 134, 138
monitors, 134-136, 138, 140-143, 165printers, 140printing, 117purity, 149
24 8311 Index 1/15/03 2:25 PM Page 388

COMMANDS 389
How can we make this index more useful? Email us at [email protected]
removing, 178-180replacing, 175-177, 180saturation, 135, 148-149scanners, 71selecting, 144-147shapes, 256-257standards, 137, 139-140Swatches palette, 146-147text, 237-238threshold settings, 174tonal range, 151-153transparency, 155tristimulus color model, 134, 142viewable colors, 50Web graphics, 88Web pages, 139Web-safe color palette, 147
columnsgutters, 58widths, 58
combiningeffects, 208-209filters, 204layers, 215, 232palettes, 31
commandsEdit menu
Clear, 38Color Settings, 38, 49Copy, 38Copy Merged, 38Cut, 38Define Brush, 38Define Pattern, 38Duplicate Image, 39Fill, 38Paste, 38Paste Into, 38, 161Preferences, 38, 55Preset Manager, 38, 51
Purge, 38Step Backward, 38Step Forward, 38Stroke, 38Undo, 38
Enhance menuAdjust Backlighting, 40Adjust Brightness/Contrast, 40Adjust Color, 40Adjust Lighting, 40Auto Color Correction, 40Auto Contrast, 40Auto Levels, 40Color Variations, 40Fill Flash, 40Quick Fix, 40
File menuAttach to Email, 37Automation Tools, 37Automation Tools, PDF Slideshow, 360Batch Processing, 37Browse, 36Close, 36Create Photomerge, 36Create Web Photo Gallery, 37Exit, 37Export, 37File Info, 37Get Info, 61Import, 37New, 35New from Clipboard, 35Online Services, 37Open, 36, 89Open As, 36, 89Open Recent, 36Page Setup, 37Photomerge, 347Photomerge , 36Place, 37Print, 37
24 8311 Index 1/15/03 2:25 PM Page 389

390 COMMANDS
Print Layouts, 37, 123Print Preview, 37Quit, 37Revert, 37Save, 36, 100Save As, 36Save for Web, 36, 107
Filter menuArtistic, 42Blur, 42Brush Strokes, 42Digimarc, 43Distort, 42Noise, 43Other, 43Pixelate, 43Render, 43Repeat Last Effect, 42Sharpen, 43Sketch, 43Stylize, 43Texture, 43Video, 43
Image menuAdjustments, 39Crop, 39Histogram, 39Mode, 39Resize, 39Rotate, 39Transform, 39
Layer menuArrange, 41Change Layer Content, 41Delete Layer, 41Duplicate Layer, 40Flatten Image, 41Group with Previous , 41Layer Content, 41Layer Style, 41
Merge Layers, 41Merge Visible, 41New, 40New Adjustment Layer, 41New Fill Layer, 41Rename Layer, 41Simplify Layer, 41Type, 41Ungroup, 41
Select menuAll, 41, 159Delete Selection, 42Deselect, 41, 159Feather, 42, 160Grow, 42, 160Inverse, 42, 160Load Selection, 42Modify, 42, 160Reselect, 42, 159Save Selection, 42Shrink, 160Similar, 42
Transform, Image, 312View menu
Actual Pixels, 43Annotations, 44Fit on Screen, 43Grid, 44New View, 43Print Size, 43Rulers, 44Selection, 44Show grid, 59Snap, 59Snap To Grid, 44Zoom In, 43Zoom Out, 43
Window menuArrange Icons, 44Bring All to Front, 44Cascade, 44
24 8311 Index 1/15/03 2:25 PM Page 390
CORRECTING 391
How can we make this index more useful? Email us at [email protected]
Close All, 44Hide Options, 44Hide Search Results, 45Hide Shortcuts, 44Hide Tools, 44Hide Welcome, 45Images, 44Minimize, 44Reset Palette Locations, 45Show Options, 44Show Search Results, 45Show Shortcuts, 44Show Tools, 44Show Welcome, 45Tile, 44
Commission Internationale L’Eclairage(CIE), 134
Common Issues button, 11, 15
composite imagesanimations, 328, 330-331backdrops, 277-278blending, 228-230, 297color graphics, 282color modes, 280-282colors, 152-155Composites recipe, 283copying, 282-283creating, 276-280creative ideas, 296-297definition, 275layers, 286line art, 281masks, 279multi-image composite images, 293-296pasting, 282-286people and/or animals, 286-290photos, 281rotating, 295-296saving, 289special effects, 290-293
stacking, 294-295transparency, 292
compressing files or images, 112
Connect to Camera or Scanner button, 11-12
Contact Sheet II dialog box, 120
contact sheets, 120-121
Conte Crayon filter, 204
contrast, 150-151
control panelsColor Sync (Macintosh), 49Display Settings (Windows), 50Monitors & Sound (Macintosh), 50Monitors (Macintosh), 50
conversionsbackground layer into layer 0, 218bitmap text into vector text, 240PDF files to Photoshop files, 97-98units of measurement, 83vector text into bitmap text, 241
Copy command (Edit menu), 38
Copy Merged command (Edit menu), 38
copyingClipboard, 277composite images, 282-283
copyright information in Web photo gal-leries, 372
copyrights, 105-106, 372
correctingcolors, 136, 147-153, 157-158, 180-182,
316-317images, 230-232photos
backlighting, 165-166color cast, 177-178, 180light source problems, 163-165midtones, 186-187
24 8311 Index 1/15/03 2:25 PM Page 391
392 CORRECTING
red eye, 179, 182-184saturation, 187shadows, 163-165tonal range, 162-163, 166-172
cratch disk. See disk, scratc, 60
Create Photomerge command (File menu),36
Create Web Photo Gallery command (Filemenu), 37
creatingdocuments, 11-12, 82-84files, 11, 82-84
Crop command (Image menu), 39
Crop tool, 22, 158
cursorspreferences, 56-57size, setting, 57standard versus precise, 57-58
Custom Shape tool, 23, 248
customizingbrushes, 52canvas size, 85-86color-management settings, 48-50drawing tools, 51-52gradients, 53-54Macintosh color settings, 49patterns, 54preferences
cursors, 56-57displays, 56-57general, 55grids, 59image cache, 61-62measurement units, 58memory, 61-62plug-ins, 59-60rulers, 58saving files, 56-57
scratch disks, 59-60transparency, 58
Preset Manager settings, 51-54swatches, 52-53tools, 21
Cut command (Edit menu), 38
Ddata, storing frequently used, 62
decreasing transparency, 58
Define Brush command (Edit menu), 38
Define Pattern command (Edit menu), 38
Delete Layer command (Layer menu), 41
Delete Selection command (Select menu),42
deletingcolors, 178-180layers, 83, 215selections, 160
Deselect command (Select menu), 41, 159
desktop size, 50
devices, selecting, 77-78
dialog boxesCanvas Size, 85-86Color Cast Correction, 177Color Picker, 145Color Settings, 139Contact Sheet II, 120Feather Selection, 280Gradient Fill, 223-224Gradient Map, 173Histogram, 163, 167Hue/Saturation, 149, 180Image Size, 84, 87, 96Layer Properties, 221Levels, 151-152, 169, 171, 289-290Lighting Effects, 321
24 8311 Index 1/15/03 2:25 PM Page 392

EDIT MENU COMMANDS 393
How can we make this index more useful? Email us at [email protected]
Liquify, 302-304, 338New, 82-84Open, 56PDF Slideshow, 360Photomerge, 345-355Posterize, 174Print, 122Save for Web, 332, 334Style Settings, 241Threshold, 174Variations, 180Warp Text, 238, 242-243Web Photo Gallery, 363
Digimarc command (Filter menu), 43
Digimarc filters, 193
digital camerasbatteries, 14images
acquiring, 13-15, 74-75downloading, 74-75file formats, 77importing, 93opening, 91-92printing, 119-120saving, 75-76viewing, 76-77
megapixels, 86resolution, 86software, 73-74TWAIN plug-ins, 13, 64-65USB connectors, 14USB-to-serial adapters, 14
digital imagesconverting 35mm film to digital, 89organizing, 90printing, 96-97
display preferences, 56-57
Display Settings control panel(Macintosh), 50
displaying data from cache, 62
Displays & Cursors Preferences window,56-57
Distort command (Filter menu), 42
Distort filters, 192
documentscreating, 11-12, 82-84height, 12measurements, 84-86opening, 89-90printing, 86saving, 100-105width, 12
Dodge tool, 25, 179, 319-320
dots per inch (dpi), 86
downloading full-color photos from thisbook, 138
dpi (dots per inch), 86
drawingbitmap graphics, 253-254shapes, 248-249
drawing tools, 20, 22, 51-52
Duplicate Image command (Edit menu),39
Duplicate Layer command (Layer menu),40
duplicating layers, 215
EEdit menu commands
Clear, 38Color Settings, 38, 49Copy, 38
24 8311 Index 1/15/03 2:25 PM Page 393

394 EDIT MENU COMMANDS
Copy Merged, 38Cut, 38Define Brush, 38Define Pattern, 38Duplicate Image, 39Fill, 38Paste, 38Paste Into, 38, 161Preferences, 38, 55Preset Manager, 38, 51Purge, 38Step Backward, 38Step Forward, 38Stroke, 38Undo, 38
editinggradients, 224-226text, 239-240
effectsapplying, 189, 195-196, 205-207combining, 208-209Frame Effects, 194Image Effects, 195overview, 194previewing, 190Text Effects, 195, 206-207Texture Effects, 194, 206-207
Effects palette, 30-32
effects tools, 20
Ellipse Marquee tool, 160-161
Ellipse tool, 23, 248
Elliptical Marquee tool, 21, 158
emailattachments, 112-113sending images via, 112-113
Encapsulated PostScript file format, 104
Enhance menu commandsAdjust Backlighting, 40Adjust Brightness/Contrast, 40
Adjust Color, 40Adjust Lighting, 40Auto Color Correction, 40Auto Contrast, 40Auto Levels, 40Color Variations, 40Fill Flash, 40Quick Fix, 40
EPS file format, 104
Equalize tool, 172-173
Eraser tool, 24, 245-247
error message about slideshow, 361
EXIF (Exchangeable Image File Format), 13
Exit command (File menu), 37
Exit Welcome Screen button, 11
Export command (File menu), 37
exporting files or images, 111
external drives, 60
eye strain, 50
Eyedropper tool, 26, 146
Ffaxing images, 121-122
Feather command (Select menu), 42, 160
Feather Selection dialog box, 280
feathering images, 160, 279-280
feathering selections, 153
File Browser palette, 12-13, 28-29
file formatsBMP, 103choosing, 105EPS, 104GIF, 103, 108, 111JPEG, 103JPEG 2000, 103opening, 95
24 8311 Index 1/15/03 2:25 PM Page 394
FILTER MENU COMMANDS 395
How can we make this index more useful? Email us at [email protected]
PCX, 103PDD, 104PDF, 104Photo CD, 103PICT, 103Pixar, 104PNG, 103, 105, 110PSD, 104Raw, 104saving, 102-105Scitex, 104Targa, 104TIFF, 104, 110-111Web graphics, 96, 109-110
File Info command (File menu), 37
File menu commandsAttach to Email, 37Automation Tools, 37Automation Tools, PDF Slideshow, 360Batch Processing, 37Browse, 36Close, 36Create Photomerge, 36Create Web Photo Gallery, 37Exit, 37Export, 37File Info, 37Get Info, 61Import, 37New, 35New from Clipboard, 35Online Services, 37Open, 36, 89Open As, 36, 89Open Recent, 36Page Setup, 37Photomerge, 347Photomerge , 36Place, 37Print, 37
Print Layouts, 37, 123Print Preview, 37Quit, 37Revert, 37Save, 36, 100Save As, 36Save for Web, 36, 107
File Transfer Protocol (FTP), 113-114
filesbackups, 48browsing, 12-13compressing, 112creating, 11, 82-84exporting, 111opening, 12-13, 36, 89-90PSD files, 90saving, 56-57, 100-105sending by email, 112-113sharing, 111-114uploading, 114viewing, 50Web, 49
Fill command (Edit menu), 38
Fill Flash command (Enhance menu), 40
Fill Flash tool, 163-165
fill layers, 221-226
filling text with images, 306-310
film negatives, scanning, 72
Filter menu commandsArtistic, 42Blur, 42Brush Strokes, 42Digimarc, 43Distort, 42Noise, 43Other, 43Pixelate, 43Render, 43
24 8311 Index 1/15/03 2:25 PM Page 395

396 FILTER MENU COMMANDS
Repeat Last Effect, 42Sharpen, 43Sketch, 43Stylize, 43Texture, 43Video, 43
filtersapplying, 189-190, 193, 195-196Artistic filters, 191, 201-204Blur filters, 191, 196-199Brush Strokes filters, 191, 201-203combining, 204Conte Crayon filter, 204Digimarc filters, 193Distort filters, 192halftone filters, 205installing, 191, 193Lighting Effects filters, 320-325Liquify filters, 191, 267, 302-304Noise filters, 192Other filters, 193overview, 190-191Pixelate filters, 192previewing, 190Render filters, 192Sharpen filters, 192, 197, 199-200Sketch filters, 192Stylize filters, 192Texture filters, 192Video filters, 193viewing, 193
Filters palette, 30-32, 191, 193
finding black or white points, 169-170
FireWire ports, 14
Fit on Screen command (View menu), 43
Flatten Image command (Layer menu), 41
flattening layers, 215, 232-234, 289
fonts, 125, 236-238
Foreground Color tool, 26
formatting text, 237-239
Frame Effects, 194
frames (animations), 328-330
FTP (File Transfer Protocol), 113-114
Ggamma, 139-140, 142
gamut (colors), 138
general preferences, 55
Get Info command (File menu), 61
GIFsanimated GIFs, 331-333CompuServe GIFs, 111GIF89a, 111overview, 103
glow effects in animations, 337
Gradient Editor, 224-226
Gradient Fill dialog box, 223-224
Gradient Map dialog box, 173
gradient maps, 173
Gradient tool, 23
gradientscustomizing, 53-54editing, 224-226fill layers, 223-225
graphicsbitmap graphics, 247, 252-254measuring, 88pixels in histograms, 152previewing, 260sharing, 89signs, 249-251text, 237vector graphics, 247, 252-253
24 8311 Index 1/15/03 2:25 PM Page 396
IMAGE MENU COMMANDS 397
How can we make this index more useful? Email us at [email protected]
Graphics Interchange Format (GIFs)CompuServe GIFs, 111GIF89a, 111overview, 103
Grayscale color mode, 117
grid, aligning objects to, 59
Grid command (View menu), 44
Grid Preferences window, 59
Group with Previous command (Layermenu), 41
groupinglayers, 252palettes, 28
Grow command (Select menu), 42, 160
Hhalftone filters, 205
Hand tool, 26
hard drive scratch disk, 60
height of documents, 12
helpCommon Issues button, 11, 15Hints palette, 16How To palette, 15tutorials, 15-16
Help Contents button, 19
Hide Options command (Window menu),44
Hide Search Results command (Windowmenu), 45
Hide Shortcuts command (Windowmenu), 44
Hide Tools command (Window menu), 44
Hide Welcome command (Window menu),45
hidinglayers, 234palettes, 18
hints, 21, 23
Hints palette, 16, 29
histogram, 152, 162-163, 166-169
Histogram command (Image menu), 39
Histogram dialog box, 163, 167
History palette, 25, 29-31
Horizontal Type Mask tool, 236-237
How To palette, 15
HTML, 88, 373
hue (colors), 135, 148-149, 180
Hue/Saturation dialog box, 149, 180
Hue/Saturation tool, 180
Hypertext Markup Language (HTML), 88,373
IICC (International Color Consortium), 50,
137, 139-140
.icm filename extension, 49
image cache preferences, 61-62
Image command (Transform menu), 312
Image Effects, 195
image files, viewing on desktop, 50
Image menu commandsAdjustments, 39Crop, 39Histogram, 39Mode, 39Resize, 39Rotate, 39Transform, 39
24 8311 Index 1/15/03 2:25 PM Page 397

398 IMAGE MODE
image mode, 144
image size, 33, 85
Image Size dialog box, 84, 87, 96
image windowopening, 12overview, 33-35working with images, 22
imagesacquiring from scanners or digital cameras,
13-15animations
animated GIFs, 331-333composite images, 328, 330-331creating, 329-330file size, 329frames, 328-330glow effects, 337in-betweens, 330key frames, 330layers, 330-331lighting, 329onion skinning, 331people, 334-341perspective, 329playback settings, 333previewing, 334saving as a PSD file, 329scale, 329shadows, 329slideshows, 339tweening, 330
background images, 11backups, 48bitmap images
BMP file format, 103creating, 252-254definition, 22differences from vector images, 25drawing, 253-254
pixelation, 22, 118quality, 311tools, 24
black or white points, 169-170captions, 105-106color correction
hue, 180-182midtones, 186-187overview, 157Recipe palette, 158red eye, 182-184saturation, 180-182, 187variations, 184-186
color modes, 33, 95-96colors
changing, 172deleting, 178-180inverting, 173mapping, 173removing, 178-180replacing, 175-177, 180threshold settings, 174
composite imagesanimations, 328, 330-331backdrops, 277-278blending, 228-230, 297color graphics, 282color modes, 280-282colors, 152-155Composites recipe, 283copying, 282-283creating, 276-280creative ideas, 296-297definition, 275layers, 286line art, 281masks, 279multi-image composite images, 293-296pasting, 282-286people and/or animals, 286-290
24 8311 Index 1/15/03 2:25 PM Page 398
IMAGES 399
How can we make this index more useful? Email us at [email protected]
photos, 281rotating, 295-296saving, 289special effects, 290-293stacking, 294-295transparency, 292
compressing, 112contact sheets, 120-121copyrights, 105-106correcting layers, 230-232digital cameras
acquiring, 74-75downloading, 74-75file formats, 77saving, 75-76viewing, 76-77
digital imagesconverting 35mm film to digital, 89organizing, 90printing, 96-97
exporting, 111faxing, 121-122feathering, 160, 279-280file formats, 95filling text with images, 306-310image size, 85image size information, 33importing, 93information, 86-87layers, 160, 230-232magnification levels, 33masks, 155merging, 161, 347-348opening, 12, 36, 89-92, 95optimizing, 106-111panoramas
aligning images within, 351arranging images, 348-350blending colors, 353
color and tonal corrections, 355-357composition, 344-347creating, 343-350dimensions, 345landscapes, 355-357number of photos in, 347perspective, 352-353publishing, 353-355resizing images within, 348rotating, 356selecting images within, 349-352tutorial, 354
pasting, 282pasting into text, 306-310pixels
histograms, 152selecting, 21, 159-160tonal range, 162-163
posterizing, 174previewing, 90, 260printing
background printing, 119colors, 117, 127converting files for print output, 96-97digital images, 116-120full-page images, 127-128grayscale printing, 117images with text, 125improving quality, 126multiple copies, 123-124photo printing, 124-125printer selection, 122settings, 86troubleshooting, 128-130
resizing, 87, 93-94, 96resolution, 84-85saving, 100-105saving with color profiles, 49, 51scanning, 69-72selecting, 13
24 8311 Index 1/15/03 2:25 PM Page 399
400 IMAGES
selectionsdeleting, 160feathering, 153loading, 160saving, 160selecting, 198
sending by email, 112-113sharing, 89, 111-114signs, 249-251slideshows
creating, 360-361error messages, 361exiting, 361PDF file, 360-361viewing, 361
special effectsfilling text with images, 306-310light sources, 320-325melting images, 302-304reflections, 310-316reversing, 305-306shadows, 315-320
text, 237vector images
creating, 252-253definition, 22differences from bitmap images, 25tools, 24
views, 33Web photo galleries
captions, 372copyright information, 372creating, 359, 365-367customizing, 362, 364-365, 368frames, 361-363HTML files, 370-374image size, 364links, 372navigating, 365, 368-370nonframes browsers, 374
styles, 361-363thumbnails, 367-368titles, 372Web sites, 363
windows, 81
Images command (Window menu), 44
Import button, 18
Import command (File menu), 37
importing images, 93
Impressionist Brush tool, 24, 197, 244-245,258-259
increasingmemory, 61transparency, 58
Indexed Color color mode, 117
Info palette, 29-31
inserting text in images or graphics, 237
installingfilters, 191, 193plug-ins, 64-65, 193
International Color Consortium (ICC), 50,137, 139-140
International Commission on Illumination,134
Inverse command (Select menu), 42, 160
inverting colors, 173
iPhoto, 90, 114
iTools Web site, 114
J-KJPEG 2000, 103
JPEGs, 103
key frames (animations), 330
Kodak Photo CD file format, 103
24 8311 Index 1/15/03 2:25 PM Page 400
LINKS IN WEB PHOTO GALLERIES 401
How can we make this index more useful? Email us at [email protected]
LLasso tool, 22, 159
Layer Content command (Layer menu), 41
Layer menu commandsArrange, 41Change Layer Content, 41Delete Layer, 41Duplicate Layer, 40Flatten Image, 41Group with Previous, 41Layer Content, 41Layer Style, 41Merge Layers, 41Merge Visible, 41New, 40New Adjustment Layer, 41New Fill Layer, 41Rename Layer, 41Simplify Layer, 41Type, 41Ungroup, 41
Layer Properties dialog box, 221
Layer Style command (Layer menu), 41
Layer Styles palette, 30, 218-221
layersadding, 214adjustment layers, 221, 226-229animations, 330-331arranging, 213Background layer, 83, 212-214, 286blending modes, 216-218colors, 221-225combining, 215, 232composite images, 286converting background layer into layer 0,
218creating, 214-215deleting, 215
duplicating, 215fill layers, 221-226flattening, 215, 232-234, 289grouping, 252hidden layers, 233-234hiding, 234image correction, 230-232image selection, 160Layer Styles palette, 218-221Layers palette, 212-216linking, 252locking, 215merging, 215, 232, 257-258moving, 213naming, 215, 221photo restoration, 269-270renaming, 215, 221selecting images, 160settings, 212shapes, 215stacking order, 212-213styles, 218-221text layer, 239-240ungrouping, 252unlocking, 215
Layers palette, 29, 32, 58, 212-216, 312
Levels dialog box, 151-152, 169, 171, 289-290
Levels tool, 169-172
libraries of shapes, 252
light (colors), 135, 149
light sources, 320-325
lighting animations, 329
Lighting Effects dialog box, 321
Lighting Effects filter, 320-325
Line tool, 23, 248
Linking layers, 252
links in Web photo galleries, 372
24 8311 Index 1/15/03 2:25 PM Page 401
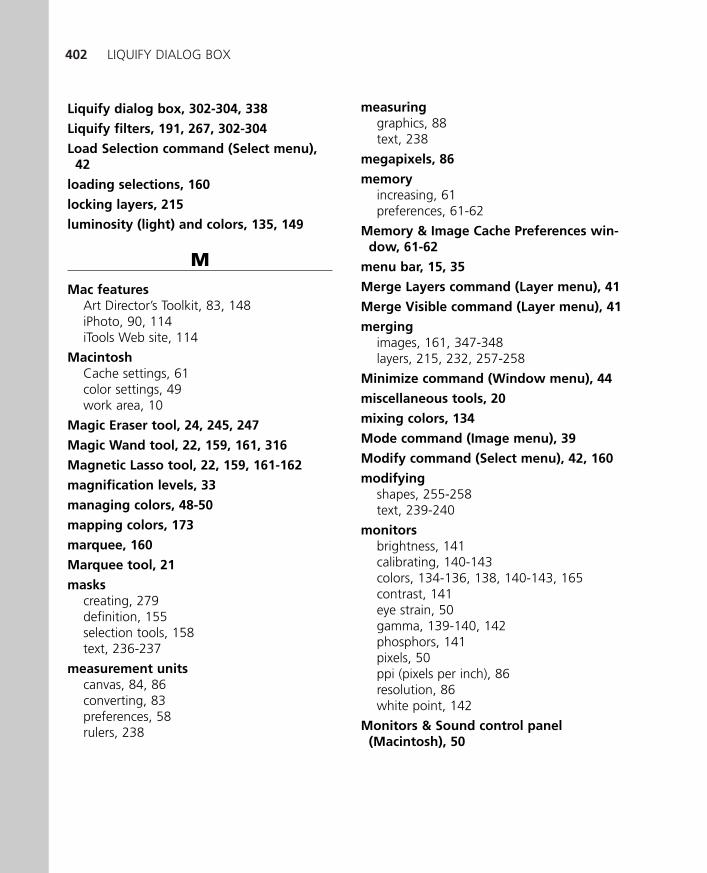
402 LIQUIFY DIALOG BOX
Liquify dialog box, 302-304, 338
Liquify filters, 191, 267, 302-304
Load Selection command (Select menu),42
loading selections, 160
locking layers, 215
luminosity (light) and colors, 135, 149
MMac features
Art Director’s Toolkit, 83, 148iPhoto, 90, 114iTools Web site, 114
MacintoshCache settings, 61color settings, 49work area, 10
Magic Eraser tool, 24, 245, 247
Magic Wand tool, 22, 159, 161, 316
Magnetic Lasso tool, 22, 159, 161-162
magnification levels, 33
managing colors, 48-50
mapping colors, 173
marquee, 160
Marquee tool, 21
maskscreating, 279definition, 155selection tools, 158text, 236-237
measurement unitscanvas, 84, 86converting, 83preferences, 58rulers, 238
measuringgraphics, 88text, 238
megapixels, 86
memoryincreasing, 61preferences, 61-62
Memory & Image Cache Preferences win-dow, 61-62
menu bar, 15, 35
Merge Layers command (Layer menu), 41
Merge Visible command (Layer menu), 41
mergingimages, 161, 347-348layers, 215, 232, 257-258
Minimize command (Window menu), 44
miscellaneous tools, 20
mixing colors, 134
Mode command (Image menu), 39
Modify command (Select menu), 42, 160
modifyingshapes, 255-258text, 239-240
monitorsbrightness, 141calibrating, 140-143colors, 134-136, 138, 140-143, 165contrast, 141eye strain, 50gamma, 139-140, 142phosphors, 141pixels, 50ppi (pixels per inch), 86resolution, 86white point, 142
Monitors & Sound control panel(Macintosh), 50
24 8311 Index 1/15/03 2:25 PM Page 402
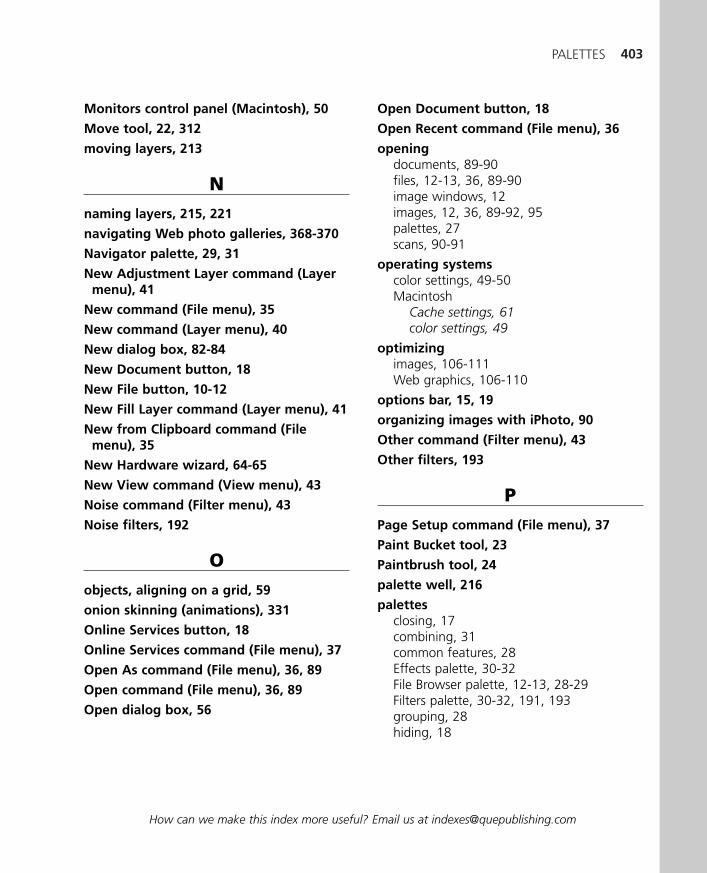
PALETTES 403
How can we make this index more useful? Email us at [email protected]
Monitors control panel (Macintosh), 50
Move tool, 22, 312
moving layers, 213
Nnaming layers, 215, 221
navigating Web photo galleries, 368-370
Navigator palette, 29, 31
New Adjustment Layer command (Layermenu), 41
New command (File menu), 35
New command (Layer menu), 40
New dialog box, 82-84
New Document button, 18
New File button, 10-12
New Fill Layer command (Layer menu), 41
New from Clipboard command (Filemenu), 35
New Hardware wizard, 64-65
New View command (View menu), 43
Noise command (Filter menu), 43
Noise filters, 192
Oobjects, aligning on a grid, 59
onion skinning (animations), 331
Online Services button, 18
Online Services command (File menu), 37
Open As command (File menu), 36, 89
Open command (File menu), 36, 89
Open dialog box, 56
Open Document button, 18
Open Recent command (File menu), 36
openingdocuments, 89-90files, 12-13, 36, 89-90image windows, 12images, 12, 36, 89-92, 95palettes, 27scans, 90-91
operating systemscolor settings, 49-50Macintosh
Cache settings, 61color settings, 49
optimizingimages, 106-111Web graphics, 106-110
options bar, 15, 19
organizing images with iPhoto, 90
Other command (Filter menu), 43
Other filters, 193
PPage Setup command (File menu), 37
Paint Bucket tool, 23
Paintbrush tool, 24
palette well, 216
palettesclosing, 17combining, 31common features, 28Effects palette, 30-32File Browser palette, 12-13, 28-29Filters palette, 30-32, 191, 193grouping, 28hiding, 18
24 8311 Index 1/15/03 2:25 PM Page 403
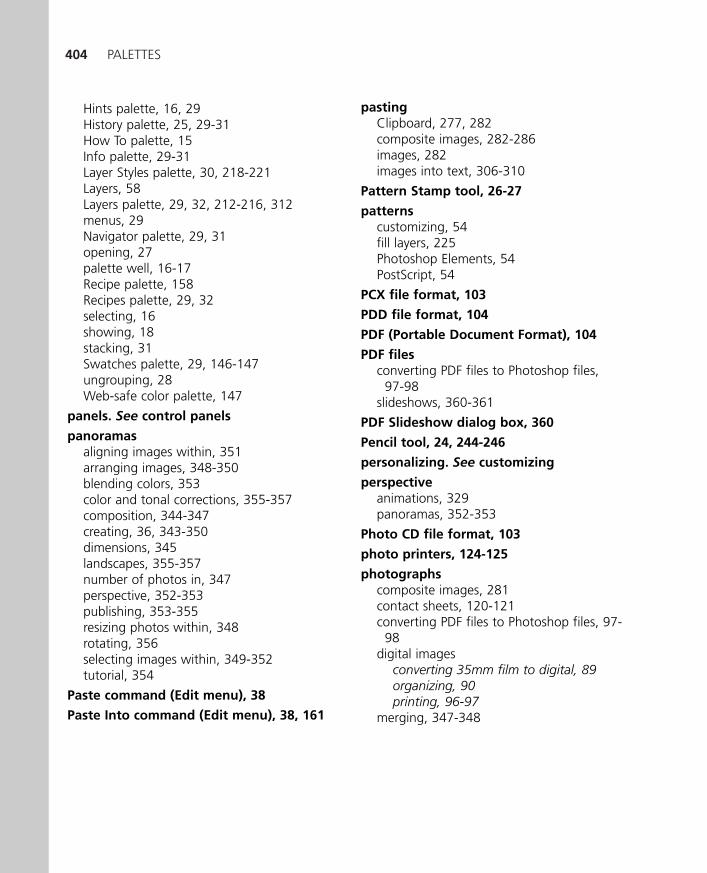
404 PALETTES
Hints palette, 16, 29History palette, 25, 29-31How To palette, 15Info palette, 29-31Layer Styles palette, 30, 218-221Layers, 58Layers palette, 29, 32, 212-216, 312menus, 29Navigator palette, 29, 31opening, 27palette well, 16-17Recipe palette, 158Recipes palette, 29, 32selecting, 16showing, 18stacking, 31Swatches palette, 29, 146-147ungrouping, 28Web-safe color palette, 147
panels. See control panels
panoramasaligning images within, 351arranging images, 348-350blending colors, 353color and tonal corrections, 355-357composition, 344-347creating, 36, 343-350dimensions, 345landscapes, 355-357number of photos in, 347perspective, 352-353publishing, 353-355resizing photos within, 348rotating, 356selecting images within, 349-352tutorial, 354
Paste command (Edit menu), 38
Paste Into command (Edit menu), 38, 161
pastingClipboard, 277, 282composite images, 282-286images, 282images into text, 306-310
Pattern Stamp tool, 26-27
patternscustomizing, 54fill layers, 225Photoshop Elements, 54PostScript, 54
PCX file format, 103
PDD file format, 104
PDF (Portable Document Format), 104
PDF filesconverting PDF files to Photoshop files,
97-98slideshows, 360-361
PDF Slideshow dialog box, 360
Pencil tool, 24, 244-246
personalizing. See customizing
perspectiveanimations, 329panoramas, 352-353
Photo CD file format, 103
photo printers, 124-125
photographscomposite images, 281contact sheets, 120-121converting PDF files to Photoshop files, 97-
98digital images
converting 35mm film to digital, 89organizing, 90printing, 96-97
merging, 347-348
24 8311 Index 1/15/03 2:25 PM Page 404
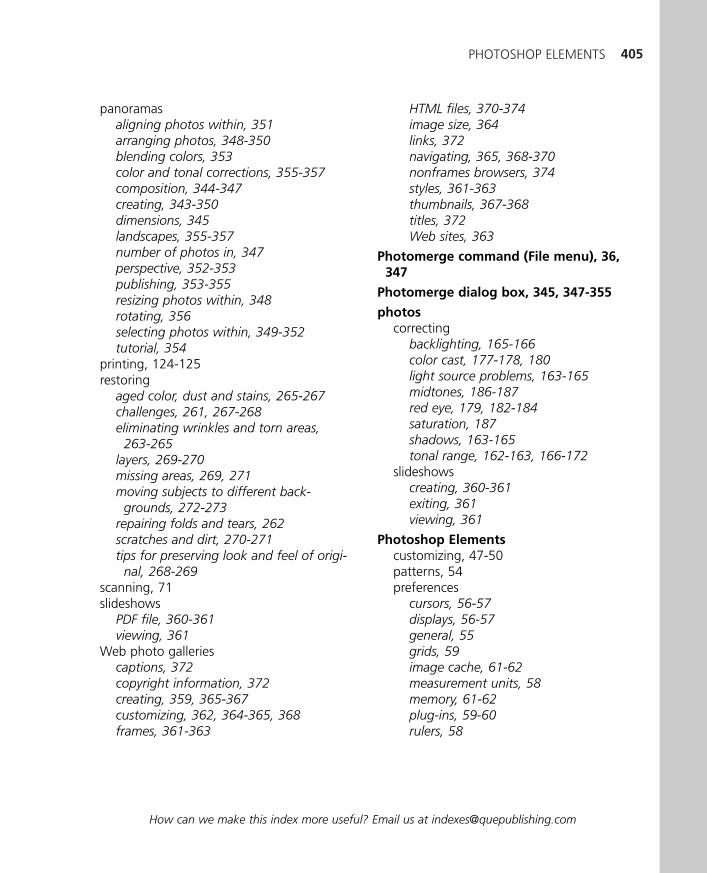
PHOTOSHOP ELEMENTS 405
How can we make this index more useful? Email us at [email protected]
panoramasaligning photos within, 351arranging photos, 348-350blending colors, 353color and tonal corrections, 355-357composition, 344-347creating, 343-350dimensions, 345landscapes, 355-357number of photos in, 347perspective, 352-353publishing, 353-355resizing photos within, 348rotating, 356selecting photos within, 349-352tutorial, 354
printing, 124-125restoring
aged color, dust and stains, 265-267challenges, 261, 267-268eliminating wrinkles and torn areas,
263-265layers, 269-270missing areas, 269, 271moving subjects to different back-
grounds, 272-273repairing folds and tears, 262scratches and dirt, 270-271tips for preserving look and feel of origi-
nal, 268-269scanning, 71slideshows
PDF file, 360-361viewing, 361
Web photo galleriescaptions, 372copyright information, 372creating, 359, 365-367customizing, 362, 364-365, 368frames, 361-363
HTML files, 370-374image size, 364links, 372navigating, 365, 368-370nonframes browsers, 374styles, 361-363thumbnails, 367-368titles, 372Web sites, 363
Photomerge command (File menu), 36,347
Photomerge dialog box, 345, 347-355
photoscorrecting
backlighting, 165-166color cast, 177-178, 180light source problems, 163-165midtones, 186-187red eye, 179, 182-184saturation, 187shadows, 163-165tonal range, 162-163, 166-172
slideshowscreating, 360-361exiting, 361viewing, 361
Photoshop Elementscustomizing, 47-50patterns, 54preferences
cursors, 56-57displays, 56-57general, 55grids, 59image cache, 61-62measurement units, 58memory, 61-62plug-ins, 59-60rulers, 58
24 8311 Index 1/15/03 2:25 PM Page 405
406 PHOTOSHOP ELEMENTS
saving files, 56-57scratch disks, 59-60transparency, 58
Preset Manager settingsbrushes, 52gradients, 53-54patterns, 54swatches, 52-53
picas, 58
PICT file format, 103
Picture Package dialog box, 123-124
Pixar file format, 104
Pixelate command (Filter menu), 43
Pixelate filters, 192
pixelation, 22, 118
pixelshistograms, 152selecting, 21, 159-160tonal range
correcting, 162-163histogram, 166-169Levels tool, 169-172
viewing, 50
pixels per inch (ppi), 86
Place command (File menu), 37
plug-insaccessing, 65-66installing, 64-65, 193preferences, 59-60TWAIN plug-ins, 13, 64-65
Plug-Ins & Scratch Disks Preferences win-dow, 59-60
plug-ins (File Import menu), 59
plug-ins (Filter Import menu), 59
PNGsanimation, 110overview, 103, 105
pointers. See cursors
points, 58
Polygon tool, 23, 248
Polygonal Lasso tool, 22, 159
Portable Document Format (PDF), 104
Posterize dialog box, 174
posterizing images, 174
PostScript patterns, 54
ppi (pixels per inch), 86
preferencescursors, 56-57displays, 56-57general, 55grids, 59image cache, 61-62measurement units, 58memory, 61-62plug-ins, 59-60rulers, 58, 56-57scratch disks, 59-60transparency, 58
Preferences command (Edit menu), 38, 55
Preset Manager settingsbrushes, 52gradients, 53-54patterns, 54swatches, 52-53
Preset Manager command (Edit menu),38, 51
Preset Manager window, 51
previewinganimations, 334effects, 190filters, 190graphics, 260images, 90, 260transparency, 58
Print command (File menu), 37
24 8311 Index 1/15/03 2:25 PM Page 406

REPAIRING PHOTOGRAPHS 407
How can we make this index more useful? Email us at [email protected]
Print dialog box, 122
Print Document button, 19
Print Layouts command (File menu), 37,123
Print Preview command (File menu), 37
Print Preview Document button, 19
Print Size command (View menu), 43
printerscolors, 140improving printer output, 126photo printers, 124-125resolution, 86selecting, 122troubleshooting, 128-130
printingdefining type sizes, 58documents, 86scans, 96-97
printing imagesbackground printing, 119color management, 127color printing, 117contact sheets, 120-121digital images, 116-120full-page images, 127-128grayscale printing, 117images with text, 125improving quality, 126multiple copies, 123-124photo printing, 124-125printer selection, 122troubleshooting, 128-130
PSD file format, 104
PSD files, 90
Pucker tool, 302-303, 305, 338-339
Purge command (Edit menu), 38
purity (colors), 149
QQuick Fix button, 19
Quick Fix command (Enhance menu), 40
Quit command (File menu), 37
RRaw file format, 104
Recipe palette, 158
recipes, 283
Recipes palette, 29, 32
Reconstruct tool, 302-303, 305-306
Rectangle tool, 23, 248
Rectangular Marquee tool, 158, 160-161
Red-Eye Brush Tool, 24, 179, 182-184
Reflection tool, 303
reflections, 310-316
removing colors, 178-180
Rename Layer command (Layer menu), 41
renaming layers, 215, 221
Render command (Filter menu), 43
Render filters, 192
repairing photographsaged color, dust and stains, 265-267challenge of, 261, 267-268folds, 262layers, 269-270missing areas, 269, 271moving subjects to different backgrounds,
272-273scratches and dirt, 270-271tears, 262tips for preserving look and feel of original,
268-269wrinkles and torn areas, 263-265
24 8311 Index 1/15/03 2:25 PM Page 407
408 REPEAT LAST EFFECT COMMAND
Repeat Last Effect command (Filtermenu), 42
replacing colors, 175-177, 180
Reselect command (Select menu), 42, 159
Reset Palette Locations command(Window menu), 45
Resize command (Image menu), 39
resizingcanvas, 85-86images, 87, 93-94, 96photos in panoramas, 348text, 237Web graphics, 96
resolutiondefinitions, 84-85digital cameras, 86images, 84-85monitors, 86printers, 86scanners, 67-68, 86Web graphics, 87-89
restoring photographsaged color, dust and stains, 265-267challenges, 261, 267-268eliminating wrinkles and torn areas,
263-265layers, 269-270missing areas, 269, 271moving subjects to different backgrounds,
272-273repairing folds and tears, 262scratches and dirt, 270-271tips for preserving look and feel of original,
268-269
Revert command (File menu), 37
RGB color mode, 117
Rotate command (Image menu), 39
rotatingcomposite images, 295-296panoramas, 356
Rounded Rectangle tool, 23, 248
rulers, 44, 58, 238
Rulers command (View menu), 44
Ssaturation (colors), 135, 148-149
Save As command (File menu), 36
Save As PDF button, 18
Save command (File menu), 36, 100
Save Document button, 18
Save for Web button, 18
Save for Web command (File menu), 36,107
Save for Web dialog box, 332, 334
Save Selection command (Select menu),42
savinganimations as a PSD file, 329composite images, 289documents, 100-105files, 56-57, 100-105files, for Web, 49images, 49, 51, 100-105selections, 160settings, 108
Saving Files Preferences window, 56-57
scale of animations, 329
scannersacquiring images, 13-15color depth, 68-69colors, 71FireWire ports, 14
24 8311 Index 1/15/03 2:25 PM Page 408
SHAPE TOOLS 409
How can we make this index more useful? Email us at [email protected]
ppi (pixels per inch), 69resolution, 67-68, 86scan area, 68-69settings, 66-69spi (samples per inch), 69TWAIN plug-ins, 13, 64-65USB connectors, 14
scanningfilm negatives, 72images, 69-72photographs, 71
scansimage quality, 72-73opening, 90-91printing, 96-97, 116-119
Scitex file format, 104
scratch disks, 59-60
Search button, 19
Select menu commandsAll, 41, 159Delete Selection, 42Deselect, 41, 159Feather, 42, 160Grow, 42, 160Inverse, 42, 160Load Selection, 42Modify, 42, 160Reselect, 42, 159Save Selection, 42Shrink, 160Similar, 42
selectingcolor modes, 95-96colors, 144-147devices, 77-78images, 13images in a panorama, 349-352images in layers, 160
palettes, 16pixels, 21, 159-160printers, 122selections, 198
Selection Brush tool, 22, 159, 162
Selection command (View menu), 44
selection tools, 158-162
selectionsdeleting, 160feathering, 153loading, 160saving, 160selecting, 198
sending images by email, 112-113
settingcolors, viewable, 50column widths, 58gutter widths, 58type sizes, 58
settingsbrushes, 52color management, 49-50gradients, 53-54layers, 212patterns, 54Preset Manager, 51-54saving, 108scanners, 66-69swatches, 52-53
shadowsanimations, 329lightening, 315-320removing, 315-320
Shape Selection tool, 23, 248, 312
shape tools, 23
24 8311 Index 1/15/03 2:25 PM Page 409

410 SHAPES
shapescustom shapes
colors, 256-257modifying, 255-258
drawing, 248-249layers, 215libraries, 252modifying, 255-258
sharingfiles, 111-114graphics, 89images, 89, 111-114
Sharpen command (Filter menu), 43
Sharpen filters, 192, 197, 199-200
Sharpen tool, 25
Shift tool, 303
shortcuts bar, 15, 17-19
Show grid command (View menu), 59
Show Options command (Window menu),44
Show Search Results command (Windowmenu), 45
Show Shortcuts command (Windowmenu), 44
Show Tools command (Window menu), 44
Show Welcome command (Windowmenu), 45
showing palettes, 18
Shrink command (Select menu), 160
signs, 249-251
Similar command (Select menu), 42
Simplify Layer command (Layer menu), 41
sizing text, 237
Sketch command (Filter menu), 43
Sketch filters, 192
slideshowsanimations, 339creating, 360-361error messages, 361exiting, 361PDF file, 360-361viewing, 361
Smudge tool, 25, 197
Snap command (View menu), 59
Snap To Grid command (View menu), 44
software for digital cameras, 73-74
special effectscomposite images, 290-293filling text with images, 306-310light sources, 320-325melting images, 302-304reflections, 310-316reversing, 305-306shadows, 315-320
Sponge tool, 25, 197
sRGB Color Space Profile, 49
sRGB IEC61966-2.1 color profile, 51
stackingcomposite images, 294-295palettes, 31
standardscolor management, 50colors, 137, 139-140
startup drive as scratch disk, 60
status bar, 16
Step Backward command (Edit menu), 38
Step Backward/Step Forward button, 19
Step Forward command (Edit menu), 38
storing data in caches, 62
24 8311 Index 1/15/03 2:25 PM Page 410
TONAL RANGE 411
How can we make this index more useful? Email us at [email protected]
strikethrough text, 238
Stroke command (Edit menu), 38
StuffIt, 112
StuffIt Expander, 113
Style Settings dialog box, 241
styles of layers, 218-221
Stylize command (Filter menu), 43
Stylize filters, 192
swatches, 52-53
Swatches palette, 29, 146-147
Switching color modes, 95-96
TTagged Image File Format (TIFF), 104,
110-111
Targa file format, 104
text3D text, 241aligning, 238anti-aliasing, 238beveling, 241bitmap text, 240-241Brush tool, 244-245colors, 237-238converting bitmap text into vector text,
240converting vector text into bitmap text,
241editing, 239-240filling with images, 306-310font families, 237font sizes, 238font styles, 238fonts, 236formatting, 237-239graphics, 237
images, 237layers, 239-240masks, 236-237measuring, 238modifying, 239-240orientation (vertical or horizontal), 238pasting images into text, 306-310Pencil tool, 244-245printing, 125resizing, 237sizing, 237strikethrough, 238transparent text, 254-255Type tool, 236-240typefaces, 236underlining, 238vector text, 240-241warping, 238-239, 242-243
Text Effects, 195, 206-207
Text tool, 23
Texture command (Filter menu), 43
Texture Effects, 194, 206-207
Texture filters, 192
three-dimensional text, 241
Threshold dialog box, 174
thumbnails in Web photo galleries, 367-368
TIFF (Tagged Image File Format), 104, 110-111
Tile command (Window menu), 44
titles in Web photo galleries, 372
tonal rangecorrecting, 162-163histogram, 166-169Levels command, 151-152Levels tool, 169-172
24 8311 Index 1/15/03 2:25 PM Page 411
412 TOOL TIPS
tool tips, 23
toolbox, 16, 19-22
toolsAdjust Backlighting tool, 165-166Airbrush tool, 245-246Background Color tool, 26Background Eraser, 247Background Eraser tool, 24bitmap images, 24Bloat tool, 302-303Blur tool, 25Brush tool, 244-246Burn tool, 25, 179, 319Clone Stamp tool, 26-27, 265Color-Picker tools, 20Crop tool, 22, 158cursors, 57-58Custom Shape tool, 23, 248customizing, 21Dodge tool, 25, 179, 319-320drawing tools, 20, 22effects tools, 20Ellipse Marquee tool, 160-161Ellipse tool, 23, 248Elliptical Marquee tool, 21, 158Equalize tool, 172-173Eraser tool, 24, 245-247Eyedropper tool, 26, 146Fill Flash tool, 163-165Foreground Color tool, 26Gradient tool, 23Hand tool, 26hints, 21, 23Hue/Saturation tool, 180Impressionist Brush tool, 24, 197, 244-245,
258-259Lasso tool, 22, 159Levels tool, 169-172Line tool, 23, 248
Magic Eraser tool, 24, 245, 247Magic Wand tool, 22, 159, 161, 316Magnetic Lasso tool, 22, 159, 161-162Marquee tool, 21miscellaneous tools, 20Move tool, 22, 312options, 21Paint Bucket tool, 23Paintbrush tool, 24Pattern Stamp tool, 26-27Pencil tool, 24, 244-246Polygon tool, 23, 248Polygonal Lasso tool, 22, 159Pucker tool, 302-303, 305, 338-339Reconstruct tool, 302-303, 305-306Rectangle tool, 23, 248Rectangular Marquee tool, 158, 160-161Red-Eye Brush tool, 24, 179, 182-184Reflection tool, 303Rounded Rectangle tool, 23, 248Selection Brush tool, 22, 159, 162Shape Selection tool, 23, 248, 312Sharpen tool, 25Shift tool, 303Smudge tool, 25, 197Sponge tool, 25, 197Text tool, 23tool tips, 23Turbulence tool, 303Twirl Clockwise tool, 303Twirl Counterclockwise tool, 303Type Mask tools, 236-237Type tool, 23, 236-240Variations tool, 180, 184-186vector images, 24Warp Text tool, 238-239, 242-243Warp tool, 302-303Zoom tool, 26
Transform command (Image menu), 39
24 8311 Index 1/15/03 2:25 PM Page 412

VIEWS 413
How can we make this index more useful? Email us at [email protected]
transparencycolors, 155composite images, 292increasing/decreasing, 58preferences, 58previewing, 58text, 254-255
Transparency Preferences window, 58
tristimulus color model, 134, 142
troubleshooting printers, 128-130
Turbulence tool, 303
Tutorial button, 11, 15-16
tutorials, 15-16, 354
TWAIN plug-ins, 13, 64-65
Twirl Clockwise tool, 303
Twirl Counterclockwise tool, 303
Type command (Layer menu), 41
Type Mask tools, 236-237
type size, 58
Type tool, 23, 236-240
typefaces, 236
Uunderlining text, 238
Undo command (Edit menu), 38
Ungroup command (Layer menu), 41
ungroupinglayers, 252palettes, 28
Units & Rulers Preferences window, 58
units of measurementcanvas, 84, 86converting, 83rulers, 238
unlocking layers, 215
uploading files, 114
USB connectors, 14
USB-to-serial adapters, 14
VVariations dialog box, 180
Variations tool, 180, 184-186
vector graphics, 247, 252-253
vector imagescreating, 252-253definition, 22differences from bitmap images, 25tools, 24
vector text, 240-241
Vertical Type Mask tool, 236-237
Video command (Filter menu), 43
Video filters, 193
View menu commandsActual Pixels, 43Annotations, 44Fit on Screen, 43Grid, 44New View, 43Print Size, 43Rulers, 44Selection, 44Show grid, 59Snap, 59Snap To Grid, 44Zoom In, 43Zoom Out, 43
viewingfilters, 193image files on desktop, 50pixels, 50tutorials, 15-16
views, 33
24 8311 Index 1/15/03 2:25 PM Page 413

414 WARP TEXT DIALOG BOX
WWarp Text dialog box, 238, 242-243
Warp Text tool, 238-239, 242-243
Warp tool, 302-303
Web files, saving, 49
Web graphicscolor profiles, 49colors
background colors, 88download time, 107download times, 91dpi (dots per inch), 87-89file formats, 96, 109-110file size, 91, 107measurements, 87-89measuring, 88optimizing, 106-110resizing, 96resolution, 87-89sharing, 89
Web pagescolors, 139HTML, 88
Web photo galleriescaptions, 372copyright information, 372creating, 359, 365-367customizing, 362, 364-365, 368frames, 361-363HTML files, 370-374image size, 364links, 372navigating, 365, 368-370nonframes browsers, 374styles, 361-363thumbnails, 367-368titles, 372Web sites, 363
Web Photo Gallery dialog box, 363
Web sitesInternational Color Consortium, 137International Commission on Illumination,
134ZDnet, 113
Web-safe color palette, 147
Welcome window, 10-12
white point (monitors), 142
Window menu commandsArrange Icons, 44Bring All to Front, 44Cascade, 44Close All, 44Hide Options, 44Hide Search Results, 45Hide Shortcuts, 44Hide Tools, 44Hide Welcome, 45Images, 44Minimize, 44Reset Palette Locations, 45Show Options, 44Show Search Results, 45Show Shortcuts, 44Show Tools, 44Show Welcome, 45Tile, 44
windowsDisplays & Cursors Preferences, 56-57General Preferences, 55Grid Preferences, 59image windows, 12, 22images, 81Memory & Image Cache, 61-62Plug-Ins & Scratch Disks Preferences, 59-60Preset Manager, 51Saving Files Preferences, 56-57Transparency Preferences, 58Units & Rulers Preferences, 58Welcome window, 10-12
24 8311 Index 1/15/03 2:25 PM Page 414

ZOOM TOOL 415
How can we make this index more useful? Email us at [email protected]
WinZip, 112
work areacomparison between Macintosh and
Windows, 10image window, 33-35menu bar, 15, 35options bar, 15, 19palette well, 16-17palettes, 16-17shortcuts bar, 15, 17-19status bar, 16toolbox, 16, 19-22Welcome window, 10-12
WS_FTP, 114
Y-X-ZZDnet Web site, 113
Zip, 112
Zoom In command (View menu), 43
Zoom Out command (View menu), 43
Zoom tool, 26
24 8311 Index 1/15/03 2:25 PM Page 415