Embed Size (px)
Citation preview

LINX AUDIO™
IT IS POSSIBLE.
Sound Clarity™ With LINX AUDIO™
Wireless Infrared Stereo Headphones


Thank you for purchasing the Sound Clarity™ Wireless Infrared Stereo Headphones.
Sound Clarity sets a new standard for infrared wireless, style, comfort and sound quality creating lifelike full rich sound and clear speech. Soft ear cushions and lightweight design provide superior comfort for hours of listening pleasure.
LINX AUDIO™ provides optimal sound quality and clarity creating a “Live Experience” with full rich sound and clear speech even at lower volumes enabling you to “Turn it Down™” without compromising sound quality. And, the on-ear volume control allows you to easily adjust volume to a safe listening level to help preserve hearing.
To ensure the best performance of your headphones, please read this manual carefully.
Sound Clarity™ With LINX AUDIO™
Wireless Infrared Headphones For All Levels of Hearing™
1

• Patent Pending LINX AUDIO™ for Superior Sound Quality and speech clarity• State of the Art Wireless Infrared Technology• Lightweight Adjustable Headband with Full Size Ear Cup and Soft Cushions
for Maximum Comfort• Automatic Level Control prevents input signal over loading• Uses high frequency infrared light to assure a clean signal for clear reception • Automatic Power Off After a few minutes without a signal source, the power to the headphones
will automatically turn itself off• 2-channel System 2 carrier signals operation system support dual sources input• For use with TV, Stereos, Personal Computers, and other popular audio products,
With or Without Hearing Aids
SPECIAL FEATURES2

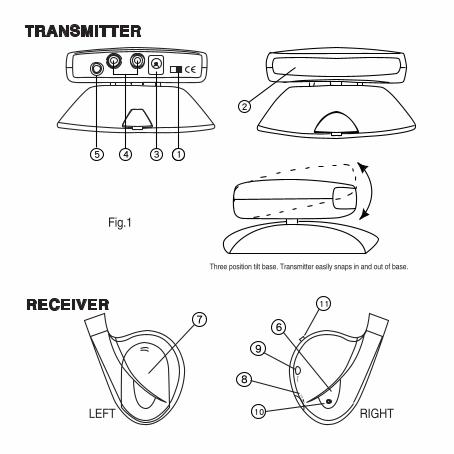
1) Power On/Off switch turns on transmitter.2) 8 high-power INFRARED LEDs transmits signal to headphones for optimum room coverage.3) DC INPUT JACK inputs DC power to transmitter.4) RCA JACK input audio signal for channel A.5) MINI PLUG JACK input audio signal for channel B.
NOTE: For TV use, channel B connect RCA JACKS of TV and MINI PLUG to TRANSMITTER. For HI-Fi use channel A connect MINI PLUG to Hi-Fi and the RCA PLUGS to TRANSMITER.
POSITIONING TIPS FOR TRANSMITTER• Place thr Transmitter’s infrared Window towards the central direction of your listening area.• Because Infrared Signals travel in straight lines, the Transmitter should be at the same height or
slightly lower than the expected height of the users Headphones.• Sunlight and strong light sources, such as incandescent indoor lighting may degrade the audio
signal and cause interference. If such problems occur, simply move the transmitter to a darker area.• Avoid placing the Transmitter towards room windows, as the infrared rays may escape instead of
reflecting off the walls of a room.
Note: For optimum operation within the room, infrared light reflects best on light colored surfaces.
EXPLANATION OF CONTROLS (Fig. 1)
TRANSMITTER
3
Pow
erVO
L
TRANSMITTER
RECEIVER
MINI PLUG DUAL RCA PLUGS
LEFT RIGHT
Fig.1
Fig.2
Fig.3
Three position tilt base. Transmitter easlly snaps in and out of base.
Pow
erVO
L
TRANSMITTER
RECEIVER
MINI PLUG DUAL RCA PLUGS
LEFT RIGHT
Fig.1
Fig.2
Fig.3
Three position tilt base. Transmitter easlly snaps in and out of base.
Pow
erVO
LTRANSMITTER
RECEIVER
MINI PLUG DUAL RCA PLUGS
LEFT RIGHT
Fig.1
Fig.2
Fig.3
Three position tilt base. Transmitter easlly snaps in and out of base.
Pow
erVO
L
TRANSMITTER
RECEIVER
MINI PLUG DUAL RCA PLUGS
LEFT RIGHT
Fig.1
Fig.2
Fig.3
Three position tilt base. Transmitter easlly snaps in and out of base.

1. Switch the Transmitter “ON” and place in a position that is slightly lower or approximate in height to your listening level when wearing the HEADPHONES.
2. Face the TRANAMITTER LED towards your listening area with no obstructions between you and the device.
3. Switch the HEADPHONE “ON”.4. Adjust the HEADPHONE volume to a level approximately greater than halfway.5. Adjust the source volume on your equipment to a maximum acceptable sound level.6. Lower the volume of the HEADPHONES to a comfortable listening level.7. Select to receive channel A or channel B source by switching channel A/B switch.
(Note: Lower the volume of headphone before switching channel A/B.)
NOTE : This unit works with Infrared technology. Therefore, the headphones are designed to operate only within the room where the transmitter is placed.
EXPLANATION OF CONTROLS (Fig. 1)4
HEADPHONE RECEIVER
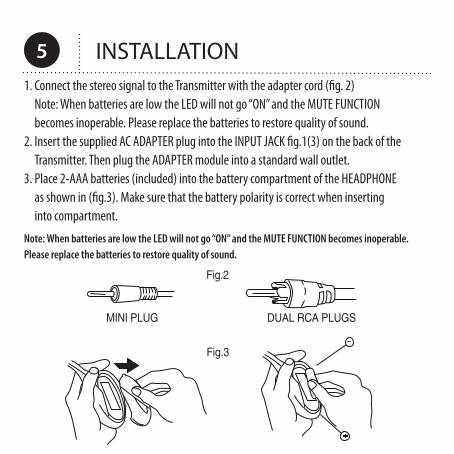
1. Connect the stereo signal to the Transmitter with the adapter cord (fig. 2) Note: When batteries are low the LED will not go “ON” and the MUTE FUNCTION becomes inoperable. Please replace the batteries to restore quality of sound.
2. Insert the supplied AC ADAPTER plug into the INPUT JACK fig.1(3) on the back of the Transmitter. Then plug the ADAPTER module into a standard wall outlet.
3. Place 2-AAA batteries (included) into the battery compartment of the HEADPHONE as shown in (fig.3). Make sure that the battery polarity is correct when inserting into compartment.
Note: When batteries are low the LED will not go “ON” and the MUTE FUNCTION becomes inoperable. Please replace the batteries to restore quality of sound.
INSTALLATION5 Pow
erVO
L
TRANSMITTER
RECEIVER
MINI PLUG DUAL RCA PLUGS
LEFT RIGHT
Fig.1
Fig.2
Fig.3
Three position tilt base. Transmitter easlly snaps in and out of base.
Pow
erVO
L
TRANSMITTER
RECEIVER
MINI PLUG DUAL RCA PLUGS
LEFT RIGHT
Fig.1
Fig.2
Fig.3
Three position tilt base. Transmitter easlly snaps in and out of base.

Two AAA batteries power the Sound Clarity Wireless Infrared Headphones. Batteries are located behind the battery cap on the front of the left ear cup. Identify the battery comparment (picture) before attempting to open battery cap. Do not attempt to open the right-side ear cup. To install the batteries, remove the battery cap by pressing down lightly with both thumbs on the battery cap, and then, gently slide the removable lid toward the bottom of the ear cup. The battery cap will slide completely off. Insert two (2) AAA batteries in accordance with the polarity symbol (+) or (-) marked in the battery compartment. Replace the lid with the down arrow on the bottom of the ear cup. Simultaneously press down lightly and slide the battery cap upwards to lock in place.
Installing/Changing the Batteries6

Identify the left (L) and Right (R) designations located on each side of the headband. The headband adjusts for a comfortable fit by sliding the top and side of the headband apart as seen in Illustration B. Place one hand on the top of the headband and the other hand on the side of the headband and pull in opposite directions to adjust the size of the headband, and then, place them on your head. Now you can make minor adjustments to create a comfortable fit.
Note: Pulling down aggressively on the ear cups may damage the headphone. You may want to make several small adjustments to achieve a perfect fit. Always wear the headphones so the cable is positioned on your left.
Adjusting Your Headphonefor a Comfortable Fit
7

Illustration B

1. Switch the Transmitter “ON” and place in a position that is slightly lower or approximate in height to your listening level when wearing the HEADPHONES.
2. Face the TRANSMITTER LED towards your listening area with no obstructions between you and the device.
3. Switch the HEADPHONE “ON”.4. Adjust the HEADPHONE volume to a level approximately greater than halfway.5. Adjust the source volume on your equipment to a maximum acceptable sound level.6. Lower the volume of the HEADPHONES to a comfortable listening level.7. Select to receive channel A or channel B source by switching channel A/B switch.
Note: Lower the volume of headphone before switching channel A/B.
OPERATION8
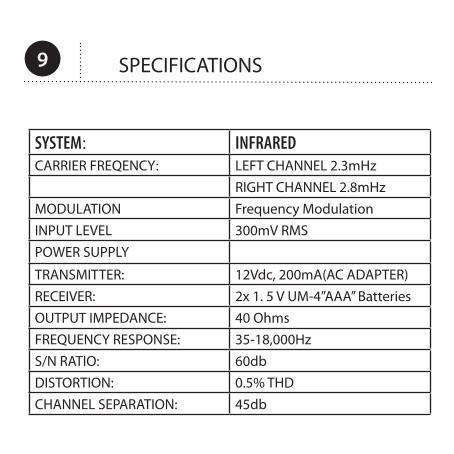
SYSTEM: INFRAREDCARRIER FREQENCY: LEFT CHANNEL 2.3mHz
RIGHT CHANNEL 2.8mHzMODULATION Frequency ModulationINPUT LEVEL 300mV RMSPOWER SUPPLY
TRANSMITTER: 12Vdc, 200mA(AC ADAPTER)RECEIVER: 2x 1. 5 V UM-4”AAA” BatteriesOUTPUT IMPEDANCE: 40 OhmsFREQUENCY RESPONSE: 35-18,000HzS/N RATIO: 60dbDISTORTION: 0.5% THDCHANNEL SEPARATION: 45db
SPECIFICATIONS9

No Sound • Make sure the headphones and the transmitter are turned on. Headphones have a
red indicator light when on and red infrared transmitter lights can be seen when an audio signal has been detected.
• Check the connections of the AV equipment to the transmitter • Check to make sure the connected AV equipment is turned on • Turn up the volume of headphones or the connected AV equipment
Troubleshooting10

Long-term exposure to loud audio volume levels may cause hearing damage. All Able Planet products include a volume control to enable you to “Turn it Down™”. Remember to adjust the sound volume to a safe listening level.
This device complies with part 15 of the FCC Rules. Operation is subject to the following two conditions: (1) This device may cause harmful interference, and (2) This device must accept any interference received, including interference that may cause undesired operation.
CAUTIONS11
Changes or modifications to this unit not expressly approved by the party responsible for the compliance could void the user’s authority to operate the equipment.
NOTE: This equipment has been tested and found to comply with the limits for a Class B digital device, pursuant to part 15 of the FCC Rules.
These limits are designed to provide reasonable installation. This equipment generates, use and can radiate radio frequency energy and, if not installed and used in accordance with the instruction, may cause harmful interference to radio communications. However, there is no guarantee that interfer-ence will not occur in a particular installation. If this equipment does cause harmful interference to radio or television reception, which can be determined by turning the equipment off and on, the user is encouraged to try correct the interference by one or more of the following measures :
Reorient or relocate the receiving antenna Increase the separation between the equipment and receiver Connect the separation into an outlet on a circuit different from that to which
the receiver is needed. Contact Able Planet technical support
WARNING12

The headphones fold flat inside its hard shell protective carrying case, making them ideal for travel around the corner, or around the world. To store, identify the left (L) and Right (R) designations located on each side of the headband. Holding the headphones with two hands with the right ear cup in your right hand, you should be able to see the CH.B / CH. A switch, and volume control. Make sure the red LED light is not illuminated. Gently turn the ear cups inward and in opposite directions to make the headphones fold flat, and then, place the headphone in its protective carrying case. If the ear cups do not turn, stop immediately. Forcing the ear cups may cause them to break. Remember to zip closed the carrying case to protect your headphone from damage.
13 Folding the Headphonesfor Storage

After you review the enclosed Warranty Information, please complete and return the Sound Clarity Product Registration card immediately, or register for your warranty online at www.ableplanet.com.
Limited Lifetime Warranty Registration14
Please feel free to contact us with questions, or to simply tell us how LINX AUDIO™ has changed your life.
Able Planet, Inc. 9500 W. 49th Ave., Unit B-100 Wheat Ridge, CO 80033
Phone: 303.215.9770 Fax: 303.215.9774 Email:[email protected]
Contact Us15
LINX AUDIO™
IT IS POSSIBLE.