Embed Size (px)
Citation preview

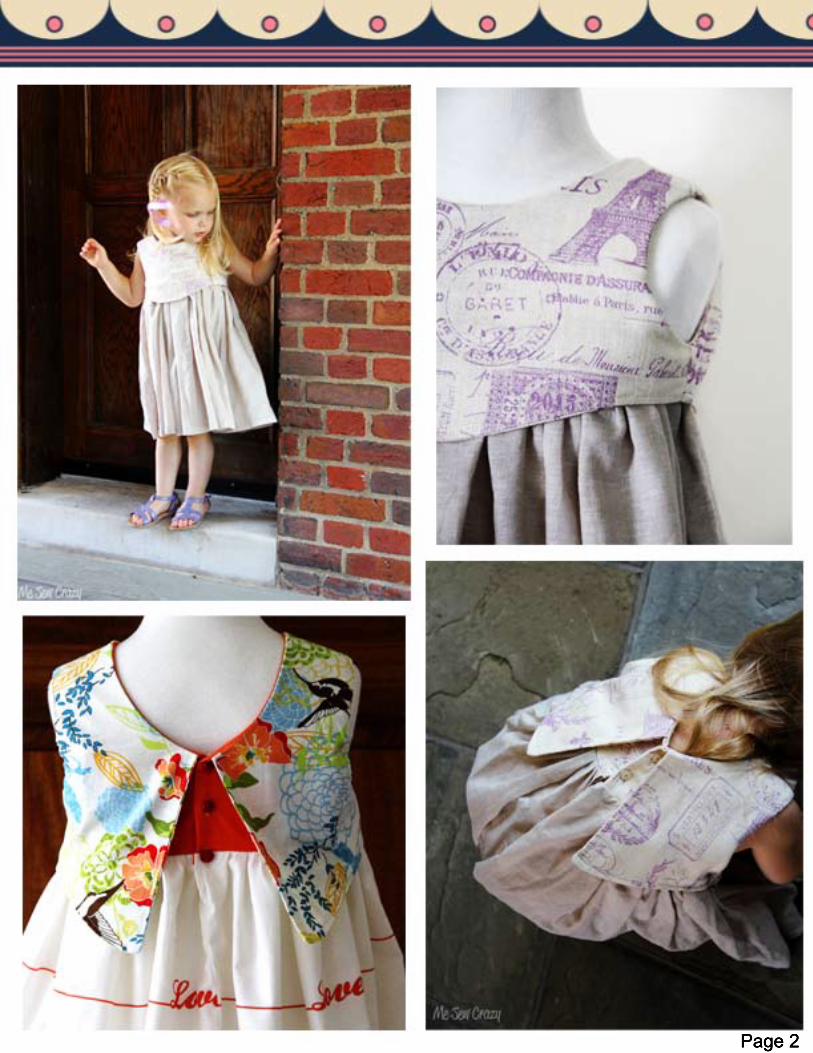
‘The Madeline’dress
e-Pattern, 2 - 6 yrs.
Me CrazySew
Page 2
Description:This sophisticated dress is absolutely stunning uponcompletion. With a fully lined outer sloped bodice, as well as a fully lined underneath bodice and skirtlayer, you will absolutely love this little number.
The full skirt, button back with open collar, and slopedfront will give you a one of a kind dress that you won’t find anywhere else!you won’t find anywhere else!
An optional shoulder bow is shown at the end for anadditional touch of whimsy.
With 2 alternate methods for preparing the bodice, you can choose which option is best for you and and your skill level and tools on hand.
Either way, you will have a completely professionallooking dress which you and any little girl will love.looking dress which you and any little girl will love.
Skill Level - this pattern would be for the 'experienced-beginner' and up. Without any zippers or other items that are normally reserved for a more experienced sewist, I put this at a 'beginner' level. But I wouldn't recommend it for your first sewing project. Someone who knows their way around the sewing machine would feel comfortable with this pattern.feel comfortable with this pattern. Page 3

How to Use this Pattern:This pattern is a downloadable PDF, your printer needs to be set to NO SCALING (Print at 100%).Lay out the pieces of paper and and match paper corners to corresponding letters.Do NOT overlap the paper. Simply butt up next to each other, and tape together.See the following page for printing out your pattern sizeSee the following page for printing out your pattern sizeinstructions.
Supplies:1.5 - 1.75 yd Exterior Fabric.5 yd Lining FabricScrap Interfacing2 or 3 ButtonsBasic Sewing Essentials (sewing machine, thread, etc)
Fabrics:Cotton & cotton blends, seersucker, muslin, broadcloth, lined eyelet, lightweight denim, linen & linen blends
Page 4
1/2”Seam
Allowance
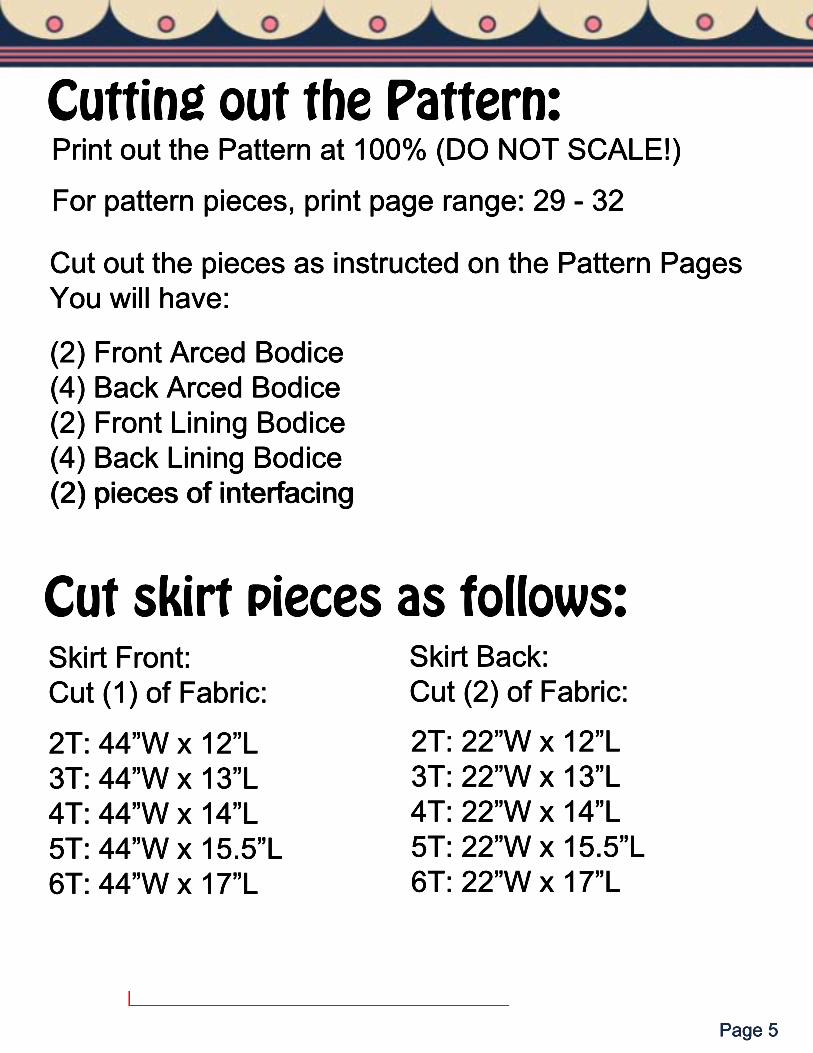
Cutting out the Pattern:Print out the Pattern at 100% (DO NOT SCALE!)
For pattern pieces, print page range: 29 - 32
Cut out the pieces as instructed on the Pattern PagesYou will have:
(2) Front Arced Bodice(4) Back Arced Bodice(2) Front Lining Bodice(4) Back Lining Bodice(2) pieces of interfacing(2) pieces of interfacing
Cut skirt pieces as follows:Skirt Front:Cut (1) of Fabric:
2T: 44”W x 12”L3T: 44”W x 13”L4T: 44”W x 14”L5T: 44”W x 15.5”L6T: 44”W x 17”L
2T: 22”W x 12”L3T: 22”W x 13”L4T: 22”W x 14”L5T: 22”W x 15.5”L6T: 22”W x 17”L
Page 5
Skirt Back:Cut (2) of Fabric:

SIZE CHART
SIZE 2T 3T 4T 5T 6T
CHEST 21 22 23 24 25
HEIGHT 35” 38” 41” 44” 47”
DRESS IS A SHORT ‘VINTAGE’ STYLE If you want a longer, below knee length, please cut the following: SKIRT CHART
SIZE 2T 3T 4T 5T 6T
Front (cut 1) 44”w x 16”l 44”w x 16.5”l 44”w x 17”l 44”w x 19”l 44”w x 21”l
Back (cut 2) 22”w x 16”l 22”w x 16.5”l 22”w x 17”l 22”w x 19”l 22”w x 21”l
**Please note This is a very FULL skirt. Please feel free to adjust the width as needed.
Sewing it Together:
Bodice Sewing Option 1:
Cut out pattern pieces from your fabric as instructed.
***Please note, there are two methods for sewing this bodicetogether, please review both options and choose which worksbest for you.***
Works best for a person with a serger. I like this method because itprovides perfect armholes easily.
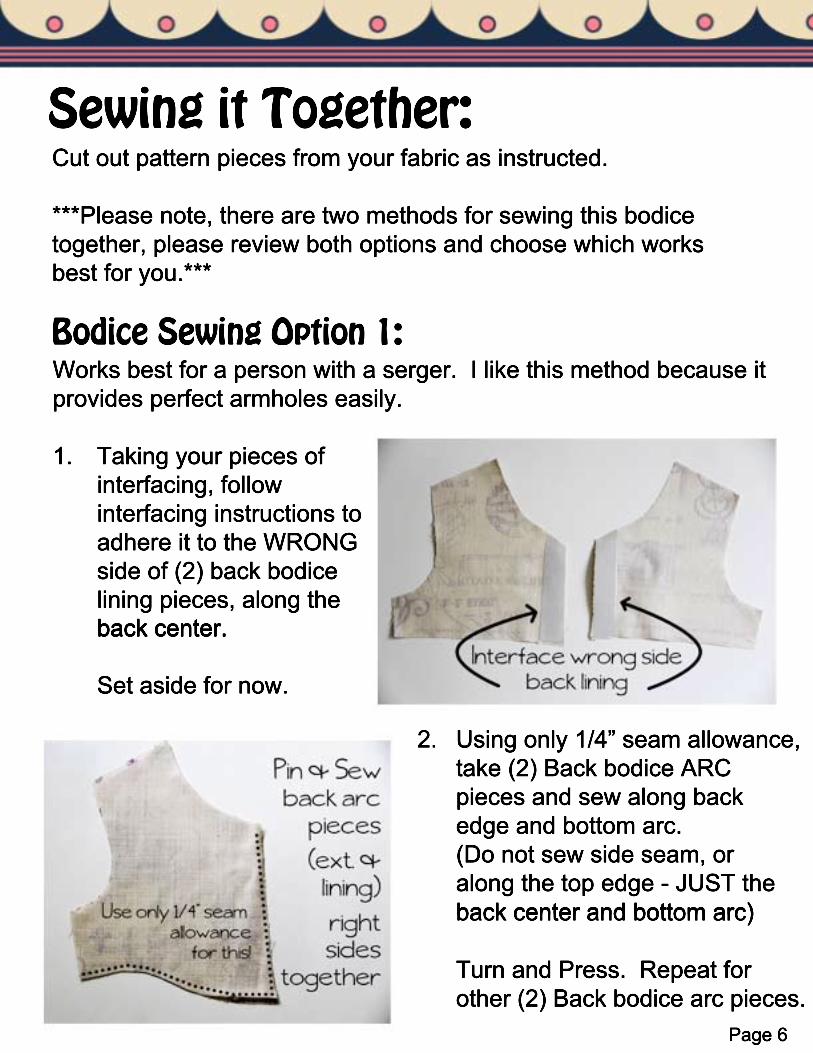
1. Taking your pieces ofinterfacing, follow interfacing instructions toadhere it to the WRONG side of (2) back bodicelining pieces, along theback center.back center.
Set aside for now.
2.Using only 1/4” seam allowance,take (2) Back bodice ARC pieces and sew along backedge and bottom arc.(Do not sew side seam, oralong the top edge - JUST theback center and bottom arc)back center and bottom arc)
Turn and Press. Repeat forother (2) Back bodice arc pieces.
Page 6
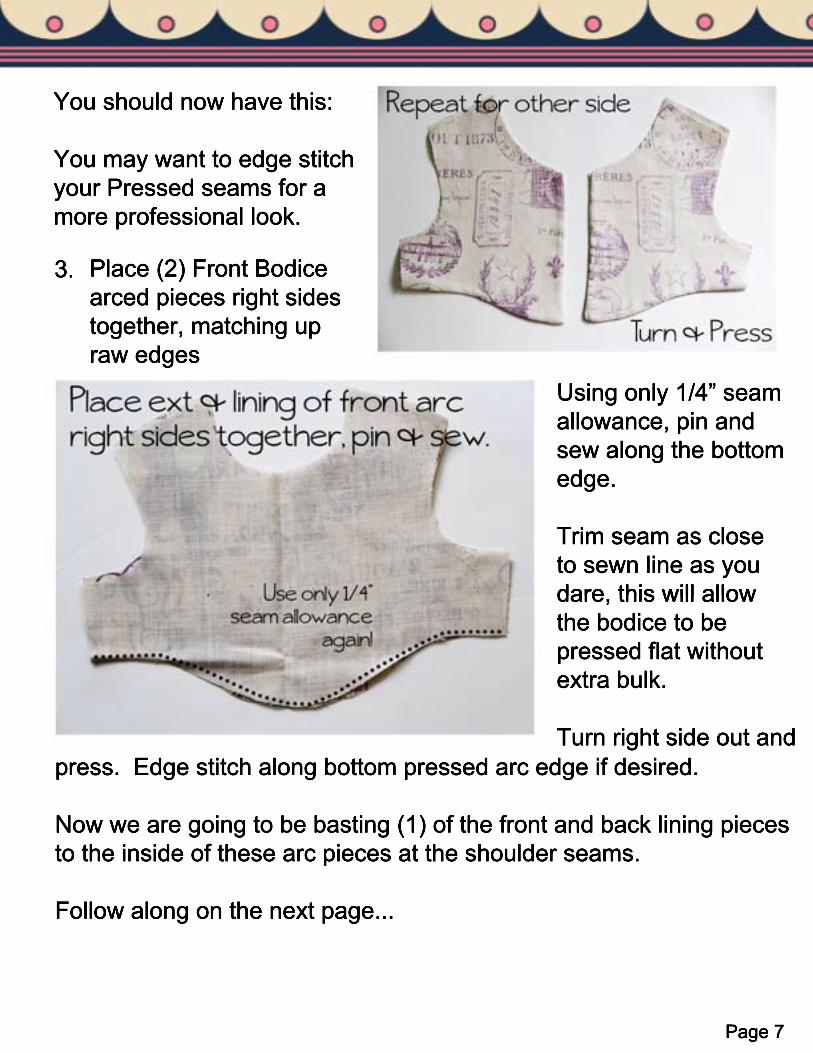
You should now have this:
You may want to edge stitch your Pressed seams for a more professional look.
3.Place (2) Front Bodicearced pieces right sidestogether, matching up raw edges
Using only 1/4” seamallowance, pin andsew along the bottomedge.
Trim seam as closeto sewn line as you dare, this will allowdare, this will allowthe bodice to bepressed flat withoutextra bulk.
Turn right side out andpress. Edge stitch along bottom pressed arc edge if desired.
Now we are going to be basting (1) of the front and back lining pieces to the inside of these arc pieces at the shoulder seams.
Follow along on the next page...
Page 7

Page 8
4.Take (1) Bodice front lining piece and attach to the Front Bodice arc piece (attach to your less perfect arc side if you have one).
The bodice lining should be right sides together with the right sides together with the back side of your arc piece.
Baste stitch at shoulderseams, in seam allowance.
Repeat this process for the Back Bodice arc pieces and (1) back lining piece for both back arc pieces.both back arc pieces.
Once again, with the Back lining piece right sides
sides together with the back side of your arc pieces. Baste stitch at shoulder seams. 5.Now take your front &back Bodice arc piecesand place right sidestogether (with the basted lining on the outside).
Sew at shoulder Sew at shoulder seams.

Page 9
You should now have somethingthat resembles the top imageon the left.
6.Take your remaining frontbodice lining piece and sewright sides together with the(2) back bodice lining piecesat shoulder seams.
See below image on left for what you will now have.what you will now have.
We are now going to work at attaching these 2 piecestogether.
7.Take your separatelining, and placeright sides togetheralong the top of the arced side ofthe arced bodice.
Pin around the backPin around the backcenter edge andneckline.***See next pagefor note before you sew***
Page 10
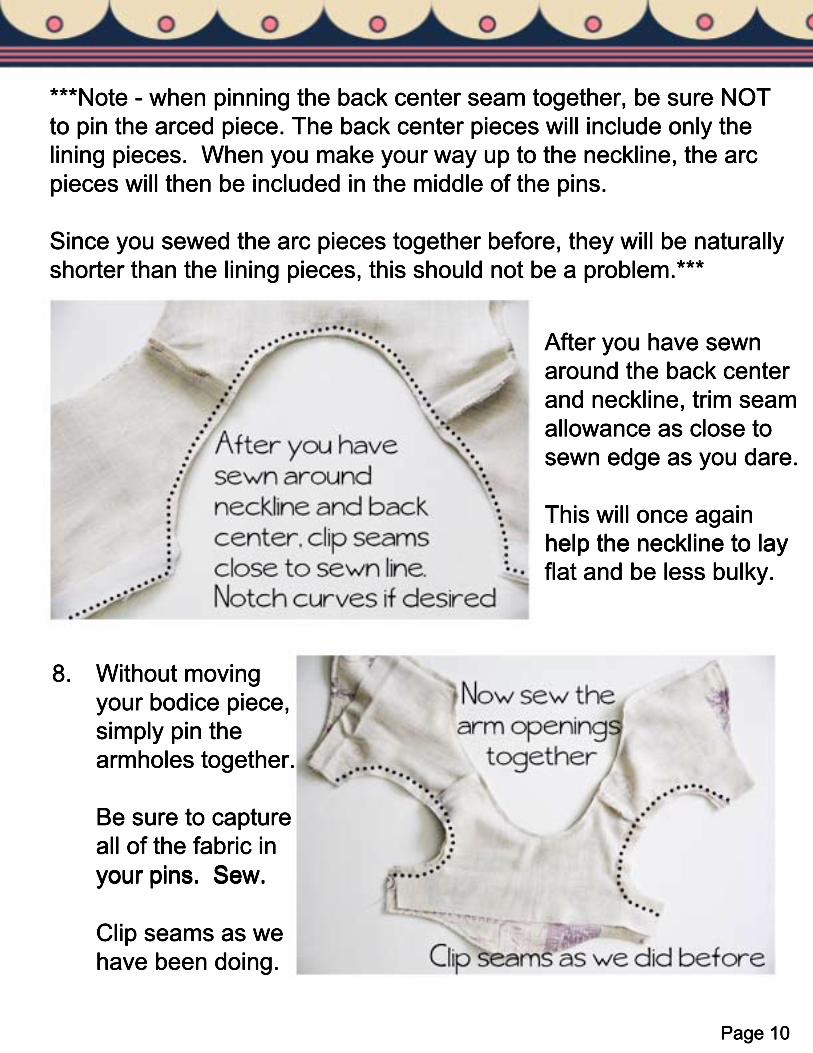
***Note - when pinning the back center seam together, be sure NOTto pin the arced piece. The back center pieces will include only the lining pieces. When you make your way up to the neckline, the arcpieces will then be included in the middle of the pins.
Since you sewed the arc pieces together before, they will be naturallyshorter than the lining pieces, this should not be a problem.***
After you have sewnaround the back centerand neckline, trim seamallowance as close tosewn edge as you dare.
This will once again help the neckline to layhelp the neckline to layflat and be less bulky.
8.Without movingyour bodice piece,simply pin the armholes together.
Be sure to captureall of the fabric inyour pins. Sew.your pins. Sew.
Clip seams as wehave been doing.

Page 11
9.Now, this is going to seem weird, but trust me - it works!
You are going to turn the bodiceright side out by pulling the back bodice out through the shoulderseam.
*Note - If your fingers are hitting a*Note - If your fingers are hitting asewn seam when reaching throughshoulder seam to get at fabric, turnthe bodice over and use other side.
Once you have it turned right side out, stick your finger or a bluntededge inside bodice and push outcorner seams. Press.corner seams. Press.
Now lets get those side seamssewn together.
There will be a lot of photos in thenext few steps to be sure you canfollow along...
Page 12
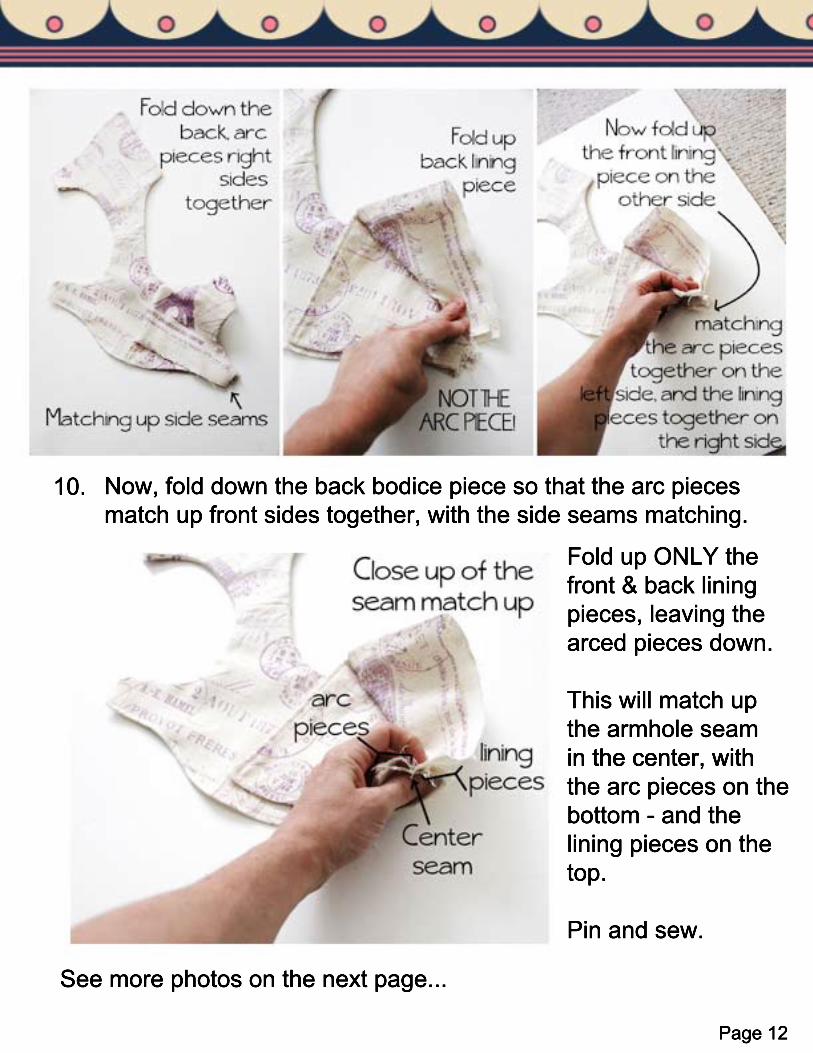
10.Now, fold down the back bodice piece so that the arc piecesmatch up front sides together, with the side seams matching.
Fold up ONLY thefront & back lining pieces, leaving the arced pieces down.
This will match upthe armhole seamin the center, within the center, withthe arc pieces on thebottom - and the lining pieces on the top.
Pin and sew.
See more photos on the next page...
Page 13
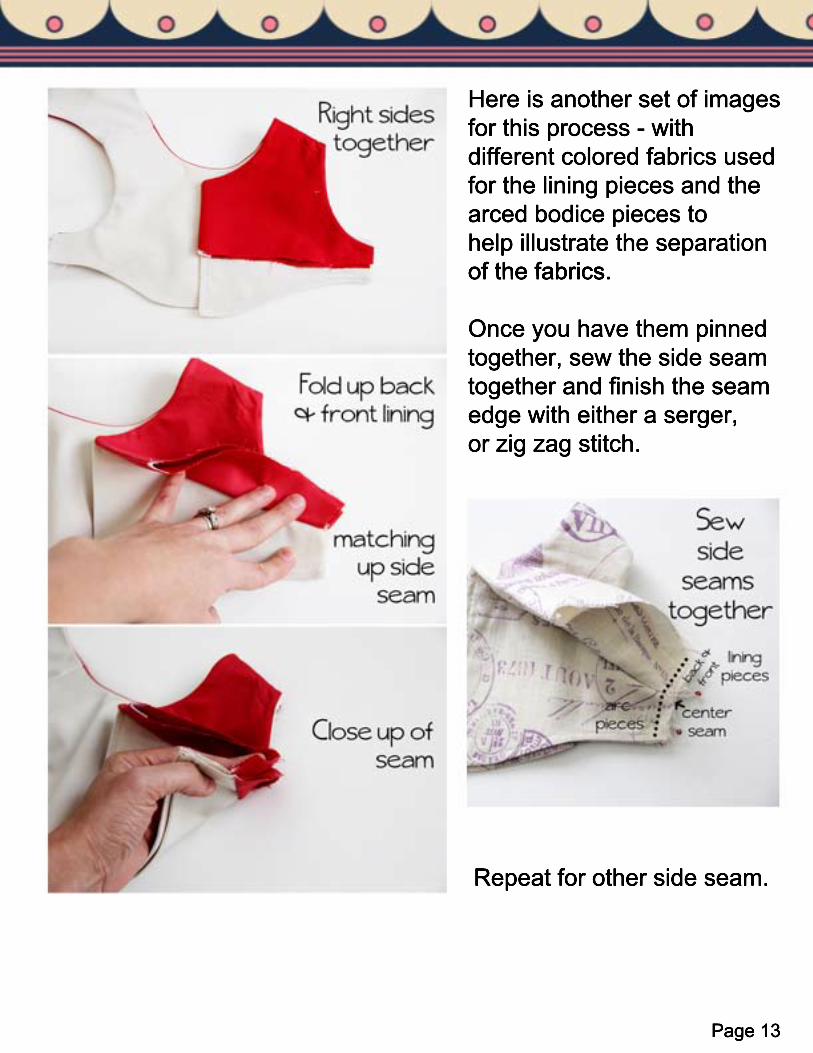
Here is another set of imagesfor this process - with different colored fabrics usedfor the lining pieces and thearced bodice pieces tohelp illustrate the separationof the fabrics.of the fabrics.
Once you have them pinnedtogether, sew the side seamtogether and finish the seamedge with either a serger,or zig zag stitch.
Repeat for other side seam.

Page 14
And just in case you were wondering...
Moving on...
Page 15
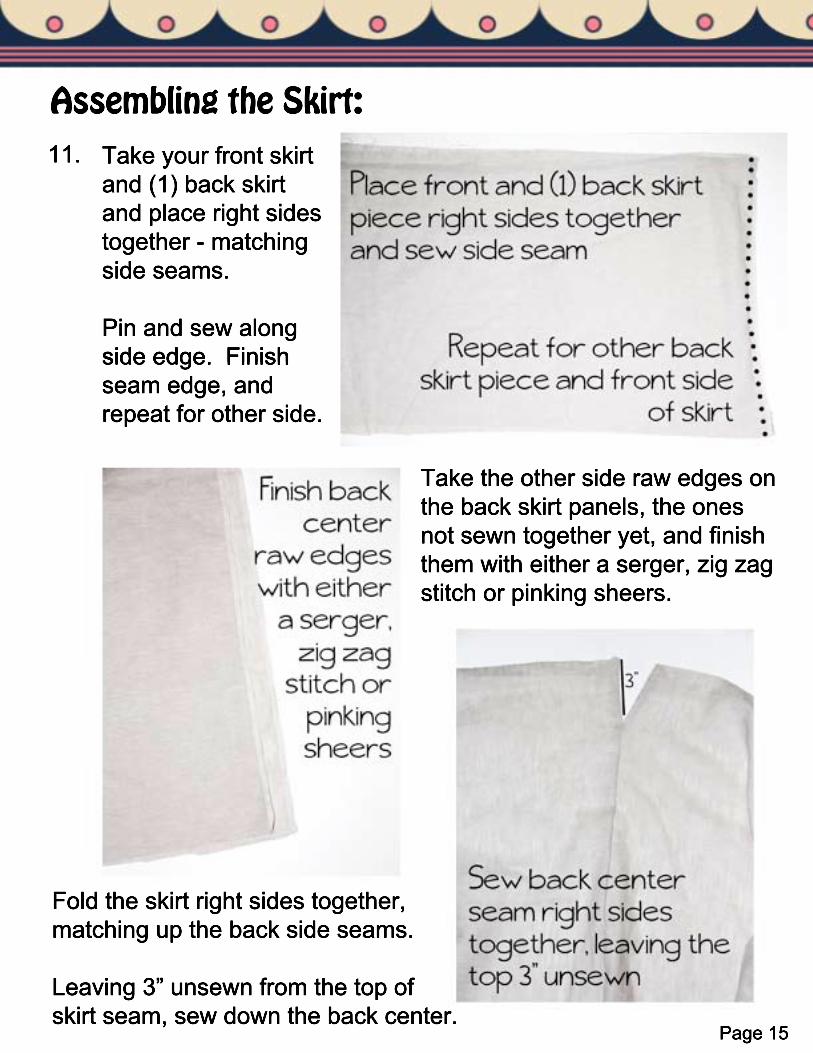
Assembling the Skirt:11. Take your front skirt
and (1) back skirtand place right sidestogether - matchingside seams.
Pin and sew along side edge. Finish side edge. Finish seam edge, and repeat for other side.
Take the other side raw edges onthe back skirt panels, the onesnot sewn together yet, and finishthem with either a serger, zig zagstitch or pinking sheers.
Fold the skirt right sides together,matching up the back side seams.
Leaving 3” unsewn from the top of skirt seam, sew down the back center.
Page 16
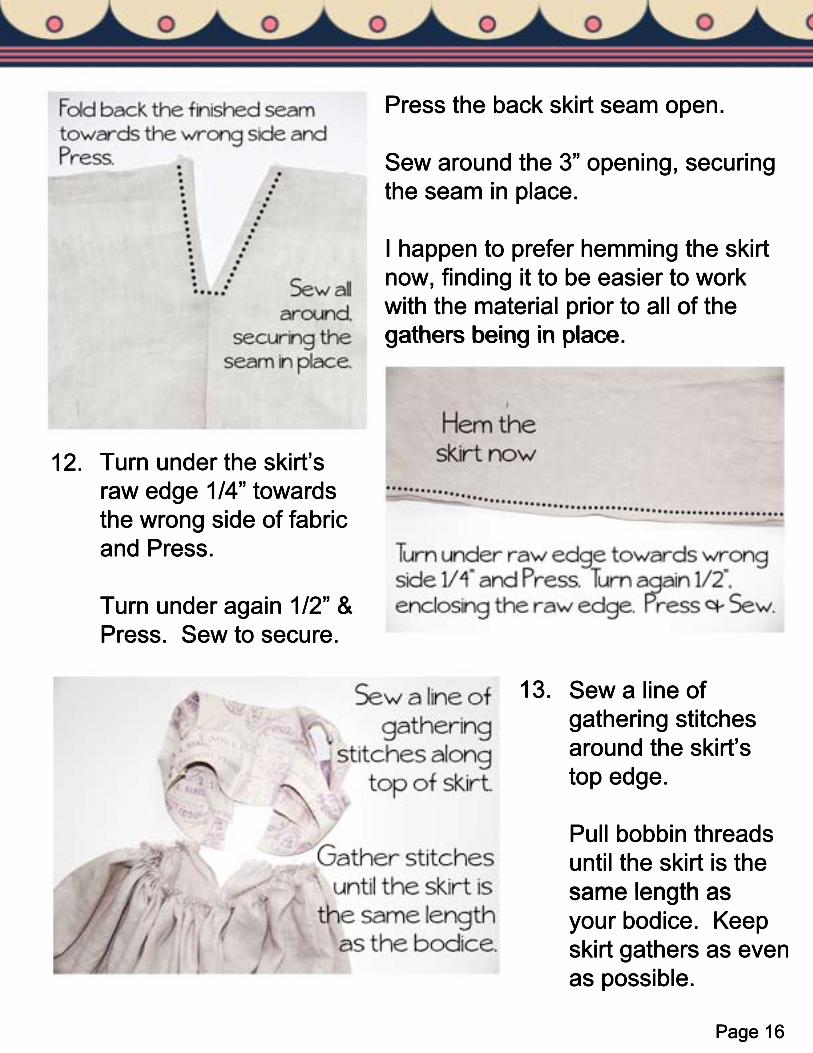
Press the back skirt seam open.
Sew around the 3” opening, securingthe seam in place.
I happen to prefer hemming the skirtnow, finding it to be easier to workwith the material prior to all of the gathers being in place. gathers being in place.
12.Turn under the skirt’sraw edge 1/4” towardsthe wrong side of fabricand Press.
Turn under again 1/2” &Press. Sew to secure.
13.Sew a line ofgathering stitchesaround the skirt’stop edge.
Pull bobbin threadsuntil the skirt is thesame length as same length as your bodice. Keepskirt gathers as evenas possible.
Page 17
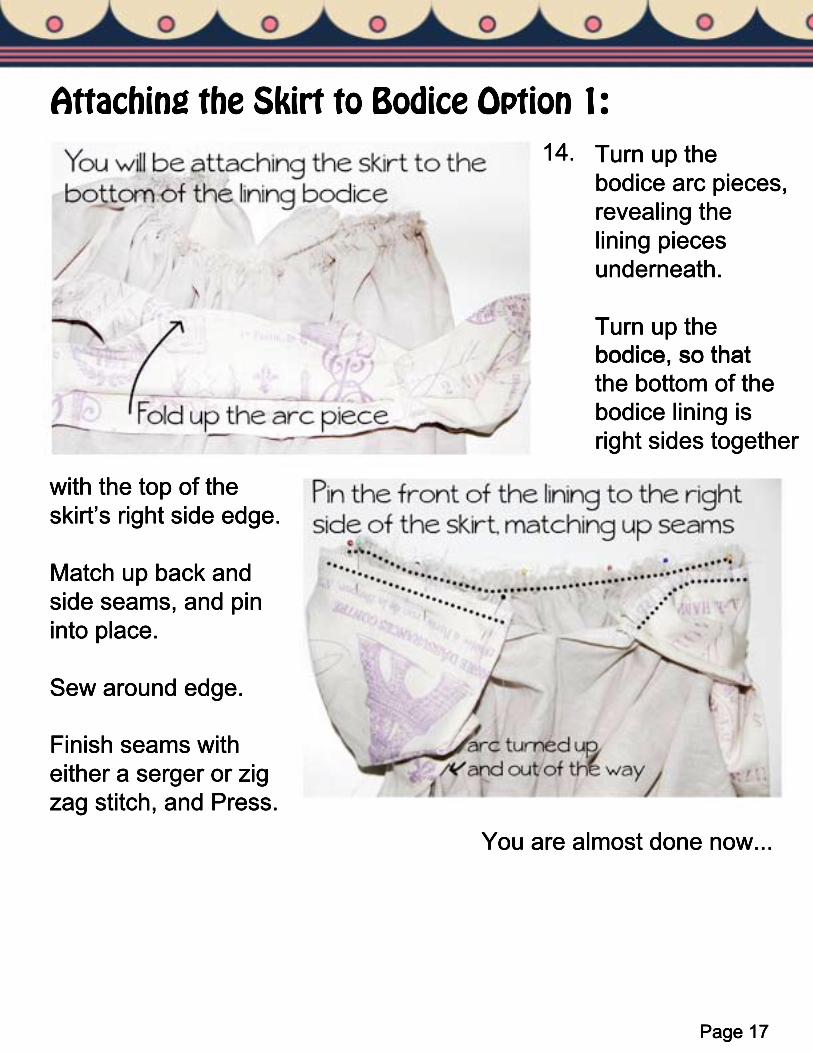
Attaching the Skirt to Bodice Option 1:14.Turn up the
bodice arc pieces,revealing the lining piecesunderneath.
Turn up the bodice, so that bodice, so that the bottom of thebodice lining isright sides together
with the top of the skirt’s right side edge.
Match up back and side seams, and pininto place.
Sew around edge.
Finish seams with Finish seams with either a serger or zigzag stitch, and Press.
You are almost done now...

Page 18
Flip up your bodice, turndown your arc pieces andadmire your handy workso far.
We are almost done.
Lastly, we will add somebuttons and buttonholes.buttons and buttonholes.
15.Use your machine’sbuttonhole makerto sew on buttonhole’saccordingly to backbodice lining.
Sew buttons on theSew buttons on theother side of the back bodice lining,matching up with thebuttonholes.
And if you chose Option 1 for the bodice, you are now finished!
For shoulder bow embellishments, skip forward to Page 25.
To complete this dress using Option 2 for the bodice assembly, read on.
Page 19
Bodice Sewing Option 2:Works best for someone who doesn’t mind taking a little more time intheir sewing to get a perfect end product. Some hand stitching maybe required to get perfect armholes. And all bodice seams will be completely concealed.
1. Taking your pieces of interfacing, follow interfacing instructions toadhere it to the WRONG side of (2) back bodice lining pieces, along the back center. (See photo on page 6).
Set aside for now.
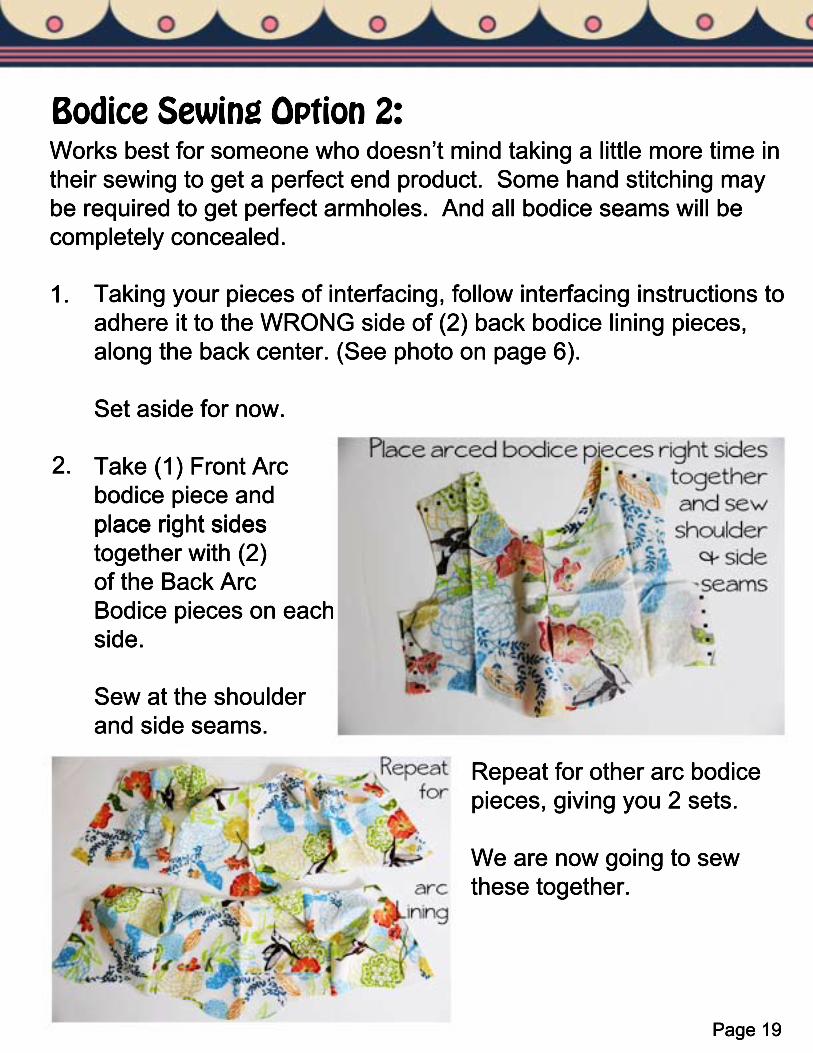
Take (1) Front Arc bodice piece and place right sidesplace right sidestogether with (2)of the Back Arc Bodice pieces on eachside.
Sew at the shoulderand side seams.
Repeat for other arc bodicepieces, giving you 2 sets.
We are now going to sewthese together.
2.

Page 20
3.Take your 2 arcbodice pieces andplace right sidestogether, matchingup all raw edges.
Pin around sidesand bottom and sewand bottom and sewusing 1/4” seamallowance.
Do not sew top!
Turn right arc bodice rightside out. Either use yourfingers or a blunt edge to push out corners.
Press.
Edge stitch around sides andbottom if desired.bottom if desired.
4.Take (1) bodice front lining piece and place right sidestogether with (2) bodice backlining pieces on each side.
Sew at shoulder and sideseams.
Page 21
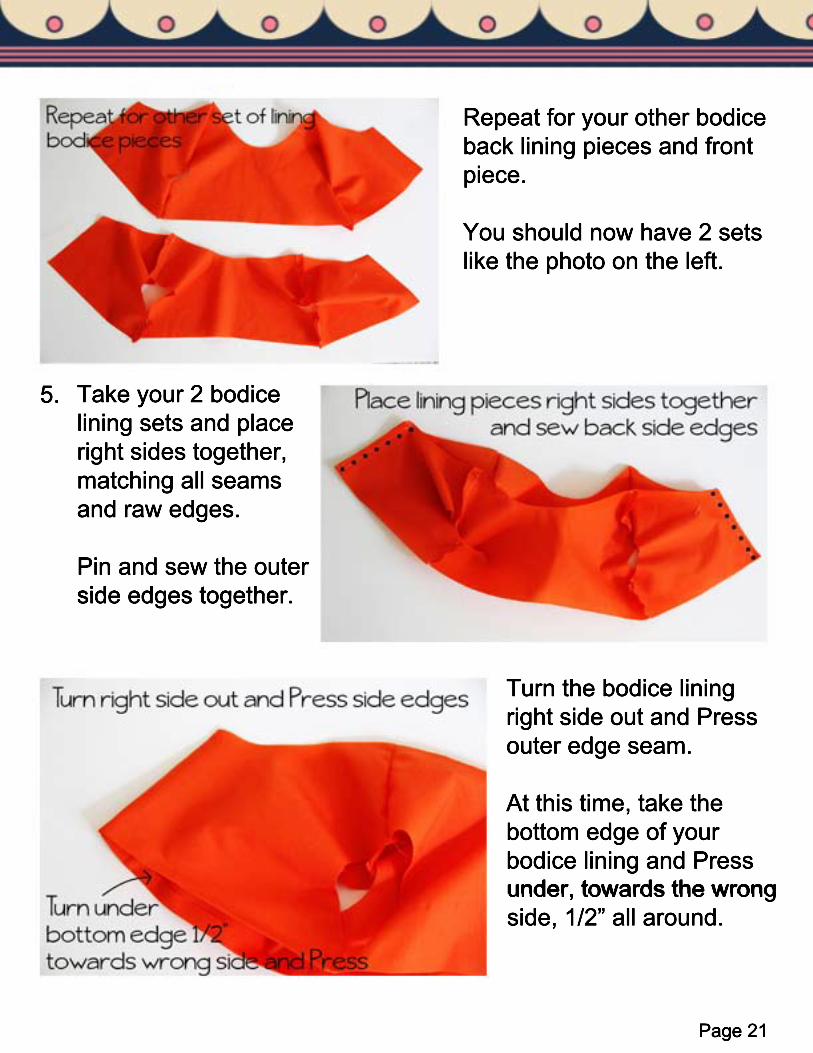
Repeat for your other bodiceback lining pieces and frontpiece.
You should now have 2 setslike the photo on the left.
5.Take your 2 bodicelining sets and placeright sides together,matching all seamsand raw edges.
Pin and sew the outerside edges together.side edges together.
Turn the bodice liningright side out and Pressouter edge seam.
At this time, take thebottom edge of yourbodice lining and Pressunder, towards the wrongunder, towards the wrongside, 1/2” all around.
Page 22
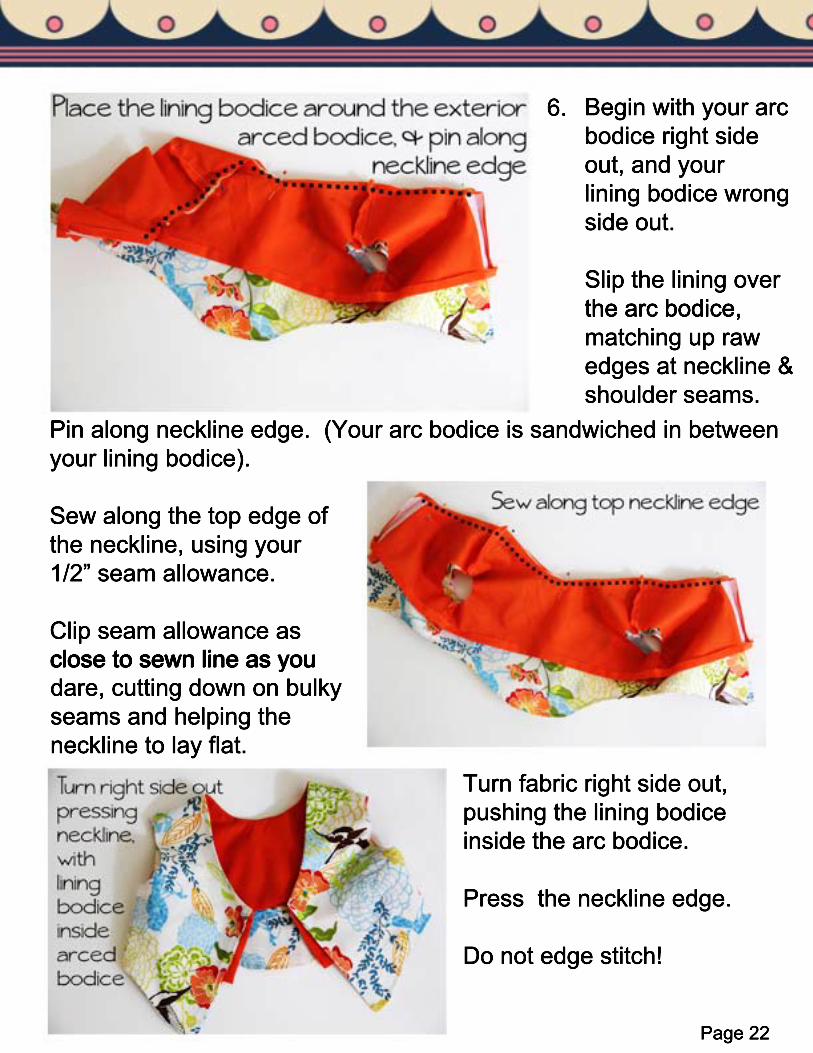
6.Begin with your arcbodice right side out, and your lining bodice wrongside out.
Slip the lining overthe arc bodice, the arc bodice, matching up rawedges at neckline &shoulder seams.
Pin along neckline edge. (Your arc bodice is sandwiched in betweenyour lining bodice).
Sew along the top edge of the neckline, using your1/2” seam allowance.
Clip seam allowance asclose to sewn line as youclose to sewn line as youdare, cutting down on bulkyseams and helping the neckline to lay flat.
Turn fabric right side out, pushing the lining bodiceinside the arc bodice.
Press the neckline edge.
Do not edge stitch!
Page 23
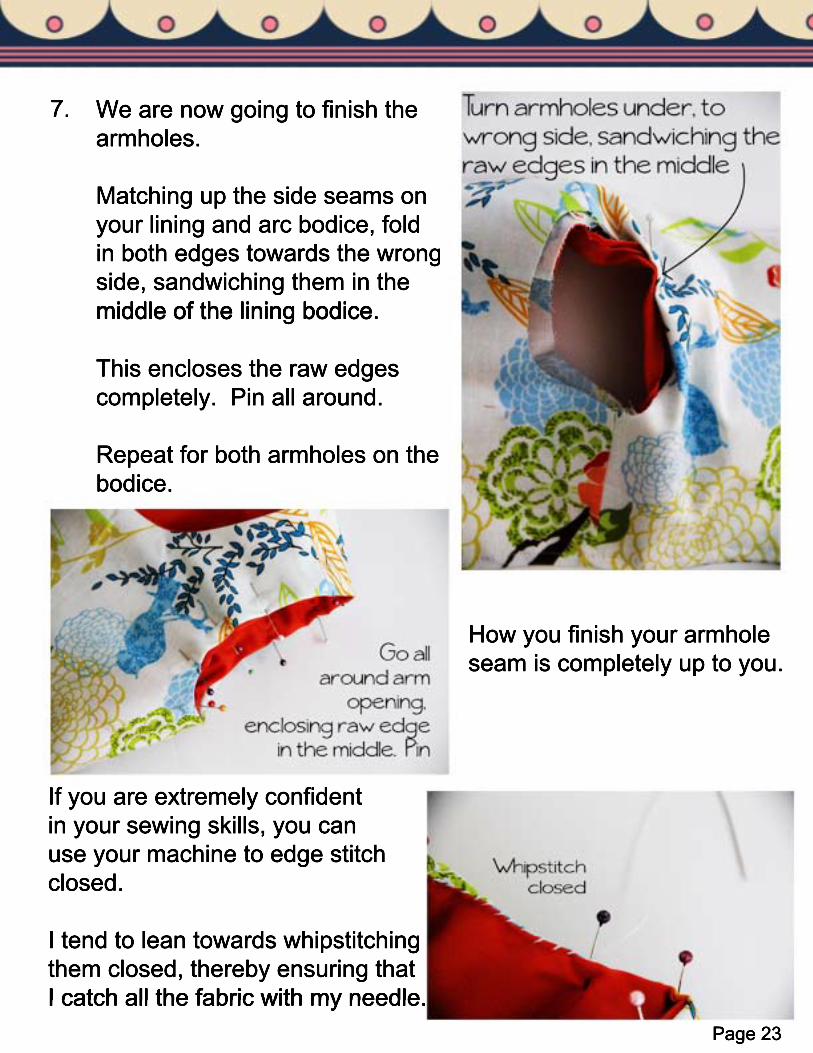
7. We are now going to finish thearmholes.
Matching up the side seams onyour lining and arc bodice, foldin both edges towards the wrongside, sandwiching them in themiddle of the lining bodice. middle of the lining bodice.
This encloses the raw edgescompletely. Pin all around.
Repeat for both armholes on thebodice.
How you finish your armhole seam is completely up to you.
If you are extremely confidentin your sewing skills, you canuse your machine to edge stitchclosed.
I tend to lean towards whipstitchingthem closed, thereby ensuring thatI catch all the fabric with my needle.I catch all the fabric with my needle.

Page 24
You should now havea completed bodice.
Now skip back to:
to assemble the skirtfor this dress.
Page 15 - 16 Sections 11 - 13
Attaching the Skirt to Bodice Option 2:8.Once you havethe top of yourskirt gathered,and the samelength as the bottom of yourbodice lining,bodice lining,match up the back seams andside seams.
Slip top of skirt1/2” inside the bottom of the bodice lining. Pin all around and edge stitch 1/8” away from bottom lining edge. This will shouldcatch both sides of the bottom of the lining bodice in your stitches,catch both sides of the bottom of the lining bodice in your stitches,and enclose all raw edges.
Turn the bodice lining down, and you are finished! Continue onfor dress shoulder bow embellishments.
Page 25
Optional Shoulder Bow Embellishment:
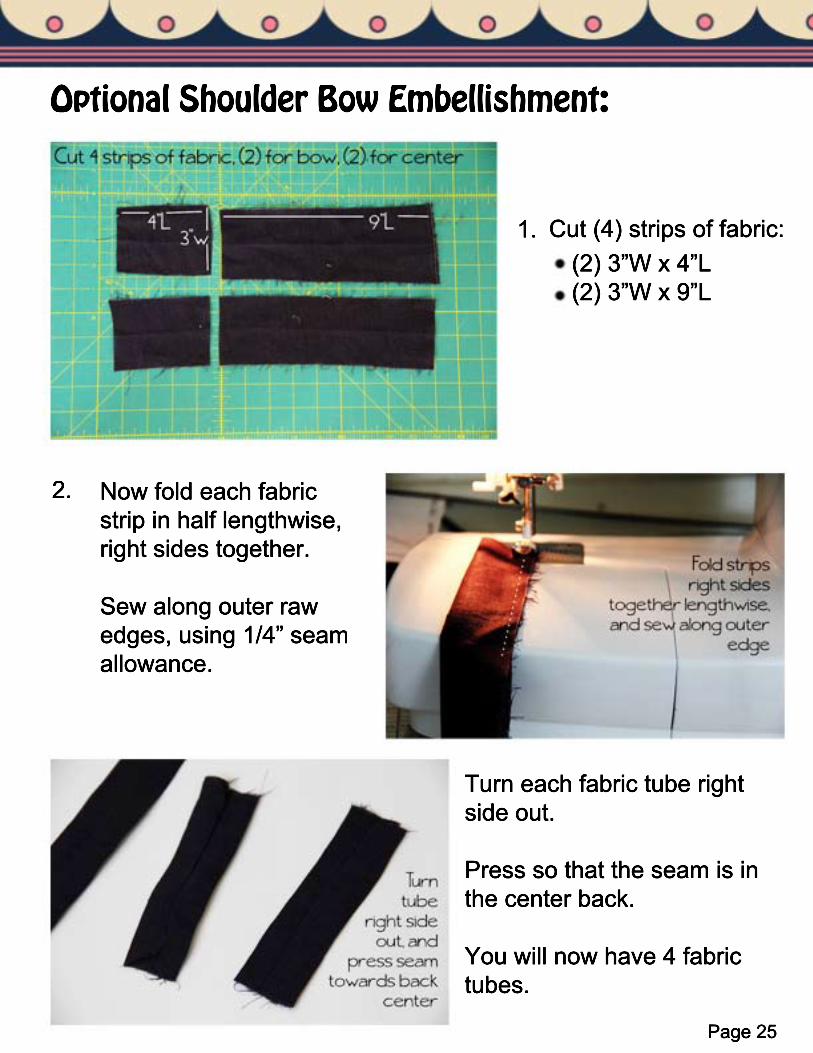
1.Cut (4) strips of fabric:(2) 3”W x 4”L(2) 3”W x 9”L
2. Now fold each fabricstrip in half lengthwise,right sides together.
Sew along outer rawedges, using 1/4” seamallowance.
Turn each fabric tube rightside out.
Press so that the seam is in the center back.
You will now have 4 fabrictubes.
Page 26
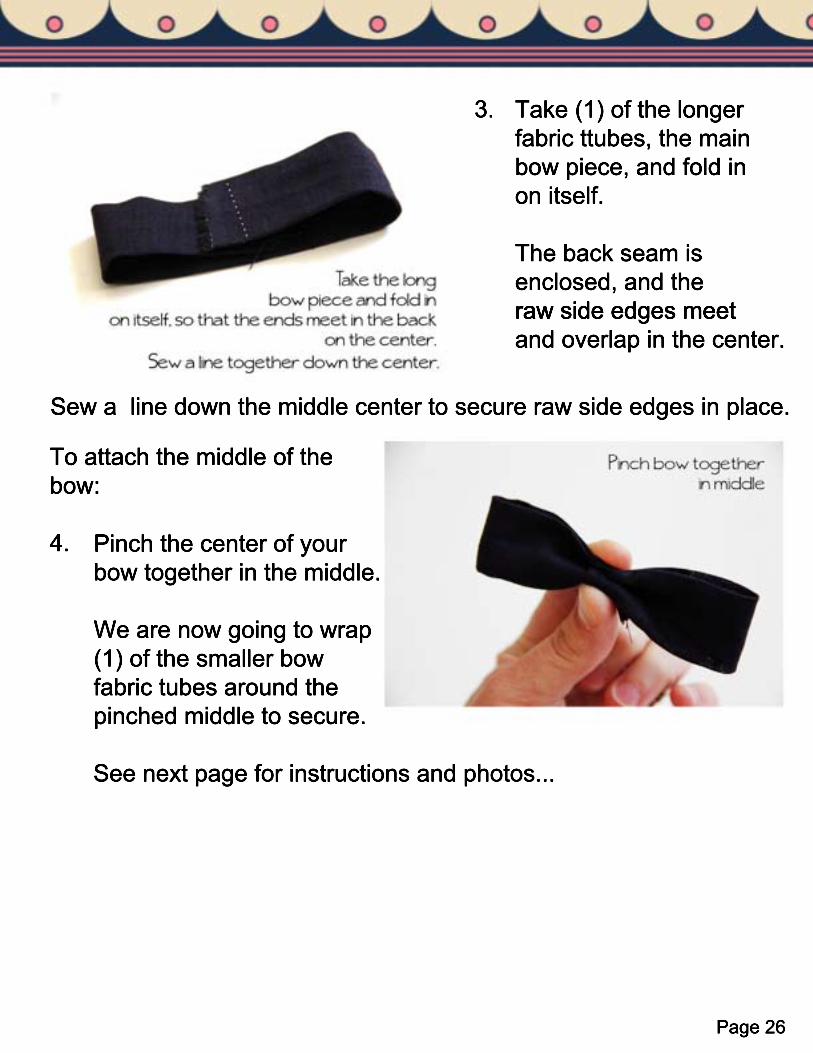
3.Take (1) of the longerfabric ttubes, the main bow piece, and fold inon itself.
The back seam is enclosed, and theraw side edges meetraw side edges meetand overlap in the center.
Sew a line down the middle center to secure raw side edges in place.
To attach the middle of thebow:
4.Pinch the center of yourbow together in the middle.
We are now going to wrap(1) of the smaller bowfabric tubes around thepinched middle to secure.
See next page for instructions and photos...See next page for instructions and photos...

Page 27
5.Take (1) smaller bowfabric tube and place 1raw side edge along theback of your pinched bowcenter. (Back center seamis against bow).
Wrap tube around pinchedWrap tube around pinchedbow center, tightly, continuing until you are all the way around. Yourback raw edge will beenclosed, and the tailof the bow center will behanging down.hanging down.
Find the very middle ofyour shoulder seam and pin down the sides of thebow center to the outsideof your dress.
See Photos on left.
Do not sew yet!Do not sew yet!

Page 28
6.Fold under the otherraw edge of the bowcenter 1/4”.
Then fold the edge ofthe bow center underthe armhole opening,so that it is now insideso that it is now insidethe bodice lining.
Pin the bow center in place on the other side of the bodice.
You want to be sure that the sides match up, so be sure toplace carefully.
7. Sew bow in place alongbow center sides. See below left Photo.
This will secure all raw edges in place! Repeat for other bow pieces &you are finished!

1” Box
Me Sew Crazy
‘The Madeline’ Dress
Page 29
AA
‘BODICE
FRONT’
2 years
3 years
4 years
5 years
6 years

Page 30
Me Sew Crazy
‘The Madeline’ Dress
AA
‘BODICE FRONT’
FOLD
LINING
Cut (2) on Fold
ARC
Cut (2) on Fold
*NOTE - When cutting the arc bodice front, cut the entire pattern piece.
When cutting the lining, stop at dashed line.

Page 31
Me Sew Crazy
‘The Madeline’ Dress
BB
‘BODICE
BACK’
2 years
3 years
4 years
5 years
6 years
Page 32
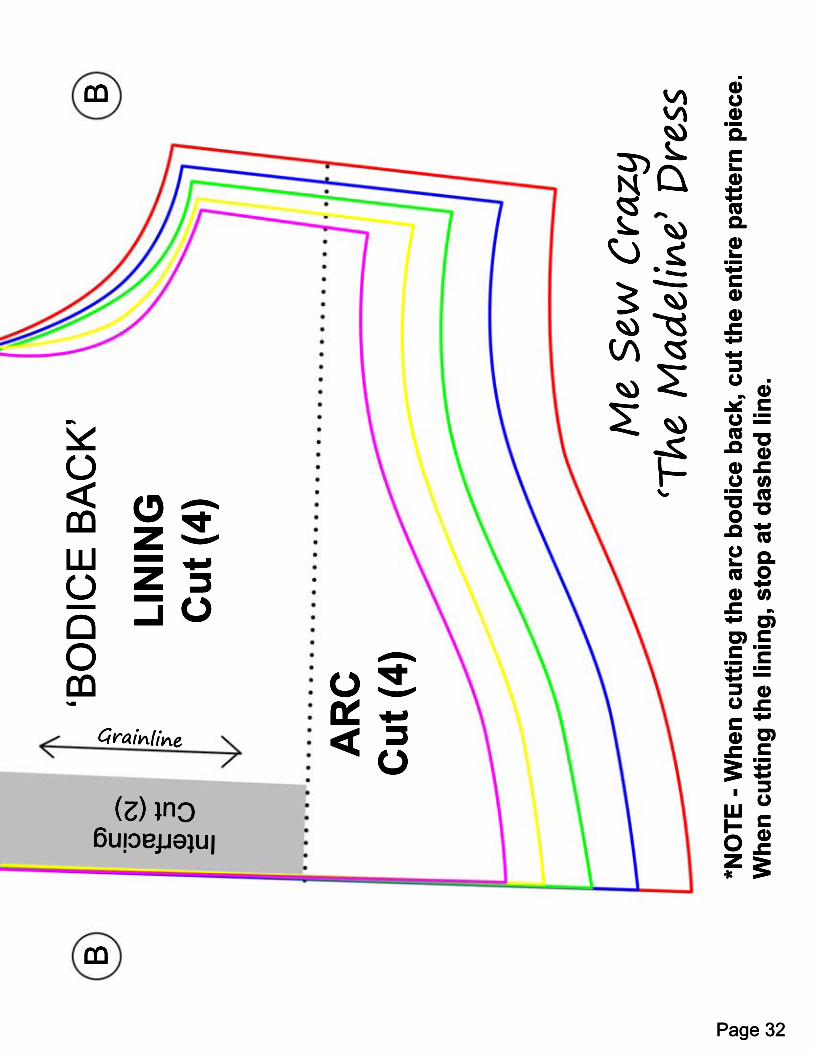
Me Sew Crazy
‘The Madeline’ Dress
BB
‘BODICE BACK’
InterfacingCut (2)
Grainline
LINING
Cut (4)
ARC
Cut (4)
*NOTE - When cutting the arc bodice back, cut the entire pattern piece.
When cutting the lining, stop at dashed line.


![Namefhgh +rz pdq\ ihhw duh lq wkuhh \dugv" name: edhelper. name: edhelper 8vh wkh slhfhv deryh wr khos \rx iloo lq wkh uxqdzd\ pdwk sx]]oh :ulwh wzr rgg qxpehuv wkdw zkhq dgghg wrjhwkhu](https://img.dokumen.tips/doc/110x75/60b29ef3a1ce3b409f4f3dc5/name-fhgh-rz-pdq-ihhw-duh-lq-wkuhh-dugv-name-edhelper-name-edhelper.jpg)


![TF S23TK SR SHEET05 - thomasandfriends.com...&XW DSDUW WKH SLHFHV RI WKH SX]]OH DQG SXW WKHP EDFN WRJHWKHU Title: TF_S23TK_SR_SHEET05 Author: matthewi Created Date: 1/29/2020 10:40:54](https://img.dokumen.tips/doc/110x75/5e62d72760c4e2772a37fb31/tf-s23tk-sr-sheet05-xw-dsduw-wkh-slhfhv-ri-wkh-sxoh-dqg-sxw-wkhp-edfn.jpg)


![BVB-06 Events Regulations-Huntington- V2 irup pxvw eh dssuryhg e\ wkh ),9% gd\v ehiruh wkh vwduw ri wkh hyhqw dqg vhqw rxw gd\v e\ wkh 2ujdql]huv wr doo sduwlflsdwlqj 1)v ),9% 6srqvruv](https://img.dokumen.tips/doc/110x75/5b1afb407f8b9a2d258e1c5c/bvb-06-events-regulations-huntington-v2-irup-pxvw-eh-dssuryhg-e-wkh-9-gdv.jpg)

![Key Findings - The DHS Program7KLV UHSRUW VXPPDUL]HV WKH À QGLQJV RI WKH 0DODZL 'HPRJUDSKLF DQG +HDOWK 6XUYH\ 0'+6 FDUULHG RXW E\ WKH 1DWLRQDO 6WDWLVWLFDO 2IÀ FH 162 7KH 0LQLVWU\](https://img.dokumen.tips/doc/110x75/6120430409b4a85cf47ce771/key-findings-the-dhs-program-7klv-uhsruw-vxppdulhv-wkh-qglqjv-ri-wkh-0dodzl.jpg)


![RYACW Annual Review 2016FINAL Booklet · 2018-05-02 · 2q%rdug )hvwlydo lq 6hswhpehu 7r wkh gholjkw ri wkh \rxqj vdloruv kh zhqw rxw rq wkh zdwhu suhvhqwhg wkh sul]hv dqg vljqhg](https://img.dokumen.tips/doc/110x75/5ec7c4efc2f4ec1c153284fa/ryacw-annual-review-2016final-booklet-2018-05-02-2qrdug-hvwlydo-lq-6hswhpehu.jpg)


