Embed Size (px)
Citation preview

A Teaching Platform forEmbedded Systems Engineering
Bachelor’s Thesis
to achieve the academic degree
Bachelor of Science
in
Computer Engineering
by
Arvid StaubRegistration Number 0726421
at theDepartment of Computer Engineering of the Vienna University of Technology
Supervisor: Univ.Ass. Dipl.-Ing. Armin Wasicek
Vienna, 6th July 2011(Signature of Author) (Signature of Supervisor)
Technische Universität WienA-1040 Wien � Karlsplatz 13 � Tel. +43-1-58801-0 � www.tuwien.ac.at


Erklärung zur Verfassung der Arbeit
Arvid StaubAichholzgasse 18/7, 1120 Wien
Hiermit erkläre ich, dass ich diese Arbeit selbständig verfasst habe, dass ich die verwende-ten Quellen und Hilfsmittel vollständig angegeben habe und dass ich die Stellen der Arbeit -einschließlich Tabellen, Karten und Abbildungen -, die anderen Werken oder dem Internet imWortlaut oder dem Sinn nach entnommen sind, auf jeden Fall unter Angabe der Quelle als Ent-lehnung kenntlich gemacht habe.
(Ort, Datum) (Unterschrift Verfasser)
i
Abstract
This work presents a teaching and learning hardware platform for hands-on training in the Em-bedded Systems Engineering lab course. A Real-Time Network of four micro-controller nodesis provided along with a rich set of peripherals: A thermal control path, a wireless sensor net-work bridge and various digital and analog user interfaces. The board includes a flexible micro-controller programmer and a debugger with an integrated 32-channel logic analyzer. A host PCcan access this functionality using a single USB interface.
Acknowledgements
I want to thank all people who contributed to this work, knowingly and unknowingly. In noparticular order, these are my supervisor Armin Wasicek of the Department of Computer En-gineering of the Vienna University of Technology, who guided this work into the best possiblepath while still allowing creative exploration and taking risks in favor of re-using old-fashioned,but proven designs. Raphael Charwot has been of great help in critical discussions about theproposed system structure. Finally Victoria Klang, for giving me unfailing support every day.Without her, I wouldn’t have had the opportunity to put the effort into this work it deserved.
My gratitude also extends to the numerous folks who contribute to the development of theFree and Open Source Software used to produce this thesis.

Table of Contents
Erklärung zur Verfassung der Arbeit i
Abstract ii
Acknowledgements ii
Table of Contents iii
List of Figures iv
Table of Acronyms vii
1 Introduction 11.1 Problem Statement . . . . . . . . . . . . . . . . . . . . . . . . . . . . . . . . 11.2 Structure of this Thesis . . . . . . . . . . . . . . . . . . . . . . . . . . . . . . 2
2 Related Work 32.1 A Platform for Teaching and Researching Distributed Real-Time Systems . . . 32.2 A Modular, XML-based JTAG Programmer for Embedded Devices . . . . . . . 42.3 A modular software package for the Embedded Systems Engineering Board . . 4
3 System Design 53.1 Thermal Control Path . . . . . . . . . . . . . . . . . . . . . . . . . . . . . . . 63.2 Real-Time Communication . . . . . . . . . . . . . . . . . . . . . . . . . . . . 73.3 Wireless Bridge . . . . . . . . . . . . . . . . . . . . . . . . . . . . . . . . . . 83.4 User Interfaces . . . . . . . . . . . . . . . . . . . . . . . . . . . . . . . . . . 83.5 Programming and Debugging Interface . . . . . . . . . . . . . . . . . . . . . . 9
4 Implementation 134.1 CPU Module . . . . . . . . . . . . . . . . . . . . . . . . . . . . . . . . . . . 134.2 LCD Module . . . . . . . . . . . . . . . . . . . . . . . . . . . . . . . . . . . 154.3 Mainboard . . . . . . . . . . . . . . . . . . . . . . . . . . . . . . . . . . . . . 184.4 Simulations . . . . . . . . . . . . . . . . . . . . . . . . . . . . . . . . . . . . 224.5 Schematics and Parts Libraries . . . . . . . . . . . . . . . . . . . . . . . . . . 25
iii

4.6 PCB Design . . . . . . . . . . . . . . . . . . . . . . . . . . . . . . . . . . . . 25
5 Results 275.1 Hardware . . . . . . . . . . . . . . . . . . . . . . . . . . . . . . . . . . . . . 275.2 Measurements . . . . . . . . . . . . . . . . . . . . . . . . . . . . . . . . . . . 285.3 Change Requests . . . . . . . . . . . . . . . . . . . . . . . . . . . . . . . . . 28
6 Conclusion 31
A Schematics 33A.1 Mainboard Schematics . . . . . . . . . . . . . . . . . . . . . . . . . . . . . . 34A.2 CPU Module Schematics . . . . . . . . . . . . . . . . . . . . . . . . . . . . . 42A.3 LCD Module Schematics . . . . . . . . . . . . . . . . . . . . . . . . . . . . . 44A.4 Listings . . . . . . . . . . . . . . . . . . . . . . . . . . . . . . . . . . . . . . 45
Bibliography 53
List of Figures
2.1 Alexander Kößler’s ESE board (source: [28]) . . . . . . . . . . . . . . . . . . . . 3
3.1 Network and Peripheral Devices . . . . . . . . . . . . . . . . . . . . . . . . . . . 53.2 Bus Coupling Unit . . . . . . . . . . . . . . . . . . . . . . . . . . . . . . . . . . 73.3 Bus communication example . . . . . . . . . . . . . . . . . . . . . . . . . . . . . 83.4 System Programmer Overview . . . . . . . . . . . . . . . . . . . . . . . . . . . . 103.5 Parallel JTAG scheme . . . . . . . . . . . . . . . . . . . . . . . . . . . . . . . . . 103.6 IEEE 1149.1-2001 TAP State Machine controlled by TMS (source: [1]) . . . . . . 11
4.1 CPU Module Pin Locations . . . . . . . . . . . . . . . . . . . . . . . . . . . . . . 154.2 LCD Controller Interface [27] . . . . . . . . . . . . . . . . . . . . . . . . . . . . 164.3 Control Path Components . . . . . . . . . . . . . . . . . . . . . . . . . . . . . . . 184.4 Heating Driver Circuit . . . . . . . . . . . . . . . . . . . . . . . . . . . . . . . . 194.5 LED Matrix High Side . . . . . . . . . . . . . . . . . . . . . . . . . . . . . . . . 214.6 Equivalent Schematics for Simulation . . . . . . . . . . . . . . . . . . . . . . . . 234.7 LED matrix row control voltag vs. LED current . . . . . . . . . . . . . . . . . . . 234.8 Equivalent schematics for heating simulation . . . . . . . . . . . . . . . . . . . . 244.9 Heating control voltag vs. resistor current and MOSFET power dissipation . . . . . 244.10 Preliminary Mechanical Mainboard Layout . . . . . . . . . . . . . . . . . . . . . 25
iv

4.11 Final Mechanical Mainboard Layout . . . . . . . . . . . . . . . . . . . . . . . . . 264.12 Manual Routing vs. Autorouter Results . . . . . . . . . . . . . . . . . . . . . . . 26
5.1 The new Embedded Systems Engineering Mainboard . . . . . . . . . . . . . . . . 275.2 Heating Driver Circuit: Simulation vs. Measurement . . . . . . . . . . . . . . . . 28
v


Table of Acronyms
ARM Advanced RISC Machine
BCD Binary Coded Digit
BOM Bill of Materials
CAD Computer-Aided Design
CPLD Complex Programmable Logic Device
CPU Central Processing Unit
DBI Display Bus Interface
DMA Direct Memory Access
EDA Electronic Design Automation
ESE Embedded Systems Engineering
FPGA Field-Programmable Gate Array
HCI Human-Computer Interaction
I2C Inter-Integrated Circuit
IC Integrated Circuit
IEEE Institute of Electrical and Electronics Engineers
I/O Input/Output
ISP In-System Programming
JTAG Joint Test Action Group
KiB Kilobyte = 1024 Byte
LCD Liquid Crystal Display
vii

LED Light Emitting Diode
LSB Least Significant Bit
MIPI Mobile Industry Processor Interface
MOSFET Metal Oxide Semiconductor Field Effect Transistor
PC Personal Computer
PCB Printed Circuit Board
PLL Phase Locked Loop
PWM Pulse Width Modulation
RISC Reduced Instruction Set Computer
SPI Serial Peripheral Interface
SRAM Static Random Access Memory
TAP Test Access Port
TFT Thin Film Transistor
TQFP Thin Profile Plastic Quad Flat Package
TTP/A Time Triggered Protocol A
UART Universal Asynchronous Receiver Transmitter
USB Universal Serial Bus
XML eXtensible Markup Language
viii

CHAPTER 1Introduction
Embedded Systems have become our ubiquitous companions over the past years. Nearly allelectronic devices we use on a daily basis contain digital processors, which implies that cus-tomer experience is becoming more and more dominated by software design decisions. Successor failure in the market is determined by well-crafted embedded software. At the same time,the functional demands to this software rise. Devices are expected to be “smart” and unintru-sive, which requires them to communicate with each other to exchange information about theirenvironment.
The course Embedded Systems Engineering held by the Department of Computer Engineer-ing of the Vienna University of Technology teaches methods for design and implementation ofreal-time distributed embedded computing applications. It offers students an opportunity forhands-on training with a real-world networked embedded system.
1.1 Problem Statement
This bachelor thesis’ objective was to design and prototype a new hardware platform that isrugged enough to endure everyday use in the lab by computer engineering students. The keyrequirements are:
• Mechanically and electrically rugged construction
• Realistic Control Path with support for Sensor Fusion
• Multiple Options for HCI1
• Wireless Sensor Network Integration
• Support for multiple micro-controller architectures
• Extensive Debugging Facilities for Students1Human-Computer Interaction
1

2 CHAPTER 1. INTRODUCTION
1.2 Structure of this Thesis
The following chapter gives a brief introduction to the context of this thesis. It presents a prede-cessor implementation and other works that explain underlying concepts or provide supplemen-tal information. A bachelor’s thesis that complements the proposed hardware platform with thenecessary system software implementation is also introduced.
A feasible system design is established in chapter 3. The modular composition of the sys-tem is detailed along with various logical concepts to fulfill all requirements from the problemstatement.
In chapter 4, an implementation for each module is set forth. This chapter covers the elec-tronic components employed and the circuits that put them to use. It also shows selected pre-layout circuit simulations and explains the schematic entry and layouting process.
The result of this work is discussed in chapter 5, which reveals the assembled prototype andoutlines measurement results of key electrical characteristics verified against the results obtainedby simulation from the previous chapter.
The last chapter concludes this thesis with a critical reflection about the practical and theo-retical work as well as its outcome. It summarizes the challenges faced during the developmentof the presented hardware platform.
Supplementary documentation in the form of schematics and source code for test programscan be found in Appendix A.

CHAPTER 2Related Work
2.1 A Platform for Teaching and Researching DistributedReal-Time Systems
Figure 2.1: Alexander Kößler’s ESE board (source: [28])
This works builds upon the concepts presented in Alexander Kößler’s master thesis. The basicmodular design philosophy is inherited from his work. Some concepts have been dropped, likethe explicit support for a remote workplace setup or the CPLD1-based multiplexed programmingchain. Others have been modified to make them more flexible and user-friendly. The examevaluation concept has evolved into a logic analyzer that reduces manual tasks in teaching andautomated grading. The electrical module interface was redesigned from scratch to adapt to theupdated requirements and new peripheral devices.
1Complex Programmable Logic Device
3

4 CHAPTER 2. RELATED WORK
2.2 A Modular, XML-based JTAG Programmer for EmbeddedDevices
One objective of this work was to integrate an existing micro-controller programmer implemen-tation. Martin Schmölzer’s programming software provides a flexible framework for program-ming different kinds of micro-controllers through the well-defined JTAG2 interface. The keyfeature is an advanced communication protocol that moves the complexity to support multiplemicro-controller families into the PC3-based host application. A legacy system approach usinga serial communication channel provided by an USB4-to-serial bridge is proposed. [28]
This work will foster the porting of Martin Schmölzer’s source code to a modern ARM5-based 32-bit micro-controller with an integrated USB device interface. While reducing compo-nent count and hence manufacturing costs, this measure will also streamline the system designand allow several add-on features to be implemented without requiring additional hardware.Removing the USB-to-serial bridge also removes the need for a proprietary device driver onthe host PC, therefore allowing a pure open-source implementation that works on virtually alloperating systems without any kernel drivers.
2.3 A modular software package for the Embedded SystemsEngineering Board
Jürgen Galler’s bachelor’s thesis presents the necessary software to operate the hardware out-lined in this work. It includes a ported version of Martin Schmölzer’s JTAG device softwarethat is binary compatible with the original host PC application. It additionally features are acommand-line driven logic analyzer utility that can acquire digital waveforms from the hard-ware and format them for viewing in the popular GTKWave application for Linux. Last but notleast, two virtual serial ports are provided by the device software that allow direct access to thetwo on-board communication buses.
The presented USB device implementation relies on kernel drivers to provide virtual serialports that connect the programmer and the buses. This limits its compatibility to the Linuxoperating system, since it employs “unusual” device descriptors that are supported badly onMicrosoft Windows and not at all on Apple Macintosh. A future enhancement could providean updated version of the device software that does not depend on kernel drivers. The resultingsystem would show improved performance and stability at the cost of requiring an adaption ofthe host PC applications. An example of this user-space-only approach is given by the logicanalyzer utility which is based on the open-source libusb library.
2Joint Test Action Group3Personal Computer4Universal Serial Bus5Advanced RISC Machine

CHAPTER 3System Design
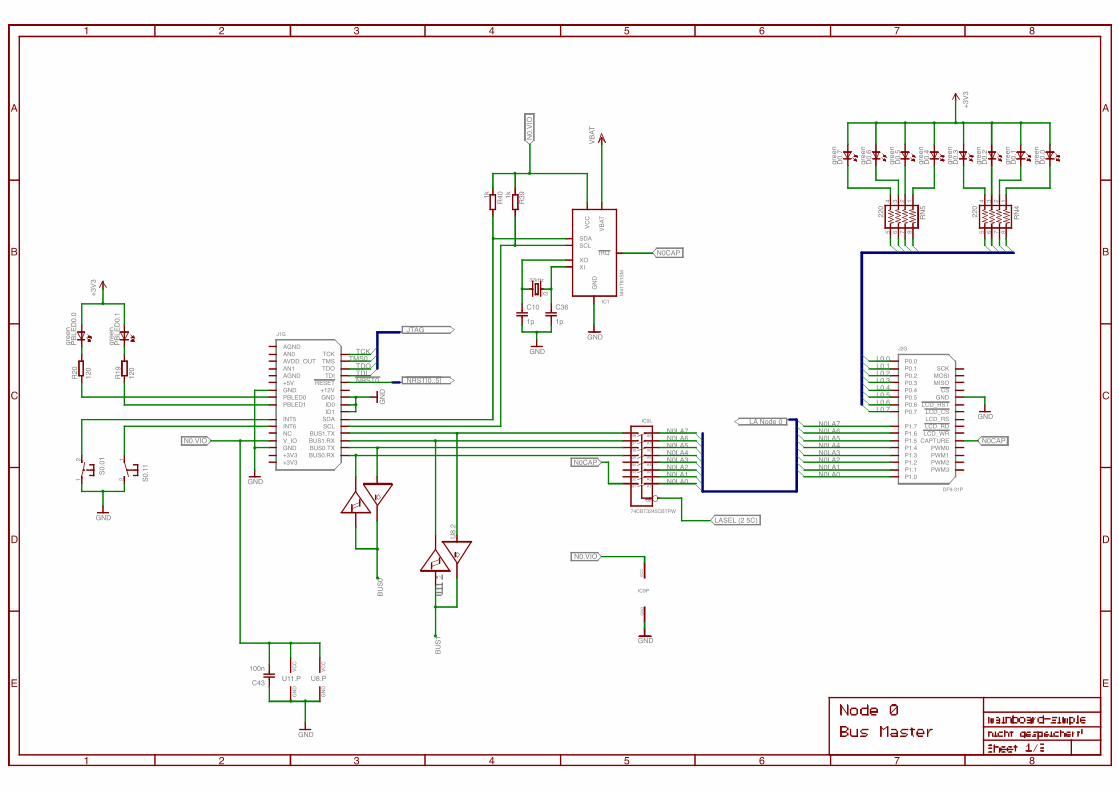
The presented hardware platform hosts four independent micro-controller nodes connected to aReal-Time network. Different peripheral devices for each node provide an extensive learningopportunity for students. A shared communication bus is included for Real-Time data transferbetween the four nodes. This concept was introduced by Alexander Kößler’s ESE1 board. [17]
This system extends the basic concept by providing a connection to a wireless sensor net-work via an included Zigbee interface.
Node 0Real-Time Clock
LED Bargraph
Node 3LED Matrix Display
Analog Potentiometers
Node 2 Hi-Res TFT Display
Node 1
LED Bargraph
Thermal Control Path
Analog Microphone
Seria
l Com
mun
icat
ion
Bus
ZigbeeBridge
Figure 3.1: Network and Peripheral Devices
1Embedded Systems Engineering
5

6 CHAPTER 3. SYSTEM DESIGN
Figure 3.1 presents the logical structure of the hardware platform. A large PCB2 shall hostall peripheral devices and provide sockets for pluggable Micro-controller Nodes. The variousperipheral devices available are summarized in Table 3.1.
Node 02 Push Buttons with LEDs3
8-LED bargraphReal-Time Clock with battery-backed oscillator and static memory
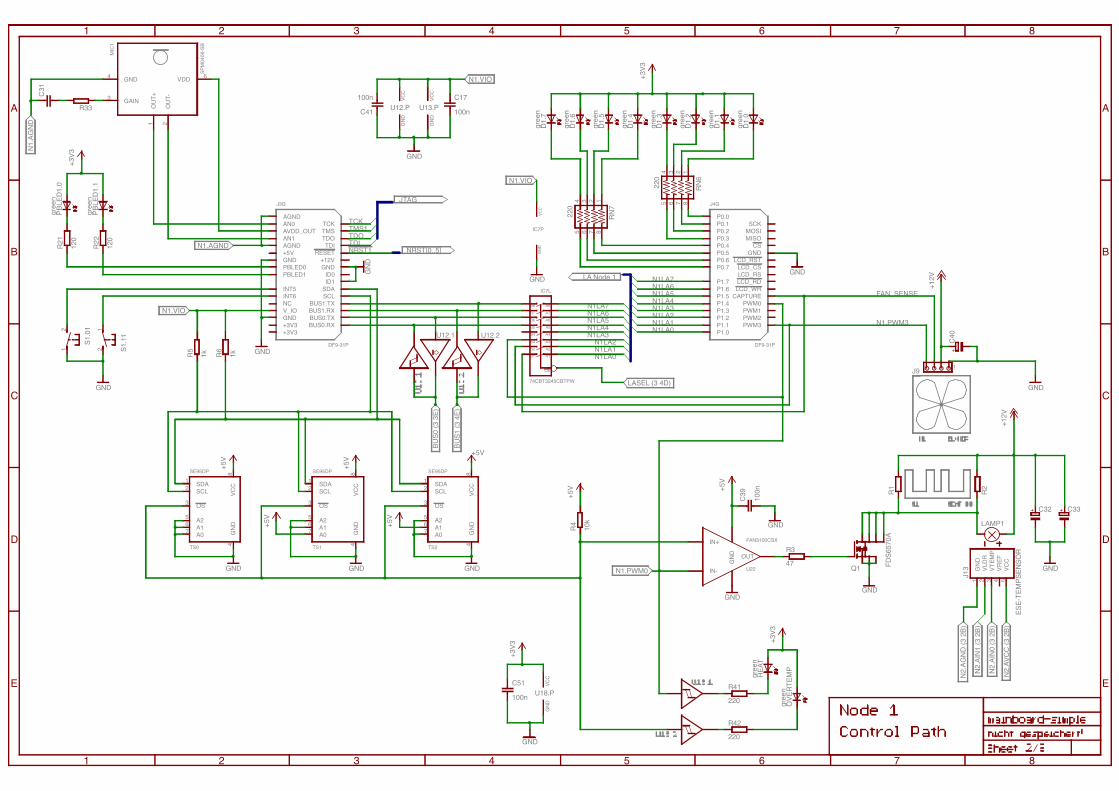
Node 1
2 Push Buttons with LEDs8-LED bargraphResistor Heating (see section 3.1)Fan3 Temperature SensorsAnalog Microphone
Node 22 Push Buttons with LEDsModular LCD4 or TFT5 displayESE analog temperature and luminosity measurement module
Node 32 Push Buttons with LEDs2 analog thumbwheel potentiometers6 digit LEDs matrix
Table 3.1: Node Peripheral Devices
The modular structure makes the system flexible to accommodate different micro-controllerarchitectures by designing pluggable CPU6 modules according to the specification in section 4.1of this thesis.
3.1 Thermal Control Path
The system’s primary focus is on the thermal control path which provides a learning platformfor control theory in combination with Real-Time networking. This control path is formed by aboard-mounted heat sink. Its temperature can be influenced by two devices:
1. Resistors for heating
2. A fan for cooling
Three digital temperature sensors provide redundant temperature feedback. All relevant controlsignals and sensors are connected to NODE 1. The digital temperature sensors output a signalto indicate an over-temperature condition if the measured temperature crosses a user-definedthreshold. This signal is used to shut down the heating circuit as a safety measure against exces-sive heating caused by erroneous node software.
2Printed Circuit Board6Central Processing Unit

3.2. REAL-TIME COMMUNICATION 7
Since this threshold is configurable via the node interface, an extra safeguard against mali-cious student programming has been introduced in the form of a fourth temperature sensor whichis only accessible by the system’s supervisory controller (see section 3.5). This fourth sensor canset a safety limit as well as report the measured temperature to a PC-based monitoring software.
An analog microphone is mounted close to the fan. It is connected to NODE 1 to allowloudness and frequency domain analysis of the fan noise. This provides an independent channelfor measuring the rotational speed and the radiated noise of the fan.
This setup provides a realistic control path that can be used for a variety of control theoryexercises, for example
• Fan control – Keeping the heat sink at a predefined temperature with random heat ingress
• Temperature profile tracking
• Creating a steady airflow with a predefined temperature
• “Silent” fan control with a fan noise limit
• . . .
3.2 Real-Time Communication
The system includes a Real-Time communication bus exclusive to the four Micro-controllerNodes. It employs a wired-AND communication scheme with one recessive and one dominantstate. A logic high level is defined as the recessive state. This state is maintained by terminationpull-up resistors. Any node can drive the bus into the dominant state by pulling it to groundpotential. This can be achieved with open-drain output drivers. Each node is connected to thebus through a bus coupling unit that translates the transmit line to open-drain and decouples thereceive line.
Figure 3.2: Bus Coupling Unit
The open drain driver ( ) makes sure that no high level can be driven onto the bus. TheSchmitt Trigger ( ) isolates the receive path and improves the noise immunity of the serial

8 CHAPTER 3. SYSTEM DESIGN
receiver. An example of bus communication is presented in Figure 3.3. It shows all relevantstates that can arise during node communication.
Node 0 TX
Node 1 TX
Node 2 TX
Node 3 TX
BUS
Figure 3.3: Bus communication example
BUS1
BUS1 is an exact copy of BUS0, except it also connects the wireless sensor network bridge. Itcan be used for a number of purposes, including:
• Backup channel for Real-Time communication
• Communication with a wireless network
• Runtime debugging
3.3 Wireless Bridge
The system includes a wireless sensor network node that acts as a bridge into a wireless IEEE7
802.15.4 network. This node is a participant of BUS1 to allow all Micro-controller Nodes tocommunicate with other boards or wireless sensor nodes via a dedicated relay application run-ning on the wireless bridge.
3.4 User Interfaces
Each Micro-controller Node is equipped with a set of simple digital user I/Os8. Two push buttonswith one LED each can be used for basic user interaction. Using the visual feedback from theLED, more elaborate functions like toggle or multi-state buttons can be implemented in software.Continuos set-points are entered via two potentiometers associated with NODE 3.
Bargraphs
NODE 0 and NODE 1 have additional arrays of 8 LEDs arranged as bar graphs. These can beused as a part of the user interface or as visual state indicators for debugging purposes.
7Institute of Electrical and Electronics Engineers8Input/Outputs

3.5. PROGRAMMING AND DEBUGGING INTERFACE 9
LCD/TFT display
NODE 2 has an interface that is capable of driving an industry standard LCD panel. The dis-play panel itself is attached as a modular PCB, which allows different panels to be used - seesection 4.2.
LED Matrix
NODE 3 is equipped with a 6-digit LED matrix display. Each character is composed of 5 x 7pixels, giving an overall number of 210 LEDs, each of which is independently addressable. Ashift register holds the pixel data for a full row while a 3-bit row-select signal is used to specifywhich row is addressed. A multiplexing sequence is required to illuminate all rows continuously.This sequence must be generated by NODE 3’s software.
3.5 Programming and Debugging Interface
An on-board companion controller provides a management interface to a host PC which offersprogramming and debugging services via an integrated USB device interface. The design is tai-lored towards easy integration of an existing modular software implementation. This softwarecontains an implementation of the low-level programming tasks to be run on the companioncontroller as well as a PC-based downloading application which is highly configurable and ex-tensible. [28]
Figure 3.4 shows the hard-wired connections of the companion controller. Designated con-nections for a micro-controller programming interface, a thermal monitor, a logic analyzer andtwo serial bus monitors are provided.
Programming Interface
The companion controller offers a program download feature that is used to update the inter-nal flash memory of Micro-controller Nodes and the included Zigbee bridge. A programmerproviding the vendor-independent IEEE 1149.1-2001 (JTAG) interface has been implemented.The “JTAG” standard is designed to support multiple devices sharing a single programminginterface. Each device to be programmed exposes a TAP9, which is composed of these signals:
TCK Test ClockTMS Test Mode SelectTDI Test Data In
TDO Test Data Out
The standard supports a very flexible wiring scheme. The most commonly used implemen-tation is a daisy-chained setup that allows the number of connected device to be discovered atrun-time by software. [1, 28]
9Test Access Port

10 CHAPTER 3. SYSTEM DESIGN
Node 0
Node 1
Node 2
Node 3
Parallel JTAG Companion Controller USB
IEEE 802.15.4 BridgeBUS0
BUS1
Logic Analyzer
Bus Taps
Figure 3.4: System Programmer Overview
Although most practical and flexible, this approach is affected by an erratum in the targetedATMega128 family of micro-controllers which makes it impossible to use page oriented datatransfer commands. Inability to use these commands results in severely degraded programmingperformance. [3]In an effort to avoid potential problems and performance penalties associated with softwarebased work-arounds, a parallel wiring scheme has been devised.
TMS0
USB
...
Node 0
Node 1 ProgrammerTMS1
TCK,TDI,TDO
Figure 3.5: Parallel JTAG scheme

3.5. PROGRAMMING AND DEBUGGING INTERFACE 11
The CLOCK, DATA IN and DATA OUT lines are connected to all devices in parallel while adedicated TEST MODE SELECT line to each programmable node is used to select the appropriatedevice for programming. All inactive devices that share the same clock and data lines must bekept in the TEST-LOGIC-RESET state. This state causes standard compliant devices to disabletheir output drivers on DATA OUT to avoid interfering with the active device. [1]
As it can be seen in Figure 3.6, applying a logic high (1) to the TEST MODE SELECT
input leads the TAP state machine into the TEST-LOGIC-RESET state within at most 5 TCKcycles. The state machine keeps idling in this state as long as the input is held at logic high.The programmer can therefore selectively access each device’s TAP without using any external
Figure 3.6: IEEE 1149.1-2001 TAP State Machine controlled by TMS (source: [1])
multiplexing hardware by using the associated TMS line and leaving all others at their inactive(high) level.
TMS0 Node 0 MicrocontrollerTMS1 Node 1 MicrocontrollerTMS2 Node 2 MicrocontrollerTMS3 Node 3 MicrocontrollerTMS4 Zigbee BridgeTMS5 External JTAG Chain
Table 3.2: TMS Association to Programmable Devices

12 CHAPTER 3. SYSTEM DESIGN
Bus Taps
The companion controller also serves as a serial bus bridge to aid with debugging serial dataprotocols. BUS0 and BUS1 are connected to hardware UART10 cores inside the companioncontroller. Data on BUS0 and BUS1 can be read and written, which allows for bus snooping(debugging) as well as fault injection and protocol robustness analysis.
Logic Analyzer
The companion controller reserves 32 dedicated data lines for capturing data from the fourMicro-controller Nodes. Each node has a directly connected 8-bit bus wired to the compan-ion controller. For added flexibility, bus switches have been added between each 8-bit bus andselected dedicated function signals like PWM11 or the communication bus I/O signals of eachnode. These are controlled by a shared active-low LASEL signal. While LASEL is asserted,the primary logic analyzer bus on all nodes should be placed in a High Impedance state to avoiddata corruption. Unused lines (see Table 3.3) may be driven regardless of the state of LASEL.
Bit Node 0 Node 1 Node 2 Node 3
7 Bus 0 TX6 Bus 0 RX5 Bus 1 TX4 Bus 1 RX3 – – – –2 – HEATREQ LCD_DDIR LEDMATRIX_SCL1 – FANPWM LCD_TEAR LEDMATRIX_SD0 Clock IRQ FANSENSE LCD_BACKLIGHT LEDMATRIX_LATCH
Table 3.3: Mapping of Special Node Functions to Logic Analyzer Bits
10Universal Asynchronous Receiver Transmitter11Pulse Width Modulation

CHAPTER 4Implementation
This chapter describes the three modules the system is composed of. The mainboard hosts thesystem power supply, Programming and Debugging Interface, Thermal Control Path, WirelessBridge, two Bus Coupling Units per node and all other node peripherals. It offers sockets forfour CPU modules and one LCD/TFT display.
The CPU module is a small pluggable PCB that hosts a micro-controller along with powersupplies and clock generation. It plugs into the mainboard and is held in place by the connec-tors. One module is required for each Real-Time network node. The LCD module is a separatepluggable PCB that mounts and interfaces the LCD panel.A complete system requires one mainboard, four CPU modules and one LCD module.
4.1 CPU Module
This module provides an abstraction layer between the mainboard and the employed micro-controller architecture. It contains a micro-controller along with its power supply and a crystaloscillator for clock generation.
Electrical Connection
The CPU module is connected by two keyed1 Hirose DF9-31 connectors. Table 4.1 and Fig-ure 4.1 descibe all I/O signals as seen from the CPU module.
1keying ensures that a connector will not be inserted the wrong way
13

14 CHAPTER 4. IMPLEMENTATION
AGND Analog GroundAN[0, 1] Analog Inputs
AVDD_OUT Analog supply voltage. Supplied by CPU module.PBLED_[0, 1] Push Button LED drive outputs
INT[5, 6] micro-controller Interrupt inputsRESET low-active micro-controller reset input. Should be driven open-drain.
NC no connectionV_IO I/O supply voltage. Supplied by CPU module.GND Ground (0V)+3V3 CPU module supply (+3.3V)
+5V CPU module supply (+5V)+12V CPU module supply (+12V)TCK JTAG clock inputTMS JTAG test mode select inputTDO JTAG test data outputTDI JTAG test data input
ID[0, 1] socket identification bitsSDA,SCL I2C interface
BUS[0, 1].TX Bus Transmit outputsBUS[0, 1].RX Bus Receive inputs
P0.[0..7] Port 0 (8 bit)P1.[0..7] Port 1 (8 bit)
SCK SPI2 clock outputMOSI SPI master out slave inMISO SPI master in slave out
CS SPI active low chip select outputLCD_RST LCD interface: controller reset output
LCD_CS LCD interface: chip select outputLCD_RS LCD interface: register select outputLCD_RD LCD interface: read strobe outputLCD_WR LCD interface: write strobe output
CAPTURE signal edge capture inputPWM[0..3] PWM outputs 0..3
Table 4.1: CPU module interface
Power Considerations
The CPU module can draw power from any of the supplied +12V , +5V or +3.3V lines. Thecombined power consumption must not exceed 1W .

4.2. LCD MODULE 15
(a) left connector (b) right connector
Figure 4.1: CPU Module Pin Locations
Implementation Details
The existing TTP/A3 implementation is designed to run on Atmel’s ATMega micro-controllers.To avoid porting the existing source code, a micro-controller of this family must be used. Addi-tionally, a second communication interface (BUS1) must also be provided by the CPU module.This requires a second UART, which is only included in the larger ATMega models.
The CPU module is populated with Atmel’s ATMega128A or ATMega1281 controller in the64-lead TQFP4 package. These micro-controllers offer all necessary peripheral cores (SPI, two-wire serial, multiple PWM units, two UARTs) and a large internal flash memory of 128KiB5. [8]The main clock is generated by an external 14.7456MHz crystal oscillator. This clock frequencyis required to ensure compatibility with the existing TTP/A implementation. A supply voltageof at least 4.5V is required to run at this clock speed. [2]The micro-controller draws power from the supplied +5V rail and derives an analog powersupply from the +12V rail using a ferrite bead for decoupling and a 5V low-noise linear volt-age regulator. The module further contains one red and one green LED for immediate statusindication.
4.2 LCD Module
This module is a small PCB that hosts the LCD panel assembly 32NHF0H by Seiko InstrumentsInc, which contains a high resolution TFT panel and an integrated driver IC6. [29]
3Time Triggered Protocol A4Thin Profile Plastic Quad Flat Package5Kilobyte = 1024 Byte6Integrated Circuit

16 CHAPTER 4. IMPLEMENTATION
Electrical Connection
The module is connected to the mainboard via a single Hirose DF9-31 header. This headerexposes an MIPI7-DBI8 Type B compliant interface.
Figure 4.2: LCD Controller Interface [27]
In this design, the 8-bit variant of the MIPI-DBI Type B Bus is used. The following signalsare routed through to the mainboard header.
CSX Chip SelectTE Tear Effect out (optional)
WRX Write StrobeRDX Read Strobe
DB[0..7] Bi-directional Data busRESX Controller Reset
The recommended I/O voltage ranges from 1.65V to 3.6V , while a voltage of 1.8V is statedas typical. [27, 29]Since the micro-controller I/O voltage is flexible and the display controller inputs are not overvoltage tolerant, this interface cannot be driven directly by the node I/O ports. A voltage trans-lator has been introduced to avoid destroying the display controller when using incompatiblevoltage levels. While this component does require an additional control signal to specify thedata flow direction on the (translated) data bus, the gained flexibility outweighs the additionaldesign complexity. An optional circuit has been included that derives this control signal fromthe read strobe input. In cases where this is undesired, the data direction signal can be drivenvia the node interface – the automatic generation circuit can be disabled by removing a solderjumper.
The system-side interface contains the following signals (as seen from the LCD module):
7Mobile Industry Processor Interface8Display Bus Interface

4.2. LCD MODULE 17
VIO I/O voltage inputGND Ground (0V )+3V3 Power Supply +3.3V
+5V Power Supply +5V+12V Power Supply +12V
BL_EN Backlight ControlDDIR Data Direction inputTEAR Tearing effect output
NC no connectionDATA[0..7] Data Bus (bi-directional)
WR Write Strobe inputRD Read Strobe input
DSEL Data/Command Select inputCS Chip Select input
RST Reset input
Table 4.2: LCD module interface
Backlight
The display panel is illuminated by a string of 6 LEDs connected in series. This provides thebest brightness uniformity, but also requires a high drive voltage of more than 20 Volts. Since thehighest available voltage is 12 Volts, this drive voltage must be generated by a step-up regulator.
Power Considerations
The LCD module can draw power from any of the supplied +12V , +5V or +3.3V lines. Thecombined power consumption does not exceed 3W .
Implementation Details
The LCD module contains an I/O voltage level conversion circuit that translates between theMicro-controller Node and the display controller. The conversion is done by an NXP Semicon-ductors 74ALVC164245, a 16 bit dual-supply translating transceiver. [20]
One of the two available 8-bit blocks is used in a fixed-direction configuration to translatethe display control signals. The second 8-bit block is used for the display data bus. Its directioncan either be configured by a dedicated signal from the Micro-controller Node or derived fromthe read strobe signal.
The backlight drive voltage is generated by Fairchild Semiconductor’s FAN5343, a mono-lithic constant current boost converter with a single-wire digital control interface. LED stringcurrent (and therefore brightness) can be adjusted in 32 steps by applying digital pulses to themodule’s BL_EN input. [12]

18 CHAPTER 4. IMPLEMENTATION
4.3 Mainboard
The mainboard hosts the system power supply, programming and debugging facilities, and allnode peripheral devices. It provides a number of external interfaces:
• Power supply inlet. Requires a stabilized +12V (nominal) source with at least 40W.
• USB Type B connector for device programming
• A JTAG interface for programming the companion controller [10]
• An additional ISP9 header for the companion controller (+3.3V serial port)
• An extension header with bus access and programming support (see schematics in Ap-pendix A)
• A header exposing BUS0 and BUS1 for debugging
The mainboard provides two regulated supply voltages to its components and submodules:+3.3V and +5V. Each voltage is generated by a non-isolated Point-of-Load synchronous buckconverter that can deliver 15W of continuos output power. [18]
The system power inlet is protected against over-current conditions by a fast blowing fuse.Unlimited reverse polarity protection is achieved by a P-channel MOSFET10 circuit. This circuitprovides a good tradeoff between part count and power loss and does not suffer from a significantvoltage drop. [11, 26]Red and green LED indicators show if the board supply voltage is applied correctly.
Heat Sink, Fan and Heating Circuit
The control path is constructed around an extruded aluminum heat sink (Figure 4.3b).
(a) Cooling Fan (b) Heat Sink (c) Heating Resistor
Figure 4.3: Control Path Components
9In-System Programming10Metal Oxide Semiconductor Field Effect Transistor

4.3. MAINBOARD 19
Two resistors in the TO-220 package (Figure 4.3c) are used to dissipate power into the heatsink to raise its temperature under direct control of NODE 1.
Figure 4.4: Heating Driver Circuit
Figure 4.4 shows the drive circuit for the heating resistors using NODE 1’s PWM0 signal. Adiscrete low side MOSFET gate driver [13] ensures fast switching performance which is desir-able to avoid nonlinear behavior of the circuit at higher switching frequencies. An incandescentlight bulb provides direct visual feedback of the resistor dropout voltage. When driven with asufficiently high PWM frequency, the brightness of the light bulb will reflect the average powerdissipation in the resistors.
A PWM-controlled radial blower (Figure 4.3a) is mounted close to the heat sink to createa forced airflow over the heat sink’s fins, thereby reducing its temperature. The selected 50mmradial fan provides a 4-wire interface that accepts a 21 kHz to 28 kHz PWM control signal tolimit the rotor speed. This concept makes use of the fan’s integrated power switching stagewhich reduces the overall component count for fan control. [16]A tachometer signal that generates two pulses per fan rotor rotation is fed back to the micro-controller’s capture input.
Companion Controller
The LPC176011 micro-controller by NXP Semiconductors is used as companion controller. This32-bit ARM Cortex M3-based micro-controller can be clocked at up to 120Mhz using an inte-grated PLL12. The on-chip USB 2.0 device is used for host PC communication. The devicesoffer up to 64KiB of SRAM13 and 512KiB of flash memory. [23]
The 32-bit logic analyzer bus is connected to the companion controller in groups of 8 bits.While it has not been possible to map out an entire 32-bit I/O port for capturing logic analyzer
11Any of the pin-compatible LPC1769/68/66/65/64 can be used.12Phase Locked Loop13Static Random Access Memory

20 CHAPTER 4. IMPLEMENTATION
data, care has been taken to place each group on a byte boundary in the controller’s ports. Thismakes it possible to use DMA14 transfers to capture the data with very little computationaloverhead.
The JTAG programmer’s CLOCK, DATA IN and DATA OUT lines are connected to an SPIperipheral core inside the LPC1760 to allow fast and efficient data transfers at up to 50 MHz,depending on the configured internal bus clock frequency. [23]
Martin Schmölzer’s XML15-based programmer software [28] was designed to run on theAVR micro-controller family. The software intended to run on the companion controller containsa port of Martin Schmölzer’s device software as well as several feature enhancements includingthe logic analyzer and bus taps. [14]Table 4.3 shows the pin mapping for all major function blocks of the companion controller.
TDO P0.0 JTAG Data Out coming from all programmable devicesTDI P0.9 JTAG Data In going to all programmable devicesTCK P1.31 JTAG clock outputTMS0 P1.24 JTAG TMS for NODE 0TMS1 P1.25 JTAG TMS for NODE 1TMS2 P1.26 JTAG TMS for NODE 2TMS3 P1.27 JTAG TMS for NODE 3TMS4 P1.28 JTAG TMS for the Zigbee BridgeTMS5 P1.29 JTAG TMS for the external scan chainRST0 P1.0 NODE 0 ResetRST1 P1.1 NODE 1 ResetRST2 P1.4 NODE 2 ResetRST3 P1.8 NODE 3 ResetRST4 P1.10 Zigbee Bridge ResetRST5 P1.9 external scan chain resetLA Node 0 P0.0..7 JTAG Logic Analyzer bus for NODE 0LA Node 1 P0.16..23 JTAG Logic Analyzer bus for NODE 1LA Node 2 P1.16..23 JTAG Logic Analyzer bus for NODE 2LA Node 3 P2.0..7 JTAG Logic Analyzer bus for NODE 3LASEL P1.14 Logic analyzer special function selector (active high)PROGLED0 P2.11 General Purpose Programmer LED (green)PROGLED1 P2.12 General Purpose Programmer LED (green)PROGLED2 P2.13 General Purpose Programmer LED (green)PROGLED3 P0.11 General Purpose Programmer LED (red)
Table 4.3: Companion Controller Pin Assignment
Two kinds of programming interfaces are provided to program the companion controller
14Direct Memory Access15eXtensible Markup Language

4.3. MAINBOARD 21
itself. A serial ISP header can be used in “production” environments to allow easy firmwareuploading. The interface for flash programming uses a simple text-based serial protocol. [24]Full symbolic debugging can be performed by using the 20-pin standard ARM JTAG header.
Bus Components
The communication busses are driven by dual-gate little logic 74LVC2G07 open drain drivers.Bus isolation is performed by 74LVC2G17 Schmitt triggers. [21, 22]
Passive termination pull-up resistors matched to the trace impedance are located at bothends of the buses. This should allow to operate the bus at frequencies way beyond the maximumusable baud rate of the targeted micro-controllers. [5, 15]
LED Matrix
A 6-digit LED matrix is connected to NODE 3. The matrix is organized in 7 rows by 30 columns.Rows are selected by a 3-to-8 line decoder in conjunction with one high side P-channel MOSFETfor each row.
Figure 4.5: LED Matrix High Side
The columns are controlled by constant current low-side LED drivers. The CAT4016 byON Semiconductor is a cascadable 16-channel constant current LED driver that is internallyorganized as a shift register. [25]A column of 30 LEDs is driven by two 16-bit LED drivers, leaving each LSB16 unused. Thecascaded digital shift register ports are connected to NODE 3’s SPI interface.
A multiplexing sequence is required to display all 7 rows in a round-robin fashion. If thissequence is driven fast enough, the rows will appear continuously lit to a human observer.
16Least Significant Bit
22 CHAPTER 4. IMPLEMENTATION
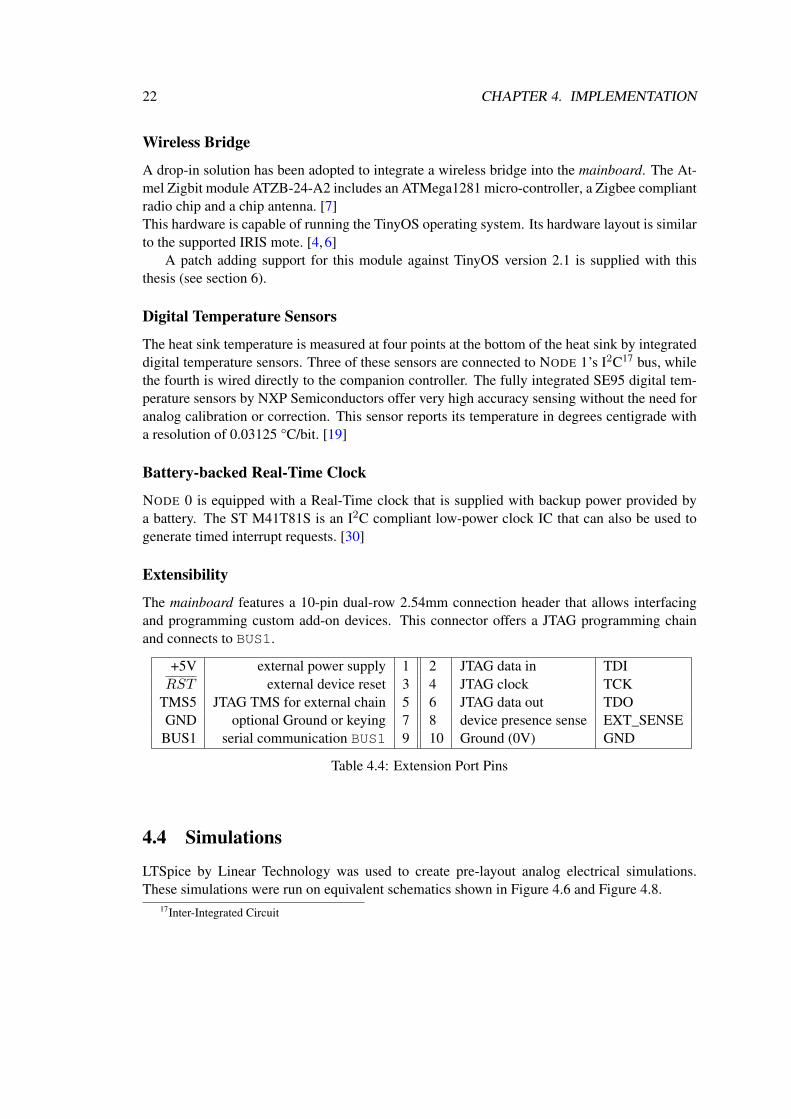
Wireless Bridge
A drop-in solution has been adopted to integrate a wireless bridge into the mainboard. The At-mel Zigbit module ATZB-24-A2 includes an ATMega1281 micro-controller, a Zigbee compliantradio chip and a chip antenna. [7]This hardware is capable of running the TinyOS operating system. Its hardware layout is similarto the supported IRIS mote. [4, 6]
A patch adding support for this module against TinyOS version 2.1 is supplied with thisthesis (see section 6).
Digital Temperature Sensors
The heat sink temperature is measured at four points at the bottom of the heat sink by integrateddigital temperature sensors. Three of these sensors are connected to NODE 1’s I2C17 bus, whilethe fourth is wired directly to the companion controller. The fully integrated SE95 digital tem-perature sensors by NXP Semiconductors offer very high accuracy sensing without the need foranalog calibration or correction. This sensor reports its temperature in degrees centigrade witha resolution of 0.03125 °C/bit. [19]
Battery-backed Real-Time Clock
NODE 0 is equipped with a Real-Time clock that is supplied with backup power provided bya battery. The ST M41T81S is an I2C compliant low-power clock IC that can also be used togenerate timed interrupt requests. [30]
Extensibility
The mainboard features a 10-pin dual-row 2.54mm connection header that allows interfacingand programming custom add-on devices. This connector offers a JTAG programming chainand connects to BUS1.
+5V external power supply 1 2 JTAG data in TDIRST external device reset 3 4 JTAG clock TCK
TMS5 JTAG TMS for external chain 5 6 JTAG data out TDOGND optional Ground or keying 7 8 device presence sense EXT_SENSE
BUS1 serial communication BUS1 9 10 Ground (0V) GND
Table 4.4: Extension Port Pins
4.4 Simulations
LTSpice by Linear Technology was used to create pre-layout analog electrical simulations.These simulations were run on equivalent schematics shown in Figure 4.6 and Figure 4.8.
17Inter-Integrated Circuit

4.4. SIMULATIONS 23
LED Matrix High Side
The LED Matrix high-side driver was simulated to verify its correctness. A P-channel MOSFETarray is used to select one out of seven rows which are driven at their low side by a shift registerchain. The gate signals are generated by a 3-to-8 line demultiplexer with inverted outputs. Since
M1
NTR4171 V1
3.3V2
PULSE(3.3 0 10us 20n 20n 100us 1000us)
R1
270
R2
5
.tran 0 10.4u 9.8u
Figure 4.6: Equivalent Schematics for Simulation
the high side needs to supply all 30 LEDs in parallel, a total current draw of up to 600mA canbe expected. The expected switching waveform of a single high-side row driver is shown inFigure 4.7, which shows an estimated timing of the drain-source current (blue) in response to a1-to-0 transition at the MOSFET’s gate input (green).
160ns 170ns 180ns 190ns 200ns 210ns 220ns 230ns 240ns 250ns 260ns 270ns0.0V
0.3V
0.6V
0.9V
1.2V
1.5V
1.8V
2.1V
2.4V
2.7V
3.0V
3.3V
0mA
60mA
120mA
180mA
240mA
300mA
360mA
420mA
480mA
540mA
600mA
660mAV(n002) I(R2)
--- C:\Dokumente und Einstellungen\arvid\Desktop\pchan-ledmatrix.raw ---
Figure 4.7: LED matrix row control voltag vs. LED current

24 CHAPTER 4. IMPLEMENTATION
Heating Driver
The heating resistors are driven by an N-channel MOSFET circuit. A simplified equivalentcircuit shown in Figure 4.8 was used for this simulation. The simulation in Figure 4.9 provides a
M1
FDS8878
R1
10
V1
12
R2
10
R3
100
V2
PULSE(0 5 10n 10n 10n 900u 1m)
R4
47
.include fan8878.subckt
.tran 3u
Figure 4.8: Equivalent schematics for heating simulation
timing estimate of the gate drive current (blue), MOSFET power loss (red) and resistor heatingcurrent (turquoise) in response to a step input (green).
0ns 60ns 120ns 180ns 240ns 300ns0.0V
0.5V
1.0V
1.5V
2.0V
2.5V
3.0V
3.5V
4.0V
4.5V
5.0V
-0.2A
0.0A
0.2A
0.4A
0.6A
0.8A
1.0A
1.2A
1.4A
1.6A
1.8A
2.0A
2.2A
2.4A
-0.8W
0.0W
0.8W
1.6W
2.4W
3.2W
4.0W
4.8W
5.6W
6.4W
7.2W
8.0WV(N002)*Ix(M1:D)+V(N004)*Ix(M1:G) V(n003) I(R4) I(R1)+I(R2)
--- C:\Dokumente und Einstellungen\arvid\Desktop\projects\ese_board\docs\heizung.raw ---
Figure 4.9: Heating control voltag vs. resistor current and MOSFET power dissipation

4.5. SCHEMATICS AND PARTS LIBRARIES 25
4.5 Schematics and Parts Libraries
All PCBs were designed using the CadSoft EAGLE schematic capture and PCB design software.This program allows consistent schematic editing and layouting by using back-annotation tosynchronize the schematic while editing the layout and vice versa. [9]
Most of the definitions for electronic components used in this design are not included inEAGLE’s parts libraries. The missing libraries were created from the vendor-supplied datasheets.
4.6 PCB Design
An initial mechanical system layout plan (Figure 4.10) was created using an open-source CAD18
software.
Figure 4.10: Preliminary Mechanical Mainboard Layout
This preliminary mechanical layout was then conveyed to the EAGLE EDA19 software. Inorder to keep the manufacturing effort to a minimum, surface mounted electronic componentswere chosen in favor of through-hole parts whenever possible. Furthermore, all electronic com-ponents are placed on the top side of the mainboard. Boards with single-side components caneven be assembled “manually”, that is by placing the components by hand and then using areflow process for soldering.
All PCBs were routed on two copper layers which allows very cost-effective manufacturing.The EAGLE autorouter did not produce satisfactory results. Figure 4.12 shows a section fromthe bottom copper layer on the mainboard, routed automatically and by hand. The autorouter
18Computer-Aided Design19Electronic Design Automation

26 CHAPTER 4. IMPLEMENTATION
Figure 4.11: Final Mechanical Mainboard Layout
(a) Manual Routing (b) EAGLE Autorouter
Figure 4.12: Manual Routing vs. Autorouter Results
failed to create a continuous ground plane from the defined copper pour area (see Figure 4.12b).It also ignored the analog ground areas and left behind 40 unrouted connections which wouldhave required a final manual routing pass.
In order to create boards with improved electrical characteristics, the autorouter result wasdiscarded and a complete manual routing was performed. The FreeRoute push & shove routingprogram [31] was used to quickly create a first routing pass. Subsequent refinements were donein the EAGLE layout editor, since exporting from EAGLE to FreeRoute is not a lossless processwhen certain advanced layout features are used.

CHAPTER 5Results
5.1 Hardware
The completely assembled prototype mainboard is presented in Figure 5.1. This PCB was as-
Figure 5.1: The new Embedded Systems Engineering Mainboard
sembled by hand, manual pick-and-place was followed by a reflow cycle and a small numberof reworks with a soldering iron. As a last step, the through-hole components were soldered inmanually.
The thermal inertia of the control path is considerable. Even at a heat ingress of P = U2
R =1447.5 = 19.2W , it takes several seconds of heating until the temperature of the heat sink begins torise noticeably. This can be considered an advantage, since slower control cycles can be used. Alater version of the hardware could also be equipped with smaller heating resistors for increasedpower dissipation.
27

28 CHAPTER 5. RESULTS
5.2 Measurements
Since the heating circuit is one of the most important parts of this design, its performance wasevaluated using an oscilloscope. A comparison against the simulated characteristics is shown inFigure 5.2. Some of simulated parameters could not be obtained for measurement. The drivesignal and the voltage drop across the MOSFET are inverted in the measured waveform.
0ns 60ns 120ns 180ns 240ns 300ns0.0V
0.5V
1.0V
1.5V
2.0V
2.5V
3.0V
3.5V
4.0V
4.5V
5.0V
-0.2A
0.0A
0.2A
0.4A
0.6A
0.8A
1.0A
1.2A
1.4A
1.6A
1.8A
2.0A
2.2A
2.4A
-0.8W
0.0W
0.8W
1.6W
2.4W
3.2W
4.0W
4.8W
5.6W
6.4W
7.2W
8.0WV(N002)*Ix(M1:D)+V(N004)*Ix(M1:G) V(n003) I(R4) I(R1)+I(R2)
--- C:\Dokumente und Einstellungen\arvid\Desktop\projects\ese_board\docs\heizung.raw ---
(a) Simulation (b) Measurement
Figure 5.2: Heating Driver Circuit: Simulation vs. Measurement
A timing deviation of a factor ≈ 2 can be observed. Still, the response time of < 300ns isexcellent. Since the typical PWM frequency will not be higher than 25 kHz, the rise time is veryshort in comparison to the duty cycle, yielding a sufficiently linear response.
5.3 Change Requests
The prototyping process revealed several improvements and fixes to be implemented in a subse-quent version of the hardware.
BOM fixes: Some electronic components were referenced incorrectly in the schematics. Thisled to wrong part variants being ordered and assembled onto the boards. Affected compo-nents are the LED matrix driver ICs and the LED arrays.
Companion controller oscillator: The main oscillator for the companion controller was se-lected to provide 8 MHz, while Jürgen Galler’s software expects a 12 MHz main clock.The faster clock speed allows to use a secondary PLL as clock source for the USB subsys-tem, which increases the flexibility of main PLL and therefore the choice of CPU clockspeeds.
Bus Pull-Up Resistor Values: Incorrect resistance values for the bus pull-ups were selectedthat exceeded the drive capability of the employed bus drivers.

5.3. CHANGE REQUESTS 29
Temperature Sensor Power Supply: A power supply filter circuit should be introduced to im-prove the measurement error of the digital temperature sensors. This is suggested by theSE95 data sheet and only requires two extra passive components per sensor.
Temperature Sensor Package: The SE95 temperature sensor was used in the very small TSSOP8package to save board space. Since the power transistor must contact the same surface, theheight difference of ≈ 1mm must be compensated by an elastic thermal gap filler. A newhardware revision could use the SE95 in the same SO8 package as the transistor, improv-ing the thermal conductance to the temperature sensors because of the reduced distance tothe heat sink.
USB SoftConnect: The implemented self-powered USB device does not correctly terminatethe host connection when it powers down. As a result, the host device drivers stay activeand produce errors when accessed. The situation can be rectified by un-plugging the USBcable. Although the impact should be minimal in practice, a fix should be implementedby using the LPC1760’s SoftConnect feature.
TX/RX swap: An error exists in the schematics for the CPU module; the RX/TX pairs of bothbus links are swapped. This error prohibits the use of hardware UARTs, but does not affectsoftware UART implementations.


CHAPTER 6Conclusion
The presented work covers the whole electronic design workflow. A system design was pro-posed, electronic components have been selected and the circuits using them were designed.Finally, the PCB layouts were constructed, the boards were manufactured and assembled, andbasic test software was written. This allowed me to gain insight into some of the challenges atdifferent stages of an electronic product design.
PCB Layout
The ambitious design goals – only two copper layers and single side component placement –proved to be difficult to meet. The EAGLE auto-router was unable produce good results underthe given circumstances. The solution was manual push and shove routing using a third partyJava program. While the provided user interface was a bit hard to get used to, the softwarequickly produced usable results. The main advantage over EAGLE’s built-in layout editor isthe ability to respect design criteria like trace width and minimum distances between copperareas during manual routing. This creates a kind of semi-automatic routing environment whichis much more flexible than the auto-router.
Software Performance
The mainboard shows some of the limits of the EAGLE software package. The design has over800 electrical connections on an area of 320cm2. Copper pour areas are normally computedwithin a fraction of a second while the same calculation in this design takes about 30 secondsto complete. This makes working with polygons harder than usual. The autorouter worked formore than 5 hours before finishing up.1 Since all computationally heavy algorithms in EAGLEseem to execute in a single thread, the program does not benefit from modern multi-core CPUs.
1This test was conducted using EAGLE 5.11.0 with default autorouter settings on an Apple MacBook, Intel Core2 Duo 2GHz, 4GB DDR3 RAM, running Mac OS X 10.6.7
31

32 CHAPTER 6. CONCLUSION
Electronic Component Supply Chain
The presented system design requires about 100 distinct electronic components. Most of thoseare easy-to-acquire mainstream components like resistors, capacitors or standard logic ICs.Some of the more specialized components include micro-controllers, power supply modules,surface mount connectors or mechanical components such as the fan or the heat sink. Thoserarer components are only stocked by a few distributors, which made it necessary to split theBOM2 into three separate orders at different distributors to come by the required parts. Even so,the Hirose DF9-31 surface mount connector went out of stock with almost all distributors duringtwo months spent on PCB design.3 As a result of this supply shortage, only the mainboard andtwo Micro-controller Nodes could be assembled and tested for prototyping.
Simulation Accuracy
All design-time simulations were obtained by a numerical pre-layout simulation process thatdoes not respect design parameters like trace resistance or component placement. The measuredresult timing deviates by a factor of ≈ 2. This leads me to conclude that pre-layout simulationare a well-suited method to study the expected behavior of a circuit when taken with a grain ofsalt.
Outlook
This thesis presented a working prototype of an up-to-date Embedded Systems Engineeringlearning platform. I hope that it will spark ideas for a lot of interesting applications in thefield of distributed embedded computing and embedded-related HCI once it is in use in actualcourses at the university.A number of future enhancements could enrich the learning experience of this work even more.
Remote workplace configurations can be established by placing a “sandwich” board betweenthe mainboard and the CPU modules. This additional board can be equipped with a pow-erful FPGA4 to implement data snooping and protocol analysis in hardware.
Upgraded CPU modules with stronger processors or more memory can be designed with min-imal effort and manufacturing costs.
Battery powered remote sensors can deliver measurements wirelessly over the Zigbee radiochannel. These modules can be produced cost-effectively and programmed using themainboard’s external programming connector.
2Bill of Materials3The manufacturing facilities of the Hirose Electric Group were hit in the 2011 series of earthquakes in Japan.4Field-Programmable Gate Array

APPENDIX ASchematics
Mainboard
Peripherals for NODE 0 Peripherals for NODE 1
Peripherals for NODE 2 Peripherals for NODE 3
LED MatrixCompanion Controller withprogramming interfaces
Power supply and Bus Taps Zigbee Controller
CPU Module
Micro-controller and AnalogPower Supply
Node Interface connectors
LCD Module
33
OE
A1A2A3A4A5A6A7A8
B1B2B3B4B5B6B7B8
GND
VCC
LA Node 0
JTAG
DF9-31P
gree
n
gree
n
gree
n
gree
n
gree
n
gree
n
gree
n
gree
n
220
220
+3V3
GND
gree
n
gree
n
120
120
+3V3
M41
T81S
M
1p 1p
GND
GND
VBAT
GND
GND
1k1k
GND
100n
GND
74CBT3245CBTPW
GND
+3V3+3V3GNDV_IONCINT6INT5
PBLED1PBLED0GND+5VAGNDAN1AVDD_OUTAN0AGND
TCKTMSTDOTDI
RESET+12VGND
ID0ID1
SDASCL
BUS1.TXBUS1.RXBUS0.TXBUS0.RX
J1G
P1.7P1.6P1.5P1.4P1.3P1.2P1.1P1.0
P0.7P0.6P0.5P0.4P0.3P0.2P0.1P0.0
SCKMOSIMISO
CSGND
LCD_RSTLCD_CSLCD_RSLCD_RDLCD_WR
CAPTUREPWM0PWM1PWM2PWM3
J2G
D0.0
D0.1
D0.2
D0.3
D0.4
D0.5
D0.6
D0.7
18
RN4
27
36
45
18
RN5
27
36
45
12 S0
.11
12
S0.0
1
PBLE
D0.0
PBLE
D0.1
R19
R20
XIXO
SCLSDA
IRQ
VCC
VBAT
GND
IC1X3
32kHz
C10 C36
R39
R40
U8.2
U8.P
GND
VCC
U11.P
GND
VCC
C43
IC9L
IC9P
NRST[0..5]NRST0
TCKTMS0
TDOTDI
L0.7L0.6L0.5L0.4L0.3L0.2L0.1L0.0
N0LA0N0LA0
N0LA1N0LA1
N0LA2N0LA2
N0LA3N0LA3
N0LA4N0LA4
N0LA5N0LA5
N0LA6N0LA6
N0LA7N0LA7
BUS1
BUS0
N0CAP
N0CAP
N0CAP
N0.V
IO
N0.VIO
N0.VIO
LASEL (2 5C)
A
B
C
D
E
1 2 3 4 5 6 7 8
A
B
C
D
E
1 2 3 4 5 6 7 8
OE
A1A2A3A4A5A6A7A8
B1B2B3B4B5B6B7B8
GND
VCC
LA Node 1
JTAG
DF9-31P DF9-31P
FDS6
570A
+12V
GND
47
+5V
GND
+5V
+5V
+5V
GNDGNDGND
10k
+5V
+5V
+5V
1k 1k
GND
+12V
ESE-
TEM
PSEN
SOR
gree
n
gree
n
gree
n
gree
n
gree
n
gree
n
gree
n
gree
n
220
220
+3V3
GND
gree
n
gree
n
120
120
+3V3
FAN3100CSX
GND
GND
GND
100n
GND
GND
GND
100n
100n
74CBT3245CBTPW
GND
gree
n
gree
n
220
220
+3V3
100n
+3V3
GND
+3V3+3V3GNDV_IONCINT6INT5
PBLED1PBLED0GND+5VAGNDAN1AVDD_OUTAN0AGND
TCKTMSTDOTDI
RESET+12VGND
ID0ID1
SDASCL
BUS1.TXBUS1.RXBUS0.TXBUS0.RX
J3G
P1.7P1.6P1.5P1.4P1.3P1.2P1.1P1.0
P0.7P0.6P0.5P0.4P0.3P0.2P0.1P0.0
SCKMOSIMISO
CSGND
LCD_RSTLCD_CSLCD_RSLCD_RDLCD_WR
CAPTUREPWM0PWM1PWM2PWM3
J4G
LAMP1
R1 R2
GND
4VC
C8
SDA1SCL2
OS3
A25A16A07
TS0
SE95DP
GND
4VC
C8
SDA1SCL2
OS3
A25A16A07
TS1
SE95DPG
ND4
VCC
8
SDA1SCL2
OS3
A25A16A07
TS2
SE95DP
Q1
R3
R4
R5 R6
J9 1
GND
1VL
DR2
VTEM
P3
VREF
4VC
C5J1
3
D1.0
D1.1
D1.2
D1.3
D1.4
D1.5
D1.6
D1.7
18
RN6
27
36
451
8
RN7
27
36
45
12 S1
.11
12
S1.0
1PB
LED1
.1
PBLE
D1.0
R21
R22
VDD 6GND4
GAIN3
OUT
+1
OUT
-2
MIC
1
SPM
0406
-SB
R33
C31
OUT
IN+
IN-
GND
U22
C32 C33
C39
C40U12.1 U12.2
U12.P
GND
VCC
U13.P
GND
VCC
C17
C41
IC7L
IC7P
U18.P
GND
VCC HE
AT
OVE
RTEM
P
R41
R42
C51
NRST[0..5]
TCKTMS1TDOTDINRST1
N1.PWM0
N1.PWM3
FAN_SENSE
N1LA0
N1LA0
N1LA6
N1LA6
N1LA7
N1LA7
N1LA1
N1LA1
N1LA2
N1LA2
N1LA3
N1LA3
N1LA4
N1LA4
N1LA5
N1LA5N1.VIO
N1.VIO
N1.VIO
N1.A
GND
N1.AGND
N2.A
IN0
(3 2
B)
N2.A
IN1
(3 2
B)
N2.A
GND
(3 2
B)
N2.A
VCC
(3 2
B)
BUS1
(3 4
E)
BUS0
(3 3
E)
LASEL (3 4D)
A
B
C
D
E
1 2 3 4 5 6 7 8
A
B
C
D
E
1 2 3 4 5 6 7 8
+ +
+

OE
A1A2A3A4A5A6A7A8
B1B2B3B4B5B6B7B8
GND
VCC
LA Node 2
JTAG
DF9-31P
DF9-31P
DF9-
31P
GND
GND
+3V3
+5V
+12V
GND
gree
n
gree
n
120
120
+3V3
GND
100n
GND
GND
100n
74CBT3245CBTPW
GND
GND
+5V
+3V3+3V3GNDV_IONCINT6INT5
PBLED1PBLED0GND+5VAGNDAN1AVDD_OUTAN0AGND
TCKTMSTDOTDI
RESET+12VGND
ID0ID1
SDASCL
BUS1.TXBUS1.RXBUS0.TXBUS0.RX
J5G
P1.7P1.6P1.5P1.4P1.3P1.2P1.1P1.0
P0.7P0.6P0.5P0.4P0.3P0.2P0.1P0.0
SCKMOSIMISO
CSGND
LCD_RSTLCD_CSLCD_RSLCD_RDLCD_WR
CAPTUREPWM0PWM1PWM2PWM3
J6G
VIO
GND
+3V3
GND
+5V
GND
+12V
GND
BL_E
NDD
IRNCNCNCTE
ARNCNC
GND
DATA
0
GND W
R RDDS
EL CS RST
J12C
DATA
1DA
TA2
DATA
3DA
TA4
DATA
5DA
TA6
DATA
7
12 S2
.11
12
S2.0
1PB
LED2
.1
PBLE
D2.0
R23
R24
U14.
1
U14.
2
U14.P
GND
VCC
U15.P
GND
VCC
C42
C44
IC6L
IC6P
1 2 3 4 5 6
JP9
NRST[0..5]
N2LA0N2LA0
N2LA1N2LA1
N2LA2N2LA2
N2LA3N2LA3
N2LA4N2LA4
N2LA5N2LA5
N2LA6N2LA6
N2LA7N2LA7
D_IO
0D_IO0
D_IO
1
D_IO1
D_IO
2
D_IO2 D_IO
3
D_IO3
D_IO
4
D_IO4
D_IO
5
D_IO5
D_IO
6
D_IO6
D_IO
7
D_IO7
D_W
R
D_WR
D_RD
D_RD
D_RS
D_RS
D_CS
D_CS
D_RS
T
D_RST
N2.IOVCC
N2.IOVCC
N2.IO
VCC
N2.IO
VCC
BUS1
BUS0
N2.A
IN0
(2 8
E)
N2.A
IN1
(2 8
E)
N2.A
GND
(2 7
E)
N2.A
VCC
(2 8
E)
LASE
L (4
6C)
A
B
C
D
E
1 2 3 4 5 6 7 8
A
B
C
D
E
1 2 3 4 5 6 7 8

Node 3 SPI
Node
3 S
PI
OE
A1A2A3A4A5A6A7A8
B1B2B3B4B5B6B7B8
GND
VCC
JTAG
LA Node 3
DF9-31PDF9-31P
GND
gree
n
gree
n
120
120
+3V3
GND
10k 10k
GND
100n
GND
100n
74CBT3245CBTPW
GND
+5V
100n
+3V3+3V3GNDV_IONCINT6INT5
PBLED1PBLED0GND+5VAGNDAN1AVDD_OUTAN0AGND
TCKTMSTDOTDI
RESET+12VGND
ID0ID1
SDASCL
BUS1.TXBUS1.RXBUS0.TXBUS0.RX
J7G
P1.7P1.6P1.5P1.4P1.3P1.2P1.1P1.0
P0.7P0.6P0.5P0.4P0.3P0.2P0.1P0.0
SCKMOSIMISO
CSGND
LCD_RSTLCD_CSLCD_RSLCD_RDLCD_WR
CAPTUREPWM0PWM1PWM2PWM3
J8G
12 S3
.11
12
S3.0
1PB
LED3
.1
PBLE
D3.0
R25
R26
RV1 RV2
U16.
1
U16.
2
U16.P
GND
VCC
U17.P
GND
VCC
C45
C46
IC5L
IC5PC47
NRST[0..5]
SCLK
SCLK
MOSI
MOSI
LATCH
LATCH
SELECT0SELECT1SELECT2TCK
TMS3TDOTDI
N3LA0
N3LA0
N3LA1
N3LA1
N3LA2
N3LA2
N3LA3
N3LA3
N3LA4
N3LA4
N3LA5
N3LA5
N3LA6
N3LA6
N3LA7
N3LA7 N3.PWM0 (5 1E)
BUS1
BUS0
N3.IOVCC (5 2D)
LASEL (6 6B)
MISO
A
B
C
D
E
1 2 3 4 5 6 7 8
A
B
C
D
E
1 2 3 4 5 6 7 8

Node
3 S
PI
Node 3 SPI
1 16
1 16
TA07-11 TA07-11 TA07-11 TA07-11 TA07-11 TA07-11
CAT4016
CAT4016
74AH
C138
PW
+3V3
100n
GND
+3V3
100n
GND
+3V3
100n
GND
+3V3
100n
GND
+3V3
100n
GND
+3V3
100n
GND
+3V3
100n
GND
GND
GND
+3V3
GND
GND
+3V3
270R
270R
3k
GND
3k
GND
100n
1u
1u
GND
+3V3
GND
GND
R1R2R3R4R5R6R7
C1 C2 C3 C4 C5
LM1
R1R2R3R4R5R6R7
C1 C2 C3 C4 C5LM2
R1R2R3R4R5R6R7
C1 C2 C3 C4 C5
LM3
R1R2R3R4R5R6R7
C1 C2 C3 C4 C5
LM4
R1R2R3R4R5R6R7
C1 C2 C3 C4 C5
LM5
R1R2R3R4R5R6R7
C1 C2 C3 C4 C5
LM6
CLKSOUTSIN
LATCH
RSET
VDD
GND
IC2
BLANK
CLKSOUTSIN
LATCH
RSET
VDD
GND
IC3
BLANK
A1
B2
C3
G2A
4G
2B5
G1
6
Y77
Y69
Y510
Y411
Y312
Y213
Y114
Y015
IC4
816
IC4P
GND
VCC
U1
C1
U2
C2
U3
C3
U4
C4
U5
C5
U6
C6
U7
C7 C11
234 5
67
1
RN28
2345 6 7
1
RN3
8
R17
R18
C30
C37
C38
ROW[0..6]
COL1
COL1COL2
COL3
COL4
COL5
COL5COL6
COL6COL7
COL8
COL9
COL1
0
COL10COL1
1
COL11COL1
2CO
L13
COL1
4CO
L15
COL15 SEG2_1SEG2_5SEG2_6SEG2_10SEG2_11SEG2_15
ROW
0
ROW0 ROW0ROW0ROW0ROW0ROW0
ROW
1ROW1 ROW1ROW1ROW1ROW1ROW1
ROW
2
ROW2 ROW2ROW2ROW2ROW2ROW2
ROW
3
ROW3 ROW3ROW3ROW3ROW3ROW3
ROW
4
ROW4 ROW4ROW4ROW4ROW4ROW4
ROW
5
ROW5 ROW5ROW5ROW5ROW5ROW5
ROW
6
ROW6 ROW6ROW6ROW6ROW6ROW6
N3.IOVCC (4 3C)
N3.IO
VCC
(4 3
C)
SCLK
SCLK
MOSILATCH
LATCH
N3.P
WM
0 (4
7C)
N3.PWM0 (4 7C)
+
A
B
C
D
E
1 2 3 4 5 6 7 8
A
B
C
D
E
1 2 3 4 5 6 7 8

LA Node 1
JTAG
LA Node 0
LA Node 3
LA Node 2
JTAG
PROGLED
PROGLED
PROGLED
JTAG8M
Hz
gree
n
gree
n
39p39p
10k
GND
GND
gree
n
22
22
PROG_EN
+3V3
PROG_ISP
+3V3
+3V3
+3V3
10k
100n
100n
+3V3
1k5
GND
100n100n100n100n
100n
100n
GND
LPC1765
IC8
GND
VUSB
GND
VUSB
+3V3
+3V3
GND
red
GND
+3V3
220
GND
GND
+3V3
1k 1k
+3V3
RST_EN
GND
+5V
GND10
k+5
V1p1p
GND
VBAT
GND
1u
X1
D0D2
C23
C24
R37
D1
R8
R9
1 2 JP3
123456
JP4
R10
C8
C9
R14
312 4
SW1
C12
C14
C15
C16
C18
C19
TDO/SWO1TDI2TMS/SWDIO3TRST4TCK/SWDCLK5
P0[26]/AD0[3]/AOUT/RXD36 P0[25]/AD0[2]/I2SRX_SDA/TXD37 P0[24]/AD0[1]/I2SRX_WS/CAP3[1]8P0[23]/AD0[0]/I2SRX_CLK/CAP3[0]9
VDDA
10
VSSA
11
VREF
P12
NC13
RSTOUT14 VREF
N15
RTCX1 16
RESET17RTCX2 18
VBAT
19
P1[31]/SCK1/AD0[5] 20P1[30]/VBUS/AD0[4] 21
XTAL1 22XTAL2 23
P0[28]/SCL0/USB_SCL24 P0[27]/SDA0/USB_SDA25
P3[26]/STCLK/MAT0[1]/PWM1[3]26 P3[25]/MAT0[0]/PWM1[2]27
VDD(
3V3)
128
P0[29]/USB_DPLUS29P0[30]/USB_DMINUS30
VSS1
31
P1[18]/USB_UP_LED/PWM1[1]/CAP1[0] 32P1[19]/MCOA0/USB_PPWR/CAP1[1] 33
P1[20]/MCI0/PWM1[2]/SCK0 34P1[21]/MCABORT/PWM1[3]/SSEL0 35
P1[22]/MCOB0/USB_PWRD/MAT1[0] 36P1[23]/MCI1/PWM1[4]/MISO0 37
P1[24]/MCI2/PWM1[5]/MOSI0 38P1[25]/MCOA1/MAT1[1] 39
P1[26]/MCOB1/PWM1[6]/CAP0[0] 40
VSS2
41
VDD(
REG
)(3V3
)142
P1[27]/CLKOUT/USB_OVRCR/CAP0[1] 43P1[28]/MCOA2/PCAP1[0]/MAT0[0] 44P1[29]/MCOB2/PCAP1[1]/MAT0[1] 45
P0[0]/RD1/TXD3/SDA146P0[1]/TD1/RXD3/SCL147
P0[10]/TXD2/SDA2/MAT3[0]48P0[11]/RXD2/SCL2/MAT3[1]49
P2[13]/EINT3/I2STX_SDA 50P2[12]/EINT2/I2STX_WS 51P2[11]/EINT1/I2STX_CLK 52P2[10]/EINT0/NMI 53
VDD(
3V3)
254
VSS3
55
P0[22]/RTS1/TD156 P0[21]/RI1/RD157 P0[20]/DTR1/SCL158 P0[19]/DSR1/SDA159 P0[18]/DCD1/MOSI0/MOSI60 P0[17]/CTS1/MISO0/MISO61
P0[15]/TXD1/SCK0/SCK62
P0[16]/RXD1/SSEL0/SSEL63
P2[9]/USB_CONNECT/RXD2/ENET_MDIO 64P2[8]/TD2/TXD2/ENET_MDC 65P2[7]/RD2/RTS1 66P2[6]/PCAP1[0]/RI1/TRACECLK 67P2[5]/PWM1[6]/DTR1/TRACEDATA[0] 68P2[4]/PWM1[5]/DSR1/TRACEDATA[1] 69P2[3]/PWM1[4]/DCD1/TRACEDATA[2] 70
VDD(
3V3)
371
VSS4
72
P2[2]/PWM1[3]/CTS1/TRACEDATA[3] 73P2[1]/PWM1[2]/RXD1 74P2[0]/PWM1[1]/TXD1 75
P0[9]/I2STX_SDA/MOSI1/MAT2[3]76 P0[8]/I2STX_WS/MISO1/MAT2[2]77P0[7]/I2STX_CLK/SCK1/MAT2[1]78 P0[6]/I2SRX_SDA/SSEL1/MAT2[0]79 P0[5]/I2SRX_WS/TD2/CAP2[1]80 P0[4]/I2SRX_CLK/RD2/CAP2[0]81
P4[28]/RX_MCLK/MAT2[0]/TXD382
VSS6
83VD
D(RE
G)(3
V3)2
84
P4[29]/TX_MCLK/MAT2[1]/RXD385
P1[17]/ENET_MDIO 86P1[16]/ENET_MDC 87P1[15]/ENET_REF_CLK 88P1[14]/ENET_RX_ER 89P1[10]/ENET_RXD1 90P1[9]/ENET_RXD0 91P1[8]/ENET_CRS 92P1[4]/ENET_TX_EN 93P1[1]/ENET_TXD1 94P1[0]/ENET_TXD0 95
VDD(
3V3)
496
VSS5
97
P0[2]/TXD0/AD0[7]98P0[3]/RXD0/AD0[6]99
RTCK100
D+D-VBUSGND
USB1
D3
GND
4VC
C8
SDA 1SCL 2
OS 3
A2 5A1 6A0 7
TS3
SE95DP
13579
SV1
1113151719
2468101214161820
18
RN1
27
36
45
R31
R32
1 2
JP1
1 23 45 67 89 10
JP2
R35
X2
32kHz
C34
C35
C50
NRST[0..5]
NRST[0..5]
BUS0
BUS1
PRO
GLED
2
PROGLED2
PRO
GLED
1
PROGLED1
PRO
GLED
0
PROGLED0PROGISP
PROGISPPROGRST
PRO
GRST
N0LA0N0LA1N0LA2N0LA3N0LA4N0LA5N0LA6N0LA7
N1LA0N1LA1N1LA2N1LA3N1LA4N1LA5N1LA6N1LA7
TDO
TDO
TDI
TDI
N3LA0N3LA1N3LA2N3LA3N3LA4N3LA5N3LA6N3LA7
N2LA0N2LA1N2LA2N2LA3N2LA4N2LA5N2LA6N2LA7
TMS0TMS1TMS2TMS3TMS4
TCK
TCK
NRST0NRST1NRST2NRST3NRST5
PROGLED3 PRO
GLED
3
PROG_TDO
PROG_TDO
PROG_TDI
PROG_TDI
PROG_TMS
PROG_TMS
PROG_TRST
PROG_TRST
PROG_TCK
PROG_TCK
PROG_RTCK
PROG_RTCK
SHUTDOWN
EXT_SENSE
NRST4
TMS5
TMS5
LASEL (4 6C)US
B
A
B
C
D
E
1 2 3 4 5 6 7 8
A
B
C
D
E
1 2 3 4 5 6 7 8

bus termination
reverse polarity protection
ground hooks
OKR-T3-W12+1
2V
GND
470u
FDS6673BZ1k
+12V
GND
267 1u
GND
+5V
OKR-T3-W12
+12V
GND
432 1u
GND
+3V3
red
680
gree
n68
0
100n
200
200
200
200
+5V
1u
red
120
red
120
GND
GND
+3V3
4A
yel ye
l
330120
GND
VBAT
GND GND GND
GND
VIN VOUTON/OFF TRIM
SIP1
C20
Q2
R7
R11
C21 GND
VIN VOUTON/OFF TRIM
SIP2 R12
C22
LED1
R13
LED2
R16
C25
R27
R28
R29
R30
C13
BUSLED0R151 6
3 4
U10P
GND
VCC
BUSLED1R34
F1
DCJ1
LED5
V
LED3
V3
R36R38
BAT11 2
JP5 1 2
JP6 1 2
JP7
12 JP8
C49C48
BUS0
BUS1
+
A
B
C
D
E
1 2 3 4 5 6 7 8
A
B
C
D
E
1 2 3 4 5 6 7 8
+
+

JTAG
ZDM
-A12
81-A
2
+3V3
GND
100n 100n
+3V3
GND
100n
100n
GND
gree
n
gree
n+3
V3
red
220
10k
+3V3
ZB1
PG0
19PG
120
PG2
21DG
ND22
DGND
23DV
CC24
DVCC
25
PD718 PD617 UART-CTS16 UART-RTS15 UART-RX14 UART-TX13 I2C-DATA(PD1)12 I2C-CLK(PD0)11 CPU-CLK10 DGND9 RESET8 32K-OUT(PG3)7 PB76 PB65 PB54 SPI-MOSI3 SPI-MISO2 SPI-CLK1
JTAG-TMS 26JTAG-TDI 27JTAG-TDO 28JTAG-TCK 29ADC-IN3(PF3) 30ADC-IN2(PF2) 31ADC-IN1(PF1) 32BAT(VCC/3,PF0) 33AREF 34AGND 35PG5 36UART-DTR 37USART0-RX 38USART0-TX 39USART0-EXTCLK 40PE3 41IRQ7 42IRQ6 43
C26 C27
U9.1
U9.2
U9.P
GND
VCC
C28
C29
D5D6D7
18
RN8
27
36
45
TP1
TP2 TP3
TP4
R43 NRST[0..5] NRST4
BUS1
A
B
C
D
E
1 2 3 4 5 6 7 8
A
B
C
D
E
1 2 3 4 5 6 7 8

MEGA1281TQFP
14.7
456
22p
22p
GND
GND
AGND
GND
1k
1k
100n
100n 100n
GND
AGND
100nAGND
5V
AGND
AVCC+
4.7u 10u
GND
AVCC+
AVCC+
0R
47u
GND
10k +5
V
+5V
+5V
+5V
+5V
+12V
GND
+5V
red
gree
n
+5V
470R
470R
10n
47u
100n
FERRITE
LCD I/F
LCD I/F
PF061 PF160 PF259 PF358
TCK57 TMS56 TDO55 TDI54
PE0 2PE1 3PE2 4PE3 5PE4 6PE5 7PE6 8PE7 9
PD7 32PD6 31PD5 30PD4 29PD3 28PD2 27PD1 26PD0 25
PC7 42PC6 41PC5 40PC4 39PC3 38PC2 37PC1 36PC0 35
PB7 17PB6 16PB5 15PB4 14PB3 13PB2 12PB1 11PB0 10
PA6 45PA7 44
PA5 46PA4 47PA3 48PA2 49PA1 50PA0 51
AVCC
64AG
ND63
AREF62
XTAL124 XTAL223 VCC
52VC
C21
GND
53G
ND22
PG318 PG419
PG033 PG134 PG243
RESET20U1
PG51
Q1
C1C2
R1
R2
C3 C4 C5
C6
VI1
2
VO 5
IC1
GNDBYPON3
C7 C8
R3
C11
R4
TP1
TP2
TP3
TP4
TP5
TP6
LED8
LED9
R5R6
C12
C9
C10
F1
PORT0X[0..7]
SCK,MISO,MOSI
SCK,
MIS
O,M
OSI
PORT1X[0..7]
SDA,SCL
TDI,T
DO,T
CK,T
MS
PWM[0..3]NODEID[0..1]
SCK
BUS1.TX/2.2C
BUS0.TX/2.2C
INT6/2.1C
INT5/2.1C
AN1/2.1B
AN0/2.1B
LCD_RSLCD_RDLCD_WR
LCD_CSLCD_RST
CAPTURE/2.6C
PBLED1/2.1B
PBLED0/2.1B
SPI_CS/2.6B
RESET/2.3B
RESET/2.3B
BUS1.RX/2.3C
BUS0.RX/2.3C
A
B
C
D
1 2 3 4 5 6
A
B
C
D
1 2 3 4 5 6
+ +

+12V
AGND
+5V GND
+3V3
GND
GND
GND
DF9-31S DF9-31S
AVCC+
LCD I/F
+3V3+3V3GNDV_IONCINT6INT5
PBLED1PBLED0GND+5VAGNDAN1AVDD_OUTAN0AGND
TCKTMSTDOTDI
RESET+12VGND
ID0ID1
SDASCL
BUS1.TXBUS1.RXBUS0.TXBUS0.RX
J1G
P1.7P1.6P1.5P1.4P1.3P1.2P1.1P1.0
P0.7P0.6P0.5P0.4P0.3P0.2P0.1P0.0
SCKMOSIMISO
CSGND
LCD_RSTLCD_CSLCD_RSLCD_RDLCD_WR
CAPTUREPWM0PWM1PWM2PWM3
J2G
PORT0X[0..7]
SCK,MISO,MOSI
PORT1X[0..7]
TDI,TDO,TCK,TMS
NODEID[0..1]
SDA,SCL
PWM[0..3]
PORT0X0PORT0X1PORT0X2PORT0X3PORT0X4PORT0X5PORT0X6PORT0X7
BUS1.TX/1.5C
PORT1X7PORT1X6PORT1X5PORT1X4PORT1X3PORT1X2PORT1X1PORT1X0
INT6/1.4C
INT5/1.4C
TDITDOTMSTCK
AN1
AN0
LCD_RSLCD_RDLCD_WR
LCD_CSLCD_RST
SDASCL
PWM0PWM1PWM2PWM3BUS0.TX/1.5D
PBLED1/1.4D
PBLED0/1.4D
SCKMOSIMISO
SPI_CS/1.1B
CAPTURE/1.4C
RESET/1.4D
NODEID0NODEID1
BUS0.RX/1.5D
BUS1.RX/1.5C
A
B
C
D
1 2 3 4 5 6
A
B
C
D
1 2 3 4 5 6
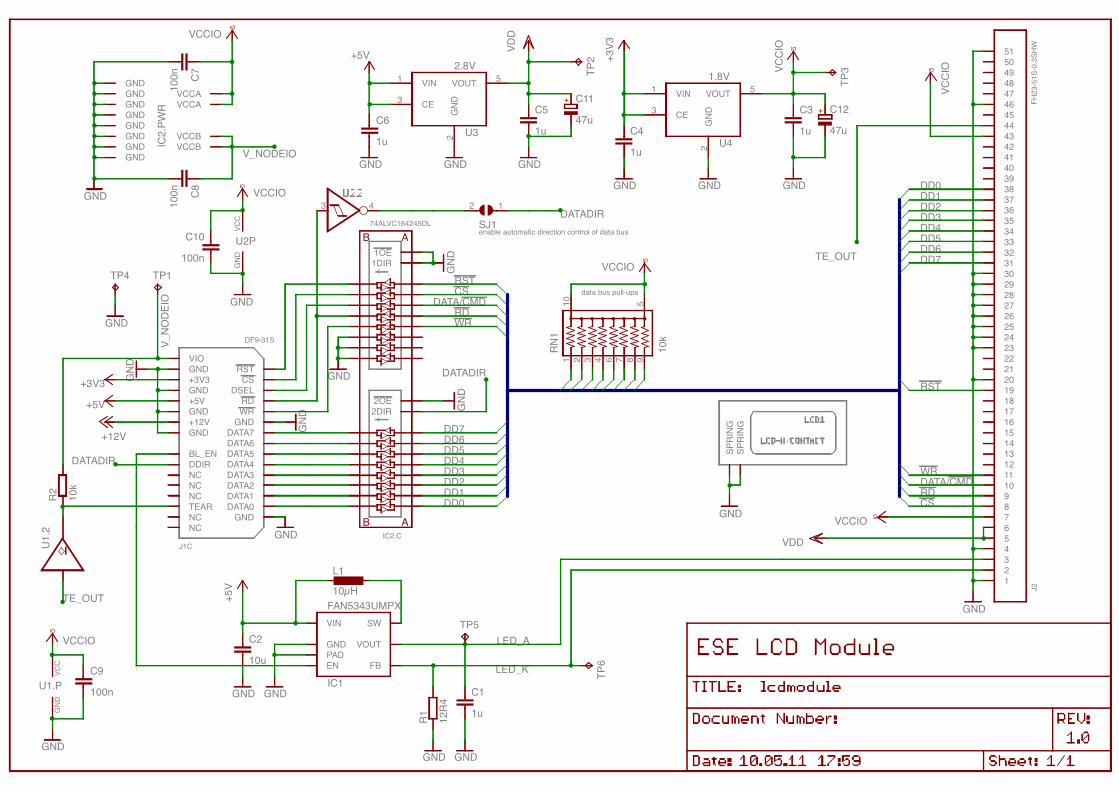
enable automatic direction control of data bus
data bus pull-ups
10µHFAN5343UMPX
1u
10u
GND
GND
GND
+3V3
+3V3
12R4
GND
GND
FH23
-51S
-0.3
SHW
GND
+5V
VDD
VCCIO
VCCIO
VCCI
O
GND
GND
+5V
+12V
2.8V1.8V VC
CIO
GND
1u
1u
1u1u
GND GND
GNDGND
VDD
GND
+5V
GND
GND
GND
GND
GND
GND
100n
100n
10k
VCCIO
VCCIO
10k
GND
VCCIO
100n
100n
DF9-31S
GND
47u47u
SPRI
NGSP
RING
L1
VIN
GND
EN
SW
VOUT
FBPAD
IC1C1
C2
R1
123456789101112131415161718192021222324252627282930313233343536373839404142434445464748495051
J2
GND
2
VIN1 VOUT 5
CE3
U3
GND
2
VIN1 VOUT 5
CE3
U4
C3
C4
C5C6
TP1
TP2
TP3
TP4
TP5
TP6
1DIR1OE
2DIR2OE
IC2.C
74ALVC164245DL
GNDGNDGNDGNDGNDGND
VCCAVCCA
VCCBVCCBGND
GNDIC
2.PW
R
C7C8
1RN
1
2 3 4
5
6 7
10
8 9
U1.2
U1.P
GND
VCC
R2
3 4
U2PG
NDVC
C
2 1
SJ1
C9
C10
VIOGND+3V3GND+5VGND+12VGND
BL_ENDDIRNCNCNCTEARNCNC
GNDDATA0
GNDWRRD
DSELCS
RST
J1C
DATA1DATA2DATA3DATA4DATA5DATA6DATA7
C11C12
LED_K
LED_A
DD0
DD0
DD1
DD1
DD2
DD2
DD3
DD3
DD4
DD4
DD5
DD5
DD6
DD6
DD7
DD7
CS
CS
RD
RD
DATA/CMD
DATA/CMD
WR
WR
V_NO
DEIO
V_NODEIO
RST
RST
TE_OUT
TE_OUT
DATADIR
DATADIR
DATADIR
IO
IO
IO
IO
AB
AB
IO
IO
IO
+
+

A.4. LISTINGS 45
A.4 Listings
Node 1 Test Program
/* ==========================================================================
** Networked Embedded Systems
* Node 1 Test Program
** Target: ATMega128
* Version: 0.1
* Author: Arvid Staub <[email protected]>
*** This program is distributed in the hope that it will be useful,
* but WITHOUT ANY WARRANTY; without even the implied warranty of
* MERCHANTABILITY or FITNESS FOR A PARTICULAR PURPOSE.
** ========================================================================== */
#include <avr/io.h>#include <stdio.h>#include <avr/pgmspace.h>#include <avr/interrupt.h>#include <avr/sleep.h>#include <avr/power.h>
#define F_CPU 14745600UL
#include <util/delay.h>
#include "TWI_Slave.h"#include "atomic.h"
#define LED_PORT PORTF#define LED_DDR DDRF
#define LED_GREEN PF3#define LED_RED PF2
#define led_off(led) do{ LED_PORT |= _BV(led); }while(0)#define led_on(led) do{ LED_PORT &= ~_BV(led); }while(0)
#define BTN_PORT PORTE#define BTN_DDR DDRE#define BTN_PIN PINE#define BTN1 PE5#define BTN2 PE6

46 APPENDIX A. SCHEMATICS
#define button_down(btn) (0==(BTN_PIN & _BV(btn)))
#define PWM_PORT PORTB#define PWM_DDR DDRB#define PWM3 PB7#define PWM0 PB4
#define SE95_CONF (3<<3)
uint8_t write_se95(uint8_t slave, uint8_t reg, uint8_t val){
TWBR = 255;TWCR = (1<<TWINT)|(1<<TWSTA)|(1<<TWEN);
while (!(TWCR & (1<<TWINT)));if ((TWSR & 0xF8) != TWI_START) return(1);
TWDR = slave | 0;TWCR = (1<<TWINT) | (1<<TWEN);
while (!(TWCR & (1<<TWINT))) ;if ((TWSR & 0xF8) != TWI_MTX_ADR_ACK) return(2);
TWDR = reg;TWCR = (1<<TWINT) | (1<<TWEN);
while (!(TWCR & (1<<TWINT))) ;if ((TWSR & 0xF8) != TWI_MTX_DATA_ACK) return(3);
TWDR = val;TWCR = (1<<TWINT) | (1<<TWEN);
while (!(TWCR & (1<<TWINT))) ;if ((TWSR & 0xF8) != TWI_MTX_DATA_ACK) return(4);
TWDR = 0;TWCR = (1<<TWINT) | (1<<TWEN);
while (!(TWCR & (1<<TWINT))) ;if ((TWSR & 0xF8) != TWI_MTX_DATA_ACK) return(5);
TWCR = (1<<TWINT)|(1<<TWEN)| (1<<TWSTO);
while((TWCR & (1<<TWINT))) TWCR = (1<<TWINT) | (1<<TWEN);TWCR = 0;
return 0;

A.4. LISTINGS 47
}
int main(void){
uint8_t cnt;uint8_t ok;
LED_PORT = 0;LED_DDR = _BV(LED_GREEN) | _BV(LED_RED);
DDRA = 0xFF;BTN_PORT = _BV(BTN1) | _BV(BTN2);
PWM_DDR = _BV(PWM3) | _BV(PWM0);PWM_PORT = _BV(PWM0);
/* enable pull-ups on BUS1 and BUS0 control pins */PORTE |= _BV(PE0);PORTE |= _BV(PE1);
PORTD |= _BV(PD2);PORTD |= _BV(PD3);
led_off(LED_GREEN);led_on(LED_RED);
PORTA = 0xFF;
ok = 0;
if(0 == write_se95(0x92, 0x03, 35) &&0 == write_se95(0x92, 0x04, 25) &&0 == write_se95(0x92, 0x01, SE95_CONF)) {
ok |= _BV(0);}
if(0 == write_se95(0x90, 0x03, 35) &&0 == write_se95(0x90, 0x04, 25) &&0 == write_se95(0x90, 0x01, SE95_CONF)) {
ok |= _BV(1);}
if(0 == write_se95(0x94, 0x03, 35) &&0 == write_se95(0x94, 0x04, 25) &&0 == write_se95(0x94, 0x01, SE95_CONF)) {
ok |= _BV(2);}

48 APPENDIX A. SCHEMATICS
if(ok == 7) {led_on(LED_GREEN);led_off(LED_RED);
}
for(;;) {
if(button_down(BTN1)) {PWM_PORT &= ~_BV(PWM0);
} else {PWM_PORT |= _BV(PWM0);
}
if(button_down(BTN2)) {PWM_PORT |= _BV(PWM3);
} else {PWM_PORT &= ~_BV(PWM3);
}
cnt++;PORTA = ~cnt;
_delay_ms(10);}
return 0;}

A.4. LISTINGS 49
Node 3 Test Program
/* ==========================================================================
** Networked Embedded Systems
* Node 3 Test Program
** Target: ATMega128
* Version: 0.1
* Author: Arvid Staub <[email protected]>
*** This program is distributed in the hope that it will be useful,
* but WITHOUT ANY WARRANTY; without even the implied warranty of
* MERCHANTABILITY or FITNESS FOR A PARTICULAR PURPOSE.
** ========================================================================== */
#include <avr/io.h>#include <stdio.h>#include <avr/pgmspace.h>#include <avr/interrupt.h>#include <avr/sleep.h>#include <avr/power.h>
#define F_CPU 14745600UL
#include <util/delay.h>
#include "atomic.h"
#define LED_PORT PORTF#define LED_DDR DDRF
#define LED_GREEN PF3#define LED_RED PF2
#define led_off(led) do{ LED_PORT |= _BV(led); }while(0)#define led_on(led) do{ LED_PORT &= ~_BV(led); }while(0)
#define BTN_PORT PORTE#define BTN_DDR DDRE#define BTN_PIN PINE#define BTN1 PE5#define BTN2 PE6#define LED_BTN1 PE2#define LED_BTN2 PE3
#define button_down(btn) (0==(BTN_PIN & _BV(btn)))
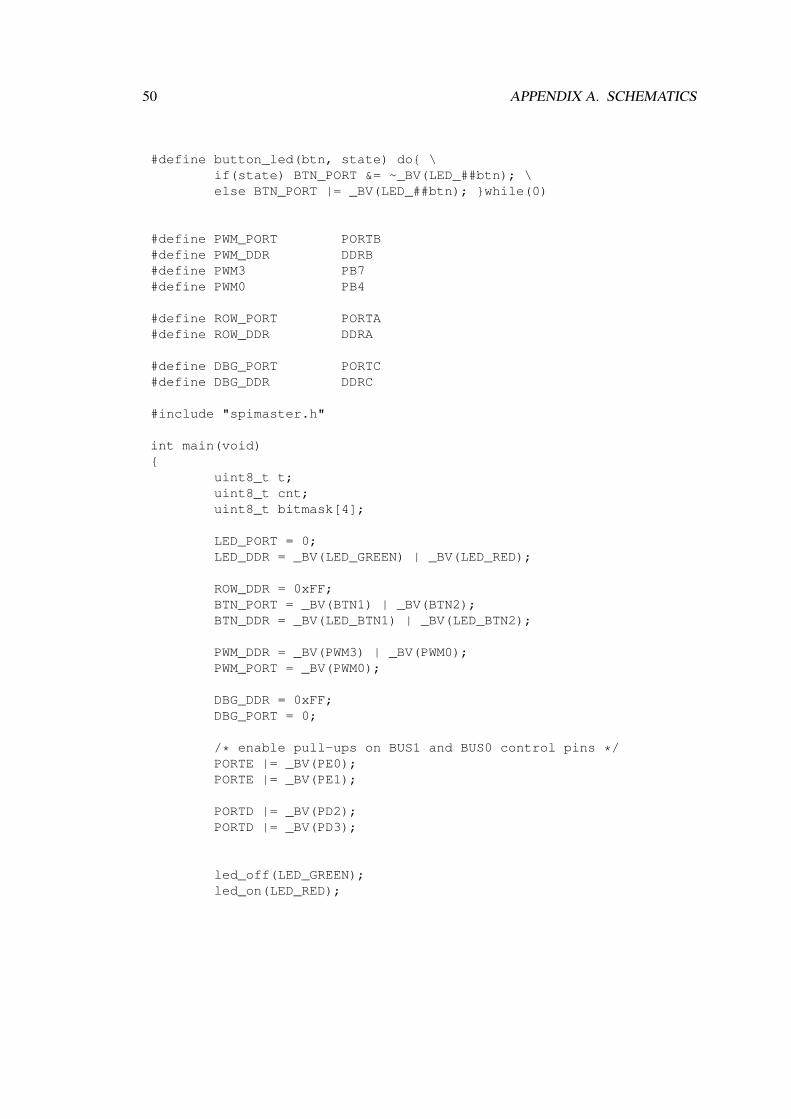
50 APPENDIX A. SCHEMATICS
#define button_led(btn, state) do{ \if(state) BTN_PORT &= ~_BV(LED_##btn); \else BTN_PORT |= _BV(LED_##btn); }while(0)
#define PWM_PORT PORTB#define PWM_DDR DDRB#define PWM3 PB7#define PWM0 PB4
#define ROW_PORT PORTA#define ROW_DDR DDRA
#define DBG_PORT PORTC#define DBG_DDR DDRC
#include "spimaster.h"
int main(void){
uint8_t t;uint8_t cnt;uint8_t bitmask[4];
LED_PORT = 0;LED_DDR = _BV(LED_GREEN) | _BV(LED_RED);
ROW_DDR = 0xFF;BTN_PORT = _BV(BTN1) | _BV(BTN2);BTN_DDR = _BV(LED_BTN1) | _BV(LED_BTN2);
PWM_DDR = _BV(PWM3) | _BV(PWM0);PWM_PORT = _BV(PWM0);
DBG_DDR = 0xFF;DBG_PORT = 0;
/* enable pull-ups on BUS1 and BUS0 control pins */PORTE |= _BV(PE0);PORTE |= _BV(PE1);
PORTD |= _BV(PD2);PORTD |= _BV(PD3);
led_off(LED_GREEN);led_on(LED_RED);

A.4. LISTINGS 51
spimaster_setup();
spimaster_set_cs(0);spimaster_transfer_sync(4, "aaaa");
spimaster_set_cs(0);_delay_us(1);spimaster_set_cs(1);_delay_us(1);spimaster_set_cs(0);
ROW_PORT = 0;spimaster_set_cs(0);
led_on(LED_GREEN);led_off(LED_RED);
t = 0;for(;;) {
if(!button_down(BTN1)) {PWM_PORT &= ~_BV(PWM0);
} else {PWM_PORT |= _BV(PWM0);
}
if(button_down(BTN2)) {PWM_PORT |= _BV(PWM3);
bitmask[0] = _BV(6-cnt);bitmask[1] = _BV(6-cnt);
} else {PWM_PORT &= ~_BV(PWM3);
bitmask[0] = _BV(cnt);bitmask[1] = _BV(cnt);
}
bitmask[2] = ~bitmask[0];bitmask[3] = ~bitmask[1];
if(0 == (cnt & _BV(2))) {button_led(BTN1, 0);button_led(BTN2, 1);
} else {button_led(BTN2, 0);

52 APPENDIX A. SCHEMATICS
button_led(BTN1, 1);}
/* transfer bitmask */spimaster_set_cs(0);spimaster_transfer_sync(4, bitmask);
/* latch data */_delay_us(1);spimaster_set_cs(1);_delay_us(1);spimaster_set_cs(0);
/* select next row */ROW_PORT = cnt;
_delay_ms(1);
cnt++;if(cnt>6) {
cnt=0;}
DBG_PORT++;}
return 0;}

Bibliography
[1] Ieee standard test access port and boundary-scan architecture. IEEE Std 1149.1-2001 (June2001).
[2] ATmega128A DC Characteristics and Speed Grades. In [8], February 2011, chapters 27.2and 27.3.
[3] ATmega128A JTAG errata. In [8], February 2011, chapters 26.9.5, 26.9.6 and 33.1.5.
[4] Iris - tinyos documentation. http://docs.tinyos.net/tinywiki/index.php/IRIS, May 2011.
[5] Pcb microstrip impedance calculator. http://www.eeweb.com/toolbox/microstrip-impedance, May 2011.
[6] Tinyos open source operating system for low-power wireless devices. http://www.tinyos.net/, May 2011.
[7] ATMEL CORPORATION. ZigBit 2.4 GHz Wireless Modules, June 2009.
[8] ATMEL CORPORATION. ATmega128A Datasheet, February 2011.
[9] CADSOFT COMPUTER GMBH. The EAGLE Layout Editor. http://www.cadsoft.de/info.htm, May 2011.
[10] DAVIS, L. Jtag bus description and interface. http://www.interfacebus.com/Design_Connector_JTAG_Bus.html, June 2011.
[11] FAIRCHILD SEMICONDUCTOR CORPORATION. FDS6673BZ P-Channel PowerTrench®MOSFET, March 2009.
[12] FAIRCHILD SEMICONDUCTOR CORPORATION. FAN5343: 6-LED Series Boost LEDDriver with Integrated Schottky Diode and Single-Wire Digital Interface, August 2010.
[13] FAIRCHILD SEMICONDUCTOR CORPORATION. FAN3100: Single 2A High-Speed, Low-Side Gate Driver, January 2011.
[14] GALLER, J. A modular software package for the embedded systems engineering board.Bachelor’s thesis, TU Wien, 2011.
53

54 BIBLIOGRAPHY
[15] HALL, S. H., AND HECK, H. L. Advanced Signal Integrity for High-Speed Digital De-signs. John Wiley & Sons, Inc., 2008, p. 477f.
[16] INTEL CORPORATION. 4-Wire Pulse Width Modulation (PWM) Controlled Fans, July2004.
[17] KÖSSLER, A. A platform for teaching and researching distributed real-time systems. Mas-ter’s thesis, Technische Universität Wien, 2009.
[18] MURATA POWER SOLUTIONS. Adjustable Output 3-Amp SIP-mount DC/DC Converters,February 2010.
[19] NXP SEMICONDUCTORS. SE95: Ultra high accuracy digital temperature sensor andthermal watchdog, September 2009.
[20] NXP SEMICONDUCTORS. 74ALVC164245: 16-bit dual supply translating transceiver;3-state, April 2010.
[21] NXP SEMICONDUCTORS. 74LVC2G07: Buffers with open-drain outputs, August 2010.
[22] NXP SEMICONDUCTORS. 74LVC2G17: Dual non-inverting Schmitt trigger with 5 Vtolerant input, August 2010.
[23] NXP SEMICONDUCTORS. LPC1769/68/67/66/65/64/63 Product data sheet, 6th ed., Au-gust 2010.
[24] NXP SEMICONDUCTORS. LPC17xx User manual, 2nd ed., August 2010.
[25] ON SEMICONDUCTOR. CAT4016: 16-Channel Constant Current LED Driver, April2010.
[26] PÜRSCHEL, M. Reverse battery protection. Infineon Technologies AG, May 2005.
[27] RENESAS ELECTRONICS. R61523 16,777,216–Color, 360x640-Dot Graphics LCD Con-troller Driver for α-Si TFT Panel, December 2009.
[28] SCHMÖLZER, M. A modular, xml-based jtag programmer for embedded devices. Bache-lor’s thesis, TU Wien, November 2008.
[29] SEIKO INSTRUMENTS INC. 3.2” 360 x RGB x 640 TFT Development Specification, March2010.
[30] STMICROELECTRONICS. M41T81S: Serial access real-time clock with alarms, September2010.
[31] WIRTZ, A. Freerouting: The interactive push and shove router. http://www.freerouting.net/, September 2010.


