Embed Size (px)
Citation preview

A Guide to Customising Your eBay Store
August, 2010
Martin Style
V1.0

2
© eBay Inc.
Table of Contents Introduction ............................................................................................................................................ 3
1. Building a Category Structure ........................................................................................................... 3
1.1 Create your categories ............................................................................................................. 3
2. Basic Store Customisation .................................................................................................................... 5
2.1 Add Your Logo .......................................................................................................................... 6
2.2 Change Your Store Theme ........................................................................................................ 7
2.3 Change Colors & Fonts ............................................................................................................. 8
2.4 Left Navigation ......................................................................................................................... 9
2.5 Custom Pages ......................................................................................................................... 10
2.6 Link to an Item, Page or Store Search ..................................................................................... 10
2.7 Promotion Boxes .................................................................................................................... 11
3. Advanced Store Customisation ....................................................................................................... 13
3.1 Fully Customised Storefronts .................................................................................................. 13
3.1.1 Inserting Your Design ...................................................................................................... 14
3.1.2 Linking your Categories ................................................................................................... 15
3.1.3 Connecting Search .......................................................................................................... 15
3.1.4 Newsletter Signup .......................................................................................................... 16
3.2 Customised Listing Description ............................................................................................... 16
3.2.1 Inserting Your Listing Description Design......................................................................... 17
3.3 Customised Category Pages .................................................................................................... 17
3.3.1 Create a Customised Store Header .................................................................................. 17
3.3.2 Create a Customised Left Navigation ............................................................................... 19
3.4 Pulling in eBay Elements ......................................................................................................... 22

3
© eBay Inc.
Introduction Creating a professional looking online store is critical for your success and eBay gives you access to easy
to use tools that enable you to change the appearance and design of your store. By creating a
personalised eBay store, it can reflect your company’s brand and personality and give you credibility
with your buyers.
This document guides you through this process, from minor personalisation such as adding your logo
and changing the colours of your store, to building a fully custom storefront.
1. Building a Category Structure Before changing the look and feel, one of the first things you should think about is the category
structure of your store. Creating categories is effectively organizing your products into groups and will
appear in a “Store Categories” box on every page of your eBay store.
Once created, your visitors can use your categories to:
1. See what types of products your store sells by just looking at your category list.
2. Browse and navigate through your store to find the products they are looking for.
The number and structure of categories that you create is entirely up to you and depends upon the
products that you will be selling through your store. Your categories can be up to 3 levels deep and
there is a limit of 300 categories per store.
1.1 Create your categories
1. Click on “My eBay” on the top right of your page.
2. Scroll to “Shortcuts” on the bottom left and click on “Manage My Store”

4
© eBay Inc.
3. In the “Store Management” box on the left, click on “Store Categories”
4. This will take you to the “Manage Store Categories” section, where you can add new categories,
remove, move or rename existing categories.
How-To
1. Create a category and subcategory:
•To create a category, click the Add Category button at the desired level.
•To create a subcategory, click the category name link, then click the Add Category button.
2. Manage your categories:
To rename, move, or delete categories, select the desired categories, and then click the button
for the action of your choice.
3. Move your listings to other Store categories:
Go to the Active Listings page in My eBay, select the listings that you want to move, and click the
Edit button.

5
© eBay Inc.
2. Basic Store Customisation Once your eBay store has been created, a standard theme will have been applied to it. A theme sets the
colours and design of your eBay Store and ‘wraps’ around the content of each of your store pages. A
standard template looks something like the one below:
All basic store customisation can be done within the “Display Settings” section of the store.
From here you can:
1. Change your store name and add a description
2. Add or change your logo
3. Edit or change your theme
4. Change options for your left navigation bar
5. Change your store header
How to Navigate to Display Settings
1. Click on “My eBay” at the top right of your page.
2. Scroll to “Shortcuts” at the bottom left and click on “Manage My Store”
3. In the “Store Management” box on the left, click on “Display Settings”

6
© eBay Inc.
2.1 Add Your Logo
1. In “Display Settings” click “Change” at the top right of the “Basic Information” box.
2. The next screen gives you 4 options. You can choose a predesigned logo, upload a logo, use a logo
hosted somewhere else or do not display a logo.
Tips
1. The logo must be a maximum pixel size of 310 (width) by 90 (height). If your graphic does not fit
or is not proportional to these dimensions, it will be resized or stretched.
2. The file must have one of the following extensions: .jpg,.jpeg,.gif, .bmp,and .png.
3. Enter the URL in the field without the "http://" prefix, for example:
www.myhost.com/mylogo.gif
4. The logo will appear within your Store's header on every page. If you've chosen one of the
"Minimal Header" themes for your Store, then the logo will not appear using this feature.

7
© eBay Inc.
2.2 Change Your Store Theme
1. In “Display Settings” click “Change to another theme” at the top right of the “Theme and Display”
box.
2. Pick from a range of standard themes and then apply it to your store by selecting it and clicking
“Save Settings”
Every theme has these elements:
Store header:
Runs across the top of the page and displays
your Store name. The header in any theme can
be expanded by adding HTML or text.
Left navigation bar:
Includes a search box and links to your custom
categories.
Custom page navigation:
Includes links to custom pages you've created.
Store footer: Runs across the bottom of the page and
displays standard information such as your
User ID.
There are two basic types of themes to choose from:
1. Predesigned themes offer professionally designed background graphics and colour combinations.
Use one of these if you want to save time on creating an appealing, consistent look for your
Store.
2. Easily Customizable themes lend themselves to creating a more custom look. Use one of these if
you'd prefer to have more control over the colours in your Store.
8
© eBay Inc.
As you look over the themes, also consider these options:
• Custom page links may appear as part of the left navigation bar or as part of the header across
the top, depending on the theme chosen.
• Most themes include a designated slot for a logo. The only exceptions are the Minimal Header
themes.
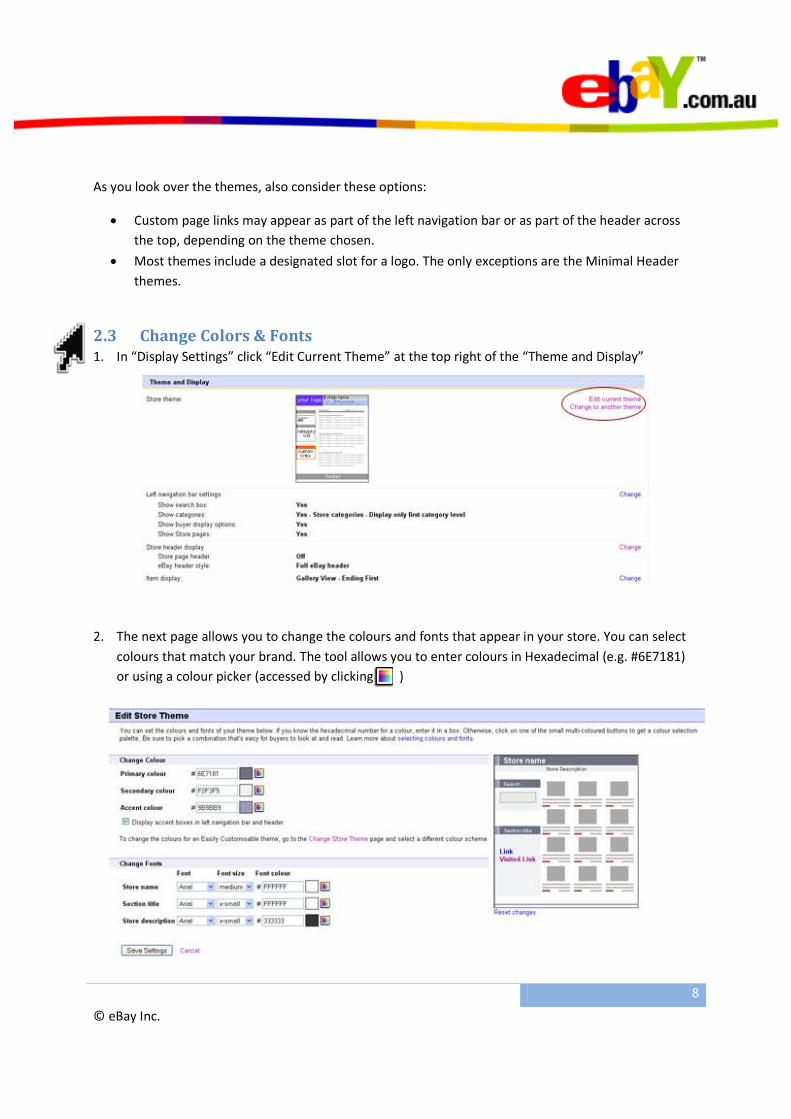
2.3 Change Colors & Fonts
1. In “Display Settings” click “Edit Current Theme” at the top right of the “Theme and Display”
2. The next page allows you to change the colours and fonts that appear in your store. You can select
colours that match your brand. The tool allows you to enter colours in Hexadecimal (e.g. #6E7181)
or using a colour picker (accessed by clicking )

9
© eBay Inc.
2.4 Left Navigation
Within your store, the eBay system can automatically show a number of left hand navigation boxes. As
part of this, there are a number of configurable options about what to include in the navigation,
including the search box, store categories, buyer display options and store pages.
Links within these are all maintained automatically. New categories and pages will appear once created,
and any deleted ones will be removed. This will simplify the management of your Store.
Make changes to these options by:
1. In “Display Settings” click “Change” next to “Left Navigation Settings”.
2. You will then get to change the following options within a form:
Left Navigation Options
Search box:
This is a search box that will search your store
for matching keyword listings.
Categories:
You can control which categories are initially
visible, none, first level, first and second, or all.
Even if you do not show the second or third
level categories initially, the user will be able to
drill into a category and see its subcategories.
Buyer display options:
This shows a link to switch between gallery and
list view, and a link to view new products listed.
Store pages: Links to your custom pages will show up in this
box automatically.

10
© eBay Inc.
2.5 Custom Pages
One of the most powerful aspects of the eBay system when it comes to customisation is the use of
custom pages. Custom pages allow you to build pages that are unique and serve a specific purpose.
They can be used for a variety of purposes such as showcasing your items and specials, explain shipping
and returns policies or describe the history of your business.
Create a custom page
1. In “Manage My Store” click the “Custom Pages” link within the “Store Management” box.
2. Under “Active Pages” click “Create new page”
3. Select the layout that you want for your page from the listed options. This will depend upon the
purpose of the page and your own preferences. Click “Continue”.
4. The next page allows you to build the page depending on the layout that you selected. The main
section of the page allows you to input custom HTML.
2.6 Link to an Item, Page or Store Search
Sometimes you might want to link to an item, page or the results of a store search from a custom page
or area within your store. You can build this link using the HTML Builder.
1. In “Manage My Store” click the “HTML Builder” link within the “Store Management” box.
11
© eBay Inc.
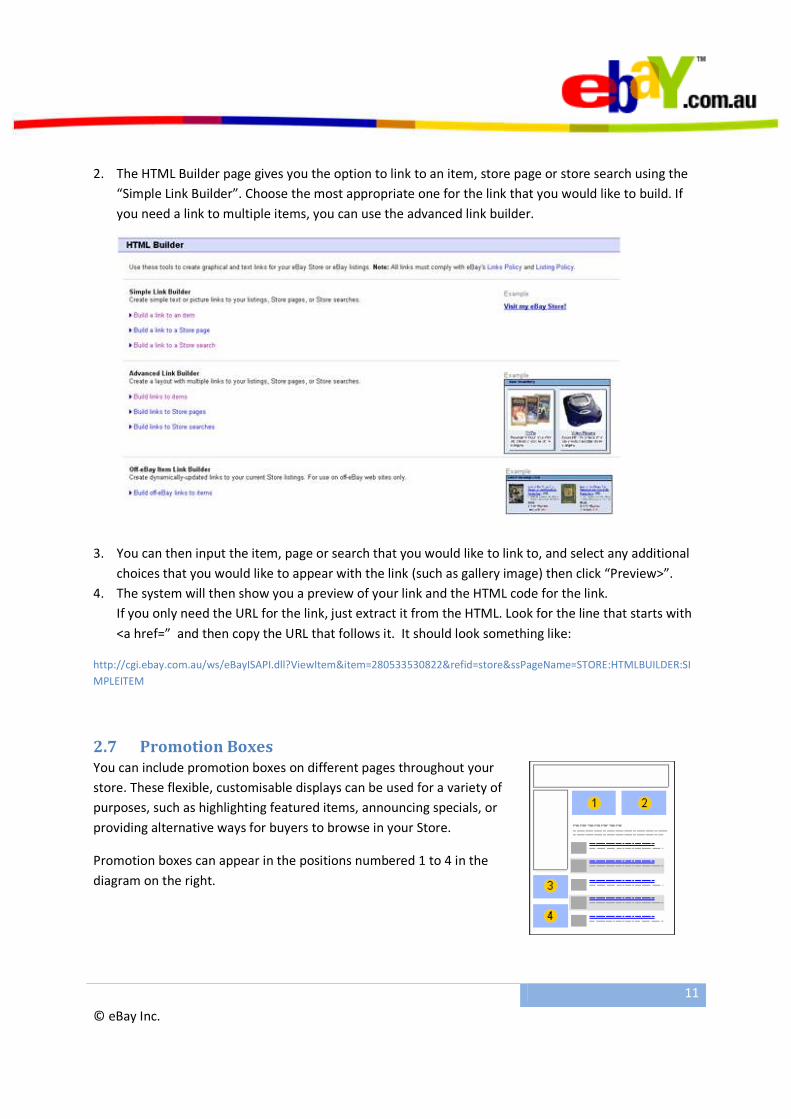
2. The HTML Builder page gives you the option to link to an item, store page or store search using the
“Simple Link Builder”. Choose the most appropriate one for the link that you would like to build. If
you need a link to multiple items, you can use the advanced link builder.
3. You can then input the item, page or search that you would like to link to, and select any additional
choices that you would like to appear with the link (such as gallery image) then click “Preview>”.
4. The system will then show you a preview of your link and the HTML code for the link.
If you only need the URL for the link, just extract it from the HTML. Look for the line that starts with
<a href=” and then copy the URL that follows it. It should look something like:
http://cgi.ebay.com.au/ws/eBayISAPI.dll?ViewItem&item=280533530822&refid=store&ssPageName=STORE:HTMLBUILDER:SI
MPLEITEM
2.7 Promotion Boxes
You can include promotion boxes on different pages throughout your
store. These flexible, customisable displays can be used for a variety of
purposes, such as highlighting featured items, announcing specials, or
providing alternative ways for buyers to browse in your Store.
Promotion boxes can appear in the positions numbered 1 to 4 in the
diagram on the right.

12
© eBay Inc.
1. In “Manage My Store” click the “Promotion Boxes” link within the “Store Management” box.
2. Click
3. You can then choose from the following types of promotion boxes:
Promotion Box Types
Advertise specific items: Feature one or more of your Store items. You can display items
that are newly listed or ending soon. You can also choose items
manually or allow eBay to feature items automatically.
Display items using one of these view types:
• Gallery view - One listing link that appears with an item
title and picture
• List view - Two listing links that appear as item titles
• Slideshow - Pictures of several items that rotate
continuously
• Countdown- Animated countdown to create excitement
for auction and fixed price listings
• Item Showcase - One to four items that appear as large
gallery images in a single extra-wide promotion box
Provide links to other
parts of your Store: Create a promotion box with links that give buyers alternative
ways of finding items in your Store. Custom links can point to a
Store category, a custom page within your Store, another on-
eBay Web page, or a page of custom search results.

13
© eBay Inc.
Design your own
promotion box: Create a fully customizable promotion box to display
information of your choice, such as shipping and payment
information, links to your email newsletter signup page, or
other useful information.
You can also create a unique promotion box by entering our
own HTML. The recommended size and character limits vary by
location.
3. Advanced Store Customisation
3.1 Fully Customised Storefronts
It is possible to create a storefront, or the page that users go to when they first visit your store, that is
completely customised and does not use any of the standard eBay elements. This is an option if you
want to have total control over the look and feel of your store. However, it does come with some
drawbacks. Fully customised storefronts lose the automation that comes with the standard eBay store
and you will need to have the resources available to build and maintain your store.
Much like creating a regular website, the first step of creating your custom storefront is to create a
design, and you would do this outside of the eBay system. Professional design agencies with specialists
in eBay store creation are available to carry out this step.
Examples of customised storefront designs are shown below:

14
© eBay Inc.
The design needs to be created in HTML as a webpage before you can implement it into your store. The
files that you need include:
• The HTML file for your design
• Images that are included in your design
• Any external CSS stylesheets that are called within your HTML
• Any scripts that are called within your HTML
All images, CSS stylesheets or scripts you use in your custom storefront must be hosted externally to
eBay.
Once you have your design template broken down into the elements listed above, you can follow these
steps to implement your customised storefront:
3.1.1 Inserting Your Design
1. In “Manage My Store” click the “Custom Pages” link within the “Store Management” box.
2. Under “Active Pages” click “Create new page”
3. Select the “1 Text Section/HTML” layout and click Continue
4. Enter a page title.
5. Copy & paste your HTML into the “Text Section 1” area.
6. Select “Hide left navigation bar” in the “Left Navigation Bar” area.
7. Click Continue.
8. The eBay system will then show you a preview. If it all looks right, click “Save and Publish”.
9. On the “Custom Pages” page, go to “Store Homepage” and select your new custom page in the
dropdown box.
10. Go to your store homepage and you should see your new custom storefront.

15
© eBay Inc.
Once you have followed these steps, you may need to modify the code for some of the following
elements to work:
• Category links
• Search
• Newsletter sign up
3.1.2 Linking your Categories
If you have incorporated a custom category list within your custom designed storefront, each of the
categories needs to be linked correctly. You will need to build the links in the HTML builder:
1. Within the HTML Builder click “Build a link to a Store Page”
2. Select the category you want to link from in the Store Links drop down list
3. Click Preview
4. Copy the URL from the HTML that appears and use that within your custom navigation on your
storefront.
3.1.3 Connecting Search
The standard HTML for your search form is:
<form name="AcceptSavedSeller" method="post"
action="http://stores.shop.ebay.com.au/CHANGE_THIS_TO_YOUR_STORE_NAME">
<input type="submit" value="" name="submit" class="search_button" />
<input type="text" name="_nkw" value="Search your keyword" onblur="if(this.value=='')this.value='Search your keyword';" onfocus="if(this.value=='Search your keyword')this.value='';" class="input_text"
/> </form>
This code will make a search form visible and will execute the search for your user. Make sure you
change the highlighted part to your store name!

16
© eBay Inc.
3.1.4 Newsletter Signup
The standard HTML for your newsletter signup is:
<form name="AcceptSavedSeller" method="post"
action="http://my.ebay.com.au/ws/eBayISAPI.dll?AcceptSavedSeller&sellerid=CHANGE_THIS_TO_YOUR_SELLERID">
<fieldset> <label></label>
<input type="submit" name="" value="" class="sign_up" />
</fieldset> </form>
This code will enable your users to sign up for your newsletter.
3.2 Customised Listing Description
In addition to having a customised storefront, you can also create customised listing descriptions for
each of your products. This enables the design and theme of your store to flow through to your product
pages. Some examples of custom listing descriptions are shown below:

17
© eBay Inc.
In both of these examples, you can see that the custom listing description must appear below the
common eBay sales elements on the listing page.
As with the custom storefront, the design of your listing description needs to be created in HTML as a
webpage before you can implement it into your store. The files that you need include:
• The HTML file for your design
• Images that are included in your design
• Any external CSS stylesheets that are called within your HTML
• Any scripts that are called within your HTML
All images, CSS stylesheets or scripts you use in your custom storefront must be hosted externally to
eBay.
3.2.1 Inserting Your Listing Description Design
1. List your item as usual by clicking on Sell >> Start Selling Now in the top right menu
2. In the “Create Your Listing” page, under “Describe the item you’re selling” copy and paste your
HTML into the space under the HTML tab.
3. You can preview this by clicking “Preview”.
4. Continue the process to list your item.
**There is no theme or template functionality available for listing descriptions and so you will need to
repeat these steps for every product that you list**
However, there are third party tools that are available that can help automate this process.
3.3 Customised Category Pages
Now that you have a customised storefront and listing descriptions, you might have seen that your
category pages only have the original eBay styling. Even in customised shops, you would need to keep
the standard eBay gallery or list view of your products on the category pages. This is because it would be
too difficult to maintain if you were to recreate them as custom pages and depending on the level of
store you have subscribed for, the number of custom pages available are restricted.
However, to ensure that your category pages carry the same theme as the rest of your store, you can
create a header for your category pages and the left navigation.
3.3.1 Create a Customised Store Header
If a global store header is not part of your customised theme, you will need to create a customised store
header for your category pages only. You may already have a custom page that incorporates a header
for your storefront, so in this case, a global store header will appear on every page; including those that
you don’t want it to appear on. A better option is to use a promotion box that appears in the “Top
Single” position on your category pages. An example of this is shown here:

18
© eBay Inc.
Once again, your header design needs to be created in HTML before you can implement it into your
store. The files that you need include:
• The HTML file for your design
• Images that are included in your design (hosted externally)
• Any external CSS stylesheets that are called within your HTML (hosted externally)
Once you have these files you can follow the steps below to create a header using a promotion box:
1. In “Manage My Store” click the “Promotion Boxes” link within the “Store Management” box.
2. Click
3. Under “Promotion box types”, choose “Communicate to your buyers” and click “Continue”

19
© eBay Inc.
4. Under “Promotion Box Location” >> “Position on Store Page” select “Top Single (extra wide)
5. Under “Store Page where promotion box should appear” select “All category pages in the Store”.
6. Click “Continue”
7. Under “Content” >> “Information Type” select “Custom”
8. In the text box, paste the HTML for your header.
9. Under “Promotion box name” give your promotion box a unique name
10. Click “Save”
Your promotion box header should now appear on your category pages.
3.3.2 Create a Customised Left Navigation
To customise the left navigation on your category pages, you have two options:
1. Use a promotion box that appears on the left instead of your normal left navigation.
2. Style the existing left navigation using a CSS file.
If you use a promotion box, you will need to obtain the links to your category pages using the HTML
builder and then hardcode them into the promotion box. This promotion box can then be shown on
pages that you select it to be. However, if you make any changes to your categories, you will need to
manually make the changes to the links within the promotion box.
Styling the existing left navigation involves pasting some CSS into either your store header or your
promotion box header that styles the existing eBay left navigation elements to suit your store design. An
example of this is shown below:

20
© eBay Inc.
The left navigation in the example uses standard eBay elements but through the use of CSS, it looks as
though it has been customised.
The CSS styles that have been used are:
#LeftPanel { /*background:#eee;*/ padding-top:30px; color: #fff; padding-left: 40px; padding-right: 10px; } #LeftPanel .v4mid, #LeftPanel .lcat { background: #333; color: #fff; } #LeftPanel a { color: #fff; font-weight:normal; } #LeftPanel .ttl { color: #fff; } #LeftPanel .v4accent { display:none; } #LeftPanel .v4title { background: #2e2d2a; font-size:16px; padding: 12px 18px 8px 0; /* width + padding = 242px */ overflow: hidden; background: #1d1c1a url(/img/ebay/ebay-sidebar-title-bg.png) right top no-repeat; padding-left:15px; } #LeftPanel .v4baccent, #LeftPanel .v4vspacer { display:none; } #LeftPanel .v4nl td { color: #fff; } #LeftPanel .v4hspacer { display:none; } #LeftPanel .v4title font { font-size:16px; }

21
© eBay Inc.
To apply these stylings you can follow these steps:
1. Save your css styles to a file that is hosted externally.
2. In “Display Settings” click “Change” next to “Store header display”.
Under “Store Page Header”, select “Yes, include additional information in the header. (Enter
below)”
3. In the text box, link to your stylesheet using the following code:
<link href="http://link.to.your.css" rel="stylesheet" type="text/css" />
Change the highlighted URL to the correct one.
4. Click “Save Settings”.
The following example shows the before and after screenshots for this change:
Before After

22
© eBay Inc.
3.4 Pulling in eBay Elements
When creating a customised store, you may want to pull in some standard eBay elements. The
advantage of doing this is that these elements are automatically maintained. eBay has built in some tags
into the system that allows you to add them into your custom HTML wherever you want the elements to
appear.
You can use HTML tags to display the following elements:
• Your User ID
• Your Feedback
• Item List
• Item Showcase
• Individual Item
• Item Details (for a particular item)
• Search box (for searching your Store)
• Promotion box
The list of these tags are shown here: http://pages.ebay.com/help/sell/stores-tags.html