Embed Size (px)
Citation preview

2
About This Manual .................................................................................................................... 4
Get to Know About Your Router ............................................................................................... 5
1.1. Product Overview ........................................................................................................... 6
1.2. Panel Layout ................................................................................................................... 6
Connect the Hardware .............................................................................................................. 8
2.1. Position Your Router ...................................................................................................... 9
2.2. Connect Your Router ...................................................................................................... 9
Log In to Your Router............................................................................................................... 11
Set Up Internet Connection ..................................................................................................... 13
4.1. Manually Set Up Your Internet Connection ................................................................. 14
4.2. Set Your Wireless Network ........................................................................................... 16
4.3. Set Up the Router as an Access Point (Bridge Mode) .................................................. 17
4.4. Set up an IPv6 Internet Connection ............................................................................. 18
Guest Network ........................................................................................................................ 19
5.1. Create a Network for Guests ........................................................................................ 20
Security Setting ........................................................................................................................ 21
6. 1. WAN Access Control .................................................................................................... 22
6.2. Wireless Access Control ............................................................................................... 26
6.3. Manage Device Access List ........................................................................................... 28
6.4. URL filter control .......................................................................................................... 29
6.5. Parent Control .............................................................................................................. 30
6.5. Device Access Control .................................................................................................. 31
VPN Server ............................................................................................................................... 32
7.1. L2TP VPN ...................................................................................................................... 33
Customize Your Network Settings ........................................................................................... 34
8.1. QoS ............................................................................................................................... 35
8.2. DHCP Static IP Assignment (Address Reservation) ....................................................... 37
8.3. LAN Port Forwarding .................................................................................................... 39
8.4. DMZ .............................................................................................................................. 40
8.5. UPnP ............................................................................................................................. 40

3
8.6. DDNS ............................................................................................................................. 41
8.7. Mesh ............................................................................................................................. 42
8.8. Wireless Roaming Setting ............................................................................................. 44
8.9. One Key Physical Examination ...................................................................................... 44
8.10. LAN Settings ................................................................................................................ 45
8.11. Dual Band Integration ................................................................................................ 47
8.12. Advanced Wireless Settings ....................................................................................... 48
8.13. Use Repeater to Extend Network ............................................................................... 51
8.14. AP Mode (Bridge Mode) ............................................................................................. 52
8.15. WAN settings .............................................................................................................. 53
8.16. TWT settings ............................................................................................................... 55
Manage the Router ................................................................................................................. 56
9.1. Upgrade Firmware ........................................................................................................ 57
9.2. Restore Default Setting ................................................................................................ 58
9.3. Change the Login Password .......................................................................................... 58
9.4. System Log .................................................................................................................... 59
9.5. Set Up System Time ...................................................................................................... 60
9.6. Set Router to Reboot Regularly .................................................................................... 60
9.7. Set Backup Restore ....................................................................................................... 61
FAQ .......................................................................................................................................... 62
FCC statement ......................................................................................................................... 65

4
About This Manual This manual is a complement of Quick Installation Guide. The Quick Installation Guide
instructs you on quick internet setup, and this guide provides details of each function and
shows you the way to configure these functions appropriate to your needs.
When using this manual, please notice that features of the router may vary slightly
depending on the model and software version you have, and on your location, language, and
internet service provider. All screenshots, images, parameters and descriptions documented
in this manual are used for demonstration only.
*Maximum wireless signal rates are the physical rates derived from IEEE Standard 802.11
specifications. Actual wireless data throughput and wireless coverage are not guaranteed
and will vary as a result of network conditions, client limitations, and environmental factors,
including building materials, obstacles, volume and density of traffic, and client location.
*Use of MU-MIMO and 1024-QAM requires clients to also support those functions.
More Info
The latest software, management app and utility can be found at Download Center at
https://www.juplink.com/
The Quick Installation Guide can be found where you find this manual or inside the package
of the router.
Specifications can be found on the product page at:
https://www.juplink.com .
Our Technical Support contact information:
+ 1-833-923-2468, EST 9:00-17:00 (Mon.-Fri.)

5
Chapter 1
Get to Know About Your
Router This chapter introduces what the router can do and shows its appearance.
It contains the following sections:
- Product Overview
- Panel Layout

6
1.1. Product Overview The Juplink router is designed to fully meet the need of Small Office/Home Office (SOHO)
networks and users demanding higher networking performance. The powerful antennas
ensure continuous Wi-Fi signal to all your devices while boosting widespread coverage
throughout your home, and the built-in Ethernet ports supply high-speed connection to your
wired devices.
1.2. Panel Layout
1.2.1. Front View
LED Status Indicators
Solid on in red - The router system is starting or failed to connect to the network.
Flashing in green - The router is performing WPS or Mesh negotiation.
Solid on in green – The router has been successfully connected to the internet.
1.2.2. Side and Rear Panels

7
Ports & Buttons
WPS Button – Press the button for about 5sec to start the WPS negotiation process of the router
Reset - To reset the router
LAN 1-4 - To connect to wired devices such as computers, switches, etc
WAN Port - To connect this router to the Internet
POWER - To connect to the power cord

8
Chapter 2
Connect the Hardware This chapter contains the following sections:
- Position Your Router
- Connect Your Router

9
2.1. Position Your Router • The router should not be located in a place where it will be exposed to moisture or
excessive heat.
• Place the router in a location where it can be connected to multiple devices as well as to a
power source.
• Make sure the cables and power cords are safely placed out of the way so they do not
create a tripping hazard.
• The router can be placed on a shelf or desktop.
• Keep the router away from devices with strong electromagnetic interference, such as
Bluetooth devices, cordless phones and microwaves.
2.2. Connect Your Router Before you start, please turn off your modem if any. Hold the antennas from the base and
make the antennas vertical to the horizontal plane.
If your internet connection is through an Ethernet cable directly from the wall instead of
through a DSL / Cable / Satellite modem, connect the Ethernet cable to the router’s WAN
port, and then follow step 3 to complete the hardware connection.
1. Connect the modem to your router’s WAN port with an Ethernet cable.
2. Power on the modem, and then wait about 2 minutes for it to restart.
3. Connect the power adapter to the router and turn on the router.
4. Verify that the LED is solid on before moving on.
5. Connect your computer to the router.
How to connect to the router:
• Method 1: Wired
Turn off the Wi-Fi on your computer and connect your computer to the router with an
Ethernet cable.
• Method 2: Wirelessly
1) Find the SSID (Network Name) printed on the label at the bottom of the router.
2) Click the network icon of your computer or go to Wi-Fi Settings of your smart device, and
then select the SSID to join the network.

10
• Method 3: Use the WPS button
Wireless devices that support WPS, including Android phones, tablets, and most USB
network adapters, can be connected to your router through this method.
Note:
-WPS is not supported by iOS devices.
-The WPS function cannot be configured if the wireless function of the router is disabled. Also, the
WPS function will be disabled if your wireless encryption is WEP. Please make sure the wireless
function is enabled and is configured with the appropriate encryption before configuring the WPS.

11
Chapter 3
Log In to Your Router

12
With a web-based utility, it is easy to configure and manage the router. The web-based
utility can be used on any Windows, Mac OS or UNIX OS with a web browser, such as
Microsoft Internet Explorer, Mozilla Firefox or Apple Safari.
Follow the steps below to log in to your router.
1) Set up the TCP/IP Protocol in Obtain an IP address automatically mode on your computer.
2) Open browser and Visit 192.168.4.1 or router.juplink.com
Note: If the login window does not appear, please refer to the FAQ Section.
You can also scan the QR code (recommended) to enter the settings page.

13
Chapter 4
Set Up Internet Connection This chapter introduces how to connect your router to the internet. The router is equipped
with a web-based Quick Setup wizard. It has necessary ISP information built in, automates
many of the steps and verifies that those steps have been successfully completed.
Furthermore, you can also set up an IPv6 connection if your ISP provides IPv6 service.
It contains the following sections:
- Manually Set Up Your Internet Connection
- Set Your Wireless Network
- Set up the Router as an Access Point (Bridge Mode)
- Set up an IPv6 Internet Connection

14
4.1. Manually Set Up Your Internet Connection In this part, you can check your current internet connection settings. You can also modify the
settings according to the service information provided by your ISP.
Follow the steps below to check or modify your internet connection settings. (If you need
the IPv6 internet connection, please refer to the section of Set Up an IPv6 Internet
Connection.) If you don't know how to choose the way to connect, please check with your
ISP for the internet access method before setting.
4.1.1. DHCP
4.1.2. PPPoE
If you select PPPoE, enter the Username and Password provided by your ISP. (PPPoE users
usually have DSL cable modems.)
Note: If you forget your Username or Password, follow the suggestions below:
① Consult ISP and obtain username and password
② Use an Ethernet cable to connect the WAN port of RX4-1800 to the LAN port of the old
router, click Get from old router. After obtaining this information successfully, replace the
original router with RX4-1800.

15
4.1.3. Static IP
If you choose Static IP, enter the information provided by your ISP in the corresponding
fields.
After finishing modifications and clicking Next, you will jump to the Set Your Wireless
Network page.
Note: You can take a screenshot to keep this information for the next time or for others to
use.
Then, click OK button. The router will reboot and reconnect to your device in about 30 seconds.

16
4.2. Set Your Wireless Network
4.2.1. Modify your Wi-Fi Network Name (SSID), Password (Wi-Fi password)
It is recommended to select Unify 2.4GHz & 5GHz for a better wireless network experience.
4.2.2. Configure your Login Password

17
4.3. Set Up the Router as an Access Point (Bridge Mode) The router can work as an access point, transforming your existing wired network to a
wireless one or expand your wireless network.
Before installation, please complete the following settings:
1) After disconnecting the WAN port on the router, connect a device (such as a PC or phone)
to your Juplink router and launch a web browser. Then, log in to your router.
2) Click Basics > WAN > WAN Mode (Link Mode).
Select Bridge from Link Mode drop-down list. Then, click Apply to finish your setting.
3) Connect the router to your existing wired router via an Ethernet cable. See figure below.

18
Note: If you want to experience seamless roaming, please ensure that the wireless settings
of all your wireless devices are consistent (have a unified SSID and password).
4.4. Set up an IPv6 Internet Connection Your ISP provides information about one of the following IPv6 internet connection types:
IPv6 (Auto Configured); IPv6 Static
4.3.1. IPV6 (Auto Configured/DHCPv6)
1) After logging in to your router, click Basics > WAN > IP Mode, and select IPv6 from the
drop-down list. Then, set IPv6 Address to Auto Configured or DHCPv6.
2) Click Apply button to finish your setting.
4.3.2. IPV6 Static
1) After logging in to your router, click Basics > WAN > IP Mode, and select IPv6 from the
drop-down list. Then, set IPv6 Address to Static, and fill in IPv6 Address and Default IPv6
Gateway as required.
2) Click Apply.

19
Chapter 5
Guest Network This function allows you to provide Wi-Fi access for guests without disclosing your main
network. When you have guests in your house, apartment, or workplace, you can create a
guest network for them.
It contains the following section:
- Create a Network for Guests

20
5.1. Create a Network for Guests
1) After logging in to your router, click Basics > WAN > Guest Network.
2) Set your Guest Network’s Wi-Fi name and Key. Also, you can modify Authentication
Mode (WPA-PSK/WPA2-PSK is recommended).
3) Click Save to finish your setting. Now your guests can access your guest network using the
SSID and password you set.

21
Chapter 6
Security Setting Create a personalized network that caters for the whole family in Security Setting. You can
ensure appropriate internet access for everyone with Parent Control, and keep your network
secure with WAN Access Control.
It contains the following sections:
- Firewall
- Wireless Access Control
- Management device access list
- URL filter control
- Parent Control
- Device Access Control

22
6. 1. WAN Access Control When Firewall is enabled, the state-based firewall rules will take into effect to establish security
protection between the router and the internet to prevent non-associated connections and DDoS
attacks from the WAN side. If the firewall is disabled, the protection will be lost and the router
will face the risk of attacks.
6.1.1. Firewall Setting - Low
After logging in to your router, click Basics > Security > Firewall.
Note: This feature is enabled by default, and the initial state is Low. Also this mode provides
low-level conventional protection, and the protection rules cannot be customized.
6.1.2. Firewall Setting - Medium
After logging in to your router, click Basics > Security > Firewall, and select Medium from
Firewall Level drop-down list. Then, click Apply to finish your setting.
Note: This mode provides medium-level network protection, which can provide the most suitable
network protection without affecting normal use, and the protection rules cannot be customized.

23
6.1.3. Firewall Setting - High
After logging in to your router, click Basics > Security > Firewall, select High from Firewall Level
drop-down list. Then, click Apply to finish your setting.
Note: This mode provides the highest level of network protection, which may affect the normal
use of the network, especially some software that requires the use of specific network ports.
Please clarify the port usage before customizing the rules. If the network cannot be used
normally after the setting is completed, please go to the network security page and change the
Firewall Level to Medium or Low.

24
6.1.4. Firewall Setting- Set Exception Rules
1) After logging in to your router, click Basics > Security > Firewall, and select High from Firewall
Level drop-down list. Then, click Apply.
2) After filling in the necessary information, click Add in Firewall exception rules page.
If it affects your normal use and needs to close this rule, click the Remove button next to the
corresponding rule. The following figure shows an example of the rules.

25
6.1.5. Firewall Setting- Set Filtering Rules
1) After logging in to your router, click Basics > Security > Firewall. Select High from Firewall
Level drop-down list. Then click Apply to finish your setting.
2) After filling in the necessary information, click Add in Firewall exception rules.
Note: Set your protocol filtering rules to block IP and its protocol packets derived from the LAN
side.
If it affects your normal use and needs to close this rule, click the Remove button next to the
corresponding rule. See the following figure for an example of the rules.

26
6.2. Wireless Access Control Wireless Access Control allows or denies wireless access to clients with the specified MAC
addresses.
6.2.1. Wireless Access Control - Add from List
1) After logging in to your router, click Basics > Security > Wireless Access Control. Select the
wireless name you want to be set from SSID drop-down list and enable this function.
2) Select Black List or White List, and click Save.
Take black list settings as an example,
Click Add from List in the Device list page to display the device that has been connected to this
Wireless network.
Select Action and click Add to finish your setting.
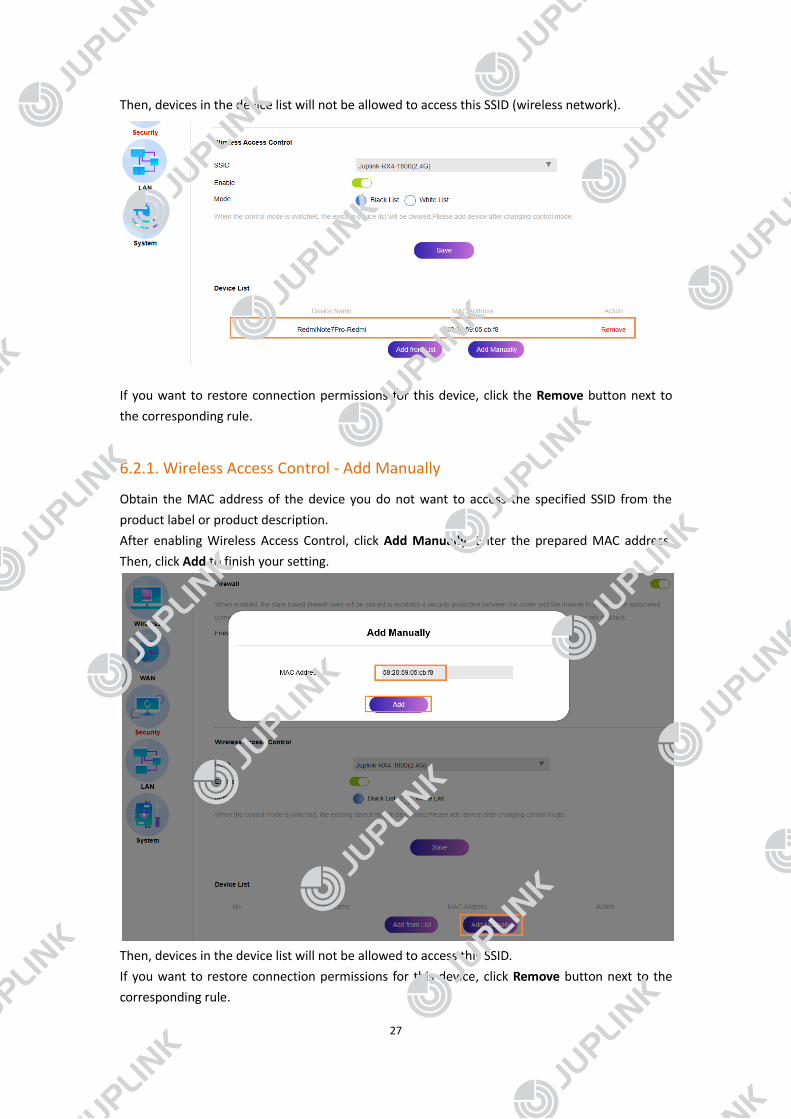
27
Then, devices in the device list will not be allowed to access this SSID (wireless network).
If you want to restore connection permissions for this device, click the Remove button next to
the corresponding rule.
6.2.1. Wireless Access Control - Add Manually
Obtain the MAC address of the device you do not want to access the specified SSID from the
product label or product description.
After enabling Wireless Access Control, click Add Manually. Enter the prepared MAC address.
Then, click Add to finish your setting.
Then, devices in the device list will not be allowed to access this SSID.
If you want to restore connection permissions for this device, click Remove button next to the
corresponding rule.

28
6.3. Manage Device Access List This page is used to manage devices that can log in to the router setting interface.
Note:
·If this feature is turned on, the router can be configured only from devices in the following MAC
address list.
·After enabling this function, the device that sets this router for the first time will be in the list.
·If you accidentally delete all the management devices, please press the RESET button and hold
for 5 seconds to restore factory settings.
·All device management is based on MAC address. There are two ways to get the MAC address:
in the device interface of the homepage; from product label or product description.
The following is an example of adding a Note7Pro mobile phone to the manager list.
Now the device has been added to the manager list.
If you want to cancel the management authority of this device, click Remove button next to the
corresponding rule.
29
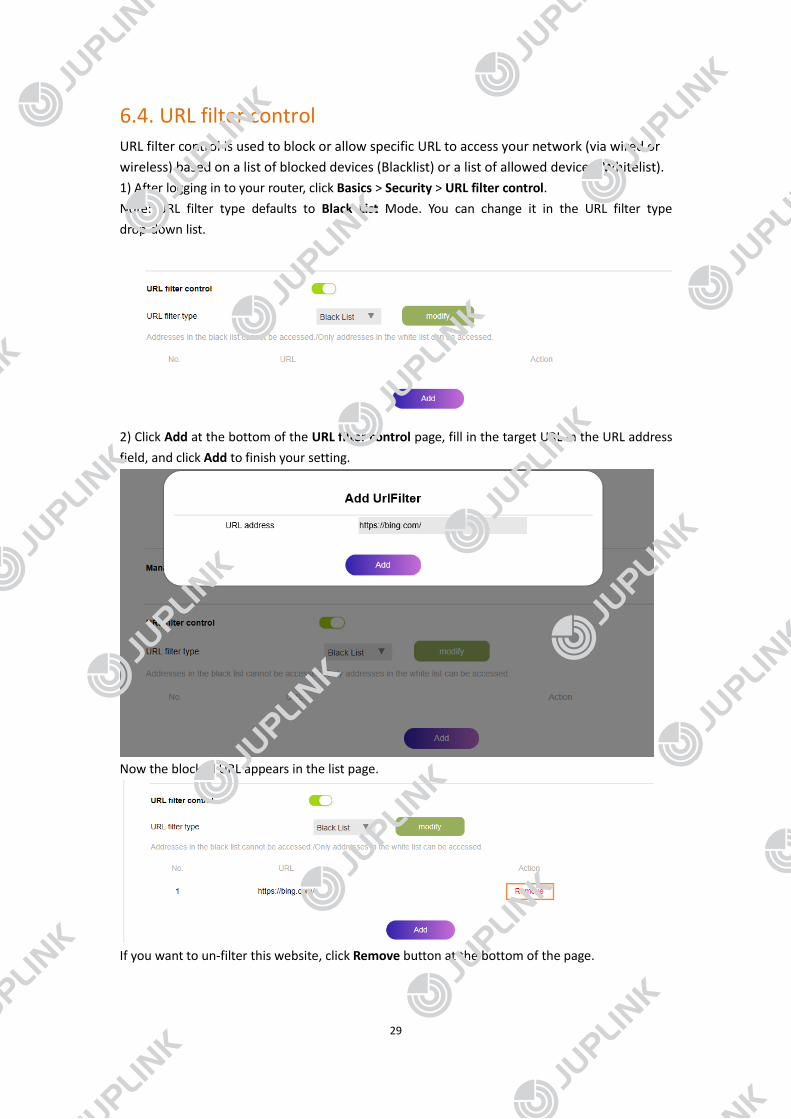
6.4. URL filter control URL filter control is used to block or allow specific URL to access your network (via wired or
wireless) based on a list of blocked devices (Blacklist) or a list of allowed devices (Whitelist).
1) After logging in to your router, click Basics > Security > URL filter control.
Note: URL filter type defaults to Black List Mode. You can change it in the URL filter type
drop-down list.
2) Click Add at the bottom of the URL filter control page, fill in the target URL in the URL address
field, and click Add to finish your setting.
Now the blocked URL appears in the list page.
If you want to un-filter this website, click Remove button at the bottom of the page.

30
6.5. Parent Control Parental control allows you to set up unique restrictions on internet access for each member
of your family, such as setting daily limits for the total time spent online.
1) Obtain the MAC address of the device you want to manage.
You can get the MAC address of the connected device from the Device page.
2) After logging in to your router, click Basics > Security > Parent Control.
If you want to cancel the management authority of this device, click Remove button next to the
corresponding rule.
Note: Only devices that have previously been connected to your router’s network are listed in the
Device page. If you are unable to find the device you want to add, connect the device to your router’s
network and then try again.

31
6.5. Device Access Control Device Access Control manages network access of a device based on its MAC address.
1) Obtain the MAC address of the device you want to manage.
You can get the MAC address of the connected device in the Device page.
2) Select the control mode from Access Control Mode drop-down list and click Save to finish
your setting.
3) Add your device’s MAC address.
If you want to cancel the management authority of this device, click Delete button next to the
corresponding rule.

32
Chapter 7
VPN Server The VPN (Virtual Private Networking) Server allows you to access your home network in a
secured way through internet when you are away from home.
The chapter describes how to set up VPN connection in L2TP connection mode.
- L2TP VPN (Use L2TP VPN to Access Your Home Network)
33
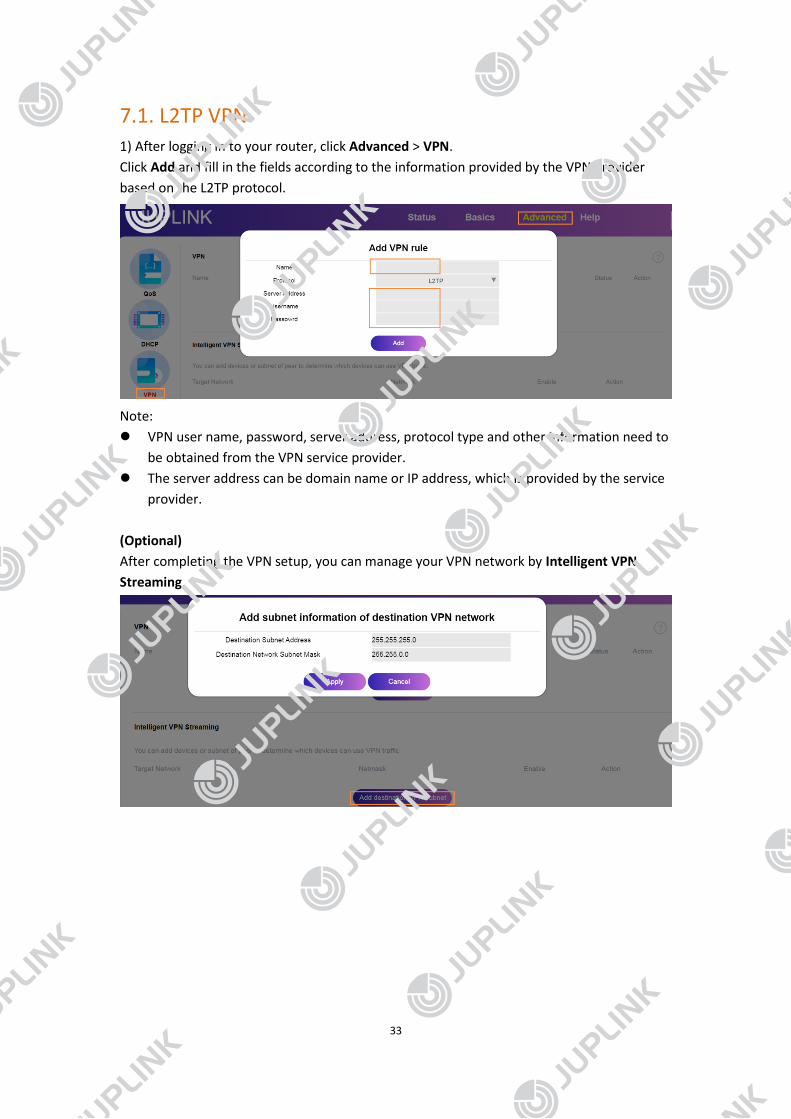
7.1. L2TP VPN 1) After logging in to your router, click Advanced > VPN.
Click Add and fill in the fields according to the information provided by the VPN provider
based on the L2TP protocol.
Note:
⚫ VPN user name, password, server address, protocol type and other information need to
be obtained from the VPN service provider.
⚫ The server address can be domain name or IP address, which is provided by the service
provider.
(Optional)
After completing the VPN setup, you can manage your VPN network by Intelligent VPN
Streaming.
34
Chapter 8
Customize Your Network
Settings This chapter guides you on how to configure advanced network features.
It contains the following sections:
- QoS
- DHCP Static IP Assignment (Address reservation)
- LAN Port Forwarding
- MDZ
- UPnP
- DDNS
- Mesh
- Wireless Roaming Setting
- One Key Physical Examination
- LAN Settings
- Dual Band Integration
- Advanced wireless settings
- Use Repeater to Extend Network
- AP mode (Bridge mode)
- WAN settings

35
8.1. QoS QoS (Quality of Service) allows you to prioritize the internet traffic of specific device.
8.1.1 QoS-Router speed limit
1) After logging in to your router, click Advanced > QoS.
2) Under Router speed limit, click Set Speed Limit and fill in the maximum upload and
download speed you want to set in the corresponding fields. Click Apply to finish all your
settings.
3) If you want to modify the speed limit, click Set Speed limit to modify the limit values, and click
Apply to finish your setting.
Note: If set to 0, the network speed of the device will not be restricted.

36
8.1.2. QoS - Router speed limit
1) After logging in to your router, Click Advanced > QoS.
2) Under Terminal device speed limit, click Set Speed Limit and fill in the maximum upload
and download speed you want to set in the corresponding fields. Then, click Apply to finish
your setting.
3) If you want to modify the speed limit, click Set Speed limit to modify the limit values, and click
Apply to finish your setting.
Note: If set to 0, the network speed of the device will not be restricted.

37
8.2. DHCP Static IP Assignment (Address Reservation) This function is used to assign a fixed IP address to your specific network device. Some devices
require a fixed IP, such as network printers, IP cameras.
Note: It is recommended to connect the device to the router first, so that it is convenient to
obtain the MAC address of the device.
8.2.1. DHCP Static IP Assignment - Add by List
1) After logging in to your router, click Advanced > DHCP.
2) Click Add by List, and select the device whose IP needs to be fixed from the list. Then,
click Add to finish your settings.
Note: If you want to modify the settings, click Remove button next to the corresponding rule.
38
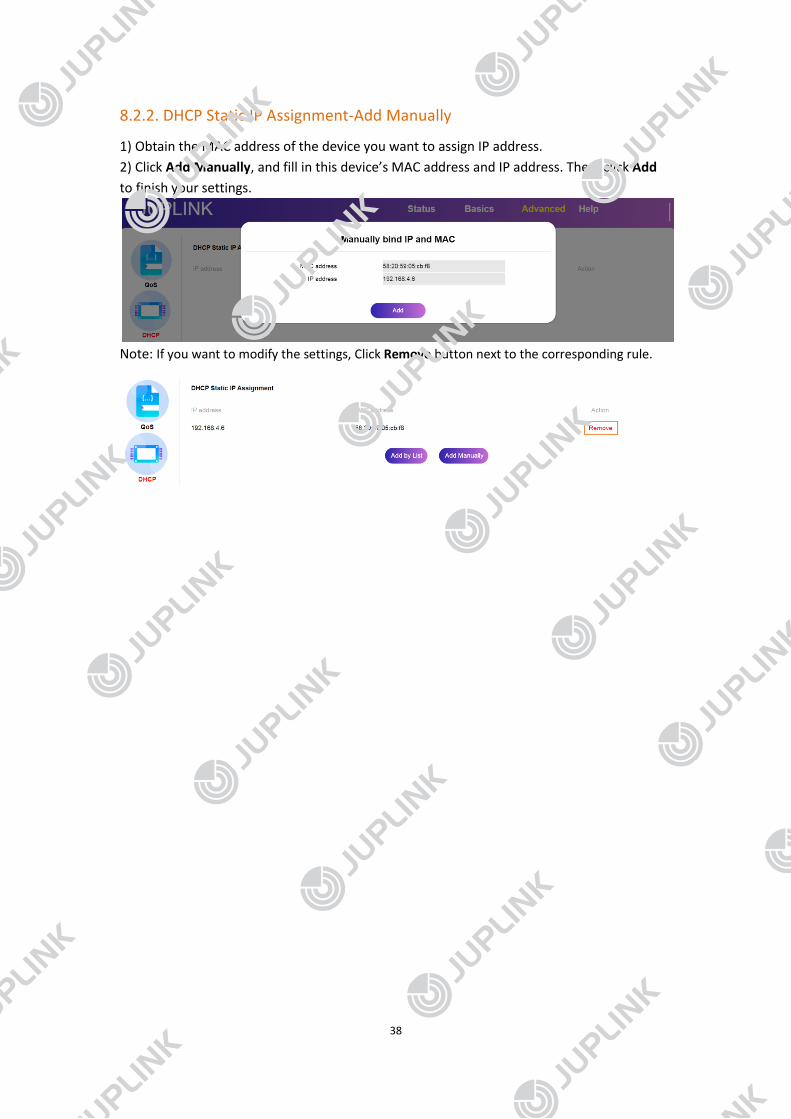
8.2.2. DHCP Static IP Assignment-Add Manually
1) Obtain the MAC address of the device you want to assign IP address.
2) Click Add Manually, and fill in this device’s MAC address and IP address. Then, click Add
to finish your settings.
Note: If you want to modify the settings, Click Remove button next to the corresponding rule.

39
8.3. LAN Port Forwarding A virtual server is a server using a device on the LAN side, which can be accessed directly
from the external network.
1) After logging in to your router, click Advanced > Application.
2) Click Add button.
3) Fill in the Protocol, Internal IP Address and Internal Port, and select Protocol Type from
the drop-down list.
Note: If you want to modify the settings, click Delete button next to the corresponding rule.

40
8.4. DMZ DMZ maps the internal IP address of an internal host to a public IP address. When a user
accesses a port of a host that provides a mapped port, the server transfers the request to
the host that provides this specific service in the LAN. With this function, you can map
multiple ports of a host with an external IP address to different ports on different internal
hosts on the internal network.
Devices commonly used for DMZ include some hard disk recorders and intranet servers.
1) After logging in to your router, click Advanced > Application.
2) Enable DMZ and fill in your device’s IP address.
Note:
⚫ Ensure that the target device has been assigned with an IP address before use.
⚫ It is recommended to be used with IP address reservation.
8.5. UPnP UPnP (Universal Plug and Play) is the universal plug and play protocol, which is the
architecture for realizing peer-to-peer network connection between computers and
intelligent electrical equipment. The conversion between the internal network address and
the network address is based on this protocol, so as long as our router supports UPnP and
we use network devices that support this protocol, we can use this function to accelerate
the point-to-point transmission speed.
Note: This feature is enabled by default.
41
8.6. DDNS DDNS stands for dynamic domain name service/server.
At present, most routers access the Internet using dynamic IP. DDNS can bind the router's
dynamic Internet IP to a fixed domain name, so that users can access the router through the
fixed domain name on the internet.
Before setting, please do as follows:
1. Obtain domain name and account password information through DDNS service provider.
2. Open DDNS service, add service, fill in the information obtained in the previous step, and
then save the settings to enable the service.
Note:
You can register an account and apply for a domain name on the service provider's official
website through the built-in DDNS operator.
The user and password are those provided by the operator; the host name is the domain
name applied from the operator; the mandatory check is the time when domain name and
WAN port IP are forced to be updated.
If there is no special requirement, it is recommended to use the default configuration.
Only one DDNS service can be started at a time.
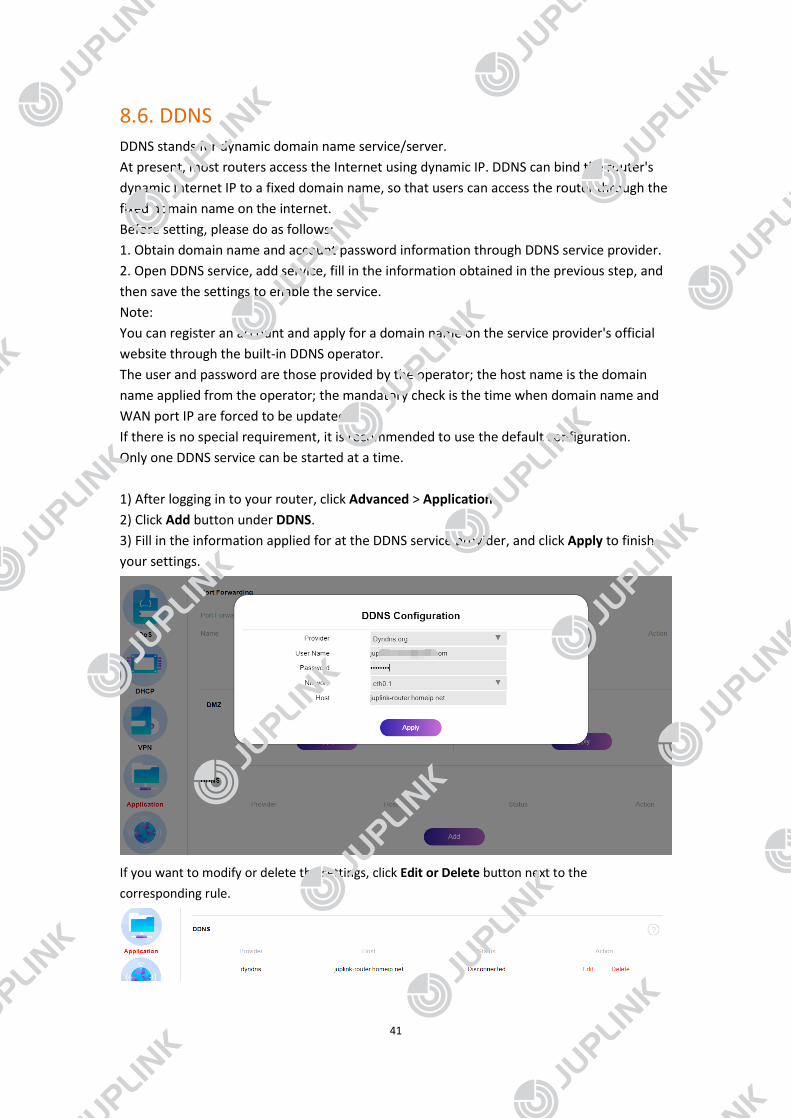
1) After logging in to your router, click Advanced > Application.
2) Click Add button under DDNS.
3) Fill in the information applied for at the DDNS service provider, and click Apply to finish
your settings.
If you want to modify or delete the settings, click Edit or Delete button next to the
corresponding rule.

42
8.7. Mesh Mesh connection mode can be quickly achieved via WPS button
1) Connect your router’s WAN port to the LAN port of the modem or another router (main
router).
2) Set up the router whose WAN port is connected, enable it to access the Internet normally
(please note that the wireless network must be set to the properly encrypted state and
password has been set).
4) Press the WPS button on both routers/modem for at least 5 seconds.
5) After about 30 seconds until the lights on both routers/modem change from flashing to
steady green, the setting is complete. By now the mesh network is established and can be
used normally.
Note:
-If you want to continue adding mesh devices, get another RX4-1500 router to build the
mesh network. Press the WPS button on the new device and the main router in the mesh
network for at least 5 seconds, and wait for the mesh network to complete.
-Devices that log in through the mesh network can only access the main router and view sub
devices in Advance > Mesh.
-If failed, please reset both routers/modem and follow the setting steps again.
Mesh status display
1) After pressing the WPS button on the main router for at least 5 seconds. Mesh page is
displayed as follows: (no following router is connected yet)
Role: Controller
Status: Waiting for pairing

43
2) After about 30 seconds, the link diagram will be displayed in the state diagram as follow:
Note:
-After successful pairing, you can only log in to the main router no matter how the device is
connected to the router.
-Generally, signal strength higher than -50 can be acceptable. If it is lower than -74, please
adjust the placement of the device.

44
8.8. Wireless Roaming Setting Adjust signal threshold in AP connection mode.
1) After logging in to your router, click Advanced > Others.
2) Modify the settings according to your actual situation if necessary (default values are
recommended).
Note: If the modifications make the network messed up, try Reset to restore to factory
default settings.
8.9. One Key Physical Examination This function is used to detect network settings.
Note: Click To Repair button will jump directly to the wireless setting page.

45
8.10. LAN Settings The router is preset with a default LAN IP 192.168.4.1, which you can use to log in to its web
management page. The LAN IP address, together with the subnet mask, also defines the
subnet that the connected devices are in. If the IP address conflicts with another device on
your local network or your network requires a specific IP subnet, you can change it.
8.10.1. Change Login Address (LAN IP Address)
1) After logging in to your router, click Basics > LAN > LAN IP Configuration.
Manually set IP address as the following format 192.168.0.XXX (XXX is any number of 2~254),
and leave the Subnet Mask as the default setting. Then, click Save to finish your settings.
2) You need reconnect the router and enter the address you set to log in to the setting page,
instead of the default 192.168.4.1.
8.10.2. DHCP Server Settings.
1) After logging in to your router, click Basics > LAN > DHCP Server Settings.
2) Here you can turn on or off the DHCP server and modify the IP address segment
automatically assigned by DHCP (default setting is recommended).

46
8.10.3. IPv6 LAN IP Configuration
1) After logging in to your router, click Basics > LAN > IPv6 LAN IP Configuration.
2) Select your Addressing Type from drop-down list (Stateless is the default setting).
After modify your Start IPv6 Address and End IPv6 Address, click Save to finish your
settings.
8.10.4. LAN prefix config
1) After logging in to your router, click Basics > LAN > LAN prefix config.
2) Turn on Enable Prefix static, and fill in Prefix setting.
It is recommended to keep Preferred LifeTime and Valid LifeTime as the default values.
3) Before setting, use the ifconfig command to view the IP address obtained in SSH and
write down the prefix.
For example, if you get 2001:250:ffff:8000:e6f4:feff:fe00:1122:3344/64, the prefix is
2001:250:ffff:8000::/64.
You can add any hexadecimal characters as your subnet address, for example
2001:250:ffff:8000:2333:dead:beef::/112.
Note: Please remember your subnet prefix and prefix length, as you will use them from time
to time later.

47
8.11. Dual Band Integration When enabled, 2.4G and 5G Wi-Fi will use the same network name, and the router will
automatically select the best Wi-Fi network for the terminal. If the terminal device is close to
the router, it switches to 5G network, otherwise it connects to 2.4G network. However, due
to differences of terminal devices, there may be some problems, such as the network may
be interrupted for a short time when the signal source is automatically switched, or even the
line may be dropped.
1) After logging in to your router, click Basic > Wireless > Enable Dual Band Integration.
2) Click Save to finish your setting.
Note:
-We recommend only modifying SSID Name and Password, and keeping other settings as
defaults.
-After completing the settings, it will take about 30 seconds for the router to restart.

48
8.12. Advanced Wireless Settings The router’s wireless network name (SSID) was preset, which can be found on the label of
the router. You can customize the wireless settings according to your needs.
8.12.1. Enable or Disable Wireless Function
1) After logging in to your router, click Basic > Wireless.
2) The wireless function is enabled by default. To disable it, just turn off the Enable button of
each wireless network and click Save button.
Note: After wireless function is disabled at both bands, you can enable it by connecting the
LAN port of the router and accessing this setting page again or resetting the router.
8.12.2. Change Wireless Network Name (SSID) and Wireless Password
1) After logging in to your router, click Basic > Wireless.
2) Set your SSID (Wi-Fi name) and Key (Wi-Fi password) and click Save button. Then, you can
reconnect your wireless network with the new SSID and key.
Note: If you change the wireless settings by operating on a wireless device, you will be disconnected
when the settings are effective. Please write down the new SSID and password (key) for future use.

49
8.12.3. Change Wireless Security Option
1) After logging in to your router, click Basic > Wireless.
2) Change Authentication mode and Encryption Mode from the drop-down lists.
Note:
It is not recommended to change the default settings unless necessary. Before selecting
other options, please check whether your device supports the new modes.
8.12.4. Change Wireless Working Mode
1) After logging in to your router, click Basic > Wireless.
2) Change wireless Working Mode from the drop-down list.
Note:
-Some wireless network cards may be outdated. When connecting to an 802.11ax wireless
router, there may be compatibility problems. Please go to the corresponding manufacturers'
official websites to download the latest drivers.
-If a device fails to be connected after several attempts, it is recommended to change the
wireless Working Mode to 802.11ac/802.11n.

50
3) You can select wireless Channel from the drop-down list (Auto is recommended).
4) You can select the bandwidth of the selected channel from Bandwidth drop-down list for
the wireless network (20MHz/40MHz/80MHz is recommended for 5G, and 20MHz for 2.4G).
5) You can change the wireless transmit power from Signal Strength drop-down list
according to your need.

51
8.13. Use Repeater to Extend Network Extend your existing wireless network range using the repeater feature.
1) After logging in to your router, click Basics > WAN
2) Click the Relay Setup button to enable the repeater function in the pop-up window.
3) Select Enable & Sync with gateway (suggest)
Note: After repeater mode is enabled, it will automatically start searching for surrounding
Wi-Fi signals. The search time is about 10 seconds. If the signal you want to expand is not
found in the list, please move your device and retry the function.

52
3) Select Wi-Fi network in repeater SSID list and enter the wireless password in the Key field.
Note: It is recommended to enable Inherit wireless name and key.
4) Click One Button Wireless Relay button. Your router will then reboot, and the expanded
new wireless network will be established in 2 minutes. After that, you can enjoy the
extended Wi-Fi.
8.14. AP Mode (Bridge Mode) 1) After logging in to your router, click Basics > WAN.
2) Select Bridge from Link Mode drop-down list, and click Apply to finish your settings.
Note:
-In bridge mode, all devices connected to this router are managed by the uplink router.
-If you have multiple APs and want unified management for seamless roaming, it is
recommended to turn on the Dual Band Integration mode and set a unified SSID.

53
8.15. WAN settings WAN setting is mainly used to set the connection mode of an uplink modem/router.
8.15.1. Change Connection Type Mode
1) After logging in to your router, click Basics > WAN.
2) Select PPPoE/IPoE (default) from Connection Type drop-down list.
Connection Type - IPoE mode:
Connection Type - PPPoE mode
Note: Please check with your ISP for the internet access method before setting.
8.15.2. Change IP Mode
Set IPv4 and IPv6 according to your needs.
1) After logging in to your router, click Basics > WAN.
2) Select IPv4 or IPv6 from IP Mode drop-down list.

54
3) Set IPv4/IPv6 Address type.
① IPv4 - DHCP (default)
② IPv4 - Static
③ IPv6 - AutoConfigured (default)
④ IPv6 - DHCP

55
⑤ IPv6 - Static
Note:
-IPv4 and IPv6 need to set address mode and DNS independently.
-After clicking Apply, the router will reboot automatically. Please try reconnecting after 1
minute.
-If DNS is not specified, the device's DNS is automatically obtained. You can modify the DNS
settings according to your need or ISP's instructions.
8.16. TWT settings Set TWT according to your needs.
Caution: This function may cause non-Wi-Fi6 Device to disconnect under certain conditions
in order to maintain better compatibility, we suggest to keep this function off.
1) After logging in to your router, click Advanced > Other.
2) Enable 2.4G TWT or 5G TWT and click Apply save your changes.

56
Chapter 9
Manage the Router This chapter will show you the configuration for managing and maintaining your router.
It contains the following sections:
- Upgrade the Firmware
- Restore Default Setting
- Change the Login Password
- System Log
- Set up System Time
- Set the Router to Reboot Regularly
- Set Backup Restore

57
9.1. Upgrade Firmware Juplink aims at providing better network experience for you. The latest firmware will be
released on the Juplink official website www.juplink.com, and you can download it for free. Note:
-DO NOT turn off the router during firmware upgrade.
-DO NOT change firmware file name including extension name of the file.
9.1.1. Manual Upgrade
1) Download firmware to your common folder.
2) After logging in to your router, click the round icon in the upper right corner of the page.
3) Click the gray field of “Please select firmware” in the pop-up window to navigate to the
location where the firmware file is saved.
4) Select the firmware file and click Upgrade. Then, your router will be upgraded and reboot.
5) Wait for about 2 minutes before reconnecting to your router.

58
9.2. Restore Default Setting 9.2.1. Manual Restore
Press the Reset Button for about 10 seconds on the rear panel of the router. Then, wait two
minutes for the router to reset and reboot.
9.2.1. Setting Page Restore
1) After logging in to your router, click Basics > System.
2) Click Restore Default button in Restore Default Setting page.
3) Wait a few minutes for the router to reset and reboot.
Note: During the resetting process, do NOT power off the router.
9.3. Change the Login Password The account management feature allows you to change your login password of the web
page.
1) After logging in to your router, click Basics > Security.
2) Set your password under Modify Password.
3) Click Apply button, and then use the new password from the next login.
Note: The current firmware does not support modifying the username.

59
9.4. System Log When the router does not work normally, you can save the system log and send it to
technical support for troubleshooting.
Note:
-If log mode is turned on, the system will start recording all selected events.
-For the log level, all events equal to or above the selected level will be recorded.
-For the display level, all events equal to or above the selected level will be displayed.
9.4.1. Enable and set log mode:
1) After logging in to your router, click Basics > System.
2) Enable Log Settings and select Log Level and Display Level from drop-down lists. Then,
click Save log Settings.
3) You can click View Log to view system records.
4) Refresh/Download/Clear Log can be used to operate log data temporarily generated in
the router.

60
9.5. Set Up System Time System time is the time displayed while the router is running. The system time you configure
here will be used for other time-based functions like parent control. You can select the way
to obtain the system time as needed.
1) After logging in to your router, click Basics > System.
2) Click Time Settings button, and select Time Server, Second NTP Time Server and Time
Zone from the drop-down lists.
3) Click Save Button to finish your settings.
9.6. Set Router to Reboot Regularly Rebooting the router can free up system resources that are no longer in use. You can choose
to reboot the router at a specified time, so that the router can run in the best state.
1) After logging in to your router, click Basics > System.
2) Click Timed Reboot Settings button and select reboot Mode from drop-down list.
Select Reboot Date and Reboot Time, and then click Apply button to finish your settings.

61
Note: To cancel previous settings, click Timed Reboot Settings button. Select Disable from
Mode drop-down list and click Apply.
9.7. Set Backup Restore Backed up the router's configuration can be used for recovery after rebooting or resetting
the router.
9.7.1 Set Backup Files
1) After logging in to your router, click Basics > System.
2) Click Create Backup button, and a configuration file will be created and saved in the root
directory of your phone or computer.
9.7.2 Restore from Backup Files
1) After logging in to your router, click Basics > System.
2) Click Restore from Config button, select configuration file restored earlier and click
Restore Now button.
Note: The device will reboot and then connect again after 2 minutes.

62
FAQ Q1: Why cannot the router set up successfully?
A1: If router did not complete the setup, you can try the following:
Press and hold the RESET button on your router with a paperclip or pin until the front indicator
turns off and after 25 seconds it turns on in Red, and it finally stays in green.
Q2: Why cannot the internet appear available?
A2: The internet appears unavailable if the internet has difficulty in communicating with your
router.
The problem may appear as a "Cannot find [internet address]" message in your Web browser.
If you are sure that the internet address is correct and you've tried several valid Internet
addresses with the same result, the message could mean that there's a problem with your ISP or
modem communicating to your router.
Then, please try the following:
- Make sure that the Internet Service Provider (ISP) information is filled in correctly.
- Make sure that the Ethernet and power cables are properly connected.
Q3: Why cannot connect the router signal after successful connection only for a while?
A3: Try the following:
-Check on the settings page for restrictions and blacklist.
-Reboot the router and connect again.
-Reset the router and set up again.
Q4: Why router and mobile get strong signal but low speed?
A4: Try the following:
-Enter the router’s setting page and verify that your router hasn’t connected any device from
unknown access.
-Check the surrounding wireless signals. If there are too many wireless signals, switch the channel
and try again.
-Check with your ISP by phone or email to confirm that the service is normal.
-If you are connected to the 2.4G band, the problem may be caused by wireless interference.
In this case, it is recommended to switch the 2.4G channel to 1 or 11 and change the bandwidth
to 20MHz.
Q5: Why cannot access the web UI of the router after entering router.juplink.com?
A5: Try the following solutions and log in again:
-Ensure that your Ethernet cable with internet connectivity is plugged into the WAN port of the
router rather than a LAN port.
-Ensure that your wireless device is connected to the router’s SSID.
-Ensure that your wired device is connected to a LAN port (1, 2, 3, or 4) of the router properly
using an Ethernet cable, and that the device is set to Obtain an IP address automatically and
Obtain DNS server address automatically.

63
-Clear the cache of your web browser or try a different web browser, and try logging in again.
-Disable the firewall of your device, and try logging in again.
-If the problem persists, reset your router and follow the setting again.
Q6: An IP address conflict message appears on the computer after it is connected to the router.
What should I do?
A6: Try the following:
-Ensure that there is no other DHCP server in your LAN or that the other DHCP server is disabled.
-Verify that the IP address of your router is not used by another device in your LAN. The default
access address of the router is router.juplink.com
-Ensure that the static IP address assigned to the computer in your LAN is not used by other
devices.
-Reboot your router and check again.
Q7: I forget the login password of the router. What should I do?
A7: Try resetting the router and logging in to the router's setting page to set the password again.
Q8: Why cannot my phone or computer find the 5GHz signal?
A8: Try the following:
-Only devices supporting 5GHz signal can find and connect to the 5GHz network. Some
computers support connecting to 2.4G only.
-Access the router’s setting page and confirm that both wireless bands have been turned on.
-Change wireless Work Mode to 802.11b/g/n/ac in Basics Wireless Setting page.
Q9: How to connect to Xfinity cable Modem?
A9: ① Connect to the Wi-Fi network of the router and log in to the web management page at
router.juplink.com
② Tap or click Network on top menu.
④ Tap or click WAN Setting.
⑤ Select PPPoE in Addressing Type.
⑥ Enter the User Name and Password of your Internet Service Provider (ISP).
⑦ Click Apply.
Q10: How to change the DNS servers on the router?
A11: ① Log in to the web management page at router.juplink.com
② Tap or click Basics on top menu.
③ Tap or click WAN Setting.
④ Select Static in IPv4 Address Type, and then you can set DNS manually.
⑤ Enter Subnet Mask information.
⑥ Enter Default Gateway.
⑦ Enter the primary DNS server you want to use.
⑧ Enter the secondary IPv4 DNS server you'd like to use.
⑨ Click Apply.
Note: Please contact your Internet Service Provider (ISP) to obtain detail DNS information.

64
Q12: Why is my Windows device not detecting my 11ax router's wireless network?
A12: If your Windows device is not detecting your 11ax router’s wireless network, you might
have an earlier Intel wireless network adapter on the device (some earlier Intel adapters include
Intel Dual Band Wireless AC-3160, AC-3165, AC-7260, AC-7265 and AC-8260).
To check which wireless network adapter is being used on your Windows device, do as follows:
① Open the Control Panel on your Windows device.
② Enter Device Manager in the search bar at the top of the window.
③ Click Device Manager.
④ Click the arrow next to network adapter to display the list of adapters.
⑤ Your wireless network adapter is displayed in the list.
Note: If your wireless network adapter is not made by Intel and you are still unable to connect to
your router’s wireless network (SSID), try rebooting or resetting your router. If your wireless
network adapter is an earlier Intel model, it might not recognize the wireless signal on your 11ax
router. In this case, connect to your router directly using wired connection to access the internet
and download the latest network adapter driver, in the following steps:
① Using an Ethernet cable, connect your Windows device to a LAN port on the back of your AX
router.
② Launch a web browser and visit
https://downloadcenter.intel.com/product/59485/Wireless-Networking
② Download the latest wireless network adapter driver for your network adapter.
③ After installing the latest driver, your device should be able to recognize your 11ax router’s
wireless network.
Q13: How to set the repeater mode on the router?
A13: ① Log in to the web management page at router.juplink.com
② Tap or click Basics on top menu.
③ Tap or click WAN Setting.
④ Tap or click Relay Setup under Wireless Repeater and enable it.
④ Select the Wi-Fi you want to extend.
⑤ Enter Your Wi-Fi password in Key field.
⑦ Tap or click One Button Wireless Relay.
Q14: How to establish a mesh network system on your router?
A14: First of all, you need to have at least 2 routers.
① Connect your router’s WAN port to the LAN port of the modem or the uplink router (main
router).
② Set up the main router, and enable it to access the Internet normally. (Please note that the
wireless network must be set to an encrypted mode other than Open.)
③ Press the WPS button on both routers/modem for at least 5 seconds.
④ After about 60 seconds, the lights on both routers/modem will stay in solid green, which
indicates the setting is complete, the mesh network is set and can be used normally.

65
FCC statement FCC compliance information statement
Product Name: Juplink RX4-1800 Router
Responsible party:
This equipment has been tested and found to comply with the limits for a Class B digital
device, pursuant to part 15 of the FCC Rules. These limits are designed to provide reasonable
protection against harmful interference in a residential installation. This equipment
Generates, uses and can radiate radio frequency energy and, if not installed and used in
accordance with the instructions, may cause harmful interference to radio communications.
However, there is no guarantee that interference will not occur in a particular installation. If
this equipment does cause harmful interference to radio or television reception, which can
be determined by turning the equipment off and on, the user is encouraged to try to correct
the interference by one or more of the following measures:
-Reorient or relocate the receiving antenna.
-Increase the separation between the equipment and receiver.
-Connect the equipment into an outlet on a circuit different from that to which the receiver
is connected.
-Consult the dealer or an experienced Radio/TV technician for help.
This device is restricted to be used in the indoor.
Operation is subject to the following two conditions:
(1) This device may not cause harmful interference, and
(2) This device must accept any interference received, including interference that may cause
undesired operation.
Radiation Exposure Statement
This device complies with FCC radiation exposure limits set forth for an uncontrolled
environment and it also complies with Part 15 of the FCC RF Rules.
This equipment should be installed and operated with minimum distance 20 cm between
the radiator & your body.
Caution:
Any changes or modifications not expressly approved by party responsible for compliance
could void the user’s authority to operate this equipment.
This transmitter must not be co-located or operating in conjunction with any other antenna
or transmitter.
Note:
-The manufacturer is not responsible for any radio or TV interference caused by
unauthorized modifications to this equipment.
-To avoid unnecessary radiation interference, it is recommended to use a shielded RJ45
cable.