Embed Size (px)
Citation preview

Manual de instruccionesInstruction manualManuel d’instructionsBedienungsanleitungManuale di istruzioni Manual de instruçõesHandleidingInstrukcja obsługiNávod k použití

ÍNDICE1. Instrucciones de seguridad 112. Piezas y componentes 133. Antes de usar 144. Funcionamiento 165. Limpieza y mantenimiento 196. Carga y recambio de la batería 217. Resolución de problemas 228. Especificaciones técnicas 229. Reciclaje de electrodomésticos 2310. Garantía y SAT 23
INDEX1. Safety instructions 242. Parts and components 263. Before use 274. Operation 285. Cleaning and maintenance 326. Battery charge and replacement 337. Troubleshooting 348. Technical specifications 359. Disposal of old electrical appliances 3510. Technical support and warranty 35

SOMMAIRE1. Instructions de sécurité 362. Pièces et composants 383. Avant utilisation 394. Fonctionnement 405. Nettoyage et entretien 446. Charger et remplacer la batterie 467. Résolution de problèmes 478. Spécifications techniques 479. Recyclage des électroménagers 4810. Garantie et SAV 48
INHALT1. Sicherheitshinweise 492. Teile und Komponenten 513. Vor dem Gebrauch 524. Bedienung 535. Reinigung und Wartung 576. Laden und Ersetzen des Akkus 597. Problembehebung 608. Technische Spezifikationen 619. Entsorgung von alten Elektrogeräten 6110. Garantie und Kundendienst 61
INDICE1. Istruzioni di sicurezza 632. Parti e componenti 653. Prima dell’uso 664. Funzionamento 675. Pulizia e manutenzione 716. Ricarica e cambio della batteria 737. Risoluzione dei problemi 748. Specifiche tecniche 749. Riciclaggio di elettrodomestici 7510. Garanzia e SAT 75
ÍNDICE1. Instruções de segurança 762. Peças e componentes 783. Antes de usar 794. Funcionamento 805. Limpeza e manutenção 846. Carga e troca da bateria 867. Resolução de problemas 868 Especificações técnicas 879. Reciclagem de eletrodomésticos 8710. Garantia e SAT 88
INHOUDSTAFEL1. Veiligheidsvoorschriften 892. Onderdelen en componenten 913. Voor u het toestel gebruikt 924. Werking 945. Schoonmaak en onderhoud 976. Opladen en vervangen van de batterij 997. Probleemoplossing 1008. Technische specificaties 1009. Recyclage van elektrische apparaten 10110. Garantie en technische ondersteuning 101
SPIS TREŚCI1. Instrukcje bezpieczństwa 1022. Części i komponenty 1043. Przed uruchomieniem 1054. Obsługa urządzenia 1065. Czyszczenie i konserwacja 1106. Zmiana I Ładowanie Baterii 1127. Rozwiązywanie problemów 1128. Dane techniczne 1139. Recykling sprzętu 11310. Gwarancja i Pomoc Techniczna 114
OBSAH1. Bezpečnostní pokyny 1152. Části a složení 1173. Před použitím 1184. Fungování 1195. Čištění a údržba 1236. Nabití a výměna baterie 1247. Řešení problémů 1258. Technické specifikace 1269. Recyklace elektrospotřebičů 12610. Záruka a technický servis 126
Fig./Img./Abb./Afb./ Rys./Obr. 1
Fig./Img./Abb./Afb./ Rys./Obr. 3
3
45
6
10
2
7
9
8
1
2
Fig./Img./Abb./Afb./ Rys./Obr. 2
3

Fig./Img./Abb./Afb./ Rys./Obr. 4
Fig./Img./Abb./Afb./ Rys./Obr.14
Fig./Img./Abb./Afb./ Rys./Obr. 5
Fig./Img./Abb./Afb./ Rys./Obr. 6
Fig./Img./Abb./Afb./ Rys./Obr. 7
Fig./Img./Abb./Afb./ Rys./Obr. 8
Fig./Img./Abb./Afb./ Rys./Obr. 9
Fig./Img./Abb./Afb./ Rys./Obr. 10
Fig./Img./Abb./Afb./ Rys./Obr. 11
Fig./Img./Abb./Afb./ Rys./Obr. 12
Fig./Img./Abb./Afb./ Rys./Obr. 13
1
2
3
4
6
7
82
1
93
104
115
Fig./Img./Abb./Afb./ Rys./Obr.15
Fig./Img./Abb./Afb./ Rys./Obr.17
Fig./Img./Abb./Afb./ Rys./Obr.18/19
Fig./Img./Abb./Afb./ Rys./Obr.16

Fig./Img./Abb./Afb./ Rys./Obr. 20
Fig./Img./Abb./Afb./ Rys./Obr. 21
Fig./Img./Abb./Afb./ Rys./Obr. 22
Fig./Img./Abb./Afb./ Rys./Obr. 23
Fig./Img./Abb./Afb./ Rys./Obr. 24
Fig./Img./Abb./Afb./ Rys./Obr. 25
Fig./Img./Abb./Afb./ Rys./Obr. 26
Fig./Img./Abb./Afb./ Rys./Obr.27
Fig./Img./Abb./Afb./ Rys./Obr.28 Fig./Img./Abb./Afb./ Rys./Obr.29
Fig./Img./Abb./Afb./ Rys./Obr. 30
Fig./Img./Abb./Afb./ Rys./Obr. 31
Fig./Img./Abb./Afb./ Rys./Obr. 32
Fig./Img./Abb./Afb./ Rys./Obr. 33
Fig./Img./Abb./Afb./ Rys./Obr. 34
Fig./Img./Abb./Afb./ Rys./Obr. 35
Fig./Img./Abb./Afb./ Rys./Obr. 36
Fig./Img./Abb./Afb./ Rys./Obr. 37
Fig./Img./Abb./Afb./ Rys./Obr. 38
Fig./Img./Abb./Afb./ Rys./Obr. 39

11
ESPAÑOL
CONGA 990 VITAL
Fig./Img./Abb./Afb./ Rys./Obr. 40
Fig./Img./Abb./Afb./ Rys./Obr.41
Fig./Img./Abb./Afb./ Rys./Obr.42 Fig./Img./Abb./Afb./ Rys./Obr.43
Fig./Img./Abb./Afb./ Rys./Obr. 44
Fig./Img./Abb./Afb./ Rys./Obr. 45
Fig./Img./Abb./Afb./ Rys./Obr. 46-47
Fig./Img./Abb./Afb./ Rys./Obr. 48
Fig./Img./Abb./Afb./ Rys./Obr. 49
Fig./Img./Abb./Afb./ Rys./Obr. 50
1. INSTRUCCIONES DE SEGURIDAD
Lea las siguientes instrucciones atentamente antes de usar el producto. Guarde este manual para referencias futuras o nuevos usuarios. Este producto debe utilizarse conforme a lo indicado en este manual de instrucciones. Cecotec no se hará responsable de ningún daño o accidente que sea consecuencia del uso inapropiado del producto. Asegúrese de que el voltaje de red coincida con el voltaje especificado en la etiqueta de clasificación del producto y de que el enchufe tenga toma de tierra. El producto solo puede ser montado y desmontado por personal cualificado. No toque el cable, la toma de corriente ni el cargador con las manos mojadas. Mantenga el robot alejado de prendas de ropa, cortinas y materiales similares. No se siente ni coloque objetos afilados o pesados encima del dispositivo.No utilice el dispositivo cerca de fuentes de calor, sustancias inflamables, superficies mojadas donde pueda caer o ser tirado al agua, ni permita que entre en contacto con agua u otros líquidos. No lo utilice en el exterior.No utilice la base de carga si tiene el cable o el enchufe roto o si no funciona correctamente. En caso de avería, contacte con el Servicio de Asistencia Técnica de Cecotec.No utilice el dispositivo en mesas, sillas o superficies en altura donde tenga riesgo de caerse.No utilice la protección del láser como asa para mover el robot.No ponga el producto en funcionamiento en lugares donde la

1312
ESPAÑOL ESPAÑOL
CONGA 990 VITAL CONGA 990 VITAL
temperatura sea inferior a 0 ºC o superior a 50 ºC.El dispositivo únicamente funciona con la batería y el cargador proporcionados. El uso de otros componentes o accesorios podría conllevar riesgo de incendio, electrocución o dañar el producto.No utilice el dispositivo para aspirar objetos inflamables o encendidos como cigarrillos, cerillas o ceniza.Antes de poner el robot en funcionamiento, retire del suelo prendas de ropa, papeles, cables u otros elementos que pudieran obstruir el dispositivo.El aparato no debe ser usado por niños desde 0 hasta 8 años.Este electrodoméstico puede ser usado por niños a partir de 8 años de edad si están continuamente supervisados.Este producto puede ser usado por niños/as de a partir de 8 años y personas con capacidades físicas, sensoriales o mentales reducidas, o con falta de experiencia y conocimiento si están supervisados o han recibido instrucción concerniente al uso del aparato de una forma segura y entienden los riesgos que este implica. No permita que los niños jueguen con el dispositivo.Supervise a los niños para asegurarse de que no jueguen con el producto. Es necesario dar una supervisión estricta si el producto está siendo usado por o cerca de niños.
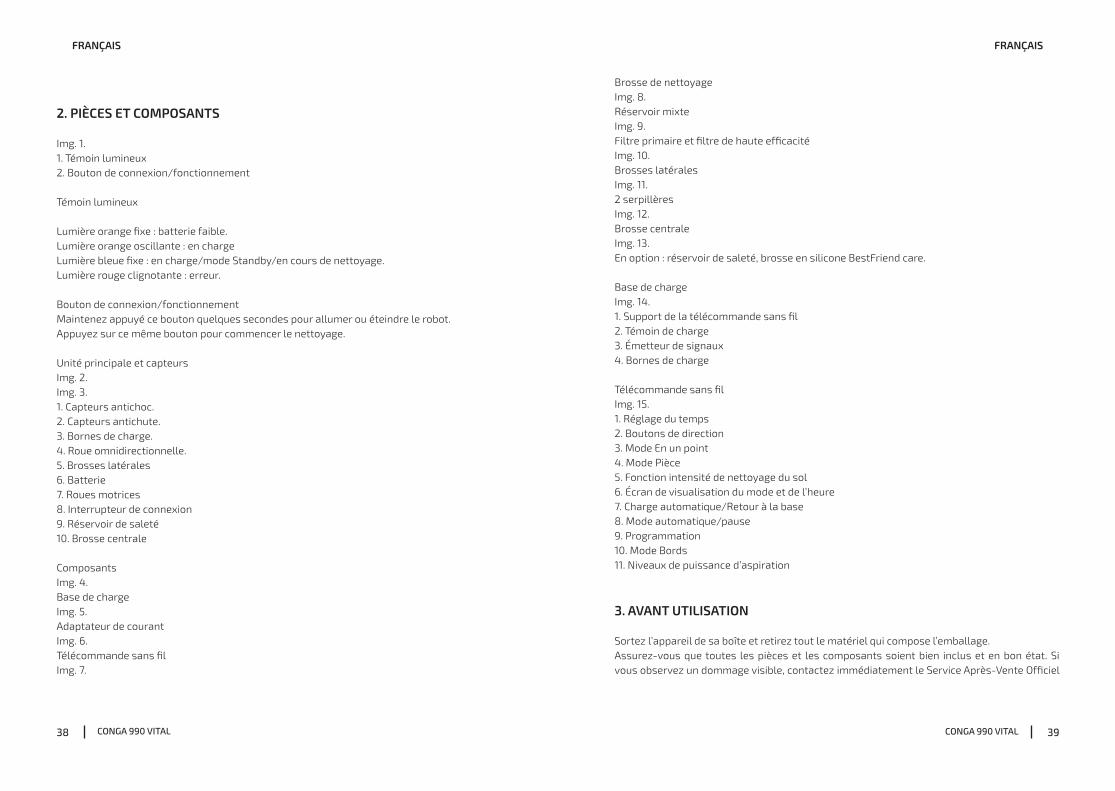
2. PIEZAS Y COMPONENTES
Fig. 1.1. Indicador luminoso2. Botón de encendido/funcionamiento
Indicador luminoso
Luz naranja fija: batería baja. Luz naranja oscilante: cargando. Luz azul fija: cargado/modo standby/limpiando. Luz roja parpadeante: error.
Botón de encendido/funcionamientoMantenga pulsado este botón unos segundos para encender o apagar el robot. Púlselo también para empezar la limpieza.
Cuerpo principal y sensores Fig. 2.Fig. 3.1. Sensores anticolisión2. Sensores anticaída3. Bornes de carga4. Rueda omnidireccional5. Cepillos laterales6. Batería7. Ruedas motrices8. Interruptor de encendido9. Depósito de suciedad10. Cepillo central
ComponentesFig. 4.Base de cargaFig. 5.Adaptador de corrienteFig. 6.Mando a distanciaFig. 7.Cepillo de limpiezaFig. 8.

1514
ESPAÑOL ESPAÑOL
CONGA 990 VITAL CONGA 990 VITAL
Depósito mixtoFig. 9.Filtro primario y filtro de alta eficienciaFig. 10.Cepillos lateralesFig. 11.2 mopasFig. 12.Cepillo centralFig. 13.Opcional: depósito de suciedad, cepillo de silicona BestFriend care.
Base de cargaFig. 14.1. Soporte del mando a distancia2. Indicador de carga3. Transmisión de señal4. Bornes de carga
Mando a distanciaFig. 15.1. Ajustes del reloj2. Botones de dirección3. Modo puntual4. Modo habitación5. Niveles de intensidad de fregado6. Pantalla de visualización de modo y hora7. Carga automática/Vuelta a casa8. Modo automático/pausa9. Programación10. Modo Bordes11. Niveles de potencia de succión
3. ANTES DE USAR
Saque el producto de la caja y retire todo el material de embalaje.Asegúrese de que todas las piezas y componentes están incluidas y en buen estado. Si se observara algún daño visible, contacte de forma inmediata con el Servicio de Asistencia Técnica oficial de Cecotec.Fig. 16.
Retire todos los objetos alrededor del robot, como prendas de ropa, papeles, cables, cortinas u otros objetos frágiles. Fig. 17.Si el área a limpiar está cerca de un balcón o unas escaleras, coloque una barrera física para evitar que se dañe el producto y para asegurar una limpieza segura.Fig. 18.Fig. 19.La exposición directa a la luz solar o los grandes contrastes de luz pueden afectar al perfecto funcionamiento de los sensores. Si esto sucediera, el robot aspirador se detendría, cámbielo de sitio para comenzar a trabajar de nuevo.
Fig. 20.Conecte la base de carga a una toma de corriente. Enrolle y guarde el cable restante en la parte inferior de la base carga para evitar accidentes.
Fig. 21.Coloque la base de carga contra la pared y deje un espacio libre mínimo de: 2 metros delante. 1 metro a cada lado
Fig. 22.Inserte los dos cepillos laterales en las ranuras situadas en la parte inferior del robot. Presione hasta escuchar un “clic” que confirme que están bien sujetos.
Fig. 23.Presione el interruptor de encendido que se encuentra en la parte inferior del robot. Asegúrese que el interruptor se encuentra en la posición ON.
Fig. 24.Coloque el robot en la base de carga y asegúrese de que los bornes de carga de ambos coincidan. Una vez que el robot esté bien colocado, emitirá un pitido y el botón de encendido se encenderá. Si la luz parpadea en naranja, significa que la batería no está completamente cargada. Para asegurar el mayor tiempo de limpieza, espere a que la luz cambie a azul permanente, esto indicará que la batería está totalmente cargada y el robot está listo para usarse.

1716
ESPAÑOL ESPAÑOL
CONGA 990 VITAL CONGA 990 VITAL
4. FUNCIONAMIENTO
Fig. 25.Comenzar la limpieza Mantenga pulsado el botón de encendido en el robot para encenderlo. Pulse el botón de encendido del robot o del mando a distancia para comenzar la limpieza.
Aviso: si el robot se queda sin batería durante la limpieza, volverá automáticamente a la base de carga. Una vez que se haya cargado la batería al completo, se puede comenzar un nuevo ciclo de limpieza.
Advertencia: el robot no podrá volver a la base de carga si no tiene un buen acceso a ella. Si el robot no ha podido acceder y se ha parado, colóquelo de forma manual en la base de carga.
PausaPulse el botón de encendido en el robot o en el mando a distancia para pausar el proceso de limpieza. Pulse el botón de encendido en el robot o en el mando a distancia para reanudar el proceso de limpieza.
Vuelta a la base de cargaFig. 26.Pulse el botón de vuelta a casa en el mando a distancia para enviar el robot a la base de carga.
ApagarMantenga pulsado el botón de encendido para apagar el robot.
Advertencia: el robot aspirador dispone de un interruptor de encendido y apagado ON/OFF situado en el cuerpo principal. Si va a permanecer largos periodos de tiempo sin usarse, se aconseja apagarlo a través de este interruptor. Como medida de seguridad, si el botón se encuentra en OFF se configuran los valores iniciales de fábrica. Si queremos que el robot funcione en modo de programación del tiempo, el interruptor siempre debe estar en posición ON, si no es así, deberemos realizar una nueva programación desde el mando a distancia.
Modos de limpiezaEste robot incluye diferentes modos y funciones que se pueden activar mediante el mando a distancia.
Modo AutoFig. 27.Al pulsar el botón de encendido, el robot comenzará la limpieza automática.
El robot limpiará toda la superficie, los bordes, alrededor de objetos como mesas, sillas, etc., hasta que el porcentaje de batería sea bajo y vuelva a la base de carga.
Modo ScrubbingFig. 28.Acople la mopa al depósito mixto y llene el depósito de agua. Introduzca el depósito mixto en el robot y seleccione el modo. Puede seleccionar el nivel de fregado mediante el mando a distancia: alto, medio o bajo. Fig. 29.Una vez seleccionado el nivel de fregado deseado desde el mando a distancia, el robot realizará la funcionalidad All in One para aspirar, fregar y barrer de forma simultánea gracias a su tanque mixto.
Aviso: si quiere pasar la mopa, sáltese el paso de llenar el depósito de agua. Para garantizar un fregado perfecto desde el inicio, se recomienda humedecer la mopa con agua de forma homogénea antes de utilizarla.
Modo puntualFig. 30.Al seleccionar este modo, el robot limpiará de forma intensiva un punto específico. Comenzará a limpiar en un punto concreto, realizará movimientos en espiral hacia afuera (1 metro) y luego volverá de nuevo al punto inicial realizando también movimientos en espiral. Para finalizar, activará el modo automático y limpiará hasta agotar la batería. Antes de poner el robot a limpiar en el modo puntual, colóquelo en el punto que desea limpiar. Pulse el botón de limpieza puntual en el mando a distancia.
Modo BordesFig. 31.Al seleccionar este modo, el robot limpiará a lo largo de la pared y alrededor de los muebles (patas de las mesas, de las sillas, etc.). Pulse el botón de bordes en el mando a distancia.
Modo HabitaciónFig. 32.Al seleccionar este modo, el robot limpiará durante 30 minutos. Pulse el botón de modo Habitación en el mando a distancia. Para asegurar la limpieza de la habitación, cierre la puerta.
Función de nivel de potencia de succiónFig. 33.Pulse el botón de niveles de potencia en el mando a distancia para controlar la potencia de succión del robot durante los procesos de limpieza. Existen tres niveles de potencia de

1918
ESPAÑOL ESPAÑOL
CONGA 990 VITAL CONGA 990 VITAL
succión: Turbo, Normal y Eco.
Función de intensidad de fregadoPulse el botón de intensidad de fregado en el mando a distancia para controlar el nivel de agua durante el fregado. Existen tres niveles de agua: Alto, Medio y Bajo.
Programación de la limpiezaEl robot incluye ajustes de programación que permiten customizar los ciclos de limpieza. La programación solo se puede llevar a cabo a través del mando a distancia o la App en los modelos compatibles. Aviso: asegúrese de que el mando a distancia esté cerca del robot tanto al configurar el reloj como al programar los ciclos de limpieza.
Configuración de la hora del mando a distanciaFig. 34.Pulse el botón del reloj en el mando a distancia. Los dígitos comenzarán a parpadear. Fig. 35.Seleccione el día de la semana utilizando las flechas de arriba y abajo.Utilice las flechas de izquierda y derecha para seleccionar entre minutos y horas. Cuando el número parpadee, utilice las flechas de arriba y abajo para cambiarlo.Fig. 36.Finalmente, pulse el botón de encendido o del reloj. El robot emitirá un pitido indicando que los ajustes del reloj han sido confirmados.
Configuración de la programación de limpiezaPara facilitar la limpieza, el robot tiene una función que permite programarlo diariamente desde el mando a distancia. Según la configuración, el robot iniciará la limpieza de forma automática los días seleccionados a las horas indicadas. Las opciones del mando a distancia son: 12:00 a. m.-11:59 a. m. y 12:00 p. m.-11:59 p. m. Antes de ajustar la hora y la configuración del robot, asegúrese de que está con el interruptor encendido (ON) y de que el botón de encendido del robot también está encendido.
Configuración con el mando a distanciaFig. 37.Pulse el botón de programación del mando a distancia. Los dígitos comenzarán a parpadear. Fig. 38.Utilice las flechas de arriba y abajo para seleccionar el día y una vez seleccionado el día, utilice y las flechas de izquierda y derecha para seleccionar minutos u horas. Para poder cambiar los minutos u horas utilice los botones de dirección y cuando empiecen a parpadear los dígitos. Pulse el botón de encendido para guardar los ajustes. Acceda a los días deseados y siga los mismos pasos para programarlos.
Fig. 39.Finalmente, pulse el botón de encendido para salir del modo de programación. El robot emitirá un pitido indicando que los ajustes de la programación de la limpieza han sido confirmados.
El usuario puede programar tantos días a la semana como se desee. La pantalla de inicio mostrará el icono de programación cuando el robot esté programado.
Cancelación de la programación de limpiezaFig. 40.Pulse el botón de programación en el mando a distancia, seleccione el día que desee eliminar y cambie la hora a 00:00 a. m., esta es la hora para cancelar el programa.
5. LIMPIEZA Y MANTENIMIENTO
Con el objetivo de alargar la vida útil del robot y de que funcione con un rendimiento óptimo, lleve a cabo los siguientes pasos de forma periódica:
Vacíe el depósito de suciedad del robot: Pulse el botón de liberación del depósito de suciedad. Abra el depósito de suciedad y vacíelo.Fig. 41.
Limpie el filtro de alta eficiencia del robot: Extraiga el filtro de alta eficiencia. Sacuda el filtro de alta eficiencia cuidadosamente para deshacerse de la suciedad. Fig. 42.
Limpie los sensores anticaída: Utilice un paño limpio, seco y suave para limpiar el polvo de los sensores anticaída, situados en la parte inferior derecha del robot. Fig. 43.
Advertencia: no aplique productos de limpieza directamente a los sensores.
Limpie el cepillo centralFig. 44.Presione ligeramente las pestañas del marco del cepillo central para abrir el compartimento y sacarlo. Retire los pelos, pelusas y demás suciedad atrapada en el cepillo y alrededor de los ejes.

2120
ESPAÑOL ESPAÑOL
CONGA 990 VITAL CONGA 990 VITAL
Fig. 45. Despeje y limpie el canal de succión del robot.Fig. 46.Instale de nuevo el cepillo central y el marco. Fig. 47.
Filtro de alta eficiencia El filtro de alta eficiencia está diseñado con una red de fibras que ayudan a atrapar las partículas de polvo, ácaros, polen… Por ello, hay que limpiarlos periódicamente para evitar que estas partículas se acumulen en el filtro y este pierda eficiencia. Lo ideal es realizar este mantenimiento una vez a la semana. A la hora de cambiarlo por uno nuevo se recomienda hacerlo como máximo a las 160 horas o menos de uso. Recomendaciones: Puede retirar la suciedad con un cepillo pequeño o golpearlos suavemente sobre una superficie dura para que caiga el polvo. El filtro de alta eficiencia no es lavable.
Filtro primario de malla y filtro esponja El sistema de filtrado se complementa con un filtro primario de malla y un filtro esponja. A la hora de cambiarlos se recomienda hacerlo como máximo a las 160 horas de uso, o cuando observe que sufren algún tipo de desgaste por el uso. Recomendaciones: Puede retirar la suciedad con un cepillo pequeño o golpearlos suavemente sobre una superficie dura para que caiga el polvo. También puede utilizar agua tibia sin detergentes para conseguir un mejor resultado, asegurándose de que estén totalmente secos antes de volver a colocarlos.
Cepillos laterales Los cepillos laterales están diseñados con multitud de cerdas y se utilizan tanto para arrastrar la suciedad hacia la boca de succión como para limpiar a fondo los bordes y esquinas. Estos cepillos se pueden desgastar con el paso del tiempo, lo que tendrá una consecuencia negativa en la eficiencia de la limpieza. Por ello, se recomienda cambiar cada cepillo lateral máximo cada 220 horas o menos. Recomendaciones: Se recomienda limpiar los cepillos laterales una vez por semana con la ayuda del cepillo de limpieza.
Cepillo central El cepillo central está diseñado con cerdas y silicona, gira a alta velocidad y ayuda a introducir la suciedad en la boca de succión. Este cepillo está en contacto con el suelo y por tanto con la suciedad, por lo que se puede desgastar con el paso del tiempo, lo que tendrá una consecuencia negativa en la eficiencia de la limpieza. Por ello, se recomienda cambiar cada cepillo lateral
máximo cada 320 horas o menos.
Recomendación: se recomienda limpiar el cepillo central una vez por semana con la ayuda del cepillo de limpieza.
Sensores Los robots de limpieza cuentan con diferentes tipos de sensores, por ejemplo, los sensores de proximidad ayudan al robot a realizar una navegación pudiendo detectar posibles obstáculos, y los sensores anticaída ayudan al robot a detectar desniveles y posibles vacíos como pueden ser unas escaleras. Estos sensores están en continuo contacto con las partículas de polvo por lo que se pueden obstruir con el paso del tiempo y ocasionar posibles fallos de navegación. Se recomienda limpiar todos los sensores del robot cada 35 horas de uso o menos, con la ayuda del cepillo de limpieza o un pequeño paño sin humedecer.
6. CARGA Y RECAMBIO DE LA BATERÍA
Fig. 48.Para alargar la vida útil de la batería, deje el robot cargando en la base de carga siempre que no esté siendo utilizado. Si el robot no se va a utilizar durante un periodo prolongado de tiempo, retire la batería y guarde el producto y la batería en un lugar seco y seguro.
Para reemplazar la batería, siga las siguientes instrucciones:Fig. 48.Desatornille los 2 tornillos del compartimento de la batería, retire la tapa de la batería y la batería. Fig. 49.Introduzca la batería nueva con la etiqueta mirando hacia arriba. Fig. 50.Coloque la batería y la tapa de la batería en su sitio y fije los tornillos de nuevo.

2322
ESPAÑOL ESPAÑOL
CONGA 990 VITAL CONGA 990 VITAL
7. RESOLUCIÓN DE PROBLEMAS
Señal del robot Causa
Luz roja fija 1 pitido Error de la rueda omnidireccional.
Limpie la rueda omnidireccional y pulse el botón de encendido para reiniciar el robot.
2 pitidos
Error de los cepillos laterales.
Limpie los cepillos laterales y pulse el botón de encendido para reiniciar el robot.
3 pitidos
Error del ventilador del motor o del filtro.
Retire y limpie el depósito de suciedad.Retire el filtro del robot y sacuda la suciedad.
4 pitidos
Error del cepillo central Retire y limpie el cepillo central del robot.
Luz roja parpadeante
2 pitidos
Error del parachoques. Compruebe si el parachoques está atascado y presione a ambos lados y al centro para desbloquearlo.
3 pitidos
Error del sensor anticaída.
Compruebe si el robot está en una superficie irregular, si las ruedas no están tocando el suelo o si está atascado en una zona oscura y llévelo a una nueva posición. De lo contrario, limpie el sensor anticaída.
4 pitidos
El robot no puede volver a la base de carga o a su posición inicial.
Asegúrese de que no hay obstáculos delante de la base de carga. Limpie los bornes de carga tanto del robot como de la base de carga con un paño limpio, suave y seco.
8. ESPECIFICACIONES TÉCNICAS
Modelo: Conga 990 Vital Referencia del producto: 05417 Potencia: 100-240 V ~, 50/60 Hz Battery: 14.4 V, 2600 mAh Made in China | Diseñado en España
9. RECICLAJE DE ELECTRODOMÉSTICOS
La directiva europea 2012/19/UE sobre Residuos de Aparatos Eléctricos y Electrónicos (RAEE) especifica que los electrodomésticos no deben ser reciclados con el resto de los desperdicios municipales. Dichos electrodomésticos han de ser desechados de forma separada, para optimizar la recuperación y reciclaje de materiales y, de esta manera, reducir el impacto que puedan tener en la salud humana y el medioambiente.
El símbolo del contenedor tachado le recuerda su obligación de desechar este producto de forma correcta. Para obtener información detallada acerca de la forma más adecuada de desechar sus electrodomésticos y/o las correspondientes baterías, el consumidor deberá contactar con las autoridades locales.
10. GARANTÍA Y SAT
Este producto tiene una garantía de 2 años desde la fecha de compra, siempre y cuando se conserve y envíe la factura de compra, el producto esté en perfecto estado físico y se le dé un uso adecuado tal y como se indica en este manual de instrucciones. La garantía no cubrirá:Si el producto ha sido usado fuera de su capacidad o utilidad, maltratado, golpeado, expuesto a la humedad, sumergido en algún líquido o substancia corrosiva, así como cualquier otra falta atribuible al consumidor. Si el producto ha sido desarmado, modificado o reparado por personas no autorizadas por el SAT oficial de Cecotec. Si la incidencia ha sido originada por el desgaste normal de las piezas debido al uso. El servicio de garantía cubre todos los defectos de fabricación durante 2 años en base a la legislación vigente, excepto piezas consumibles. En caso de mal uso por parte del usuario el servicio de garantía no se hará responsable de la reparación. Si en alguna ocasión detecta una incidencia con el producto o tiene alguna consulta, póngase en contacto con el Servicio de Asistencia Técnica oficial de Cecotec a través del número de teléfono +34 96 321 07 28.

2524
ENGLISH ENGLISH
CONGA 990 VITAL CONGA 990 VITAL
1. SAFETY INSTRUCTIONS
Read these instructions thoroughly before using the appliance. Keep this instruction manual for future reference or new users. This product must be used in accordance with the directions in this instruction manual. Cecotec cannot be held liable or responsible for any damages or injuries caused by improper use. Make sure that the mains voltage matches the voltage stated on the rating label of the appliance and that the wall outlet is grounded. This product can only be disassembled by qualified personnel. Do not touch wires, power supplies or power adapters with wet hands. Keep the robot away from clothing, curtains and any other similar materials. Do not sit or place heavy or sharp objects on top of the appliance.Do not operate the appliance close to heat sources, flammable substances, wet surfaces where it can fall or be pushed into water or allow it to come into contact with water or other liquids. Do not use outdoors.Do not use the charging base if it has a damaged cord or plug or if it is not operating properly. In case of fault or malfunction, contact the official Technical Support Service of Cecotec.Do not operate the device on tables, chairs or other high surfaces where it could fall.Do not use the laser protection as handle when moving or holding the robot.Do not operate the product in places where temperature is below 0 ºC or above 50 ºC.The appliance can only be operated with the supplied battery
and power adapter. The use of other components or accessories could cause risk of fire, electric shock or product damage.Do not use the device to vacuum flammable or burning objects such as cigarettes, matches or ash.Before operating the robot, please remove any object on the floor such as clothing, papers, power cords or other items that may obstruct the device. The appliance is not intended to be used by children under the age of 8.It can be used by children over the age of 8, as long as they are given continuous supervision.This appliance can be used by children aged 8 and above, and persons with reduced physical, sensory or mental capabilities or lack of experience and knowledge, as long as they have been given supervision or instruction concerning the use of the appliance in a safe way and understand the hazards involved. Do not allow children to play with the appliance.Supervise children, they shall not play with the appliance. Close supervision is necessary when the appliance is being used by or near children.

2726
ENGLISH ENGLISH
CONGA 990 VITAL CONGA 990 VITAL
2. PARTS AND COMPONENTS
Fig. 1. 1. Light indicator2. Power/operation button
Light indicator
Steady orange light: low battery. Blinking orange light: Charging Steady blue light: fully charged/standby mode/cleaning. Red light blinks: error.
Power/operation buttonLong press this button for a few seconds to turn the robot on or off. Press it to start cleaning too.
Main body and sensors Fig. 2. Fig. 3.1. Anti-collision sensors2. Free-fall sensors3. Charging terminals4. Omnidirectional wheel5. Side brushes6. Battery7. Driving wheels8. Power switch9. Dust tank10. Main brush
ComponentsFig. 4. Charging baseFig. 5.Power adapterFig. 6. Remote controlFig. 7. Cleaning brushFig. 8.
Wet & dry tankFig. 9.Primary filter and High-efficiency filterFig. 10.Side brushesFig. 11.2 mopsFig. 12.Main brushFig. 13. Optional: Dust tank, silicone BestFriend care brush.
Charging baseFig. 14.1. Remote control holder2. Charge indicator3. Signal transmitter4. Charging terminals
Remote controlFig. 15. 1. Time settings2. Direction buttons3. Spot mode4. Room mode5. Scrubbing intensity levels6. Mode and time display7. Automatic charge/back home8. Auto-cleaning/pause9. Schedule10. Edge mode11. Suction power levels
3. BEFORE USE
Take the product out of the box and remove all packaging materials.Make sure all parts and components are included and in good conditions. If any sign of visible damage is observed, contact immediately with the official Technical Support Service of Cecotec.Fig. 16.Remove all objects around the robot such as clothing, papers, cables, curtains or other fragile

2928
ENGLISH ENGLISH
CONGA 990 VITAL CONGA 990 VITAL
objects. Fig. 17.If there is a balcony or staircase in the area to be cleaned, a physical barrier must be placed in order to prevent product damage and ensure safe operation.Fig. 18. Fig. 19.Direct exposure to sun light or great light contrasts may affect to the correct operating of the sensors. If this happens and the robot stops, change it to a new location for it to start operating again.
Fig. 20.Connect the charging base to a power supply. Wind and store the remaining cord in the lower part of the charging base to avoid accidents.
Fig. 21.Place the charging base against the wall and leave a minimum free space of: 2 metres to the front. 1 metre to each side.
Fig. 22.Install both side brushes in their corresponding slots, located on the robot’s bottom part. Press until it clicks to make sure they are properly fixed.
Fig. 23.Press the power switch located on the bottom part of the robot. Make sure the power switch in ON.
Fig. 24.Place the robot on the charging base and make sure the charging terminals on the robot match with those of the charging base. Once the robot is properly placed, it will beep once and the button will light up. If the light blinks orange, it means the battery is not completely charged. To ensure maximum cleaning time, wait until the light switches to steady blue. This will indicate the battery is fully charged and that the robot is ready to clean.
4. OPERATION
Fig. 25.Start cleaning Long press the power button on the robot to activate the robot. Press the power button on the robot or on the remote control to start cleaning.
Note: If the robot runs out of battery during cleaning, it will automatically return to the charging base. Once the battery is fully charged, the robot can start a new cleaning cycle.
Warning: If there is no good access to the charging base, the robot will not be able to return to its charging position. In that case, once the robot has stopped, take it manually to the charging base.
PausePress the power button on the robot or on the remote control to pause the cleaning process. Press the power button on the robot or on the remote control to resume the cleaning process.
Return to the charging baseFig. 26.Press the back home button on the remote control in order to send the robot to the charging base.
Turn offLong press the power button to turn the robot off.
Warning: The robot vacuum cleaner has a power switch located on its main body. If the robot is not going to be used for long periods of time, it is suggested to switch it off. If the robot is switched off, it will restore factory default settings as a safety measure. The robot will only carry out scheduled cleaning if it has been scheduled while the switch is ON, otherwise, it will have to be scheduled again from the remote control.
Cleaning modesThis robot includes different modes and different functions that can be activated from the remote control.
Auto modeFig. 27.Press the power button for the robot to start Auto cleaning mode. The robot will clean the whole surface, edges, around objects such as tables, chairs etc. Once it starts running out of battery, it will return to the charging base.
Scrubbing modeFig. 28.Attach the mop cloth to the Wet & dry tank and fill the tank with water. Install the Wet & dry tank in the robot and turn it on. Use the remote control to select the desired scrubbing power level: High, Medium or Low.

3130
ENGLISH ENGLISH
CONGA 990 VITAL CONGA 990 VITAL
Fig. 29.Activate the All in One function from the remote control for the robot to vacuum, scrub and sweep at the same time thanks to its Wet & dry tank.
Note: If you want to sweep the floor, skip the water-filling step. To ensure perfect scrubbing from the start, it is suggested to dampen the mop cloth evenly with water before use.
Spot modeFig. 30.The robot will carry out an intense cleaning of a specific area when this mode is activated. It will start cleaning at a specific point and will move outwards in a spiral motion (1 metre). Then, it will return to the starting point in a spiral motion again. Finally, it will activate Auto cleaning mode and will clean until it runs out of battery. Before operating the robot with spot cleaning mode, place it on the spot to be cleaned. Press the spot cleaning button on the remote control.
Edge modeFig. 31.When this mode is selected, the robot will clean along walls and around furniture (table or chair legs, for example). Press the edge cleaning button on the remote control.
Room modeFig. 32.The robot will carry out a 30-minute cleaning cycle when this mode is activated. Press the room cleaning button on the remote control. To ensure an efficient cleaning of the room, close the door.
Suction power level functionFig. 33.Press the suction power level button on the remote control in order to control the robot's suction power during the cleaning process. There are 3 power levels: Turbo, Normal and Eco.
Scrubbing intensity levels functionPress the water intensity button on the remote control to adjust the water intensity during the scrubbing process. There are 3 water intensity levels: High, Medium and Low.
Cleaning schedulingThis robot includes scheduling settings in order for you to customize the cleaning cycles. The robot can only be scheduled through the remote control or through the App (only models with App).
Note: Make sure the remote control is close to the robot when setting the clock or scheduling cleaning cycles.
Setting the remote control’s timeFig. 34.Press the time button on the remote control. Digits will start blinking. Fig. 35.Select the current day of the week by pressing the up and down arrows.Use the left and right arrows to set minutes and hours. Use the up and down arrows to change the digit while it blinks.Fig. 36.Finally, press the power button or the time button. The robot will beep when the time settings have been confirmed.
Setting cleaning scheduleFor a better and more comfortable cleaning, the robot includes a schedule function to set daily schedules through the remote control. In accordance with the configuration, the robot will automatically start cleaning the selected days at the desired time. The time options on the remote control are: 12:00 a. m.–11:59 p.m. and 12:00 p.m.–11:59 p.m. Before setting the time and the robot configuration, make sure the robot’s power switch is ON and that the power button on the robot is on.
Configuration with the remote controlFig. 37.Press the schedule button on the remote control. Digits will start blinking. Fig. 38.Use the up and down arrows to select the day. Once you have selected it, use the left and right arrows to select minutes and hours. Use direction buttons when digits are blinking to configure the desired minutes and hours. Press the power button to save the settings. Enter the desired days and follow the same steps to schedule them.
Fig. 39.Finally, press the power button to quit the scheduling mode. The robot will beep once indicating the scheduled cleaning settings have been confirmed.
The user may schedule as many days per week as desired. The home screen will display the scheduling button when the robot is scheduled.
Cancelling the scheduled cleaningFig. 40.Press the schedule button on the remote control, select the day you wish to delete and change the set time to 00:00 am., this is the time to be set to cancel the cleaning program.

3332
ENGLISH ENGLISH
CONGA 990 VITAL CONGA 990 VITAL
5. CLEANING AND MAINTENANCE
In order to lengthen your robot’s shelf life and to allow your robot to operate at peak performance, carry out the following procedures periodically.
Emptying the robot’s dust tank Press the dust tank’s release button. Open the dust tank and empty it.Fig. 41.
Cleaning the robot’s High-efficiency filter Remove the high-efficiency filter. Carefully shake off all dust from the High-efficiency filter. Fig. 42.
Cleaning the free-fall sensors Use a clean, dry and soft cloth to wipe off any dust from the free-fall sensor located on the right side of the robot’s bottom part. Fig. 43.
Warning: Do not spray cleaning products directly on the sensor.
Clean the main brush.Fig. 44.Slightly press the main brush frame’s tabs in order to open the main brush storage gap and to remove it. Remove any hair, fluffs or dust collected in the brush and around the axes.Fig. 45. Clear and clean the robot’s suction channel.Fig. 46.Reinstall the main brush and its frame. Fig. 47.
High-efficiency filter The high-efficiency filter is designed with fibres that help trapping dust particles, dust mites, pollen... It is very important to clean periodically the filter, to avoid this particles from building up in the filter, causing efficiency loss. It is convenient to carry out this maintenance once a week. It is suggested to replace the filter by a new one after a maximum of 160 hours of use. Recommendations: Dirt can be removed with a small brush or by shaking it carefully against a hard surface for
dust to fall off. The high-efficiency filter cannot be washed.
Mesh primary filter and sponge filter The filtering system is featured with a mesh primary filter and a sponge filter. It is suggested to replace them either after a maximum of 160 hours of use or when they are worn out due to operation. Recommendations: Dirt can be removed with a small brush or by shaking it carefully against a hard surface for dust to fall off. You can also use warm water without detergents to obtain better results. Always make sure they are completely dry before installing them again.
Side brushes Side brushes are designed with multiple bristles and are used to push dirt towards the suction nozzle and to clean thoroughly edges and corners. These brushes can wear out over time, affecting negatively to the cleaning efficiency. For this reason, it is suggested to replace each side brush after a maximum of 220 hours. Recommendations: It is recommended to clean the side brushes once a week with the help of the cleaning brush.
Main brush The main brush is designed with bristles and silicone, spins at top speed and helps introducing dirt into the suction nozzle. This brush is in contact with the floor, and therefore with dirt, so it can be worn out over time, affecting negatively to the cleaning efficiency. For this reason, it is suggested to replace each side brush after a maximum of 320 hours.
Recommendation: It is recommended to clean the main brush once a week with the help of the cleaning brush.
Sensors Cleaning robot vacuum cleaners have different types of sensors, for example, proximity sensors that allow the robot to move around while detecting obstacles or free-fall sensors that help the robot to detect slopes or possible gaps/unevenness such as staircases. These sensors are always in contact with dust particles, and therefore can be blocked over time, causing possible navigation errors. is suggested to clean all the robot’s sensors with the cleaning brush or with a dry cloth after a maximum of 35 hours of operation.
6. BATTERY CHARGE AND REPLACEMENT
Fig. 48.To lengthen the battery’s service life, keep the robot charging on the charging base when not

3534
ENGLISH ENGLISH
CONGA 990 VITAL CONGA 990 VITAL
in use. If the robot is not going to be used for a long period of time, remove the battery and store the product and the battery in a safe and dry place.
To replace the battery, follow the instructions below:Fig. 48.Unscrew the 2 screws on the battery compartment, remove the battery cover and the battery. Fig. 49.Insert the new battery with the battery label facing up. Fig. 50.Place the battery and the battery cover in its place and fix properly de screws back again.
7. TROUBLESHOOTING
Robot signal Cause
Red light steady on
1 beep Wheel error (omnidirectional).
Clean the omnidirectional wheel and press the power button to restart.
2 beeps
Side brushes error Clean the side brushes and press the power button to restart the robot.
3 beeps
Motor fan or filter error Remove and clean the robot’s dust tank.Remove the robot’s filter and shake off any dust rests.
4 beeps Main brush error
Remove and clean the robot’s main brush.
Red light blinks 2 beeps Bumper error
Check if the bumper is blocked and press on both sides and center to unblock it.
3 beeps Free-fall sensor error.
Check if the robot is placed on an uneven surface, if its wheels are off the ground or if it is stuck in a dark place and move it to a new location. If not, clean the free-fall sensor.
4 beeps
The robot cannot return to its charging base or starting position.
Make sure there are no obstacles in front of the charging base. Clean the charging terminals on both the charging base and the robot with a clean, soft and dry cloth.
8. TECHNICAL SPECIFICATIONS
Model: Conga 990 Vital Product reference: 05417 Power: 100-240 V ~, 50/60 Hz Battery: 14.4 V, 2600 mAh Made in China | Designed in Spain
9. DISPOSAL OF OLD ELECTRICAL APPLIANCES
The European directive 2012/19/EU on Waste Electrical and Electronic Equipment (WEEE), specifies that old household electrical appliances must not be disposed of with the normal unsorted municipal waste. Old appliances must be collected separately, in order to optimize the recovery and recycling of the materials they contain, and reduce the impact on human health and the environment. The crossed out “wheeled bin” symbol on the product reminds you of your
obligation to dispose of the appliance correctly. Consumers must contact their local authorities or retailer for information concerning the correct disposal of old appliances and/or their batteries.
10. TECHNICAL SUPPORT AND WARRANTY
This product is under warranty for 2 years from the date of purchase, as long as the proof of purchase is submitted, the product is in perfect physical condition, and it has been given proper use, as explained in this instruction manual. The warranty will not cover the following situations:The product has been used for purposes other than those intended for it, misused, beaten, exposed to moisture, immersed in liquid or corrosive substances, as well as any other fault attributable to the customer. The product has been disassembled, modified, or repaired by persons, not authorised by the official Technical Support Service of Cecotec. Faults deriving from the normal wear and tear of its parts, due to use. The warranty service covers every manufacturing defects of your appliance for 2 years, based on current legislation, except consumable parts. In the event of misuse, the warranty will not apply. If at any moment you detect any problem with your product or have any doubt, do not hesitate

3736
FRANÇAIS FRANÇAIS
CONGA 990 VITAL CONGA 990 VITAL
to contact Cecotec Technical Support Service at +34 963 210 728.
1. INSTRUCTIONS DE SÉCURITÉ
Veuillez lire les instructions suivantes avec attention avant d’utiliser l’appareil. Gardez bien ce manuel pour de futures références ou pour tout nouvel utilisateur. Cet appareil doit être utilisé conformément aux instructions de ce manuel d’instructions. Cecotec ne se fera responsable d’aucun dommage ni accident qui soit dû à une utilisation inappropriée de l’appareil. Assurez-vous que le voltage du réseau coïncide avec le voltage spécifié sur l’étiquette de classification de l’appareil et que la prise possède une connexion à terre. L’appareil peut être monté et démonté uniquement par du personnel qualifié. Ne touchez pas le câble, la prise de courant ni le chargeur avec les mains mouillées. Maintenez l’appareil éloigné des vêtements, des rideaux et matériaux similaires. Ne vous asseyez pas sur l’appareil et ne placez pas d’objets lourds ni pointus dessus.N’utilisez pas l’appareil près de sources de chaleur, substances inflammables, surfaces mouillées où il peut tomber des gouttes d’eau, là où l’appareil pourrait tomber dans l’eau et ne le laissez pas entrer en contact avec de l’eau ni avec aucun autre liquide. Ne l’utilisez pas en extérieurs.N’utilisez pas la base de charge si le câble ou la prise sont abîmés ou si elle ne fonctionne pas correctement. Si vous détectez un problème avec l’appareil, contactez le Service Après-Vente Officiel de Cecotec.N’utilisez pas l’appareil sur des tables, des chaises ni surfaces
élevées desquelles il pourrait tomber.N’utilisez pas la protection du laser comme poignée pour déplacer le robot. Ne placez pas l’appareil en fonctionnement dans des endroits où la température est inférieure à 0 ºC ou supérieure à 50 ºC.L’appareil fonctionne uniquement avec la batterie et le chargeur fournis. L’utilisation d’autres composants ou accessoires peut provoquer des risques d’incendies, d’électrocutions ou abîmer l’appareil. N’utilisez pas l’appareil pour aspirer des objets inflammables ou encore allumés comme des cigarettes, des allumettes ou de la cendre.Avant de mettre le robot en marche, retirez du sol les vêtements, les papiers, les câbles et autres éléments qui pourraient obstruer son passage.L’appareil ne doit pas être utilisé par des enfants de 0 à 8 ans. Il peut être utilisé par des enfants de 8 ans et plus s’ils sont surveillés constamment.Cet appareil peut être utilisé par des personnes aux capacités physiques, mentales ou sensorielles réduites, ou sans expérience ni connaissances si elles sont surveillées et/ou ont reçu les informations nécessaires à sa correcte utilisation et qu’elles ont bien compris les risques qu’il implique. Ne laissez pas les enfants jouer avec l’appareil.Surveillez les enfants pour vous assurer qu’ils ne jouent pas avec l’appareil. Une surveillance stricte est nécessaire si le produit est utilisé par ou à côté des enfants.
3938
FRANÇAIS FRANÇAIS
CONGA 990 VITAL CONGA 990 VITAL
2. PIÈCES ET COMPOSANTS
Img. 1. 1. Témoin lumineux2. Bouton de connexion/fonctionnement
Témoin lumineux
Lumière orange fixe : batterie faible. Lumière orange oscillante : en charge Lumière bleue fixe : en charge/mode Standby/en cours de nettoyage. Lumière rouge clignotante : erreur.
Bouton de connexion/fonctionnementMaintenez appuyé ce bouton quelques secondes pour allumer ou éteindre le robot. Appuyez sur ce même bouton pour commencer le nettoyage.
Unité principale et capteurs Img. 2.Img. 3.1. Capteurs antichoc.2. Capteurs antichute.3. Bornes de charge.4. Roue omnidirectionnelle.5. Brosses latérales6. Batterie7. Roues motrices8. Interrupteur de connexion9. Réservoir de saleté10. Brosse centrale
ComposantsImg. 4. Base de charge Img. 5. Adaptateur de courant Img. 6.Télécommande sans fil Img. 7.
Brosse de nettoyageImg. 8. Réservoir mixteImg. 9. Filtre primaire et filtre de haute efficacitéImg. 10.Brosses latéralesImg. 11.2 serpillèresImg. 12. Brosse centraleImg. 13. En option : réservoir de saleté, brosse en silicone BestFriend care.
Base de charge Img. 14. 1. Support de la télécommande sans fil2. Témoin de charge3. Émetteur de signaux4. Bornes de charge
Télécommande sans fil Img. 15. 1. Réglage du temps2. Boutons de direction3. Mode En un point4. Mode Pièce5. Fonction intensité de nettoyage du sol6. Écran de visualisation du mode et de l’heure7. Charge automatique/Retour à la base8. Mode automatique/pause9. Programmation10. Mode Bords11. Niveaux de puissance d’aspiration
3. AVANT UTILISATION
Sortez l’appareil de sa boîte et retirez tout le matériel qui compose l’emballage.Assurez-vous que toutes les pièces et les composants soient bien inclus et en bon état. Si vous observez un dommage visible, contactez immédiatement le Service Après-Vente Officiel

4140
FRANÇAIS FRANÇAIS
CONGA 990 VITAL CONGA 990 VITAL
de Cecotec.Img. 16.Retirez tous les objets qui se trouvent autour du robot, comme les vêtements, les papiers, les câbles ou autres objets fragiles. Img. 17.Si la zone à nettoyer se trouve près d’un balcon ou d’escaliers, placez une barrière physique pour éviter que l’appareil ne s’abîme et afin d’assurer un nettoyage sécurisé.Img. 18. Img. 19.L’exposition à la lumière directe du soleil ou aux grands contrastes de lumière peut affecter le parfait fonctionnement des capteurs. Si cela arrive, le robot aspirateur s’arrête, déplacez-le à un autre endroit pour qu’il recommence à travailler.
Img. 20.Branchez la base de charge à une prise de courant. Enroulez et rangez le câble restant au niveau de la partie inférieure de la base de charge pour éviter de possibles accidents.
Img. 21. Placez la base de charge contre le mur et laissez un espace libre de minimum : 2 mètres devant. 1 mètre de chaque côté
Img. 22. Insérez les deux brosses latérales dans les fentes situées sur la partie inférieure du robot. Appuyez jusqu’à entendre un « clic » qui confirme qu’elles sont bien fixées.
Img. 23.Appuyez sur l’interrupteur de connexion qui se trouve sur la partie inférieure du robot. Assurez-vous que l’interrupteur soit bien sur la position « ON ».
Img. 24.Placez le robot sur sa base de charge et assurez-vous que les bornes de charge du robot et de la base coïncident. Une fois que le robot est bien placé, il émet un « bip » et le bouton de connexion s’allume. Si la lumière clignote orange, la batterie n’est pas complètement chargée. Pour assurer une meilleure durée de nettoyage, attendez que la lumière passe au bleu fixe, indiquant que la batterie est complètement chargée et le robot prêt à l’emploi.
4. FONCTIONNEMENT
Img. 25.
Commencer le nettoyage Maintenez appuyé le bouton de connexion du robot pour l’allumer. Appuyez sur le bouton de connexion sur le robot ou sur la télécommande pour commencer le nettoyage.
Note : si le robot se décharge et se retrouve sans batterie pendant le nettoyage, il retourne automatiquement à sa base de charge. Une fois la batterie est complètement rechargée, un nouveau cycle de nettoyage peut commencer.
Avertissement : le robot ne peut pas retourner à sa base de charge s’il n’y a pas un bon accès jusqu’à elle. Si le robot ne peut y accéder et il s’est arrêté, placez-le manuellement sur sa base de charge.
PauseAppuyez sur le bouton de connexion du robot ou sur celui de la télécommande pour mettre en pause le processus de nettoyage. Appuyez sur le bouton de connexion du robot ou sur celui de la télécommande pour reprendre le processus de nettoyage.
Retour à la base de chargeImg. 26.Appuyez sur le bouton « Retour à la base » depuis la télécommande pour envoyer le robot à sa base de charge.
ÉteindreMaintenez appuyé le bouton de connexion du robot pour l’éteindre.
Avertissement : le robot aspirateur possède un interrupteur de connexion et de déconnexion ON/OFF situé dans l’unité principale. Si vous n’allez pas utiliser le robot pendant longtemps, il est recommandé de l’éteindre à travers cet interrupteur. Comme mesure de sécurité, si l’interrupteur se trouve sur « OFF », les valeurs initiales du fabricant se configurent. Si vous souhaitez que le robot fonctionne en mode Programmation du temps, l’interrupteur doit être sur la position « ON », dans le cas contraire, vous devrez réaliser une nouvelle programmation depuis la télécommande.
Modes de nettoyageCe robot possède de différents modes et fonctions qui peuvent être activés à travers la télécommande sans fil.
Mode AutoImg. 27.

4342
FRANÇAIS FRANÇAIS
CONGA 990 VITAL CONGA 990 VITAL
Lorsque vous appuyez sur le bouton de connexion, le robot commence le nettoyage automatique. Le robot nettoie toute la surface, les bords, autour des objets comme les tables, chaises, etc., jusqu’à ce que le pourcentage de la batterie soit faible et qu’il retourne à sa base de charge.
Mode ScrubbingImg. 28.Ajustez la serpillère au réservoir mixte et remplissez ceci avec de l’eau. Introduisez le réservoir mixte dans le robot et sélectionnez le mode. Vous pouvez sélectionner le niveau de nettoyage du sol à travers la télécommande sans fil : élevé, moyen et faible. Img. 29.Lorsque vous avez sélectionné le niveau du nettoyage du sol depuis la télécommande, le robot utilisera la fonction All in One pour aspirer, nettoyer le sol et balayer en même temps grâce au réservoir mixte.
Note : si vous souhaitez que le robot passe la serpillère, veuillez passer l’étape dans laquelle il faut remplir le réservoir d’eau. Pour garantir un nettoyage parfait depuis le début, il est recommandé d’humidifier le tissu avec de l’eau de manière homogène avant de l’utiliser.
Mode En un pointImg. 30.Lorsque vous sélectionnez ce mode, le robot nettoie intensivement un point spécifique. Il commence à nettoyer un point concret, réalise des mouvements en spirale vers l’extérieur (1 mètre) puis revient au point initial en réalisant des mouvements en spirale. Pour en finir, il activera le mode automatique et nettoiera jusqu’à épuiser la batterie. Avant d’activer le mode de nettoyage En un point, placez le robot sur le point que vous souhaitez nettoyer. Appuyez sur le bouton de Nettoyage en un point sur la télécommande.
Mode BordsImg. 31. Lorsque vous sélectionnez ce mode, le robot nettoie le long des murs et autour des meubles (pieds de tables, de chaises, etc.). Appuyez sur le bouton des Bords de la télécommande.
Mode PièceImg. 32.Lorsque vous sélectionnez ce mode, le robot nettoie pendant 30 minutes. Appuyez sur le bouton Pièce de la télécommande sans fil. Afin d’assurer le complet nettoyage de la pièce, fermez la porte.
Fonction Niveau de puissance d’aspirationImg. 33. Appuyez sur le bouton des niveaux de puissance de la télécommande pour contrôler la puissance d’aspiration du robot pendant les processus de nettoyage. Il existe 3 niveaux de puissance de succion : Turbo, Normal et Eco.
Fonction intensité de nettoyage du solAppuyez sur le bouton de l’intensité du nettoyage du sol de la télécommande pour contrôler le niveau d’eau pendant le nettoyage du sol. Il existe 3 niveaux d’eau : Élevé, Moyen et Bas.
Programmation du nettoyageLe robot inclut des paramètres de programmation qui permettent de personnaliser les cycles de nettoyage. La programmation peut être réalisée uniquement depuis la télécommande sans fil ou depuis l’App pour les modèles compatibles. Note : assurez-vous que la télécommande soit près du robot lorsque vous configurez l’horloge et programmez les cycles de nettoyage.
Configurer l’heure de la télécommande sans filImg. 34.Appuyez sur le bouton de l’horloge de la télécommande sans fil. Les chiffres commencent à clignoter. Img. 35.Sélectionnez le jour de la semaine en utilisant les flèches vers le haut et le bas.Utilisez les flèches vers la droite et la gauche pour sélectionner entre les minutes et les heures. Lorsque les chiffres clignotent, utilisez les flèches vers le haut et le bas pour les changer.Img. 36.Finalement, appuyez sur le bouton de connexion ou sur celui de l’horloge. Le robot émettra un « bip » pour indiquer que les paramètres de l’horloge ont été confirmés.
Configurer le nettoyagePour faciliter le nettoyage, le robot possède une fonction qui permet de le programmer quotidiennement grâce à la télécommande à distance. En fonction de la configuration, le robot commencera le nettoyage automatiquement les jours indiqués aux heures indiquées. Les options de la télécommande sans fil sont : 12:00 am - 11:59 pm et 12:00 pm - 11:59 pm. Avant d’ajuster l’heure et la configuration du robot, assurez-vous que l’interrupteur de connexion est sur la position « ON » et que le bouton de connexion du robot est aussi allumé.
Configurer la télécommande sans filImg. 37.Appuyez sur le bouton de programmation de la télécommande sans fil. Les chiffres

4544
FRANÇAIS FRANÇAIS
CONGA 990 VITAL CONGA 990 VITAL
commencent à clignoter. Img. 38.Utilisez les flèches vers le haut et le bas pour sélectionner le jour. Ensuite, utilisez celles vers la gauche et la droite pour sélectionner les minutes et les heures. Pour modifier les minutes ou heures, utilisez les boutons de direction et lorsque les chiffres commencent à clignoter. Appuyez sur le bouton de connexion pour enregistrer les réglages. Accédez aux jours souhaités et suivez les mêmes étapes pour les programmer.
Img. 39.Enfin, appuyez sur le bouton de connexion pour sortir du mode Programmation. Le robot émettra un « bip » pour indiquer que les réglages de la programmation de nettoyage ont été confirmés.
Vous pouvez programmer autant de jour de la semaine que vous souhaitez. L’écran affichera l’icône de la programmation lorsque le robot soit programmé.
Annuler la programmation du nettoyageImg. 40.Appuyez sur le bouton de la télécommande sans fil, sélectionnez le jour que vous voulez éliminer et changez l’heure à 00:00 am. Cette est l’heure pour annuler le programme.
5. NETTOYAGE ET ENTRETIEN
Dans l’objectif de prolonger la durée de vie du robot et pour qu’il fonctionne avec un rendement optimal, réalisez les étapes suivantes périodiquement :
Videz le réservoir de saleté du robot : Appuyez sur le bouton de libération du réservoir de saleté. Ouvrez le réservoir de saleté et videz-le.Img. 41.
Nettoyez le filtre de haute efficacité du robot : Enlevez le filtre de haute efficacité. Secouez le filtre de haute efficacité avec soin pour enlever la saleté. Img. 42.
Nettoyez les capteurs antichute : Utilisez un chiffon doux, sec et propre pour nettoyer la poussière des capteurs antichute, situés au niveau de la partie inférieure droite du robot. Img. 43.
Avertissement : n’appliquez pas de produits nettoyants directement sur les capteurs. Nettoyez la brosse centrale Img. 44.Appuyez légèrement sur les languettes du cadre de la brosse centrale pour ouvrir le compartiment de la brosse centrale et extrayez-la. Retirez les cheveux, les poils, les bouloches et autres types de saleté attrapés dans la brosse et autour des axes. Img. 45. Dégagez et nettoyez le canal d’aspiration du robot.Img. 46.Réinstallez la brosse centrale et son cadre. Img. 47.
Filtre de haute efficacité Le filtre de haute efficacité a été conçu avec un réseau de fibres qui aident à attraper les particules de poussière, acariens, pollen, ... Pour cela, il vous faut les nettoyer périodiquement pour éviter que ces particules s’accumulent dans le filtre et que celui-ci perde de l’efficacité. L’idéal est de réaliser cet entretien une fois par semaine. Lorsque vous remplacez le filtre pour un nouveau, il est recommandé de le faire plus ou moins avant les 160 heures utilisations. Recommandations : Vous pouvez retirer la saleté avec une petite brosse ou donner de petits coups doucement sur la surface pour que la poussière tombe. Le filtre de haute efficacité ne peut pas être lavé.
Filtre primaire en maille et filtre éponge Le système de filtrage est complété par un filtre primaire en maille et un filtre éponge. Si vous souhaitez les remplacer, il est recommandé de le faire avant les 160 heures d’utilisation ou lorsque vous observez qu’ils sont usés. Recommandations : Vous pouvez retirer la saleté avec une petite brosse ou donnez de petits coups doucement sur la surface pour que la poussière tombe. Vous pouvez aussi utiliser de l’eau tiède sans détergents pour obtenir un meilleur résultat, en vous assurant qu’ils soient totalement secs avant de les replacer.
Brosses latérales Les brosses latérales ont été conçues avec une multitude de poils doux et doivent être utilisées pour attraper la saleté vers la buse d’aspiration mais aussi pour nettoyer à fond les bords et recoins. Ces brosses peuvent s’user avec le temps, ce qui aura une conséquence négative sur l’efficacité du nettoyage. Pour cela, il est recommandé de remplacer chaque brosse latéral avant les 220 heures d’utilisation.

4746
FRANÇAIS FRANÇAIS
CONGA 990 VITAL CONGA 990 VITAL
Recommandations : Il est recommandé de nettoyer les brosses latérales une fois par semaine à l’aide d’une brosse de nettoyage.
Brosse centrale La brosse centrale a été conçue avec des poils doux et de la silicone, elle tourne à haute vitesse et aide à aspirer la saleté dans la buse de succion. Cette brosse est en contact avec le sol et donc avec la saleté, elle peut donc s’user avec le temps, ce qui aura une conséquence négative sur l’efficacité du nettoyage. Pour cela, il est recommandé de remplacer chaque brosse latérale avant les 320 heures d’utilisation.
Recommandation : il est recommandé de nettoyer la brosse centrale une fois par semaine à l’aide d’une brosse de nettoyage.
Capteurs Les robots de nettoyage possèdent différents types de capteurs, comme par exemple, les capteurs de proximité qui aident le robot à réaliser une navigation en détectant de possibles obstacles et les capteurs antichute qui aident le robot à détecter les dénivelés et de possibles vides comme c’est le cas pour les escaliers par exemple. Ces capteurs sont en contacts continus avec les particules de poussière, ils peuvent donc s’obstruer avec le temps et provoquer de possibles erreurs de navigation. Il est recommandé de nettoyer les capteurs du robot au moins toutes les 35 heures d’utilisation, à l’aide de la brosse de nettoyage ou d’un petit chiffon sec.
6. CHARGER ET REMPLACER LA BATTERIE
Img. 48.Pour prolonger la durée de vie de la batterie, laissez le robot charger sur sa base de charge à chaque fois que vous l’utilisez pas. Si le robot ne va pas être utilisé pendant longtemps, retirez la batterie et rangez l’appareil et sa batterie dans un lieu sec et sécurisé.
Pour remplacer la batterie, suivez les instructions suivantes :Img. 48.Dévissez les 2 vis du compartiment de la batterie, retirez le couvercle de la batterie puis la batterie. Img. 49.Introduisez la nouvelle batterie avec l’étiquette vers le haut. Img. 50.Replacez la batterie et le couvercle de la batterie puis revissez les vis.
7. RÉSOLUTION DE PROBLÈMES
Signal du robot Cause
Lumière rouge fixe
1 « bip »
Erreur au niveau de la roue omnidirectionnelle.
Nettoyez la roue omnidirectionnelle et appuyez sur le bouton de connexion pour réinitialiser le robot.
2 « bips »
Erreur au niveau des brosses latérales.
Nettoyez les brosses latérales et appuyez sur le bouton de connexion pour redémarrer le robot.
3 « bips »
Erreur au niveau du ventilateur du moteur ou du filtre.
Retirez et nettoyez le réservoir de saleté.Retirez le filtre du robot et secouez la saleté.
4 « bips »
Erreur au niveau de la brosse centrale.
Retirez et nettoyez la brosse centrale du robot.
Lumière rouge clignotante
2 « bips »
Erreur au niveau du pare-chocs.
Vérifiez que le pare-chocs ne soit pas bloqué et appuyez sur les deux côtés et au centre pour le débloquer.
3 « bips »
Erreur au niveau du capteur anti-chute.
Vérifiez que le robot ne soit pas placé sur une surface irrégulière, que les roues touchent bien le sol et que le robot ne soit pas coincé dans une zone sombre puis déplacez-le à un autre endroit. Dans le cas contraire, nettoyez le capteur antichute.
4 « bips »
Le robot ne peut retourner à sa base de charge ou à sa position initiale.
Assurez-vous qu’il n’y ait pas d’obstacles devant la base de charge. Nettoyez les bornes de charge du robot et de la base de charge avec un chiffon doux, propre et sec.
8. SPÉCIFICATIONS TECHNIQUES
Modèle : CONGA 990 Vital Référence : 05417 Puissance : 100-240 V ~, 50/60 Hz

49
DEUTSCH
CONGA 990 VITAL 48
FRANÇAIS
CONGA 990 VITAL
Battery: 14.4 V, 2600 mAh Made in China I Conçu en Espagne
9. RECYCLAGE DES ÉLECTROMÉNAGERS
La directive européenne 2012/19/UE relative aux Déchets d'Équipements Électriques et Électroniques (DEEE) spécifie que les électroménagers ne doivent pas être recyclés avec le reste des déchets municipaux. Ces électroménagers doivent être jetés séparément, afin d’optimiser la
récupération et le recyclage des matériaux et, de cette manière, réduire l’impact qu’ils peuvent avoir sur la santé et sur l’environnement. Le symbole de la poubelle rayée vous rappelle l’obligation de vous défaire de ce produit correctement. Pour obtenir des informations détaillées sur la manière la plus adéquate de vous défaire de vos électroménagers et/ou des batteries correspondantes, vous devez contacter les autorités locales.
10. GARANTIE ET SAV
Ce produit possède une garantie de 2 ans à partir de la date d’achat, à condition de toujours présenter la facture d’achat, que le produit soit en parfait état, et ait été utilisé correctement comme indiqué dans ce manuel d’instructions. La garantie ne couvre pas :Un produit qui ait été utilisé en-dehors de ses capacités ou usages normaux, ayant subi des coups, ayant été abîmé, exposé à l’humidité, submergé dans un liquide ou une substance corrosive, ainsi que tous les incidents dont la faute serait imputable au consommateur. Un produit qui ait été démonté, modifié ou réparé par des personnes non autorisées par le Service Après-Vente Officiel de Cecotec. Lorsque le problème a été provoqué par l’usure normale des composants dû à l’utilisation. Le service de garantie couvre tous les défauts de fabrication pendant 2 ans selon la législation en vigueur, à l’exception des pièces consommables. Dans le cas d’une mauvaise utilisation de la part de l’utilisateur, le service de garantie ne se fera pas responsable de la réparation. Si vous détectez un incident ou un problème avec le produit, vous devez contacter le Service
Après-Vente Officiel de Cecotec au +34 9 63 21 07 28.
1. SICHERHEITSHINWEISE
Lesen Sie die folgenden Hinweise aufmerksam durch, bevor Sie das Produkt verwenden. Bewahren Sie die Bedienungsanleitung für künftige Benutzer oder zum Nachschlagen gut auf. Befolgen Sie diese Anweisungen, um das Gerät zu betreiben. Cecotec übernimmt keine Haftung für Schäden bzw. Unfälle, die durch unsachgemäße Handhabung entstehen. Vergewissern Sie sich, dass die Netzspannung mit der auf dem Typenschild des Gerätes angegebenen Spannung übereinstimmt und dass die Steckdose geerdet ist. Das Produkt muss ausschließlich vom qualifizierten Personal montiert und demontiert werden. Berühren Sie das Kabel, die Steckdose oder das Ladegerät nicht mit nassen Händen. Halten Sie den Roboter immer fern von Kleidungsstücken, Gardinen o.Ä. Sitzen Sie sich bitte nicht oben auf das Gerät oder stellen Sie keinen Gegenstand darauf. Betrieben Sie das Gerät nicht in der Nähe von Wärmequellen, entzündbaren Stoffen oder nassen Oberflächen, wo es fallen könnte. Vermeiden Sie das Kontakt des Gerätes mit Wasser oder anderen Flüssigkeiten. Verwenden Sie das Gerät nicht im Freien. Verwenden Sie die Ladestation nicht, wenn das Kabel oder der Netzstecker kaputt sind oder die Ladestation nicht richtig funktioniert. Kontaktieren Sie bei Ausfall mit dem Kundendienst von Cecotec.Verwenden Sie nicht das Gerät auf Tischen, Stühle oder

5150
DEUTSCH DEUTSCH
CONGA 990 VITAL CONGA 990 VITAL
erhöhten Flächen, wo es Sturzgefahr haben sollte.Verwenden Sie die Lasersicherung nicht als Griff, um den Roboter zu bewegen.Stellen Sie das Gerät nicht in Orten, wo die Temperatur niedriger als 0 ºC oder höher als 50 ºC ist.Das Gerät funktioniert nur mit dem mitgelieferten Akku und Ladegerät. Die Verwendung von anderen Komponenten oder Zubehöre könnte zu Brandgefahr, Stromschlag oder Schäden führen.Verwenden Sie das Gerät nicht, um entflammbare Gegenstände wie Zigarette, Streichhölzer oder Asche zu saugen.Bevor Sie das Gerät in Betrieb nehmen, entfernen Sie Kleidungsstücke, Papiere, Kabel oder andere Gegenstände, die es verstopfen könnten.Das Gerät darf von Kindern unter 8 Jahren nicht benutzt werden.Es darf von Kindern ab 8 Jahren benutzt werden, sofern sie unter ständiger Beaufsichtigung während der Nutzung des Gerätes stehen.Dieses Produkt kann von Kindern ab 8 Jahren und Personen mit eingeschränkten körperlichen, sensorischen oder geistigen Fähigkeiten oder mit mangelnder Erfahrung und Kenntnissen verwendet werden, wenn sie in der sicheren Anwendung des Geräts beaufsichtigt oder unterwiesen werden und die damit verbundenen Risiken verstehen. Lassen Sie Kinder nicht mit dem Gerät spielen.Kinder sollten beaufsichtigt werden, damit sie nicht mit dem Gerät spielen. Eine besondere genaue und konsequente Beaufsichtigung ist geboten, wenn das Gerät in der Nähe von Kindern verwendet wird.
2. TEILE UND KOMPONENTEN
Abb. 1.1. Signallampe2. Start-Taste/ Betrieb
Signallampe
Oranges Licht: Niedriger Akku. Oszillierendes, oranges Licht: wird geladen. Festes blaues Licht: aufgeladen/ Standby-Modus/ reinigen. Rotes blikendes Licht: Fehler.
Start-Taste/ BetriebHalten Sie diese Taste wenigen Sekunden gedrückt, um den Roboter ein- oder auszuschalten. Drücken Sie diese Taste, um die Reinigung zu starten.
Hauptgerät und Sensoren Abb. 2.Abb. 3.1. Aufprallsensoren2. Absturzsensoren3. Ladekontakte4. Laufrolle5. Seitliche Bürsten6. AkkuLaufrollenEin-/AusschalterStaubbehälterHauptbürste
KomponentenAbb. 4.LadestationAbb. 5.NetzsteckerAbb. 6.Fernbedienung

5352
DEUTSCH DEUTSCH
CONGA 990 VITAL CONGA 990 VITAL
Abb. 7.ReinigungsbürsteAbb. 8. MischbehälterAbb. 9. Primärfilter und HocheffizienzfilterAbb. 10.Seitliche BürstenAbb. 11.2 MoppsAbb. 12.HauptbürsteAbb. 13.Optional: Schmutzbehälter, BestFriend care Silikonbürste.
LadestationAbb. 14.1. Fernbedienungshalter2. Akkuanzeiger3. Signalübertragung4. Ladekontakte
FernbedienungAbb. 15.1. Einstellungen der Uhrzeit2. Pfeiltasten3. Punktueller Modus4. Raum Modus5. Stufen der Intensität des Wischen6. Anzeige von Modus und Zeit7. Automatisches Aufladen/Back Home8. Automatischer Modus/ Pause9. Programmierung10. Edge-Modus11. Saugleistungsstufen
3. VOR DEM GEBRAUCH
Nehmen Sie das Produkt aus der Verpackung und entnehmen Sie alle Verpackungsmaterial.Prüfen Sie, ob die Lieferung vollständig und in gutem Zustand ist. Falls Sie sichtbare Schäden
bemerken, kontaktieren Sie sofort den technischen Kundendienst von Cecotec.Abb. 16.Entfernen Sie alle Gegenstände um den Roboter herum, z. B. Kleidung, Papiere, Kabel, Vorhänge oder andere zerbrechliche Gegenstände. Abb. 17.Falls der Reinigungsbereich sich in der Nähe von Balkonen oder Treppen befindet, stellen Sie etwas da vor, um Sachschäden zu vermeiden und eine sichere Reinigung zu gewährleisten. Abb. 18.Abb. 19.Die direkte Sonneneinstrahlung oder ein hohen Lichtkontrast könnte die Sensoren beschädigen. In einem Fall oben dargestellt wird der Roboter das Reinigen anhalten. Starten Sie den Roboter an einem neuen Standort.
Abb. 20.Schließen Sie die Ladestation an einer Steckdose an. Wickeln Sie und lagern Sie das Kabel im unteren Teil der Ladestation auf, um Unfälle zu vermeiden.
Abb. 21.Stellen Sie die Ladestation gegen die Wand und lassen Sie einen Freiraum von mindestens: 2 Meter voraus. 1 Meter an beiden Seiten
Abb. 22.Setzen Sie beide seitlichen Bürste in die Schlitze im unteren Teil des Roboters ein. Drücken Sie, bis ein „Klick“ zu hören ist, dass signalisiert, dass sie gut festgezogen sind.
Abb. 23.Drücken Sie den Start-Schalter im unteren Teil des Roboters. Vergewissern Sie sich, dass sich der Schalter auf ON-Position befindet.
Abb. 24.Stellen Sie den Roboter auf die Ladestation und stellen Sie sicher, dass die Ladekontakte von beiden einrasten. Wenn der Roboter korrekt gestellt ist, wird er einen Signalton erzeugen und der Schalter aufleuchten. Wenn der Akku nicht vollständig aufgeladen ist, wird das Licht orange leuchten. Um die Akkulaufzeit zu verlängern warten Sie bis das Licht nicht mehr blinkt. Das signalisiert, dass der Akku vollständig aufgeladen ist und der Roboter einsatzbereit ist.

5554
DEUTSCH DEUTSCH
CONGA 990 VITAL CONGA 990 VITAL
4. BEDIENUNG
Abb. 25.Reinigung starten Halten Sie den Star-Schalter am Roboter gedrückt , um es einzuschalten. Drücken Sie den Start-Schalter des Roboters oder auf der Fernbedienung, um die Reinigung zu starten.
Hinweis: Bei Entleerung des Akkus während des Reinigungsvorgangs wird der Roboter zur Ladestation automatisch zurückkehren. Nach vollständigem Aufladen des Akkus kann ein neuer Reinigungszyklus angefangen werden.
Warnung: Der Roboter kann nicht zur Ladestation zurückkehren, wenn er keinen guten Zugang dazu hat. Wenn der Roboter keinen Zugang hat und hat sich gehalten, stellen Sie es manuell auf der Ladestation.
PauseDrücken Sie den Start-Schalter am Roboter oder auf der Fernbedienung, um die Reinigung zu pausieren. Drücken Sie den Schalter am Roboter oder auf der Fernbedienung, um die Reinigung fortzusetzen.
Rückkehr zur LadesationAbb. 26.Drücken Sie die „Back Home“ Taste auf der Fernbedienung, um den Roboter zur Ladestation zu senden.
AusschaltenHalten Sie den Schalter gedrückt, um den Roboter auszuschalten.
Warnung: Der Saugroboter verfügt über einen Ein / Aus-Ein / Aus-Schalter am Hauptkörper. Wenn Sie über einem langeren Zeitraim den Roboter nicht verwenden, schalten Sie es aus, indem Sie diese Taste drücken. Als Sicherheitsmaßnahme werden bei OFF-Position dieser Taste die Standartwerte wiederherstellt. Stellen Sie dieser Taste auf ON-Position, wenn Sie den Roboter mit Zeit-Programmierung Modus verwenden möchten. Wenn nicht, müssen Sie eine neue Programmierung mit der Fernbedienung.
ReinigungsartenDieser Roboter enthält verschiedene Betriebsarten und Funktionen, die über die Fernbedienung aktiviert werden kann.
Auto ModusAbb. 27.Wenn Sie den Netzschalter drücken, startet der Roboter die automatische Reinigung. Der Roboter reinigt die ganze Bondenfläche, die Ecken, um Gegestände wie Tische, Stühlen, u.a. herum, bis der Akkustand der Conga geringer wird und er zur Ladestation zurückkehrt. Scrubbing-ModusAbb. 28.Setzen Sie den Mopp auf den Mischbehälter ein und füllen Sie den Wassertank. Setzen Sie den Mischbehälter in den Roboter und wählen Sie den Modus aus. Sie können die Leistungsstufe durch die Fernbedienung einstellen: hoch, mittle oder niedrig. Abb. 29.Sobald die gewünschte Wischstufe über die Fernbedienung ausgewählt wurde, führt der Roboter die All-in-One-Funktion aus, um dank des Mischbehälter gleichzeitig zu saugen, zu schrubben und zu kehren.
Hinweis: Wenn Sie mit trockenem Wischmopp reinigen möchten, führen Sie diesen Schritt nicht durch. Für ein perfektes Wischen wird es empfohlen, vor der Verwendung den Mopp mit Wasser einheitlich zu befeuchten.
Punktueller ModusAbb. 30.Wählen Sie diesen Modus aus, um einen bestimmten Reinigungspunkt zu reinigen. Der Roboter wird einen bestimmten Reinigungsbereich mit spiralförmigen Bewegungen nach außen (1 Meter) dann zum Ausgangspunkt mit spiralförmigebewegungen zurückkehren. Zum Schluss, aktiviert er den automatischen Modus und reinigt, bis die Batterie leer wird. Vor Einstellung des Spot-Modus, stellen Sie den Roboter auf den zu reinigenden Bereich, den Sie reinigen möchten. Drücken Sie die Taste von pünktlicher Reinigung mit der Fernbedienung.
Edge-ModusAbb. 31.Wählen Sie diesen Modus aus, damit der Roboter entlang der Wände und um Möbel (Tischbeine, Stuhlbeine) herum. Drücken Sie die Randtaste auf der Fernbedienung.
Raum ModusAbb. 32.Beim Auswählen dieses Modus wird der Roboter während 30 Min. reinigen. Drücken Sie die Raum-Taste auf der Fernbedienung Um die Reinigung des Raumes zu gewährleisten, schließen Sie die Tür.

5756
DEUTSCH DEUTSCH
CONGA 990 VITAL CONGA 990 VITAL
Saugleistungsstufen-FunktionAbb. 33.Drücken Sie die Leistungsstufen-Taste auf der Fernbedienung, um die Saugleistung des Roboters beim Reinigen zu steuern. Er verfügt über 3 Saugleistungen: Turbo , Normal und Eco.
Intensität der Wisch-FunktionDrücken Sie die Intensität-Taste auf der Fernbedienung, um die Wassermenge beim Wischen zu kontrollieren. Er verfügt über 3 Wasserstufen: Hoch, Mittle und Niedrig .
Programmierung der ReinigungDer Roboter integriert Einstellungen, um die Reinigungszyklen zu personalisieren. Die Programmierung kann nur durch die Fernbedienung oder App von kompatibel Modellen durchgeführt werden. Hinweis: Stellen Sie sicher, dass sich die Fernbedienung beim Einstellen der Uhzeit und beim Programmieren der Reinigungszyklen in der Nähe vom Roboter befindet.
Uhreinstellung der Fernbedienung.Abb. 34.Drücken Sie die Uhrzeit-Taste auf der Fernbedienung. Die Ziffern werden blinken. Abb. 35.Wählen Sie den gewünschten Wochentag mit den Aufwärts- und Abwärtspfeilen.Verwenden Sie die linke und rechte Taste, um die Minuten und Stunden auszuwählen. Wenn die Nummer blinkt, ändern Sie sie mit den Aufwärts- und Abwärtspfeilen.Abb. 36.Drücken Sie abschließend die Ein- / Aus-Taste oder die Uhr-Taste. Der Roboter wird piepsen, um das Festlegen der Uhrzeit anzuzeigen.
Konfiguration des ReinigungsplansUm die Reinigung zu erleichtern, hat der Roboter eine Funktion, die ihn täglich mit der Fernbedienung programmieren lässt. Der Roboter wird gemäß der Einstellungden die automatische Reinigung der ausgewählten Tage und Uhrzeiten durchführen. Die Möglichkeiten der Fernbedienung sind 12:00 a.m. - 11:59 a.m. und 12:00 p.m. - 11:59 p.m. Bevor Sie die Uhrzeit und die Konfiguration des Roboters einstellen, vergewissern Sie sich, dass die Start-Taste des Roboters (ON) und die Einschalttaste eingeschaltet sind.
Einstellung der FernbedienungAbb. 37.Drücken Sie die Programmierung-Taste auf der Fernbedienung. Die Ziffern werden blinken. Abb. 38.Verwenden Sie die Aufwärts- und Abwärtspfeilen, um den Tag auszuwählen, und sobald der Tag ausgewählt ist, verwenden Sie die Links-rechts Pfeile, um die Minuten oder Stunden
auszuwählen. Um Uhrzeit oder Minuten umzuschalten, benutzen Sie die Richtungstasten und , sobald die Ziffern anfangen zu blinken. Drücken Sie die Start-Taste, um die Einstellungen zu speichern. Zugreifen Sie auf der gewüschten Tage und folgen Sie die gleichen Schritten, um diese einszustellen.
Abb. 39.Anschließend drücken die Start-Taste, um den Programmierung-Modus zu verlassen. Der Roboter wird piepsen, um das Festlegen der Reinigungszeit anzuzeigen.
Der Benutzer kann so viele Wochentage einstellen, wie er möchte. Auf der Startseite wird das Programmierungssymbol angezeigt, wenn der Roboter programmiert ist.
Abbrechen der ProgrammierungAbb. 40.Drücken Sie die Programmierung-Taste auf der Fernbedienung, wählen Sie den Tag aus, den Sie löschen möchten, und stellen Sie die Uhrzeit auf 00:00 Uhr ein. Wenn Sie diese Zeit eingeben, wird der Programm abgebrochen.
5. REINIGUNG UND WARTUNG
Um die Lebensdauer des Roboters zu verlängern und eine optimale Leistung zu erreichen, führen Sie die folgenden Schritte regelmäßig durch:
Entleeren Sie den Staubbehälter: Drücken Sie die Freigabetaste des Staubbehälters. Öffnen Sie den Staubbehälter und leeren Sie ihn.Abb. 41.
Reinigen Sie den Hochleistungsfilter des Roboters: Entnehmen Sie den Hochleistungsfilter. Schütteln Sie den Hochleistungsfilter vorsichtig, um den Schmutz zu entfernen. Abb. 42.
Reinigen Sie die Absturzsensoren: Verwenden Sie ein sauberes, trockenes, weiches Tuch, um den Staub der Absturzsensoren zu entfernen. Abb. 43.
Warnung: Tragen Sie keine Reinigungsmittel direkt auf die Sensoren auf.

5958
DEUTSCH DEUTSCH
CONGA 990 VITAL CONGA 990 VITAL
Reinigen Sie die HauptbürsteAbb. 44.Drücken Sie leicht auf die Laschen am mittleren Bürstenrahmen, um das Fach zu öffnen und es zu entfernen. Entfernen Sie Haare, Gewirre und Schmutz in der Bürste und um die Achsen.Abb. 45. Räumen und reinigen Sie den Saugkanal des Roboters.Abb. 46.Setzen Sie die Hauptbürste und den Rahmen erneut. Abb. 47.
Hochleistungsfilter Der hocheffiziente Filter ist mit Faser hergestellt, um Staubpartikel, Polen, Milbe... zu fangen. Deshalb muss es regelmäßig gereinigt werden, sodass diese Partikel nicht akkumuliert werden und eine hohe Saugleistung zu halten. Es wird empfohlen, einmal pro Woche die Reinigung durchzuführen. Es wird empfohlen, den Filter nach 160 Std. zu ersetzen. Empfehlungen: Man kann den Staub mit einer kleinen Bürste entfernen oder beim Der Hochleistungsfilter ist nicht waschbar.
Primärfilter und Schwammfilter Das Filternsystem ist mit einem Primärfilter und einem Schwammfilter ausgestattet. Es wird empfohlen, diese nach max. 160 Std. zu ersetzen oder wenn Sie Abnutzung bemerken. Empfehlungen: Man kann den Staub mit einer kleinen Bürste entfernen oder beim Man kann auch lauwarmes Wasser ohne Reinigungsmittel verwenden, um einen besseren Ergebniss zu erreichen. Vergewissern Sie sich, dass die Filter vollständig trocken sind, bevor Sie sie wieder einsetzen.
Seitliche Bürsten Die seitliche Bürste sind mit Borsten ausgestattet, um den Schmutz in die Saugdüse zu schieben und Ecken und Rände gründlich zu reinigen. Diese Filter können im Laufe der Zeit abgenutzt werden und die Reinigungsvorgang negativ beeinflüssen. Es wird dann empfohlen, jede seitliche Bürste max nach 220 Std. zu ersetzen. Empfehlungen: Seitliche Bürsten einmal pro Woche mithilfe der Reinigungsbürste zu reinigen.
Hauptbürste Die Hauptbürste ist mit Borsten und Silikon ausgestattet, dreht mit der maximalen Geschwindigket. Diese Bürste ist in Kontakt mit dem Boden und den Staub und kann im Laufe der Zeit abgenutzt werden und den Reinigungsvorgang negativ beeinflüssen. Es wird dann
empfohlen, jede seitliche Bürste max nach 320 Std. zu ersetzen.
Empfehlung: Es wird empfohlen, die Zentralbürste einmal wöchentlich mit Hilfe der Reinigungsbürste zu reinigen.
Sensoren Die Saugroboter enthalten verschiedene Sensoren wie z.B. die Annäherungssensoren, um eine Navigation ohne Hindernisse durchzuführen und die Absturzsensoren, um Gefälle bzw. Treppe zu bemerken. Die Sensoren sind in Kontakt mit den Staubpartikel und können im Laufe der Zeit verstopf werden und zum Navigationsfehler führen. Es wird empfohlen, die Sensoren nach ca. 35 Std. mithilfe der Reinigungs bürste oder einem trockenen Tuch zu reingen.
6. LADEN UND ERSETZEN DES AKKUS
Abb. 48.Um die Lebensdauer des Akkus zu verlängern, lassen Sie den Roboter auf der Ladestation aufladen, solange ihn nicht benutzt wird. Wenn Sie den Roboter für eine lange Zeit nicht verwenden wird, entnehmen Sie den Akku und lagern Sie das Produkt und den Akku an einem trockenen und sicheren Ort.
Um den Akku zu wechseln, führen Sie die folgenden Hinweise durch:Abb. 48.Schrauben Sie den 2 Schrauben aus dem Batteriefach ab und entnehmen Sie den Deckel des Etiketts und den Akku. Abb. 49.Stecken Sie den neuen Akku mit dem Etikett nach oben. Abb. 50.Stellen Sie den Akku und seinen Deckel an seinem Ort und machen Sie den Schrauben erneut fest.

6160
DEUTSCH DEUTSCH
CONGA 990 VITAL CONGA 990 VITAL
7. PROBLEMBEHEBUNG
Signal des Roboters Ursache
Rotes Licht 1 Signalton Fehler mit dem Allseitiges Rad.
Reinigen Sie die Laufrolle und drücken Sie den Schalter, um den Roboter zurückzusetzen.
2 Signaltöne Fehler mit den Seitenbürsten.
Reinigen Sie den Seitenbürsten und drücken Sie den Schalter, um den Roboter zurückzusetzen.
3 Signaltöne Fehler mit dem Ventilator des Motors oder mit dem Filter.
Entnehmen und reinigen Sie den Schmutzbehälter.Entnehmen Sie den Filter des Roboters und schütteln Sie den Schmutz ab..
4 Signaltöne Hauptbürste-Fehler Reinigen und entnehmen Sie die Hauptbürste.
Blinkendes rotes Licht
2 Signaltöne Fehler mit der Stoßstange.
Überprüfen Sie, ob die Stoßstange blockiert ist und drücken Sie auf jeder Seite und in der Mitte, um sie freizulegen.
3 Signaltöne Fehler mit dem Absturzsensor.
Überprüfen Sie, ob der Roboter auf einer unebenen Oberfläche befindet, ob die Räder den Boden nicht berühren oder ob er in einem dunklen Bereich stecken bleibt, und stellen Sie ihn an einen neuen Standort. Wenn der Problem weiter besteht, reinigen Sie den Absturzsensor.
4 Signaltöne Der Roboter kann nicht zur Ladestation oder zur Ausgangsposition zurückkehren.
Vergewissern Sie sich, dass kein Gegenstand in der Nähe bzw. vor der Ladestation steht. Reinigen Sie den Ladekontakten des Roboters und der Ladestation mit einem sauberen, weichen und trocken Tuch.
8. TECHNISCHE SPEZIFIKATIONEN
Modell: Conga 990 Vital Produktreferenz: 05417 Leistung: 100-240 V ~, 50/60 Hz Akku: 14.4 V, 2600 mAh Made in China | Entworfen in Spanien
9. ENTSORGUNG VON ALTEN ELEKTROGERÄTEN
Die Europäische Richtlinie 2012/19/EU über Elektro- und Elektronik-Altgeräte (WEEE) legt fest, dass alte Haushaltsgeräte nicht mit dem normalen unsortierten Siedlungsabfall entsorgt werden dürfen. Alte Geräte müssen gesondert gesammelt werden, um die Verwertung und das Recycling der enthaltenen Materialien zu optimieren und die Auswirkungen auf die menschliche Gesundheit und die Umwelt zu reduzieren.
Das durchgestrichene Symbol "durchgestrichene Abfalltonne" auf dem Produkt erinnert Sie an Ihre Verpflichtung, das Gerät korrekt zu entsorgen. Die Verbraucher müssen sich mit Ihren örtlichen Behörden oder Einzelhändlern in Verbindung setzen, um Informationen über die ordnungsgemäße Entsorgung ihrer Altgeräte und/ oder ihrer Batterien zu erhalten.
10. GARANTIE UND KUNDENDIENST
Dieses Produkt hat 2 Jahre Garantie. Die Garantiezeit beginnt mit dem Kaufdatum bzw. Lieferdatum, soweit der hierfür vorhandene und sorgfältig aufbewahrte Kaufbeleg rechtzeitig eingereicht wird, und das Produkt unter angemessener und sachgemäßer Behandlung, wie es in dieser Bedienungsanleitung beschrieben wurde, sich in einem hierfür entsprechenden, optimalen Zustand befindet. Die Garantie deckt keine Schäden bei denen:Das Produkt über seine Kapazität oder Anwendbarkeit hinaus missbraucht, geschlagen, nicht ordnungsgemäß behandelt wurde oder mit ätzenden bzw. Korrosiven Substanzen oder Flüssigkeiten in Kontakt geraten ist oder die jeweilige Störung, Fehler, Schaden bzw. Defekt dem Verbraucher zugerechnet werden kann. Das Produkt von Personen demontiert, repariert oder modifiziert wurde, die nicht vom offiziellen Technischen Kundendienst durch Cecotec autorisiert worden sind. Der Grund hierfür durch die normale Abnutzung und Verschleiß der Teile und des Zubehörs entstanden ist. Die Garantieleistung deckt alle Herstellungsbedingten Schäden und Fehler Ihres Produktes

63
ITALIANO
CONGA 990 VITAL 62
DEUTSCH
CONGA 990 VITAL
für die Dauer von 2 Jahren, nach geltendem Recht. Diese eingeschränkte Gewährleistung gilt nicht für Mängel, die sich aus Unfällen, Missbrauch, unsachgemäße Wartung oder normale Abnutzung ergeben. Sollte unerwartet eine Störung auftreten oder haben Sie Fragen über Ihrem Produkt, dann können Sie sich mit der Auskunftstelle in Verbindung setzen über die Telefonnummer: +34 963210728
1. ISTRUZIONI DI SICUREZZA
Leggere attentamente le seguenti istruzioni prima di usare il prodotto. Conservare questo manuale per riferimenti futuri o nuovi utenti. Questo prodotto deve essere utilizzato secondo le istruzioni di questo manuale. Cecotec non si farà responsabile di nessun danno o incidente che sia la conseguenza dell’uso inappropriato del prodotto. Verificare che la tensione di rete coincida con la tensione specificata sull’etichetta di classificazione del prodotto e che la presa elettrica sia dotata di conduttore di terra. Il prodotto può essere solamente montato e smontato da personale qualificato. Non toccare il cavo, la presa della corrente nè il caricabatterie con le mani bagnate. Mantenere il robot lontano da indumenti, tende e materiali simili. Non sedersi né collocare oggetti affilati o pesanti sopra al prodotto. Non utilizzare il dispositivo vicino a fonti di calore, sostanze infiammabili, superfici bagnate dove possa cadere o essere gettato in acqua, nè permettere che entri a contatto con acqua o altri liquidi. Non utilizzare in esterni. Non utilizzare la base di ricarica se il cavo o la spina sono rotti o non funziona correttamente. In caso di avaria, contattare il Servizio di Assistenza Tecnica di Cecotec. Non utilizzare il dispositivo su tavoli, sedie o superfici in altezza dove vi sia il rischio che possa cadere. Non utilizzare la protezione del laser come manico per muovere il robot. Non mettere il prodotto in funzionamento in luoghi dove la

6564
ITALIANO ITALIANO
CONGA 990 VITAL CONGA 990 VITAL
temperatura è inferiore a 0 ºC o superiore a 50 ºC. Il dispositivo funziona solamente con la batteria e il caricabatterie forniti. L’uso di altre componenti o accessori potrebbe comportare il rischio di incendio, elettrocuzione o danneggiare il prodotto. Non utilizzare il dispositivo per aspirare oggetti infiammabili o accesi come sigarette, fiammiferi o ceneri. Prima di mettere il robot in funzionamento, rimuovere dal pavimento indumenti, carta, cavi o altri elementi che possano ostruire il dispositivo. L’apparato non deve essere usato da bambini da 0 a 8 anni. Questo elettrodomestico può essere usato da bambini a partire dagli 8 anni sotto la supervisione continua di un adulto. Questo prodotto può essere usato da bambini/e a partire dagli 8 anni e persone con capacità fisiche, sensoriali o mentali ridotte, o con mancanza di esperienza e conoscenza solo sotto supervisione o avendo ricevuto istruzioni riguardo l’uso dell’apparato in una forma sicura e comprendono i rischi che lo stesso implica. Non permettere l’utilizzo del dispositivo ai bambini.Supervisionare i bambini per assicurarsi che non giochino con il prodotto. È necessario supervisionare rigidamente nel caso in cui il prodotto venga utilizzato da o vicino a bambini.
2. PARTI E COMPONENTI
Fig. 1. 1. Indicatore luminoso 2. Tasto di accensione/funzionamento
Indicatore luminoso
Luce arancione fissa: batteria scarica. Luce arancione oscillante: in carica Luce blu fissa: caricato/modalità standby/pulizia in corso. Luce rossa lampeggiante: errore.
Tasto di accensione/funzionamento Mantenere premuto questo tasto per alcuni secondi per accendere o spegnere il robot. Premerlo anche per cominciare la pulizia.
Corpo principale e sensori Fig. 2. Fig. 3. 1. Sensori anticollisione2. Sensori anticaduta3. Poli di ricarica4. Ruota omnidirezionale5. Spazzole laterali 6. Batteria 7. Ruote motrici 8. Interruttore di accensione 9. Serbatoio dello sporco 10. Spazzola centrale
Componenti Fig. 4. Base di ricaricaFig. 5. Adattatore della corrente Fig. 6. Telecomando a distanza Fig. 7. Spazzolino per la puliziaFig. 8.

6766
ITALIANO ITALIANO
CONGA 990 VITAL CONGA 990 VITAL
Serbatoio misto Fig. 9. Filtro primario e filtro altamente efficiente Fig. 10. Spazzole laterali Fig. 11. 2 panniFig. 12. Spazzola centrale Fig. 13. Optional: serbatoio dello sporco, spazzola in silicone BestFriend Care.
Base di ricaricaFig. 14. 1. Supporto del telecomando a distanza2. Indicatore di ricarica 3. Trasmettitore di segnale4. Poli di ricarica
Telecomando a distanza Fig. 15.1. Impostazioni dell’orologio 2.Tasti direzionali 3. Modalità In un punto 4. Modalità Stanza 5. Funzione di intensità di lavaggio 6. Display di visualizzazione modalità ed ora 7. Ricarica automatica/Ritorno alla base8. Modalità automatica/pausa 9. Programmazione 10. Modalità Bordi 11. Livello di potenza di aspirazione
3. PRIMA DELL’USO
Rimuovere il prodotto dalla scatola e ritirare tutto il materiale dall’imballaggio. Verificare che tutte le parti e componenti siano incluse e in buono stato. Se si osservano danni visibili, contattare immediatamente il Servizio di Assistenza Tecnica ufficiale di Cecotec. Fig. 16. Ritirare tutti gli oggetti attorno al robot, come indumenti, carta, fili, tende o altri oggetti fragili.
Fig. 17. Se la zona da pulire si trova nei pressi di un balcone o scale, collocare una barriera fisica per evitare di danneggiare il prodotto e per assicurare una pulizia sicura.Fig. 18. Fig. 19. L’esposizione diretta alla luce solare o i grandi contrasti di luce potrebbero ripercuotere sul perfetto funzionamento dei sensori. Si ciò dovesse accadere, il robot aspirapolvere si fermerebbe, cambiarlo di postazione per cominciare di nuovo con il funzionamento.
Fig. 20. Collegare la base di ricarica a una presa di corrente. Avvolgere e conservare il cavo restante nella parte inferiore della base di ricarica per evitare incidenti.
Fig. 21.Collocare la base di ricarica contro la parete e lasciare uno spazio libero minimo di: 2 metri di fronte. 1 metro per ogni lato
Fig. 22.Inserire le due spazzole laterali nelle fessure situate nella parte inferiore del robot. Premere fino a sentire un “clic” che conferma che siano ben sostenute.
Fig. 23. Premere l’interruttore di accensione che si trova nella parte inferiore del robot. Verificare che l’interuttore si trovi in posizione ON.
Fig. 24. Collocare il robot nella base di ricarica e verificare che i poli di ricarica di entrambi coincidano. Una volta che il robot è stato ben collocato, emetterà un bip e il tasto si accenderà. Se la luce dovesse lampeggiare di arancione, significa che la batteria non è completamente carica. Per verificare il maggior tempo di pulizia, attendere che la luce cambi in blu permanente, ciò indicherà che la batteria è totalmente carica e il robot è pronto per l’uso.
4. FUNZIONAMENTO
Fig. 25. Cominciare la pulizia Mantenere premuto il tasto di accensione nel robot per accenderlo. Premere il tasto di accensione del robot o del telecomando a distanza per cominciare la pulizia.

6968
ITALIANO ITALIANO
CONGA 990 VITAL CONGA 990 VITAL
Avviso: se il robot resta senza batteria durante la pulizia, tornerà automaticamente alla base di ricarica. Una volta caricata completamente la batteria, si può cominciare un nuovo ciclo di pulizia.
Avvertenza: il robot non potrà tornare alla base di ricarica se non ha un buon accesso alla stessa. Se il robot non ha potuto accedere e si è fermato, collocarlo manualmente nella base di ricarica.
Pausa Premere il tasto di accensione/spegnimento sul robot o sul telecomando a distanza per mettere in pausa il processo di pulizia. Premere il tasto di accensione sul robot o sul telecomando a distanza per riprendere il processo di pulizia.
Ritorno alla base di ricaricaFig. 26.Premere il tasto Ritorno alla base sul telecomando a distanza per inviare il robot alla base di ricarica.
SpegnereMantenere premuto il tasto di accensione/spegnimento per spegnere il robot.
Avvertenza: il robot aspirapolvere è dotato di un interruttore di accensione e spegnimento ON/OFF situato sul corpo principale. Se dovesse rimanere per lunghi periodi di tempo senza essere usato, si consiglia di spegnerlo attraverso questo interruttore. Come misura di sicurezza, se il tasto si trova su OFF si vengono configurati i valori iniziali di fabbricazione. Se desideriamo che il robot funzioni in modalità di programmazione del tempo, l’interruttore deve trovarsi sempre in posizione ON, in caso contrario, è necessario effettuare una nuova programmazione dal telecomando a distanza.
Modalità di pulizia Questo robot include differenti modalità e funzioni che si possono attivare mediante il telecomando a distanza.
Modalità Auto Fig. 27. Premendo questo tasto, il robot comincerà la pulizia automatica. Il robot pulirà tutta la superficie, i bordi, attorno a oggetti come tavoli, sedie, ecc., fino a che la batteria si scarichi e torni alla base di ricarica.
Modalità Scrubbing
Fig. 28.Sistemare il panno nel serbatoio misto e riempire il serbatoio dell’acqua. Introdurre il serbatoio misto nel robot e selezionare la modalità. È possibile selezionare il livello di lavaggio mediante il telecomando a distanza: alto, medio o basso. Fig. 29.Una volta selezionato il livello di lavaggio desiderato dal telecomando a distanza, il robot attraverso la funzione All in One potrà aspirare, lavare il pavimento e passare la scopa simultaneamente grazie al suo serbatoio misto.
Avviso: se si desidera passare il panno, saltare il passaggio relativo al riempimento del serbatoio dell’acqua. Per garantire un lavaggio perfetto dall’inizio, si consiglia di inumidire, in modo omogeneo, il panno con acqua prima di utilizzarlo.
Modalità In un punto Fig. 30.Selezionando questa modalità, il robot pulirà in modo intensivo un punto specifico. Comincerà a pulire in un punto concreto, effettuerà movimenti a spirale verso l’esterno (1 metro) e successivamente tornerà di nuovo al punto iniziale effettuando movimenti a spirale. Per terminare, attiverà la modalità automatica e pulirà fino a scaricare la batteria. Prima di azionare il robot in modalità in un punto, collocarlo nel punto che desidera pulire. Premere il tasto di pulizia in un punto sul telecomando a distanza.
Modalità Bordi Fig. 31.Selezionando questa modalità, il robot pulirà lungo la parete e attorno ai mobili (gambe dei tavoli, delle sedie, ecc.). Premere il tasto Bordi sul telecomando a distanza.
Modalità Stanza Fig. 32. Selezionando questa modalità il robot pulirà per 30 minuti. Premere il tasto della modalità Stanza sul telecomando a distanza o sulla App. Per garantire la pulizia della stanza, chiudere la porta.
Funzione del livello di potenza di aspirazioneFig. 33.Premere il tasto dei livelli di potenza sul telecomando a distanza per verificare la potenza di aspirazione del robot durante i processi di pulizia. Esistono tre livelli di potenza di aspirazione: Turbo, Normale ed Eco.

7170
ITALIANO ITALIANO
CONGA 990 VITAL CONGA 990 VITAL
Funzione di intensità di lavaggio Premere il tasto di intensità di lavaggio sul telecomando a distanza per verificare il livello dell’acqua durante il lavaggio. Esistono tre livelli d’acqua: Alto, Medio e Basso.
Programmazione della pulizia Il robot include impostazioni di programmazione che permettono di personalizzare i cicli di pulizia. La programmazione si può solamente effettuare attraverso il telecomando a distanza o la App nei modelli compatibili. Avviso: verificare che il telecomando a distanza si trovi vicino al robot sia nel configurare l’ora che nel programmare i cicli di pulizia.
Configurazione dell’ora con il telecomando a distanzaFig. 34.Premere il tasto dell’orologio sul telecomando a distanza. Le cifre cominceranno a lampeggiare. Fig. 35.Selezionare il giorno della settimana utilizzando le frecce verso l’alto e il basso. Utilizzare le frecce di sinistra e destra per selezionare i minuti e le ore. Quando il numero lampeggerà, utilizzare le frecce verso l’alto e il basso per cambiarlo.Fig. 36.Infine, premere il tasto di accensione o sull’orologio. Il robot emetterà un bip indicando che le impostazioni dell’orologio sono state confermate.
Configurare la programmazione della pulizia.Per facilitare la pulizia, il robot possiede una funzione che permette di programmarlo ogni giorno dal telecomando a distanza Secondo la configurazione, il robot inizierà automaticamente la pulizia per i giorni e ore indicate. Le opzioni del telecomando a distanza sono: 12:00 a. m.- 11:59 a. m. e 12:00 p. m.- 11:59 p. m. Prima di impostare l’ora e la configurazione del robot, verificare che stia con l’interruttore acceso (ON) e che il tasto di del robot sia anch’esso acceso.
Configurazione con il telecomando a distanzaFig. 37.Premere il tasto di programmazione del telecomando a distanza. Le cifre cominceranno a lampeggiare. Fig.38.Utilizzare i tasti direzionali di sopra e sotto per selezionare il giorno e una volta fatto, utilizzare le frecce di sinistra e destra per selezionare minuti od ore. Per poter cambiare i minuti od ore utilizzare i tasti direzionali e quando cominciano a lampeggiare le cifre. Premere il tasto di accensione per salvare le impostazioni. Accedere ai giorni desiderati e seguire i passaggi per programmarli.
Fig. 39.Infine, premere il tasto di accensione per uscire dal modalità di programmazione. Il robot emetterà un bip indicando che le impostazioni della programmazione della pulizia sono state confermate.
L’utilizzatore può programmare i giorni della settimana che si desiderano. Il display di inizio mostrerà quando il robot è stato programmato.
Cancellazione della programmazione di pulizia Fig. 40.Premere il tasto di programmazione sul telecomando a distanza, selezionare il giorno che si desidera eliminare e cambiare l’ora a 00:00 a.m., quest’ultima è l’ora indicata per cancellare il programma.
5. PULIZIA E MANUTENZIONE
Con l’obiettivo di allungare la vita utile del robot e che funzionicon un rendimento ottimo, effettuare periodicamente i seguenti passaggi:
Svuotare il serbatoio dello sporco del robot: Premere il tasto di rilascio del serbatoio dello sporco. Aprire il deposito dello sporco e svuotarlo. Fig. 41.
Pulire il filtro altamente efficiente del robot: Ritirare il filtro altamente efficiente. Scuotere il filtro altamente efficiente con attenzione per rimuovere lo sporco. Fig. 42.
Pulire i sensori anticaduta: Utilizzare un panno pulito, asciutto e morbido per rimuovere la polvere dai sensori anticaduta, situati nella parte inferiore destra del robot. Fig. 43.
Avvertenza: non applicare prodotti per la pulizia direttamente sui sensori.
Pulire la spazzola centraleFig. 44. Premere leggermente le linguette del livello indicato sulla spazzola centrale per aprire lo scomparto della spazzola e rimuoverlo.

7372
ITALIANO ITALIANO
CONGA 990 VITAL CONGA 990 VITAL
Ritirare i peli, pelucchi e altro sporco intrappolato nella spazzola e attorno agli assi. Fig. 45. Liberare e pulire il canale di aspirazione del robot. Fig. 46.Installare di nuovo la spazzola centrale e il livello indicato. Fig. 47.
Filtro altamente efficiente Il filtro ad alta efficienza è progettato con una rete di fibre che aiutano a catturare le particelle di polvere, acari, polline, ecc. Per questa ragione, bisogna pulirlo regolarmente per evitare che queste particelle si acculumino nel filtro perdendo di efficienza. L’ideale sarebbe effettuare tale manutenzione una volta a settimana. Al momento di cambiarlo per uno nuovo si consiglia di farlo come massimo alla 160 ora o meno di uso. Suggerimenti: Si può rimuovere lo sporco con una spazzola piccola o strofinare dolcemente su di una superficie dura per far cadere la polvere. Il filtro altamente efficiente non è lavabile.
Filtro primario a maglia e filtro spugna Il sistema di filtraggio si complementa con un filtro primario a maglia e un filtro spugna. All’ora di cambiarli si consiglia di farlo per un massimo di 160 ore d’uso, o quando osservi che soffrino alcun tipo di usura per l’uso. Suggerimenti: Si può rimuovere lo sporco con una spazzola piccola o strofinare dolcemente su di una superficie dura per far cadere la polvere. Si può anche utilizzare acqua tiepida senza detergenti per ottenere un migliore risultato, verificando che siano totalmente asciutti prima di tornare a collocarli.
Spazzole laterali Le spazzole laterali sono progettate con una moltitudine di setole e si utilizzano sia per catturare lo sporco verso la bocca di aspirazione che per pulire a fondo bordi e angoli. Queste spazzole si possono usurare con il passare del tempo, ciò che avrà conseguenze negative sull’efficienza della pulizia. Per questo motivo si consiglia di cambiare ogni spazzola laterale al massimo ogni 220 ora o meno. Suggerimenti: Si consiglia di pulire le spazzole laterali una volta a settimana con l’aiuto della spazzola per pulire.
Spazzola centrale La spazzola centrale è progettata con setole e silicone, gira ad alta velocità e aiuta a introdurre lo sporco nella bocca di aspirazione. Questa spazzola si trova a contatto con il pavimento e
di conseguenza con lo sporco, per cui potrebbe essere soggetta ad usura con il passare del tempo, che avrà conseguenze negative sull’efficienza della pulizia. Per questo motivo si consiglia di cambiare ogni spazzola laterale al massimo ogni 320 ora o meno.
Suggerimento: si consiglia di pulire la spazzola laterale una volta a settimana con l’aiuto della spazzola per pulire.
Sensori I robot di pulizia sono dotati di differenti tipi di sensori, ad esempio, i sensori di prossimità aiutano il robot a effettuare una navigazione potendo localizzare possibili ostacoli, e i sensori anticaduta aiutano il robot a localizzare dislivelli e possibili vuoti come possono essere le scale. Questi sensori stanno a continuo contatto con le particelle di polvere per cui si possono ostruire con il passare del tempo e provocare possibili errori di navigazione. Si consiglia di pulire tutti i sensori del robot ogni 35 ore di uso o meno, con l’aiuto della spazzola di pulizia o di un piccolo panno senza inumidire.
6. RICARICA E CAMBIO DELLA BATTERIA
Fig. 48.Per allungare la vita utile della batteria, lasciare il robot sulla base di ricarica se non si sta utilizzando. Se il robot non viene utilizzato durante un periodo prolungato di tempo, rimuovere la batteria e conservare il prodotto e la batteria in un luogo asciutto e sicuro.
Per sostituire la batteria, seguire le seguenti istruzioni:Fig. 48.Svitare le due viti dallo scomparto della batteria, rimuovere la placca della batteria e la batteria. Fig. 49.Introdurre la batteria nuova con l’etichetta verso l’alto. Fig. 50.Collocare la batteria e la placca della batteria al suo posto e fissare di nuovo le viti.

7574
ITALIANO ITALIANO
CONGA 990 VITAL CONGA 990 VITAL
7. RISOLUZIONE DEI PROBLEMI
Segnale del robot Causa
Luce rossa fissa
1 bip Errore della ruota omnidirezionale.
Pulire la ruota omnidirezionale e premere il tasto di accensione per riavviare il robot.
2 bip Errore delle spazzole laterali. Pulire le spazzole laterali e premere il tasto di accensione per riavviare il robot.
3 bip Errore del ventola del motore o del filtro.
Rimuovere e pulire il serbatoio dello sporco.Rimuovere il filtro del robot e scuotere lo sporco.
4 bip Errore della spazzola centrale Rimuovere e pulire la spazzola centrale del robot.
Luce rossa lampeggiante
2 bip Errore del paraurti. Verificare se il paraurti è intasato e premere su entrambi i lati e al centro per sbloccarlo.
3 bip Errore del sensore anticaduta. Verificare se il robot si trova su una superficie irregolare, se le ruote non stiano toccando il suolo o se è intasato in una zona buia e portarlo a una nuova posizione. Al contrario, pulire il sensore anticaduta.
4 bip Il robot non può tornare alla base di ricarica o alla sua posizione iniziale.
Verificare che non ci siano ostacoli davanti alla base di ricarica. Pulire i poli di ricarica sia del robot che della base di ricarica con un panno pulito, morbido e asciutto.
8. SPECIFICHE TECNICHE
Modello: Conga 990 Vital Riferimento del prodotto: 05417 Potenza: 100-240V ~ 50/60Hz Battery: 14.4 V, 2600 mAh Made in China | Progettato in Spagna
9. RICICLAGGIO DI ELETTRODOMESTICI
La direttiva europea 2012/19/UE in riferimento ai Rifiuti di Apparati Elettrici ed Elettronici (RAEE) specifica che gli elettrodomestici non devono essere riciclati con il resto dei rifiuti municipali. Tali elettrodomestici devono essere gettati separatamente, al fine di ottimizzare il recupero e il riciclaggio di materiali e, in questo modo, ridurre l’impatto sulla salute umana e sul medioambiente. Il simbolo del cassonetto dei rifiuti barrato le ricorda l’obbligo di gettare
correttamente questo prodotto. Per ottenere informazioni dettagliate sulla forma più adeguata per gettare gli elettrodomestici e/o le corrispondenti batterie, il consumatore dovrà contattare le autorità locali.
10. GARANZIA E SAT
Questo prodotto ha una garanzia di 2 anni a partire dalla data di acquisto, sempre e quando viene conservata e inviata la fattura di acquisto, il prodotto stia in perfetto stato fisico e si utilizzi in modo adeguato così come indicato nel manuale di istruzioni. La garanzia non coprirà: • Se il prodotto è stato utilizzato al di fuori della sua capacità o di utilizzo, maltrattato, colpito, esposto ad umidità, sommerso da qualche liquido o sostanza corrosiva, così come qualsiasi altra mancanza attribuibile al consumatore. • Se il prodotto è stato smontato, modificato o riparato da persone non autorizzate dal SAT ufficiale di Cecotec. • Se il problema è stato generato da un’usura normale dei pezzi dovuta all’uso. Il servizio di garanzia copre tutti i difetti di fabbricazione per 2 anni secondo la legislazione in vigore, ad eccezione dei pezzi consumabili. Nel caso di cattivo uso da parte dell’utente, il servizio di garanzia non si farà responsabile della riparazione. Qualora ci fosse un problema con il prodotto o avere una consulenza, contattare il Servizio di Assistenza Tecnica ufficiale di Cecotec attraverso il numero di telefono +34 96 321 07 28.
7776
PORTUGUÊS PORTUGUÊS
CONGA 990 VITAL CONGA 990 VITAL
1. INSTRUÇÕES DE SEGURANÇA
Leia as seguintes instruções atentamente antes de usar o produto. Guarde este manual para referências futuras ou novos usuários. Este produto deve ser usado conforme indicam as instruções deste manual. Cecotec não se responsabiliza de nenhum dano ou acidente que seja consequência do uso inapropriado do produto. Certifique-se de que a voltagem de rede coincide com a voltagem especificada na etiqueta de classificação do produto e de que a tomada tenha ligação à terra. O produto só poderá ser montado e desmontado por pessoas qualificadas. Não toque no cabo, na ficha nem no carregador com as mãos molhadas. Mantenha o robot longe de roupa, cortinas e outros objetos e materiais similares. Não se sente nem coloque objetos pesados ou afiados em cima do produto.Não utilize o produto perto de fontes de calor, substâncias inflamáveis, superfícies molhadas onde possa cair ou ser atirado à água, nem permita que entre em contacto com água ou outros líquidos. Não utilize em exteriores.Não utilize a base de carga se tiver o cabo ou a ficha estragados ou se não funcionar corretamente. Em caso de avaria, contacte com o Serviço de Assistência Técnica de Cecotec. Não utilize o dispositivo em mesas, cadeiras ou superfícies em altura onde tenha o risco de cair.Não utilize a proteção do laser como asa para mover o robot.Não ponha o produto em funcionamento em lugares onde a
temperatura seja inferior a 0 ºC ou superior a 50 ºC.O dispositivo unicamente funciona com a bateria e o carregador proporcionados. O uso de outros componentes ou acessórios poderá levar ao risco de incêndio, eletrocussão ou danificar o produto.Não utilize o dispositivo para aspirar objetos inflamáveis ou beatas de cigarros, brasas ou cinzas.Antes de pôr o robot em funcionamento, retire do chão peças de roupa, papeis, cabos ou outros elementos que possam obstruir o dispositivo.O aparelho não deve ser usado por crianças de 0 a 8 anos.Este aparelho pode ser usado por crianças de 8 anos se estiveram continuamente sob supervisão.Este produto pode ser usado por crianças a partir de 8 anos e pessoas com capacidades físicas, sensoriais ou mentais reduzidas, ou com falta de experiência e conhecimento se estão supervisionados ou tenham recebido instruções concernentes ao uso do aparelho de uma forma segura e entendem os riscos que este implica. Supervisione as crianças de que não brinquem com o produto. É necessário dar supervisão estrita se o produto estiver a ser usado perto ou por crianças.

7978
PORTUGUÊS PORTUGUÊS
CONGA 990 VITAL CONGA 990 VITAL
2. PEÇAS E COMPONENTES
Fig. 1.1. Indicador luminoso2. Botão de ligar/funcionamento
Indicador luminoso
Luz laranja: bateria baixa. Luz laranja oscilante: a carregar Luz fixa: carregado/modo standby/a limpar. Luz vermelha a piscar: erro.
Botão de ligar/funcionamentoMantenha pressionado este botão uns segundos para ligar ou desligar o robot. Pressione também para começar a limpeza.
Corpo principal e sensores Fig. 2. Fig. 3.1. Sensores anti colisão2. Sensores anti queda3. Bornos de carga4. Roda omnidirecional5. Escovas laterais6. Bateria7. Rodas motrizes8. Interruptor de ligar9. Depósito de sujidade10. Escova central
Componentes:Fig. 4. Base de carga Fig. 5.Adaptador de corrente Fig. 6.Comando a distância Fig. 7.Escova de limpezaFig. 8
Depósito mistoFig. 9.Filtro primário e filtro de alta eficiência.Fig. 10.Escovas lateraisFig. 11.2 mopas Fig. 12.Escova centralFig. 13.Opcional: depósito de sujidade, escova de silicone BestFriend Care.
Base de carga Fig. 14.1. Suporte do comando a distância2. Indicador de carga3. Transmissor de sinal 4. Bornes de carga
Comando a distância Fig. 15.1. Ajustes de tempo2. Botões de direção 3. Modo pontual4. Modo quarto5. Níveis de intensidade de lavagem 6. Ecrã de visualização de modo e hora7. Carga automática/Regresso à base8. Modo automático/pausa9. Programação10. Modo Bordas11. Níveis de potência de sucção
3. ANTES DE USAR
Tire o produto da caixa e retire todo o material de embalagem.Certifique-se de que todas as peças e componentes estão incluídas e em bom estado. Se observar algum dano visível, entre em contacto imediatamente com o Serviço de Assistência Técnica oficial de Cecotec.Fig. 16.

8180
PORTUGUÊS PORTUGUÊS
CONGA 990 VITAL CONGA 990 VITAL
Retire os objetos que tenha ao redor do robot, como peças de roupa, papéis, cabos, cortinas ou outros objetos frágeis. Fig. 17.Se a área a limpar está perto de uma varanda ou escadas, coloque uma barreira física para evitar que o robot se danifique e garantir uma limpeza em segurança.Fig. 18.Fig. 19.A exposição direta à luz solar ou os grandes contrastes de luz podem afetar o perfeito funcionamento dos sensores. Se isto acontecer, o robot aspirador parará. Mude de lugar para trabalhar outra vez.
Fig. 20.Conecte a base de carga à corrente elétrica. Enrole e guarde o cabo na parte inferior da base de carga para evitar acidentes.
Fig. 21.Coloque a base de carga contra a parede e deixe um espaço livre mínimo de: 2 metros à frente 1 metro de cada lado
Fig. 22.Insira as duas escovas laterais nas ranhuras situadas na parte inferior do robot. Pressione até escutar um “clic” que confirme que estão bem fixos.
Fig. 23.Pressione o interruptor de ligar que se encontra na parte inferior do robot. Certifique-se de que o interruptor se encontra na posição ON.
Fig. 24.Coloque o robot na base de carga e certifique-se de que os bornos de carga de ambos coincidam. Uma vez que o robot esteja bem colocado, emitirá um sinal sonoro e o botão acenderá. Se a luz piscar a laranja, significa que a bateria não está completamente carregada. Para garantir o maior tempo de limpeza, espere que a luz mude a azul permanente, isto indicará que a bateria está totalmente carregada e o robot está pronto para ser usado.
4. FUNCIONAMENTO
Fig. 25.Começar a limpeza Mantenha pressionado o botão de ligar o robot para ligar o robot.
Pressione o botão de ligar o robot ou do comando a distância para começar a limpeza.
Aviso: se o robot ficar sem bateria durante a limpeza, voltará automaticamente à base de carga. Uma vez que a bateria se tenha carregado por completo, pode começar um novo ciclo de limpeza.
Advertência: o robot não poderá voltar à base de carga se não tiver um bom acesso a esta. Se o robot não puder aceder e ficar parado, coloque de forma manual na base de carga.
PausaPressione o botão de ligar/desligar no robot ou no comando a distância para pausar o processo de limpeza. Pressione o botão de ligar no robot ou no comando a distância para retomar o processo de limpeza.
Regresso à base de cargaFig. 26.Pressione o botão Regresso à base no comando a distância para enviar o robot à base de carga.
DesligarMantenha pressionado o botão de ligar para desligar o robot.
Advertência: o robot aspirador dispõe de um interruptor de ligar e desligar On/Off situado no corpo principal. Se ficar longos períodos de tempo sem ser usado, é aconselhável desligar através deste interruptor. Como medida de segurança, se o botão se encontra em Off, se configuram os valores iniciais de fábrica. Se queremos que o robot funcione em modo de programação do tempo, o interruptor sempre deve estar em posição ON, caso contrário, devemos realizar uma nova programação desde o comando a distância ou a App.
Modos de limpezaEste robot inclui diferentes modos e funções que se podem ativar mediante o comando a distância.
Modo AutoFig. 27.Ao pressionar este botão, o robot começará a limpeza automática. O robot limpará toda a superfície, o rodapé, ao redor de objetos como mesas, cadeiras, etc., até que a percentagem de bateria e regresse à base de carga.
Modo ScrubbingFig. 28.

8382
PORTUGUÊS PORTUGUÊS
CONGA 990 VITAL CONGA 990 VITAL
Encaixe a mopa ao depósito misto e encha o depósito de água. Introduza o depósito misto no robot e selecione o modo. Pode selecionar o nível de lavagem mediante o comando a distância: alto, médio ou baixo. Fig. 29.Depois de ter selecionado o nível de lavagem desejado desde o comando a distância, o robot realizará a funcionalidade All in One para aspirar, esfregar e varrer de forma simultânea graças ao seu depósito misto.
Aviso: se quiser passar a mopa, salte este passo de encher o depósito de água. Para garantir um esfregado perfeito desde o início, é recomendável humedecer a mopa com água de forma homogénea antes de a usar.
Modo pontualFig. 30.Ao selecionar este modo, o robot limpará de forma intensiva num ponto específico. Começará a limpar num ponto específico, realizará movimentos em espiral para fora (1 metro) e depois retomará desde o ponto inicial realizando também movimentos em espiral. Para finalizar, ativará o modo automático e limpará até esgotar a bateria. Antes de pôr o robot a limpar no modo pontual, coloque no ponto que deseja limpar. Pressione o botão de limpeza pontual no comando a distância.
Modo BordasFig. 31.Ao selecionar este modo, o robot limpará ao longo da parede e ao redor dos móveis (pernas de mesas e cadeiras, etc.). Pressione o botão de limpeza em bordas no comando a distância.
Modo QuartoFig. 32.Ao selecionar este modo, o robot limpará durante 30 minutos. Pressione o botão de modo Quartos no comando a distância. Para garantir a limpeza do quarto, feche a porta.
Função de nível de potência de sucçãoFig. 33.Pressione o botão de níveis de potência no comando a distância para controlar a potência de sucção do robot durante os processos de limpeza. Existem três níveis de potência de sucção: Eco, Normal e Turbo.
Função de intensidade de lavagemPressione o botão no comando a distância para controlar o nível de água enquanto esfrega. Existem três níveis de água: Alto, Médio e Baixo .
Programar a limpeza O robot inclui ajustes de programação que permitem personalizar os ciclos de limpeza. A programação só pode ser feita através do comando a distância ou da App nos modelos compatíveis. Aviso: certifique-se de que o comando a distância está perto tanto ao configurar o relógio como ao programar os ciclos de limpeza.
Configuração da hora do comando a distância.Fig. 34.Pressione o botão do relógio no comando a distância. Os dígitos começarão a piscar. Fig. 35.Selecione o dia da semana com as flechas de cima e baixo.Utilize as flechas de esquerda e direita para selecionar entre minutos e horas. Quando o numero começar a piscar, utilize as flechas para cima e abaixo para trocar. Fig. 36.Finalmente, pressione o botão de ligar ou do relógio. O robot emitirá um sinal sonoro indicando que os ajustes do relógio foram confirmados.
Configuração da programação de limpezaPara facilitar a limpeza, o robot tem uma função que permite programar diariamente desde o comando a distância. De acordo com a configuração, o robot iniciará a limpeza de forma automática nos dias selecionados às horas indicadas. As opções de tempo do comando a distância são: 12:00 a. m. – 11:59 a.m. e 12:00 p.m. – 11:59 p.m. Antes de ajustar a hora e a configuração do robot, certifique-se de que o robot está com o interruptor ligado (ON) e de que o botão do robot também está aceso.
Configuração com o comando a distância.Fig. 37.Pressione o botão de programação do comando a distância. Os dígitos começarão a piscar. Fig. 38.Utilize as flechas de cima e baixo para selecionar o dia e uma vez selecionado o dia, utilize as flechas de esquerda e direita para selecionar minutos e horas. Para poder trocar os minutos ou horas, utilize botões de direção e quando os dígitos comecem a piscar. Pressione o botão de ligar para guardar os ajustes. Aceda aos dias desejados e siga os mesmos passos para programar.
Fig. 39.Finalmente, pressione o botão de ligar para sair do modo de programação. O robot emitirá um sinal sonoro indicando que os ajustes da limpeza foram confirmados.

8584
PORTUGUÊS PORTUGUÊS
CONGA 990 VITAL CONGA 990 VITAL
O usuário pode programar tantos dias da semana que desejar. O ecrã de inicio mostrara o ícone de programação quando o robot estiver programado.
Cancelação da programação de limpezaFig. 40.Pressione o botão de programação no comando a distancia, selecione o dia que deseje eliminar e mude a hora a 00:00 a.m., esta é a hora para cancelar o programa.
5. LIMPEZA E MANUTENÇÃO
Com o objetivo de aumentar a vida útil do robot de que funcione com um melhor rendimento, realize os seguintes passos de forma periódica:
Esvazie o deposito de sujidade do robot: Pressione o botão de desbloqueio do deposito de sujidade. Abra o deposito de sujidade e esvazie.Fig. 41.
Limpe o filtro de alta eficiência do robot: Extraia o filtro de alta eficiência. Sacuda o filtro cuidadosamente para tirar a sujidade. Fig. 42.
Limpe os sensores anti queda: Utilize um pano limpo, seco e suave para limpar o pó dos sensores anti queda situados na parte inferior direita do robot. Fig. 43.
Advertência: não aplique produtos de limpeza diretamente nos sensores.
Limpe a escova centralFig. 44.Pressione ligeiramente as abas da moldura da escova central para abrir o compartimento e tire-o. Retire os pelos, cabelos e outra sujidade presa na escova e ao redor das arestas.Fig. 45. Despeje e limpe o canal de sucção do robot.Fig. 46.Volte a instalar a escova central e a moldura. Fig. 47.
Filtro de alta eficiência O filtro de alta eficiência está desenhado com uma rede de fibras que ajudam a agarrar as partículas de pó, ácaros, pólen... Por isso haverá que limpar periodicamente para evitar que estas partículas se acumulem no filtro e este perca eficiência. O ideal é realizar esta manutenção uma vez por semana. Quando trocar por um novo, é recomendável que o faça com 160 horas antes de usar o robot. Recomendações: Pode retirar a sujidade com uma escova pequena ou batendo suavemente sobre uma superfície dura para que o pó caia. O filtro de alta eficiência não é lavável.
Filtro primário de malha e filtro esponja O sistema de filtragem se complementa com um filtro primário de malha e um filtro esponja. Quando os trocar, é recomendável fazer no máximo 160 horas antes ou quando observe que tenha algum tipo de desgaste por uso. Recomendações: Pode retirar a sujidade com uma escova ou batendo suavemente sobre uma superfície dura para que o pó caia. Também pode utilizar água morna sem detergentes para conseguir um melhor resultado, garantindo de que esteja totalmente seco antes de voltar a colocar.
Escovas laterais As escovas laterais estão desenhadas com cerdas e que se utilizam tanto para arrastar a sujidade para a boca de sucção como para limpar a fundo bordas e esquinas. Estas escovas podem ser desgastadas com o passar do tempo, o que terá como consequência negativa na eficiência da limpeza. Para isso, é recomendável trocar cada escova lateral a cada 220 horas ou menos. Recomendações: É recomendável limpar as escovas laterais uma vez por semana com a ajuda de uma escova de limpeza.
Escova central A escova central está desenhada com cerdas e silicone, gira a alta velocidade e ajuda a introduzir a sujidade na boca de sucção. Esta escova está em contacto com o chão e com a sujidade, pelo que se pode desgastar com o passar do tempo, o que terá uma consequência negativa na eficiência da limpeza. Para isso, é recomendável trocar cada escova central a cada 320 horas ou menos.
É recomendável limpar a escova central uma vez por semana com a ajuda de uma escova de limpeza.
Sensores Os robots de limpeza contam com diferentes tipos de sensores, por exemplo, os sensores de

8786
PORTUGUÊS PORTUGUÊS
CONGA 990 VITAL CONGA 990 VITAL
proximidade que ajudam ao robot a realizar uma navegação para detetar possíveis obstáculos, e os sensores anti queda que ajudam ao robot a detetar desníveis e possíveis vazios como podem ser umas escadas. Estes sensores estão em contínuo contacto com as partículas de pó, pelo que podem obstruir com o passar do tempo e causar possíveis falhas na navegação. É recomendável limpar todos os sensores do robot a cada 35 horas de uso ou menos, com a ajuda de uma escova de limpeza ou um pano sem humedecer.
6. CARGA E TROCA DA BATERIA
Fig. 48.Para aumentar a vida útil da bateria, deixe o robot a carregar na base de carga que sempre que não estiver em uso. Se o robot não for usado por um longo período de tempo, retire a bateria e guarde o produto e a bateria num lugar seco e seguro.
Para substituir a bateria siga as seguintes instruções.Fig. 48.Desaperte os 2 parafusos do compartimento da bateria, retire a tampa da bateria e a bateria. Fig. 49.Introduza a bateria nova com a etiqueta para cima. Fig. 50.Coloque a bateria e a tampa da bateria no seu lugar e aperte os parafusos outra vez.
7. RESOLUÇÃO DE PROBLEMAS
Sinal do robot Causa
Luz vermelha fixa
1 bip Erro da roda omnidirecional.
Limpe a roda omnidirecional e pressione o botão de ligar para reiniciar o robot.
2 bip Erro nas escovas laterais
Limpe as escovas laterais e pressione o botão de ligar para reiniciar o robot.
3 bip Erro da ventoinha do motor ou do filtro.
Retire e limpe o deposito de sujidade.Retire o filtro do robot e sacuda a sujidade.
4 bip Erro na escova central Retire e limpe a escova central do robot.
Luz vermelha a piscar
2 bip Erro no para choques. Verifique se o para-choques está bloqueado e pressione em ambos lados e ao centro para desbloquear.
3 bip Erro no sensor anti queda.
Verifique se o robot esta numa superfície irregular se as rodas não estão a tocar no chão ou se esta preso numa zona escura e leve a uma nova posição. Caso contrario, limpe o sensor anti queda.
4 bip O robot não pode voltar a base de carga ou a sua posição inicial.
Certifique-se de que não existem obstáculos na base de carga. Limpe os bornos de carga tanto do robot como da base de carga com um pano limpo, suave e seco.
8 ESPECIFICAÇÕES TÉCNICAS
Modelo: CONGA 990 Vital Referência: 05417 Potência: 100-240 V ~ 50/60 Hz Bateria: 14.4 V, 2600 mAh Made in China | Desenhado em Espanha
9. RECICLAGEM DE ELETRODOMÉSTICOS
A diretiva europeia 2012/19/UE sobre Resíduos de Aparelhos Elétricos e Eletrónicos (RAEE) especifica que os eletrodomésticos não devem ser reciclados com o resto dos resíduos municipais. Ditos eletrodomésticos terão de ser eliminados de forma separada, para otimizar a recuperação e reciclagem de materiais e, desta maneira, reduzir o impacto que possam ter na saúde humana e no meio ambiente.
O símbolo do contentor riscado recorda a sua obrigação de eliminar este produto de forma correta. Para obter informação detalhada acerca da forma mais adequada de eliminar os seus eletrodomésticos e/ou as correspondentes baterias, o consumidor deverá contactar com as autoridades locais.

89
NEDERLANDS
CONGA 990 VITAL 88
PORTUGUÊS
CONGA 990 VITAL
10. GARANTIA E SAT
Este produto tem uma garantia de 2 anos desde a data de compra, sempre e quando se conserve e envie a fatura de compra, o produto esteja em perfeito estado físico e se lhe dê um uso adequado tal e como se indica neste Manual de Instruções. A garantia não cobrirá:• Se o produto tiver sido usado fora da sua capacidade ou utilidade, maltratado, batido, exposto à humidade, submergido em algum líquido ou substância corrosiva, assim como qualquer outra falta atribuível ao consumidor. • Se o produto foi desmontado, modificado ou reparado por pessoas não autorizadas pelo SAT oficial de Cecotec. • Se a ocorrência foi originada pelo desgaste normal das peças devido ao uso. O serviço de garantia cobre todos os defeitos de fabricação durante 2 anos com base à legislação vigente, exceto peças consumíveis. Em caso de mal uso por parte do usuário, o serviço de garantia não se fará responsável pela reparação. Se em alguma ocasião deteta uma ocorrência com o produto ou tem alguma consulta, entre em contacto com o Serviço de Assistência Técnica oficial de Cecotec através do número de telefone +34 96 321 07 28.
1. VEILIGHEIDSVOORSCHRIFTEN
Lees de volgende voorschriften aandachtig voordat u het toestel gebruikt. Bewaar deze handleiding voor toekomstig(e) gebruik of gebruikers. Gebruik het toestel volgens de instructies in deze handleiding. Cecotec is niet aansprakelijk voor schade of ongevallen te wijten aan een foutief gebruik van het toestel. Zorg ervoor dat de netspanning overeenkomt met de spanning vermeld op het classificatielabel van het toestel en dat het stopcontact geaard is. Het toestel mag alleen gemonteerd en gedemonteerd worden door gekwalificeerd personeel. Raak de kabel, het stopcontact en de oplader niet aan met natte handen. Houd de robot buiten het bereik van kleding, gordijnen en gelijksoortige materialen. Ga niet op de robot zitten en plaats er geen scherpe of zware voorwerpen op.Gebruik de robot niet in de buurt van warmtebronnen, ontvlambare stoffen en natte oppervlakken waar hij kan vallen of in het water terecht kan komen. Laat de robot niet in contact komen met water of andere vloeistoffen. Gebruik de robot niet buiten.Gebruik het oplaadstation niet als de kabel of de stekker beschadigd zijn of niet correct werken. Neem in dit geval contact op met de technische dienst van Cecotec.Gebruik de robot niet op tafels, stoelen of hoge oppervlakken waar hij vanaf zou kunnen vallen.Gebruik de bescherming van de laser niet als handvat om de robot te verplaatsen.

9190
NEDERLANDS NEDERLANDS
CONGA 990 VITAL CONGA 990 VITAL
Schakel de robot niet in op plaatsen met een temperatuur onder 0 ºC of boven 50 ºC.De robot werkt alleen met de meegeleverde batterij en oplader. Andere onderdelen of accessoires gebruiken kan een risico op brand, elektrocutie of schade aan het product met zich mee brengen.Gebruik de robot niet om brandbare objecten of smeulende sigaretten, lucifers of as op te zuigen.Zorg ervoor dat de vloer vrij is van kleding, papier, kabels en andere objecten die de robot kunnen hinderen voordat u hem inschakelt.Het toestel mag niet gebruikt worden door kinderen van 0 tot 8 jaar.Het toestel kan gebruikt worden door kinderen vanaf 8 jaar indien ze onder voortdurend toezicht staan.Dit toestel kan gebruikt worden door kinderen vanaf 8 jaar en personen met een verminderd fysiek, zintuiglijk of mentaal vermogen of met een gebrek aan ervaring en kennis, indien ze onder toezicht staan of als ze instructies hebben gekregen betreffende het veilige gebruik van het toestel en ze de risico’s begrijpen die ermee verbonden zijn. Zorg ervoor dat kinderen niet spelen met het apparaat.Strikt toezicht is noodzakelijk als het toestel gebruikt wordt door of in de buurt van kinderen.
2. ONDERDELEN EN COMPONENTEN
Fig. 1.1. Indicatielampje2. Aan/uit-knop / Werkingsknop
Indicatielampje
Oranje licht: lege batterij. Oscillerend oranje licht: aan het opladen Blauw licht: opgeladen / stand-by / aan het schoonmaken. Rood knipperlicht: foutmelding.
Aan/uit-knop / WerkingsknopHoud deze knop ingedrukt gedurende enkele seconden om de robot in of uit te schakelen. Druk ook op deze knop om te beginnen met schoonmaken.
Behuizing en sensoren Fig. 2.Fig. 3. 1. Anti-aanvaringsensoren2. Anti-valsensor3. Oplaadpoorten4. Omnidirectioneel wieltje5. Zijdelingse borstels6. Batterij7. Aandrijfwieltjes8. Aan/uit-schakelaar9. Vuilreservoir 10. Centrale borstel
OnderdelenFig. 4. OplaadstationFig. 5.Netwerkadapter Fig. 6. AfstandsbedieningFig. 7. SchoonmaakborstelFig. 8.

9392
NEDERLANDS NEDERLANDS
CONGA 990 VITAL CONGA 990 VITAL
Gemengd reservoirFig. 9. Hoofdfilter en hoogrendementsfilterFig. 10. Zijdelingse borstelsFig. 11.2 dweilenFig. 12.Centrale borstelFig. 13. Optioneel: vuilreservoir, rubberen BestFriendCare borstel
OplaadstationFig. 14.1. Houder voor de afstandsbediening2. Oplaadindicator3. Signaalzender 4. Oplaadpoorten
AfstandsbedieningFig. 15.1. Instellingen voor de klok2. Richtingsknoppen3. Specifiek punt4. Kamermenu5. Standen voor de schrobsterkte6. Scherm met weergave met tijd en menu7. Automatisch opladen / Back home8. Automatische schoonmaak/pauze9. Programmering10. Menu voor Randen 11. Standen voor de zuigkracht
3. VOOR U HET TOESTEL GEBRUIKT
Haal het toestel uit de doos en verwijder al het verpakkingsmateriaal.Controleer of alle onderdelen en componenten in de verpakking zitten en in een goede staat zijn. Als u schade vaststelt, contacteer de technische dienst van Cecotec.Fig. 16.Verwijder alle objecten rond de robot, zoals kleding, papier, kabels, gordijnen of andere
breekbare objecten. Fig. 17.Als het gebied dat u wilt schoonmaken in de buurt is van een balkon of trappen, plaats dan een fysieke barrière om te vermijden dat het toestel beschadigd raakt en om een veilige schoonmaak te verzekeren.Fig. 18.Fig. 19.De robot blootstellen aan direct zonlicht of aan grote lichtcontrasten kan de goede werking van de sensoren beïnvloeden. In dit geval zal de robot stoppen met schoonmaken. Verplaats de robot om ervoor te zorgen dat hij opnieuw begint met schoonmaken.
Fig. 20.Sluit het oplaadstation aan op een stopcontact. Rol de resterende kabel op en berg hem op in de onderkant van het oplaadstation om ongelukken te vermijden.
Fig. 21.Plaats het oplaadstation tegen de muur aan en zorg voor een minimale ruimte van: 2 meter aan de voorkant. 1 meter aan elke zijde
Fig. 22.Plaats de twee zijdelingse borstels in de openingen die zich aan de onderkant van de robot bevinden. Druk de borstels in de openingen totdat u een klik hoort. Dit betekent dat de borstels goed bevestigd zijn.
Fig. 23.Druk op de aan/uit-schakelaar die zich aan de onderkant van de robot bevindt. Zorg ervoor dat de schakelaar in de ON-positie staat.
Fig. 24.Plaats de robot op het oplaadstation en zorg ervoor dat de oplaadpoorten van de robot en het oplaadstation verbonden zijn. De robot piept en de knop licht op als hij goed geplaatst is. Als u een oranje knipperlicht ziet betekent dit dat de batterij niet volledig is opgeladen. Laad de robot verder op tot het licht blauw wordt. Dan is de robot volledig opgeladen en zal u hem langer kunnen gebruiken.

9594
NEDERLANDS NEDERLANDS
CONGA 990 VITAL CONGA 990 VITAL
4. WERKING
Fig. 25 Beginnen met schoonmaken Houd de aan/uit-knop op de robot ingedrukt om hem in te schakelen. Druk op de aan/uit-knop op de robot of op de afstandsbediening om te beginnen met schoonmaken.
Opmerking: als de batterij van de robot leeg raakt tijdens het schoonmaken keert hij automatisch terug naar het oplaadstation. Zodra de batterij volledig opgeladen is zal de robot een nieuwe schoonmaakcyclus beginnen.
Waarschuwing: de robot kan niet terugkeren naar het oplaadstation als hij geen goede toegang heeft. Plaats de robot in dit geval zelf op het oplaadstation.
PauzeDruk op de aan/uit-knop op de robot of op de afstandsbediening om de schoonmaak te pauzeren. Druk op de aan/uit-knop op de robot of op de afstandsbediening om het schoonmaakproces te hervatten.
Terugkeren naar het oplaadstationFig. 26.Druk op de Back home-knop op de afstandsbediening om de robot naar het oplaadstation te sturen.
UitschakelenHoud de aan/uit-knop op de robot ingedrukt om hem uit te schakelen.
Waarschuwing: de robot beschikt over een hoofdschakelaar die zich aan de onderkant van de robot zelf bevindt. Schakel de hoofdschakelaar uit als u de robot gedurende langere tijd niet zal gebruiken. Als de hoofdschakelaar uit staat keert de robot terug naar de fabrieksinstellingen als veiligheidsmaatregel. Als u de robot op geprogrammeerde tijdstippen wil laten werken moet de hoofdschakelaar altijd aan staan. Zo niet zal u de robot opnieuw moeten programmeren met behulp van de afstandsbediening.
Schoonmaakmenu’sDeze robot beschikt over verschillende menu’s en functies die geactiveerd kunnen worden via de afstandsbediening of de applicatie.
Automatische schoonmaak
Fig. 27.Als u de knop aan/uit-knop duwt start de de robot de automatische schoonmaak. De robot zal het hele oppervlak, alle randen en rondom objecten zoals tafels, stoelen, etc. schoonmaken totdat het batterijniveau te laag is en hij moet terugkeren naar het oplaadstation.
SchrobmenuFig. 28.Bevestig de dweil aan het waterreservoir en vul het met water. Plaats het waterreservoir in de robot en kies het schrobmenu. U kan de schrobsterkte kiezen via de afstandsbediening: hoog, medium of laag. Fig. 29.Zodra de schrobsterkte ingesteld is (via de afstandsbediening of de applicatie) zal de robot tegelijk stofzuigen, vegen, dweilen en schrobben dankzij het gemengd reservoir en de All in One-functie.
Opmerking: als u droog wil schoonmaken sla dan het vullen van het waterreservoir over. Als u nat wil schoonmaken maak de dweil vooraf nat om een perfecte schoonmaak te verzekeren vanaf de start.
Specifiek puntFig. 30.In dit menu gaat de robot een specifiek punt intensief schoonmaken. De robot begint de schoonmaak vanaf het gekozen punt en werkt dan verder in spiraalbewegingen naar binnen en naar buiten toe (1 meter). Daarna maakt de robot verder schoon in de automatische stand tot de batterij leeg is. Plaats de robot op het punt dat u wilt schoonmaken voor u hem inschakelt in deze stand. Druk op de knop voor de schoonmaak van een specifiek punt op de afstandsbediening.
Menu voor Randen Fig. 31.Als u dit menu kiest gaat de robot langs de muren en rondom meubelen (tafelpoten, stoelpoten, etc.) schoonmaken. Druk op de knop voor de schoonmaak van randen op de afstandsbediening of in de applicatie.
Kamermenu Fig. 32.In dit menu gaat de robot 30 minuten schoonmaken. Druk op de knop voor de schoonmaak van kamers op de afstandsbediening of in de applicatie. Sluit de deur van de kamer om zeker te zijn dat de robot enkel daar schoonmaakt.
De vermogenssterkte regelen

9796
NEDERLANDS NEDERLANDS
CONGA 990 VITAL CONGA 990 VITAL
Fig. 33.Druk op de knop voor vermogenssterkte op de afstandsbediening om de zuigkracht te regelen tijdens het schoonmaken. De robot beschikt over drie standen voor de zuigkracht: Turbo, Normaal en Eco .
De schrobsterkte regelenDruk op de knop om de schrobsterkte te regelen op de afstandsbediening om de sterkte van de waterstroom te regelen tijdens het schoonmaken. De robot beschikt over drie standen voor de sterkte van de waterstroom: Hoog, Gemiddeld en Laag.
De schoonmaak programmerenDe robot beschikt over programma’s waarmee u de schoonmaak kan personaliseren. De programmering kan enkel geprogrammeerd worden via de afstandsbediening of via de applicatie bij de compatibele modellen. Opmerking: zorg dat de afstandsbediening zich voldoende dicht bij de robot bevindt tijdens het instellen van de klok en het programmeren van de schoonmaak.
De tijd instellen via de afstandsbedieningFig. 34.Druk op het klokje op de afstandsbediening. De cijfers zullen gaan knipperen. Fig. 35.Kies de dag van de week met de pijlen naar boven en naar beneden.Gebruik de pijlen naar links en naar rechts om de uren en minuten in te stellen. Zodra de cijfers knipperen kan u ze veranderen met de pijlen naar boven en beneden. Fig. 36.Om te eindigen drukt u op de aan/uit-knop of terug op het klokje. De robot piept om de instellingen van de klok te bevestigen.
Instellen van de schoonmaakprogramma’s Om het schoonmaken makkelijker te maken kan u de robot dagelijks programmeren vanaf de afstandsbediening. Naargelang de instellingen zal de robot automatisch beginnen met schoonmaken op de gekozen dagen en op de ingestelde tijdstippen. De opties op de afstandsbediening zijn: 12:00 a.m. - 11:59 a.m. en 12:00 p.m. - 11:59 p.m. Zorg dat zowel de hoofdschakelaar als de aan/uit-knop aan staan voordat u begint met programmeren.
Programmeren met de afstandsbedieningFig. 37.Druk op de programmeerknop op de afstandsbediening. De cijfers zullen gaan knipperen. Fig. 38.Gebruik de pijlen naar boven en beneden om de dagen te kiezen en de pijlen naar links en rechts
om de uren en minuten te kiezen. Gebruik de pijlen om de minuten en uren te wijzigen als ze beginnen te knipperen. Druk op de aan/uit-knop om de instellingen op te slaan. Programmeer de andere dagen op dezelfde manier.
Fig. 39.Tot slot, druk op de aan/uit-knop om uit de instellingen te gaan. De robot bevestigt de geprogrammeerde schoonmaak met een pieptoon.
U kan zoveel dagen per week programmeren als u wil. Het beginscherm zal weergeven wanneer de robot geprogrammeerd is.
De programmering van de schoonmaak annuleren Fig. 40.Druk op de programmeerknop op de afstandsbediening en selecteer de dag die u wil verwijderen. En verander de tijd naar 00:00 a.m. om de geplande schoonmaak te annuleren.
5. SCHOONMAAK EN ONDERHOUD
Voer de onderstaande handelingen regelmatig uit om de levensduur van de robot te verlengen en om een optimaal rendement te behouden.
Maak het vuilreservoir van de robot leeg: Druk op de openingsknop van het vuilreservoir. Open het vuilreservoir en maak het leeg.Fig. 41.
Maak de hoogrendementsfilter schoon: Verwijder de hoogrendementsfilter. Schud de filter voorzichtig uit om het vuil te verwijderen. Fig. 42.
Maak de anti-valsensoren schoon: Gebruik een schone, droge en zachte doek om het stof te verwijderen van de anti-valsensoren die zich aan de rechteronderkant van de robot bevinden. Fig. 43.
WAARSCHUWING: breng geen schoonmaakmiddelen aan op de sensoren.
Maak de centrale borstel schoonFig. 44.

9998
NEDERLANDS NEDERLANDS
CONGA 990 VITAL CONGA 990 VITAL
Druk lichtjes op de lipjes van de behuizing van de centrale borstel om het compartiment te openen en hem te verwijderen. Verwijder de haren, pluizen en andere vuil dat zich heeft verzameld in de borstel en rond de assen.Fig. 45. Maak het zuigkanaal van de robot schoon en vrij.Fig. 46.Plaats de centrale borstel terug in de behuizing. Fig. 47.
Hoogrendementsfilter De hoogrendementsfilter is gemaakt van een netwerk van vezels die stof, mijten, pollen, … opvangen. Deze filter moet regelmatig schoon gemaakt worden om te vermijden dat er zich vuil verzamelt in de filter en hij zijn efficiëntie verliest. Ideaal is een wekelijks onderhoud van deze filter. Het wordt aanbevolen om het filter te vervangen na maximaal 160 gebruiksuren.Aanbevelingen: U kan vuil verwijderen met een kleine borstel of door zachtjes te kloppen met de filter op een hard oppervlak zodat het stof eruit valt. De hoogrendementsfilter kan niet gewassen worden.
Hoofdfilter van gaas en sponsfilter Het filtersysteem wordt aangevuld met een gaasfilter en een sponsfilter. Het wordt aanbevolen om deze filters te vervangen na maximaal 160 gebruiksuren of als u slijtage opmerkt.Aanbevelingen: U kan vuil verwijderen met een kleine borstel of door zachtjes te kloppen met het filter op een hard oppervlak, zodat het stof eruit valt. U kan de filters ook wassen met lauw water zonder zeep om betere resultaten te verkrijgen. Zorg ervoor dat de filters volledig droog zijn voordat u ze terugplaatst.
Zijdelingse borstels De zijdelingse borstels zijn ontworpen met een groot aantal haren die zowel gebruikt kunnen worden om vuil richting de zuigmond te bewegen als om randen en hoeken grondig schoon te maken. Deze borstels kunnen slijten na verloop van tijd, wat een negatief effect kan hebben op de efficiëntie van de schoonmaak. Om deze reden wordt het aanbevolen om de zijdelingse borstels te vervangen als na maximaal 220 gebruiksuren. Aanbevelingen: Het wordt aangeraden om de zijdelingse borstels één keer per week schoon te maken met behulp van de schoonmaakborstel.
Centrale borstel De centrale borstel is gemaakt van haren en rubber. Deze borstel draait met een hoge snelheid
en zorgt ervoor dat alle vuil in de zuigmond terecht komt. De centrale borstel maakt contact met de vloer en dus ook met het vuil. Bijgevolg kan de borstel verslijten na verloop van tijd, wat een negatief effect kan hebben op de efficiëntie van de schoonmaak. Om deze reden wordt het aanbevolen om de zijdelingse borstels te vervangen na maximaal 320 gebruiksuren.
Het wordt aanbevolen om de centrale borstel één keer per week schoon te maken met behulp van de schoonmaakborstel.
Sensoren De robotstofzuiger beschikt over verschillende soorten sensoren. Bijvoorbeeld, de nabijheidssensoren helpen de robot met navigeren door mogelijke obstakels te detecteren en de anti-valsensoren helpen de robot met het detecteren van hoogteverschillen en mogelijke openingen, zoals trappen. Deze sensoren komen voortdurend in contact met stofdeeltjes. Bijgevolg kunnen de sensoren bedekt raken met stof en mogelijk zorgen voor navigatiefouten na verloop van tijd. Het wordt aangeraden om de sensoren van de robot schoon te maken na maximaal 35 gebruiksuren. Maak de sensoren schoon met behulp van de schoonmaakborstel of met een droog doekje.
6. OPLADEN EN VERVANGEN VAN DE BATTERIJ
Fig. 48. Laat altijd de robot opladen in het oplaadstation als hij niet gebruikt wordt om de levensduur van de batterij te verlengen. Als de robot niet gebruikt zal worden gedurende een langere tijd, haal dan de batterij uit het product en bewaar het product en de batterij op een droge en veilige plaats.
Volg de onderstaande instructies om de batterij te vervangen:Fig. 48. Draai de 2 schroeven van het batterijcompartiment los. Verwijder het deksel van de batterij en haal de batterij uit de robot. Fig. 49.Plaats de nieuwe batterij met het etiket naar boven. Fig. 50.Zet het deksel terug en schroef het opnieuw vast.

101100
NEDERLANDS NEDERLANDS
CONGA 990 VITAL CONGA 990 VITAL
7. PROBLEEMOPLOSSING
Signaal van de robot Oorzaak
Rood licht 1 pieptoon Fout in het wendbaar wieltje
Maak het wendbaar wieltje schoon en druk op de aan/uit-knop om de robot opnieuw op te starten.
2 pieptonen
Foutmelding in de zijdelingse borstels.
Maak de zijdelingse borstels schoon en druk op de aan/uit-knop om de robot opnieuw op te starten.
3 pieptonen
Foutmelding in de ventilator van de motor of het filter.
Verwijder het vuilreservoir en maak het schoon.Verwijder de filter van de robot en schud het vuil eruit.
4 pieptonen
Foutmelding in de centrale borstel.
Verwijder de centrale borstel en maak hem schoon.
Rood knipperlicht
2 pieptonen
Foutmelding in de bumper.
Controleer of de bumper vast zit en druk op beide zijden en op het midden om hem te deblokkeren.
3 pieptonen
Foutmelding in de anti-val sensor.
Plaats de robot op een andere plek als hij zich op een onregelmatig oppervlak bevindt, als de wieltjes de vloer niet raken of als de robot vast zit in een donkere ruimte. Indien dit niet werkt, maak dan de anti-valsensor schoon.
4 pieptonen
De robot keert niet terug naar het oplaadstation of zijn beginpositie.
Zorg ervoor dat er zich geen obstakels bevinden voor het oplaadstation. Maak de oplaadpoorten van zowel de robot als het oplaadstation schoon met een schone, zachte en droge doek.
8. TECHNISCHE SPECIFICATIES
Model: Conga 990 Vital Productreferentie: 05417 Vermogen: 100-240 V ~, 50/60 Hz Batterij: 14.4 V, 2600 mAh Made in China | Ontworpen in Spanje
9. RECYCLAGE VAN ELEKTRISCHE APPARATEN
De Europese richtlijn 2012/19 betreffende Afgedankte Elektrische en Elektronische Apparatuur (AEEA) bepaalt dat kleine huishoudelijke elektrische apparaten niet gerecycleerd mogen worden met het restafval. Deze elektrische apparaten moeten apart gesorteerd worden om het hergebruik en de recyclage van materialen te optimaliseren en om hun impact op mens en milieu te beperken.
Het symbool van de doorstreepte afvalbak herinnert u aan uw verplichting om dit product correct te sorteren. Voor gedetailleerde informatie over de aangewezen manier om kleine huishoudelijke elektrische apparaten en/of hun batterijen moet de consument de plaatselijke overheid contacteren.
10. GARANTIE EN TECHNISCHE ONDERSTEUNING
Dit product heeft een garantieperiode van 2 jaar vanaf de aankoopdatum op voorwaarde dat de aankoopfactuur bewaard is gebleven en voorgelegd kan worden, het product zich in een goede fysieke staat bevindt en het gebruikt is op een correcte manier en zoals aangegeven in deze handleiding. De garantie vervalt:Als het product gebruikt is buiten zijn capaciteit of bruikbaarheid, misbruikt of erop geslagen is, blootgesteld is aan vochtigheid, ondergedompeld is in een vloeistof of corrosieve substantie, evenals elk ander defect dat te wijten valt aan de consument. Als het product uit elkaar gehaald, gemodificeerd of gerepareerd is geweest door personen die niet geautoriseerd zijn door de technische dienst van Cecotec. Als het incident veroorzaakt is door de normale slijtage van de onderdelen als gevolg van gebruik. De garantie dekt alle fabricagefouten gedurende 2 jaar op basis van de huidige wetgeving, met uitzondering op verbruiksartikelen. In het geval van verkeerd gebruik door de gebruiker wordt de reparatie niet gedekt door de garantie. Als u in elk geval een incident met het product detecteert of als u een vraag heeft, neem dan contact op met de technische dienst van Cecotec via het telefoonnummer +34 96 321 07 28.

103102
POLSKI POLSKI
CONGA 990 VITAL CONGA 990 VITAL
1. INSTRUKCJE BEZPIECZŃSTWA
Przed uruchomieniem urządzenia przeczytaj uważnie poniższą instrukcję. Zachowaj tę instrukcję na potrzeby późniejszych konsultacji i dla nowych użytkowników. Urządzenie powinno być używane wyłącznie zgodnie z instrukcją. Cecotec nie bierze odpowiedzialności za szkody spowodowane niewłaściwym użytkowaniem produktu. Przed podłączeniem urządzenia do gniazdka upewnij się, czy napięcie w gniazdku odpowiada napięciu na tabliczce znamionowej urządzenia oraz czy gniazdko posiada uziemienie. Urządzenie może być zmontowane i rozmontowane tylko przez autoryzowany personel. Nie dotykaj kabla, uziemienia ani ładowarki mokrymi rękami. Przed użyciem robota, usuń z podłogi ubrania, zasłony, papiery i inne przedmioty, które mogłyby zostać zassane. Nie siadaj ani nie kładź ciężkich lub ostrych przedmiotów na urządzeniu.Nie używaj urządzenia w pobliżu źródeł ciepła, substancji łatwopalnych ani mokrych powierzchni, gdzie mogłoby wpaść lub zostać wrzucone do wody. Nie pozwól, aby urządzenie weszło w kontakt z wodą. Nie używaj produktu na zewnątrz.Nie używaj stacji ładowania, jeśli zauważysz, że nie działa poprawnie oraz gdy kabel lub wtyczka są uszkodzone. W przypadku awarii skontaktuj się z Serwisem Pomocy Technicznej Cecotec.Nie używaj urządzenia do czyszczenia stołów, krzeseł ani innych powierzchni, z których mogłoby upaść.Nie używaj osłonki czujnika laserowego jako uchwytu do przenoszenia urządzenia.Nie używaj urządzenia w temperaturach poniżej 0 ºC lub
powyżej 50 ºCUrządzenie może być zasilanie jedynie oryginalną baterią lub ładowarką. Użycie innych sprzętów do zasilania urządzenia grozi pożarem, porażeniem prądem lub uszkodzeniem urządzenia. Nie używaj urządzenia do odkurzania łatwopalnych przedmiotów, jak np. niedopałki papierosów, żar czy zapałki.Usuń z podłogi wszystkie przedmioty, które mogą blokować ruch urządzenia lub zakłócić jego funkcjonowanie, np. kable, ubrania, papiery itd.Z urządzenia nie mogą korzystać dzieci w wieku od 0 do 8 lat.Urządzenie może być używane przez dzieci w wieku powyżej 8 lat, jeśli znajdują się pod stałą opieką.Z urządzenia mogą korzystać dzieci powyżej 8 roku życia, osoby z niepełnosprawnością ruchową lub umysłową oraz osoby bez doświadczenia z podobnym sprzętem w obecności osoby odpowiedzialnej i świadomej zagrożeń wynikających z nieprawidłowego użycia urządzenia, lub jeśli uprzednio zostały dokładnie poinstruowane w zakresie jego obsługi. Nie można pozwolić dzieciom na zabawę urządzeniem.Zwróć uwagę, czy dzieci nie używają urządzenia do zabawy. Konieczny jest ścisły nadzór, jeśli produkt jest używany przez dzieci lub w ich pobliżu.

105104
POLSKI POLSKI
CONGA 990 VITAL CONGA 990 VITAL
2. CZĘŚCI I KOMPONENTY
Rys. 1.1. Kontrolka2. Przycisk zasilania / operacji
Kontrolka
Stałe pomarańczowe światło: słaba bateria. Pomarańczowe mrugające światło: ładuje Niebieskie światło ciągłe: tryb ładowania / czuwania / czyszczenia. Migające czerwone światło: błąd.
Przycisk zasilania / operacjiNaciśnij i przytrzymaj ten przycisk przez kilka sekund, aby włączyć lub wyłączyć robota. Naciśnij go również, aby rozpocząć czyszczenie.
Korpus urządzenia i czujniki Rys. 2.Rys. 3.1. Czujnik antykolizyjny 2. Czujniki uskoku podłoża3. Złącza ładowania4. Kółko wielokierunkowe5. Szczotki boczne6. Bateria7. Koła napędowe8. Włącznik9. Zbiornik na brud10. Środkowa szczotka
CzęściRys. 4.Stacja ładowania Rys. 5.Adapter Rys. 6.Pilot zdalnego sterowaniaRys. 7.Pędzelek do czyszczeniaRys. 8.
Zbiornik mieszanyRys. 9.Filtr główny i filtr o wysokiej wydajnościRys. 10.Szczotki boczneRys. 11.2 mopyRys. 12.Środkowa szczotkaRys. 13.Opcjonalnie: pojemnik na zanieczyszczenia, silikonowa szczotka pielęgnacyjna BestFriend.
Stacja ładowania Rys. 14.1. Obsługa zdalnego sterowania 2. Kontrolka ładowania3. Nadajnik sygnału 4. Złącza ładowania
Pilot zdalnego sterowaniaRys. 15.1. Ustawienia zegara2. Przyciski kierunkowe 3. Tryb punktowy:4. Program pokój5. Funkcja intensywności zmywania podłogi 6. Ekran wyświetlania trybu i godziny7. Automatyczne ładowanie / powrót do bazy 8. Tryb automatyczny / pauza9. Programacja10. Program Krawędzie 11. Poziom mocy ssania
3. PRZED URUCHOMIENIEM
Wyjmij produkt z opakowania i rozpakuj.Upewnij się, czy urządzenie jest kompletne (czy dołączone są wszytskie części). Jeśli zauważysz jakąś nieprawidłowość, natychmiast skontaktuj się z oficjalnym Serwisem Pomocy Technicznej firmy Cecotec.Rys. 16.

107106
POLSKI POLSKI
CONGA 990 VITAL CONGA 990 VITAL
Usuń wszystkie przedmioty wokół robota, takie jak odzież, papiery, kable, zasłony lub inne delikatne przedmioty. Rys. 17.Jeśli czyszczony obszar znajduje się w pobliżu balkonu lub schodów, umieść barierę, aby zapobiec uszkodzeniu produktu i zapewnić bezpieczne sprzątanie.Rys. 18.Rys. 19.Bezpośrednia ekspozycja na światło słoneczne lub duże kontrasty świetlne mogą wpływać na idealne działanie czujników. Jeśli tak się stanie, odkurzacz robota zatrzyma się, zmień go, aby ponownie zacząć działać.
Rys. 20.Podłącz stację ładującą do gniazdka elektrycznego. Zwiń i przechowuj pozostały kabel na spodzie podstawy ładującej, aby uniknąć wypadków.
Rys. 21.Umieść stację ładującą przy ścianie i pozostaw minimalny odstęp: 2 metry do przodu. 1 metr z każdej strony
Rys. 22.Włóż dwie boczne szczotki do otworów znajdujących się na spodzie robota. Naciskaj, aż usłyszysz „kliknięcie” potwierdzające, że jesteś dobrze przywiązany.
Rys. 23.Naciśnij włącznik zasilania na spodzie robota. Upewnij się, że przełącznik jest w pozycji ON.
Rys. 24.Umieść robota w podstawie ładującej i upewnij się, że styki ładowania obu pokrywają się. Po ustawieniu robota rozlegnie się sygnał dźwiękowy i przycisk zaświeci się. Jeśli lampka miga na pomarańczowo, oznacza to, że akumulator nie jest w pełni naładowany. Aby zapewnić najdłuższy czas czyszczenia, poczekaj, aż lampka zmieni kolor na stały niebieski, co oznacza, że akumulator jest w pełni naładowany, a robot jest gotowy do użycia.
4. OBSŁUGA URZĄDZENIA
Rys. 25.Rozpoczęcie sprzątania Naciśnij i przytrzymaj przycisk zasilania na robocie, aby go włączyć. Naciśnij przycisk zasilania na robocie lub pilocie, aby rozpocząć czyszczenie.
Ostrzeżenie: jeśli robotowi wyczerpie się akumulator podczas czyszczenia, automatycznie wróci do stacji ładującej. Po całkowitym naładowaniu akumulatora można rozpocząć nowy cykl czyszczenia.
Ostrzeżenie: robot nie będzie mógł wrócić do bazy ładującej, jeśli nie będzie miał do niej dobrego dostępu. Jeśli robot nie był w stanie uzyskać dostępu i zatrzymał się, umieść go ręcznie na stacji ładującej.
PauzaNaciśnij przycisk zasilania na robocie lub pilocie, aby wstrzymać proces czyszczenia. Naciśnij przycisk zasilania na robocie lub pilocie, aby wznowić proces czyszczenia.
Powrót do bazy ładującejRys. 26.Naciśnij przycisk na pilocie zdalnego sterowania, aby odesłać robota do stacji ładowania.
WyłączNaciśnij i przytrzymaj przycisk zasilania, aby wyłączyć robota.
Ostrzeżenie: odkurzacz robota ma przełącznik zasilania znajdujący się na korpusie głównym. Jeśli nie będzie używany przez długi czas, zaleca się wyłączenie go za pomocą tego przełącznika. Ze względów bezpieczeństwa, jeśli przycisk jest wyłączony, konfigurują się początkowe ustawiena fabryczne. Jeśli chcemy, aby robot pracował w trybie programowania czasowego, przełącznik musi zawsze znajdować się w pozycji włączonej, w przeciwnym razie będziemy musieli wykonać nowe programowanie z pilota lub aplikacji.
Tryby sprzątaniaTen robot zawiera różne tryby i funkcje, które można aktywować za pomocą pilota lub aplikacji.
Program AutoRys. 27.Po naciśnięciu przycisku zasilania robot rozpocznie automatyczne czyszczenie. Robot będzie czyścił całą powierzchnię, krawędzie, przedmioty takie jak stoły, krzesła itp., Aż procent naładowania baterii będzie niski i powróci do bazy ładowania.
Tryb ScrubbingRys. 28.Przypnij mop do zbiornika na wodę i napełnij zbiornik na wodę. Włóż zbiornik wody do robota i wybierz tryb. Możesz wybrać poziom szorowania za pomocą pilota: wysoki, średni lub niski. Rys. 29.

109108
POLSKI POLSKI
CONGA 990 VITAL CONGA 990 VITAL
Po wybraniu żądanego poziomu szorowania za pomocą pilota lub aplikacji, robot wykona funkcję All in One, aby jednocześnie odkurzać, szorować i zamiatać dzięki zbiornikowi mieszanemu.
Uwaga: jeśli chcesz przejść obok mopa, pomiń etap napełniania zbiornika wody. Aby zapewnić doskonały peeling od samego początku, zaleca się równomierne zwilżenie mopa przed użyciem.
Tryb punktowy:Rys. 30.Wybierając ten tryb, robot intensywnie wyczyści określony punkt. Rozpocznie czyszczenie w określonym punkcie, wykona ruchy spiralne na zewnątrz (1 metr), a następnie powróci do punktu początkowego, wykonując również ruchy spiralne. Wreszcie, aktywuje tryb automatyczny i czyści, aż do wyczerpania się baterii. Przed przełączeniem robota w tryb punktowy umieść go w miejscu, w którym chcesz wyczyścić. Naciśnij przycisk czyszczenia punktowego na pilocie lub aplikacji.
Program Krawędzie Rys. 31.Wybierając ten tryb, robot będzie czyścić wzdłuż ściany i wokół mebli (nogi stołów, krzeseł itp.). Naciśnij przycisk sprzątania krawędzi na pilocie lub aplikacji.
Program pokój Rys. 32.Po wybraniu tego trybu robot będzie czyścić przez 30 minut. Naciśnij przycisk mode pokoju na pilocie lub w aplikacji. Aby zapewnić czystość w pomieszczeniu, zamknij drzwi.
Funkcja poziomu mocy Rys. 33.Naciśnij przycisk poziomu mocy na pilocie lub wybierz moc w aplikacji, aby kontrolować moc ssania robota podczas procesów czyszczenia. Istnieją trzy poziomy mocy ssącej: turbo, normalna i eco. Turbo/Normal/Eco.
Funkcja intensywności zmywania podłogiNaciśnij przycisk poziomu szorowania na pilocie lub wybierz moc w aplikacji, aby kontrolować poziom wody podczas szorowania. Istnieją trzy poziomy wody: Wysoka, średnia i niska.
Programowanie sprzątaniaRobot zawiera ustawienia programowania, które pozwalają dostosować cykle sprzątania. Programowanie można przeprowadzić tylko za pomocą pilota lub aplikacji na kompatybilnych
modelach. Ostrzeżenie: upewnij się, że pilot znajduje się odpowiednio blisko robota zarówno podczas ustawiania zegara, jak i programowania cykli czyszczenia.
Urządzeniem można sterować za pomocą pilota. Rys. 34.Naciśnij przycisk zegara na pilocie. Cyfry zaczną migać Rys. 35.Wybierz dzień tygodnia za pomocą strzałek w górę i w dół.Użyj lewej i prawej strzałki, aby wybrać minuty i godziny. Gdy liczba miga, użyj strzałek w górę i w dół, aby ją zmienić. Rys. 36.Na końcu, naciśnij przycisk zasilania lub zegara. Robot wyemituje sygnał dźwiękowy wskazujący, że ustawienia harmonogramu czyszczenia zostały potwierdzone.
Ustawienia harmonogramu czyszczeniaAby ułatwić czyszczenie, robot ma funkcję, która pozwala programować go codziennie za pomocą pilota. Zgodnie z konfiguracją robot automatycznie rozpocznie czyszczenie wybranych dni we wskazanych godzinach. Dostępne są opcje zdalnego sterowania: 12:00 - 11:59 i 12:00 - 23:59 Przed dostosowaniem czasu i ustawień robota upewnij się, że jest on włączony, a przycisk włączania / wyłączania robota jest również włączony.
Urządzeniem można sterować za pomocą pilota. Rys. 37.Naciśnij przycisk do czyszczenia kontrolera. Cyfry zaczną migać Rys. 38.Użyj strzałek w górę i w dół, aby wybrać dzień, a po wybraniu dnia użyj strzałek w lewo i w prawo, aby wybrać minuty lub godziny. Aby zmienić minuty lub godziny, użyj przycisków kierunku i kiedy cyfry zaczną migać. Naciśnij ponownie przycisk wł. / Wył., Aby zapisać ustawienia. Uzyskaj dostęp do żądanych dni i wykonaj te same kroki, aby je zaplanować.
Rys. 39.Na koniec naciśnij przycisk programowania czyszczenia, aby wyjść z trybu programowania. Robot wyemituje sygnał dźwiękowy wskazujący, że ustawienia harmonogramu czyszczenia zostały potwierdzone.
Użytkownik może zaplanować dowolną liczbę dni w tygodniu. Ekran startowy pokaże, kiedy robot jest zaprogramowany.
Aby anulować harmonogram czyszczenia:

111110
POLSKI POLSKI
CONGA 990 VITAL CONGA 990 VITAL
Rys. 40.Naciśnij przycisk na pilocie, wybierz dzień, który chcesz usunąć, i zmień godzinę na 00:00, jest to czas na anulowanie programu.
5. CZYSZCZENIE I KONSERWACJA
Aby przedłużyć żywotność robota i zapewnić mu optymalną wydajność, należy okresowo wykonywać następujące czynności:
Opróżnij zbiornik zanieczyszczeń robota. Naciśnij przycisk zwalniający pojemnik na zanieczyszczenia. Otwórz pojemnik na brud i opróżnij go.Rys. 41.
Wyczyść filtr o wysokiej wydajności robota: Wyciągnij wysoko wydajny filtr Ostrożnie opróżnij filter, aby pozbyć się brudu. Rys. 42.
Czyszczenie czujników zabezpieczających przed upadkiem Za pomocą czystej, suchej i miękkiej ściereczki zetrzyj kurz z czujników zatrzymania upadku, znajdujących się w prawym dolnym rogu robota. Rys. 43.
Ostrzeżenie: Nie nakładaj środków czyszczących bezpośrednio na czujniki.
Centralne czyszczenie szczotkami Rys.44.Delikatnie naciśnij zaczepy na środkowej ramie szczotki, aby otworzyć komorę i wyjąć ją. Usuń włosy, kłaczki i inne zabrudzenia uwięzione w szczotce i wokół wałków.Rys. 45. Wyczyść i wyczyść kanał ssący robota.Rys. 46.Ponownie zainstaluj środkową szczotkę i ramę. Rys. 47.
Filtr o wysokiej wydajności Filtr o wysokiej wydajności został zaprojektowany z siecią włókien, które pomagają wychwytywać cząsteczki kurzu, roztocza, pyłki ... Dlatego należy je okresowo czyścić, aby zapobiec gromadzeniu się tych cząstek w filtrze, a to traci wydajność. Najlepiej wykonywać tę
konserwację raz w tygodniu. Przy wymianie na nowy zaleca się zrobienie tego najpóźniej co najmniej 160 godzin. Wskazówki: Zalecenia: Możesz usunąć zabrudzenia za pomocą małej szczotki lub delikatnie postukać je o twardą powierzchnię, aby opadł kurz. Filtr o wysokiej wydajności nie nadaje się do prania w pralce.
Główny filtr siatkowy i filtr gąbkowy System filtracji uzupełnia główny filtr siatkowy i filtr gąbkowy. Podczas ich zmiany zaleca się to po 160 godzinach użytkowania lub gdy zauważysz, że ulegają one zużyciu. Wskazówki: Zalecenia: Możesz usunąć zabrudzenia za pomocą małej szczotki lub delikatnie postukać je o twardą powierzchnię, aby opadł kurz. Możesz również użyć ciepłej wody bez detergentów, aby uzyskać lepszy wynik, upewniając się, że są całkowicie suche przed ich wymianą.
Szczotki boczne Szczotki boczne są wyposażone w wiele szczecin i służą zarówno do wciągania brudu do otworu ssącego, jak i do dokładnego czyszczenia krawędzi i narożników. Szczotki te mogą się z czasem zużywać, co będzie miało negatywny wpływ na skuteczność czyszczenia. Dlatego zaleca się wymianę każdej maksymalnej szczotki bocznej co 220 godzin lub mniej. Wskazówki: Zalecenia: zaleca się czyszczenie szczotek bocznych raz w tygodniu za pomocą szczoteczki do czyszczenia.
Środkowa szczotka Centralna szczotka jest wyposażona w szczecinę i silikon, obraca się z dużą prędkością i pomaga wprowadzić brud do otworu ssącego. Szczotka styka się z ziemią, a zatem z brudem, dzięki czemu z czasem może się zużywać, co będzie miało negatywny wpływ na skuteczność czyszczenia. Dlatego zaleca się wymianę każdej maksymalnej szczotki bocznej co 320 godzin lub mniej.
Zalecenia: zaleca się czyszczenie środkowej szczotki raz w tygodniu za pomocą szczoteczki do czyszczenia.
Czujniki Roboty czyszczące mają różne rodzaje czujników, na przykład czujniki zbliżeniowe pomagają robotowi w nawigacji i wykrywają możliwe przeszkody, a czujniki zabezpieczające przed upadkiem pomagają robotowi wykryć nierówności i możliwe puste przestrzenie, takie jak schody. Czujniki te są w ciągłym kontakcie z cząsteczkami pyłu, dzięki czemu mogą się zatkać w czasie i spowodować ewentualne awarie nawigacji. Zaleca się czyszczenie wszystkich czujników robota co 35 godzin użytkowania lub krócej, za pomocą szczotki do czyszczenia lub szmatki bez zwilżania.

113112
POLSKI POLSKI
CONGA 990 VITAL CONGA 990 VITAL
6. ZMIANA I ŁADOWANIE BATERII
Rys. 48.Aby przedłużyć żywotność akumulatora, pozostaw robota ładującego się na stacji ładującej, ilekroć nie jest używany. Jeśli nie zamierzasz korzystać z urządzenia przez dłuższy czas, wyciągnij baterię i przechowuj w suchym i bezpiecznym miejscu.
Para reemplazar la batería, siga las siguientes instrucciones:Rys. 48.Odkręć 2 śruby komory baterii, zdejmij pokrywę baterii i baterię. Rys. 49.Włóż nową baterię etykietą do góry. Rys. 50.Umieść baterię i pokrywę baterii na swoim miejscu i dokręć śrubki na nowo.
7. ROZWIĄZYWANIE PROBLEMÓW
Sygnał robota Przyczyna
Niebieskie światło:
1 sygnał dźwiękowy
Błąd koła wielokierunkowego
Oczyść koło wielokierunkowe i naciśnij przycisk zasilania, aby uruchomić ponownie urządzenie.
2 sygnały dźwiękowe
Błąd bocznych szczotek Oczyść szczotki boczne urządzenia i naciśnij przycisk zasilania, aby uruchomić ponownie robota.
3 sygnały dźwiękowe
Błąd wentylatora silnika lub filtra.
Wyjmij i wyczyść pojemnik na zanieczyszczenia.Zdejmij pokrywę wysoko wydajnego filtra i oczyść go z brudu.
4 sygnały dźwiękowe
Błąd centralnej szczotki Zdejmij i wyczyść środkową szczotkę robota.
Migające czerwone światło
2 sygnały dźwiękowe
Błąd zderzaka Sprawdź, czy zderzak się zablokował i naciśnij po obu stronach i środku, aby go odblokować.
3 sygnały dźwiękowe
Błąd czujnika przeciwupadkowego
Sprawdź, czy robot stoi na nierównej powierzchni, czy koła nie dotykają ziemi lub czy utknął w ciemnym miejscu i ustaw go w nowej pozycji. W przeciwnym razie, wyczyść czujnik przeciw upadkowy.
4 sygnały dźwiękowe
Robot nie może wrócić do bazy ładowania lub do pozycji rozpęczcia pracy.
Upewnij się, że przed bazą ładowania nie ma żadnych przeszkód. Oczyść styki ładowania robota i bazę ładowania czystą, miękką i suchą szmatką.
8. DANE TECHNICZNE
Model: Conga 990 Vital Referencja: 05417 Moc: 100-240 V ~, 50/60 Hz Bateria 14.4 V, 2600 mAh Made in China | Zaprojektowany w Hiszpanii
9. RECYKLING SPRZĘTU
Dyrektywa Parlamentu Europejskiego i Rady 2012/19/UE w sprawie zużytego sprzętu elektrycznego i elektronicznego (WEEE) zakazuje wyrzucania ww. sprzętu razem z innymi odpadami. Omawiane sprzęty muszą być składowane osobno dla zoptymalizowania odzyskiwania surowców i recyklingu materiałów. W ten sposób negatywny wpływ elektroodpadów na zdrowie ludzkie i środowisko zostaje znacznie zredukowany. Symbol przekreślonego kołowego kontenera na odpady informuje o
obowiązku zadbania o oddanie zużytego sprzętu do specjalnego punktu zbiórki ZSEE.

115115
ČEŠTINA
CONGA 990 VITAL 114
POLSKI
CONGA 990 VITAL
Jeśli potrzebujesz informacji na temat recyklingu i punktów zbiórki sprzętu w twojej miejscowości, skontaktuj się z urzędem twojej gminy.
10. GWARANCJA I POMOC TECHNICZNA
Produktjest objęty 2 letnią gwarancją od daty zakupu. Z gwarancji można korzystać po okazaniu dowodu zakupu. Produkt nie podlega gwarancji, jeśli był używany niezgodnie z instrukcją lub jeśli jest fizycznie uszkodzony. Produkt NIE podlega gwarancji, jeśli:był używany niezgodnie ze swoim przeznaczeniem, wystawiony na działanie wody lub wilgoci, mechanicznie uszkodzony przez użytkownika, wystawiony na działanie substancji żrących czy nosi jakiekolwiek inne znamiona uszkodzeń wynikających z winy użytkownika. urządzenie było naprawiane lub modyfikowane przez osoby nieautoryzowane przez firmę Cecotec. odnosi się do przypadków, spowodowanych normalnym zużywaniem się elementów w trakcie ich użytkowania. Gwarancja obejmuje wszystkie wady fabryczne produktu przez 2 lata od daty zakupu, nie włączając w to części podlegających zużyciu. Urządzenie nie było używane przez użytkownika w odpowiedni sposób. W przypadku wykrycia ewentualnego defektu urządzenia lub w razie potrzeby konsultacji skontaktuj się z Serwisem Obsługi Technicznej Cecotec pod numerem +34 96 321 07 28.
1. BEZPEČNOSTNÍ POKYNY
Před použitím přístroje si pozorně přečtěte následující bezpečnostní pokyny. Uchovejte tento manuál pro pozdější použití nebo pro nové uživatele.Tento přístroj se musí používat v souladu s tímto návodem na použití. Cecotec není zodpovědný za žádné škody nebo nehody způsobené nevhodným používáním.Ujistěte se, že elektrická síť má stejné napětí jako je uvedené na etiketě produktu a že zásuvka je uzemněná.Produkt může být smontován a rozebrán pouze kvalifikovaným personálem.Nedotýkejte se kabelu, zásuvky ani nabíječky mokrýma rukama.Držte robota z dosahu oblečení, záclon a podobných materiálů.Nesedejte si ani nepokládejte ostré anebo těžké předměty na přístroj.Nepoužívejte přístroj v blízkosti zdrojů tepla, hořlavých látek, mokrých povrchů, odkud by mohl spadnout nebo být vhozen do vody, a nedovolte, aby přišel do kontaktu s vodou nebo jinými tekutinami. Nepoužívejte venku.Nepoužívejte nabíjecí základnu, pokud má kabel nebo zásuvku poškozenou, nebo pokud nefungují správně. V případě problému kontaktujte Asistenční technický servis Cecotec.Nepoužívejte přístroj na stolech, židlích nebo jiných vyvýšených místech, odkud by mohl spadnout.Nepoužívejte ochranu laseru jako rukojeť na přemístění robota.Nezapínejte přístroj v místech, kde teplota spadne pod 0 ºC nebo převýší 50 ºC.Přístroj funguje pouze s poskytnutou baterií a nabíječkou. Použití jiných komponentů nebo příslušenství by mohlo způsobit nebezpečí požáru, zkratu nebo produkt poškodit.Nepoužívejte přístroj na vysávání hořlavých předmětů nebo předmětů zapálených, jako jsou cigarety, zápalky nebo popel.
117116 117116
ČEŠTINA ČEŠTINA
CONGA 990 VITAL CONGA 990 VITAL
Než robota zapnete, seberte z podlahy oblečení, papíry, kabely nebo jiné předměty, které by mohly robotovi překážet.Přístroj by neměl být používán dětmi do 8mi let.Tento přístroj může být používán dětmi od 8mi let, pokud jsou pod neustálým dozorem.Tento produkt může být používán dětmi nad 8 let a osobami s fyzickým, senzorickým anebo mentálním postižením, nebo osobami, kterým chybí zkušenost a znalost, pokud jsou pod dozorem anebo jim byly poskytnuty informace o používání aparátu a mohou jej používat bezpečně a rozumí nebezpečím, které z tohoto používání vyplývají. Nedovolte, aby si s přístrojem hrály děti.Dohlížejte na děti, abyste se ujistili, že si s přístrojem nehrají. Je naprosto nezbytné na přístroj dohlížet, pokud je používán v blízkosti dětí nebo přímo dětmi.2. ČÁSTI A SLOŽENÍ
Obr. 1.1. Světelný indikátor2. Tlačítko zapnutí/fungování
Světelný indikátor
Oranžové nepřerušované světlo: nízké nabití baterie Blikající oranžové světlo: nabíjení Modré nepřerušované světlo: nabíjení/standby/úklid. Červené blikající světlo: chyba.
Tlačítko zapnutí/fungováníPodržte stisknuté toto tlačítko podobu několika vteřin pro zapnutí nebo vypnutí robota. Stiskněte ho také pro začátek úklidu.
Základní tělo a senzoryObr. 2.Obr. 3.1. Antikolizní senzor2. Senzor proti pádu
3. Nabíjecí terminál4. Kolo do všech směrů5. Boční kartáče6. Baterie7. Pohyblivá kola8. Přerušovač zapnutí9. Nádoba na nečistoty10.Centrální kartáč
KomponentyObr. 4.Nabíjecí základnaObr. 5.Adaptér elektrického prouduObr. 6.Dálkové ovládáníObr. 7.Kartáč na čištěníObr. 8. Nádoba na směsný odpadObr. 9.Primární filtr a vysoce účinný filtrObr. 10.Boční kartáčeObr. 11.2 mopyObr. 12.Centrální kartáčObr. 13.Volitelné: nádoba na nečistoty, silikonový kartáč BestFriend Care.
Nabíjecí základnaObr. 14. 1. Držák dálkového ovládání.2. Indikátor nabití3. Přenašeč signálu4. Nabíjecí terminál
Dálkové ovládáníObr. 15. 1. Nastavení hodin

119118 119118
ČEŠTINA ČEŠTINA
CONGA 990 VITAL CONGA 990 VITAL
2. Směrová tlačítka3. Program Spot (Přesný)4. Program Místnost5. Stupně intenzity vytírání6. Obrazovka zobrazení programu a hodin7. Automatické nabití/návrat domů8. Automatický program/pauza9. Programování10. Program Okraje11. Stupně sacího výkonu
3. PŘED POUŽITÍM
Vyjměte přístroj z krabice a odstraňte všechny obaly.Ujistěte se, že jsou obsaženy všechny části a díly, a že jsou v dobrém stavu. Pokud najdete nějaké viditelné poškození, okamžitě se obraťte na oficiální Technický servis firmy Cecotec.Obr. 16.Odstraňte z okolí robota všechny předměty, jako například oblečení, papíry, kabely, záclony a jiné křehké předměty. Obr. 17.Pokud se místnost, kterou chcete uklízet, nachází v blízkosti balkónu nebo schodů, umístěte na toto místo fyzickou překážku, abyste zabránili poškození produktu a zajistili tak bezpečné fungování.Obr. 18.Obr. 19.Přímé vystavení slunečnímu záření nebo velkým světelným kontrastům, může ovlivnit bezchybné fungování senzorů. Pokud k tomu dojde, robot se zastaví. Přeneste ho na jiné místo a začne znovu uklízet.
Obr. 20.Zapojte nabíjecí základnu do elektrického přívodu. Smotejte a schovejte zbývající kabel do spodní části nabíjecí základny, aby se zabránilo nehodám.
Obr. 21.Umístěte nabíjecí základnu proti zdi a nechejte volné místo minimálně: 2 metry před. 1 metr na každou stranu
Obr. 22.Vložte boční kartáče do slotů umístěných na spodní straně robota. Tlačte, až uslyšíte cvaknutí,
které potvrzuje, že jsou dobře zajištěné.
Obr. 23Stiskněte tlačítko zapnutí, které se nachází na spodní straně robota. Ujistěte se, že tlačítko se nachází v pozici ON.
Obr. 24.Vložte robota do nabíjecí základny a ujistěte se, že terminály na obou stranách souhlasí. Poté, co je robot správně umístěn, zapípá a tlačítko se rozsvítí. Pokud světlo bliká oranžově, znamená to, že baterie není zcela nabitá. Abyste zajistili delší čas uklízení, počkejte, až se světlo změní na stabilní modré světlo. Znamená to, že baterie je úplně nabitá a robot je připraven k použití.
4. FUNGOVÁNÍ
Obr. 25.Začít s úklidem Podržte stisknuté tlačítko zapnutí/vypnutí pro zapnutí robota. Stiskněte tlačítko zapnutí na robotovi nebo na dálkovém ovládání a robot začne uklízet. UPOZORNĚNÍ: Pokud je během úklidu baterie téměř vybitá, robot se také automaticky vrátí na nabíjecí základnu. Jakmile se baterie znovu zcela dobije, může začít další cyklus úklidu.
UPOZORNĚNÍ: robot se nemůže vrátit na nabíjecí základnu, pokud k ní nemá dobrý přístup. Pokud se robot k ní robot nemohl dostat a zastavil se, vraťte ho do nabíjecí základny manuálně.
PřerušeníStiskněte na robotovi nebo na dálkovém ovládání tlačítko zapnutí, abyste přerušili proces úklidu. Stiskněte na robotovi nebo na dálkovém ovládání tlačítko zapnutí, abyste pokračovali v procesu úklidu.
Návrat na nabíjecí základnuObr. 26.Stiskněte tlačítko Návrat domů na dálkovém ovládání a robot se automaticky vrátí na nabíjecí základnu.
VypnutíPodržte stisknuté tlačítko zapnutí pro vypnutí robota.
UPOZORNĚNÍ: robotický vysavač má tlačítko zapnutí/vypnutí ON/OFF umístěný na hlavním těle. Pokud by robot měl zůstat delší dobu bez používání, doporučuje se vypnout robota pomocí

121120 121120
ČEŠTINA ČEŠTINA
CONGA 990 VITAL CONGA 990 VITAL
tohoto tlačítka. Jako bezpečnostní opatření, pokud se tlačítko nachází v pozici OFF, veškerá nastavení se vrátí do továrního nastavení. Pokud chceme, aby robot fungoval v aktuálním nastavení, tlačítko musí být vždy v pozici ON. Pokud tomu tak není, musíme robota znovu naprogramovat pomocí dálkového ovládání.
Programy úkliduTento robot má několik programů a funkcí, které se dají spustit přes dálkové ovládání.
Program AutoObr. 27.Po stisknutí tlačítka zapnutí robot začne automaticky uklízet. Robot bude uklízet celý povrch, okraje, okolo předmětů jako jsou stoly, židle atp., dokud mu nezačne docházet baterie a vrátí se pak na nabíjecí základnu.
Program DrhnutíObr. 28.Nasaďte mop na nádobu na směsný odpad a naplňte ji vodou. Vložte nádobu na směsný odpad do robota a zvolte program. Je možné vybrat stupeň vytírání pomocí dálkového ovládání: vysoký, střední a nízký. Obr. 29.Jakmile je vybraný požadovaný stupeň vytírání pomocí dálkového ovládání nebo pomocí aplikace, robot začne uklízet v programu All in One - vysaje, vytře a zamete najednou díky své nádobě na směsný odpad.
Doporučení: pokud chcete mopovat, přeskočte krok naplnění nádoby vodou. Pro dokonalé vytření od začátku se doporučuje před použitím navlhčit celý mop.
Program Spot (Přesný)Obr. 30.Pokud vyberte tento program, robot pořádně uklidí jedno místo. Začne úklidem jednoho místa, začne se pohybovat ve spirále směrem ven (1 metr) a pak se ve spirále vrátí znovu na začátek. Pro dokončení aktivuje automatický program a bude uklízet, dokud mu nedojde baterie. Před tím, než pošlete robota uklízet na jedno místo, postavte ho na místo, které chcete uklidit. Stiskněte tlačítko přesného úklidu na dálkovém ovládání.
Program OkrajeObr. 31.Po zvolení tohoto programu začne robot uklízet kolem zdí a nábytku (nohy stolu, židlí atp.). Stiskněte tlačítko Okraje na dálkovém ovládání.
Program Místnost
Obr. 32.Po zvolení tohoto programu, robot bude uklízet po dobu 30ti minut. Stiskněte tlačítko Místnost na dálkovém ovládání. Abyste zajistili úklid místnosti, zavřete dveře.
Funkce stupňů sacího výkonuObr. 33.Stiskněte tlačítko stupňů na dálkovém ovládání, pro kontrolu síly vysávání robota během procesu úklidu. Existují 3 stupně sacího výkonu: Turbo, Normal a Eco.
Funkce intenzity vysáváníStiskněte tlačítko stupňů vytírání na dálkovém ovládání pro kontrolu stupňů vody během vytírání. Existují 3 stupně vytírání: vysoká, střední a nízká.
Naprogramování úkliduRobot disponuje přizpůsobením naprogramování, které umožňují upravit cyklus úklidu. Naprogramování je možné provést pouze přes dálkové ovládání nebo aplikaci u kompatibilních modelů. UPOZORNĚNÍ: ujistěte se, že dálkové ovládání je blízko robota, pokud budete jak nastavovat hodiny, tak cykly úklidu.
Konfigurace pomocí dálkového ovládáníObr. 34.Stiskněte tlačítko hodin na dálkovém ovládání. Číslice začnou blikat. Obr. 35.Vyberte den v týdnu stisknutím tlačítek směru nahoru a dolů.Použijte tlačítka doprava a doleva a vyberte minuty a hodiny. Jakmile začne číslice blikat, použijte směrové šipky nahoru a dolů, abyste číslice měnili.Obr. 36.Nakonec stiskněte tlačítko zapnutí nebo hodin. Robot vydá pípnutí, aby dal vědět, že nastavení hodin je potvrzeno.
Nastavení naprogramování úkliduPro usnadnění úklidu má robot funkci, která dovoluje naprogramovat ho na každý den pomocí dálkového ovládání. Podle nastavení začne robot automaticky uklízet každý stanovený den ve stanovenou hodinu. Možnosti nastavení času na dálkovém ovládání jsou: 12:00 – 11:59 (den) a 12:00 – 11:59 (noc). Před nastavením času a naprogramováním robota se ujistěte, že je přerušovač je zapnutý (ON) a že tlačítko zapnutí/vypnutí je v poloze zapnuto.
Konfigurace pomocí dálkového ovládání

123122 123122
ČEŠTINA ČEŠTINA
CONGA 990 VITAL CONGA 990 VITAL
Obr. 37.Stiskněte tlačítko programování na dálkovém ovládání. Číslice začnou blikat. Obr. 38.Pro výběr dne použijte tlačítka nahoru a dolů. Pro výběr minuty a hodiny použijte tlačítka doprava a doleva. Abyste mohli změnit hodiny nebo minuty, použijte směrová tlačítka, jakmile číslice začnou blikat. Stiskněte tlačítko zapnutí pro uložení změn. Nastavte požadované dny a postupujte stejným způsobem pro jejich naprogramování.
Obr. 39.Nakonec stiskněte tlačítko zapnutí, abyste opustili programování. Robot vydá pípnutí, aby dal vědět, že změny programování úklidu jsou potvrzeny.
Uživatel si může naprogramovat tolik dnů v týdnu, kolik si přeje. Základní obrazovka zobrazí ikonu programování, když je robot naprogramovaný.
Zrušení naprogramovaných úklidůObr. 40.Stiskněte tlačítko dálkového ovládání, vyberte den, který chcete odstranit a změňte hodinu na 00:00 am. Takto program zrušíte.
5. ČIŠTĚNÍ A ÚDRŽBA
Abyste prodloužili životnost robota a aby fungoval co nejlépe, následujte v periodických cyklech tyto kroky:
Vyprázdněte nádobu na nečistoty Stiskněte tlačítko uvolnění nádoby na odpad. Otevřete nádobu na nečistoty a vyprázdněte ji.Obr. 41.
Vyčistěte vysoce účinný filtr robota: Vyjměte vysoce účinný filtr. Opatrně protřepejte vysoce účinný filtr, abyste uvolnili nečistoty. Obr. 42.
Vyčistěte senzory proti pádu: Použijte čistý, suchý a jemný hadřík, abyste odstranili prach ze senzorů proti pádu, který se nachází na pravé spodní straně robota. Obr. 43.
POZOR: neaplikujte čistící prostředky přímo na senzory.
Vyčištění centrálního kartáčeObr. 44.Stiskněte lehce úchyt rámu centrálního kartáče pro otevření přihrádky a jeho vytažení. Odstraňte vlasy, chmýří a další nečistoty uvízlé v kartáči a na jeho okrajích.Obr. 45. Vyčistěte kartáč a sací otvor robota.Obr. 46.Znovu instalujte centrální kartáč a rám. Obr. 47.
Vysoce účinný filtr Vysoce účinný filtr je navržen jako síť vláken, které pomáhají zachytit prachové částice, roztoče, pyl… Proto je nutné periodicky ho čistit, abyste zabránili nahromadění částic a ztrátě účinnosti filtru. Doporučujeme provádět tuto údržbu jednou týdně. Pokud budete filtr měnit za nový, doporučuje se tak učinit po maximálně 160ti hodinách provozu. Doporučení: Nečistoty se dají odstranit malým kartáčkem nebo je lehce vytřepat o tvrdý povrch, abyste odstranili prach. Vysoce účinný filtr není možné vyprat. Primární filtr a sekundární filtr Systém filtrace je doplněn primárním síťovým filtrem a sekundárním filtrem na principu houby. Vyměnit tyto filtry se doporučuje po maximálně 160ti hodinách používání, nebo když vidíte, že jsou opotřebované. Doporučení: Nečistoty se dají odstranit malým kartáčkem nebo je lehce vytřepat o tvrdý povrch, abyste odstranili prach. Pro dosažení lepšího výsledku je možné použít vlažnou vodu s detergentem. Ujistěte se ale, že jsou části naprosto suché, než je vrátíte do přístroje.
Boční kartáče Boční kartáče jsou navrženy s velkým množstvím štětin. Slouží k nahrnutí nečistot do sacího ústí robota, stejně jako vyčištění okrajů a rohů. Kartáče se mohou postupem času opotřebit, což bude mít negativní vliv na efektivitu úklidu. Proto se doporučuje boční kartáče vyměnit maximálně po 220ti hodinách používání. Doporučení: Doporučuje se jednou týdně boční kartáče čistit a napomoci tak dobrému úklidu.
Centrální kartáč Centrální kartáč je navržen ze silikonu a štětin, rychle se otáčí a pomáhá nahrnout nečistoty do sacího ústí. Kartáče jsou v kontaktu s podlahou, a tím pádem i s nečistotami, a proto se mohou postupem času opotřebit, což bude mít negativní vliv na efektivitu úklidu. Proto se doporučuje boční kartáče vyměnit maximálně po 320ti hodinách používání.

125124 125124
ČEŠTINA ČEŠTINA
CONGA 990 VITAL CONGA 990 VITAL
Doporučuje se jednou týdně centrální kartáč čistit pomocí čistícího kartáče.
Senzory Roboti na úklid mají různé druhy senzorů, například senzory blízkosti, které robotovi pomáhají navigovat po místnosti a detekovat různé překážky, a senzory proti pádu, které robotovi pomáhají detekovat nerovnosti a prázdné místo, jako jsou například schody. Tyto senzory jsou neustále v kontaktu s částicemi prachu, takže je možné, že se časem zanesou a může dojít k chybám v navigaci. Doporučuje se čistit senzory robota po každých maximálně 35ti hodinách provozu nebo dříve, pomocí čistícího kartáče nebo malého suchého hadříku.
6. NABITÍ A VÝMĚNA BATERIE
Obr. 48.Abyste prodloužili životnost baterie, nechejte robota nabíjet v nabíjecí základně vždy, když ho nepoužíváte. Pokud robota nebude delší dobu používat, vyndejte baterii a skladujte ji na bezpečném a suchém místě. Pro výměnu baterie následujte tyto kroky:Obr. 48.Odšroubujte dva šroubky z přihrádky baterie, odstraňte víko baterie a baterii. Obr. 49.Vložte novou baterii etiketou nahoru. Obr. 50.Vložte baterii a víko baterie na své místo a upevněte znovu šrouby.
7. ŘEŠENÍ PROBLÉMŮ
Signál robota Příčina
Červené nepřerušované světlo
1 pípnutí
Chyba na kole centrálním kole.
Vyčistěte centrální kolo a stiskněte tlačítko zapnutí pro restartování robota.
2 pípnutí
Chyba bočních kartáčů
Vyčistěte boční kartáče a stiskněte tlačítko zapnutí pro restartování robota.
3 pípnutí
Chyba ventilátoru motoru nebo filtru.
Vyjměte nádobu na nečistoty a vyčistěte ji.Vyjměte z robota filtr a vytřepejte nečistoty.
4 pípnutí
Chyba centrálního kartáče
Vyjměte a vyčistěte centrální kartáč robota.
Červené blikající světlo
2 pípnutí
Chyba nárazníku. Zkontrolujte, jestli není nárazník zablokovaný a stiskněte obě jeho strany a střed pro odblokování.
3 pípnutí
Chyba senzoru proti pádu.
Zkontrolujte, jestli robot není na nerovném povrchu, jestli se kola dotýkají země, popřípadě jestli není uvězněný na temném místě a přeneste ho na nové místo. V opačném případě vyčistěte senzor proti pádu.
4 pípnutí
Robot se nemůže vrátit na nabíjecí základnu nebo do počáteční pozice.
Ujistěte se, že před nabíjecí základnou nejsou žádné překážky. Vyčistěte terminál, robota a nabíjecí základnu čistým, jemným a suchým hadříkem.
8. TECHNICKÉ SPECIFIKACE
MODEL: Conga 990 Vital Reference produktu: 05417 Výkon: 100-240 V ~, 50/60 Hz Baterie: 14.4 V, 2600 mAh Vyrobeno v Číně | Navrženo ve Španělsku
9. RECYKLACE ELEKTROSPOTŘEBIČŮ
Evropská směrnice 2012/19/EU o odpadních elektrických a elektronických zařízeních (OEEZ) specifikuje elektrospotřebiče, které se nemají recyklovat spolu s ostatním komunálním odpadem. Tyto elektrospotřebiče se musí zlikvidovat samostatně, aby se tak dosáhlo co nejlepší recyklace a využití materiálů, a tímto se omezil dopad, který by lidé mohli mít na životní prostředí.
Symbol přeškrtnutého kontejneru připomíná povinnost zlikvidovat tento produkt správně.Pro obdržení detailních informací o nejvhodnějším možném způsobu naložení s vaším elektrospotřebičem, a/nebo o bateriích, kontaktujte místní úřady.

126126
ČEŠTINA
CONGA 990 VITAL
10. ZÁRUKA A TECHNICKÝ SERVIS
Tento produkt má záruku 2 roky od data zakoupení v případě, že zákazník disponuje fakturou nebo dokladem o koupi a produkt je v perfektním stavu a nakládá se s ním adekvátním způsobem tak, jak je uvedeno s v tomto návodu na použití.Záruka nezahrnuje:Pokud byl produkt používán nad svoji kapacitu anebo užitnost, byl špatně používán, utrpěl náraz, byl vystaven vlhkosti, ponořen do tekutiny nebo jiné korozivní substance, a jakoukoli vinu připsatelnou spotřebiteli.Pokud byl produkt rozmontován, modifikován anebo opravován servisem neautorizovaným oficiálním servisem Cecotec.Pokud byl problém zaviněn normálním používáním a opotřebením součástek.Záruční servis kryje veškeré defekty zaviněné během výroby po dobu 2 let na základě platné legislativy, s výjimkou spotřebních dílů. V případě špatného zacházení ze strany spotřebitele není záruční servis odpovědný za opravu. Pokud byste někdy zjistili problémy s tímto přístrojem, nebo byste měli nějaké dotazy, spojte se s oficiálním Technickým asistenčním servisem Cecotec na telefonním čísle +34 96 321 07 28.

128
ESPAÑOL
CONGA 990 VITAL
EA02200211
Grupo Cecotec Innovaciones S.L.C/de la Pinadeta s/n, 46930
Quart de Poblet, Valencia, Spain
www.cecotec.es