Embed Size (px)
Citation preview

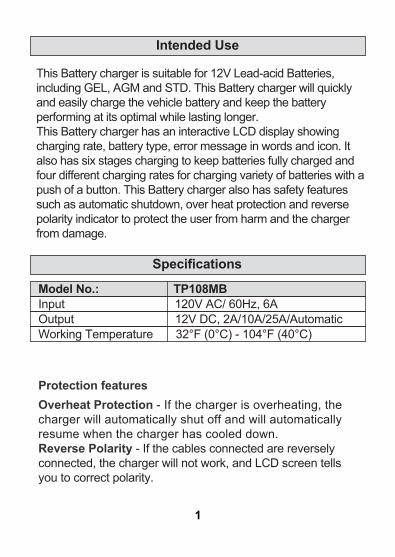
Smart Battery Charger2 / 10 / 25 AMP
QUICK CHARGE
BOOST CHARGE
2A TRICKLE CHARGE
10A
25A
REC ONDITIONASSIST ENGINE START
STAND ARD/AGM/GE LSELECTABL E
2A/10A/25 A/AUTOSELECTABL E
E481323TP108MB

Intended Use 1
Specifications 1
Important Safety Information 2
Main Parts of Product 8
Before Each Use 9
Operating Instructions 10
Maintenance 16
Troubleshooting 16
Table of Contents
WARNING: Read carefully and understand all ASSEMBLY AND OPERATION INSTRUCTIONS before operating. Failure to follow the safety rules and other basic safety precautions may result in serious personal injury.
Should you have any questions or need any support, please contact us at [email protected]
Intended Use
Specifications
This Battery charger is suitable for 12V Lead-acid Batteries, including GEL, AGM and STD. This Battery charger will quickly and easily charge the vehicle battery and keep the battery performing at its optimal while lasting longer.This Battery charger has an interactive LCD display showing charging rate, battery type, error message in words and icon. It also has six stages charging to keep batteries fully charged and four different charging rates for charging variety of batteries with a push of a button. This Battery charger also has safety features such as automatic shutdown, over heat protection and reverse polarity indicator to protect the user from harm and the charger from damage.
Protection featuresOverheat Protection - If the charger is overheating, the charger will automatically shut off and will automatically resume when the charger has cooled down.Reverse Polarity - If the cables connected are reversely connected, the charger will not work, and LCD screen tells you to correct polarity.
Model No.: TP108MBInput 120V AC/ 60Hz, 6AOutput 12V DC, 2A/10A/25A/AutomaticWorking Temperature 32°F (0°C) - 104°F (40°C)
1
Important Safety Information
Overtime Charging Protection - If the battery cannot be fully charged within 24 hours, charger will stop charging automatically.Short Circuit Protection - if the cables connected suffer from short circuit when the charger working, charger will stop charging automatically.
• Risk of Explosive Gases, Electric Shock or Fire.• Keep out of reach of children.• To reduce the risk of personal or property damage, read and understand all directions and warnings prior to use of this battery charger.• Do not use in wet conditions or near combustible materials. Keep away from flames, smoke or sparks while charging. Never smoke in the area of the battery or engine.• To reduce the risk of electric shock, connect to only properly grounded outlets. Use of an extension cord is not recommended and could result in fire.• Do not operate if cords or wires are frayed or defective, or if charger base is defective in any way. Do not attempt to open the charger as this could result in electric shock.• Use only on lead acid batteries. Do not use this charger for charging dry cell batteries, as this could result in personal injury or property damage due to battery explosion.• Do not charge a frozen battery.
2

WORK AREA SAFETY• Make sure you have adequate space to use this charger. Position the charger as far away from the battery as permitted by DC Cable.• Never place the charger directly above the battery that is being charged; as this may cause the charger to be damaged by gases expelled from the battery.• Never set a battery or any other object on the charger.• Use only in a well-ventilated area.• Never allow battery acid to drip on the charger when reading electrolyte specific gravity or filling battery.• Do not operate charger in a closed-in area or restrict ventilation in any way.
• Use of an attachment not recommended or sold by the battery charger manufacturer may result in a risk of fire, electric shock, or injury to persons.• Do not operate charger if it has received a sharp blow, been dropped, or otherwise damaged in any way; take it to a qualified serviceman.• To reduce risk of electric shock, unplug charger from outlet before attempting any repairs or cleaning. Turning off controls will not reduce this risk.
3

PERSONAL SAFETY• Make sure that someone is within range of your voice to come to your aid if needed while you work with or are near a lead-acid battery.• Wear complete eye and clothing protection when working with lead-acid batteries.• Avoid touching your eyes while working with a battery. Have plenty of fresh water and soap nearby for use in case battery acid contacts your eyes, skin or clothing. If this happens, wash immediately with soap and water, then get medical attention.• Take care not to drop any metal tool or object onto the battery. This may result in a spark or short circuit across the battery or another electrical device that may cause an explosion.
4
• Remove all personal metal items, such as rings, brace lets, necklaces, and watches from your body while working with a lead-acid battery. A battery can produce a short circuit current high enough to weld such objects to metal, causing a severe burn.• Never overcharge a battery.

ELECTRICAL SAFETY• Never alter AC cord or plug provided. If it does not fit the outlet, have a proper outlet installed by a qualified electrician. Improper connection can result in a risk of fire or electric shock.• Do not operate charger with damaged cord/plug - replace the cord/plug immediately.• “Warning: Changes or modifications to this unit not expressly approved by the party responsible for compli ance could void the user’s authority to operate the equipment.”• “NOTE: This equipment has been tested and found to comply with the limits for a Class B digital device, pursuant to Part 15 of the FCC Rules. These limits are designed to provide reasonable protection against harmful interference in a residential installation. This equipment generates uses and can radiate radio frequency energy and, if not installed and used in accordance with the instructions, may cause harmful interference to radio communications.
5
• However, there is no guarantee that interference will not occur in a particular installation. If this equipment does cause harmful interference to radio or television reception, which can be determined by turning the equipment off and on, the user is encouraged to try to correct the interference by one or more of the following measures:

• NOTE: If using this battery charger/maintainer for a marine battery, the battery must be removed and charged on shore unless you have purchased special equipment designed for marine use to allow for onboard charging.• Check the polarity of the battery posts. Note: The positive (+) post is usually larger in diameter than the negative (-) post.• The length of the cord external to the battery charger and including the attachment plug shall not be less than 6 feet (1.8m) as measured from the face of the attach ment plug to the point of attachment or entry.• Connect the red positive (+) charger clip to the positive (+) battery post.
Reorient or relocate the receiving antenna. Increase the separation between the equipment and receiver. Connect the equipment into an outlet on a circuit different from that to which the receiver is connected.• Consult the dealer or an experienced radio/TV techni cian for help.”
6
• Place the free end of the battery cable as far away from the battery to be charged as the cable will allow and then connect the black negative (-) charger clip to the free end of the cable. NEVER face the battery when making the connection.• When disconnecting the charger/maintainer, always use the reverse order from the connection process, staying as far away as possible from the battery.AC POWER CORD/PLUG CONNECTIONS AND PROPER GROUNDING• This battery maintainer is designed for use on a 120V circuit. Always plug the AC power cord/plug into a properly grounded outlet that follows all local ordinances. • NEVER change or alter the AC power cord or plug pins.
7

Main Parts of Product
SubassemblyNo.
1
65
2 3
LCD Display Window - shows charging status, charging current, voltage, battery type, start aid and error information in words and icon.
Charging Amp Selection Button - press to select the charging rate from 2A, 10A, 25A and automatic charging rate.
Battery Type Selection Button - press to select the battery type from AGM, GEL, and Standard battery.
Charge Button - press to begin charging and press again to stop
Reconditioning Button - press to activate the battery recondition function and press again to stop
2
3
5
4
8
14
QUICK CHARGE
BOOST CHARGE
2A TRICKLE CHARGE
10A
25A
RECONDITIONASSIST ENGINE START
STANDARD/AGM/GELSELECTABLE
2A/10A/25A/AUTOSELECTABLE

If it is necessary to remove the battery prior to charging, always remove the grounded terminal first. Ensure all electrical accessories are off prior to charging.
It is best to clean the battery terminals prior to charging. Using a battery terminal brush is a good way to remove corrosion.
When charging a lead-acid battery that is not sealed, it may be necessary to add distilled water into battery so the battery acid solution reaches the level as specified by manufacturer. Careful do not overfill the battery.
Subassembly
Before Each Use
No.
6Start Aid Button - press to activate engine start function. LCD display window will guide how to proceed step by step and press again to stop
SHIELD EYES: Explosive gases can cause eye injury or blindness.
CONTAINS SULFURIC ACID:May cause severe burns and blindness.
9

Read individual precautions and warnings outlined by the battery manufacturer relative to charging / maintaining. Ensure that charger clips make a tight connection.
NEVER smoke or allow a spark or flame in the vicinity of the battery or engine. Use charger for charging LEAD-ACID batteries only.
NEVER charge a frozen battery.
SELECT CHARGING RATE
This smart charger has an Optimal function (defaulted setting). The optimal function automatically selects not want to use the optimal function, you can choose your charging rate manually. This Smart Charger has three additional charging rate options. Press the "AMP" button to choose the desired charging rate.
2A - Can be used for small battery or slow charging.
10A - Can be used for medium size automobile battery or quick charging.
25A - Can be used for large automobile battery or rapid charging.
Note: If you want your battery to sustain a longer life, slow charges it. Slow charging will take longer but will charge your battery more thoroughly. If your battery needs to charge in a short amount of time, use the Rapid charge setting.
Operating Instructions
10

BATTERY RECONDITIONINGWhen your battery has been unused for long periods of time, the battery will be in a deep discharged state. The battery reconditioning function is to recover the battery from deep discharge and help the battery last longer.
CHARGING TIMECharging time may vary depending on some factors listed below stop the process.Battery State – Depending on the voltage of your battery, it may take up to 10 hours to charge. Batteries with higher voltage can usually be charged in a few hours.Battery Rating – A higher rated battery will take longer to charge than a lower rated battery under the same conditions. A battery is rated in ampere-hours (Ah), reserve capacity (RC) and cold-cranking amps (CCA).Charge Rate – The charge rate is measured in amps. A battery charged at a lower rate will take longer than a battery charged at a higher rate. However, smaller batteries can be easily damaged by charging at a rate which is too high for the capacity of the battery.Temperature – Cold temperature will affect a battery’s ability to accept a charge. Charging in cold temperatures will increase the amount of time required to charge a battery.
DESULFATIONIf the battery is left discharged for an extended period, the battery could become sulfated. A sulfated battery will not accept a normal charge.
11

7-STAGE CHARGING
1. Desulphation: Pulse charges the battery to break down the buildup of lead sulphate crystals. Lead sulphate crystals can occur when a battery has been discharged or left unused for a period of time, seriously affecting the perfor-mance and lifetime of the battery.
2. Soft Start: A slow steady buildup of the charging process that limits the power supplied to protect the battery.
3. Bulk Charge: The main part of the charge process where 80% of the charge is applied.
4. Absorption: Fully charges the battery by slowly reducing the charge rate to allow the battery to absorb more power.
5. Battery Test: An automatic test to determine the battery condition after charging. If further charging required the Recondition stage is selected, if fully charged the battery goes into Float status.
CU
PPEN
T
VO
LTA
GE
12
6. Recondition: Unique charge state to recover deeply discharged batteries.

7.Float: Maintains the battery at 100% charge without overcharging or damaging the battery, allowing the Smart Charge to be left connected to the battery indefinitely. Ideal for batteries used intermittently, such as seasonally used vehicles including classic cars, motorcycles.
Note: The Float process takes 5-10 minutes to fill the battery. DO NOT disconnect the connection (AC\DC) during this time. If disconnect the DC connection or the battery is filled, the LCD Display will automatically turn off 5-10 minutes later.
LCD DISPLAYCHARGING DISPLAYPlease follow the charging steps to connect battery first, and then plug in to AC power. If the connection to the battery is loose, the LCD will display this icon. The clamp image will flash and the screen will show: "PLEASE PUT THE CLAMPS ON".
When the connection is set, the LCD will display the battery voltage, battery capacity % and battery graphic.
13

Press the "AMP" button to choose the desired charging rate, if you don’t know how many Amps to choose, please select automatic charging rate. Press the “BATTERY TYPE” button to select your battery type, if you are not sure, please choose “Standard”, then press the “CHARGE” button to start charging. The LCD will display as shown.
Note: If user does not select the charging Amp and battery type within 30 seconds, it will start charging the battery using the default setting (auto charging rate for STD battery).
CHARGING PROGRESS
14
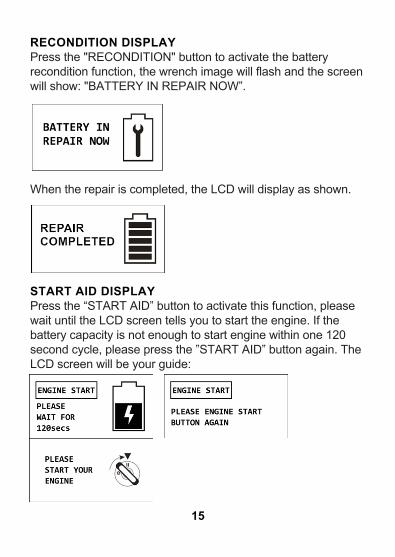
RECONDITION DISPLAYPress the "RECONDITION" button to activate the battery recondition function, the wrench image will flash and the screen will show: "BATTERY IN REPAIR NOW”.
When the repair is completed, the LCD will display as shown.
START AID DISPLAYPress the “START AID” button to activate this function, please wait until the LCD screen tells you to start the engine. If the battery capacity is not enough to start engine within one 120 second cycle, please press the ”START AID” button again. The LCD screen will be your guide:
15

Maintenance
Troubleshooting
Always unplug and disconnect the charger before performing maintenance on the unit. After each use, use a dry, lint-free cloth to clean battery corrosion and other dirt from the clips,cords and charger. Ensure that all components are in good working order. Never open the charger as there are no serviceable parts inside the unit. The charger should be stored in an upright position when not in use. Store in a cool, dry location.
A fault graphic will show on the LCD display screen when there is a problem. Please fix the problem to continue the operation of the charger.
Words and icons will be displayed on the LCD screen when there is a problem.
16

Possible Cause Corrective ActionFailure
Wrong Battery
Overtime Charging
Reverse Polarity
Over Heat
Battery Failure
17
1. Selected charging rate is too small for big battery;2. The battery condition is not good.
Clamps connected to wrong polarity.
1. A short circuit inside the battery;2. An appliance is drawing power from battery being charged.
Correct the polarity be connected.
The temperature of the charger is too high
Make sure the vents are clear. The charger will resume charging when cooled.
1. Check the battery condition. Replace battery if needed.2. Disconnect the appliance and try to charge again.
1. Select higher charging rate and recharge;2. Battery may be dead, check the battery condition. Replace battery if needed.
Please connect to a 12V lead acid battery.
The charger may connect to a 24V battery by mistake.


![INDEX [m.media-amazon.com]](https://img.dokumen.tips/doc/110x75/61b40d21a734852bc16b684a/index-mmedia-.jpg)