Embed Size (px)
Citation preview

CHAPTER 57
Introducing the VisualStudio Extensibility
IN THIS CHAPTER
. Introducing Visual StudioExtensibility
. Building a Visual StudioPackage
. Deploying Visual StudioExtensions
. Managing Extensions with theExtension Manager
. Managing Add-Ins with the Add-In Manager
. Extending the Code Editor
Visual Studio is with no doubt a great application, offer-ing hundreds of integrated tools that cover hundreds ofaspects of the development experience. It is also a complexand composite application, made of components. Forexample, each tool window is a single component devel-oped separately and then put together with the rest of theenvironment. Developing Visual Studio components andthen putting them together is something made possiblebecause of Visual Studio Extensibility. This means thatVisual Studio is an extensible application and that otherdevelopers, like you and me, can build their own compo-nents to be put together within the IDE. Although, asmentioned before, Visual Studio offers hundreds of toolsthat covers many development needs, it cannot cover allpossible requirements; with regard to this, one of thebiggest benefits inside the Visual Studio development envi-ronment is that you can customize it with additional tools,windows, and items that can make your developer life eveneasier. In this chapter you get started with the Visual Studio2010 extensibility, building custom components, and alsotaking a tour of what is new in the 2010 version.
Introducing Visual StudioExtensibilitySince previous versions, Visual Studio has always been anextensible environment. This means that it can be extendedand enhanced with additional tools, windows, add-ins,packages, and macros to increase your productivity withspecific instruments that you might need for adjusting theenvironment to your developer needs. Behind the scenes,
57_0672331004_ch57.qxp 5/3/10 4:09 PM Page 1199
1200 CHAPTER 57 Introducing the Visual Studio Extensibility
Visual Studio is a mixed-mode application meaning that it is built on both COM and .NETarchitectures, although in the 2008 and 2010 versions the managed architecture plays abigger role than in the past.
Visual Studio takes advantage of several .NET assemblies whose names begin withMicrosoft.VisualStudio.XXX.dll (where XXX stands for a particular environment area) formaintaining its infrastructure. Such assemblies expose lots of namespaces whose namesbegin with Microsoft.VisualStudio and play an important role in the IDE extensibility,because the developer can build components referencing those assemblies to get access toIDE functionalities and extend the functionalities with custom packages or add-ins. As youcan imagine, this opens to interesting development scenarios; building extensions forVisual Studio can be an important business, and several companies build extensions forVisual Studio. But this is what developers could do with Visual Studio until the 2008version. With the new Visual Studio 2010 IDE, Microsoft completely revisited the IDEarchitecture and infrastructure so that the environment can be extended in further waysother than classic add-ins. The next section explains what is new in the Visual Studio2010 extensibility before showing practical examples.
What’s New in the Extensibility with Visual Studio 2010
The IDE has been completely revisited in Visual Studio 2010. Several areas now rely onWindows Presentation Foundation, bringing a lot of improvements to the developer expe-rience. The most evident area affected by this change is the code editor, which is entirelybuilt upon WPF. Visual Studio 2010 enables extending the code editor with specific WPFobjects that can actually enrich the code editor with useful or just attractive extensions.Another key concept is how the IDE infrastructure is now built. The old extensibilityarchitecture has now been replaced with the Managed Extensibility Framework (or justMEF), a set of .NET libraries that favors building extensible applications with compositiontechniques according to a plug-in model. MEF is actually an open source project availableon the CodePlex website that you can use to build your own extensible applications. Youcan check out MEF here: http://mef.codeplex.com. After this brief introduction we candivide the Visual Studio extensibility into two main areas: packages and add-ins develop-ment and code editor extensions development. The next section provides more details onthe available projects, for now focus on the concept of extension. Each componentextending the IDE is called extension, independently from its nature (for example, pack-ages or code editor extensions). This concept, together with the new extensibility features(especially for the WPF-based features) required a new deployment system for extensions.With Visual Studio 2010, Microsoft introduces a new .VSIX file format, specific for deploy-ing extensions and that is intended as a replacement for the .VSI file format (with someexceptions as explained later in this chapter). But before going into further discussions,you need some additional tools required for developing versus Visual Studio, known as theVisual Studio 2010 SDK.
57_0672331004_ch57.qxp 5/3/10 4:09 PM Page 1200

1201Building a Visual Studio Package
The Visual Studio 2010 SDK
Basically you create custom extensions for and with Visual Studio taking advantage ofspecific project templates. To enable Visual Studio 2010 extensibility projects, you need todownload and install the Visual Studio 2010 Software Development Kit, which is availablefrom the Visual Studio Extensibility Center located here: http://msdn.microsoft.com/en-us/vsx/default.aspx. The SDK setup can install tools, project templates, and documenta-tion so that you can build custom extensions for the IDE. In the Microsoft Visual Studio2010 SDK you can find shortcuts to online tools, samples, and documentation about theextensibility. Also there is a subfolder named Tools where you can find a shortcut for start-ing Visual Studio under the experimental hive and for resetting the environment. Theexperimental hive is a fully functional instance of Visual Studio used for extension debug-ging and testing, and in most cases you do not need to launch it manually, because it willbe launched by the development instance of Visual Studio. The experimental hive keepstrack of all extensions you develop and debug, so you can reset the instance when youwant it to be clean.
EXTENSIBILITY SAMPLES
The Visual Studio Extensibility team from Microsoft published (and periodicallyupdates) code examples about extending Visual Studio 2010 onto the MSDN CodeGallery. I suggest you to visit the dedicated Web page located here: http://code.msdn.microsoft.com/vsx. You can find several interesting examples covering almost everyextensibility area.
The SDK installs additional projects templates for the Visual Studio extensibility assummarized in the following list:
. Editor extensibility projects. Basically such projects are fully functional code exam-ples that you can use for understanding how extensions work.
. Add-ins, integration packages, and Visual Studio Shell projects.
. Extension deployment projects, including toolbox controls.
All the listed projects templates are available in the New Project dialog. In next sectionyou develop your first extension for Visual Studio 2010 taking advantage of the new WPFinfrastructure.
Building a Visual Studio PackageThe goal of this introductory chapter on the Visual Studio extensibility is showing howyou create and deploy a Visual Studio Package. Basically Visual Studio is made of packages.Each package represents a working unit. For example, the toolbox is a package; SolutionExplorer is another package, and so on. You can extend Visual Studio by building customintegration packages. There are different kinds of integration packages, such as toolwindows, menus, wizards, and languages. The big difference between a package and an
57
57_0672331004_ch57.qxp 5/3/10 4:09 PM Page 1201
1202 CHAPTER 57 Introducing the Visual Studio Extensibility
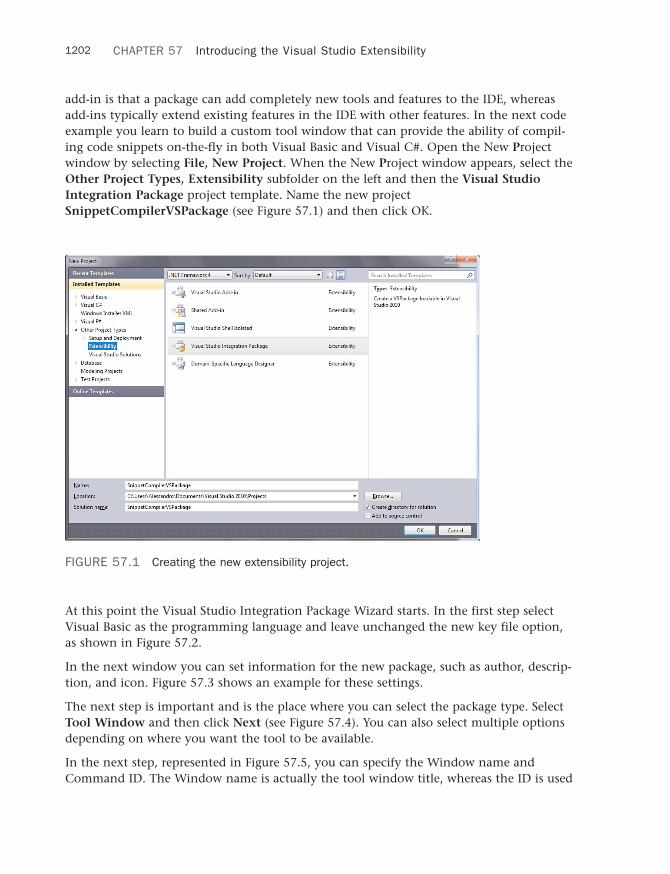
add-in is that a package can add completely new tools and features to the IDE, whereasadd-ins typically extend existing features in the IDE with other features. In the next codeexample you learn to build a custom tool window that can provide the ability of compil-ing code snippets on-the-fly in both Visual Basic and Visual C#. Open the New Projectwindow by selecting File, New Project. When the New Project window appears, select theOther Project Types, Extensibility subfolder on the left and then the Visual StudioIntegration Package project template. Name the new projectSnippetCompilerVSPackage (see Figure 57.1) and then click OK.
At this point the Visual Studio Integration Package Wizard starts. In the first step selectVisual Basic as the programming language and leave unchanged the new key file option,as shown in Figure 57.2.
In the next window you can set information for the new package, such as author, descrip-tion, and icon. Figure 57.3 shows an example for these settings.
The next step is important and is the place where you can select the package type. SelectTool Window and then click Next (see Figure 57.4). You can also select multiple optionsdepending on where you want the tool to be available.
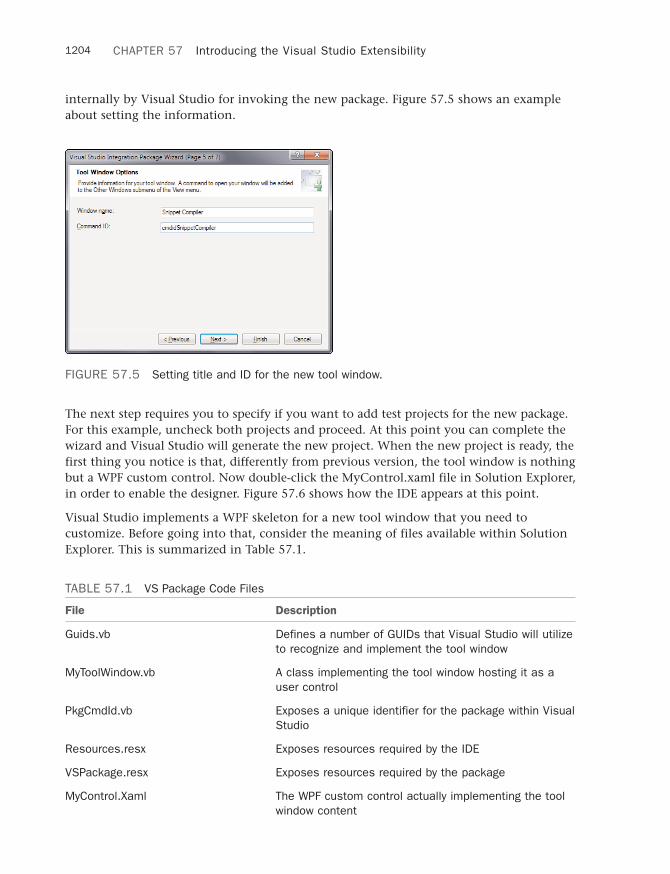
In the next step, represented in Figure 57.5, you can specify the Window name andCommand ID. The Window name is actually the tool window title, whereas the ID is used
FIGURE 57.1 Creating the new extensibility project.
57_0672331004_ch57.qxp 5/3/10 4:09 PM Page 1202

1203Building a Visual Studio Package
57
FIGURE 57.2 Setting language and key file options.
FIGURE 57.3 Setting package information.
FIGURE 57.4 Package type selection.
57_0672331004_ch57.qxp 5/3/10 4:09 PM Page 1203
1204 CHAPTER 57 Introducing the Visual Studio Extensibility
internally by Visual Studio for invoking the new package. Figure 57.5 shows an exampleabout setting the information.
The next step requires you to specify if you want to add test projects for the new package.For this example, uncheck both projects and proceed. At this point you can complete thewizard and Visual Studio will generate the new project. When the new project is ready, thefirst thing you notice is that, differently from previous version, the tool window is nothingbut a WPF custom control. Now double-click the MyControl.xaml file in Solution Explorer,in order to enable the designer. Figure 57.6 shows how the IDE appears at this point.
Visual Studio implements a WPF skeleton for a new tool window that you need tocustomize. Before going into that, consider the meaning of files available within SolutionExplorer. This is summarized in Table 57.1.
FIGURE 57.5 Setting title and ID for the new tool window.
TABLE 57.1 VS Package Code Files
File Description
Guids.vb Defines a number of GUIDs that Visual Studio will utilizeto recognize and implement the tool window
MyToolWindow.vb A class implementing the tool window hosting it as auser control
PkgCmdId.vb Exposes a unique identifier for the package within VisualStudio
Resources.resx Exposes resources required by the IDE
VSPackage.resx Exposes resources required by the package
MyControl.Xaml The WPF custom control actually implementing the toolwindow content
57_0672331004_ch57.qxp 5/3/10 4:09 PM Page 1204

1205Building a Visual Studio Package
57
FIGURE 57.6 The IDE is ready on the new extensibility project, showing the WPF customcontrol.
There is also a subfolder named Resources that contains the icons used within the packageand that identifies the new tool in Visual Studio. All code files contain comments that canhelp you understand what that particular file is for. For example, take a look at theSnippetCompilerVsPackagePackage.vb file. For your convenience, Listing 57.1 shows the
TABLE 57.1 Continued
File Description
SnippetCompilerVsPackagePackage.vb The class implementing the tool window
SnippetCompilerVsPackage.vsct An xml file defining the layout of the package, includingcompany information
Source.extension.vsixmanifest An xml file used for deploying packages as a .Vsix file(see later in this chapter)
Key.snk Strong name file required for signing the packageassembly
57_0672331004_ch57.qxp 5/3/10 4:09 PM Page 1205
1206
content of this file. Notice how comments are detailed and how they provide completeexplanations on types and their role within the user interface.
LISTING 57.1 Understanding Packages Behind the Scenes
Imports Microsoft.VisualBasic
Imports System
Imports System.Diagnostics
Imports System.Globalization
Imports System.Runtime.InteropServices
Imports System.ComponentModel.Design
Imports Microsoft.Win32
Imports Microsoft.VisualStudio.Shell.Interop
Imports Microsoft.VisualStudio.OLE.Interop
Imports Microsoft.VisualStudio.Shell
‘’’ <summary>
‘’’ This is the class that implements the package exposed by this assembly.
‘’’
‘’’ The minimum requirement for a class to be considered a valid package for
‘’’ Visual Studio is to implement the IVsPackage interface and register itself with
‘’’ the shell.
‘’’ This package uses the helper classes defined inside the
‘’’ Managed Package Framework (MPF)
‘’’ to do it: it derives from the Package class that provides the implementation of
‘’’ the IVsPackage interface and uses the registration attributes defined in the
‘’’ ‘’’ framework to register itself and its components with the shell.
‘’’ </summary>
‘ The PackageRegistration attribute tells the PkgDef creation utility
‘ (CreatePkgDef.exe) that this class is a package.
‘
‘ The InstalledProductRegistration attribute is used to register the information
needed to show this package
‘ in the Help/About dialog of Visual Studio.
‘
‘ The ProvideMenuResource attribute is needed to let the shell know that this
‘ package exposes some menus.
‘ The ProvideToolWindow attribute registers a tool window exposed by this package.
<PackageRegistration(UseManagedResourcesOnly := true), _
InstalledProductRegistration(“#110”, “#112”, “1.0”, IconResourceID := 400), _
ProvideMenuResource(“Menus.ctmenu”, 1), _
ProvideToolWindow(GetType(MyToolWindow)), _
Guid(GuidList.guidSnippetCompilerVSPackagePkgString)> _
Public NotInheritable Class SnippetCompilerVSPackagePackage
Inherits Package
CHAPTER 57 Introducing the Visual Studio Extensibility
57_0672331004_ch57.qxp 5/3/10 4:09 PM Page 1206
1207Building a Visual Studio Package
57
‘’’ <summary>
‘’’ Default constructor of the package.
‘’’ Inside this method you can place any initialization code that does not require
‘’’ any Visual Studio service because at this point the package object is created
‘’’ but not sited yet inside Visual Studio environment. The place to do all the
‘’’ other initialization is the Initialize method.
‘’’ </summary>
Public Sub New()
Trace.WriteLine(String.Format(CultureInfo.CurrentCulture,
“Entering constructor for: {0}”,
Me.GetType().Name))
End Sub
‘’’ <summary>
‘’’ This function is called when the user clicks the menu item that shows the
‘’’ tool window. See the Initialize method to see how the menu item is associated to
‘’’ this function using the OleMenuCommandService service and the MenuCommand class.
‘’’ </summary>
Private Sub ShowToolWindow(ByVal sender As Object, ByVal e As EventArgs)
‘ Get the instance number 0 of this tool window. This window is single instance
‘ so this instance
‘ is actually the only one.
‘ The last flag is set to true so that if the tool window does not exists it
‘ will be created.
Dim window As ToolWindowPane = Me.FindToolWindow(GetType(MyToolWindow), 0, True)
If (window Is Nothing) Or (window.Frame Is Nothing) Then
Throw New NotSupportedException(Resources.CanNotCreateWindow)
End If
Dim windowFrame As IVsWindowFrame = TryCast(window.Frame, IVsWindowFrame)
Microsoft.VisualStudio.ErrorHandler.ThrowOnFailure(windowFrame.Show())
End Sub
‘’’’’’’’’’’’’’’’’’’’’’’’’’’’’’’’’’’’’’’’’’’’’’’’’’’’’’’’’’’’’’’’’’’’’’’’’’’’
‘ Overriden Package Implementation
#Region “Package Members”
‘’’ <summary>
‘’’ Initialization of the package; this method is called right
‘’’ after the package is sited, so this is the place
‘’’ where you can put all the initilaization code that rely on services provided by
‘’’ VisualStudio.
57_0672331004_ch57.qxp 5/3/10 4:09 PM Page 1207
1208
‘’’ </summary>
Protected Overrides Sub Initialize()
Trace.WriteLine(String.Format(CultureInfo.CurrentCulture,
“Entering Initialize() of: {0}”,
Me.GetType().Name))
MyBase.Initialize()
‘ Add our command handlers for menu (commands must exist in the .vsct file)
Dim mcs As OleMenuCommandService = _
TryCast(GetService(GetType(IMenuCommandService)), OleMenuCommandService)
If Not mcs Is Nothing Then
‘ Create the command for the tool window
Dim toolwndCommandID As New CommandID(GuidList.
guidSnippetCompilerVSPackageCmdSet,
CInt(PkgCmdIDList.cmdidSnippetCompiler))
Dim menuToolWin As New MenuCommand(New EventHandler _
(AddressOf ShowToolWindow), toolwndCommandID)
mcs.AddCommand(menuToolWin)
End If
End Sub
#End Region
End Class
The class inherits from Microsoft.VisualStudio.Shell.Package, the base class exposingthe required interface for every functional package. Notice how the ShowToolWindowmethod gets an instance of the Microsoft.VisualStudio.Shell.ToolWindowPane classpointing to the custom tool window (Me.FindToolWindow (GetType(MyToolWindow))). Thesame exam can be done on the ToolWindow.vb file. After doing this, it is possible tocustomize the WPF control. The goal of the tool window is enabling on-the fly compila-tion for code snippets. With that said, there is the need of implementing the user interfaceside, so in the XAML editor type the code shown in Listing 57.2.
LISTING 57.2 Implementing the Tool Window User Interface
<UserControl x:Class=”MyControl”
xmlns=”http://schemas.microsoft.com/winfx/2006/xaml/presentation”
xmlns:x=”http://schemas.microsoft.com/winfx/2006/xaml”
xmlns:mc=”http://schemas.openxmlformats.org/markup-compatibility/2006”
xmlns:d=”http://schemas.microsoft.com/expression/blend/2008”
xmlns:vsfx=”clr-
namespace:Microsoft.VisualStudio.Shell;assembly=Microsoft.VisualStudio.Shell.10.0”
mc:Ignorable=”d”
d:DesignHeight=”300” d:DesignWidth=”300”
CHAPTER 57 Introducing the Visual Studio Extensibility
57_0672331004_ch57.qxp 5/3/10 4:09 PM Page 1208
1209Building a Visual Studio Package
57
Name=”MyToolWindow”
Background=”{DynamicResource
{x:Static vsfx:VsBrushes.ToolWindowBackgroundKey}}”>
<Grid>
<Grid.RowDefinitions>
<RowDefinition Height=”30” />
<RowDefinition Height=”40” />
<RowDefinition />
<RowDefinition Height=”50” />
<RowDefinition Height=”40” />
<RowDefinition />
</Grid.RowDefinitions>
<!— This will allow selecting the compiler —>
<ComboBox Name=”LanguageCombo” Text=”VisualBasic” Margin=”5”>
<ComboBoxItem Content=”VisualBasic” />
<ComboBoxItem Content=”CSharp” />
</ComboBox>
<TextBlock Margin=”5” Grid.Row=”1”
Foreground=”{DynamicResource
{x:Static vsfx:VsBrushes.ToolWindowTextKey}}”>
Write or paste your code here:</TextBlock>
<TextBox Grid.Row=”2” Name=”CodeTextBox” Margin=”5”
Foreground=”{DynamicResource
{x:Static vsfx:VsBrushes.ToolWindowTextKey}}”
AcceptsReturn=”True” AcceptsTab=”True”
VerticalAlignment=”Stretch”
VerticalScrollBarVisibility=”Auto”
HorizontalScrollBarVisibility=”Auto” />
<Button Grid.Row=”3” Content=”Compile code” Width=”80” Height=”40”
Name=”button1”/>
<TextBlock Grid.Row=”4” Margin=”10”
Foreground=”{DynamicResource
{x:Static vsfx:VsBrushes.ToolWindowTextKey}}”>
Compilation results:</TextBlock>
<ListBox Grid.Row=”5” ItemsSource=”{Binding}”
Name=”ErrorsListBox” Margin=”5”
Foreground=”{DynamicResource
{x:Static vsfx:VsBrushes.ToolWindowTextKey}}”/>
</Grid>
</UserControl>
On the Visual Basic side, enter the MyControl.xaml.vb file and write the code shown inListing 57.3. This adds compile functionalities to the tool window when the button is
57_0672331004_ch57.qxp 5/3/10 4:09 PM Page 1209

1210
clicked. Basically the code makes use of the System.CodeDom namespace for gettinginstances of the .NET compilers, as you will understand through comments in the code.
LISTING 57.3 Code for Compiling On-the-Fly the Code Typed Inside the Tool Window
Imports System.Security.Permissions
Imports System
Imports System.Reflection
Imports System.Reflection.Emit
Imports System.CodeDom.Compiler
Imports System.Windows.Controls
‘’’<summary>
‘’’ Interaction logic for MyControl.xaml
‘’’</summary>
Partial Public Class MyControl
Inherits System.Windows.Controls.UserControl
<System.Diagnostics.CodeAnalysis.SuppressMessage(“Microsoft.Globalization”,
“CA1300:SpecifyMessageBoxOptions”)> _
Private Sub button1_Click(ByVal sender As Object,
ByVal e As System.EventArgs) Handles button1.Click
Try
If String.IsNullOrEmpty(CodeTextBox.Text) = False Then
Me.ErrorsListBox.ItemsSource = _
Compile(CType(Me.LanguageCombo.SelectedItem,
ComboBoxItem).Content.ToString)
End If
Catch ex As Exception
‘Handle other exceptions here, no compiler errors
End Try
End Sub
Private Function Compile(ByVal language As String) As IEnumerable(Of String)
‘Gets the ComboBox selected language
Dim languageProvider As String = language
‘Creates an instance of the desired compiler
Dim CompilerProvider As CodeDomProvider = _
CodeDomProvider.CreateProvider(languageProvider)
CHAPTER 57 Introducing the Visual Studio Extensibility
57_0672331004_ch57.qxp 5/3/10 4:09 PM Page 1210

1211Building a Visual Studio Package
57
‘Sets compiler parameters
Dim params As New CompilerParameters()
Dim results As CompilerResults
‘Configure self-explanatory parameters
With params
.GenerateExecutable = False
.GenerateInMemory = True
.IncludeDebugInformation = False
‘You can add multiple references here
.ReferencedAssemblies.Add(“System.dll”)
End With
‘Compiles the specified source code
results = CompilerProvider.
CompileAssemblyFromSource(params,
CodeTextBox.Text)
‘If no errors, the ListBox is empty
If results.Errors.Count = 0 Then
Return Nothing
Else
‘If any errors, creates a list of errors...
Dim errorsList As New List(Of String)
‘..iterating the compiler errors
For Each item As CompilerError In results.Errors
errorsList.Add(item.ErrorText & “ Line “ & item.Line.ToString)
Next
Return errorsList.AsEnumerable
errorsList = Nothing
End If
End Function
End Class
At this point you can test the new tool window. This can be accomplished by simplypressing F5 as you would do in any other kind of .NET application. This starts a newinstance of Visual Studio known as Experimental Hive. It is a fully functional instance ofVisual Studio that is used for debugging custom extensions. If the new tool window is notvisible, simply click the new View, Other Windows, Snippet Compiler command. Figure57.7 shows how the new tool window appears in the IDE.
57_0672331004_ch57.qxp 5/3/10 4:09 PM Page 1211

1212
The new tool window is a fully functional one, so it can be anchored like any other VisualStudio window. To stop the test environment, simply close the experimental instance ofVisual Studio. Until now you saw a debugging scenario. When the debugging and testingphase is completed, you need to deploy the extension to other developers. As explained inthe next section, Visual Studio 2010 offers a new, simple deployment system for this kindof extensions.
Deploying Visual Studio ExtensionsAmong new features in the Visual Studio extensibility, deploying extensions also changes.Microsoft introduces a new file type named VSIX (with .vsix extension) for packagingdeploying Visual Studio extensions. This new format is intended as a replacement for theprevious .vsi file format first introduced with Visual Studio 2005. Basically a VSIX packageis nothing but a zip archive that is built with regard to the open packaging convention.This means that if you rename the .vsix package into .zip, you can browse its contentwith any compression tool supporting zips. This kind of package needs to store someother files:
. A [Content_Types].xml file that describes the archive content according to the openpackaging convention
CHAPTER 57 Introducing the Visual Studio Extensibility
FIGURE 57.7 The new tool window running inside Visual Studio 2010.
57_0672331004_ch57.qxp 5/3/10 4:09 PM Page 1212

1213Deploying Visual Studio Extensions
57
. An extension.vsixmanifest file storing information on the extension and on how itwill be deployed
. Binary files for the extension (set named product payload)
. Support files, such as license, icons, and so on
VSIX packages cannot deploy add-ins, macros, and code snippets, whereas they candeploy any other kind of extensions. You can also deploy extensions via WindowsInstaller packages; this is preferable when you need to accomplish specific requirementssuch as installing assemblies to the GAC or writing to the Registry. For all other cases,VSIX packages are a good thing.
DEPLOYING ADD-INS AND CODE SNIPPETS
Because you cannot deploy Visual Studio add-ins and code snippets with Vsix pack-ages, you still need to build a .vsi package or recur to Windows Installer projects.
There are also some other good reasons for preferring VSIX packages. First, they can checkfor updates. Second, they can be uploaded to the Visual Studio Gallery so that other devel-opers can download your extension directly from the Visual Studio Extension Manager.(That will be covered later in this chapter.) Another good reason is that you do not needto edit a VSIX package manually. Visual Studio offers an integrated designer for creatingVSIX packages directly into the current project. Continuing the previous example, double-click the source.extension.vsixmanifest file in Solution Explorer. This file is added toeach extensibility project at creation time and is the deployment manifest for the exten-sion. Once this is done, Visual Studio 2010 looks like Figure 57.8.
With the exception of the ID field, which is filled by Visual Studio, you just need to fillblank and self-explanatory fields with custom values, as Figure 57.8 exemplifies. It isworth mentioning that VSIX packages are localizable (check out the Locale combo box)and can target multiple editions of Visual Studio (click the Select Editions button). Youcan also specify a license agreement (License Terms field) adding an existing text file orRTF file. The References group simply enables specifying other extensions that the currentone depends on. To build the deployment package, simply build the project. The VSIXpackage is now available in the project output folder (Bin\Debug or Bin\Release). Withregard to the previous example, the package is named SnippetCompilerVSPackage.Vsix. Ifyou double-click such a file, you will be prompted with some information before installa-tion begins, as represented in Figure 57.9.
By clicking Install, the new custom extension will be available onto the target system.This means that you simply need to deploy the VSIX package and you are done.
57_0672331004_ch57.qxp 5/3/10 4:09 PM Page 1213
1214 CHAPTER 57 Introducing the Visual Studio Extensibility
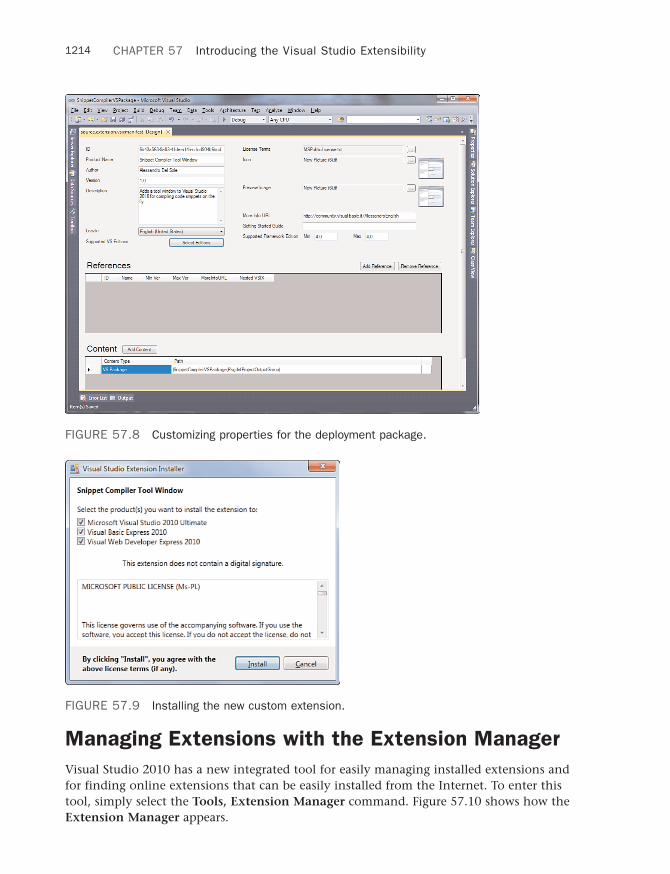
FIGURE 57.8 Customizing properties for the deployment package.
FIGURE 57.9 Installing the new custom extension.
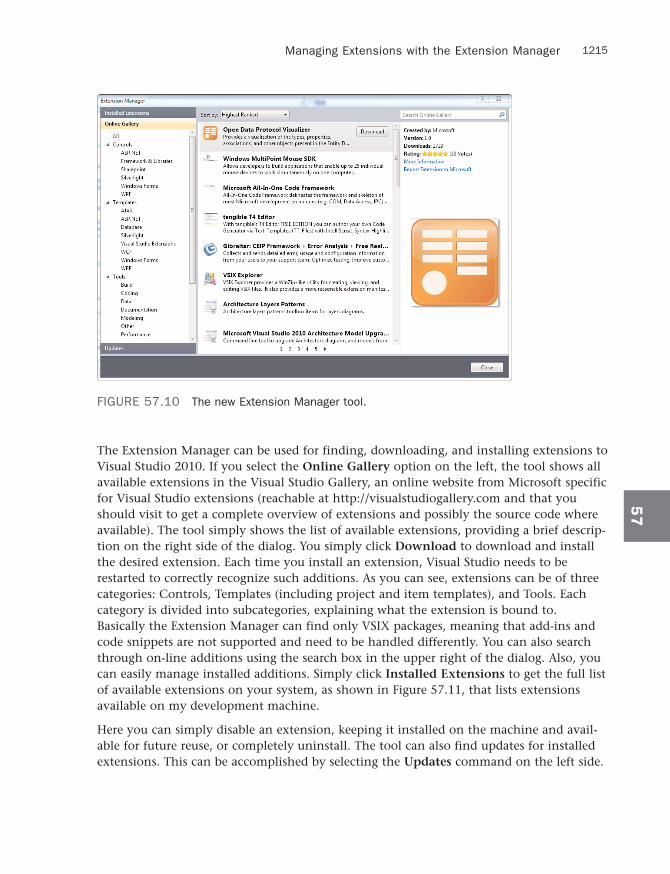
Managing Extensions with the Extension ManagerVisual Studio 2010 has a new integrated tool for easily managing installed extensions andfor finding online extensions that can be easily installed from the Internet. To enter thistool, simply select the Tools, Extension Manager command. Figure 57.10 shows how theExtension Manager appears.
57_0672331004_ch57.qxp 5/3/10 4:09 PM Page 1214
1215Managing Extensions with the Extension Manager
57
The Extension Manager can be used for finding, downloading, and installing extensions toVisual Studio 2010. If you select the Online Gallery option on the left, the tool shows allavailable extensions in the Visual Studio Gallery, an online website from Microsoft specificfor Visual Studio extensions (reachable at http://visualstudiogallery.com and that youshould visit to get a complete overview of extensions and possibly the source code whereavailable). The tool simply shows the list of available extensions, providing a brief descrip-tion on the right side of the dialog. You simply click Download to download and installthe desired extension. Each time you install an extension, Visual Studio needs to berestarted to correctly recognize such additions. As you can see, extensions can be of threecategories: Controls, Templates (including project and item templates), and Tools. Eachcategory is divided into subcategories, explaining what the extension is bound to.Basically the Extension Manager can find only VSIX packages, meaning that add-ins andcode snippets are not supported and need to be handled differently. You can also searchthrough on-line additions using the search box in the upper right of the dialog. Also, youcan easily manage installed additions. Simply click Installed Extensions to get the full listof available extensions on your system, as shown in Figure 57.11, that lists extensionsavailable on my development machine.
Here you can simply disable an extension, keeping it installed on the machine and avail-able for future reuse, or completely uninstall. The tool can also find updates for installedextensions. This can be accomplished by selecting the Updates command on the left side.
FIGURE 57.10 The new Extension Manager tool.
57_0672331004_ch57.qxp 5/3/10 4:09 PM Page 1215

1216 CHAPTER 57 Introducing the Visual Studio Extensibility
FIGURE 57.11 Managing installed extensions.
Managing Add-Ins with the Add-In ManagerVisual Studio 2010 enables enhancing the environment with add-ins. As mentioned at thebeginning of this chapter, an add-in basically extends an existing functionality. You canmanage installed add-ins via the Add-in Manager tool, which was already available inprevious versions. You enter the tool by selecting Tools, Add-In Manager. Figure 57.12shows how the tool looks when some add-ins are installed.
FIGURE 57.12 The Add-in Manager.
57_0672331004_ch57.qxp 5/3/10 4:09 PM Page 1216

1217Extending the Code Editor
57
Each add-in you can specify must be loaded at the IDE startup or if it has command-linesupport. Because building custom add-ins is something that was already available in previ-ous versions of the IDE, this topic is not covered here, so refer to the official MSDN pageat http://msdn.microsoft.com/en-us/library/80493a3w(VS.100).aspx.
Extending the Code EditorAs explained at the beginning of this chapter, one of the most important new features inthe Visual Studio 2010 is the capability of extending the code editor, which is now basedon WPF. Code editor extensions get the instance of the WPF objects keeping the editoritself alive. For a better understanding, instead of building a particular extension, weexplain required objects taking advantage of one of the sample projects added by theVisual Studio 2010 SDK. Create a new project and select the Visual Basic, Extensibilityfolder; finally select the Editor Text Adornment project template, as shown inFigure57.13.
The goal of this sample project is simple: adorning each “a” character in the code with adifferent background color. The most important object in providing editor extensions isthe Microsoft.VisualStudio.Text.Editor.IWpfTextView type that represents theinstance of the code editor. For the current example, there is the need of placing anadornment on all occurrences of the specified character. To place adornments, you needan instance of the IAdornmentLayer type that represents a space for placing adornments.Listing 57.4 shows the complete code; read comments that can help you understand whatis under the hood.
FIGURE 57.13 Selecting the code editor extension template.
57_0672331004_ch57.qxp 5/3/10 4:09 PM Page 1217

1218 CHAPTER 57 Introducing the Visual Studio Extensibility
LISTING 57.4 Providing a Code Editor Extension with Adornments
Imports System.Windows
Imports System.Windows.Controls
Imports System.Windows.Media
Imports Microsoft.VisualStudio.Text
Imports Microsoft.VisualStudio.Text.Editor
Imports Microsoft.VisualStudio.Text.Formatting
‘’’ <summary>
‘’’ ScarletCharacter adornment places red boxes behind all
‘’’ the “a”s in the editor window
‘’’ </summary>
Class ScarletCharacter
Private WithEvents _view As IWpfTextView
Private ReadOnly _layer As IAdornmentLayer
Private ReadOnly _brush As Brush
Private ReadOnly _pen As Pen
‘The IWpFTextView object represents the
‘instance of the code editor
Public Sub New(ByVal view As IWpfTextView)
_view = view
‘IAdornmentLayer represents the place where
‘adorners are placed
_layer = view.GetAdornmentLayer(“ScarletCharacter”)
‘Create the pen and brush to color the box behind the a’s
Dim brush As New SolidColorBrush(Color.
FromArgb(&H20, &H0, &H0, &HFF))
brush.Freeze()
Dim penBrush As New SolidColorBrush(Colors.Red)
penBrush.Freeze()
Dim pen As New Pen(penBrush, 0.5)
pen.Freeze()
_brush = brush
_pen = pen
End Sub
‘’’ <summary>
‘’’ On layout change add the adornment to any reformated lines
‘’’ </summary>
Private Sub OnLayoutChanged(ByVal sender As Object,
57_0672331004_ch57.qxp 5/3/10 4:09 PM Page 1218

1219Extending the Code Editor
57
ByVal e As TextViewLayoutChangedEventArgs) _
Handles _view.LayoutChanged
‘TextViewLayoutChangedEventArgs provides information when
‘the code editor layout changes
For Each line In e.NewOrReformattedLines
Me.CreateVisuals(line)
Next line
End Sub
‘’’ <summary>
‘’’ Within the given line add the scarlet box behind the a
‘’’ </summary>
Private Sub CreateVisuals(ByVal line As ITextViewLine)
‘grab a reference to the lines in the current TextView
Dim textViewLines = _view.TextViewLines
Dim lineStart As Integer = line.Start
Dim lineEnd As Integer = line.End
‘Loop through each character, and place a box around any a
For i = lineStart To lineEnd - 1
If _view.TextSnapshot(i) = “a”c Then
Dim charSpan As New SnapshotSpan(_view.TextSnapshot,
Span.FromBounds(i, i + 1))
Dim g As Geometry = textViewLines.GetMarkerGeometry(charSpan)
If g IsNot Nothing Then
Dim drawing As New GeometryDrawing(_brush, _pen, g)
drawing.Freeze()
Dim drawingImage As New DrawingImage(drawing)
drawingImage.Freeze()
Dim image As New Image()
image.Source = drawingImage
‘Align the image with the top of the bounds of the text geometry
Canvas.SetLeft(image, g.Bounds.Left)
Canvas.SetTop(image, g.Bounds.Top)
‘AdornmentPositioningBehavior sets how
‘the adornment is placed
_layer.AddAdornment(AdornmentPositioningBehavior.
TextRelative, charSpan,
Nothing, image, Nothing)
End If
End If
57_0672331004_ch57.qxp 5/3/10 4:09 PM Page 1219

1220 CHAPTER 57 Introducing the Visual Studio Extensibility
Next
End Sub
End Class
Notice how the Microsoft.VisualStudio.Text namespace exposes objects and othernamespaces for interacting with the code editor. Now run the extension by pressing F5.Try to create a new console project and write some text containing “a” characters and youwill see how they are surrounded with a different background, as shown in Figure 57.14.
There are so many scenarios in which you might need to extend the Visual Studio codeeditor. You can find lots of interesting extensions by searching the Visual Studio Gallerywith the Extension Manager.
FIGURE 57.14 The WPF editor extension adorning some text.
57_0672331004_ch57.qxp 5/3/10 4:09 PM Page 1220

1221Summary
57
SummaryVisual Studio 2010 is an extensible development environment that can be enhanced withcustom extensions such as add-ins, packages, and new code editor extensions due to anew architecture based on Windows Presentation Foundation. Instrumentation requiredfor creating extensibility projects are available when installing the Visual Studio 2010 SDKthat provides projects templates, tools, and documentation. This chapter explained how tobuild a custom tool window based on WPF for the Visual Studio development environ-ment. Then you saw how custom extensions can be packaged into VSIX files anddeployed to other developers. Next you saw how you can take advantage of the newExtension Manager for getting and easily installing extensions from the Visual StudioGallery. The last example provided in this chapter was about extending the WPF-basedcode editor by taking advantage of Visual Studio’s managed assemblies.
57_0672331004_ch57.qxp 5/3/10 4:09 PM Page 1221

57_0672331004_ch57.qxp 5/3/10 4:09 PM Page 1222
![[Priorto7/15/87,HealthDepartment[470]Ch57 ... · Ch57,p.2 InspectionsandAppeals[481] IAC12/10/14 “Responsibleparty”meansthepersonwhosignsorcosignstheresidencyagreementrequired](https://img.dokumen.tips/doc/110x75/5ed77fcfe200687e44403e84/priorto71587healthdepartment470ch57-ch57p2-inspectionsandappeals481.jpg)