Embed Size (px)
Citation preview

5’ 3-POINT ROUGH CUT MOWER98795
SET UP AND OPERATING INSTRUCTIONS
Visit our website at: http://www.harborfreight.com
Read this material before using this product. Failure to do so can result in serious injury. SAVE THIS MANUAL.
Copyright© 2008 by Harbor Freight Tools®. All rights reserved. No portion of this manual or any artwork contained herein may be reproduced in any shape or form without the express written consent of Harbor Freight Tools. Diagrams within this manual may not be drawn proportionally. Due to continuing improvements, actual product may differ slightly from the product described herein. Tools required for assembly and service may not be included.
For technical questions or replacement parts, please call 1-800-444-3353.Revised Manual 09l
SKU 98795 For technical questions, please call 1-800-444-3353. Page 2
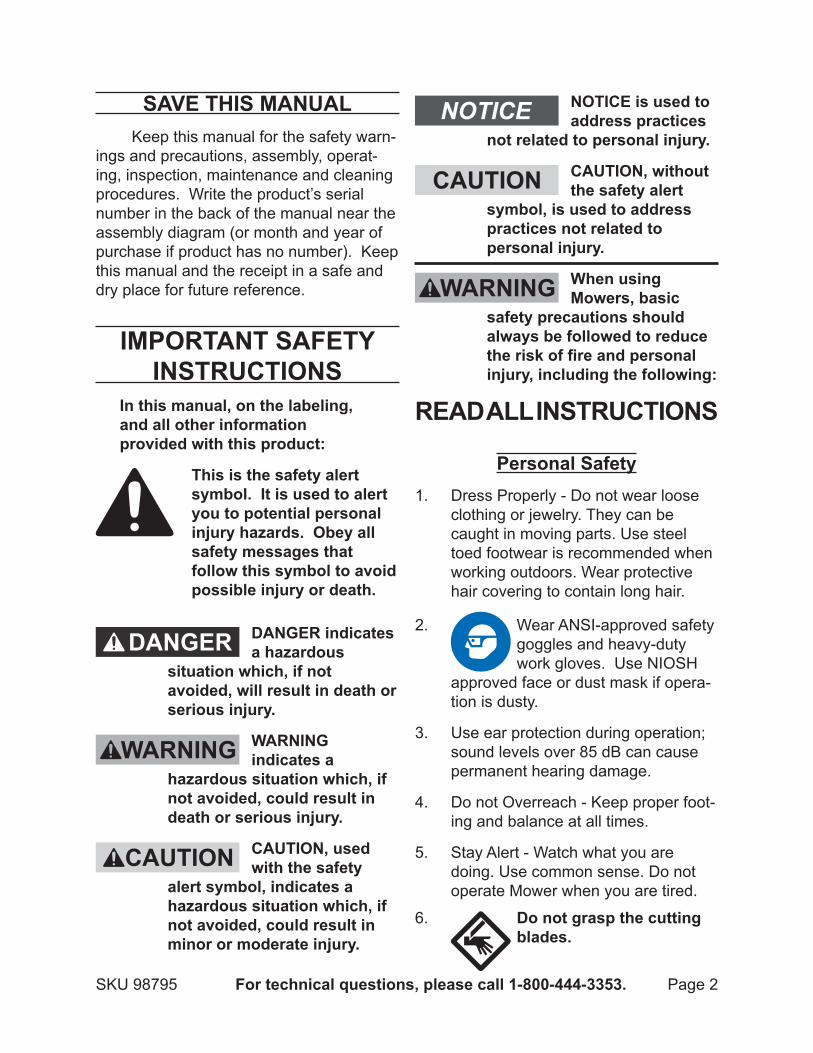
SAVE THIS MANUALKeep this manual for the safety warn-
ings and precautions, assembly, operat-ing, inspection, maintenance and cleaning procedures. Write the product’s serial number in the back of the manual near the assembly diagram (or month and year of purchase if product has no number). Keep this manual and the receipt in a safe and dry place for future reference.
IMPORTANT SAFETY INSTRUCTIONS
In this manual, on the labeling, and all other information provided with this product:
This is the safety alert symbol. It is used to alert you to potential personal injury hazards. Obey all safety messages that follow this symbol to avoid possible injury or death.
DANGER indicates a hazardous
situation which, if not avoided, will result in death or serious injury.
WARNING indicates a
hazardous situation which, if not avoided, could result in death or serious injury.
CAUTION, used with the safety
alert symbol, indicates a hazardous situation which, if not avoided, could result in minor or moderate injury.
NOTICE is used to address practices
not related to personal injury.
CAUTION, without the safety alert
symbol, is used to address practices not related to personal injury.
When using Mowers, basic
safety precautions should always be followed to reduce the risk of fire and personal injury, including the following:
READ ALL INSTRUCTIONS
Personal Safety1. Dress Properly - Do not wear loose
clothing or jewelry. They can be caught in moving parts. Use steel toed footwear is recommended when working outdoors. Wear protective hair covering to contain long hair.
2. Wear ANSI-approved safety goggles and heavy-duty work gloves. Use NIOSH
approved face or dust mask if opera-tion is dusty.
3. Use ear protection during operation; sound levels over 85 dB can cause permanent hearing damage.
4. Do not Overreach - Keep proper foot-ing and balance at all times.
5. Stay Alert - Watch what you are doing. Use common sense. Do not operate Mower when you are tired.
6. Do not grasp the cutting blades.
SKU 98795 For technical questions, please call 1-800-444-3353. Page 3
7. Keep hands and feet away from cutting area.
8. Keep hands away from blades.
9. Wear thick jeans and steel-toed work boots to help prevent injury caused by flying debris.
Mower Use and Care1. Avoid Dangerous Environment
- Do not use in damp or wet loca-tions.
2. Do not Use In Rain.
3. Keep Children Away - All visitors should be kept at a distance of at least 20 yards from work area.
4. When servicing use only identical replacement parts.
5. Use Right Mower - Do not use the Mower for any job except that for which it is intended.
6. Do not Force the Mower - It will do the job better and with less likelihood of injury at the rate for which it was designed. Do not exceed 3 MPH dur-ing use.
7. Raise Mower, secure it in the upright position, and do not exceed 20 MPH during transport. Do not transport Mower on public roads.
8. Store Idle Mowers Indoors - When not in use, Mowers should be stored indoors in a dry, locked-up place - out of reach of children.
9. Maintain Mower With Care - Keep cutting edge sharp and clean for best performance and to reduce the risk of injury. Follow instructions for lubricat-ing and changing accessories. Keep surfaces dry, clean, and free from oil and grease.
10. Before use of the Mower. Check for alignment of moving parts, binding of moving parts, breakage of parts, mounting, and any other condition that may affect its operation. A guard or other part that is damaged should be properly repaired or replaced by a qualified technician.
11. Disconnect the Mower from the tractor when not in use, before ser-vicing, and when changing acces-sories such as blades, and the like.
12. Keep guards in place and in work-ing order.
13. Keep blades sharp.
14. Do not use this Mower for edging operations. Debris may be force-fully thrown out resulting in seri-ous injury.
General Safety1. Read and follow all instructions in the
tractor manual that the Mower will be connected to.
2. Keep this manual in the storage tube that is connected to the mower, so that it will not get lost.
3. Use a tractor equipped with a R.O.P.S. (Roll-Over Protective Struc-ture) and wear the seat belt.
4. Do not allow riders on tractor or mower.
SKU 98795 For technical questions, please call 1-800-444-3353. Page 4
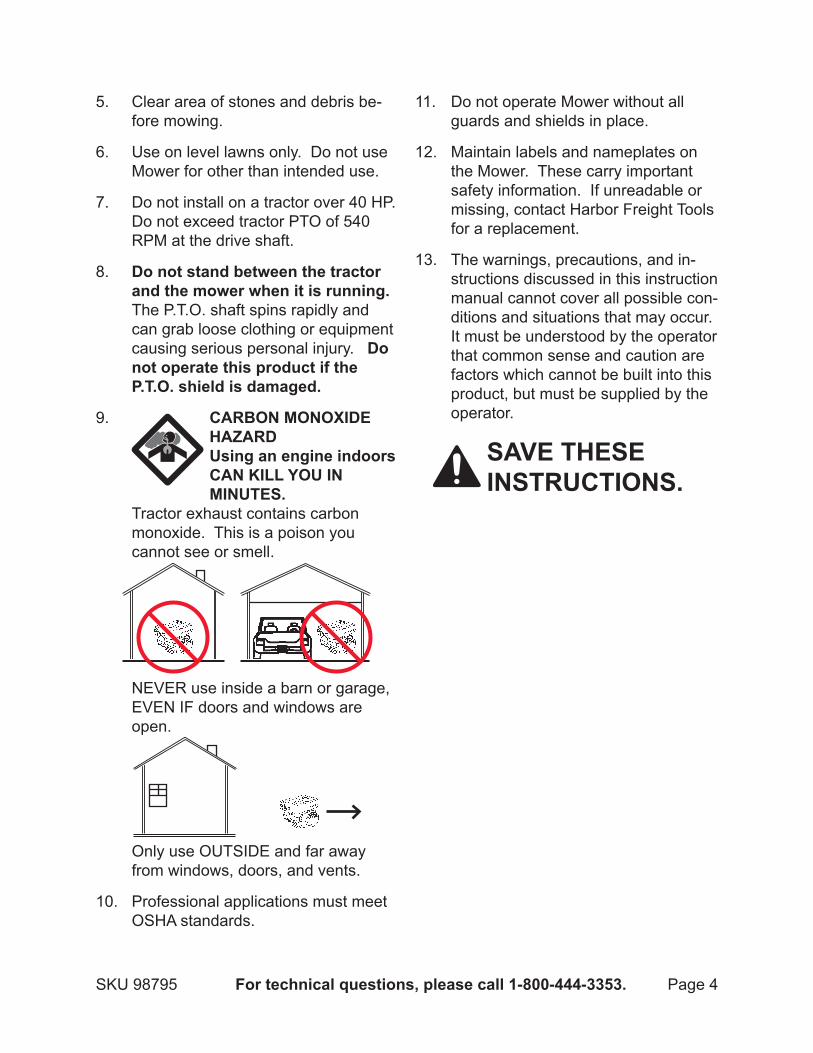
5. Clear area of stones and debris be-fore mowing.
6. Use on level lawns only. Do not use Mower for other than intended use.
7. Do not install on a tractor over 40 HP. Do not exceed tractor PTO of 540 RPM at the drive shaft.
8. Do not stand between the tractor and the mower when it is running. The P.T.O. shaft spins rapidly and can grab loose clothing or equipment causing serious personal injury. Do not operate this product if the P.T.O. shield is damaged.
9. CARBON MONOXIDE HAZARD Using an engine indoors CAN KILL YOU IN MINUTES.
Tractor exhaust contains carbon monoxide. This is a poison you cannot see or smell.
NEVER use inside a barn or garage, EVEN IF doors and windows are open.
Only use OUTSIDE and far away from windows, doors, and vents.
10. Professional applications must meet OSHA standards.
11. Do not operate Mower without all guards and shields in place.
12. Maintain labels and nameplates on the Mower. These carry important safety information. If unreadable or missing, contact Harbor Freight Tools for a replacement.
13. The warnings, precautions, and in-structions discussed in this instruction manual cannot cover all possible con-ditions and situations that may occur. It must be understood by the operator that common sense and caution are factors which cannot be built into this product, but must be supplied by the operator.
SAVE THESE INSTRUCTIONS.
SKU 98795 For technical questions, please call 1-800-444-3353. Page 5
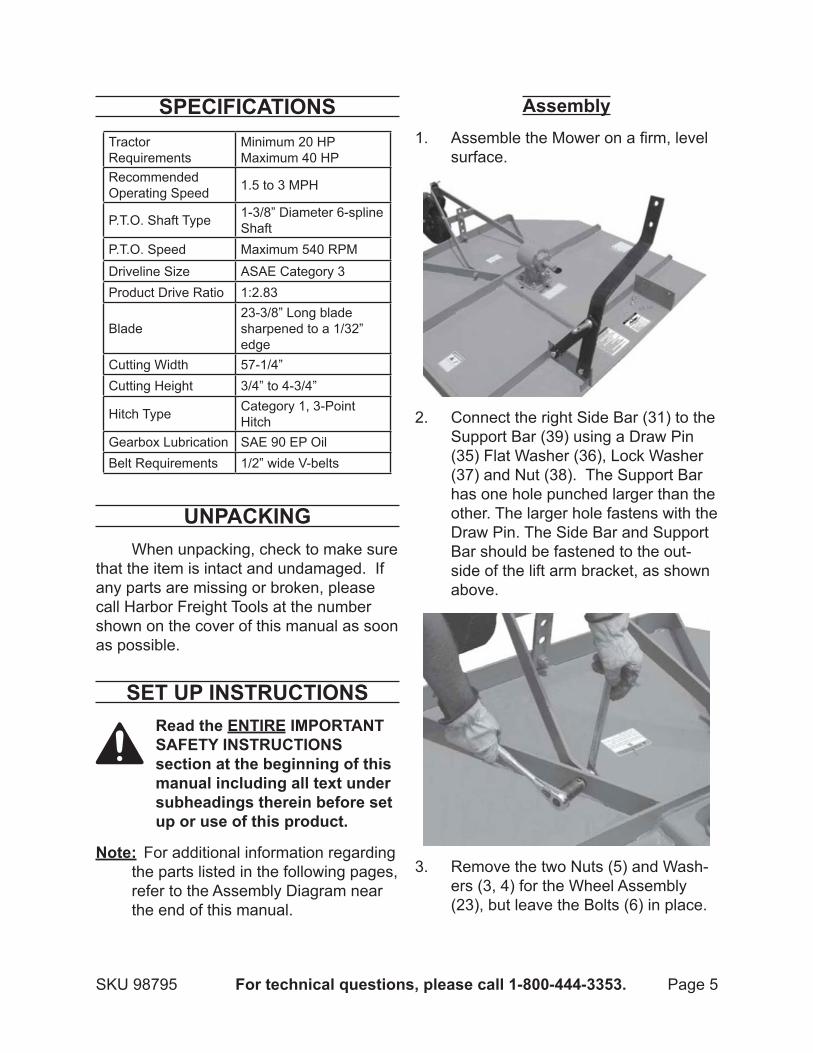
SPECIFICATIONSTractor Requirements
Minimum 20 HP Maximum 40 HP
Recommended Operating Speed 1.5 to 3 MPH
P.T.O. Shaft Type 1-3/8” Diameter 6-spline Shaft
P.T.O. Speed Maximum 540 RPMDriveline Size ASAE Category 3Product Drive Ratio 1:2.83
Blade23-3/8” Long blade sharpened to a 1/32” edge
Cutting Width 57-1/4”Cutting Height 3/4” to 4-3/4”
Hitch Type Category 1, 3-Point Hitch
Gearbox Lubrication SAE 90 EP OilBelt Requirements 1/2” wide V-belts
UNPACKINGWhen unpacking, check to make sure
that the item is intact and undamaged. If any parts are missing or broken, please call Harbor Freight Tools at the number shown on the cover of this manual as soon as possible.
SET UP INSTRUCTIONSRead the ENTIRE IMPORTANT SAFETY INSTRUCTIONS section at the beginning of this manual including all text under subheadings therein before set up or use of this product.
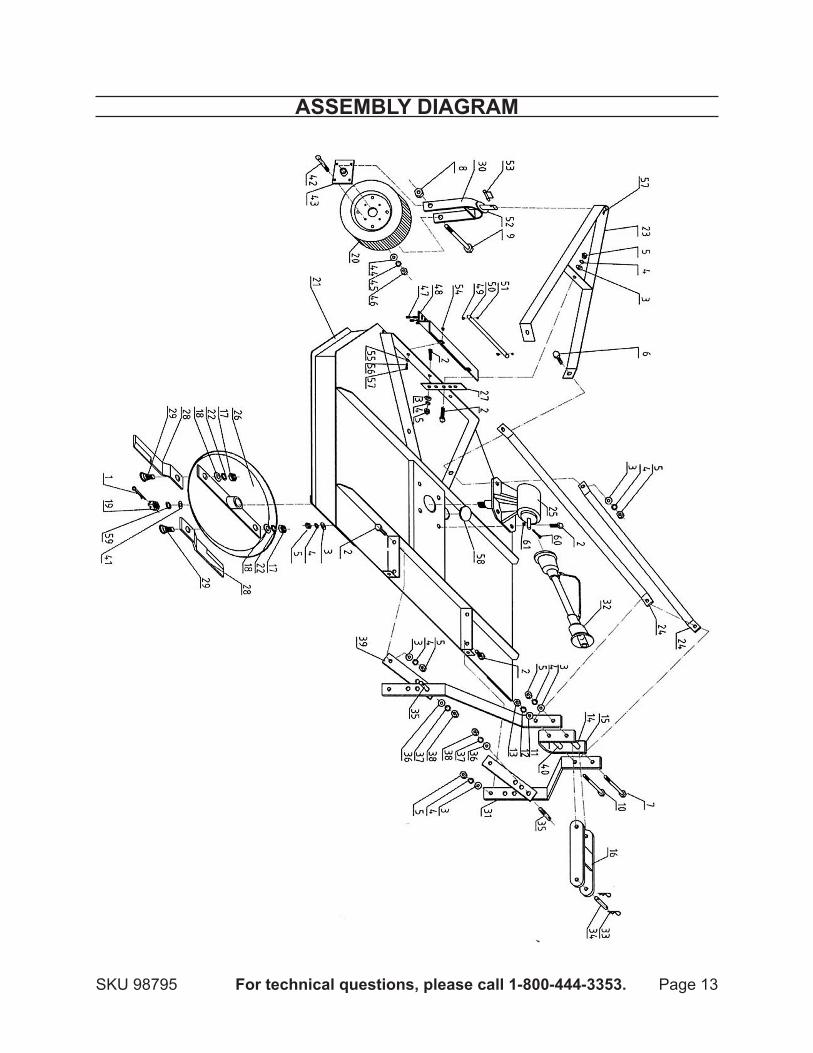
Note: For additional information regarding the parts listed in the following pages, refer to the Assembly Diagram near the end of this manual.
Assembly1. Assemble the Mower on a firm, level
surface.
2. Connect the right Side Bar (31) to the Support Bar (39) using a Draw Pin (35) Flat Washer (36), Lock Washer (37) and Nut (38). The Support Bar has one hole punched larger than the other. The larger hole fastens with the Draw Pin. The Side Bar and Support Bar should be fastened to the out-side of the lift arm bracket, as shown above.
3. Remove the two Nuts (5) and Wash-ers (3, 4) for the Wheel Assembly (23), but leave the Bolts (6) in place.
SKU 98795 For technical questions, please call 1-800-444-3353. Page 6
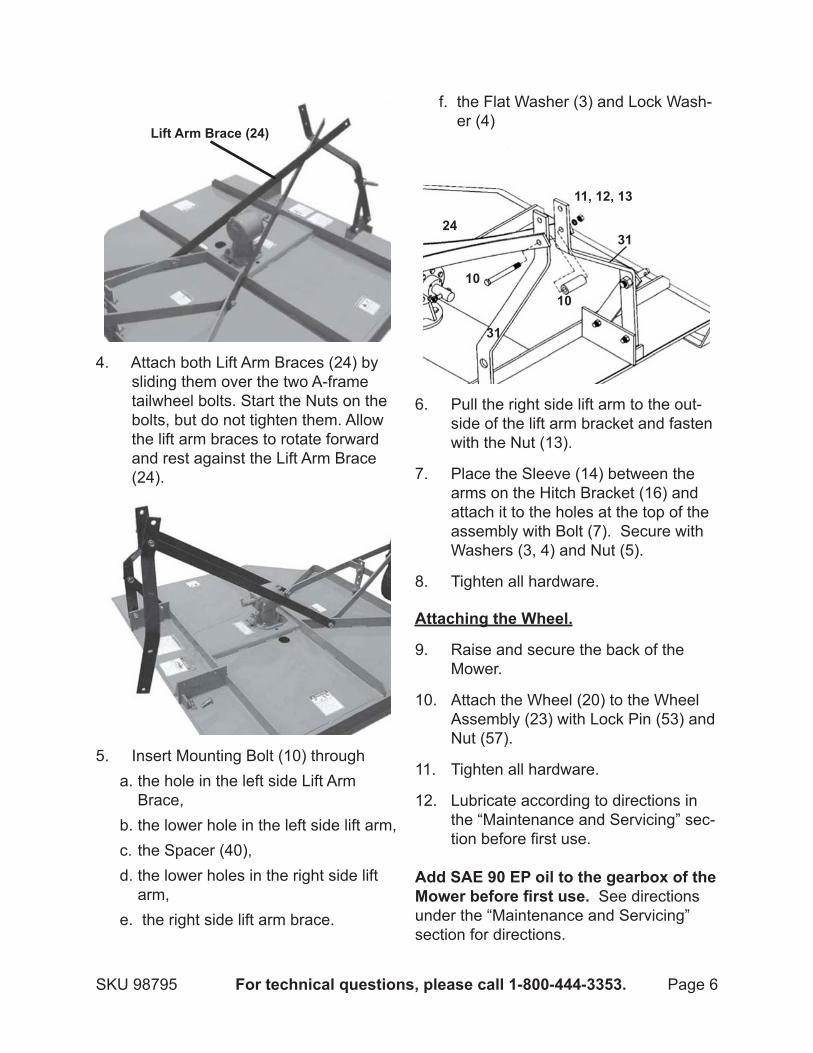
4.
Lift Arm Brace (24)
Attach both Lift Arm Braces (24) by sliding them over the two A-frame tailwheel bolts. Start the Nuts on the bolts, but do not tighten them. Allow the lift arm braces to rotate forward and rest against the Lift Arm Brace (24).
5. Insert Mounting Bolt (10) through a. the hole in the left side Lift Arm
Brace, b. the lower hole in the left side lift arm, c. the Spacer (40), d. the lower holes in the right side lift
arm,e. the right side lift arm brace.
f. the Flat Washer (3) and Lock Wash-er (4)
6.
1010
11, 12, 13
24
31
31
Pull the right side lift arm to the out-side of the lift arm bracket and fasten with the Nut (13).
7. Place the Sleeve (14) between the arms on the Hitch Bracket (16) and attach it to the holes at the top of the assembly with Bolt (7). Secure with Washers (3, 4) and Nut (5).
8. Tighten all hardware.
Attaching the Wheel.
9. Raise and secure the back of the Mower.
10. Attach the Wheel (20) to the Wheel Assembly (23) with Lock Pin (53) and Nut (57).
11. Tighten all hardware.
12. Lubricate according to directions in the “Maintenance and Servicing” sec-tion before first use.
Add SAE 90 EP oil to the gearbox of the Mower before first use. See directions under the “Maintenance and Servicing” section for directions.

SKU 98795 For technical questions, please call 1-800-444-3353. Page 7
Attaching the Mower to the Tractor
TO PREVENT SERIOUS INJURY
OR DEATH. Back the tractor up to the mower so that the lower draft arms are in alignment with the mower lift pins. Stop the engine, lock the brakes, place the tractor in park, and remove the key from the ignition.
1. Read the tractor manufacturer’s di-rections for P.T.O. connections to the tractor.
2. Shorten or remove the tractor draw-bar so it will not interfere with the up and down movement of the mower.
3. Connect the tractor and stabilizer bars to the lower lift pins. Adjust the top link so it will connect to the top holes in the A-Frame or into the holes in the floating top link.
4. Slide yoke onto the tractor P.T.O. shaft.
5. Move yoke back and forth until lock-ing pin has engaged on the P.T.O. shaft groove. When attaching the driveline yoke to the tractor P.T.O. shaft; the spring activated locking pin must seat properly in the tractor P.T.O. shaft groove.
6. Secure the P.T.O. shaft guard with the chains connected to the main unit.
7. Use stabilizer bars or sway blocks appropriate to the tractor to prevent side sway of the mower.
OPERATING INSTRUCTIONSRead the ENTIRE IMPORTANT SAFETY INFORMATION section at the beginning of this manual including all text under subheadings therein before set up or use of this product.
1. The gearbox of the Mower must be filled with a SAE 90 EP oil before first use of the Mower.
2. Before operating the Mower, put on ANSI-approved safety goggles and other safety gear. Safety goggles and other safety gear are sold sepa-rately.
3. Attach the Mower to the tractor.
4. Raise the Mower and brace it up securely before adjusting the wheel for height of grass desired. Always brace the Mower when it is raised; hydraulic systems can fail causing the mower to fall onto the operator.
5. Start the tractor and allow it to warm up and achieve idle speed.
6. To transport the Mower, disengage the P.T.O. and raise it to full transport height before moving to the mowing area.
7. Lower the Mower. Reduce engine speed and engage the tractor P.T.O. Gradually increase the engine speed to develop full P.T.O. speed of 540 RPM.
8. Enter the area to be cut with the cutter operating at P.T.O. speed. If it becomes necessary to regulate engine speed during operation do so gradually.
SKU 98795 For technical questions, please call 1-800-444-3353. Page 8
9. This Mower is only recommended for light duty use on level lawns. Cutting speed will depend upon the height, type, and density of the grass to be cut. Tall or thick grass should be cut at low speed, while short, thin grass can be cut faster. Grass should be cut when dry; wet grass will stick to the Mower and clog it up.
10. If the mower contacts a hidden ob-struction, immediately stop operation. Raise the mower, turn off the tractor, and disconnect the drive shaft. Se-cure the mower in the upright posi-tion. Verify that the mower is not damaged before continuing.
IN ORDER TO AVOID PERSONAL INJURY OR PROPERTY DAMAGE. When attempting to stop a tractor which does not have a live P.T.O, the momentum created by the blades of a mower can cause the tractor to be pushed forward. Do not operate this mower unless the tractor has a live or independent P.T.O.
11. When finished, move the Mower to the intended storage area, and allow the P.T.O. to rotate to a stop before getting off the tractor.
12. To prevent accidents, disconnect the mower from the tractor after use. Clean, then store the appliance in-doors out of children’s reach.
SKU 98795 For technical questions, please call 1-800-444-3353. Page 9
MAINTENANCE AND SERVICING
Procedures not specifically explained in this manual must be performed only by a qualified technician.
TO PREVENT SERIOUS INJURY
FROM ACCIDENTAL OPERATION: Turn the tractor “OFF” and disconnect the mower before performing any inspection, maintenance, or cleaning procedures.
TO PREVENT SERIOUS INJURY FROM TOOL FAILURE: Do not use damaged equipment. If abnormal noise or vibration occurs, have the problem corrected before further use.
Cleaning, Maintenance, and Lubrication
1. BEFORE EACH USE, inspect the general condition of the Mower. Check for loose screws, misalignment or binding of moving parts, cracked or broken parts, and any other condition that may affect its safe operation.
2. AFTER USE, clean external surfaces of the appliance with clean cloth.
Lubrication1. The Wheel axle (9), Blade Spindles
and U-joints must be lubricated with white lithium grease before each use and after every eight hours of opera-
tion. Additional lubrications points are indicated in the following dia-gram.
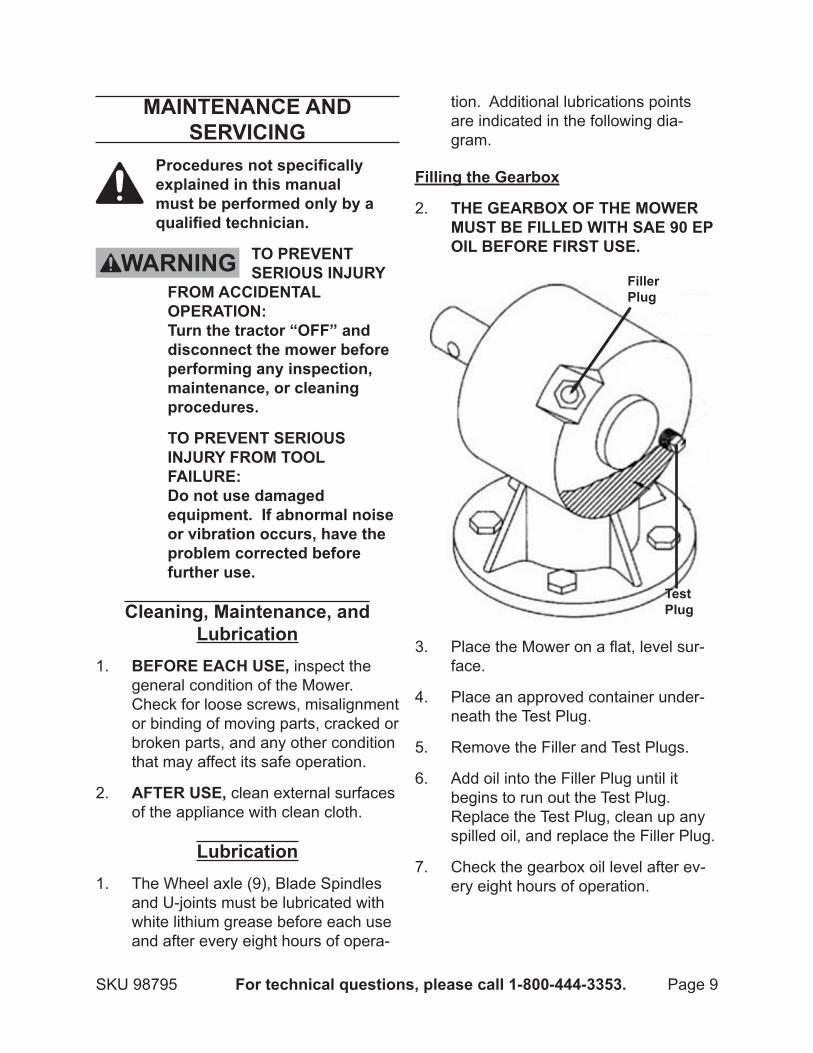
Filling the Gearbox
2. THE GEARBOX OF THE MOWER MUST BE FILLED WITH SAE 90 EP OIL BEFORE FIRST USE.
3.
Test Plug
Filler Plug
Place the Mower on a flat, level sur-face.
4. Place an approved container under-neath the Test Plug.
5. Remove the Filler and Test Plugs.
6. Add oil into the Filler Plug until it begins to run out the Test Plug. Replace the Test Plug, clean up any spilled oil, and replace the Filler Plug.
7. Check the gearbox oil level after ev-ery eight hours of operation.
SKU 98795 For technical questions, please call 1-800-444-3353. Page 10
Wheel Lubrication
8. The Hex Bolt (9) and Flat Plate (52) of the Wheel should be lubricated before each use and after every eight hours of operation with white lithium grease.
Driveshaft Lubrication
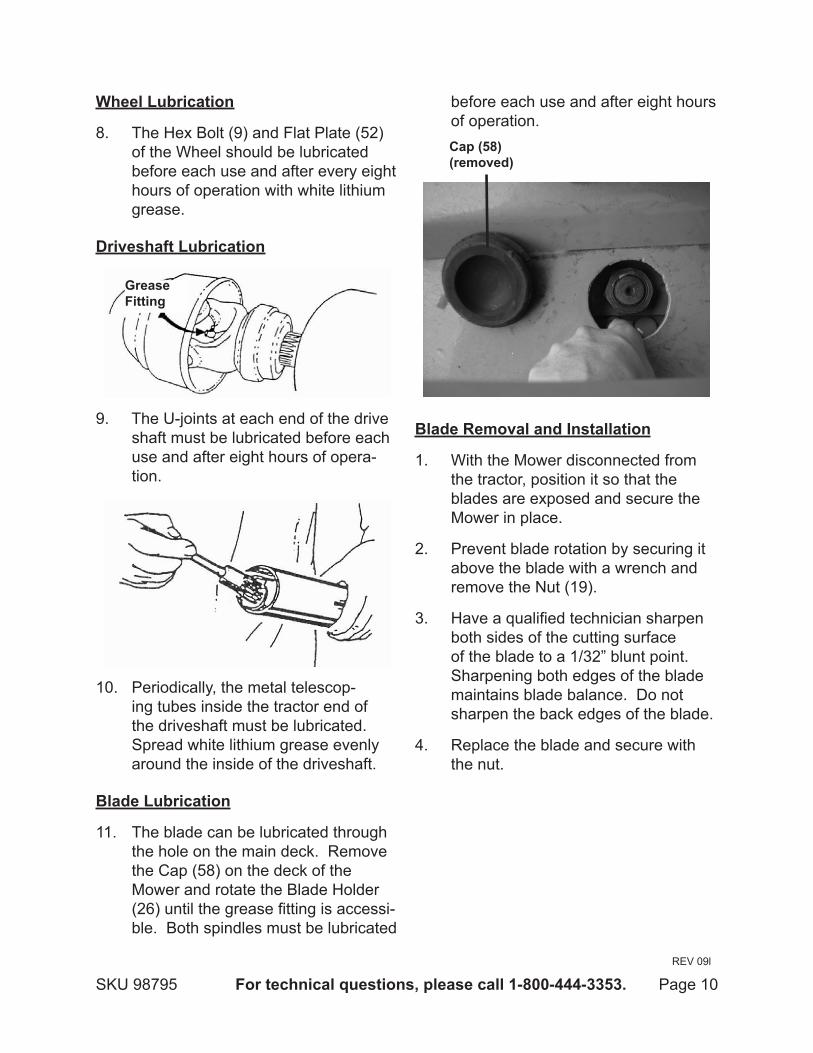
9.
Grease Fitting
The U-joints at each end of the drive shaft must be lubricated before each use and after eight hours of opera-tion.
10. Periodically, the metal telescop-ing tubes inside the tractor end of the driveshaft must be lubricated. Spread white lithium grease evenly around the inside of the driveshaft.
Blade Lubrication
11. The blade can be lubricated through the hole on the main deck. Remove the Cap (58) on the deck of the Mower and rotate the Blade Holder (26) until the grease fitting is accessi-ble. Both spindles must be lubricated
before each use and after eight hours of operation.Cap (58) (removed)
Blade Removal and Installation
1. With the Mower disconnected from the tractor, position it so that the blades are exposed and secure the Mower in place.
2. Prevent blade rotation by securing it above the blade with a wrench and remove the Nut (19).
3. Have a qualified technician sharpen both sides of the cutting surface of the blade to a 1/32” blunt point. Sharpening both edges of the blade maintains blade balance. Do not sharpen the back edges of the blade.
4. Replace the blade and secure with the nut.
REV 09l
SKU 98795 For technical questions, please call 1-800-444-3353. Page 11
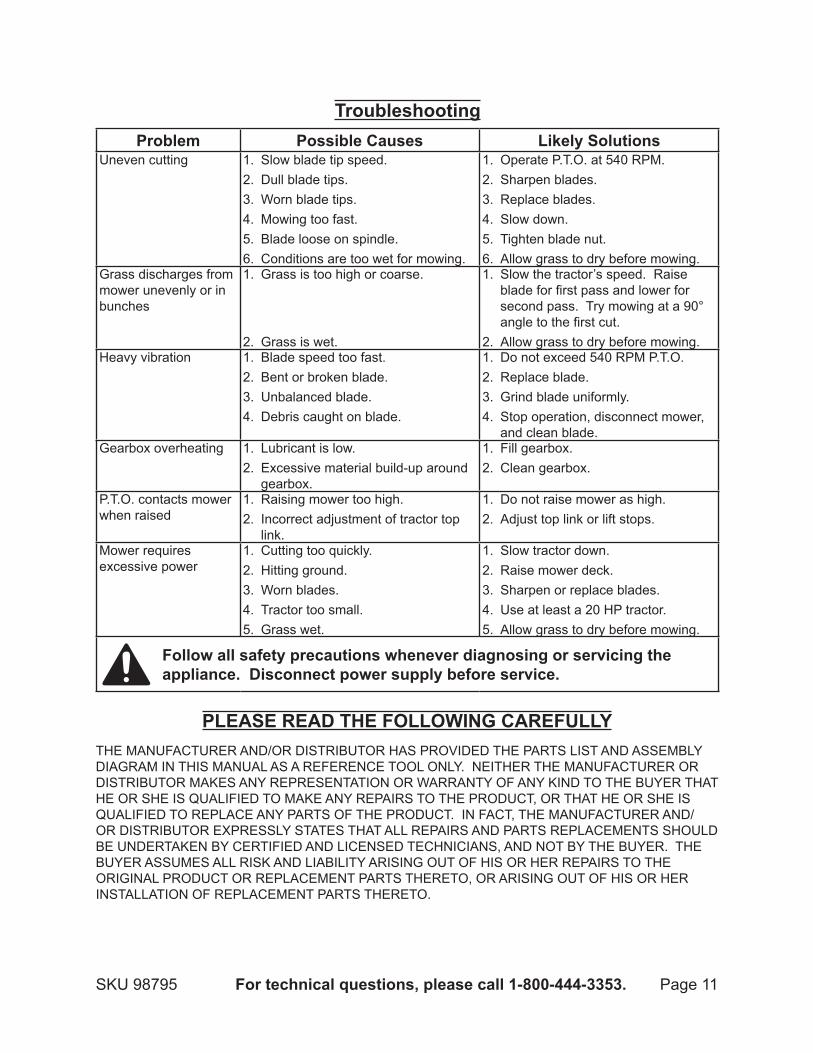
TroubleshootingProblem Possible Causes Likely Solutions
Uneven cutting 1. Slow blade tip speed.2. Dull blade tips.3. Worn blade tips.4. Mowing too fast.5. Blade loose on spindle.6. Conditions are too wet for mowing.
1. Operate P.T.O. at 540 RPM.2. Sharpen blades.3. Replace blades.4. Slow down.5. Tighten blade nut.6. Allow grass to dry before mowing.
Grass discharges from mower unevenly or in bunches
1. Grass is too high or coarse.
2. Grass is wet.
1. Slow the tractor’s speed. Raise blade for first pass and lower for second pass. Try mowing at a 90° angle to the first cut.
2. Allow grass to dry before mowing.Heavy vibration 1. Blade speed too fast.
2. Bent or broken blade.3. Unbalanced blade.4. Debris caught on blade.
1. Do not exceed 540 RPM P.T.O. 2. Replace blade.3. Grind blade uniformly.4. Stop operation, disconnect mower,
and clean blade.Gearbox overheating 1. Lubricant is low.
2. Excessive material build-up around gearbox.
1. Fill gearbox.2. Clean gearbox.
P.T.O. contacts mower when raised
1. Raising mower too high.2. Incorrect adjustment of tractor top
link.
1. Do not raise mower as high.2. Adjust top link or lift stops.
Mower requires excessive power
1. Cutting too quickly.2. Hitting ground.3. Worn blades.4. Tractor too small.5. Grass wet.
1. Slow tractor down.2. Raise mower deck.3. Sharpen or replace blades.4. Use at least a 20 HP tractor.5. Allow grass to dry before mowing.
Follow all safety precautions whenever diagnosing or servicing the appliance. Disconnect power supply before service.
PLEASE READ THE FOLLOWING CAREFULLYTHE MANUFACTURER AND/OR DISTRIBUTOR HAS PROVIDED THE PARTS LIST AND ASSEMBLY DIAGRAM IN THIS MANUAL AS A REFERENCE TOOL ONLY. NEITHER THE MANUFACTURER OR DISTRIBUTOR MAKES ANY REPRESENTATION OR WARRANTY OF ANY KIND TO THE BUYER THAT HE OR SHE IS QUALIFIED TO MAKE ANY REPAIRS TO THE PRODUCT, OR THAT HE OR SHE IS QUALIFIED TO REPLACE ANY PARTS OF THE PRODUCT. IN FACT, THE MANUFACTURER AND/OR DISTRIBUTOR EXPRESSLY STATES THAT ALL REPAIRS AND PARTS REPLACEMENTS SHOULD BE UNDERTAKEN BY CERTIFIED AND LICENSED TECHNICIANS, AND NOT BY THE BUYER. THE BUYER ASSUMES ALL RISK AND LIABILITY ARISING OUT OF HIS OR HER REPAIRS TO THE ORIGINAL PRODUCT OR REPLACEMENT PARTS THERETO, OR ARISING OUT OF HIS OR HER INSTALLATION OF REPLACEMENT PARTS THERETO.

SKU 98795 For technical questions, please call 1-800-444-3353. Page 12
PARTS LISTPart Description Qty
1 Cotter Pin 5x50 12 Hex Head Bolt M16x45 103 Flat Washer 144 Lock Washer 145 Hex Nut M16 146 Hex Head Bolt M16x70 27 Bolt M16x130 18 Hex Nut M16 19 Hex Bolt M24x180 1
10 Mounting Bolt M14x130 111 Flat Washer 112 Lock Washer 113 Nut M14 114 Sleeve 115 U-Bracket 116 Hitch Bracket 117 Hex Nut 218 Flat Washer 219 Nut M24 120 Tail Wheel 121 Deck 122 Lock Washer 223 Wheel Assembly 124 Lift Arm Brace 225 Gear Box 126 Blade Holder 127 Adjusting Bar 128 Blade 229 Bolt 230 Wheel Yoke 131 Side Bar 2
PARTS LISTPart Description Qty
32 P.T.O. 133 Hairpin 134 Pin 135 Draw Pin 236 Flat Washer 237 Lock Washer 238 Nut M22 239 Support Bar 240 Sleeve 141 Flat Washer 142 Carriage Bolt M12x30 443 Link Plate 144 Flat Washer 445 Lock Washer 446 Nut M12 447 Chain 2448 Chain Plate 149 Bolt M6x25 250 Chain Rod 151 Lock Nut M6 252 Flat Plate 153 Lock Pin 154 Bolt M10x35 255 Flat Washer 256 Lock Washer 257 Nut 258 Cap 159 Lock Washer 160 Bolt M12x85 161 Lock Nut M12 1
Record Product’s Serial Number Here: Note: If product has no serial number, record month and year of purchase instead.
Note: Some parts are listed and shown for illustration purposes only, and are not avail-able individually as replacement parts.
SKU 98795 For technical questions, please call 1-800-444-3353. Page 13
ASSEMBLY DIAGRAM
SKU 98795 For technical questions, please call 1-800-444-3353. Page 14
90 Day Warranty
Harbor Freight Tools Co. makes every effort to assure that its products meet high quality and durability standards, and warrants to the original purchaser that this product is free from defects in materials and workmanship for the period of 90 days from the date of purchase. This warranty does not apply to damage due directly or indirectly, to misuse, abuse, negligence or accidents, repairs or alterations outside our facilities, criminal activity, improper installation, normal wear and tear, or to lack of maintenance. We shall in no event be liable for death, injuries to persons or property, or for incidental, contingent, special or consequential damages arising from the use of our product. Some states do not allow the exclusion or limitation of incidental or consequential damages, so the above limitation of exclusion may not apply to you. THIS WARRANTY IS EXPRESSLY IN LIEU OF ALL OTHER WARRANTIES, EXPRESS OR IMPLIED, INCLUDING THE WARRANTIES OF MERCHANTABILITY AND FITNESS.To take advantage of this warranty, the product or part must be returned to us with transportation charges prepaid. Proof of purchase date and an explanation of the complaint must accompany the merchandise. If our inspection verifies the defect, we will either repair or replace the product at our election or we may elect to refund the purchase price if we cannot readily and quickly provide you with a replacement. We will return repaired products at our expense, but if we determine there is no defect, or that the defect resulted from causes not within the scope of our warranty, then you must bear the cost of returning the product.This warranty gives you specific legal rights and you may also have other rights which vary from state to state.
3491 Mission Oaks Blvd. • PO Box 6009 • Camarillo, CA 93011 • (800) 444-3353