Embed Size (px)
Citation preview

MAKE: STYLE:
45
WARNING: NEVER EXCEED YOUR VEHICLE MANUFACTURER'S RECOMMENDED TOWING CAPACITY
WEIGHT CARRYING:
INSTALLATION TIPS:
INSTALLATION REQUIRES:
VEHICLE PHOTO:
HITCH ILLUSTRATION:
REPRESENTATIVE PHOTO
MAKE SURE YOUR HITCH MATCHES
LEVEL OF DIFFICULTY: MODERATE
EASY MODERATE CHALLENGING
1. BEFORE YOU BEGIN INSTALLATION, READ ALL
INSTRUCTIONS THOROUGHLY.
2. TO EASE INSTALLATION, 2 PEOPLE MAY BE
REQUIRED.
3. USING PROPER TOOLS WILL GREATLY IMPROVE
THE QUALITY OF THE INSTALL AND REDUCE THE
TIME REQUIRED.
4. NEED HELP OR HAVE SOME QUESTIONS?
CALL TECHNICAL SUPPORT AT 800.798.0813
Safety glasses should be worn at all times whileinstalling this product.
YEARS: 2015 CHEVROLET MODEL: COLORADO & CANYON TRUCK
GROSS LOAD CAPACITY WHEN USED AS A STRAIGHT LINE PULL:
9,000 LBS MAX.5,000
500
TRAILER WEIGHT:
TONGUE WEIGHT:
31074 INSTALLATION INSTRUCTIONS
LBS.
LBS.
MIN.
MIN.90
IF YOU ARE HESITANT TO UNDERTAKE
THIS TASK ON YOUR OWN, CONTACT AN AUTHORIZED
CURT INSTALLER FOR ADDITIONAL ASSISTANCE.
NOVICE INSTALL TIME:
PRO INSTALL TIME:
SCAN FOR
MORE INFO
PERIODICALLY CHECK THIS RECEIVER HITCH TO ENSURE ALL FASTENERS ARE TIGHT AND ALL STRUCTURAL COMPONENTS ARE SOUNDCURT Manufacturing LLC. warrants this product to be free of defects in material and/or workmanship at the time of retail purchase by the original purchaser. If the product is found to be defective,CURT Manufacturing LLC. may repair or replace the product at their option, when the product is returned, prepaid, with proof of purchase. Alteration to, misuse of, or improper installation of this productvoids the warranty. CURT Manufacturing LLC.'s liability is limited to repair or replacement of products found to be defective, and specifically excludes liability for incidental or consequential loss or damage.
For more information log onto www.curtmfg.com, & for helpful towing tips log onto www.hitchinfo.com 12/19/2014
RATCHETTORQUEWRENCH
AVIATION
SHEARS
SOCKET
11/16"15mm10mm
FASCIA TRIMMING
FISHWIRE REQUIRED
OPTIONAL SKID PLATE TRIM AND REPLACE
11/16"
OPEN END
WRENCH

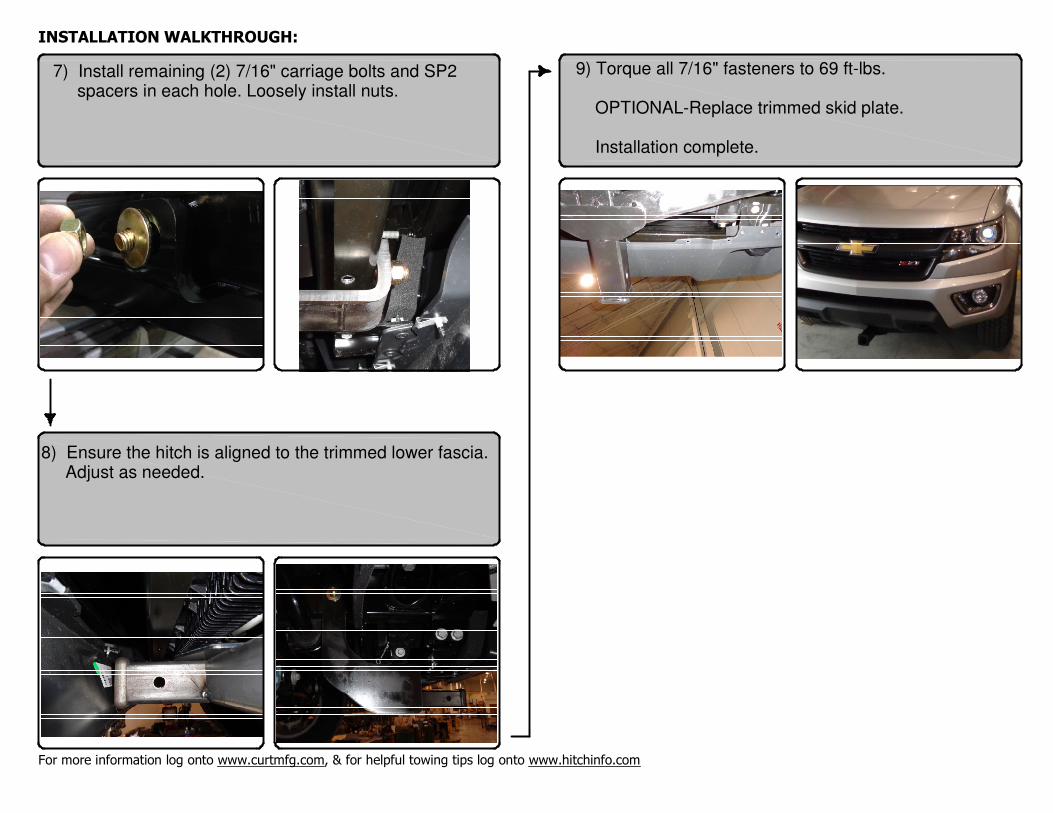
INSTALLATION WALKTHROUGH:
For more information log onto www.curtmfg.com, & for helpful towing tips log onto www.hitchinfo.com
Parts List
DESCRIPTIONPART NUMBERQTYITEM
.250 x 1.00 x 2.50" SQUARE HOLE SPACERCM-SP1041
CARRIAGE BOLT7/16-14 x 1 1/242
7/16" FISHWIRE7_16 FISHWIRE43
HEX FLANGE NUT7/16-1444
1) Determine if trimming is required on vehicle by raising hitch into position. If needed, mark and trim lower fascia, as shown above, or remove lower fascia and return to owner. Note: Check for proper fit prior to trimming.
2) Remove skid plate. OPTIONAL-Trim 1/2" from edge and replace later (SEE SKID PLATE TRIM DETAIL)
3
21
3.00 in 3.50 in LOWER FASCIA
NOTE: DIMENSIONS AREAPPROX. CONFIRM FITPRIOR TO TRIMMING
FASCIA TRIM DETAIL
DRIVER SIDEFRAME RAIL
PASSENDER SIDE
FRAME RAIL
FRAMECROSS
MEMBER
MOUNTIND HOLE(BOTH SIDES)
EXIXTING HOLE(BOTH SIDES) LOWER
FASCIA
FRONT MOUNTING
TAB
ACCESS HOLE(BOTH SIDES)
4
.50 in
SKID PLATE TRIM DETAIL

INSTALLATION WALKTHROUGH:
For more information log onto www.curtmfg.com, & for helpful towing tips log onto www.hitchinfo.com
5) Loosely install nuts, being careful not to push bolt into the frame.
4) Fishwire (2) 7/16" carriage bolts and SP2 spacers into position through the access holes as shown.
6) Rotate the hitch into position aligning holes in the frame cross member with the slots in the front mounting tabs.
3) Raise hitch into position aligning the mounting holes with the upper holes in hitch on both sides.
INSTALLATION WALKTHROUGH:
For more information log onto www.curtmfg.com, & for helpful towing tips log onto www.hitchinfo.com
9) Torque all 7/16" fasteners to 69 ft-lbs. OPTIONAL-Replace trimmed skid plate. Installation complete.
8) Ensure the hitch is aligned to the trimmed lower fascia. Adjust as needed.
7) Install remaining (2) 7/16" carriage bolts and SP2 spacers in each hole. Loosely install nuts.

GROSS LOAD CAPACITY WHEN USED AS A WEIGHT CARRYING HITCH: LBS. TRAILER WEIGHT & LBS. TONGUE WEIGHT.
GROSS LOAD CAPACITY WHEN USED AS A STRAIGHT LINE PULL: 9,000 LBS. MAX. LINE PULL.
*** DO NOT EXCEED VEHICLE MANUFACTURER'S RECOMMENDED TOWING CAPACITY. ***
HAVING INSTALLATION QUESTIONS? CALL TECHNICAL SUPPORT AT 1-800-798-0813
PERIODICALLY CHECK THIS RECEIVER HITCH TO ENSURE THAT ALL FASTENERS
ARE TIGHT AND THAT ALL STRUCTURAL COMPONENTS ARE SOUND.
CURT Manufacturing LLC., warrants this product to be free of defects in material and/or workmanship at the time of retail purchase by the original purchaser.If the product is found to be defective, CURT Manufacturing LLC., may repair or replace the product, at their option, when the product is returned, prepaid,with proof of purchase. Alteration to, misuse of, or improper installation of this product voids the warranty. CURT Manufacturing LLC.'s liability is limited torepair or replacement of products found to be defective, and specifically excludes liability for incidental or consequential loss or damage.
5,000 500
CHEVROLET COLORADO & CANYON
12/19/2014
31074
90
35
45
HITCH WEIGHT: LBS.
INSTALL TIME
PROFESSIONAL: MINUTES
NOVICE (DIY): MINUTES
INSTALL NOTES:
Scan
for more
information
Parts List
DESCRIPTIONPART NUMBERQTYITEM
.250 x 1.00 x 2.50" SQUARE HOLE SPACERCM-SP1041
CARRIAGE BOLT7/16-14 x 1 1/242
7/16" FISHWIRE7_16 FISHWIRE43
HEX FLANGE NUT7/16-1444
- NO DRILLING REQUIRED- MAY REQUIRE FASCIA TRIMMING OR REMOVAL
TOOLS REQUIRED
RATCHETTORQUE WRENCH
AVIATION SHEARS11/16" SOCKET15mm SOCKET10mm SOCKET
11/16" OPEN END WRENCH
DRIVER SIDEFRAME RAIL
PASSENGER SIDE
FRAME RAIL
ACCESS HOLE(BOTH SIDES)
EXISTING HOLE(BOTH SIDES)
LOWER FASCIA
3
MOUNTING HOLE(BOTH SIDES)
FRONT MOUNTING
TAB
FRAME CROSSMEMBER
INSTALLATION STEPS
2
1
1) Determine if trimming is required on vehicle by raising hitch into position. If needed, mark and trim lower fascia, as shown above, or remove lower fascia and return to owner. Note: Check for proper fit prior to trimming. 2) Remove skid plate. OPTIONAL-Trim 1/2" from edge and replace later (SEE SKID PLATE TRIM DETAIL) 3) Raise hitch into position aligning the mounting holes with the upper holes in hitch on both sides. 4) Fishwire (2) 7/16" carriage bolts and SP2 spacers into position through the access holes as shown. 5) Loosely install nuts, being careful not to push bolt into the frame. 6) Rotate the hitch into position aligning holes in the frame cross member with the slots in the front mounting tabs. 7) Install remaining (2) 7/16" carriage bolts and SP2 spacers in each hole. Loosely install nuts. 8) Ensure the hitch is aligned to the trimmed lower fascia. Adjust as needed. 9) Torque all 7/16" fasteners to 69 ft-lbs. OPTIONAL-Replace trimmed skid plate. Installation complete.
3.00 3.50
FASCIA TRIM DETAIL
LOWER FASCIA
NOTE: DIMENSIONS AREAPPROX. CONFIRM FITPRIOR TO TRIMMING
4
SKID PLATE TRIM DETAIL
.38in

CURT Manufacturing LLC., warrants this product to be free of defects in material and/or workmanship at the time of retail purchase by the original purchaser. If the product is found to be defective,CURT Manufacturing LLC., may repair or replace the product, at their option, when the product is returned, prepaid, with proof of purchase. Alteration to, misuse of, or improper installation of thisproduct voids the warranty. CURT Manufacturing LLC.'s liability is limited to repair or replacement of products found to be defective, and specifically excludes liability for incidental or consequentialloss or damage.
FRONT MOUNTED ACCESSORIES
1) Do not exceed front axle Gross Weight Rating (GAWR). Consult owners manual or specification plate located on driver's door frame. Measure gross front axle weight by placing front wheels of loaded vehicle on a scale. WARNING: Exceeding GAWR may overload the front axle and/or suspension. This could result in accident,
property damage and personal injury.
2) Reposition front mounted license plate if obstructed. 3) Do not obstruct vehicle lights. 4) Allow free air flow into grille opening. 5) Rear wheel traction may be reduced. This could effect handling. Reduce speed and drive with caution. 6) Accessories extend front of vehicle. This may reduce approach angle. Use caution when parking and maneuvering. 7) Do not obstruct driver view. VEHICLE RECOVERY AND WINCHING TIPS
1) Use OEM tow hooks, recovery eyes or a clevis mount for attachment of a tow strap or winch cable. WARNING: NEVER use a ball and/or ball mount as an anchor point for tow strap or winch cable. Severe personal injury or death could result. 2) Observe winch manufacturer's recommendations, cautions and warnings. 3) Attach return cable to tow hook or recovery eye when using a snatch block (See figure 1). CAUTION: Do not attach return cable to winch mount. This may overload winch mount and/or front mounted receiver.
RATING
For Maximum line pull rating, winch cable must not exceed: - 15 degree angle up or down from horizontal (See Figure 2). - 45 degree angle left or right from straight ahead (See Figure 3). CAUTION: Exceeding the maximum line pull rating may over load winch, winch mount, and/or front mounted receiver.
FIGURE 2 FIGURE 3
***DO NOT EXCEED VEHICLE MANUFACTURER'S RECOMMENDED TOWING CAPACITY ***.
CHEVROLET COLORADO & CANYON
TREE SAVER STRAP
RETURN CABLE
SOLID OBJECT
SNATCH BLOCK
FIGURE 1
CABLE DAMPING
TOWELS OR JACKETS.
TOW HOOK OR
RECOVERY EYE
31074