Embed Size (px)
DESCRIPTION
maodelos para armar con material knex
Citation preview


Parts ListBefore you start building, be sure to compare the parts in your set with the parts listed here.
If anything is missing, call or write to us using the information on the back cover.We’re here to help!
Start BuildingTo begin your model, find step number and follow thenumbers. Each piece has its own shape and color. Look at thepictures, find the pieces that match what you see, and connectthem together. It helps to face your model in the same directionas the instructions while you build. The arrows show you wherethe parts connect, but not all connection points have arrows.The faded color parts are the ones you have already put together.
SpacersThere are places in yourmodel where you needto use spacers. Be sureto use the correct numberof spacers shown in theinstructions.
ConnectorsYou can slide these special connectors together.Push tightly until you hear a “click”. Pay closeattention to the instructions and position themhorizontally or vertically exactly as they areshown.
K’NEXBuilding Basics
Caution: Rubber Bands can cause injury from snap-back,breaking, or loss of control. While assembling models shownin instructions, hold rubber band tightly, and do not overstretch.Use Rubber Bands only as shown in these instructions.DO NOT USE FRAYED OR TORN RUBBER BANDS.Caution: Keep Rubber Bands away from face and eyes.
1
1
2
3
1 2-
CONTENTSClock Tower/Rocket/Milk Shake . . . . 3Wheelchair . . . . . . . . . . . . . . . . . . . . . . 4Buggy . . . . . . . . . . . . . . . . . . . . . . . . . . 5Race Car . . . . . . . . . . . . . . . . . . . . . . . . 6Boat Ride . . . . . . . . . . . . . . . . . . . . . . . 8Crane . . . . . . . . . . . . . . . . . . . . . . . . . 11Helicopter. . . . . . . . . . . . . . . . . . . . . . 14Big Box Truck . . . . . . . . . . . . . . . . . . . 17Model Ideas . . . . . . . . . . . . . . . . . . . . 21
CONTENIDOReloj Torre/Cohete/Leche Sacudida . 3Silla de Ruedas . . . . . . . . . . . . . . . . . . 4Calesa . . . . . . . . . . . . . . . . . . . . . . . . . . 5Coche de Carreras . . . . . . . . . . . . . . . . 6Paseo de Barco . . . . . . . . . . . . . . . . . . 8Grúa . . . . . . . . . . . . . . . . . . . . . . . . . . 11Helicóptero. . . . . . . . . . . . . . . . . . . . . 14Camión de Caja Grande . . . . . . . . . . 17Ideas Modelo . . . . . . . . . . . . . . . . . . . 21
CONTENUSTour d'horloge/Fusée/Lait Secousse. 3Fauteuil Roulant . . . . . . . . . . . . . . . . . 4Voiture . . . . . . . . . . . . . . . . . . . . . . . . . 5Racer. . . . . . . . . . . . . . . . . . . . . . . . . . . 6Tour de bateau. . . . . . . . . . . . . . . . . . . 8Grue . . . . . . . . . . . . . . . . . . . . . . . . . . 11Hélicoptère. . . . . . . . . . . . . . . . . . . . . 14Grand Camion de Boîte . . . . . . . . . . 17Idées Modéles . . . . . . . . . . . . . . . . . . 21
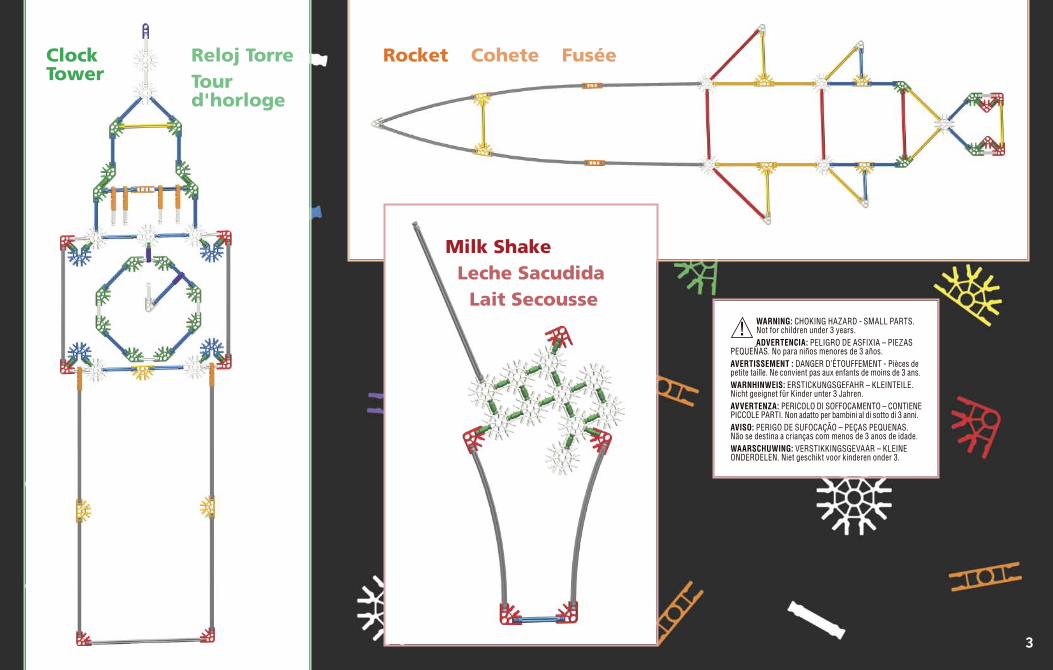
3
ClockTower
Reloj TorreTourd'horloge
Rocket Cohete Fusée
Milk ShakeLeche SacudidaLait Secousse
WARNING: CHOKING HAZARD - SMALL PARTS.Not for children under 3 years.ADVERTENCIA: PELIGRO DE ASFIXIA – PIEZAS
PEQUEÑAS. No para niños menores de 3 años.AVERTISSEMENT : DANGER D’ÉTOUFFEMENT - Pièces depetite taille. Ne convient pas aux enfants de moins de 3 ans.WARNHINWEIS: ERSTICKUNGSGEFAHR – KLEINTEILE.Nicht geeignet für Kinder unter 3 Jahren.AVVERTENZA: PERICOLO DI SOFFOCAMENTO – CONTIENEPICCOLE PARTI. Non adatto per bambini al di sotto di 3 anni.AVISO: PERIGO DE SUFOCAÇÃO – PEÇAS PEQUENAS.Não se destina a crianças com menos de 3 anos de idade.WAARSCHUWING: VERSTIKKINGSGEVAAR – KLEINEONDERDELEN. Niet geschikt voor kinderen onder 3.

4
Wheelchair
3
3
2
2
1
2
3
4
5
Silla deRuedasFauteuilRoulant

BuggyCalesaVoiture
1
2
34
5
5

6
Race CarCoche deCarrerasRacer
17
17
10
1
2
3
1 3-

1
1
1
1
4
5
6
7
1 7-
1 3-
7

8
BoatRide
33
3
3
4
2
1
2
3
1 3-
Paseo deBarcoTour deBateau

9
4
1
1
4
7
6
5
4 7-

10
22
12
21
1
1
8
10
9
1 10-
1 3-
4 7-

11
CraneGrúa
Grue3
2
2
1 2-1
2

12
3
4
5
1 3-1 5-
1 3-
1 2-

13
88
1
1
6
7
8
1 8-1 5-

14
Helicopter
HelicópteroHélicoptère
4
4
1
2
3
4
1 4-

15
4
57
6
1 7-1 4-

16
41
1 10-
10
9
8
1 7-

17
Box Bed Truck Camión deCaja Grande
GrandCamionde Boîte
6
6
1
1
1
2
3
4
5
1 5-
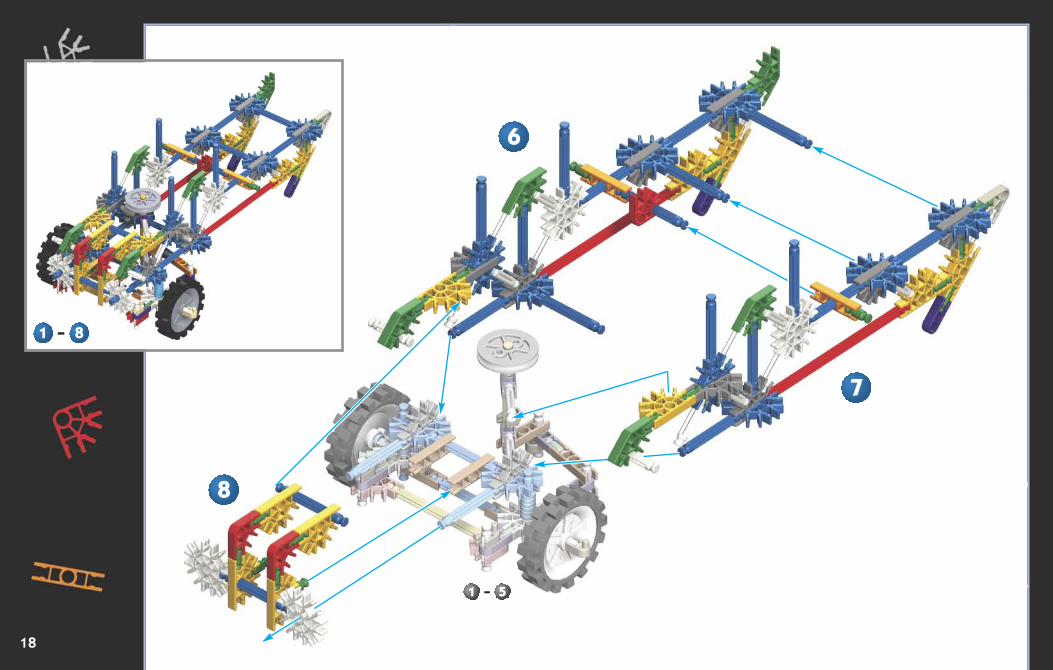
18
6
8
7
1 8-
1 5-

19
9
9
13
12
11
10
9
1 13-
1 8-

20
3
15
14
16
1 16-
1 13-

For instructions of these modelsgo to www.knex.com/instructions
and enter code 11309
Ya que las instrucciones de losestos modelos van a
www.knex.com/instructionsy entre en el código 11309
Car les instructions de ces modèlesvont à www.knex.com/instructionset entrez dans le code 11309
You canalso build...
Ustedtambiénpuedeconstruir...
Vouspouvez aussiconstruire...
21
Model Ideas Ideas Modelo Idées Modéles

Lista de piezasAntes de empezar con la construcción, asegúrate de compararlas piezas en tu conjunto con la lista de las piezas aquí. Si faltanalgunas, llámanos o escríbenos siguiendo las instrucciones en lapágina trasera. Estamos aquí para ayudarte.
PRECAUCIÓN: Las gomas pueden causar daños sise sueltan con fuerza, se rompen o se pierde su control.Al construir los modelos que se muestran en las instrucciones,sujetar bien la goma y no estirarla demasiado. Las gomasdeben usarse únicamente como se indica en las instrucciones.NO USAR GOMAS QUE ESTÉN DESGASTADAS NIRASGADAS. Precaución: Mantenga las gomas elásticasalejadas de la cara y los ojos.
ATTENTION : Les élastiques peuvent causer desblessures en claquant, en se cassant ou quand on lesmanipule imprudemment. Tenez fermement l’élastique lorsde l’assemblage du modèle en veillant à ne pas trop le tendre.N’utilisez les élastiques que selon les instructions.N’UTILISEZ PAS D’ÉLASTIQUES ÉRAILLÉS OU DÉCHIRÉS.Attention : Tenez les élastiques en caoutchouc à l’écart duvisage et des yeux.
A construirPara empezar tu modelo, es necesario buscar el pasonúmero y seguir los números. Cada pedazo tiene su propiaforma y su propio color. Mira las imágenes, busca los pedazosque corresponden con lo que se ve y conéctalos. Durante laconstrucción, te ayudará si tienes el modelo en la mismadirección que las instrucciones. Las flechas muestran dondelas partes se conectan; sin embargo, no todos los puntos deconexión tienen flechas. Las partes descoloradas son las queya se han conectado.
ConectoresSe puede juntar estos conectores especiales deslizándolos.Empujar ligeramente hasta oír un “clic”. Hace falta prestarmucha atención a las instrucciones y posicionar los conectoreshorizontal o verticalmente exactamente tal como se muestran.
EspaciadoresHay lugares en tu modelo donde tendrás que utilizar espaci-adores. Asegúrate de utilizar el color correcto y el número deespaciadores indicados en las instrucciones.
EspañolES
Consejos básicos deconstrucción de K'NEX
Notions de base K'NEXpour le montage
FrançaisFR
Commence la constructionPour commencer ton modèle, trouve l’étape numéro 1 et suis lesnuméros. Chaque pièce a sa propre forme et sa propre couleur.Regarde les illustrations, trouve les pièces qui correspondentà ce que tu vois et assemble-les. Pour t’aider pendant que tuconstruis, oriente ton modèle dans le même sens que lesinstructions. Les flèches t’indiquent où les pièces s’assemblent,mais les points de raccordement n’ont pas tous des flèches. Lespièces de couleur délavée sont celles que tu as déjà assemblées.
ConnecteursTu peux assembler ces connecteurs tout à fait uniques en lesfaisant glisser l’un avec l’autre. Pousse fort jusqu’à ce que tuentendes un « clic ». Lis les instructions attentivement etpositionne-les horizontalement ou verticalement, en suivantexactement les illustrations.
EspaceursIl y a des endroits sur ton modèle ou tu auras besoin de te servird’espaceurs. Assure-toi d’utiliser la bonne couleur et le nombred’espaceurs indiqué sur les instructions.
Liste des piècesAvant de commencer à construire, assure-toi de comparer lespièces dans ta boîte à la liste de pièces fournie ici. S’il manquequelque chose, téléphone-nous ou écris-nous en te servant desinformations figurant au verso de la notice. Nous sommes là pourt’aider !
1
2
3
1 2-
1
22

Deutsch
Grundlegende Bauanleitungen für K'NEXLos geht’s mit dem BauenBeginne mit dem Bauen des Modells beim 1. Schritt und folge den Zahlen. Jedes Teil hat seine eigene Form und Farbe. Schaue die Bilderan, suche nach den passenden Teilen zu den Bildern und füge sie richtig zusammen. Halte dein Modell während des Zusammenbauensmöglichst genau so wie in der Anleitung. Die Pfeile deuten an, wo die Teile zusammengefügt werden. Allerdings haben nicht alleVerbindungspunkte Pfeile. Die bereits zusammengefügten Teile sind in blassen Farben abgebildet.
VerbindungsstückeDiese besonderen Verbindungsstücke kannst du zusammenschieben. Drücke sie fest, bis du ein Klicken hörst. Achte genau auf dieAnleitung und positioniere die Verbindungsstücke genau wie in der Abbildung.
AbstandsstückeAn manchen Stellen in deinem Modell musst du Abstandsstücke einbauen. Achte darauf, die richtige Farbe und Anzahl vonAbstandsstücken wie in der Anleitung gezeigt zu verwenden.
VORSICHT: Gummibänder können Verletzungen hervorrufen, wenn sie reißen, zurückspringen oder wenn sie nicht vorsichtig gehand-habt werden. Halten Sie die Gummibänder während des Zusammenbaus der Modelle fest, ohne sie jedoch zu überdehnen. VerwendenSie die Gummibänder gemäß den Anweisungen. VERWENDEN SIE NIEMALS AUSGEFRANSTE ODER ZERRISSENE GUMMIBÄNDER.
Zahl von TeilenBevor du mit dem Bauen anfängst, solltest du prüfen ob die Teile in deinem Bausatz mit denen auf dieser Teileliste übereinstimmen.Falls etwas fehlt, rufe uns an oder schreibe uns (siehe Rückseite). Wir sind für dich da!
Italiano
Il fondamentale di costruzione di K’NEXCominciare la costruzionePer cominciare il tuo modello, trova il passo numero 1 e segui i numeri. Ogni pezzo ha la sua forma e il suo colore. Guarda le figure,trova i pezzi che corrispondono a ciò che vedi e congiungili insieme. È un aiuto se tieni il tuo modello di fronte a te nella stessa direzionedelle istruzioni mentre costruisci. Le frecce ti indicano dove sono congiunte le parti ma non tutti i punti di congiunzione hanno le frecce.Le parti con i colori sbiaditi sono quelle che hai già messo insieme.
ConnettoriPuoi infilare insieme questi connettori speciali. Spingi bene finché non senti un “clic”. Fa’ ben attenzione alle istruzioni e mettiliorizzontalmente o verticalmente esattamente come viene mostrato.
SpaziatoriCi sono posti nel tuo modello dove hai bisogno di usare gli spaziatori. Assicurati di usare il numero e il colore corretti degli spaziatorimostrati nelle istruzioni.
ATTENZIONE: Elastici può causare lesioni da snap-back, rottura, o perdita di controllo. Durante il montaggio dei modelli indicati nelleistruzioni, tenere ben elastico, e non tirare troppo. Utilizzare Elastici solo come indicato in queste istruzioni. NON USARE SFILACCIATIO STRAPPATI ELASTICI.
Elenco delle partiPrima di cominciare a costruire, accertati di confrontare le parti che sono nel tuo set con l’elenco delle parti qui. Se ne manca una chiamacio scrivici usando le informazioni che sono nella retrocopertina. Noi siamo qui per aiutarti!
Português
Fundamentos de Construção K’NEXInicia construçãoPara iniciares a construção do teu modelo, procura a etapa 1 e segue os números. Cada peça tem a sua própria configuração e cor.Observa as ilustrações, procura as peças que correspondem ao que estás a ver e liga umas às outras. É mais fácil se estiveres viradopara o modelo na mesma direcção mostrada nas ilustrações durante o processo de construção. As setas mostram os pontos onde aspeças são conectadas, mas nem todos os pontos de conexão possuem setas. As peças com cores desbotadas pertencem às secçõesque já foram coordenadas.
ConectoresPodes fazer deslizar estes conectores especiais em conjunto. Empurra com força até escutares um “estalido”. Presta muita atenção àsinstruções e posiciona-as na horizontal ou na vertical, exactamente como são mostradas.
EspaçadoresExistem segmentos no teu modelo onde necessitas de colocar espaçadores. Certifica-te de que usas a cor e o número de espaçadoresexactos, de acordo com o mostrado nas instruções.
ATENÇÃO: As borrachas poderão causar ferimentos ao serem esticadas, ao quebrarem ou ao perderem controlo. Ao montar osmodelos mostrados nas instruções, segure bem a borracha e não a estique demasiado. Utilize as borrachas apenas da formaexemplificada nestas instruções. NÃO UTILIZE BORRACHAS CORROÍDAS OU QUEBRADAS.
Lista de peçasAntes de iniciares a construção, certifica-te de que comparas as peças do teu conjunto com a lista das peças aqui. Se faltar alguma peçatelefona ou escreve-nos usando as informações indicadas na contracapa. Estamos aqui para te ajudar!
Nederlands
Basisstappen voor K'NEX bouwenBegin te bouwenOm je model te beginnen, moet je eerst stap nummer 1 vinden en dan de nummers volgen. Elk stuk heeft zijn eigen vorm en kleur.Kijk naar de prentjes, vind de stukken die overstemmen met wat je ziet, en maak ze aan mekaar vast. Het helpt wanneer je modeldezelfde richting volgt als de aanwijzingen terwijl je bouwt. De pijlen duiden je aan waar de onderdelen zich vasthechten, maar niet allehechtingspunten hebben pijlen. De onderdelen met afnemende kleur werden reeds eerder aan mekaar vastgemaakt.
VerbindingstukkenDeze speciale verbindingsstukken kunnen in mekaar geschoven worden. Druk ze goed tezamen tot wanneer je een “klik” hoort.Geef goed aandacht aan de aanwijzingen en richt ze horizontaal of vertikaal af, precies zoals afgebeeld.
AfstandsstukkenEr zijn plaatsen in je model waar afstandsstukken moeten gebruikt worden. Vergewis je ervan de correcte kleur en het nummer van deafstandsstukken te gebruiken die aangeduid zijn in de aanwijzingen.
FORSIGTIG: Gummibånd kan forårsage personskade, hvis de springer tilbage, går i stykker eller springer af. Når modellerne samlesefter instruktionerne, skal man holde gummibåndene stramme, men ikke strække dem for meget. Gummibåndene må kun bruges,som anvist. BRUG ALDRIG SLIDTE ELLER BESKADIGEDE GUMMIBÅND.
OnderdelenlijstVoor je begint te bouwen, vergewis je ervan de onderdelen in je geheel na te gaan met de onderdelenlijst hier. Wanneer iets ontbreekt, belons op of schrijf ons door gebruik te maken van de informatie op het achterblad. We staan er om je te helpen !
PT
NLIT
DE
23