Embed Size (px)
Citation preview

Oracle® Database2 Day + Real Application Clusters Guide
12c Release 1 (12.1)
E17616-18
February 2017

Oracle Database 2 Day + Real Application Clusters Guide, 12c Release 1 (12.1)
E17616-18
Copyright © 2006, 2017, Oracle and/or its affiliates. All rights reserved.
Primary Author: Janet Stern
Contributing Authors: Mark Bauer, Vivian Schupmann, Douglas Williams, Mike Zampiceni
Contributors: Eric Belden, David Brower, Jonathan Creighton, Sudip Datta, Venkatadri Ganesan, ShamikGanguly, Prabhaker Gongloor, Mayumi Hayasaka, Masakazu Ito, Aneesh Khandelwal, Sushil Kumar, BarbLundhild, Venkat Maddali, Gaurav Manglik, Markus Michalewicz, Mughees Minhas, Tim Misner, JoeParadise, Srinivas Poovala, Hanlin Qian, Mark Scardina, Cathy Shea, Jacqueline Sideri, Vijay Sriram,Vishwanath Subrahmannya Sastry, Ara Vagharshakian
This software and related documentation are provided under a license agreement containing restrictions onuse and disclosure and are protected by intellectual property laws. Except as expressly permitted in yourlicense agreement or allowed by law, you may not use, copy, reproduce, translate, broadcast, modify, license,transmit, distribute, exhibit, perform, publish, or display any part, in any form, or by any means. Reverseengineering, disassembly, or decompilation of this software, unless required by law for interoperability, isprohibited.
The information contained herein is subject to change without notice and is not warranted to be error-free. Ifyou find any errors, please report them to us in writing.
If this is software or related documentation that is delivered to the U.S. Government or anyone licensing it onbehalf of the U.S. Government, then the following notice is applicable:
U.S. GOVERNMENT END USERS: Oracle programs, including any operating system, integrated software,any programs installed on the hardware, and/or documentation, delivered to U.S. Government end users are"commercial computer software" pursuant to the applicable Federal Acquisition Regulation and agency-specific supplemental regulations. As such, use, duplication, disclosure, modification, and adaptation of theprograms, including any operating system, integrated software, any programs installed on the hardware,and/or documentation, shall be subject to license terms and license restrictions applicable to the programs.No other rights are granted to the U.S. Government.
This software or hardware is developed for general use in a variety of information management applications.It is not developed or intended for use in any inherently dangerous applications, including applications thatmay create a risk of personal injury. If you use this software or hardware in dangerous applications, then youshall be responsible to take all appropriate fail-safe, backup, redundancy, and other measures to ensure itssafe use. Oracle Corporation and its affiliates disclaim any liability for any damages caused by use of thissoftware or hardware in dangerous applications.
Oracle and Java are registered trademarks of Oracle and/or its affiliates. Other names may be trademarks oftheir respective owners.
Intel and Intel Xeon are trademarks or registered trademarks of Intel Corporation. All SPARC trademarks areused under license and are trademarks or registered trademarks of SPARC International, Inc. AMD, Opteron,the AMD logo, and the AMD Opteron logo are trademarks or registered trademarks of Advanced MicroDevices. UNIX is a registered trademark of The Open Group.
This software or hardware and documentation may provide access to or information about content, products,and services from third parties. Oracle Corporation and its affiliates are not responsible for and expresslydisclaim all warranties of any kind with respect to third-party content, products, and services unlessotherwise set forth in an applicable agreement between you and Oracle. Oracle Corporation and its affiliateswill not be responsible for any loss, costs, or damages incurred due to your access to or use of third-partycontent, products, or services, except as set forth in an applicable agreement between you and Oracle.
Contents
Preface ................................................................................................................................................................ xi
Audience ....................................................................................................................................................... xi
Documentation Accessibility .................................................................................................................... xii
Related Documents..................................................................................................................................... xii
Conventions................................................................................................................................................. xii
Changes in This Release for Oracle Database 2 Day + Real Application ClustersGuide ............................................................................................................................................................ xiii
Changes in Oracle Database 12c Release 1 (12.1) .................................................................................. xiii
New Features ..................................................................................................................................... xiii
Desupported Features ...................................................................................................................... xiv
1 Introduction to Deploying a Real Application Clusters Environment
1.1 About the 2 Day + Real Application Clusters Guide .................................................................. 1-1
1.1.1 What This Guide Is Not........................................................................................................ 1-2
1.1.2 Related Materials................................................................................................................... 1-2
1.1.3 Overview of Oracle RAC Documentation ......................................................................... 1-2
1.2 About Oracle Grid Infrastructure for a Cluster and Oracle RAC.............................................. 1-4
1.3 About Oracle Automatic Storage Management ........................................................................... 1-4
1.3.1 About Using Oracle ASM Disk Groups with Oracle RAC.............................................. 1-5
1.3.2 Benefits of Using Oracle ASM ............................................................................................. 1-6
1.3.3 About Oracle ACFS............................................................................................................... 1-7
1.3.4 About Oracle ASM Running in an Oracle RAC Environment ....................................... 1-7
1.4 About Oracle Real Application Clusters ....................................................................................... 1-8
1.4.1 About Oracle RAC One Node ............................................................................................. 1-9
1.4.2 About Oracle Multitenant with Oracle RAC................................................................... 1-10
1.4.3 About Installing Oracle RAC on Different Operating Systems.................................... 1-11
1.5 Tools for Installing, Configuring, and Managing Oracle RAC ................................................ 1-11
2 Preparing Your Cluster
2.1 Verifying System Requirements ..................................................................................................... 2-1
iii
2.1.1 Checking Operating System Certifications........................................................................ 2-2
2.1.2 About Hardware Requirements.......................................................................................... 2-3
2.1.3 About Shared Storage ........................................................................................................... 2-4
2.1.4 About Network Hardware Requirements ......................................................................... 2-5
2.1.5 About IP Address Requirements ........................................................................................ 2-6
2.1.6 Verifying Operating System and Software Requirements .............................................. 2-8
2.2 Preparing the Server....................................................................................................................... 2-10
2.2.1 About Operating System Users and Groups................................................................... 2-11
2.2.2 Configuring Operating System Users and Groups on Linux Systems........................ 2-15
2.2.3 Configuring Secure Shell on Linux Systems ................................................................... 2-16
2.2.4 About Configuring the Software Owner's Shell Environment on Linux Systems .... 2-17
2.3 Configuring the Network .............................................................................................................. 2-18
2.3.1 Verifying the Network Configuration.............................................................................. 2-21
2.4 Preparing the Operating System and Software.......................................................................... 2-23
2.4.1 About Setting the Time on All Nodes .............................................................................. 2-23
2.4.2 About Configuring Kernel Parameters ............................................................................ 2-24
2.4.3 About Performing Platform-Specific Configuration Tasks........................................... 2-24
2.5 Configuring Installation Directories and Shared Storage ........................................................ 2-25
2.5.1 About the Oracle Inventory Directory ............................................................................. 2-26
2.5.2 Locating the Oracle Inventory Directory ......................................................................... 2-26
2.5.3 Creating the Oracle Grid Infrastructure for a Cluster Home Directory...................... 2-27
2.5.4 Creating the Oracle Base Directory................................................................................... 2-28
2.5.5 About the Oracle Home Directory.................................................................................... 2-29
2.5.6 Configuring Shared Storage .............................................................................................. 2-29
2.5.7 Configuring Files on an NAS Device for Use with Oracle ASM.................................. 2-30
2.5.8 Using ASMLIB to Mark the Shared Disks as Candidate Disks .................................... 2-32
2.5.9 Configuring Disk Device Persistence ............................................................................... 2-35
3 Installing Oracle Grid Infrastructure
3.1 Using Oracle Enterprise Manager Cloud Control for Provisioning Operations..................... 3-2
3.2 Preparing to Install the Oracle Software ....................................................................................... 3-2
3.3 Verifying My Oracle Support Credentials .................................................................................... 3-3
3.4 Installing Oracle Grid Infrastructure for a Cluster ...................................................................... 3-3
3.4.1 Configuring the Operating System Environment ............................................................ 3-4
3.4.2 About Cluster Verification Utility Fixup Scripts on Linux and UNIX .......................... 3-5
3.4.3 Using Oracle Universal Installer to Install the Oracle Grid Infrastructure for a
Cluster .......................................................................................................................................... 3-5
3.4.4 Completing the Oracle Clusterware Configuration....................................................... 3-10
3.5 Installing the Oracle Database Software and Creating a Database ......................................... 3-11
3.5.1 Configuring the Operating System Environment .......................................................... 3-12
3.5.2 Creating Additional Oracle ASM Disk Groups .............................................................. 3-12
3.5.3 Using Oracle Universal Installer to Install Oracle RAC Software................................ 3-13
3.5.4 Verifying Your Oracle RAC Database Installation......................................................... 3-18
iv

3.6 Performing Postinstallation Tasks................................................................................................ 3-20
3.6.1 About Verifying the Oracle Clusterware Installation .................................................... 3-21
3.6.2 Creating an Oracle RAC Database Using DBCA............................................................ 3-21
3.6.3 Backing Up Installation Files ............................................................................................. 3-21
3.6.4 Verifying Oracle Enterprise Manager Operations.......................................................... 3-22
3.6.5 About Downloading and Installing Oracle Database Patches ..................................... 3-23
3.6.6 About Configuring User Accounts ................................................................................... 3-23
3.7 About Converting an Oracle Database to an Oracle RAC Database....................................... 3-23
3.7.1 About Preparing for Database Conversion ..................................................................... 3-24
3.7.2 Overview of the Database Conversion Process Using Cloud Control ........................ 3-25
3.7.3 Overview of the Database Conversion Process Using rconfig ..................................... 3-26
3.7.4 Converting an Oracle RAC Database into an Oracle RAC One Node Database ....... 3-27
4 Administering Database Instances and Cluster Databases
4.1 About Oracle Real Application Clusters Database Management.............................................. 4-2
4.2 About Oracle RAC One Node Database Management ............................................................... 4-2
4.3 About Oracle RAC Management Using Enterprise Manager.................................................... 4-3
4.4 Starting and Stopping Oracle RAC Databases and Database Instances................................... 4-3
4.5 Managing Oracle Real Application Clusters Initialization Parameters.................................... 4-4
4.5.1 About Configuring Initialization Parameters for an Oracle RAC Database ............... 4-5
4.5.2 About the Server Parameter File for Oracle Real Application Clusters ...................... 4-10
4.5.3 Editing Initialization Parameter Settings for an Oracle RAC Database ...................... 4-10
4.6 About Administering Storage in Oracle RAC ............................................................................ 4-15
4.6.1 About Automatic Undo Management in Oracle RAC................................................... 4-15
4.6.2 Oracle Automatic Storage Management in Oracle RAC ............................................... 4-16
4.6.3 Administering Redo Logs in Oracle RAC ....................................................................... 4-18
5 Administering Oracle Clusterware Components
5.1 About Oracle Clusterware............................................................................................................... 5-1
5.1.1 About the Voting Disks ........................................................................................................ 5-2
5.1.2 About Oracle Cluster Registry ............................................................................................ 5-2
5.1.3 About High Availability of Oracle Clusterware Files...................................................... 5-3
5.2 Managing the Oracle Clusterware Stack ....................................................................................... 5-3
5.2.1 Starting Oracle Clusterware................................................................................................. 5-4
5.2.2 Stopping Oracle Clusterware .............................................................................................. 5-4
5.3 Administering Voting Disks for Oracle Clusterware .................................................................. 5-5
5.3.1 Adding and Removing Voting Disks ................................................................................. 5-5
5.3.2 Backing Up and Recovering Voting Disks ........................................................................ 5-6
5.3.3 Migrating Voting Disks to Oracle ASM Storage............................................................... 5-7
5.4 Backing Up and Recovering the Oracle Cluster Registry ........................................................... 5-8
5.4.1 Viewing Available OCR Backups ....................................................................................... 5-9
5.4.2 Manually Backing Up the OCR........................................................................................... 5-9
5.4.3 Recovering the OCR............................................................................................................ 5-10
v

5.5 Changing the Oracle Cluster Registry Configuration ............................................................... 5-11
5.5.1 Adding an OCR Location................................................................................................... 5-12
5.5.2 Migrating the OCR to Oracle ASM Storage..................................................................... 5-12
5.5.3 Replacing an OCR ............................................................................................................... 5-13
5.5.4 Removing an OCR............................................................................................................... 5-14
5.5.5 Repairing an OCR Configuration on a Local Node ....................................................... 5-14
5.6 Troubleshooting the Oracle Cluster Registry ............................................................................. 5-15
5.6.1 About the OCRCHECK Utility.......................................................................................... 5-15
5.6.2 Common Oracle Cluster Registry Problems and Solutions .......................................... 5-16
6 Client High Availability with Services, FAN, FCF, and Application Continuity
6.1 About Continuous Service Availability with Database Services............................................... 6-1
6.1.1 About Oracle Services........................................................................................................... 6-2
6.1.2 About the Database Resource Manager............................................................................. 6-6
6.1.3 About Oracle RAC High Availability Framework........................................................... 6-7
6.1.4 About Fast Application Notification (FAN)...................................................................... 6-7
6.1.5 About FAN Callouts ............................................................................................................. 6-8
6.1.6 About Using Transaction Guard for Improving Client Failover.................................... 6-9
6.1.7 About Application Continuity for Masking Outages .................................................... 6-10
6.1.8 About the Load Balancing Advisory ................................................................................ 6-14
6.1.9 About Connection Load Balancing................................................................................... 6-15
6.1.10 About Run-time Connection Load Balancing ............................................................... 6-17
6.2 Creating Services............................................................................................................................. 6-20
6.2.1 Creating Services Using Enterprise Manager ................................................................. 6-20
6.2.2 Creating Services Using SRVCTL ..................................................................................... 6-22
6.3 Administering Services .................................................................................................................. 6-23
6.3.1 About Service Administration Using Enterprise Manager ........................................... 6-24
6.3.2 Using the Cluster Managed Database Services Page ..................................................... 6-24
6.3.3 Verifying Oracle Net Supports Newly Created Services............................................... 6-25
6.4 Configuring Clients for High Availability .................................................................................. 6-27
6.4.1 Configuring Oracle Net Services Parameters For Highly Available Connections .... 6-28
6.4.2 Configuring JDBC Clients for High Availability ............................................................ 6-29
6.4.3 Configuring OCI Clients for High Availability .............................................................. 6-35
6.4.4 Configuring ODP.NET Clients for High Availability.................................................... 6-38
7 Administering Backup and Recovery
7.1 Overview of Oracle RAC Database Backup and Recovery ........................................................ 7-2
7.2 About the Fast Recovery Area in Oracle RAC ............................................................................. 7-3
7.3 Archiving the Oracle Real Application Clusters Database Redo Logs..................................... 7-4
7.3.1 About Archived Redo Log Files for an Oracle RAC Database ....................................... 7-5
7.3.2 About Parallelism and Backups Across Multiple RMAN Channels ............................. 7-6
7.3.3 Configuring Archiving for Your Oracle RAC Database.................................................. 7-6
7.4 About Preparing for Backup and Recovery Operations ............................................................. 7-8
vi
7.4.1 About Credentials for Performing Backup and Recovery ............................................. 7-8
7.4.2 About Configuring Backup Settings................................................................................... 7-9
7.5 Performing Backups of Your Oracle Real Application Clusters Database............................... 7-9
7.5.1 Backing Up Archived Redo Log Files .............................................................................. 7-10
7.6 Recovering Your Oracle Real Application Clusters Database ................................................. 7-11
7.6.1 About Preparing to Restore and Recover Your Oracle RAC Database ....................... 7-12
7.6.2 About Restoring Archived Redo Log File Files .............................................................. 7-13
7.6.3 About Performing Recovery Using Parallelism.............................................................. 7-14
7.6.4 Recovering the Oracle RAC Database Using Enterprise Manager .............................. 7-14
7.6.5 Recovering the Server Parameter File from an Automatic File Backup...................... 7-15
7.7 About Managing Your Database Backup Files........................................................................... 7-16
7.8 Displaying Backup Reports for Your Oracle Real Application Clusters Database............... 7-16
8 Monitoring Performance and Troubleshooting
8.1 Monitoring Oracle RAC Database and Cluster Performance .................................................... 8-2
8.1.1 About Automatic Database Diagnostic Monitor and Oracle RAC Performance......... 8-3
8.1.2 Viewing ADDM for Oracle RAC Findings........................................................................ 8-4
8.1.3 Using the Cluster Database Performance Page................................................................. 8-7
8.2 Viewing Other Performance Related Charts .............................................................................. 8-16
8.2.1 Accessing the Cluster Cache Coherency Page ................................................................ 8-17
8.2.2 Accessing the Top Consumers Page................................................................................. 8-19
8.2.3 Accessing the Top Sessions Page ...................................................................................... 8-20
8.2.4 Accessing the Top Activity Page....................................................................................... 8-21
8.2.5 Accessing the Instance Activity Page ............................................................................... 8-22
8.2.6 Accessing the Top Segments Page .................................................................................... 8-23
8.2.7 Accessing the Database Locks Page.................................................................................. 8-24
8.3 Viewing the Cluster Database Topology..................................................................................... 8-25
8.4 Monitoring Oracle Clusterware.................................................................................................... 8-25
8.4.1 Accessing the Oracle Clusterware Information .............................................................. 8-27
8.4.2 Reviewing the Oracle Clusterware Home Page.............................................................. 8-27
8.4.3 Viewing the Cluster Performance Page ........................................................................... 8-30
8.4.4 Viewing the Cluster Targets Page..................................................................................... 8-31
8.4.5 Viewing the Cluster Administration Page....................................................................... 8-31
8.4.6 About the Cluster Interconnects Page.............................................................................. 8-32
8.4.7 Viewing the Cluster Topology Page................................................................................. 8-34
8.5 Troubleshooting Configuration Problems in Oracle RAC Environments ............................. 8-35
8.5.1 Using CRSCTL to Diagnose Cluster Issues ..................................................................... 8-35
8.5.2 Using the Cluster Verification Utility to Diagnose Problems....................................... 8-41
8.5.3 Viewing Oracle RAC Database Alerts.............................................................................. 8-45
8.5.4 Viewing Oracle RAC Database Alert Log Messages...................................................... 8-46
9 Adding and Deleting Nodes and Instances
9.1 Preparing the New Node................................................................................................................. 9-2
vii

9.2 Verifying the New Node Meets the Prerequisites for Installation ............................................ 9-2
9.3 Extending the Oracle Grid Infrastructure Home to the New Node.......................................... 9-3
9.4 Extending the Oracle RAC Home Directory................................................................................. 9-4
9.5 Adding the New Node to the Cluster using Enterprise Manager............................................. 9-5
9.6 Creating an Instance on the New Node ........................................................................................ 9-5
9.6.1 Adding a New Instance for a Policy-Managed Database................................................ 9-6
9.6.2 Adding a New Instance for an Administrator-Managed Database............................... 9-7
9.7 Deleting an Instance From the Cluster Database ......................................................................... 9-8
9.7.1 Deleting an Instance From a Policy-Managed Database ................................................. 9-9
9.7.2 Deleting an Instance From an Administrator-Managed Database ................................ 9-9
9.8 Removing a Node From the Cluster ............................................................................................ 9-11
10 Managing Oracle Software and Applying Patches
10.1 About Patches and Patch Sets ..................................................................................................... 10-2
10.2 Using Oracle Enterprise Manager Cloud Control for Patching Operations ........................ 10-3
10.3 Obtaining the Patch ...................................................................................................................... 10-3
10.4 Preparing to Use OPatch.............................................................................................................. 10-4
10.4.1 Checking the ORACLE_HOME Environment Variable .............................................. 10-5
10.4.2 Performing a Backup Before Patching Software........................................................... 10-5
10.4.3 Staging the Patch on Each Node ..................................................................................... 10-5
10.4.4 Updating the PATH Environment Variable.................................................................. 10-6
10.4.5 Configuring SSH User Equivalency ............................................................................... 10-6
10.5 Applying Patches.......................................................................................................................... 10-8
10.5.1 Patching the Grid Home................................................................................................... 10-9
10.5.2 All Node Patching ........................................................................................................... 10-10
10.5.3 Rolling Patching .............................................................................................................. 10-10
10.5.4 Minimum Downtime Patching...................................................................................... 10-10
10.6 Applying Patch Sets ................................................................................................................... 10-11
10.7 Troubleshooting Patch Deployment ........................................................................................ 10-12
10.7.1 Updating the Node List for OPatch.............................................................................. 10-13
10.7.2 About OPatch Log and Trace Files ............................................................................... 10-13
10.7.3 Resolving the "Not a valid patch area" Error .............................................................. 10-14
10.7.4 Resolving the "Unable to remove a partially installed interim patch" Error.......... 10-14
10.8 Upgrading the Oracle Software ................................................................................................ 10-15
Glossary
Index
viii

List of Tables
1-1 Tools for Installing, Configuring, and Managing Oracle RAC........................................... 1-112-1 Required Operating System Users and Groups for Oracle Grid Infrastructure and
Oracle RAC Installations.................................................................................................... 2-122-2 Manual Network Configuration Example............................................................................. 2-204-1 Parameters That Should Have Identical Settings on All Instances...................................... 4-85-1 Common OCR Problems and Solutions................................................................................. 5-168-1 Cluster Cache Coherency Charts............................................................................................ 8-1810-1 Patching Oracle Home Directories......................................................................................... 10-8
ix

x
Preface
Oracle Database 2 Day + Real Application Clusters Guide describes how to install,configure, and administer Oracle Clusterware, Oracle Automatic Storage Management(Oracle ASM), and Oracle Real Application Clusters (Oracle RAC) on a two-nodesystem using the Oracle Linux operating system.
Note:
For Linux operating systems other then Oracle Linux, see Oracle RealApplication Clusters Installation Guide for Linux and UNIX. For other operatingsystems, see the platform-specific Oracle RAC installation guide.
This guide covers topics that a reasonably knowledgeable Oracle databaseadministrator (DBA) would need to know when moving from managing a single-instance Oracle Database environment to managing an Oracle RAC environment.
Audience (page xi)
Documentation Accessibility (page xii)
Related Documents (page xii)
Conventions (page xii)
AudienceOracle Database 2 Day + Real Application Clusters Guide is an Oracle RAC databaseadministration guide for DBAs who want to install and use Oracle RAC. This guideassumes you have already read Oracle Database 2 Day DBA. This guide is intended forDBAs who:
• Want basic DBA skills for managing an Oracle RAC environment
• Manage Oracle databases for small- to medium-sized businesses
To use this guide, you should be familiar with the administrative proceduresdescribed in Oracle Database 2 Day DBA.
xi

Note:
Some DBAs may be interested in moving the data from their single-instanceOracle Database to their Oracle RAC database. This guide also explains theprocedures for doing this.
Documentation AccessibilityFor information about Oracle's commitment to accessibility, visit the OracleAccessibility Program website at http://www.oracle.com/pls/topic/lookup?ctx=acc&id=docacc.
Access to Oracle Support
Oracle customers that have purchased support have access to electronic supportthrough My Oracle Support. For information, visit http://www.oracle.com/pls/topic/lookup?ctx=acc&id=info or visit http://www.oracle.com/pls/topic/lookup?ctx=acc&id=trs if you are hearing impaired.
Related DocumentsFor more information, see the following in the Oracle Database documentation set:
• Oracle Real Application Clusters Installation Guide for Linux and UNIX
• Oracle Grid Infrastructure Installation Guide for Linux
• Oracle Real Application Clusters Administration and Deployment Guide
• Oracle Database 2 Day DBA
• Oracle Automatic Storage Management Administrator's Guide
ConventionsThe following text conventions are used in this guide:
Convention Meaning
boldface Boldface type indicates graphical user interface elements associatedwith an action, or terms defined in text or the glossary.
italic Italic type indicates book titles, emphasis, or placeholder variables forwhich you supply particular values.
monospace Monospace type indicates commands within a paragraph, URLs, codein examples, text that appears on the screen, or text that you enter.
xii

Changes in This Release for OracleDatabase 2 Day + Real Application Clusters
Guide
This preface lists changes in Oracle Database 2 Day + Real Application Clusters Guide.
Changes in Oracle Database 12c Release 1 (12.1) (page xiii)
Changes in Oracle Database 12c Release 1 (12.1)The following are changes in Oracle Database 2 Day + Real Application Clusters Guide forOracle Database 12c Release 1 (12.1).
New Features (page xiii)
Desupported Features (page xiv)
New FeaturesThe following features are new in this release:
• Oracle Enterprise Manager Database Express replaces Oracle Enterprise ManagerDatabase Control (DB Control)
In previous Oracle Database releases, DB Control was the primary databasemanagement tool described in this manual. DB Control is not included in thisrelease.
See Oracle Database 2 Day DBA.
• Oracle Home User Support for Oracle Database
Starting with Oracle Database 12c Release 1 (12.1), Oracle Database supports theuse of an Oracle Home User, which can be specified at installation time. TheOracle Home User can be a Built-in Account or a Windows User Account. If youspecify a Windows User Account, then the user should be a low privileged (non-Administrator) account to ensure that the Oracle Home User has a limited set ofprivileges. Using an Oracle Home User ensures that Oracle Database serviceshave only those privileges required to run Oracle products.
See Oracle Database Platform Guide for Microsoft Windows.
• Application Continuity
Application Continuity attempts to mask outages from end users and applicationsby recovering requests following recoverable outages, unplanned and planned.
xiii
Application Continuity performs this recovery beneath the application so that theoutage appears to the application as a delayed execution. Application Continuitymasks recoverable outages - those in which requests would succeed if they werere-issued. Examples include system failures, network disconnects, foregroundfailures, and storage failures.
See Oracle Database Development Guide.
• Transaction Guard
Before Oracle Database 12c Release 1 (12.1), it was difficult for a databaseapplication to recover after an outage, because the commit message that OracleDatabase (the server) returned to the application (the client) was not persistent. Ifthe connection between Oracle Database and the application broke or if thedatabase session became unavailable, then the application received adisconnection error message. After an outage, if an application user resubmittedan in-flight transaction that had been committed, then duplicate transactionsresulted.
The Oracle Database feature Transaction Guard ensures that each transactionexecutes at most once. Its PL/SQL interface, theDBMS_APP_CONT.GET_LTXID_OUTCOME procedure, enables an application todetermine the outcome of the in-flight transaction after an outage and thenrecover any work that was lost due to the outage.
See Oracle Database Development Guide.
• Java and JDBC Support for Application Continuity
Application Continuity for Java is available with Oracle Database, JDBC Thindriver, and the Oracle connection pools: UCP (Universal Connection Pool) andWebLogic Server Active GridLink.
Application Continuity is transparent for Java EE and Java SE applications thatuse Oracle JDBC, use Oracle connection pools (UCP or WLS Active GridLink), anddo not have external actions. For applications with external actions (for example,using autonomous transactions or using UTL_HTTP to issue an SOA call),Application Continuity is transparent only if the application's correctness ispreserved when these external actions are replayed after a failure.
See Oracle Database JDBC Developer's Guide.
• Oracle JDBC Support for Transaction Guard
See Oracle Database JDBC Developer's Guide.
Desupported FeaturesSome features previously described in this document are desupported in OracleDatabase 12c Release 1 (12.1). See Oracle Database Upgrade Guide for a list ofdesupported features.
xiv
1Introduction to Deploying a Real
Application Clusters Environment
Oracle Real Application Clusters (Oracle RAC) enables an Oracle database to runacross a cluster of servers, providing fault tolerance, performance, and scalability withno application changes necessary.
Oracle RAC provides high availability for applications by removing the single point offailure with a single server.
About the 2 Day + Real Application Clusters Guide (page 1-1)This guide is a task-oriented guide for Oracle Real Application Clusters(Oracle RAC) database administration.
About Oracle Grid Infrastructure for a Cluster and Oracle RAC (page 1-4)Oracle Grid Infrastructure for a cluster refers to the installation of thecombined products. Oracle Clusterware and Oracle ASM are stillindividual products, and are referred to by those names.
About Oracle Automatic Storage Management (page 1-4)Oracle Automatic Storage Management (Oracle ASM) is an integrated,high-performance volume manager and file system.
About Oracle Real Application Clusters (page 1-8)Oracle RAC extends Oracle Database so that you can store, update, andefficiently retrieve data using multiple database instances on differentservers at the same time.
Tools for Installing, Configuring, and Managing Oracle RAC (page 1-11)There are different tools used for installing, configuring, and managingOracle Clusterware, Oracle Automatic Storage Management (OracleASM), and Oracle Real Application Clusters (Oracle RAC).
1.1 About the 2 Day + Real Application Clusters GuideThis guide is a task-oriented guide for Oracle Real Application Clusters (Oracle RAC)database administration.
This guide shows you how to configure and manage the environment for OracleClusterware and Oracle RAC. The administration procedures and examples in thisguide assume Oracle Linux is the operating system. For the purposes of this guide, atwo-node cluster is used in the procedures and examples.
The goal of this guide is to help you understand the basic steps required to install andmaintain an Oracle RAC environment, including how to perform basictroubleshooting, performance monitoring, and backup and recovery activities. Thisguide is based on Oracle Linux, but you do not have to be a Linux expert to use thisguide.
Introduction to Deploying a Real Application Clusters Environment 1-1
What This Guide Is Not (page 1-2)The 2 Day + Real Application Clusters Guide is not a comprehensivedescription of Oracle Real Application Clusters (Oracle RAC). Itdescribes concepts only when necessary for completing a particular task.
Related Materials (page 1-2)The 2 Day + Real Application Clusters Guide is part of a comprehensive setof learning materials for administering Oracle Databases
Overview of Oracle RAC Documentation (page 1-2)The 2 Day + Real Application Clusters Guide describes how to install,configure, and manage Oracle Real Application Clusters (Oracle RAC)and Oracle Clusterware.
1.1.1 What This Guide Is NotThe 2 Day + Real Application Clusters Guide is not a comprehensive description ofOracle Real Application Clusters (Oracle RAC). It describes concepts only whennecessary for completing a particular task.
See Also:
Oracle Real Application Clusters Administration and Deployment Guide for adetailed description of Oracle RAC concepts
1.1.2 Related MaterialsThe 2 Day + Real Application Clusters Guide is part of a comprehensive set of learningmaterials for administering Oracle Databases
The learning materials include a 2 Day DBA Oracle By Example (OBE) series, availableon Oracle Technology Network, and Oracle University instructor-led classes. The OBEseries also has animated demos you view using a web browser.
You can view the OBE content for Oracle Database and Oracle RAC at the followingwebsite:
http://www.oracle.com/technetwork/tutorials/
1.1.3 Overview of Oracle RAC DocumentationThe 2 Day + Real Application Clusters Guide describes how to install, configure, andmanage Oracle Real Application Clusters (Oracle RAC) and Oracle Clusterware.
This guide provides examples for how you could deploy Oracle RAC on a two-nodecluster, using the Oracle Linux operating system. Oracle Linux is fully compatible —both source and binary — with Red Hat Enterprise Linux. It includes the identical setof packages at the same version levels with the same source code as the Red Hatdistribution.
This guide is for DBAs who have experience with single-instance Oracle environmentsand have read Oracle Database 2 Day DBA.
Useful Oracle RAC Guides (page 1-3)Oracle provides a comprehensive set of documentation for Oracle RealApplication Clusters (Oracle RAC).
About the 2 Day + Real Application Clusters Guide
1-2 Oracle Database 2 Day + Real Application Clusters Guide

Other Useful Oracle Documentation (page 1-3)In addition to the Oracle Database 2 Day DBA guide, there are many otherbooks that are referenced when performing DBA tasks.
1.1.3.1 Useful Oracle RAC GuidesOracle provides a comprehensive set of documentation for Oracle Real ApplicationClusters (Oracle RAC).
The following list contains useful related documentation:
• Oracle Real Application Clusters Administration and Deployment Guide
• Oracle Clusterware Administration and Deployment Guide
• Oracle Real Application Clusters Installation Guide for Linux and UNIX (or otheroperating system)
• Oracle Grid Infrastructure Installation and Upgrade Guide for Linux (or otheroperating system)
Note:
Additional information for this release may be available in the Oracle DatabaseReadme or Oracle Database Release Notes for Linux for Oracle Database 12cRelease 1 (12.1). You can locate these documents on your Oracle productinstallation media or on the Oracle Technology Network website:
http://www.oracle.com/technetwork
1.1.3.2 Other Useful Oracle DocumentationIn addition to the Oracle Database 2 Day DBA guide, there are many other books thatare referenced when performing DBA tasks.
The following list displays other books in the Oracle documentation library that werereferenced within this guide:
• Oracle Automatic Storage Management Administrator's Guide
• Oracle Database Concepts
• Oracle Database Administrator’s Guide
• Oracle Database Net Services Administrator's Guide
• Oracle Database Administrator's Reference for Linux and UNIX-Based OperatingSystems
• Oracle Database Licensing Information
• Oracle Database Reference
• Oracle Database Backup and Recovery User’s Guide
• Oracle Database 2 Day + Performance Tuning Guide
• Oracle Database Performance Tuning Guide
• Oracle Universal Installer (OUI) User’s Guide
About the 2 Day + Real Application Clusters Guide
Introduction to Deploying a Real Application Clusters Environment 1-3
• Oracle Database Upgrade Guide
1.2 About Oracle Grid Infrastructure for a Cluster and Oracle RACOracle Grid Infrastructure for a cluster refers to the installation of the combinedproducts. Oracle Clusterware and Oracle ASM are still individual products, and arereferred to by those names.
Oracle Clusterware and Oracle ASM are installed into a single home directory, whichis called the Grid home.
Oracle Clusterware enables servers, referred to as hosts or nodes, to operate as if theyare one server, commonly referred to as a cluster. Although the servers are standaloneservers, each server has additional processes that communicate with other servers. Inthis way the separate servers appear as if they are one server to applications and endusers. Oracle Clusterware provides the infrastructure necessary to run Oracle RAC.The combined processing power of the multiple servers provides greater availability,throughput, and scalability than is available from a single server.
The nodes in a cluster can be organized into a server pool for better resourcemanagement. Each server pool has the following properties:
• The minimum number of nodes that should be in the server pool
• The maximum number of nodes that can be in the server pool
• The relative importance of this server pool to other server pools
Upon installation of Oracle Grid Infrastructure for a cluster, a default server pool,called the Free pool, is created automatically. All servers in a new installation areassigned to the Free server pool, initially. If you create a new server pool, then theservers move from the Free pool to the new server pool automatically.
When you create an Oracle RAC database that is a policy-managed database, youspecify the number of servers that are needed for the database, and a server pool isautomatically created for the database. Oracle Clusterware populates the server poolwith the servers it has available. If you do not use server pools, then you create an administrator-managed database.
Note:
This guide discusses the creation and management of only an administrator-managed Oracle RAC database.
See Also:
• Oracle Real Application Clusters Administration and Deployment Guide
• Oracle Clusterware Administration and Deployment Guide
1.3 About Oracle Automatic Storage ManagementOracle Automatic Storage Management (Oracle ASM) is an integrated, high-performance volume manager and file system.
Oracle ASM supports storing the Oracle Clusterware OCR and voting disk files, andalso provides a general purpose cluster file system called Oracle Automatic Storage
About Oracle Grid Infrastructure for a Cluster and Oracle RAC
1-4 Oracle Database 2 Day + Real Application Clusters Guide

Management Cluster File System (Oracle ACFS). Oracle ASM is based on the principlethat the database should manage storage instead of requiring an administrator to do it.Oracle ASM eliminates the need for you to directly manage potentially thousands ofOracle database files.
About Using Oracle ASM Disk Groups with Oracle RAC (page 1-5)Oracle ASM groups the disks in your storage system into one or moredisk groups. You manage a small set of disk groups and Oracle ASMautomates the placement of the database files within those disk groups.
Benefits of Using Oracle ASM (page 1-6)Oracle ASM reduces the administrative overhead for managing databasestorage by consolidating data storage into a small number of diskgroups. Oracle ASM disk groups provide a number of additionalbenefits.
About Oracle ACFS (page 1-7)Oracle Automatic Storage Management Cluster File System (OracleACFS) is a multi-platform, scalable file system, and storage managementtechnology that extends Oracle Automatic Storage Management (OracleASM) functionality to support all customer files.
About Oracle ASM Running in an Oracle RAC Environment (page 1-7)In an Oracle RAC environment, Oracle ASM has multiple instanceswhich run on one or more nodes in the cluster.
1.3.1 About Using Oracle ASM Disk Groups with Oracle RACOracle ASM groups the disks in your storage system into one or more disk groups.You manage a small set of disk groups and Oracle ASM automates the placement ofthe database files within those disk groups.
Oracle Cluster Registry (OCR) and voting disks can also be placed on Oracle ASMdisk groups. When using Oracle Real Application Clusters (Oracle RAC), eachinstance must have access to the data files and recovery files for the Oracle RACdatabase. Using Oracle ASM is an easy way to satisfy this requirement.
In the following figure, the normal redundancy disk group stored in Oracle ASMcontains three failure groups (shown as three disks) to store the voting disk and OCRfiles for Oracle Clusterware. Because the voting disk records which nodes arecurrently members of the cluster, there must be at least three voting disks for a two-node cluster. If the Oracle ASM disk group did not contain the voting disk and OCRfiles, then you could have a normal redundancy disk group with only two failuregroups.
About Oracle Automatic Storage Management
Introduction to Deploying a Real Application Clusters Environment 1-5
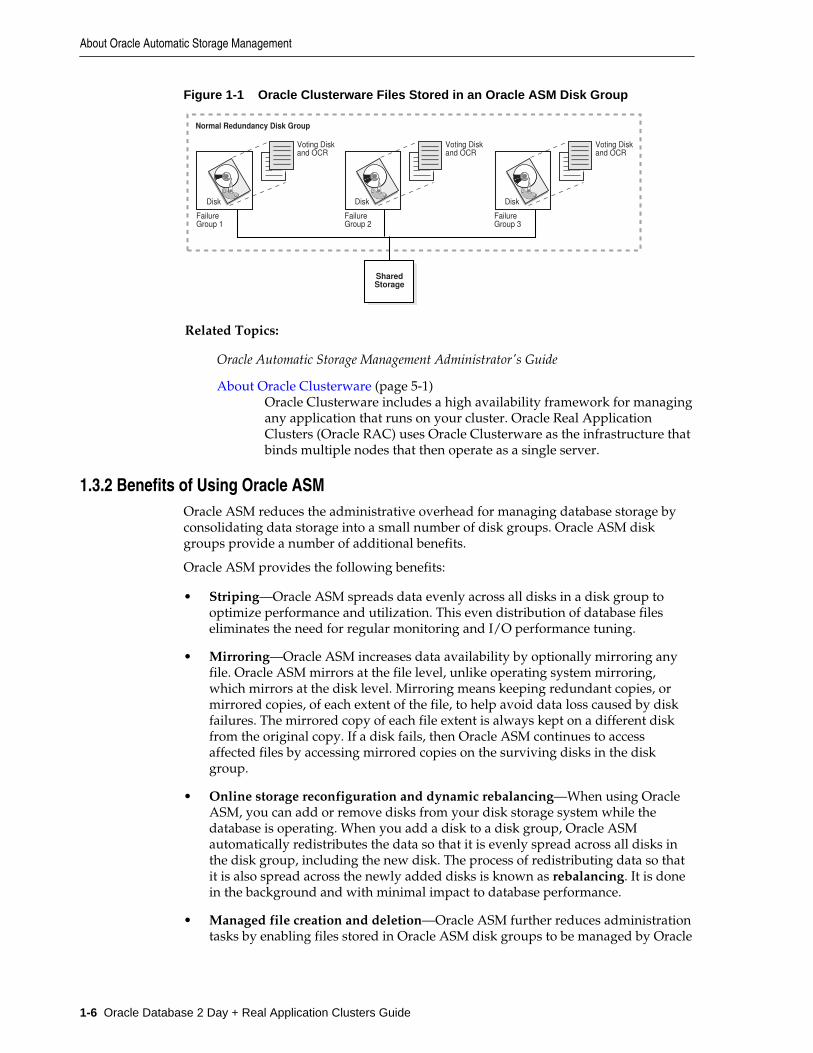
Figure 1-1 Oracle Clusterware Files Stored in an Oracle ASM Disk Group
Disk
Normal Redundancy Disk Group
Shared�Storage
Voting Disk�and OCR
Disk
Voting Disk�and OCR
Disk
Voting Disk�and OCR
Failure �Group 1
Failure �Group 2
Failure �Group 3
Related Topics:
Oracle Automatic Storage Management Administrator's Guide
About Oracle Clusterware (page 5-1)Oracle Clusterware includes a high availability framework for managingany application that runs on your cluster. Oracle Real ApplicationClusters (Oracle RAC) uses Oracle Clusterware as the infrastructure thatbinds multiple nodes that then operate as a single server.
1.3.2 Benefits of Using Oracle ASMOracle ASM reduces the administrative overhead for managing database storage byconsolidating data storage into a small number of disk groups. Oracle ASM diskgroups provide a number of additional benefits.
Oracle ASM provides the following benefits:
• Striping—Oracle ASM spreads data evenly across all disks in a disk group tooptimize performance and utilization. This even distribution of database fileseliminates the need for regular monitoring and I/O performance tuning.
• Mirroring—Oracle ASM increases data availability by optionally mirroring anyfile. Oracle ASM mirrors at the file level, unlike operating system mirroring,which mirrors at the disk level. Mirroring means keeping redundant copies, ormirrored copies, of each extent of the file, to help avoid data loss caused by diskfailures. The mirrored copy of each file extent is always kept on a different diskfrom the original copy. If a disk fails, then Oracle ASM continues to accessaffected files by accessing mirrored copies on the surviving disks in the diskgroup.
• Online storage reconfiguration and dynamic rebalancing—When using OracleASM, you can add or remove disks from your disk storage system while thedatabase is operating. When you add a disk to a disk group, Oracle ASMautomatically redistributes the data so that it is evenly spread across all disks inthe disk group, including the new disk. The process of redistributing data so thatit is also spread across the newly added disks is known as rebalancing. It is donein the background and with minimal impact to database performance.
• Managed file creation and deletion—Oracle ASM further reduces administrationtasks by enabling files stored in Oracle ASM disk groups to be managed by Oracle
About Oracle Automatic Storage Management
1-6 Oracle Database 2 Day + Real Application Clusters Guide
Database. Oracle ASM automatically assigns file names when files are created,and automatically deletes files when they are no longer needed by the database.
1.3.3 About Oracle ACFSOracle Automatic Storage Management Cluster File System (Oracle ACFS) is a multi-platform, scalable file system, and storage management technology that extendsOracle Automatic Storage Management (Oracle ASM) functionality to support allcustomer files.
Oracle ACFS supports Oracle Database files and application files, includingexecutables, database data files, database trace files, database alert logs, applicationreports, BFILEs, and configuration files. Other supported files are video, audio, text,images, engineering drawings, and all other general-purpose application file data.Oracle ACFS conforms to POSIX standards for Linux and UNIX, and to Windowsstandards for Windows.
An Oracle ACFS file system communicates with Oracle ASM and is configured withOracle ASM storage. Oracle ACFS leverages Oracle ASM functionality that enables:
• Oracle ACFS dynamic file system resizing
• Maximized performance through direct access to Oracle ASM disk group storage
• Balanced distribution of Oracle ACFS across Oracle ASM disk group storage forincreased I/O parallelism
• Data reliability through Oracle ASM mirroring protection mechanisms
1.3.4 About Oracle ASM Running in an Oracle RAC EnvironmentIn an Oracle RAC environment, Oracle ASM has multiple instances which run on oneor more nodes in the cluster.
Oracle ASM is implemented as a special kind of Oracle instance, with its own SystemGlobal Area and background processes. In a standard Oracle RAC environment, thereis one Oracle ASM instance for each node, and the Oracle ASM instances communicatewith each other on a peer-to-peer basis. Only one Oracle ASM instance is supportedon a node, but you can have multiple database instances that use Oracle ASM residingon the same node.
The following figure shows the storage configuration commonly used for a 2-nodeOracle RAC database.
About Oracle Automatic Storage Management
Introduction to Deploying a Real Application Clusters Environment 1-7

Figure 1-2 Oracle Instances and Oracle ASM Storage
Disk Group B
Oracle Recovery Catalog
Oracle Recovery Catalog
Oracle Recovery Catalog
Oracle Recovery Catalog
Oracle Recovery Catalog
Disk Group A
ASM Clustered Pool of Storage
Oracle RAC �
Oracle Database�Instance
ASM�Instance
Oracle Database�Instance
ASM�Instance
Node 1 Node 2
Oracle recommends that you use Oracle ASM for your Oracle Clusterware files andOracle RAC datafiles. Oracle databases can use both Oracle ASM files and non-OracleASM files. You can also create a file system using Oracle ACFS to store your databaseOracle Home and any other external (non-database) files in the cluster.
See Also:
• Oracle Database 2 Day + Real Application Clusters for information about theOracle Clusterware files
• Oracle Automatic Storage Management Administrator's Guide for informationabout Oracle ASM concepts and features
1.4 About Oracle Real Application ClustersOracle RAC extends Oracle Database so that you can store, update, and efficientlyretrieve data using multiple database instances on different servers at the same time.
Oracle RAC provides the software that manages multiple servers and instances as asingle group. The data files that comprise the database must reside on shared storagethat is accessible from all servers that are part of the cluster. Each server in the clusterruns the Oracle RAC software.
An Oracle database has a one-to-one relationship between data files and the databaseinstance. An Oracle RAC database, however, has a one-to-many relationship betweendata files and database instances. In an Oracle RAC database, multiple instances accessa single set of database files.
Each database instance in an Oracle RAC database uses its own memory structuresand background processes. Oracle RAC uses Cache Fusion to synchronize the datastored in the buffer cache of each database instance. Cache Fusion moves current datablocks (which reside in memory) between database instances, rather than having one
About Oracle Real Application Clusters
1-8 Oracle Database 2 Day + Real Application Clusters Guide
database instance write the data blocks to disk and requiring another databaseinstance to reread the data blocks from disk. When one instance requires a data blocklocated in the buffer cache of another instance, Cache Fusion transfers the data blockdirectly between the instances using the interconnect , enabling the Oracle RACdatabase to access and modify data as if the data resided in a single buffer cache.
Oracle RAC is also a key component for implementing the enterprise grid computingarchitecture using Oracle software. Having multiple database instances accessing asingle set of data files prevents the server from being a single point of failure. If a nodein the cluster fails, then the Oracle database continues running on the remainingnodes. Individual nodes can be stopped for maintenance while application userscontinue to work.
Oracle RAC supports mainstream business applications, such as OLTP, DSS, and alsopopular packaged products such as SAP, PeopleSoft, Siebel, and Oracle E*BusinessSuite, and custom applications. Any packaged or custom application that scales on anOracle database scales well on Oracle RAC without requiring changes to theapplication code.
You will learn more about the operation of the Oracle RAC database in a cluster, howto build the cluster, and the structure of an Oracle RAC database in other sections ofthis guide.
About Oracle RAC One Node (page 1-9)Oracle RAC One Node is a single instance of an Oracle RAC-enableddatabase running on one node in the cluster, only, under normaloperations.
About Oracle Multitenant with Oracle RAC (page 1-10)Oracle Multitenant is based on an architecture that allows a multitenantcontainer database (CDB) to hold several pluggable databases (PDBs).
About Installing Oracle RAC on Different Operating Systems (page 1-11)Oracle Real Application Clusters is supported on a variety of differentoperating systems.
See Also:
• Oracle Real Application Clusters Administration and Deployment Guide formore information about Oracle RAC concepts and architecture
• Oracle Clusterware Administration and Deployment Guide for moreinformation about Oracle Clusterware concepts and architecture
1.4.1 About Oracle RAC One NodeOracle RAC One Node is a single instance of an Oracle RAC-enabled databaserunning on one node in the cluster, only, under normal operations.
Oracle Real Application Clusters One Node (Oracle RAC One Node) is an option toOracle Database Enterprise Edition available since Oracle Database 11g Release 2(11.2). This option adds to the flexibility that Oracle offers for database consolidationwhile reducing management overhead by providing a standard deployment for Oracledatabases in the enterprise. Oracle RAC One Node database requires Oracle GridInfrastructure and, therefore, requires the same hardware setup as an Oracle RACdatabase.
About Oracle Real Application Clusters
Introduction to Deploying a Real Application Clusters Environment 1-9
Unlike Oracle RAC, Oracle RAC One Node normally has only one instance thataccesses a shared set of data files, also known as the database. This database is fullyOracle RAC-enabled, but does not span multiple hardware systems at the same time.Instead, the Oracle RAC One Node database instance fails over to another server in thecluster if a server, instance or a related and monitored component on this server fails.With Oracle RAC One Node, there is no limit to server scalability and, if applicationsgrow to require more resources than a single node can supply, then you can upgradeyour applications online to Oracle RAC. If the node that is running Oracle RAC OneNode becomes overloaded, then you can relocate the instance to another node in thecluster.
For cases of planned downtime such as operating system or database patching, OracleRAC One Node provides a unique feature, Online Database Relocation, which allowsrelocating a database from one server to another without interrupting the databaseservice. With Oracle RAC One Node you can use the Online Database Relocationfeature to relocate the database instance with no downtime for application users.
See Also:
• "About Oracle Real Application Clusters (page 1-8)"
• Oracle Real Application Clusters Administration and Deployment Guide formore information about Oracle RAC One Node
1.4.2 About Oracle Multitenant with Oracle RACOracle Multitenant is based on an architecture that allows a multitenant containerdatabase (CDB) to hold several pluggable databases (PDBs).
Oracle Multitenant is an option with Oracle Database 12c that simplifies consolidation,provisioning, upgrades, and more. You can adopt an existing database as a PDBwithout having to change the application tier. In this architecture, Oracle RACprovides the local high availability that is required when consolidating variousbusiness-critical applications on one system.
When using PDBs with Oracle RAC, the multitenant CDB is based on Oracle RAC.This means for the CDB database, there is an instance running on multiple nodes inthe cluster. You can make each PDB available on either every instance of the OracleRAC CDB or a subset of instances. In either case, access to and management of thePDBs are regulated using dynamic database services, which are also used byapplications to connect to the respective PDB.
If you create an Oracle RAC database as a CDB and plug one or more PDBs into theCDB, then, by default, a PDB is not started automatically on any instance of the OracleRAC CDB. When you assign the first dynamic database service to the PDB (other thanthe default database service which has the same name as the database name), then thePDB is made available on those instances on which the service runs.
Whether a PDB is available on more than one instance of an Oracle RAC CDB, theCDB is typically managed by the services running on the PDB. You can manuallyenable PDB access on each instance of an Oracle RAC CDB by starting the PDBmanually on that instance.
About Oracle Real Application Clusters
1-10 Oracle Database 2 Day + Real Application Clusters Guide

1.4.3 About Installing Oracle RAC on Different Operating SystemsOracle Real Application Clusters is supported on a variety of different operatingsystems.
If you plan to install and configure Oracle RAC on an operating system other thanOracle Linux, then you can still use this guide to obtain a general understanding abouthow to deploy Oracle RAC. You can also use this guide for deploying Oracle RAC onclusters with more than two nodes. For all environments that do not match theenvironment that this guide describes, modify the examples accordingly.
When installing Oracle RAC on a different platform or different operating systemversion than Oracle Linux or Red Hat Enterprise Linux, refer to the installation andconfiguration guides for that platform. For example, if you are installing Oracle RACon the Oracle Solaris operating system, then you would use the following guides:
• Oracle Grid Infrastructure Installation Guide for Oracle Solaris
• Oracle Real Application Clusters Installation Guide for Solaris Operating System
Oracle Clusterware and Oracle RAC do not support heterogeneous platforms in thesame cluster. For example, you cannot have one node in the cluster running OracleLinux and another node in the same cluster running Oracle Solaris. All nodes mustrun the same operating system; that is, they must be binary compatible. Oracle RACdoes not support machines having different chip architectures in the same cluster.However, you can have machines of different speeds and sizes in the same cluster.
See Also:
Oracle Real Application Clusters Administration and Deployment Guide for anoverview of installing Oracle RAC
1.5 Tools for Installing, Configuring, and Managing Oracle RACThere are different tools used for installing, configuring, and managing OracleClusterware, Oracle Automatic Storage Management (Oracle ASM), and Oracle RealApplication Clusters (Oracle RAC).
Table 1-1 Tools for Installing, Configuring, and Managing Oracle RAC
Tool or Utility Purpose Description of Its Use
Oracle Universal Installer (OUI) Installs Oracle GridInfrastructure for a cluster(which consists of OracleClusterware and OracleASM) and OracleDatabase with OracleRAC.
After you configure thenodes to use in yourcluster, OUI installs theOracle software on thespecified nodes using anetwork connection.
Tools for Installing, Configuring, and Managing Oracle RAC
Introduction to Deploying a Real Application Clusters Environment 1-11
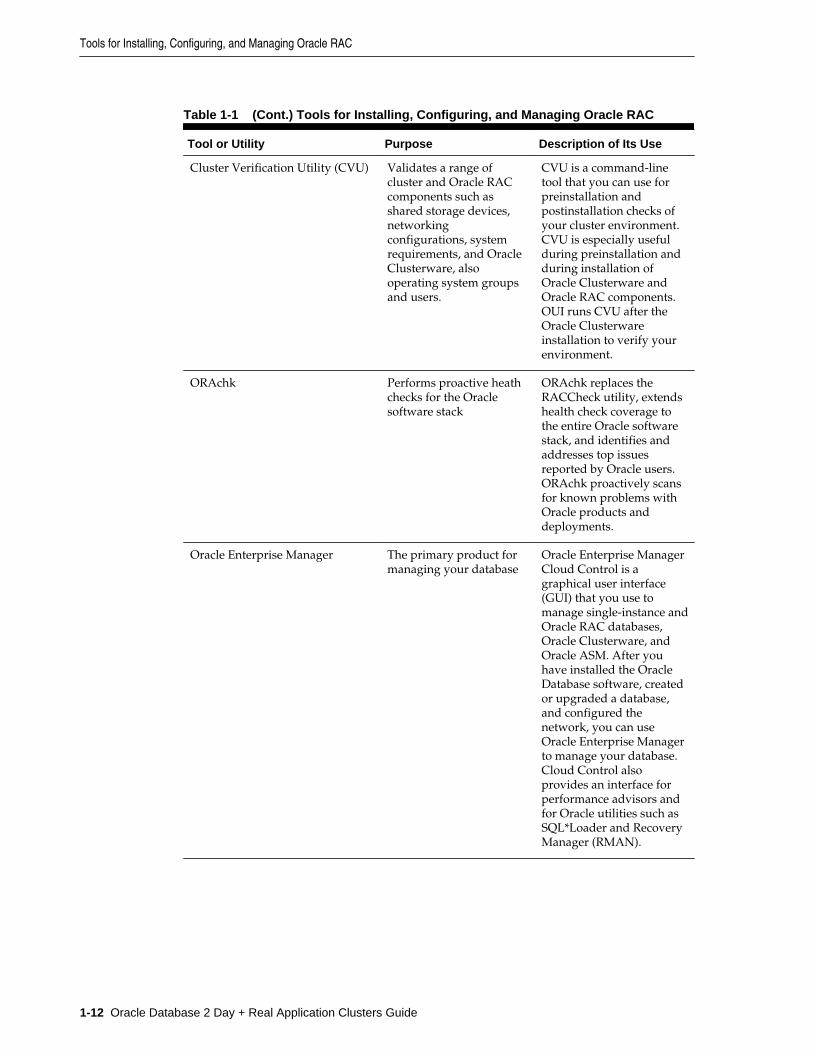
Table 1-1 (Cont.) Tools for Installing, Configuring, and Managing Oracle RAC
Tool or Utility Purpose Description of Its Use
Cluster Verification Utility (CVU) Validates a range ofcluster and Oracle RACcomponents such asshared storage devices,networkingconfigurations, systemrequirements, and OracleClusterware, alsooperating system groupsand users.
CVU is a command-linetool that you can use forpreinstallation andpostinstallation checks ofyour cluster environment.CVU is especially usefulduring preinstallation andduring installation ofOracle Clusterware andOracle RAC components.OUI runs CVU after theOracle Clusterwareinstallation to verify yourenvironment.
ORAchk Performs proactive heathchecks for the Oraclesoftware stack
ORAchk replaces theRACCheck utility, extendshealth check coverage tothe entire Oracle softwarestack, and identifies andaddresses top issuesreported by Oracle users.ORAchk proactively scansfor known problems withOracle products anddeployments.
Oracle Enterprise Manager The primary product formanaging your database
Oracle Enterprise ManagerCloud Control is agraphical user interface(GUI) that you use tomanage single-instance andOracle RAC databases,Oracle Clusterware, andOracle ASM. After youhave installed the OracleDatabase software, createdor upgraded a database,and configured thenetwork, you can useOracle Enterprise Managerto manage your database.Cloud Control alsoprovides an interface forperformance advisors andfor Oracle utilities such asSQL*Loader and RecoveryManager (RMAN).
Tools for Installing, Configuring, and Managing Oracle RAC
1-12 Oracle Database 2 Day + Real Application Clusters Guide

Table 1-1 (Cont.) Tools for Installing, Configuring, and Managing Oracle RAC
Tool or Utility Purpose Description of Its Use
SQL*Plus Issues SQL and PL/SQLstatements to OracleDatabase
SQL*Plus provides acommand-line interfacethat enables you to performdatabase managementoperations for a database,and also to query, insert,update, or delete datadirectly in the database.
Server Control (SRVCTL) Manages the resourcesdefined in the OracleCluster Registry (OCR).These resources includethe node applications,called nodeapps, thatcomprise OracleClusterware, whichincludes the OracleNotification Service(ONS), and the Virtual IP(VIP).
You use SRVCTL, acommand-line interface, tomanage databases,instances, listeners,services, and applicationsthat run in an OracleClusterware environment.Using SRVCTL you canstart and stop nodeapps,databases, instances,listeners, and services,delete or move instancesand services, add services,and manage configurationinformation.
Cluster Ready Services Control(CRSCTL)
Manages OracleClusterware daemons.These daemons includeCluster SynchronizationServices (CSS), Cluster-Ready Services (CRS), andEvent Manager (EVM).
CRSCTL is a command-linetool that you can use tostart and stop OracleClusterware and todetermine the currentstatus of your OracleClusterware installation.
Database Configuration Assistant(DBCA)
Creates and configuresOracle Databases
DBCA can be launched byOUI, depending upon thetype of install that youselect. You can also launchDBCA as a standalone toolat any time after OracleDatabase installation. Youcan run DBCA ininteractive mode ornoninteractive/silentmode. Interactive modeprovides a graphicalinterface and guidedworkflow for creating andconfiguring a database.DBCA is the preferred wayto create a database,because it is a moreautomated approach, andyour database is ready touse when DBCAcompletes.
Tools for Installing, Configuring, and Managing Oracle RAC
Introduction to Deploying a Real Application Clusters Environment 1-13

Table 1-1 (Cont.) Tools for Installing, Configuring, and Managing Oracle RAC
Tool or Utility Purpose Description of Its Use
Oracle Automatic StorageManagement ConfigurationAssistant (ASMCA)
Installs and configuresOracle ASM
ASMCA is a utility thatsupports installing andconfiguring Oracle ASMinstances, disk groups,volumes, and OracleAutomatic StorageManagement Cluster FileSystem (Oracle ACFS).ASMCA provides both aGUI and a non-GUIinterface.
Oracle Automatic StorageManagement Command Lineutility (ASMCMD)
Administers Oracle ASM ASMCMD is a command-line utility that you can useto manage Oracle ASMinstances, Oracle ASM diskgroups, file access controlfor disk groups, files anddirectories within OracleASM disk groups,templates for disk groups,and Oracle ASM volumes.
Listener Control (LSNRCTL) Administers listeners The Listener Control utilityis a command-line interfacethat you use to administerlisteners. You can use itscommands to performbasic managementfunctions on one or morelisteners. Additionally, youcan view and changeparameter settings for thelistener.
If you have installed Oracle Grid Infrastructure for a cluster for Oracle Database 12cRelease 1 (12.1), then, when using utilities to manage your cluster, databases, databaseinstances, Oracle ASM, and listeners, use the appropriate binary that is in the homedirectory of the object or component you are managing. Set the ORACLE_HOMEenvironment variable to point to this directory, for example:
• If you use ASMCMD, SRVCTL, SQL*Plus, or LSNRCTL to manage Oracle ASM orits listener, then use the executable files located in the Grid home, not theexecutable files located in the Oracle Database home, and set the ORACLE_HOMEenvironment variable to the location of the Grid home.
• If you use SRVCTL, SQL*Plus, or LSNRCTL to manage a database instance or itslistener, then use the binaries located in the Oracle home where the databaseinstance or listener is running, and set the ORACLE_HOME environment variable tothe location of that Oracle home
Tools for Installing, Configuring, and Managing Oracle RAC
1-14 Oracle Database 2 Day + Real Application Clusters Guide

See Also:
Oracle Real Application Clusters Administration and Deployment Guide for moreinformation about the tools and utilities used to manage Oracle RAC
Tools for Installing, Configuring, and Managing Oracle RAC
Introduction to Deploying a Real Application Clusters Environment 1-15

Tools for Installing, Configuring, and Managing Oracle RAC
1-16 2 Day + Real Application Clusters Guide
2Preparing Your Cluster
This chapter contains the information that your system administrator and networkadministrator need to help you, as the DBA, configure two nodes in your cluster. Thischapter assumes a basic understanding of the Linux operating system. In some cases,you may need to refer to details in Oracle Grid Infrastructure Installation and UpgradeGuide for your operating system. In addition, you must have these additionalprivileges have to perform certain tasks in this chapter: root or sudo privileges forUNIX and Linux systems, Administrator privileges on Windows systems.
Verifying System Requirements (page 2-1)Before you begin your installation, check to ensure that your systemmeets the requirements for Oracle Real Application Clusters (OracleRAC).
Preparing the Server (page 2-10)After you have verified that your system meets the basic requirementsfor installing Oracle RAC, the next step is to configure the server inpreparation for installation.
Configuring the Network (page 2-18)Before you install Oracle Grid Infrastructure and Oracle RAC you needto decide on network names and configure IP addresses.
Preparing the Operating System and Software (page 2-23)When you install the Oracle software on your server, Oracle UniversalInstaller expects the operating system to have specific packages andsoftware applications installed.
Configuring Installation Directories and Shared Storage (page 2-25)Oracle RAC requires access to a shared file system for storing OracleClusterware files. You must also determine where the Oracle softwareand database files will be installed.
See Also:
• "About Installing Oracle RAC on Different Operating Systems(page 1-11)"
• "Tools for Installing, Configuring, and Managing Oracle RAC (page 1-11)"
2.1 Verifying System RequirementsBefore you begin your installation, check to ensure that your system meets therequirements for Oracle Real Application Clusters (Oracle RAC).
Preparing Your Cluster 2-1
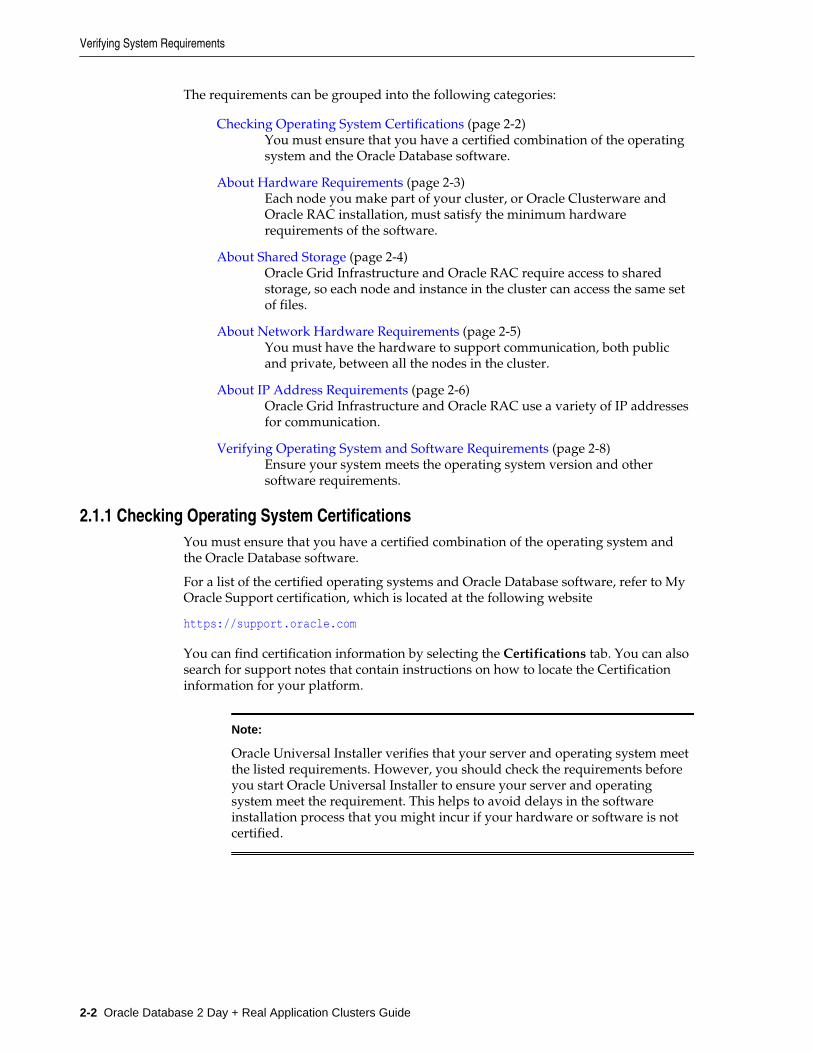
The requirements can be grouped into the following categories:
Checking Operating System Certifications (page 2-2)You must ensure that you have a certified combination of the operatingsystem and the Oracle Database software.
About Hardware Requirements (page 2-3)Each node you make part of your cluster, or Oracle Clusterware andOracle RAC installation, must satisfy the minimum hardwarerequirements of the software.
About Shared Storage (page 2-4)Oracle Grid Infrastructure and Oracle RAC require access to sharedstorage, so each node and instance in the cluster can access the same setof files.
About Network Hardware Requirements (page 2-5)You must have the hardware to support communication, both publicand private, between all the nodes in the cluster.
About IP Address Requirements (page 2-6)Oracle Grid Infrastructure and Oracle RAC use a variety of IP addressesfor communication.
Verifying Operating System and Software Requirements (page 2-8)Ensure your system meets the operating system version and othersoftware requirements.
2.1.1 Checking Operating System CertificationsYou must ensure that you have a certified combination of the operating system andthe Oracle Database software.
For a list of the certified operating systems and Oracle Database software, refer to MyOracle Support certification, which is located at the following website
https://support.oracle.com
You can find certification information by selecting the Certifications tab. You can alsosearch for support notes that contain instructions on how to locate the Certificationinformation for your platform.
Note:
Oracle Universal Installer verifies that your server and operating system meetthe listed requirements. However, you should check the requirements beforeyou start Oracle Universal Installer to ensure your server and operatingsystem meet the requirement. This helps to avoid delays in the softwareinstallation process that you might incur if your hardware or software is notcertified.
Verifying System Requirements
2-2 Oracle Database 2 Day + Real Application Clusters Guide
See Also:
• "Preparing the Server (page 2-10)"
• "Verifying Operating System and Software Requirements (page 2-8)"
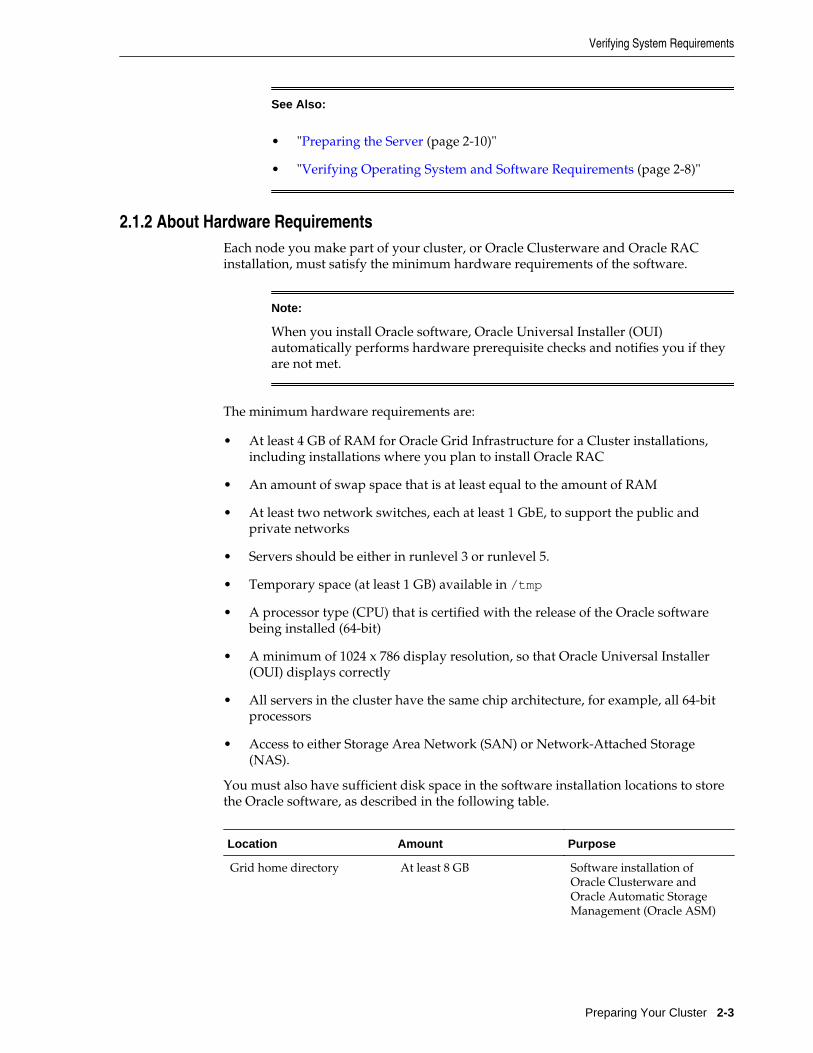
2.1.2 About Hardware RequirementsEach node you make part of your cluster, or Oracle Clusterware and Oracle RACinstallation, must satisfy the minimum hardware requirements of the software.
Note:
When you install Oracle software, Oracle Universal Installer (OUI)automatically performs hardware prerequisite checks and notifies you if theyare not met.
The minimum hardware requirements are:
• At least 4 GB of RAM for Oracle Grid Infrastructure for a Cluster installations,including installations where you plan to install Oracle RAC
• An amount of swap space that is at least equal to the amount of RAM
• At least two network switches, each at least 1 GbE, to support the public andprivate networks
• Servers should be either in runlevel 3 or runlevel 5.
• Temporary space (at least 1 GB) available in /tmp
• A processor type (CPU) that is certified with the release of the Oracle softwarebeing installed (64-bit)
• A minimum of 1024 x 786 display resolution, so that Oracle Universal Installer(OUI) displays correctly
• All servers in the cluster have the same chip architecture, for example, all 64-bitprocessors
• Access to either Storage Area Network (SAN) or Network-Attached Storage(NAS).
You must also have sufficient disk space in the software installation locations to storethe Oracle software, as described in the following table.
Location Amount Purpose
Grid home directory At least 8 GB Software installation ofOracle Clusterware andOracle Automatic StorageManagement (Oracle ASM)
Verifying System Requirements
Preparing Your Cluster 2-3
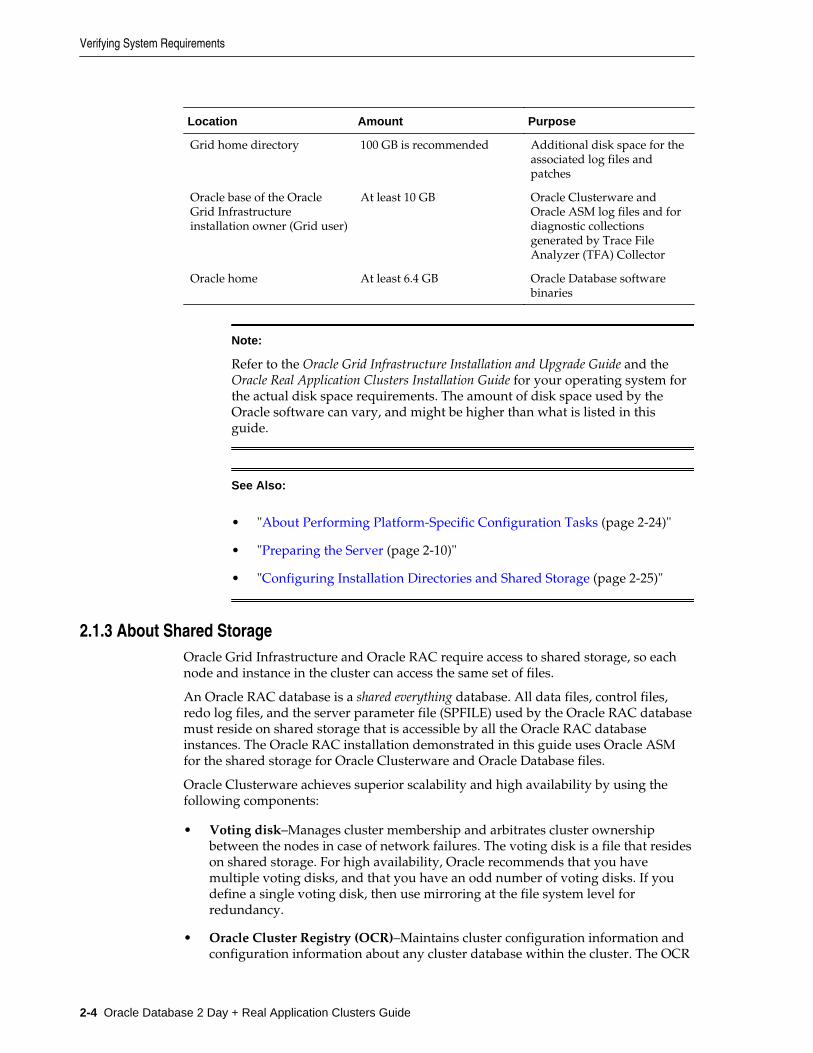
Location Amount Purpose
Grid home directory 100 GB is recommended Additional disk space for theassociated log files andpatches
Oracle base of the OracleGrid Infrastructureinstallation owner (Grid user)
At least 10 GB Oracle Clusterware andOracle ASM log files and fordiagnostic collectionsgenerated by Trace FileAnalyzer (TFA) Collector
Oracle home At least 6.4 GB Oracle Database softwarebinaries
Note:
Refer to the Oracle Grid Infrastructure Installation and Upgrade Guide and the Oracle Real Application Clusters Installation Guide for your operating system forthe actual disk space requirements. The amount of disk space used by theOracle software can vary, and might be higher than what is listed in thisguide.
See Also:
• "About Performing Platform-Specific Configuration Tasks (page 2-24)"
• "Preparing the Server (page 2-10)"
• "Configuring Installation Directories and Shared Storage (page 2-25)"
2.1.3 About Shared StorageOracle Grid Infrastructure and Oracle RAC require access to shared storage, so eachnode and instance in the cluster can access the same set of files.
An Oracle RAC database is a shared everything database. All data files, control files,redo log files, and the server parameter file (SPFILE) used by the Oracle RAC databasemust reside on shared storage that is accessible by all the Oracle RAC databaseinstances. The Oracle RAC installation demonstrated in this guide uses Oracle ASMfor the shared storage for Oracle Clusterware and Oracle Database files.
Oracle Clusterware achieves superior scalability and high availability by using thefollowing components:
• Voting disk–Manages cluster membership and arbitrates cluster ownershipbetween the nodes in case of network failures. The voting disk is a file that resideson shared storage. For high availability, Oracle recommends that you havemultiple voting disks, and that you have an odd number of voting disks. If youdefine a single voting disk, then use mirroring at the file system level forredundancy.
• Oracle Cluster Registry (OCR)–Maintains cluster configuration information andconfiguration information about any cluster database within the cluster. The OCR
Verifying System Requirements
2-4 Oracle Database 2 Day + Real Application Clusters Guide
contains information such as which database instances run on which nodes andwhich services run on which databases. The OCR also stores information aboutprocesses that Oracle Clusterware controls. The OCR resides on shared storagethat is accessible by all the nodes in your cluster. Oracle Clusterware canmultiplex, or maintain multiple copies of, the OCR and Oracle recommends thatyou use this feature to ensure high availability.
• Grid Infrastructure Management Repository–Supports Oracle Database Qualityof Service management, Memory Guard, and Cluster Health Monitor
These Oracle Clusterware components require the following disk space on a sharedfile system:
• Three Oracle Clusterware Registry (OCR) files, a least 400 MB for each volume, or1.2 GB total disk space
• Three voting disk files, 300 MB each volume, or 900 MB total disk space
• The Grid Infrastructure Management Repository requires an additional 5.9 GB ofdisk space and is stored in an OCR volume
See Also:
• The chapter on configuring storage in Oracle Grid Infrastructure Installationand Upgrade Guide
• "Configuring Installation Directories and Shared Storage (page 2-25)"
• "Configuring Shared Storage (page 2-29)"
2.1.4 About Network Hardware RequirementsYou must have the hardware to support communication, both public and private,between all the nodes in the cluster.
Oracle Clusterware requires that you connect the nodes in the cluster to a privatenetwork by way of a private interconnect . The private interconnect is a separatenetwork that you configure between cluster nodes. The interconnect serves as thecommunication path between nodes in the cluster. This interconnect should be aprivate interconnect, meaning it is not accessible to nodes that are not members of thecluster.
The interconnect used by Oracle RAC is the same interconnect that Oracle Clusterwareuses. Each cluster database instance uses the interconnect for messaging tosynchronize the use of shared resources by each instance. Oracle RAC also uses theinterconnect to transmit data blocks that are shared between the instances.
When you configure the network for Oracle RAC and Oracle Clusterware, each nodein the cluster must meet the following requirements:
• Each node must have at least two network interface cards (NICs), or networkadapters. One adapter is for the public network interface and the other adapter isfor the private network interface (the interconnect). Install additional networkadapters on a node if that node meets either of the following conditions:
– Does not have at least two network adapters
Verifying System Requirements
Preparing Your Cluster 2-5
– Has two network interface cards but is using network attached storage(NAS). You should have a separate network adapter for NAS.
– Has two network cards, but you want to use the Redundant InterconnectUsage feature, which allows multiple network adapters to be accessed as asingle adapter. Redundant Interconnect Usage enables load-balancing andhigh availability across multiple (up to 4) private networks (also known asinterconnects).
• For easier management, public interface names should be the same for all nodes.If the public interface on one node uses the network adapter eth0, then youshould configure eth0 as the public interface on all nodes. Network interfacenames are case-sensitive.
• The network adapter for the public interface must support TCP/IP.
• The network adapter for the private interface must support the user datagramprotocol (UDP) using high-speed network adapters and a network switch thatsupports TCP/IP (Gigabit Ethernet or better).
Note:
– UDP is the default interface protocol for Oracle RAC and OracleClusterware.
– You must use a switch for the interconnect. Oracle recommends that youuse a dedicated network switch. Token-rings or crossover cables are notsupported for the interconnect.
– Loopback devices are not supported.
• For the private network, the endpoints of all designated interconnect interfacesmust be completely reachable on the network. Every node in the cluster must beable to connect to every private network interface in the cluster.
• The host name of each node must conform to the RFC 952 standard, whichpermits alphanumeric characters. Host names using underscores ("_") are notallowed.
See Also:
• Oracle Grid Infrastructure Installation and Upgrade Guide for Linux for moreinformation about the configuration requirements for RedundantInterconnect Usage
• "Configuring the Network (page 2-18)"
• "Verifying System Requirements (page 2-1)"
2.1.5 About IP Address RequirementsOracle Grid Infrastructure and Oracle RAC use a variety of IP addresses forcommunication.
Verifying System Requirements
2-6 Oracle Database 2 Day + Real Application Clusters Guide
When performing an advanced installation of Oracle Grid Infrastructure for a cluster,you can chose to use Grid Naming Service (GNS) and Dynamic Host ConfigurationProtocol (DHCP) for virtual IPs (VIPs). GNS uses multicast Domain Name Server(mDNS) to enable the cluster to assign host names and IP addresses dynamically asnodes are added and removed from the cluster, without requiring additional networkaddress configuration in the domain name server (DNS).
You can configure the public network interfaces for cluster nodes to use IPv4, IPv6, orboth types of IP addresses. During installation, the nodes can be connected tonetworks that have both address types, but you cannot configure the VIPs to use bothaddress types during installation. After installation, you can configure cluster membernodes with a mixture of IPv4 and IPv6 addresses. Oracle Grid Infrastructure andOracle RAC support the standard IPv6 address notations specified by RFC 2732.
This guide documents how to perform a typical installation, which does not use GNSand uses only IPv4 addresses. You must configure the following addresses manuallyin your corporate DNS:
• A fixed public IP address for each node
• A virtual IP address for each node
• Three single client access name (SCAN) addresses for the cluster
Note:
Oracle Clusterware uses interfaces marked as private as the clusterinterconnects. You do not need to specify IP addresses for the interconnect.
During installation a SCAN for the cluster is configured, which is a domain name thatresolves to all the SCAN addresses allocated for the cluster. The public IP addresses,SCAN addresses, and VIP addresses must all be on the same subnet. The SCAN mustbe unique within your network. The SCAN addresses should not respond to pingcommands before installation. In a Typical installation, the SCAN is also the name ofthe cluster, so the SCAN must meet the same requirements as the cluster name andcan be no longer than 15 characters.
During installation of the Oracle Grid Infrastructure for a cluster, a listener is createdfor each of the SCAN addresses. Clients that access the Oracle RAC database shoulduse the SCAN or SCAN address, not the VIP name or address. If an application uses aSCAN to connect to the cluster database, then the network configuration files on theclient computer do not have to be modified when nodes are added to or removed fromthe cluster. The SCAN and its associated IP addresses provide a stable name for clientsto use for connections, independent of the nodes that form the cluster. Clients canconnect to the cluster database using the easy connect naming method and the SCAN.
Verifying System Requirements
Preparing Your Cluster 2-7

See Also:
• "Configuring the Network (page 2-18)"
• "Verifying System Requirements (page 2-1)"
• Oracle Database Net Services Administrator's Guide for information aboutthe easy connect naming method
• Oracle Grid Infrastructure Installation and Upgrade Guide for your platformfor more information about configuring GNS and IPv6 network addressesfor your cluster
2.1.6 Verifying Operating System and Software RequirementsEnsure your system meets the operating system version and other softwarerequirements.
Refer to the Oracle Grid Infrastructure Installation and Upgrade Guide and the Oracle RealApplication Clusters Installation Guide for your platform for information about specificrequirements for your environment.
About Operating System and Software Requirements (page 2-8)Before installing the Oracle software, check that your operating systemmeets the requirements.
About Installation Fixup Scripts (page 2-9)Oracle Universal Installer (OUI) detects when the minimumrequirements for an installation are not met, and creates shell scripts,called Fixup scripts, to finish incomplete system configuration steps.
Checking the Current Operating System Configuration (page 2-9)Instead of waiting for the installation to notify you of an incorrectconfiguration, you can use operating system commands to manuallycheck the operating system configuration before installation. This helpsyou determine if additional time will be needed to update the operatingsystem before starting the Oracle Grid Infrastructure installation.
2.1.6.1 About Operating System and Software RequirementsBefore installing the Oracle software, check that your operating system meets therequirements.
The operating system and software requirements might include:
• The operating system release
• The kernel version of the operating system
• Modifying the values for kernel parameters
• Installed packages, patches, or patch sets
• Installed compilers and drivers
• Web browser type and version
• Additional application software requirements
Verifying System Requirements
2-8 Oracle Database 2 Day + Real Application Clusters Guide
If you are currently running an operating system release that is not supported byOracle Database 12c Release 1 (12.1), then you must first upgrade your operatingsystem before installing Oracle Real Application Clusters.
If you are using Oracle Linux as your operating system, then you can use the OracleValidated RPM system configuration script to configure your system.
2.1.6.2 About Installation Fixup ScriptsOracle Universal Installer (OUI) detects when the minimum requirements for aninstallation are not met, and creates shell scripts, called Fixup scripts, to finishincomplete system configuration steps.
If OUI detects an incomplete task, then it generates a Fixup script (runfixup.sh).You can run the script after you click Fix and Check Again.
Fixup scripts do the following:
• If necessary, set kernel parameters to values required for successful installation,including:
– Shared memory parameters
– Open file descriptor and UDP send/receive parameters
• Create and set permissions on the Oracle Inventory (central inventory) directory.
• Create or reconfigure primary and secondary group memberships for theinstallation owner, if necessary, for the Oracle Inventory directory and theoperating system privileges groups
• Set shell limits, if necessary, to required values.
2.1.6.3 Checking the Current Operating System ConfigurationInstead of waiting for the installation to notify you of an incorrect configuration, youcan use operating system commands to manually check the operating systemconfiguration before installation. This helps you determine if additional time will beneeded to update the operating system before starting the Oracle Grid Infrastructureinstallation.
To determine if the operating system requirements for Oracle Linux have beenmet:
1. To determine which distribution and version of Linux is installed, enter the one ofthe following commands at the operating system prompt as the root user:
# cat /etc/oracle-release# cat /etc/redhat-release# lsb_release -id
2. To determine which chip architecture each server is using and which version of thesoftware you should install, run the following command at the operating systemprompt as the root user:
# uname -m
This command displays the processor type. For a 64-bit architecture, the outputwould be "x86_64".
Verifying System Requirements
Preparing Your Cluster 2-9
3. To determine if the required errata level is installed, run the uname command asthe root user, as shown in this example:
# uname -r2.6.39-100.7.1.el6uek.x86_64
Like most software, the Linux kernel is updated to fix bugs in the operating system.These kernel updates are referred to as erratum kernels or errata levels.
The output in the previous example shows that the kernel version is 2.6.39, and theerrata level (EL) is 100.7.1.e16uek. Review the required errata level for yourdistribution. If the errata level is below the required minimum errata level, theninstall the latest kernel update for your operating system. The kernel updates areavailable from your operating system vendor.
4. To ensure there are no operating system issues affecting installation, make sure youhave installed all the operating system patch updates and packages that are listedin Oracle Grid Infrastructure Installation Guide for your platform. If you are usingOracle Linux, then you can determine if the required packages, or programs thatperform specific functions or calculations, are installed by using the followingcommand as the root user:
# rpm -q package_name
The variable package_name is the name of the package you are verifying, such assetarch. If a package is not installed, then install it from your Linux distributionmedia or download the required package version from your Linux vendor'swebsite.
You can also use either up2date or YUM (Yellow dog Updater Modified) to installpackages and their dependencies on some Linux systems. YUM uses repositories toautomatically locate and obtain the correct RPM packages for your system.
See Also:
• "About Installing Oracle RAC on Different Operating Systems(page 1-11)"
• "Preparing the Server (page 2-10)"
• "Preparing the Operating System and Software (page 2-23)"
• "About Configuring the Software Owner's Shell Environment on LinuxSystems (page 2-17)"
• "About Performing Platform-Specific Configuration Tasks (page 2-24)"
• Oracle Grid Infrastructure Installation Guide and the Oracle Real ApplicationClusters Installation Guide for your platform
2.2 Preparing the ServerAfter you have verified that your system meets the basic requirements for installingOracle RAC, the next step is to configure the server in preparation for installation.
Preparing the Server
2-10 Oracle Database 2 Day + Real Application Clusters Guide

About Operating System Users and Groups (page 2-11)Depending on whether this is the first time Oracle software is installedon this server, you may have to create operating system groups andusers.
Configuring Operating System Users and Groups on Linux Systems (page 2-15)This task describes how to create the grid and oracle users prior toinstalling the software.
Configuring Secure Shell on Linux Systems (page 2-16)To install Oracle software, Secure Shell (SSH) connectivity must be setup between all cluster member nodes.
About Configuring the Software Owner's Shell Environment on Linux Systems(page 2-17)
On Oracle Linux, you run Oracle Universal Installer (OUI) from thegrid account. OUI obtains information from the environment variablesconfigured for the grid user.
See Also:
"About Performing Platform-Specific Configuration Tasks (page 2-24)"
2.2.1 About Operating System Users and GroupsDepending on whether this is the first time Oracle software is installed on this server,you may have to create operating system groups and users.
Required Operating System Users and Groups (page 2-11)To install Oracle Grid Infrastructure for a cluster and Oracle RealApplication Clusters (Oracle RAC), you must create certain operatingsystem groups and users.
Separate Operating System Users and Groups for Oracle Software Installationson UNIX and Linux Systems (page 2-13)
Instead of using a single operating system user as the owner of everyOracle software installation, you can use multiple users, each owningone or more Oracle software installations.
Separate Operating System Users and Groups for Oracle Software Installationson Windows Systems (page 2-13)
On the Windows platform, management of operating system users andgroups is different from Linux and UNIX Systems.
Optional Operating System Users and Groups (page 2-14)You can use additional users and groups to divide administrative accessprivileges to the Oracle Grid Infrastructure for a cluster installation fromother administrative users and groups associated with other Oracleinstallations. Separating administrative access is implemented byspecifying membership in different operating system groups, andseparating installation privileges is implemented by using differentinstallation owners for each Oracle installation.
2.2.1.1 Required Operating System Users and GroupsTo install Oracle Grid Infrastructure for a cluster and Oracle Real Application Clusters(Oracle RAC), you must create certain operating system groups and users.
Preparing the Server
Preparing Your Cluster 2-11

Table 2-1 Required Operating System Users and Groups for Oracle GridInfrastructure and Oracle RAC Installations
Operating System User or Group Description
The Oracle Inventory group for allOracle software installations(oinstall).
The Oracle Inventory group must be the primarygroup for Oracle software installation owners onLinux and UNIX platforms. Members of the OracleInventory group have access to the OracleInventory directory. This directory is the centralinventory record of all Oracle software installationson a server and the installation logs and trace filesfrom each installation. On Windows systems, thisgroup is created and managed automatically.
An Oracle software owner, orinstallation user. This is the useraccount you use when installing thesoftware.
If you want to use a single software owner for allinstallations, then typically the user name isoracle. If you plan to install Oracle GridInfrastructure for a cluster and Oracle RAC usingseparate software owners to separate Oracle GridInfrastructure for a cluster administrative privilegesfrom Oracle Database administrative privileges,then typically you would use grid for Oracle GridInfrastructure for a cluster owner and oracle forthe Oracle RAC owner.
The OSDBA group (typically, dba) forOracle Database authentication.
The OSDBA group is a system privileges groupwhose members are granted the SYSDBA privilegeto administer Oracle Database and the SYSASMprivilege to administer Oracle Clusterware andOracle ASM. To provide fine-grained control ofadministrative privileges you can create multipleoperating system groups.
Note:
When installing Oracle RAC on a Microsoft Windows platform:
• OUI automatically creates the groups used for system authenticatingaccess to the Oracle software.
• The user performing the installation must be an Administrator user.
• If you specify an Oracle Home user during installation, this user must bea domain user.
On Linux and UNIX systems, if you use one installation owner for both Oracle GridInfrastructure for a cluster and Oracle RAC, then when you want to performadministration tasks, you must change the value for ORACLE_HOME environmentvariable to match the instance you want to administer (Oracle ASM, in the Grid home,or a database instance in the Oracle home). To change the ORACLE_HOME environmentvariable, use a command syntax similar to the following example, where /u01/app/12.1.0/grid is the Oracle Grid Infrastructure for a cluster home:
ORACLE_HOME=/u01/app/12.1.0/grid; export ORACLE_HOME
Preparing the Server
2-12 Oracle Database 2 Day + Real Application Clusters Guide

If you try to administer an instance using SQL*Plus, LSNRCTL, or ASMCMD whileORACLE_HOME is set to an incorrect binary path, then you will encounter errors. TheOracle home path does not affect SRVCTL commands.
On Windows systems, to perform administration tasks, you simply run theappropriate utility for either Oracle Grid Infrastructure or Oracle RAC andORACLE_HOME is configured automatically.
Related Topics:
Optional Operating System Users and Groups (page 2-14)
2.2.1.2 Separate Operating System Users and Groups for Oracle SoftwareInstallations on UNIX and Linux SystemsInstead of using a single operating system user as the owner of every Oracle softwareinstallation, you can use multiple users, each owning one or more Oracle softwareinstallations.
A user created to own only the Oracle Grid Infrastructure for a cluster installation iscalled the grid user. This user owns both the Oracle Clusterware and OracleAutomatic Storage Management binaries. A user created to own either all Oraclesoftware installations (including Oracle Grid Infrastructure for a cluster), or onlyOracle Database software installations, is called the oracle user.
You can also use different users for each Oracle Database software installation.Additionally, you can specify a different OSDBA group for each Oracle Databasesoftware installation. By using different operating system groups for authenticatingadministrative access to each Oracle Database installation, users have SYSDBAprivileges for the databases associated with their OSDBA group, rather than for all thedatabases on the system.
Members of the OSDBA group can also be granted the SYSASM system privilege,which gives them administrative access to Oracle ASM. As described in "OptionalOperating System Users and Groups (page 2-14)", you can configure a separateoperating system group for Oracle ASM authentication to separate users with SYSASMaccess to the Oracle ASM instances from users with SYSDBA access to the databaseinstances.
If you want to create separate Oracle software owners so you can use separate usersand operating system privilege groups for the different Oracle software installations,then note that each of these users must have the Oracle central inventory group(oinstall) as their primary group. Members of this group have the required writeprivileges to the Oracle Inventory directory.
Note:
The Oracle Grid Infrastructure for a cluster installation can be owned by onlyone user. You cannot have one user that owns the Oracle Clusterwareinstalled files and a different user that owns the Oracle ASM installed files.
2.2.1.3 Separate Operating System Users and Groups for Oracle SoftwareInstallations on Windows SystemsOn the Windows platform, management of operating system users and groups isdifferent from Linux and UNIX Systems.
Preparing the Server
Preparing Your Cluster 2-13

You create at least one Oracle Installation user (an Administrator user who installsOracle software) when you install Oracle Grid Infrastructure. You can use this OracleInstallation user or a different Oracle Installation user when installing Oracle Databasesoftware.
You should create additional non-privileged Windows user accounts to be used asOracle Home users during installation. An Oracle Home User is different from anOracle Installation user. An Oracle Installation user is the user who needsadministrative privileges to install Oracle products. An Oracle Home user is a low-privileged Windows User Account specified during installation that runs most of theWindows services required for the Oracle home. Different Oracle homes on a systemcan share the same Oracle Home user or use different Oracle Home users. You do notneed to create any operating system groups because they are created and managedautomatically by the Oracle software.
The Oracle Home user can be a Built-in Account or a Windows domain user. TheWindows domain user should be a low-privileged, non-administrative account toensure that the Oracle Database services running under Oracle Home User have onlythose privileges required to run Oracle products. Create separate Oracle Home usersfor each Oracle software product to have separate administrative controls for thedifferent Oracle Homes.
If you use different Oracle Home users for each Oracle Database software installation,then you can use the ORA_HOMENAME_DBA group that is associated with each Oraclehome to separate SYSDBA privileges for each installation. A member of anORA_HOMENAME_DBA group can use operating system authentication to log in to onlythe Oracle Databases that run from the Oracle home with the name HOMENAME.Members of the ORA_DBA group can use operating system authentication to log in toany Oracle database with SYSDBA privileges.
You can also use the Oracle ASM access control feature to enable role separation forOracle ASM management. In previous releases, this feature was disabled on Windowsbecause all Oracle Database services ran as Local System. For Oracle ASMadministration, the new groups ORA_ASMADMIN, ORA_ASMDBA and ORA_ASMOPER areautomatically created and populated during Oracle Grid Infrastructure installation.
2.2.1.4 Optional Operating System Users and GroupsYou can use additional users and groups to divide administrative access privileges tothe Oracle Grid Infrastructure for a cluster installation from other administrative usersand groups associated with other Oracle installations. Separating administrativeaccess is implemented by specifying membership in different operating systemgroups, and separating installation privileges is implemented by using differentinstallation owners for each Oracle installation.
The optional users and groups you can use are:
• The Oracle Automatic Storage Management Group, or OSASM group (typicallyasmadmin for Linux and ORA_ASMADMIN for Windows).
• The ASM Database Administrator group, or OSDBA for ASM group (typicallyasmdba for Linux and ORA_ASMDBA for Windows).
• The OSOPER for Oracle Database group (typically, oper on Linux and ORA_OPERon Windows).
• The OSOPER for Oracle ASM group (typically asmoper on Linux andORA_ASMOPER on Windows).
Preparing the Server
2-14 Oracle Database 2 Day + Real Application Clusters Guide
• The OSBACKUPDBA group for Oracle Database.
• The OSDGDBA group for Oracle Data Guard.
• The OSKMDBA group for encryption key management.
See Also:
• "About Configuring the Software Owner's Shell Environment on LinuxSystems (page 2-17)"
• "Preparing the Server (page 2-10)"
• Oracle Grid Infrastructure Installation Guide for your operating system formore information about configuring separation of privileges by role.
2.2.2 Configuring Operating System Users and Groups on Linux SystemsThis task describes how to create the grid and oracle users prior to installing thesoftware.
The instructions in this guide use one software owner for the Oracle GridInfrastructure installation, and a separate user is used for the Oracle Database (OracleReal Application Clusters) installation. The users are named grid and oracle. Theoracle user belongs to the oinstall and dba operating system groups.
To create software owners with all operating system-authenticatedadministration privileges:
1. Determine the groups that exist on your server by listing the contents of the /etc/group file.
cat /etc/group
2. If this is the first time Oracle software has been installed on your server, and theOracle Inventory group does not exist, then create the Oracle Inventory group(oinstall) with a group ID that is currently not in use on all the nodes in yourcluster. Enter a command as the root user that is similar to the following:
# /usr/sbin/groupadd -g 1000 oinstall
3. Create an OSDBA (dba) group with a group ID that is currently not in use on allthe nodes in your cluster by entering a command as the root user that is similar tothe following:
# /usr/sbin/groupadd -g 1001 dba
4. Create an OSDBA group for Oracle ASM (asmdba) with a group ID that iscurrently not in use on all the nodes in your cluster by entering a command as theroot user that is similar to the following:
# /usr/sbin/groupadd -g 1002 asmdba
5. If the user that owns the Oracle software (grid or oracle) does not exist on yourserver, then you must create the user. Select a user ID (UID) that is currently not inuse on all the nodes in your cluster. To determine which users have been createdon your server, list the contents of the /etc/passwd file using the command:
Preparing the Server
Preparing Your Cluster 2-15

cat /etc/passwd
The following command shows how to create the grid user and the user's homedirectory (/home/grid) with the default group as oinstall and the secondarygroups as dba and asmdba, using a UID of 1100:
# /usr/sbin/useradd -u 1100 –g oinstall -G dba,asmdba -d /home/grid -r grid
The following command shows how to create the oracle user and the user's homedirectory (/home/oracle) with the default group as oinstall and the secondarygroup as dba, using a UID of 1100:
# /usr/sbin/useradd -u 1200 –g oinstall -G dba,asmdba -d /home/oracle -r oracle
6. Set the password for the grid and oracle accounts using the followingcommand. Replace password with your own password.
passwd gridChanging password for user grid.New UNIX password: passwordretype new UNIX password: passwordpasswd: all authentication tokens updated successfully.passwd oracleChanging password for user oracle.New UNIX password: passwordretype new UNIX password: passwordpasswd: all authentication tokens updated successfully.
7. Repeat Step 1 through Step 6 on each node in your cluster.
8. Verify that the attributes of the user grid and oracle are identical on each nodeof your cluster:
id gridid oracle
The command output should be similar to the following:
uid=1100(grid) gid=1000(oinstall) groups=1000(oinstall),1001(dba),1002(asmdba)uid=1200(oracle) gid=1000(oinstall) groups=1000(oinstall),1001(dba),1002(asmdba)
See Also:
• "Configuring Installation Directories and Shared Storage (page 2-25)"
• "About Oracle Automatic Storage Management (page 1-4)"
2.2.3 Configuring Secure Shell on Linux SystemsTo install Oracle software, Secure Shell (SSH) connectivity must be set up between allcluster member nodes.
OUI uses the ssh and scp commands during installation to run remote commands onand copy files to the other cluster nodes. You must configure SSH so that thesecommands do not prompt for a password. SSH is also used by the configurationassistants, Enterprise Manager, and when adding nodes to the cluster.
Preparing the Server
2-16 Oracle Database 2 Day + Real Application Clusters Guide

You can configure SSH from the Oracle Universal Installer (OUI) interface duringinstallation for the user account running the installation. The automatic configurationcreates passwordless SSH connectivity between all cluster member nodes.
To enable the script to run, you must remove stty commands from the profiles of anyOracle software installation owners, and remove other security measures that aretriggered during a login, and that generate messages to the terminal. These messages,mail checks, and other displays prevent Oracle software installation owners fromusing the SSH configuration script that is built into the Oracle Universal Installer. Ifthey are not disabled, then SSH must be configured manually before an installationcan be run.
On Linux systems, to enable Oracle Universal Installer to use the ssh and scpcommands without being prompted for a pass phrase, you must have userequivalency in the cluster. User equivalency exists in a cluster when the followingconditions exist on all nodes in the cluster:
• A given user has the same user name, user ID (UID), and password.
• A given user belongs to the same groups.
• A given group has the same group ID (GID).
See Also:
• "Configuring Operating System Users and Groups on Linux Systems(page 2-15)" for information about configuring user equivalency
• Oracle Grid Infrastructure Installation Guide for your platform for moreinformation about manually configuring SSH
2.2.4 About Configuring the Software Owner's Shell Environment on Linux SystemsOn Oracle Linux, you run Oracle Universal Installer (OUI) from the grid account.OUI obtains information from the environment variables configured for the griduser.
Before running OUI, you must make the following changes to the shell startup file forthe software owner of Oracle Grid Infrastructure for a cluster:
• Set the default file mode creation mask (umask) of the installation user (grid) to022 in the shell startup file. Setting the mask to 022 ensures that the userperforming the software installation creates files with 644 permissions.
• Set ulimit settings for file descriptors (nofile) and processes (nproc) for theinstallation user (grid).
• Set the software owner's environment variable DISPLAY environment variables inpreparation for the Oracle Grid Infrastructure for a cluster installation.
• Remove any lines in the file that set values for ORACLE_SID, ORACLE_HOME, orORACLE_BASE environment variables.
After you have saved your changes, run the shell startup script to configure theenvironment.
Preparing the Server
Preparing Your Cluster 2-17
Also, if the /tmp directory has less than 1 GB of available disk space, but you haveidentified a different, non-shared file system that has at least 1 GB of available space,then you can set the TEMP and TMPDIR environment variables to specify the alternatetemporary directory on this file system.
To review your current environment settings, use the env | more command as thegrid user.
Note:
Remove any stty commands from hidden files (such as logon or profilescripts) before you start the installation. On Linux systems, if there are anysuch files that contain stty commands, then when these files are loaded bythe remote shell during installation, OUI indicates an error and stops theinstallation.
See Also:
• Oracle Grid Infrastructure Installation Guide for your platform for moreinformation on how to configure the Oracle software owner environmentbefore installation
• "About Operating System Users and Groups (page 2-11)"
2.3 Configuring the NetworkBefore you install Oracle Grid Infrastructure and Oracle RAC you need to decide onnetwork names and configure IP addresses.
Clients and applications connect to the database using a single client access name(SCAN). The SCAN and its associated IP addresses provide a stable name for clients touse for connections, independent of the nodes that form the cluster. A SCAN works bybeing able to resolve to multiple IP addresses referencing multiple listeners in thecluster that handle public client connections. The installation process creates theselisteners, called SCAN listeners.
To configure the network in preparation for installing Oracle Grid Infrastructurefor a cluster:
1. Determine your cluster name.
The cluster name should satisfy the following conditions:
• The cluster name is at least one character long and less than 15 characters long.
• The cluster name must consist of the same character set used for host names:single-byte alphanumeric characters (a to z, A to Z, and 0 to 9) and hyphens (-).
• The cluster name is globally unique throughout your host domain
• If you use third-party vendor clusterware, then Oracle recommends that youuse the vendor cluster name.
2. Determine the public host name and virtual host name for each node in the cluster.
Configuring the Network
2-18 Oracle Database 2 Day + Real Application Clusters Guide
• For the public host name, use the primary host name of each node. In otherwords, use the name displayed by the hostname command. This host namecan be either the permanent or the virtual host name, for example: racnode1.
• Determine a virtual host name for each node. A virtual host name is a publicnode name that Oracle Clusterware uses to reroute client requests sent to thenode if the node is down. Oracle recommends that you provide a name in theformat <public hostname>-vip, for example: racnode1-vip.
3. Identify the interface names and associated IP addresses for all network adaptersby executing the following command on each node:
# /sbin/ifconfig
From the output, identify the interface name (such as eth0) and IP address foreach network adapter you specify as a public network interface.
If your operating system supports a graphic user interface (GUI) for modifying thesystem configuration, then you can also use the following command to start a GUIthat you can use to configure the network adapters and /etc/hosts file:
/usr/bin/system-config-network &
Note:
When you install Oracle Clusterware and Oracle RAC, you are asked toprovide the interface name and IP address for each network adapter.
4. On each node in the cluster, assign a public IP address with an associated networkname to one network adapter. The public name for each node should be registeredwith your domain name system (DNS). IP addresses on the subnet you identify asprivate are assigned as private IP addresses for cluster member nodes. You do nothave to configure these addresses manually in the /etc/hosts file.
You can test whether an interconnect interface is reachable using a ping command.
5. On each node in the cluster, configure a third IP address that serves as a virtual IPaddress.
Use an IP address that meets the following requirements:
• The virtual IP address and the network name must not be currently in use.
• The virtual IP address must be on the same subnet as your public IP address.
The virtual host name for each node should be registered with your DNS.
6. Define a SCAN that resolves to three IP addresses in your DNS.
7. When you complete the network configuration, the IP address and networkinterface configuration should be similar to what is shown in the following table(Your node names and IP addresses might be different):
Configuring the Network
Preparing Your Cluster 2-19

Table 2-2 Manual Network Configuration Example
Identity Home Node Host Node Given Name Type Address AddressAssigned By
Resolved By
Node 1Public
Node 1 racnode1 racnode11 Public 192.0.2.101 Fixed DNS
Node 1VIP
Node 1 Selected byOracleClusterware
racnode1-vip Virtual 192.0.2.104 Fixed DNS,hostsfile
Node 1Private
Node 1 racnode1 racnode1-priv
Private 192.168.0.1 Fixed DNS,hostsfile, ornone
Node 2Public
Node 2 racnode2 racnode21 Public 192.0.2.102 Fixed DNS
Node 2VIP
Node 2 Selected byOracleClusterware
racnode2-vip Virtual 192.0.2.105 Fixed DNS,hostsfile
Node 2Private
Node 2 racnode2 racnode2-priv
Private 192.168.0.2 Fixed DNS,hostsfile, ornone
SCANVIP 1
none Selected byOracleClusterware
docrac-scan virtual 192.0.2.201 Fixed DNS
SCANVIP 2
none Selected byOracleClusterware
docrac-scan virtual 192.0.2.202 Fixed DNS
SCANVIP 3
none Selected byOracleClusterware
docrac-scan virtual 192.0.2.203 Fixed DNS
1 Node host names may resolve to multiple addresses.
Even if you are using a DNS, Oracle recommends that you add lines to the /etc/hosts file on each node, specifying the public IP addresses. Configure the /etc/hosts file so that it is similar to the following example:
#eth0 - PUBLIC192.0.2.100 racnode1.example.com racnode1192.0.2.101 racnode2.example.com racnode2
Configuring the Network
2-20 Oracle Database 2 Day + Real Application Clusters Guide
Note:
Make a note of the addresses you configured in the /etc/hosts file orregistered with DNS. When you install Oracle Grid Infrastructure for a clusterand Oracle RAC, you are prompted for the public, virtual IP, and SCANaddresses.
Oracle strongly recommends that you do not configure SCAN VIP addressesin the hosts file. Use DNS resolution for SCAN VIPs.
The fully qualified SCAN for the cluster defaults to cluster_name-scan.GNS_subdomain_name, for example docrac-scan.grid.example.com.The short SCAN for the cluster is docrac-scan. Without GNS, and configuringSCAN in DNS directly, then the fully qualified SCAN would be similar todocrac-scan.example.com. You can use any name for the SCAN, if it is uniquewithin your network and conforms to the RFC 952 standard.
8. If you configured the IP addresses in a DNS server, then, as the root user, changethe hosts search order in /etc/nsswitch.conf on all nodes as shown here:
Old:
hosts: files nis dns
New:
hosts: dns files nis
9. After modifying the nsswitch.conf file, restart the nscd daemon on each nodeusing the following command:
# /sbin/service nscd restart
After you have completed the installation process, configure clients to use the SCANto access the cluster. Using the previous example, the clients would use docrac-scanto connect to the cluster.
See Also:
• "About Network Hardware Requirements (page 2-5)"
• Oracle Grid Infrastructure Installation and Upgrade Guide for your platform
Verifying the Network Configuration (page 2-21)After you have configured the network, perform verification tests tomake sure it is configured properly. If there are problems with thenetwork connection between nodes in the cluster, then the OracleClusterware installation fails.
2.3.1 Verifying the Network ConfigurationAfter you have configured the network, perform verification tests to make sure it isconfigured properly. If there are problems with the network connection betweennodes in the cluster, then the Oracle Clusterware installation fails.
Configuring the Network
Preparing Your Cluster 2-21

To verify the network configuration on a two-node cluster that is running OracleLinux:
1. As the root user, verify the configuration of the public and private networks.Verify that the interfaces are configured on the same network (either private orpublic) on all nodes in your cluster.
In this example, eth0 is used for the public network and eth1 is used for theprivate network on each node.
# /sbin/ifconfig eth0 Link encap:Ethernet HWaddr 00:0E:0C:08:67:A9 inet addr: 192.0.2.100 Bcast:192.0.2.255 Mask:255.255.240.0 UP BROADCAST RUNNING MULTICAST MTU:1500 Metric:1 RX packets:270332689 errors:0 dropped:0 overruns:0 frame:0 TX packets:112346591 errors:2 dropped:0 overruns:0 carrier:2 collisions:202 txqueuelen:1000 RX bytes:622032739 (593.2 MB) TX bytes:2846589958 (2714.7 MB) Base address:0x2840 Memory:fe7e0000-fe800000 eth1 Link encap:Ethernet HWaddr 00:04:23:A6:CD:59 inet addr: 10.10.10.11 Bcast: 10.10.10.255 Mask:255.255.240.0 UP BROADCAST RUNNING MULTICAST MTU:1500 Metric:1 RX packets:21567028 errors:0 dropped:0 overruns:0 frame:0 TX packets:15259945 errors:0 dropped:0 overruns:0 carrier:0 collisions:0 txqueuelen:1000 RX bytes:4091201649 (3901.6 MB) TX bytes:377502797 (360.0 MB) Base address:0x2800 Memory:fe880000-fe8a0000
2. As the root user, verify the network configuration by using the ping command totest the connection from each node in your cluster to all the other nodes. Forexample, as the root user, you might run the following commands on each node:
# ping -c 3 racnode1.example.com# ping -c 3 racnode1 # ping -c 3 racnode2.example.com# ping -c 3 racnode2
You should not get a response from the nodes using the ping command for thevirtual IPs (racnode1-vip, racnode2-vip) or the SCAN IPs until after OracleClusterware is installed and running. If the ping commands for the publicaddresses fail, then resolve the issue before you proceed.
3. Ensure that you can access the default gateway with a ping command. To identifythe default gateway, use the route command, as described in the Oracle LinuxHelp utility.
See Also:
• "Checking the Settings for the Interconnect (page 8-43)"
• "Configuring the Network (page 2-18)"
• "About Network Hardware Requirements (page 2-5)"
Configuring the Network
2-22 Oracle Database 2 Day + Real Application Clusters Guide
2.4 Preparing the Operating System and SoftwareWhen you install the Oracle software on your server, Oracle Universal Installerexpects the operating system to have specific packages and software applicationsinstalled.
About Setting the Time on All Nodes (page 2-23)Before starting the installation, ensure that the date and time settings onall the cluster nodes are set as closely as possible to the same date andtime.
About Configuring Kernel Parameters (page 2-24)OUI checks the current settings for various kernel parameters to ensurethey meet the minimum requirements for deploying Oracle RAC. Forproduction database systems, Oracle recommends that you tune thesettings to optimize the performance of your particular system.
About Performing Platform-Specific Configuration Tasks (page 2-24)You may be required to perform special configuration steps that arespecific to the operating system on which you are installing Oracle RAC,or for the components used with your cluster.
See Also:
• "Preparing the Server (page 2-10)"
• "Verifying Operating System and Software Requirements (page 2-8)"
2.4.1 About Setting the Time on All NodesBefore starting the installation, ensure that the date and time settings on all the clusternodes are set as closely as possible to the same date and time.
A cluster time synchronization mechanism ensures that the internal clocks of all thecluster members are synchronized. For Oracle RAC on Linux, you can use either theNetwork Time Protocol (NTP) or the Oracle Cluster Time Synchronization Service.
NTP is a protocol designed to synchronize the clocks of servers connected by anetwork. When using NTP, each server on the network runs client software toperiodically make timing requests to one or more servers, referred to as reference NTPservers. The information returned by the timing request is used to adjust the server'sclock. All the nodes in your cluster should use the same reference NTP server.
Note:
If you use NTP on Linux or UNIX platforms, then you must configure it usingthe -x flag. See the Oracle Grid Infrastructure Installation and Upgrade Guide foryour platform for details on how to configure NTP.
If you do not configure NTP, then Oracle configures and uses the Cluster TimeSynchronization Service (CTSS). CTSS can also be used to synchronize the internalclocks of all the members in the cluster. CTSS keeps the member nodes of the clustersynchronized. CTSS designates the first node in the cluster as the master and then
Preparing the Operating System and Software
Preparing Your Cluster 2-23

synchronizes all other nodes in the cluster to have the same time as the master node.CTSS does not use any external clock for synchronization.
Note:
Using NTP or CTSS does not protect your system against human errorresulting from a change in the system time for a node.
2.4.2 About Configuring Kernel ParametersOUI checks the current settings for various kernel parameters to ensure they meet theminimum requirements for deploying Oracle RAC. For production database systems,Oracle recommends that you tune the settings to optimize the performance of yourparticular system.
Note:
If you find parameter settings or shell limit values on your system that aregreater than the values mentioned by OUI, then do not modify the parametersetting.
2.4.3 About Performing Platform-Specific Configuration TasksYou may be required to perform special configuration steps that are specific to theoperating system on which you are installing Oracle RAC, or for the components usedwith your cluster.
The following list provides examples of operating-specific installation tasks:
• Configure the use of Huge Pages on SUSE Linux, Red Hat Enterprise Linux, orOracle Linux.
• Set shell limits for the oracle user on Red Hat Linux or Oracle Linux systems toincrease the number of files and processes available to Oracle Clusterware andOracle RAC.
• Create X library symbolic links on HP-UX.
• Configure network tuning parameters on AIX Based Systems.
See Also:
• "Preparing the Server (page 2-10)"
• "Preparing the Operating System and Software (page 2-23)"
• "About Installing Oracle RAC on Different Operating Systems(page 1-11)"
• Oracle Grid Infrastructure Installation Guide for your platform
Preparing the Operating System and Software
2-24 Oracle Database 2 Day + Real Application Clusters Guide

2.5 Configuring Installation Directories and Shared StorageOracle RAC requires access to a shared file system for storing Oracle Clusterware files.You must also determine where the Oracle software and database files will beinstalled.
You must complete certain storage configuration tasks before you start OracleUniversal Installer.
Note:
Additional configuration is required to use the Oracle Automatic StorageManagement library Driver (ASMLIB) with third party vendor multipathdisks. Refer to Oracle Grid Infrastructure Installation Guide for your operatingsystem for more details about these requirements.
About the Oracle Inventory Directory (page 2-26)The Oracle Inventory (oraInventory) directory is the central inventoryrecord of all Oracle software installations on a server.
Locating the Oracle Inventory Directory (page 2-26)If you have an existing Oracle Inventory, then ensure that you use thesame Oracle Inventory for all Oracle software installations, and ensurethat all Oracle software users you intend to use for installation havepermissions to write to this directory.
Creating the Oracle Grid Infrastructure for a Cluster Home Directory(page 2-27)
During installation, you are prompted to provide a path to a homedirectory in which to place the software for Oracle Grid Infrastructurefor a cluster. OUI installs Oracle Clusterware and Oracle ASM into adirectory referred to as Grid_home.
Creating the Oracle Base Directory (page 2-28)Before installing any Oracle software, you must configure an Oracle basedirectory. OUI uses the Oracle base directory to determine the locationof the Oracle Inventory directory, and also for installing Oracle RAC.
About the Oracle Home Directory (page 2-29)The Oracle home directory is the location in which the Oracle RACsoftware is installed.
Configuring Shared Storage (page 2-29)Each node in a cluster requires external shared disks for storing theOracle Clusterware (Oracle Cluster Registry and voting disk) files, andOracle Database files.
Configuring Files on an NAS Device for Use with Oracle ASM (page 2-30)To use an NFS file system, it must be on a certified NAS device. If youhave a certified network attached storage (NAS) device, then you cancreate zero-padded files in an NFS mounted directory and use those filesas disk devices in an Oracle ASM disk group.
Configuring Installation Directories and Shared Storage
Preparing Your Cluster 2-25

Using ASMLIB to Mark the Shared Disks as Candidate Disks (page 2-32)You can use the ASMLIB utility to configure disks used by OracleAutomatic Storage Management (Oracle ASM).
Configuring Disk Device Persistence (page 2-35)If you use ASMLIB, then you do not have to ensure permissions anddevice path persistency in udev.
See Also:
• "About Operating System Users and Groups (page 2-11)"
• Oracle Grid Infrastructure Installation and Upgrade Guide for your platform
2.5.1 About the Oracle Inventory DirectoryThe Oracle Inventory (oraInventory) directory is the central inventory record of allOracle software installations on a server.
The oraInventory directory contains the following:
• A registry of the Oracle home directories (Oracle Grid Infrastructure for a clusterand Oracle Database) on the system
• Installation logs and trace files from installations of Oracle software. These filesare also copied to the respective Oracle homes for future reference
OUI creates the oraInventory directory during installation. By default, the OracleInventory directory is not installed under the Oracle Base directory. This is because allOracle software installations share a common Oracle Inventory, so there is only oneOracle Inventory for all users, whereas each user that performs a software installationcan use a separate Oracle base directory.
2.5.2 Locating the Oracle Inventory DirectoryIf you have an existing Oracle Inventory, then ensure that you use the same OracleInventory for all Oracle software installations, and ensure that all Oracle softwareusers you intend to use for installation have permissions to write to this directory.
To determine if you have an Oracle central inventory directory (oraInventory) onyour system:
1. Run the following command to check for an existing Oracle Inventory directory:
# more /etc/oraInst.loc
• If the oraInst.loc file exists, then the output from this command is similarto the following:
inventory_loc=/u01/app/oraInventoryinst_group=oinstall
In the previous output example:
– The inventory_loc group shows the location of the Oracle Inventory.
Configuring Installation Directories and Shared Storage
2-26 Oracle Database 2 Day + Real Application Clusters Guide

– The inst_group parameter shows the name of the Oracle Inventorygroup (in this example, oinstall).
• If the Oracle Inventory directory does not exist, then the command returns anerror message indicating that the file or directory does not exist.
2. If the Oracle Inventory directory does not exist, then you do not have to create onebefore installing the Oracle software.
See Also: "About the Oracle Inventory Directory (page 2-26)"
2.5.3 Creating the Oracle Grid Infrastructure for a Cluster Home DirectoryDuring installation, you are prompted to provide a path to a home directory in whichto place the software for Oracle Grid Infrastructure for a cluster. OUI installs OracleClusterware and Oracle ASM into a directory referred to as Grid_home.
Ensure that the directory path you provide for the Grid_home meets the followingrequirements:
• It should be created in a path outside existing Oracle homes.
• It should not be located in a user home directory.
• It should be created either as a subdirectory in a path where all files can be ownedby root, or in a unique path.
• If you create the path before installation, then it should be owned by theinstallation owner of Oracle Grid Infrastructure for a cluster (oracle or grid),and set to 775 permissions.
Before you start the installation, you must have sufficient disk space on a file systemfor the Oracle Grid Infrastructure for a cluster directory. The file system that you usefor the Grid home directory must have at least 4.5 GB of available disk space.
The path to the Grid home directory must be the same on all nodes. As the root user,you should create a path compliant with Oracle Optimal Flexible Architecture (OFA)guidelines, so that OUI can select that directory during installation.
To create the Grid home directory:
Log in to the operating system as the root user, then enter the following commands,where grid is the name of the user that will install the Oracle Grid Infrastructuresoftware:
# mkdir -p /u01/app/12.1.0/grid# chown -R grid:oinstall /u01/app/12.1.0/grid
Note:
On Linux and UNIX systems, you must ensure the Grid home directory is nota subdirectory of the Oracle base directory. Installing Oracle Clusterware in anOracle base directory causes installation errors.
Configuring Installation Directories and Shared Storage
Preparing Your Cluster 2-27
Related Topics:
About Hardware Requirements (page 2-3)Each node you make part of your cluster, or Oracle Clusterware andOracle RAC installation, must satisfy the minimum hardwarerequirements of the software.
Configuring Shared Storage (page 2-29)Each node in a cluster requires external shared disks for storing theOracle Clusterware (Oracle Cluster Registry and voting disk) files, andOracle Database files.
2.5.4 Creating the Oracle Base DirectoryBefore installing any Oracle software, you must configure an Oracle base directory.OUI uses the Oracle base directory to determine the location of the Oracle Inventorydirectory, and also for installing Oracle RAC.
Oracle Universal Installer (OUI) creates the Oracle base directory for you in thelocation you specify. This directory is owned by the user performing the installation.The Oracle base directory (ORACLE_BASE) helps to facilitate the organization of Oracleinstallations, and helps to ensure that installations of multiple databases maintain anOptimal Flexible Architecture (OFA) configuration.
OFA guidelines recommend that you use a path similar to the following for the Oraclebase directory:
/mount_point/app/user
In the preceding path example, the variable mount_point is the mount point directoryfor the file system where you intend to install the Oracle software and user is theOracle software owner (typically oracle). For OUI to recognize the path as an Oraclesoftware path, it must be in the form u0[1-9]/app, for example, /u01/app.
The path to the Oracle base directory must be the same on all nodes. The permissionson the Oracle base directory should be at least 750.
Assume you have determined that the file system mounted as /u01 has sufficientroom for both the Oracle Grid Infrastructure for a cluster and Oracle RAC software.You have decided to make the /u01/app/oracle/ directory the Oracle basedirectory. The user installing all the Oracle software is the oracle user.
To create the Oracle base directory:
1. Log in as the root user.
2. Use the mkdir command to create the path to the Oracle base directory.
# mkdir -p /u01/app/oracle/
3. Change the ownership of the Oracle base path to the Oracle software owner,oracle.
# chown -R oracle:oinstall /u01/app/oracle/
4. Change the permissions on the Oracle base directory to 775.
# chmod -R 775 /u01/app/oracle/
Configuring Installation Directories and Shared Storage
2-28 Oracle Database 2 Day + Real Application Clusters Guide

2.5.5 About the Oracle Home DirectoryThe Oracle home directory is the location in which the Oracle RAC software isinstalled.
You can use an Oracle home directory created in the local file system, forexample, /u01/app/oracle/product/12.1.0/dbhome_1. The same directorymust exist on every node in the cluster. You do not have to create these directoriesbefore installation. By default, the installer suggests a subdirectory of the Oracle basedirectory for the Oracle home.
You can also use a shared Oracle home. The location of the shared Oracle home can beon network storage, or a supported cluster file system such as Oracle AutomaticStorage Management Cluster File System (Oracle ACFS). For more information aboutOracle ACFS, see Oracle Automatic Storage Management Administrator's Guide.
If you use the local file system for the Oracle home directory, and you want to install adifferent release of Oracle RAC or Oracle Database on the same server, then you mustuse a separate Oracle home directory for each software installation. Multiple releasesof the same product or different products can run from different Oracle homesconcurrently. Products installed in one Oracle home do not conflict or interact withproducts installed in another Oracle home.
Using different Oracle homes for your installed software enables you to performmaintenance operations on the Oracle software in one home without effecting thesoftware in another Oracle home. However, it also increases your softwaremaintenance costs, because each Oracle home must be upgraded or patchedseparately.
2.5.6 Configuring Shared StorageEach node in a cluster requires external shared disks for storing the OracleClusterware (Oracle Cluster Registry and voting disk) files, and Oracle Database files.
The supported types of shared storage depend upon the platform you are using, forexample:
• Oracle Automatic Storage Management (strongly recommended)
• A supported cluster file system, such as OCFS2 for Linux, or General Parallel FileSystem (GPFS) on IBM platforms
• Network file system (NFS), which is not supported on Linux on POWER or onIBM zSeries Based Linux
• (Upgrades only) Shared disk partitions consisting of block devices. Block devicesare disk partitions that are not mounted using the Linux file system. OracleClusterware and Oracle RAC write to these partitions directly.
Note:
You cannot use OUI to install Oracle Clusterware files on block or rawdevices. You cannot put Oracle Clusterware binaries and files on OracleAutomatic Storage Management Cluster File System (Oracle ACFS).
Configuring Installation Directories and Shared Storage
Preparing Your Cluster 2-29
If you decide to use OCFS2 to store the Oracle Clusterware files, then you must use theproper version of OCFS2 for your operating system version. OCFS2 works with OracleLinux and Red Hat Linux kernel version 2.6
For all installations, you must choose the storage option to use for Oracle Clusterwarefiles and Oracle Database files. The examples in this guide use Oracle ASM to store theOracle Clusterware and Oracle Database files. The Oracle Grid Infrastructure for acluster and Oracle RAC software is installed on disks local to each node, not on ashared file system.
This guide describes two different methods of configuring the shared disks for usewith Oracle ASM:
• Configuring Files on an NAS Device for Use with Oracle ASM (page 2-30)
• Using ASMLIB to Mark the Shared Disks as Candidate Disks (page 2-32)
Note:
For the most up-to-date information about supported storage options forOracle RAC installations, refer to the Certifications pages on My OracleSupport at:
https://support.oracle.com
See Also:
• Oracle Grid Infrastructure Installation and Upgrade Guide for your platform ifyou are using a cluster file system or NFS
2.5.7 Configuring Files on an NAS Device for Use with Oracle ASMTo use an NFS file system, it must be on a certified NAS device. If you have a certifiednetwork attached storage (NAS) device, then you can create zero-padded files in anNFS mounted directory and use those files as disk devices in an Oracle ASM diskgroup.
To ensure high availability of Oracle Clusterware files on Oracle ASM, you must haveat least 2 GB of disk space for Oracle Clusterware files in three separate failure groups,with at least three physical disks. Each disk must have at least 1 GB of capacity toensure that there is sufficient space to create Oracle Clusterware files.
Use the following guidelines when identifying appropriate disk devices:
• All of the devices in an Oracle Automatic Storage Management disk group shouldbe the same size and have the same performance characteristics.
• A disk group should not contain multiple partitions on a single physical diskdevice.
• Using logical volumes as a device in an Oracle Automatic Storage Managementdisk group is not supported with Oracle RAC.
• The user account with which you perform the installation (oracle) must havewrite permissions to create the files in the path that you specify.
Configuring Installation Directories and Shared Storage
2-30 Oracle Database 2 Day + Real Application Clusters Guide

To configure NAS device files for creating disk groups:
1. Add and configure access to the disks to the NAS device. Make sure each clusternode has been granted access to all the disks used by Oracle Grid Infrastructure fora cluster and Oracle Database software.
Refer to your NAS device documentation for more information about completingthis step.
2. On a cluster node, log in as the root user (or use sudo for the following steps).
3. Configure access to the disks on the NAS devices. The process for completing thisstep can vary depending on the type of disks and the type of NAS service.
One example of the configuration process is shown here. The first step is to create amount point directory on the local system:
# mkdir -p /mnt/oracleasm
4. To ensure that the NFS file system is mounted when the system restarts, add anentry for the file system in the mount file /etc/fstab.
For more information about editing the mount file for the operating system, refer tothe Linux man pages. For more information about recommended mount options,refer to Oracle Grid Infrastructure Installation and Upgrade Guide for your platform.
5. Enter a command similar to the following to mount the NFS file system on the localsystem, where host is the host name or IP address of the file server, andpathname is the location of the storage within NFS (for example, /public):
# mount <host>:<pathname> /mnt/oracleasm
6. Choose a name for the disk group to create, for example, nfsdg.
7. Create a directory for the files on the NFS file system, using the disk group name asthe directory name, for example:
# mkdir /mnt/oracleasm/nfsdg
8. Use commands similar to the following to create the required number of zero-padded files in this directory:
# dd if=/dev/zero of=/mnt/oracleasm/nfsdg/disk1 bs=1024k count=1000
This example creates a 1 GB file named disk1 on the NFS file system. You mustcreate one, two, or three files respectively to create an external, normal, or highredundancy disk group.
9. Enter the following commands to change the owner, group, and permissions on thedirectory and files that you created:
# chown -R oracle:dba /mnt/oracleasm# chmod -R 660 /mnt/oracleasm
10. When installing Oracle RAC, if you choose to create an Oracle ASM disk group,then you must change the disk discovery path to specify a regular expression thatmatches the file names you created, for example, /mnt/oracleasm/nfsdg/*.
Configuring Installation Directories and Shared Storage
Preparing Your Cluster 2-31
2.5.8 Using ASMLIB to Mark the Shared Disks as Candidate DisksYou can use the ASMLIB utility to configure disks used by Oracle Automatic StorageManagement (Oracle ASM).
If you configure a shared disk to be mounted automatically when the server restarts,then, unless you have configured special files for device persistence, a disk thatappeared as /dev/sdg before the system shutdown can appear as /dev/sdh afterthe system is restarted.
If you use ASMLIB to configure the shared disks, then when you restart the node:
• The disk device names do not change
• The ownership and group membership for these disk devices remains the same
• You can copy the disk configuration implemented by Oracle ASM to other nodesin the cluster by running a simple command
Note:
• If you followed the instructions in the topic "Configuring Files on an NASDevice for Use with Oracle ASM (page 2-30)" to configure your sharedstorage, then you do not have to perform the tasks in this topic.
• If you choose not to use ASMLIB, then see "Configuring Disk DevicePersistence (page 2-35)"
The following topics describe how to install and configure ASMLib, and how to useASMLib to configure your shared disk devices:
Installing ASMLIB (page 2-32)The ASMLIB software for various Linux platforms is available from theOracle Technology Network.
Configuring ASMLIB (page 2-33)After the ASMLIB software is installed, a few steps have to be taken bythe system administrator to make the Oracle ASM driver available.
Using ASMLIB to Create Oracle ASM Disks (page 2-34)Use the ASMLIB utility to configure and mark the disks used by OracleAutomatic Storage Management (Oracle ASM).
2.5.8.1 Installing ASMLIBThe ASMLIB software for various Linux platforms is available from the OracleTechnology Network.
Select the link for your platform on the ASMLIB download page of Oracle TechnologyNetwork at:
http://www.oracle.com/technetwork/topics/linux/asmlib/index-101839.html
You should see four to six packages for your Linux platform. The oracleasmlibpackage provides the actual Oracle ASM library. The oracleasm-support package
Configuring Installation Directories and Shared Storage
2-32 Oracle Database 2 Day + Real Application Clusters Guide

provides the utilities used to get the Oracle ASM driver up and running. Both of thesepackages must be installed.
The remaining packages provide the kernel driver for the Oracle ASM library. Eachpackage provides the driver for a different kernel. You must install the appropriatepackage for the kernel you run. Use the uname -r command to determine the versionof the kernel on your server. The oracleasm kernel driver package has that versionstring in its name. For example, if you run Red Hat Enterprise Linux 4 AS, and thekernel you are using is the 2.6.9-55.0.12.ELsmp kernel, then you would choose theoracleasm-2.6.9-55.0.12.ELsmp-2.0.3-1.x86_64.rpm package.
Note:
The Oracle ASMLIB kernel driver (oracleasm) is included in theUnbreakable Enterprise Kernel for Oracle Linux. You do not have to installanydriver packages when using this kernel. You must still install theoracleasm-support and oracleasmlib packages.
To install the ASMLIB software packages:
1. Download the ASMLIB packages to each node in your cluster.
2. Change to the directory where the package files were downloaded.
3. As the root user, use the rpm command to install the packages. For example:
# rpm -Uvh oracleasm-support-2.1.3-1.el4.x86_64.rpm# rpm -Uvh oracleasmlib-2.0.4-1.el4.x86_64.rpm# rpm -Uvh oracleasm-2.6.9-55.0.12.ELsmp-2.0.3-1.x86_64.rpm
After you have completed these commands, ASMLIB is installed on the system.
4. Repeat steps 2 and 3 on each node in your cluster.
2.5.8.2 Configuring ASMLIBAfter the ASMLIB software is installed, a few steps have to be taken by the systemadministrator to make the Oracle ASM driver available.
To make the Oracle ASM driver available, the Oracle ASM driver must be loaded, andthe driver file system must be mounted. This is taken care of by the initializationscript, /usr/sbin/oracleasm.
To configure the ASMLIB software after installation:
1. As the root user, run the following command:
# /usr/sbin/oracleasm configure -I
The script prompts you for the default user and group to own the Oracle ASMdriver access point. Specify the Oracle Database software owner (oracle) and theOSDBA group (dba).
The script also prompts you to specify whether you want to start the ASMLIBdriver when the node is started and whether you want to scan for presence of anyOracle Automatic Storage Management disks when the node is started. Answer yesfor both of these questions.
Configuring Installation Directories and Shared Storage
Preparing Your Cluster 2-33
2. Repeat step 1 on each node in your cluster.
2.5.8.3 Using ASMLIB to Create Oracle ASM DisksUse the ASMLIB utility to configure and mark the disks used by Oracle AutomaticStorage Management (Oracle ASM).
Every disk that is used in an Oracle ASM disk group must be accessible on each node.After you make the physical disk available to each node, you can then mark the diskdevice as an Oracle ASM disk. The /usr/sbin/oracleasm script is used for thistask.
If the target disk device supports partitioning, then you must first create a singlepartition that encompasses the entire disk. If the target disk device does not supportpartitioning, then you do not have to create a partition on the disk.
To create Oracle ASM disks using ASMLIB:
1. As the root user, use oracleasm to create Oracle ASM disks using the followingsyntax:
# /usr/sbin/oracleasm createdisk disk_name device_partition_name
In this command, disk_name is the name you choose for the Oracle ASM disk.The name you choose must contain only ASCII capital letters, numbers, orunderscores, and the disk name must start with a letter, for example, DISK1 orVOL1, or RAC_FILE1. The name of the disk partition to mark as an Oracle ASMdisk is the device_partition_name. For example:
# /usr/sbin/oracleasm createdisk DISK1 /dev/sdb1
If you must unmark a disk that was used in a createdisk command, then youcan use the following syntax:
# /usr/sbin/oracleasm deletedisk disk_name
2. Repeat step 1 for each disk that Oracle ASM uses.
3. After you have created all the Oracle ASM disks for your cluster, use thelistdisks command to verify their availability:
# /usr/sbin/oracleasm listdisks
DISK1DISK2DISK3
4. On all the other nodes in the cluster, use the scandisks command to view thenewly created Oracle ASM disks. You do not have to create the Oracle ASM diskson each node, only on one node in the cluster.
# /usr/sbin/oracleasm scandisks
Scanning system for ASM disks [ OK ]
5. After scanning for Oracle ASM disks, display the available Oracle ASM disks oneach node to verify their availability:
# /usr/sbin/oracleasm listdisksDISK1
Configuring Installation Directories and Shared Storage
2-34 Oracle Database 2 Day + Real Application Clusters Guide
DISK2DISK3
Note:
At this point, you should restart each node on which you are installing OracleGrid Infrastructure for a cluster. After the node has restarted, view theconfigured shared storage on each node. This helps to ensure that the systemconfiguration is complete and persists across node shutdowns.
2.5.9 Configuring Disk Device PersistenceIf you use ASMLIB, then you do not have to ensure permissions and device pathpersistency in udev.
By default, the Linux 2.6 kernel device file naming scheme udev dynamically createsdevice file names when the server is started, and assigns ownership of them to root.If udev applies default settings, then it changes device file names and owners forvoting disks or Oracle Cluster Registry partitions, corrupting them when the server isrestarted. For example, a voting disk on a device named /dev/sdd owned by the usergrid may be on a device named /dev/sdf owned by root after restarting theserver.
If you do not use ASMLIB, then you must create a custom rules file for the shareddisks mounted on each node. When udev is started, it sequentially carries out rules(configuration directives) defined in rules files. These files are in the path /etc/udev/rules.d/. Rules files are read in lexical order. For example, rules in the file10-wacom.rules are parsed and carried out before rules in the rules file 90-ib.rules.
Where rules files describe the same devices, on Asianux, Red Hat, and Oracle Linux,the last file read is the one that is applied. On SUSE 2.6 kernels, the first file read is theone that is applied.
To configure a rules file for disk devices, see the chapter on configuring storage in Oracle Grid Infrastructure Installation Guide for your platform.
See Also:
• "Configuring Shared Storage (page 2-29)"
• Oracle Grid Infrastructure Installation Guide for your platform
Configuring Installation Directories and Shared Storage
Preparing Your Cluster 2-35

Configuring Installation Directories and Shared Storage
2-36 2 Day + Real Application Clusters Guide

3Installing Oracle Grid Infrastructure
Before installing Oracle Real Application Clusters (Oracle RAC) and Oracle RAC OneNode using Oracle Universal Installer (OUI), you must first install the Oracle GridInfrastructure for a cluster software, which consists of Oracle Clusterware and OracleAutomatic Storage Management (Oracle ASM).
Using Oracle Enterprise Manager Cloud Control for Provisioning Operations(page 3-2)
As part of the database provisioning solution, Oracle EnterpriseManager Cloud Control enables you to provision Oracle Databases (alsoknown as single-instance databases) and Oracle Real ApplicationClusters (Oracle RAC) databases.
Preparing to Install the Oracle Software (page 3-2)Prepare a staging area for the installation files.
Verifying My Oracle Support Credentials (page 3-3)When you first start OUI, you are prompted to enter your e-mail addressand My Oracle Support password.
Installing Oracle Grid Infrastructure for a Cluster (page 3-3)The software for Oracle Grid Infrastructure for a cluster consists ofOracle Clusterware and Oracle Automatic Storage Management (OracleASM).
Installing the Oracle Database Software and Creating a Database (page 3-11)After Oracle Grid Infrastructure for a cluster is functional, you can installthe Oracle Database software on the nodes of your cluster.
Performing Postinstallation Tasks (page 3-20)After you have installed the Oracle Real Application Clusters (OracleRAC) software and created an Oracle RAC database there are additionaltasks to perform before your cluster database is ready for use. Thesesteps are recommended, but are not required.
About Converting an Oracle Database to an Oracle RAC Database (page 3-23)If you have a single-instance database and you want to convert to OracleRAC or Oracle RAC One Node, then you can use rconfig, OracleEnterprise Manager, or Database Configuration Assistant (DBCA) toassist you with the task of converting a single-instance databaseinstallation to an Oracle Real Application Clusters (Oracle RAC)database.
Installing Oracle Grid Infrastructure 3-1
3.1 Using Oracle Enterprise Manager Cloud Control for ProvisioningOperations
As part of the database provisioning solution, Oracle Enterprise Manager CloudControl enables you to provision Oracle Databases (also known as single-instancedatabases) and Oracle Real Application Clusters (Oracle RAC) databases.
Using Oracle Enterprise Manager Cloud Control, you can extend or delete Oracle RACnodes, and provision Oracle RAC One node databases. Oracle Enterprise ManagerCloud Control also helps in setting up the environment for provisioning and doesvarious pre-checks on the host to verify provisioning is successful. Before you can useOracle Enterprise Manager Cloud Control to provision your Oracle software, youmust perform the following system configuration tasks:
• Discover all host by installing the Enterprise Manager Agent on all nodes.
• Configure named and preferred credentials in Enterprise Manager.
• Configure a software library and setup roles.
• Download software from Oracle Technology Network to create installation mediacomponents in Enterprise Manager. Optionally, you can create a ProvisioningProfile (similar to a gold image) from an existing system.
Details on how to perform these tasks, and how to provision your Oracle GridInfrastructure and Oracle RAC software using Oracle Enterprise Manager CloudControl are available in Oracle Enterprise Manager Lifecycle Management Administrator'sGuide.
3.2 Preparing to Install the Oracle SoftwarePrepare a staging area for the installation files.
Oracle Clusterware is installed as part of Oracle Grid Infrastructure for a cluster. OUIinstalls Oracle Clusterware into a directory structure called the Grid_home. This homeis separate from the home directories of other Oracle software products installed onthe same server. Because Oracle Clusterware works closely with the operating system,you must have system administrator privileges for some installation tasks. In addition,some Oracle Clusterware processes must run as the special operating system user,root. OUI also installs Oracle Automatic Storage Management (Oracle ASM) in theGrid home directory.
You install the Oracle RAC software from the Oracle Database 12c installation media.By default, the standard Oracle Database 12c software installation process installs theOracle RAC option when OUI recognizes that you are performing the installation on acluster. OUI installs Oracle RAC into a directory structure called the Oracle_home. Thishome is separate from the home directories of other Oracle software products installedon the same server.
To prepare to install the Oracle software:
1. If you have the Oracle software on CDs or DVDs, then insert the disc for OracleGrid Infrastructure for a cluster into a disk drive on your computer. Make sure thedisk drive has been mounted at the operating system level. You must change discswhen installing the Oracle Database software.
If you do not have installation disks, but are instead installing from ZIP files, thencontinue to Step 2.
Using Oracle Enterprise Manager Cloud Control for Provisioning Operations
3-2 Oracle Database 2 Day + Real Application Clusters Guide
2. If the installation software is in one or more ZIP files, then create a stagingdirectory on one node, for example, racnode1, to store the unzipped files, asshown here:
mkdir -p /stage/oracle/12.1.0
3. Copy the ZIP files to this staging directory. For example, if the files weredownloaded to a directory named /home/user1, and the ZIP file is named12100_linux_db.zip, then use the following command to move the ZIP file tothe staging directory:
cd /home/user1cp 12100_linux_db.zip /stage/oracle/12.1.0
4. As the oracle user on the first node, unzip the Oracle media, as shown in thefollowing example:
cd /stage/oracle/12.1.0unzip 12100_linux_db.zip
3.3 Verifying My Oracle Support CredentialsWhen you first start OUI, you are prompted to enter your e-mail address and MyOracle Support password.
By entering this information, you enable the following features:
• Oracle Configuration Manager is installed and configured. This option enablesyou to associate information about your Oracle RAC configuration with your MyOracle Support account. In the event that you must place a service request withOracle Support, that configuration information can help provide a more rapidresolution to the service issue.
• You can receive e-mail notification of security alerts from My Oracle Support.
• Automatic download and application of the most recent patches to the newlyinstalled Oracle software (with Oracle Grid Infrastructure for a cluster or OracleDatabase). The software updates that can be downloaded include patches, criticalpatch updates, installer updates, and patch sets.
If you choose to enable these features, then you must supply your My Oracle Supportaccount name (your e-mail address) and your password. You may have to configurethe proxy settings before your computer can connect to My Oracle Support.
If you have downloaded the software updates, then during installation you can enterthe directory location where the files are stored on the local server instead ofdownloading them from My Oracle Support. The software updates are applied to theinstalled software during the installation process.
See Also:
• Oracle Database 2 Day DBA
3.4 Installing Oracle Grid Infrastructure for a ClusterThe software for Oracle Grid Infrastructure for a cluster consists of Oracle Clusterwareand Oracle Automatic Storage Management (Oracle ASM).
Verifying My Oracle Support Credentials
Installing Oracle Grid Infrastructure 3-3

Configuring the Operating System Environment (page 3-4)Before starting the installer, you should set and unset environmentvariables.
About Cluster Verification Utility Fixup Scripts on Linux and UNIX (page 3-5)During installation on Linux and UNIX platforms, for certainprerequisite check failures, you can click Fix & Check Again to generatea fixup script.
Using Oracle Universal Installer to Install the Oracle Grid Infrastructure for aCluster (page 3-5)
You use Oracle Universal Installer (OUI) to install the software on onenode in the cluster, and the installer copies the software to the othercluster nodes.
Completing the Oracle Clusterware Configuration (page 3-10)After you have installed Oracle Clusterware, verify that the nodeapplications are started.
3.4.1 Configuring the Operating System EnvironmentBefore starting the installer, you should set and unset environment variables.
You run OUI from the grid or oracle user account. Before you start OUI to installOracle Grid Infrastructure for a cluster, you do not have to configure the environmentof the grid user. You can specify the directories to use for the central inventory andthe Grid home during the installation process.
However, you can set the ORACLE_BASE environment variable to the directory inwhich you want the Oracle Inventory files located. For example, if you plan to makethe Oracle Database home directory /u01/app/oracle/product/12.1.0/dbhome_1, then you would set ORACLE_BASE to the directory /u01/app/oracle/.If you set the ORACLE_BASE directory before installation, then this becomes thedefault location for the central inventory displayed by OUI.
You can also set the ORACLE_HOME environment variable to the location chosen for theGrid home. If you set the ORACLE_HOME directory before installation, then thisbecomes the default location for the Grid home displayed by OUI.
(Optional) To modify the user environment before installing Oracle GridInfrastructure for a cluster on Oracle Linux:
1. As the grid or oracle user, execute the following commands:
[oracle]$ unset ORACLE_HOME[oracle]$ unset ORACLE_SID[oracle]$ unset ORACLE_BASE[oracle]$ export ORACLE_BASE=/u01/app/oracle/[oracle]$ export ORACLE_HOME=/u01/app/12.1.0/grid
2. Verify the changes have been made by executing the following commands:
[oracle]$ echo $ORACLE_SID
[oracle]$ echo $ORACLE_HOME/u01/app/12.1.0/grid
[oracle]$ echo $ORACLE_BASE/u01/app/oracle/
Installing Oracle Grid Infrastructure for a Cluster
3-4 Oracle Database 2 Day + Real Application Clusters Guide
3.4.2 About Cluster Verification Utility Fixup Scripts on Linux and UNIXDuring installation on Linux and UNIX platforms, for certain prerequisite checkfailures, you can click Fix & Check Again to generate a fixup script.
The installer detects when the minimum requirements for an installation are not met,and creates shell scripts, called Fixup scripts, to finish incomplete systemconfiguration steps. If the installer detects an incomplete task, then it generates aFixup script (runfixup.sh). You also can have CVU generate Fixup scripts beforeinstallation.
Fixup scripts do the following:
• If necessary, set kernel parameters to values required for successful installation,including:
– Shared memory parameters.
– Open file descriptor and UDP send/receive parameters.
• Create and set permissions on the Oracle Inventory (central inventory) directory.
• Create or reconfigure primary and secondary group memberships for theinstallation owner, if necessary, for the Oracle Inventory directory and theoperating system privileges groups.
• Set shell limits if necessary to required values.
You can run the script after you click Fix and Check Again. You are prompted by theinstaller to run the fixup script as the root user in a separate session or you canspecify through the installer interface that the scripts should be run automatically. Youmust run the script on all the nodes specified by the installer.
Modifying the contents of the generated fixup script is not recommended.
Note:
Using fixup scripts does not ensure that all the required prerequisites forinstalling Oracle Grid Infrastructure for a cluster and Oracle RAC are satisfied.You must still verify that all the requirements listed in Preparing Your Cluster(page 2-1) are met to ensure a successful installation.
3.4.3 Using Oracle Universal Installer to Install the Oracle Grid Infrastructure for aCluster
You use Oracle Universal Installer (OUI) to install the software on one node in thecluster, and the installer copies the software to the other cluster nodes.
As the user that owns the software for Oracle Grid Infrastructure for a cluster(grid)on the first node, install Oracle Grid Infrastructure for a cluster. Note that OUIuses Secure Shell (SSH) to copy the binary files from this node to the other nodesduring the installation. OUI can configure SSH for you during installation.
Installing Oracle Grid Infrastructure for a Cluster
Installing Oracle Grid Infrastructure 3-5
Note:
If you are installing Oracle Clusterware on a server that has a single-instanceOracle Database 11g installation, then stop the existing Oracle ASM instances,if any. After Oracle Clusterware is installed, start the Oracle ASM instancesagain. When you restart the single-instance Oracle database and the OracleASM instances, the Oracle ASM instances use the Cluster SynchronizationServices Daemon (CSSD) instead of the daemon for the single-instance Oracledatabase.
To install the software for Oracle Grid Infrastructure for a cluster:
1. Use the following command to start OUI, where staging_area is the location ofthe staging area on disk, or the root level of the installation media:
cd /staging_area/clusterware/Disk1./runInstaller
After a few minutes, the Download Software Updates window appears.
2. Choose to download the latest software updates, providing your registered MyOracle Support user name and password. Click Next.
You can use a staging location for the software updates or use software updatesyou have previously downloaded for this release. You can also proceed withoutchecking for updates.
The Select Installation Option window appears.
3. Choose the Install and Configure Grid Infrastructure for a Cluster option, thenclick Next.
The Select Cluster Type window appears.
4. Choose the Configure a Standard cluster option, then click Next.
The Select Installation Type window appears.
5. Select Typical Installation, then click Next.
The Specify Cluster Configuration window appears.
6. In the SCAN Name field, enter a name for your cluster that is unique throughoutyour entire enterprise network. In the Hostname column of the table of clusternodes, you should see your local node, for example racnode1.example.com. ClickAdd to add another node to the cluster.
For example, you might choose a name that is based on the node names' commonprefix. This guide uses the SCAN name docrac.
Note:
Specify both nodes during installation even if you plan to use Oracle RAC OneNode.
The Add Cluster Node Information pop-up window appears.
Installing Oracle Grid Infrastructure for a Cluster
3-6 Oracle Database 2 Day + Real Application Clusters Guide

7. Enter the second node's public name (racnode2), and virtual IP name(racnode2-vip), then click OK.
You are returned to the Specify Cluster Configuration window. You should nowsee both nodes listed in the table of cluster nodes.
8. Click the Identify Network Interfaces button.
In the Identify Network Interfaces window, verify that each interface has thecorrect interface type (Public or Private) associated with it. If you have networkinterfaces that should not be used by Oracle Clusterware, then set the networkinterface type to Do Not Use.
Make sure both nodes are selected, then click the SSH Connectivity button at thebottom of the window. The bottom panel of the window displays the SSHConnectivity information.
9. Enter the operating system username and password for the Oracle software owner(oracle). Select the option If you have configured SSH connectivity between thenodes, then select the Reuse private and public keys existing in user homeoption. Click Setup.
A message window appears, indicating that it might take several minutes toconfigure SSH connectivity between the nodes. After a short period, anothermessage window appears indicating that passwordless SSH connectivity has beenestablished between the cluster nodes. Click OK to continue.
10. When returned to the Specify Cluster Configuration window, click Next tocontinue.
After several checks are performed, the Specify Install Locations window appears.
11. In the Specify Install Locations window, specify information for all the fields in thiswindow, then click Next.
• For the Oracle base field, make sure it is set to the location you chose for yourOracle base directory, for example /u01/app/username/. If not, then clickBrowse. In the Choose Directory window, go up the path until you can selectthe /u01/app/username/ directory, then click Choose Directory.
• For the Software Location field, make sure it is set to the location you chose foryour Grid home, for example /u01/app/12.1.0/grid. If not, then clickBrowse. In the Choose Directory window, go up the path until you canselect /u01/app/12.1.0/grid, then click Choose Directory.
• For the Cluster Registry Storage Type, choose Automatic StorageManagement.
• Enter a password for a SYSASM user in the SYSASM Password and ConfirmPassword fields. This password is used for managing Oracle ASM afterinstallation, so make note of it in a secure place.
• For the OSASM group, use the drop-down list to choose the operating systemgroup for managing Oracle ASM, for example, dba.
The Create ASM Disk Group window appears.
12. In the Disk Group Name field, enter a name for the disk group, for exampleDATA. Choose the Redundancy level for this disk group, and then in the Add
Installing Oracle Grid Infrastructure for a Cluster
Installing Oracle Grid Infrastructure 3-7

Disks section, choose the disks to add to this disk group. When you have finishedselecting the disks for this disk group, click Next.
In the Add Disks section you should see the disks that you configured using theASMLIB utility in "Using ASMLIB to Mark the Shared Disks as Candidate Disks(page 2-32)".
If you have not installed Oracle software previously on this computer, then theCreate Inventory window appears.
13. Change the path for the inventory directory, if required. Then, click Next.
If you are using the same directory names as the examples in this book, then itshould show a value of /u01/app/oraInventory. The group name for theoraInventory directory should show oinstall.
Note:
The path displayed for the inventory directory should be the oraInventorysubdirectory of the directory one level above the Oracle base directory. Forexample, if you set the ORACLE_BASE environment variable to /u01/app/grid/ before starting OUI, then the Oracle inventory path displayedis /u01/app/oraInventory.
The Root Script Execution Configuration window appears.
14. Select the option to Automatically run configuration scripts. Enter the credentialsfor the root user or a sudo account, then click Next.
Alternatively, you can Run the scripts manually as the root user at the end of theinstallation process when prompted by OUI.
The Perform Prerequisite Checks window appears.
15. If any of the checks have a status of Failed and are not Fixable, then you mustmanually correct these issues. After you have fixed the issue, you can click theCheck Again button to have the installer recheck the requirement and update thestatus. Repeat as needed until all the checks have a status of Succeeded. Click Next.
Installing Oracle Grid Infrastructure for a Cluster
3-8 Oracle Database 2 Day + Real Application Clusters Guide
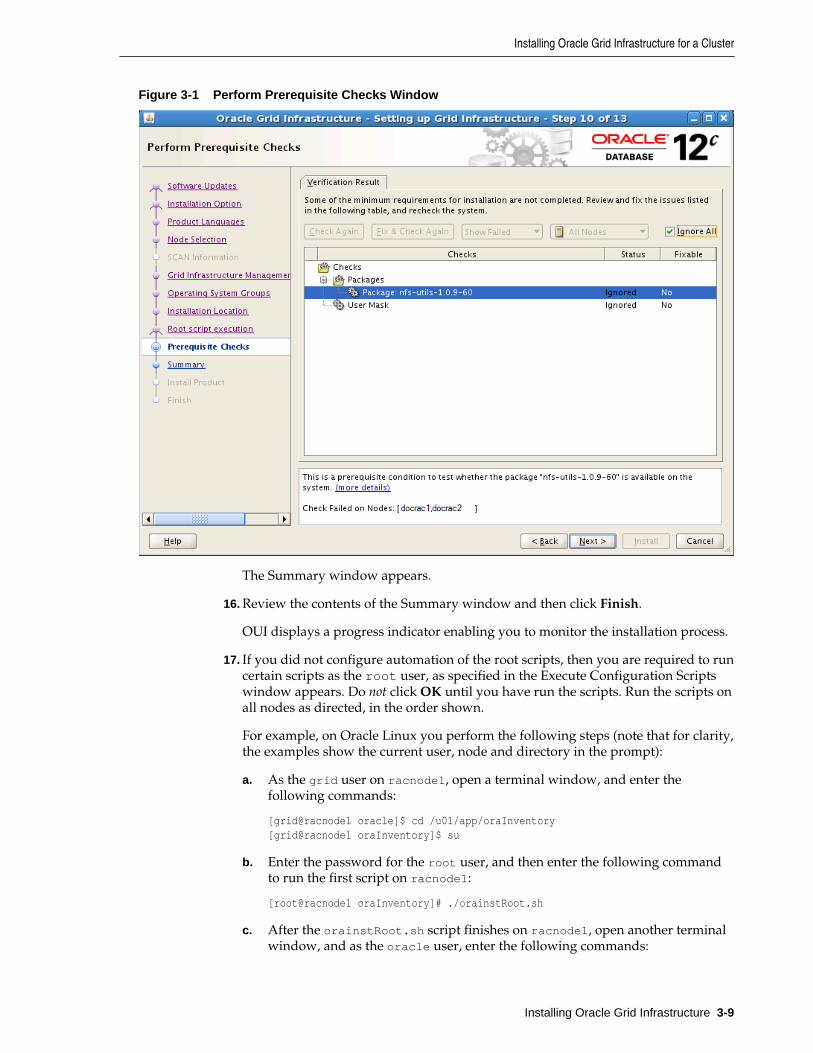
Figure 3-1 Perform Prerequisite Checks Window
The Summary window appears.
16. Review the contents of the Summary window and then click Finish.
OUI displays a progress indicator enabling you to monitor the installation process.
17. If you did not configure automation of the root scripts, then you are required to runcertain scripts as the root user, as specified in the Execute Configuration Scriptswindow appears. Do not click OK until you have run the scripts. Run the scripts onall nodes as directed, in the order shown.
For example, on Oracle Linux you perform the following steps (note that for clarity,the examples show the current user, node and directory in the prompt):
a. As the grid user on racnode1, open a terminal window, and enter thefollowing commands:
[grid@racnode1 oracle]$ cd /u01/app/oraInventory[grid@racnode1 oraInventory]$ su
b. Enter the password for the root user, and then enter the following commandto run the first script on racnode1:
[root@racnode1 oraInventory]# ./orainstRoot.sh
c. After the orainstRoot.sh script finishes on racnode1, open another terminalwindow, and as the oracle user, enter the following commands:
Installing Oracle Grid Infrastructure for a Cluster
Installing Oracle Grid Infrastructure 3-9
[grid@racnode1 oracle]$ ssh racnode2[grid@racnode2 oracle]$ cd /u01/app/oraInventory[grid@racnode2 oraInventory]$ su
d. Enter the password for the root user, and then enter the following commandto run the first script on racnode2:
[root@racnode2 oraInventory]# ./orainstRoot.sh
e. After the orainstRoot.sh script finishes on racnode2, go to the terminalwindow you opened in part a of this step. As the root user on racnode1, enterthe following commands to run the second script, root.sh:
[root@racnode1 oraInventory]# cd /u01/app/12.1.0/grid[root@racnode1 grid]# ./root.sh
Press Enter at the prompt to accept the default value.
Note:
You must run the root.sh script on the first node and wait for it to finish. Youcan run root.sh scripts concurrently on all other nodes except for the lastnode on which you run the script. Like the first node, the root.sh script onthe last node must be run separately.
f. After the root.sh script finishes on racnode1, go to the terminal window youopened in part c of this step. As the root user on racnode2, enter the followingcommands:
[root@racnode2 oraInventory]# cd /u01/app/12.1.0/grid[root@racnode2 grid]# ./root.sh
After the root.sh script completes, return to the OUI window where theInstaller prompted you to run the orainstRoot.sh and root.sh scripts. ClickOK.
The software installation monitoring window reappears.
18. Continue monitoring the installation until the Finish window appears. Then clickClose to complete the installation process and exit the installer.
Caution:
After installation is complete, do not remove manually or run cron jobs thatremove /tmp/.oracle or /var/tmp/.oracle directories or their fileswhile Oracle software is running on the server. If you remove these files, thenthe Oracle software can encounter intermittent hangs. Oracle Clusterwareinstallations can fail with the error:
CRS-0184: Cannot communicate with the CRS daemon.
3.4.4 Completing the Oracle Clusterware ConfigurationAfter you have installed Oracle Clusterware, verify that the node applications arestarted.
Installing Oracle Grid Infrastructure for a Cluster
3-10 Oracle Database 2 Day + Real Application Clusters Guide
Depending on which operating system you use, you may have to perform somepostinstallation tasks to configure the Oracle Clusterware components properly.
To complete the Oracle Clusterware configuration on Oracle Linux:
1. As the grid user on the first node, check the status of the Oracle Clusterwaretargets by entering the following command:
/u01/app/12.1.0/grid/bin/crsctl check cluster -all
This command provides output showing if all the required cluster services, such asgsd, ons, and vip, are started on the nodes of your cluster.
2. In the displayed output, you should see the Oracle Clusterware daemons are onlinefor each node in the cluster.
******************************************************************racnode1:CRS-4537: Cluster Ready Services is onlineCRS-4529: Cluster Synchronization Services is onlineCRS-4533: Event Manager is online******************************************************************racnode2:CRS-4537: Cluster Ready Services is onlineCRS-4529: Cluster Synchronization Services is onlineCRS-4533: Event Manager is online******************************************************************
If you see that one or more Oracle Clusterware resources are offline, or are missing,then the Oracle Clusterware software did not install properly.
Note:
Avoid changing host names after you complete the Oracle Clusterwareinstallation, including adding or deleting domain qualifications. Nodes withchanged host names must be deleted from the cluster and added back with thenew name.
3.5 Installing the Oracle Database Software and Creating a DatabaseAfter Oracle Grid Infrastructure for a cluster is functional, you can install the OracleDatabase software on the nodes of your cluster.
Oracle Universal Installer (OUI) installs the software on the local node and then copiesthe binary files from the local node to all the other nodes in the cluster.
Configuring the Operating System Environment (page 3-12)You run Oracle Universal Installer (OUI) from the oracle user account.You don’t have to configure the environment of the oracle user beforeyou start OUI.
Creating Additional Oracle ASM Disk Groups (page 3-12)If you want to use a separate disk group for your Oracle database files orfor the fast recovery area, then you must create the additional OracleASM disk groups before installing Oracle Database software.
Installing the Oracle Database Software and Creating a Database
Installing Oracle Grid Infrastructure 3-11
Using Oracle Universal Installer to Install Oracle RAC Software (page 3-13)After you have configured the operating system environment, you canuse Oracle Universal Installer to install the Oracle RAC software andcreate an Oracle RAC database.
Verifying Your Oracle RAC Database Installation (page 3-18)If you chose to create an Oracle RAC database during installation, thenverify that all the database services are up and running.
See Also:
• "Installing Oracle Grid Infrastructure for a Cluster (page 3-3)"
3.5.1 Configuring the Operating System EnvironmentYou run Oracle Universal Installer (OUI) from the oracle user account. You don’thave to configure the environment of the oracle user before you start OUI.
You can set the ORACLE_BASE environment variable to the directory in which youwant the Oracle Inventory files for the Oracle Database software located. For example,if you plan to make the Oracle Database home directory /u01/app/oracle/product/12.1.0/dbhome_1, then you would set ORACLE_BASE to thedirectory /u01/app/oracle/. If you set the ORACLE_BASE environment variablebefore installation, then the path specified becomes the default location for the centralinventory displayed by OUI.
You can also set the ORACLE_HOME environment variable to the location chosen for theOracle Database home. If you set the ORACLE_HOME environment variable beforeinstallation, then the path specified becomes the default location for the Oracle homedisplayed by OUI.
(Optional) To modify the user environment before installing Oracle Databasesoftware on Oracle Linux:
1. As the oracle user, execute the following commands:
[oracle]$ unset ORACLE_SID[oracle]$ export ORACLE_BASE=/u01/app/oracle/[oracle]$ export ORACLE_HOME=/u01/app/oracle/product/12.1.0/dbhome_1
2. Verify the changes have been made by executing the following commands:
[oracle]$ echo $ORACLE_SID
[oracle]$ echo $ORACLE_HOME/u01/app/oracle/product/12.1.0/dbhome_1[oracle]$ echo $ORACLE_BASE/u01/app/oracle/
3.5.2 Creating Additional Oracle ASM Disk GroupsIf you want to use a separate disk group for your Oracle database files or for the fastrecovery area, then you must create the additional Oracle ASM disk groups beforeinstalling Oracle Database software.
If you chose to store the Oracle Clusterware files on Oracle ASM during the OracleGrid Infrastructure for a cluster installation, then a single disk group was created in
Installing the Oracle Database Software and Creating a Database
3-12 Oracle Database 2 Day + Real Application Clusters Guide

Oracle ASM. You can use this same disk group to store the data files for your Oracledatabase, or you can create a separate disk group for the Oracle Database files.
To create an additional disk group using ASMCA:
1. Prepare the disks or devices for use with Oracle ASM, as described in "ConfiguringInstallation Directories and Shared Storage (page 2-25)".
2. Start the Oracle Automatic Storage Configuration Assistant (ASMCA) from theGrid home:
/u01/app/12.1.0/grid/bin/asmca
ASMCA starts, and displays the Disk Groups window.
3. Click the Create button to create a disk group.
The Create Disk Group window appears.
4. Provide the following information:
• In the Disk Group Name field, enter a name for the new disk group, forexample, FRA.
• Choose a Redundancy level, for example, Normal.
• Select the disks to include in the new disk group.
After you have provided all the information, click OK. A progress window titledDiskGroup: Creation appears. After a few minutes, a message appears indicatingthe disk group was created successfully. Click OK to continue.
5. Repeat Step 3 and 4 to create additional disk groups, or click Exit, then select Yes toexit the utility.
See Also:
• "About Oracle Automatic Storage Management (page 1-4)"
• "Configuring Files on an NAS Device for Use with Oracle ASM(page 2-30)"
• "Using ASMLIB to Mark the Shared Disks as Candidate Disks (page 2-32)"
3.5.3 Using Oracle Universal Installer to Install Oracle RAC SoftwareAfter you have configured the operating system environment, you can use OracleUniversal Installer to install the Oracle RAC software and create an Oracle RACdatabase.
To install Oracle Database software on your cluster and to create a database:
1. As the oracle user, use the following commands to start OUI, wherestaging_area is the location of the staging area on disk, or the location of themounted installation disk:
Installing the Oracle Database Software and Creating a Database
Installing Oracle Grid Infrastructure 3-13
cd /staging_area./runInstaller
The Configure Security Updates window appears.
2. Optional: Enter your email address and My Oracle Support password, then clickNext to continue.
If you want to receive notification by email of any newly discovered security issuesrelated to the software you are installing, then enter an email address in the Emailfield. If you also want to receive the security updates through My Oracle Support,then use the same email address that is registered with My Oracle Support, selectthe I wish to receive security updates via My Oracle Support option, and enteryour My Oracle Support login password in the My Oracle Support Password field.
If you provide an email address, then the Oracle Configuration Manager (OCM)tool will also be installed. This utility provides Oracle Support Services withconfiguration information about your system when creating service requests. Youcan disable the OCM tool after installation, but Oracle strongly discourages this.OCM does not access, collect, or store any personal information (except fortechnical support contact information), or any business data files residing in yoursoftware environment. For more information about OCM, see http://www.oracle.com/technetwork/documentation/ocm-092152.html.
After you click Next, the Select Installation Option window appears.
3. Select Create and configure a database, then click Next to continue:
The System Class window appears.
4. Choose Server Class, then click Next.
If you choose the Desktop Class option, then OUI installs a single-instancedatabase, not a clustered database.
The Grid Installation Options window appears.
5. Choose either the Oracle Real Application Clusters database installation optionor the Oracle RAC One Node database installation option.
The Select Install Type window appears.
6. Choose Admin-managed or Policy-Managed for your database, then click Next tocontinue.
If you chose Admin-Managed, then the Select List of Nodes window appears. Ifyou selected Policy-Managed, then the Select Install Type window appears.
7. For an administrator-managed database, you must select the nodes in the clusterwhere you want to run Oracle RAC or Oracle RAC One Node.
a. Select the nodes on which you want to install Oracle Database software andcreate an Oracle RAC instance. All the available nodes in the cluster are selectedby default.
Installing the Oracle Database Software and Creating a Database
3-14 Oracle Database 2 Day + Real Application Clusters Guide
Note:
Select both nodes during installation, even if you are creating an Oracle RACOne Node database.
b. Click the SSH Connectivity button at the bottom of the window.
The bottom panel of the window displays the SSH Connectivity information.
8. Because you configured SSH connectivity between the nodes for the Oracle GridInfrastructure for a cluster installation, select the Reuse private and public keysexisting in user home option. Click Test.
If you are using a network user that has a home directory on shared storage, thenalso select the User home if shared by the selected nodes option.
A message window appears, indicating that passwordless SSH connectivity hasbeen established between the cluster nodes. Click OK to continue.
9. When returned to the Node Selection window, click Next to continue.
The Select Install Type window appears.
10. Choose the Typical install option, and click Next.
A typical installation requires minimal input. It installs the software and optionallycreates a general-purpose database. If you choose the Advanced installation type(not documented in this guide), then you are prompted to provide moreinformation about how the database should be configured. For example, you couldset passwords for each user account individually, choose a different template forthe starter database, choose a nondefault language for the database, and so on.
The Typical Install Configuration window appears.
11. In this window, you must provide the following information:
• Oracle base location: The default value is /u01/app/oracle/. If you did notset the ORACLE_BASE environment variable and the default location isdifferent from the directory location you have chosen, then enter the directoryfor your Oracle base or click the Browse button to change the directory path.
• Software location: If you did not set the ORACLE_HOME environment variablebefore starting the installation, then enter the directory for your Oracle homeor click the Browse button to change the directory path.
• Storage Type: In this drop-down list, choose Automatic Storage Management(ASM). If you do not want to use Oracle ASM, then choose File System.Because Oracle ASM was installed with the Oracle Grid Infrastructure for acluster, Oracle Automatic Storage Management is the default value.
• Database file location: Choose the disk group to use for storing the databasefiles. You can use the same disk group that Oracle Clusterware uses. If you donot want to use the same disk group that is currently being used to store theOracle Clusterware files, then you must exit the installation and create a newdisk group using Oracle ASM utilities. Refer to "Creating Additional OracleASM Disk Groups (page 3-12)" for more information on creating a disk group.
Installing the Oracle Database Software and Creating a Database
Installing Oracle Grid Infrastructure 3-15

If you chose the File System storage type, then enter the directory location ofthe shared storage where the database files will be created.
• ASMSNMP Password: Enter the password for the ASMSNMP user. TheASMSNMP user is used primarily by Oracle Enterprise Manager to monitorOracle ASM instances. See Oracle Automatic Storage Management Administrator'sGuide for more information about the ASMSNMP user.
If you chose File System for the Storage Type, then this field is disabled.
• Database edition: From this drop-down list choose either Enterprise Edition orStandard Edition. The number in parentheses next to your choice indicates theamount of disk space required.
• OSDBA Group: From this drop-down list select the operating system groupused for database administration, for example, dba.
• Global database name: Enter the fully qualified global name for yourdatabase. The global database name is in the formDB_UNIQUE_NAME.DB_DOMAIN, for example, orcl.example.com.
Note:
The first eight characters of the ORACLE_SID must be a unique identifier foreach database. The SID prefix cannot contain underscore (_), dollar ($), orpound (#) characters. The total length of the ORACLE_SID cannot exceed 15characters for Oracle RAC databases.
• Administrative password: Enter the password to be used for theadministrative account, such as SYS, SYSTEM, and DBSNMP.
• Confirm Password: Enter the same password in this field.
12. After you have provided all the necessary information, click Next.
The Perform Prerequisite Checks window appears.
13. After a short period of time, the Summary window appears. Review theinformation on this window, then click Finish to continue.
If any of the information in the Summary window is incorrect, then use the Backbutton to return to a previous window and correct it.
After you click Finish, OUI displays a progress indicator to show that theinstallation has begun. This step takes several minutes to complete.
14. After the software is installed on each node, if you select the option to create adatabase, then OUI starts the Database Configuration Assistant (DBCA).
This utility creates the database using the global database name specified in Step 9.At the end of the database creation, you see the DBCA window with the databaseconfiguration information displayed.
There is also a Password Management button that you can click to unlock thedatabase user accounts, or change their default passwords.
After making note of the information in the Summary window, click OK.
Installing the Oracle Database Software and Creating a Database
3-16 Oracle Database 2 Day + Real Application Clusters Guide

OUI configures Oracle Configuration Management, if you provided theinformation in Step 2.
If you chose to perform a software-only installation, then the databaseconfiguration assistants are not started. You must run DBCA separately to createthe Oracle RAC One Node database.
See Also:
Oracle Real Application Clusters Installation Guide for your platform forinformation about creating an Oracle RAC One Node database using DBCA
15. Perform the following steps to run the root.sh script (note that for clarity, theexamples show the current user, node and directory in the prompt):
In the last step of the installation process, you are prompted to perform the task ofrunning the root.sh script on both nodes, as specified in the ExecuteConfiguration Scripts window. Do not click OK until you have run the scripts onall nodes.
Figure 3-2 Execute Configuration Scripts Window
a. Open a terminal window as the oracle user on the first node. Changedirectories to your Oracle home directory, and then switch to the root user byentering the following commands:
[oracle@racnode1 oracle]$ cd /u01/app/oracle/product/12.1.0/dbhome_1[oracle@racnode1 dbhome_1]$ su
b. Enter the password for the root user, and then run the script specified in theExecute Configuration scripts window:
[root@racnode1 dbhome_1]# ./root.sh
Installing the Oracle Database Software and Creating a Database
Installing Oracle Grid Infrastructure 3-17
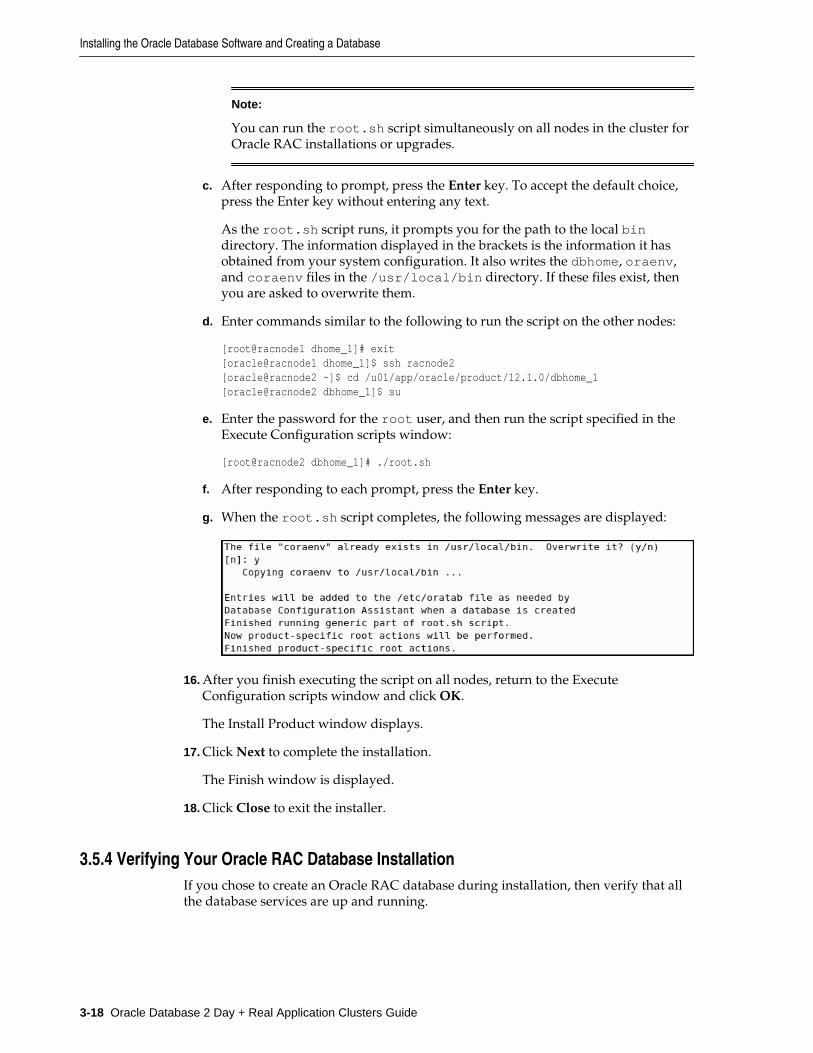
Note:
You can run the root.sh script simultaneously on all nodes in the cluster forOracle RAC installations or upgrades.
c. After responding to prompt, press the Enter key. To accept the default choice,press the Enter key without entering any text.
As the root.sh script runs, it prompts you for the path to the local bindirectory. The information displayed in the brackets is the information it hasobtained from your system configuration. It also writes the dbhome, oraenv,and coraenv files in the /usr/local/bin directory. If these files exist, thenyou are asked to overwrite them.
d. Enter commands similar to the following to run the script on the other nodes:
[root@racnode1 dhome_1]# exit[oracle@racnode1 dhome_1]$ ssh racnode2[oracle@racnode2 ~]$ cd /u01/app/oracle/product/12.1.0/dbhome_1[oracle@racnode2 dbhome_1]$ su
e. Enter the password for the root user, and then run the script specified in theExecute Configuration scripts window:
[root@racnode2 dbhome_1]# ./root.sh
f. After responding to each prompt, press the Enter key.
g. When the root.sh script completes, the following messages are displayed:
16. After you finish executing the script on all nodes, return to the ExecuteConfiguration scripts window and click OK.
The Install Product window displays.
17. Click Next to complete the installation.
The Finish window is displayed.
18. Click Close to exit the installer.
3.5.4 Verifying Your Oracle RAC Database InstallationIf you chose to create an Oracle RAC database during installation, then verify that allthe database services are up and running.
Installing the Oracle Database Software and Creating a Database
3-18 Oracle Database 2 Day + Real Application Clusters Guide

To verify the Oracle RAC database services are started:
1. Log in as the oracle user and go to the Grid_home/bin directory:
[oracle] $ cd /u01/app/12.1.0/grid/bin
2. Run the following command to view the status of the resources managed by OracleClusterware that contain the string 'ora':
[oracle] $ ./crsctl status resource -w "TYPE co 'ora'" -t
The output of the command should show that the Oracle Clusterware, Oracle ASM,and Oracle Database resources are available (online) for each host. An example ofthe output is:
---------------------------------------------------------------------------NAME TARGET STATE SERVER STATE_DETAILS---------------------------------------------------------------------------Local Resources---------------------------------------------------------------------------ora.DATA.dg ONLINE ONLINE racnode1 ONLINE ONLINE racnode2
ora.LISTENER.lsnr ONLINE ONLINE racnode1 ONLINE ONLINE racnode2
ora.asm
ONLINE ONLINE racnode1 Started ONLINE ONLINE racnode2 Started
ora.eons ONLINE ONLINE racnode1 ONLINE ONLINE racnode2
ora.gsd OFFLINE OFFLINE racnode1 OFFLINE OFFLINE racnode2
ora.net1.network ONLINE ONLINE racnode1 ONLINE ONLINE racnode2
ora.ons ONLINE ONLINE racnode1 ONLINE ONLINE racnode2ora.registry.acfs ONLINE ONLINE racnode1 ONLINE ONLINE racnode2---------------------------------------------------------------------------Cluster Resources---------------------------------------------------------------------------ora.LISTENER_SCAN1.lsnr 1 ONLINE ONLINE racnode1ora.oc4j 1 OFFLINE OFFLINEora.orcl.db 1 ONLINE ONLINE racnode1 Open 2 ONLINE ONLINE racnode2 Openora.racnode1.vip
Installing the Oracle Database Software and Creating a Database
Installing Oracle Grid Infrastructure 3-19
1 ONLINE ONLINE racnode1ora.racnode2.vip 1 ONLINE ONLINE racnode2ora.scan1.vip 1 ONLINE ONLINE racnode1
Caution:
After installation is complete, do not remove manually or run cron jobs thatremove /tmp/.oracle or /var/tmp/.oracle directories or their fileswhile Oracle software is running on the server. If you remove these files, thenthe Oracle software can encounter intermittent hangs. Oracle Clusterwareinstallations will fail with the error:
CRS-0184: Cannot communicate with the CRS daemon.
See Also:
"Performing Postinstallation Tasks (page 3-20)"
3.6 Performing Postinstallation TasksAfter you have installed the Oracle Real Application Clusters (Oracle RAC) softwareand created an Oracle RAC database there are additional tasks to perform before yourcluster database is ready for use. These steps are recommended, but are not required.
About Verifying the Oracle Clusterware Installation (page 3-21)Use Cluster Verification Utility (CVU) to verify that your installation isconfigured correctly.
Creating an Oracle RAC Database Using DBCA (page 3-21)The Database Configuration Assistant (DBCA) utility is used to createOracle Databases.
Backing Up Installation Files (page 3-21)Certain files used during installation are very important to the operationof the installed software.
Verifying Oracle Enterprise Manager Operations (page 3-22)When you create an Oracle RAC database and choose Database Controlfor your database management, the Enterprise Manager DatabaseControl utility is installed and configured automatically.
About Downloading and Installing Oracle Database Patches (page 3-23)Ensure that you run the latest patch set of the installed software.
About Configuring User Accounts (page 3-23)You can use different operating system accounts for accessing andmanaging your Oracle RAC database.
See Also:
• "Verifying Your Oracle RAC Database Installation (page 3-18)"
Performing Postinstallation Tasks
3-20 Oracle Database 2 Day + Real Application Clusters Guide
3.6.1 About Verifying the Oracle Clusterware InstallationUse Cluster Verification Utility (CVU) to verify that your installation is configuredcorrectly.
After the Oracle Clusterware installation is complete, OUI automatically runs ClusterVerification Utility (CVU) as a configuration assistant to verify that the OracleClusterware installation has been completed successfully.
If CVU reports problems with your configuration, then correct these errors beforeproceeding.
See Also:
Oracle Clusterware Administration and Deployment Guide for more informationabout using CVU and resolving configuration problems
3.6.2 Creating an Oracle RAC Database Using DBCAThe Database Configuration Assistant (DBCA) utility is used to create OracleDatabases.
If you did not select the option to create an Oracle Real Application Clusters (OracleRAC) database during installation, then you will need to create one using DBCA afteryou have verified that the installation of the Oracle RAC software was successful. Thesteps for creating an Oracle RAC database are documented in Oracle Real ApplicationClusters Installation Guide for Linux and UNIX.
3.6.3 Backing Up Installation FilesCertain files used during installation are very important to the operation of theinstalled software.
It is important to back up these files and keep them in a separate location from theinstalled software in case of hardware failure.
About Backing Up the root.sh Script (page 3-21)Oracle recommends that you back up the root.sh script after youcomplete an installation.
About Backing Up the emkey.ora File (page 3-22)Oracle recommends that you back up the emkey.ora file after youcomplete an installation.
3.6.3.1 About Backing Up the root.sh ScriptOracle recommends that you back up the root.sh script after you complete aninstallation.
If you install other products in the same Oracle home directory, then OUI updates thecontents of the existing root.sh script during the installation. If you requireinformation contained in the original root.sh script, then you can recover it from theroot.sh backup copy.
Performing Postinstallation Tasks
Installing Oracle Grid Infrastructure 3-21
3.6.3.2 About Backing Up the emkey.ora FileOracle recommends that you back up the emkey.ora file after you complete aninstallation.
During the installation described in this guide, the Enterprise Manager DatabaseControl management repository is placed in secure mode. All Enterprise Managerdata is encrypted using the encryption key stored in the file emkey.ora. If this file isdamaged or lost, and cannot be restored from a backup, then you are no longer able touse the existing Enterprise Manager repository.
The emkey.ora file is located in the Oracle_home/node_name_Database_name/sysman/config directory. For example, on the racnode2 server, the encryption keyfile for the orcl.example.com database would be located at /u01/app/oracle/product/12.1.0/dbhome_1/racnode2_orcl/sysman/config/emkey.oradirectory.
3.6.4 Verifying Oracle Enterprise Manager OperationsWhen you create an Oracle RAC database and choose Database Control for yourdatabase management, the Enterprise Manager Database Control utility is installedand configured automatically.
To verify Oracle Enterprise Manager Database Control has been started in yournew Oracle RAC environment:
1. Make sure the ORACLE_UNQNAME environment variable is set to the unique nameof the database to which you want to connect, for example orcl. Also make surethe ORACLE_HOME environment variable is set to the location of the installed OracleDatabase software.
$ export ORACLE_UNQNAME=orcl$ echo $ORACLE_HOME/u01/app/oracle/product/12.1.0/dbhome_1
$ echo $ORACLE_UNQNAMEorcl
2. Go to the Oracle_home/bin directory.
3. Run the following command as the oracle user:
./emctl status dbconsole
The Enterprise Manager Control (EMCTL) utility displays the current status of theDatabase Control console on the current node.
Oracle Enterprise Manager 11g Database Control Release 11.2.0.1.0Copyright (c) 1996, 2009 Oracle Corporation. All rights reserved.https://racnode1.example.com:1158/em/console/aboutApplicationOracle Enterprise Manager 11g is running.------------------------------------------------------------------Logs are generated in directory /u01/app/oracle/product/12.1.0/dbhome_1/racnode1_orcl/sysman/log
4. If the EMCTL utility reports that Database Control is not started, then use thefollowing command to start it:
./emctl start dbconsole
Performing Postinstallation Tasks
3-22 Oracle Database 2 Day + Real Application Clusters Guide
Following a typical installation, Database Control serves console pages from thenode where database was created. The console also monitors agents on all nodes ofthe cluster. However, you can configure Enterprise Manager to have multipleDatabase Control consoles within a cluster using Enterprise ManagerConfiguration Assistant (EMCA).
See Also:
• Oracle Database 2 Day DBA
• "About Oracle RAC Management Using Enterprise Manager (page 4-3)"
3.6.5 About Downloading and Installing Oracle Database PatchesEnsure that you run the latest patch set of the installed software.
Periodically, Oracle issues bug fixes for its software called patches. Patch sets are acollection of bug fixes that were produced up to the time of the patch set release. Patchsets are fully tested product fixes. Application of a patch set affects the softwareresiding in your Oracle home.
If you configured access to My Oracle Support during installation, then the latestpatches should have been downloaded and applied during installation.
If you did not configure access to My Oracle Support within OUI, then you shouldapply the latest patch set for your release and any necessary patches that are notincluded in a patch set. Information about downloading and installing patches andpatch sets is covered in Managing Oracle Software and Applying Patches (page 10-1).
See Also:
Oracle Grid Infrastructure Installation Guide for Linux for detailed instructions onhow to locate and download patches and patch sets
3.6.6 About Configuring User AccountsYou can use different operating system accounts for accessing and managing yourOracle RAC database.
The oracle user operating system account is the account that you used to install theOracle Database software. You can modify the shell configuration file to setenvironment variables such as ORACLE_HOME whenever you log in as that operatingsystem user.
See Also: About Operating System Users and Groups (page 2-11)
3.7 About Converting an Oracle Database to an Oracle RAC DatabaseIf you have a single-instance database and you want to convert to Oracle RAC orOracle RAC One Node, then you can use rconfig, Oracle Enterprise Manager, orDatabase Configuration Assistant (DBCA) to assist you with the task of converting asingle-instance database installation to an Oracle Real Application Clusters (OracleRAC) database.
About Converting an Oracle Database to an Oracle RAC Database
Installing Oracle Grid Infrastructure 3-23

rconfig is a command line utility. The Convert to Cluster Database option in OracleEnterprise Manager Cloud Control provides a GUI conversion tool. Additionally, afteryou have converted your single-instance database to an Oracle RAC database, you canuse the srvctl utility to convert the database to an Oracle RAC One Node database.
About Preparing for Database Conversion (page 3-24)Before you start the process of converting your database to a clusterdatabase, your database environment must meet certain prerequisites.
Overview of the Database Conversion Process Using Cloud Control (page 3-25)You can convert a single-instance database to an Oracle RAC databaseusing Oracle Enterprise Manager Cloud Control.
Overview of the Database Conversion Process Using rconfig (page 3-26)This topic provides an outline of the process of converting a single-instance database to an Oracle RAC database using the rconfig utility.
Converting an Oracle RAC Database into an Oracle RAC One Node Database(page 3-27)
After you use the rconfig utility to convert a single-instance Oracledatabase into a single-node Oracle RAC database, you can use thesrvctl utility to convert the database into an Oracle RAC One Nodedatabase.
3.7.1 About Preparing for Database ConversionBefore you start the process of converting your database to a cluster database, yourdatabase environment must meet certain prerequisites.
• The existing database and the target Oracle RAC database must be on the samerelease of Oracle Database 12c and must be running on the same platform.
• The hardware and operating system software used to implement your OracleRAC database must be certified for use with the release of the Oracle RACsoftware you are installing.
• You must configure shared storage for your Oracle RAC database. You will needadditional shared storage for the Oracle Clusterware files, such as the OracleCluster Registry, the voting files, and the Grid Infrastructure ManagementRepository.
• You must verify that any applications that run against the Oracle RAC databasedo not need any additional configuration before they can be used successfullywith the cluster database. This applies to both Oracle applications and databasefeatures, such as Oracle Streams, and applications and products that do not comefrom Oracle.
• Backup procedures should be available before converting from a single-instanceOracle Database to Oracle RAC.
• For archiving in Oracle RAC environments, the archive log file format requires athread number.
• The archived redo log files from all instances of an Oracle RAC database arerequired for media recovery. If you archive to a file and you do not use a clusterfile system, or some other means to provide shared file systems, then you requirea method of accessing the archived redo log files from all nodes on which thecluster database has instances.
About Converting an Oracle Database to an Oracle RAC Database
3-24 Oracle Database 2 Day + Real Application Clusters Guide

Note:
For information about using individual Oracle Database 12c databaseproducts or options, refer to the product documentation library, which isavailable on the Oracle Help Center website at http://docs.oracle.com/en/database/
See Also:
• "About Installing Oracle RAC on Different Operating Systems(page 1-11)"
• "Verifying System Requirements (page 2-1)"
• "Configuring Installation Directories and Shared Storage (page 2-25)"
3.7.2 Overview of the Database Conversion Process Using Cloud ControlYou can convert a single-instance database to an Oracle RAC database using OracleEnterprise Manager Cloud Control.
This section summarizes the process of converting a single-instance database to anOracle RAC database:
• Complete the prerequisite tasks for converting to an Oracle RAC database:
– Oracle Clusterware and Oracle Database software is installed on all targetnodes.
– Oracle Clusterware is started.
– The Oracle Database binary is enabled for Oracle RAC on all target nodes.
– Shared storage is configured and accessible from all nodes.
– User equivalency is configured for the operating system user performing theconversion.
– Enterprise Manager agents are configured and running on all nodes, and areconfigured with the cluster and host information.
– The database being converted has been backed up successfully.
• Access the Database Home page for the database you want to convert. Forinstructions on navigating to the Database Home page, see "Accessing theDatabase Home Page" in the Oracle Database 2 Day DBAGuide.
• From the Availability menu, select Convert to Cluster Database.
• Provide the necessary credentials.
• Select the host nodes that should contain instances of the new database.
• Provide listener and instance configuration information.
• Specify the location of the shared storage to be used for the data files.
About Converting an Oracle Database to an Oracle RAC Database
Installing Oracle Grid Infrastructure 3-25
• Submit the job.
• Complete the post-conversion tasks.
The resulting Oracle RAC database uses a server pool instead of a fixed configuration.
See Also:
Oracle Real Application Clusters Administration and Deployment Guide for acomplete description of this process
3.7.3 Overview of the Database Conversion Process Using rconfigThis topic provides an outline of the process of converting a single-instance databaseto an Oracle RAC database using the rconfig utility.
• Complete the prerequisite tasks for converting to an Oracle RAC database.
– Oracle Clusterware and Oracle Database software is installed on all targetnodes.
– Oracle Clusterware is started.
– The Oracle Database binary is enabled for Oracle RAC on all target nodes.
– Shared storage is configured and accessible from all nodes.
– User equivalency is configured for the operating system user performing theconversion.
– The database being converted has been backed up successfully.
• Using rconfig, you can convert a single-instance database to either anadministrator-managed cluster database or a policy-managed cluster database.Modify the parameters in either the ConvertToRAC_AdminManaged.xml orConvertToRAC_PolicyManaged.xml sample file, as appropriate for yourenvironment, then save the file to a new location. Both files are located in theOracle_home/assistants/rconfig/sampleXMLs directory.
• Run the rconfig command, supplying the name of the modified XML file asinput.
• Complete the post-conversion tasks.
You can also use the rconfig utility to convert single-instance Oracle ASM toclustered Oracle ASM.
See Also:
Oracle Real Application Clusters Administration and Deployment Guide for acomplete description of this process
About Converting an Oracle Database to an Oracle RAC Database
3-26 Oracle Database 2 Day + Real Application Clusters Guide
3.7.4 Converting an Oracle RAC Database into an Oracle RAC One Node DatabaseAfter you use the rconfig utility to convert a single-instance Oracle database into asingle-node Oracle RAC database, you can use the srvctl utility to convert thedatabase into an Oracle RAC One Node database.
To convert your database to an Oracle RAC One Node database, use the followingcommand:
srvctl convert database -db database_name -dbtype RACONENODE
An Oracle RAC One Node database must be part of a multi-node cluster to supportfailover or online database relocation. You must either install Oracle GridInfrastructure for a cluster and Oracle RAC on at least two nodes, or add a node toyour existing single-node Oracle RAC database.
See Also:
• "Adding and Deleting Nodes and Instances (page 9-1)" for moreinformation about adding nodes
• "About Oracle RAC One Node (page 1-9)" for more information aboutOracle RAC One Node
About Converting an Oracle Database to an Oracle RAC Database
Installing Oracle Grid Infrastructure 3-27

About Converting an Oracle Database to an Oracle RAC Database
3-28 2 Day + Real Application Clusters Guide
4Administering Database Instances and
Cluster Databases
Web-based Oracle Enterprise Manager Cloud Control enables you to manage OracleReal Application Clusters (Oracle RAC) databases. You can use the Cloud Controlconsole to administer multiple Oracle RAC databases and cluster nodes.
The Enterprise Manager console is a central point of control for the Oracleenvironment. Using this console you can perform many tasks, such as starting andstopping database components and managing parameters and parameter files inOracle RAC
About Oracle Real Application Clusters Database Management (page 4-2)There are differences when managing an Oracle RAC databasecompared to a single-instance Oracle Database.
About Oracle RAC One Node Database Management (page 4-2)Oracle RAC One Node databases are administered slightly differentlyfrom Oracle RAC or single-instance databases.
About Oracle RAC Management Using Enterprise Manager (page 4-3)The web-based Oracle Enterprise Manager Cloud Control consoleenables you to manage Oracle RAC and Oracle RAC One Nodedatabases.
Starting and Stopping Oracle RAC Databases and Database Instances(page 4-3)
You can start up and shut down the cluster database from the EnterpriseManager Cluster Database Home page.
Managing Oracle Real Application Clusters Initialization Parameters(page 4-4)
Managing initialization parameters for an Oracle RAC database isessentially the same as managing them for a single-instance Oracledatabase.
About Administering Storage in Oracle RAC (page 4-15)This topic provides additional information for using Enterprise Managerto manage some storage structures of an Oracle RAC database.
See Also:
Oracle Database 2 Day DBA for an overview of database monitoring tasks
Administering Database Instances and Cluster Databases 4-1
4.1 About Oracle Real Application Clusters Database ManagementThere are differences when managing an Oracle RAC database compared to a single-instance Oracle Database.
Oracle Real Application Clusters (Oracle RAC) provides technology that links two ormore individual computers so that they function as one system. Oracle RAC enableseach node, which is a computer that is a member of a cluster, to share access to theOracle database. If one cluster node fails or is taken offline, then the other clusternodes continue operating and the entire Oracle RAC database remains available. Twoor more inexpensive computers can appear to applications as if they were a single,much more powerful and more expensive, computer.
To increase the performance of an Oracle RAC database, you can add cluster nodes.Each additional node can help speed up application processing, support more users orprocesses, or both. In addition, you can also add cluster nodes to increase theavailability and reliability of a two-node Oracle RAC database. The more nodes thatyour Oracle RAC environment has, the less the impact of the loss of any individualnode on the database.
An Oracle RAC database requires three components: cluster nodes, shared storage,and Oracle Clusterware. Although you can choose how many nodes your clustershould have and what type of shared storage to use, this guide describes one specificconfiguration for a two-node cluster. This two-node configuration uses OracleAutomatic Storage Management (Oracle ASM) for storage management and RecoveryManager (RMAN) for the backup and recovery strategy.
Most administration tasks are the same for Oracle single-instance and Oracle RACdatabases. This guide provides additional instructions for database administrationtasks specific to Oracle RAC, and recommendations for managing Oracle RACdatabases.
Note:
If you are using Oracle Database Standard Edition, then your cluster mustadhere to the license restrictions. See Oracle Database Licensing Information forspecific details on these restrictions.
See Also:
Oracle Database 2 Day DBA for information about managing single instancedatabases
4.2 About Oracle RAC One Node Database ManagementOracle RAC One Node databases are administered slightly differently from OracleRAC or single-instance databases.
Oracle Real Application Clusters One Node (Oracle RAC One Node) is a singleinstance of an Oracle Real Application Clusters (Oracle RAC) database that runs onone node in a cluster. Instead of stopping and starting instances, you use Oracle RACOne Node online database relocation to relocate the Oracle RAC One Node instance toanother server.
About Oracle Real Application Clusters Database Management
4-2 Oracle Database 2 Day + Real Application Clusters Guide

• Administrator-managed Oracle RAC One Node databases: You must monitor thecandidate node list and make sure a server is always available for failover ifpossible. Candidate servers reside in the Generic server pool of the cluster. If thenode currently hosting the Oracle RAC One node database instance fails, then thedatabase and its services fail over to one of the candidate servers.
• Policy-managed Oracle RAC One Node databases: You must ensure that theserver pools are configured such that a server will be available for the database tofail over to in case its current node becomes unavailable. Also, the destinationnode for online database relocation must be located in the database's server pool.
For an overview of the online database relocation procedure, see the following topic:
See Also:
Oracle Real Application Clusters Administration and Deployment Guide for moreinformation about managing Oracle RAC One Node databases
4.3 About Oracle RAC Management Using Enterprise ManagerThe web-based Oracle Enterprise Manager Cloud Control console enables you tomanage Oracle RAC and Oracle RAC One Node databases.
Enterprise Manager is a central point of control for the Oracle environment that youaccess by way of a graphical user interface (GUI). You can use Enterprise Manager tocreate and modify services, and to start and stop the cluster database instances and thecluster database. Use Enterprise Manager Cloud Control to administer your entireOracle RAC environment, not just the Oracle RAC database.
When you log in to Oracle Enterprise Manager Cloud Control and access the databasehome page for an Oracle RAC database, the Cluster Database Home page appears. TheCluster Database Home page is similar to a single-instance Database Home page.However, on the Cluster Database Home page, Enterprise Manager displays thesystem state and availability of the entire Oracle RAC environment. This includes asummary about alert messages and job activity, and the status of and links to all thedatabase and Oracle Automatic Storage Management (Oracle ASM) instances. Byclicking the Cluster tab on this page you can view the Cluster Home page to view thestatus of and alerts for the underlying cluster.
Note:
Oracle Enterprise Manager Cloud Control manages all the Oracle ASMinstances on the nodes. Only one Oracle ASM instance exists on a node, nomatter how many Oracle databases use Oracle ASM for storage.
4.4 Starting and Stopping Oracle RAC Databases and Database InstancesYou can start up and shut down the cluster database from the Enterprise ManagerCluster Database Home page.
By using the Enterprise Manager Cluster Database Home page for cluster databasestartup and shutdown operations, you ensure that all the instances that belong to theOracle RAC database are in a consistent state. Oracle Enterprise Manager enables youto more easily manage an Oracle RAC database.
About Oracle RAC Management Using Enterprise Manager
Administering Database Instances and Cluster Databases 4-3
You can start and stop individual instances in an Oracle RAC database. Starting andstopping one instance in an Oracle RAC database does not stop or start the otherdatabase instances. To completely stop an Oracle RAC database, you must shut downall of its instances.
You can also start and shut down instances using SQL*Plus or Server Control(SRVCTL).
To start and stop an entire Oracle RAC database, assuming you are using aserver parameter file (SPFILE):
1. In Oracle Enterprise Manager, go to the Cluster Database Home page, logging in asuser SYS.
See Oracle Database 2 Day DBA for details on logging in to Oracle EnterpriseManager.
2. In the Cluster Database Home page, in the General section, click Startup if thedatabase is down, or Shutdown if the database is started.
The Startup/Shutdown: Specify Credentials page appears.
3. Enter the host credentials for the cluster nodes. The host credentials are the username and password for a user who is a member of the OSDBA or OSOPER operatingsystem group.
The Startup/Shutdown: Select Operation page appears.
4. Click Select All to select all the instances, or then click Shutdown to stop all thedatabase instances or Startup to start all the database instances.
To start and stop individual instances, on the Startup/Shutdown: Select Operationpage, select the database instances, then click Startup or Shutdown to perform thedesired operation on the selected database instances. You can also start and shutdown instances using SQL*Plus or Server Control (SRVCTL).
The Startup/Shutdown: Confirmation page appears.
5. Click Yes.
Note:
You can start and shut down individual instances from each instance's homepage. However, it is easier to perform instance startup and shutdownoperations directly from the Startup/Shutdown: Select Operation page.
See Also:
Oracle Real Application Clusters Administration and Deployment Guide for moreinformation about using command-line interfaces to start and stop OracleRAC database instances
4.5 Managing Oracle Real Application Clusters Initialization ParametersManaging initialization parameters for an Oracle RAC database is essentially the sameas managing them for a single-instance Oracle database.
Managing Oracle Real Application Clusters Initialization Parameters
4-4 Oracle Database 2 Day + Real Application Clusters Guide

Note the following differences for parameters in Oracle RAC databases:
• Parameters that are cluster-specific have the value Cluster Database in theCategory column.
• Parameters that are the same on each instance in the Oracle RAC database areidentified in the Instance column with an asterisk (*).
• Parameters that are set to different values on each instance of an Oracle RACdatabase are listed by instance name.
One difference when managing initialization parameters in an Oracle RACenvironment is that parameters can apply to more than one instance of the database. Ifyou change a parameter setting that is marked by an asterisk, which indicates that theparameter is a cluster-wide database initialization parameter, then you change thatparameter's setting for all the instances in your Oracle RAC database. If you change aninitialization parameter prefixed with an instance name, or an instance-specificinitialization parameter, then the change affects only that instance; the change does notaffect the parameter's settings on other database instances.
This section contains the following topics:
About Configuring Initialization Parameters for an Oracle RAC Database(page 4-5)
Oracle Database stores initialization parameters in either a serverparameter file or a text-based parameter file.
About the Server Parameter File for Oracle Real Application Clusters(page 4-10)
A server parameter file is a repository for initialization parameters.
Editing Initialization Parameter Settings for an Oracle RAC Database(page 4-10)
You can use Enterprise Manager to view and edit the initializationparameter settings for your Oracle RAC database.
See Also:
• Oracle Real Application Clusters Administration and Deployment Guide formore information about initialization parameters in an Oracle RACenvironment
4.5.1 About Configuring Initialization Parameters for an Oracle RAC DatabaseOracle Database stores initialization parameters in either a server parameter file or atext-based parameter file.
A server parameter file (SPFILE) is a type of repository for initialization parametersthat is maintained on the server where the Oracle database server runs, or on sharedstorage for an Oracle RAC database. Initialization parameters stored in a serverparameter file are persistent, in that any changes made to the parameters while aninstance is running can persist across instance shutdown and startup.
An initialization parameter file (PFILE) is a text file that contains initializationparameter settings. In contrast to the SPFILE, this parameter file is not binary and doesnot need to be located on the database server. The text-based initialization parameterfile can be read by the database, but it is not written to by the database.
Managing Oracle Real Application Clusters Initialization Parameters
Administering Database Instances and Cluster Databases 4-5
By default, Oracle Database sets most parameters to a default value and this value isthe same across all instances. However, many initialization parameters can also havedifferent values on different instances as described in Oracle Database Reference Otherparameters must be either unique or identical across instances, as described in thefollowing sections:
Parameters that Must Have Identical Settings on All Instances (page 4-6)Certain initialization parameters that are critical at database creation orthat affect certain database operations must have the same value forevery instance in an Oracle RAC database.
Parameters That Have Unique Settings on All Instances (page 4-7)Certain initialization parameters must have unique values for everyinstance in an Oracle RAC database.
Parameters That Should Have Identical Settings on All Instances (page 4-8)Oracle recommends that you set the values for these parameters to thesame value on all instances.
About Modifying the SERVICE_NAMES Parameter for Oracle RAC (page 4-9)The SERVICE_NAMES parameter should not be modified in the samemanner as other initialization parameters.
See Also:
• Oracle Real Application Clusters Administration and Deployment Guide formore information about initialization parameters in Oracle RACenvironments
4.5.1.1 Parameters that Must Have Identical Settings on All InstancesCertain initialization parameters that are critical at database creation or that affectcertain database operations must have the same value for every instance in an OracleRAC database.
Specify these parameter values in the SPFILE, or within the individual PFILEs for eachinstance. The following list contains the parameters that must be identical on everyinstance:
• CLUSTER_DATABASE
• COMPATIBLE
• CONTROL_FILES
• DB_BLOCK_SIZE
• DB_DOMAIN
• DB_FILES
• DB_NAME
• DB_RECOVERY_FILE_DEST
• DB_RECOVERY_FILE_DEST_SIZE
Managing Oracle Real Application Clusters Initialization Parameters
4-6 Oracle Database 2 Day + Real Application Clusters Guide

• DB_UNIQUE_NAME
• DML_LOCKS (only if set to 0)
• INSTANCE_TYPE (RDBMS or ASM)
• PARALLEL_EXECUTION_MESSAGE_SIZE
• REMOTE_LOGIN_PASSWORDFILE
• RESULT_CACHE_MAX_SIZE (either enabled or disabled on all instances)
• UNDO_MANAGEMENT
4.5.1.2 Parameters That Have Unique Settings on All InstancesCertain initialization parameters must have unique values for every instance in anOracle RAC database.
For the following parameters, the parameter must be set on all instances to a value thatis unique to that instance:
• ASM_PREFERRED_READ_FAILURE_GROUPS
Using the ASM_PREFERRED_READ_FAILURE_GROUPS initialization parameter,you can specify a list of preferred read failure group names. The disks in thosefailure groups become the preferred read disks. Thus, every node can read fromits local disks. This results in higher efficiency and performance and reducednetwork traffic. The setting for this parameter is instance-specific, and the valuesneed not be the same on all instances.
• CLUSTER_INTERCONNECTS
Use the CLUSTER_INTERCONNECTS initialization parameter to specify analternative interconnect to the one Oracle Clusterware is using for the privatenetwork. Each instance of the Oracle RAC database gets a unique value whensetting the CLUSTER_INTERCONNECTS initialization parameter.
• INSTANCE_NUMBER
Oracle Database uses the INSTANCE_NUMBER parameter to distinguish amonginstances at startup and the INSTANCE_NAME parameter to assign redo log groupsto specific instances. The instance name can take the formdb_unique_name_instance_number and when it has this form of name andnumber separated by an underscore, the number after the underscore is used asthe INSTANCE_NUMBER. With policy-managed databases, you no longer have toexplicitly assign instance numbers and the instance name defaults todb_unique_name_instance_number, where Oracle Database assigns theinstance number.
• ROLLBACK_SEGMENTS (if the UNDO_MANAGEMENT initialization parameter is notset to AUTO)
If you use the ROLLBACK_SEGMENTS parameters, then Oracle recommendssetting unique values for it by using the SID identifier in the SPFILE. However,you must set a unique value for INSTANCE_NUMBER for each instance and youcannot use a default value.
• UNDO_TABLESPACE (if UNDO_MANAGEMENT is set to AUTO)
Managing Oracle Real Application Clusters Initialization Parameters
Administering Database Instances and Cluster Databases 4-7
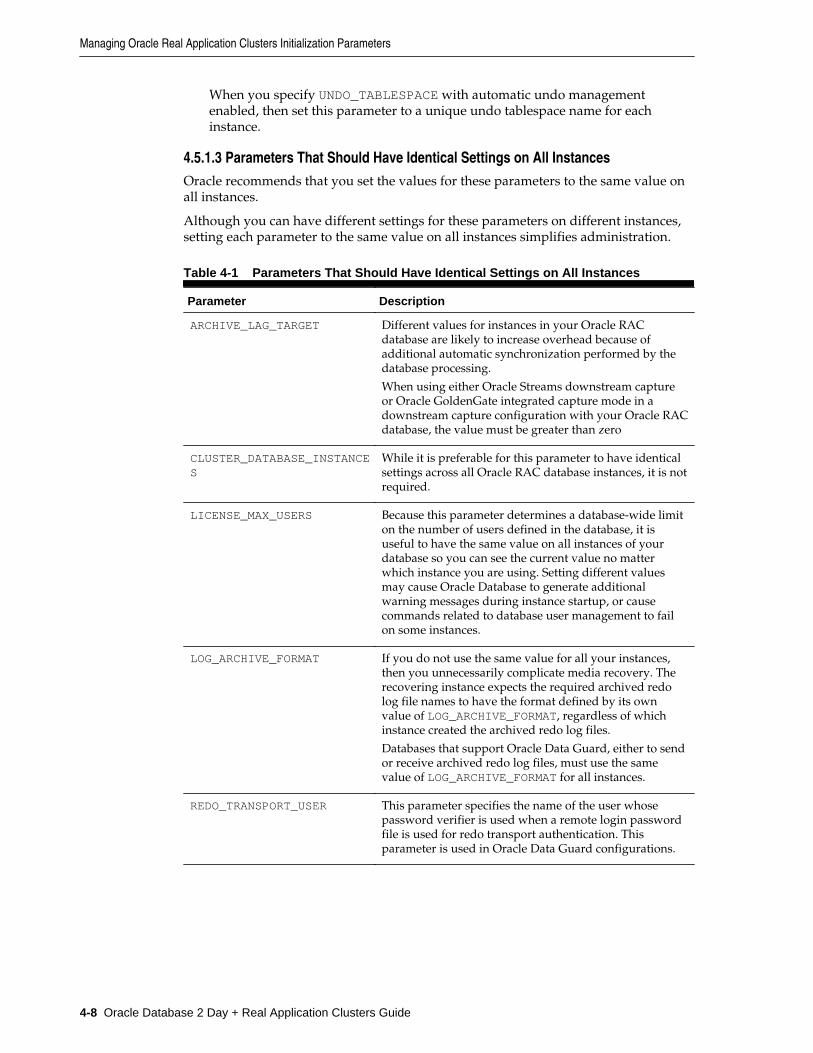
When you specify UNDO_TABLESPACE with automatic undo managementenabled, then set this parameter to a unique undo tablespace name for eachinstance.
4.5.1.3 Parameters That Should Have Identical Settings on All InstancesOracle recommends that you set the values for these parameters to the same value onall instances.
Although you can have different settings for these parameters on different instances,setting each parameter to the same value on all instances simplifies administration.
Table 4-1 Parameters That Should Have Identical Settings on All Instances
Parameter Description
ARCHIVE_LAG_TARGET Different values for instances in your Oracle RACdatabase are likely to increase overhead because ofadditional automatic synchronization performed by thedatabase processing.
When using either Oracle Streams downstream captureor Oracle GoldenGate integrated capture mode in adownstream capture configuration with your Oracle RACdatabase, the value must be greater than zero
CLUSTER_DATABASE_INSTANCES
While it is preferable for this parameter to have identicalsettings across all Oracle RAC database instances, it is notrequired.
LICENSE_MAX_USERS Because this parameter determines a database-wide limiton the number of users defined in the database, it isuseful to have the same value on all instances of yourdatabase so you can see the current value no matterwhich instance you are using. Setting different valuesmay cause Oracle Database to generate additionalwarning messages during instance startup, or causecommands related to database user management to failon some instances.
LOG_ARCHIVE_FORMAT If you do not use the same value for all your instances,then you unnecessarily complicate media recovery. Therecovering instance expects the required archived redolog file names to have the format defined by its ownvalue of LOG_ARCHIVE_FORMAT, regardless of whichinstance created the archived redo log files.
Databases that support Oracle Data Guard, either to sendor receive archived redo log files, must use the samevalue of LOG_ARCHIVE_FORMAT for all instances.
REDO_TRANSPORT_USER This parameter specifies the name of the user whosepassword verifier is used when a remote login passwordfile is used for redo transport authentication. Thisparameter is used in Oracle Data Guard configurations.
Managing Oracle Real Application Clusters Initialization Parameters
4-8 Oracle Database 2 Day + Real Application Clusters Guide

Table 4-1 (Cont.) Parameters That Should Have Identical Settings on All Instances
Parameter Description
SPFILE If this parameter does not identify the same file to allinstances, then each instance may behave differently andunpredictably in fail over, load-balancing, and duringnormal operations. Additionally, a change you make tothe SPFILE with an ALTER SYSTEM SET or ALTERSYSTEM RESET command is saved only in the SPFILEused by the instance where you run the command. Yourchange is not reflected in instances using differentSPFILEs.
If the SPFILE values are different in instances for whichthe values were set by the server, then you should restartthe instances that are not using the default SPFILE.
TRACE_ENABLED If you want diagnostic trace information to be alwaysavailable for your Oracle RAC database, you must setTRACE_ENABLED to TRUE on all of your databaseinstances. If you trace on only some of your instances,then diagnostic information might not be available whenrequired should the only accessible instances be thosewith TRACE_ENABLED set to FALSE.
UNDO_RETENTION By setting different values for UNDO_RETENTION in eachinstance, you are likely to reduce scalability andencounter unpredictable behavior following a failover.Therefore, you should carefully consider whether thereare any benefits before you assign different values for thisparameter to the instances in your Oracle RAC database.
4.5.1.4 About Modifying the SERVICE_NAMES Parameter for Oracle RACThe SERVICE_NAMES parameter should not be modified in the same manner as otherinitialization parameters.
The SERVICE_NAMES initialization parameter specifies one or more names by whichclients can connect to the instance. The instance registers its service names with thelistener. When a client requests a service, the listener determines which instances offerthe requested service and routes the client to the appropriate instance.
In an Oracle RAC database, you should not modify this parameter directly. Instead,define services for your database and database instances using the Clustered ManagedDatabase Services page in Oracle Enterprise Manager. If you must change a service,then you can use either Enterprise Manager or SRVCTL. When you use either OracleEnterprise Manager or SRVCTL to create and start the service, the SERVICE_NAMESparameter is updated automatically once the service is active.
Related Topics:
About Oracle Services (page 6-2)Services divide workloads into mutually disjoint groupings. Each servicerepresents a workload with common attributes, service-level thresholds,and priorities.
Managing Oracle Real Application Clusters Initialization Parameters
Administering Database Instances and Cluster Databases 4-9

4.5.2 About the Server Parameter File for Oracle Real Application ClustersA server parameter file is a repository for initialization parameters.
When you create the database, Oracle creates an SPFILE in the file location that youspecify. This location can be an Oracle ASM disk group or a file on a cluster filesystem. Oracle recommends that you store the SPFILE using Oracle ASM.
All instances in the cluster database use the same SPFILE at startup. Oracle RAC usesa traditional parameter file only if an SPFILE does not exist or if you specify PFILE inyour STARTUP command. Oracle recommends that you use an SPFILE to simplifyadministration, maintain parameter setting consistency, and to guarantee parametersetting persistence across database shutdown and startup events. In addition, you canconfigure RMAN to back up your SPFILE.
See Also:
• Oracle Database Backup and Recovery User’s Guide for information aboutusing RMAN to backup the SPFILE
4.5.3 Editing Initialization Parameter Settings for an Oracle RAC DatabaseYou can use Enterprise Manager to view and edit the initialization parameter settingsfor your Oracle RAC database.
You can set the parameters on the Current subpage of the Initialization Parameterspage to particular values to initialize many of the memory and process settings of anOracle instance. When you modify initialization parameters using the Current tab, thechanges are applied only to the running instances, not the SPFILE, unless the Applychanges in current running instance(s) mode to SPFile option is selected.
When you modify initialization parameters using the SPFile subpage, the changes areapplied only to the SPFILE, not the currently running instances, unless the Applychanges in SPFile mode to the current running instance(s) option is selected.Resetting parameters using the SPFile subpage is different than resetting the sameparameters using the Current subpage. You can either reset the parameter value for aninstance back to the default value for all instances, or you can delete the defaultparameter setting (unset the parameter) for all instances.
To view or modify the initialization parameters using Enterprise Manager:
1. Access the Cluster Database Home page.
See Oracle Database 2 Day DBA for details on logging in to Oracle EnterpriseManager.
2. From the Administration menu, select Initialization Parameters.
If the Database Login page appears, then log in as a SYSDBA user, for example,SYS or SYSTEM.
3. In the Initialization Parameters page, select either the Current or SPFile subpage tomodify the parameter settings.
4. Choose a parameter using the Select column.
Managing Oracle Real Application Clusters Initialization Parameters
4-10 Oracle Database 2 Day + Real Application Clusters Guide

5. Click Add, then edit the entry to change the target instance or parameter value.You can optionally add a comment describing the reason for the change.
6. After you make changes to one or more of the parameters, click Apply to acceptand implement the changes.
Modifying the Initialization Parameter for Oracle RAC Using the Current Tab inOracle Enterprise Manager (page 4-11)
The Current subpage of the Initialization Parameters page contains a listof configuration parameters for that instance and database.
Modifying the Initialization Parameter for Oracle RAC Using the SPFile Tab inOracle Enterprise Manager (page 4-12)
You can add or reset parameters using the SPFile subpage of theInitialization Parameters page.
Example: Modifying the OPEN_CURSORS Parameter (page 4-14)This topic provides an example of modifying the OPEN_CURSORSparameter.
Related Topics:
Oracle Database 2 Day DBA
4.5.3.1 Modifying the Initialization Parameter for Oracle RAC Using the Current Tab inOracle Enterprise ManagerThe Current subpage of the Initialization Parameters page contains a list ofconfiguration parameters for that instance and database.
You can set the parameters on the Current subpage of the Initialization Parameterspage to particular values to initialize many of the memory and process settings of anOracle instance. When you modify initialization parameters using the Current tab, thechanges are applied only to the running instances, not the SPFILE, unless the "Applychanges in current running instance(s) mode to SPFile" option is selected.
The Instance column shows the instances for which the parameter has the value listedin the table. An asterisk (*) indicates that the parameter has the same value for allremaining instances of the cluster database. For example, if open_cursors = 250for node1 and open_cursors = 300 for node2, then the Instance column foropen_cursors = 250 displays an asterisk, but the Instance column foropen_cursors = 300 contains "node2". This shorthand notation saves space whenthe cluster database has many instances.
Managing Oracle Real Application Clusters Initialization Parameters
Administering Database Instances and Cluster Databases 4-11
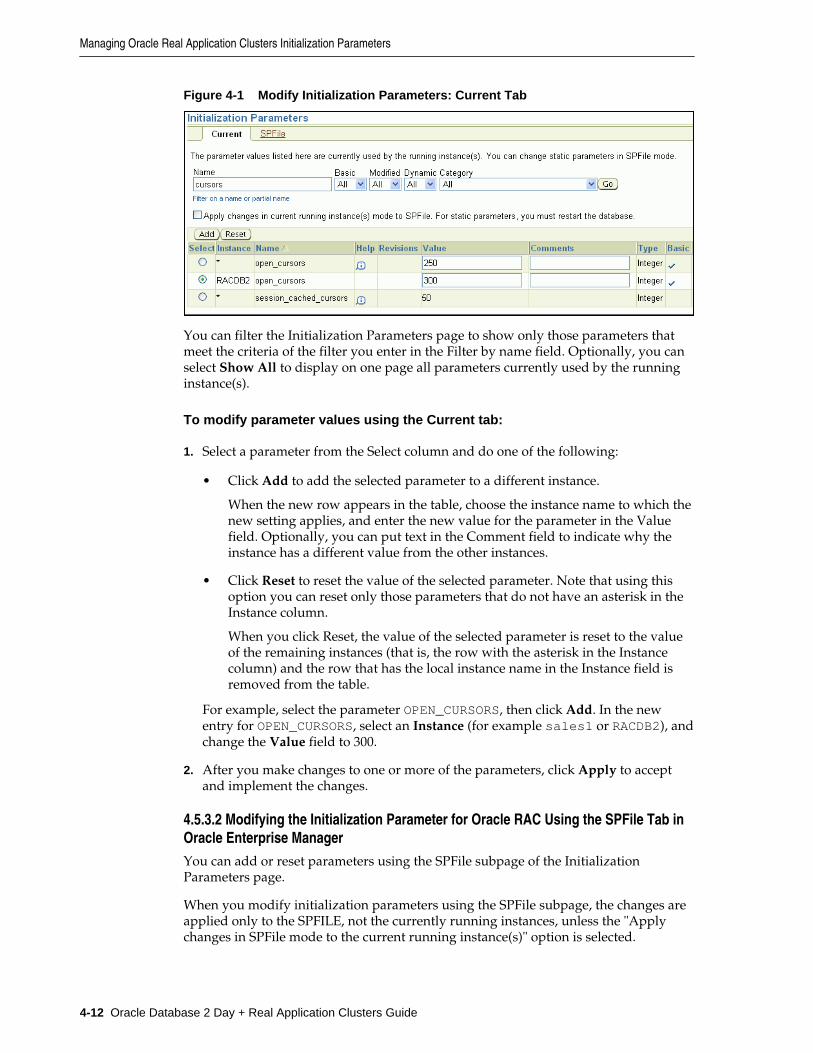
Figure 4-1 Modify Initialization Parameters: Current Tab
You can filter the Initialization Parameters page to show only those parameters thatmeet the criteria of the filter you enter in the Filter by name field. Optionally, you canselect Show All to display on one page all parameters currently used by the runninginstance(s).
To modify parameter values using the Current tab:
1. Select a parameter from the Select column and do one of the following:
• Click Add to add the selected parameter to a different instance.
When the new row appears in the table, choose the instance name to which thenew setting applies, and enter the new value for the parameter in the Valuefield. Optionally, you can put text in the Comment field to indicate why theinstance has a different value from the other instances.
• Click Reset to reset the value of the selected parameter. Note that using thisoption you can reset only those parameters that do not have an asterisk in theInstance column.
When you click Reset, the value of the selected parameter is reset to the valueof the remaining instances (that is, the row with the asterisk in the Instancecolumn) and the row that has the local instance name in the Instance field isremoved from the table.
For example, select the parameter OPEN_CURSORS, then click Add. In the newentry for OPEN_CURSORS, select an Instance (for example sales1 or RACDB2), andchange the Value field to 300.
2. After you make changes to one or more of the parameters, click Apply to acceptand implement the changes.
4.5.3.2 Modifying the Initialization Parameter for Oracle RAC Using the SPFile Tab inOracle Enterprise ManagerYou can add or reset parameters using the SPFile subpage of the InitializationParameters page.
When you modify initialization parameters using the SPFile subpage, the changes areapplied only to the SPFILE, not the currently running instances, unless the "Applychanges in SPFile mode to the current running instance(s)" option is selected.
Managing Oracle Real Application Clusters Initialization Parameters
4-12 Oracle Database 2 Day + Real Application Clusters Guide
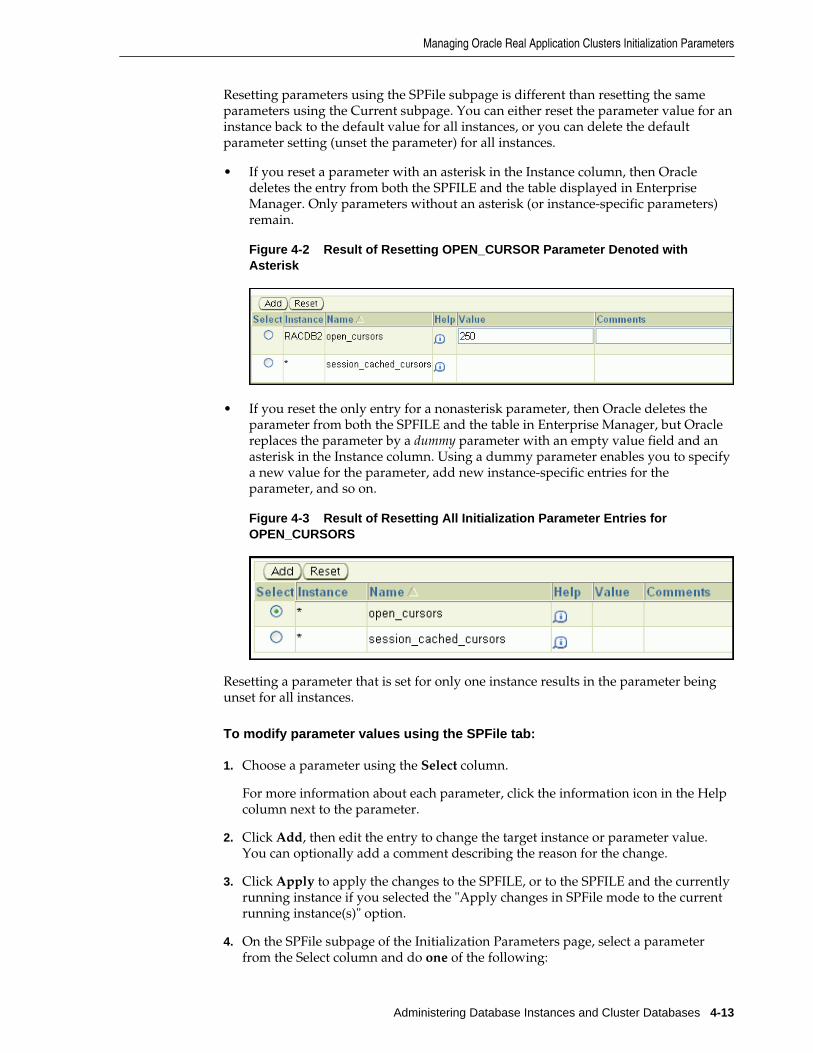
Resetting parameters using the SPFile subpage is different than resetting the sameparameters using the Current subpage. You can either reset the parameter value for aninstance back to the default value for all instances, or you can delete the defaultparameter setting (unset the parameter) for all instances.
• If you reset a parameter with an asterisk in the Instance column, then Oracledeletes the entry from both the SPFILE and the table displayed in EnterpriseManager. Only parameters without an asterisk (or instance-specific parameters)remain.
Figure 4-2 Result of Resetting OPEN_CURSOR Parameter Denoted withAsterisk
• If you reset the only entry for a nonasterisk parameter, then Oracle deletes theparameter from both the SPFILE and the table in Enterprise Manager, but Oraclereplaces the parameter by a dummy parameter with an empty value field and anasterisk in the Instance column. Using a dummy parameter enables you to specifya new value for the parameter, add new instance-specific entries for theparameter, and so on.
Figure 4-3 Result of Resetting All Initialization Parameter Entries forOPEN_CURSORS
Resetting a parameter that is set for only one instance results in the parameter beingunset for all instances.
To modify parameter values using the SPFile tab:
1. Choose a parameter using the Select column.
For more information about each parameter, click the information icon in the Helpcolumn next to the parameter.
2. Click Add, then edit the entry to change the target instance or parameter value.You can optionally add a comment describing the reason for the change.
3. Click Apply to apply the changes to the SPFILE, or to the SPFILE and the currentlyrunning instance if you selected the "Apply changes in SPFile mode to the currentrunning instance(s)" option.
4. On the SPFile subpage of the Initialization Parameters page, select a parameterfrom the Select column and do one of the following:
Managing Oracle Real Application Clusters Initialization Parameters
Administering Database Instances and Cluster Databases 4-13
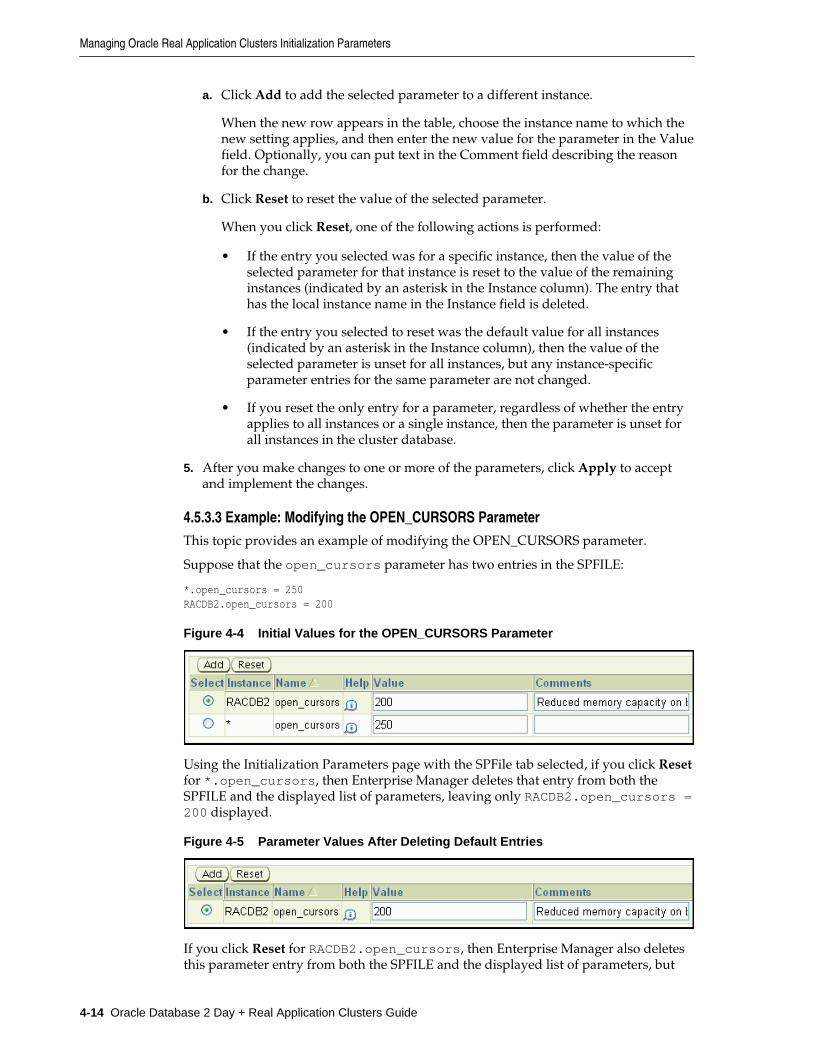
a. Click Add to add the selected parameter to a different instance.
When the new row appears in the table, choose the instance name to which thenew setting applies, and then enter the new value for the parameter in the Valuefield. Optionally, you can put text in the Comment field describing the reasonfor the change.
b. Click Reset to reset the value of the selected parameter.
When you click Reset, one of the following actions is performed:
• If the entry you selected was for a specific instance, then the value of theselected parameter for that instance is reset to the value of the remaininginstances (indicated by an asterisk in the Instance column). The entry thathas the local instance name in the Instance field is deleted.
• If the entry you selected to reset was the default value for all instances(indicated by an asterisk in the Instance column), then the value of theselected parameter is unset for all instances, but any instance-specificparameter entries for the same parameter are not changed.
• If you reset the only entry for a parameter, regardless of whether the entryapplies to all instances or a single instance, then the parameter is unset forall instances in the cluster database.
5. After you make changes to one or more of the parameters, click Apply to acceptand implement the changes.
4.5.3.3 Example: Modifying the OPEN_CURSORS ParameterThis topic provides an example of modifying the OPEN_CURSORS parameter.
Suppose that the open_cursors parameter has two entries in the SPFILE:
*.open_cursors = 250 RACDB2.open_cursors = 200
Figure 4-4 Initial Values for the OPEN_CURSORS Parameter
Using the Initialization Parameters page with the SPFile tab selected, if you click Resetfor *.open_cursors, then Enterprise Manager deletes that entry from both theSPFILE and the displayed list of parameters, leaving only RACDB2.open_cursors =200 displayed.
Figure 4-5 Parameter Values After Deleting Default Entries
If you click Reset for RACDB2.open_cursors, then Enterprise Manager also deletesthis parameter entry from both the SPFILE and the displayed list of parameters, but
Managing Oracle Real Application Clusters Initialization Parameters
4-14 Oracle Database 2 Day + Real Application Clusters Guide

then a new entry, *.open_cursors = <NULL> is added to the displayed list ofparameters for the reset parameter.
Figure 4-6 Parameter Values After Deleting Custom Entry and Default Entry
4.6 About Administering Storage in Oracle RACThis topic provides additional information for using Enterprise Manager to managesome storage structures of an Oracle RAC database.
About Automatic Undo Management in Oracle RAC (page 4-15)Oracle RAC automatically manages undo segments within a specificundo tablespace that is assigned to an instance.
Oracle Automatic Storage Management in Oracle RAC (page 4-16)Oracle Automatic Storage Management (Oracle ASM) automaticallyoptimizes storage to maximize performance by managing the storageconfiguration across the disks that Oracle ASM manages.
Administering Redo Logs in Oracle RAC (page 4-18)These topics provide an overview of additional concepts and proceduresfor configuring redo log files in Oracle RAC environments.
See Also:
Oracle Database 2 Day DBA for managing storage for single-instance databases
4.6.1 About Automatic Undo Management in Oracle RACOracle RAC automatically manages undo segments within a specific undo tablespacethat is assigned to an instance.
Only the instance assigned to the undo tablespace can modify the contents of thattablespace. However, each instance can read the undo data blocks created by anyinstance. Also, when performing transaction recovery, any instance can update anyundo tablespace, if that undo tablespace is not currently being used by anotherinstance for undo generation or transaction recovery. You assign undo tablespaces inyour Oracle RAC database by specifying a different value for the UNDO_TABLESPACEparameter for each instance in your SPFILE or individual PFILEs. You cannotsimultaneously use automatic undo management and manual undo management inan Oracle RAC database. In other words, all instances of an Oracle RAC database mustoperate in the same undo mode.
See Also:
Oracle Database 2 Day DBA for more information about managing the undodata for your database
About Administering Storage in Oracle RAC
Administering Database Instances and Cluster Databases 4-15
4.6.2 Oracle Automatic Storage Management in Oracle RACOracle Automatic Storage Management (Oracle ASM) automatically optimizes storageto maximize performance by managing the storage configuration across the disks thatOracle ASM manages.
Oracle ASM optimizes storage by evenly distributing the storage load across all theavailable storage within your cluster database environment. Oracle ASM partitionsyour total disk space requirements into uniformly sized units across all the disks in adisk group. Oracle ASM can also automatically mirror data to prevent data loss.Because of these features, Oracle ASM also significantly reduces your administrativeoverhead.
As in single-instance Oracle databases, using Oracle ASM in Oracle RAC does notrequire I/O tuning. The following topics describe Oracle ASM and Oracle ASMadministration:
About Oracle ASM Components in Oracle RAC (page 4-16)An Oracle ASM instance can operate in several configurations in OracleFlex ASM.
About Disk Group Configurations for Oracle ASM in Oracle RAC (page 4-17)When you create a disk group for a cluster, or add new disks to anexisting clustered disk group, you must prepare only the underlyingphysical storage on shared disks.
About Standalone Oracle ASM Disk Group Management (page 4-17)If you choose not to configure Oracle ASM during installation, then youmust manually configure Oracle ASM, or perform standalone OracleASM disk group management.
About Oracle ASM Instance and Disk Group Management (page 4-18)You can perform administrative operations on Oracle ASM disk groupsusing Enterprise Manager such as adding and deleting them.
4.6.2.1 About Oracle ASM Components in Oracle RACAn Oracle ASM instance can operate in several configurations in Oracle Flex ASM.
Oracle Flex ASM enables an Oracle ASM instance to run on a separate physical serverfrom the database servers. With this deployment, larger clusters of Oracle ASMinstances can support more database clients while reducing the Oracle ASM footprintfor the overall system. When using Oracle Flex ASM, Oracle ASM clients areconfigured with direct access to storage.
With Oracle Flex ASM, you can consolidate all the storage requirements into a singleset of disk groups. All these disk groups are mounted by and managed by a small setof Oracle ASM instances running in a single cluster. You can specify the number ofOracle ASM instances with a cardinality setting. The default is three instances.
Each Oracle ASM instance has either an SPFILE or PFILE type parameter file.
For the environment described in this guide, there is an Oracle ASM instance on eachnode and the Oracle ASM instances use SPFILEs.
Related Topics:
Oracle Automatic Storage Management Administrator's Guide
About Administering Storage in Oracle RAC
4-16 Oracle Database 2 Day + Real Application Clusters Guide

4.6.2.2 About Disk Group Configurations for Oracle ASM in Oracle RACWhen you create a disk group for a cluster, or add new disks to an existing clustereddisk group, you must prepare only the underlying physical storage on shared disks.
The shared disk requirement is the only substantial difference between using OracleASM in an Oracle RAC database compared to using it in a single-instance Oracledatabase. Oracle ASM automatically rebalances the storage load after you add ordelete a disk or disk group.
In a cluster, each Oracle ASM instance manages the metadata updates to the diskgroups for the node on which it is running. In addition, each Oracle ASM instancecoordinates disk group metadata with other nodes in the cluster.
As in single-instance Oracle databases, you can use Enterprise Manager, Oracle ASMconfiguration assistant (ASMCA), Oracle ASM command-line utility (ASMCMD),SQL*Plus, and SRVCTL to administer disk groups for Oracle ASM in an Oracle RACenvironment.
See Also:
• About Oracle ASM Running in an Oracle RAC Environment (page 1-7) foran illustration of the relationship between Oracle RAC instances, OracleASM instances, and the shared storage
• Oracle Automatic Storage Management Administrator's Guide for informationabout how to use SQL*Plus to administer Oracle ASM instances
4.6.2.3 About Standalone Oracle ASM Disk Group ManagementIf you choose not to configure Oracle ASM during installation, then you mustmanually configure Oracle ASM, or perform standalone Oracle ASM disk groupmanagement.
You can configure Oracle ASM during installation of Oracle Grid Infrastructure for acluster. You do not have to create a database to modify Oracle ASM storageproperties.
To manually configure Oracle ASM, you must first run ASMCA to create the OracleASM instances and create at least one disk group. After Oracle ASM is running, thenyou can use DBCA to create an Oracle RAC database that uses Oracle ASM forstorage.
Note:
If you installed the Oracle Cluster Registry (OCR) and Voting Disks on OracleASM as part of your Oracle Grid Infrastructure for a cluster install, then OUIcreates the Oracle ASM instances and you do not have to run ASMCA. Youmust use ASMCA only if you did not specify Oracle ASM storage for the OCRand Voting disks during installation.
About Administering Storage in Oracle RAC
Administering Database Instances and Cluster Databases 4-17

See Also:
Oracle Automatic Storage Management Administrator's Guide for informationabout how to use the Oracle Automatic Storage Management command-lineutility ASMCA
4.6.2.4 About Oracle ASM Instance and Disk Group ManagementYou can perform administrative operations on Oracle ASM disk groups usingEnterprise Manager such as adding and deleting them.
You can also monitor Oracle ASM disk group performance and control disk groupavailability at the instance level. For example, Enterprise Manager provides someOracle RAC-specific features for Oracle ASM, such as the following:
• When you add a disk group, the disk group definition includes a check box toindicate whether the disk group is automatically mounted to all the clusterdatabase instances.
• The default Disk Group Performance page displays instance-level performancedetails when you click a performance characteristic such as Write Response Timeor I/O Throughput.
• When you mount and dismount Oracle ASM disk groups, you can use a checkbox to indicate which instances should mount or dismount a particular OracleASM Disk Group.
4.6.3 Administering Redo Logs in Oracle RACThese topics provide an overview of additional concepts and procedures forconfiguring redo log files in Oracle RAC environments.
Managing redo log files in Oracle RAC environments is similar to managing redo logfiles in single-instance Oracle Database environments.
About Redo Log Groups and Redo Threads in Oracle RAC Databases(page 4-19)
Redo logs contain a record of changes that have been made to data files.
About Accessing Redo Log Files for an Oracle RAC Database (page 4-20)In an Oracle RAC database, each instance writes and archives the redolog groups in its redo thread in the same manner that single-instanceOracle databases do.
Using Enterprise Manager to View and Create Online Redo Log Files(page 4-20)
On the Redo Log Groups page, you can create additional redo loggroups and add members to the redo log group. The Thread columnidentifies the instance, or redo thread, to which a redo log file belongs.
About Administering Storage in Oracle RAC
4-18 Oracle Database 2 Day + Real Application Clusters Guide

See Also:
• Oracle Database 2 Day DBA for more information about online redo logs
• Oracle Automatic Storage Management Administrator's Guide for informationabout creating online redo logs groups in Oracle ASM
4.6.3.1 About Redo Log Groups and Redo Threads in Oracle RAC DatabasesRedo logs contain a record of changes that have been made to data files.
In a single-instance Oracle database, redo logs are stored in two or more redo log filegroups. Each of these groups contains a redo log file and possibly one or moremirrored copies of that file. In an Oracle RAC database, each instance requires its ownset of redo log groups, which is known as a redo thread. Mirrored copies of the redolog files provide your system with extra protection against data loss that is due tohardware failures or data corruption. If a redo log file is unreadable, then OracleDatabase attempts to access its mirrored copy. The redo log file mirrors should belocated on different disk devices from the primary redo log files.
Figure 4-7 Illustration of Redo Threads for an Oracle RAC Database
Shared Storage��Archived�Redo Log Files
RAC�Database
Instance 1
RAC�Database
Instance 2
0001
0002
00031_001 2_003
2_002
2_001
Shared Storage��Online�Redo Log Files
Log�1_002
Log�1_001
Log�1_003
Log�2_005
Log�2_004
Log�2_003
Thread 1 Thread 2
LGWR LGWR
ARC0ARC0
Each instance's redo thread must contain at least two redo log groups. Each redo loggroup should contain at least two members: a redo log and its mirrored copy. If you
About Administering Storage in Oracle RAC
Administering Database Instances and Cluster Databases 4-19
create your Oracle RAC database using DBCA, then your Oracle RAC databaseautomatically implements a configuration that meets the Oracle recommendations.
You should create redo log groups only if you are using administrator-manageddatabases. For policy-managed databases, if an instance starts due to a change inserver pool cardinality, then Oracle Database automatically creates redo log files,enables a redo thread for the instance if there is not a redo thread allocated to thatinstance, and creates the undo tablespace if there is not an undo tablespace allocated tothat instance. The database must be using Oracle Managed Files and Oracle ASM inthis situation.
In an Oracle RAC database, all the redo log files reside on shared storage. In addition,each instance must have access to the redo log files of all the other instances in thecluster. If your Oracle RAC database uses Oracle ASM, then Oracle ASM manages theshared storage for the redo log files and the access to those files.
Note:
DBCA creates redo threads and undo tablespaces up to the maximum valuespecified by the CLUSTER_DATABASE_INSTANCES parameter at the time ofcreation for better performance.
See Also:
• Oracle Real Application Clusters Administration and Deployment Guide formore information about redo log file storage in Oracle RAC.
4.6.3.2 About Accessing Redo Log Files for an Oracle RAC DatabaseIn an Oracle RAC database, each instance writes and archives the redo log groups inits redo thread in the same manner that single-instance Oracle databases do.
However, in recovery mode, the instance performing the recovery can read andprocess all the redo threads for the database, regardless of which instance generatedthe redo thread. Being able to read all the redo threads enables a running instance torecover the work completed by one or more failed instances.
In case of instance failure, a surviving instance can read the redo logs of the failedinstance. Users can continue to access and update the database without waiting for thefailed instance to be restarted. For example, assume that you have an Oracle RACdatabase with two instances, instance A and instance B. If instance A is down, theninstance B can read the redo log files for both instance A and B to ensure a successfulrecovery.
4.6.3.3 Using Enterprise Manager to View and Create Online Redo Log FilesOn the Redo Log Groups page, you can create additional redo log groups and addmembers to the redo log group. The Thread column identifies the instance, or redothread, to which a redo log file belongs.
To access the redo log file groups using Enterprise Manager:
1. Access the Cluster Database Home page.
See Oracle Database 2 Day DBA for details on logging in to Oracle EnterpriseManager.
About Administering Storage in Oracle RAC
4-20 Oracle Database 2 Day + Real Application Clusters Guide
2. From the Administration menu, select Storage, and then select Redo Log Groups.
The Redo Log Groups page appears.
3. On the Redo Log Group page, perform any of the following tasks:
• View the status, number of members, thread, file size, status, and archivestatus of each redo log group
• Create or delete log groups
• Edit a redo log group to add or remove members
• Perform other redo log group management tasks, including clearing log files,duplicating a log group, generating sizing advice, and forcing a log switch
See Also:
• Oracle Real Application Clusters Administration and Deployment Guide foradditional information about redo threads in an Oracle RAC environment
• Oracle Automatic Storage Management Administrator's Guide for informationabout creating online redo logs groups in Oracle ASM
• Oracle Database 2 Day DBA for more information about managing onlineredo log files
About Administering Storage in Oracle RAC
Administering Database Instances and Cluster Databases 4-21

About Administering Storage in Oracle RAC
4-22 2 Day + Real Application Clusters Guide
5Administering Oracle Clusterware
Components
The main components to manage in your Oracle Clusterware environment are thevoting disks and the Oracle Cluster Registry (OCR).
About Oracle Clusterware (page 5-1)Oracle Clusterware includes a high availability framework for managingany application that runs on your cluster. Oracle Real ApplicationClusters (Oracle RAC) uses Oracle Clusterware as the infrastructure thatbinds multiple nodes that then operate as a single server.
Managing the Oracle Clusterware Stack (page 5-3)By default, Oracle Clusterware is configured to restart whenever theserver it resides on is restarted. During certain maintenance operations,you may be required to stop or start the Oracle Clusterware stackmanually.
Administering Voting Disks for Oracle Clusterware (page 5-5)Voting disks manage information about node membership. Each votingdisk must be accessible by all nodes in the cluster for nodes to bemembers of the cluster.
Backing Up and Recovering the Oracle Cluster Registry (page 5-8)Oracle Clusterware automatically creates Oracle Cluster Registry (OCR)backups every four hours. At any one time, Oracle Clusterware alwaysretains the latest three backup copies of the OCR that are four hours old,one day old, and one week old.
Changing the Oracle Cluster Registry Configuration (page 5-11)To ensure proper operation of Oracle Clusterware, make sure the OCR ishighly available.
Troubleshooting the Oracle Cluster Registry (page 5-15)The Oracle Cluster Registry (OCR) manages Oracle Clusterware andOracle RAC database configuration information.
See Also:
• "About Oracle Grid Infrastructure for a Cluster and Oracle RAC(page 1-4)"
5.1 About Oracle ClusterwareOracle Clusterware includes a high availability framework for managing anyapplication that runs on your cluster. Oracle Real Application Clusters (Oracle RAC)
Administering Oracle Clusterware Components 5-1

uses Oracle Clusterware as the infrastructure that binds multiple nodes that thenoperate as a single server.
In an Oracle RAC environment, Oracle Clusterware monitors all Oracle components(such as instances and listeners). If a failure occurs, then Oracle Clusterwareautomatically attempts to restart the failed component and also redirects operations toa surviving component.
Oracle Clusterware manages applications to ensure they start when the system starts.Oracle Clusterware also monitors the applications to ensure they are always available.For example, if an application process fails, then Oracle Clusterware attempts torestart the process based on scripts that you customize. If a node in the cluster fails,then you can program application processes that typically run on the failed node torestart on another node in the cluster.
About the Voting Disks (page 5-2)Voting disks are one of the key files for Oracle Clusterware.
About Oracle Cluster Registry (page 5-2)The Oracle Cluster Registry is a file that contains information about thecluster node list and instance-to-node mapping information.
About High Availability of Oracle Clusterware Files (page 5-3)High availability configurations have redundant hardware and softwarethat maintain operations by avoiding single points of failure.
Related Topics:
About Oracle Grid Infrastructure for a Cluster and Oracle RAC (page 1-4)Oracle Grid Infrastructure for a cluster refers to the installation of thecombined products. Oracle Clusterware and Oracle ASM are stillindividual products, and are referred to by those names.
5.1.1 About the Voting DisksVoting disks are one of the key files for Oracle Clusterware.
The voting disk records node membership information. A node must be able to accessmore than half the voting disks at any time. To avoid simultaneous loss of multiplevoting disks, each voting disk should be on a storage device that does not share anycomponents (controller, interconnect, and so on) with the storage devices used for theother voting disks.
For example, if you have five voting disks configured, then a node must be able toaccess at least three of the voting disks at any time. If a node cannot access theminimum required number of voting disks, then it is evicted, or removed, from thecluster. After the cause of the failure has been corrected and access to the voting diskshas been restored, you can instruct Oracle Clusterware to recover the failed node andrestore it to the cluster.
5.1.2 About Oracle Cluster RegistryThe Oracle Cluster Registry is a file that contains information about the cluster nodelist and instance-to-node mapping information.
The Oracle Cluster Registry (OCR) also contains information about OracleClusterware resource profiles for resources that you have customized. The voting diskdata is also backed up in OCR.
About Oracle Clusterware
5-2 Oracle Database 2 Day + Real Application Clusters Guide

Each node in a cluster also has a local copy of the OCR, called an Oracle Local Registry(OLR), that is created when Oracle Clusterware is installed. Multiple processes oneach node have simultaneous read and write access to the OLR particular to the nodeon which they reside, whether Oracle Clusterware is fully functional. By default, OLRis located at Grid_home/cdata/$HOSTNAME.olr
5.1.3 About High Availability of Oracle Clusterware FilesHigh availability configurations have redundant hardware and software that maintainoperations by avoiding single points of failure.
When a component is down, Oracle Clusterware redirects its managed resources to aredundant component. However, if a disaster strikes, or a massive hardware failureoccurs, then having redundant components might not be enough. To fully protectyour system it is important to have backups of your critical files.
The Oracle Clusterware installation process creates the voting disk and the OCR onshared storage. If you select the option for normal redundant copies during theinstallation process, then Oracle Clusterware automatically maintains redundantcopies of these files to prevent the files from becoming single points of failure. Thenormal redundancy feature also eliminates the need for third-party storageredundancy solutions. When you use normal redundancy, Oracle Clusterwareautomatically maintains two copies of the OCR file and three copies of the voting diskfile.
See Also:
Oracle Clusterware Administration and Deployment Guide for more informationabout managing voting disks
5.2 Managing the Oracle Clusterware StackBy default, Oracle Clusterware is configured to restart whenever the server it resideson is restarted. During certain maintenance operations, you may be required to stop orstart the Oracle Clusterware stack manually.
Note:
Do not use Oracle Clusterware Control (CRSCTL) commands on Oracleentities (such as resources, resource types, and server pools) that have namesbeginning with ora unless you are directed to do so by Oracle Support. TheServer Control utility (SRVCTL) is the correct utility to use on Oracle entities.
Starting Oracle Clusterware (page 5-4)You use the CRSCTL utility to manage Oracle Clusterware.
Stopping Oracle Clusterware (page 5-4)You use the CRSCTL utility to manage Oracle Clusterware.
See Also:
• "About Oracle Clusterware (page 5-1)"
Managing the Oracle Clusterware Stack
Administering Oracle Clusterware Components 5-3
5.2.1 Starting Oracle ClusterwareYou use the CRSCTL utility to manage Oracle Clusterware.
• If the Oracle High Availability Services daemon (OHASD) is running on all thecluster nodes, then you can start the entire Oracle Clusterware stack (all theprocesses and resources managed by Oracle Clusterware) on all nodes in thecluster by executing the following command on any node:
crsctl start cluster -all
• You can start the Oracle Clusterware stack on specific nodes by using the -noption followed by a space-delimited list of node names, for example:
crsctl start cluster -n racnode1 racnode4
To use the crsctl start cluster command, the OHASD process must berunning on the specified nodes.
• To start the entire Oracle Clusterware stack on a node, including the OHASDprocess, run the following command on that node:
crsctl start crs
See Also:
• "About Oracle Clusterware (page 5-1)"
• "Managing the Oracle Clusterware Stack (page 5-3)"
5.2.2 Stopping Oracle ClusterwareYou use the CRSCTL utility to manage Oracle Clusterware.
• To stop Oracle Clusterware on all nodes in the cluster, execute the followingcommand on any node:
crsctl stop cluster -all
The previous command stops the resources managed by Oracle Clusterware, theOracle ASM instance, and all the Oracle Clusterware processes (except forOHASD and its dependent processes).
• To stop Oracle Clusterware and Oracle ASM on select nodes, include the -noption followed by a space-delimited list of node names, for example:
crsctl stop cluster -n racnode1 racnode3
If you do not include either the -all or the -n option in the stop clustercommand, then Oracle Clusterware and its managed resources are stopped onlyon the node where you execute the command.
• To completely shut down the entire Oracle Clusterware stack, including theOHASD process, use the crsctl stop crs command.
Managing the Oracle Clusterware Stack
5-4 Oracle Database 2 Day + Real Application Clusters Guide
CRSCTL attempts to gracefully stop the resources managed by OracleClusterware during the shutdown of the Oracle Clusterware stack. If anyresources that Oracle Clusterware manages are still running after executing thecrsctl stop crs command, then the command fails. You must then use the -foption to unconditionally stop all resources and stop the Oracle Clusterwarestack, for example:
crsctl stop crs -f
Note:
When you shut down the Oracle Clusterware stack, you also shut down theOracle Automatic Storage Management (Oracle ASM) instances. If the OracleClusterware files (voting disk and OCR) are stored in an Oracle ASM diskgroup, then the only way to shut down the Oracle ASM instances is to shutdown the Oracle Clusterware stack.
See Also:
• "About Oracle Clusterware (page 5-1)"
• "Managing the Oracle Clusterware Stack (page 5-3)"
5.3 Administering Voting Disks for Oracle ClusterwareVoting disks manage information about node membership. Each voting disk must beaccessible by all nodes in the cluster for nodes to be members of the cluster.
Adding and Removing Voting Disks (page 5-5)You must manually add and remove voting disks if they are stored onlocal storage.
Backing Up and Recovering Voting Disks (page 5-6)You do not have to back up the voting disk. The voting disk data isautomatically backed up in the Oracle Cluster Registry (OCR) as part ofany configuration change and is automatically restored to any votingdisk added.
Migrating Voting Disks to Oracle ASM Storage (page 5-7)You should store the Oracle Clusterware voting disk files in an OracleASM disk group.
5.3.1 Adding and Removing Voting DisksYou must manually add and remove voting disks if they are stored on local storage.
If you choose to store Oracle Clusterware files on Oracle ASM and use redundancy forthe disk group, then Oracle ASM automatically maintains the ideal number of votingfiles based on the redundancy of the disk group.
If you use a different form of shared storage to store the voting disks, then you candynamically add and remove voting disks after installing Oracle RAC. Do this usingthe following commands where path is the fully qualified path for the additionalvoting disk.
Administering Voting Disks for Oracle Clusterware
Administering Oracle Clusterware Components 5-5
To add or remove a voting disk that is stored on disk:
1. Run the following command as the grid user to add a voting disk:
crsctl add css votedisk path
2. Run the following command as the grid user to remove a voting disk:
crsctl delete css votedisk path
5.3.2 Backing Up and Recovering Voting DisksYou do not have to back up the voting disk. The voting disk data is automaticallybacked up in the Oracle Cluster Registry (OCR) as part of any configuration changeand is automatically restored to any voting disk added.
Backing Up Voting Disks (page 5-6)The voting disk data is automatically backed up in Oracle ClusterRegistry (OCR) as part of any configuration change so you do not haveto perform manual backups of the voting disk.
Replacing Voting Disks (page 5-7)You replace a voting disk by deleting the unusable voting disk and thenadding a new voting disk to your configuration.
Restoring Voting Disks (page 5-7)If all voting disks are corrupted, then you can restore them
See Also:
• "About Oracle Clusterware (page 5-1)"
• Oracle Clusterware Administration and Deployment Guide for moreinformation about managing voting disks
5.3.2.1 Backing Up Voting DisksThe voting disk data is automatically backed up in Oracle Cluster Registry (OCR) aspart of any configuration change so you do not have to perform manual backups ofthe voting disk.
The voting disk data is automatically backed up in OCR as part of any configurationchange so you do not have to perform manual backups of the voting disk. The votingdisk files are backed up automatically by Oracle Clusterware if the contents of the fileshave changed in the following ways:
• Configuration parameters, for example misscount, have been added or modified
• After performing voting disk add or delete operations
See Also:
Oracle Clusterware Administration and Deployment Guide for more informationabout managing voting disks
Administering Voting Disks for Oracle Clusterware
5-6 Oracle Database 2 Day + Real Application Clusters Guide

5.3.2.2 Replacing Voting DisksYou replace a voting disk by deleting the unusable voting disk and then adding a newvoting disk to your configuration.
If a voting disk is damaged, and no longer usable by Oracle Clusterware, then you canreplace or re-create the voting disk. The voting disk contents are restored from abackup when a new voting file is added; this occurs regardless of whether the votingdisk file is stored in Oracle Automatic Storage Management (Oracle ASM).
To replace a corrupt, damaged, or missing voting disk that is not stored inOracle ASM:
1. Use CRSCTL to remove the damaged voting disk. For example, if the damagedvoting disk is stored in the disk location /dev/sda3, then execute the command:
crsctl delete css votedisk /dev/sda3
2. Use CRSCTL to create a new voting disk in the same location, for example:
crsctl add css votedisk /dev/sda3
See Also:
Oracle Clusterware Administration and Deployment Guide for more informationabout managing voting disks
5.3.2.3 Restoring Voting DisksIf all voting disks are corrupted, then you can restore them
• The process of restoring voting disks is described in Oracle ClusterwareAdministration and Deployment Guide.
Note:
Restoring a voting disk from a copy created with the Linux or UNIX operatingsystem dd command is not supported
5.3.3 Migrating Voting Disks to Oracle ASM StorageYou should store the Oracle Clusterware voting disk files in an Oracle ASM diskgroup.
If you choose to store your voting disks in Oracle ASM, then Oracle ASM stores all thevoting disks for the cluster in the disk group you choose. You cannot combine votingdisks stored in Oracle ASM and voting disks not stored in Oracle ASM in the samecluster.
The number of voting files you can store in a particular Oracle ASM disk groupdepends upon the redundancy of the disk group. By default, Oracle ASM puts eachvoting disk in its own failure group within the disk group. A normal redundancy diskgroup must contain at least two failure groups but if you are storing your voting diskson Oracle ASM, then a normal redundancy disk group must contain at least three
Administering Voting Disks for Oracle Clusterware
Administering Oracle Clusterware Components 5-7
failure groups. A high redundancy disk group must contain at least three failuregroups.
Once you configure voting disks on Oracle ASM, you can only make changes to thevoting disks' configuration using the crsctl replace votedisk command. This istrue even in cases where there are no working voting disks. Despite the fact that thecrsctl query css votedisk command reports zero voting disks in use, OracleClusterware remembers the fact that Oracle ASM was in use and the replace verb isrequired. Only after you use the replace verb to move voting disks back to non-Oracle ASM storage are the CRSCTL commands add css votedisk and deletecss votedisk again usable.
To move voting disks from shared storage to an Oracle ASM disk group:
1. Use the Oracle ASM Configuration Assistant (ASMCA) to create an Oracle ASMdisk group.
2. Verify that the ASM Compatibility attribute for the disk group is set to 12.1.0.0 orhigher.
3. Use CRSCTL to create a voting disk in the Oracle ASM disk group by specifyingthe disk group name in the following command:
crsctl replace votedisk +ASM_disk_group
See Also:
• "Creating Additional Oracle ASM Disk Groups (page 3-12)"
• Oracle Automatic Storage Management Administrator's Guide for moreinformation about disk group compatibility attributes
• Oracle Clusterware Administration and Deployment Guide for moreinformation about managing voting disks
5.4 Backing Up and Recovering the Oracle Cluster RegistryOracle Clusterware automatically creates Oracle Cluster Registry (OCR) backupsevery four hours. At any one time, Oracle Clusterware always retains the latest threebackup copies of the OCR that are four hours old, one day old, and one week old.
You cannot customize the backup frequencies or the number of files that OracleClusterware retains. You can use any backup software to copy the automaticallygenerated backup files at least once daily to a different device from where the primaryOCR file resides.
Viewing Available OCR Backups (page 5-9)Use the ocrconfig utility to view the backups generated automaticallyby Oracle Clusterware.
Manually Backing Up the OCR (page 5-9)Use the ocrconfig utility to force Oracle Clusterware to perform abackup of Oracle Cluster Registry (OCR) at any time, rather than waitfor the automatic backup that occurs at four-hour intervals.
Backing Up and Recovering the Oracle Cluster Registry
5-8 Oracle Database 2 Day + Real Application Clusters Guide

Recovering the OCR (page 5-10)There are two methods for recovering the OCR. The first method usesautomatically generated OCR file copies and the second method usesmanually created OCR export files.
5.4.1 Viewing Available OCR BackupsUse the ocrconfig utility to view the backups generated automatically by OracleClusterware.
To find the most recent backup of the OCR:
• Run the following command on any node in the cluster:
ocrconfig -showbackup
5.4.2 Manually Backing Up the OCRUse the ocrconfig utility to force Oracle Clusterware to perform a backup of OracleCluster Registry (OCR) at any time, rather than wait for the automatic backup thatoccurs at four-hour intervals.
This option is especially useful when you want to obtain a binary backup on demand,such as before you make changes to OCR. The Oracle Local Registry (OLR) onlysupports manual backups.
To manually backup the contents of the OCR:
1. Log in as the root user.
2. Use the following command to force Oracle Clusterware to perform an immediatebackup of the OCR:
ocrconfig -manualbackup
The date and identifier of the recently generated OCR backup is displayed.
3. If you must change the location for the OCR backup files, then use the followingcommand, where directory_name is the new location for the backups:
ocrconfig -backuploc directory_name
The default location for generating backups on Oracle Linux systems is Grid_home/cdata/cluster_name where cluster_name is the name of your cluster and Grid_homeis the home directory of the Oracle Grid Infrastructure for a cluster installation.Because the default backup is on a local file system, Oracle recommends that youinclude the backup file created with the ocrconfig command as part of youroperating system backup using standard operating system or third-party tools.
Note:
You can use the ocrconfig -backuploc command to change the locationwhere the OCR backups are created.
Backing Up and Recovering the Oracle Cluster Registry
Administering Oracle Clusterware Components 5-9

5.4.3 Recovering the OCRThere are two methods for recovering the OCR. The first method uses automaticallygenerated OCR file copies and the second method uses manually created OCR exportfiles.
Checking the Status of the OCR (page 5-10)In event of a failure, before you attempt to restore the Oracle ClusterRegistry (OCR), ensure that the OCR is unavailable.
Restoring the OCR from Automatically Generated OCR Backups (page 5-10)When restoring the OCR from automatically generated backups, youfirst have to determine which backup file to use for the recovery.
5.4.3.1 Checking the Status of the OCRIn event of a failure, before you attempt to restore the Oracle Cluster Registry (OCR),ensure that the OCR is unavailable.
To check the status of the OCR:
1. Run the following command:
ocrcheck
2. If this command does not display the message 'Device/File integritycheck succeeded' for at least one copy of the OCR, then all copies of the OCRhave failed. You must restore the OCR from a backup or OCR export.
3. If there is at least one copy of the OCR available, then you can use that copy torestore the other copies of the OCR.
See Also:
• "About the OCRCHECK Utility (page 5-15)"
5.4.3.2 Restoring the OCR from Automatically Generated OCR BackupsWhen restoring the OCR from automatically generated backups, you first have todetermine which backup file to use for the recovery.
To restore the OCR from an automatically generated backup on an Oracle Linuxsystem:
1. Log in as the root user.
2. Identify the available OCR backups using the ocrconfig command:
[root]# ocrconfig -showbackup
3. Review the contents of the backup using the following ocrdump command, wherefile_name is the name of the OCR backup file for which the contents should bewritten out to the file ocr_dump_output_file:
[root]# ocrdump ocr_dump_output_file -backupfile file_name
Backing Up and Recovering the Oracle Cluster Registry
5-10 Oracle Database 2 Day + Real Application Clusters Guide

If you do not specify an output file name, then the utility writes the OCR contentsto a file named OCRDUMPFILE in the current directory.
4. As the root user, stop Oracle Clusterware on all the nodes in your cluster byexecuting the following command:
[root]# crsctl stop cluster -all
5. As the root user, restore the OCR by applying an OCR backup file that youidentified in Step 2 (page 5-10) using the following command, where file_name isthe name of the OCR to restore. Ensure that the OCR devices that you specify in theOCR configuration exist, and that these OCR devices are valid before running thiscommand.
[root]# ocrconfig -restore file_name
6. As the root user, restart Oracle Clusterware on all the nodes in your cluster byrunning the following command:
[root]# crsctl start cluster -all
7. Use the Cluster Verification Utility (CVU) to verify the OCR integrity. Exit theroot user account, and, as the software owner of the Oracle Grid Infrastructure fora cluster installation, run the following command, where the -n all argumentretrieves a list of all the cluster nodes that are configured as part of your cluster:
cluvfy comp ocr -n all [-verbose]
5.5 Changing the Oracle Cluster Registry ConfigurationTo ensure proper operation of Oracle Clusterware, make sure the OCR is highlyavailable.
The OCR contains information about the cluster node list, which instances run onwhich nodes, and information about Oracle Clusterware resource profiles forapplications that have been modified to be managed by Oracle Clusterware.
Note:
The operations in this section affect the OCR for the entire cluster. However,the ocrconfig command cannot modify OCR configuration information fornodes that are shut down or for nodes on which Oracle Clusterware is notrunning. Avoid shutting down nodes while modifying the OCR using theocrconfig command.
Adding an OCR Location (page 5-12)You can add an Oracle Cluster Registry (OCR) location after an upgradeor after completing the Oracle RAC installation.
Migrating the OCR to Oracle ASM Storage (page 5-12)You should store the Oracle Cluster Registry (OCR) in an OracleAutomatic Storage Management (Oracle ASM) disk group.
Replacing an OCR (page 5-13)If you must change the location of an existing Oracle Cluster Registry(OCR), or change the location of a failed OCR to the location of aworking one, then you can use this procedure if one OCR file remainsonline.
Changing the Oracle Cluster Registry Configuration
Administering Oracle Clusterware Components 5-11

Removing an OCR (page 5-14)To remove an Oracle Cluster Registry (OCR) file, at least one copy of theOCR must be online.
Repairing an OCR Configuration on a Local Node (page 5-14)If a node in your cluster was not available when you modified the OCRconfiguration, then you must repair the OCR configuration on that nodebefore it is restarted.
5.5.1 Adding an OCR LocationYou can add an Oracle Cluster Registry (OCR) location after an upgrade or aftercompleting the Oracle RAC installation.
Oracle Clusterware supports up to five OCR copies. Additional OCR copies providegreater fault tolerance.
To add an OCR file:
• As the root user, enter the following command to add a new OCR file:
[root]# ocrconfig -add new_ocr_file_name
This command updates the OCR configuration on all the nodes on which OracleClusterware is running.
5.5.2 Migrating the OCR to Oracle ASM StorageYou should store the Oracle Cluster Registry (OCR) in an Oracle Automatic StorageManagement (Oracle ASM) disk group.
To improve Oracle Clusterware storage manageability, OCR is configured, by default,to use Oracle ASM in Oracle Database 12c. However, if you upgrade from a previousrelease, then you can migrate OCR to reside on Oracle ASM, and take advantage of theimprovements in managing Oracle Clusterware storage.
The OCR inherits the redundancy of the disk group. If you want high redundancy forthe OCR, then you must create an Oracle ASM disk group with high redundancy. Youshould use a disk group with at least normal redundancy, unless you have an externalmirroring solution. If you store the OCR in an Oracle ASM disk group, and the OracleASM instance fails on a node, then the OCR becomes unavailable only on that node.The failure of one Oracle ASM instance does not affect the availability of the entirecluster.
Oracle does not support storing the OCR on different storage types simultaneously,such as storing the OCR on both Oracle ASM and a shared file system, except during amigration. After you have migrated the OCR to Oracle ASM storage, you must deletethe existing OCR files.
To move the OCR from shared storage to an Oracle ASM disk group:
1. Ensure the upgrade to Oracle Clusterware 12c is complete. Run the followingcommand to verify the current running version:
$ crsctl query crs activeversion
2. Verify that the ASM Compatibility attribute for the disk group is set to 11.2.0.2 orhigher.
Changing the Oracle Cluster Registry Configuration
5-12 Oracle Database 2 Day + Real Application Clusters Guide
3. Use the Oracle ASM Configuration Assistant (ASMCA) to create an Oracle ASMdisk group that is at least the same size as the existing OCR and has at least normalredundancy.
Ensure that Oracle ASM disk groups that you create are mounted on all of thenodes in the cluster.
4. To add OCR to an Oracle ASM disk group, ensure that the Oracle Clusterwarestack is running, then execute the following OCRCONFIG command as the rootuser, specifying the Oracle ASM disk group name:
# ocrconfig -add +ASM_disk_group
You can run this command more than once if you add multiple OCR locations. Youcan have up to five OCR locations. However, each successive run must point to adifferent disk group.
5. Remove the non-Oracle ASM storage locations by running the following commandas the root user:
# ocrconfig -delete old_storage_location
You must run this command once for every shared storage location for the OCRthat is not using Oracle ASM. For example:
# ocrconfig -delete /ocrdata/ocr_1# ocrconfig -delete /ocrdata/ocr_2
See Also:
• "Creating Additional Oracle ASM Disk Groups (page 3-12)"
• Oracle Automatic Storage Management Administrator's Guide for moreinformation about disk group compatibility attributes
• Oracle Clusterware Administration and Deployment Guide for moreinformation about migrating the OCR to Oracle ASM
5.5.3 Replacing an OCRIf you must change the location of an existing Oracle Cluster Registry (OCR), orchange the location of a failed OCR to the location of a working one, then you can usethis procedure if one OCR file remains online.
To change the location of an OCR or replace an OCR file:
1. Use the OCRCHECK utility to verify that a copy of the OCR other than the one youare going to replace is online, using the following command:
ocrcheck
Note:
The OCR that you are replacing can be either online or offline.
Changing the Oracle Cluster Registry Configuration
Administering Oracle Clusterware Components 5-13
2. Use the following command to verify that Oracle Clusterware is running on thenode on which you are going to perform the replace operation:
crsctl check cluster -all
3. As the root user, enter the following command to designate a new location for thespecified OCR file:
[root]# ocrconfig -replace source_ocr_file -replacement destination_ocr_file
This command updates the OCR configuration on all the nodes on which OracleClusterware is running.
4. Use the OCRCHECK utility to verify that OCR replacement file is online:
ocrcheck
5.5.4 Removing an OCRTo remove an Oracle Cluster Registry (OCR) file, at least one copy of the OCR must beonline.
You can remove an OCR location to reduce OCR-related overhead or to stop mirroringyour OCR because you moved the OCR to a redundant storage system, such as aredundant array of independent disks (RAID).
To remove an OCR location from your cluster:
1. Use the OCRCHECK utility to ensure that at least one OCR other than the OCRthat you are removing is online.
ocrcheck
Note:
Do not perform this OCR removal procedure unless there is at least one activeOCR online.
2. As the root user, run the following command on any node in the cluster toremove a specific OCR file:
[root]# ocrconfig -delete ocr_file_name
This command updates the OCR configuration on all the nodes on which OracleClusterware is running.
5.5.5 Repairing an OCR Configuration on a Local NodeIf a node in your cluster was not available when you modified the OCR configuration,then you must repair the OCR configuration on that node before it is restarted.
To repair an OCR configuration:
1. As the root user, run one or more of the following commands on the node onwhich Oracle Clusterware is stopped, depending on the number and type ofchanges that were made to the OCR configuration:
[root]# ocrconfig –repair -add new_ocr_file_name
Changing the Oracle Cluster Registry Configuration
5-14 Oracle Database 2 Day + Real Application Clusters Guide
[root]# ocrconfig –repair -delete ocr_file_name
[root]# ocrconfig –repair -replace source_ocr_file -replacement dest_ocr_file
These commands update the OCR configuration only on the node from which yourun the command.
Note:
You cannot perform these operations on a node on which the OracleClusterware daemon is running.
2. Restart Oracle Clusterware on the node you have just repaired.
3. As the root user, check the OCR configuration integrity of your cluster using thefollowing command:
[root]# ocrcheck
5.6 Troubleshooting the Oracle Cluster RegistryThe Oracle Cluster Registry (OCR) manages Oracle Clusterware and Oracle RACdatabase configuration information.
About the OCRCHECK Utility (page 5-15)The OCRCHECK utility displays the data block format version used bythe Oracle Cluster Registry (OCR), the available space and used space inthe OCR, the ID used for the OCR, and the locations you haveconfigured for the OCR.
Common Oracle Cluster Registry Problems and Solutions (page 5-16)The following table describes common Oracle Cluster Registry (OCR)problems and their corresponding solutions.
5.6.1 About the OCRCHECK UtilityThe OCRCHECK utility displays the data block format version used by the OracleCluster Registry (OCR), the available space and used space in the OCR, the ID used forthe OCR, and the locations you have configured for the OCR.
The OCRCHECK utility calculates a checksum for all the data blocks in all the OCRsthat you have configured to verify the integrity of each block. It also returns anindividual status for each OCR file and a result for the overall OCR integrity check.The following is a sample of the OCRCHECK output:
Status of Oracle Cluster Registry is as follows : Version : 3 Total space (kbytes) : 262144 Used space (kbytes) : 16256 Available space (kbytes) : 245888 ID : 570929253 Device/File Name : +CRS_DATA Device/File integrity check succeeded... Decive/File not configured
Cluster registry integrity check succeeded
Troubleshooting the Oracle Cluster Registry
Administering Oracle Clusterware Components 5-15
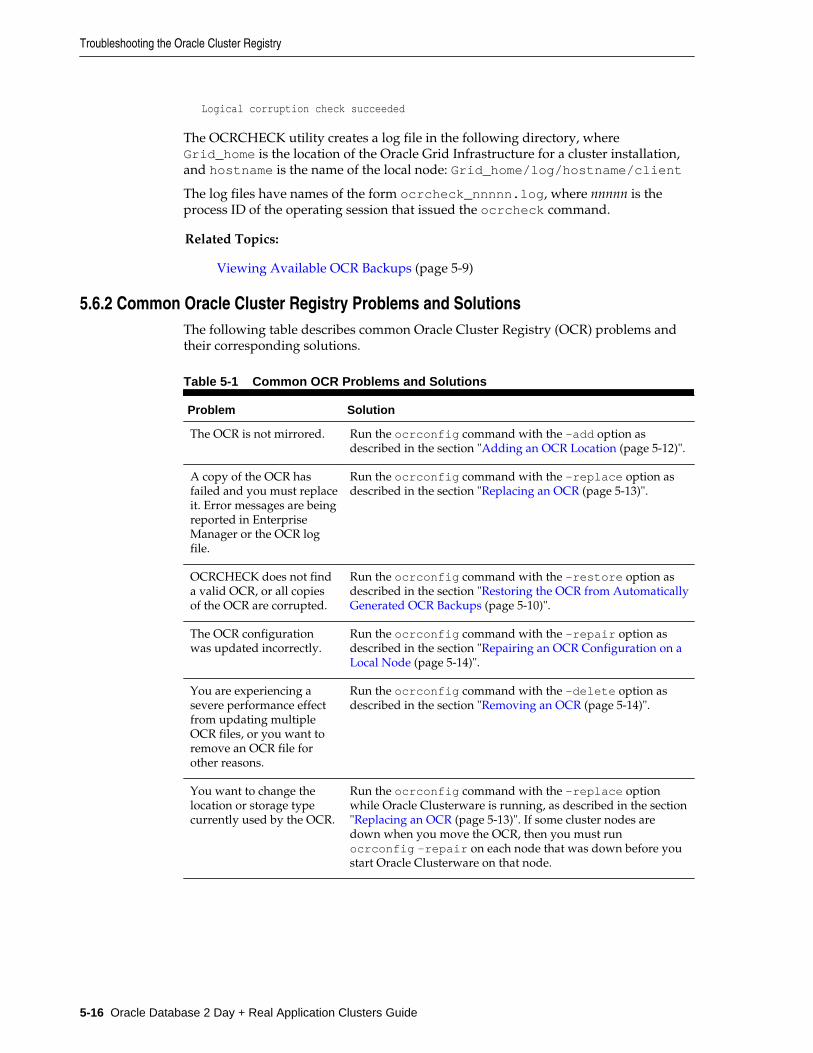
Logical corruption check succeeded
The OCRCHECK utility creates a log file in the following directory, whereGrid_home is the location of the Oracle Grid Infrastructure for a cluster installation,and hostname is the name of the local node: Grid_home/log/hostname/client
The log files have names of the form ocrcheck_nnnnn.log, where nnnnn is theprocess ID of the operating session that issued the ocrcheck command.
Related Topics:
Viewing Available OCR Backups (page 5-9)
5.6.2 Common Oracle Cluster Registry Problems and SolutionsThe following table describes common Oracle Cluster Registry (OCR) problems andtheir corresponding solutions.
Table 5-1 Common OCR Problems and Solutions
Problem Solution
The OCR is not mirrored. Run the ocrconfig command with the -add option asdescribed in the section "Adding an OCR Location (page 5-12)".
A copy of the OCR hasfailed and you must replaceit. Error messages are beingreported in EnterpriseManager or the OCR logfile.
Run the ocrconfig command with the -replace option asdescribed in the section "Replacing an OCR (page 5-13)".
OCRCHECK does not finda valid OCR, or all copiesof the OCR are corrupted.
Run the ocrconfig command with the -restore option asdescribed in the section "Restoring the OCR from AutomaticallyGenerated OCR Backups (page 5-10)".
The OCR configurationwas updated incorrectly.
Run the ocrconfig command with the -repair option asdescribed in the section "Repairing an OCR Configuration on aLocal Node (page 5-14)".
You are experiencing asevere performance effectfrom updating multipleOCR files, or you want toremove an OCR file forother reasons.
Run the ocrconfig command with the -delete option asdescribed in the section "Removing an OCR (page 5-14)".
You want to change thelocation or storage typecurrently used by the OCR.
Run the ocrconfig command with the -replace optionwhile Oracle Clusterware is running, as described in the section"Replacing an OCR (page 5-13)". If some cluster nodes aredown when you move the OCR, then you must runocrconfig -repair on each node that was down before youstart Oracle Clusterware on that node.
Troubleshooting the Oracle Cluster Registry
5-16 Oracle Database 2 Day + Real Application Clusters Guide

6Client High Availability with Services, FAN,
FCF, and Application Continuity
You can achieve client high availability and scalability in Oracle Real ApplicationClusters (Oracle RAC) using database services, Fast Application Notification (FAN),Fast Connection Failover (FCF), and Application Continuity. Older applications canuse Transparent Application Failover (TAF).
About Continuous Service Availability with Database Services (page 6-1)You can deploy Oracle RAC environments to achieve continuous servicein many different ways.
Creating Services (page 6-20)You can create a service using Oracle Enterprise Manager or theSRVCTL utility.
Administering Services (page 6-23)You can create and administer services using Enterprise Manager. Youcan also use the SRVCTL utility to perform most service managementtasks.
Configuring Clients for High Availability (page 6-27)There are three central elements to consider when automating failoverfor application clients.
6.1 About Continuous Service Availability with Database ServicesYou can deploy Oracle RAC environments to achieve continuous service in manydifferent ways.
Applications using a clustered database generally want to load balance their workloadacross the cluster. Oracle Real Application Clusters (Oracle RAC) runs on OracleClusterware, which provides a highly available (HA) application framework. OracleClusterware provides the necessary service and integration points between OracleRAC and custom enterprise applications using FAN. Across data centers Global DataServices (GDS) also provides these integration points for services and FAN.
Depending on the number of nodes and your environment's complexity andobjectives, your choices for the optimal workload management and high availabilityconfiguration depend on a variety of considerations.
To implement continuous service for your applications using Oracle RAC database,use the following features:
About Oracle Services (page 6-2)Services divide workloads into mutually disjoint groupings. Each servicerepresents a workload with common attributes, service-level thresholds,and priorities.
Client High Availability with Services, FAN, FCF, and Application Continuity 6-1

About the Database Resource Manager (page 6-6)The Database Resource Manager is a database feature you can use tocontrol the database resources allocated to users, applications, andservices.
About Oracle RAC High Availability Framework (page 6-7)The Oracle RAC high availability framework enables Oracle RAC tomaintain the database, components, and applications in a running statealways.
About Fast Application Notification (FAN) (page 6-7)Fast Application Notification (FAN) is a high availability notificationmechanism that Oracle RAC uses to notify other processes about clusterconfiguration and service-level information, including status changessuch as UP or DOWN events.
About FAN Callouts (page 6-8)FAN callouts are server-side executable files that Oracle RAC runsimmediately when high availability events occur.
About Using Transaction Guard for Improving Client Failover (page 6-9)Transaction Guard provides a generic tool for applications to use for at-most-once execution in case of planned and unplanned outages andrepeated submissions.
About Application Continuity for Masking Outages (page 6-10)Application Continuity can mask database outages for both planned andunplanned events.
About the Load Balancing Advisory (page 6-14)The Load Balancing Advisory provides information to applications orclients about the current service levels that the Oracle RAC databaseinstances are providing.
About Connection Load Balancing (page 6-15)Oracle Net connection load balancing spreads user connections across allthe instances that support the service used to connect to the database.
About Run-time Connection Load Balancing (page 6-17)Run-time Connection Load Balancing is a feature of Oracle connectionpools that can distribute client work requests across the instances in anOracle RAC database based on the Load Balancing Advisoryinformation.
See Also:
"Creating Services (page 6-20)"
6.1.1 About Oracle ServicesServices divide workloads into mutually disjoint groupings. Each service represents aworkload with common attributes, service-level thresholds, and priorities.
Dynamic database services, often referred to as simply services, are logicalabstractions for managing workloads in Oracle Database.A single service canrepresent an application, multiple applications or a subset of a single application. Forexample, the Oracle E-Business suite defines a service for each responsibility, such as
About Continuous Service Availability with Database Services
6-2 Oracle Database 2 Day + Real Application Clusters Guide

general ledger, accounts receivable, order entry, and so on. A single service can beassociated with one or more instances of an Oracle RAC database, and a singleinstance can support multiple services.
Note:
A database service can only be offered on a single network.
Services provide the following benefits:
• Provide a single entity for managing applications that compete for the sameresources
• Enable each workload to be managed as a unit
• Hide the complexity of the cluster from the client
To manage workloads, you can define services that you assign to a particularapplication or to a subset of an application's operations. You can also use services tomanage the workload for different types of work. For example, online users can useone service while batch processing can use a different service and reporting can useyet another service type.
Traditionally an Oracle database provided a single service and all users connected tothe same service. A database always has this default database service that is thedatabase name. This service cannot be modified. It should only be used foradministrative tasks because it always enables you to connect to the database. Thedefault database service should not be used for high availability because it cannot bedisabled or relocated. Always use user-defined database services for yourapplications.
Note:
Do not use the default database service for application workloads because thedefault database service is for administration purposes and cannot bemodified. The default database service has the same name as the DB_NAME orDB_UNIQUE_NAME database initialization parameter. Create at least oneservice as described in "Creating Services (page 6-20)".
When a user or application connects to a database, Oracle recommends that you use aservice for the connection. Oracle Database automatically creates one database servicewhen the database is created. For basic or administrative connections, this may be allyou need. However, for more flexibility in the management of the applicationsconnecting to the database and their workload, you should create one or moreapplication services and specify which database instances offer the services.
You can define services for both policy-managed and administrator-manageddatabases.
• Policy-managed database: When you define services for a policy-manageddatabase, you assign the service to a server pool where the database is running.You can define the service as either uniform (running on all instances in the serverpool) or singleton (running on only one instance in the server pool).
About Continuous Service Availability with Database Services
Client High Availability with Services, FAN, FCF, and Application Continuity 6-3

• Administrator-managed database: When you define a service for an administrator-managed database, you define which instances normally supportthat service.These are known as the PREFERRED instances. You can also defineother instances to support a service if the preferred instance fails. These areknown as AVAILABLE instances. A service that runs on an administrator-managed database must have at least one PREFERRED instance.
Services are integrated with the Database Resource Manager, which enables you torestrict the resources that a service uses within an instance. In addition, OracleScheduler jobs can run using a service, as opposed to using a specific instance.
About Service Failover in Administrator-Managed Databases (page 6-4)When configuring service failover in administrator-managed databases,you must configure preferred and available instances.
About Service Failover in Policy-Managed Databases (page 6-5)Service failover in policy-managed databases behaves differently if theservice is UNIFORM or SINGLETON.
About Automatic Starting of Services (page 6-5)When you define a service, you can also define the management policyfor that service.
See Also:
• "Administering Services (page 6-23)"
• Oracle Database 2 Day DBA for more information about client connectionsto the database
6.1.1.1 About Service Failover in Administrator-Managed DatabasesWhen configuring service failover in administrator-managed databases, you mustconfigure preferred and available instances.
During normal operation a service can be running on any combination of the preferredand available instances, up to the cardinality of the service (the number of PREFERREDinstances defined). Only at initial startup of the service will Oracle Clusterwareattempt to start the service on the PREFERRED instances. If an instance fails, then theservice fails over to one of the combined list of preferred and available instances that isnot offering the service. You can also manually relocate the service to one of theinstances in the combined list of preferred and available instances not offering theservice.
If a service fails over to an available instance, then the service is not moved back to itspreferred instance automatically. However, you can automate the relocation of aservice to its preferred instance by using a FAN callout.
If you configure a preferred instance for a service, but do not specify at least oneavailable instance for the service, then the service does not failover to another instanceif the preferred instance fails.
Using Enterprise Manager, you can also specify an instance as Not Used. This settingmeans the service does not run on the instance, even if the preferred instance for theservice fails.
About Continuous Service Availability with Database Services
6-4 Oracle Database 2 Day + Real Application Clusters Guide
See Also:
• "About FAN Callouts (page 6-8)"
• FAST APPLICATION NOTIFICATION WITH ORACLE DATABASE 12Cwhite paper for an example of a callout script in the section "Appendix DSample Callout program"
• "Creating Services (page 6-20)"
• Oracle Database High Availability Overview for more information about thehigh availability products and features available for Oracle Database
6.1.1.2 About Service Failover in Policy-Managed DatabasesService failover in policy-managed databases behaves differently if the service isUNIFORM or SINGLETON.
When you specify that a service is UNIFORM, Oracle Clusterware attempts to ensurethat the service always runs on all the available instances for the specified server pool.If the instance fails, then the service is no longer available on that instance. If thecardinality of the server pool increases and an instance is added to the database, thenthe service is started on the new instance. You cannot manually relocate the service toa specific instance.
When you specify that a service is SINGLETON, Oracle Clusterware attempts toensure that the service always runs on only one of the available instances for thespecified server pool. If the instance fails, then the service fails over to a differentinstance in the server pool. You cannot specify which instance in the server pool theservice should run on.
For SINGLETON services, if a service fails over to a new instance, then the service isnot moved back to its original instance when that instance becomes available again.
See Also:
• "Creating Services (page 6-20)"
• Oracle Real Application Clusters Administration and Deployment Guide formore information about automatic workload management using databaseservices
6.1.1.3 About Automatic Starting of ServicesWhen you define a service, you can also define the management policy for thatservice.
You can choose either an automatic or manual management policy:
• Automatic: The service always starts when the database starts.
• Manual: Requires you to start the service manually after the database starts.
About Continuous Service Availability with Database Services
Client High Availability with Services, FAN, FCF, and Application Continuity 6-5

Note:
When you use automatic services in an administrator-managed database,during planned database startup, services may start on the first instances thatbecome available rather than their preferred instances.
Related Topics:
Creating Services (page 6-20)
6.1.2 About the Database Resource ManagerThe Database Resource Manager is a database feature you can use to control thedatabase resources allocated to users, applications, and services.
The Database Resource Manager ensures that users, applications, and services receivetheir share of the available database resources. The Database Resource Managerenables an Oracle RAC database running on one or more nodes to support multipleapplications and mixed workloads with optimal efficiency.
The Database Resource Manager provides the ability to prioritize work within anOracle database or your Oracle RAC environment. For example, high priority users,such as online workers, would get more resources to minimize response time, whilelower priority users, such as batch jobs or reports, would get fewer resources, andcould take longer to run. Database Resource Manager enables more granular controlover resources.
Resources are allocated to users according to a resource plan specified by the databaseadministrator. The following terms are used in specifying a resource plan:
• A resource plan specifies how the resources are to be distributed among varioususers based on resource consumer groups.
• Resource consumer groups enable the administrator to group user sessions byresource requirements. Resource consumer groups are different from user roles;one database user can have different sessions assigned to different resourceconsumer groups.
• Resource allocation methods are the methods or policies used by the DatabaseResource Manager when allocating for a particular resource. Resource consumergroups and resource plans use the resource allocation methods. The databaseprovides the resource allocation methods that are available, but the DBAdetermines which method to use.
• Resource plan directives are a means of assigning consumer groups to particularplans and partitioning resources among consumer groups by specifyingparameters for each resource allocation method.
• Subplans, which the DBA can create within a resource plan, enable furthersubdivision of resources among different users of an application.
• Levels provide a mechanism to specify distribution of unused resources amongavailable users. Up to eight levels of resource allocation can be specified.
The Database Resource Manager enables you to map a resource consumer group to aservice so that users who connect using that service are members of the specifiedresource consumer group, and thus restricted to the resources available to thatresource consumer group.
About Continuous Service Availability with Database Services
6-6 Oracle Database 2 Day + Real Application Clusters Guide

You can access a tutorial for Resource Manager in Enterprise Manager. Simplynavigate to the Cluster Database Home page, then, from the Administration menu,select Resource Manager, and then Getting Started. See Oracle Database 2 Day DBA fordetails on logging in to Oracle Enterprise Manager.
See Also:
Oracle Database Administrator’s Guide for more information about the DatabaseResource Manager
6.1.3 About Oracle RAC High Availability FrameworkThe Oracle RAC high availability framework enables Oracle RAC to maintain thedatabase, components, and applications in a running state always.
If an instance, component, or application fails, then it can be automatically restarted tokeep Oracle Database operating at full capacity.
Oracle Database focuses on maintaining service availability. In Oracle RAC, Oracleservices are designed to be continuously available with workloads shared across oneor more instances. The Oracle RAC high availability framework maintains serviceavailability by storing the configuration information for each service in the OracleCluster Registry (OCR). Oracle Clusterware recovers and balances services acrossinstances based on the service definition.
See Also:
Oracle Database High Availability Overview for information about determiningthe high availability requirements for your system
6.1.4 About Fast Application Notification (FAN)Fast Application Notification (FAN) is a high availability notification mechanism thatOracle RAC uses to notify other processes about cluster configuration and service-level information, including status changes such as UP or DOWN events.
One of the main requirements of a highly available application is for it to be quicklynotified when something happens to critical system components. Notification enablesthe application to execute event-handling programs. The timely execution of suchprograms minimizes the time it takes to react to cluster resource organizations and theimpact of cluster component failures by avoiding costly connection time outs andapplication time outs.
FAN enables the automated recovery of applications when cluster components fail.For cluster configuration changes, the Oracle RAC high availability frameworkpublishes a FAN event immediately after a change occurs regarding the state of theinstances in the cluster. Instead of waiting for the application to query the databaseand detect a problem, applications can receive FAN events and react immediately.
FAN UP and DOWN events can apply to instances, services, and nodes. FAN alsopublishes Load Balancing Advisory events. FAN UP and DOWN events provide thefollowing benefits:
• For DOWN events, the disruption to the application can be minimized becausesessions that are connected to the failed instance or node can be terminated.
About Continuous Service Availability with Database Services
Client High Availability with Services, FAN, FCF, and Application Continuity 6-7

Incomplete transactions can be terminated and the application user notifiedimmediately. Application users who request connections are directed to instancesthat are started and are providing the requested service.
• For UP events, when services and instances are started, new connections can becreated so that the application can immediately take advantage of the extraresources.
Oracle Clusterware and Oracle RAC use Oracle Notification Service (ONS) topropagate FAN messages both within the Oracle cluster and to client or mid-tiermachines. ONS is installed with Oracle Clusterware and the resources to manage theONS daemons are created automatically during the installation process. ONSdaemons run on each node of the cluster and send and receive messages from aconfigured list of nodes where other ONS daemons are active; this list of nodes caninclude nodes outside the cluster, such as application server tiers or client nodes.
FAN can also be used with Oracle Data Guard, Active Data Guard, Oracle WebLogicServer Active GridLink for RAC, Universal Connection Pool (UCP) clients, GlobalData Services, and OCI-based clients including OCI/OCCI, ODP.NET and OCISession Pool, among others.
See Also:
• "About Connection Load Balancing (page 6-15)"
• "About the Load Balancing Advisory (page 6-14)"
6.1.5 About FAN CalloutsFAN callouts are server-side executable files that Oracle RAC runs immediately whenhigh availability events occur.
A callout is essentially a shell script or precompiled executable written in anyprogramming language. Some examples of how you can use FAN callouts to automatethe actions performed when events occur in a cluster configuration are as follows:
• Starting and stopping server-side applications
• Relocating low-priority services when high-priority services come online
• Sending text or numeric messages to pagers
The executable files for FAN callouts are stored in the Grid_home/racg/usrcosubdirectory. If this subdirectory does not exist in your Grid home, then you mustcreate this directory with the same permissions and ownership as the Grid_home/racg/tmp subdirectory.
All executables in the Grid_home/racg/usrco subdirectory are executedimmediately, in an asynchronous fashion, when a FAN event is received through theOracle Notification Service (ONS). For most event types, the callout is executed on onenode in the cluster (the node generating the event), thus a copy of the executable filesused by FAN callouts should be available on every node that runs Oracle Clusterware.An example of a callout script can be found in the section "Appendix D SampleCallout program (PERL based)" in the following white paper, available on OracleTechnology Network: http://www.oracle.com/technetwork/database/options/clustering/overview/fastapplicationnotification12c-2980342.pdf
About Continuous Service Availability with Database Services
6-8 Oracle Database 2 Day + Real Application Clusters Guide

See Also:
• Oracle Database Administrator’s Guide for more information about usingFAN callouts
• Oracle Real Application Clusters Administration and Deployment Guide formore information about configuring Fast Application Notification andFAN callouts
6.1.6 About Using Transaction Guard for Improving Client FailoverTransaction Guard provides a generic tool for applications to use for at-most-onceexecution in case of planned and unplanned outages and repeated submissions.
Starting with Oracle Database 12c, applications can use a logical transaction ID(LTXID) to determine the outcome of the last transaction open in a database sessionfollowing an outage. Without using Transaction Guard, applications that attempt toretry operations following outages can cause logical corruption by committingduplicate transactions.
Without Transaction Guard, one of the fundamental problems for recoveringapplications after an outage is that the commit message that is sent back to the client isnot durable. If there is a break between the client and the server, the client sees anerror message indicating that the communication failed (also called a recoverableerror). This error does not inform the application whether the submission executedany commit operations, or if a procedural call ran to completion while executing allexpected commits. The error also does not indicate session state changes orintermittent failures. Worse yet, the application may still be running disconnectedfrom the client.
These recoverable errors can cause end users or applications that have their ownreplay (instead of using Application Continuity) to issue duplicate transactionsubmissions, re-issue changes that are already committed in the database, and otherforms of "logical corruption." The transaction cannot be validly resubmitted if the non-transactional state is incorrect or if it is committed. Continuing to process a committedbut not completed call can result in the application using a database session that is inthe wrong state.
In Oracle Database 12c Release 1 (12.1), Transaction Guard provides new, integratedtools for applications to use to achieve idempotence automatically and transparently,and in a manner that scales. Transaction Guard uses the logical transaction ID (LTXID)to eliminate duplicate transactions, a process referred to as transaction idempotence.The logical transaction id persists on commit and is reused following a rollback.During normal runtime, a LTXID is automatically held in the session at both the clientand server for each database transaction. At commit, the LTXID persists as part ofcommitting the transaction and the database returns the next LTXID to use to theclient.
Example 6-1 How Application Continuity or an Application Uses Transaction Guard
1. The Oracle Client driver receives a FAN down event.
2. FAN automatically aborts the terminated session.
3. If it is a recoverable error, then:
About Continuous Service Availability with Database Services
Client High Availability with Services, FAN, FCF, and Application Continuity 6-9

a. Get the last LTXID from the failed session using the APIs provided by theclient driver: getLogicalTransactionId() for JDBC, LogicalTransactionId for ODP.NET, and OCI_ATTR_GET for OCI.
b. Obtain a new session.
c. Call the PL/SQL procedure DBMS_APP_CONT.GET_LTXID_OUTCOME withthe last LTXID gotten from the failed session.
Note:
You must grant the EXECUTE privilege on the DBMS_APP_CONT package tothe database users that use the package.
d. If the outcome of this transaction is COMMITTED and COMPLETED, thenreturn the result of that transaction to the application.
e. If the outcome of the session state (such as messages or the PL/SQL block) isCOMMITTED, but not COMPLETED, then return the result of thattransaction to the application and a warning that the transaction wascommitted, but there may be additional states such as row counts preventingthe application from continuing.
Note:
Most applications will not need these states. This is a consideration for thosethat do. For those that do not care about row counts or other states from thecall, then return COMMITTED to the application.
f. If the outcome of the transaction is not COMMITTED, then, the user orapplication can chose to resubmit the last request.
See Also:
• Oracle Database Development Guide for more information about TransactionGuard and idempotence
• Oracle Real Application Clusters Administration and Deployment Guide formore information about Transaction Guard and client failover for OracleRAC
• Oracle Database JDBC Developer's Guide about using Transaction Guardwith Java applications
• Oracle Data Provider for .NET Developer's Guide for Microsoft Windows forinformation about Transaction Guard support for ODP.NET applications
6.1.7 About Application Continuity for Masking OutagesApplication Continuity can mask database outages for both planned and unplannedevents.
About Continuous Service Availability with Database Services
6-10 Oracle Database 2 Day + Real Application Clusters Guide
Following planned and unplanned outages, Application Continuity attempts to maskthe outage by rebuilding the database session, and resubmitting the pending workfollowing recoverable errors that make the database session unavailable.
When Application Continuity is configured, an end-user request is replayed if it didnot complete (if replay is enabled when the outage occurred); replay is started if thetime has not exceeded the replay timeout attribute specified for the service. When acomponent fails or becomes unresponsive, Application Continuity attempts to restorethe database sessions back to the current time. When replay succeeds, this featuremasks applications from transient outages (such as session failure, instance or nodeoutages, network failures and so on) and from planned outages such as repairs,configuration changes and patching the software.
Preparing to Use Application Continuity (page 6-11)Before you can use Application Continuity, you must complete variouschecks.
Using Application Continuity for Planned Outages (page 6-13)Application Continuity is recommended for planned outages combinedwith draining requests from Oracle connection pools.
6.1.7.1 Preparing to Use Application ContinuityBefore you can use Application Continuity, you must complete various checks.
Before you can use Application Continuity, you must configure attributes for the database services used by the applications. The application may also need to bemodified to borrow and return connections rather than pin connections. This isnormally a property. Request boundaries need to be added if one of the integratedpools (UCP, WLS data source) is not being used. You may also need to mark requestboundaries if not returning connections to the Oracle Connection Pool and a propertyis not available to unpin. With Oracle Database 12c Release 1 (12.1), ApplicationContinuity for Java is available for general use with the JDBC-Thin Oracle driver, theJDBC Universal Connection Pool, and WebLogic Server Active Grid Link. It is alsoavailable with OCI 12c when using PeopleSoft Applications.
To use Application Continuity with an Oracle RAC database, use the followingconfiguration checklist:
Service Configuration Checks
• Create a dynamic database service (also referred to as an application service) toconnect to the database. Do not use the Oracle SID, instance name, or the defaultdatabase service to connect to an Oracle RAC or Oracle Data Guard database.
• For the service, set failovertype to TRANSACTION, commit_outcome to TRUEand notification to TRUE. Optionally, to find the best connections to use, setrlb_goa to SERVICE_TIME and clb_gloal to SHORT. See "Creating ServicesUsing SRVCTL (page 6-22)".
Software Configuration Checks (Database and Middle-tier)
• Use Oracle Database 12c Release 1 (12.1) or later.
• Use the JDBC Universal Connection Pool (12.1) or WebLogic Active GridLink(12.1.2 or later) configured with the JDBC Replay data source. You can also use theJDBC Replay data source with your own JDBC connection pool.
About Continuous Service Availability with Database Services
Client High Availability with Services, FAN, FCF, and Application Continuity 6-11

• If a statement cache at the application server level is enabled (for example, theWebLogic or third-party application server statement cache), then this must bedisabled when the replay is used. Instead, configure the JDBC statement cache,which supports Application Continuity. The JDBC statement cache also performsbetter because it is optimized for JDBC and Oracle. Useoracle.jdbc.implicitstatementcachesize=nnn.
• Use FAN and FCF for WebLogic Active GridLink Data Source, UniversalConnection Pool, or, as an option, use simple JDBC FAN with third party pool.
• Check the resource requirements; ensure there is sufficient CPU and memory atthe middle tier.
Application Continuity is managed on the server-side, and uses hardware whenavailable for CRCs. On the client side, additional CPU costs are incurred forgarbage collection. The replay driver requires more memory than the base driverbecause the calls are retained until the end of a request. At the end of the request,the calls are released to the garbage collector. This action differs from the basedriver that releases closed calls.
Note:
CPU overhead is reduced on the database side for platforms with current Inteland Sparc chips where validation is assisted by the hardware.
• Determine whether the application can use mutables, or sequential data thatmight be different on a different instance. If so, then you configure the applicationto keep the original values for SYSDATE, SYSTIMESTAMP, SYS_GUID, andsequences during failover.
See Oracle Database SQL Language Reference for information on issuing the GRANTprivilege to users for KEEP [DATE TIME|SYSGUID|Sequence].
• Grant EXECUTE on the DBMS_APP_CONT PL/SQL package to the users that willuse Application Continuity.
• After consulting the application certification, assign the GRANT privilege forkeeping mutables to the users that will use replay.
• Check with the application developers to determine if any requests should not bereplayed. The application must explicitly call an API to disable replay for thoserequests.
Application Code Checks (consult with the application developer)
• Determine whether the application uses Oracle JDBC concrete classes. If it does,and if access is needed to Oracle proprietary APIs, then plan to replace theseconcrete classes with standard JDBC or Oracle JDBC interfaces. Refer to MyOracle Support Note 1364193.1 at :
https://support.oracle.com/CSP/main/article?cmd=show&type=NOT&id=1364193.1
• Use a connection string that sets connection retries and a delay between theseretries. For an example of configuring the connection properties using JDBC, see"Configuring JDBC Clients for Fast Connection Failover (page 6-30)".
About Continuous Service Availability with Database Services
6-12 Oracle Database 2 Day + Real Application Clusters Guide

• Decide whether an optional callback will be used for initializing connections fromthe application to the database. When using Oracle WebLogic Server or theUniversal Connection Pool, connection labeling is recommended. If registered, acallback will execute at runtime and replay.
• Determine whether replay must be explicitly disabled for any code path in theapplication. In particular, review external PL/SQL calls such as messaging andcallouts and server side Java. If these should not be replayed, then use thedisableReplay API.
• Determine whether the application must have begin and end request API's addedto the application's own connection pool to identify request boundaries or if theapplication borrows and returns connections from the WebLogic Server Pool orUniversal Connection Pool for each request.
If the application borrows and returns connections from the WebLogic Server Poolor Universal Connection Pool for each request, then no change is needed.
If the application uses Oracle connection pools, and does not return connectionsbetween requests, see if there is a property to set to return connections to the pool.If there is no property to set, or if using the application's own connection pool,then you must add beginRequest and endRequest boundaries.
See Also:
• Oracle Database Development Guide for more information on howApplication Continuity works, and how you can use it in applications
• Oracle Database Concepts for more information about transactions
• Oracle Database JDBC Developer's Guide for more information aboutApplication Continuity for Java applications
• "Creating Services (page 6-20)"
6.1.7.2 Using Application Continuity for Planned OutagesApplication Continuity is recommended for planned outages combined with drainingrequests from Oracle connection pools.
Using any FAN-aware pool with FAN configured (OCI, UCP, DRCP, WebLogicServer, or ODP.NET), the steps are as follows:
1. Use the SRVCTL relocate command to relocate the service from the instancebeing shut down without disrupting the sessions (do not use the -forceparameter). If relocating a uniform service, then use srvctl stop service atthe instance (do not use the -force parameter).
2. The FAN event for the planned outage clears the idle sessions immediately andmarks the active sessions to be released at check in (end of request). This drainsthe sessions from the instance without disrupting work.
3. All sessions should check in, but in reality this does not always happen. Whensufficient time has elapsed for the sessions to check in, stop the instance using theABORT shutdown option. For Application Continuity enabled pools (UCP andWebLogic Server), Application Continuity attempts to recover those remainingsessions that did not check in.
About Continuous Service Availability with Database Services
Client High Availability with Services, FAN, FCF, and Application Continuity 6-13
This step applies for UCP and WLS, and any pool that adds beginRequest/endRequest on JDBC Thin Replay Driver.
4. Restart the instance and service. Run-time load balancing, if enabled, balances thesessions back to use the restored instance at the next request boundaries.
6.1.8 About the Load Balancing AdvisoryThe Load Balancing Advisory provides information to applications or clients about thecurrent service levels that the Oracle RAC database instances are providing.
Applications can take advantage of the load balancing Fast Application Notification(FAN) events to direct work requests to the instance in the cluster that provides thebest performance based on the workload management directives that you havedefined for that service. Also, when an instance is restarted, Oracle RAC uses FANevents to notify the application's connection pool so that the connection pool cancreate connections to the recently started instance and take advantage of the additionalresources that this instance provides.
The load balancing advisory is integrated with the Automatic Workload Repositorybuilt into Oracle Database 12c. The Automatic Workload Repository measuresresponse time and CPU consumption for each service.
The advice given by the Load Balancing Advisory takes into account the power of theserver and the current workload of the service on the server. Enabling the LoadBalancing Advisory helps improve the throughput of applications by not sendingwork to instances that are overworked, running slowly, not responding, or have failed.
Your application can take advantage of the Load Balancing Advisory without anyprogrammatic changes if you use an integrated Oracle client, one that has the Run-time Connection Load Balancing feature. Due to the integration with FAN, Oracleintegrated clients are more aware of the current status of an Oracle cluster. Thisprevents client connections from waiting or trying to connect to an instance that is nolonger available. The integrated clients for FAN events include the UniversalConnection Pool (UCP) used by Oracle Database 12c JDBC, Oracle Database 12cODP.NET, and Oracle Database 12c Oracle Call Interface (OCI).
You configure your Oracle RAC environment to use the Load Balancing Advisory bydefining service-level goals for each service used. Defining a service-level goal enablesthe Load Balancing Advisory for that service and enables the publication of FAN loadbalancing events. There are two types of service-level goals for Run-time ConnectionLoad Balancing:
• Service Time. The Load Balancing Advisory attempts to direct work requests toinstances according to their response time. Load Balancing Advisory data is basedon the elapsed time for work done by connections using the service, and theavailable bandwidth to the service. This goal is best suited for workloads thatrequire varying lengths of time to complete, for example, an internet shoppingsystem.
• Throughput. The Load Balancing Advisory measures the percentage of the totalresponse time that the CPU consumes for the service. This measures the efficiencyof an instance, rather than the response time. This goal is best suited forworkloads where each work request completes in a similar amount of time, forexample, a trading system.
If you do not select the Enable Load Balancing Advisory option, then the service-levelgoal is set to None, which disables load balancing for that service.
About Continuous Service Availability with Database Services
6-14 Oracle Database 2 Day + Real Application Clusters Guide
See Also:
• "About Fast Application Notification (FAN) (page 6-7)"
• "Configuring Clients for High Availability (page 6-27)"
• "Administering Services (page 6-23)"
• "About Continuous Service Availability with Database Services(page 6-1)"
• Oracle Real Application Clusters Administration and Deployment Guide formore information about integrated Oracle clients
6.1.9 About Connection Load BalancingOracle Net connection load balancing spreads user connections across all the instancesthat support the service used to connect to the database.
Oracle Net is a software component that resides on the client and on the Oracledatabase server. It establishes and maintains the connection between the clientapplication and the server, and exchanges messages between them using industrystandard protocols. For the client application and a database to communicate, theclient application must specify location details for the database it wants to connect to,and the database must provide some sort of identification or address.
On the database server, the Oracle Net Listener, commonly known as the listener, is aprocess that listens for client connection requests. The configuration file for the listeneris the listener.ora.
Oracle Database 12c database clients use SCAN and the easy connect method toconnect to the database. SCAN can resolve to multiple IP addresses, reflectingmultiple listeners in the cluster handling public client connections. When using theeasy connect method, you do not have to configure any client network files. Yousimply specify a connect identifier with the following format:
SCAN[:port]/service_name
SCAN represents the SCAN for your cluster. If you do not specify a port number, thenthe default value of 1521 is used for the TCP port identifier. The service_name is thename of a dynamic database service.
You can also use Net Configuration Assistant (NETCA) to create a net service name.The net service name resolves to the connect descriptor. The address portion of theconnect descriptor is actually the protocol address of the listener. The client uses aconnect descriptor to specify the database or instance to which the client wants toconnect.
When a net service name is used, establishing a connection to a database instancetakes place by first mapping the net service name to the connect descriptor. Thismapped information is stored in one or more repositories of information that areaccessed using naming methods. The most commonly used naming method is LocalNaming, where the net service names and their connect descriptors are stored in alocalized configuration file named tnsnames.ora.
When the client connects to the cluster database using a service, you can use theOracle Net connection load balancing feature to spread user connections across all theinstances that are supporting that service. There are two types of load balancing that
About Continuous Service Availability with Database Services
Client High Availability with Services, FAN, FCF, and Application Continuity 6-15
you can implement: client-side and server-side load balancing. In an Oracle RACdatabase, client connections should use both types of connection load balancing. Whenyou create an Oracle RAC database using Oracle Database Configuration Assistant(DBCA), DBCA configures and enables server-side load balancing by default.
About Client-Side Load Balancing (page 6-16)Client-side load balancing balances the connection requests across thelisteners.
About Server-Side Load Balancing (page 6-17)With server-side load balancing, the listener directs a connection requestto the best instance currently providing the service by using informationfrom the Load Balancing Advisory.
See Also:
• "About Workload Management with Dynamic Database Services(page 6-1)"
• "Verifying Oracle Net Supports Newly Created Services (page 6-25)"
• Oracle Database 2 Day DBA for more information about networkconfigurations
• Oracle Database 2 Day DBA
• Oracle Database 2 Day DBA
6.1.9.1 About Client-Side Load BalancingClient-side load balancing balances the connection requests across the listeners.
When the listener receives the connection request, the listener connects the user to aninstance that the listener knows provides the requested service.
Client-side load balancing is defined in your client connection definition by setting theparameter LOAD_BALANCE=yes in the tnsnames.ora file. When you set thisparameter to yes, the Oracle client randomly selects an address from the address list,and connects to that node's listener. This balances client connections across theavailable listeners in the cluster.
When you create an Oracle RAC database using DBCA, the assistant creates a sampleload balancing connection definition in the tnsnames.ora file.
Client-side load balancing includes connection failover. With connection failover, if anerror is returned from the chosen address, then Oracle Net Services tries the nextaddress in the address list until either a successful connection is made or it hasexhausted all the addresses in the list.
About Continuous Service Availability with Database Services
6-16 Oracle Database 2 Day + Real Application Clusters Guide
See Also:
• "About Connection Load Balancing (page 6-15)"
• "About the Load Balancing Advisory (page 6-14)"
• Oracle Database 2 Day DBA for more information about networkconfigurations
• Oracle Database 2 Day DBA for more information about client connections
• Oracle Database 2 Day DBA for more information about the tools you canuse for configuring the network
6.1.9.2 About Server-Side Load BalancingWith server-side load balancing, the listener directs a connection request to the bestinstance currently providing the service by using information from the Load BalancingAdvisory.
For each service, you can define the method the listener uses for load balancing bysetting the connection load balancing goal. You can use a goal of either long or shortfor connection load balancing. These goals have the following characteristics:
• Short—Connections are distributed across instances based on the best responsetime. Use the Short connection load balancing goal for applications that haveconnections of brief duration.
• Long—Connections are distributed across instances based on the number ofsessions in each instance, for each instance that supports the service. Use the Longconnection load balancing goal for applications that have connections of longduration. This is typical for connection pools and SQL*Forms sessions. Long is thedefault connection load balancing goal.
Note:
If you did not use DBCA to create your database, or if you are using listenerports other than the default of 1521, then you must configure theLOCAL_LISTENER and REMOTE_LISTENER database initializationparameters for your cluster database to point to SCAN:port.
See Also:
• "About Connection Load Balancing (page 6-15)"
• "About the Load Balancing Advisory (page 6-14)"
6.1.10 About Run-time Connection Load BalancingRun-time Connection Load Balancing is a feature of Oracle connection pools that candistribute client work requests across the instances in an Oracle RAC database basedon the Load Balancing Advisory information.
About Continuous Service Availability with Database Services
Client High Availability with Services, FAN, FCF, and Application Continuity 6-17

The connection allocation is based on the current performance level provided by thedatabase instances as indicated by the Load Balancing Advisory FAN events. Thisprovides load balancing at the transaction level, instead of load balancing at the timeof the initial database connection.
With Run-time Connection Load Balancing, applications use Load Balancing Advisoryinformation to provide better performance to users. OCI Session pools and ODP.NETconnection pools support Run-time Connection Load Balancing. For Java applications,Oracle recommends the Universal Connection Pool (UCP). The Universal ConnectionPool is integrated to take advantage of Load Balancing Advisory information. UCP,introduced in Oracle Database 11g patch set 1 (11.1.0.7), can be used against OracleDatabase 10g, Oracle Database 11g, or Oracle Database 12c.
You must enable the client data source for Run-time Connection Load Balancing witha service that has the following configuration:
• The Load Balancing Advisory is enabled and the service-level goal is set toSERVICE_TIME, THROUGHPUT , or NONE.
• The service connection load balancing goal is set to Short.
The illustration in the steps below illustrates Run-time Connection Load Balancing. Inthis illustration, the Oracle RAC database has three instances. Suppose that the LoadBalancing Advisory indicates that Instance1 and Instance3 have the best performance,while Instance2 currently has less than optimal performance. When Run-timeConnection Load Balancing is enabled for the Universal Connection Pool, thefollowing process occurs:
1. A client requests a connection from the connection pool.
2. Run-time Connection Load Balancing selects the connection that belongs to themost efficient (best) instance from the connection pool. In the illustration in thenext step, there are three possible nodes to which the connection can be routed.Instance1, which has the least amount of CPU workload, is currently beingassigned about 60 percent of the incoming connections. Instance2, which iscurrently overloaded, is only being assigned around 10 percent of the incomingconnections. Instance3, which has a high workload, is being assigned around 30percent of the incoming connections. The best instance to handle the connectionrequest in this case would be Instance1.
3. The client receives the connection that would process the work request with thebest response time.
About Continuous Service Availability with Database Services
6-18 Oracle Database 2 Day + Real Application Clusters Guide

Figure 6-1 Run-time Connection Load Balancing
CRM Client�connection requests
Connection�
Cache
10%60% 30%
DatabaseDatabase
Instance 3Instance 2Instance 1
CRM is�very �busy
CRM is�bored
CRM is�busy
Starting with Oracle Database 11g you can use an additional flag in the load balancingadvisory event called affinity hint. The affinity hint is a flag that indicates if affinity isa benefit for a particular instance and service combination. Different instances offeringthe same service can have different settings for the affinity hint.
The affinity hint is automatic when the load balancing advisory is turned on throughsetting the goal on the service. This flag is for temporary affinity that lasts for theduration of a web session. Web conversations often connect and disconnect manytimes during the entire session. During each of these connects, it may access the sameor similar data, for example, a shopping cart, Siebel, and so on. Affinity can improvebuffer cache efficiency, which lowers CPU usage and transaction latency.
Applications using Oracle Database 12c and UCP can take advantage of this newaffinity feature. If the affinity flag is turned on in the Load Balancing Advisory event,then UCP creates an Affinity Context for the web session such that when that sessiondoes a get connection from the pool, the pool always tries to give it a connection to theinstance it connected to the first time it acquired a session. The choice of instance forthe first connection is based on the current load balancing advisory information.
Related Topics:
About Connection Load Balancing (page 6-15)
About the Load Balancing Advisory (page 6-14)
About FAN Callouts (page 6-8)
About Continuous Service Availability with Database Services
Client High Availability with Services, FAN, FCF, and Application Continuity 6-19
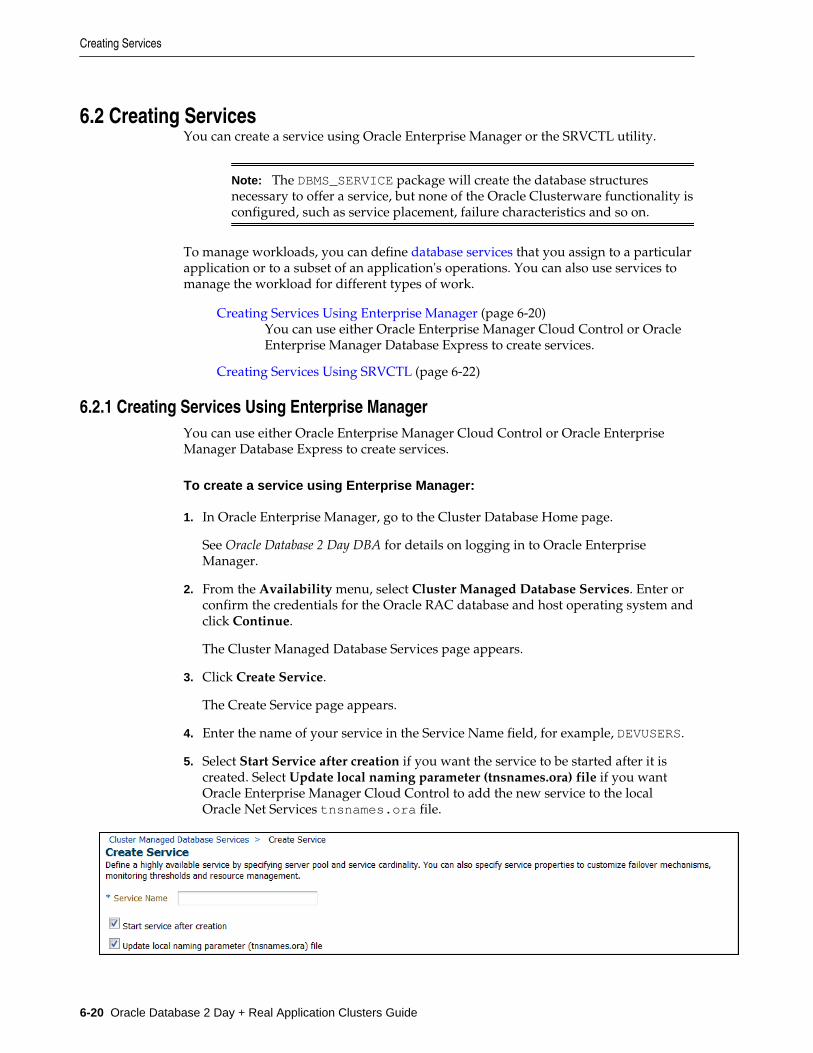
6.2 Creating ServicesYou can create a service using Oracle Enterprise Manager or the SRVCTL utility.
Note: The DBMS_SERVICE package will create the database structuresnecessary to offer a service, but none of the Oracle Clusterware functionality isconfigured, such as service placement, failure characteristics and so on.
To manage workloads, you can define database services that you assign to a particularapplication or to a subset of an application's operations. You can also use services tomanage the workload for different types of work.
Creating Services Using Enterprise Manager (page 6-20)You can use either Oracle Enterprise Manager Cloud Control or OracleEnterprise Manager Database Express to create services.
Creating Services Using SRVCTL (page 6-22)
6.2.1 Creating Services Using Enterprise ManagerYou can use either Oracle Enterprise Manager Cloud Control or Oracle EnterpriseManager Database Express to create services.
To create a service using Enterprise Manager:
1. In Oracle Enterprise Manager, go to the Cluster Database Home page.
See Oracle Database 2 Day DBA for details on logging in to Oracle EnterpriseManager.
2. From the Availability menu, select Cluster Managed Database Services. Enter orconfirm the credentials for the Oracle RAC database and host operating system andclick Continue.
The Cluster Managed Database Services page appears.
3. Click Create Service.
The Create Service page appears.
4. Enter the name of your service in the Service Name field, for example, DEVUSERS.
5. Select Start Service after creation if you want the service to be started after it iscreated. Select Update local naming parameter (tnsnames.ora) file if you wantOracle Enterprise Manager Cloud Control to add the new service to the localOracle Net Services tnsnames.ora file.
Creating Services
6-20 Oracle Database 2 Day + Real Application Clusters Guide

6. (Policy-managed databases only) For the service type, select UNIFORM orSINGLETON.
7. (Administrator-managed databases only) For each instance choose whether thatinstance is a Preferred instance or an Available instance. If you do not want theservice to run on an instance under any circumstances, then set the Service Policyfor that instance to Not Used.
8. In the Service Properties section, select Short for Connection Load Balancing Goalto distribute the connection workload based on elapsed time instead of the overallnumber of connections. Otherwise, choose Long.
9. Select Enable Load Balancing Advisory under the sub-heading NotificationProperties to enable the Load Balancing Advisory for this service, as shown in thefollowing screenshot. Choose a service-level goal of either Service Time orThroughput.
Creating Services
Client High Availability with Services, FAN, FCF, and Application Continuity 6-21
10. Select Enable Fast Application Notification under the heading NotificationProperties if an Oracle Call Interface (OCI) or ODP.NET application uses thisservice, and you want to enable FAN.
11. In the Service Threshold Levels section, you can optionally set the service-levelthresholds by entering a value in milliseconds for Warning and Critical thresholdsfor the Elapsed Time and CPU Time metrics.
12. If you want to use a Resource Plan to control the resources used by this service,then select the name of the consumer group from the Consumer Group Mappinglist in the Resource Management Properties section. For example, you might choosethe LOW_GROUP consumer group to give development users low priority todatabase resources.
Note:
You cannot change the consumer group name for a service on the Edit Servicepage. This is because there may be several consumer groups associated with agiven service. However, the Edit Service page contains a link to the ResourceConsumer Group Mapping page, where you can modify the consumer groupmapping for the service.
13. If a specific Oracle Scheduler job class uses this service, then you can specify themapping by selecting the name from the Job Scheduler Mapping list in theResource Management Properties.
14. Click OK to create the service.
See Also:
• "About Workload Management with Dynamic Database Services(page 6-1)"
• "About Connection Load Balancing (page 6-15)"
• "About the Load Balancing Advisory (page 6-14)"
• "About Fast Application Notification (FAN) (page 6-7)"
• "Administering Services (page 6-23)"
• Oracle Database Administrator's Guide for more information about theOracle Scheduler
6.2.2 Creating Services Using SRVCTLSRVCTL is a command-line interface that you can use to create services andadminister Oracle Database objects that Oracle Clusterware manages. For functionalitythat is not available with Oracle Enterprise Manager Database Express, you can useSRVCTL commands instead. See Oracle Real Application Clusters Administration andDeployment Guide for information about how to use the SRVCTL utility.
Creating Services
6-22 Oracle Database 2 Day + Real Application Clusters Guide
To configure services for Application Continuity or Transaction Guard usingSRVCTL:
1. To configure services for Application Continuity, you must set the serviceattributes failovertype to TRANSACTION, commit_outcome to TRUE, andnotification to TRUE. Additionally, you can set values for these other serviceattributes for Application Continuity and load balancing:
• replay_init_time: Specifies the time in seconds after which replay will notbe started; example settings are 60, 300, or 600 seconds; the recommendedvalue is 900 seconds.
• retention: Specifies the time (in seconds) that the commit outcome isretained for Transaction Guard. Recommended value is 86400 (24 hours).
• failoverretry: Number of connection retries for each replay attempt;recommended value is 30.
• failoverdelay: Delay in seconds between connection retries; recommendedvalue is 10.
• clbgoal: For connection load balancing, use SHORT when using run-time loadbalancing.
• rlbgoal: Set to SERVICE_TIME.
To use SRVCTL to modify the service attributes, use a command similar to thefollowing, where racdb is the name of your Oracle RAC database, and app1 is thename of the service you are modifying:
srvctl modify service -db racdb -service app1 -clbgoal SHORT -rlbgoal SERVICE_TIME -failoverretry 30 -failoverdelay 10 -failovertype TRANSACTION -replay_init_time 1800 -retention 86400 -notification TRUE commit_outcome TRUE
2. To create a service for Application Continuity for a policy-managed Oracle RACdatabase, use a command similar to the following, where racdb is the name ofyour Oracle RAC database, app2 is the name of the service you are modifying, andSvrpool1 is the name of the server pool in which the service is offered:
srvctl modify service -db racdb -service app2 -serverpool ora.Srvpool1-clbgoal SHORT -rlbgoal SERVICE_TIME -failoverretry 30-failoverdelay 10 -failovertype TRANSACTION -replay_init_time 1800 -retention 86400 -notification TRUE -commit_outcome TRUE
3. To enable Transaction Guard, and but not Application Continuity, create theservice with commit_outcome = TRUE. You can also use the attribute retentionto specify how long in seconds to maintain the history. Additionally, it isrecommended that you set the attribute notification to TRUE, for FAN events.
To use SRVCTL to modify the service attributes, use a command similar to thefollowing, where racdb is the name of your Oracle RAC database, and app2 is thename of the service you are creating:
srvctl modify service -db racdb -service app2 -commit_outcome TRUE -retention 86400 -notification TRUE
6.3 Administering ServicesYou can create and administer services using Enterprise Manager. You can also usethe SRVCTL utility to perform most service management tasks.
Administering Services
Client High Availability with Services, FAN, FCF, and Application Continuity 6-23

About Service Administration Using Enterprise Manager (page 6-24)The Cluster Managed Database Services page is the master page forbeginning all tasks related to services.
Using the Cluster Managed Database Services Page (page 6-24)When managing services using Enterprise Manager, you use the ClusterManaged Database Services page.
Verifying Oracle Net Supports Newly Created Services (page 6-25)By configuring and using a SCAN for your cluster, you no longer haveto modify the network setup on each client. Using the lsnrctl utilityyou can verify that the new service is recognized by Oracle Net andavailable to the database clients.
See Also:
• "About Oracle Services (page 6-2)"
• "Creating Services (page 6-20)"
6.3.1 About Service Administration Using Enterprise ManagerThe Cluster Managed Database Services page is the master page for beginning alltasks related to services.
To access this page, go to the Cluster Database Maintenance page, then click ClusterManaged Database Services in the Services section. You can use this page and linksfrom this page to do the following:
• View a list of services for the cluster.
• View the instances on which each service is currently running.
• View the status for each service.
• Create or edit a service.
• Start or stop a service.
• Enable or disable a service.
• Perform instance-level tasks for a service.
• Delete a service.
See Also:
• "About Oracle Services (page 6-2)"
• "Creating Services (page 6-20)"
6.3.2 Using the Cluster Managed Database Services PageWhen managing services using Enterprise Manager, you use the Cluster ManagedDatabase Services page.
Administering Services
6-24 Oracle Database 2 Day + Real Application Clusters Guide
To access the Cluster Managed Database Services page:
1. In Oracle Enterprise Manager, go to the Cluster Database Home page.
See Oracle Database 2 Day DBA for details on logging in to Oracle EnterpriseManager.
2. From the Availability menu, select Cluster Managed Database Services. Enter orconfirm the credentials for the Oracle RAC database and host operating system andclick Continue.
The Cluster Managed Database Services page appears and displays the servicesthat are available on the cluster database instances.
3. Perform any of the following tasks using this page:
• View a list of services for the cluster, the instances on which each service iscurrently running, the status of each service, the server pool associated withthe service, the responsiveness of the service, and any alerts or messages forthat service.
• Start or stop a service.
• Test the connection for a service, or display the Oracle Net TNS strings beingused.
• Access the Create Service page.
• Edit, delete, enable, or disable a service.
• Access the Edit Server Pool page for the server pool associate with eachservice.
See Also:
• "About Service Administration Using Enterprise Manager (page 6-24)"
• "About Oracle Services (page 6-2)"
• "Creating Services (page 6-20)"
6.3.3 Verifying Oracle Net Supports Newly Created ServicesBy configuring and using a SCAN for your cluster, you no longer have to modify thenetwork setup on each client. Using the lsnrctl utility you can verify that the newservice is recognized by Oracle Net and available to the database clients.
Administering Services
Client High Availability with Services, FAN, FCF, and Application Continuity 6-25

Note:
When using utilities to manage your cluster, databases, database instances,Oracle Automatic Storage Management (Oracle ASM), and listeners, use theappropriate binary that is in the home directory of the object or componentyou are managing. Also, set your ORACLE_HOME environment variable topoint to this directory.
For example, to use lsnrctl to manage the SCAN listener, use the binarieslocated in the Grid home (where the listener is running), and set theORACLE_HOME environment variable to the location of the Grid home.
To verify Oracle Net Services supports the newly created service:
1. Determine if the listener on the local node recognizes the new service by using thefollowing command:
lsnrctl status LISTENER_SCAN1
You should see a list for the new service, similar to the following:
Services Summary...Service "DEVUSERS.example.com" has 2 instance(s). Instance "sales1", status READY, has 1 handler(s) for this service... Instance "sales2", status READY, has 1 handler(s) for this service...
The displayed name for your newly created service, for exampleDEVUSERS.example.com, is the service name you use in your connection strings.
2. (Optional) Use a text editor to modify the tnsnames.ora file in theOracle_home/network/admin directory on each node that contains an instancelisted as a Preferred or Available instance for the service, and on each client thatuses the service to connect to the database. Add an entry similar to the following,specifying the VIP address for each node:
DEVUSERS = (DESCRIPTION = (ADDRESS_LIST = (ADDRESS = (PROTOCOL = TCP)(HOST = docrac1-vip)(PORT = 1521)) (ADDRESS = (PROTOCOL = TCP)(HOST = docrac2-vip)(PORT = 1521)) (LOAD_BALANCE = yes) ) (CONNECT_DATA = (SERVICE_NAME = DEVUSERS.oracle.com)) )
In the previous example, the ADDRESS_LIST parameter contains one ADDRESS foreach node that contains an instance configured as either Preferred or Available forthe service.
3. Test the Oracle Net Services configuration by attempting to connect to the OracleRAC database using SQL*Plus and the SCAN.
The connect identifier for easy connect naming has the following format:
"[//]SCAN[:port]/service_name"
SCAN is the SCAN for your cluster, which defaults tocluster_name.GNS_sub_domain. The service_name is the name of the database service
Administering Services
6-26 Oracle Database 2 Day + Real Application Clusters Guide
you want to use for connecting to the database. You can optionally specify the TCPport number on which the Oracle SCAN listener listens for connections.
For example, you might use the following commands to connect to the DEVUSERSservice for Oracle RAC database in the docrac cluster, which belongs to theexample.com domain:
$ sqlplus system@\"docrac.example.com/DEVUSERS.example.com\"Enter password: password
After you enter the password, you should see a message indicating you aresuccessfully connected to the Oracle RAC database. If you get an error message,then examine the connect identifier and verify the user name, password, andservice name were typed in correctly and all the information is correct for yourOracle RAC environment.
See Also:
• "About Connection Load Balancing (page 6-15)"
• Oracle Database 2 Day DBA for details on how to view the listenerconfiguration
• Oracle Database 2 Day DBA for details on how to connect to an Oracledatabase from a client computer
6.4 Configuring Clients for High AvailabilityThere are three central elements to consider when automating failover for applicationclients.
• First, clients that are connected at the time of failure must be quickly andautomatically notified that a failure has occurred to avoid waiting for TCP/IPnetwork time-outs before attempting to connect to the new database instance(such time-outs range anywhere from eight minutes to two hours, depending onoperating system). Oracle RAC configurations use Fast Application Notification(FAN) to notify JDBC clients, OCI clients, and ODP.NET clients. FAN eventnotifications and callouts enable automatic and fast redirection of clients after asite failure.
• The second central element of client failover, is the redirection of new incomingrequests to the new instance after a failure has occurred, which can beimplemented using application services. When you create and activate applicationservices on several instances of an Oracle RAC database, then if the servicebecomes unavailable on one instance, clients connections are redirected to otherinstances where the service is available. Applications need only provide the nameof the database service in their connect strings–there is no need to specify aninstance name because, using listener cross registration, SCAN listeners and otherremote listeners in the cluster are aware of which instances are currentlyproviding a service when a connection request comes in.
• The third central element is masking the outage from the client and theapplication. Masking outages of the database session is a complex task forapplication development and, therefore, errors and timeouts are often exposed tothe client. Application Continuity attempts to mask outages from applications byreplaying incomplete application requests after unplanned and planned outages.
Configuring Clients for High Availability
Client High Availability with Services, FAN, FCF, and Application Continuity 6-27
For applications that are unable to take advantage of Application Continuity, twoadditional features are available: Transparent Application Failover (TAF) for OCIbased applications and Transaction Guard. Transaction Guard enables applications tobuild their own masking of outages by knowing the outcome of the last in-flighttransaction.
This section deals with configuring high availability for application clients.
Configuring Oracle Net Services Parameters For Highly Available Connections(page 6-28)
When using services to connect to a database, there are variousparameters you can set to configure high availability.
Configuring JDBC Clients for High Availability (page 6-29)You can configure JDBC clients to use a connection pool, ApplicationContinuity and Transaction Guard to make them highly available.
Configuring OCI Clients for High Availability (page 6-35)The Oracle Call Interface (OCI) provides integration with FAN and LoadBalancing Advisory events. To take advantage of the Load BalancingAdvisory, you must enable the OCI Session pool.
Configuring ODP.NET Clients for High Availability (page 6-38)Oracle Data Provider for .NET (ODP.NET) provides integration withFast Application Notification (FAN), Run-time Connection LoadBalancing, Transparent Application Failover (TAF), and TransactionGuard.
See Also:
• "About Fast Application Notification (FAN) (page 6-7)"
• "About Oracle Services (page 6-2)"
• Oracle Real Application Clusters Administration and Deployment Guide forinformation about client-side connection configuration
6.4.1 Configuring Oracle Net Services Parameters For Highly Available ConnectionsWhen using services to connect to a database, there are various parameters you can setto configure high availability.
• For applications that need to connect to an Oracle Database, use the followingOracle Net Services parameters to minimize connection wait times:
– CONNECT_TIMEOUT: controls the amount of time to wait when attempting toconnect to an address
– RETRY_COUNT: controls the number of times the application attempts toconnect to the database
– TRANSPORT_CONNECT_TIME: controls the amount of time allowed for aclient to establish a TCP connection to the database
You can specify these parameters in either the timeout section of thetnsnames.ora file or at the DESCRIPTION level of a connect string, for example:
Configuring Clients for High Availability
6-28 Oracle Database 2 Day + Real Application Clusters Guide

net_service_name= (DESCRIPTION= (CONNECT_TIMEOUT=60)(RETRY_COUNT=3)(TRANSPORT_CONNECT_TIMEOUT=3 (ADDRESS_LIST= (ADDRESS=(PROTOCOL=tcp)(HOST=docrac.example.com)(PORT=1521)) (CONNECT_DATA= (SERVICE_NAME=racdb.example.com)))
Note:
– The CONNECT_TIMEOUT parameter is equivalent to the sqlnet.oraparameter sqlnet.OUTBOUND_CONNECT_TIMEOUT and overrides it.
– You should not configure thesqlnet.outbound_connection_timeout parameter on the serversqlnet.ora file, as this can impact Oracle Clusterware operations.
– The TRANSPORT_CONNECT_TIMEOUT parameter is equivalent to thesqlnet.ora parameter tcp.CONNECT_TIMEOUT and overrides it.
See Also:
Oracle Database Net Services Reference for more information about the timeoutand retry parameters for Oracle Net Services
6.4.2 Configuring JDBC Clients for High AvailabilityYou can configure JDBC clients to use a connection pool, Application Continuity andTransaction Guard to make them highly available.
An application that uses JDBC connections should use a connection pool, so anexisting connection can be used in the pool instead of making a new connection to thedatabase every time you access data. The Universal Connection Pool (UCP) is a Java-based connection pool that supports any type of connection (JDBC, LDAP, JCA), toany type of database (Oracle or non-Oracle) with any middle tier (Oracle or non-Oracle). It also supports standalone deployments such as TopLink or BPEL. UCP alsosupports integration features of Oracle Database such as Fast Connection Failover,Run-time Connection Load Balancing, Web Affinity, Application Continuity, andTransaction Guard with Oracle RAC when using the JDBC Thin driver.
Without Fast Connection Failover, if a node or network goes down and the applicationattempts to connect to that instance, then the connection request might hang forseveral minutes waiting for the TCP time out to be reached. If you chose not to use aconnection pool with the integrated FCF feature, then your application can still benotified of Oracle RAC high availability events by configuring the Connection FailureNotification feature.
Application Continuity provides a general purpose, application-independentinfrastructure that enables recovery of work from an application perspective, after theoccurrence of a planned or unplanned outage. The outage can be related to the system,communication, or hardware layer following a repair, a configuration change, or apatch application. Application Continuity restores the database session by replayingthe non-transactional and transactional user calls to reconstruct the database session asif the outage had not occurred. Application Continuity performs this replay beneaththe application so that the outage appears to the application as a delayed execution.
Configuring Clients for High Availability
Client High Availability with Services, FAN, FCF, and Application Continuity 6-29

Transaction Guard is a reliable protocol and tool that returns the outcome of the lastin-flight transaction after an outage makes the database session unavailable.Transaction Guard avoids the costs of ambiguous errors that lead to end userfrustration, customer support calls, and lost opportunities.
Note:
• Transaction Guard does not replay distributed or XA transactions.
• When using the Universal Connection Pool (UCP), configure FastApplication Notification and, optionally, Application Continuity. Do notconfigure Connection Failure Notification (theConnectionFailureNotification connection property).
Configuring JDBC Clients for Fast Connection Failover (page 6-30)Follow these steps to configure JDBC Clients for Fast ConnectionFailover.
Configuring Simple FAN for JDBC Thin Driver Non-Pooled Clients (page 6-32)To configure simple FAN for non-pooled JDBC clients, you use theConnectionFailureNotification connection property.
Configuring JDBC Clients for Application Continuity for Java (page 6-33)A new Replay data source(oracle.jdbc.replay.OracleDataSource) serves as the front-endfor applications to obtain a connection when using ApplicationContinuity for Java.
Configuring JDBC-Thin Clients to Use Transaction Guard (page 6-34)Transaction Guard is a reliable protocol and tool that returns theoutcome of the last in-flight transaction after an outage that makes thedatabase session unavailable.
See Also:
• "About Workload Management with Dynamic Database Services(page 6-1)"
• "About Oracle Services (page 6-2)"
• Oracle Real Application Clusters Administration and Deployment Guide formore information about deploying Oracle RAC for high availability
• Oracle Universal Connection Pool for JDBC Developer's Guide for moreinformation about the Universal Connection Pool for Java
6.4.2.1 Configuring JDBC Clients for Fast Connection FailoverFollow these steps to configure JDBC Clients for Fast Connection Failover.
The Universal Connection Pool (UCP) subscribes to FAN when Oracle NotificationService is configured and the pool propertysetFastConnectionFailoverEnabled is enabled.
Configuring Clients for High Availability
6-30 Oracle Database 2 Day + Real Application Clusters Guide
UCP also subscribes to the FAN Load Balancing events if you configure the dynamicdatabase service used in the connection for run-time load balancing. Instead ofrandomly assigning a free connection to a work request, the connection pool choosesthe connection that gives the best service according to the latest information it hasreceived. If a node becomes hung, then run-time load balancing quickly shiftsconnections from the hung node to other nodes in the cluster.
To configure JDBC clients for Fast Connection Failover:
1. Use the Cluster Managed Services page in Oracle Enterprise Manager CloudControl to create new services. See "Creating Services (page 6-20)" for moreinformation about creating services.
2. Enable fast connection failover for JDBC clients by setting the UCP DataSourceproperty FastConnectionFailoverEnabled to TRUE. Also, configure a remoteOracle Notification Services (ONS) subscription within the JDBC application sothat the Java Virtual Machine (JVM) can spawn the ONS when needed, as shown inthe following example:
PoolDataSource pds = PoolDataSourceFactory.getPoolDataSource();Pds.setConnnectionPoolName("FCFSampleUCP");pds.setONSConfiguration("nodes=racnode1:4200,racnode2:4200");pds.setFastConnectionFailoverEnabled(true);pds.setConnectionFactoryClassName("oracle.jdbc.pool.OracleDataSource");
The remote ONS subscription must contain every host that the client applicationcan use for failover.
3. Set the oracle.net.ns.SQLnetDef.TCP_CONNTIMEOUT_STR property to anonzero value on the data source. When this property is set, if the JDBC clientattempts to connect to a host that is unavailable, then the connection attempt isbounded to the time specified fororacle.net.ns.SQLnetDef.TCP_CONNTIMEOUT_STR. After the specified timehas elapsed and a successful connection has not been made, the client attempts toconnect to the next host in the address list. Setting this property to a value of threeseconds is sufficient for most installations.
4. Configure JDBC clients to use a connect descriptor that includes the SCAN and theservice name, and the port that the SCAN listener listens on (if not using thedefault value of 1521), for example:
@//docrac.example.com:1525/orcl_JDBC
Note:
Do not configure Transparent Application Failover (TAF) with FastConnection Failover for JDBC clients as TAF processing can interfere withFAN ONS processing.
For example, if the database initialization parameter remote_listener is set to theSCAN listener addresses, then, in the JDBC application, you would connect to thedatabase using a connect string similar to the following:
pds.setURL("jdbc:oracle:thin:@(DESCRIPTION = (TRANSPORT_CONNECT_TIMEOUT=3)(RETRY_COUNT=3)(FAILOVER=ON)(CONNECT_TIMEOUT=60) (ADDRESS_LIST =(ADDRESS=(PROTOCOL=tcp)
Configuring Clients for High Availability
Client High Availability with Services, FAN, FCF, and Application Continuity 6-31

(HOST=docrac.example.com)(PORT=1521)) (CONNECT_DATA=(SERVICE_NAME=service_name)))
If you are using a JDBC driver, then you must include the complete connectdescriptor in the URL because the JDBC Thin driver does not use Oracle Net.
5. Verify that both ucp.jar and ons.jar are in the application CLASSPATH.
See Also:
• "Creating Services (page 6-20)"
• "About Fast Application Notification (FAN) (page 6-7)"
• Oracle Database JDBC Developer's Guide for more information aboutinstalling and configuring Oracle RAC Fast Application Notification forJava
• Oracle Universal Connection Pool for JDBC Developer's Guide for moreinformation about using the Universal Connection Pool for databaseconnections using Java
• Oracle Database 2 Day + Java Developer's Guide for information aboutcreating a method to authenticate users
• Oracle Real Application Clusters Administration and Deployment Guide forinformation about installing and configuring Oracle RAC FastApplication Notification
6.4.2.2 Configuring Simple FAN for JDBC Thin Driver Non-Pooled ClientsTo configure simple FAN for non-pooled JDBC clients, you use theConnectionFailureNotification connection property.
JDBC simple FAN enables standalone Oracle JDBC connections to quickly respond tonode failures. This feature enables a standalone JDBC Thin Driver connection to listenfor FAN events and respond to a node down event by marking the connection closed,permitting user applications to begin recovery quicker. It does not alter the behavior ofthe application, except that JDBC method calls throw exceptions more quickly after anode goes down.
To configure FAN for non-pooled JDBC Clients:
1. Set the Connection Failure Notification property either as a system property usingthe -D option, or by including it in the connection properties argument whencreating a connection.
To set it as a system property, use a command similar to the following:
java -Doracle.jdbc.ConnectionFailureNotification=true
To set it within the connection properties argument, use code similar to thefollowing:
Properties props = new Properties();props.put("ConnectionFailureNotification", "true");Connection = DriverManager.getConnection(url, props);
Configuring Clients for High Availability
6-32 Oracle Database 2 Day + Real Application Clusters Guide
2. Configure the transport mechanism by which the node down events are received. IfOracle Notification Services (ONS) is the selected transport mechanism, then usethe SetONSConfiguration property, as demonstrated in the following code,where racnode1 and racnode2 represent nodes in the cluster that have ONSrunning on them:
props.setONSConfiguration("nodes=racnode1:4200,racnode2:4200");
3. Verify that ons.jar is in the application CLASSPATH.
See Also:
• "About Oracle RAC High Availability Framework (page 6-7)"
• Oracle Database JDBC Developer's Guide for information about installingand configuring Oracle RAC Fast Application Notification
• Oracle Database 2 Day + Java Developer's Guide for information aboutcreating a method to authenticate users
6.4.2.3 Configuring JDBC Clients for Application Continuity for JavaA new Replay data source (oracle.jdbc.replay.OracleDataSource) serves asthe front-end for applications to obtain a connection when using ApplicationContinuity for Java.
The Replay data source serves as the connection factory that produces new physicalJDBC connections, for both UCP and WebLogic Server Active GridLink data sources.In collaboration with Oracle Database, the JDBC replay driver maintains a history ofcalls during a client conversation with Oracle Database 12c, as instructed by thedatabase. Following any outage of the session caused by a loss of database service,planned or unplanned, the JDBC replay driver attempts to rebuild the non-transactional and transactional database session states, so that the outage appears as adelayed execution.
To use Application Continuity for Java and the JDBC replay driver, you must use anOracle Database 12c client and connect to an Oracle Database 12c database.Application Continuity for Java is supported in the following configurations:
• JDBC applications using Oracle JDBC Replay data source and using neither UCPor WebLogic Server Active GridLink—typical standalone JDBC cases
• JDBC applications using UCP data sources—standalone or 3rd party applicationservers configured to use a UCP data source
• JDBC applications using only WebLogic Server Active GridLink but not UCP datasources—typical WebLogic Server J2EE cases
To configure JDBC clients to use the JDBC Replay Driver:
1. Verify you are using an application that has been certified for replay.
2. Use SRVCTL to create a service for use by the application, if one does not alreadyexist. Set the FAILOVER_TYPE attribute to TRANSACTION, commit_outcomeattribute to TRUE, and notification for FAN to TRUE for this service..
See "Creating Services (page 6-20)" for more information about creating services.
Configuring Clients for High Availability
Client High Availability with Services, FAN, FCF, and Application Continuity 6-33

3. Configure the connection element using the replayDataSource object, as shownin the following example:
replayDataSource rds = PoolDataSourceFactory.getreplayDataSource();rds.setConnnectionPoolName("replayExample");rds.setONSConfiguration("nodes=racnode1:4200,racnode2:4200");rds.setFastConnectionFailoverEnabled(true);rds.setConnectionFactoryClassName("oracle.jdbc.replay.OracleDataSourceImpl");
Connection conn = replayDataSource.getConnection();
Refer to the URL example in "Configuring JDBC Clients for Fast ConnectionFailover (page 6-30)".
4. When connecting to the database, use a URL that can access all instances offeringthe service. See "Configuring Oracle Net Services Parameters For Highly AvailableConnections (page 6-28)" for more information about creating highly availabledatabase connections.
Note:
If you disconnect or terminate a session that uses Application Continuity, thenApplication Continuity attempts to recover the session. To disconnect orterminate the session without replay, see Oracle Database Development Guide.
See Also:
• Oracle Database JDBC Developer’s Guide for information about configuringOracle JDBC for Application Continuity for Java
• Oracle Database Development Guide for more information about usingApplication Continuity
• Oracle Universal Connection Pool Developer’s Guide for information aboutusing Application Continuity with the Universal Connection Pool
6.4.2.4 Configuring JDBC-Thin Clients to Use Transaction GuardTransaction Guard is a reliable protocol and tool that returns the outcome of the lastin-flight transaction after an outage that makes the database session unavailable.
Transaction Guard avoids the costs of ambiguous errors that lead to user frustration,customer support calls, and lost opportunities. Without Transaction Guard,applications and users who attempt to retry operations following an outage can causelogical corruption by committing duplicate transactions or committing transactionsout of order.
See Also:
• Oracle Database JDBC Developer's Guide for information about configuringJDBC-Thin clients for use with Transaction Guard
• Oracle Database Development Guide for more information about usingTransaction Guard
Configuring Clients for High Availability
6-34 Oracle Database 2 Day + Real Application Clusters Guide
6.4.3 Configuring OCI Clients for High AvailabilityThe Oracle Call Interface (OCI) provides integration with FAN and Load BalancingAdvisory events. To take advantage of the Load Balancing Advisory, you must enablethe OCI Session pool.
Configuring OCI Clients to Receive FAN Notifications (page 6-35)Oracle Call Interface (OCI) clients can register to receive notificationsabout Oracle Real Application Clusters (Oracle RAC) high availabilityevents and respond when events occur.
Configuring OCI Clients to use Transaction Guard (page 6-36)Oracle Call Interface (OCI) clients can use Transaction Guard to replayan in-flight transaction when a recoverable error occurs.
See Also:
• "Using Transaction Guard" in Oracle Database Development Guide
• "Configuring Transparent Application Failover" in Oracle Call InterfaceProgrammer's Guide
6.4.3.1 Configuring OCI Clients to Receive FAN NotificationsOracle Call Interface (OCI) clients can register to receive notifications about OracleReal Application Clusters (Oracle RAC) high availability events and respond whenevents occur.
Registering to receive Fast Application Notification (FAN) events improves theconnection failover response time in OCI and also removes terminated connectionsfrom connection and session pools. This feature works for all OCI client applications.
To configure OCI clients to receive FAN notifications:
1. Use the Cluster Managed Services page in Oracle Enterprise Cloud Control to acreate services for the OCI clients.
You should configure the primary instance as preferred for that service. ForNotification Properties, choose "Enable Fast Application Notification for OCI andODP.NET Applications".
2. Link the OCI client applications with thread library libthread or libpthread.
3. In your application, you must check if an event has occurred, using code similar tothe following example:
void evtcallback_fn(ha_ctx, eventhp)... printf("HA Event received.\n"); if (OCIHandleAlloc( (dvoid *)envhp, (dvoid **)&errhp, (ub4) OCI_HTYPE_ERROR, (size_t) 0, (dvoid **) 0)) return; if (retcode = OCIAttrGet(eventhp, OCT_HTYPE_EVENT, (dvoid *)&srvhp, (ub4 *)0, OCI_ATTR_HA_SRVFIRST, errhp)) checkerr (errhp, (sword)retcode; else {
Configuring Clients for High Availability
Client High Availability with Services, FAN, FCF, and Application Continuity 6-35

printf("found first server handle.\n"); /*get associated instance name */ if (retcode = OCIAttrGet(srvhp, OCI_HTYPE_SERVER, (dvoid *)&instname, (ub4 *)&sizep, OCI_ATTR_INSTNAME, errhp)) checkerr (errhp, (sword)retcode); else printf("instance name is %s.\n", instname);
4. After a HA event is received, clients and applications can register a callback that isinvoked whenever a high availability event occurs, as shown in the followingexample:
/*Registering HA callback function */ if (checkerr(errhp, OCIAttrSet(envhp, (ub4) OCI_HTYPE_ENV, (dvoid *)evtcallback_fn, (ub4) 0, (ub4)OCI_ATTR_EVTCBK, errhp))) { printf("Failed to set register EVENT callback.\n"); return EX_FAILURE; } if (checkerr(errhp, OCIAttrSet(envhp, (ub4) OCI_HTYPE_ENV, (dvoid *)evtctx, (ub4) 0, (ub4)OCI_ATTR_EVTCTX, errhp))) { printf("Failed to set register EVENT callback context.\n"); return EX_FAILURE; }return EX_SUCCESS;
After registering an event callback and context, OCI calls the registered functiononce for each high availability event.
See Also:
• "Creating Services (page 6-20)"
• "Administering Services (page 6-23)"
• "About Fast Application Notification (FAN) (page 6-7)"
• Oracle Call Interface Programmer's Guide for more information about eventnotification and user-registered callbacks
• Oracle Real Application Clusters Administration and Deployment Guide formore information about configuring fast application notification for OCIclients.
6.4.3.2 Configuring OCI Clients to use Transaction GuardOracle Call Interface (OCI) clients can use Transaction Guard to replay an in-flighttransaction when a recoverable error occurs.
OCI supports Fast Application Notification (FAN) messages and TransparentApplication Failover (TAF). FAN is designed to quickly notify an OCI-basedapplication of outages at the node, database, instance, service, and public networklevels. Once notified of the failure, an application can leverage TAF to re-establish thefailed connection on a surviving instance. What is missing is the ability to reliablydetermine the outcome of the failed transaction and the ability to recover the current
Configuring Clients for High Availability
6-36 Oracle Database 2 Day + Real Application Clusters Guide

transaction after database connectivity has been restored. This section describes howto configure OCI to enable transactional TAF. Transactional TAF is the OCI driver'sability to replay a transaction that is active when a recoverable error occurs.
To configure OCI clients to use Transaction Guard:
1. Use the Cluster Managed Services page in Oracle Enterprise Manager CloudControl to a create services for the OCI clients.
a. Set the commit_outcome attribute to TRUE.
b. Set the failover type for the service to TRANSACTION.
If the OCI application issues database requests that contain more than onetransaction, then you must also set the SESSION_STATE service attribute toSTATIC. Setting SESSION_STATE to static enables the TAF callback to restorethe non-transactional session state required for each database transaction,independent of the application request boundaries.
2. Perform the steps described in "Configuring OCI Clients to Receive FANNotifications (page 6-35)" to enable FAN for OCI clients.
3. If you use a connection pool with your OCI application, then transaction recordingbegins at session check-out and is purged at session check-in.
If you do not use a connection pool, then, within the OCI application, mark thebeginning and the end of an application request, as shown in the followingexample. The transaction history between the beginning and end of the applicationrequest is recorded for possible playback.
The following pseudo-code provides an example of how to configure an OCI clientapplication to use Transaction Guard:
Get_Connection();
Configure_Connection();
/* mark the beginning of an application request; purge session's recorded call history */
state = OCI_SESSION_STATE_RESTORABLE; OCIAttrSet(usrhp, OCI_HTYPE_SESSION, &state, 0, OCI_ATTR_SESSION_STATE, errhp); /* process an application request */
/* mark end of application request; purge session's recorded call history */state = OCI_SESSION_STATELESS; OCIAttrSet(usrhp, OCI_HTYPE_SESSION, &state, 0, OCI_ATTR_SESSION_STATE, errhp);
Release_connection();
Configuring Clients for High Availability
Client High Availability with Services, FAN, FCF, and Application Continuity 6-37
See Also:
• "Creating Services (page 6-20)"
• "Administering Services (page 6-23)"
• "About Fast Application Notification (FAN) (page 6-7)"
• Oracle Call Interface Programmer's Guide for more information about eventnotification and user-registered callbacks
• Oracle Real Application Clusters Administration and Deployment Guide formore information about configuring fast application notification for OCIclients.
6.4.4 Configuring ODP.NET Clients for High AvailabilityOracle Data Provider for .NET (ODP.NET) provides integration with Fast ApplicationNotification (FAN), Run-time Connection Load Balancing, Transparent ApplicationFailover (TAF), and Transaction Guard.
When a connection to an Oracle instance is unexpectedly severed, TAF seamlesslyattempts to failover to another Oracle instance. Due to the delay that a failover canincur, the application may wish to be notified by a TAF callback. ODP.NET supportsTAF callback through the Failover event of the OracleConnection object. To receiveTAF callbacks, an event handler function must be registered with the Failover eventof the OracleConnection object. Also the connection parameter enlist should beset to false for TAF to work.
ODP.NET connection pools subscribe to FAN notifications from Oracle RAC thatindicate when nodes are down and when services are up or down. Based on thesenotifications, the ODP.NET connection pool:
• Interrupts active sessions so they do not wait on TCP/IP timeouts, and
• Clears idle sessions previously connected to the down node or instance ornetwork so they are not passed to user sessions
• Creates new connections to healthy nodes, if possible
ODP.NET provides Run-time Connection Load Balancing to provide enhanced loadbalancing of the application workload. Instead of randomly selecting an availableconnection from the connection pool, it chooses the connection that can provide thebest service based on the current workload information.
Configuring ODP.NET Clients to Receive FAN Notifications (page 6-39)The procedures for enabling ODP.NET are similar to the procedures forenabling JDBC in that you must set parameters in the connection stringto enable Fast Connection Failover (FCF).
About ODP.NET Clients and Using Transaction Guard (page 6-40)When an ODP.NET application submits a transaction commit requestand some type of failure occurs, such as a node, network, or databasefailure, ODP.NET can now deterministically conclude whether thetransaction committed or not.
Configuring Clients for High Availability
6-38 Oracle Database 2 Day + Real Application Clusters Guide
6.4.4.1 Configuring ODP.NET Clients to Receive FAN NotificationsThe procedures for enabling ODP.NET are similar to the procedures for enablingJDBC in that you must set parameters in the connection string to enable FastConnection Failover (FCF).
To configure ODP.NET clients to receive FAN notifications:
1. Use the Cluster Managed Services page in Oracle Enterprise Manager CloudControl to a create services for the ODP.NET clients.
a. For Notification Properties, choose Enable Fast Application Notification forOCI and ODP.NET Applications.
b. Set the Connection Load Balancing Goal to Long.
2. Set the ha events connection string attribute to true either at connection time orin the data source definition to subscribe to FAN high availability events andenable Fast Connection Failover for ODP.NET connection pools.
Note that this only works if you are using connection pools (the pooling attributeto true).
You can also enable Run-time Connection Load Balancing by setting the run-timeload balancing attribute for the service to SERVICE_TIME.
Use code similar to the following, where username is the name of the database userthat the application uses to connect to the database, password is the password forthat database user, and the service name is odpserv:
// C#using System;using Oracle.DataAccess.Client;class HAEventEnablingSample{ static void Main() { OracleConnection con = new OracleConnection();
// Open a connection using ConnectionString attributes // Also, enable "load balancing" con.ConnectionString = "User Id=username;Password=password;" + "Data Source=//docrac.example.com/odpserv;" + "Min Pool Size=10;Connection Lifetime=86400;Connection Timeout=60;" + "HA Events=true;Incr Pool Size=5;Decr Pool Size=2";
con.Open(); // Carry out work against the database here. con.Close(); // Dispose OracleConnection object con.Dispose(); } }
3. The run-time load balancing events are published as messages in the SYS.SYS$SERVICE_METRICS queue. You must grant dequeue permission on this queue tothe database user that the application uses to connect to the database.
Configuring Clients for High Availability
Client High Availability with Services, FAN, FCF, and Application Continuity 6-39
Use a command similar to the following, where username represents the databaseuser that the .NET application uses to connect to the database:
executedbms_aqadm.grant_queue_privilege('DEQUEUE','SYS.SYS$SERVICE_METRICS', username);
The username specified in this step equals the username used for the User Idargument in the previous step.
See Also:
• "Creating Services (page 6-20)"
• "About Fast Application Notification (FAN) (page 6-7)"
• Oracle Data Provider for .NET Developer's Guide for Microsoft Windows formore information about event notification and user-registered callbacks
• Oracle Real Application Clusters Administration and Deployment Guide formore information about configuring fast application notification forODP.NET clients.
6.4.4.2 About ODP.NET Clients and Using Transaction GuardWhen an ODP.NET application submits a transaction commit request and some typeof failure occurs, such as a node, network, or database failure, ODP.NET can nowdeterministically conclude whether the transaction committed or not.
Starting with Oracle Database 12c, applications can use a logical transaction ID(LTXID) to determine the outcome of the last transaction open in a database sessionfollowing an outage. Using Transaction Guard, the end user experience is vastlyimproved by returning to the application and user, following an outage, whether thelast submission committed and completed or did not. A committed result stayscommitted. An uncommitted result stays uncommitted, and is a green light, forexample, for the user or application to resubmit.
Without using Transaction Guard, applications that attempt to retry operationsfollowing outages can cause logical corruption by committing duplicate transactions.
See Also:
• "Creating Services (page 6-20)"
• "Administering Services (page 6-23)"
• Oracle Data Provider for .NET Developer's Guide for Microsoft Windows for anexample of using Transaction Guard in an ODP.NET application
• "About Fast Application Notification (FAN) (page 6-7)"
• Oracle Real Application Clusters Administration and Deployment Guide formore information about configuring fast application notification forODP.NET clients.
Configuring Clients for High Availability
6-40 Oracle Database 2 Day + Real Application Clusters Guide
7Administering Backup and Recovery
To protect the database against data loss and reconstruct the database after data loss,you must devise, implement, and manage a backup and recovery strategy for yourOracle RAC Database.
Overview of Oracle RAC Database Backup and Recovery (page 7-2)To protect your Oracle Real Application Clusters (Oracle RAC) databasefrom hardware failures or disasters, you must have a physical copy ofthe database files.
About the Fast Recovery Area in Oracle RAC (page 7-3)Using a fast recovery area minimizes the need to manually manage diskspace for your backup-related files and balance the use of space amongthe different types of files.
Archiving the Oracle Real Application Clusters Database Redo Logs (page 7-4)To make your data highly available, it is important to configure thedatabase so you can recover your data after a system failure. Redo logscontain a record of changes that were made to datafiles.
About Preparing for Backup and Recovery Operations (page 7-8)Before taking backups of your Oracle Real Application Clusters (OracleRAC) database using Enterprise Manager, you must configure access forthe user performing the backups, or credentials.
Performing Backups of Your Oracle Real Application Clusters Database(page 7-9)
You can use Oracle Enterprise Manager to backup your Oracle RealApplication Clusters (Oracle RAC) database.
Recovering Your Oracle Real Application Clusters Database (page 7-11)The Enterprise Manager Guided Recovery capability provides aRecovery Wizard that encapsulates the logic required for a wide range ofrestore and recovery scenarios.
About Managing Your Database Backup Files (page 7-16)You can use Oracle Enterprise Manager to manage your databasebackup files.
Displaying Backup Reports for Your Oracle Real Application Clusters Database(page 7-16)
You can use Oracle Enterprise Manager to view backup reports.
Administering Backup and Recovery 7-1

See Also:
• Oracle Database 2 Day DBA for conceptual information about databasebackup and recovery
• Oracle Database Backup and Recovery User’s Guide for more informationabout using the Recovery Manager utility
7.1 Overview of Oracle RAC Database Backup and RecoveryTo protect your Oracle Real Application Clusters (Oracle RAC) database fromhardware failures or disasters, you must have a physical copy of the database files.
The files protected by the backup and recovery facilities built into Oracle EnterpriseManager include data files, control files, server parameter files (SPFILEs), andarchived redo log files. Using these files, your database can be reconstructed. Thebackup mechanisms that work at the physical level protect against damage at the filelevel, such as the accidental deletion of a data file or the failure of a disk drive.Database recovery involves restoring, or copying, the damaged files from backup andperforming media recovery on the restored files. Media recovery is the application ofredo logs or incremental backups to a restored data file to update it to the current timeor some other specified time.
The Oracle Database flashback features, such as Oracle Flashback Drop and OracleFlashback Table, provide a range of physical and logical data recovery tools asefficient, easy-to-use alternatives to physical and logical backup operations. Theflashback features enable you to reverse the effects of unwanted database changeswithout restoring data files from backup or performing media recovery.
The Enterprise Manager physical backup and recovery features are built on theRecovery Manager (RMAN) command-line client. Enterprise Manager makesavailable many of the RMAN features, and provides wizards and automatic strategiesto simplify and further automate RMAN-based backup and recovery.
Note:
For the RMAN utility to work properly on Linux platforms, the$ORACLE_HOME/bin directory must appear in the PATH variable beforethe /usr/X11R6/bin directory.
The Enterprise Manager Guided Recovery capability provides a Recovery Wizard thatencapsulates the logic required for a wide range of file restoration and recoveryscenarios, including the following:
• Complete restoration and recovery of the database
• Point-in-time recovery of the database or selected tablespaces
• Flashback Database
• Other flashback features of Oracle Database for logical-level repair of unwantedchanges to database objects
• Media recovery at the block level for data files with corrupt blocks
Overview of Oracle RAC Database Backup and Recovery
7-2 Oracle Database 2 Day + Real Application Clusters Guide
If the database files are damaged or need recovery, then Enterprise Manager candetermine which parts of the database must be restored from a backup and recovered,including early detection of situations such as corrupted database files. EnterpriseManager guides you through the recovery process, prompting for needed informationand performing the required recovery actions.
See Also:
• "Performing Backups of Your Oracle Real Application Clusters Database(page 7-9)"
• "Recovering Your Oracle Real Application Clusters Database(page 7-11)"
• "About Managing Your Database Backup Files (page 7-16)"
• Oracle Database 2 Day DBA for information about performing OracleDatabase backup and recovery with Oracle Recovery Manager (RMAN)
7.2 About the Fast Recovery Area in Oracle RACUsing a fast recovery area minimizes the need to manually manage disk space for yourbackup-related files and balance the use of space among the different types of files.
Oracle recommends that you enable a fast recovery area to simplify your backupmanagement. The larger the fast recovery area is, the more useful it becomes. Ideally,the fast recovery area should be large enough to contain all the following files:
• A copy of all data files
• Incremental backups
• Online redo logs
• Archived redo log files that have not yet been backed up
• Control files and control file copies
• Autobackups of the control file and database initialization parameter file
The fast recovery area for an Oracle RAC database must be placed on an Oracle ASMdisk group, a cluster file system, or on a shared directory that is configured through anetwork file system file for each Oracle RAC instance. In other words, the fastrecovery area must be shared among all of the instances of an Oracle RAC database.
Note:
The preferred configuration for Oracle RAC is to use Oracle AutomaticStorage Management (Oracle ASM) for storing the fast recovery area, using adifferent disk group for your recovery set than for your data files.
The location and disk quota must be the same on all instances. Oracle recommendsthat you place the fast recovery area on the shared Oracle ASM disks. In addition, youmust set the DB_RECOVERY_FILE_DEST and DB_RECOVERY_FILE_DEST_SIZEparameters to the same values on all instances.
About the Fast Recovery Area in Oracle RAC
Administering Backup and Recovery 7-3
To use the fast recovery feature, you must first configure the fast recovery area foreach instance in your Oracle RAC database.
See Also:
• "Creating Additional Oracle ASM Disk Groups (page 3-12)"
• "Editing Initialization Parameter Settings for an Oracle RAC Database(page 4-10)"
• Oracle Database 2 Day DBA for more information about the fast recoveryarea
• Oracle Database 2 Day DBA for information about how to configure backupand recovery for your database
• Oracle Database Backup and Recovery User’s Guide for information aboutconfiguring the fast recovery area
7.3 Archiving the Oracle Real Application Clusters Database Redo LogsTo make your data highly available, it is important to configure the database so youcan recover your data after a system failure. Redo logs contain a record of changes thatwere made to datafiles.
Redo logs are stored in redo log groups. You must have at least two redo log groupsfor your database.
After the redo log files in a group have filled up, the log writer process (LGWR)switches the writing of redo records to a new redo log group. Oracle Database canautomatically save the inactive group of redo log files to one or more offlinedestinations, known collectively as the archived redo log (also called the archive log).The process of turning redo log files into archived redo log files is called archiving.
When you archive your redo log, you write redo log files to another location beforethey are overwritten. This location is called the archived redo log. These copies of redolog files extend the amount of redo data that can be saved and used for recovery.Archiving can be either enabled or disabled for the database, but Oracle recommendsthat you enable archiving.
About Archived Redo Log Files for an Oracle RAC Database (page 7-5)The primary consideration when configuring archiving is to ensure thatall archived redo logs can be read from every node during recovery, andif possible during backups.
About Parallelism and Backups Across Multiple RMAN Channels (page 7-6)RMAN supports parallelism, which is the use of multiple channels andserver sessions to perform the work of a single backup job or filerestoration task.
Configuring Archiving for Your Oracle RAC Database (page 7-6)For Oracle RAC, each instance has its own thread of redo. The preferredconfiguration for Oracle RAC is to configure the fast recovery area usingan Oracle ASM disk group that is separate from the Oracle ASM diskgroup used for your data files. Alternatively, you can use a cluster filesystem archiving scheme.
Archiving the Oracle Real Application Clusters Database Redo Logs
7-4 Oracle Database 2 Day + Real Application Clusters Guide

See Also:
• "Administering Redo Logs in Oracle RAC (page 4-18)"
• Oracle Database 2 Day DBA for information about archived redo log files
• Oracle Database 2 Day DBA for information on planning space usage forthe fast recovery area
7.3.1 About Archived Redo Log Files for an Oracle RAC DatabaseThe primary consideration when configuring archiving is to ensure that all archivedredo logs can be read from every node during recovery, and if possible duringbackups.
When you use Oracle Database Configuration Assistant (DBCA) to create your OracleReal Application Clusters (Oracle RAC) database, each instance is configured with atleast two redo log files that are stored in the shared storage area. If you have a two-node Oracle RAC database, then at least four redo logs are created for the database,two for each instance.
If you use a cluster file system to store the archived redo log files for your Oracle RACdatabase, then the redo log files are shared file system files. If you use Oracle ASM tostore the archived redo log files for your Oracle RAC database, then each instanceautomatically has access to all the archived redo log files generated by the database. Ifyou use shared storage to store the archived redo log files on each node, then youmust configure the operating system to grant access to those directories for eachinstance of the cluster database that needs access to them.
During recovery, because the archived log destinations are visible from the node thatperforms the recovery, Oracle RAC can successfully recover the archived redo logdata. For creating backups of your Oracle RAC database, the strategy that you choosedepends on how you configure the archiving destinations for each node. Whether onlyone node or all nodes perform archived redo log backups, you must ensure that thearchived redo logs for every instance are backed up.
To backup the archived redo logs from a single node, that node must have access tothe archived log files of the other instances. The archived redo log naming scheme thatyou use is important because when a node writes to a log with a specific file name onits file system, the file must be readable by any node that must access this archivedredo log. For example, if node1 archives a log to /oracle/arc_dest/log_1_100_23452345.arc, then node2 can back up this archived redo log only if itcan read/oracle/arc_dest/log_1_100_23452345.arc on its own file system.
See Also:
• Oracle Automatic Storage Management Administrator's Guide for informationabout creating archived log files in Oracle ASM
• Oracle Real Application Clusters Administration and Deployment Guide forinformation about naming conventions for archived redo log files inOracle RAC
Archiving the Oracle Real Application Clusters Database Redo Logs
Administering Backup and Recovery 7-5
7.3.2 About Parallelism and Backups Across Multiple RMAN ChannelsRMAN supports parallelism, which is the use of multiple channels and server sessionsto perform the work of a single backup job or file restoration task.
Recovery Manager (RMAN) depends on server sessions, processes that run on thedatabase server, to perform backup and recovery tasks. Each server session in turncorresponds to an RMAN channel, representing one stream of data to or from abackup device.
Because the Oracle Database control file, SPFILE, and data files are accessible by anyinstance, the backup operation of these files is distributed across all the allocatedchannels. For backups of the archived redo log, the actions performed by RMANdepend on the type of archiving scheme used by your Oracle RAC database.
If you use a local archiving scheme, then each instance writes the archived redo logfiles to a local directory. When multiple channels are allocated that have access to thearchived redo log, for each archived redo log file, RMAN determines which channelshave access to that archived redo log file. Then, RMAN groups the archived redo logfiles that can be accessed by a channel and schedules a backup job using that channel.
If each node in the cluster writes the archived redo log files to Oracle ASM, a clusteredfile system, or other type of shared storage, then each instance has access to all thearchived redo log files. In this case, the backup of the archived redo log is distributedacross all the allocated channels.
See Also:
• "About Archived Redo Log Files for an Oracle RAC Database (page 7-5)"
• "Performing Backups of Your Oracle Real Application Clusters Database(page 7-9)"
• Oracle Database 2 Day DBA for more information about RMAN backups
• Oracle Database 2 Day DBA for more information about configuringbackup device settings
7.3.3 Configuring Archiving for Your Oracle RAC DatabaseFor Oracle RAC, each instance has its own thread of redo. The preferred configurationfor Oracle RAC is to configure the fast recovery area using an Oracle ASM disk groupthat is separate from the Oracle ASM disk group used for your data files.Alternatively, you can use a cluster file system archiving scheme.
To configure archiving for your Oracle RAC database:
1. In Oracle Enterprise Manager, go to the Cluster Database Home page, and log in asa SYSDBA user.
See Oracle Database 2 Day DBA for details on logging in to Oracle EnterpriseManager.
2. From the Availability menu, select Backup and Recovery, and then RecoverySettings.
Archiving the Oracle Real Application Clusters Database Redo Logs
7-6 Oracle Database 2 Day + Real Application Clusters Guide

The Recovery Settings page appears.
3. In the Media Recovery section, select the ARCHIVELOG mode option.
4. In the Log Archive Filename Format field, accept the default value, or enter thedesired format.
For clustered databases, the format for the archive log file name should contain the%t modifier, to indicate which redo log thread the archived redo log file belongs to.As a best practice, the format for the archive log file name should also include the%s (log sequence number) and %r (resetlogs identifier) modifiers.
5. If the archive log destination is the same for all instances, then in the Archive LogDestination field, change the value to the location of the archive log destination forthe cluster database.
For example, you might set it to +DATA if using Oracle ASM, or to /u01/oradata/arch if you want local archiving on each node.
If you must configure a different archive log destination for any instance, then youmust go to the Initialization Parameters page and modify theLOG_ARCHIVE_DEST_1 parameter that corresponds to the instance for which youwant to configure the archive log destination. The Instance column should displaythe name of the instance, for example sales1. Change the Value field to containthe location of the archive log destination for that instance.
6. If you want to configure multiple archive log destinations for the database, then onthe Recovery Settings page, click Add Another Row under the Archive LogDestination field.
7. After you have finished configuring archiving, click Apply.
8. When prompted to restart the database, click Yes.
9. Enter the host and SYSDBA user credentials, then click Continue.
10. Wait a couple of minutes, then click Refresh.
If the database has been restarted, then you are prompted to enter the logincredentials.
See Also:
• "About Archived Redo Log Files for an Oracle RAC Database (page 7-5)"
• "About Configuring Initialization Parameters for an Oracle RAC Database(page 4-5)"
• "Editing Initialization Parameter Settings for an Oracle RAC Database(page 4-10)"
• Oracle Database 2 Day DBA for information about configuring settingsused for instance recovery, media recovery, and fast recovery
• Oracle Real Application Clusters Administration and Deployment Guide formore information about configuring and managing archived redo log filesfor an Oracle RAC database
Archiving the Oracle Real Application Clusters Database Redo Logs
Administering Backup and Recovery 7-7

7.4 About Preparing for Backup and Recovery OperationsBefore taking backups of your Oracle Real Application Clusters (Oracle RAC)database using Enterprise Manager, you must configure access for the user performingthe backups, or credentials.
You can also configure the default values for certain backup settings, so they do nothave to be specified every time a backup is taken.
About Credentials for Performing Backup and Recovery (page 7-8)When using Enterprise Manager, you must have the proper credentialsto perform the configuration tasks for backup and recovery, to schedulebackup jobs, and to perform recovery.
About Configuring Backup Settings (page 7-9)You can configure several settings and policies for backups.
See Also: "About Operating System Users and Groups (page 2-11)"
7.4.1 About Credentials for Performing Backup and RecoveryWhen using Enterprise Manager, you must have the proper credentials to perform theconfiguration tasks for backup and recovery, to schedule backup jobs, and to performrecovery.
The following credentials may be required:
• The Oracle database administrator user you use when you log in to EnterpriseManager
• The host operating system user whose credentials you provide when performingbackup and recovery tasks
To perform or schedule RMAN tasks, you must either log in to Enterprise Manager asa user with SYSDBA or SYSBACKUP administrative privilege, or provide host operatingsystem credentials for a user who is a member of the dba group. The host operatingsystem user must also have execute permission for the RMAN command-line client.
For tasks requiring host operating system credentials, a Host Credentials form appearsat the bottom of the page used to perform the task. Enterprise Manager uses thecredentials when it invokes RMAN to perform jobs you requested or scheduled.
The Host Credentials form always includes an option labeled Save as PreferredCredential. If you select this option before performing your action, then the providedcredentials are stored persistently for the currently logged-in Oracle database user.The preferred credentials are reused by default whenever you log in as that user andperform operations requiring host credentials.
About Preparing for Backup and Recovery Operations
7-8 Oracle Database 2 Day + Real Application Clusters Guide
See Also:
• "About Operating System Users and Groups (page 2-11)"
• "About Configuring User Accounts (page 3-23)"
• Oracle Database 2 Day DBA for information about the user credentialsrequired to perform backup and recovery
7.4.2 About Configuring Backup SettingsYou can configure several settings and policies for backups.
Assuming you have a fast recovery area configured, you can configure several settingsand policies that determine how backups are stored, which data is backed up, andhow long backups are retained before being purged from the fast recovery area. Youcan also configure settings to optimize backup performance for your environment.
See Also:
• "Configuring Archiving for Your Oracle RAC Database (page 7-6)"
• "Overview of Oracle RAC Database Backup and Recovery (page 7-2)"
• Oracle Database 2 Day DBA for more information about configuringbackup policy settings
• Oracle Database 2 Day DBA for more information about configuringbackup settings
7.5 Performing Backups of Your Oracle Real Application ClustersDatabase
You can use Oracle Enterprise Manager to backup your Oracle Real ApplicationClusters (Oracle RAC) database.
When you use Oracle ASM to manage database files, Oracle recommends that you useRMAN for creating backups.
You must have both database (SYSDBA) privileges and host operating system (OSDBA)credentials to perform backup and recovery operations. If you log in to EnterpriseManager with SYSDBA privileges, then any operating system user who has executepermission for the RMAN command-line client can perform backups of an Oracle RealApplication Clusters (Oracle RAC) database. However, if you log in as a database userwithout SYSDBA privileges, then you must provide the name and password of anoperating system user that is a member of the OSDBA group before you can performthe backup operation.
To back up an Oracle RAC database:
1. On the Cluster Database Home page, select Availability.
The Cluster Database Availability page appears.
Performing Backups of Your Oracle Real Application Clusters Database
Administering Backup and Recovery 7-9
2. In the Backup/Recovery section, under the heading Manage, select ScheduleBackup.
3. Follow the backup procedures outlined in Chapter 9, "Performing Backup andRecovery" of Oracle Database 2 Day DBA or click Help on this page.
See Also:
• "About Operating System Users and Groups (page 2-11)"
• "About Credentials for Performing Backup and Recovery (page 7-8)"
Backing Up Archived Redo Log Files (page 7-10)You can configure RMAN to automatically delete the archived redo logfiles from disk after they have been safely backed up.
7.5.1 Backing Up Archived Redo Log FilesYou can configure RMAN to automatically delete the archived redo log files from diskafter they have been safely backed up.
This feature helps to reduce the disk space used by your Oracle RAC database, andprevents unnecessary outages that might occur if you run out of available disk space.
Whether only one node or all nodes perform archive log backups, ensure that allarchived redo log files for all nodes are backed up. If you use a local archiving scheme,then allocate multiple channels to provide RMAN access to all the archived redo logfiles.
To configure RMAN to automatically delete the archived redo log file files fromdisk after they have been safely backed up, when creating or scheduling yourdatabase backups:
1. In Oracle Enterprise Manager, go to the Cluster Database Home page, and log in asa SYSDBA user.
See Oracle Database 2 Day DBA for details on logging in to Oracle EnterpriseManager.
2. From the Availability menu, select Backup and Recovery, and then ScheduleBackup.
3. Choose a backup type and click Schedule Customized Backup.
4. While specifying the options for your backup, select Also back up all archived logson disk if you are performing an online backup. There is no need to back uparchived redo log files when performing an offline backup because the database isin a consistent state at the time of backup and does not require media recovery ifyou restore.
5. Select Delete all archived logs from disk after they are successfully backed up ifyou are using shared storage for your archived redo log files.
Performing Backups of Your Oracle Real Application Clusters Database
7-10 Oracle Database 2 Day + Real Application Clusters Guide
Note:
Do not select Delete all archived logs from disk after they are successfullybacked up if you are using a fast recovery area as your only archive logdestination. In this case, archived redo log files that have been backed up aredeleted automatically as space is needed for storage of other files.
See Also:
• "About Archived Redo Log Files for an Oracle RAC Database (page 7-5)"
• Oracle Database 2 Day DBA for more information about configuringbackup settings
7.6 Recovering Your Oracle Real Application Clusters DatabaseThe Enterprise Manager Guided Recovery capability provides a Recovery Wizard thatencapsulates the logic required for a wide range of restore and recovery scenarios.
Enterprise Manager can determine which parts of the database must be restored andrecovered, including early detection of situations such as corrupted database files.Enterprise Manager takes you through the recovery process, prompting forinformation and performing required file restoration and recovery actions.
This section discusses both instance recovery and media recovery.
About Preparing to Restore and Recover Your Oracle RAC Database (page 7-12)The node that performs the recovery of an Oracle Real ApplicationClusters (Oracle RAC) database must be able to restore all the requireddata files. That node must also be able to either read all the requiredarchived redo log files on disk or be able to restore the archived redo logfiles from backup files.
About Restoring Archived Redo Log File Files (page 7-13)If you use Oracle ASM or a clustered file system for storing the archivedredo log files, then any instance can restore the archived redo log files.
About Performing Recovery Using Parallelism (page 7-14)Oracle Real Application Clusters (Oracle RAC) automatically selects theoptimum degree of parallelism for instance failure and media recovery.
Recovering the Oracle RAC Database Using Enterprise Manager (page 7-14)You can use Oracle Enterprise Manager and Recovery Manager (RMAN)to restore and recover an Oracle Real Application Clusters (Oracle RAC)database.
Recovering the Server Parameter File from an Automatic File Backup(page 7-15)
You can use Enterprise Manager to recover a lost or damaged serverparameter file (SPFILE).
Recovering Your Oracle Real Application Clusters Database
Administering Backup and Recovery 7-11
See Also:
• "Overview of Oracle RAC Database Backup and Recovery (page 7-2)"
• "About the Fast Recovery Area in Oracle RAC (page 7-3)"
7.6.1 About Preparing to Restore and Recover Your Oracle RAC DatabaseThe node that performs the recovery of an Oracle Real Application Clusters (OracleRAC) database must be able to restore all the required data files. That node must alsobe able to either read all the required archived redo log files on disk or be able torestore the archived redo log files from backup files.
About Configuring Access to the Archive Log (page 7-12)During recovery, because the archive log file destinations are visiblefrom the node that performs the recovery, Oracle RAC can successfullyaccess the archived redo log files during recovery.
About Putting the Oracle RAC Database Instances into the Correct State(page 7-13)
If your database requires media recovery, you must start the databaseinstances in the correct mode before beginning recovery.
See Also:
• "About Archived Redo Log Files for an Oracle RAC Database (page 7-5)"
• Oracle Database 2 Day DBA for information about database backup andrecovery concepts
• Oracle Database 2 Day DBA for information about archived redo log files
7.6.1.1 About Configuring Access to the Archive LogDuring recovery, because the archive log file destinations are visible from the nodethat performs the recovery, Oracle RAC can successfully access the archived redo logfiles during recovery.
If you do not use shared storage or a clustered file system to store the archived redolog files for your cluster database, then you must make the archived redo log filesavailable to the node performing the recovery.
See Also:
• "About Archived Redo Log Files for an Oracle RAC Database (page 7-5)"
• "Administering Redo Logs in Oracle RAC (page 4-18)"
• Oracle Database 2 Day DBA for information about the online redo log files
• Oracle Database 2 Day DBA for information about archived redo log files
Recovering Your Oracle Real Application Clusters Database
7-12 Oracle Database 2 Day + Real Application Clusters Guide
7.6.1.2 About Putting the Oracle RAC Database Instances into the Correct StateIf your database requires media recovery, you must start the database instances in thecorrect mode before beginning recovery.
Recovery of a failed instance in Oracle RAC is automatic. If an Oracle RAC databaseinstance fails, then a surviving database instance processes the online redo logsgenerated by the failed instance to ensure that the database contents are in a consistentstate. When recovery completes, Oracle Clusterware attempts to restart the failedinstance automatically.
Media recovery is a manual process that occurs while a database is closed. A mediafailure is the failure of a read or write operation of a disk file required to run thedatabase, due to a physical problem with the disk such as a head malfunction. Anydatabase file can be vulnerable to a media failure. If a media failure occurs, then youmust perform media recovery to restore and recover the damaged database files.Media recovery is always done by one instance in the cluster.
Before starting media recovery, the instance that is performing the recovery should bestarted in MOUNT mode. The other instances should be started in NOMOUNT mode.
See Also:
• "Starting and Stopping Oracle RAC Databases and Database Instances(page 4-3)"
• Oracle Database 2 Day DBA for information about the Oracle advisedrecovery feature and Data Recovery Advisor
7.6.2 About Restoring Archived Redo Log File FilesIf you use Oracle ASM or a clustered file system for storing the archived redo log files,then any instance can restore the archived redo log files.
During a restore operation, RMAN automatically locates the most recent backups ofthe database that are available. A channel connected to a specific node attempts torestore files that were backed up only to that node. For example, assume that anarchived redo log file with the sequence number 1_001 is backed up to a deviceattached to the node racnode1, while the archived redo log file with sequencenumber 2_003 is backed up to a device attached to the node racnode2. If you allocatechannels that connect to nodes racnode1 and racnode2 for a restore operation, thenthe channel connected to racnode1 restores log sequence 1_001, but not log sequence2_003. The channel connected to racnode2 can restore log sequence 2_003, but not logsequence 1_001.
See Also:
• "About Archived Redo Log Files for an Oracle RAC Database (page 7-5)"
• "Configuring Archiving for Your Oracle RAC Database (page 7-6)"
• Oracle Database Backup and Recovery User's Guide for more informationabout restoring archived redo log file files
Recovering Your Oracle Real Application Clusters Database
Administering Backup and Recovery 7-13
7.6.3 About Performing Recovery Using ParallelismOracle Real Application Clusters (Oracle RAC) automatically selects the optimumdegree of parallelism for instance failure and media recovery.
When using Enterprise Manager and Recovery Manager (RMAN) to perform therecovery, Oracle RAC automatically makes parallel the following three stages ofrecovery:
• Restoring Data files—When restoring data files, the number of channels youallocate in the RMAN recovery script effectively sets the parallelism that RMANuses. For example, if you allocate five channels, then you can have up to fiveparallel streams restoring data files.
• Applying Incremental Backups—Similarly, when you are applying incrementalbackups, the number of channels you allocate determines the potentialparallelism.
• Applying Archived Redo Log Files—Using RMAN, the application of archivedredo log files is performed in parallel. Oracle RAC automatically selects theoptimum degree of parallelism based on available CPU resources.
See Also:
• "Overview of Oracle RAC Database Backup and Recovery (page 7-2)"
• Oracle Database 2 Day DBA for more information about incrementalbackups of data files
• Oracle Database 2 Day DBA for more information about configuringrecovery settings
7.6.4 Recovering the Oracle RAC Database Using Enterprise ManagerYou can use Oracle Enterprise Manager and Recovery Manager (RMAN) to restoreand recover an Oracle Real Application Clusters (Oracle RAC) database.
When using Enterprise Manager and RMAN, the process of recovering and restoringan Oracle RAC database is essentially the same as for a single-instance Oracledatabase, except that you access RMAN from the Availability page at the clusterdatabase level, instead of at the instance level.
To use Enterprise Manager and RMAN to restore and recover an Oracle RACdatabase:
1. In Oracle Enterprise Manager, go to the Cluster Database Home page, and log in asa SYSDBA user.
See Oracle Database 2 Day DBA for details on logging in to Oracle EnterpriseManager.
2. From the Availability menu, select Backup and Recovery, and then PerformRecovery.
The Perform Recovery page appears.
Recovering Your Oracle Real Application Clusters Database
7-14 Oracle Database 2 Day + Real Application Clusters Guide

3. Follow the recovery procedures outlined in Chapter 9 of Oracle Database 2 DayDBA.
See Also:
• "About Preparing to Restore and Recover Your Oracle RAC Database(page 7-12)"
• Oracle Database 2 Day DBA for more information about performing user-directed recovery
7.6.5 Recovering the Server Parameter File from an Automatic File BackupYou can use Enterprise Manager to recover a lost or damaged server parameter file(SPFILE).
To recover an SPFILE for an Oracle RAC database:
1. Start the database in MOUNT mode.
2. In Oracle Enterprise Manager, go to the Cluster Database Home page, and log in asa SYSDBA user.
See Oracle Database 2 Day DBA for details on logging in to Oracle EnterpriseManager.
3. From the Availability menu, select Backup and Recovery, and then PerformRecovery.
When the database is not open, the Perform Recovery link takes you to the SPFILErestore page.
4. Specify the location of the fast recovery area, if configured.
5. In the Backup Information section, select Use Other Backup Information and Usean Autobackup.
6. On the Perform Recovery: Restore SPFILE page, specify a different location for theSPFILE to be restored to.
7. When finished selecting your options, click Restore, then click Yes to confirm youwant to restore the SPFILE.
8. After the SPFILE is restored, you are prompted to log in to the database again.
See Also:
• "Starting and Stopping Oracle RAC Databases and Database Instances(page 4-3)"
• "About the Server Parameter File for Oracle Real Application Clusters(page 4-10)"
• Oracle Database Backup and Recovery User’s Guide for more informationabout recovering a server parameter file
Recovering Your Oracle Real Application Clusters Database
Administering Backup and Recovery 7-15

7.7 About Managing Your Database Backup FilesYou can use Oracle Enterprise Manager to manage your database backup files.
Managing RMAN backup files, with or without Enterprise Manager, consists of twotasks:
1. Managing the backup files for your database that are stored on disk or tape
2. Managing the record of those backup files in the RMAN repository
Enterprise Manager simplifies both backup file management tasks. Other tasksinvolved in managing backup files include the following:
• Searching for backup files
• Validating the contents of backup sets or image copies
• Cross-checking a backup
• Deleting expired or obsolete backup files
• Marking backup files as available or unavailable
See Also:
• "Overview of Oracle RAC Database Backup and Recovery (page 7-2)"
• "Performing Backups of Your Oracle Real Application Clusters Database(page 7-9)"
• Oracle Database 2 Day DBA for more information about managing RMANbackup files
• Oracle Database 2 Day DBA for information about backup reports
• Oracle Database 2 Day DBA for information about validating your backupsand testing your backup strategy
• Oracle Database 2 Day DBA for information about deleting expiredbackups
• Oracle Database 2 Day DBA for information about marking backups asavailable or unavailable
7.8 Displaying Backup Reports for Your Oracle Real Application ClustersDatabase
You can use Oracle Enterprise Manager to view backup reports.
Backup reports contain summary and detailed information about past backup jobs runby Recovery Manager (RMAN), including backup jobs run through Oracle EnterpriseManager and the RMAN command-line client.
About Managing Your Database Backup Files
7-16 Oracle Database 2 Day + Real Application Clusters Guide
To view backup reports:
1. In Oracle Enterprise Manager, go to the Cluster Database Home page, and log in asa SYSDBA user.
See Oracle Database 2 Day DBA for details on logging in to Oracle EnterpriseManager.
2. From the Availability menu, select Backup and Recovery, and then BackupReports.
The View Backup Report page appears, with a list of recent backup jobs.
3. In the Search section, specify any filter conditions and click Go to restrict the list tobackups of interest.
You can use the Search section of the page to restrict the backups listed by the timeof the backup, the type of data backed up, and the status of the jobs (whether itsucceeded or failed, and whether warnings were generated during the job).
4. To view detailed information about any backup, click the backup job name in theBackup Name column.
The Backup Report page is displayed for the selected backup job. This pagecontains summary information about this backup job, such as how many files ofeach type were backed up, the total size of the data backed up, and the number,size, and type of backup files created.
The Backup Report page also contains a Search section that you can use to quicklyrun a search for another backup job or backup jobs from a specific date range. Theresulting report contains aggregate information for backup jobs matching thesearch criteria.
See Also:
• "About Managing Your Database Backup Files (page 7-16)"
• "Performing Backups of Your Oracle Real Application Clusters Database(page 7-9)"
• Oracle Database 2 Day DBA for more information about displaying backupreports
Displaying Backup Reports for Your Oracle Real Application Clusters Database
Administering Backup and Recovery 7-17

Displaying Backup Reports for Your Oracle Real Application Clusters Database
7-18 2 Day + Real Application Clusters Guide

8Monitoring Performance and
Troubleshooting
Performance tuning for an Oracle Real Application Clusters (Oracle RAC) database isvery similar to performance tuning for a single-instance database.
Many of the tuning tasks that you perform on single-instance Oracle databases canalso improve performance of your Oracle RAC database. The following topics focus onthe performance tuning and monitoring tasks that are unique to Oracle RAC.
Monitoring Oracle RAC Database and Cluster Performance (page 8-2)Oracle Enterprise Manager Cloud Control is cluster-aware and providesa central console to manage your cluster database.
Viewing Other Performance Related Charts (page 8-16)In the Additional Monitoring Links and Additional Instance MonitoringLinks section of the Cluster Database Performance page, there are linksto other charts that are useful in evaluating the performance of yourcluster database.
Viewing the Cluster Database Topology (page 8-25)Using Enterprise Manager you can view a graphical representation ofyour cluster environment. Using the topology view you can quickly seethe components that comprise your cluster database environment, suchas database instances, listeners, Oracle ASM instances, hosts, andinterfaces.
Monitoring Oracle Clusterware (page 8-25)You can use Enterprise Manager to monitor Oracle Clusterware.
Troubleshooting Configuration Problems in Oracle RAC Environments(page 8-35)
The Cluster Ready Services Control (CRSCTL) command check enablesyou to determine the status of several Oracle Clusterware componentssimultaneously.
Monitoring Performance and Troubleshooting 8-1
See Also:
• Oracle Database 2 Day DBA for more information about basic databasetuning
• Oracle Database 2 Day + Performance Tuning Guide for more informationabout general performance tuning
• Oracle Database Performance Tuning Guide
• Oracle Real Application Clusters Administration and Deployment Guide formore information about diagnosing problems for Oracle Real ApplicationClusters components
• Oracle Clusterware Administration and Deployment Guide for moreinformation about diagnosing problems for Oracle Clusterwarecomponents
8.1 Monitoring Oracle RAC Database and Cluster PerformanceOracle Enterprise Manager Cloud Control is cluster-aware and provides a centralconsole to manage your cluster database.
From the Cluster Database Home page, you can do all of the following:
• View the overall system status, such as the number of nodes in the cluster andtheir current status. This high-level view capability means that you do not have toaccess each individual database instance for details if you just want to seeinclusive, aggregated information.
• View alert messages aggregated across all the instances with lists for the source ofeach alert message. An alert message is an indicator that signifies that a particularmetric condition has been encountered. A metric is a unit of measurement used toreport the system's conditions.
• Review issues that are affecting the entire cluster and those that are affectingindividual instances.
• Monitor cluster cache coherency statistics to help you identify processing trendsand optimize performance for your Oracle RAC environment. Cache coherencystatistics measure how well the data in caches on multiple instances issynchronized. If the data caches are completely synchronized with each other,then reading a memory location from the cache on any instance returns the mostrecent data written to that location from any cache on any instance.
• Determine if any of the services for the cluster database are having availabilityproblems. A service is considered to be a problem service if it is not running on allpreferred instances, if its response time thresholds are not met, and so on.Clicking on the link on the Cluster Database Home page opens the ClusterManaged Database services page where the service can be managed.
• Review any outstanding Clusterware interconnect alerts.
Also note the following points about monitoring Oracle RAC environments:
• Performance monitoring features, such as Automatic Workload Repository(AWR) and Statspack, are Oracle RAC-aware.
Monitoring Oracle RAC Database and Cluster Performance
8-2 Oracle Database 2 Day + Real Application Clusters Guide

Note:
Instead of using Statspack, Oracle recommends that you use the moresophisticated management and monitoring features of the Oracle Database 12cDiagnostic and Tuning packs, which include AWR.
• You can use global dynamic performance views, or GV$ views, to view statisticsacross instances. These views are based on the single-instance V$ views.
About Automatic Database Diagnostic Monitor and Oracle RAC Performance(page 8-3)
The Automatic Database Diagnostic Monitor (ADDM) is a self-diagnostic engine built into the Oracle Database.
Viewing ADDM for Oracle RAC Findings (page 8-4)By default, Automatic Database Diagnostic Monitor (ADDM) runs everyhour to analyze snapshots taken by the AWR during that period. If thedatabase finds performance problems, then it displays the results of theanalysis under Diagnostic Summary on the Cluster Database Homepage.
Using the Cluster Database Performance Page (page 8-7)The Cluster Database Performance page of Oracle Enterprise Managerprovides a quick glimpse of the performance statistics for a database.
See Also:
• "About Oracle RAC Management Using Enterprise Manager (page 4-3)"
• Oracle Database 2 Day DBA for information about Automatic DatabaseDiagnostic Monitor (ADDM)
• Oracle Database 2 Day + Performance Tuning Guide for information aboutthe various tools used to tune and optimize your Oracle RAC database
8.1.1 About Automatic Database Diagnostic Monitor and Oracle RAC PerformanceThe Automatic Database Diagnostic Monitor (ADDM) is a self-diagnostic engine builtinto the Oracle Database.
ADDM examines and analyzes data captured in the Automatic Workload Repository(AWR) to determine possible performance problems in Oracle Database. ADDM thenlocates the root causes of the performance problems, provides recommendations forcorrecting them, and quantifies the expected benefits. ADDM analyzes the AWR datafor performance problems at both the database and the instance level.
An ADDM analysis is performed as each AWR snapshot is generated, which is everyhour by default. The results are saved in the database and can be viewed by usingEnterprise Manager. Any time you have a performance problem, you should firstreview the results of the ADDM analysis. An ADDM analysis is performed from thetop down, first identifying symptoms, then refining the analysis to reach the rootcauses, and finally providing remedies for the problems.
For the cluster-wide analysis, Enterprise Manager reports two types of findings:
Monitoring Oracle RAC Database and Cluster Performance
Monitoring Performance and Troubleshooting 8-3
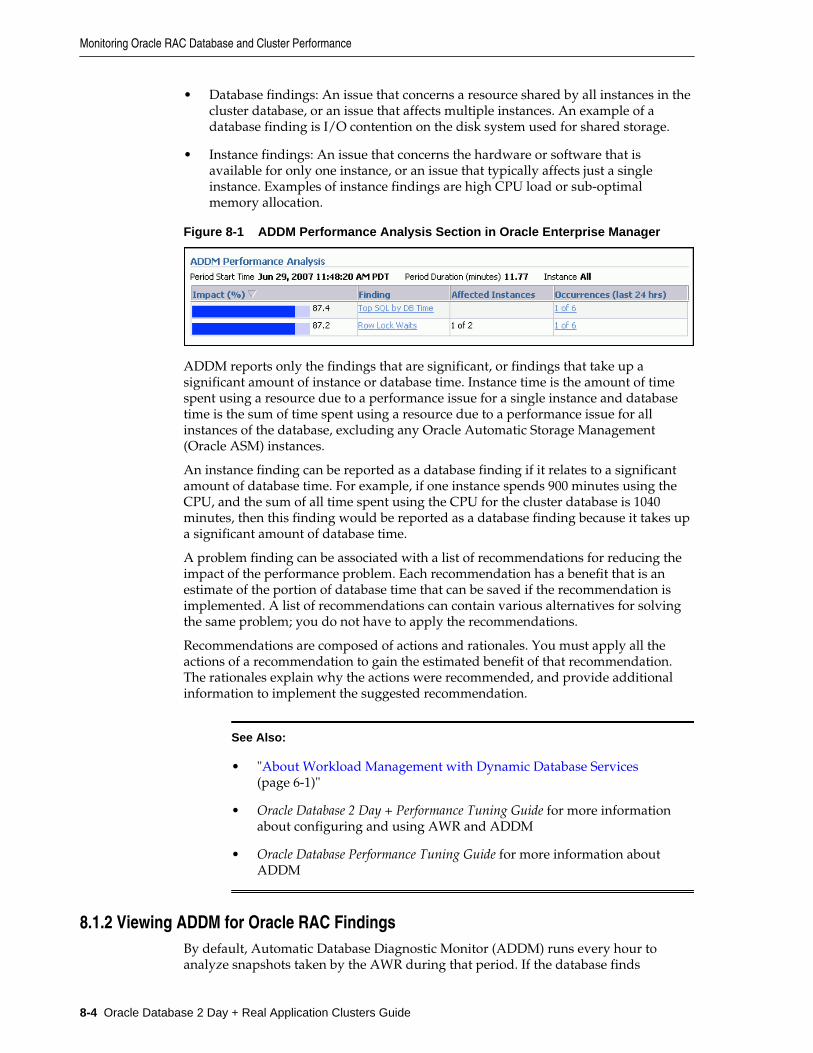
• Database findings: An issue that concerns a resource shared by all instances in thecluster database, or an issue that affects multiple instances. An example of adatabase finding is I/O contention on the disk system used for shared storage.
• Instance findings: An issue that concerns the hardware or software that isavailable for only one instance, or an issue that typically affects just a singleinstance. Examples of instance findings are high CPU load or sub-optimalmemory allocation.
Figure 8-1 ADDM Performance Analysis Section in Oracle Enterprise Manager
ADDM reports only the findings that are significant, or findings that take up asignificant amount of instance or database time. Instance time is the amount of timespent using a resource due to a performance issue for a single instance and databasetime is the sum of time spent using a resource due to a performance issue for allinstances of the database, excluding any Oracle Automatic Storage Management(Oracle ASM) instances.
An instance finding can be reported as a database finding if it relates to a significantamount of database time. For example, if one instance spends 900 minutes using theCPU, and the sum of all time spent using the CPU for the cluster database is 1040minutes, then this finding would be reported as a database finding because it takes upa significant amount of database time.
A problem finding can be associated with a list of recommendations for reducing theimpact of the performance problem. Each recommendation has a benefit that is anestimate of the portion of database time that can be saved if the recommendation isimplemented. A list of recommendations can contain various alternatives for solvingthe same problem; you do not have to apply the recommendations.
Recommendations are composed of actions and rationales. You must apply all theactions of a recommendation to gain the estimated benefit of that recommendation.The rationales explain why the actions were recommended, and provide additionalinformation to implement the suggested recommendation.
See Also:
• "About Workload Management with Dynamic Database Services(page 6-1)"
• Oracle Database 2 Day + Performance Tuning Guide for more informationabout configuring and using AWR and ADDM
• Oracle Database Performance Tuning Guide for more information aboutADDM
8.1.2 Viewing ADDM for Oracle RAC FindingsBy default, Automatic Database Diagnostic Monitor (ADDM) runs every hour toanalyze snapshots taken by the AWR during that period. If the database finds
Monitoring Oracle RAC Database and Cluster Performance
8-4 Oracle Database 2 Day + Real Application Clusters Guide
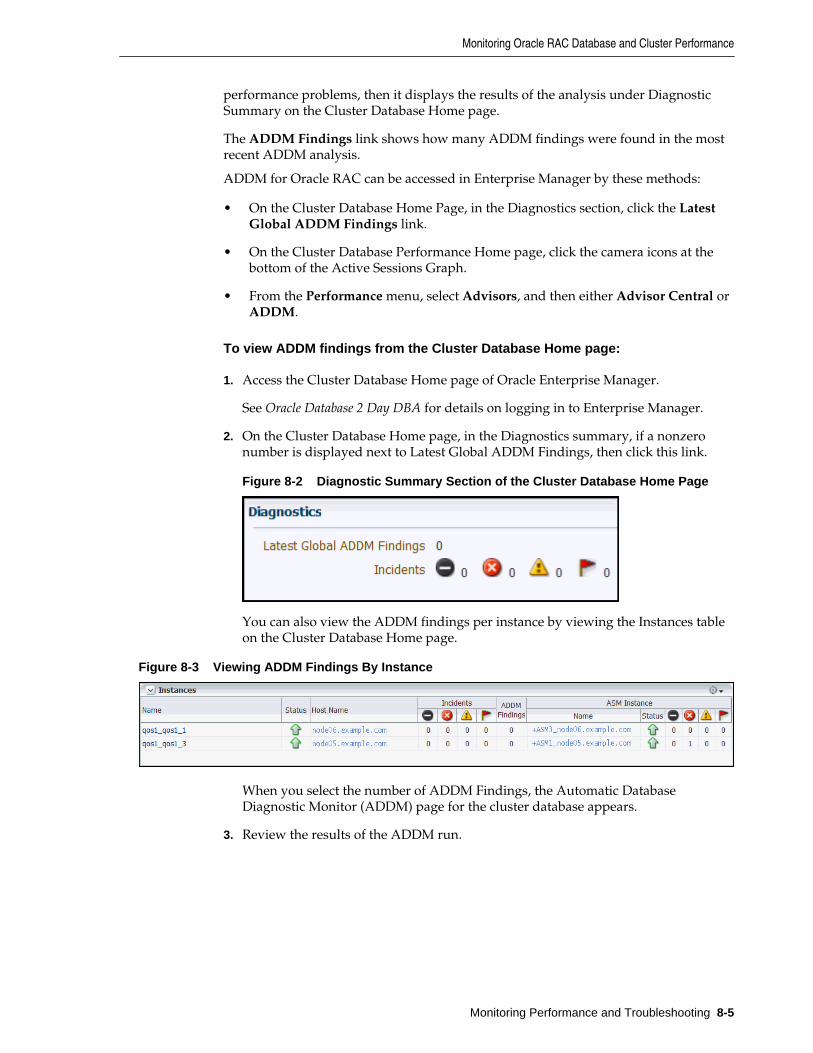
performance problems, then it displays the results of the analysis under DiagnosticSummary on the Cluster Database Home page.
The ADDM Findings link shows how many ADDM findings were found in the mostrecent ADDM analysis.
ADDM for Oracle RAC can be accessed in Enterprise Manager by these methods:
• On the Cluster Database Home Page, in the Diagnostics section, click the LatestGlobal ADDM Findings link.
• On the Cluster Database Performance Home page, click the camera icons at thebottom of the Active Sessions Graph.
• From the Performance menu, select Advisors, and then either Advisor Central orADDM.
To view ADDM findings from the Cluster Database Home page:
1. Access the Cluster Database Home page of Oracle Enterprise Manager.
See Oracle Database 2 Day DBA for details on logging in to Enterprise Manager.
2. On the Cluster Database Home page, in the Diagnostics summary, if a nonzeronumber is displayed next to Latest Global ADDM Findings, then click this link.
Figure 8-2 Diagnostic Summary Section of the Cluster Database Home Page
You can also view the ADDM findings per instance by viewing the Instances tableon the Cluster Database Home page.
Figure 8-3 Viewing ADDM Findings By Instance
When you select the number of ADDM Findings, the Automatic DatabaseDiagnostic Monitor (ADDM) page for the cluster database appears.
3. Review the results of the ADDM run.
Monitoring Oracle RAC Database and Cluster Performance
Monitoring Performance and Troubleshooting 8-5
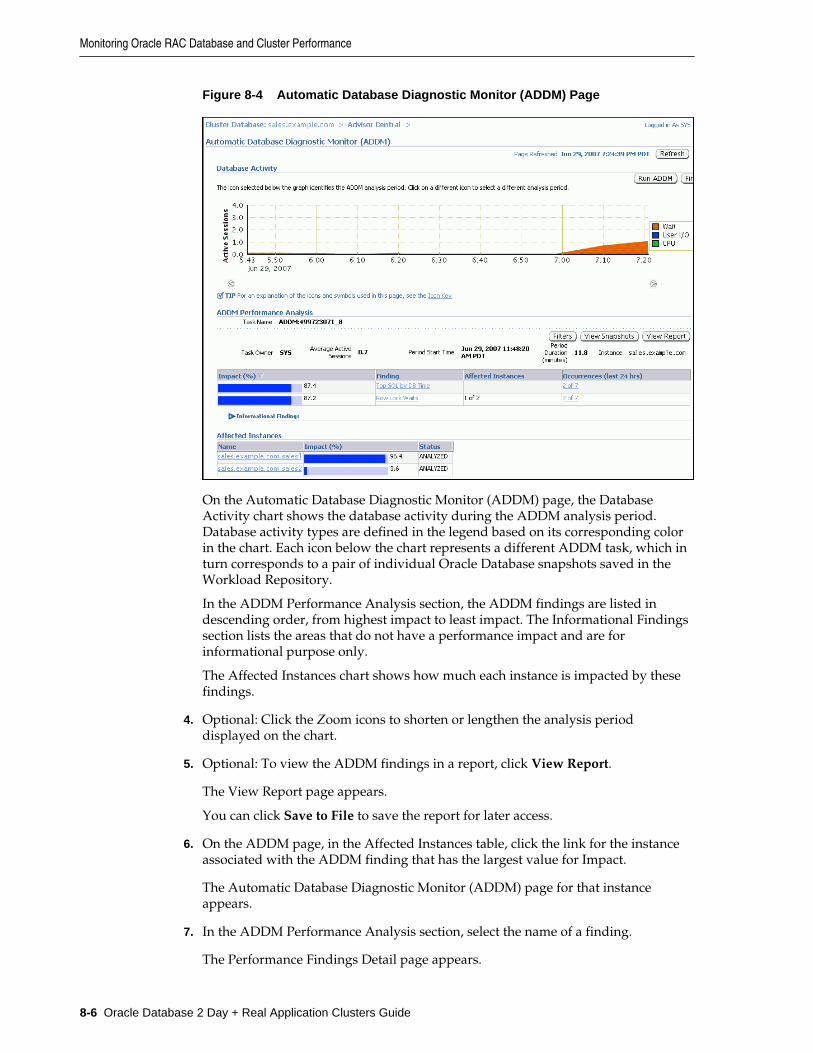
Figure 8-4 Automatic Database Diagnostic Monitor (ADDM) Page
On the Automatic Database Diagnostic Monitor (ADDM) page, the DatabaseActivity chart shows the database activity during the ADDM analysis period.Database activity types are defined in the legend based on its corresponding colorin the chart. Each icon below the chart represents a different ADDM task, which inturn corresponds to a pair of individual Oracle Database snapshots saved in theWorkload Repository.
In the ADDM Performance Analysis section, the ADDM findings are listed indescending order, from highest impact to least impact. The Informational Findingssection lists the areas that do not have a performance impact and are forinformational purpose only.
The Affected Instances chart shows how much each instance is impacted by thesefindings.
4. Optional: Click the Zoom icons to shorten or lengthen the analysis perioddisplayed on the chart.
5. Optional: To view the ADDM findings in a report, click View Report.
The View Report page appears.
You can click Save to File to save the report for later access.
6. On the ADDM page, in the Affected Instances table, click the link for the instanceassociated with the ADDM finding that has the largest value for Impact.
The Automatic Database Diagnostic Monitor (ADDM) page for that instanceappears.
7. In the ADDM Performance Analysis section, select the name of a finding.
The Performance Findings Detail page appears.
Monitoring Oracle RAC Database and Cluster Performance
8-6 Oracle Database 2 Day + Real Application Clusters Guide
8. View the available Recommendations for resolving the performance problem. Runthe SQL Tuning Advisor to tune the SQL statements that are causing theperformance findings.
See Also:
• Oracle Database 2 Day + Performance Tuning Guide for more informationabout monitoring user activity
• Oracle Database 2 Day DBA for more information about tuning a databaseand instance
8.1.3 Using the Cluster Database Performance PageThe Cluster Database Performance page of Oracle Enterprise Manager provides aquick glimpse of the performance statistics for a database.
Enterprise Manager accumulates data from each instance over specified periods oftime, called collection-based data. Enterprise Manager also provides current data fromeach instance, known as real-time data. Statistics are rolled up across all the instancesin the cluster database.
Using the links next to the charts, you can get more specific information and performany of the following tasks:
• Identify the causes of performance issues.
• Decide whether resources need to be added or redistributed.
• Tune your SQL plan and schema for better optimization.
• Resolve performance issues.
The following screenshot shows a partial view of the Cluster Database Performancepage. You access this page by selecting Performance Home from Performance menu.
Monitoring Oracle RAC Database and Cluster Performance
Monitoring Performance and Troubleshooting 8-7
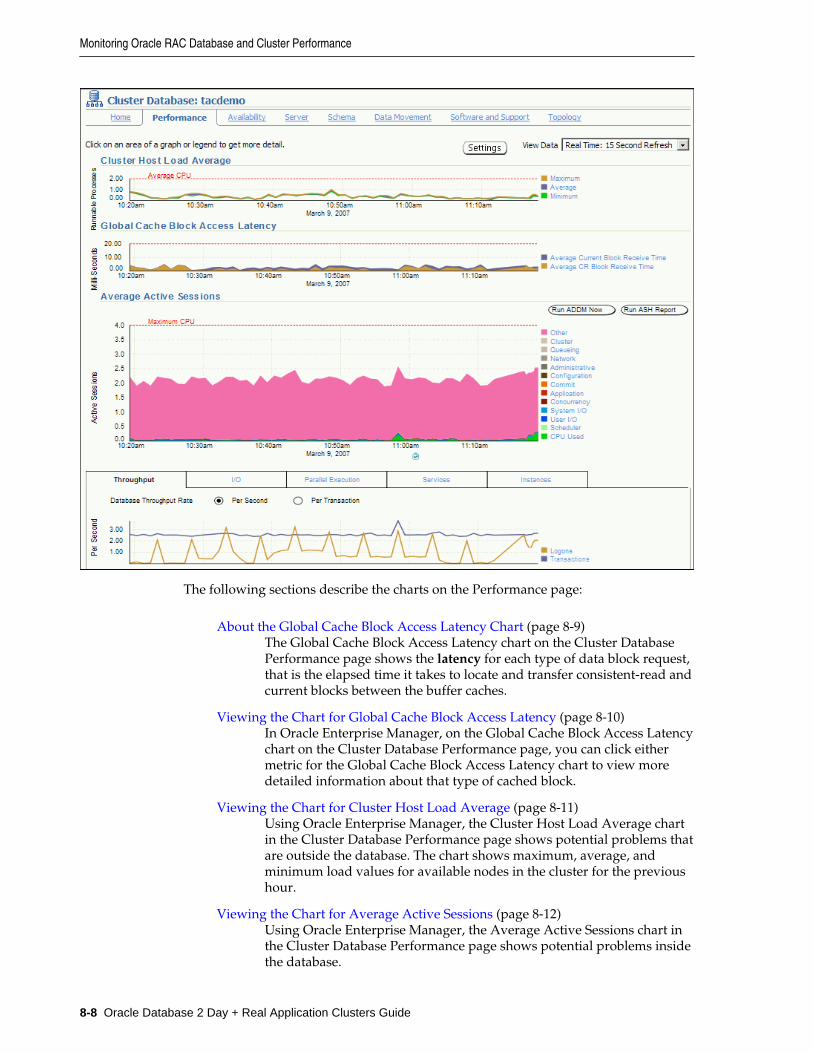
The following sections describe the charts on the Performance page:
About the Global Cache Block Access Latency Chart (page 8-9)The Global Cache Block Access Latency chart on the Cluster DatabasePerformance page shows the latency for each type of data block request,that is the elapsed time it takes to locate and transfer consistent-read andcurrent blocks between the buffer caches.
Viewing the Chart for Global Cache Block Access Latency (page 8-10)In Oracle Enterprise Manager, on the Global Cache Block Access Latencychart on the Cluster Database Performance page, you can click eithermetric for the Global Cache Block Access Latency chart to view moredetailed information about that type of cached block.
Viewing the Chart for Cluster Host Load Average (page 8-11)Using Oracle Enterprise Manager, the Cluster Host Load Average chartin the Cluster Database Performance page shows potential problems thatare outside the database. The chart shows maximum, average, andminimum load values for available nodes in the cluster for the previoushour.
Viewing the Chart for Average Active Sessions (page 8-12)Using Oracle Enterprise Manager, the Average Active Sessions chart inthe Cluster Database Performance page shows potential problems insidethe database.
Monitoring Oracle RAC Database and Cluster Performance
8-8 Oracle Database 2 Day + Real Application Clusters Guide

Viewing the Database Throughput Chart (page 8-13)Using Oracle Enterprise Manager, the last chart on the Cluster DatabasePerformance page monitors the usage of various database resources. Byclicking the Throughput tab at the top of this chart you can view theDatabase Throughput chart.
Viewing the Services Chart (page 8-14)On the Performance page of Oracle Enterprise Manager, the usagemetrics of various database resources are shown in charts. If you clickthe Services tab at the top of this chart, then you can view the Serviceschart.
Viewing the Active Sessions by Instance Chart (page 8-15)On the Performance page of Oracle Enterprise Manager, there is a chartthat monitors the usage of various database resources. By clicking theInstances tab at the top of this chart you can view the Active Sessions byInstance chart.
See Also:
• Oracle Database 2 Day + Performance Tuning Guide for information aboutmonitoring real-time database performance
• Oracle Database 2 Day + Performance Tuning Guide for information aboutthe Oracle Database performance method
8.1.3.1 About the Global Cache Block Access Latency ChartThe Global Cache Block Access Latency chart on the Cluster Database Performancepage shows the latency for each type of data block request, that is the elapsed time ittakes to locate and transfer consistent-read and current blocks between the buffercaches.
Each cluster database instance has its own buffer cache in its System Global Area(SGA). Using Cache Fusion, Oracle RAC environments logically combine eachinstance's buffer cache to enable the database instances to process data as if the dataresided on a logically combined, single cache.
When a process attempts to access a data block, it first tries to locate a copy of the datablock in the local buffer cache. If a copy of the data block is not found in the localbuffer cache, then a global cache operation is initiated. Before reading a data blockfrom disk, the process attempts to find the data block in the buffer cache of anotherinstance. If the data block is in the buffer cache of another instance, then Cache Fusiontransfers a version of the data block to the local buffer cache, rather than having onedatabase instance write the data block to disk and requiring the other instance toreread the data block from disk. For example, after the orcl1 instance loads a datablock into its buffer cache, the orcl2 instance can more quickly acquire the data blockfrom the orcl1 instance by using Cache Fusion rather than by reading the data blockfrom disk.
The Global Cache Block Access Latency chart shows data for two different types ofdata block requests: current and consistent-read (CR) blocks. When you update data inthe database, Oracle Database must locate the most recent version of the data blockthat contains the data, which is called the current block. If you perform a query, thenonly data committed before the query began is visible to the query. Data blocks thatwere changed after the start of the query are reconstructed from data in the undo
Monitoring Oracle RAC Database and Cluster Performance
Monitoring Performance and Troubleshooting 8-9
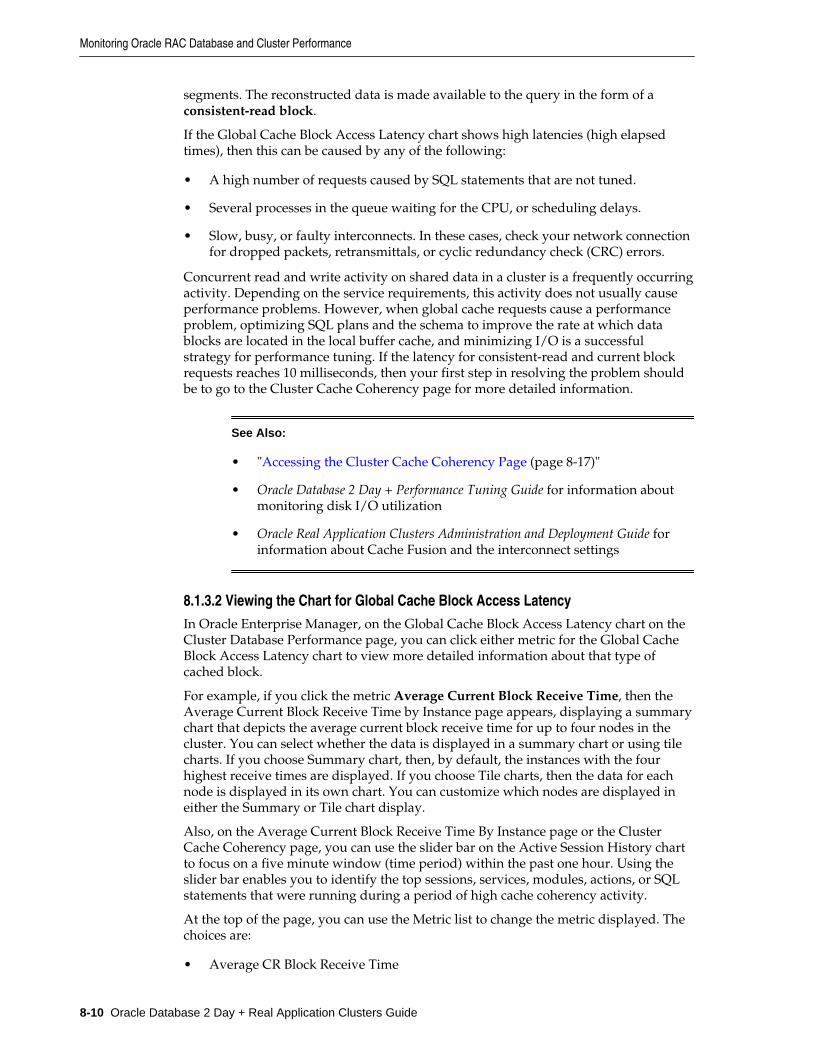
segments. The reconstructed data is made available to the query in the form of aconsistent-read block.
If the Global Cache Block Access Latency chart shows high latencies (high elapsedtimes), then this can be caused by any of the following:
• A high number of requests caused by SQL statements that are not tuned.
• Several processes in the queue waiting for the CPU, or scheduling delays.
• Slow, busy, or faulty interconnects. In these cases, check your network connectionfor dropped packets, retransmittals, or cyclic redundancy check (CRC) errors.
Concurrent read and write activity on shared data in a cluster is a frequently occurringactivity. Depending on the service requirements, this activity does not usually causeperformance problems. However, when global cache requests cause a performanceproblem, optimizing SQL plans and the schema to improve the rate at which datablocks are located in the local buffer cache, and minimizing I/O is a successfulstrategy for performance tuning. If the latency for consistent-read and current blockrequests reaches 10 milliseconds, then your first step in resolving the problem shouldbe to go to the Cluster Cache Coherency page for more detailed information.
See Also:
• "Accessing the Cluster Cache Coherency Page (page 8-17)"
• Oracle Database 2 Day + Performance Tuning Guide for information aboutmonitoring disk I/O utilization
• Oracle Real Application Clusters Administration and Deployment Guide forinformation about Cache Fusion and the interconnect settings
8.1.3.2 Viewing the Chart for Global Cache Block Access LatencyIn Oracle Enterprise Manager, on the Global Cache Block Access Latency chart on theCluster Database Performance page, you can click either metric for the Global CacheBlock Access Latency chart to view more detailed information about that type ofcached block.
For example, if you click the metric Average Current Block Receive Time, then theAverage Current Block Receive Time by Instance page appears, displaying a summarychart that depicts the average current block receive time for up to four nodes in thecluster. You can select whether the data is displayed in a summary chart or using tilecharts. If you choose Summary chart, then, by default, the instances with the fourhighest receive times are displayed. If you choose Tile charts, then the data for eachnode is displayed in its own chart. You can customize which nodes are displayed ineither the Summary or Tile chart display.
Also, on the Average Current Block Receive Time By Instance page or the ClusterCache Coherency page, you can use the slider bar on the Active Session History chartto focus on a five minute window (time period) within the past one hour. Using theslider bar enables you to identify the top sessions, services, modules, actions, or SQLstatements that were running during a period of high cache coherency activity.
At the top of the page, you can use the Metric list to change the metric displayed. Thechoices are:
• Average CR Block Receive Time
Monitoring Oracle RAC Database and Cluster Performance
8-10 Oracle Database 2 Day + Real Application Clusters Guide

• Average Current Block Receive Time
• GC Current Blocks Received
• GC CR Blocks Received
• Physical Reads
• Global Cache Block Transfers
Each metric displays a monitoring page for that metric. On each metric monitoringpage you can view the data for that metric in either a summary chart or using tilecharts. You can also view the Maximum, Average, Minimum chart on the metricmonitoring page to view the maximum, average, and minimum values for the metricfor all active cluster database instances.
Figure 8-5 Average Current Block Receive Time by Instance Page
See Also:
• "Accessing the Cluster Cache Coherency Page (page 8-17)"
• Oracle Database 2 Day + Performance Tuning Guide for information aboutmonitoring disk I/O utilization
• Oracle Real Application Clusters Administration and Deployment Guide formore information about monitoring the performance of inter-instancemessaging and contention
8.1.3.3 Viewing the Chart for Cluster Host Load AverageUsing Oracle Enterprise Manager, the Cluster Host Load Average chart in the ClusterDatabase Performance page shows potential problems that are outside the database.The chart shows maximum, average, and minimum load values for available nodes inthe cluster for the previous hour.
If the load average is higher than the average of the total number of CPUs across allthe hosts in the cluster, then too many processes are waiting for CPU resources. SQL
Monitoring Oracle RAC Database and Cluster Performance
Monitoring Performance and Troubleshooting 8-11

statements that are not tuned often cause high CPU usage. Compare the load averagevalues with the values displayed for CPU Used in the Average Active Sessions chart.If the sessions value is low and the load average value is high, then this indicates thatsomething else on the host, other than your database, is consuming the CPU.
You can click any of the load value labels for the Cluster Host Load Average chart toview more detailed information about that load value. For example, if you click thelabel Average, then the Hosts: Average Load page appears, displaying charts thatdepict the average host load for up to four nodes in the cluster.
You can select whether the data is displayed in a summary chart, combining the datafor each node in one display, or using tile charts, where the data for each node isdisplayed in its own chart. You can click Customize to change the number of tilecharts displayed in each row or the method of ordering the tile charts.
For more information about changing the data displayed on the Hosts: Average Loadpage, refer to the Enterprise Manager online Help.
See Also:
• Oracle Database 2 Day + Performance Tuning Guide for information aboutmonitoring host activity
• Oracle Database 2 Day + Performance Tuning Guide for a list of commonperformance problems found in databases
8.1.3.4 Viewing the Chart for Average Active SessionsUsing Oracle Enterprise Manager, the Average Active Sessions chart in the ClusterDatabase Performance page shows potential problems inside the database.
Categories, called wait classes, show how much of the database is using a resource,such as CPU or disk I/O. Comparing CPU time to wait time helps to determine howmuch of the response time is consumed with useful work rather than waiting forresources that are potentially held by other processes.
The chart displays the workload on the database or instance and identifiesperformance issues. At the cluster database level, this chart shows the aggregate waitclass statistics across all the instances. For a more detailed analysis, you can click theclipboard icon at the bottom of the chart to view the ADDM analysis for the databasefor that time period.
Compare the peaks on the Average Active Sessions chart with those on the DatabaseThroughput charts. If the Average Active Sessions chart displays many sessionswaiting, indicating internal contention, but throughput is high, then the situation maybe acceptable. The database is probably also performing efficiently if internalcontention is low but throughput is high. However, if internal contention is high andthroughput is low, then consider tuning the database.
If you click the wait class legends beside the Average Active Sessions chart, then youcan view instance-level information stored in Active Sessions by Instance pages. Youcan use the Wait Class action list on the Active Sessions by Instance page to view thedifferent wait classes. The Active Sessions by Instance pages show the service times forup to four instances. Using the Customize button you can select the instances that aredisplayed. You can view the data for the instances separately using tile charts, or youcan combine the data into a single summary chart.
Monitoring Oracle RAC Database and Cluster Performance
8-12 Oracle Database 2 Day + Real Application Clusters Guide

Figure 8-6 Active Sessions by Instance: CPU Used Chart
If you must diagnose and fix problems that are causing the higher number of waitevents in a specific category, then you can select an instance of interest and view thewait events, also the SQL, sessions, services, modules, and actions that are consumingthe most database resources.
See Also:
• Oracle Database 2 Day + Performance Tuning Guide for more informationabout monitoring user activity
• Oracle Database 2 Day DBA for more information about tuning a databaseand instance
8.1.3.5 Viewing the Database Throughput ChartUsing Oracle Enterprise Manager, the last chart on the Cluster Database Performancepage monitors the usage of various database resources. By clicking the Throughputtab at the top of this chart you can view the Database Throughput chart.
The Database Throughput charts summarize any resource contention that appears inthe Average Active Sessions chart, and also show how much work the database isperforming on behalf of the users or applications. The Per Second view shows thenumber of transactions compared to the number of logons, and the amount of physicalreads compared to the redo size per second. The Per Transaction view shows theamount of physical reads compared to the redo size per transaction. Logons is thenumber of users that are logged on to the database.
You can also obtain information at the instance level by clicking a legend to the rightof the charts to access the Database Throughput by Instance page. This page shows thebreakdown of the aggregated Database Throughput chart for up to four instances.Using the Customize button you can select the instances that are displayed. You canview the data for the instances separately using tile charts, or you can combine thedata into a single summary chart. You can use this page to view the throughput for aparticular instance, which may help you diagnose throughput problems.
You can drill down further on the Database Throughput by Instance page to see thesessions of an instance consuming the greatest resources. Click an instance name
Monitoring Oracle RAC Database and Cluster Performance
Monitoring Performance and Troubleshooting 8-13

legend just under the chart to go to the Top Sessions subpage of the Top Consumerspage for that instance.
Figure 8-7 Top Consumer Page of Oracle Enterprise Manager
For more information about the information on this page, refer to the EnterpriseManager Help system.
See Also:
• Oracle Database 2 Day + Performance Tuning Guide for more informationabout monitoring instance activity
• Oracle Database 2 Day DBA for more information about tuning a databaseand instance
8.1.3.6 Viewing the Services ChartOn the Performance page of Oracle Enterprise Manager, the usage metrics of variousdatabase resources are shown in charts. If you click the Services tab at the top of thischart, then you can view the Services chart.
The Services chart shows the top services being used by the active sessions. Onlyactive services are shown. You can select a service legend to the right of the chart to goto the Service subpage of the Top Consumers page. The Activity subtab is selected bydefault. On this page you can view real-time data showing the session loads by waitclasses for the service.
Monitoring Oracle RAC Database and Cluster Performance
8-14 Oracle Database 2 Day + Real Application Clusters Guide
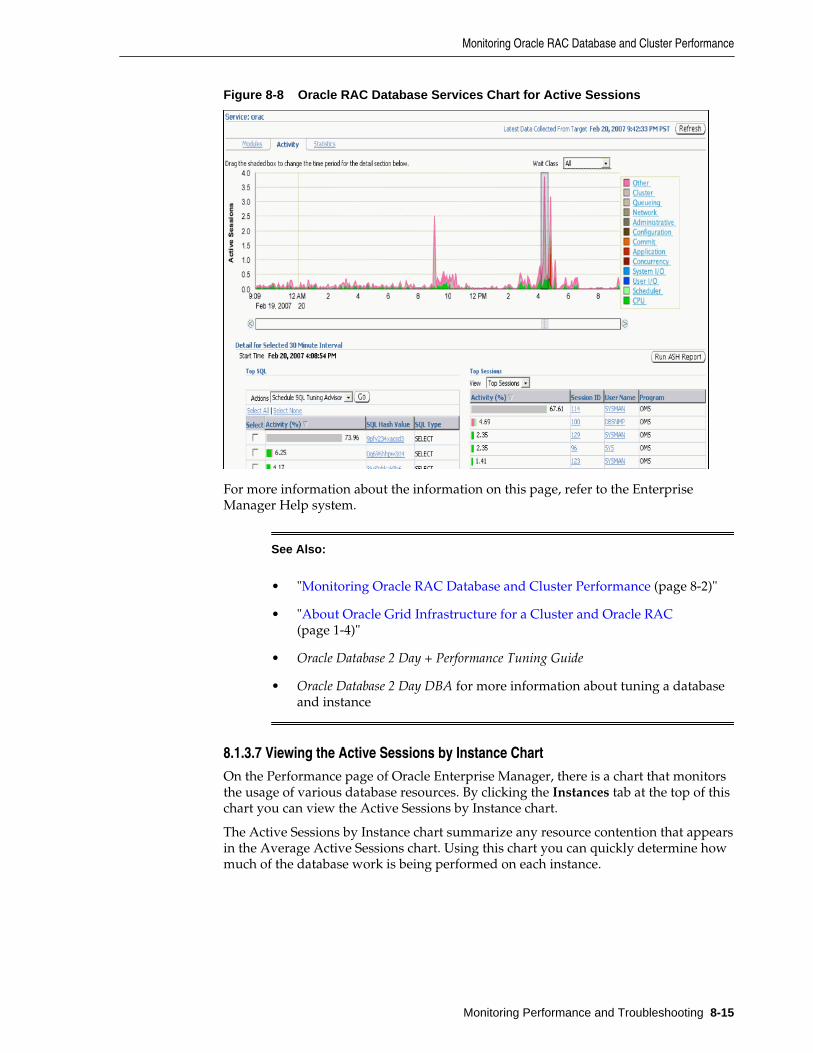
Figure 8-8 Oracle RAC Database Services Chart for Active Sessions
For more information about the information on this page, refer to the EnterpriseManager Help system.
See Also:
• "Monitoring Oracle RAC Database and Cluster Performance (page 8-2)"
• "About Oracle Grid Infrastructure for a Cluster and Oracle RAC(page 1-4)"
• Oracle Database 2 Day + Performance Tuning Guide
• Oracle Database 2 Day DBA for more information about tuning a databaseand instance
8.1.3.7 Viewing the Active Sessions by Instance ChartOn the Performance page of Oracle Enterprise Manager, there is a chart that monitorsthe usage of various database resources. By clicking the Instances tab at the top of thischart you can view the Active Sessions by Instance chart.
The Active Sessions by Instance chart summarize any resource contention that appearsin the Average Active Sessions chart. Using this chart you can quickly determine howmuch of the database work is being performed on each instance.
Monitoring Oracle RAC Database and Cluster Performance
Monitoring Performance and Troubleshooting 8-15
Figure 8-9 Active Sessions by Instance Chart
You can also obtain information at the instance level by clicking a legend to the rightof the chart to access the Top Sessions page. On the Top Session page you can viewreal-time data showing the sessions that consume the greatest system resources.
For more information about the information on this page, refer to the EnterpriseManager Help system.
See Also:
• "Monitoring Oracle RAC Database and Cluster Performance (page 8-2)"
• "About Oracle Grid Infrastructure for a Cluster and Oracle RAC(page 1-4)"
• Oracle Database 2 Day + Performance Tuning Guide
• Oracle Database 2 Day DBA for more information about tuning a databaseand instance
8.2 Viewing Other Performance Related ChartsIn the Additional Monitoring Links and Additional Instance Monitoring Links sectionof the Cluster Database Performance page, there are links to other charts that areuseful in evaluating the performance of your cluster database.
Accessing the Cluster Cache Coherency Page (page 8-17)The Cluster Cache Coherency page contains summary charts for cachecoherency metrics for the cluster.
Accessing the Top Consumers Page (page 8-19)The Top Consumers page provides access to several tabs that enable youto view real-time or collection-based data for the services, modules,
Viewing Other Performance Related Charts
8-16 Oracle Database 2 Day + Real Application Clusters Guide

actions, clients, and sessions that are consuming the most systemresources.
Accessing the Top Sessions Page (page 8-20)The Top Sessions page shows a real-time summary list of sessions basedon aggregated data. You can see which sessions have consumed thegreatest amount of system resources, referred to as the top sessions, andthen decide whether you want to stop the sessions.
Accessing the Top Activity Page (page 8-21)
Accessing the Instance Activity Page (page 8-22)The Instance Activity page enables you to view instance activity forseveral metrics within general metric categories, such as cursors,transactions, sessions, logical I/O, physical I/O, and net I/O. You canview data for each second or transaction.
Accessing the Top Segments Page (page 8-23)Collecting and viewing statistics at the segment level is an effectivemethod for identifying frequently accessed tables or indexes in adatabase. The Top Segments page enables you to gather segment-levelstatistics to identify performance problems associated with individualsegments.
Accessing the Database Locks Page (page 8-24)The Database Locks page shows user locks, all database locks, or locksthat are blocking other users or applications.
See Also:
• "Monitoring Oracle RAC Database and Cluster Performance (page 8-2)"
• Oracle Database 2 Day + Performance Tuning Guide for more informationabout monitoring user activity
• Oracle Database 2 Day DBA for more information about tuning a databaseand instance
8.2.1 Accessing the Cluster Cache Coherency PageThe Cluster Cache Coherency page contains summary charts for cache coherencymetrics for the cluster.
The following table describes the Cluster Cache Coherency charts and the actions toperform to access more comprehensive information for problem resolution.
Viewing Other Performance Related Charts
Monitoring Performance and Troubleshooting 8-17

Table 8-1 Cluster Cache Coherency Charts
Name Description
Global Cache Block AccessLatency
Shows the total elapsed time, or latency, for a block request.Click a legend to the right of the chart to view the average timeit takes to receive data blocks for each block type (current orCR) by instance.
On the Average Block Receive Time by Instance page, you canclick an instance legend under the chart to go to the BlockTransfer for Local Instance page, where you can identify whichblock classes, such as undo blocks, data blocks, and so on, aresubject to intense global cache activity. This page displays theblock classes that are being transferred, and which instances aretransferring most of the blocks. Cache transfer indicates howmany current and CR blocks for each block class were receivedfrom remote instances, including how many transfers incurreda delay (busy) or an unexpected longer delay (congested).
Global Cache BlockTransfer Rate
Shows the total aggregated number of blocks received by allinstances in the cluster by way of an interconnect.
Click a legend to the right of the chart to go to the Global CacheBlocks Received by Instance page for that type of block. Fromthere, you can click an instance legend under the chart to go tothe Segment Statistics by Instance page, where you can seewhich segments are causing cache contention.
Global Cache BlockTransfers and PhysicalReads
Shows the percentage of logical read operations that retrieveddata from the buffer cache of other instances by way of DirectMemory Access and from disk. It is essentially a profile of howmuch work is performed in the local buffer cache, rather thanthe portion of remote references and physical reads, which bothhave higher latencies.
Click a legend to the right of the chart to go to the Global CacheBlock Transfers vs. Logical Reads by Instance and PhysicalReads vs. Logical Reads by Instance pages. From there, you canclick an instance legend under the chart to go to the SegmentStatistics by Instance page, where you can see which segmentsare causing cache contention.
To access the Cluster Cache Coherency page:
1. Access the Cluster Database Home page of Oracle Enterprise Manager.
See Oracle Database 2 Day DBA for details on logging in to Enterprise Manager.
2. From the Performance menu, select Performance Home.
The Cluster Database Performance Home page appears.
3. Click Cluster Cache Coherency in the Additional Monitoring Links section at thebottom of the page.
4. Alternatively, click either of the legends to the right of the Global Cache BlockAccess Latency chart.
The Cluster Cache Coherency page appears.
Viewing Other Performance Related Charts
8-18 Oracle Database 2 Day + Real Application Clusters Guide

Figure 8-10 Cluster Cache Coherency Page of Oracle Enterprise Manager
See Also:
• Oracle Database 2 Day + Performance Tuning Guide for more informationabout monitoring instance activity
8.2.2 Accessing the Top Consumers PageThe Top Consumers page provides access to several tabs that enable you to view real-time or collection-based data for the services, modules, actions, clients, and sessionsthat are consuming the most system resources.
To access the Top Consumers page:
1. Access the Cluster Database Home page of Oracle Enterprise Manager.
See Oracle Database 2 Day DBA for details on logging in to Enterprise Manager.
2. From the Performance menu, select Performance Home.
The Cluster Database Performance Home page appears.
3. Click Top Consumers in the Additional Monitoring Links section at the bottom ofthe page.
When accessed this way, the Top Consumers page initially displays the Overviewtab by default, which shows aggregated summary data for the highest resourceconsumers.
Viewing Other Performance Related Charts
Monitoring Performance and Troubleshooting 8-19

Figure 8-11 Top Consumers Page of Oracle Enterprise Manager
4. Optional: Click the portion of a chart representing the consumer or click the linkunder the chart for that consumer to view instance-level information about thatconsumer.
The page that appears shows the running instances that are serving the consumer.
5. Optional: Expand the names in the Action or Module column to show data forindividual instances.
See Also:
• Oracle Database 2 Day + Performance Tuning Guide for more informationabout monitoring real-time database performance
8.2.3 Accessing the Top Sessions PageThe Top Sessions page shows a real-time summary list of sessions based onaggregated data. You can see which sessions have consumed the greatest amount ofsystem resources, referred to as the top sessions, and then decide whether you want tostop the sessions.
Viewing Other Performance Related Charts
8-20 Oracle Database 2 Day + Real Application Clusters Guide
To access the Top Sessions page:
1. Access the Cluster Database Home page of Oracle Enterprise Manager.
See Oracle Database 2 Day DBA for details on logging in to Enterprise Manager.
2. From the Performance menu, select Performance Home.
The Cluster Database Performance Home page appears.
3. Click Top Consumers in the Additional Monitoring Links section at the bottom ofthe page.
4. On the Top Consumers page, click the Top Sessions subtab.
See Also:
• "Monitoring Oracle RAC Database and Cluster Performance (page 8-2)"
• Oracle Database 2 Day + Performance Tuning Guide for more informationabout monitoring the top database sessions
8.2.4 Accessing the Top Activity PageThe Top Activity page enables you to view the cluster database activity by waits,services and instances. Also, you can see the details for the Top SQL and Top Sessionsfor a specific five minute interval by moving the slider bar on the Top Activity chart.
In the Top SQL detail section, you can select problematic SQL statements and eitherschedule the SQL Tuning Advisor for those statements or create a SQL Tuning Set.
By default, the Top Sessions for the selected time period are shown. Using the Viewaction list in this section you can change the display to one of the following:
• Top Sessions
• Top Services
• Top Modules
• Top Actions
• Top Clients
• Top Files
• Top Objects
• Top PL/SQL
• Top Instances
To access the Top Activity page:
1. Access the Cluster Database Home page of Oracle Enterprise Manager.
See Oracle Database 2 Day DBA for details on logging in to Enterprise Manager.
Viewing Other Performance Related Charts
Monitoring Performance and Troubleshooting 8-21

2. From the Performance menu, select Performance Home.
The Cluster Database Performance Home page appears.
3. Click Top Activity in the Additional Monitoring Links section at the bottom of thepage.
The Top Activity page appears.
See Also:
• "Monitoring Oracle RAC Database and Cluster Performance (page 8-2)"
• Oracle Database 2 Day + Performance Tuning Guide for more informationabout monitoring user activity
• Oracle Database 2 Day DBA for more information about tuning a databaseand instance
8.2.5 Accessing the Instance Activity PageThe Instance Activity page enables you to view instance activity for several metricswithin general metric categories, such as cursors, transactions, sessions, logical I/O,physical I/O, and net I/O. You can view data for each second or transaction.
To access the Instance Activity page:
1. Access the Cluster Database Home page of Oracle Enterprise Manager.
See Oracle Database 2 Day DBA for details on logging in to Enterprise Manager.
2. From the Performance menu, select Performance Home.
The Cluster Database Performance Home page appears.
3. Click Instance Activity in the Additional Monitoring Links section at the bottom ofthe page.
4. Optional: Click a metric legend under the chart if in Graphic mode, or click a namein the summary table if in Tabular mode to access top sessions statistics for aparticular metric.
Viewing Other Performance Related Charts
8-22 Oracle Database 2 Day + Real Application Clusters Guide

Figure 8-12 Instance Activity Graph in Oracle Enterprise Manager
5. Optional: Use the Switch Database Instance list to change the instance for whichthe data is displayed in the chart.
See Also:
• Oracle Database 2 Day + Performance Tuning Guide for more informationabout monitoring instance activity
8.2.6 Accessing the Top Segments PageCollecting and viewing statistics at the segment level is an effective method foridentifying frequently accessed tables or indexes in a database. The Top Segmentspage enables you to gather segment-level statistics to identify performance problemsassociated with individual segments.
This page is particularly useful for Oracle RAC, because it also tracks the number ofconsistent-read and current blocks received by an object. A high number of currentblocks received plus a high number of buffer waits may indicate potential resourcecontention.
To access the Top Segments page:
1. Access the Cluster Database Home page of Oracle Enterprise Manager.
See Oracle Database 2 Day DBA for details on logging in to Enterprise Manager.
2. From the Performance menu, select Performance Home.
The Cluster Database Performance Home page appears.
3. Click Top Segments in the Additional Monitoring Links section at the bottom ofthe page.
You can view segments for all instances, or use a filter to see segments for a specificinstance.
Viewing Other Performance Related Charts
Monitoring Performance and Troubleshooting 8-23
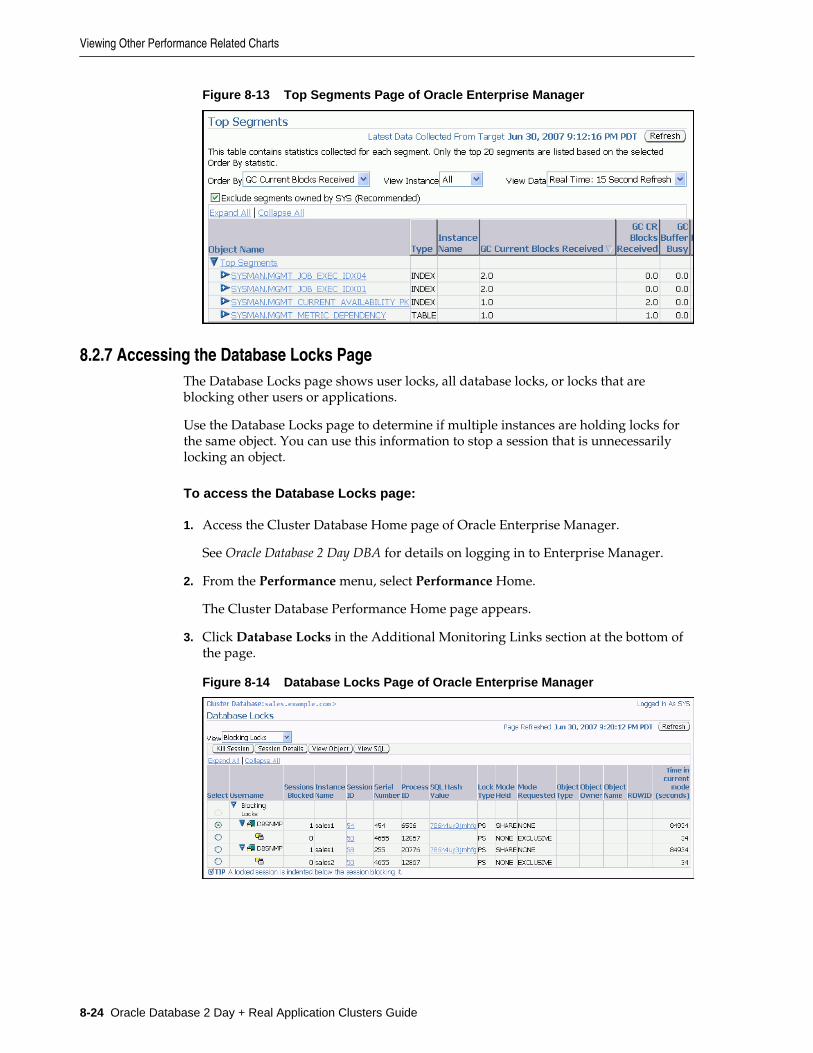
Figure 8-13 Top Segments Page of Oracle Enterprise Manager
8.2.7 Accessing the Database Locks PageThe Database Locks page shows user locks, all database locks, or locks that areblocking other users or applications.
Use the Database Locks page to determine if multiple instances are holding locks forthe same object. You can use this information to stop a session that is unnecessarilylocking an object.
To access the Database Locks page:
1. Access the Cluster Database Home page of Oracle Enterprise Manager.
See Oracle Database 2 Day DBA for details on logging in to Enterprise Manager.
2. From the Performance menu, select Performance Home.
The Cluster Database Performance Home page appears.
3. Click Database Locks in the Additional Monitoring Links section at the bottom ofthe page.
Figure 8-14 Database Locks Page of Oracle Enterprise Manager
Viewing Other Performance Related Charts
8-24 Oracle Database 2 Day + Real Application Clusters Guide
See Also:
• Oracle Database Administrator’s Guide for more information aboutmonitoring locks
8.3 Viewing the Cluster Database TopologyUsing Enterprise Manager you can view a graphical representation of your clusterenvironment. Using the topology view you can quickly see the components thatcomprise your cluster database environment, such as database instances, listeners,Oracle ASM instances, hosts, and interfaces.
After you click the topology chart to activate the controls, you can mouse over acomponent to see the status and configuration details for that component. If you selecta component in the topology chart, then you can then right-click that component toview a set of menu actions specific for that component.
To view the topology for your cluster database environment:
1. Access the Cluster Database Home page of Oracle Enterprise Manager.
See Oracle Database 2 Day DBA for details on logging in to Enterprise Manager.
2. From the Cluster Database menu, select Configuration, and then Topology.
The Cluster Database Topology page appears.
3. Optional: Move the mouse cursor over any component in the topology diagram todisplay information about that component in a popup box.
4. Select any component in the topology diagram to change the information displayedin the Selection Details section.
5. Optional: Click Legend at the bottom of the page, on the left-hand side, to displaythe Topology Legend page.
This page describes the icons used in Cluster Topology and Cluster DatabaseTopology.
6. Optional: Right-click the currently selected component to view the menu actionsavailable for that component.
See Also:
• "Viewing the Cluster Topology Page (page 8-34)"
8.4 Monitoring Oracle ClusterwareYou can use Enterprise Manager to monitor Oracle Clusterware.
Other monitoring features available with Enterprise Manager include:
• Viewing the status of Oracle Clusterware on each node of the cluster
• Receiving notifications if there are any VIP relocations
Viewing the Cluster Database Topology
Monitoring Performance and Troubleshooting 8-25

• Monitoring the overall throughput across the private interconnect
• Receiving notifications if nodeapps go down or come up
• Viewing alerts if a database instance is using the public interface instead of theVIP
• Monitoring the Clusterware alert log for OCR or voting disk related issues, nodeevictions, and other clusterware errors
You can also monitor Oracle Clusterware resources and use cluster component healthmonitoring for individual components. To monitor resources you click theAdministration link from the Cluster home page. To monitor the health of individualcluster components, click the All Metrics link in the Related Links section of theCluster home page.
Accessing the Oracle Clusterware Information (page 8-27)From the Cluster Database Home page, there a several ways to accessOracle Clusterware information.
Reviewing the Oracle Clusterware Home Page (page 8-27)The Cluster Home page enables you to monitor the health and workloadof your cluster. It provides a central place for general cluster stateinformation and is updated periodically.
Viewing the Cluster Performance Page (page 8-30)The Cluster Performance page displays utilization statistics, such asCPU, Memory, and Disk I/O, during the past hour for all hosts of acluster, which is part of the greater Enterprise Manager environment.
Viewing the Cluster Targets Page (page 8-31)The Cluster Targets page provides a complete list of all targets on thecluster. The table includes the target name, type, host, and location, alsothe target's availability, warning and critical alerts, and last load time.
Viewing the Cluster Administration Page (page 8-31)Using the Cluster Administration menu you can manage OracleClusterware resources, create resource types, and manage server pools.You can also use this page to configure Oracle Database Quality ofService (QoS) Management.
About the Cluster Interconnects Page (page 8-32)The Cluster Interconnects page is useful for monitoring the interconnectinterfaces, determining configuration issues, and identifying transferrate-related issues, including excess traffic.
Viewing the Cluster Topology Page (page 8-34)The Oracle Enterprise Manager Topology Viewer enables you to visuallysee the relationships between target types in your cluster.
See Also:
• "About Verifying the Oracle Clusterware Installation (page 3-21)"
• "Using CRSCTL to Diagnose Cluster Issues (page 8-35)"
Monitoring Oracle Clusterware
8-26 Oracle Database 2 Day + Real Application Clusters Guide
8.4.1 Accessing the Oracle Clusterware InformationFrom the Cluster Database Home page, there a several ways to access OracleClusterware information.
To access Oracle Clusterware information:
1. Access the Cluster Database Home page of Oracle Enterprise Manager.
See Oracle Database 2 Day DBA for details on logging in to Enterprise Manager.
2. In the General section, click the link next to Cluster to view the Cluster Home page.
3. On the Cluster Home page, in the Diagnostic Summary section, click the numbernext to Interconnect Alerts to view the Interconnects subpage for the cluster.
Alternatively, from the Cluster menu, select Interconnects to display theInterconnects page.
4. From the Cluster menu, select Configuration, and then select Topology. Click anode in the graphical display to activate the controls.
5. Click the Interface component. Right-click the Interface component, then chooseView Details from the menu to display the Interconnects page for the cluster.
6. In the Cluster Databases section of the Cluster Home page, select the name of acluster database to return to the Cluster Database Home page for that database.
See Also:
"Viewing the Cluster Topology Page (page 8-34)"
8.4.2 Reviewing the Oracle Clusterware Home PageThe Cluster Home page enables you to monitor the health and workload of yourcluster. It provides a central place for general cluster state information and is updatedperiodically.
The various sections of the Cluster Home page provide information about the clusterenvironment and status of the hosts, targets, and clusterware components. Forexample, the Alerts and Diagnostic Summary sections warn you of errors andperformance problems that are impacting the operation of your cluster. You can clickthe provided links to see more detail about the problem areas.
To monitor the general state of the cluster:
1. From the Cluster Database Home page, in the General section, click the link next toCluster.
The Cluster Home page appears. An example of the Cluster Home page is shownin the following figure.
Monitoring Oracle Clusterware
Monitoring Performance and Troubleshooting 8-27

Figure 8-15 Cluster Home Page in Oracle Enterprise Manager
2. Optional: Click the Refresh button to update the information displayed.
The date and time that data was last collected from the cluster is displayed to theleft of the Refresh button.
3. Get a quick view of the cluster in the General section, which includes the followinginformation:
• Status of the cluster, Up or Down
Click the Status link to drill down to cluster availability details.
• Number of hosts in the cluster
• Cluster name
• The status of Oracle Clusterware overall and the hosts
• Oracle Clusterware version
• Oracle Clusterware home directory
4. In the Configuration section, use the View list to select which of the followinginformation is displayed for the available hosts in the cluster:
• Operating Systems (including Hosts and OS Patches)
• Hardware (including hardware configuration and hosts)
Click the links under Host or OS Patches for detailed information.
5. View the Diagnostic Summary section which contains the number of activeInterconnect alerts. Click the number of alerts to view the Interconnects subpage.
6. Investigate the Cluster Databases table to view the cluster databases associatedwith this cluster, their availability, any alerts or policy violations on thosedatabases, their security compliance score, and the database software version.
Monitoring Oracle Clusterware
8-28 Oracle Database 2 Day + Real Application Clusters Guide

7. View the Alerts section, which includes the following items:
• Category list
Optionally choose a category from the list to view only alerts in that category.
• Critical
This is the number of metrics that have crossed critical thresholds plus thenumber of other critical alerts, such as those caused by incidents (criticalerrors).
• Warning
This is the number of metrics that have crossed warning thresholds.
• Alerts table
The Alerts table provides information about any alerts that have been issuedalong with the severity rating of each. Click the alert message in the Messagecolumn for more information about the alert.
When an alert is triggered, the name of the metric for which the alert wastriggered is displayed in the Name column. The severity icon for the alert(Warning or Critical) is displayed, along with the time the alert was triggered,the value of the alert, and the time the metric's value was last checked.
8. View the date of the Last Security Evaluation and the Compliance score for thecluster in the Security section.
The compliance score is a value between 0 and 100 where 100 is a state of completecompliance to the security policies. The compliance score calculation for each targetand policy combination to a great extent is influenced by the severity of theviolation and importance of the policy, and to a lesser extent by the percentage ofviolating rows over the total number of rows tested.
9. Review the status of any jobs submitted to the cluster within the last seven days inthe Job Activity section.
10. Determine if there are patches to be applied to Oracle Clusterware by reviewingthe Critical Patch Advisories for Oracle Homes section.
To view available patches, you must have first configured your My Oracle SupportCredentials as discussed in "Verifying My Oracle Support Credentials (page 3-3)".
11. View basic performance statistics for each host in the cluster in the Hosts table atthe bottom of the page.
Click any link in this table to view further details about that statistic.
12. Use the Cluster menu at the top of the page to view detailed information forPerformance, Targets, Interconnects, or Topology.
See Also:
"Viewing the Cluster Topology Page (page 8-34)"
Monitoring Oracle Clusterware
Monitoring Performance and Troubleshooting 8-29
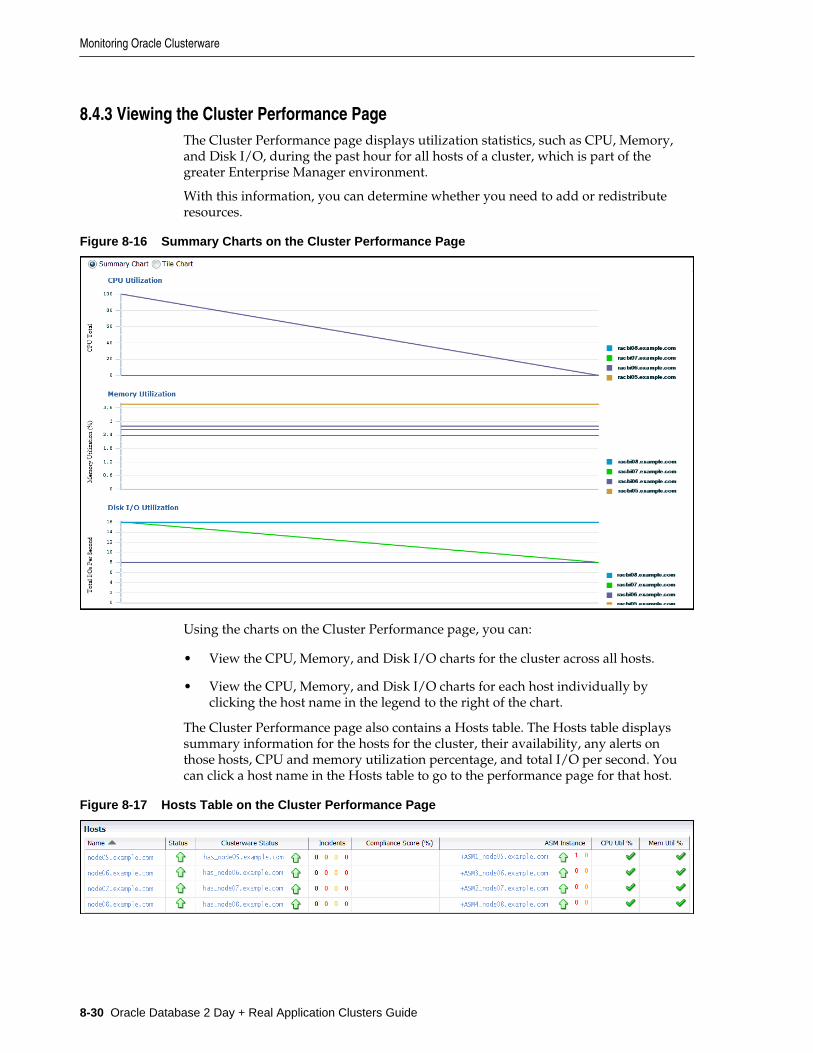
8.4.3 Viewing the Cluster Performance PageThe Cluster Performance page displays utilization statistics, such as CPU, Memory,and Disk I/O, during the past hour for all hosts of a cluster, which is part of thegreater Enterprise Manager environment.
With this information, you can determine whether you need to add or redistributeresources.
Figure 8-16 Summary Charts on the Cluster Performance Page
Using the charts on the Cluster Performance page, you can:
• View the CPU, Memory, and Disk I/O charts for the cluster across all hosts.
• View the CPU, Memory, and Disk I/O charts for each host individually byclicking the host name in the legend to the right of the chart.
The Cluster Performance page also contains a Hosts table. The Hosts table displayssummary information for the hosts for the cluster, their availability, any alerts onthose hosts, CPU and memory utilization percentage, and total I/O per second. Youcan click a host name in the Hosts table to go to the performance page for that host.
Figure 8-17 Hosts Table on the Cluster Performance Page
Monitoring Oracle Clusterware
8-30 Oracle Database 2 Day + Real Application Clusters Guide
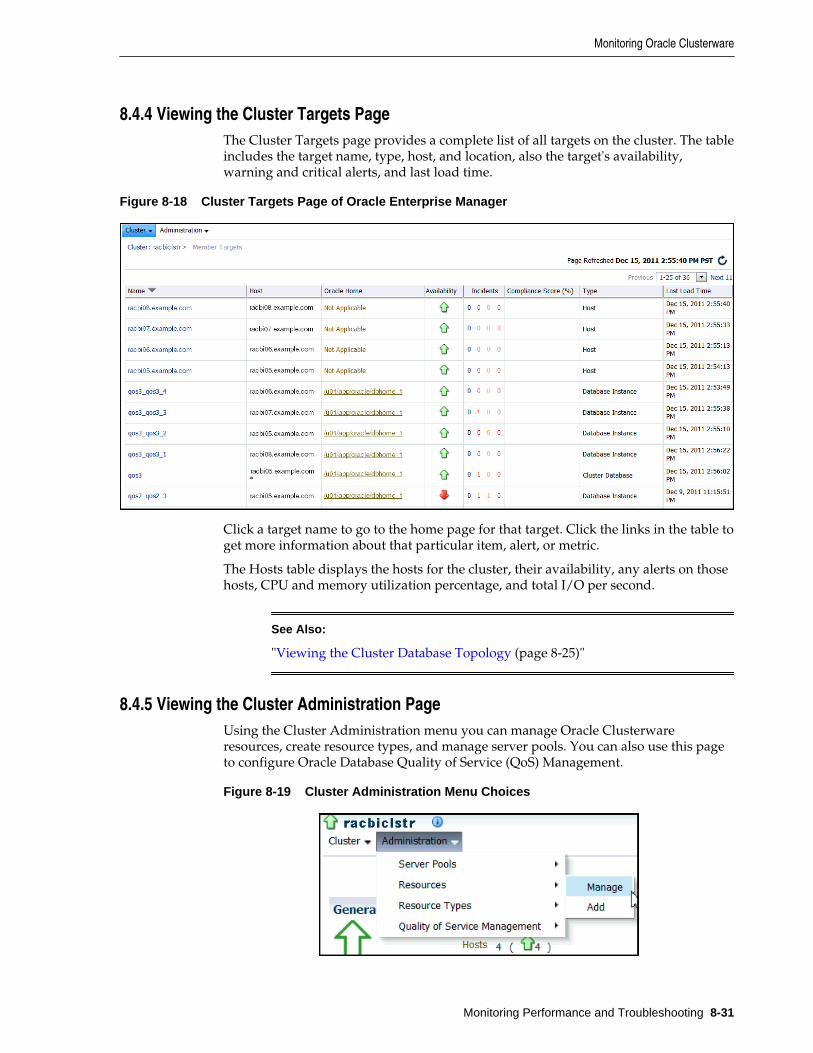
8.4.4 Viewing the Cluster Targets PageThe Cluster Targets page provides a complete list of all targets on the cluster. The tableincludes the target name, type, host, and location, also the target's availability,warning and critical alerts, and last load time.
Figure 8-18 Cluster Targets Page of Oracle Enterprise Manager
Click a target name to go to the home page for that target. Click the links in the table toget more information about that particular item, alert, or metric.
The Hosts table displays the hosts for the cluster, their availability, any alerts on thosehosts, CPU and memory utilization percentage, and total I/O per second.
See Also:
"Viewing the Cluster Database Topology (page 8-25)"
8.4.5 Viewing the Cluster Administration PageUsing the Cluster Administration menu you can manage Oracle Clusterwareresources, create resource types, and manage server pools. You can also use this pageto configure Oracle Database Quality of Service (QoS) Management.
Figure 8-19 Cluster Administration Menu Choices
Monitoring Oracle Clusterware
Monitoring Performance and Troubleshooting 8-31
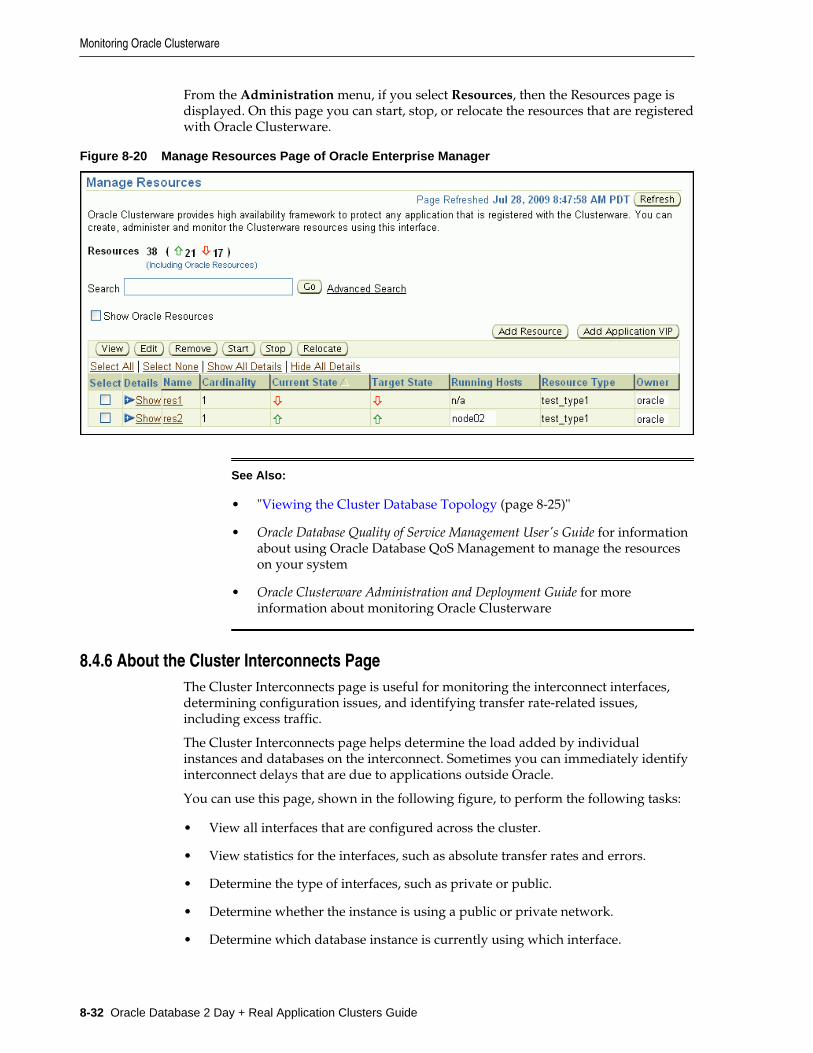
From the Administration menu, if you select Resources, then the Resources page isdisplayed. On this page you can start, stop, or relocate the resources that are registeredwith Oracle Clusterware.
Figure 8-20 Manage Resources Page of Oracle Enterprise Manager
See Also:
• "Viewing the Cluster Database Topology (page 8-25)"
• Oracle Database Quality of Service Management User's Guide for informationabout using Oracle Database QoS Management to manage the resourceson your system
• Oracle Clusterware Administration and Deployment Guide for moreinformation about monitoring Oracle Clusterware
8.4.6 About the Cluster Interconnects PageThe Cluster Interconnects page is useful for monitoring the interconnect interfaces,determining configuration issues, and identifying transfer rate-related issues,including excess traffic.
The Cluster Interconnects page helps determine the load added by individualinstances and databases on the interconnect. Sometimes you can immediately identifyinterconnect delays that are due to applications outside Oracle.
You can use this page, shown in the following figure, to perform the following tasks:
• View all interfaces that are configured across the cluster.
• View statistics for the interfaces, such as absolute transfer rates and errors.
• Determine the type of interfaces, such as private or public.
• Determine whether the instance is using a public or private network.
• Determine which database instance is currently using which interface.
Monitoring Oracle Clusterware
8-32 Oracle Database 2 Day + Real Application Clusters Guide
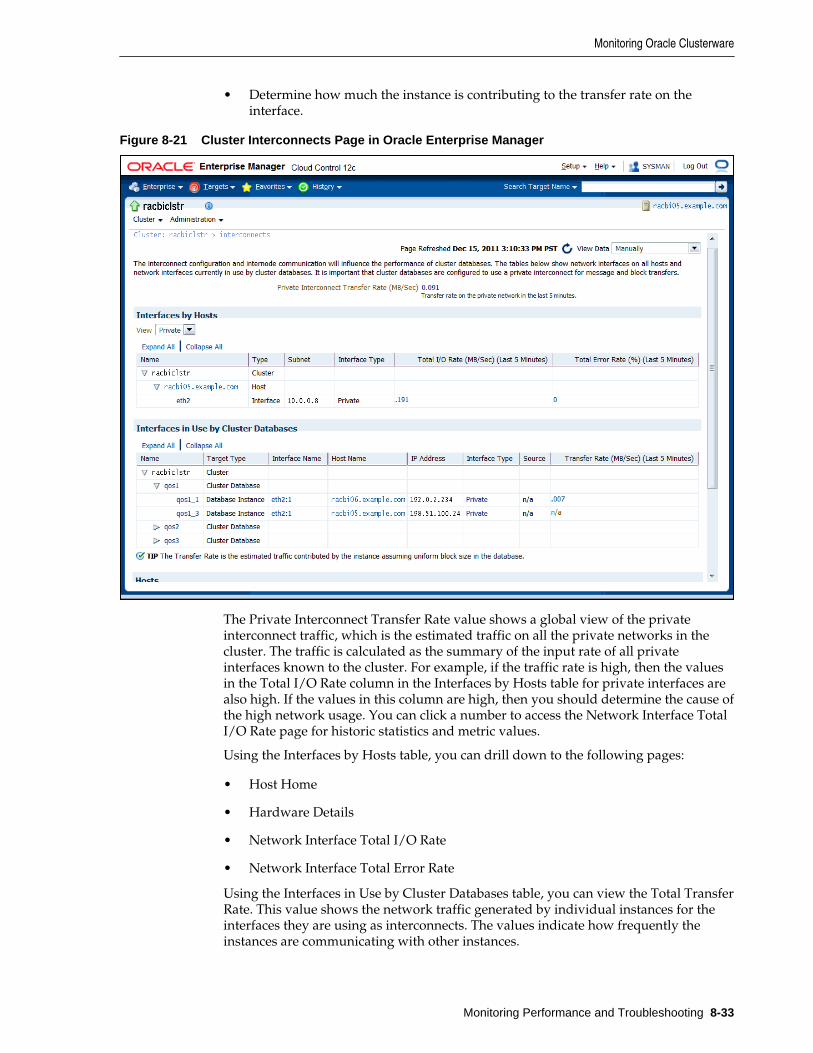
• Determine how much the instance is contributing to the transfer rate on theinterface.
Figure 8-21 Cluster Interconnects Page in Oracle Enterprise Manager
The Private Interconnect Transfer Rate value shows a global view of the privateinterconnect traffic, which is the estimated traffic on all the private networks in thecluster. The traffic is calculated as the summary of the input rate of all privateinterfaces known to the cluster. For example, if the traffic rate is high, then the valuesin the Total I/O Rate column in the Interfaces by Hosts table for private interfaces arealso high. If the values in this column are high, then you should determine the cause ofthe high network usage. You can click a number to access the Network Interface TotalI/O Rate page for historic statistics and metric values.
Using the Interfaces by Hosts table, you can drill down to the following pages:
• Host Home
• Hardware Details
• Network Interface Total I/O Rate
• Network Interface Total Error Rate
Using the Interfaces in Use by Cluster Databases table, you can view the Total TransferRate. This value shows the network traffic generated by individual instances for theinterfaces they are using as interconnects. The values indicate how frequently theinstances are communicating with other instances.
Monitoring Oracle Clusterware
Monitoring Performance and Troubleshooting 8-33
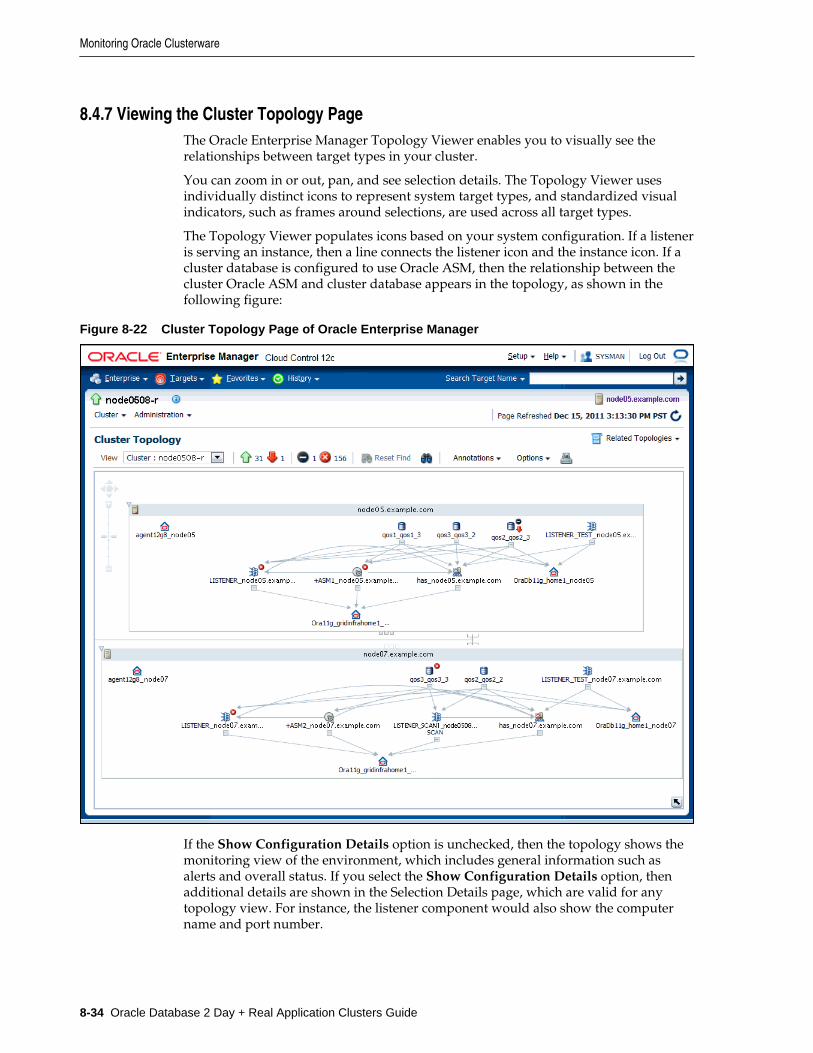
8.4.7 Viewing the Cluster Topology PageThe Oracle Enterprise Manager Topology Viewer enables you to visually see therelationships between target types in your cluster.
You can zoom in or out, pan, and see selection details. The Topology Viewer usesindividually distinct icons to represent system target types, and standardized visualindicators, such as frames around selections, are used across all target types.
The Topology Viewer populates icons based on your system configuration. If a listeneris serving an instance, then a line connects the listener icon and the instance icon. If acluster database is configured to use Oracle ASM, then the relationship between thecluster Oracle ASM and cluster database appears in the topology, as shown in thefollowing figure:
Figure 8-22 Cluster Topology Page of Oracle Enterprise Manager
If the Show Configuration Details option is unchecked, then the topology shows themonitoring view of the environment, which includes general information such asalerts and overall status. If you select the Show Configuration Details option, thenadditional details are shown in the Selection Details page, which are valid for anytopology view. For instance, the listener component would also show the computername and port number.
Monitoring Oracle Clusterware
8-34 Oracle Database 2 Day + Real Application Clusters Guide
You can click an icon and then the right mouse button to display a menu of availableactions. Several actions go to pages related to the target type where you can performmonitoring or tuning tasks.
Refer to the Enterprise Manager Online Help for more information about the contentsof this page.
See Also:
"Viewing the Cluster Database Topology (page 8-25)"
8.5 Troubleshooting Configuration Problems in Oracle RAC EnvironmentsThe Cluster Ready Services Control (CRSCTL) command check enables you todetermine the status of several Oracle Clusterware components simultaneously.
Problems can occur when attempting to complete the installation or database creationprocess manually instead of using the Oracle Database management tools. Otherproblems occur due to the database administrator or system administrator missingimportant operating system or cluster configuration steps before installation. BothOracle Clusterware and Oracle Database components have subcomponents that youcan troubleshoot.
Using CRSCTL to Diagnose Cluster Issues (page 8-35)You can use CRSCTL commands as the root operating system user todiagnose problems with your Oracle Clusterware installation, or toenable dynamic debugging for Oracle Clusterware.
Using the Cluster Verification Utility to Diagnose Problems (page 8-41)The Cluster Verification Utility (CVU) can assist you in diagnosing awide variety of configuration problems.
Viewing Oracle RAC Database Alerts (page 8-45)Alert messages are displayed in Enterprise Manager. The Alerts table issimilar to that shown for single-instance databases, but in a clusterdatabase, it includes columns for the target name and target type.
Viewing Oracle RAC Database Alert Log Messages (page 8-46)An alert log is created for each instance in a cluster database.
See Also:
• "Tools for Installing, Configuring, and Managing Oracle RAC (page 1-11)"
• "About Verifying the Oracle Clusterware Installation (page 3-21)"
8.5.1 Using CRSCTL to Diagnose Cluster IssuesYou can use CRSCTL commands as the root operating system user to diagnoseproblems with your Oracle Clusterware installation, or to enable dynamic debuggingfor Oracle Clusterware.
About the Oracle Clusterware Alert Log (page 8-36)Oracle Clusterware posts alert messages when important events occur.For example, you might see alert messages from the Cluster Ready
Troubleshooting Configuration Problems in Oracle RAC Environments
Monitoring Performance and Troubleshooting 8-35

Services (CRS) daemon process when it starts, if it aborts, if the failoverprocess fails, or if automatic restart of an Oracle Clusterware resourcefailed.
About the Oracle Clusterware Component Log Files (page 8-37)Starting with Oracle Clusterware 12c release 1 (12.1.0.2), diagnostic datafiles written by Oracle Clusterware programs are known as trace filesand have a .trc file extension, and appear together in the tracesubdirectory of the Automatic Diagnostic Repository (ADR) home.
Checking the Status of the Oracle Clusterware Installation (page 8-37)Use the CRSCTL check command to display the status of an OracleClusterware component or daemon.
Running the Oracle Clusterware Diagnostics Collection Script (page 8-38)The Oracle Clusterware Diagnostics Collection script collects diagnosticinformation for your Oracle Clusterware installation. The diagnosticsprovide additional information so that Oracle Support Services canresolve problems. It displays the status of the Cluster SynchronizationServices (CSS), Event Manager (EVM), and the Oracle Clusterware (CRS)daemons.
Enabling Debugging of Oracle Clusterware Components (page 8-38)You can enable debugging for the Oracle Cluster daemons, EventManager (EVM), and their modules by running CRSCTL commands.
Enabling Debugging for an Oracle Clusterware Resource (page 8-39)You can use CRSCTL commands to enable debugging for resourcemanaged by Oracle Clusterware.
Enabling Oracle Clusterware Daemons (page 8-40)When the Oracle Clusterware daemons are enabled, they startautomatically when the node is started.
Disabling Oracle Clusterware Daemons (page 8-40)To prevent the daemons from starting automatically, you can disablethem using crsctl commands.
See Also:
• "Tools for Installing, Configuring, and Managing Oracle RAC (page 1-11)"
• Oracle Clusterware Administration and Deployment Guide
8.5.1.1 About the Oracle Clusterware Alert LogOracle Clusterware posts alert messages when important events occur. For example,you might see alert messages from the Cluster Ready Services (CRS) daemon processwhen it starts, if it aborts, if the failover process fails, or if automatic restart of anOracle Clusterware resource failed.
Enterprise Manager monitors the Clusterware log file and posts an alert on the ClusterHome page if an error is detected. For example, if a voting disk is not available, then aCRS-1604 error is raised, and a critical alert is posted on the Cluster Home page. Youcan customize the error detection and alert settings on the Metric and Policy Settingspage.
Troubleshooting Configuration Problems in Oracle RAC Environments
8-36 Oracle Database 2 Day + Real Application Clusters Guide
The Oracle Clusterware alert log should be the first place to look for serious errors. Itoften contains references to other diagnostic logs that provide detailed information ona specific component. The location of the Oracle Clusterware log file isORACLE_BASE/diag/crs/hostname/crs/trace/alert.log, whereORACLE_BASE is the Oracle base path you specified when you installed Oracle GridInfrastructure and hostname is the name of the host.
See Also:
• Oracle Clusterware Administration and Deployment Guide for moreinformation about Oracle Clusterware diagnostic and alert log data
• "Monitoring Oracle Clusterware (page 8-25)"
8.5.1.2 About the Oracle Clusterware Component Log FilesStarting with Oracle Clusterware 12c release 1 (12.1.0.2), diagnostic data files writtenby Oracle Clusterware programs are known as trace files and have a .trc fileextension, and appear together in the trace subdirectory of the Automatic DiagnosticRepository (ADR) home.
Besides trace files, the trace subdirectory in the Oracle Clusterware ADR homecontains the simple text Oracle Clusterware alert log. It always has the namealert.log. The alert log is also written as an XML file in the alert subdirectory of theADR home, but the text alert log is most easily read.
See Also:
Oracle Clusterware Administration and Deployment Guide
8.5.1.3 Checking the Status of the Oracle Clusterware InstallationUse the CRSCTL check command to display the status of an Oracle Clusterwarecomponent or daemon.
To determine the condition of your Oracle Clusterware installation:
1. Log in to the operating system as the root user in a command window.
2. Use CRSCTL to check the status of Oracle Clusterware using the followingcommand:
# crsctl check crs
3. Check the status of an individual Oracle Clusterware daemon using the followingsyntax, where daemon is crsd, cssd, or evmd:
# crsctl check daemon
4. To list the status of all Oracle Clusterware resources running on any node in thecluster, use the following command:
# crsctl status resource -t
Troubleshooting Configuration Problems in Oracle RAC Environments
Monitoring Performance and Troubleshooting 8-37

This command lists the status of all registered Oracle Clusterware resources, whichincludes the VIPs, listeners, databases, services, and Oracle ASM instances and diskgroups in a tabular form.
See Also:
• Oracle Clusterware Administration and Deployment Guide
• "About Oracle Grid Infrastructure for a Cluster and Oracle RAC(page 1-4)"
• "Monitoring Oracle Clusterware (page 8-25)"
8.5.1.4 Running the Oracle Clusterware Diagnostics Collection ScriptThe Oracle Clusterware Diagnostics Collection script collects diagnostic informationfor your Oracle Clusterware installation. The diagnostics provide additionalinformation so that Oracle Support Services can resolve problems. It displays thestatus of the Cluster Synchronization Services (CSS), Event Manager (EVM), and theOracle Clusterware (CRS) daemons.
To run the Oracle Clusterware Diagnostics Collection script:
1. In a command window, log in to the operating system as the root user.
2. Run the diagcollection.pl script from the operating system prompt asfollows, where Grid_home is the home directory of your Oracle Grid Infrastructurefor a cluster installation:
# Grid_home/bin/diagcollection.pl --collect
See Also:
• Oracle Clusterware Administration and Deployment Guide
• "About Oracle Grid Infrastructure for a Cluster and Oracle RAC(page 1-4)"
• "Monitoring Oracle Clusterware (page 8-25)"
8.5.1.5 Enabling Debugging of Oracle Clusterware ComponentsYou can enable debugging for the Oracle Cluster daemons, Event Manager (EVM),and their modules by running CRSCTL commands.
To enable debugging of Oracle Clusterware components:
1. In a command window, log in to the operating system as the root user.
2. Use the following command to obtain the module names for a component, wherecomponent_name is crs, evm, css or the name of the component for which youwant to enable debugging:
# crsctl lsmodules component_name
Troubleshooting Configuration Problems in Oracle RAC Environments
8-38 Oracle Database 2 Day + Real Application Clusters Guide

For example, viewing the modules of the css component might return thefollowing results:
# crsctl lsmodules cssThe following are the CSS modules :: CSSDCOMMCRSCOMMNS
3. Use CRSCTL as follows, where component_name is the name of the OracleClusterware component for which you want to enable debugging, module is thename of module, and debugging_level is a number from 1 to 5:
# crsctl debug log component module:debugging_level
For example, to enable the lowest level of tracing for the CSSD module of the csscomponent, you would use the following command:
# crsctl debug log css CSSD:1
See Also:
• Oracle Clusterware Administration and Deployment Guide
• "About Oracle Grid Infrastructure for a Cluster and Oracle RAC(page 1-4)"
• "Monitoring Oracle Clusterware (page 8-25)"
8.5.1.6 Enabling Debugging for an Oracle Clusterware ResourceYou can use CRSCTL commands to enable debugging for resource managed by OracleClusterware.
To enable debugging of an Oracle Clusterware resource:
1. In a command window, log in to the operating system as the root user.
2. Obtain a list of the resources available for debugging by running the followingcommand:
# crsctl check crs
3. Run the following command to enable debugging, where resource_name is thename of an Oracle Clusterware resource, such as ora.racnode1.vip, anddebugging_level is a number from 1 to 5:
# crsctl debug log res resource_name:debugging_level
Troubleshooting Configuration Problems in Oracle RAC Environments
Monitoring Performance and Troubleshooting 8-39
See Also:
• Oracle Clusterware Administration and Deployment Guide
• "About Oracle Grid Infrastructure for a Cluster and Oracle RAC(page 1-4)"
• "Monitoring Oracle Clusterware (page 8-25)"
8.5.1.7 Enabling Oracle Clusterware DaemonsWhen the Oracle Clusterware daemons are enabled, they start automatically when thenode is started.
To enable automatic startup for all Oracle Clusterware daemons:
1. In a command window, log in to the operating system as the root user.
2. Run the following CRSCTL command:
# crsctl enable crs
See Also:
• Oracle Clusterware Administration and Deployment Guide
• "About Oracle Grid Infrastructure for a Cluster and Oracle RAC(page 1-4)"
• "Monitoring Oracle Clusterware (page 8-25)"
• Oracle Real Application Clusters Administration and Deployment Guide
8.5.1.8 Disabling Oracle Clusterware DaemonsTo prevent the daemons from starting automatically, you can disable them usingcrsctl commands.
To disable automatic startup for all Oracle Clusterware daemons:
1. In a command window, log in to the operating system as the root user.
2. Run the following CRSCTL command:
# crsctl disable crs
Troubleshooting Configuration Problems in Oracle RAC Environments
8-40 Oracle Database 2 Day + Real Application Clusters Guide
See Also:
• Oracle Clusterware Administration and Deployment Guide
• "About Oracle Grid Infrastructure for a Cluster and Oracle RAC(page 1-4)"
• "Monitoring Oracle Clusterware (page 8-25)"
• Oracle Real Application Clusters Administration and Deployment Guide
8.5.2 Using the Cluster Verification Utility to Diagnose ProblemsThe Cluster Verification Utility (CVU) can assist you in diagnosing a wide variety ofconfiguration problems.
Verifying the Existence of Node Applications (page 8-41)You use the CVU comp nodeapp command to verify the existence ofnode applications, namely the virtual IP (VIP), Oracle NotificationServices (ONS), and Global Service Daemon (GSD), on all the nodes.
Verifying the Integrity of Oracle Clusterware Components (page 8-42)You use the CVU comp crs command to verify the existence of all theOracle Clusterware components.
Verifying the Integrity of the Oracle Cluster Registry (page 8-43)You use the CVU comp ocr command to verify the integrity of theOracle Clusterware registry.
Verifying the Integrity of Your Entire Cluster (page 8-43)Use the CVU comp clu command to check that all nodes in the clusterhave the same view of the cluster configuration.
Checking the Settings for the Interconnect (page 8-43)Use the CVU comp nodereach or comp nodeconcommand to checkthe settings for the interconnect.
Enabling Tracing (page 8-45)CVU does not generate trace files unless you enable tracing.
See Also:
• Oracle Clusterware Administration and Deployment Guide
• "Monitoring Oracle Clusterware (page 8-25)"
8.5.2.1 Verifying the Existence of Node ApplicationsYou use the CVU comp nodeapp command to verify the existence of nodeapplications, namely the virtual IP (VIP), Oracle Notification Services (ONS), andGlobal Service Daemon (GSD), on all the nodes.
Troubleshooting Configuration Problems in Oracle RAC Environments
Monitoring Performance and Troubleshooting 8-41
To verify the existence of node applications:
1. In a command window, log in to the operating system as the user who owns theOracle Clusterware software installation.
2. Use the comp nodeapp command of CVU, using the following syntax:
cluvfy comp nodeapp [ -n node_list] [-verbose]
where node_list represents the nodes to check.
3. If the cluvfy command returns the value of UNKNOWN for a particular node, thenCVU cannot determine whether a check passed or failed.
Determine if the failure was caused by one of the following reasons:
• The node is down.
• Executable files that CVU requires are missing in the CRS_home/bin directoryor the Oracle_home/bin directory.
• The user account that ran CVU does not have permissions to run commonoperating system executable files on the node.
• The node is missing an operating system patch or required package.
• The kernel parameters on that node were not configured correctly and CVUcannot obtain the operating system resources required to perform its checks.
See Also:
• "Troubleshooting Configuration Problems in Oracle RAC Environments(page 8-35)"
• Oracle Clusterware Administration and Deployment Guide for moreinformation about the Cluster Verification Utility
8.5.2.2 Verifying the Integrity of Oracle Clusterware ComponentsYou use the CVU comp crs command to verify the existence of all the OracleClusterware components.
To verify the integrity of Oracle Clusterware components:
1. In a command window, log in to the operating system as the user who owns theOracle Clusterware software installation.
2. Use the comp crs command of CVU, using the following syntax:
cluvfy comp crs [ -n node_list] [-verbose]
where node_list represents the nodes to check.
Troubleshooting Configuration Problems in Oracle RAC Environments
8-42 Oracle Database 2 Day + Real Application Clusters Guide

See Also:
• Oracle Clusterware Administration and Deployment Guide for moreinformation about the Cluster Verification Utility
8.5.2.3 Verifying the Integrity of the Oracle Cluster RegistryYou use the CVU comp ocr command to verify the integrity of the OracleClusterware registry.
To verify the integrity of the Oracle Clusterware registry:
1. In a command window, log in to the operating system as the user who owns theOracle Clusterware software installation.
2. Use the comp ocr command of CVU, using the following syntax:
cluvfy comp ocr [ -n node_list] [-verbose]
where node_list represents the nodes to check.
See Also:
• Oracle Clusterware Administration and Deployment Guide for moreinformation about the Cluster Verification Utility
8.5.2.4 Verifying the Integrity of Your Entire ClusterUse the CVU comp clu command to check that all nodes in the cluster have the sameview of the cluster configuration.
To verify the integrity of your cluster:
1. In a command window, log in to the operating system as the user who owns theOracle Clusterware software installation.
2. Use the comp clu command of CVU, using the following syntax:
cluvfy comp clu [-verbose]
See Also:
• Oracle Clusterware Administration and Deployment Guide for moreinformation about the Cluster Verification Utility
• "Verifying Your Oracle RAC Database Installation (page 3-18)"
8.5.2.5 Checking the Settings for the InterconnectUse the CVU comp nodereach or comp nodeconcommand to check the settings forthe interconnect.
Cache Fusion enhances the performance of Oracle RAC by utilizing a high-speedinterconnect to send data blocks to another instance's buffer cache. The high-speed
Troubleshooting Configuration Problems in Oracle RAC Environments
Monitoring Performance and Troubleshooting 8-43

interconnect should be a private network with the highest bandwidth to maximizeperformance.
For network connectivity verification, CVU discovers all the available networkinterfaces if you do not specify an interface on the CVU command line.
To check the settings for the interconnect:
1. In a command window, log in to the operating system as the user who owns theOracle Clusterware software installation.
2. To verify the accessibility of the cluster nodes, specified by node_list, from the localnode or from any other cluster node, specified by srcnode, use the componentverification command nodereach as follows:
cluvfy comp nodereach -n node_list [ -srcnode node ] [-verbose]
3. To verify the connectivity among the nodes, specified by node_list, through theavailable network interfaces from the local node or from any other cluster node,use the comp nodecon command as shown in the following example:
cluvfy comp nodecon -n node_list -verbose
When you issue the nodecon command as shown in the previous example, itinstructs CVU to perform the following tasks:
• Discover all the network interfaces that are available on the specified clusternodes.
• Review the corresponding IP addresses and subnets for the interfaces.
• Obtain the list of interfaces that are suitable for use as VIPs and the list ofinterfaces to private interconnects.
• Verify the connectivity among all the nodes through those interfaces.
When you run the nodecon command in verbose mode, it identifies the mappingsbetween the interfaces, IP addresses, and subnets.
4. To verify the connectivity among the nodes through specific network interfaces,use the comp nodecon command with the -i option and specify the interfaces tobe checked with the interface_list argument:
cluvfy comp nodecon -n node_list -i interface_list [-verbose]
For example, you can verify the connectivity among the nodes racnode1,racnode2, and racnode3, through the specific network interface eth0 by runningthe following command:
cluvfy comp nodecon -n racnode1,racnode2,racnode3 -i eth0 -verbose
See Also:
• "Configuring the Network (page 2-18)"
• Oracle Clusterware Administration and Deployment Guide for moreinformation about the Cluster Verification Utility
Troubleshooting Configuration Problems in Oracle RAC Environments
8-44 Oracle Database 2 Day + Real Application Clusters Guide

8.5.2.6 Enabling TracingCVU does not generate trace files unless you enable tracing.
The CVU trace files are created in the ORACLE_BASE/crsdata/host_name/cvudirectory by default. Oracle Database automatically rotates the log files and the mostrecently created log file has the name cvutrace.log.0. You should removeunwanted log files or archive them to reclaim disk place if needed.
To enable tracing using CVU:
1. In a command window, log in to the operating system as the root user.
2. Set the environment variable SRVM_TRACE to true.
# set SRVM_TRACE=true; export SRVM_TRACE
3. Run the command to trace.
See Also:
Oracle Clusterware Administration and Deployment Guide for more informationabout enabling tracing
8.5.3 Viewing Oracle RAC Database AlertsAlert messages are displayed in Enterprise Manager. The Alerts table is similar to thatshown for single-instance databases, but in a cluster database, it includes columns forthe target name and target type.
To view the alert messages for an Oracle RAC database:
1. On the Cluster Database Home page, scroll down to the section titled Alerts.
The section Related Alerts displays nondatabase alert messages, for example, alertmessages for Oracle Net.
2. View the alerts for your database and database instances.
The following screenshot shows an example of the Alerts display for a clustereddatabase named docrac.
Figure 8-23 Example of the Alerts Section on the Cluster Database Home Page
Troubleshooting Configuration Problems in Oracle RAC Environments
Monitoring Performance and Troubleshooting 8-45

For example, if a user connected to the orcl1 instance exceeded their allotted logintime, then you would see an alert message with the following values:
• Target name: orcl_orcl1
• Target type: Database instance
• Category: Response
• Name: User logon time
• Message: User logon time is 10250 milliseconds
• Alert triggered: Date and time when the alert condition occurred
See Also:
Oracle Database 2 Day + Performance Tuning Guide for more information aboutmonitoring performance alerts
8.5.4 Viewing Oracle RAC Database Alert Log MessagesAn alert log is created for each instance in a cluster database.
To view the alert log for an Oracle RAC database instance:
1. On the Cluster Database Home page, scroll down to the Instances section.
2. Click the name of the instance for which you want to view the alert log.
The Cluster Database Instance Home page appears.
3. In the Diagnostic Summary section, click the link next to the heading Alert Log todisplay the alert log entries containing ORA- errors.
The Alert Log Errors page appears.
4. Optional: Click Alert Log Contents in the Related Links section to view all theentries in the alert log.
On the View Alert Log Contents page, click Go to view the most recent entries, oryou can enter your own search criteria.
See Also:
Oracle Real Application Clusters Administration and Deployment Guide for moreinformation about where to find files for analyzing errors in Oracle RAC
Troubleshooting Configuration Problems in Oracle RAC Environments
8-46 Oracle Database 2 Day + Real Application Clusters Guide
9Adding and Deleting Nodes and Instances
You can extend an existing Oracle Real Application Clusters (Oracle RAC) home toother nodes and instances in the cluster, and delete Oracle RAC instances and removenodes from the cluster.
You can add nodes when configuring a new Oracle RAC cluster, or you can removenodes to resize an existing cluster.
Note:
When adding or deleting nodes, it is very important that you perform eachstep in the order shown.
Preparing the New Node (page 9-2)Before a node can be added to the cluster, you must perform the samepreinstallation steps on the new node as you did for all the existingnodes in the cluster.
Verifying the New Node Meets the Prerequisites for Installation (page 9-2)When adding a node to an existing cluster, the new node must match theconfiguration of the other nodes in the cluster.
Extending the Oracle Grid Infrastructure Home to the New Node (page 9-3)After the new node has been configured to support Oracle Clusterware,you use Oracle Universal Installer (OUI) to add a Grid home to the nodebeing added to your cluster.
Extending the Oracle RAC Home Directory (page 9-4)Now that you have extended the Grid home to the new node, you mustextend the Oracle home on racnode1 to racnode3.
Adding the New Node to the Cluster using Enterprise Manager (page 9-5)The newly added node is automatically detected by Oracle EnterpriseManager.
Creating an Instance on the New Node (page 9-5)You can add an instance to the cluster using either the InstanceManagement option of Database Configuration Assistant (DBCA) orusing Enterprise Manager.
Deleting an Instance From the Cluster Database (page 9-8)You can delete an instance from the cluster using either the InstanceManagement option of Database Configuration Assistant (DBCA) orusing Enterprise Manager.
Adding and Deleting Nodes and Instances 9-1

Removing a Node From the Cluster (page 9-11)Removing a node from the cluster can be as easy as simply shuttingdown the server.
See Also:
Oracle Real Application Clusters Administration and Deployment Guide for moreinformation about adding and removing nodes from your cluster database
9.1 Preparing the New NodeBefore a node can be added to the cluster, you must perform the same preinstallationsteps on the new node as you did for all the existing nodes in the cluster.
This includes the following tasks:
• Checking hardware compatibility
• Configuring the operating system
• Configuring SSH connectivity between the new node and the other clustermembers
• Configuring access to shared storage
• Creating groups, users, and directories
See Also:
• " Preparing Your Cluster (page 2-1)"
• "Configuring the Network (page 2-18)"
• "About Verifying the Oracle Clusterware Installation (page 3-21)"
9.2 Verifying the New Node Meets the Prerequisites for InstallationWhen adding a node to an existing cluster, the new node must match theconfiguration of the other nodes in the cluster.
The new nodes must run the same operating system and version of the operatingsystem as the other nodes. The new computer must also use the same chip architecture(32-bit or 64-bit) as the other nodes. However, you can have computers of differentspeeds and sizes in the same cluster.
After you have configured the new nodes, use cluvfy to verify that all therequirements for installation have been met. To verify the new node meets thehardware requirement, run the following command on an existing node (for example,either racnode1 or racnode2) from the Grid_home/bin directory:
cluvfy stage -pre crsinst -n racnode3 -verbose
Preparing the New Node
9-2 Oracle Database 2 Day + Real Application Clusters Guide

See Also:
• " Preparing Your Cluster (page 2-1)"
• "Configuring the Network (page 2-18)"
• "About Verifying the Oracle Clusterware Installation (page 3-21)"
9.3 Extending the Oracle Grid Infrastructure Home to the New NodeAfter the new node has been configured to support Oracle Clusterware, you useOracle Universal Installer (OUI) to add a Grid home to the node being added to yourcluster.
This task assumes that you are adding a node named racnode3 and that you havesuccessfully installed Oracle Clusterware on racnode1 in a nonshared home, whereGrid_home represents the successfully installed Oracle Clusterware home.
To extend the Oracle Grid Infrastructure for a cluster home to include the newnode:
1. Verify the new node has been properly prepared for an Oracle Clusterwareinstallation by running the following CLUVFY command on the racnode1 node:
cluvfy stage -pre nodeadd -n racnode3 -verbose
2. As the oracle user (owner of the software installation for Oracle GridInfrastructure for a cluster) on racnode1, go to Grid_home/addnode and run theaddNode.sh script in silent mode:
• If you are using Grid Naming Service (GNS):
./addNode.sh -silent "CLUSTER_NEW_NODES={racnode3}"
• If you are not using Grid Naming Service (GNS):
./addNode.sh -silent "CLUSTER_NEW_NODES={racnode3}" "CLUSTER_NEW_VIRTUAL_HOSTNAMES={racnode3-vip}"
When running these commands, the curly braces ( { } ) are not optional and mustbe included or the command returns an error.
You can alternatively use a response file instead of placing all the arguments in thecommand line. See Oracle Clusterware Administration and Deployment Guide for moreinformation on using response files.
3. When the script finishes, run the root.sh script as the root user on the newnode, racnode3, from the Oracle home directory on that node.
4. If you are not using Oracle Grid Naming Service (GNS), then you must add thename and address for racnode3 to DNS.
You should now have Oracle Clusterware running on the new node. To verify theinstallation of Oracle Clusterware on the new node, you can run the followingcommand on the newly configured node, racnode3:
$ cd /u01/app/12.1.0/grid/bin$ ./cluvfy stage -post nodeadd -n racnode3 -verbose
Extending the Oracle Grid Infrastructure Home to the New Node
Adding and Deleting Nodes and Instances 9-3

Note:
Avoid changing host names after you complete the Oracle Clusterwareinstallation, including adding or deleting domain qualifications. Nodes withchanged host names must be deleted from the cluster and added back with thenew name.
See Also:
• "Completing the Oracle Clusterware Configuration (page 3-10)"
• Oracle Real Application Clusters Administration and Deployment Guide formore information about adding and removing nodes from your clusterdatabase
• Oracle Clusterware Administration and Deployment Guide for moreinformation on using response files
9.4 Extending the Oracle RAC Home DirectoryNow that you have extended the Grid home to the new node, you must extend theOracle home on racnode1 to racnode3.
The procedure for adding an Oracle home to the new node is very similar to theprocedure you just completed for extending the Grid home to the new node.
The following steps assume that you have completed the tasks described in theprevious sections, "Preparing the New Node (page 9-2)" and "Extending the OracleGrid Infrastructure Home to the New Node (page 9-3)", and that racnode3 is amember node of the cluster to which racnode1 belongs.
To extend the Oracle RAC installation to include the new node:
1. Ensure that you have successfully installed the Oracle RAC software on at least onenode in your cluster environment. To use these procedures as shown, replaceOracle_home with the location of your installed Oracle home directory.
2. Go to the Oracle_home/addnode directory on racnode1 and run theaddNode.sh script in silent mode as shown in the following example:
$ cd /u01/app/oracle/product/12.1.0/dbhome_1/addnode$ ./addNode.sh -silent "CLUSTER_NEW_NODES={racnode3}"
3. When the script finishes, run the root.sh script as the root user on the newnode, racnode3, from the Oracle home directory on that node.
For policy-managed databases with Oracle Managed Files (OMF) enabled, nofurther actions are needed.
For a policy-managed database, when you add a new node to the cluster, it isplaced in the Free pool by default. If you increase the cardinality of the databaseserver pool, then an Oracle RAC instance is added to the new node, racnode3,and it is moved to the database server pool. No further action is necessary.
4. Add shared storage for the undo tablespace and redo log files.
Extending the Oracle RAC Home Directory
9-4 Oracle Database 2 Day + Real Application Clusters Guide
If OMF is not enabled for your database, then you must manually add an undotablespace and redo logs.
5. If you have an administrator-managed database, then add a new instance on thenew node as described in "Creating an Instance on the New Node (page 9-5)".
If you followed the installation instructions in this guide, then your clusterdatabase is an administrator-managed database and stores the database files onOracle Automatic Storage Management (Oracle ASM) with OMF enabled.
After completing these steps, you should have an installed Oracle home on the newnode.
See Also:
• "Verifying Your Oracle RAC Database Installation (page 3-18)"
• Oracle Real Application Clusters Administration and Deployment Guide formore information about adding and removing nodes from your clusterdatabase
9.5 Adding the New Node to the Cluster using Enterprise ManagerThe newly added node is automatically detected by Oracle Enterprise Manager.
If you followed the steps described in "Extending the Oracle RAC Home Directory(page 9-4)", then the cluster node is added to the cluster by the addNode.sh script.After the software is started on the new node, it is detected by Oracle EnterpriseManager. If an Oracle Enterprise Manager agent was not installed on the new node,then an alert is issued for that host, with the message "Incomplete configuration."
See Also:
• "Completing the Oracle Clusterware Configuration (page 3-10)"
• Oracle Real Application Clusters Administration and Deployment Guide formore information about adding and removing nodes from your clusterdatabase
9.6 Creating an Instance on the New NodeYou can add an instance to the cluster using either the Instance Management option ofDatabase Configuration Assistant (DBCA) or using Enterprise Manager.
Before using either of these options you must first configure the new node to be a partof the cluster and install the software on the new node as described in the previoussections.
Note:
The steps described in this section require a license for the Enterprise ManagerProvisioning Management pack. Refer to the Oracle Database LicensingInformation for information about the availability of these features on yoursystem.
Adding the New Node to the Cluster using Enterprise Manager
Adding and Deleting Nodes and Instances 9-5
There are two methods of adding an instance to the new node:
Adding a New Instance for a Policy-Managed Database (page 9-6)To add an instance to a policy-managed database, you simply increasethe cardinality of the server pool for the database.
Adding a New Instance for an Administrator-Managed Database (page 9-7)When adding an instance to an administrator-managed database, youmust specify the name of the database instance and which node it shouldrun on.
See Also:
"About Oracle Real Application Clusters (page 1-8)"
9.6.1 Adding a New Instance for a Policy-Managed DatabaseTo add an instance to a policy-managed database, you simply increase the cardinalityof the server pool for the database.
The database instance and Oracle ASM instance on the new node are created andconfigured automatically when a node is added to the server pool.
To add an instance to a policy-managed database using Enterprise Manager:
1. In Oracle Enterprise Manager, go to the Cluster Database Home page.
See Oracle Database 2 Day DBA for details on logging in to Oracle EnterpriseManager.
2. From the Availability menu, select Cluster Database Operations, and then selectAdd Instance.
The Add Instance: Cluster Credentials page appears.
3. Enter the credentials of the Oracle Clusterware software owner and the SYSASMuser, then click Next.
After the credentials have been validated, the Edit Server Pool page appears.
4. Modify the server pool settings then click Submit.
5. From the Cluster Database menu, select Home to return to the Cluster DatabaseHome page.
6. Review the number of instances available for your cluster database.
See Also:
Oracle Real Application Clusters Administration and Deployment Guide for moreinformation about adding and removing nodes from your cluster database
Creating an Instance on the New Node
9-6 Oracle Database 2 Day + Real Application Clusters Guide

9.6.2 Adding a New Instance for an Administrator-Managed DatabaseWhen adding an instance to an administrator-managed database, you must specify thename of the database instance and which node it should run on.
To add an instance to an administrator-managed database using EnterpriseManager:
1. In Oracle Enterprise Manager, go to the Cluster Database Home page.
See Oracle Database 2 Day DBA for details on logging in to Oracle EnterpriseManager.
2. From the Availability menu, select Cluster Database Operations, and then selectAdd Instance.
The Add Instance: Cluster Credentials page appears.
3. Enter the credentials of the Oracle Clusterware software owner and for theSYSASM user, then click Next.
After the credentials have been validated, the Add Instance: Host page appears.
4. In the Name of the database instance to be added field, either use the defaultinstance name, or enter a different name for the database instance, such asracnode3.
5. Select the node on which you want to create the new instance, then Next.
Note:
This procedure assumes that the Oracle Database software is configured onthe selected node and that there is no instance for the cluster databasecurrently running on the selected node.
Figure 9-1 Add Instance: Host Page of Oracle Enterprise Manager
After the selected host has been validated, the Add Instance: Review page appears.
6. Review the information, then click Submit Job to proceed.
A confirmation page appears.
Creating an Instance on the New Node
Adding and Deleting Nodes and Instances 9-7
7. Click View Job to check on the status of the submitted job.
The Job Run detail page appears.
8. Click your browser's Refresh button until the job shows a status of Succeeded orFailed.
If the job shows a status of Failed, then you can click the name of the step thatfailed to view the reason for the failure.
9. From the Cluster Database menu, select Home to return to the Cluster DatabaseHome page.
The number of instances available in the cluster database is increased by one.
See Also:
Oracle Real Application Clusters Administration and Deployment Guide for moreinformation about adding and removing nodes from your cluster database
9.7 Deleting an Instance From the Cluster DatabaseYou can delete an instance from the cluster using either the Instance Managementoption of Database Configuration Assistant (DBCA) or using Enterprise Manager.
Sometimes, it might be necessary to remove a database instance from your clusterdatabase. For example, to retire or repurpose a server, you first remove the databaseinstance running on that server.
Note:
The steps described in this section require a license for the Enterprise ManagerProvisioning Management pack. Refer to the Oracle Database LicensingInformation for information about the availability of these features on yoursystem.
If you choose to use DBCA to delete an instance, then start the DBCA utility from anode that will remain part of the cluster.
When you delete an instance from a clustered database, there are two methods:
Deleting an Instance From a Policy-Managed Database (page 9-9)To delete an instance from a policy-managed databases, you simplydecrease the cardinality of the server pool for the database.
Deleting an Instance From an Administrator-Managed Database (page 9-9)To remove an instance from an administrator-managed database, youmust specify the name of the database instance to delete and which nodethe instance is running on.
See Also:
Oracle Real Application Clusters Administration and Deployment Guide for moreinformation about removing Oracle RAC from a cluster node
Deleting an Instance From the Cluster Database
9-8 Oracle Database 2 Day + Real Application Clusters Guide
9.7.1 Deleting an Instance From a Policy-Managed DatabaseTo delete an instance from a policy-managed databases, you simply decrease thecardinality of the server pool for the database.
The database instance and Oracle ASM instance on the deallocated node are removedfrom the cluster and the node is either reassigned to another server pool or placed inthe Free pool.
To delete a policy-managed database instance using Enterprise Manager:
1. In Oracle Enterprise Manager, go to the Cluster Database Home page.
See Oracle Database 2 Day DBA for details on logging in to Oracle EnterpriseManager.
2. From the Availability menu, select Cluster Database Operations, and then selectDelete Instance.
The Edit Server Pool page appears.
3. Enter the credentials for the Oracle Database software owner and the SYSASMuser, then click Next.
The Delete Instance: Database Instance page appears
4. Modify the server pool settings then click Submit.
5. From the Cluster Database menu, select Home to return to the Cluster DatabaseHome page.
6. Review the number of instances available for your cluster database.
See Also:
Oracle Real Application Clusters Administration and Deployment Guide for moreinformation about adding and removing nodes from your cluster database
9.7.2 Deleting an Instance From an Administrator-Managed DatabaseTo remove an instance from an administrator-managed database, you must specify thename of the database instance to delete and which node the instance is running on.
To delete an administrator-managed database instance using EnterpriseManager:
1. In Oracle Enterprise Manager, go to the Cluster Database Home page.
See Oracle Database 2 Day DBA for details on logging in to Oracle EnterpriseManager.
2. From the Availability menu, select Cluster Database Operations, and then selectDelete Instance.
The Delete Instance: Cluster Credentials page appears.
Deleting an Instance From the Cluster Database
Adding and Deleting Nodes and Instances 9-9
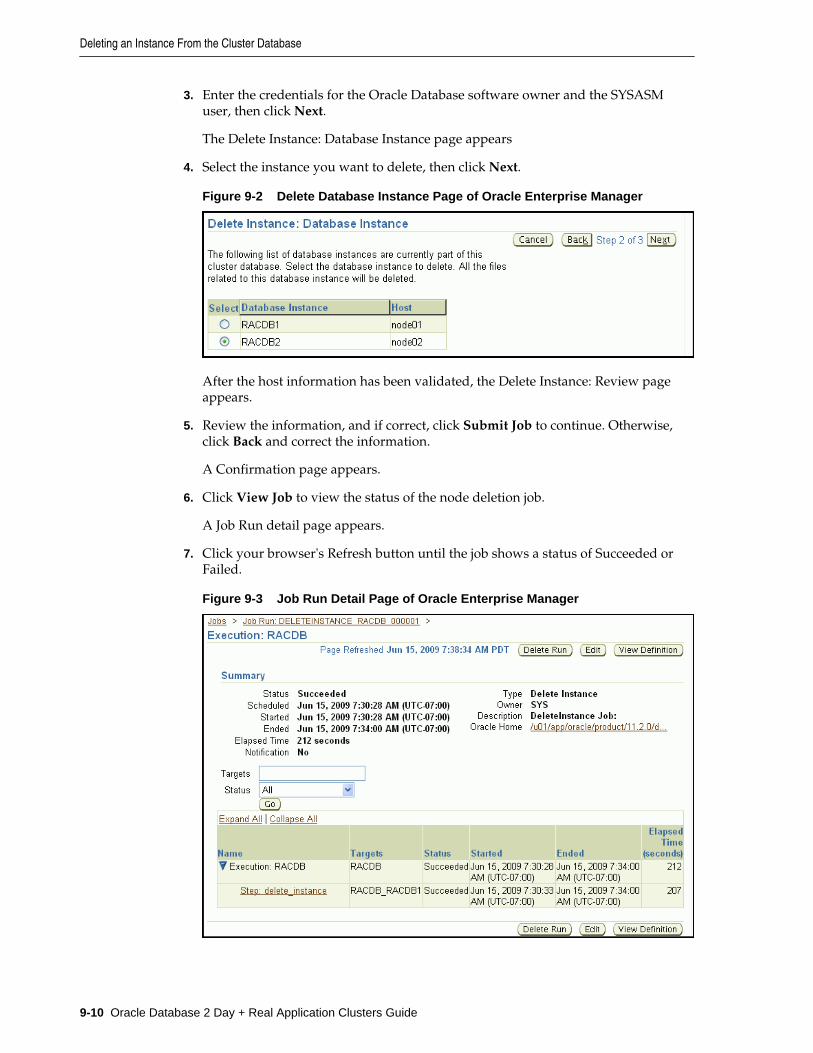
3. Enter the credentials for the Oracle Database software owner and the SYSASMuser, then click Next.
The Delete Instance: Database Instance page appears
4. Select the instance you want to delete, then click Next.
Figure 9-2 Delete Database Instance Page of Oracle Enterprise Manager
After the host information has been validated, the Delete Instance: Review pageappears.
5. Review the information, and if correct, click Submit Job to continue. Otherwise,click Back and correct the information.
A Confirmation page appears.
6. Click View Job to view the status of the node deletion job.
A Job Run detail page appears.
7. Click your browser's Refresh button until the job shows a status of Succeeded orFailed.
Figure 9-3 Job Run Detail Page of Oracle Enterprise Manager
Deleting an Instance From the Cluster Database
9-10 Oracle Database 2 Day + Real Application Clusters Guide

If the job shows a status of Failed, then you can click the name of the step thatfailed to view the reason for the failure.
8. From the Cluster Database menu, select Home to return to the Cluster DatabaseHome page.
The number of available instances in the cluster database is reduced by one.
See Also:
Oracle Real Application Clusters Administration and Deployment Guide for moreinformation about adding and removing nodes from your cluster database
9.8 Removing a Node From the ClusterRemoving a node from the cluster can be as easy as simply shutting down the server.
If the node was not pinned and does not host any Oracle databases using OracleDatabase 11g release 1 or earlier, then the node is automatically removed from thecluster when it is shut down. If the node was pinned or if it hosts a database instancefrom earlier releases, then explicit deletion is needed.
To repurpose this server, you can restart the node with a different profile in place, oryou can use other software to put a new software image on the server.
See Also:
Oracle Real Application Clusters Administration and Deployment Guide for moreinformation about adding and removing nodes from your cluster database
Removing a Node From the Cluster
Adding and Deleting Nodes and Instances 9-11

Removing a Node From the Cluster
9-12 2 Day + Real Application Clusters Guide

10Managing Oracle Software and Applying
Patches
To manage Oracle software and apply patches in Oracle Real Application Clusters(Oracle RAC) environments, you use Oracle Universal Installer or the OPatch utility.
About Patches and Patch Sets (page 10-2)Oracle issues product fixes for its software called patches. They areassociated with particular releases and versions of Oracle products.
Using Oracle Enterprise Manager Cloud Control for Patching Operations(page 10-3)
Using Cloud Control with its Provisioning & Patching functionality, youcan automate the patching of your Oracle Grid Infrastructure and OracleRAC software.
Obtaining the Patch (page 10-3)You obtain patches and patch sets from My Oracle Support, which is theOracle Support Services website.
Preparing to Use OPatch (page 10-4)Before you apply the patch to your Oracle RAC database, your OracleASM installation, or to your Oracle Clusterware installation, you mustprepare the operating system environment and stage the patch locally.
Applying Patches (page 10-8)Patching in an Oracle RAC environment is slightly different compared topatching a single node. If OPatch detects a cluster, then it uses OUI toquery the software inventory to find the local node name and node list.
Applying Patch Sets (page 10-11)For instructions on applying the latest patch set to your Oracle RACdatabase and Oracle Clusterware installations on Oracle Linux, searchfor "Oracle 12c Release 1 (12.1) Support Status and Alerts"documentation on the My Oracle Support website.
Troubleshooting Patch Deployment (page 10-12)Applying patches to your Oracle RAC environment can be complicatedat times and you may be required to troubleshoot the patch deployment.
Upgrading the Oracle Software (page 10-15)Upgrades are performed when you install a new software release orversion, or apply a patch set.
Managing Oracle Software and Applying Patches 10-1
See Also:
• Oracle Database 2 Day DBA for more information about softwaremanagement and patch releases
• Oracle OPatch User's Guide for Windows and UNIX for details on how to getthe latest version of OPatch
10.1 About Patches and Patch SetsOracle issues product fixes for its software called patches. They are associated withparticular releases and versions of Oracle products.
The patching cycle involves downloading patches, applying patches, and verifying theapplied patch to ensure that the bug fixes present in the patch reflect appropriately.
Patching involves migrating from one version of the software product to another,within a particular release, unlike upgrading which involves moving from one releaseof a product to another newer release of the software product. When you apply thepatch to your Oracle software installation, it updates the executable files, libraries, andobject files in the software home directory. The patch application can also updateconfiguration files and Oracle-supplied SQL schemas.
Oracle periodically releases the following types of patches to fix the bugs encounteredin the Oracle software:
Patch Type Description
Interim Patches Released to fix a bug, or a collection of bugs. Previouslycalled patch set exceptions (PSE), one-off patches, or hotfixes.
Interim Patches (for Securitybug fixes)
Released to provide customer specific security fixes.Previously referred to as a test patch, fix verification binary,or e-fix.
Diagnostic Patches Mainly help diagnose and verify a fix, or a collection of bugfixes.
Bundle Patch Updates Cumulative collection of fixes for a specific product orcomponent. Previously referred to as a maintenance pack,service pack, cumulative patch, update release, or MLR.
Patch Set Updates (PSU) Cumulative patch bundles that contain well-tested andproven bug fixes for critical issues. PSUs have limited newcontent, and do not include any changes that require re-certification.
Security Patch Updates A cumulative collection of security bug fixes. Previouslyknown as Critical Patch Updates, or CPUs.
Interim patches are bug fixes available to customers in response to specific bugs. Theyrequire a particular base release or patchset to be installed before you can apply them.These patches are not versioned and are generally available in a future patchset andalso the next product release. Interim patches are applied by using Enterprise ManagerCloud Control or OPatch, which is included with your Oracle Database installation.
About Patches and Patch Sets
10-2 Oracle Database 2 Day + Real Application Clusters Guide

Patch sets updates (PSUs) and patch bundles are mechanisms for delivering fullytested and integrated product fixes. All the fixes in a patch set have been tested andare certified to work with each other. Because a patch set includes only low impactpatches, it does not require you to certify applications or tools against the updatedOracle Database software. When you apply a patch set, many different files andutilities are modified. This results in a release number change for your Oraclesoftware, for example, from Oracle Database 11.2.0.3.0 to Oracle Database 11.2.0.3.2.You use OPatch to apply PSUs.
10.2 Using Oracle Enterprise Manager Cloud Control for PatchingOperations
Using Cloud Control with its Provisioning & Patching functionality, you can automatethe patching of your Oracle Grid Infrastructure and Oracle RAC software.
Before you can use Cloud Control to patch your Oracle software, you must performthe following system configuration tasks:
• Install the Enterprise Manager Agent on all cluster nodes
• Use PDP setup to ensure the host user has the necessary privileges to completepatching tasks
• Configure named and preferred credentials in Enterprise Manager
• Configure a software library for storing patch files
Details on how to perform these tasks, and how to patch your Oracle GridInfrastructure and Oracle RAC software using Cloud Control are available from thefollowing PDF file: http://www.oracle.com/technetwork/oem/pdf/512066.pdf
The rest of this chapter describes how to install patches without using Cloud Control.
10.3 Obtaining the PatchYou obtain patches and patch sets from My Oracle Support, which is the OracleSupport Services website.
The Oracle Support Services website is located at: https://support.oracle.com
To locate patches on the My Oracle Support website:
1. Log in to your account on My Oracle Support.
2. Select the Patches & Updates tab.
3. If you know the patch number, then you can enter it into the Patch Name orNumber field, then click Search.
If you want to search for all available patches for your system, then select Productor Family (Advanced Search), which is located above the Patch Name or Numberfield. Supply the following information:
• Choose the products you want to patch (for example, Oracle Clusterware,Oracle Database, or an individual product such as Universal Installer)
• Specify the software release for the products you selected, for example, Oracle12.1.0.1.0.
Using Oracle Enterprise Manager Cloud Control for Patching Operations
Managing Oracle Software and Applying Patches 10-3

• Specify the platform on which the software is installed.
Click Search to look for available patches.
The Patch Search Results page is displayed.
4. On the Patch Search Results page, select the number of the patch you want todownload.
A details page for that patch appears on your screen.
5. Click the ReadMe button to view the ReadMe file for the patch, or click Downloadto download the patch to your local computer.
If you download the patch to a computer that is not a node in the cluster, then youmust transfer the file using a binary protocol to a cluster node.
You can also choose to add the patch to your current patch plan or create a newpatch plan. A patch plan is a collection of patches that you want to apply as a group.To learn more about using patch plans, in the Add to Plan drop-down list selectWhy use a Plan?
See Also:
• "Verifying My Oracle Support Credentials (page 3-3)"
• "About Downloading and Installing Oracle Database Patches (page 3-23)"
• Oracle Database 2 Day DBA for more information about softwaremanagement and patch releases
10.4 Preparing to Use OPatchBefore you apply the patch to your Oracle RAC database, your Oracle ASMinstallation, or to your Oracle Clusterware installation, you must prepare theoperating system environment and stage the patch locally.
Checking the ORACLE_HOME Environment Variable (page 10-5)OPatch verifies if the Oracle home is present.
Performing a Backup Before Patching Software (page 10-5)Oracle strongly recommends that you back up the software directoryyou are patching before performing any patch operation. This applies toOracle Database or Oracle Grid Infrastructure software installationdirectories.
Staging the Patch on Each Node (page 10-5)After you download the patch from My Oracle Support, you must copythe patch to each node that runs the software being patched.
Updating the PATH Environment Variable (page 10-6)You can either specify the path to the opatch executable file whenrunning OPatch, or you can update the PATH environment variable toinclude the OPatch directory.
Configuring SSH User Equivalency (page 10-6)User equivalency exists when the operating system user on each node isconsidered to be identical.
Preparing to Use OPatch
10-4 Oracle Database 2 Day + Real Application Clusters Guide
See Also:
• Oracle Database 2 Day DBA for more information about how to keep yourOracle Database software up-to-date
• Oracle OPatch User's Guide for Windows and UNIX
10.4.1 Checking the ORACLE_HOME Environment VariableOPatch verifies if the Oracle home is present.
You must ensure that the ORACLE_HOME environment variable is set to the Oraclehome of the product you are trying to patch. Also, you must use a version of OPatchthat has the same version number as the Oracle home being patched.
Check the respective vendor documentation for the details to set the environmentvariable.
To check the current setting of the ORACLE_HOME variable on Linux:
1. In a command window, log in to the operating system as the grid or oracle user.
2. Use the echo command to display the current setting of the ORACLE_HOMEenvironment variable.
echo $ORACLE_HOME
See Also:
"Configuring the Operating System Environment (page 3-12)"
10.4.2 Performing a Backup Before Patching SoftwareOracle strongly recommends that you back up the software directory you are patchingbefore performing any patch operation. This applies to Oracle Database or Oracle GridInfrastructure software installation directories.
To back up the software installation:
1. Back up the software installed in the specified Oracle home using any of thefollowing:
a. An operating system utility, such as zip, cp -r, tar, or cpio, to back up thesoftware in the Oracle home directory to disk.
b. The Oracle Secure Backup utility to back up the software in the Oracle homedirectory to tape.
10.4.3 Staging the Patch on Each NodeAfter you download the patch from My Oracle Support, you must copy the patch toeach node that runs the software being patched.
Preparing to Use OPatch
Managing Oracle Software and Applying Patches 10-5
10.4.4 Updating the PATH Environment VariableYou can either specify the path to the opatch executable file when running OPatch, oryou can update the PATH environment variable to include the OPatch directory.
The opatch binary file is located in the Oracle_home/OPatch directory.
To update the PATH environment variable on Oracle Linux systems:
1. In a command window, log in to the operating system as the Oracle home owner,or a user that has write permission for the files in the Oracle home.
2. Use a shell command similar to the following to update the value of the PATHenvironment variable, where /u01/app/oracle/product/12.1.0/dbhome_1is the location of your Oracle home directory:
$ export PATH=$PATH:/u01/app/oracle/product/12.1.0/dbhome_1/OPatch
You could also modify the shell profile script for the current user to have thisvariable configured every time you log in.
See Also:
"Configuring the Operating System Environment (page 3-12)"
10.4.5 Configuring SSH User EquivalencyUser equivalency exists when the operating system user on each node is considered tobe identical.
For information on configuring user equivalency, see "Configuring Operating SystemUsers and Groups on Linux Systems (page 2-15)".
Testing SSH User Equivalency (page 10-6)Use the operating system SSH command to verify the user equivalencyis working.
Enabling SSH User Equivalency (page 10-7)Before you patch a system, make sure the user equivalency is working.
10.4.5.1 Testing SSH User EquivalencyUse the operating system SSH command to verify the user equivalency is working.
1. On the system where you want to run OPatch, log in as the software owner. If youare patching Oracle Grid Infrastructure, login as the grid user. If you are patchingOracle RAC software, then login as the oracle user.
2. Use the following command to test user equivalency:
[oracle@racnode1] $ ssh racnode2 date
a. If the date is returned, then user equivalency between the source anddestination node has been configured.
b. If you see output similar to the following, then SSH user equivalency is notenabled:
Preparing to Use OPatch
10-6 Oracle Database 2 Day + Real Application Clusters Guide

Enter passphrase for key '/home/oracle/.ssh/id_rsa':
3. If you determine from this test that SSH user equivalency does not exist, thenenable SSH user equivalency before continuing with the patching operation.
See Also:
• "Configuring Operating System Users and Groups on Linux Systems(page 2-15)"
• Oracle Grid Infrastructure Installation and Upgrade Guide for your specificoperating system for instructions on how to configure SSH
10.4.5.2 Enabling SSH User EquivalencyBefore you patch a system, make sure the user equivalency is working.
To enable SSH user equivalency:
1. On the system where you want to run OPatch, open a command window and login as the software owner. Login as grid if patching Oracle Grid Infrastructuresoftware, or login as oracle if patching Oracle Database software.
2. Start the SSH agent and load the SSH keys into memory using the followingcommands:
$ /usr/bin/ssh-agent $SHELL$ /usr/bin/ssh-add
These commands start the ssh-agent on the local node, and load the RSA andDSA keys into the current session's memory so that you are not prompted to usepass phrases when issuing SSH commands.
3. At the prompt, enter the pass phrase for each key that you generated whenconfiguring Secure Shell, for example:
[oracle@racnode1 .ssh]$ exec /usr/bin/ssh-agent $SHELL[oracle@racnode1 .ssh]$ /usr/bin/ssh-addEnter passphrase for /home/oracle/.ssh/id_rsa passphraseIdentity added: /home/oracle/.ssh/id_rsa (/home/oracle/.ssh/id_rsa)Identity added: /home/oracle/.ssh/id_dsa (/home/oracle/.ssh/id_dsa)
4. To test if you have configured SSH correctly, run the following command.
[oracle@racnode1] $ ssh racnode2 date
If you have configured SSH correctly, then you are not prompted for a password ora pass phrase.
Important:
Do not close this command window until you have completed the patchinstallation. If you must close the command window in which you enabledSSH user equivalency before the patch installation is complete, then repeatStep 1 to Step 4 before starting the patch installation.
Preparing to Use OPatch
Managing Oracle Software and Applying Patches 10-7

See Also:
• "Configuring Operating System Users and Groups on Linux Systems(page 2-15)"
• Oracle Grid Infrastructure Installation and Upgrade Guide for your specificoperating system for instructions on how to configure SSH
10.5 Applying PatchesPatching in an Oracle RAC environment is slightly different compared to patching asingle node. If OPatch detects a cluster, then it uses OUI to query the softwareinventory to find the local node name and node list.
Before you install a patch, you must stop all the applications running from thesoftware directory that is being patched. In a cluster, you may have to shut downadditional applications, depending upon which software is being patched. Thefollowing table lists the applications to stop when patching Oracle software.
Table 10-1 Patching Oracle Home Directories
Oracle Home Directory Applications to Stop
Oracle RAC Database Oracle RAC database, Enterprise Manager Agent, listener, andany other applications that run from the Oracle RAC homedirectory
Oracle Grid Infrastructure Oracle RAC database and all applications running from theOracle RAC home directory, any single-instance databases thatuse the same Oracle ASM instance as the cluster database, theOracle ASM instance, all node applications, Oracle Clusterware,and any other applications that run from the Grid homedirectory
Patching the Grid Home (page 10-9)Before you can apply a patch or make other modifications to thesoftware files in the Grid home, you must first unlock the Grid home.
All Node Patching (page 10-10)In all node patching, all the nodes in the cluster are initially shut downand the patch is applied on all the nodes.
Rolling Patching (page 10-10)In rolling patching, one group of nodes is shut down, the patch isapplied to those nodes, and the nodes are brought back up.
Minimum Downtime Patching (page 10-10)Minimum downtime patching shortens the time that all the nodes haveto be down to apply a patch.
Applying Patches
10-8 Oracle Database 2 Day + Real Application Clusters Guide
See Also:
• "Obtaining the Patch (page 10-3)"
• "Preparing to Use OPatch (page 10-4)"
• Oracle Universal Installer Installation Guide
• Oracle OPatch User's Guide for Windows and UNIX for information aboutpatch automation
10.5.1 Patching the Grid HomeBefore you can apply a patch or make other modifications to the software files in theGrid home, you must first unlock the Grid home.
There are two parts to patching Oracle Grid Infrastructure for a cluster:
• Unlock the Grid home
• Apply patches to the Grid home
To unlock the Grid home, perform the following steps:
1. Change directory to the path Grid_home/crs/install, where Grid_home is thepath to the Grid home. As the root user, unlock the Grid home using commandssimilar to the following:
cd /u01/app/12.1.0/grid/crs/install rootcrs.sh -prepatch -crshome /u01/app/12.1.0/grid
When you run the rootcrs.bat script with the -prepatch option, it stops theOracle Clusterware stack and unlocks the files in the Grid home so they can bemodified.
Note:
Starting with Oracle Database 12c Release 1 (12.1.0.2), on Microsoft Windowssystems, the rootcrs.sh script replaces the rootcrs.pl script in the OracleGrid Infrastructure home.
2. Change user to the software owner for Oracle Grid Infrastructure for a cluster andapply the patch to the Grid home, using one of the patching methods described inthis section.
3. After you have finished modifying the Grid home, lock it again as the root userusing commands similar to the following:
cd /u01/app/12.1.0/grid/crs/install rootcrs.sh -postpatch
The rootcrs.sh script with the -postpatch option locks the Grid home againand restarts the Oracle Clusterware stack.
Applying Patches
Managing Oracle Software and Applying Patches 10-9

10.5.2 All Node PatchingIn all node patching, all the nodes in the cluster are initially shut down and the patchis applied on all the nodes.
After all the nodes have been patched, then the Oracle Clusterware stack and all itsregistered resources are restarted on each node. This method is typically used for verycritical patches and it leads to maximum downtime. OPatch uses this method if thepatch cannot be applied in a rolling fashion, and you did not specify theminimize_downtime option.
See Also:
• "Obtaining the Patch (page 10-3)"
• "Preparing to Use OPatch (page 10-4)"
• "Applying Patch Sets (page 10-11)"
10.5.3 Rolling PatchingIn rolling patching, one group of nodes is shut down, the patch is applied to thosenodes, and the nodes are brought back up.
Rolling patching is performed group by group, separately, until all the nodes in thecluster are patched. This is the most efficient means of applying an interim patch to anOracle RAC or Oracle Grid Infrastructure for a cluster installation. By patching groupsof nodes individually, there is zero downtime for the cluster database because at leastone instance is always available on a different node.
While most patches can be applied in a rolling fashion, some patches cannot beapplied in this fashion. The README file for the patch indicates whether you can applythe patch using the rolling patch method. If the patch cannot be applied using therolling patch method, then you must use either "Minimum Downtime Patching(page 10-10)" or "All Node Patching (page 10-10)" to apply the patch.
See Also:
• "Obtaining the Patch (page 10-3)"
• "Preparing to Use OPatch (page 10-4)"
• "Applying Patch Sets (page 10-11)"
10.5.4 Minimum Downtime PatchingMinimum downtime patching shortens the time that all the nodes have to be down toapply a patch.
In minimum downtime patching, one set of nodes is shut down and the patch isapplied to those nodes. After the first set of nodes has been patched, the second set ofnodes is shut down. The first set of nodes is then restarted and the patch is applied tothe second set of nodes. After the patch has been applied to the second set of nodes,
Applying Patches
10-10 Oracle Database 2 Day + Real Application Clusters Guide

those nodes are restarted. This method leads to less downtime for Oracle RAC,compared to having all the nodes shut down at the same time.
When you use the minimum downtime patching method, the following actions occur:
• The local node is always patched first.
• The local node is used as a base to patch the other nodes.
• The user is prompted for the set of nodes to patch first from the remaining nodes.
• For each node in this first set, the user is asked to stop the instance and then thepatch is propagated to that node before continuing to the next node. When theinitial set of nodes has been patched, the user is asked to shut down the remainingnodes.
• After the local node is patched, the patch is propagated to the last set of nodes andthe inventory is updated. The last instances are stopped on the remote nodes. Youcan then start the patched nodes (the first set of nodes) before patching theremaining nodes.
See Also:
• "Obtaining the Patch (page 10-3)"
• "Preparing to Use OPatch (page 10-4)"
• "Applying Patch Sets (page 10-11)"
10.6 Applying Patch SetsFor instructions on applying the latest patch set to your Oracle RAC database andOracle Clusterware installations on Oracle Linux, search for "Oracle 12c Release 1(12.1) Support Status and Alerts" documentation on the My Oracle Support website.
This document provides a summary of the patch sets available for Oracle 12c Release1. Using this document, you can easily locate and view the Patch Set Notes for yourplatform. The Oracle Database Patch Set Notes document contains the followinginformation:
• System requirements and information about how to install or reinstall the patchset
• A list of all bugs fixed to date that are specific to Oracle Database for specifiedplatform
• A list of known issues relating to Oracle Database for the specified platform
To locate the Patch Set notes on My Oracle Support:
1. Log in to My Oracle Support.
2. Select the Patches & Updates tab.
3. Select Quick Links to the Latest Patchsets, Mini Packs, and Maintenance Packs.
4. Under the heading Latest Oracle Server/Tools Patchsets, select Oracle Database.
Applying Patch Sets
Managing Oracle Software and Applying Patches 10-11
A list of operating systems appears.
5. Place your cursor over the entry that matches your operating system, or use thetriangular arrows to search for your operating system.
When you place the cursor over the entry for your operating system, for example,Linux x86, a list of database versions appears.
6. Select 12.1.0
The Advanced Search page appears.
7. Scroll to the bottom of this page to see the list of available patch sets.
8. Select the number in the Patch column for the patch set you want to view ordownload.
The Patchset description and download page appears.
9. Click View Readme to see the patch set notes.
On this page you can also click Download to download the patch to yourcomputer.
10. If you choose to download the patch, then follow the instructions in the ReadMefile of the patch set to apply the patch set to your software.
See Also:
"Preparing to Use OPatch (page 10-4)"
10.7 Troubleshooting Patch DeploymentApplying patches to your Oracle RAC environment can be complicated at times andyou may be required to troubleshoot the patch deployment.
If you have problems applying a patch to your Oracle RAC database, then reviewthese solutions to common problems. If the problem you encountered is not listed,then review the log and trace files and use My Oracle Support to obtain assistance.
Updating the Node List for OPatch (page 10-13)If OPatch does not automatically detect Oracle RAC or its nodes, theninvestigate the contents of the inventory and ensure they are complete.
About OPatch Log and Trace Files (page 10-13)Logging and tracing is a common aid for debugging. OPatch maintainslogs for all apply, rollback, and lsinventory operations.
Resolving the "Not a valid patch area" Error (page 10-14)You might get this error if the directory that the OPatch utility is using todo the patch does not match the template for what it is checking, or if theOPatch utility is run from an invalid directory.
Resolving the "Unable to remove a partially installed interim patch" Error(page 10-14)
If the patching process is interrupted, then you might get the error"Unable to remove a partially installed interim patch" when you try toinstall the patch a second time.
Troubleshooting Patch Deployment
10-12 Oracle Database 2 Day + Real Application Clusters Guide
See Also:
• Oracle OPatch User's Guide for Windows and UNIX
• "Preparing to Use OPatch (page 10-4)"
• "Viewing Oracle RAC Database Alert Log Messages (page 8-46)"
• "About the Oracle Clusterware Alert Log (page 8-36)"
10.7.1 Updating the Node List for OPatchIf OPatch does not automatically detect Oracle RAC or its nodes, then investigate thecontents of the inventory and ensure they are complete.
To update the node list for OPatch:
• If the list of nodes for your cluster is not complete, then you can update it by usingOracle Universal Installer and the -updateNodeList flag, as demonstrated inthe following example:
Oracle_home/oui/bin/runInstaller -updateNodeList ORACLE_HOME=/u01/app/oracle/product/12.1.0/dbhome_1 CLUSTER_NODES=racnode1,racnode2,racnode3 -noClusterEnabled
See Also:
Oracle Universal Installer Installation Guide for more information aboutupdating the node list
10.7.2 About OPatch Log and Trace FilesLogging and tracing is a common aid for debugging. OPatch maintains logs for allapply, rollback, and lsinventory operations.
The log files are located in the Oracle_home/cfgtoollogs/opatch directory. Eachlog file is tagged with the time stamp of the operation. Log files are named asopatch_mm-dd-yyyy_hh-mm-ss.log, where mm-dd-yyyy is the current date andhh-mm-ss is the current time. Each time you run OPatch, a new log file is created.
For example, if a log file is created on May 17, 2015 at 11:55 PM, then it is named asfollows:
opatch_05-17-2015_23-55-00.log
OPatch also maintains an index of the commands processed by OPatch and the logfiles associated with it in the opatch_history.txt file located in theOracle_home/cfgtoollogs/opatch directory. A sample of theopatch_history.txt file is as follows:
Date & Time : Tue Apr 26 23:00:55 PDT 2015Oracle Home : /u01/app/oracle/product/12.1.0/dbhome_1OPatch Ver. : 12.1.0.0.0Current Dir : /scratch/oui/OPatchCommand : lsinventoryLog File :
Troubleshooting Patch Deployment
Managing Oracle Software and Applying Patches 10-13

/u01/app/oracle/product/12.1.0/dbhome_1/cfgtoollogs/opatch/opatch-2015_Apr_26_23-00-55-PDT_Tue.log
See Also:
Oracle OPatch User's Guide for Windows and UNIX
10.7.3 Resolving the "Not a valid patch area" ErrorYou might get this error if the directory that the OPatch utility is using to do the patchdoes not match the template for what it is checking, or if the OPatch utility is run froman invalid directory.
The Patch_Shiphome directory should have the following structure:
• An etc subdirectory that has the metadata files
• A files subdirectory that has the patch files
• The etc/config/inventory.xml file and the actions.xml file under thesame directory
To resolve the "Not a valid patch area" error:
• Perform one of the following actions:
1. Remove the patch shiphome directory and re-create it with the properstructure (by extracting the files again).
2. Start the OPatch utility from the directory where the patch to be installed hasbeen unzipped and staged on disk.
3. Use the following command when starting OPatch:
opatch apply /Patch_Shiphome
where Patch_Shiphome is the location where the patch has been staged ondisk.
See Also:
Oracle OPatch User's Guide for Windows and UNIX
10.7.4 Resolving the "Unable to remove a partially installed interim patch" ErrorIf the patching process is interrupted, then you might get the error "Unable to removea partially installed interim patch" when you try to install the patch a second time.
To resolve the partially installed patch error:
1. Ensure that the environment variable ORACLE_HOME is set to the Oracle homedirectory you are attempting to patch.
2. Go to the Oracle_home/.patch_storage/patch-id_timestamp directoryand run the restore.sh script (or restore.bat on Windows platforms) asfollows:
Troubleshooting Patch Deployment
10-14 Oracle Database 2 Day + Real Application Clusters Guide
Oracle_home/.patch_storage/patch-id_timestamp/restore.sh
3. On Linux and UNIX systems, use the Oracle_home/.patch_storage/patch-id_timestamp/make.txt file (if available) to modify your operating systemenvironment, as follows:
/bin/sh make.txt
4. Attempt to apply the patch again.
See Also:
Oracle OPatch User's Guide for Windows and UNIX
10.8 Upgrading the Oracle SoftwareUpgrades are performed when you install a new software release or version, or applya patch set.
An upgrade modifies most, if not all, of the installed Oracle software files, whereas apatch typically modifies only a few files. You can perform rolling upgrades, or you canshut down the Oracle Database and Oracle Clusterware software to perform theupgrade.
You perform out-of-place upgrades when upgrading the software to a new release. Toperform an out-of-place upgrade, you install the Oracle Grid Infrastructure for acluster into a new Grid home. When performing the upgrade, you specify the locationof the new Grid home instead of selecting the existing software location.
When performing an out-of-place upgrade, the old and new version of the softwareare present on the nodes at the same time, each in a different home location, but onlyone version of the software is active at any given time. To upgrade your OracleDatabase 11g software to Oracle Database 12c Release 1 (12.1), you install Oracle GridInfrastructure for a cluster and Oracle Database into new Oracle home directories. Atthe end of the upgrade process, the active version of the software is changed to use theOracle Grid Infrastructure for a cluster or Oracle Database 12c Release 1 (12.1)software.
You can use Database Upgrade Assistant (DBUA) to upgrade an existing database tothe current release of Oracle Database. Database Upgrade Assistant (DBUA) guidesyou through the upgrade process and configures your database for the new release.DBUA automates the upgrade process and makes appropriate recommendations forconfiguration options such as tablespaces and online redo log files.
See Also:
• Oracle Database 2 Day DBA for more information about using DBUA toupgrade a database
• Oracle Grid Infrastructure Installation and Upgrade Guide for your operatingsystem for more information on performing software upgrades
• Oracle Database Upgrade Guide
Upgrading the Oracle Software
Managing Oracle Software and Applying Patches 10-15

Upgrading the Oracle Software
10-16 2 Day + Real Application Clusters Guide

Glossary
administrator-managed databaseAn administrator-managed database is a database created on nodes that are not part ofa server pool; the database or clusterware administrator manages these databases.
affinityAny strategy that is expected to increase the probability that an application or clientfinds the requested data cached in the instance to which the request is routed.
affinity hintA flag that indicates if affinity is active or inactive for a particular instance and servicecombination.
all node patchingA method of applying patches to the nodes in a cluster. When using the all nodepatching method, all the nodes that are part of the Oracle Real Application Clustersdatabase are initially brought down and the patch is applied on all the nodes. After thepatch is applied to all nodes, then the nodes are brought back up.
Application ContinuityA feature that can reestablish database sessions and resubmit pending work forrecoverable errors, thereby protecting applications from transient failures. When acomponent fails, the recovery restores the state as it was before the failure. A userrequest is executed on time and at most once.
Automatic Workload Repository (AWR)A built-in repository that exists in every Oracle Database. At regular intervals, OracleDatabase makes a snapshot of all of its vital statistics and workload information andstores them in the AWR.
cache coherencyThe synchronization of data in multiple caches so that reading a memory locationthrough any cache returns the most recent data written to that location through anyother cache. Sometimes called cache consistency.
Glossary-1

Cache FusionA diskless cache coherency mechanism in Oracle Real Application Clusters thatprovides copies of blocks directly from a holding instance's memory cache to arequesting instance's memory cache.
clusterMultiple interconnected computers or servers that appear as if they are one server toend users and applications.
cluster databaseThe generic term for an Oracle Real Application Clusters database.
cluster file systemA distributed file system that is a cluster of servers that collaborate to provide highperformance service to their clients. Cluster file system software deals withdistributing requests to storage cluster components.
Cluster Synchronization Services (CSS)An Oracle Clusterware component that discovers and tracks the membership state ofeach node by providing a common view of membership across the cluster. CSS alsomonitors process health, specifically the health of the database instance. See also OCSSD.
Cluster Verification Utility (CVU)A tool that verifies a wide range of Oracle RAC-specific components such as sharedstorage devices, networking configurations, system requirements, Oracle Clusterware,groups, and users.
connect descriptorA specially formatted description of the destination for a network connection. Aconnect descriptor contains destination service and network route information. Thenetwork route provides, at a minimum, the location of the listener through use of anetwork address.
CRSDA Linux or UNIX process that performs high availability recovery and managementoperations such as maintaining the OCR. Also manages application resources andruns as root user (or by a user in the admin group on Mac operating system X-basedsystems) and restarts automatically upon failure.
database servicesEntities that you can define in Oracle RAC databases that enable you to groupdatabase workloads and route work to the optimal instances that are assigned to offerthe service.
Cache Fusion
Glossary-2
Dynamic Host Configuration Protocol (DHCP)A network application protocol used by devices (DHCP clients) to obtainconfiguration information for operation in an Internet Protocol network. This protocolreduces system administration workload, enabling devices to be added to the networkwith little or no manual intervention.
Event Manager (EVM)The background process that publishes Oracle Clusterware events. EVM scans thedesignated callout directory and runs all scripts in that directory when an eventoccurs.
Event Manager Daemon (EVMD)A Linux or UNIX event manager daemon that starts the racgevt process to managecallouts.
Fast Application Notification (FAN)Applications use FAN to enable rapid failure detection, balancing of connection poolsafter failures, and re-balancing of connection pools when failed components arerepaired. The FAN notification process uses system events that Oracle publishes whencluster servers become unreachable or if network interfaces fail.
Fast Connection FailoverFast Connection Failover provides high availability to FAN integrated clients, such asclients that use JDBC, OCI, or ODP.NET. If you configure the client to use fastconnection failover, then the client automatically subscribes to FAN events and canreact to database UP and DOWN events. In response, Oracle gives the client a connectionto an active instance that provides the requested database service.
forced disk writeIn Oracle Real Application Clusters, a particular data block can only be modified byone instance at a time. If one instance modifies a data block that another instanceneeds, then whether a forced disk write is required depends on the type of requestsubmitted for the block.
Free poolA default server pool used in policy-based cluster and capacity management of OracleClusterware resources. The free pool contains servers that are not assigned to anyserver pool.
General Parallel File System (GPFS)General Parallel File System (GPFS) is a shared-disk IBM file system product thatprovides data access from all of the nodes in a homogenous or heterogeneous cluster.
General Parallel File System (GPFS)
Glossary-3

Global Cache Service (GCS)A process that implements Cache Fusion. It maintains the block mode for blocks in theglobal role. It is responsible for block transfers between instances. The Global CacheService employs various background processes such as the Global Cache ServiceProcesses (LMSn) and Global Enqueue Service Daemon (LMD).
Global Cache Service Processes (LMSn)Processes that manage remote messages. Oracle RAC provides for up to 10 GlobalCache Service Processes.
Global Cache Service (GCS) resourcesGlobal resources that coordinate access to data blocks in the buffer caches of multipleOracle RAC instances to provide cache coherency.
global database nameThe full name of the database that uniquely identifies it from any other database. Theglobal database name is of the form database_name.database_domain—for example:TEST.US.EXAMPLE.COM
global dynamic performance viewsDynamic performance views storing information about all open instances in an OracleReal Application Clusters cluster. (Not only the local instance.) In contrast, standarddynamic performance views (V$) only store information about the local instance.
Global Enqueue Service (GES)A service that coordinates enqueues that are shared globally.
Global Enqueue Service Daemon (LMD)The resource agent process that manages requests for resources to control access toblocks. The LMD process also handles deadlock detection and remote resourcerequests. Remote resource requests are requests originating from another instance.
Global Enqueue Service Monitor (LMON)The background LMON process monitors the entire cluster to manage globalresources. LMON manages instance deaths and the associated recovery for any failedinstance. In particular, LMON handles the part of recovery associated with globalresources. LMON-provided services are also known as Cluster Group Services.
Global Services Daemon (GSD)A component that receives requests from SRVCTL to execute administrative job tasks,such as startup or shutdown. The command is executed locally on each node, and theresults are returned to SRVCTL. GSD is installed on the nodes by default.
Global Cache Service (GCS)
Glossary-4

Grid homeThe Oracle Home directory for Oracle Grid Infrastructure for a cluster, which includesOracle Clusterware and Oracle ASM.
grid infrastructureThe software that provides the infrastructure for an enterprise grid architecture.Oracle Grid Infrastructure for a cluster bundles these infrastructure software productsinto one product. In an Oracle cluster, Oracle Grid Infrastructure for a cluster includesOracle Clusterware and Oracle Automatic Storage Management (Oracle ASM). For astandalone Oracle Database server, Oracle Grid Infrastructure for a cluster includesOracle Restart and Oracle ASM.
Grid Naming Service (GNS)A generic service which resolves the names of hosts in a delegated normal DNS zoneby mapping them to IP addresses within the zone. GNS enables the use of DynamicHost Configuration Protocol (DHCP) address for Oracle RAC database nodes,simplifying deployment. GNS also resolves host names passed back from a SCANlistener.
high availabilitySystems with redundant components that provide consistent and uninterruptedservice, even following hardware or software failures. This involves some degree ofredundancy.
High Availability Cluster Multi-Processing (HACMP)High Availability Cluster Multi-Processing is an IBM AIX-based high availabilitycluster software product. HACMP has two major components: high availability (HA)and cluster multi-processing (CMP).
instanceFor an Oracle RAC database, each node in a cluster usually has one instance of therunning Oracle software that references the database. When a database is started,Oracle allocates a memory area called the System Global Area (SGA) and starts one ormore Oracle processes. This combination of the SGA and the Oracle processes is calledan instance. Each instance has unique Oracle System Identifier (SID), instance name,rollback segments, and thread ID.
instance membership recoveryThe method used by Oracle RAC guaranteeing that all cluster members are functionalor active. IMR polls and arbitrates the membership. Any members that do not show aheartbeat by way of the control file or who do not respond to periodic activity inquirymessages are presumed terminated.
instance membership recovery
Glossary-5
instance nameRepresents the name of the instance and uniquely identifies a specific instance whenclusters share common services names. The INSTANCE_NAME parameter in theinstance initialization file, initsid.ora, identifies the instance name. The instancename equals the Oracle System Identifier (SID).
instance numberA number that associates extents of data blocks with particular instances. The instancenumber enables you to start an instance and ensure that it uses the extents allocated toit for inserts and updates. This ensures that an instance does not use space allocatedfor other instances.
interconnectThe private network communication link used to synchronize the memory cache ofthe nodes in the cluster.
listenerA process that resides on the server and whose responsibility is to listen for incomingclient connection requests and manage the traffic to the server. When a client requestsa network session with a database server, a listener receives the actual request. If theclient information matches the listener information, then the listener grants aconnection to the database server.
logical transaction IDA globally unique identifier that defines a transaction from the applicationperspective.
Logical Volume Manager (LVM)A generic term that describes Linux or UNIX subsystems for online disk storagemanagement.
Inter-Process Communication (IPC)A high-speed operating system-dependent transport component. The IPC transfersmessages between instances on different nodes. Also referred to as the interconnect.
Master Boot Record (MBR)A program that executes when a computer starts. Typically, the MBR resides on thefirst sector of a local hard disk. The program begins the startup process by examiningthe partition table to determine which partition to use for starting the computer. TheMBR program then transfers control to the boot sector of the startup partition, whichcontinues the startup process.
instance name
Glossary-6

minimum downtime patchingIn minimum downtime patching, the nodes are divided into two sets. The first set isshut down and the patch is applied to it. The second set is then shut down. The firstset is brought up and then the patch is applied to the second set. After the patch isapplied to the second set, those nodes are also brought up, finishing the patchingoperation.
multicast Domain Name Server (mDNS)A part of Zero Configuration Networking (Zeroconf), mDNS provides the ability toaddress hosts using DNS-like names without the need of an existing, managed DNSserver.
mutablesData returned from mutable objects. An example of a mutable is a call toSYSTIMESTAMP function.
mutable objectsA function that obtains a new value every time it is called. Examples of mutableobjects are SYSDATE, SYSTIMESTAMP, SYS_GUID, and sequence.NEXTVAL.
net service nameA simple name for a service that resolves to a connect descriptor. Users initiate aconnect request by passing a user name and password along with a net service namein a connect string for the database service to which they want to connect.
Network Attached Storage (NAS)Storage that is attached to a server by way of a network.
Network Interface Card (NIC)A card that you insert into a computer to connect the computer to a network.
network switchA hardware device that connects computers within a network.
Network Time Protocol (NTP)An Internet standard protocol, built on top of TCP/IP, that ensures the accuratesynchronization to the millisecond of the computer clock times in a network ofcomputers.
nodesA node is a computer on which the Oracle Clusterware software is installed or will beinstalled.
nodes
Glossary-7
Object Link Manager (OLM)The Oracle interface that maps symbolic links to logical drives and displays them inthe OLM graphical user interface.
OCSSDA Linux or UNIX process that manages the Cluster Synchronization Services (CSS)daemon. Manages cluster node membership and runs as oracle user; failure of thisprocess results in cluster restart.
optimal flexible architecture (OFA)A set of file naming and configuration guidelines created to ensure reliable Oracleinstallations that require little maintenance.
Oracle Base directoryThe mountpoint for all software installations performed by a particular user. AnOracle base directory can contain multiple Oracle homes for Oracle software products,either of the same or different releases, all installed by the same operating system user.The Oracle Base directory is also the directory where the software parameter files, logfiles, trace files, and so on, associated with a specific installation owner are located.
Oracle Cluster File System (OCFS)The Oracle proprietary cluster file system software that is available for Linuxplatforms.
Oracle Cluster Registry (OCR)The Oracle RAC configuration information repository that manages information aboutthe cluster node list and instance-to-node mapping information. The OCR alsomanages information about Oracle Clusterware resource profiles for customizedapplications.
Oracle ClusterwareThis is clusterware that is provided by Oracle to manage cluster database processingincluding node membership, group services, global resource management, and highavailability functions.
Oracle Home directoryThe binary location for a particular software installation.
Typically The Oracle Home directory is a subdirectory of the Oracle Base directory forthe software installation owner. However, with Oracle Grid Infrastructure for acluster, the Oracle Home directory (in this case, the Grid home) is located outside ofthe Oracle Base directory for the Oracle Grid Infrastructure for a cluster installationowner, because the path of the Grid home is changed to root ownership.
Object Link Manager (OLM)
Glossary-8
Oracle Interface Configuration Tool (OIFCFG)A command-line tool for both single-instance Oracle databases and Oracle RACdatabases that enables you to allocate and de-allocate network interfaces tocomponents, direct components to use specific network interfaces, and retrievecomponent configuration information. The Oracle Universal Installer (OUI) also usesOIFCFG to identify and display available interfaces.
Oracle Inventory directoryThe Oracle Inventory directory is the central inventory location for all Oracle softwareinstalled on a server.
Oracle Notification Services (ONS)A publish and subscribe service for communicating information about all FAN events.
Oracle Universal Installer (OUI)A tool to install Oracle Clusterware, the Oracle relational database software, and theOracle Real Application Clusters software. You can also use the Oracle UniversalInstaller to launch the Database Configuration Assistant (DBCA).
policy-managed databaseA policy-managed database is created using a server pool. Oracle Clusterwareallocates and reassigns capacity based on policies you define, enabling faster resourcefailover and dynamic capacity assignment.
recoverable errorA class of errors that arise because of an external system failure, independently of theapplication session logic that is executing. Recoverable errors occur following plannedand unplanned outages of networks, nodes, storage, and databases. An example of anonrecoverable error is submission of invalid data values.
Recovery Manager (RMAN)An Oracle tool that enables you to back up, copy, restore, and recover data files,control files, and archived redo logs. It is included with the Oracle server and does notrequire separate installation. You can invoke RMAN as a command line utility fromthe operating system (O/S) prompt or use the GUI-based Enterprise Manager BackupManager.
redo threadThe redo generated by a database instance.
rolling patchingIn Rolling Patching, one node (or group of nodes) is shutdown, the patch applied andthe node brought back up again. This is repeated for each node in the cluster until allthe nodes in the Real Application Clusters are patched.
rolling patching
Glossary-9

Run-time Connection Load BalancingEnables Oracle to make intelligent service connection decisions based on theconnection pool that provides the optimal service for the requested application basedon current workloads. The JDBC, ODP.NET, and OCI clients are integrated with theload balancing advisory; you can use any of these client environments to provide run-time connection load balancing.
scalabilityThe ability to add additional nodes to Oracle Real Application Clusters applicationsand achieve markedly improved scale-up and speed-up.
SCANA single name, or network alias, for the cluster. Oracle Database 11g database clientsuse SCAN to connect to the database. SCAN can resolve to multiple IP addresses,reflecting multiple listeners in the cluster handling public client connections.
Secure Shell (SSH)A program for logging into a remote computer over a network. You can use SSH toexecute commands on a remote computer and to move files from one computer toanother. SSH uses strong authentication and secure communications over insecurechannels.
Server Control (SRVCTL) UtilityServer Management (SRVM) comprises the components required to operate OracleEnterprise Manager in Oracle Real Application Clusters. The SRVM components, suchas the Intelligent Agent, Global Services Daemon, and SRVCTL, enable you to managecluster databases running in heterogeneous environments through an open client/server architecture using Oracle Enterprise Manager.
server poolA server pool is a logical division of nodes in a cluster into a group to support policy-managed databases.
shared everythingA database architecture in which all instances share access to all of the data.
singleton servicesServices that run on only one instance at any one time.
split brain syndromeWhere two or more instances attempt to control a cluster database. In a two-nodeenvironment, for example, one instance attempts to manage updates simultaneouslywhile the other instance attempts to manage updates.
Run-time Connection Load Balancing
Glossary-10

system identifier (SID)The Oracle system identifier (SID) identifies a specific instance of the running Oraclesoftware. For an Oracle Real Application Clusters database, each node within thecluster has an instance referencing the database.
threadEach Oracle instance has its own set of online redo log groups. These groups are calleda thread of online redo. In non-Oracle Real Application Clusters environments, eachdatabase has only one thread that belongs to the instance accessing it. In Oracle RealApplication Clusters environments, each instance has a separate thread, that is, eachinstance has its own online redo log. Each thread has its own current log member.
thread numberAn identifier for the redo thread to be used by an instance, specified by theINSTANCE_NUMBER initialization parameter. You can use any available redo threadnumber but an instance cannot use the same redo thread number as another instance.
transactionA logical unit of work that contains one or more SQL statements. All statements in atransaction commit or roll back together. The use of transactions is one of the mostimportant ways that a database management system differs from a file system.
Transaction GuardA database feature that uses a logical transaction ID to prevent the possibility of aclient application submitting duplicate transactions after a recoverable error.
transaction IDAn identifier that is unique to a transaction and represents the undo segment number,slot, and sequence number.
transaction idempotenceThe ability to return a guaranteed outcome for a transaction: whether it committedand whether the call was completed.
transparent application failover (TAF)A run-time failover for high-availability environments, such as Oracle RealApplication Clusters, TAF refers to the failover and re-establishment of application-to-service connections. It enables client applications to automatically reconnect to thedatabase if the connection fails, and optionally resume a SELECT statement that wasin progress. This reconnect happens automatically from within the Oracle CallInterface (OCI) library.
voting diskA file that manages information about node membership.
voting disk
Glossary-11

Index
A
add instance, 9-6, 9-7adding OCR locations, 5-12additional Real Application Clusters documentation,
1-2ADDM
See Automatic Database Diagnostic Monitoradministrative tools
overview, 1-11administrator-managed database
adding instances, 4-19, 9-4, 9-7and rconfig, 3-26creating redo log groups, 4-19definition of, 1-4deleting instances, 9-9
affinity, 6-17alert log, 8-46all node patching, 10-10Application Continuity
configuring service attributes, 6-22overview of, 6-10
architecturechip architecture, 1-11, 2-3, 2-9, 9-2determining the chip architecture, 2-9enterprise grid computing, 1-8
archive logsbacking up, 7-6, 7-10deleting after backups, 7-10instance access to, 7-5, 7-12recovery, 7-12, 7-13
ARCHIVE_LAG_TARGET, 4-8archiving
configuring, 7-6enabling, 7-6
ASMSee Oracle ASM
ASMCASee Oracle ASM Configuration Assistant (ASMCA)
ASMCMDdescription of, 1-11
ASMLIBand device persistency, 2-35configuring, 2-33
ASMLIB (continued)creating Oracle ASM disks, 2-34installing, 2-32
Automatic Database Diagnostic Monitor (ADDM)database findings, 8-3description, 8-3instance findings, 8-3recommendations, 8-3
Automatic Storage ManagementSee Oracle ASM
Bbackup
credentials, 7-8backups
archive logs, 7-5, 7-10description of, 7-2emkey.ora, 3-22location of OCR backups, 5-9managing backups, 7-16manual OCR backups, 5-9Oracle Cluster Registry (OCR), 5-8Oracle software, 10-5parallelism, 7-6performing using Enterprise Manager, 7-2, 7-9privileges, 7-8root.sh script, 3-21settings, 7-9storing in a fast recovery area, 7-3viewing backup reports, 7-16viewing OCR backups, 5-9voting disks, 5-3
block devicesconfiguring partitions, 2-30
blockscache transfers of, 8-9cached, 1-8, 8-23corrupt, 7-2OCR format, 5-15request latency, 8-9undo, 4-15
bonding
Index-1

bonding (continued)interconnect, 2-5
buffer cache, 8-9
CCache Fusion
definition of, 1-8mechanism, 8-9
CDBSee container database (CDB)
certifications, 2-2client connections, 2-6client-side load balancing, 6-16cluster database
adding a new node, 9-1ADDM findings, 8-3administration, 4-1alert log, 8-46alerts, 8-45and Oracle ASM, 4-16and the OCR, 2-4and the private interconnect, 2-5archiving, 7-6backing up, 7-2, 7-9buffer cache, 8-9comparison of Oracle RAC to single-instance, 1-8configuring initialization parameters, 4-5connecting to, 6-15converting to, 3-23performance, 8-1recovery, 7-2, 7-14server parameter files, 4-10starting and stopping, 4-3topology, 8-25undo tablespaces, 4-15
Cluster Health Monitor, 2-4Cluster Ready Services (CRS)
checking daemon status, 8-37checking state of all registered resources, 8-37
Cluster Ready Services Control (CRSCTL)checking the Oracle Clusterware status, 5-13description of, 1-11using to add and remove voting disks, 5-5using to start Oracle Clusterware processes, 5-10using to stop Oracle Clusterware processes, 5-10using to troubleshoot Oracle Clusterware issues,
8-37Cluster Synchronization Services (CSS)
checking daemon status, 8-37Cluster Time Synchronization Service (CTSS), 2-23Cluster Verification Utility
check postinstallation configuration, 9-3description of, 1-11location of trace files, 8-45use by OUI, 3-21
Cluster Verification Utility (continued)verify node applications, 8-41verifying network connectivity, 8-43verifying OCR integrity, 5-10
CLUSTER_DATABASE, 4-6CLUSTER_INTERCONNECTS, 4-7CLUVFY
See Cluster Verification UtilityCOMPATIBLE, 4-6configuring ASMLIB, 2-33connect descriptor, 6-15connection load balancing
goals, 6-17connection pools, 6-17container database (CDB), 1-10control files
location, 2-4parallelized backups, 7-6
CONTROL_FILES, 4-6converting single-instance databases to Oracle RAC
prerequisites, 3-24using rconfig, 3-26
creating Oracle ASM disks, 2-34CRSCTL
See Cluster Ready Services ControlCSS
See Cluster Synchronization ServicesCVU
See Cluster Verification Utility
Ddata files
location, 2-4parallelized backups, 7-6
databaseadministrator-managed, 1-4findings in ADDM analysis, 8-3policy-managed, 1-4
See also cluster databaseDatabase Configuration Assistant (DBCA)
deleting an instance, 9-5, 9-8description of, 1-11
database initialization parametersmodifying, 4-10
database namelimitations, 3-13
Database Resource Managerterminology, 6-6
Database Upgrade Assistant (DBUA), 10-15DB_BLOCK_SIZE, 4-6DB_DOMAIN, 4-6DB_FILES, 4-6DB_NAME, 4-6DB_RECOVERY_FILE_DEST, 4-6DB_RECOVERY_FILE_DEST_SIZE, 4-6DB_UNIQUE_NAME, 4-6
Index-2

dba group, 2-11DBMS_SERVICE, 6-20DBUA
See Database Upgrade Assistant (DBUA)delete instance, 9-9Desktop class, 3-13device path persistency, 2-35diagcollection.pl script, 8-38disconnect session, 6-33disk groups
creating, 3-12DML_LOCKS, 4-6documentation
Real Application Clusters, 1-3domain name system, 2-18DSA keys, 2-16
Eediting
database initialization parameters, 4-10Enterprise Manager
alerts, 8-45Average Active Sessions chart, 8-12backup and recovery, 7-2backup reports, 7-16Cluster Cache Coherency page, 8-17Cluster Database page, 8-2Cluster Database Performance page, 8-7Cluster Host Load Average chart, 8-11Cluster Managed Database Services page, 6-24Database Locks page, 8-24Database Throughput charts, 8-13description of, 1-11encryption key, 3-22Global Cache Block Access Latency chart, 8-9Instance Activity page, 8-22Instances charts, 8-15performing recovery, 7-14Recovery wizard, 7-2, 7-11Services charts, 8-14Top Consumers page, 8-19Top Segments page, 8-23Top Sessions page, 8-20
errata level, 2-9erratum kernel
See errata levelerror
recoverable, 6-9event
FAN load balancing, 6-14UP and DOWN, 6-7use by FAN callouts, 6-8
Event Manager (EVM)checking daemon status, 8-37
EVMSee Event Manager
FFAN
See Fast Application NotificationFast Application Notification
callouts, 6-8events, 6-7
fast recovery areaconfiguring, 7-3creating disk group for, 3-12
fixup scripts, 3-5
G
General Parallel File System (GPFS), 2-29GNS
See Grid Naming ServiceGrid home
patching, 10-9unlocking, 10-9
Grid Infrastructure Management Repository, 2-4Grid Naming Service (GNS), 2-6Grid Plug and Play, 4-7grid user
creating, 2-15Grid_home
choosing, 2-27definition of, 3-2disk space requirements, 2-27
Hhardware
checking certifications, 2-2hardware requirements, 2-10high availability framework, 5-1
I
idempotence, 6-9initialization parameters
ARCHIVE_LAG_TARGET, 4-8CLUSTER_DATABASE, 4-6CLUSTER_INTERCONNECTS, 4-7COMPATIBLE, 4-6CONTROL_FILES, 4-6DB_BLOCK_SIZE, 4-6DB_DOMAIN, 4-6DB_FILES, 4-6DB_NAME, 4-6DB_RECOVERY_FILE_DEST, 4-6DB_RECOVERY_FILE_DEST_SIZE, 4-6DB_UNIQUE_NAME, 4-6DML_LOCKS, 4-6INSTANCE_NAME, 4-7INSTANCE_NUMBER, 4-7INSTANCE_TYPE, 4-6
Index-3

initialization parameters (continued)LICENSE_MAX_SESSIONS, 4-8LICENSE_MAX_USERS, 4-8LOG_ARCHIVE_FORMAT, 4-8modifying for the current instance, 4-11modifying for the SPFILE, 4-12PARALLEL_EXECUTION_MESSAGE_SIZE, 4-6REDO_TRANSPORT_USER, 4-8REMOTE_LOGIN_PASSWORDFILE, 4-6RESULT_CACHE_MAX_SIZE, 4-6ROLLBACK_SEGMENTS, 4-7SERVICE_NAMES, 4-9SPFILE, 4-8that must be different on each instance, 4-7that must be identical on all instances, 4-6that should be the same on each instance, 4-8TRACE_ENABLED, 4-8UNDO_MANAGEMENT, 4-6, 4-7UNDO_RETENTION, 4-8UNDO_TABLESPACE, 4-7
installing ASMLIB, 2-32installing RPMs, 2-9instance
adding, 9-6, 9-7deleting, 9-9findings in ADDM analysis, 8-3setting initialization parameters, 4-4starting for the database, 4-3stopping for the database, 4-3
instance management, 4-2INSTANCE_NAME, 4-7INSTANCE_NUMBER, 4-7INSTANCE_TYPE, 4-6integrated clients, 6-14interconnect
definition of, 1-8, 2-5
JJDBC clients
configuring, 6-29
Kkernel parameters
configuring on Linux x86 operating system, 2-24kill session, 6-33
L
LICENSE_MAX_SESSIONS, 4-8LICENSE_MAX_USERS, 4-8Linux x86 operating system
configuring kernel parameters, 2-24listener
and client-side load balancing, 6-16
listener (continued)and server-side load balancing, 6-17checking status of, 6-25description of, 6-15service registration, 4-9
load balancingclient-side, 6-16connection goals, 6-17definition of, 6-15run-time connection, 6-17server-side, 6-17
Load Balancing Advisory, 6-17LOG_ARCHIVE_FORMAT, 4-8logical transaction ID, 6-9LXTID, 6-9
Mmembership
and the OCR, 2-4Memory Guard, 2-4memory requirements, 2-10migrating the OCR to Oracle ASM, 5-12migrating voting disks to Oracle ASM, 5-7minimum downtime patching, 10-10modifying
database initialization parameters, 4-10multipath devices, 2-25
NNAS devices
configuring for Oracle ASM, 2-30network adapters, 2-5network file system (NFS)
configuring for use with Oracle ASM, 2-30support for, 2-29using for shared storage, 2-29
network interface names, 2-5Network Time Protocol (NTP), 2-23NFS
See network file systemNIC bonding, 2-5nodeapps
definition of, 1-11nodes
definition of, 1-4eviction, 5-2
O
OCFS2, 2-29OCR
migrate to Oracle ASM, 5-12See also Oracle Cluster Registry
OCRCHECKdescription of, 5-15
Index-4

OCRCHECK (continued)using to verify status of the OCR, 5-10
oinstall group, 2-11, 2-13OLR
See Oracle Local RegistryOnline Database Relocation, 1-9ONS
See Oracle Notification ServiceOPatch
"Not a valid patch area" error, 10-14partially installed patch, 10-14preparing to use, 10-4updating the cluster node list, 10-13viewing log and trace files, 10-13
operating systemchecking certifications, 2-2
Optimal Flexible Architecture (OFA), 2-28Oracle ASM
convert to clustered Oracle ASM, 3-26creating disk groups, 3-12creating voting disks, 5-7file management, 1-6installing, 3-5managing, 4-16mirroring, 1-6number of instances per node, 1-7operating system group requirements, 2-14rebalancing, 1-6shut down instances, 5-4storing the OCR, 5-12striping, 1-6use of, 2-4use with Oracle RAC, 1-7
Oracle ASM Cluster File System (Oracle ACFS), 1-7,2-29
Oracle ASM Configuration Assistant (ASMCA)description of, 1-11starting, 3-12
Oracle Automatic Storage Management (Oracle ASM)See Oracle ASM
Oracle base directory, 2-28Oracle Cluster Registry (OCR)
backing up, 5-8changing the location of, 5-13definition of, 2-4location of OCR backups, 5-9manual backups, 5-9mirroring the OCR, 5-12multiplexing, 2-4recovering, 5-10removing a mirror, 5-14repairing, 5-14restoring from backup, 5-10status, 5-10troubleshooting, 5-15usage in Oracle RAC, 6-7viewing backups of, 5-9
Oracle Clusterwareand process control, 5-1monitoring using Enterprise Manager, 8-27use of, 5-1
Oracle Configuration Managerinstallation, 3-3
Oracle Configuration Manager (OCM), 3-13Oracle Database Quality of Service Management, 2-4Oracle Flashback, 7-2Oracle Flex ASM, 4-16Oracle Grid Infrastructure
software owner, 2-11Oracle home directory
creating, 2-29definition of, 3-2
Oracle Inventorygroup, 2-11
Oracle Local Registry (OLR)defined, 5-3
Oracle Multitenant, 1-10Oracle Net
configuration, 6-15Oracle Notification Service (ONS), 1-11, 6-7Oracle RAC
creating a database, 3-11Oracle RAC One Node
administration, 4-2creating a database, 3-11
Oracle Real Application Clustershigh availability framework, 6-7installation on different platforms, 1-11overview of administration, 1-1patching, 3-23
Oracle software owner, 2-11Oracle Support
checking certifications, 2-2Oracle Universal Installer (OUI)
description of, 1-11Oracle Grid Infrastructure installation, 3-5Oracle Real Application Clusters installation, 3-2preparing for installation, 3-2starting, 3-5
oracle usercreating, 2-15modifying environment of, 2-17
ORACLE_BASE, 2-28ORACLE_HOME
backing up, 10-5changing, 2-11when to set the environment variable, 1-11
ORACLE_SIDlimitations, 3-13
oracleasmconfigure, 2-33drivers, 2-32packages, 2-32
OSASM group, 2-14
Index-5

OSDBA group, 2-11OSOPER group, 2-14OUI
See Oracle Universal Installerout-of-place upgrade, 10-15
P
packages, 2-9parallel recovery, 7-14PARALLEL_EXECUTION_MESSAGE_SIZE, 4-6parameters
See initialization parameterspatch plan, 10-3patch sets
definition of, 10-2patches
all node patching method, 10-10applying, 10-8applying previously downloaded patches during
installation, 3-3definition of, 10-2locating, 10-3minimum downtime patching, 10-10rolling patching, 10-10
PDBSee pluggable database (PDB)
permissions file for udev, 2-35physical RAM requirements, 2-10pluggable database (PDB), 1-10policy-managed database
definition of, 1-4private interconnect
and Oracle Clusterware, 2-5public interface name, 2-5
R
RAM requirements, 2-10rconfig, 3-23recoverable error, 6-9recovery
archive logs, 7-12, 7-13database, 7-14description of, 7-2enabling archiving, 7-6instance state during, 7-13Oracle Cluster Registry (OCR), 5-10parallelism, 7-14privileges, 7-8restoring the OCR from backup, 5-10server parameter file, 7-15voting disks, 5-7with Enterprise Manager, 7-2
Recovery Manager (RMAN)channels, 7-6parallelism and backups, 7-6
redo logslocation, 2-4
REDO_TRANSPORT_USER, 4-8redundancy
normal, 5-3Redundant Interconnect Usage, 2-5REMOTE_LOGIN_PASSWORDFILE, 4-6requirements
hardware, 2-10network, 2-5software, 2-8storage, 2-4
resource managerSee Database Resource Manager
RESULT_CACHE_MAX_SIZE, 4-6ROLLBACK_SEGMENTS, 4-7rolling patch method, 10-10root.sh, 3-21RPMs
ASMLIB, 2-32RSA keys, 2-16rules files for udev, 2-35Run-time Connection Load Balancing, 6-17
Sscripts
fixup, 3-5secure shell
configuring, 2-16Server class, 3-13Server Control (SRVCTL)
description of, 1-11server parameter file
description of, 4-5recovery, 7-15
server pools, 1-4server-side load balancing, 6-17service
management policy, 6-5SERVICE_NAMES, 4-9services
administration, 6-23available instance, 6-2creating, 6-20definition of, 6-2failover, 6-4, 6-5failover type
transactional, 6-36preferred instance, 6-2use with workload management, 6-2using for database connections, 6-15
sessionsdisconnect, 6-33kill, 6-33terminate, 6-33
shared Oracle home directory, 2-29
Index-6

shared storagesupported types, 2-29
single-instance database, 3-13software requirements
checking software requirements, 2-8SPFILE, 4-8
See also server parameter fileSQL*Plus
description of, 1-11SSH
See secure shellswap space
requirements, 2-10SYSOPER privilege, 2-14System Global Area (SGA), 8-9
Ttablespaces
undo, 4-15temporary disk space
requirements, 2-10terminate session, 6-33time synchronization, 2-23tnsnames.ora file, 6-15, 6-16, 6-25topology, 8-25TRACE_ENABLED, 4-8transaction failover, 6-9Transaction Guard
configuring JDBC clients, 6-33configuring JDBC-Thin clients, 6-34configuring OCI clients, 6-36configuring service attributes, 6-22
transaction idempotence, 6-9transactional TAF, 6-36Troubleshooting
alert log messages, 8-46interconnect settings, 8-43Using Cluster Ready Services Control (CRSCTL),
8-35, 8-37Using Cluster Verification Utility (cluvfy), 8-41
Troubleshooting (continued)viewing cluster database alerts, 8-45
U
udev, 2-35undo segments, 4-15UNDO_MANAGEMENT, 4-6, 4-7UNDO_RETENTION, 4-8UNDO_TABLESPACE, 4-7Universal Connection Pool (UCP), 6-17, 6-29unlock Grid home, 10-9up2date, 2-9upgrades
out-of-place, 10-15user equivalence, 2-16, 10-6user equivalency
enabling, 10-7
VVIP
See Virtual IPVirtual IP (VIP), 1-11voting disks
adding and removing, 5-5backing up, 5-3definition of, 2-4migrate to Oracle ASM, 5-7multiple, 2-4recovering, 5-7
WWindows operating system
creating users, 2-13workload management, 6-1
Y
YUM, 2-9
Index-7

Index-8