Embed Size (px)
Citation preview

SERIES 60 SERVICE MANUAL
1.6 ROCKER COVER
The rocker cover completely encloses the valve and injector operating mechanism on top of thecylinder head (and in some cases an engine brake), including the overhead camshaft.
Depending on the installation, the rocker cover may be a one-piece, two-piece or three-piecedesign. See Figure 1-103, see Figure 1-104, and see Figure 1-105.
The one-piece rocker cover is molded of a sound-dampening, fiberglass-reinforced, syntheticmaterial. It is internally ribbed to distribute the hold-down bolt clamp load for effective, fullperimeter sealing. See Figure 1-102.
Effective July 1993, a breather baffle is installed on the low-profile aluminum rocker cover.
NOTE:Effective May 1999, all Series 60 engines are built with a reusable rocker covergasket. This gasket does not need to be replaced at the time of removal providedthere is not any damage observed.
1. Gasket 5. Cover Plug
2. Rocker Cover 6. Bolt
3. Isolator 7. Element
4. Washer 8. Clip
Figure 1-102 One-piece Rocker Cover - Series 60 Diesel Engine
All information subject to change without notice.6SE483 0204 Copyright © 2003 DETROIT DIESEL CORPORATION From Bulletin 8-60-03 1-125
1.6 ROCKER COVER
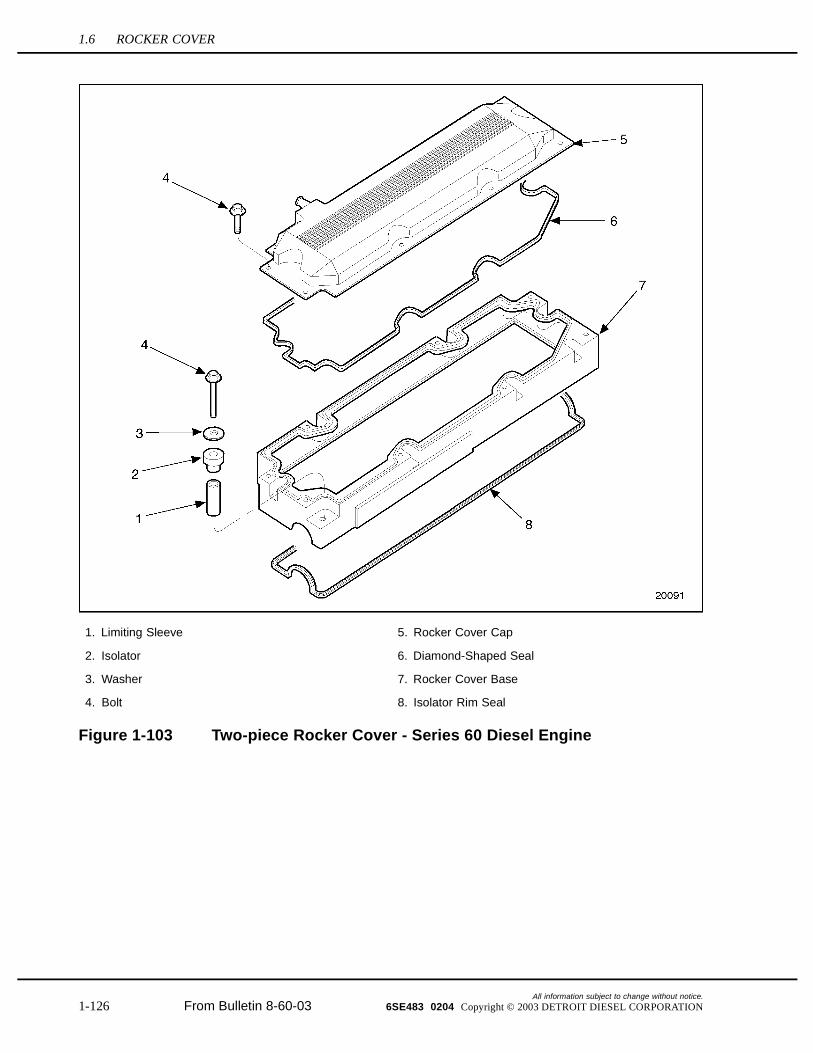
1. Limiting Sleeve 5. Rocker Cover Cap
2. Isolator 6. Diamond-Shaped Seal
3. Washer 7. Rocker Cover Base
4. Bolt 8. Isolator Rim Seal
Figure 1-103 Two-piece Rocker Cover - Series 60 Diesel Engine
All information subject to change without notice.
1-126 From Bulletin 8-60-03 6SE483 0204 Copyright © 2003 DETROIT DIESEL CORPORATION
SERIES 60 SERVICE MANUAL
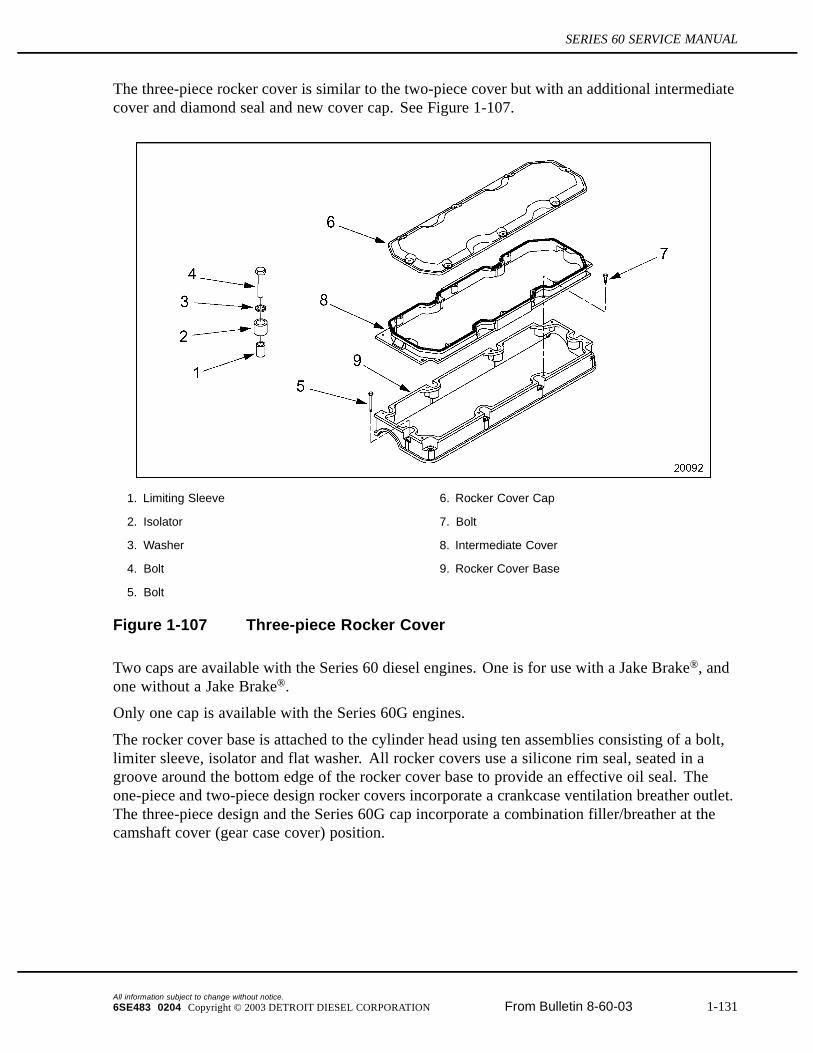
The three-piece rocker cover is similar to the two-piece cover but with an additional intermediatecover and diamond seal and new cover cap. See Figure 1-107.
1. Limiting Sleeve 6. Rocker Cover Cap
2. Isolator 7. Bolt
3. Washer 8. Intermediate Cover
4. Bolt 9. Rocker Cover Base
5. Bolt
Figure 1-107 Three-piece Rocker Cover
Two caps are available with the Series 60 diesel engines. One is for use with a Jake Brake®, andone without a Jake Brake®.
Only one cap is available with the Series 60G engines.
The rocker cover base is attached to the cylinder head using ten assemblies consisting of a bolt,limiter sleeve, isolator and flat washer. All rocker covers use a silicone rim seal, seated in agroove around the bottom edge of the rocker cover base to provide an effective oil seal. Theone-piece and two-piece design rocker covers incorporate a crankcase ventilation breather outlet.The three-piece design and the Series 60G cap incorporate a combination filler/breather at thecamshaft cover (gear case cover) position.
All information subject to change without notice.6SE483 0204 Copyright © 2003 DETROIT DIESEL CORPORATION From Bulletin 8-60-03 1-131

1.6 ROCKER COVER
1.6.1 Repair or Replacement of Rocker Cover
To determine if repair is possible or replacement is necessary, perform the following procedure.See Figure 1-108.
Figure 1-108 Flowchart for Repair or Replacement of Rocker Cover
All information subject to change without notice.
1-132 From Bulletin 8-60-03 6SE483 0204 Copyright © 2003 DETROIT DIESEL CORPORATION

SERIES 60 SERVICE MANUAL
1.6.2 Removal and Cleaning of One-piece Rocker Cover For DieselEngines Only
Preclean the rocker cover, especially around its seat on the head, and in the attaching bolt recesses,to keep dirt and debris out of the valve gear chamber.
Perform the following steps to remove the one-piece rocker cover:
1. Remove the center plugs, hold-down bolts, washers and isolators.
2. Lift the rocker cover straight up off the engine.
1.6.2.1 Cleaning and Inspection of the One-piece Rocker Cover ForDiesel Engines Only
Inspect the rocker cover as follows:
1. Remove the breather element and retainer clip.
NOTICE:
To avoid damaging the silicone isolators, do not clean them withmineral spirits, fuel oil or any petroleum based solvents.
2. Remove bolt assemblies and isolators and clean in detergent and water solution.
3. Remove gasket from rocker cover and clean the gasket and rocker cover. Removeold RTV sealant from the corners of the gasket and clean the gasket and rocker covercomponents in clean fuel oil.
NOTE:Pay special attention to the breather element. Clean thoroughly or replace as required.
To avoid injury from flying debris when using compressedair, wear adequate eye protection (face shield or safetygoggles) and do not exceed 40 psi (276 kPa) air pressure.
4. Blow dry with compressed air.
5. Clean the breather recess in the rocker cover.
6. Check for damage. Replace as necessary.
7. Reinstall the breather element and retainer clip.
All information subject to change without notice.6SE483 0204 Copyright © 2003 DETROIT DIESEL CORPORATION From Bulletin 8-60-03 1-133

1.6 ROCKER COVER
1.6.3 Removal and Cleaning of Two-piece Rocker Cover For DieselEngines Only
Preclean the two piece rocker cover, especially around its seat on the head, and in the attachingbolt recesses, to keep dirt and debris out of the valve gear chamber.
Perform the following steps to remove the two-piece rocker cover:
1. Remove the eight screws that attach the rocker cover cap to the base.
2. Lift the cap off the base.
3. Loosen and remove the ten bolt and isolator assemblies that attach the base to the cylinderhead.
4. Lift the base straight up off the cylinder head.
1.6.3.1 Inspection of Two-piece Rocker Cover
Perform the following steps to inspect the two-piece valve rocker cover which has a removablebreather housing:
1. Remove the three screws and retainer that retains the breather housing.
2. Remove the breather housing, seal, and wire mesh element.
3. Wash the components in clean fuel oil.
To avoid injury from flying debris when using compressedair, wear adequate eye protection (face shield or safetygoggles) and do not exceed 40 psi (276 kPa) air pressure.
4. Blow dry with compressed air.
All information subject to change without notice.
1-134 From Bulletin 8-60-03 6SE483 0204 Copyright © 2003 DETROIT DIESEL CORPORATION

SERIES 60 SERVICE MANUAL
Before inspecting the rocker cover, clean the isolators as follows:
NOTICE:
To avoid damaging isolators, do not use solvents of any kind,or any petroleum distillates to clean them. The isolators can becleaned with mild soap and water if necessary. Install new sealsand isolators clean and dry.
1. Wash isolators with mild soap and water.
To avoid injury from flying debris when using compressedair, wear adequate eye protection (face shield or safetygoggles) and do not exceed 40 psi (276 kPa) air pressure.
2. Be sure to completely dry gasket grooves in the rocker cover with compressed air.
3. Use new gaskets (do not reuse old gaskets).
NOTICE:
Reuse gaskets with manufacturing date after May 28, 1999.
4. Inspect the lower rocker cover base-to-cylinder head gasket for damage replace if gasketis damaged.
5. If gasket is not damaged clean off excess RTV, clean gasket with clean fuel oil drycompletely and reuse part.
1.6.5.1 Inspection of Three-piece Rocker Cover
Inspect the three-piece valve cover as follows:
1. Wash the components in clean fuel oil.
To avoid injury from flying debris when using compressedair, wear adequate eye protection (face shield or safetygoggles) and do not exceed 40 psi (276 kPa) air pressure.
2. Blow dry with compressed air.
3. Clean the breather recess in the rocker cover.
4. Check for damage. Replace as necessary.
All information subject to change without notice.6SE483 0204 Copyright © 2003 DETROIT DIESEL CORPORATION From Bulletin 8-60-03 1-137

1.6 ROCKER COVER
1.6.6 Disassembly of Rocker Cover
Disassemble the rocker cover as follows:
1. Disengage the clip that holds the crankcase vent breather element in the valve cover bypressing the center of the spring steel retaining clip outward and removing the straight end.
2. Rotate the clip upward to remove the curved end.
3. Remove the wire mesh element.
1.6.7 Pre-installation of Rocker Cover
Preform the following steps prior to installing the rocker cover:
1. Install the rocker cover seal in corners of the camshaft cap section (arch at each endof the valve cover) first.
NOTE:Be sure the rocker cover grooves and the seals are clean, free of oil and dry.
2. Install the cam cap section, starting in the center, by pushing the seal into the groove at thetop of the arch. Then install each section at its halfway point. Seat the seal completelyaround the arch. Be sure the corners are still firmly seated after the arch is completed.They should present a square corner parallel to the rocker cover rail. Repeat this procedurefor the cam cap section on the other end. See Figure 1-110.
Figure 1-110 Rocker Cover Gasket Installation
All information subject to change without notice.
1-138 From Bulletin 8-60-03 6SE483 0204 Copyright © 2003 DETROIT DIESEL CORPORATION


![CONTROL PLATE ROCKER COVER CARBURETOR PB ......PB SWITCH 3.970 [100.84] CONTROL PLATE 7.654 [194.42] CARBURETOR 11.020 [279.92] 7.310 [185.69] ROCKER COVER 5.576 [141.64] ROCKER COVER](https://img.dokumen.tips/doc/110x75/5f8436ca734ec87cf519b067/control-plate-rocker-cover-carburetor-pb-pb-switch-3970-10084-control.jpg)

![CONTROL PLATE ROCKER COVER CARBURETOR PB SWITCH · 2018-08-14 · [259.1] spark plug boot 5.150 [130.81] cylinder shield 9.850 [250.19] rewind cover 2.436 [61.88] crankshaft extension](https://img.dokumen.tips/doc/110x75/5f041f797e708231d40c6d7c/control-plate-rocker-cover-carburetor-pb-switch-2018-08-14-2591-spark-plug.jpg)

![ROCKER COVER [QR25DE] ROCKER COVER …...2009/03/23 · Revision: May 2004 2002 Altima 3. Tighten the rocker cover bolts in two steps, in the numerical order as shown. 4. Connect](https://img.dokumen.tips/doc/110x75/5e6816a2c400e2056561b5d6/rocker-cover-qr25de-rocker-cover-20090323-revision-may-2004-2002-altima.jpg)