Embed Size (px)
Citation preview
OptiX iManager T2000 Operator Guide for SDH Contents
T2-041694-20051201-C-2.23 Huawei Technologies Proprietary i
Contents
11 Configuring Alarm and Performance Monitoring ..........................................................11-1
11.1 Setting Networkwide Alarm Attributes ................................................................................... 11-1 11.1.1 Creating an Alarm Attribute Template ........................................................................... 11-2 11.1.2 Creating Alarm Correlation Rules.................................................................................. 11-3 11.1.3 Creating Fault Diagnosis Rules...................................................................................... 11-4 11.1.4 Setting the Alarm Function Switch ................................................................................ 11-5 11.1.5 Enabling Alarm Notification .......................................................................................... 11-6 11.1.6 Enabling an Alarm Box and Setting Parameters ............................................................ 11-7 11.1.7 Setting Alarm Filter Status ............................................................................................. 11-9 11.1.8 Setting Alarm Dump Conditions.................................................................................. 11-10
11.2 Setting NE Alarm Attributes.................................................................................................. 11-12 11.3 Setting NM Alarm Attributes................................................................................................. 11-13 11.4 Setting Board/Port Alarm Attributes ..................................................................................... 11-14
11.4.1 Setting Alarm Severities and Auto Reporting .............................................................. 11-14 11.4.2 Setting Alarm Suppression Status ................................................................................ 11-15 11.4.3 Setting the Bit Error Alarm Threshold ......................................................................... 11-16 11.4.4 Setting the AIS Insertion Switch .................................................................................. 11-17 11.4.5 Setting the UNEQ Insertion Switch ............................................................................. 11-17 11.4.6 Setting Alarm Reversion .............................................................................................. 11-18
11.5 Setting SDH Trail Alarm Attributes ...................................................................................... 11-20 11.5.1 Setting Trail Alarm Suppression .................................................................................. 11-20 11.5.2 Setting Trail Alarm Reversion...................................................................................... 11-21
11.6 Setting Performance Monitoring Parameters ........................................................................ 11-23 11.6.1 Creating a Performance Threshold Template ............................................................... 11-23 11.6.2 Setting Board Performance Threshold ......................................................................... 11-24 11.6.3 Setting Performance Dump Conditions ....................................................................... 11-26 11.6.4 Starting or Stopping Performance Monitoring............................................................. 11-28 11.6.5 Setting a Performance Monitoring Object ................................................................... 11-29 11.6.6 Setting ATM Performance Monitoring......................................................................... 11-30 11.6.7 Setting Ethernet Performance Monitoring ................................................................... 11-31
11.7 Resetting a Performance Register.......................................................................................... 11-32
Contents OptiX iManager T2000
Operator Guide for SDH
ii Huawei Technologies Proprietary T2-041694-20051201-C-2.23
11.7.1 Resetting an NE Performance Register........................................................................ 11-32 11.7.2 Resetting an ATM Performance Register ..................................................................... 11-33 11.7.3 Resetting an Ethernet Performance Register................................................................ 11-34
11.8 Setting SDH Trail Performance Parameters .......................................................................... 11-35
OptiX iManager T2000 Operator Guide for SDH 11 Configuring Alarm and Performance Monitoring
T2-041694-20051201-C-2.23 Huawei Technologies Proprietary 11-1
11 Configuring Alarm and Performance Monitoring
This chapter describes how to configure alarm and performance monitoring.
Follow the process below to configure alarm monitoring parameters.
Stage Description
1 Setting Networkwide Alarm Attributes
2 Setting NE Alarm Attributes
3 Setting NM Alarm Attributes
4 Setting Board/Port Alarm Attributes
5 Setting SDH Trail Alarm Attributes
Follow the process below to configure performance monitoring parameters.
Stage Description Remark
1 Setting Performance Monitoring Parameters -
2 Setting SDH Trail Performance Parameters -
3 Resetting a Performance Register Optional
11.1 Setting Networkwide Alarm Attributes This section describes how to set alarm attributes that affects the whole network. The following tasks are described:
Creating an Alarm Attribute Template Creating Alarm Correlation Rules Creating Fault Diagnosis Rules
11 Configuring Alarm and Performance Monitoring OptiX iManager T2000
Operator Guide for SDH
11-2 Huawei Technologies Proprietary T2-041694-20051201-C-2.23
Setting the Alarm Function Switch Enabling Alarm Notification Enabling an Alarm Box and Setting Parameters Setting Alarm Filter Status Setting Alarm Dump Conditions
11.1.1 Creating an Alarm Attribute Template
Background
Use this procedure to create an alarm attribute template.
Setting alarm attributes NE by NE is very time-consuming. The T2000 provides an easy way to set alarm attributes for multiple NEs by creating a performance threshold template.
Prerequisite
NM user must have the authority of "NE and network operator" or a person with higher authorities.
Procedure
Follow the steps below to create an alarm attribute template.
Step Action
1 Select [Fault/NM Alarm Attribute] from the Main Menu.
2 Select the "Alarm Attribute Template" tab.
3 Select a template from the "Template" drop-down list.
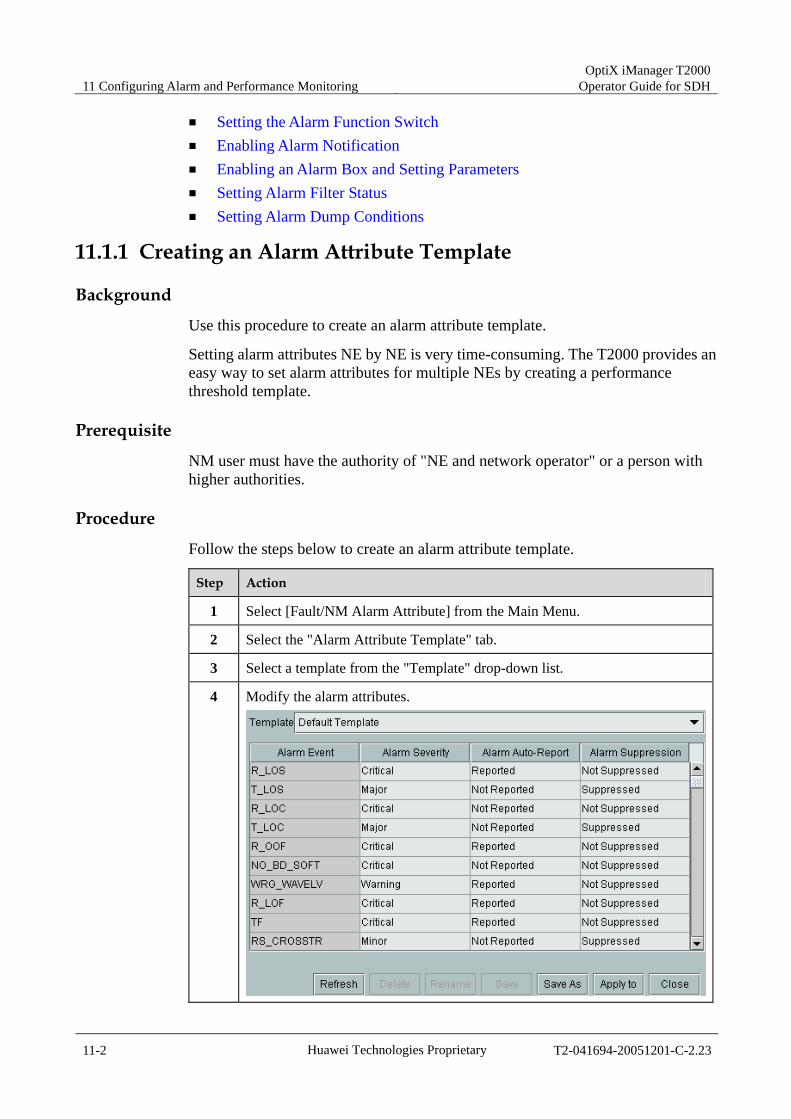
4 Modify the alarm attributes.
OptiX iManager T2000 Operator Guide for SDH 11 Configuring Alarm and Performance Monitoring
T2-041694-20051201-C-2.23 Huawei Technologies Proprietary 11-3
Step Action
5 Click <Save> to save the modification.
6 Click <Save As> and enter a template name to save it as a new template.
11.1.2 Creating Alarm Correlation Rules
Background
Creating alarm correlation rules can suppress alarms which are induced by another alarm, to facilitate fault locating and troubleshooting. Use this procedure to create alarm correlation rules.
Prerequisite
NM user must have the authority of "NE and network maintainer" or a person with higher authorities.
Procedure
Follow the steps below to create alarm correlation rules.
Step Action
1 Select [Fault/NM Alarm Attribute] from the Main Menu.
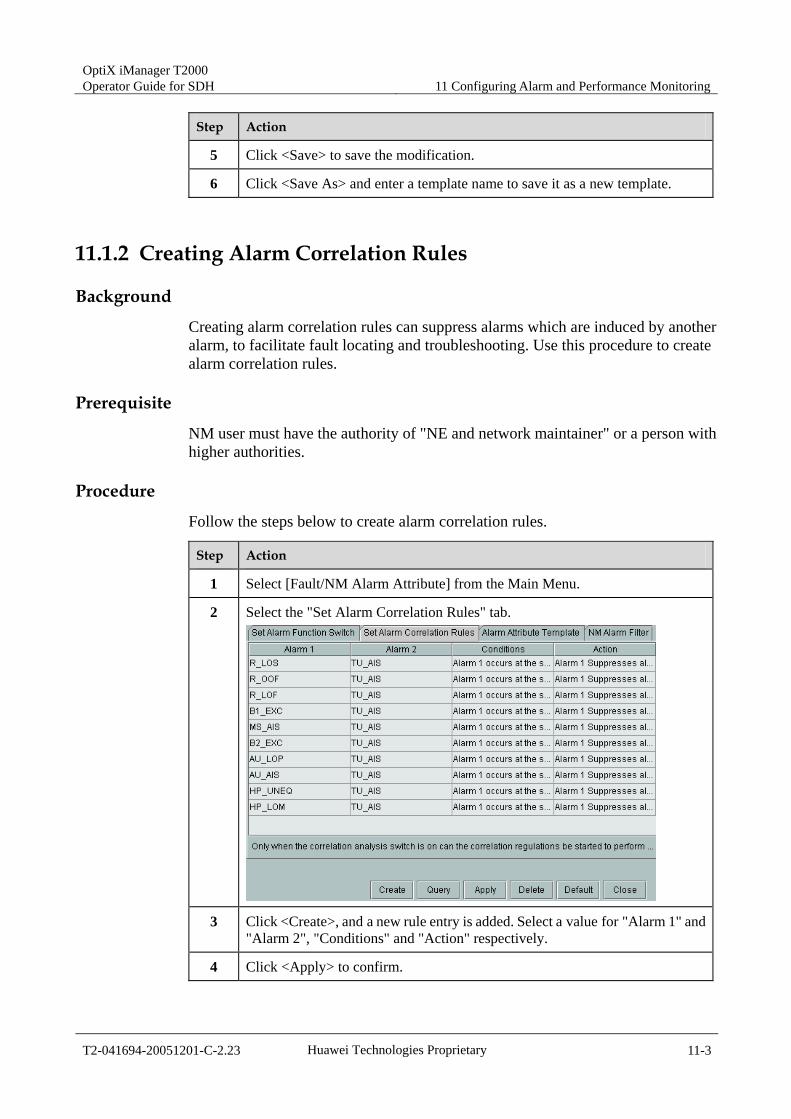
2 Select the "Set Alarm Correlation Rules" tab.
3 Click <Create>, and a new rule entry is added. Select a value for "Alarm 1" and "Alarm 2", "Conditions" and "Action" respectively.
4 Click <Apply> to confirm.
11 Configuring Alarm and Performance Monitoring OptiX iManager T2000
Operator Guide for SDH
11-4 Huawei Technologies Proprietary T2-041694-20051201-C-2.23
Step Action
5 Repeat step 3 and step 4 to create more rules as you need.
11.1.3 Creating Fault Diagnosis Rules
Prerequisite
NM user must have the authority of "NE and network maintainer" or a person with higher authorities.
Procedure
Follow the steps below to create fault diagnosis rules.
Step Action
1 Select [Fault/Set Fault Diagnosis Rules] from the Main Menu.
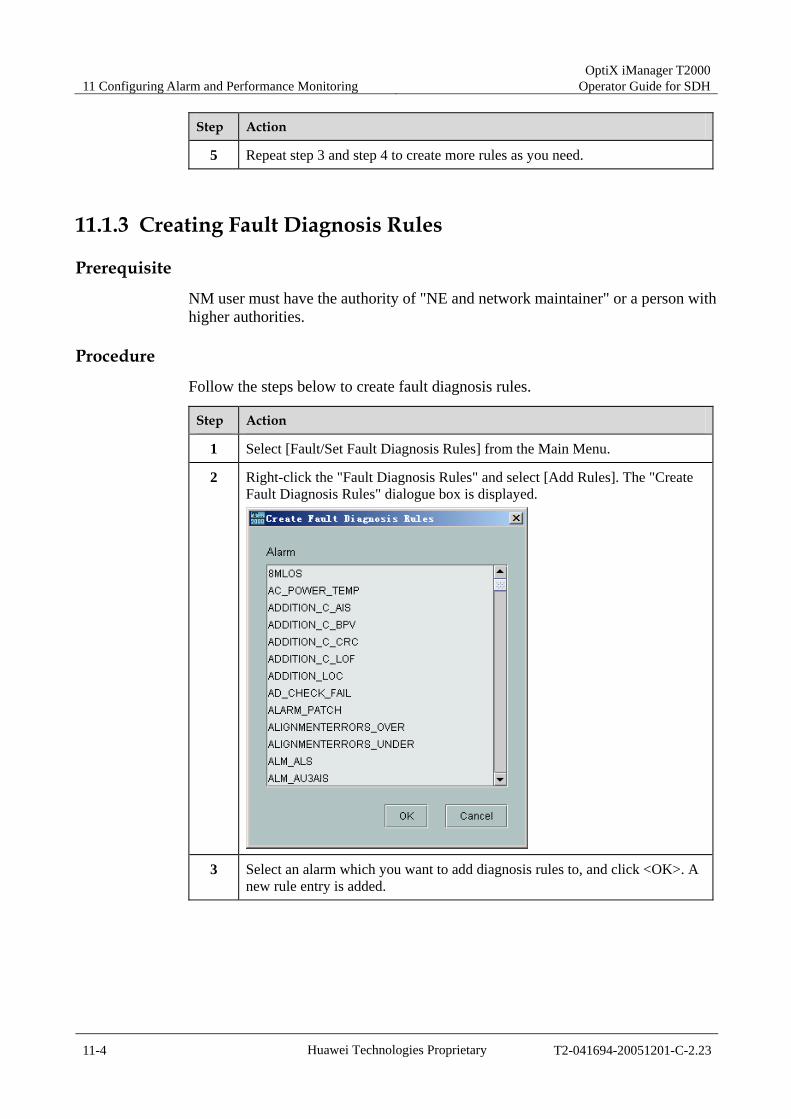
2 Right-click the "Fault Diagnosis Rules" and select [Add Rules]. The "Create Fault Diagnosis Rules" dialogue box is displayed.
3 Select an alarm which you want to add diagnosis rules to, and click <OK>. A new rule entry is added.
OptiX iManager T2000 Operator Guide for SDH 11 Configuring Alarm and Performance Monitoring
T2-041694-20051201-C-2.23 Huawei Technologies Proprietary 11-5
Step Action
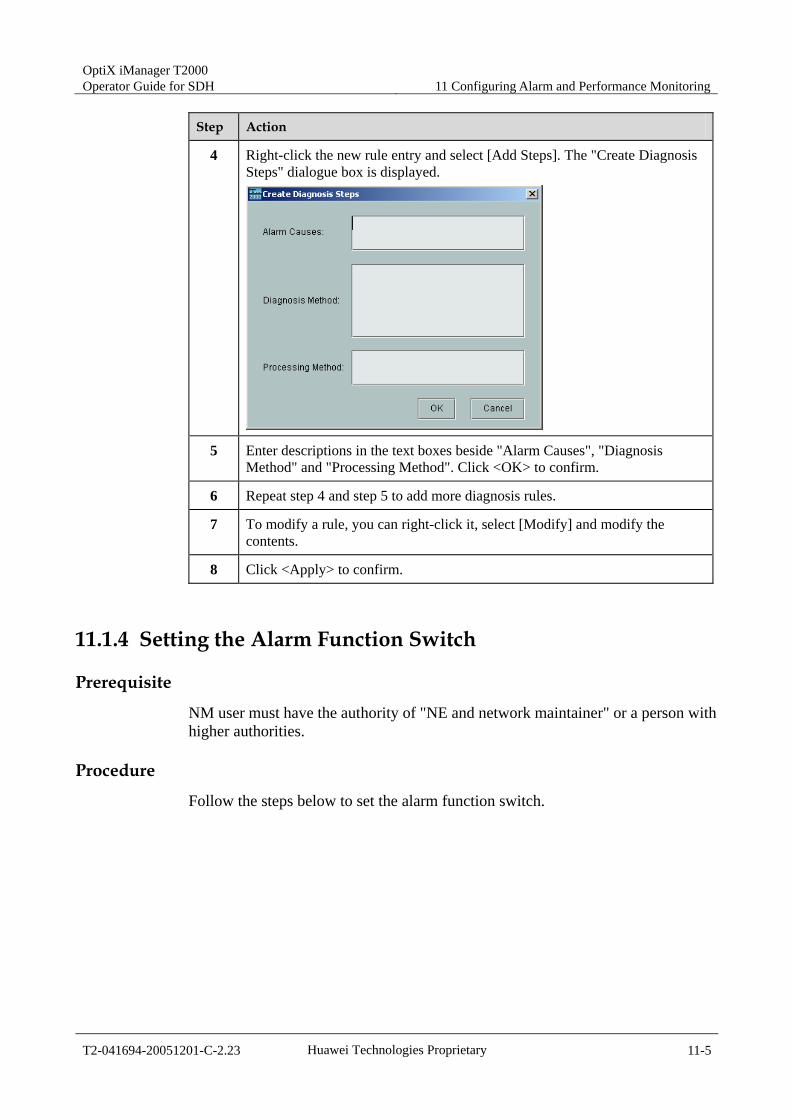
4 Right-click the new rule entry and select [Add Steps]. The "Create Diagnosis Steps" dialogue box is displayed.
5 Enter descriptions in the text boxes beside "Alarm Causes", "Diagnosis Method" and "Processing Method". Click <OK> to confirm.
6 Repeat step 4 and step 5 to add more diagnosis rules.
7 To modify a rule, you can right-click it, select [Modify] and modify the contents.
8 Click <Apply> to confirm.
11.1.4 Setting the Alarm Function Switch
Prerequisite
NM user must have the authority of "NE and network maintainer" or a person with higher authorities.
Procedure
Follow the steps below to set the alarm function switch.
11 Configuring Alarm and Performance Monitoring OptiX iManager T2000
Operator Guide for SDH
11-6 Huawei Technologies Proprietary T2-041694-20051201-C-2.23
Step Action
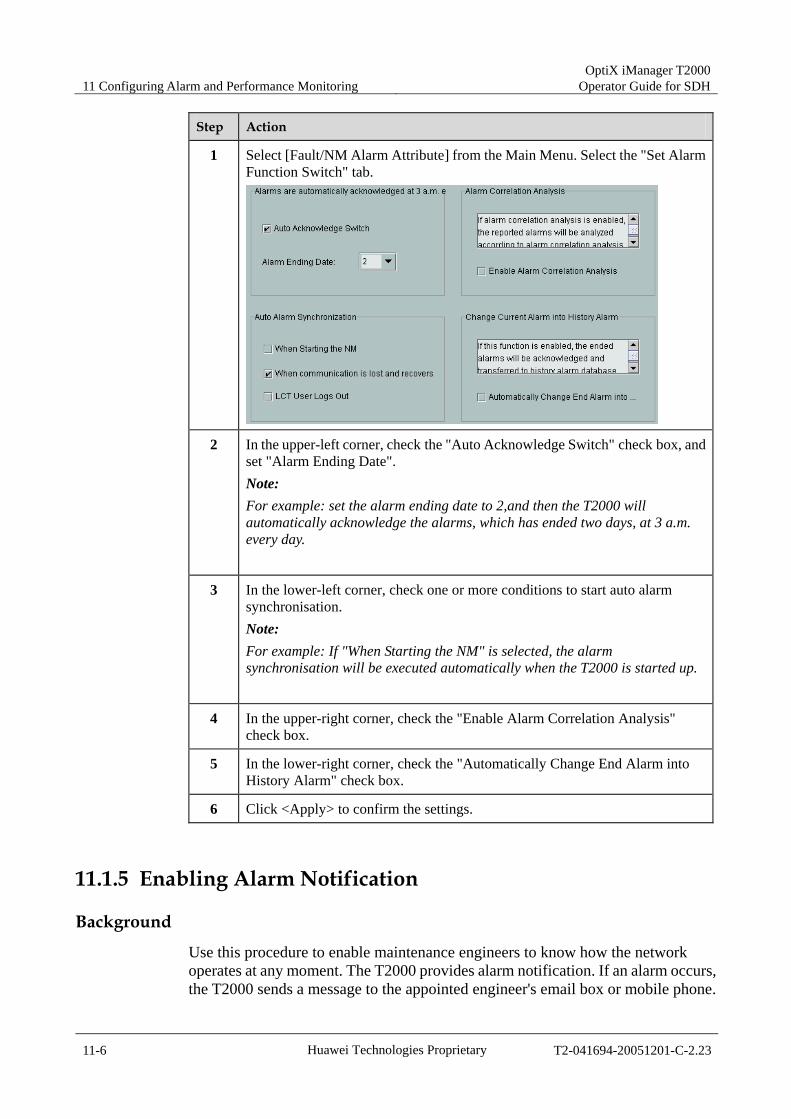
1 Select [Fault/NM Alarm Attribute] from the Main Menu. Select the "Set Alarm Function Switch" tab.
2 In the upper-left corner, check the "Auto Acknowledge Switch" check box, and set "Alarm Ending Date". Note: For example: set the alarm ending date to 2,and then the T2000 will automatically acknowledge the alarms, which has ended two days, at 3 a.m. every day.
3 In the lower-left corner, check one or more conditions to start auto alarm synchronisation. Note: For example: If "When Starting the NM" is selected, the alarm synchronisation will be executed automatically when the T2000 is started up.
4 In the upper-right corner, check the "Enable Alarm Correlation Analysis" check box.
5 In the lower-right corner, check the "Automatically Change End Alarm into History Alarm" check box.
6 Click <Apply> to confirm the settings.
11.1.5 Enabling Alarm Notification
Background
Use this procedure to enable maintenance engineers to know how the network operates at any moment. The T2000 provides alarm notification. If an alarm occurs, the T2000 sends a message to the appointed engineer's email box or mobile phone.

OptiX iManager T2000 Operator Guide for SDH 11 Configuring Alarm and Performance Monitoring
T2-041694-20051201-C-2.23 Huawei Technologies Proprietary 11-7
Prerequisite
NM user must have the authority of "NE and network maintainer" or a person with higher authorities.
Procedure
Follow the steps below to enable alarm notification.
Step Action
1 Select [Fault/Set Alarm Notification] from the Main Menu.
2 Click <Create> to add a notification entry.
3 Enter a value in "User Name" and "Communication Number" text boxes. Then specify parameters "Communication Mode", "Severity", "Alarm Type", "NE" and "Switch". Click <Apply>. Note: There are two communication modes: mobile phone and email. The T2000 will send messages only when raised alarms are compliant with the settings for "Severity", "Alarm Type" and "NE". You can create up to 15 notification entries.
4 If the communication mode is email, you need to click <Communication Settings> and set the SMTP address.
11.1.6 Enabling an Alarm Box and Setting Parameters
Background
Use this procedure to set an alarm box. So the T2000 can remind maintenance engineers by the alarm box when alarms occur.
Prerequisite
NM user must have the authority of "NE and network administrator" or a person with higher authorities.
11 Configuring Alarm and Performance Monitoring OptiX iManager T2000
Operator Guide for SDH
11-8 Huawei Technologies Proprietary T2-041694-20051201-C-2.23
Caution
The alarm box has four alarm severities: emergency, important, common and notification. They correspond to the four alarm severities of the T2000: critical, major, minor, and warning.
The alarm box has different alarm beeping ways: For an emergency or important alarm, the alarm box keeps beeping until it is stopped manually or the alarm is cleared. For a common or notification alarm, it beeps for a fixed time period (one minute) and then stops or is stopped manually.
Procedure
Follow the steps below to set an alarm box.
Step Action
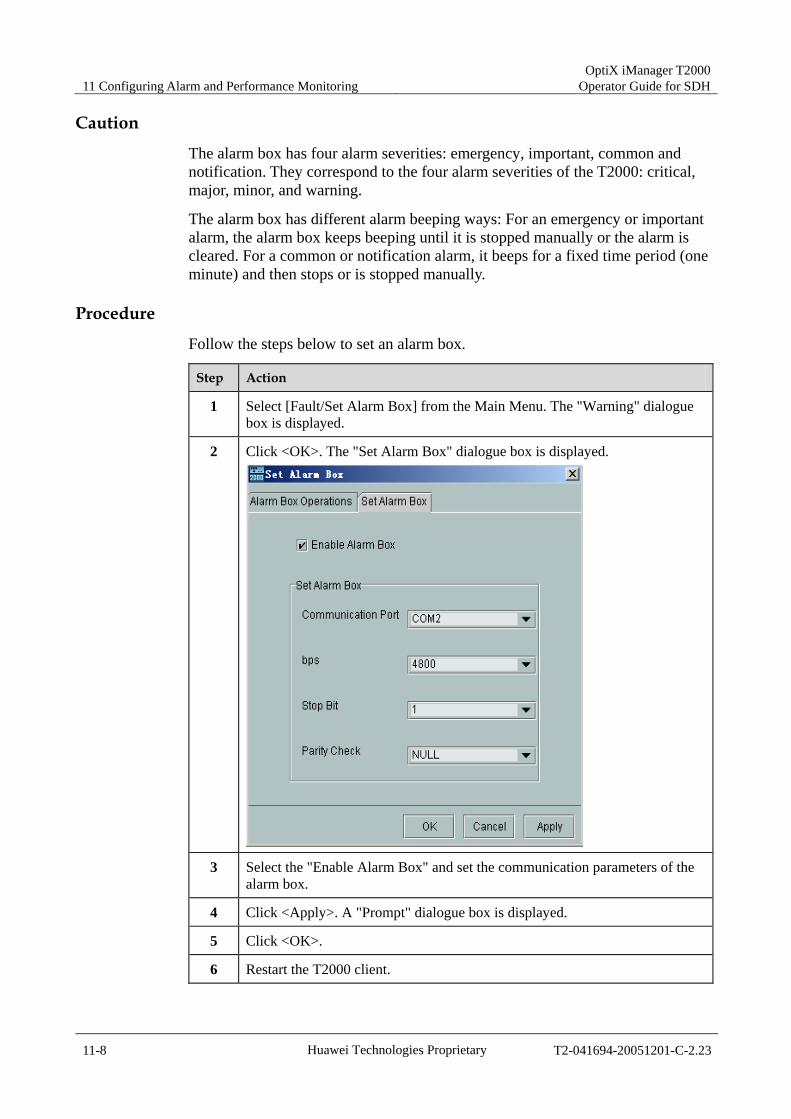
1 Select [Fault/Set Alarm Box] from the Main Menu. The "Warning" dialogue box is displayed.
2 Click <OK>. The "Set Alarm Box" dialogue box is displayed.
3 Select the "Enable Alarm Box" and set the communication parameters of the alarm box.
4 Click <Apply>. A "Prompt" dialogue box is displayed.
5 Click <OK>.
6 Restart the T2000 client.
OptiX iManager T2000 Operator Guide for SDH 11 Configuring Alarm and Performance Monitoring
T2-041694-20051201-C-2.23 Huawei Technologies Proprietary 11-9
Step Action
7 Repeat step 1 and step 2 to display the "Set Alarm Box" dialogue box.
8 Select the "Alarm Box Operations" tab. You can turn off one or more indicators as you need. To mute the sound of the alarm box, click <Mute Alarm Sound>. If you click <Mute Alarm Sound> again, the sound will resume.
11.1.7 Setting Alarm Filter Status
Background
Use this procedure to set alarm filter status.
After an NE reports alarms to the T2000, the T2000 will decide whether to display and save the alarm information according to the alarm filter status.
Prerequisite
NM user must have the authority of "NE and network operator" or a person with higher authorities.
Procedure
Follow the steps below to set alarm filter status.
Step Action
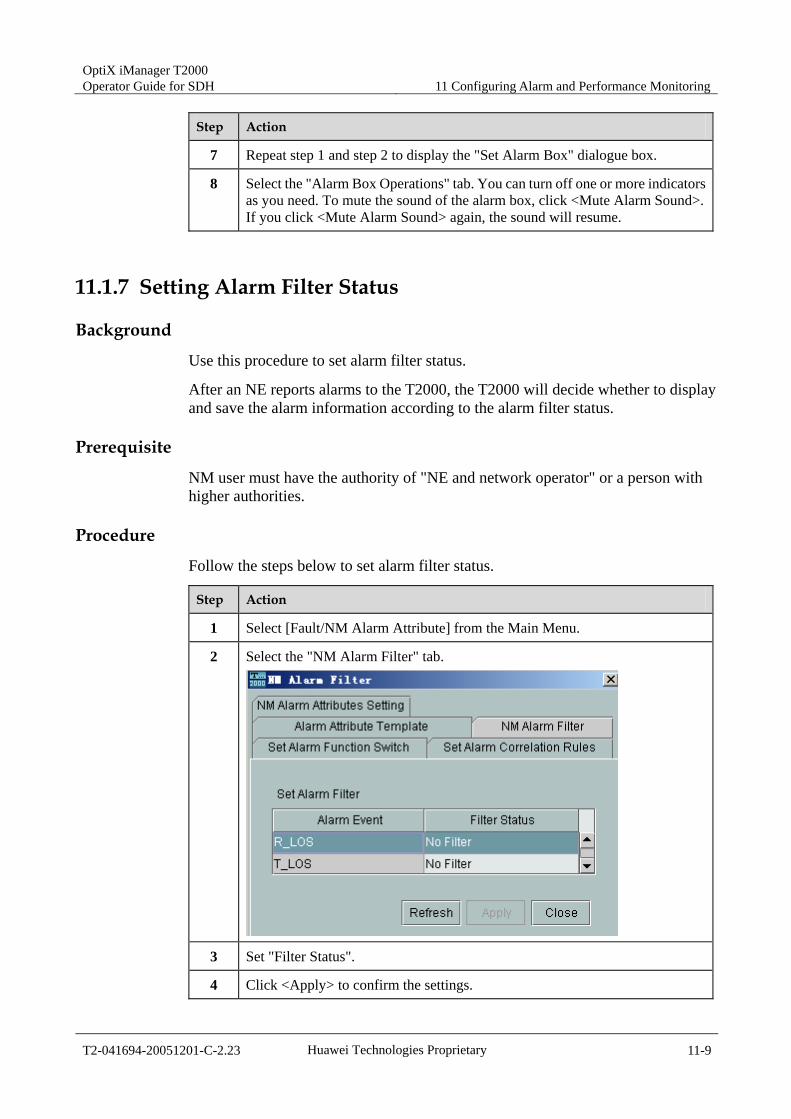
1 Select [Fault/NM Alarm Attribute] from the Main Menu.
2 Select the "NM Alarm Filter" tab.
3 Set "Filter Status".
4 Click <Apply> to confirm the settings.
11 Configuring Alarm and Performance Monitoring OptiX iManager T2000
Operator Guide for SDH
11-10 Huawei Technologies Proprietary T2-041694-20051201-C-2.23
11.1.8 Setting Alarm Dump Conditions
Background
Use this procedure to set alarm dump conditions.
To avoid data overflow or damage, you need to dump alarm data in time.
You can dump the alarm data manually. Alternatively, you can set the alarm dump conditions. The T2000 will dump the alarm data automatically.
There are two methods for auto dumping the alarm data: dumping when overflow and dumping in schedule.
Prerequisite
NM user must have the authority of "NE and network maintainer" or a person with higher authorities.
Procedure
I. Set Automatic Alarm Dump Conditions
Follow the steps below to set alarm dump condition.
Step Action
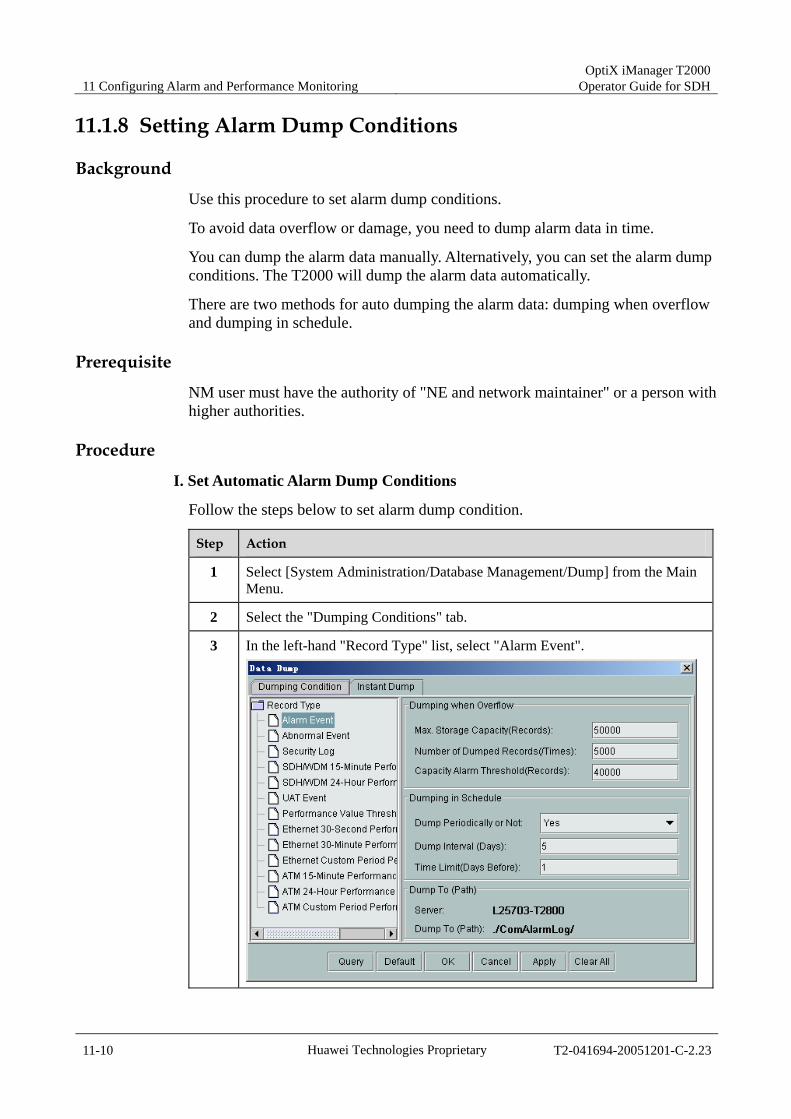
1 Select [System Administration/Database Management/Dump] from the Main Menu.
2 Select the "Dumping Conditions" tab.
3 In the left-hand "Record Type" list, select "Alarm Event".
OptiX iManager T2000 Operator Guide for SDH 11 Configuring Alarm and Performance Monitoring
T2-041694-20051201-C-2.23 Huawei Technologies Proprietary 11-11
Step Action
4 In the right-hand pane, under "Dumping when Overflow", set a value for "Max. Storage Capacity(Records)", "Number of Dumped Records(/Times)" and "Capacity Alarm Threshold(Records)" respectively.
5 Under "Dumping in Schedule", set "Dump Periodically or not" to "Yes". Set "Dump Interval(Days)" and "Time Limit(Days Before)".
6 Click <OK> to confirm the settings.
II. Set Instant Alarm Dump Conditions
Follow the steps bellow to set instant alarm dump conditions.
Step Action
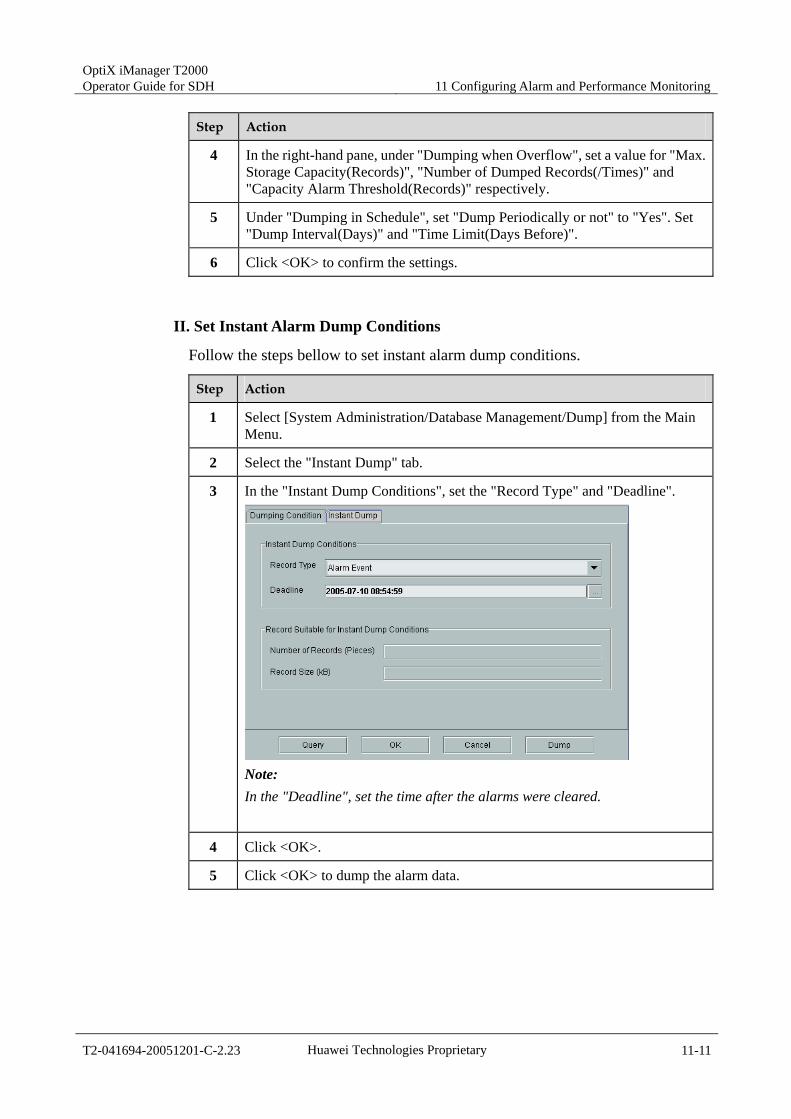
1 Select [System Administration/Database Management/Dump] from the Main Menu.
2 Select the "Instant Dump" tab.
3 In the "Instant Dump Conditions", set the "Record Type" and "Deadline".
Note: In the "Deadline", set the time after the alarms were cleared.
4 Click <OK>.
5 Click <OK> to dump the alarm data.
11 Configuring Alarm and Performance Monitoring OptiX iManager T2000
Operator Guide for SDH
11-12 Huawei Technologies Proprietary T2-041694-20051201-C-2.23
11.2 Setting NE Alarm Attributes
Prerequisite
NM user must have the authority of "NE and network maintainer" or a person with higher authorities.
Procedure
Follow the steps below to set NE alarm attributes.
Step Action
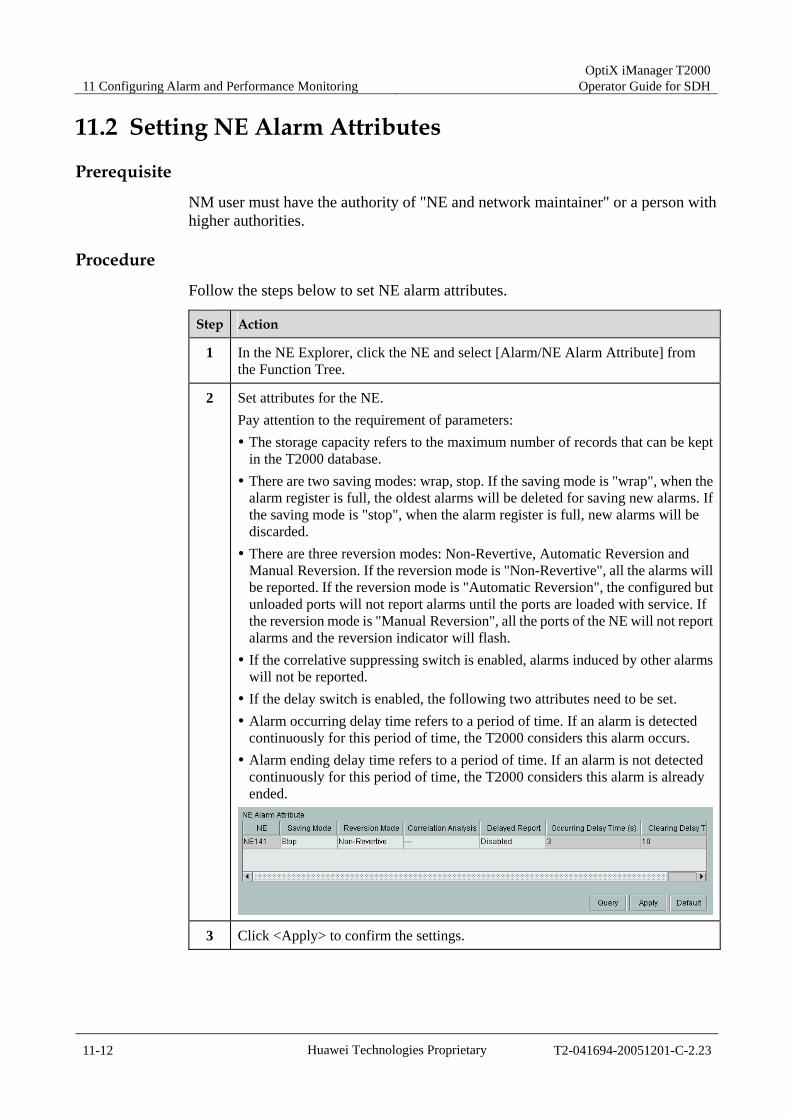
1 In the NE Explorer, click the NE and select [Alarm/NE Alarm Attribute] from the Function Tree.
2 Set attributes for the NE. Pay attention to the requirement of parameters: The storage capacity refers to the maximum number of records that can be kept in the T2000 database.
There are two saving modes: wrap, stop. If the saving mode is "wrap", when the alarm register is full, the oldest alarms will be deleted for saving new alarms. If the saving mode is "stop", when the alarm register is full, new alarms will be discarded.
There are three reversion modes: Non-Revertive, Automatic Reversion and Manual Reversion. If the reversion mode is "Non-Revertive", all the alarms will be reported. If the reversion mode is "Automatic Reversion", the configured but unloaded ports will not report alarms until the ports are loaded with service. If the reversion mode is "Manual Reversion", all the ports of the NE will not report alarms and the reversion indicator will flash.
If the correlative suppressing switch is enabled, alarms induced by other alarms will not be reported.
If the delay switch is enabled, the following two attributes need to be set. Alarm occurring delay time refers to a period of time. If an alarm is detected continuously for this period of time, the T2000 considers this alarm occurs.
Alarm ending delay time refers to a period of time. If an alarm is not detected continuously for this period of time, the T2000 considers this alarm is already ended.
3 Click <Apply> to confirm the settings.
OptiX iManager T2000 Operator Guide for SDH 11 Configuring Alarm and Performance Monitoring
T2-041694-20051201-C-2.23 Huawei Technologies Proprietary 11-13
11.3 Setting NM Alarm Attributes
Background
Use this procedure to set NM alarm attributes, including alarm suppression and alarm severity.
NM alarm refers to the alarm generated upon T2000 system failure or the platform on which the T2000 system runs. Such alarms include NE_COMMU_BREAK, NE_NOT_LOGIN, DISK_FREE_SPACE_LOW, DB_FREE_SPACE_LOW. NM alarms are stored on the T2000.
Prerequisite
NM user must have the authority of "NE and network operator" and above.
Procedure Step Action
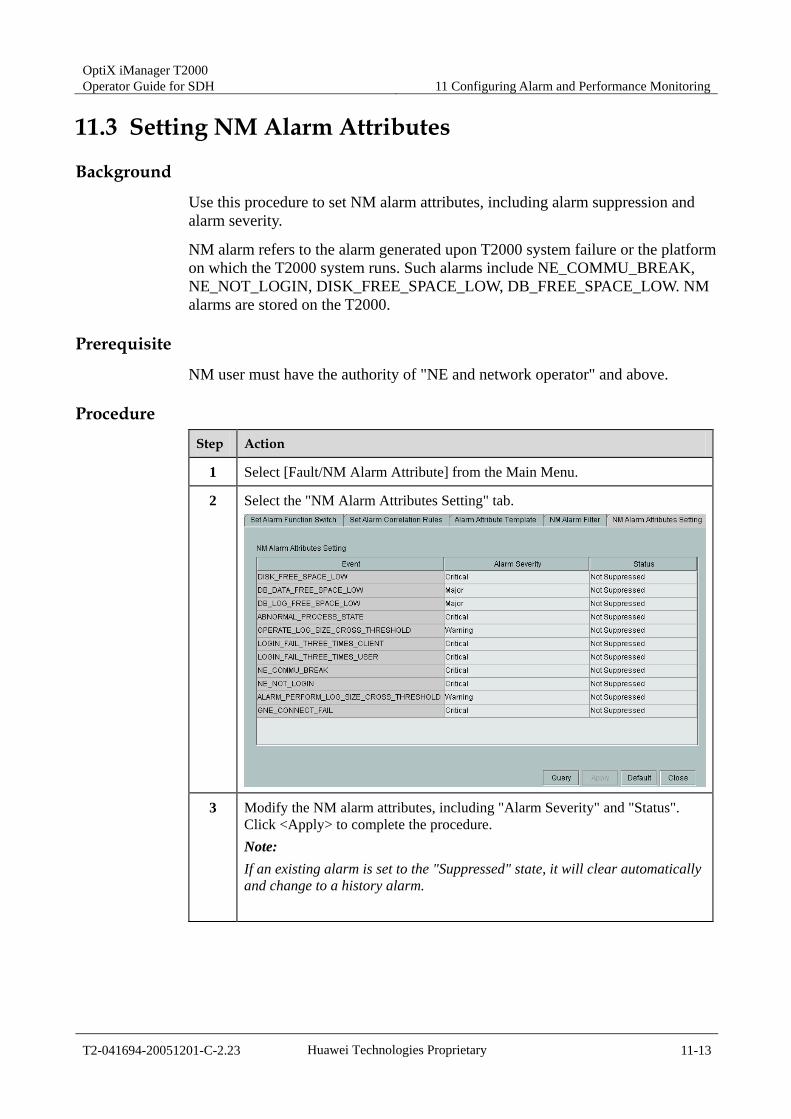
1 Select [Fault/NM Alarm Attribute] from the Main Menu.
2 Select the "NM Alarm Attributes Setting" tab.
3 Modify the NM alarm attributes, including "Alarm Severity" and "Status". Click <Apply> to complete the procedure. Note: If an existing alarm is set to the "Suppressed" state, it will clear automatically and change to a history alarm.
11 Configuring Alarm and Performance Monitoring OptiX iManager T2000
Operator Guide for SDH
11-14 Huawei Technologies Proprietary T2-041694-20051201-C-2.23
11.4 Setting Board/Port Alarm Attributes This section describes how to set alarm attributes for boards and ports. The following tasks are described:
Setting Alarm Severities and Auto Reporting Setting Alarm Suppression Status Setting the Bit Error Alarm Threshold Setting the AIS Insertion Switch Setting the UNEQ Insertion Switch Setting Alarm Reversion
11.4.1 Setting Alarm Severities and Auto Reporting
Background
Use this procedure to set alarm severities and the auto reporting function for boards. Setting alarm severities allows you to modify the severity of an alarm in the T2000. Disable auto reporting of a specified alarm of an NE or board, then the NE does not report this alarm automatically to the T2000 when the alarm is raised. But the T2000 can query this alarm from the NE by synchronising alarms.
Prerequisite
NM user must have the authority of "NE and network operator" or a person with higher authorities.
Procedure
Follow the steps below to set alarm severity and the auto report.
OptiX iManager T2000 Operator Guide for SDH 11 Configuring Alarm and Performance Monitoring
T2-041694-20051201-C-2.23 Huawei Technologies Proprietary 11-15
Step Action
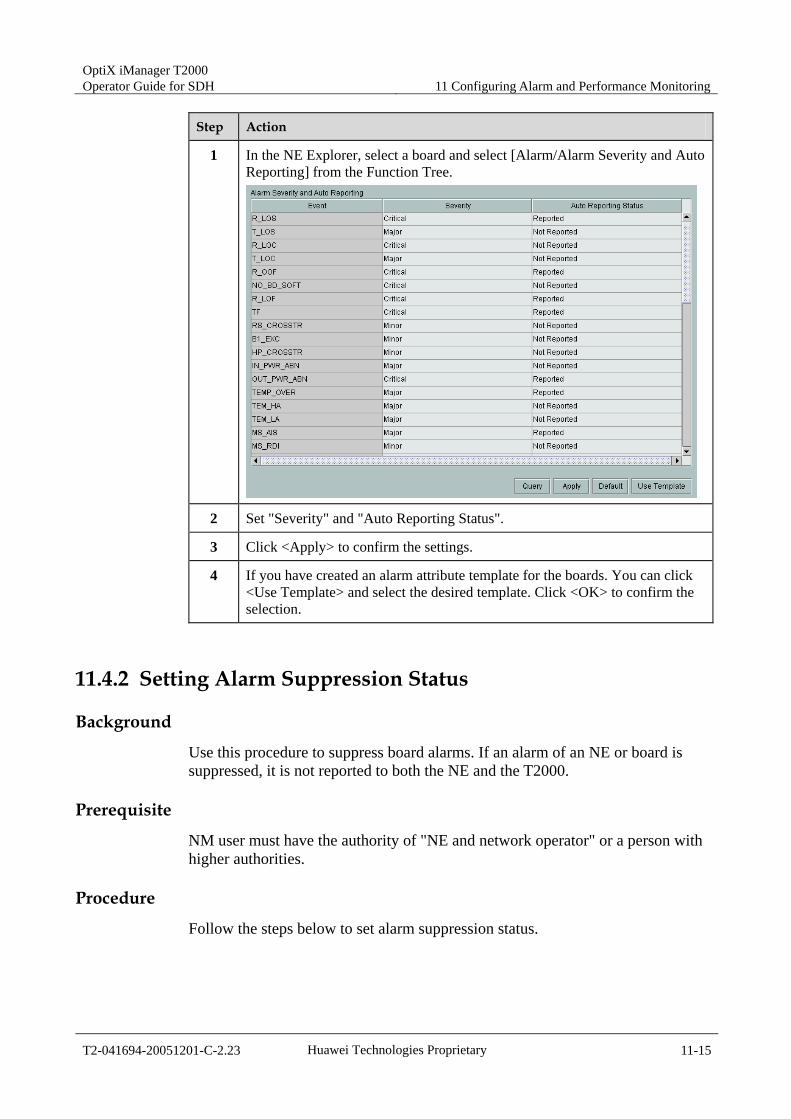
1 In the NE Explorer, select a board and select [Alarm/Alarm Severity and Auto Reporting] from the Function Tree.
2 Set "Severity" and "Auto Reporting Status".
3 Click <Apply> to confirm the settings.
4 If you have created an alarm attribute template for the boards. You can click <Use Template> and select the desired template. Click <OK> to confirm the selection.
11.4.2 Setting Alarm Suppression Status
Background
Use this procedure to suppress board alarms. If an alarm of an NE or board is suppressed, it is not reported to both the NE and the T2000.
Prerequisite
NM user must have the authority of "NE and network operator" or a person with higher authorities.
Procedure
Follow the steps below to set alarm suppression status.
11 Configuring Alarm and Performance Monitoring OptiX iManager T2000
Operator Guide for SDH
11-16 Huawei Technologies Proprietary T2-041694-20051201-C-2.23
Step Action
1 In the NE Explorer, select a board and select [Alarm/Alarm Suppression] from the Function Tree.
2 Set alarm suppression status as you need.
3 Click <Apply> to confirm the settings.
4 If you have created an alarm attribute template for the boards. You can click <Use Template> and select the desired template. Click <OK> to confirm the selection.
11.4.3 Setting the Bit Error Alarm Threshold
Background
Use this procedure to set the bit error alarm threshold.
When the number of bit errors exceeds the threshold, an alarm occurs.
Prerequisite
NM user must have the authority of "NE and network operator" or a person with higher authorities.
Procedure
Follow the steps below to set the bit error alarm threshold.
Step Action
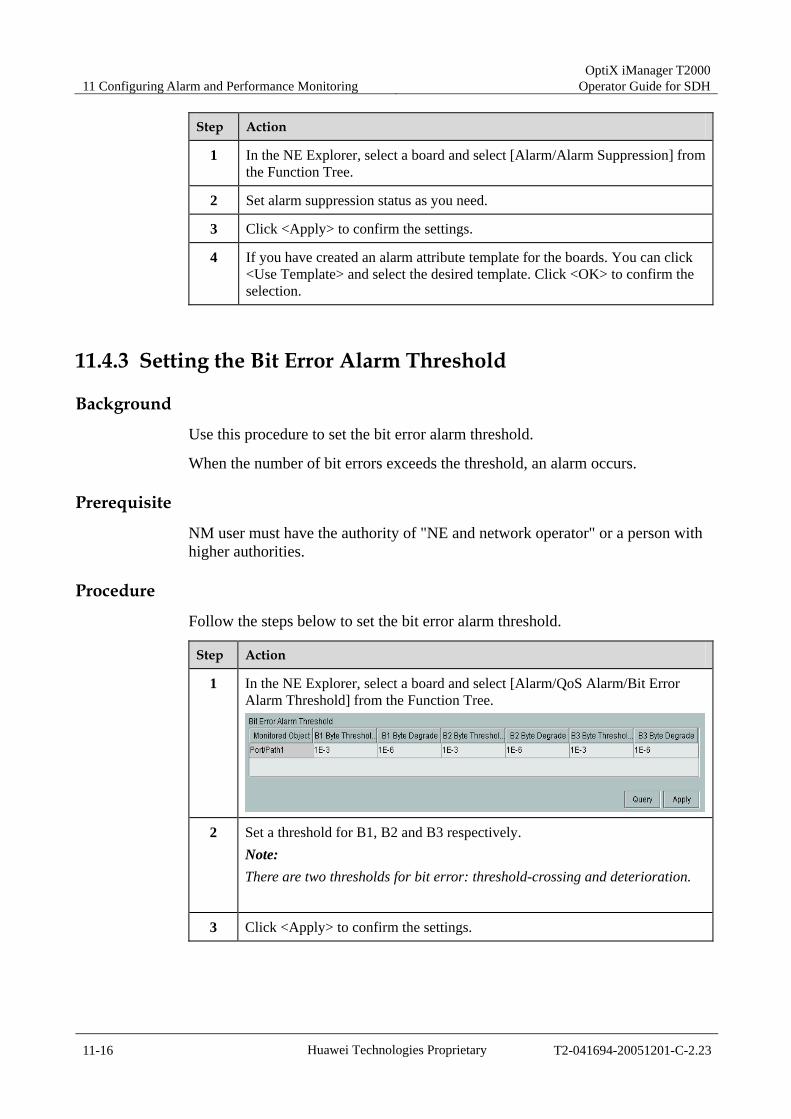
1 In the NE Explorer, select a board and select [Alarm/QoS Alarm/Bit Error Alarm Threshold] from the Function Tree.
2 Set a threshold for B1, B2 and B3 respectively. Note: There are two thresholds for bit error: threshold-crossing and deterioration.
3 Click <Apply> to confirm the settings.
OptiX iManager T2000 Operator Guide for SDH 11 Configuring Alarm and Performance Monitoring
T2-041694-20051201-C-2.23 Huawei Technologies Proprietary 11-17
11.4.4 Setting the AIS Insertion Switch
Background
Use this procedure to set AIS insertion switch.
For services requiring high quality of service (QoS), when a specific QoS-affecting event (for example, B3_EXC) is detected, the T2000 will insert AIS at the port immediately, thus triggering the related protection mechanism and switching the service at this port to a protection path to guarantee QoS.
Prerequisite
NM user must have the authority of "NE and network operator" or a person with higher authorities.
Procedure
Follow the steps below to set AIS insertion switch.
Step Action
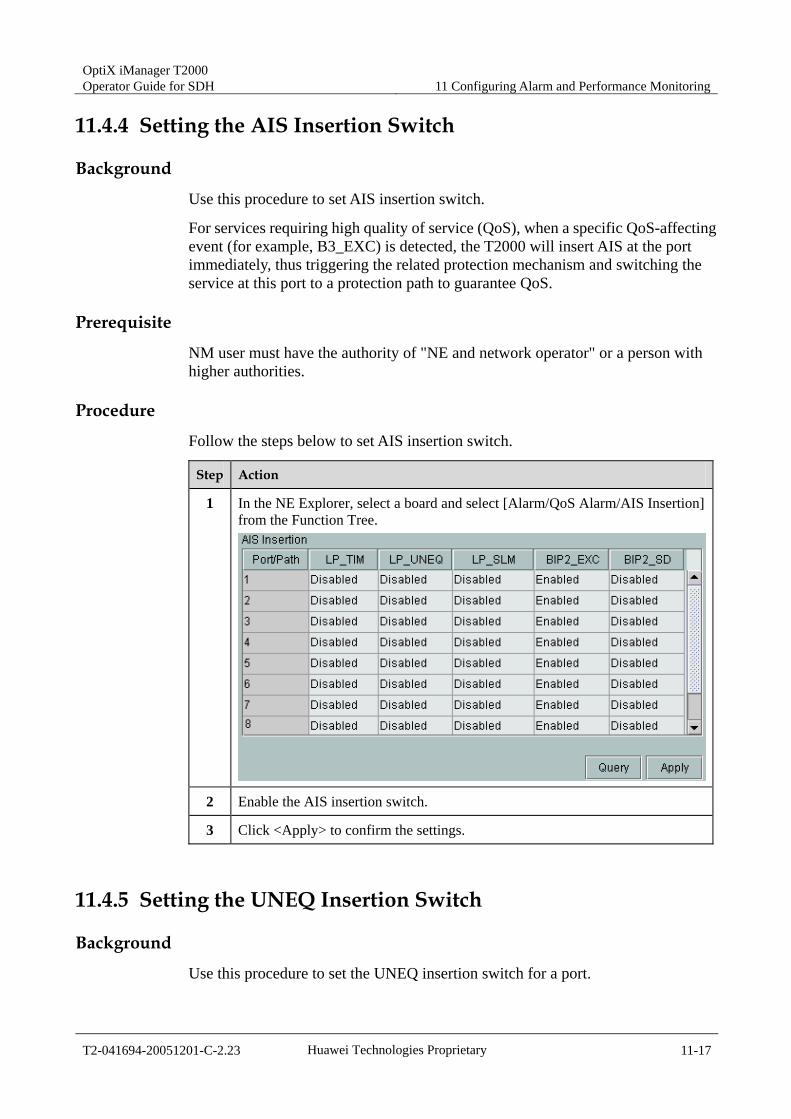
1 In the NE Explorer, select a board and select [Alarm/QoS Alarm/AIS Insertion] from the Function Tree.
2 Enable the AIS insertion switch.
3 Click <Apply> to confirm the settings.
11.4.5 Setting the UNEQ Insertion Switch
Background
Use this procedure to set the UNEQ insertion switch for a port.
11 Configuring Alarm and Performance Monitoring OptiX iManager T2000
Operator Guide for SDH
11-18 Huawei Technologies Proprietary T2-041694-20051201-C-2.23
After UNEQ is inserted in a path, the service of this path will be interrupted, and none of the alarms of this path but TA_LOS will be detected. You can select whether to monitor the TA_LOS alarm of this port.
Prerequisite
NM user must have the authority of "NE and network operator" or a person with higher authorities.
Procedure
Follow the steps below to set the UNEQ insertion switch.
Step Action
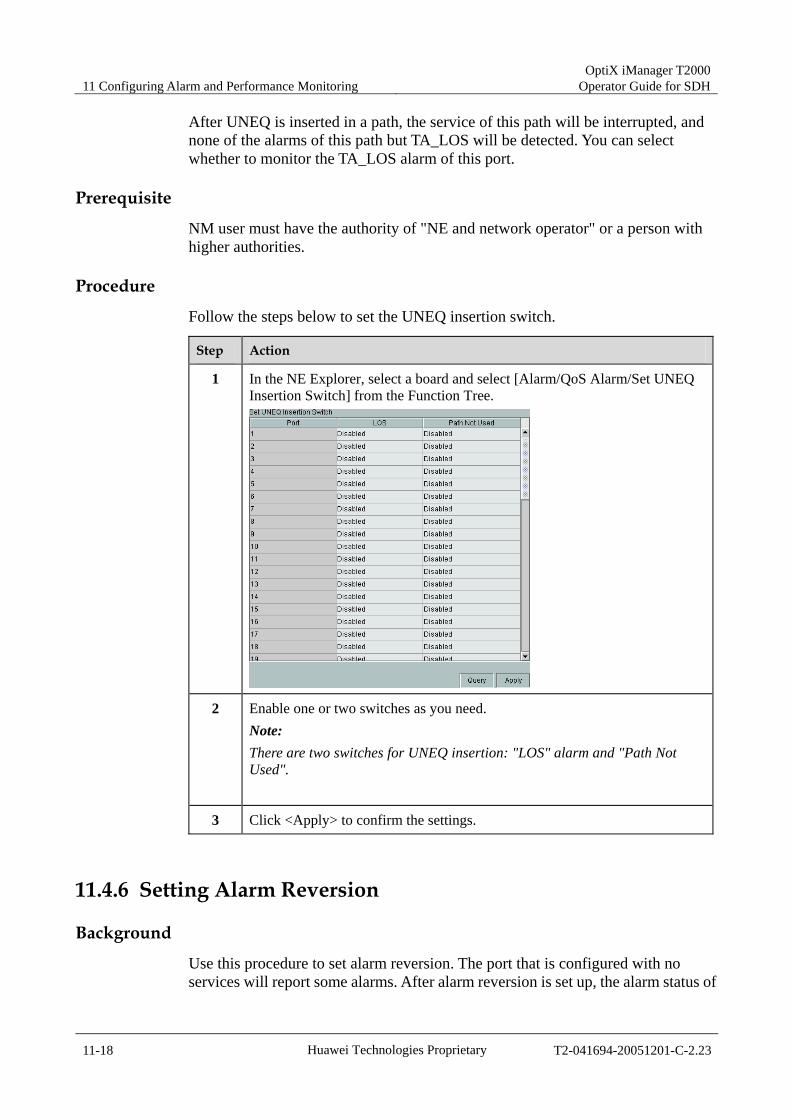
1 In the NE Explorer, select a board and select [Alarm/QoS Alarm/Set UNEQ Insertion Switch] from the Function Tree.
2 Enable one or two switches as you need. Note: There are two switches for UNEQ insertion: "LOS" alarm and "Path Not Used".
3 Click <Apply> to confirm the settings.
11.4.6 Setting Alarm Reversion
Background
Use this procedure to set alarm reversion. The port that is configured with no services will report some alarms. After alarm reversion is set up, the alarm status of
OptiX iManager T2000 Operator Guide for SDH 11 Configuring Alarm and Performance Monitoring
T2-041694-20051201-C-2.23 Huawei Technologies Proprietary 11-19
this port differs from the actual situation. In this way, some alarms that you do not need to pay attention to can be filtered.
If alarm reversion mode is set to auto-revertive, the NE will disable alarm reversion when the alarm is cleared, and the alarm status returns to normal. If set to manual revertive, the alarm status returns to normal only when alarm reversion is disabled manually.
Prerequisite
NM user must have the authority of "NE and network operator" or a person with higher authorities.
Procedure
Follow the steps below to set alarm reversion.
Step Action
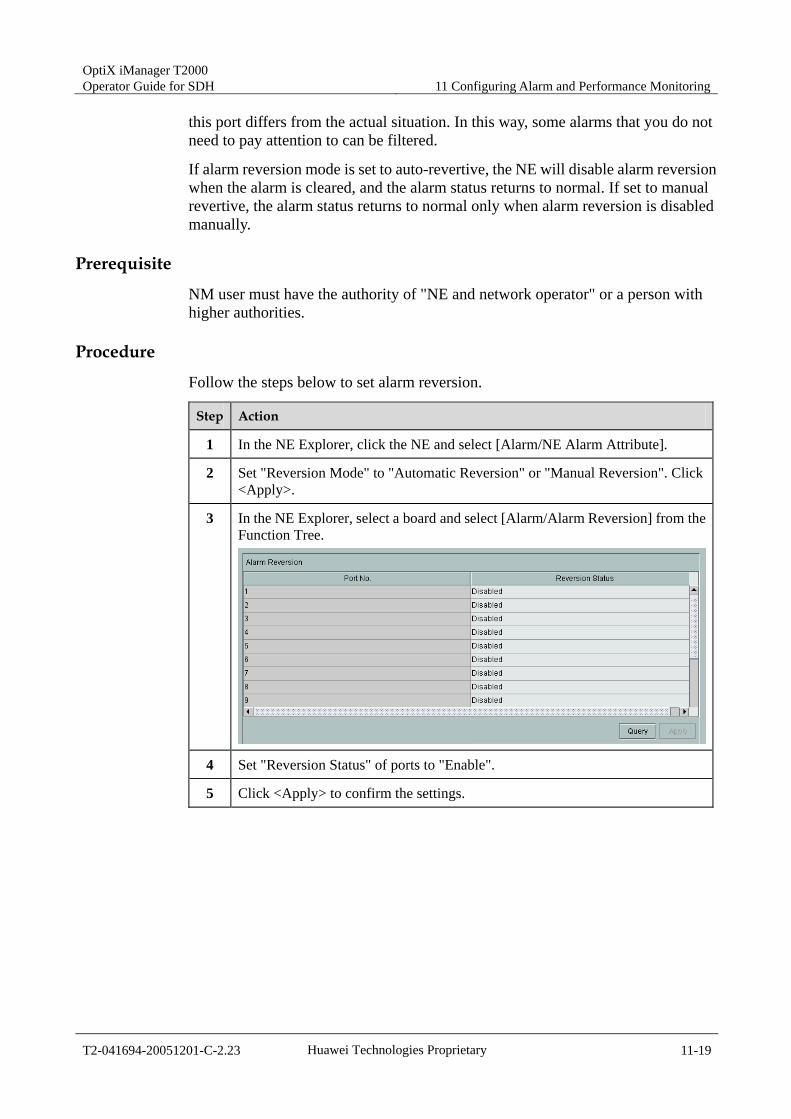
1 In the NE Explorer, click the NE and select [Alarm/NE Alarm Attribute].
2 Set "Reversion Mode" to "Automatic Reversion" or "Manual Reversion". Click <Apply>.
3 In the NE Explorer, select a board and select [Alarm/Alarm Reversion] from the Function Tree.
4 Set "Reversion Status" of ports to "Enable".
5 Click <Apply> to confirm the settings.
11 Configuring Alarm and Performance Monitoring OptiX iManager T2000
Operator Guide for SDH
11-20 Huawei Technologies Proprietary T2-041694-20051201-C-2.23
11.5 Setting SDH Trail Alarm Attributes This section describes how to set alarm attributes for SDH trails. The following tasks are described:
Setting Trail Alarm Suppression Setting Trail Alarm Reversion
11.5.1 Setting Trail Alarm Suppression
Background
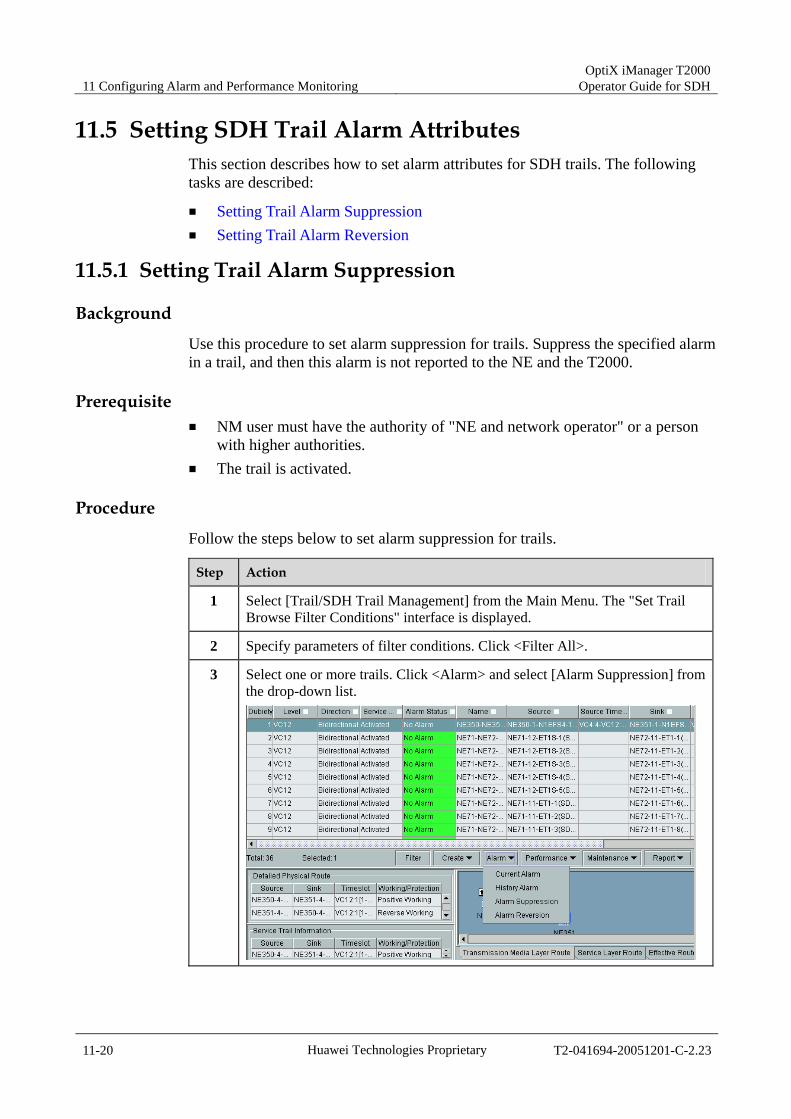
Use this procedure to set alarm suppression for trails. Suppress the specified alarm in a trail, and then this alarm is not reported to the NE and the T2000.
Prerequisite NM user must have the authority of "NE and network operator" or a person
with higher authorities. The trail is activated.
Procedure
Follow the steps below to set alarm suppression for trails.
Step Action
1 Select [Trail/SDH Trail Management] from the Main Menu. The "Set Trail Browse Filter Conditions" interface is displayed.
2 Specify parameters of filter conditions. Click <Filter All>.
3 Select one or more trails. Click <Alarm> and select [Alarm Suppression] from the drop-down list.

OptiX iManager T2000 Operator Guide for SDH 11 Configuring Alarm and Performance Monitoring
T2-041694-20051201-C-2.23 Huawei Technologies Proprietary 11-21
Step Action
4 The "Alarm Suppression" dialogue box is displayed. Set "Suppression Status" for alarm events. Click <Apply> to confirm the settings.
5 Click <Apply> to confirm the settings.
6 If you have created an alarm template for the trails, you can click <Open Template> and select the desired template. Click <OK> to confirm the selection.
7 Click <Cancel> in the "Alarm Suppression" dialogue box.
11.5.2 Setting Trail Alarm Reversion
Prerequisite NM user must have the authority of "NE and network operator" or a person
with higher authorities. The trail is activated.
Procedure
Follow the steps below to set alarm reversion for trails.
11 Configuring Alarm and Performance Monitoring OptiX iManager T2000
Operator Guide for SDH
11-22 Huawei Technologies Proprietary T2-041694-20051201-C-2.23
Step Action
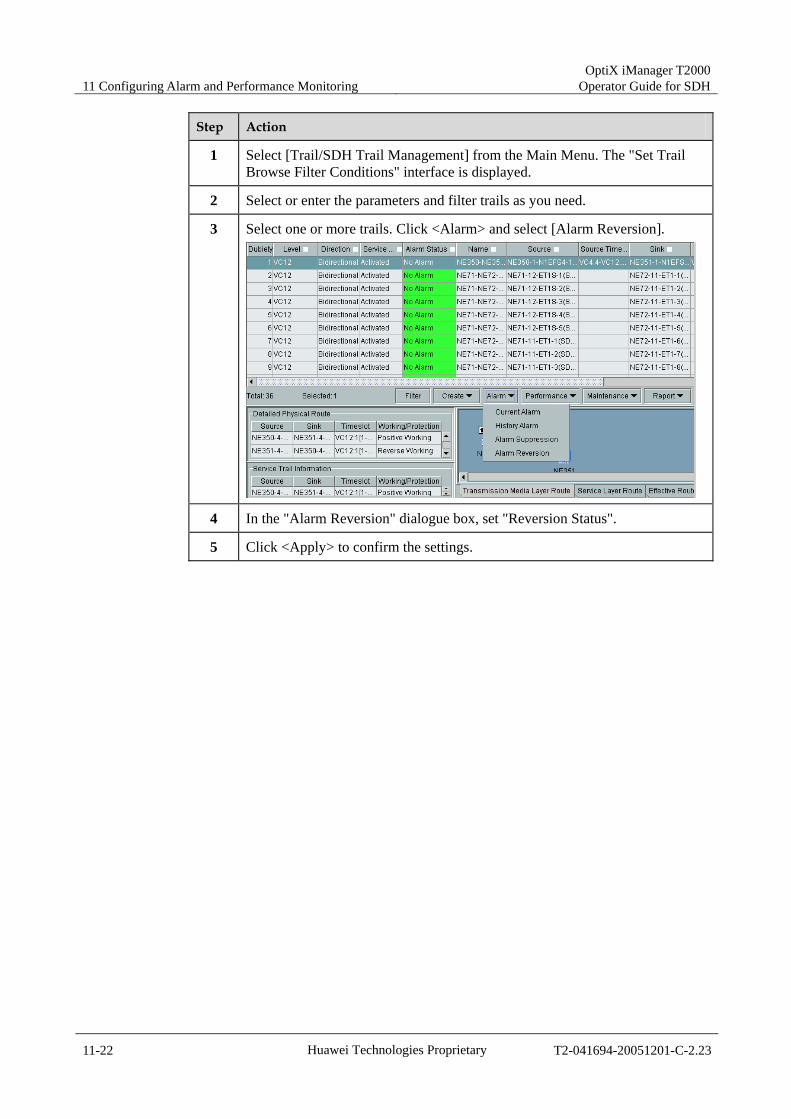
1 Select [Trail/SDH Trail Management] from the Main Menu. The "Set Trail Browse Filter Conditions" interface is displayed.
2 Select or enter the parameters and filter trails as you need.
3 Select one or more trails. Click <Alarm> and select [Alarm Reversion].
4 In the "Alarm Reversion" dialogue box, set "Reversion Status".
5 Click <Apply> to confirm the settings.
OptiX iManager T2000 Operator Guide for SDH 11 Configuring Alarm and Performance Monitoring
T2-041694-20051201-C-2.23 Huawei Technologies Proprietary 11-23
11.6 Setting Performance Monitoring Parameters This section describes how to set performance monitoring parameters. The following tasks are described:
Creating a Performance Threshold Template Setting Board Performance Threshold Setting Performance Dump Conditions Starting or Stopping Performance Monitoring Setting a Performance Monitoring Object Setting ATM Performance Monitoring Setting Ethernet Performance Monitoring
11.6.1 Creating a Performance Threshold Template
Background
Use this procedure to create a performance threshold template.
Setting performance thresholds NE by NE is very time-consuming. The T2000 provides an easy way to set performance thresholds for multiple NEs by creating a performance threshold template.
Prerequisite
NM user must have the authority of "NE and network maintainer" or a person with higher authorities.
Procedure
Follow the steps below to create a performance threshold template.
Step Action
1 Select [Performance/Performance Threshold Template] from the Main Menu.
2 Select a template from the "Template Name" drop-down list.
11 Configuring Alarm and Performance Monitoring OptiX iManager T2000
Operator Guide for SDH
11-24 Huawei Technologies Proprietary T2-041694-20051201-C-2.23
Step Action
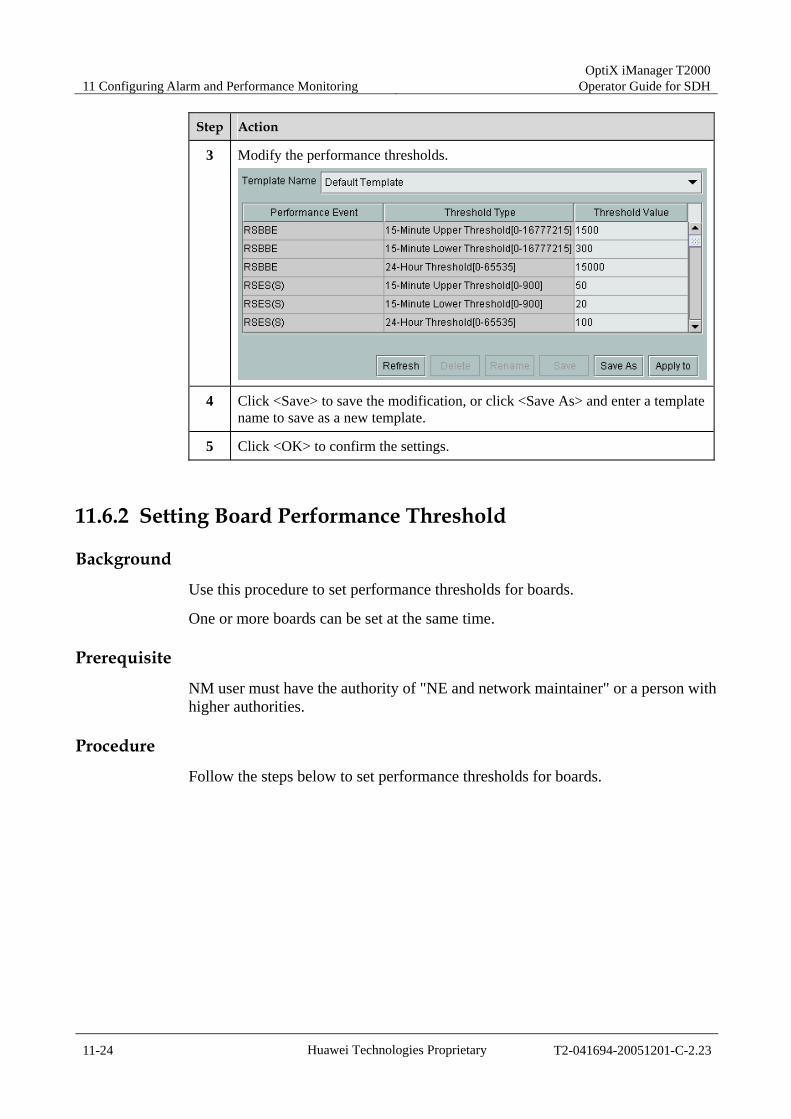
3 Modify the performance thresholds.
4 Click <Save> to save the modification, or click <Save As> and enter a template name to save as a new template.
5 Click <OK> to confirm the settings.
11.6.2 Setting Board Performance Threshold
Background
Use this procedure to set performance thresholds for boards.
One or more boards can be set at the same time.
Prerequisite
NM user must have the authority of "NE and network maintainer" or a person with higher authorities.
Procedure
Follow the steps below to set performance thresholds for boards.
OptiX iManager T2000 Operator Guide for SDH 11 Configuring Alarm and Performance Monitoring
T2-041694-20051201-C-2.23 Huawei Technologies Proprietary 11-25
Step Action
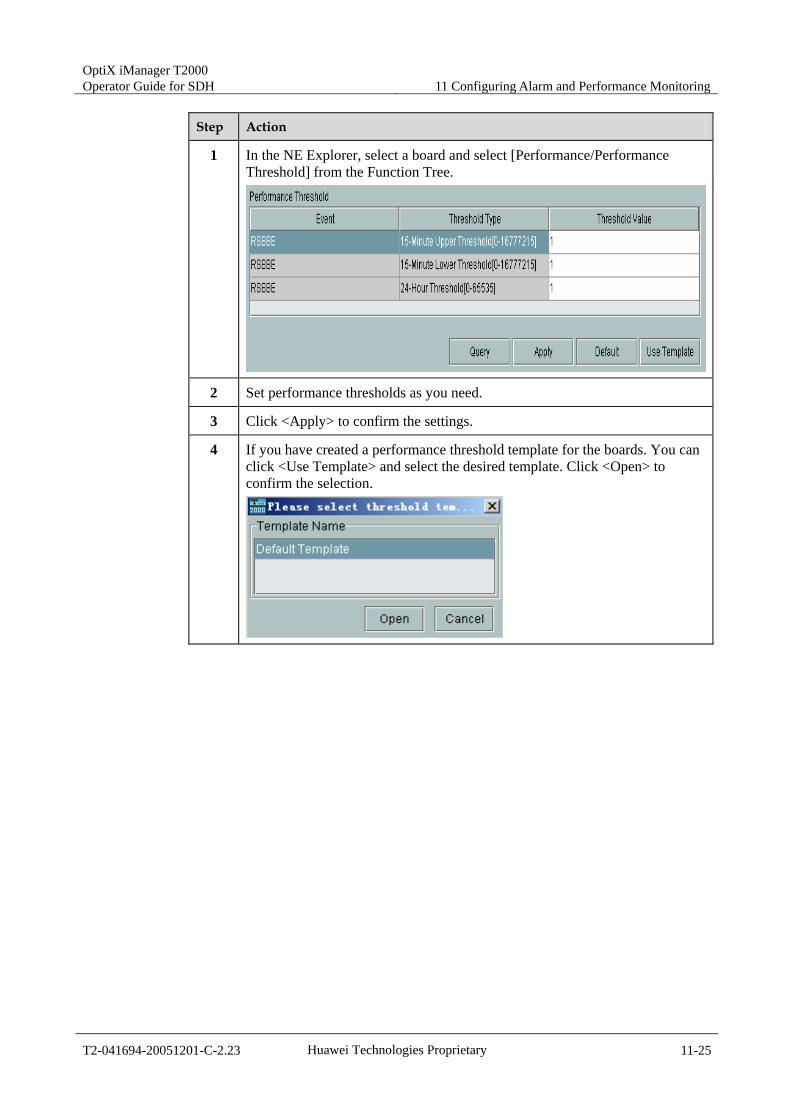
1 In the NE Explorer, select a board and select [Performance/Performance Threshold] from the Function Tree.
2 Set performance thresholds as you need.
3 Click <Apply> to confirm the settings.
4 If you have created a performance threshold template for the boards. You can click <Use Template> and select the desired template. Click <Open> to confirm the selection.
11 Configuring Alarm and Performance Monitoring OptiX iManager T2000
Operator Guide for SDH
11-26 Huawei Technologies Proprietary T2-041694-20051201-C-2.23
11.6.3 Setting Performance Dump Conditions
Background
Use this procedure to set performance dump conditions.
To avoid data overflow or damage, you need to dump performance data in time.
You can dump the performance data manually. Alternatively, you can set the performance dump conditions. The T2000 will dump the performance data automatically.
There are two methods for auto dumping the performance data: dumping when overflow and dumping in schedule.
Prerequisite
NM user must have the authority of "NE and network maintainer" or a person with higher authorities.
Procedure
Follow the steps below to set performance automatically dump conditions.
Step Action
1 Select [System Administration/Database Management/Dump] from the Main Menu.
2 Select the "Dumping Condition" tab.
OptiX iManager T2000 Operator Guide for SDH 11 Configuring Alarm and Performance Monitoring
T2-041694-20051201-C-2.23 Huawei Technologies Proprietary 11-27
Step Action
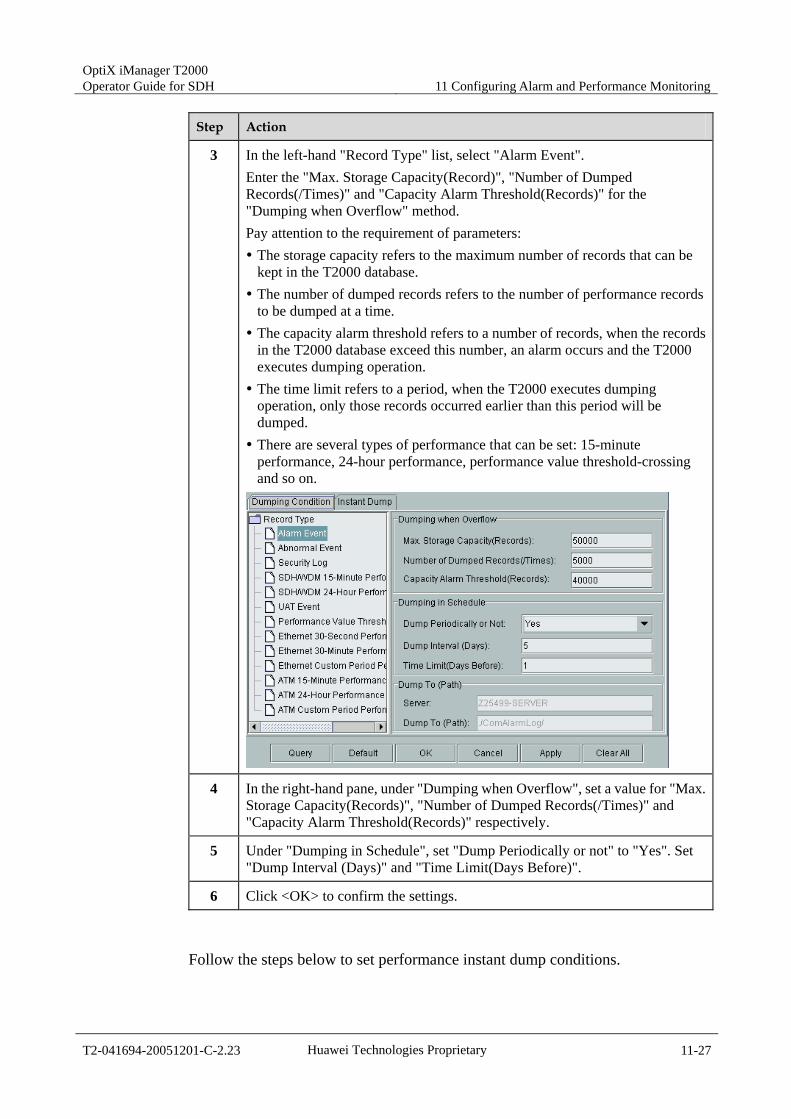
3 In the left-hand "Record Type" list, select "Alarm Event". Enter the "Max. Storage Capacity(Record)", "Number of Dumped Records(/Times)" and "Capacity Alarm Threshold(Records)" for the "Dumping when Overflow" method. Pay attention to the requirement of parameters: The storage capacity refers to the maximum number of records that can be kept in the T2000 database.
The number of dumped records refers to the number of performance records to be dumped at a time.
The capacity alarm threshold refers to a number of records, when the records in the T2000 database exceed this number, an alarm occurs and the T2000 executes dumping operation.
The time limit refers to a period, when the T2000 executes dumping operation, only those records occurred earlier than this period will be dumped.
There are several types of performance that can be set: 15-minute performance, 24-hour performance, performance value threshold-crossing and so on.
4 In the right-hand pane, under "Dumping when Overflow", set a value for "Max. Storage Capacity(Records)", "Number of Dumped Records(/Times)" and "Capacity Alarm Threshold(Records)" respectively.
5 Under "Dumping in Schedule", set "Dump Periodically or not" to "Yes". Set "Dump Interval (Days)" and "Time Limit(Days Before)".
6 Click <OK> to confirm the settings.
Follow the steps below to set performance instant dump conditions.
11 Configuring Alarm and Performance Monitoring OptiX iManager T2000
Operator Guide for SDH
11-28 Huawei Technologies Proprietary T2-041694-20051201-C-2.23
Step Action
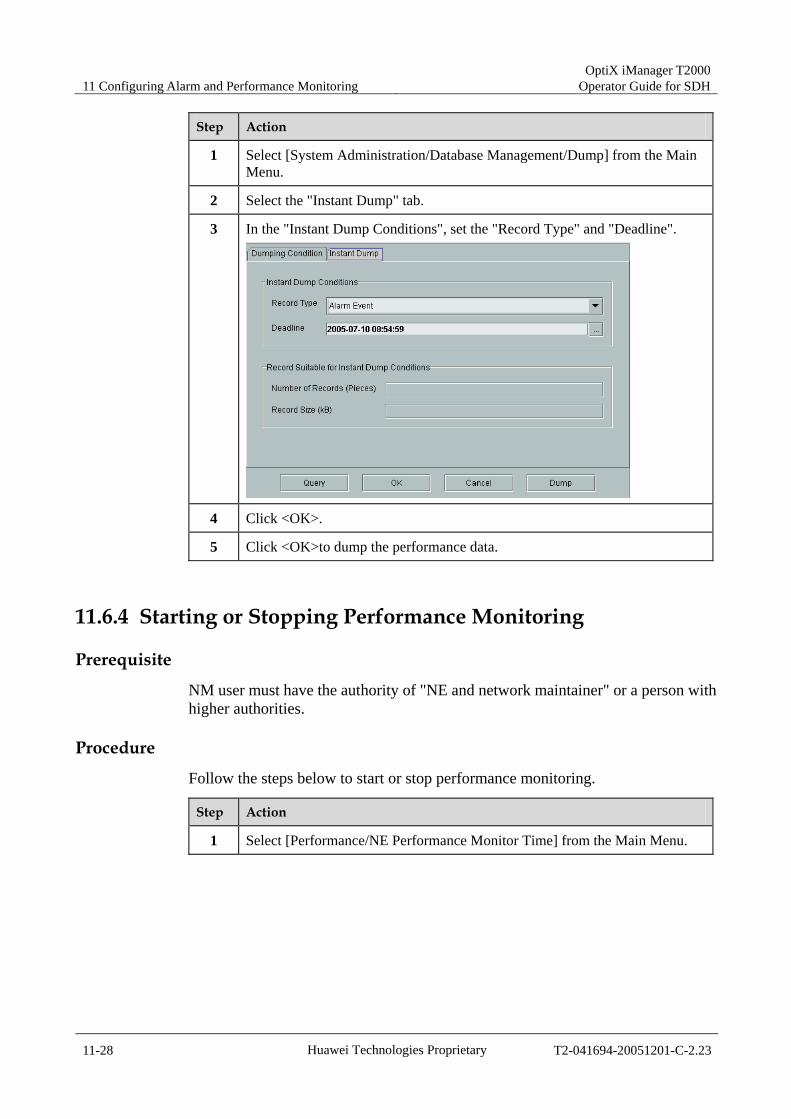
1 Select [System Administration/Database Management/Dump] from the Main Menu.
2 Select the "Instant Dump" tab.
3 In the "Instant Dump Conditions", set the "Record Type" and "Deadline".
4 Click <OK>.
5 Click <OK>to dump the performance data.
11.6.4 Starting or Stopping Performance Monitoring
Prerequisite
NM user must have the authority of "NE and network maintainer" or a person with higher authorities.
Procedure
Follow the steps below to start or stop performance monitoring.
Step Action
1 Select [Performance/NE Performance Monitor Time] from the Main Menu.
OptiX iManager T2000 Operator Guide for SDH 11 Configuring Alarm and Performance Monitoring
T2-041694-20051201-C-2.23 Huawei Technologies Proprietary 11-29
Step Action
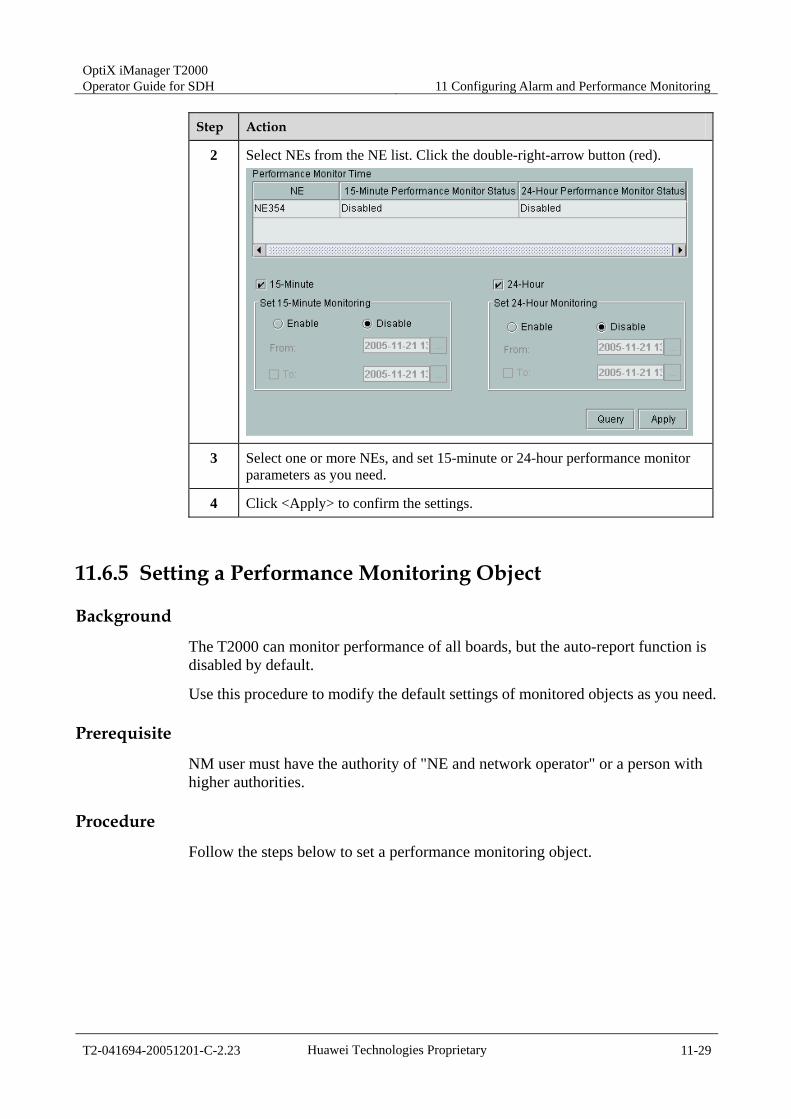
2 Select NEs from the NE list. Click the double-right-arrow button (red).
3 Select one or more NEs, and set 15-minute or 24-hour performance monitor parameters as you need.
4 Click <Apply> to confirm the settings.
11.6.5 Setting a Performance Monitoring Object
Background
The T2000 can monitor performance of all boards, but the auto-report function is disabled by default.
Use this procedure to modify the default settings of monitored objects as you need.
Prerequisite
NM user must have the authority of "NE and network operator" or a person with higher authorities.
Procedure
Follow the steps below to set a performance monitoring object.
11 Configuring Alarm and Performance Monitoring OptiX iManager T2000
Operator Guide for SDH
11-30 Huawei Technologies Proprietary T2-041694-20051201-C-2.23
Step Action
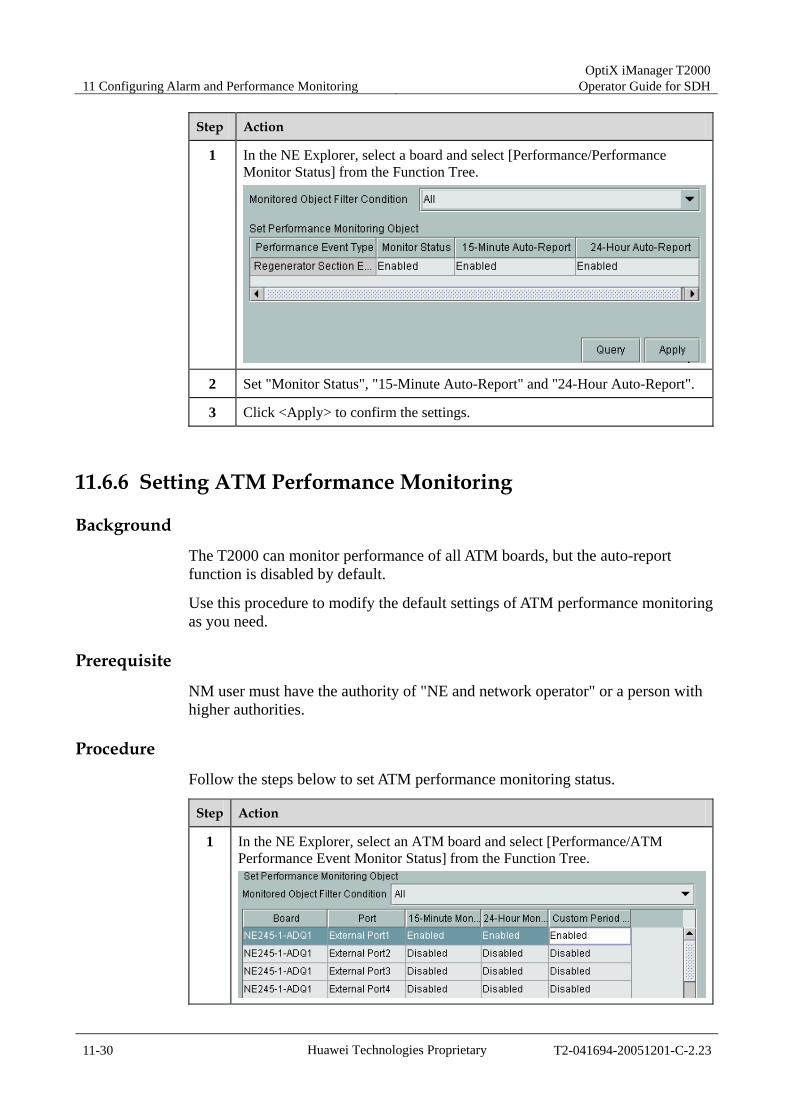
1 In the NE Explorer, select a board and select [Performance/Performance Monitor Status] from the Function Tree.
2 Set "Monitor Status", "15-Minute Auto-Report" and "24-Hour Auto-Report".
3 Click <Apply> to confirm the settings.
11.6.6 Setting ATM Performance Monitoring
Background
The T2000 can monitor performance of all ATM boards, but the auto-report function is disabled by default.
Use this procedure to modify the default settings of ATM performance monitoring as you need.
Prerequisite
NM user must have the authority of "NE and network operator" or a person with higher authorities.
Procedure
Follow the steps below to set ATM performance monitoring status.
Step Action
1 In the NE Explorer, select an ATM board and select [Performance/ATM Performance Event Monitor Status] from the Function Tree.
OptiX iManager T2000 Operator Guide for SDH 11 Configuring Alarm and Performance Monitoring
T2-041694-20051201-C-2.23 Huawei Technologies Proprietary 11-31
Step Action
2 Set "Custom Period Monitor", "15-Minute Monitor" and "24-Hour Monitor".
3 Click <Apply> to confirm the settings.
11.6.7 Setting Ethernet Performance Monitoring
Background
The T2000 can monitor performance of all Ethernet boards, but the auto-report is disabled by default.
Use this procedure to modify the default settings of ATM performance monitoring as you need.
Prerequisite
NM user must have the authority of "NE and network operator" or a person with higher authorities.
Procedure
Follow the steps below to set Ethernet performance monitoring status.
Step Action
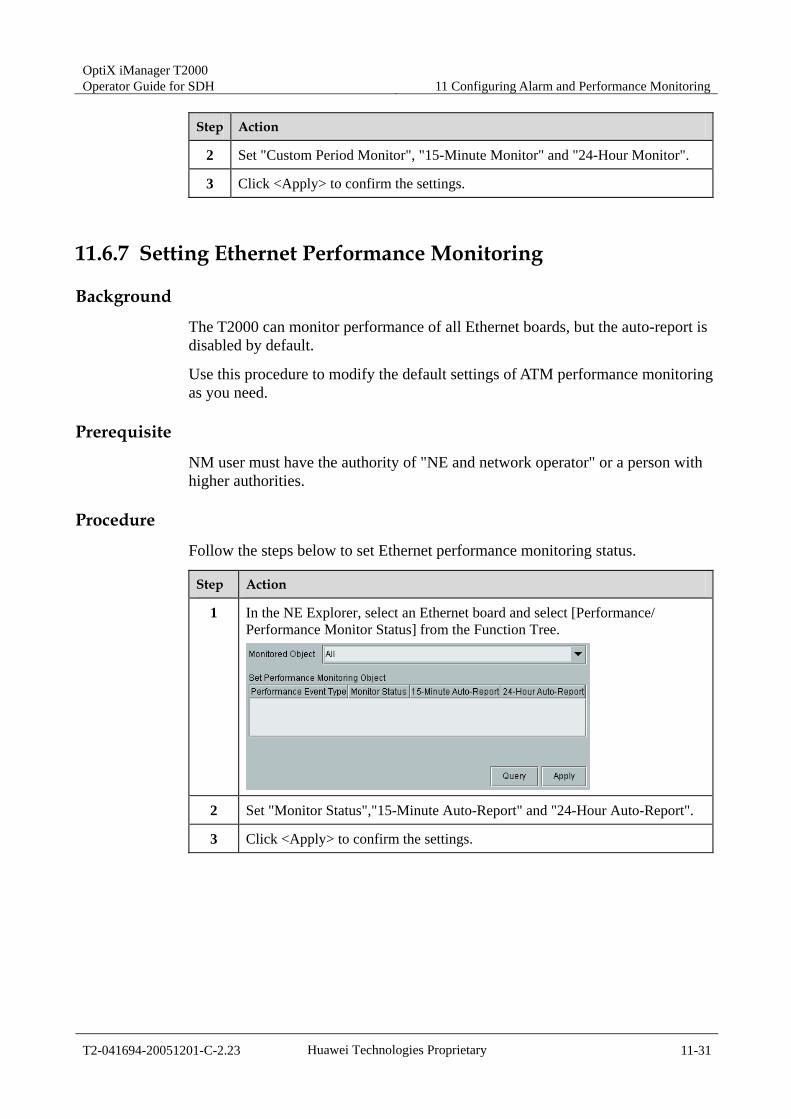
1 In the NE Explorer, select an Ethernet board and select [Performance/ Performance Monitor Status] from the Function Tree.
2 Set "Monitor Status","15-Minute Auto-Report" and "24-Hour Auto-Report".
3 Click <Apply> to confirm the settings.
11 Configuring Alarm and Performance Monitoring OptiX iManager T2000
Operator Guide for SDH
11-32 Huawei Technologies Proprietary T2-041694-20051201-C-2.23
11.7 Resetting a Performance Register This section describes how to reset a performance register. By the performance register type, this operation is subdivided to:
Resetting an NE Performance Register Resetting an ATM Performance Register Resetting an Ethernet Performance Register
11.7.1 Resetting an NE Performance Register
Background
Use this procedure to reset an NE performance register.
After a network test or fault recovery, you need to reset the performance register to enter a new performance monitoring period.
Prerequisite
NM user must have the authority of "NE and network operator" or a person with higher authorities.
Procedure
Follow the steps below to reset NE performance register.
Step Action
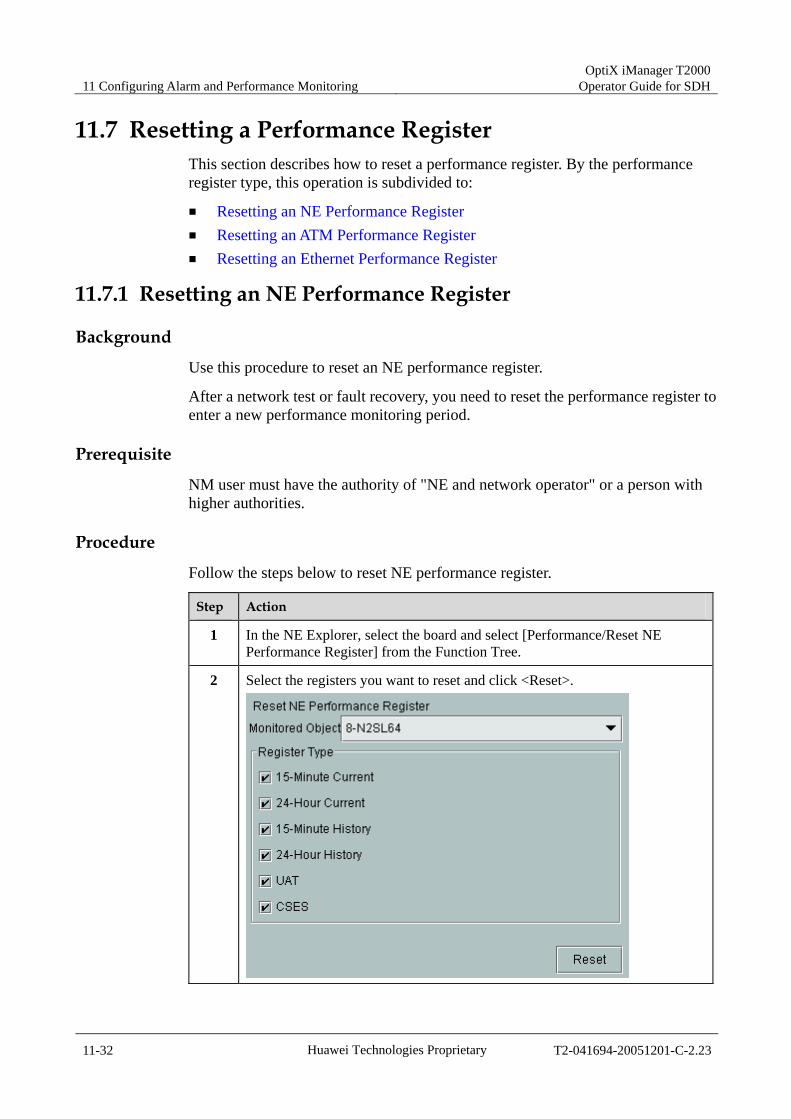
1 In the NE Explorer, select the board and select [Performance/Reset NE Performance Register] from the Function Tree.
2 Select the registers you want to reset and click <Reset>.
OptiX iManager T2000 Operator Guide for SDH 11 Configuring Alarm and Performance Monitoring
T2-041694-20051201-C-2.23 Huawei Technologies Proprietary 11-33
Step Action
3 Click <Yes> in the confirmation dialogue box.
4 Click <Close> in the result dialogue box.
11.7.2 Resetting an ATM Performance Register
Background
Use this procedure to reset an ATM performance register.
After a network test or fault recovery, you need to reset the performance register to enter a new performance monitoring period.
Prerequisite
NM user must have the authority of "NE and network operator" or a person with higher authorities.
Procedure
Follow the steps below to reset an ATM performance register.
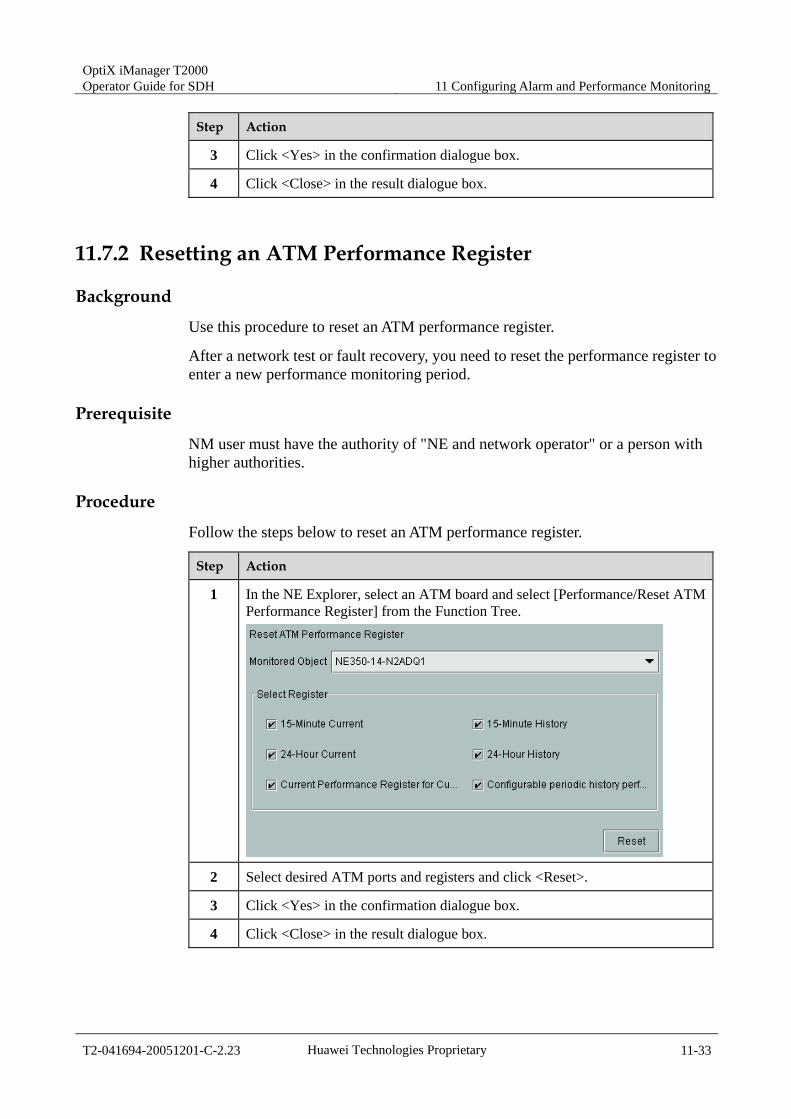
Step Action
1 In the NE Explorer, select an ATM board and select [Performance/Reset ATM Performance Register] from the Function Tree.
2 Select desired ATM ports and registers and click <Reset>.
3 Click <Yes> in the confirmation dialogue box.
4 Click <Close> in the result dialogue box.
11 Configuring Alarm and Performance Monitoring OptiX iManager T2000
Operator Guide for SDH
11-34 Huawei Technologies Proprietary T2-041694-20051201-C-2.23
11.7.3 Resetting an Ethernet Performance Register
Background
Use this procedure to reset an Ethernet performance register.
After a network test or fault recovery, you need to reset the performance register to enter a new performance monitoring period.
Prerequisite
NM user must have the authority of "NE and network operator" or a person with higher authorities.
Procedure
Follow the steps below to reset an Ethernet performance register.
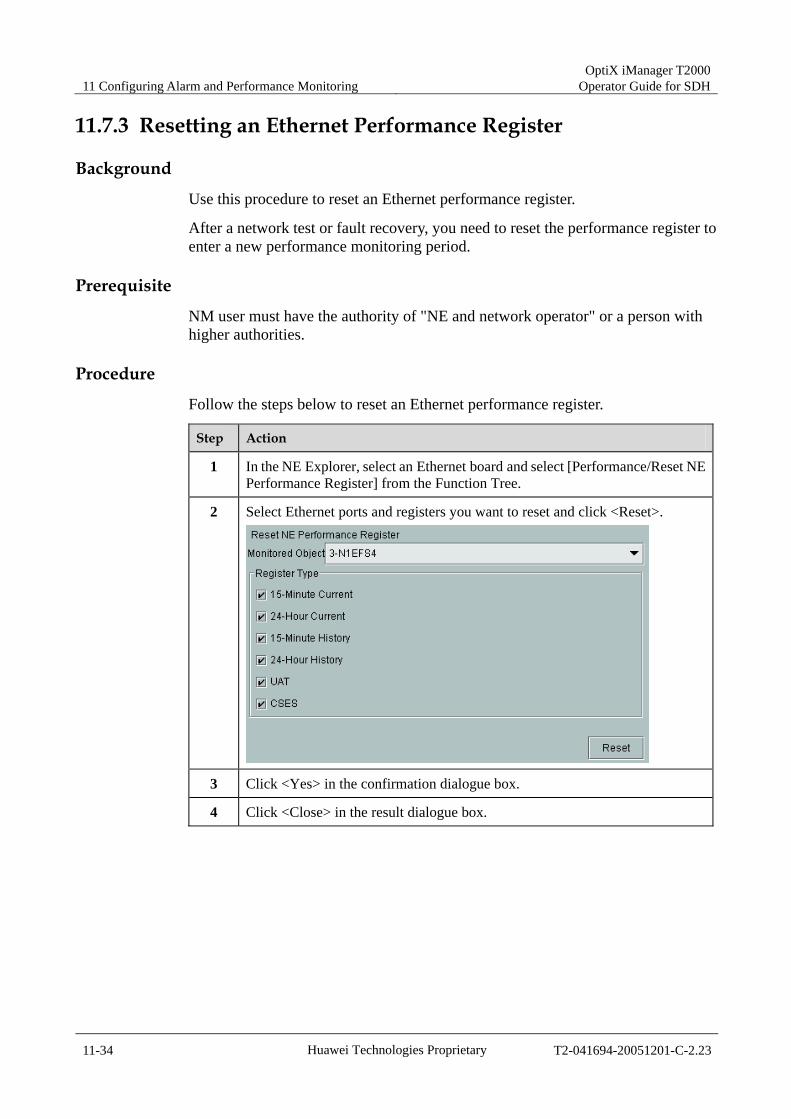
Step Action
1 In the NE Explorer, select an Ethernet board and select [Performance/Reset NE Performance Register] from the Function Tree.
2 Select Ethernet ports and registers you want to reset and click <Reset>.
3 Click <Yes> in the confirmation dialogue box.
4 Click <Close> in the result dialogue box.
OptiX iManager T2000 Operator Guide for SDH 11 Configuring Alarm and Performance Monitoring
T2-041694-20051201-C-2.23 Huawei Technologies Proprietary 11-35
11.8 Setting SDH Trail Performance Parameters
Prerequisite
NM user must have the authority of "NE and network operator" or a person with higher authorities.
Procedure
Follow the steps below to set performance parameters for a trail.
Step Action
1 Select [Trail/SDH Trail Management] from the Main Menu. The "Set Trail Browse Filter Conditions" interface is displayed.
2 Specify parameters of filter conditions . Click <Filter All>.
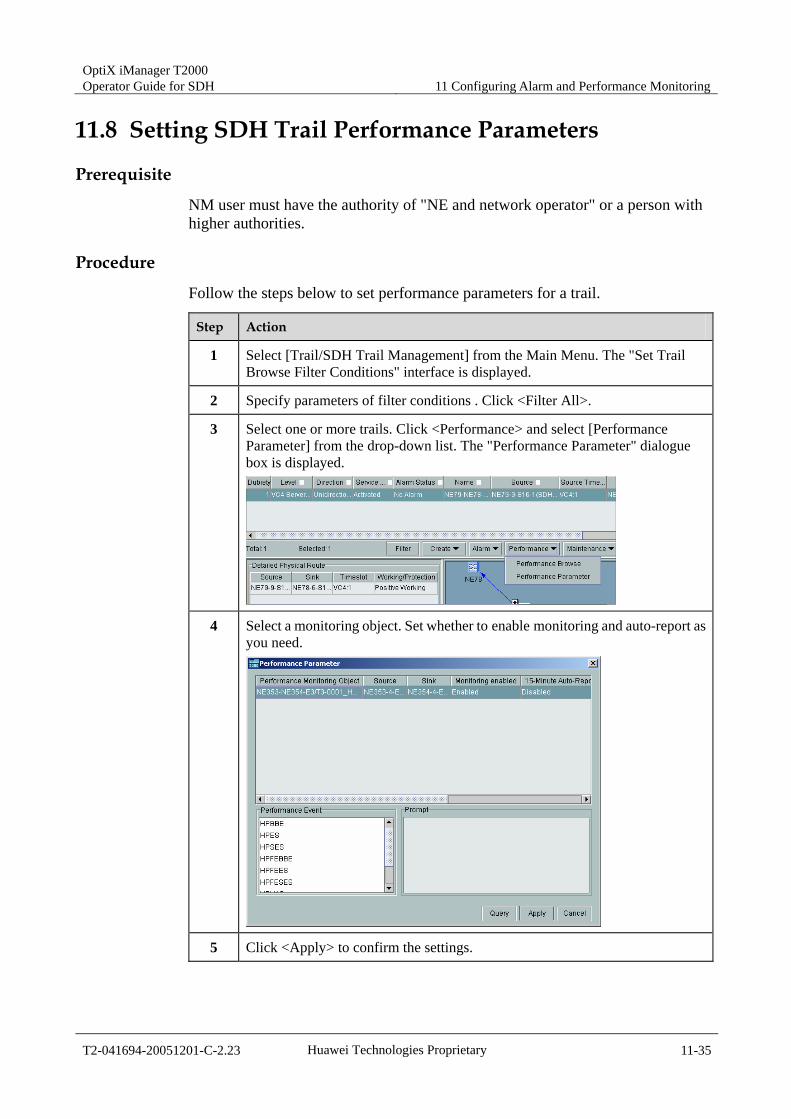
3 Select one or more trails. Click <Performance> and select [Performance Parameter] from the drop-down list. The "Performance Parameter" dialogue box is displayed.
4 Select a monitoring object. Set whether to enable monitoring and auto-report as you need.
5 Click <Apply> to confirm the settings.

![Book-[J_Scheerens;_Cees_A_W_Glas;_Sally_Thomas]_Education evaluation, assessment and monitoring.pdf](https://img.dokumen.tips/doc/110x75/56d6c0b31a28ab30169b6365/book-jscheerensceesawglassallythomaseducation-evaluation-assessment.jpg)