Embed Size (px)
Citation preview

Page 1
1 11. Product Description
The EPC-26A/27 PC/AT-compatible CPU module is an EMC form factor EPC based on the DX2 and DX4 Intel486 processor. The EPC-26A uses the 50 MHz Intel486 DX2 CPU, while the EPC-27 uses the 100 MHz IntelDX4.
The EPC-26A/27 uses the Pico-Power Redwood chip set, a two-chip set packaged in a 176-pin TQFP.
This EPC meets stringent safety and low EMI standards (UL-1950). All front panel accessible ports have filter networks for reduced EMI and increased ESD protection.
The EPC-26A/27 processor modules contain the following features: • The EPC-26A contains an Intel DX2 Enhanced processor (208-pin
SQFP package, 3.3V). The EPC-27 is an Intel DX4 processor. • One 72-pin 3.3V SIMM socket for memory sizes of 4, 8, 16 or 32 MB • PC/AT compatible keyboard interface, reset switch and run LED • Standard PC-compatible peripherals • Time-of-day clock with 256 bytes of battery-backed CMOS RAM and
user-replaceable battery • One RS-232 9-pin DTE serial port (COM1) and one RJ45 serial port
(COM2) • Flashable Phoenix BIOS • EXM expansion interface • Optional 2 or 4 MB Flash memory and 128 KB SRAM and watchdog
timer If your EPC-26A/27 contains the optional Flash/SRAM configuration, you will also receive a File/Utilities diskette containing formatting software and SRAM drivers. The software is explained in detail in the XFORMAT Software User’s Manual that accompanies the diskette.

________________________________________________________________ 07-0266-00 June 1995
EPC®-26A/27
Hardware Reference
® RadiSys Corporation
15025 S.W. Koll Parkway
Beaverton OR 97006
(503) 646-1800
FAX: (503) 646-1850

EPC-26A/27 Hardware Reference
Page ii
EPC and RadiSys are registered trademarks of RadiSys Corporation. IBM and PC/AT are trademarks of International Business Machines Corporation. Microsoft Windows and MS-DOS are registered trademarks of Microsoft Corporation. Intel and Intel486 are trademarks of Intel Corporation.
June 1995
Copyright © 1995 by RadiSys Corporation
All rights reserved.

EPC-26A/27 Hardware Reference
Page iii
Hardware Warranty RadiSys Corporation ("RadiSys") warrants the EPC system and component modules to the original purchaser for two years from the product's shipping date. If an EPC product fails to operate in compliance with its specification during this period, RadiSys will, at its option, repair or replace the product at no charge. The customer is, however, responsible for shipping the product; RadiSys assumes no responsibility for the product until it is received. This warranty does not cover repair of products that have been damaged by abuse, accident, disaster, misuse, or incorrect installation.
RadiSys' limited warranty covers products only as delivered. User modification, such as the addition of memory arrays or other devices, may void the warranty, and if the product is damaged during installation of the modifications, this warranty does not cover repair or replacement.
This warranty in no way warrants suitability of the product for any specific application.
IN NO EVENT WILL RADISYS BE LIABLE FOR ANY DAMAGES, INCLUDING LOST PROFITS, LOST SAVINGS, OR OTHER INCIDENTAL OR CONSEQUENTIAL DAMAGES ARISING OUT OF THE USE OR INABILITY TO USE THE PRODUCT EVEN IF RADISYS HAS BEEN ADVISED OF THE POSSIBILITY OF SUCH DAMAGES, OR FOR ANY CLAIM BY ANY PARTY OTHER THAN THE PURCHASER.
THE ABOVE WARRANTY IS IN LIEU OF ANY AND ALL OTHER WAR-RANTIES, EXPRESSED OR IMPLIED OR STATUTORY, INCLUDING THE WARRANTIES OF MERCHANTABILITY, FITNESS FOR A PARTICULAR PURPOSE OR USE, TITLE AND NONINFRINGEMENT. Repair or replacement as provided above shall be the Purchaser's sole and exclusive remedy and RadiSys' exclusive liability for any breach of warranty.

EPC-26A/27 Hardware Reference
Page iv
NOTES

EPC-26A/27 Hardware Reference
Page v
Table of Contents
1. Product Description....................................................................................1 Specifications .............................................................................................2
2. BIOS Configuration......................................................................................3 Introduction.................................................................................................3 Installation ..................................................................................................3 Insertion in an EXM Carrier........................................................................3 BIOS Setup Screens ..................................................................................4 Main BIOS Setup Menu..............................................................................5
IDE Adapter Sub-Menus ....................................................................6 Boot Sequence Sub-Menu .................................................................8
About Drive Letter Assignment ................................................9 Keyboard Features Menu...................................................................11
Advanced Menu .........................................................................................12 Integrated Peripherals Sub-Menu ......................................................14 Memory Shadow Sub-Menu...............................................................14
EXM Menu..................................................................................................16 EXM Menu Entries for EPC-26A/27 ...................................................17 EXM Menu Entries for Additional EXMs.............................................17
Exit Menu ...................................................................................................18
3. Theory of Operation....................................................................................21 Processor and Coprocessor ......................................................................21 Memory ......................................................................................................21 Memory Expansion.....................................................................................22
Memory Map.......................................................................................22 ROM and ROM Shadowing........................................................................23 Battery ........................................................................................................23 Jumpers......................................................................................................24 Video Controllers........................................................................................25 Front Panel LED.........................................................................................25 Optional Flash/SRAM Memory...................................................................25 Watchdog Timer .........................................................................................26 Resetting the EPC......................................................................................27
4. Connectors ..................................................................................................29 Serial Ports.................................................................................................29 Keyboard ....................................................................................................30 EXM Expansion Connector ........................................................................30

EPC-26A/27 Hardware Reference
Page vi
5. Troubleshooting & Error Messages ......................................................... 31 Troubleshooting ......................................................................................... 31 Common Error Messages.......................................................................... 32
6. Programming Interface .............................................................................. 39 Registers.................................................................................................... 39
Configuration Registers........................................................... 40 Addressing Registers .............................................................. 40 Flash Data Access .................................................................. 41
SRAM data access ............................................................................ 41 Battery Low Condition........................................................................ 41
SRAM Standard Memory Array ................................................................. 42
7. Support and Service................................................................................... 45 In North America........................................................................................ 45
Technical Support .............................................................................. 45 Bulletin Board..................................................................................... 45 Repair Services.................................................................................. 46 Warranty Repairs ............................................................................... 46 Non-Warranty Services...................................................................... 46 Arranging Service .............................................................................. 47
Other Countries ......................................................................................... 48
Appendix A: Mechanical Dimensions ......................................................... 1
Appendix B: Chip Set & I/O Map ................................................................... 1
Appendix C: Interrupts and DMA Channels ................................................ 1 Interrupts.................................................................................................... 1 DMA Channels........................................................................................... 2

EPC-26A/27 Hardware Reference
Page 2
1 1 Specifications
The following table lists the environmental and electrical specifications of the EPC (with SIMM memory included).
Environmental Temperature operating 0° to 60° C (* see below) storage -40° to 85° C Humidity operating 5 - 95% (non-condensing) storage 5 - 95% (non-condensing) Vibration operating .015" Peak to Peak 2.5g (max) 5-2000 Hz storage .030" Peak to Peak 5g (max) 5-2000 HzShock operating 30g 11 msec duration storage 50g 11 msec duration Electrical Power maximum +5V @ 1.2 A typical +5V @ 0.8 A
Table 1. EPC Environmental and Electrical Specifications.
* Upper temperature limit degrades 2° C per 1000 ft. elevation. Maximum elevation 10,000 ft.
NOTE: The EPC-27 requires 200 ft/min airflow for 60°C operation. For configurations with no airflow, the maximum operating temperature for the EPC-27 is 43°C.
See Appendix A for mechanical dimensions.

Page 3
2 22. BIOS Configuration
Introduction The EPC-26A/27 uses the Phoenix BIOS. This section details the various menus and sub-menus that are used to configure the system. Your system may be pre-configured and require very little intervention. This section is written as though you are encountering each field in sequence and for the first time.
Installation Before installing the EPC, unpack and inspect it for shipping damage.
DO NOT REMOVE THE MODULE FROM ITS ANTI-STATIC BAG UNLESS YOU ARE IN A STATIC-FREE ENVIRONMENT. THE EPC, LIKE MOST OTHER ELECTRONIC DEVICES, IS SUSCEPTIBLE TO ESD DAMAGE. ESD DAMAGE IS NOT ALWAYS IMMEDIATELY OBVIOUS, IN THAT IT CAN CAUSE A PARTIAL BREAKDOWN IN SEMICONDUCTOR DEVICES THAT MIGHT NOT IMMEDIATELY RESULT IN A FAILURE.
ENSURE THAT THE INSTALLATION PROCESS AS DESCRIBED HEREIN IS ALSO PERFORMED IN A STATIC-FREE ENVIRONMENT.
Insertion in an EXM Carrier Insertion of the EPC into an EXM carrier is straightforward. Remove a blank EXM panel from the carrier (by unscrewing the thumbscrews) and insert the EPC into the card guides. Firmly press the EPC front panel to ensure that the module is properly seated in the subplane and secure it with the thumb-screws.
EPC-26A/27 Hardware Reference
2 2
Page 4
MAKE SURE THAT POWER TO YOUR SYSTEM IS OFF. THE EPC IS NOT DESIGNED TO BE INSERTED OR REMOVED FROM A LIVE SYSTEM.
WHEN INSERTING THE EPC, AVOID TOUCHING THE CIRCUIT BOARD, AND MAKE SURE THE ENVIRONMENT IS STATIC-FREE.
INSERT IT WITH ADEQUATE CONTINUOUS FORCE RATHER THAN TAPPING OR HAMMERING ON IT.
BIOS Setup Screens The EPC-26A/27's BIOS contains a setup function to display and alter the system configuration. This information is maintained in the EPC-26A/27's nonvolatile CMOS RAM and is used by the BIOS to initialize the hardware in the EMC chassis.
The BIOS Setup can only be entered during the system reset process, following a power-up, front panel reset, or equivalent. Press the F2 key when prompted to enter Setup.
NOTE: The prompt to press the F2 key to enter the BIOS setup can optionally be suppressed in the BIOS setup. However, you can still press the F2 key to enter the BIOS setup screens, even if the prompt is suppressed.
Use the up and down cursor (arrow) keys to move from field to field. Use the right and left arrows to move from menu to menu, as noted in the menu bar at the top of the screen. If you use the arrow keys to leave a menu and then return, your active field is always at the beginning of the menu. If you select a sub-menu and then return to the main menu, you return to that sub-menu heading.
Fields with a triangle to the left are actually sub-menu headings; press Enter when the cursor rests on one of these headings to reach that sub-menu. For most fields, position the cursor at the field and from the numeric keypad, press the + and - keys to rotate through the available choices. Certain numeric fields can also be entered via the keyboard. Once the entry has been changed to appear as desired, use the up and down arrow to move to the next field.

BIOS Configuration
2 2
Page 5
Main BIOS Setup Menu The main BIOS setup menu is shown below:
PhoenixBIOS Setup - Copyright 1992-94 Phoenix Technologies Ltd.
Main Advanced EXM Exit
Item Specific Help
System Time: [16:17:18]System Date: [03/02/95]Diskette A: [1.44 MB, 3½"]Diskette B: [Not Installed]IDE Adapter 0 Master: (C: 235 Mb)IDE Adapter 0 Slave: (None)Video System: [EGA/VGA]Boot Sequence: [A: then C:]Numlock: [Auto]
System Memory: 640 KBExtended Memory: 3072 KB
F1 Help Select Item -/+ Change Values F9 Setup DefaultsESC Exit Select Menu Enter Select Sub-Menu F10 Previous Values
<Tab>, <Shift-Tab>, or<Enter> selects field.
EPC-26A/27
Figure 2-1. Main Menu.
The fields in each menu and sub-menu are explained below. Additional help information is available in the help area on the BIOS setup screen.
System Time:/System Date:
These values are changed by moving to each field and typing in the desired entry. Use the tab key to move from hour to minute to second, or month to day to year.
Diskette A:/Diskette B:
This field identifies the type of floppy disk drive installed as the A drive. If the EPC-26A/27 has a floppy drive installed, the proper setting is usually for a 1.44 MB floppy disk drive. Other options include 360K, 720K, 1.2 MBytes, and 2.88 Mbytes. If no drive is installed, the proper setting is NOT INSTALLED.

EPC-26A/27 Hardware Reference
2 2
Page 6
IDE Adapter 0 Master/Slave Sub-Menus:
These fields are headings for menus that allow you to enter complete disk drive information. Once the information is entered for the drive, the entry in the Main Menu shows the drive selected. For more information, turn to the section concerning the IDE Adapter Menus.
Boot Sequence Sub-Menu
The Boot Sequence Sub-Menu allows you to change the boot delay, boot sequence, and disable several displays during the boot process, such as the SETUP prompt, POST errors, floppy drive check, and summary screen. Once you have set the boot sequence, your choice displays in this entry in the Main menu. For more information, turn to the section concerning the Boot Sequence Sub-Menu.
Keyboard Features (Numlock) Sub-Menu
Use this menu to enable or disable various keyboard features, including enabling the Numlock key, enabling the key click, and setting the keyboard auto-repeat rate and delay. The Numlock setting displays for this entry in the Main Menu. For more information, turn to the section concerning the Keyboard Features Sub-Menu.
There are two more lines on the Main BIOS Setup Screen: “System Memory” and “Extended Memory.” These are display-only fields set by the BIOS. No user interaction is required.
IDE Adapter Sub-Menus
There are two IDE adapter sub-menus: one for the master drive and one for the slave drive. To use an EXM-HD or EXM-MX series mass storage unit, you must configure a master adapter; the slave is optional, and not relevant to most RadiSys hardware. To see the detailed characteristics of the device or to change the device, choose the IDE Adapter 0 Master Sub-Menu to configure the fixed disk. The following screen displays:

BIOS Configuration
2 2
Page 7
PhoenixBIOS Setup - Copyright 1992-94 Phoenix Technologies Ltd.
IDE Adapter 0 Master (C: 235 Mb)
Item Specific HelpAutotype Fixed Disk: [Press Enter]
Type: [User] 235 MbCylinders: [723]Heads: [ 13]Sectors/Track: [ 51]
F1 Help Select Item -/+ Change Values F9 Setup DefaultsESC Exit Select Menu Enter Select Sub-Menu F10 Previous Values
Write Precomp: [None]
Figure 2-2. IDE Adapter Sub-Menu.
Autotype Fixed Disk
Use this option when setting up new disks. This option allows the BIOS to determine the proper settings of the disk based on information on the disk, which is detected by the EPC-26A/27 BIOS for drives that comply with ANSI specifications. Use the ENTER key to invoke this function.
Existing (formatted) disks must be set up using the same parameters that were used originally when the disk was formatted. You must enter the specific cylinder, head, sector information as listed on the label attached to the drive at the factory. Use the “User” type described below.
Type
For the majority of users who are using a system that was pre-configured, you probably have an IDE hard disk drive. Select “None” if you are not using an IDE hard disk drive. In the case for which you have an IDE disk but cannot employ the “Autotype” feature, then select “User” for the Type and enter the correct drive values for cylinders, heads, and sectors/track from the label attached by RadiSys at the factory.

EPC-26A/27 Hardware Reference
2 2
Page 8
Note that there are some restrictions when setting up devices on the EPC-26A/27. If you plan to boot from a non-IDE device, such as the resident Flash memory, set the master drive as None and use the BIOS extension. You cannot boot from Flash and still have an IDE drive; the IDE drive must be drive C: if it is to be used. Flash BIOS extensions are enabled and configured in the Advanced Menu.
Once you have completed the setup for the IDE Master, you can choose the IDE Adapter 0 Slave Sub-menu to configure your second drive. When finished, press the ESC key to return to the Main Menu.
Boot Sequence Sub-Menu
The Boot Sequence Sub-Menu allows you to change the boot sequence options. The following displays:
PhoenixBIOS Setup - Copyright 1992-94 Phoenix Technologies Ltd.
Boot Options
Item Specific Help
Boot Delay: [0]
Boot Sequence [A: then C:]
POST Errors: [Enabled]
F1 Help Select Item -/+ Change Values F9 Setup DefaultsESC Exit Select Menu Enter Select Sub-Menu F10 Previous Values
Floppy Check: [Enabled]
Summary Screen: [Enabled]
SETUP Prompt: [Enabled]
Figure 2-3. Boot Sequence Sub-Menu.
Boot Delay:
Use this option to set the system to delay booting for a time period in seconds that you set. This allows for long start up times on boot devices that spin up slowly. The default is zero.

BIOS Configuration
2 2
Page 9
Boot Sequence:
Use this option to define how the system treats floppy drive A: when booting. You can boot from a floppy in the A: drive or boot directly from the fixed disk drive. To reduce the amount of time required to boot, set the boot sequence to use the C: drive only. Note that the C: drive may be an IDE drive or Flash memory. The options are as follows:
1. A: then C: Used to boot from the floppy disk drive, or if no floppy is present in the A: drive, boot from the C: drive.
2. C: then A: Used to boot from the C: drive, whether Flash or IDE, or if none is present, boot from the A: drive.
3. C: only Used to boot from the C: drive without searching for an A: drive.
The default is A: then C:. The setting chosen here displays in the Boot Sequence Sub-Menu prompt.
About Drive Letter Assignment
The BIOS determines the boot device algorithmically. First it determines where the floppy drive fits into the sequence; however, for simplicity here, assume no A: drive. The BIOS starts by determining if an IDE controller is enabled. If so, this becomes the C: drive and is expected to be the boot device.
The BIOS searches memory for enabled mass-storage devices, and builds a device table. The first device it finds will be the C: drive, and thus the boot device. The search is performed either prior to IDE installation or after, depending on the selection in the Advanced Menu.
If an IDE drive is specified in the BIOS setup, it becomes the C: drive. Next, the BIOS looks for BIOS extensions predefined offsets with C800h to DFFFFh, up to the maximum of two drives.
There are many different boot options. One supported directly on the EPC-26A/27 hardware and BIOS is booting from a Flash ROMdisk. For more information on booting from a Flash ROMdisk, refer to setups in the Advanced Menu and the XFORMAT Software User’s Manual.

EPC-26A/27 Hardware Reference
2 2
Page 10
Setup Prompt:
Use this option to enable or disable the message “Press F2 to enter Setup.” Even if the message is disabled, you can still press F2 to enter the Setup Menu. The default is to enable this prompt.
POST Errors:
Use this option to stop during the boot if the system encounters error messages. Otherwise, the system will continue to attempt to boot despite any startup error messages that display. The default is to enable this option.
Floppy Check:
Use this option to enable or disable the floppy drive search during the boot. To speed up booting, you can disable the floppy check. It is still possible to boot from the A: drive even with the floppy check disabled. The default is to enable the floppy check.
Summary Screen:
Use this option to enable or disable a summary of the system configuration, which displays before the operating system starts to load. To save time, you can disable the summary screen. The default is to enable the summary screen display.
When you have completed the Boot Options Menu, exit back to the Main BIOS Setup Menu using the ESC key and complete the Keyboard Features Sub-Menu.

BIOS Configuration
2 2
Page 11
Keyboard Features Menu
Use this sub-menu to enable or disable various keyboard features.
Figure 2-4. Keyboard Features Sub-Menu.
Numlock
Use this option to enable or disable the Numlock feature of the keyboard. This enables the use of the keypad numbers. The default is to automatically engage the Numlock key at boot-up.
Key Click
Use this option to enable or disable the key click feature on the keyboard. If enabled, the keyboard produces an audible click each time a key is pressed.
Keyboard auto-repeat rate:
Use this option to set the auto-repeat rate if holding a key down on the keyboard. The rates are from 2-30 per second.
PhoenixBIOS Setup - Copyright 1992-94 Phoenix Technologies Ltd.
Item Specific HelpNumlock [Auto]Key Click: [Disabled]Keyboard auto-repeat rate: [30/sec]Keyboard auto-repeat delay [1/2 sec]
F1 Help Select Item -/+ Change Values F9 Setup DefaultsESC Exit Select Menu Enter Select Sub-Menu F10 Previous Values
Keyboard Features
EPC-26A/27 Hardware Reference
2 2
Page 12
Keyboard auto-repeat delay:
Use this option to set the delay between when a key is pressed and when the auto-repeat feature begins. Options are 1/4, 1/2, 3/4, and one second.
When you are finished with this menu, press ESC to exit back to the main BIOS Setup Menu.
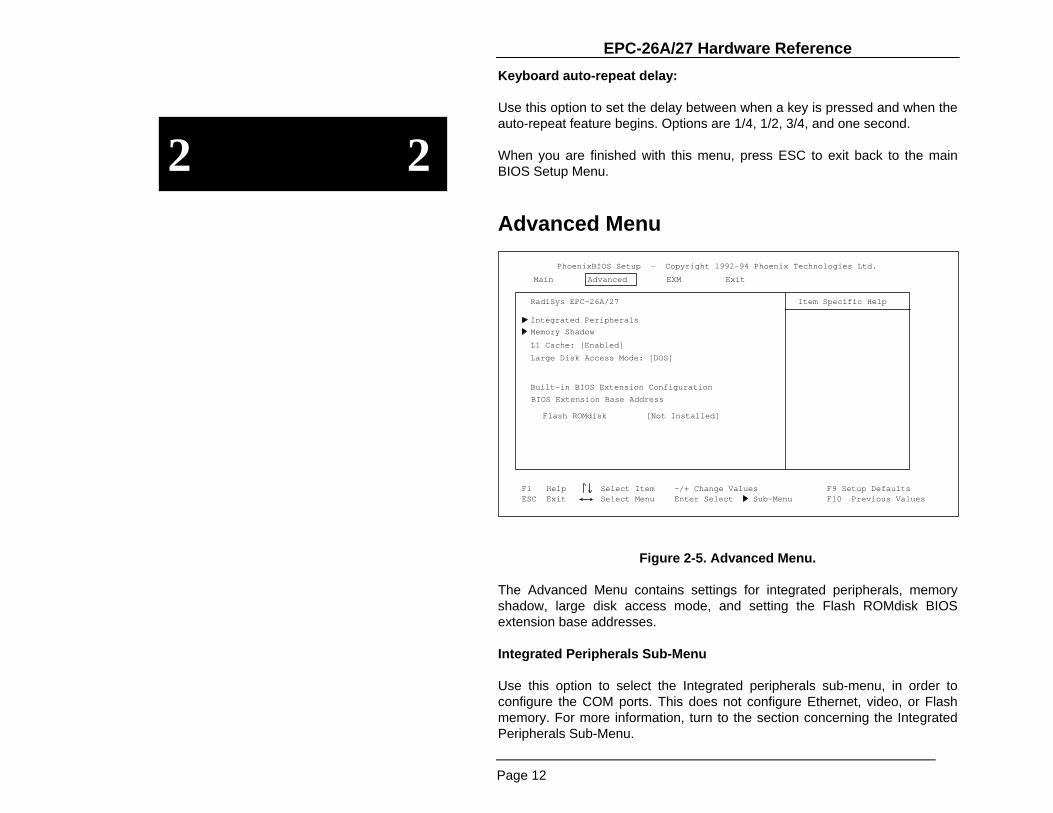
Advanced Menu
PhoenixBIOS Setup - Copyright 1992-94 Phoenix Technologies Ltd.
Main Advanced EXM Exit
Item Specific HelpRadiSys EPC-26A/27
Integrated Peripherals
L1 Cache: [Enabled]
F1 Help Select Item -/+ Change Values F9 Setup DefaultsESC Exit Select Menu Enter Select Sub-Menu F10 Previous Values
Memory Shadow
Large Disk Access Mode: [DOS]
Built-in BIOS Extension Configuration
BIOS Extension Base Address
Flash ROMdisk [Not Installed]
Figure 2-5. Advanced Menu.
The Advanced Menu contains settings for integrated peripherals, memory shadow, large disk access mode, and setting the Flash ROMdisk BIOS extension base addresses.
Integrated Peripherals Sub-Menu
Use this option to select the Integrated peripherals sub-menu, in order to configure the COM ports. This does not configure Ethernet, video, or Flash memory. For more information, turn to the section concerning the Integrated Peripherals Sub-Menu.

BIOS Configuration
2 2
Page 13
Memory Shadow Sub-Menu
The term “Memory Shadow” refers to the technique of copying information from ROM into RAM and accessing it in this alternate memory location. For more information, turn to the section concerning the Memory Shadow Sub-Menu.
Large Disk Access Mode:
If using a drive larger than 528 Mbytes, set this to DOS if you are running DOS, or set this to Other if using a different operating system.
Built-in BIOS Extension Configuration BIOS Extension Base Address Flash ROMdisk:
Use this option to enable Flash memory disks on the EPC-26A/27. This must be selected for the Flash memory to appear as a drive. The base address you select defines where the Flash ROMdisk BIOS extension is installed.
Options are the following:
DC000-DFFF0h D8000-DBFF0h D4000-D7FF0h D0000-D3FF0h CC000-CFFF0h C8000-CBFFFh Not Installed
Please note that you cannot have an IDE drive if the resident Flash memory is the boot device. For more information, refer to “About Drive Letter Assignment”.

EPC-26A/27 Hardware Reference
2 2
Page 14
Integrated Peripherals Sub-Menu
Use the options in this sub-menu to enable or disable the COM ports.
PhoenixBIOS Setup - Copyright 1992-94 Phoenix Technologies Ltd.
Integrated Peripherals
Item Specific Help
COM 1 [3F8, IRQ4]COM 2 [2F8, IRQ3]
F1 Help Select Item -/+ Change Values F9 Setup DefaultsESC Exit Select Menu Enter Select Sub-Menu F10 Previous Values
Figure 2-6. Integrated Peripherals Sub-Menu.
COM PORT/COM PORT
Use this option to enable or disable the COM1 and COM2 ports. The default for COM1 is 3F8 and IRQ4; the default for COM2 is 2F8 and IRQ3.
When you are finished, press ESC to exit back to the Advanced Menu.
Memory Shadow Sub-Menu
The term “Memory Shadow” refers to the technique of copying information from ROM into RAM and accessing it in this alternate memory location. The Memory Shadow Sub-Menu is discussed below.
BIOS Configuration
2 2
Page 15
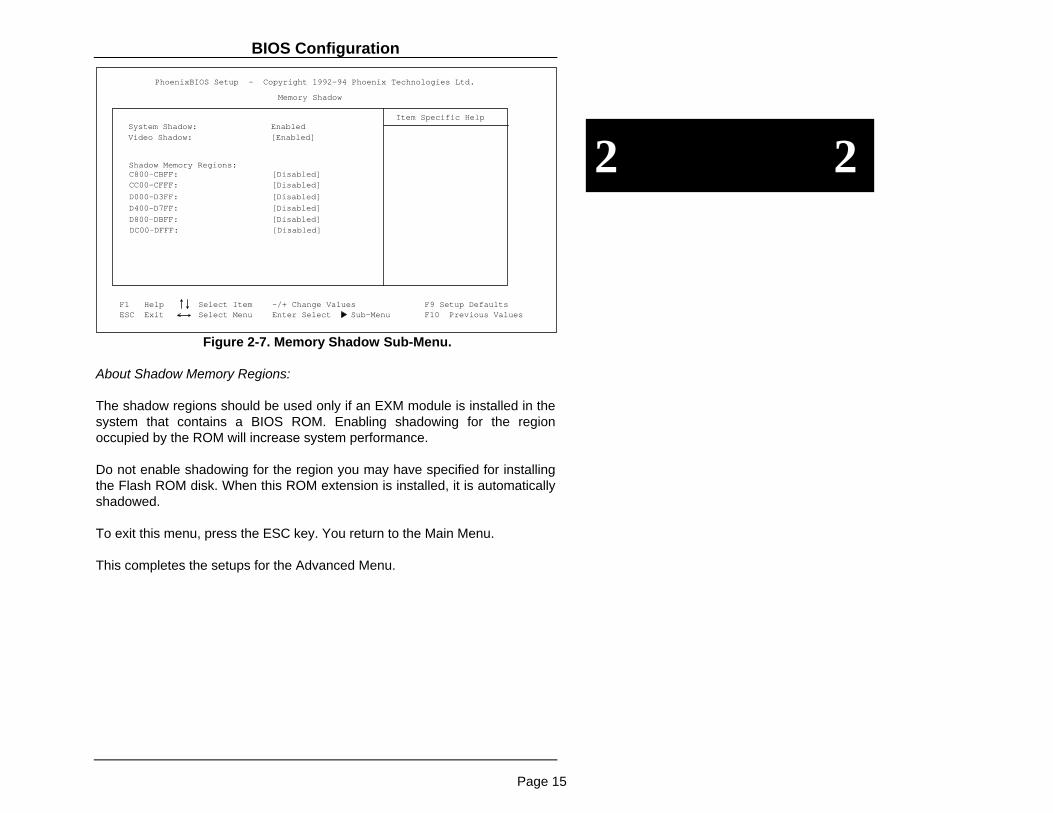
PhoenixBIOS Setup - Copyright 1992-94 Phoenix Technologies Ltd.
Memory Shadow
Item Specific HelpSystem Shadow: EnabledVideo Shadow: [Enabled]
Shadow Memory Regions:C800-CBFF: [Disabled]
F1 Help Select Item -/+ Change Values F9 Setup DefaultsESC Exit Select Menu Enter Select Sub-Menu F10 Previous Values
CC00-CFFF: [Disabled]D000-D3FF: [Disabled]D400-D7FF: [Disabled]D800-DBFF: [Disabled]DC00-DFFF: [Disabled]
Figure 2-7. Memory Shadow Sub-Menu.
About Shadow Memory Regions:
The shadow regions should be used only if an EXM module is installed in the system that contains a BIOS ROM. Enabling shadowing for the region occupied by the ROM will increase system performance.
Do not enable shadowing for the region you may have specified for installing the Flash ROM disk. When this ROM extension is installed, it is automatically shadowed.
To exit this menu, press the ESC key. You return to the Main Menu.
This completes the setups for the Advanced Menu.

EPC-26A/27 Hardware Reference
2 2
Page 16
EXM Menu Use this menu to set up the optional EXM expansion modules in your EPC-26A/27. Enter the EXM-ID, plus option byte information for OB1 and OB2. This information is found in the hardware reference manual shipped with each EXM expansion module.
Figure 2-8. EXM Menu.
Available EXM Slots [12]
The EXM Setup Menu will support up to 12 EXM slots. The Setup Menu provides a selection for the number of available slots in a system. The selected number of slots is stored in CMOS. The EPC-26A/27 will configure the EXM bus according to the number of EXM slots selected. The default slot configuration is for 12 slots.
0 1 2 3 4 5 6 7 8 9 10 11
PhoenixBIOS Setup - Copyright 1992-94 Phoenix Technologies Ltd.
Main Advanced EXM Exit
Item Specific HelpRadiSys EPC-26A/27
EXM Slot 0 ID: FD Option Byte 1: 01
F1 Help Select Item -/+ Change Values F9 Setup DefaultsESC Exit Select Menu Enter Select Sub-Menu F10 Previous Values
<Tab>, <Shift-Tab>, or<Enter> selects field.
Option Byte 2: 00
EXM Slot 1 ID: 7D Option Byte 1: 07 Option Byte 2: 00
EXM Slot 2 ID: FF Option Byte 1: 00 Option Byte 2: 00
Available EXM Slots [12]

BIOS Configuration
2 2
Page 17
Figure 2-9. Slot Numbering in an EMC chassis.
The standard chassis shown in Figure 2-9 may differ from your chassis. If you are unsure about EXM slot numbering in your chassis, refer to the chassis’ specification sheet for information.
All slots not occupied by an EXM module should show an ID of FF and OB1/OB2 of 00 00 indicating that no EXM is present
EXM Menu Entries for EPC-26A/27
There are two possible entries for the EPC-26A/27, depending on whether the optional Flash/SRAM is present. These entries must be made for the exact slot the EPC-26A/27 occupies.
If no Flash/SRAM is present, use FF 00 00 for the ID/OB1/OB2 entries in that slot.
If the optional Flash/SRAM is present, use FD 01 00 for the ID/OB1/OB2 entries in that slot.
EXM Menu Entries for Additional EXMs
For any additional EXMs installed in the chassis with the EPC-26A/27, consult the hardware reference manual for ID/OB1/OB2 information regarding the fields discussed below.
ID:
Enter the EXM-IDs for the EXMs you intend to install in this system. The number of EXMs that can be installed depends on the chassis you are using.
Option Byte 1:/ Option Byte 2:
Each EXM expansion module has values you must enter for the option byte 1 and option byte 2 configuration data. When you are finished with this menu, press the right arrow key to move to the Exit Menu, or press ESC.

EPC-26A/27 Hardware Reference
2 2
Page 18
Slots 0 through n
Enter the configuration information for each remaining EXM expansion module to be installed. Note that while most EXM hardware reference manuals depict a different setup BIOS from the EPC-26A/27, the ID/OB1/OB2 information is valid.

BIOS Configuration
2 2
Page 19
When using EXMs with configurable interrupts, DMA channels, I/O addresses, and/or memory addresses, avoid conflicts with built-in functions of the EPC-26A/27. Guidelines are:
1. If an interrupt is needed, use IRQ3, IRQ5, IRQ9, IRQ12, or IRQ15. IRQ7 can be used if a printer port is not being used. IRQ3 should not be used if the COM2 port is being used.
2. Use DMA channels 1, 3, 6, and 7. 3. Do not select I/O addresses that conflict with those in the EPC-
26A/27. A complete list appears in Appendix A. For instance, I/O addresses in the 300-33F range can be used.
4. If the EXM needs to use upper memory addresses, they must be in the 0C8000-0EFFFF range.
Exit Menu Use the options in this menu to save and exit, or abandon your changes and exit to the system.
PhoenixBIOS Setup - Copyright 1992-94 Phoenix Technologies Ltd.
Main Advanced EXM Exit
Item Specific HelpRadiSys EPC-26A/27
Save values and ExitDiscard values and ExitGet Default ValuesLoad Previous ValuesSave Current Values
F1 Help Select Item -/+ Change Values F9 Setup DefaultsESC Exit Select Menu Enter Select Sub-Menu F10 Previous Values
<Tab>, <Shift-Tab>, or<Enter> selects field.
Figure 2-11. Exit Menu.

EPC-26A/27 Hardware Reference
2 2
Page 20
Save Values and xit
Use this option if you want to save the values you have just entered and exit in order to load the operating system. The new values are loaded, and you exit and reboot.
Discard Values and Exit
Use this option if you want to discard the changes you just made and revert to the BIOS as it was before you started. The system boots with the old values.
Get default values
Use this option if you need to reset the BIOS values to the original, default values that were present before any other end users made changes.
Load previous values
Use this option if you want to load the system with the previous values before this editing session started. You do not exit.
Save Current values
Use this option to save the edits you have made during this session. You do not exit, and you can resume editing.

BIOS Configuration
2 2
Page 21
NOTES

Page 21
3 3
3. Theory of Operation
The EPC-26A/27 is a PC/AT compatible processor module. The standard functions of the PC architecture are embodied in the PicoPower Redwood chip set.
Processor and Coprocessor The EPC-27 uses the 100 MHz 208-pin, 3.3V Intel486 DX4 SL Enhanced CPU which contains an integrated math coprocessor. The EPC-26A uses the 50 MHz DX2 in a similar configuration.
Memory There is no base memory soldered to the EPC. Memory must be configured using a single SIMM module. See the figure below.
Top
RearSIMM Socket
Figure 3-1. SIMM Socket Location.
WARNING: Many of the components used in this EPC are designed to operate at 3.3V. Specifically this includes the CPU, the memory, and the PC chip set. The user should be careful not to place the SIMM memory modules that are delivered in this product in the socket of another product that uses 5V memory devices. This could cause permanent damage to the memory devices.

EPC-26A/27 Hardware Reference
Page 22
3 3
Memory Expansion A single 72-pin SIMM socket is provided for memory expansion. A standard SIMM module is used for expansion, and must meet the following criteria:
- 3.3 Volt
- fast page mode
- 72-pin
- 70 nanosecond DRAM or better
- single-sided or double-sided
There are four different 72-pin SIMM modules that can be installed into the SIMM socket. The different sizes available are 4, 8, 16 and 32 MBytes.
Memory Map
The Intel DX2/DX4 SL Enhanced CPU supports a 32-bit physical memory address. Memory at addresses between 0 and 32 MB is mapped as follows:
Range Content 0000000 - 009FFFFh DRAM (first 640 KB) 00A0000 - 00BFFFFh Mapped to EXM expansion interface; almost always
used by a video controller as video RAM 00C0000 - 00C7FFFh Shadowed video BIOS (if video is used)
(write protected) 00C8000 - 00DFFFFh Mapped to EXM expansion interface 00E0000 - 00EFFFF System Upper Memory 00F0000 - 00FFFFFh Write-protected DRAM containing BIOS 0100000 - 13FFFFFh Extended memory when installed or mapped to EXM
expansion interface 1400000 - 1FEFFFFh Mapped to EXM expansion interface 1FF0000 - 1FFFFFFh Mapped to BIOS ROM
Table 3-2. Memory Map. 0C8000 - 0EFFFF may be used either as page frame, BIOS extension, I/O buffer (i.e. for extended memory managers, Ethernet, etc.) or may be used by DOS as upper memory blocks if an extended memory manager driver is installed.

Theory of Operation
Page 23
3 3
Note that since the EXM expansion interface has 24 address lines, some of the "mapped to EXM expansion interface" address areas map repeatedly, or wrap-around, in the expansion interface's address space.
ROM and ROM Shadowing The EPC system BIOS is mapped into the top of the processor's 32-bit address space. The BIOS contains the PC BIOS, self-test functions, and the setup screen program. This BIOS is stored in a single independent flash chip. This flash chip should not be confused with the optional “Flash Memory”.
For best possible performance, the BIOS initialization software copies the ROM contents into DRAM (called shadowing) at addresses 0F0000-0FFFFF (also called the "F" page). After copying into this area, the BIOS write-protects it. Subsequent writes to this area complete successfully but do not alter the data.
The BIOS also searches segment C8000h through DFFFFh for the existence of additional BIOS EPROMs. Optional ROM extensions may be shadowed if so specified in the Advanced Setup Menu or Memory Shadow Sub-Menu.
Battery The battery powers the CMOS RAM, Time of Day clock, and optional SRAM when system power is not present. At 60°C, the battery should have a shelf life of over four years. In a system that is powered on much of the time and where the ambient power-off temperature is less than 60°C, the battery is estimated to have a life of 10 years.
The battery supplied with the EPC is a 23mm. 3V lithium "coin" battery or equivalent (e.g. Panasonic BR2330 or Rayovac BR2335). It is mounted on the component side of the circuit board near the bottom front corner. Should the battery fail, you may obtain and install a replacement. The figure below illustrates how to change the battery.

EPC-26A/27 Hardware Reference
Page 24
3 3Figure 3-3. Battery Replacement.
Replacing the battery is a simple task. However, it is recommended that all setup parameters (especially hard disk drive info pertaining to number of heads and cyclinders) be written down while the battery is still good.
Jumpers There are four jumpers on the EPC-26A/27 used primarily with the Flash formatting operation. The jumpers, which are located near the card edge and next to the SIMM socket, are show below.
H2 Reserved for future use. H3 Use to enable writing to flash H4 Do not use H5 Forces a hosted re-flash of the BIOS. Must jumper H3 also.
Gently liftetaining clip 2. Slide battery
in/out in line withthe direction of theretaining clip.
H2H3H4H5
BIOS Boot Block Update (Reserved)Write EnableManufacturing Jumper - Do not use
Force BIOS Update

Theory of Operation
Page 25
3 3
Video Controllers The EPC can operate with or without a video controller such as the EXM-13A.
At power-up, the BIOS searches the EXM configuration information by slot number (starting at 0) for the first video EXM where the card enable bit is set. If one is found, it will be initialized and used at power-up and the search exits.
If no video card is enabled in the EXM configuration information, a second search is done across the EXM expansion interface (beginning at slot 0) looking for an EXM video adapter. When a video adapter is found, the system will enable it and quit the search.
If no video controller is present, the BIOS operates without one. Programs that use the standard operating system and BIOS character output functions run successfully because the output is ignored. However, programs that rely on specific video modes, that write directly into the video RAM, or that directly call video BIOS functions, will fail.
Front Panel LED The EPC-26A/27 has one green LED on the front panel. This RUN LED is lit whenever the EPC's DRAM memory is being accessed. It first comes on at power-up and should remain lit as long as the system is running. It is normal for the RUN LED to flicker during power-up. If the processor halts (or hangs) or runs entirely out of cache, the LED will go out.
Optional Flash/SRAM Memory An option exists to purchase the EPC-26A/27 with a combination of 128 KBytes of SRAM and 2 or 4 MBytes of flash memory included on the EPC. RadiSys also markets an EXM-2A expansion module with even more flexibility in combining flash and SRAM. Note that the Flash/SRAM included with the EPC is compatible with the EXM-2A architecture. If this option is included, the EPC appears to software as though there were an integrated EXM-2A in the system.

EPC-26A/27 Hardware Reference
Page 26
3 3
Software cannot distinguish this from a system with a separate EXM-2A card using the same configuration. A system cannot enable both the optional Flash/SRAM and an EXM-2A expansion module at the same time.
Note that the XFORMAT program used to format flash memory is also distributed with the EXM-2 and EXM-2A expansion modules. Any references to the EXM-2 and/or EXM-2A are intended to denote your flash memory.
Refer to the XFORMAT Software User’s Manual for more information about formatting SRAM and flash memory.
Watchdog Timer The watchdog timer is only included with the optional Flash/SRAM. The watchdog timer is a 16-bit binary counter that monitors for overflow and, when detected, will signal a watchdog timer event based on the enable bits set in register 815D. The counter counts with a 64 KHz free running clock. This will cause a watchdog event after approximately 512 ms if the application software does not reset the timer.
An I/O read to address 815D resets the counter.
Bit 0 of register 815D enables an interrupt if the counter overflows. The clock is disabled to the counter if the interrupt is pending and not serviced. Service of the interrupt is signaled to the counter by reading register 815D. This will reset the counter value and resume counting. The interrupt is signaled on IRQ10.
Bit 1 of register 815D enables a HW reset to occur if the counter overflows. This reset will reset the entire system. This bit, if set, takes precedence over the setting of bit 0 in this register.
Application software that utilizes this timer should take care to reset the counter just prior to enabling either the interrupt or reset bits in register 815D. This will inhibit a spurious timer event from occurring just after enabling the timer.
Watchdog Register 815D
7 - 2 1 0 Unused H/W
Reset IRQ
enable

Theory of Operation
Page 27
3 3
Resetting the EPC There are a number of ways to reset (reboot) the EPC.
Power-off, Power-on
This causes the entire system to reset. The system will run the power-on self-tests and reboot the operating system.
Front-panel Reset button
The Reset button causes the EPC to perform a hardware reset. The system will run the power-on self-tests and reboot the operating system.
Expansion Interface
Pin A57 on the EXM expansion interface connector is defined as ~RESETIN. Asserting this input (low) will reset the processor. This is provided to allow remote reset to be implemented. This is a full hardware reset. The system will run the power-on self-tests and reboot the operating system.
CTRL+ALT+DEL
This keyboard sequence is called a "warm boot." The EPC does not reinitialize all of the processor's hardware. The power-on self-test does not run. However, the operating system will be reloaded. This type of reset typically only works under DOS.
Additional abnormal conditions that cause a reset
Low Vcc No DRAM refresh signal from the micromonitor

EPC-26A/27 Hardware Reference
Page 28
3 3
NOTES

Page 29
4 4
4. Connectors
This chapter specifies the details of the connectors on the EPC. These connectors adhere to existing standards. Pins are labeled from the point of view of looking into the front of the connector on the EPC.
Serial Ports There are two COM ports on the EPC-26A/27. The COM1 serial port is an RS-232 DB-9 DTE connector. It has the following drive capability: VOL = -5V min @ 3K load to GND and VOH = 5V min @ 3K load to GND. COM1 is defined in the following table:
Pin Signal Pin Signal
1 DCD 6 DSR 2 RxD 7 RTS 3 TxD 8 CTS 4 DTR 9 Ring indicator 5 Ground
Table 4. COM1 DB9 Pin-out.
1
5
6
9

EPC-26A/27 Hardware Reference
Page 30
4 4
COM2 is a DTE RJ45 phone jack and is defined in the following table:
Pin Signal
1 Shield 2 CTS 3 TxD 4 DTR 5 RxD 6 DCD 7 Ground 8 RTS
Table 5. COM2 RJ45 Pin-out.
Keyboard The keyboard connector is a 6-pin DIN defined below:
Pin Signal Pin Signal 1 Data 4 +5V 2 not used 5 Clock 3 Ground 6 not used
Table 6. Keyboard Connector Pin-out.
EXM Expansion Connector
The EXM expansion connector on the rear of the EPC is a 116-pin cardedge connector. The mating connector is an AMP 650090-1 or equivalent. Pins A1 through A58 are on the component side of the board with pin A1 at the bottom of the board. Pins B1 through B58 are on the solder side of the board with pin B1at the bottom of the board.
More information about the EXM interface is available upon request.
1
8
1
2
3
4
5
6

Page 31
5 5
5. Troubleshooting & Error Messages
Troubleshooting This section deals with problems that you may encounter that do not provide an error message. If an error message is displayed, see the next section of this chapter, Common Error Messages.
Symptoms Possible cause(s) Solution System appears to boot (evidenced by RUN LED being on, floppy and/or hard disk being accessed) but provides no video.
Video adapter not fully seated. Monitor or cable problem. Video adapter failure. EPC cannot talk to EXM expansion interface.
Remove the video adapter. Reinsert the video adapter and verify proper seating of the edge connector. Verify that the cable pins are not bent and the cable is fully seated in the video adapter. If necessary, try the monitor on another system to verify that the monitor is good. Replace video adapter. Verify that the EPC is fully seated in the edge connector.
System fails at power-up -will not run power-on self-test.
The system is not getting power. Hardware failure.
Verify that +5V power is good and that the EPC is fully seated. Replace the EPC.

EPC-26A/27 Hardware Reference
Page 32
5 5
Symptoms Possible cause(s) Solution Serial port(s) do not work. Port is disabled in the
Setup screen. Interrupt conflicts. Port hardware failure.
Enter the Setup screen. Use cursor arrows to move to the appropriate field and toggle the entry to enable the port. Another module may be using the same interrupts as COM1 and/or COM2. Verify that no other card in sytem is using IRQ3 or IRQ4. Replace the EPC.
Common Error Messages This section contains a summary of error and warning messages alphabetized by message text. These are messages generated by the BIOS and MS-DOS that may be related to your hardware configuration.
BAD OR MISSING COMMAND INTERPRETER DOS
Problem: The DOS operating system cannot find the Command line interpreter.
Solution(s): Either COMMAND.COM is not present at the specified (or default) directory level of the boot disk or the "SHELL=" statement in your CONFIG.SYS lists the file incorrectly (wrong directory or misspelled).
SYSTEM CMOS CHECKSUM BAD -- RUN SETUP CMOS
Problem: One of the entries in the CMOS RAM is incorrect.
Solution(s): Run the BIOS setup program to determine what is wrong, and correct it. If the error occurs repeatedly, the EPC's battery has failed.

Troubleshooting & Error Messages
Page 33
5 5
DISK BOOT FAILURE, INSERT SYSTEM DISK AND PRESS ENTER BIOS
Problem: No boot disk could be found. Your hard disk may not have been partitioned into logical drive(s). PCs look for logical drives to boot from. Hard disks are physical drives; partitions are logical drives.
Solution(s): If your BIOS setup screen has all disks disabled, or if your hard disk is disabled and no floppy diskette is inserted in the A: drive, run the BIOS setup program and verify that all disk parameters are correct. If they are, insert a bootable floppy disk in the A: drive and press enter. If a hard disk is present, verify that it is properly partitioned and formatted as a system disk and one partition is set active.
INCORRECT DRIVE A TYPE - RUN SETUP BIOS
Problem: The floppy diskette(s) installed in the system do not match the configuration information listed in the BIOS setup screen. This may be due to incorrect entries in the BIOS setup screen or one or both drives may not be responding at power-up.
Solution(s): Run the BIOS setup program. Make sure the BIOS setup entries relating to floppy drives correctly reflect the attached floppy drives. If you have no floppy drives, both drive A and drive B should be set to none.
Also, verify that all floppy drives are firmly connected (via ribbon cable) and that each drive has power. If the floppy drive is getting power through the ribbon cable, make sure that the appropriate jumpers are set correctly.
FAILURE FIXED DISK 0 BIOS
Problem: The IDE disk controller for drive C cannot be initialized.
Solution(s): Ensure that the +5V power to the controller and hard disk are good and, if used, the ribbon cable to the hard disk is fully seated.
If you are not using an IDE drive, enter the BIOS setup program. Enter the Fixed disk menu. Change the drive type to match the device being used.

EPC-26A/27 Hardware Reference
Page 34
5 5
EXM CONFIGURATION ERROR BIOS
Problem: The EXMs installed (or not installed) do not match the configuration information in the BIOS setup EXM menu.
Solution(s): Run the BIOS setup program. Enter the EXM menu. Verify the information listed on the screen, save any changes and reboot.
If necessary, refer to the section EXM Setup Screen, in Chapter 2 of this manual and/or your EXM manual(s) for more details.
DISKETTE DRIVE A ERROR BIOS
Problem: The configuration information in the BIOS setup says that one or more floppy disk drives are expected, but a floppy disk controller could not be found.
Solution(s): If you have no floppy diskette drives, enter the setup program and set both floppy drives to "NONE."
If you are using a floppy drive(s), verify that both the floppy controller and the floppy drive(s) have power.
GENERAL FAILURE READING DRIVE ... DOS
Problem: This almost always indicates the presence of an unformatted hard disk partition or diskette.
Solution(s): Format the partition or diskette using the utilities supplies by your operating system.
INVALID DRIVE SPECIFICATION DOS
Problem: You are trying to access a logical drive (e.g., A:, B:, ...) that is not known to the operating system.
Solution(s): Select a different logical drive. If you are trying to access a hard disk, you may need to create the logical partition.

Troubleshooting & Error Messages
Page 35
5 5
KEYBOARD ERROR BIOS
Problem: This message indicates that the system did not recognize a keyboard at power-up or you pressed a key during the power-on selftest.
Solution(s): Check the integrity of the keyboard connector.
If you think you pressed a key during power-up, reboot the system using the front panel reset button.
Some keyboards are designed with a switch (or jumper) to allow the user to configure the keyboard for use with an AT machine or an XT machine. If this is the case with your keyboard, verify that the switch is in the AT position.
The keyboard may not be a valid PC/AT keyboard (e.g., it is a PC/XT-only or PS/2 keyboard). If this is the case, replace the keyboard with a PC/AT style keyboard.
MISSING OPERATING SYSTEM BIOS
Problem: Although the system could read the hard disk and find the active partition, the operating system files could not be found.
Solution(s): This can be caused by using a drive type number in the BIOS setup menu that does not match the type number used to format the hard disk. run the BIOS setup program. Enter the Fixed Disk menu. Select the correct drive type to match the type used to format the disk originally. Save the changes and reboot the system.
This can also occur if the hard disk is partitioned and one partition is set active, but the partition is not formatted. Format the partition using the utilities supplied with your operating system.

EPC-26A/27 Hardware Reference
Page 36
5 5
NON-SYSTEM DISK OR DISK ERROR BIOS REPLACE AND PRESS ANY KEY WHEN READY
Problem: This is caused by an attempt to boot from a disk or diskette that is not recognized as a system disk; that is no system files exist on the disk or diskette.
Solution(s): Most often it results when you reboot with a non-system diskette in the floppy drive, because the BIOS always attempts to boot from the floppy drive if a diskette is installed.
If you are trying to boot from the hard disk, make sure that you do not have a diskette in drive A and press any key.
If you are trying to boot from floppy, insert a known good bootable system diskette in drive A and press any key.
NOT READY READING DRIVE ... DOS
Problem: This is usually caused by not fully inserting a diskette into the floppy drive.
Solution(s): Eject the floppy diskette and reinsert making sure that the diskette seats completely into the floppy drive.
PARITY ERROR IN SEGMENT ... DOS
Problem: This could be a software error (reading a nonexistent memory area) or a true hardware failure.
Solution(s): Attempt to repeat the error. If the error occurs during the execution of your own proprietary software, verify that the memory location specified in your software is valid.
PRESS A KEY TO REBOOT BIOS
Problem: A C: drive exists but is not set active.
Solution(s): Run your operating system disk partitoning program (like FDISK) and set the primary partition active.

Troubleshooting & Error Messages
Page 37
5 5
REAL TIME CLOCK ERROR - RUN SETUP BIOS
Problem: The battery-backed TOD clock is incorrect.
Solution(s): Run the BIOS setup program to determine what is wrong, and correct it. If the error occurs repeatedly, the EPC's battery has failed.

EPC-26A/27 Hardware Reference
Page 38
5 5
NOTES

Page 39
6 6
6. Programming Interface
Registers
This chapter contains information needed to write custom software drivers for the EPC’s Flash or SRAM. If using the supplied software that supports Flash or SRAM as a disk device, skip this chapter. The EPC-26A/27 defines the following registers in the I/O space. Bit 7 Bit 6 Bit 5 Bit 4 Bit 3 Bit 2 Bit 1 Bit 0 I/O port
Device ID Reg 1 1 1 1 1 1 0 1 100
Config Option Byte 1 Reg x x x x x x 0 Cden 102
Low Address Register Low Order Bits 0-7 of Flash/SRAM Address 8380
Middle Address Register Low-Middle Bits 8-15 of Flash/SRAM Address 8381
Middle Address Register High-Middle Bits 16-23 of Flash/SRAM Address 8382
Flash Data Access 8383
SRAM Data Access 8384
Reserved 8385
High Address Register High Order Bits 24-31 of Flash/SRAM Address 8386
Battery Status x x x x x x x Batt ok 8387
Figure 8. Flash/SRAM Registers.
The first two registers are standard read/write EXM registers for device identification and configuration. The EPC-26A/27 responds to accesses to ports 100h and 102h only if its EXM expansion interface line -EXMID is as-

EPC-26A/27 Hardware Reference
Page 40
6 6
serted. Registers 8380 - 8382 and register 8386 are write-only registers. Registers 8383 and 8384 are read/write, and register 8387 is read-only.
Configuration Registers The Device ID register is an 8-bit read-only register at I/O address 100h, which may be read when ~EXMID is asserted. It returns the value FDh, so that the EPC-26A/27 appears as an EXM-2A device ID. The Configuration Option Byte 1 Register (OB1) is an 8-bit register at I/O address 102h which may be read or written when ~EXMID is asserted. The only writable bit in OB1 is CDEN, which specifies whether the Flash/SRAM which appears as an EXM-2A is enabled (1) or disabled (0). If disabled, the Flash/SRAM will not respond to the 8380-8387 I/O addresses; it will only respond to reads from I/O port 100h and reads and writes from I/O port 102h (if -EXMID is asserted). During reads, the Flash/SRAM returns bit 1 in OB1 as a 0. This reveals the board as an EXM-2A.
Addressing Registers The flash and SRAM devices are accessed by placing an address in the four address registers and then reading or writing the appropriate data register, which causes the data byte at the location specified in the address registers to be read or written. The four address registers are write-only. The EPC-26A/27’s EXM-2A interface does not implement the High address register (8386). The I/O address 8386 is reserved for future use.
The EPC-26A/27’s EXM-2A interface provides a means of performing fast reads and writes of sequential bytes in the flash memory or SRAM. After each read or write access, the Low Address Register is incremented, allowing the next byte of data to be accessed without re-writing the address registers. When the Low Address Register reaches FFh, the next access will increment the Low Address Register to 00h, but it will not affect the value of the other address registers.
Only the lower eight address bits are auto-incremented on a read/write to the SRAM or flash. Thus, the maximum string I/O read or write length that can be issued by software to access the flash or SRAM data is limited to 256 bytes. To obtain this maximum length, software must first load the address registers with an address that is aligned to a 256 byte boundary. To read a subsequent, contiguous 256 bytes, the software must manually update the Low-Middle, High-Middle, and High registers (and the lower address register, if the previous string read/write to flash/SRAM was not 256 bytes in length) before issuing another 256 byte string read/write.

Programming Interface
Page 41
6 6
Flash Data Access Flash disk data can be read from address 8383. Writing to this address will cause a write to a flash device control register, which may result in unpredictable results. The details of manipulating the flash devices, such as using their command register and identifier, are not specified here; consult the datasheets for the Intel flash memory devices. Note that some functions require the write-protection jumper to be in the write-enabled position.
SRAM data access
The battery-backed SRAM is accessed in a similar fashion as the flash. The three low order address registers are set to the appropriate SRAM address and then an I/O read or write is performed to I/O address 8384 to read or write a byte of SRAM.
Address aliasing occurs when accessing the lower density SRAM chips. This may be used by software to determine the size of memory installed. The EPC-26A/27 uses a 128Kx8 chip SRAM chip; address aliasing begins at the 1MB boundary. Note that during power-down transition there is a very small probability that a single byte of SRAM or flash memory could be incorrectly written. This is the same problem that a disk drive has if it is powered off during a sector write.
Battery Low Condition If bit 0 is set to 0 in register 8387, the battery needs replacing because the voltage is less than approximately 2.5V. Note that the XFORMAT software will fail when the battery is low. The SRAMDISK.SYS driver issues a warning before continuing. The remainder of the bits in register 8387 are undefined.

EPC-26A/27 Hardware Reference
Page 42
6 6
SRAM Standard Memory Array Typically, access to the SRAM is via a file system installed by the device driver SRAMDISK.SYS. For users who wish to bypass the file system and use the SRAM as a standard memory array, the following ANSI C routine is provided as an example of how to program an executable file. #include <stdio.h> #include <memory.h> #include <conio.h> typedef unsigned char UCHAR; typedef unsigned short USHORT; typedef unsigned long ULONG; #define FAR _far #define BYTESPERSECTION 0x100 #define EXMID 0x96 #define EXMENABLE 0x00000001 #define LSWLOWBYTE 0x8380 #define LSWHIGHBYTE 0x8381 #define MSWLOWBYTE 0x8382 #define MSWHIGHBYTE 0x8386 #define SRAMDATA 0x8384 UCHAR Slot = 5; /* presumes Flash is in slot 5 */ void readsection(UCHAR FAR *target, ULONG sramoffset) { UCHAR ob; register USHORT rinductor; /* // Enable the card to allow register access */ outp(EXMID,Slot); ob = inp(0x102); outp(0x102,ob | EXMENABLE); /* // Load initial offset value (sramoffset should be // divisible by 256) */ outp(MSWHIGHBYTE,(USHORT) (sramoffset >> 24)); outp(MSWLOWBYTE,(USHORT) (sramoffset >> 16)); outp(LSWHIGHBYTE,(USHORT) (sramoffset >>8)); outp(LSWLOWBYTE,(USHORT) sramoffset); /* // Read a section using the autoincrement feature. */ for (rinductor = 0; rinductor < BYTESPERSECTION; rinductor++) { *target++ = (UCHAR) inp(SRAMDATA); } outp(0x102,ob); /* restore the option byte */ }
Programming Interface
Page 43
6 6
void writesection(UCHAR FAR *source, ULONG sramoffset) { UCHAR ob; register USHORT rinductor; /* // Enable the card to allow register access */ outp(EXMID,Slot); ob = inp(0x102); outp(0x102,ob | EXMENABLE); /* // Load initial offset value (sramoffset should be // divisible by 256) */ outp(MSWHIGHBYTE,(USHORT) (sramoffset >> 24)); outp(MSWLOWBYTE,(USHORT) (sramoffset >> 16)); outp(LSWHIGHBYTE,(USHORT) (sramoffset >>8)); outp(LSWLOWBYTE,(USHORT) sramoffset); /* // Write a section using the autoincrement feature. */ for (rinductor = 0; rinductor < BYTESPERSECTION; rinductor++) { outp(SRAMDATA,*source++); } outp(0x102,ob); /* restore the option byte */ } void main() { UCHAR test[BYTESPERSECTION]; UCHAR readbuffer[BYTESPERSECTION]; register USHORT minductor; for (minductor = 0; minductor < BYTESPERSECTION; minductor++) test[minductor] = minductor; writesection(test,0); readsection(readbuffer,0); if (memcmp(test,readbuffer,BYTESPERSECTION)) printf("Buffer did not compare \n\r") else printf("Buffers comparison ok \n\r"): }

EPC-26A/27 Hardware Reference
Page 44
6 6
NOTES

Page 45
7 7
7. Support and Service
In North America
Technical Support
RadiSys maintains a technical support phone line at (503) 646-1800 that is staffed weekdays (except holidays) between 8 AM and 5 PM Pacific time. If you have a problem outside these hours, you can leave a message on voice-mail using the same phone number. You can also request help via electronic mail or by FAX addressed to RadiSys Technical Support. The RadiSys FAX number is (503) 646-1850. The RadiSys E-mail address on the Internet is [email protected]. If you are sending E-mail or a FAX, please include information on both the hardware and software being used and a detailed description of the problem, specifically how the problem can be reproduced. We will respond by E-mail, phone or FAX by the next business day.
Technical Support Services are designed for customers who have purchased their products from RadiSys or a sales representative. If your RadiSys product is part of a piece of OEM equipment, or was integrated by someone else as part of a system, support will be better provided by the OEM or system vendor that did the integration and understands the final product and environment.
Bulletin Board
RadiSys operates an electronic bulletin board (BBS) 24 hours per day to provide access to the latest drivers, software updates and other information. The bulletin board is not monitored regularly, so if you need a fast response please use the telephone or FAX numbers listed above.
The BBS operates at up to 14400 baud. Connect using standard settings of eight data bits, no parity, and one stop bit (8, N, 1). The telephone number is (503) 646-8290.

EPC-26A/27 Hardware Reference
Page 46
7 7
Repair Services
Factory Repair Service is provided for all RadiSys products. Standard service for all RadiSys products covers factory repair with customers paying shipping to the factory and RadiSys paying for return shipment. Overnight return shipment is available at customer expense. Normal turn-around time for repair and re-certification is five working days.
Quick Exchange services (immediate shipment of a loaner unit while the failed product is being repaired) or other extra-cost services can be arranged, but need to be negotiated in advance to allow RadiSys to pool the correct product configurations. RadiSys does not maintain a general "loaner" pool: units are available only for customers that have negotiated this service in advance.
RadiSys does not provide a fixed-price "swap-out" repair service, as customers have indicated that issues of serial number tracking and version control make it more convenient to receive their original products back after repair.
Warranty Repairs
Products under warranty (see warranty information in the front of this manual) will have manufacturing defects repaired at no charge. Products sent in for warranty repair that have no faults will be subject to a recertification charge. Extended Warranties are available and can be purchased at a standard price for any product still under warranty. RadiSys will gladly quote prices for Extended Warranties on products whose warranties have lapsed; contact the factory if this applies.
Customer induced damage (resulting from misuse, abuse, or exceeding the product specifications) is not covered by the standard product warranty.
Non-Warranty Services
There are several classes of non-warranty service. These include repair of customer induced problems, repairs of failures for products outside the warranty period, recertification (functional testing) of a product either in or out of warranty, and procurement of spare parts.

Support and Service
Page 47
7 7
All non-warranty repairs are subject to service charges. RadiSys has determined that pricing repairs based on time and materials is more cost-effective for the customer than a flat-rate repair charge. When product is received, it will be analyzed and, if appropriate, a cost estimate will be communicated to the customer for authorization. After the customer authorizes the repair and billing arrangements have been made, the product will be repaired and returned to the customer.
A recertification service is provided for products either in or out of warranty. This service will verify correct operation of a product by inspection and testing of the product with standard manufacturing tests. There is a product-dependent charge for recertification.
There are only a few components that are generally considered field-repairable, but, because RadiSys understands that some customers want or need the option of repairing their own equipment, all components are available in a spares program. There is a minimum billing charge associated with this program.
Arranging Service
To schedule service for a product, please call RadiSys Technical Support directly at (503) 646-1800. Have the product model and serial numbers available, along with a description of the problem. A Technical Support representative will issue a Returned Materials Authorization (RMA) number, a code number by which we track the product while it is being processed. Once you have received the RMA number, follow the instructions of the Technical Support representative and return the product to us, freight prepaid, with the RMA number clearly marked on the exterior of the package. If possible re-use the original shipping containers and packaging. In any case, be sure you follow good ESD-control practices when handling the product, and ensure that anti-static bags and packing materials with adequate padding and shock-absorbing properties are used.
Ship the product, freight prepaid, to
Product Service Center RadiSys Corporation 15025 SW Koll Parkway Beaverton, Oregon 97006-6902

EPC-26A/27 Hardware Reference
Page 48
7 7
When shipping the product, include the following information: return address, contact names and phone numbers in purchasing and engineering, and a description of the suspected problem. Any ancillary information that might be helpful with the debugging process will be appreciated.
Other Countries Contact the sales organization from which you purchased your RadiSys product for service and support.

Page A1
A AAppendix A: Mechanical Dimensions
Figure 8. EPC Mechanical Dimensions.

EPC-26A/27 Hardware Reference
Page A2
A A NOTES

Page A1
A AAppendix A: Mechanical Dimensions
Figure 8. EPC Mechanical Dimensions.

EPC-26A/27 Hardware Reference
Page A2
A A NOTES

Page B1
B BAppendix B:
Chip Set & I/O Map
The following defines the I/O addresses decoded by the EPC. It does not define addresses that might be decoded by EXMs.
First (8-bit) DMA controller:
PicoPower Redwood chip set emulating 8237 of PC/AT I/O Addr Functional group Usage
000 DMA Channel 0 address 001 Channel 0 count 002 Channel 1 address 003 Channel 1 count 004 Channel 2 address 005 Channel 2 count 006 Channel 3 address 007 Channel 3 count 008 Command/status 009 DMA request 00A Command register (R)
Single-bit DMA req mask(W) 00B Mode 00C Set byte pointer (R)
Clear byte pointer (W) 00D Temporary register (R)
Master clear (W) 00E Clear mode reg counter (R)
Clear all DMA req mask(W) 00F All DMA request mask
First Interrupt controller:
PicoPower Redwood chip set emulating 8259 of PC/AT I/O Addr Functional group Usage
020 Interrupt controller 1 Port 0 021 Port 1
82C42 controller:
I/O Addr Functional group Usage ED Data register EC Index register

EPC-26A/27 Hardware Reference
Page B2
B B
Counter-Timer functions: PicoPower Redwood chip set emulating 8254 of PC/AT
I/O Addr Functional group Usage 040 Timer Counter 0 041 Counter 1 042 Counter 2 043 Control (W)
Keyboard Port:
PicoPower Redwood chip set emulating PC/AT I/O Addr Functional group Usage
060 Keyboard controller Data I/O register
061 NMI status NMI status
064 Keyboard controller Command/status register
Time-of-Day Clock: PicoPower Redwood chip set emulating MC6818 of PC/AT
I/O Addr Functional group Usage 070 Real-time clock RTC index reg / NMI enable 071 RTC data register
0 seconds 1 seconds alarm 2 minutes 3 minutes alarm 4 hours 5 hours alarm 6 day of week 7 date of month 8 month 9 year A status A B status B C status C D status D E RAM ... 3F RAM
DMA Page Registers:
PicoPower Redwood chip set emulating 74LS612 of PC/AT I/O Addr Functional group Usage
081 DMA Channel 2 page register 082 Channel 3 page register 083 Channel 1 page register 087 Channel 0 page register 089 Channel 6 page register 08A Channel 7 page register 08B Channel 5 page register 08F Refresh page register

Appendix B: Chip Set & I/O Map
Page B3
B B
Second Interrupt Controller: PicoPower Redwood chip set emulating 8259 of PC/AT
I/O Addr Functional group Usage 0A0 Interrupt controller 2 Port 0 0A1 Port 1
Second (16-bit) DMA Controller:
PicoPower Redwood chip set emulating 8237 of PC/AT I/O Addr Functional group Usage
0C0 DMA Channel 4 address 0C2 Channel 4 count 0C4 Channel 5 address 0C6 Channel 5 count 0C8 Channel 6 address 0CA Channel 6 count 0CC Channel 7 address 0CE Channel 7 count 0D0 Command/status 0D2 DMA request 0D4 Command register (R)
Single-bit DMA req mask(W) 0D6 Mode 0D8 Set byte pointer (R)
Clear byte pointer (W) 0DA Temporary register (R)
Master clear (W) 0DC Clear mode reg counter (R)
Clear all DMA req mask (W) 0DE All DMA request mask
Coprocessor Interface: An integrated co-processor replaces the 80287 of PC/AT
I/O Addr Functional group Usage 0F0 Coprocessor Clear coprocessor busy 0F1 Reset coprocessor
Serial I/O (Com2) Port: PicoPower Redwood chip set emulates 16550 of PC/AT
I/O Addr Functional group Usage 2F8 COM2 serial port Receiver/transmitter buffer
Baud rate divisor latch (LSB) 2F9 Interrupt enable register
Baud rate divisor latch (MSB) 2FA Interrupt ID register 2FB Line control register 2FC Modem control register 2FD Line status register 2FE Modem status register

EPC-26A/27 Hardware Reference
Page B4
B B
Serial I/O (Com1) Port: PicoPower Redwood chip set emulates 16550 of PC/AT
I/O Addr Functional group Usage 3F8 COM1 serial port Receiver/transmitter buffer
Baud rate divisor latch (LSB) 3F9 Interrupt enable register
Baud rate divisor latch (MSB) 3FA Interrupt ID register 3FB Line control register 3FC Modem control register 3FD Line status register 3FE Modem status register

Appendix B: Chip Set & I/O Map
Page B5
B B

Page C1
C C
Appendix C: Interrupts and DMA
Channels
Interrupts The assignment of interrupts for the EPC is shown in the following table:
NMI DRAM parity error, EXM expansion interface I/O channel check IRQ0 timer IRQ1 keyboard IRQ2 IRQ8 - IRQ15 cascade through IRQ2 IRQ3 COM2 serial port IRQ4 COM1 serial port IRQ5 unassigned IRQ6 usually needed for floppy disk controller IRQ7 unassigned IRQ8 clock IRQ9 unassigned IRQ10 watchdog timer (for Flash/SRAM option) IRQ11 unassigned IRQ12 unassigned IRQ13 coprocessor IRQ14 used by optional IDE disk controller IRQ15 unassigned

EPC-26A/27 Hardware Reference
Page C2
C C
DMA Channels The assignment of DMA channels for the EPC is shown in the following table.
0 unassigned (8-bit) 1 unassigned (8-bit) 2 usually needed for floppy disk (8-bit) 3 unassigned 4 (Channel 0 - Channel 3 cascade through Channel 4) 5 unassigned (16-bit) 6 unassigned (16-bit) 7 unassigned - not connected to EXM expansion interface (16-bit)

Page D1
D D
Appendix D: Creating Bootable Disks
From Non-Bootable Drives
In order to create a bootable disk image from a non-bootable drive, use the XFORMAT function with the /N flag. Refer to the example below:
XFORMAT /N=6 /B=D: C:\FLASH
This example assumes that the D: drive is a non-bootable device, such as a network drive or a RAM disk, and contains the necessary system files; that DOS 6 is the operating system; and that files from the C:\FLASH directory will be copied to the system disk.
The drive specified by the /B= option must contain the system files COMMAND.COM, IO.SYS and MSDOS.SYS in addition to the BB6.00 boot block file. These files are automatically copied to the flash disk root directory when the disk is made bootable. If these system files are not present, an error message displays and XFORMAT fails.
Since the IO.SYS and MSDOS.SYS files are hidden (i.e., do not display when using a DIR command), it is necessary to unhide them so that the DOS COPY command can transfer the files. For example, to reveal the attributes set for the MSDOS.SYS file, type the following:
ATTRIB MSDOS.SYS
Letters that display include S (system file), H (hidden file) and R (read-only). To prepare the hidden file MSDOS.SYS for copying, type either of the following:
ATTRIB -s -h MSDOS.SYS or ATTRIB MSDOS.SYS -s -h

EPC-27 Hardware Reference
Page D2
D D
Refer to the Microsoft MS-DOS User Guide and Reference or use the online help by typing ATTRIB /? at the command line for more information about the ATTRIB command and various file attributes.
It is a requirement for the IO.SYS and MSDOS.SYS files to be hidden, system, and read-only files in order for them to be bootable and/or safe from accidental damage. Be sure to re-run ATTRIB after copying the files to the destination disk to reset the system files.

Page E1
E E
Appendix E: Formatting Flash and
SRAM
Distribution Diskette Contents The distribution diskette contains the following files that are of interest when formatting Flash/SRAM:
XFORMAT.EXE DOS-only flash formatting executable SRAMDISK.SYS SRAM device driver BB5.00 Boot block files for DOS 5.0 BB6.00 Boot block files for DOS 6.0, 6.1, & 6.2 README.TXT Disk contents decription, plus any additional user information added after the manual was printed
Installation Create a directory on the C: drive called C:\EPC (or another name you choose). Copy the files from the distribution diskette to the C:\EPC directory.

EPC-27 Hardware Reference
Page E2
E E
Formatting Program The first task that you must perform before using the Flash/SRAM is format the flash memory and copy directories and files to it. This procedure is performed by the program named XFORMAT. It is distributed on the distribution diskette. This program formats both flash and SRAM.
When XFORMAT is used to format flash memory, the function first checks the status of the battery to determine if enough voltage is present, then erases all flash memory, formats it, optionally adds system files to make it a boot device, and optionally copies a directory structure and files into it. The program is invoked with the following command line:
XFORMAT [options] [srcdir]
All files in directory srcdir (typically a directory on your hard disk) and all of its sub-directories (if any) and their files are copied into the flash. To make changes to the flash disk you must rerun the XFORMAT function.
Because SRAM disks are read/write, the [srcdir] parameter is optional for SRAM drive types. Files can be written to an SRAM device using standard DOS copy commands (COPY, XCOPY) after formatting it and loading the device driver.
For flash, each file is created with the same attributes except the files are also marked as read-only and unarchived (see the DOS ATTRIB command for more information). For SRAM, each file is created with the same attributes as the corresponding source file. The date/time stamp for file modification or creation stays the same also.
The following flags are available when using the XFORMAT function. Note that a dash (-) can be used interchangeably with a slash (/) to set flags.
/B=<sysdir> Boot Disk Flag. Creates a bootable disk image using the DOS system files specified by the <sysdir> parameter. The function formats and copies files to the formatted disk. A bootable disk image is created. The operation fails if it cannot find the operating system files.
It is possible to create a bootable disk image from a non-bootable source drive. Refer to Appendix D for details.
This flag is for use with flash disks only.

Appendix E: Formattig Flash and SRAM
Page E3
E E
/F<name> <size>
File Output Flag. Outputs the disk image to the file <name> with size <size>. <size> is a hex value that specifies the number of Kbytes in the target file. This option is useful for creating VME memory disks and images for users that are going to write their own flash writing program, and is not strictly applicable to only the EXM-2A, but is documented here for completeness.
/H Help Flag. Displays a list of available flags and their options.
/N=<ver> Non-Boot Version Flag. Creates a bootable disk image using the boot block file specified by the <ver> parameter. (The location of the boot block file is specified by /B or /S flags.) This option is useful for creating bootable flash disks from non-bootable sources such as network and RAM disk drives (see Appendix B for more information on creating bootable images from non-bootable disks). The boot block file for /N=5 is BB5.00 (DOS 5) and the boot block file for /N=6 is BB6.00 (DOS 6.X). The boot block files are supplied on the distribution diskette.
This operation fails if it cannot find the operating system files.
This flag is for use with flash disks only.
/P=<slot> Position Flag. The slot number specified is the EXM slot number where the EPC-24/25/26 is located in the chassis.
/Q=m Quiet Mode Flag. Suppresses progress display messages. May be combined with the No Reboot Flag (i.e., /Q=mr).
/Q=r No Reboot Flag. Suppresses reboot upon successful completion. May be combined with the Quiet Mode Flag (i.e., /Q=rm).
It is necessary to flush the DOS buffer areas prior to accessing newly formatted disks. This is accomplished by rebooting. This reboot suppression flag is strictly for use when XFORMAT is used in a batch file where the reboot command is at the end of the batch file.

EPC-27 Hardware Reference
Page E4
E E
/S System Flag. Creates a bootable disk image using the DOS system files on the disk that XFORMAT is invoked from.
This operation fails if it cannot find the operating system files.
This flag is for use with flash disks only.
/T=<type> Type Flag. Specifies the type of format to be performed. When <type> is S, the function formats the SRAM.
/V Volume Label Flag. Prompts for a disk volume label. A volume label identifies the disk and can be a maximum of 11 characters. The label conforms to the MS-DOS convention, thus the following are not allowed: * . + , : ; < > = ? [ ] \ / | ( ) ^ & . Label letters are converted to upper case.
Note that not all flags are valid for every system. The /S, /B, and /N flags are not valid for SRAM drives and generate an error message when attempts are made to use these flags on SRAM.
Some examples of the XFORMAT invocation are described below.
XFORMAT /B=a: a:
Formats the flash memory in slot 0 as a DOS system disk from the DOS system disk in drive a:, and copies all files from device A: to the flash memory (including subdirectories).
XFORMAT /p=0 /T=S C:\SRAM
Formats the SRAM and copies all files and subdirectories of directory C:\SRAM into the EPC.
XFORMAT a:
Formats the flash memory and copies all files from device A: to the flash (including subdirectories). The EPC will not be bootable if not formatted with the /S or /B flag.
XFORMAT /p=0 /N=6 /b=d: C:\FLASH

Appendix E: Formattig Flash and SRAM
Page E5
E E
Format the flash memory in slot 0 using the system files and the boot block file BB6.00 from directory D:\ and copy all files from C:\FLASH. Note that you cannot simply copy a file to a flash disk. You must use XFORMAT to erase, format, and copy the contents of a directory to the flash disk.
Unless the /F option is selected, XFORMAT automatically determines the amount of available space on your EPC. It also calculates the amount of space needed for the files to be copied, and aborts without erasing the flash memory if there is insufficient space.
After formatting flash memory, expect to see only about 90% of that total available for storage space. For example, 2 Mbytes of unformatted flash will convert to about 1.8 Mbytes available.
XFORMAT aborts if the source device (for either the file copy or for the system files) is the same flash being formatted.
Since the flash memory is represented to DOS as a fixed (non-removable) disk, DOS may have buffered data from the flash memory's files prior to its being formatted. As a result, you should reboot your system prior to accessing files in a newly formatted flash system.
SRAM Disk Device Driver
When installing an SRAM drive, make sure you run XFORMAT on the drive before running the SRAMDISK.SYS driver. The driver will not recognize the SRAM disk until it has been formatted using XFORMAT.
The SRAM driver SRAMDISK.SYS allows use of the SRAM as a disk, usually E: after using an IDE disk for C: and flash as D:. The SRAM disk is not bootable.
When SRAMDISK.SYS is loaded, it will check the status of the battery voltage. If the battery voltage is above 2.5V, the driver will load. If the battery voltage is below 2.5V, an error message displays for a few seconds before continuing.
To load the SRAMDISK.SYS driver, edit the CONFIG.SYS file and insert the following line:
DEVICE=[path]SRAMDISK.SYS /[slot]

EPC-27 Hardware Reference
Page E6
E E
The slot you select depends on where the EPC is installed in the EXM Setup Screen. For example, to configure the SRAM in an EPC located in slot 3, use the following command:
DEVICE=C:\EPC\SRAMDISK.SYS /3
The path you insert depends on what directory you create when you copy the EXM-2A software from the RadiSys distribution diskette to your target drive.
The SRAM driver can be loaded high to conserve conventional memory. Use the following line under DOS 6.X:
DEVICEHIGH=[path]SRAMDISK.SYS /[slot]
SRAM data integrity may be jeopardized when power is removed during a series of write operations to the SRAM. For this reason, XFORMAT checksums each sector. The SRAMDISK.SYS driver must compute the same checksum in order for the sector read to be successful. Corrupt sectors may be repaired with standard disk tools such as Norton Utilities.

Appendix E: Formattig Flash and SRAM
Page E7
E E
Error Messages The following alphabetically listed error messages display during error conditions using XFORMAT.EXE or SRAMDISK.SYS. Error Message BATTERY NEEDS REPLACEMENT Explanation The XFORMAT program or the SRAMDISK.SYS driver
have detected that the battery power is below 2.5V. Resolution Replace the battery. Error Message CANNOT READ COMMAND.COM Explanation The command processor COMMAND.COM could not be
located. Resolution Copy COMMAND.COM to the appropriate directory and
re-invoke XFORMAT. Error Message <path> COMMAND.COM WILL NOT BE COPIED TO
THE TARGET Explanation A version of COMMAND.COM was found in the top
directory of the <srcdir>. Resolution Delete COMMAND.COM from the <srcdir> directory
and re-invoke XFORMAT. Error Message INSUFFICIENT SPACE ON TARGET DEVICE Explanation The source directory specified is too large to fit onto the
target. Resolution Remove some of the files from the source directory. Error Message INVALID SLOT NUMBER SPECIFIED Explanation The slot number is not a decimal number. Resolution Ensure that the slot number does not contain any alpha or
special characters. Error Message INVALID SOURCE PATHNAME Explanation XFORMAT could not find the directory specified as the
source pathname. Resolution Ensure that the source pathname exists.

EPC-27 Hardware Reference
Page E8
E E
Error Message INVALID TARGET SIZE SPECIFIED Explanation An illegal character was detected in the file size portion of
the /F parameter. Resolution Specify the file size using only hex characters. Error Message MORE THAN ONE SOURCE PATH WAS SPECIFIED Explanation Multiple source paths were detected on the command line. Resolution Remove one of the source paths from XFORMAT's
invocation line. Error Message NO ARGUMENTS SPECIFIED Explanation The command line does not specify any operations. Resolution Execute XFORMAT with /H to display flags and options. Error Message NO SLOT SELECTED FOR THE EXM-2 Explanation XFORMAT requires specification of a slot when
formatting SRAM and EXM flash memory. Resolution Rerun XFORMAT using the /P(osition) flag to indicate
which EXM slot to format. Error Message NO SRAM MEMORY IN SPECIFIED SLOT Explanation The /T=S option was selected, however, no SRAM memory
was detected on the card in the specified slot. Resolution Ensure the /P(osition) flag is correct or that the /T(ype) flag
is specified correctly. Error Message SOURCE PATHNAME TOO LONG Explanation Insufficient storage for the pathname string. Resolution Copy the files to a directory that is closer to the root. Error Message SLOT <n> DOES NOT CONTAIN ENABLED
EXM-2 Explanation The slot number specified in the SRAMDISK.SYS
configuration line in CONFIG.SYS does not contain enabled flash memory.
Resolution Enable the flash in the EXM Setup Screen, or verify that the flash is listed in the correct slot.

Appendix E: Formattig Flash and SRAM
Page E9
E E
Error Message SLOT NUMBER OUT OF RANGE Explanation The EXM slot number listed does not contain a
flash/SRAM. Resolution Ensure that the EXM slot specified contains Flash/SRAM. Error Message SRAM FILE SYSTEMS ARE NOT BOOTABLE. DO
NOT SPECIFY THE /S OR /B PARAMETERS Explanation XFORMAT does not create bootable SRAM disks. Resolution Remove the /S, /N or /B flag. Error Message SYSTEM DOES NOT CONTAIN ONBOARD FLASH Explanation /T=O was specified for a system that does not contain
onboard flash (flash on the CPU card). Resolution Repeat the command without the /T=O option. Error Message TARGET SIZE NOT SPECIFIED Explanation The /F option is ill-formed. Resolution The syntax for the /F flag is /F<filename> <size>. The
filename is specified and is followed by the file size in kilobytes.
Error Message UNABLE TO INITIALIZE FLASH DEVICE Explanation XFORMAT has determined that no flash memory exists. Resolution Check that the system is properly connected to a +12V
power supply. Error Message UNABLE TO READ BOOT RECORD FILE Explanation The boot record files are not in the <srcdir> path. Resolution Copy the boot record files to the proper directory Error Message UNABLE TO READ SRAM DRIVE Explanation The SRAMDISK.SYS driver cannot read SRAM memory. Resolution Ensure the SRAM disk is formatted. The OB1 option byte
must be enabled via the EXM Setup Screen. Error Message UNRECOGNIZED FLAG Explanation A mis-spelled or illegal flag was used. Resolution Check the command line to ensure only legal flags are used.

EPC-27 Hardware Reference
Page E10
E E
Any function or application other than XFORMAT that attempts to write to the flash disk will cause the system to lock up. Typical applications that write to disk might be Norton Utilities or PC Tools; typical DOS functions would be COPY, XCOPY, FORMAT, and FDISK. COPY and XCOPY operate correctly to/from the SRAM disk.
The SRAM and flash portions of the EPC are visible to the operating system as separate logical drives. Applications that read the flash memory operate identically as if they were reading any "read only" media, such as CD-ROM disks.
DOS functions such as COPY and XCOPY will operate correctly when copying from the flash disk.
! CA UTION

Page F1
F F
Appendix F: Flash BIOS Updating
Flash BIOS Updating The EPC supports flash BIOS updates for system BIOS. These updates are accomplished by running the NEW.BAT file, which contains the DOS executable NEWBIOS.EXE
The Utilities diskette contains Flash formatting files in the root directory, and a subdirectory named using a 5-digit number to indicate the BIOS level included on the diskette. At this writing, this subdirectory is \30505 (BIOS version 3.05.05).
The NEWBIOS program executes in either self-hosted or remote download modes. Self-hosted mode is for updating the flash BIOS of the system in which the NEWBIOS program is executing and is the default mode.
Remote download is only necessary for reprogramming BIOSes damaged by a power failure during a previous BIOS update process. Remote download requires a remote PC connected by a NULL modem to the EPC’s COM1: port. On a standard DB-9 connector, the NULL modem should have pin 2 (Transmit Data) connected to pin 3 (Receive Data) and also pin 7 (Clear To Send) connected to pin 8 (Request To Send). Pin 5 (Signal ground) should be a direct connection between the DCE and DTE devices. The command line must contain the /P parameter to indicate which port is to be used on the computer running the NEWBIOS program (not the COM port on the EPC). For example, use /P = 1 for COM1 on the source computer.
NEWBIOS can run from the floppy drive or the hard disk. To install the update files on your hard disk, create a subdirectory on your hard disk drive and use the DOS COPY command to copy the files from the \30505 directory.

EPC-27 Hardware Reference
Page F2
F F
When in self-hosted mode, NEWBIOS uses a checksum to ensure that the BIOS is corrupted before proceeding. When running NEWBIOS as a remote download, the checksum step is bypassed.
To display the usage model, type NEWBIOS and press <ENTER>. Available options include:
NEWBIOS /F=<filelist> [/C=timeout] [/R=retries] [/P=port]
/C = <ms> Wait period. Default is 30000 milliseconds. /R = <count> Retries. Default is 16 retries. /P = <n> COM port used on the source computer for remote downloads.
If no port selection is made using the /P=Port # parameter, NEWBIOS begins execution in self-hosted mode. NEWBIOS reprograms 120 Kbytes of the 128K flash BIOS. The first 8 Kbytes are used for the boot block and are not reprogrammable.
Download files are specified by using the /F=<filename> parameter. Files are copied into flash memory from low to high memory addresses. The files list must provide for the necessary files, in the correct order, and located at the correct offsets. To help accomplish this, two files (FILL16.BIN and FILL8.BIN) are included on the Utilities diskette.
The necessary order and offsets are as follows: Offset File File(s) to Use 0 16K “filler” FILL16.BIN 16K 16K “filler” FILL16.BIN 32K 16K “filler” FILL16.BIN 48K 64K system BIOS EPC24.BIN 112K 8K “filler” FILL8.BIN For this example, assume that you are updating the BIOS on the system that is running NEWBIOS.EXE. Make sure the H3 jumper is installed (refer to Figure 7, p. 16) to allow writing to the flash device. Remove this jumper after programming since aberrant programs may write to the flash device and corrupt the BIOS. To update the BIOS in self-hosted mode, follow the instructions below:

Appendix F: Flash BIOS Updating
Page F3
F F
1. Insert the EPC’s BIOS update diskette in drive A.
2. Switch the command line to drive A by typing A: and pressing <ENTER>.
3. Display the contents of the NEW.BAT file by typing TYPE NEW.BAT and press <ENTER>.
The first time you perform this step, the following default file contents display:
NEWBIOS /F=FILL16.BIN /F=FILL16.BIN /F=FILL16.BIN /F=EPC24.BIN /F=FILL8.BIN
4. Make sure the new system BIOS you are using is the exact size of EPC24.BIN (65,536 bytes).
5. Run the NEW.BAT file to begin the update.
6. The following message displays: "You have selected to update this computer's BIOS. Is this correct? (Y/N) : "
Select Y for yes if you are ready to proceed. Proceed to the next step. Select N for no if you want to re-check the NEW.BAT contents; go back to step 3.
7. Each file name included in NEW.BAT displays as the program executes.
8. This message displays: "Update completed successfully. Press any key to reboot."
Press any letter or number on the keyboard. The system reboots using the new BIOS. Use this same procedure to update the BIOS using the remote download procedure, making sure to include the port designation (/P= ) as discussed above.
These files are included for system updating with the EPC utilities diskette: NEW.BAT Self-hosted update batch file NEWBIOS.EXE Flash BIOS update program invoked from NEW.BAT FILL8.BIN 8 KBytes fill file for unused portion of flash device FILL16.BIN 16 KBytes fill file for unused portion of flash device EPC24.BIN 64 KBytes EPC System BIOS

EPC-27 Hardware Reference
Page F4
F F
Refer to the README.TXT file on the floppy for additional information. Note that you cannot use the NEWBIOS.EXE file on this Utilities diskette with any other RadiSys EPC, and you can only use NEWBIOS.EXE shipped on this EPC’s Utilities diskette on this EPC.
Saving/Restoring CMOS Parameters
It is possible to use the NEWBIOS function to copy and restore CMOS parameters into a 4K parameter block on the flash chip. This is useful if battery life becomes an issue, or for backup.
To save your CMOS parameters into a partition block in the flash memory, type the following:
NEWBIOS /S
To reverse the process and load the saved CMOS parameters in the flash memory back into CMOS, type the following:
NEWBIOS /L

Page I-1 1
Index
3.3V operation, 21
72-pin SIMM socket, 22
A
abnormal conditions, 27 About Drive Letter Assignment, 9 About Shadow Memory Regions, 15 Address aliasing, 41 address lines, 23 address space, 23 Addressing Registers, 40 Advanced Setup Menu, 23 Anti-Static Bag, 3 Autotype Fixed Disk, 7 Available EXM Slots, 16 avoiding IRQ conflicts, 18
B
battery, 23, 32, 37 shelf life, 23
Battery Low, 41 battery-backed SRAM, 41 BIOS, 23
advanced menu, 12 autotype fixed disk, 7 boot delay, 8 boot drive assignment, 9 boot sequence, 9 boot sequence sub-menu, 6 COM1 and COM2 ports, 14 Exit Menu, 18 EXM Setup Menu, 16
Flash ROMdisk installation, 13 floppy drive install, 5 floppy drive search, 10 IDE adapter sub-menus, 6 Integrated Peripherals sub-menu, 12, 14 key click, 11 keyboard auto-repeat delay, 12 keyboard auto-repeat rate, 11 keyboard features sub-menu, 6, 11 main BIOS setup menu, 5 Memory Shadow sub-menu, 13, 14 numlock feature, 11 setting up Flash memory, 8 setup, 3–19 Setup Screens, 4 summary screen, 10
BIOS EPROMs, 23 BIOS extension, 22 BIOS initialization, 23 BIOS ROM, 22 Boot Delay, 8 Boot Sequence, 9 Boot Sequence Sub-Menu, 6, 8 booting from a Flash ROMdisk, 9 Bulletin Board, 45
C
card guides, 3 chassis slots, 17 CMOS RAM, 4, 23, 32 Com1, 1, 29 COM1 and COM2 ports, 14

EPC-24/26 Hardware Reference
Page I-2
Com2, 1, 18, 29 connectors, 29 cooling requirements, 2 CPU, 1, 21
D
disk boot failure, 33 DMA channels, 18, C2
E
electronic mail, 45 environmental and electrical specifications, 2 Environmentals, 2 ESD damage, 3 ESD protection, 1 exm configuration error, 34 EXM configuration information, 25 EXM expansion connector, 30 EXM expansion interface, 1, 22, 23 EXM expansion modules, 16 EXM registers, 39 EXM Setup Menu, 16 EXM slot numbering, 17 EXM-13A, 25 EXM-2A expansion module, 25 EXM-HD, 6 EXM-MX, 6 Extended memory, 22 extended memory manager driver, 22
F
FAX, 45 File/Utilities diskette, 1 filter networks, 1 Flash, 39 flash chip, 23 Flash memory, 1, 13, 23
booting, 9 Flash memory setup in BIOS, 8 Flash ROM disk, 15 Flash ROMdisk, 12 Flash ROMdisk BIOS extension, 13 flash write-protection jumper, 41 Flash/SRAM, 25, 40
EXM Menu entries, 17 power-down transition, 41
Floppy disk drives, 5 floppy diskette errors, 33, 34 floppy drive search, 10 for memory expansion, 22 formatting SRAM and flash memory, 26 front panel LED, 25 Front-panel Reset button, 27
G
general failure, 34
H
HW reset, 26
I
I/O addresses, 18 I/O buffer, 22 I/O map, B1 IDE adapter sub-menus, 6 IDE disk, 7 IDE Master, 8 installing the EPC, 3 integrated math coprocessor, 21 Internet, 45 Interrupt
assignments, 18 interrupt mapping, 1 IRQ conflicts, 18

Index
Page I-3 3
J
jumpers, 24
K
key click, 11 Keyboard auto-repeat delay, 12 Keyboard auto-repeat rate, 11 keyboard connector, 30 keyboard errors, 35 keyboard features, 6 keyboard features menu, 11
L
LED, 25 Low Vcc, 27
M
main BIOS setup menu, 5 manipulating the flash devices, 41 maximum operating temperature, 2 memory, 1, 21, 22 Memory Map, 22 Memory Shadow Sub-Menu, 23
N
no video, 25 Non-system disk error, 36 Non-Warranty Services, 46 Numlock feature, 11
O
operating temperature requirements, 2 Option Byte 1 Register, 40 optional SRAM, 23 out of cache, 25 overflow, 26
P
page frame, 22 Parallel port, 18 PARITY ERROR, 36 Phoenix BIOS, 1, 3 Pico-Power Redwood chip set, 1 PicoPower Redwood chip set., 21 Pin A57, 27 POST Errors, 10 power-down transition, 41 Power-off, Power-on reset, 27 power-on self-tests, 27 Printer port, 18 programming an executable file, 42
R
real time clock error, 36, 37 reboot the EPC, 27 reduced EMI, 1 re-flash of the BIOS, 24 registers, 39 reset
abnormal conditions, 27 CTRL+ALT+DEL, 27 front panel reset button, 27 hardware, 26 power-on, power-off, 27
reset switch, 1 RJ45 phone jack, 30 ROM shadowing, 23 run LED, 1, 25
S
serial ports, 1,29 Setup Prompt, 10 setup screens, 3–19 SIMM socket, 1, 21 software, 1 SRAM, 1, 25, 39, 42
address aliasing, 41

EPC-24/26 Hardware Reference
Page I-4
fast reads and writes, 40 programming an executable file, 42
SRAM drivers, 1 SRAMDISK.SYS driver, 41, 42 standard memory array, 42 summary screen, 10 system BIOS mapping, 23 System Upper Memory, 22
T
Technical Support, 45 the PC architecture, 21 thumbscrews, 3 Time-of-day clock, 1 TOD clock, 23, 36, 37 Troubleshooting, 31
V
video BIOS, 22 video controller, 22, 25 video RAM, 22, 25
W
warm boot, 27 Warranty Repairs, 46 watchdog event, 26 watchdog timer, 1, 26 write enable jumper, 24 writing custom software drivers, 39
X
XFORMAT software, 26, 41 XFORMAT Software User’s Manual, 1, 9, 26


![26a Augustan Program[1]](https://img.dokumen.tips/doc/110x75/577ce3c61a28abf1038cfa67/26a-augustan-program1.jpg)