Embed Size (px)
Citation preview

1
10/13/2016 Course: INFM372 Human-Computer Interaction & Usability Study Instructor: Dr. Feng Liu Student: Patrick McClellan Assignment: Summarize all steps taken for homelesspetinitiative.com. Go thru interview process, wireframe, prototypes, everything! Talk about what we learned. Include stakeholder map from week 3 in final report for homeless pet. Project homelesspetinitiave.com Team Members: Patrick McClellan Yanbin Zhang Hanson Acheampong Benjamin Howard Norman Note: Hanson Acheampong and Benjamin Howard Norman worked on another project for the website restoredchristianity.com, however they assisted during the interview process by taking notes and also recorded audio and video of the sessions. Great job guys!
Process Steps for homelesspetinitiave.com 1. Introduction to the project homelesspetinitiave.com 2. Emailed Client to set up interview date and time 3. Composed questions for the client 4. Define stakeholders 5. Client interview 6. Write up summary after interview 7. Post Interview Task Analysis and Scenarios 8. Script and storyboard scenarios 9. Create navigation structure 10. Create wireframe 11. Create second version of wireframe 12. Create Usability questionnaire for next group 13. Create prototype 14. Set up second client interview 15. Interview client and observe the use of the prototype and obtain feedback 16. Updated prototype based on observations from the interview

2
Part 1: Introduction to homelesspetinitiave.com
The project for homelesspetinitiave.com is for client Lindsey Verlander, who is the Director at
the Eastside Animal Hospital in Snellville, GA. Homelesspetinitiave.com is a non-profit started by
Lindsey because she is very passionate about animals and she understands that the pets of homeless
people help keep homeless people mentally grounded. To make the project more interesting, there was
not a website for homelesspetinitiave.com to review therefore we really did not know what to expect
before going into the first interview with her.
Part 2: Set Up Client Interview
The first step was to set up the interview for of the website projects with Donna Lane for
restoredchristianity.com and Lindsey Verlander for homelesspetinitiave.com. I used email to coordinate
the times between the students and the clients. The clients were responsive by email and it was not too
difficult to set up a time and location to do the initial client interviews. We ended up setting up a
convenient time at Donna Lane’s office in Snellville, GA. I tried my best to schedule around the other
student’s schedule, but ultimately we had to be more flexible for the client and arrange our schedules
accordingly.
3
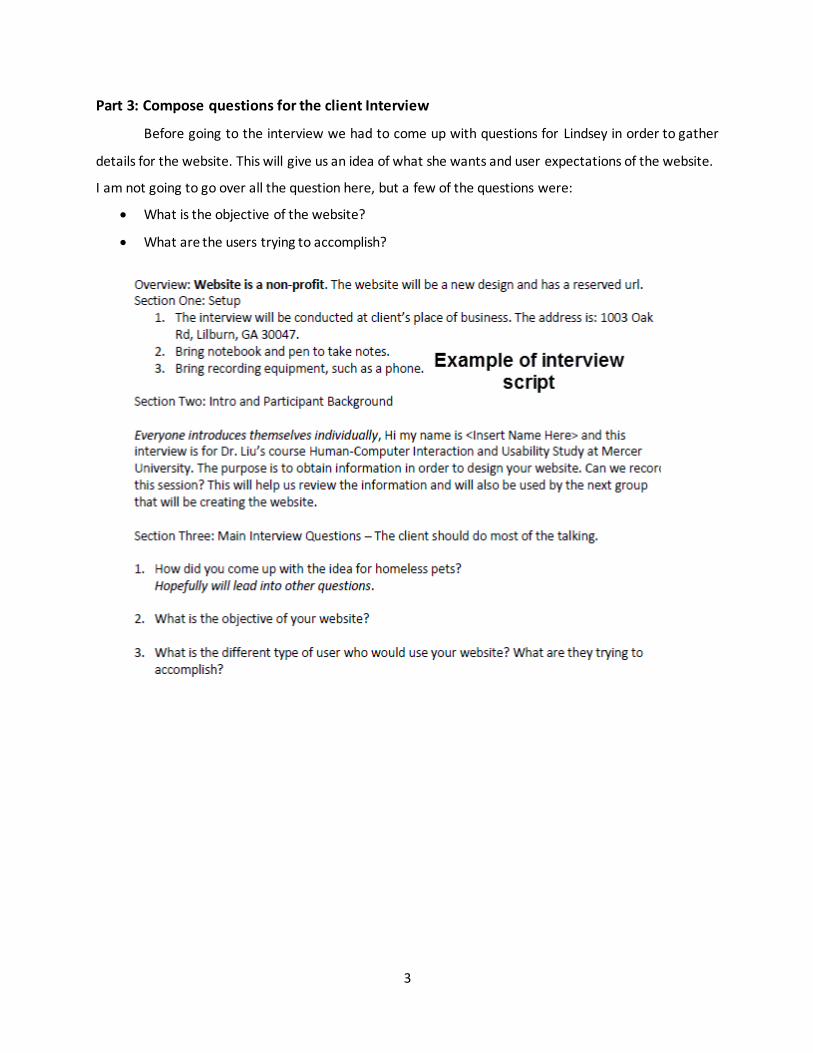
Part 3: Compose questions for the client Interview
Before going to the interview we had to come up with questions for Lindsey in order to gather
details for the website. This will give us an idea of what she wants and user expectations of the website.
I am not going to go over all the question here, but a few of the questions were:
What is the objective of the website?
What are the users trying to accomplish?

4
Part 4: Define stakeholders
We defined the stake holders for homelessperinitiative.com as the following:
Lindsey Verlander
Operational Staff
Customers
Partners
Suppliers
Development Teams
Other Non-Profits
Stakeholders
Lindsey Verlander
Operational Staff
Customers
Partners Suppliers
Development Teams
Other Non-Profits

5
Part 5: Client Interview
I was nervous at the interview and because I was nervous I really wanted to NOT follow the
script, but after meeting the client(s) I felt more at ease. What really surprised me was that we thought
the website was for homeless pets, but turns out the website is for caring for the pets of homeless
people. One thing I learned is that let the client do the talking. Sounds easy but for me I want to express
my thoughts and ideas to the client. I learned to not only let the client speak, but after they finished
talking give the client more time to say more and provide more details.
NOTE: I did not send a thank you email to the clients after the interview. This is important because the
clients time is important and it is good to acknowledge that to them.
Part 6: Write up summary after interview
After the interview was over I wrote up my thoughts about the interview. I learned this part is
important because it is important to write down your thoughts about the client before the memory
fades.

6
Part 7: Post Interview Task Analysis and Scenarios
After the client interview we had a pretty good idea of the purpose of the website so we came
up with multiple scenarios of how the site will be used. This process helped me learn how the site
navigation will be structured. One example of a task analysis:
Mary is concerned because she visited a homeless shelter and noticed a homeless
person and their pet dog. The homeless person was sharing their food with the
dog and the dog was very dirty. Mary wants to know how she can help donate
food to the homeless person and their dog. Mary goes home and searches online
and finds homelesspetinitiative.com. Mary finds a donation link and finds a way
to donate food at an upcoming event. Mary drives to the event and makes a
donation of pet food to the homeless shelter.

7
Part 8: Script and storyboard scenarios
This process was then converted to a story board to further enhance the scenario. Even though
my art work is not that good, this process helped me understand how the user will interact with the
website to resolve the task at hand.

8
Part 9: Create navigation structure
With Task Analysis and Scenarios completed we were able to come up with an idea of how the
structure will look for the website. This initial structure would change later during the process.
homelesspet initiative
find location near you: show sorted
list of the partener
page
Home
mission statement
coming events
Services
vet care
pet food
Events
calender
donation
money
by paypal and credit card
pet food
location
parteners contact us
emergency call #
sorted partenar by location
employee /admin page
input form search function

9
Part 10: Create wireframe
Initial Prototype and Wireframe – Week 5. The first wireframe prototype was done using
Microsoft Word. This was not a good idea because the dimensions of the site were not in the standard
website size 1024 x 768.
Version One Wireframe

10
Part 11: Create second version of wireframe
The second wireframe prototype was designed using Adobe InDesign and I was able to
encompass the dimensions 1024 x 768. It was starting to look better but still needed some work. Never
though finding the right prototyping would be this difficult.
Version Two Wireframe – week 6 revised version
11
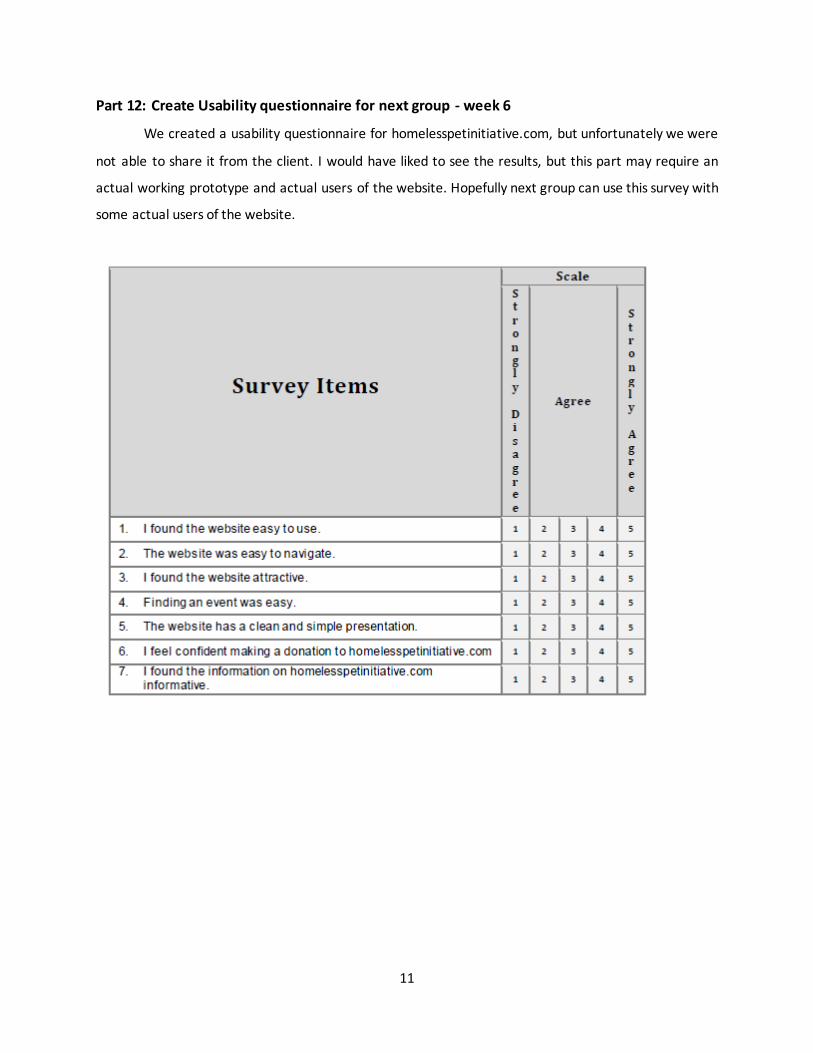
Part 12: Create Usability questionnaire for next group - week 6
We created a usability questionnaire for homelesspetinitiative.com, but unfortunately we were
not able to share it from the client. I would have liked to see the results, but this part may require an
actual working prototype and actual users of the website. Hopefully next group can use this survey with
some actual users of the website.
12
Part 13: Create Prototype – Pre Client interview Week 7
We were nearing the end of the session and it was time to share our final prototypes with the
client. Before we could do that we had to come up with Professional looking prototype. There are many
tools out there to do web site wire frames and prototypes. I spent many hours using a website called
proto.io and eventually gave up because I found the website had a high learning curve and I did not
want to use Adobe InDesign. I went to stack overflow and found users there recommended a website
called balsamiq.com. After reviewing the website, I decided to go with that because it had easy to use
drag and drop features and had a very good wireframe/prototype feel to it.
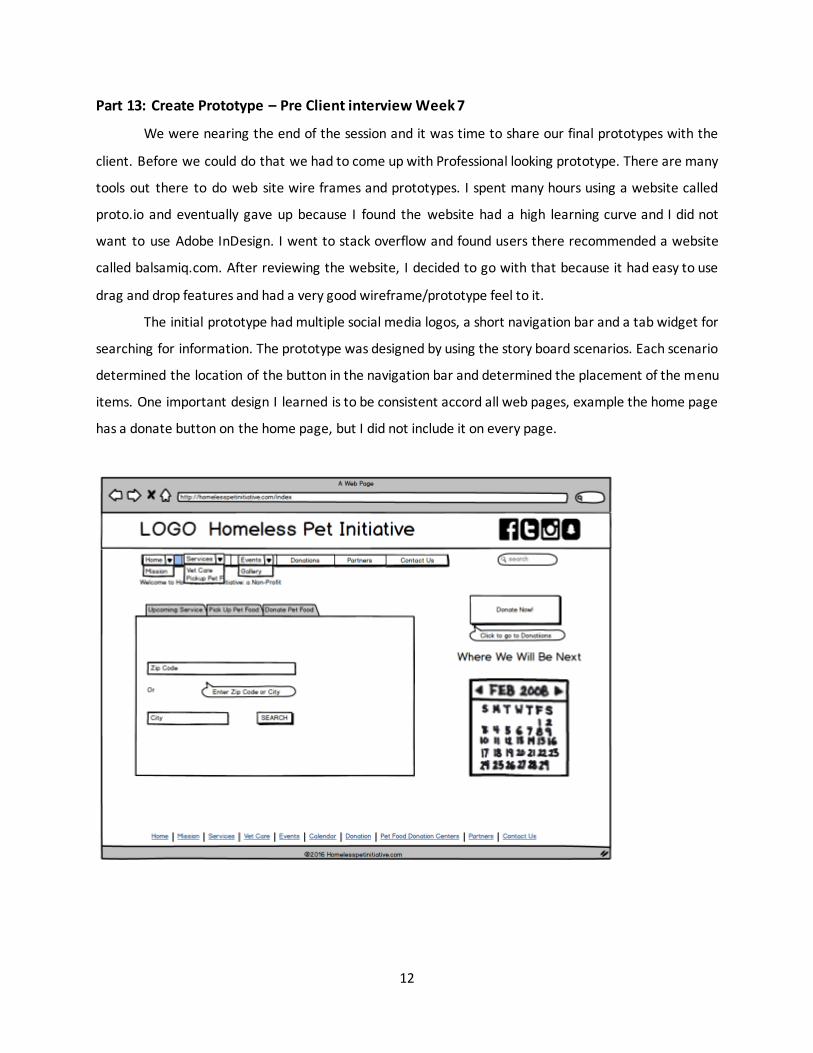
The initial prototype had multiple social media logos, a short navigation bar and a tab widget for
searching for information. The prototype was designed by using the story board scenarios. Each scenario
determined the location of the button in the navigation bar and determined the placement of the menu
items. One important design I learned is to be consistent accord all web pages, example the home page
has a donate button on the home page, but I did not include it on every page.

13
Part 14: Set up second client interview
While we were getting the prototypes ready, I arranged the second interview for both of the
projects restoredchristianity.com and homelesspetinitiative.com. Fortunately we were able to decide on
a convenient time and I was able to get a confirmation from Donna Lane and Lindsey Verlander.

14
Part 15: Interview client and observe the use of the prototype and obtain feedback – week 7
and 8
With the prototypes in hand we visited the clients at Donna Lanes office in Snellville, GA. The
purpose of this interview was to have the client go through some scenarios and observe them while they
performed the tasks outlined in the scenarios. Before we can start the interview process Dr. Liu provided
a script, which I read to Lindsey Verlander.
15
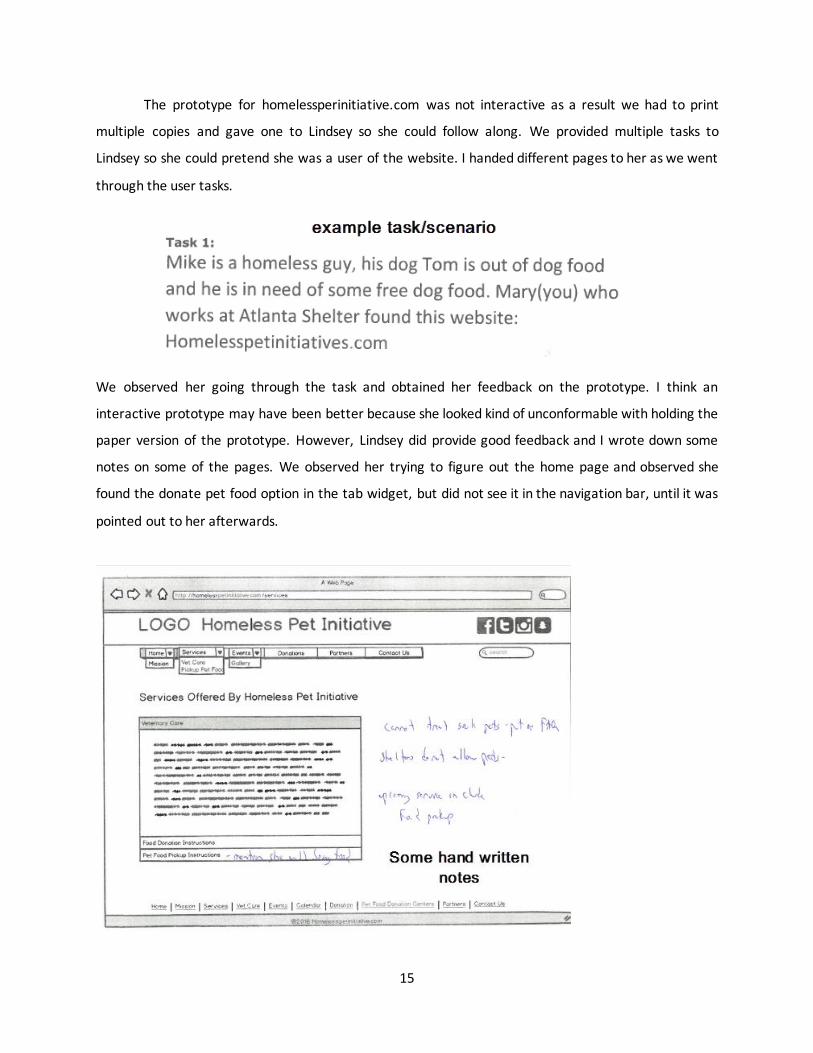
The prototype for homelessperinitiative.com was not interactive as a result we had to print
multiple copies and gave one to Lindsey so she could follow along. We provided multiple tasks to
Lindsey so she could pretend she was a user of the website. I handed different pages to her as we went
through the user tasks.
We observed her going through the task and obtained her feedback on the prototype. I think an
interactive prototype may have been better because she looked kind of unconformable with holding the
paper version of the prototype. However, Lindsey did provide good feedback and I wrote down some
notes on some of the pages. We observed her trying to figure out the home page and observed she
found the donate pet food option in the tab widget, but did not see it in the navigation bar, until it was
pointed out to her afterwards.

16
After the interview I sent the clients a “Thank You” email thanking them for their time. (I did not forget
this time).
Part 16: Updated prototype based on observations from the interview
Here are some of the changes we made:
Updated social media logos from four to two.
Moved search option into the header
Removed pickup pet food from the tab widget
Added a donate now button to every page
Lengthened navigation bar
Added a FAQ page
Moved donations in the navigation bar over one button to the left

17
Final Thoughts:
There was so much we covered over this project but I can see the importance of obtaining client
feedback and observing the user follow certain tasks to test web sites functionality. Observing a user
perform tasks can help us as web developers change the website in order to make it more user friendly
and improve the time the user spends browsing the website.