Embed Size (px)
Citation preview
1
Procedures in Intrusion Investigation of a UNIX/Linux
HostCS-585F:
Computer-Related Law and Computer Forensics
Fall 2002
By Yu-Li Chen
Rajesh Menon
Joe Meslovich

2
Introduction
• UNIX does not have a good reputation for reliability or security (Gollmann, 1999).
• UNIX systems directly connected to the Internet are often subject to hacking attempts (Kruse & Heiser, 2002).
• The skill and knowledge to investigate a compromised UNIX system becomes essential for both UNIX users and forensic investigators.

3
Approach• Looking for signs of a compromised UNIX system
• Preserving and gathering evidence
• Collecting information and seizing the data
• Analyzing the file system
• Examining signs of intrusion

4
Signs of a compromised UNIX system1. Examine log files
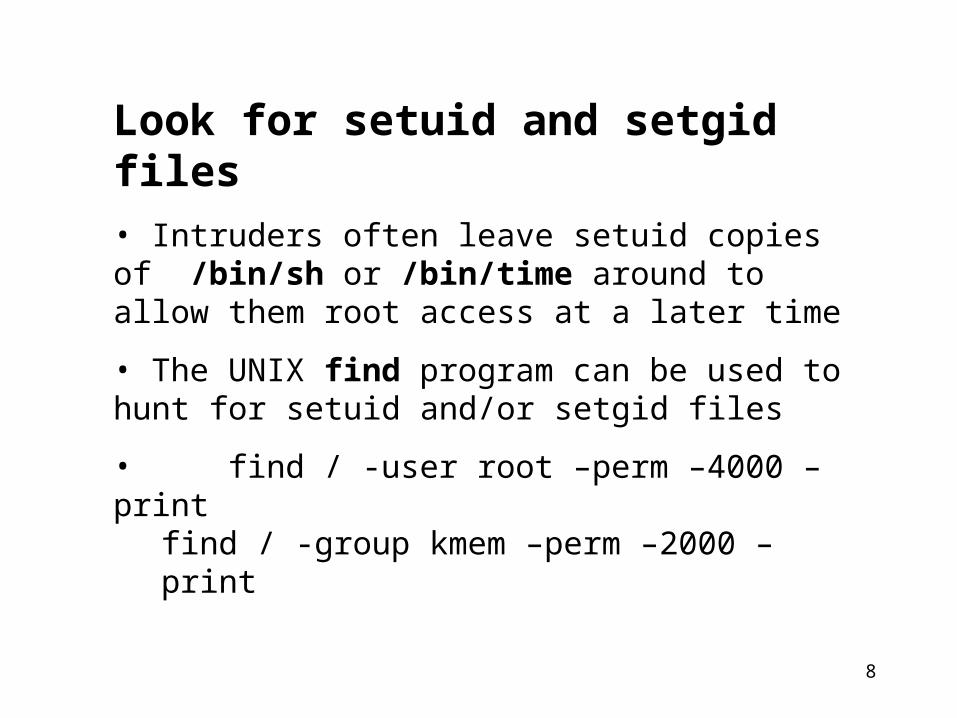
2. Look for setuid and setgid files
3. Check the system binaries
4. Look for signs of a network sniffer
5. Examine files run by cron and at
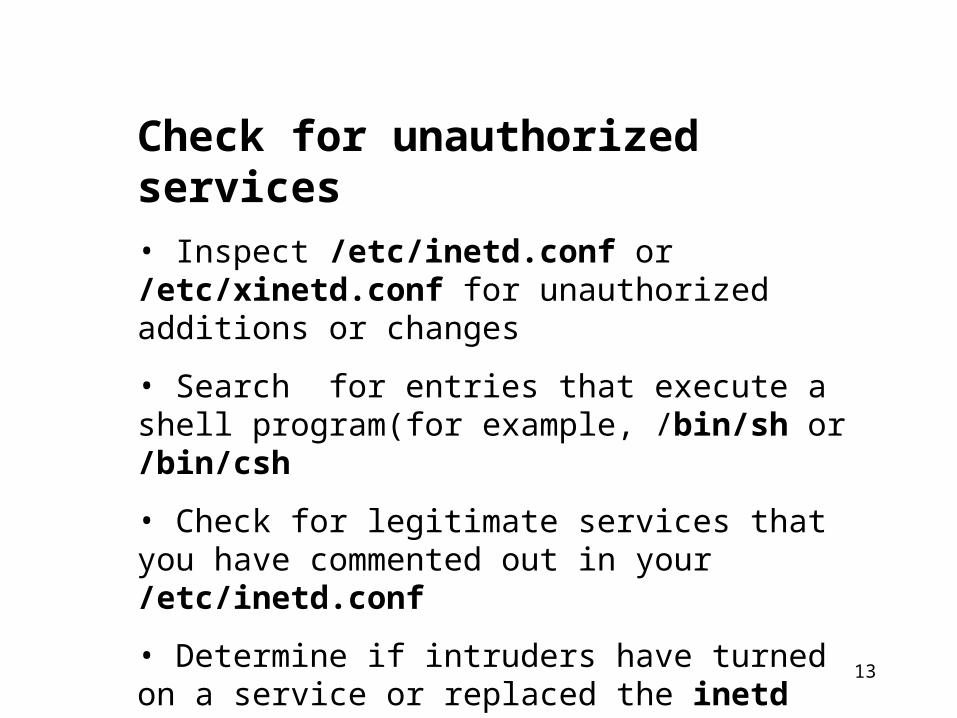
6. Check for unauthorized services
7. Examine /etc/passwd file
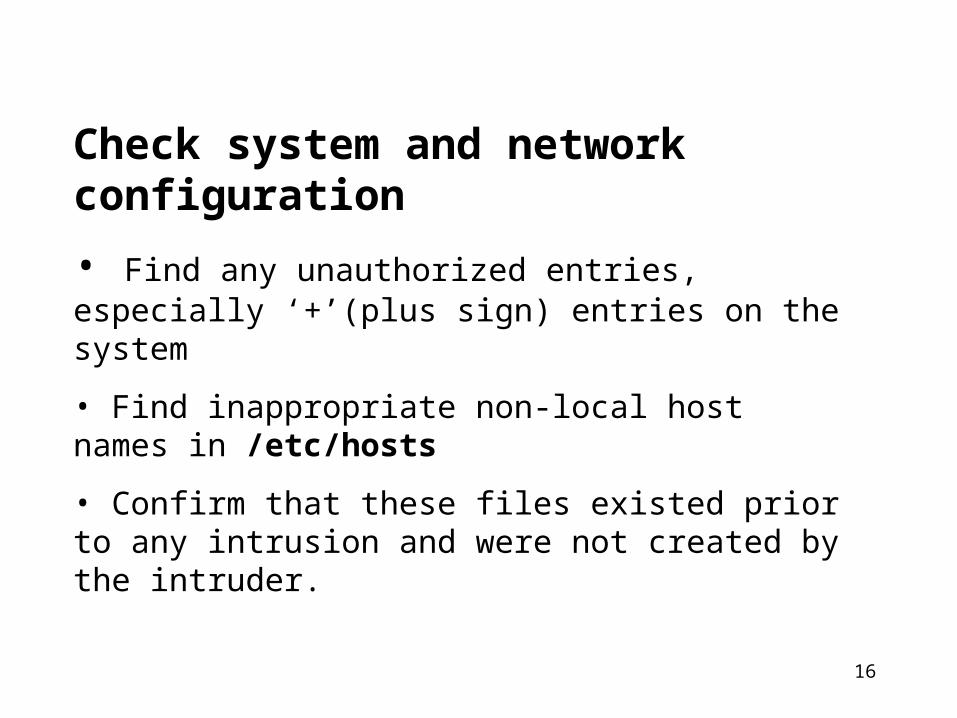
8. Check system and network configuration
9. Look every where for unusual or hidden files
10. Examine all machines on the local network

5
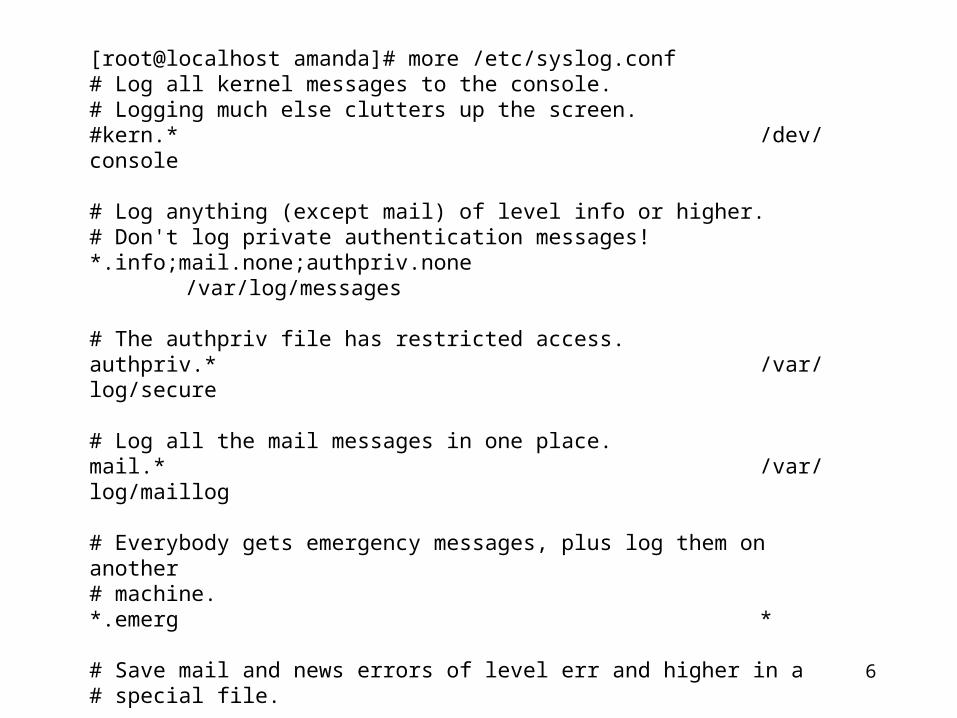
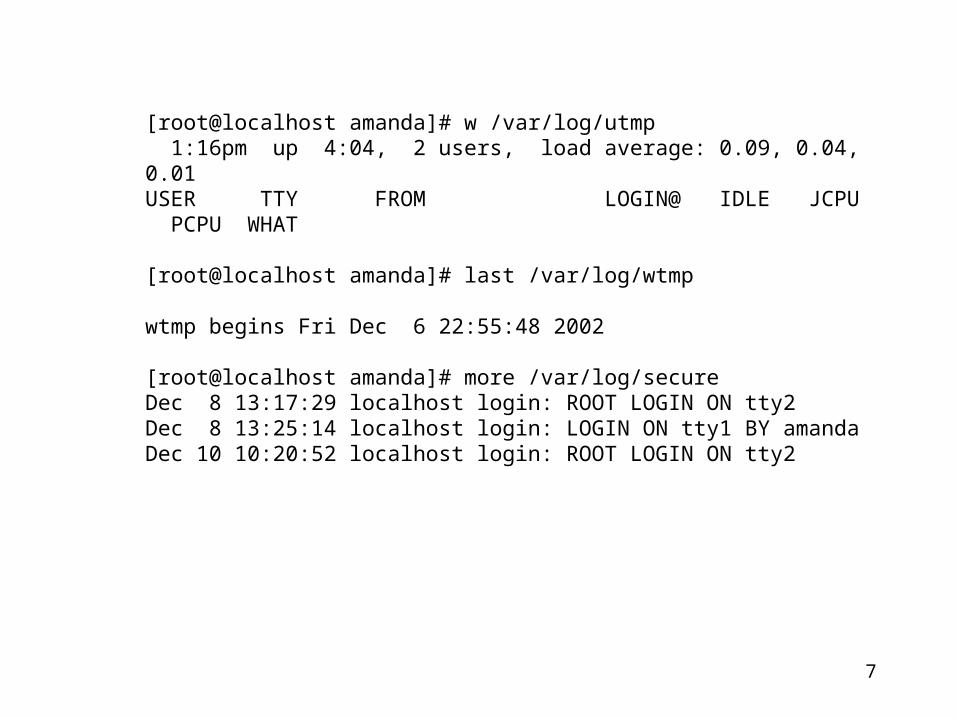
Examine log filesRefer to /etc/syslog.conf to see how logging is configured for each system service. The default location for these log file is the /var/log directory.
• messages log - look for anomalies
• xferlog will contain log files for all of the ftp transfers
• utmp contains binary information for every user currently logged in-use who or w to access this file
• wtmp is modified every time a user successfully logs in, logs out, or your machine reboots-use last to get information
• secure is used by some versions of UNIX (RedHat Linux for example) to log tcp wrapper messages -look for anomalies
6
[root@localhost amanda]# more /etc/syslog.conf# Log all kernel messages to the console.# Logging much else clutters up the screen.#kern.* /dev/console
# Log anything (except mail) of level info or higher.# Don't log private authentication messages!*.info;mail.none;authpriv.none /var/log/messages
# The authpriv file has restricted access.authpriv.* /var/log/secure
# Log all the mail messages in one place.mail.* /var/log/maillog
# Everybody gets emergency messages, plus log them on another# machine.*.emerg *
# Save mail and news errors of level err and higher in a# special file.
7
[root@localhost amanda]# w /var/log/utmp 1:16pm up 4:04, 2 users, load average: 0.09, 0.04, 0.01USER TTY FROM LOGIN@ IDLE JCPU PCPU WHAT
[root@localhost amanda]# last /var/log/wtmp
wtmp begins Fri Dec 6 22:55:48 2002
[root@localhost amanda]# more /var/log/secureDec 8 13:17:29 localhost login: ROOT LOGIN ON tty2Dec 8 13:25:14 localhost login: LOGIN ON tty1 BY amandaDec 10 10:20:52 localhost login: ROOT LOGIN ON tty2
8
Look for setuid and setgid files• Intruders often leave setuid copies of /bin/sh or /bin/time around to allow them root access at a later time
• The UNIX find program can be used to hunt for setuid and/or setgid files
• find / -user root –perm –4000 –printfind / -group kmem –perm –2000 –print

9
[root@localhost amanda]# find / -user root -perm -4000 -printfind: /mnt/cdrom: Input/output errorfind: /proc/6/fd: Permission deniedfind: /proc/1376/fd/4: No such file or directory/bin/mount/bin/umount/bin/su/bin/ping/sbin/pwdb_chkpwd/usr/X11R6/bin/Xwrapper/usr/X11R6/bin/imwheel-solo/usr/X11R6/bin/xlock/usr/bin/chage/usr/bin/gpasswd/usr/bin/chfn/usr/bin/chsh/usr/bin/newgrp/usr/bin/crontab/usr/bin/passwd

10
Check the system binaries• Intruders may change program on UNIX systems such as login, su, telnet, netstat, ifconfig, ls, find du, df, libc, sync
• Compare the versions on your systems with known good copies
• Trojan horse programs may produce the same standard checksum and timestamp as the legitimate version
• Standard UNIX sum command and the timestamps associate with the programs are not sufficient
• The use of cmp, MD5, Tripwire, and other cryptographic checksum tools is sufficient

11
Look for signs of a network sniffer
• Intruders may install a network monitoring program, commonly called a sniffer (or packet sniffer)• A sniffer could be installed on your system if any process currently has any of your network interfaces in promiscuous mode• Some legitimate network monitors and protocol analyzers will set a network interface in promiscuous mode

12
Examine files run by cron and at• The cron and at commands are used to schedule commands and processes that repeat at specified intervals
• Intruders may leave back doors in files run from cron or submitted to at
• These techniques can let an intruder back on the system
• Verify that all files/programs referenced (directly or indirectly) by the cron and at jobs
at -l
crontab -l
13
Check for unauthorized services• Inspect /etc/inetd.conf or /etc/xinetd.conf for unauthorized additions or changes
• Search for entries that execute a shell program(for example, /bin/sh or /bin/csh
• Check for legitimate services that you have commented out in your /etc/inetd.conf
• Determine if intruders have turned on a service or replaced the inetd program with a Trojan horse program.

14
Examine the /etc/passwd file
• Check the /etc/passwd file on the system for modifications
• Look for the unauthorized creation of new accounts, accounts with no passwords, or UID changes (especially UID 0) to existing accounts
• Use stat /etc/passwd to look at access and modification information
• Use cat /etc/passwd to show the contents of the file

15
[root@localhost amanda]# more /etc/passwdroot:x:0:0:root:/root:/bin/bashbin:x:1:1:bin:/bin:daemon:x:2:2:daemon:/sbin:adm:x:3:4:adm:/var/adm:lp:x:4:7:lp:/var/spool/lpd:sync:x:5:0:sync:/sbin:/bin/syncshutdown:x:6:0:shutdown:/sbin:/sbin/shutdownhalt:x:7:0:halt:/sbin:/sbin/haltmail:x:8:12:mail:/var/spool/mail:news:x:9:13:news:/var/spool/news:uucp:x:10:14:uucp:/var/spool/uucp:operator:x:11:0:operator:/root:games:x:12:100:games:/usr/games:
16
Check system and network configuration
• Find any unauthorized entries, especially ‘+’(plus sign) entries on the system
• Find inappropriate non-local host names in /etc/hosts
• Confirm that these files existed prior to any intrusion and were not created by the intruder.

17
Look for unusual or hidden files
• Files that start with a period . and are normally not shown by ls can be used to hide tools and information
• A common technique on UNIX systems is to put a hidden directory in a user’s account with an unusual name
• The find program can be used to look for hidden files
For example:
find / -name “..’’ –print –xdevfind / -name “.’’ –print –xdev | cat –v

18
Examine all machines on the local network
• If one host has been compromised, others on the network have been, too.

19
Before collecting evidence….
• Keep a regular old notebook handy and take careful notes of what you do during your investigation.
• Start with the script command to ensure that everything you do is captured in a file. script investigation.txt date uname –a
• use your own clean tools CD (if you have one) to read all the files that you are going to investigate
mount -t iso9660 /dev/cdrom /mnt/cdrom
PATH = /mnt/cdrom
echo $PATH
/mnt/cdrom
20
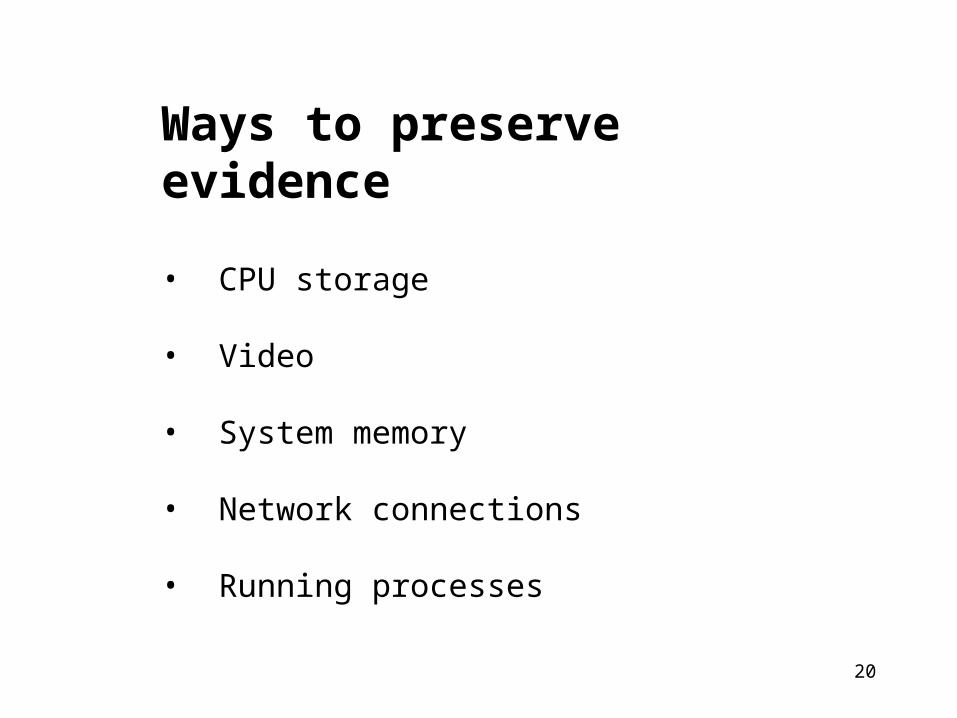
Ways to preserve evidence
• CPU storage
• Video
• System memory
• Network connections
• Running processes

21
CPU storage
a. Registers: Infeasible to capture and of minimal utility.b. Caches: Infeasible to capture as a discrete entity but should be captured as part of system memory image
When UNIX systems are shutdown with the shutdown command, all services are clearly shutdown and cached file system buffers are flushed, data is written to disc and can be captured as part of system memory image.

22
Video
To save a copy of the screen:1. Press Ctrl-Alt-F2 ( on a RedHat Linux system) to enter another virtual terminals on the console and log on as root(if you know the password).2. Use xwd command to dump an individual window or use –root option to dump entire screen
xwd –display localhost:0 –root > screenshot.xwd
3. Return to the X display by pressing Ctrl-Alt-F7 4. Examine it to make sure that you didn’t capture the screen saver with xwud command
xwud –in screenshot.xwd

23
System memory
• Easy to capture, but the act of capturing it changes it• The physical memory on a UNIX system is /dev/mem; the virtual memory is /dev/kmem• use the dd command to copy the memory from the suspect machine
dd if =/dev/mem of =suspect.mem.imagedd if =/dev/kmem of = suspect.kmem.image
• It is impossible to verify accuracy when copying such highly volatile

24
Network connections•Network state provides important information on both current network connections and listening processes
• Know when attacker has left a network process running or when unauthorized connections are taking place either inbound or outbound
• netstat –p show the processes associated with specific network connections
• netstat –rn display the routing tables
• arp –v capture the address resolution tables
• (date; netstat –p; netstat –rn; arp –v) > suspect.netstatus.txt
25
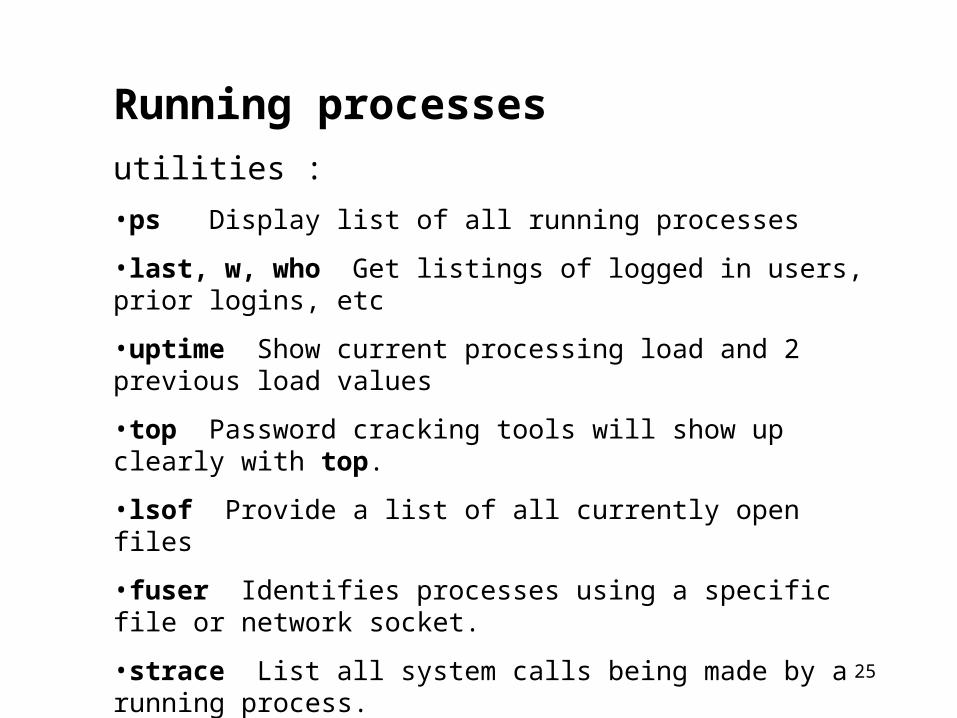
Running processes
utilities :
•ps Display list of all running processes
•last, w, who Get listings of logged in users, prior logins, etc
•uptime Show current processing load and 2 previous load values
•top Password cracking tools will show up clearly with top.
•lsof Provide a list of all currently open files
•fuser Identifies processes using a specific file or network socket.
•strace List all system calls being made by a running process.
•truss, ktrace Earlier versions of system call trace.
•ltrace Library routine trace.
26
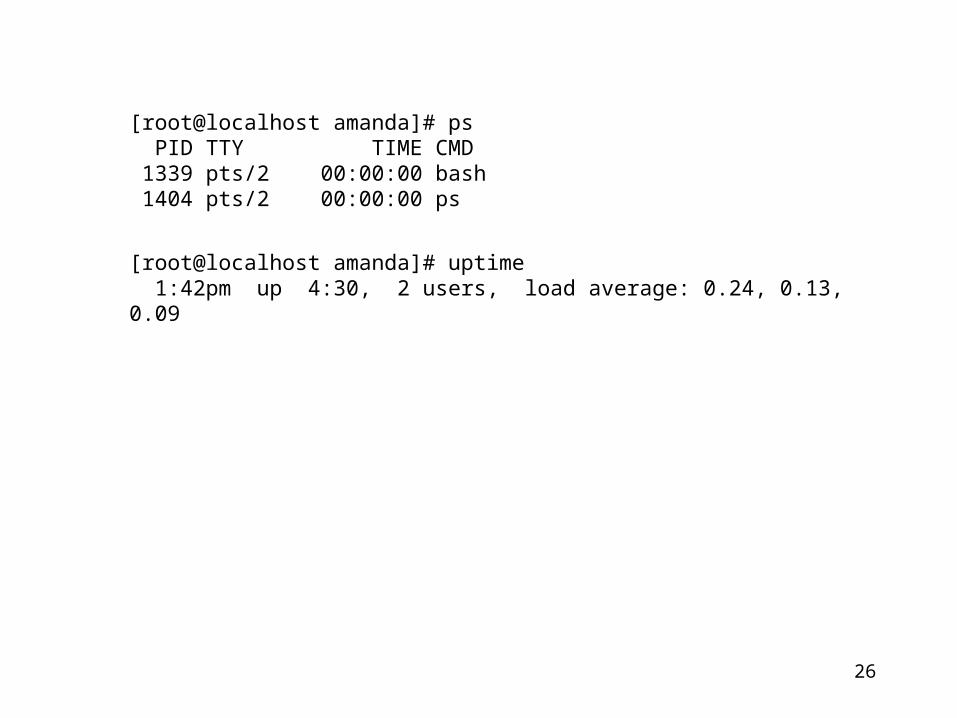
[root@localhost amanda]# ps PID TTY TIME CMD 1339 pts/2 00:00:00 bash 1404 pts/2 00:00:00 ps
[root@localhost amanda]# uptime 1:42pm up 4:30, 2 users, load average: 0.24, 0.13, 0.09

27
/proc
• Pseudo-filesystem that provides a structured interface to /dev/kmem
• No attacks that hide /proc entries have been reported
• A more reliable guide to currently running processes than the commonly hacked ps utility
• ls –d /proc/[0-9]* >suspect_proc.txt

28
Signs of hostile processes• Any discrepancy between ps, top, and /proc
• Unrecognized commands, especially ones that start with a . or ./
• Daemons running more than once that should be running only once, such as inetd
• High uptimes (high system utilization) and especially a process using an unusual level of system resources
• High network utilization

29
The scenario
• The production server of the ABC company is suspected to be compromised
• The precondition imposed on the forensics team --- the server cannot be brought down
• Forensics is to be conducted on the live server
• MD5 hash of the original disks was not taken

30
Steps of the investigation
• 1) Collection of the evidence for the file-system analysis
• 2) Investigation into the suspect file-system
31
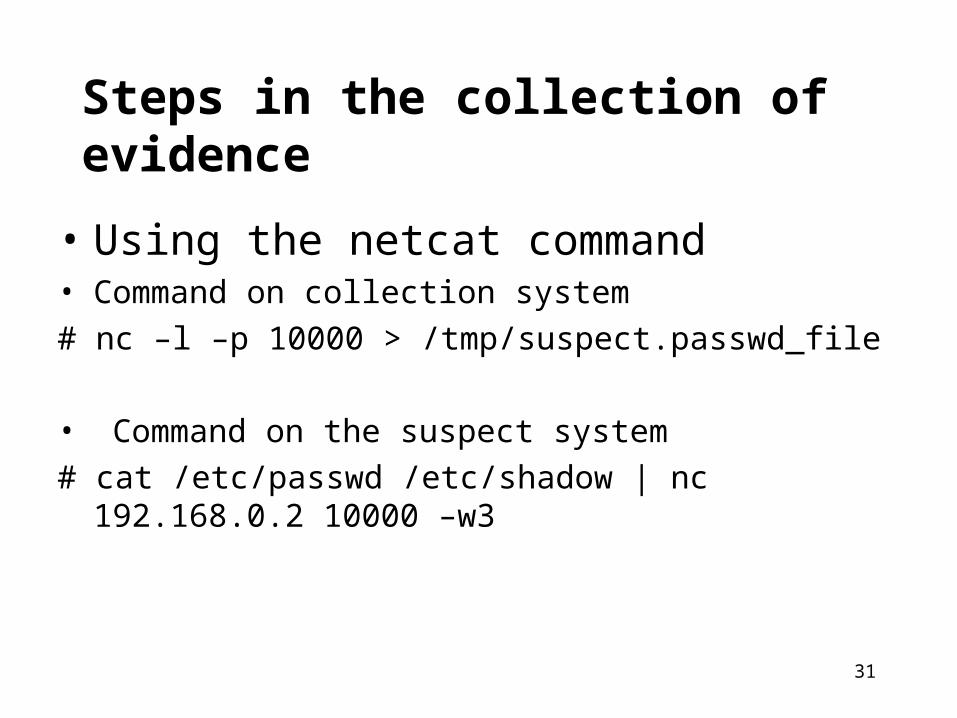
Steps in the collection of evidence
• Using the netcat command• Command on collection system
# nc –l –p 10000 > /tmp/suspect.passwd_file
• Command on the suspect system
# cat /etc/passwd /etc/shadow | nc 192.168.0.2 10000 –w3

32
Steps in the collection of evidence (contd)
1) Log the investigation steps carried out on the suspect system
• Command:
# script investigation.txt
2) Maintain a journal to enumerate the results of the investigation

33
Steps in the collection of evidence (contd)
3) Verify the date and time of the suspect system and determine the DNS name and the OS version of the system
• Commands:# date
# uname -a
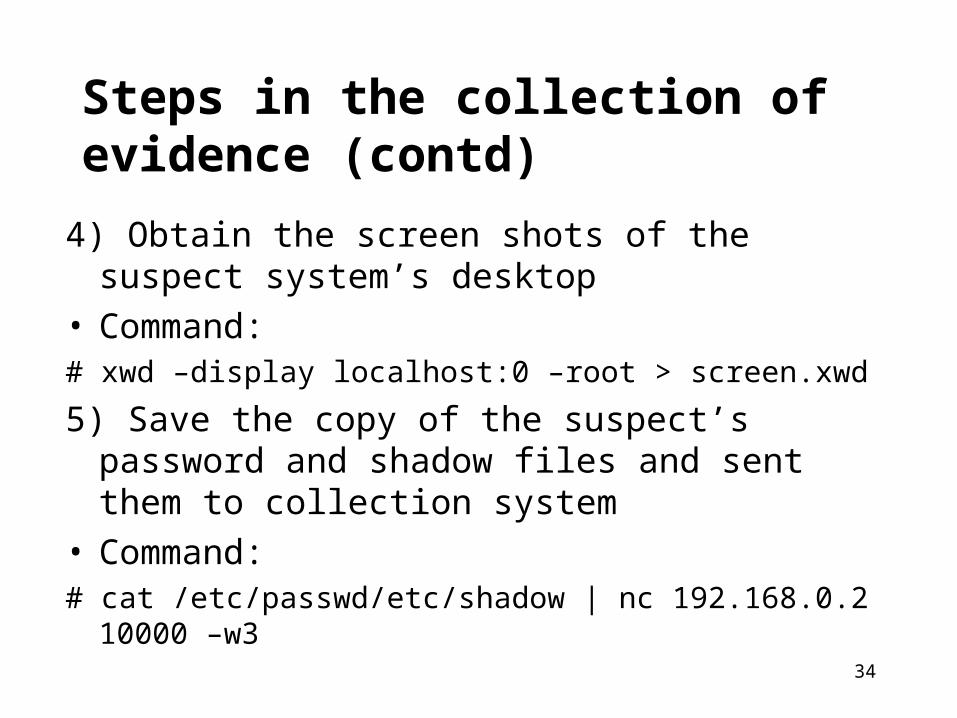
34
Steps in the collection of evidence (contd)
4) Obtain the screen shots of the suspect system’s desktop
• Command:# xwd –display localhost:0 –root > screen.xwd
5) Save the copy of the suspect’s password and shadow files and sent them to collection system
• Command:# cat /etc/passwd/etc/shadow | nc 192.168.0.2 10000 –
w3
35
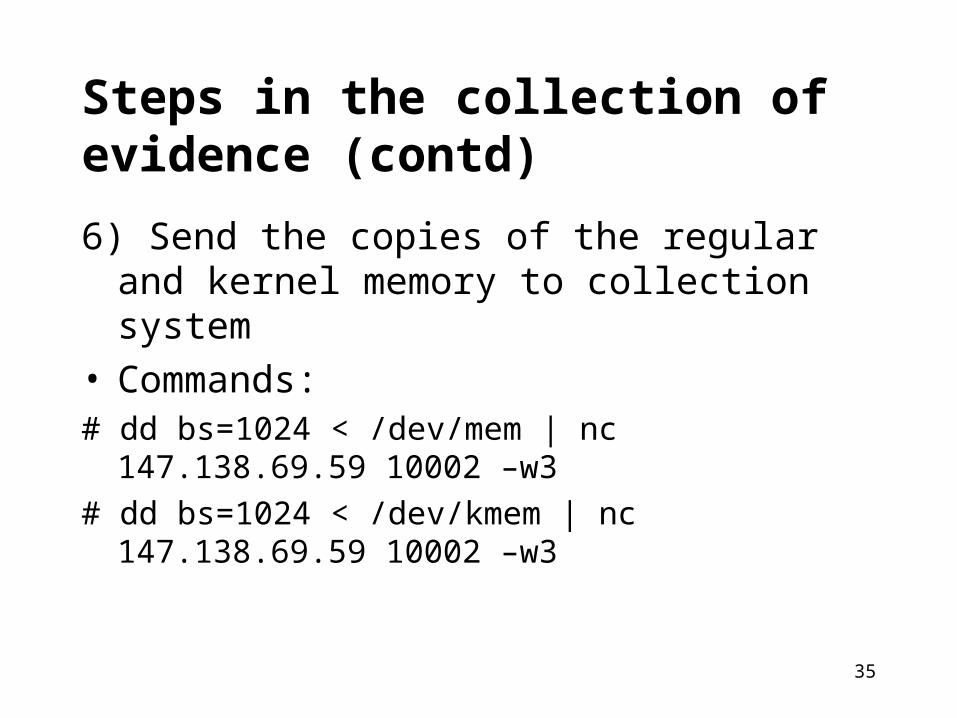
Steps in the collection of evidence (contd)
6) Send the copies of the regular and kernel memory to collection system
• Commands:# dd bs=1024 < /dev/mem | nc 147.138.69.59 10002 –
w3
# dd bs=1024 < /dev/kmem | nc 147.138.69.59 10002 –w3

36
Steps in the collection of evidence (contd)
• 7) Send the date, details of processes with network connections, the kernel routing table and the address resolution protocol to collection system
• Command:# (date; netstat –p; netstat –rn; arp –v) | nc
147.138.69.59 10002 –w3

37
Steps in the collection of evidence (contd)
8) Commands to verify the state of suspect machine
1. Command to find the time for which the system was running since its last reboot
• Command: # uptime
2. Command to find the users remotely connected to the system
• Command: # who

38
Steps in the collection of evidence (contd)
3) Check for the processes that take up system resources
• Command:# top

39
Steps in the collection of evidence (contd)
9) Information about the running processes sent to the collection system
• Command: # (ps –aux; ps –auxeww; lsof) | nc 147.138.69.59 10002
–w3

40
Steps in the collection of evidence (contd)
10) Find the list of running processes on the suspect system and make a tar file to be sent to the collection system
• Commands:# ls –d /proc/[0-9]* | nc 147.138.69.59 10002 –w3
# tar –cvpf proc.tar /proc/[0-9]*
# nc 147.138.69.59 10003 –w3 < proc.tar

41
Steps in the collection of evidence (contd)
11) Determine the physical devices and partitions on the suspect system
• Commands:# mount
# fdisk –l /dev/hda

42
Steps in the collection of evidence (contd)
12) Make a data dump of the partitions of the suspect system hard disk and send it to collection system
• Commands:# dd if=/dev/hda1 bs = 1024 | nc 147.138.69.59 10002 –
w3

43
Steps in the collection of evidence (contd)
13) Making the MD5 hash of the files received and the data dump of the partitions of the suspect hard disk
• Command: # md5sum –b suspect.hda1.image

44
The Analysis

45
The Suspect System
• Hardware: Dell Optiplex GX1
• Operating System: RedHat Linux 8.0
• Kernel Version: 2.4.18-14
• Primary Use: Web Server (Apache/2.0.40)
46
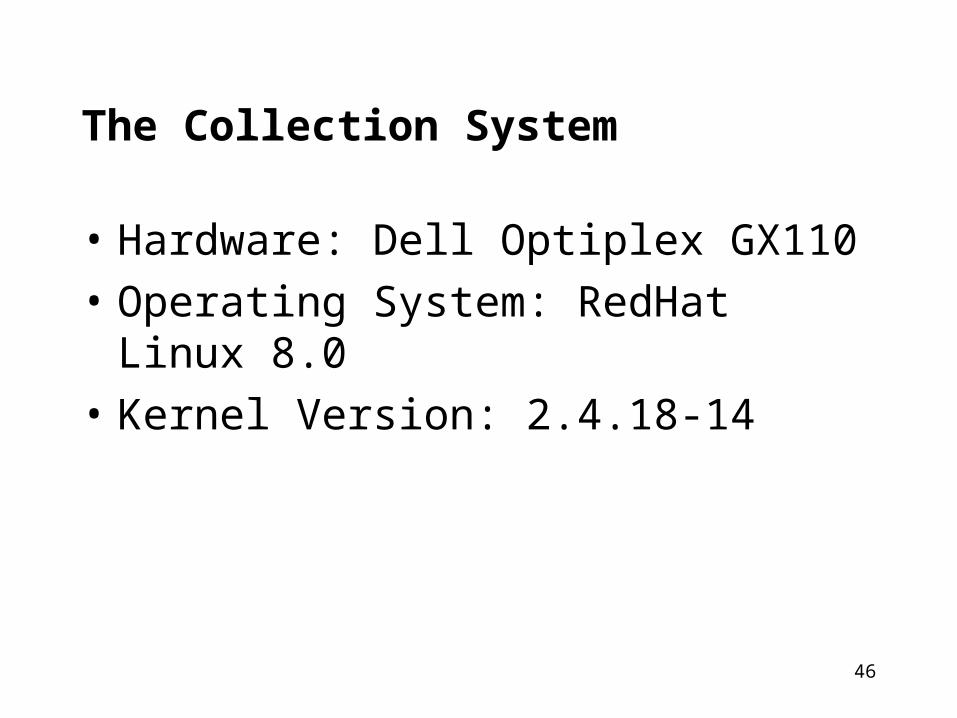
The Collection System
• Hardware: Dell Optiplex GX110
• Operating System: RedHat Linux 8.0
• Kernel Version: 2.4.18-14

47
The first problem during collection
• We were unable to collect the /dev/kmem file.
• The dd command terminated with the an error.
# dd bs=1024 < /dev/kmem | nc 147.138.69.69 10003 -w 3
dd: reading `standard input': Bad address
0+0 records in
0+0 records out

48
The second problem during collection
• The images of the hard drive created using dd were corrupt.
• Each dd displayed an error message after each dump completed.
dd: reading `/dev/hda1': Input/output error
49
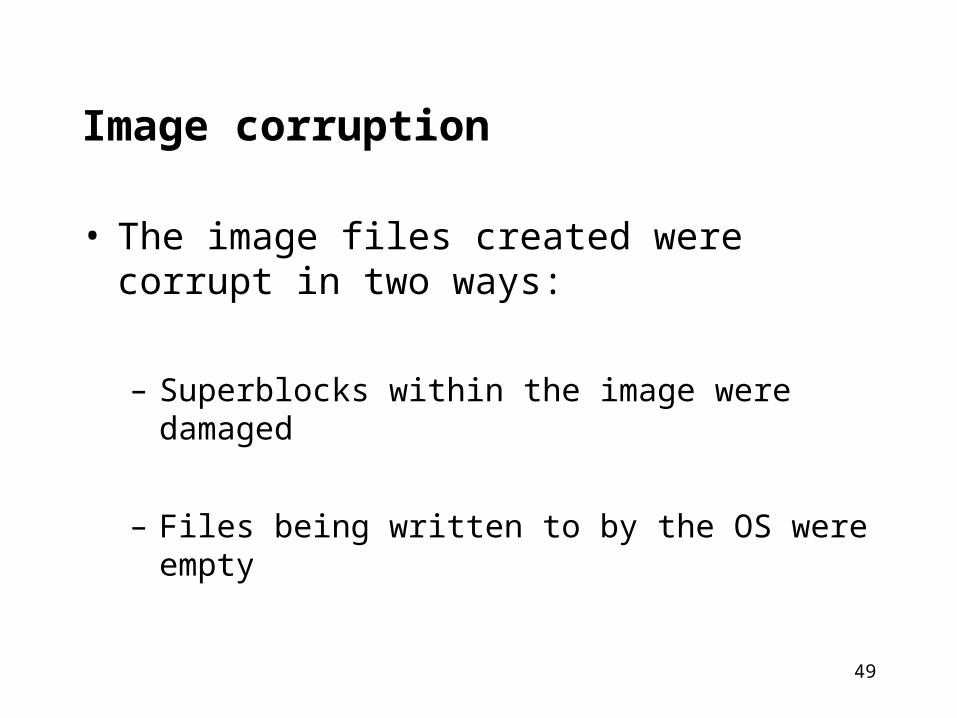
Image corruption
• The image files created were corrupt in two ways:
– Superblocks within the image were damaged
– Files being written to by the OS were empty

50
Compensating for the Corruption
• The images that were used had to be mounted once in read-write mode to correct the superblocks if they were to be used.
• The live file-systems were investigated instead of the image.
• Tar balls of the missing log files were created.

51
Analyzing the Stored Data
• passwd files – no anomalies
• Network status file – no anomalies
• Process status file – no anomalies
• /proc directory – no anomalies

52
Analyzing the Log Files
• Web server access_log and error_log– No anomalies found
• messages log– Anomalies found!

53
The messages log
• Two attackers attempted to gain access between 12:17 PM EST and 2:31 PM EST on Friday December 6, 2002
• Attacker number one attempted to gain access to the system by way of the ftp server.
• Attacker number two attempted at least one port scan and tried to gain access through the ftp and telnet services

54
Attacker Number One
• Made twelve distinct attempts to open an ftp session with the suspect server.
• Tried to access the service as the root user, and an unprivileged user. In both cases the attacker failed to guess the passwords.
Dec 6 12:53:10 dorm69-52 ftp(pam_unix)[1613]: authentication failure; logname=uid=0 euid=0 tty=/dev/ftpd1613 ruser= rhost=Venger.bridgewater.edu user=joe
Dec 6 12:53:12 dorm69-52 ftpd: Venger.bridgewater.edu: connected: IDLE[1613]: failed login from Venger.bridgewater.edu [147.138.20.15]

55
Attacker Number Two
• Initially attempted an anonymous ftp to the system.
• Waited one hour then made several attempts to telnet into the system as root, lp, and as a blank username.
• Ended attack with a port scan of the suspect server.
Dec 6 14:31:07 dorm69-52 fingerd[2273]: Client hung up - probable port-
scan

56
Looking at the Filesystem
• xferlog – no anomalous entries
• /etc/hosts – no trust relationships
• /dev – no hidden regular files
• SUID/SGID – no anomalous files
• core files – no files found
57
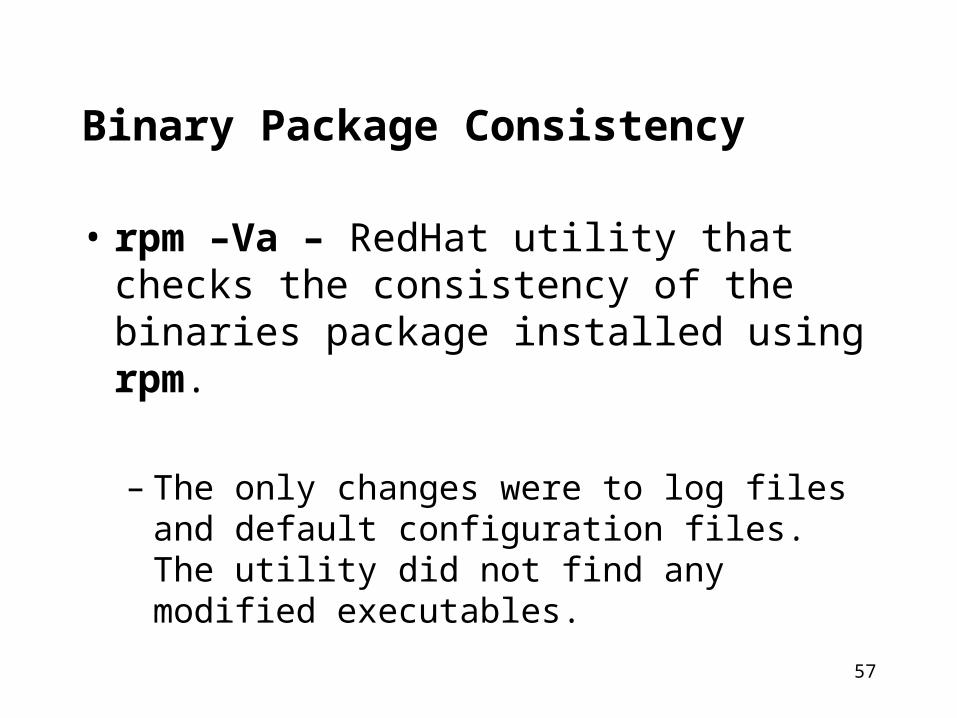
Binary Package Consistency
• rpm –Va – RedHat utility that checks the consistency of the binaries package installed using rpm.
– The only changes were to log files and default configuration files. The utility did not find any modified executables.
58
Conclusion
• Always double check syntax
• Always have an alternate way of collecting a piece of data

59
Any Questions?