Embed Size (px)
Citation preview
1
DATIM SIMS Module Training
February, 2015

2
Outline• What is DATIM?• Timelines• DATIM
– Creating Accounts/Logging in– Help– Dashboard– Apps– Organization Unit Hierarchy, iPSLs– Data Entry– Logging out
• SIMS– Packed vs. unpacked– Facility – Community– Above Site– Key Populations– DOD mil sites data entry– Import– Pivot tables, SIMS reports

3
DATIMData for Accountability, Transparency, and Impact
Powered by dhis2
PEPFAR’s new information system

DATIM Deployment TimingCountry Group
COP Due Date
In-Country DATIM
Training (recommended)
DATIM “Live” User
Account Release
COP Target Entry
Window
SAPR Results Entry
Window
“First Wave”Angola, Burundi, Cote d'Ivoire, Ethiopia, Ghana, Namibia, South Sudan, Swaziland, Vietnam, Zambia, Zimbabwe
April 3Mid-February – Mid-March
Late February
Late February – Late March
April 1 – May 15
“Second Wave”Botswana, Cameroon, DRC, Haiti, Kenya, Lesotho, Malawi, Mozambique, Nigeria, Rwanda, South Africa, Tanzania, Uganda
May 1Late February – Late March
Late March Late March – Late April
April 1 – May 15
“Third Wave”Asia Regional, Burma, Cambodia, Caribbean, Central America, Central Asia, DR, Guyana, India, Indonesia, PNG, Ukraine
April 3
DATIM Deployment Group is planning DATIM trainings that follow COP submission for “Third Wave” OUs. COP targets for these OUs will be submitted in a tool other than DATIM. Communication regarding how these OUs will submit SAPR data is forthcoming.
4**Wave assignments are undergoing revisions. This table reflects the DATIM Deployment Group’s understanding as of January 29, 2015.
Upcoming Webinars(Invitations Forthcoming)
• Demoland Overview (February 5 – USG Only)
• Advanced Site Administration (Site Administrators Only)
• User Administration (User Administrators Only)
• DATIM Support Procedures/User Account Release Preparation
• Workflow Management• Data De-Duplication
5

DATIM Training Resources Portal
• Publicly-available training resources– Task tutorials– Generic Demoland training environment access
information– Train-the-trainer materials– DATIM training planning materials
• Ongoing content development and updates • Access the portal at:
www.datim-training.org
6

DATIM FAQs• Why is PEPFAR deploying a new information system?
– Effective targeting of resources to the disease burden to accelerate progress towards an AIDS-Free generation in the current budget environment requires the continuous collection, management, analysis, and review of various data streams at greater levels of granularity.
– PEPFAR HQ has developed tools and a system (DATIM) to help support data management and promote data analysis and use for continual program improvement and a dynamic program response.
• Does DATIM replace FACTSInfo?– No, the use of FACTSInfo is mandated by the Department of
State. – There will be NO double entry in FACTSInfo and DATIM
7

DATIM FAQs• What is DATIM?
– DATIM is an specific and customized instance of DHIS2 (see slide 2) for PEPFAR
• Was DATIM piloted?– DATIM was piloted in one OU to support site-level APR data
entry and submission for FY2014. Lessons from the pilot informed plans for the broader implementation.
• Will the OUs that did not attend the December DATIM training in Johannesburg have an opportunity for similar DATIM training?– Yes, the remaining 12 OUs will receive similar DATIM training.
These are largely expected to take place after the COP reviews based on feedback from these OUs. More information is forthcoming.
8

9
dhis2
Learn more about dhis2 at www.dhis2.org
Tool for collection, validation, analysis, and presentation of aggregate statistical data
Free and open source software developed by Health Information Systems Programme (HISP); development coordinated by University of Oslo
Used regularly by over 30,000 users in 46 countries
Vibrant developer and implementer community

Questions/Comments
• Until users have access to the Help Desk (tied to “live” DATIM user accounts), please submit questions and comments to the DDG through an in-country DATIM POC (a USG member of the in-country DATIM Deployment Group) at [email protected]
10

SIMS Users in DATIM, FY2015 Q1• The number of initial SIMS DATIM users for FY2015 Q1 data
entry and submissions is purposely limited, as this activity is occurring prior to the full roll-out of DATIM in each OU.
• These users will have access to the SIMS datasets (only) in DATIM for their OU (only).
• Account invitations will be emailed Monday, Feb 2 to new SIMS users for FY2015 Q1 submissions. Existing SIMS users DATIM accounts will be maintained.
• Once DATIM is fully deployed to an OU, the User account creation and management for an OU will rest with the OU, and more SIMS users can then be created by the OU.
11

DATIM SIMS Timeline for FY2015 Q1 submission
• Feb 2: DATIM account invitations for new SIMS users will be emailed.
• Feb 2: Expected by COB EST that the newest DATIM release will be pushed to Production. Includes:– iPSLs loaded for all OUs– Addition of SIMS Above site datasets
• Feb 2 – Feb 5: DATIM SIMS module training for new OUs
• Jan 1 – Feb 17: Ability for “old” SIMS OUs to enter Facility and Community assessments data
• Feb 2 – Feb 17: Full ability for all OUs to enter SIMS data entry in DATIM for Facility, Community, and Above Site assessments data.
• Feb 17 COB: SIMS FY2015 Q1 assessments due in DATIM12

13
DATIM Training Overview

Creating Your Account1. You will receive 2 emails from DHIS2 “Create
User Account Invitation”

Creating Your Account1st email contains a link, 2nd email a passwordFollow the instructions in the emails to set upyour account

Logging In
16
1. Navigate to www.datim.org2. Notice whether or not there is a red warning that your browser is not
supported (example above, using IE 8, which is not supported).3. Enter your user name and password. Remember, both are case sensitive.4. Click the “Sign In” button

A few things to keep in mind
• If you can, use Chrome, there are a few things that work better there.
• If you are having issues, try logging out of DATIM, clearing your browser’s cache (browsing history), then logging back into DATIM.
To do clear your cache, click CTRL H and click on Clear Browsing History at the top of the page

How to get help
Please request Help from within DATIM – this provides much more information to the Help Desk about your account to help them answer your question.
1. From the Dashboard, click on Apps.2. From the Apps drop down menu, select the DATIM Support icon.3. If you do not initially see the DATIM support icon, select the “More apps”
button in order to view all apps.

How to get help
19
• From the DATIM support page, click on “Submit a request” to submit a help ticket.
• You will get an automated notice of your help ticket within a few minutes. You can reply to this notice in order to cc others on your help ticket if needed.
• You will receive an email anytime your help ticket is updated.
• You can also check on the status of help tickets by clicking on “My activities”.

There are a lot of other
Help resources on
the DATIM support page
as well!
Also see:www.datim-training.org
20

DATIM Dashboard
21
The Dashboard is the main “home” page of DATIM. You can access the Apps and Profile menus from here. Graphs, charts, etc. shown on the page are customizable.

Apps
22
• Most of the DATIM functionality is organized in the different Apps.
• To access these, click on the “Apps” symbol on the top blue menu bar, and a list of Apps that you have access to will appear.
• Click on any of the Apps to open them.
• Click on the “More apps” button to see all Apps you have access to.

DATIM Organization Unit Hierarchy
Organization Unit Hierarchy

• The left hand Organization Unit navigation menu lists the Organization Units (sites and associated geo/political administrative hierarchy) populated originally from the OU’s iPSL.
• The Organization Unit Hierarchy organized from the national org unit to various sub-national org units to the facilities. The “levels” in the Org Unit Hierarchy vary from OU to OU.
• Datasets (e.g. the SIMS Facility dataset, or the SIMS Community dataset) are assigned only to those org units in the hierarchy that they apply to (e.g. the SIMS facility data set is only assigned to facility org units).
• It is from the Organization Unit Hierarchy Menu that you must first select the Facility site (facility), Community site (political/admin unit), or Above Site entity (national org unit) in order to begin SIMS data entry for that site’s assessment. Make sure you have selected the correct Organization Unit!
Data entry form
Organization Unit Hierarchy

• You can also search for a organization unit by clicking on the Search icon above the Organization Unit Hierarchy.
• Enter your search criteria, then click Find.
• Sites matching your search criteria will be shown in a blue list.
• Once you click on one of the org units from the blue list, the hierarchy will be expanded and the site automatically will be selected.
25
Searching the Organization Unit Hierarchy

DATIM Data Entry
26
• To open the Data Entry app, first click on the Apps icon.
• Then click on the “Data Entry” app icon.
• Click on the More Apps button to see all of the apps available to your account.

Data Entry
27
• Data entry is organized by data set, which is equivalent to a collection form.
• All data sets that are filled must refer to an organization unit (a location/site), a period (e.g. “January 2014”) and a funding mechanism. These items must be selected before the data entry can begin.

Data Entry in Offline Mode• When Internet connectivity is
lost during a data entry session, the system will provide the notification on the top of the data entry page: “You are now offline, data will be stored locally”.
• Data entry can continue as before and values will be stored locally on your computer.
• You can navigate to other org units, data sets and mechanisms, but historical data that have not been registered in the current offline session will not be available.
28

• When Internet is back again, you will be notified that “There is data stored locally, please upload to server”.
• You need to click on the Upload button in order to push your locally stored data to the central server.
29
Data Entry in Offline Mode

Navigation/Saving Data/Log-Out• Data are saved automatically as they are entered. Data cells colored in
light green on the data entry form indicate that the data have been saved to the server.
• When you navigate away from a form or log out, your information is not lost. Using the left-hand Organization Unit Navigation Menu and the green section of the Data Entry form, you can select the specific organization unit/period/funding mechanism combination to bring back the data entry form (and data) for that site assessment.
• You can click the Complete button at the bottom of the Data Entry form to mark for yourself or your team that you have completely finished entering data for the given organization unit/period/funding mechanism combination. Clicking on the Complete button does not affect whether the data are saved, as data are saved automatically as they are entered.
• To Logout of DATIM, click on the “Profile” button on the blue bar at the top right hand section of the screen. Then click on the “Log out” button that appears.

SIMS data entry in DATIM
31

Unpacked vs. Packed• “Unpacked” – SIMS tools or applications that collect and/or
store all SIMS visit data elements, including the data from all questions within a CEE.
• “Packed” – SIMS tools or applications that collect and/or store SIMS visits’ site info, mechanism info, and final CEE scores and comments data elements only. Also, community intervention point CEE scores are NOT collected in Packed applications, only the Community Site level CEE scores are collected.
• SIMS datasets in DATIM are “packed”.
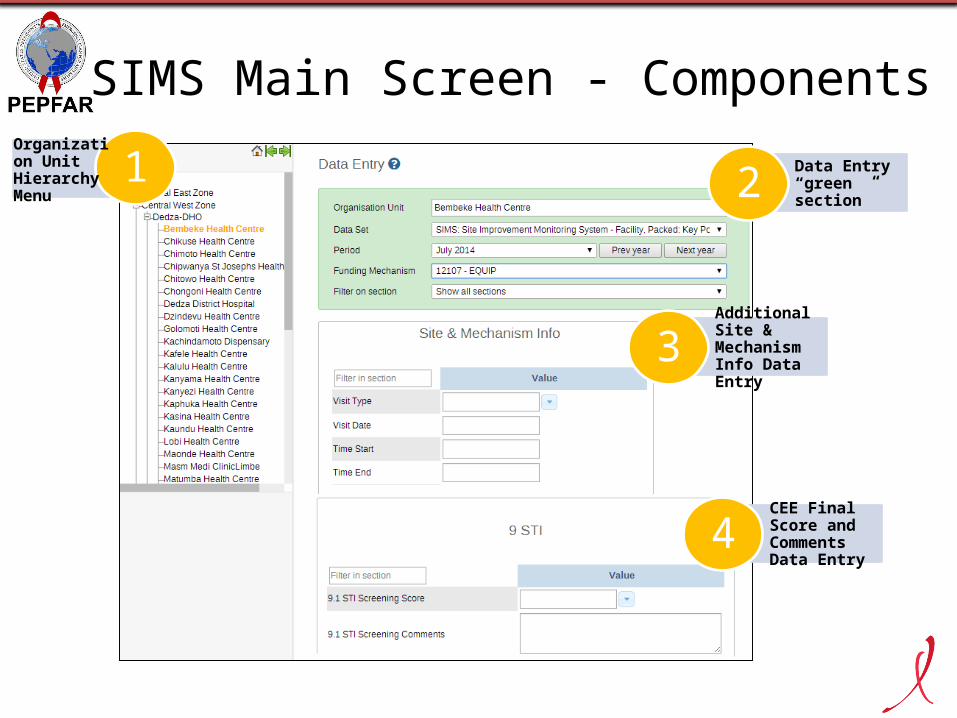
SIMS Main Screen - ComponentsData Entry “green section”2
Additional Site & Mechanism Info Data Entry3
CEE Final Score and Comments Data Entry4
1Organization Unit Hierarchy Menu

Organization Unit Navigation Menu
• The left hand Organization Unit navigation menu lists the Organization Units (sites) from the OU’s iPSL, organized by admin unit levels.
• The iPSL is the critical backbone for any data entry in DATIM (including SIMS).
• It is from the Organization Unit Navigation Menu that you must first select the Facility site (facility), Community site (political/admin unit), or Above site entity (National org unit) in order to begin SIMS data entry for that site/entity.
• Once an org unit is selected on the Organization Unit Navigation Menu, the Initial Data Entry form will appear. Under the Data Set drop down, the possible SIMS Data sets will be available to select.

Facility - Data Entry
• Organization Unit – At the Facility level, Organization Unit is synonymous with SIMS Facility Site Names– Select the Facility Site of the SIMS visit from the left-hand Organization Unit Navigation Menu.– Once an Organization Unit (Facility Site) is selected, the system knows the above site (e.g. OU,
Province, District) data as well.• Data Set. Select the “SIMS – Facility, Packed” data set.• Period is by month. Select the month that the SIMS site assessment occurred in.• Funding Mechanism. Select the funding mechanism for the SIMS site assessment.
– By selecting a mechanism, the system knows the partner and agency as well. • Unique key: The Organization Unit, Period, and Funding Mechanism combined are the
unique key to identify data in DATIM. The dataset is NOT part of the unique key.

Facility – Site & Mechanism• Visit Type:
– Select from the drop-down, the visit type.• Visit Date:
– Enter the specific date that the SIMS visit occurred on
• Time Start: free text• Time End: free text• Facility Level: free text• Village/Town: free text• Agency Agreement Number:
– Enter the Agency Agreement # (not the FACTS Info mechanism ID) if it exists. Free text.
• Latitude, Longitude, and Datum: – lat/long of the facility site, and the geodetic datum
setting used to collect the lat/long, if known• Partner Agreement Signed:
– Select from the Drop down• Overall Site Strengths & Challenges:
– Enter from Facility Site Dashboard, if available. Free Text.
Tip #1 – The data for the Site and Mechanism Info section are collected on the paper Facility Site Cover Sheet or the paper Facility Site Dashboard.
Tip #2 – Some fields from the Facility Site Cover Sheet are not included on the SIMS in DATIM data entry form since they are known in the system through the Site (Organization Unit) and the Mechanism selected.

Facility – Domains and CEEs
Needs Urgent Remediation
Needs Improvement
Surpasses Expectations
Meets Expectations
Tip: CEE scores and Comments fields are not required fields. • If the Domain is not relevant to
the Facility Site (OrgUnit), the user should not enter any data for any of the CEEs in that Domain (Data Set Section).
• If the Domain is relevant, but a CEE within the Domain is not relevant, the user should select “Not Applicable” for the “Score” for that CEE.
• If the Domain is relevant, and the CEE is relevant, but the data are missing, the user should leave the “score” blank, and enter information into the “Comments” field for the CEE describing why the data are missing

Facility – CEE data entry
• Domain Title – Listed at the top of each section• Core Essential Element (CEE) – Each CEE contains a Score and a Comments field.• Score – final score for the CEE as recorded on Facility Paper tool. • Comments – overall comments for the CEE, if any
CEE
Domain
CEE Score data entry
CEE Comments data entry

Facility – CEE data entry
39
Tip #1 – To correct/change CEE values entered, you must select the field and delete out of your entry. This is because values shown in the drop-downs are filtered based on what has been typed so far. For example, above, only the Light Green and Dark Green values are listed since “green” has been typed into the data entry field.
available drop-down values are filtered

Facility– Form Submission
• Run Validation – Clicking on this button will run a validation to determine if all fields have been entered in the correct format and all required fields have been entered.
• Complete – In DATIM, all data is automatically saved as it is entered (when data entry is done online). Clicking on the Complete button indicates when you have completely finished entering data for the SIMS assessment record, but does not affect whether/how the data are saved in the system.
• Incomplete – Click on the Incomplete button if you need to edit/enter data in a record you had previously set as Complete.

Community - Data Entry
• Organization Unit – At the political/admin level chosen by an OU as its community sites, Organization Unit is synonymous
with Community Site Names– Select the Community Site of the SIMS visit from the left-hand Organization Unit Navigation Menu.– Once an Organization Unit (Community Site) is selected, the system knows the above site (e.g. OU,
Province, District) data as well.• Data Set. Select the “SIMS – Community, Packed” data set.• Period is by month. Select the month that the SIMS site assessment occurred in.• Funding Mechanism. Select the funding mechanism for the SIMS site assessment.
– By selecting a mechanism, the system knows the partner and agency as well. • Unique key: The Organization Unit, Period, and Funding Mechanism combined are the
unique key to identify data in DATIM. The dataset is NOT part of the unique key.

Community – Site & Mechanism Info
Tip #1 – The data for the Site and Mechanism Info section are collected on the paper Community Site Cover Sheet or the paper Community Site Dashboard.
Tip #2 – All form free text fields have a 255 character limit.
Tip #3 – Some fields from the Community Site Cover Sheet are not included on the SIMS in DATIM data entry form since they are known in the system through the Site (Organization Unit) and the Mechanism selected.
• Geopolitical Unit Level– Enter the geopolitical unit level that is being used as
community sites (e.g. ward, etc.) Free text.
• Funding Mechanism Number. – Enter the Agency Agreement # (not the FACTS Info
mechanism ID) if applicable. Free text.
• Community Site Visit ID– Enter the ID of the site visit, NOT the ID of the site itself.
Free text.
• Visit Type– Select from the drop-down, the visit type.
• Visit Date– Enter the specific date that the SIMS visit occurred on
• Partner Agreement Signed– Select from the Drop down
• Intervention Points Description– Description of all intervention points within the
Community Site visit. Enter from the Community Site Dashboard, if available. Free text.
• Overall Site Strengths & Challenges– Enter from Community Site Dashboard, if available. Free
Text.

Community – Domains and CEEs
Needs Urgent Remediation
Needs Improvement
Surpasses Expectations
Meets Expectations
Tip: CEE scores and Comments fields are not required fields. • If the Domain is not relevant to
the Community Site (OrgUnit), the user should not enter any data for any of the CEEs in that Domain (Data Set Section).
• If the Domain is relevant, but a CEE within the Domain is not relevant, the user should select “Not Applicable” for the “Score” for that CEE.
• If the Domain is relevant, and the CEE is relevant, but the data are missing, the user should leave the “score” blank, and enter information into the “Comments” field for the CEE describing why the data are missing
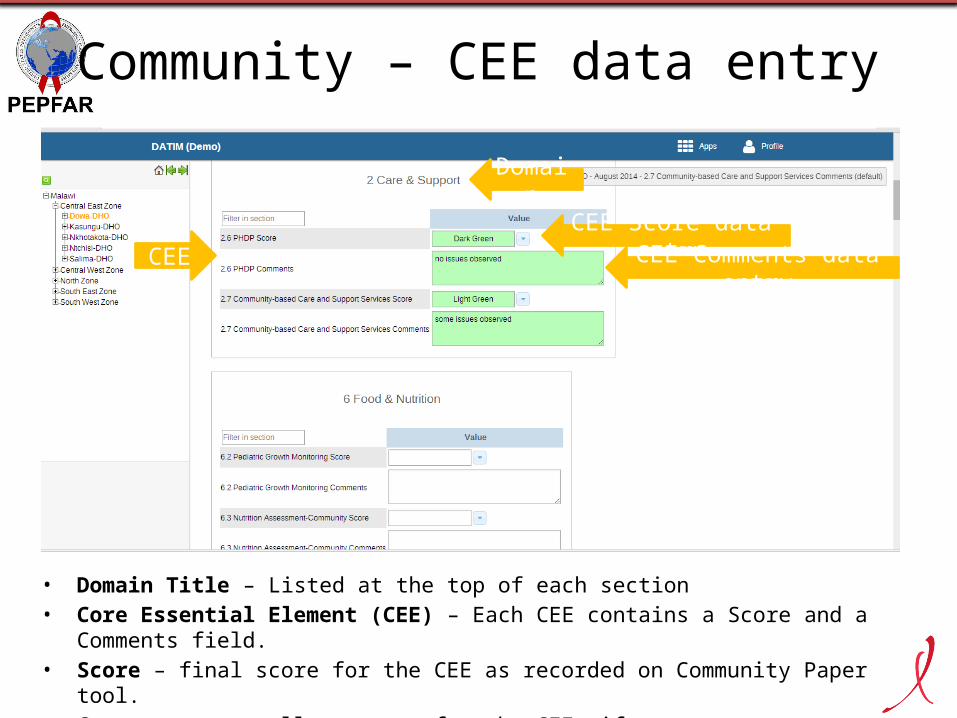
Community – CEE data entry
• Domain Title – Listed at the top of each section• Core Essential Element (CEE) – Each CEE contains a Score and a Comments field.• Score – final score for the CEE as recorded on Community Paper tool. • Comments – overall comments for the CEE, if any
CEE
Domain
CEE Score data entryCEE Comments data entry

Community – CEE data entry
45
Tip #1 – To correct/change CEE values entered, you must select the field and delete out of your entry. This is because values shown in the drop-downs are filtered based on what has been typed so far. For example, above, only the Light Green and Dark Green values are listed since “green” has been typed into the data entry field.
available drop-down values are filtered

Community – Form Submission
• Run Validation – Clicking on this button will run a validation to determine if all fields have been entered in the correct format and all required fields have been entered.
• Complete – In DATIM, all data is automatically saved as it is entered (when data entry is done online). Clicking on the Complete button indicates when you have completely finished entering data for the SIMS assessment record, but does not affect whether/how the data are saved in the system.
• Incomplete – Click on the Incomplete button if you need to edit data in a record you had previously set as Complete. This should be done sparingly.

Above site
47

Facility: Key Populations
• The Key Populations dataset consists only of the Domains & CEE related to Key Populations (Domains 9 STI and 11 Key Populations).
• Access to the SIMS Key Populations datasets in DATIM is limited to those who have the requisite permissions to enter/edit key population SIMS data.
• For each SIMS facility site record, data need to be entered into the SIMS – Facility dataset AND, if applicable, the SIMS – Facility: Key Populations dataset

Community: Key Populations
• The Key Populations dataset consists only of the Domains & CEE related to Key Populations (Domains 9 STI and 11 Key Populations).
• Access to the SIMS Key Populations datasets in DATIM is limited to those who have the requisite permissions to enter/edit key population SIMS data.
• For each SIMS community site record, data need to be entered into the SIMS – Community dataset AND, if applicable, the SIMS – Community: Key Populations dataset

DOD mil
50

Importing SIMS data into DATIM
51

• What is the policy for developing a data exchange from an existing site-level information system into DATIM?– Approval: DATIM must approve all DATIM data exchange development projects
from existing systems before they begin. DATIM must complete the final testing and provide final approval of the data exchange developed before any imports are run on the Production instance of DATIM from the data exchange.
– Format: Data to be imported into DATIM from existing systems must be formatted by the other existing system into the currently accepted import formats in DATIM and using the existing data element codes, site IDs, and formats in DATIM. For approved projects, DATIM will provide and maintain up-to-date documentation information on codes and formats available to create a data exchange into DATIM, as well as the appropriate system access to develop and test the data exchange.
– Technical Assistance: Unless otherwise approved through DATIM, the owners/developers of the other system are expected to provide the technical assistance to update their system as needed to be able to transfer data in the DATIM format and codes provided, to conduct exchange testing, and to provide assistance and training as needed to their system users for exporting data from their system.
52
Importing SIMS data into DATIM

Importing SIMS data into DATIM from an agency-specific SIMS application
1. Create/export a data transfer file from the agency-specific SIMS application. – Please contact the managers of the agency-specific application
for information on how to do this. Currently, only the CDC application supports this and only at the national level for the community and facility datasets only.
2. Note that the Implementing Mechanism ID and the Facility or Community Site ID for each SIMS record included in the data transfer file must match with existing IDs in DATIM in order to be imported.– The Mechanism ID must be the FACTS Info Mechanism ID
53

Importing SIMS data into DATIM from an agency-specific SIMS application
3. From your DATIM home page, click on the “Apps” section on the upper right hand side, then select the Import/Export Utility from the Apps menu.
54

Importing SIMS data into DATIM from an agency-specific SIMS application
4. Select appropriate type of Import. For example, if your data transfer file is an html file, select “XML Data Import”.
55

Importing SIMS data into DATIM from an agency-specific SIMS application
5. Click on “Choose file” and select the data transfer file to be imported.6. Click on “More options”, then set “Data element ID scheme” to
“Code”, and “Org unit ID scheme” to “Code.”7. Click the “Import” button.
56
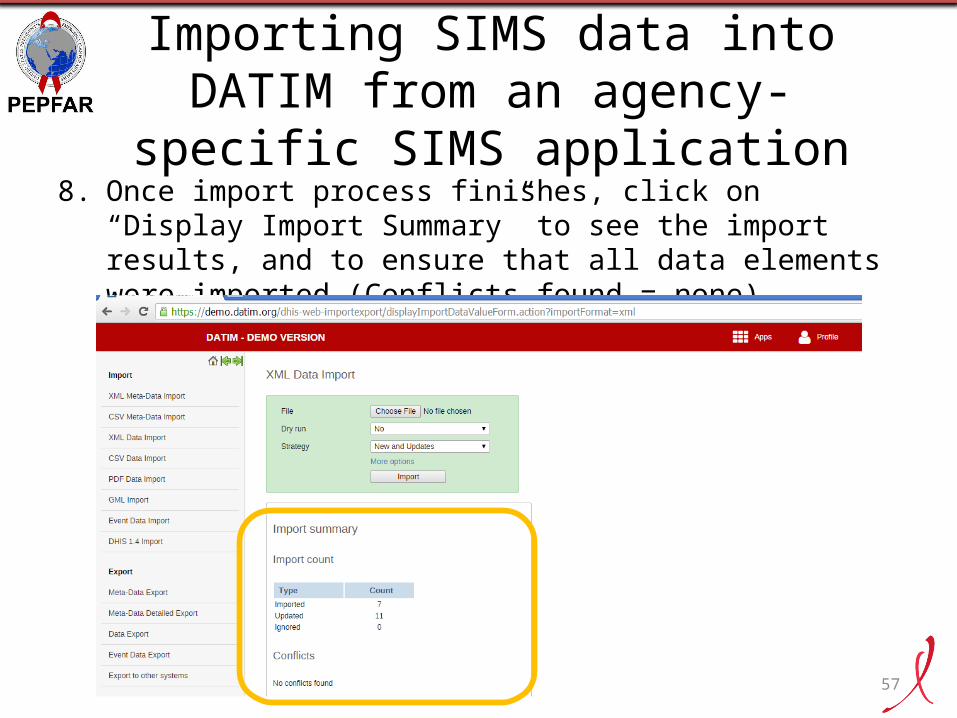
Importing SIMS data into DATIM from an agency-specific SIMS application
8. Once import process finishes, click on “Display Import Summary” to see the import results, and to ensure that all data elements were imported (Conflicts found = none).
57

Basic SIMS reports in DATIM
58

Reporting tools in DATIM
59

1. Select Pivot Table from the Apps menu.
2. On left hand menu, ignore the “Indicators” section, instead, click on the “Data elements” section.
3. From the dropdown, select “All SIMS” to list all SIMS data elements.
4. Click on the magnifying glass to filter those data elements. For example, type “score” in order to see only the CEE “score” data elements listed.
60
Creating a basic SIMS report example

5. Highlight (click on while holding down the Shift button) the data elements in the left hand pane of the Data elements section to include in the report.
6. Click on the blue arrow pointing right to add those highlighted data elements to the right hand pane of the Data elements section.
61
Creating a basic SIMS report example

Creating a basic SIMS report example
7. Click on the “Periods” section.
8. Then check the box for the time frame you want included in the report.
62

Creating a basic SIMS report example
9. Highlight the Organization Units (sites) to be included in the report.
10. Similarly, select the Funding Mechanisms or Funding Partners to be included in the report.
11. Click on the Update button to run the table.
63

Creating a basic SIMS report example
14. Click on the “Layout” button.
15. On the Table Layout menu that appears, drag and drop items to customize according the report to the example here, or as you would like.
16. Click “Update” on the Table layout menu to apply the changes. 64

Creating a basic SIMS report example
17. Click on the “Options” button.
18. On the Table Options menu that appears, uncheck all check boxes, or otherwise customize as you would like.
19. Click “Update” on the Options layout menu to apply the changes.
65

Creating a basic SIMS report example
66
• Resulting example report above. Note that the data above are not real and are for demo purposes only.
• Reports can then be exported by clicking on the Download button.
• This is just one example. Many reports are possible and can be customized as needed with existing reporting tools.
• Because the SIMS dataset is score-based, there will also be custom reports created to better fit this special type of dataset.

Creating a basic SIMS report example
• Note the “Aggregation Type” option.
• When set to “by data element” the CEE scores will be added if there is more than one for data point entered for the pivot table criteria selected.
• When set to “By count”, the CEE scores entered for the pivot table criteria will be counted. This is useful to determine where there is more than one record for the pivot table criteria selected.
67

Resources
• The SIMS Project Page on PEPFAR.net!– https://
www.pepfarii.net/Project-Pages/collab-39/SitePages/Home.aspx – The SIMS Project Page contains all SIMS tools as well as many training
materials (including this slide deck).
• For SIMS content related questions, email [email protected]
• For DATIM questions:– If you have DATIM account access, submit your question by clicking
on DATIM Support in the Apps menu – If you do not have DATIM account access, email [email protected]
68


![Amortizacija Zajma Primarno Datim Anuitetima-final[2]](https://img.dokumen.tips/doc/110x75/5571fc5549795991699703ab/amortizacija-zajma-primarno-datim-anuitetima-final2.jpg)