Embed Size (px)
Citation preview

User's GuideCMP0139-00 EN

Contents
IntroductionNotes on Manuals. . . . . . . . . . . . . . . . . . . . . . . . . . 5
Meaning of Symbols. . . . . . . . . . . . . . . . . . . . . . 5Illustrations. . . . . . . . . . . . . . . . . . . . . . . . . . . . 5Product Model Descriptions. . . . . . . . . . . . . . . . 5Manual Organization. . . . . . . . . . . . . . . . . . . . . 5Viewing PDF Manuals. . . . . . . . . . . . . . . . . . . . . 5
Printer Parts. . . . . . . . . . . . . . . . . . . . . . . . . . . . . . 7Front. . . . . . . . . . . . . . . . . . . . . . . . . . . . . . . . . 7Inside. . . . . . . . . . . . . . . . . . . . . . . . . . . . . . . . . 9Back. . . . . . . . . . . . . . . . . . . . . . . . . . . . . . . . . 11Control panel. . . . . . . . . . . . . . . . . . . . . . . . . . 13Home screen operations. . . . . . . . . . . . . . . . . . 13
Features of Printer. . . . . . . . . . . . . . . . . . . . . . . . . 16Realizing High Resolution. . . . . . . . . . . . . . . . . 16Insistence on Ease-of-Use. . . . . . . . . . . . . . . . . 16
Notes on Usage and Storage. . . . . . . . . . . . . . . . . . 17Installation space. . . . . . . . . . . . . . . . . . . . . . . . 17Notes when using the printer. . . . . . . . . . . . . . . 18Notes when not using the printer. . . . . . . . . . . . 18Notes on handling ink cartridges. . . . . . . . . . . . 19Notes on handling paper. . . . . . . . . . . . . . . . . . 20
Saving Power. . . . . . . . . . . . . . . . . . . . . . . . . . . . . 21
Introducing the SoftwareProvided Software. . . . . . . . . . . . . . . . . . . . . . . . . 22Built-in Software in the Printer. . . . . . . . . . . . . . . . 23How to Use Web Config. . . . . . . . . . . . . . . . . . . . . 24
How to Start. . . . . . . . . . . . . . . . . . . . . . . . . . . 24Closing. . . . . . . . . . . . . . . . . . . . . . . . . . . . . . . 24Function Summary. . . . . . . . . . . . . . . . . . . . . . 24
Updating Software or Installing AdditionalSoftware. . . . . . . . . . . . . . . . . . . . . . . . . . . . . . . . 25
Checking Whether Updates Available andUpdating Software. . . . . . . . . . . . . . . . . . . . . . . 25Receiving Update Notifications. . . . . . . . . . . . . 25
Uninstalling Software. . . . . . . . . . . . . . . . . . . . . . 26Windows. . . . . . . . . . . . . . . . . . . . . . . . . . . . . 26Mac. . . . . . . . . . . . . . . . . . . . . . . . . . . . . . . . . 26
Loading and Setting the PaperNotes on Loading the Paper. . . . . . . . . . . . . . . . . . 27Paper Load Position. . . . . . . . . . . . . . . . . . . . . . . . 27Loading and Removing the Roll Paper. . . . . . . . . . 28
Loading Roll Paper. . . . . . . . . . . . . . . . . . . . . . 28Cutting the Roll Paper. . . . . . . . . . . . . . . . . . . . 30Removing Roll Paper. . . . . . . . . . . . . . . . . . . . . 32
Loading and Removing Paper in/from the AutoSheet Feeder. . . . . . . . . . . . . . . . . . . . . . . . . . . . . 34
Attaching and Removing the Stacker (forPlain Paper). . . . . . . . . . . . . . . . . . . . . . . . . . . 34Loading Paper in the Auto Sheet Feeder. . . . . . . 34Removing Paper from the Auto Sheet Feeder. . . 36
Loading and Removing Cut Sheet(1 sheet). . . . . . . 37Loading Cut Sheet(1 sheet). . . . . . . . . . . . . . . . 37Removing Cut Sheet (1 Sheet). . . . . . . . . . . . . . 38
Setting Loaded Paper. . . . . . . . . . . . . . . . . . . . . . . 39For Roll Paper. . . . . . . . . . . . . . . . . . . . . . . . . . 39For Auto Sheet Feeder / Cut Sheet(1 sheet). . . . . 41
Optimizing Paper Settings (Media Adjust). . . . . . . 43Notes on Making Adjustments. . . . . . . . . . . . . . 43Adjustment Procedure. . . . . . . . . . . . . . . . . . . . 43
Printing with the Printer Driver from Your ComputerBasic Operating Procedures (Windows). . . . . . . . . 46
Printing Procedure. . . . . . . . . . . . . . . . . . . . . . 46Canceling Printing. . . . . . . . . . . . . . . . . . . . . . 48Customizing the Printer Driver. . . . . . . . . . . . . 49
Basic Operating Procedures (Mac). . . . . . . . . . . . . 52Printing Procedure. . . . . . . . . . . . . . . . . . . . . . 52Canceling Printing. . . . . . . . . . . . . . . . . . . . . . 55Customizing the Printer Driver. . . . . . . . . . . . . 55
Printing CAD Drawings. . . . . . . . . . . . . . . . . . . . 57Enlargements and Horizontal and VerticalBanners. . . . . . . . . . . . . . . . . . . . . . . . . . . . . . . . 59
Fitting Documents to the Width of the RollPaper. . . . . . . . . . . . . . . . . . . . . . . . . . . . . . . . 60Fitting Documents to the Output Size. . . . . . . . . 61Choosing a Print Size. . . . . . . . . . . . . . . . . . . . . 63
Printing at Non-Standard Sizes. . . . . . . . . . . . . . . 64Correct color and print. . . . . . . . . . . . . . . . . . . . . 68Color Management Printing. . . . . . . . . . . . . . . . . . 72
About Color Management. . . . . . . . . . . . . . . . . 72Color Management Print Settings. . . . . . . . . . . . 72Setting color management with the applications. 73Setting color management with the printerdriver. . . . . . . . . . . . . . . . . . . . . . . . . . . . . . . . 75
Multi-Page Printing (N-up). . . . . . . . . . . . . . . . . . 79
SC-T5100 Series/SC-T3100 Series/SC-T5100N Series/SC-T3100N Series User's Guide
Contents
2

Manual 2-Sided Printing (Windows Only). . . . . . . 80Notes on Using 2-Sided Printing. . . . . . . . . . . . 80Setting Procedures for Printing. . . . . . . . . . . . . 80
Folded 2-Sided Printing (Windows only). . . . . . . . 82Poster Printing (Windows Only). . . . . . . . . . . . . . 83Printing Multiple Documents (Layout Manager)(Windows Only). . . . . . . . . . . . . . . . . . . . . . . . . . 88
Setting Procedures for Printing. . . . . . . . . . . . . 88Saving and Recalling Settings. . . . . . . . . . . . . . . 89
Printing Using the HP-GL/2 or HP RTL Mode from a ComputerPrinter Settings. . . . . . . . . . . . . . . . . . . . . . . . . . . 91
Basic Print Settings. . . . . . . . . . . . . . . . . . . . . . 91HP-GL/2 Specific Print Settings. . . . . . . . . . . . . 91
CAD Application Settings. . . . . . . . . . . . . . . . . . . 92
Changing the Network Connection MethodsSwitching to Wired LAN. . . . . . . . . . . . . . . . . . . . 93Switching to Wireless LAN. . . . . . . . . . . . . . . . . . . 93Directly Connection Wirelessly (Wi-Fi Direct). . . . 94
Printing Using AirPrint
Making Enlarged Copies with an A3 or A4 ScannerConnecting the Scanner. . . . . . . . . . . . . . . . . . . . . 96Making Enlarged Copies. . . . . . . . . . . . . . . . . . . . 97Placing Documents in the Scanner. . . . . . . . . . . . . 97
Using the MenuMenu List. . . . . . . . . . . . . . . . . . . . . . . . . . . . . . . 99Paper Setting menu. . . . . . . . . . . . . . . . . . . . . . . 109
Roll Paper menu. . . . . . . . . . . . . . . . . . . . . . . 109Auto Sheet Feeder menu. . . . . . . . . . . . . . . . . 112Cut Sheet(1 sheet) menu. . . . . . . . . . . . . . . . . 113
Printer Status menu. . . . . . . . . . . . . . . . . . . . . . . 114Settings menu. . . . . . . . . . . . . . . . . . . . . . . . . . . 115
General Settings. . . . . . . . . . . . . . . . . . . . . . . 115Maintenance. . . . . . . . . . . . . . . . . . . . . . . . . . 131Printer Status/Print. . . . . . . . . . . . . . . . . . . . . 132
Enlarged Copy menu. . . . . . . . . . . . . . . . . . . . . . 133
MaintenanceClear Print Head Clogs. . . . . . . . . . . . . . . . . . . . 134
Checking for Clogged Print Head, andCleaning. . . . . . . . . . . . . . . . . . . . . . . . . . . . . 134Powerful Cleaning. . . . . . . . . . . . . . . . . . . . . . 134
Replacing Consumables. . . . . . . . . . . . . . . . . . . . 135Handling of Used Consumables. . . . . . . . . . . . 135Replacing Ink Cartridges. . . . . . . . . . . . . . . . . 135Maintenance Box Replacement. . . . . . . . . . . . . 137Replacing the Cutter. . . . . . . . . . . . . . . . . . . . 138
Problem SolverWhat to do When a Message is Displayed. . . . . . . 140When a Maintenance Call/Printer Error Occurs. . 141Troubleshooting. . . . . . . . . . . . . . . . . . . . . . . . . 142
You cannot print (because the printer doesnot work). . . . . . . . . . . . . . . . . . . . . . . . . . . . 142The printer sounds like it is printing, butnothing prints. . . . . . . . . . . . . . . . . . . . . . . . . 144The prints are not what you expected. . . . . . . . 145Feeding or ejecting problems. . . . . . . . . . . . . . 150Others. . . . . . . . . . . . . . . . . . . . . . . . . . . . . . 152
AppendixOptions and Consumable Products. . . . . . . . . . . . 154
Epson Special Media. . . . . . . . . . . . . . . . . . . . 154Ink cartridges. . . . . . . . . . . . . . . . . . . . . . . . . 154Others. . . . . . . . . . . . . . . . . . . . . . . . . . . . . . 155
Supported Media. . . . . . . . . . . . . . . . . . . . . . . . . 157Epson Special Media Table. . . . . . . . . . . . . . . . 157Supported Commercially Available Paper. . . . . 160
Printable area. . . . . . . . . . . . . . . . . . . . . . . . . . . 163Roll Paper. . . . . . . . . . . . . . . . . . . . . . . . . . . . 163Cut Sheet (Auto Sheet Feeder). . . . . . . . . . . . . 165Cut Sheet (1 Sheet). . . . . . . . . . . . . . . . . . . . . 165
Moving or Transporting the Printer. . . . . . . . . . . 166Moving to a Different Location in the SameBuilding. . . . . . . . . . . . . . . . . . . . . . . . . . . . . 166When Transporting. . . . . . . . . . . . . . . . . . . . . 167Handling if Transporting/Leaving the Printerin an Environment of -10°C or Less. . . . . . . . . 167
System Requirements. . . . . . . . . . . . . . . . . . . . . . 169Printer Driver. . . . . . . . . . . . . . . . . . . . . . . . . 169Web Config. . . . . . . . . . . . . . . . . . . . . . . . . . . 170
Specifications Table. . . . . . . . . . . . . . . . . . . . . . . 171For European users. . . . . . . . . . . . . . . . . . . . . 172
SC-T5100 Series/SC-T3100 Series/SC-T5100N Series/SC-T3100N Series User's Guide
Contents
3

Where To Get HelpTechnical Support Web Site. . . . . . . . . . . . . . . . . 174Contacting Epson Support. . . . . . . . . . . . . . . . . . 174
Before Contacting Epson. . . . . . . . . . . . . . . . . 174Help for Users in North America. . . . . . . . . . . 175Help for Users in Europe. . . . . . . . . . . . . . . . . 175Help for Users in Australia. . . . . . . . . . . . . . . . 175Help for Users in Singapore. . . . . . . . . . . . . . . 176Help for Users in Thailand. . . . . . . . . . . . . . . . 176Help for Users in Vietnam. . . . . . . . . . . . . . . . 176Help for Users in Indonesia. . . . . . . . . . . . . . . 176Help for Users in Hong Kong. . . . . . . . . . . . . . 177Help for Users in Malaysia. . . . . . . . . . . . . . . . 177Help for Users in India. . . . . . . . . . . . . . . . . . . 177Help for Users in the Philippines. . . . . . . . . . . 178
SC-T5100 Series/SC-T3100 Series/SC-T5100N Series/SC-T3100N Series User's Guide
Contents
4

Introduction
Notes on Manuals
Meaning of Symbols
Warning: Warnings must be followed toavoid serious bodily injury.
Caution: Cautions must be followed toavoid bodily injury.
c Important: Important must be followed toavoid damage to this product.
Note: Notes contain useful oradditional information on theoperation of this product.
U Indicates related referencecontent.
Illustrations
The illustrations may differ slightly from the modelyou are using. Please be aware of this when using themanuals.
Product Model Descriptions
Some models described in this manual may not besold in your country or region.
Manual Organization
The manuals for the product are organized as shownbelow.
You can view the PDF manuals using Adobe AcrobatReader or Preview (Mac).
Setup Guide(booklet)
Provides information on howto setup the printer afterunpacking it from the box.Make sure you read thismanual to perform operationssafely.
Operator's Guide(booklet or PDF)
Provides selected informationon how to use the printer andfrequently used features of theprinter.
General Information(PDF)
Provides important safetyinstructions, printerspecifications and contactdetails.
Online Manual
User's Guide(this manual)
Provides overall informationand instructions on using theprinter and on solvingproblems.
Administrator'sGuide (PDF)
Provides networkadministrators withinformation on managementand printer settings.
Viewing PDF Manuals
This section uses the Adobe Acrobat Reader DC as anexample to explain the basic operations for viewingthe PDF in Adobe Acrobat Reader.
A Click to print the PDF manual.
SC-T5100 Series/SC-T3100 Series/SC-T5100N Series/SC-T3100N Series User's Guide
Introduction
5

B Each time it is clicked the bookmarks are hiddenor shown.
C Click the title to open the relevant page.
Click [+] to open the titles lower in the hierarchy.
D If the reference is in blue text, click the blue text toopen the relevant page.
To return to the original page, do the following.
For Windows
While pressing the Alt key, press the key.
For Mac
While pressing the command key, press the key.
E You can input and search for keywords, such as thenames of items you want to confirm.
For Windows
Right click on a page in the PDF manual and selectFind in the menu that is displayed to open thesearch toolbar.
For Mac
Select Find in the Edit menu to open the searchtoolbar.
F To enlarge the text in the display that is too smallto see well, click . Click to reduce the size.To specify a part of an illustration or screenshot toenlarge, do the following.
For Windows
Right click on the page in the PDF manual andselect Marquee Zoom in the menu that isdisplayed. The pointer changes to a magnifyingglass, use it to specify the range of the place youwant to enlarge.
For Mac
Click View menu - Zoom - Marquee Zoom in thisorder to change the pointer to a magnifying glass.Use the pointer as a magnifying glass to specify therange of the place you want to enlarge.
G Opens the previous page or next page.
SC-T5100 Series/SC-T3100 Series/SC-T5100N Series/SC-T3100N Series User's Guide
Introduction
6

Printer Parts
Front
The illustration shows the SC-T3100 Series (24 inch model with stand).
A Control panel
U “Control panel” on page 13
B Cutter cover
Open when replacing the cutter.
U “Replacing the Cutter” on page 138
C Paper basket
Output from the printer collects in this basket, keeping the media clean and free of creases.
A dedicated stand that comes with a paper basket is provided as an option for SC-T3100N Series andSC-T5100N Series.
U “Options and Consumable Products” on page 154
SC-T5100 Series/SC-T3100 Series/SC-T5100N Series/SC-T3100N Series User's Guide
Introduction
7

D Casters
There are two casters on each leg. The casters are normally kept locked once the printer is in place.
E Stacker (for plain paper)
Attach this stacker to the front of the printer in this way when continuously printing multiple sheets of plainpaper from the auto sheet feeder. The printed paper is stacked in this tray after ejection. Remove the stackerwhen using roll paper or Cut Sheet (1 sheet).
U “Attaching and Removing the Stacker (for Plain Paper)” on page 34
F B1 width paper support (SC-T5100 Series/SC-T5100N Series only)
For roll paper or cut sheet (1 sheet) equivalent to B1 width (718 to 738 mm) only, raise the B1 width papersupport before printing to prevent scuffing and soiling of the print surface.U “Loading Roll Paper” on page 28 U “Loading Cut Sheet(1 sheet)” on page 37
G Edge guides
Slide these guides against the left and right edges of the paper loaded in the auto sheet feeder. It can preventpaper from being fed skewed.
H Auto sheet feeder
This allows you to load multiple sheets of A3 to A4 cut sheet. The loaded paper is automatically fed and printedcontinuously.U “Loading Paper in the Auto Sheet Feeder” on page 34
I Cut sheet cover
Open this cover when using the auto sheet feeder or when loading a cut sheet of paper.U “Loading Cut Sheet(1 sheet)” on page 37 When loading roll paper, open this cover and then open the roll paper cover.
To prevent dust from accumulating inside the printer, use the printer with this cover closed when not using theauto sheet feeder and when not loading a cut sheet of paper.
J Front cover
Open this cover when replacing ink cartridges or clearing a paper jam.
SC-T5100 Series/SC-T3100 Series/SC-T5100N Series/SC-T3100N Series User's Guide
Introduction
8

Inside
A Roll paper cover
This cover protects the loaded roll paper and prevents dust from entering inside the printer. Except when load‐ing or removing roll paper, it should be closed when using the printer.U “Loading Roll Paper” on page 28
B Paper slot
This is the slot through which roll paper or single sheets of cut sheet are fed during printing. Feed single sheetsone at a time.
C Ink cartridges
Install cartridges into all slots.
U “Replacing Ink Cartridges” on page 135
D Cartridge cover
Open when replacing ink cartridges.
E Spindle
When loading roll paper into the printer, insert this through the roll paper.
F Movable flange (transparent)
This fixes the roll paper placed on the spindle. Attach or detach it when placing or removing roll paper on/fromthe spindle.
SC-T5100 Series/SC-T3100 Series/SC-T5100N Series/SC-T3100N Series User's Guide
Introduction
9

G Spindle holder
Place the spindle in this holder after it is attached to the roll paper. There is a holder on both the left and rightsides.
U “Loading Roll Paper” on page 28
SC-T5100 Series/SC-T3100 Series/SC-T5100N Series/SC-T3100N Series User's Guide
Introduction
10

Back
A Maintenance box cover
Open the cover when replacing the Maintenance Box.
B Maintenance Box
This container is for collecting the waste ink.
U “Maintenance Box Replacement” on page 137
C AC inlet
Connect the supplied power cable here.
D LAN port
Connects the LAN cable.
E Status light (green, orange)
The color indicates the network transmission speed.
Off:
Orange:
Green:
10BASE-T
100BASE-T
1000BASE-T
SC-T5100 Series/SC-T3100 Series/SC-T5100N Series/SC-T3100N Series User's Guide
Introduction
11

F Data light (yellow)
The network connection status and data reception are indicated by a lit or flashing light.
On:
Flashing:
Connected.
Receiving data.
G OPTION port
Connect a scanner to perform enlarged copying.U “Making Enlarged Copies with an A3 or A4 Scanner” on page 96
H USB port
Connects the USB cable.
I Vents
Do not block the vents.U “Installation space” on page 17
SC-T5100 Series/SC-T3100 Series/SC-T5100N Series/SC-T3100N Series User's Guide
Introduction
12

Control panel
A Home buttonTouch this button while a menu is displayed toreturn to the Home screen. The home button is offwhen it cannot be used during operations such aspaper feeding.
B P light (power light)On : The power is on.
Flashing : The printer is performing a processsuch as starting up, powering off, datareceiving, or print head cleaning.Please wait without performing anyoperation until this light stopsflashing. Do not disconnect the powercord.
Off : The power is off.
C P button (power button)Turns the power on and off.
D ScreenThis is a touch panel to display the printer's status,menus, error messages, and so on. You can selectthe menu items and options displayed on thisscreen by gently touching (tapping) them, andscroll the screen by moving your finger while itremains touching the screen.
Home screen operations
Overview of Home screen operations U Operator'sGuide (booklet or PDF)
A Information display areaDisplays the printer's status, error messages, and soon.
B Roll paper information area❏ When roll paper is loaded
Displays information on the loaded roll paper. WhenPaper Remaining is set to On, the approximateremaining amount (remaining length) is displayed.Touching this area displays a menu to performoperations such as setting and adjusting the rollpaper.U “Roll Paper menu” on page 109
❏ When roll paper is not loadedDisplays "---". Touching this area displays theprocedure for loading roll paper.
C Paper Setting menu button
SC-T5100 Series/SC-T3100 Series/SC-T5100N Series/SC-T3100N Series User's Guide
Introduction
13

Touch this button when loading, removing, setting,or adjusting paper.
❏ See the following for more details on Roll Paper.U “Loading and Removing the Roll Paper” onpage 28Menu descriptions U “Roll Paper menu” onpage 109
❏ See the following for more details on Auto SheetFeeder.U “Loading and Removing Paper in/from the AutoSheet Feeder” on page 34Menu descriptions U “Auto Sheet Feeder menu”on page 112
❏ See the following for more details on Cut Sheet(1sheet).U “Loading and Removing Cut Sheet(1 sheet)” onpage 37Menu descriptions U “Cut Sheet(1 sheet) menu”on page 113
D Printer Status menu buttonTouch this button when you want to check thestatus of consumables or details of displayednotifications.U “Printer Status menu” on page 114
E Settings menu buttonTouch this button when you want to performmaintenance or configure the printer operationsettings, network settings, or other settings. See thefollowing for more details.U “Settings menu” on page 115
F Information iconWhen there are notifications, such as consumableremaining amount low warnings, the number ofnotifications is indicated by a badge at the top rightof this icon. If you touch this icon when the badgeis displayed, a list of the notifications that requireyour action is displayed. Touching each itemdisplays instructions on what to do. If you do notperform the actions, the badge will not disappear.
G Network icon
The network connection status is indicated by anicon as shown below.
Touching the icon allows you to switch the net‐work connection status.
U “Changing the Network Connection Methods”on page 93
Not connected to a wired LAN or thewired LAN or wireless LAN not set.
Connected to a wired LAN.
Wireless LAN (Wi-Fi) is disabled.
Searching for SSID, IP address not set,or signal strength is 0 or poor.
Connected to a wireless LAN (Wi-Fi).The number of lines indicates thesignal strength. The more lines thereare, the better the signal strength.
Wi-Fi Direct (simple AP) connection isdisabled.
Wi-Fi Direct (simple AP) connection isenabled.
H Consumables status iconEstimates of the remaining amounts of inkcartridges and the empty space in the MaintenanceBox are indicated by the length of the bars. Theshorter a bar is, the lower the remaining amount ofink or space.
When is displayed, the remaining amount ofthe corresponding ink cartridge or the amount ofempty space in the Maintenance Box is low.Touching the icon displays the consumables statusscreen so that you can check the ink cartridge andMaintenance Box product numbers. This is ashortcut button for Supply Status in the PrinterStatus menu.
U “Printer Status menu” on page 114
SC-T5100 Series/SC-T3100 Series/SC-T5100N Series/SC-T3100N Series User's Guide
Introduction
14

Note:When you connect an Epson A3 or A4 scanner to theprinter, Enlarged Copy appears to allow you to easilymake enlarged copies.
U “Making Enlarged Copies with an A3 or A4Scanner” on page 96
SC-T5100 Series/SC-T3100 Series/SC-T5100N Series/SC-T3100N Series User's Guide
Introduction
15

Features of Printer
Realizing High Resolution
CAD drawings that are clear, legible,and can even be used safelyoutdoors
Newly-developed Epson UltraChrome XD2 inkenables the printer to produce extremely detaileddrawings both in black and white and in color.
The supplied printer driver offers a line drawing mode,making it easier to optimize printing for line drawingand, through unsurpassed reproduction of linedrawing and fine lines in the form of connected lines,diagonals, and curves, ensuring the best possibleresults when the printer is used for drawings.
In addition, you can even safely take your drawingsoutdoors with you because they are printed using inkwith excellent water resistance.
U “Printing CAD Drawings” on page 57
Posters and displays that are vividand also allow for short-termoutdoor display
Posters with vivid hues can be printed simply byselecting, for example, Poster (Photo)/Perspective inSelect Target of the supplied printer driver.
Short-term outdoor display is even supported sinceink that also has excellent light fastness is used.
Your posters will last even longer if you use laminationprocessing.
The effect differs depending on the paper.
Insistence on Ease-of-Use
Space-saving large-format printer
This printer is compact and lightweight compared toprevious large-format Epson printers, so you will haveno trouble finding a location to place it. The modelwithout a stand can even be placed on a drawingstorage cabinet or the like. See the following fordimensions.
U “Specifications Table” on page 171
Automatic switching between autosheet feeder (cut sheet) and rollpaper
This printer allows not only roll paper to be loaded butalso multiple sheets of A3 size or smaller sheet to beloaded in the auto sheet feeder at the same time. Whenyou select either of these two Source settings of theprinter driver, the paper is switched automatically toallow you to print easily.
Smooth operation while checkingthe operating instructions on thescreen
In addition to having a screen design that enablesintuitive operation, this printer allows you to checkillustrated instructions of operations such as how toload paper.
U Operator's Guide (booklet or PDF)
Printer driver that is simple and easyto operate
Print settings can be optimized simply by choosing thedesired use or target. This spares you the trouble ofadjusting print settings individually. When you select aSource setting, printing failures due to paper loadingmistakes are reduced because the size and type ofpaper loaded in the printer are applied automatically.In addition to checking the set conditions in anillustration in the printer driver, you can also check adetailed image in the preview screen before printing.
SC-T5100 Series/SC-T3100 Series/SC-T5100N Series/SC-T3100N Series User's Guide
Introduction
16

Support for wireless LAN connection
This printer can be freely placed where desired withoutconsidering cable routing because it can connect witha computer via a wireless LAN to print. Of course, italso supports a wired LAN connection.
Furthermore, even if your device is not connected to aLAN, this printer also allows printing by directlyconnecting with it using Wi-Fi Direct. From an iOSdevice, you can also print easily using AirPrint.
U “Switching to Wireless LAN” on page 93
U “Directly Connection Wirelessly (Wi-Fi Direct)”on page 94
U “Printing Using AirPrint” on page 95
Notes on Usage andStorage
Installation space
Make sure that you secure the following space, clear ofany other objects, so that paper ejection andconsumable replacement are not obstructed.
See the “Specifications Table“ for the externaldimensions of the printer.
U “Specifications Table” on page 171
SC-T5100 Series/SC-T3100 Series
W D H
SC-T5100Series
1318 mm 1270 mm 1063 mm
SC-T3100Series
1020 mm 1270 mm 1063 mm
SC-T5100N Series/SC-T3100N Series
SC-T5100 Series/SC-T3100 Series/SC-T5100N Series/SC-T3100N Series User's Guide
Introduction
17

W D H
SC-T5100NSeries
1318 mm 915 mm 380 mm
SC-T3100NSeries
1020 mm 915 mm 380 mm
*At least 130 mm of space is required at the back whenreplacing the Maintenance Box.
Notes when using the printer
Note the following points when using this printer toavoid breakdowns, malfunctions, and print qualitydecline.
❏ When using the printer, observe the operatingtemperature and humidity range described in the"Specifications Table".U “Specifications Table” on page 171Even when the conditions above are met, you maynot be able to print properly if the environmentalconditions are not suitable for the paper. Be sureto use the printer in an environment where thepaper's requirements are met. For more details,see the documentation supplied with the paper.Also, when operating in dry areas, air conditionedenvironment, or under direct sunlight, maintainthe appropriate humidity.
❏ Do not install the printer next to heat sources ordirectly in the path of air from a ventilator or airconditioner. Failure to observe this precautioncould result in the print head nozzles drying andclogging.
❏ The print head may not be capped (i.e., may notmove to the right-hand side) if an error occursand the printer is turned off without first resolvingthe error. Capping is a function for automaticallycovering the print head with a cap (lid) to preventthe print head from drying out. In this case, turnon the power and wait a while until capping isperformed automatically.
❏ When the power is on, do not remove the powerplug or cut the power at the breaker. The printhead may not be capped properly. In this case,turn on the power and wait a while until cappingis performed automatically.
❏ Even when printing is not performed, some ofeach color of ink will be consumed by inkcartridge replacement, print head cleaning, andother maintenance operations needed to keep theprint head in good condition.
❏ The printer may automatically perform print headcleaning to maintain good printing quality. Pleasewait until cleaning finishes without opening any ofthe covers or turning off the power.
Notes when not using the printer
If you are not using it, note the following points whenstoring the printer. If it is not stored correctly, you maynot be able to print properly the next time it is used.
❏ When storing the printer, store it flat with the inkcartridges installed. Do not place the printer tilted,upright, or upside down.
❏ If you do not print for a long time, the print headnozzles may become clogged. We recommend thatyou print once a week to prevent the print headfrom clogging.
❏ The roller may leave an impression on paper thatis left in the printer. This can also cause wavy orcurled paper resulting in paper feeding problemsor the print head could be scratched. Remove anypaper when storing.
❏ Store the printer after confirming that the printhead has been capped (the print head ispositioned at the far right). If the print head is leftuncapped for a long time, the print quality maydecline.
Note:If the print head is not capped, turn the printer on,and then turn it off.
❏ To prevent the accumulation of dust and otherforeign matter in the printer, close all coversbefore placing it in storage.If the printer will be not be used for an extendedperiod, protect it with an anti-static cloth or othercover.The print head nozzles are very small, and theycan become clogged easily if fine dust gets on theprint head, and you may not be able to printproperly.
SC-T5100 Series/SC-T3100 Series/SC-T5100N Series/SC-T3100N Series User's Guide
Introduction
18

❏ The print head may fail if the environmentaltemperature becomes -10°C or lower. If theenvironmental temperature in the room or duringtransport is expected to become -10°C or lower, besure to discharge the ink in advance.U “Handling if Transporting/Leaving thePrinter in an Environment of -10°C or Less” onpage 167
Notes on handling ink cartridges
Note the following points when handling inkcartridges to maintain good print quality.
❏ The ink cartridges packaged with your printer arepartly used during initial setup. In order toproduce high quality printouts, the print head inyour printer will be fully charged with ink. Thisone-off process consumes a quantity of ink andtherefore these cartridges may print fewer pagescompared to subsequent ink cartridges.
❏ The Initial Cartridge included together with theprinter are designed for printer setup and not forresale or later use. After some ink is used forcharging, the rest is available for printing. For theinitial setup, make sure to use Initial Cartridge.
❏ We recommend that ink cartridges be stored atroom temperature out of direct sunlight and usedbefore the expiry date printed on the packaging.
❏ To ensure good results, use all the ink in thecartridges within 6 months of opening thepackages.
❏ Do not open the ink cartridge package until youare ready to install it in the printer. The cartridgeis vacuum packed to maintain its reliability.
❏ Ink cartridges that have been stored at lowtemperatures for an extended period should beallowed to return to room temperature over aperiod of at least three hours.
❏ Be sure to peel off the tape (yellow) beforeinstalling an ink cartridge. If you attempt toforcibly install an ink cartridge without removingthe tape, the printer may become unable to printproperly. Never peel off anything else such as thefilm or label. Ink may leak.
❏ Do not touch the IC chips on the ink cartridges.You may not be able to print properly.U “Replacing Ink Cartridges” on page 135
❏ Install the ink cartridges for all the colors. Printingis not possible if they are not all installed.
❏ Do not leave the printer without ink cartridgesinstalled. The print head nozzles may dry andprinting may become no longer possible.
❏ The ink level and other data are stored in the ICchip, allowing cartridges to be used after beingremoved and replaced. However, if an inkcartridge with not much ink remaining is removedand reinstalled, it may not be usable because someink is consumed to ensure the reliability of theprinter.
❏ To avoid getting dust on the ink supply port, storea removed partially used ink cartridge with theink supply port downward or horizontal in thesame environment as this product. The ink supplyport has a valve in it so it does not need to becapped.
❏ Removed ink cartridges may have ink around theink supply port, so be careful not to get any ink onthe surrounding area when removing thecartridges.
❏ To maintain the quality of the print head, thisprinter stops printing before ink cartridges arecompletely expended.
❏ Although the ink cartridges may contain recycledmaterials, this does not affect printer function orperformance.
❏ Do not dismantle or remodel ink cartridges. Youmay not be able to print properly.
❏ Do not drop or otherwise subject an ink cartridgeto a strong impact. Ink may leak from thecartridge.
❏ Even when the printer is not in use, some of eachcolor of ink will be consumed by ink cartridgereplacement, print head cleaning, and othermaintenance operations needed to keep the printhead in good condition.
SC-T5100 Series/SC-T3100 Series/SC-T5100N Series/SC-T3100N Series User's Guide
Introduction
19

❏ A mixture of color inks may be used to print blackdepending on the paper type and print qualitysettings even for black and white and grayscaleprinting.
Notes on handling paper
Note the following points when handling and storingthe paper. If the paper is not in good condition, printquality may decline.
Check the documentation supplied with each paper.
Notes on Handling
❏ Use Epson special media under normal roomconditions (temperature: 15 to 25°C, humidity: 40to 60%).
❏ Do not fold the paper or scratch the surface of thepaper.
❏ Avoid touching the printable surface of the paperwith your bare hands. Moisture and oils from yourhands can affect print quality.
❏ Handle paper by the edges. We recommendwearing cotton gloves.
❏ Changes in temperature and humidity may causepaper to become wavy or curled. Check thefollowing points.
❏ Load the paper just before printing.
❏ Do not use wavy or curled paper.For roll paper, cut off the wavy or curled partsand then load it again.For cut sheets, use new paper.
❏ Do not wet the paper.
❏ Do not throw away the paper packaging as youcan use it for storing the paper.
❏ Avoid locations that are subject to direct sunlight,excessive heat, or humidity.
❏ Keep cut sheets in their original package afteropening, and keep them in a flat place.
❏ Remove roll paper that is not in use from theprinter. Rewind it correctly and then store it in theoriginal packaging that came with the roll paper. Ifyou leave the roll paper in the printer for a longtime, its quality may decline.
Notes on handling printed paper
To maintain long lasting, high quality print results,note the following points.
❏ Do not rub or scratch print outs. If they arerubbed or scratched, the ink may peel off.
❏ Do not touch the surface of print outs. The inkmay peel off.
❏ Make sure the print outs are completely dry beforefolding of stacking; otherwise, the color maychange where they touch (leaves a mark). Thesemarks will disappear if they are separatedimmediately and dried; however, they will remainif not separated.
❏ If you put the print outs in an album before theyare completely dry, they may be blurred.
❏ Do not use a dryer to dry the print outs.
❏ Avoid direct sunlight.
❏ Prevent color distortion while displaying orstoring the print outs by following the instructionsin the paper's documentation.
Note:Typically, print outs and photos fade over time (colordistortion) due to the effects of light and variousconstituents in the air. This also applies to Epson specialmedia. However, with the correct storage method, thedegree of color distortion can be minimized.
❏ See the documentation supplied with Epson specialmedia for detailed information on handling thepaper after printing.
❏ The colors of photos, posters, and other printedmaterials appear different under different lightingconditions (light sources*). The colors of print outsfrom this printer may also appear different underdifferent light sources.* Light sources include sunlight, fluorescent light,incandescent light, and other types.
SC-T5100 Series/SC-T3100 Series/SC-T5100N Series/SC-T3100N Series User's Guide
Introduction
20

Saving Power
The printer enters sleep mode or turns offautomatically if no operations are performed for a setperiod. You can adjust the time before powermanagement is applied. Any increase will affect theproduct's energy efficiency. Please consider theenvironment before making any change.
Sleep mode
The printer enters sleep mode when there are noerrors, no print jobs being received, and no controlpanel or other operations performed. When theprinter enters sleep mode, the control panel's screenturns off and the internal motors and other partsswitch off to consume less power.
Sleep mode is exited if a print job is received or thescreen of the control panel is touched.
The delay before the printer enters sleep mode can beselected from values between 1 and 210 minutes. Atdefault settings, the printer enters sleep mode if nooperations are performed for 15 minutes. The delaycan be changed from the Basic Settings menu.
U “General Settings - Basic Settings” on page 115
Note:When the printer enters sleep mode, the control panel'sscreen goes blank as if the power has been turned off,but the P light remains lit.
Power Off Timer
This function automatically turns the printer off if noerrors occur, no print jobs are received, and no controlpanel or other operations are performed for a setperiod of time.
The default setting differs as follows depending on themodel.
❏ SC-T5100/SC-T5100N/SC-T5180/SC-T5180N/SC-T3100/SC-T3100N/SC-T3180NSet to 8h.
❏ SC-T5130/SC-T5160/SC-T5160N/SC-T3130/SC-T3130N/SC-T3160/SC-T3160NSet to Off.
Power Off Timer settings can be changed from theBasic Settings menu.
U “General Settings - Basic Settings” on page 115
SC-T5100 Series/SC-T3100 Series/SC-T5100N Series/SC-T3100N Series User's Guide
Introduction
21

Introducing the Software
Provided Software
The following table lists the provided software.
The supplied software disc contains the software for Windows. When using a Mac or a computer without a discdrive, download the software from http://epson.sn and then install it.
For details on the various software, see the online help of each software or the Administrator's Guide (onlinemanual).
Note:Convenient software compatible with this printer is introduced on the Epson website. Please check the information fromthe following link.
http://www.epson.com
Software Name Function
Printer Driver Install the printer driver to take full advantage of the functionality of this printer whenprinting.
U “Printing with the Printer Driver from Your Computer” on page 46
EPSON Software Updater Software to check whether there is any software update information and then notifyyou and install the software if an update is available. It allows you to update thefirmware and already installed software of the printer.
U “Updating Software or Installing Additional Software” on page 25
LFP Print Plug-In for Office
(Windows Only)
Plug-in software for Microsoft Office applications (Word, Excel, and PowerPoint).Installing this plug-in displays ribbon items in Office applications that give quick accessto horizontal and vertical banner printing and enlarged printing.
It can be installed by selecting it in the Additional Installation screen when installing thesoftware. You can also install it later with EPSON Software Updater.
The supported Microsoft versions are shown below.
Office 2003/Office 2007/Office 2010/Office 2013/Office 2016
EpsonNet Config Software to configure the initial settings of the network or change the settings of thenetwork in bulk when installing or relocating Epson printers and scanners.
EpsonNet Config is not installed automatically. Download it from the Epson website andthen install it if necessary.
http://www.epson.com
For Windows, you can install the software from the following folder on the suppliedsoftware disc.
\\Network\EpsonNetConfig
U Administrator's Guide
SC-T5100 Series/SC-T3100 Series/SC-T5100N Series/SC-T3100N Series User's Guide
Introducing the Software
22

Built-in Software in the Printer
The following software comes preinstalled in the printer. Start and use it from a Web browser via the network.
Software Name Function
Web Config The network security settings can be configured from Web Config. This software alsohas an email notification function for notifying of printer errors and other problems.
U “How to Use Web Config” on page 24
SC-T5100 Series/SC-T3100 Series/SC-T5100N Series/SC-T3100N Series User's Guide
Introducing the Software
23

How to Use Web Config
This section describes how to start the software andprovides a summary of its functions.
How to Start
Start the software from a web browser on a computeror smart device that is connected to the same networkas the printer.
A Check the IP address of the printer.
Touch on the Home screen, select theconnected network, and check the IP address.
Note:The IP address can also be checked by printing anetwork connection check report. A report can beprinted by touching the following in order fromthe Home screen.
Settings - General Settings - Network Settings -Connection Check
B Start a Web browser on a computer or smartdevice connected to the printer via the network.
C Enter the IP address of the printer in theaddress bar of the Web browser and press theEnter or Return key.
Format:
IPv4: http://IP address of printer/
IPv6: http://[IP address of printer]/
Example:
IPv4: http://192.168.100.201/
IPv6: http://[2001:db8::1000:1]/
Closing
Close the Web browser.
Function Summary
This section introduces the main functions of WebConfig. For more details, see the Administrator'sGuide.
Main Functions
❏ Check the printer's status, such as the remainingamount of ink.
❏ Check and update the printer's firmware version.
❏ Configure the printer's network settings andadvanced security settings, such as SSL/TLScommunication, IPsec/IP filtering, andIEEE802.1X, which cannot be configured with theprinter alone.
❏ Edit the custom paper settings and export andimport the settings.The custom paper settings registered in Settings -General Settings - Printer Settings - CustomPaper Setting of the printer can be changed aswell as exported to a file and then imported(registered) to another printer. This is convenientwhen you install multiple printers and want to usecommon custom paper settings for them.
SC-T5100 Series/SC-T3100 Series/SC-T5100N Series/SC-T3100N Series User's Guide
Introducing the Software
24

Updating Software orInstalling AdditionalSoftware
When you install the software during setup asdescribed in the Setup Guide, Epson Software Updateris installed. Epson Software Updater allows you toupdate the firmware and already installed software inyour computer as well as install additional softwarecompatible with the printer.
Note:The software is updated as needed for greaterconvenience and more robust functionality. Werecommend setting to receive update notifications withEpson Software Updater and updating the software assoon as possible when there is a notification.
Checking Whether Updates Available and Updating Software
A Check that the computer and printer are in thefollowing states.
❏ Computer is connected to the Internet.
❏ Printer and computer can communicate.
B Start Epson Software Updater.
❏ WindowsDisplay the list of all the programs and thenclick Epson Software Updater in the EpsonSoftware folder.
Note:
❏ If you press the Windows key (key withWindows logo mark) on the keyboard andthen type the software name in the search boxof the displayed window, the software appearsimmediately.
❏ The software can also be started by clickingthe printer icon on the Taskbar of the desktopand then selecting Software Update.
❏ MacSelect Go - Applications - Epson Software -EPSON Software Updater.
C Select the software or manuals to be updatedand then update them.
Follow the on-screen instructions.
c Important:
Do not turn off the computer or printerduring the update.
Note:Software not displayed in the list cannot beupdated with Epson Software Updater. Check thelatest versions of software on the Epson website.
Please note that you cannot update or installsoftware using Epson Software Updater if you areusing a Windows Server OS. Download thesoftware from the Epson website.
http://www.epson.com
Receiving Update Notifications
Windows
A Start Epson Software Updater.
B Click Auto update settings.
C Select the interval to perform the update checkin the Interval to Check field of the printer andthen click OK.
Mac
The software is set by default to check and notifywhether there are updates every 30 days.
SC-T5100 Series/SC-T3100 Series/SC-T5100N Series/SC-T3100N Series User's Guide
Introducing the Software
25

Uninstalling Software
Windows
c Important:
❏ You must log in as an Administrator.
❏ If the password or confirmation of anadministrator is requested, enter the passwordand then continue with the operation.
A Turn off the printer, and unplug the interfacecable.
B Close all applications running on yourcomputer.
C Go to the Control Panel and click Uninstall aprogram from the Programs category.
D Select the software you want to remove andthen click Uninstall/Change (or Change/Remove / Add/Remove).
You can remove the printer driver and EPSONStatus Monitor 3 by selecting EPSONSC-XXXXX Printer Uninstall.
E Select the printer icon, and then click OK.
F Follow the on-screen instructions to continue.
When the delete confirmation message appears,click Yes.
Restart the computer if you are reinstalling the printerdriver.
Mac
When reinstalling or upgrading the printer driver orother software, follow the steps below to uninstall thetarget software first.
Printer Driver
Use the "Uninstaller".
Downloading the Uninstaller
Download Uninstaller from the Epson website.
http://www.epson.com/
Using the Uninstaller
Follow the instructions on the Epson website.
Other Software
Drag and drop folder with the software name from theApplications folder into Trash to delete.
SC-T5100 Series/SC-T3100 Series/SC-T5100N Series/SC-T3100N Series User's Guide
Introducing the Software
26

Loading and Settingthe Paper
Notes on Loading thePaper
Caution:
Do not rub the edges of the paper with your hands.The edges of the paper are thin and sharp andcould cause an injury.
Do not leave paper loaded in the printer
The roller may leave an impression on paper that is leftin the printer. In addition, the paper may becomewavy or curled due to damp, which may cause paperfeeding problems, paper jams, or soiled prints.
We recommend that you return the paper to itsoriginal package and store it flat, and take it out of thepackage for use when printing.
Do not load roll paper with the right and left edgesuneven
Loading roll paper with the right and left edgesuneven may cause paper feeding problems or papermeandering may occur during printing. Rewind thepaper to make the edges even, or use roll paper withno problem.
Do not load curled paper
Loading curled paper may cause paper jams or soiledprints. Flatten the paper before use by bending it inthe opposite way or use paper with no problem.
Unsupported paper
Do not use paper that is wavy, torn, cut, folded, toothick, too thin, has a sticker affixed, etc. Doing so maycause paper jams or soiled prints. See the following forpaper supported by the printer.
U “Epson Special Media Table” on page 157
U “Supported Commercially Available Paper” onpage 160
Paper Load Position
The position to load paper differs depending on theshape and size of the paper to be loaded. See thefollowing for more details on the paper that can beused with the printer.U “Supported Media” on page 157
Roll Paper
Roll paper from 329 mm to the maximum printablewidth can be loaded.
Auto Sheet Feeder
Multiple sheets of A3 to A4 paper can be loaded. Thenumber of sheets that can be loaded at once differsdepending on the paper. See the following for moredetails.U “Cut Sheet” on page 158
SC-T5100 Series/SC-T3100 Series/SC-T5100N Series/SC-T3100N Series User's Guide
Loading and Setting the Paper
27

Cut Sheet(1 sheet)
One sheet of cut paper from A4 to the maximumprintable width can be loaded.
Note:
❏ The paper slot for Roll Paper and Cut Sheet(1 sheet)is the same. Insert either one into the paper slot.
❏ Paper can be loaded in the auto sheet feeder whileleaving roll paper loaded. You can switch to one ofthe paper sources in the printer driver.
Loading and Removingthe Roll Paper
Place the roll paper on the supplied spindle and thenload the roll paper in the printer.
When replacing paper, remove the loaded paper first.U “Removing Roll Paper” on page 32 U “Removing Cut Sheet (1 Sheet)” on page 38
When paper is loaded in the auto sheet feeder, removeit and then load it again after you finish loading orremoving the roll paper. Before printing on roll paper,remove the stacker.
U “Removing Paper from the Auto Sheet Feeder” onpage 36
U “Attaching and Removing the Stacker (for PlainPaper)” on page 34
Loading Roll Paper
Caution:
Make sure to grip the flanges of the spindle whenloading a roll paper. If you hold and load the rollpaper by gripping the other parts, your hand orfinger may get injured.
Note:You can load the paper while viewing the loadingprocedure on the screen. To view the procedure on thescreen, touch the Roll paper information area of theHome screen.
A Check that "Load paper." is displayed on theHome screen and then open the cut sheet cover.
B Release the central lock, and then open the rollpaper cover.
C Remove the inserted spindle.
D Pull off the transparent flange from the spindle.
SC-T5100 Series/SC-T3100 Series/SC-T5100N Series/SC-T3100N Series User's Guide
Loading and Setting the Paper
28

E Place the roll paper on a flat surface and theninsert the spindle.
With the black flange is on the right, orient theroll paper so that the leading edge is as shownin the figure below.
F Push the flange to the roll paper until there isno gap between the flange and roll paper.
G Attach the transparent flange and push it untilthere is no gap between the flange and rollpaper.
If there are gaps between the flanges at bothends and the roll paper, the paper may be fedskewed resulting in an error.
H Orient the paper roll so that the black flange ofthe spindle is on the right side and then insertthe spindle shafts into the cavities in the left andright of the spindle holder.
I Check that the leading edge of the roll paper isnot bent and then insert it into the paper slotuntil you hear a beep.
c Important:
Hold the paper edges and insert the paperstraight into the paper slot. Inserting itskewed will cause a skew error or paper jam.
Note:If the leading edge of the roll paper is nothorizontal or not cut cleanly, it will be cutautomatically after loading completes. However, itwill not be cut if Auto Cut is set to Off.
J Close the roll paper cover and cut sheet cover.
K On the displayed screen, set the paper type thatmatches the loaded paper and set remainingamount management if necessary.
Not setting the appropriate paper type willcause print quality trouble. See the following formore details on the paper types and remainingamount settings.U “For Roll Paper” on page 39
SC-T5100 Series/SC-T3100 Series/SC-T5100N Series/SC-T3100N Series User's Guide
Loading and Setting the Paper
29

c Important:
When paper equivalent to B1 width isloaded in SC-T5100 Series/SC-T5100NSeries
Raise the B1 width paper support as shown inthe figure only when you have loaded B1width (718 to 738 mm) paper. If you do notraise the B1 width paper support, the printsurface may be scuffed or soiled.
Leave the support lowered when printing to asize other than equivalent to B1 width.
L For SC-T5100 Series and SC-T3100 Series,check that the paper basket attached to thestand is open.
Note:Close the paper basket before printing banners orother documents of sizes that will not fit in thepaper basket. Before the paper ejected from theprinter touches the floor, we suggest that you takeit in both hands close to the paper eject slot andcontinue to lightly support it until printing iscomplete.
Cutting the Roll Paper
Auto Cut
Auto Cut is set to On for the printer by default. WhenOn is set, the roll paper is cut automatically at thefollowing times.
❏ When the leading edge is detected as nothorizontalAfter the roll paper is loaded, the leading edgepart is cut straight.
❏ When printing of one page is finishedThe roll paper is cut before printing of the nextpage starts.
If you do not want to cut each page or you want to cutat a desired position, see the following procedure.
Cutting after Last Page Printed or atDesired Position
Turn off auto cut in the printer driver, print, and thencut using the Feed/Cut Paper menu of the printerafter printing finishes.
A Select Off in Advanced - Roll Paper Option -Auto Cut of the printer driver and then print.
Leave the auto cut setting of the printer on.
Note:
❏ The auto cut setting of the printer driver haspriority over that of the printer. The auto cutsetting of the printer driver is reset to thedefault setting of Normal Cut when theapplication closes.
❏ To turn off auto cut when HP-GL/2 modeprinting or enlarged copying, turn off theauto cut setting of the printer. Touch the Rollpaper information area - Advanced MediaSetting - Auto Cut - Off from the Homescreen. The change to the setting is saved as asetting of the currently selected paper type.
B Touch the Roll paper information area -Feed/Cut Paper from the Home screen of theprinter after printing finishes.
Use the buttons displayed on the screen to cutand feed the paper.
When cutting at the printer default cutposition (right after the bottom margin)
Touch the (Cut) button. The paper is cutand the paper leading edge returns to the printwait position.
SC-T5100 Series/SC-T3100 Series/SC-T5100N Series/SC-T3100N Series User's Guide
Loading and Setting the Paper
30

When cutting at desired position
Touch and hold down the (Forward) or (Backward) button until the position you
want to cut comes to the position of thedotted line in the figure.
A cut position cannot be set further insidethan the bottom margin.
Touch the (Cut) button.
The paper is cut.
Note:When the length of in the figure is shorterthan the following length, the paper is fedautomatically until the required length is obtainedat the time of cutting.
❏ Plain paper or tracing paper: 100 mm
❏ Photo paper or coated paper: 80 mm
❏ Synthetic paper and other thick paper:60 mm
Cutting Commercially AvailableSynthetic or Canvas Paper withScissors
When using commercially available paper that cannotbe cleanly cut with the cutter of the printer, print cutlines and cut the paper with scissors.
c Important:
❏ If commercially available synthetic or canvaspaper is cut with the built-in cutter, the cuttermay be damaged or its life may be shortened.When using such paper, cut the paper withscissors as described in the followingprocedure.
❏ Do not use a cutter. The printer may bedamaged.
A Turn off the auto cut setting and then print.
To print cut lines, turn off the auto cut setting ofthe printer. When printing via the printerdriver, also turn off the setting of the printerdriver.
❏ Printer settingsRoll paper information area - AdvancedMedia Setting - Auto Cut - Off from theHome screen.
❏ Printer driver settingsAdvanced - Roll Paper Option - Auto Cut -Off
B Touch the Roll paper information area -Feed/Cut Paper from the Home screen of theprinter after printing finishes.
C Operate the buttons displayed on the screen.
When printing cut lines at the printer defaultposition (right after the bottom margin)
Touch the (Cut) button. The cut or printcut lines selection screen appears.
When printing cut lines at desired position
Touch and hold down the (Forward) or (Backward) button until the position you wantto print the cut lines comes to the position ofthe dotted line in the figure.
SC-T5100 Series/SC-T3100 Series/SC-T5100N Series/SC-T3100N Series User's Guide
Loading and Setting the Paper
31

Cut lines cannot be printed further inside thanthe bottom margin. Once you have finishedmoving the paper, touch (Cut). The cut orprint cut lines selection screen appears.
D Touch Print Cutting Guideline.
Cut lines are printed and the paper is ejectedautomatically to a position where it can beeasily cut with scissors.
E Cut the paper along the cut lines with scissorsand then touch Done.
The paper rewinds to return the paper leadingedge to the print wait position.
Removing Roll Paper
This section describes how to remove and store rollpaper after printing. The rollers may leave impressionson roll paper if you leave the paper loaded in theprinter.
Note:You can remove the paper while viewing the procedureon the screen. To view the procedure on the screen,touch the Roll paper information area - Remove fromthe Home screen.
A When the trailing edge of printed paper is heldin the printer, pull out the paper toward you byholding both edges of the paper with yourhands.
The printed paper will drop out automatically ifthe next printing is started.
B Open the cut sheet cover.
C Release the central lock, and then open the rollpaper cover.
D Touch Remove.
The paper is rewound and ejected.
Note:If printed paper is not cut and remains, aconfirmation screen appears.
Touch Cut to cut the paper at the default cutposition or touch Print Cutting Guideline toprint cut lines at the default position.
If you want to change the cut position or cutlines print position to desired position, touchClose and change the position in the Feed/CutPaper menu.
See the following for more details.U “Cutting the Roll Paper” on page 30
E Hold the flanges on both ends of the spindleand remove the spindle from the spindle holder.
F Detach the transparent flange from the spindle.
G Remove the spindle from the roll paper.
SC-T5100 Series/SC-T3100 Series/SC-T5100N Series/SC-T3100N Series User's Guide
Loading and Setting the Paper
32

c Important:
After rewinding the roll paper carefully, storeit in the original package.
H Attach the transparent flange to the spindle andreturn the spindle in the printer.
I Close the roll paper cover and cut sheet cover.
SC-T5100 Series/SC-T3100 Series/SC-T5100N Series/SC-T3100N Series User's Guide
Loading and Setting the Paper
33

Loading and RemovingPaper in/from the AutoSheet Feeder
Attaching and Removing the Stacker (for Plain Paper)
Attach the supplied stacker before continuouslyprinting multiple sheets of plain paper from the autosheet feeder. The number of sheets that can be ejectedto the stacker is approximately 20.
However, when printing on roll paper or cut sheet (1sheet), remove the stacker so that the paper can beejected smoothly.
How to attach
Attach the stacker by inserting the hooks of the stackerstraight into the holes in the front of the printer.
How to remove
Remove the stacker by pulling it toward you.
Loading Paper in the Auto Sheet Feeder
Note:
❏ The number of sheets that can be loaded in theauto sheet feeder differs depending on the paper.See the following for more details.U “Cut Sheet” on page 158 U “Supported Commercially Available Paper” onpage 160
❏ You can load the paper while viewing theprocedure on the screen. To view the procedure onthe screen, touch Paper Setting - Auto SheetFeeder from the Home screen.
A Check that "Load paper." or "Ready" isdisplayed on the Home screen and then openthe cut sheet cover.
SC-T5100 Series/SC-T3100 Series/SC-T5100N Series/SC-T3100N Series User's Guide
Loading and Setting the Paper
34

B Tilt the auto sheet feeder toward the back andthen pull it out upward. C Load sheets of paper with the print side facing
up in the auto sheet feeder.
Align the paper edges and then load the paper.
c Important:
Insert all paper in portrait orientation.Inserting paper in landscape orientation maycause a decline in print quality.
D Slide the edge guides against the edges of thepaper.
If the edge guides are positioned away from thepaper edges, the paper could be fed skewed,which may cause a skew error or paper jam.
E On the displayed screen, set the paper type andsize that match the loaded paper.
Not setting the appropriate paper type willcause print quality trouble. See the following formore details on the paper types and sizes.U “For Auto Sheet Feeder / Cut Sheet(1sheet)” on page 41
SC-T5100 Series/SC-T3100 Series/SC-T5100N Series/SC-T3100N Series User's Guide
Loading and Setting the Paper
35

Removing Paper from the Auto Sheet Feeder
A Widen the edge guides and then remove thepaper.
B Fold down the auto sheet feeder and then tilt itto the front.
C Close the cut sheet cover.
SC-T5100 Series/SC-T3100 Series/SC-T5100N Series/SC-T3100N Series User's Guide
Loading and Setting the Paper
36

Loading and RemovingCut Sheet(1 sheet)
Loading Cut Sheet(1 sheet)
When roll paper is loaded, remove it.
U “Removing Roll Paper” on page 32
When paper is loaded in the auto sheet feeder, removeit and then fold down the auto sheet feeder. Also, if thestacker is attached, remove it.
U “Removing Paper from the Auto Sheet Feeder” onpage 36
U “Attaching and Removing the Stacker (for PlainPaper)” on page 34
A Check that "Load paper." is displayed on theHome screen and then touch Paper Setting -Cut Sheet(1 sheet).
B Open the cut sheet cover.
C Load a sheet of paper with the print side facingup, and then align its right edge with the markline on the right and its left edge with the markline for the paper size.
c Important:
Insert all paper in portrait orientation.Inserting paper in landscape orientation maycause a decline in print quality.
D Insert the leading edge of the paper straight intothe paper slot until you hear a beep.
c Important:
Hold the paper edges and insert the paperstraight into the paper slot. Inserting itskewed will cause a skew error or paper jam.
E On the displayed screen, set the paper type andsize that match the loaded paper.
Not setting the appropriate paper type willcause print quality trouble. See the following formore details on the paper types and sizes.U “For Auto Sheet Feeder / Cut Sheet(1sheet)” on page 41
SC-T5100 Series/SC-T3100 Series/SC-T5100N Series/SC-T3100N Series User's Guide
Loading and Setting the Paper
37

c Important:
When B1 size paper is loaded in SC-T5100Series/SC-T5100N Series
Raise the B1 width paper support as shown inthe figure only when you have loaded B1width (718 to 738 mm) paper. If you do notraise the B1 width paper support, the printsurface may be scuffed or soiled.
Leave the support lowered when printing to asize other than equivalent to B1 width.
F For SC-T5100 Series and SC-T3100 Series,check that the paper basket attached to thestand is open.
Removing Cut Sheet (1 Sheet)
When Removing Unprinted CutSheet
Touch Paper Setting - Cut Sheet(1 sheet) - Removefrom the Home screen.
The paper is ejected.
When Removing Printed Cut Paper
Pull out the paper toward you by holding the edges ofthe paper with your hands.
The trailing edge of the paper stops in the state inwhich is held in the printer after printing. The paperwill drop out automatically if the next printing isstarted before it is removed by hand.
SC-T5100 Series/SC-T3100 Series/SC-T5100N Series/SC-T3100N Series User's Guide
Loading and Setting the Paper
38

Setting Loaded Paper
For Roll Paper
Configure the following settings after loading rollpaper.
Paper Type Settings
This is the most important setting to obtain theoptimum print results. Not setting a paper type thatmatches the loaded paper will cause wrinkles, scuffing,uneven colors, and other trouble.
Manage Remaining Amount Settings
If you enable the Manage Remaining Amount settingand then enter the total length of the loaded roll paper,an estimate of the remaining amount of roll paper willbe displayed on the Home screen of the printer and onthe screen of the printer driver. Furthermore, anotification can also be displayed when the remainingamount has become low.
The remaining amount values are saved associatedwith the paper types. This enables, for example, theremaining amount to be managed separately for plainpaper and tracing paper.
Note:If you want to use remaining amount managementwith two roll paper of the same paper type but differentwidths, register the width of one of them in CustomPaper Setting. Custom Paper Setting registration adds anew paper type setting. Perform the registration inSettings - General Settings - Printer Settings -Custom Paper Setting. For details on Custom PaperSetting, see the following Custom Paper Setting menu.
U “General Settings - Printer Settings” on page 117
How to Set
A The currently set paper type is shown on thescreen displayed after loading roll paper.
When changing Paper Type
Proceed to step 2.
When setting Paper Remaining withoutchanging Paper Type
Proceed to step 5.
When not changing either of them
Touch OK. You can start printing once Readyappears on the screen.
Note:The settings are confirmed if no operations areperformed for 90 seconds on the above screen. Tochange the settings later, touch the Roll paperinformation area - Change Paper Type from theHome screen and then configure the settings.
B Touch Paper Type.
The following paper type selection screenappears.
Note:The most recently selected three paper types aredisplayed in addition to Others.
SC-T5100 Series/SC-T3100 Series/SC-T5100N Series/SC-T3100N Series User's Guide
Loading and Setting the Paper
39

C Select the paper type that matches the loadedroll paper.
Epson Special Media
Select the same product name as the one shownon the package of the paper.
Commercially available non-Epson paper
Select from the following commerciallyavailable paper types.
❏ Plain paper
❏ Coated Paper(Generic)
❏ Photo Paper(Generic)
❏ Tracing Paper
❏ Tracing Paper <LowDuty>
❏ Matte Film
To select a paper type that is not displayed onthe screen, touch Others.
Select a category and select the target papertype.
Note:If you scroll downward in the category selectionscreen, Custom Paper appears. To select custompaper that has already been registered, touchCustom Paper.
D When a paper type is selected, the screenreturns to the one in step 1.
If you will not set the remaining amountmanagement setting, touch OK.
E Touch Paper Remaining.
F Touch Setup.
The setting changes to On, and RemainingAmount and Remaining Alert are enabled.Touch each one and enter a value as follows.
❏ Remaining Amount: Total length of roll paper(see the manual supplied with the roll paper)
❏ Remaining Alert: Remaining amount valuethat will be the timing for displaying theremaining amount warning notification.
Note:On the keypad screen for entering a numericvalue, enter numbers that include a number of thefirst decimal place. For example, if you want toenter 5 m, touch [5] and [0].
G Touch at the top left of the screen to returnto the screen of step 5 and then touch OK.
You can start printing once Ready appears onthe screen.
Note:If you replace the paper after the remaining amountindication has become 0 m or the paper has actuallyrun out, Remaining Amount returns to the defaultsetting value of 30 m.
SC-T5100 Series/SC-T3100 Series/SC-T5100N Series/SC-T3100N Series User's Guide
Loading and Setting the Paper
40

For Auto Sheet Feeder / Cut Sheet(1 sheet)
Configure the following settings after loading paper inthe Auto Sheet Feeder or loading Cut Sheet(1 sheet).
Paper Type Settings
This is the most important setting to obtain theoptimum print results. Not setting a paper type thatmatches the loaded paper will cause wrinkles, scuffing,uneven colors, and other trouble.
Paper Size Setting
The paper size of paper loaded in the auto sheet feederor loaded Cut Sheet(1 sheet) is not detectedautomatically. Set the size of the loaded paper.
How to Set
A The currently set paper type is shown on thescreen displayed after loading cut sheet.
When changing Paper Type
Proceed to step 2.
When changing Paper Size without changingPaper Type
Proceed to step 4.
When not changing either of them
Touch OK. You can start printing once Readyappears on the screen.
Note:The settings are confirmed if no operations areperformed for 90 seconds on the above screen. Tochange the settings later, touch the following inorder from the Home screen and then configurethe settings.
❏ Auto Sheet FeederPaper Setting - Auto Sheet Feeder - ChangePaper Type/Paper Size
❏ Cut Sheet(1 sheet)Paper Setting - Cut Sheet(1 sheet) - ChangePaper Type/Paper Size
B Touch Paper Type.
The following paper type selection screenappears.
Note:The most recently selected three paper types aredisplayed in addition to Others.
C Select the paper type that matches the loadedpaper.
Epson Special Media
Select the same product name as the one shownon the package of the paper.
Commercially available non-Epson paper
Select from the following commerciallyavailable paper types.
❏ Plain paper
❏ Coated Paper(Generic)
❏ Photo Paper(Generic)
❏ Tracing Paper
❏ Tracing Paper <LowDuty>
❏ Matte Film
SC-T5100 Series/SC-T3100 Series/SC-T5100N Series/SC-T3100N Series User's Guide
Loading and Setting the Paper
41

To select a paper type that is not displayed onthe screen, touch Others.
Select a category and select the target papertype. When a paper type is confirmed, thescreen returns to the one in step 1.
Note:If you scroll downward in the category selectionscreen, Custom Paper appears. To select custompaper that has already been registered, touchCustom Paper.
D Touch Paper Size.
If you will not change the paper size, touch OK.
Auto Sheet Feeder
Cut Sheet(1 sheet)
Select a category and select the target papersize.
Note:Setting non-standard size
For a non-standard size, touch User-Defined atthe end of the list and then enter the paper widthand length.
On the keypad screen for entering a numericvalue, enter numbers that include a number of thefirst decimal place. For example, if you want toenter 5 m, touch [5] and [0].
E When the screen of step 1 is redisplayed, touchOK.
You can start printing once Ready appears onthe screen.
SC-T5100 Series/SC-T3100 Series/SC-T5100N Series/SC-T3100N Series User's Guide
Loading and Setting the Paper
42

Optimizing PaperSettings (Media Adjust)
Perform Media Adjust in the following cases. It allowsyou to adjust the settings to perform printingappropriately with the paper to be used easily inwizard format.
❏ When there are streaks in print results or ruledlines are duplicated or text is blurred
❏ When registered with custom paper settings
The adjustment results are stored until the next timeadjustment is performed. After adjustment iscomplete, you will be able to perform printingappropriately by simply selecting that paper type.
Note:Adjustment for paper registered with custompaper settings
With roll paper and cut sheet, the paper settings foroptimal printing differ even when the paper type isexactly the same. When using both roll paper and cutsheet of the same paper type, register custom paperseparately and also make the adjustments separately.
Custom Paper Setting registration adds a new papertype setting. Perform the registration in Settings -General Settings - Printer Settings - Custom PaperSetting.
For details on Custom Paper Setting, see the followingCustom Paper Setting menu.U “General Settings - Printer Settings” on page 117
Notes on Making Adjustments
❏ Correctly load the paper that actually requiresadjustment and then select the paper type thatmatches the loaded paper.
❏ If paper with visible curls, wrinkles, waves, folds,or bends is used, correct adjustment may not bepossible. Remove curled, wavy, or folded sectionsby cutting them off.
Adjustment Procedure
The adjustment procedure is performed in wizardformat. When you proceed with operations inaccordance with the instructions displayed on thescreen, a set of adjustment patterns will be printedtwice.Adjustment is performed by visually checking both thefirst and second sets of patterns and specifying theoptimal patterns.The following shows the length and number of sheetsof paper used for adjustment pattern printing.
Roll paper: Approx. 420 mm
Auto sheet feeder: 2 sheets of A4 or A3
Cut sheet: 1 sheet for A2 or larger, 2 sheets for smallerthan A2
A Touch the following in order from the Homescreen.
❏ Roll paperRoll paper information area - Media Adjust
❏ Auto Sheet FeederPaper Setting - Auto Sheet Feeder - MediaAdjust
❏ Cut Sheet(1 sheet)Paper Setting - Cut Sheet(1 sheet) - MediaAdjust
B Touch Start.
Printing of the first set of adjustment patternsstarts.
c Important:
When using A2 size or larger cut sheet, orusing roll paper with the auto cut turned off,the paper cannot be removed to print thesecond set of patterns even though printing ofthe first set of patterns has finished. Do notpull the printed paper.
Note:A print head nozzle clogging check is performedautomatically before adjustment pattern printing.If nozzles are determined to be clogged, cleaningstarts and the adjustment patterns will be printedafter cleaning finishes.
SC-T5100 Series/SC-T3100 Series/SC-T5100N Series/SC-T3100N Series User's Guide
Loading and Setting the Paper
43

C Enter the numeric value of the pattern with theleast streaks among the printed adjustmentpatterns of #1 and then touch Adjustment #2.
In the following example, pattern 0 has the leaststreaks so you would enter 0.
If there is no difference between two adjacentpatterns and you are unsure which is the bestone to choose, enter the numeric value thatcomes between them. For example, if you areunsure whether to enter pattern 0 or 2, enter 1.
D Enter the numeric value of the pattern with theleast streaks among the adjustment patterns of#2 in the same way as for #1 and then touchAdjustment #3.
E Enter the numeric value of the pattern with themost visible straight line among the adjustmentpatterns of #3 and then touch Adjustment #4.
In the following example, pattern 0 has themost visible straight line so you would enter 0.
If there is no difference between two adjacentpatterns and you are unsure which is the bestone to choose, enter the numeric value thatcomes between them. For example, if you areunsure whether to enter pattern 0 or 2, enter 1.
F Enter the numeric value of the pattern with themost visible straight line among the adjustmentpatterns of #4 in the same way as for #3.
G Touch OK.
Printing of the second set of adjustmentpatterns starts. For cut sheet smaller than A2size, load the second sheet of paper.
c Important:
When using A2 size or larger cut sheet, orusing roll paper with the auto cut turned off,the part with the first set of patterns printedon it is pulled inside the printer in order toprint the second set of patterns. Do not touchthe paper with your hands.
H Enter the numeric value of the pattern with theleast streaks among the printed adjustmentpatterns of #1 and then touch Adjustment #2.
In the following example, pattern 0 has the leaststreaks so you would enter 0.
I Enter the numeric value of the pattern with theleast streaks among the adjustment patterns of#2 in the same way as for #1 and then touchAdjustment #3.
J Enter the numeric value of the pattern with theleast streaks among the adjustment patterns of#3 and then touch OK.
In the following example, pattern 0 has the leaststreaks so you would enter 0.
If there is no difference between two adjacentpatterns and you are unsure which is the bestone to choose, enter the numeric value thatcomes between them. For example, if you areunsure whether to enter pattern 0 or 2, enter 1.
SC-T5100 Series/SC-T3100 Series/SC-T5100N Series/SC-T3100N Series User's Guide
Loading and Setting the Paper
44

The adjustment results are saved as settings of thecurrently selected paper type. The optimal printingresults can be obtained from the next time by simplyselecting that paper type.
SC-T5100 Series/SC-T3100 Series/SC-T5100N Series/SC-T3100N Series User's Guide
Loading and Setting the Paper
45

Printing with thePrinter Driver fromYour Computer
Basic OperatingProcedures (Windows)
Printing Procedure
This section describes the basic procedure to printvarious data, including the data of Word, Excel, andPowerPoint of Microsoft Office and PDFs of AdobeAcrobat, using the printer driver from a computer.
A Turn on the printer, and load the paper.
U “Loading Roll Paper” on page 28
U “Loading Paper in the Auto Sheet Feeder”on page 34
U “Loading Cut Sheet(1 sheet)” on page 37
B When you have created the data in theapplication, click Print in the File menu.
C Select the printer in Printer and then clickPrinter Properties.
The printer driver dialog will be displayed.
Note:When printing a PDF fileIn the Print dialog box of Adobe Acrobat, selectthe Actual size (or Page Scaling: None) radialbutton and Choose paper source by PDF pagesize check box. To enlarge or reduce the size,configure the setting in the printer driver settingsdialog box.
D Check Document Size on the Printer Settingstab of the printer driver.
The paper size set in the application is displayedautomatically. However, the paper sizes (pagesizes) of some applications such as PowerPointmay not be displayed correctly. In such a case,click Settings... and specify the size in thedisplayed Change Paper Size dialog box.
SC-T5100 Series/SC-T3100 Series/SC-T5100N Series/SC-T3100N Series User's Guide
Printing with the Printer Driver from Your Computer
46

If the desired size is not available in thepull-down menu of the Change Paper Sizedialog box, click Custom Paper Size... and thenset and save a custom size.
U “Printing at Non-Standard Sizes” onpage 64
E Set Output Size.
To enlarge or reduce the size, select from thepull-down menu below the Document Size.
See the following for more details onenlargement settings.
U “Enlargements and Horizontal and VerticalBanners” on page 59
F Select Source and check the roll paper width(paper size when cut sheet) and paper type.
Select from Roll Paper, Auto Sheet Feeder, andSheet. If you select a paper source for whichpaper is not loaded in the printer, appears.
For Roll Paper Width (Paper Size when cutsheet) and Media Type, the settings configuredin the control panel of the printer are appliedautomatically.
Note:If the paper is loaded or changed after opening theprinter driver's dialog box, the paper size andpaper type settings configured on the printer willnot be applied. In this case, click the Acquire Infobutton to apply the settings.
G Select Select Target in Print Quality.
Choose an option according to the type ofdocument and how it will be used.
To set the color correction method or colorbalance in detail to match your preferences,clear the Simple Settings check box. See thefollowing for more details.
U “Correct color and print” on page 68
SC-T5100 Series/SC-T3100 Series/SC-T5100N Series/SC-T3100N Series User's Guide
Printing with the Printer Driver from Your Computer
47

H Check that the Print Preview check box isselected and then click OK.
If a preview is not necessary, clear the check boxand then click OK.
Note:In the print preview, you can check and changethe print settings while viewing the image to beactually printed. We recommend to check with thepreview when printing on roll paper or large-sizedpaper.
I Click Print in the Print dialog box of theapplication.
The print preview screen appears.
J Check the print settings in the print previewscreen, and if there is no problem, click Print tostart printing.
The icons and menus at the top of the previewscreen allow you to change the image displaysettings. You can change the print settings usingthe menus on the right side. See the help formore details.
Note:See the printer driver help for more details on settingitems. You can display the help in the following twoways:
❏ Click Help at the bottom right of the screen.
❏ Right-click the item you want to check and thenclick Help. (This is not possible in the print previewscreen.)
Canceling Printing
There are a few ways to stop printing operationsdepending on the situation. When the computer hasfinished sending data to the printer, you cannot cancelthe print job from the computer. Cancel on the printer.
Canceling from a Computer
When the Progress Bar is displayed
Click Cancel.
When the Progress Bar is not displayed
A Click the printer icon on the taskbar.
Whether or not an icon is displayed depends onthe settings selected for Windows.
SC-T5100 Series/SC-T3100 Series/SC-T5100N Series/SC-T3100N Series User's Guide
Printing with the Printer Driver from Your Computer
48

B Select the print data you want to cancel andclick Cancel in the Document menu.
To cancel all print data, click Cancel AllDocuments in the Printer menu.
If the job has been sent to the printer, print datais not displayed on the above screen.
Canceling on the printer
The Cancel button is displayed on the control panelscreen during printing. Touch the Cancel button. Theprint job is canceled even in the middle of printing. Itmay take a while before the printer returns to theready status.
However, print jobs in the print queue on a computercannot be deleted in this way. Use the procedure of"Canceling from a Computer" to delete print jobs inthe print queue.
Customizing the Printer Driver
You can save the settings or change the display itemsas you prefer.
Saving Frequently Used Settings
If you start the printer driver from the Control Panel,change the settings to those you use frequently, andthen save the settings, the printer driver's dialog boxwill be displayed with the saved settings from anyapplication that it is displayed.
A Open View devices and printers or Devicesand Printers.
Windows 10/8.1/8/7
Click in the following order: Hardware andSound (or Hardware) > View devices andprinters (or Devices and Printers).
Windows Vista
Click in the following order: Hardware andSound and then Printer.
Windows XP
Click in the following order: Printers andOther Hardware, and then Printers and Faxes.
Note:If your Windows XP Control Panel is in ClassicView, click Start, Control Panel, and thenPrinters and Faxes.
B Right-click your printer icon, and clickPrinting preferences.
C The printer driver setting screen is displayed.
SC-T5100 Series/SC-T3100 Series/SC-T5100N Series/SC-T3100N Series User's Guide
Printing with the Printer Driver from Your Computer
49

Make the necessary settings. These settingsbecome the default settings of the printer driver.
Saving various settings as yourSelect Settings
You can save all printer driver settings as a SelectSetting. This allows you to easily load settings thathave been stored in Select Settings, and repeatedlyprint using exactly the same settings.
A Set each item on the Printer Settings, Layout,and Advanced tabs to the settings you want tosave as Select Settings.
B Click Custom Settings.
C Enter the desired name in Name, and then clickSave.
You can save up to 100. The saved select settingscan be recalled from Select Setting.
Note:How to share Select Setting with multiplecomputers
Select the settings you want to share, clickExport..., and then export the settings to a file.Display the same screen of the printer driver onanother computer, click Import..., and thenimport the settings.
Rearranging display items
The display items of Select Setting, Media Type, andPaper Size can be arranged as follows to display theones you use normally right away.
❏ Hide unnecessary items.
❏ Rearrange in an order of most frequent use.
❏ Arrange in groups (folders).
A Click Utility tab - Menu Arrangement.
SC-T5100 Series/SC-T3100 Series/SC-T5100N Series/SC-T3100N Series User's Guide
Printing with the Printer Driver from Your Computer
50

B Select Edit Item.
C Change the display order and groups in List.
❏ You can move and order items by draggingand dropping.
❏ To add a new group (folder), click AddGroup....
❏ To delete a group (folder), click DeleteGroup.
❏ Drag and drop unnecessary items to NotDisplay.
Note:When Delete Group is performed, the group(folder) is deleted, but the settings in the deletedgroup (folder) remain. Delete them individuallyfrom List in the save location.
D Click Save.
SC-T5100 Series/SC-T3100 Series/SC-T5100N Series/SC-T3100N Series User's Guide
Printing with the Printer Driver from Your Computer
51

Basic OperatingProcedures (Mac)
Printing Procedure
This section describes the basic procedure to printusing the printer driver from a computer.
Basic Printing Procedure
A Turn on the printer, and load the paper.
U “Loading Roll Paper” on page 28
U “Loading Paper in the Auto Sheet Feeder”on page 34
U “Loading Cut Sheet(1 sheet)” on page 37
B When you have created the data in theapplication, click Print in the File menu.
C Click Show Details (or ) at the bottom ofthe screen.
Note:If page settings are not displayed in the printdialog, click the "page settings" option (e.g., PageSetup) in the File menu.
D Check that this printer is selected, and then setthe paper size.
There are three options for each paper size. Forexample, if you click the A2 size, the followingthree options appear.
❏ A2
❏ A2 (Retain Scale)
❏ A2 (Roll Paper - Banner)
Normally, select the option without parenthesis(A2 in the example above). Select the other twooptions at the following times.
Retain Scale
PDF and image data may be printed reducedslightly even when the output size is set to Sameas Paper Size in the following procedure. Thisoccurs to make sure there are the marginsrequired by the printer (3 mm on each the leftand right). Select this when you want to print atthe actual size without reducing the size.
Roll Paper - Banner
Select this when printing a banner to roll paperfrom an application designed for bannerprinting.
SC-T5100 Series/SC-T3100 Series/SC-T5100N Series/SC-T3100N Series User's Guide
Printing with the Printer Driver from Your Computer
52

E Select Printer Settings from the list and setOutput Size.
If Printer Settings is not displayed in the list,the dedicated printer driver for this printer hasnot been added. See the following and then addthe printer driver.
U “How to Select the Dedicated PrinterDriver for This Printer” on page 54
To enlarge or reduce the size, select from thepull-down menu below the Paper Size.
See the following for more details onenlargement settings.
U “Enlargements and Horizontal and VerticalBanners” on page 59
F Select Paper Source and check the roll paperwidth (paper size when cut sheet) and papertype.
Select from Roll Paper, Auto Sheet Feeder, andSheet. If you select a paper source for whichpaper is not loaded in the printer, appears.
For Roll Paper Width (Paper Size when cutsheet) and Media Type, the settings configuredin the control panel of the printer are appliedautomatically.
Note:If the paper is loaded or changed after opening theprinter driver's dialog box, the paper size andpaper type settings configured on the printer willnot be applied. In this case, click the Acquire Infobutton to apply the settings.
SC-T5100 Series/SC-T3100 Series/SC-T5100N Series/SC-T3100N Series User's Guide
Printing with the Printer Driver from Your Computer
53

G Select Select Target in Print Quality.
Choose an option according to the type ofdocument and how it will be used.
To set the color correction method or colorbalance in detail to match your preferences,clear the Simple Settings check box. See thefollowing for more details.
U “Correct color and print” on page 68
H Check that the Print Preview check box isselected and then click Print.
If a preview is not necessary, clear the check boxand then click Print.
Note:In the print preview, you can check and changethe print settings while viewing the image to beactually printed. We recommend to check with thepreview when printing on roll paper or large-sizedpaper.
I Check the print settings in the print previewscreen, and if there is no problem, click Print tostart printing.
The icons and menus at the top of the previewscreen allow you to change the image displaysettings. You can change the print settings usingthe menus on the right side. See the help formore details.
Note:See the printer driver help for more details on settingitems. Click in the printer driver settings dialog boxto display Help.
How to Select the Dedicated PrinterDriver for This Printer
You can print using AirPrint from a Mac computer.However, printing by automatically fitting thedocument to the width of the roll paper and selecting aprint quality suitable for the print target are notpossible. If the menus described in the previoussection "Basic Printing Procedure" are not displayed,select the dedicated printer driver for the printer inPrinter. The dedicated printer driver for this printer isdisplayed as follows.
❏ When USB connection: EPSON SC-TXXXX
❏ When network connection: EPSON TXXXX orEPSON TXXXX-YYYYYY
*: "XXXX" is the product model number. "YYYYYY" is the lastsix digits of the MAC address.
If the dedicated printer driver for this printer is notdisplayed in the list, add it with the followingprocedure.
SC-T5100 Series/SC-T3100 Series/SC-T5100N Series/SC-T3100N Series User's Guide
Printing with the Printer Driver from Your Computer
54

A Select System Preferences - Printers &Scanners (Print & Scan or Print & Fax) fromthe Apple menu.
B Click [+] and select Add Printer or Scanner.
C When the list of devices appears, select thededicated printer driver for this printer andclick Add.
Canceling Printing
There are a few ways to stop printing operationsdepending on the situation. When the computer hasfinished sending data to the printer, you cannot cancelthe print job from the computer. Cancel on the printer.
Canceling from a Computer
A Click the icon of this printer in the Dock.
B Select the job you want to cancel, and then clickDelete.
If the job has been sent to the printer, print datais not displayed on the above screen.
Canceling on the printer
The Cancel button is displayed on the control panelscreen during printing. Touch the Cancel button. Theprint job is canceled even in the middle of printing. Itmay take a while before the printer returns to theready status.
However, print jobs in the print queue on a computercannot be deleted in this way. Use the procedure of"Canceling from a Computer" to delete print jobs inthe print queue.
Customizing the Printer Driver
You can assign a name to frequently used settinginformation (paper size and each item of the basicsettings) and then save the information to Presets.This allows you to easily load settings and repeatedlyprint using exactly the same settings.
Saving Frequently Used Settings asPreset
A Set each item on the Paper Size and PrinterSettings tabs to the settings you want to save asPresets.
B Click Save Current Settings as Preset inPresets.
C Enter a name, and then click OK.
Note:When All printers is selected from PresetAvailable For, you can select the saved Presetsfrom all printer drivers installed on yourcomputer.
SC-T5100 Series/SC-T3100 Series/SC-T5100N Series/SC-T3100N Series User's Guide
Printing with the Printer Driver from Your Computer
55

The settings are saved to Presets. You can thenselect the settings you saved from Presets.
Deleting from Presets
A Click Show Presets... in Presets of the Printdialog box.
B Select the setting you want to delete, clickDelete, and then click OK.
SC-T5100 Series/SC-T3100 Series/SC-T5100N Series/SC-T3100N Series User's Guide
Printing with the Printer Driver from Your Computer
56

Printing CAD Drawings
There are the following two methods to print CADdrawings.
Printing with the printer driver
This method is best suited for printing CAD drawingssuch as the appearance views of buildings at highquality. This section describes the procedure to printusing the printer driver from AutoCAD 2018.
c Important:
If lines or parts in your drawing are not printedproperly, print using the HP-GL/2 or HP RTLmode.
Printing using the HP-GL/2 or HP RTL mode
This method is best suited for printing CAD and GISdrawings such as maps and blueprints.
You can print from an application that supportsHP-GL/2 (compatible with HP Designjet 750C) andHP RTL. See the following for more details.
U “Printing Using the HP-GL/2 or HP RTL Modefrom a Computer” on page 91
A Open the data to be printed and then click Plot.
B Select the printer in Printer/plotter and thenclick Properties.
C Click Custom Properties.
The printer driver's dialog box for this printerappears.
SC-T5100 Series/SC-T3100 Series/SC-T5100N Series/SC-T3100N Series User's Guide
Printing with the Printer Driver from Your Computer
57

D Set Output Size and Source in the printer driver.
U “Basic Operating Procedures (Windows)”on page 46
U “Basic Operating Procedures (Mac)” onpage 52
E Select CAD/Line Drawing - Black, CAD/LineDrawing - Color, or CAD/Line Drawing -Bi-Level from the Select Target list.
Windows
Mac
F Check other settings, and then start printing.
Note:If the output size is portrait and the height issmaller than the width of the roll paper, the printimage is printed rotated 90° to save paper. Thisfunction is enabled if the Auto Rotate check box isselected in Roll Paper Option on the Advancedtab.
SC-T5100 Series/SC-T3100 Series/SC-T5100N Series/SC-T3100N Series User's Guide
Printing with the Printer Driver from Your Computer
58

Enlargements andHorizontal and VerticalBanners
The printer driver can enlarge or reduce documentsfor different paper sizes. There are three settingmethods.
Before printing at non-standard sizes, includingvertical or horizontal banners and documents withequal sides, enter the desired paper size in the printerdriver.
U “Printing at Non-Standard Sizes” on page 64
❏ Fit to Roll Paper WidthAutomatically enlarges or reduces the image sizeto fit the roll paper width.
❏ Fit to Output SizeAutomatically enlarges or reduces the image sizeto fit the paper size.
❏ Specify SizeYou can specify the enlargement or reductionratio. Use this method for a non-standard papersize.
Note:
❏ When printing from applications designedexpressly for horizontal or vertical banners, adjustprinter driver settings as described in theapplication documentation.
❏ When using a Windows application designed forbanners, select Print Banner on the Layout tab ifnecessary.
SC-T5100 Series/SC-T3100 Series/SC-T5100N Series/SC-T3100N Series User's Guide
Printing with the Printer Driver from Your Computer
59

Fitting Documents to the Width of the Roll Paper
A Check the document size (or paper size) settingon the Printer Settings tab of the printer driver.
Windows
Display the Printer Settings tab of the printerdriver from the application and check that thedocument size is the same as the setting of theapplication.
If it differs, click Settings... and specify thecorrect size in the Change Paper Size dialogbox.
U “Basic Operating Procedures (Windows)”on page 46
Mac
Open the page setup screen of the applicationand check that this printer is selected in Printerand check the paper size.
Select a paper size that does not have (RetainScale) or (Roll Paper - Banner).
If the size is different, select the correct sizefrom the pull-down menu.
U “Basic Operating Procedures (Mac)” onpage 52
Note:In the case of an application without a page setupmenu item, you can set the paper size if you openthe Print dialog box from the Print menu item.
B Click Fit to Roll Paper Width on the PrinterSettings tab of the printer driver and selecteither Fit Short Side to Roll Paper Width orFit Long Side to Roll Paper Width.
Windows
Mac
SC-T5100 Series/SC-T3100 Series/SC-T5100N Series/SC-T3100N Series User's Guide
Printing with the Printer Driver from Your Computer
60

Fit Short Side to Roll Paper Width
Select this when you want to print with theprint image enlarged to the maximum size forthe loaded roll paper.
Fit Long Side to Roll Paper Width
Select this when you want to print with theprint image enlarged as much as possible to theextent that paper will not be wasted.
C Check other settings, and then start printing.
Fitting Documents to the Output Size
A Check the document size (or paper size) settingon the Printer Settings tab of the printer driver.
Windows
Display the Printer Settings tab of the printerdriver from the application and check that thedocument size is the same as the setting of theapplication.
If it differs, click Settings... and specify thecorrect size in the Change Paper Size dialogbox.
U “Basic Operating Procedures (Windows)”on page 46
Mac
Open the page setup screen of the applicationand check that this printer is selected in Printerand check the paper size.
Select a paper size that does not have (RetainScale) or (Roll Paper - Banner).
SC-T5100 Series/SC-T3100 Series/SC-T5100N Series/SC-T3100N Series User's Guide
Printing with the Printer Driver from Your Computer
61

If the size is different, select the correct sizefrom the pull-down menu.
U “Basic Operating Procedures (Mac)” onpage 52
B Select Fit to Output Size on the Printer Settingstab of the printer driver.
Windows
Mac
C Select the desired size from the Output Sizepull-down menu.
Windows
Mac
D Check other settings, and then start printing.
SC-T5100 Series/SC-T3100 Series/SC-T5100N Series/SC-T3100N Series User's Guide
Printing with the Printer Driver from Your Computer
62

Choosing a Print Size
A Check the document size (or paper size) settingon the Printer Settings tab of the printer driver.
Windows
Display the Printer Settings tab of the printerdriver from the application and check that thedocument size is the same as the setting of theapplication.
If it differs, click Settings... and specify thecorrect size in the Change Paper Size dialogbox.
U “Basic Operating Procedures (Windows)”on page 46
Mac
Open the page setup screen of the applicationand check that this printer is selected in Printerand check the paper size.
Select a paper size that does not have (RetainScale) or (Roll Paper - Banner).
If the size is different, select the correct sizefrom the pull-down menu.
U “Basic Operating Procedures (Mac)” onpage 52
Note:In the case of an application without a page setupmenu item, you can set the paper size if you openthe Print dialog box from the Print menu item.
B Display the Output Size input screen from thePrinter Settings tab of the printer driver.
Windows
Select Others... and then select Specify Size inthe displayed Output Size dialog box.
Mac
Select Specify Size.
SC-T5100 Series/SC-T3100 Series/SC-T5100N Series/SC-T3100N Series User's Guide
Printing with the Printer Driver from Your Computer
63

C Select the size specification method fromWidth, Length, and Scale to and then enter thesetting value.
The print image is enlarged or reduced so that itbecomes the specified width, length, or scalewhile maintaining the aspect ratio of the printdata.
Windows
Mac
D Check other settings, and then start printing.
Printing at Non-StandardSizes
Before printing at non-standard sizes, includingvertical or horizontal banners and documents withequal sides, save the desired paper size in the printerdriver. Once they have been saved in the printerdriver, custom sizes can be selected in the applicationPage Setup and other print dialogs.
The following sizes can be used.
PaperWidth
SC-T5100 Series /SC-T5100N Series
89 to 914 mm
SC-T3100 Series /SC-T3100N Series
89 to 610 mm
PaperLength*
127 to 18000 mm
*: The paper length can be longer when using an applicationthat supports banner printing. However, the actual printsize depends on the application, the paper size loaded inthe printer, and the computer environment.
c Important:
❏ The smallest size supported by the printer is 89mm wide × 127 mm long. When a smaller sizethan this is set in Custom Paper Size... of theprinter driver, trim the unnecessary margins.
❏ For Custom Paper Sizes of a Mac, althoughyou can specify a large paper size whichcannot be loaded in this printer, it will not beprinted properly.
❏ The available output size is limited dependingon the application.
SC-T5100 Series/SC-T3100 Series/SC-T5100N Series/SC-T3100N Series User's Guide
Printing with the Printer Driver from Your Computer
64

Making Settings in Windows
A Display the Printer Settings tab of the printerdriver from the application and then clickCustom Paper Size....
The User-Defined Paper Size dialog boxappears.
B Set the paper size to use in the User-DefinedPaper Size dialog box and then click Save.
❏ The Paper Size Name is displayed as andocument size or output size option. Set ameaningful name such as "400x500mm" or"Horizontal Banner".
❏ To view the Paper Width and Paper Heightvalues for a standard size close to the desiredcustom size, select the appropriate option inBase Paper Size.
❏ If you select an aspect ratio in Fix AspectRatio and select Landscape or Portrait forBase, you can set the size by just entering avalue in either Paper Width or Paper Height.
Note:
❏ To change the paper size you saved, select thepaper size name from the list on the left.
❏ To delete a saved paper size, select the papersize name from the list on the left of thescreen and then click Delete.
❏ You can save up to 100 paper sizes.
C Click OK to close the User-Defined Paper Sizedialog box. Also close the printer driver's dialogbox.
Registration of the user-defined size is nowcomplete.
D Select the registered paper size in, for example,the page size settings of the application andthen create the data.
Note:If the registered paper size is not displayed in theapplication, check whether it exceeds the sizessupported by the application.
E When you have finished creating the data,display the Printer Settings tab of the printerdriver from the Print dialog box.
The registered paper size is displayed in PaperSize on the Printer Settings tab.
U “Basic Operating Procedures (Windows)”on page 46
F Check other settings, and then start printing.
SC-T5100 Series/SC-T3100 Series/SC-T5100N Series/SC-T3100N Series User's Guide
Printing with the Printer Driver from Your Computer
65

Settings in Mac
A Open the page setup screen of the applicationand check that this printer is selected in Printerand then select Manage Custom Sizes fromPaper Size.
U “Basic Operating Procedures (Mac)” onpage 52
Note:In the case of an application without a page setupmenu item, the paper size settings can bedisplayed by opening the Print dialog box from thePrint menu item.
B Click + and then enter the paper size name.
C Enter values in Width and Height of the PaperSize, enter the margins, and then click OK.
The ranges of page sizes and margin sizes thatcan be specified differ depending on yourprinter model and the settings on the printer.
U “Printable area” on page 163
Note:
❏ To edit a saved custom size, choose its namefrom the list on the left.
❏ To duplicate a saved paper size, select itsname from the list on the left of the screenand click Duplicate.
❏ To delete a saved paper size, select its namefrom the list on the left of the screen and click-.
❏ The custom paper size setting differsdepending on the operating system version.See your operating system's documentationfor details.
D Click OK to close the Custom Paper Sizesdialog box. Also close the printer driver's dialogbox by clicking Cancel.
Registration of the custom paper size is nowcomplete.
E Select the registered paper size in, for example,the page size settings of the application andthen create the data.
Note:If the registered paper size is not displayed in theapplication, check whether it exceeds the sizessupported by the application.
SC-T5100 Series/SC-T3100 Series/SC-T5100N Series/SC-T3100N Series User's Guide
Printing with the Printer Driver from Your Computer
66

F When you have finished creating the data,display the Printer Settings tab of the printerdriver from the Print dialog box.
The registered paper size is displayed inDocument Size on the Printer Settings tab.
U “Basic Operating Procedures (Mac)” onpage 52
G Check other settings, and then start printing.
SC-T5100 Series/SC-T3100 Series/SC-T5100N Series/SC-T3100N Series User's Guide
Printing with the Printer Driver from Your Computer
67

Correct color and print
The optimal method is selected from the followingcolor correction methods for each print target in theprint quality settings of the printer driver.
❏ EPSON Standard (sRGB)Optimizes the sRGB space and corrects the color.
❏ Business GraphicsPerforms color correction to sharpen your imagesbased on the sRGB space.
❏ Line DrawingOptimizes color correction for line drawing byprocessing the border between lines and thebackground as discontinuous.
❏ GISPerforms the optimal printing for topographicmaps and other data of the geographicinformation system (GIS).
❏ ICMPerforms color management to match the colorsin the image data to those in the printed output(Windows only).U “Color Management Printing” on page 72
❏ Off (No Color Adjustment)Color correction is not performed by the printerdriver. Choose if color management is performedby the application.U “Color Management Printing” on page 72
If you clear the Simple Settings check box, you cancheck which of the above color correction methods isused. Standard of Select Target is the most suitablesetting for the currently selected paper type.
Clicking the Settings... button allows you to, forexample, finely adjust the Gamma, Brightness,Contrast, Saturation, and color balance.
Use this option when the application in use does nothave a color correction function.
Note:The color correction options available vary with theoperating system and the type of paper used.
If you want to select the color correction methodyourself, select Custom at the very bottom of the printtarget list.
Making Settings in Windows
A When using applications featuring a colormanagement function, specify how to adjustcolors from these applications.
When using applications without a colormanagement function, start from Step 2.
Depending on the type of the application, makethe settings following the table below.
Adobe Photoshop CS3 or laterAdobe Photoshop Elements 6 or laterAdobe Photoshop Lightroom 1 or later
SC-T5100 Series/SC-T3100 Series/SC-T5100N Series/SC-T3100N Series User's Guide
Printing with the Printer Driver from Your Computer
68

OS Color ManagementSettings
Windows 10,
Windows 8.1,
Windows 8,
Windows 7,
Windows Vista
Printer Manages Colors
Windows XP(Service Pack 2 orlater and .NET 3.0or later)
Windows XP(other than theabove)
No Color Management
In other applications, set No ColorManagement.
Note:For information on supported platforms, see thewebsite for the application in question.
Setting example of Adobe Photoshop CC
Open the Print dialog box.
Select Color Management, select PrinterManages Colors in Color Handling, and clickPrint.
B Display the Printer Settings tab of the printerdriver and then clear the Simple Settings checkbox in the Print Quality area.
U “Basic Operating Procedures (Windows)”on page 46
C Select the print target. If you want to select thecolor correction method yourself, selectCustom at the very bottom of the list.
D When Custom is selected for the print target,select the color and color correction methodsettings.
SC-T5100 Series/SC-T3100 Series/SC-T5100N Series/SC-T3100N Series User's Guide
Printing with the Printer Driver from Your Computer
69

E If necessary, click Settings... and then adjustitems such as the Gamma, Brightness, Contrast,Saturation, and color balance.
See the printer driver help for more details oneach item.
Note:You can adjust the correction value by checkingthe sample image on the left side of the screen.Furthermore, you can select Color Circle or SlideBar of Color Adjustment Method and finelyadjust the color balance.
F Check other settings, and then start printing.
Settings in Mac
A When using applications featuring a colormanagement function, specify how to adjustcolors from these applications.
When using applications without a colormanagement function, start from Step 2.
When using the following applications, set thecolor management setting to Printer ManagesColors.
Adobe Photoshop CS3 or laterAdobe Photoshop Elements 6 or laterAdobe Photoshop Lightroom 1 or later
In other applications, set No ColorManagement.
Note:For information on supported platforms, see thewebsite for the application in question.
Setting example of Adobe Photoshop CC
Open the Print dialog box.
Select Color Management, select PrinterManages Colors in Color Handling, and clickPrint.
B Display the Print screen.
U “Basic Operating Procedures (Mac)” onpage 52
C Select Color Matching from the list, and thenclick EPSON Color Controls.
Note:EPSON Color Controls will not be available inthe following applications if Step 1 is omitted.
❏ Adobe Photoshop CS3 or later
❏ Adobe Photoshop Lightroom 1 or later
❏ Adobe Photoshop Elements 6 or later
SC-T5100 Series/SC-T3100 Series/SC-T5100N Series/SC-T3100N Series User's Guide
Printing with the Printer Driver from Your Computer
70

D Select Printer Settings from the list and thenclear the Simple Settings check box in thePrint Quality area.
E Select the print target. If you want to select thecolor correction method yourself, selectCustom at the very bottom of the list.
F When Custom is selected for the print target,select the color and color correction methodsettings.
G If necessary, click Settings... and then adjustitems such as the Gamma, Brightness, Contrast,Saturation, and color balance.
See the printer driver help for more details oneach item.
H Check other settings, and then start printing.
SC-T5100 Series/SC-T3100 Series/SC-T5100N Series/SC-T3100N Series User's Guide
Printing with the Printer Driver from Your Computer
71

Color ManagementPrinting
About Color Management
Even when using the same image data, the originalimage and the displayed image may look different, andthe printed results may look different to the image yousee on the display. This occurs due to the difference incharacteristics when input devices such as scannersand digital cameras capture colors as electronic data,and when output devices such as display screens andprinters reproduce colors from the color data. Thecolor management system is a means to adjustdifferences in color conversion characteristics amonginput and output devices. A color management systemis included with operating systems such as Windowsand Mac OS, in addition to image processingapplications. Windows and Mac OS X include theICM and ColorSync color management systems,respectively.
In a color management system, a color definition filecalled a "Profile" is used to perform color matchingbetween devices. (This file is also called an ICCprofile.) The profile of an input device is called aninput profile (or source profile), and the profile of anoutput device, such as a printer, is called a printerprofile (or output profile). A profile is prepared foreach media type in this printer's driver.
The color conversion areas by the input device and thecolor reproduction area by the output device differ. Asa result, there are color areas that do not match evenwhen performing color matching using a profile. Inaddition to specifying profiles, the color managementsystem also specifies conversion conditions for areaswhere color matching failed as "intent". The name andtype of intent vary depending on the colormanagement system you are using.
You cannot match the colors on the printed results anddisplay by color management between the input deviceand the printer. To match both colors, you need toperform color management between the input deviceand the display as well.
Color Management Print Settings
You can perform color management printing usingthis printer's printer driver in the following two ways.
Choose the best method according to the applicationyou are using, the operating system environment, theaim of the print out, and so on.
Setting color management with the applications
This method is for printing from applications thatsupport color management. All color managementprocesses are carried out by the application's colormanagement system. This method is useful when youwant to obtain the same color management printresults using a common application among differentoperating system environments.
U “Setting color management with the applications”on page 73
Setting color management with the printer driver
The printer driver uses the operating system's colormanagement system and carries out all colormanagement processes. You can configure the colormanagement settings in the printer driver using thefollowing two methods.
❏ Host ICM (Windows) / ColorSync (Mac OS X)Set when printing from applications that supportcolor management. This is effective in producingsimilar print results from different applicationsunder the same operating systems.U “Color Management Printing by Host ICM(Windows)” on page 75U “Color Management Printing by ColorSync(Mac)” on page 76
❏ Driver ICM (Windows only)This allows you to perform color managementprinting from applications that do not supportcolor management.U “Color Management Printing by DriverICM(Windows Only)” on page 77
SC-T5100 Series/SC-T3100 Series/SC-T5100N Series/SC-T3100N Series User's Guide
Printing with the Printer Driver from Your Computer
72

Setting profiles
Settings for the input profile, printer profile, and intent(matching method) vary between three types of colormanagement printing since their color managementengines are used differently. This is because colormanagement usage differs between the engines. Makesettings in the printer driver or application asdescribed in the following table.
Inputprofilesettings
Printerprofilesettings
Intentsettings
Driver ICM(Windows)
PrinterDriver
PrinterDriver
PrinterDriver
Host ICM(Windows)
Application PrinterDriver
PrinterDriver
ColorSync(Mac OS X)
Application PrinterDriver
Application
Application Application Application Application
Printer profiles for each paper type that is neededwhen performing color management are installed withthe printer's printer driver. You can select the profilefrom the printer driver's settings screen.
You can select the profile from the printer driver'ssettings screen.
U “Color Management Printing by DriverICM(Windows Only)” on page 77
U “Color Management Printing by Host ICM(Windows)” on page 75
U “Color Management Printing by ColorSync(Mac)” on page 76
U “Setting color management with the applications”on page 73
Setting color management with the applications
Print using applications with a color managementfunction. Make the color management settings in theapplication and disable the printer driver's coloradjustment function.
A Make color management settings in theapplications.
Setting example of Adobe Photoshop CC
Open the Print dialog box.
Select Color Management, select PhotoshopManages Colors in Color Handling, selectPrinter Profile and Rendering Intent, and clickPrint.
B Display the printer driver's settings screen(Windows) or Print screen (Mac).
Make printer driver settings.
For Windows
U “Basic Operating Procedures (Windows)”on page 46
For Mac
U “Basic Operating Procedures (Mac)” onpage 52
SC-T5100 Series/SC-T3100 Series/SC-T5100N Series/SC-T3100N Series User's Guide
Printing with the Printer Driver from Your Computer
73

C Set color management to off.
For Windows
Clear the Simple Settings check box in thePrint Quality area of the Printer Settings taband select Off (No Color Adjustment) from theprint target list.
Note:In Windows 7, Windows Vista, and Windows XP(Service Pack 2 or later and .NET 3.0), Off (NoColor Adjustment) is selected automatically.
For Mac
Select Printer Settings from the list and clearthe Simple Settings check box in the PrintQuality area, and select Off (No ColorAdjustment) from the print target list.
D Check other settings, and then start printing.
SC-T5100 Series/SC-T3100 Series/SC-T5100N Series/SC-T3100N Series User's Guide
Printing with the Printer Driver from Your Computer
74

Setting color management with the printer driver
Color Management Printing by HostICM (Windows)
Use image data in which an input profile has beenembedded. Also, the application must support ICM.
A Make the settings for color adjustment usingthe application.
Depending on the type of the application, makethe settings following the table below.
Adobe Photoshop CS3 or laterAdobe Photoshop Elements 6.0 or laterAdobe Photoshop Lightroom 1 or later
OS Color ManagementSettings
Windows 8.1,
Windows 8,
Windows 7,
Windows Vista
Printer Manages Colors
Windows XP(Service Pack 2 orlater and .NET 3.0or later)
Windows XP(other than theabove)
No Color Management
In other applications, set No ColorManagement.
Note:For information on supported platforms, see thewebsite for the application in question.
Setting example of Adobe Photoshop CC
Open the Print dialog box.
Select Color Management, select PrinterManages Colors in Color Handling, and clickPrint.
When using an application without a colormanagement function, start from step 2.
B Clear the Simple Settings check box in thePrint Quality area on the Printer Settings tab ofthe printer driver and then select ICM from theSelect Target list.
U “Basic Operating Procedures (Windows)”on page 46
SC-T5100 Series/SC-T3100 Series/SC-T5100N Series/SC-T3100N Series User's Guide
Printing with the Printer Driver from Your Computer
75

C Click Settings....
D Select Host ICM in ICM Mode.
See the printer driver help for more details.
The printer profile corresponding to the MediaType* selected on the Printer Settings tab is setautomatically and is displayed in the PrinterProfile Description area.
To change the profile, select the Show allprofiles check box.
*: If Source is selected on the Printer Settingstab, the paper type set on the printer is setautomatically. Media Type becomes Use PrinterSettings, and the paper type name is displayedon the right side.
E Check other settings, and then start printing.
Color Management Printing byColorSync (Mac)
Use image data in which an input profile has beenembedded. Also, the application must supportColorSync.
Note:Depending on the application, color managementprinting by ColorSync may not be supported.
A Disable the color management functions in theapplication.
B Display the Print screen.
U “Basic Operating Procedures (Mac)” onpage 52
C Select Color Matching from the list, and thenclick ColorSync.
The printer profile corresponding to thecurrently selected paper type* is specifiedautomatically and displayed at the bottom ofthe profile area. To change the profile, select thedesired profile from the Profile pull-downmenu.
*: It is set in the screen displayed by selectingPrinter Settings from the list. If Source isselected, the paper type set on the printer is setautomatically, and Use Printer Settings isdisplayed. The paper type name is displayed onthe right side of it.
D Check other settings, and then start printing.
SC-T5100 Series/SC-T3100 Series/SC-T5100N Series/SC-T3100N Series User's Guide
Printing with the Printer Driver from Your Computer
76

Color Management Printing byDriver ICM(Windows Only)
The printer driver uses its own printer profiles toperform color management. You can use the followingtwo color correction methods.
❏ Driver ICM (Basic)Specify one type of profile and intent forprocessing the entire image data.
❏ Driver ICM (Advanced)The printer driver distinguishes the image datainto the Image, Graphics, and Text areas. Specifya different profile and intent for each of the threeareas.
When using applications featuring a colormanagement function
Make the settings for color processing using theapplication before making printer driver settings.
Depending on the type of the application, make thesettings following the table below.
Adobe Photoshop CS3 or laterAdobe Photoshop Elements 6.0 or laterAdobe Photoshop Lightroom 1 or later
OS Color ManagementSettings
Windows 8.1,
Windows 8,
Windows 7,
Windows Vista
Printer Manages Colors
Windows XP (Service Pack2 or later and .NET 3.0 orlater)
Windows XP (other thanthe above)
No Color Management
In other applications, set No Color Management.
Note:For information on supported platforms, see the websitefor the application in question.
Setting example of Adobe Photoshop CC
Open the Print dialog box.
Select Color Management, select Printer ManagesColors in Color Handling, and click Print.
A Clear the Simple Settings check box in thePrint Quality area on the Printer Settings tab ofthe printer driver and then select ICM from theSelect Target list.
U “Basic Operating Procedures (Windows)”on page 46
SC-T5100 Series/SC-T3100 Series/SC-T5100N Series/SC-T3100N Series User's Guide
Printing with the Printer Driver from Your Computer
77

B Click Settings....
C Select Driver ICM (Basic) or Driver ICM(Advanced) in ICM Mode of the ICM dialogbox.
If you select Driver ICM (Advanced), you canspecify the profile and intent for each of imagedata such as photos, graphics data, and textdata.
Intent Explanation
Saturation Keeps the current saturationunchanged and converts thedata.
Perceptual Converts the data so that amore visually natural image isproduced. This feature is usedwhen a wider gamut of color isused for image data.
Intent Explanation
RelativeColorimetric
Converts the data so that a setof color gamut and white point(or color temperature)coordinates in the original datamatch their corresponding printcoordinates. This feature is usedfor many types of colormatching.
AbsoluteColorimetric
Assigns absolute color gamutcoordinates to the original andprint data and converts thedata. Therefore, color toneadjustment is not performed onany white point (or colortemperature) for the original orprint data. This feature is usedfor special purposes such aslogo color printing.
D Check other settings, and then start printing.
SC-T5100 Series/SC-T3100 Series/SC-T5100N Series/SC-T3100N Series User's Guide
Printing with the Printer Driver from Your Computer
78

Multi-Page Printing(N-up)
Two or four consecutive pages can be printed on asingle sheet.
Making Settings in Windows
Note:In Windows, you can use the Reduce/Enlarge function(Fit to Page) to print the data on different sizes of paper.
U “Printing at Non-Standard Sizes” on page 64
A Display the Layout tab of the printer driver andselect the Page Layout check box. Then, selectN-up and click the Settings button.
U “Basic Operating Procedures (Windows)”on page 46
B Set Number of pages per sheet and PageOrder in the Print Layout dialog box.
If the Print page frames check box is selected,page frames are printed on each page.
C Check other settings, and then start printing.
Settings in Mac
A Display the Print dialog box, select Layout fromthe list, and specify the number of pages persheet and so on.
U “Basic Operating Procedures (Mac)” onpage 52
SC-T5100 Series/SC-T3100 Series/SC-T5100N Series/SC-T3100N Series User's Guide
Printing with the Printer Driver from Your Computer
79

Note:You can print frames around arranged pagesusing the Border function.
B Check other settings, and then start printing.
Manual 2-Sided Printing(Windows Only)
This function is enabled only when Auto Sheet Feederis selected in Source. It is not available when RollPaper or Sheet is selected.
This function allows printing on both sides by turningover the paper after printing of the even pages finishesand then printing the odd pages.
Notes on Using 2-Sided Printing
Observe the following points when performing2-sided printing.
❏ Use paper compatible with 2-sided printing.
❏ Depending on the paper type and data to beprinted, the ink may bleed through to the otherside of the paper.
❏ Performing 2-sided printing continuously maycause the print quality to decline or a paper jam. Ifthe print quality declines, reduce the ink densityin the printer driver or print one sheet at a time.
❏ If 2-sided printing is performed continuously, theinside of the printer may become soiled with ink.If the paper is soiled from the rollers afterprinting, perform cleaning. U “Smearing occurson printed matter from the auto sheet feeder.” onpage 148
Note:Paper can be further saved by performing 2-sidedprinting in combination with multi-page printing.
U “Multi-Page Printing (N-up)” on page 79
Setting Procedures for Printing
A Load the paper in the auto sheet feeder.
U “Loading Paper in the Auto Sheet Feeder”on page 34
SC-T5100 Series/SC-T3100 Series/SC-T5100N Series/SC-T3100N Series User's Guide
Printing with the Printer Driver from Your Computer
80

B Display the Printer Settings tab of the printerdriver and select Auto Sheet Feeder in Source.
U “Basic Operating Procedures (Windows)”on page 46
C Display the Layout tab of the printer driver andselect the 2-sided printing check box.
Note:
❏ If you click Margin Setting, you can setBinding Edge and Binding Margin. Performa test print because the set binding marginwidth and the actual print result may differdepending the application used.
❏ Selecting the Folded Booklet check boxenables printing to make a booklet. In theexample in the figure below, the pages thatwill be on the inside when the paper is foldedinto two (pages 2, 3, 6, 7, 10, and 11) areprinted first.
D Check other settings, and then start printing.
E When the guide screen appears after printing ofthe odd pages is finished, load the paper againfollowing the instructions on the screen andthen click Resume.
SC-T5100 Series/SC-T3100 Series/SC-T5100N Series/SC-T3100N Series User's Guide
Printing with the Printer Driver from Your Computer
81

Folded 2-Sided Printing(Windows only)
Two consecutive pages can be printed on a singlesheet. The second page is flipped 180° and printedadjacent to the first page, allowing the paper to befolded to make a 2-sided document.
A Display the Layout tab of the printer driver andselect the Page Layout check box. Then, selectFolded Double-Side and click the Settings...button.
U “Basic Operating Procedures (Windows)”on page 46
B Set Binding Edge and Binding Margin in theFolded Double-Side Setting dialog box.
C Check other settings, and then start printing.
SC-T5100 Series/SC-T3100 Series/SC-T5100N Series/SC-T3100N Series User's Guide
Printing with the Printer Driver from Your Computer
82

Poster Printing (WindowsOnly)
A single page can be printed across multiple sheets.The sheets can then be joined together to form largeposters (up to 16 times the original size).
A Display the Layout tab of the printer driver andselect the Page Layout check box. Then, selectPoster and click the Settings... button.
U “Basic Operating Procedures (Windows)”on page 46
B Set Number of panels in the Poster dialog box.
C If you want to print marks to serve as a guidewhen joining together paper printed withposter printing, select the Print Cutting Guidescheck box.
Overlapping Alignment Marks
Prints guides for joining the paper withoverlapping. The finished size is smaller only forthe overlapping portions.
SC-T5100 Series/SC-T3100 Series/SC-T5100N Series/SC-T3100N Series User's Guide
Printing with the Printer Driver from Your Computer
83

Print page frames
Prints frames for joining the paper withoutoverlapping.
D Check other settings, and then start printing.
Joining poster sheets when multi-page printing
If Overlapping Alignment Marks is selected, joinguides (indicated by the lines drawn through andaround the X marks in the illustration below) will beprinted on each sheet.
Note:If the output is in color, the join guides will be in blueand the cut guides in red; otherwise, all the guides willbe printed in black.
The following section describes how to join fourprinted pages together.
SC-T5100 Series/SC-T3100 Series/SC-T5100N Series/SC-T3100N Series User's Guide
Printing with the Printer Driver from Your Computer
84

A Ready the two top sheets and trim the excessfrom the left sheet by cutting along the linejoining the two join guides (the centers of the Xmarks).
B Lay the upper left sheet on top of upper rightsheet. Lineup the X marks as shown in theillustration below, and temporarily fasten themusing an adhesive tape on the back.
C With the two sheets overlapping, trim theexcess by cutting along the line joining the twocut guides (the lines to the left of the X marks).
D Rejoin the two sheets.
Use an adhesive tape to stick the backs of thesheets together.
E Repeat steps 1 to 4 for the lower two sheets.
SC-T5100 Series/SC-T3100 Series/SC-T5100N Series/SC-T3100N Series User's Guide
Printing with the Printer Driver from Your Computer
85

F Trim the bottom from the upper sheets bycutting along the line joining the two guides(the lines above the X marks).
G Lay the upper sheet on top of the lower sheet.Lineup the X marks as shown in the illustrationbelow, and temporarily fasten them using anadhesive tape on the back.
H With the two sheets overlapping, trim theexcess by cutting along the line joining the twocut guides (the lines above the X marks).
SC-T5100 Series/SC-T3100 Series/SC-T5100N Series/SC-T3100N Series User's Guide
Printing with the Printer Driver from Your Computer
86

I Join the upper and lower sheets together.
Use an adhesive tape to stick the backs of thesheets together.
J After joining all the sheets, trim off the bordersby cutting along the cut guides (outside the Xmarks).
SC-T5100 Series/SC-T3100 Series/SC-T5100N Series/SC-T3100N Series User's Guide
Printing with the Printer Driver from Your Computer
87

Printing MultipleDocuments (LayoutManager)(Windows Only)
Documents created in different applications can beprinted together in your choice of layout. This allowsyou to improve print work efficiency and conservepaper.
Sample Multi-Document Layout
Sample Free Vertical/Horizontal Layout
Setting Procedures for Printing
A Open the file you want to print in yourapplication.
B Select the Layout Manager check box on thePrinter Settings tab of the printer driver andcheck that the size set in the application isdisplayed in Document Size.
U “Basic Operating Procedures (Windows)”on page 46
Note:Document Size is the size of the document to beplaced on the Layout Manager screen. The actualprinting paper size is set in the screen in Step 6.
SC-T5100 Series/SC-T3100 Series/SC-T5100N Series/SC-T3100N Series User's Guide
Printing with the Printer Driver from Your Computer
88

C Click OK. When printing from an application,the Layout Manager screen opens.
The print data is not printed, but one page isplaced on the paper of the Layout Managerscreen as one object.
D Leaving the Layout Manager screen open,repeat steps 1 to 3 until all the print data hasbeen added to the layout.
The objects are added to the Layout Managerscreen.
E Arrange the objects on the Layout Managerscreen.
Objects can be moved or resized by dragging aswell as rearranged or rotated using the toolbuttons or the options in the Object menu.
The overall size and placement of the objectscan be changed using the Preferences andArrangement options in the File menu.
See the Layout Manager screen help for moredetails on each function.
F Click Properties in the File menu and set theprint settings in the printer driver dialog box.
Set Print Quality in the Media Settings dialogbox.
G Click the File menu in the Layout Managerscreen, and then click Print.
Printing starts.
Saving and Recalling Settings
The layout and setting information on the LayoutManager screen can be saved as a file. If you need toclose your application in the middle of a job, you cansave it to a file and then open it later to continue yourwork.
Saving
A Click the File menu on the Layout Managerscreen, and then click Save As....
B Enter the file name, select the location, andthen click Save.
C Close the Layout Manager screen.
SC-T5100 Series/SC-T3100 Series/SC-T5100N Series/SC-T3100N Series User's Guide
Printing with the Printer Driver from Your Computer
89

Opening saved files
A Right-click the printer icon ( ) on theWindows taskbar, and then click LayoutManager in the displayed menu.
The Layout Manager screen appears.
Note:When the printer icon is not displayed on theWindows taskbar
Open the Utility tab of the printer driver and clickthe Monitoring Preferences. Select the Registerthe shortcut icon to the taskbar check box in theMonitoring Preferences dialog box.
B Click Open in the File menu on the LayoutManager screen.
C Select the location and open the required file.
SC-T5100 Series/SC-T3100 Series/SC-T5100N Series/SC-T3100N Series User's Guide
Printing with the Printer Driver from Your Computer
90

Printing Using theHP-GL/2 or HP RTLMode from aComputer
The printer can emulate* HP-GL/2 (compatible withHP Designjet 750C) and HP RTL. This sectiondescribes the settings of the printer and the settings inthe CAD application for printing while emulating.
* Not all functions are supported. If you will use anuntested application, test its output in advance.
For a list of applications that have been tested, visitthe Epson website at http://www.epson.com.
c Important:
The printer may not perform as expected if the sizeof the data to be printed is extremely large.
Note:CAD drawings can also be printed using the CAD/ linedrawing mode of the supplied printer driver. Werecommend printing from the printer driver when youwant to print with better image quality.
U “Printing CAD Drawings” on page 57
Printer Settings
Change the printer settings for printing in theHP-GL/2 or HP RTL mode as necessary in the controlpanel of the printer. The printer settings include basicprint settings such as the paper source and margins(Universal Print Settings) and HP-GL/2 specificsettings such as palette settings (HP-GL/2 UniqueSettings).
Basic Print Settings
A Touch Settings - General Settings - PrinterSettings - Universal Print Settings from theHome screen.
B Check Paper Source and change the setting ifnecessary.
The default setting is Roll Paper. WhenHP-GL/2 or HP RTL print data is sent, an erroroccurs if paper is not loaded for the papersource set here.
C Check the other items and make changes ifnecessary.
See the following for more details on UniversalPrint Settings items.
U “General Settings - Printer Settings” onpage 117
HP-GL/2 Specific Print Settings
If you want to change HP-GL2 specific settings such asrotating print data, merging lines, and changing theDefine Palette set in the application, use the followingprocedure.
A Touch Settings - General Settings - PrinterSettings - HP-GL/2 Unique Settings from theHome screen.
B Touch and change the settings of the desireditems.
See the following for more details on HP-GL/2Unique Settings items.
U “General Settings - Printer Settings” onpage 117
SC-T5100 Series/SC-T3100 Series/SC-T5100N Series/SC-T3100N Series User's Guide
Printing Using the HP-GL/2 or HP RTL Mode from a Computer
91

Note:When HP-GL/2 or HP RTL printing is not performedproperly
The printer automatically determines whether normalprinting from the printer driver or emulation printingof HP-GL/2 or HP RTL from the sent print data andthen switches the print mode accordingly. If modeswitching is not performed correctly and printing is notperformed properly, configure the setting as follows.
❏ When the computer and printer are connected viaUSBSelect Settings - General Settings - PrinterSettings - Printing Language - USB from theHome screen and then change the setting fromAuto to HP-GL/2.
❏ When the computer and printer are connected viaa networkSelect Settings - General Settings - PrinterSettings - Printing Language - Network from theHome screen and then change the setting fromAuto to HP-GL/2.
To print from the printer driver as usual after HP-GL/2or HP RTL finishes, return the setting to Auto.
CAD Application Settings
Set the output device as follows according to yourmodel. This explanation uses AutoCAD 2018 as anexample.
A Click Plot.
B Set the plotter in Printer/plotter.
❏ SC-T5100 Series/SC-T5100N Series:HP Designjet 750C C3196A
❏ SC-T3100 Series/SC-T3100N Series:HP Designjet 750C C3195A
SC-T5100 Series/SC-T3100 Series/SC-T5100N Series/SC-T3100N Series User's Guide
Printing Using the HP-GL/2 or HP RTL Mode from a Computer
92

Changing theNetwork ConnectionMethods
The printer can connect to a wired LAN or a wirelessLAN. Furthermore, it also supports Wi-Fi Direct(Simple AP) which allows a smart device or otherdevice to directly connect wirelessly with the printereven when there is no wired LAN or wireless LANenvironment.
The printer cannot connect to a wired LAN andwireless LAN at the same time. A Wi-Fi Directconnection is possible regardless of whether or not theprinter is connected to a network.
This section describes the procedures to use to switchthe connection method.
Note:See the Administrator's Guide (online manual) fordetails on the network settings.
Switching to Wired LAN
A Touch on the Home screen.
Note:The shape and color of the icon differ dependingon the connection status.U “Home screen operations” on page 13
B Touch Description.
C Touch Wired LAN Connection Method.
D Touch Start Setup.
The process to disable the wireless LANconnection with the access point starts. Waituntil the The Wi-Fi connection is disabled.message appears.
E Connect your router and the printer with aLAN cable.
See the following for the location of theprinter's LAN port.U “Back” on page 11
Switching to WirelessLAN
The SSID (network name) and password of the accesspoint to which the printer is to be connected arerequired. Confirm them in advance. The printer can beconnected to a wireless LAN while the LAN cable isstill connected.
Note:If your access point supports WPS (Wi-Fi ProtectedSetup), the printer can be connected using Push ButtonSetup(WPS) or PIN Code Setup(WPS) without usingan SSID and password.U “General Settings - Network Settings” on page 127
A Touch on the Home screen.
Note:The shape and color of the icon differ dependingon the connection status.U “Home screen operations” on page 13
B Touch Router.
C Touch Start Setup.
Details of the wired LAN connection status aredisplayed.
D Touch Change to Wi-Fi connection., check thedisplayed message, and touch Yes.
E Touch Wi-Fi Setup Wizard.
F Select the desired SSID.
If the desired SSID is not displayed, touchSearch Again to update the list. If it is still notdisplayed, touch Enter Manually and directlyenter the SSID.
SC-T5100 Series/SC-T3100 Series/SC-T5100N Series/SC-T3100N Series User's Guide
Changing the Network Connection Methods
93

G Touch Enter Password and enter the password.
Note:
❏ Differentiate between uppercase andlowercase when entering the password.
❏ If the SSID was entered directly, set Passwordto Available before entering the password.
H When input is finished, touch OK.
I Check the settings and then touch Start Setup.
J Touch OK to finish the procedure.
If the connection fails, select Print CheckReport to print a network connection checkreport. You can check the measure to take in thereport.
K Close the Network Connection Settings screen.
Directly ConnectionWirelessly (Wi-Fi Direct)
A direct connection with the printer can be establishedtemporarily when, for example, the printer is notconnected to a network or you do not have permissionto log on to the network.
Wi-Fi Direct is disabled by default. The followingdescribes the procedure from enabling Wi-Fi Direct toconnecting.
Note:The printer can connect with up to four smart devicesor computers at the same time. If you want to connectanother device when there are already four devicesconnected, disconnect the connection with the printerfrom an already connected device.
A Touch on the Home screen.
Note:The shape and color of the icon differ dependingon the connection status.U “Home screen operations” on page 13
B Touch Wi-Fi Direct.
When Wi-Fi Direct is already enabled, thenetwork (SSID), password, number ofconnected devices, etc. are displayed. Proceedto step 5.
Note:When any of the displayed network (SSID), devicename, etc. is partially not visible because it is cutoff at the right edge of the screen, touch thecorresponding item to display the entire settingvalue.
C Touch Start Setup.
D Touch Start Setup.
Wi-Fi Direct is enabled and the network(SSID), password are displayed.
E Open the Wi-Fi setting screen on the deviceyou want to connect with the printer, select theSSID displayed on the screen of the printer, andenter the password just as it is displayed on thescreen.
F When a connection is established, touch Closeto finish the procedure.
G Touch Close on the screen of the printer toclose the network connection settings screen.
When the printer driver is installed on the connecteddevice, you can print using the printer driver.
You can print using AirPrint from a Mac computer oriOS device.
U “Printing Using AirPrint” on page 95
Note:When you turn off the power of the printer, theconnections with connected devices are all disconnected.To reconnect after turning the printer back on, performthe procedure again from step 1.
SC-T5100 Series/SC-T3100 Series/SC-T5100N Series/SC-T3100N Series User's Guide
Changing the Network Connection Methods
94

Printing UsingAirPrint
You can easily print wirelessly using AirPrint from aniPhone, iPad, or iPod touch running the latest iOS orfrom one of the latest Mac computers.
This section describes the procedure to print from asmart device.
Note:Printing such as the following is not possible withAirPrint.
❏ Printing by automatically fitting the document tothe roll paper width
❏ Printing by automatically enlarging or reducing tofit the output paper size
❏ Setting a print quality suitable for the print target
For such printing, please use the printer driver.
U “How to Select the Dedicated Printer Driver for ThisPrinter” on page 54
A Connect the smart device and printer viawireless LAN or Wi-Fi Direct.
See the following for more details.U “Switching to Wireless LAN” on page 93 U “Directly Connection Wirelessly (Wi-FiDirect)” on page 94
B Load the paper in the printer.
C Open the document or photo to be printed onyour smart device.
D Tap the share icon to display the print option.
E Tap the printer icon or Print.
Note:The print option is not displayed for anapplication that does not support AirPrint. Checkwhether it is supported in the help or otherdocumentation of the application.
F Tap Select Printer and select the printer fromthe displayed list.
G Tap Print to start printing.
SC-T5100 Series/SC-T3100 Series/SC-T5100N Series/SC-T3100N Series User's Guide
Printing Using AirPrint
95

Making EnlargedCopies with an A3 orA4 Scanner
Connecting an Epson A3 or A4 scanner to the printermakes creating enlarged copies a snap; no computer isrequired.
Supported scanners
❏ DS-530
❏ DS-6500
❏ DS-60000
Check the Epson website for the latest information onsupported scanners.
http://www.epson.com
Supported Sizes
Document Size*1 Output Size
5 x 7 inch
Letter
A5
B5
A4
B4
A3
User-Defined*2
A2
US C (17x22in)
JIS B2
US D (22x34in)
A1
JIS B1*3
US E (34x44in)*3
A0*3
User-Defined*4
*1 Differs depending on the specifications of the scanner tobe connected.
*2 89 to 297 mm wide (216 mm when A4 scanner)
*3 Not supported by SC-T3100 Series/SC-T3100N Series.
*4 89 to 914 mm wide (up to 610 mm for SC-T3100 Series/SC-T3100N Series)
Supported paper
Roll paper only. Enlarged copying to cut sheet is notpossible.
Unsupported paper types
The following paper cannot be used for enlargedcopying.
❏ Enhanced Adhesive Synthetic Paper
❏ Enhanced Low Adhesive Synthetic Paper
U “Epson Special Media Table” on page 157
Connecting the Scanner
A Ready both the printer and the scanner.
For information on setting up the scanner, seethe documentation supplied with the scanner.
B Turn the printer and scanner off.
C Connect the scanner to the printer using theUSB cable supplied with the scanner.
c Important:
Connect the scanner directly to the printer.Enlarged copies are only available when thescanner is connected directly to the printer.
SC-T5100 Series/SC-T3100 Series/SC-T5100N Series/SC-T3100N Series User's Guide
Making Enlarged Copies with an A3 or A4 Scanner
96

Making Enlarged Copies
A Turn the printer and scanner on.
The devices may be turned on in any order.
B Load roll paper supported by the enlargedcopying function into the printer.
U “Loading Roll Paper” on page 28
C Place the document on the scanner glass or inthe auto document feeder (ADF).
U “Placing Documents in the Scanner” onpage 97
For information on using the scanner, see thedocumentation supplied with the device.
D Touch Enlarged Copy on the Home screen.
The enlarged copy dialog box is displayed.
Note:If Enlarged Copy is not displayed on the Homescreen, check the following.
❏ Are the connectors of the USB cableconnecting the printer and scanner insertedfirmly?
❏ Is the power of the scanner on?
❏ Is the scanner a model that supports enlargedcopying?
E Select the size of the document loaded in thescanner in Original Size and set theenlargement setting in Reduce/Enlarge.
If you set Auto Fit Page to On, printing isperformed by automatically enlarging to fit thewidth of the roll paper loaded in the printer.
c Important:
The image quality may decline or streaks mayappear depending on the document ormagnification.
If streaks appear, try performing paperadjustment.
U “Optimizing Paper Settings (MediaAdjust)” on page 43
If the problem is not resolved, refer to thescanner manual and then clean the inside ofthe scanner.
Note:If you touch (Presets), you can assign a nameto frequently used copy settings and then registerthem to Presets.
The screen for entering a name can be switched asshown below with the button marked.
Also, each touch of the following bottom left iconswitches the input method as follows.
ABC: Enters alphabet letters
123#: Enters numbers and symbols
F Touch the numeric value for the number ofcopies and then enter the number of copies inthe keypad screen.
G Touch to start copying.
Copying can also be started by touching the ]button of the scanner.
Placing Documents in theScanner
Failure to observe the following precautions whenplacing the original in the scanner may result inreduced print quality or scanning failures.
SC-T5100 Series/SC-T3100 Series/SC-T5100N Series/SC-T3100N Series User's Guide
Making Enlarged Copies with an A3 or A4 Scanner
97

❏ DS-530 is a scanner that scans both sidessimultaneously but it cannot scan both sides of thedocument with enlarged copying. Place the sideyou want copying facing downward in the ADF.
❏ Be sure to insert the original in landscape (wide)orientation.
❏ If there are documents both on the glass and inthe ADF, the document in the ADF will bescanned.Remove documents from the ADF before placinga document on the glass.
❏ The ADF can not be used when:
❏ When JIS B1 or A0 is selected for Reduce/Enlarge and multiple copies will be made
❏ The original is printed on thick stock (e.g.,postcards or photographs)
❏ When multiple copies are made from an originalplaced on the glass, the original may be scannedonce for each copy.Wait until all the copies have been printed beforeopening the scanner cover.
❏ Use the ADF to scan multi-page documents.
❏ If multiple copies are set for scanning multiplesheets continuously, the copies will be printed on apage basis as shown below.Example: Order in which pages are output whenthe printer is used to make two copies of a twopage document
SC-T5100 Series/SC-T3100 Series/SC-T5100N Series/SC-T3100N Series User's Guide
Making Enlarged Copies with an A3 or A4 Scanner
98

Using the Menu
Menu List
The items and options available in the menu are described below. See the reference pages for more details on eachitem.
Paper Setting
The Paper Setting menu is displayed if paper is loaded.
Details of each item U “Paper Setting menu” on page 109
Settings item Settings value
Roll Paper
Remove Display the removal method
Feed/Cut Paper Backward, Forward, Cut
Media Adjust Start
Advanced Media Setting
Platen Gap 1.6, 2.1, 2.6
(Displayed when in Paper Type, Custom Paper is selected.)
Top/Bottom Margins Standard, Top 3 mm/Bottom 3 mm, Top 15 mm/Bottom 15 mm,Top 45 mm/Bottom 15 mm
Back Tension Auto, Standard, High, Extra High
Drying Time
Drying Time per Pass 0 to 10.0 sec
Drying Time per Page 0 to 60 min
Auto Cut On, Off
Manage Remaining Amount
Setup On, Off
Remaining Amount 5.0 to 150.0 m
Remaining Alert 1.0 to 15.0 m
SC-T5100 Series/SC-T3100 Series/SC-T5100N Series/SC-T3100N Series User's Guide
Using the Menu
99

Settings item Settings value
Change Paper Type
Paper Type
Plain paper Display supported paper types
Coated Paper(Generic)
Premium Glossy Sheet
Others
Auto Sheet Feeder
Media Adjust Start
Change Paper Type/Paper Size
Paper Type
Plain paper Display supported paper types
Coated Paper(Generic)
Premium Glossy Sheet
Others
Paper Size Display supported paper sizes
Cut Sheet(1 sheet)
SC-T5100 Series/SC-T3100 Series/SC-T5100N Series/SC-T3100N Series User's Guide
Using the Menu
100

Settings item Settings value
Remove Eject paper
Media Adjust Start
Change Paper Type/Paper Size
Paper Type
Plain paper Display supported paper types
Coated Paper(Generic)
Premium Glossy Sheet
Others
Paper Size
A Series Display supported paper sizes
US-ANSI
US-ARCH
B Series (ISO)
B Series (JIS)
Others
User-Defined Display paper size input screen
Printer Status
Details of each item U “Printer Status menu” on page 114
Settings item Settings value
Supply Status Display approximate remaining amounts, as well as productnumber of consumables
Message List Display list of messages communicating printer status
Firmware Version Display firmware version
Print Status Sheet
Configuration Status Sheet Print
SC-T5100 Series/SC-T3100 Series/SC-T5100N Series/SC-T3100N Series User's Guide
Using the Menu
101

Settings
Settings item Settings value
General Settings
Basic Settings (Details of each item U “General Settings - Basic Settings” on page 115)
LCD Brightness 1 to 9
Sound
Mute On, Off
Normal Mode
Button Press 0 to 10
Error Notice 0 to 10
Sound Type Pattern1, Pattern2
Sleep Timer 1 to 210 minutes
Power Off Timer Off, 30minutes, 1h, 2h, 4h, 8h, 12h
Circuit Breaker Interlock Startup On, Off
Date/Time Settings
Date/Time Date: yyyy.mm.dd, mm.dd.yyyy, dd.mm.yyyy
Time: 12h, 24h
Time Difference -12:45 to +13:45 (15 minute increments)
Language Display supported languages
Operation Time Out On, Off
Keyboard QWERTY, AZERTY, QWERTZ
Length Unit m, ft / in
SC-T5100 Series/SC-T3100 Series/SC-T5100N Series/SC-T3100N Series User's Guide
Using the Menu
102

Settings item Settings value
Printer Settings (Details of each item U “General Settings - Printer Settings” on page 117)
Paper Source Settings
Error Notice
Paper Size Notice On, Off
Paper Type Notice On, Off
Roll Paper Setup
Detect Paper Meandering On, Off
Print Cutting Guideline On, Off
After-Print Options Hold Paper, Eject Paper
Custom Paper Setting
(Custom paper types 01 to 10 are displayed, and touching any of these will display settings items.)
Change Name Registered name input screen
Change Reference Paper
Plain paper Display supported paper types
Matte Paper
Photo Paper
CAD
Others
Advanced Media Setting
Platen Gap 1.6, 2.1, 2.6
Top/Bottom Margins Standard, Top 3 mm/Bottom 3 mm, Top 15 mm/Bottom 15 mm, Top45 mm/Bottom 15 mm
Back Tension Auto, Standard, High, Extra High
Drying Time
Drying Time per Pass 0.0 to 10.0 sec
Drying Time per Page 0.0 to 60 min
Auto Cut On, Off
Restore Default Yes, No
Printing Language
USB Auto, HP-GL/2
Network Auto, HP-GL/2
SC-T5100 Series/SC-T3100 Series/SC-T5100N Series/SC-T3100N Series User's Guide
Using the Menu
103

Settings item Settings value
Universal Print Settings
Paper Source Roll Paper, Auto Sheet Feeder, Cut Sheet(1 sheet)
Quality Standard, Speed, Fine, Super Fine
Color Mode Color, Black/White
Page Margins option Clip By Margins, Oversize
Page Margin 3 mm, 5 mm
Smoothing On, Off
Base Output Size
Auto -
A Series Display supported paper sizes
US-ANSI
US-ARCH
B Series (ISO)
B Series (JIS)
Others
User-Defined Display paper size input screen
Resolution Standard, 300dpi, 600dpi, 1200dpi
Color Mode (Common) EPSON Standard (sRGB), Business Graphics, GIS, Line Drawing, Off(No Color Management)
HP-GL/2 Unique Settings
Rotate 0°, 90°, 180°, 270°
Origin Setup Left Edge, Center
Mirror Image On, Off
Line Merge On, Off
Color Mode (HP-GL/2) EPSON Standard (sRGB), Business Graphics, GIS, Line Drawing, Off(No Color Management)
Select Palette Software, Default, Palette A, Palette B
Print Color Palette Print
Define Palette
Palette A Display screen to set pen width and pen color
Palette B
Restore default HP-GL/2 Unique Settings Yes, No
SC-T5100 Series/SC-T3100 Series/SC-T5100N Series/SC-T3100N Series User's Guide
Using the Menu
104

Settings item Settings value
Thick Paper Off, Accept
Bidirectional Accept, Off
PC Connection via USB Enable, Disable
USB I/F Timeout Setting 0.5 to 300 sec
Network Settings (Details of each item U “General Settings - Network Settings” on page 127)
Wi-Fi Setup
Router
Connect via Wi-Fi When wireless LAN connection disabled: Display Connect via Wi-FimenuWhen wireless LAN connection connected: Display connectionstatus and settings information
Wi-Fi Setup Wizard
Push Button Setup(WPS)
Others
PIN Code Setup(WPS)
Wi-Fi Auto Connect
Disable Wi-Fi
Wi-Fi Direct
Wi-Fi Direct When Wi-Fi Direct disabled: Display Wi-Fi Direct wizardWhen Wi-Fi Direct enabled: Display settings information andnumber of connected devicesChange Password
Disable Wi-Fi Direct
Delete Registered Device
Wired LAN Setup Start Setup
(Displayed when connected to a wireless LAN.)
Network Status
Wired LAN/Wi-Fi Status Display current connection settings
Wi-Fi Direct Status
Print Status Sheet Print
SC-T5100 Series/SC-T3100 Series/SC-T5100N Series/SC-T3100N Series User's Guide
Using the Menu
105

Settings item Settings value
Connection Check Start network connection check
Advanced
Device Name Display settings change screen
TCP/IP
Proxy Server
IPv6 Address Enable, Disable
Link Speed & Duplex Auto, 10BASE-T Half Duplex, 10BASE-T Full Duplex, 100BASE-TX HalfDuplex, 100BASE-TX Full Duplex
Redirect HTTP to HTTPS Enable, Disable
Disable IPsec/IP Filtering Proceed
(Displayed when enabled.)Disable IEEE802.1X
System Administration (Details of each item U “General Settings - System Administration” on page 130)
Security Settings
Admin Settings
Admin Password Register, Change, Clear All Settings
Lock Setting Off, On
Restore Default Settings
all Wi-Fi/network settings Yes, No
Clear All Data and Settings Yes, No
Firmware Update
Update Start Checking
Notification Off, On
Supply Status Display approximate remaining amounts, as well as productnumber of consumables
Maintenance (Details of each item U “Maintenance” on page 131)
SC-T5100 Series/SC-T3100 Series/SC-T5100N Series/SC-T3100N Series User's Guide
Using the Menu
106

Settings item Settings value
Print Quality Adjustment Start
Print Head Nozzle Check Start
Head Cleaning Start
Paper Guide Cleaning Start
Ink Cartridge(s) Replacement Start
Replace Maintenance Box Display procedure
Replace Cutter Start
Powerful Cleaning Start
Discharging/Charging Ink Start
Language Display supported languages
Printer Status/Print (Details of each item U “Printer Status/Print” on page 132)
Print Status Sheet
Configuration Status Sheet Print
Network Display General Settings - Network Settings - Network Status
SC-T5100 Series/SC-T3100 Series/SC-T5100N Series/SC-T3100N Series User's Guide
Using the Menu
107

Enlarged Copy
Displayed when an Epson A3 or A4 scanner is connected to the printer. Set scaling in this menu to enable enlargedprinting of the scanned documents.
Details of each item U “Enlarged Copy menu” on page 133
Settings item Settings value
Copies 1 to 99
Color Mode Black/White, Color
Original Size A4, A5, A3, B5, B4, Letter, 13 x 18 cm (5 x 7 in), User-Defined
Reduce/Enlarge
Auto Fit Page On, Off
Custom Size A0*, US E (34x44in)*, JIS B1*, A1, US D (22x34in), JIS B2, US C(17x22in), A2, User-Defined
*Only SC-T5100 Series/SC-T5100N Series is displayed.
Density -4 to 4
Quality Speed, Fine
SC-T5100 Series/SC-T3100 Series/SC-T5100N Series/SC-T3100N Series User's Guide
Using the Menu
108

Paper Setting menu
Roll Paper menu
❏ The Paper Setting menu is displayed if paper is loaded.
❏ Media Adjust adjustment results, and settings in Advanced Media Setting and Manage Remaining Amountare stored for each paper type in Paper Type. Changing adjustments and settings will save these as thecurrently selected paper type settings even if the power is turned off.
*Default setting
Settings item Settings value Explanation
Remove Rewind the roll paper until it is ejected from inside the printer.
U “Removing Roll Paper” on page 32
Feed/Cut Paper Backward Use Backward and Forward to move the paper to the desiredposition. Touch Cut to cut the paper using the built-in cutter.
U “Cutting the Roll Paper” on page 30Forward
Cut
Media Adjust Start Run this adjustment when there is a problem with print results, orafter registering custom paper settings.
Touch Start to print an adjustment pattern. Then, follow theon-screen instructions to make adjustments.
Adjustment results will be saved as the currently selected papertype settings.
U “Optimizing Paper Settings (Media Adjust)” on page 43
Advanced Media Setting
SC-T5100 Series/SC-T3100 Series/SC-T5100N Series/SC-T3100N Series User's Guide
Using the Menu
109

Settings item Settings value Explanation
Platen Gap 1.6 Displayed when in Paper Type, Custom Paper is selected. Whenregistering Custom Paper, this is the Platen Gap (distance betweenprint head and paper) for the paper selected in Change ReferencePaper, therefore this does not normally need to be changed.Change to a wider setting (a higher value) if print results aresmeared.
2.1
2.6
Top/Bottom Margins Standard* Setting this to Standard will set the top/bottom margins as followsdepending on the printer driver print targets.
❏ CAD/Line Drawing: 3 mm/3 mm
❏ Other: 30 mm/30 mm
Left and right margins will remain at 3 mm regardless of settings. Ifthere is any soiling to the top section of the print results, then tryincreasing the top margin before printing.
U “Printable area” on page 163
Top 3 mm/Bottom3 mm
Top 15 mm/Bottom 15 mm
Top 45 mm/Bottom 15 mm
Back Tension Auto If there is any wrinkling on the paper during printing, set this toHigh or Extra High.
Standard
High
Extra High
Drying Time
Drying Time per Pass 0.0 to 10.0seconds (0.0*)
Select the time the print head pauses to allow drying after eachpass. Choose from values between 0.0 and 10.0 seconds.Depending on the paper type, the ink may take a while to dry. If theink blurs on the paper, set a longer time for drying the ink.Increasing the drying time increases the time needed to print.
Drying Time per Page 0.0 to 60 minutes(0.0*)
Specify how long the printer pauses to allow the ink to dry afterprinting each page; choose from values between 0.0 and 60minutes. Depending on the ink density or paper type, the ink maytake a while to dry. If the ink blurs on the paper, set a longer timefor drying the ink. The longer the drying time, the more timerequired for printing.
Auto Cut On* Choose On to automatically cut roll paper using the built-in cutteras each page is printed or Off to disable auto paper cutting. Settingthis to On automatically cuts the edge when the edge is not ahorizontal cut when setting paper. The setting selected with theprinter driver takes priority when the printer driver is used.
U “Cutting the Roll Paper” on page 30
Off
Manage Remaining Amount
SC-T5100 Series/SC-T3100 Series/SC-T5100N Series/SC-T3100N Series User's Guide
Using the Menu
110

Settings item Settings value Explanation
Setup On Select whether to display/record (On) or not to display/record (Off)the amount of remaining roll paper. Setting this to On, enablesRemaining Amount and Remaining Alert.
U “For Roll Paper” on page 39
Off*
Remaining Amount 5.0 to 150.0 m(30*)
Inputting the roll paper total length set in Remaining Amountdisplays the approximate remaining amount of roll paper on theprinter's Home screen and on the printer driver screen.
In Remaining Alert, set the limit at which to display a warningwhen the amount of remaining roll paper drops below that limit.You can set in 0.1 m increments.
Remaining Alert 1.0 to 15.0 m (5.0*)
Change Paper Type
Paper Type Plain paper* Select the type of paper loaded. The three options other thanOthers display the most recently selected paper type. When thedesired paper type is not displayed, touch Others to display these,and select.
U “For Roll Paper” on page 39
CoatedPaper(Generic)
Premium GlossySheet
Others
SC-T5100 Series/SC-T3100 Series/SC-T5100N Series/SC-T3100N Series User's Guide
Using the Menu
111

Auto Sheet Feeder menu
The Paper Setting menu is displayed if paper is loaded.
*Default setting
Settings item Settings value Explanation
Media Adjust Start Run this adjustment when there is a problem with print results,or after registering custom paper settings.
Touch Start to print an adjustment pattern. Then, follow theon-screen instructions to make adjustments.
Adjustment results will be saved as the currently selected papertype settings.
U “Optimizing Paper Settings (Media Adjust)” on page 43
Change Paper Type/Paper Size
Paper Type Plain paper* Select the type of paper loaded. The three options other thanOthers display the most recently selected paper type. When thedesired paper type is not displayed, touch Others to displaythese, and select.
U “For Auto Sheet Feeder / Cut Sheet(1 sheet)” on page 41
CoatedPaper(Generic)
Premium GlossySheet
Others
Paper Size A4 Select the size of paper loaded.
If the desired size is not in the options, then select User-Defined,and enter the paper width and length.
A3
JIS B4
ISO B4
Letter (8 1/2x11in)
Legal (8 1/2x14in)
US B (11x17in)
ARCH A (9x12in)
User-Defined
SC-T5100 Series/SC-T3100 Series/SC-T5100N Series/SC-T3100N Series User's Guide
Using the Menu
112

Cut Sheet(1 sheet) menu
The Paper Setting menu is displayed if paper is loaded.
*Default setting
Settings item Settings value Explanation
Remove Touch to eject set cut sheet (1 sheet) without printing. Touch toeject to the front.
U “Removing Cut Sheet (1 Sheet)” on page 38
Media Adjust Start Run this adjustment when there is a problem with print results,or after registering custom paper settings.
Touch Start to print an adjustment pattern. Then, follow theon-screen instructions to make adjustments.
Adjustment results will be saved as the currently selected papertype settings.
U “Optimizing Paper Settings (Media Adjust)” on page 43
Change Paper Type/Paper Size
Paper Type Plain paper* Select the type of paper loaded. The three options other thanOthers display the most recently selected paper type. When thedesired paper type is not displayed, touch Others to displaythese, and select.
U “For Auto Sheet Feeder / Cut Sheet(1 sheet)” on page 41
CoatedPaper(Generic)
Premium GlossySheet
Others
Paper Size A Series Select the size of paper loaded.
If the desired size is not in the options, then select User-Defined,and enter the paper width and length.
US-ANSI
US-ARCH
B Series (ISO)
B Series (JIS)
Others
User-Defined
SC-T5100 Series/SC-T3100 Series/SC-T5100N Series/SC-T3100N Series User's Guide
Using the Menu
113

Printer Status menu
*Default setting
Settings item Settings value Explanation
Supply Status Display the approximate remaining amounts of each color in inkcartridge and its product number, and the approximate capacity inand product number of the Maintenance Box.
The shorter a bar is, the lower the remaining amount or amount ofink or space. Even if is displayed, printing is possible untilreplacement is instructed. However, ensure that a new ink cartridgeof that color, or a new Maintenance Box is readied in advance.
Furthermore, the ink color codes beside the bars indicate thefollowing.
❏ K: Black
❏ M: Magenta
❏ Y: Yellow
❏ C: Cyan
Message List Display a list of messages communicating printer status. Select amessage from the list to display detailed information.
Firmware Version Display the printer firmware version.
Print Status Sheet
Configuration Status Sheet Print a list of current printer settings. Use this to view all informationat a glance.
SC-T5100 Series/SC-T3100 Series/SC-T5100N Series/SC-T3100N Series User's Guide
Using the Menu
114

Settings menu
General Settings
General Settings - Basic Settings
*Default setting
Settings item Settings value Explanation
LCD Brightness 1 to 9 (9*) Adjust screen brightness.
Sound
Mute On Setting this to On will mute sound when touching the menu orother items on the control panel screen, and the confirmationsound when inserting paper into the paper slot when loadingpaper.
Off*
Normal Mode
Button Press 0 to 10 (5*) Adjust the volume of the sound when touching the menu orother items on the control panel screen, and of the confirmationsound when inserting paper into the paper slot when loadingpaper.
Error Notice 0 to 10 (5*) Adjust the volume of the sound notifying of an error.
Sound Type Pattern1* Adjust the type of the sound when touching the menu or otheritems on the control panel screen, and of the confirmation soundwhen inserting paper into the paper slot when loading paper.Pattern2
Sleep Timer 1 to 210 minutes (15*) The printer will enter sleep mode if no errors have occurred, noprint jobs have been received, and no actions are performed onthe control panel for an extended period of time. This settingselects the amount of time until the printer enters sleep mode.
U “Saving Power” on page 21
Power Off Timer Off You can select the time after which the printer will turn offautomatically if no errors have occurred, no print jobs have beenreceived, or no actions are performed on the control panel for anextended period of time.
U “Saving Power” on page 21
30minutes
1h
2h
4h
8h*
12h
Circuit Breaker InterlockStartup
On* Select whether to turn the printer on (On) or off (Off) when thebreaker switch is turned on.
Off
Date/Time Settings
SC-T5100 Series/SC-T3100 Series/SC-T5100N Series/SC-T3100N Series User's Guide
Using the Menu
115

Settings item Settings value Explanation
Date/Time - Enter the current date and time.
Time Difference -12:45 to +13:45 (0.00*) Set the difference with coordinated universal time (UTC) in 15minute increments.
In network environments with a time difference, set this asnecessary when administrating the printer.
Language Japanese Select the language used on the control panel's screen.
English
French
Italian
German
Portuguese
Spanish
Dutch
Polish
Russian
Korean
Simplified Chinese
Traditional Chinese
Operation Time Out On* Setting this to On will, if no operations are made for a fixedamount of time on a screen display other than on the Homescreen, display a message, and return to the Home screen.Off
Keyboard QWERTY* Select the key arrangement for the text input screen displayedwhen entering the Custom Paper registered name or similar.
AZERTY
QWERTZ
Length Unit m* Select the units of length to use when displaying the length ofroll paper and other items.
ft / in
SC-T5100 Series/SC-T3100 Series/SC-T5100N Series/SC-T3100N Series User's Guide
Using the Menu
116

General Settings - Printer Settings
*Default setting
Settings item Settings value Explanation
Paper Source Settings
Error Notice
Paper Size Notice On Setting this to On will display an error message when the outputsize or paper type settings of print jobs sent to the printer differfrom those settings in the printer.Off*
Paper Type Notice On
Off*
Roll Paper Setup
Detect Paper Me‐andering
On* If On is selected, an error will be displayed in the control panel andprinting will stop if the paper is skewed; select Off to disable thisfeature. On is recommended in most circumstances as skewedpaper may cause the printer to jam.
Off
Print CuttingGuideline
On If Auto Cut is Off, you can choose to print (On) or not print (Off) cutlines on roll paper. Cut lines are not printed if Auto Cut is On orwhen cut sheets are used.Note, however, that if the roll width selected with the computer isnarrower than the paper loaded in the printer, cut lines will beprinted regardless of the option selected for Auto Cut.The setting selected with the printer driver takes priority when theprinter driver is used.
Off*
After-Print Options Hold Paper* After printing, select whether to retain in the paper eject slot (HoldPaper) or fully eject (Eject Paper) the bottom of cut sheets orautomatically cut roll paper. This function prevents printed paperbeing ejected and falling to the floor, whereupon the printedsurface may be marked, therefore we recommend this be set toHold Paper.If Hold Paper is set, manually grasp the edge of the paper andremove it from the printer in order to prevent it falling to the floor.
Eject Paper
SC-T5100 Series/SC-T3100 Series/SC-T5100N Series/SC-T3100N Series User's Guide
Using the Menu
117

Settings item Settings value Explanation
Custom Paper Setting
(Touching any of registry number 01 to 10 will display settings items.)
Change Name Register and change the name of the custom paper settings. Thename registered here is displayed in the Paper Type list.
Touch this to display the keyboard screen. Up to 20 characters maybe input for the name. The keypad screen can be switched asshown below with the button marked.
Touch the icons at bottom left to switch between input methods.
ABC: Enters alphabet letters
123#: Enters numbers and symbols
To change the key layout of the full keyboard, use Keyboard in theBasic Settings menu.
U “General Settings - Basic Settings” on page 115
Change ReferencePaper
Plain paper* You can select the media type that is the closest to the paper youare using.
Matte Paper
Photo Paper
CAD
Others
Advanced Media Setting
Platen Gap 1.6 This is the Platen Gap (distance between print head and paper) forthe paper selected in Change Reference Paper, therefore thisdoes not normally need to be changed. Change to a wider setting(a higher value) if print results are smeared.
2.1
2.6
SC-T5100 Series/SC-T3100 Series/SC-T5100N Series/SC-T3100N Series User's Guide
Using the Menu
118

Settings item Settings value Explanation
Top/Bottom Mar‐gins
Standard* Setting this to Standard will set the top/bottom margins as followsdepending on the printer driver print targets.
❏ CAD/Line Drawing: 3 mm/3 mm
❏ Other: 30 mm/30 mm
Left and right margins will remain at 3 mm regardless of settings. Ifthere is any soiling to the top section of the print results, then tryincreasing the top margin before printing.
U “Printable area” on page 163
Top 3 mm/Bottom 3 mm
Top 15 mm/Bottom 15mm
Top 45 mm/Bottom 15mm
Back Tension Auto* If there is any wrinkling on the paper during printing, select Highor Extra High.
Standard
High
Extra High
Drying Time
Drying Time perPass
0.0 to 10.0 seconds (0.0*) Select the time the print head pauses to allow drying after eachpass. Choose from values between 0.0 and 10.0 seconds.Depending on the paper type, the ink may take a while to dry. Ifthe ink blurs on the paper, set a longer time for drying the ink.Increasing the drying time increases the time needed to print.
Drying Time perPage
0.0 to 60 minutes (0.0*) Specify how long the printer pauses to allow the ink to dry afterprinting each page; choose from values between 0 and 60 minutes.Depending on the ink density or paper type, the ink may take awhile to dry. If the ink blurs on the paper, set a longer time fordrying the ink. The longer the drying time, the more time requiredfor printing.
Auto Cut On* Choose On to automatically cut roll paper using the built-in cutteras each page is printed or Off to disable auto paper cutting. Settingthis to On also automatically cuts the leading edge if the edge isnot a horizontal cut when the roll paper is loaded.
The setting selected with the printer driver takes priority when theprinter driver is used.
U “Cutting the Roll Paper” on page 30
Off
Restore Default Restore the selected Custom Paper settings to default settings.
Printing Language
USB Auto* Normally, leave the setting as Auto. If HP-GL/2 or HP RTL print datais sent from a CAD application or plotter, this is automaticallydetermined, and switched to HP-GL/2 mode.If HP-GL/2 mode printing is not carried out normally, or if normallyprinting in HP-GL/2 or HP RTL, set as HP-GL/2.
HP-GL/2
Network Auto*
HP-GL/2
SC-T5100 Series/SC-T3100 Series/SC-T5100N Series/SC-T3100N Series User's Guide
Using the Menu
119

Settings item Settings value Explanation
Universal Print Settings
(Print setting for when printing in HP-GL/2 or HP RTL mode, or when printing with AirPrint.)
Paper Source Roll Paper* Select the paper source. If the paper is not loaded as in the setpaper source, then an error will occur during printing.
Auto Sheet Feeder
Cut Sheet(1 sheet)
Quality Standard* Select the print quality. Standard will print with the quality modeappropriate for that paper's Paper Type settings selected in PaperSource.Speed
Fine
Super Fine
Color Mode Color* Specify whether to print in color or switch to black and white andthen print.
Black/White
Page Margins option Clip By Margins* Depending on the base output size setting, adds the value selectedfor the page margin (area of in the following illustration) insidethe hard clip area of the PS command of the data or the sizeselected for base output size (area of in the followingillustration). When there is a print object in the margin section, it isclipped and not printed.
SC-T5100 Series/SC-T3100 Series/SC-T5100N Series/SC-T3100N Series User's Guide
Using the Menu
120

Settings item Settings value Explanation
Oversize The position at which the margin is added depends on the baseoutput size setting, as shown below.
❏ When set to AutoAdds the value selected for page margin (area of in thefollowing illustration) outside the hard clip area of the PScommand of the data (area of in the followingillustration).
❏ When set to a standard size or user defined sizeAdds the value selected for page margin (area of in thefollowing illustration) outside the size selected for base outputsize (area of in the following illustration). With the actualoutput size, the margin section becomes larger than theselected size (the area of in the following illustration).
SC-T5100 Series/SC-T3100 Series/SC-T5100N Series/SC-T3100N Series User's Guide
Using the Menu
121

Settings item Settings value Explanation
Page Margin 3 mm* Select the top, bottom, left, and right margin values.
For a cut sheet, the top, bottom, left, and right margin values are 3mm regardless of the settings.5 mm
Smoothing On This setting is enabled when Resolution is set to Standard, andresolution not specified in the sent print data. Setting this to Onprints at the maximum resolution corresponding to that paper'sPaper Type settings selected in Paper Source, but depending onthe data, this may result in a long print time, or failures in printingbecause of insufficient memory.
Off*
Base Output Size Auto* The hard clip area of the PS command of the data becomes thebase output size. The actual output size depends on the PageMargins option. When the data does not contain a PS command,the smallest rectangle area of in the following illustrationincluding the print object becomes the base output size.
A Series The compatible standard sizes for the selected Paper Source aredisplayed, therefore select the Base Output Size. The actual outputsize depends on the Page Margins option.For a cut sheet, this setting is available only when the data does notcontain a PS command. If the data contains a PS command, thissetting is not available, and the hard clip area of the PS commandbecomes the Base Output Size.
US-ANSI
US-ARCH
B Series (ISO)
B Series (JIS)
Others
User-Defined Select this option when outputting at non-standard sizes. Afterselecting this setting, set Paper Width and Paper Height. You canset in 0.1 mm increments.
The actual output size depends on the Page Margins option.
SC-T5100 Series/SC-T3100 Series/SC-T5100N Series/SC-T3100N Series User's Guide
Using the Menu
122

Settings item Settings value Explanation
Resolution Standard* This setting is enabled when resolution not specified in the sentprint data. When Standard is selected, this will print in accordancewith that paper's Paper Type settings selected in Paper Source,and at the resolution in the Quality settings.
300dpi
600dpi
1200dpi
Color Mode (Com‐mon)
EPSON Standard (sRGB) Optimize the sRGB space and correct the color.
Business Graphics* Perform color correction to sharpen your images based on thesRGB space.
GIS Perform color correction suitable for when printing GIS(Geographic Information System) topographical maps or similar.
Line Drawing Perform color correction suitable for CAD drawings and other linedrawings.
Off (No ColorManagement)
Do not perform color correction.
HP-GL/2 Unique Settings
(Print settings inherent to HP-GL/2 or HP RTL modes.)
Rotate 0°* You can rotate the coordinates of the drawn data counterclockwisein units of 90° before printing. Note that objects drawn by RTL arenot rotated. When both this setting and the RO command specifyrotation, rotation is performed using the combined amount ofboth values. Note that rotation by the RO command is for objectsonly (the arrow section in the following illustration), and rotation isnot performed for the drawn area (the square section in thefollowing illustration). As a result, objects in a section that protrudefrom the drawn area are not printed.
90°
180°
270°
Origin Setup Left Edge* Set the data coordinate origin.
Center
SC-T5100 Series/SC-T3100 Series/SC-T5100N Series/SC-T3100N Series User's Guide
Using the Menu
123

Settings item Settings value Explanation
Mirror Image On Select whether to flip horizontally (mirror) using the center of theoutput size width as the basis line and then print (On) or printwithout flipping horizontally (Off).
If an angle is specified for rotate, the rotated result is flippedhorizontally.
Off*
Line Merge On Select whether to merge the intersection of the overlapping lineswithin the image according to the MC command of the data (On),or move lines to be printed later to the front at intersections (Off).Off*
Color Mode(HP-GL/2)
EPSON Standard (sRGB) Optimize the sRGB space and correct the color.
Business Graphics Perform color correction to sharpen your images based on thesRGB space.
GIS Perform color correction suitable for when printing GIS(Geographic Information System) topographical maps or similar.
Line Drawing* Perform color correction suitable for CAD drawings and other linedrawings.
Off (No ColorManagement)
Do not perform color correction.
SC-T5100 Series/SC-T3100 Series/SC-T5100N Series/SC-T3100N Series User's Guide
Using the Menu
124

Settings item Settings value Explanation
Select Palette Software* From the following selections, choose the palette that specifies thecolor and thickness of the logical pen.
❏ Software: Print according to the pen configurations set in theapplication, and ignore the built-in palette of the printer.
❏ Default: Print according to the settings of the built-in paletteof the printer specified in advance. The settings of the palettecannot be changed. The built-in palette specifies a logical penwith a pen width of 0.35 mm and 256 colors.
❏ Palette A / Palette B: Print according to the settings of thebuilt-in palette that you specified for Define Palette. If DefinePalette setting is not set, the results are the same as whenDefault is selected.
When Default / Palette A / Palette B are set, pen configurations setin the application are ignored.
Selected palette settings can be printed with Print Color Paletteand confirmed.
Default
Palette A
Palette B
Print Color Palette Print Settings of the palette selected in Select Palette are printed as A3size. You can check the colors corresponding to the color numberfor the pen colors.
Define Palette
Palette A
Pen 0 to Pen 15
Pen Width 0.13 to 12.00 mm In Select Palette, selecting Palette A will print in accordance withsettings defined here.You can define a unique built-in palette by specifying the penwidth and color for the 16 types of logical pen. Select the pennumber, and then define the pen width and pen color for each pen.
You can use Print Color Palette to print and check the colorscorresponding to the color number for the pen colors.
Pen Color 0 to 255
Palette B
Pen 0 to Pen 15
Pen Width 0.13 to 12.00 mm In Select Palette, selecting Palette B will print in accordance withsettings defined here.Settings details are the same as for Palette A.Pen Color 0 to 255
Restore defaultHP-GL/2 Unique Set‐tings
No Select Yes to restore all HP-GL/2 Unique Settings settings to defaultsettings.
Yes
Thick Paper Off* If the paper is thick, the print head may scuff the print surface.Choose On to prevent scuffing. If On is set, the platen gap, which isthe distance between the print head and the paper, will widen.However, if the platen gap is already at its maximum, then settingthis to On will have no effect.
On
Bidirectional On* Setting this to On means the print head prints while moving leftand right. Setting this to Off means that ruled lines will have lessmisalignment, but printing will take more time.Off
SC-T5100 Series/SC-T3100 Series/SC-T5100N Series/SC-T3100N Series User's Guide
Using the Menu
125

Settings item Settings value Explanation
PC Connection via USB Enable* Setting this to Enable allows access from a USB-connectedcomputer. Setting this to Disable does not allow access.
Disable
USB I/F Timeout Set‐ting
0.5 to 300 seconds (60*) If printing stops mid-way when the printer and computer areconnected by a USB cable, set a longer time.
SC-T5100 Series/SC-T3100 Series/SC-T5100N Series/SC-T3100N Series User's Guide
Using the Menu
126

General Settings - Network Settings
*Default setting
Settings item Settings value Explanation
Wi-Fi Setup
Router (Connect via Wi-Fi) Disconnected or disabled
This is displayed in gray. Touch this, and on the next screen touching StartSetup will display a Wi-Fi Setup Wizard menu, performing a connectionoperation.
Connected
Touch to display the connection status and settings information. Touch ChangeSettings to display a Wi-Fi Setup Wizard menu, where you can switch accesspoints.
U “Switching to Wireless LAN” on page 93
Wi-Fi Setup Wizard The list of SSIDs for the detected access points is displayed. From the list, selectthe SSID to connect to, and connect.
Push Button Setup(WPS) If the access point to use supports WPS (Wi-Fi Protected Setup), then this menuitem can be used for connection. Input of SSID and password is not required.After selecting this menu item, touch and hold the push button on the accesspoint until it flashes, then again touch Start Setup on the printer screen toconnect.
Others
PIN Code Setup(WPS) If the access point to use supports WPS (Wi-Fi Protected Setup), then this menuitem can be used for connection. Touch this to display the PIN code and StartSetup. Input the displayed PIN code from a computer into the access pointwithin 2 minutes, then touch Start Setup to connect.
Wi-Fi Auto Connect The menu used after installing software from the Software Disc, and connectingto the printer by following the wizard.
Disable Wi-Fi Selecting this means that the wireless LAN connection will be initialized anddisconnected. In the event of problems with the wireless LAN connection, usethis menu to reconnect and attempt to resolve the problem.
SC-T5100 Series/SC-T3100 Series/SC-T5100N Series/SC-T3100N Series User's Guide
Using the Menu
127

Settings item Settings value Explanation
Wi-Fi Direct (Wi-Fi Direct) Disconnected or disabled
This is displayed in gray. Touch this, and on the next screen touching StartSetup will display Start Setup. Touch Start Setup to enable Wi-Fi Direct, andthis will display the printer SSID and password.
Connected
Touch to display the printer SSID and password, as well as the number ofconnected devices. Touch Change Settings to display a Change Passwordmenu.
U “Directly Connection Wirelessly (Wi-Fi Direct)” on page 94
Change Password You can change the Wi-Fi Direct password. Changing the password willdisconnect all connected computers and smart devices.
Disable Wi-Fi Direct Performing this operation will disconnect all connected computers and smartdevices. To disconnect only specific devices, disconnect the connectionbetween that device and the printer.
Delete Registered Device Android smart device menu item.
When using the Wi-Fi Direct function on an Android smart device to connect tothe printer, a screen upon which to select whether to approve or refuse thisconnection will be displayed on the printer. If refuse is selected, thensubsequent connection with this device will not be possible. To connect withdevices for which connection has been refused, open this menu, and deleteregistered device information.
Wired LAN Setup Touch to change a wireless LAN connection to an wired LAN connection. TouchStart Setup to disable wireless LAN connection.
U “Switching to Wired LAN” on page 93
Network Status
Wired LAN/Wi-Fi Status Display current communications status and connection settings such as IPaddress, etc.
Wi-Fi Direct Status Display number of connected devices and connection settings such as SSID.
Print Status Sheet Print current network connection detailed information.
Connection Check Confirm the network status of the printer, and print a network connection checkreport. In the event of problems, respond in accordance with the diagnosticsresults.
Advanced
SC-T5100 Series/SC-T3100 Series/SC-T5100N Series/SC-T3100N Series User's Guide
Using the Menu
128

Settings item Settings value Explanation
Device Name Set the name of the printer to use on the network.
TCP/IP Auto* Automatically assign the printer IP address using DHCP functionality in therouter.
Manual Select this to manually assign a fixed IP address, then input the IP address,subnet mask, and other required information. For details, see the Administrator'sGuide.
Proxy Server Use When using a proxy server to directly connect from the intranet to the Internetso that the printer may directly access the Internet for firmware updates orsimilar, select Use, and set the server name and port number.Do Not Use*
IPv6 Address Enable* Select whether to enable or disable the IPv6 function.
Disable
Link Speed &Duplex
Auto* Normally, set this to Auto.
10BASE-T HalfDuplex
10BASE-T FullDuplex
100BASE-TX HalfDuplex
100BASE-TX FullDuplex
Redirect HTTPto HTTPS
Enable* Select whether to enable or disable the function to auto-redirect HTTP toHTTPS.
Disable
DisableIPsec/IP Filter‐ing
Enable To enable IPsec/IP filtering functionality, use Web Config. For details, see theAdministrator's Guide.
Disable*
DisableIEEE802.1X
Enable To enable IEEE802.1X functionality, use Web Config. For details, see theAdministrator's Guide.
Disable*
SC-T5100 Series/SC-T3100 Series/SC-T5100N Series/SC-T3100N Series User's Guide
Using the Menu
129

General Settings - System Administration
*Default setting
Settings item Settings value Explanation
Security Settings
Admin Settings
Admin Password Register When using the Lock Setting function, touch Register and set theadministrator password. If changing a password that has alreadybeen set, touch Change and set the new password.
Set the password and set Lock Setting to On to ask for input of apassword when displaying specific settings menus such as networkconfiguration.
These menus will only be displayed if the correct password isentered, preventing non-administrators from accidentallychanging settings.
Keep the password in a safe place.
Should you forget the password, contact your dealer or EpsonSupport.
Change
Clear All Settings
Lock Setting Off* Setting this to On means that input of the administrator passwordwill be requested when selecting the following menu items, andunless the password is entered, changing of configurations orrunning functions will not be possible. When selecting On, first setthe Admin Password.
❏ Sleep Timer
❏ Power Off Timer
❏ Circuit Breaker Interlock Startup
❏ Date/Time Settings
❏ Operation Time Out
❏ Printing Language
❏ Universal Print Settings
❏ PC Connection via USB
❏ USB I/F Timeout Setting
❏ Network Settings
❏ Powerful Cleaning
❏ Discharging/Charging Ink
On
Restore Default Settings
all Wi-Fi/network set‐tings
Yes Touch Yes to restore all network settings to default settings.
No
Clear All Data andSettings
Yes Touch Yes to restore all settings with the exception of Date/TimeSettings, Length Unit, and Language in the Settings menu todefault settings.No
Firmware Update
SC-T5100 Series/SC-T3100 Series/SC-T5100N Series/SC-T3100N Series User's Guide
Using the Menu
130

Settings item Settings value Explanation
Update Using this function requires that the printer be connected to anetwork that can be connected to the Internet. Touch StartChecking to access the Epson website, and to start a search fornew firmware. If there is a display indicating that there is newfirmware, then follow the on-screen instructions to update thefirmware.Updating firmware takes approximately 5 minutes. However, thismay take longer depending on the network environment.During update, do not turn off the printer or unplug the powercable from the outlet. Failure to observe this precaution could leadto damage.
Notification Off* Setting this to On means the printer will automatically checkperiodically for new firmware. If new firmware is found, a messagewill be displayed when the power is turned on.On
Maintenance
Settings item Settings value Explanation
Print QualityAdjustment
Start Perform the same adjustment as in Media Adjust in the PaperSetting menu. When carrying out this action from this menu, selectthe paper source from the first screen.
U “Optimizing Paper Settings (Media Adjust)” on page 43
Print Head NozzleCheck
Start Check for clogged nozzles by printing a check pattern.
U “Checking for Clogged Print Head, and Cleaning” on page 134
Head Cleaning Start Perform if the printed check pattern has faint or missing areas.
U “Checking for Clogged Print Head, and Cleaning” on page 134
Paper Guide Cleaning Start Perform if there is soiling on the printed surface when printingfrom the auto sheet feeder.
U “Smearing occurs on printed matter from the auto sheetfeeder.” on page 148
Ink Cartridge(s)Replacement
Start Touch Start to move the print head to the position at which the inkcartridge can be replaced. The replacement procedure is shown onthe screen, so replace the ink cartridges while referring to this.
U “Replacing Ink Cartridges” on page 135
Replace MaintenanceBox
Start Select when replacing the Maintenance Box while confirming theprocedure. If you are familiar with replacement and do not need toconfirm the procedure, you can replace the Maintenance Boxwithout selecting this menu item.
U “Maintenance Box Replacement” on page 137
Replace Cutter Start Select to replace the cutter if the paper is not cut cleanly. Follow theon-screen instructions to replace.
U “Replacing the Cutter” on page 138
Powerful Cleaning Start Perform if the check pattern has faint or missing areas even aftercarrying out Head Cleaning three times in a row.
U “Powerful Cleaning” on page 134
SC-T5100 Series/SC-T3100 Series/SC-T5100N Series/SC-T3100N Series User's Guide
Using the Menu
131

Settings item Settings value Explanation
Discharging/ChargingInk
Start The print head may fail if the environmental temperature becomes-10°C or lower. Perform this action if you expect to be transporting/storing the printer in an environment of -10°C or less.
Touch Start, and follow the on-screen instructions to eject the ink.
When operations are complete, the power turns off automatically.
U “Handling if Transporting/Leaving the Printer in anEnvironment of -10°C or Less” on page 167
Printer Status/Print
Settings item Settings value Explanation
Print Status Sheet
Configuration Status Sheet Print a list of current printer settings. Use this to view allinformation at a glance.
Network Display current network settings details. Displayed details are thesame as displayed in General Settings - Network Settings -Network Status.
SC-T5100 Series/SC-T3100 Series/SC-T5100N Series/SC-T3100N Series User's Guide
Using the Menu
132

Enlarged Copy menu
Displayed when an Epson A3 or A4 scanner is connected to the printer. Set scaling in this menu to enable enlargedprinting of the scanned documents.
U “Making Enlarged Copies with an A3 or A4 Scanner” on page 96
*Default setting
Settings item Settings value Explanation
Copies 1 to 99 Specify the number of copies.
Color Mode Black/White Choose whether to do enlarged copying in color or in black andwhite.
Color*
Original Size A4
A5
A3
B5
B4
Letter
13 x 18 cm (5 x 7 in)
Select the document size loaded on the scanner. The sizes availablevary with the scanner. Sizes other than those shown here cannot beused.
Reduce/Enlarge
Auto Fit Page On* Setting this to On means that the copy is enlarged so that the shortedge of the document fits the width of the roll paper currentlyloaded in the printer.
If the short edge of the document is wider than the roll paper, thiswill be printed at actual size.
If the printer is unable to detect the width of the roll paper, then anerror will occur when copying is started.
Off
Custom Size Actual Size
A0
US E (34x44in)
JIS B1
A1
US D (22x34in)
JIS B2
US C (17x22in)
A2
User-Defined
Select the output size. To the left of each size, the percentage ofenlargement of the selected document size is displayed.
A0, US E, and B1 display only SC-T5100 Series/SC-T5100N Series.
If the desired size is not on the list, then in User-Defined, set adesired size.
Density -4 to 4 (0*) Choose copy density.
Quality Speed Choose Copy Quality in view of image quality and print speed.
Fine
SC-T5100 Series/SC-T3100 Series/SC-T5100N Series/SC-T3100N Series User's Guide
Using the Menu
133

Maintenance
Clear Print Head Clogs
If there are banding and unevenness, if text is faint, orif there are differences in the colors of images in theprinted results, then the print head may be clogged.Check the nozzles, and if clogged, carry out print headcleaning. If these are still clogged even after cleaninghas been carried out three times in a row, thenperform Powerful Cleaning.
Confirm the following before performing cleaning.
❏ Ink is consumed during print head cleaning.Cleaning is not required except when there areproblems with printing, or if nozzle clogging hasbeen confirmed through a nozzle check.Powerful Cleaning consumes more ink thannormal head cleaning.
❏ If the remaining ink level is low, prepare a new inkcartridge.
❏ If the remaining capacity in the Maintenance Boxis low, prepare a new Maintenance Box.
Checking for Clogged Print Head, and Cleaning
A From the Home screen, touch Settings -Maintenance - Print Head Nozzle Check.
B Touch Start to start print of a check pattern.
When changing the paper source displayed onthe start screen, touch Paper Source.
C Check the printed check pattern for clogging.
Example of clean nozzles
If none of the pattern is missing, then the printhead nozzles are not clogged. Touch to endthe nozzle clogging check.
Example of clogged nozzles
If the pattern has missing areas, touch todisplay the Head Cleaning screen. Proceed tothe next step.
D Touch Start to start cleaning.
When cleaning is complete, Print the pattern?will be displayed. Touch Yes to return to Step 2.Repeat Steps 2 to 4, and check if the problemhas been resolved.
If the nozzles are still clogged after performing printhead cleaning three times in a row, then performPowerful Cleaning.
Powerful Cleaning
Perform Powerful Cleaning if the nozzles are stillclogged after performing print head cleaning threetimes in a row.
A From the Home screen, touch Settings -Maintenance - Powerful Cleaning.
B Touch Start to start cleaning.
When cleaning is complete, Print the pattern?will be displayed. Touch Yes, and on the nextscreen touch Start to print a check pattern.Check if the nozzle clogging has been removed.
If the nozzles are still clogged after performingPowerful Cleaning, turn off the printer and leave itovernight or longer. When left for some time, theclogged ink may dissolve.
If the nozzles are still clogged, contact your dealer orEpson Support.
SC-T5100 Series/SC-T3100 Series/SC-T5100N Series/SC-T3100N Series User's Guide
Maintenance
134

Replacing Consumables
Handling of Used Consumables
If using the printer in an office or other business,dispose of used consumables in accordance with lawsand regulations, such as by contracting an industrialwaste disposal company.
If using the printer in a domestic situation, place thesein a plastic bag, then dispose of in accordance withlaws and regulations as well as regional ordinances,and as directed by local government.
Replacing Ink Cartridges
If any of the ink colors remaining amount falls belowthe minimum amount, printing will not be possible.
If an ink cartridge remaining amount falls below theminimum amount, you can continue printing afterreplacing the ink cartridge.
If the remaining ink amount drops yet printing iscontinued, then replacement of an ink cartridgeduring printing may be required. When replacing inkduring a print job, you may see a difference in colordepending on the drying conditions. When this is notpermissible, we recommend first replacing the inkcartridge with a new one before printing. The removedink cartridge can be installed again and used until theremaining amount falls below the minimum amount.However, if an ink cartridge with not much inkremaining is removed and reinstalled, it may not beusable because some ink is consumed to ensure thereliability of the printer.
Supported ink cartridges U “Options andConsumable Products” on page 154
c Important:
Epson recommends the use of genuine Epson inkcartridges. Epson cannot guarantee the quality orreliability of non-genuine ink. The use ofnon-genuine ink may cause damage that is notcovered by Epson‘s warranties, and under certaincircumstances, may cause erratic printer behavior.Information about non-genuine ink levels may notbe displayed, and use of non-genuine ink isrecorded for possible use in service support.
A From the Home screen, touch Settings -Maintenance - Ink Cartridge(s) Replacement.
B Touch Start and open the front cover.
The print head moves to the position at whichthe ink cartridge can be replaced.
c Important:
Do not move the print head by hand. Failureto observe this precaution could damage theprinter.
C Hold the new ink cartridge as shown below, andshake it up and down around 20 times (for 10seconds).
D Remove the new ink cartridge from the packageand then peel off only the yellow tape.
SC-T5100 Series/SC-T3100 Series/SC-T5100N Series/SC-T3100N Series User's Guide
Maintenance
135

c Important:
Do not touch the parts shown in theillustration. You may not be able to printproperly.
E Open the cartridge cover.
F Remove the ink cartridge to replace.
c Important:
Removed ink cartridges may have ink aroundthe ink supply port, so be careful not to getany ink on the surrounding area whenremoving the cartridges.
G Holding the new cartridge with the label facingup, and insert it perpendicularly.
Push the area marked "Push" firmly.
Repeat Steps 3 to 7 (Except step 5) to replaceother ink cartridges.
c Important:
Install ink cartridges into all slots. You cannotprint if any of the slots are empty.
H Close the cartridge cover and front cover.
Ink charging starts. When Replacement iscomplete. is displayed, ink cartridgereplacement is complete.
c Important:
Do not turn off the printer during inkcharging. Doing so cause insufficient inkcharge resulting in printing faint image ornothing.
SC-T5100 Series/SC-T3100 Series/SC-T5100N Series/SC-T3100N Series User's Guide
Maintenance
136

Maintenance Box Replacement
If The Maintenance Box is at the end of its servicelife. is displayed, replace the Maintenance Box.
If The Maintenance Box is nearing the end of itsservice life. is displayed, ready a new MaintenanceBox. Printing is possible until replacement isinstructed.
Supported maintenance boxes U “Options andConsumable Products” on page 154
c Important:
Do not replace the Maintenance Box whileprinting. Waste ink may leak.
Note:You can replace the Maintenance Box while viewing theprocedure on the screen. To see the guide, from theHome screen, touch Settings - Maintenance - ReplaceMaintenance Box.
A Open the Maintenance Box cover on the backof the printer.
B Pull out the Maintenance Box.
C Place the used Maintenance Box in the clearbag included with the new Maintenance Box,and make sure that the zipper is closed tight.
c Important:
Until the fastener is closed securely, do not tiltthe Maintenance Box. Waste ink may leak.
D Align the groove on the new Maintenance Boxwith the rail in the insertion location, and insertfully.
c Important:
Do not touch the IC chip on the MaintenanceBox. Doing so may prevent normal operationand printing.
E Close the Maintenance Box cover.
SC-T5100 Series/SC-T3100 Series/SC-T5100N Series/SC-T3100N Series User's Guide
Maintenance
137

Replacing the Cutter
Replace the cutter when it is not cutting paper cleanly.
Supported cuttersU “Options and ConsumableProducts” on page 154
Use a cross-head screwdriver to replace the cutter.Make sure you have a cross-head screwdriver with youbefore you start work.
Caution:
Store the cutter out of reach of children. Thecutter's blade could cause an injury. Pay carefulattention when replacing the cutter.
c Important:
❏ Dropping the cutter, or knocking it againsthard objects may chip the blade.
❏ The protective material and sheet is to protectthe blade on the new cutter. Do not removethem until you are instructed to do so.
A From the Home screen, touch Settings -Maintenance - Replace Cutter.
The Replace Cutter screen appears.
B Touch Start and open the cutter cover.
C Loosen the screw holding the cutter in placeusing a cross-head screwdriver and pull thecutter straight out.
Note:Place the used cutter in a plastic bag, then disposeof in accordance with regional ordinances, and asdirected by local government.
D Install the new cutter.
Insert the cutter so that the pin on the printermatches up with the hole on the cutter. Use across-head screwdriver to tighten down thescrew to hold the cutter in place.
SC-T5100 Series/SC-T3100 Series/SC-T5100N Series/SC-T3100N Series User's Guide
Maintenance
138

c Important:
Screw the cutter firmly, otherwise the cutposition may be slightly shifted or skewed.
E Remove the protective material shown below.
c Important:
Do not remove the protective sheet withhands.
F Touch OK.
The cutter will move, and the protective sheetwill come off. Remove the protective sheet fromthe printer.
G Close the cutter cover.
SC-T5100 Series/SC-T3100 Series/SC-T5100N Series/SC-T3100N Series User's Guide
Maintenance
139

Problem Solver
What to do When a Message is Displayed
If the printer displays one of the messages shown below, refer to the solution listed and take the necessary steps.
Messages What to do
Cannot recognize ink cartridges.Try installing again.
❏ Remove and reinsert the ink cartridge. If the message persists, insert a new inkcartridge (do not reinstall the cartridge that caused the error).U “Replacing Ink Cartridges” on page 135
❏ Condensation may occur in the ink cartridge. Leave it at room temperature for atleast three hours before installing the ink cartridge again.U “Notes on handling ink cartridges” on page 19
Ink is low. The ink is low. Ready a new ink cartridge. Printing is possible until replacement isinstructed.
U “Options and Consumable Products” on page 154
The maintenance box is notrecognized. Install it correctly.
Reinstall the Maintenance Box. If the message persists after reinstalling it, replace witha new Maintenance Box (do not reinstall the Maintenance Box that caused the error).
U “Maintenance Box Replacement” on page 137
There is not enough space inmaintenance box to performhead cleaning. You can continueprinting until replacement isrequired.
The Maintenance Box does not have enough capacity to store ink discharged in printhead cleaning, therefore do not perform cleaning. To perform cleaning, replace theMaintenance Box with a new one. The used Maintenance Box may be reinstalled aftercleaning is completed.
U “Maintenance Box Replacement” on page 137
Command Error
Check the printer driver setting.
Touch Cancel to stop printing. Confirm that the printer driver you are using supportsthis printer.
Scanner Error
Refer to manual for details.
❏ Release the scanner transportation lock and turn the printer and scanner off andthen on again.
❏ Turn the devices on and off several times. The scanner can be used after themessage is no longer displayed.
If this message appears on the LCD panel again, contact your dealer or Epson Support.
Recovery Mode Firmware update has failed, so the printer has started in recovery mode. Use theprocedure below to update the firmware again.
(1) Connect a computer and the printer using a USB cable.(Updates during recovery mode cannot use a network connection.)
(2) Download the latest firmware from the Epson website, and start update. Refer tothe firmware download page for update methods.
SC-T5100 Series/SC-T3100 Series/SC-T5100N Series/SC-T3100N Series User's Guide
Problem Solver
140

When a Maintenance Call/Printer Error Occurs
Error messages What to do
Maintenance Request
Replace Parts Soon/End Of Parts ServiceLife XXXXXXXX
A part used in the printer is nearing the end of its service life.
Contact your dealer or Epson Support and tell them the maintenance requestcode.
You cannot clear a maintenance error until the part is replaced. A service calloccurs if you continue to use the printer.
Printer Error
Printer error. Turn the power off and onagain. If the problem persists, contactEpson Support.
XXXXXX
Turn off the printer, disconnect the power cable from the outlet and from theAC inlet on the printer, and then reconnect. Turn on the printer again multipletimes.
If the same error is displayed on the LCD panel, contact your dealer or EpsonSupport for assistance. Tell them the error code is "XXXXXX".
SC-T5100 Series/SC-T3100 Series/SC-T5100N Series/SC-T3100N Series User's Guide
Problem Solver
141

Troubleshooting
You cannot print (because the printer does not work)
The printer does not turn on.
o Is the power cable plugged into theelectrical outlet or the printer?
Make sure the power cable is securely plugged intothe printer.
o Is there a problem with the power outlet?
Make sure your outlet works by connecting thepower cable for another electric product.
The printer turns off automatically.
o Is the automatic power off configured?
To prevent the printer turning off automatically,select Off.
U “General Settings - Basic Settings” on page 115
The printer driver is not installedproperly (Windows).
o Is the icon for this printer displayed in theDevices and Printers / Printers / Printers andFaxes folder?
❏ YesThe printer driver is installed. See the "Theprinter is not communicating with thecomputer" section.
❏ NoThe printer driver is not installed. Install theprinter driver.
o Does the printer port setting match theprinter connection port?
Check the printer port.
Click the Port tab in the printer Properties dialogand check the option selected for Print to thefollowing port(s).
❏ USB: USBxxx (x stands for the port number) forthe USB connection
❏ Network: The correct IP address for the networkconnection
If it is not indicated, the printer driver is not installedcorrectly. Delete and reinstall the printer driver.
U “Uninstalling Software” on page 26
The printer driver is not installedproperly (Mac).
o Is the printer added to the printer list?
Select System Preferences > Printers & Scanners(or Print & Fax) from the Apple menu.
If the printer name is not displayed, add the printer.
U “How to Select the Dedicated Printer Driver forThis Printer” on page 54
The printer is not communicatingwith the computer.
o Is the cable plugged in properly?
Confirm that the interface cable is securelyconnected to both the printer port and thecomputer. Also, make sure the cable is not brokennor bent. If you have a spare cable, try connectingwith the spare cable.
o Does the interface cable specification matchthe specifications for the computer?
Make sure the interface cable specifications matchthe specifications for the printer and the computer.
U “System Requirements” on page 169
SC-T5100 Series/SC-T3100 Series/SC-T5100N Series/SC-T3100N Series User's Guide
Problem Solver
142

o When using a USB hub, is it being usedcorrectly?
In the USB specification, daisy-chains of up to fiveUSB hubs are possible. However, we recommendthat you connect the printer to the first hubconnected directly to the computer. Depending onthe hub you are using, the operation of the printermay become unstable. If this should occur, plug theUSB cable directly into your computer's USB port.
o Is the USB hub recognized correctly?
Make sure the USB hub is recognized correctly onthe computer. If the computer correctly detects theUSB hub, disconnect all USB hubs from thecomputer and connect the printer directly to thecomputer USB port. Ask the USB hub manufacturerabout USB hub operation.
You cannot print under the networkenvironment.
o Are the network settings correct?
Ask your network administrator for the networksettings.
o Connect the printer directly to thecomputer using a USB cable, and then try toprint.
If you are able to print via USB, there is a problemwith network settings. Ask your systemadministrator, or refer to the manual for yournetwork system.
Printing from iPhone or iPad is notpossible.
o Check printer settings.
❏ Connect the iPhone or iPad to the samenetwork (SSID) as the printer.
❏ In Web Config, enable AirPrint settings.U “How to Use Web Config” on page 24
The printer has an error.
o View the message displayed in the controlpanel.
U “What to do When a Message is Displayed” onpage 140
The printer stops printing.
o Is the status of print queue Pause?(Windows)
If you stop printing or the printer stops printingbecause of an error, the print queue enters a Pausestatus. You cannot print in this status.
Double-click the printer icon in the Devices andPrinters, Printers, or Printers and Faxes folder; ifprinting is paused, open the Printer menu and clearthe Pause check box.
o Does the current printer status showPaused? (Mac)
Open the status dialog for your printer and checkwhether printing is paused.
(1) Select System Preferences > Printers &Scanners (or Print & Fax) > Open Print Queuefrom the Apple menu.
(2) Double-click the icon for any printer that isPaused.
(3) Click Resume Printer.
SC-T5100 Series/SC-T3100 Series/SC-T5100N Series/SC-T3100N Series User's Guide
Problem Solver
143

Your problem is not listed here.
o Decide whether the trouble is caused by theprinter driver or the application. (Windows)
Perform a test print from the printer driver so thatyou can check that the connection between theprinter and computer is correct and the printerdriver settings are correct.
(1) Make sure that the printer is turned on and inready status, and load A4 or larger paper.
(2) Open the Devices and Printers, Printers, orPrinters and Faxes folder.
(3) Right-click the printer icon, and selectProperties.
(4) In the Properties dialog, select the General taband click Print Test Page.
After a while the printer starts to print a test page.
❏ If the test page is printed correctly, theconnection between the printer and computeris correct. Go to the next section.
❏ If the test page is not printed correctly, checkthe items above again.U “You cannot print (because the printerdoes not work)” on page 142
The "Driver Version" shown on the test page is theversion number of the Windows internal driver. Thisdiffers from the Epson printer driver version that youinstalled.
The printer sounds like it is printing, but nothing prints
o Confirm the printer operation.
Print a nozzle check pattern.
U “Checking for Clogged Print Head, andCleaning” on page 134
If there are no gaps in the nozzle check pattern,then the printer is not damaged. Check thefollowing item.
o Is the message Motor self adjustmentrunning. displayed on the control panel'sscreen?
The printer adjusts the internal motor. Wait for awhile without turning off the printer.
SC-T5100 Series/SC-T3100 Series/SC-T5100N Series/SC-T3100N Series User's Guide
Problem Solver
144

The prints are not what you expected
If the following problems with print quality occur, then respond by following the process flow on this page.
Horizontal or vertical bandingDuplicated ruled lines or warpedlettering
Wrinkling, smearing, or unevencoloring
Check the paper ❏ Check that the paper is compatible with the printer, and that there are nowrinkles, folds, or bending.U “Epson Special Media” on page 154U “Supported Commercially Available Paper” on page 160U “Notes on Loading the Paper” on page 27
❏ Check that the paper type setting matches the loaded paper, and if not, change it.U “Setting Loaded Paper” on page 39
If print results do not improve
Perform Media Adjust Paper settings are optimized for the paper loaded.
U “Optimizing Paper Settings (Media Adjust)” on page 43
If print results do not improve
Check for clogged printhead, and perform cleaning
Check for print head nozzle clogging, and if these are clogged, carry out cleaning.
U “Checking for Clogged Print Head, and Cleaning” on page 134
If nozzle clogging does not improve after repeating cleaning 3 times
Perform Powerful Cleaning Perform Powerful Cleaning.
U “Powerful Cleaning” on page 134
Refer to the following page onwards for other problems with print quality and ways to resolve these.
SC-T5100 Series/SC-T3100 Series/SC-T5100N Series/SC-T3100N Series User's Guide
Problem Solver
145

Ink drips
o Are the print head nozzles clogged?
Perform print head cleaning. From the printer menu,touch Settings - Maintenance - Head Cleaning.
Fine lines in drawings are notprinted
o Is a suitable resolution set?
Try the following measures.
❏ In your application software, set the resolutionto 600 dpi.
❏ Confirm that the data paper size is correctly setin the printer driver document size, and remedyif different.
❏ If PDF, print directly from the source data forthat PDF.
❏ In the printer driver, select Emphasize ThinLines.Emphasize Thin Lines is displayed bydeselecting Simple Settings in the Print Qualityfield on the Printer Settings screen.
Vertical unevenness when printingfrom the auto sheet feeder
o Are the auto sheet feeder rollers dirty?
A dirty roller may cause uneven vertical lines on theprint results. To remedy, clean the rollers. If verticallines appear on glossy paper, we recommend thatinstead of using the auto sheet feeder, you feedindividual sheets from Cut Sheet(1 sheet) forprinting.
U “Smearing occurs on printed matter from theauto sheet feeder.” on page 148
U “Loading Cut Sheet(1 sheet)” on page 37
Differences in color/light/dark
If there are differences in color/light/dark, then handlethese by following the process below.
U “The prints are not what you expected” onpage 145
If these measures do not resolve the issue, check thefollowing items.
o Is the Color Density setting appropriate?
If you feel that lines in drawings are too light, thenon the printer driver Advanced screen, click PaperConfiguration, and increase the ink density.
Conversely, on tracing paper if the ink density is toohigh, then either reduce the ink density, or in printerPaper Type settings, select Tracing Paper<LowDuty> and print.
o Are you using a genuine Epson inkcartridge?
This printer is developed for use with Epson inkcartridges. If you use non-Epson ink cartridges,printouts may be faint, or the color of the printedimage may be changed because the remaining inklevel is not correctly detected. Be sure to use thecorrect ink cartridge.
o Are you using an old ink cartridge?
The print quality drops when an old ink cartridge isused. Replace the old ink cartridge with a new one.We recommend using all the ink in the cartridgebefore the expiry date printed on the package(within 6 months of installation in the printer).
o Have you tried changing the print qualitysettings?
In the printer driver Printer Settings-Print Quality,select Print with High Quality and try printing. Ifthis is not selected, this places priority on speed,however this can adversely impact print quality tosome extent.
o Is color management enabled?
Enable color management.
U “Color Management Printing” on page 72
SC-T5100 Series/SC-T3100 Series/SC-T5100N Series/SC-T3100N Series User's Guide
Problem Solver
146

o Have you compared the printing result withthe image on the display monitor?
Since the monitor and the printer produce colorsdifferently, printed colors will not always matchon-screen colors perfectly.
o Did you open the front cover while printing?
If the front cover is opened while printing, the printhead stops suddenly, causing unevenness in color.Do not open the front cover while printing.
The color is not exactly the same asanother printer.
o Colors vary depending on the printer typedue to each printer's characteristics.
Because inks, printer drivers, and printer profiles aredeveloped for each printer model, the colors printedby different printer models are not exactly the same.
You can achieve similar colors with the same coloradjustment method or the same gamma setting byusing the printer driver.
U “Correct color and print” on page 68
The print is not positioned properlyon the media.
o Have you specified the print area?
Check the print area in the settings of theapplication and the printer.
o Is the Document Size setting correct?
If the option selected for Document Size or PaperSize in the printer driver does not match the paperloaded in the printer, the print may not be in thecorrect position or some of the data may not beprinted. In this case, check the print settings.
o Is the paper skewed?
If Off is selected for Detect Paper Meandering inthe Printer Settings menu, printing will continueeven if the paper is skewed, resulting in data beingprinted off the edges of the paper. In the PrinterSettings menu, set Detect Paper Meandering toOn.
U “General Settings - Printer Settings” onpage 117
o Is the roll paper margin set wide?
If margins narrower than the margins set in the rollpaper Advanced Media Setting - Top/BottomMargins menu are set in the application software,then priority is given to the printer settings.
U “Roll Paper menu” on page 109
Vertical ruled lines are misaligned.
o Has Media Adjust been carried out?
Confirm that paper type settings that match thepaper are selected, and perform Media Adjust.
U “Setting Loaded Paper” on page 39
U “Optimizing Paper Settings (Media Adjust)” onpage 43
o After media adjust, does the same problemoccur?
In the printer driver Printer Settings screen, deselectSimple Settings in the Print Quality field. SelectLevel - Max Quality, deselect High Speed, and tryprinting.
However, printing may take some time.
Bidirectional printing moves the print head left andright while printing, so if the print head ismisaligned (with gaps), ruled lines may be printedas misaligned.
The printed surface is scuffed orsoiled.
o Is the paper too thick or too thin?
Check that the paper specifications are compatiblewith this printer.
U “Epson Special Media Table” on page 157
U “Supported Commercially Available Paper” onpage 160
SC-T5100 Series/SC-T3100 Series/SC-T5100N Series/SC-T3100N Series User's Guide
Problem Solver
147

o Is the paper wrinkled or creased?
Do not use old paper or paper with creases in it.Always use new paper.
o Is the paper wavy or curled?
Changes in temperature and humidity may causepaper to become wavy or curled which can causescratching.
Check the following points.
❏ Insert the paper just before printing.
❏ Do not use wavy or curled paper.For roll paper, cut off the wavy or curled partsand then load it again.For cut sheets, use new paper.U “Notes on Loading the Paper” on page 27
o Is the print head scuffing the printedsurface?
Enable the Thick Paper function, and try printing.From the Home screen, touch Settings - PrinterSettings - Thick Paper - Accept.
If, after enabling the Thick Paper function, smearingis not improved, then register as a custom paper,and increase the Platen Gap value to its maximumvalue.
Perform custom paper registration from Settings -General Settings - Printer Settings - CustomPaper Setting.
U “General Settings - Printer Settings” onpage 117
Perform Platen Gap from the Home screen RollPaper Information field - Advanced Media Setting -Platen Gap.
U “Roll Paper menu” on page 109
o Is the print head scuffing the edge of thepaper?
If smearing or soiling occurs on the edge of the rollpaper, from the Home screen touch the roll paperinformation field - Advanced Media Setting - Top/Bottom Margins, change the edge setting to 45mm, and try printing.
o Is the print head scuffing the trailing edgeof the paper?
Depending on the paper usage, storage conditions,and the content of the print data, the bottom edgemay be scuffed when printing. In this situation it isbest to create your data with a wider bottommargin.
The same smearing or soling occurson the printed surface of both rollpaper and cut paper.
Follow the steps below to clean the roller by feedingplain paper.
A Turn on the printer, and load it with widestavailable roll paper.
U “Loading Roll Paper” on page 28
B Touch Paper Setting - Roll Paper - Feed/CutPaper from the Home screen.
C Touch and hold the (Forward) button untilthe paper is no longer marked.
Paper is fed while the (Forward) button istouched. If the paper is not soiled, cleaning iscomplete.
D Touch the (Cut) button to cut the paper.
Smearing occurs on printed matterfrom the auto sheet feeder.
Soiling or uneven color may appear on the printedsurface when printing on paper supplied from the autosheet feeder. This occurs in particular with glossypaper.
If vertical soiling appears on glossy paper, werecommend that instead of using the auto sheet feeder,you feed individual sheets from Cut Sheet(1 sheet) forprinting.
U “Loading Cut Sheet(1 sheet)” on page 37
Follow the steps below to feed and eject plain paper toclean the auto sheet feeder roller.
SC-T5100 Series/SC-T3100 Series/SC-T5100N Series/SC-T3100N Series User's Guide
Problem Solver
148

A Turn on the printer, and load a number ofsheets of A3 size plain paper in the auto sheetfeeder.
U “Loading Paper in the Auto Sheet Feeder”on page 34
B From the Home screen, touch Settings -Maintenance - Paper Guide Cleaning.
C Touch Start.
The paper is ejected.
D Confirm if there is any soiling on the ejectedpaper.
❏ If there is soiling: Touch and hold Run Againuntil the soiling is gone.
❏ If there is no soiling: Touch Done to completeroller cleaning.
The paper is creased.
o Are you using the printer at normal roomtemperature?
Epson special media should be used at normal roomtemperature (temperature: 15 to 25°C, humidity: 40to 60%). For information about paper such as thinpaper from other manufacturers that requiresspecial handling, see the documentation suppliedwith the paper.
o Is there a gap between both edges of theroll paper and the flanges?
Confirm that the spindle flanges are right up againstboth edges of the roll paper, with no gaps. If thereare any gaps, then the paper is fed at an angle, andthis may result in wrinkling.
U “Loading Roll Paper” on page 28
o Has Media Adjust been carried out?
Confirm that paper type settings that match thepaper being used, and perform Media Adjust.
U “Setting Loaded Paper” on page 39
U “Optimizing Paper Settings (Media Adjust)” onpage 43
o Is the roll paper tension weak?
If wrinkles occur on the roll paper, increase thepaper tension settings. In the roll paper informationfield - Advanced Media Setting - Back Tension,select High or Extra High.
The reverse side of the printed paperis soiled.
o Is ink dry on the printed surface?
Depending on the printing density and media type,the ink may take a while to dry. Do not stack thepaper until the printed surface is dry.
Additionally, setting the drying time on the printerin Roll Paper - Advanced Media Setting - DryingTime - Drying Time per Page to a longer time willstop post-print processing (ejection, cutting),waiting for the paper to dry naturally.
U “Roll Paper menu” on page 109
Blurred text, lines, and images
o Is the Media Type setting correct?
Confirm that the paper type selected with theprinter matches the paper being used, and that theprinter driver Media Type settings are Use PrinterSettings. The amount of ink to be fired is controlledaccording to the media type. If the settings do notmatch the paper loaded, too much ink may be fired.
U “Setting Loaded Paper” on page 39
o Is the Color Density setting appropriate?
On the printer driver Advanced screen, click PaperConfiguration, and decrease the ink density. Theprinter may be printing with much ink for somepaper. We recommend that black and colordensities be decreased similarly.
o Are you printing on tracing paper?
If too much ink is discharged, on the printer driverAdvanced screen, click Paper Configuration, anddecrease the ink density. Alternatively, changingPaper Type to Tracing Paper <LowDuty> mayresult in an improvement.
SC-T5100 Series/SC-T3100 Series/SC-T5100N Series/SC-T3100N Series User's Guide
Problem Solver
149

Feeding or ejecting problems
Unable to feed or eject paper.
o Is the paper loaded in the correct position?
See the following for the correct paper loadingpositions.
U “Loading Roll Paper” on page 28
U “Loading Paper in the Auto Sheet Feeder” onpage 34
U “Loading Cut Sheet(1 sheet)” on page 37
o Is the paper loaded in the correct direction?
Load cut sheets vertically. If they are not loaded inthe correct direction, the paper may not berecognized and an error may occur.
U “Loading Paper in the Auto Sheet Feeder” onpage 34
U “Loading Cut Sheet(1 sheet)” on page 37
o Is the paper wrinkled or creased?
Do not use old paper or paper with creases in it.Always use new paper.
o Is the paper damp?
Do not use paper that is damp. Also, Epson specialmedia should be left in the bag until you intend touse it. If it is left out for a long time, the paper curlsup and gets damp so that it does not feed properly.
o Is the paper wavy or curled?
If changes in temperature and humidity cause paperto become wavy or curled, the printer may not beable to recognize the paper size correctly.
Check the following points.
❏ Insert the paper just before printing.
❏ Do not use wavy or curled paper.For roll paper, cut off the wavy or curled partsand then load it again.For cut sheets, use new paper.
U “Notes on Loading the Paper” on page 27
o Are the edges of the roll paper uneven?
Loading roll paper with the right and left edgesuneven may cause paper feeding problems or papermeandering may occur during printing. Rewind thepaper to make the edges even before using rollpaper or use roll paper with no problem.
U “Notes on Loading the Paper” on page 27
o Is the paper too thick or too thin?
Check that the paper specifications are compatiblewith this printer.
U “Epson Special Media” on page 154
U “Supported Commercially Available Paper” onpage 160
o Are you using the printer at normal roomtemperature?
Epson special media should be used at normal roomtemperature (temperature: 15 to 25°C, humidity: 40to 60%). For information about paper from othermanufacturers, see the documentation suppliedwith the paper.
o Is paper jammed in the printer?
Open the front cover of the printer and check thatthere are no paper jams or foreign objects in theprinter. If paper is jammed, see "Roll paper jam" or"Cut sheets jam" below and clear the jammed paper.
SC-T5100 Series/SC-T3100 Series/SC-T5100N Series/SC-T3100N Series User's Guide
Problem Solver
150

Paper does not collect in the paperbasket or is creased or folded
o Does the print job require a lot of ink, or isthe humidity of the workplace high?
Depending on the job and the work environment,paper may not collect in the paper basket. Take thefollowing measures as appropriate.
❏ Paper does not collect in the paper basket: Useyour hands to lightly press the paper into thepaper basket as it is ejected from the printer.
❏ The paper folds after it has been cutautomatically: Select manual cutting and takethe paper in both hands after it is cut.
❏ The paper creases and does not collect well inthe paper basket: Resume printing after closingthe paper basket. Before the paper ejectedfrom the printer touches the floor, take it inboth hands close to the paper eject slot andcontinue to lightly support it until printing iscomplete.
Roll paper jam
To remove jammed paper, follow the steps below:
A Open the cut sheet cover.
B Release the central lock, and then open the rollpaper cover.
C Cut the top portion of any torn or crinkledareas using a commercially available cutter.
D Close the roll paper cover and cut sheet cover.
E When ejecting paper from the front, grasp thepaper with both hands, and slowly pull it outtowards you.
F Open the front cover, remove the jammedpaper, then close the front cover.
c Important:
Do not touch the print head. If you touch theprint head with your hand, static electricitymay cause a malfunction.
G If Then turn the power off and on again. isdisplayed on the screen, turn off the printer, andthen turn it back on.
After removing the paper, reload the paper and restartprinting.
U “Loading Roll Paper” on page 28
SC-T5100 Series/SC-T3100 Series/SC-T5100N Series/SC-T3100N Series User's Guide
Problem Solver
151

c Important:
Before you reload the roll paper, cut the edgestraight horizontally. Cut any wavy or creasedsections.
If there are any wrinkles on the edge, then papermay not be fed, or it may jam.
Cut sheets jam
To remove jammed paper, follow the steps below:
A Open the front cover.
B When ejecting paper from the front, grasp thepaper with both hands, and slowly pull it outtowards you.
C Remove the jammed paper, then close the frontcover.
c Important:
Do not touch the print head. If you touch theprint head with your hand, static electricitymay cause a malfunction.
D If Then turn the power off and on again. isdisplayed on the screen, turn off the printer, andthen turn it back on.
After removing the paper, reload the paper and restartprinting.
U “Loading Paper in the Auto Sheet Feeder” onpage 34
U “Loading Cut Sheet(1 sheet)” on page 37
Others
The control panel display keepsturning off.
o Is the printer in sleep mode?
Sleep mode is exited if a print job is received or thescreen of the control panel is touched. The delaybefore entering sleep mode can be changed fromthe Basic Settings menu.
U “General Settings - Basic Settings” on page 115
Color ink runs out quickly even whenprinting in the Black&White mode orwhen printing black data.
o Color ink may be consumed even if inprinting in black and white mode, orprinting black data.
o Color ink is also consumed during the printhead cleaning process.
When performing Head Cleaning or PowerfulCleaning, ink of all colors will be consumed even ifblack and white mode is selected.
The paper is not cut cleanly.
o Replace the cutter.
If the paper is not cut cleanly, replace the cutter.
U “Replacing the Cutter” on page 138
SC-T5100 Series/SC-T3100 Series/SC-T5100N Series/SC-T3100N Series User's Guide
Problem Solver
152

A light is visible inside the printer.
o This is not a failure.
The light is a light inside the printer.
The administrator password hasbeen lost
o Should you forget the administrator password,contact your dealer or Epson Support.
Print head is automatically cleaned
o To ensure print quality, the printer mayautomatically perform head cleaning when theprinter is turned on or before starting printing.
The printer turned off due to a powercut
o Turn off the printer, and then turn it backon.
When the printer is not turned off normally, theprint head may not be capped correctly. If the printhead is left uncapped for a long time, the printquality may decline.
When you turn on the printer, capping is performedautomatically after a few minutes.
SC-T5100 Series/SC-T3100 Series/SC-T5100N Series/SC-T3100N Series User's Guide
Problem Solver
153

Appendix
Options and Consumable Products
The following options and consumable products are available for use with your printer. (As of April, 2018)
For the latest information, see the Epson Web site.
Epson Special Media
U “Epson Special Media Table” on page 157
Ink cartridges
Epson recommends the use of genuine Epson ink cartridges. Epson cannot guarantee the quality or reliability ofnon-genuine ink. The use of non-genuine ink may cause damage that is not covered by Epson‘s warranties, andunder certain circumstances, may cause erratic printer behavior.
Information about non-genuine ink levels may not be displayed, and use of non-genuine ink is recorded forpossible use in service support.
Printer model Ink color Product Number
80ml 50ml 26ml
SC-T5100
SC-T3100
SC-T5100N
SC-T3100N
Black T40D1 T40C1 -
Cyan - T40D2 T40C2
Magenta - T40D3 T40C3
Yellow - T40D4 T40C4
SC-T5130
SC-T3130
SC-T3130N
Black T40B1 T40A1 -
Cyan - T40B2 T40A2
Magenta - T40B3 T40A3
Yellow - T40B4 T40A4
SC-T5160
SC-T3160
SC-T5160N
SC-T3160N
Black T40U1 T40S1 -
Cyan - T40U2 T40S2
Magenta - T40U3 T40S3
Yellow - T40U4 T40S4
SC-T5100 Series/SC-T3100 Series/SC-T5100N Series/SC-T3100N Series User's Guide
Appendix
154

Printer model Ink color Product Number
80ml 50ml 26ml
SC-T5180
SC-T5180N
SC-T3180N
Black T40H1 T40G1 -
Cyan - T40H2 T40G2
Magenta - T40H3 T40G3
Yellow - T40H4 T40G4
Others
Product Part number Explanation
Maintenance Box S210057 Maintenance Box to be used for replacementwhen the previous Maintenance Box hasinsufficient capacity remaining.
U “Maintenance Box Replacement” onpage 137
Auto Cutter Spare Blade
(except for SC-T5180 / SC-T5180N /SC-T3180N)
S210055 U “Replacing the Cutter” on page 138
Auto Cutter Spare Blade
(for SC-T5180 / SC-T5180N / SC-T3180N)
S210056
Stand (36")
(except for SC-T5180 / SC-T5180N /SC-T3180N)
C12C933091 Dedicated stand with a paper basket formodels without a stand. Select the width inaccordance with a model you are using.
Stand (36")
(for SC-T5180 / SC-T5180N / SC-T3180N)
C12C933101
Stand (24")
(except for SC-T5180 / SC-T5180N /SC-T3180N)
C12C933151
Stand (24")
(for SC-T5180 / SC-T5180N / SC-T3180N)
C12C933161
SC-T5100 Series/SC-T3100 Series/SC-T5100N Series/SC-T3100N Series User's Guide
Appendix
155

Product Part number Explanation
Roll Feed Spindle (36")
(except for SC-T5180 / SC-T5180N /SC-T3180N)
C12C933131 This is the same as the roll paper spindlesupplied with the printer. Select the width inaccordance with a model you are using.
Roll Feed Spindle (36")
(for SC-T5180 / SC-T5180N / SC-T3180N)
C12C933141
Roll Feed Spindle (24")
(except for SC-T5180 / SC-T5180N /SC-T3180N)
C12C933211
Roll Feed Spindle (24")
(for SC-T5180 / SC-T5180N / SC-T3180N)
C12C933221
SC-T5100 Series/SC-T3100 Series/SC-T5100N Series/SC-T3100N Series User's Guide
Appendix
156

Supported Media
We recommend you use the following Epson special media for high-quality printing results. Refer to the followingfor supported commercially available paper.
U “Supported Commercially Available Paper” on page 160
Epson Special Media Table
Epson paper supported by this printer is described below. (As of April, 2018).
Not all paper types and sizes are available in all countries or regions.
Note:The paper names in the following table are displayed by the paper type settings in the menu of the printer driver or theprinter. Some parts of paper names may be omitted.
Example): Premium Glossy Photo Paper (170) may be abbreviated to Premium Glossy 170.
Roll Paper
Paper Name Size
Singleweight Matte Paper 420 mm/A2
432 mm/17 in.
515 mm/B2
594 mm/A1
610 mm/24 in.
728 mm/B1*
914 mm/36 in.*
Doubleweight Matte Paper 594 mm/A1
610 mm/24 in.
728 mm/B1*
914 mm/36 in.*
Premium Glossy Photo Paper (170) 420 mm/A2
594 mm/A1
610 mm/24 in.
728 mm/B1*
914 mm/36 in.*
SC-T5100 Series/SC-T3100 Series/SC-T5100N Series/SC-T3100N Series User's Guide
Appendix
157

Paper Name Size
Premium Semigloss Photo Paper (170) 420 mm/A2
594 mm/A1
610 mm/24 in.
728 mm/B1*
914 mm/36 in.*
Enhanced Adhesive Synthetic Paper 610 mm/24 in.
914 mm/36 in.*
Enhanced Low Adhesive Synthetic Paper 610 mm/24 in.
914 mm/36 in.*
* Available only with SC-T5100 Series.
Cut Sheet
Paper Name Size*
Auto Sheet Feeder
AvailabilityLoadableNumber ofSheets
Photo Quality Inkjet Paper A4
Letter
Legal
A3
✓ 5
Super A3/B
SuperB
A2
US-C
- -
Archival Matte Paper A4
Letter
A3
✓ 5
Super A3/B
SuperB
A2
US C
- -
Photo paper Glossy A4
Letter
A3
✓ 5
A3+
SuperB
US-B
- -
SC-T5100 Series/SC-T3100 Series/SC-T5100N Series/SC-T3100N Series User's Guide
Appendix
158

Paper Name Size*
Auto Sheet Feeder
AvailabilityLoadableNumber ofSheets
Premium Glossy Photo Paper A4
Letter
11 x 14 in.
A3
✓ 5
Super A3/B
SuperB
A2
US-C
- -
Premium Semigloss Photo Paper A4
Letter
A3
✓ 5
Super A3/B
SuperB
A2
US-C
- -
Premium Luster Photo Paper A4
Letter
A3
✓ 5
A2
US-C- -
SC-T5100 Series/SC-T3100 Series/SC-T5100N Series/SC-T3100N Series User's Guide
Appendix
159

Supported Commercially Available Paper
This printer supports the following paper specifications for non-Epson media.
c Important:
❏ Do not use paper that is wrinkled, scuffed, torn, or dirty.
❏ Commercially available paper corresponding to the paper types in the table can be loaded in and fedthrough the printer as long as they meet the following specifications, however Epson cannot guarantee theprint quality.
❏ Commercially available paper types not in the table can be loaded in the printer as long as they meet thefollowing specifications, however Epson cannot guarantee the feed and print quality.
Roll Paper
Paper Type Plain paper, coated paper, photo paper, tracing paper, matte film
Roll core size 2 inch
Roll paper outer diameter 110 mm or less
Paper width SC-T5100 Series/SC-T5100N Series: 329 to 914 mm (36 inch)
SC-T3100 Series/SC-T3100N Series: 329 to 610 mm (24 inch)
Paper thickness 0.05 to 0.21 mm
Roll weight 3 kg or less
Cut Sheet (Auto Sheet Feeder)
Paper type Plain paper, coated paper, photo paper
Paper size A4 to A3
Paper thickness 0.12 to 0.27 mm
The maximum number of sheets that can be set in the auto sheet feeder is 50 for plain paper, and 5 for other typesof paper.
However, depending on the thickness of the paper, feeding paper may fail even if the numbers of sheets lower thanthese are set. In these cases, reduce the number of sheets of paper loaded.
Cut Sheet (1 Sheet)
Paper type Plain paper, coated paper, photo paper, tracing paper, matte film
Paper width SC-T5100 Series/SC-T5100N Series: 210 to 914 mm (36 inch)
SC-T3100 Series/SC-T3100N Series: 210 to 610 mm (24 inch)
SC-T5100 Series/SC-T3100 Series/SC-T5100N Series/SC-T3100N Series User's Guide
Appendix
160

Length 279.4 mm (Letter) to 1,189 mm
Paper thickness 0.12 to 0.27 mm
SC-T5100 Series/SC-T3100 Series/SC-T5100N Series/SC-T3100N Series User's Guide
Appendix
161

Before Printing on Commercially Available Paper
When using commercially available paper, select the paper type setting that matches to the paper from thefollowing settings.
❏ Plain paper
❏ Coated Paper(Generic)
❏ Photo Paper(Generic)
❏ Tracing Paper
❏ Tracing Paper <LowDuty>
❏ Matte Film
If there is banding, wrinkling or smearing, or uneven color on the printing results, perform Media Adjust.
U “Optimizing Paper Settings (Media Adjust)” on page 43
When using Commercially Available Synthetic, Canvas or Film-type Paper
Before printing, carry out one of the following.
❏ Add as a new paper type setting (register as custom paper), and carry out media adjust.From the Home screen, touch Settings - General Settings - Printer Settings - Custom Paper Setting, andregister a custom paper. After registering the paper, perform Media Adjust. Paper adjustment results will besaved as the newly added paper type settings.Refer to the following menu for details on custom paper settings.U “General Settings - Printer Settings” on page 117
❏ Select the paper type from the following Epson Special Media settings, and perform Media Adjust.Enhanced Adhesive Syn., Enhanced Low Adh. Syn., Heavyweight Polyester, Glossy Film2By performing the Media Adjust, paper settings for Epson Special Media will be overwritten by the settings forthe paper you use.U “Optimizing Paper Settings (Media Adjust)” on page 43
Note:Test the print quality with this printer before purchasing a large amount of paper.
SC-T5100 Series/SC-T3100 Series/SC-T5100N Series/SC-T3100N Series User's Guide
Appendix
162

Printable area
This section describes the printable areas for theprinter.
If the print range settings in application software arelarger than the following printer printable areas,sections beyond the specified margins are not printed.
Roll Paper
The gray area in the illustration below shows theprintable area.
The arrow in the illustration indicates the direction ofthe ejected paper.
*1 SC-T5100 Series/SC-T5100N Series
*2 SC-T3100 Series/SC-T3100N Series
*3 In the printer driver Layout screen, selectingPrint Banner sets the top and bottom margins ofthe paper to 0 mm.
Margins for roll paper depend on the settings valuesfor Top/Bottom Margins in the menu, as shown in thetable below.
Top/Bottom Margins settings U “Roll Paper menu”on page 109
The default setting is Standard.
Top/Bottom MarginsSettings
Margin Values
Standard A,C=30 mm*
B,D=3 mm
Top 3 mm/Bottom 3 mm A,C=3 mm
B,D=3 mm
Top 15 mm/Bottom 15 mm A,C=15 mm
B,D=3 mm
Top 45 mm/Bottom 15 mm A=45 mm
C=15 mm
B,D=3 mm
3 mm A,B,C,D=3 mm
5 mm A,B,C,D=5 mm
* If Standard is selected when the following twoconditions are met, then the top and bottommargins will be 3 mm.
❏ The paper type settings are one of the followingSingleweight Matte, Coated Paper(Generic), Plainpaper, Plain Paper Thin, Plain Paper Thick, TracingPaper, Tracing Paper <LowDuty>, or Matte Film
❏ The printer driver print targets are one of thefollowingCAD/Line Drawing - Black, CAD/Line Drawing -Color, CAD/Line Drawing - Bi-Level
SC-T5100 Series/SC-T3100 Series/SC-T5100N Series/SC-T3100N Series User's Guide
Appendix
163

c Important:
❏ Printing is distorted when the trailing edge ofthe roll paper comes off the core. Make sure thetrailing edge does not come inside the printingarea.
❏ If the print range settings width is smallerthan the print data width , then thesections beyond the printable width willnot be printed.
SC-T5100 Series/SC-T3100 Series/SC-T5100N Series/SC-T3100N Series User's Guide
Appendix
164

Cut Sheet (Auto Sheet Feeder)
The gray area in the illustration below shows theprintable area. The arrow in the illustration indicatesthe direction of the ejected paper.
Cut Sheet (1 Sheet)
The gray area in the illustration below shows theprintable area. The arrow in the illustration indicatesthe direction of the ejected paper.
*1 SC-T5100 Series/SC-T5100N Series
*2 SC-T3100 Series/SC-T3100N Series
SC-T5100 Series/SC-T3100 Series/SC-T5100N Series/SC-T3100N Series User's Guide
Appendix
165
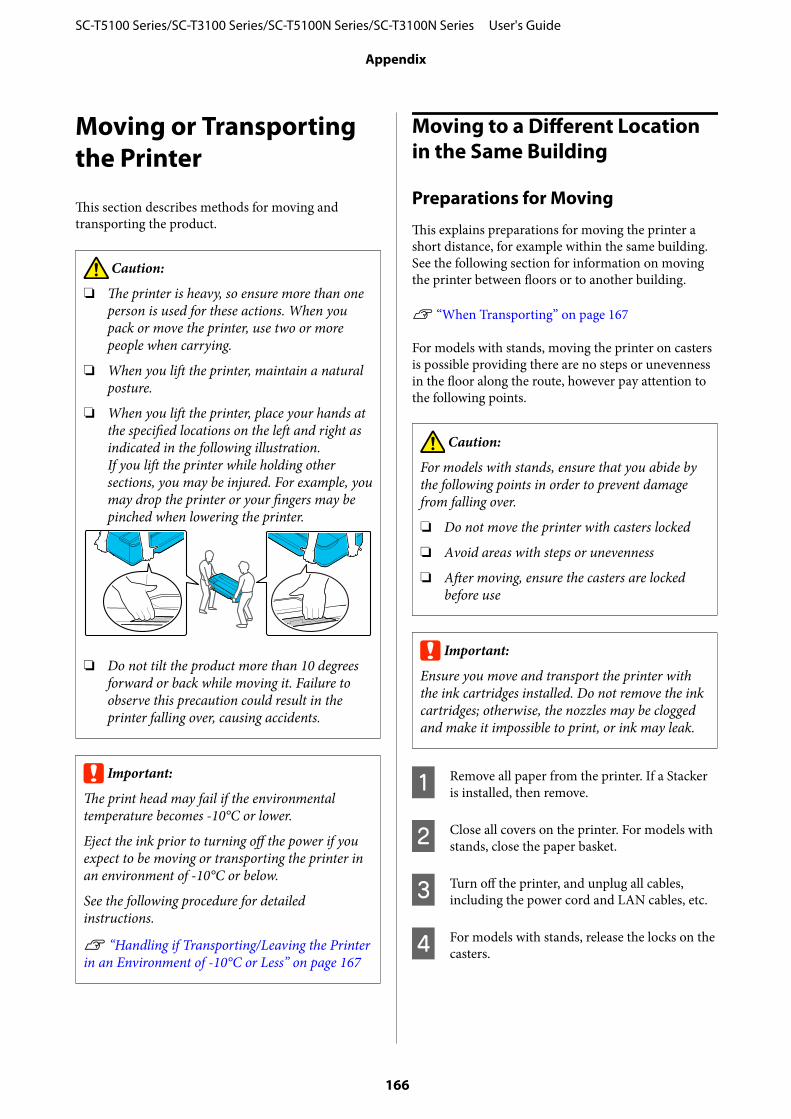
Moving or Transportingthe Printer
This section describes methods for moving andtransporting the product.
Caution:
❏ The printer is heavy, so ensure more than oneperson is used for these actions. When youpack or move the printer, use two or morepeople when carrying.
❏ When you lift the printer, maintain a naturalposture.
❏ When you lift the printer, place your hands atthe specified locations on the left and right asindicated in the following illustration.If you lift the printer while holding othersections, you may be injured. For example, youmay drop the printer or your fingers may bepinched when lowering the printer.
❏ Do not tilt the product more than 10 degreesforward or back while moving it. Failure toobserve this precaution could result in theprinter falling over, causing accidents.
c Important:
The print head may fail if the environmentaltemperature becomes -10°C or lower.
Eject the ink prior to turning off the power if youexpect to be moving or transporting the printer inan environment of -10°C or below.
See the following procedure for detailedinstructions.
U “Handling if Transporting/Leaving the Printerin an Environment of -10°C or Less” on page 167
Moving to a Different Location in the Same Building
Preparations for Moving
This explains preparations for moving the printer ashort distance, for example within the same building.See the following section for information on movingthe printer between floors or to another building.
U “When Transporting” on page 167
For models with stands, moving the printer on castersis possible providing there are no steps or unevennessin the floor along the route, however pay attention tothe following points.
Caution:
For models with stands, ensure that you abide bythe following points in order to prevent damagefrom falling over.
❏ Do not move the printer with casters locked
❏ Avoid areas with steps or unevenness
❏ After moving, ensure the casters are lockedbefore use
c Important:
Ensure you move and transport the printer withthe ink cartridges installed. Do not remove the inkcartridges; otherwise, the nozzles may be cloggedand make it impossible to print, or ink may leak.
A Remove all paper from the printer. If a Stackeris installed, then remove.
B Close all covers on the printer. For models withstands, close the paper basket.
C Turn off the printer, and unplug all cables,including the power cord and LAN cables, etc.
D For models with stands, release the locks on thecasters.
SC-T5100 Series/SC-T3100 Series/SC-T5100N Series/SC-T3100N Series User's Guide
Appendix
166

Operations after Moving
This explains operations to prepare for use aftermoving the printer.
A Connect the power cable, and turn the printeron.
B Check for print head nozzle clogging, and ifthese are clogged, carry out print head cleaning.
U “Checking for Clogged Print Head, andCleaning” on page 134
When Transporting
Before transporting the printer, contact your dealer orEpson Support.
U “Where To Get Help” on page 174
Handling if Transporting/Leaving the Printer in an Environment of -10°C or Less
The print head may fail if the environmentaltemperature becomes -10°C or lower. Discharge theink following the procedures below if you expect theprinter to encounter environments of -10°C or below.
c Important:
This procedure discharges ink into theMaintenance Box, therefore the Maintenance Boxrequires adequate remaining capacity. If theremaining capacity box is low, first prepare a newreplacement Maintenance Box.
A If paper is loaded, remove all paper.
U “Removing Roll Paper” on page 32
U “Removing Cut Sheet (1 Sheet)” on page 38
B From the Home screen, touch Settings -Maintenance - Discharging/Charging Ink.
C Touch Start.
Move the ink cartridge to the replacementposition.
D Open the front cover.
E Open the cartridge cover, and remove all inkcartridges.
After ink discharge, reinstall the ink cartridges.Place the removed ink cartridges nearby withthe ink supply port down, or laid horizontally.
F Close the cartridge cover and front cover.
Close the front cover to start ink discharge.
c Important:
Do not open the cover or turn the printer offduring ink discharge.
G If Open the front cover and insert all the inkcartridges. is displayed, open the front coverand cartridge cover again.
H Set all ink cartridges removed in Step 5.
I Close the cartridge cover and front cover.
Closing the front cover automatically turns offthe power to the printer.
After this, refer to the following forpreparations for movement/transport.
U “Moving to a Different Location in theSame Building” on page 166
U “When Transporting” on page 167
SC-T5100 Series/SC-T3100 Series/SC-T5100N Series/SC-T3100N Series User's Guide
Appendix
167

c Important:
When a You will need a new XXX ink cartridgeto start using the printer again. message isdisplayed, prepare an ink cartridge of the colorshown with XXX by the time the printer is nextused.
The next time the power is turned on, if theamount of ink required in order to perform inkcharging (filling with ink until the print headnozzle section, readying the device for printing) isnot available, then the printer will not be usableuntil the ink cartridge is replaced.
SC-T5100 Series/SC-T3100 Series/SC-T5100N Series/SC-T3100N Series User's Guide
Appendix
168

System Requirements
Software for this printer can be used in the following environments. (As of April, 2018)
Supported OS and other elements may change.
For the latest information, see the Epson Web site.
Printer Driver
Windows
Operating system Windows 10 / Windows 10 x64Windows 8.1 / Windows 8.1 x64Windows 8 / Windows 8 x64Windows 7 / Windows 7 x64Windows Vista / Windows Vista x64Windows XP / Windows XP x64Windows Server 2016Windows Server 2012 R2Windows Server 2012Windows Server 2008 R2Windows Server 2008Windows Server 2003 R2Windows Server 2003 SP2 or later
CPU Intel Core 2 Duo 3.05 GHz or more
Available memory space 1 GB or more
Hard disk (Available volume to install) 32 GB or more
Display resolution WXGA (1280×800) or better
Connection method with the printer* USB, Ethernet, or Wi-Fi
*For details on the connection methods (interface specifications), see the following.
U “Specifications Table” on page 171
Mac
Operating system Mac OS X v10.6.8 or later
CPU Intel Core 2 Duo 3.05 GHz or more
Available memory space 4 GB or more
Hard disk (Available volume to install) 32 GB or more
Display resolution WXGA+ (1440×900) or better
Connection method with the printer* USB, Ethernet, or Wi-Fi
*For details on the connection methods (interface specifications), see the following.
U “Specifications Table” on page 171
SC-T5100 Series/SC-T3100 Series/SC-T5100N Series/SC-T3100N Series User's Guide
Appendix
169

Web Config
Windows
Browser Internet Explorer 11, Microsoft Edge, Firefox*1, Chrome*1
Connection method with theprinter*2
Ethernet or Wi-Fi
*1 Use the latest version.
*2 See the following for details on the network interfaces.
U “Specifications Table” on page 171
Mac
Browser Safari*1, Firefox*1, Chrome*1
Connection method with theprinter*2
Ethernet or Wi-Fi
*1 Use the latest version.
*2 See the following for details on the network interfaces.
U “Specifications Table” on page 171
Smart device
Operating system iOS*1 Android OS*1
Browser Safari*1 Default browser
Connection method with theprinter*2
Wi-Fi Wi-Fi
*1 Use the latest version.
*2 See the following for details on the network interfaces.
U “Specifications Table” on page 171
SC-T5100 Series/SC-T3100 Series/SC-T5100N Series/SC-T3100N Series User's Guide
Appendix
170

Specifications Table
The (A) to (D) letters used in the table represent theprinter models as shown below.
(A): SC-T5100 Series(B): SC-T3100 Series(C): SC-T5100N Series(D): SC-T3100N Series
Printer Specifications
Printing method On-demand ink jet
Nozzle configura‐tion
800 nozzles × 4 colors
(Black, Cyan, Magenta, Yellow)
Resolution (maxi‐mum)
2400 × 1200 dpi
Control code ESC/P2, ESC/P raster (undisclosedcommand), ESC/P3, ESC/P-R,HP-GL/2, HP RTL, PJL
Built-in memory 1.0 GB
Rated voltage AC100-240 V
Rated frequency 50/60 Hz
Rated current 1.4 A
Power consumption
Printing Approx. 28 W
Ready mode Approx. 8 W
Sleep mode Approx. 1.6 W
Power off Approx. 0.2 W
Temperature
Printing 10 to 35°C (15 to 25°C isrecommended)
In storage (beforeunpacking)
-20 to 60°C (within 120 hours at60°C, within a month at 40°C)
In storage (afterunpacking)
Ink charged: -10 to 40°C (within amonth at 40°C)
Ink discharged*1: -20 to 25°C(within a month at 25°C)
Humidity
Printer Specifications
Printing 20 to 80% (40 to 60% isrecommended. Withoutcondensation)
In storage 5 to 85% (without condensation)
Temperature and humidity range for operating (the rangeshown by diagonal lines is recommended)
Dimensions (Width × Depth × Height)
Maximum*2 (A): 1268 × 982 × 913 mm(B): 970 × 982 × 913 mm(C): 1268 × 811 × 230 mm(D): 970 × 811 × 230 mm
Storage (A): 1268 × 696 × 913 mm(B): 970 × 696 × 913 mm(C): 1268 × 505 × 230 mm(D): 970 × 505 × 230 mm
Weight*3 (A): Approx. 46 kg(B): Approx. 38 kg(C): Approx. 33 kg(D): Approx. 27 kg
*1 Use the Discharging/Charging Ink menu in theMaintenance menu to discharge ink from the printer.U “Handling if Transporting/Leaving the Printer in anEnvironment of -10°C or Less” on page 167
*2 With the paper basket is opened and the paper stacker isattached
*3 Not including the ink cartridges and the paper stacker
c Important:
Use the printer at an altitude of 2000 m or less.
SC-T5100 Series/SC-T3100 Series/SC-T5100N Series/SC-T3100N Series User's Guide
Appendix
171

Interface Specifications
USB port for a com‐puter
SuperSpeed USB
Option port (USBport for a scanner)
Hi-Speed USB
Ethernet*1
StandardsIEEE802.3i (10BASE-T)IEEE802.3u (100BASE-TX)IEEE802.3ab (1000BASE-T)IEEE802.3az (Energy EfficientEthernet)*2
Wi-Fi
Standards IEEE802.11b/g/n*3
Frequency Range 2.4 GHz
ConnectionModes
InfrastructureWi-Fi Direct (Simple AP)*4
Wireless Securities WEP (64/128bit)WPA-PSK (TKIP)WPA2-PSK (AES)*5
Network PrintingProtocols/Func‐tions*6
EpsonNet Print (Windows)Standard TCP/IP (Windows)WSD Printing (Windows)Bonjour Printing (Mac)IPP Printing (Mac)AirPrint (iOS, Mac)Printing from FTP client
Security Protocols SSL/TLS (HTTPS Server/Client,IPPS)IEEE802.1XIPsec/IP FilteringSMTPS (STARTTLS, SSL/TLS)SNMPv3
*1: Use a category 5 or higher STP (Shielded twisted pair)cable.
*2: The connected device should comply with IEEE802.3azstandards.
*3: IEEE802.11n is only available for the HT20.
*4: Not supported for IEEE 802.11b.
*5: Complies with WPA2 standards with support for WPA/WPA2 Personal.
*6: EpsonNet Print supports IPv4 only. The others supportboth IPv4 and IPv6.
Warning:
To prevent radio interference to the licensedservice, this device is intended to be operatedindoors and away from windows to providemaximum shielding. Equipment (or its transmitantenna) that is installed outdoors is subject tolicensing
Ink Specifications
Type Dedicated ink cartridges
Pigment ink Black, Cyan, Magenta, Yellow
Use by date See the expiration date printedon the ink cartridge package oron the cartridge (store at normaltemperature)
Print quality guar‐antee expiry
Six months (after unpacking)
Storage temperature
Uninstalled -20 to 40°C (within four days at-20°C, within a month at 40°C)
Installed -20 to 40°C (within four days at-20°C, within a month at 40°C)
Transporting -20 to 60°C (within four days at-20°C, within a month at 40°C,within 72 hours at 60°C)
Cartridge Dimensions (Width × Depth × Height)
80 ml 41.0 × 97.0 × 49.5* mm
50 ml / 26 ml 27.0 × 97.0 × 49.5* mm
*Not including the protruding portions
c Important:
❏ The ink freezes if left at below -13°C for a longtime. If it does freeze, leave it at roomtemperature (25°C) for at least three hours.
❏ Do not refill the ink cartridges.
For European users
CE Marking
Simplified EU Declaration of Conformity:
SC-T5100 Series/SC-T3100 Series/SC-T5100N Series/SC-T3100N Series User's Guide
Appendix
172

Hereby, Seiko Epson Corporation declares that thisequipment Model:K291A is in compliance withdirective 2014/53/EU. The full text of the EUdeclaration of conformity is available at the followinginternet address.
http://www.epson.eu/conformity
Radio Equipment Information
This product intentionally emit radio wave describedas follows.(a) frequency band in which the radio equipmentoperates; 2.4 to 2.4835 GHz(b) maximum radio-frequency power transmitted inthe frequency band in which the radio equipmentoperates;20dBm (eirp power)
SC-T5100 Series/SC-T3100 Series/SC-T5100N Series/SC-T3100N Series User's Guide
Appendix
173

Where To Get Help
Technical Support WebSite
Epson‘s Technical Support Web Site provides help withproblems that cannot be solved using thetroubleshooting information in your productdocumentation. If you have a Web browser and canconnect to the Internet, access the site at:
http://support.epson.net/
If you need the latest drivers, FAQs, manuals, or otherdownloadables, access the site at:
http://www.epson.com
Then, select the support section of your local EpsonWeb site.
Contacting EpsonSupport
Before Contacting Epson
If your Epson product is not operating properly andyou cannot solve the problem using thetroubleshooting information in your productdocumentation, contact Epson support services forassistance. If Epson support for your area is not listedbelow, contact the dealer where you purchased yourproduct.
Epson support will be able to help you much morequickly if you give them the following information:
❏ Product serial number(The serial number label is usually on the back ofthe product.)
❏ Product model
❏ Product software version(Click About, Version Info, or similar button inthe product software.)
❏ Brand and model of your computer
❏ Your computer operating system name andversion
❏ Names and versions of the software applicationsyou normally use with your product
SC-T5100 Series/SC-T3100 Series/SC-T5100N Series/SC-T3100N Series User's Guide
Where To Get Help
174

Help for Users in North America
Epson provides the technical support services listedbelow.
Internet Support
Visit Epson‘s support website at http://epson.com/support and select your product for solutions tocommon problems. You can download drivers anddocumentation, get FAQs and troubleshooting advice,or e-mail Epson with your questions.
Speak to a Support Representative
Dial: (562) 276-1300 (U.S.), or (905) 709-9475(Canada), 6 am to 6 pm, Pacific Time, Mondaythrough Friday. Days and hours of support are subjectto change without notice. Toll or long distance chargesmay apply.
Before you call Epson for support, please have thefollowing information ready:
❏ Product name
❏ Product serial number
❏ Proof of purchase (such as a store receipt) anddate of purchase
❏ Computer configuration
❏ Description of the problem
Note:For help using any other software on your system, seethe documentation for that software for technicalsupport information.
Purchase Supplies and Accessories
You can purchase genuine Epson ink cartridges,ribbon cartridges, paper, and accessories from anEpson authorized reseller. To find the nearest reseller,call 800-GO-EPSON (800-463-7766). Or you canpurchase online at http://www.epsonstore.com (U.S.sales) or http://www.epson.ca (Canadian sales).
Help for Users in Europe
Check your Pan-European Warranty Document forinformation on how to contact Epson support.
Help for Users in Australia
Epson Australia wishes to provide you with a highlevel of customer service. In addition to your productdocumentation, we provide the following sources forobtaining information:
Your Dealer
Don‘t forget that your dealer can often help identifyand resolve problems. The dealer should always be thefirst call for advise on problems; they can often solveproblems quickly and easily as well as give advise onthe next step to take.
Internet URLhttp://www.epson.com.au
Access the Epson Australia World Wide Web pages.Worth taking your modem here for the occasionalsurf! The site provides a download area for drivers,Epson contact points, new product information andtechnical support (e-mail).
Epson Helpdesk
Epson Helpdesk is provided as a final backup to makesure our clients have access to advice. Operators on theHelpdesk can aid you in installing, configuring andoperating your Epson product. Our Pre-sales Helpdeskstaff can provide literature on new Epson products andadvise where the nearest dealer or service agent islocated. Many types of queries are answered here.
The Helpdesk numbers are:
Phone: 1300 361 054
Fax: (02) 8899 3789
SC-T5100 Series/SC-T3100 Series/SC-T5100N Series/SC-T3100N Series User's Guide
Where To Get Help
175

We encourage you to have all the relevant informationon hand when you ring. The more information youprepare, the faster we can help solve the problem. Thisinformation includes your Epson productdocumentation, type of computer, operating system,application programs, and any information you feel isrequired.
Help for Users in Singapore
Sources of information, support, and services availablefrom Epson Singapore are:
World Wide Web(http://www.epson.com.sg)
Information on product specifications, drivers fordownload, Frequently Asked Questions (FAQ), SalesEnquiries, and Technical Support via e-mail areavailable.
Epson HelpDesk(Phone: (65) 6586 3111)
Our HelpDesk team can help you with the followingover the phone:
❏ Sales enquiries and product information
❏ Product usage questions or problems
❏ Enquiries on repair service and warranty
Help for Users in Thailand
Contacts for information, support, and services are:
World Wide Web(http://www.epson.co.th)
Information on product specifications, drivers fordownload, Frequently Asked Questions (FAQ), ande-mail are available.
Epson Hotline(Phone: (66) 2685 -9899)
Our Hotline team can help you with the following overthe phone:
❏ Sales enquiries and product information
❏ Product usage questions or problems
❏ Enquiries on repair service and warranty
Help for Users in Vietnam
Contacts for information, support, and services are:
Epson Hotline (Phone): 84-8-823-9239
Service Center: 80 Truong Dinh Street,District 1, Hochiminh CityVietnam
Help for Users in Indonesia
Contacts for information, support, and services are:
World Wide Web(http://www.epson.co.id)
❏ Information on product specifications, drivers fordownload
❏ Frequently Asked Questions (FAQ), SalesEnquiries, questions through e-mail
Epson Hotline
❏ Sales enquiries and product information
❏ Technical supportPhone (62) 21-572 4350
Fax (62) 21-572 4357
Epson Service Center
Jakarta Mangga Dua Mall 3rd floor No 3A/BJl. Arteri Mangga Dua,Jakarta
Phone/Fax: (62) 21-62301104
SC-T5100 Series/SC-T3100 Series/SC-T5100N Series/SC-T3100N Series User's Guide
Where To Get Help
176

Bandung Lippo Center 8th floorJl. Gatot Subroto No.2Bandung
Phone/Fax: (62) 22-7303766
Surabaya Hitech Mall lt IIB No. 12Jl. Kusuma Bangsa 116 – 118Surabaya
Phone: (62) 31-5355035Fax: (62) 31 -5477837)
Yogyakarta Hotel Natour GarudaJl. Malioboro No. 60Yogyakarta
Phone: (62) 274-565478
Medan Wisma HSBC 4th floorJl. Diponegoro No. 11Medan
Phone/Fax: (62) 61-4516173
Makassar MTC Karebosi Lt. Ill Kav. P7-8JI. Ahmad Yani No.49Makassar
Phone: (62)411-350147/411-350148
Help for Users in Hong Kong
To obtain technical support as well as other after-salesservices, users are welcome to contact Epson HongKong Limited.
Internet Home Page
Epson Hong Kong has established a local home pagein both Chinese and English on the Internet to provideusers with the following information:
❏ Product information
❏ Answers to Frequently Asked Questions (FAQs)
❏ Latest versions of Epson product drivers
Users can access our World Wide Web home page at:
http://www.epson.com.hk
Technical Support Hotline
You can also contact our technical staff at thefollowing telephone and fax numbers:
Phone: (852) 2827-8911
Fax: (852) 2827-4383
Help for Users in Malaysia
Contacts for information, support, and services are:
World Wide Web(http://www.epson.com.my)
❏ Information on product specifications, drivers fordownload
❏ Frequently Asked Questions (FAQ), SalesEnquiries, questions through e-mail
Epson Trading (M) Sdn. Bhd.
Head Office.
Phone: 603-56288288
Fax: 603-56288388/399
Epson Helpdesk
❏ Sales enquiries and product information (Infoline)Phone: 603-56288222
❏ Enquiries on repair services & warranty, productusage and technical support (Techline)
Phone: 603-56288333
Help for Users in India
Contacts for information, support, and services are:
SC-T5100 Series/SC-T3100 Series/SC-T5100N Series/SC-T3100N Series User's Guide
Where To Get Help
177

World Wide Web(http://www.epson.co.in)
Information on product specifications, drivers fordownload, and products enquiry are available.
Epson India Head Office - Bangalore
Phone: 080-30515000
Fax: 30515005
Epson India Regional Offices:
Location Telephonenumber
Fax number
Mumbai 022-28261515 /16/17
022-28257287
Delhi 011-30615000 011-30615005
Chennai 044-30277500 044-30277575
Kolkata 033-22831589 / 90 033-22831591
Hyderabad 040-66331738/ 39 040-66328633
Cochin 0484-2357950 0484-2357950
Coimbatore 0422-2380002 NA
Pune 020-30286000 /30286001/30286002
020-30286000
Ahmedabad 079-26407176 / 77 079-26407347
Helpline
For Service, Product info or to order a cartridge -18004250011 (9AM - 9PM) - This is a Toll-freenumber.
For Service (CDMA & Mobile Users) - 3900 1600(9AM - 6PM) Prefix local STD code
Help for Users in the Philippines
To obtain technical support as well as other after salesservices, users are welcome to contact the EpsonPhilippines Corporation at the telephone and faxnumbers and e-mail address below:
Trunk Line: (63-2) 706 2609
Fax: (63-2) 706 2665
HelpdeskDirect Line:
(63-2) 706 2625
E-mail: [email protected]
World Wide Web (http://www.epson.com.ph)
Information on product specifications, drivers fordownload, Frequently Asked Questions (FAQ), andE-mail Enquiries are available.
Toll-Free No. 1800-1069-EPSON(37766)
Our Hotline team can help you with the following overthe phone:
❏ Sales enquiries and product information
❏ Product usage questions or problems
❏ Enquiries on repair service and warranty
SC-T5100 Series/SC-T3100 Series/SC-T5100N Series/SC-T3100N Series User's Guide
Where To Get Help
178


