Embed Size (px)
Citation preview

INSTALLATION MANUAL
ZET MODULAR STEEL ROOF TILES

2
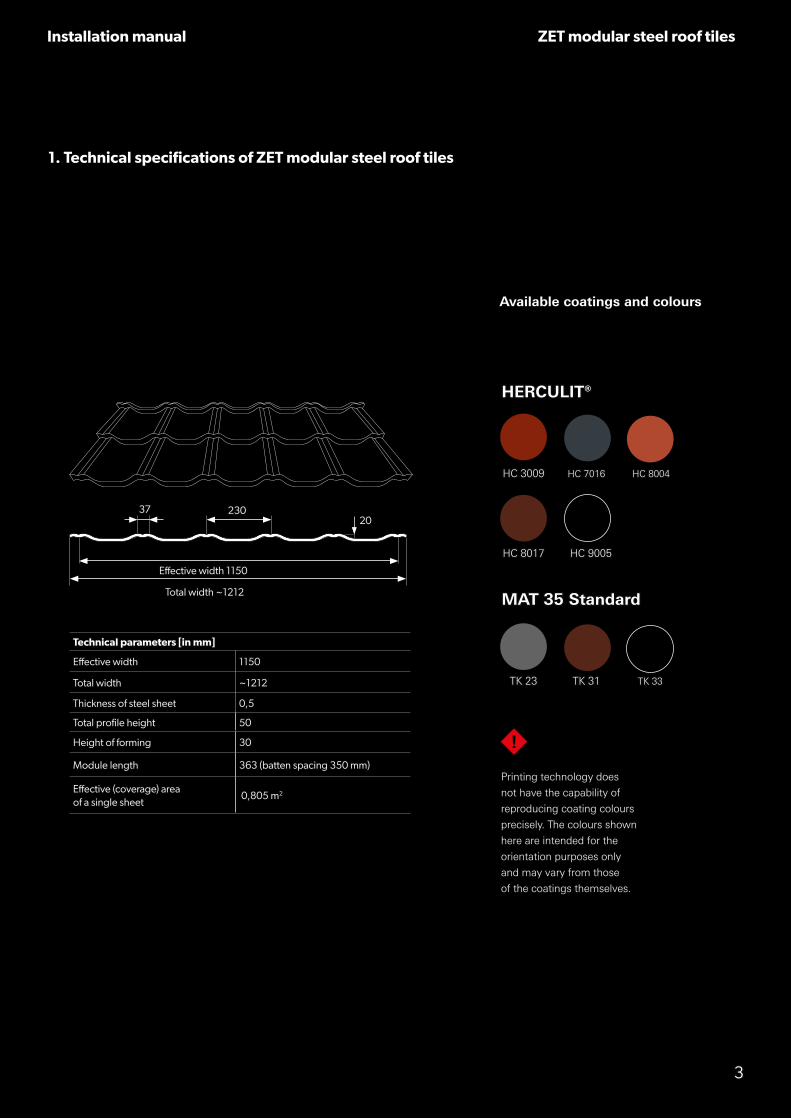
1. Technical specifications of ZET modular steel roof tiles
2. ZET flashing system
3. General recommendations
4. Construction preparation
5. “Z” type lock
6. ZET Roof battens spacing
7. Sequence of ZET Roof sheets installation
8. Installation of ZET Look tiles
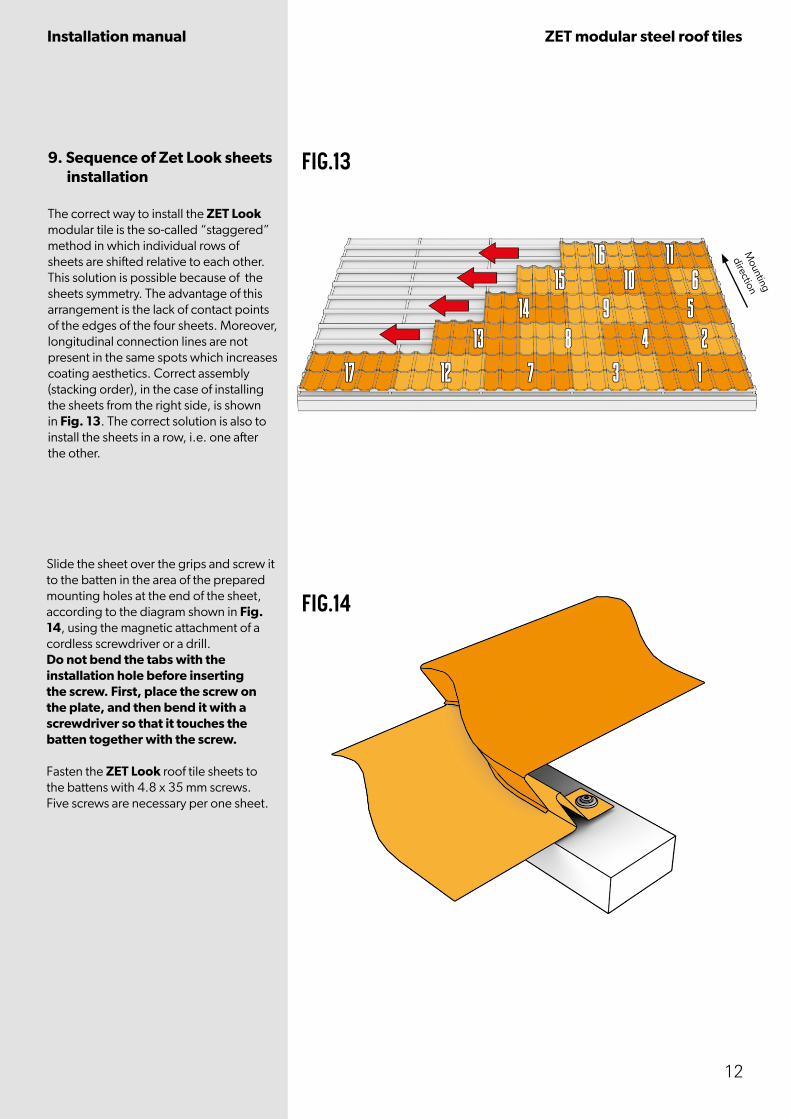
9. Sequence of ZET Look sheets installation
10. Cutting sheets to the valley gutter
11. Ridge tiles installation
12. Wind brace installation
13. Wall flashing installation
P. 3
P. 4
P. 6
P. 7
P. 8
P. 9
P. 10
P. 10
P. 12
P. 13
P. 13
P. 14
P. 15
Contents
THIS MANUAL IS ILLUSTRATIVE AND DOES NOT RELEASE CONTRACTORS FROM THE OBLIGATION TO FOLLOW THE RULES
OF THE ROOFING PRACTICE.
3737 230230
HC 3009HC 3009
TK 23TK 23
HC 7016HC 7016
TK 31TK 31
HC 8004HC 8004
TK 33TK 33
HC 8017HC 8017 HC 9005HC 9005
HHERCULIT®ERCULIT®
MAT 35 StandardMAT 35 Standard
Available coatings and coloursAvailable coatings and colours
Printing technology does Printing technology does
not have the capability of not have the capability of
reproducing coating colours reproducing coating colours
precisely. The colours shown precisely. The colours shown
here are intended for the here are intended for the
orientation purposes onlyorientation purposes only
and may vary from those and may vary from those
of the coatings themselves.of the coatings themselves.
!
1. Technical specifications of ZET modular steel roof tiles 1. Technical specifications of ZET modular steel roof tiles
33
Technical parameters [in mm]Technical parameters [in mm]
Effective widthEffective width 11501150
Total widthTotal width ~1212~1212
Thickness of steel sheetThickness of steel sheet 0,50,5
Total profile heightTotal profile height 5050
Height of formingHeight of forming 3030
Module lengthModule length 363 (batten spacing 350 mm)363 (batten spacing 350 mm)
Effective (coverage) area Effective (coverage) area of a single sheetof a single sheet
0,805 m 0,805 m22
Total width ~1212Total width ~1212
Effective width 1150Effective width 1150
3737 2302302020
Installation manual ZET modular steel roof tiles
190
20
20
20
UNIVERSAL VERGE TRIM/ WIND BRACE EXTENSION BARREL-SHAPED RIDGE TILE ZET
35
230
175
75
10
4
Installation manual ZET modular steel roof tiles
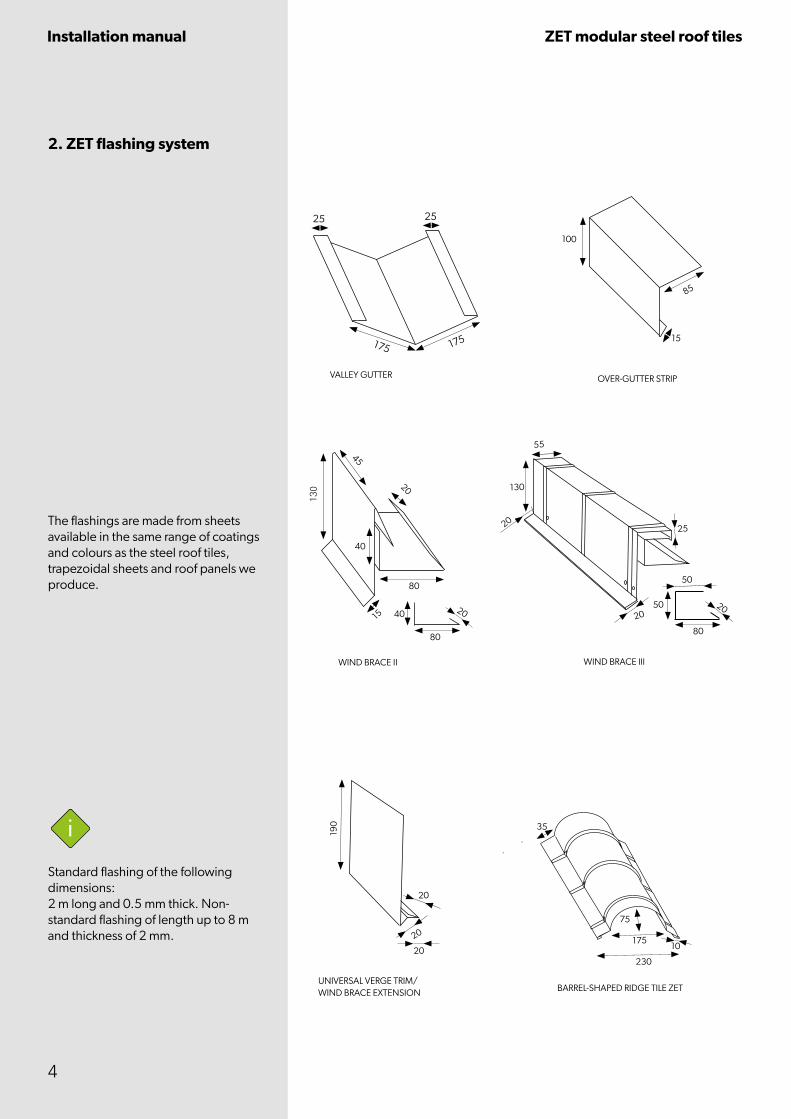
2. ZET flashing system
The flashings are made from sheets available in the same range of coatings and colours as the steel roof tiles, trapezoidal sheets and roof panels we produce.
WIND BRACE II WIND BRACE III
80
20
45
40
15
85
100
15
130
Standard flashing of the following dimensions: 2 m long and 0.5 mm thick. Non-standard flashing of length up to 8 m and thickness of 2 mm.
20
20
130
55
25
50
20
80
50
175175
2525
20
80
40
VALLEY GUTTER OVER-GUTTER STRIP
90
62 100
196
70
SNOW GUARDS
52
UNIVERSAL VENTILATION FLASHING / STARTING PROFILE
12
29
26
25
25
27
120
49
5
Installation manual ZET modular steel roof tiles
EAVES STRIP ZET Look STARTING PROFILE
WALL FLASHING WITH EXPANSION STRIP
EXPANSION STRIP
10
10
30
20
10
165
110
17
20
120
20
10
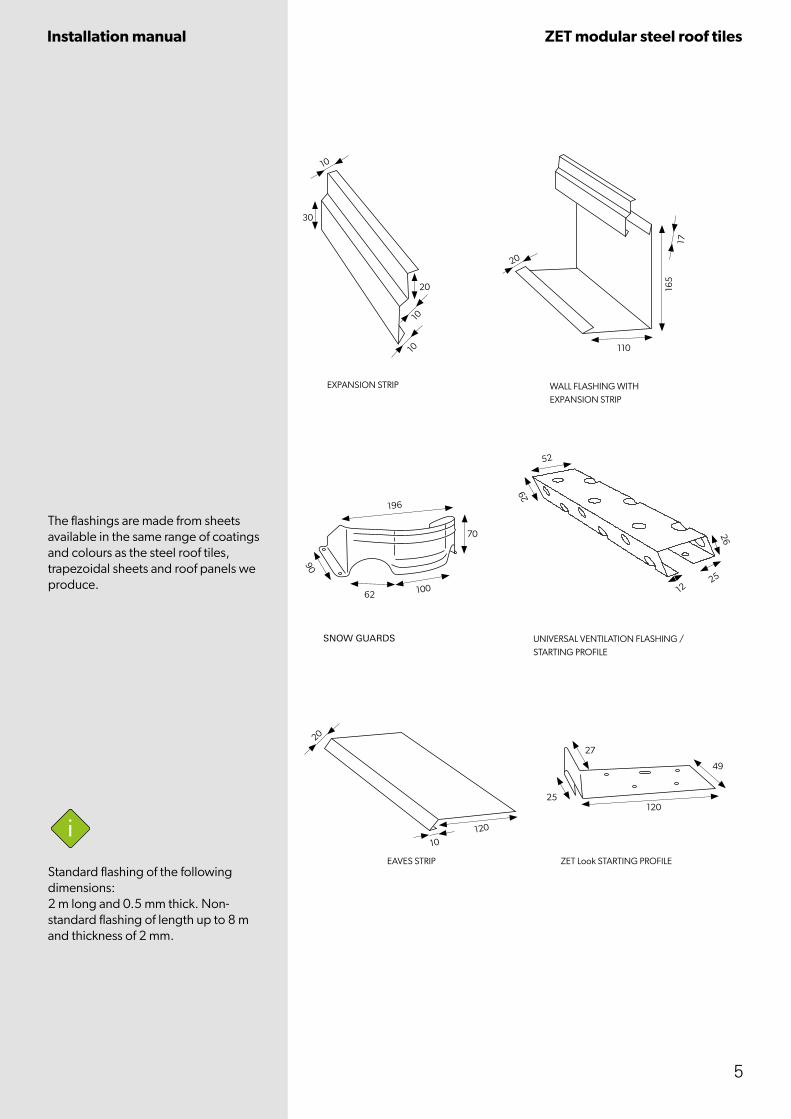
The flashings are made from sheets available in the same range of coatings and colours as the steel roof tiles, trapezoidal sheets and roof panels we produce.
Standard flashing of the following dimensions: 2 m long and 0.5 mm thick. Non-standard flashing of length up to 8 m and thickness of 2 mm.

6
Installation manual ZET modular steel roof tiles
3. General recommendations
Transport
Storage
Cutting the steel sheet
Maintenance
The ZET modular tile is delivered on non-returnable euro pallets. No specialist transport is necessary to deliver the ordered material. However, during transport, it is necessary to fix the material so that it cannot move freely. Light modules allow the transport to the installation site (e.g. using a stairwell) which can be performed by one person without the need to use specialist equipment.
The ZET modular tile should be stored in dry and ventilated storage rooms. In case of long-term storage, the stacks must be placed on a sloped surface in order to enable moisture to evaporate or drain. Distance of a stored package from the ground should be at least 14 cm. Maximum storage time is 6 months since the production date. However, after 2 weeks since the production date, remove the foil covering the pallet in order to provide air circulation between the sheets.Important - damage to the steel sheet panel surfaces as a result of moisture dismisses any claims.
It is not allowed to cut the sheets with tools that cause thermal effect (sudden increase of temperature), e.g. angle grinder. This causes a damage to the organic and zinc coating and thus leads to corrosion accelerated by hot filings melting into the sheet surface. To cut the sheets, use a nibbler or manual scissors if the sections are short.
Attention - one of the guarantee conditions is to protect open cut edges of coated sheet with lacquer.
In case of coating damage caused during transport, installation or treatment, carefully clean the damaged surface of dirt and grease and coat the damaged area with lacquer. Edges of the roof not protected with a lacquer may delaminate. This is a natural phenomenon and does not represent the grounds for guarantee claims. It is recommended to control the roof every year in order to perform maintenance works. Before starting the works, remember to write down the serial number of one of the sheets. It is necessary to fill out the guarantee form.
ZET modular roofing tiles can be used on roofs with an inclination angle of not less than 9°.

FIG.1
FIG.2
7
Installation manual ZET modular steel roof tiles
4. Construction preparation
a = b
The ZET modular roof tile should be installed on a normally prepared substrate using battens and counter battens. The installation and preparation of the base should be performed according to normal roofing procedures. It is necessary to remember about the eaves and ridge ventilation. During the installation of ZET Roof and ZET Look, the use of the Universal Ventilation Flashing is required (Fig. 2). It also acts as a starter profile. Before installing the ZET modular roof tile, check the diagonals of the roof.The roof inclination slope cannot be less than 9 degrees.
a b
The universal ventilation flashing must be installed using mounting holes in the bottom flashing edge. Insert the screws through the larger pilot holes in the top edge, as shown in the cross -section on the right.

FIG.5
FIG.4
8
Installation manual ZET modular steel roof tiles
Due to the construction of the sheets (“Z” rib), it is not allowed to take another sheets from the package by lifting them up directly. Before lifting the sheet, push it gently a few centimetres. Make sure that installation dents do not scratch the lower sheet when sliding on the pallet.
5.”Z” type lock
ZET is a symmetrical modular steel roof tile.It is equipped with a “Z” lock, which compensates for stresses in the sheet. This solves the problem of fastening the sheets using screws as well as accelerates installation and reduces its costs.
The symmetry of the ZET Roof profile is also a significant convenience during assembly thanks to which the installation direction of the sheets is free. The choice of the mounting direction may be imposed; for example, for aesthetic reasons. Additionally, when a given profile is used in places with strong gusts of wind, the direction of the longitudinal joints of the sheets can be adjusted to their direction. However, in such a case, remember that the vector of covering should be opposite to the direction from which the wind blows most often. Such an arrangement significantly increases the resistance of the cover to strong gusts.
Over-gutter strip
Universal ventilation flashing
Eaves strip
Vapour-permeable foil / membrane
Batten
Counter-batten
Rafter
FIG.3

b
b
a
Universal ventilation flashing
Over-gutter strip
9
Installation manual ZET modular steel roof tiles
FIG.7
6.ZET Roof battens spacing
The contractor must make every effort and precision to fix and prepare the roof for the installation of ZET Roof steel roof tiles. Accurate arrangement of the battens is critical and highly affects the final result. Spacing of the main battens is most important, i.e. 350 mm. Distance between the bottom edge of the first batten and the top edge of the second batten from the eaves side should be 340 mm (acc. to Fig. 7).
a = 340 mmb = 350 mmbatten width 40 x 50 mm
b
a
b
b
FIG.6

1122
3388
66
4499 55
10101111
15151616
a = 400 mmb = 350 mmbatten width 80 x 40 mm
b
b
b
a
a
b
b
Mounting
direction
77121217171313
1414
10
Installation manual ZET modular steel roof tiles
It is very important that during installation, the sheets are maximally pushed against each other at the joint so that there is no play at the “Z” lock.
7. Sequence of ZET Roof sheets installationThe correct way to install the ZET Roof modular tile is the so-called “staggered” method in which individual rows of sheets are shifted to each other. This solution is possible because of the sheets symmetry. The advantage of this arrangement is the lack of contact points of the edges of the four sheets. Moreover, longitudinal connection lines are not present in the same spots which increases coating aesthetics. Correct assembly (stacking order), in the case of installing the sheets from the right side, is shown in Fig. 8.
FIG.8
8. Installation of ZET Look tiles
For the installation of the ZET Look modular steel roof tile, it is recommended to use 8 cm wide battens.
Accurate arrangement of the battens is critical and highly affects the final result. Spacing of the main battens is most important, i.e. 350 mm. Distance between the bottom edge of the first batten and the top edge of the second batten from the eaves side should be 400 mm (acc. to Fig. 9).
FIG.9
8 cm
Universal ventilation flashing
Over-gutter strip
11
Installation manual ZET modular steel roof tiles
FIG.10
FIG.11
FIG.12
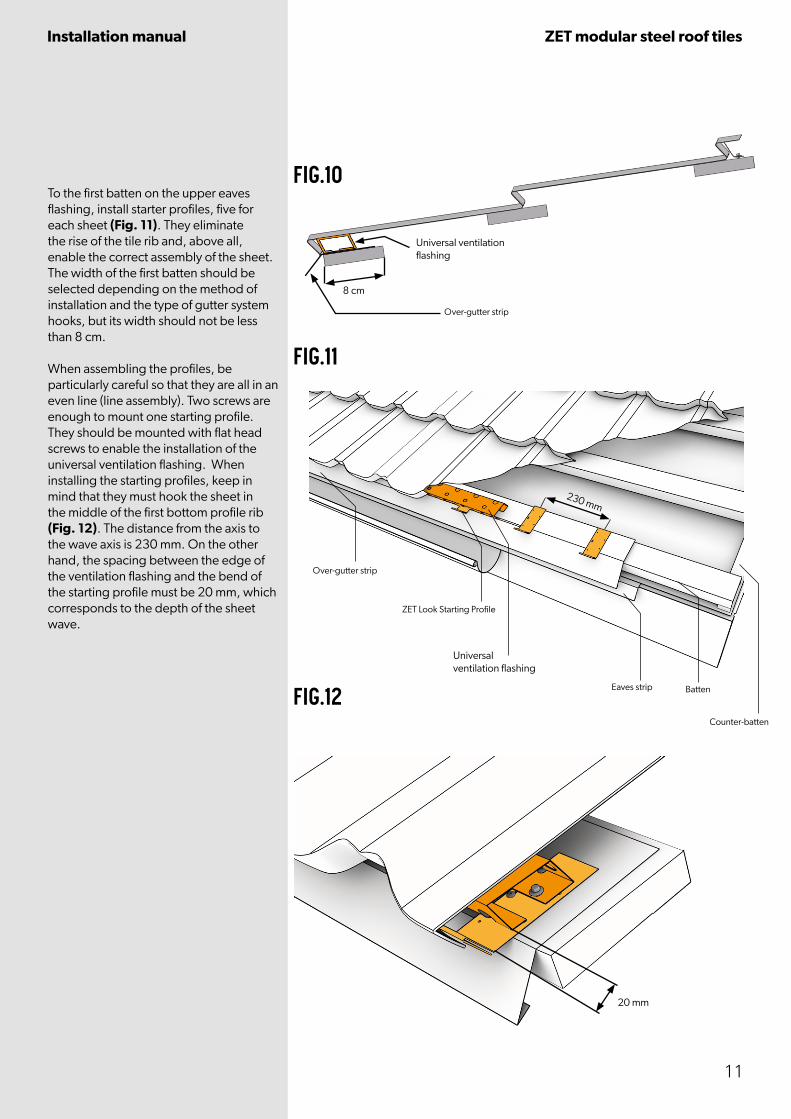
To the first batten on the upper eaves flashing, install starter profiles, five for each sheet (Fig. 11). They eliminate the rise of the tile rib and, above all, enable the correct assembly of the sheet. The width of the first batten should be selected depending on the method of installation and the type of gutter system hooks, but its width should not be less than 8 cm.
When assembling the profiles, be particularly careful so that they are all in an even line (line assembly). Two screws are enough to mount one starting profile.They should be mounted with flat head screws to enable the installation of the universal ventilation flashing. When installing the starting profiles, keep in mind that they must hook the sheet in the middle of the first bottom profile rib (Fig. 12). The distance from the axis to the wave axis is 230 mm. On the other hand, the spacing between the edge of the ventilation flashing and the bend of the starting profile must be 20 mm, which corresponds to the depth of the sheet wave.
Over-gutter strip
Universal ventilation flashing
ZET Look Starting Profile
Eaves strip
20 mm
230 mm
Batten
Counter-batten
1122
3388
77
66
4499 55
10101111
121217171313
14141515
1616 Mounting
direction
12
Installation manual ZET modular steel roof tiles
Slide the sheet over the grips and screw it to the batten in the area of the prepared mounting holes at the end of the sheet, according to the diagram shown in Fig. 14, using the magnetic attachment of a cordless screwdriver or a drill.Do not bend the tabs with the installation hole before inserting the screw. First, place the screw on the plate, and then bend it with a screwdriver so that it touches the batten together with the screw.
Fasten the ZET Look roof tile sheets to the battens with 4.8 x 35 mm screws. Five screws are necessary per one sheet.
The correct way to install the ZET Look modular tile is the so-called “staggered” method in which individual rows of sheets are shifted relative to each other. This solution is possible because of the sheets symmetry. The advantage of this arrangement is the lack of contact points of the edges of the four sheets. Moreover, longitudinal connection lines are not present in the same spots which increases coating aesthetics. Correct assembly (stacking order), in the case of installing the sheets from the right side, is shown in Fig. 13. The correct solution is also to install the sheets in a row, i.e. one after the other.
FIG.14
FIG.139. Sequence of Zet Look sheets installation

13
Installation manual ZET modular steel roof tiles
FIG.16
FIG.17
11. Ridge tiles installation
ZET modular steel roof tiles are offered with ridge tiles, the structure and ribbing spacing of which exactly correspond to that of the tile sheets. This provides high aesthetics of the roofing.
It ridge batten must be installed on supports in order to provide continuity of the roofing ventilation space.
The ridge tiles must be installed using short screws 4.8 x 20 mm “sheet to sheet” every second ridge of the wave, using the previously installed ridge strip or profiled gaskets.
Roofing ventilation
FIG.1510. Cutting sheets to the valley gutter
Cutting the sheets to the valley gutter should be carried out in the valley line, which will ensure an aesthetic finish.
We recommend using expansion gasket as the valley gutter seal up to sheet rib height.

14
Installation manual ZET modular steel roof tiles
FIG.19
FIG.20At the external element of the wind brace, use the farmer screw, and when necessary, apply a 15 - 30 cm overlap when connecting the wind braces.The edge sheets are fixed using the screw in every valley of the sheets along the wind brace line.
Correct arrangement of the fasteners on the roof area should cover all extreme installation points and every second ones inside the roof area.
Tile sheets should be placed on the channel of the wind brace (Fig. 19).
FIG.1812. Wind brace installation
Due to the fact that at the edge of the roof slope we often deal with a strong influence of the wind, we must remember to install the wind brace flashing appropriately. In this case, use the wind brace III. First, install the wind brace tray (Fig. 18). This element must be installed using installation clips both from the roof area side and the external side. Before covering the roof, glue the expansion gasket of expansion range up to 3 cm (according to the sheet rib height) to the bottom area of the flashing.

15
Installation manual ZET modular steel roof tiles
FIG.21
FIG.22
FIG.22
13. Wall flashing installation
The first step is to prepare and attach the grips to the roof, which will be used to attach the wall flashing. Such grips can be prepared from strips of steel sheet bent at right angles.Since these grips will have to be bent in the next step, attaching them to the wall flashing, they must be correspondingly higher than the flashing.
When preparing the flashing, its upper edge should be rolled, which will enable a secure connection with the previously prepared grips without the need to use additional fasteners.Before the installation, the flashing should be applied to the roof edge in order to adjust it, taking into account the type of wall and the slope angle. Install the cut and bent flashing to the battens using flat installation clips. Make sure that the flashing abuts the wall along its whole length. If it is necessary to connect the wall flashing, use a 50 mm overlap but the overlap should be increased in case of roof inclination below 25°.
Then, the flashing is attached to the wall with the previously prepared grips.
grip
wall flashing

16
Installation manual ZET modular steel roof tiles
Correct arrangement of the fasteners on the roof area should cover all extreme installation points and every second ones inside the roof area.
The joint with the wall should be protected with an expansion strip and, if necessary, additionally sealed with roofing sealant.
The expansion strip must be attached to the wall.
FIG.24
FIG.23

Notes
17

Notes
18

Notes
19

BLACHPROFIL 2® Sp. z o. o.ul. Nadwiślańska 11/139 30-527 KrakówNIP: 6762431701
+48 12 415 55 [email protected]
Zakłady produkcyjne: Production Plants:
Grojec, ul. Grojecka 39 32-566 Alwernia near Kraków
ul. Budowlanych 1041-303 Dąbrowa Górnicza 06/2021/CZ02/2022/EN


