Embed Size (px)
Citation preview
February 2015
Xerox® WorkCentre® 5022/5024Multifunction Printer
User Guide

©2014 Xerox Corporation. All rights reserved. Xerox®, Xerox and Design®, CentreWare®, and WorkCentre® are trademarks of Xerox Corporation in the United States and/or other countries.
Microsoft, Windows, Windows Server, Windows XP, Windows Vista, and Windows 7 are trademarks or registered trademarks of Microsoft Corporation.
Microsoft product screen shot(s) reprinted with permission from Microsoft Corporation.
Document version 2.0: February 2015
BR8824
Contents
1 Before Using the Machine
Preface . . . . . . . . . . . . . . . . . . . . . . . . . . . . . . . . . . . . . . . . . . . . . . . . . . . . . . . . . . . . . . . . . . . . . . . . . . . . . . . . . 1-1Types of Manuals . . . . . . . . . . . . . . . . . . . . . . . . . . . . . . . . . . . . . . . . . . . . . . . . . . . . . . . . . . . . . . . . . . . . . . . 1-2Using this Guide. . . . . . . . . . . . . . . . . . . . . . . . . . . . . . . . . . . . . . . . . . . . . . . . . . . . . . . . . . . . . . . . . . . . . . . . . 1-3
Organization of this Guide . . . . . . . . . . . . . . . . . . . . . . . . . . . . . . . . . . . . . . . . . . . . . . . . . . . . . . . . . . . 1-3Conventions. . . . . . . . . . . . . . . . . . . . . . . . . . . . . . . . . . . . . . . . . . . . . . . . . . . . . . . . . . . . . . . . . . . . . . . . . 1-3
Safety Notes . . . . . . . . . . . . . . . . . . . . . . . . . . . . . . . . . . . . . . . . . . . . . . . . . . . . . . . . . . . . . . . . . . . . . . . . . . . . 1-5Electrical Safety . . . . . . . . . . . . . . . . . . . . . . . . . . . . . . . . . . . . . . . . . . . . . . . . . . . . . . . . . . . . . . . . . . . . . 1-5Machine Installation. . . . . . . . . . . . . . . . . . . . . . . . . . . . . . . . . . . . . . . . . . . . . . . . . . . . . . . . . . . . . . . . . 1-7Operational Safety . . . . . . . . . . . . . . . . . . . . . . . . . . . . . . . . . . . . . . . . . . . . . . . . . . . . . . . . . . . . . . . . . . 1-9Consumables. . . . . . . . . . . . . . . . . . . . . . . . . . . . . . . . . . . . . . . . . . . . . . . . . . . . . . . . . . . . . . . . . . . . . . .1-10Location of Warning and Caution Labels . . . . . . . . . . . . . . . . . . . . . . . . . . . . . . . . . . . . . . . . . . . . .1-11
Regulations . . . . . . . . . . . . . . . . . . . . . . . . . . . . . . . . . . . . . . . . . . . . . . . . . . . . . . . . . . . . . . . . . . . . . . . . . . . .1-12Radio Frequency Emissions (Class A) . . . . . . . . . . . . . . . . . . . . . . . . . . . . . . . . . . . . . . . . . . . . . . . . .1-12Product Safety Certification (UL, CB). . . . . . . . . . . . . . . . . . . . . . . . . . . . . . . . . . . . . . . . . . . . . . . . .1-12
Environment . . . . . . . . . . . . . . . . . . . . . . . . . . . . . . . . . . . . . . . . . . . . . . . . . . . . . . . . . . . . . . . . . . . . . . . . . . .1-12About Licenses . . . . . . . . . . . . . . . . . . . . . . . . . . . . . . . . . . . . . . . . . . . . . . . . . . . . . . . . . . . . . . . . . . . . . . . . .1-12
JPEG Code . . . . . . . . . . . . . . . . . . . . . . . . . . . . . . . . . . . . . . . . . . . . . . . . . . . . . . . . . . . . . . . . . . . . . . . . .1-12Libcurl . . . . . . . . . . . . . . . . . . . . . . . . . . . . . . . . . . . . . . . . . . . . . . . . . . . . . . . . . . . . . . . . . . . . . . . . . . . . .1-13FreeBSD . . . . . . . . . . . . . . . . . . . . . . . . . . . . . . . . . . . . . . . . . . . . . . . . . . . . . . . . . . . . . . . . . . . . . . . . . . .1-13ICC Profile (Little cms) . . . . . . . . . . . . . . . . . . . . . . . . . . . . . . . . . . . . . . . . . . . . . . . . . . . . . . . . . . . . . .1-14WIDE DHCP Client. . . . . . . . . . . . . . . . . . . . . . . . . . . . . . . . . . . . . . . . . . . . . . . . . . . . . . . . . . . . . . . . . .1-14MD5 . . . . . . . . . . . . . . . . . . . . . . . . . . . . . . . . . . . . . . . . . . . . . . . . . . . . . . . . . . . . . . . . . . . . . . . . . . . . . . .1-15
Legal Notice . . . . . . . . . . . . . . . . . . . . . . . . . . . . . . . . . . . . . . . . . . . . . . . . . . . . . . . . . . . . . . . . . . . . . . . . . . .1-16
2 Environment Settings
Supported Environment . . . . . . . . . . . . . . . . . . . . . . . . . . . . . . . . . . . . . . . . . . . . . . . . . . . . . . . . . . . . . . . . . 2-1Print Feature . . . . . . . . . . . . . . . . . . . . . . . . . . . . . . . . . . . . . . . . . . . . . . . . . . . . . . . . . . . . . . . . . . . . . . . . 2-1Scan Feature . . . . . . . . . . . . . . . . . . . . . . . . . . . . . . . . . . . . . . . . . . . . . . . . . . . . . . . . . . . . . . . . . . . . . . . . 2-2Fax Feature . . . . . . . . . . . . . . . . . . . . . . . . . . . . . . . . . . . . . . . . . . . . . . . . . . . . . . . . . . . . . . . . . . . . . . . . . 2-3
Interface Cables . . . . . . . . . . . . . . . . . . . . . . . . . . . . . . . . . . . . . . . . . . . . . . . . . . . . . . . . . . . . . . . . . . . . . . . . 2-4Using the USB Interface . . . . . . . . . . . . . . . . . . . . . . . . . . . . . . . . . . . . . . . . . . . . . . . . . . . . . . . . . . . . . 2-4Using the Ethernet Interface . . . . . . . . . . . . . . . . . . . . . . . . . . . . . . . . . . . . . . . . . . . . . . . . . . . . . . . . . 2-5
Setting the Network Environment . . . . . . . . . . . . . . . . . . . . . . . . . . . . . . . . . . . . . . . . . . . . . . . . . . . . . . . . 2-6Setting the Machine's IP Address (IPv4) . . . . . . . . . . . . . . . . . . . . . . . . . . . . . . . . . . . . . . . . . . . . . . 2-6Setting the Machine's IP Address (IPv6) . . . . . . . . . . . . . . . . . . . . . . . . . . . . . . . . . . . . . . . . . . . . . . 2-7When Using the Printer Setup Utility for Setting the IP Address. . . . . . . . . . . . . . . . . . . . . . . . . 2-7
Activating the Communication Port To Use . . . . . . . . . . . . . . . . . . . . . . . . . . . . . . . . . . . . . . . . . . . . . .2-11
Xerox® WorkCentre® 5022/5024 Multifunction PrinterUser Guide
iii
Contents
Setting the Send E-mail Function . . . . . . . . . . . . . . . . . . . . . . . . . . . . . . . . . . . . . . . . . . . . . . . . . . . . . . . .2-13SMTP Server Settings . . . . . . . . . . . . . . . . . . . . . . . . . . . . . . . . . . . . . . . . . . . . . . . . . . . . . . . . . . . . . . .2-13E-mail Header and Body Settings . . . . . . . . . . . . . . . . . . . . . . . . . . . . . . . . . . . . . . . . . . . . . . . . . . . .2-14
Using Xerox® CentreWare® Internet Services . . . . . . . . . . . . . . . . . . . . . . . . . . . . . . . . . . . . . . . . . . .2-17Xerox® CentreWare® Internet Services. . . . . . . . . . . . . . . . . . . . . . . . . . . . . . . . . . . . . . . . . . . . . .2-17Supported Environments and Settings . . . . . . . . . . . . . . . . . . . . . . . . . . . . . . . . . . . . . . . . . . . . . . .2-17Starting Xerox® CentreWare® Internet Services . . . . . . . . . . . . . . . . . . . . . . . . . . . . . . . . . . . . .2-18Setting Items on Xerox® CentreWare® Internet Services . . . . . . . . . . . . . . . . . . . . . . . . . . . . .2-19Properties Tab. . . . . . . . . . . . . . . . . . . . . . . . . . . . . . . . . . . . . . . . . . . . . . . . . . . . . . . . . . . . . . . . . . . . . .2-21Support Tab. . . . . . . . . . . . . . . . . . . . . . . . . . . . . . . . . . . . . . . . . . . . . . . . . . . . . . . . . . . . . . . . . . . . . . . .2-33Address Book Tab . . . . . . . . . . . . . . . . . . . . . . . . . . . . . . . . . . . . . . . . . . . . . . . . . . . . . . . . . . . . . . . . . .2-33
Installing the Print Driver/Scan Driver. . . . . . . . . . . . . . . . . . . . . . . . . . . . . . . . . . . . . . . . . . . . . . . . . . . .2-37Installing the Print Driver . . . . . . . . . . . . . . . . . . . . . . . . . . . . . . . . . . . . . . . . . . . . . . . . . . . . . . . . . . .2-37Installing the Scan Driver . . . . . . . . . . . . . . . . . . . . . . . . . . . . . . . . . . . . . . . . . . . . . . . . . . . . . . . . . . .2-37Uninstalling . . . . . . . . . . . . . . . . . . . . . . . . . . . . . . . . . . . . . . . . . . . . . . . . . . . . . . . . . . . . . . . . . . . . . . . .2-38
3 Product Overview
Machine Components . . . . . . . . . . . . . . . . . . . . . . . . . . . . . . . . . . . . . . . . . . . . . . . . . . . . . . . . . . . . . . . . . . . 3-1Front, Left Side . . . . . . . . . . . . . . . . . . . . . . . . . . . . . . . . . . . . . . . . . . . . . . . . . . . . . . . . . . . . . . . . . . . . . . 3-2Right Side, Rear . . . . . . . . . . . . . . . . . . . . . . . . . . . . . . . . . . . . . . . . . . . . . . . . . . . . . . . . . . . . . . . . . . . . . 3-4Inside. . . . . . . . . . . . . . . . . . . . . . . . . . . . . . . . . . . . . . . . . . . . . . . . . . . . . . . . . . . . . . . . . . . . . . . . . . . . . . . 3-5Duplex Automatic Document Feeder (Optional) . . . . . . . . . . . . . . . . . . . . . . . . . . . . . . . . . . . . . . . 3-6
Power Source . . . . . . . . . . . . . . . . . . . . . . . . . . . . . . . . . . . . . . . . . . . . . . . . . . . . . . . . . . . . . . . . . . . . . . . . . . . 3-7Switching the Power On . . . . . . . . . . . . . . . . . . . . . . . . . . . . . . . . . . . . . . . . . . . . . . . . . . . . . . . . . . . . . . 3-7Switching the Power Off . . . . . . . . . . . . . . . . . . . . . . . . . . . . . . . . . . . . . . . . . . . . . . . . . . . . . . . . . . . . . 3-7
Energy Saver Modes . . . . . . . . . . . . . . . . . . . . . . . . . . . . . . . . . . . . . . . . . . . . . . . . . . . . . . . . . . . . . . . . . . . . . 3-9Entering the Energy Saver Modes . . . . . . . . . . . . . . . . . . . . . . . . . . . . . . . . . . . . . . . . . . . . . . . . . . . . . 3-9Exiting Energy Saver Modes . . . . . . . . . . . . . . . . . . . . . . . . . . . . . . . . . . . . . . . . . . . . . . . . . . . . . . . . .3-10
Control Panel . . . . . . . . . . . . . . . . . . . . . . . . . . . . . . . . . . . . . . . . . . . . . . . . . . . . . . . . . . . . . . . . . . . . . . . . . .3-11Using Quick-Buttons . . . . . . . . . . . . . . . . . . . . . . . . . . . . . . . . . . . . . . . . . . . . . . . . . . . . . . . . . . . . . . . .3-14About Icons on the Display. . . . . . . . . . . . . . . . . . . . . . . . . . . . . . . . . . . . . . . . . . . . . . . . . . . . . . . . . .3-16
About the Default Display Screen . . . . . . . . . . . . . . . . . . . . . . . . . . . . . . . . . . . . . . . . . . . . . . . . . . . . . . .3-18Setting the Default Display . . . . . . . . . . . . . . . . . . . . . . . . . . . . . . . . . . . . . . . . . . . . . . . . . . . . . . . . .3-18
Account Modes . . . . . . . . . . . . . . . . . . . . . . . . . . . . . . . . . . . . . . . . . . . . . . . . . . . . . . . . . . . . . . . . . . . . . . . .3-20Types of Account Modes . . . . . . . . . . . . . . . . . . . . . . . . . . . . . . . . . . . . . . . . . . . . . . . . . . . . . . . . . . . .3-20
Entering Text . . . . . . . . . . . . . . . . . . . . . . . . . . . . . . . . . . . . . . . . . . . . . . . . . . . . . . . . . . . . . . . . . . . . . . . . . .3-24Setting the Options Configuration. . . . . . . . . . . . . . . . . . . . . . . . . . . . . . . . . . . . . . . . . . . . . . . . . . . . . . .3-26
4 Loading Paper
Paper Types. . . . . . . . . . . . . . . . . . . . . . . . . . . . . . . . . . . . . . . . . . . . . . . . . . . . . . . . . . . . . . . . . . . . . . . . . . . . . 4-1Supported Paper Weights and Sheet Counts . . . . . . . . . . . . . . . . . . . . . . . . . . . . . . . . . . . . . . . . . . 4-2Supported Paper Types . . . . . . . . . . . . . . . . . . . . . . . . . . . . . . . . . . . . . . . . . . . . . . . . . . . . . . . . . . . . . . 4-2Unusable Paper . . . . . . . . . . . . . . . . . . . . . . . . . . . . . . . . . . . . . . . . . . . . . . . . . . . . . . . . . . . . . . . . . . . . . 4-3Storing and Handling Paper . . . . . . . . . . . . . . . . . . . . . . . . . . . . . . . . . . . . . . . . . . . . . . . . . . . . . . . . . . 4-4
Xerox® WorkCentre® 5022/5024 Multifunction PrinterUser Guide
iv
Contents
Loading Paper . . . . . . . . . . . . . . . . . . . . . . . . . . . . . . . . . . . . . . . . . . . . . . . . . . . . . . . . . . . . . . . . . . . . . . . . . . 4-5Loading Paper in Trays 1 to 4 (Optional) . . . . . . . . . . . . . . . . . . . . . . . . . . . . . . . . . . . . . . . . . . . . . . 4-6Loading Paper in Tray 5 (Bypass) . . . . . . . . . . . . . . . . . . . . . . . . . . . . . . . . . . . . . . . . . . . . . . . . . . . . . 4-7
Changing Paper Size. . . . . . . . . . . . . . . . . . . . . . . . . . . . . . . . . . . . . . . . . . . . . . . . . . . . . . . . . . . . . . . . . . . . . 4-9Changing the Paper Size for Trays 1 to 4 . . . . . . . . . . . . . . . . . . . . . . . . . . . . . . . . . . . . . . . . . . . . . . 4-9
Changing the Paper Settings . . . . . . . . . . . . . . . . . . . . . . . . . . . . . . . . . . . . . . . . . . . . . . . . . . . . . . . . . . . .4-11
5 Copy
Copying Procedure . . . . . . . . . . . . . . . . . . . . . . . . . . . . . . . . . . . . . . . . . . . . . . . . . . . . . . . . . . . . . . . . . . . . . . 5-1Placing the Document . . . . . . . . . . . . . . . . . . . . . . . . . . . . . . . . . . . . . . . . . . . . . . . . . . . . . . . . . . . . . . . 5-1Advanced Settings. . . . . . . . . . . . . . . . . . . . . . . . . . . . . . . . . . . . . . . . . . . . . . . . . . . . . . . . . . . . . . . . . . . 5-5Entering the Number of Copies . . . . . . . . . . . . . . . . . . . . . . . . . . . . . . . . . . . . . . . . . . . . . . . . . . . . . . . 5-5Starting the Copy Job. . . . . . . . . . . . . . . . . . . . . . . . . . . . . . . . . . . . . . . . . . . . . . . . . . . . . . . . . . . . . . . . 5-6About Auto Rotation. . . . . . . . . . . . . . . . . . . . . . . . . . . . . . . . . . . . . . . . . . . . . . . . . . . . . . . . . . . . . . . . . 5-8
Operations Performed While Copying. . . . . . . . . . . . . . . . . . . . . . . . . . . . . . . . . . . . . . . . . . . . . . . . . . . . . 5-9Stopping a Copy Job. . . . . . . . . . . . . . . . . . . . . . . . . . . . . . . . . . . . . . . . . . . . . . . . . . . . . . . . . . . . . . . . . 5-9Checking Job Status . . . . . . . . . . . . . . . . . . . . . . . . . . . . . . . . . . . . . . . . . . . . . . . . . . . . . . . . . . . . . . . . . 5-9
ID Card Copy . . . . . . . . . . . . . . . . . . . . . . . . . . . . . . . . . . . . . . . . . . . . . . . . . . . . . . . . . . . . . . . . . . . . . . . . . .5-10Advanced Copy Settings . . . . . . . . . . . . . . . . . . . . . . . . . . . . . . . . . . . . . . . . . . . . . . . . . . . . . . . . . . . . . . . .5-13
Lighten/Darken. . . . . . . . . . . . . . . . . . . . . . . . . . . . . . . . . . . . . . . . . . . . . . . . . . . . . . . . . . . . . . . . . . . . .5-14Original Type. . . . . . . . . . . . . . . . . . . . . . . . . . . . . . . . . . . . . . . . . . . . . . . . . . . . . . . . . . . . . . . . . . . . . . .5-152 Sided . . . . . . . . . . . . . . . . . . . . . . . . . . . . . . . . . . . . . . . . . . . . . . . . . . . . . . . . . . . . . . . . . . . . . . . . . . . .5-16Collate . . . . . . . . . . . . . . . . . . . . . . . . . . . . . . . . . . . . . . . . . . . . . . . . . . . . . . . . . . . . . . . . . . . . . . . . . . . . .5-17Paper Supply . . . . . . . . . . . . . . . . . . . . . . . . . . . . . . . . . . . . . . . . . . . . . . . . . . . . . . . . . . . . . . . . . . . . . . .5-17Reduce/Enlarge . . . . . . . . . . . . . . . . . . . . . . . . . . . . . . . . . . . . . . . . . . . . . . . . . . . . . . . . . . . . . . . . . . . .5-19Pages per Side. . . . . . . . . . . . . . . . . . . . . . . . . . . . . . . . . . . . . . . . . . . . . . . . . . . . . . . . . . . . . . . . . . . . . .5-20Original Size. . . . . . . . . . . . . . . . . . . . . . . . . . . . . . . . . . . . . . . . . . . . . . . . . . . . . . . . . . . . . . . . . . . . . . . .5-20Original - Binding Position. . . . . . . . . . . . . . . . . . . . . . . . . . . . . . . . . . . . . . . . . . . . . . . . . . . . . . . . . . .5-22Output - Binding Position . . . . . . . . . . . . . . . . . . . . . . . . . . . . . . . . . . . . . . . . . . . . . . . . . . . . . . . . . . .5-22Edge Erase . . . . . . . . . . . . . . . . . . . . . . . . . . . . . . . . . . . . . . . . . . . . . . . . . . . . . . . . . . . . . . . . . . . . . . . . .5-23
Managing the Copy Paper with Accounting . . . . . . . . . . . . . . . . . . . . . . . . . . . . . . . . . . . . . . . . . . . . . .5-24Operations when Using the Copy Feature . . . . . . . . . . . . . . . . . . . . . . . . . . . . . . . . . . . . . . . . . . . .5-24Checking the Total Number of Impressions Copied . . . . . . . . . . . . . . . . . . . . . . . . . . . . . . . . . . .5-24
6 Fax
Overview of Fax Operations . . . . . . . . . . . . . . . . . . . . . . . . . . . . . . . . . . . . . . . . . . . . . . . . . . . . . . . . . . . . . . 6-1Placing a Document . . . . . . . . . . . . . . . . . . . . . . . . . . . . . . . . . . . . . . . . . . . . . . . . . . . . . . . . . . . . . . . . . 6-1Specifying the Recipient . . . . . . . . . . . . . . . . . . . . . . . . . . . . . . . . . . . . . . . . . . . . . . . . . . . . . . . . . . . . . 6-5Making Advanced Settings . . . . . . . . . . . . . . . . . . . . . . . . . . . . . . . . . . . . . . . . . . . . . . . . . . . . . . . . . . . 6-7Starting the Fax Job . . . . . . . . . . . . . . . . . . . . . . . . . . . . . . . . . . . . . . . . . . . . . . . . . . . . . . . . . . . . . . . . . 6-8
Operations During Faxing (Sending) . . . . . . . . . . . . . . . . . . . . . . . . . . . . . . . . . . . . . . . . . . . . . . . . . . . . .6-10Canceling the Fax Being Sent . . . . . . . . . . . . . . . . . . . . . . . . . . . . . . . . . . . . . . . . . . . . . . . . . . . . . . .6-10Checking Job Status . . . . . . . . . . . . . . . . . . . . . . . . . . . . . . . . . . . . . . . . . . . . . . . . . . . . . . . . . . . . . . . .6-10
Operations During Faxing (Receiving) . . . . . . . . . . . . . . . . . . . . . . . . . . . . . . . . . . . . . . . . . . . . . . . . . . .6-11Canceling the Fax Being Received . . . . . . . . . . . . . . . . . . . . . . . . . . . . . . . . . . . . . . . . . . . . . . . . . . .6-11
Xerox® WorkCentre® 5022/5024 Multifunction PrinterUser Guide
v
Contents
Using the Control Panel Buttons to Specify the Fax Recipient . . . . . . . . . . . . . . . . . . . . . . . . . . . . .6-12Using the Numeric Keypad . . . . . . . . . . . . . . . . . . . . . . . . . . . . . . . . . . . . . . . . . . . . . . . . . . . . . . . . . .6-12Using the One Touch Panels. . . . . . . . . . . . . . . . . . . . . . . . . . . . . . . . . . . . . . . . . . . . . . . . . . . . . . . . .6-12Using the Address Book Button . . . . . . . . . . . . . . . . . . . . . . . . . . . . . . . . . . . . . . . . . . . . . . . . . . . . . .6-14Using the Speed Dial Button . . . . . . . . . . . . . . . . . . . . . . . . . . . . . . . . . . . . . . . . . . . . . . . . . . . . . . . .6-16
Advanced Fax Settings . . . . . . . . . . . . . . . . . . . . . . . . . . . . . . . . . . . . . . . . . . . . . . . . . . . . . . . . . . . . . . . . .6-17Resolution . . . . . . . . . . . . . . . . . . . . . . . . . . . . . . . . . . . . . . . . . . . . . . . . . . . . . . . . . . . . . . . . . . . . . . . . .6-18Original Type. . . . . . . . . . . . . . . . . . . . . . . . . . . . . . . . . . . . . . . . . . . . . . . . . . . . . . . . . . . . . . . . . . . . . . .6-18Lighten/Darken. . . . . . . . . . . . . . . . . . . . . . . . . . . . . . . . . . . . . . . . . . . . . . . . . . . . . . . . . . . . . . . . . . . . .6-19Original Size. . . . . . . . . . . . . . . . . . . . . . . . . . . . . . . . . . . . . . . . . . . . . . . . . . . . . . . . . . . . . . . . . . . . . . . .6-20Send Priority . . . . . . . . . . . . . . . . . . . . . . . . . . . . . . . . . . . . . . . . . . . . . . . . . . . . . . . . . . . . . . . . . . . . . . .6-21Polling . . . . . . . . . . . . . . . . . . . . . . . . . . . . . . . . . . . . . . . . . . . . . . . . . . . . . . . . . . . . . . . . . . . . . . . . . . . . .6-212 Sided . . . . . . . . . . . . . . . . . . . . . . . . . . . . . . . . . . . . . . . . . . . . . . . . . . . . . . . . . . . . . . . . . . . . . . . . . . . .6-22Edge Erase . . . . . . . . . . . . . . . . . . . . . . . . . . . . . . . . . . . . . . . . . . . . . . . . . . . . . . . . . . . . . . . . . . . . . . . . .6-23ECM . . . . . . . . . . . . . . . . . . . . . . . . . . . . . . . . . . . . . . . . . . . . . . . . . . . . . . . . . . . . . . . . . . . . . . . . . . . . . . .6-23Off Hook . . . . . . . . . . . . . . . . . . . . . . . . . . . . . . . . . . . . . . . . . . . . . . . . . . . . . . . . . . . . . . . . . . . . . . . . . . .6-24Delayed Fax. . . . . . . . . . . . . . . . . . . . . . . . . . . . . . . . . . . . . . . . . . . . . . . . . . . . . . . . . . . . . . . . . . . . . . . .6-25
Sending/Receiving Faxes Manually . . . . . . . . . . . . . . . . . . . . . . . . . . . . . . . . . . . . . . . . . . . . . . . . . . . . . .6-26Receipt of Faxes. . . . . . . . . . . . . . . . . . . . . . . . . . . . . . . . . . . . . . . . . . . . . . . . . . . . . . . . . . . . . . . . . . . . . . . .6-28Sending a Fax Directly from your Computer . . . . . . . . . . . . . . . . . . . . . . . . . . . . . . . . . . . . . . . . . . . . . .6-29
Sending a Direct Fax. . . . . . . . . . . . . . . . . . . . . . . . . . . . . . . . . . . . . . . . . . . . . . . . . . . . . . . . . . . . . . . .6-29
7 Scan
Scanning Procedure . . . . . . . . . . . . . . . . . . . . . . . . . . . . . . . . . . . . . . . . . . . . . . . . . . . . . . . . . . . . . . . . . . . . . 7-1Placing the Document . . . . . . . . . . . . . . . . . . . . . . . . . . . . . . . . . . . . . . . . . . . . . . . . . . . . . . . . . . . . . . . 7-1Using the Scan Feature . . . . . . . . . . . . . . . . . . . . . . . . . . . . . . . . . . . . . . . . . . . . . . . . . . . . . . . . . . . . . . 7-5
Using an Application to Load Scan Data from the Machine via USB . . . . . . . . . . . . . . . . . . . . . . . . 7-6Sending Scan Data to PC as E-mail Attachment - E-mail . . . . . . . . . . . . . . . . . . . . . . . . . . . . . . . . . . . 7-7Sending Scan Data to PC over Network - PC (Network) . . . . . . . . . . . . . . . . . . . . . . . . . . . . . . . . . . . .7-10Operations During Scanning . . . . . . . . . . . . . . . . . . . . . . . . . . . . . . . . . . . . . . . . . . . . . . . . . . . . . . . . . . . .7-13
Canceling the Current Scan Job. . . . . . . . . . . . . . . . . . . . . . . . . . . . . . . . . . . . . . . . . . . . . . . . . . . . . .7-13Checking Job Status . . . . . . . . . . . . . . . . . . . . . . . . . . . . . . . . . . . . . . . . . . . . . . . . . . . . . . . . . . . . . . . .7-13
Advanced Scanner Settings . . . . . . . . . . . . . . . . . . . . . . . . . . . . . . . . . . . . . . . . . . . . . . . . . . . . . . . . . . . . .7-15Lighten/Darken. . . . . . . . . . . . . . . . . . . . . . . . . . . . . . . . . . . . . . . . . . . . . . . . . . . . . . . . . . . . . . . . . . . . .7-16Original Type. . . . . . . . . . . . . . . . . . . . . . . . . . . . . . . . . . . . . . . . . . . . . . . . . . . . . . . . . . . . . . . . . . . . . . .7-172 Sided . . . . . . . . . . . . . . . . . . . . . . . . . . . . . . . . . . . . . . . . . . . . . . . . . . . . . . . . . . . . . . . . . . . . . . . . . . . .7-18Resolution . . . . . . . . . . . . . . . . . . . . . . . . . . . . . . . . . . . . . . . . . . . . . . . . . . . . . . . . . . . . . . . . . . . . . . . . .7-19Color Mode . . . . . . . . . . . . . . . . . . . . . . . . . . . . . . . . . . . . . . . . . . . . . . . . . . . . . . . . . . . . . . . . . . . . . . . .7-20File Format. . . . . . . . . . . . . . . . . . . . . . . . . . . . . . . . . . . . . . . . . . . . . . . . . . . . . . . . . . . . . . . . . . . . . . . . .7-20Original Size. . . . . . . . . . . . . . . . . . . . . . . . . . . . . . . . . . . . . . . . . . . . . . . . . . . . . . . . . . . . . . . . . . . . . . . .7-21
8 Print
Major Print Driver Functions . . . . . . . . . . . . . . . . . . . . . . . . . . . . . . . . . . . . . . . . . . . . . . . . . . . . . . . . . . . . . 8-1Printing . . . . . . . . . . . . . . . . . . . . . . . . . . . . . . . . . . . . . . . . . . . . . . . . . . . . . . . . . . . . . . . . . . . . . . . . . . . . . . . . . 8-2Operations During Printing. . . . . . . . . . . . . . . . . . . . . . . . . . . . . . . . . . . . . . . . . . . . . . . . . . . . . . . . . . . . . . . 8-3
Stopping the Print Job . . . . . . . . . . . . . . . . . . . . . . . . . . . . . . . . . . . . . . . . . . . . . . . . . . . . . . . . . . . . . . . 8-3
Xerox® WorkCentre® 5022/5024 Multifunction PrinterUser Guide
vi

Contents
9 Tools
System Settings Procedure . . . . . . . . . . . . . . . . . . . . . . . . . . . . . . . . . . . . . . . . . . . . . . . . . . . . . . . . . . . . . . . 9-1Entering System Administration Mode . . . . . . . . . . . . . . . . . . . . . . . . . . . . . . . . . . . . . . . . . . . . . . . . 9-1Changing the Settings . . . . . . . . . . . . . . . . . . . . . . . . . . . . . . . . . . . . . . . . . . . . . . . . . . . . . . . . . . . . . . . 9-2Exiting System Administration Mode . . . . . . . . . . . . . . . . . . . . . . . . . . . . . . . . . . . . . . . . . . . . . . . . . 9-3
List of Tools Menu Items Displayed in System Administration Mode . . . . . . . . . . . . . . . . . . . . . . . . 9-4Default Settings. . . . . . . . . . . . . . . . . . . . . . . . . . . . . . . . . . . . . . . . . . . . . . . . . . . . . . . . . . . . . . . . . . . . . . . . . 9-8
Copy. . . . . . . . . . . . . . . . . . . . . . . . . . . . . . . . . . . . . . . . . . . . . . . . . . . . . . . . . . . . . . . . . . . . . . . . . . . . . . . . 9-8ID Card Copy. . . . . . . . . . . . . . . . . . . . . . . . . . . . . . . . . . . . . . . . . . . . . . . . . . . . . . . . . . . . . . . . . . . . . . .9-10Scan . . . . . . . . . . . . . . . . . . . . . . . . . . . . . . . . . . . . . . . . . . . . . . . . . . . . . . . . . . . . . . . . . . . . . . . . . . . . . . .9-10Fax . . . . . . . . . . . . . . . . . . . . . . . . . . . . . . . . . . . . . . . . . . . . . . . . . . . . . . . . . . . . . . . . . . . . . . . . . . . . . . . .9-12
Device Information. . . . . . . . . . . . . . . . . . . . . . . . . . . . . . . . . . . . . . . . . . . . . . . . . . . . . . . . . . . . . . . . . . . . .9-15Tray Settings. . . . . . . . . . . . . . . . . . . . . . . . . . . . . . . . . . . . . . . . . . . . . . . . . . . . . . . . . . . . . . . . . . . . . . . . . . .9-16Custom Paper Size Settings . . . . . . . . . . . . . . . . . . . . . . . . . . . . . . . . . . . . . . . . . . . . . . . . . . . . . . . . . . . . .9-18Control Panel Language . . . . . . . . . . . . . . . . . . . . . . . . . . . . . . . . . . . . . . . . . . . . . . . . . . . . . . . . . . . . . . . .9-19Default Display . . . . . . . . . . . . . . . . . . . . . . . . . . . . . . . . . . . . . . . . . . . . . . . . . . . . . . . . . . . . . . . . . . . . . . . .9-20Phone Book . . . . . . . . . . . . . . . . . . . . . . . . . . . . . . . . . . . . . . . . . . . . . . . . . . . . . . . . . . . . . . . . . . . . . . . . . . . .9-21
Speed Dial . . . . . . . . . . . . . . . . . . . . . . . . . . . . . . . . . . . . . . . . . . . . . . . . . . . . . . . . . . . . . . . . . . . . . . . . .9-21Group. . . . . . . . . . . . . . . . . . . . . . . . . . . . . . . . . . . . . . . . . . . . . . . . . . . . . . . . . . . . . . . . . . . . . . . . . . . . . .9-24
Wired Network . . . . . . . . . . . . . . . . . . . . . . . . . . . . . . . . . . . . . . . . . . . . . . . . . . . . . . . . . . . . . . . . . . . . . . . . .9-27Ethernet . . . . . . . . . . . . . . . . . . . . . . . . . . . . . . . . . . . . . . . . . . . . . . . . . . . . . . . . . . . . . . . . . . . . . . . . . . .9-27TCP/IP . . . . . . . . . . . . . . . . . . . . . . . . . . . . . . . . . . . . . . . . . . . . . . . . . . . . . . . . . . . . . . . . . . . . . . . . . . . . .9-27IP Filter . . . . . . . . . . . . . . . . . . . . . . . . . . . . . . . . . . . . . . . . . . . . . . . . . . . . . . . . . . . . . . . . . . . . . . . . . . . .9-29
Copy Settings . . . . . . . . . . . . . . . . . . . . . . . . . . . . . . . . . . . . . . . . . . . . . . . . . . . . . . . . . . . . . . . . . . . . . . . . . .9-30Sharpness . . . . . . . . . . . . . . . . . . . . . . . . . . . . . . . . . . . . . . . . . . . . . . . . . . . . . . . . . . . . . . . . . . . . . . . . . .9-30Background Suppression . . . . . . . . . . . . . . . . . . . . . . . . . . . . . . . . . . . . . . . . . . . . . . . . . . . . . . . . . . . .9-30Back. Suppression Level . . . . . . . . . . . . . . . . . . . . . . . . . . . . . . . . . . . . . . . . . . . . . . . . . . . . . . . . . . . . .9-30Reduce/Enlarge Preset . . . . . . . . . . . . . . . . . . . . . . . . . . . . . . . . . . . . . . . . . . . . . . . . . . . . . . . . . . . . . .9-30Auto Collate. . . . . . . . . . . . . . . . . . . . . . . . . . . . . . . . . . . . . . . . . . . . . . . . . . . . . . . . . . . . . . . . . . . . . . . .9-31
Scan Settings . . . . . . . . . . . . . . . . . . . . . . . . . . . . . . . . . . . . . . . . . . . . . . . . . . . . . . . . . . . . . . . . . . . . . . . . . .9-32Background Suppression . . . . . . . . . . . . . . . . . . . . . . . . . . . . . . . . . . . . . . . . . . . . . . . . . . . . . . . . . . . .9-32Back. Suppression Level . . . . . . . . . . . . . . . . . . . . . . . . . . . . . . . . . . . . . . . . . . . . . . . . . . . . . . . . . . . . .9-32Image Compression . . . . . . . . . . . . . . . . . . . . . . . . . . . . . . . . . . . . . . . . . . . . . . . . . . . . . . . . . . . . . . . .9-32Sharpness . . . . . . . . . . . . . . . . . . . . . . . . . . . . . . . . . . . . . . . . . . . . . . . . . . . . . . . . . . . . . . . . . . . . . . . . . .9-32Edge Erase . . . . . . . . . . . . . . . . . . . . . . . . . . . . . . . . . . . . . . . . . . . . . . . . . . . . . . . . . . . . . . . . . . . . . . . . .9-33Maximum Attachment Size . . . . . . . . . . . . . . . . . . . . . . . . . . . . . . . . . . . . . . . . . . . . . . . . . . . . . . . . .9-33Recipient Confirmation . . . . . . . . . . . . . . . . . . . . . . . . . . . . . . . . . . . . . . . . . . . . . . . . . . . . . . . . . . . . .9-33
Xerox® WorkCentre® 5022/5024 Multifunction PrinterUser Guide
vii
Contents
Fax Settings . . . . . . . . . . . . . . . . . . . . . . . . . . . . . . . . . . . . . . . . . . . . . . . . . . . . . . . . . . . . . . . . . . . . . . . . . . .9-34Mode . . . . . . . . . . . . . . . . . . . . . . . . . . . . . . . . . . . . . . . . . . . . . . . . . . . . . . . . . . . . . . . . . . . . . . . . . . . . . .9-34Fax Answer. . . . . . . . . . . . . . . . . . . . . . . . . . . . . . . . . . . . . . . . . . . . . . . . . . . . . . . . . . . . . . . . . . . . . . . . .9-34Tel/Fax Answer . . . . . . . . . . . . . . . . . . . . . . . . . . . . . . . . . . . . . . . . . . . . . . . . . . . . . . . . . . . . . . . . . . . . .9-34Line Volume. . . . . . . . . . . . . . . . . . . . . . . . . . . . . . . . . . . . . . . . . . . . . . . . . . . . . . . . . . . . . . . . . . . . . . . .9-35Line Type . . . . . . . . . . . . . . . . . . . . . . . . . . . . . . . . . . . . . . . . . . . . . . . . . . . . . . . . . . . . . . . . . . . . . . . . . .9-35Dial Type . . . . . . . . . . . . . . . . . . . . . . . . . . . . . . . . . . . . . . . . . . . . . . . . . . . . . . . . . . . . . . . . . . . . . . . . . .9-35Call Interval . . . . . . . . . . . . . . . . . . . . . . . . . . . . . . . . . . . . . . . . . . . . . . . . . . . . . . . . . . . . . . . . . . . . . . . .9-35Redial Attempts . . . . . . . . . . . . . . . . . . . . . . . . . . . . . . . . . . . . . . . . . . . . . . . . . . . . . . . . . . . . . . . . . . . .9-35Redial Interval . . . . . . . . . . . . . . . . . . . . . . . . . . . . . . . . . . . . . . . . . . . . . . . . . . . . . . . . . . . . . . . . . . . . .9-36Junk Filter . . . . . . . . . . . . . . . . . . . . . . . . . . . . . . . . . . . . . . . . . . . . . . . . . . . . . . . . . . . . . . . . . . . . . . . . . .9-36Send Header . . . . . . . . . . . . . . . . . . . . . . . . . . . . . . . . . . . . . . . . . . . . . . . . . . . . . . . . . . . . . . . . . . . . . . .9-36Company Name . . . . . . . . . . . . . . . . . . . . . . . . . . . . . . . . . . . . . . . . . . . . . . . . . . . . . . . . . . . . . . . . . . . .9-36Fax Number. . . . . . . . . . . . . . . . . . . . . . . . . . . . . . . . . . . . . . . . . . . . . . . . . . . . . . . . . . . . . . . . . . . . . . . .9-36Forward. . . . . . . . . . . . . . . . . . . . . . . . . . . . . . . . . . . . . . . . . . . . . . . . . . . . . . . . . . . . . . . . . . . . . . . . . . . .9-36Auto Reduce On Receipt . . . . . . . . . . . . . . . . . . . . . . . . . . . . . . . . . . . . . . . . . . . . . . . . . . . . . . . . . . . .9-37Border Limit . . . . . . . . . . . . . . . . . . . . . . . . . . . . . . . . . . . . . . . . . . . . . . . . . . . . . . . . . . . . . . . . . . . . . . . .9-37Receive Size . . . . . . . . . . . . . . . . . . . . . . . . . . . . . . . . . . . . . . . . . . . . . . . . . . . . . . . . . . . . . . . . . . . . . . . .9-37Print Size (Received Letter) . . . . . . . . . . . . . . . . . . . . . . . . . . . . . . . . . . . . . . . . . . . . . . . . . . . . . . . . . .9-38Immediate Fax Switch . . . . . . . . . . . . . . . . . . . . . . . . . . . . . . . . . . . . . . . . . . . . . . . . . . . . . . . . . . . . . .9-38Off Hook Level . . . . . . . . . . . . . . . . . . . . . . . . . . . . . . . . . . . . . . . . . . . . . . . . . . . . . . . . . . . . . . . . . . . . .9-38Region . . . . . . . . . . . . . . . . . . . . . . . . . . . . . . . . . . . . . . . . . . . . . . . . . . . . . . . . . . . . . . . . . . . . . . . . . . . . .9-38Activity Report . . . . . . . . . . . . . . . . . . . . . . . . . . . . . . . . . . . . . . . . . . . . . . . . . . . . . . . . . . . . . . . . . . . . .9-39Transmission Report . . . . . . . . . . . . . . . . . . . . . . . . . . . . . . . . . . . . . . . . . . . . . . . . . . . . . . . . . . . . . . . .9-40Broadcast Report . . . . . . . . . . . . . . . . . . . . . . . . . . . . . . . . . . . . . . . . . . . . . . . . . . . . . . . . . . . . . . . . . . .9-40Protocol Report . . . . . . . . . . . . . . . . . . . . . . . . . . . . . . . . . . . . . . . . . . . . . . . . . . . . . . . . . . . . . . . . . . . . .9-41
System Settings . . . . . . . . . . . . . . . . . . . . . . . . . . . . . . . . . . . . . . . . . . . . . . . . . . . . . . . . . . . . . . . . . . . . . . . .9-42Power Saver Timer. . . . . . . . . . . . . . . . . . . . . . . . . . . . . . . . . . . . . . . . . . . . . . . . . . . . . . . . . . . . . . . . . .9-42Auto Reset . . . . . . . . . . . . . . . . . . . . . . . . . . . . . . . . . . . . . . . . . . . . . . . . . . . . . . . . . . . . . . . . . . . . . . . . .9-42Auto Print . . . . . . . . . . . . . . . . . . . . . . . . . . . . . . . . . . . . . . . . . . . . . . . . . . . . . . . . . . . . . . . . . . . . . . . . . .9-42Idle Timeout . . . . . . . . . . . . . . . . . . . . . . . . . . . . . . . . . . . . . . . . . . . . . . . . . . . . . . . . . . . . . . . . . . . . . . .9-43Job Cancel . . . . . . . . . . . . . . . . . . . . . . . . . . . . . . . . . . . . . . . . . . . . . . . . . . . . . . . . . . . . . . . . . . . . . . . . .9-43Clock . . . . . . . . . . . . . . . . . . . . . . . . . . . . . . . . . . . . . . . . . . . . . . . . . . . . . . . . . . . . . . . . . . . . . . . . . . . . . .9-43Audio Tones. . . . . . . . . . . . . . . . . . . . . . . . . . . . . . . . . . . . . . . . . . . . . . . . . . . . . . . . . . . . . . . . . . . . . . . .9-46Job History Verbose. . . . . . . . . . . . . . . . . . . . . . . . . . . . . . . . . . . . . . . . . . . . . . . . . . . . . . . . . . . . . . . . .9-48Auto Paper Selection. . . . . . . . . . . . . . . . . . . . . . . . . . . . . . . . . . . . . . . . . . . . . . . . . . . . . . . . . . . . . . . .9-48User Control. . . . . . . . . . . . . . . . . . . . . . . . . . . . . . . . . . . . . . . . . . . . . . . . . . . . . . . . . . . . . . . . . . . . . . . .9-48Paper Size Settings . . . . . . . . . . . . . . . . . . . . . . . . . . . . . . . . . . . . . . . . . . . . . . . . . . . . . . . . . . . . . . . . .9-49Show Toner Alert . . . . . . . . . . . . . . . . . . . . . . . . . . . . . . . . . . . . . . . . . . . . . . . . . . . . . . . . . . . . . . . . . . .9-49Show Drum Alert . . . . . . . . . . . . . . . . . . . . . . . . . . . . . . . . . . . . . . . . . . . . . . . . . . . . . . . . . . . . . . . . . . .9-49Show Drum Warning. . . . . . . . . . . . . . . . . . . . . . . . . . . . . . . . . . . . . . . . . . . . . . . . . . . . . . . . . . . . . . . .9-49Maintenance . . . . . . . . . . . . . . . . . . . . . . . . . . . . . . . . . . . . . . . . . . . . . . . . . . . . . . . . . . . . . . . . . . . . . . .9-50
Security Settings . . . . . . . . . . . . . . . . . . . . . . . . . . . . . . . . . . . . . . . . . . . . . . . . . . . . . . . . . . . . . . . . . . . . . . .9-51System Administrator Passcode . . . . . . . . . . . . . . . . . . . . . . . . . . . . . . . . . . . . . . . . . . . . . . . . . . . . .9-51
User Management . . . . . . . . . . . . . . . . . . . . . . . . . . . . . . . . . . . . . . . . . . . . . . . . . . . . . . . . . . . . . . . . . . . . .9-52Confirm/Edit . . . . . . . . . . . . . . . . . . . . . . . . . . . . . . . . . . . . . . . . . . . . . . . . . . . . . . . . . . . . . . . . . . . . . . .9-52Reset Copied Impressions . . . . . . . . . . . . . . . . . . . . . . . . . . . . . . . . . . . . . . . . . . . . . . . . . . . . . . . . . . .9-54
Xerox® WorkCentre® 5022/5024 Multifunction PrinterUser Guide
viii
Contents
10 Machine Status
Checking Consumables . . . . . . . . . . . . . . . . . . . . . . . . . . . . . . . . . . . . . . . . . . . . . . . . . . . . . . . . . . . . . . . . .10-1Selecting Language . . . . . . . . . . . . . . . . . . . . . . . . . . . . . . . . . . . . . . . . . . . . . . . . . . . . . . . . . . . . . . . . . . . .10-3Checking the Machine’s IP Address . . . . . . . . . . . . . . . . . . . . . . . . . . . . . . . . . . . . . . . . . . . . . . . . . . . . . .10-5Checking the Meter. . . . . . . . . . . . . . . . . . . . . . . . . . . . . . . . . . . . . . . . . . . . . . . . . . . . . . . . . . . . . . . . . . . . .10-6Printing Reports/Lists . . . . . . . . . . . . . . . . . . . . . . . . . . . . . . . . . . . . . . . . . . . . . . . . . . . . . . . . . . . . . . . . . . .10-7Notification Display . . . . . . . . . . . . . . . . . . . . . . . . . . . . . . . . . . . . . . . . . . . . . . . . . . . . . . . . . . . . . . . . . . 10-10ID Card Guidance Display. . . . . . . . . . . . . . . . . . . . . . . . . . . . . . . . . . . . . . . . . . . . . . . . . . . . . . . . . . . . . 10-11Quick-Button Selection Timer . . . . . . . . . . . . . . . . . . . . . . . . . . . . . . . . . . . . . . . . . . . . . . . . . . . . . . . . . 10-12
11 Job Status
Checking Current/Pending Jobs . . . . . . . . . . . . . . . . . . . . . . . . . . . . . . . . . . . . . . . . . . . . . . . . . . . . . . . . .11-1Checking Reserved Fax Jobs . . . . . . . . . . . . . . . . . . . . . . . . . . . . . . . . . . . . . . . . . . . . . . . . . . . . . . . . .11-1
Canceling the Current Job . . . . . . . . . . . . . . . . . . . . . . . . . . . . . . . . . . . . . . . . . . . . . . . . . . . . . . . . . . . . . .11-3Canceling a Pending Fax Job . . . . . . . . . . . . . . . . . . . . . . . . . . . . . . . . . . . . . . . . . . . . . . . . . . . . . . . . . . . .11-4
12 Maintenance
Replacing Consumables . . . . . . . . . . . . . . . . . . . . . . . . . . . . . . . . . . . . . . . . . . . . . . . . . . . . . . . . . . . . . . . .12-1Replacing the Toner Cartridge . . . . . . . . . . . . . . . . . . . . . . . . . . . . . . . . . . . . . . . . . . . . . . . . . . . . . . .12-3Replacing the Drum Cartridge . . . . . . . . . . . . . . . . . . . . . . . . . . . . . . . . . . . . . . . . . . . . . . . . . . . . . . .12-7
Cleaning the Machine . . . . . . . . . . . . . . . . . . . . . . . . . . . . . . . . . . . . . . . . . . . . . . . . . . . . . . . . . . . . . . . . 12-12Cleaning the Exterior . . . . . . . . . . . . . . . . . . . . . . . . . . . . . . . . . . . . . . . . . . . . . . . . . . . . . . . . . . . . . 12-12Cleaning the Document Cover and the Document Glass. . . . . . . . . . . . . . . . . . . . . . . . . . . . . 12-12Cleaning the Document Presser and the Narrow Glass Strip . . . . . . . . . . . . . . . . . . . . . . . . . 12-13Cleaning the Document Feeder Rollers . . . . . . . . . . . . . . . . . . . . . . . . . . . . . . . . . . . . . . . . . . . . . 12-15
13 Problem Solving
Troubleshooting. . . . . . . . . . . . . . . . . . . . . . . . . . . . . . . . . . . . . . . . . . . . . . . . . . . . . . . . . . . . . . . . . . . . . . . .13-1Machine Problems. . . . . . . . . . . . . . . . . . . . . . . . . . . . . . . . . . . . . . . . . . . . . . . . . . . . . . . . . . . . . . . . . . . . . .13-2Image Quality Problems . . . . . . . . . . . . . . . . . . . . . . . . . . . . . . . . . . . . . . . . . . . . . . . . . . . . . . . . . . . . . . . .13-6Copying Problems . . . . . . . . . . . . . . . . . . . . . . . . . . . . . . . . . . . . . . . . . . . . . . . . . . . . . . . . . . . . . . . . . . . . 13-12
Unable to Copy. . . . . . . . . . . . . . . . . . . . . . . . . . . . . . . . . . . . . . . . . . . . . . . . . . . . . . . . . . . . . . . . . . . 13-12Copy Output Problems . . . . . . . . . . . . . . . . . . . . . . . . . . . . . . . . . . . . . . . . . . . . . . . . . . . . . . . . . . . . 13-13
Printer Problems. . . . . . . . . . . . . . . . . . . . . . . . . . . . . . . . . . . . . . . . . . . . . . . . . . . . . . . . . . . . . . . . . . . . . . 13-15Unable to Print . . . . . . . . . . . . . . . . . . . . . . . . . . . . . . . . . . . . . . . . . . . . . . . . . . . . . . . . . . . . . . . . . . . 13-15Print Output Problems . . . . . . . . . . . . . . . . . . . . . . . . . . . . . . . . . . . . . . . . . . . . . . . . . . . . . . . . . . . . 13-16
Fax Problems . . . . . . . . . . . . . . . . . . . . . . . . . . . . . . . . . . . . . . . . . . . . . . . . . . . . . . . . . . . . . . . . . . . . . . . . 13-17Problems When Sending Faxes . . . . . . . . . . . . . . . . . . . . . . . . . . . . . . . . . . . . . . . . . . . . . . . . . . . . 13-17Problems When Receiving Faxes . . . . . . . . . . . . . . . . . . . . . . . . . . . . . . . . . . . . . . . . . . . . . . . . . . . 13-18
Xerox® WorkCentre® 5022/5024 Multifunction PrinterUser Guide
ix
Contents
Scan Problems . . . . . . . . . . . . . . . . . . . . . . . . . . . . . . . . . . . . . . . . . . . . . . . . . . . . . . . . . . . . . . . . . . . . . . . 13-20Unable to Scan . . . . . . . . . . . . . . . . . . . . . . . . . . . . . . . . . . . . . . . . . . . . . . . . . . . . . . . . . . . . . . . . . . . 13-20Unable to Load Scan Data to a PC . . . . . . . . . . . . . . . . . . . . . . . . . . . . . . . . . . . . . . . . . . . . . . . . . 13-20Unable to Send Scan Data in E-mail . . . . . . . . . . . . . . . . . . . . . . . . . . . . . . . . . . . . . . . . . . . . . . . 13-21Unable to Forward a Scan Document on the Network (SMB) . . . . . . . . . . . . . . . . . . . . . . . . 13-22Scan Image Quality Problems . . . . . . . . . . . . . . . . . . . . . . . . . . . . . . . . . . . . . . . . . . . . . . . . . . . . . 13-23
Network Related Problems . . . . . . . . . . . . . . . . . . . . . . . . . . . . . . . . . . . . . . . . . . . . . . . . . . . . . . . . . . . . 13-25Problems Using TCP/IP (LPD/Port9100) . . . . . . . . . . . . . . . . . . . . . . . . . . . . . . . . . . . . . . . . . . . . 13-25Problems Using Xerox® CentreWare® Internet Services . . . . . . . . . . . . . . . . . . . . . . . . . . . . 13-26Problems With E-mail Functions . . . . . . . . . . . . . . . . . . . . . . . . . . . . . . . . . . . . . . . . . . . . . . . . . . . 13-27Internet/Intranet Connection Problems . . . . . . . . . . . . . . . . . . . . . . . . . . . . . . . . . . . . . . . . . . . . 13-27IPv4 or IPv6 Connection Problems . . . . . . . . . . . . . . . . . . . . . . . . . . . . . . . . . . . . . . . . . . . . . . . . . 13-29
Error Codes . . . . . . . . . . . . . . . . . . . . . . . . . . . . . . . . . . . . . . . . . . . . . . . . . . . . . . . . . . . . . . . . . . . . . . . . . . 13-32Paper Jams . . . . . . . . . . . . . . . . . . . . . . . . . . . . . . . . . . . . . . . . . . . . . . . . . . . . . . . . . . . . . . . . . . . . . . . . . . 13-45
Paper Jam in Left Cover A . . . . . . . . . . . . . . . . . . . . . . . . . . . . . . . . . . . . . . . . . . . . . . . . . . . . . . . . . 13-48Paper Jam in One Tray Module Cover B . . . . . . . . . . . . . . . . . . . . . . . . . . . . . . . . . . . . . . . . . . . . 13-50Paper Jam in Two Tray Module Cover C . . . . . . . . . . . . . . . . . . . . . . . . . . . . . . . . . . . . . . . . . . . . 13-51Paper Jams in Tray 1 to 4 . . . . . . . . . . . . . . . . . . . . . . . . . . . . . . . . . . . . . . . . . . . . . . . . . . . . . . . . . 13-52Paper Jams in the Tray 5 (Bypass) . . . . . . . . . . . . . . . . . . . . . . . . . . . . . . . . . . . . . . . . . . . . . . . . . 13-53
Document Jams . . . . . . . . . . . . . . . . . . . . . . . . . . . . . . . . . . . . . . . . . . . . . . . . . . . . . . . . . . . . . . . . . . . . . . 13-54
14 Appendix
Specifications . . . . . . . . . . . . . . . . . . . . . . . . . . . . . . . . . . . . . . . . . . . . . . . . . . . . . . . . . . . . . . . . . . . . . . . . . .14-1Basic Functions/Copy Functions . . . . . . . . . . . . . . . . . . . . . . . . . . . . . . . . . . . . . . . . . . . . . . . . . . . . .14-2Print Functions . . . . . . . . . . . . . . . . . . . . . . . . . . . . . . . . . . . . . . . . . . . . . . . . . . . . . . . . . . . . . . . . . . . . .14-5Scan Functions (Local)*1 . . . . . . . . . . . . . . . . . . . . . . . . . . . . . . . . . . . . . . . . . . . . . . . . . . . . . . . . . . . .14-5Scan Functions (Network)*1 (Optional). . . . . . . . . . . . . . . . . . . . . . . . . . . . . . . . . . . . . . . . . . . . . . .14-7Fax Functions (Optional) . . . . . . . . . . . . . . . . . . . . . . . . . . . . . . . . . . . . . . . . . . . . . . . . . . . . . . . . . . . .14-8Duplex Automatic Document Feeder (Optional) . . . . . . . . . . . . . . . . . . . . . . . . . . . . . . . . . . . . . .14-8Duplex Output Unit (Optional) . . . . . . . . . . . . . . . . . . . . . . . . . . . . . . . . . . . . . . . . . . . . . . . . . . . . . .14-9One Tray Module (Optional). . . . . . . . . . . . . . . . . . . . . . . . . . . . . . . . . . . . . . . . . . . . . . . . . . . . . . . . .14-9Two Tray Module (Optional) . . . . . . . . . . . . . . . . . . . . . . . . . . . . . . . . . . . . . . . . . . . . . . . . . . . . . . . .14-9
Printable Area. . . . . . . . . . . . . . . . . . . . . . . . . . . . . . . . . . . . . . . . . . . . . . . . . . . . . . . . . . . . . . . . . . . . . . . . 14-10Optional Components . . . . . . . . . . . . . . . . . . . . . . . . . . . . . . . . . . . . . . . . . . . . . . . . . . . . . . . . . . . . . . . . 14-11Notes and Restrictions . . . . . . . . . . . . . . . . . . . . . . . . . . . . . . . . . . . . . . . . . . . . . . . . . . . . . . . . . . . . . . . . 14-12
Notes and Restrictions on the Use of the Machine . . . . . . . . . . . . . . . . . . . . . . . . . . . . . . . . . . 14-12Notes and Restrictions on the Use of the Copy Feature . . . . . . . . . . . . . . . . . . . . . . . . . . . . . 14-13Notes and Restrictions on the Use of the Print Feature . . . . . . . . . . . . . . . . . . . . . . . . . . . . . . 14-13Notes and Restrictions on the Use of the Scan Feature . . . . . . . . . . . . . . . . . . . . . . . . . . . . . . 14-14Notes and Restrictions on the Use of the Fax Feature . . . . . . . . . . . . . . . . . . . . . . . . . . . . . . . 14-15Notes and Restrictions when Connecting to Internet or Intranet. . . . . . . . . . . . . . . . . . . . . 14-16Notes and Restrictions when Operating from Computers . . . . . . . . . . . . . . . . . . . . . . . . . . . . 14-16Notes and Restrictions for Using SMB. . . . . . . . . . . . . . . . . . . . . . . . . . . . . . . . . . . . . . . . . . . . . . 14-16Notes and Restrictions for Using TCP/IP (LPD/Port9100) . . . . . . . . . . . . . . . . . . . . . . . . . . . . 14-17Notes and Restrictions for IPv6 Connection . . . . . . . . . . . . . . . . . . . . . . . . . . . . . . . . . . . . . . . . 14-18
Xerox® WorkCentre® 5022/5024 Multifunction PrinterUser Guide
x
Contents
Fax Activity Report . . . . . . . . . . . . . . . . . . . . . . . . . . . . . . . . . . . . . . . . . . . . . . . . . . . . . . . . . . . . . . . . . . . 14-19Sent . . . . . . . . . . . . . . . . . . . . . . . . . . . . . . . . . . . . . . . . . . . . . . . . . . . . . . . . . . . . . . . . . . . . . . . . . . . . . 14-20Received . . . . . . . . . . . . . . . . . . . . . . . . . . . . . . . . . . . . . . . . . . . . . . . . . . . . . . . . . . . . . . . . . . . . . . . . . 14-21
Index . . . . . . . . . . . . . . . . . . . . . . . . . . . . . . . . . . . . . . . . . . . . . . . . . . . . . . . . . . . . . . . . . . . . . . . . I-1
Xerox® WorkCentre® 5022/5024 Multifunction PrinterUser Guide
xi

Contents
Xerox® WorkCentre® 5022/5024 Multifunction PrinterUser Guide
xii
1Before Using the Machine
This chapter describes how to use this guide, as well as safety notes and legal notice you should read before using the machine.
Preface
Thank you for selecting the WorkCentre 5022/5024 (hereafter referred to as "the machine").
This guide describes how to operate the machine and the precautions you should follow during operation. To get the most out of the machine and to use it effectively, be sure to read this guide before use.
This guide assumes that you have a basic knowledge of the operating environment of the personal computer in use and networking environments. For information on the environment of the personal computer in use and the basic knowledge and operations of networking environments, refer to the manuals provided with the personal computer, operating system, and network system.
After reading this guide, be sure to keep it handy for quick reference. It will be useful in case you forget how to perform operations or if a problem occurs with the machine.
WARNING: This equipment will be inoperable when the main power fails.
Xerox® WorkCentre® 5022/5024 Multifunction PrinterUser Guide
1-1
Before Using the Machine
Types of Manuals
The following guides are provided with the machine.
User Guide (this guide) (Driver CD Kit)
The guide describes how to use the copy, print, fax and scan features as well as how to set the paper, perform everyday maintenance, make machine status settings, perform troubleshooting, and set up a network.
Basic Operation Guide (Booklet) (Driver CD Kit)
The guide describes a quick reference for the basic operations, daily maintenance, and problem solving for this machine.
Manual (HTML)
The manual describes installation and configuration procedures for print drivers and the printer environment. This manual is included in the Driver CD Kit.
Print Driver Help
The help describes print features and operations.
Xerox® WorkCentre® 5022/5024 Multifunction PrinterUser Guide
1-2
Before Using the Machine
Using this Guide
This guide is intended for first time users of the machine. It describes the basic operations for the copy, fax, scan, and print features.
Organization of this Guide
This guide consists of the following chapters:
1 Before Using the Machine: Describes how to use this guide and provides license information.
2 Environment Settings: Describes the environment required to operate the machine.
3 Product Overview: Describes the names of the machine parts as well as basic operations, such as how
to turn the machine on and off, how to use the energy saver feature, and how to use Xerox®
CentreWare® Internet Services.
4 Loading Paper: Describes the types of paper and other media that you can use on the machine and how to load paper in a tray.
5 Copy: Describes the basic operation and features of the copy feature.
6 Fax: Describes the basic operations and features for the Fax services.
7 Scan: Describes the basic operations and features of the scan feature.
8 Print: Describes the basic printing operations.
9 Tools: Describes System Administration mode as well as how to change the default settings.
10 Machine Status: Describes how to check the faults that occurred in the machine and to print various reports.
11 Job Status: Describes how to check job status and how to delete jobs.
12 Maintenance: Describes how to replace consumables and to clean the machine.
13 Problem Solving: Describes troubleshooting procedures to solve the problems with the machine.
14 Appendix: Describes the specifications of the machine, optional accessories, and cautions/restrictions.
Conventions
• The screen shots and illustrations used in this guide vary depending on the machine configuration and optional components installed. Some of the items in the screen shots may not be displayed or available depending on your machine configuration.
• The procedures in this guide may vary depending on the driver and utility software being used due to the upgrades.
• In this document, "Computer" refers to a personal computer or workstation.
Xerox® WorkCentre® 5022/5024 Multifunction PrinterUser Guide
1-3
Before Using the Machine
• The following terms are used in this guide:
- Important: Important infomation that you should read.
- Note: Additional information on operations or features.
• The following symbols are used in this guide:
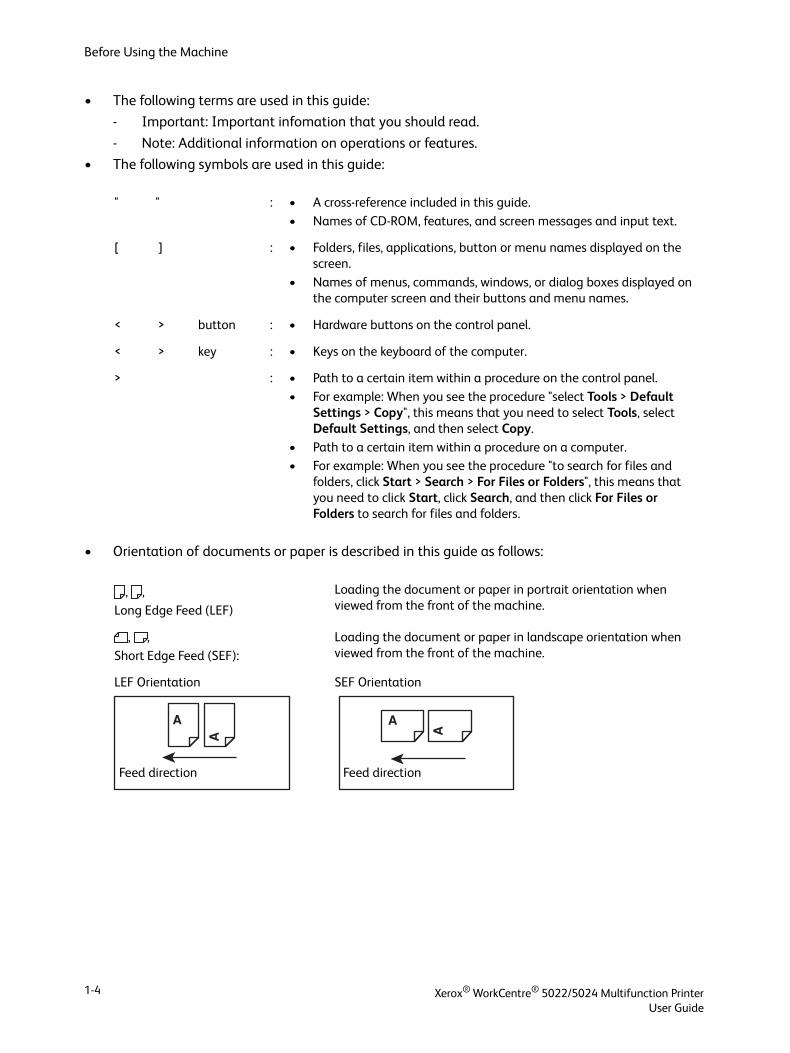
• Orientation of documents or paper is described in this guide as follows:
" " : • A cross-reference included in this guide.
• Names of CD-ROM, features, and screen messages and input text.
[ ] : • Folders, files, applications, button or menu names displayed on the screen.
• Names of menus, commands, windows, or dialog boxes displayed on the computer screen and their buttons and menu names.
< > button : • Hardware buttons on the control panel.
< > key : • Keys on the keyboard of the computer.
> : • Path to a certain item within a procedure on the control panel.
• For example: When you see the procedure "select Tools > Default Settings > Copy", this means that you need to select Tools, select Default Settings, and then select Copy.
• Path to a certain item within a procedure on a computer.• For example: When you see the procedure "to search for files and
folders, click Start > Search > For Files or Folders", this means that you need to click Start, click Search, and then click For Files or Folders to search for files and folders.
, ,Long Edge Feed (LEF)
Loading the document or paper in portrait orientation when viewed from the front of the machine.
, ,
Short Edge Feed (SEF):
Loading the document or paper in landscape orientation when viewed from the front of the machine.
LEF Orientation SEF Orientation
Feed directionFeed direction
Xerox® WorkCentre® 5022/5024 Multifunction PrinterUser Guide
1-4
Before Using the Machine
Safety Notes
Before using this product, read "Safety Notes" carefully for safety use.
This product and recommended supplies have been tested and found to comply with strict safety requirements including safety agency approvals and compliance with environmental standards. Follow the following instructions for safety use.
Note Any unauthorized alteration including an addition of new functions or connection to external devices may not be covered by the product warranty. Contact your local Xerox representative for more information.
Follow all warning instructions marked on this product. The following symbols are used to indicate danger of personal injury or machine damage:
Electrical Safety
This product must be operated by a power source as indicated on the machine's data plate. Consult your local power company to check if your power source meets the requirements.
WARNINGS:
• Connect this product to a protective earth circuit.
• This product is supplied with a plug that has a protective earth pin. The plug fits only into an earthed electrical outlet. This is a safety feature. If the plug doesn't fit to the outlet, contact an electrician to replace the outlet to avoid risk of electric shock. Never use an earthed adapter plug to connect the product to the electrical outlet that has no earth connection terminal.
Improper connection of a grounding conductor may cause electric shock.
• Plug the power cord directly into a grounded electrical outlet. To prevent overheat and a fire accident, do not use an extension cord, a multi-plug adaptor or a multiple connector. Consult your local Xerox representative to check if an outlet is grounded.
• Connect this product to a branch circuit or an outlet that has larger capacity than the rated ampere and voltage of this product. See the data plate on the rear panel of this product for its rated ampere and voltage.
• Never touch the power cord with wet hands. It may cause electric shock.
DANGER: High risk of severe or fatal injury if not followed strictly.
WARNING: Risk of severe or fatal injury if not followed strictly.
CAUTION: Risk of injury to user or damage to machine if not followed strictly.
Xerox® WorkCentre® 5022/5024 Multifunction PrinterUser Guide
1-5
Before Using the Machine
• Do not place any object on the power cord.
• Always keep the plug connection free of dust. A dusty or damp environment may cause a minute electric current in a connector. It may generate heat and eventually cause a fire.
• To avoid the risk of electric shock and fire, use only the power cord supplied with this product or a cord designated by Xerox.
The power cord is for use with this product exclusively. Do not use it with any other product.
Do not damage or alter the power cord. Damage and alteration may generate heat and eventually cause electric shock or fire.
If the power cord is damaged or insulated wires are exposed, contact your local Xerox representative for a replacement. Do not use a damaged or uninsulated cord to avoid the risk of electric shock and fire.
CAUTIONS:
• When cleaning this product, always switch off and unplug it. Access to a live machine interior may cause electric shock.
• Do not plug in or unplug this product with the switch in the On position. Plugging and unplugging a live connector may deform the plug and generate heat, and eventually cause a fire.
• Hold the plug, not the cord, when unplugging this product, or it may damage the cord and cause electric shock or fire.
• Always switch off and unplug the machine when it (i.e., fax function) is not used over weekends or long holidays. Failure to do so may cause deterioration of the insulation and eventually electric shock or fire.
Note The machine cannot receive fax messages when the power is off.
• Once a month, switch off this product and check the following:
- the power cord is plugged firmly into an electrical outlet
- the plug is not excessively heated, rusted or bent
- the plug and electrical outlet are free of dust
- the power cord is not cracked or worn down
If you notice any unusual condition, switch off and unplug this product first and contact your local Xerox representative.
Xerox® WorkCentre® 5022/5024 Multifunction PrinterUser Guide
1-6
Before Using the Machine
Machine Installation
WARNING: Do not locate this product where people might step on or trip over the power cord. Friction or excessive pressure may generate heat and eventually cause electric shock or a fire accident.
CAUTIONS:
• Never locate this product in the following places:
- Near radiators or any other heat sources
- Near volatile flammable materials such as curtains
- In the hot, humid, dusty or poorly ventilated environment
- In the place receiving direct sunlight
- Near cookers or humidifiers
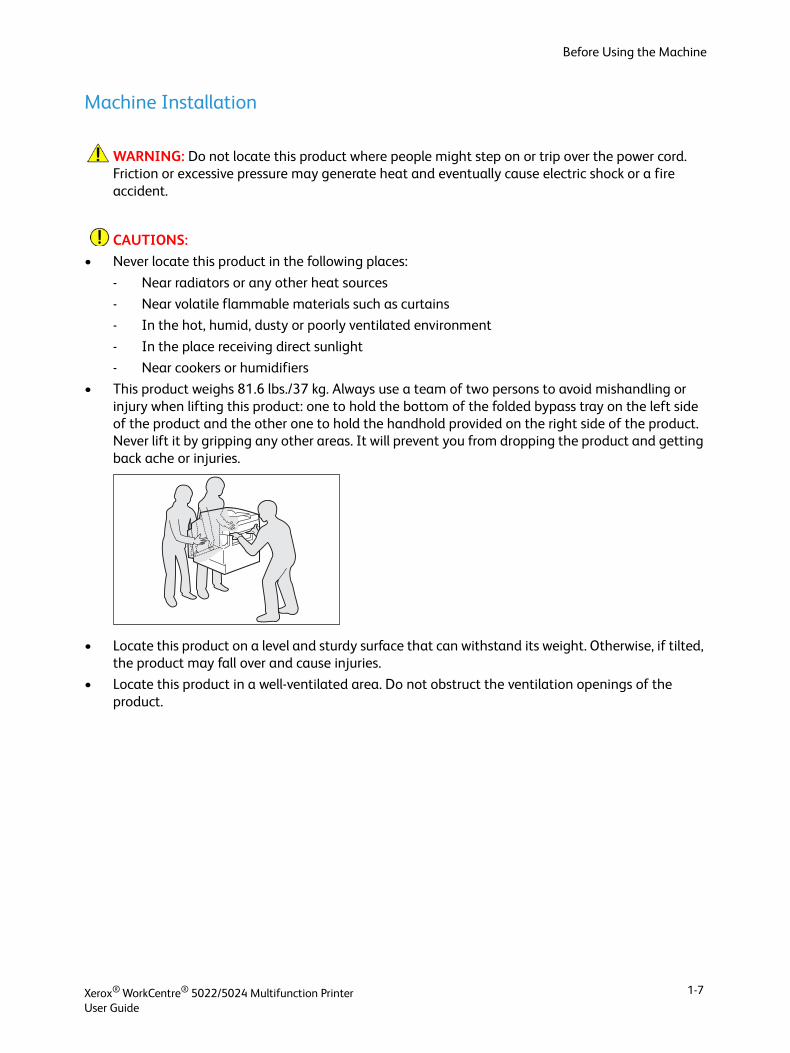
• This product weighs 81.6 lbs./37 kg. Always use a team of two persons to avoid mishandling or injury when lifting this product: one to hold the bottom of the folded bypass tray on the left side of the product and the other one to hold the handhold provided on the right side of the product. Never lift it by gripping any other areas. It will prevent you from dropping the product and getting back ache or injuries.
• Locate this product on a level and sturdy surface that can withstand its weight. Otherwise, if tilted, the product may fall over and cause injuries.
• Locate this product in a well-ventilated area. Do not obstruct the ventilation openings of the product.
Xerox® WorkCentre® 5022/5024 Multifunction PrinterUser Guide
1-7
Before Using the Machine
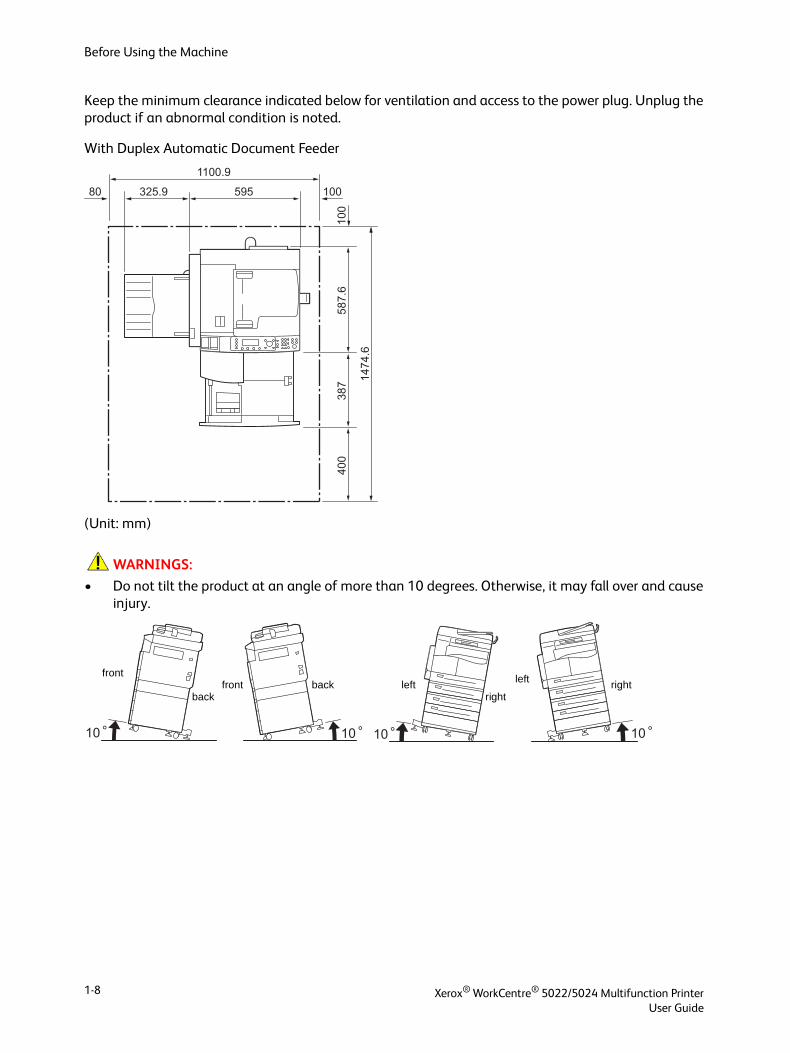
Keep the minimum clearance indicated below for ventilation and access to the power plug. Unplug the product if an abnormal condition is noted.
With Duplex Automatic Document Feeder
(Unit: mm)
WARNINGS:
• Do not tilt the product at an angle of more than 10 degrees. Otherwise, it may fall over and cause injury.
1100.9
100595325.980
100
587.
638
7
1474
.6
400
10 °10 ° 10 ° 10 °
frontfront
backback leftleft right
right
Xerox® WorkCentre® 5022/5024 Multifunction PrinterUser Guide
1-8
Before Using the Machine
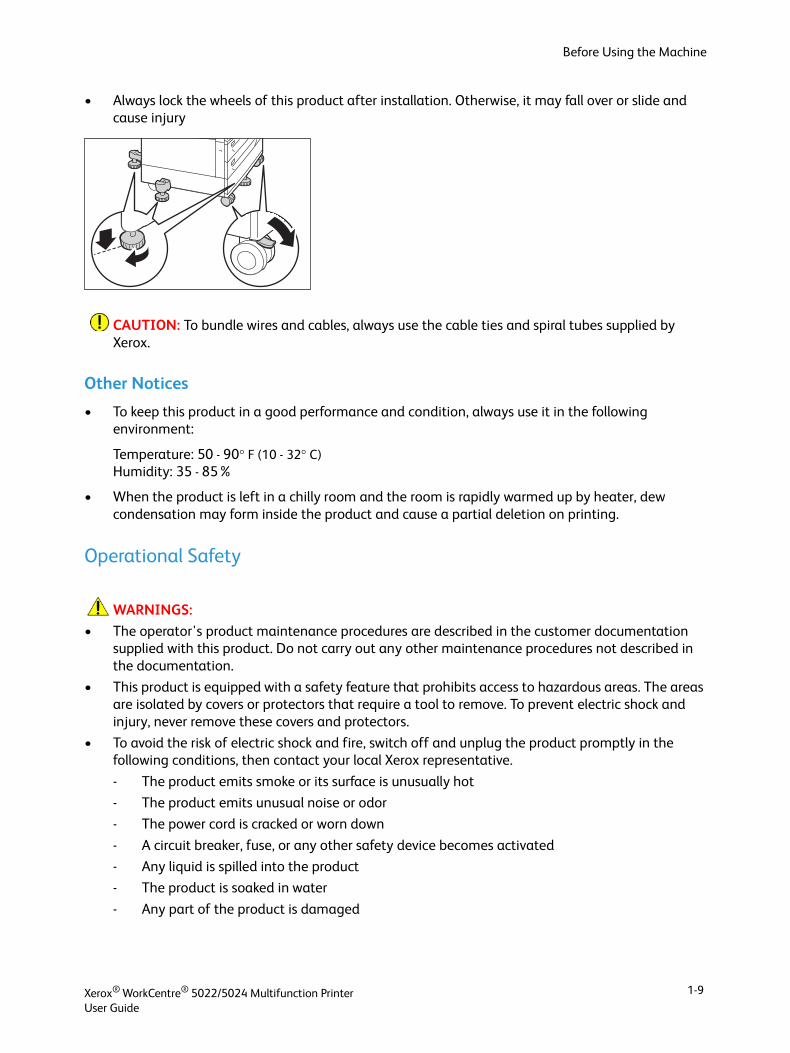
• Always lock the wheels of this product after installation. Otherwise, it may fall over or slide and cause injury
CAUTION: To bundle wires and cables, always use the cable ties and spiral tubes supplied by Xerox.
Other Notices
• To keep this product in a good performance and condition, always use it in the following environment:
Temperature: 50 - 90° F (10 - 32° C)Humidity: 35 - 85%
• When the product is left in a chilly room and the room is rapidly warmed up by heater, dew condensation may form inside the product and cause a partial deletion on printing.
Operational Safety
WARNINGS:
• The operator's product maintenance procedures are described in the customer documentation supplied with this product. Do not carry out any other maintenance procedures not described in the documentation.
• This product is equipped with a safety feature that prohibits access to hazardous areas. The areas are isolated by covers or protectors that require a tool to remove. To prevent electric shock and injury, never remove these covers and protectors.
• To avoid the risk of electric shock and fire, switch off and unplug the product promptly in the following conditions, then contact your local Xerox representative.
- The product emits smoke or its surface is unusually hot
- The product emits unusual noise or odor
- The power cord is cracked or worn down
- A circuit breaker, fuse, or any other safety device becomes activated
- Any liquid is spilled into the product
- The product is soaked in water
- Any part of the product is damaged
Xerox® WorkCentre® 5022/5024 Multifunction PrinterUser Guide
1-9
Before Using the Machine
• Do not insert any object into slots or openings of this product.
• Do not put any of the following items on the product:
- Liquid container such as flower vases or coffee cups
- Metal parts such as staples or clips
- Heavy objects
• If liquid is spilled over or metal parts are slipped into the product, it may cause electric shock or fire.
• Do not use conductive paper such as carbon paper or conductively-coated paper. When a paper jam occurs, it may short-circuit the machine and eventually cause a fire.
CAUTIONS:
• Keep electrical and mechanical safety interlocks active. Keep the safety interlocks away from magnetic materials. Magnetic materials may accidentally activate the product and cause injury or electric shock.
• Do not attempt to remove paper that is deeply jammed inside the machine, particularly if it is wrapped around the fusing unit or the heat roller. Doing so may cause injury or burns. Switch off the product immediately and contact your local Xerox representative.
• Do not apply excessive force to hold a thick document on the document glass. It may break the glass and cause injury.
• Ventilate well during extended operation or mass copying. Inadequate ventilation may affect the office air environment with an ozone odor.
Provide proper ventilation to ensure a comfortable and safe environment.
Consumables
WARNINGS:
• Store all consumables in accordance with the instructions given on its package or container.
• Use a broom or a wet cloth to wipe off spilled toner. Never use a vacuum cleaner for spills. Doing so increases the risk of fire and explosion from electric sparks igniting inside the vacuum cleaner. If you spill a large volume of toner, contact your local Xerox representative.
• Never throw a toner cartridge into an open flame. Remaining toner in the cartridge may catch fire and cause burn injury or explosion.
If you have a used toner cartridge no longer needed, contact your local Xerox representative for its disposal.
CAUTIONS:
• Keep drum cartridges and toner cartridges out of the reach of children. If a child accidentally swallows toner, spit it out, rinse mouth with water, drink water and consult a physician immediately.
Xerox® WorkCentre® 5022/5024 Multifunction PrinterUser Guide
1-10
Before Using the Machine
• When replacing drum cartridges and toner cartridges, be careful not to spill the toner. In case of any toner spills, avoid contact with clothes, skin, eyes and mouth as well as inhalation.
If you get toner particles in your eyes, wash it out with plenty of water for at least 15 minutes until the irritation is gone. Consult a physician if necessary.
If you inhale toner particles, move to a fresh air location and rinse your mouth with water.
If you swallow toner, spit it out, rinse your mouth with water, drink plenty of water and consult a physician immediately.
• When removing the fusing unit, always switch it off first and wait for 40 minutes until it cools.
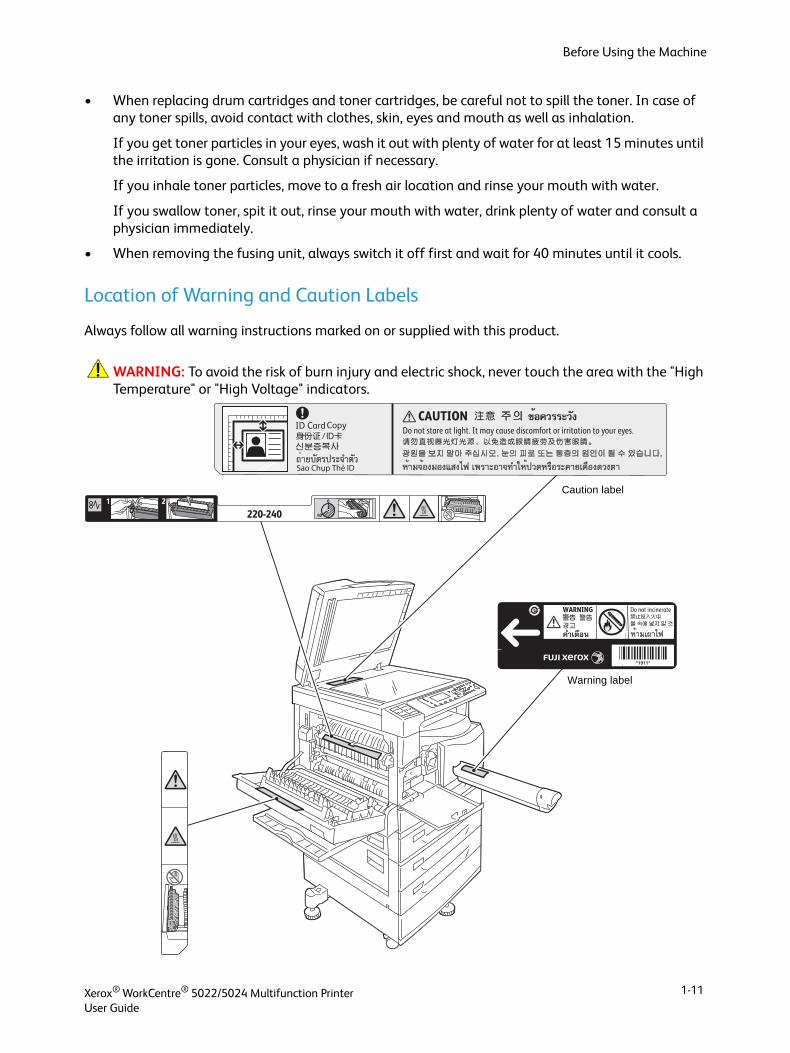
Location of Warning and Caution Labels
Always follow all warning instructions marked on or supplied with this product.
WARNING: To avoid the risk of burn injury and electric shock, never touch the area with the "High Temperature" or "High Voltage" indicators.
Caution label
Warning label
Xerox® WorkCentre® 5022/5024 Multifunction PrinterUser Guide
1-11
Before Using the Machine
Regulations
Radio Frequency Emissions (Class A)
This product has been tested and found to comply with the limits for a class A digital device, pursuant to International Standard for Electromagnetic Interference (CISPR Publ. 22) and Radiocommunication Act 1992 in Australia/New Zealand. These limits are designed to provide reasonable protection against harmful interference when the product is operated in a commercial environment. This product generates, uses, and can radiate radio frequency energy and, if not installed and used in accordance with the customer documentation, may cause harmful interference to radio communications. Operation of this product in a residential area is likely to cause harmful interference in which case the user is required to correct the interference at their own expense.
Changes and modifications to this product not specifically approved by Xerox may void the user's authority to operate this equipment.
Product Safety Certification (UL, CB)
This product is certified by the following agency using the safety standards listed.
Agency: TUV
Standard: IEC60950-1:ed. 2
Environment
For environmental protection and efficient use of resources, Xerox recycles returned toner cartridges to manufacture parts and materials, or for energy recovery.
Proper disposal is required for used toner cartridges and drum cartridges. Do not open toner cartridge containers. Return them to your local Xerox representative.
About Licenses
This section describes information about licenses. Be sure to read it thoroughly.
JPEG Code
Our printer software uses some of the codes defined by the Independent JPEG Group.
Xerox® WorkCentre® 5022/5024 Multifunction PrinterUser Guide
1-12
Before Using the Machine
Libcurl
COPYRIGHT AND PERMISSION NOTICE
Copyright (c) 1996 - 2006, Daniel Stenberg, <[email protected]>.
All rights reserved.
Permission to use, copy, modify, and distribute this software for any purpose with or without fee is hereby granted, provided that the above copyright notice and this permission notice appear in all copies.
THE SOFTWARE IS PROVIDED "AS IS", WITHOUT WARRANTY OF ANY KIND, EXPRESS OR IMPLIED, INCLUDING BUT NOT LIMITED TO THE WARRANTIES OF MERCHANTABILITY, FITNESS FOR A PARTICULAR PURPOSE AND NONINFRINGEMENT OF THIRD PARTY RIGHTS. IN NO EVENT SHALL THE AUTHORS OR COPYRIGHT HOLDERS BE LIABLE FOR ANY CLAIM, DAMAGES OR OTHER LIABILITY, WHETHER IN AN ACTION OF CONTRACT, TORT OR OTHERWISE, ARISING FROM, OUT OF OR IN CONNECTION WITH THE SOFTWARE OR THE USE OR OTHER DEALINGS IN THE SOFTWARE.
Except as contained in this notice, the name of a copyright holder shall not be used in advertising or otherwise to promote the sale, use or other dealings in this Software without prior written authorization of the copyright holder.
FreeBSD
This product contains the part of FreeBSD codes.
The FreeBSD Copyright
Copyright 1994-2006 The FreeBSD Project. All rights reserved.
Redistribution and use in source and binary forms, with or without modification, are permitted provided that the following conditions are met:
Redistributions of source code must retain the above copyright notice, this list of conditions and the following disclaimer.
Xerox® WorkCentre® 5022/5024 Multifunction PrinterUser Guide
1-13
Before Using the Machine
Redistributions in binary form must reproduce the above copyright notice, this list of conditions and the following disclaimer in the documentation and/or other materials provided with the distribution.
THIS SOFTWARE IS PROVIDED BY THE FREEBSD PROJECT "AS IS" AND ANY EXPRESS OR IMPLIED WARRANTIES, INCLUDING, BUT NOT LIMITED TO, THE IMPLIED WARRANTIES OF MERCHANTABILITY AND FITNESS FOR A PARTICULAR PURPOSE ARE DISCLAIMED. IN NO EVENT SHALL THE FREEBSD PROJECT OR CONTRIBUTORS BE LIABLE FOR ANY DIRECT, INDIRECT, INCIDENTAL, SPECIAL, EXEMPLARY, OR CONSEQUENTIAL DAMAGES (INCLUDING, BUT NOT LIMITED TO, PROCUREMENT OF SUBSTITUTE GOODS OR SERVICES; LOSS OF USE, DATA, OR PROFITS; OR BUSINESS INTERRUPTION) HOWEVER CAUSED AND ON ANY THEORY OF LIABILITY, WHETHER IN CONTRACT, STRICT LIABILITY, OR TORT (INCLUDING NEGLIGENCE OR OTHERWISE) ARISING IN ANY WAY OUT OF THE USE OF THIS SOFTWARE, EVEN IF ADVISED OF THE POSSIBILITY OF SUCH DAMAGE.
The views and conclusions contained in the software and documentation are those of the authors and should not be interpreted as representing official policies, either expressed or implied, of the FreeBSD Project.
ICC Profile (Little cms)
Little cms copyright (c) 1988-2004 Marti Maria
WIDE DHCP Client
WIDE Project DHCP Implementation
Copyright (c) 1995 Akihiro Tominaga
Copyright (c) 1995 WIDE Project
All rights reserved.
Permission to use, copy, modify and distribute this software and its documentation is hereby granted, provided only with the following conditions are satisfied:
1. Both the copyright notice and this permission notice appear in all copies of the software, derivative works or modified versions, and any portions thereof, and that both notices appear in supporting documentation.
2. All advertising materials mentioning features or use of this software must display the following acknowledgement:
This product includes software developed by WIDE Project and its contributors.
3. Neither the name of WIDE Project nor the names of its contributors may be used to endorse or promote products derived from this software without specific prior written permission.
Xerox® WorkCentre® 5022/5024 Multifunction PrinterUser Guide
1-14
Before Using the Machine
Feedback of the results generated from any improvements or extensions made to this software would be much appreciated.
Any such feedback should be sent to:
Akihiro Tominaga
WIDE Project
Keio University, Endo 5322, Kanagawa, Japan
(E-mail: [email protected])
WIDE project has the rights to redistribute these changes.
MD5
Copyright (C) 1991-2, RSA Data Security, Inc. Created 1991. All rights reserved.
License to copy and use this software is granted provided that it is identified as the "RSA Data Security, Inc. MD5 Message-Digest Algorithm" in all material mentioning or referencing this software or this function.
License is also granted to make and use derivative works provided that such works are identified as "derived from the RSA Data Security, Inc. MD5 Message-Digest Algorithm" in all material mentioning or referencing the derived work.
RSA Data Security, Inc. makes no representations concerning either the merchantability of this software or the suitability of this software for any particular purpose.
It is provided "as is" without express or implied warranty of any kind.
These notices must be retained in any copies of any part of this documentation and/or software.
Xerox® WorkCentre® 5022/5024 Multifunction PrinterUser Guide
1-15
Before Using the Machine
Legal Notice
Copying or printing certain documents may be illegal in your country. Fines or imprisonment may be imposed on those found guilty. The following are examples of items that may be illegal to copy or print in your country.
• Currency
• Banknotes and checks
• Bank and government bonds and securities
• Passports and identification cards
• Copyright material or trademarks without the consent of the owner
• Postage stamps and other negotiable instruments
This list is not inclusive and no liability is assumed for either its completeness or accuracy. In case of doubt, contact your legal counsel.
Xerox® WorkCentre® 5022/5024 Multifunction PrinterUser Guide
1-16
2Environment Settings
Supported Environment
This section describes the environment settings needed to use the machine's print and scan features.
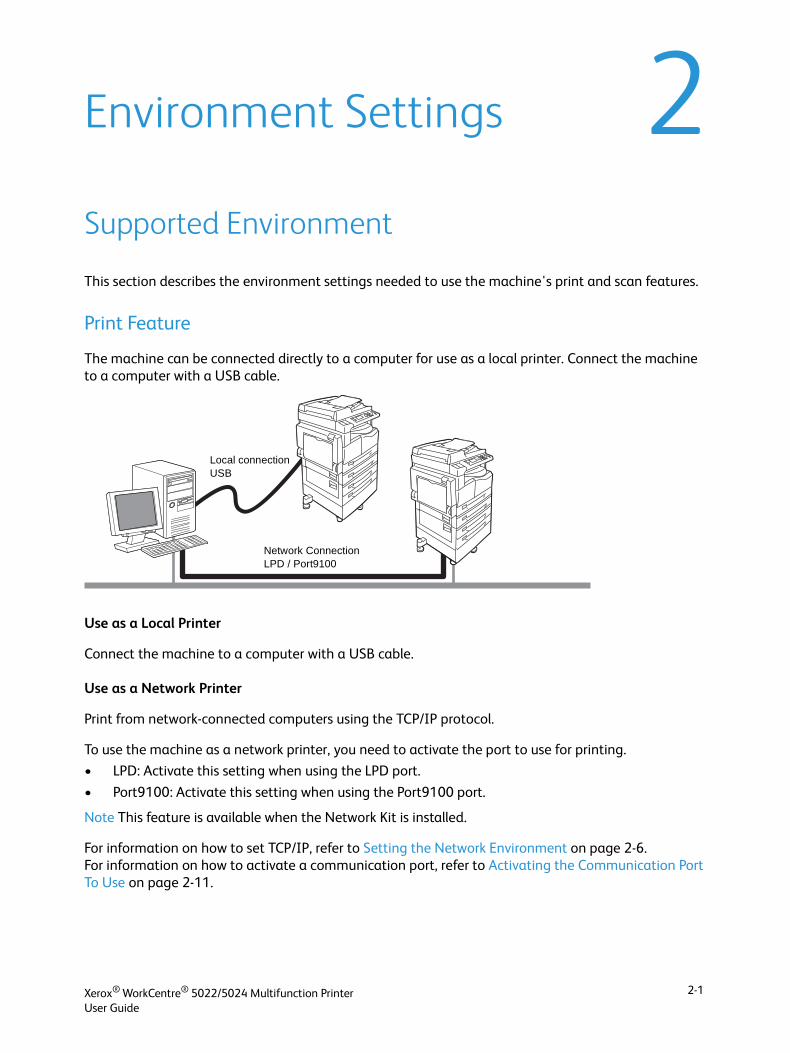
Print Feature
The machine can be connected directly to a computer for use as a local printer. Connect the machine to a computer with a USB cable.
Use as a Local Printer
Connect the machine to a computer with a USB cable.
Use as a Network Printer
Print from network-connected computers using the TCP/IP protocol.
To use the machine as a network printer, you need to activate the port to use for printing.
• LPD: Activate this setting when using the LPD port.
• Port9100: Activate this setting when using the Port9100 port.
Note This feature is available when the Network Kit is installed.
For information on how to set TCP/IP, refer to Setting the Network Environment on page 2-6.For information on how to activate a communication port, refer to Activating the Communication Port To Use on page 2-11.
Local connectionUSB
Network Connection LPD / Port9100
Xerox® WorkCentre® 5022/5024 Multifunction PrinterUser Guide
2-1
Environment Settings
Scan Feature
The machine supports the following Scan functions:
Using the USB connection
Scan with PC application
Uses the USB connection to import scan data in a computer with a TWAIN or Windows Imaging Acquisition (WIA) compatible application.
To use this function, you must install the scan driver from the Driver CD Kit CD-ROM.
Note To install the scan driver, follow the instructions provided in the manual (HTML file) included on the CD-ROM.
For information on how to use this feature, refer to Using an Application to Load Scan Data from the Machine via USB on page 7-6.
Using the Network connection
Scan to E-mail
Uses the SMTP protocol to send the document scanned by the machine as an e-mail attachment.
To send scanned data as an e-mail attachment, you must activate the SMTP port.
(Setting at the time of factory shipment: Enabled)
This function is also used to set the e-mail header and body and SMTP server settings used when e-mails are sent as well as the recipient address (system administrator's e-mail address) for e-mail notification when a transmission error occurs.
Note This feature is available when the Network Kit is installed.
For information on how to activate the SMTP port, refer to Activating the Communication Port To Use on page 2-11.For information on how to set the SMTP server, refer to SMTP Server Settings on page 2-13.For information on how to enter the header and body of an e-mail, refer to E-mail Header and Body Settings on page 2-14.For information on how to set the system administrator's e-mail address, refer to Administrator's E-mail Address on page 2-21.For information on how to use this feature, refer to Sending Scan Data to PC as E-mail Attachment - E-mail on page 7-7.
Scan to PC (Network)
Uses the SMB protocol to save the document scanned by the machine in a common folder created on a network PC.
To save scanned data on a computer, you must activate the SMB port.
Xerox® WorkCentre® 5022/5024 Multifunction PrinterUser Guide
2-2
Environment Settings
(Setting at the time of factory shipment: Enabled)
Note This feature is available when the Network Kit is installed.
For information on how to activate the SMB port, refer to Activating the Communication Port To Use on page 2-11.
For information on how to use this feature, refer to Sending Scan Data to PC over Network - PC (Network) on page 7-10.
Fax Feature
The machine supports the following communication networks for fax transmissions:
• Public switched telephone network (PSTN)
• Private branch exchanges (PBX)
You must also make settings in Region and Clock to use the Fax functions on this machine.
Note This option is available when the Fax Kit is installed.
For information on how to make the region setting, refer to Region on page 9-38.For information on how to make the clock settings, refer to Clock on page 9-43.
Xerox® WorkCentre® 5022/5024 Multifunction PrinterUser Guide
2-3
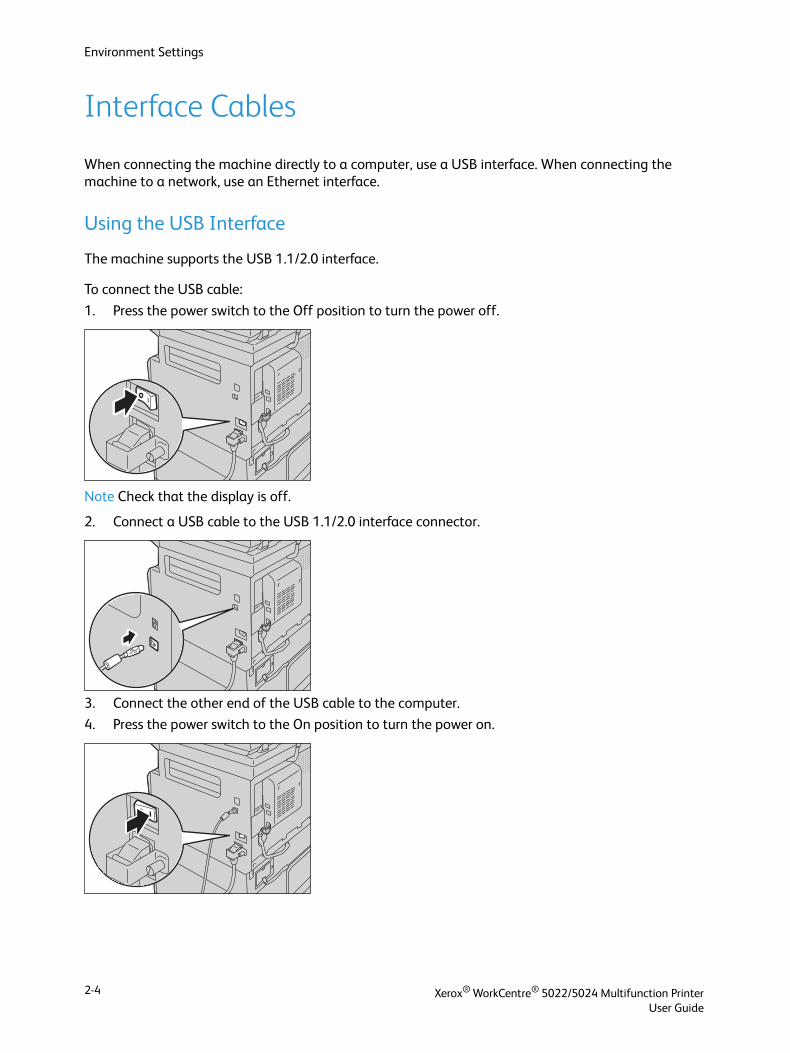
Environment Settings
Interface Cables
When connecting the machine directly to a computer, use a USB interface. When connecting the machine to a network, use an Ethernet interface.
Using the USB Interface
The machine supports the USB 1.1/2.0 interface.
To connect the USB cable:
1. Press the power switch to the Off position to turn the power off.
Note Check that the display is off.
2. Connect a USB cable to the USB 1.1/2.0 interface connector.
3. Connect the other end of the USB cable to the computer.
4. Press the power switch to the On position to turn the power on.
Xerox® WorkCentre® 5022/5024 Multifunction PrinterUser Guide
2-4
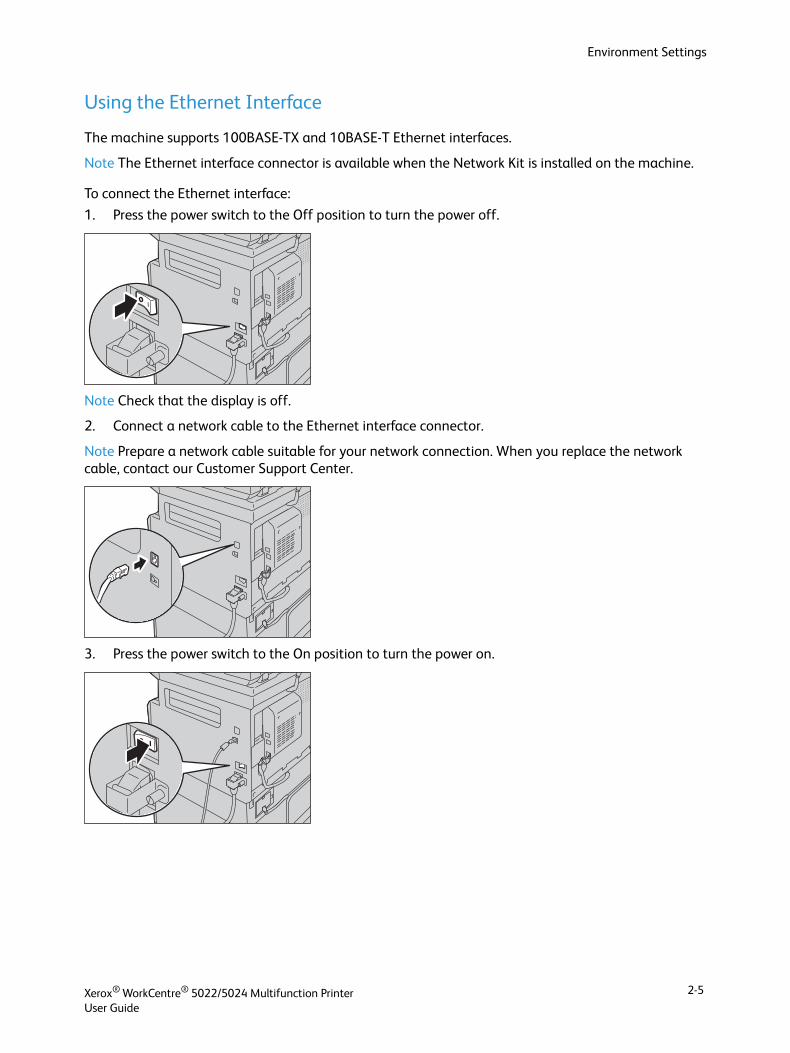
Environment Settings
Using the Ethernet Interface
The machine supports 100BASE-TX and 10BASE-T Ethernet interfaces.
Note The Ethernet interface connector is available when the Network Kit is installed on the machine.
To connect the Ethernet interface:
1. Press the power switch to the Off position to turn the power off.
Note Check that the display is off.
2. Connect a network cable to the Ethernet interface connector.
Note Prepare a network cable suitable for your network connection. When you replace the network cable, contact our Customer Support Center.
3. Press the power switch to the On position to turn the power on.
Xerox® WorkCentre® 5022/5024 Multifunction PrinterUser Guide
2-5
Environment Settings
Setting the Network Environment
This section describes how to make the settings needed to use the TCP/IP protocol.
The machine supports IPv6 addresses in an IPv6 network environment. For more information, refer to Setting the Machine's IP Address (IPv6) on page 2-7.
Setting the Machine's IP Address (IPv4)
To use the TCP/IP protocol, you must set the machine's IP address.
By default, the machine is set to obtain its IP address automatically.
This setting automatically sets the machine's IP address when the machine is connected to a network containing a DHCP server.
Print the System Settings Report to check whether the machine's IP address has already been set.
You can also check the IP address in the following methods:
• On the Machine Status screen
• Using the Tools menu items
• Using Xerox® CentreWare® Internet Services
For information on how to print the System Settings Report, refer to Printing Reports/Lists on page 10-7.For information on how to check on the Machine Status screen, refer to Checking the Machine’s IP Address on page 10-5.For information on how to check using Tools, refer to TCP/IP on page 9-27.
For information on how to check using Xerox® CentreWare® Internet Services, refer to TCP/IP (Connectivity > Protocols) on page 2-22.
If the machine's IP address has not been set, set the IP address by using the Printer Setup Utility for Setting IP Address included in the Driver CD Kit or using the control panel to change the Get IP Address setting to Control Panel.
Notes
• If the network has a DHCP server, the machine's IP address may be changed, so check the address periodically.
• The machine can acquire address information automatically by using a BOOTP or RARP server. To use a BOOTP or RARP server to acquire the machine's IP address, use the control panel to change the Get IP Address setting to BOOTP or RARP.
For information on how to use the Printer Setup Utility for Setting IP Address, refer to When Using the Printer Setup Utility for Setting the IP Address on page 2-7.For information on how to set the IP address from the control panel, refer to TCP/IP on page 9-27.
Xerox® WorkCentre® 5022/5024 Multifunction PrinterUser Guide
2-6
Environment Settings
Setting the Machine's IP Address (IPv6)
The machine supports IPv6 addresses in an IPv6 network environment.
The machine's IP address type is set to IPv4 by factory default. To use the machine in an IPv6 network environment, set the IP address type to IPv6 or both types. The IPv6 address is set automatically when the machine is restarted.
Print the System Settings Report to check the IPv6 address.
You can also check the IP address in the following methods:
• On the Machine Status screen
• Using the Tools menu items
• Using Xerox® CentreWare® Internet Services
For information on how to print the System Settings Report, refer to Printing Reports/Lists on page 10-7.For information on how to check on the Machine Status screen, refer to Checking the Machine’s IP Address on page 10-5.For information on how to check using Tools, refer to TCP/IP on page 9-27.
For information on how to check using Xerox® CentreWare® Internet Services, refer to TCP/IP (Connectivity > Protocols) on page 2-22.
You can set a fixed IPv6 address for the machine using either of the following methods:
• Use the Printer Setup Utility for Setting IP Address.
• Use the control panel to make the setting manually. Enter System Administration mode. From the Tools menu, select Wired Network > TCP/IP > IP Mode. Set the IP Mode to IPv6 or Dual Stack. From the IPv6 menu, set Set IPv6 to Enable, and then enter the IP address into IP Address.
• Use Xerox® CentreWare® Internet Services to make the setting manually. Print the System
Settings Report to check the address set automatically, and then use the address to access Xerox®
CentreWare® Internet Services.
From the Properties tab, select Connectivity > Protocols > TCP/IP > IP Mode. Set the IP Mode to IPv6 or Dual Stack. The IPv6 address can be entered manually if the Enabled checkbox in Enable Manual Address is checked under IPv6.
For information on how to use the Printer Setup Utility for Setting IP Address, refer to When Using the Printer Setup Utility for Setting the IP Address on page 2-7.For information on how to set the IP address from the control panel, refer to TCP/IP on page 9-27.
For information on how to make settings from Xerox® CentreWare® Internet Services, refer to Setting Items on Xerox® CentreWare® Internet Services on page 2-19.
When Using the Printer Setup Utility for Setting the IP Address
This section describes how to set the IP address using the Printer Setup Utility for Setting IP Address included in the Driver CD Kit CD-ROM.
Note When using the Printer Setup Utility for Setting IP Address, make sure that the machine is not in use or in System Administration mode.
Xerox® WorkCentre® 5022/5024 Multifunction PrinterUser Guide
2-7
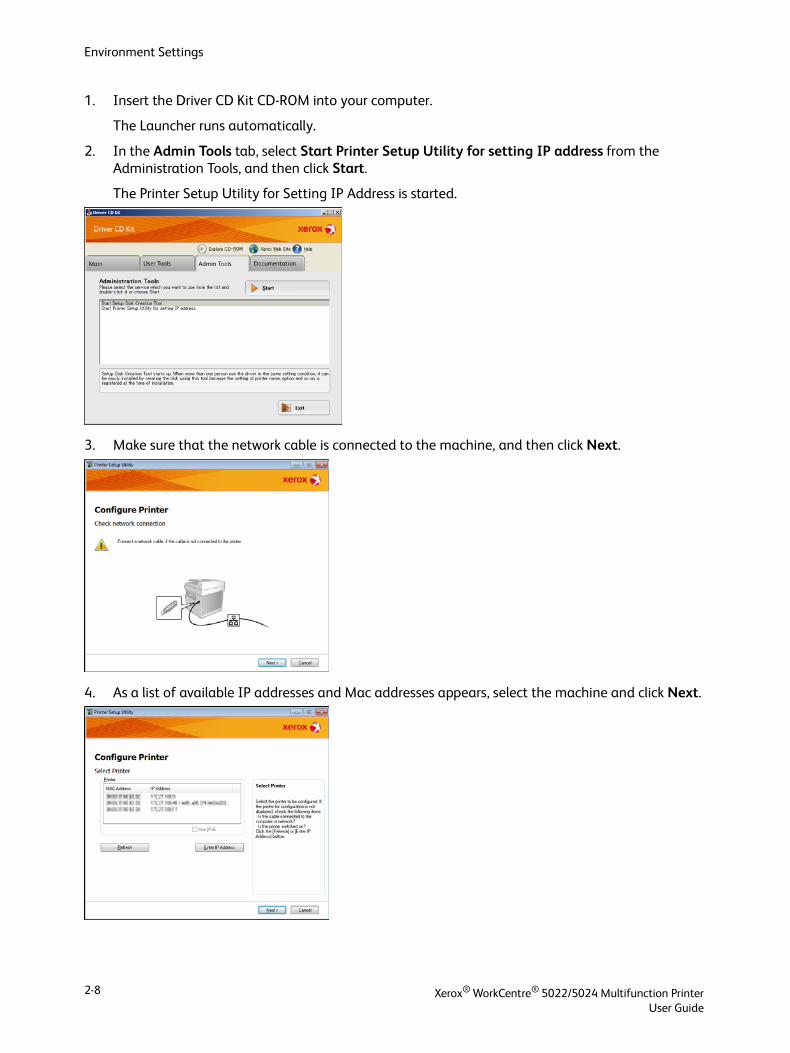
Environment Settings
1. Insert the Driver CD Kit CD-ROM into your computer.
The Launcher runs automatically.
2. In the Admin Tools tab, select Start Printer Setup Utility for setting IP address from the Administration Tools, and then click Start.
The Printer Setup Utility for Setting IP Address is started.
3. Make sure that the network cable is connected to the machine, and then click Next.
4. As a list of available IP addresses and Mac addresses appears, select the machine and click Next.
Xerox® WorkCentre® 5022/5024 Multifunction PrinterUser Guide
2-8
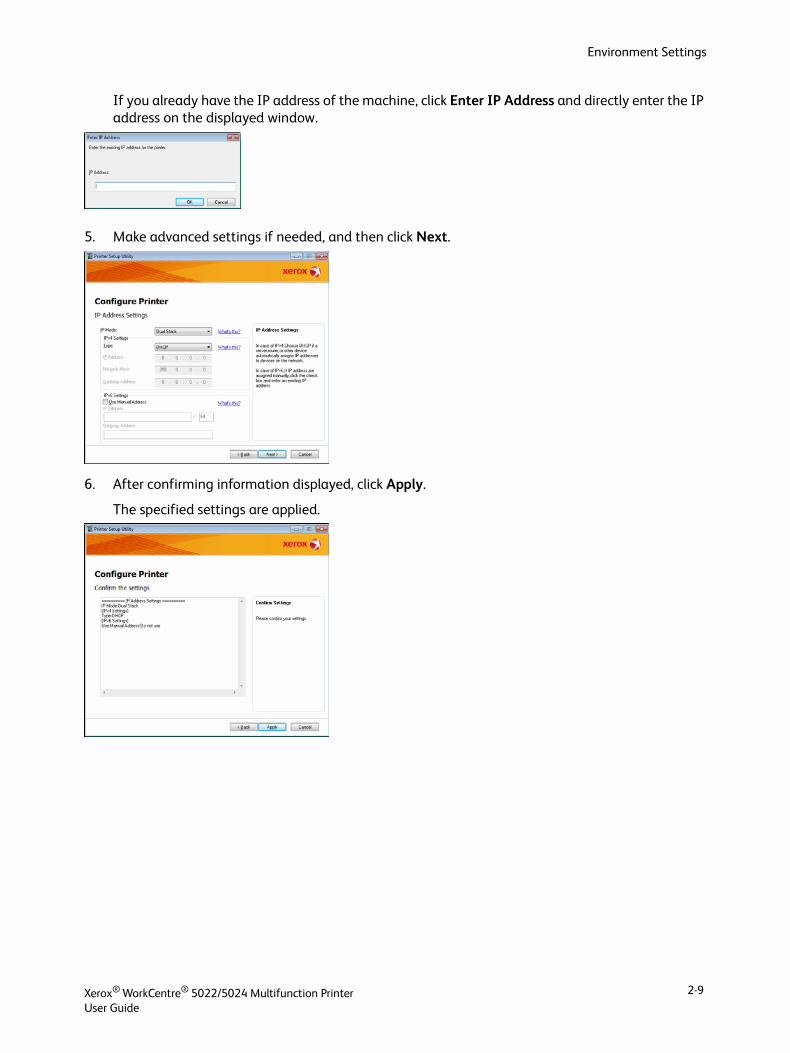
Environment Settings
If you already have the IP address of the machine, click Enter IP Address and directly enter the IP address on the displayed window.
5. Make advanced settings if needed, and then click Next.
6. After confirming information displayed, click Apply.
The specified settings are applied.
Xerox® WorkCentre® 5022/5024 Multifunction PrinterUser Guide
2-9
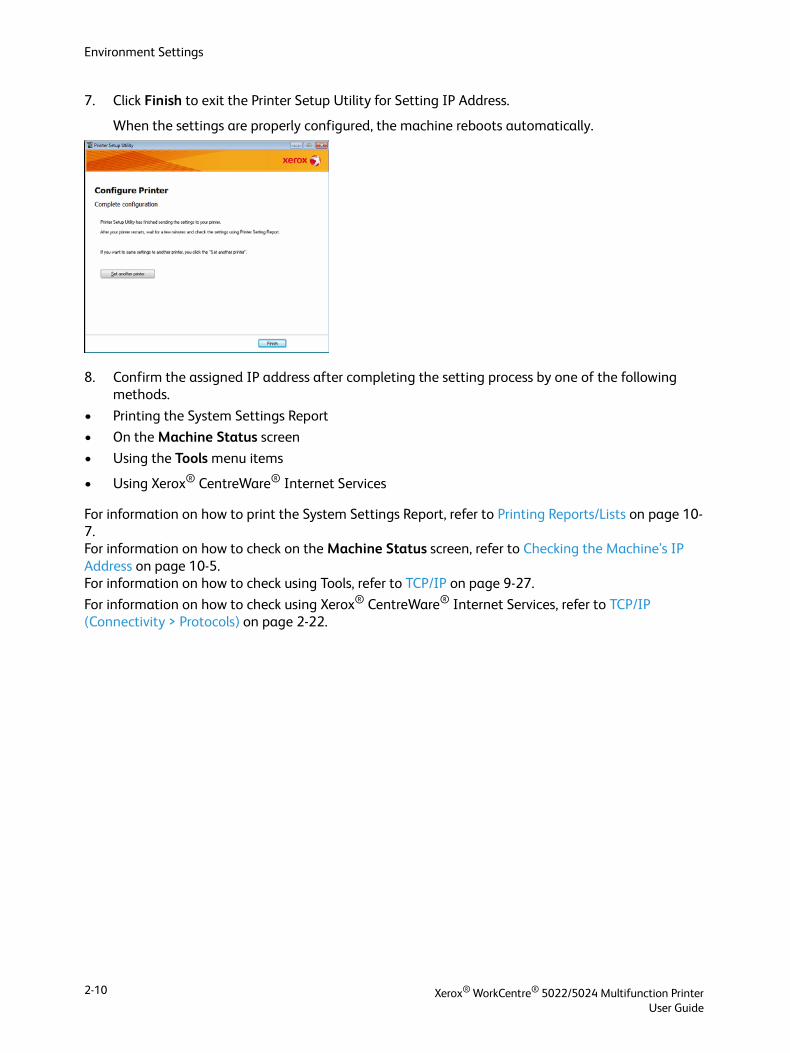
Environment Settings
7. Click Finish to exit the Printer Setup Utility for Setting IP Address.
When the settings are properly configured, the machine reboots automatically.
8. Confirm the assigned IP address after completing the setting process by one of the following methods.
• Printing the System Settings Report
• On the Machine Status screen
• Using the Tools menu items
• Using Xerox® CentreWare® Internet Services
For information on how to print the System Settings Report, refer to Printing Reports/Lists on page 10-7.For information on how to check on the Machine Status screen, refer to Checking the Machine’s IP Address on page 10-5.For information on how to check using Tools, refer to TCP/IP on page 9-27.
For information on how to check using Xerox® CentreWare® Internet Services, refer to TCP/IP (Connectivity > Protocols) on page 2-22.
Xerox® WorkCentre® 5022/5024 Multifunction PrinterUser Guide
2-10
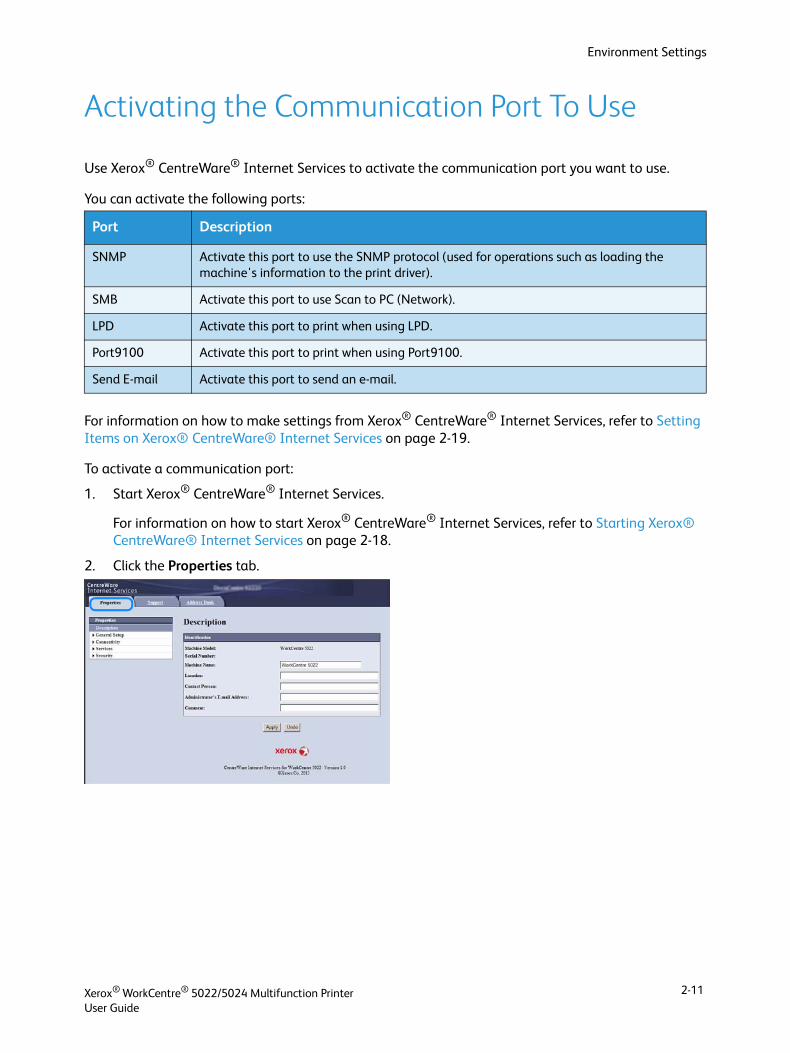
Environment Settings
Activating the Communication Port To Use
Use Xerox® CentreWare® Internet Services to activate the communication port you want to use.
You can activate the following ports:
For information on how to make settings from Xerox® CentreWare® Internet Services, refer to Setting Items on Xerox® CentreWare® Internet Services on page 2-19.
To activate a communication port:
1. Start Xerox® CentreWare® Internet Services.
For information on how to start Xerox® CentreWare® Internet Services, refer to Starting Xerox® CentreWare® Internet Services on page 2-18.
2. Click the Properties tab.
Port Description
SNMP Activate this port to use the SNMP protocol (used for operations such as loading the machine's information to the print driver).
SMB Activate this port to use Scan to PC (Network).
LPD Activate this port to print when using LPD.
Port9100 Activate this port to print when using Port9100.
Send E-mail Activate this port to send an e-mail.
Xerox® WorkCentre® 5022/5024 Multifunction PrinterUser Guide
2-11
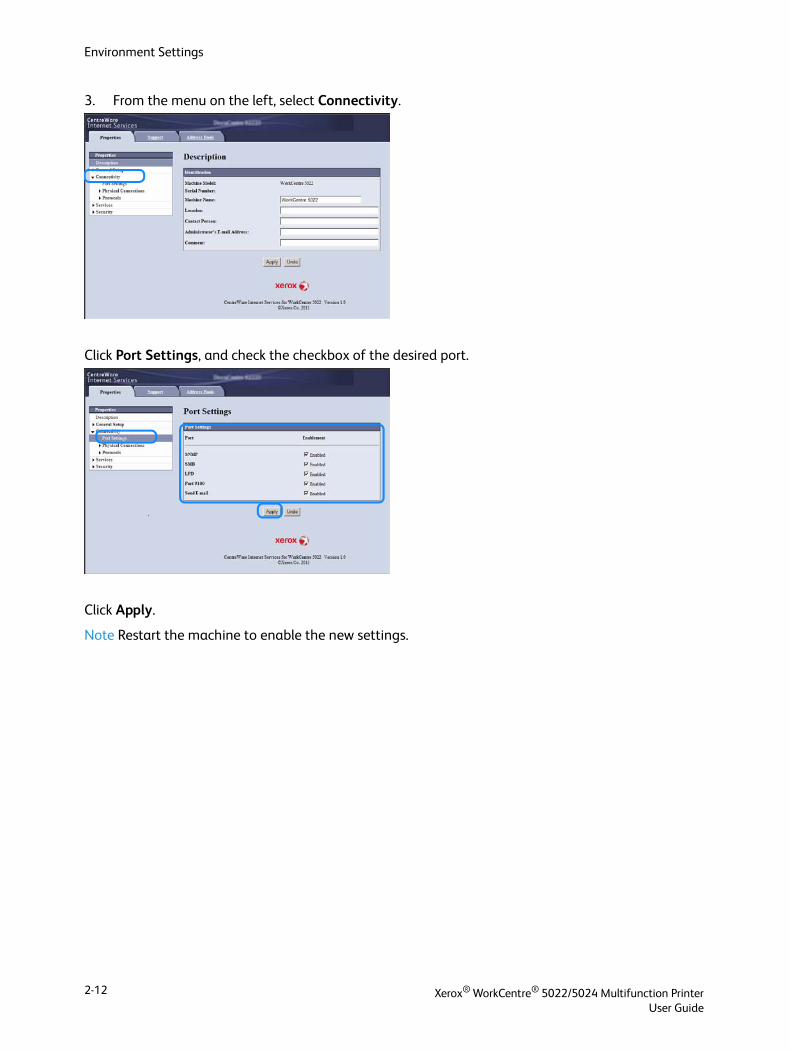
Environment Settings
3. From the menu on the left, select Connectivity.
Click Port Settings, and check the checkbox of the desired port.
Click Apply.
Note Restart the machine to enable the new settings.
Xerox® WorkCentre® 5022/5024 Multifunction PrinterUser Guide
2-12
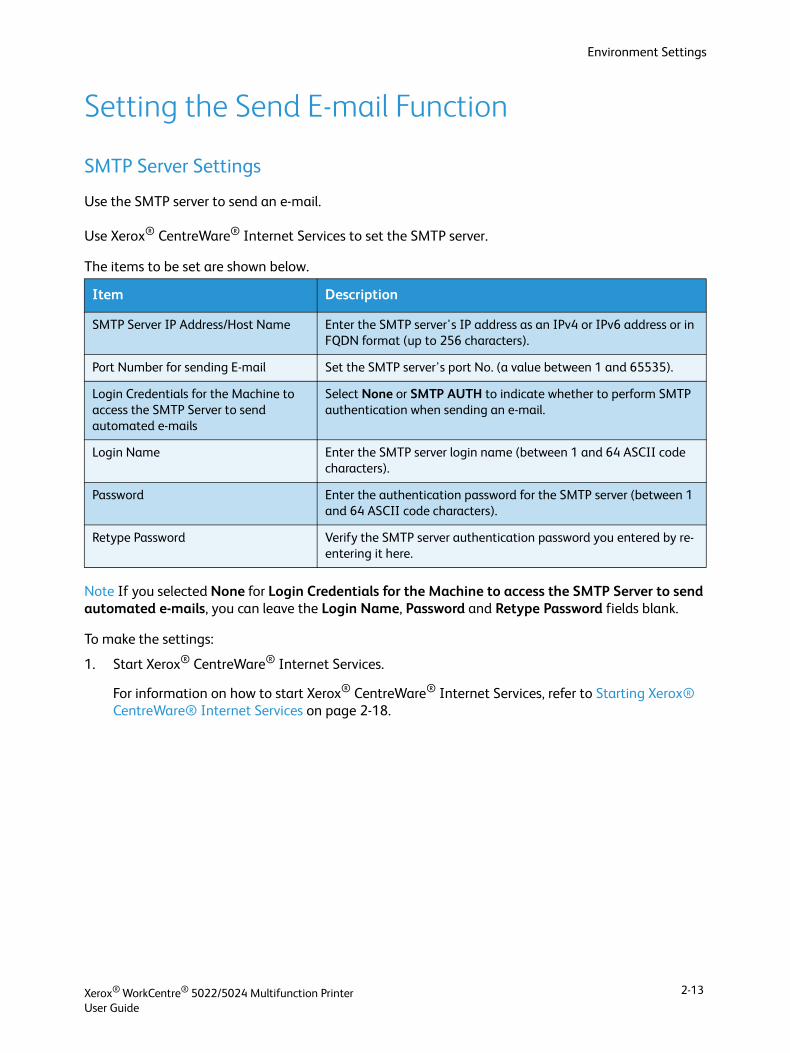
Environment Settings
Setting the Send E-mail Function
SMTP Server Settings
Use the SMTP server to send an e-mail.
Use Xerox® CentreWare® Internet Services to set the SMTP server.
The items to be set are shown below.
Note If you selected None for Login Credentials for the Machine to access the SMTP Server to send automated e-mails, you can leave the Login Name, Password and Retype Password fields blank.
To make the settings:
1. Start Xerox® CentreWare® Internet Services.
For information on how to start Xerox® CentreWare® Internet Services, refer to Starting Xerox® CentreWare® Internet Services on page 2-18.
Item Description
SMTP Server IP Address/Host Name Enter the SMTP server's IP address as an IPv4 or IPv6 address or in FQDN format (up to 256 characters).
Port Number for sending E-mail Set the SMTP server's port No. (a value between 1 and 65535).
Login Credentials for the Machine to access the SMTP Server to send automated e-mails
Select None or SMTP AUTH to indicate whether to perform SMTP authentication when sending an e-mail.
Login Name Enter the SMTP server login name (between 1 and 64 ASCII code characters).
Password Enter the authentication password for the SMTP server (between 1 and 64 ASCII code characters).
Retype Password Verify the SMTP server authentication password you entered by re-entering it here.
Xerox® WorkCentre® 5022/5024 Multifunction PrinterUser Guide
2-13

Environment Settings
2. Click the Properties tab.
3. From the menu on the left, select Connectivity > Protocols.
4. Click SMTP Server, and enter the settings.
5. Click Apply.
E-mail Header and Body Settings
When sending a scanned document as an e-mail attachment, you can enter an e-mail header and body.
Xerox® WorkCentre® 5022/5024 Multifunction PrinterUser Guide
2-14
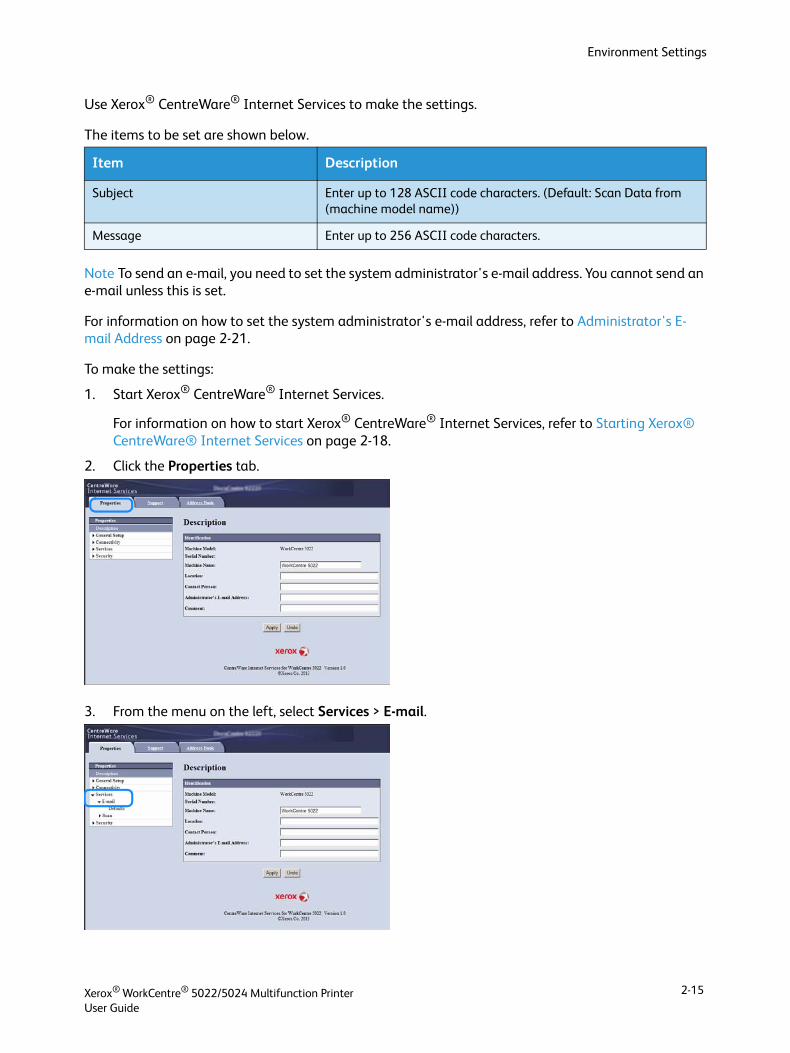
Environment Settings
Use Xerox® CentreWare® Internet Services to make the settings.
The items to be set are shown below.
Note To send an e-mail, you need to set the system administrator's e-mail address. You cannot send an e-mail unless this is set.
For information on how to set the system administrator's e-mail address, refer to Administrator's E-mail Address on page 2-21.
To make the settings:
1. Start Xerox® CentreWare® Internet Services.
For information on how to start Xerox® CentreWare® Internet Services, refer to Starting Xerox® CentreWare® Internet Services on page 2-18.
2. Click the Properties tab.
3. From the menu on the left, select Services > E-mail.
Item Description
Subject Enter up to 128 ASCII code characters. (Default: Scan Data from (machine model name))
Message Enter up to 256 ASCII code characters.
Xerox® WorkCentre® 5022/5024 Multifunction PrinterUser Guide
2-15

Environment Settings
4. Click Defaults, and enter the Subject, Message, and Maximum Attachment Size.
Xerox® WorkCentre® 5022/5024 Multifunction PrinterUser Guide
2-16
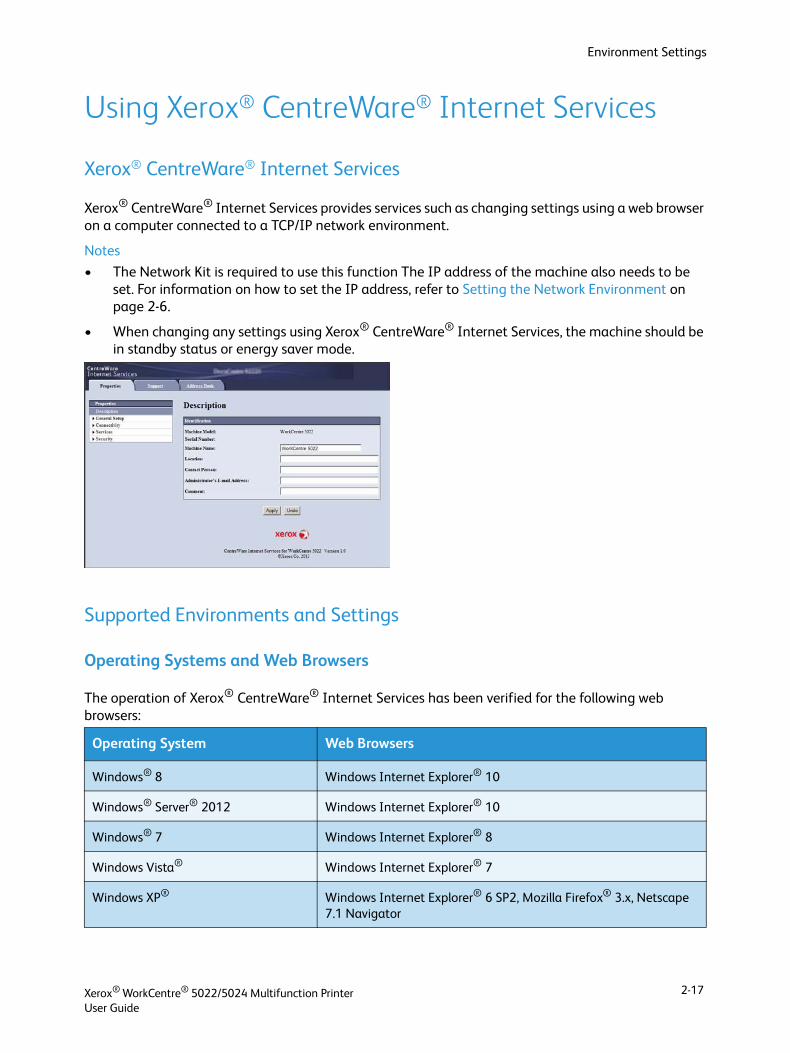
Environment Settings
Using Xerox® CentreWare® Internet Services
Xerox® CentreWare® Internet Services
Xerox® CentreWare® Internet Services provides services such as changing settings using a web browser on a computer connected to a TCP/IP network environment.
Notes
• The Network Kit is required to use this function The IP address of the machine also needs to be set. For information on how to set the IP address, refer to Setting the Network Environment on page 2-6.
• When changing any settings using Xerox® CentreWare® Internet Services, the machine should be in standby status or energy saver mode.
Supported Environments and Settings
Operating Systems and Web Browsers
The operation of Xerox® CentreWare® Internet Services has been verified for the following web browsers:
Operating System Web Browsers
Windows® 8 Windows Internet Explorer® 10
Windows® Server® 2012 Windows Internet Explorer® 10
Windows® 7 Windows Internet Explorer® 8
Windows Vista® Windows Internet Explorer® 7
Windows XP® Windows Internet Explorer® 6 SP2, Mozilla Firefox® 3.x, Netscape 7.1 Navigator
Xerox® WorkCentre® 5022/5024 Multifunction PrinterUser Guide
2-17

Environment Settings
Web Browser Settings
Specifying the machine's address in the web browser is recommended.
Note If you specify the machine's address using a proxy server, the service response time may be slow or the screens may not appear. If these problems occur, you will need to set the machine's IP address in the web browser and choose not to use a proxy server. See your web browser's manual for how to make the setting.
You will also need to make other web browser settings to make Xerox® CentreWare® Internet Services work properly.
The following procedure is based on the Internet Explorer 6.0.
1. From the Tools menu, select Internet Options.
2. In the General tab, click Settings under Temporary Internet Files.
3. In the Settings dialog box, select Check for newer versions of stored pages:.
4. Select Every visit to the page or Every time you start Internet Explorer.
5. Click OK.
6. Click OK in the Internet Options dialog box.
Starting Xerox® CentreWare® Internet Services
To start Xerox® CentreWare® Internet Services:
1. Start your computer and a web browser.
2. In your web browser's address bar, enter the machine's IP address or URL, and then press the Enter key.
The top page of Xerox® CentreWare® Internet Services is displayed.
- Example IP address (IPv4)
- Example IP address (IPv6)
- Example URL
Notes
• If your network uses DNS (Domain Name System) and the machine's host name is registered on the domain name server, you can access the machine using the Internet address combining the host name and the domain name. For example, if the host name is "myhost", and the domain name is "example.com" then the Internet address is "myhost.example.com".
Xerox® WorkCentre® 5022/5024 Multifunction PrinterUser Guide
2-18
Environment Settings
• When specifying a port number, add ":" and the port number after the IP address or the Internet address.
• The IPv6 address cannot be entered manually in some cases depending on the web browser that you use.
• HTTPS is not supported.
Setting Items on Xerox® CentreWare® Internet Services
The table below lists the menu items on the Xerox® CentreWare® Internet Services screens.
Notes
• You must have a user name and a passcode to change the settings. The user ID "admin" and the passcode "1111" is set as default. For information on how to change the user ID and the passcode, refer to Using Xerox® CentreWare® Internet Services on page 2-17 and System Administrator Settings (Security) on page 2-32.
• You cannot enter the system administration mode from a computer while the machine control panel is in use, the machine side is in the system administration mode, or there are any current or pending jobs. If you still cannot enter System Administration mode, wait for 5 minutes and try
Xerox® WorkCentre® 5022/5024 Multifunction PrinterUser Guide
2-19
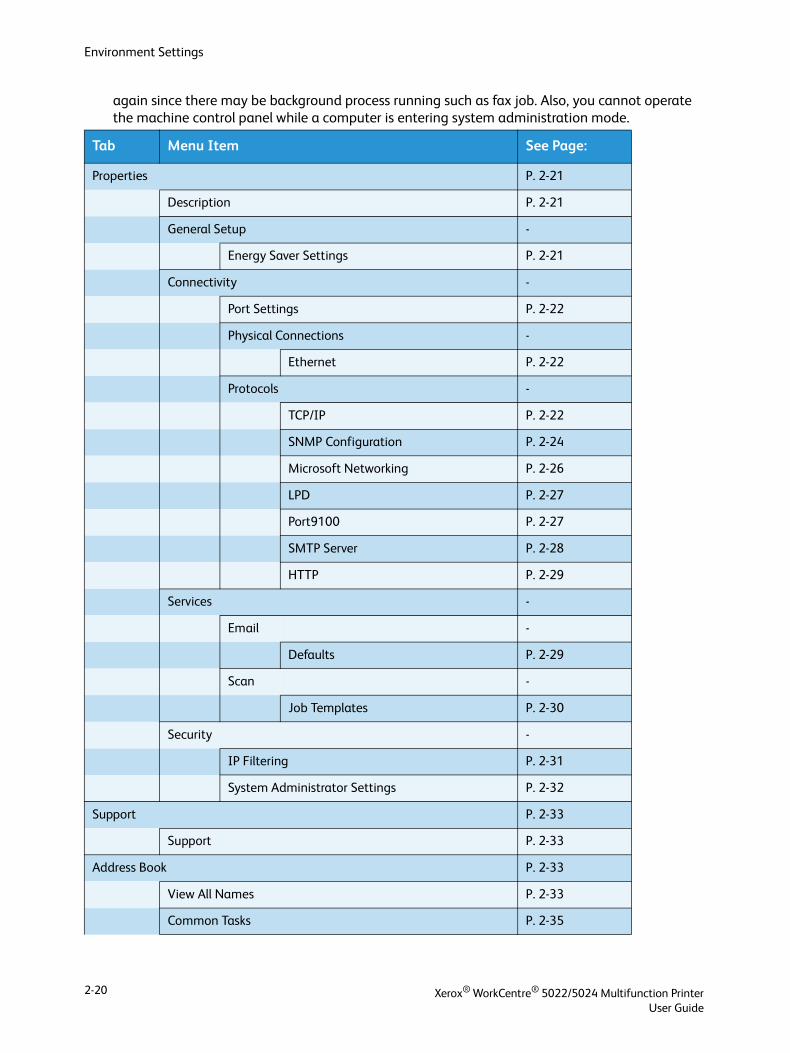
Environment Settings
again since there may be background process running such as fax job. Also, you cannot operate the machine control panel while a computer is entering system administration mode.
Tab Menu Item See Page:
Properties P. 2-21
Description P. 2-21
General Setup -
Energy Saver Settings P. 2-21
Connectivity -
Port Settings P. 2-22
Physical Connections -
Ethernet P. 2-22
Protocols -
TCP/IP P. 2-22
SNMP Configuration P. 2-24
Microsoft Networking P. 2-26
LPD P. 2-27
Port9100 P. 2-27
SMTP Server P. 2-28
HTTP P. 2-29
Services -
Email -
Defaults P. 2-29
Scan -
Job Templates P. 2-30
Security -
IP Filtering P. 2-31
System Administrator Settings P. 2-32
Support P. 2-33
Support P. 2-33
Address Book P. 2-33
View All Names P. 2-33
Common Tasks P. 2-35
Xerox® WorkCentre® 5022/5024 Multifunction PrinterUser Guide
2-20

Environment Settings
Note Double-byte characters cannot be used in Xerox® CentreWare® Internet Services.
Properties Tab
Description
Energy Saver Settings (General Setup)
Note Neither of Low Power mode or Sleep mode can be disabled.
Add New Name P. 2-35
Management P. 2-35
Import Data P. 2-35
Export Data P. 2-36
Delete All Names P. 2-36
Item Description
Machine Model The product name is displayed.
Serial Number The product serial number is displayed.
Machine Name You can enter the printer name (up to 32 ASCII code characters excluding colons (:), equal signs (=), at symbols (@), or asterisks (*), which are not valid). (Default: "WorkCentre 5022" or "WorkCentre 5024")
Location You can enter the machine's location (up to 255 ASCII code characters).
Contact Person You can enter the contact person's information (up to 255 ASCII code characters).
Administrator's E-mail Address You can enter the e-mail address of the system administrator (up to 128 characters).
This information is required for sending an e-mail.
Item Description
Time to Low Power Mode You can set the time elapse from the last operation until the machine enters Low Power mode. You can set a value between 1 and 60 minutes. (Default: 1)
Time to Sleep Mode You can set the time elapse from Low Power mode until the machine enters Sleep mode. You can set a value between 1 and 239 minutes. (Default: 1)
Apply button You can apply changes by pressing this button.
Tab Menu Item See Page:
Xerox® WorkCentre® 5022/5024 Multifunction PrinterUser Guide
2-21
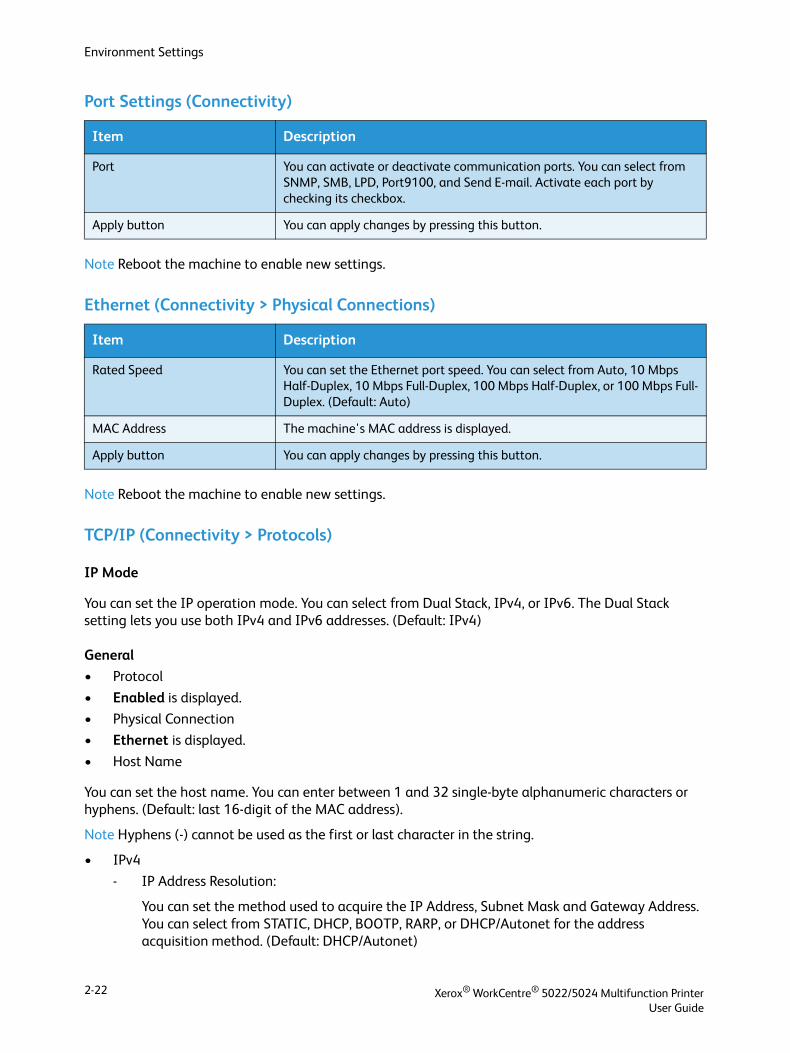
Environment Settings
Port Settings (Connectivity)
Note Reboot the machine to enable new settings.
Ethernet (Connectivity > Physical Connections)
Note Reboot the machine to enable new settings.
TCP/IP (Connectivity > Protocols)
IP Mode
You can set the IP operation mode. You can select from Dual Stack, IPv4, or IPv6. The Dual Stack setting lets you use both IPv4 and IPv6 addresses. (Default: IPv4)
General
• Protocol
• Enabled is displayed.
• Physical Connection
• Ethernet is displayed.
• Host Name
You can set the host name. You can enter between 1 and 32 single-byte alphanumeric characters or hyphens. (Default: last 16-digit of the MAC address).
Note Hyphens (-) cannot be used as the first or last character in the string.
• IPv4
- IP Address Resolution:
You can set the method used to acquire the IP Address, Subnet Mask and Gateway Address. You can select from STATIC, DHCP, BOOTP, RARP, or DHCP/Autonet for the address acquisition method. (Default: DHCP/Autonet)
Item Description
Port You can activate or deactivate communication ports. You can select from SNMP, SMB, LPD, Port9100, and Send E-mail. Activate each port by checking its checkbox.
Apply button You can apply changes by pressing this button.
Item Description
Rated Speed You can set the Ethernet port speed. You can select from Auto, 10 Mbps Half-Duplex, 10 Mbps Full-Duplex, 100 Mbps Half-Duplex, or 100 Mbps Full-Duplex. (Default: Auto)
MAC Address The machine's MAC address is displayed.
Apply button You can apply changes by pressing this button.
Xerox® WorkCentre® 5022/5024 Multifunction PrinterUser Guide
2-22
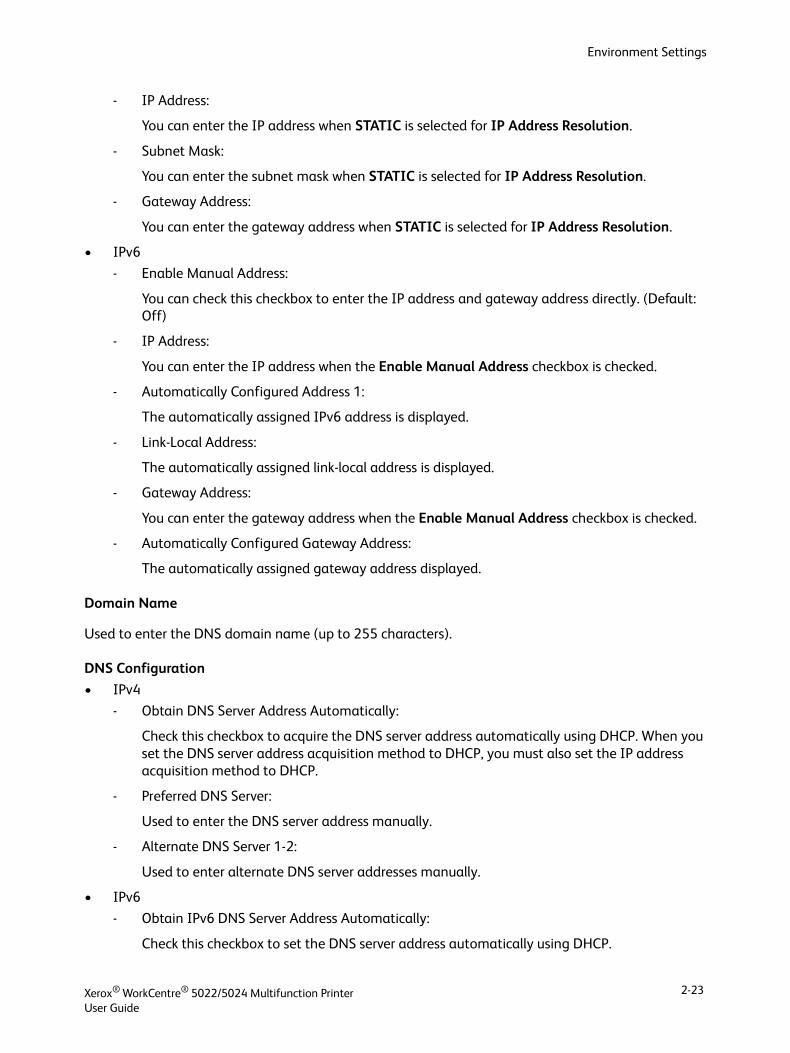
Environment Settings
- IP Address:
You can enter the IP address when STATIC is selected for IP Address Resolution.
- Subnet Mask:
You can enter the subnet mask when STATIC is selected for IP Address Resolution.
- Gateway Address:
You can enter the gateway address when STATIC is selected for IP Address Resolution.
• IPv6
- Enable Manual Address:
You can check this checkbox to enter the IP address and gateway address directly. (Default: Off)
- IP Address:
You can enter the IP address when the Enable Manual Address checkbox is checked.
- Automatically Configured Address 1:
The automatically assigned IPv6 address is displayed.
- Link-Local Address:
The automatically assigned link-local address is displayed.
- Gateway Address:
You can enter the gateway address when the Enable Manual Address checkbox is checked.
- Automatically Configured Gateway Address:
The automatically assigned gateway address displayed.
Domain Name
Used to enter the DNS domain name (up to 255 characters).
DNS Configuration
• IPv4
- Obtain DNS Server Address Automatically:
Check this checkbox to acquire the DNS server address automatically using DHCP. When you set the DNS server address acquisition method to DHCP, you must also set the IP address acquisition method to DHCP.
- Preferred DNS Server:
Used to enter the DNS server address manually.
- Alternate DNS Server 1-2:
Used to enter alternate DNS server addresses manually.
• IPv6
- Obtain IPv6 DNS Server Address Automatically:
Check this checkbox to set the DNS server address automatically using DHCP.
Xerox® WorkCentre® 5022/5024 Multifunction PrinterUser Guide
2-23
Environment Settings
- Preferred DNS Server:
Used to enter the DNS server address manually.
- Alternate DNS Server 1-2:
Used to enter alternate DNS server addresses manually.
• Dynamic DNS Registration (IPv4)
Sets dynamic updating of the IPv4 DNS server. Checking Enabled enables dynamic updating of the DNS server. Checking Overwrite enables dynamic updating of the data in the DNS server database.
• Dynamic DNS Registration (IPv6)
Sets dynamic updating of the IPv6 DNS server. Checking Enabled enables dynamic updating of the DNS server. Checking Overwrite enables dynamic updating of the data in the DNS server database.
• Generate Domain Search List Automatically
Check Enabled to create domain search lists automatically.
• Domain Name 1-3
Used to enter the name of the domain to search (up to 255 characters).
• Connection Time-Out
Sets the timeout period when searching for domains (between 1 and 60 seconds). (Default: 1)
• DNS Resolution via IPv6 First
Check Enabled to prioritize IPv6 for resolving DNS names when IP mode is set to Dual Stack. (Default: On)
Apply button
Press this button to confirm the entered settings.
Note Reboot the machine to enable new settings.
SNMP Configuration (Connectivity > Protocols)
You can set the SNMP protocol.
General
• SNMP Port Status
You can check Enabled to use SNMP. (Default: On)
• Edit SNMP v1/v2c Properties button
You can make advanced SNMP v1/v2c settings by pressing this button. (Default: On)
- Community Name (Read Only):
You can enter the community name to acquire (up to 32 ASCII code characters). (Default: blank (public))
Xerox® WorkCentre® 5022/5024 Multifunction PrinterUser Guide
2-24
Environment Settings
- Community Name (Read/Write):
You can enter the community name to acquire/write (up to 32 ASCII code characters). (Default: blank (private))
- Trap Community Name:
You can enter the community name for trap notification (up to 32 ASCII code characters). (Default: blank (SNMP_trap))
- System Administrator's Login ID:
You can enter information related to the person in charge of maintenance of the machine (up to 127 ASCII code characters)(Default: blank).
Authentication Failure Generic Traps
You can check Enabled to send an authentication failure trap notification when an access attempt was made with an invalid community name not registered in the machine. (Default: On)
Advanced button
You can make the following settings by pressing this button:
• Add UDP IPv4 Address button
You can add a recipient address for UDP IPv4 trap notification by pressing this button.
- IP Address:
You can enter the IP address for entry.
- UDP Port Number:
You can set the UDP port No. for entry (a value between 1 and 65535).
- SNMP Version:
You can specify the SNMP version for entry as v1 or v2c. (Default: SNMP v1)
- Trap Community Name:
You can enter the trap community name for entry (between 1 and 32 ASCII code characters). (Default: SNMP_trap)
- Trap to be Received:
You can set whether to send notification of Print, Cold Start, and Authentication Failure events.
• Add UDP IPv6 Address button
You can add a recipient address for UDP IPv6 trap notification by pressing this button.
- IP Address:
You can enter the IP address for entry.
- UDP Port Number:
You can set the UDP port No. for entry (a value between 1 and 65535).
Xerox® WorkCentre® 5022/5024 Multifunction PrinterUser Guide
2-25
Environment Settings
- SNMP Version:
You can specify the SNMP version for entry as v1 or v2c. (Default: SNMP v1)
- Trap Community Name:
You can enter the trap community name for entry (between 1 and 32 ASCII code characters). (Default: SNMP_trap)
- Trap to be Received:
You can set whether to send notification of Print, Cold Start and Authentication Failure events.
• Delete button
You can delete the traps specified for the trap notification recipient IP address by pressing this button.
• Edit button
You can display notification information of the trap you are using. You can specify the events for which to send notification.
Apply button
You can apply changes by pressing this button.
Note Reboot the machine to enable new settings.
Microsoft Networking (Connectivity > Protocols)
You can set the SMB protocol and WINS server.
Filing Destination
• SMB Port Status
You can check Enabled to use SMB. (Default: On)
• Physical Connection
Ethernet is displayed.
• Transport
TCP/IP is displayed.
Server Information (WINS Server)
Note Displays when IP Mode is set to IPv4 or Dual Stack.
• Protocol
Displays Enabled.
• Obtain WINS Server Address Automatically
You can check this checkbox to acquire the WINS server address automatically using DHCP. When you set the WINS server address acquisition method to DHCP, you must also set the IP address acquisition method to DHCP. (Default: ON)
Xerox® WorkCentre® 5022/5024 Multifunction PrinterUser Guide
2-26
Environment Settings
• Primary Server IP Address & Port
You can set the primary WINS server address.
• Secondary Server IP Address & Port
You can set the secondary WINS server address.
Apply button
You can apply changes by pressing this button.
Note Reboot the machine to enable new settings.
LPD (Connectivity > Protocols)
You can set the LPD port.
General
• LPD Port Status
You can check Enabled to use LPD. (Default: On)
• Physical Connection
Ethernet is displayed.
• Port Number
You can set the LPD port No. (a value between 1 and 65535). You must set a unique number for each port. (Default: 515)
• Connection Time-Out
You can set the timeout period that the machine waits before terminating the connection when incoming data stops (between 2 and 3600 seconds). (Default: 60)
• Maximum Connections per Port
The maximum number of connections is displayed.
Apply button
You can apply changes by pressing this button.
Note Reboot the machine to enable new settings.
Port9100 (Connectivity > Protocols)
You can set Port9100.
General
• Port9100 Port Status
You can check Enabled to use Port9100. (Default: On)
Xerox® WorkCentre® 5022/5024 Multifunction PrinterUser Guide
2-27
Environment Settings
• Physical Connection
Ethernet is displayed.
Port Information
• TCP Port Number
You can set the Port9100 port No. (a value between 1 and 65535).
You must set a unique number for each port. (Default: 9100)
• Maximum Connections per Port
The maximum number of connections is displayed.
• End of Job Timeout
You can set the amount of time the machine waits before terminating the connection when incoming data stops (between 2 and 3600 seconds). (Default: 60)
• PDL Switching
Enabled is displayed.
Apply button
You can apply changes by pressing this button.
Note Reboot the machine to enable new settings.
SMTP Server (Connectivity > Protocols)
You can set the SMTP server.
Required Information
• SMTP Server IP Address/Host Name
You can enter the SMTP server's address as an IPv4 or IPv6 address or in FQDN format (up to 256 characters).
• Port Number for Sending E-mail
You can set the port number used by the SMTP server to send an e-mail (a value between 1 and 65535). (Default: 25)
• Login Credentials for the Machine to access the SMTP Server to send automated e-mails
You can set the authentication method when sending an e-mail by SMTP. You can select None or SMTP AUTH. (Default: None)
• Login Name
For SMTP servers requiring authentication, enter the e-mail address of the authenticated SMTP user (between 1 to 64 ASCII code characters). This can be left blank if SMTP authentication is skipped.
Xerox® WorkCentre® 5022/5024 Multifunction PrinterUser Guide
2-28
Environment Settings
• Password
You can enter the password for authentication (between 1 and 64 ASCII code characters). This can be left blank if SMTP authentication is skipped.
• Retype Password
You can verify the authentication password you entered by re-entering it here.
Apply button
You can apply changes by pressing this button.
HTTP (Connectivity > Protocols)
You can set the HTTP protocol.
Configuration
• Connection
Enabled is displayed.
• Physical Connection
Ethernet is displayed.
• Keep Alive Timeout
The keep-alive timeout period is displayed.
• Port Number
You can set the port No. used for HTTP communication (a value between 1 and 65535). You must set a unique number for each port. (Default: 80)
• Connection Time-Out
Set the connection timeout period from 1 through 255 seconds. (Default: 30)
• Title
You can select the display for the title displayed on a browser from None Internet Services or Printer model - IP Address.
Apply button
You can apply changes by pressing this button.
Note Reboot the machine to enable new settings.
Defaults (Services > E-mail)
General
• Subject (Default: Scan Data from "model name")
You can enter the E-mail header (up to 128 ASCII code characters).
Xerox® WorkCentre® 5022/5024 Multifunction PrinterUser Guide
2-29
Environment Settings
• Message
You can enter the E-mail body (up to 256 ASCII code characters).
• Maximum Attached Size (Default: 20MB)
You can set the maximum file size between 2 and 20 MB to attach to an e-mail.
Apply button
You can apply changes by pressing this button.
Note Reboot the machine to enable new settings.
Job Templates (Services > Scan)
Network Scanning
• Output Color
You can set the color mode from Black & White or Color. (Default: Black & White)
• Original Type
You can set the type of document to optimize the scan data from Text, Photo & Text, or Photo. (Default: Text)
Advanced Settings
• Lighten/Darken
You can set the density from five levels. (Default: Normal)
• Sharpness
You can set the sharpness from five levels. (Default: Normal)
• Background Suppression
You can check Enabled to enable background suppression. (Default: On)
• Background Suppression Level
You can set the background suppression from five levels. (Default: Normal)
• Resolution
You can set the scan resolution from 200x200dpi, 300x300dpi, 400x400dpi, or 600x600dpi. (Default: 200x200dpi)
Note When Color Mode is set to Color and 400x400dpi or 600x600dpi is selected for the resolution, the Color Mode is automatically set to Black & White.
• Image Compression
You can set the file compression from five levels. (Default: Standard)
Xerox® WorkCentre® 5022/5024 Multifunction PrinterUser Guide
2-30
Environment Settings
Layout Adjustment
• Edge Erase
You can set the edge erase value between 0 and 10 mm for erasing the black shadows created around the edges of the paper when scanning with the document cover open. (Default: 2 mm)
Filing Options
• File Format
In Color mode, you can set the file format for the scanned data from JPEG or PDF. (Default: PDF)
In Black & White mode, you can set the file format for the scanned data from TIFF or PDF. (Default: PDF)
IP Filtering (Security)
You can restrict the supported IP addresses.
IPv4 Filtering
• IP Filtering
You can check Enabled to enable IP Filtering. (Default: Off)
• IP Filter Rule List
The accessible IPv4 address is displayed.
• Add button
The Add IP Filter Rule - IPv4 screen is displayed. You can add the accessible IPv4 address. You can add up to 10 IPv4 addresses.
- Source IP Address:
You can set the IP address that is allowed from access. (Default: 0.0.0.0)
- Source IP Mask:
You can set the prefix length of the IP address that is allowed from access. (Default: 0)
• Edit button
The Edit IP Filter Rule - IPv4 screen is displayed. You can edit the accessible IPv4 address.
- Source IP Address:
You can set the accessible IP address.
- Source IP Mask:
You can set the prefix length of the accessible IP address. (Default: 0)
• Delete button
You can delete the accessible IPv4 address.
IPv6 Filtering
• IP Filtering
You can check Enabled to enable IP Filtering. (Default: Off)
Xerox® WorkCentre® 5022/5024 Multifunction PrinterUser Guide
2-31
Environment Settings
• IP Filter Rule List
The accessible IPv6 address is displayed.
• Add button
The Add IP Filter Rule - IPv6 screen is displayed. Adds an accessible IPv6 address. You can add up to 10 IPv6 addresses.
- Source IP Address:
You can set the accessible IP address.
- Source IP Mask:
You can set the prefix length of the accessible IP address (Default: 0)
• Edit button
The Edit IP Filter Rule - IPv6 screen is displayed. Edits the accessible IPv6 address.
- Source IP Address:
You can set the accessible IP address. (Default: 0:0:0:0:0:0:0:0)
- Source IP Mask:
You can set the prefix length of the accessible IP address. (Default: 0)
• Delete button
You can delete the accessible IPv6 address by pressing this button.
Apply button
You can apply changes by pressing this button.
Note Reboot the machine to enable new settings.
System Administrator Settings (Security)
You can set the system administrator's user ID and the passcode.
System Administrator Settings
• Administrator's Login ID
You can enter the system administrator's user ID (between 1 and 32 ASCII code characters in length, excludes "+", ";", "<", ">", """, "?", "[", "]", "'", "{", "}", "|", ":". (Default: admin)
• Administrator's Passcode
You can set the system administrator's passcode (between 4 and 12 ASCII code characters or blank). (Default: 1111)
• Retype Administrator's Passcode
You need to re-enter the system administrator’s passcode.
Xerox® WorkCentre® 5022/5024 Multifunction PrinterUser Guide
2-32
Environment Settings
• Maximum Login Attempts
When login attempts using the system administrator’s user ID fail repeatedly, access is denied when the number of failed attempts reaches the number set here.
Specify a number between 0 and 10. Specify 0 to disable this setting.
The total number of failed authentication attempts is reset when authentication is successful or the system is restarted. (Default: 5)
Apply button
You can apply changes by pressing this button.
Support Tab
The links to support information is displayed. The link settings can be changed.
Support
Change Settings button
You can change the links to support information by pressing this button.
• Name
You can enter the link name (between 1 and 63 ASCII code characters).
• URL
You can enter the link address (between 1 and 63 alphanumeric characters including the at symbol (@), percent sign (%), period (.), colon (:), forward slash (/), underline(_), hyphen (-), tilde (~), question mark (?), and ampersand (&), which are valid).
Apply button
You can apply changes by pressing this button.
Address Book Tab
The list of location information where the scanned data is stored is displayed.
You can register the total of 30 E-mail and Server addresses.
View All Names
Address Number
The registered numbers (4 digits) of the E-mail or Server addresses are displayed.
Name
The registered names of the E-mail or Server addresses are displayed.
Xerox® WorkCentre® 5022/5024 Multifunction PrinterUser Guide
2-33
Environment Settings
Address Type
The address types of the registered addresses are displayed.
Actions
Edit/Delete address information.
• Edit
Edit the selected address information.
• Delete
Delete the selected address information.
Common Settings
• Address Number
The registered number of the address is displayed. (Not editable)
• Name
Enter the name of the address to be registered in ASCII code or UTF-8 with up to 16 characters.
Note The entered characters should match the language setting specified in the machine. Otherwise, the text will be garbled. Some characters may not be displayed correctly.
• Address Type
Select the address type (E-mail or Server) of the registered address.
• E-mail Address (E-Mail only)
Enter the e-mail address to be registered in ASCII code alphabetic or symbols with up to 64 characters.
• Server Name/IP Address (Server only)
Enter the DNS name (FQDN) of a server, an IP address, or a NetBIOS name (only for SMB) to be registered in ASCII code alphabetic or symbols (.-: (three symbols)) with up to 64 characters.
• Shared Name (Server only)
Enter the SMB shared name to be registered with up to 32 characters in ASCII code alphabetic, numbers, blank, and UTF-8.
Note The entered characters should match the language setting specified in the machine. Otherwise, the text will be garbled. Some characters may not be displayed correctly.
Detailed Settings (Server only)
• Server Path
Enter the storage directory path to be registered with up to 96 characters in ASCII code alphabetic, numbers, blank, and UTF-8.
Note The entered characters should match the language setting specified in the machine. Otherwise, the text will be garbled. Some characters may not be displayed correctly.
Xerox® WorkCentre® 5022/5024 Multifunction PrinterUser Guide
2-34
Environment Settings
• User Name
Enter the user name to be registered with up to 96 characters in ASCII code alphabetic, numbers, and blank.
• Password
Enter the password for SMB to be registered with up to 32 characters in ASCII code numbers, symbols, and blank.
• Retype Password
Re-enter the password for confirmation.
• Port Number
Select whether to specify the port number used for the transfer protocol to be registered. To specify the port number, select the Enter Number and enter a value from 139, 445, 5000 to 65535.
• Apply button
Click this button to confirm the entered settings.
• Undo button
Click this button to cancel the entered settings.
Common Tasks
Add New Name
• Address Number
Select whether to specify a speed dial number to be registered. To specify the speed dial number, select the Specify Preferred Address Number and enter the speed dial number that you want to register. If the Specify Preferred Address Number is not selected, a speed dial number is automatically assigned.
• Name
Enter a name of the address to be registered in ASCII code or UTF-8 with up to 16 characters.
• Address Type
Select the address type (E-mail or Server) of the registered address.
Management
Import Data
Imports an Address Book file (*.dat) of other machines.
Note If the imported data is modified, it will not be exported properly.
• Address Book File
Specify an Address Book file (*.dat) to import. Click the Browse... button to select the file (*.dat) to import in the dialog box displayed.
Xerox® WorkCentre® 5022/5024 Multifunction PrinterUser Guide
2-35
Environment Settings
Export Data
Downloads an Address Book file (*.dat).
Delete All Names...
Deletes all address data.
Note Press this button to apply the entered settings.
Xerox® WorkCentre® 5022/5024 Multifunction PrinterUser Guide
2-36
Environment Settings
Installing the Print Driver/Scan Driver
Installing the Print Driver
To enable the machine to print, you must first install a print driver from the Driver CD Kit CD-ROM.
The CD-ROM contains the following print driver.
To install the print driver, follow the instructions provided in the CD-ROM Documentation (HTML) included on the CD-ROM.
Installing the Scan Driver
A direct USB connection to a computer lets you load scanned data from the machine directly to the computer.
Print Driver Name Description
Xerox® WorkCentre 5022/5024
Click Print Driver in the Main menu of the Driver CD Kit to start the installation.
The standard print driver converts the data created by the application software to images before sending them to the printer.
XXXXX: Displayed as either "5022" or "5024," depending on the model of your machine.
Xerox® WorkCentre® 5022/5024 Multifunction PrinterUser Guide
2-37
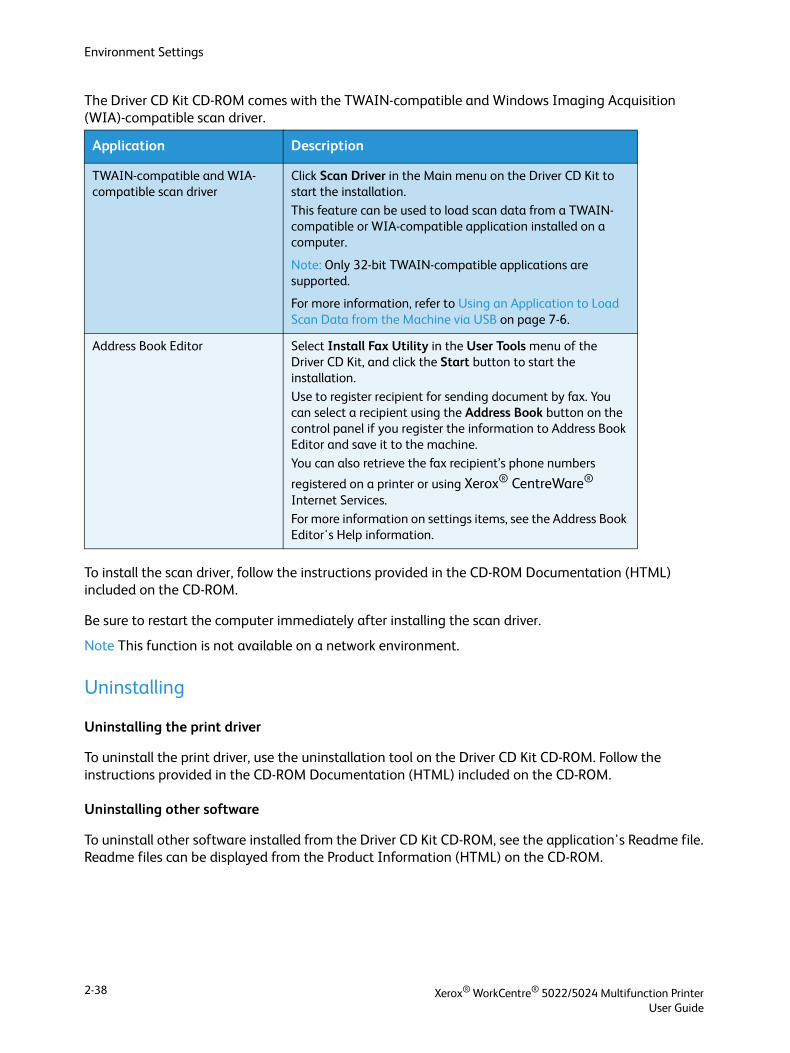
Environment Settings
The Driver CD Kit CD-ROM comes with the TWAIN-compatible and Windows Imaging Acquisition (WIA)-compatible scan driver.
To install the scan driver, follow the instructions provided in the CD-ROM Documentation (HTML) included on the CD-ROM.
Be sure to restart the computer immediately after installing the scan driver.
Note This function is not available on a network environment.
Uninstalling
Uninstalling the print driver
To uninstall the print driver, use the uninstallation tool on the Driver CD Kit CD-ROM. Follow the instructions provided in the CD-ROM Documentation (HTML) included on the CD-ROM.
Uninstalling other software
To uninstall other software installed from the Driver CD Kit CD-ROM, see the application's Readme file. Readme files can be displayed from the Product Information (HTML) on the CD-ROM.
Application Description
TWAIN-compatible and WIA-compatible scan driver
Click Scan Driver in the Main menu on the Driver CD Kit to start the installation.
This feature can be used to load scan data from a TWAIN-compatible or WIA-compatible application installed on a computer.
Note: Only 32-bit TWAIN-compatible applications are supported.
For more information, refer to Using an Application to Load Scan Data from the Machine via USB on page 7-6.
Address Book Editor Select Install Fax Utility in the User Tools menu of the Driver CD Kit, and click the Start button to start the installation.
Use to register recipient for sending document by fax. You can select a recipient using the Address Book button on the control panel if you register the information to Address Book Editor and save it to the machine.
You can also retrieve the fax recipient’s phone numbers
registered on a printer or using Xerox® CentreWare® Internet Services.
For more information on settings items, see the Address Book Editor's Help information.
Xerox® WorkCentre® 5022/5024 Multifunction PrinterUser Guide
2-38
3Product Overview
This chapter lists the name of each machine component, and describes basic operations such as how to turn the power on/off and use the control panel.
Machine Components
This section describes the machine components and their features.
Xerox® WorkCentre® 5022/5024 Multifunction PrinterUser Guide
3-1
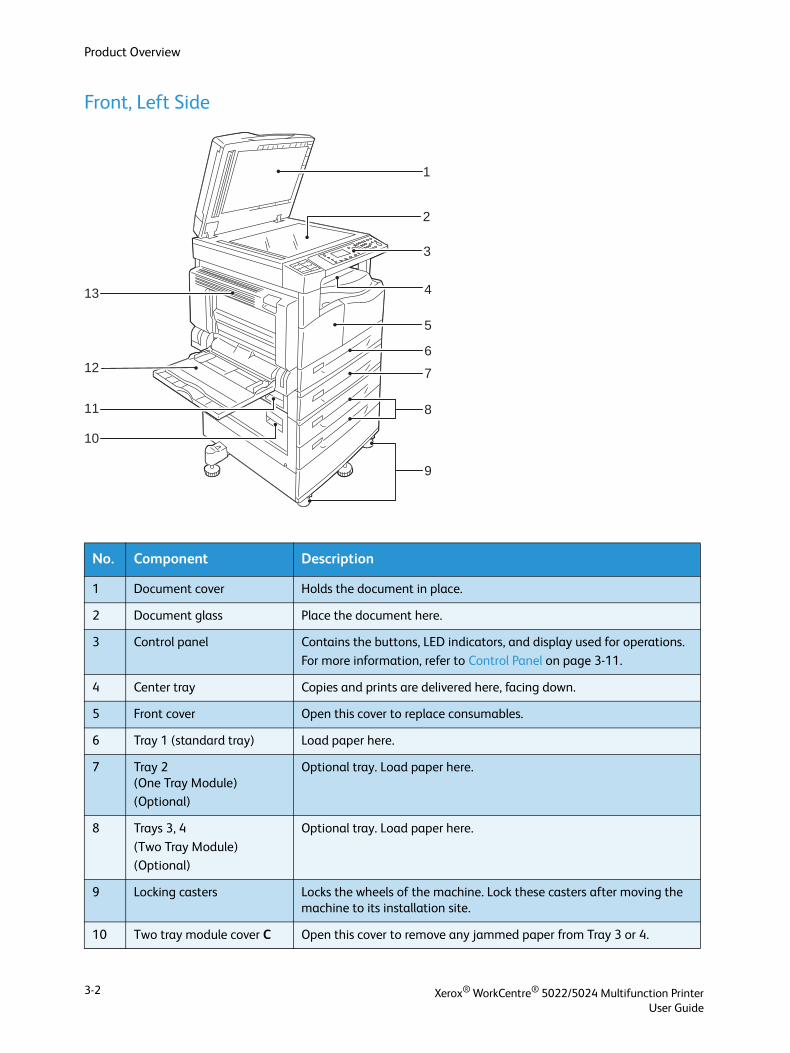
Product Overview
Front, Left Side
No. Component Description
1 Document cover Holds the document in place.
2 Document glass Place the document here.
3 Control panel Contains the buttons, LED indicators, and display used for operations.
For more information, refer to Control Panel on page 3-11.
4 Center tray Copies and prints are delivered here, facing down.
5 Front cover Open this cover to replace consumables.
6 Tray 1 (standard tray) Load paper here.
7 Tray 2(One Tray Module)(Optional)
Optional tray. Load paper here.
8 Trays 3, 4
(Two Tray Module)(Optional)
Optional tray. Load paper here.
9 Locking casters Locks the wheels of the machine. Lock these casters after moving the machine to its installation site.
10 Two tray module cover C Open this cover to remove any jammed paper from Tray 3 or 4.
2
4
1
13
12
3
5
7
8
9
6
11
10
Xerox® WorkCentre® 5022/5024 Multifunction PrinterUser Guide
3-2
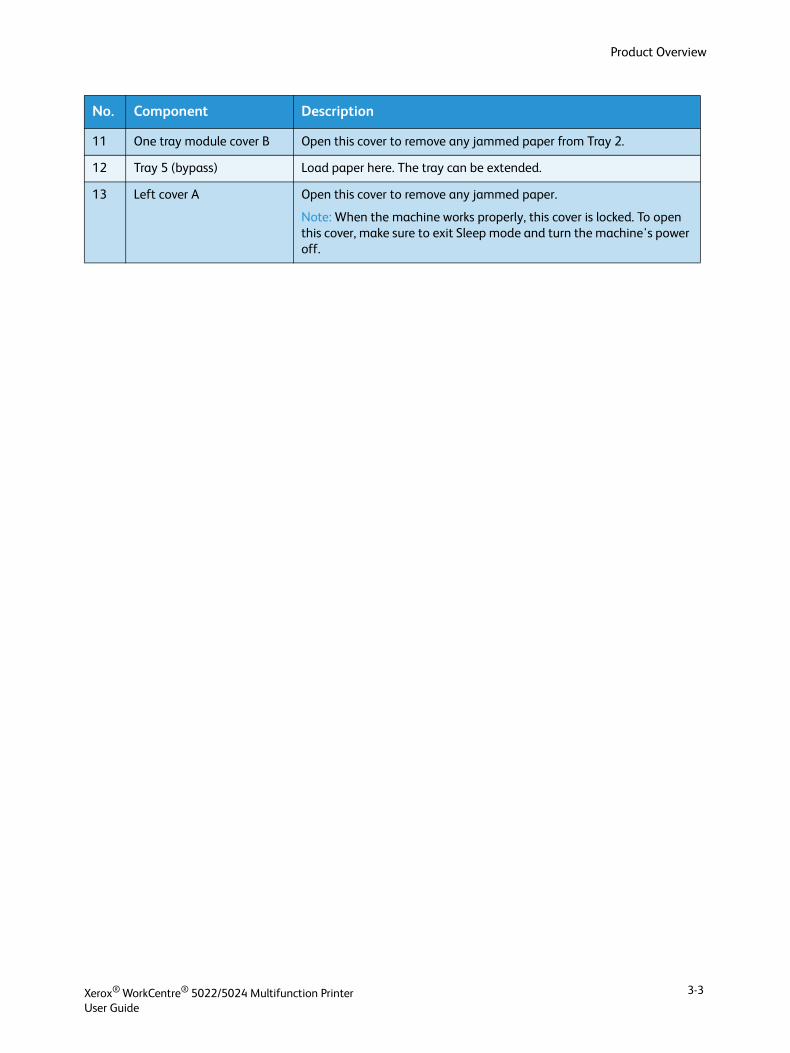
Product Overview
11 One tray module cover B Open this cover to remove any jammed paper from Tray 2.
12 Tray 5 (bypass) Load paper here. The tray can be extended.
13 Left cover A Open this cover to remove any jammed paper.
Note: When the machine works properly, this cover is locked. To open this cover, make sure to exit Sleep mode and turn the machine's power off.
No. Component Description
Xerox® WorkCentre® 5022/5024 Multifunction PrinterUser Guide
3-3
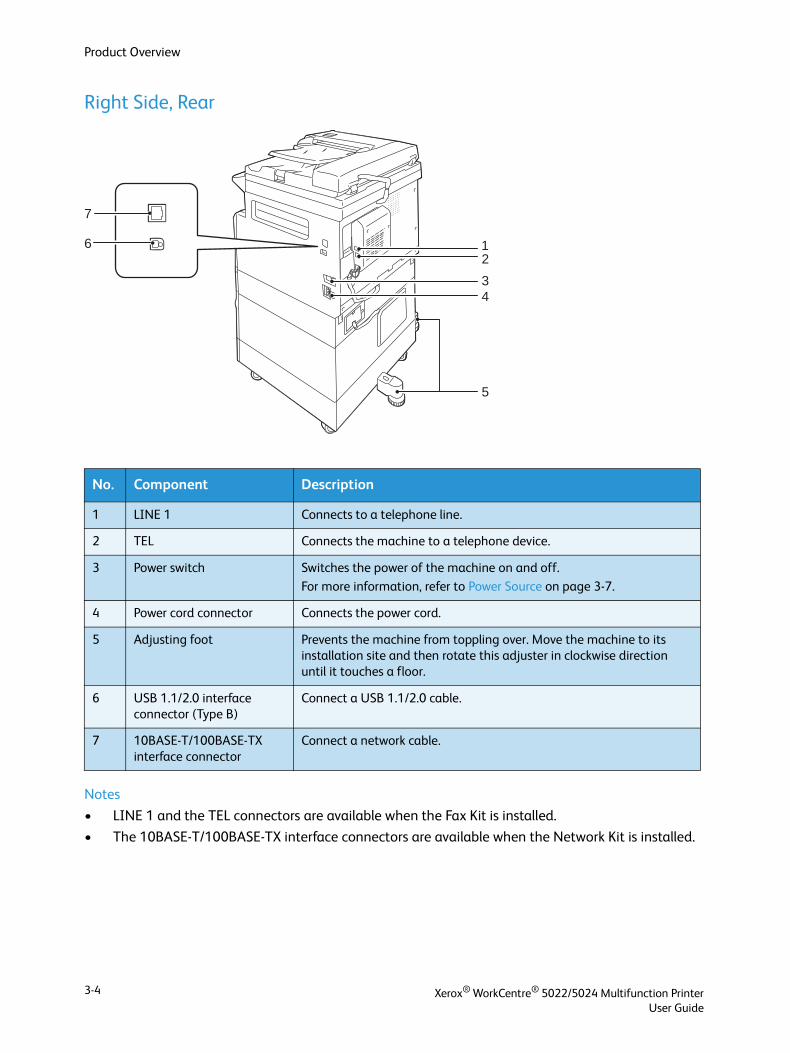
Product Overview
Right Side, Rear
Notes
• LINE 1 and the TEL connectors are available when the Fax Kit is installed.
• The 10BASE-T/100BASE-TX interface connectors are available when the Network Kit is installed.
No. Component Description
1 LINE 1 Connects to a telephone line.
2 TEL Connects the machine to a telephone device.
3 Power switch Switches the power of the machine on and off.
For more information, refer to Power Source on page 3-7.
4 Power cord connector Connects the power cord.
5 Adjusting foot Prevents the machine from toppling over. Move the machine to its installation site and then rotate this adjuster in clockwise direction until it touches a floor.
6 USB 1.1/2.0 interface connector (Type B)
Connect a USB 1.1/2.0 cable.
7 10BASE-T/100BASE-TX interface connector
Connect a network cable.
5
6
7
34
12
Xerox® WorkCentre® 5022/5024 Multifunction PrinterUser Guide
3-4
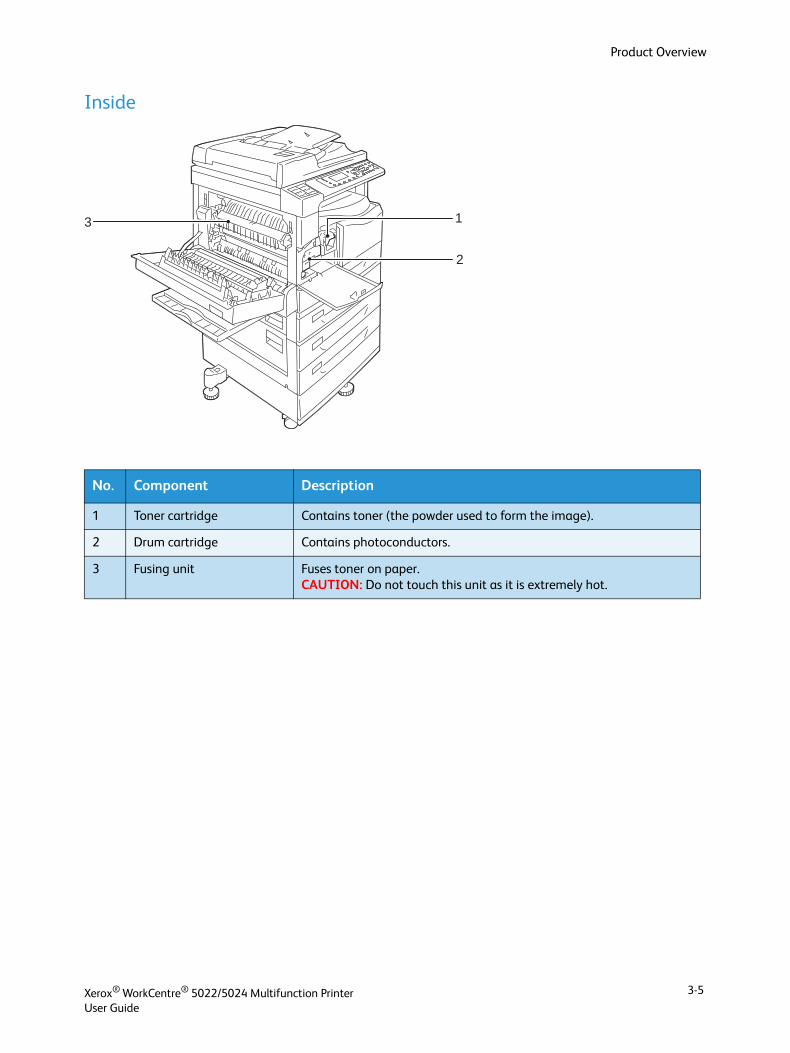
Product Overview
Inside
No. Component Description
1 Toner cartridge Contains toner (the powder used to form the image).
2 Drum cartridge Contains photoconductors.
3 Fusing unit Fuses toner on paper. CAUTION: Do not touch this unit as it is extremely hot.
13
2
Xerox® WorkCentre® 5022/5024 Multifunction PrinterUser Guide
3-5
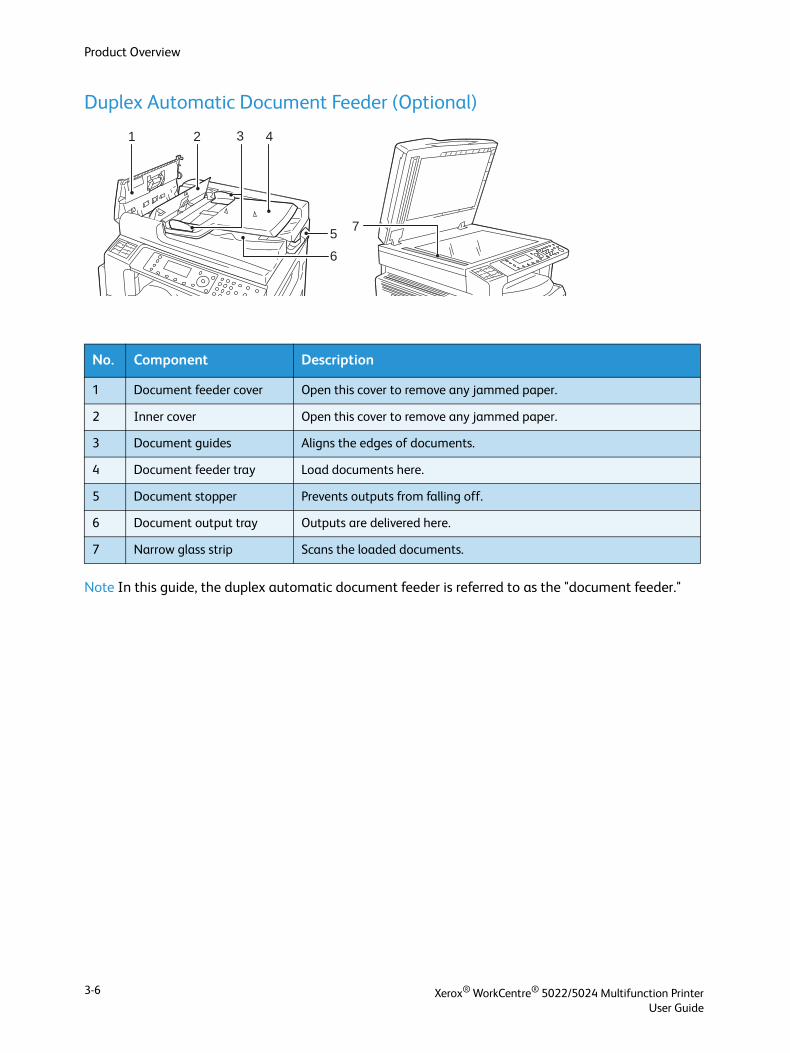
Product Overview
Duplex Automatic Document Feeder (Optional)
Note In this guide, the duplex automatic document feeder is referred to as the "document feeder."
No. Component Description
1 Document feeder cover Open this cover to remove any jammed paper.
2 Inner cover Open this cover to remove any jammed paper.
3 Document guides Aligns the edges of documents.
4 Document feeder tray Load documents here.
5 Document stopper Prevents outputs from falling off.
6 Document output tray Outputs are delivered here.
7 Narrow glass strip Scans the loaded documents.
5
6
7
1 3 42
Xerox® WorkCentre® 5022/5024 Multifunction PrinterUser Guide
3-6

Product Overview
Power Source
Switching the Power On
The following describes how to switch the power on.
The machine takes approximately 19 seconds to warm up and to be ready to copy, print, or fax after the power is turned on. It may take slightly longer than normal depending on the device configuration.
Switch the power off at the end of the day or when not using the machine for an extended period of time.
1. Press the power switch to the On position to switch the power on.
Notes
• The "Please wait" message indicates that the machine is warming up. The machine is not accessible while it is warming up.
• Make sure that the power cable is connected to the machine and the wall outlet properly..
Switching the Power Off
The following describes how to switch the power off.
Notes
• Do not switch the power off in the following situations. If the power is switched off, the processing data may be erased.
- While data is being received
- While a job is being printed
- While a job is being copied
- While a job is being scanned
• When switching the power off, wait 5 seconds after outputs have been delivered.
• When powering the machine on after it has been switched off, wait 10 seconds after the display goes off.
Xerox® WorkCentre® 5022/5024 Multifunction PrinterUser Guide
3-7
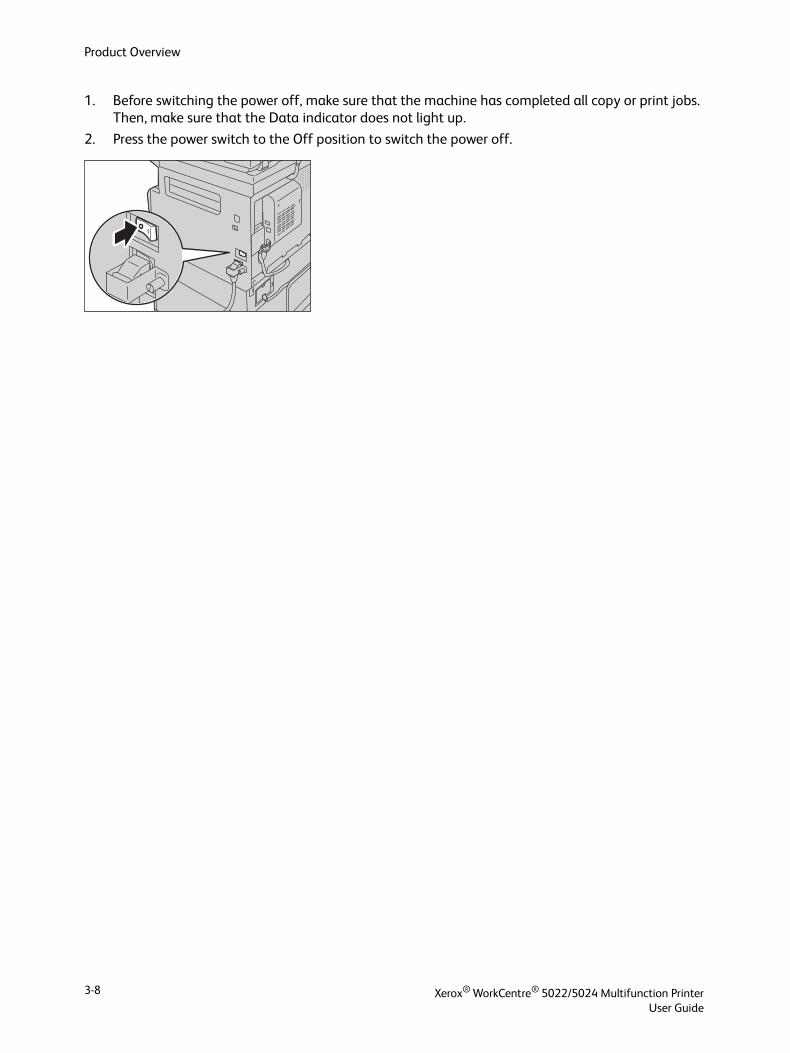
Product Overview
1. Before switching the power off, make sure that the machine has completed all copy or print jobs. Then, make sure that the Data indicator does not light up.
2. Press the power switch to the Off position to switch the power off.
Xerox® WorkCentre® 5022/5024 Multifunction PrinterUser Guide
3-8
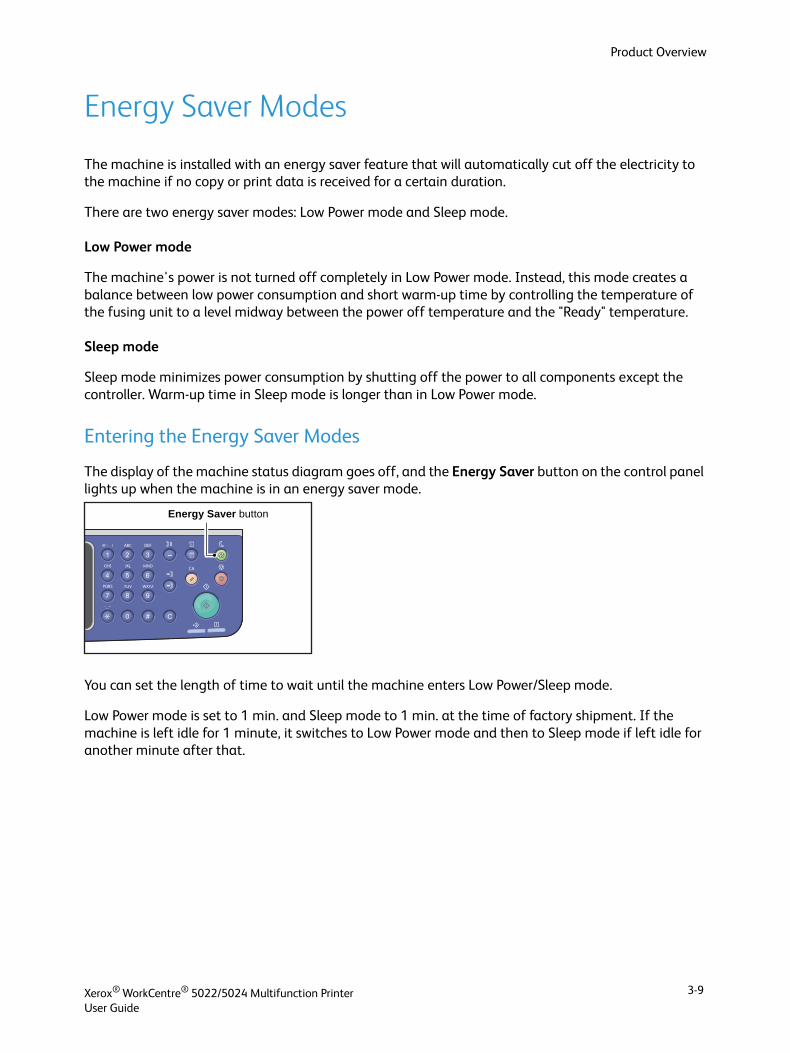
Product Overview
Energy Saver Modes
The machine is installed with an energy saver feature that will automatically cut off the electricity to the machine if no copy or print data is received for a certain duration.
There are two energy saver modes: Low Power mode and Sleep mode.
Low Power mode
The machine's power is not turned off completely in Low Power mode. Instead, this mode creates a balance between low power consumption and short warm-up time by controlling the temperature of the fusing unit to a level midway between the power off temperature and the "Ready" temperature.
Sleep mode
Sleep mode minimizes power consumption by shutting off the power to all components except the controller. Warm-up time in Sleep mode is longer than in Low Power mode.
Entering the Energy Saver Modes
The display of the machine status diagram goes off, and the Energy Saver button on the control panel lights up when the machine is in an energy saver mode.
You can set the length of time to wait until the machine enters Low Power/Sleep mode.
Low Power mode is set to 1 min. and Sleep mode to 1 min. at the time of factory shipment. If the machine is left idle for 1 minute, it switches to Low Power mode and then to Sleep mode if left idle for another minute after that.
Energy Saver button
Xerox® WorkCentre® 5022/5024 Multifunction PrinterUser Guide
3-9
Product Overview
You can set the amount of time the machine waits before entering Low Power mode from 1 to 60 minutes, and the amount of time the machine waits before entering Sleep mode from 1 to 239 minutes.
Note The life of the fusing unit is largely influenced by power distribution time on the machine. Setting the amount of time the machine waits before activating the energy saver feature to a long value will keep the machine's power on longer, and the fusing unit may have to be replaced more often. It may cause an early replacement of the fusing unit of the machine. For more information, contact our Customer Support Center.
For more information on how to set the time interval for Low Power mode and/or Sleep mode, refer to Energy Saver Settings (General Setup) on page 2-21.
Exiting Energy Saver Modes
The following describes how to deactivate an Energy Saver mode.
The machine exits Energy Saver mode and the Energy Saver button light goes off in the following instances:
Exiting Low Power Mode
• Receiving a job
• Pressing the Energy Saver button
• Entering System Administration mode from a computer
• Pressing any button on the control panel
• Taking paper out or putting in a tray
• Opening or closing the document cover
• Opening or closing any cover of the machine
• Placing a document in the document feeder
Exiting Sleep Mode
• Receiving a job
• Pressing the Energy Saver button
• Entering System Administration mode from a computer
Xerox® WorkCentre® 5022/5024 Multifunction PrinterUser Guide
3-10
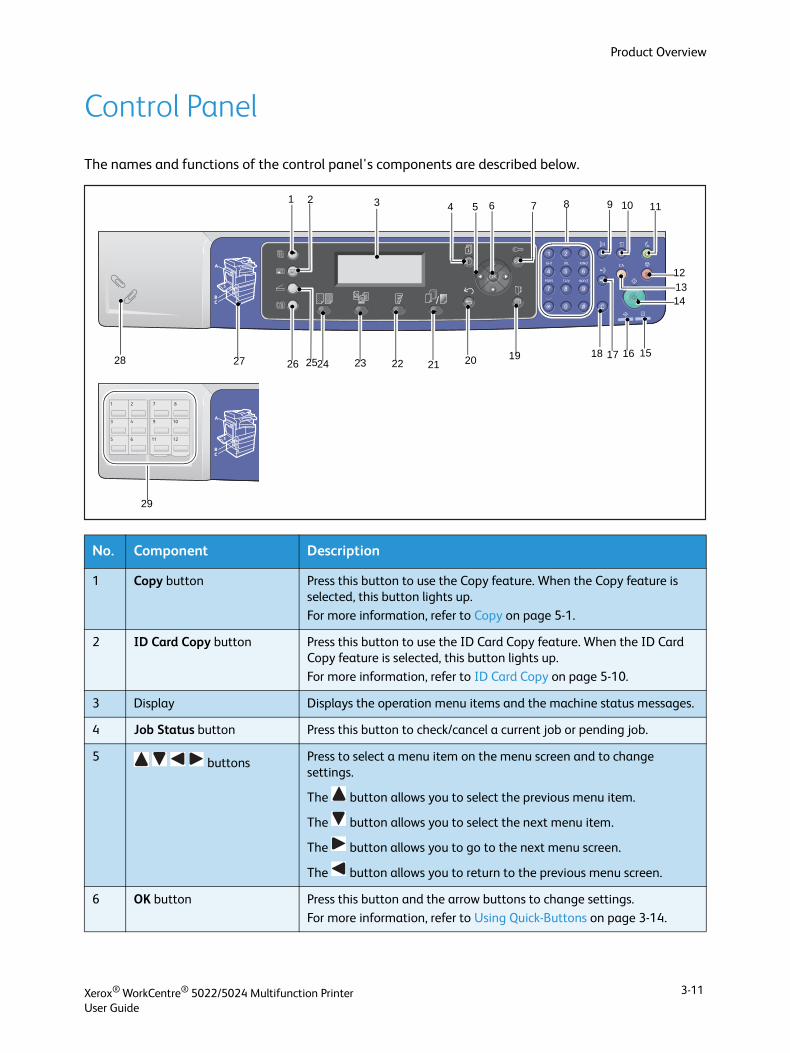
Product Overview
Control Panel
The names and functions of the control panel's components are described below.
No. Component Description
1 Copy button Press this button to use the Copy feature. When the Copy feature is selected, this button lights up.
For more information, refer to Copy on page 5-1.
2 ID Card Copy button Press this button to use the ID Card Copy feature. When the ID Card Copy feature is selected, this button lights up.
For more information, refer to ID Card Copy on page 5-10.
3 Display Displays the operation menu items and the machine status messages.
4 Job Status button Press this button to check/cancel a current job or pending job.
5 buttons Press to select a menu item on the menu screen and to change settings.
The button allows you to select the previous menu item.
The button allows you to select the next menu item.
The button allows you to go to the next menu screen.
The button allows you to return to the previous menu screen.
6 OK button Press this button and the arrow buttons to change settings.
For more information, refer to Using Quick-Buttons on page 3-14.
1 2 3 4 5 6 7 8 9 10 11
121314
1516171819202122232425262728
29
Xerox® WorkCentre® 5022/5024 Multifunction PrinterUser Guide
3-11
Product Overview
7 Log In/Out button Press this button to enter or exit System Administration mode (for at least for 4 seconds) or Account mode. This button lights up when the machine is in System Administration mode.
8 Numeric keypad Press this button to enter numbers (such as number of copies) or text.
9 Dial Pause button Press this button to insert a pause between numbers when entering a recipient's number.
10 Machine Status button Press this button to print reports and check the machine information such as the status of consumables and the machine’s IP address.
11 Energy Saver button Lights up when the machine enters Energy Saver mode to conserve power when the machine is left idle for a while. You can also press this button to enter or exit Energy Saver mode.
12 Stop button Press this button to cancel a current job or failed job.
13 ClearAll button Press this button to reset the displayed settings of each feature to default values or clear the entered numbers. The setting is returned to the same condition as the machine is powered on.
14 Start button Press this button to start scanning documents or confirm the value of each setting.
15 Error indicator Blinks if a system error occurs.
This indicator lights up when a problem other than a system error occurs with the machine, including paper jams and running out of paper.
16 Data indicator Blinks when the machine is sending or receiving data to or from a client. This indicator lights up when data is stored in the machine's memory or when the machine receives faxes waiting to be printed.
17 Speed Dial button Press this button to specify a recipient with entering a Speed Dial number when sending a fax.
18 C (Clear) button Press this button to delete one numerical value that you have entered.
19 Address Book button Press this button to display the recipients registered for the Address Book when sending data by fax, e-mail, or network.
20 Back button Press this button to return the display to the previous screen.
21 Collated/Resolution button
(Quick-Button)
Press this button to display the setting screen for the Collated or Resolution function that lets you change the output method for Copy feature and the resolution for Scan feature.
This button lights up when this function is available.
22 2 Sided button
(Quick-Button)
Press this button to display the setting screen for the 2 Sided function that lets you select 2 sided printing for Copy and Scan features.
This button lights up when this function is available.
No. Component Description
Xerox® WorkCentre® 5022/5024 Multifunction PrinterUser Guide
3-12
Product Overview
Note Some buttons are not available on some models. If you add certain options, you will be able to use them. For more information, contact our Customer Support Center.
23 Original Type button(Quick-Button)
Press this button to display the setting screen for the Original Type function that lets you change the type of document for Copy, ID Card Copy, and Scan features. This button lights up when this function is available.
24 Lighten/Darken button
(Quick-Button)
Press this button to display the setting screen for the Lighten/Darken function that lets you adjust the brightness for Copy, ID Card Copy, and Scan features. Also, the Toner Saver setting is available for Copy feature.
This button lights up when this function is available.
25 Scan button Press this button to use the Scan feature. When the Scan feature is selected, this button lights up.For more information, refer to Scan on page 7-1.
26 Fax button Press this button to use the Fax feature. When the Fax feature is selected, this button lights up.
For more information, refer to Fax on page 6-1.
27 Outline view Used to verify the location indicated in an error message appears on the display.
28 Paper clip tray Used as a place to store paper clips, staples, etc.
29 One touch panels (Only available for machines with the Fax Kit)
Used to specify the recipient when sending a fax. The recipients registered for one touch buttons 1 to 36 correspond to Speed Dial numbers 001 to 036.
No. Component Description
Xerox® WorkCentre® 5022/5024 Multifunction PrinterUser Guide
3-13
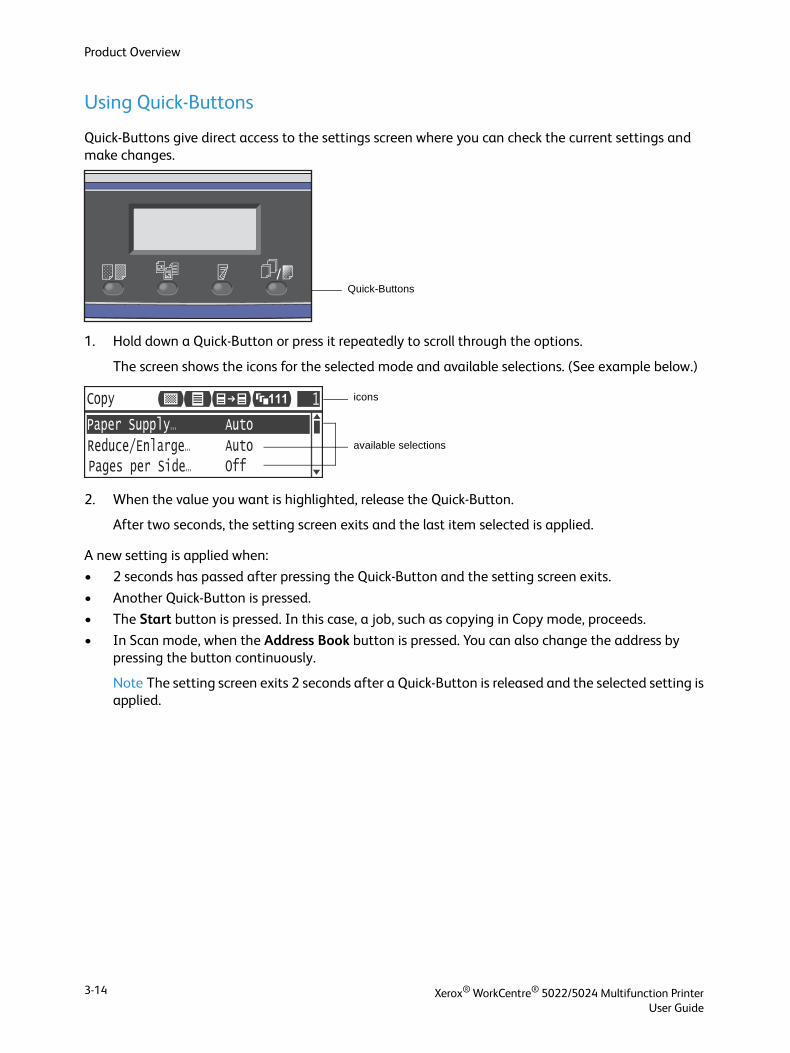
Product Overview
Using Quick-Buttons
Quick-Buttons give direct access to the settings screen where you can check the current settings and make changes.
1. Hold down a Quick-Button or press it repeatedly to scroll through the options.
The screen shows the icons for the selected mode and available selections. (See example below.)
2. When the value you want is highlighted, release the Quick-Button.
After two seconds, the setting screen exits and the last item selected is applied.
A new setting is applied when:
• 2 seconds has passed after pressing the Quick-Button and the setting screen exits.
• Another Quick-Button is pressed.
• The Start button is pressed. In this case, a job, such as copying in Copy mode, proceeds.
• In Scan mode, when the Address Book button is pressed. You can also change the address by pressing the button continuously.
Note The setting screen exits 2 seconds after a Quick-Button is released and the selected setting is applied.
Quick-Buttons
Paper Supply...
Copy
AutoReduce/Enlarge... OffPages per Side...
Auto
1111 icons
available selections
Xerox® WorkCentre® 5022/5024 Multifunction PrinterUser Guide
3-14
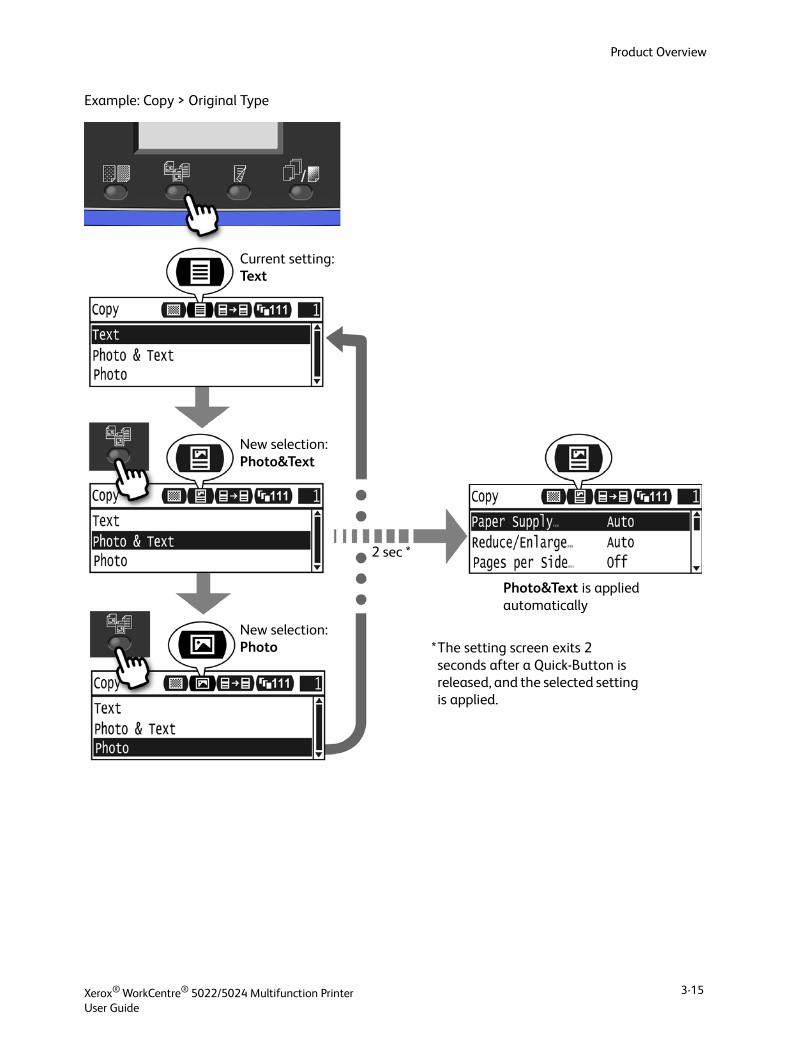
Product Overview
Example: Copy > Original Type
Current setting: Text
New selection: Photo&Text
New selection: Photo
2 sec *
The setting screen exits 2 seconds after a Quick-Button is released, and the selected setting is applied.
*
Photo&Text is applied automatically
Xerox® WorkCentre® 5022/5024 Multifunction PrinterUser Guide
3-15
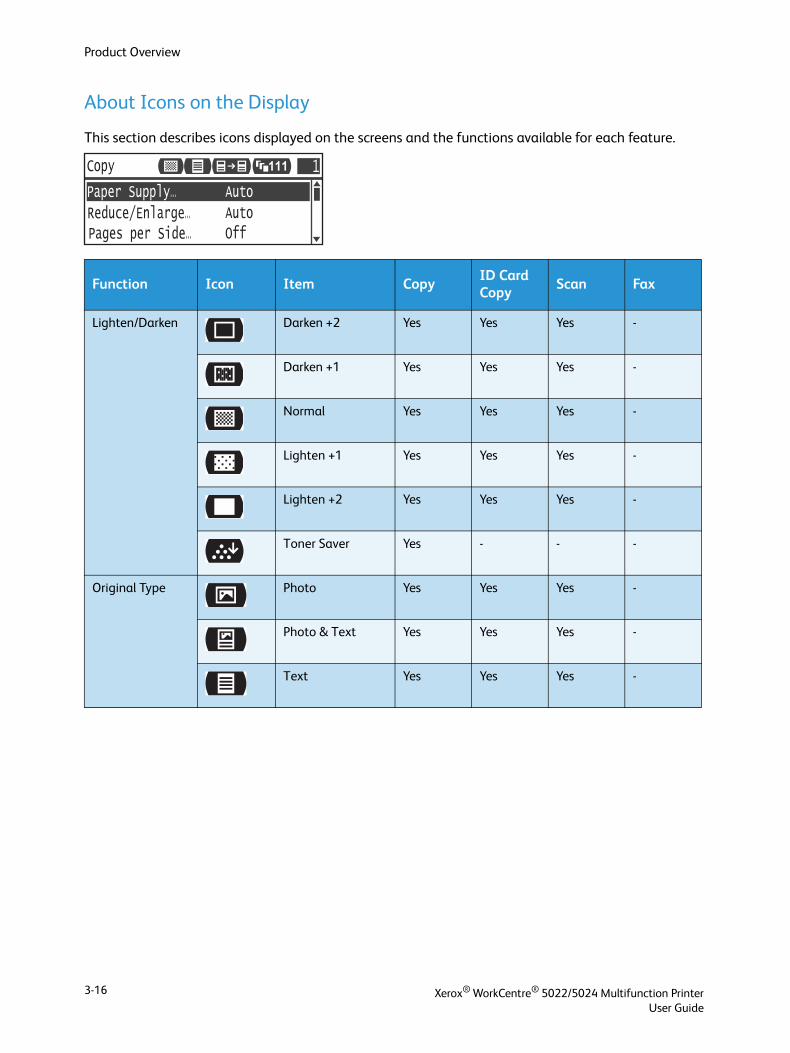
Product Overview
About Icons on the Display
This section describes icons displayed on the screens and the functions available for each feature.
Function Icon Item CopyID Card Copy
Scan Fax
Lighten/Darken Darken +2 Yes Yes Yes -
Darken +1 Yes Yes Yes -
Normal Yes Yes Yes -
Lighten +1 Yes Yes Yes -
Lighten +2 Yes Yes Yes -
Toner Saver Yes - - -
Original Type Photo Yes Yes Yes -
Photo & Text Yes Yes Yes -
Text Yes Yes Yes -
Paper Supply...
Copy
AutoReduce/Enlarge... OffPages per Side...
Auto
1111
Xerox® WorkCentre® 5022/5024 Multifunction PrinterUser Guide
3-16
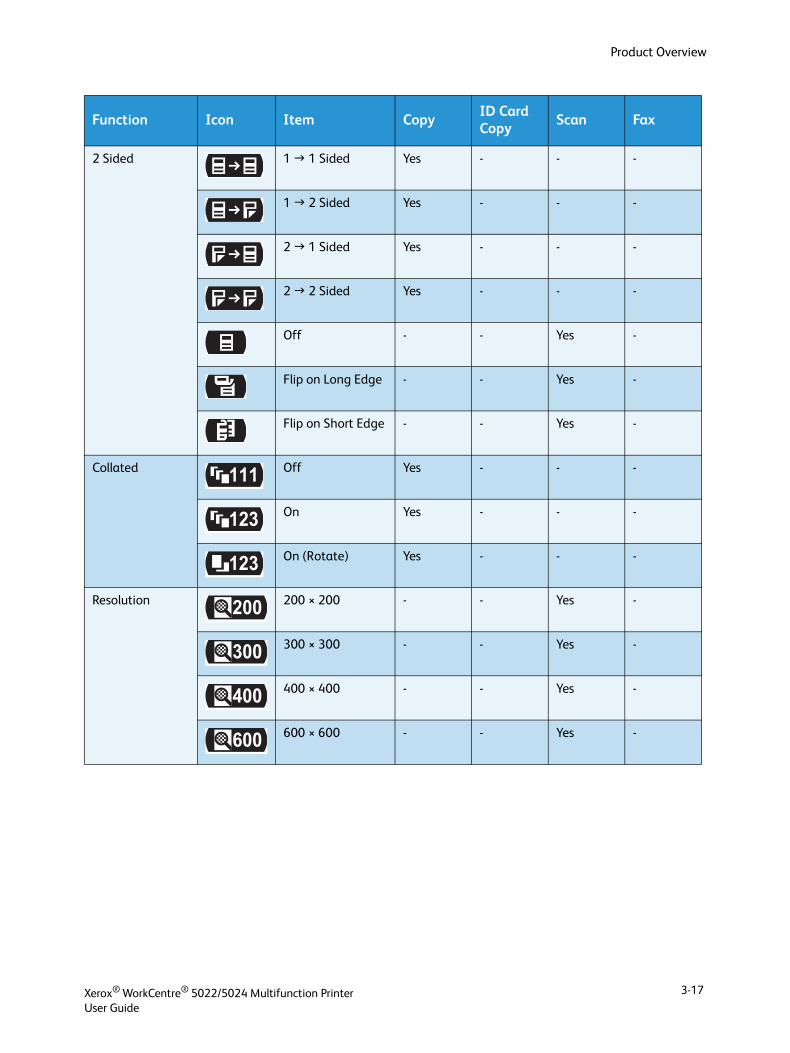
Product Overview
2 Sided 1 1 Sided Yes - - -
1 2 Sided Yes - - -
2 1 Sided Yes - - -
2 2 Sided Yes - - -
Off - - Yes -
Flip on Long Edge - - Yes -
Flip on Short Edge - - Yes -
Collated Off Yes - - -
On Yes - - -
On (Rotate) Yes - - -
Resolution 200 × 200 - - Yes -
300 × 300 - - Yes -
400 × 400 - - Yes -
600 × 600 - - Yes -
Function Icon Item CopyID Card Copy
Scan Fax
111
123
123
200
300
400
600
Xerox® WorkCentre® 5022/5024 Multifunction PrinterUser Guide
3-17
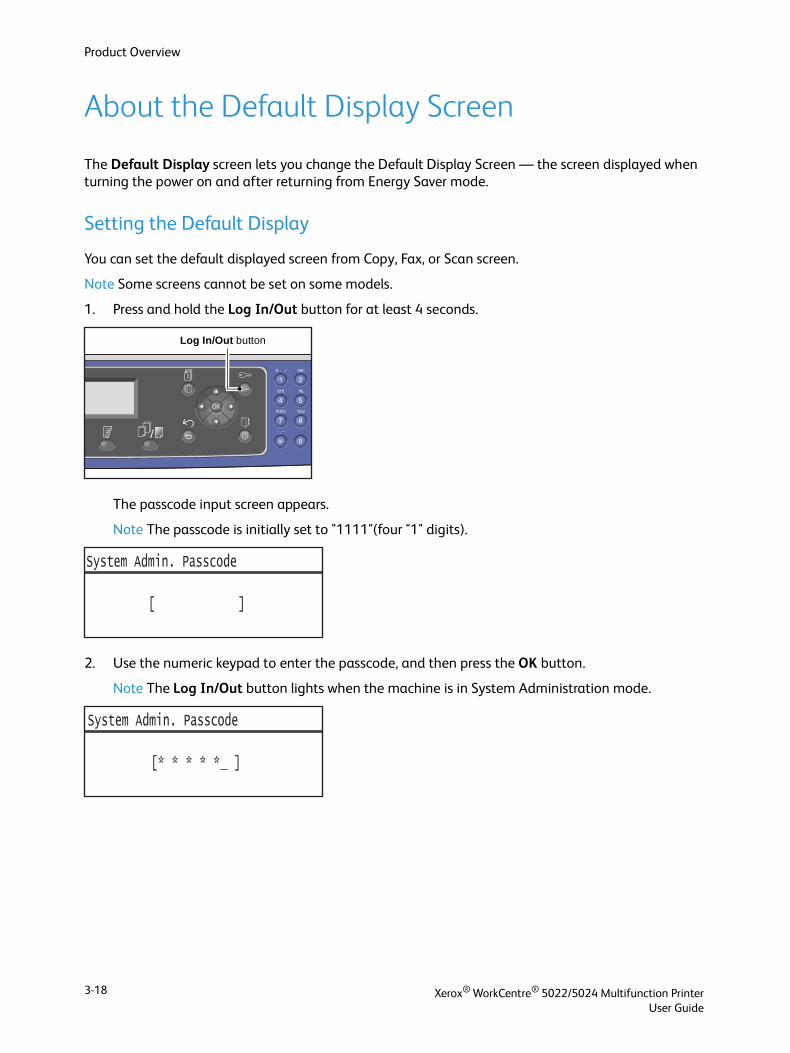
Product Overview
About the Default Display Screen
The Default Display screen lets you change the Default Display Screen — the screen displayed when turning the power on and after returning from Energy Saver mode.
Setting the Default Display
You can set the default displayed screen from Copy, Fax, or Scan screen.
Note Some screens cannot be set on some models.
1. Press and hold the Log In/Out button for at least 4 seconds.
The passcode input screen appears.
Note The passcode is initially set to "1111"(four "1" digits).
2. Use the numeric keypad to enter the passcode, and then press the OK button.
Note The Log In/Out button lights when the machine is in System Administration mode.
Log In/Out button
[ ]
System Admin. Passcode
[* * * * * ]
System Admin. Passcode
Xerox® WorkCentre® 5022/5024 Multifunction PrinterUser Guide
3-18
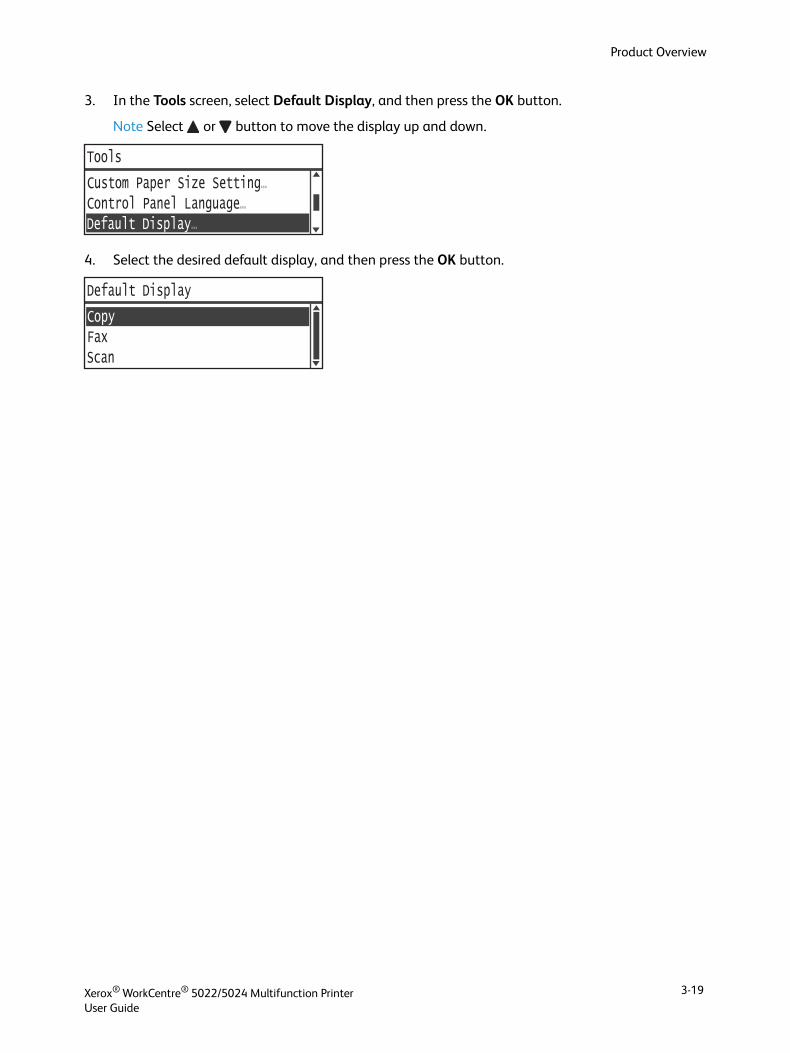
Product Overview
3. In the Tools screen, select Default Display, and then press the OK button.
Note Select or button to move the display up and down.
4. Select the desired default display, and then press the OK button.
Control Panel Language...Default Display...
Tools
Custom Paper Size Setting...
FaxScan
Default Display
Copy
Xerox® WorkCentre® 5022/5024 Multifunction PrinterUser Guide
3-19
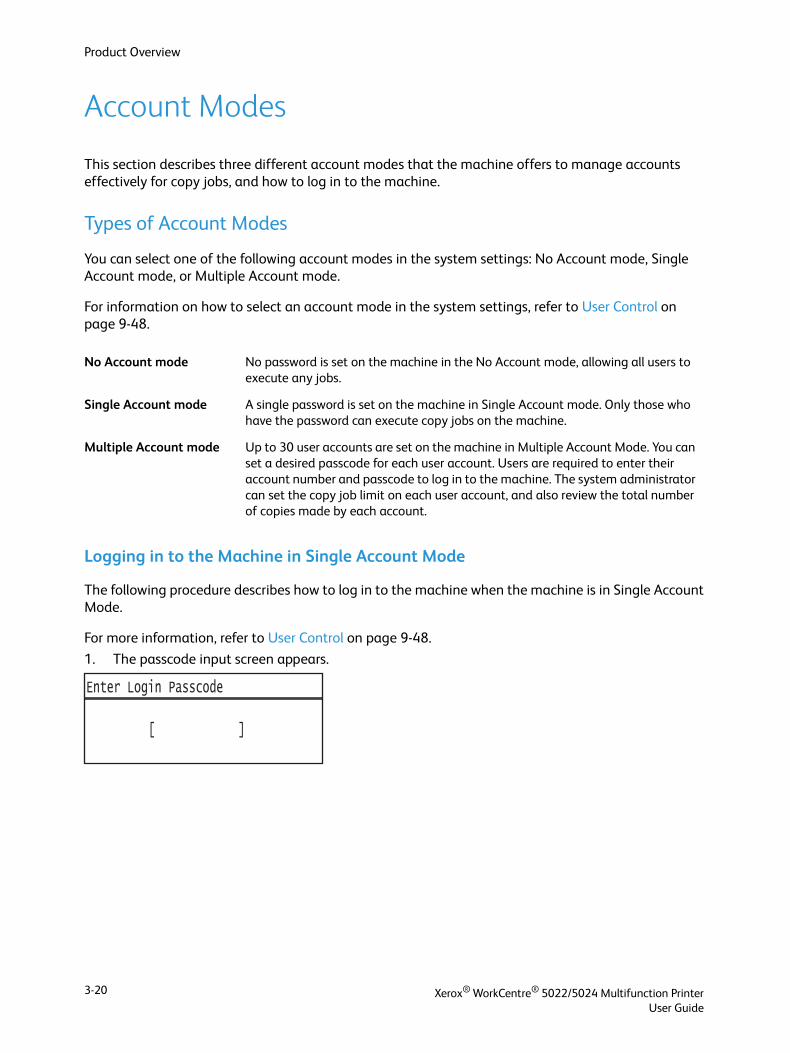
Product Overview
Account Modes
This section describes three different account modes that the machine offers to manage accounts effectively for copy jobs, and how to log in to the machine.
Types of Account Modes
You can select one of the following account modes in the system settings: No Account mode, Single Account mode, or Multiple Account mode.
For information on how to select an account mode in the system settings, refer to User Control on page 9-48.
Logging in to the Machine in Single Account Mode
The following procedure describes how to log in to the machine when the machine is in Single Account Mode.
For more information, refer to User Control on page 9-48.
1. The passcode input screen appears.
No Account mode No password is set on the machine in the No Account mode, allowing all users to execute any jobs.
Single Account mode A single password is set on the machine in Single Account mode. Only those who have the password can execute copy jobs on the machine.
Multiple Account mode Up to 30 user accounts are set on the machine in Multiple Account Mode. You can set a desired passcode for each user account. Users are required to enter their account number and passcode to log in to the machine. The system administrator can set the copy job limit on each user account, and also review the total number of copies made by each account.
[ ]
Enter Login Passcode
Xerox® WorkCentre® 5022/5024 Multifunction PrinterUser Guide
3-20
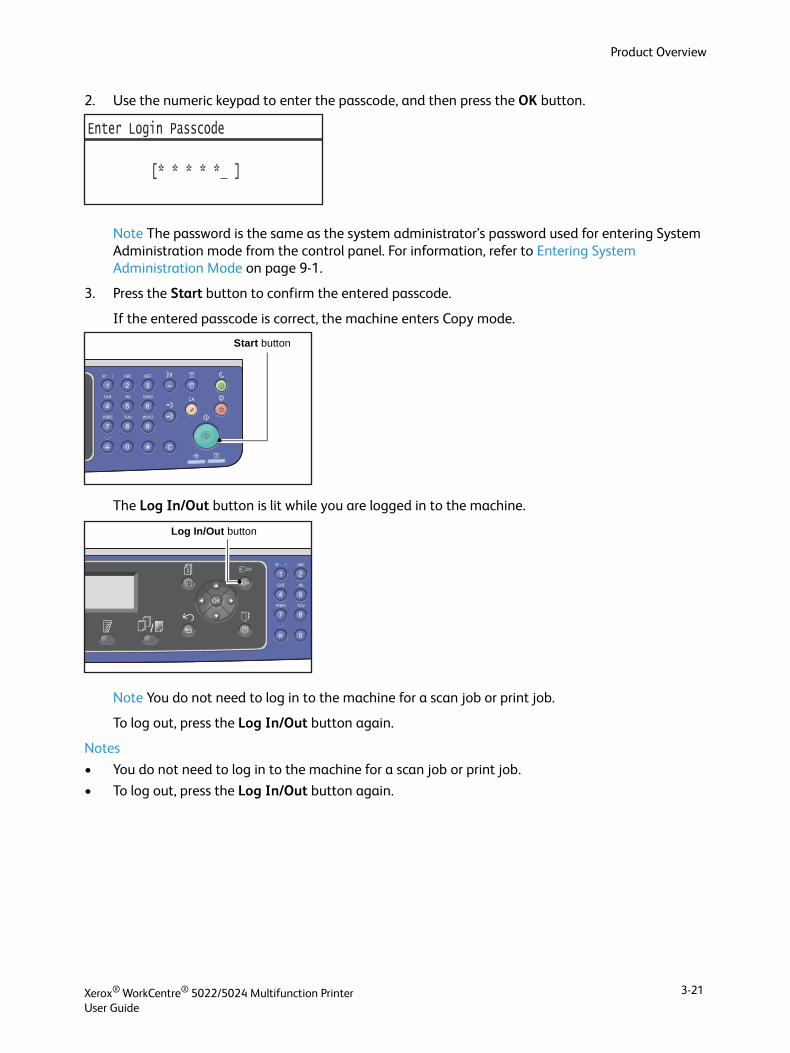
Product Overview
2. Use the numeric keypad to enter the passcode, and then press the OK button.
Note The password is the same as the system administrator’s password used for entering System Administration mode from the control panel. For information, refer to Entering System Administration Mode on page 9-1.
3. Press the Start button to confirm the entered passcode.
If the entered passcode is correct, the machine enters Copy mode.
The Log In/Out button is lit while you are logged in to the machine.
Note You do not need to log in to the machine for a scan job or print job.
To log out, press the Log In/Out button again.
Notes
• You do not need to log in to the machine for a scan job or print job.
• To log out, press the Log In/Out button again.
[* * * * * ]
Enter Login Passcode
Start button
Log In/Out button
Xerox® WorkCentre® 5022/5024 Multifunction PrinterUser Guide
3-21
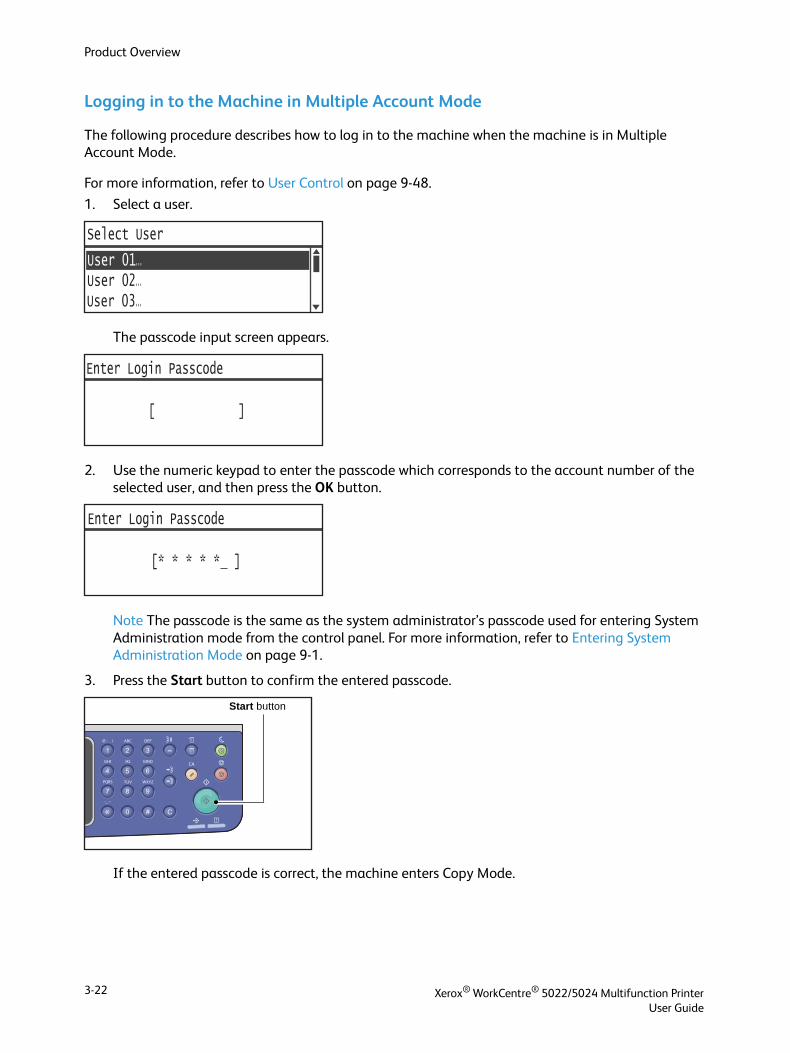
Product Overview
Logging in to the Machine in Multiple Account Mode
The following procedure describes how to log in to the machine when the machine is in Multiple Account Mode.
For more information, refer to User Control on page 9-48.
1. Select a user.
The passcode input screen appears.
2. Use the numeric keypad to enter the passcode which corresponds to the account number of the selected user, and then press the OK button.
Note The passcode is the same as the system administrator’s passcode used for entering System Administration mode from the control panel. For more information, refer to Entering System Administration Mode on page 9-1.
3. Press the Start button to confirm the entered passcode.
If the entered passcode is correct, the machine enters Copy Mode.
User 02...User 03...
Select User
User 01...
[ ]
Enter Login Passcode
[* * * * * ]
Enter Login Passcode
Start button
Xerox® WorkCentre® 5022/5024 Multifunction PrinterUser Guide
3-22
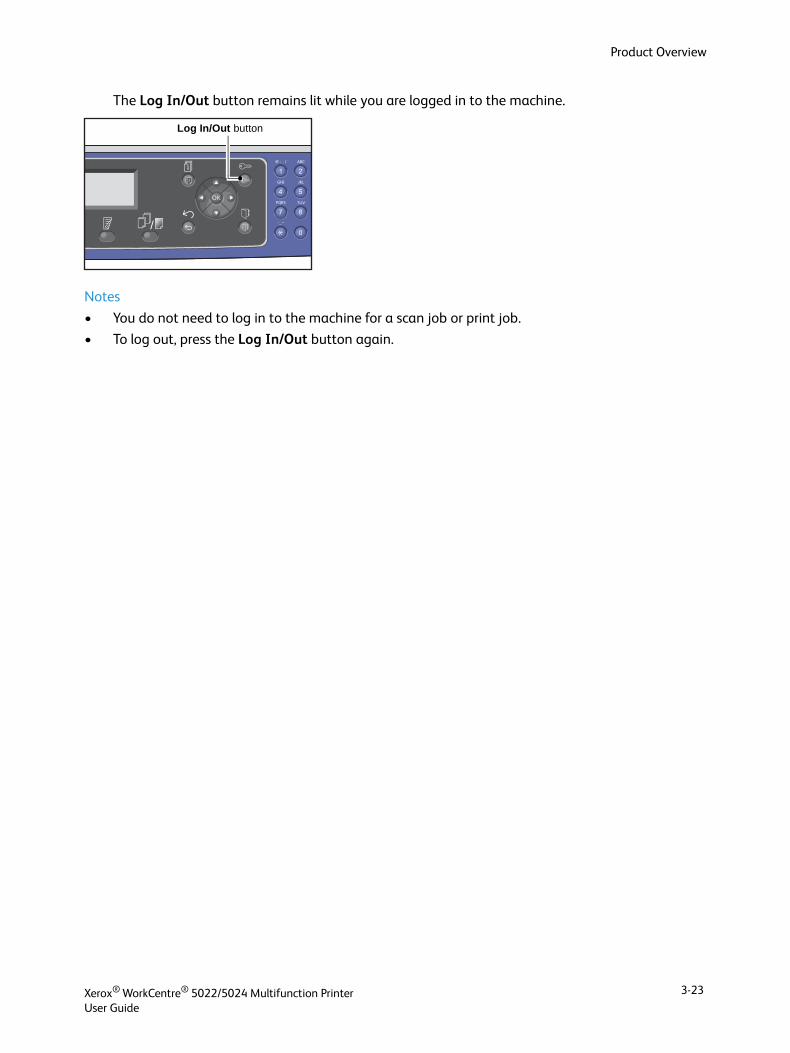
Product Overview
The Log In/Out button remains lit while you are logged in to the machine.
Notes
• You do not need to log in to the machine for a scan job or print job.
• To log out, press the Log In/Out button again.
Log In/Out button
Xerox® WorkCentre® 5022/5024 Multifunction PrinterUser Guide
3-23
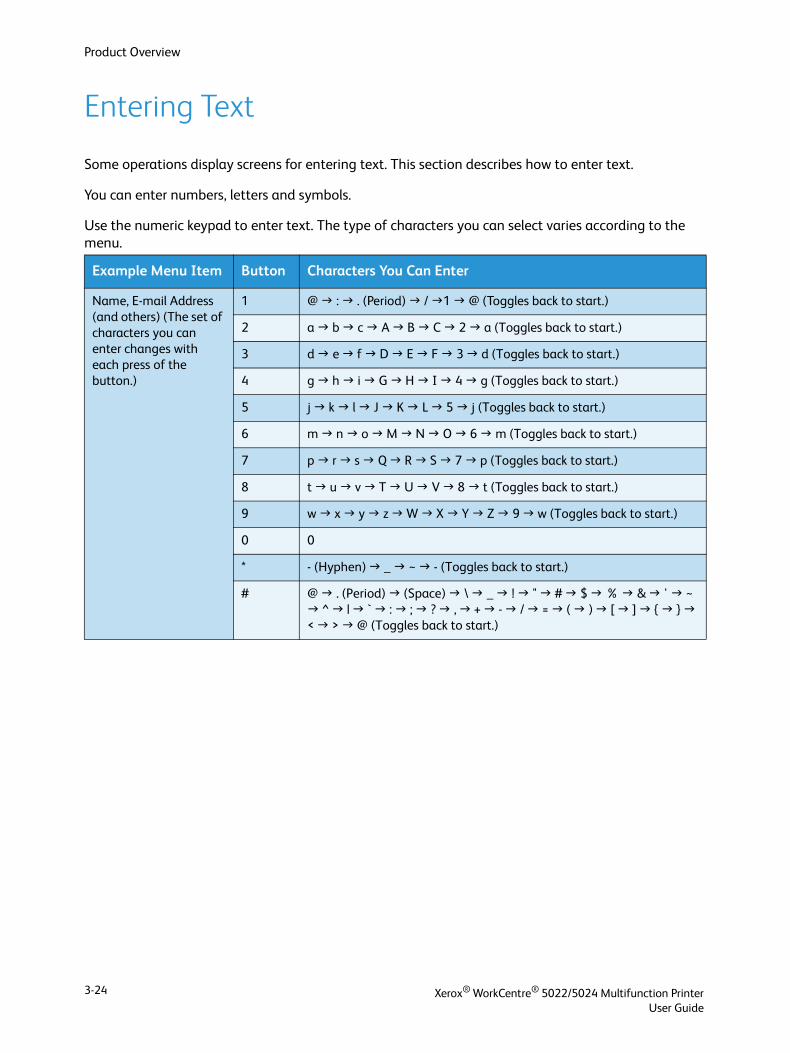
Product Overview
Entering Text
Some operations display screens for entering text. This section describes how to enter text.
You can enter numbers, letters and symbols.
Use the numeric keypad to enter text. The type of characters you can select varies according to the menu.
Example Menu Item Button Characters You Can Enter
Name, E-mail Address (and others) (The set of characters you can enter changes with each press of the button.)
1 @ : . (Period) / 1 @ (Toggles back to start.)
2 a b c A B C 2 a (Toggles back to start.)
3 d e f D E F 3 d (Toggles back to start.)
4 g h i G H I 4 g (Toggles back to start.)
5 j k l J K L 5 j (Toggles back to start.)
6 m n o M N O 6 m (Toggles back to start.)
7 p r s Q R S 7 p (Toggles back to start.)
8 t u v T U V 8 t (Toggles back to start.)
9 w x y z W X Y Z 9 w (Toggles back to start.)
0 0
* - (Hyphen) _ ~ - (Toggles back to start.)
# @ . (Period) (Space) \ _ ! " # $ % & ' ~ ^ | ` : ; ? , + - / = ( ) [ ] { } < > @ (Toggles back to start.)
Xerox® WorkCentre® 5022/5024 Multifunction PrinterUser Guide
3-24
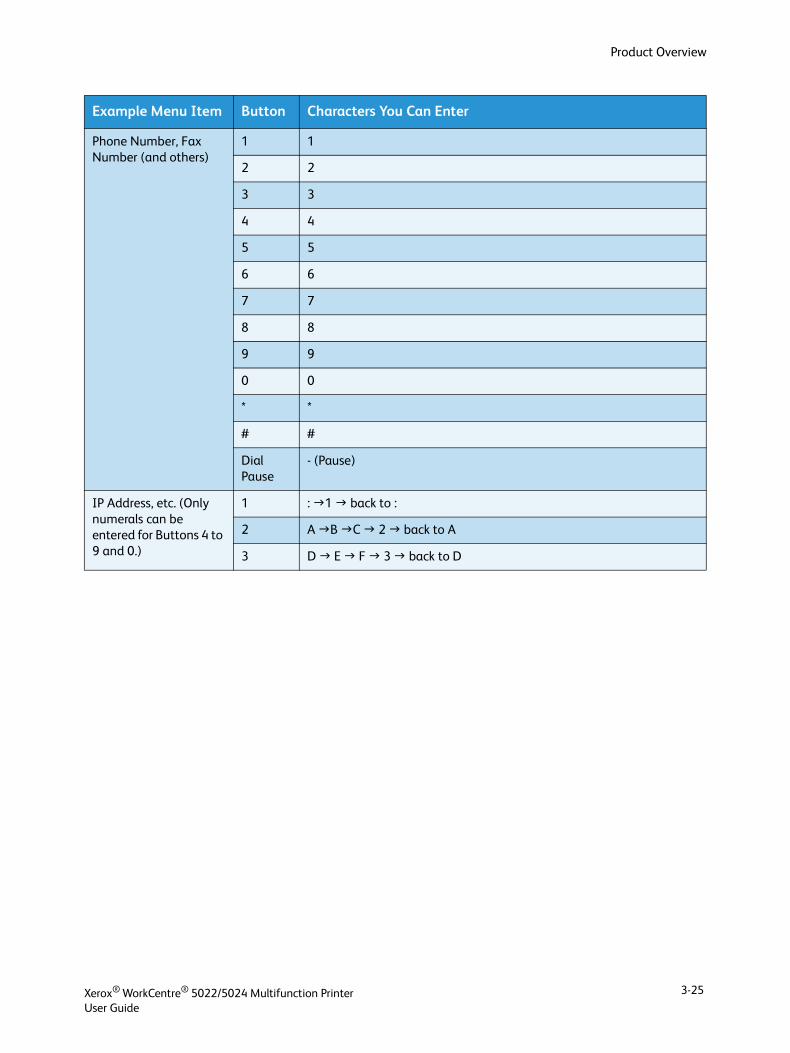
Product Overview
Phone Number, Fax Number (and others)
1 1
2 2
3 3
4 4
5 5
6 6
7 7
8 8
9 9
0 0
* *
# #
Dial Pause
- (Pause)
IP Address, etc. (Only numerals can be entered for Buttons 4 to 9 and 0.)
1 : 1 back to :
2 A B C 2 back to A
3 D E F 3 back to D
Example Menu Item Button Characters You Can Enter
Xerox® WorkCentre® 5022/5024 Multifunction PrinterUser Guide
3-25
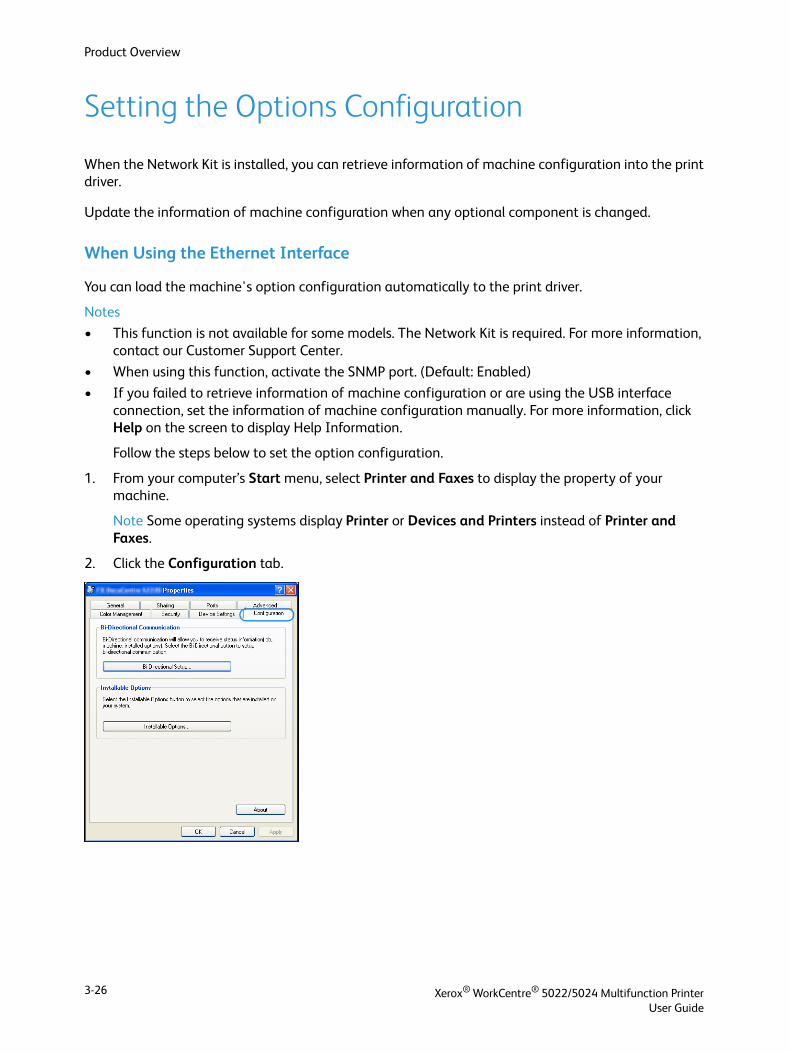
Product Overview
Setting the Options Configuration
When the Network Kit is installed, you can retrieve information of machine configuration into the print driver.
Update the information of machine configuration when any optional component is changed.
When Using the Ethernet Interface
You can load the machine's option configuration automatically to the print driver.
Notes
• This function is not available for some models. The Network Kit is required. For more information, contact our Customer Support Center.
• When using this function, activate the SNMP port. (Default: Enabled)
• If you failed to retrieve information of machine configuration or are using the USB interface connection, set the information of machine configuration manually. For more information, click Help on the screen to display Help Information.
Follow the steps below to set the option configuration.
1. From your computer’s Start menu, select Printer and Faxes to display the property of your machine.
Note Some operating systems display Printer or Devices and Printers instead of Printer and Faxes.
2. Click the Configuration tab.
Xerox® WorkCentre® 5022/5024 Multifunction PrinterUser Guide
3-26
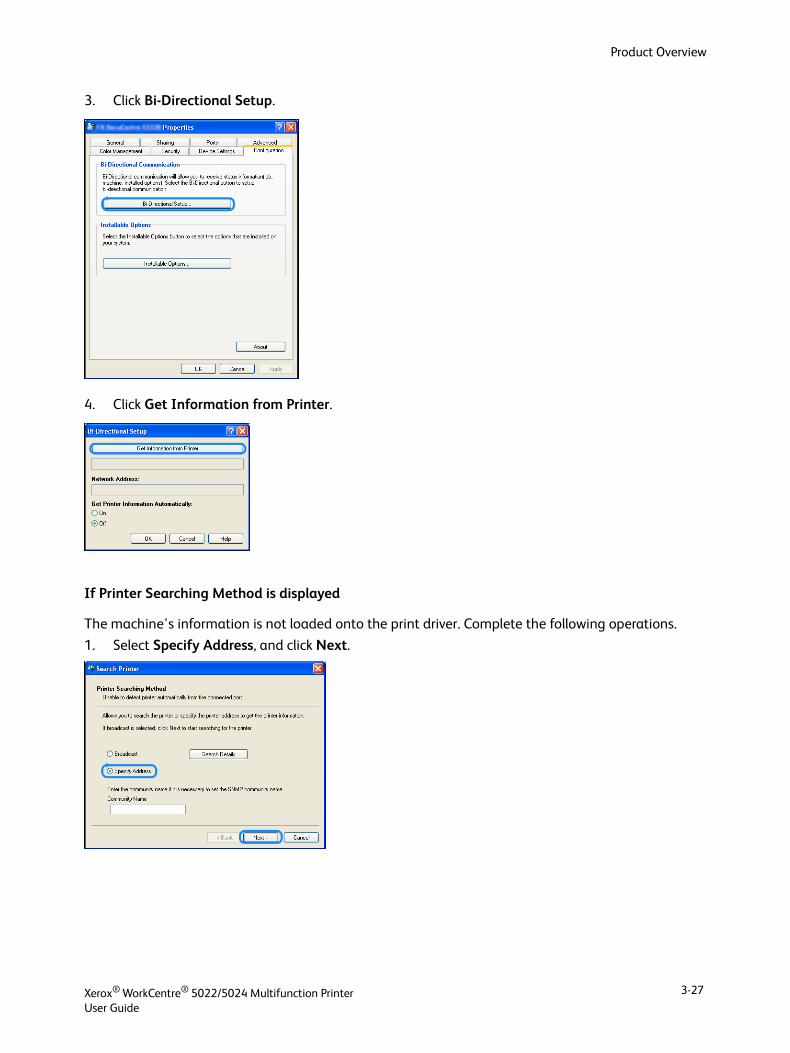
Product Overview
3. Click Bi-Directional Setup.
4. Click Get Information from Printer.
If Printer Searching Method is displayed
The machine's information is not loaded onto the print driver. Complete the following operations.
1. Select Specify Address, and click Next.
Xerox® WorkCentre® 5022/5024 Multifunction PrinterUser Guide
3-27
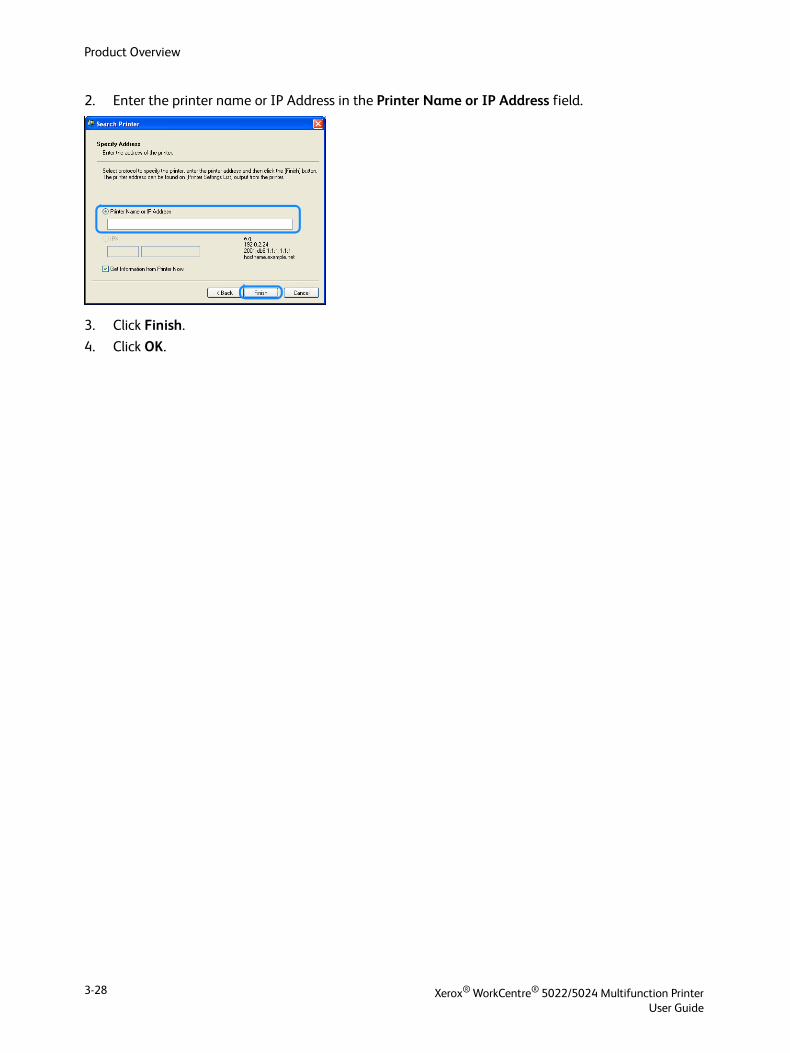
Product Overview
2. Enter the printer name or IP Address in the Printer Name or IP Address field.
3. Click Finish.
4. Click OK.
Xerox® WorkCentre® 5022/5024 Multifunction PrinterUser Guide
3-28
4Loading Paper
This chapter describes the paper that can be used with the machine, precautions when handling paper, and how to load paper in trays.
Paper Types
To achieve optimum machine performance, use only paper types recommended by Xerox. Use of non-recommended paper types may result in paper jams, lower print quality, malfunctions, or damage to the machine.
If you wish to use paper other than the paper recommended by Xerox, contact our Customer Support Center.
Notes
• Do not use conductive paper such as origami paper, carbonic paper, or conductively-coated paper. When a paper jam occurs, it may short-circuit the machine and eventually cause a fire.
• Moisture generated by water, rain, or vapor may cause the printed images to fade. For more information, contact our Customer Support Center.
Xerox® WorkCentre® 5022/5024 Multifunction PrinterUser Guide
4-1
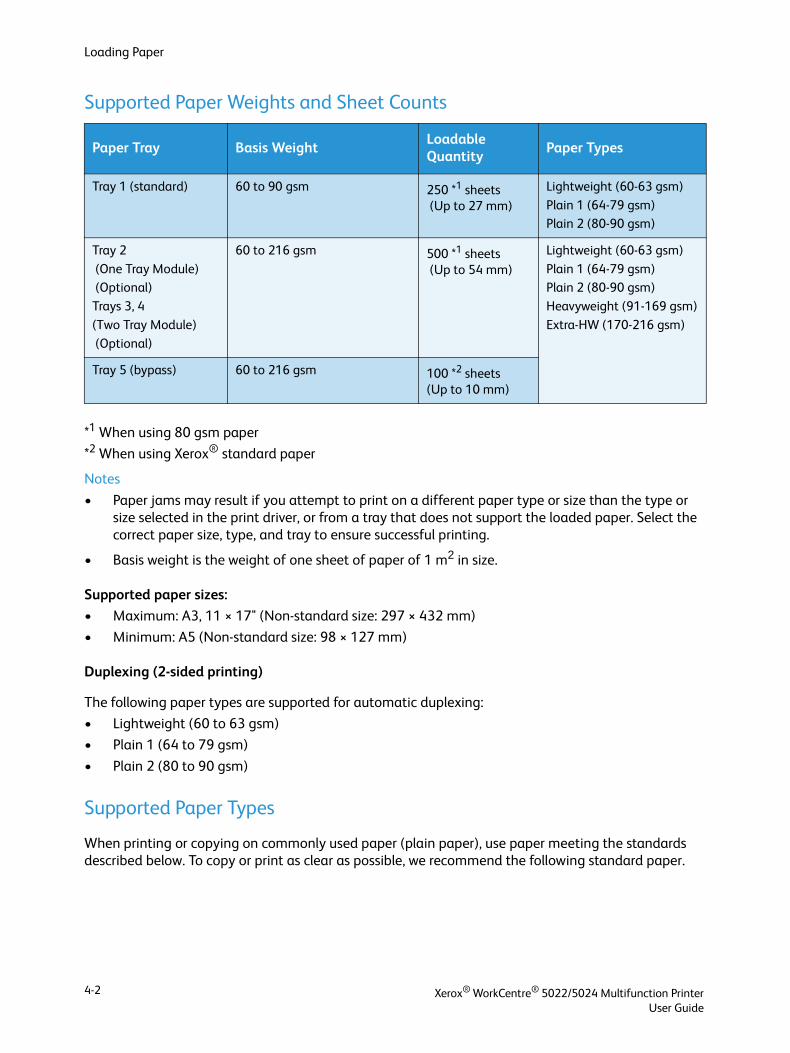
Loading Paper
Supported Paper Weights and Sheet Counts
*1 When using 80 gsm paper
*2 When using Xerox® standard paper
Notes
• Paper jams may result if you attempt to print on a different paper type or size than the type or size selected in the print driver, or from a tray that does not support the loaded paper. Select the correct paper size, type, and tray to ensure successful printing.
• Basis weight is the weight of one sheet of paper of 1 m2 in size.
Supported paper sizes:
• Maximum: A3, 11 × 17" (Non-standard size: 297 × 432 mm)
• Minimum: A5 (Non-standard size: 98 × 127 mm)
Duplexing (2-sided printing)
The following paper types are supported for automatic duplexing:
• Lightweight (60 to 63 gsm)
• Plain 1 (64 to 79 gsm)
• Plain 2 (80 to 90 gsm)
Supported Paper Types
When printing or copying on commonly used paper (plain paper), use paper meeting the standards described below. To copy or print as clear as possible, we recommend the following standard paper.
Paper Tray Basis WeightLoadable Quantity
Paper Types
Tray 1 (standard) 60 to 90 gsm 250 *1 sheets (Up to 27 mm)
Lightweight (60-63 gsm)
Plain 1 (64-79 gsm)Plain 2 (80-90 gsm)
Tray 2
(One Tray Module) (Optional)
Trays 3, 4
(Two Tray Module)
(Optional)
60 to 216 gsm 500 *1 sheets (Up to 54 mm)
Lightweight (60-63 gsm)
Plain 1 (64-79 gsm)Plain 2 (80-90 gsm)
Heavyweight (91-169 gsm)
Extra-HW (170-216 gsm)
Tray 5 (bypass) 60 to 216 gsm 100 *2 sheets(Up to 10 mm)
Xerox® WorkCentre® 5022/5024 Multifunction PrinterUser Guide
4-2
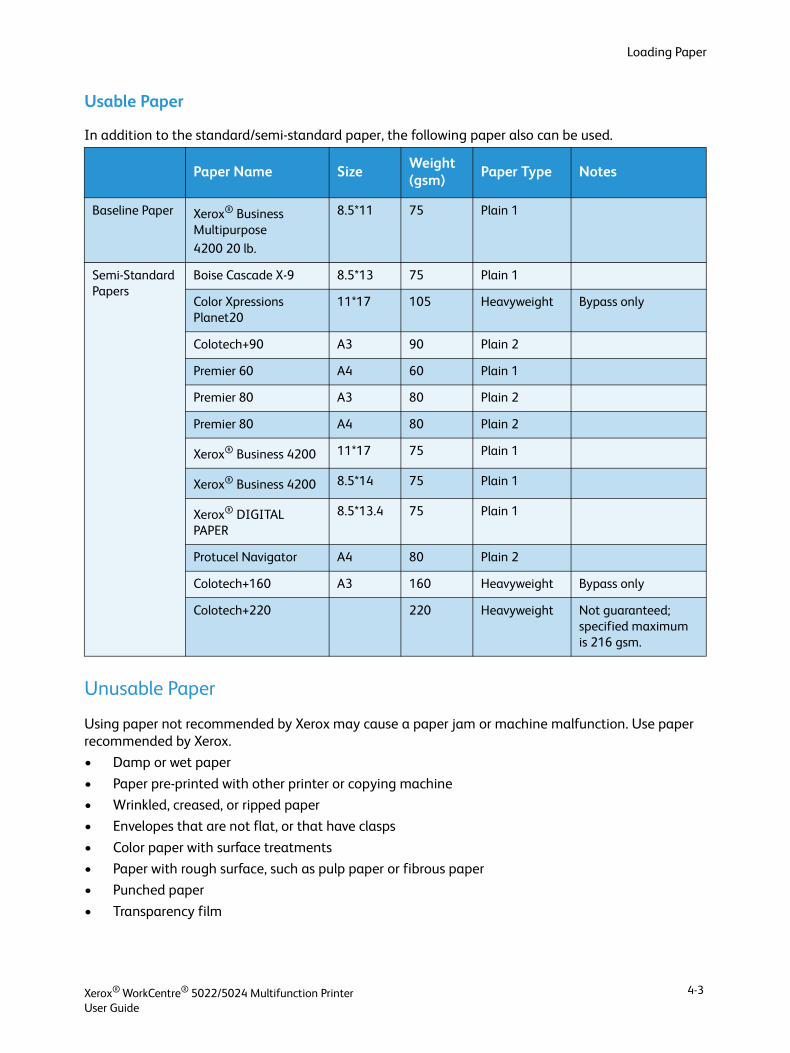
Loading Paper
Usable Paper
In addition to the standard/semi-standard paper, the following paper also can be used.
Unusable Paper
Using paper not recommended by Xerox may cause a paper jam or machine malfunction. Use paper recommended by Xerox.
• Damp or wet paper
• Paper pre-printed with other printer or copying machine
• Wrinkled, creased, or ripped paper
• Envelopes that are not flat, or that have clasps
• Color paper with surface treatments
• Paper with rough surface, such as pulp paper or fibrous paper
• Punched paper
• Transparency film
Paper Name SizeWeight (gsm)
Paper Type Notes
Baseline Paper Xerox® Business Multipurpose
4200 20 lb.
8.5*11 75 Plain 1
Semi-Standard Papers
Boise Cascade X-9 8.5*13 75 Plain 1
Color Xpressions Planet20
11*17 105 Heavyweight Bypass only
Colotech+90 A3 90 Plain 2
Premier 60 A4 60 Plain 1
Premier 80 A3 80 Plain 2
Premier 80 A4 80 Plain 2
Xerox® Business 4200 11*17 75 Plain 1
Xerox® Business 4200 8.5*14 75 Plain 1
Xerox® DIGITAL PAPER
8.5*13.4 75 Plain 1
Protucel Navigator A4 80 Plain 2
Colotech+160 A3 160 Heavyweight Bypass only
Colotech+220 220 Heavyweight Not guaranteed; specified maximum is 216 gsm.
Xerox® WorkCentre® 5022/5024 Multifunction PrinterUser Guide
4-3
Loading Paper
Storing and Handling Paper
Please keep the following points in mind when storing paper
• Store paper inside a cabinet or other dry place. Paper that has absorbed moisture can result in paper jams and lower image quality.
• After opening a package of paper, wrap and store any remaining paper. We recommend that you store remaining paper in moisture prevention packets.
• Store paper on a flat surface to prevent bends or warping.
Please adhere to the following points when loading paper in a tray
• Align the stack of paper neatly before loading it in a tray.
• Do not use creased or wrinkled paper.
• Do not use warped or curled paper.
• Do not load paper of mixed sizes together into a tray.
• Take care not to touch the print side. Oils from your skin could adhere to the print media, which could affect printing quality. If unavoidable, be sure to use a finger cot, gloves, or other means to cover your fingers before touching the print media.
• LEF is recommended for heavyweight media feeds from the Tray 5 (bypass). If a misfeed occurs, please apply an intentional upper curl to the leading edge of the paper.
• Do not load paper above the maximum fill line in Trays 1 to 5. It may cause paper jams.
• When Heavyweight Paper/Extra-HW Paper is supplied to Tray 5 and causes paper jams, reduce the paper quantity or turn over the paper in Tray 5.
Xerox® WorkCentre® 5022/5024 Multifunction PrinterUser Guide
4-4
Loading Paper
Loading Paper
Types of paper loaded in trays
The machine automatically detects the size and orientation of paper loaded in a tray, but the paper type must be set manually. Each tray's default paper type setting is Plain 1 paper. Change the paper type setting when loading a different type of paper. You can also set a non-standard paper size as Custom Size paper in Tray 5 (the bypass tray).
For information on how to change the paper type setting, refer to Changing the Paper Settings on page 4-11.
Automatic Paper Selection
When processing a print job, specify the settings in the print driver's screen by selecting Automatically Select for Select By Tray under Paper in the Paper/Output tab. The machine automatically selects a tray to match the specified document size and orientation. This function is called Automatic Paper Selection.
To activate Automatic Paper Selection when copying, set Paper Supply to Auto.
The Automatic Paper Selection function selects the trays in order from Tray 1 > Tray 2 > Tray 3 > Tray 4 > Tray 5 if there is more than one paper tray that matches.
Notes
• Trays 2 to 4 are optional components.
• When the machine runs out of paper during copying or printing, the tray switches to the next tray containing paper of the same size and orientation or the tray set in priority. If the tray containing paper of a different size or orientation is selected and runs out of paper again, the printing process is paused until paper is loaded instead of switching to the next tray (Auto Paper Selection function).
For more information on setting the Auto Paper Selection function, refer to Auto Paper Selection on page 9-48.
Xerox® WorkCentre® 5022/5024 Multifunction PrinterUser Guide
4-5
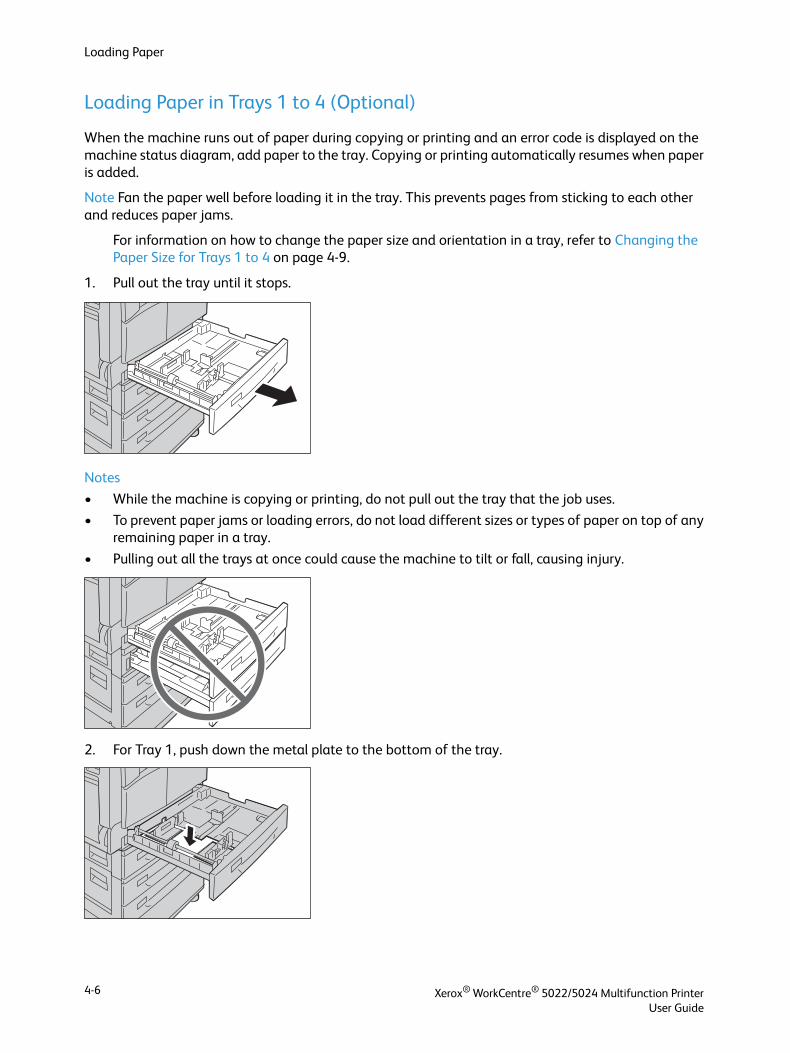
Loading Paper
Loading Paper in Trays 1 to 4 (Optional)
When the machine runs out of paper during copying or printing and an error code is displayed on the machine status diagram, add paper to the tray. Copying or printing automatically resumes when paper is added.
Note Fan the paper well before loading it in the tray. This prevents pages from sticking to each other and reduces paper jams.
For information on how to change the paper size and orientation in a tray, refer to Changing the Paper Size for Trays 1 to 4 on page 4-9.
1. Pull out the tray until it stops.
Notes
• While the machine is copying or printing, do not pull out the tray that the job uses.
• To prevent paper jams or loading errors, do not load different sizes or types of paper on top of any remaining paper in a tray.
• Pulling out all the trays at once could cause the machine to tilt or fall, causing injury.
2. For Tray 1, push down the metal plate to the bottom of the tray.
Xerox® WorkCentre® 5022/5024 Multifunction PrinterUser Guide
4-6
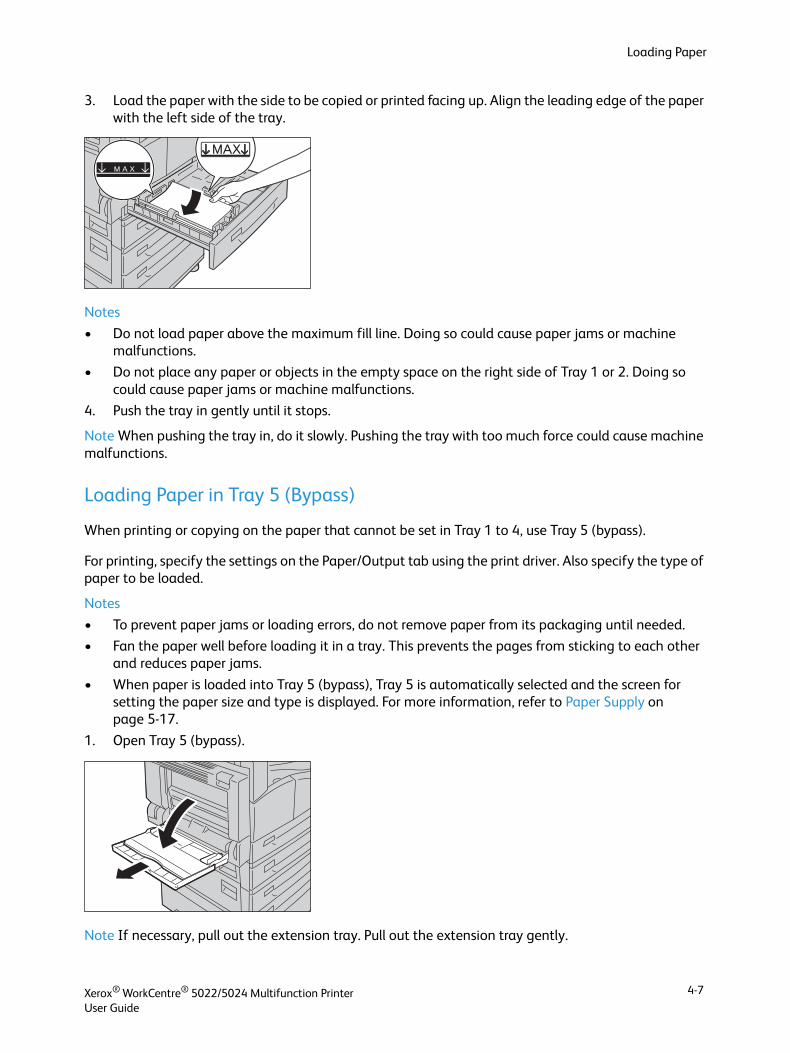
Loading Paper
3. Load the paper with the side to be copied or printed facing up. Align the leading edge of the paper with the left side of the tray.
Notes
• Do not load paper above the maximum fill line. Doing so could cause paper jams or machine malfunctions.
• Do not place any paper or objects in the empty space on the right side of Tray 1 or 2. Doing so could cause paper jams or machine malfunctions.
4. Push the tray in gently until it stops.
Note When pushing the tray in, do it slowly. Pushing the tray with too much force could cause machine malfunctions.
Loading Paper in Tray 5 (Bypass)
When printing or copying on the paper that cannot be set in Tray 1 to 4, use Tray 5 (bypass).
For printing, specify the settings on the Paper/Output tab using the print driver. Also specify the type of paper to be loaded.
Notes
• To prevent paper jams or loading errors, do not remove paper from its packaging until needed.
• Fan the paper well before loading it in a tray. This prevents the pages from sticking to each other and reduces paper jams.
• When paper is loaded into Tray 5 (bypass), Tray 5 is automatically selected and the screen for setting the paper size and type is displayed. For more information, refer to Paper Supply on page 5-17.
1. Open Tray 5 (bypass).
Note If necessary, pull out the extension tray. Pull out the extension tray gently.
Xerox® WorkCentre® 5022/5024 Multifunction PrinterUser Guide
4-7
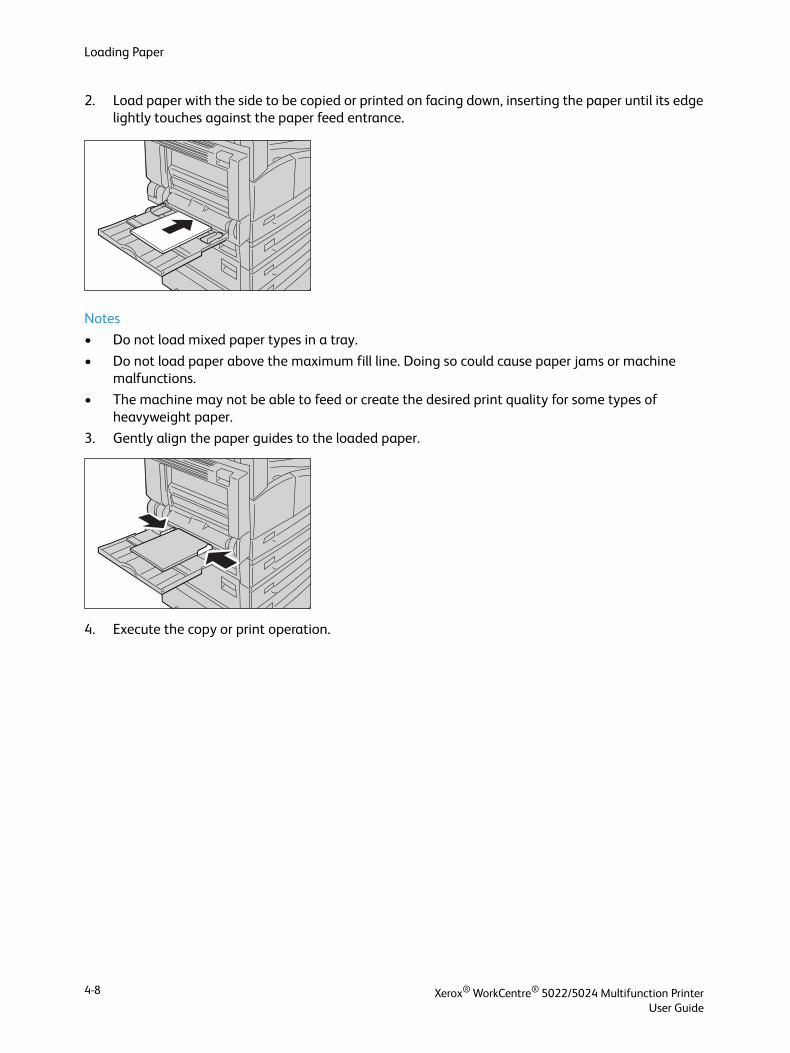
Loading Paper
2. Load paper with the side to be copied or printed on facing down, inserting the paper until its edge lightly touches against the paper feed entrance.
Notes
• Do not load mixed paper types in a tray.
• Do not load paper above the maximum fill line. Doing so could cause paper jams or machine malfunctions.
• The machine may not be able to feed or create the desired print quality for some types of heavyweight paper.
3. Gently align the paper guides to the loaded paper.
4. Execute the copy or print operation.
Xerox® WorkCentre® 5022/5024 Multifunction PrinterUser Guide
4-8
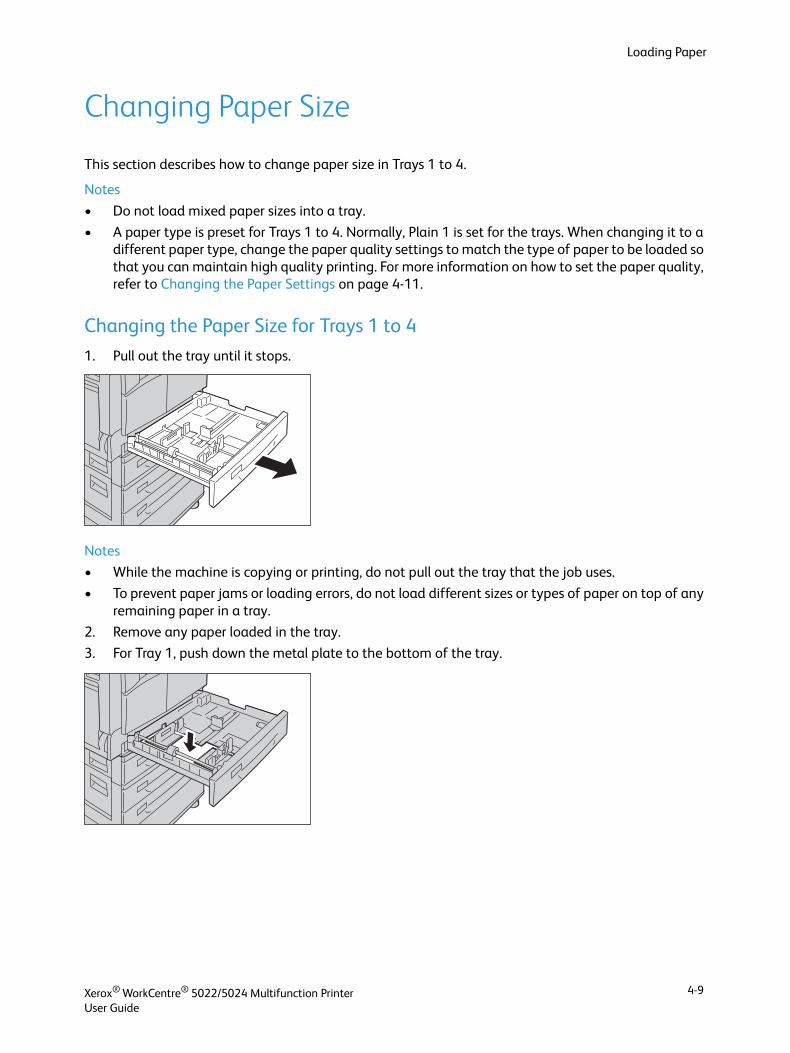
Loading Paper
Changing Paper Size
This section describes how to change paper size in Trays 1 to 4.
Notes
• Do not load mixed paper sizes into a tray.
• A paper type is preset for Trays 1 to 4. Normally, Plain 1 is set for the trays. When changing it to a different paper type, change the paper quality settings to match the type of paper to be loaded so that you can maintain high quality printing. For more information on how to set the paper quality, refer to Changing the Paper Settings on page 4-11.
Changing the Paper Size for Trays 1 to 4
1. Pull out the tray until it stops.
Notes
• While the machine is copying or printing, do not pull out the tray that the job uses.
• To prevent paper jams or loading errors, do not load different sizes or types of paper on top of any remaining paper in a tray.
2. Remove any paper loaded in the tray.
3. For Tray 1, push down the metal plate to the bottom of the tray.
Xerox® WorkCentre® 5022/5024 Multifunction PrinterUser Guide
4-9
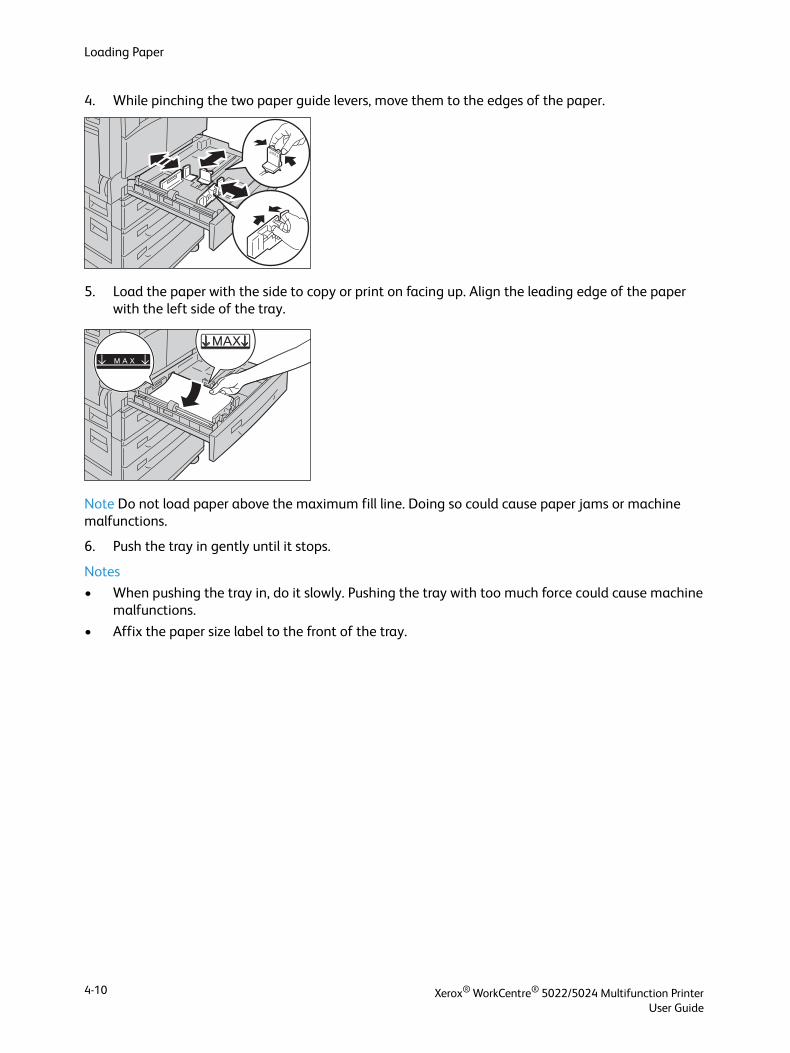
Loading Paper
4. While pinching the two paper guide levers, move them to the edges of the paper.
5. Load the paper with the side to copy or print on facing up. Align the leading edge of the paper with the left side of the tray.
Note Do not load paper above the maximum fill line. Doing so could cause paper jams or machine malfunctions.
6. Push the tray in gently until it stops.
Notes
• When pushing the tray in, do it slowly. Pushing the tray with too much force could cause machine malfunctions.
• Affix the paper size label to the front of the tray.
Xerox® WorkCentre® 5022/5024 Multifunction PrinterUser Guide
4-10
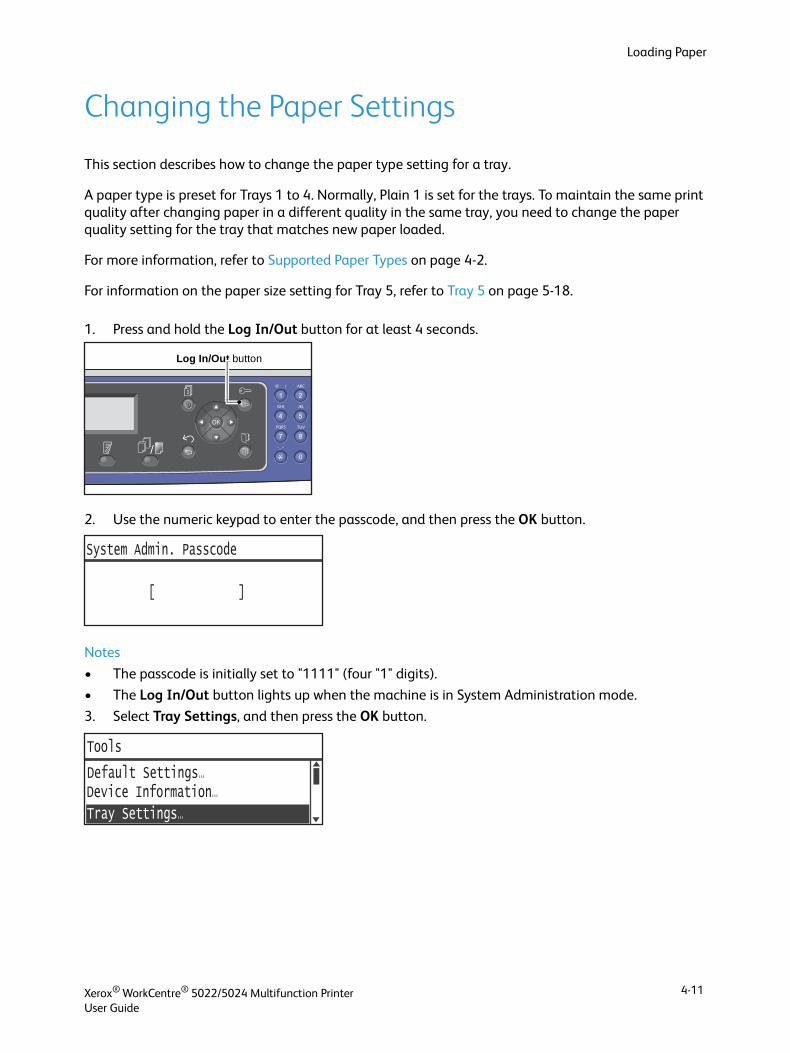
Loading Paper
Changing the Paper Settings
This section describes how to change the paper type setting for a tray.
A paper type is preset for Trays 1 to 4. Normally, Plain 1 is set for the trays. To maintain the same print quality after changing paper in a different quality in the same tray, you need to change the paper quality setting for the tray that matches new paper loaded.
For more information, refer to Supported Paper Types on page 4-2.
For information on the paper size setting for Tray 5, refer to Tray 5 on page 5-18.
1. Press and hold the Log In/Out button for at least 4 seconds.
2. Use the numeric keypad to enter the passcode, and then press the OK button.
Notes
• The passcode is initially set to "1111" (four "1" digits).
• The Log In/Out button lights up when the machine is in System Administration mode.
3. Select Tray Settings, and then press the OK button.
Log In/Out button
[ ]
System Admin. Passcode
Tray Settings...
Device Information...
Tools
Default Settings...
Xerox® WorkCentre® 5022/5024 Multifunction PrinterUser Guide
4-11
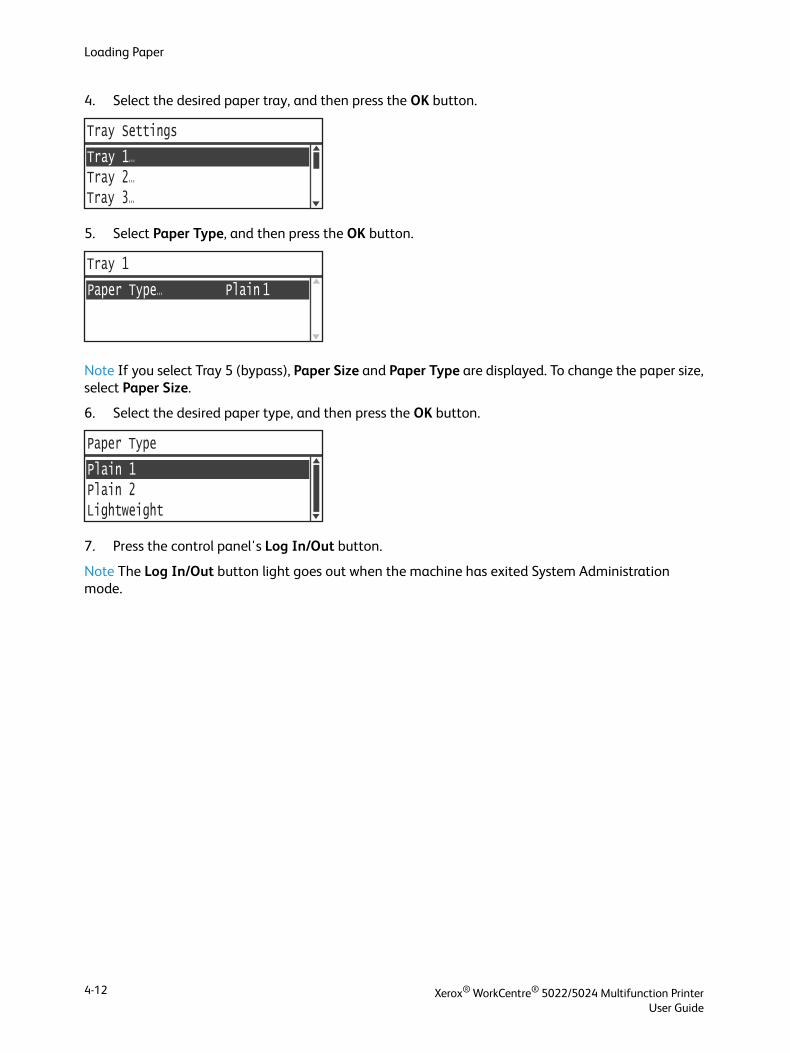
Loading Paper
4. Select the desired paper tray, and then press the OK button.
5. Select Paper Type, and then press the OK button.
Note If you select Tray 5 (bypass), Paper Size and Paper Type are displayed. To change the paper size, select Paper Size.
6. Select the desired paper type, and then press the OK button.
7. Press the control panel's Log In/Out button.
Note The Log In/Out button light goes out when the machine has exited System Administration mode.
Tray 2...Tray 3...
Tray Settings
Tray 1...
Tray 1
Paper Type... Plain 1
Plain 2
Paper Type
Plain 1
Lightweight
Xerox® WorkCentre® 5022/5024 Multifunction PrinterUser Guide
4-12
5Copy
Copying Procedure
This section describes the basic copy procedures.
Placing the Document
The following two methods are available to load documents:
Document feeder
• Single sheet
• Multiple sheets
Document glass
• Shingle sheet
• Bound documents, such as book
Note The document feeder is not available for some models. An optional component is required. Contact your local Xerox representative.
Document Feeder
Supported document sizes
You can place documents of the standard sizes in the document feeder.
When a document is placed in the document feeder, the machine detects the document size
automatically. The following standard size documents are detected automatically: A3 , B4 , A4 ,
A4 , B5 , B5 , A5 , 11 × 17" , 8.5 × 14" , 8.5 × 13" , 8.5 × 11" , 8.5 × 11" , 8K , 16K
, and16K .
Notes
• You can select one of the following alternative document sizes:
- 8.5 × 14" or 8.5 × 13"
- B5 or 16K
• When using a 2-sided document in the document feeder, make sure to set Original - Binding Position properly.
Xerox® WorkCentre® 5022/5024 Multifunction PrinterUser Guide
5-1
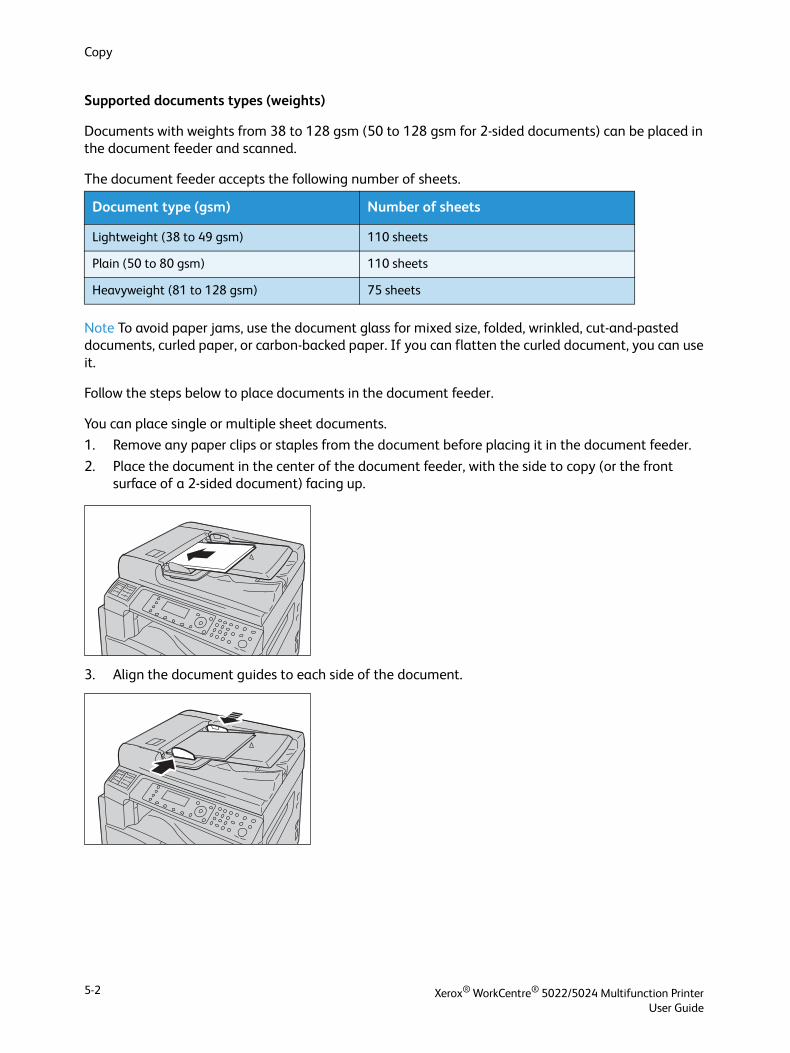
Copy
Supported documents types (weights)
Documents with weights from 38 to 128 gsm (50 to 128 gsm for 2-sided documents) can be placed in the document feeder and scanned.
The document feeder accepts the following number of sheets.
Note To avoid paper jams, use the document glass for mixed size, folded, wrinkled, cut-and-pasted documents, curled paper, or carbon-backed paper. If you can flatten the curled document, you can use it.
Follow the steps below to place documents in the document feeder.
You can place single or multiple sheet documents.
1. Remove any paper clips or staples from the document before placing it in the document feeder.
2. Place the document in the center of the document feeder, with the side to copy (or the front surface of a 2-sided document) facing up.
3. Align the document guides to each side of the document.
Document type (gsm) Number of sheets
Lightweight (38 to 49 gsm) 110 sheets
Plain (50 to 80 gsm) 110 sheets
Heavyweight (81 to 128 gsm) 75 sheets
Xerox® WorkCentre® 5022/5024 Multifunction PrinterUser Guide
5-2
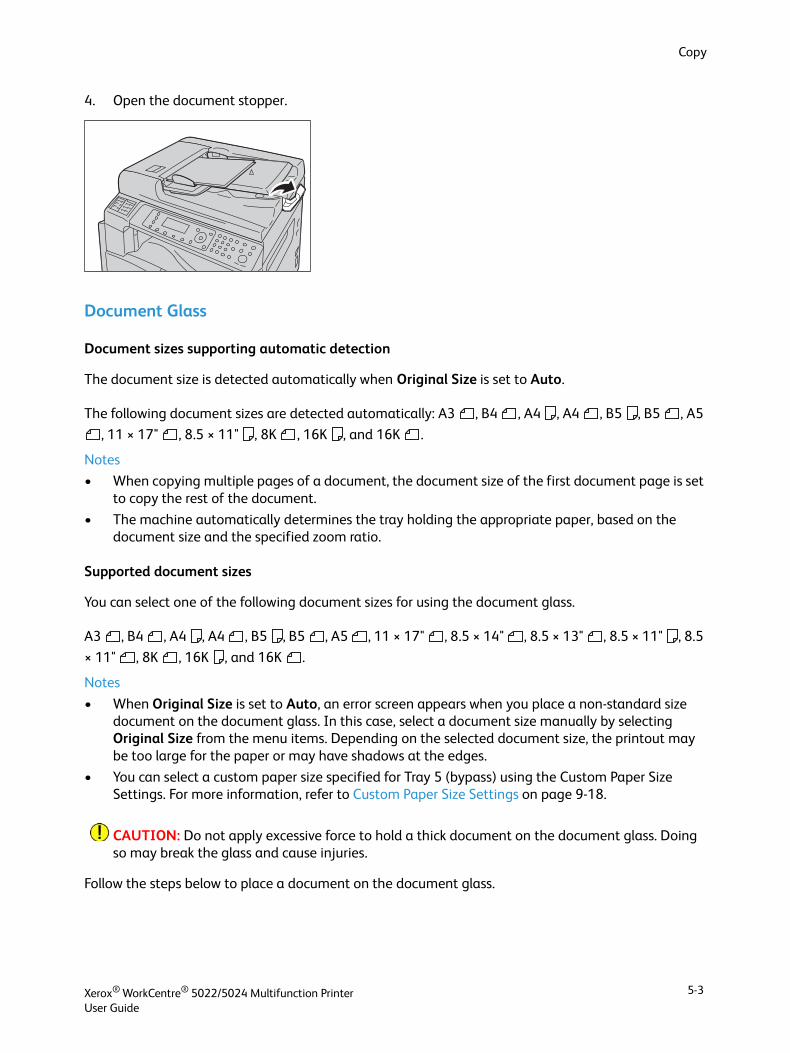
Copy
4. Open the document stopper.
Document Glass
Document sizes supporting automatic detection
The document size is detected automatically when Original Size is set to Auto.
The following document sizes are detected automatically: A3 , B4 , A4 , A4 , B5 , B5 , A5
, 11 × 17" , 8.5 × 11" , 8K , 16K , and 16K .
Notes
• When copying multiple pages of a document, the document size of the first document page is set to copy the rest of the document.
• The machine automatically determines the tray holding the appropriate paper, based on the document size and the specified zoom ratio.
Supported document sizes
You can select one of the following document sizes for using the document glass.
A3 , B4 , A4 , A4 , B5 , B5 , A5 , 11 × 17" , 8.5 × 14" , 8.5 × 13" , 8.5 × 11" , 8.5
× 11" , 8K , 16K , and 16K .
Notes
• When Original Size is set to Auto, an error screen appears when you place a non-standard size document on the document glass. In this case, select a document size manually by selecting Original Size from the menu items. Depending on the selected document size, the printout may be too large for the paper or may have shadows at the edges.
• You can select a custom paper size specified for Tray 5 (bypass) using the Custom Paper Size Settings. For more information, refer to Custom Paper Size Settings on page 9-18.
CAUTION: Do not apply excessive force to hold a thick document on the document glass. Doing so may break the glass and cause injuries.
Follow the steps below to place a document on the document glass.
Xerox® WorkCentre® 5022/5024 Multifunction PrinterUser Guide
5-3

Copy
You can place a single sheet document or bound document, such as a book, on the document glass.
1. Open the document cover.
Note When using the document glass, make sure to close the document cover after finishing your copy job.
2. Place the document face down and align it against the top left corner of the document glass.
3. Close the document cover.
Xerox® WorkCentre® 5022/5024 Multifunction PrinterUser Guide
5-4
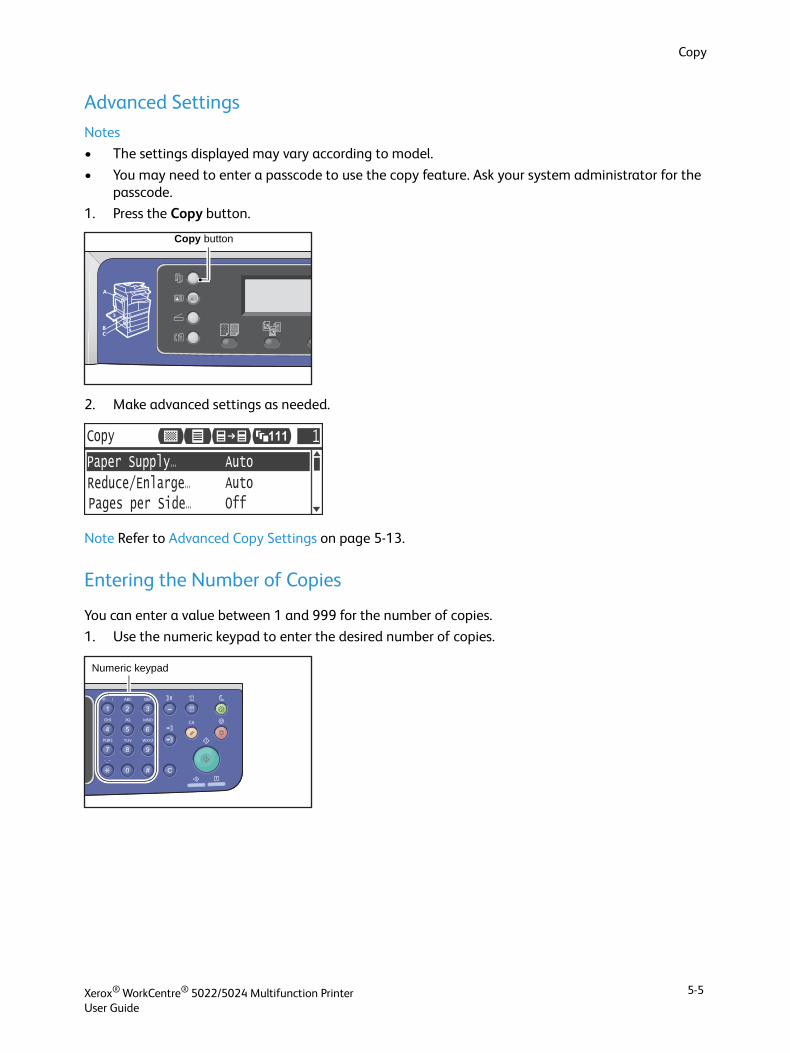
Copy
Advanced Settings
Notes
• The settings displayed may vary according to model.
• You may need to enter a passcode to use the copy feature. Ask your system administrator for the passcode.
1. Press the Copy button.
2. Make advanced settings as needed.
Note Refer to Advanced Copy Settings on page 5-13.
Entering the Number of Copies
You can enter a value between 1 and 999 for the number of copies.
1. Use the numeric keypad to enter the desired number of copies.
Copy button
Paper Supply...
Copy
AutoReduce/Enlarge... OffPages per Side...
Auto
1111
Numeric keypad
Xerox® WorkCentre® 5022/5024 Multifunction PrinterUser Guide
5-5
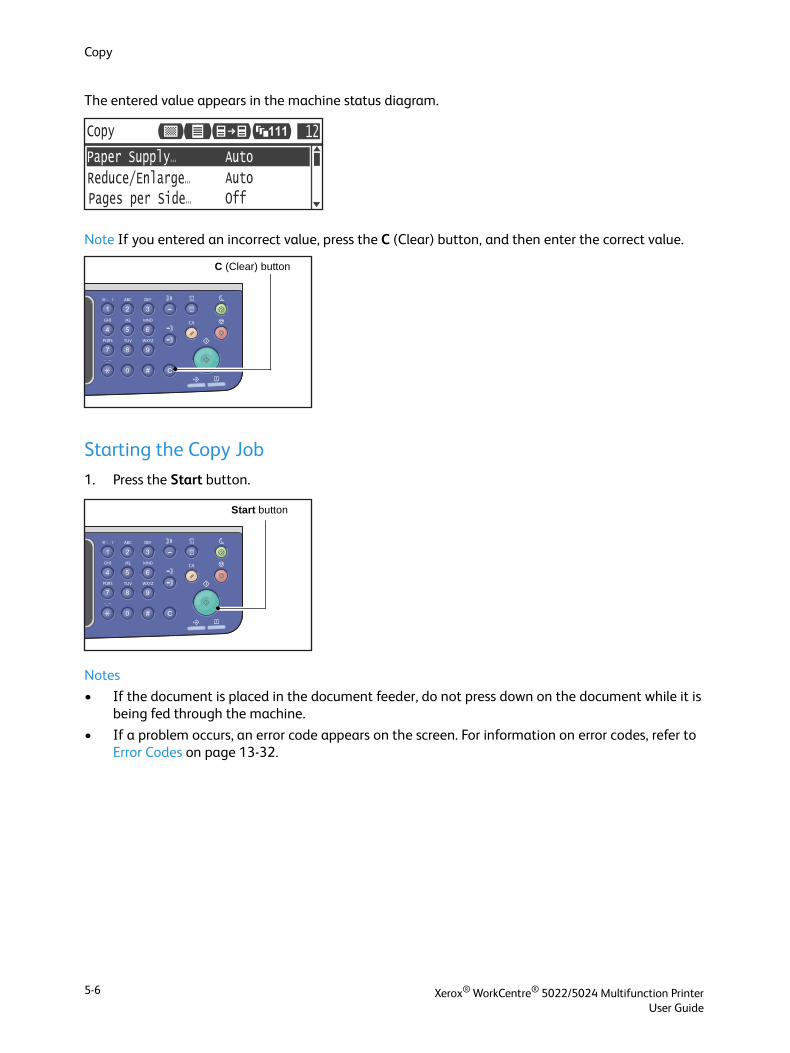
Copy
The entered value appears in the machine status diagram.
Note If you entered an incorrect value, press the C (Clear) button, and then enter the correct value.
Starting the Copy Job
1. Press the Start button.
Notes
• If the document is placed in the document feeder, do not press down on the document while it is being fed through the machine.
• If a problem occurs, an error code appears on the screen. For information on error codes, refer to Error Codes on page 13-32.
Paper Supply...
Copy
AutoReduce/Enlarge... OffPages per Side...
Auto
12111
C (Clear) button
Start button
Xerox® WorkCentre® 5022/5024 Multifunction PrinterUser Guide
5-6
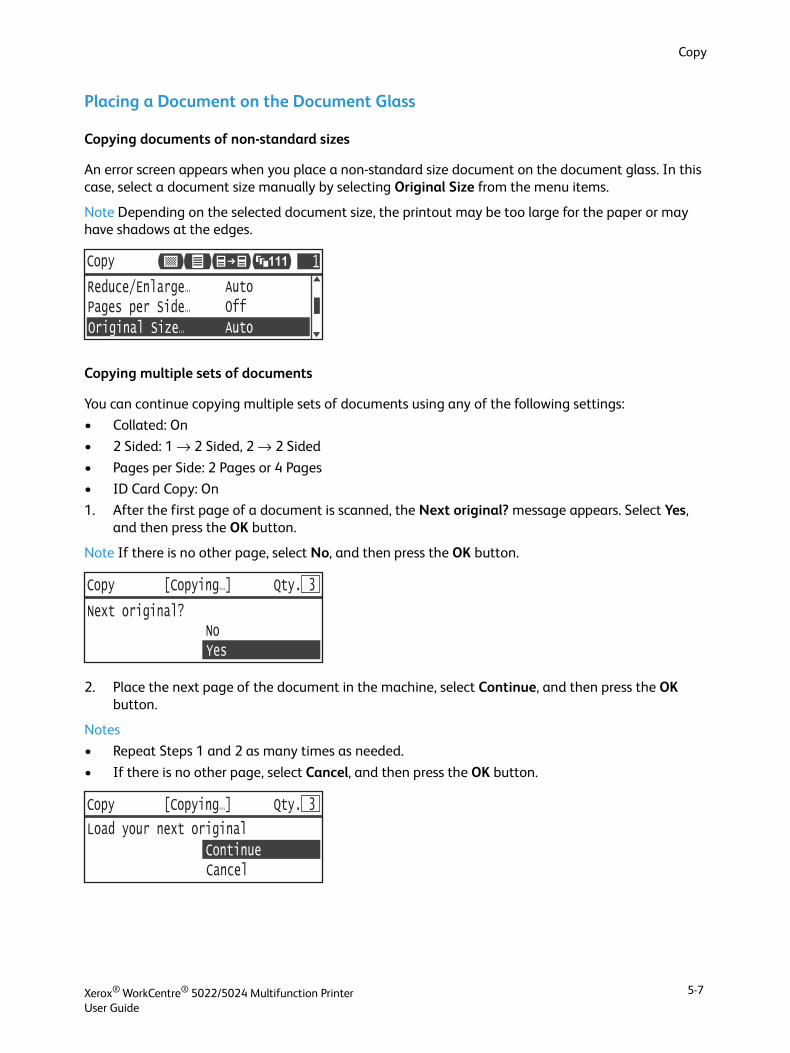
Copy
Placing a Document on the Document Glass
Copying documents of non-standard sizes
An error screen appears when you place a non-standard size document on the document glass. In this case, select a document size manually by selecting Original Size from the menu items.
Note Depending on the selected document size, the printout may be too large for the paper or may have shadows at the edges.
Copying multiple sets of documents
You can continue copying multiple sets of documents using any of the following settings:
• Collated: On
• 2 Sided: 1 → 2 Sided, 2 → 2 Sided
• Pages per Side: 2 Pages or 4 Pages
• ID Card Copy: On
1. After the first page of a document is scanned, the Next original? message appears. Select Yes, and then press the OK button.
Note If there is no other page, select No, and then press the OK button.
2. Place the next page of the document in the machine, select Continue, and then press the OK button.
Notes
• Repeat Steps 1 and 2 as many times as needed.
• If there is no other page, select Cancel, and then press the OK button.
OffPages per Side... AutoReduce/Enlarge...
AutoOriginal Size...
Copy 1111
Copy [Copying...] Qty. 3
Next original? No Yes
Copy [Copying...] Qty. 3
Load your next original
Continue Cancel
Xerox® WorkCentre® 5022/5024 Multifunction PrinterUser Guide
5-7

Copy
3. After you place all of the document pages in the machine, select No when Next original? appears, and then click the OK button.
About Auto Rotation
The copy feature supports the Auto Rotation function that the machine automatically prints a scanned page to fit onto a page of paper by rotating the scanned image although the orientation of the document is different from the paper loaded in the tray.
You can set this feature in the following cases:
• The tray selection is set to automatic.
• The zoom ratio is set to automatic.
• The zoom ratio is set to 100% and both document and paper are the same size.
• The Pages per Side function is used.
If none of the above conditions applied when copying, the machine does not perform Auto Rotation, which may result in a part of the image to be missing.
Copy [Copying...] Qty. 3
Next original? No Yes
Xerox® WorkCentre® 5022/5024 Multifunction PrinterUser Guide
5-8
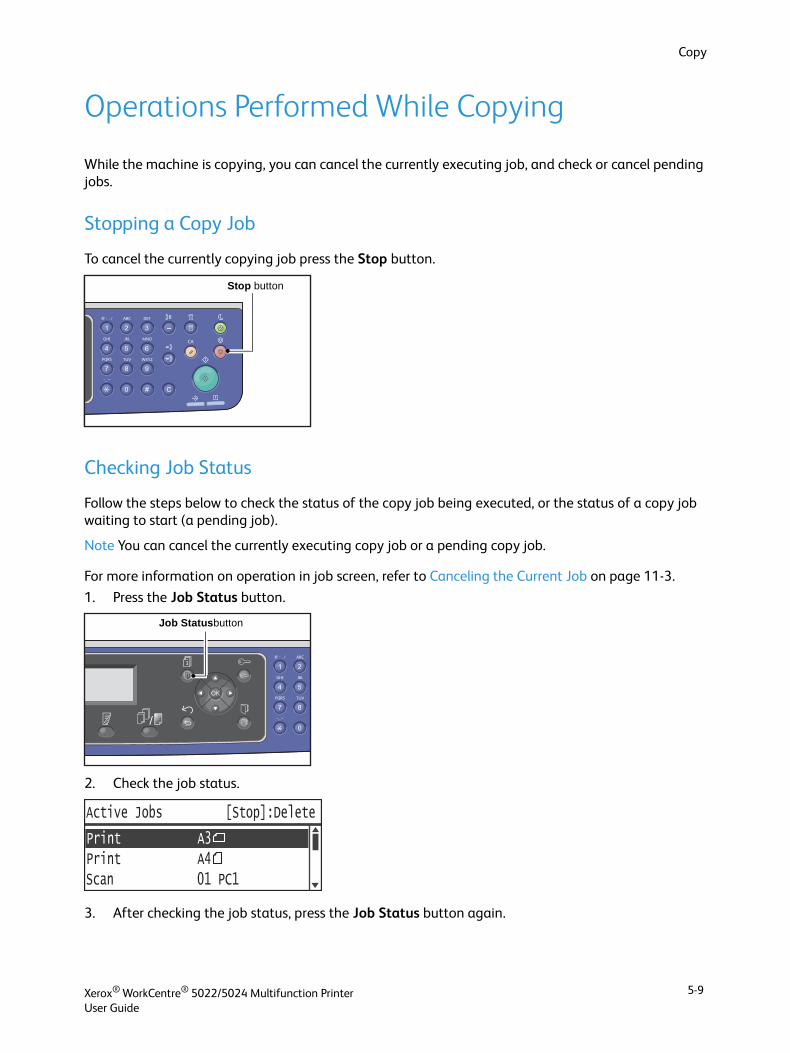
Copy
Operations Performed While Copying
While the machine is copying, you can cancel the currently executing job, and check or cancel pending jobs.
Stopping a Copy Job
To cancel the currently copying job press the Stop button.
Checking Job Status
Follow the steps below to check the status of the copy job being executed, or the status of a copy job waiting to start (a pending job).
Note You can cancel the currently executing copy job or a pending copy job.
For more information on operation in job screen, refer to Canceling the Current Job on page 11-3.
1. Press the Job Status button.
2. Check the job status.
3. After checking the job status, press the Job Status button again.
Stop button
Job Statusbutton
Print A4 Scan 01 PC1
Active Jobs [Stop]:Delete
Print A3
Xerox® WorkCentre® 5022/5024 Multifunction PrinterUser Guide
5-9
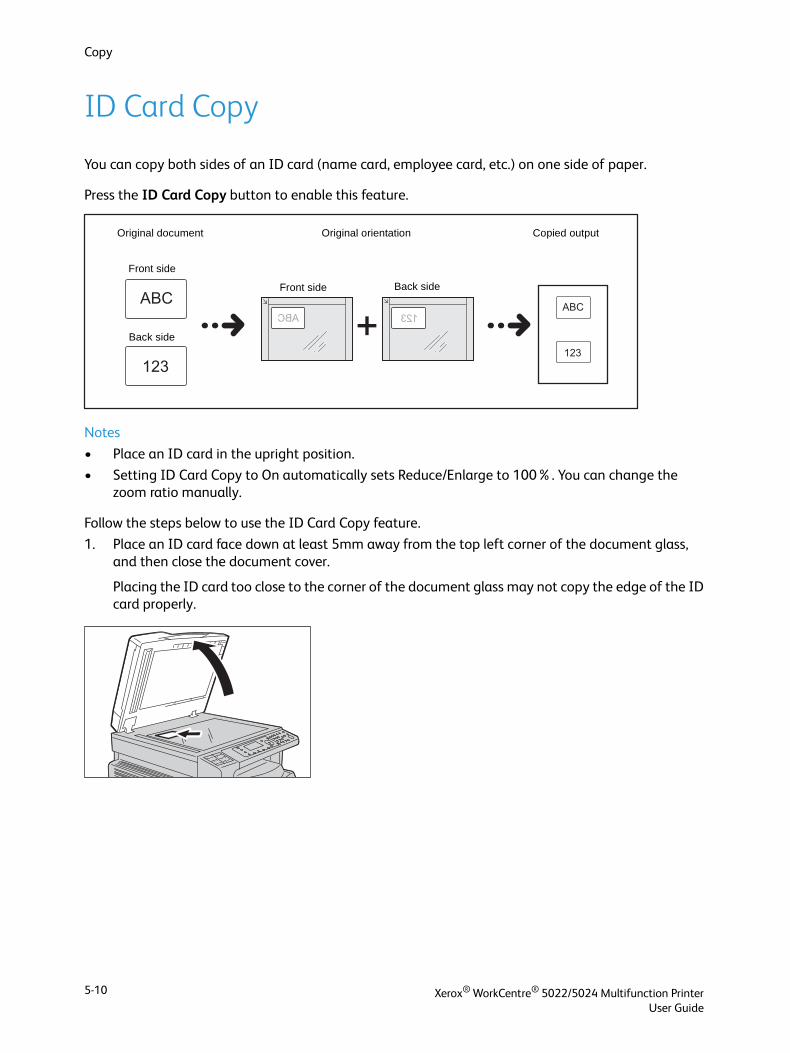
Copy
ID Card Copy
You can copy both sides of an ID card (name card, employee card, etc.) on one side of paper.
Press the ID Card Copy button to enable this feature.
Notes
• Place an ID card in the upright position.
• Setting ID Card Copy to On automatically sets Reduce/Enlarge to 100%. You can change the zoom ratio manually.
Follow the steps below to use the ID Card Copy feature.
1. Place an ID card face down at least 5mm away from the top left corner of the document glass, and then close the document cover.
Placing the ID card too close to the corner of the document glass may not copy the edge of the ID card properly.
Original document Original orientation Copied output
Front side
Front side Back side
Back side
Xerox® WorkCentre® 5022/5024 Multifunction PrinterUser Guide
5-10
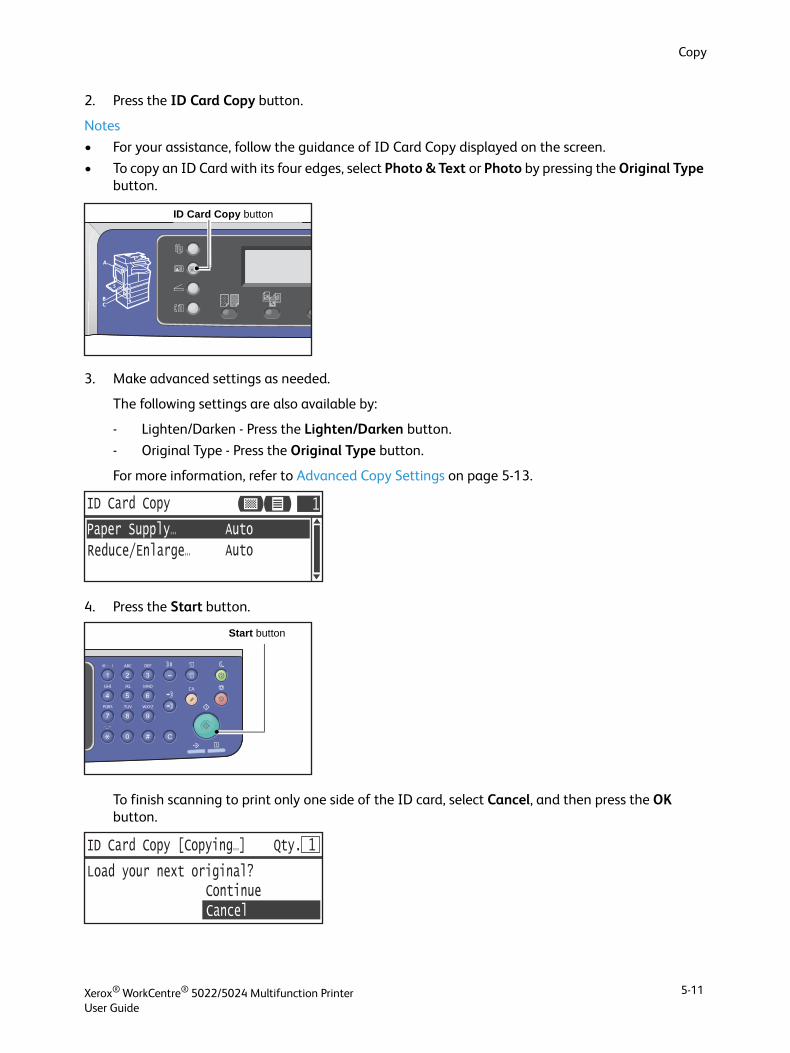
Copy
2. Press the ID Card Copy button.
Notes
• For your assistance, follow the guidance of ID Card Copy displayed on the screen.
• To copy an ID Card with its four edges, select Photo & Text or Photo by pressing the Original Type button.
3. Make advanced settings as needed.
The following settings are also available by:
- Lighten/Darken - Press the Lighten/Darken button.
- Original Type - Press the Original Type button.
For more information, refer to Advanced Copy Settings on page 5-13.
4. Press the Start button.
To finish scanning to print only one side of the ID card, select Cancel, and then press the OK button.
ID Card Copy button
Paper Supply...
ID Card Copy
AutoReduce/Enlarge...
Auto
11
Start button
ID Card Copy [Copying...] Qty. 1
Load your next original? Continue Cancel
Xerox® WorkCentre® 5022/5024 Multifunction PrinterUser Guide
5-11
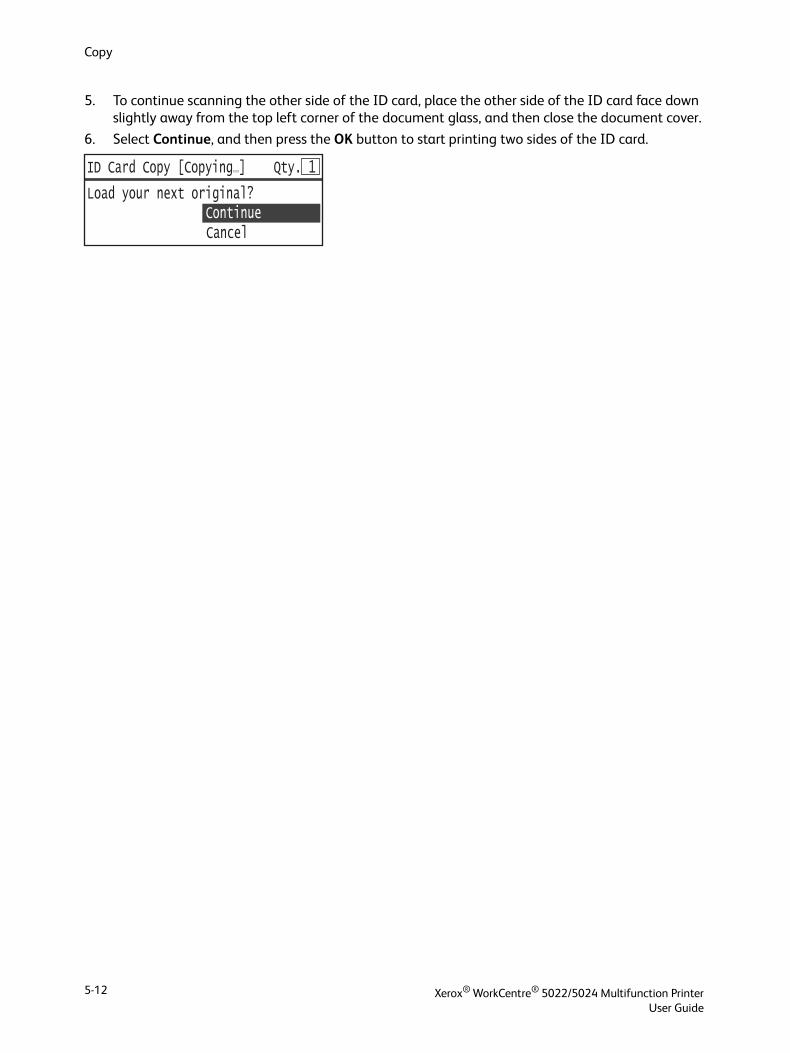
Copy
5. To continue scanning the other side of the ID card, place the other side of the ID card face down slightly away from the top left corner of the document glass, and then close the document cover.
6. Select Continue, and then press the OK button to start printing two sides of the ID card.
ID Card Copy [Copying...] Qty. 1
Load your next original? Continue Cancel
Xerox® WorkCentre® 5022/5024 Multifunction PrinterUser Guide
5-12
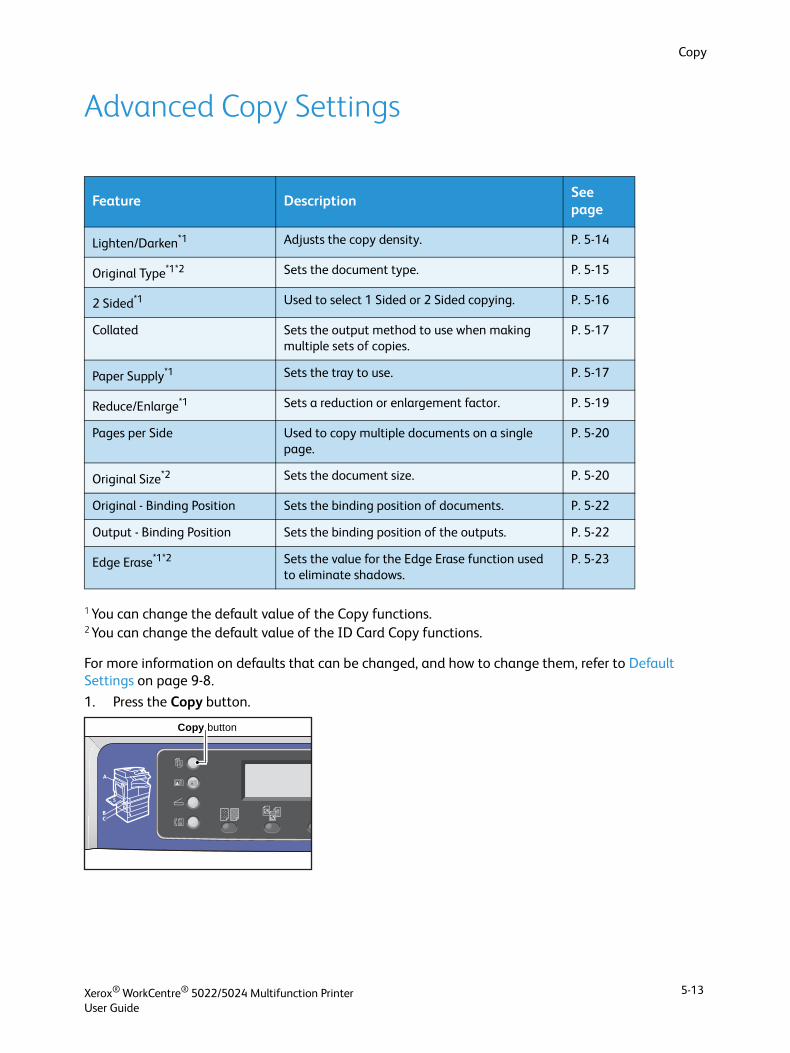
Copy
Advanced Copy Settings
1 You can change the default value of the Copy functions.2 You can change the default value of the ID Card Copy functions.
For more information on defaults that can be changed, and how to change them, refer to Default Settings on page 9-8.
1. Press the Copy button.
Feature DescriptionSee page
Lighten/Darken*1 Adjusts the copy density. P. 5-14
Original Type*1*2 Sets the document type. P. 5-15
2 Sided*1 Used to select 1 Sided or 2 Sided copying. P. 5-16
Collated Sets the output method to use when making multiple sets of copies.
P. 5-17
Paper Supply*1 Sets the tray to use. P. 5-17
Reduce/Enlarge*1 Sets a reduction or enlargement factor. P. 5-19
Pages per Side Used to copy multiple documents on a single page.
P. 5-20
Original Size*2 Sets the document size. P. 5-20
Original - Binding Position Sets the binding position of documents. P. 5-22
Output - Binding Position Sets the binding position of the outputs. P. 5-22
Edge Erase*1*2 Sets the value for the Edge Erase function used to eliminate shadows.
P. 5-23
Copy button
Xerox® WorkCentre® 5022/5024 Multifunction PrinterUser Guide
5-13

Copy
2. Select the desired setting as needed.
Lighten/Darken
You can set the density from five levels. The farther left the position of , the darker the copy; the farther right, the lighter and toner saver mode.
1. Press the Lighten/Darken button.
2. Brightness level and Toner Saver changes every time the Lighten/Darken button is pressed. The selection is applied when the screen returns to the main menu screen without pressing the OK button.
You can change the displayed time length of the setting screen.
For more information on changing the displayed time length of the setting screen, refer to Quick-Button Selection Timer on page 10-12.
Dark +2 Creates copies with the darkest density. Use this setting to scan documents containing light objects.
Dark +1 Creates copies with a fairly dark density. Use this setting to scan documents containing fairly light objects.
Normal Creates copies with the same density as the document.
Light +1 Creates copies with a fairly light density. Use this setting to scan documents containing fairly dark objects.
Paper Supply...
Copy
AutoReduce/Enlarge... OffPages per Side...
Auto
1111
Lighten/Darken button
Xerox® WorkCentre® 5022/5024 Multifunction PrinterUser Guide
5-14
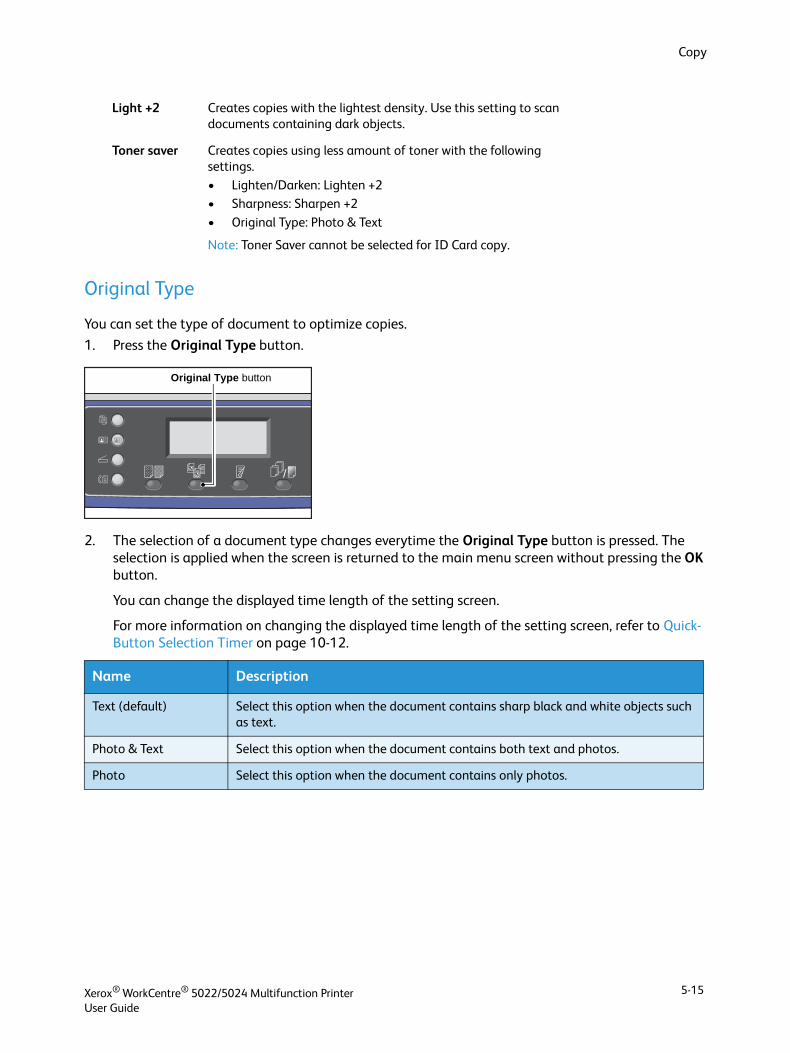
Copy
Original Type
You can set the type of document to optimize copies.
1. Press the Original Type button.
2. The selection of a document type changes everytime the Original Type button is pressed. The selection is applied when the screen is returned to the main menu screen without pressing the OK button.
You can change the displayed time length of the setting screen.
For more information on changing the displayed time length of the setting screen, refer to Quick-Button Selection Timer on page 10-12.
Light +2 Creates copies with the lightest density. Use this setting to scan documents containing dark objects.
Toner saver Creates copies using less amount of toner with the following settings.
• Lighten/Darken: Lighten +2• Sharpness: Sharpen +2
• Original Type: Photo & Text
Note: Toner Saver cannot be selected for ID Card copy.
Name Description
Text (default) Select this option when the document contains sharp black and white objects such as text.
Photo & Text Select this option when the document contains both text and photos.
Photo Select this option when the document contains only photos.
Original Type button
Xerox® WorkCentre® 5022/5024 Multifunction PrinterUser Guide
5-15
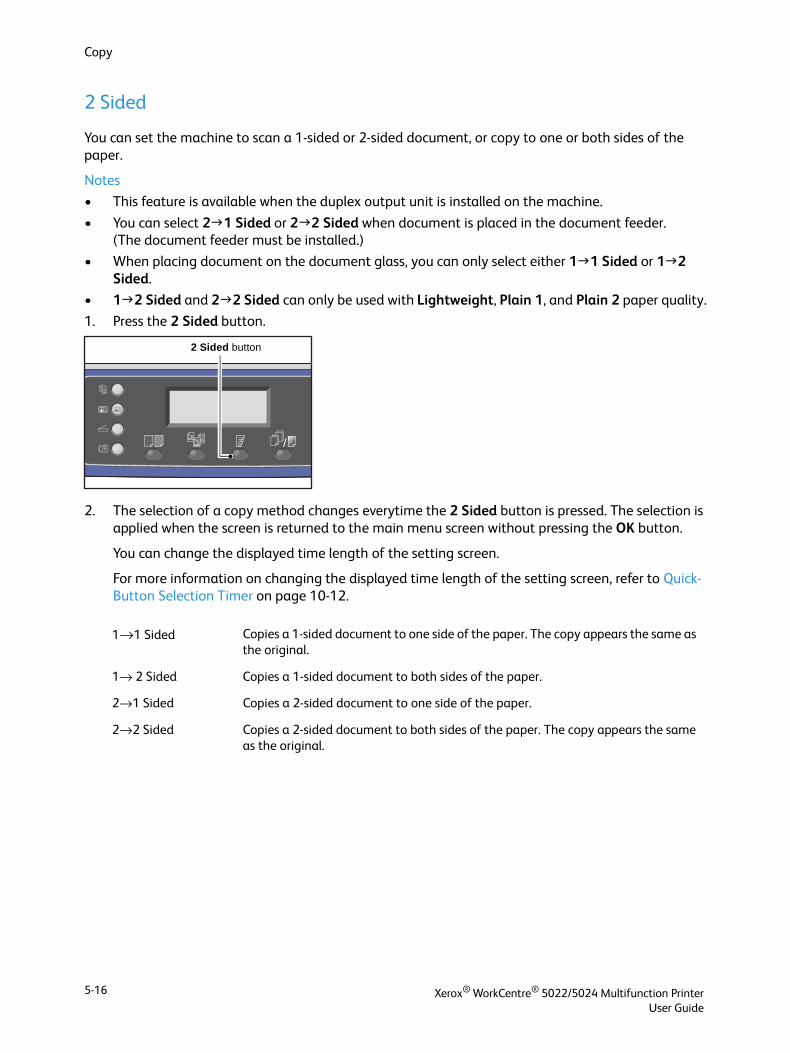
Copy
2 Sided
You can set the machine to scan a 1-sided or 2-sided document, or copy to one or both sides of the paper.
Notes
• This feature is available when the duplex output unit is installed on the machine.
• You can select 21 Sided or 22 Sided when document is placed in the document feeder.(The document feeder must be installed.)
• When placing document on the document glass, you can only select either 11 Sided or 12 Sided.
• 12 Sided and 22 Sided can only be used with Lightweight, Plain 1, and Plain 2 paper quality.
1. Press the 2 Sided button.
2. The selection of a copy method changes everytime the 2 Sided button is pressed. The selection is applied when the screen is returned to the main menu screen without pressing the OK button.
You can change the displayed time length of the setting screen.
For more information on changing the displayed time length of the setting screen, refer to Quick-Button Selection Timer on page 10-12.
1→1 Sided Copies a 1-sided document to one side of the paper. The copy appears the same as the original.
1→ 2 Sided Copies a 1-sided document to both sides of the paper.
2→1 Sided Copies a 2-sided document to one side of the paper.
2→2 Sided Copies a 2-sided document to both sides of the paper. The copy appears the same as the original.
2 Sided button
Xerox® WorkCentre® 5022/5024 Multifunction PrinterUser Guide
5-16

Copy
Collate
You can set the output method for copying sets of multiple documents.
1. Press the Collated/Resolution button.
2. The selection of an output method changes everytime the Collated/Resolution button is pressed. The selection is applied when the screen is returned to the main menu screen without pressing the OK button.
You can change the displayed time length of the setting screen.
For more information on changing the displayed time length of the setting screen, refer to Quick-Button Selection Timer on page 10-12.
Paper Supply
1. Select Paper Supply, and then press the OK button.
Off Uncollated. The machine does not sort copy sets. The machine copies the specified number of copy sets one after another.
On The machine outputs sheets sorted into sets that are arranged in page order.
When a document is placed in the document feeder, it automatically turns on. You can also change the setting to off manually.
On (Rotate) The machine outputs sheets sorted into sets that are arranged in page order by alternating between landscape and portrait orientations.Use A4, B5, Letter, or 16K paper size with the document oriented in the same direction.
Collated/Resolution button
Off
Copy
OnOn(Rotate)
1111Collated button
Paper Supply...
Copy
AutoReduce/Enlarge... OffPages per Side...
Auto
1111
Xerox® WorkCentre® 5022/5024 Multifunction PrinterUser Guide
5-17
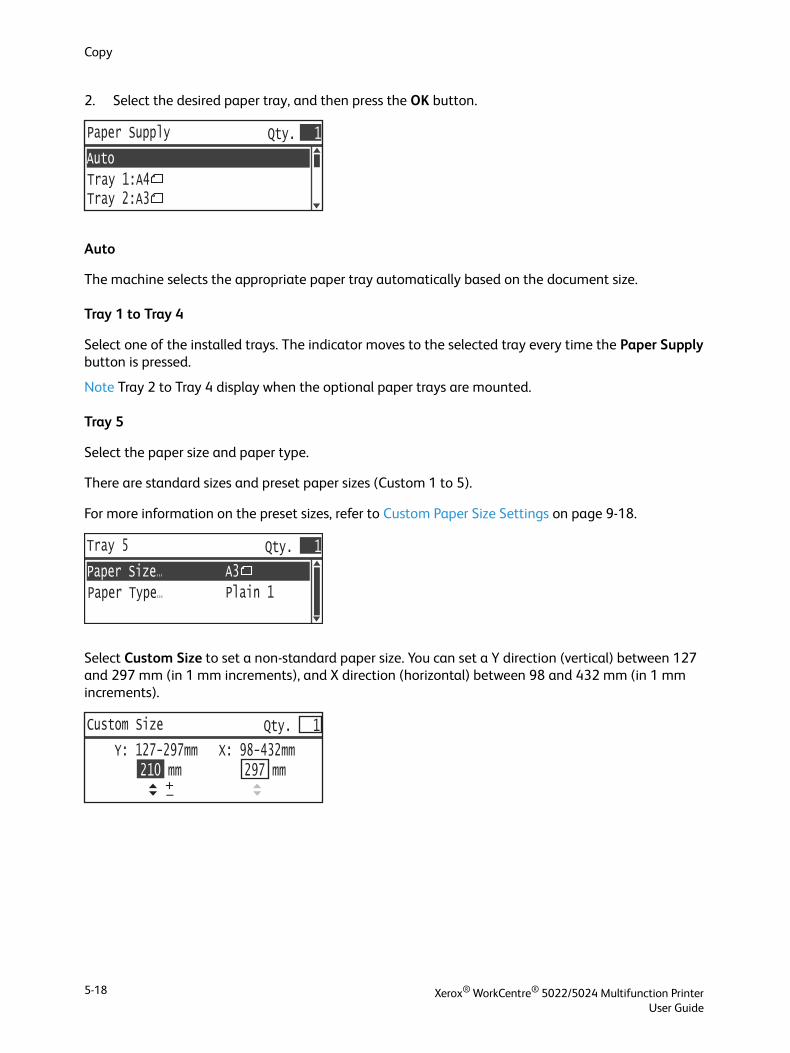
Copy
2. Select the desired paper tray, and then press the OK button.
Auto
The machine selects the appropriate paper tray automatically based on the document size.
Tray 1 to Tray 4
Select one of the installed trays. The indicator moves to the selected tray every time the Paper Supply button is pressed.
Note Tray 2 to Tray 4 display when the optional paper trays are mounted.
Tray 5
Select the paper size and paper type.
There are standard sizes and preset paper sizes (Custom 1 to 5).
For more information on the preset sizes, refer to Custom Paper Size Settings on page 9-18.
Select Custom Size to set a non-standard paper size. You can set a Y direction (vertical) between 127 and 297 mm (in 1 mm increments), and X direction (horizontal) between 98 and 432 mm (in 1 mm increments).
Auto
Paper Supply Qty. 1
Tray 1:A4Tray 2:A3
Paper Size...
Tray 5 Qty. 1
Plain 1Paper Type...
A3
Y: 127-297mm X: 98-432mm
Custom Size Qty. 1
210 mm 297 mm
Xerox® WorkCentre® 5022/5024 Multifunction PrinterUser Guide
5-18
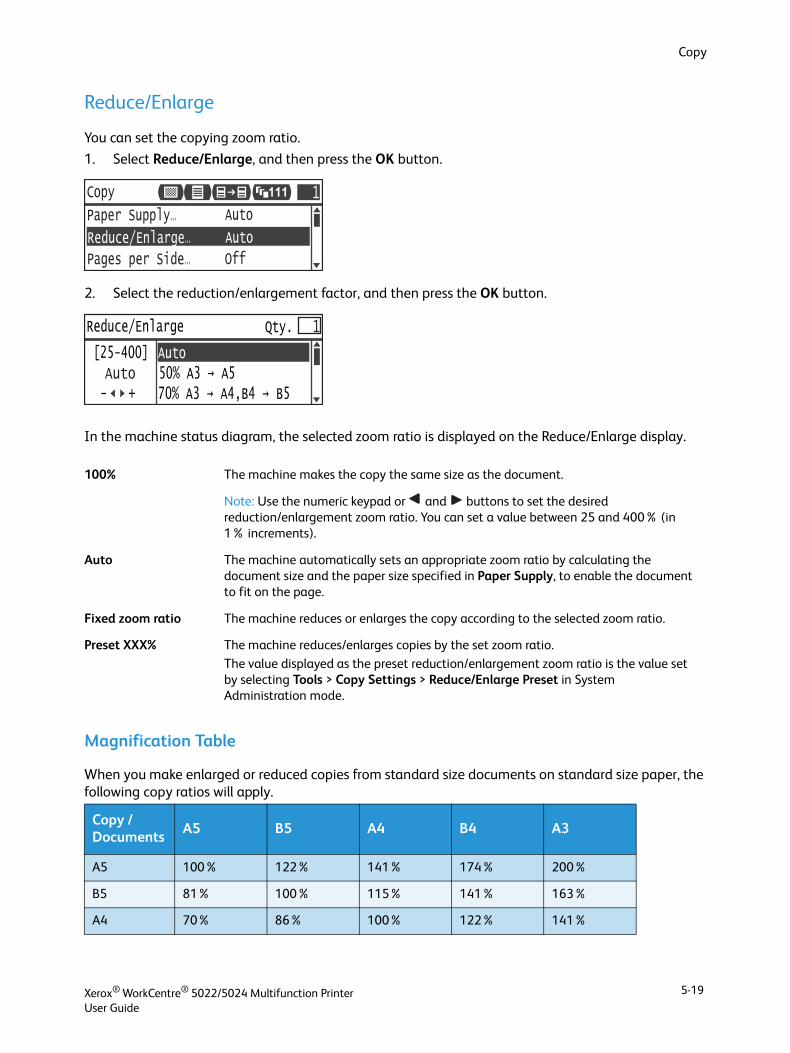
Copy
Reduce/Enlarge
You can set the copying zoom ratio.
1. Select Reduce/Enlarge, and then press the OK button.
2. Select the reduction/enlargement factor, and then press the OK button.
In the machine status diagram, the selected zoom ratio is displayed on the Reduce/Enlarge display.
Magnification Table
When you make enlarged or reduced copies from standard size documents on standard size paper, the following copy ratios will apply.
100% The machine makes the copy the same size as the document.
Note: Use the numeric keypad or and buttons to set the desired reduction/enlargement zoom ratio. You can set a value between 25 and 400% (in 1% increments).
Auto The machine automatically sets an appropriate zoom ratio by calculating the document size and the paper size specified in Paper Supply, to enable the document to fit on the page.
Fixed zoom ratio The machine reduces or enlarges the copy according to the selected zoom ratio.
Preset XXX% The machine reduces/enlarges copies by the set zoom ratio.
The value displayed as the preset reduction/enlargement zoom ratio is the value set by selecting Tools > Copy Settings > Reduce/Enlarge Preset in System Administration mode.
Copy /Documents
A5 B5 A4 B4 A3
A5 100% 122% 141% 174% 200%
B5 81% 100% 115% 141% 163%
A4 70% 86% 100% 122% 141%
Paper Supply... Auto
AutoReduce/Enlarge... OffPages per Side...
Copy 1111
[25-400]
70% A3 → A4,B4 → B5
Reduce/Enlarge
AutoAuto
- +50% A3 → A5
Qty. 1
Xerox® WorkCentre® 5022/5024 Multifunction PrinterUser Guide
5-19
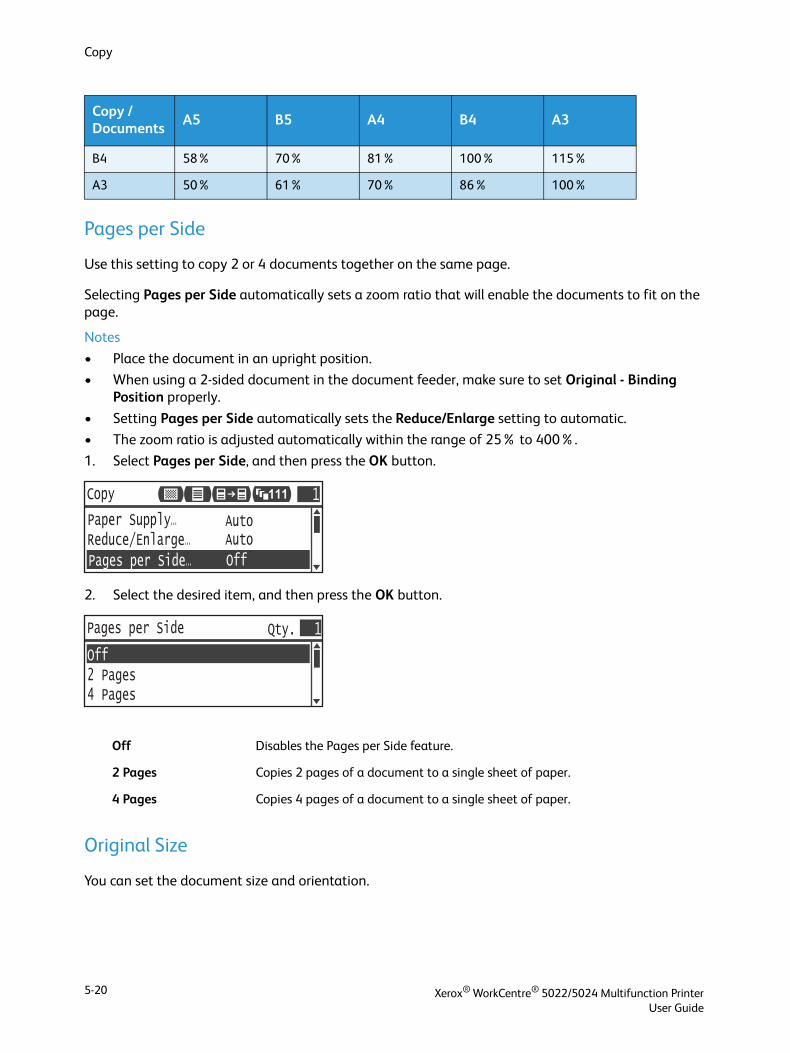
Copy
Pages per Side
Use this setting to copy 2 or 4 documents together on the same page.
Selecting Pages per Side automatically sets a zoom ratio that will enable the documents to fit on the page.
Notes
• Place the document in an upright position.
• When using a 2-sided document in the document feeder, make sure to set Original - Binding Position properly.
• Setting Pages per Side automatically sets the Reduce/Enlarge setting to automatic.
• The zoom ratio is adjusted automatically within the range of 25% to 400%.
1. Select Pages per Side, and then press the OK button.
2. Select the desired item, and then press the OK button.
Original Size
You can set the document size and orientation.
B4 58% 70% 81% 100% 115%
A3 50% 61% 70% 86% 100%
Off Disables the Pages per Side feature.
2 Pages Copies 2 pages of a document to a single sheet of paper.
4 Pages Copies 4 pages of a document to a single sheet of paper.
Copy /Documents
A5 B5 A4 B4 A3
AutoReduce/Enlarge... AutoPaper Supply...
OffPages per Side...
Copy 1111
Pages per Side Qty. 1
2 PagesOff
4 Pages
Xerox® WorkCentre® 5022/5024 Multifunction PrinterUser Guide
5-20
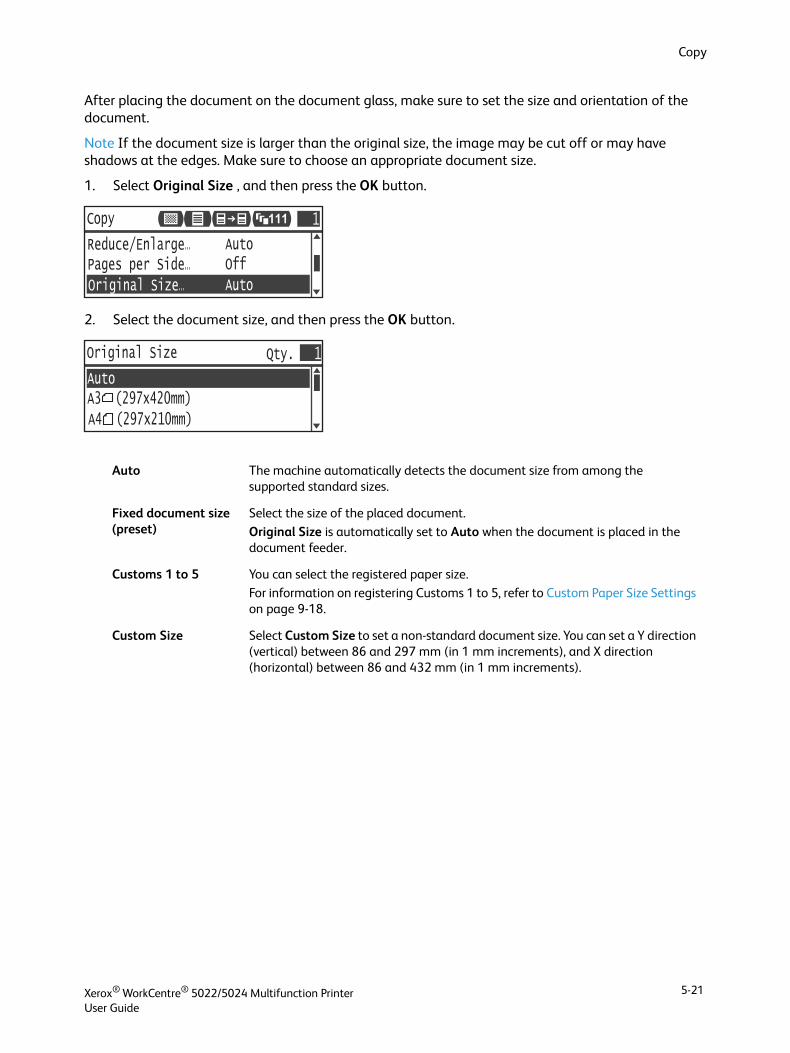
Copy
After placing the document on the document glass, make sure to set the size and orientation of the document.
Note If the document size is larger than the original size, the image may be cut off or may have shadows at the edges. Make sure to choose an appropriate document size.
1. Select Original Size , and then press the OK button.
2. Select the document size, and then press the OK button.
Auto The machine automatically detects the document size from among the supported standard sizes.
Fixed document size (preset)
Select the size of the placed document.
Original Size is automatically set to Auto when the document is placed in the document feeder.
Customs 1 to 5 You can select the registered paper size.
For information on registering Customs 1 to 5, refer to Custom Paper Size Settings on page 9-18.
Custom Size Select Custom Size to set a non-standard document size. You can set a Y direction (vertical) between 86 and 297 mm (in 1 mm increments), and X direction (horizontal) between 86 and 432 mm (in 1 mm increments).
OffPages per Side... AutoReduce/Enlarge...
AutoOriginal Size...
Copy 1111
Original Size Qty. 1
A3 (297x420mm)Auto
A4 (297x210mm)
Xerox® WorkCentre® 5022/5024 Multifunction PrinterUser Guide
5-21
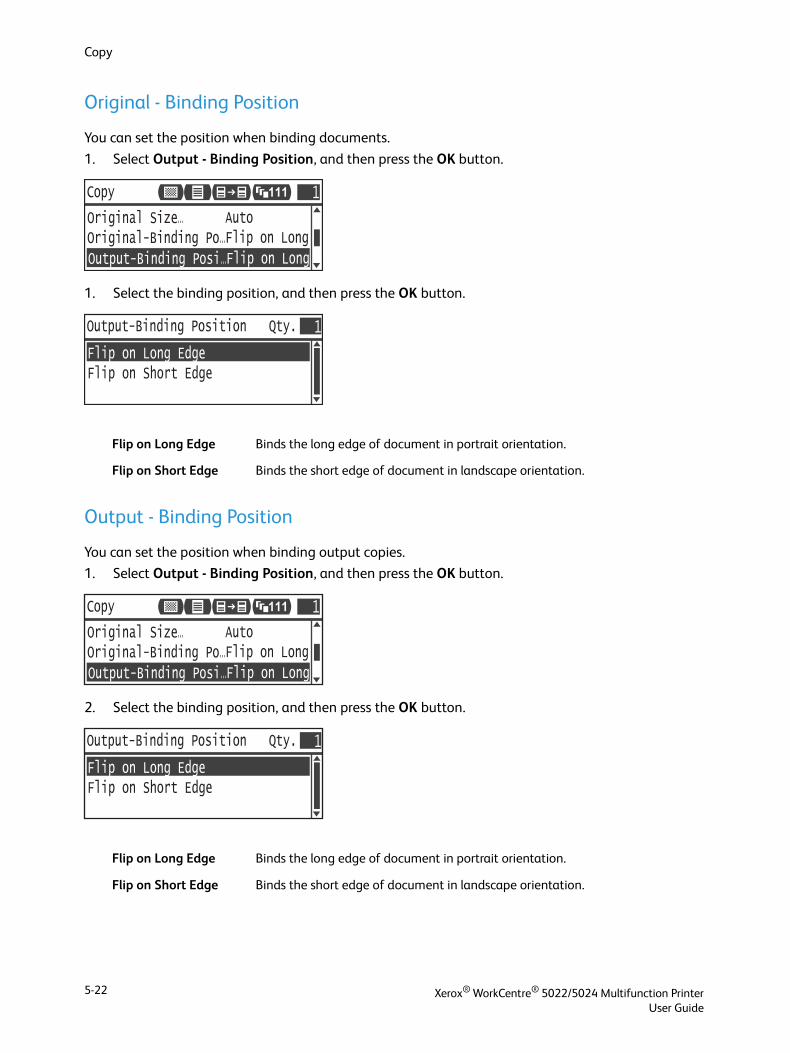
Copy
Original - Binding Position
You can set the position when binding documents.
1. Select Output - Binding Position, and then press the OK button.
1. Select the binding position, and then press the OK button.
Output - Binding Position
You can set the position when binding output copies.
1. Select Output - Binding Position, and then press the OK button.
2. Select the binding position, and then press the OK button.
Flip on Long Edge Binds the long edge of document in portrait orientation.
Flip on Short Edge Binds the short edge of document in landscape orientation.
Flip on Long Edge Binds the long edge of document in portrait orientation.
Flip on Short Edge Binds the short edge of document in landscape orientation.
Flip on LongOriginal-Binding Po... AutoOriginal Size...
Flip on LongOutput-Binding Posi...
Copy 1111
Output-Binding Position Qty. 1
Flip on Short EdgeFlip on Long Edge
Flip on LongOriginal-Binding Po... AutoOriginal Size...
Flip on LongOutput-Binding Posi...
Copy 1111
Output-Binding Position Qty. 1
Flip on Short EdgeFlip on Long Edge
Xerox® WorkCentre® 5022/5024 Multifunction PrinterUser Guide
5-22
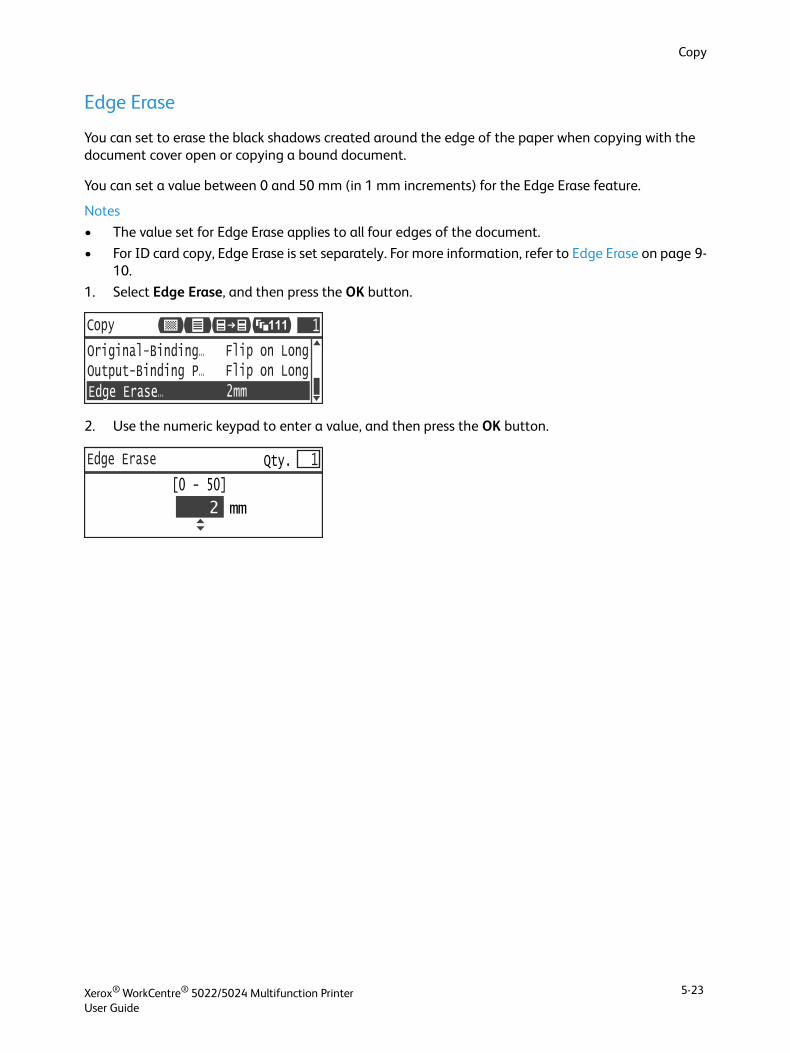
Copy
Edge Erase
You can set to erase the black shadows created around the edge of the paper when copying with the document cover open or copying a bound document.
You can set a value between 0 and 50 mm (in 1 mm increments) for the Edge Erase feature.
Notes
• The value set for Edge Erase applies to all four edges of the document.
• For ID card copy, Edge Erase is set separately. For more information, refer to Edge Erase on page 9-10.
1. Select Edge Erase, and then press the OK button.
2. Use the numeric keypad to enter a value, and then press the OK button.
Flip on LongOutput-Binding P... Flip on LongOriginal-Binding...
2mmEdge Erase...
Copy 1111
Edge Erase
[0 - 50]
2
Qty. 1
Xerox® WorkCentre® 5022/5024 Multifunction PrinterUser Guide
5-23
Copy
Managing the Copy Paper with Accounting
You can manage copy paper usage for up to 30 users.
You can set the passcode and maximum number of copied impressions permitted for each user.
The following features are available with the Accounting function.
• Display/set the password.
• Display the total number of copied impressions.
• Display/set the maximum number of impressions permitted for copying.
• Clear the total number of impressions.
To enable Accounting: User Control on page 9-48Items available with Accounting: User Management on page 9-52
Operations when Using the Copy Feature
The operation procedure differs depending on the account mode you are using.
For more information, refer to Account Modes on page 3-20.
Checking the Total Number of Impressions Copied
The machine can display the total number of impressions each user has copied and the maximum number of impressions each user is permitted to copy.
This function can be used when managing the copy paper.
For more information, refer to User Management on page 9-52.
Xerox® WorkCentre® 5022/5024 Multifunction PrinterUser Guide
5-24
6Fax
Overview of Fax Operations
The basic flow of fax operations including placing document in the machine, setting the recipient address, and making advanced settings is described below.
You must set the Region and Clock items to use the Fax feature. For more information, refer to Region on page 9-38 and System Settings on page 9-42.
Placing a Document
The following two methods are available to place a document:
Document feeder
• Single sheet
• Multiple sheets
Note The document feeder is not available for some models. An optional component is required. Contact your local Xerox representative.
Document glass
• Single sheet
• Bound documents, such as books
Document Feeder
Supported document sizes
You can place standard size document in the document feeder.
When a document is placed in the document feeder, the machine detects the document size
automatically. The following standard size documents are detected automatically: A3 , B4 , A4 ,
A4 , B5 , B5 *, A5 , 11 × 17" , 8.5 × 14" *, 8.5 × 13" *, 8.5 × 11" , 8.5 × 11" , 8K ,
16K , and 16K *.
Notes
• You can select one of the following alternative document sizes:
- B5 (default) or 16K
- 8.5 × 14" (default) or 8.5 × 13"
Xerox® WorkCentre® 5022/5024 Multifunction PrinterUser Guide
6-1
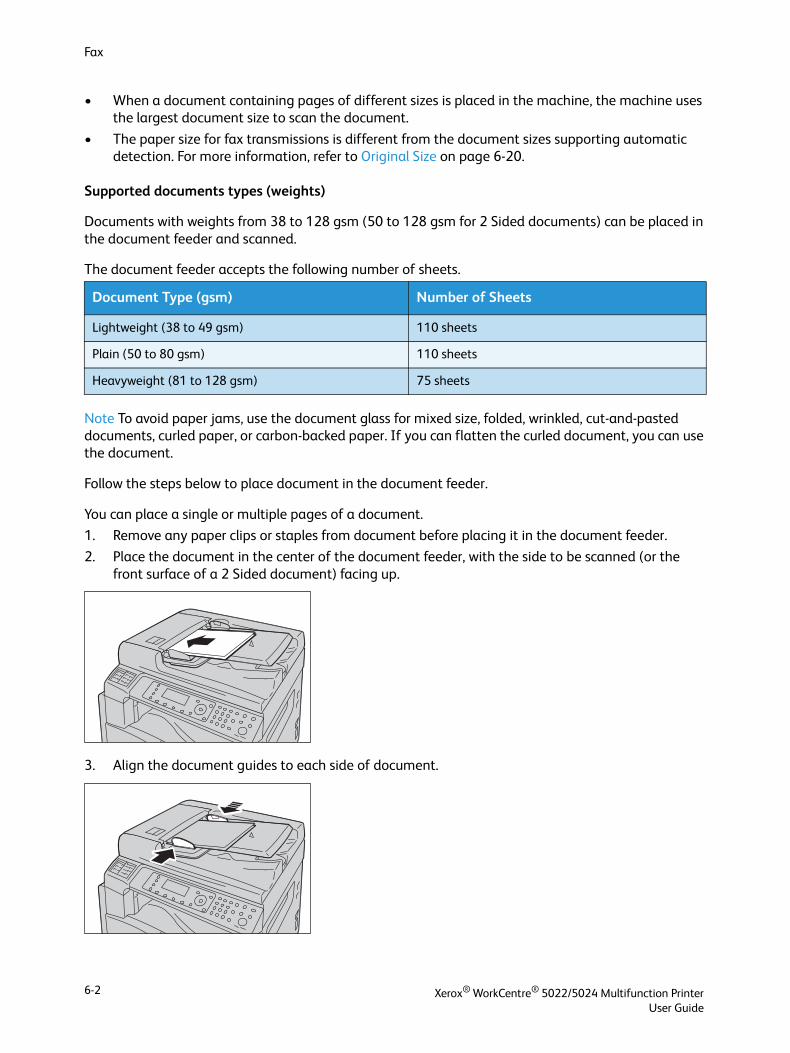
Fax
• When a document containing pages of different sizes is placed in the machine, the machine uses the largest document size to scan the document.
• The paper size for fax transmissions is different from the document sizes supporting automatic detection. For more information, refer to Original Size on page 6-20.
Supported documents types (weights)
Documents with weights from 38 to 128 gsm (50 to 128 gsm for 2 Sided documents) can be placed in the document feeder and scanned.
The document feeder accepts the following number of sheets.
Note To avoid paper jams, use the document glass for mixed size, folded, wrinkled, cut-and-pasted documents, curled paper, or carbon-backed paper. If you can flatten the curled document, you can use the document.
Follow the steps below to place document in the document feeder.
You can place a single or multiple pages of a document.
1. Remove any paper clips or staples from document before placing it in the document feeder.
2. Place the document in the center of the document feeder, with the side to be scanned (or the front surface of a 2 Sided document) facing up.
3. Align the document guides to each side of document.
Document Type (gsm) Number of Sheets
Lightweight (38 to 49 gsm) 110 sheets
Plain (50 to 80 gsm) 110 sheets
Heavyweight (81 to 128 gsm) 75 sheets
Xerox® WorkCentre® 5022/5024 Multifunction PrinterUser Guide
6-2
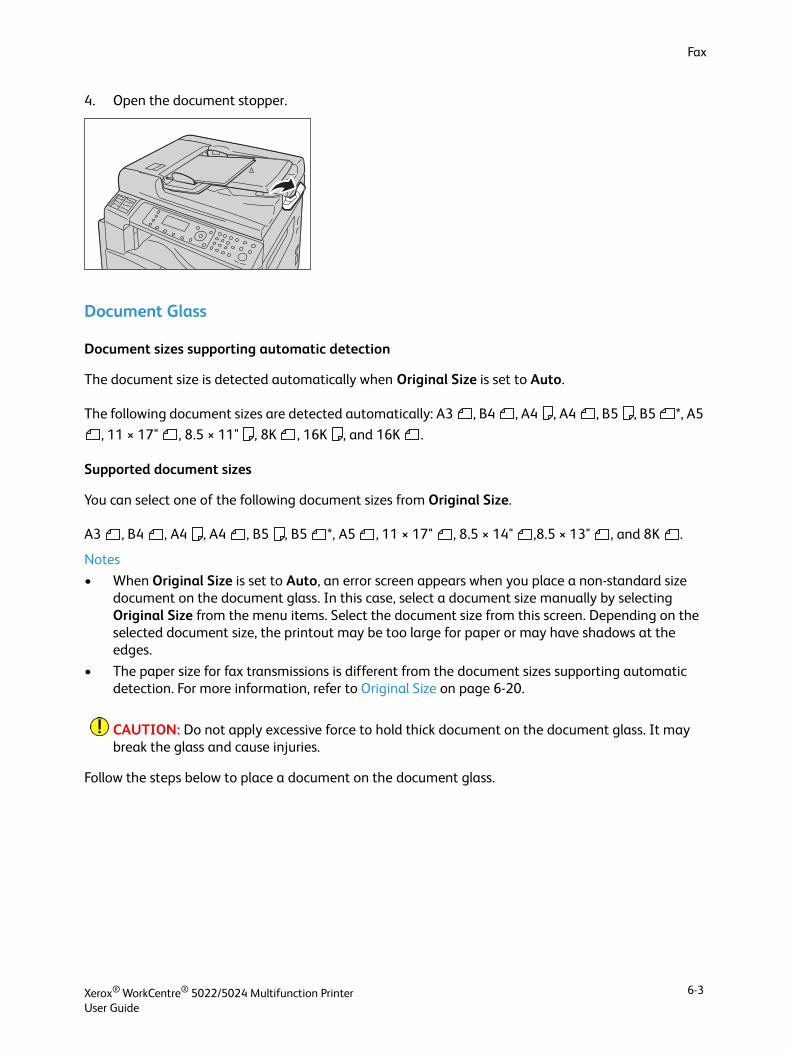
Fax
4. Open the document stopper.
Document Glass
Document sizes supporting automatic detection
The document size is detected automatically when Original Size is set to Auto.
The following document sizes are detected automatically: A3 , B4 , A4 , A4 , B5 , B5 *, A5
, 11 × 17" , 8.5 × 11" , 8K , 16K , and 16K .
Supported document sizes
You can select one of the following document sizes from Original Size.
A3 , B4 , A4 , A4 , B5 , B5 *, A5 , 11 × 17" , 8.5 × 14" ,8.5 × 13" , and 8K .
Notes
• When Original Size is set to Auto, an error screen appears when you place a non-standard size document on the document glass. In this case, select a document size manually by selecting Original Size from the menu items. Select the document size from this screen. Depending on the selected document size, the printout may be too large for paper or may have shadows at the edges.
• The paper size for fax transmissions is different from the document sizes supporting automatic detection. For more information, refer to Original Size on page 6-20.
CAUTION: Do not apply excessive force to hold thick document on the document glass. It may break the glass and cause injuries.
Follow the steps below to place a document on the document glass.
Xerox® WorkCentre® 5022/5024 Multifunction PrinterUser Guide
6-3
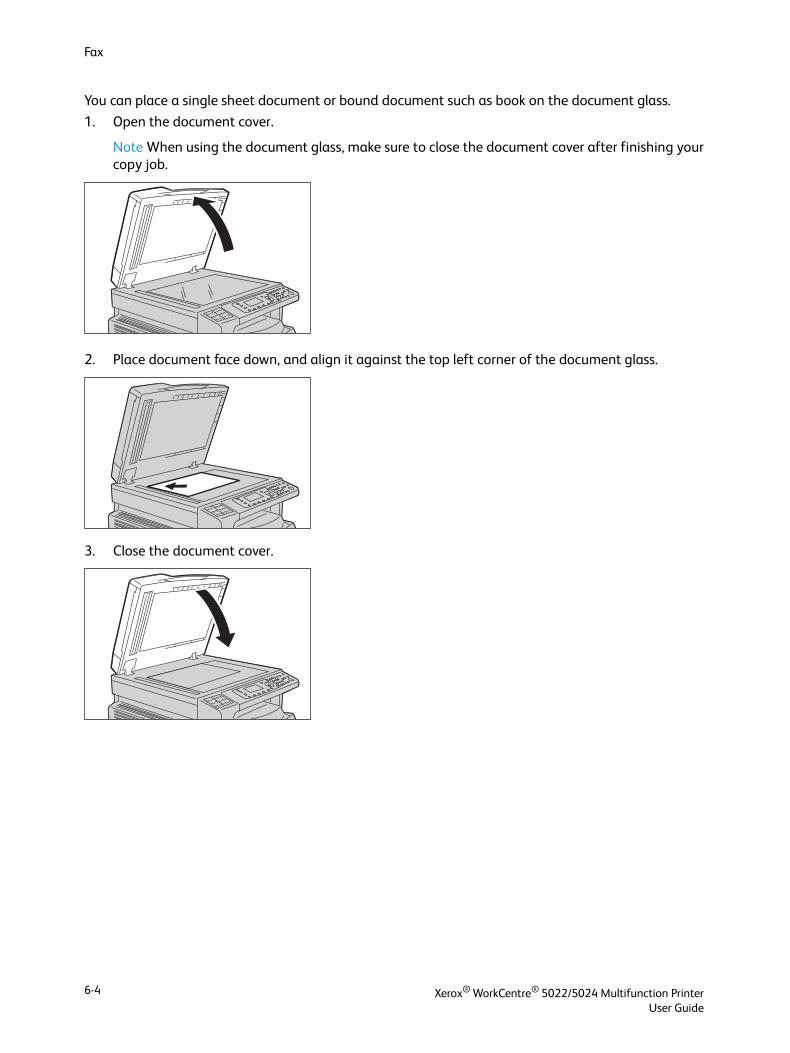
Fax
You can place a single sheet document or bound document such as book on the document glass.
1. Open the document cover.
Note When using the document glass, make sure to close the document cover after finishing your copy job.
2. Place document face down, and align it against the top left corner of the document glass.
3. Close the document cover.
Xerox® WorkCentre® 5022/5024 Multifunction PrinterUser Guide
6-4
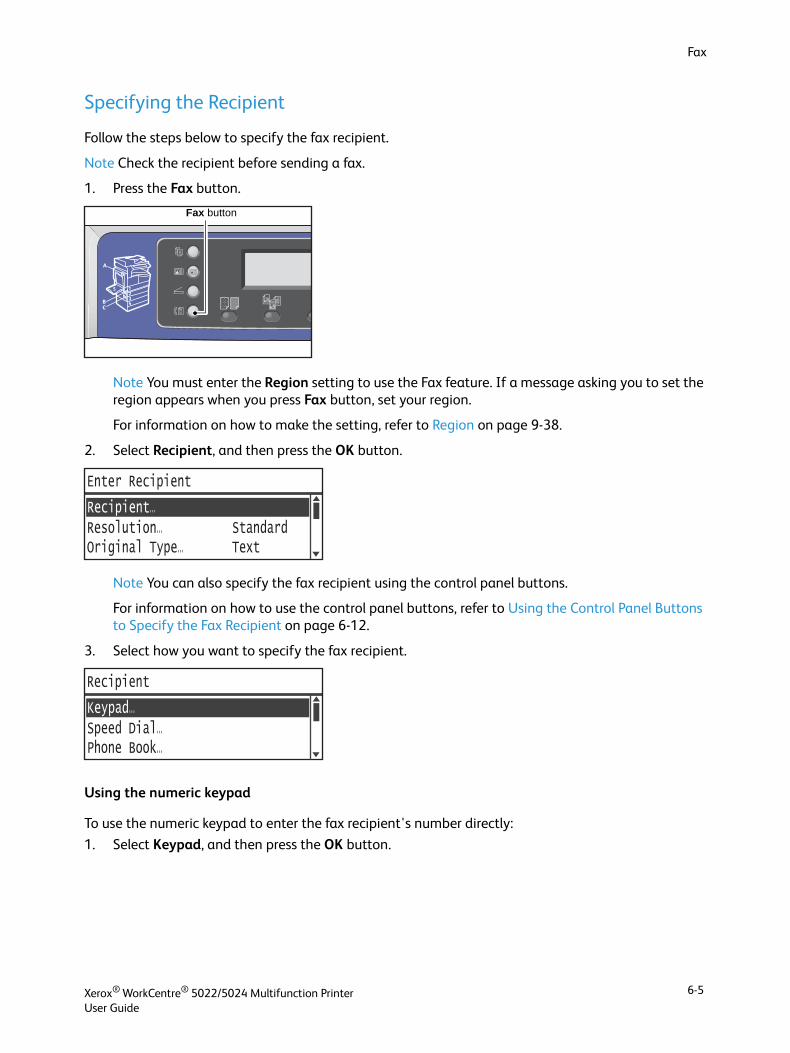
Fax
Specifying the Recipient
Follow the steps below to specify the fax recipient.
Note Check the recipient before sending a fax.
1. Press the Fax button.
Note You must enter the Region setting to use the Fax feature. If a message asking you to set the region appears when you press Fax button, set your region.
For information on how to make the setting, refer to Region on page 9-38.
2. Select Recipient, and then press the OK button.
Note You can also specify the fax recipient using the control panel buttons.
For information on how to use the control panel buttons, refer to Using the Control Panel Buttons to Specify the Fax Recipient on page 6-12.
3. Select how you want to specify the fax recipient.
Using the numeric keypad
To use the numeric keypad to enter the fax recipient's number directly:
1. Select Keypad, and then press the OK button.
Fax button
Resolution... Standard
Enter Recipient
Recipient...
Original Type... Text
Speed Dial...
Recipient
Keypad...
Phone Book...
Xerox® WorkCentre® 5022/5024 Multifunction PrinterUser Guide
6-5
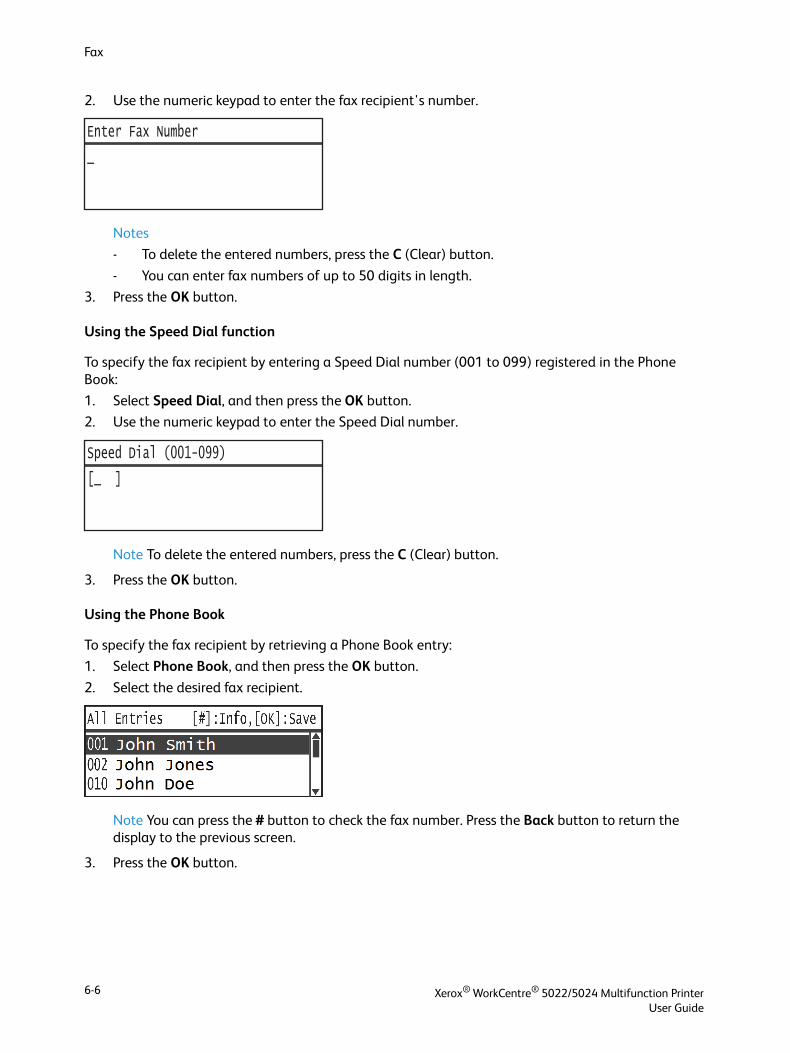
Fax
2. Use the numeric keypad to enter the fax recipient's number.
Notes
- To delete the entered numbers, press the C (Clear) button.
- You can enter fax numbers of up to 50 digits in length.
3. Press the OK button.
Using the Speed Dial function
To specify the fax recipient by entering a Speed Dial number (001 to 099) registered in the Phone Book:
1. Select Speed Dial, and then press the OK button.
2. Use the numeric keypad to enter the Speed Dial number.
Note To delete the entered numbers, press the C (Clear) button.
3. Press the OK button.
Using the Phone Book
To specify the fax recipient by retrieving a Phone Book entry:
1. Select Phone Book, and then press the OK button.
2. Select the desired fax recipient.
Note You can press the # button to check the fax number. Press the Back button to return the display to the previous screen.
3. Press the OK button.
Enter Fax Number
_
Speed Dial (001-099)
[_ ]
Xerox® WorkCentre® 5022/5024 Multifunction PrinterUser Guide
6-6
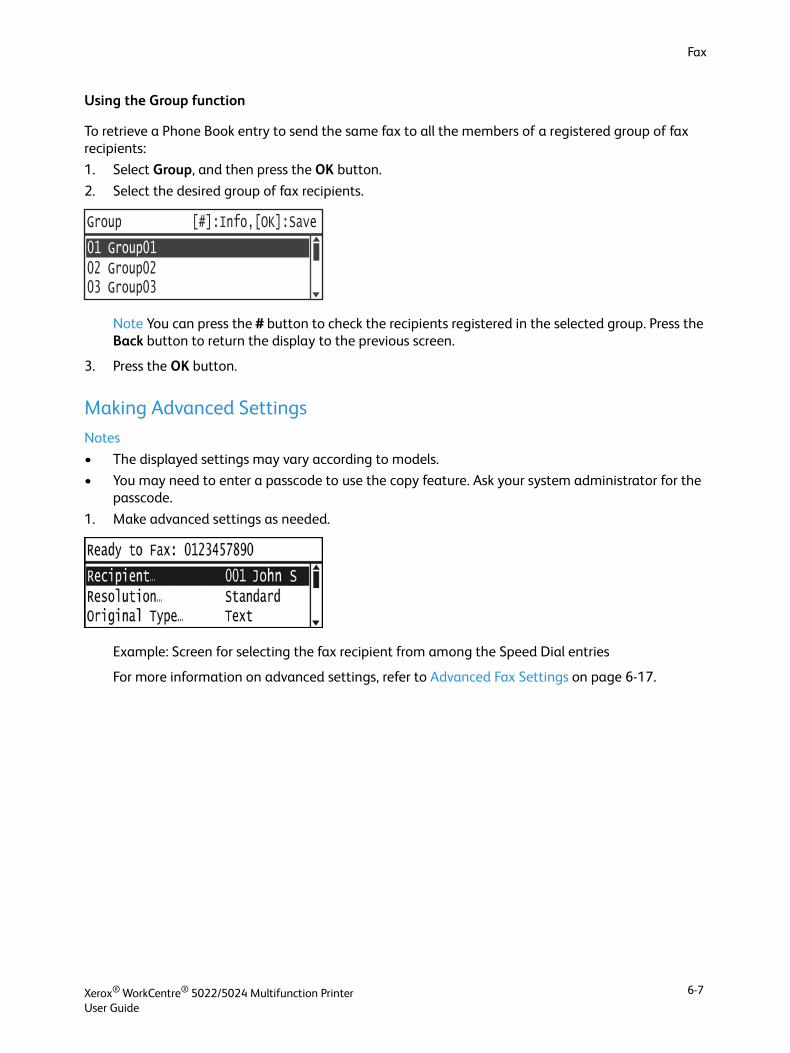
Fax
Using the Group function
To retrieve a Phone Book entry to send the same fax to all the members of a registered group of fax recipients:
1. Select Group, and then press the OK button.
2. Select the desired group of fax recipients.
Note You can press the # button to check the recipients registered in the selected group. Press the Back button to return the display to the previous screen.
3. Press the OK button.
Making Advanced Settings
Notes
• The displayed settings may vary according to models.
• You may need to enter a passcode to use the copy feature. Ask your system administrator for the passcode.
1. Make advanced settings as needed.
Example: Screen for selecting the fax recipient from among the Speed Dial entries
For more information on advanced settings, refer to Advanced Fax Settings on page 6-17.
02 Group02
Group
01 Group01
03 Group03
[#]:Info,[OK]:Save
Xerox® WorkCentre® 5022/5024 Multifunction PrinterUser Guide
6-7
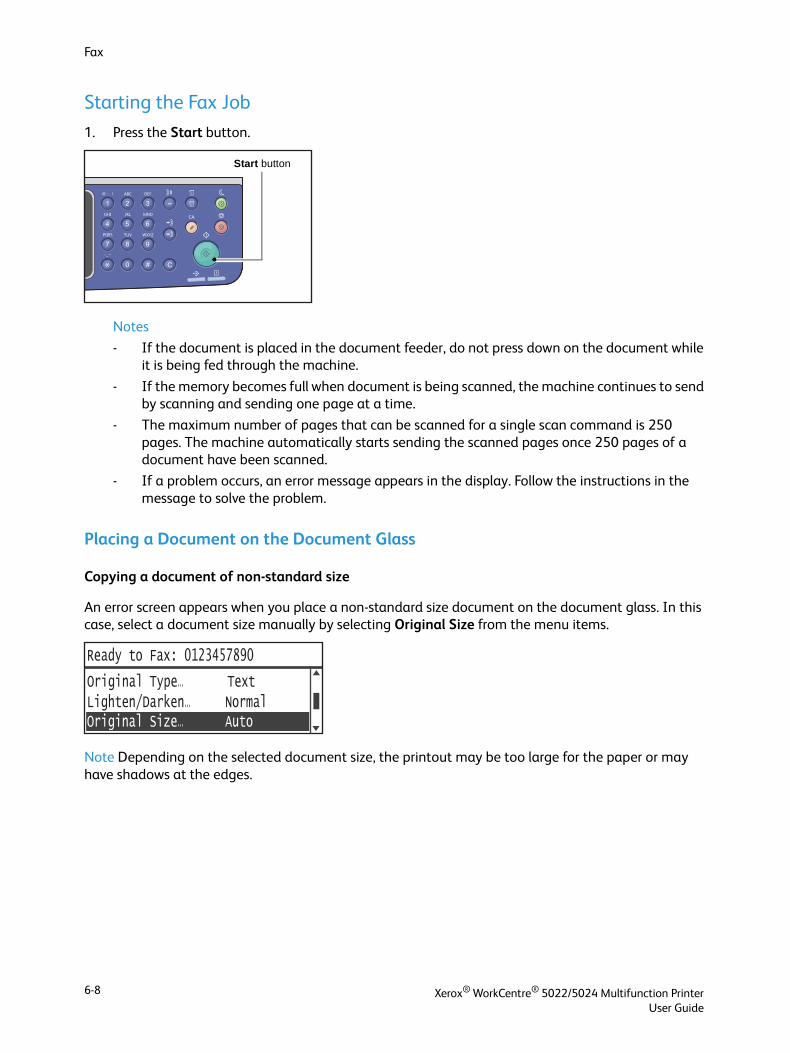
Fax
Starting the Fax Job
1. Press the Start button.
Notes
- If the document is placed in the document feeder, do not press down on the document while it is being fed through the machine.
- If the memory becomes full when document is being scanned, the machine continues to send by scanning and sending one page at a time.
- The maximum number of pages that can be scanned for a single scan command is 250 pages. The machine automatically starts sending the scanned pages once 250 pages of a document have been scanned.
- If a problem occurs, an error message appears in the display. Follow the instructions in the message to solve the problem.
Placing a Document on the Document Glass
Copying a document of non-standard size
An error screen appears when you place a non-standard size document on the document glass. In this case, select a document size manually by selecting Original Size from the menu items.
Note Depending on the selected document size, the printout may be too large for the paper or may have shadows at the edges.
Start button
Lighten/Darken... NormalOriginal Type... Text
Original Size... Auto
Ready to Fax: 0123457890
Xerox® WorkCentre® 5022/5024 Multifunction PrinterUser Guide
6-8
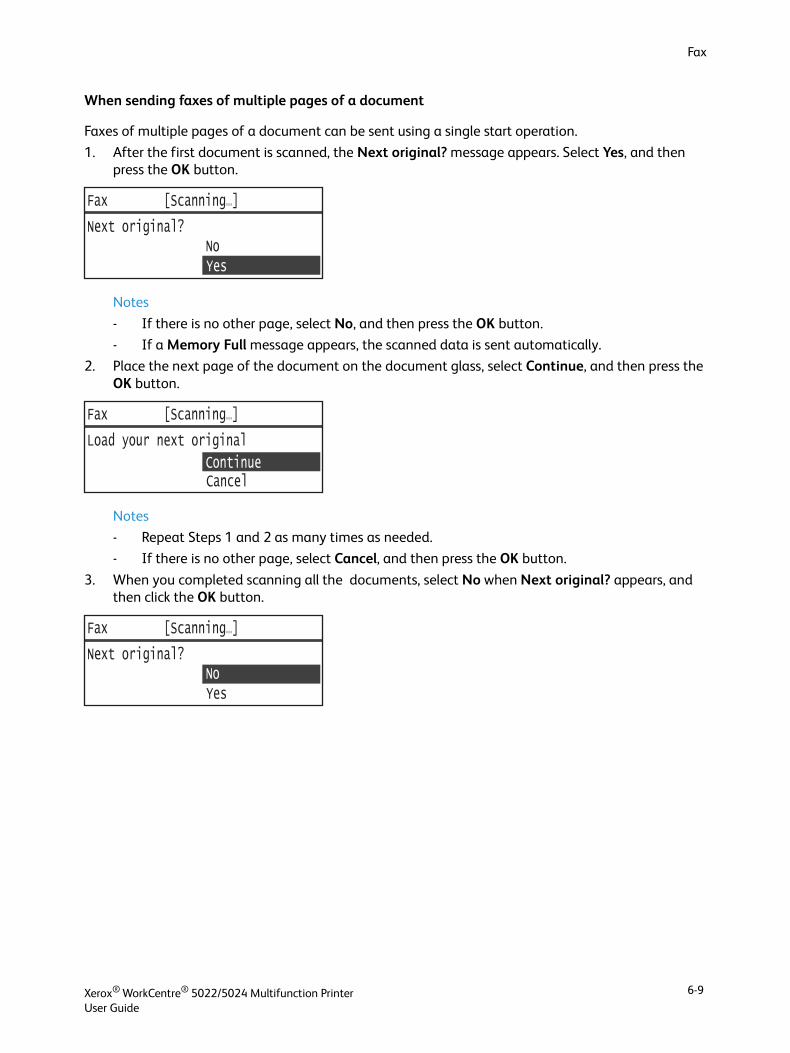
Fax
When sending faxes of multiple pages of a document
Faxes of multiple pages of a document can be sent using a single start operation.
1. After the first document is scanned, the Next original? message appears. Select Yes, and then press the OK button.
Notes
- If there is no other page, select No, and then press the OK button.
- If a Memory Full message appears, the scanned data is sent automatically.
2. Place the next page of the document on the document glass, select Continue, and then press the OK button.
Notes
- Repeat Steps 1 and 2 as many times as needed.
- If there is no other page, select Cancel, and then press the OK button.
3. When you completed scanning all the documents, select No when Next original? appears, and then click the OK button.
Fax [Scanning...]
Next original? No Yes
Fax [Scanning...]
Load your next original
Continue Cancel
Fax [Scanning...]
Next original? No Yes
Xerox® WorkCentre® 5022/5024 Multifunction PrinterUser Guide
6-9
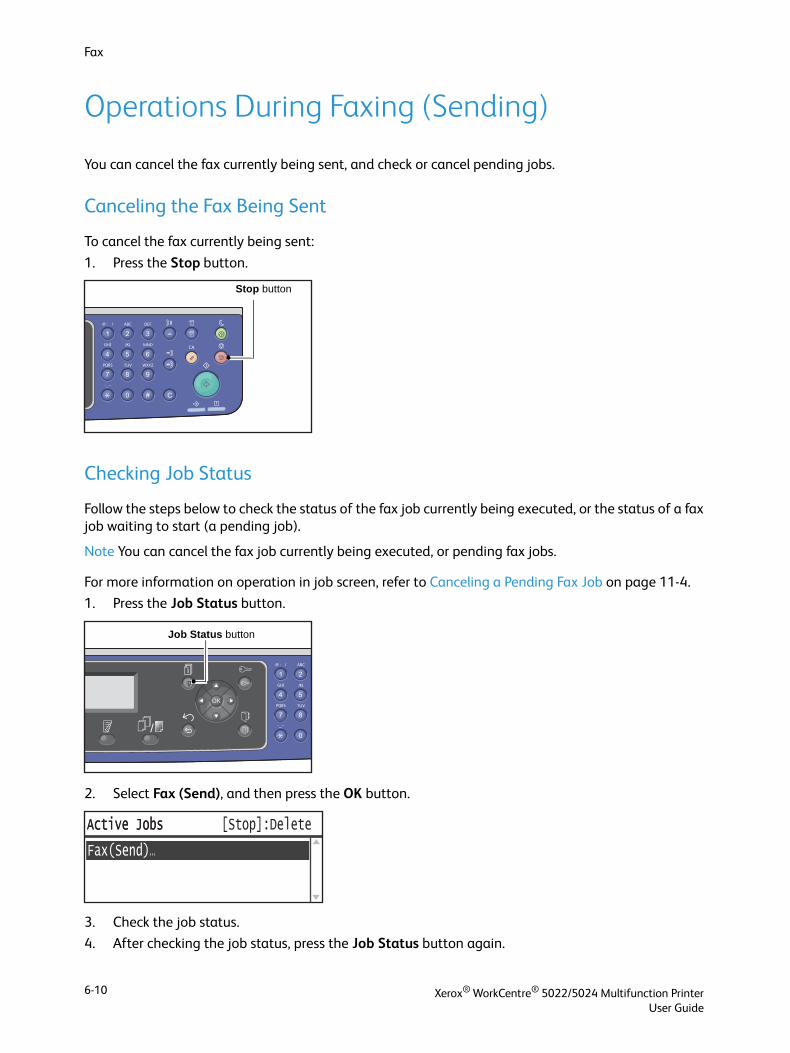
Fax
Operations During Faxing (Sending)
You can cancel the fax currently being sent, and check or cancel pending jobs.
Canceling the Fax Being Sent
To cancel the fax currently being sent:
1. Press the Stop button.
Checking Job Status
Follow the steps below to check the status of the fax job currently being executed, or the status of a fax job waiting to start (a pending job).
Note You can cancel the fax job currently being executed, or pending fax jobs.
For more information on operation in job screen, refer to Canceling a Pending Fax Job on page 11-4.
1. Press the Job Status button.
2. Select Fax (Send), and then press the OK button.
3. Check the job status.
4. After checking the job status, press the Job Status button again.
Stop button
Job Status button
Active Jobs
Fax(Send)...
Active Jobs [Stop]:Delete
Xerox® WorkCentre® 5022/5024 Multifunction PrinterUser Guide
6-10
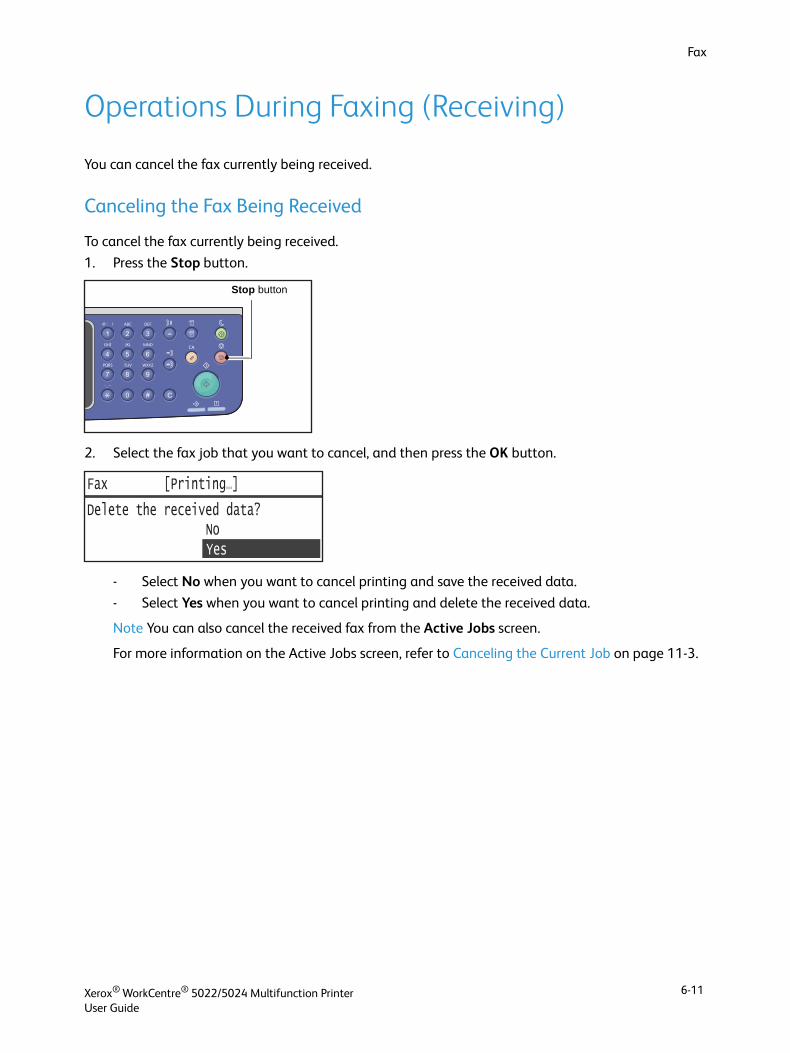
Fax
Operations During Faxing (Receiving)
You can cancel the fax currently being received.
Canceling the Fax Being Received
To cancel the fax currently being received.
1. Press the Stop button.
2. Select the fax job that you want to cancel, and then press the OK button.
- Select No when you want to cancel printing and save the received data.
- Select Yes when you want to cancel printing and delete the received data.
Note You can also cancel the received fax from the Active Jobs screen.
For more information on the Active Jobs screen, refer to Canceling the Current Job on page 11-3.
Stop button
Fax [Printing...]
Delete the received data? No Yes
Xerox® WorkCentre® 5022/5024 Multifunction PrinterUser Guide
6-11

Fax
Using the Control Panel Buttons to Specify the Fax Recipient
You can use the control panel buttons to specify the fax recipient.
Using the Numeric Keypad
To use the numeric keypad to enter the fax recipient's number directly:
1. Press the Fax button.
The Enter Recipient screen displays.
2. With the Recipient item selected, use the numeric keypad to enter the recipient's fax number.
Note You can enter the fax numbers of up to 50 digits in length.
3. Press the OK button.
Using the One Touch Panels
You can specify the fax recipient using the One Touch panel. The fax numbers registered for each One Touch button are the same as the fax numbers registered for Speed Dial entries 001 to 036.
Fax button
Resolution... Standard
Enter Recipient
Recipient...
Original Type... Text
Enter Fax Number [OK]:Save
0123456789_
Xerox® WorkCentre® 5022/5024 Multifunction PrinterUser Guide
6-12
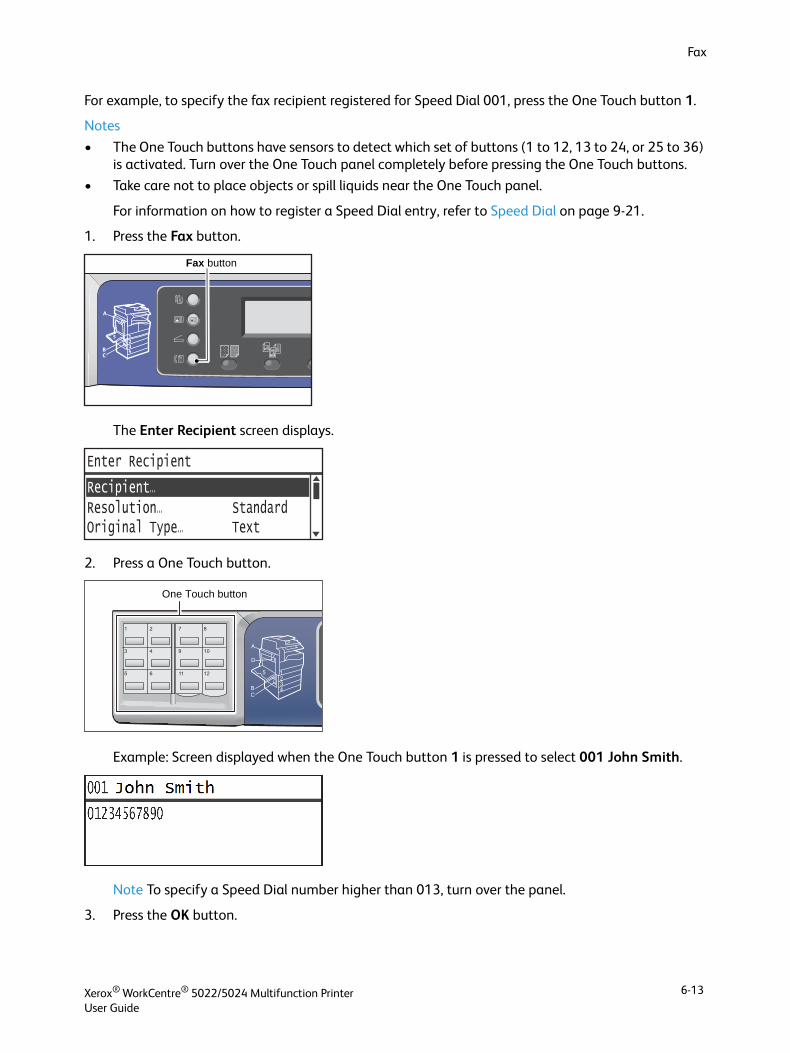
Fax
For example, to specify the fax recipient registered for Speed Dial 001, press the One Touch button 1.
Notes
• The One Touch buttons have sensors to detect which set of buttons (1 to 12, 13 to 24, or 25 to 36) is activated. Turn over the One Touch panel completely before pressing the One Touch buttons.
• Take care not to place objects or spill liquids near the One Touch panel.
For information on how to register a Speed Dial entry, refer to Speed Dial on page 9-21.
1. Press the Fax button.
The Enter Recipient screen displays.
2. Press a One Touch button.
Example: Screen displayed when the One Touch button 1 is pressed to select 001 John Smith.
Note To specify a Speed Dial number higher than 013, turn over the panel.
3. Press the OK button.
Fax button
Resolution... Standard
Enter Recipient
Recipient...
Original Type... Text
1 2
3 4
5 6
7 8
9 10
11 12
One Touch button
Xerox® WorkCentre® 5022/5024 Multifunction PrinterUser Guide
6-13

Fax
Using the Address Book Button
Press the Address Book button to display Phone Book entries you can browse through to find the desired recipient.
You can send a fax to a recipient registered as a Phone Book Speed Dial entry, or to multiple recipients registered as a Group entry.
1. Press the Fax button.
The Enter Recipient screen displays.
2. Press the Address Book button.
3. Select the desired fax recipient.
Sending a fax to a recipient registered as a Speed Dial entry
1. Select All Entries, and then press the OK button.
Fax button
Resolution... Standard
Enter Recipient
Recipient...
Original Type... Text
Address Book button
Group...
Recipient
All Entries...
Xerox® WorkCentre® 5022/5024 Multifunction PrinterUser Guide
6-14
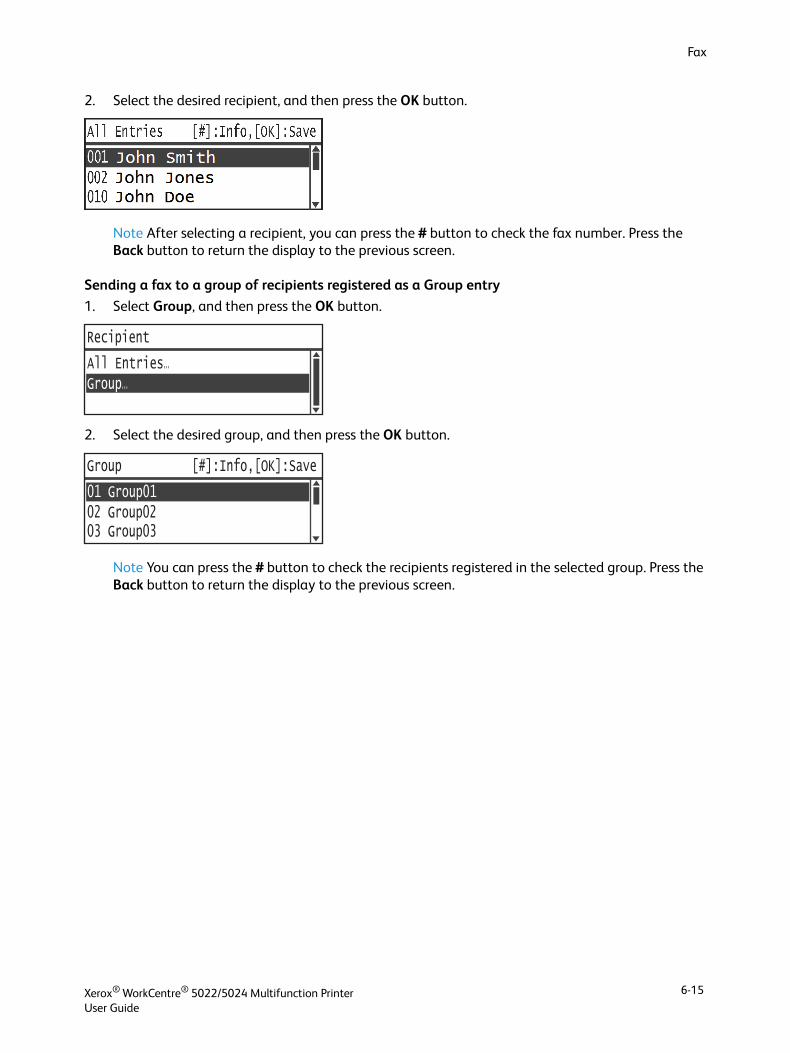
Fax
2. Select the desired recipient, and then press the OK button.
Note After selecting a recipient, you can press the # button to check the fax number. Press the Back button to return the display to the previous screen.
Sending a fax to a group of recipients registered as a Group entry
1. Select Group, and then press the OK button.
2. Select the desired group, and then press the OK button.
Note You can press the # button to check the recipients registered in the selected group. Press the Back button to return the display to the previous screen.
Group...
Recipient
All Entries...
02 Group02
Group
01 Group01
03 Group03
[#]:Info,[OK]:Save
Xerox® WorkCentre® 5022/5024 Multifunction PrinterUser Guide
6-15
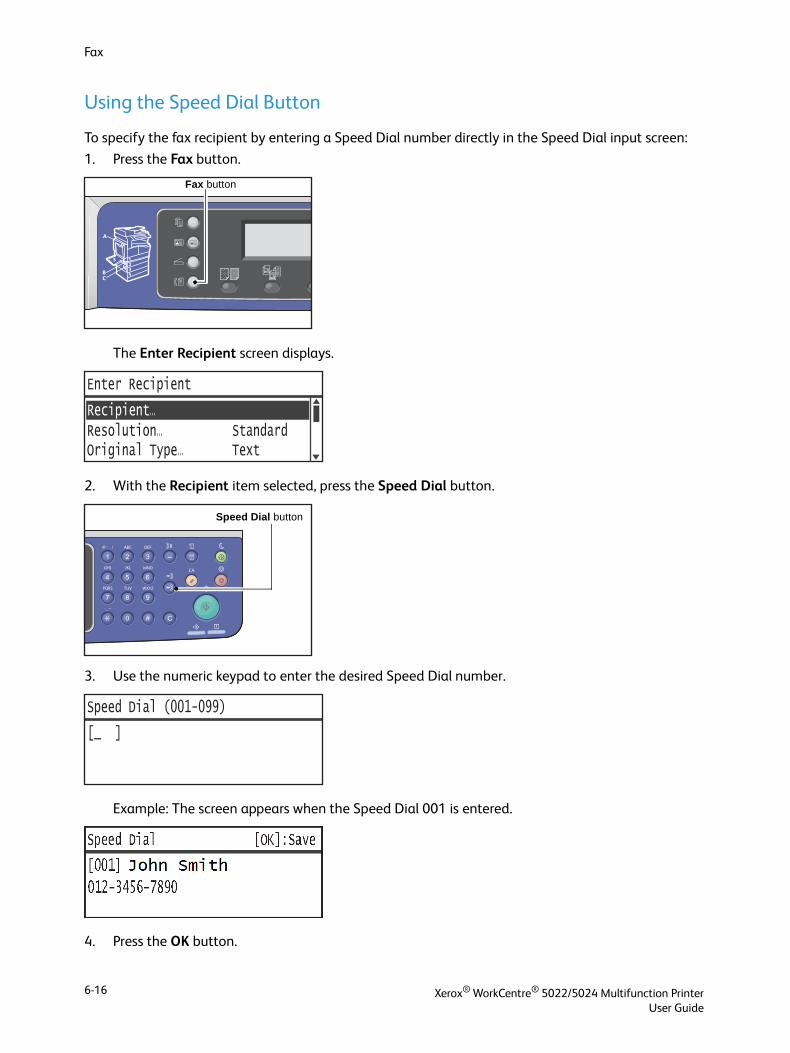
Fax
Using the Speed Dial Button
To specify the fax recipient by entering a Speed Dial number directly in the Speed Dial input screen:
1. Press the Fax button.
The Enter Recipient screen displays.
2. With the Recipient item selected, press the Speed Dial button.
3. Use the numeric keypad to enter the desired Speed Dial number.
Example: The screen appears when the Speed Dial 001 is entered.
4. Press the OK button.
Fax button
Resolution... Standard
Enter Recipient
Recipient...
Original Type... Text
Speed Dial button
Speed Dial (001-099)
[_ ]
Xerox® WorkCentre® 5022/5024 Multifunction PrinterUser Guide
6-16
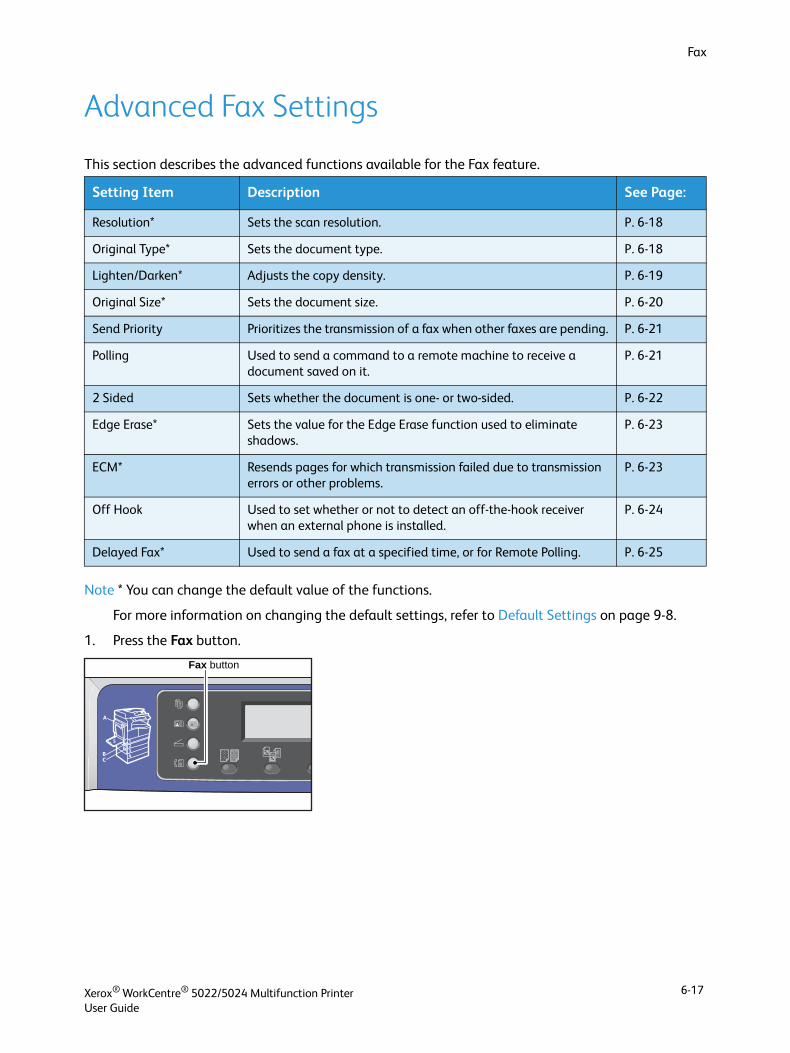
Fax
Advanced Fax Settings
This section describes the advanced functions available for the Fax feature.
Note * You can change the default value of the functions.
For more information on changing the default settings, refer to Default Settings on page 9-8.
1. Press the Fax button.
Setting Item Description See Page:
Resolution* Sets the scan resolution. P. 6-18
Original Type* Sets the document type. P. 6-18
Lighten/Darken* Adjusts the copy density. P. 6-19
Original Size* Sets the document size. P. 6-20
Send Priority Prioritizes the transmission of a fax when other faxes are pending. P. 6-21
Polling Used to send a command to a remote machine to receive a document saved on it.
P. 6-21
2 Sided Sets whether the document is one- or two-sided. P. 6-22
Edge Erase* Sets the value for the Edge Erase function used to eliminate shadows.
P. 6-23
ECM* Resends pages for which transmission failed due to transmission errors or other problems.
P. 6-23
Off Hook Used to set whether or not to detect an off-the-hook receiver when an external phone is installed.
P. 6-24
Delayed Fax* Used to send a fax at a specified time, or for Remote Polling. P. 6-25
Fax button
Xerox® WorkCentre® 5022/5024 Multifunction PrinterUser Guide
6-17
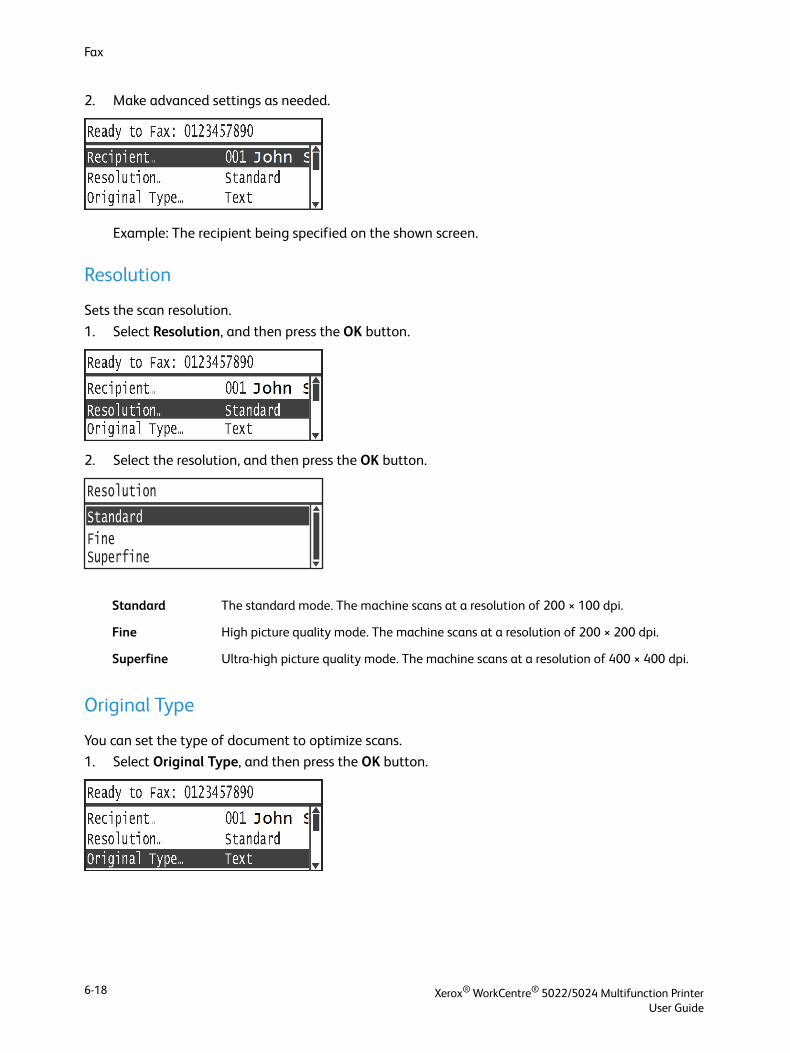
Fax
2. Make advanced settings as needed.
Example: The recipient being specified on the shown screen.
Resolution
Sets the scan resolution.
1. Select Resolution, and then press the OK button.
2. Select the resolution, and then press the OK button.
Original Type
You can set the type of document to optimize scans.
1. Select Original Type, and then press the OK button.
Standard The standard mode. The machine scans at a resolution of 200 × 100 dpi.
Fine High picture quality mode. The machine scans at a resolution of 200 × 200 dpi.
Superfine Ultra-high picture quality mode. The machine scans at a resolution of 400 × 400 dpi.
Fine
Resolution
Standard
Superfine
Xerox® WorkCentre® 5022/5024 Multifunction PrinterUser Guide
6-18
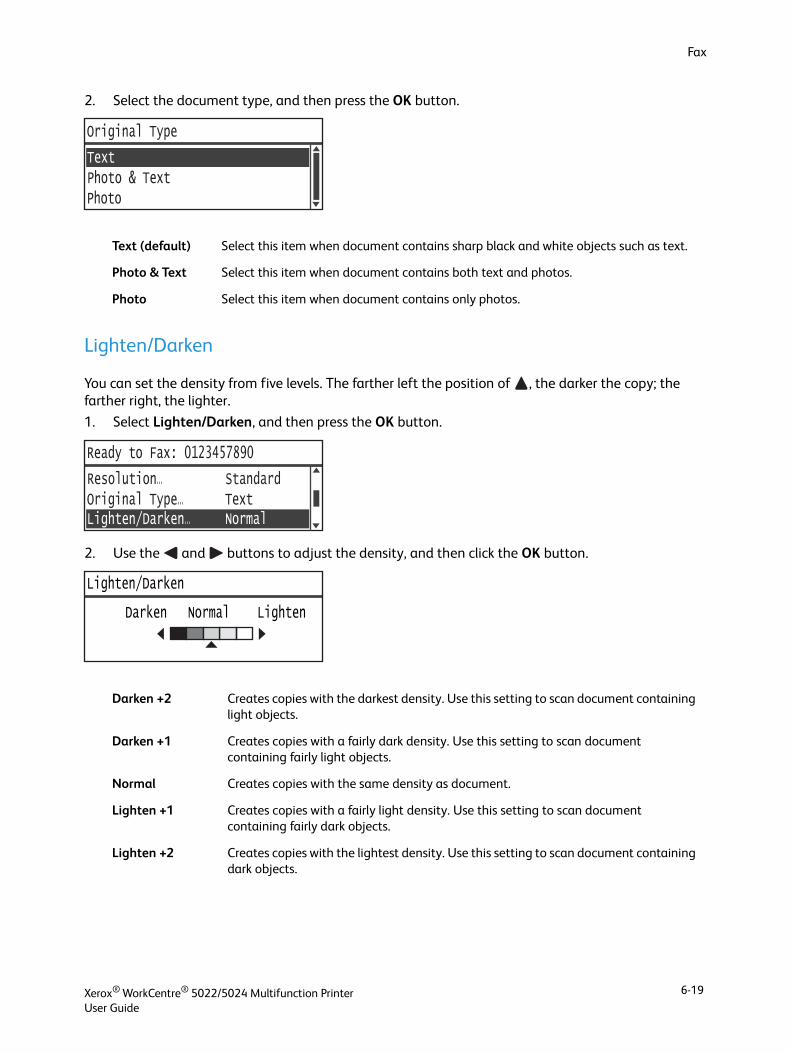
Fax
2. Select the document type, and then press the OK button.
Lighten/Darken
You can set the density from five levels. The farther left the position of , the darker the copy; the farther right, the lighter.
1. Select Lighten/Darken, and then press the OK button.
2. Use the and buttons to adjust the density, and then click the OK button.
Text (default) Select this item when document contains sharp black and white objects such as text.
Photo & Text Select this item when document contains both text and photos.
Photo Select this item when document contains only photos.
Darken +2 Creates copies with the darkest density. Use this setting to scan document containing light objects.
Darken +1 Creates copies with a fairly dark density. Use this setting to scan document containing fairly light objects.
Normal Creates copies with the same density as document.
Lighten +1 Creates copies with a fairly light density. Use this setting to scan document containing fairly dark objects.
Lighten +2 Creates copies with the lightest density. Use this setting to scan document containing dark objects.
Photo & TextPhoto
Original Type
Text
Original Type... TextResolution... Standard
Lighten/Darken... Normal
Ready to Fax: 0123457890
Lighten/Darken
Lighten/Darken...
Darken Normal Lighten
Xerox® WorkCentre® 5022/5024 Multifunction PrinterUser Guide
6-19
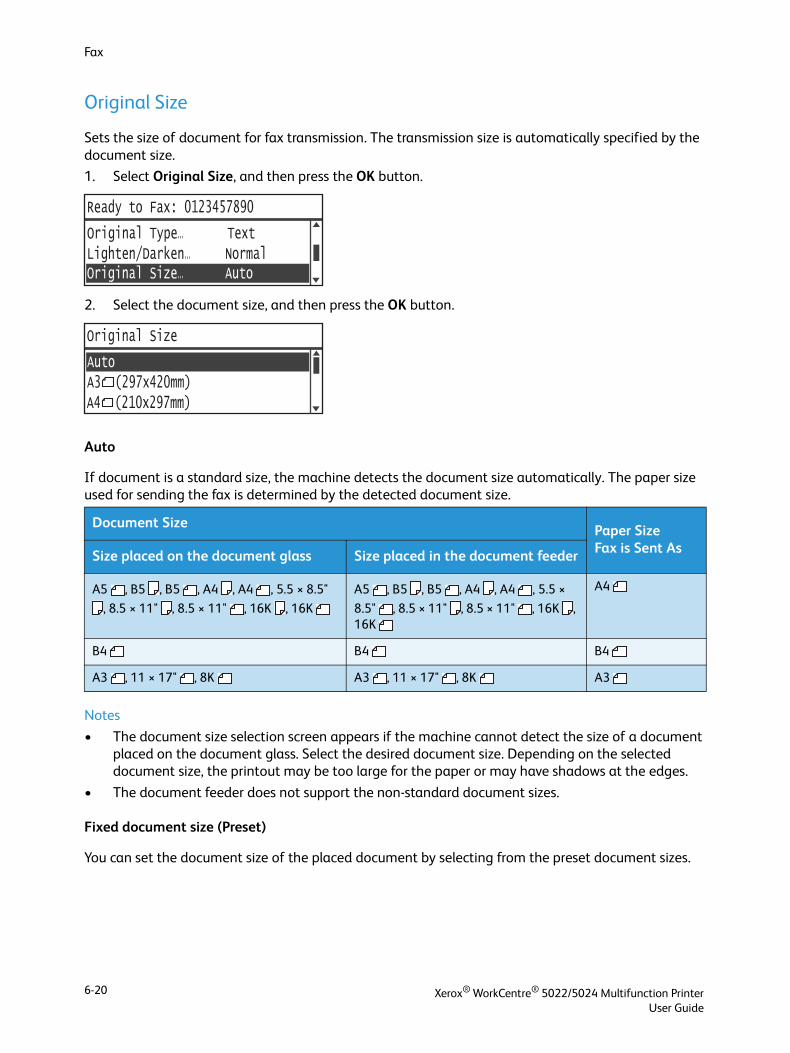
Fax
Original Size
Sets the size of document for fax transmission. The transmission size is automatically specified by the document size.
1. Select Original Size, and then press the OK button.
2. Select the document size, and then press the OK button.
Auto
If document is a standard size, the machine detects the document size automatically. The paper size used for sending the fax is determined by the detected document size.
Notes
• The document size selection screen appears if the machine cannot detect the size of a document placed on the document glass. Select the desired document size. Depending on the selected document size, the printout may be too large for the paper or may have shadows at the edges.
• The document feeder does not support the non-standard document sizes.
Fixed document size (Preset)
You can set the document size of the placed document by selecting from the preset document sizes.
Document Size Paper SizeFax is Sent AsSize placed on the document glass Size placed in the document feeder
A5 , B5 , B5 , A4 , A4 , 5.5 × 8.5"
, 8.5 × 11" , 8.5 × 11" , 16K , 16K
A5 , B5 , B5 , A4 , A4 , 5.5 ×
8.5" , 8.5 × 11" , 8.5 × 11" , 16K , 16K
A4
B4 B4 B4
A3 , 11 × 17" , 8K A3 , 11 × 17" , 8K A3
Lighten/Darken... NormalOriginal Type... Text
Original Size... Auto
Ready to Fax: 0123457890
A3 (297x420mm)A4 (210x297mm)
Original Size
Auto
Xerox® WorkCentre® 5022/5024 Multifunction PrinterUser Guide
6-20
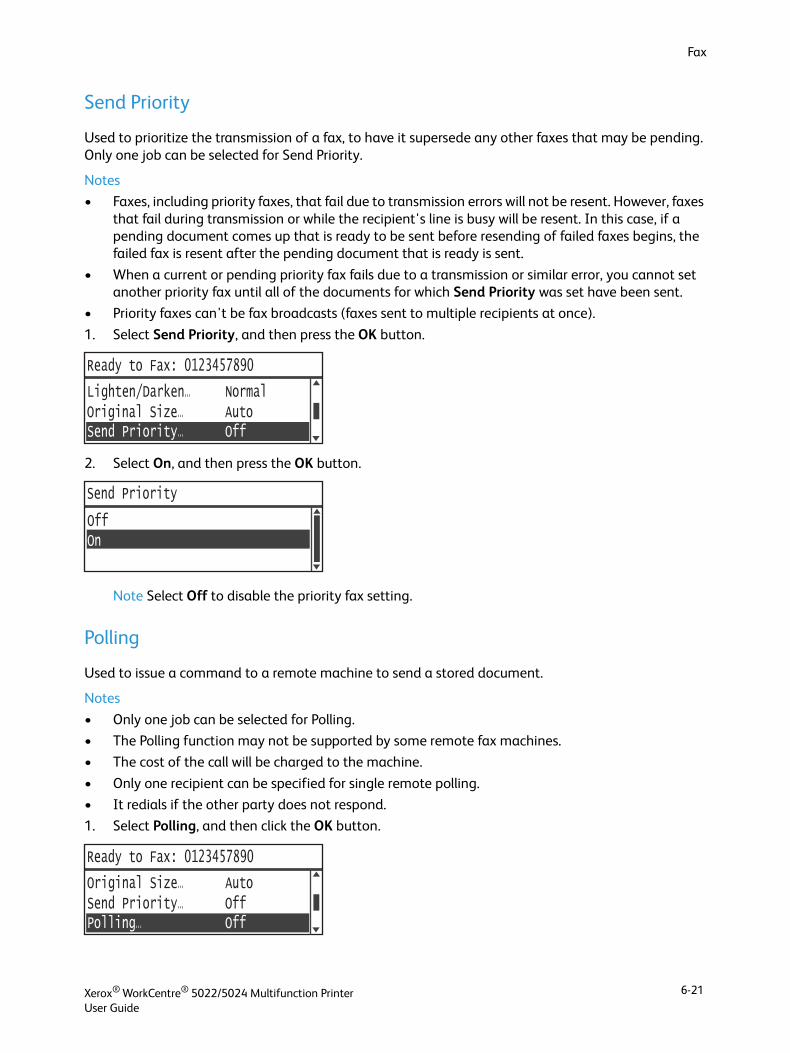
Fax
Send Priority
Used to prioritize the transmission of a fax, to have it supersede any other faxes that may be pending. Only one job can be selected for Send Priority.
Notes
• Faxes, including priority faxes, that fail due to transmission errors will not be resent. However, faxes that fail during transmission or while the recipient's line is busy will be resent. In this case, if a pending document comes up that is ready to be sent before resending of failed faxes begins, the failed fax is resent after the pending document that is ready is sent.
• When a current or pending priority fax fails due to a transmission or similar error, you cannot set another priority fax until all of the documents for which Send Priority was set have been sent.
• Priority faxes can't be fax broadcasts (faxes sent to multiple recipients at once).
1. Select Send Priority, and then press the OK button.
2. Select On, and then press the OK button.
Note Select Off to disable the priority fax setting.
Polling
Used to issue a command to a remote machine to send a stored document.
Notes
• Only one job can be selected for Polling.
• The Polling function may not be supported by some remote fax machines.
• The cost of the call will be charged to the machine.
• Only one recipient can be specified for single remote polling.
• It redials if the other party does not respond.
1. Select Polling, and then click the OK button.
Original Size... AutoLighten/Darken... Normal
Send Priority... Off
Ready to Fax: 0123457890
Send Priority
OnOff
Send Priority... OffOriginal Size... Auto
Polling... Off
Ready to Fax: 0123457890
Xerox® WorkCentre® 5022/5024 Multifunction PrinterUser Guide
6-21
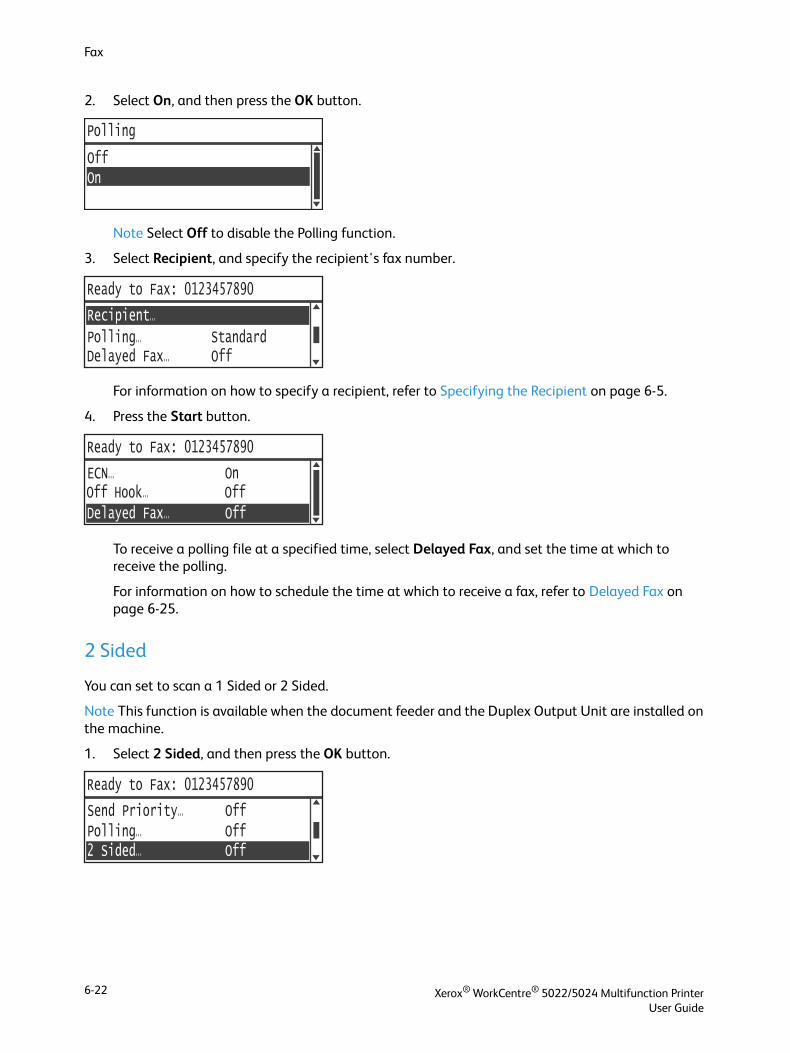
Fax
2. Select On, and then press the OK button.
Note Select Off to disable the Polling function.
3. Select Recipient, and specify the recipient's fax number.
For information on how to specify a recipient, refer to Specifying the Recipient on page 6-5.
4. Press the Start button.
To receive a polling file at a specified time, select Delayed Fax, and set the time at which to receive the polling.
For information on how to schedule the time at which to receive a fax, refer to Delayed Fax on page 6-25.
2 Sided
You can set to scan a 1 Sided or 2 Sided.
Note This function is available when the document feeder and the Duplex Output Unit are installed on the machine.
1. Select 2 Sided, and then press the OK button.
Polling
OnOff
Delayed Fax... Off
Recipient...
Polling... Standard
Ready to Fax: 0123457890
Off Hook... Off
Ready to Fax: 0123457890
ECN... On
Delayed Fax... Off
Polling... OffSend Priority... Off
2 Sided... Off
Ready to Fax: 0123457890
Xerox® WorkCentre® 5022/5024 Multifunction PrinterUser Guide
6-22
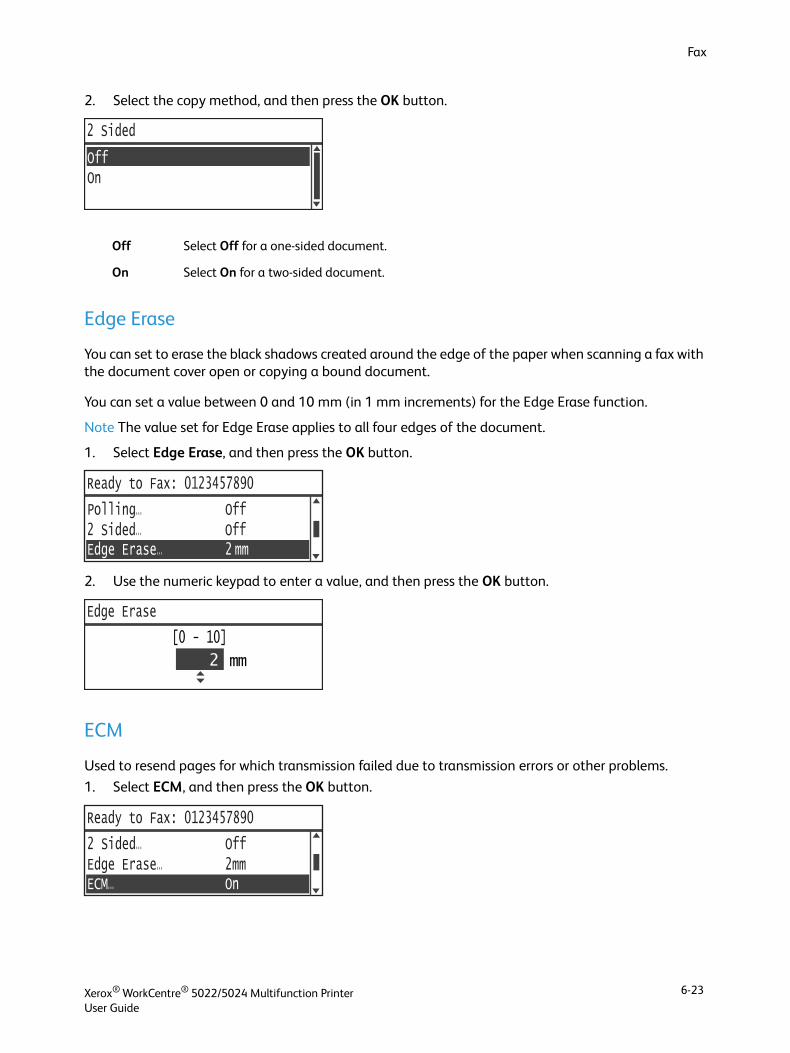
Fax
2. Select the copy method, and then press the OK button.
Edge Erase
You can set to erase the black shadows created around the edge of the paper when scanning a fax with the document cover open or copying a bound document.
You can set a value between 0 and 10 mm (in 1 mm increments) for the Edge Erase function.
Note The value set for Edge Erase applies to all four edges of the document.
1. Select Edge Erase, and then press the OK button.
2. Use the numeric keypad to enter a value, and then press the OK button.
ECM
Used to resend pages for which transmission failed due to transmission errors or other problems.
1. Select ECM, and then press the OK button.
Off Select Off for a one-sided document.
On Select On for a two-sided document.
2 Sided
OnOff
2 Sided... OffPolling... Off
Edge Erase... 2 mm
Ready to Fax: 0123457890
Edge Erase
[0 - 10]
2
Edge Erase... 2mm2 Sided... Off
ECM... On
Ready to Fax: 0123457890
Xerox® WorkCentre® 5022/5024 Multifunction PrinterUser Guide
6-23
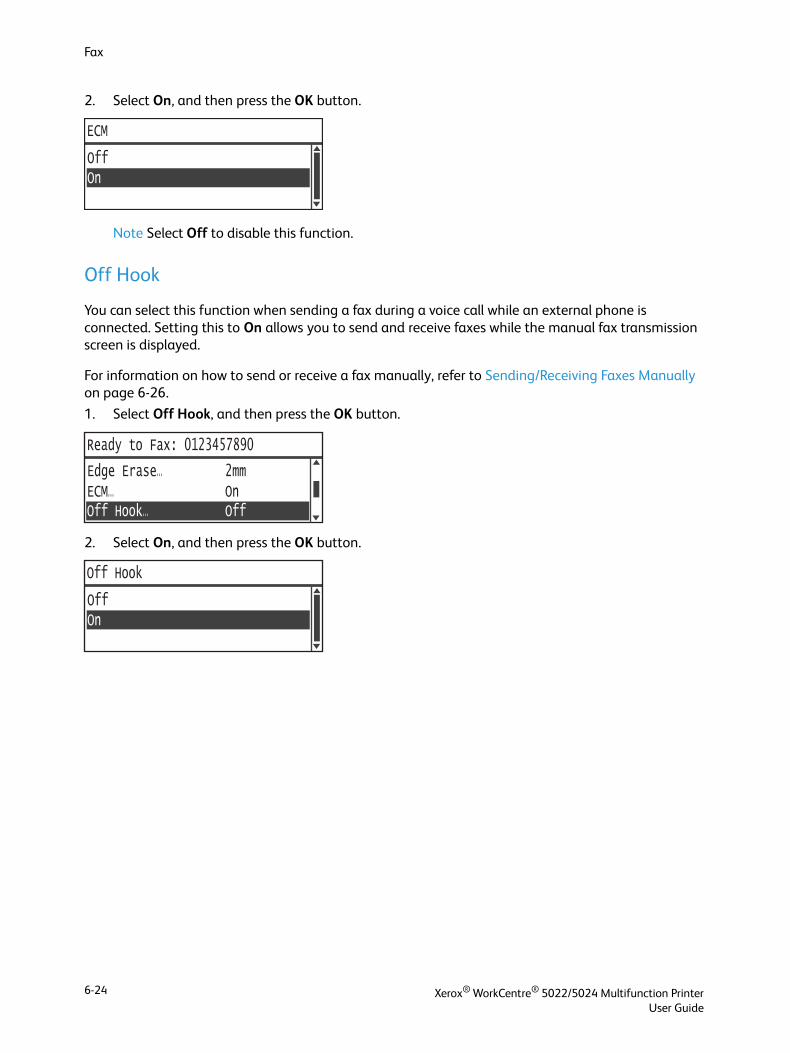
Fax
2. Select On, and then press the OK button.
Note Select Off to disable this function.
Off Hook
You can select this function when sending a fax during a voice call while an external phone is connected. Setting this to On allows you to send and receive faxes while the manual fax transmission screen is displayed.
For information on how to send or receive a fax manually, refer to Sending/Receiving Faxes Manually on page 6-26.
1. Select Off Hook, and then press the OK button.
2. Select On, and then press the OK button.
ECM
OnOff
ECM... OnEdge Erase... 2mm
Off Hook... Off
Ready to Fax: 0123457890
Off Hook
OnOff
Xerox® WorkCentre® 5022/5024 Multifunction PrinterUser Guide
6-24
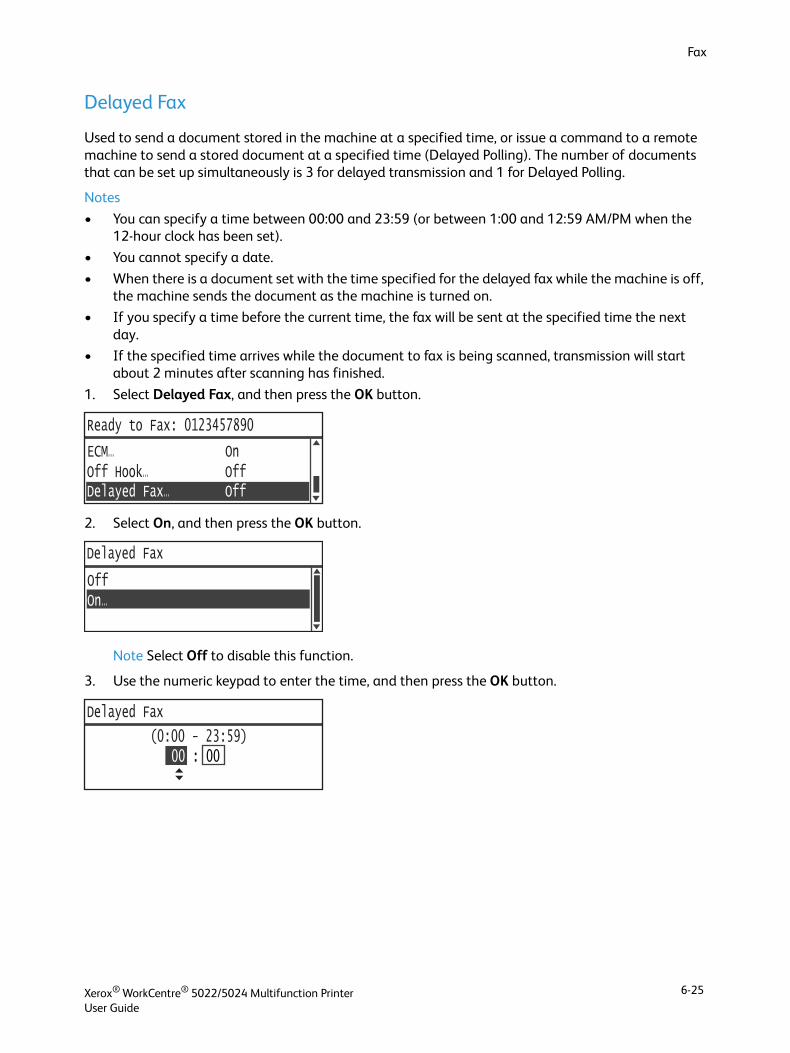
Fax
Delayed Fax
Used to send a document stored in the machine at a specified time, or issue a command to a remote machine to send a stored document at a specified time (Delayed Polling). The number of documents that can be set up simultaneously is 3 for delayed transmission and 1 for Delayed Polling.
Notes
• You can specify a time between 00:00 and 23:59 (or between 1:00 and 12:59 AM/PM when the 12-hour clock has been set).
• You cannot specify a date.
• When there is a document set with the time specified for the delayed fax while the machine is off, the machine sends the document as the machine is turned on.
• If you specify a time before the current time, the fax will be sent at the specified time the next day.
• If the specified time arrives while the document to fax is being scanned, transmission will start about 2 minutes after scanning has finished.
1. Select Delayed Fax, and then press the OK button.
2. Select On, and then press the OK button.
Note Select Off to disable this function.
3. Use the numeric keypad to enter the time, and then press the OK button.
Off Hook... OffECM... On
Delayed Fax... Off
Ready to Fax: 0123457890
Delayed Fax
On...Off
Delayed Fax
00 : 00(0:00 - 23:59)
Xerox® WorkCentre® 5022/5024 Multifunction PrinterUser Guide
6-25
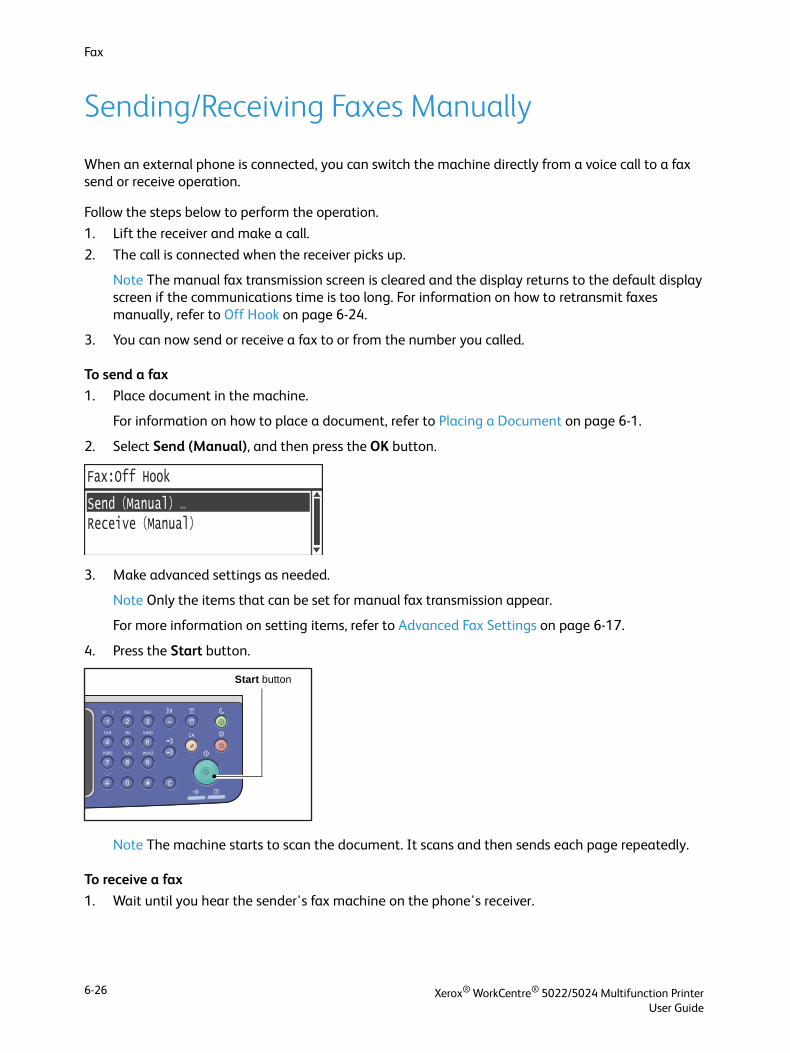
Fax
Sending/Receiving Faxes Manually
When an external phone is connected, you can switch the machine directly from a voice call to a fax send or receive operation.
Follow the steps below to perform the operation.
1. Lift the receiver and make a call.
2. The call is connected when the receiver picks up.
Note The manual fax transmission screen is cleared and the display returns to the default display screen if the communications time is too long. For information on how to retransmit faxes manually, refer to Off Hook on page 6-24.
3. You can now send or receive a fax to or from the number you called.
To send a fax
1. Place document in the machine.
For information on how to place a document, refer to Placing a Document on page 6-1.
2. Select Send (Manual), and then press the OK button.
3. Make advanced settings as needed.
Note Only the items that can be set for manual fax transmission appear.
For more information on setting items, refer to Advanced Fax Settings on page 6-17.
4. Press the Start button.
Note The machine starts to scan the document. It scans and then sends each page repeatedly.
To receive a fax
1. Wait until you hear the sender's fax machine on the phone's receiver.
Fax:Off Hook
Receive ManualSend Manual ...
Start button
Xerox® WorkCentre® 5022/5024 Multifunction PrinterUser Guide
6-26
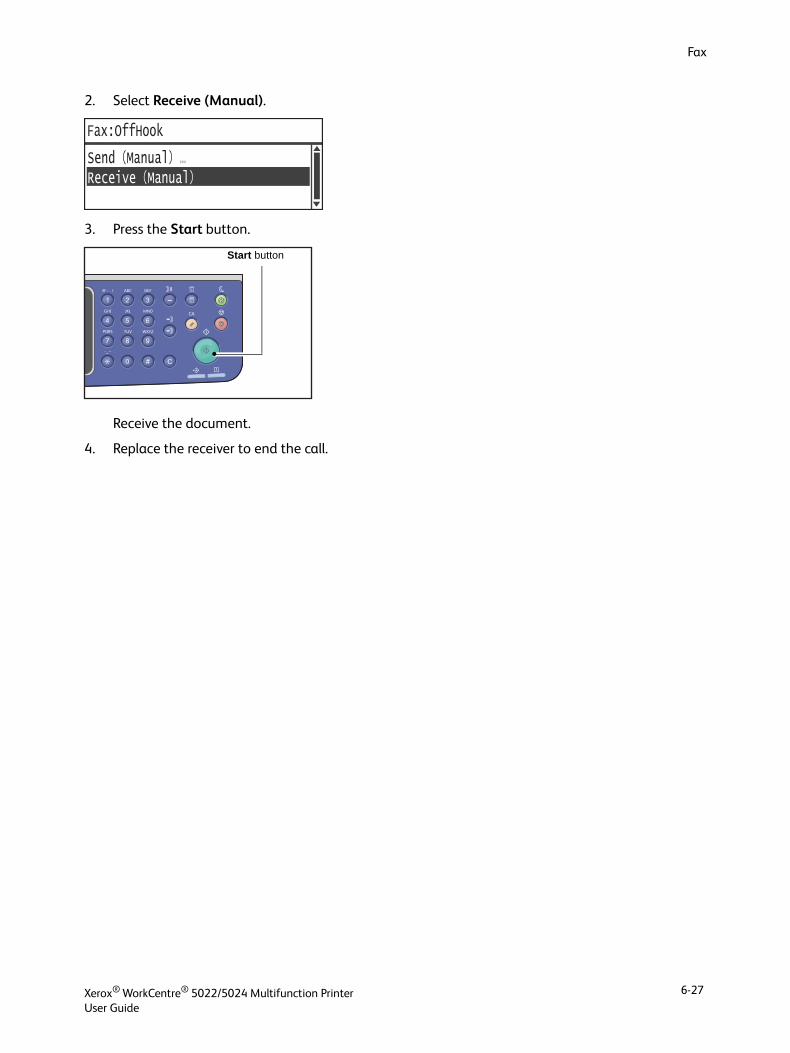
Fax
2. Select Receive (Manual).
3. Press the Start button.
Receive the document.
4. Replace the receiver to end the call.
Fax:OffHook
Receive ManualSend Manual ...
Start button
Xerox® WorkCentre® 5022/5024 Multifunction PrinterUser Guide
6-27
Fax
Receipt of Faxes
Received faxes can be printed on paper with the paper type of Plain 1, sized B5 , 8.5 × 11" , 8.5 × 11" , A4 , B4 , or A3 using one-sided printing only.
You can restrict the paper size on which incoming faxes are received. For more information, refer to Receive Size on page 9-37.
The paper type for the received fax is always set to Plain 1, regardless of the paper type setting specified for each tray.
Xerox® WorkCentre® 5022/5024 Multifunction PrinterUser Guide
6-28
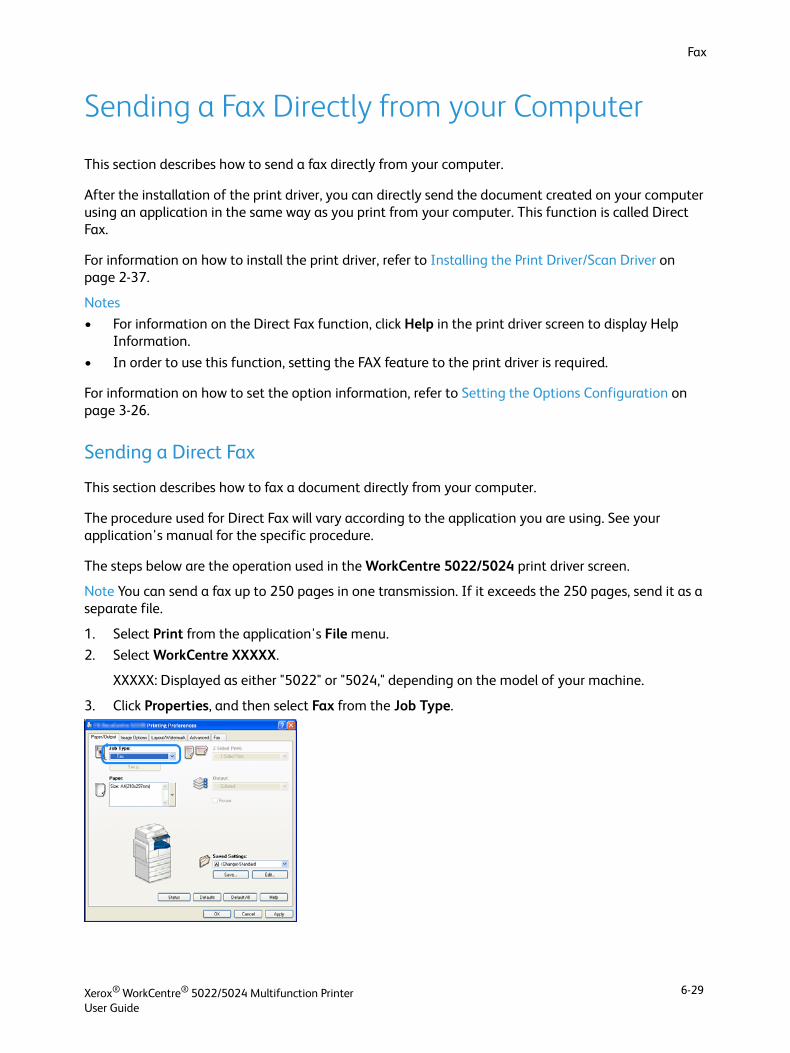
Fax
Sending a Fax Directly from your Computer
This section describes how to send a fax directly from your computer.
After the installation of the print driver, you can directly send the document created on your computer using an application in the same way as you print from your computer. This function is called Direct Fax.
For information on how to install the print driver, refer to Installing the Print Driver/Scan Driver on page 2-37.
Notes
• For information on the Direct Fax function, click Help in the print driver screen to display Help Information.
• In order to use this function, setting the FAX feature to the print driver is required.
For information on how to set the option information, refer to Setting the Options Configuration on page 3-26.
Sending a Direct Fax
This section describes how to fax a document directly from your computer.
The procedure used for Direct Fax will vary according to the application you are using. See your application's manual for the specific procedure.
The steps below are the operation used in the WorkCentre 5022/5024 print driver screen.
Note You can send a fax up to 250 pages in one transmission. If it exceeds the 250 pages, send it as a separate file.
1. Select Print from the application's File menu.
2. Select WorkCentre XXXXX.
XXXXX: Displayed as either "5022" or "5024," depending on the model of your machine.
3. Click Properties, and then select Fax from the Job Type.
Xerox® WorkCentre® 5022/5024 Multifunction PrinterUser Guide
6-29
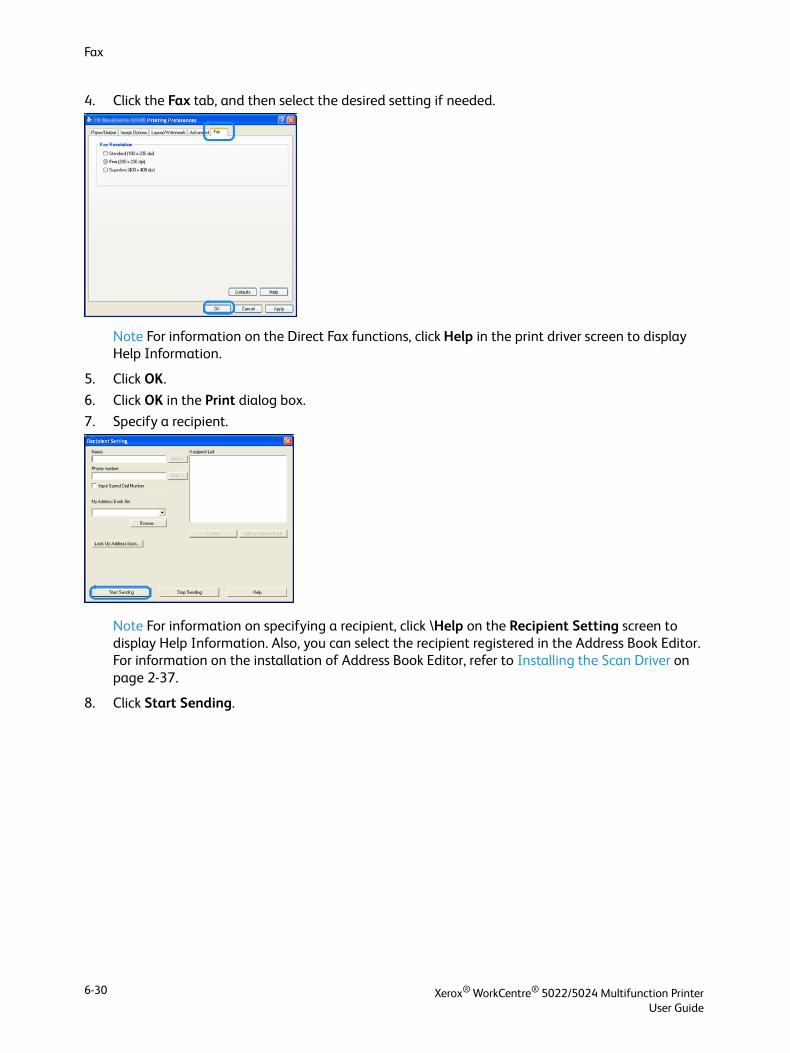
Fax
4. Click the Fax tab, and then select the desired setting if needed.
Note For information on the Direct Fax functions, click Help in the print driver screen to display Help Information.
5. Click OK.
6. Click OK in the Print dialog box.
7. Specify a recipient.
Note For information on specifying a recipient, click \Help on the Recipient Setting screen to display Help Information. Also, you can select the recipient registered in the Address Book Editor. For information on the installation of Address Book Editor, refer to Installing the Scan Driver on page 2-37.
8. Click Start Sending.
Xerox® WorkCentre® 5022/5024 Multifunction PrinterUser Guide
6-30
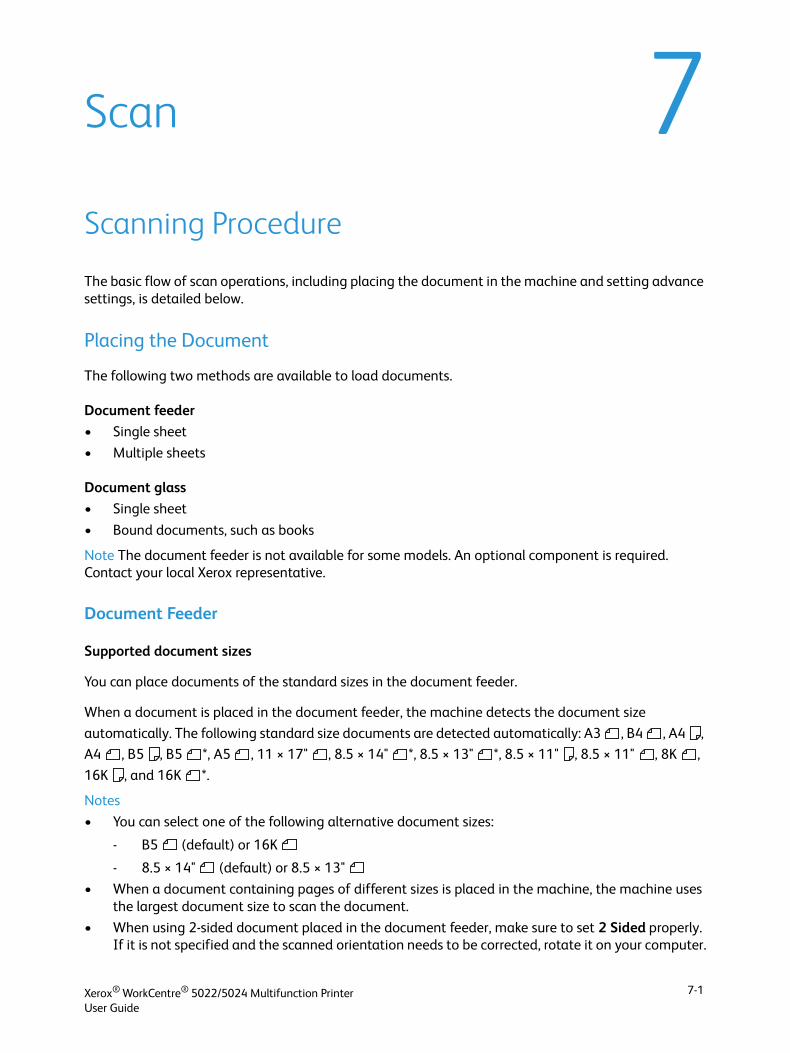
7Scan
Scanning Procedure
The basic flow of scan operations, including placing the document in the machine and setting advance settings, is detailed below.
Placing the Document
The following two methods are available to load documents.
Document feeder
• Single sheet
• Multiple sheets
Document glass
• Single sheet
• Bound documents, such as books
Note The document feeder is not available for some models. An optional component is required. Contact your local Xerox representative.
Document Feeder
Supported document sizes
You can place documents of the standard sizes in the document feeder.
When a document is placed in the document feeder, the machine detects the document size
automatically. The following standard size documents are detected automatically: A3 , B4 , A4 ,
A4 , B5 , B5 *, A5 , 11 × 17" , 8.5 × 14" *, 8.5 × 13" *, 8.5 × 11" , 8.5 × 11" , 8K ,
16K , and 16K *.
Notes
• You can select one of the following alternative document sizes:
- B5 (default) or 16K
- 8.5 × 14" (default) or 8.5 × 13"
• When a document containing pages of different sizes is placed in the machine, the machine uses the largest document size to scan the document.
• When using 2-sided document placed in the document feeder, make sure to set 2 Sided properly. If it is not specified and the scanned orientation needs to be corrected, rotate it on your computer.
Xerox® WorkCentre® 5022/5024 Multifunction PrinterUser Guide
7-1
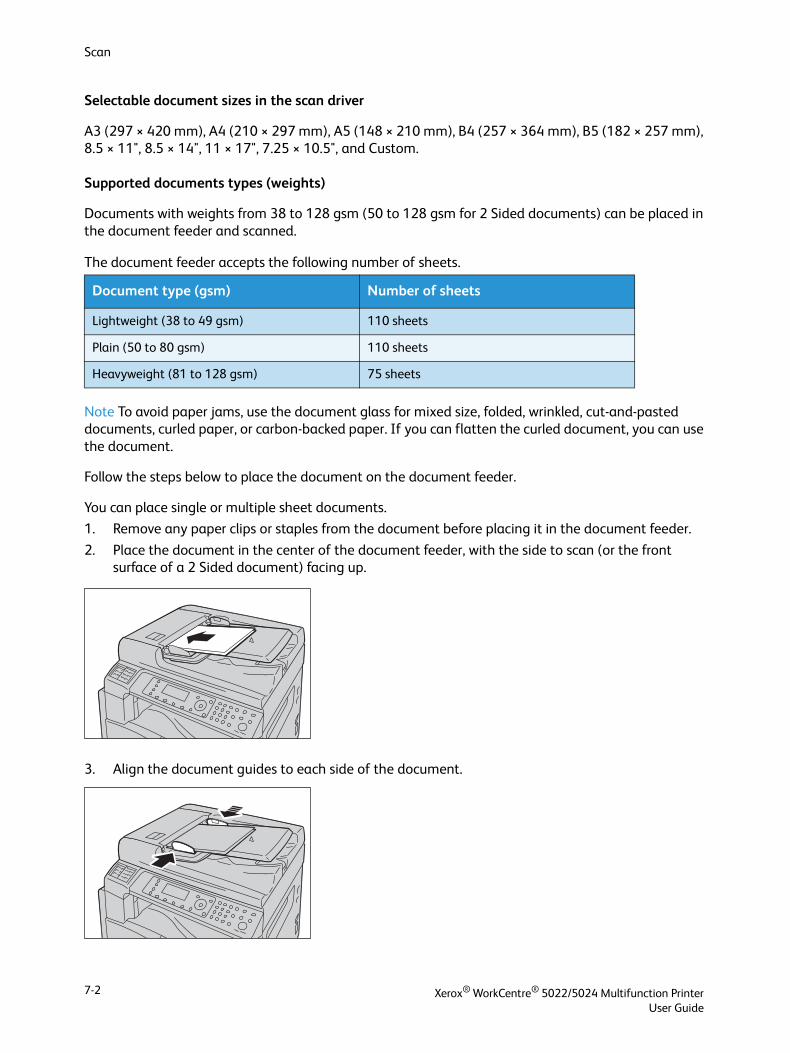
Scan
Selectable document sizes in the scan driver
A3 (297 × 420 mm), A4 (210 × 297 mm), A5 (148 × 210 mm), B4 (257 × 364 mm), B5 (182 × 257 mm), 8.5 × 11", 8.5 × 14", 11 × 17", 7.25 × 10.5", and Custom.
Supported documents types (weights)
Documents with weights from 38 to 128 gsm (50 to 128 gsm for 2 Sided documents) can be placed in the document feeder and scanned.
The document feeder accepts the following number of sheets.
Note To avoid paper jams, use the document glass for mixed size, folded, wrinkled, cut-and-pasted documents, curled paper, or carbon-backed paper. If you can flatten the curled document, you can use the document.
Follow the steps below to place the document on the document feeder.
You can place single or multiple sheet documents.
1. Remove any paper clips or staples from the document before placing it in the document feeder.
2. Place the document in the center of the document feeder, with the side to scan (or the front surface of a 2 Sided document) facing up.
3. Align the document guides to each side of the document.
Document type (gsm) Number of sheets
Lightweight (38 to 49 gsm) 110 sheets
Plain (50 to 80 gsm) 110 sheets
Heavyweight (81 to 128 gsm) 75 sheets
Xerox® WorkCentre® 5022/5024 Multifunction PrinterUser Guide
7-2

Scan
4. Open the document stopper.
Document Glass
Document sizes supporting automatic detection
The document size is detected automatically when Original Size is set to Auto.
The following document sizes are detected automatically: A3 , B4 , A4 , A4 , B5 , B5 , A5
, 11 × 17" , 8.5 × 11" , 8K , 16K , and 16K .
Supported document sizes
You can select one of the following document sizes from Original Size.
A3 , B4 , A4 , A4 , B5 , B5 , A5 , 11 × 17" , 8.5 × 14" *, 8.5 × 13" *, 8.5 × 11" ,
8.5 × 11" , 8K , and 16K .
Note When Original Size is set to Auto, an error screen appears when you place a non-standard size document on the document glass. In this case, select a document size manually by selecting Original Size from the menu items. Depending on the selected document size, the printout may be too large for the paper or may have shadows at the edges.
Selectable document sizes in the scan driver
A3 (297 × 420 mm), A4 (210 × 297 mm), A5 (148 × 210 mm), B4 (257 × 364 mm), B5 (182 × 257 mm), 8.5 × 11", 8.5 × 14", 11 × 17", 7.25 × 10.5", and Custom.
CAUTION: Do not apply excessive force to hold thick document on the document glass. It may break the glass and cause injuries.
Xerox® WorkCentre® 5022/5024 Multifunction PrinterUser Guide
7-3

Scan
Follow the steps below to place a single sheet document, or bound document such as book, on the document glass.
1. Open the document cover.
Note When using the document glass, make sure to close the document cover after finishing your scan job.
2. Place the document face down, and align it against the top left corner of the document glass.
3. Close the document cover.
Xerox® WorkCentre® 5022/5024 Multifunction PrinterUser Guide
7-4
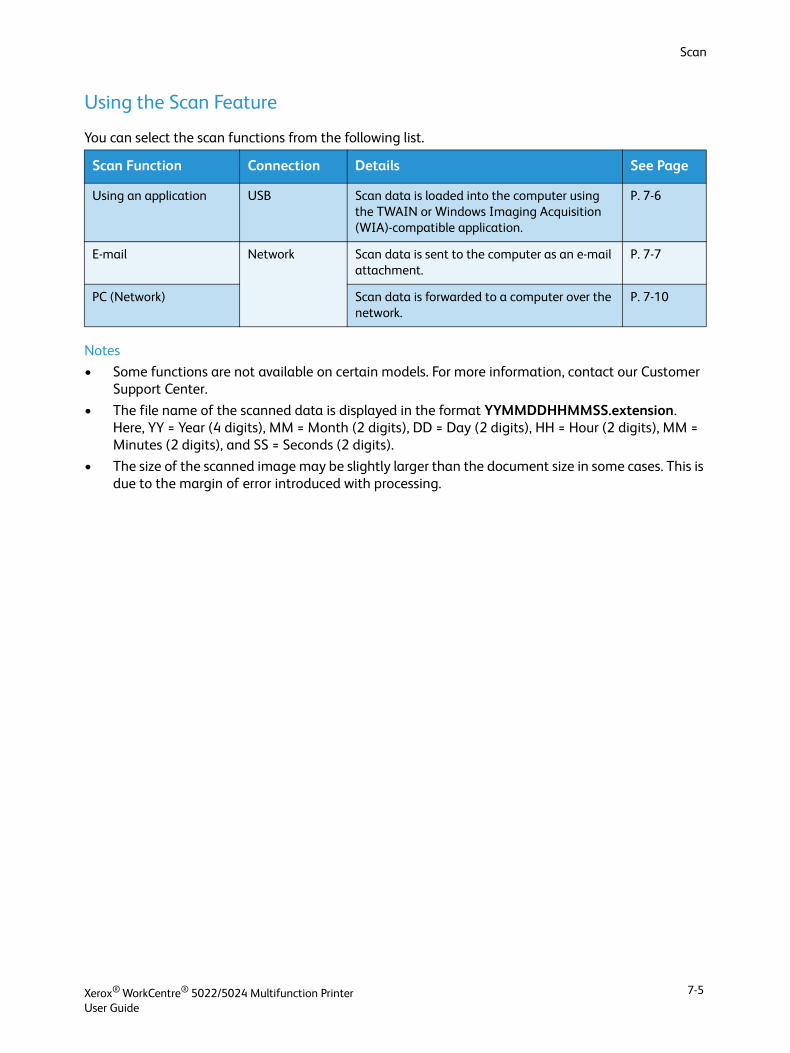
Scan
Using the Scan Feature
You can select the scan functions from the following list.
Notes
• Some functions are not available on certain models. For more information, contact our Customer Support Center.
• The file name of the scanned data is displayed in the format YYMMDDHHMMSS.extension. Here, YY = Year (4 digits), MM = Month (2 digits), DD = Day (2 digits), HH = Hour (2 digits), MM = Minutes (2 digits), and SS = Seconds (2 digits).
• The size of the scanned image may be slightly larger than the document size in some cases. This is due to the margin of error introduced with processing.
Scan Function Connection Details See Page
Using an application USB Scan data is loaded into the computer using the TWAIN or Windows Imaging Acquisition (WIA)-compatible application.
P. 7-6
E-mail Network Scan data is sent to the computer as an e-mail attachment.
P. 7-7
PC (Network) Scan data is forwarded to a computer over the network.
P. 7-10
Xerox® WorkCentre® 5022/5024 Multifunction PrinterUser Guide
7-5
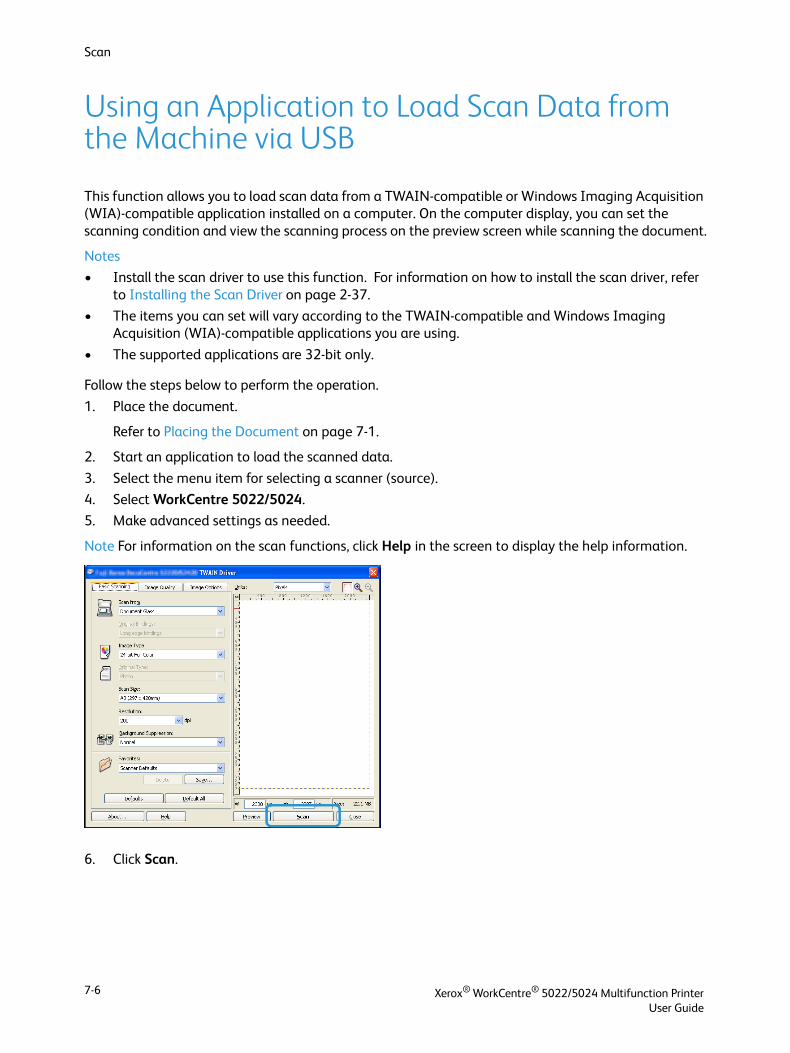
Scan
Using an Application to Load Scan Data from the Machine via USB
This function allows you to load scan data from a TWAIN-compatible or Windows Imaging Acquisition (WIA)-compatible application installed on a computer. On the computer display, you can set the scanning condition and view the scanning process on the preview screen while scanning the document.
Notes
• Install the scan driver to use this function. For information on how to install the scan driver, refer to Installing the Scan Driver on page 2-37.
• The items you can set will vary according to the TWAIN-compatible and Windows Imaging Acquisition (WIA)-compatible applications you are using.
• The supported applications are 32-bit only.
Follow the steps below to perform the operation.
1. Place the document.
Refer to Placing the Document on page 7-1.
2. Start an application to load the scanned data.
3. Select the menu item for selecting a scanner (source).
4. Select WorkCentre 5022/5024.
5. Make advanced settings as needed.
Note For information on the scan functions, click Help in the screen to display the help information.
6. Click Scan.
Xerox® WorkCentre® 5022/5024 Multifunction PrinterUser Guide
7-6
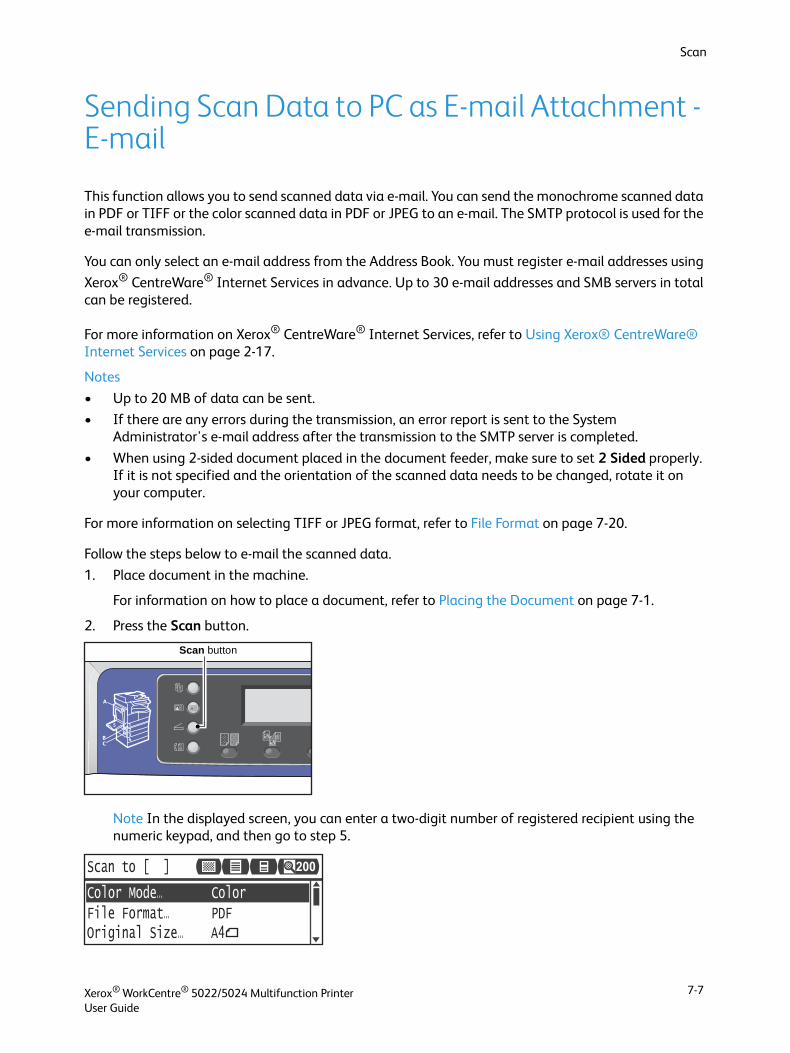
Scan
Sending Scan Data to PC as E-mail Attachment - E-mail
This function allows you to send scanned data via e-mail. You can send the monochrome scanned data in PDF or TIFF or the color scanned data in PDF or JPEG to an e-mail. The SMTP protocol is used for the e-mail transmission.
You can only select an e-mail address from the Address Book. You must register e-mail addresses using
Xerox® CentreWare® Internet Services in advance. Up to 30 e-mail addresses and SMB servers in total can be registered.
For more information on Xerox® CentreWare® Internet Services, refer to Using Xerox® CentreWare® Internet Services on page 2-17.
Notes
• Up to 20 MB of data can be sent.
• If there are any errors during the transmission, an error report is sent to the System Administrator's e-mail address after the transmission to the SMTP server is completed.
• When using 2-sided document placed in the document feeder, make sure to set 2 Sided properly. If it is not specified and the orientation of the scanned data needs to be changed, rotate it on your computer.
For more information on selecting TIFF or JPEG format, refer to File Format on page 7-20.
Follow the steps below to e-mail the scanned data.
1. Place document in the machine.
For information on how to place a document, refer to Placing the Document on page 7-1.
2. Press the Scan button.
Note In the displayed screen, you can enter a two-digit number of registered recipient using the numeric keypad, and then go to step 5.
Scan button
File Format... PDFColor Mode... Color
Scan to [ ]
Original Size... A4
200
Xerox® WorkCentre® 5022/5024 Multifunction PrinterUser Guide
7-7
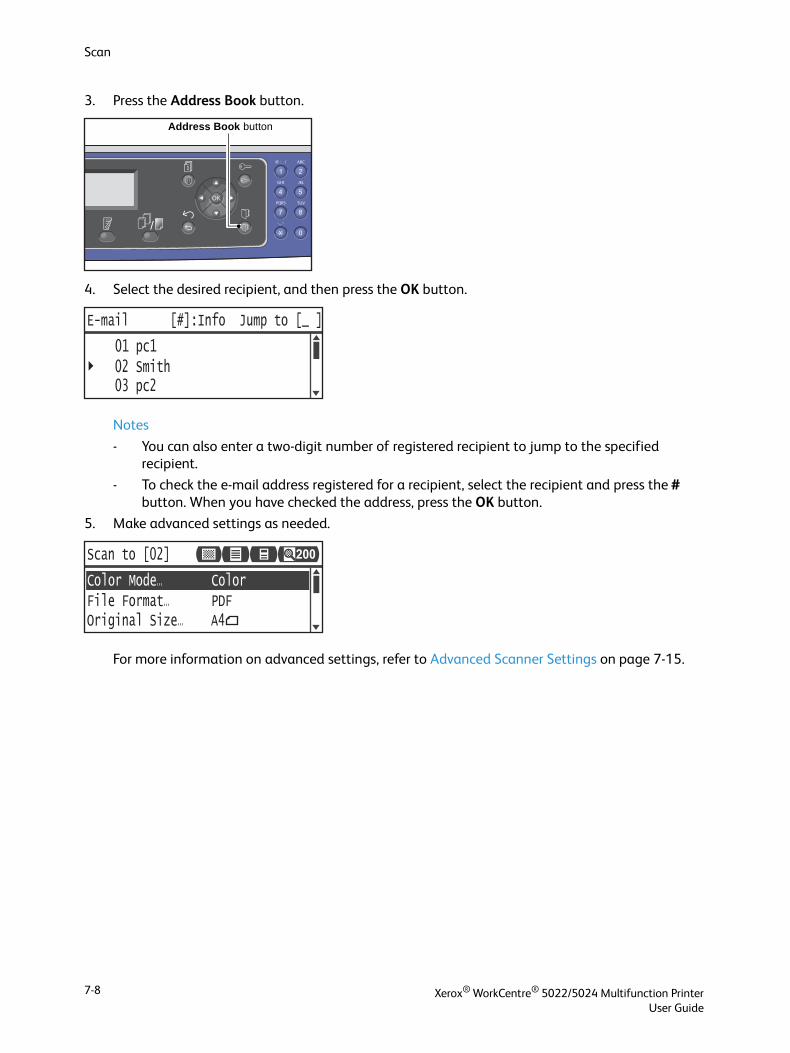
Scan
3. Press the Address Book button.
4. Select the desired recipient, and then press the OK button.
Notes
- You can also enter a two-digit number of registered recipient to jump to the specified recipient.
- To check the e-mail address registered for a recipient, select the recipient and press the # button. When you have checked the address, press the OK button.
5. Make advanced settings as needed.
For more information on advanced settings, refer to Advanced Scanner Settings on page 7-15.
Address Book button
03 pc2
[#]:Info Jump to [_ ]
01 pc1 02 Smith
File Format... PDFColor Mode... Color
Scan to [02]
Original Size... A4
200
Xerox® WorkCentre® 5022/5024 Multifunction PrinterUser Guide
7-8
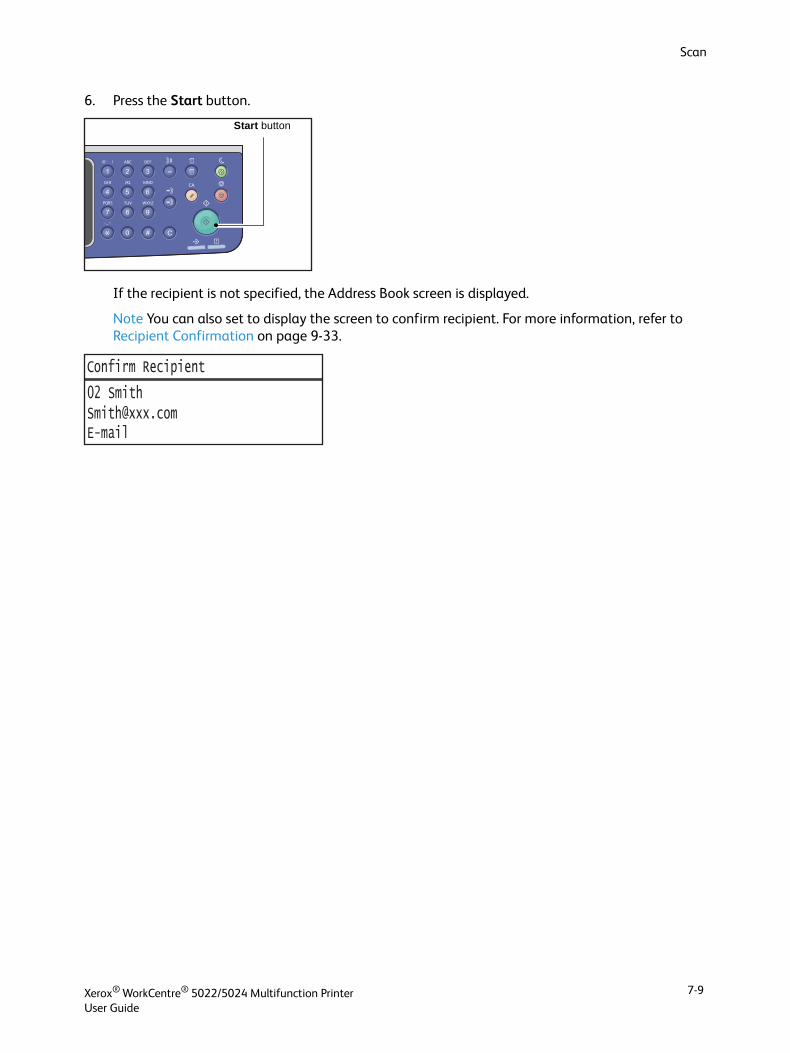
Scan
6. Press the Start button.
If the recipient is not specified, the Address Book screen is displayed.
Note You can also set to display the screen to confirm recipient. For more information, refer to Recipient Confirmation on page 9-33.
Start button
[email protected] Smith
Confirm Recipient
Xerox® WorkCentre® 5022/5024 Multifunction PrinterUser Guide
7-9
Scan
Sending Scan Data to PC over Network - PC (Network)
This function allows you to send scanned data to a network-based computer. You can send the monochrome scanned data in PDF or TIFF or the color scanned data in PDF or JPEG to the specified computer. The SMB protocol is used for the data transmission.
You can only select a forwarding computer from the Address Book. You must register computer
addresses using Xerox® CentreWare® Internet Services in advance. Up to 30 e-mail addresses and SMB servers in total can be registered.
For more information on Xerox® CentreWare® Internet Services, refer to Using Xerox® CentreWare® Internet Services on page 2-17.
Notes
• To forward scan data, you must first create a shared folder in which to save the data on the computer. Set the write permission for the shared folder.
• If you forward a data file having the same name as a file already in the shared folder, the new file will replace the old one.
• Up to 20 MB of data can be scanned to PC (Network). If the volume exceeds 20 MB, you can select whether to cancel or send the part. (Scan data volume may differ depending on the graphical content in the original document, color mode, and resolution.)
• If a network error occurred or the machine or the computer is disconnected during the transmission, a part of the transferred file is stored in the computer. To delete this file, delete it manually.
• When using a 2-sided document placed in the document feeder, make sure to set 2 Sided properly. If it is not specified and the orientation of the scanned data needs to be changed, rotate it on your computer.
For more information on selecting TIFF or JPEG format, refer to File Format on page 7-20.
To forward scanned data to a network computer:
1. Place document in the machine.
For information on how to place a document, refer to Placing the Document on page 7-1.
Xerox® WorkCentre® 5022/5024 Multifunction PrinterUser Guide
7-10
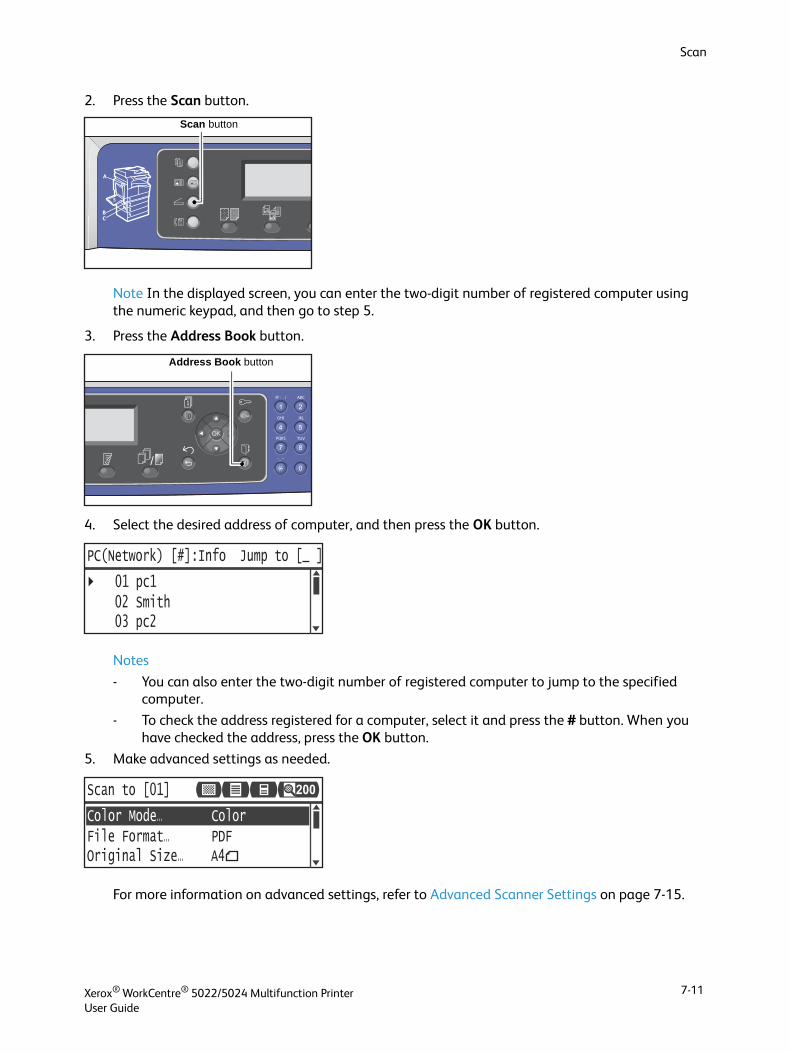
Scan
2. Press the Scan button.
Note In the displayed screen, you can enter the two-digit number of registered computer using the numeric keypad, and then go to step 5.
3. Press the Address Book button.
4. Select the desired address of computer, and then press the OK button.
Notes
- You can also enter the two-digit number of registered computer to jump to the specified computer.
- To check the address registered for a computer, select it and press the # button. When you have checked the address, press the OK button.
5. Make advanced settings as needed.
For more information on advanced settings, refer to Advanced Scanner Settings on page 7-15.
Scan button
Address Book button
02 Smith
PC(Network) [#]:Info Jump to [_ ]
01 pc1
03 pc2
File Format... PDFColor Mode... Color
Scan to [01]
Original Size... A4
200
Xerox® WorkCentre® 5022/5024 Multifunction PrinterUser Guide
7-11
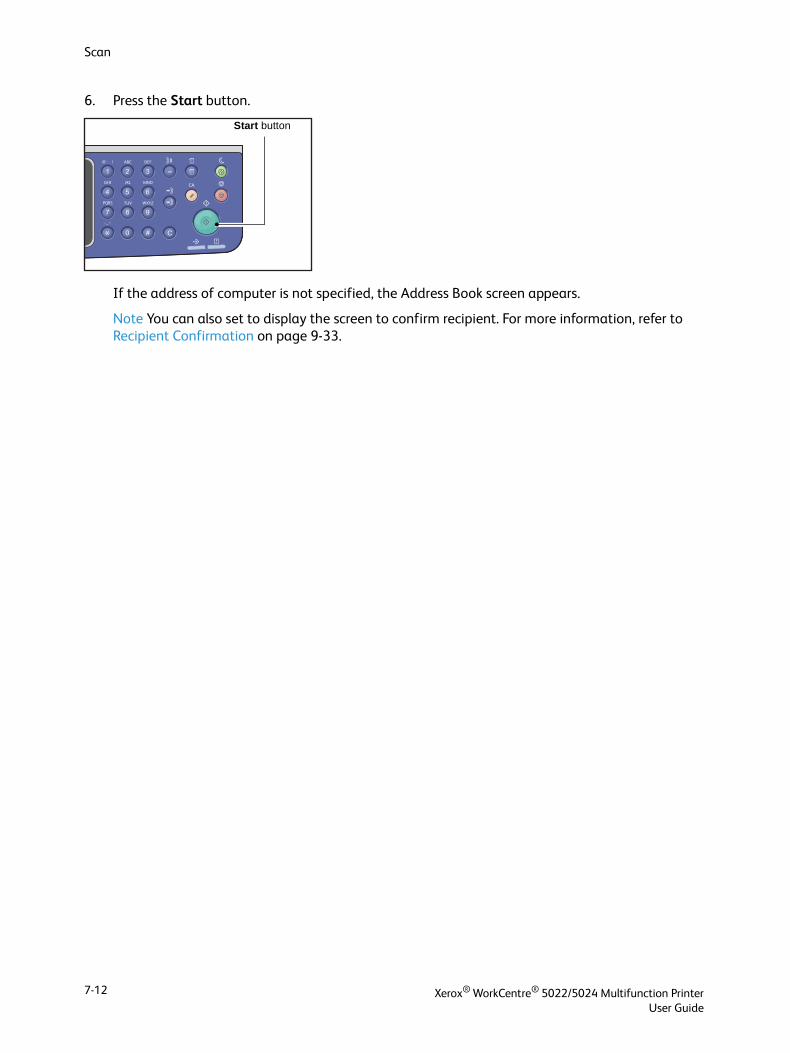
Scan
6. Press the Start button.
If the address of computer is not specified, the Address Book screen appears.
Note You can also set to display the screen to confirm recipient. For more information, refer to Recipient Confirmation on page 9-33.
Start button
Xerox® WorkCentre® 5022/5024 Multifunction PrinterUser Guide
7-12
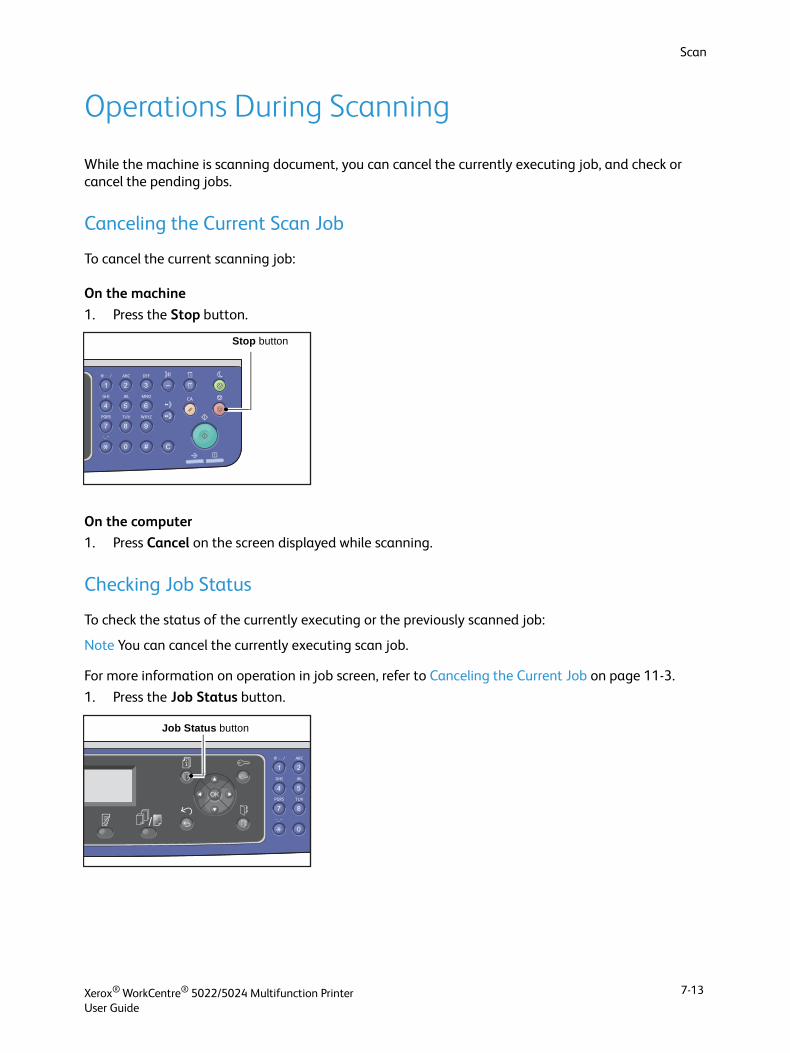
Scan
Operations During Scanning
While the machine is scanning document, you can cancel the currently executing job, and check or cancel the pending jobs.
Canceling the Current Scan Job
To cancel the current scanning job:
On the machine
1. Press the Stop button.
On the computer
1. Press Cancel on the screen displayed while scanning.
Checking Job Status
To check the status of the currently executing or the previously scanned job:
Note You can cancel the currently executing scan job.
For more information on operation in job screen, refer to Canceling the Current Job on page 11-3.
1. Press the Job Status button.
Stop button
Job Status button
Xerox® WorkCentre® 5022/5024 Multifunction PrinterUser Guide
7-13
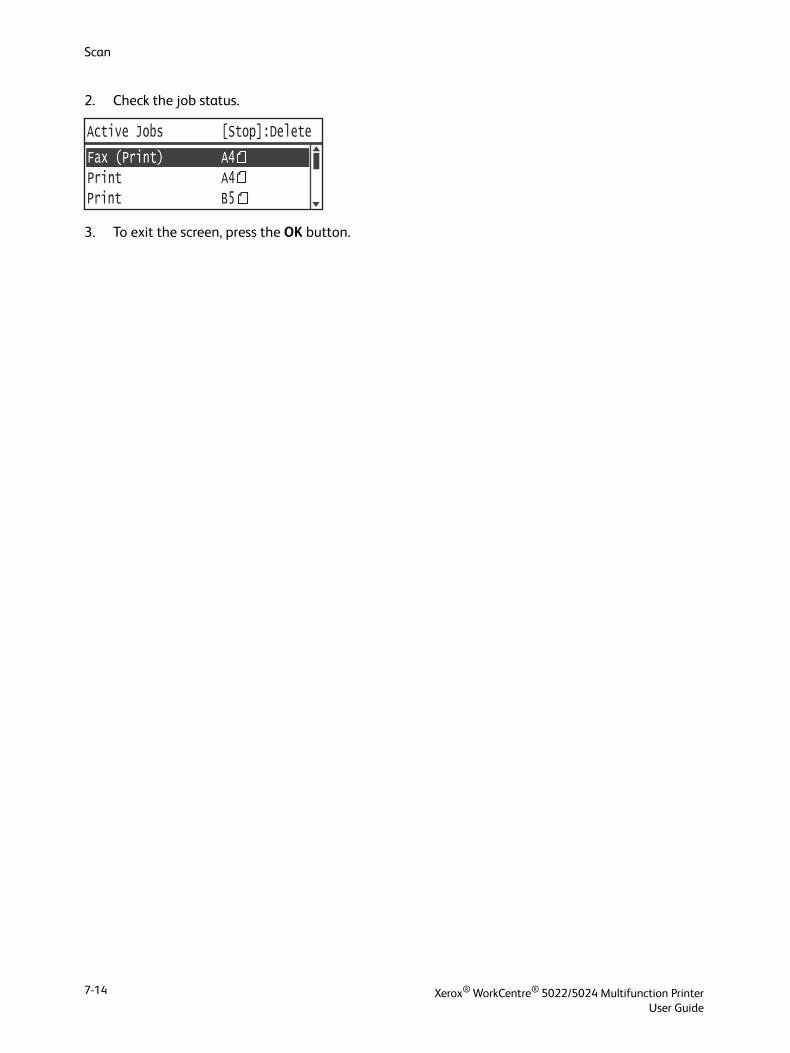
Scan
2. Check the job status.
3. To exit the screen, press the OK button.
Print A4 Print B5
Active Jobs [Stop]:Delete
Fax (Print) A4
Xerox® WorkCentre® 5022/5024 Multifunction PrinterUser Guide
7-14
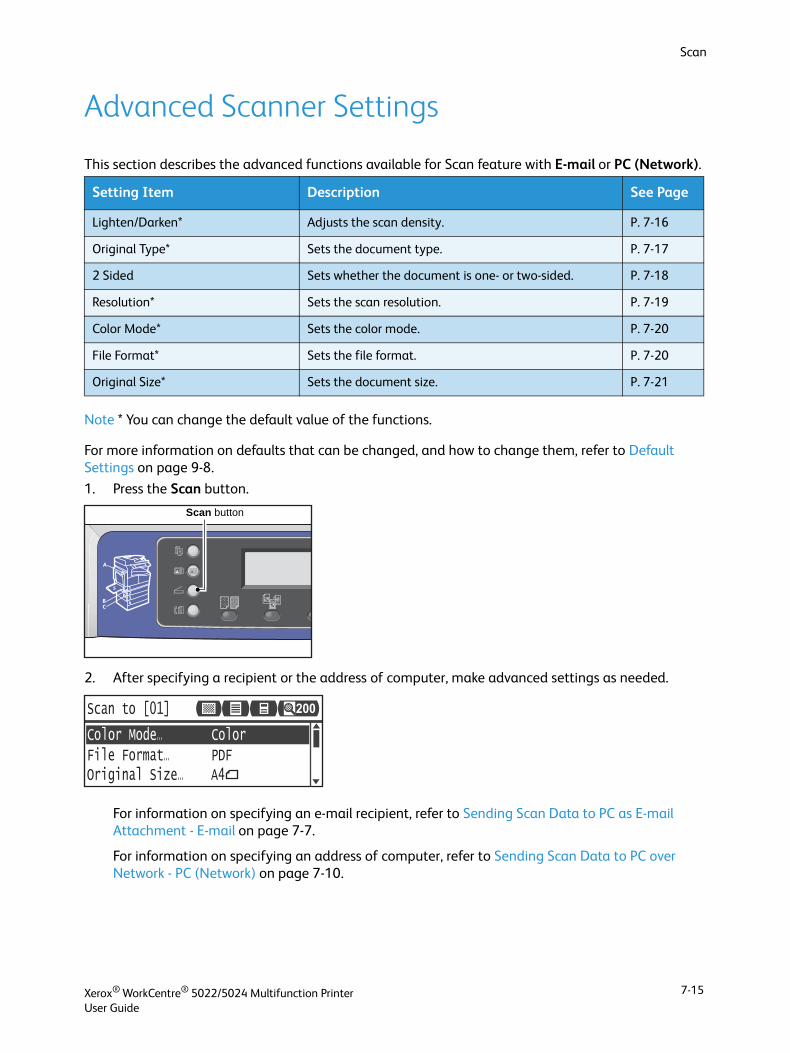
Scan
Advanced Scanner Settings
This section describes the advanced functions available for Scan feature with E-mail or PC (Network).
Note * You can change the default value of the functions.
For more information on defaults that can be changed, and how to change them, refer to Default Settings on page 9-8.
1. Press the Scan button.
2. After specifying a recipient or the address of computer, make advanced settings as needed.
For information on specifying an e-mail recipient, refer to Sending Scan Data to PC as E-mail Attachment - E-mail on page 7-7.
For information on specifying an address of computer, refer to Sending Scan Data to PC over Network - PC (Network) on page 7-10.
Setting Item Description See Page
Lighten/Darken* Adjusts the scan density. P. 7-16
Original Type* Sets the document type. P. 7-17
2 Sided Sets whether the document is one- or two-sided. P. 7-18
Resolution* Sets the scan resolution. P. 7-19
Color Mode* Sets the color mode. P. 7-20
File Format* Sets the file format. P. 7-20
Original Size* Sets the document size. P. 7-21
Scan button
File Format... PDFColor Mode... Color
Scan to [01]
Original Size... A4
200
Xerox® WorkCentre® 5022/5024 Multifunction PrinterUser Guide
7-15
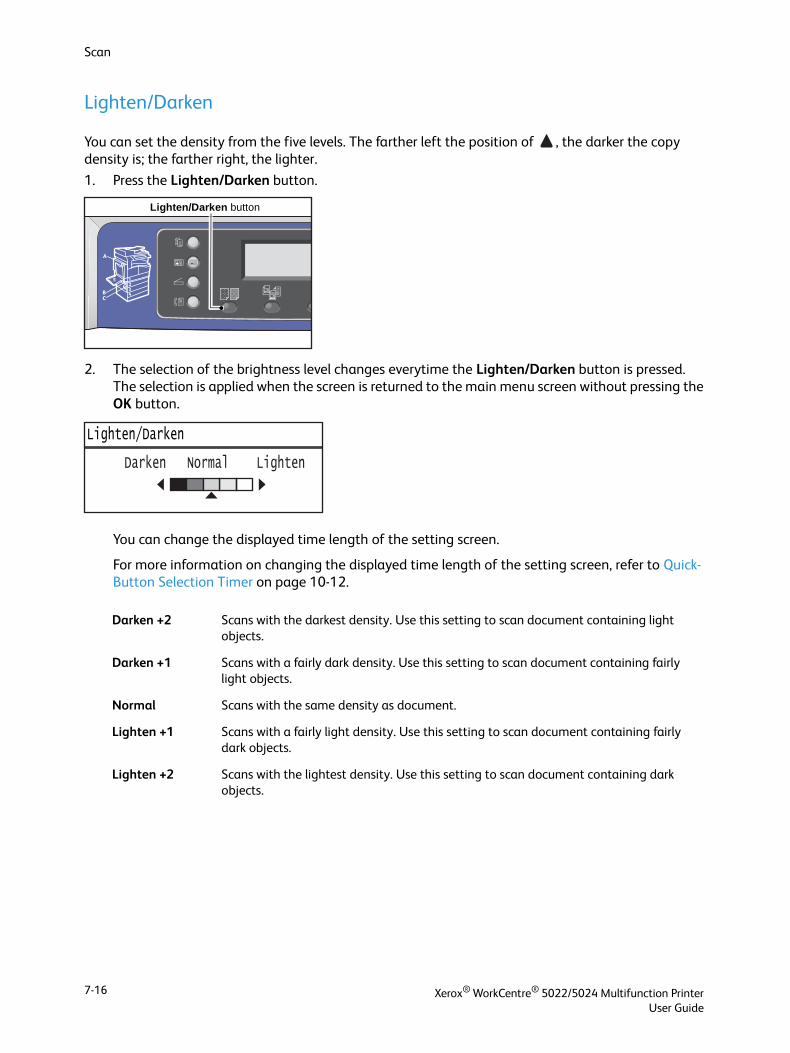
Scan
Lighten/Darken
You can set the density from the five levels. The farther left the position of , the darker the copy density is; the farther right, the lighter.
1. Press the Lighten/Darken button.
2. The selection of the brightness level changes everytime the Lighten/Darken button is pressed. The selection is applied when the screen is returned to the main menu screen without pressing the OK button.
You can change the displayed time length of the setting screen.
For more information on changing the displayed time length of the setting screen, refer to Quick-Button Selection Timer on page 10-12.
Darken +2 Scans with the darkest density. Use this setting to scan document containing light objects.
Darken +1 Scans with a fairly dark density. Use this setting to scan document containing fairly light objects.
Normal Scans with the same density as document.
Lighten +1 Scans with a fairly light density. Use this setting to scan document containing fairly dark objects.
Lighten +2 Scans with the lightest density. Use this setting to scan document containing dark objects.
Lighten/Darken button
Lighten/Darken
Lighten/Darken...
Darken Normal Lighten
Xerox® WorkCentre® 5022/5024 Multifunction PrinterUser Guide
7-16
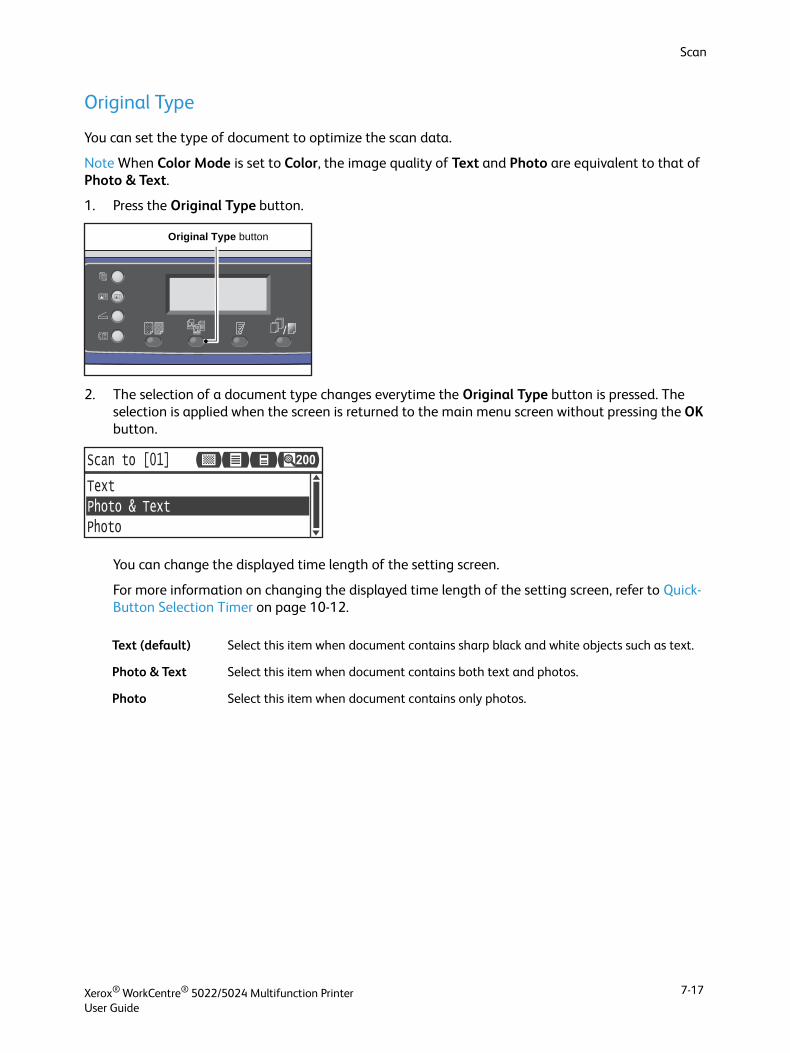
Scan
Original Type
You can set the type of document to optimize the scan data.
Note When Color Mode is set to Color, the image quality of Text and Photo are equivalent to that of Photo & Text.
1. Press the Original Type button.
2. The selection of a document type changes everytime the Original Type button is pressed. The selection is applied when the screen is returned to the main menu screen without pressing the OK button.
You can change the displayed time length of the setting screen.
For more information on changing the displayed time length of the setting screen, refer to Quick-Button Selection Timer on page 10-12.
Text (default) Select this item when document contains sharp black and white objects such as text.
Photo & Text Select this item when document contains both text and photos.
Photo Select this item when document contains only photos.
Original Type button
Photo & TextPhoto
Text
Scan to [01] 200
Xerox® WorkCentre® 5022/5024 Multifunction PrinterUser Guide
7-17
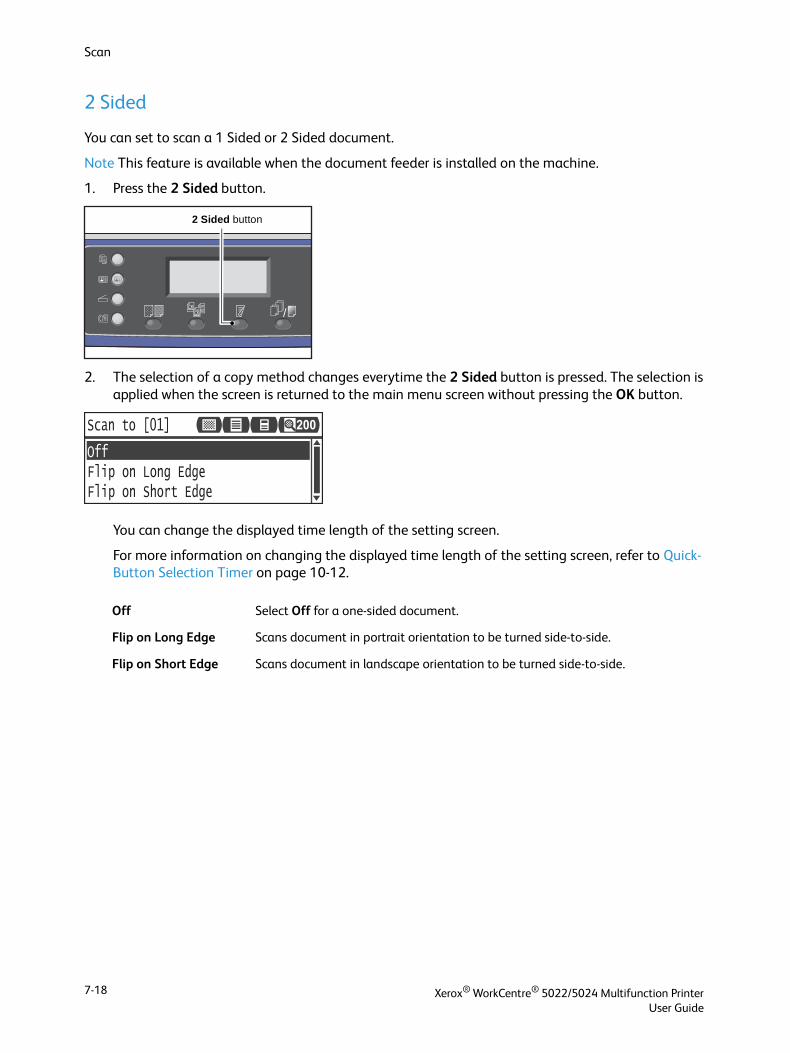
Scan
2 Sided
You can set to scan a 1 Sided or 2 Sided document.
Note This feature is available when the document feeder is installed on the machine.
1. Press the 2 Sided button.
2. The selection of a copy method changes everytime the 2 Sided button is pressed. The selection is applied when the screen is returned to the main menu screen without pressing the OK button.
You can change the displayed time length of the setting screen.
For more information on changing the displayed time length of the setting screen, refer to Quick-Button Selection Timer on page 10-12.
Off Select Off for a one-sided document.
Flip on Long Edge Scans document in portrait orientation to be turned side-to-side.
Flip on Short Edge Scans document in landscape orientation to be turned side-to-side.
2 Sided button
Flip on Long EdgeOff
Flip on Short Edge
Scan to [01] 200
Xerox® WorkCentre® 5022/5024 Multifunction PrinterUser Guide
7-18
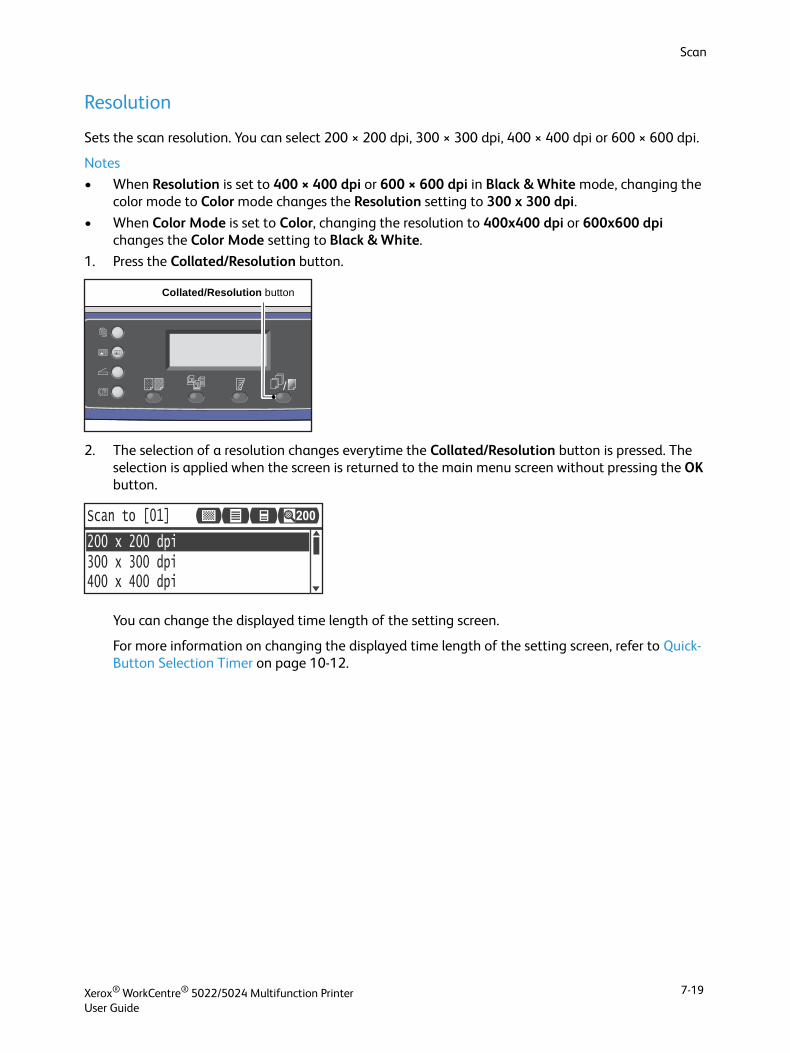
Scan
Resolution
Sets the scan resolution. You can select 200 × 200 dpi, 300 × 300 dpi, 400 × 400 dpi or 600 × 600 dpi.
Notes
• When Resolution is set to 400 × 400 dpi or 600 × 600 dpi in Black & White mode, changing the color mode to Color mode changes the Resolution setting to 300 x 300 dpi.
• When Color Mode is set to Color, changing the resolution to 400x400 dpi or 600x600 dpi changes the Color Mode setting to Black & White.
1. Press the Collated/Resolution button.
2. The selection of a resolution changes everytime the Collated/Resolution button is pressed. The selection is applied when the screen is returned to the main menu screen without pressing the OK button.
You can change the displayed time length of the setting screen.
For more information on changing the displayed time length of the setting screen, refer to Quick-Button Selection Timer on page 10-12.
Collated/Resolution button
300 x 300 dpi200 x 200 dpi
400 x 400 dpi
Scan to [01] 200
Xerox® WorkCentre® 5022/5024 Multifunction PrinterUser Guide
7-19
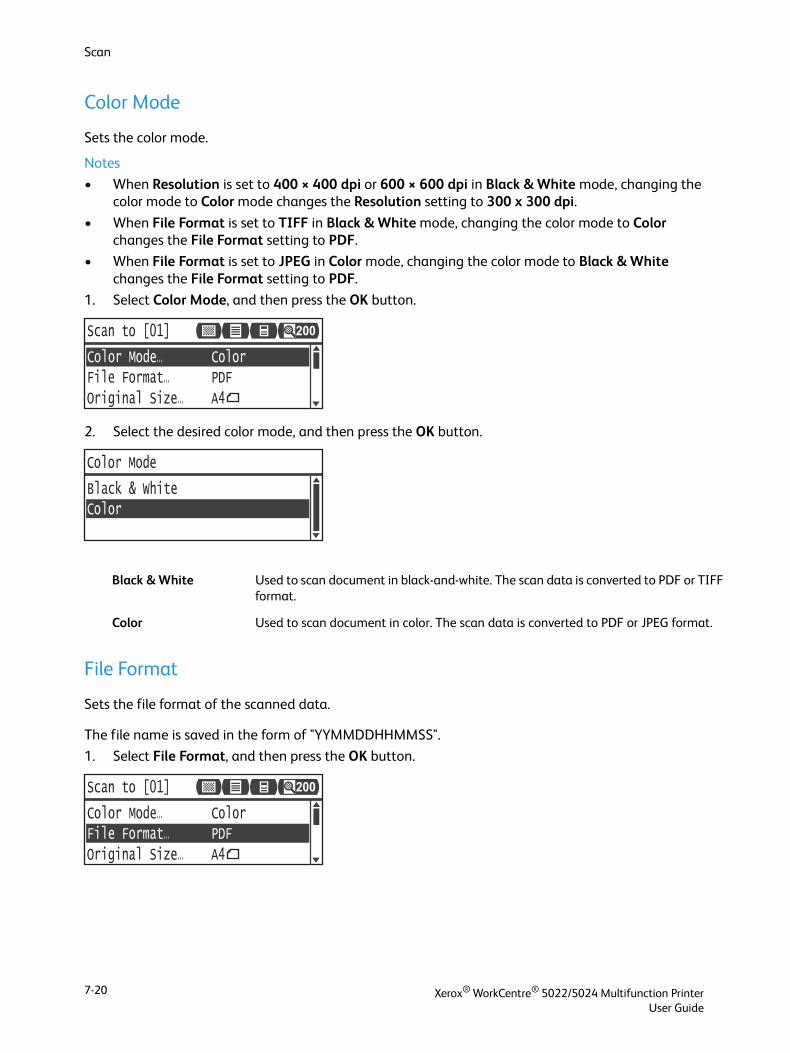
Scan
Color Mode
Sets the color mode.
Notes
• When Resolution is set to 400 × 400 dpi or 600 × 600 dpi in Black & White mode, changing the color mode to Color mode changes the Resolution setting to 300 x 300 dpi.
• When File Format is set to TIFF in Black & White mode, changing the color mode to Color changes the File Format setting to PDF.
• When File Format is set to JPEG in Color mode, changing the color mode to Black & White changes the File Format setting to PDF.
1. Select Color Mode, and then press the OK button.
2. Select the desired color mode, and then press the OK button.
File Format
Sets the file format of the scanned data.
The file name is saved in the form of "YYMMDDHHMMSS".
1. Select File Format, and then press the OK button.
Black & White Used to scan document in black-and-white. The scan data is converted to PDF or TIFFformat.
Color Used to scan document in color. The scan data is converted to PDF or JPEG format.
File Format... PDFOriginal Size... A4
Color Mode... Color
Scan to [01] 200
Color
Color Mode
Black & White
Original Size... A4
Color Mode... ColorFile Format... PDF
Scan to [01] 200
Xerox® WorkCentre® 5022/5024 Multifunction PrinterUser Guide
7-20
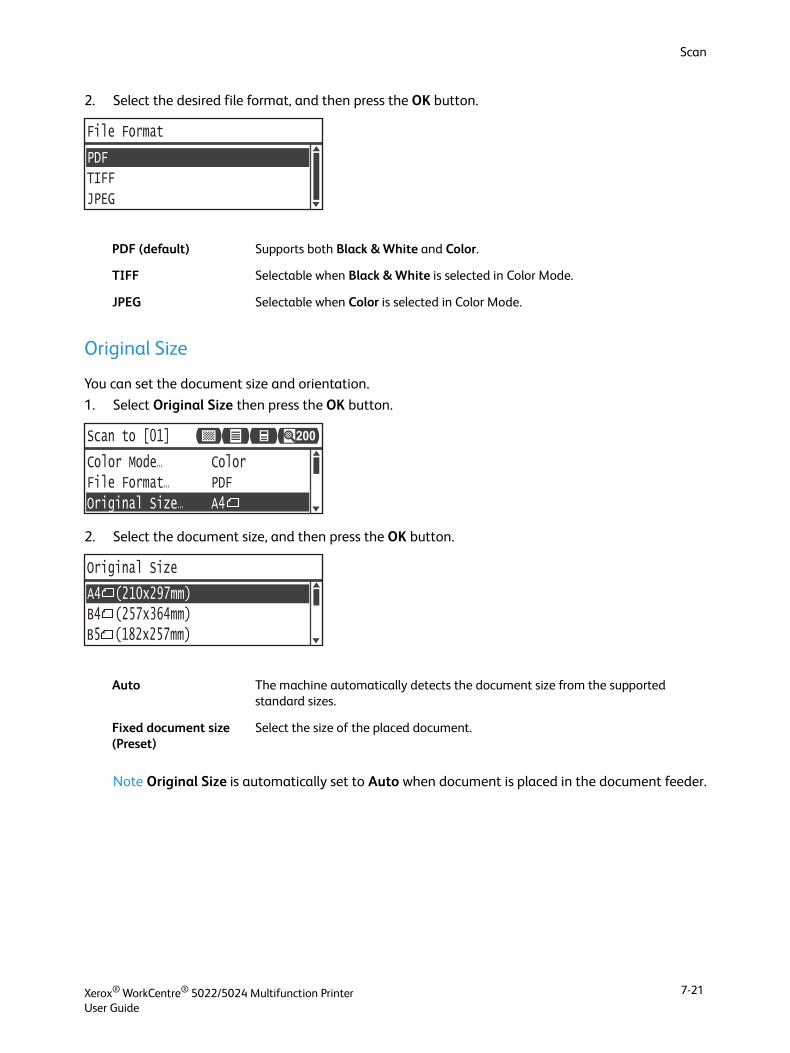
Scan
2. Select the desired file format, and then press the OK button.
Original Size
You can set the document size and orientation.
1. Select Original Size then press the OK button.
2. Select the document size, and then press the OK button.
Note Original Size is automatically set to Auto when document is placed in the document feeder.
PDF (default) Supports both Black & White and Color.
TIFF Selectable when Black & White is selected in Color Mode.
JPEG Selectable when Color is selected in Color Mode.
Auto The machine automatically detects the document size from the supported standard sizes.
Fixed document size (Preset)
Select the size of the placed document.
TIFF
File Format
JPEG
Original Size... A4
Color Mode... ColorFile Format... PDF
Scan to [01] 200
B4 (257x364mm)B5 (182x257mm)
Original Size
A4 (210x297mm)
Xerox® WorkCentre® 5022/5024 Multifunction PrinterUser Guide
7-21

Scan
Xerox® WorkCentre® 5022/5024 Multifunction PrinterUser Guide
7-22
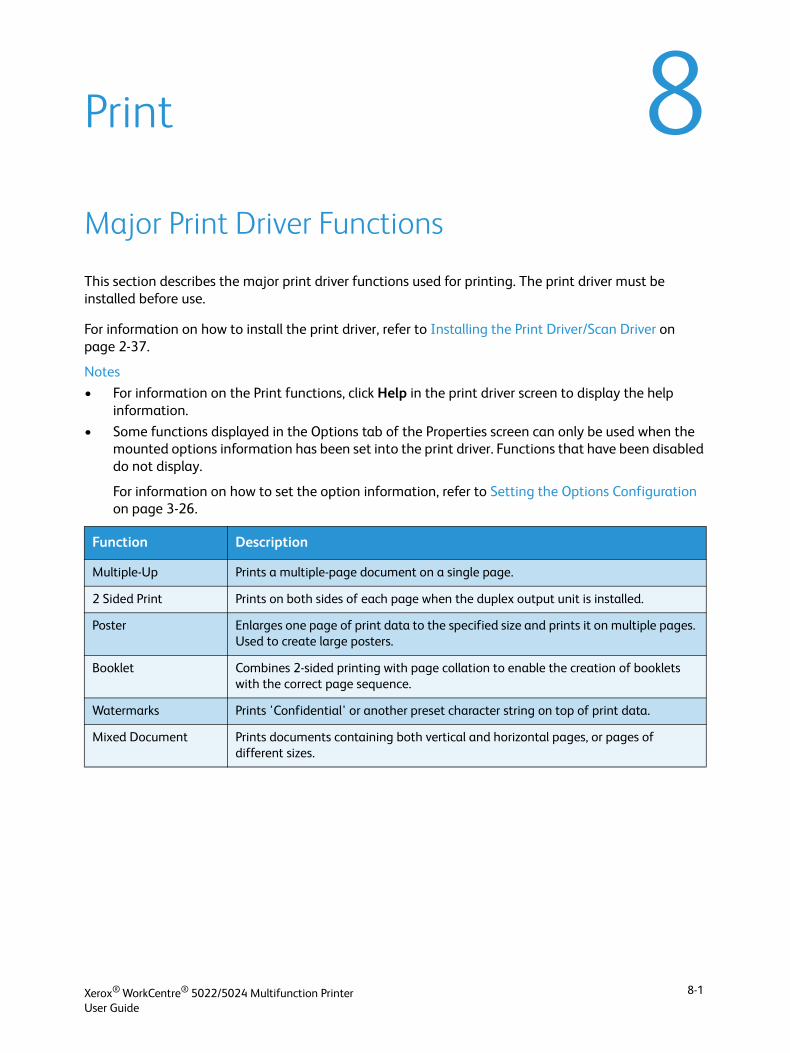
8Print
Major Print Driver Functions
This section describes the major print driver functions used for printing. The print driver must be installed before use.
For information on how to install the print driver, refer to Installing the Print Driver/Scan Driver on page 2-37.
Notes
• For information on the Print functions, click Help in the print driver screen to display the help information.
• Some functions displayed in the Options tab of the Properties screen can only be used when the mounted options information has been set into the print driver. Functions that have been disabled do not display.
For information on how to set the option information, refer to Setting the Options Configuration on page 3-26.
Function Description
Multiple-Up Prints a multiple-page document on a single page.
2 Sided Print Prints on both sides of each page when the duplex output unit is installed.
Poster Enlarges one page of print data to the specified size and prints it on multiple pages. Used to create large posters.
Booklet Combines 2-sided printing with page collation to enable the creation of booklets with the correct page sequence.
Watermarks Prints 'Confidential' or another preset character string on top of print data.
Mixed Document Prints documents containing both vertical and horizontal pages, or pages of different sizes.
Xerox® WorkCentre® 5022/5024 Multifunction PrinterUser Guide
8-1
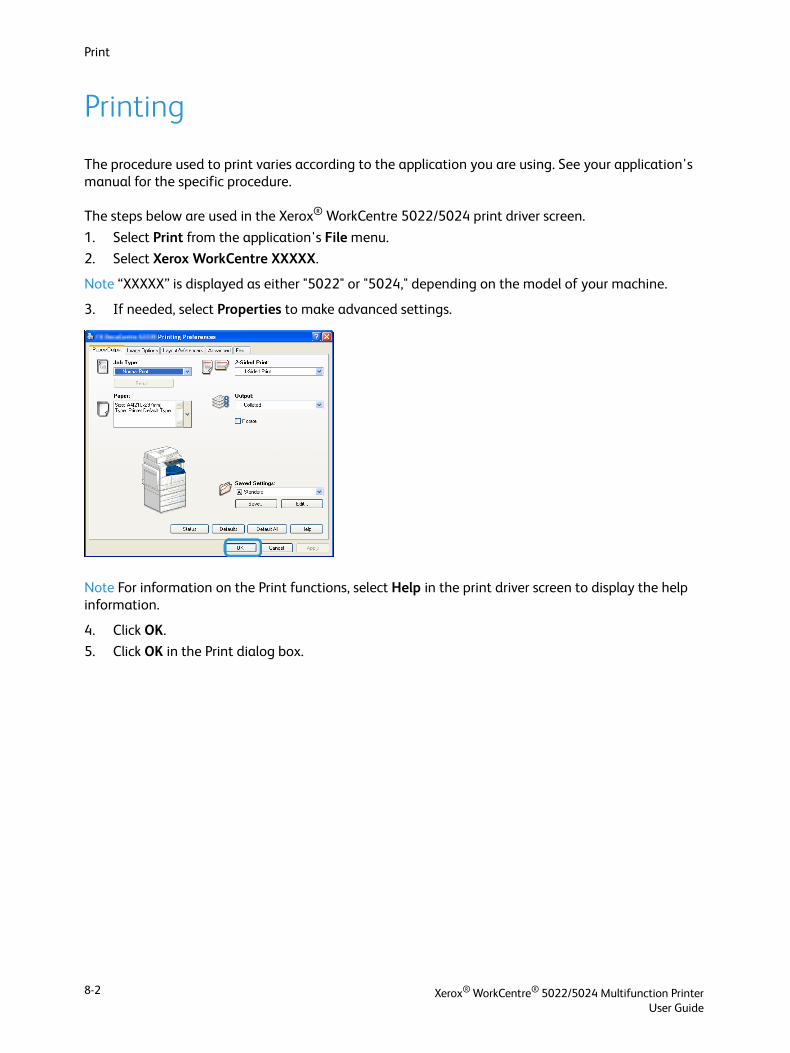
Printing
The procedure used to print varies according to the application you are using. See your application's manual for the specific procedure.
The steps below are used in the Xerox® WorkCentre 5022/5024 print driver screen.
1. Select Print from the application's File menu.
2. Select Xerox WorkCentre XXXXX.
Note “XXXXX” is displayed as either "5022" or "5024," depending on the model of your machine.
3. If needed, select Properties to make advanced settings.
Note For information on the Print functions, select Help in the print driver screen to display the help information.
4. Click OK.
5. Click OK in the Print dialog box.
Xerox® WorkCentre® 5022/5024 Multifunction PrinterUser Guide
8-2
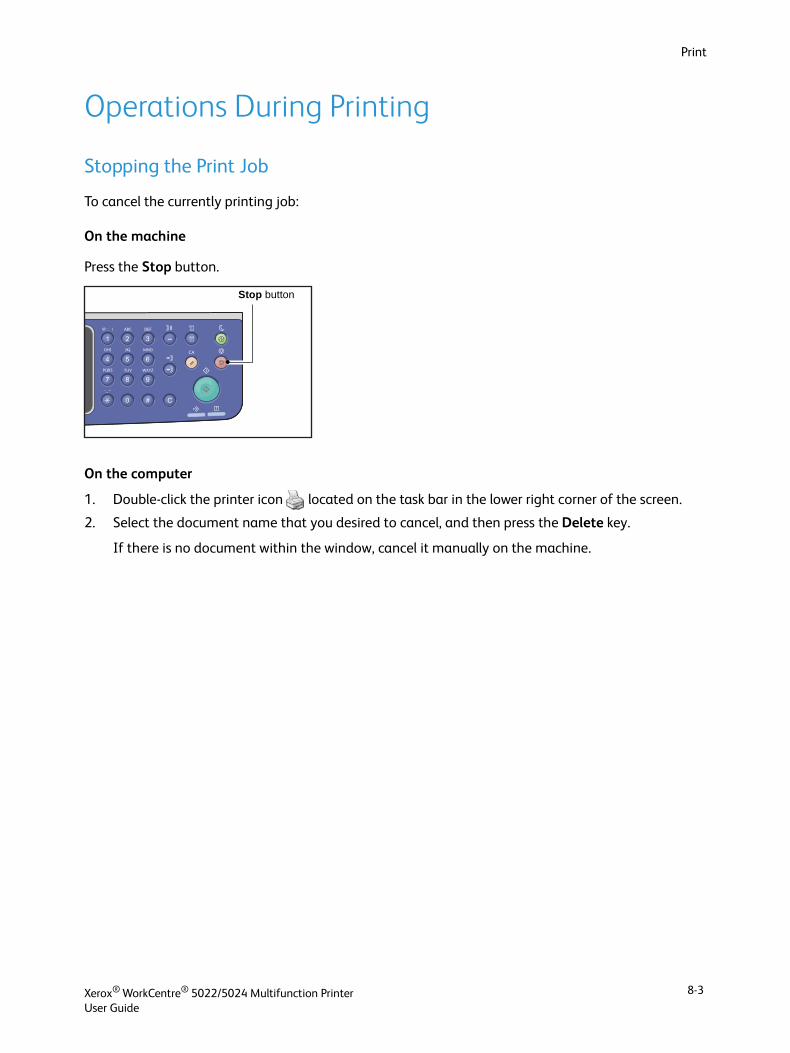
Operations During Printing
Stopping the Print Job
To cancel the currently printing job:
On the machine
Press the Stop button.
On the computer
1. Double-click the printer icon located on the task bar in the lower right corner of the screen.
2. Select the document name that you desired to cancel, and then press the Delete key.
If there is no document within the window, cancel it manually on the machine.
Stop button
Xerox® WorkCentre® 5022/5024 Multifunction PrinterUser Guide
8-3

Xerox® WorkCentre® 5022/5024 Multifunction PrinterUser Guide
8-4
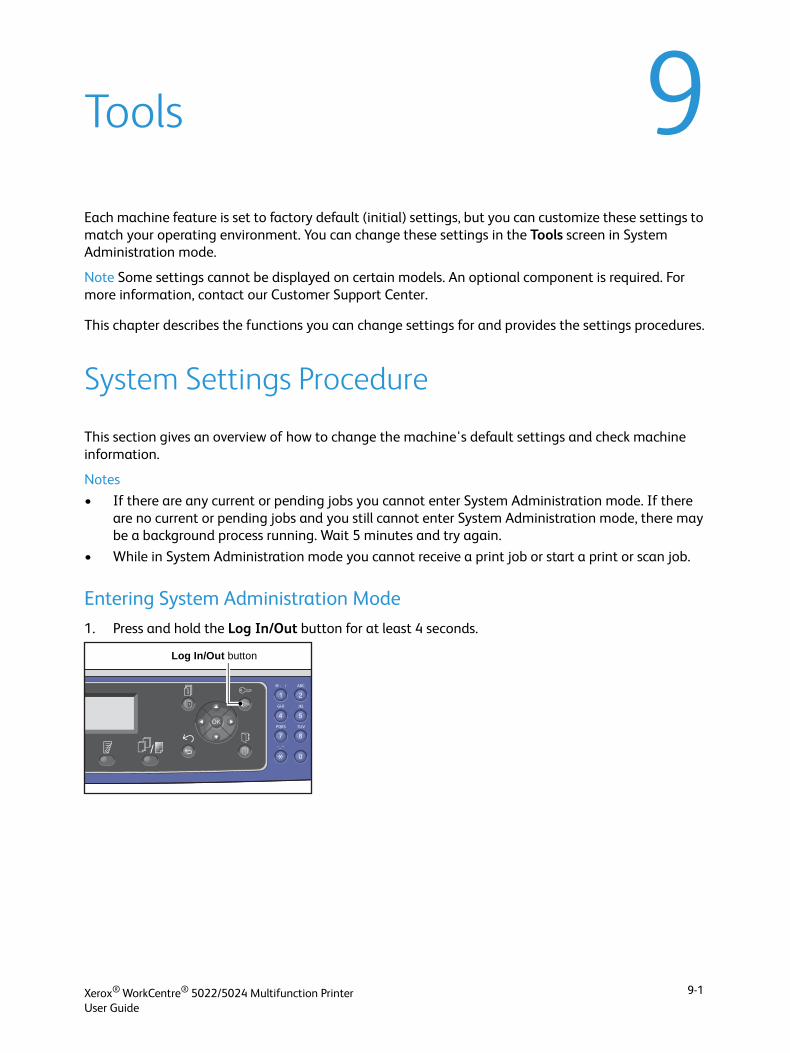
9Tools
Each machine feature is set to factory default (initial) settings, but you can customize these settings to match your operating environment. You can change these settings in the Tools screen in System Administration mode.
Note Some settings cannot be displayed on certain models. An optional component is required. For more information, contact our Customer Support Center.
This chapter describes the functions you can change settings for and provides the settings procedures.
System Settings Procedure
This section gives an overview of how to change the machine's default settings and check machine information.
Notes
• If there are any current or pending jobs you cannot enter System Administration mode. If there are no current or pending jobs and you still cannot enter System Administration mode, there may be a background process running. Wait 5 minutes and try again.
• While in System Administration mode you cannot receive a print job or start a print or scan job.
Entering System Administration Mode
1. Press and hold the Log In/Out button for at least 4 seconds.
Log In/Out button
Xerox® WorkCentre® 5022/5024 Multifunction PrinterUser Guide
9-1
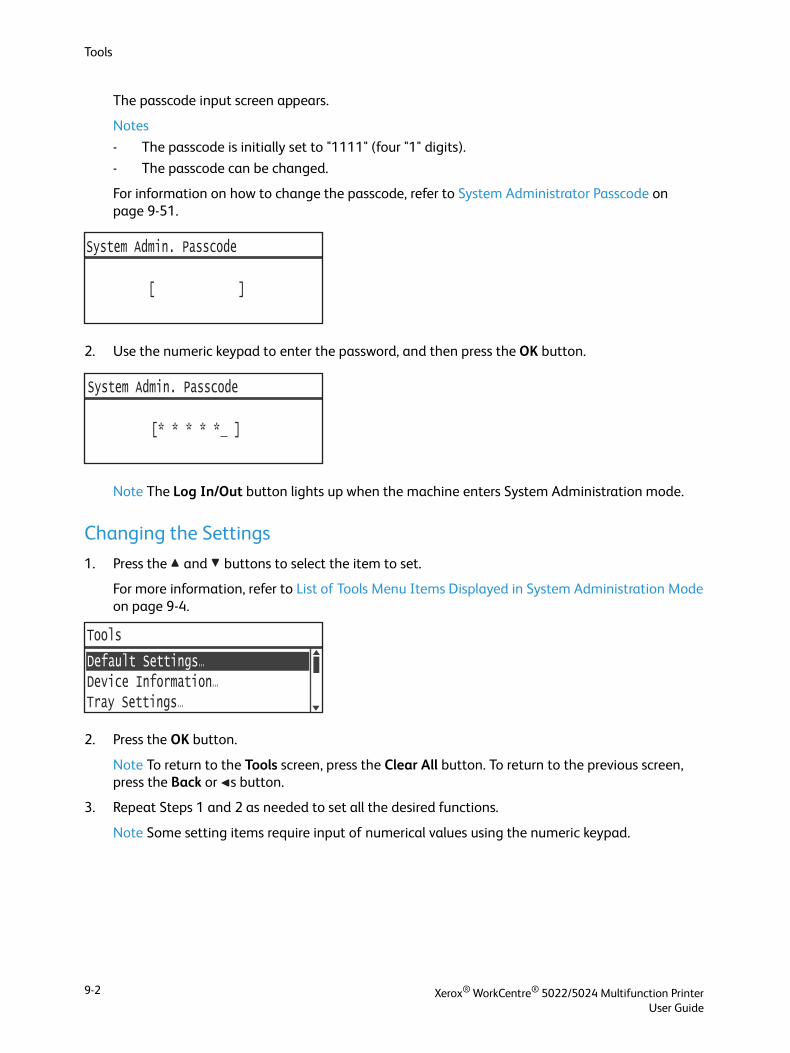
Tools
The passcode input screen appears.
Notes
- The passcode is initially set to "1111" (four "1" digits).
- The passcode can be changed.
For information on how to change the passcode, refer to System Administrator Passcode on page 9-51.
2. Use the numeric keypad to enter the password, and then press the OK button.
Note The Log In/Out button lights up when the machine enters System Administration mode.
Changing the Settings
1. Press the and buttons to select the item to set.
For more information, refer to List of Tools Menu Items Displayed in System Administration Mode on page 9-4.
2. Press the OK button.
Note To return to the Tools screen, press the Clear All button. To return to the previous screen, press the Back or s button.
3. Repeat Steps 1 and 2 as needed to set all the desired functions.
Note Some setting items require input of numerical values using the numeric keypad.
[ ]
System Admin. Passcode
[* * * * * ]
System Admin. Passcode
Device Information...Tray Settings...
Tools
Default Settings...
Xerox® WorkCentre® 5022/5024 Multifunction PrinterUser Guide
9-2
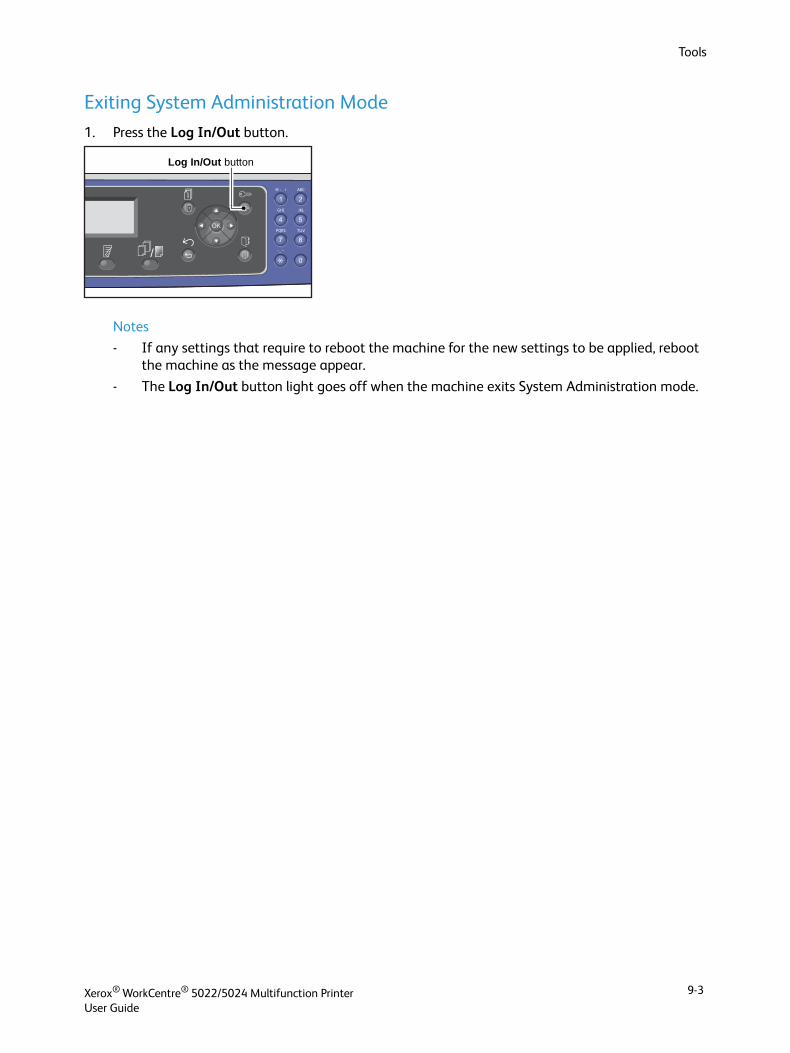
Tools
Exiting System Administration Mode
1. Press the Log In/Out button.
Notes
- If any settings that require to reboot the machine for the new settings to be applied, reboot the machine as the message appear.
- The Log In/Out button light goes off when the machine exits System Administration mode.
Log In/Out button
Xerox® WorkCentre® 5022/5024 Multifunction PrinterUser Guide
9-3
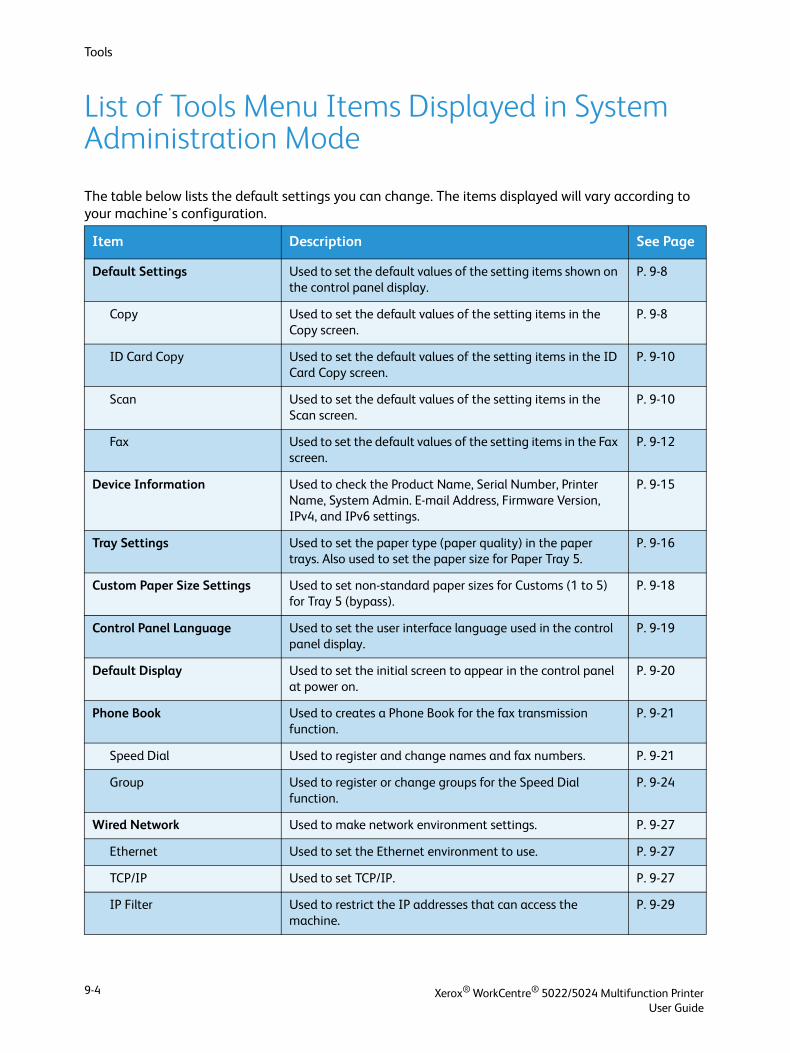
Tools
List of Tools Menu Items Displayed in System Administration Mode
The table below lists the default settings you can change. The items displayed will vary according to your machine's configuration.
Item Description See Page
Default Settings Used to set the default values of the setting items shown on the control panel display.
P. 9-8
Copy Used to set the default values of the setting items in the Copy screen.
P. 9-8
ID Card Copy Used to set the default values of the setting items in the ID Card Copy screen.
P. 9-10
Scan Used to set the default values of the setting items in the Scan screen.
P. 9-10
Fax Used to set the default values of the setting items in the Fax screen.
P. 9-12
Device Information Used to check the Product Name, Serial Number, Printer Name, System Admin. E-mail Address, Firmware Version, IPv4, and IPv6 settings.
P. 9-15
Tray Settings Used to set the paper type (paper quality) in the paper trays. Also used to set the paper size for Paper Tray 5.
P. 9-16
Custom Paper Size Settings Used to set non-standard paper sizes for Customs (1 to 5) for Tray 5 (bypass).
P. 9-18
Control Panel Language Used to set the user interface language used in the control panel display.
P. 9-19
Default Display Used to set the initial screen to appear in the control panel at power on.
P. 9-20
Phone Book Used to creates a Phone Book for the fax transmission function.
P. 9-21
Speed Dial Used to register and change names and fax numbers. P. 9-21
Group Used to register or change groups for the Speed Dial function.
P. 9-24
Wired Network Used to make network environment settings. P. 9-27
Ethernet Used to set the Ethernet environment to use. P. 9-27
TCP/IP Used to set TCP/IP. P. 9-27
IP Filter Used to restrict the IP addresses that can access the machine.
P. 9-29
Xerox® WorkCentre® 5022/5024 Multifunction PrinterUser Guide
9-4
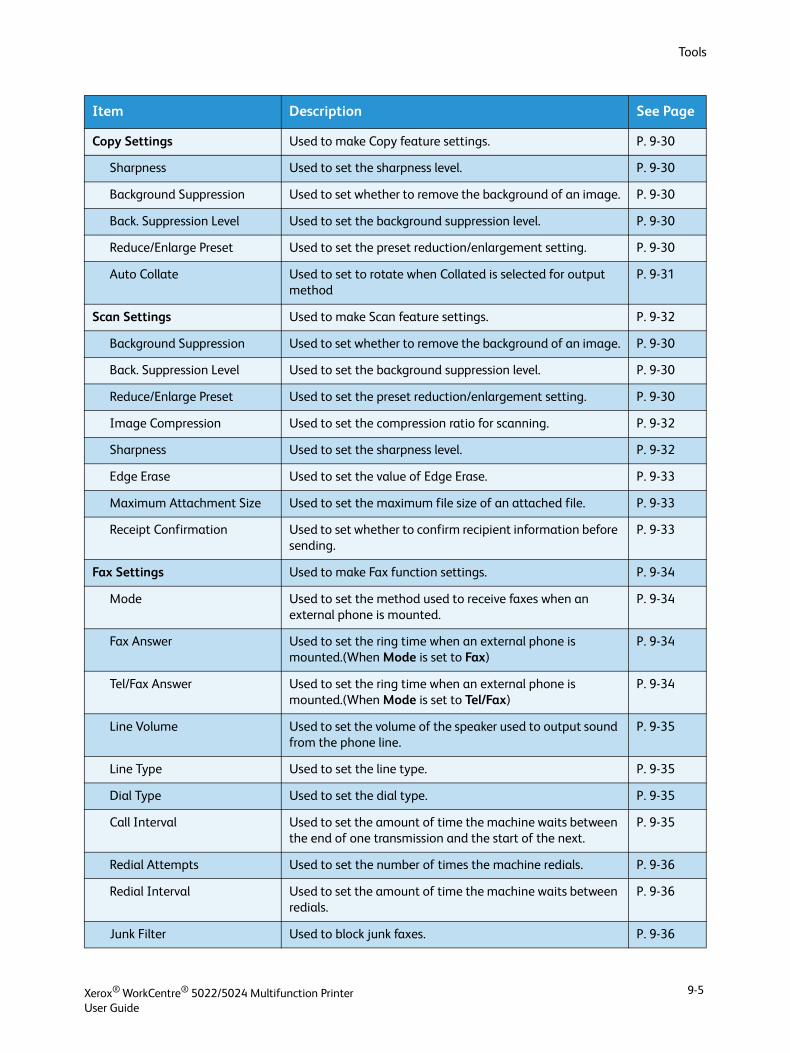
Tools
Copy Settings Used to make Copy feature settings. P. 9-30
Sharpness Used to set the sharpness level. P. 9-30
Background Suppression Used to set whether to remove the background of an image. P. 9-30
Back. Suppression Level Used to set the background suppression level. P. 9-30
Reduce/Enlarge Preset Used to set the preset reduction/enlargement setting. P. 9-30
Auto Collate Used to set to rotate when Collated is selected for output method
P. 9-31
Scan Settings Used to make Scan feature settings. P. 9-32
Background Suppression Used to set whether to remove the background of an image. P. 9-30
Back. Suppression Level Used to set the background suppression level. P. 9-30
Reduce/Enlarge Preset Used to set the preset reduction/enlargement setting. P. 9-30
Image Compression Used to set the compression ratio for scanning. P. 9-32
Sharpness Used to set the sharpness level. P. 9-32
Edge Erase Used to set the value of Edge Erase. P. 9-33
Maximum Attachment Size Used to set the maximum file size of an attached file. P. 9-33
Receipt Confirmation Used to set whether to confirm recipient information before sending.
P. 9-33
Fax Settings Used to make Fax function settings. P. 9-34
Mode Used to set the method used to receive faxes when an external phone is mounted.
P. 9-34
Fax Answer Used to set the ring time when an external phone is mounted.(When Mode is set to Fax)
P. 9-34
Tel/Fax Answer Used to set the ring time when an external phone is mounted.(When Mode is set to Tel/Fax)
P. 9-34
Line Volume Used to set the volume of the speaker used to output sound from the phone line.
P. 9-35
Line Type Used to set the line type. P. 9-35
Dial Type Used to set the dial type. P. 9-35
Call Interval Used to set the amount of time the machine waits between the end of one transmission and the start of the next.
P. 9-35
Redial Attempts Used to set the number of times the machine redials. P. 9-36
Redial Interval Used to set the amount of time the machine waits between redials.
P. 9-36
Junk Filter Used to block junk faxes. P. 9-36
Item Description See Page
Xerox® WorkCentre® 5022/5024 Multifunction PrinterUser Guide
9-5

Tools
Send Header Used to set whether to send information including the print date and sender information on outgoing faxes or not.
P. 9-36
Company Name Used to register the sender name. P. 9-36
Fax Number Used to register the machine's fax number. P. 9-36
Forward Used to set whether to forward the incoming fax or not. P. 9-36
Auto Reduce On Receipt Used to set whether to reduce the image size when the incoming data is too large for the output paper.
P. 9-37
Border Limit Used to set the image size limit at which to split the page when the incoming data is too large for the output paper.
P. 9-37
Receive Size Used to restrict the paper size of faxes that can be received. P. 9-37
Print Size (Received Letter) Used to set whether to print the incoming Letter size data on Letter paper or A4 paper.
P. 9-38
Immediate Fax Switch Used to set the remaining memory level at which to move to immediate communications during fax transmission.
P. 9-38
Off Hook Level Used to set the detection level of an off-the-hook receiver when using an external phone.
P. 9-38
Region Used to set the region name. P. 9-38
Activity Report Used to set whether to automatically print out the results of sent and received documents that are stored in memory.
P. 9-39
Transmission Report Used to set the method used to print fax transmission results.
P. 9-40
Broadcast Report Used to set the method of printing transmission results when "broadcasting" (sending the same fax to multiple recipients at once).
P. 9-40
Protocol Report Used to set the method used to print protocols. P. 9-41
System Settings Used to set other functions. P. 9-42
Power Saver Timer Used to set the amount of time the machine waits before entering its power-saving modes.
P. 9-42
Auto Reset Used to set the amount of time the machine waits before resetting the screen while an operation is being performed.
P. 9-42
Auto Print Used to set the amount of time the machine waits before starting to print and after receiving a print job.
P. 9-42
Idle Timeout Used to set the amount of time the machine waits before documents are added.
P. 9-43
Job Cancel Used to set whether to automatically cancel the job when a job error occurs.
P. 9-43
Clock Used to set the time on the machine's system clock. P. 9-43
Item Description See Page
Xerox® WorkCentre® 5022/5024 Multifunction PrinterUser Guide
9-6
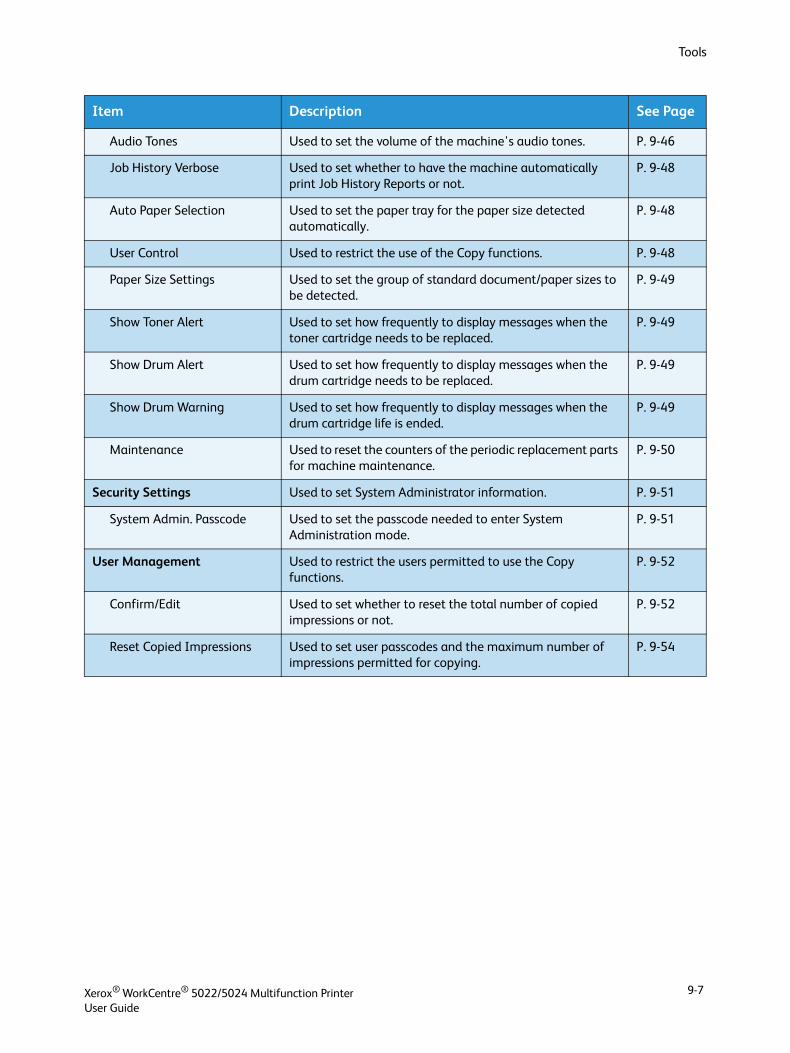
Tools
Audio Tones Used to set the volume of the machine's audio tones. P. 9-46
Job History Verbose Used to set whether to have the machine automatically print Job History Reports or not.
P. 9-48
Auto Paper Selection Used to set the paper tray for the paper size detected automatically.
P. 9-48
User Control Used to restrict the use of the Copy functions. P. 9-48
Paper Size Settings Used to set the group of standard document/paper sizes to be detected.
P. 9-49
Show Toner Alert Used to set how frequently to display messages when the toner cartridge needs to be replaced.
P. 9-49
Show Drum Alert Used to set how frequently to display messages when the drum cartridge needs to be replaced.
P. 9-49
Show Drum Warning Used to set how frequently to display messages when the drum cartridge life is ended.
P. 9-49
Maintenance Used to reset the counters of the periodic replacement parts for machine maintenance.
P. 9-50
Security Settings Used to set System Administrator information. P. 9-51
System Admin. Passcode Used to set the passcode needed to enter System Administration mode.
P. 9-51
User Management Used to restrict the users permitted to use the Copy functions.
P. 9-52
Confirm/Edit Used to set whether to reset the total number of copied impressions or not.
P. 9-52
Reset Copied Impressions Used to set user passcodes and the maximum number of impressions permitted for copying.
P. 9-54
Item Description See Page
Xerox® WorkCentre® 5022/5024 Multifunction PrinterUser Guide
9-7
Tools
Default Settings
Use the Default Settings screen to make default settings for the Copy, Scan and Fax features.
For information on how to display the Default Settings screen, refer to System Settings Procedure on page 9-1.
Copy
Sets the default advanced copy settings displayed when the control panel's Copy button is pressed.
Paper Supply
Sets the paper tray displayed in Paper Supply. Select the default paper tray to use for copying.
Auto is set at the time of factory shipment.
Tray 2, Tray 3, and Tray 4 are displayed when the optional paper trays are mounted.
The machine selects a paper tray whose tray is set to On for Auto Paper Selection to use for copying when Auto is selected. If there is more than one paper tray available that satisfies the conditions, the machine selects the tray with the highest priority to use for copying. However, those trays with the setting of paper quality or paper size that does not support 2 Sided function are excluded from the selection. The priority of the trays to use is Tray 1 > Tray 2 > Tray 3 > Tray 4 > Tray 5.
If an optional paper tray is set as default, the default setting returns to Auto if that tray is removed.
Reduce/Enlarge
Sets the default value displayed for Reduce/Enlarge.
You can select 100%, Auto, 50% A3A5, 70% A3A4, B4gB5, 81% B4A4, B5gA5, 86% A3B4, A4gB5, 115% B4A3, B5A4, 122% A4B4, A5B5, 141% A4A3, B5B4, 200% A5A3, 5.5 x 8.5"11 x 17", or Preset XXX%.
Auto is set at the time of factory shipment.
Notes
• The value displayed for Preset XXX% is the value registered for Reduce/Enlarge Preset in Copy Settings.
• When Auto is set, the machine reduces or enlarges the document to fit the specified paper size when copying.
2 Sided
Set the default value displayed for 2 Sided.
Xerox® WorkCentre® 5022/5024 Multifunction PrinterUser Guide
9-8
Tools
1 1 Sided is set at the time of factory shipment.
Original Type
Sets the default value displayed for Original Type. This setting optimizes the copy characteristics for the specified document type.
Text is set at the time of factory shipment.
Lighten/Darken
Sets the default copy density value displayed in Lighten/Darken.
You can select Darken +2, Darken +1, Normal, Lighten +1, Lighten +2, or Toner Saver.
Normal sets the copy density at about the same as the document; Darken +2 sets a higher density than the document; Lighten +2 sets a lower density.
Toner Saver sets the following values for each feature to conserve the toner usage. Lighten/Darken: Lighten +2, Sharpness: Sharpen +2, and Original Type: Photo& Text.
Normal is set at the time of factory shipment.
Edge Erase
Sets the default value displayed for Edge Erase. Setting a value for this menu item erases the black shadows created around the edges of the paper when copying with the document cover open.
You can set values between 0 and 50 mm (in 1 mm increments).
2 mm is set at the time of factory shipment.
1 1 Sided Set when copying one-sided document on one side of each output page.
1 2 Sided Set when copying one-sided document on both sides of each output page.
2 1 Sided Set when copying two-sided document on one side of each output page.
2 2 Sided Set when copying two-sided document on both sides of each output page.
Text Set when copying documents with sharp black and white contrast, such as text documents.
Photo & Text Set when copying documents containing both text and photos.
Photo Set when copying photos.
Note: This item is disabled when Color Mode is set to Black & White and enabled when Color Mode is set to Color.
Xerox® WorkCentre® 5022/5024 Multifunction PrinterUser Guide
9-9
Tools
ID Card Copy
Sets the default advanced ID Card Copy settings displayed when the control panel’s ID Card Copy button is pressed.
Original Size
Sets the default value displayed for Original Size.
You can select values between 86 and 297 mm (in 1 mm increments).
100 mm is set at the time of factory shipment.
Original Type
Sets the default value displayed for Original Type. This setting optimizes the copy characteristics for the specified document type.
Text is set at the time of factory shipment.
Edge Erase
Sets the default value displayed for Edge Erase. Setting a value for this menu item erases the black shadows created around the edges of the paper when copying with the document cover open.
You can select values between 0 and 10 mm (in 1 mm increments).
3 mm is set at the time of factory shipment.
Scan
Sets the default advanced scan settings displayed when the control panel's Scan button is pressed.
Color Mode
Sets the default color mode used for scanning (the item displayed for Color Mode).
Black & White is set at the time of factory shipment.
Text Set when copying documents with sharp black and white contrast, such as a text documents.
Photo & Text Set when copying documents containing both text and photos.
Photo Set when copying photos.
Xerox® WorkCentre® 5022/5024 Multifunction PrinterUser Guide
9-10
Tools
Note When Resolution is set to 400 dpi or 600 dpi, selecting Color changes Resolution to 300 dpi.
File Format (B&W)
Sets the default file format used for scanning in monochrome.
PDF is set at the time of factory shipment.
File Format (Color)
Sets the default file format used for scanning in color.
PDF is set at the time of factory shipment.
Resolution
Sets the default scan resolution displayed for Resolution.
You can select 200 dpi, 300 dpi, 400 dpi, or 600 dpi.
200 dpi is set at the time of factory shipment.
Note When the Color Mode is set to Color, you can only select 200 dpi or 300 dpi.
Original Size
Sets the default value displayed for Original Size.
You can select Auto, A3 (297 x 420mm), A4 (297 x 210mm), A4 (210 x 297mm), B4 (257 x 364mm), B5 (257 x 182mm), B5 (182 x 257mm), 8K (270 x 390mm), 16K (270x 195mm), 16K (195 x 270mm), A5 (148 x 210mm), 11 x 17" , 8.5 x 14" , 8.5 x 13" , 8.5 x 11" , or 8.5 x 11" .
A4 (297 x 210mm) is set at the time of factory shipment.
Black & White Scans document as black-and-white documents.
Color Scans document as color documents.
PDF Saves the scanned document in PDF file format.
TIFF Saves the scanned document in TIFF file format.
PDF Saves the scanned document in PDF file format.
JPEG Saves the scanned document in JPEG file format.
Xerox® WorkCentre® 5022/5024 Multifunction PrinterUser Guide
9-11
Tools
Original Type
Sets the default value displayed for Original Type. This setting optimizes the scanning characteristics for the specified document type.
Text is set at the time of factory shipment.
When Color Mode is set to Color, the image quality of Text and Photo are equivalent to that of Photo & Text.
Lighten/Darken
Sets the default scan density value displayed for Lighten/Darken.
You can select Darken +2, Darken +1, Normal, Lighten +1, or Lighten +2.
Normal sets the scan density at about the same as the document; Darken +2 sets a higher density than the document; Lighten +2 sets a lower density.
Normal is set at the time of factory shipment.
Fax
Sets the default advanced fax settings displayed when the control panel's Fax button is pressed.
This menu item is not displayed when the Fax Kit is not mounted. When the Region item has not been set in the Fax Settings, some items are not displayed. Set the Region item beforehand.
Resolution
Sets the default fax scan resolution displayed for Resolution.
Standard is set at the time of factory shipment.
Text Set when scanning documents with sharp black and white contrast, such as a text documents.
Photo & Text Set when scanning documents containing both text and photos.
Photo Set when scanning photos.
Note: This item is disabled when Color Mode is set to Black & White and enabled when Color Mode is set to Color.
Standard Scans faxes at the resolution of 200 x 100 dpi (7.9 x 3.9 dots/mm).
Fine Scans faxes at the resolution of 200 x 200 dpi (7.9 x 7.9 dots/mm).
Superfine Scans faxes at the resolution of 400 x 400 dpi (15.7 x 15.7 dots/mm).
Xerox® WorkCentre® 5022/5024 Multifunction PrinterUser Guide
9-12
Tools
Original Type
Sets the default value displayed for Original Type. This setting optimizes the fax scanning characteristics to the specified document type.
Text is set at the time of factory shipment.
Lighten/Darken
Sets the default fax scanning resolution displayed for Lighten/Darken.
You can select Darken +2, Darken +1, Normal, Lighten +1, or Lighten +2.
Normal sets the fax scanning density at about the same as the document; Darken +2 sets a higher density than the document; Lighten +2 sets a lower density.
Normal is set at the time of factory shipment.
Original Size
Set the default value displayed for Original Size.
You can select Auto, A3 (297 x 420mm), A4 (210 x 297mm), B4 (257 x 364mm), B5 (182 x 257mm), 8K (270 x 390mm), A5 (148 x 210mm), 11 x 17" , 8.5 x 14" , or 8.5 x 13" .
Auto is set at the time of factory shipment.
Original Size is set to Auto when a document is placed in the document feeder.
Edge Erase
Sets the default value displayed for Edge Erase. Setting a value for this setting erases the black shadows created around the edges of paper when faxing with the document cover open.
You can set values between 0 and 10 mm (in 1 mm increments).
2 mm is set at the time of factory shipment.
ECM
Sets the default value displayed for ECM. This setting resends the fax if an error resulting in transmission failure occurs.
You can select On or Off.
Text Set when faxing documents with sharp black and white contrast, such as a text documents.
Photo & Text Set when faxing documents containing both text and photos.
Photo Set when faxing photos.
Xerox® WorkCentre® 5022/5024 Multifunction PrinterUser Guide
9-13
Tools
On is set at the time of factory shipment.
Delayed Fax
Sets the default value displayed for Delayed Fax.
This setting lets you specify the time to send a fax. When 24-hour clock display has been set, you can set any time between 0:00 and 23:59 (in 1 minute increments). When 12-hour clock display has been set, you can set any time between 1:00 and 12:59 (in 1 minute increments).
The time is set to 21:00 at the time of factory shipment.
Xerox® WorkCentre® 5022/5024 Multifunction PrinterUser Guide
9-14
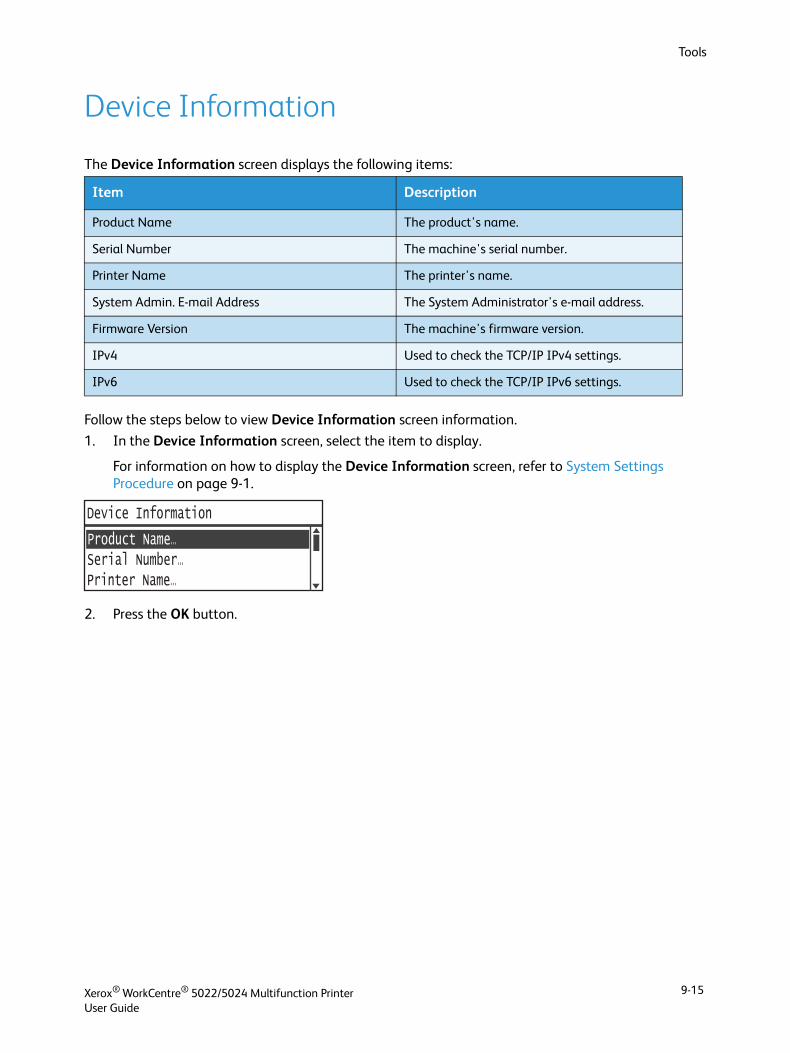
Tools
Device Information
The Device Information screen displays the following items:
Follow the steps below to view Device Information screen information.
1. In the Device Information screen, select the item to display.
For information on how to display the Device Information screen, refer to System Settings Procedure on page 9-1.
2. Press the OK button.
Item Description
Product Name The product's name.
Serial Number The machine's serial number.
Printer Name The printer's name.
System Admin. E-mail Address The System Administrator's e-mail address.
Firmware Version The machine's firmware version.
IPv4 Used to check the TCP/IP IPv4 settings.
IPv6 Used to check the TCP/IP IPv6 settings.
Serial Number...Printer Name...
Device Information
Product Name...
Xerox® WorkCentre® 5022/5024 Multifunction PrinterUser Guide
9-15
Tools
Tray Settings
The Tray Settings set the paper type (paper quality) for each paper tray. The Tray Settings is also used to set the paper size for Paper Tray 5 (bypass).
To maintain the same print quality after changing the quality of paper in a tray, change the tray's default paper quality setting to match the new paper.
Tray 2 to Tray 4 are displayed when the optional paper trays are mounted.
For information on how to display the Tray Settings screen, refer to System Settings Procedure on page 9-1.
Tray 1
Paper Type
Sets the type (quality) of the paper in Tray 1.
You can select Plain 1, Plain 2, or Lightweight.
Plain 1 is set at the time of factory shipment.
Tray 2 to Tray 4
Paper Type
Sets the type (quality) of the paper in Tray 2 to Tray 4 (optional trays).
You can select Plain 1, Plain 2, Heavyweight, Extra-HW, or Lightweight.
Tray 5
Paper Size
Sets the size of the paper in Tray 5 (bypass).
You can select A3 (297 x 420mm), A4 (297 x 210mm), A4 (210 x 297mm), B4 (257 x 364mm), B5 (257 x 182mm), B5 (182 x 257mm), 8K (270 x 390mm), 16K (270x 195mm), 16K (195 x 270mm), A5 (148 x 210mm), 11 x 17" , 8.5 x 14" , 8.5 x 13" , 8.5 x 11" , 8.5 x 11" , Custom 1 - Custom 5, or Custom Size.
If you select Custom Size and press the OK button, you can set a non-standard paper size (X (horizontal) 98 to 432 mm, Y (vertical) 127 to 297 mm).
A4 (297 x 210mm) is set at the time of factory shipment.
Xerox® WorkCentre® 5022/5024 Multifunction PrinterUser Guide
9-16
Tools
Paper Type
Sets the type (quality) of the paper in Tray 5 (bypass).
You can select Plain 1, Plain 2, Heavyweight, Extra-HW, or Lightweight.
Plain 1 is set at the time of factory shipment.
Xerox® WorkCentre® 5022/5024 Multifunction PrinterUser Guide
9-17
Tools
Custom Paper Size Settings
You can set the non-standard paper sizes to the Customs (1 to 5) for the Tray 5 (bypass) (X (horizontal) 98 to 432 mm, Y (vertical) 127 to 297 mm).
The registered Customs can be selected in Original Size for the Copy feature.
Xerox® WorkCentre® 5022/5024 Multifunction PrinterUser Guide
9-18
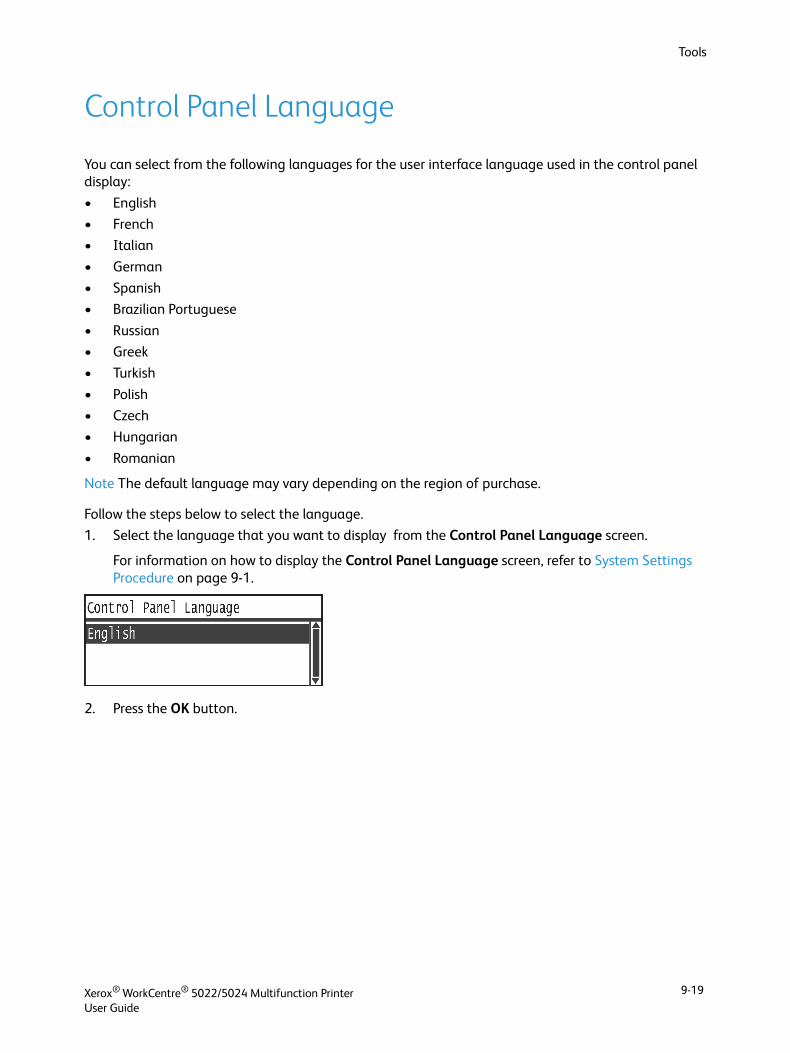
Tools
Control Panel Language
You can select from the following languages for the user interface language used in the control panel display:
• English
• French
• Italian
• German
• Spanish
• Brazilian Portuguese
• Russian
• Greek
• Turkish
• Polish
• Czech
• Hungarian
• Romanian
Note The default language may vary depending on the region of purchase.
Follow the steps below to select the language.
1. Select the language that you want to display from the Control Panel Language screen.
For information on how to display the Control Panel Language screen, refer to System Settings Procedure on page 9-1.
2. Press the OK button.
Xerox® WorkCentre® 5022/5024 Multifunction PrinterUser Guide
9-19
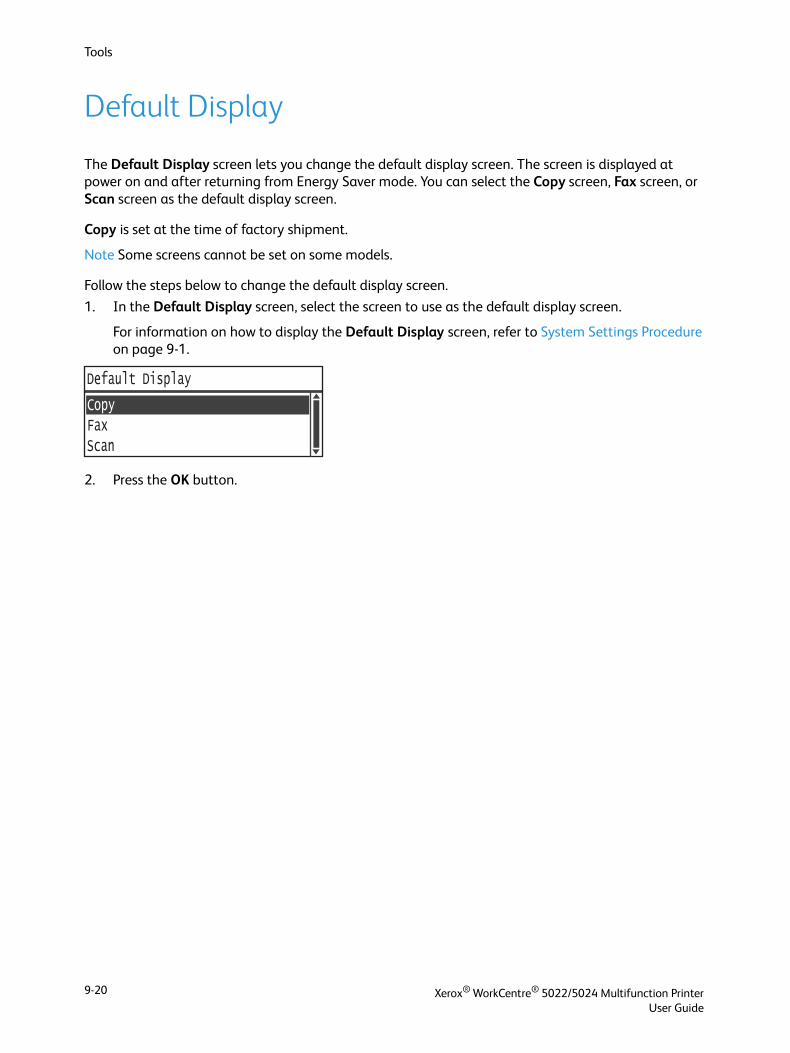
Tools
Default Display
The Default Display screen lets you change the default display screen. The screen is displayed at power on and after returning from Energy Saver mode. You can select the Copy screen, Fax screen, or Scan screen as the default display screen.
Copy is set at the time of factory shipment.
Note Some screens cannot be set on some models.
Follow the steps below to change the default display screen.
1. In the Default Display screen, select the screen to use as the default display screen.
For information on how to display the Default Display screen, refer to System Settings Procedure on page 9-1.
2. Press the OK button.
FaxScan
Default Display
Copy
Xerox® WorkCentre® 5022/5024 Multifunction PrinterUser Guide
9-20
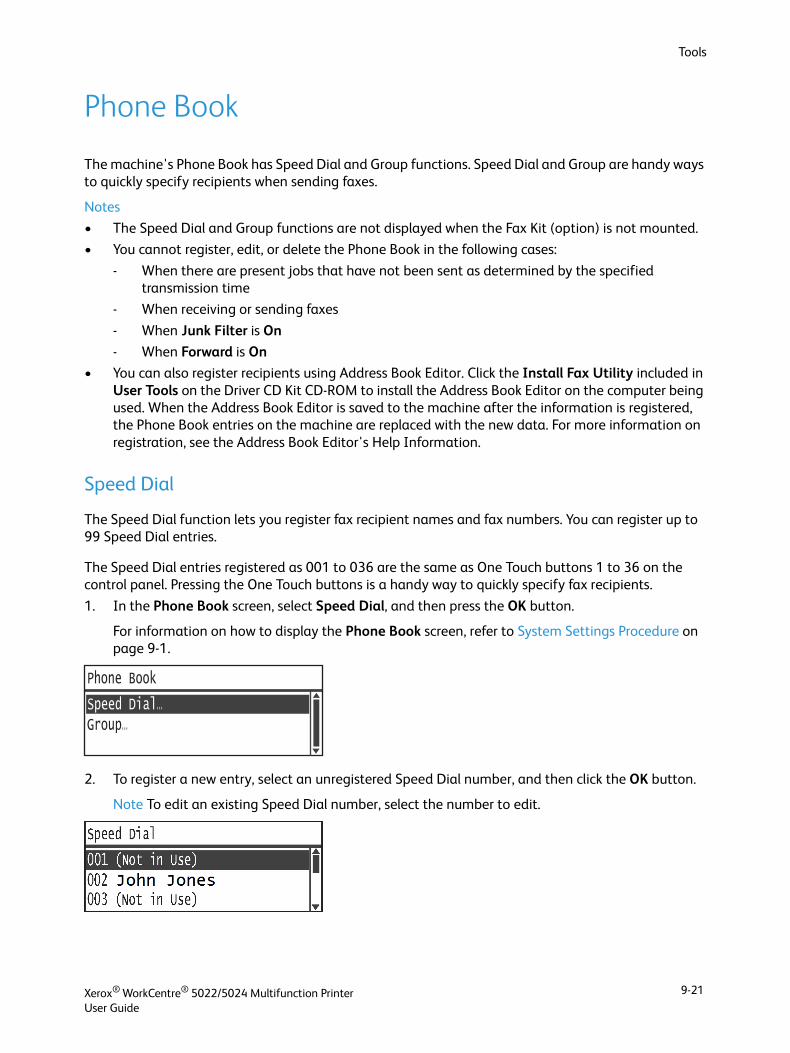
Tools
Phone Book
The machine's Phone Book has Speed Dial and Group functions. Speed Dial and Group are handy ways to quickly specify recipients when sending faxes.
Notes
• The Speed Dial and Group functions are not displayed when the Fax Kit (option) is not mounted.
• You cannot register, edit, or delete the Phone Book in the following cases:
- When there are present jobs that have not been sent as determined by the specified transmission time
- When receiving or sending faxes
- When Junk Filter is On
- When Forward is On
• You can also register recipients using Address Book Editor. Click the Install Fax Utility included in User Tools on the Driver CD Kit CD-ROM to install the Address Book Editor on the computer being used. When the Address Book Editor is saved to the machine after the information is registered, the Phone Book entries on the machine are replaced with the new data. For more information on registration, see the Address Book Editor's Help Information.
Speed Dial
The Speed Dial function lets you register fax recipient names and fax numbers. You can register up to 99 Speed Dial entries.
The Speed Dial entries registered as 001 to 036 are the same as One Touch buttons 1 to 36 on the control panel. Pressing the One Touch buttons is a handy way to quickly specify fax recipients.
1. In the Phone Book screen, select Speed Dial, and then press the OK button.
For information on how to display the Phone Book screen, refer to System Settings Procedure on page 9-1.
2. To register a new entry, select an unregistered Speed Dial number, and then click the OK button.
Note To edit an existing Speed Dial number, select the number to edit.
Group...
Phone Book
Speed Dial...
Xerox® WorkCentre® 5022/5024 Multifunction PrinterUser Guide
9-21

Tools
3. Select Name, and then press the OK button.
4. Enter the name to register, and then press the OK button.
Note Names can be up to 32 single-byte alphanumeric characters in length.
5. Select Fax Number, and then press the OK button.
6. Enter the fax number to register, and then press the OK button.
Note You can enter up to 50 characters for the fax number (numbers as well as the number sign (#), asterisk (*), and underscore (_)).
7. Select Apply Settings, and then press the OK button.
8. Select Yes, and then press the OK button.
Fax Number...
Speed Dial 001 [C]:Delete
Name...
Apply Settings...
001:Enter Name
_
001:Enter Phone No.
_
No
Apply Settings [Are You Sure?]
Yes
Xerox® WorkCentre® 5022/5024 Multifunction PrinterUser Guide
9-22
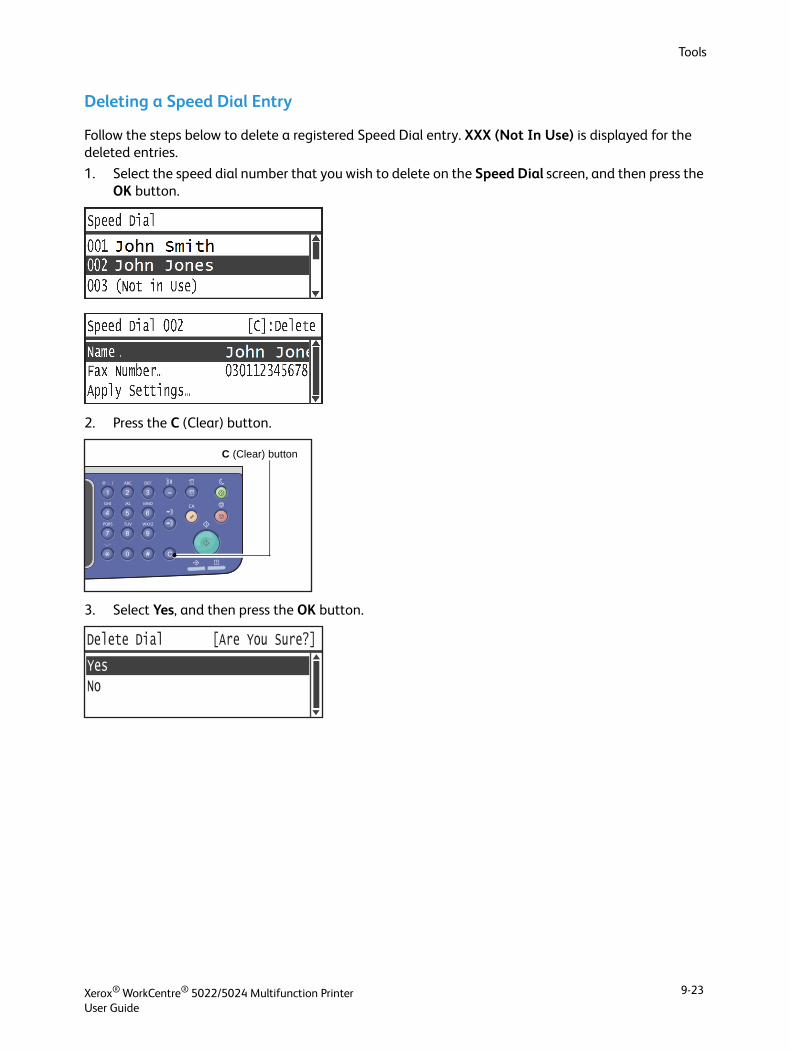
Tools
Deleting a Speed Dial Entry
Follow the steps below to delete a registered Speed Dial entry. XXX (Not In Use) is displayed for the deleted entries.
1. Select the speed dial number that you wish to delete on the Speed Dial screen, and then press the OK button.
2. Press the C (Clear) button.
3. Select Yes, and then press the OK button.
C (Clear) button
No
Delete Dial [Are You Sure?]
Yes
Xerox® WorkCentre® 5022/5024 Multifunction PrinterUser Guide
9-23
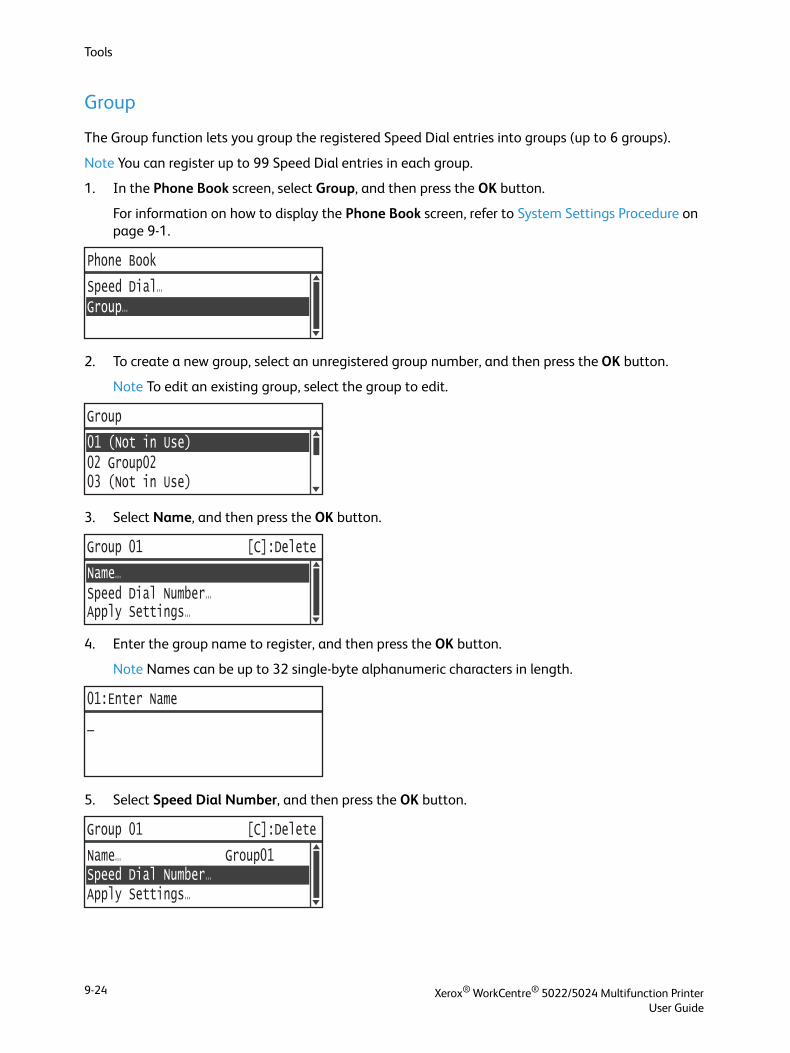
Tools
Group
The Group function lets you group the registered Speed Dial entries into groups (up to 6 groups).
Note You can register up to 99 Speed Dial entries in each group.
1. In the Phone Book screen, select Group, and then press the OK button.
For information on how to display the Phone Book screen, refer to System Settings Procedure on page 9-1.
2. To create a new group, select an unregistered group number, and then press the OK button.
Note To edit an existing group, select the group to edit.
3. Select Name, and then press the OK button.
4. Enter the group name to register, and then press the OK button.
Note Names can be up to 32 single-byte alphanumeric characters in length.
5. Select Speed Dial Number, and then press the OK button.
Group...
Phone Book
Speed Dial...
02 Group02
Group
01 (Not in Use)
03 (Not in Use)
Speed Dial Number...
Group 01 [C]:Delete
Name...
Apply Settings...
01:Enter Name
_
Speed Dial Number...
Group 01 [C]:Delete
Name... Group01
Apply Settings...
Xerox® WorkCentre® 5022/5024 Multifunction PrinterUser Guide
9-24
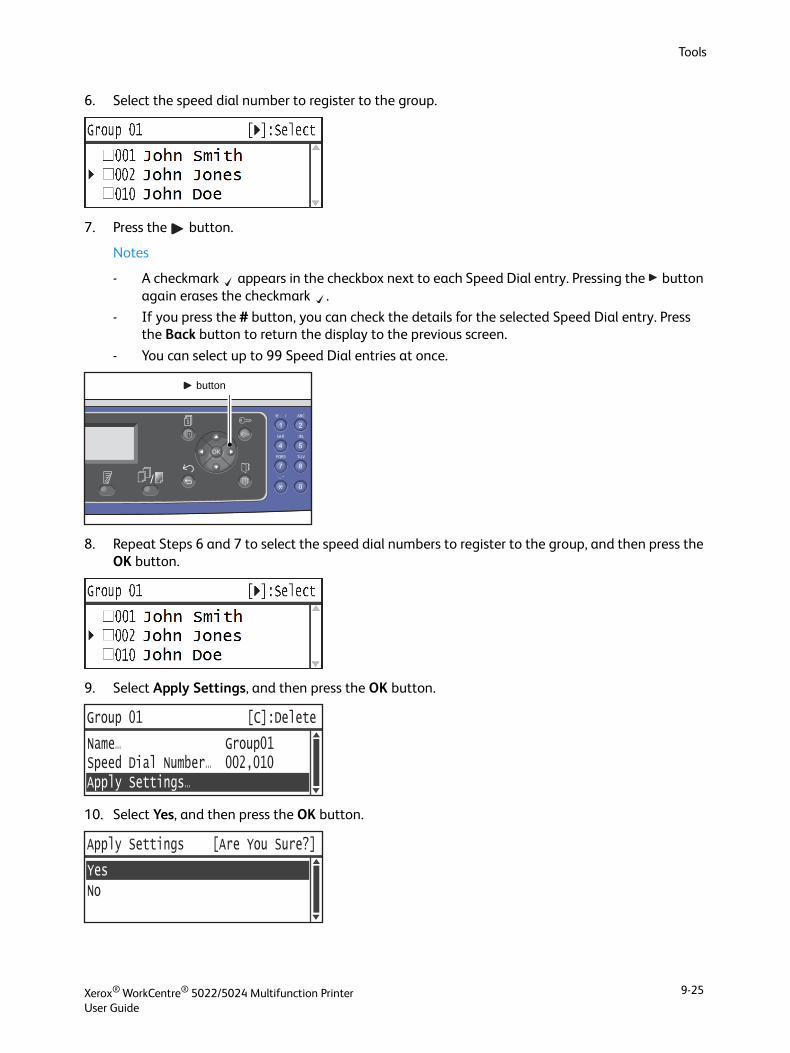
Tools
6. Select the speed dial number to register to the group.
7. Press the button.
Notes
- A checkmark appears in the checkbox next to each Speed Dial entry. Pressing the button again erases the checkmark .
- If you press the # button, you can check the details for the selected Speed Dial entry. Press the Back button to return the display to the previous screen.
- You can select up to 99 Speed Dial entries at once.
8. Repeat Steps 6 and 7 to select the speed dial numbers to register to the group, and then press the OK button.
9. Select Apply Settings, and then press the OK button.
10. Select Yes, and then press the OK button.
button
Speed Dial Number... 002,010
Group 01 [C]:Delete
Name... Group01
Apply Settings...
No
Apply Settings [Are You Sure?]
Yes
Xerox® WorkCentre® 5022/5024 Multifunction PrinterUser Guide
9-25
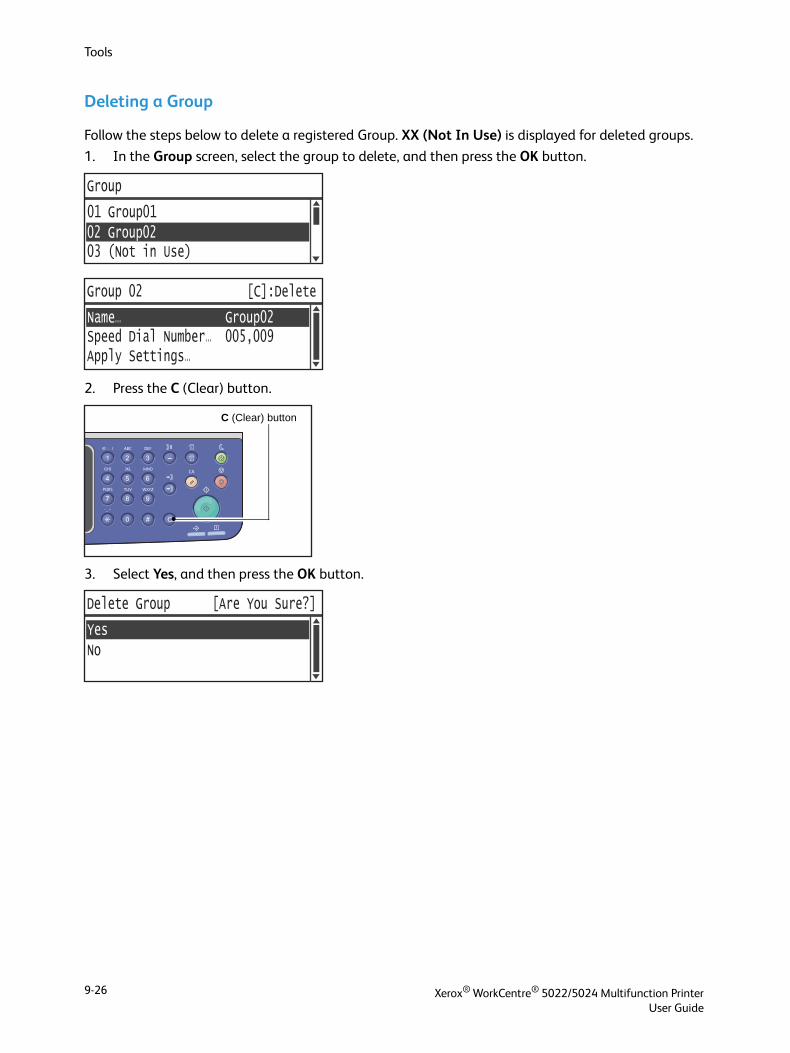
Tools
Deleting a Group
Follow the steps below to delete a registered Group. XX (Not In Use) is displayed for deleted groups.
1. In the Group screen, select the group to delete, and then press the OK button.
2. Press the C (Clear) button.
3. Select Yes, and then press the OK button.
02 Group02
Group
01 Group01
03 (Not in Use)
Speed Dial Number... 005,009
Group 02 [C]:Delete
Name... Group02
Apply Settings...
C (Clear) button
No
Delete Group [Are You Sure?]
Yes
Xerox® WorkCentre® 5022/5024 Multifunction PrinterUser Guide
9-26
Tools
Wired Network
Used to make network environment settings.
Note This function does not display unless the Network Kit is installed.
For information on how to display the Wired Network screen, refer to System Settings Procedure on page 9-1.
Ethernet
Used to set the Ethernet type to use.
Speed
You can select Auto, 10BASE-T Half, 10BASE-T Full, 100BASE-TX Half, or 100BASE-TX Full.
Auto is set at the time of factory shipment.
MAC Address
You can select Auto, 10BASE-T Half, 10BASE-T Full, 100BASE-TX Half, or 100BASE-TX Full.
Auto is set at the time of factory shipment.
TCP/IP
Sets TCP/IP.
This setting is activated after restarting the machine.
IP Mode
Sets the TCP/IP operation mode.
IPv4 is set at the time of factory shipment.
Dual Stack Select this setting when using the machine in an environment using both IPv4 and IPv6.
IPv4 Select this setting when using the machine in an IPv4 environment.
IPv6 Select this setting when using the machine in an IPv6 environment.
Xerox® WorkCentre® 5022/5024 Multifunction PrinterUser Guide
9-27
Tools
IPv4
Sets IPv4.
IPv6
Sets IPv6.
Get IP Address Sets the method used to acquire the IP address, subnet mask, and gateway address.• DHCP
Automatically acquires the IP address, subnet mask, and gateway address from the DHCP server.
• BOOTPAutomatically acquires the IP address, subnet mask, and gateway address from the BOOTP server.
• RARP
Automatically acquires the IP address from the RARP server.
• DHCP/AutoNetAutomatically acquires the IP address, subnet mask, and gateway address from the DHCP server.
If communication with the DHCP server fails, the AutoIP function is activated to allocate an IP address (169.254.xxx.xxx). If communication with the DHCP server is later re-established, the settings are reacquired from the DHCP server.
• Control PanelThe setting used to set the IP address, subnet mask, and gateway address manually.
IP Address When Get IP Address is set to Control Panel, the IP address is set by manual input from the numeric keypad.
Note: Enter the IP address in the format xxx.xxx.xxx.xxx, where each 'xxx' is a value between 0 and 255.
Subnet Mask When Get IP Address is set to Control Panel, the subnet mask is set by manual input from the numeric keypad.
Note: Enter the subnet mask in the format xxx.xxx.xxx.xxx, where each 'xxx' is a value between 0 and 255.
Gateway Address When Get IP Address is set to Control Panel, the gateway address is set by manual input from the numeric keypad.
Note: Enter the gateway address in the format xxx.xxx.xxx.xxx, where each 'xxx' is a value between 0 and 255.
Set IPv6 Sets whether to use IPv6.You can select Disable or Enable.
Disable is set at the time of factory shipment.
IP Address Use the numeric keypad to enter the IP address.
Xerox® WorkCentre® 5022/5024 Multifunction PrinterUser Guide
9-28
Tools
IP Filter
Sets whether to restrict the IP addresses that can access the machine.
Notes
• The IP filter is a function used to suppress printing using TCP/IP.
• This setting is activated after restarting the machine.
IPv4
Sets whether to restrict the IPv4 addresses that can access the machine. When this setting is enabled, you can register up to 10 IP addresses/subnet masks to support.
IPv6
Sets whether to restrict the IPv6 addresses that can access the machine. When this setting is enabled, you can register up to 10 IP addresses/subnet masks to support.
Prefix Use the numeric keypad to set the prefix length of the IP address (between 1 to 128).
Gateway Address Use the numeric keypad to enter the gateway address.
Xerox® WorkCentre® 5022/5024 Multifunction PrinterUser Guide
9-29
Tools
Copy Settings
Used to set the functions for the Copy feature.
For information on how to display the Copy Settings screen, refer to System Settings Procedure on page 9-1.
Sharpness
You can select Soften +2, Soften +1, Normal, Sharpen +1, or Sharpen +2.
Normal sets the sharpness at the standard level; Soften +2 sets it lower; Sharpen +2 sets it higher.
Normal is set at the time of factory shipment.
For more information, refer to Scan Settings > Sharpness on page 9-32.
Background Suppression
Sets whether to suppress the document’s background color.
You can select Off or On.
On is set at the time of factory shipment.
For more information, refer to Scan Settings > Background Suppression on page 9-32.
Back. Suppression Level
Sets the background suppression level used when Background Suppression is set to On in Copy Settings.
You can select from Low, Normal, Higher +1, Higher +2, and Higher +3. Normal is the standard suppression level, Low is the lowest suppression Level, and Higher +3 is the highest suppression level.
Normal is set at the time of factory shipment.
For more information, refer to Scan Settings > Back. Suppression Level on page 9-32.
Reduce/Enlarge Preset
Used to set the preset Reduce/Enlarge value by selecting Copy > Reduce/Enlarge in the Default Settings.
You can set a value between 25 and 400% (in 1% increments).
400% is set at the time of factory shipment.
For more information, refer to Default Settings > Copy > Reduce/Enlarge on page 9-8.
Xerox® WorkCentre® 5022/5024 Multifunction PrinterUser Guide
9-30
Tools
Auto Collate
Sets to rotate for the Collated function when document is placed in the document feeder.
You can select Do Not Rotate or Rotate.
Do Not Rotate is set at the time of factory shipment.
Xerox® WorkCentre® 5022/5024 Multifunction PrinterUser Guide
9-31
Tools
Scan Settings
Used to set the functions for the Scan feature.
The following settings are available for the Scan to E-mail and Scan to PC (Network) functions. For the TWAIN and Windows Imaging Acquisition (WIA) application settings, the settings that you specify with the application are applied.
For information on how to display the Scan Settings screen, refer to System Settings Procedure on page 9-1.
Background Suppression
Sets the default value displayed for Background Suppression. Sets whether to suppress the document's background color.
You can select Off or On.
On is set at the time of factory shipment.
For more information, refer to Copy Settings : Background Suppression on page 9-30.
Back. Suppression Level
Sets the background suppression level used when Background Suppression is set to On in Scan Settings. This setting is enabled when scanning black-and-white documents.
You can select from Low, Normal, Higher +1, Higher +2, and Higher +3. Normal is the standard suppression level, Low is the lowest suppression Level, and Higher +3 is the highest suppression level.
Normal is set at the time of factory shipment.
For more information, refer to Copy Settings : Back. Suppression Level on page 9-30.
Image Compression
Used to set the file compression ratio when document is scanned.
You can select Higher +2, Higher +1, Normal, Lower -1, or Lower -2. Higher +2 is the highest compression ratio, and Lower -2 is the lowest compression ratio.
Normal is set at the time of factory shipment.
Selecting Higher+2 reduces file size, but also reduces image resolution.
Sharpness
Sets the default sharpness value displayed for Sharpness.
Xerox® WorkCentre® 5022/5024 Multifunction PrinterUser Guide
9-32
Tools
You can select Soften +2, Soften +1, Normal, Sharpen +1, or Sharpen +2.
Normal sets the sharpness at the standard level; Soften +2 sets it lower; Sharpen +2 sets it higher.
Normal is set at the time of factory shipment.
For more information, refer to Copy Settings : Sharpness on page 9-30.
Edge Erase
Sets the default value displayed for Edge Erase. Setting a value for this menu item erases the black shadows created around the edges of the paper when scanning with the document cover open.
You can set values between 0 and 10 mm (in 1 mm increments).
2 mm is set at the time of factory shipment.
For more information, refer to Default Settings > ID Card Copy > Edge Erase on page 9-10.
For more information, refer to Default Settings > Fax > Edge Erase on page 9-13
Maximum Attachment Size
Sets the maximum file size for an e-mail attachment.
You can set values between 2 and 20 MB (in 1 MB increments).
20 MB is set at the time of factory shipment.
Recipient Confirmation
Sets whether to confirm the recipient information before sending data.
You can select On or Off.
Off is set at the time of factory shipment.
Xerox® WorkCentre® 5022/5024 Multifunction PrinterUser Guide
9-33
Tools
Fax Settings
Used to set the functions for the Fax feature.
If Unknown is set for Region, no other settings besides Region are shown. When you use the fax function, be sure to make the Region setting and Clock in System Settings.
The machine needs to be restarted whenever the Fax Settings are changed.
For information on how to display the Fax Settings screen, refer to System Settings Procedure on page 9-1.
Mode
Sets the method used to receive faxes automatically when an external phone is mounted.
This item is set to Fax at the time of factory shipment.
Fax
Set Fax Mode to use machine as a fax machine only. The machine receives faxes automatically after the number of rings set in Fax Answer.
Note The machine can also be used as a phone to make outgoing calls.
Tel/Fax
Set TEL/FAX Mode to use the machine as both a fax machine and phone. Phone calls can be answered by picking up the receiver before the number of rings set in Tel/Fax Answer is exceeded. If the call is from fax machine, the fax can be received manually.
Fax Answer
Sets the external phone's number of rings when Mode is set to Fax.
You can set a value between 1 and 15 redials (in increments of 1).
Note The default value varies by region. The default value is set when Region is set.
Tel/Fax Answer
Sets the external phone's number of rings when Mode is set to Tel/Fax.
You can set a value between 1 and 15 rings (in increments of 1).
The time is set to 2 times at the time of factory shipment.
The default value varies by region. The default value is set when Region is set.
Xerox® WorkCentre® 5022/5024 Multifunction PrinterUser Guide
9-34
Tools
Line Volume
Sets the external phone's number of rings when Mode is set to Tel/Fax.
You can set a value between 1 and 15 rings (in increments of 1).
The time is set to 2 times at the time of factory shipment.
The default value varies by region. The default value is set when Region is set.
Line Type
Sets the line type to use.
PSTN is set at the time of factory shipment.
PSTN
Set for fax transmissions on a standard phone line.
PBX
Set for fax transmissions on an internal private branch exchange within a corporation, or on a public line.
Dial Type
Sets the dial type.
You can select PB, DP (10 PPS), or DP (20 PPS).
Note The default value varies by region. The default value is set when Region is set.
Call Interval
Sets the amount of time the machine waits between the end of transmission and the start of the next.
You can set a value between 3 and 255 seconds (in 1 second increments).
Setting a high Call Interval value increases the total time needed for "broadcast" faxes (sent to multiple recipients at once), but the machine can receive faxes during the waiting periods.
Note The default value varies by region. The default value is set when Region is set.
Redial Attempts
Sets the number of times the automatic redial operation is performed when the recipient is busy or does not answer.
Note The default value varies by region. The default value is set when Region is set.
Xerox® WorkCentre® 5022/5024 Multifunction PrinterUser Guide
9-35
Tools
Redial Interval
Sets the amount of time the machine waits between redials.
You can set a value between 1 and 15 minutes (in 1 minute increments).
The time is set to 5 minutes at the time of factory shipment.
Junk Filter
Used to set whether to block junk faxes from being received or not.
You can select On or Off.
Off is set at the time of factory shipment.
Send Header
Sets whether to record and send fax header information (such as date, sender, and recipient) at the beginning of faxes.
You can select On or Off.
On is set at the time of factory shipment.
Company Name
Used to register the sender's name to be sent to the recipient when a fax is sent.
You can enter up to 32 single-byte alphanumeric characters.
Fax Number
Used to register the machine's fax number to be sent to the recipient when a fax is sent.
You can enter up to 20 digits, including numbers (0 to 9).
Forward
Sets whether or not to forward a fax document received on this machine to another fax number.
Xerox® WorkCentre® 5022/5024 Multifunction PrinterUser Guide
9-36
Tools
Off is set at the time of factory shipment.
Notes
• When On is selected, faxes cannot be forwarded if there are more than 20 faxes scheduled for transmission. Incoming faxes are printed out.
• If the recipient of the forwarded fax is also set to forward received faxes and has specified the machine as the recipient, an infinite loop of forwarding operations could result. Ensure an infinite loop will not result when setting the fax forwarding number.
• If the fax could not be forwarded due to the recipient's line being busy or a similar issue, the fax number is redialed. Incoming faxes are printed out if the number of redials exceeds the number of redials set on the machine.
Auto Reduce On Receipt
Used to set incoming oversized faxes to reduce in size and print them to fit in a single page.
You can select On or Off.
On is set at the time of factory shipment.
Border Limit
Used to set incoming oversized faxes to only print the portion that fits on in a single page.
You can set values between 0 and 127 mm (in 1 mm increments).
16 mm is set at the time of factory shipment.
Receive Size
Used to restrict the paper size incoming faxes are printed. When an incoming fax is received, the machine notifies the sender fax machine of the required fax size.
A4/B4/A3 is set at the time of factory shipment.
Notes
• Document width is used to indicate the fax size restriction.
• If you received a fax in B4 paper size when the machine has no tray containing B5 paper, it is printed in A3 paper. If the machine has the tray for B4 paper size ready and the tray is empty, the message for loading paper is displayed on the screen.
Off Prints received faxes.
On Forwards received faxes to the specified fax number. Select On and press the OK button to display the Speed Dial entry screen. Use the numeric keypad to enter the fax forwarding number.
Auto The machine prints incoming faxes by selecting the tray containing the paper of the correct size.
A4 The machine restricts incoming faxes to A4 size (210 mm width).
Xerox® WorkCentre® 5022/5024 Multifunction PrinterUser Guide
9-37
Tools
Print Size (Received Letter)
Used to set the paper size to print document that was sent in Letter or A4 size.
Letter/A4 is set at the time of factory shipment.
The machine operates according to the Auto Reduce on Receipt or Border Limit settings on whether to automatically reduce or discard portions of A4 document received when the paper size is set to Letter/A4 or Letter.
Immediate Fax Switch
When the amount of remaining memory becomes low while saving an outgoing fax, the machine can be set to start transmission during the save operation when the amount of remaining memory reaches a set value. This is referred to as Immediate communication. Used to set the remaining memory level to switch to the immediate communication.
You can set a value between 0 and 99% (in 1% increments).
0% is set at the time of factory shipment.
Off Hook Level
Used to set the level for detecting an off-the-hook receiver when an external phone is mounted.
You can select from 10 volts, 15 volts, 20 volts, 25 volts, and 35 volts. 10 volts is the lowest extraction level, and 35 volts is the highest extraction level.
10 volts is set at the time of factory shipment.
Region
Sets the machine's region of use.
You can select from Unknown, India, Russia, South Africa, Central Africa, Emirates, Saudi Arabia, Egypt, Mexico, or Turkey.
A4/B4 The machine restricts incoming faxes to A4 size (210 mm width) and B4 size (257 mm width).
A4/B4/A3 The machine restricts incoming faxes to A4 size (210 mm width), B4 size (257 mm width), and A3 size (297 mm width).
Letter/A4 The machine prints the fax in Letter size first. If the Letter size is not available, it prints in A4 size.
Letter The machine prints the fax in Letter size.
Xerox® WorkCentre® 5022/5024 Multifunction PrinterUser Guide
9-38
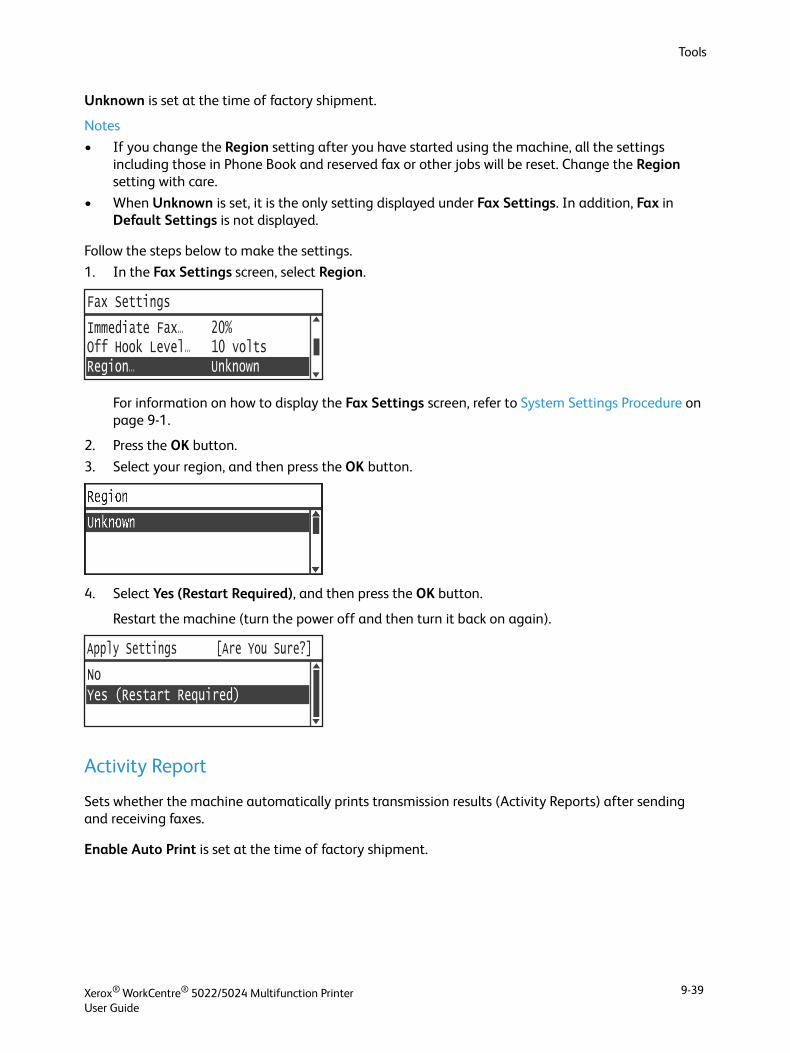
Tools
Unknown is set at the time of factory shipment.
Notes
• If you change the Region setting after you have started using the machine, all the settings including those in Phone Book and reserved fax or other jobs will be reset. Change the Region setting with care.
• When Unknown is set, it is the only setting displayed under Fax Settings. In addition, Fax in Default Settings is not displayed.
Follow the steps below to make the settings.
1. In the Fax Settings screen, select Region.
For information on how to display the Fax Settings screen, refer to System Settings Procedure on page 9-1.
2. Press the OK button.
3. Select your region, and then press the OK button.
4. Select Yes (Restart Required), and then press the OK button.
Restart the machine (turn the power off and then turn it back on again).
Activity Report
Sets whether the machine automatically prints transmission results (Activity Reports) after sending and receiving faxes.
Enable Auto Print is set at the time of factory shipment.
Off Hook Level... 10 volts
Fax Settings
Immediate Fax... 20%
Region... Unknown
Yes (Restart Required)
Apply Settings [Are You Sure?]
No
Xerox® WorkCentre® 5022/5024 Multifunction PrinterUser Guide
9-39
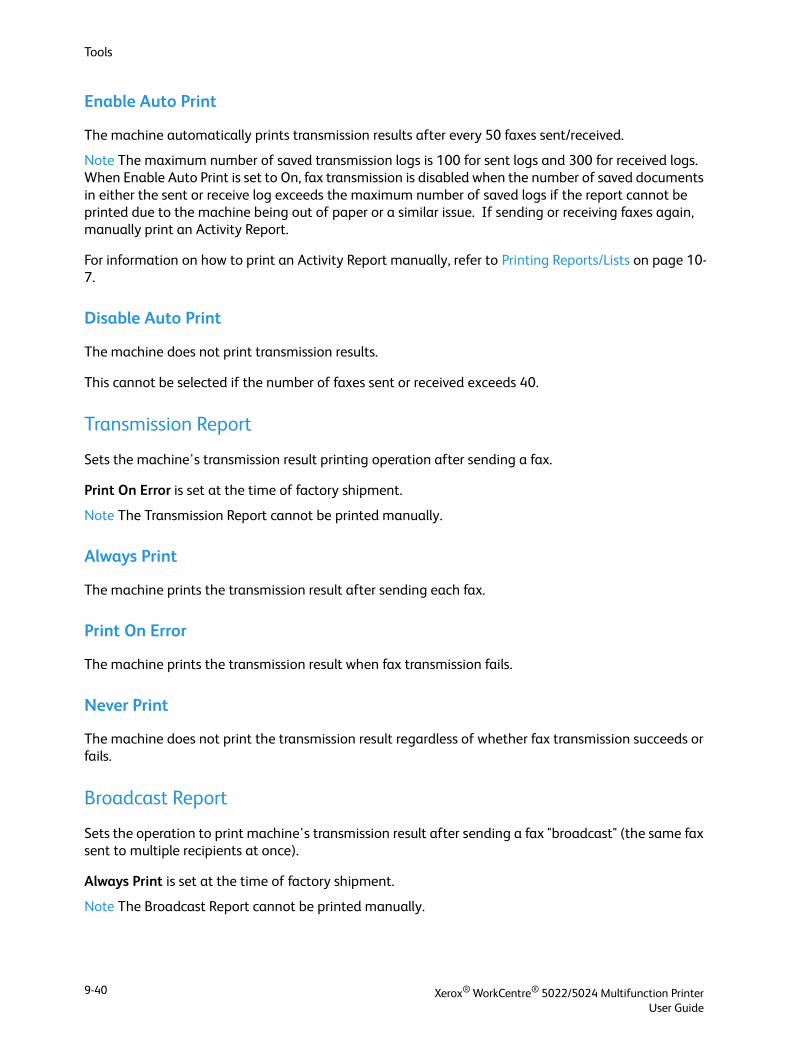
Tools
Enable Auto Print
The machine automatically prints transmission results after every 50 faxes sent/received.
Note The maximum number of saved transmission logs is 100 for sent logs and 300 for received logs. When Enable Auto Print is set to On, fax transmission is disabled when the number of saved documents in either the sent or receive log exceeds the maximum number of saved logs if the report cannot be printed due to the machine being out of paper or a similar issue. If sending or receiving faxes again, manually print an Activity Report.
For information on how to print an Activity Report manually, refer to Printing Reports/Lists on page 10-7.
Disable Auto Print
The machine does not print transmission results.
This cannot be selected if the number of faxes sent or received exceeds 40.
Transmission Report
Sets the machine's transmission result printing operation after sending a fax.
Print On Error is set at the time of factory shipment.
Note The Transmission Report cannot be printed manually.
Always Print
The machine prints the transmission result after sending each fax.
Print On Error
The machine prints the transmission result when fax transmission fails.
Never Print
The machine does not print the transmission result regardless of whether fax transmission succeeds or fails.
Broadcast Report
Sets the operation to print machine's transmission result after sending a fax "broadcast" (the same fax sent to multiple recipients at once).
Always Print is set at the time of factory shipment.
Note The Broadcast Report cannot be printed manually.
Xerox® WorkCentre® 5022/5024 Multifunction PrinterUser Guide
9-40
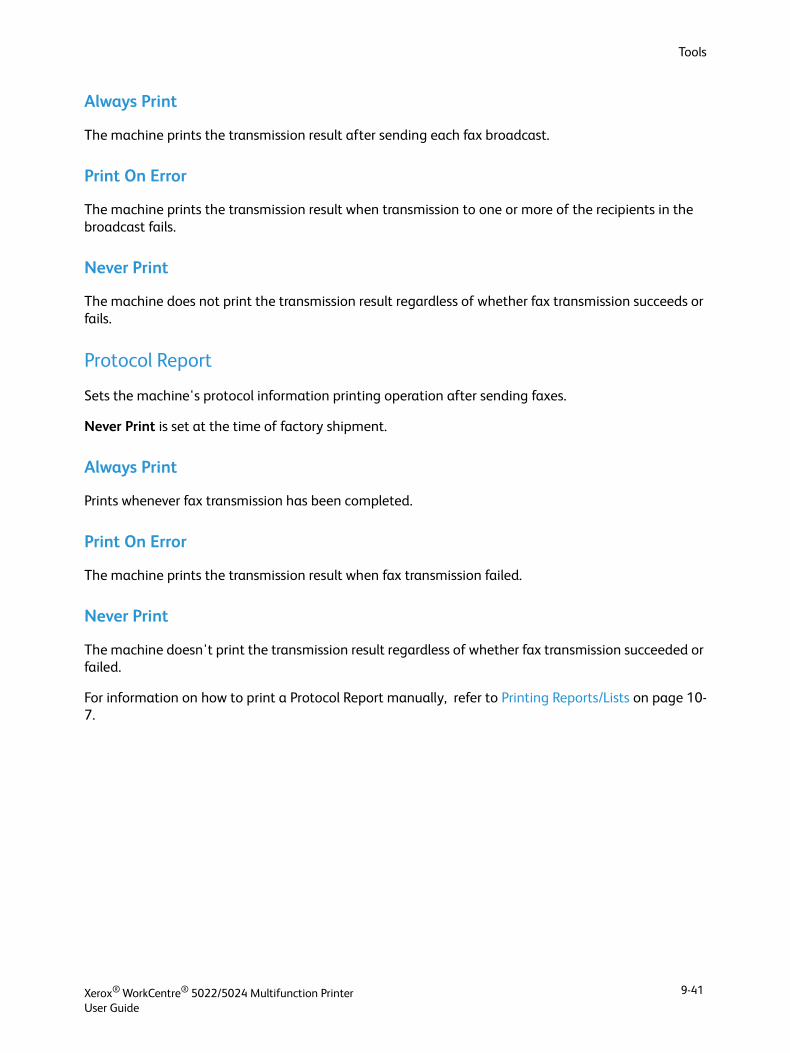
Tools
Always Print
The machine prints the transmission result after sending each fax broadcast.
Print On Error
The machine prints the transmission result when transmission to one or more of the recipients in the broadcast fails.
Never Print
The machine does not print the transmission result regardless of whether fax transmission succeeds or fails.
Protocol Report
Sets the machine's protocol information printing operation after sending faxes.
Never Print is set at the time of factory shipment.
Always Print
Prints whenever fax transmission has been completed.
Print On Error
The machine prints the transmission result when fax transmission failed.
Never Print
The machine doesn't print the transmission result regardless of whether fax transmission succeeded or failed.
For information on how to print a Protocol Report manually, refer to Printing Reports/Lists on page 10-7.
Xerox® WorkCentre® 5022/5024 Multifunction PrinterUser Guide
9-41
Tools
System Settings
Used to make other settings.
For information on how to display the System Settings screen, refer to System Settings Procedure on page 9-1.
Power Saver Timer
Used to make settings for the Energy Saver function.
Low Power Mode
Sets the amount of time the machine waits before entering Low Power mode.
You can set a value between 1 and 60 minutes (in 1 minute increments).
The machine's power is not turned OFF completely in Low Power mode. Instead, this mode creates a balance between low power consumption and short warm-up time by controlling the temperature of the fusing unit to a level midway between the power OFF temperature and the "Ready" temperature.
1 minute is set at the time of factory shipment.
Sleep Mode
Used to set the amount of time the machine waits before entering Low Power mode or Sleep mode.
You can set a value between 1 and 239 minutes (in 1 minute increments).
Sleep mode minimizes power consumption by shutting off the power to all components except the controller. Warm-up time in Sleep mode is longer than in Low Power mode.
1 minute is set at the time of factory shipment.
Auto Reset
Sets the amount of time the machine waits before automatically returning to the Default Display screen when no operation is being performed.
You can select 15 seconds, 30 seconds, 45 seconds, 1 minute, 2 minutes, 3 minutes, or 4 minutes.
45 seconds is set at the time of factory shipment.
Auto Print
Used to set the amount of time the machine waits after operating the control panel, loading paper on the document feeder, or closing a tray until starting to print automatically.
Xerox® WorkCentre® 5022/5024 Multifunction PrinterUser Guide
9-42
Tools
You can set a value between 1 and 240 seconds (in 1 second increments).
10 seconds is set at the time of factory shipment.
Idle Timeout
The amount of time to wait is set according to the operations listed below when document is placed on the document glass and being scanned.
The amount of time that passes to continue to the next job assuming that there is no additional document to be loaded.
You can select 20 seconds, 30 seconds, 60 seconds, or 90 seconds.
30 seconds is set at the time of factory shipment.
Job Cancel
Sets whether the machine automatically cancel the job when an error occurs.
You can select On or Off. If On is selected, you can set a value between 60 and 5940 seconds (in 1 second increments).
600 seconds is set at the time of factory shipment.
Clock
Sets the time on the machine's system clock. This item sets the clock used to print the current time on the reports.
Notes
• This item can only be set when the Fax Kit or Network Kit is installed.
• When setting the time for the first time, first set the Date Format and Time Format.
Follow the steps below to make the settings.
Date & Time
Set the current date and time.
You can select from UTC -12:00 to +13:00.
Xerox® WorkCentre® 5022/5024 Multifunction PrinterUser Guide
9-43
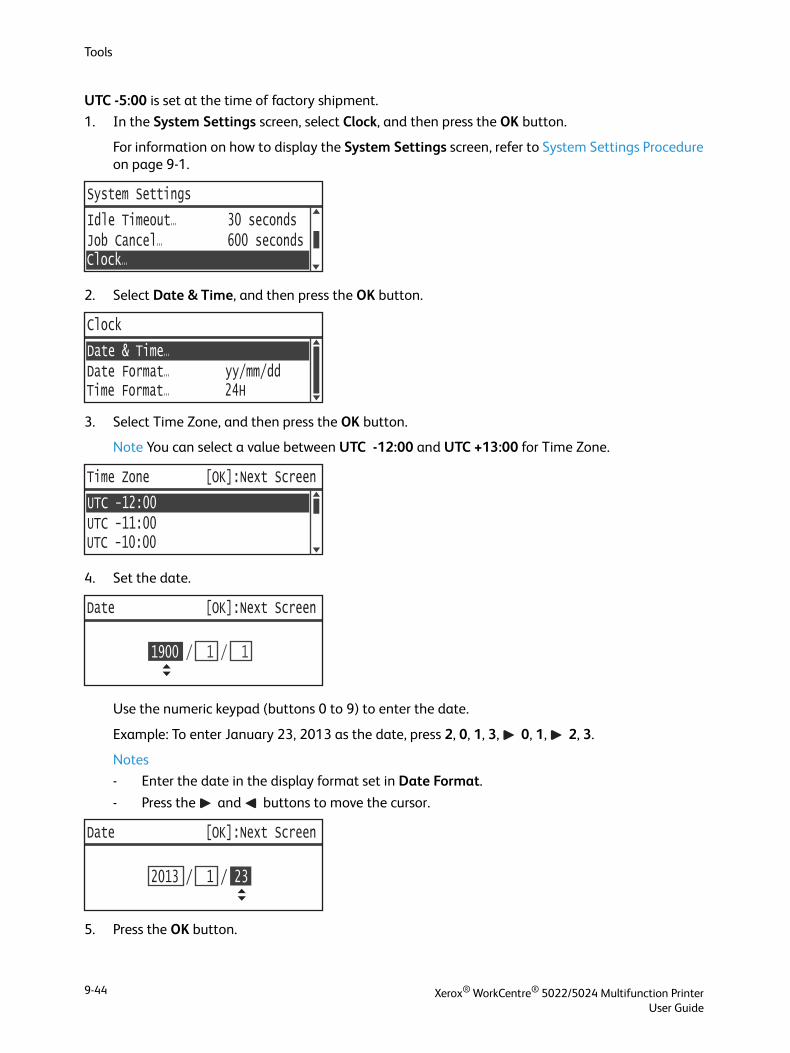
Tools
UTC -5:00 is set at the time of factory shipment.
1. In the System Settings screen, select Clock, and then press the OK button.
For information on how to display the System Settings screen, refer to System Settings Procedure on page 9-1.
2. Select Date & Time, and then press the OK button.
3. Select Time Zone, and then press the OK button.
Note You can select a value between UTC -12:00 and UTC +13:00 for Time Zone.
4. Set the date.
Use the numeric keypad (buttons 0 to 9) to enter the date.
Example: To enter January 23, 2013 as the date, press 2, 0, 1, 3, 0, 1, 2, 3.
Notes
- Enter the date in the display format set in Date Format.
- Press the and buttons to move the cursor.
5. Press the OK button.
Job Cancel... 600 seconds Clock...
System Settings
Idle Timeout... 30 seconds
Date Format... yy/mm/dd Time Format... 24H
Clock
Date & Time...
UTC -11:00UTC -10:00
Time Zone [OK]:Next Screen
UTC -12:00
Date [OK]:Next Screen
1900 / 1 / 1
Date [OK]:Next Screen
2013 / 1 / 23
Xerox® WorkCentre® 5022/5024 Multifunction PrinterUser Guide
9-44
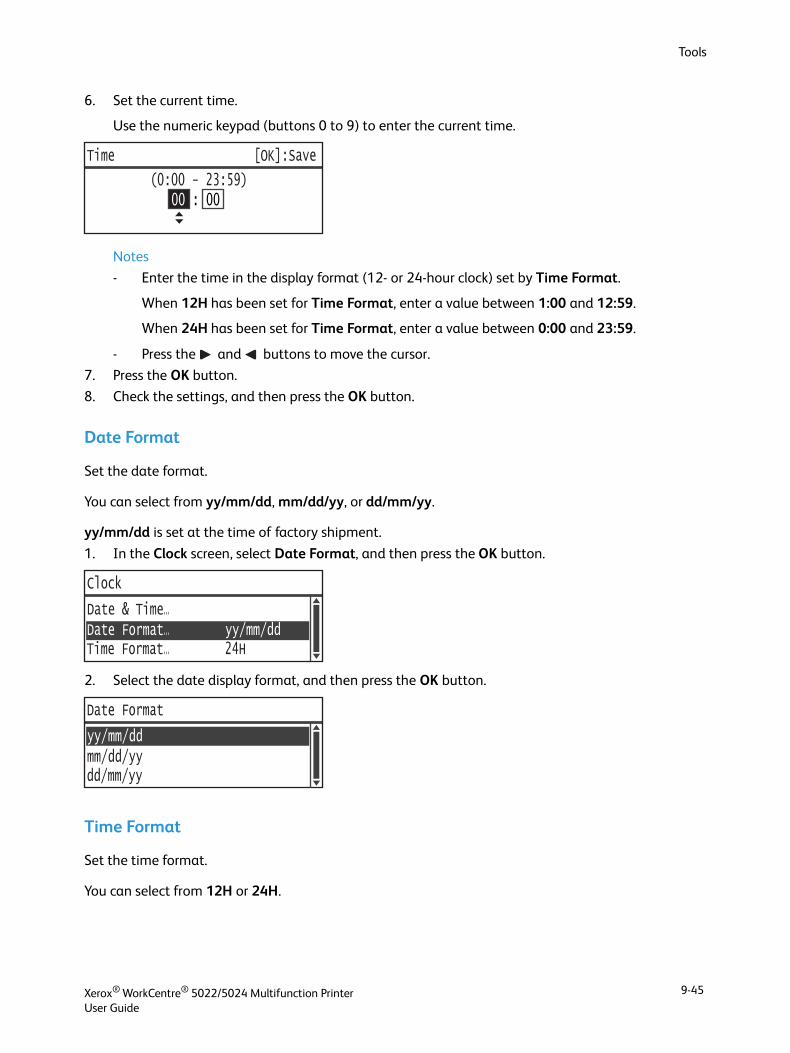
Tools
6. Set the current time.
Use the numeric keypad (buttons 0 to 9) to enter the current time.
Notes
- Enter the time in the display format (12- or 24-hour clock) set by Time Format.
When 12H has been set for Time Format, enter a value between 1:00 and 12:59.
When 24H has been set for Time Format, enter a value between 0:00 and 23:59.
- Press the and buttons to move the cursor.
7. Press the OK button.
8. Check the settings, and then press the OK button.
Date Format
Set the date format.
You can select from yy/mm/dd, mm/dd/yy, or dd/mm/yy.
yy/mm/dd is set at the time of factory shipment.
1. In the Clock screen, select Date Format, and then press the OK button.
2. Select the date display format, and then press the OK button.
Time Format
Set the time format.
You can select from 12H or 24H.
Time [OK]:Save
(0:00 - 23:59)00 : 00
Date Format... yy/mm/dd Time Format... 24H
Clock
Date & Time...
mm/dd/yydd/mm/yy
Date Format
yy/mm/dd
Xerox® WorkCentre® 5022/5024 Multifunction PrinterUser Guide
9-45
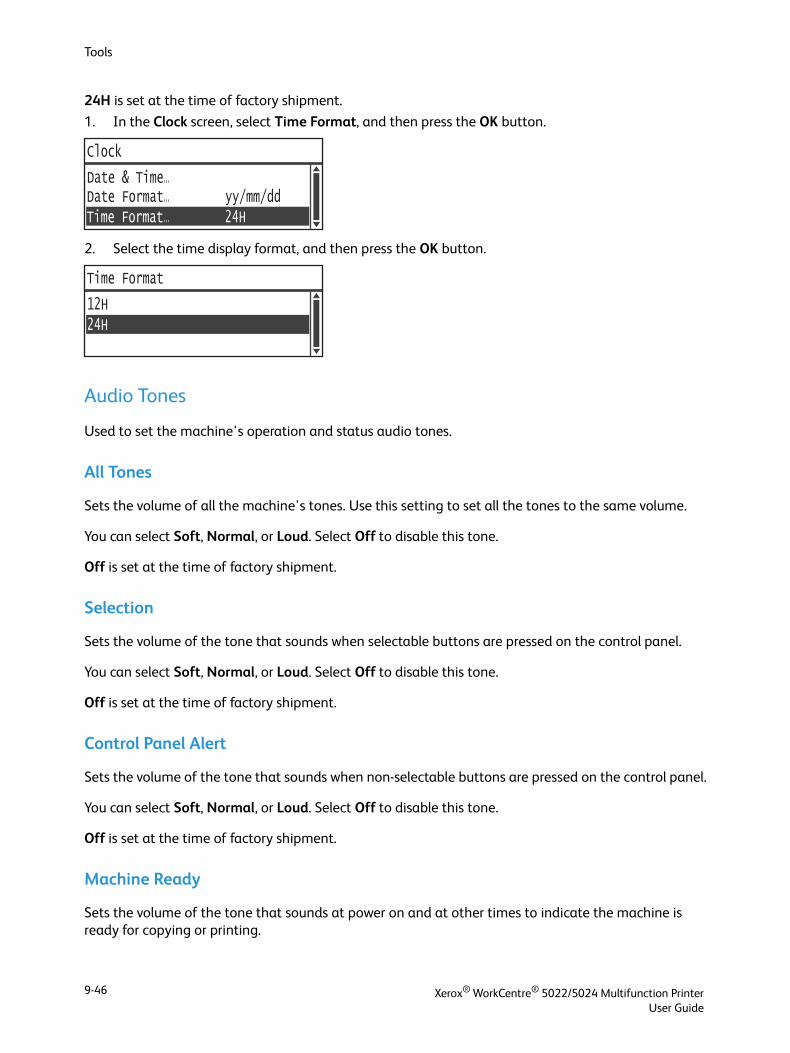
Tools
24H is set at the time of factory shipment.
1. In the Clock screen, select Time Format, and then press the OK button.
2. Select the time display format, and then press the OK button.
Audio Tones
Used to set the machine's operation and status audio tones.
All Tones
Sets the volume of all the machine's tones. Use this setting to set all the tones to the same volume.
You can select Soft, Normal, or Loud. Select Off to disable this tone.
Off is set at the time of factory shipment.
Selection
Sets the volume of the tone that sounds when selectable buttons are pressed on the control panel.
You can select Soft, Normal, or Loud. Select Off to disable this tone.
Off is set at the time of factory shipment.
Control Panel Alert
Sets the volume of the tone that sounds when non-selectable buttons are pressed on the control panel.
You can select Soft, Normal, or Loud. Select Off to disable this tone.
Off is set at the time of factory shipment.
Machine Ready
Sets the volume of the tone that sounds at power on and at other times to indicate the machine is ready for copying or printing.
Date Format... yy/mm/ddTime Format... 24H
Clock
Date & Time...
24H
Time Format
12H
Xerox® WorkCentre® 5022/5024 Multifunction PrinterUser Guide
9-46
Tools
You can select Soft, Normal, or Loud. Select Off to disable this tone.
Normal is set at the time of factory shipment.
Job Complete
Sets the volume of the tone that sounds to indicate a job has completed normally.
You can select Soft, Normal, or Loud. Select Off to disable this tone.
Normal is set at the time of factory shipment.
Fault
Sets the volume of the tone that sounds to indicate a job has failed.
You can select Soft, Normal, or Loud. Select Off to disable this tone.
Normal is set at the time of factory shipment.
Alert Tone
Sets the volume of the tone that sounds to indicate a job has failed and been put on hold due to a problem such as a document/paper jam.
You can select Soft, Normal, or Loud. Select Off to disable this tone.
Normal is set at the time of factory shipment.
Out of Paper
Sets the volume of the tone that sounds to indicate a job has failed and been put on hold because the paper tray has run out of paper.
You can select Soft, Normal, or Loud. Select Off to disable this tone.
Normal is set at the time of factory shipment.
Consumables
Sets the volume of the tone that sounds to indicate the toner cartridge needs to be replaced.
You can select Soft, Normal, or Loud. Select Off to disable this tone.
Normal is set at the time of factory shipment.
Auto Clear
Sets the volume of the tone that sounds 5 seconds before the display will automatically return to the Default Display screen when Auto Reset has been set.
Xerox® WorkCentre® 5022/5024 Multifunction PrinterUser Guide
9-47
Tools
You can select Soft, Normal, or Loud. Select Off to disable this tone.
Off is set at the time of factory shipment.
Base Tone
Sets the standard volume of buttons that toggle settings (buttons that can be pressed repeatedly to switch a setting among different values).
You can select Soft, Normal, or Loud. Select Off to disable this tone.
Off is set at the time of factory shipment.
Job History Verbose
Sets the machine to record Copy and USB Scan jobs on the Job History Reports.
You can select On or Off.
Off is set at the time of factory shipment.
Auto Paper Selection
Sets the target trays for the automatic tray selection.
Note Tray 1 is included in the automatic tray selection.
Tray 2 to 4
Sets each tray to be included in the automatic tray selection.
You can select On or Off.
On is set at the time of factory shipment.
Note Tray 2 to Tray 4 are displayed when the optional paper trays are mounted.
User Control
Used to restrict the users permitted to use the Copy feature.
When this setting is enabled, users must enter a passcode to use the Copy feature.
Off is set at the time of factory shipment.
Off
Users are permitted to use the Copy feature without entering a passcode.
Xerox® WorkCentre® 5022/5024 Multifunction PrinterUser Guide
9-48

Tools
Single
Users must enter a single specified passcode to use the Copy feature. Use the system administrator's passcode.
For information on how to set a passcode, refer to System Administrator Passcode on page 9-51.
Multiple
Select this setting when managing the amount of copy paper used by user or group using Accounting. You can set passcodes and maximum number of impressions permitted for copying for each user or group.
For more information on setting procedure, refer to User Management on page 9-52.
Paper Size Settings
Used to specify the size of paper to be automatically detected when you use standard sizes of a document or the machine is set to detect sizes of a document.
You can select from A/B Series (8K/16K), Inch Series, A/B Series (8 x 13"), or A/B Series (8 x 13"/8 x 14").
A/B Series (8K/16K) is set at the time of factory shipment.
Show Toner Alert
Used to set how frequently to display messages on screen when it is close to the time to replace the toner cartridge.
You can select from Off, At Startup, or At Auto Clear.
At Startup is set at the time of factory shipment.
Show Drum Alert
Used to set how frequently to display messages on the screen when it is close to the time to replace the drum cartridge.
You can select from Off, At Startup, or At Auto Clear.
At Startup is set at the time of factory shipment.
Show Drum Warning
Used to set how frequently to display messages on the screen when the drum cartridge life is ended.
You can select from Off, At Startup, or At Auto Clear.
At Auto Clear is set at the time of factory shipment.
Xerox® WorkCentre® 5022/5024 Multifunction PrinterUser Guide
9-49

Tools
Maintenance
Used to clear the counter of the consumables/periodic replacement parts when directed by your local Xerox representative.
Note Do not use this function except as necessary.
Xerox® WorkCentre® 5022/5024 Multifunction PrinterUser Guide
9-50

Tools
Security Settings
System Administrator Passcode
Used to set the passcode for entering System Administration mode.
You can enter between 4 to 6 numbers from 0 to 9.
1111 (four "1" digits) is set at the time of factory shipment.
Follow the steps below to make the settings.
1. In the Tools screen, select Security Settings, and then press the OK button.
For information on how to display the Tools screen, refer to System Settings Procedure on page 9-1.
2. Select System Admin. Passcode, and then press the OK button.
3. Enter the desired passcode in the New Passcode field.
Note The entered passcode is displayed as asterisks (*).
4. Press the OK button.
System Settings...Security Settings...
Tools
Fax Settings...
Security Settings
System Admin. Passcode...
System Admin. Passcode
New Passcode
[* * * * * ]
Xerox® WorkCentre® 5022/5024 Multifunction PrinterUser Guide
9-51
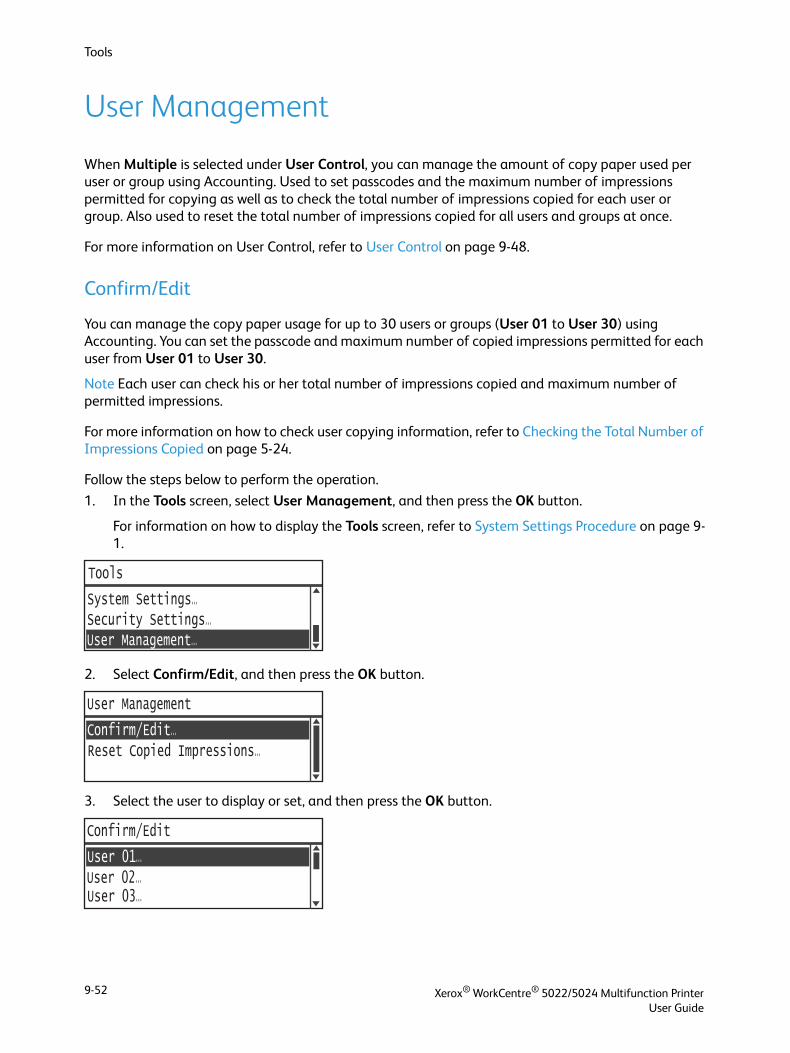
Tools
User Management
When Multiple is selected under User Control, you can manage the amount of copy paper used per user or group using Accounting. Used to set passcodes and the maximum number of impressions permitted for copying as well as to check the total number of impressions copied for each user or group. Also used to reset the total number of impressions copied for all users and groups at once.
For more information on User Control, refer to User Control on page 9-48.
Confirm/Edit
You can manage the copy paper usage for up to 30 users or groups (User 01 to User 30) using Accounting. You can set the passcode and maximum number of copied impressions permitted for each user from User 01 to User 30.
Note Each user can check his or her total number of impressions copied and maximum number of permitted impressions.
For more information on how to check user copying information, refer to Checking the Total Number of Impressions Copied on page 5-24.
Follow the steps below to perform the operation.
1. In the Tools screen, select User Management, and then press the OK button.
For information on how to display the Tools screen, refer to System Settings Procedure on page 9-1.
2. Select Confirm/Edit, and then press the OK button.
3. Select the user to display or set, and then press the OK button.
Security Settings...User Management...
Tools
System Settings...
User Management
Confirm/Edit...Reset Copied Impressions...
Confirm/Edit
User 01...User 02...User 03...
Xerox® WorkCentre® 5022/5024 Multifunction PrinterUser Guide
9-52
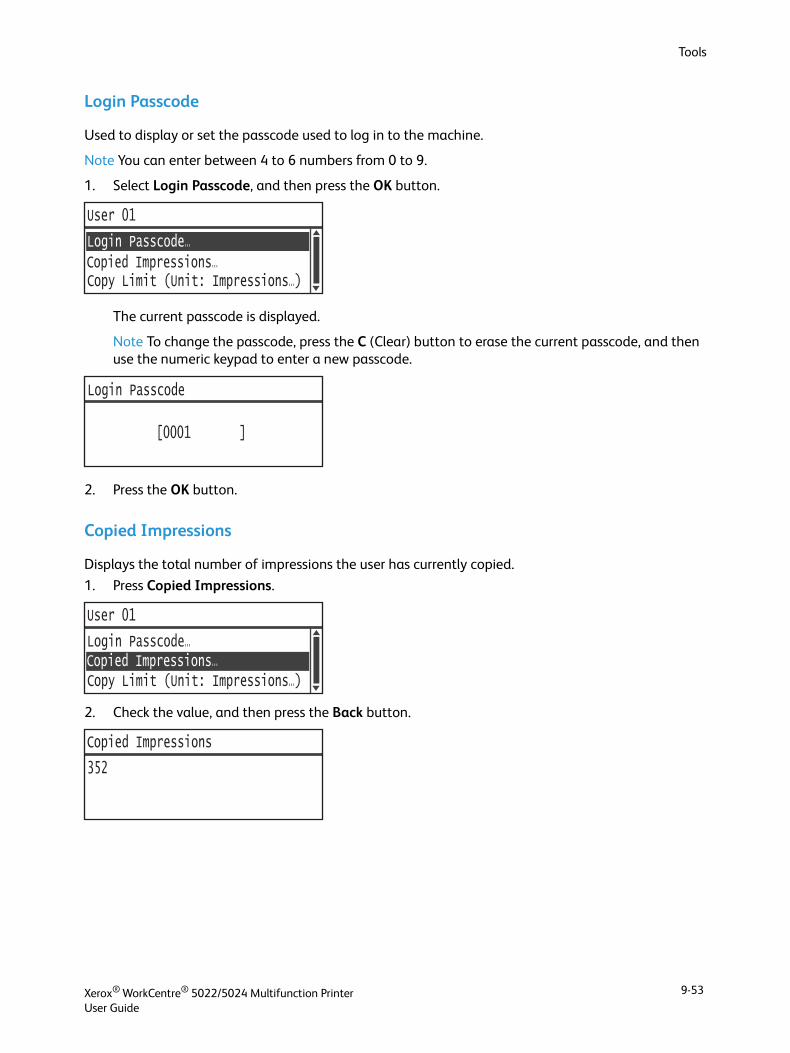
Tools
Login Passcode
Used to display or set the passcode used to log in to the machine.
Note You can enter between 4 to 6 numbers from 0 to 9.
1. Select Login Passcode, and then press the OK button.
The current passcode is displayed.
Note To change the passcode, press the C (Clear) button to erase the current passcode, and then use the numeric keypad to enter a new passcode.
2. Press the OK button.
Copied Impressions
Displays the total number of impressions the user has currently copied.
1. Press Copied Impressions.
2. Check the value, and then press the Back button.
User 01
Login Passcode...Copied Impressions...Copy Limit (Unit: Impressions...)
[0001 ]
Login Passcode
User 01
Login Passcode...Copied Impressions...Copy Limit (Unit: Impressions...)
Copied Impressions
352
Xerox® WorkCentre® 5022/5024 Multifunction PrinterUser Guide
9-53

Tools
Copy Limit (Unit: Impressions)
Used to display or set the maximum number of impressions the user is permitted to copy.
1. Press Copy Limit (Unit: Impressions).
2. To change the value, use the numeric keypad to enter the maximum number of permitted impressions.
Notes
- You can set a value between 0 and 255 (Unit: 1,000 impressions) for the maximum number of permitted impression . Set 0 to disable the restriction on maximum number of copies.
- The user's current total number of impressions is reset to 0 when the maximum number of permitted impressions is changed.
3. Press the OK button.
Reset Copied Impressions
You can select whether to reset the total number of copied impressions for all registered users, User01 to User30, at once. Click Yes to reset the total number of impressions copied to 0.
Follow the steps below to perform the operation.
1. In the Tools screen, select User Management, and then press the OK button.
For information on how to display the Tools screen, refer to System Settings Procedure on page 9-1.
User 01
Login Passcode...Copied Impressions...Copy Limit (Unit: Impressions...)
Copy Limit (Unit: Impressions)
15 (x 1000)[0 - 255]
Security Settings...User Management...
Tools
System Settings...
Xerox® WorkCentre® 5022/5024 Multifunction PrinterUser Guide
9-54
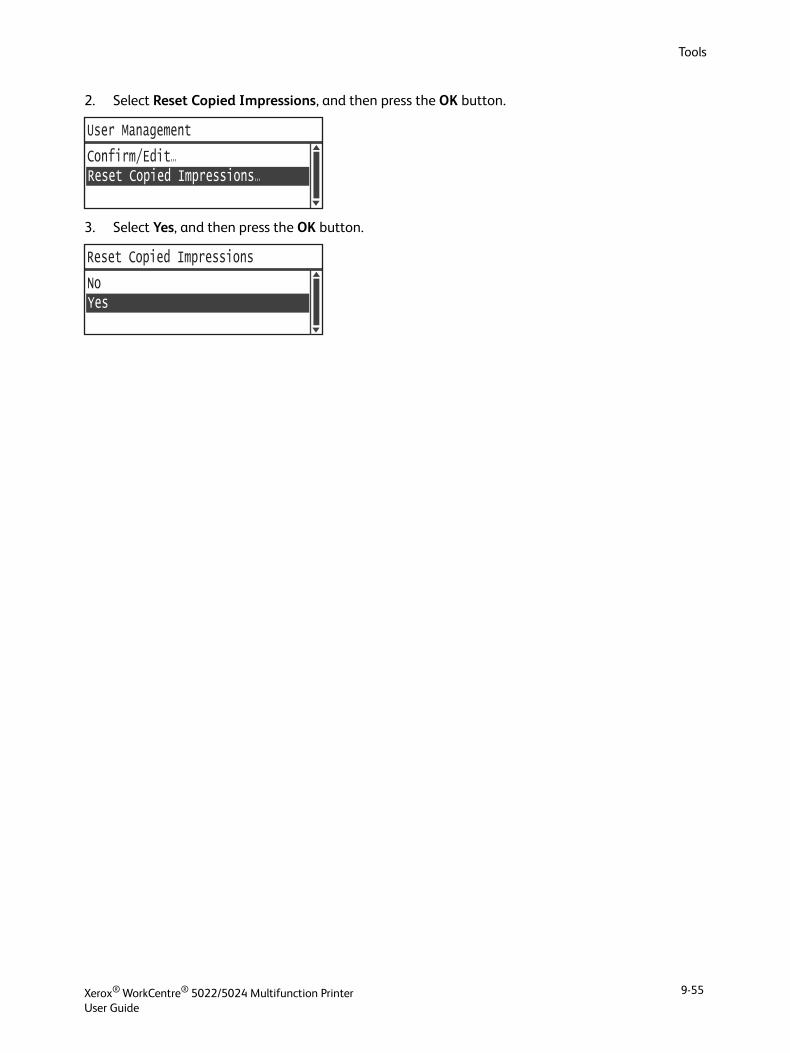
Tools
2. Select Reset Copied Impressions, and then press the OK button.
3. Select Yes, and then press the OK button.
User Management
Confirm/Edit...Reset Copied Impressions...
Reset Copied Impressions
NoYes
Xerox® WorkCentre® 5022/5024 Multifunction PrinterUser Guide
9-55

Tools
Xerox® WorkCentre® 5022/5024 Multifunction PrinterUser Guide
9-56
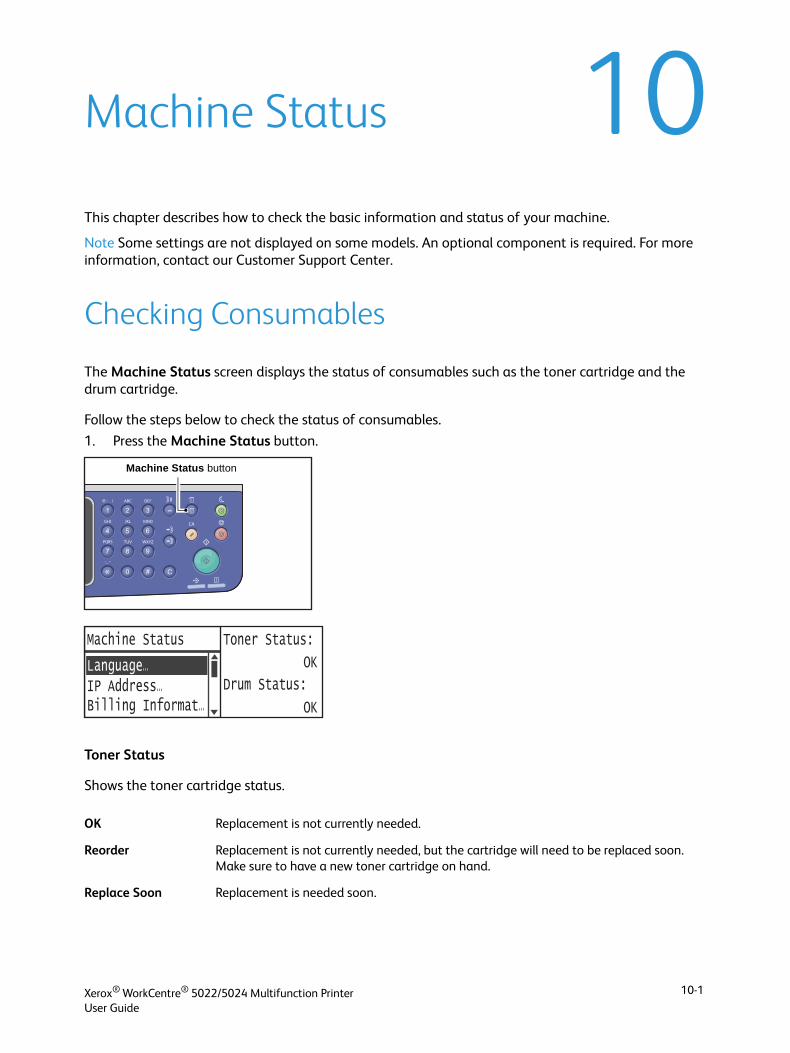
10Machine Status
This chapter describes how to check the basic information and status of your machine.
Note Some settings are not displayed on some models. An optional component is required. For more information, contact our Customer Support Center.
Checking Consumables
The Machine Status screen displays the status of consumables such as the toner cartridge and the drum cartridge.
Follow the steps below to check the status of consumables.
1. Press the Machine Status button.
Toner Status
Shows the toner cartridge status.
OK Replacement is not currently needed.
Reorder Replacement is not currently needed, but the cartridge will need to be replaced soon. Make sure to have a new toner cartridge on hand.
Replace Soon Replacement is needed soon.
Machine Status button
IP Address...
Machine Status Toner Status:
OK
OK
Drum Status:Billing Informat...
Language...
Xerox® WorkCentre® 5022/5024 Multifunction PrinterUser Guide
10-1
Machine Status
Drum Status
Shows the drum cartridge status.
Replace Now Replacement is needed now.
Error A toner cartridge error occurred.
OK Replacement is not currently needed.
Reorder Replacement is not currently needed, but the cartridge will need to be replaced soon. Make sure to have a new drum cartridge on hand.
Replace Soon Replacement is needed soon.
Replace Now Replacement is needed now.
Error A drum cartridge error occurred.
Xerox® WorkCentre® 5022/5024 Multifunction PrinterUser Guide
10-2
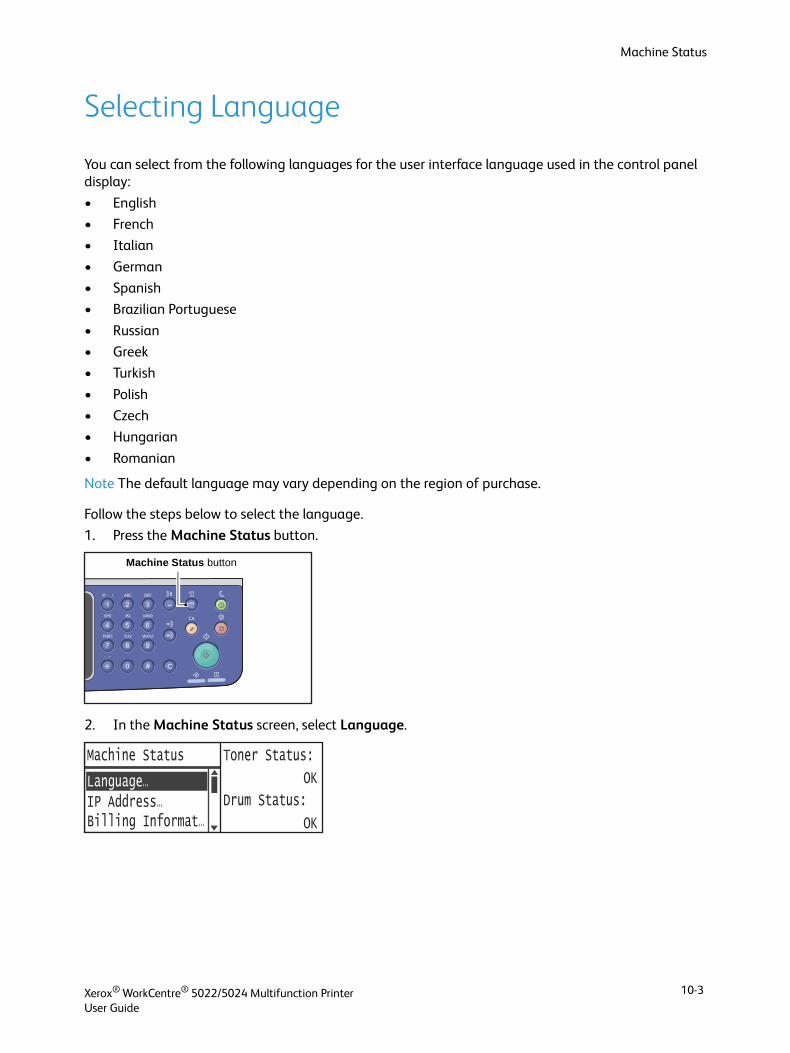
Machine Status
Selecting Language
You can select from the following languages for the user interface language used in the control panel display:
• English
• French
• Italian
• German
• Spanish
• Brazilian Portuguese
• Russian
• Greek
• Turkish
• Polish
• Czech
• Hungarian
• Romanian
Note The default language may vary depending on the region of purchase.
Follow the steps below to select the language.
1. Press the Machine Status button.
2. In the Machine Status screen, select Language.
Machine Status button
IP Address...
Machine Status Toner Status:
OK
OK
Drum Status:Billing Informat...
Language...
Xerox® WorkCentre® 5022/5024 Multifunction PrinterUser Guide
10-3
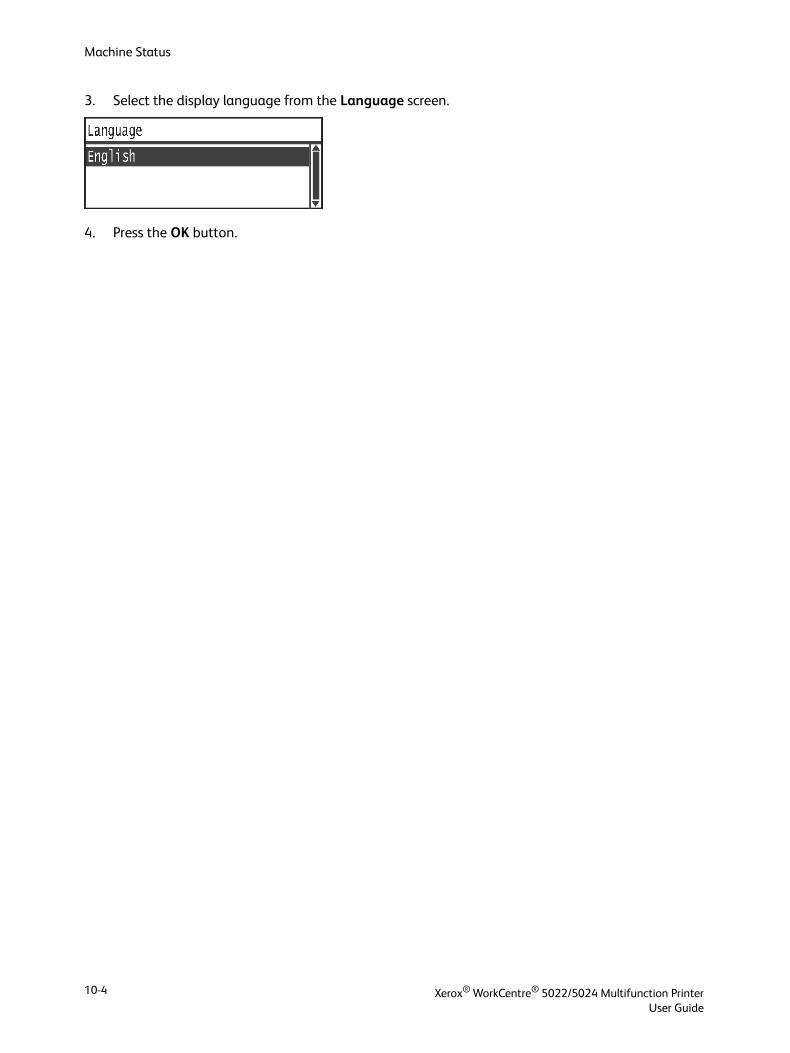
Machine Status
3. Select the display language from the Language screen.
4. Press the OK button.
Xerox® WorkCentre® 5022/5024 Multifunction PrinterUser Guide
10-4
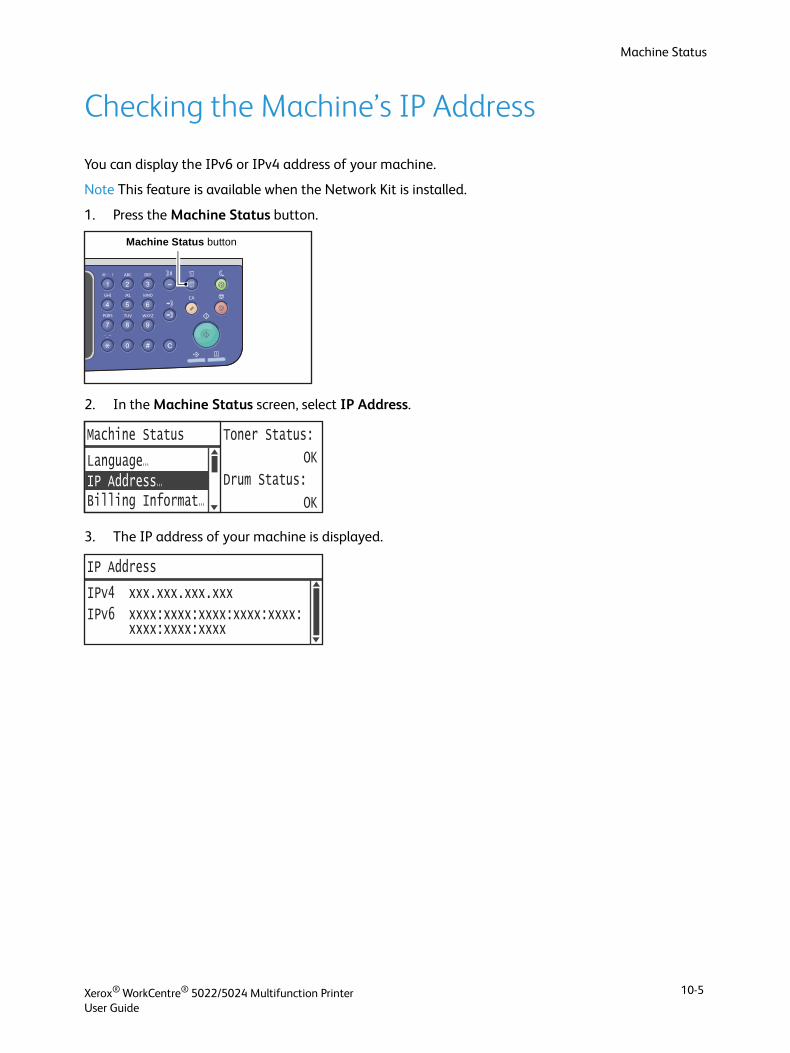
Machine Status
Checking the Machine’s IP Address
You can display the IPv6 or IPv4 address of your machine.
Note This feature is available when the Network Kit is installed.
1. Press the Machine Status button.
2. In the Machine Status screen, select IP Address.
3. The IP address of your machine is displayed.
Machine Status button
IP Address...
Machine Status
Language...
Billing Informat...
Toner Status:
OK
Drum Status:
OK
IP Address
IPv4 xxx.xxx.xxx.xxx
IPv6 xxxx:xxxx:xxxx:xxxx:xxxx: xxxx:xxxx:xxxx
Xerox® WorkCentre® 5022/5024 Multifunction PrinterUser Guide
10-5
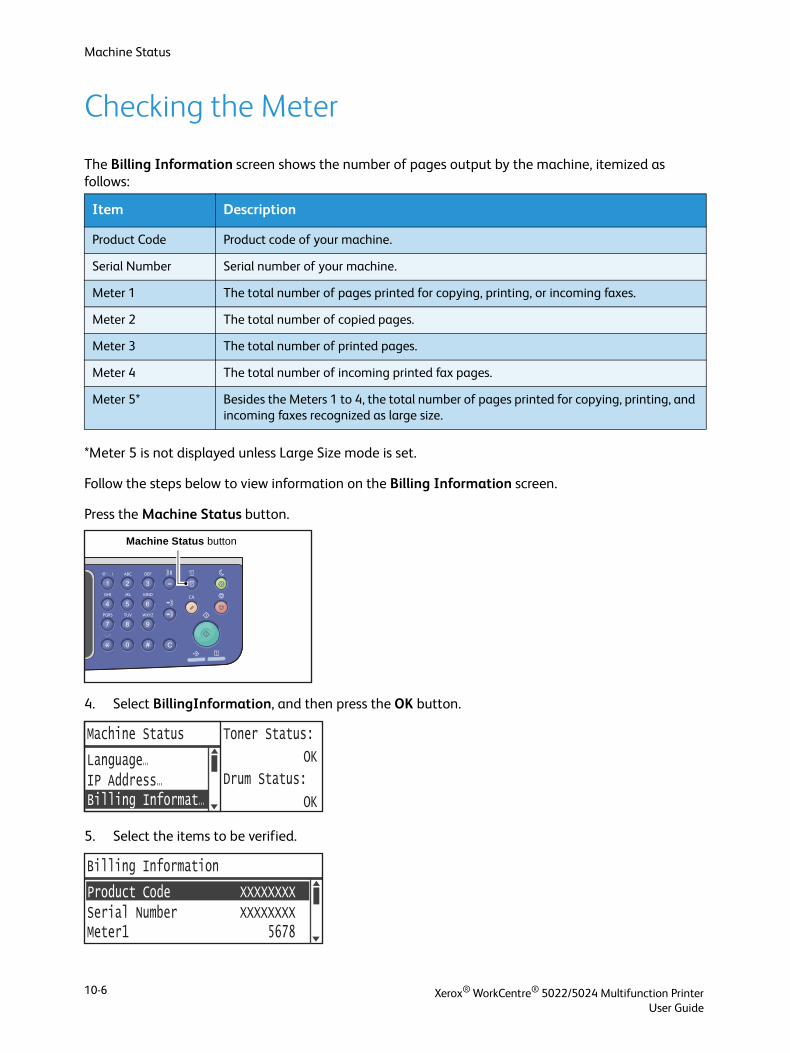
Machine Status
Checking the Meter
The Billing Information screen shows the number of pages output by the machine, itemized as follows:
*Meter 5 is not displayed unless Large Size mode is set.
Follow the steps below to view information on the Billing Information screen.
Press the Machine Status button.
4. Select BillingInformation, and then press the OK button.
5. Select the items to be verified.
Item Description
Product Code Product code of your machine.
Serial Number Serial number of your machine.
Meter 1 The total number of pages printed for copying, printing, or incoming faxes.
Meter 2 The total number of copied pages.
Meter 3 The total number of printed pages.
Meter 4 The total number of incoming printed fax pages.
Meter 5* Besides the Meters 1 to 4, the total number of pages printed for copying, printing, and incoming faxes recognized as large size.
Machine Status button
Machine Status Toner Status:
OK
Drum Status:
OK
IP Address...Billing Informat...
Language...
Serial Number XXXXXXXX
Billing Information
Product Code XXXXXXXX
Meter1 5678
Xerox® WorkCentre® 5022/5024 Multifunction PrinterUser Guide
10-6
Machine Status
Printing Reports/Lists
The machine can print the following reports/lists:
Report/List Description
System Settings Report Prints the machine's hardware configuration, version information, number of pages printed by each function, status of consumables, the items that can be
set by Xerox® CentreWare® Internet Service, and their values.
Service Settings Report Prints the items that can be set from the control panel in System Administration mode.
Job History Report Shows the job execution results. Prints the results of the most recent jobs (up to 50 jobs' worth).
Notes• When the Job History exceeds 50 jobs, each new job replaces the oldest
job in the history.• In some cases, page errors occurring during continuous printing of various
jobs (single-page jobs) due to paper jams and other problems may not be registered to the Page Error History.
• Refer to the Fax Activity Report for fax transmission results.
For information on how to set the machine to print the Job History Report automatically, refer to Job History Verbose on page 9-48.
Error History Report Prints information on errors generated in the machine. Up to 42 errors are recorded sequentially from newest to oldest. Records information on up to 10 paper jams or similar errors.
Note: The Error History may record less than 42 errors if it contains errors with a large amount of information. When the Error History exceeds its capacity, each new error recorded replaces the oldest error.
Job Counter Report Prints the total number of pages printed by each feature. In Multiple Account mode, the total and the permitted maximum number of copies by each user are also printed.
Fax Protocol Report Prints the protocol information of fax transmission.
Fax Address Book *1 Prints the Speed Dial and Group information.
Address Book *3 Prints the e-mail and server addresses.
Xerox® WorkCentre® 5022/5024 Multifunction PrinterUser Guide
10-7
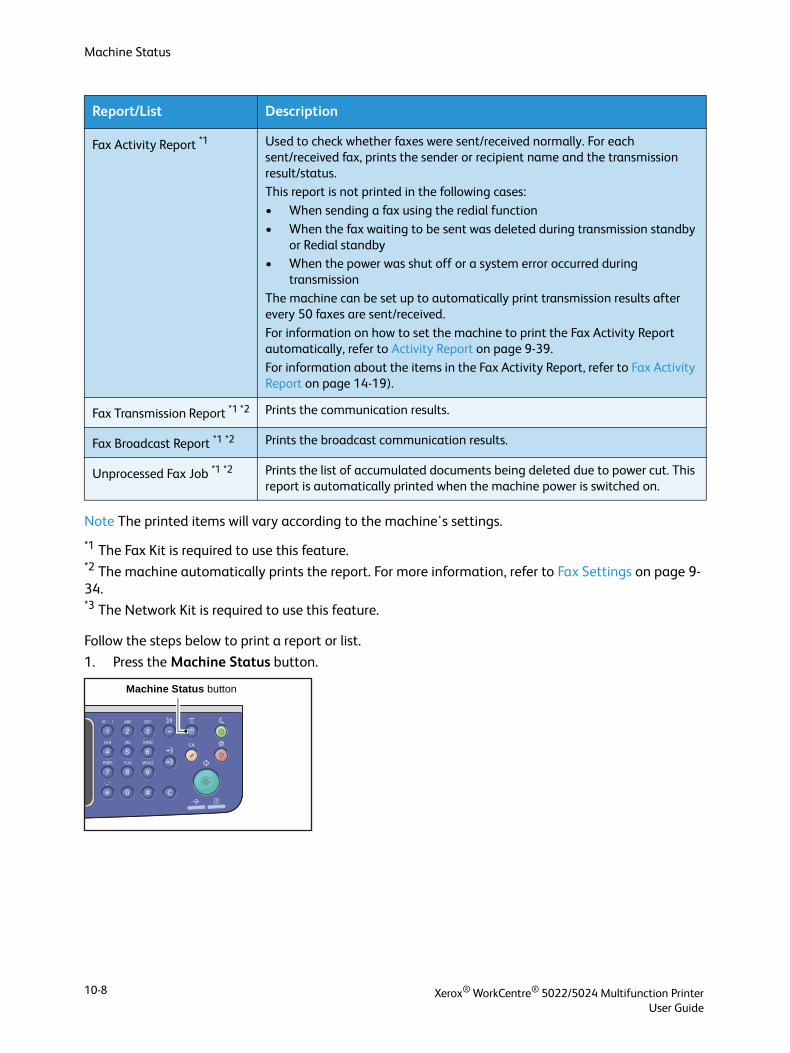
Machine Status
Note The printed items will vary according to the machine's settings.
*1 The Fax Kit is required to use this feature.*2 The machine automatically prints the report. For more information, refer to Fax Settings on page 9-34.*3 The Network Kit is required to use this feature.
Follow the steps below to print a report or list.
1. Press the Machine Status button.
Fax Activity Report *1 Used to check whether faxes were sent/received normally. For each sent/received fax, prints the sender or recipient name and the transmission result/status.This report is not printed in the following cases:
• When sending a fax using the redial function
• When the fax waiting to be sent was deleted during transmission standby or Redial standby
• When the power was shut off or a system error occurred during transmission
The machine can be set up to automatically print transmission results after every 50 faxes are sent/received.
For information on how to set the machine to print the Fax Activity Report automatically, refer to Activity Report on page 9-39.
For information about the items in the Fax Activity Report, refer to Fax Activity Report on page 14-19).
Fax Transmission Report *1 *2 Prints the communication results.
Fax Broadcast Report *1 *2 Prints the broadcast communication results.
Unprocessed Fax Job *1 *2 Prints the list of accumulated documents being deleted due to power cut. This report is automatically printed when the machine power is switched on.
Report/List Description
Machine Status button
Xerox® WorkCentre® 5022/5024 Multifunction PrinterUser Guide
10-8
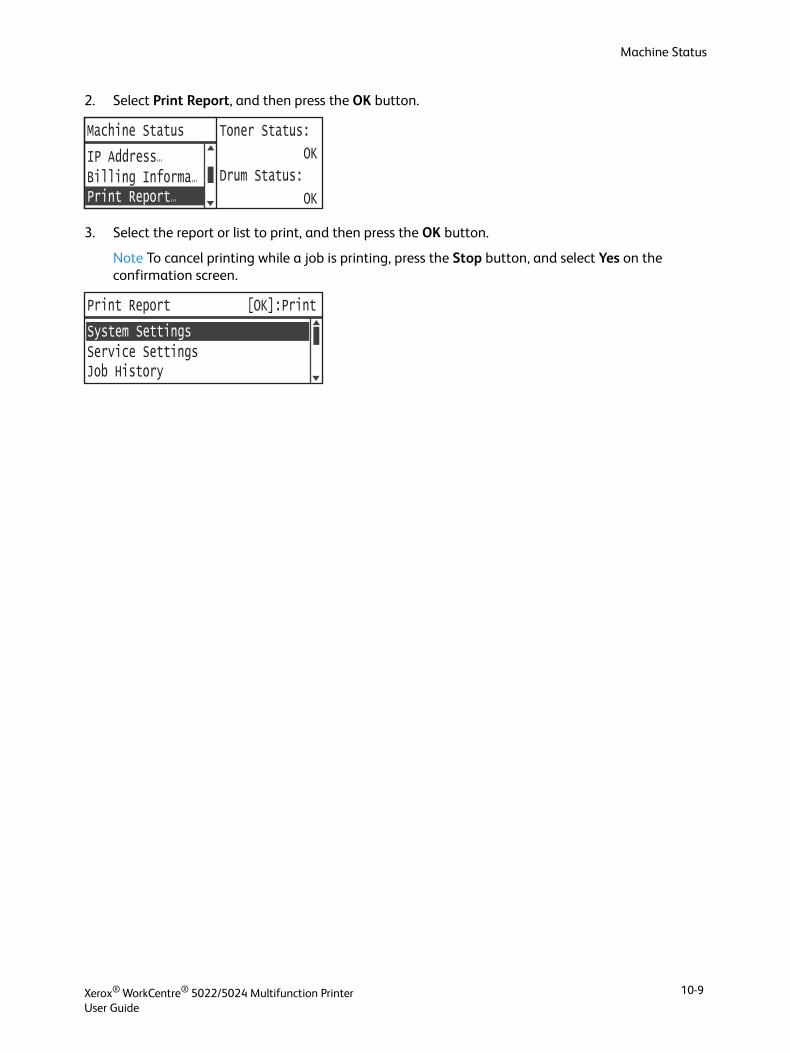
Machine Status
2. Select Print Report, and then press the OK button.
3. Select the report or list to print, and then press the OK button.
Note To cancel printing while a job is printing, press the Stop button, and select Yes on the confirmation screen.
Billing Informa...Print Report...
Machine Status
IP Address...
Toner Status:
OK
Drum Status:
OK
Service Settings
Print Report [OK]:Print
System Settings
Job History
Xerox® WorkCentre® 5022/5024 Multifunction PrinterUser Guide
10-9
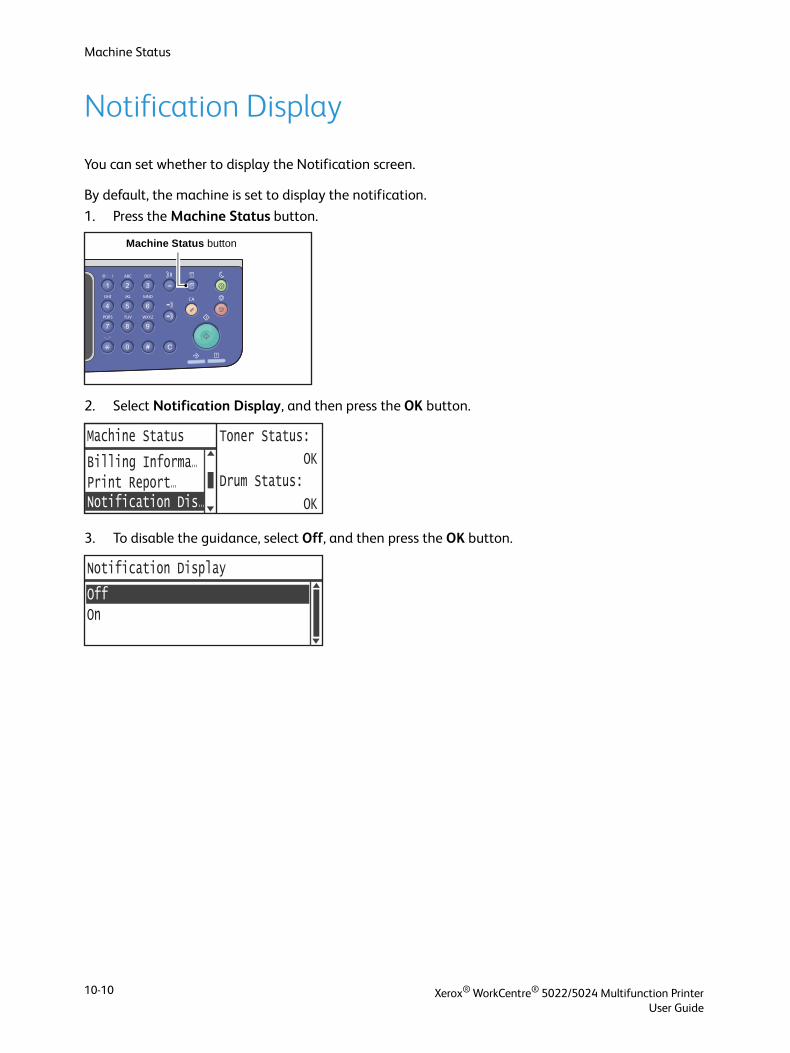
Machine Status
Notification Display
You can set whether to display the Notification screen.
By default, the machine is set to display the notification.
1. Press the Machine Status button.
2. Select Notification Display, and then press the OK button.
3. To disable the guidance, select Off, and then press the OK button.
Machine Status button
Print Report...Notification Dis...
Machine Status
Billing Informa...
Toner Status:
OK
Drum Status:
OK
On
Notification Display
Off
Xerox® WorkCentre® 5022/5024 Multifunction PrinterUser Guide
10-10
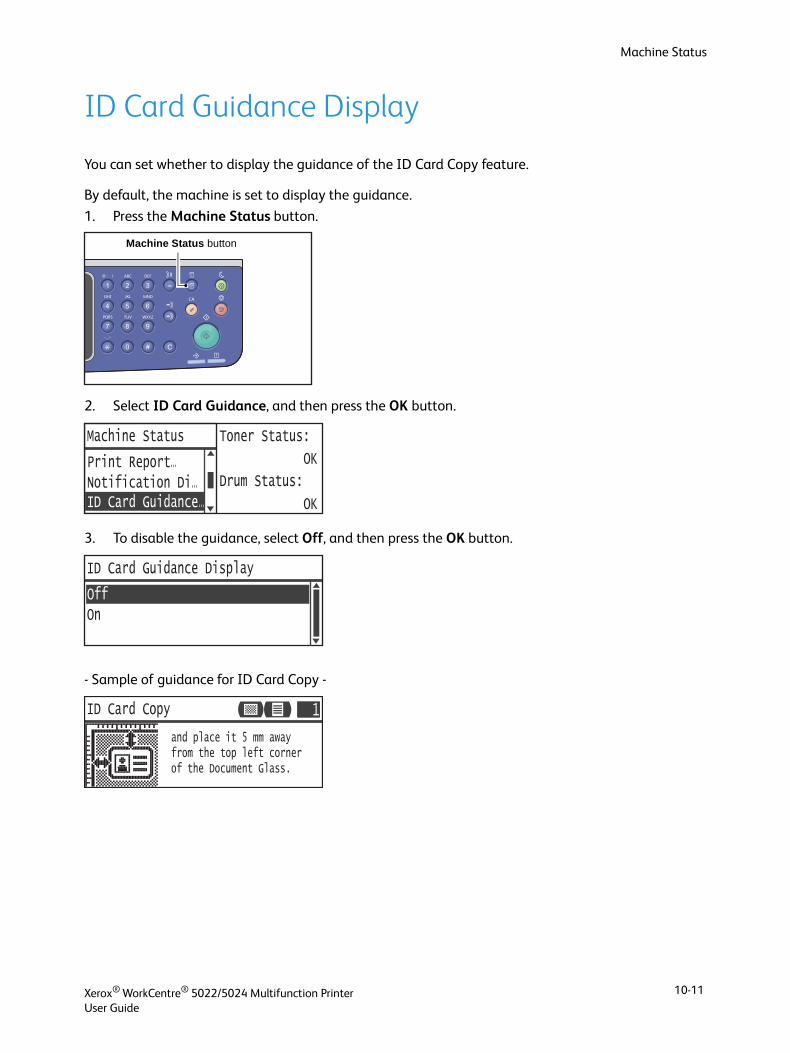
Machine Status
ID Card Guidance Display
You can set whether to display the guidance of the ID Card Copy feature.
By default, the machine is set to display the guidance.
1. Press the Machine Status button.
2. Select ID Card Guidance, and then press the OK button.
3. To disable the guidance, select Off, and then press the OK button.
- Sample of guidance for ID Card Copy -
Machine Status button
Notification Di...ID Card Guidance...
Machine Status
Print Report...
Toner Status:
OK
Drum Status:
OK
On
ID Card Guidance Display
Off
ID Card Copy
and place it 5 mm awayfrom the top left cornerof the Document Glass.
11
Xerox® WorkCentre® 5022/5024 Multifunction PrinterUser Guide
10-11

Machine Status
Quick-Button Selection Timer
You can set the displayed time length of the setting screens when a Quick-Button is pressed.
By default, the time length is set to 2 seconds.
Press the Machine Status button.
4. Select Quick-Button Selection Timer, and then press the OK button.
5. Select the desired time, and then press the OK button.
Machine Status button
ID Card Guidance...Quick-Button Se...
Machine Status
Notification Di...
Toner Status:
OK
Drum Status:
OK
3 seconds4 seconds
Quick-Button Selection Timer
2 seconds
4 seconds
Xerox® WorkCentre® 5022/5024 Multifunction PrinterUser Guide
10-12

11Job Status
This chapter describes how to check the status of current or pending jobs, and how to cancel jobs.
Note Some settings cannot be displayed on some models. An optional component is required. For more information, contact our Customer Support Center.
Checking Current/Pending Jobs
You can check the status of the following current or pending jobs:
• Current print, scan or fax job
• Pending print jobs
• Pending fax jobs to send
Note Completed jobs are not displayed.
1. Press the Job Status button.
Scroll to check the jobs.
Checking Reserved Fax Jobs
If any outgoing faxes have been reserved, you can check them in the Fax (Send) List screen.
Job Status button
Print A4 Print B5
Active Jobs [Stop]:Delete
Fax (Print) A4
Xerox® WorkCentre® 5022/5024 Multifunction PrinterUser Guide
11-1
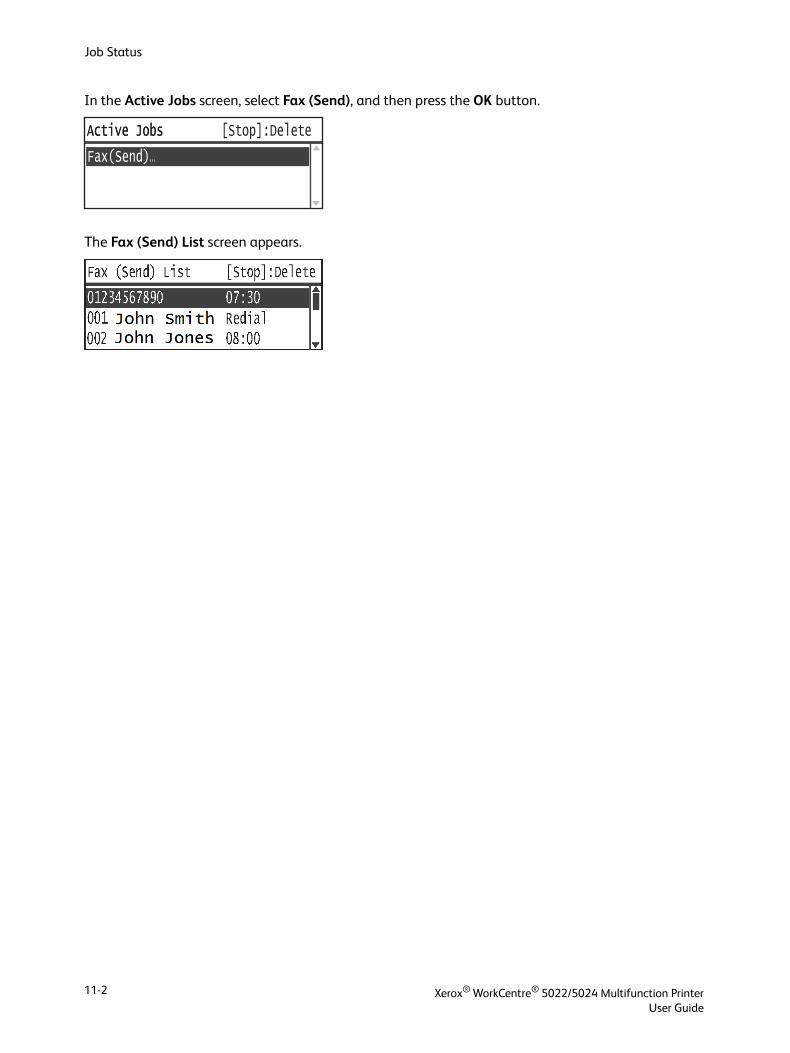
Job Status
In the Active Jobs screen, select Fax (Send), and then press the OK button.
The Fax (Send) List screen appears.
Active Jobs
Fax(Send)...
Active Jobs [Stop]:Delete
Xerox® WorkCentre® 5022/5024 Multifunction PrinterUser Guide
11-2

Job Status
Canceling the Current Job
1. Press the Job Status button.
2. Select the current job.
3. Press the Stop button.
Notes
• You may not be able to cancel a job depending on the status of the job processing.
• If the machine is being used as a local printer, it may take some time to cancel the job depending on the type of print job being executed.
Job Status button
Print A4 Print B5
Active Jobs [Stop]:Delete
Fax (Print) A4
Stop button
Xerox® WorkCentre® 5022/5024 Multifunction PrinterUser Guide
11-3
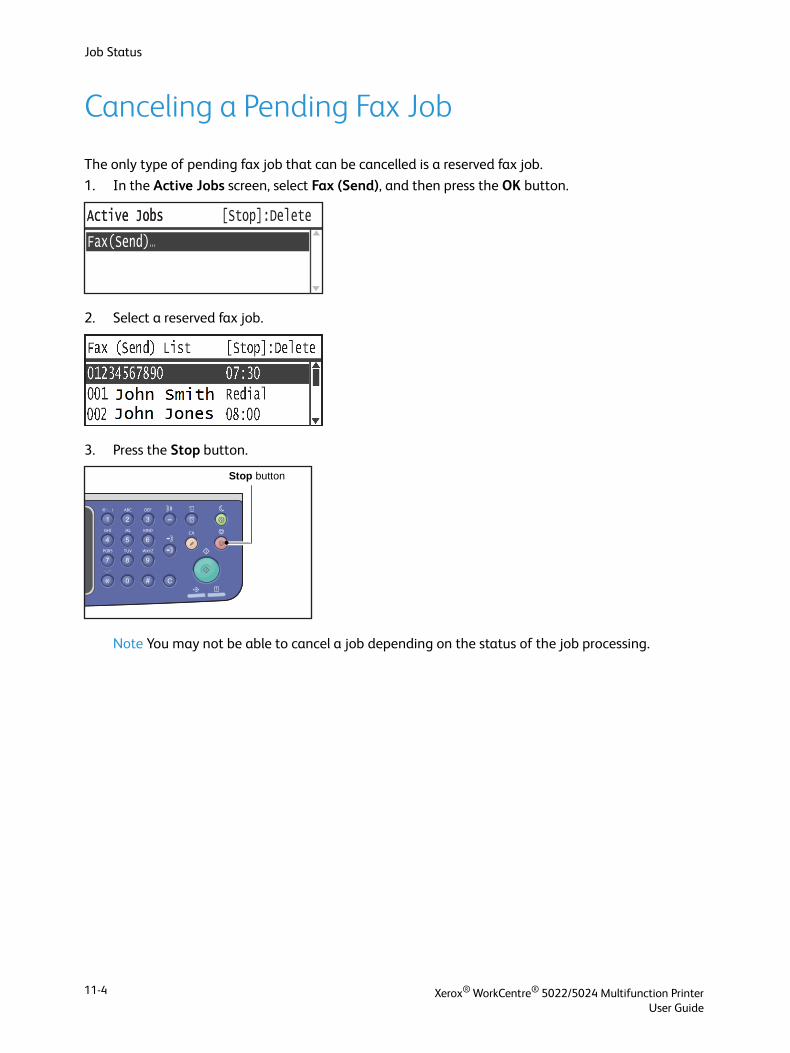
Job Status
Canceling a Pending Fax Job
The only type of pending fax job that can be cancelled is a reserved fax job.
1. In the Active Jobs screen, select Fax (Send), and then press the OK button.
2. Select a reserved fax job.
3. Press the Stop button.
Note You may not be able to cancel a job depending on the status of the job processing.
Active Jobs
Fax(Send)...
Active Jobs [Stop]:Delete
Stop button
Xerox® WorkCentre® 5022/5024 Multifunction PrinterUser Guide
11-4
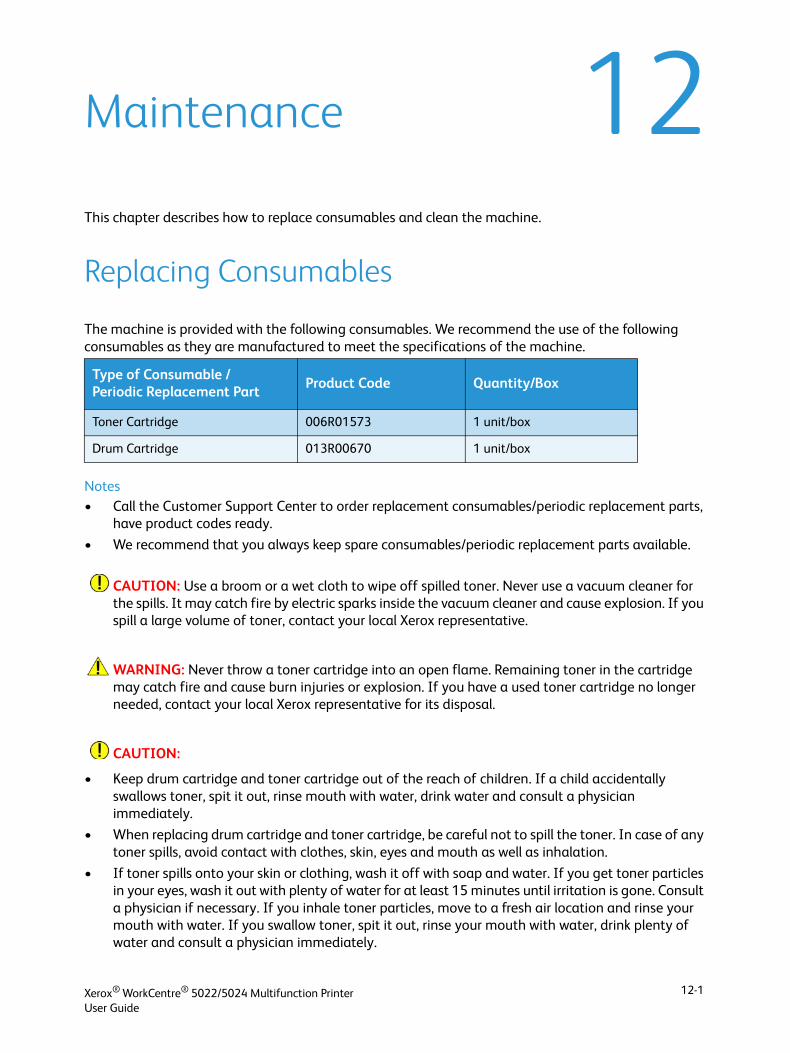
12Maintenance
This chapter describes how to replace consumables and clean the machine.
Replacing Consumables
The machine is provided with the following consumables. We recommend the use of the following consumables as they are manufactured to meet the specifications of the machine.
Notes• Call the Customer Support Center to order replacement consumables/periodic replacement parts,
have product codes ready.
• We recommend that you always keep spare consumables/periodic replacement parts available.
CAUTION: Use a broom or a wet cloth to wipe off spilled toner. Never use a vacuum cleaner for the spills. It may catch fire by electric sparks inside the vacuum cleaner and cause explosion. If you spill a large volume of toner, contact your local Xerox representative.
WARNING: Never throw a toner cartridge into an open flame. Remaining toner in the cartridge may catch fire and cause burn injuries or explosion. If you have a used toner cartridge no longer needed, contact your local Xerox representative for its disposal.
CAUTION:
• Keep drum cartridge and toner cartridge out of the reach of children. If a child accidentally swallows toner, spit it out, rinse mouth with water, drink water and consult a physician immediately.
• When replacing drum cartridge and toner cartridge, be careful not to spill the toner. In case of any toner spills, avoid contact with clothes, skin, eyes and mouth as well as inhalation.
• If toner spills onto your skin or clothing, wash it off with soap and water. If you get toner particles in your eyes, wash it out with plenty of water for at least 15 minutes until irritation is gone. Consult a physician if necessary. If you inhale toner particles, move to a fresh air location and rinse your mouth with water. If you swallow toner, spit it out, rinse your mouth with water, drink plenty of water and consult a physician immediately.
Type of Consumable /Periodic Replacement Part
Product Code Quantity/Box
Toner Cartridge 006R01573 1 unit/box
Drum Cartridge 013R00670 1 unit/box
Xerox® WorkCentre® 5022/5024 Multifunction PrinterUser Guide
12-1
Maintenance
Handling consumables/periodic replacement parts
• Do not store boxes of consumables/periodic replacement parts upright.
• Do not unpack consumables/periodic replacement parts before use. Avoid storing consumables/periodic replacement parts in the following locations:
- High temperature and humid locations
- Near heat-generating devices
- Areas exposed to direct sunlight
- Dusty areas
• When using consumables/periodic replacement parts, carefully read precautions for use. Precautions for use are instructed on their bodies or packages, or a precaution sheet is included in their packages.
• We recommend always keeping spare consumables/periodic replacement parts in stock.
• When calling our Customer Support Center to order consumables/periodical replacement parts, have the product codes ready.
• The use of consumables/periodic replacement parts not recommended by Xerox could impair machine quality and performance. Use only consumables/periodic replacement parts recommended by Xerox.
Checking the status of consumables
You can check the status of consumables on the Machine Status screen.
For more information, refer to Checking Consumables on page 10-1.
Xerox® WorkCentre® 5022/5024 Multifunction PrinterUser Guide
12-2
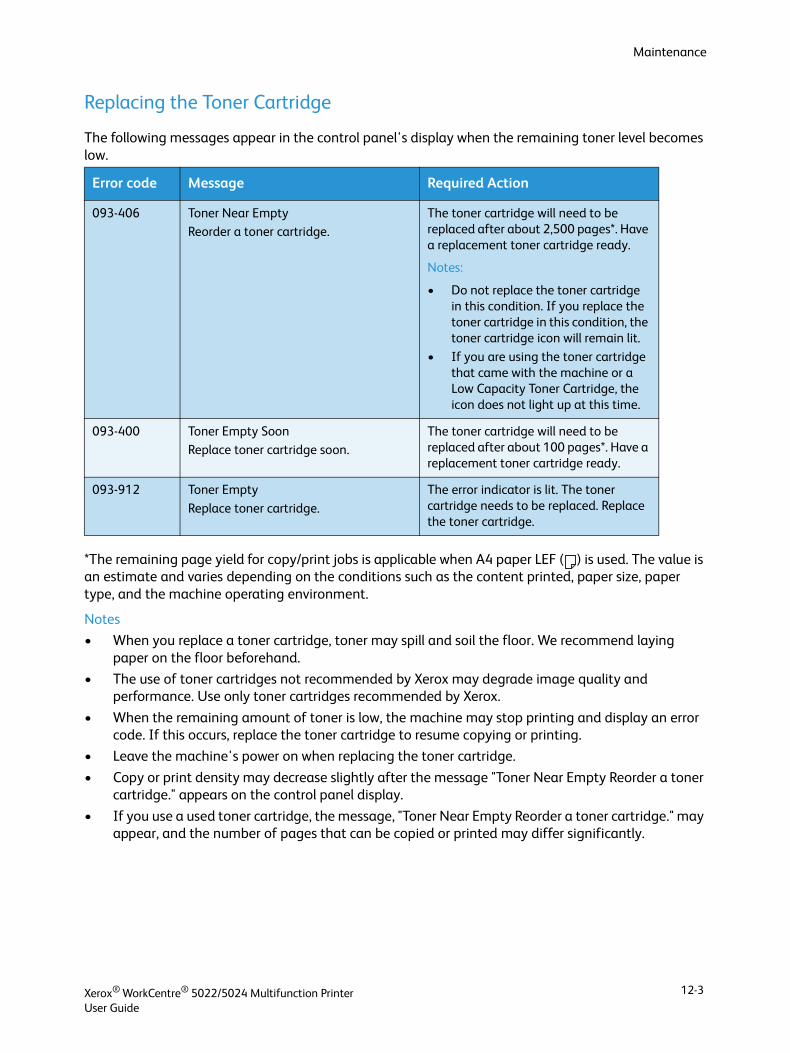
Maintenance
Replacing the Toner Cartridge
The following messages appear in the control panel's display when the remaining toner level becomes low.
*The remaining page yield for copy/print jobs is applicable when A4 paper LEF ( ) is used. The value is an estimate and varies depending on the conditions such as the content printed, paper size, paper type, and the machine operating environment.
Notes
• When you replace a toner cartridge, toner may spill and soil the floor. We recommend laying paper on the floor beforehand.
• The use of toner cartridges not recommended by Xerox may degrade image quality and performance. Use only toner cartridges recommended by Xerox.
• When the remaining amount of toner is low, the machine may stop printing and display an error code. If this occurs, replace the toner cartridge to resume copying or printing.
• Leave the machine's power on when replacing the toner cartridge.
• Copy or print density may decrease slightly after the message "Toner Near Empty Reorder a toner cartridge." appears on the control panel display.
• If you use a used toner cartridge, the message, "Toner Near Empty Reorder a toner cartridge." may appear, and the number of pages that can be copied or printed may differ significantly.
Error code Message Required Action
093-406 Toner Near EmptyReorder a toner cartridge.
The toner cartridge will need to be replaced after about 2,500 pages*. Have a replacement toner cartridge ready.
Notes:
• Do not replace the toner cartridge in this condition. If you replace the toner cartridge in this condition, the toner cartridge icon will remain lit.
• If you are using the toner cartridge that came with the machine or a Low Capacity Toner Cartridge, the icon does not light up at this time.
093-400 Toner Empty SoonReplace toner cartridge soon.
The toner cartridge will need to be replaced after about 100 pages*. Have a replacement toner cartridge ready.
093-912 Toner Empty
Replace toner cartridge.
The error indicator is lit. The toner cartridge needs to be replaced. Replace the toner cartridge.
Xerox® WorkCentre® 5022/5024 Multifunction PrinterUser Guide
12-3
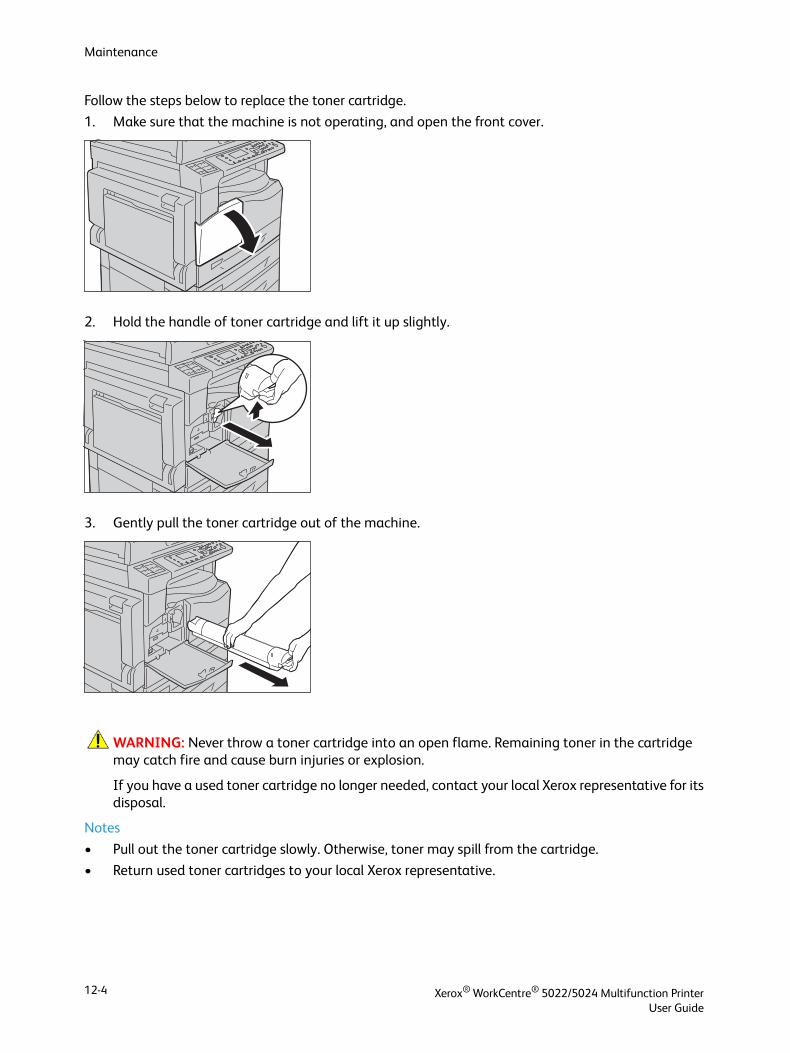
Maintenance
Follow the steps below to replace the toner cartridge.
1. Make sure that the machine is not operating, and open the front cover.
2. Hold the handle of toner cartridge and lift it up slightly.
3. Gently pull the toner cartridge out of the machine.
WARNING: Never throw a toner cartridge into an open flame. Remaining toner in the cartridge may catch fire and cause burn injuries or explosion.
If you have a used toner cartridge no longer needed, contact your local Xerox representative for its disposal.
Notes
• Pull out the toner cartridge slowly. Otherwise, toner may spill from the cartridge.
• Return used toner cartridges to your local Xerox representative.
Xerox® WorkCentre® 5022/5024 Multifunction PrinterUser Guide
12-4
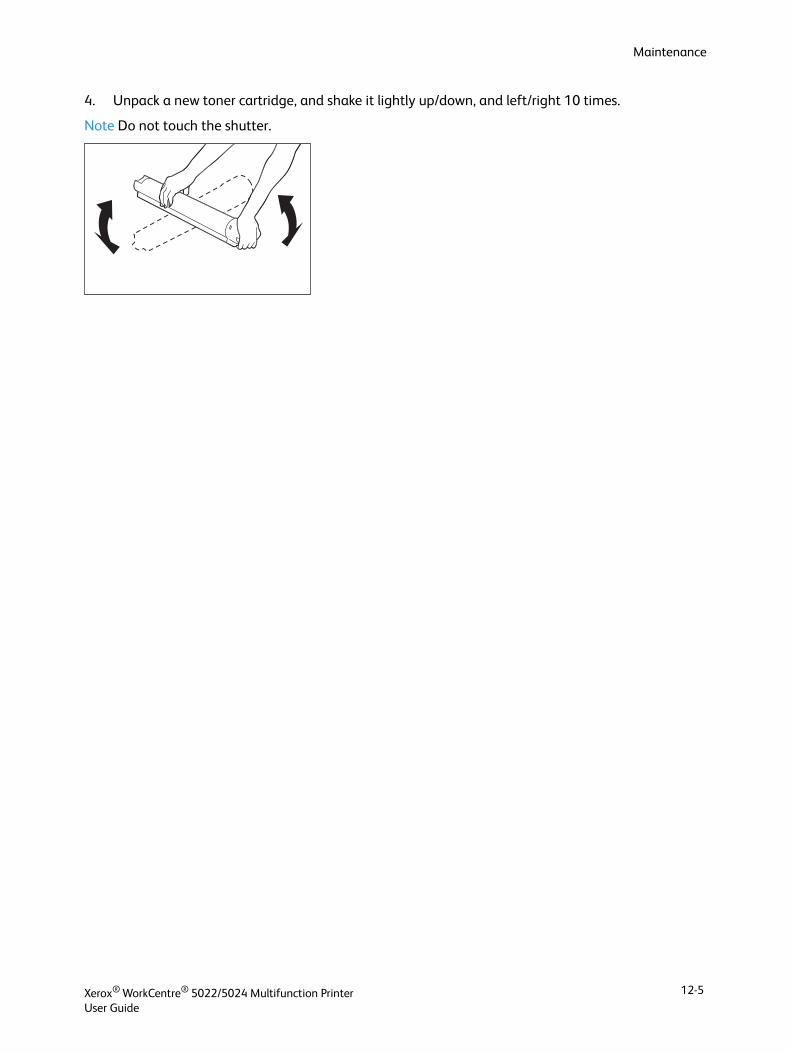
Maintenance
4. Unpack a new toner cartridge, and shake it lightly up/down, and left/right 10 times.
Note Do not touch the shutter.
Xerox® WorkCentre® 5022/5024 Multifunction PrinterUser Guide
12-5
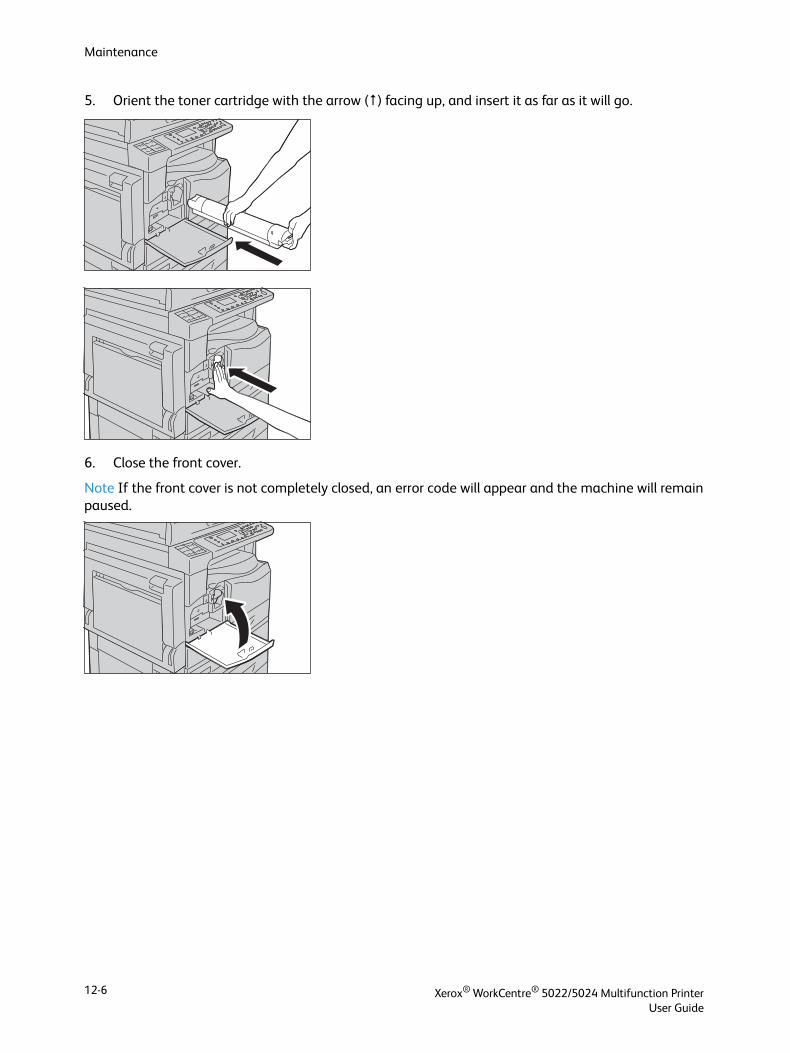
Maintenance
5. Orient the toner cartridge with the arrow () facing up, and insert it as far as it will go.
6. Close the front cover.
Note If the front cover is not completely closed, an error code will appear and the machine will remain paused.
Xerox® WorkCentre® 5022/5024 Multifunction PrinterUser Guide
12-6

Maintenance
Replacing the Drum Cartridge
The following error codes and icons display in the machine status diagram when the drum cartridge is near the end of its service life.
Call the Customer Support Center to order a replacement drum cartridge.
*The remaining page yield for copy/print jobs is applicable when A4 paper LEF ( ) is used. Actual remaining service life will vary depending on the paper size and orientation, number of consecutive pages printed, and the machine's operating environment. Use the figures above only as a guideline.
Notes
• The use of drum cartridges not recommended by Xerox may degrade image quality and performance. Use only drum cartridges recommended by Xerox.
• Do not expose drum cartridges to direct sunlight or strong light from indoor fluorescent lighting. Do not touch or scratch the surface of the drum. Doing so may result in unsatisfactory print quality.
Error Code Message Required Action
091-440 Drum Near End of Life
Drum cartridge is near end of life.
Reorder a drum cartridge.
The drum cartridge will need to be replaced after the following number of pages. Have a replacement drum cartridge ready.
WorkCentre 5024: Approx. 4,000 pages
WorkCentre 5022: Approx. 3,000 pages
091-402091-441
Drum Near End of LifeDrum cartridge is near end of life.
Replace drum cartridge soon.
The drum cartridge will need to be replaced after about 1,000 pages*. Have a replacement drum cartridge ready.
091-430 Drum End of LifeReplace drum cartridge.
The error icon is lit. The drum cartridge needs to be replaced. Replace the drum cartridge.
091-401 Drum Near End of Life
Image quality problem may occur.
Replacement of drum cartridge is recommended.
The error icon is lit. It is time of expiration for the warranty period of the image quality on the drum cartridge.
091-406 Drum end of Life
Machine problem may occur.
Replace drum cartridge.
The error icon is lit. It is time of expiration for the warranty period of performance on the drum cartridge.
091-424 Drum End of Life
Machine problem will occur soon.
Replace drum cartridge immediately.
The error icon is lit. The machine detected a failure due to the use of a dram cartridge that is not supported.
Replace the drum cartridge immediately.
Xerox® WorkCentre® 5022/5024 Multifunction PrinterUser Guide
12-7
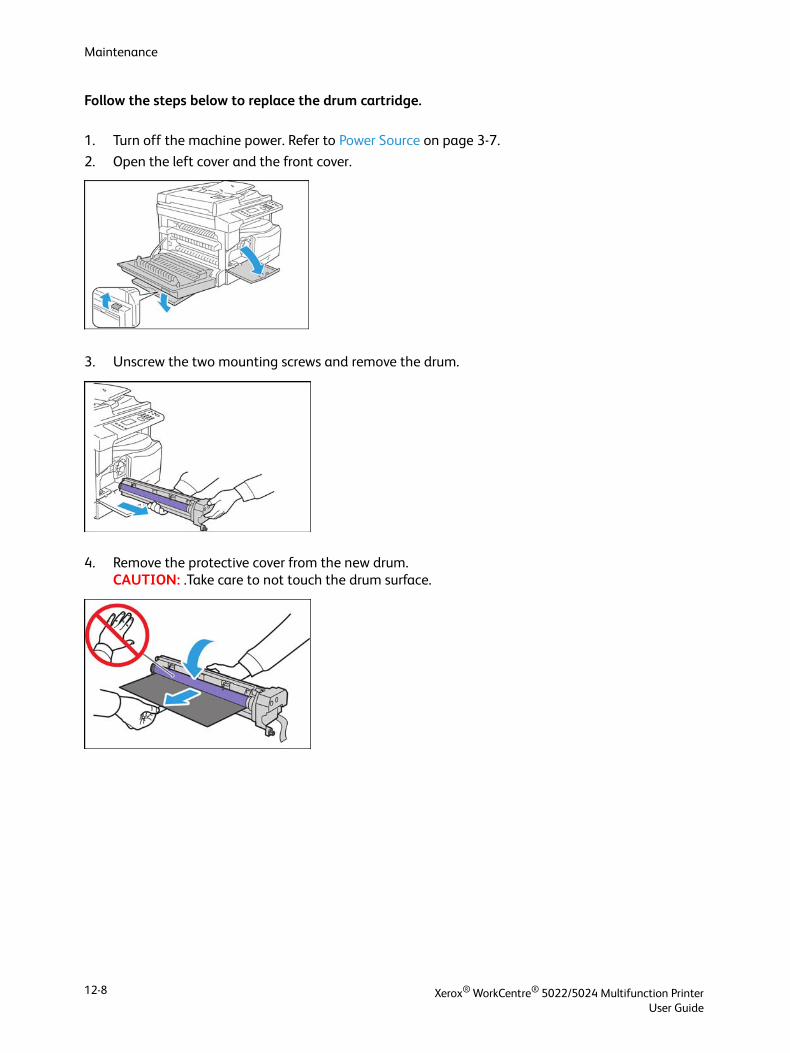
Maintenance
Follow the steps below to replace the drum cartridge.
1. Turn off the machine power. Refer to Power Source on page 3-7.
2. Open the left cover and the front cover.
3. Unscrew the two mounting screws and remove the drum.
4. Remove the protective cover from the new drum. CAUTION: .Take care to not touch the drum surface.
Xerox® WorkCentre® 5022/5024 Multifunction PrinterUser Guide
12-8
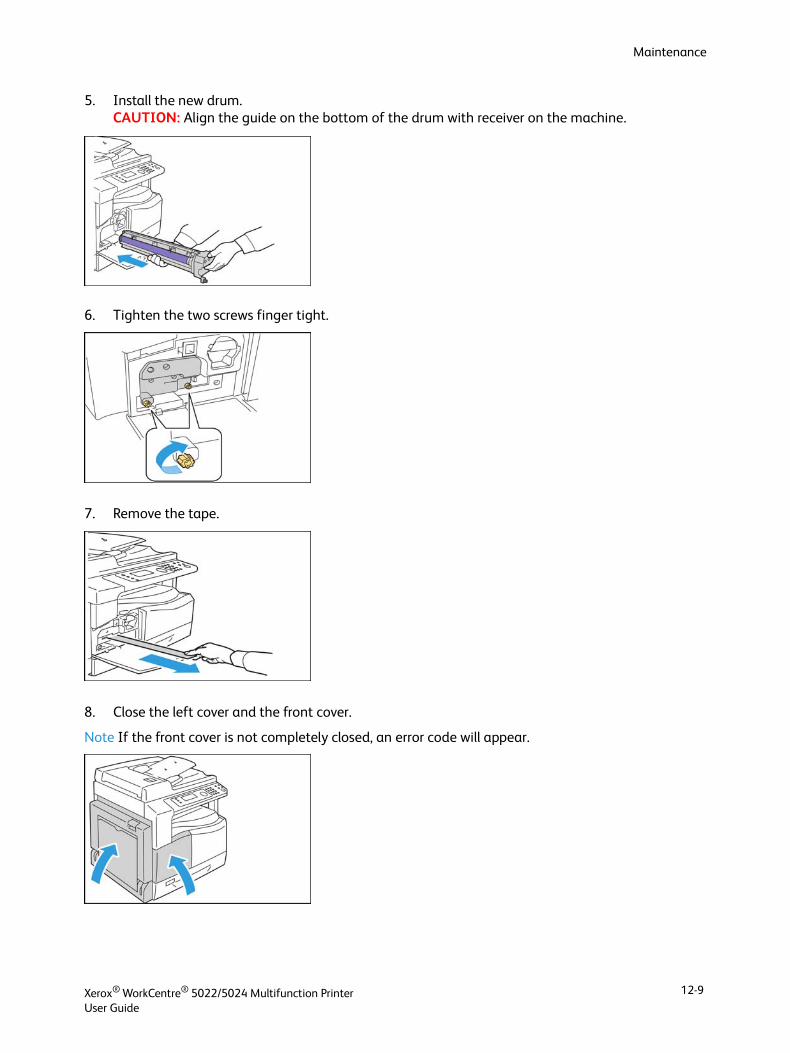
Maintenance
5. Install the new drum. CAUTION: Align the guide on the bottom of the drum with receiver on the machine.
6. Tighten the two screws finger tight.
7. Remove the tape.
8. Close the left cover and the front cover.
Note If the front cover is not completely closed, an error code will appear.
Xerox® WorkCentre® 5022/5024 Multifunction PrinterUser Guide
12-9
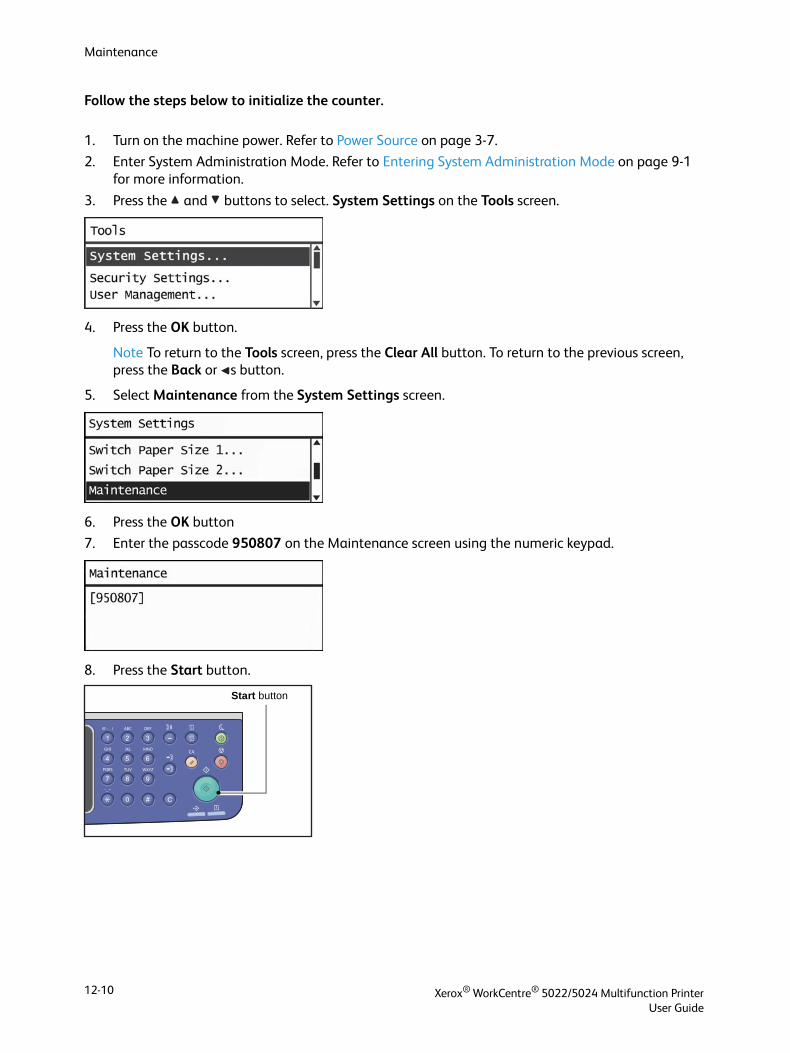
Maintenance
Follow the steps below to initialize the counter.
1. Turn on the machine power. Refer to Power Source on page 3-7.
2. Enter System Administration Mode. Refer to Entering System Administration Mode on page 9-1 for more information.
3. Press the and buttons to select. System Settings on the Tools screen.
4. Press the OK button.
Note To return to the Tools screen, press the Clear All button. To return to the previous screen, press the Back or s button.
5. Select Maintenance from the System Settings screen.
6. Press the OK button
7. Enter the passcode 950807 on the Maintenance screen using the numeric keypad.
8. Press the Start button.
Start button
Xerox® WorkCentre® 5022/5024 Multifunction PrinterUser Guide
12-10
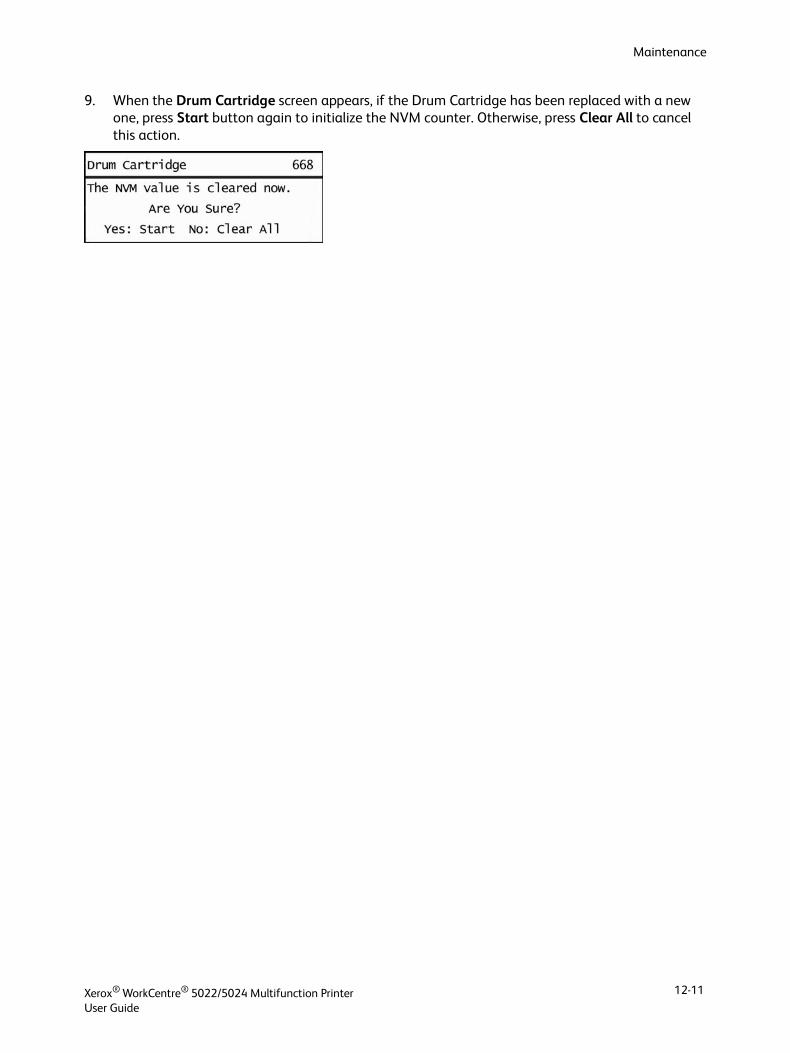
Maintenance
9. When the Drum Cartridge screen appears, if the Drum Cartridge has been replaced with a new one, press Start button again to initialize the NVM counter. Otherwise, press Clear All to cancel this action.
Xerox® WorkCentre® 5022/5024 Multifunction PrinterUser Guide
12-11
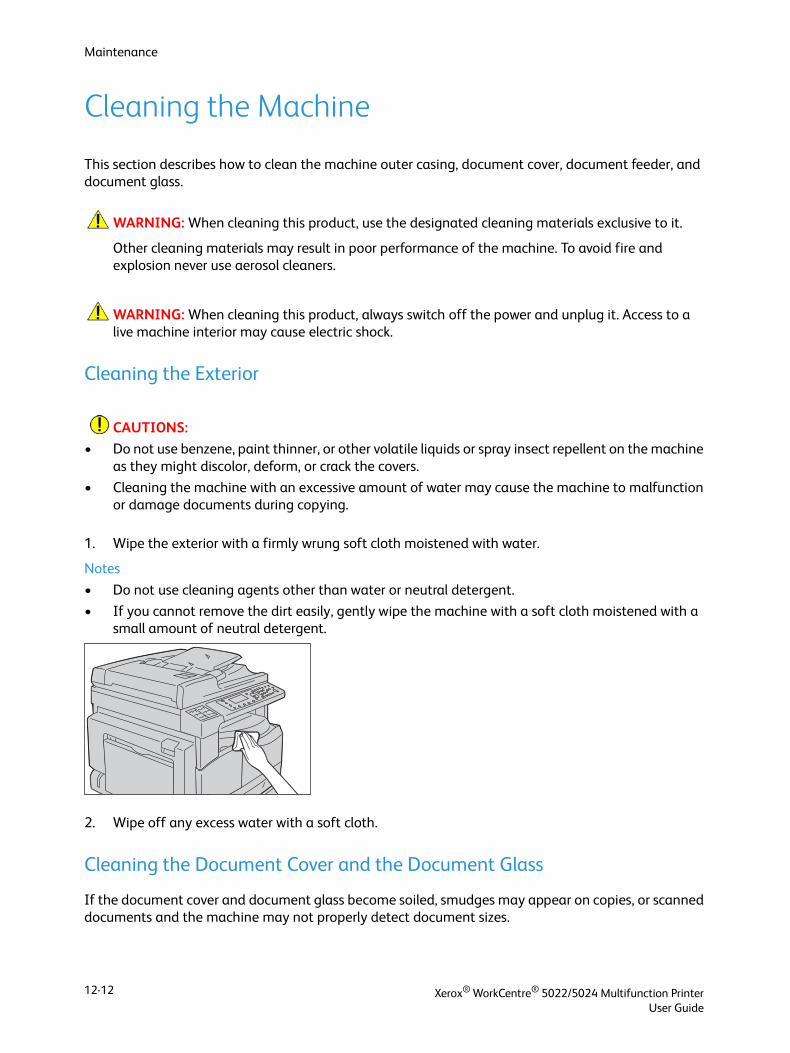
Maintenance
Cleaning the Machine
This section describes how to clean the machine outer casing, document cover, document feeder, and document glass.
WARNING: When cleaning this product, use the designated cleaning materials exclusive to it.
Other cleaning materials may result in poor performance of the machine. To avoid fire and explosion never use aerosol cleaners.
WARNING: When cleaning this product, always switch off the power and unplug it. Access to a live machine interior may cause electric shock.
Cleaning the Exterior
CAUTIONS:
• Do not use benzene, paint thinner, or other volatile liquids or spray insect repellent on the machine as they might discolor, deform, or crack the covers.
• Cleaning the machine with an excessive amount of water may cause the machine to malfunction or damage documents during copying.
1. Wipe the exterior with a firmly wrung soft cloth moistened with water.
Notes
• Do not use cleaning agents other than water or neutral detergent.
• If you cannot remove the dirt easily, gently wipe the machine with a soft cloth moistened with a small amount of neutral detergent.
2. Wipe off any excess water with a soft cloth.
Cleaning the Document Cover and the Document Glass
If the document cover and document glass become soiled, smudges may appear on copies, or scanned documents and the machine may not properly detect document sizes.
Xerox® WorkCentre® 5022/5024 Multifunction PrinterUser Guide
12-12

Maintenance
To ensure clean copies at all times, clean the document cover and the document glass about once a month.
CAUTIONS:
• Do not use benzene, paint thinner, or other organic solvents. Doing so might damage the paint or coating on plastic parts.
• Cleaning the machine with an excessive amount of water may cause the machine to malfunction or damage documents during copying, or scanning.
1. Wipe the document cover with a soft cloth moistened with water to remove any dirt, and then wipe it with a soft, dry cloth.
Notes
• Do not use cleaning agents other than water or neutral detergent.
• If you cannot remove dirt easily, gently wipe the document cover with a soft cloth moistened with a small amount of neutral detergent.
2. Wipe the document glass with a soft cloth moistened with water to remove any dirt, and then wipe it with a soft, dry cloth.
Notes
• Do not use cleaning agents other than water or neutral detergent.
• If you cannot remove dirt easily, gently wipe the document glass with a soft cloth moistened with a small amount of neutral detergent.
Cleaning the Document Presser and the Narrow Glass Strip
If the document presser or narrow glass strip becomes soiled, smudges may appear on copies, or scanned documents and the machine may not properly detect document sizes.
Xerox® WorkCentre® 5022/5024 Multifunction PrinterUser Guide
12-13
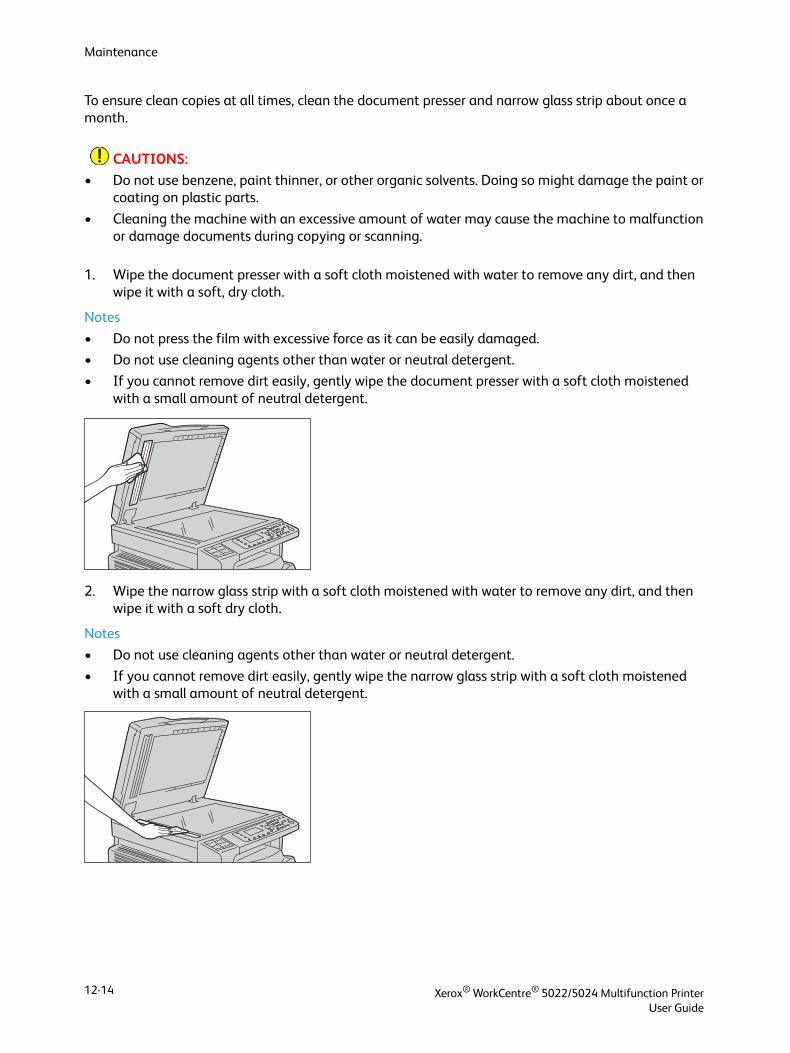
Maintenance
To ensure clean copies at all times, clean the document presser and narrow glass strip about once a month.
CAUTIONS:
• Do not use benzene, paint thinner, or other organic solvents. Doing so might damage the paint or coating on plastic parts.
• Cleaning the machine with an excessive amount of water may cause the machine to malfunction or damage documents during copying or scanning.
1. Wipe the document presser with a soft cloth moistened with water to remove any dirt, and then wipe it with a soft, dry cloth.
Notes
• Do not press the film with excessive force as it can be easily damaged.
• Do not use cleaning agents other than water or neutral detergent.
• If you cannot remove dirt easily, gently wipe the document presser with a soft cloth moistened with a small amount of neutral detergent.
2. Wipe the narrow glass strip with a soft cloth moistened with water to remove any dirt, and then wipe it with a soft dry cloth.
Notes
• Do not use cleaning agents other than water or neutral detergent.
• If you cannot remove dirt easily, gently wipe the narrow glass strip with a soft cloth moistened with a small amount of neutral detergent.
Xerox® WorkCentre® 5022/5024 Multifunction PrinterUser Guide
12-14
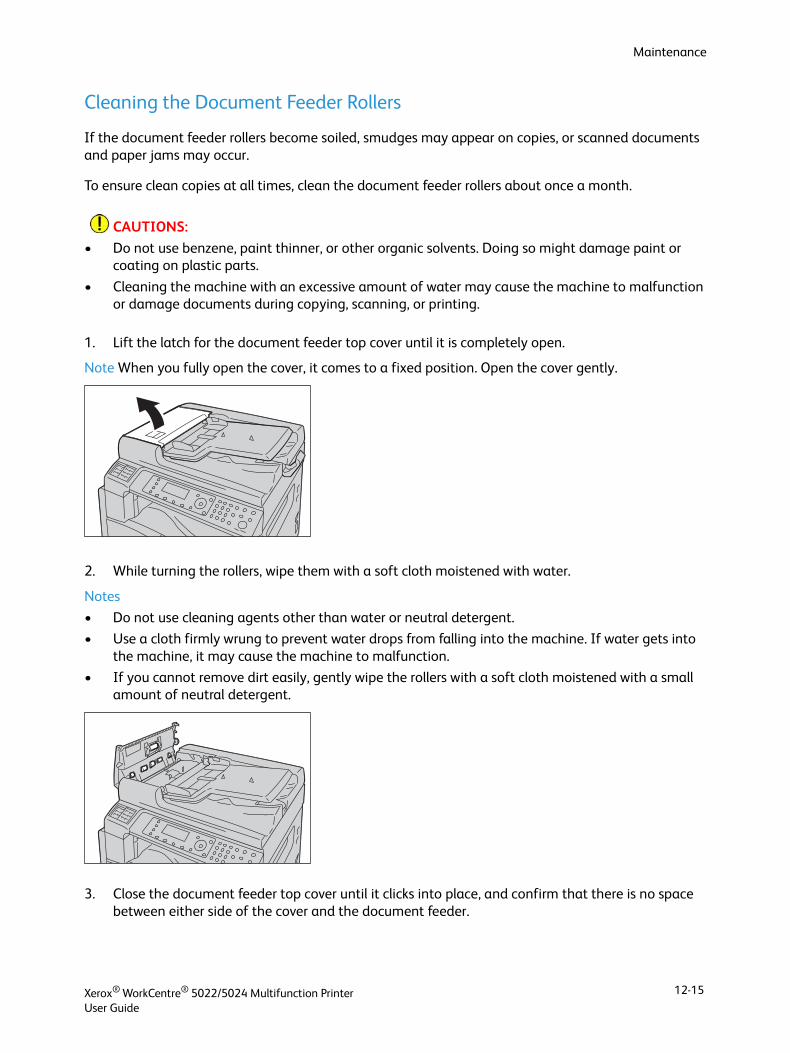
Maintenance
Cleaning the Document Feeder Rollers
If the document feeder rollers become soiled, smudges may appear on copies, or scanned documents and paper jams may occur.
To ensure clean copies at all times, clean the document feeder rollers about once a month.
CAUTIONS:
• Do not use benzene, paint thinner, or other organic solvents. Doing so might damage paint or coating on plastic parts.
• Cleaning the machine with an excessive amount of water may cause the machine to malfunction or damage documents during copying, scanning, or printing.
1. Lift the latch for the document feeder top cover until it is completely open.
Note When you fully open the cover, it comes to a fixed position. Open the cover gently.
2. While turning the rollers, wipe them with a soft cloth moistened with water.
Notes
• Do not use cleaning agents other than water or neutral detergent.
• Use a cloth firmly wrung to prevent water drops from falling into the machine. If water gets into the machine, it may cause the machine to malfunction.
• If you cannot remove dirt easily, gently wipe the rollers with a soft cloth moistened with a small amount of neutral detergent.
3. Close the document feeder top cover until it clicks into place, and confirm that there is no space between either side of the cover and the document feeder.
Xerox® WorkCentre® 5022/5024 Multifunction PrinterUser Guide
12-15

Maintenance
Xerox® WorkCentre® 5022/5024 Multifunction PrinterUser Guide
12-16
13Problem Solving
This chapter provides possible solutions to various problems you may encounter with the machine.
Troubleshooting
Follow the troubleshooting procedures below to solve problems.
If the error is not resolved even after following the above procedure, contact our Customer Support Center.
Problem Cause/Action
The machine does not work properly. Refer to Machine Problems on page 13-2.
A message is displayed. For information on paper jams, refer to Paper Jams on page 13-46.
For information on document jams, refer to Document Jams on page 13-55.
Refer to Error Codes on page 13-32.
The image quality is poor. Refer to Image Quality Problems on page 13-6.
Trouble during copying Refer to Copying Problems on page 13-12.
Trouble during printing Refer to Printer Problems on page 13-15.
Trouble during faxing Refer to Fax Problems on page 13-17.
Trouble during scanning Refer to Scan Problems on page 13-20.
Network problems Refer to Network Related Problems on page 13-25.
Xerox® WorkCentre® 5022/5024 Multifunction PrinterUser Guide
13-1
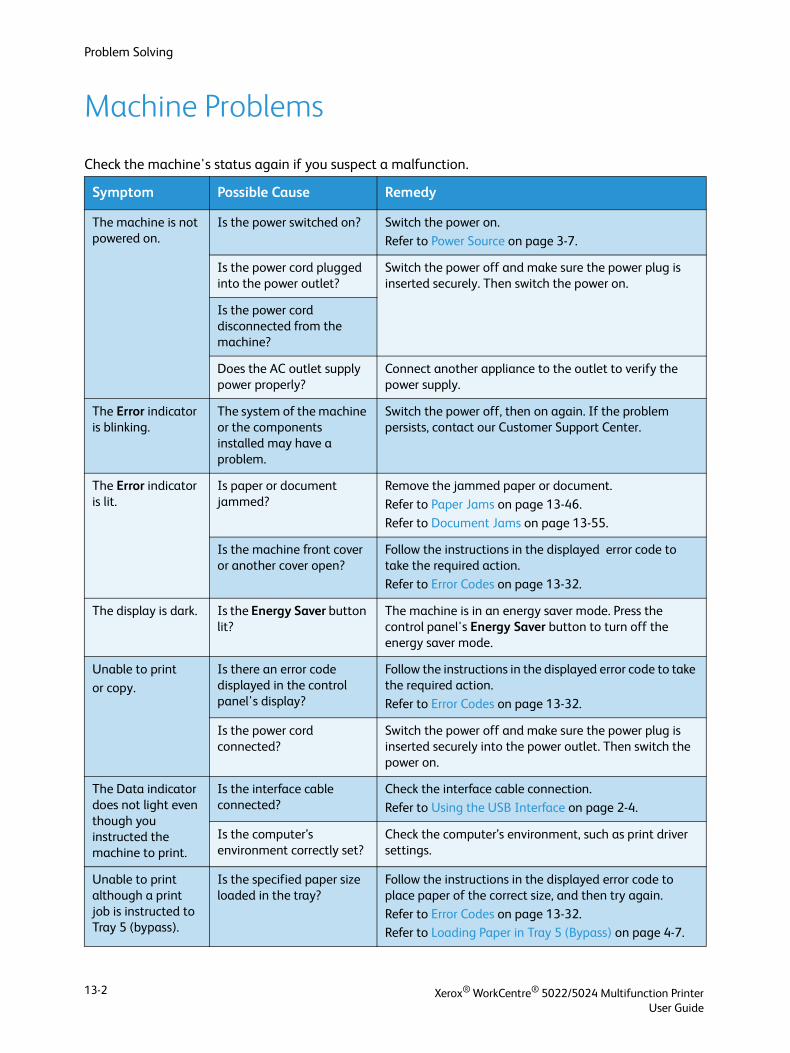
Problem Solving
Machine Problems
Check the machine's status again if you suspect a malfunction.
Symptom Possible Cause Remedy
The machine is not powered on.
Is the power switched on? Switch the power on.
Refer to Power Source on page 3-7.
Is the power cord plugged into the power outlet?
Switch the power off and make sure the power plug is inserted securely. Then switch the power on.
Is the power cord disconnected from the machine?
Does the AC outlet supply power properly?
Connect another appliance to the outlet to verify the power supply.
The Error indicator is blinking.
The system of the machine or the components installed may have a problem.
Switch the power off, then on again. If the problem persists, contact our Customer Support Center.
The Error indicator is lit.
Is paper or document jammed?
Remove the jammed paper or document.
Refer to Paper Jams on page 13-46.
Refer to Document Jams on page 13-55.
Is the machine front cover or another cover open?
Follow the instructions in the displayed error code to take the required action.
Refer to Error Codes on page 13-32.
The display is dark. Is the Energy Saver button lit?
The machine is in an energy saver mode. Press the control panel's Energy Saver button to turn off the energy saver mode.
Unable to print
or copy.
Is there an error code displayed in the control panel's display?
Follow the instructions in the displayed error code to take the required action.
Refer to Error Codes on page 13-32.
Is the power cord connected?
Switch the power off and make sure the power plug is inserted securely into the power outlet. Then switch the power on.
The Data indicator does not light even though you instructed the machine to print.
Is the interface cable connected?
Check the interface cable connection.
Refer to Using the USB Interface on page 2-4.
Is the computer’s environment correctly set?
Check the computer’s environment, such as print driver settings.
Unable to print although a print job is instructed to Tray 5 (bypass).
Is the specified paper size loaded in the tray?
Follow the instructions in the displayed error code to place paper of the correct size, and then try again.
Refer to Error Codes on page 13-32.Refer to Loading Paper in Tray 5 (Bypass) on page 4-7.
Xerox® WorkCentre® 5022/5024 Multifunction PrinterUser Guide
13-2
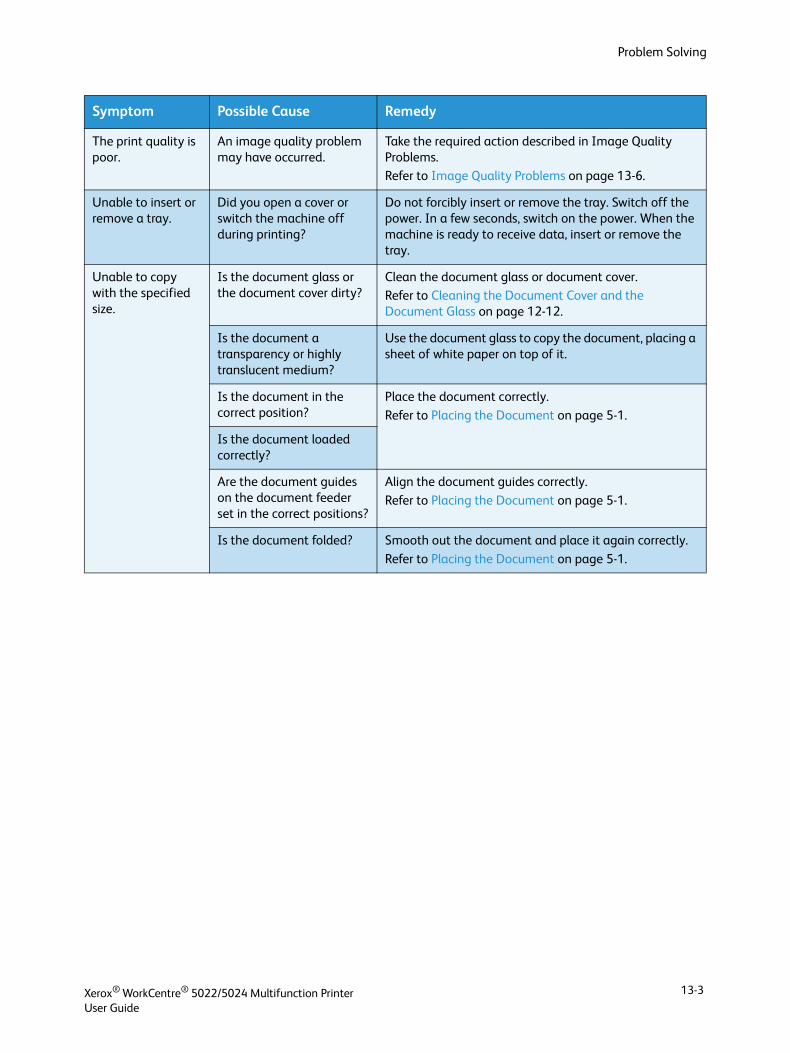
Problem Solving
The print quality is poor.
An image quality problem may have occurred.
Take the required action described in Image Quality Problems.Refer to Image Quality Problems on page 13-6.
Unable to insert or remove a tray.
Did you open a cover or switch the machine off during printing?
Do not forcibly insert or remove the tray. Switch off the power. In a few seconds, switch on the power. When the machine is ready to receive data, insert or remove the tray.
Unable to copy with the specified size.
Is the document glass or the document cover dirty?
Clean the document glass or document cover.Refer to Cleaning the Document Cover and the Document Glass on page 12-12.
Is the document a transparency or highly translucent medium?
Use the document glass to copy the document, placing a sheet of white paper on top of it.
Is the document in the correct position?
Place the document correctly.
Refer to Placing the Document on page 5-1.
Is the document loaded correctly?
Are the document guides on the document feeder set in the correct positions?
Align the document guides correctly.
Refer to Placing the Document on page 5-1.
Is the document folded? Smooth out the document and place it again correctly.
Refer to Placing the Document on page 5-1.
Symptom Possible Cause Remedy
Xerox® WorkCentre® 5022/5024 Multifunction PrinterUser Guide
13-3
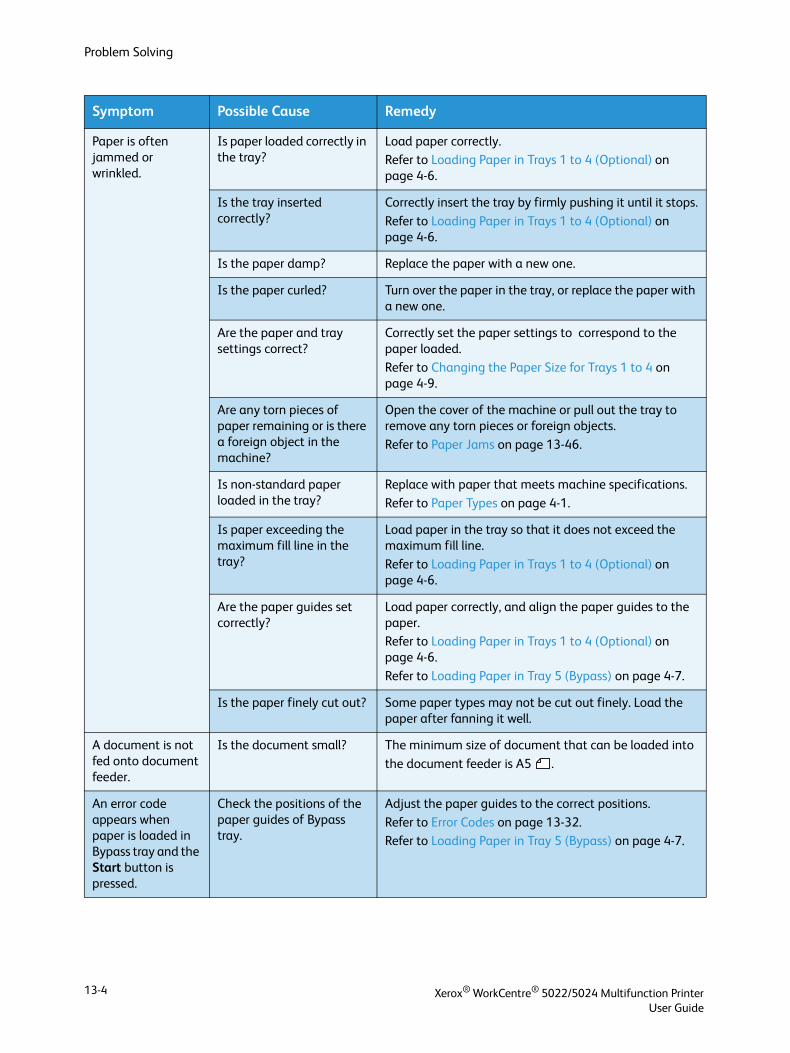
Problem Solving
Paper is often jammed or wrinkled.
Is paper loaded correctly in the tray?
Load paper correctly.Refer to Loading Paper in Trays 1 to 4 (Optional) on page 4-6.
Is the tray inserted correctly?
Correctly insert the tray by firmly pushing it until it stops.
Refer to Loading Paper in Trays 1 to 4 (Optional) on page 4-6.
Is the paper damp? Replace the paper with a new one.
Is the paper curled? Turn over the paper in the tray, or replace the paper with a new one.
Are the paper and tray settings correct?
Correctly set the paper settings to correspond to the paper loaded.
Refer to Changing the Paper Size for Trays 1 to 4 on page 4-9.
Are any torn pieces of paper remaining or is there a foreign object in the machine?
Open the cover of the machine or pull out the tray to remove any torn pieces or foreign objects.
Refer to Paper Jams on page 13-46.
Is non-standard paper loaded in the tray?
Replace with paper that meets machine specifications.
Refer to Paper Types on page 4-1.
Is paper exceeding the maximum fill line in the tray?
Load paper in the tray so that it does not exceed the maximum fill line.
Refer to Loading Paper in Trays 1 to 4 (Optional) on page 4-6.
Are the paper guides set correctly?
Load paper correctly, and align the paper guides to the paper.Refer to Loading Paper in Trays 1 to 4 (Optional) on page 4-6.
Refer to Loading Paper in Tray 5 (Bypass) on page 4-7.
Is the paper finely cut out? Some paper types may not be cut out finely. Load the paper after fanning it well.
A document is not fed onto document feeder.
Is the document small? The minimum size of document that can be loaded into
the document feeder is A5 .
An error code appears when paper is loaded in Bypass tray and the Start button is pressed.
Check the positions of the paper guides of Bypass tray.
Adjust the paper guides to the correct positions.
Refer to Error Codes on page 13-32.Refer to Loading Paper in Tray 5 (Bypass) on page 4-7.
Symptom Possible Cause Remedy
Xerox® WorkCentre® 5022/5024 Multifunction PrinterUser Guide
13-4
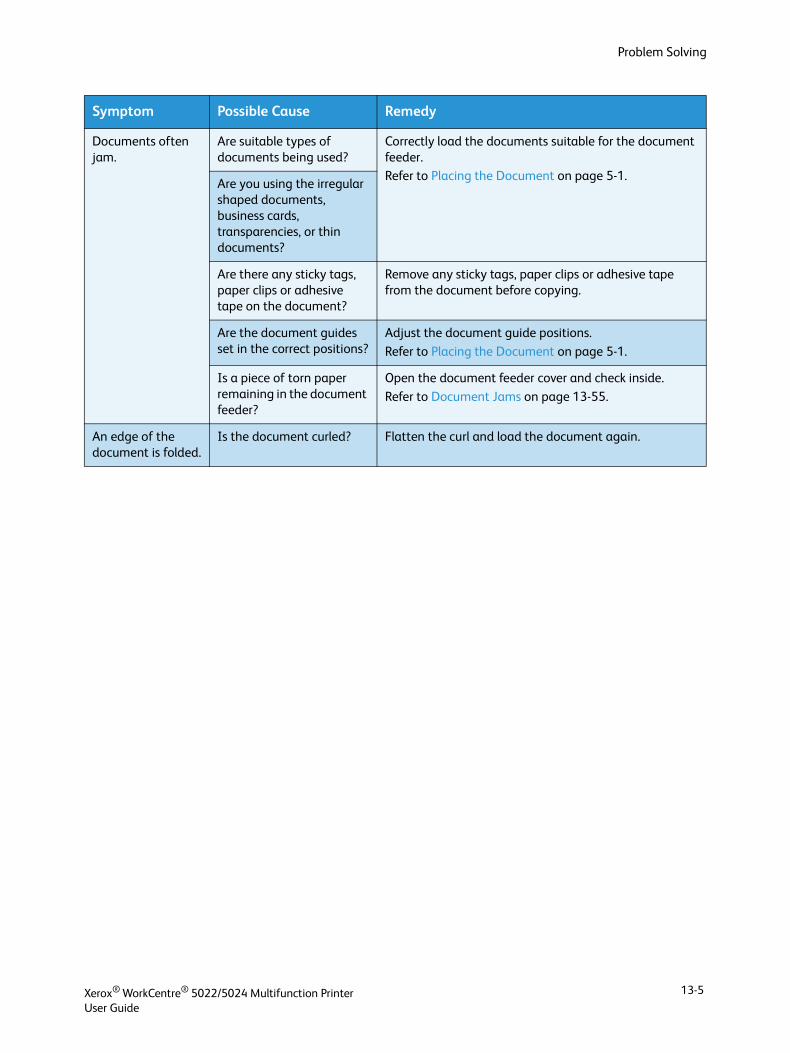
Problem Solving
Documents often jam.
Are suitable types of documents being used?
Correctly load the documents suitable for the document feeder.Refer to Placing the Document on page 5-1.
Are you using the irregular shaped documents, business cards, transparencies, or thin documents?
Are there any sticky tags, paper clips or adhesive tape on the document?
Remove any sticky tags, paper clips or adhesive tape from the document before copying.
Are the document guides set in the correct positions?
Adjust the document guide positions.
Refer to Placing the Document on page 5-1.
Is a piece of torn paper remaining in the document feeder?
Open the document feeder cover and check inside.
Refer to Document Jams on page 13-55.
An edge of the document is folded.
Is the document curled? Flatten the curl and load the document again.
Symptom Possible Cause Remedy
Xerox® WorkCentre® 5022/5024 Multifunction PrinterUser Guide
13-5
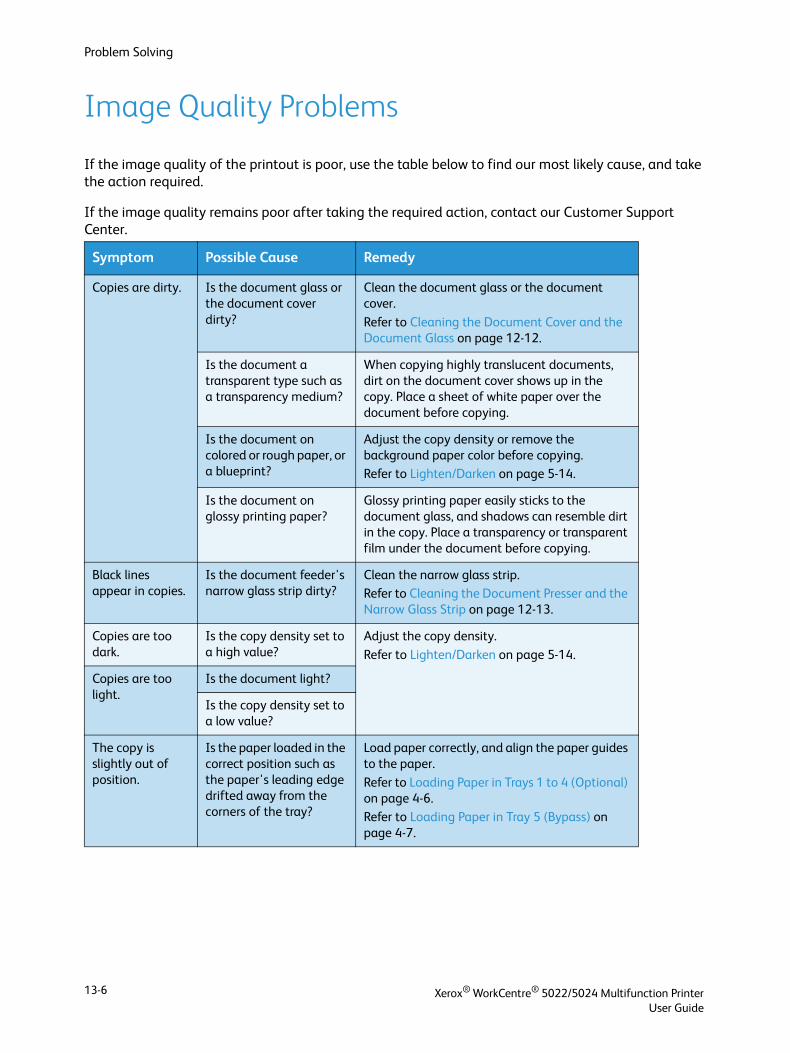
Problem Solving
Image Quality Problems
If the image quality of the printout is poor, use the table below to find our most likely cause, and take the action required.
If the image quality remains poor after taking the required action, contact our Customer Support Center.
Symptom Possible Cause Remedy
Copies are dirty. Is the document glass or the document cover dirty?
Clean the document glass or the document cover.
Refer to Cleaning the Document Cover and the Document Glass on page 12-12.
Is the document a transparent type such as a transparency medium?
When copying highly translucent documents, dirt on the document cover shows up in the copy. Place a sheet of white paper over the document before copying.
Is the document on colored or rough paper, or a blueprint?
Adjust the copy density or remove the background paper color before copying.Refer to Lighten/Darken on page 5-14.
Is the document on glossy printing paper?
Glossy printing paper easily sticks to the document glass, and shadows can resemble dirt in the copy. Place a transparency or transparent film under the document before copying.
Black lines appear in copies.
Is the document feeder's narrow glass strip dirty?
Clean the narrow glass strip.Refer to Cleaning the Document Presser and the Narrow Glass Strip on page 12-13.
Copies are too dark.
Is the copy density set to a high value?
Adjust the copy density.
Refer to Lighten/Darken on page 5-14.
Copies are too light.
Is the document light?
Is the copy density set to a low value?
The copy is slightly out of position.
Is the paper loaded in the correct position such as the paper's leading edge drifted away from the corners of the tray?
Load paper correctly, and align the paper guides to the paper.
Refer to Loading Paper in Trays 1 to 4 (Optional) on page 4-6.Refer to Loading Paper in Tray 5 (Bypass) on page 4-7.
Xerox® WorkCentre® 5022/5024 Multifunction PrinterUser Guide
13-6
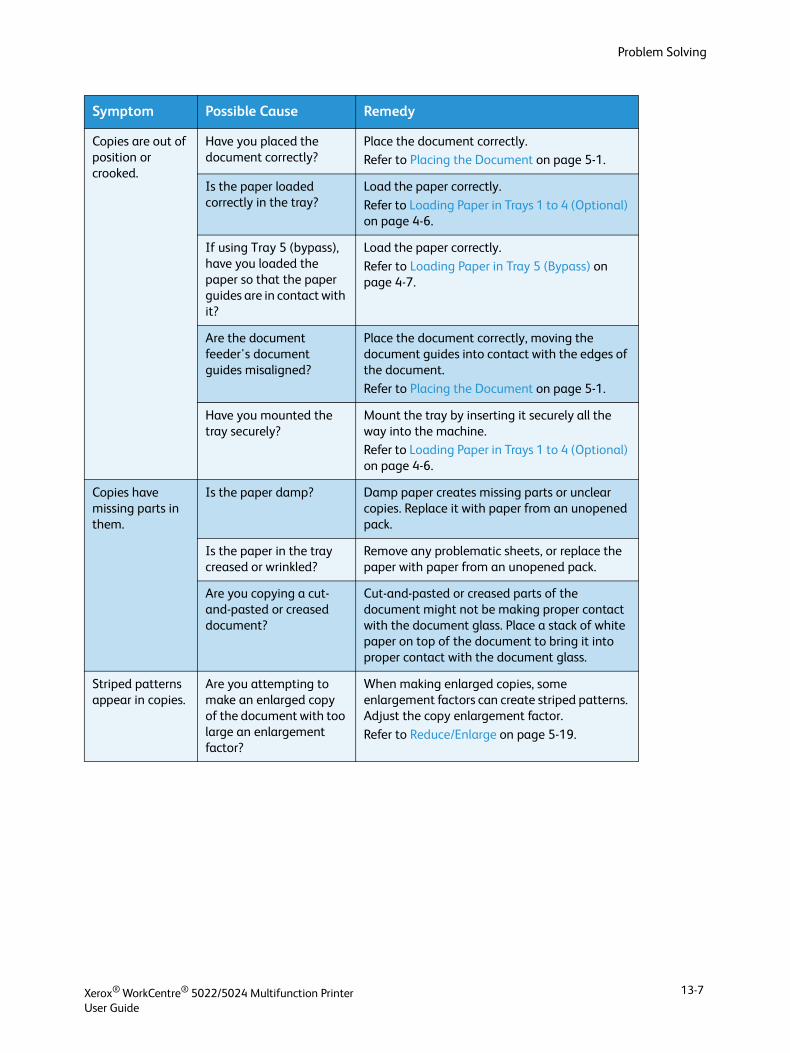
Problem Solving
Copies are out of position or crooked.
Have you placed the document correctly?
Place the document correctly.Refer to Placing the Document on page 5-1.
Is the paper loaded correctly in the tray?
Load the paper correctly.
Refer to Loading Paper in Trays 1 to 4 (Optional) on page 4-6.
If using Tray 5 (bypass), have you loaded the paper so that the paper guides are in contact with it?
Load the paper correctly.
Refer to Loading Paper in Tray 5 (Bypass) on page 4-7.
Are the document feeder's document guides misaligned?
Place the document correctly, moving the document guides into contact with the edges of the document.
Refer to Placing the Document on page 5-1.
Have you mounted the tray securely?
Mount the tray by inserting it securely all the way into the machine.Refer to Loading Paper in Trays 1 to 4 (Optional) on page 4-6.
Copies have missing parts in them.
Is the paper damp? Damp paper creates missing parts or unclear copies. Replace it with paper from an unopened pack.
Is the paper in the tray creased or wrinkled?
Remove any problematic sheets, or replace the paper with paper from an unopened pack.
Are you copying a cut-and-pasted or creased document?
Cut-and-pasted or creased parts of the document might not be making proper contact with the document glass. Place a stack of white paper on top of the document to bring it into proper contact with the document glass.
Striped patterns appear in copies.
Are you attempting to make an enlarged copy of the document with too large an enlargement factor?
When making enlarged copies, some enlargement factors can create striped patterns. Adjust the copy enlargement factor.
Refer to Reduce/Enlarge on page 5-19.
Symptom Possible Cause Remedy
Xerox® WorkCentre® 5022/5024 Multifunction PrinterUser Guide
13-7
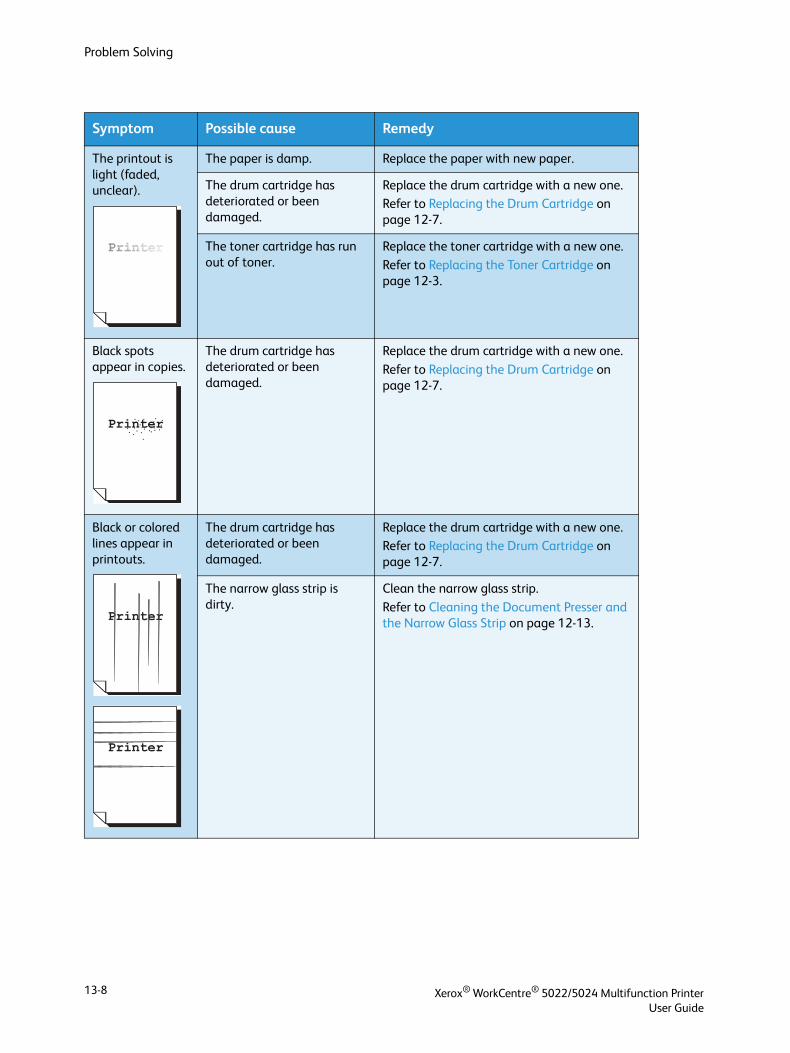
Problem Solving
Symptom Possible cause Remedy
The printout is light (faded, unclear).
The paper is damp. Replace the paper with new paper.
The drum cartridge has deteriorated or been damaged.
Replace the drum cartridge with a new one.Refer to Replacing the Drum Cartridge on page 12-7.
The toner cartridge has run out of toner.
Replace the toner cartridge with a new one.
Refer to Replacing the Toner Cartridge on page 12-3.
Black spots appear in copies.
The drum cartridge has deteriorated or been damaged.
Replace the drum cartridge with a new one.
Refer to Replacing the Drum Cartridge on page 12-7.
Black or colored lines appear in printouts.
The drum cartridge has deteriorated or been damaged.
Replace the drum cartridge with a new one.Refer to Replacing the Drum Cartridge on page 12-7.
The narrow glass strip is dirty.
Clean the narrow glass strip.
Refer to Cleaning the Document Presser and the Narrow Glass Strip on page 12-13.
Xerox® WorkCentre® 5022/5024 Multifunction PrinterUser Guide
13-8
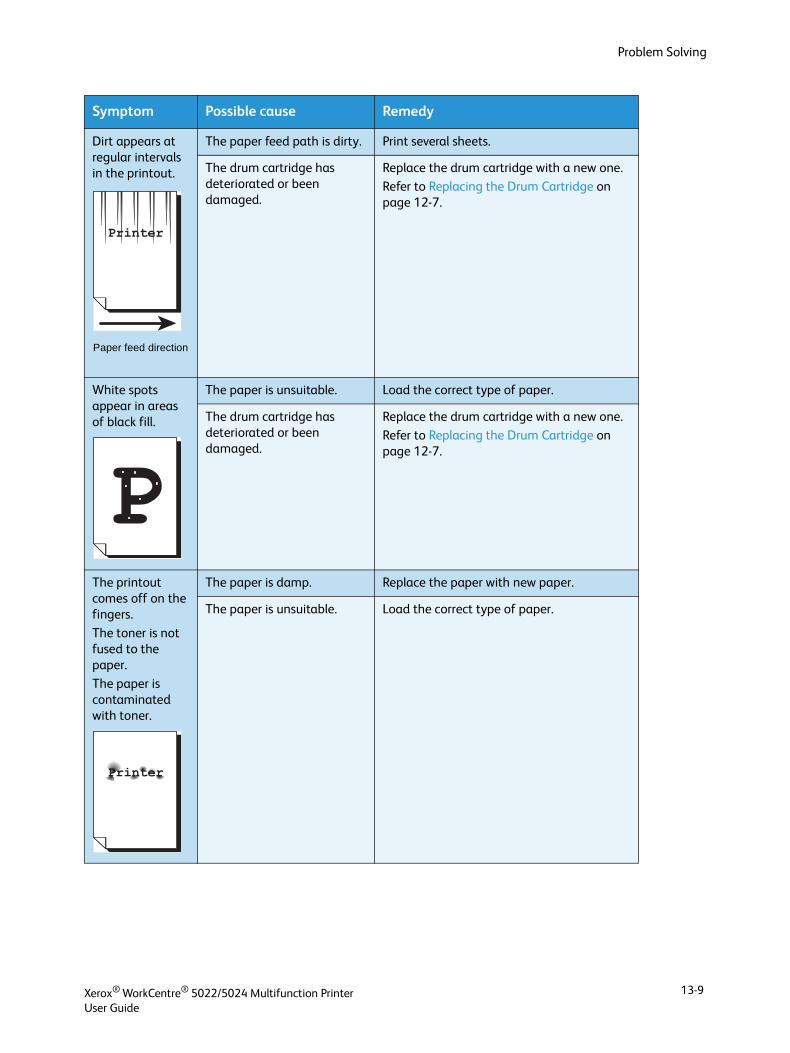
Problem Solving
Dirt appears at regular intervals in the printout.
The paper feed path is dirty. Print several sheets.
The drum cartridge has deteriorated or been damaged.
Replace the drum cartridge with a new one.
Refer to Replacing the Drum Cartridge on page 12-7.
White spots appear in areas of black fill.
The paper is unsuitable. Load the correct type of paper.
The drum cartridge has deteriorated or been damaged.
Replace the drum cartridge with a new one.
Refer to Replacing the Drum Cartridge on page 12-7.
The printout comes off on the fingers.
The toner is not fused to the paper.
The paper is contaminated with toner.
The paper is damp. Replace the paper with new paper.
The paper is unsuitable. Load the correct type of paper.
Symptom Possible cause Remedy
Paper feed direction
Xerox® WorkCentre® 5022/5024 Multifunction PrinterUser Guide
13-9
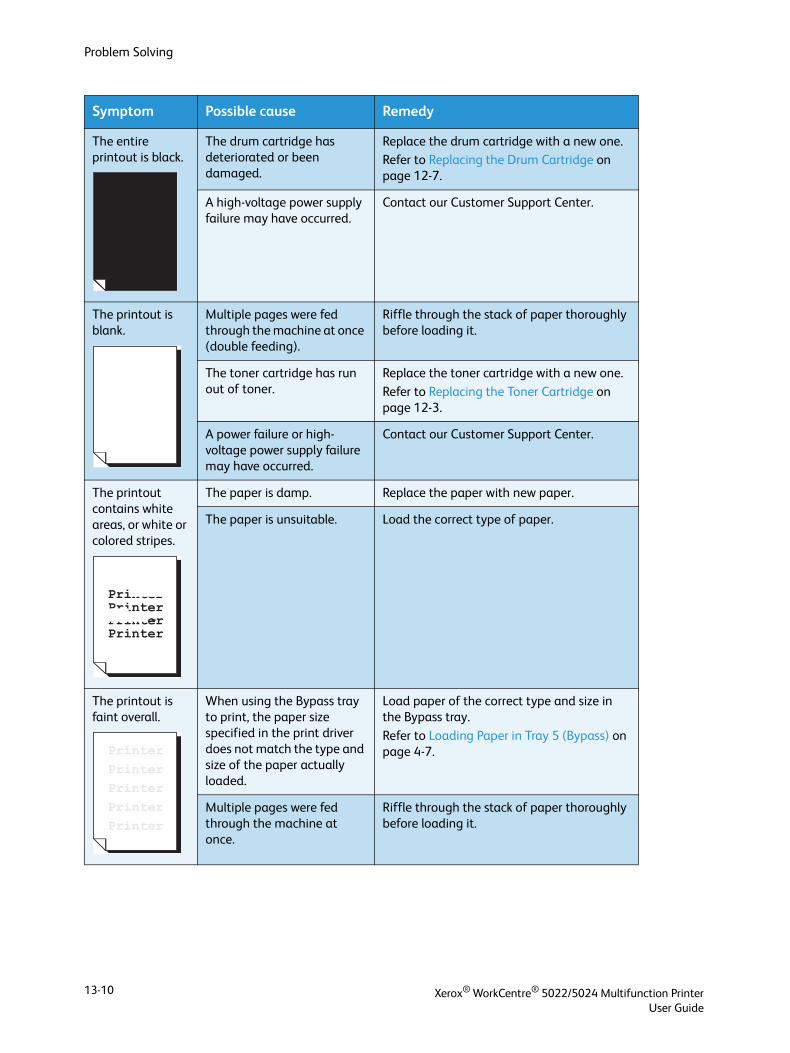
Problem Solving
The entire printout is black.
The drum cartridge has deteriorated or been damaged.
Replace the drum cartridge with a new one.Refer to Replacing the Drum Cartridge on page 12-7.
A high-voltage power supply failure may have occurred.
Contact our Customer Support Center.
The printout is blank.
Multiple pages were fed through the machine at once (double feeding).
Riffle through the stack of paper thoroughly before loading it.
The toner cartridge has run out of toner.
Replace the toner cartridge with a new one.
Refer to Replacing the Toner Cartridge on page 12-3.
A power failure or high-voltage power supply failure may have occurred.
Contact our Customer Support Center.
The printout contains white areas, or white or colored stripes.
The paper is damp. Replace the paper with new paper.
The paper is unsuitable. Load the correct type of paper.
The printout is faint overall.
When using the Bypass tray to print, the paper size specified in the print driver does not match the type and size of the paper actually loaded.
Load paper of the correct type and size in the Bypass tray.
Refer to Loading Paper in Tray 5 (Bypass) on page 4-7.
Multiple pages were fed through the machine at once.
Riffle through the stack of paper thoroughly before loading it.
Symptom Possible cause Remedy
Xerox® WorkCentre® 5022/5024 Multifunction PrinterUser Guide
13-10
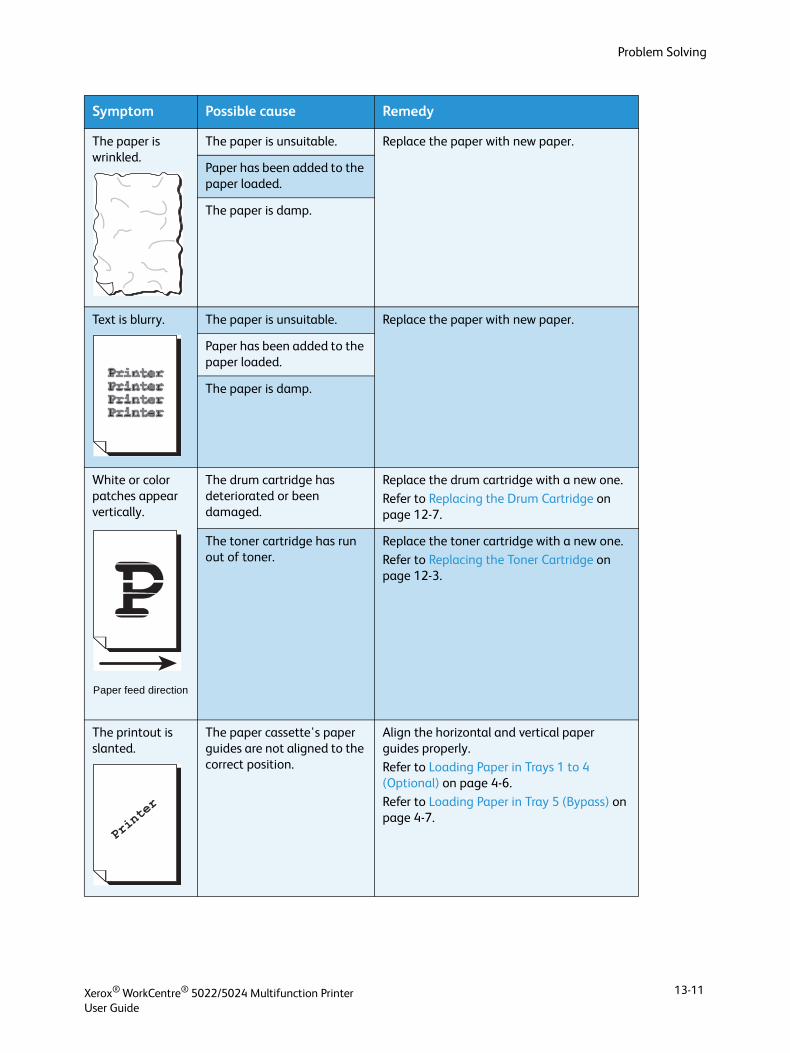
Problem Solving
The paper is wrinkled.
The paper is unsuitable. Replace the paper with new paper.
Paper has been added to the paper loaded.
The paper is damp.
Text is blurry. The paper is unsuitable. Replace the paper with new paper.
Paper has been added to the paper loaded.
The paper is damp.
White or color patches appear vertically.
The drum cartridge has deteriorated or been damaged.
Replace the drum cartridge with a new one.
Refer to Replacing the Drum Cartridge on page 12-7.
The toner cartridge has run out of toner.
Replace the toner cartridge with a new one.
Refer to Replacing the Toner Cartridge on page 12-3.
The printout is slanted.
The paper cassette's paper guides are not aligned to the correct position.
Align the horizontal and vertical paper guides properly.
Refer to Loading Paper in Trays 1 to 4 (Optional) on page 4-6.
Refer to Loading Paper in Tray 5 (Bypass) on page 4-7.
Symptom Possible cause Remedy
Paper feed direction
Xerox® WorkCentre® 5022/5024 Multifunction PrinterUser Guide
13-11
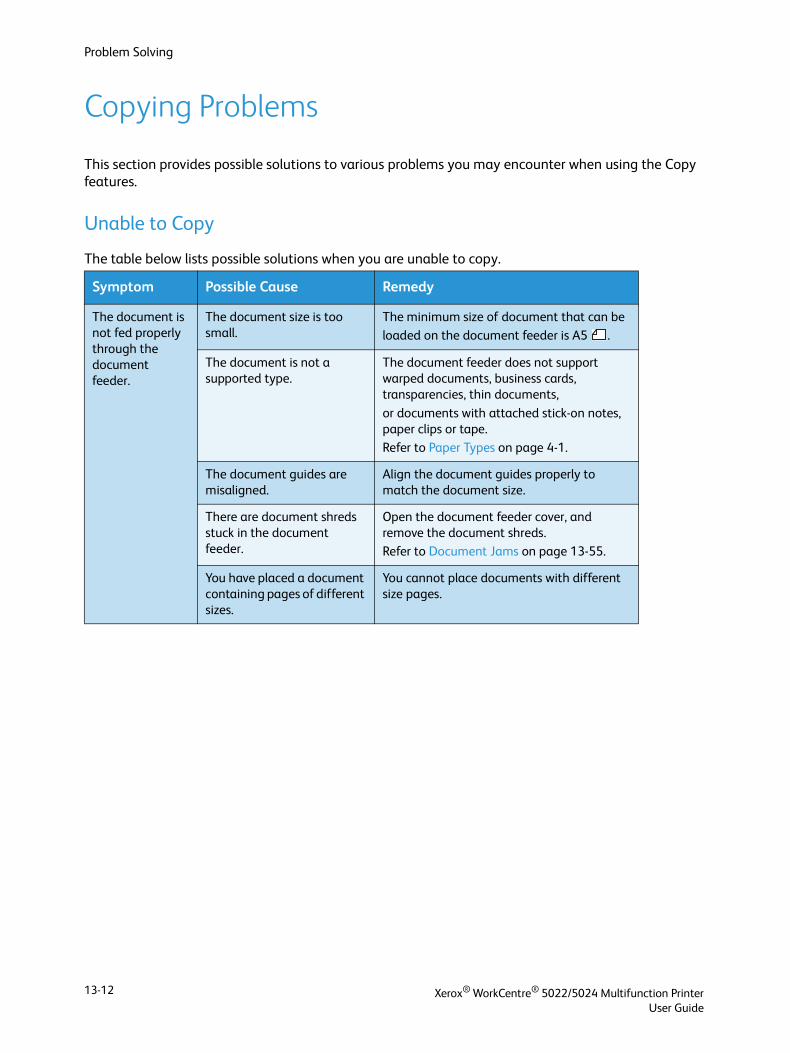
Problem Solving
Copying Problems
This section provides possible solutions to various problems you may encounter when using the Copy features.
Unable to Copy
The table below lists possible solutions when you are unable to copy.
Symptom Possible Cause Remedy
The document is not fed properly through the document feeder.
The document size is too small.
The minimum size of document that can be loaded on the document feeder is A5 .
The document is not a supported type.
The document feeder does not support warped documents, business cards, transparencies, thin documents,
or documents with attached stick-on notes, paper clips or tape.Refer to Paper Types on page 4-1.
The document guides are misaligned.
Align the document guides properly to match the document size.
There are document shreds stuck in the document feeder.
Open the document feeder cover, and remove the document shreds. Refer to Document Jams on page 13-55.
You have placed a document containing pages of different sizes.
You cannot place documents with different size pages.
Xerox® WorkCentre® 5022/5024 Multifunction PrinterUser Guide
13-12
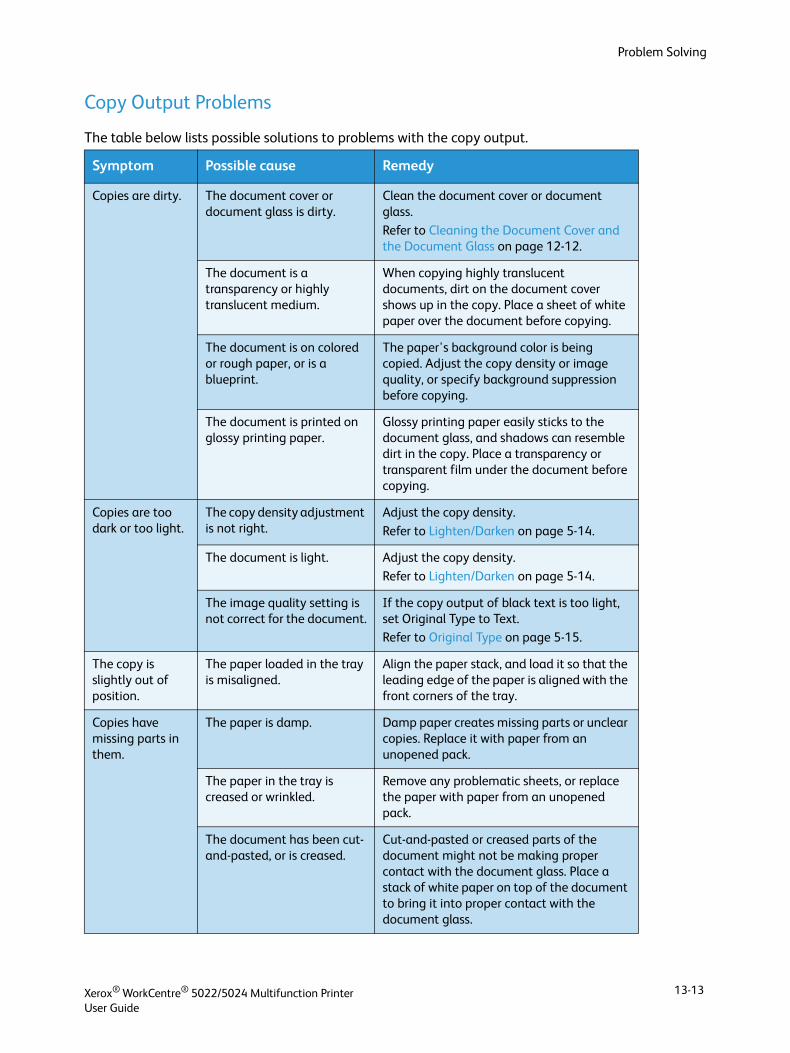
Problem Solving
Copy Output Problems
The table below lists possible solutions to problems with the copy output.
Symptom Possible cause Remedy
Copies are dirty. The document cover or document glass is dirty.
Clean the document cover or document glass.
Refer to Cleaning the Document Cover and the Document Glass on page 12-12.
The document is a transparency or highly translucent medium.
When copying highly translucent documents, dirt on the document cover shows up in the copy. Place a sheet of white paper over the document before copying.
The document is on colored or rough paper, or is a blueprint.
The paper's background color is being copied. Adjust the copy density or image quality, or specify background suppression before copying.
The document is printed on glossy printing paper.
Glossy printing paper easily sticks to the document glass, and shadows can resemble dirt in the copy. Place a transparency or transparent film under the document before copying.
Copies are too dark or too light.
The copy density adjustment is not right.
Adjust the copy density.
Refer to Lighten/Darken on page 5-14.
The document is light. Adjust the copy density.
Refer to Lighten/Darken on page 5-14.
The image quality setting is not correct for the document.
If the copy output of black text is too light, set Original Type to Text.Refer to Original Type on page 5-15.
The copy is slightly out of position.
The paper loaded in the tray is misaligned.
Align the paper stack, and load it so that the leading edge of the paper is aligned with the front corners of the tray.
Copies have missing parts in them.
The paper is damp. Damp paper creates missing parts or unclear copies. Replace it with paper from an unopened pack.
The paper in the tray is creased or wrinkled.
Remove any problematic sheets, or replace the paper with paper from an unopened pack.
The document has been cut-and-pasted, or is creased.
Cut-and-pasted or creased parts of the document might not be making proper contact with the document glass. Place a stack of white paper on top of the document to bring it into proper contact with the document glass.
Xerox® WorkCentre® 5022/5024 Multifunction PrinterUser Guide
13-13
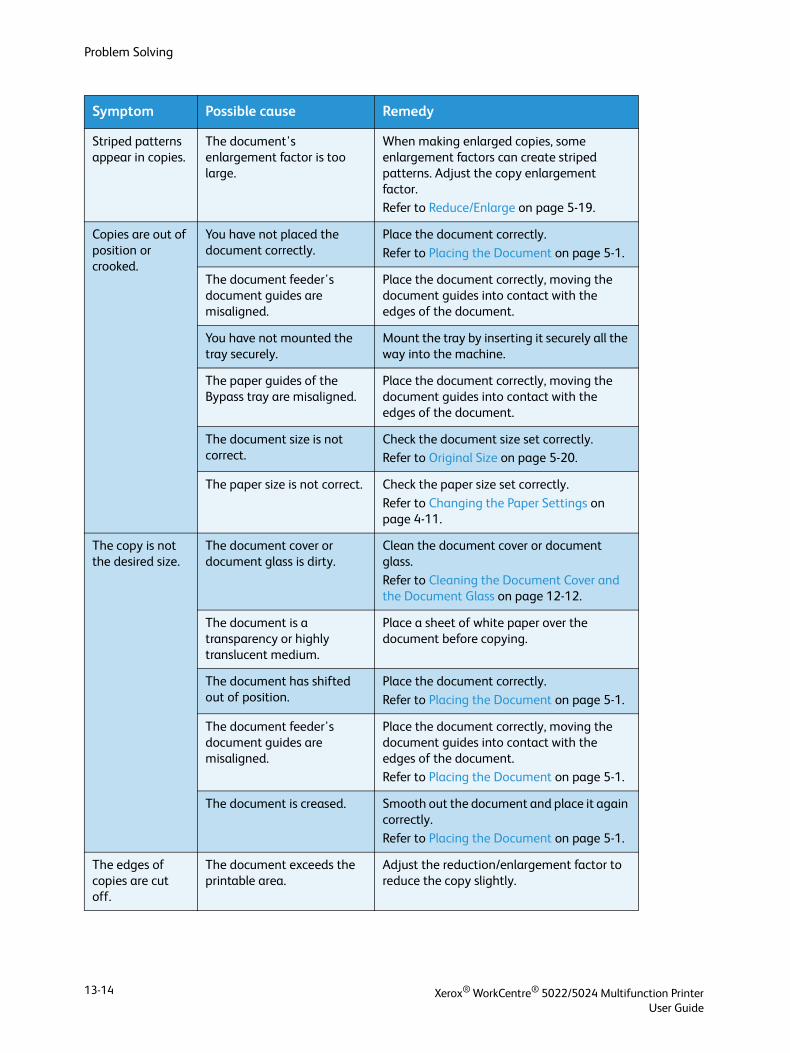
Problem Solving
Striped patterns appear in copies.
The document's enlargement factor is too large.
When making enlarged copies, some enlargement factors can create striped patterns. Adjust the copy enlargement factor.Refer to Reduce/Enlarge on page 5-19.
Copies are out of position or crooked.
You have not placed the document correctly.
Place the document correctly.
Refer to Placing the Document on page 5-1.
The document feeder's document guides are misaligned.
Place the document correctly, moving the document guides into contact with the edges of the document.
You have not mounted the tray securely.
Mount the tray by inserting it securely all the way into the machine.
The paper guides of the Bypass tray are misaligned.
Place the document correctly, moving the document guides into contact with the edges of the document.
The document size is not correct.
Check the document size set correctly.Refer to Original Size on page 5-20.
The paper size is not correct. Check the paper size set correctly.
Refer to Changing the Paper Settings on page 4-11.
The copy is not the desired size.
The document cover or document glass is dirty.
Clean the document cover or document glass.
Refer to Cleaning the Document Cover and the Document Glass on page 12-12.
The document is a transparency or highly translucent medium.
Place a sheet of white paper over the document before copying.
The document has shifted out of position.
Place the document correctly.
Refer to Placing the Document on page 5-1.
The document feeder's document guides are misaligned.
Place the document correctly, moving the document guides into contact with the edges of the document.Refer to Placing the Document on page 5-1.
The document is creased. Smooth out the document and place it again correctly.
Refer to Placing the Document on page 5-1.
The edges of copies are cut off.
The document exceeds the printable area.
Adjust the reduction/enlargement factor to reduce the copy slightly.
Symptom Possible cause Remedy
Xerox® WorkCentre® 5022/5024 Multifunction PrinterUser Guide
13-14

Problem Solving
Printer Problems
This section provides possible solutions to various problems you may encounter when using the Print features.
Unable to Print
The table below lists possible solutions when you are unable to print.
Symptom Possible Cause Remedy
Data remains in the printer icon.
The machine's power is not on. Switch the machine's power on .
Refer to Power Source on page 3-7.
The PC's cable is disconnected. Connect the PC's cable.
The machine's cable is disconnected.
Connect the machine's cable.
Refer to Using the USB Interface on page 2-4.
An error has occurred in the machine.
Check the error information, and take the required action.
There is a problem in the network connecting the computer and machine.
Contact your Network Administrator.
The port is not activated. Activate the port to use.Refer to Activating the Communication Port To Use on page 2-11.
The machine is connected to multiple computers.
Wait a while, and then try printing again.
Data has been sent to the machine.
No paper has been loaded. Load paper.
There is no paper of the specified size.
Load paper of the specified size.
Refer to Loading Paper on page 4-5.
An error has occurred in the machine.
Check the error information, and take the required action.
Job execution has been paused. Use the screen to select whether to cancel the job.
Xerox® WorkCentre® 5022/5024 Multifunction PrinterUser Guide
13-15
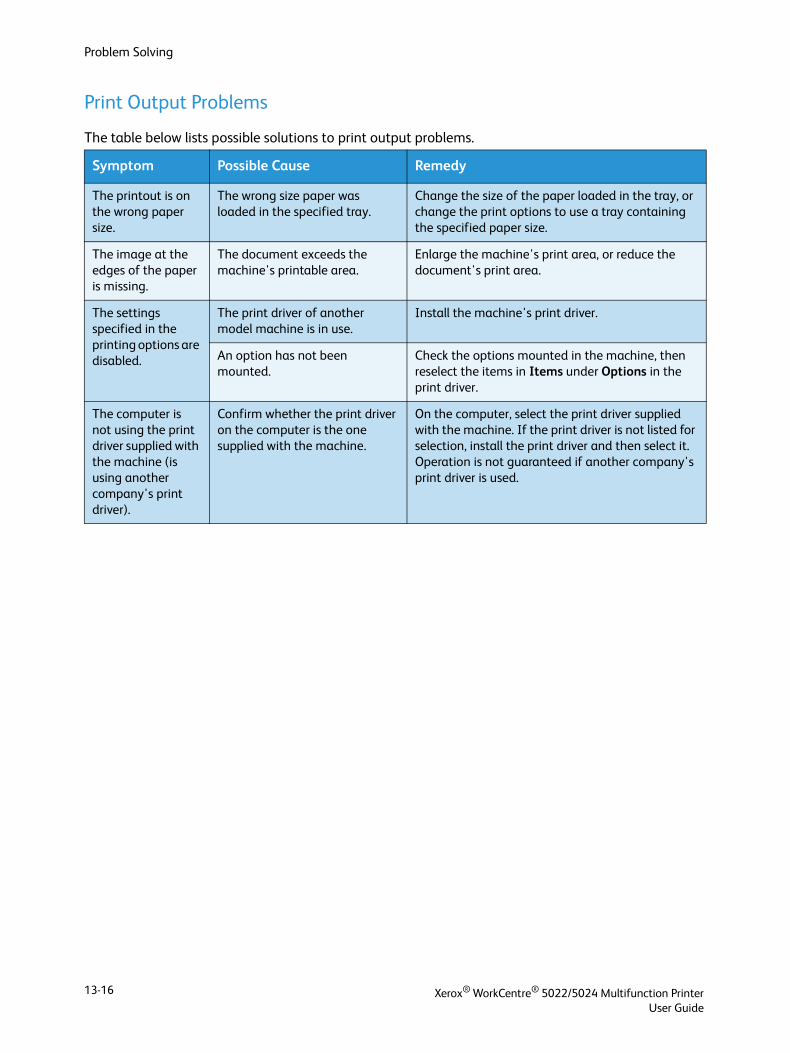
Problem Solving
Print Output Problems
The table below lists possible solutions to print output problems.
Symptom Possible Cause Remedy
The printout is on the wrong paper size.
The wrong size paper was loaded in the specified tray.
Change the size of the paper loaded in the tray, or change the print options to use a tray containing the specified paper size.
The image at the edges of the paper is missing.
The document exceeds the machine's printable area.
Enlarge the machine's print area, or reduce the document's print area.
The settings specified in the printing options are disabled.
The print driver of another model machine is in use.
Install the machine's print driver.
An option has not been mounted.
Check the options mounted in the machine, then reselect the items in Items under Options in the print driver.
The computer is not using the print driver supplied with the machine (is using another company's print driver).
Confirm whether the print driver on the computer is the one supplied with the machine.
On the computer, select the print driver supplied with the machine. If the print driver is not listed for selection, install the print driver and then select it. Operation is not guaranteed if another company's print driver is used.
Xerox® WorkCentre® 5022/5024 Multifunction PrinterUser Guide
13-16
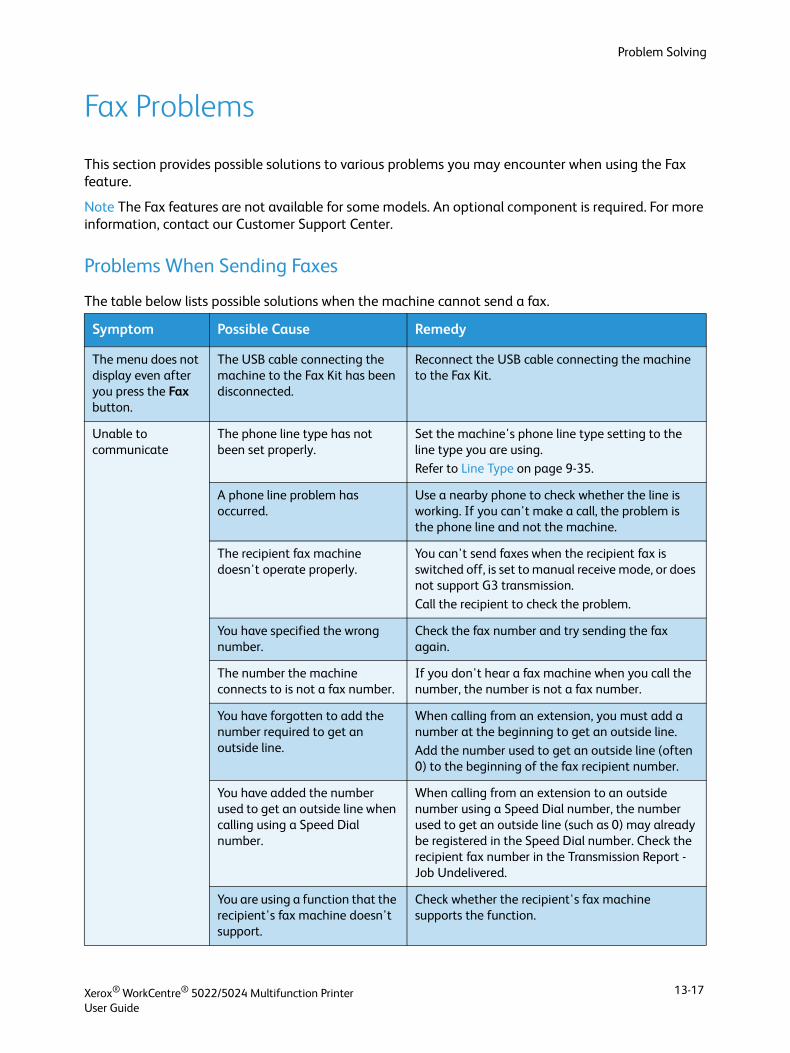
Problem Solving
Fax Problems
This section provides possible solutions to various problems you may encounter when using the Fax feature.
Note The Fax features are not available for some models. An optional component is required. For more information, contact our Customer Support Center.
Problems When Sending Faxes
The table below lists possible solutions when the machine cannot send a fax.
Symptom Possible Cause Remedy
The menu does not display even after you press the Fax button.
The USB cable connecting the machine to the Fax Kit has been disconnected.
Reconnect the USB cable connecting the machine to the Fax Kit.
Unable to communicate
The phone line type has not been set properly.
Set the machine's phone line type setting to the line type you are using.
Refer to Line Type on page 9-35.
A phone line problem has occurred.
Use a nearby phone to check whether the line is working. If you can't make a call, the problem is the phone line and not the machine.
The recipient fax machine doesn't operate properly.
You can't send faxes when the recipient fax is switched off, is set to manual receive mode, or does not support G3 transmission.
Call the recipient to check the problem.
You have specified the wrong number.
Check the fax number and try sending the fax again.
The number the machine connects to is not a fax number.
If you don't hear a fax machine when you call the number, the number is not a fax number.
You have forgotten to add the number required to get an outside line.
When calling from an extension, you must add a number at the beginning to get an outside line.
Add the number used to get an outside line (often 0) to the beginning of the fax recipient number.
You have added the number used to get an outside line when calling using a Speed Dial number.
When calling from an extension to an outside number using a Speed Dial number, the number used to get an outside line (such as 0) may already be registered in the Speed Dial number. Check the recipient fax number in the Transmission Report - Job Undelivered.
You are using a function that the recipient's fax machine doesn't support.
Check whether the recipient's fax machine supports the function.
Xerox® WorkCentre® 5022/5024 Multifunction PrinterUser Guide
13-17
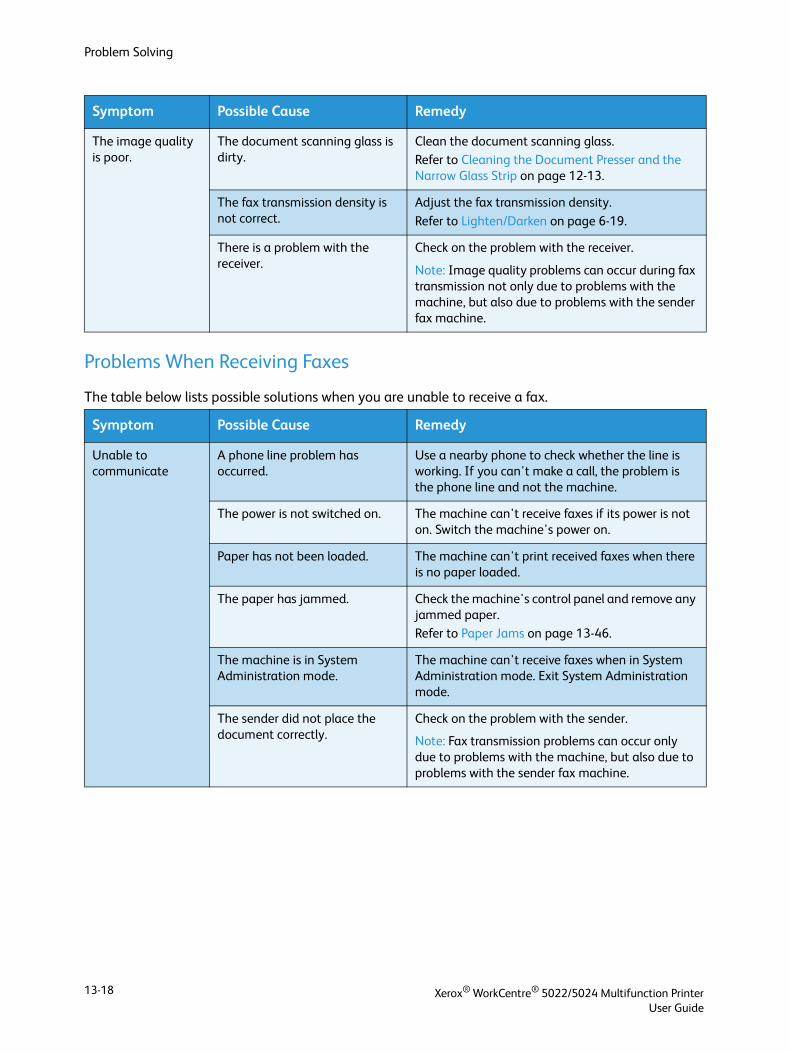
Problem Solving
Problems When Receiving Faxes
The table below lists possible solutions when you are unable to receive a fax.
The image quality is poor.
The document scanning glass is dirty.
Clean the document scanning glass.Refer to Cleaning the Document Presser and the Narrow Glass Strip on page 12-13.
The fax transmission density is not correct.
Adjust the fax transmission density.
Refer to Lighten/Darken on page 6-19.
There is a problem with the receiver.
Check on the problem with the receiver.
Note: Image quality problems can occur during fax transmission not only due to problems with the machine, but also due to problems with the sender fax machine.
Symptom Possible Cause Remedy
Unable to communicate
A phone line problem has occurred.
Use a nearby phone to check whether the line is working. If you can't make a call, the problem is the phone line and not the machine.
The power is not switched on. The machine can't receive faxes if its power is not on. Switch the machine's power on.
Paper has not been loaded. The machine can't print received faxes when there is no paper loaded.
The paper has jammed. Check the machine's control panel and remove any jammed paper.Refer to Paper Jams on page 13-46.
The machine is in System Administration mode.
The machine can't receive faxes when in System Administration mode. Exit System Administration mode.
The sender did not place the document correctly.
Check on the problem with the sender.
Note: Fax transmission problems can occur only due to problems with the machine, but also due to problems with the sender fax machine.
Symptom Possible Cause Remedy
Xerox® WorkCentre® 5022/5024 Multifunction PrinterUser Guide
13-18
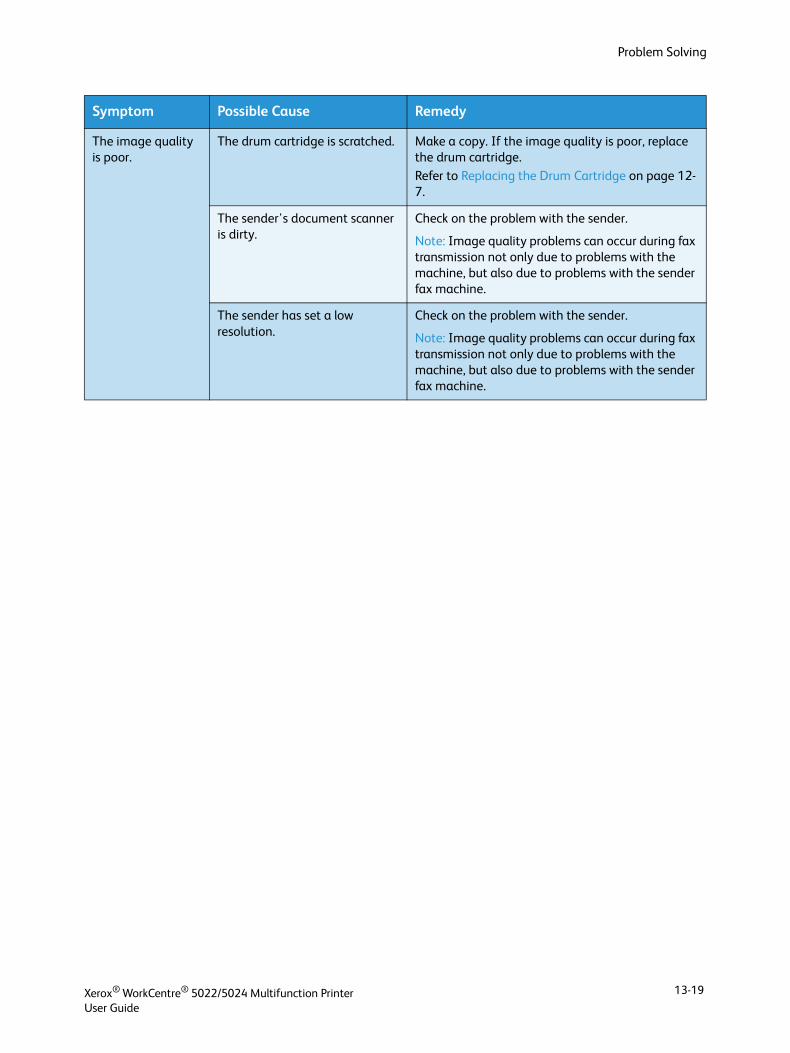
Problem Solving
The image quality is poor.
The drum cartridge is scratched. Make a copy. If the image quality is poor, replace the drum cartridge.Refer to Replacing the Drum Cartridge on page 12-7.
The sender's document scanner is dirty.
Check on the problem with the sender.
Note: Image quality problems can occur during fax transmission not only due to problems with the machine, but also due to problems with the sender fax machine.
The sender has set a low resolution.
Check on the problem with the sender.
Note: Image quality problems can occur during fax transmission not only due to problems with the machine, but also due to problems with the sender fax machine.
Symptom Possible Cause Remedy
Xerox® WorkCentre® 5022/5024 Multifunction PrinterUser Guide
13-19
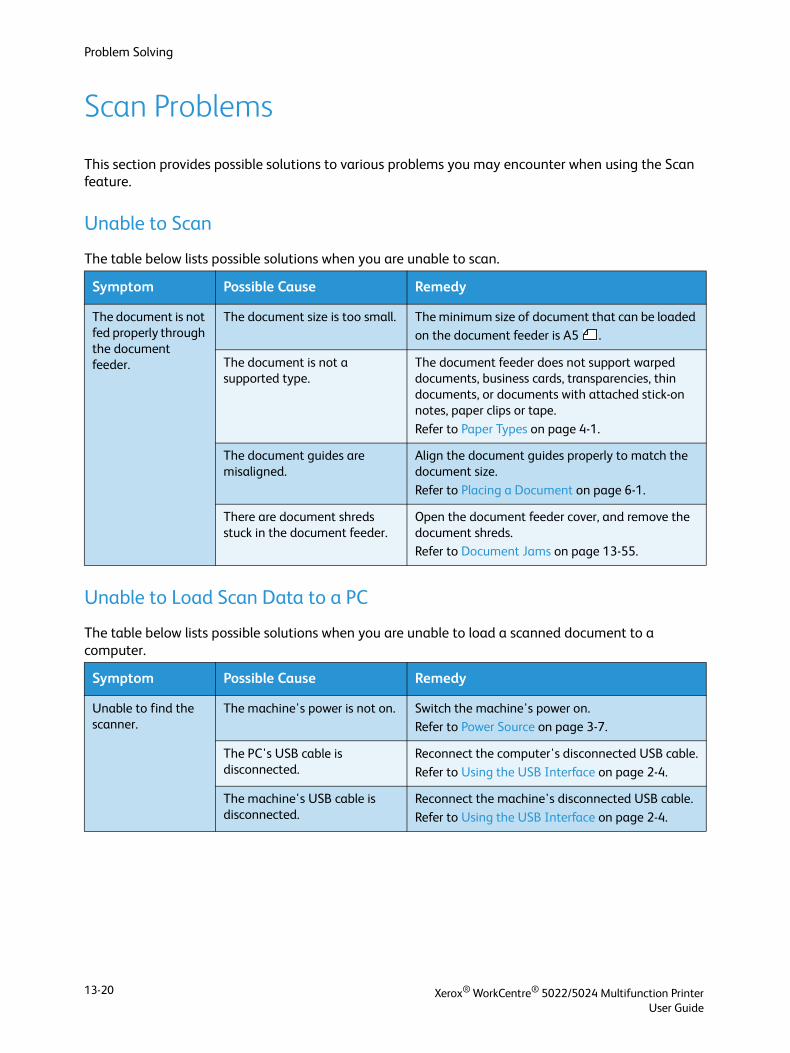
Problem Solving
Scan Problems
This section provides possible solutions to various problems you may encounter when using the Scan feature.
Unable to Scan
The table below lists possible solutions when you are unable to scan.
Unable to Load Scan Data to a PC
The table below lists possible solutions when you are unable to load a scanned document to a computer.
Symptom Possible Cause Remedy
The document is not fed properly through the document feeder.
The document size is too small. The minimum size of document that can be loaded on the document feeder is A5 .
The document is not a supported type.
The document feeder does not support warped documents, business cards, transparencies, thin documents, or documents with attached stick-on notes, paper clips or tape.
Refer to Paper Types on page 4-1.
The document guides are misaligned.
Align the document guides properly to match the document size.
Refer to Placing a Document on page 6-1.
There are document shreds stuck in the document feeder.
Open the document feeder cover, and remove the document shreds. Refer to Document Jams on page 13-55.
Symptom Possible Cause Remedy
Unable to find the scanner.
The machine's power is not on. Switch the machine's power on.Refer to Power Source on page 3-7.
The PC's USB cable is disconnected.
Reconnect the computer's disconnected USB cable.
Refer to Using the USB Interface on page 2-4.
The machine's USB cable is disconnected.
Reconnect the machine's disconnected USB cable.
Refer to Using the USB Interface on page 2-4.
Xerox® WorkCentre® 5022/5024 Multifunction PrinterUser Guide
13-20
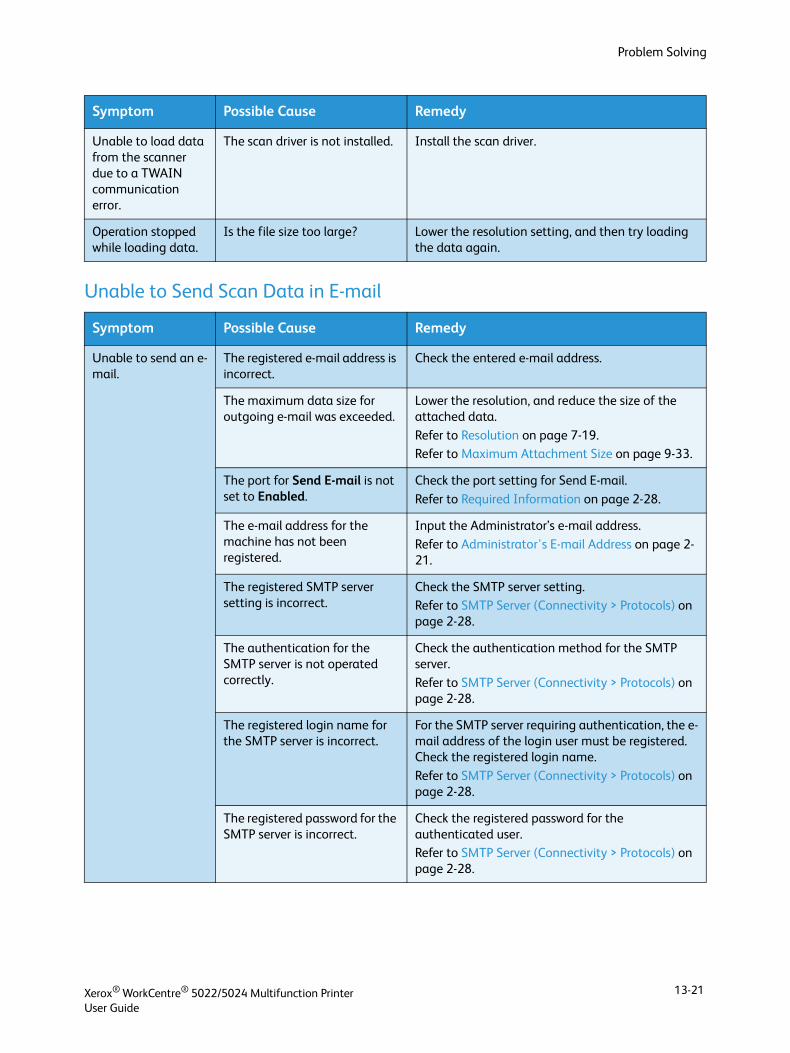
Problem Solving
Unable to Send Scan Data in E-mail
Unable to load data from the scanner due to a TWAIN communication error.
The scan driver is not installed. Install the scan driver.
Operation stopped while loading data.
Is the file size too large? Lower the resolution setting, and then try loading the data again.
Symptom Possible Cause Remedy
Unable to send an e-mail.
The registered e-mail address is incorrect.
Check the entered e-mail address.
The maximum data size for outgoing e-mail was exceeded.
Lower the resolution, and reduce the size of the attached data.
Refer to Resolution on page 7-19.Refer to Maximum Attachment Size on page 9-33.
The port for Send E-mail is not set to Enabled.
Check the port setting for Send E-mail.
Refer to Required Information on page 2-28.
The e-mail address for the machine has not been registered.
Input the Administrator’s e-mail address.
Refer to Administrator's E-mail Address on page 2-21.
The registered SMTP server setting is incorrect.
Check the SMTP server setting.Refer to SMTP Server (Connectivity > Protocols) on page 2-28.
The authentication for the SMTP server is not operated correctly.
Check the authentication method for the SMTP server.
Refer to SMTP Server (Connectivity > Protocols) on page 2-28.
The registered login name for the SMTP server is incorrect.
For the SMTP server requiring authentication, the e-mail address of the login user must be registered. Check the registered login name.
Refer to SMTP Server (Connectivity > Protocols) on page 2-28.
The registered password for the SMTP server is incorrect.
Check the registered password for the authenticated user.Refer to SMTP Server (Connectivity > Protocols) on page 2-28.
Symptom Possible Cause Remedy
Xerox® WorkCentre® 5022/5024 Multifunction PrinterUser Guide
13-21
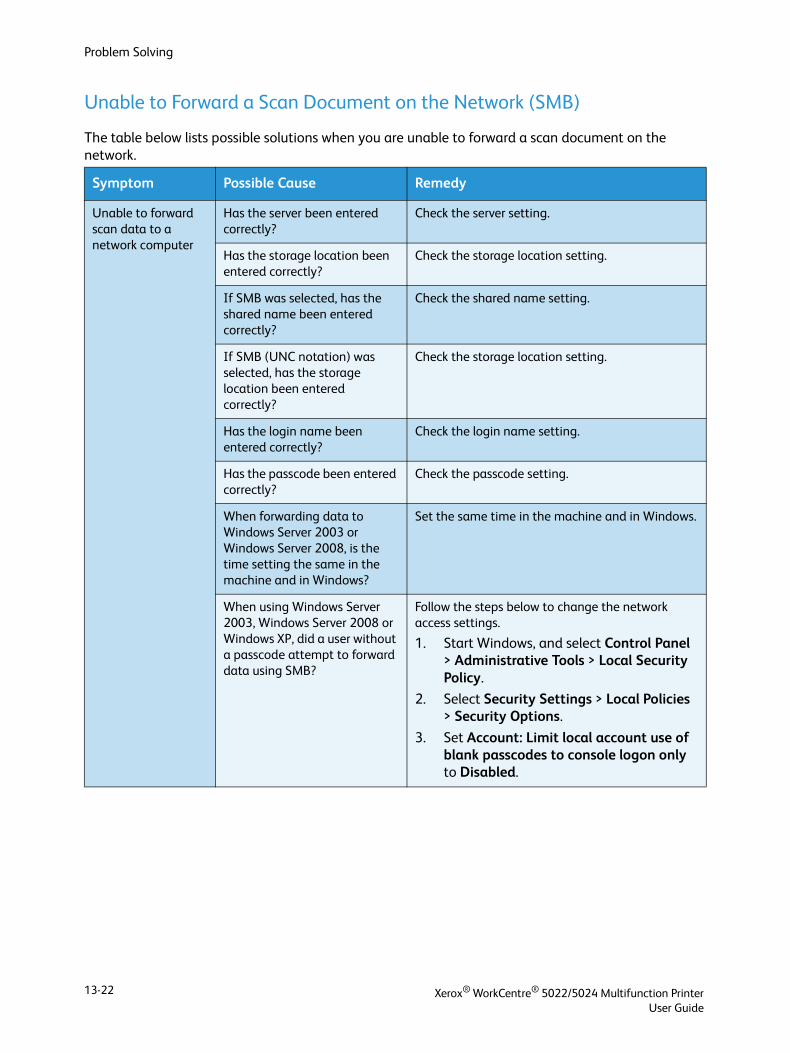
Problem Solving
Unable to Forward a Scan Document on the Network (SMB)
The table below lists possible solutions when you are unable to forward a scan document on the network.
Symptom Possible Cause Remedy
Unable to forward scan data to a network computer
Has the server been entered correctly?
Check the server setting.
Has the storage location been entered correctly?
Check the storage location setting.
If SMB was selected, has the shared name been entered correctly?
Check the shared name setting.
If SMB (UNC notation) was selected, has the storage location been entered correctly?
Check the storage location setting.
Has the login name been entered correctly?
Check the login name setting.
Has the passcode been entered correctly?
Check the passcode setting.
When forwarding data to Windows Server 2003 or Windows Server 2008, is the time setting the same in the machine and in Windows?
Set the same time in the machine and in Windows.
When using Windows Server 2003, Windows Server 2008 or Windows XP, did a user without a passcode attempt to forward data using SMB?
Follow the steps below to change the network access settings.
1. Start Windows, and select Control Panel > Administrative Tools > Local Security Policy.
2. Select Security Settings > Local Policies > Security Options.
3. Set Account: Limit local account use of blank passcodes to console logon only to Disabled.
Xerox® WorkCentre® 5022/5024 Multifunction PrinterUser Guide
13-22
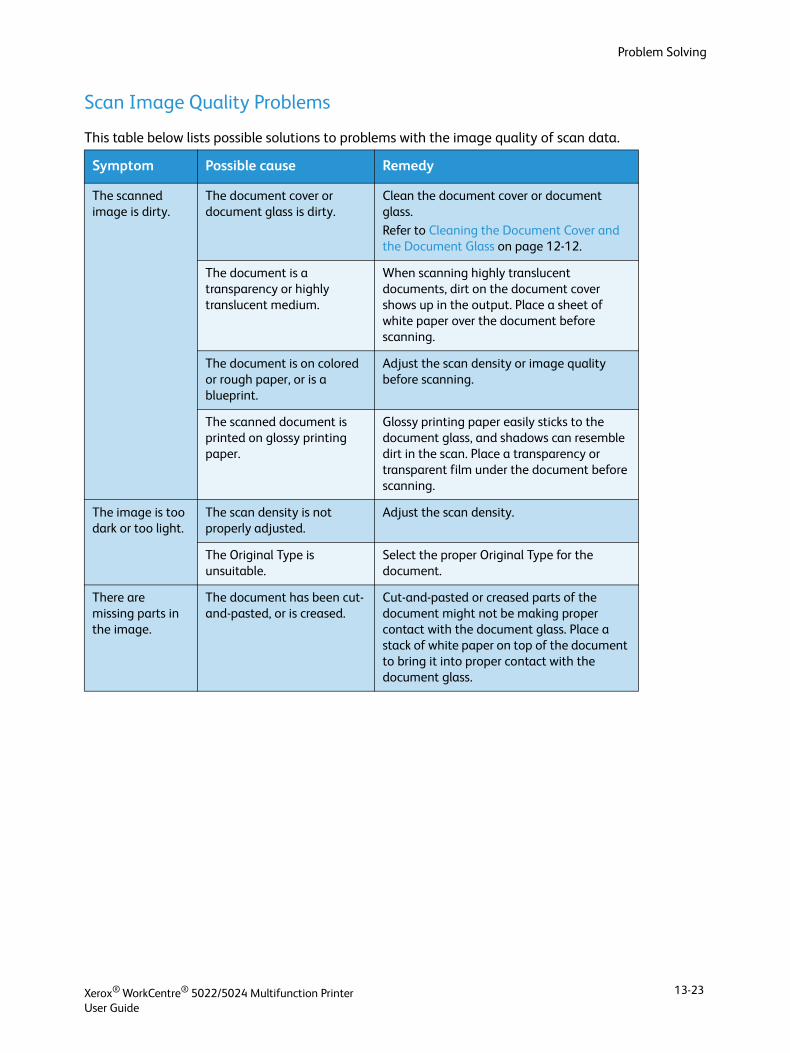
Problem Solving
Scan Image Quality Problems
This table below lists possible solutions to problems with the image quality of scan data.
Symptom Possible cause Remedy
The scanned image is dirty.
The document cover or document glass is dirty.
Clean the document cover or document glass.
Refer to Cleaning the Document Cover and the Document Glass on page 12-12.
The document is a transparency or highly translucent medium.
When scanning highly translucent documents, dirt on the document cover shows up in the output. Place a sheet of white paper over the document before scanning.
The document is on colored or rough paper, or is a blueprint.
Adjust the scan density or image quality before scanning.
The scanned document is printed on glossy printing paper.
Glossy printing paper easily sticks to the document glass, and shadows can resemble dirt in the scan. Place a transparency or transparent film under the document before scanning.
The image is too dark or too light.
The scan density is not properly adjusted.
Adjust the scan density.
The Original Type is unsuitable.
Select the proper Original Type for the document.
There are missing parts in the image.
The document has been cut-and-pasted, or is creased.
Cut-and-pasted or creased parts of the document might not be making proper contact with the document glass. Place a stack of white paper on top of the document to bring it into proper contact with the document glass.
Xerox® WorkCentre® 5022/5024 Multifunction PrinterUser Guide
13-23
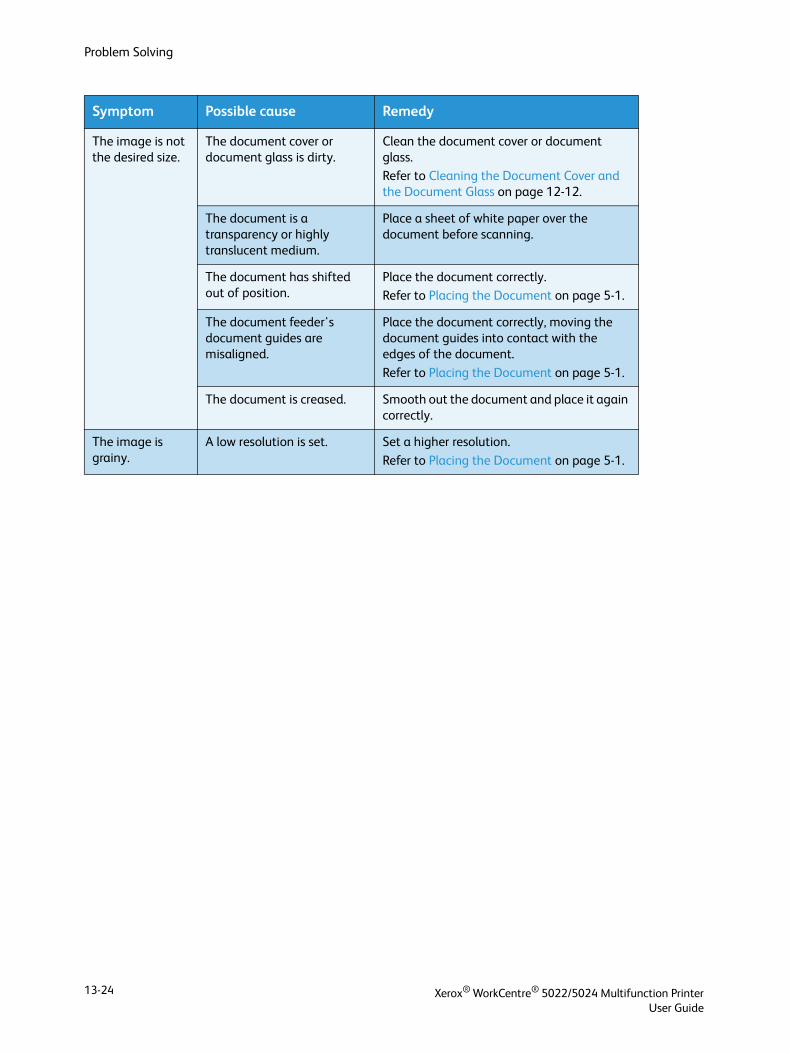
Problem Solving
The image is not the desired size.
The document cover or document glass is dirty.
Clean the document cover or document glass.Refer to Cleaning the Document Cover and the Document Glass on page 12-12.
The document is a transparency or highly translucent medium.
Place a sheet of white paper over the document before scanning.
The document has shifted out of position.
Place the document correctly.Refer to Placing the Document on page 5-1.
The document feeder's document guides are misaligned.
Place the document correctly, moving the document guides into contact with the edges of the document.
Refer to Placing the Document on page 5-1.
The document is creased. Smooth out the document and place it again correctly.
The image is grainy.
A low resolution is set. Set a higher resolution.
Refer to Placing the Document on page 5-1.
Symptom Possible cause Remedy
Xerox® WorkCentre® 5022/5024 Multifunction PrinterUser Guide
13-24
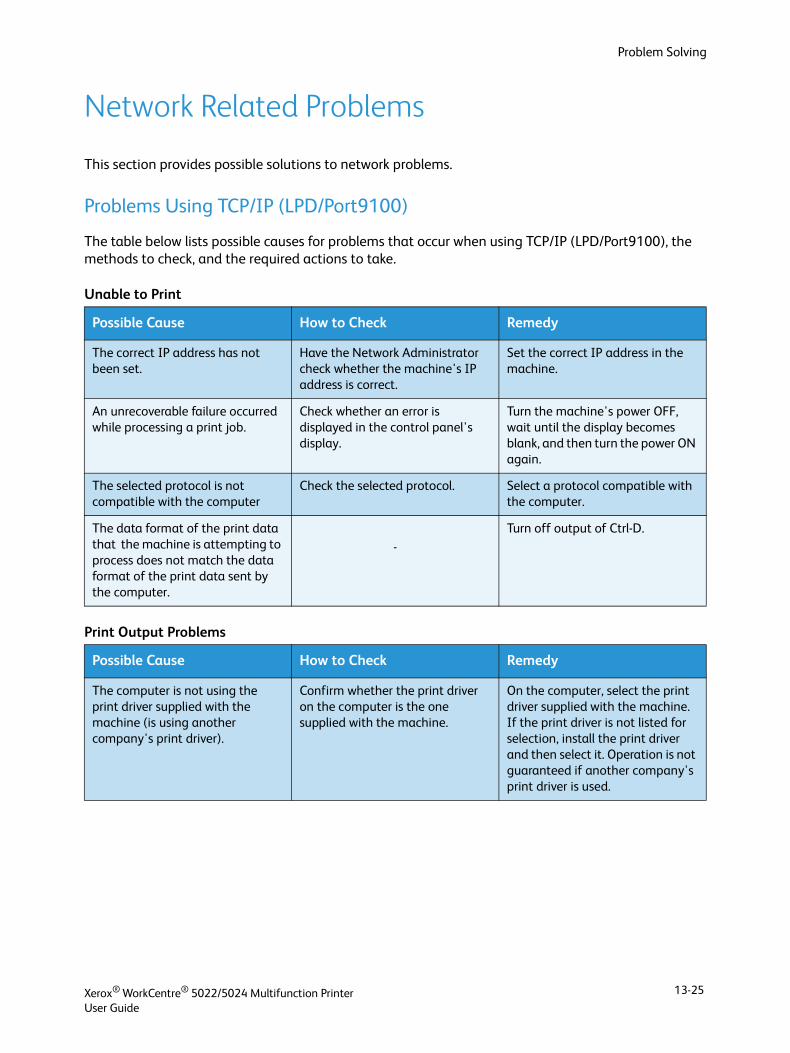
Problem Solving
Network Related Problems
This section provides possible solutions to network problems.
Problems Using TCP/IP (LPD/Port9100)
The table below lists possible causes for problems that occur when using TCP/IP (LPD/Port9100), the methods to check, and the required actions to take.
Unable to Print
Print Output Problems
Possible Cause How to Check Remedy
The correct IP address has not been set.
Have the Network Administrator check whether the machine's IP address is correct.
Set the correct IP address in the machine.
An unrecoverable failure occurred while processing a print job.
Check whether an error is displayed in the control panel's display.
Turn the machine's power OFF, wait until the display becomes blank, and then turn the power ON again.
The selected protocol is not compatible with the computer
Check the selected protocol. Select a protocol compatible with the computer.
The data format of the print data that the machine is attempting to process does not match the data format of the print data sent by the computer.
-
Turn off output of Ctrl-D.
Possible Cause How to Check Remedy
The computer is not using the print driver supplied with the machine (is using another company's print driver).
Confirm whether the print driver on the computer is the one supplied with the machine.
On the computer, select the print driver supplied with the machine. If the print driver is not listed for selection, install the print driver and then select it. Operation is not guaranteed if another company's print driver is used.
Xerox® WorkCentre® 5022/5024 Multifunction PrinterUser Guide
13-25
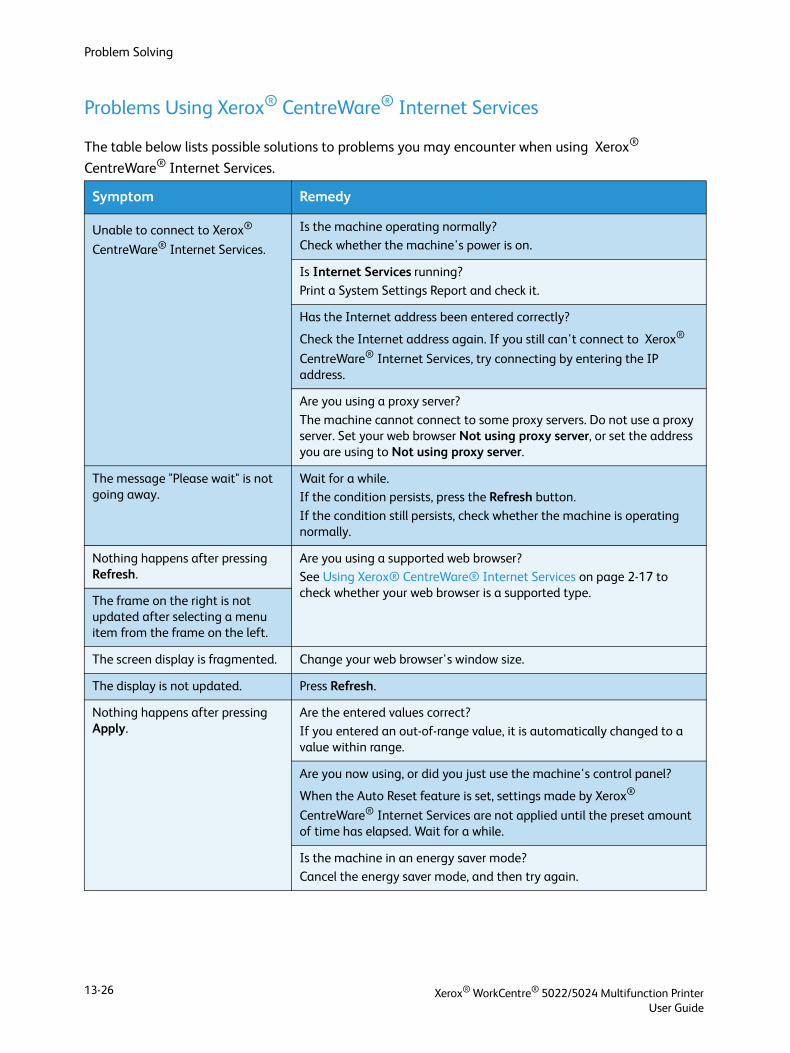
Problem Solving
Problems Using Xerox® CentreWare® Internet Services
The table below lists possible solutions to problems you may encounter when using Xerox®
CentreWare® Internet Services.
Symptom Remedy
Unable to connect to Xerox®
CentreWare® Internet Services.
Is the machine operating normally?Check whether the machine's power is on.
Is Internet Services running?
Print a System Settings Report and check it.
Has the Internet address been entered correctly?
Check the Internet address again. If you still can't connect to Xerox®
CentreWare® Internet Services, try connecting by entering the IP address.
Are you using a proxy server?
The machine cannot connect to some proxy servers. Do not use a proxy server. Set your web browser Not using proxy server, or set the address you are using to Not using proxy server.
The message "Please wait" is not going away.
Wait for a while.If the condition persists, press the Refresh button.
If the condition still persists, check whether the machine is operating normally.
Nothing happens after pressing Refresh.
Are you using a supported web browser?See Using Xerox® CentreWare® Internet Services on page 2-17 to check whether your web browser is a supported type.
The frame on the right is not updated after selecting a menu item from the frame on the left.
The screen display is fragmented. Change your web browser's window size.
The display is not updated. Press Refresh.
Nothing happens after pressing Apply.
Are the entered values correct?
If you entered an out-of-range value, it is automatically changed to a value within range.
Are you now using, or did you just use the machine's control panel?
When the Auto Reset feature is set, settings made by Xerox®
CentreWare® Internet Services are not applied until the preset amount of time has elapsed. Wait for a while.
Is the machine in an energy saver mode?Cancel the energy saver mode, and then try again.
Xerox® WorkCentre® 5022/5024 Multifunction PrinterUser Guide
13-26
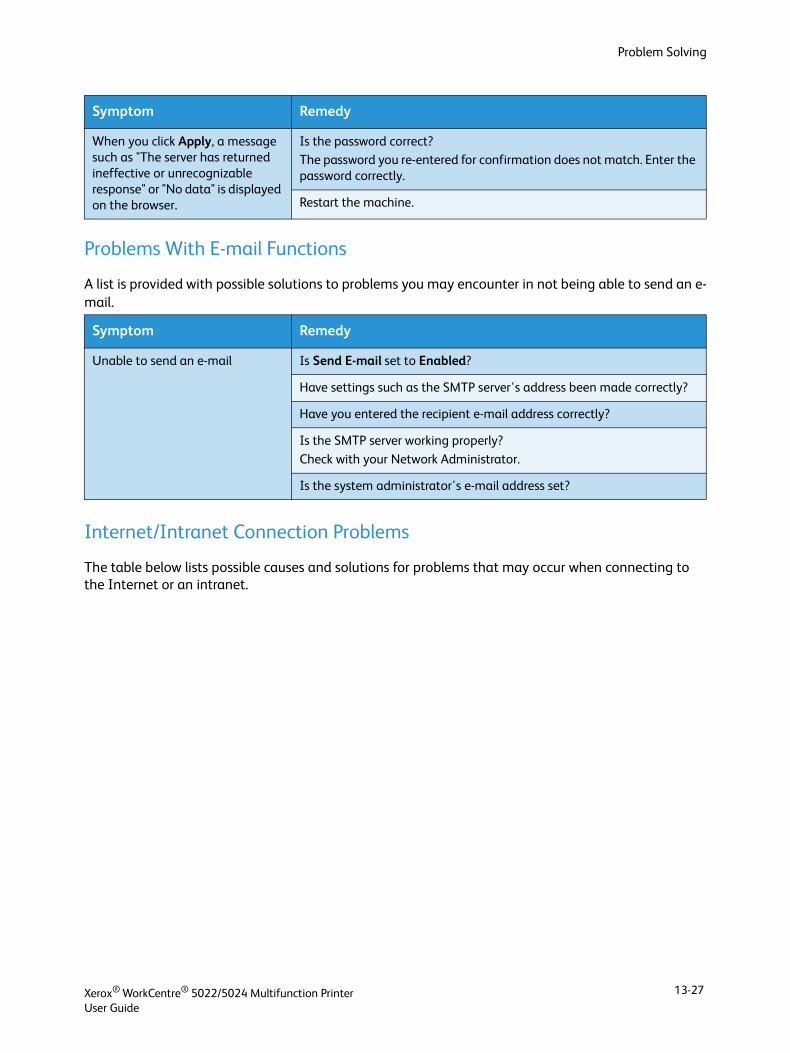
Problem Solving
Problems With E-mail Functions
A list is provided with possible solutions to problems you may encounter in not being able to send an e-mail.
Internet/Intranet Connection Problems
The table below lists possible causes and solutions for problems that may occur when connecting to the Internet or an intranet.
When you click Apply, a message such as "The server has returned ineffective or unrecognizable response" or "No data" is displayed on the browser.
Is the password correct?The password you re-entered for confirmation does not match. Enter the password correctly.
Restart the machine.
Symptom Remedy
Unable to send an e-mail Is Send E-mail set to Enabled?
Have settings such as the SMTP server's address been made correctly?
Have you entered the recipient e-mail address correctly?
Is the SMTP server working properly?
Check with your Network Administrator.
Is the system administrator's e-mail address set?
Symptom Remedy
Xerox® WorkCentre® 5022/5024 Multifunction PrinterUser Guide
13-27
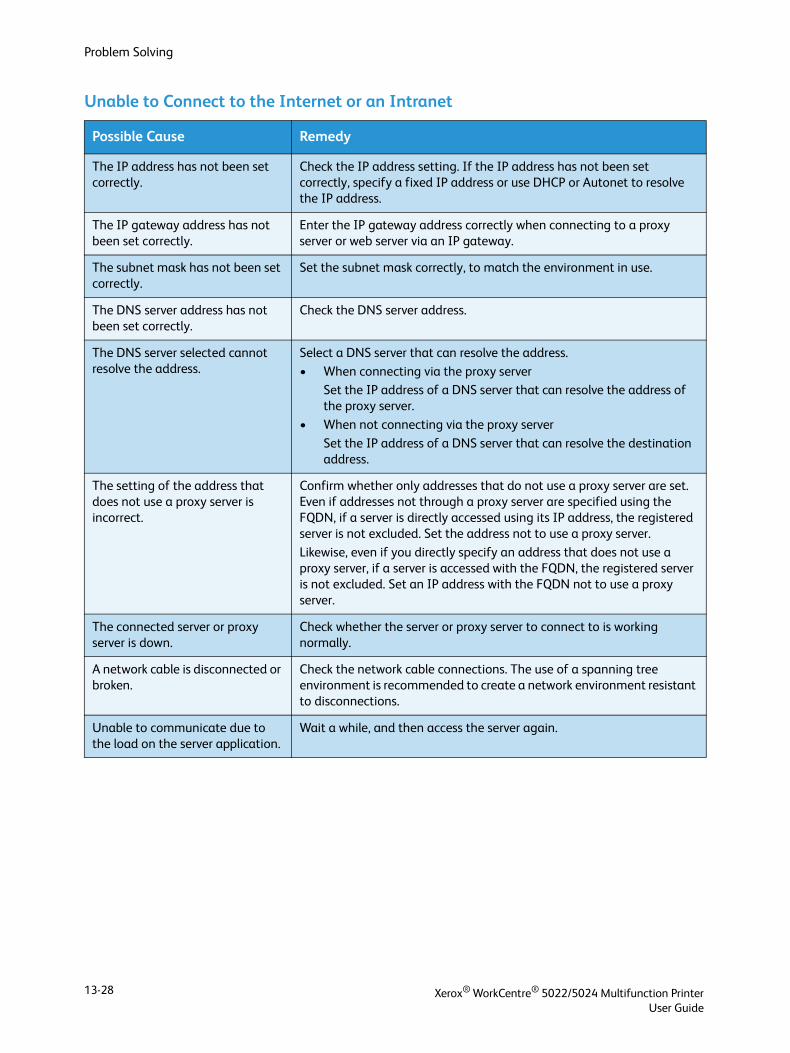
Problem Solving
Unable to Connect to the Internet or an Intranet
Possible Cause Remedy
The IP address has not been set correctly.
Check the IP address setting. If the IP address has not been set correctly, specify a fixed IP address or use DHCP or Autonet to resolve the IP address.
The IP gateway address has not been set correctly.
Enter the IP gateway address correctly when connecting to a proxy server or web server via an IP gateway.
The subnet mask has not been set correctly.
Set the subnet mask correctly, to match the environment in use.
The DNS server address has not been set correctly.
Check the DNS server address.
The DNS server selected cannot resolve the address.
Select a DNS server that can resolve the address.
• When connecting via the proxy serverSet the IP address of a DNS server that can resolve the address of the proxy server.
• When not connecting via the proxy server
Set the IP address of a DNS server that can resolve the destination address.
The setting of the address that does not use a proxy server is incorrect.
Confirm whether only addresses that do not use a proxy server are set. Even if addresses not through a proxy server are specified using the FQDN, if a server is directly accessed using its IP address, the registered server is not excluded. Set the address not to use a proxy server.
Likewise, even if you directly specify an address that does not use a proxy server, if a server is accessed with the FQDN, the registered server is not excluded. Set an IP address with the FQDN not to use a proxy server.
The connected server or proxy server is down.
Check whether the server or proxy server to connect to is working normally.
A network cable is disconnected or broken.
Check the network cable connections. The use of a spanning tree environment is recommended to create a network environment resistant to disconnections.
Unable to communicate due to the load on the server application.
Wait a while, and then access the server again.
Xerox® WorkCentre® 5022/5024 Multifunction PrinterUser Guide
13-28
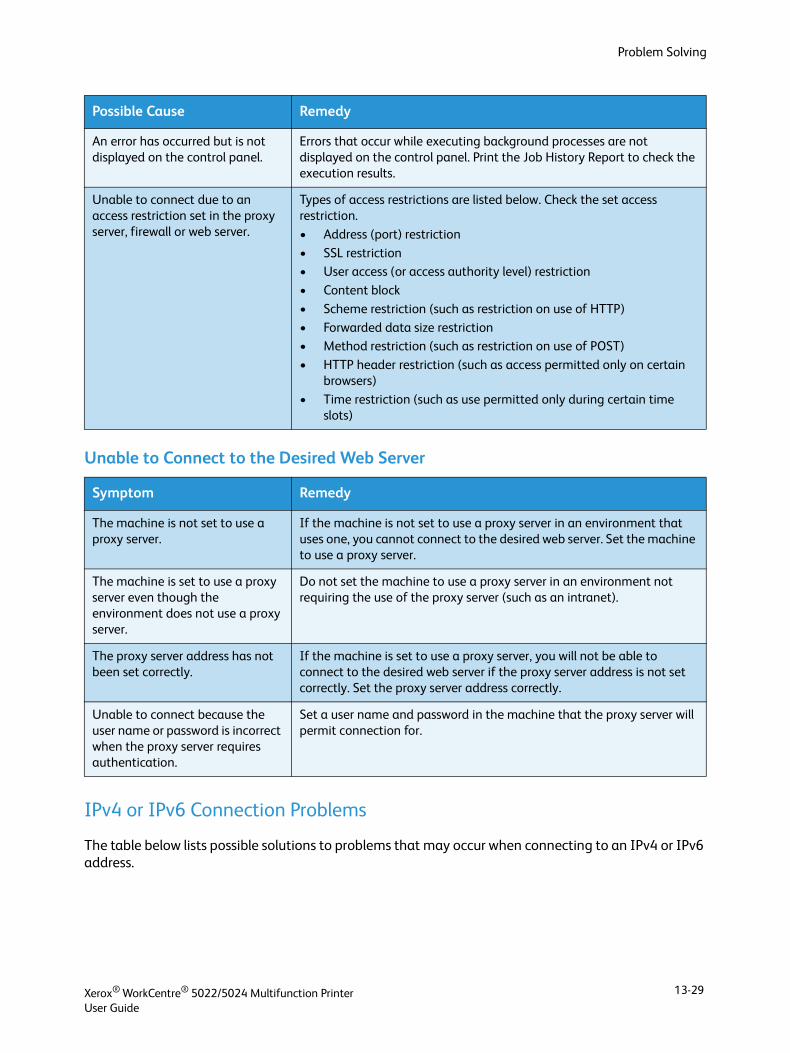
Problem Solving
Unable to Connect to the Desired Web Server
IPv4 or IPv6 Connection Problems
The table below lists possible solutions to problems that may occur when connecting to an IPv4 or IPv6 address.
An error has occurred but is not displayed on the control panel.
Errors that occur while executing background processes are not displayed on the control panel. Print the Job History Report to check the execution results.
Unable to connect due to an access restriction set in the proxy server, firewall or web server.
Types of access restrictions are listed below. Check the set access restriction.
• Address (port) restriction
• SSL restriction• User access (or access authority level) restriction
• Content block
• Scheme restriction (such as restriction on use of HTTP)
• Forwarded data size restriction• Method restriction (such as restriction on use of POST)
• HTTP header restriction (such as access permitted only on certain browsers)
• Time restriction (such as use permitted only during certain time slots)
Symptom Remedy
The machine is not set to use a proxy server.
If the machine is not set to use a proxy server in an environment that uses one, you cannot connect to the desired web server. Set the machine to use a proxy server.
The machine is set to use a proxy server even though the environment does not use a proxy server.
Do not set the machine to use a proxy server in an environment not requiring the use of the proxy server (such as an intranet).
The proxy server address has not been set correctly.
If the machine is set to use a proxy server, you will not be able to connect to the desired web server if the proxy server address is not set correctly. Set the proxy server address correctly.
Unable to connect because the user name or password is incorrect when the proxy server requires authentication.
Set a user name and password in the machine that the proxy server will permit connection for.
Possible Cause Remedy
Xerox® WorkCentre® 5022/5024 Multifunction PrinterUser Guide
13-29
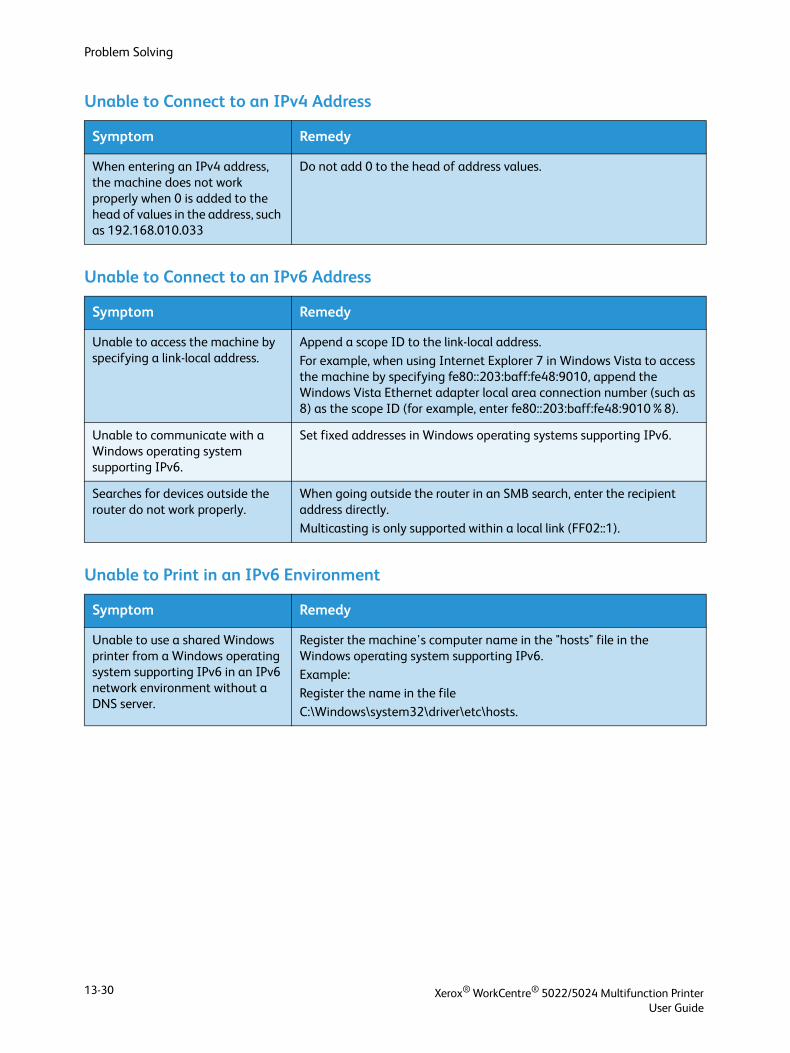
Problem Solving
Unable to Connect to an IPv4 Address
Unable to Connect to an IPv6 Address
Unable to Print in an IPv6 Environment
Symptom Remedy
When entering an IPv4 address, the machine does not work properly when 0 is added to the head of values in the address, such as 192.168.010.033
Do not add 0 to the head of address values.
Symptom Remedy
Unable to access the machine by specifying a link-local address.
Append a scope ID to the link-local address.
For example, when using Internet Explorer 7 in Windows Vista to access the machine by specifying fe80::203:baff:fe48:9010, append the Windows Vista Ethernet adapter local area connection number (such as 8) as the scope ID (for example, enter fe80::203:baff:fe48:9010%8).
Unable to communicate with a Windows operating system supporting IPv6.
Set fixed addresses in Windows operating systems supporting IPv6.
Searches for devices outside the router do not work properly.
When going outside the router in an SMB search, enter the recipient address directly.
Multicasting is only supported within a local link (FF02::1).
Symptom Remedy
Unable to use a shared Windows printer from a Windows operating system supporting IPv6 in an IPv6 network environment without a DNS server.
Register the machine's computer name in the "hosts" file in the Windows operating system supporting IPv6.
Example:Register the name in the file
C:\Windows\system32\driver\etc\hosts.
Xerox® WorkCentre® 5022/5024 Multifunction PrinterUser Guide
13-30
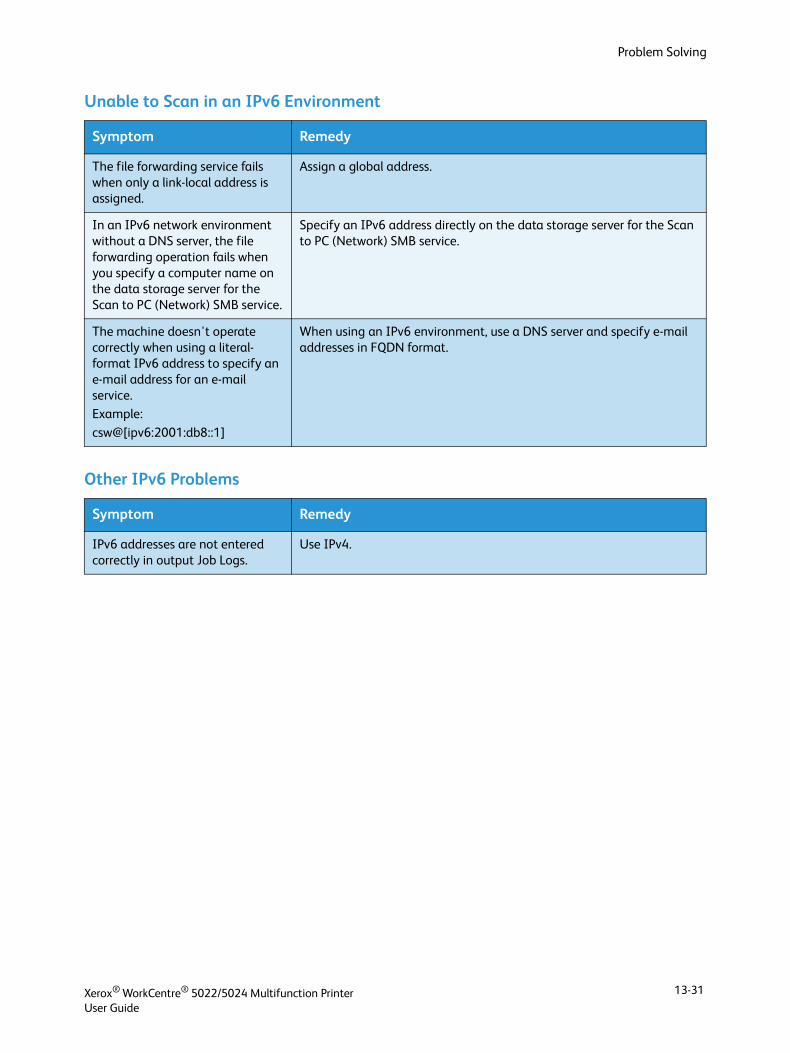
Problem Solving
Unable to Scan in an IPv6 Environment
Other IPv6 Problems
Symptom Remedy
The file forwarding service fails when only a link-local address is assigned.
Assign a global address.
In an IPv6 network environment without a DNS server, the file forwarding operation fails when you specify a computer name on the data storage server for the Scan to PC (Network) SMB service.
Specify an IPv6 address directly on the data storage server for the Scan to PC (Network) SMB service.
The machine doesn't operate correctly when using a literal-format IPv6 address to specify an e-mail address for an e-mail service.Example:
csw@[ipv6:2001:db8::1]
When using an IPv6 environment, use a DNS server and specify e-mail addresses in FQDN format.
Symptom Remedy
IPv6 addresses are not entered correctly in output Job Logs.
Use IPv4.
Xerox® WorkCentre® 5022/5024 Multifunction PrinterUser Guide
13-31
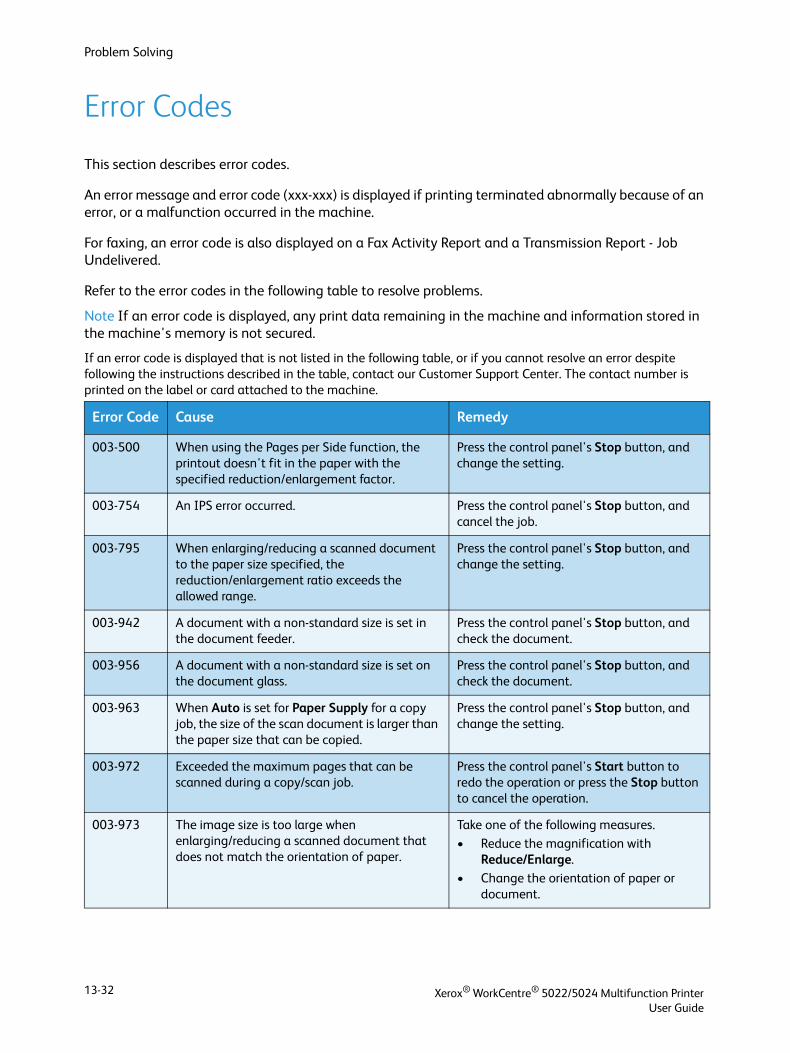
Problem Solving
Error Codes
This section describes error codes.
An error message and error code (xxx-xxx) is displayed if printing terminated abnormally because of an error, or a malfunction occurred in the machine.
For faxing, an error code is also displayed on a Fax Activity Report and a Transmission Report - Job Undelivered.
Refer to the error codes in the following table to resolve problems.
Note If an error code is displayed, any print data remaining in the machine and information stored in the machine's memory is not secured.
If an error code is displayed that is not listed in the following table, or if you cannot resolve an error despite following the instructions described in the table, contact our Customer Support Center. The contact number is printed on the label or card attached to the machine.
Error Code Cause Remedy
003-500 When using the Pages per Side function, the printout doesn't fit in the paper with the specified reduction/enlargement factor.
Press the control panel's Stop button, and change the setting.
003-754 An IPS error occurred. Press the control panel's Stop button, and cancel the job.
003-795 When enlarging/reducing a scanned document to the paper size specified, the reduction/enlargement ratio exceeds the allowed range.
Press the control panel's Stop button, and change the setting.
003-942 A document with a non-standard size is set in the document feeder.
Press the control panel's Stop button, and check the document.
003-956 A document with a non-standard size is set on the document glass.
Press the control panel's Stop button, and check the document.
003-963 When Auto is set for Paper Supply for a copy job, the size of the scan document is larger than the paper size that can be copied.
Press the control panel's Stop button, and change the setting.
003-972 Exceeded the maximum pages that can be scanned during a copy/scan job.
Press the control panel's Start button to redo the operation or press the Stop button to cancel the operation.
003-973 The image size is too large when enlarging/reducing a scanned document that does not match the orientation of paper.
Take one of the following measures.
• Reduce the magnification with Reduce/Enlarge.
• Change the orientation of paper or document.
Xerox® WorkCentre® 5022/5024 Multifunction PrinterUser Guide
13-32
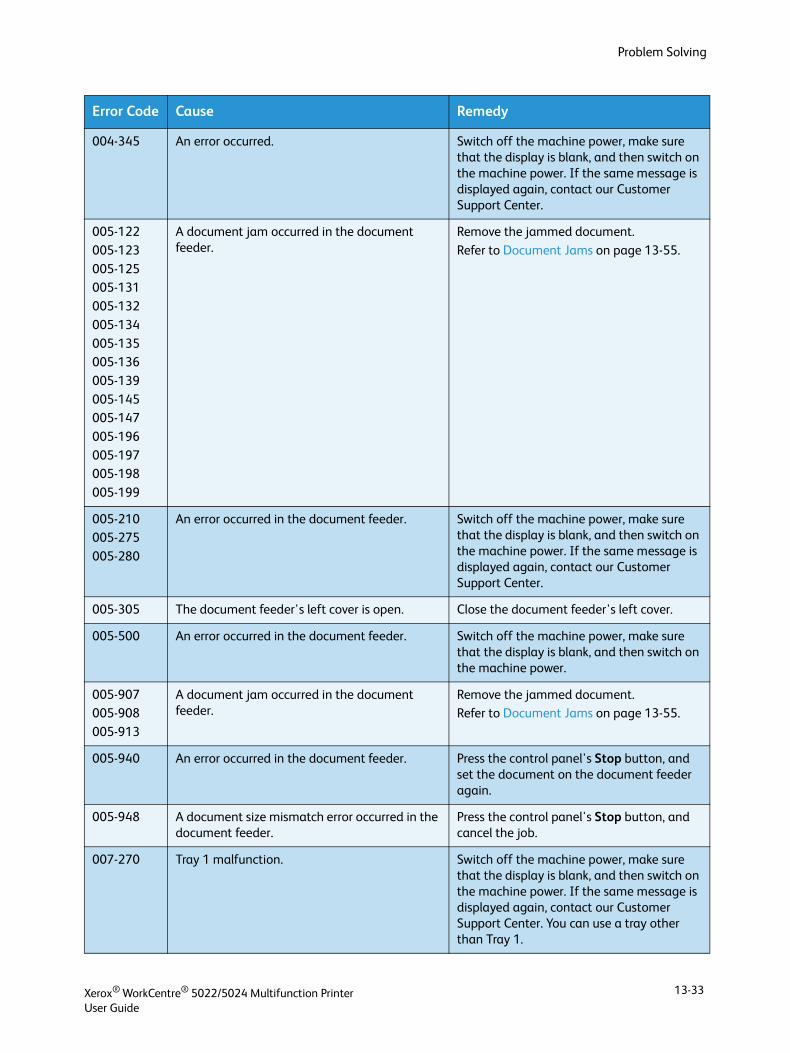
Problem Solving
004-345 An error occurred. Switch off the machine power, make sure that the display is blank, and then switch on the machine power. If the same message is displayed again, contact our Customer Support Center.
005-122
005-123
005-125005-131
005-132
005-134
005-135005-136
005-139
005-145005-147
005-196
005-197005-198
005-199
A document jam occurred in the document feeder.
Remove the jammed document.
Refer to Document Jams on page 13-55.
005-210005-275
005-280
An error occurred in the document feeder. Switch off the machine power, make sure that the display is blank, and then switch on the machine power. If the same message is displayed again, contact our Customer Support Center.
005-305 The document feeder's left cover is open. Close the document feeder's left cover.
005-500 An error occurred in the document feeder. Switch off the machine power, make sure that the display is blank, and then switch on the machine power.
005-907005-908
005-913
A document jam occurred in the document feeder.
Remove the jammed document.Refer to Document Jams on page 13-55.
005-940 An error occurred in the document feeder. Press the control panel's Stop button, and set the document on the document feeder again.
005-948 A document size mismatch error occurred in the document feeder.
Press the control panel's Stop button, and cancel the job.
007-270 Tray 1 malfunction. Switch off the machine power, make sure that the display is blank, and then switch on the machine power. If the same message is displayed again, contact our Customer Support Center. You can use a tray other than Tray 1.
Error Code Cause Remedy
Xerox® WorkCentre® 5022/5024 Multifunction PrinterUser Guide
13-33
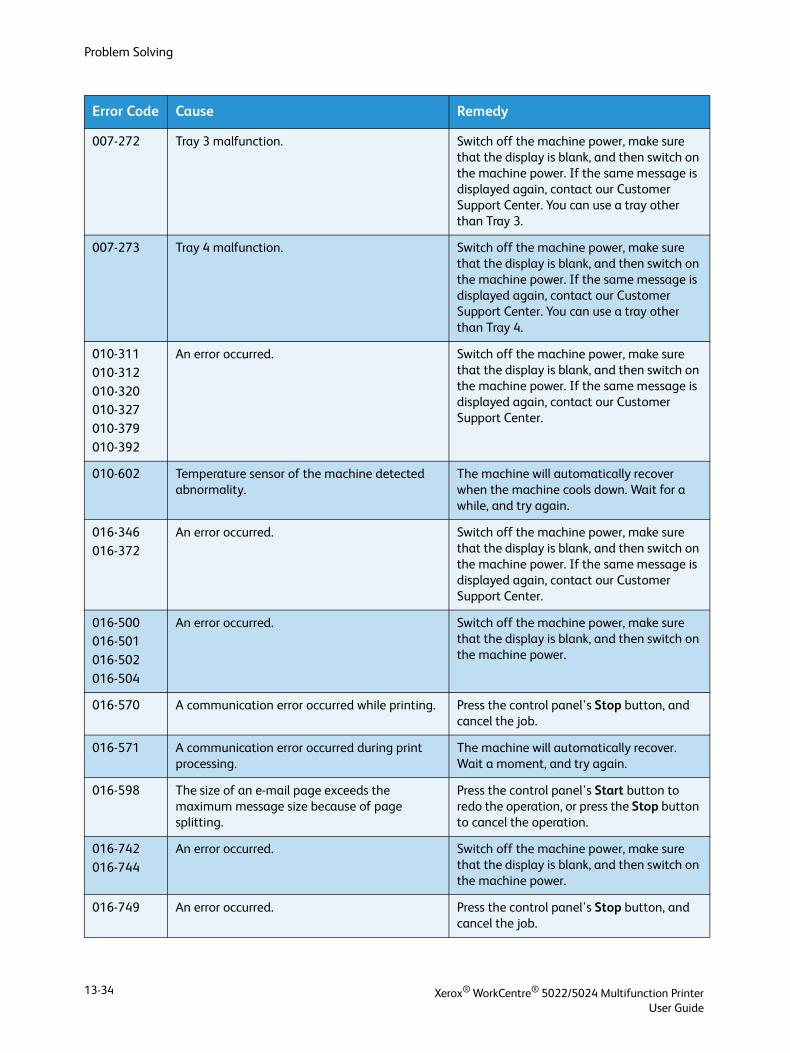
Problem Solving
007-272 Tray 3 malfunction. Switch off the machine power, make sure that the display is blank, and then switch on the machine power. If the same message is displayed again, contact our Customer Support Center. You can use a tray other than Tray 3.
007-273 Tray 4 malfunction. Switch off the machine power, make sure that the display is blank, and then switch on the machine power. If the same message is displayed again, contact our Customer Support Center. You can use a tray other than Tray 4.
010-311
010-312
010-320010-327
010-379
010-392
An error occurred. Switch off the machine power, make sure that the display is blank, and then switch on the machine power. If the same message is displayed again, contact our Customer Support Center.
010-602 Temperature sensor of the machine detected abnormality.
The machine will automatically recover when the machine cools down. Wait for a while, and try again.
016-346
016-372
An error occurred. Switch off the machine power, make sure that the display is blank, and then switch on the machine power. If the same message is displayed again, contact our Customer Support Center.
016-500016-501
016-502
016-504
An error occurred. Switch off the machine power, make sure that the display is blank, and then switch on the machine power.
016-570 A communication error occurred while printing. Press the control panel's Stop button, and cancel the job.
016-571 A communication error occurred during print processing.
The machine will automatically recover. Wait a moment, and try again.
016-598 The size of an e-mail page exceeds the maximum message size because of page splitting.
Press the control panel's Start button to redo the operation, or press the Stop button to cancel the operation.
016-742
016-744
An error occurred. Switch off the machine power, make sure that the display is blank, and then switch on the machine power.
016-749 An error occurred. Press the control panel's Stop button, and cancel the job.
Error Code Cause Remedy
Xerox® WorkCentre® 5022/5024 Multifunction PrinterUser Guide
13-34
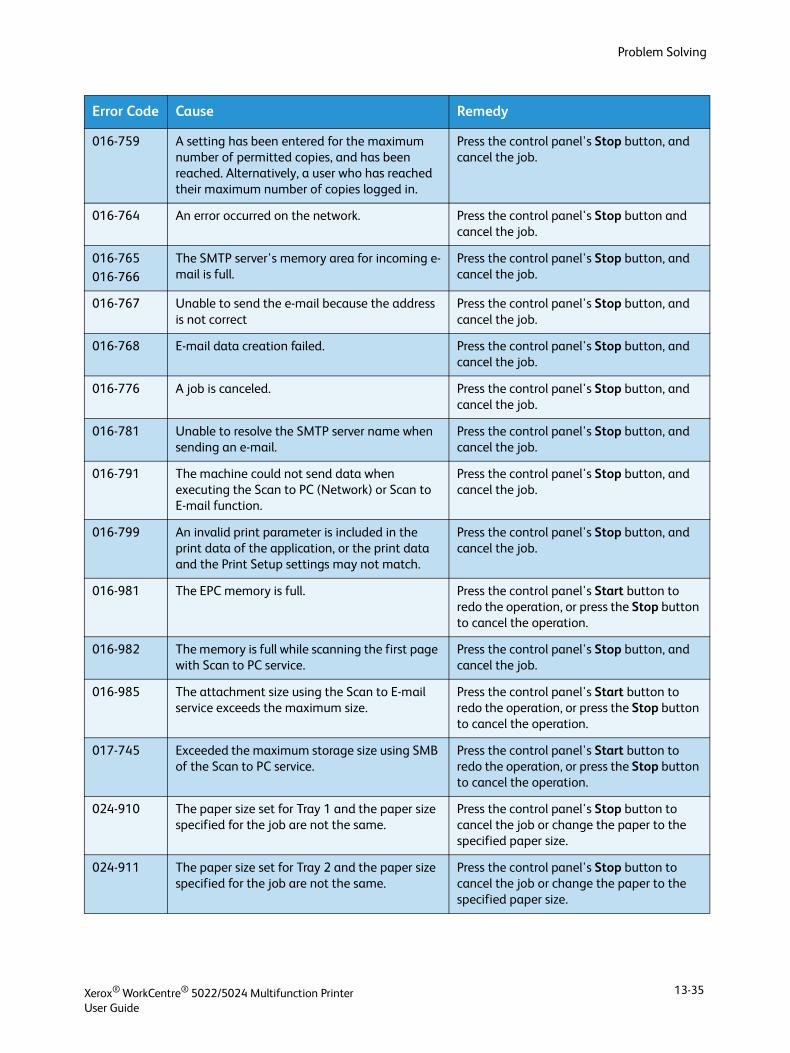
Problem Solving
016-759 A setting has been entered for the maximum number of permitted copies, and has been reached. Alternatively, a user who has reached their maximum number of copies logged in.
Press the control panel's Stop button, and cancel the job.
016-764 An error occurred on the network. Press the control panel's Stop button and cancel the job.
016-765
016-766
The SMTP server's memory area for incoming e-mail is full.
Press the control panel's Stop button, and cancel the job.
016-767 Unable to send the e-mail because the address is not correct
Press the control panel's Stop button, and cancel the job.
016-768 E-mail data creation failed. Press the control panel's Stop button, and cancel the job.
016-776 A job is canceled. Press the control panel's Stop button, and cancel the job.
016-781 Unable to resolve the SMTP server name when sending an e-mail.
Press the control panel's Stop button, and cancel the job.
016-791 The machine could not send data when executing the Scan to PC (Network) or Scan to E-mail function.
Press the control panel's Stop button, and cancel the job.
016-799 An invalid print parameter is included in the print data of the application, or the print data and the Print Setup settings may not match.
Press the control panel's Stop button, and cancel the job.
016-981 The EPC memory is full. Press the control panel's Start button to redo the operation, or press the Stop button to cancel the operation.
016-982 The memory is full while scanning the first page with Scan to PC service.
Press the control panel's Stop button, and cancel the job.
016-985 The attachment size using the Scan to E-mail service exceeds the maximum size.
Press the control panel's Start button to redo the operation, or press the Stop button to cancel the operation.
017-745 Exceeded the maximum storage size using SMB of the Scan to PC service.
Press the control panel's Start button to redo the operation, or press the Stop button to cancel the operation.
024-910 The paper size set for Tray 1 and the paper size specified for the job are not the same.
Press the control panel's Stop button to cancel the job or change the paper to the specified paper size.
024-911 The paper size set for Tray 2 and the paper size specified for the job are not the same.
Press the control panel's Stop button to cancel the job or change the paper to the specified paper size.
Error Code Cause Remedy
Xerox® WorkCentre® 5022/5024 Multifunction PrinterUser Guide
13-35
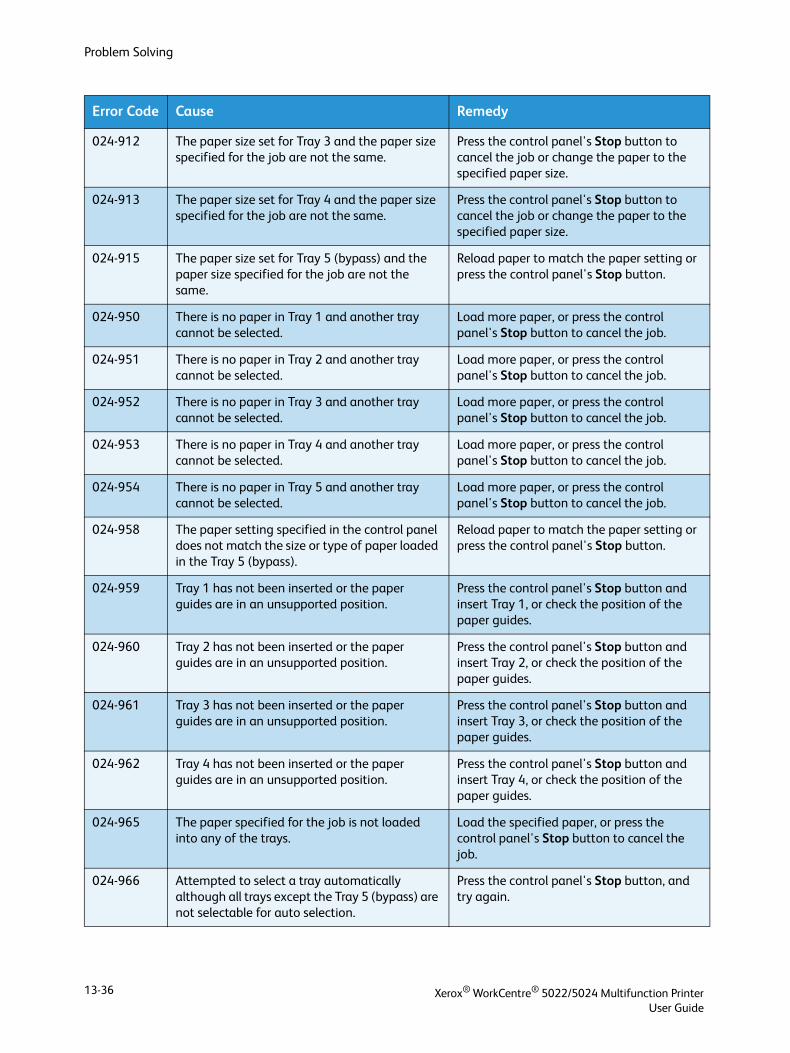
Problem Solving
024-912 The paper size set for Tray 3 and the paper size specified for the job are not the same.
Press the control panel's Stop button to cancel the job or change the paper to the specified paper size.
024-913 The paper size set for Tray 4 and the paper size specified for the job are not the same.
Press the control panel's Stop button to cancel the job or change the paper to the specified paper size.
024-915 The paper size set for Tray 5 (bypass) and the paper size specified for the job are not the same.
Reload paper to match the paper setting or press the control panel's Stop button.
024-950 There is no paper in Tray 1 and another tray cannot be selected.
Load more paper, or press the control panel's Stop button to cancel the job.
024-951 There is no paper in Tray 2 and another tray cannot be selected.
Load more paper, or press the control panel's Stop button to cancel the job.
024-952 There is no paper in Tray 3 and another tray cannot be selected.
Load more paper, or press the control panel's Stop button to cancel the job.
024-953 There is no paper in Tray 4 and another tray cannot be selected.
Load more paper, or press the control panel's Stop button to cancel the job.
024-954 There is no paper in Tray 5 and another tray cannot be selected.
Load more paper, or press the control panel's Stop button to cancel the job.
024-958 The paper setting specified in the control panel does not match the size or type of paper loaded in the Tray 5 (bypass).
Reload paper to match the paper setting or press the control panel's Stop button.
024-959 Tray 1 has not been inserted or the paper guides are in an unsupported position.
Press the control panel's Stop button and insert Tray 1, or check the position of the paper guides.
024-960 Tray 2 has not been inserted or the paper guides are in an unsupported position.
Press the control panel's Stop button and insert Tray 2, or check the position of the paper guides.
024-961 Tray 3 has not been inserted or the paper guides are in an unsupported position.
Press the control panel's Stop button and insert Tray 3, or check the position of the paper guides.
024-962 Tray 4 has not been inserted or the paper guides are in an unsupported position.
Press the control panel's Stop button and insert Tray 4, or check the position of the paper guides.
024-965 The paper specified for the job is not loaded into any of the trays.
Load the specified paper, or press the control panel's Stop button to cancel the job.
024-966 Attempted to select a tray automatically although all trays except the Tray 5 (bypass) are not selectable for auto selection.
Press the control panel's Stop button, and try again.
Error Code Cause Remedy
Xerox® WorkCentre® 5022/5024 Multifunction PrinterUser Guide
13-36
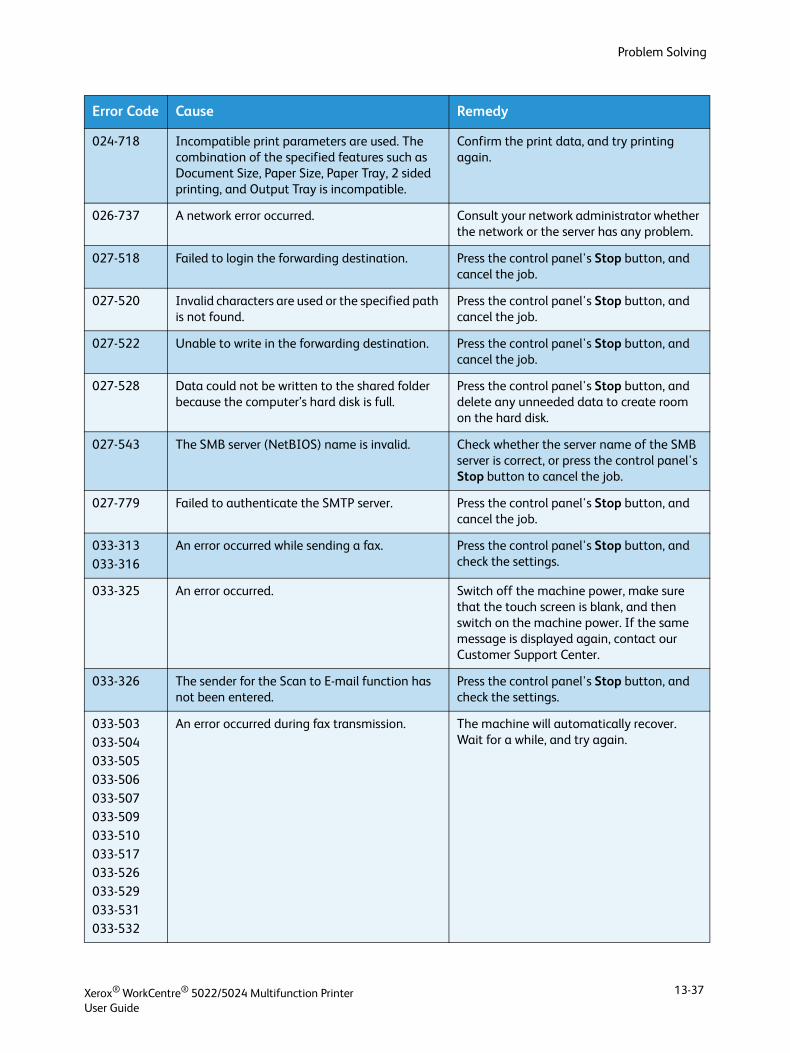
Problem Solving
024-718 Incompatible print parameters are used. The combination of the specified features such as Document Size, Paper Size, Paper Tray, 2 sided printing, and Output Tray is incompatible.
Confirm the print data, and try printing again.
026-737 A network error occurred. Consult your network administrator whether the network or the server has any problem.
027-518 Failed to login the forwarding destination. Press the control panel's Stop button, and cancel the job.
027-520 Invalid characters are used or the specified path is not found.
Press the control panel's Stop button, and cancel the job.
027-522 Unable to write in the forwarding destination. Press the control panel's Stop button, and cancel the job.
027-528 Data could not be written to the shared folder because the computer’s hard disk is full.
Press the control panel's Stop button, and delete any unneeded data to create room on the hard disk.
027-543 The SMB server (NetBIOS) name is invalid. Check whether the server name of the SMB server is correct, or press the control panel's Stop button to cancel the job.
027-779 Failed to authenticate the SMTP server. Press the control panel's Stop button, and cancel the job.
033-313
033-316
An error occurred while sending a fax. Press the control panel's Stop button, and check the settings.
033-325 An error occurred. Switch off the machine power, make sure that the touch screen is blank, and then switch on the machine power. If the same message is displayed again, contact our Customer Support Center.
033-326 The sender for the Scan to E-mail function has not been entered.
Press the control panel's Stop button, and check the settings.
033-503
033-504033-505
033-506
033-507033-509
033-510
033-517033-526
033-529
033-531033-532
An error occurred during fax transmission. The machine will automatically recover. Wait for a while, and try again.
Error Code Cause Remedy
Xerox® WorkCentre® 5022/5024 Multifunction PrinterUser Guide
13-37
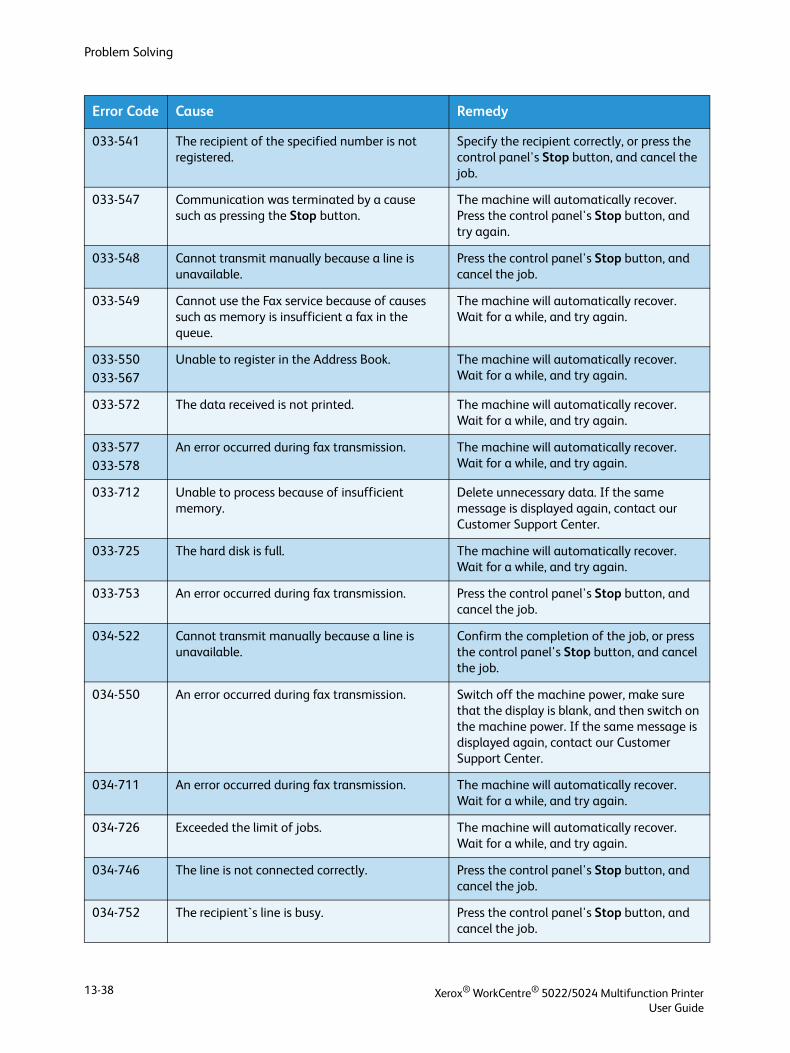
Problem Solving
033-541 The recipient of the specified number is not registered.
Specify the recipient correctly, or press the control panel's Stop button, and cancel the job.
033-547 Communication was terminated by a cause such as pressing the Stop button.
The machine will automatically recover. Press the control panel's Stop button, and try again.
033-548 Cannot transmit manually because a line is unavailable.
Press the control panel's Stop button, and cancel the job.
033-549 Cannot use the Fax service because of causes such as memory is insufficient a fax in the queue.
The machine will automatically recover. Wait for a while, and try again.
033-550033-567
Unable to register in the Address Book. The machine will automatically recover. Wait for a while, and try again.
033-572 The data received is not printed. The machine will automatically recover. Wait for a while, and try again.
033-577033-578
An error occurred during fax transmission. The machine will automatically recover. Wait for a while, and try again.
033-712 Unable to process because of insufficient memory.
Delete unnecessary data. If the same message is displayed again, contact our Customer Support Center.
033-725 The hard disk is full. The machine will automatically recover. Wait for a while, and try again.
033-753 An error occurred during fax transmission. Press the control panel's Stop button, and cancel the job.
034-522 Cannot transmit manually because a line is unavailable.
Confirm the completion of the job, or press the control panel's Stop button, and cancel the job.
034-550 An error occurred during fax transmission. Switch off the machine power, make sure that the display is blank, and then switch on the machine power. If the same message is displayed again, contact our Customer Support Center.
034-711 An error occurred during fax transmission. The machine will automatically recover. Wait for a while, and try again.
034-726 Exceeded the limit of jobs. The machine will automatically recover. Wait for a while, and try again.
034-746 The line is not connected correctly. Press the control panel's Stop button, and cancel the job.
034-752 The recipient`s line is busy. Press the control panel's Stop button, and cancel the job.
Error Code Cause Remedy
Xerox® WorkCentre® 5022/5024 Multifunction PrinterUser Guide
13-38
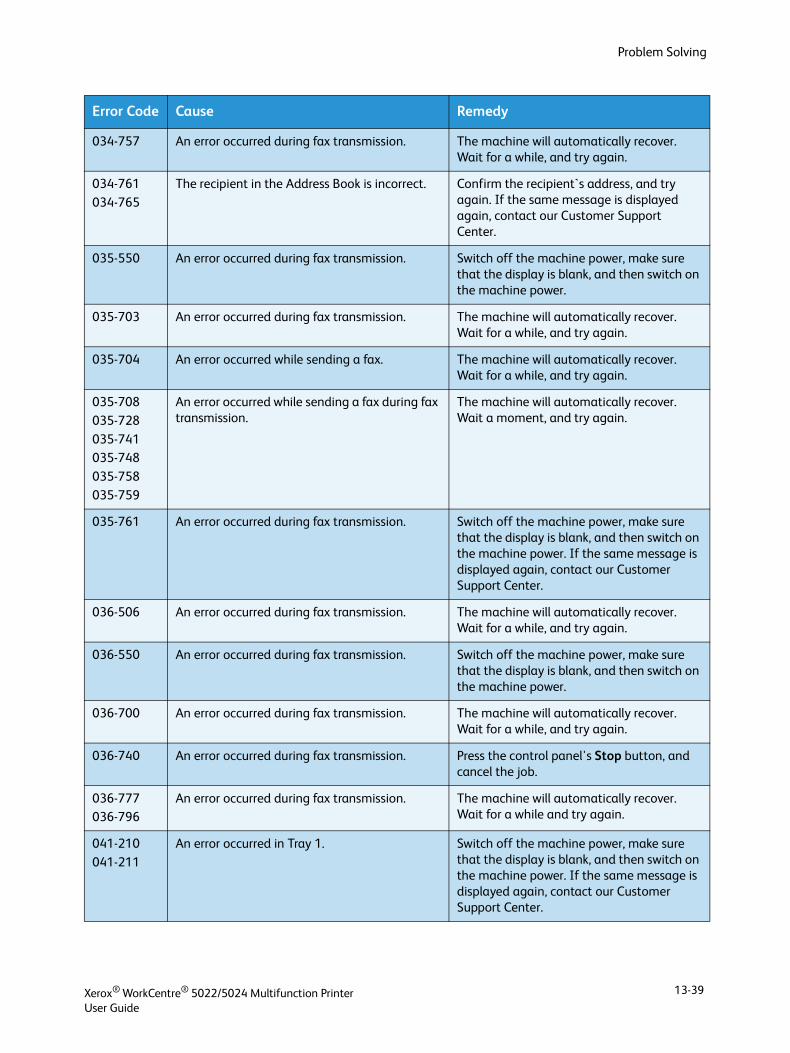
Problem Solving
034-757 An error occurred during fax transmission. The machine will automatically recover. Wait for a while, and try again.
034-761
034-765
The recipient in the Address Book is incorrect. Confirm the recipient`s address, and try again. If the same message is displayed again, contact our Customer Support Center.
035-550 An error occurred during fax transmission. Switch off the machine power, make sure that the display is blank, and then switch on the machine power.
035-703 An error occurred during fax transmission. The machine will automatically recover. Wait for a while, and try again.
035-704 An error occurred while sending a fax. The machine will automatically recover. Wait for a while, and try again.
035-708
035-728
035-741035-748
035-758
035-759
An error occurred while sending a fax during fax transmission.
The machine will automatically recover. Wait a moment, and try again.
035-761 An error occurred during fax transmission. Switch off the machine power, make sure that the display is blank, and then switch on the machine power. If the same message is displayed again, contact our Customer Support Center.
036-506 An error occurred during fax transmission. The machine will automatically recover. Wait for a while, and try again.
036-550 An error occurred during fax transmission. Switch off the machine power, make sure that the display is blank, and then switch on the machine power.
036-700 An error occurred during fax transmission. The machine will automatically recover. Wait for a while, and try again.
036-740 An error occurred during fax transmission. Press the control panel's Stop button, and cancel the job.
036-777036-796
An error occurred during fax transmission. The machine will automatically recover. Wait for a while and try again.
041-210
041-211
An error occurred in Tray 1. Switch off the machine power, make sure that the display is blank, and then switch on the machine power. If the same message is displayed again, contact our Customer Support Center.
Error Code Cause Remedy
Xerox® WorkCentre® 5022/5024 Multifunction PrinterUser Guide
13-39
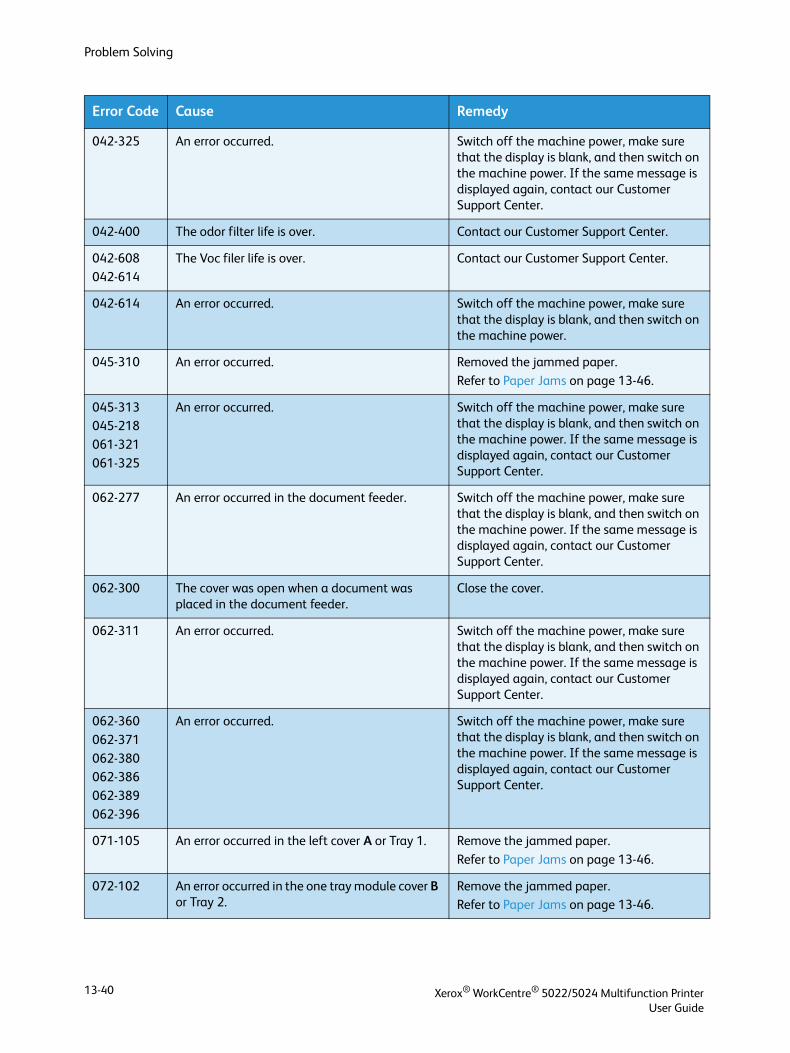
Problem Solving
042-325 An error occurred. Switch off the machine power, make sure that the display is blank, and then switch on the machine power. If the same message is displayed again, contact our Customer Support Center.
042-400 The odor filter life is over. Contact our Customer Support Center.
042-608
042-614
The Voc filer life is over. Contact our Customer Support Center.
042-614 An error occurred. Switch off the machine power, make sure that the display is blank, and then switch on the machine power.
045-310 An error occurred. Removed the jammed paper.
Refer to Paper Jams on page 13-46.
045-313045-218
061-321
061-325
An error occurred. Switch off the machine power, make sure that the display is blank, and then switch on the machine power. If the same message is displayed again, contact our Customer Support Center.
062-277 An error occurred in the document feeder. Switch off the machine power, make sure that the display is blank, and then switch on the machine power. If the same message is displayed again, contact our Customer Support Center.
062-300 The cover was open when a document was placed in the document feeder.
Close the cover.
062-311 An error occurred. Switch off the machine power, make sure that the display is blank, and then switch on the machine power. If the same message is displayed again, contact our Customer Support Center.
062-360
062-371
062-380062-386
062-389
062-396
An error occurred. Switch off the machine power, make sure that the display is blank, and then switch on the machine power. If the same message is displayed again, contact our Customer Support Center.
071-105 An error occurred in the left cover A or Tray 1. Remove the jammed paper.
Refer to Paper Jams on page 13-46.
072-102 An error occurred in the one tray module cover B or Tray 2.
Remove the jammed paper.Refer to Paper Jams on page 13-46.
Error Code Cause Remedy
Xerox® WorkCentre® 5022/5024 Multifunction PrinterUser Guide
13-40
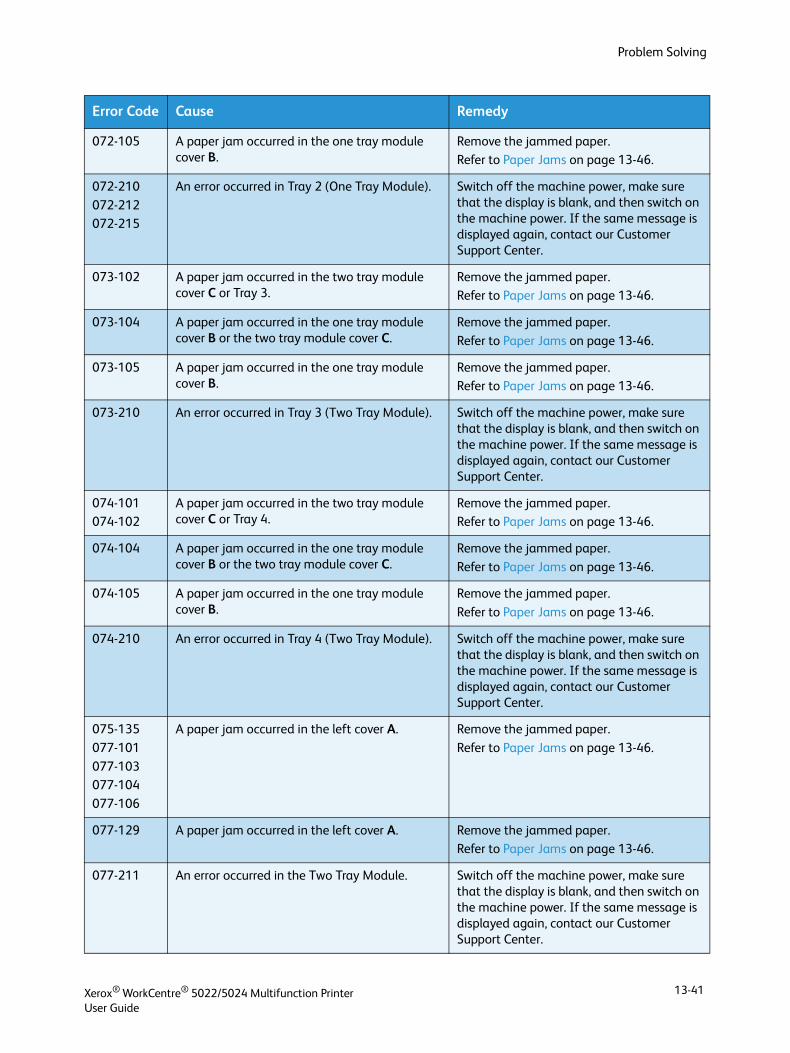
Problem Solving
072-105 A paper jam occurred in the one tray module cover B.
Remove the jammed paper.Refer to Paper Jams on page 13-46.
072-210
072-212072-215
An error occurred in Tray 2 (One Tray Module). Switch off the machine power, make sure that the display is blank, and then switch on the machine power. If the same message is displayed again, contact our Customer Support Center.
073-102 A paper jam occurred in the two tray module cover C or Tray 3.
Remove the jammed paper.Refer to Paper Jams on page 13-46.
073-104 A paper jam occurred in the one tray module cover B or the two tray module cover C.
Remove the jammed paper.
Refer to Paper Jams on page 13-46.
073-105 A paper jam occurred in the one tray module cover B.
Remove the jammed paper.Refer to Paper Jams on page 13-46.
073-210 An error occurred in Tray 3 (Two Tray Module). Switch off the machine power, make sure that the display is blank, and then switch on the machine power. If the same message is displayed again, contact our Customer Support Center.
074-101074-102
A paper jam occurred in the two tray module cover C or Tray 4.
Remove the jammed paper.Refer to Paper Jams on page 13-46.
074-104 A paper jam occurred in the one tray module cover B or the two tray module cover C.
Remove the jammed paper.
Refer to Paper Jams on page 13-46.
074-105 A paper jam occurred in the one tray module cover B.
Remove the jammed paper.
Refer to Paper Jams on page 13-46.
074-210 An error occurred in Tray 4 (Two Tray Module). Switch off the machine power, make sure that the display is blank, and then switch on the machine power. If the same message is displayed again, contact our Customer Support Center.
075-135
077-101
077-103077-104
077-106
A paper jam occurred in the left cover A. Remove the jammed paper.
Refer to Paper Jams on page 13-46.
077-129 A paper jam occurred in the left cover A. Remove the jammed paper.Refer to Paper Jams on page 13-46.
077-211 An error occurred in the Two Tray Module. Switch off the machine power, make sure that the display is blank, and then switch on the machine power. If the same message is displayed again, contact our Customer Support Center.
Error Code Cause Remedy
Xerox® WorkCentre® 5022/5024 Multifunction PrinterUser Guide
13-41
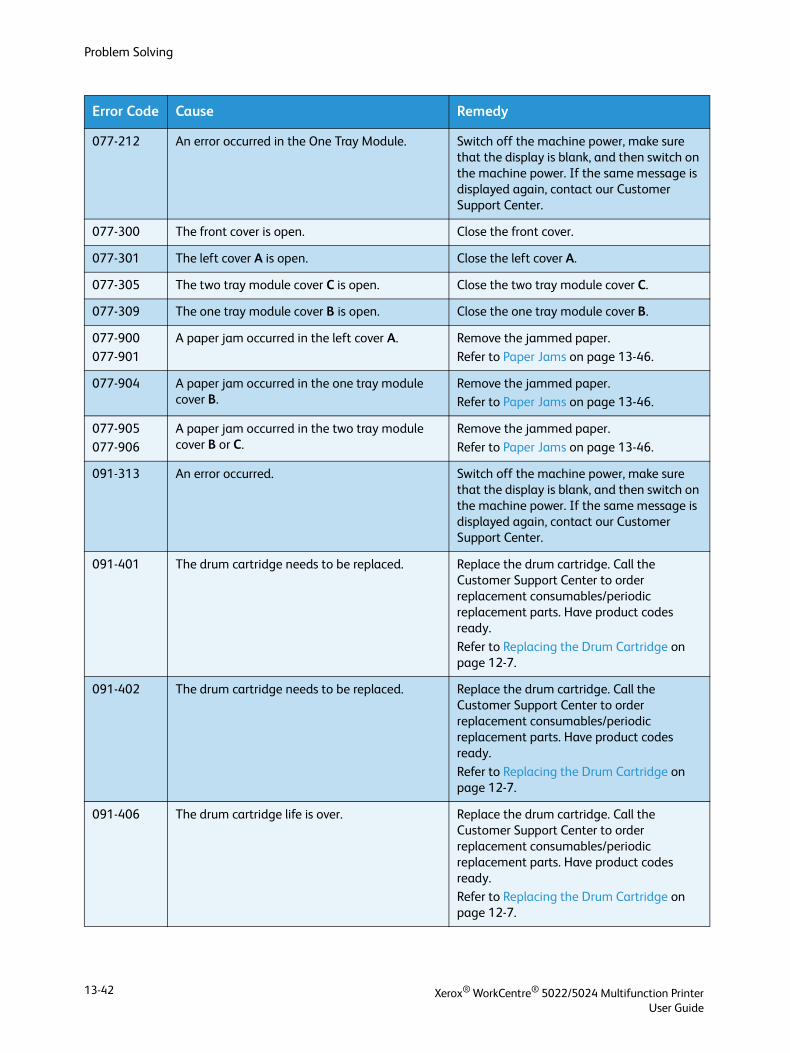
Problem Solving
077-212 An error occurred in the One Tray Module. Switch off the machine power, make sure that the display is blank, and then switch on the machine power. If the same message is displayed again, contact our Customer Support Center.
077-300 The front cover is open. Close the front cover.
077-301 The left cover A is open. Close the left cover A.
077-305 The two tray module cover C is open. Close the two tray module cover C.
077-309 The one tray module cover B is open. Close the one tray module cover B.
077-900
077-901
A paper jam occurred in the left cover A. Remove the jammed paper.
Refer to Paper Jams on page 13-46.
077-904 A paper jam occurred in the one tray module cover B.
Remove the jammed paper.Refer to Paper Jams on page 13-46.
077-905
077-906
A paper jam occurred in the two tray module cover B or C.
Remove the jammed paper.
Refer to Paper Jams on page 13-46.
091-313 An error occurred. Switch off the machine power, make sure that the display is blank, and then switch on the machine power. If the same message is displayed again, contact our Customer Support Center.
091-401 The drum cartridge needs to be replaced. Replace the drum cartridge. Call the Customer Support Center to order replacement consumables/periodic replacement parts. Have product codes ready.
Refer to Replacing the Drum Cartridge on page 12-7.
091-402 The drum cartridge needs to be replaced. Replace the drum cartridge. Call the Customer Support Center to order replacement consumables/periodic replacement parts. Have product codes ready.
Refer to Replacing the Drum Cartridge on page 12-7.
091-406 The drum cartridge life is over. Replace the drum cartridge. Call the Customer Support Center to order replacement consumables/periodic replacement parts. Have product codes ready.Refer to Replacing the Drum Cartridge on page 12-7.
Error Code Cause Remedy
Xerox® WorkCentre® 5022/5024 Multifunction PrinterUser Guide
13-42
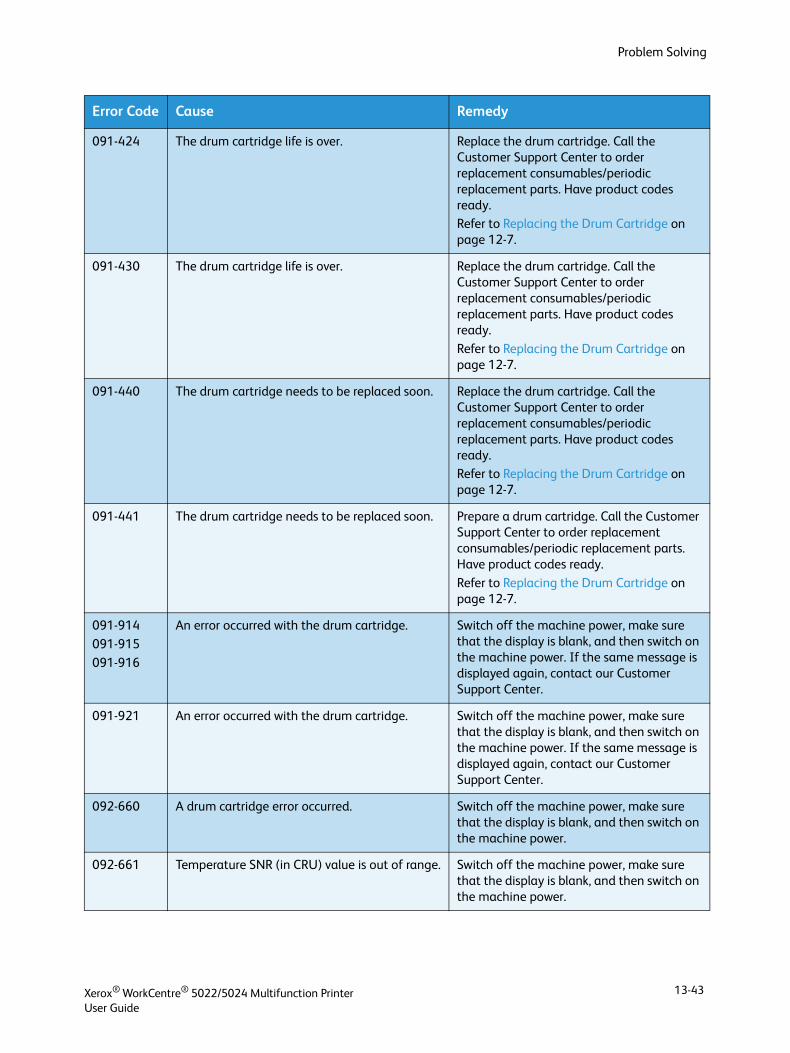
Problem Solving
091-424 The drum cartridge life is over. Replace the drum cartridge. Call the Customer Support Center to order replacement consumables/periodic replacement parts. Have product codes ready.Refer to Replacing the Drum Cartridge on page 12-7.
091-430 The drum cartridge life is over. Replace the drum cartridge. Call the Customer Support Center to order replacement consumables/periodic replacement parts. Have product codes ready.
Refer to Replacing the Drum Cartridge on page 12-7.
091-440 The drum cartridge needs to be replaced soon. Replace the drum cartridge. Call the Customer Support Center to order replacement consumables/periodic replacement parts. Have product codes ready.Refer to Replacing the Drum Cartridge on page 12-7.
091-441 The drum cartridge needs to be replaced soon. Prepare a drum cartridge. Call the Customer Support Center to order replacement consumables/periodic replacement parts. Have product codes ready.
Refer to Replacing the Drum Cartridge on page 12-7.
091-914
091-915
091-916
An error occurred with the drum cartridge. Switch off the machine power, make sure that the display is blank, and then switch on the machine power. If the same message is displayed again, contact our Customer Support Center.
091-921 An error occurred with the drum cartridge. Switch off the machine power, make sure that the display is blank, and then switch on the machine power. If the same message is displayed again, contact our Customer Support Center.
092-660 A drum cartridge error occurred. Switch off the machine power, make sure that the display is blank, and then switch on the machine power.
092-661 Temperature SNR (in CRU) value is out of range. Switch off the machine power, make sure that the display is blank, and then switch on the machine power.
Error Code Cause Remedy
Xerox® WorkCentre® 5022/5024 Multifunction PrinterUser Guide
13-43
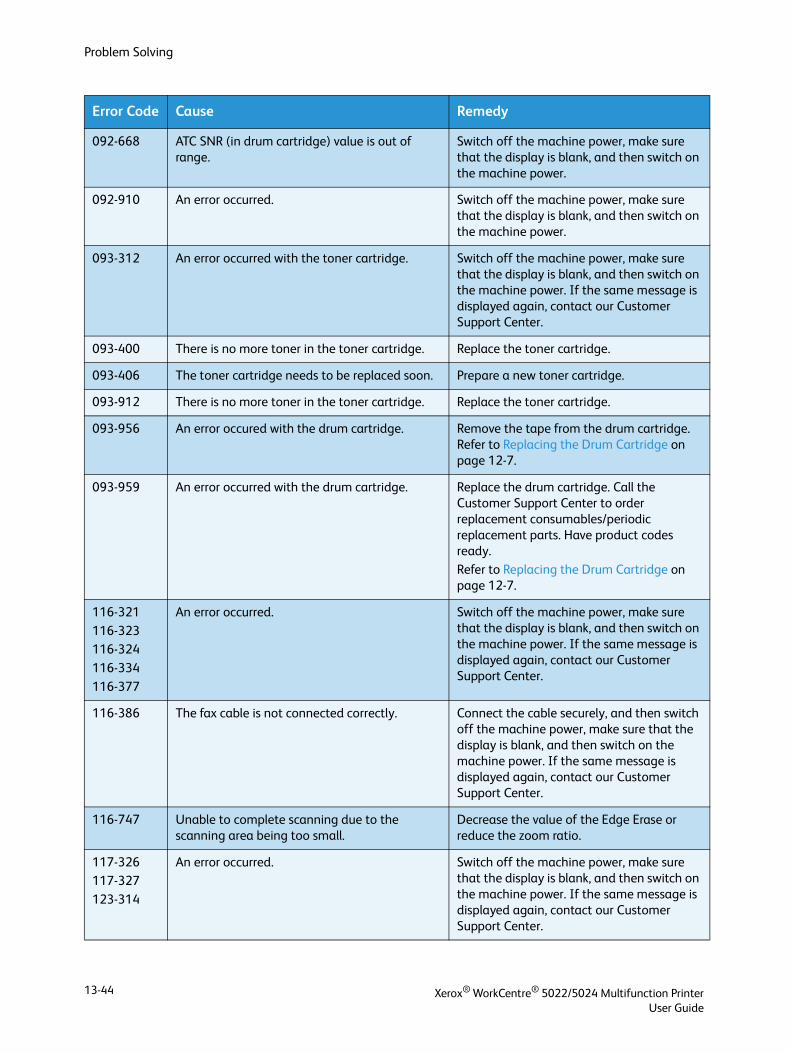
Problem Solving
092-668 ATC SNR (in drum cartridge) value is out of range.
Switch off the machine power, make sure that the display is blank, and then switch on the machine power.
092-910 An error occurred. Switch off the machine power, make sure that the display is blank, and then switch on the machine power.
093-312 An error occurred with the toner cartridge. Switch off the machine power, make sure that the display is blank, and then switch on the machine power. If the same message is displayed again, contact our Customer Support Center.
093-400 There is no more toner in the toner cartridge. Replace the toner cartridge.
093-406 The toner cartridge needs to be replaced soon. Prepare a new toner cartridge.
093-912 There is no more toner in the toner cartridge. Replace the toner cartridge.
093-956 An error occured with the drum cartridge. Remove the tape from the drum cartridge. Refer to Replacing the Drum Cartridge on page 12-7.
093-959 An error occurred with the drum cartridge. Replace the drum cartridge. Call the Customer Support Center to order replacement consumables/periodic replacement parts. Have product codes ready.Refer to Replacing the Drum Cartridge on page 12-7.
116-321
116-323116-324
116-334
116-377
An error occurred. Switch off the machine power, make sure that the display is blank, and then switch on the machine power. If the same message is displayed again, contact our Customer Support Center.
116-386 The fax cable is not connected correctly. Connect the cable securely, and then switch off the machine power, make sure that the display is blank, and then switch on the machine power. If the same message is displayed again, contact our Customer Support Center.
116-747 Unable to complete scanning due to the scanning area being too small.
Decrease the value of the Edge Erase or reduce the zoom ratio.
117-326117-327
123-314
An error occurred. Switch off the machine power, make sure that the display is blank, and then switch on the machine power. If the same message is displayed again, contact our Customer Support Center.
Error Code Cause Remedy
Xerox® WorkCentre® 5022/5024 Multifunction PrinterUser Guide
13-44
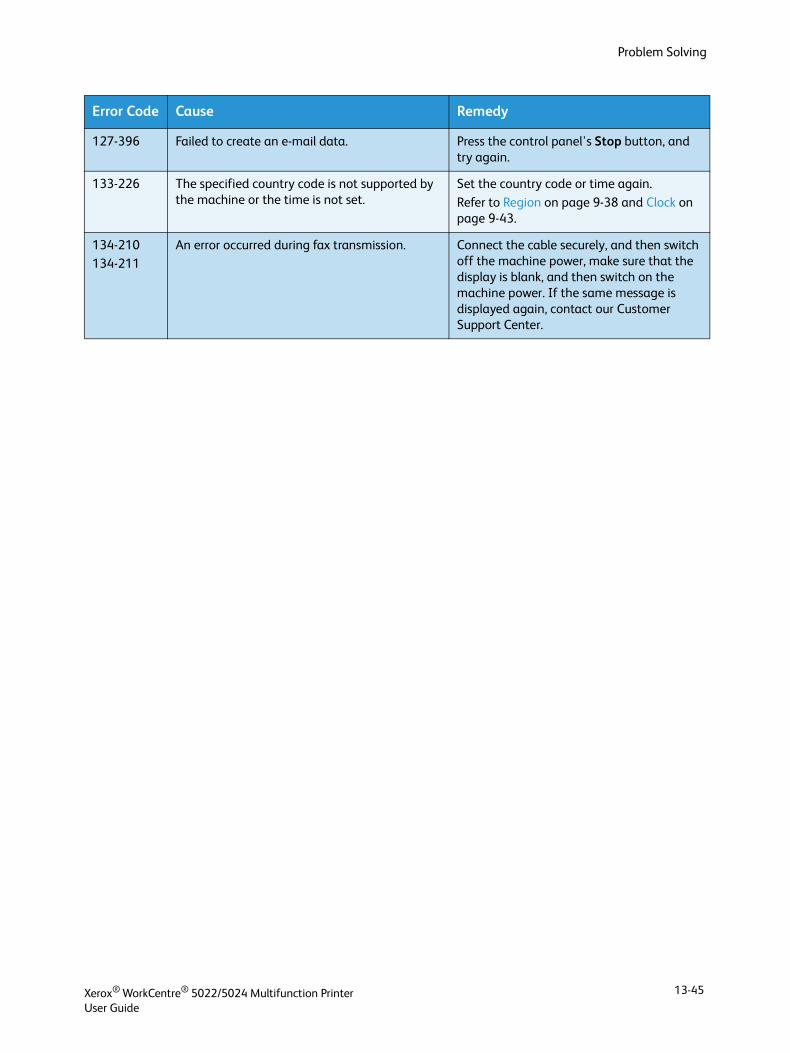
Problem Solving
127-396 Failed to create an e-mail data. Press the control panel's Stop button, and try again.
133-226 The specified country code is not supported by the machine or the time is not set.
Set the country code or time again.
Refer to Region on page 9-38 and Clock on page 9-43.
134-210134-211
An error occurred during fax transmission. Connect the cable securely, and then switch off the machine power, make sure that the display is blank, and then switch on the machine power. If the same message is displayed again, contact our Customer Support Center.
Error Code Cause Remedy
Xerox® WorkCentre® 5022/5024 Multifunction PrinterUser Guide
13-45
Problem Solving
Paper Jams
This section describes procedures to clear paper jams.
When paper jams in the machine, the machine stops and an alarm sounds. A message is also displays on the screen.
Carefully remove the jammed paper without tearing it. Do not leave any pieces of paper in the machine.
Notes
• If the paper jam message remains displayed after you have cleared it, paper is jammed in another part of the machine. Follow the instructions in the message to take the required action.
• After removing the jammed paper, a copy job resumes automatically.
• A print job resumes automatically from the page being printed just before the paper jam occurred.
• While running a copy job using the document feeder without collating the copied output (meaning that the document feeder feeds and scans the documents one sheet at a time), if a paper jam occurs on the machine, the machine resumes to make a copy of the already-scanned document automatically after removing the jammed paper. However, as for the remaining document, you must press the Start button again to allow the document feeder to feed and scan the rest of the loaded documents.
WARNING: If you need to pull out a tray to remove paper jam, contact your local Xerox representative. Do not pull out a tray, otherwise it may cause injuries.
CAUTION: Do not attempt to remove a paper deeply jammed inside the product, particularly a paper wrapped around the fusing unit or the heat roller. Otherwise, it may cause Injuries or burns. Switch off the product immediately and contact your local Xerox representative.
Xerox® WorkCentre® 5022/5024 Multifunction PrinterUser Guide
13-46
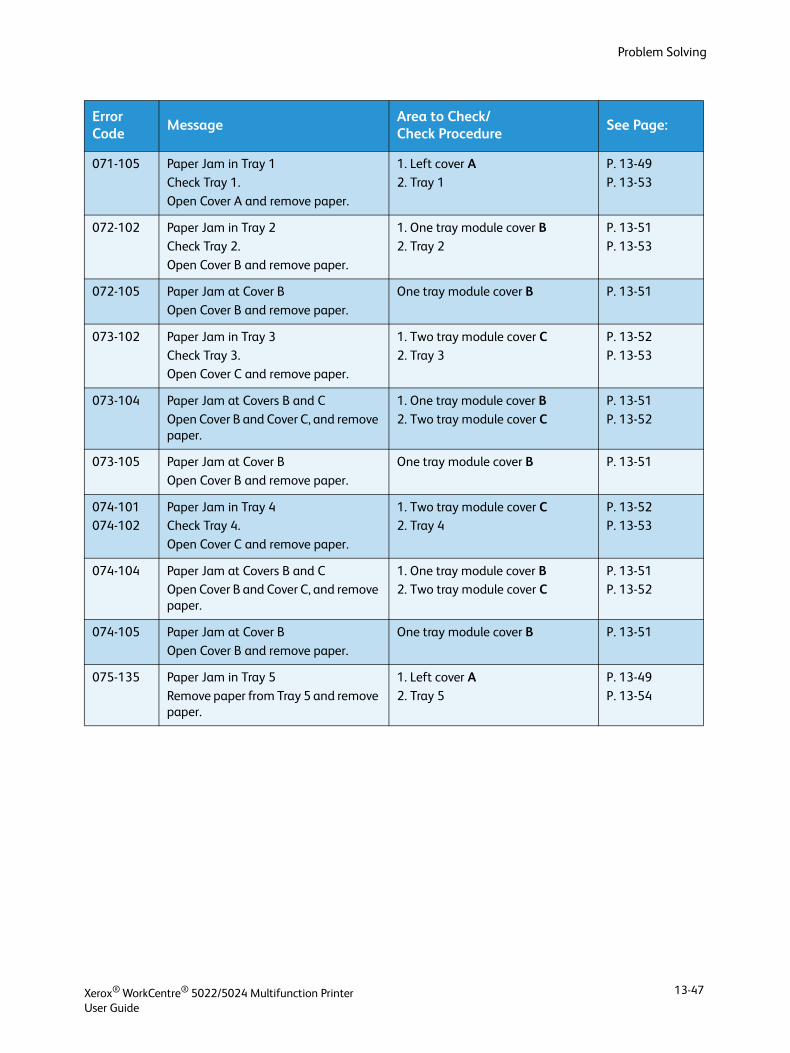
Problem Solving
Error Code
MessageArea to Check/Check Procedure
See Page:
071-105 Paper Jam in Tray 1
Check Tray 1.
Open Cover A and remove paper.
1. Left cover A2. Tray 1
P. 13-49
P. 13-53
072-102 Paper Jam in Tray 2
Check Tray 2.
Open Cover B and remove paper.
1. One tray module cover B2. Tray 2
P. 13-51
P. 13-53
072-105 Paper Jam at Cover B
Open Cover B and remove paper.
One tray module cover B P. 13-51
073-102 Paper Jam in Tray 3
Check Tray 3.Open Cover C and remove paper.
1. Two tray module cover C2. Tray 3
P. 13-52
P. 13-53
073-104 Paper Jam at Covers B and C
Open Cover B and Cover C, and remove paper.
1. One tray module cover B2. Two tray module cover C
P. 13-51
P. 13-52
073-105 Paper Jam at Cover B
Open Cover B and remove paper.
One tray module cover B P. 13-51
074-101074-102
Paper Jam in Tray 4Check Tray 4.
Open Cover C and remove paper.
1. Two tray module cover C2. Tray 4
P. 13-52P. 13-53
074-104 Paper Jam at Covers B and COpen Cover B and Cover C, and remove paper.
1. One tray module cover B2. Two tray module cover C
P. 13-51P. 13-52
074-105 Paper Jam at Cover B
Open Cover B and remove paper.
One tray module cover B P. 13-51
075-135 Paper Jam in Tray 5
Remove paper from Tray 5 and remove paper.
1. Left cover A2. Tray 5
P. 13-49
P. 13-54
Xerox® WorkCentre® 5022/5024 Multifunction PrinterUser Guide
13-47
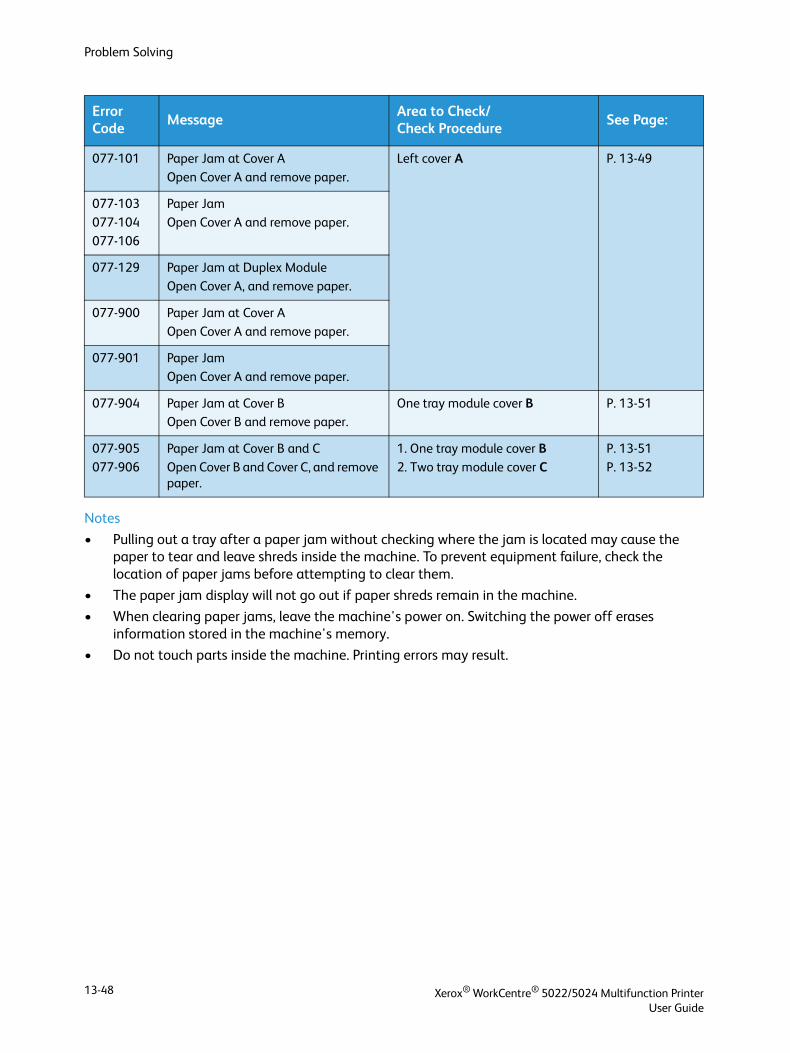
Problem Solving
Notes
• Pulling out a tray after a paper jam without checking where the jam is located may cause the paper to tear and leave shreds inside the machine. To prevent equipment failure, check the location of paper jams before attempting to clear them.
• The paper jam display will not go out if paper shreds remain in the machine.
• When clearing paper jams, leave the machine's power on. Switching the power off erases information stored in the machine's memory.
• Do not touch parts inside the machine. Printing errors may result.
077-101 Paper Jam at Cover A
Open Cover A and remove paper.
Left cover A P. 13-49
077-103
077-104
077-106
Paper Jam
Open Cover A and remove paper.
077-129 Paper Jam at Duplex Module
Open Cover A, and remove paper.
077-900 Paper Jam at Cover A
Open Cover A and remove paper.
077-901 Paper Jam
Open Cover A and remove paper.
077-904 Paper Jam at Cover BOpen Cover B and remove paper.
One tray module cover B P. 13-51
077-905
077-906
Paper Jam at Cover B and C
Open Cover B and Cover C, and remove paper.
1. One tray module cover B2. Two tray module cover C
P. 13-51
P. 13-52
Error Code
MessageArea to Check/Check Procedure
See Page:
Xerox® WorkCentre® 5022/5024 Multifunction PrinterUser Guide
13-48
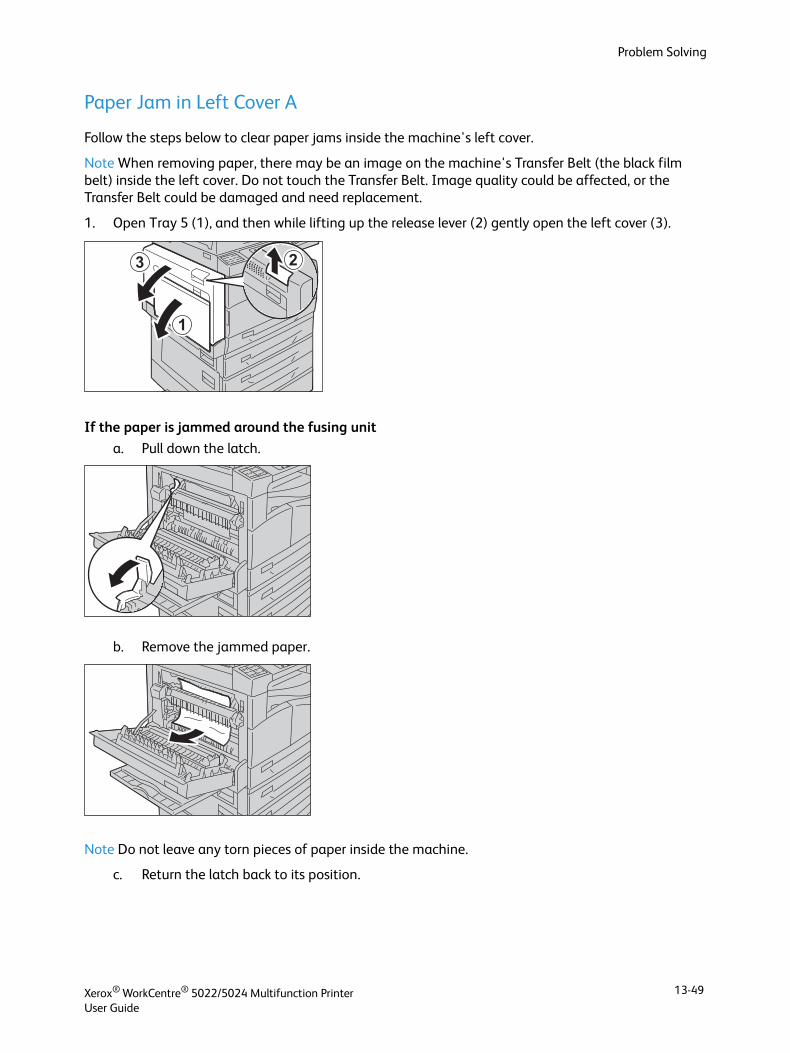
Problem Solving
Paper Jam in Left Cover A
Follow the steps below to clear paper jams inside the machine's left cover.
Note When removing paper, there may be an image on the machine's Transfer Belt (the black film belt) inside the left cover. Do not touch the Transfer Belt. Image quality could be affected, or the Transfer Belt could be damaged and need replacement.
1. Open Tray 5 (1), and then while lifting up the release lever (2) gently open the left cover (3).
If the paper is jammed around the fusing unit
a. Pull down the latch.
b. Remove the jammed paper.
Note Do not leave any torn pieces of paper inside the machine.
c. Return the latch back to its position.
Xerox® WorkCentre® 5022/5024 Multifunction PrinterUser Guide
13-49
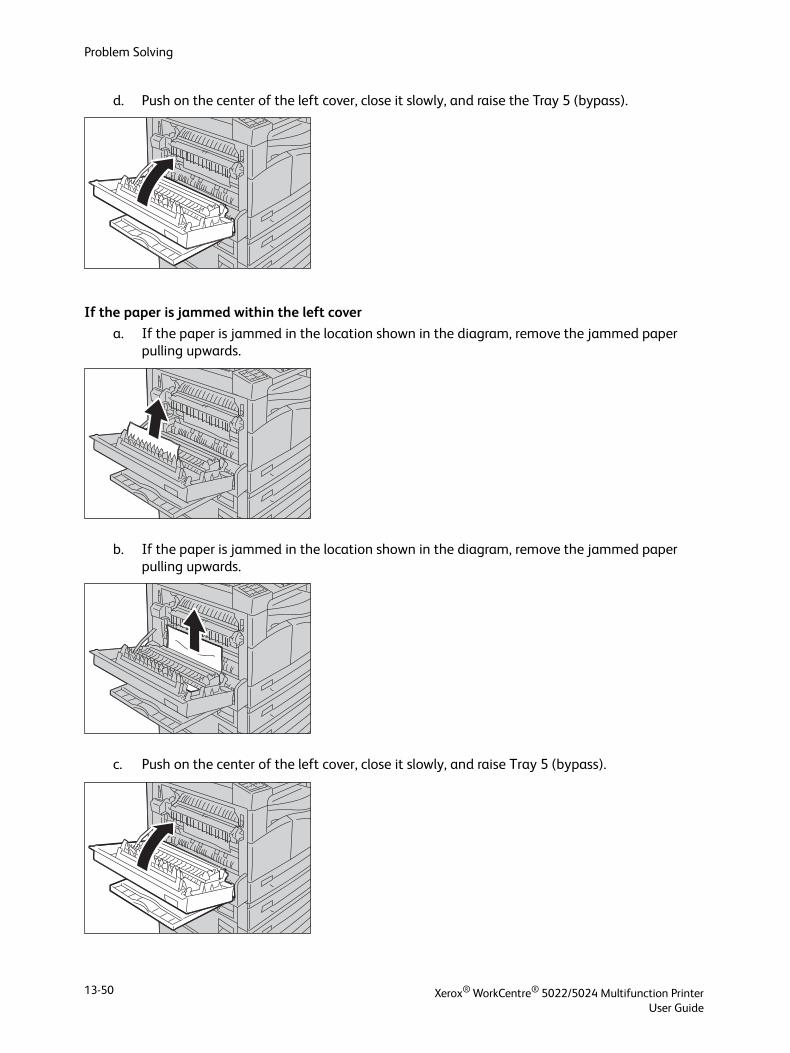
Problem Solving
d. Push on the center of the left cover, close it slowly, and raise the Tray 5 (bypass).
If the paper is jammed within the left cover
a. If the paper is jammed in the location shown in the diagram, remove the jammed paper pulling upwards.
b. If the paper is jammed in the location shown in the diagram, remove the jammed paper pulling upwards.
c. Push on the center of the left cover, close it slowly, and raise Tray 5 (bypass).
Xerox® WorkCentre® 5022/5024 Multifunction PrinterUser Guide
13-50
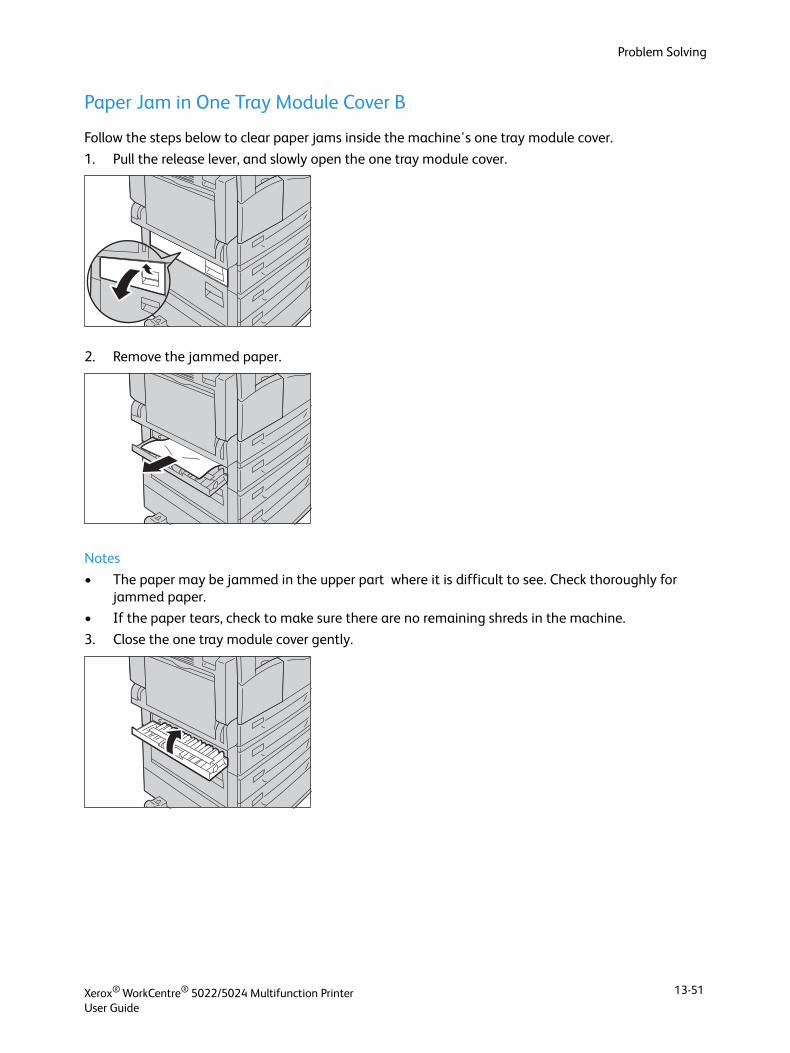
Problem Solving
Paper Jam in One Tray Module Cover B
Follow the steps below to clear paper jams inside the machine's one tray module cover.
1. Pull the release lever, and slowly open the one tray module cover.
2. Remove the jammed paper.
Notes
• The paper may be jammed in the upper part where it is difficult to see. Check thoroughly for jammed paper.
• If the paper tears, check to make sure there are no remaining shreds in the machine.
3. Close the one tray module cover gently.
Xerox® WorkCentre® 5022/5024 Multifunction PrinterUser Guide
13-51
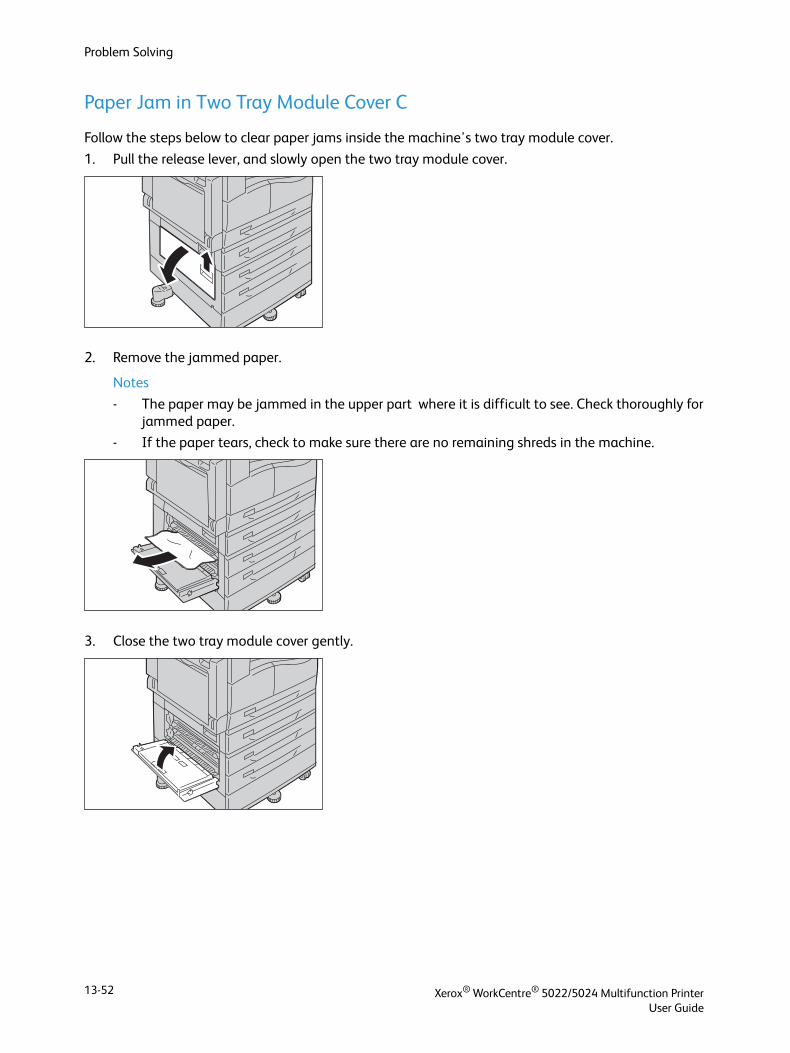
Problem Solving
Paper Jam in Two Tray Module Cover C
Follow the steps below to clear paper jams inside the machine's two tray module cover.
1. Pull the release lever, and slowly open the two tray module cover.
2. Remove the jammed paper.
Notes
- The paper may be jammed in the upper part where it is difficult to see. Check thoroughly for jammed paper.
- If the paper tears, check to make sure there are no remaining shreds in the machine.
3. Close the two tray module cover gently.
Xerox® WorkCentre® 5022/5024 Multifunction PrinterUser Guide
13-52
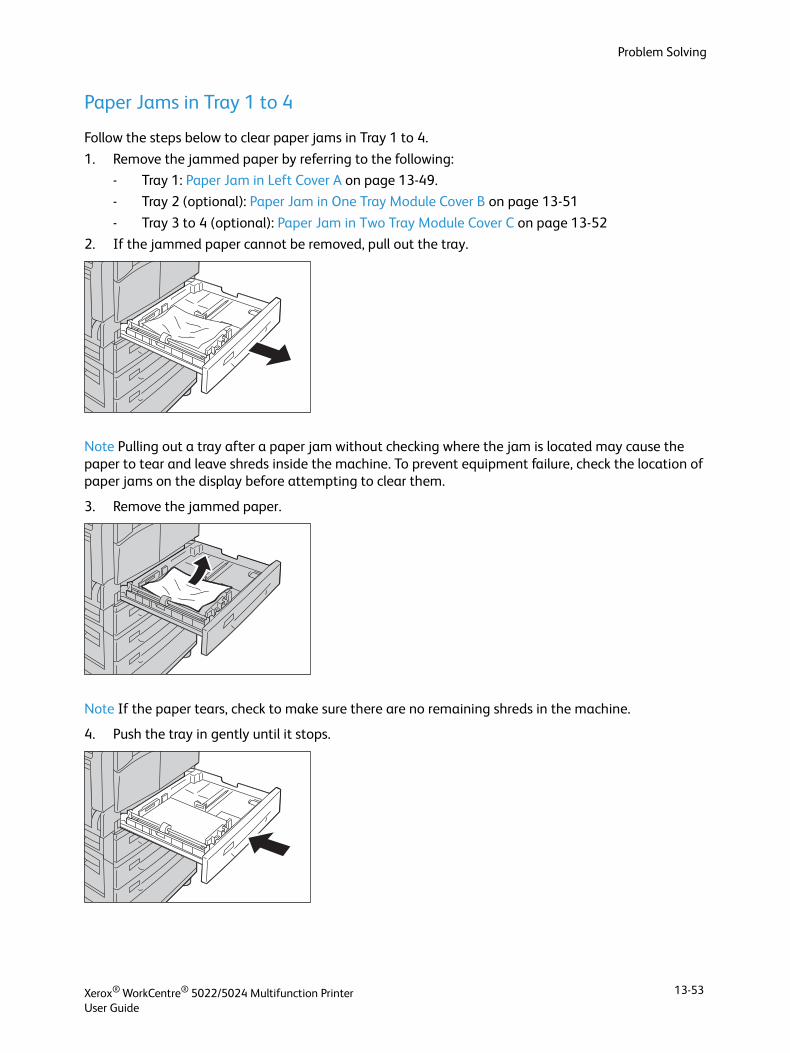
Problem Solving
Paper Jams in Tray 1 to 4
Follow the steps below to clear paper jams in Tray 1 to 4.
1. Remove the jammed paper by referring to the following:
- Tray 1: Paper Jam in Left Cover A on page 13-49.
- Tray 2 (optional): Paper Jam in One Tray Module Cover B on page 13-51
- Tray 3 to 4 (optional): Paper Jam in Two Tray Module Cover C on page 13-52
2. If the jammed paper cannot be removed, pull out the tray.
Note Pulling out a tray after a paper jam without checking where the jam is located may cause the paper to tear and leave shreds inside the machine. To prevent equipment failure, check the location of paper jams on the display before attempting to clear them.
3. Remove the jammed paper.
Note If the paper tears, check to make sure there are no remaining shreds in the machine.
4. Push the tray in gently until it stops.
Xerox® WorkCentre® 5022/5024 Multifunction PrinterUser Guide
13-53
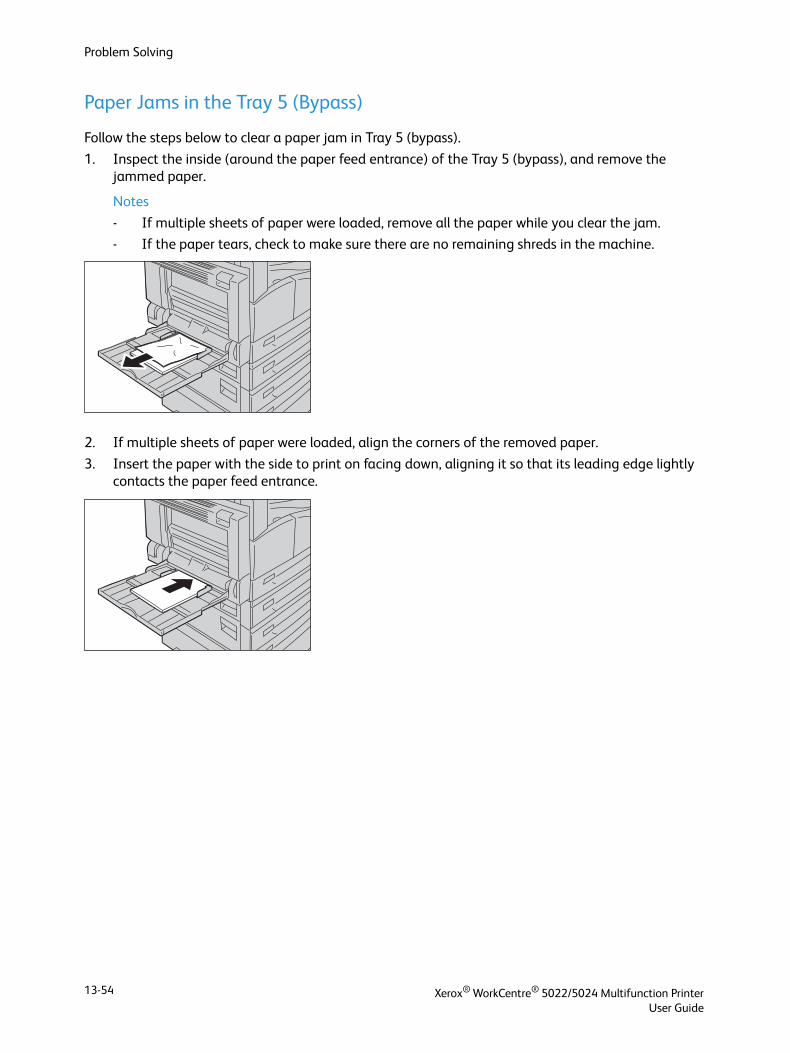
Problem Solving
Paper Jams in the Tray 5 (Bypass)
Follow the steps below to clear a paper jam in Tray 5 (bypass).
1. Inspect the inside (around the paper feed entrance) of the Tray 5 (bypass), and remove the jammed paper.
Notes
- If multiple sheets of paper were loaded, remove all the paper while you clear the jam.
- If the paper tears, check to make sure there are no remaining shreds in the machine.
2. If multiple sheets of paper were loaded, align the corners of the removed paper.
3. Insert the paper with the side to print on facing down, aligning it so that its leading edge lightly contacts the paper feed entrance.
Xerox® WorkCentre® 5022/5024 Multifunction PrinterUser Guide
13-54
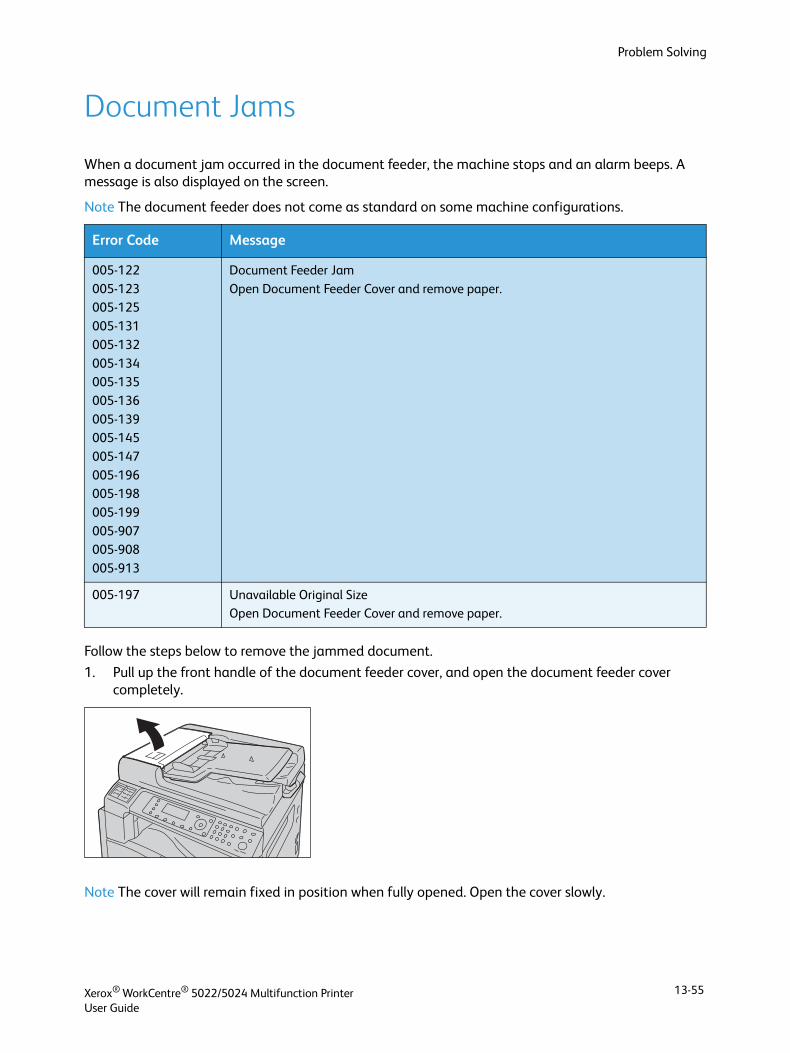
Problem Solving
Document Jams
When a document jam occurred in the document feeder, the machine stops and an alarm beeps. A message is also displayed on the screen.
Note The document feeder does not come as standard on some machine configurations.
Follow the steps below to remove the jammed document.
1. Pull up the front handle of the document feeder cover, and open the document feeder cover completely.
Note The cover will remain fixed in position when fully opened. Open the cover slowly.
Error Code Message
005-122
005-123005-125
005-131
005-132
005-134005-135
005-136
005-139005-145
005-147
005-196005-198
005-199
005-907005-908
005-913
Document Feeder Jam
Open Document Feeder Cover and remove paper.
005-197 Unavailable Original SizeOpen Document Feeder Cover and remove paper.
Xerox® WorkCentre® 5022/5024 Multifunction PrinterUser Guide
13-55
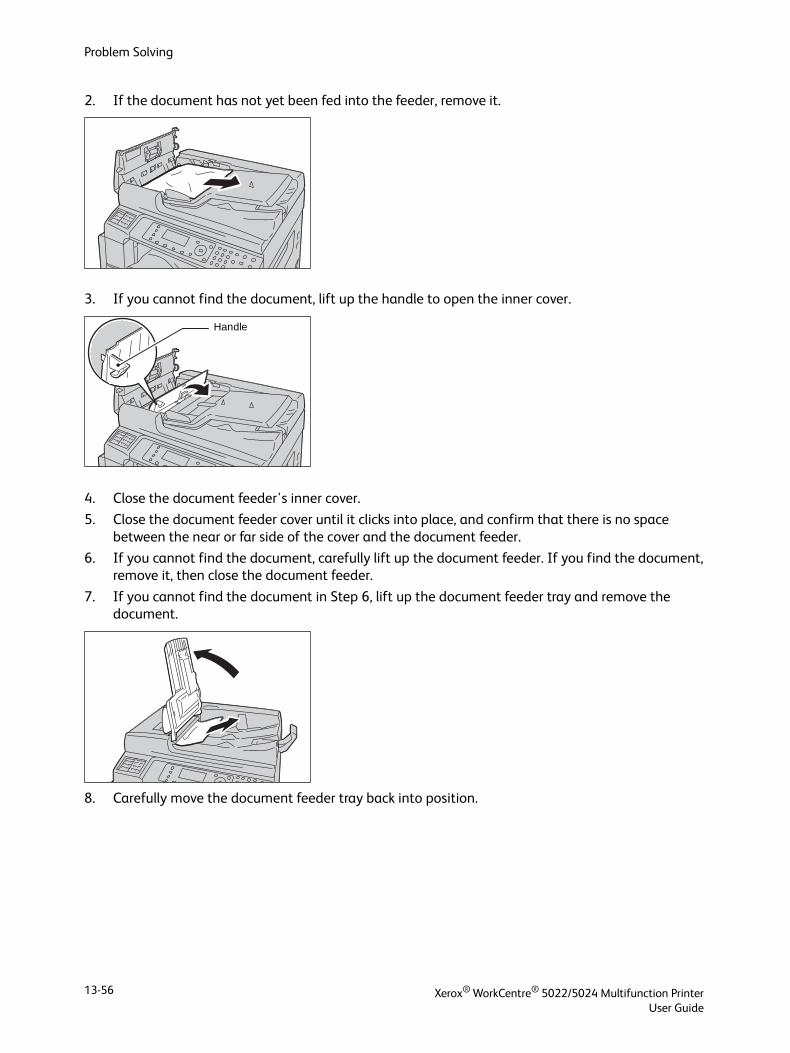
Problem Solving
2. If the document has not yet been fed into the feeder, remove it.
3. If you cannot find the document, lift up the handle to open the inner cover.
4. Close the document feeder's inner cover.
5. Close the document feeder cover until it clicks into place, and confirm that there is no space between the near or far side of the cover and the document feeder.
6. If you cannot find the document, carefully lift up the document feeder. If you find the document, remove it, then close the document feeder.
7. If you cannot find the document in Step 6, lift up the document feeder tray and remove the document.
8. Carefully move the document feeder tray back into position.
Handle
Xerox® WorkCentre® 5022/5024 Multifunction PrinterUser Guide
13-56
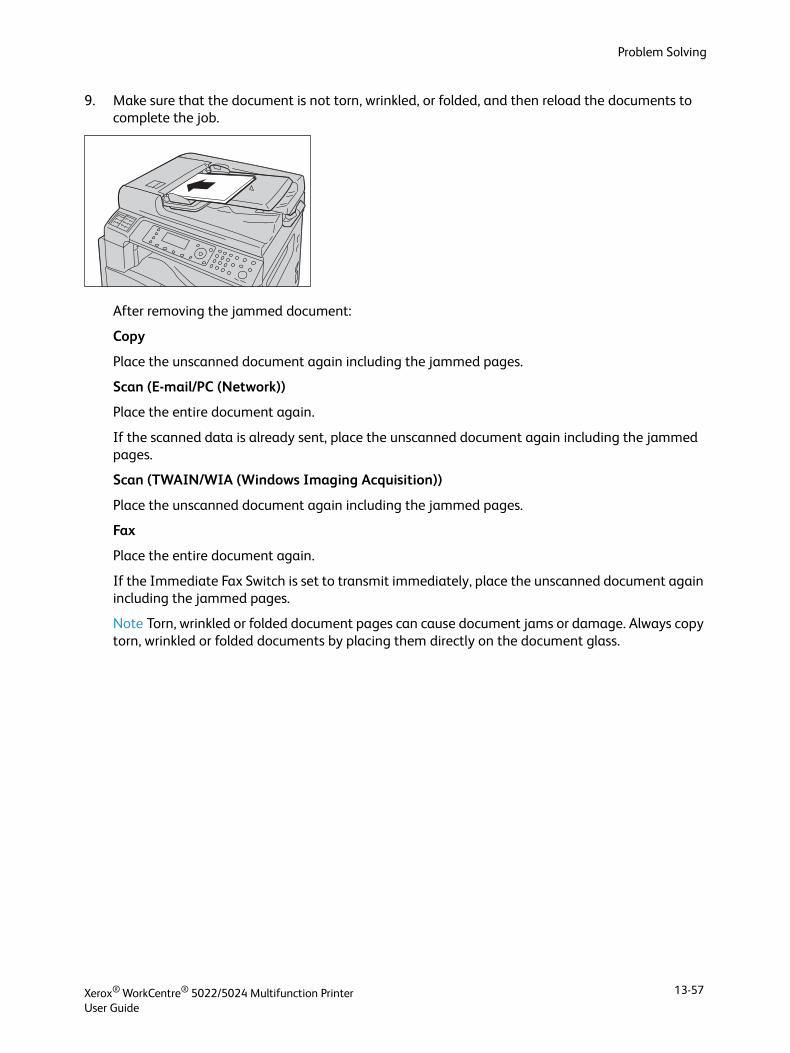
Problem Solving
9. Make sure that the document is not torn, wrinkled, or folded, and then reload the documents to complete the job.
After removing the jammed document:
Copy
Place the unscanned document again including the jammed pages.
Scan (E-mail/PC (Network))
Place the entire document again.
If the scanned data is already sent, place the unscanned document again including the jammed pages.
Scan (TWAIN/WIA (Windows Imaging Acquisition))
Place the unscanned document again including the jammed pages.
Fax
Place the entire document again.
If the Immediate Fax Switch is set to transmit immediately, place the unscanned document again including the jammed pages.
Note Torn, wrinkled or folded document pages can cause document jams or damage. Always copy torn, wrinkled or folded documents by placing them directly on the document glass.
Xerox® WorkCentre® 5022/5024 Multifunction PrinterUser Guide
13-57

Problem Solving
Xerox® WorkCentre® 5022/5024 Multifunction PrinterUser Guide
13-58
14Appendix
This chapter describes the machine specifications, optional components, and notes and restrictions.
Specifications
This section lists the main specifications of the machine. Note that the specifications and the appearance of the product may change without prior notice.
Xerox® WorkCentre® 5022/5024 Multifunction PrinterUser Guide
14-1
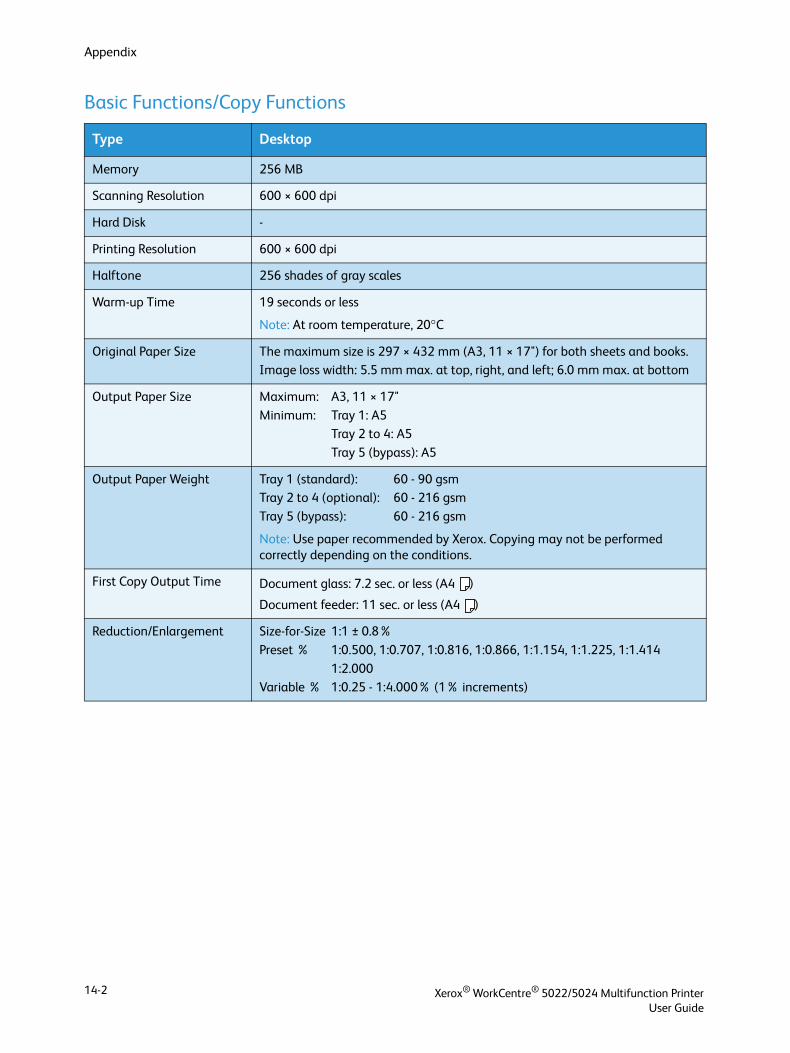
Appendix
Basic Functions/Copy Functions
Type Desktop
Memory 256 MB
Scanning Resolution 600 × 600 dpi
Hard Disk -
Printing Resolution 600 × 600 dpi
Halftone 256 shades of gray scales
Warm-up Time 19 seconds or less
Note: At room temperature, 20°C
Original Paper Size The maximum size is 297 × 432 mm (A3, 11 × 17") for both sheets and books.Image loss width: 5.5 mm max. at top, right, and left; 6.0 mm max. at bottom
Output Paper Size Maximum: A3, 11 × 17"
Minimum: Tray 1: A5Tray 2 to 4: A5
Tray 5 (bypass): A5
Output Paper Weight Tray 1 (standard): 60 - 90 gsmTray 2 to 4 (optional): 60 - 216 gsm
Tray 5 (bypass): 60 - 216 gsm
Note: Use paper recommended by Xerox. Copying may not be performed correctly depending on the conditions.
First Copy Output Time Document glass: 7.2 sec. or less (A4 )
Document feeder: 11 sec. or less (A4 )
Reduction/Enlargement Size-for-Size 1:1 ± 0.8%
Preset % 1:0.500, 1:0.707, 1:0.816, 1:0.866, 1:1.154, 1:1.225, 1:1.414
1:2.000Variable % 1:0.25 - 1:4.000% (1% increments)
Xerox® WorkCentre® 5022/5024 Multifunction PrinterUser Guide
14-2
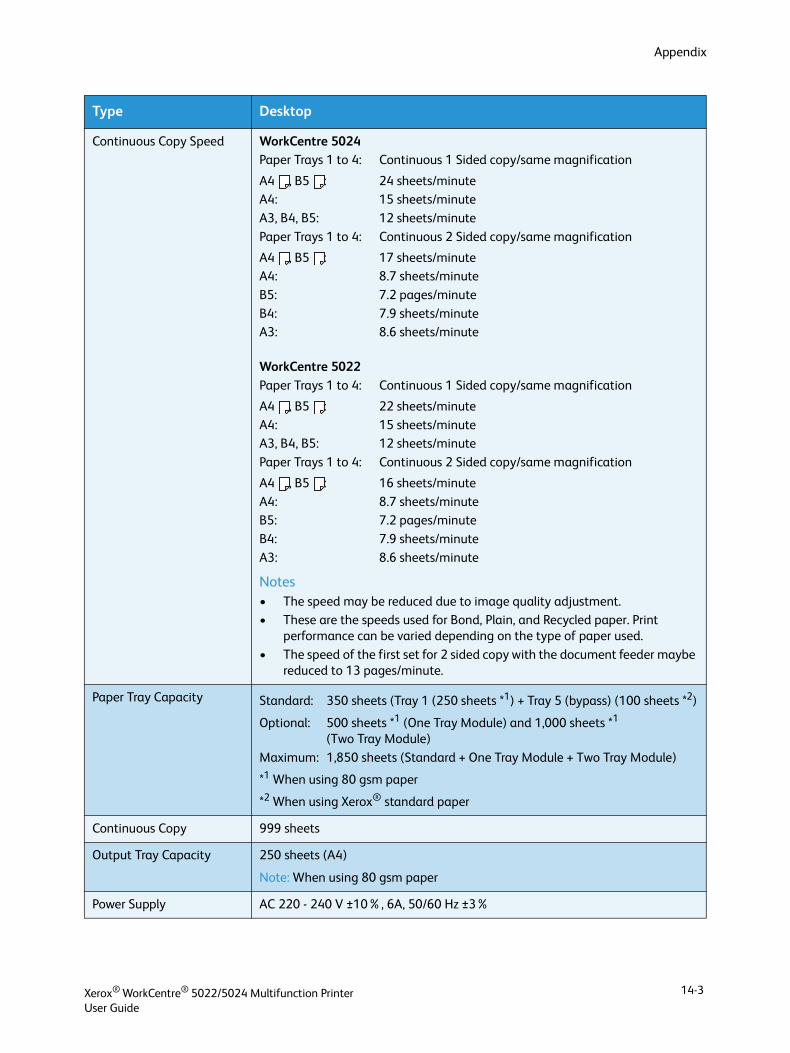
Appendix
Continuous Copy Speed WorkCentre 5024Paper Trays 1 to 4: Continuous 1 Sided copy/same magnification
A4 , B5 : 24 sheets/minuteA4: 15 sheets/minute
A3, B4, B5: 12 sheets/minute
Paper Trays 1 to 4: Continuous 2 Sided copy/same magnification
A4 , B5 : 17 sheets/minuteA4: 8.7 sheets/minute
B5: 7.2 pages/minute
B4: 7.9 sheets/minuteA3: 8.6 sheets/minute
WorkCentre 5022Paper Trays 1 to 4: Continuous 1 Sided copy/same magnification
A4 , B5 : 22 sheets/minute
A4: 15 sheets/minuteA3, B4, B5: 12 sheets/minute
Paper Trays 1 to 4: Continuous 2 Sided copy/same magnification
A4 , B5 : 16 sheets/minute
A4: 8.7 sheets/minuteB5: 7.2 pages/minute
B4: 7.9 sheets/minute
A3: 8.6 sheets/minute
Notes• The speed may be reduced due to image quality adjustment.• These are the speeds used for Bond, Plain, and Recycled paper. Print
performance can be varied depending on the type of paper used.
• The speed of the first set for 2 sided copy with the document feeder maybe reduced to 13 pages/minute.
Paper Tray Capacity Standard: 350 sheets (Tray 1 (250 sheets *1) + Tray 5 (bypass) (100 sheets *2)
Optional: 500 sheets *1 (One Tray Module) and 1,000 sheets *1
(Two Tray Module)
Maximum: 1,850 sheets (Standard + One Tray Module + Two Tray Module)
*1 When using 80 gsm paper
*2 When using Xerox® standard paper
Continuous Copy 999 sheets
Output Tray Capacity 250 sheets (A4)
Note: When using 80 gsm paper
Power Supply AC 220 - 240 V ±10%, 6A, 50/60 Hz ±3%
Type Desktop
Xerox® WorkCentre® 5022/5024 Multifunction PrinterUser Guide
14-3
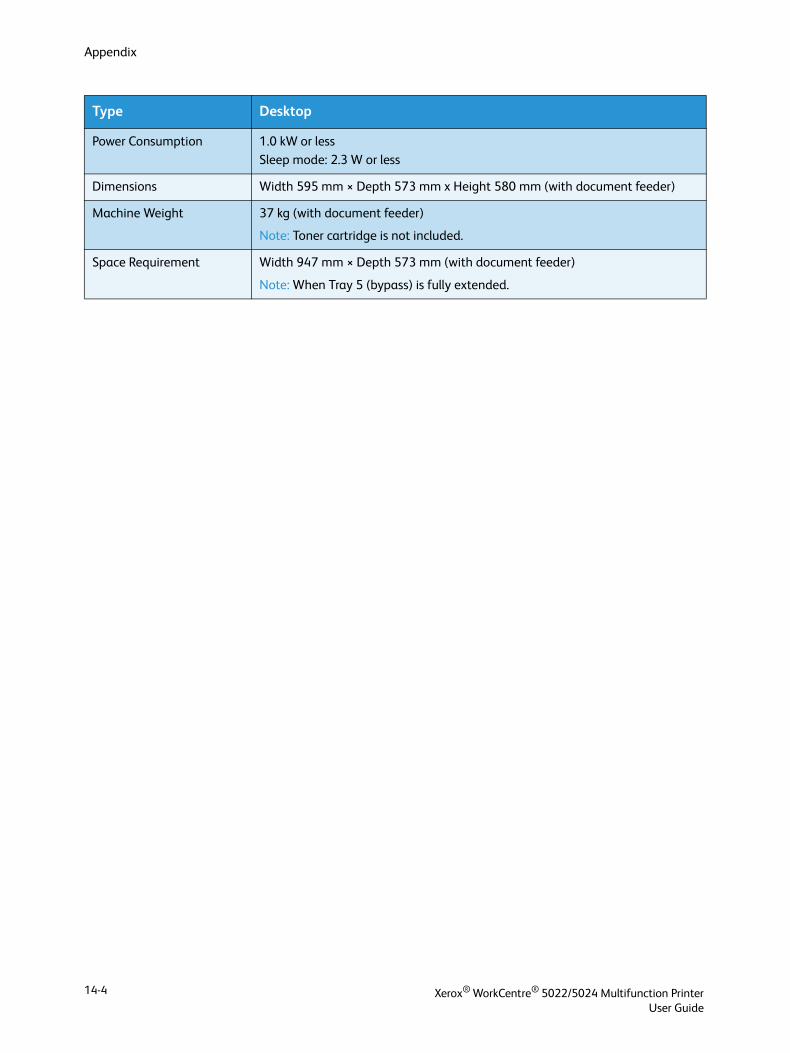
Appendix
Power Consumption 1.0 kW or lessSleep mode: 2.3 W or less
Dimensions Width 595 mm × Depth 573 mm x Height 580 mm (with document feeder)
Machine Weight 37 kg (with document feeder)
Note: Toner cartridge is not included.
Space Requirement Width 947 mm × Depth 573 mm (with document feeder)
Note: When Tray 5 (bypass) is fully extended.
Type Desktop
Xerox® WorkCentre® 5022/5024 Multifunction PrinterUser Guide
14-4

Appendix
Print Functions
Scan Functions (Local)*1
Type Built-in
Output Paper Size Same as the Basic Functions/Copy Functions
Continuous Print Speed Same as the Basic Functions/Copy Functions
Note: The speed may be reduced due to image quality adjustment. Print speed may also drop depending on the document.
Print Resolution Output resolution: 600 × 600 dpiData processing resolution: 600 × 600 dpi
PDL Standard: FX HBPL (Host Based Print Language)
Optional: PCL
Protocol Network connection: TCP/IP v4/v6 (lpd, Port9100)
Operating System Microsoft® Windows® XP
Microsoft® Windows Server® 2003
Microsoft® Windows® XP Professional x64 Edition
Microsoft® Windows Server® 2003 x64 Edition
Microsoft® Windows Vista®
Microsoft® Windows Vista® x64
Microsoft® Windows Server® 2008
Microsoft® Windows Server® 2008 x64 Edition
Microsoft® Windows Server® 2008 R2
Microsoft® Windows® 7
Microsoft® Windows® 7 x64
Microsoft® Windows® 8 x64
Microsoft® Windows® 8
Microsoft® Windows Server® 2012 x64 Edition
For information about the latest supported OS, refer to the Xerox Web site.
Connectivity Standard: USB 1.1/2.0, TWAIN, Optional: Ethernet 100BASE-TX/10BASE-T
Type Color Scanner
Original Paper Size Same as the Basic Functions/Copy Functions
Scanning Resolution Monochrome: 600 × 600 dpi, 400 × 400 dpi,
300 × 300 dpi, 200 × 200 dpiColor: 300 × 300 dpi, 200 × 200 dpi,
Xerox® WorkCentre® 5022/5024 Multifunction PrinterUser Guide
14-5

Appendix
*1 The Local scan function is installed as standard in CPS and CPS NW model.*2 The scanning speed varies depending on documents.*3 WIA stands for Windows Imaging Acquisition.*4 Please refer to the Xerox web site for the latest support operating systems.
Scanning Halftone Color: 8-bit input / 8-bit output for each RGB colorMonochrome: 1-bit output
Scanning Speed*2 Monochrome: 18 sheets/minute
Color: 4 sheets/minute
With a standard Xerox document (A4 ), at 200 dpi, using TWAIN driver (USB)
Scan to PC (TWAIN/
WIA*3: USB)
Driver TWAIN/WIA*3
Operating
Systems*4Microsoft® Windows® XP
Microsoft® Windows Server® 2003
Microsoft® Windows® XP Professional x64 Edition
Microsoft® Windows Server® 2003 x64 Edition
Microsoft® Windows Vista®
Microsoft® Windows Vista® x64
Microsoft® Windows Server® 2008
Microsoft® Windows Server® 2008 x64 Edition
Microsoft® Windows Server® 2008 R2
Microsoft® Windows® 7
Microsoft® Windows® 7 x64
Microsoft® Windows® 8 x64,
Microsoft® Windows® 8,
Microsoft® Windows Server® 2012 x64 Edition
Type Color Scanner
Xerox® WorkCentre® 5022/5024 Multifunction PrinterUser Guide
14-6
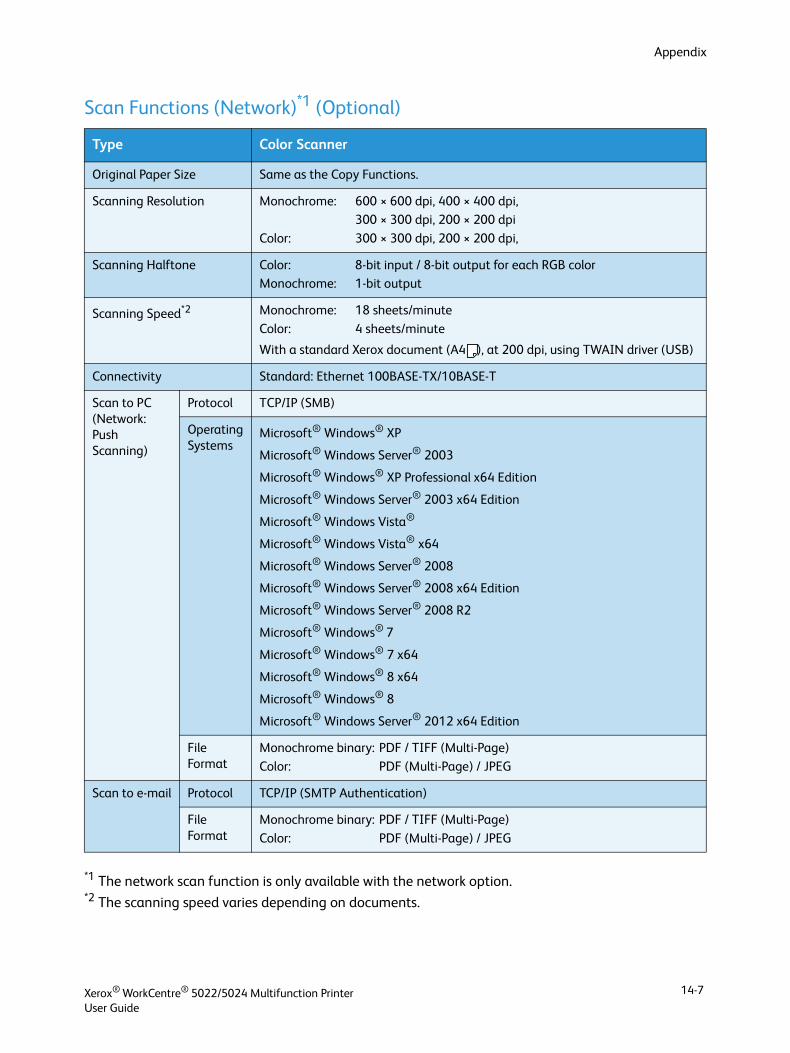
Appendix
Scan Functions (Network)*1 (Optional)
*1 The network scan function is only available with the network option.*2 The scanning speed varies depending on documents.
Type Color Scanner
Original Paper Size Same as the Copy Functions.
Scanning Resolution Monochrome: 600 × 600 dpi, 400 × 400 dpi, 300 × 300 dpi, 200 × 200 dpi
Color: 300 × 300 dpi, 200 × 200 dpi,
Scanning Halftone Color: 8-bit input / 8-bit output for each RGB colorMonochrome: 1-bit output
Scanning Speed*2 Monochrome: 18 sheets/minute
Color: 4 sheets/minute
With a standard Xerox document (A4 ), at 200 dpi, using TWAIN driver (USB)
Connectivity Standard: Ethernet 100BASE-TX/10BASE-T
Scan to PC (Network: Push Scanning)
Protocol TCP/IP (SMB)
Operating Systems
Microsoft® Windows® XP
Microsoft® Windows Server® 2003
Microsoft® Windows® XP Professional x64 Edition
Microsoft® Windows Server® 2003 x64 Edition
Microsoft® Windows Vista®
Microsoft® Windows Vista® x64
Microsoft® Windows Server® 2008
Microsoft® Windows Server® 2008 x64 Edition
Microsoft® Windows Server® 2008 R2
Microsoft® Windows® 7
Microsoft® Windows® 7 x64
Microsoft® Windows® 8 x64
Microsoft® Windows® 8
Microsoft® Windows Server® 2012 x64 Edition
File Format
Monochrome binary: PDF / TIFF (Multi-Page)
Color: PDF (Multi-Page) / JPEG
Scan to e-mail Protocol TCP/IP (SMTP Authentication)
File Format
Monochrome binary: PDF / TIFF (Multi-Page)
Color: PDF (Multi-Page) / JPEG
Xerox® WorkCentre® 5022/5024 Multifunction PrinterUser Guide
14-7
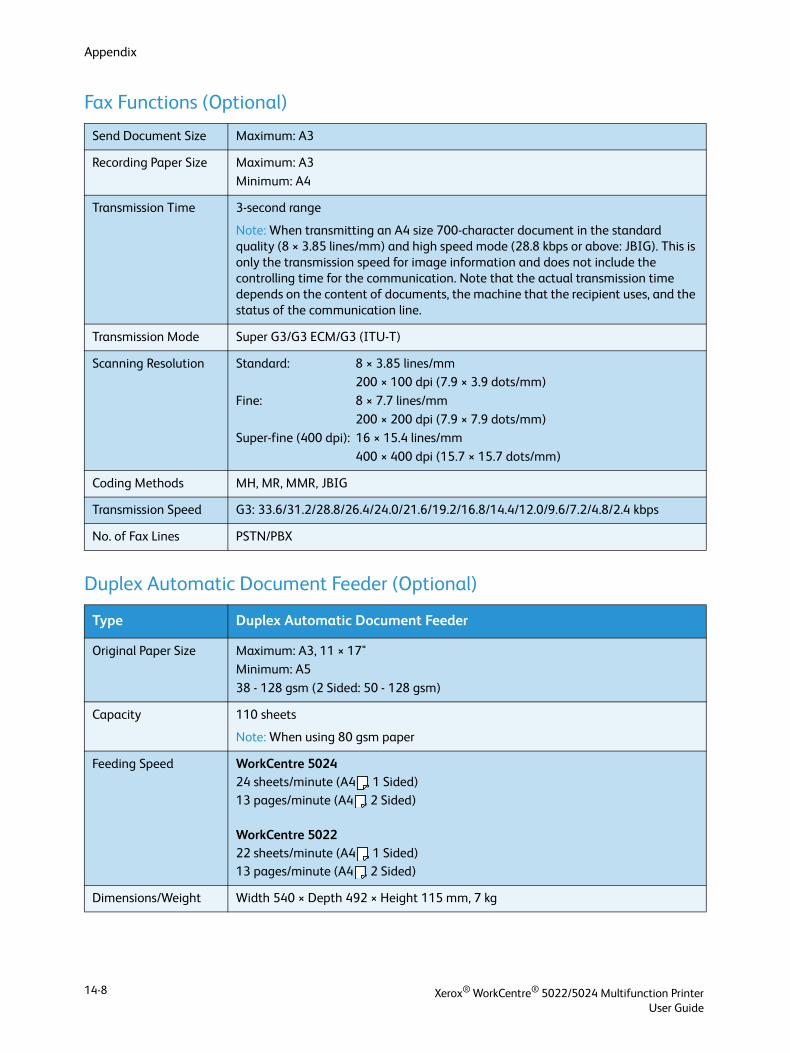
Appendix
Fax Functions (Optional)
Duplex Automatic Document Feeder (Optional)
Send Document Size Maximum: A3
Recording Paper Size Maximum: A3
Minimum: A4
Transmission Time 3-second range
Note: When transmitting an A4 size 700-character document in the standard quality (8 × 3.85 lines/mm) and high speed mode (28.8 kbps or above: JBIG). This is only the transmission speed for image information and does not include the controlling time for the communication. Note that the actual transmission time depends on the content of documents, the machine that the recipient uses, and the status of the communication line.
Transmission Mode Super G3/G3 ECM/G3 (ITU-T)
Scanning Resolution Standard: 8 × 3.85 lines/mm200 × 100 dpi (7.9 × 3.9 dots/mm)
Fine: 8 × 7.7 lines/mm
200 × 200 dpi (7.9 × 7.9 dots/mm)Super-fine (400 dpi): 16 × 15.4 lines/mm
400 × 400 dpi (15.7 × 15.7 dots/mm)
Coding Methods MH, MR, MMR, JBIG
Transmission Speed G3: 33.6/31.2/28.8/26.4/24.0/21.6/19.2/16.8/14.4/12.0/9.6/7.2/4.8/2.4 kbps
No. of Fax Lines PSTN/PBX
Type Duplex Automatic Document Feeder
Original Paper Size Maximum: A3, 11 × 17"Minimum: A5
38 - 128 gsm (2 Sided: 50 - 128 gsm)
Capacity 110 sheets
Note: When using 80 gsm paper
Feeding Speed WorkCentre 502424 sheets/minute (A4 , 1 Sided)13 pages/minute (A4 , 2 Sided)
WorkCentre 502222 sheets/minute (A4 , 1 Sided)13 pages/minute (A4 , 2 Sided)
Dimensions/Weight Width 540 × Depth 492 × Height 115 mm, 7 kg
Xerox® WorkCentre® 5022/5024 Multifunction PrinterUser Guide
14-8
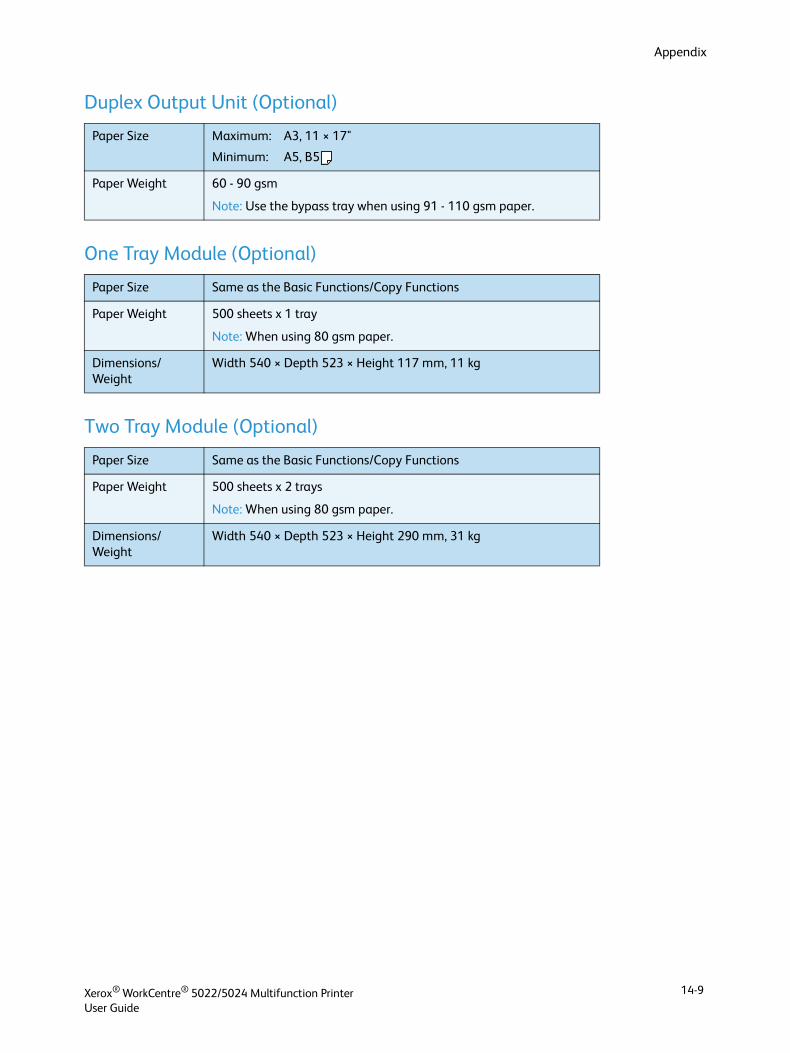
Appendix
Duplex Output Unit (Optional)
One Tray Module (Optional)
Two Tray Module (Optional)
Paper Size Maximum: A3, 11 × 17"
Minimum: A5, B5
Paper Weight 60 - 90 gsm
Note: Use the bypass tray when using 91 - 110 gsm paper.
Paper Size Same as the Basic Functions/Copy Functions
Paper Weight 500 sheets x 1 tray
Note: When using 80 gsm paper.
Dimensions/Weight
Width 540 × Depth 523 × Height 117 mm, 11 kg
Paper Size Same as the Basic Functions/Copy Functions
Paper Weight 500 sheets x 2 trays
Note: When using 80 gsm paper.
Dimensions/Weight
Width 540 × Depth 523 × Height 290 mm, 31 kg
Xerox® WorkCentre® 5022/5024 Multifunction PrinterUser Guide
14-9
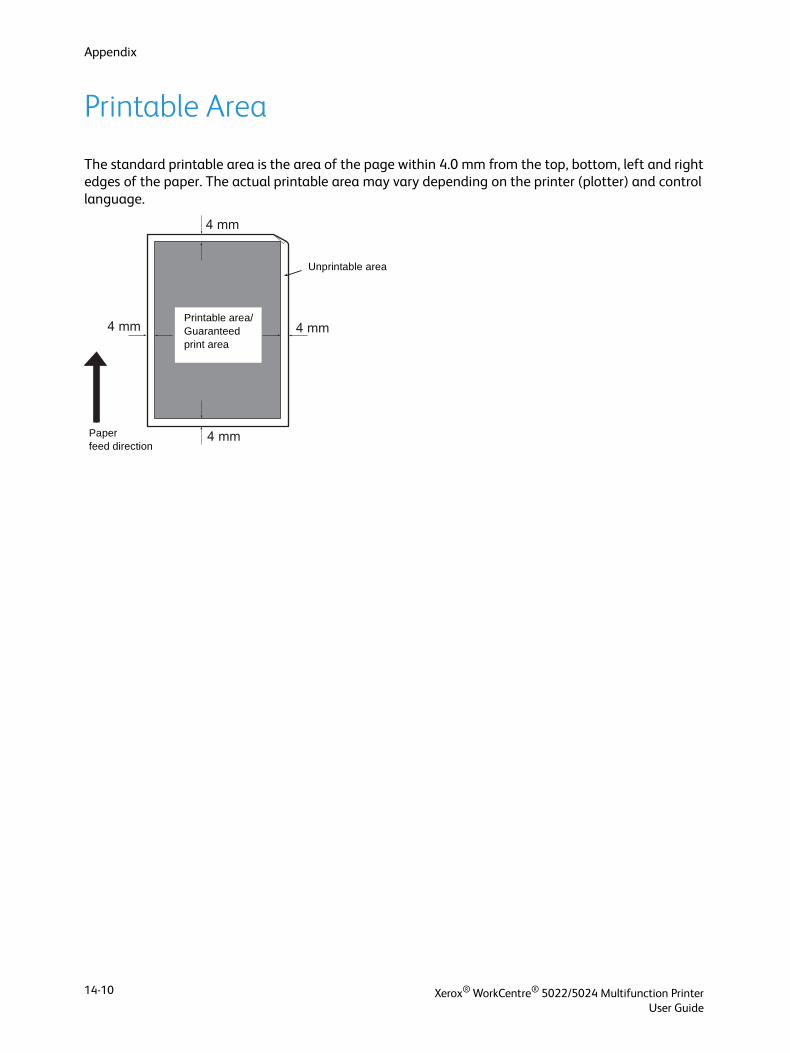
Appendix
Printable Area
The standard printable area is the area of the page within 4.0 mm from the top, bottom, left and right edges of the paper. The actual printable area may vary depending on the printer (plotter) and control language.
4 mm4 mm
4 mm
4 mm
Unprintable area
Paper feed direction
Printable area/Guaranteed print area
Xerox® WorkCentre® 5022/5024 Multifunction PrinterUser Guide
14-10
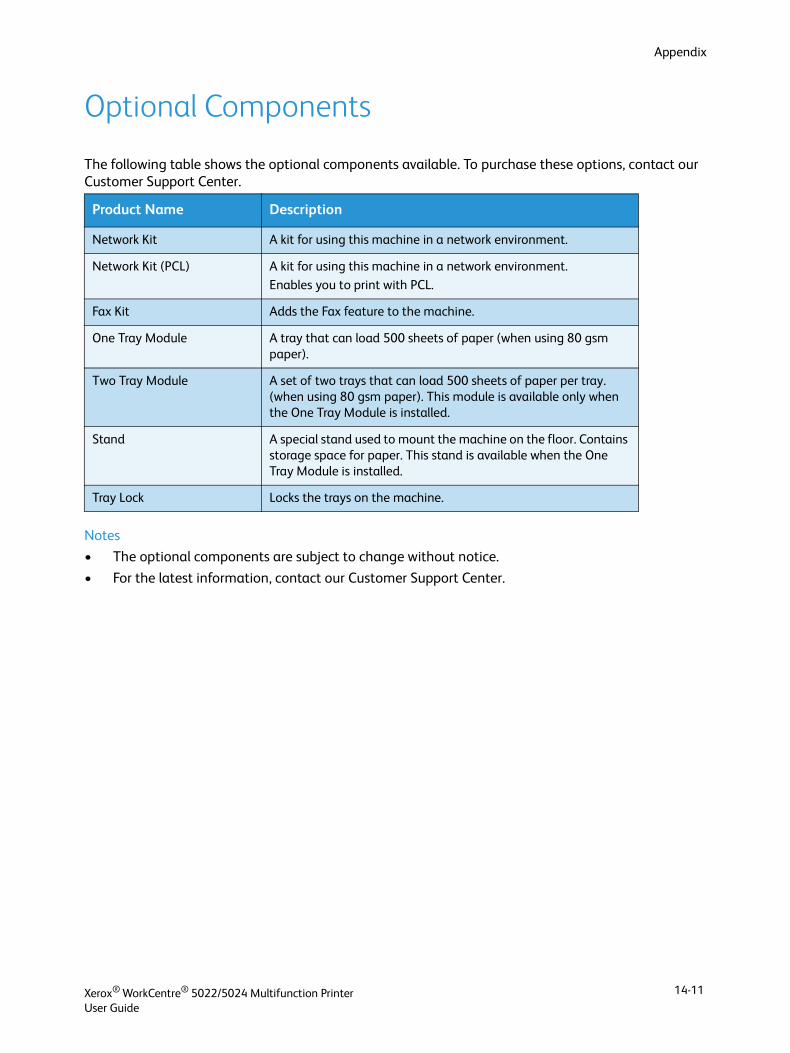
Appendix
Optional Components
The following table shows the optional components available. To purchase these options, contact our Customer Support Center.
Notes
• The optional components are subject to change without notice.
• For the latest information, contact our Customer Support Center.
Product Name Description
Network Kit A kit for using this machine in a network environment.
Network Kit (PCL) A kit for using this machine in a network environment.
Enables you to print with PCL.
Fax Kit Adds the Fax feature to the machine.
One Tray Module A tray that can load 500 sheets of paper (when using 80 gsm paper).
Two Tray Module A set of two trays that can load 500 sheets of paper per tray. (when using 80 gsm paper). This module is available only when the One Tray Module is installed.
Stand A special stand used to mount the machine on the floor. Contains storage space for paper. This stand is available when the One Tray Module is installed.
Tray Lock Locks the trays on the machine.
Xerox® WorkCentre® 5022/5024 Multifunction PrinterUser Guide
14-11
Appendix
Notes and Restrictions
This section describes the notes and restrictions to observe when using the machine.
Notes and Restrictions on the Use of the Machine
Notes on Switching Off the Power
After the power is switched off, the machine performs internal power off processes for a while. After turning the power off, turning it on again before the screen display has disappeared will not start the machine right away. Before turning the power on, check that the operation screen display has disappeared.
Installing and Moving the Machine
• Contact our Customer Support Center or a Customer Engineer before moving the machine.
• Do not subject the machine to shocks while it is in operation.
• Take care not to get fingers caught when closing the document cover.
• Do not place objects near fan intakes on the machine's outer casing.
Character Codes
In data transmission from a computer, if characters that the machine does not support are included in the file names, these characters may not be displayed correctly. Only ASCII characters can be used.
Hard Disk
You cannot install a hard disk into this product.
Job History Report
If the output file name includes characters other than alphanumeric, it is not displayed correctly on the Job History Report.
Printing Results
• The sort feature to change the paper orientation for each set causes a decrease in productivity relative to the ordinary sort.
• Depending on the type of used media, rubber roller marks may be left behind along the scanning direction or toner wax components adhere to the paper during 2 Sided printing or when the output destination is changed during continuous printing.
• Droplets of water may adhere to the printing paper immediately after the power is turned on to the machine.
• Depending on the type of used media, pinch roller marks and minute scratches may form in the scanning direction.
• Line unevenness may occur along the scanning direction in high-volume printing in low-humidity environments.
Xerox® WorkCentre® 5022/5024 Multifunction PrinterUser Guide
14-12
Appendix
• Colors may appear muted on the underside of high-density images in printing in low-temperature, low-humidity environments.
• Small white spots may appear within images on the back side of the paper in printing in low-humidity environments.
Document Feeder
The machine does not detect a document placed in the document feeder during Sleep mode.
Notes and Restrictions on the Use of the Copy Feature
Copy Feature
The machine does not offer the Improves Fit function.
ID Card Copy
The front and back side of the placed ID card are printed on each half sheet of a paper in center except the following cases:
• When the size of the ID card is larger than the standard printable size of the ID Card Copy feature, the image is not printed in center.
• When the size of ID card is larger than the standard printable size of the ID Card Copy feature, a part of the image may be cut off.
• The edges of the ID card may be cut off due to the edge erase.
About Memory
If the machine’s memory capacity becomes insufficient when copying using the collate feature, it outputs only the document data which is being scanned.
Notes and Restrictions on the Use of the Print Feature
Output of Long Feed Documents
The output of long feed documents is not supported.
Print Jobs while the Control Panel is being Operated
The processing print job or output speed may be reduced in the following cases:
• When the control panel is operated during print job execution
• When the print job's status is displayed in the Job Status screen
• Even if the print driver is configured to skip blank pages, the blank pages with white characters, newline characters and space characters will be printed.
When the print results differ from the settings
As in the following cases, insufficient memory for the print page buffer may cause print result in not printing as specified.
Xerox® WorkCentre® 5022/5024 Multifunction PrinterUser Guide
14-13
Appendix
• A 2-sided print job is printed on one side.
• A job was terminated (if data cannot be written to the print page buffer, the job including that page, is terminated).
Meter Counts for 2 Sided Printing
When printing a 2 sided print job, depending on the application being used, blank sheets can be inserted automatically to adjust pages. These blank sheets inserted by the application also are counted by the meter.
Automatic Cancellation of Print Jobs
A job is canceled if a malfunction occurred in the machine or the selected tray that is not installed.
2-Sided Printing
When performing 2-sided printing on a machine on which the duplex output unit is not installed, printing only occurs on one side. In this case, print orientation may not be as expected.
Memory Full Errors
• A File System Full or similar error will appear during attempts to send print data at volumes exceeding 30 MB per job using the LPD protocol and printing will be disabled. If this occurs, change the protocol in the Port Settings of the printer driver to Port9100 (RAW DATA Socket), or break the job into different sections before printing.
• If the machine stops due to an error caused by the machine running out of paper, the cover on the machine being open, or some other issue, the last job will be canceled while in progress if an attempt is made to send continuous print job data exceeding 30 MB total, even with local printing via USB or printing using the Port9100 protocol. (Jobs for files that are stored during printing will resume printing once the error has been resolved and removed.) To restart printing for the last job that was canceled, first remove the write error message displayed on the client computer side before attempting to execute the print job again.
Notes and Restrictions on the Use of the Scan Feature
This section describes notes and restrictions to observe when using the Scan feature.
For the notes and restrictions on the scan driver, see the "Readme" information on the CD-ROM for the Driver CD Kit that came with the machine.
Restriction on Scanning Capacity
The maximum scanning capacity for one page is 297 × 432 mm. For standard sizes, A3 or 11 × 17 inches.
Network Reference on SMB Environment
• If you configure more than 256 shared resources other than shared folders (such as shared printers) shared resources other than shared folders may be displayed in the shared folder list.
• Network settings (such as the workgroup names, server names and shared names) displayed in lists may not be displayed alphabetically.
Xerox® WorkCentre® 5022/5024 Multifunction PrinterUser Guide
14-14
Appendix
• If the registered destination of SMB is incorrect, the job does not end by pressing the Stop button after proceeded to the transmission movement. The job ends when the error code "026-737" appears.
Compression Format of Scanned Images
The compression formats for Scan to PC (Network) and Scan to E-mail are PDF or TIFF format for monochrome images and PDF or JPEG format for color images.
E-mail Authentication
The E-mail feature supports SMTP Authentication only.
E-mail Recipient Specification
The E-mail feature does not support specification of multiple recipients.
Simultaneous Use of PC-compatible (USB) and Windows Imaging Acquisition (WIA)-compatible Applications
If you attempt to execute a Windows Imaging Acquisition (WIA)-compatible application while the Button Manager is running, a message may appear stating that scan to PC could not be performed. To restart and try again, close the Windows Imaging Acquisition (WIA)-compatible application.
Address Book
• When registering addresses using Xerox® CentreWare® Internet Services, we recommend using an Ethernet crossover cable to connect the machine to your computer to protect your e-mail address might be intercepted on the network since the machine does not support SSL.
• 2-byte UTF-8 is supported for the Server Path and the Share Name of the SMB server, and names to be registered in the address book. However, the languages except Korean and Simplified Chinese cannot be displayed on the machine’s display.
Canceling the Scan Job
It may be impossible to stop the job by pressing the Stop button during the transmission by Scan (SMB/Email), for example when the network cable is unplugged or when the transmission has already been completed.
Notes and Restrictions on the Use of the Fax Feature
Fax Communication Environment
The machine does not support G4 or G3 communication on ISDN lines.
Relay Broadcast Function
The machine does not have relay station functions or repeater station functions.
Xerox® WorkCentre® 5022/5024 Multifunction PrinterUser Guide
14-15
Appendix
Notes and Restrictions when Connecting to Internet or Intranet
Internet/Intranet Connections
• Depending on the web server, server application, proxy server, and firewall, you may not be able to connect to the Internet or intranet.
• To connect to the Internet or intranet using a third party server application, proxy, or firewall, the following requirements must be met:
• The software must run on Windows XP, Windows Server 2003, Windows Server 2008, Windows Server 2008 R2, Windows Vista, Windows 7, Windows 8, or Windows Server 2012.
• RFC2617: HTTP Authentication: Basic and Digest Access Authentication must be satisfied. (only Basic authentication is supported, the other authentications are not supported)
• Supporting the GET/CONNECT/POST methods
Xerox® CentreWare® Internet Services
• Depending on the browser settings, text for language selection may not be displayed correctly.
• If the language selection on Xerox® CentreWare® Internet Services differs from the language
setting specified in the machine, texts entered on Xerox® CentreWare® Internet Services are not displayed correctly on the machine. It is required to match the both language settings.
• The tabs may not be displayed correctly when there are several browsers to access to Xerox®
CentreWare® Internet Services at the same time or condition of the network. In this case, refresh the display.
• The maximum login number configured on Xerox® CentreWare® Internet Services differs from the actual permitted number of authentication failure accessed via Internet Explorer. It does not occur on Firefox and Google Chrome.
Notes and Restrictions when Operating from Computers
Supported OS
The supported OS may vary depending on the functions. For more information, refer to Specifications on page 14-1.
For information about the latest supported OS, refer to the Xerox Web site.
Notes and Restrictions for Using SMB
This section describes notes and restrictions to observe when using SMB.
Configuration on the Machine
• IP addresses are managed for the entire system. Configure the settings only after consulting your network administrator.
• The setting of subnet mask and gateway addresses may be required depending on the network environment. Consult your network administrator and configure the required settings.
Xerox® WorkCentre® 5022/5024 Multifunction PrinterUser Guide
14-16
Appendix
Configuration on the Computer
• IP addresses are managed for the entire system. Configure the settings only after consulting your network administrator.
• When setting the network such as IP addresses with a host used under the Network Information Service (NIS), consult your NIS administrator.
• SMB Authentication
• When an IP address or a host name is used to designate the authentication server for SMB authentication, even if the domain name is incorrect, the authentication succeeds if the correct user name and passcode are entered.
Files on the Computer
• If a network error occurred or the machine or the computer is disconnected during the SMB transmission, a part of the transferred file is stored in the computer. To delete this file, delete it manually.
• If there is a file with the same name exists on the computer, the file on the computer is overwritten with the file sent from the machine.
Notes and Restrictions for Using TCP/IP (LPD/Port9100)
This section describes notes and restrictions to observe when using TCP/IP (LPD/Port9100).
Configuration on the Machine
• IP addresses are managed for the entire system. Configure the settings only after consulting your network administrator.
• The setting of subnet mask and gateway addresses may be required depending on the network environment. Consult your network administrator and configure the required settings.
Configuration on the Computer
• IP addresses are managed for the entire system. Configure the settings only after consulting your network administrator.
• When setting the network such as IP addresses with a host used under the Network Information Service (NIS), consult your NIS administrator.
While Printing
When you change a computer's IP address or a computer name, queries and cancel processes submitted from the machine are no longer executed correctly. Thus, turn the machine off and on when there is no print data in the receiving buffer.
Note You can use the machine's control panel to cancel printing of the current print data in the machine's receiving buffer but not printing of pending print data.
Communication Restriction by IP Address
If IPv4/IPv6 address which allows communication is registered on the machine, it may be impossible to communicate with the registered address. In this case, specify the fixed IPv4/IPv6 address on the host and set the same address on the machine as the address to be permitted the communication.
Xerox® WorkCentre® 5022/5024 Multifunction PrinterUser Guide
14-17
Appendix
Notes and Restrictions for IPv6 Connection
This section describes notes and restrictions to observe when using IPv6 connection.
• You can only use the following operating system versions to print in an IPv6 environment:
- Windows XP
- Windows Vista
- Windows 7
- Windows Server 2008
- Windows Server 2008 R2
- Windows 8
- Windows Server 2012
Note IPv6 must be installed on Windows XP computers.
• Some features of SMB are not supported (If you attempt to use services with a NetBIOS name, communication may not be available in some environment).
• IPv6-in-IPv4-tunneling in the machine itself is not supported.
Note If IP Mode is set to IPv6, the IPv6-inIPv4-tunneling cannot be performed.
• Communication problems may occur when multiple routers exist on the same subnet.
• The network settings of the DNS server or a server used by the machine may cause performance problems when using services in a dual stack environment.
• Automatically set IPv6 addresses and IPv6 DNS server addresses may be unavailable addresses.
"Unavailable IPv6 addresses" mean site-local addresses (fec0::) or addresses with the IPv6 documentation prefix (2001:db8::/32).
• IPv4 DNS information can sometimes be used directly after machine startup if the IP operation mode is Dual Stack, DNS information has been set for both IPv4 and IPv6, and the machine is communicating with a device specified using an FQDN.
• The address displayed as the machine's IP address may change.
• For example, in Dual Stack mode, either the IPv4 address or IPv6 address may not be displayed, or a different IPv6 address may be displayed.
• When IPv6 is enabled and IPv4 is disabled on the machine, you cannot specify a storage location for the Browse feature of the Scan to PC (SMB) function.
• In the following cases, the machine may not be able to identify whether addresses are for the same device, so may not be able to execute status check (lpq) or cancel (lprm) commands for user print jobs executed by LPD.
- When simultaneously operating IPv4 and IPv6 addresses with the same host
- When simultaneously operating multiple IPv6 addresses with the same host
• IPv6 addresses may not be correctly recorded on job logs. Use an IPv4 network for correct logging.
• When searching a device outside the router via SMB, directly specify the address. Multicasting is supported only within a local link (FF02::1).
• In an IPv6 network environment without a DNS server, authentication fails when a computer name is specified in the SMB server settings for SMB authentication. Specify an IPv6 address directly as the authentication server's computer name.
Xerox® WorkCentre® 5022/5024 Multifunction PrinterUser Guide
14-18
Appendix
Fax Activity Report
Fax Activity Report lets you check whether fax send and receive operations ended normally. For each fax sent or received, the reports record the sender or recipient name and the transmission result/status.
For information on how to print the fax activity report, refer to Printing Reports/Lists on page 10-7.
Xerox® WorkCentre® 5022/5024 Multifunction PrinterUser Guide
14-19
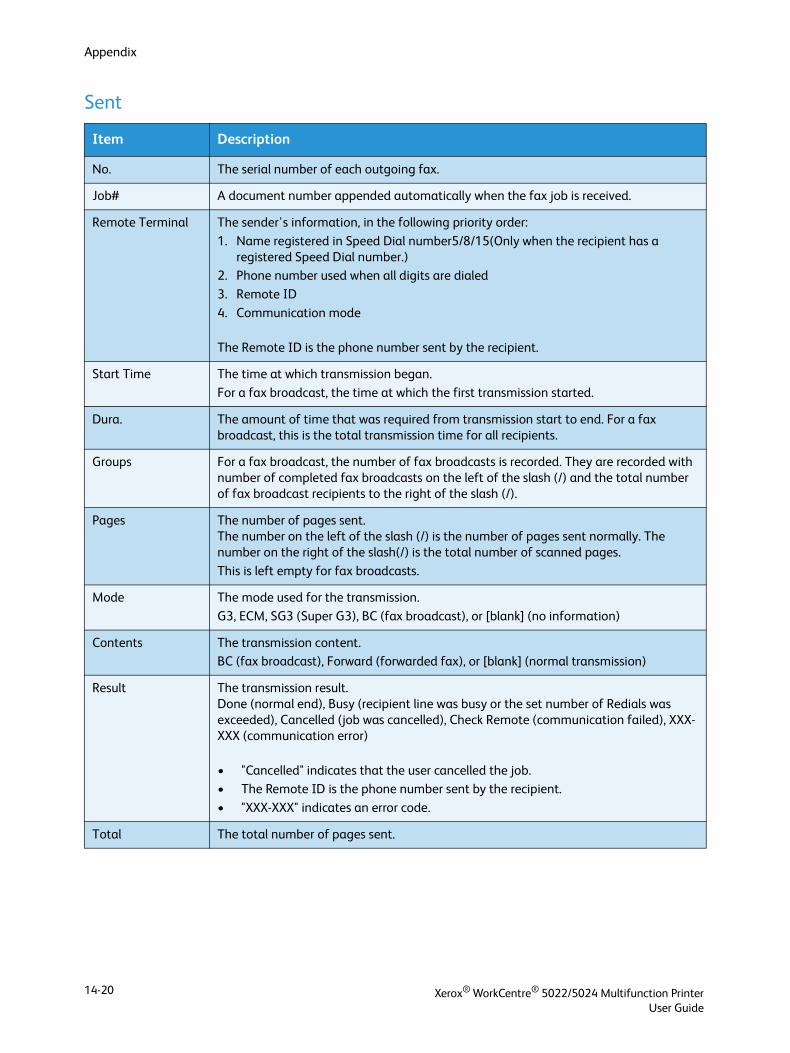
Appendix
Sent
Item Description
No. The serial number of each outgoing fax.
Job# A document number appended automatically when the fax job is received.
Remote Terminal The sender's information, in the following priority order:
1. Name registered in Speed Dial number5/8/15(Only when the recipient has a registered Speed Dial number.)
2. Phone number used when all digits are dialed
3. Remote ID
4. Communication mode
The Remote ID is the phone number sent by the recipient.
Start Time The time at which transmission began.
For a fax broadcast, the time at which the first transmission started.
Dura. The amount of time that was required from transmission start to end. For a fax broadcast, this is the total transmission time for all recipients.
Groups For a fax broadcast, the number of fax broadcasts is recorded. They are recorded with number of completed fax broadcasts on the left of the slash (/) and the total number of fax broadcast recipients to the right of the slash (/).
Pages The number of pages sent.The number on the left of the slash (/) is the number of pages sent normally. The number on the right of the slash(/) is the total number of scanned pages.
This is left empty for fax broadcasts.
Mode The mode used for the transmission.
G3, ECM, SG3 (Super G3), BC (fax broadcast), or [blank] (no information)
Contents The transmission content.BC (fax broadcast), Forward (forwarded fax), or [blank] (normal transmission)
Result The transmission result.Done (normal end), Busy (recipient line was busy or the set number of Redials was exceeded), Cancelled (job was cancelled), Check Remote (communication failed), XXX-XXX (communication error)
• "Cancelled" indicates that the user cancelled the job.• The Remote ID is the phone number sent by the recipient.
• "XXX-XXX" indicates an error code.
Total The total number of pages sent.
Xerox® WorkCentre® 5022/5024 Multifunction PrinterUser Guide
14-20
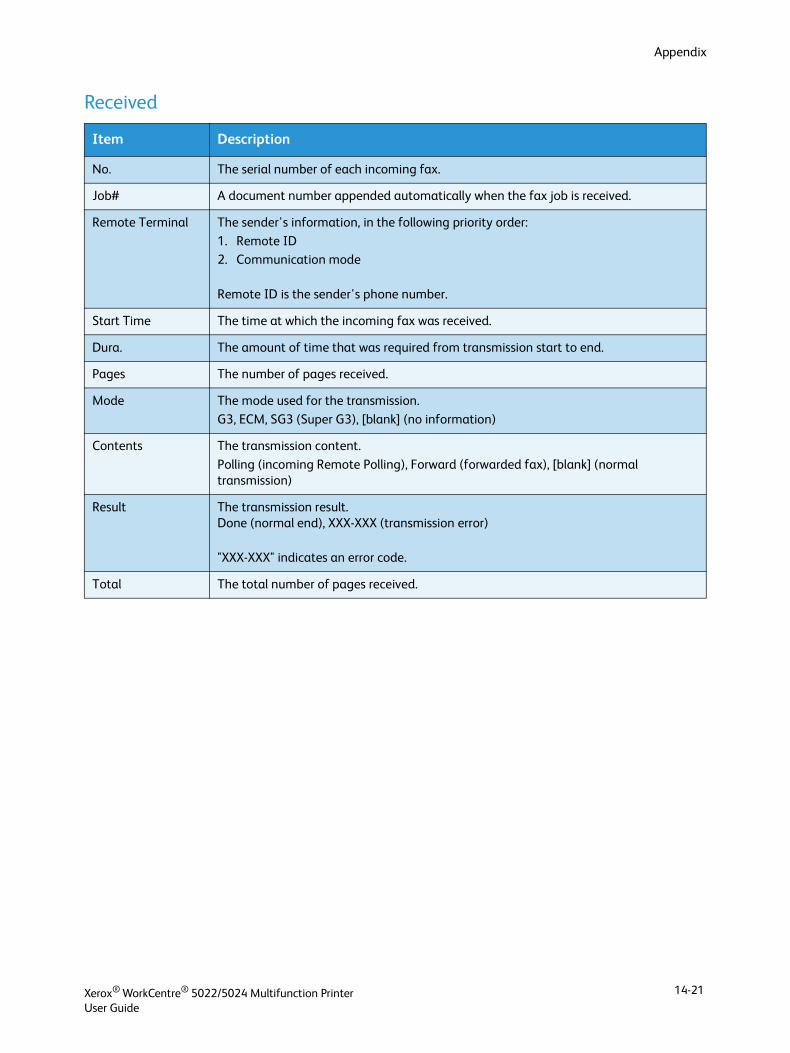
Appendix
Received
Item Description
No. The serial number of each incoming fax.
Job# A document number appended automatically when the fax job is received.
Remote Terminal The sender's information, in the following priority order:
1. Remote ID2. Communication mode
Remote ID is the sender's phone number.
Start Time The time at which the incoming fax was received.
Dura. The amount of time that was required from transmission start to end.
Pages The number of pages received.
Mode The mode used for the transmission.
G3, ECM, SG3 (Super G3), [blank] (no information)
Contents The transmission content.
Polling (incoming Remote Polling), Forward (forwarded fax), [blank] (normal transmission)
Result The transmission result.Done (normal end), XXX-XXX (transmission error)
"XXX-XXX" indicates an error code.
Total The total number of pages received.
Xerox® WorkCentre® 5022/5024 Multifunction PrinterUser Guide
14-21

Appendix
Xerox® WorkCentre® 5022/5024 Multifunction PrinterUser Guide
14-22
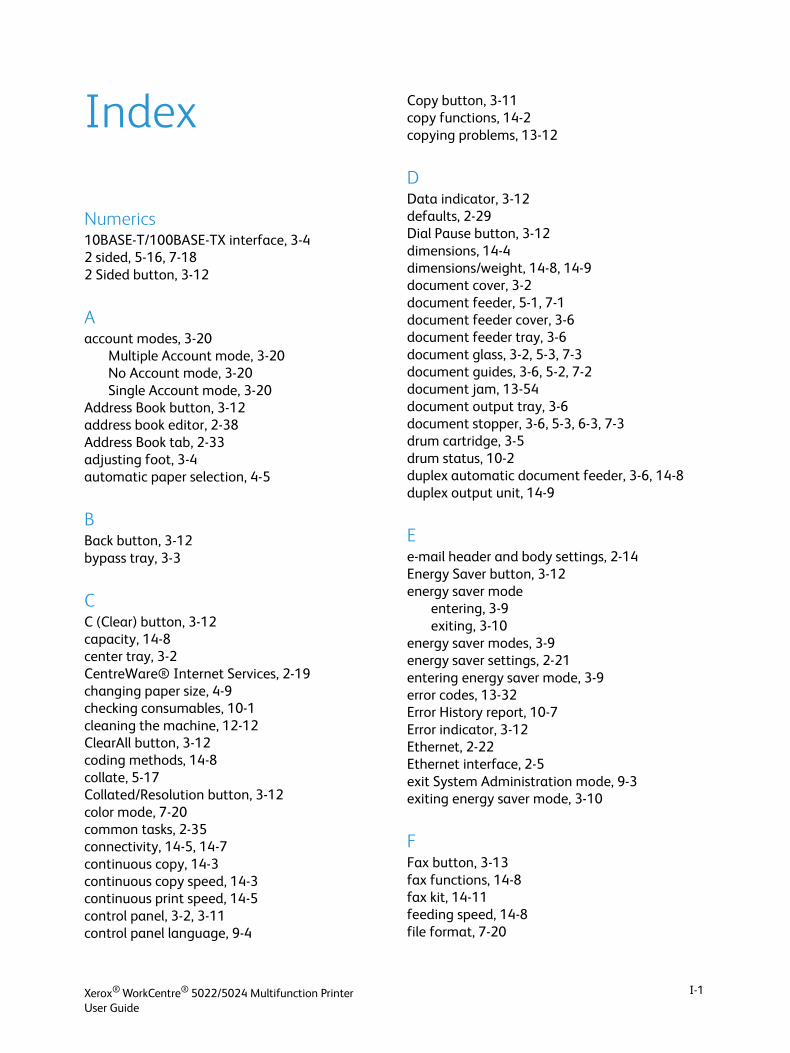
Index
Numerics10BASE-T/100BASE-TX interface, 3-42 sided, 5-16, 7-182 Sided button, 3-12
Aaccount modes, 3-20
Multiple Account mode, 3-20No Account mode, 3-20Single Account mode, 3-20
Address Book button, 3-12address book editor, 2-38Address Book tab, 2-33adjusting foot, 3-4automatic paper selection, 4-5
BBack button, 3-12bypass tray, 3-3
CC (Clear) button, 3-12capacity, 14-8center tray, 3-2CentreWare® Internet Services, 2-19changing paper size, 4-9checking consumables, 10-1cleaning the machine, 12-12ClearAll button, 3-12coding methods, 14-8collate, 5-17Collated/Resolution button, 3-12color mode, 7-20common tasks, 2-35connectivity, 14-5, 14-7continuous copy, 14-3continuous copy speed, 14-3continuous print speed, 14-5control panel, 3-2, 3-11control panel language, 9-4
Xerox® WorkCentre® 5022/5024 Multifunction PrinterUser Guide
Copy button, 3-11copy functions, 14-2copying problems, 13-12
DData indicator, 3-12defaults, 2-29Dial Pause button, 3-12dimensions, 14-4dimensions/weight, 14-8, 14-9document cover, 3-2document feeder, 5-1, 7-1document feeder cover, 3-6document feeder tray, 3-6document glass, 3-2, 5-3, 7-3document guides, 3-6, 5-2, 7-2document jam, 13-54document output tray, 3-6document stopper, 3-6, 5-3, 6-3, 7-3drum cartridge, 3-5drum status, 10-2duplex automatic document feeder, 3-6, 14-8duplex output unit, 14-9
Ee-mail header and body settings, 2-14Energy Saver button, 3-12energy saver mode
entering, 3-9exiting, 3-10
energy saver modes, 3-9energy saver settings, 2-21entering energy saver mode, 3-9error codes, 13-32Error History report, 10-7Error indicator, 3-12Ethernet, 2-22Ethernet interface, 2-5exit System Administration mode, 9-3exiting energy saver mode, 3-10
FFax button, 3-13fax functions, 14-8fax kit, 14-11feeding speed, 14-8file format, 7-20
I-1
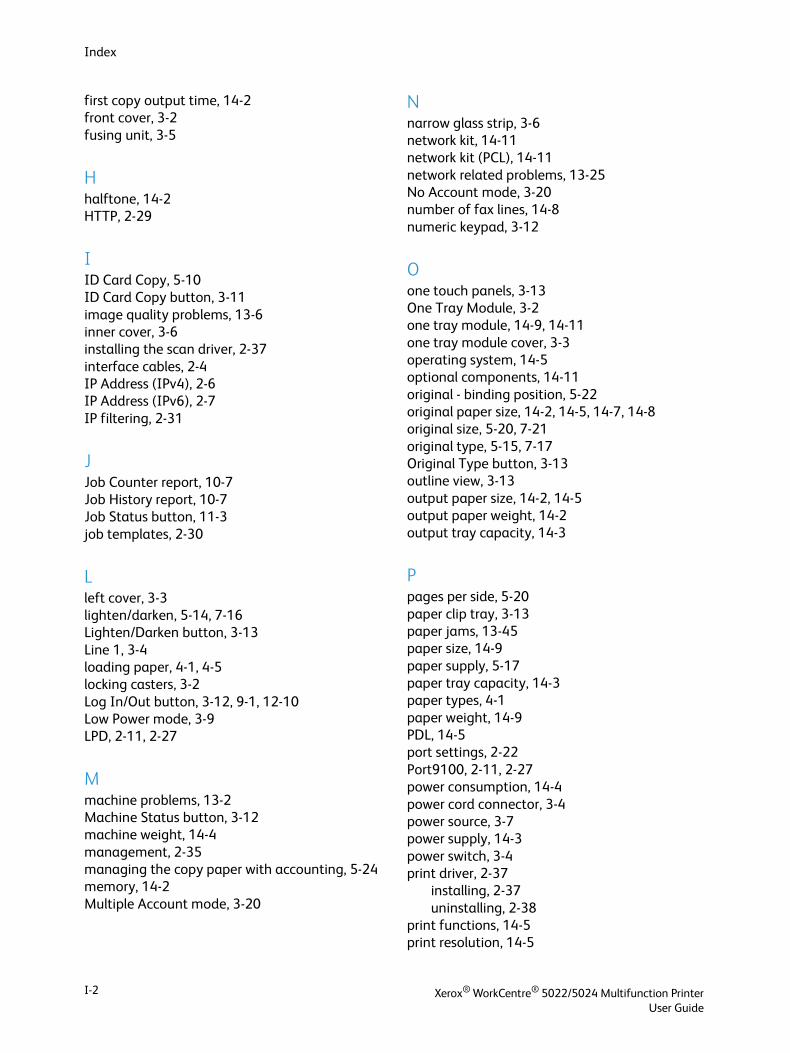
Index
first copy output time, 14-2front cover, 3-2fusing unit, 3-5
Hhalftone, 14-2HTTP, 2-29
IID Card Copy, 5-10ID Card Copy button, 3-11image quality problems, 13-6inner cover, 3-6installing the scan driver, 2-37interface cables, 2-4IP Address (IPv4), 2-6IP Address (IPv6), 2-7IP filtering, 2-31
JJob Counter report, 10-7Job History report, 10-7Job Status button, 11-3job templates, 2-30
Lleft cover, 3-3lighten/darken, 5-14, 7-16Lighten/Darken button, 3-13Line 1, 3-4loading paper, 4-1, 4-5locking casters, 3-2Log In/Out button, 3-12, 9-1, 12-10Low Power mode, 3-9LPD, 2-11, 2-27
Mmachine problems, 13-2Machine Status button, 3-12machine weight, 14-4management, 2-35managing the copy paper with accounting, 5-24memory, 14-2Multiple Account mode, 3-20
I-2
Nnarrow glass strip, 3-6network kit, 14-11network kit (PCL), 14-11network related problems, 13-25No Account mode, 3-20number of fax lines, 14-8numeric keypad, 3-12
Oone touch panels, 3-13One Tray Module, 3-2one tray module, 14-9, 14-11one tray module cover, 3-3operating system, 14-5optional components, 14-11original - binding position, 5-22original paper size, 14-2, 14-5, 14-7, 14-8original size, 5-20, 7-21original type, 5-15, 7-17Original Type button, 3-13outline view, 3-13output paper size, 14-2, 14-5output paper weight, 14-2output tray capacity, 14-3
Ppages per side, 5-20paper clip tray, 3-13paper jams, 13-45paper size, 14-9paper supply, 5-17paper tray capacity, 14-3paper types, 4-1paper weight, 14-9PDL, 14-5port settings, 2-22Port9100, 2-11, 2-27power consumption, 14-4power cord connector, 3-4power source, 3-7power supply, 14-3power switch, 3-4print driver, 2-37
installing, 2-37uninstalling, 2-38
print functions, 14-5print resolution, 14-5
Xerox® WorkCentre® 5022/5024 Multifunction PrinterUser Guide
Index
printable area, 14-10printer problems, 13-15printing, 8-2printing resolution, 14-2Properties tab, 2-21protocol, 14-5
QQuick-Buttons, 3-14
RReceive (Manual), 6-27recording paper size, 14-8reduce/enlarge, 5-19reduction/enlargement, 14-2replacing consumables, 12-1replacing the drum cartridge, 12-7replacing the toner cartridge, 12-3reports, 10-7resolution, 7-19
SScan button, 3-13scan driver, 2-37, 2-38
uninstalling, 2-38scan functions
local, 14-5network, 14-7
scan problems, 13-20scan to e-mail, 14-7scan to PC, 14-6, 14-7scanning halftone, 14-6, 14-7scanning resolution, 14-2, 14-5, 14-7, 14-8scanning speed, 14-6, 14-7Send (Manual), 6-26send document size, 14-8send e-mail, 2-11Service Settings report, 10-7Single Account mode, 3-20Sleep mode, 3-9SMB, 2-11SMTP server, 2-28SMTP server settings, 2-13SNMP, 2-11SNMP configuration, 2-24space requirement, 14-4specifications, 14-1
Xerox® WorkCentre® 5022/5024 Multifunction PrinterUser Guide
speed dial, 6-16Speed Dial button, 3-12stand, 14-11Start button, 3-12Stop button, 3-12storing and handling paper, 4-4Support tab, 2-33supported paper type, 4-2switching the power off, 3-7switching the power on, 3-7System Administration mode, 9-1system administrator settings, 2-32System Settings report, 10-7
TTCP/IP, 2-22Tel, 3-4toner cartridge, 3-5toner status, 10-1transmission mode, 14-8transmission speed, 14-8transmission time, 14-8Tray 1, 3-2Tray 2, 3-2Tray 3, 3-2Tray 4, 3-2tray lock, 14-11troubleshooting, 13-1two tray module, 14-9, 14-11two tray module cover, 3-2
Uunusable paper, 4-3usable paper, 4-3USB interface, 2-4, 3-4
Vview all names, 2-33
Wwarm-up time, 14-2
XXerox® CentreWare® Internet Services, 2-19
I-3

Index
I-4
Xerox® WorkCentre® 5022/5024 Multifunction PrinterUser Guide