Embed Size (px)
Citation preview

instructables
Mk4 Golf Multifunction Steering Wheel and Cruise Retrofit
by bugsy_malone 666
Mk4 Golf Multifunction Steering Wheel and Cruise Retrofit: Page 1
Ever get tired of having to take your hand o thesteering wheel, move it slightly towards the centre ofthe car to operate some radio functions? Ever wanted tohave cruise control?
Well thats what I wanted, having had newerVolkswagens with these features, I decided it would benice to retro t these items in to my mk4 golf as theywere factory options at the time the car was produced. Itseems its not something thats well documented andthere are just bits on various forums, but not exactlywhat I am doing here: Cruise control + MultifunctionSteering wheel retro t. It seems there are some forumthreads on how to do cruise control, but still noteverything is greatly documented. Hopefully thisinstructable will help quite alot in the process.
One thing I will say about this instructable is that I amworking on a particular model of mk4 golf, which whilemany steps are the same, some will di er. My model ofcar is a UK 2001 V6 4Motion Golf, its classed as a'highline' so consequently has some wiring/itemsalready in place. Not 100% sure on if cars of othercountries are going to be the same.
A prerequisite of the cruise upgrade is a car thats ' y-by-wire' as in it has an electronic throttle pedal and throttlebody, I think this applies to diesels from about 1998-2005 and petrol cars 2000-2005, I had a year 2000 BoraV5 engine and that was throttle cable, not y by wire,but thats the change over period depending on engine Ithink. Once again theres quite a few models out therewith various engines:
Petrol/GasolinePetrol/Gasoline
1.4 1.4 - economy model, additional wiring required
1.61.6- economy model, some engines additional wiringrequired (apparently some had factory wiring, maybelater models)
1.81.8
1.8 Turbo1.8 Turbo
2.0 2.0 - economy model, additional wiring required (I think)
2.3 V5 20v 2.3 V5 20v (10v model is cable throttle)
2.8 V6 24v 2.8 V6 24v (12v version will be cable throttle)
DieselDiesel
1.9SDI1.9SDI
1.9TDI1.9TDI
To do this install you should be pretty competent withcars, wielding a spanner, screwdriver, meaning you mostlikely have the tools to do the job, some of the stu Iused was this:
Torx bits/Socket set - all of the dash parts are held inplace with Torx Screws.
Various Spanners
Pozidrive/Flathead screwdrivers
Soldering iron+Solder
Electrical tape/Heatshrink (heatshrink preferred)
A Laptop and VCDS + Cable for coding, or afriend/mechanic who can do this - Fairly important as itsneeded to activate the cruise control
Optional - Tesa Fabric tape for wrapping any of the loom,like the factory did. I guess standard PVC electrical tapewill do.
Optional - Plastic pry-bar set for removing interiorpanels(saves damaging the interior with a screw driver).
I'd suggest this is the sort of job to do over a weekend,although I have been doing it over several weeks as youcan take o some panels, trace out locations and get toknow what your connectors are ect, then do it over someevenings/weekends, or try hard and do it in a day.
Mk4 Golf Multifunction Steering Wheel and Cruise Retrofit: Page 2

Step 1: Gather Your Components
Mk4 Golf Multifunction Steering Wheel and Cruise Retrofit: Page 3
Step 2: Wiring Looms - a Few Modifications.
Depending on the model and engine you are startingwith this list will vary slightly, so I'll break it down in to a'core' and 'additional'
CoreCore
-Multifunction steering wheel (MFSW)-Multifunction steering wheel (MFSW)
You can source this from a breakers yard, ebay etc, you'llwant the wheel and airbag, it can be found on mk4 golf,Bora/Jetta and Passat from 1998 - 2005
-Cruise Control Indicator Stalk -Cruise Control Indicator Stalk
These come in 2 varieties: Cruise only and Cruise for carswith MFSW from the factory. Whats the di erence? Well2 part numbers which translate to a cruise controlindicator stalk that has 'on/o ' on the face of the stalkand 2 buttons on the end - 8L0 953 513 J8L0 953 513 J and the MFSWstalk that just has on/o slide switch on the face - 8L08L0
953 513 S. I'm planning to use a standard cruise stalk, butwith the steering wheel as the normal stalks arecheaper/more available!
- Wiring looms- Wiring looms
Theres technically a couple of looms you'll need for this,if you have a highline vehicle, chances are most of it isalready in place, you will just require the stalk wiring andthe MFSW wiring. I got my cruise stalk wiring on ebayfrom China, the MFSW bit, I also got on ebay, but theyare all made by a company called Kufatec(based inGermany). The alternative is to strip it out of a donorvehicle.
-Clockspring-Clockspring
Apparently cars with ESP already have the rightclockspring, it has additional cables required for theMFSW. I believe normal cars have a 4 pin clockspring,
ESP ones have a 5 pin clockspring.
-Control Relay 452/451-Control Relay 452/451
Can be found on ebay relatively cheap, if your car is pre2001 Relay 452, apparently 2002> Relay 451. Seemscounter intuitive, but apparently relay 451 is for canbuscars and can be coded with VAGcom to act like relay 452!
Additional (for other/economy models)Additional (for other/economy models)
-Switches-Switches
You'll need a clutch switch+associated wiring which I amnot certain is present on all models, which ideally youcan get from a donor vehicle, any vehicle with ESPbutton(mk4 platform) on the dash should have this evenif it doesnt have cruise or MFSW. Trace the wiring, takephotos and disconnect as gently as possible. If you canget a donor to strip out will make things much easier :)
Brake Switch is di erent, its a 4 pin brake switch, 1 circuitis for the lights, the other feeds back to the car fortraction control etc, check yours rst.
- Wiring- Wiring
Its advisable to look for a proper cruise control retro t kiton somewhere like ebay that contains more than justthe 5 cable stalk connection wire, there are additionalcables that run to the ECU that highline cars alreadyhave.
-Clockspring-Clockspring
You will de nitely need a di erent one on your car if notequiped with ESP button on the dash already.Apparently the clockspring has a sensor for detectingposition in it on ESP cars, so VW decided to make onetype.
Mk4 Golf Multifunction Steering Wheel and Cruise Retrofit: Page 4
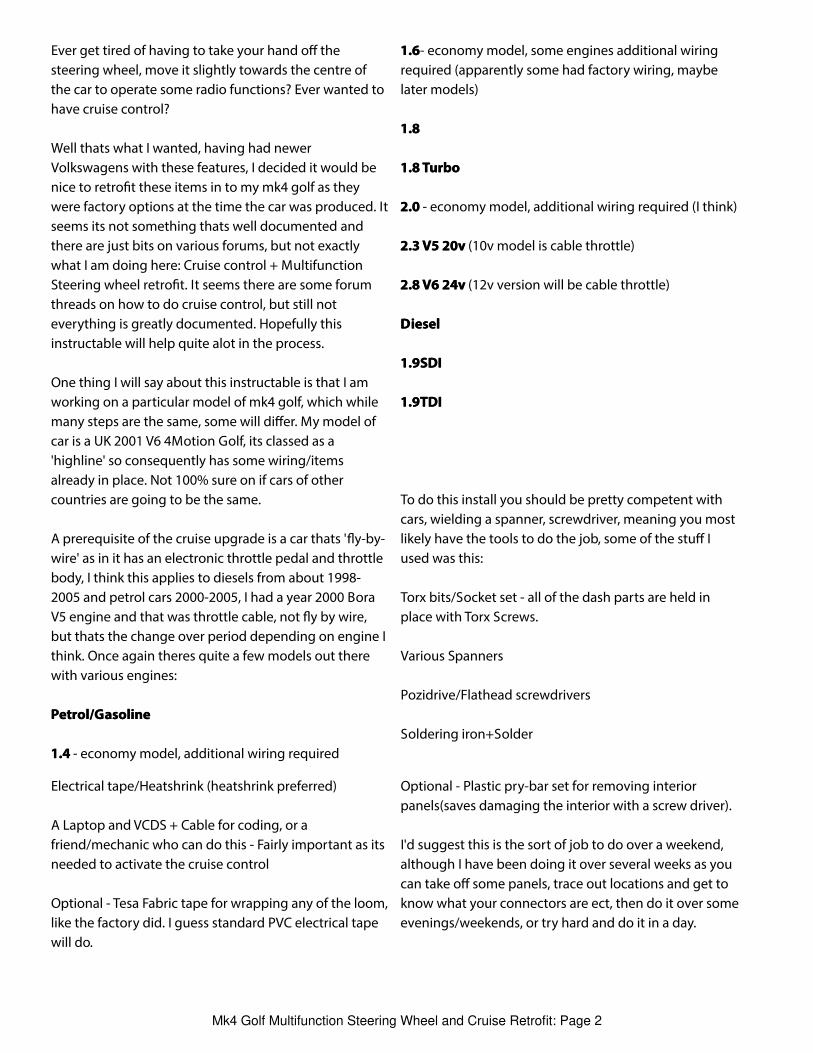
One of the rst jobs before we start in the car ismodifying the wiring looms and understanding wherethey are going to go. I spent about a day lookingthrough a Bentley Manual and my looms, along withdrawing it out so that I could positively understand whatI was connecting where.
The Kufatec loom I got from eBay was an 'all white' loomthat has its location/colour printed in German on thewire. What makes that akward is it doesnt seem to followthe colours of the VW wiring loom according to theBentley Manual!
I also had a cruise stalk loom from China, cheap and thecolours were about what the manual said, these need tobe spliced in to the Kufatec loom. I gured that I can usea standalone cruise stalk and a multifunction wheel sideby side, as essentially the control relay and the stalkbuttons do the same thing, so why not join themtogether? (plus it seems easier to get standalone stalkscompared to the price of MFSW ones)
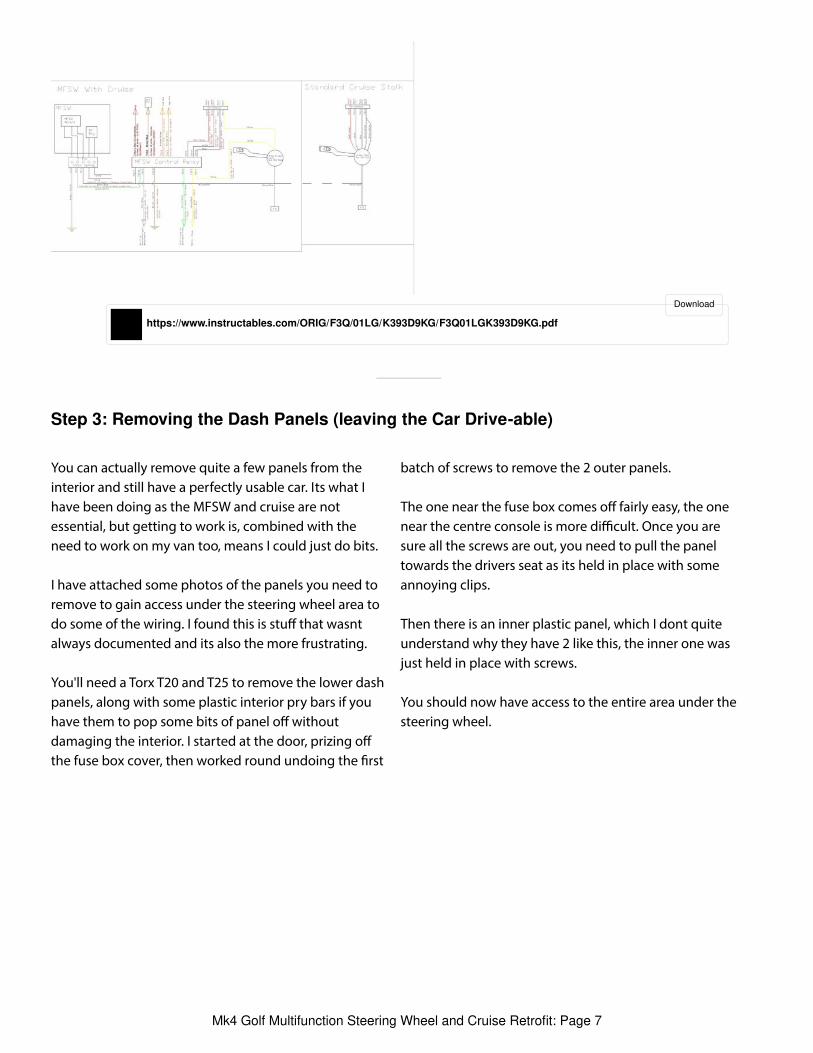
I have attached a wiring diagram for the steering wheeland stalk so you can see how it essentially connects tothe same locations.I have included a picture thatscoloured and the single colour PDF version of the wiringdiagram I drew up on CAD as you can zoom in with thePDF to read the small writing, hopefully this will helpalot!
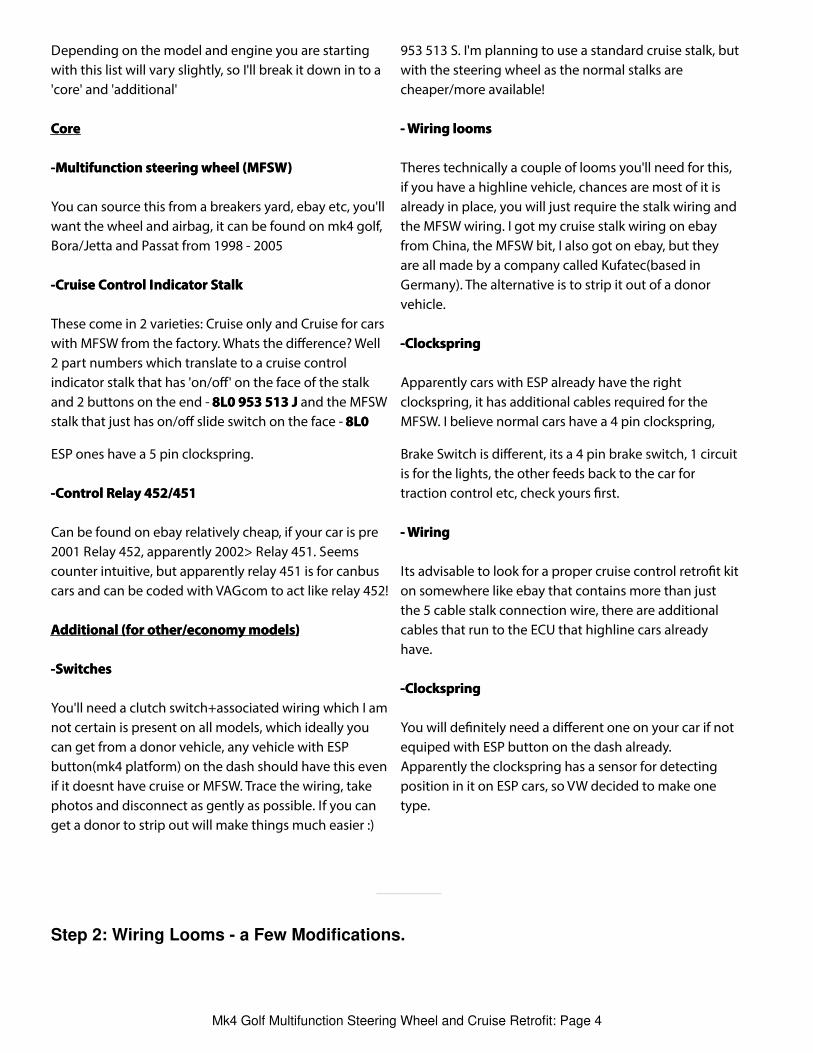
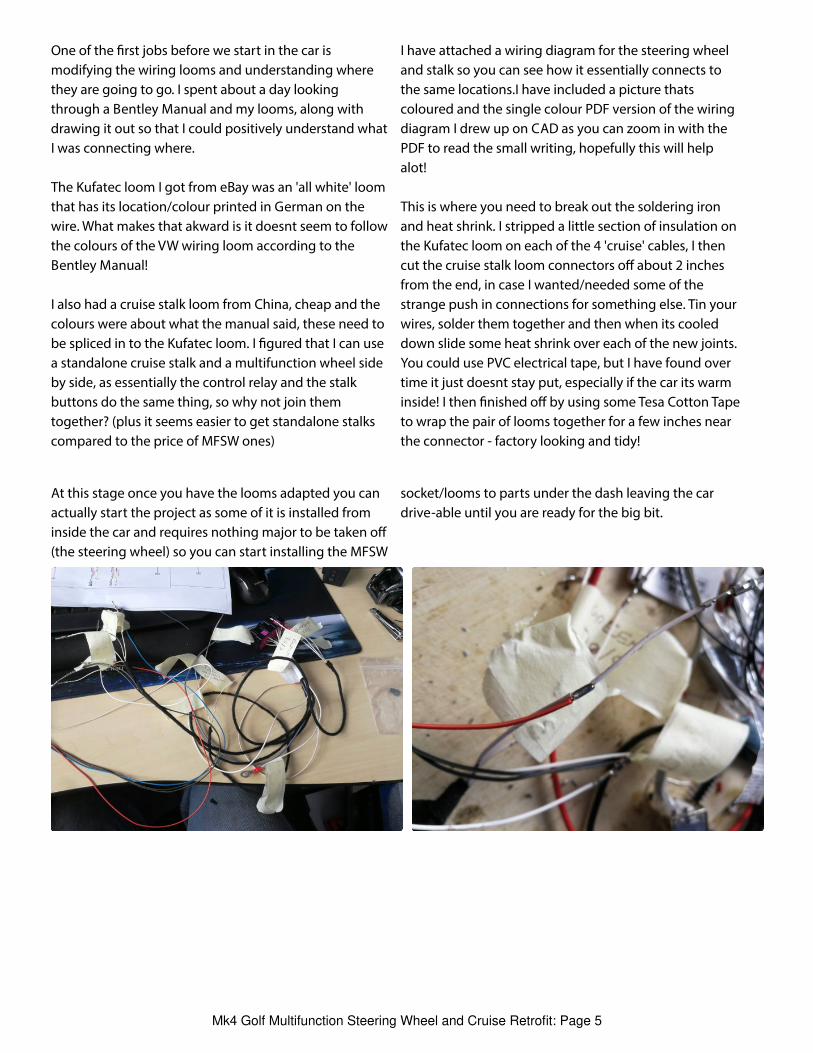
This is where you need to break out the soldering ironand heat shrink. I stripped a little section of insulation onthe Kufatec loom on each of the 4 'cruise' cables, I thencut the cruise stalk loom connectors o about 2 inchesfrom the end, in case I wanted/needed some of thestrange push in connections for something else. Tin yourwires, solder them together and then when its cooleddown slide some heat shrink over each of the new joints.You could use PVC electrical tape, but I have found overtime it just doesnt stay put, especially if the car its warminside! I then nished o by using some Tesa Cotton Tapeto wrap the pair of looms together for a few inches nearthe connector - factory looking and tidy!
At this stage once you have the looms adapted you canactually start the project as some of it is installed frominside the car and requires nothing major to be taken o(the steering wheel) so you can start installing the MFSW
socket/looms to parts under the dash leaving the cardrive-able until you are ready for the big bit.
Mk4 Golf Multifunction Steering Wheel and Cruise Retrofit: Page 5
Mk4 Golf Multifunction Steering Wheel and Cruise Retrofit: Page 6
Step 3: Removing the Dash Panels (leaving the Car Drive-able)
https://www.instructables.com/ORIG/F3Q/01LG/K393D9KG/F3Q01LGK393D9KG.pdf
Download
You can actually remove quite a few panels from theinterior and still have a perfectly usable car. Its what Ihave been doing as the MFSW and cruise are notessential, but getting to work is, combined with theneed to work on my van too, means I could just do bits.
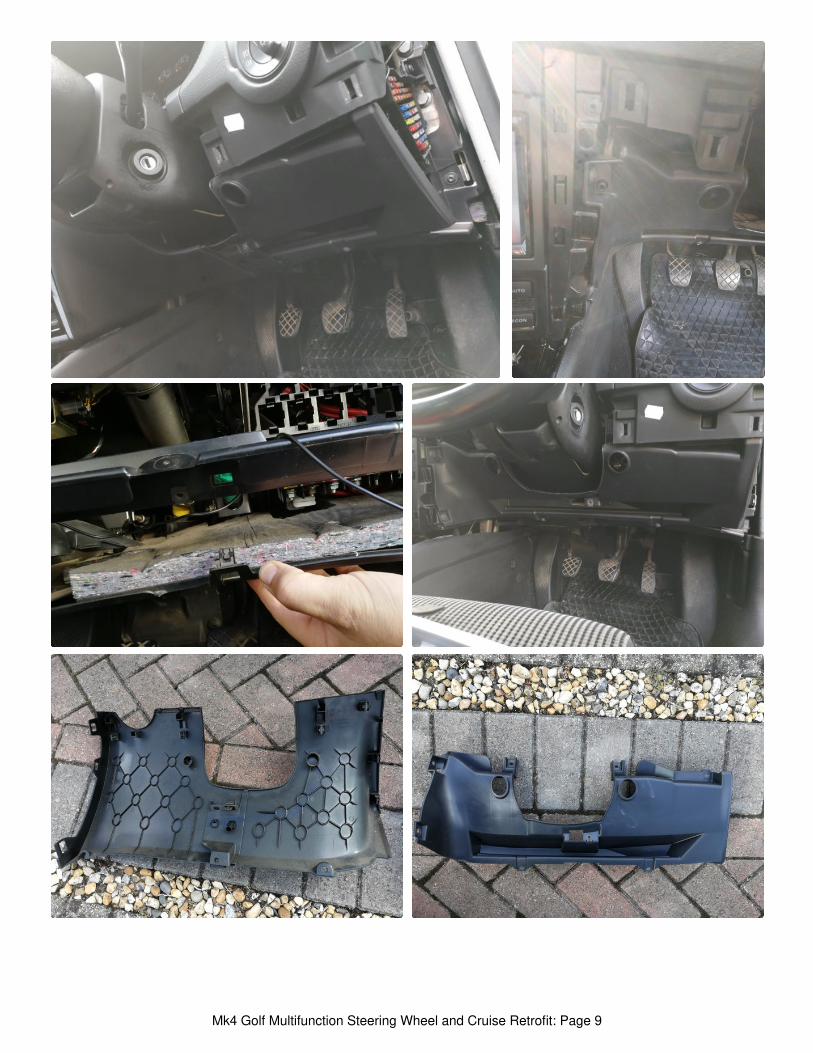
I have attached some photos of the panels you need toremove to gain access under the steering wheel area todo some of the wiring. I found this is stu that wasntalways documented and its also the more frustrating.
You'll need a Torx T20 and T25 to remove the lower dashpanels, along with some plastic interior pry bars if youhave them to pop some bits of panel o withoutdamaging the interior. I started at the door, prizing othe fuse box cover, then worked round undoing the rst
batch of screws to remove the 2 outer panels.
The one near the fuse box comes o fairly easy, the onenear the centre console is more di cult. Once you aresure all the screws are out, you need to pull the paneltowards the drivers seat as its held in place with someannoying clips.
Then there is an inner plastic panel, which I dont quiteunderstand why they have 2 like this, the inner one wasjust held in place with screws.
You should now have access to the entire area under thesteering wheel.
Mk4 Golf Multifunction Steering Wheel and Cruise Retrofit: Page 7

Mk4 Golf Multifunction Steering Wheel and Cruise Retrofit: Page 8
Mk4 Golf Multifunction Steering Wheel and Cruise Retrofit: Page 9
Step 4: Wiring in the MFSW+Cruise Wiring Part 1 - T10 Bulkhead Connector Interior
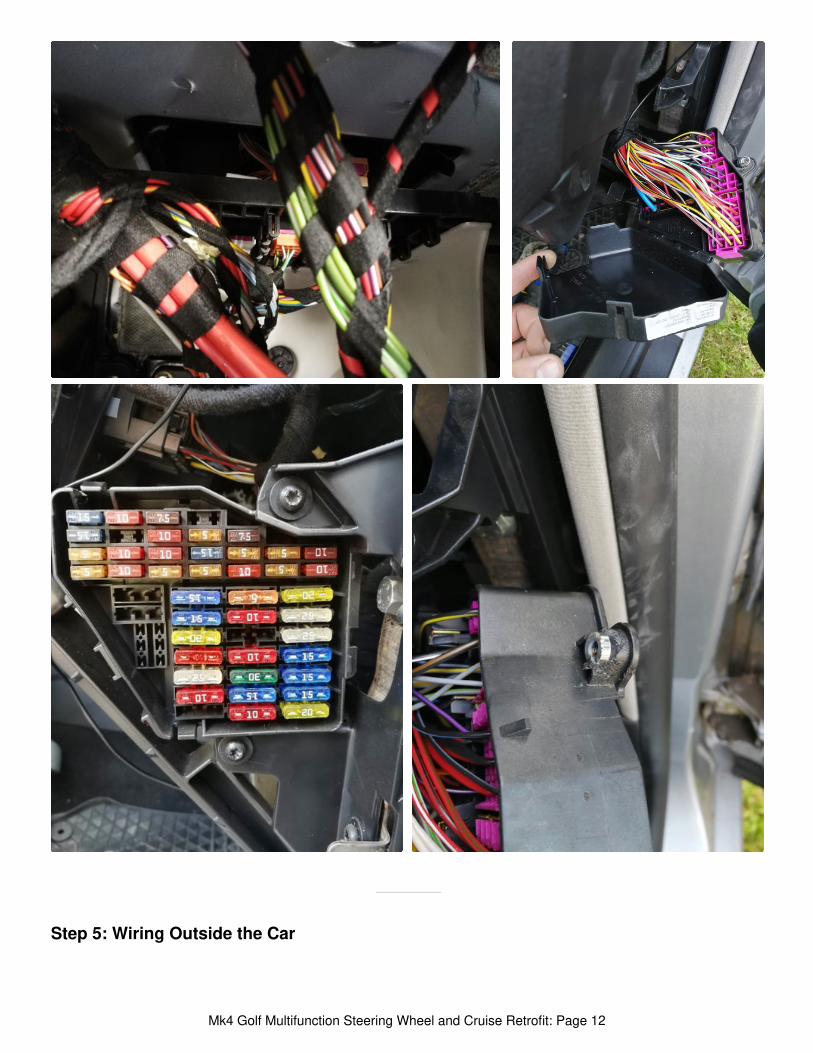
You've already made the modi cations to the loom sonow you can start installing it, We'll start by doing themore awkward connector, the T10 bulkhead connector. Ifound that realistically despite my car being already 'pre-wired' you still need to remove the scuttle panel andaccess the T10 connector from both inside and outsideof the car.
There is a black connector that goes through thebulkhead, I have come to know this as the 'T10'connector, which on highline models is already wiredfrom the the engine bay side to the ECU apparently,meaning some connections just need inserting in thecorrect locations.
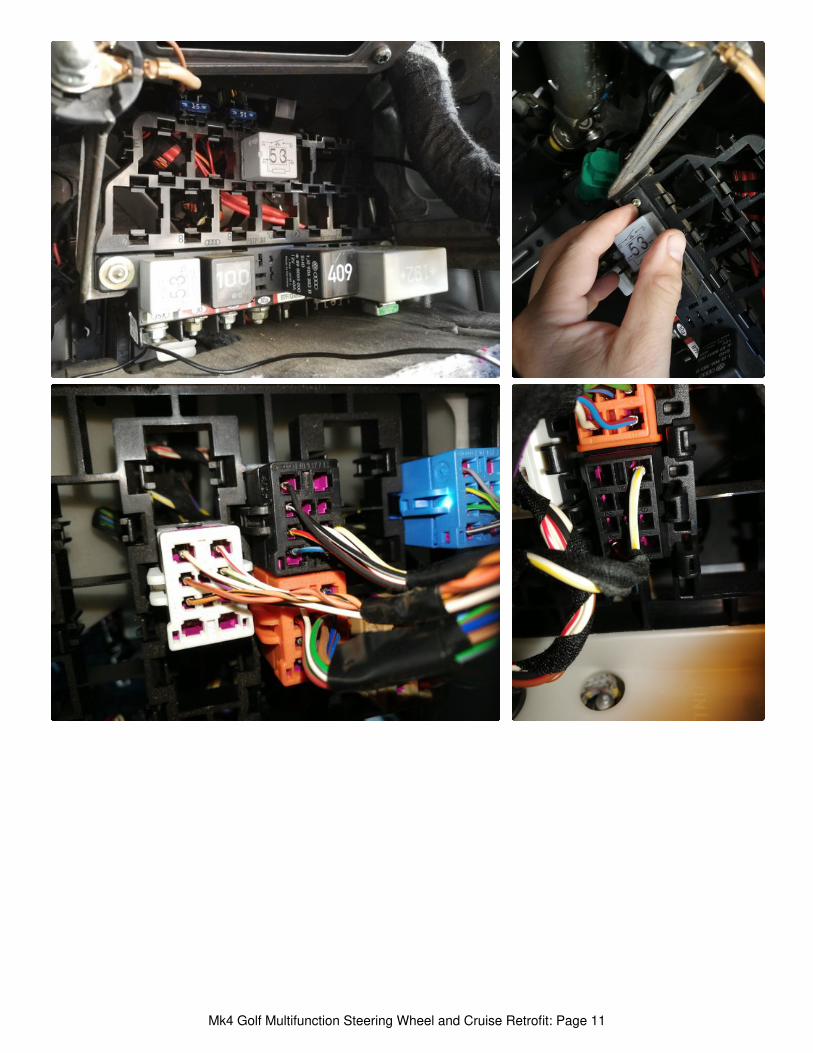
In order to get to the T10 connector inside, you actuallyneed to remove the main relay mounting frame, which issecured in place with an M6 nut each side (a 10mmsocket), I found there was one relay module I had tounplug to access one. The other thing you'll need toremove is the side fusebox, which is held in place with 2xTorx T25 screws, in the case of my car someone hadmanaged to screw this right up and it took me over an
hour to get them out, looks like the threads need re-tapping!
With the side fuse box unbolted it needs twisting andpulling through the hole in the side panel, this will allowyou to then remove the relay frame panel, giving youaccess to the T10 connector.
You'll then need to go to the next step to unclip the plugfrom engine side so you can insert the cables inside (its a
ddly job). Once the connector is free, you'll need to putthe purple center piece slightly through the connector(it slides sideways) as they will allow you to insert newnew cables.
Once you have inserted the required cables in the T10connector, you can now also plug the 452/1 'relay'holder in to the relay frame. It goes in position 5+6. Theframe can now go back in place and you can if youneeded just reel up the wires with some tape and putthem in under the dash and keep driving the car.
Mk4 Golf Multifunction Steering Wheel and Cruise Retrofit: Page 10
Mk4 Golf Multifunction Steering Wheel and Cruise Retrofit: Page 11
Step 5: Wiring Outside the Car
Mk4 Golf Multifunction Steering Wheel and Cruise Retrofit: Page 12
Although I havent done this step to my car (because its ahighline and pre wired) technically, I thought I wouldgive some of it a mention.
On cars that need the additional wiring from the 'T10'connection on the bulk head that takes the wiring frominside to outside the car, you'll need to remove someadditional parts to get to the ECU.
As I found even with a highline you still need access tothe T10 connector to add 4 wires in from the passengercompartment to the connector.
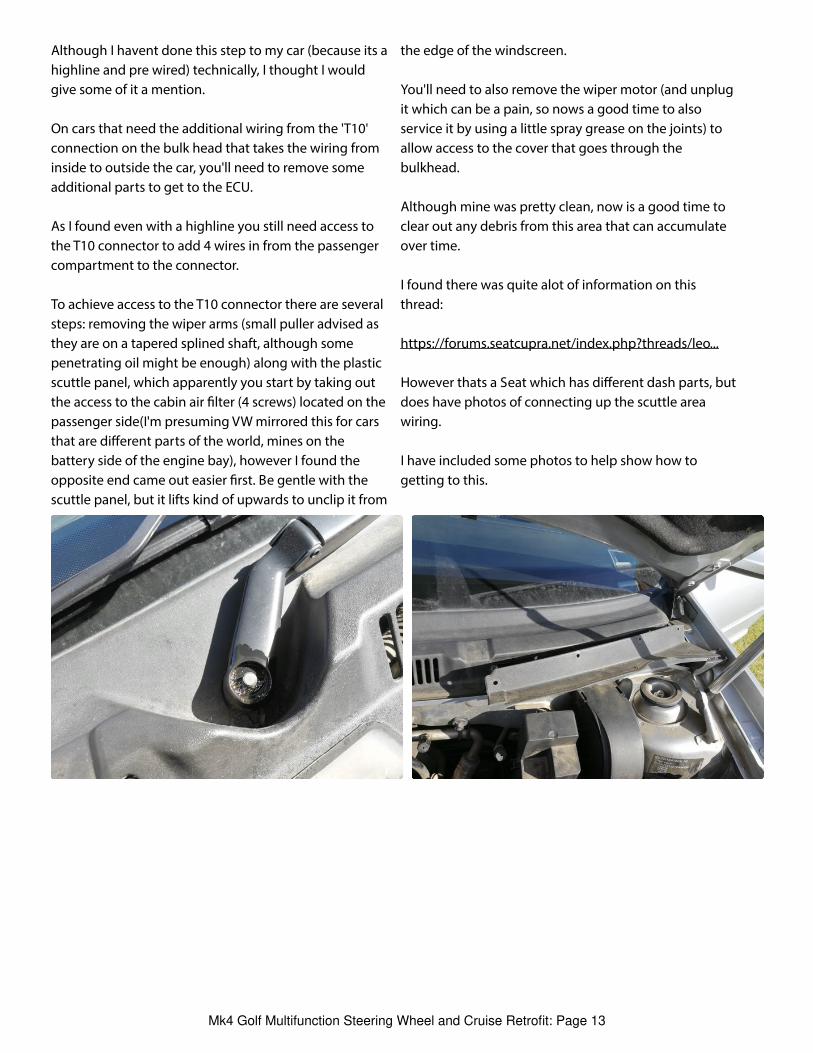
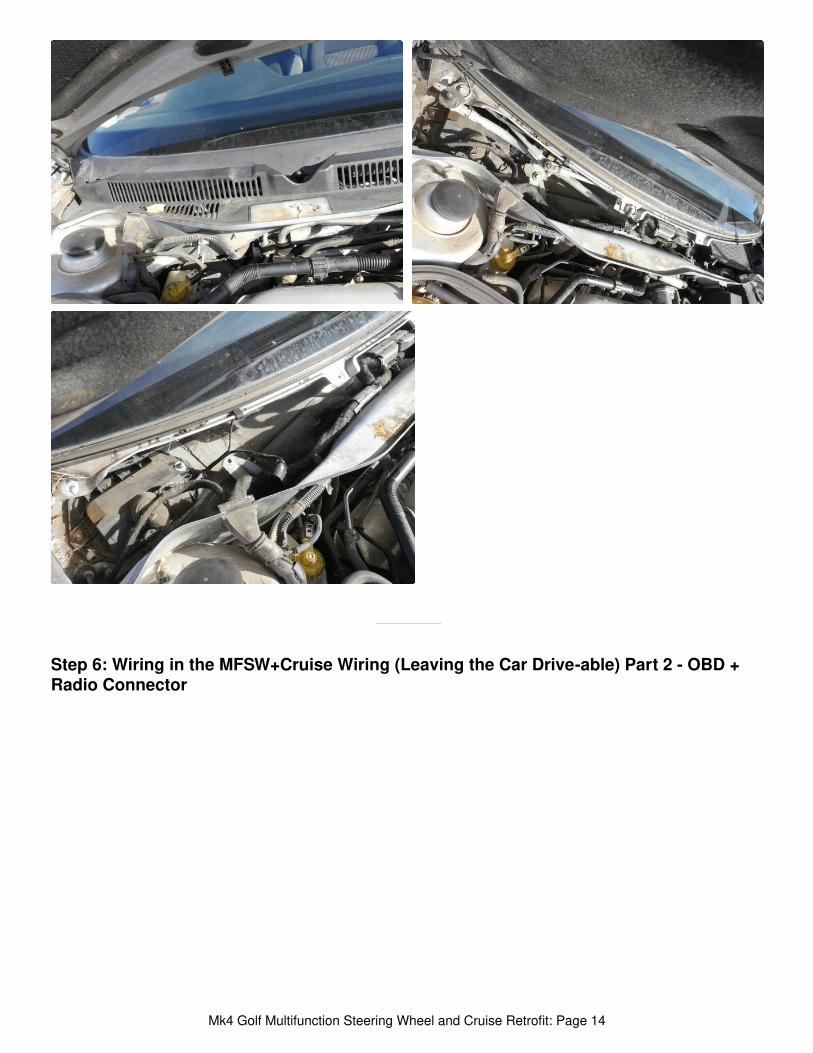
To achieve access to the T10 connector there are severalsteps: removing the wiper arms (small puller advised asthey are on a tapered splined shaft, although somepenetrating oil might be enough) along with the plasticscuttle panel, which apparently you start by taking outthe access to the cabin air lter (4 screws) located on thepassenger side(I'm presuming VW mirrored this for carsthat are di erent parts of the world, mines on thebattery side of the engine bay), however I found theopposite end came out easier rst. Be gentle with thescuttle panel, but it lifts kind of upwards to unclip it from
the edge of the windscreen.
You'll need to also remove the wiper motor (and unplugit which can be a pain, so nows a good time to alsoservice it by using a little spray grease on the joints) toallow access to the cover that goes through thebulkhead.
Although mine was pretty clean, now is a good time toclear out any debris from this area that can accumulateover time.
I found there was quite alot of information on thisthread:
https://forums.seatcupra.net/index.php?threads/leo...
However thats a Seat which has di erent dash parts, butdoes have photos of connecting up the scuttle areawiring.
I have included some photos to help show how togetting to this.
Mk4 Golf Multifunction Steering Wheel and Cruise Retrofit: Page 13
Step 6: Wiring in the MFSW+Cruise Wiring (Leaving the Car Drive-able) Part 2 - OBD +Radio Connector
Mk4 Golf Multifunction Steering Wheel and Cruise Retrofit: Page 14
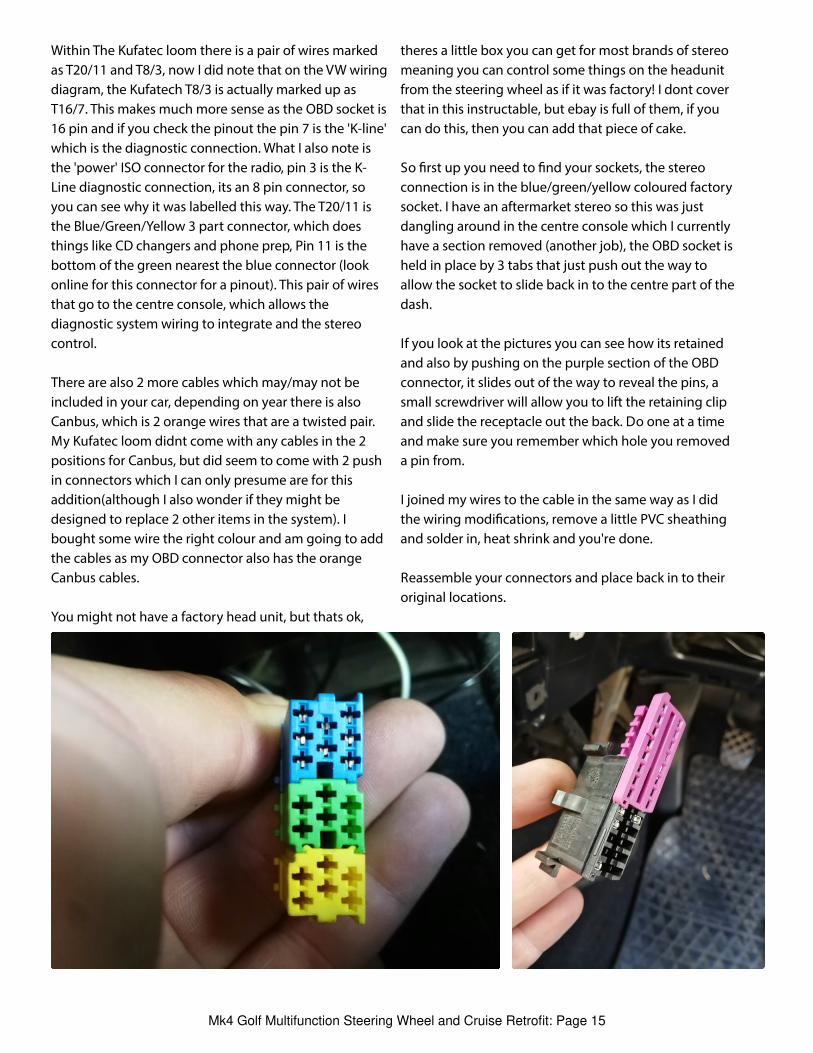
Within The Kufatec loom there is a pair of wires markedas T20/11 and T8/3, now I did note that on the VW wiringdiagram, the Kufatech T8/3 is actually marked up asT16/7. This makes much more sense as the OBD socket is16 pin and if you check the pinout the pin 7 is the 'K-line'which is the diagnostic connection. What I also note isthe 'power' ISO connector for the radio, pin 3 is the K-Line diagnostic connection, its an 8 pin connector, soyou can see why it was labelled this way. The T20/11 isthe Blue/Green/Yellow 3 part connector, which doesthings like CD changers and phone prep, Pin 11 is thebottom of the green nearest the blue connector (lookonline for this connector for a pinout). This pair of wiresthat go to the centre console, which allows thediagnostic system wiring to integrate and the stereocontrol.
There are also 2 more cables which may/may not beincluded in your car, depending on year there is alsoCanbus, which is 2 orange wires that are a twisted pair.My Kufatec loom didnt come with any cables in the 2positions for Canbus, but did seem to come with 2 pushin connectors which I can only presume are for thisaddition(although I also wonder if they might bedesigned to replace 2 other items in the system). Ibought some wire the right colour and am going to addthe cables as my OBD connector also has the orangeCanbus cables.
You might not have a factory head unit, but thats ok,
theres a little box you can get for most brands of stereomeaning you can control some things on the headunitfrom the steering wheel as if it was factory! I dont coverthat in this instructable, but ebay is full of them, if youcan do this, then you can add that piece of cake.
So rst up you need to nd your sockets, the stereoconnection is in the blue/green/yellow coloured factorysocket. I have an aftermarket stereo so this was justdangling around in the centre console which I currentlyhave a section removed (another job), the OBD socket isheld in place by 3 tabs that just push out the way toallow the socket to slide back in to the centre part of thedash.
If you look at the pictures you can see how its retainedand also by pushing on the purple section of the OBDconnector, it slides out of the way to reveal the pins, asmall screwdriver will allow you to lift the retaining clipand slide the receptacle out the back. Do one at a timeand make sure you remember which hole you removeda pin from.
I joined my wires to the cable in the same way as I didthe wiring modi cations, remove a little PVC sheathingand solder in, heat shrink and you're done.
Reassemble your connectors and place back in to theiroriginal locations.
Mk4 Golf Multifunction Steering Wheel and Cruise Retrofit: Page 15
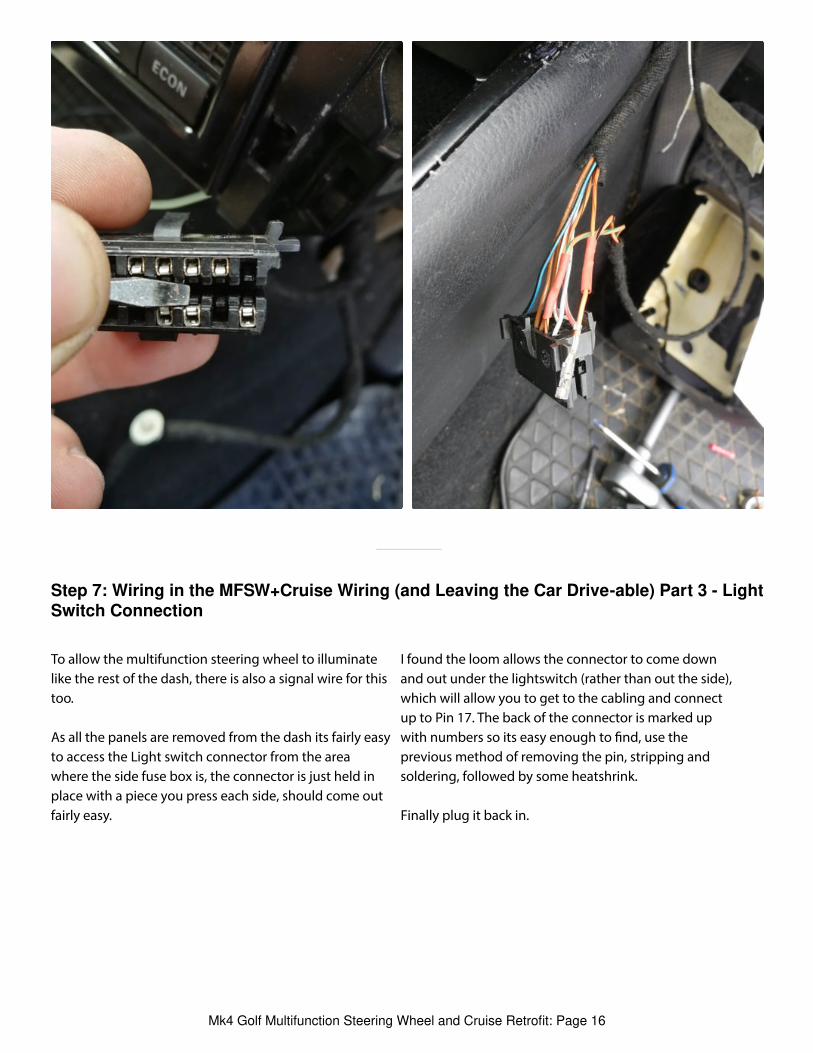
Step 7: Wiring in the MFSW+Cruise Wiring (and Leaving the Car Drive-able) Part 3 - LightSwitch Connection
To allow the multifunction steering wheel to illuminatelike the rest of the dash, there is also a signal wire for thistoo.
As all the panels are removed from the dash its fairly easyto access the Light switch connector from the areawhere the side fuse box is, the connector is just held inplace with a piece you press each side, should come outfairly easy.
I found the loom allows the connector to come downand out under the lightswitch (rather than out the side),which will allow you to get to the cabling and connectup to Pin 17. The back of the connector is marked upwith numbers so its easy enough to nd, use theprevious method of removing the pin, stripping andsoldering, followed by some heatshrink.
Finally plug it back in.
Mk4 Golf Multifunction Steering Wheel and Cruise Retrofit: Page 16
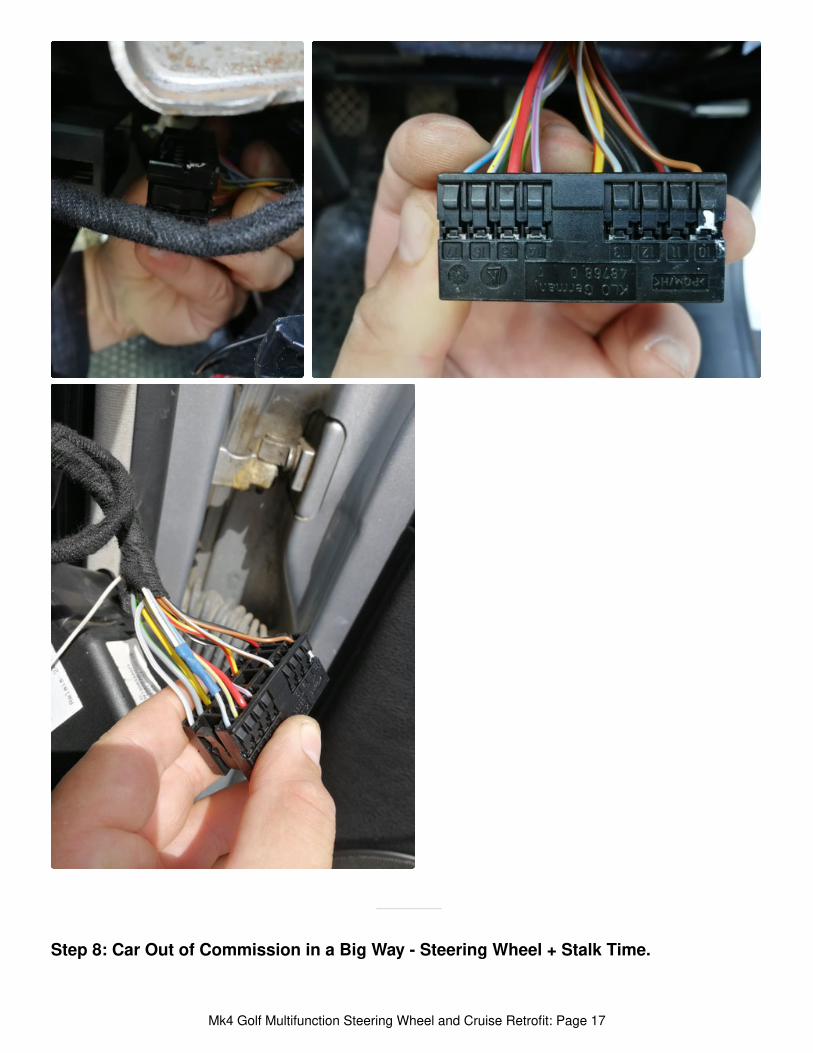
Step 8: Car Out of Commission in a Big Way - Steering Wheel + Stalk Time.
Mk4 Golf Multifunction Steering Wheel and Cruise Retrofit: Page 17
Lets start with some safety.
Airbags in cars will save your life in an accident, howeverthe nature of how they are triggered means they shouldbe handled with care.
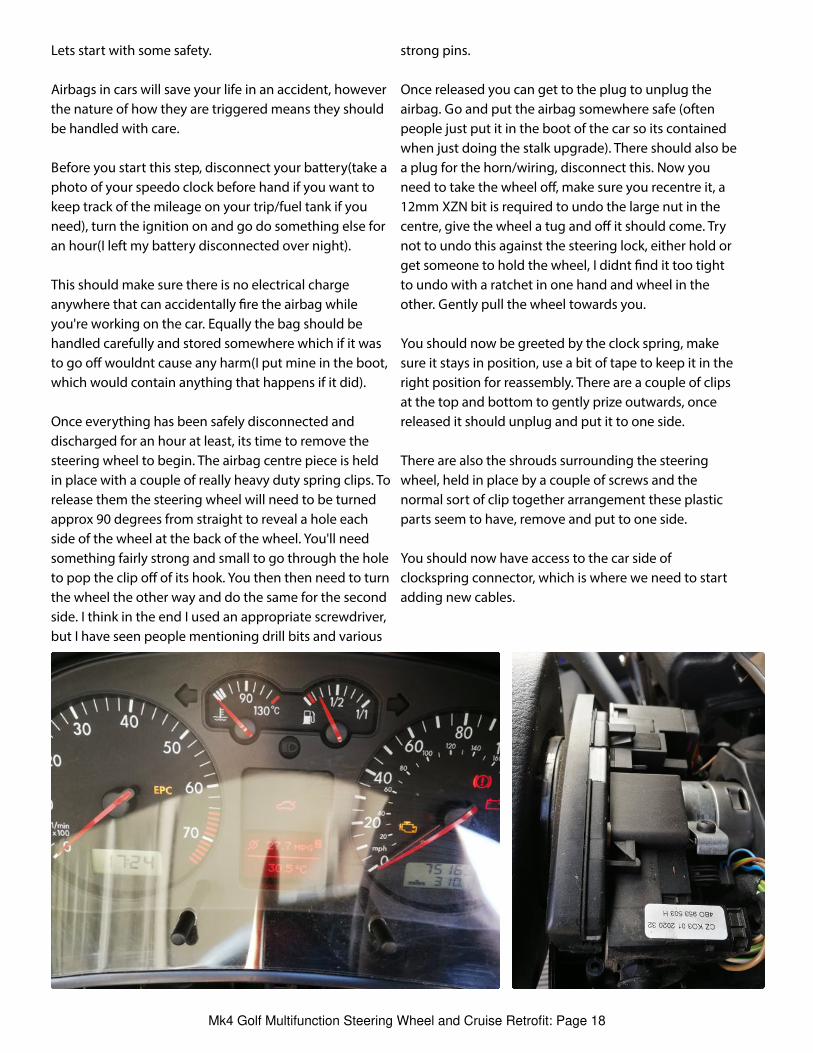
Before you start this step, disconnect your battery(take aphoto of your speedo clock before hand if you want tokeep track of the mileage on your trip/fuel tank if youneed), turn the ignition on and go do something else foran hour(I left my battery disconnected over night).
This should make sure there is no electrical chargeanywhere that can accidentally re the airbag whileyou're working on the car. Equally the bag should behandled carefully and stored somewhere which if it wasto go o wouldnt cause any harm(I put mine in the boot,which would contain anything that happens if it did).
Once everything has been safely disconnected anddischarged for an hour at least, its time to remove thesteering wheel to begin. The airbag centre piece is heldin place with a couple of really heavy duty spring clips. Torelease them the steering wheel will need to be turnedapprox 90 degrees from straight to reveal a hole eachside of the wheel at the back of the wheel. You'll needsomething fairly strong and small to go through the holeto pop the clip o of its hook. You then then need to turnthe wheel the other way and do the same for the secondside. I think in the end I used an appropriate screwdriver,but I have seen people mentioning drill bits and various
strong pins.
Once released you can get to the plug to unplug theairbag. Go and put the airbag somewhere safe (oftenpeople just put it in the boot of the car so its containedwhen just doing the stalk upgrade). There should also bea plug for the horn/wiring, disconnect this. Now youneed to take the wheel o , make sure you recentre it, a12mm XZN bit is required to undo the large nut in thecentre, give the wheel a tug and o it should come. Trynot to undo this against the steering lock, either hold orget someone to hold the wheel, I didnt nd it too tightto undo with a ratchet in one hand and wheel in theother. Gently pull the wheel towards you.
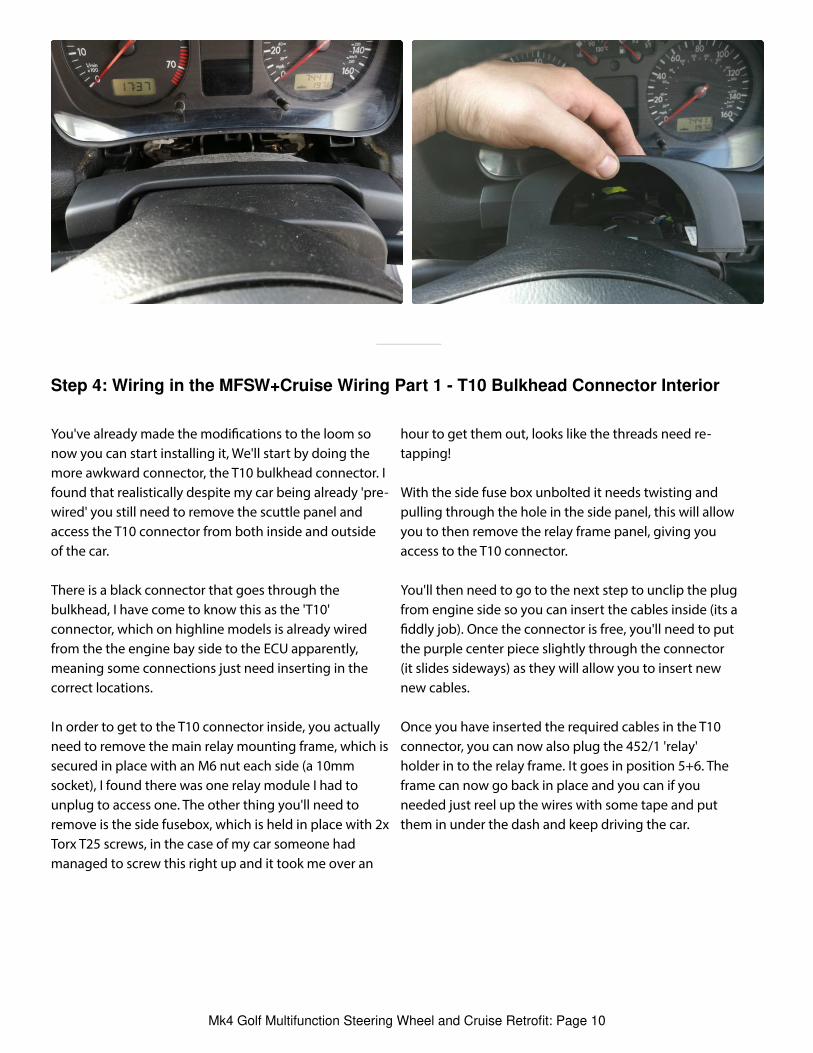
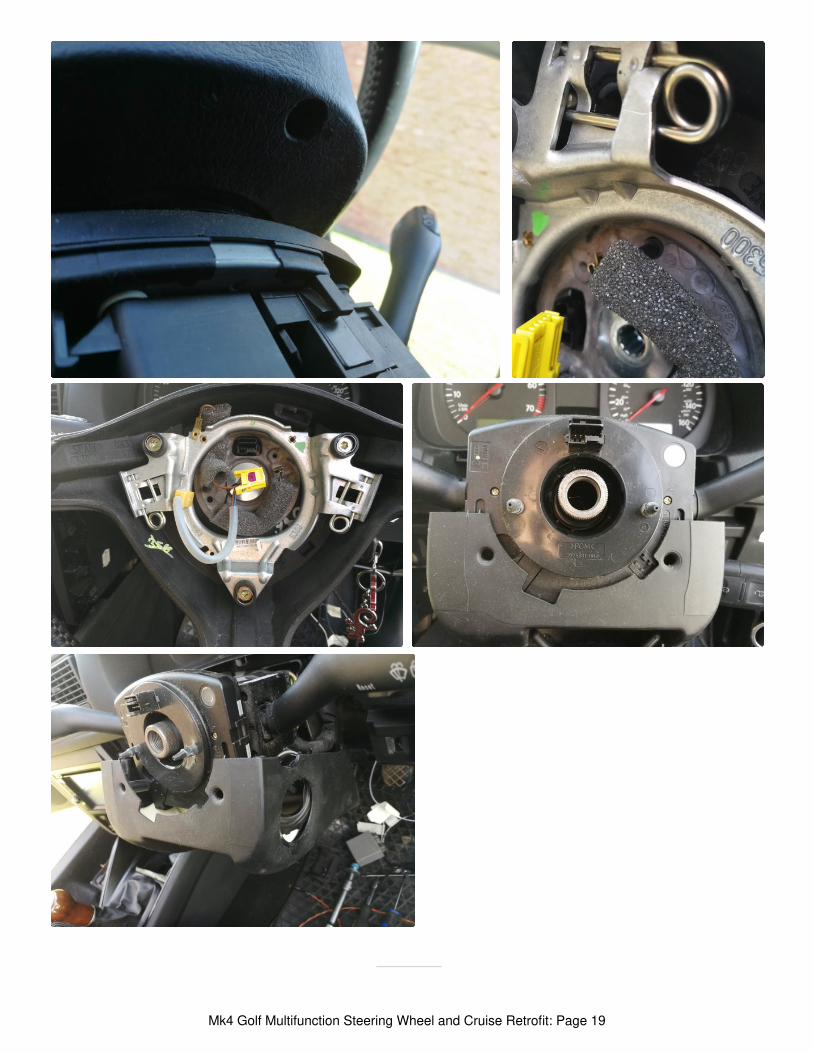
You should now be greeted by the clock spring, makesure it stays in position, use a bit of tape to keep it in theright position for reassembly. There are a couple of clipsat the top and bottom to gently prize outwards, oncereleased it should unplug and put it to one side.
There are also the shrouds surrounding the steeringwheel, held in place by a couple of screws and thenormal sort of clip together arrangement these plasticparts seem to have, remove and put to one side.
You should now have access to the car side ofclockspring connector, which is where we need to startadding new cables.
Mk4 Golf Multifunction Steering Wheel and Cruise Retrofit: Page 18
Mk4 Golf Multifunction Steering Wheel and Cruise Retrofit: Page 19
Step 9: Wiring in the MFSW+Cruise Wiring Part 4 - Steering Wheel & Final Connections
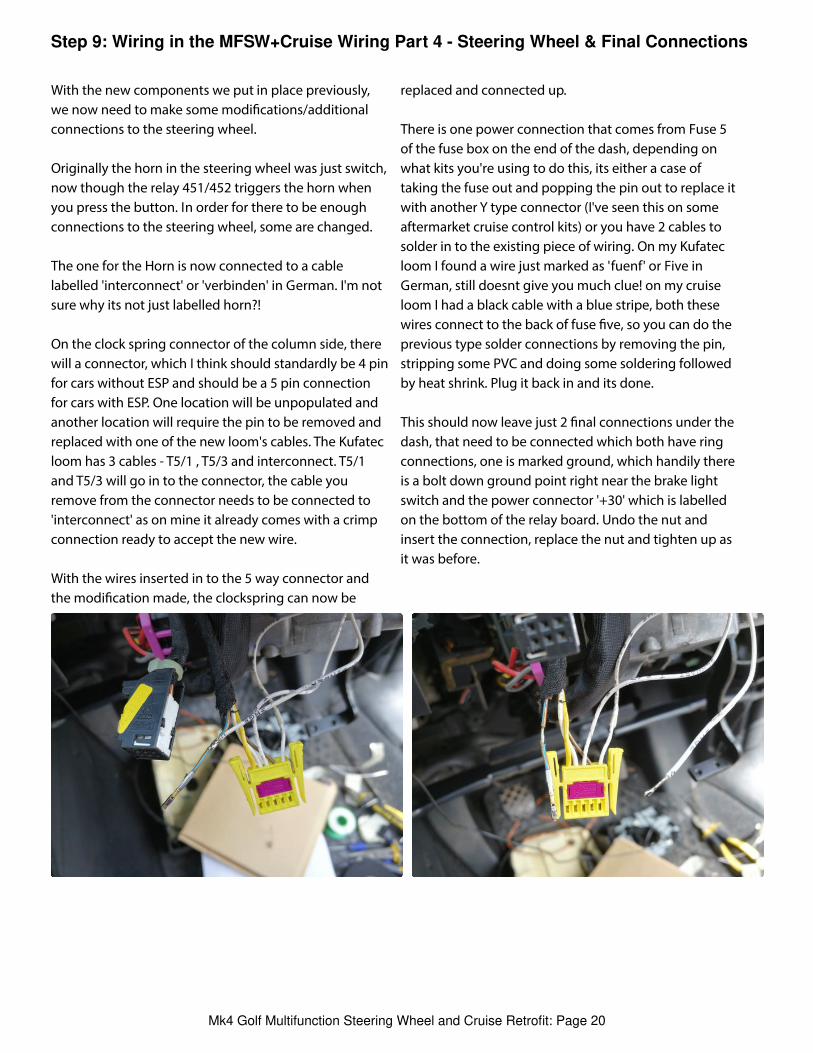
With the new components we put in place previously,we now need to make some modi cations/additionalconnections to the steering wheel.
Originally the horn in the steering wheel was just switch,now though the relay 451/452 triggers the horn whenyou press the button. In order for there to be enoughconnections to the steering wheel, some are changed.
The one for the Horn is now connected to a cablelabelled 'interconnect' or 'verbinden' in German. I'm notsure why its not just labelled horn?!
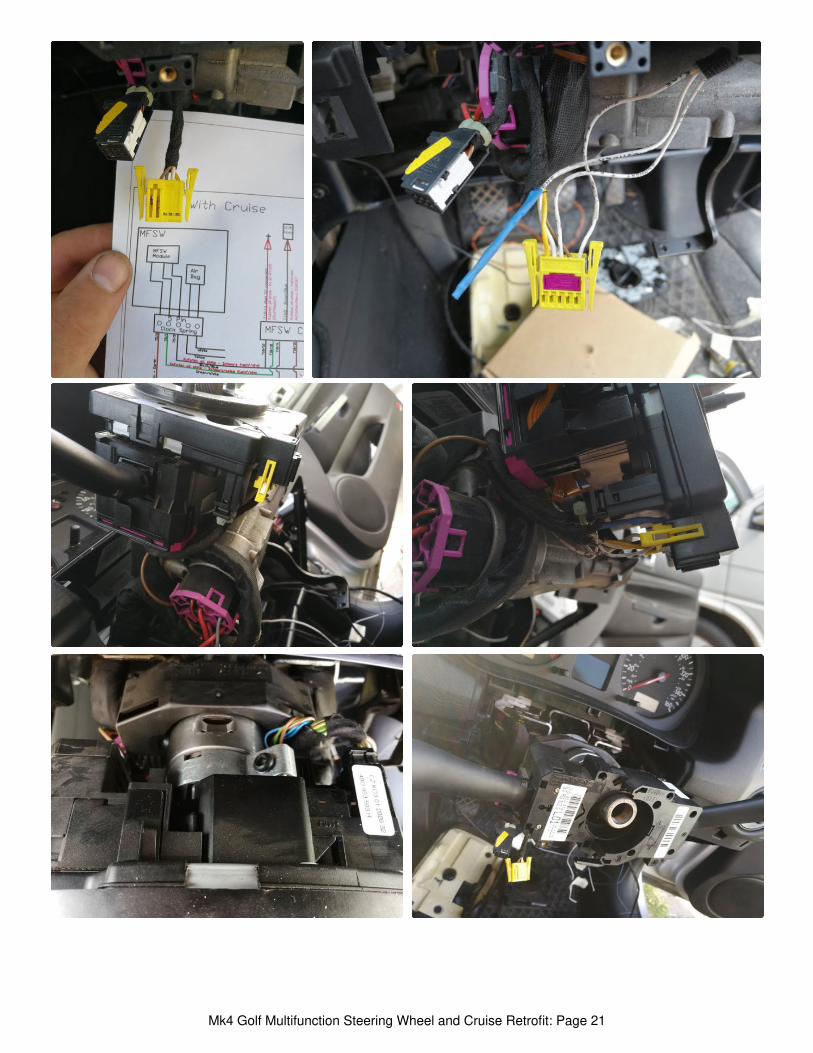
On the clock spring connector of the column side, therewill a connector, which I think should standardly be 4 pinfor cars without ESP and should be a 5 pin connectionfor cars with ESP. One location will be unpopulated andanother location will require the pin to be removed andreplaced with one of the new loom's cables. The Kufatecloom has 3 cables - T5/1 , T5/3 and interconnect. T5/1and T5/3 will go in to the connector, the cable youremove from the connector needs to be connected to'interconnect' as on mine it already comes with a crimpconnection ready to accept the new wire.
With the wires inserted in to the 5 way connector andthe modi cation made, the clockspring can now be
replaced and connected up.
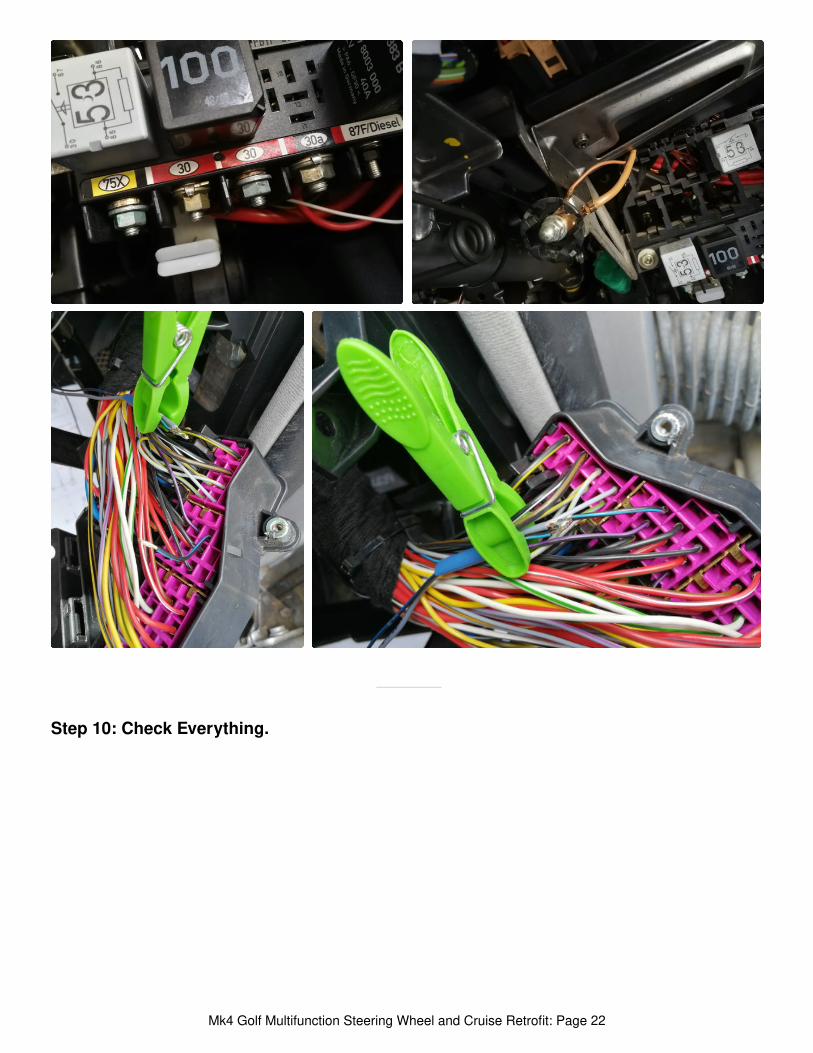
There is one power connection that comes from Fuse 5of the fuse box on the end of the dash, depending onwhat kits you're using to do this, its either a case oftaking the fuse out and popping the pin out to replace itwith another Y type connector (I've seen this on someaftermarket cruise control kits) or you have 2 cables tosolder in to the existing piece of wiring. On my Kufatecloom I found a wire just marked as 'fuenf' or Five inGerman, still doesnt give you much clue! on my cruiseloom I had a black cable with a blue stripe, both thesewires connect to the back of fuse ve, so you can do theprevious type solder connections by removing the pin,stripping some PVC and doing some soldering followedby heat shrink. Plug it back in and its done.
This should now leave just 2 nal connections under thedash, that need to be connected which both have ringconnections, one is marked ground, which handily thereis a bolt down ground point right near the brake lightswitch and the power connector '+30' which is labelledon the bottom of the relay board. Undo the nut andinsert the connection, replace the nut and tighten up asit was before.
Mk4 Golf Multifunction Steering Wheel and Cruise Retrofit: Page 20
Mk4 Golf Multifunction Steering Wheel and Cruise Retrofit: Page 21
Step 10: Check Everything.
Mk4 Golf Multifunction Steering Wheel and Cruise Retrofit: Page 22
Step 11: Coding in Cruise Control
Step 12: Testing and Finish
So now you think you have everything in place, doublecheck all the electrical connections are secure, fuseboxes back in place and that everything you have doneseems to be right and secure. At this stage you can leaveall the panels o as we need to do some testing.
Reconnect the battery. Do this with the keys in theigniton in the on position and nobody in the drivers seat.
Hopefully the airbag didnt just go o and everything onthe dash has just come up zero'd. The horn should workwithout doing anything, hopefully that didnt set theairbag o either - not that I am paranoid about theairbag going o !
Check all your basic operations like indicators and highbeam functions operate and make sure your car seemsok.
In order to do a road test you'll have to re t yourwipes/scuttle panel at this stage, so re t all the itemsbonnet side, but you can leave the panels o inside incase connections need checking.
In theory you can now drive the car again, but obviouslynothing will work cruise wise, or radio (although I neverchecked as I didnt have a stock radio).
In order to get this to work, you'll need to (or a friend)code in the cruise control option to the system. Mostpopular software for this is VCDS by Rosstech. I have agenuine cable, not sure if repro cables will work for this.
Having had the battery o its also going to throw awhole load of fault codes up that need resetting.
Start by resetting those before moving on to adding theoption of cruise control.
With the laptop plugged in, ignition on, go in to VCDSand follow this sequence:
[Key on][Key on]
[Select] -[Select] - (control modules or something I think was rststep)
[01 - Engine][01 - Engine]
[Login - 11][Login - 11]
Enter 11463 to activate cruise controlEnter 11463 to activate cruise control
[Do It!][Do It!]
[Key o ][Key o ]
Unfortunately I didnt take any photos, but it is asstraight forward as that.
Now also another thing you can do at this stage with thelaptop plugged in is to select the module for the steeringwheel (in the same way you selected engine). If you goin to 'Measuring blocks' a new screen comes up andwhen you press the buttons on the steering wheel, itwell tell you which one, I did a check on mine andeverything works, including the cancel button thatdoesnt work to actually cancel the cruise in realoperation (to be investigated, but I think it may be anadditional cable not present in any of my retro ttedlooms). I might see if I can get some photos of this as Iwant to do some more tests.
Mk4 Golf Multifunction Steering Wheel and Cruise Retrofit: Page 23
With any luck everything has gone ok and you havecruise control and no extra faults come up.
So now you need to go and test it out on the road!
Find somewhere with no tra c and nice long straightroads of 40mph+, turn the stalk switch slider to 'on',which if you have a highline model a green symbol willilluminate on the dash, now by pressing either 'set' onthe steering wheel or the button on the end of the stalk(if you used a full cruise stalk like me) should set thecurrent speed, let o the throttle and it should cruise?Not all cars apparently have the cruise light in thespeedo, so you have to test this way. Now press thebrake slightly, is the car just slowing down like youknocked o the cruise? If yes great. If not there may be aproblem, cruise should disable by sliding the stalk switchto o , or a last resort is to turn o the ignition. On somecars you should also be able to use 'cancel' on thesteering wheel to do the same, I havent found out whymine doesnt work yet, I'm not sure if a further cablemight be required or if it only works on canbus 2002>models with a 451 relay. I'll update this if I nd out.
If it seems to work ok, Good Job!
If it doesnt work correctly, the rst thing is to plug in
VCDS and nd out what error code come up, my car hadapparently an intermittent brake light switch before Ieven started so I changed that to avoid any problems.
As an extra, I have since starting the draft for this articlealso gotten a control box for the radio (I have akenwood), which is made by a company calledConnects2. Its fairly straight forward to t and I ampleased to say all the buttons work for controlling thestereo (volume/track select). There are currently 2buttons I dont have use of:
Cancel - I want to check this out, but its not on the cruisestalk either, it may be something for Canbus cars,however checking in VCDS when doing the coding, thesoftware could tell me I was pressing the button, so it isworking, just not doing anything.
Theres a button on the back of the steering wheelbehind the cruise buttons, I dont know what its for(havent looked it up yet) but I think it might be foranswering a telephone. Whatever it is, it doesnt doanything even with my Connects2 adapter box.
Hopefully this instructable made your drive just that biteasier.
Mk4 Golf Multifunction Steering Wheel and Cruise Retrofit: Page 24


