Embed Size (px)
Citation preview

WSIPC Guide to Salary Matrixes (Matrix Master)
TERMS OF USE The information contained herein is licensed, trade-secret and proprietary and may not be used, disclosed or reproduced without permission of the licensing authorities, WSIPC and/or Skyward, Inc. As a condition of use, the User agrees to protect and keep the information from disclosure or falling into the public domain. The failure to comply with this agreement may result in the immediate termination of the User’s right to access the information. COPYRIGHT © Copyright 2014 by Washington School Information Processing Cooperative. All rights reserved. Reproduction of any part of this manual in any medium without the express and written permission of Washington School Information Processing Cooperative (WSIPC) is prohibited by law. This edition is printed in the United States of America. The contents may be corrected or modified by revisions without prior notice. Pages may be added, deleted, or changed as required. The WSIPC logo is a registered trademark of Washington School Information Processing Cooperative. Skyward® is the registered trademark for Skyward, Inc. located in Stevens Point, Wisconsin.
What do you think about this guide? We’d like to hear from you! Your feedback helps us to improve our Guides and learning materials for you. To leave feedback, click here.
Contents
Contents
About This Guide ..................................................................................................... 1 What You Should Know Before You Start ..............................................................1
Be Sure You’re Signed In .......................................................................................1 How to Use This Guide .............................................................................................1
Navigation Paths ....................................................................................................1 Getting Around ......................................................................................................2 Screen shots ............................................................................................................2
What’s in a WSIPC Guide ........................................................................................2
Accessing the Matrix Master Codes Table ............................................................... 3
Understanding Lane Codes ...................................................................................... 4
Understanding the Salary Matrices Screen .............................................................. 5
Cloning Salary Matrixes ........................................................................................... 6 Clone a Contract Salary Matrix from LEAP DOCUMENT 1 ..................................6
Round LEAP Salary Amounts ...............................................................................7 Clone an Existing Salary Matrix ...............................................................................8
Update Step Amount .............................................................................................9 Add a New Step .....................................................................................................9 Add a Lane Amount.............................................................................................10
Adding a Salary Matrix .......................................................................................... 11 Add Lanes and Steps ................................................................................................13 View Lanes and Steps ..............................................................................................14
Editing a Salary Matrix ........................................................................................... 15 Edit a Step Amount .................................................................................................16
Editing District Base and Using Step Amount Mass Change Process .................... 17 Edit District Base .....................................................................................................17 Use the Step Amount Mass Change Process ..........................................................18
Deleting a Salary Matrix......................................................................................... 20
Viewing a Salary Matrix ......................................................................................... 21 Standard View Example ..........................................................................................21 Detailed View Example ...........................................................................................21
October 2014 i Version 05.14.06.00.09
Contents
Import Lane Amounts ............................................................................................ 22 Choose Data to be Imported ...................................................................................24
Reporting on a Salary Matrix ................................................................................. 26 Lane Detail Report Example ...................................................................................29 Group Matrix Report Example ...............................................................................30 Where Used Report Example .................................................................................31
Appendix A – Frequently Asked Questions ........................................................... 32 Can I delete a Salary Matrix from another Plan year? ..........................................32 Can I import a new complete Salary Matrix? ........................................................32 Can I update a Salary Matrix after I prepare my new Plans? ...............................32 Is there a way to mass add additional Steps to some Lanes in an existing Salary Matrix? .....................................................................................................................33 How can I track who changed a Salary Matrix? ....................................................33 How do I fix a Salary Matrix that someone edited and saved changes to in error? ........................................................................................................................34 How do I get the Lane Amounts listed on the Salary Matrix Maintenance screen to be the correct amounts? ......................................................................................34 How do I update a Salary Matrix with new union settled wages? .......................34
October 2014 ii Version 05.14.06.00.09
About This Guide
About This Guide
Salary Matrixes define pay structures based on Lane and Step amounts. The Lanes may be based on degrees earned and the Steps may represent years of experience. Contract and Hourly Matrix Types are most commonly used, but this Guide has information for each type of matrix. The Matrix Master Codes table is where various Salary Matrixes are created and maintained. Note Salary Matrixes apply to all Positions and Assignments in
Employee Management and Salary Negotiations Plans. Changing existing Salary Matrixes changes the salary of the employee.
What You Should Know Before You Start You’ll find that this Guide is much more helpful, and the information described makes more sense, if you have some understanding of Code tables.
Be Sure You’re Signed In This Guide is intended to be read while you are working in Salary Matrixes, so be sure you are signed in. Many of the procedures and concepts discussed in the Guide are best understood if you practice as you read.
How to Use This Guide This section shows you how to follow navigation paths in a Guide, and how to navigate around the Guide using various features. This section also describes how and when screen shots are used in the Guide.
Navigation Paths The procedures in this Guide begin with navigation menu paths. Select the Display Navigation Menu Paths check box in User Preferences to ensure that you can follow these paths. The option is not available in User Preferences if it is already enabled for the entire district. To learn more about setting User Preferences, see the WSIPC Guide to Skyward’s School Management System.
October 2014 1 Version 05.14.06.00.09
About This Guide
Getting Around If you’re using this Guide electronically, you can click any text in blue font to move to the section of the Guide that the text refers to. Because the Guides are published in PDF format, you can also use the PDF navigation pane to quickly move from one section to another. If the pane is hidden, click the Bookmark
button in the menu bar on the left side of the screen.
Screen shots You’ll find screen shots throughout the guide to help you learn how to use the software. The data entered in the screen shots in this Guide is an example of the data you might enter. These screen shots are updated with each edition to make sure what you see on your screen matches what you see in the Guide. To prevent the Guide from becoming a lengthy picture book, WSIPC Guides use screen shots only to help illustrate a key idea or when options on a screen are described. This allows WSIPC Guides to be effective and concise.
What’s in a WSIPC Guide WSIPC Guides are designed to provide readers with everything they need to know to safely and effectively use Skyward’s software. WSIPC strives to make Guides that address the diverse needs of these audiences. Therefore, this Guide doesn’t contain information customized for specific audiences, districts, or schools. If you need to create educational materials that address the specific needs of your Service Center or district, consider using this Guide as a starting point for developing your own customized materials.
October 2014 2 Version 05.14.06.00.09

Accessing the Matrix Master Codes Table
Accessing the Matrix Master Codes Table
You can access the Matrix Master Codes table through Employee Setup, Employee Management Setup, and Salary Negotiations Setup. This Guide shows the procedure steps through Employee Setup. Depending on your Security Level, you may be able to access the Matrix Master Codes table through any of the following menu paths: Employee Setup:
Human Resources\Employee\EP Setup\CO\MM Employee Management Setup:
Human Resources\Employee Administration\EM Setup\CO\MM Salary Negotiations Setup:
Human Resources\Employee Administration\SN Setup\CO\MM
October 2014 3 Version 05.14.06.00.09
Understanding Lane Codes
Understanding Lane Codes
Information in the Lane Codes table is used in Salary Matrixes. Lanes are the column headings in a Salary Matrix and they define pay grades (levels). The Lane Code field in the Lane Codes table is five digits. The code is unique and descriptive, possibly relating it to specific jobs or degrees. For example, in Food Service you might have jobs such as Assistant, Baker, and Cashier. Lane Codes for these jobs could be FSA1 (Food Service Assistant 1), FSA2 (Food Service Assistant 2), FSBK1 (Food Service Baker 1), and FSC1 (Food Service Cashier 1). You can also have Lane Codes based on degrees, such as BA (Bachelor of Arts), MA (Masters), and PHD (Doctorate). Some Lane Codes may be more generic, such as LaneA, LaneB, or Level1, Level2, or Level3. Lane Codes may also be numeric based on legacy Salary schedules. Regardless of how your Lane Codes are structured, these codes are the column headings you’ll see when you view a Salary Matrix.
October 2014 4 Version 05.14.06.00.09
Understanding the Salary Matrices Screen
Understanding the Salary Matrices Screen
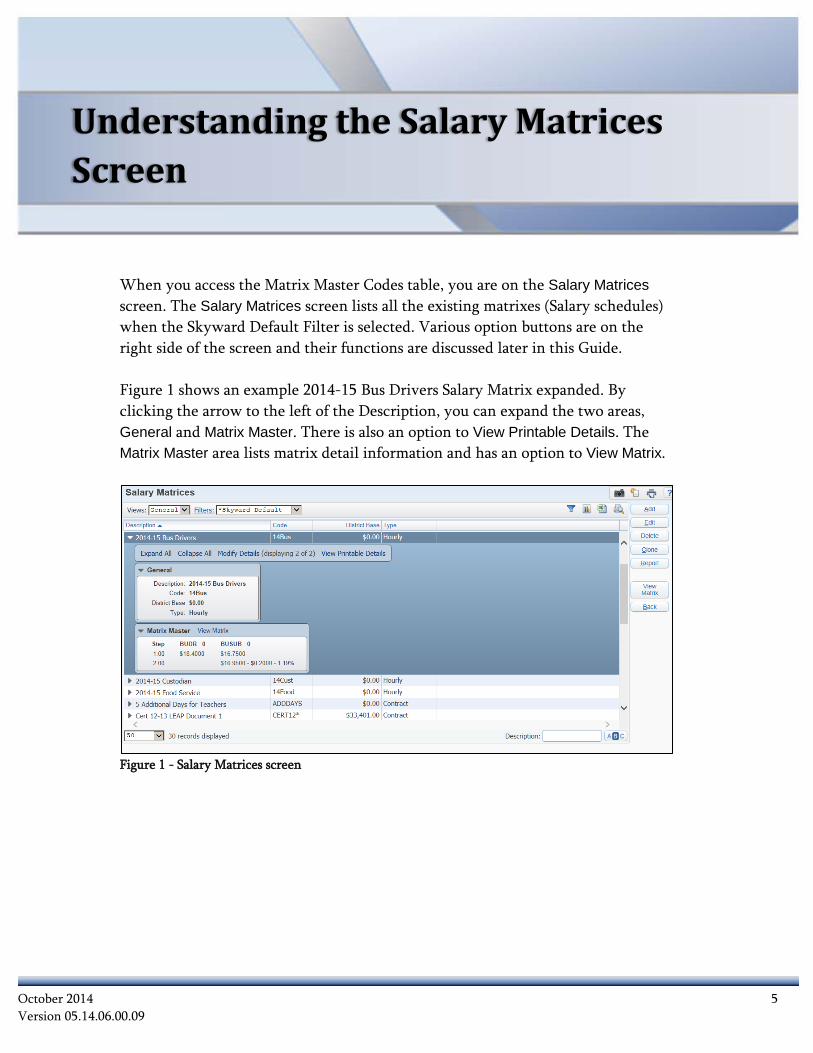
When you access the Matrix Master Codes table, you are on the Salary Matrices screen. The Salary Matrices screen lists all the existing matrixes (Salary schedules) when the Skyward Default Filter is selected. Various option buttons are on the right side of the screen and their functions are discussed later in this Guide. Figure 1 shows an example 2014-15 Bus Drivers Salary Matrix expanded. By clicking the arrow to the left of the Description, you can expand the two areas, General and Matrix Master. There is also an option to View Printable Details. The Matrix Master area lists matrix detail information and has an option to View Matrix.
Figure 1 - Salary Matrices screen
October 2014 5 Version 05.14.06.00.09
Cloning Salary Matrixes
Cloning Salary Matrixes
When you clone Salary Matrixes, you typically clone contract and hourly matrixes. The clone process saves time and reduces the amount of manual entry. Tip You can delete a newly cloned Salary Matrix, but it won’t be
removed from the Salary Matrices screen until you leave the screen and return.
Caution Do not change or delete an existing Salary Matrix in use on
employee records. Changing existing Salary Matrixes changes the salary of the employee.
Clone a Contract Salary Matrix from LEAP DOCUMENT 1 The example in the procedure below creates a contract Salary Matrix for certificated instructional staff by cloning LEAP DOCUMENT 1, which represents the State Staff Mix Factors. To clone a contract Salary Matrix from LEAP DOCUMENT 1:
1. Go to Human Resources\Employee\EP Setup\CO\MM.
2. To see only the Contract Matrixes, click Filters, select Contract, and click Apply Filter.
3. Select LEAP DOCUMENT 1 (Matrix Code LEAP1Sb).
4. Click Clone.
5. Type a new code in the Matrix Code box and a new description in the
Matrix Description box.
6. Click Use Assignment’s Calculated Contract Amount (Default) and click Save.
7. Click the Edit button to the right of the Matrix Description box.
October 2014 6 Version 05.14.06.00.09
Cloning Salary Matrixes
8. Type “10,000.00” in the District Base box and click Save. A Recalculate Lanes message appears.
9. Click Do Not Update Any Lanes and click OK.
10. Click Edit again and enter the current starting salary in the District Base
box (such as the starting salary of 34,048 for 2014-2015).
11. Click Save. A Recalculate Lanes message appears.
12. Click Update Lane Amounts and click OK.
13. Click Back, and then click Back again.
Round LEAP Salary Amounts Round LEAP salary amounts so the Steps in each Lane are whole dollars and match the state salary amounts for Certificated Instructional Staff. To round LEAP salary amounts:
1. Go to Human Resources\Employee\EP Setup\CO\MM.
2. To see only the Contract Matrixes, click Filters, select Contract, and click Apply Filter.
3. Select the newly cloned matrix and click Edit.
4. Expand a Lane Code and click Round Amount in the Step Amount area.
5. When the Matrix Rounding Options screen appears, leave all options as
defaulted, and click Save.
Note Each Step Amount for each Lane now shows the cents at .00 except for the BA 135 Lane. The program allows only 99 as the maximum on the credit range for rounding. You must manually round each Step amount for the BA 135 Lane Some districts prefer to have a Lane Code of G (Grandfathered) instead of BA, so you may see G for the 135 Lane.
October 2014 7 Version 05.14.06.00.09
Cloning Salary Matrixes
6. Expand the BA (or G) 135 Lane Code.
7. In the Step Amount area, click Edit for the first Step.
8. Click inside the Amount box and do one of the following:
To round the value down, press the Backspace button on your keyboard two times through the cents amount and it changes to 00.
To round the value up, press the Backspace button on your keyboard four times and enter the rounded value.
9. Click Save and Next to move to the next Step.
10. When you finish updating Steps, click Save.
You have created a new Salary Matrix based on LEAP DOCUMENT 1.
Clone an Existing Salary Matrix This process shows how to clone any existing Salary Matrix, update Step amounts, add a new Step, and add a new Lane. To clone an existing Salary Matrix:
1. Go to Human Resources\Employee\EP Setup\CO\MM.
2. To see only the type of matrix you want to clone, click Filters, select a filter type, and click Apply Filter.
3. Select a Salary Matrix and click Clone.
4. Enter a new code in the Matrix Code box and a new description in the
Matrix Description box.
5. Select Use Assignment’s Calculated Contract Amount (Default).
6. Click Save.
October 2014 8 Version 05.14.06.00.09
Cloning Salary Matrixes
Update Step Amount If you are continuing from the process described in “Clone an Existing Salary Matrix”, the procedure below shows how to update the Step Amount on a cloned matrix. To update the Step Amount:
1. Select the newly cloned Salary Matrix and click Edit.
2. Expand a Lane Code.
3. In the Step Amount area, click Edit for the first Step.
4. Type the hourly rate in the Amount box.
5. Do one of the following:
To continue updating steps, click Save and Next to move to the next Step.
If you are finished updating Steps, click Save.
6. Expand the Lane Code to see the Step and Step Amount information.
Add a New Step To add more experience-based pay rates to the matrix you cloned in the process described in “Clone an Existing Salary Matrix”, follow the procedure below to add a new Step for the Lane Code. To add a new Step:
1. Select the newly cloned matrix and click Edit.
2. Expand a Lane Code.
3. In the Step Amount area, click Add.
4. In the Step to Add box, type the next Step value.
5. In the Amount box, type the hourly rate.
October 2014 9 Version 05.14.06.00.09
Cloning Salary Matrixes
6. Click Save.
7. Expand the Lane Code to see the Step and Step Amount information.
Add a Lane Amount To add a Lane Amount to the matrix you cloned in the process described in “Clone an Existing Salary Matrix”, follow the procedure below. To add a Lane Amount:
1. Select the newly cloned matrix and click Edit.
2. Click Add.
3. Click Lane, select a Lane Code, and click Select.
4. Type information in the Lane Starting Step, End Step, and By boxes.
5. In the Lane Amount box, type the Lane Amount.
6. Click the Increase By arrow and select Amount or Percent.
7. Enter an amount in the Amount box.
8. Click Save.
9. Expand the newly added Lane Code to see the Step and Step Amount information.
October 2014 10 Version 05.14.06.00.09
Adding a Salary Matrix
Adding a Salary Matrix
Adding a Salary Matrix can take longer if the Lane Codes are not already set up. Review the Lane Codes table (Human Resources\Employee\Employee Setup\CO\LA) to verify if additional Lane Codes need to be added before adding a Salary Matrix. To add a Salary Matrix:
1. Go to Human Resources\Employee\EP Setup\CO\MM.
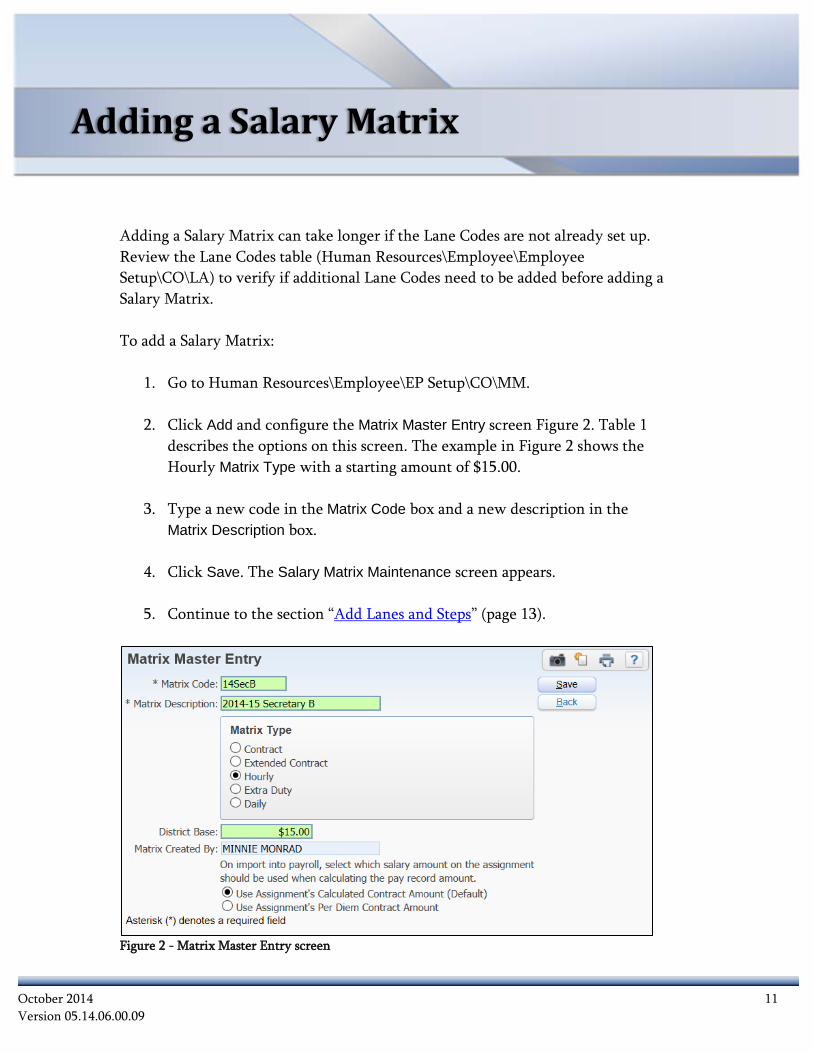
2. Click Add and configure the Matrix Master Entry screen Figure 2. Table 1 describes the options on this screen. The example in Figure 2 shows the Hourly Matrix Type with a starting amount of $15.00.
3. Type a new code in the Matrix Code box and a new description in the
Matrix Description box.
4. Click Save. The Salary Matrix Maintenance screen appears.
5. Continue to the section “Add Lanes and Steps” (page 13).
Figure 2 - Matrix Master Entry screen
October 2014 11 Version 05.14.06.00.09
Adding a Salary Matrix
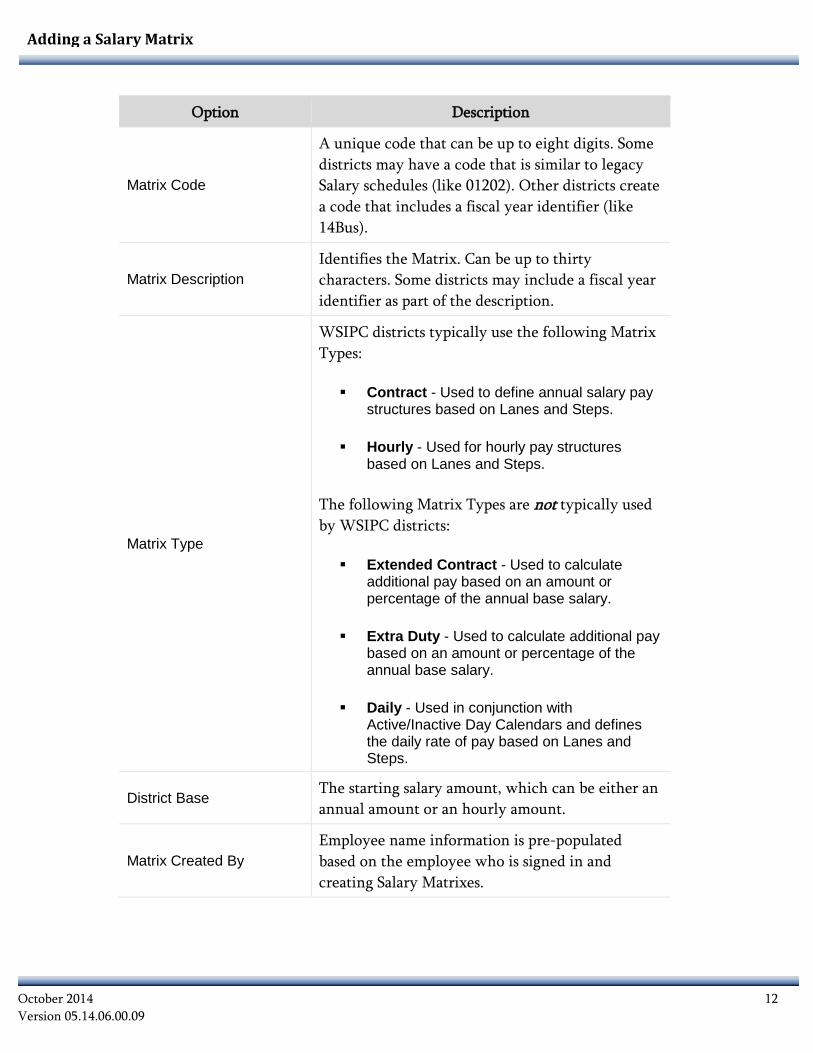
Option Description
Matrix Code
A unique code that can be up to eight digits. Some districts may have a code that is similar to legacy Salary schedules (like 01202). Other districts create a code that includes a fiscal year identifier (like 14Bus).
Matrix Description Identifies the Matrix. Can be up to thirty characters. Some districts may include a fiscal year identifier as part of the description.
Matrix Type
WSIPC districts typically use the following Matrix Types: Contract - Used to define annual salary pay
structures based on Lanes and Steps. Hourly - Used for hourly pay structures
based on Lanes and Steps. The following Matrix Types are not typically used by WSIPC districts: Extended Contract - Used to calculate
additional pay based on an amount or percentage of the annual base salary.
Extra Duty - Used to calculate additional pay
based on an amount or percentage of the annual base salary.
Daily - Used in conjunction with
Active/Inactive Day Calendars and defines the daily rate of pay based on Lanes and Steps.
District Base The starting salary amount, which can be either an annual amount or an hourly amount.
Matrix Created By Employee name information is pre-populated based on the employee who is signed in and creating Salary Matrixes.
October 2014 12 Version 05.14.06.00.09
Adding a Salary Matrix
Option Description
Use Assignment’s Calculated Contract Amount (Default)
The calculated contract amount on the Assignment is used to calculate the pay record amount for the import to payroll and is based on start dates, FTE, and more. Best Practice: Select this option.
Use Assignment’s Per Diem Contract Amount
WSIPC recommends that you do not use this option. WA State Reporting uses the Calculated Contract salary amount in assignments.
Table 1 - Matrix Master Entry screen options
Add Lanes and Steps After adding the Matrix Master, you’ll add Lanes and Steps.
1. On the Salary Matrix Maintenance screen, click Add.
2. On the Matrix Lane Maintenance screen (Figure 3), select a Lane.
3. Enter information in the Lane Starting Step, Ending Step, and By boxes.
4. Enter information in the Lane Amount box. This amount is the first Step of the Matrix Lane.
5. In the Increase By box, select Amount or Percent.
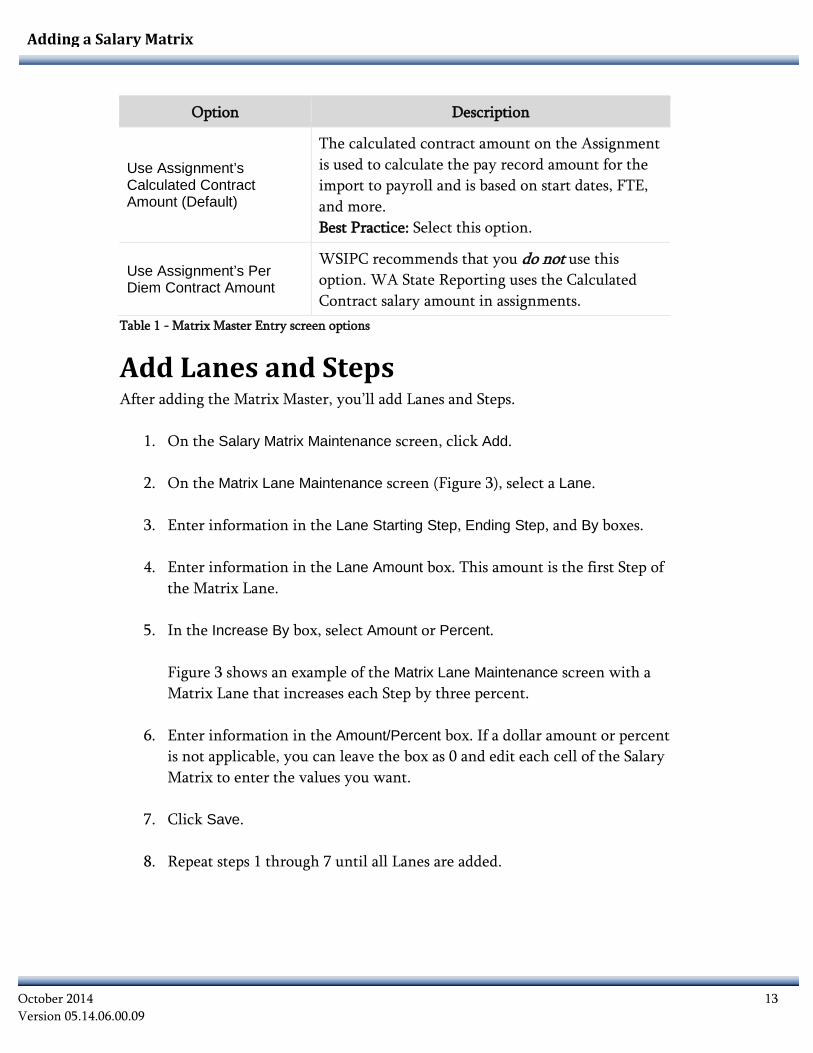
Figure 3 shows an example of the Matrix Lane Maintenance screen with a Matrix Lane that increases each Step by three percent.
6. Enter information in the Amount/Percent box. If a dollar amount or percent
is not applicable, you can leave the box as 0 and edit each cell of the Salary Matrix to enter the values you want.
7. Click Save.
8. Repeat steps 1 through 7 until all Lanes are added.
October 2014 13 Version 05.14.06.00.09
Adding a Salary Matrix
Figure 3 - Matrix Lane Maintenance screen
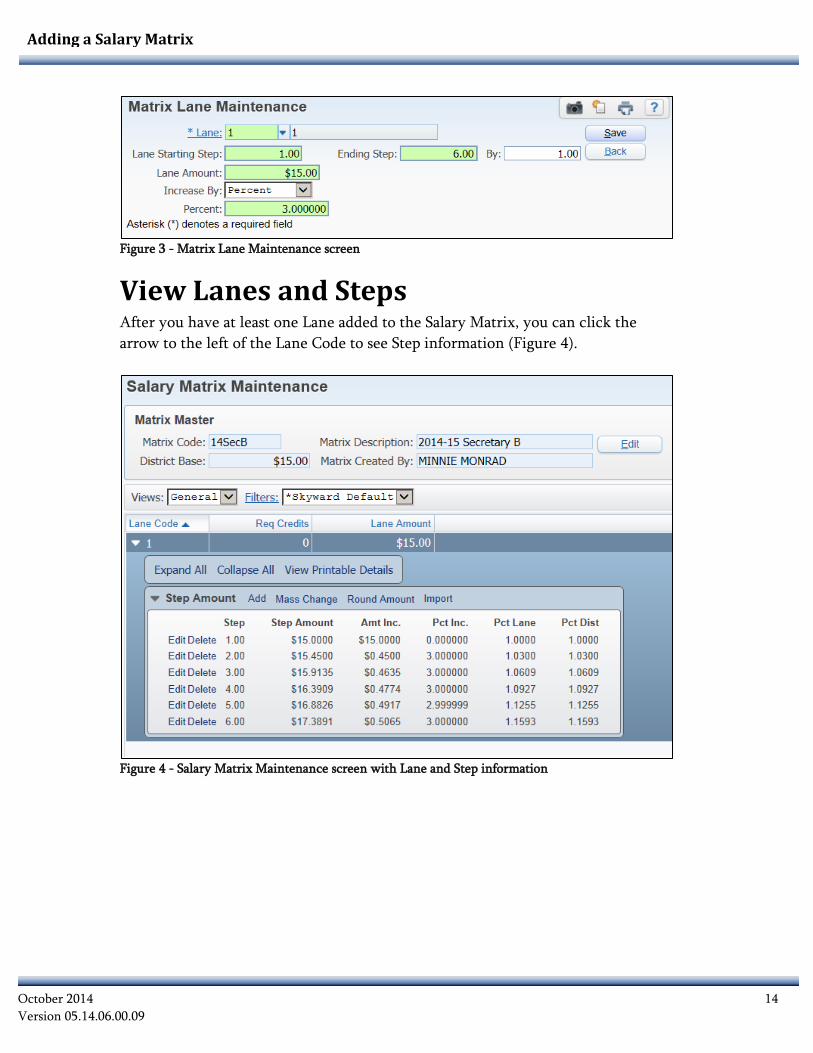
View Lanes and Steps After you have at least one Lane added to the Salary Matrix, you can click the arrow to the left of the Lane Code to see Step information (Figure 4).
Figure 4 - Salary Matrix Maintenance screen with Lane and Step information
October 2014 14 Version 05.14.06.00.09
Editing a Salary Matrix
Editing a Salary Matrix
There are times when you may need to edit a Salary Matrix. For example, you may need to change the District Base amount, change a matrix description, or you may need to add or update Steps. Caution Editing existing Salary Matrixes in use on Assignments in Plans
could change employee salaries. For example, if you changed a Step Amount for a current year Salary Matrix, this would change the Assignments and potentially change the employee salary amount.
To edit a Salary Matrix:
1. Go to Human Resources\Employee\EP Setup\CO\MM.
2. Select a Salary Matrix and click Edit.
3. Do one of the following:
Click Edit at the top of the Salary Matrix Maintenance screen to change the Matrix Description or District Base boxes.
Click Edit on the right side of the Salary Matrix Maintenance screen to
change Lane Code information on the Matrix Lane Maintenance screen.
4. Click Save.
5. Continue to the section “Edit a Step Amount” below.
October 2014 15 Version 05.14.06.00.09
Editing a Salary Matrix
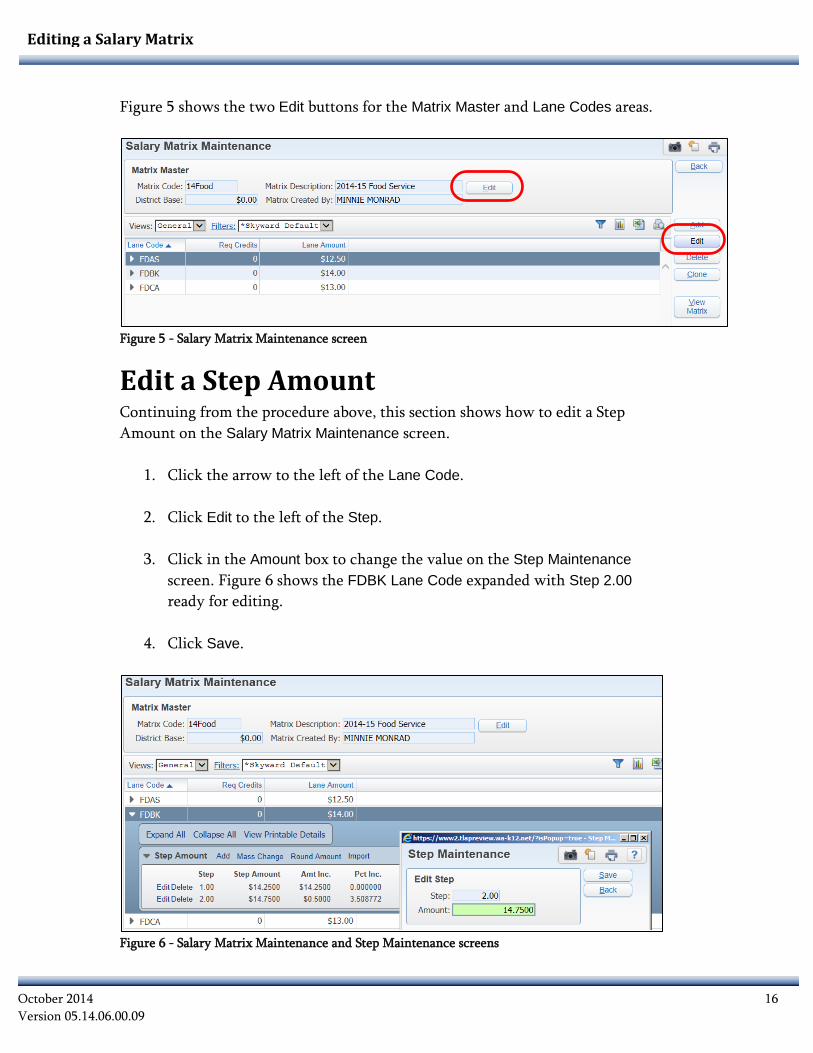
Figure 5 shows the two Edit buttons for the Matrix Master and Lane Codes areas.
Figure 5 - Salary Matrix Maintenance screen
Edit a Step Amount Continuing from the procedure above, this section shows how to edit a Step Amount on the Salary Matrix Maintenance screen.
1. Click the arrow to the left of the Lane Code.
2. Click Edit to the left of the Step.
3. Click in the Amount box to change the value on the Step Maintenance screen. Figure 6 shows the FDBK Lane Code expanded with Step 2.00 ready for editing.
4. Click Save.
Figure 6 - Salary Matrix Maintenance and Step Maintenance screens
October 2014 16 Version 05.14.06.00.09
Editing District Base and Using Step Amount Mass Change Process
Editing District Base and Using Step Amount Mass Change Process
You may find the Edit District Base and Step Amount Mass Change Process helpful when working with some types of matrixes. For example, this process may help if you clone a Contract Matrix for professional staff and you want to increase it by three percent without having to manually update each Lane and Step. You’ll first clone a Contract Matrix, edit the District Base, and then use the Step Amount Mass Change Process to update all Lanes at once.
Edit District Base The procedure below shows you how to edit the District Base for a Contract Matrix after you clone the matrix. To edit the District Base:
1. Go to Human Resources\Employee\EP Setup\CO\MM.
2. Select the newly cloned matrix and click Edit.
3. Click the Edit button to the right of the Matrix Description box.
4. Enter the new amount in the District Base box.
5. Click Save. A Recalculate Lanes message appears.
6. Click Update Lane Amounts and click OK. Tip Return to the Codes screen so that saved changes to the matrix
are refreshed.
October 2014 17 Version 05.14.06.00.09
Editing District Base and Using Step Amount Mass Change Process
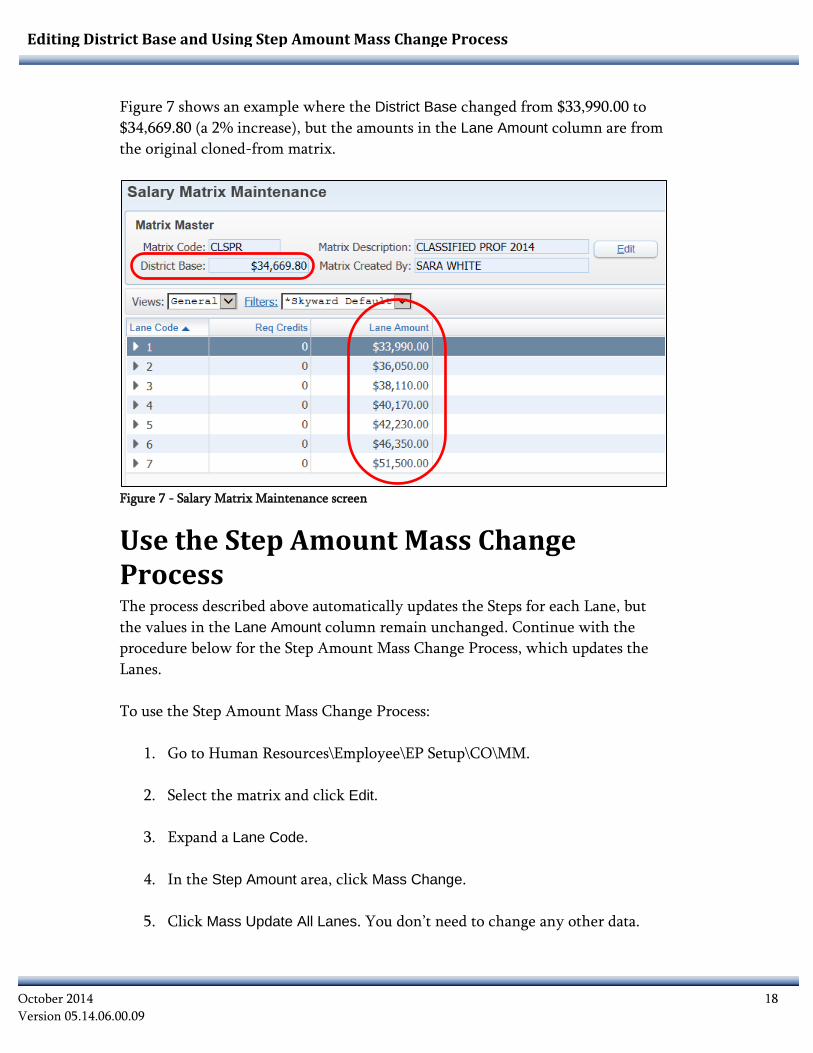
Figure 7 shows an example where the District Base changed from $33,990.00 to $34,669.80 (a 2% increase), but the amounts in the Lane Amount column are from the original cloned-from matrix.
Figure 7 - Salary Matrix Maintenance screen
Use the Step Amount Mass Change Process The process described above automatically updates the Steps for each Lane, but the values in the Lane Amount column remain unchanged. Continue with the procedure below for the Step Amount Mass Change Process, which updates the Lanes. To use the Step Amount Mass Change Process:
1. Go to Human Resources\Employee\EP Setup\CO\MM.
2. Select the matrix and click Edit.
3. Expand a Lane Code.
4. In the Step Amount area, click Mass Change.
5. Click Mass Update All Lanes. You don’t need to change any other data.
October 2014 18 Version 05.14.06.00.09
Editing District Base and Using Step Amount Mass Change Process
6. Click Run.
7. When the process is complete, click OK.
8. Click Back on the Salary Matrix Maintenance screen.
9. Click Back on the Salary Matrices screen.
10. Click Matrix Master.
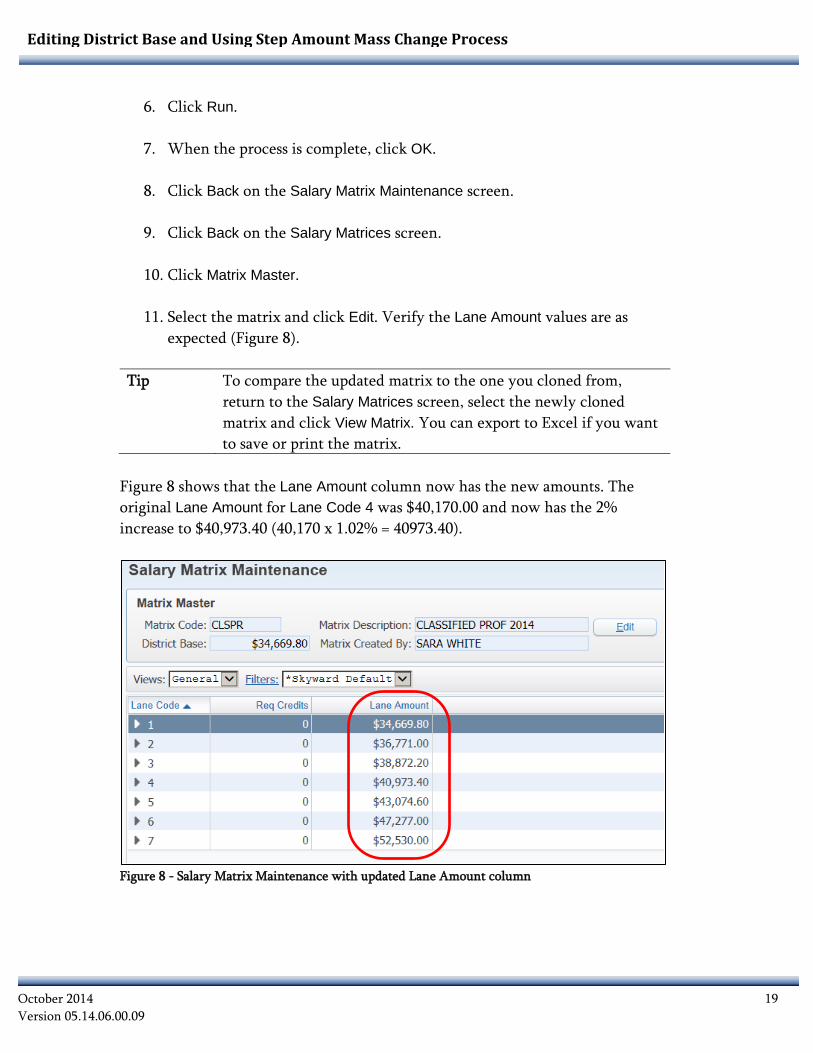
11. Select the matrix and click Edit. Verify the Lane Amount values are as expected (Figure 8).
Tip To compare the updated matrix to the one you cloned from,
return to the Salary Matrices screen, select the newly cloned matrix and click View Matrix. You can export to Excel if you want to save or print the matrix.
Figure 8 shows that the Lane Amount column now has the new amounts. The original Lane Amount for Lane Code 4 was $40,170.00 and now has the 2% increase to $40,973.40 (40,170 x 1.02% = 40973.40).
Figure 8 - Salary Matrix Maintenance with updated Lane Amount column
October 2014 19 Version 05.14.06.00.09
Deleting a Salary Matrix
Deleting a Salary Matrix
This section discusses deleting a Salary Matrix.
Caution Do not delete any Salary Matrixes already in use on Assignments in any Plans.
To delete a Salary Matrix:
1. Go to Human Resources\Employee\EP Setup\CO\MM.
2. Select a Salary Matrix and click Delete. The following message appears:
“Are you sure you want to delete this Matrix Master Record?”
3. Click Yes.
4. When the process is complete, the following message appears:
“Matrix deleted successfully.”
5. Click OK. The matrix still appears on the Salary Matrices screen.
6. Click Back. If you return to the Salary Matrices screen, the deleted matrix is no longer listed.
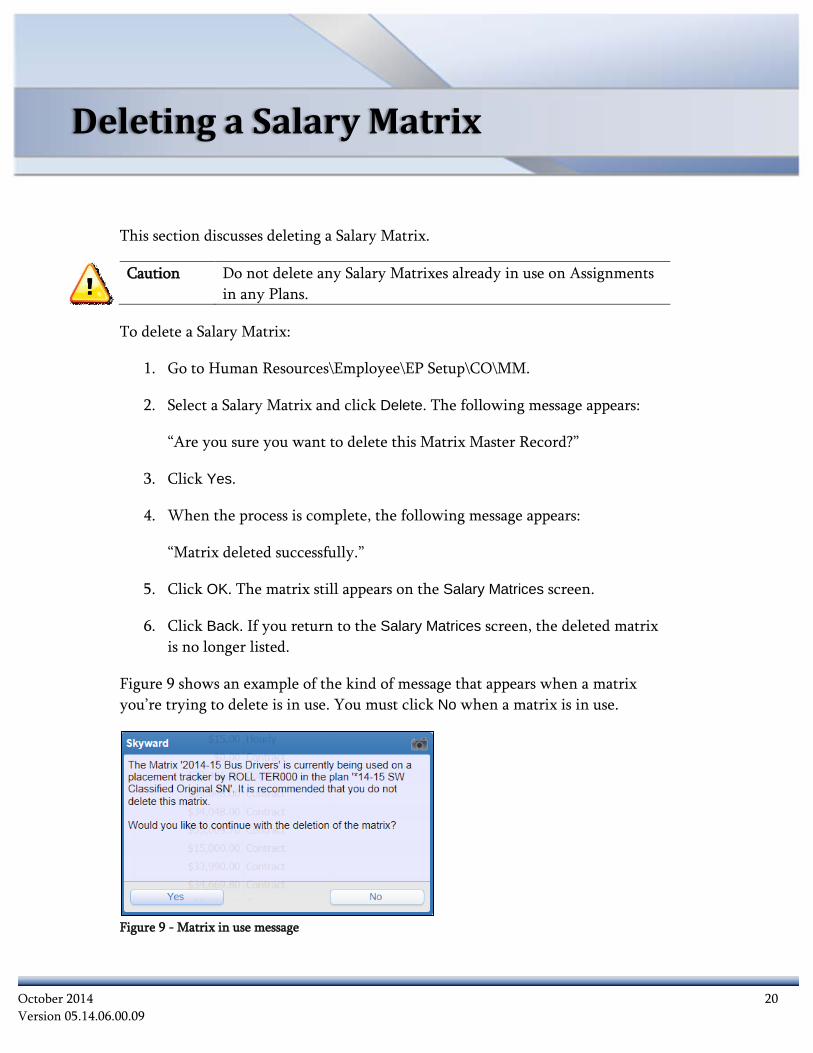
Figure 9 shows an example of the kind of message that appears when a matrix you’re trying to delete is in use. You must click No when a matrix is in use.
Figure 9 - Matrix in use message
October 2014 20 Version 05.14.06.00.09
Viewing a Salary Matrix
Viewing a Salary Matrix
The View Matrix option displays a full view of the Lane and Step data with both a Standard View and Detailed View. You can also export this data to Excel. To view a Salary Matrix:
1. Go to Human Resources\Employee\EP Setup\CO\MM.
2. Select a Salary Matrix and click View Matrix.
3. If you want to save or print the matrix, click the Excel button .
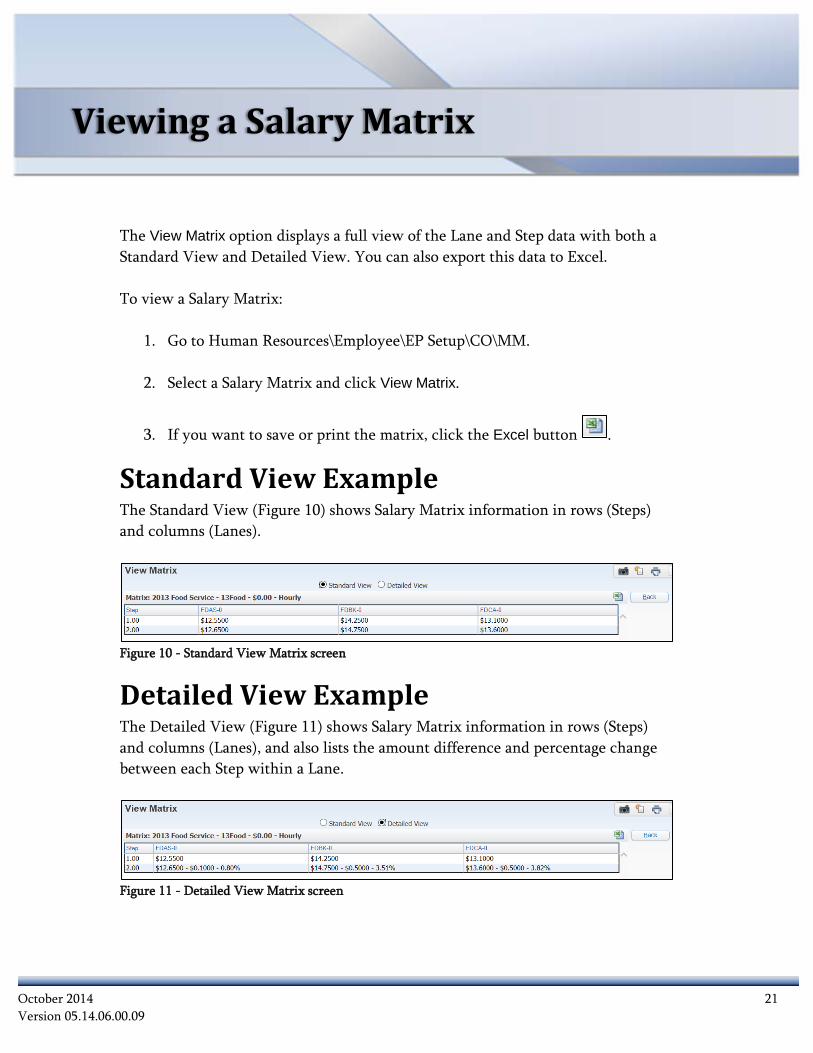
Standard View Example The Standard View (Figure 10) shows Salary Matrix information in rows (Steps) and columns (Lanes).
Figure 10 - Standard View Matrix screen
Detailed View Example The Detailed View (Figure 11) shows Salary Matrix information in rows (Steps) and columns (Lanes), and also lists the amount difference and percentage change between each Step within a Lane.
Figure 11 - Detailed View Matrix screen
October 2014 21 Version 05.14.06.00.09
Import Lane Amounts
Import Lane Amounts
Within a Salary Matrix, you can use the Import option to create or update Lane Amounts. You import data from a CSV file, and the CSV file can have several Lanes (columns) and Steps (rows). The import process imports the data for all Steps within the selected Lane. The import process is done for each Lane in a Salary Matrix. The software is not designed to import a complete Salary Matrix all at once from a CSV file. Tip Use View Matrix and export to Excel to get current Salary Matrix
Step and Lane data. You can then edit the information to new amounts, save as a CSV file, and import each Lane.
To import Lane Amounts:
1. Go to Human Resources\Employee\EP Setup\CO\MM.
2. Select a Salary Matrix and click Edit.
3. Click the arrow to the left of the Lane Code you want to update and click Expand All.
4. Click Import.
5. On the Matrix Step Import screen, click Add New Sheet.
6. Enter a description in the Description box.
7. Click the Browse button, navigate to the location of your file, and open the
file. For the import to run correctly, make sure that Row 1 in the spreadsheet is a heading row.
8. Click Run.
9. When the process is complete, click View Report to see the message “File
uploaded successfully.”
October 2014 22 Version 05.14.06.00.09
Import Lane Amounts
10. Click Back on the Import Excel Sheet screen.
11. On the Matrix Step Import screen, click Extract Data From Sheet.
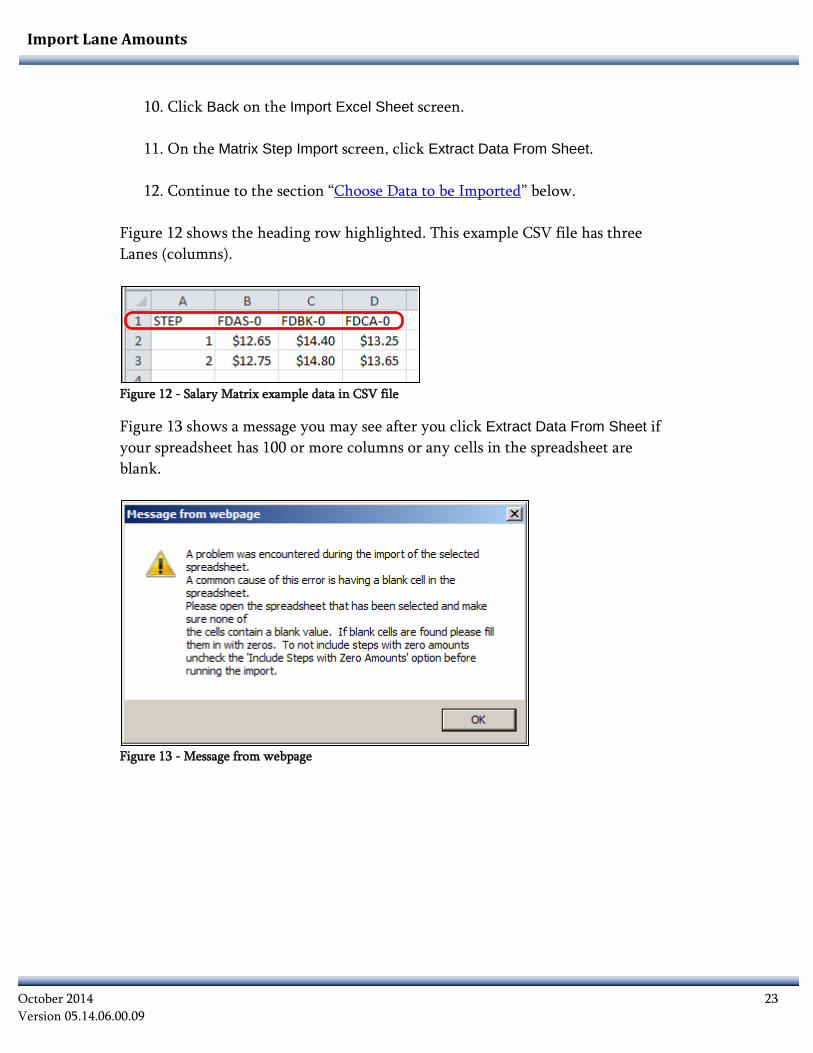
12. Continue to the section “Choose Data to be Imported” below. Figure 12 shows the heading row highlighted. This example CSV file has three Lanes (columns).
Figure 12 - Salary Matrix example data in CSV file
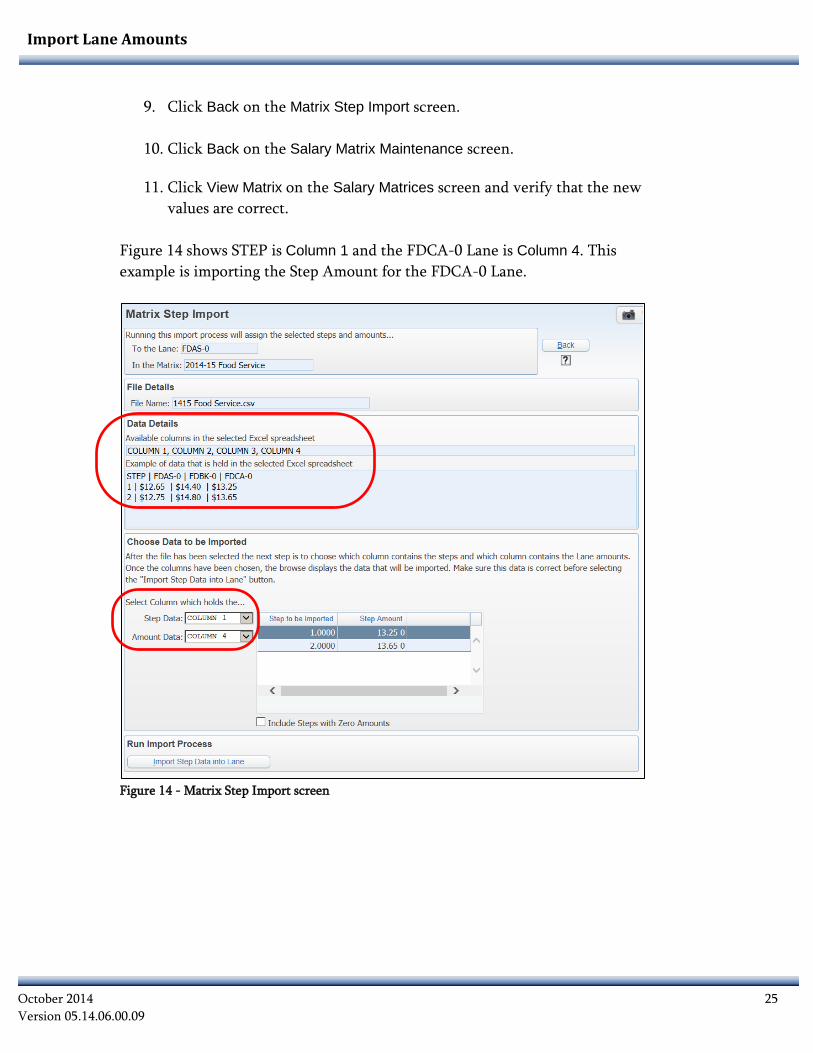
Figure 13 shows a message you may see after you click Extract Data From Sheet if your spreadsheet has 100 or more columns or any cells in the spreadsheet are blank.
Figure 13 - Message from webpage
October 2014 23 Version 05.14.06.00.09

Import Lane Amounts
Choose Data to be Imported After the data is extracted from the file, information is listed on the Matrix Step Import screen. Note Data from the selected CSV file should display in the Data Details
area of the Matrix Step Import screen. See (Figure 14) for an example. If you don’t see example data from your CSV file, return to the Matrix Step Import screen and delete your file. Review your CSV file and start over with Import Lane Amounts (page 22).
To choose data to be imported:
1. In the Step Data box, select Column 1 if your CSV file has the Steps in the first column.
2. In the Amount Data box, select the correct column for the Lane you are
importing amounts for.
3. Verify that you see what you expect in the Step to be imported and Step Amount columns (see the bottom of the screen in Figure 14 for an example).
4. Do one of the following:
If the information is what you expect to see, continue to step 5.
If you do not see the information you expect, click Back and start
the process again. To learn more about this process, see “Import Lane Amounts” (page 22).
5. Decide whether or not you need to select Include Steps with Zero Amounts
based on the information in your import file.
6. Click Import Step Data into Lane. A message appears asking if you want to continue.
7. Click OK.
8. When the data import process completes, click OK.
October 2014 24 Version 05.14.06.00.09
Import Lane Amounts
9. Click Back on the Matrix Step Import screen.
10. Click Back on the Salary Matrix Maintenance screen.
11. Click View Matrix on the Salary Matrices screen and verify that the new values are correct.
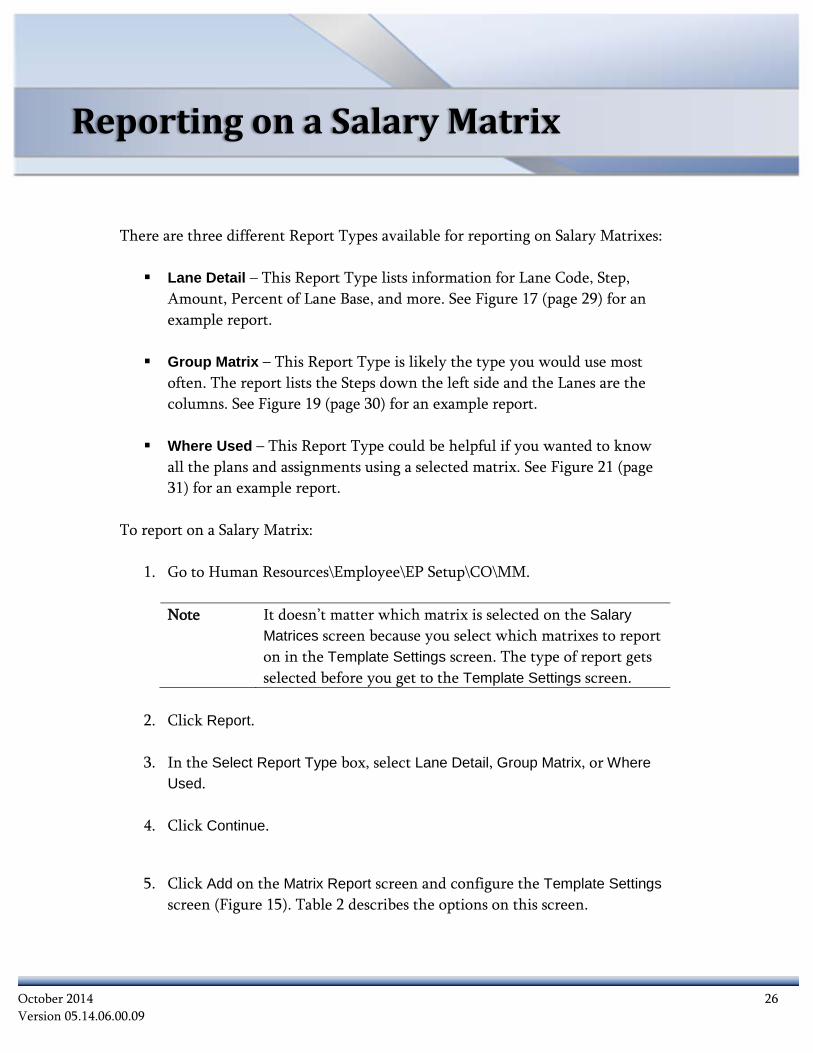
Figure 14 shows STEP is Column 1 and the FDCA-0 Lane is Column 4. This example is importing the Step Amount for the FDCA-0 Lane.
Figure 14 - Matrix Step Import screen
October 2014 25 Version 05.14.06.00.09
Reporting on a Salary Matrix
Reporting on a Salary Matrix
There are three different Report Types available for reporting on Salary Matrixes: Lane Detail – This Report Type lists information for Lane Code, Step,
Amount, Percent of Lane Base, and more. See Figure 17 (page 29) for an example report.
Group Matrix – This Report Type is likely the type you would use most
often. The report lists the Steps down the left side and the Lanes are the columns. See Figure 19 (page 30) for an example report.
Where Used – This Report Type could be helpful if you wanted to know
all the plans and assignments using a selected matrix. See Figure 21 (page 31) for an example report.
To report on a Salary Matrix:
1. Go to Human Resources\Employee\EP Setup\CO\MM.
Note It doesn’t matter which matrix is selected on the Salary Matrices screen because you select which matrixes to report on in the Template Settings screen. The type of report gets selected before you get to the Template Settings screen.
2. Click Report.
3. In the Select Report Type box, select Lane Detail, Group Matrix, or Where
Used.
4. Click Continue.
5. Click Add on the Matrix Report screen and configure the Template Settings screen (Figure 15). Table 2 describes the options on this screen.
October 2014 26 Version 05.14.06.00.09
Reporting on a Salary Matrix
6. Click Save and Print.
7. When the process is complete, click View Report.
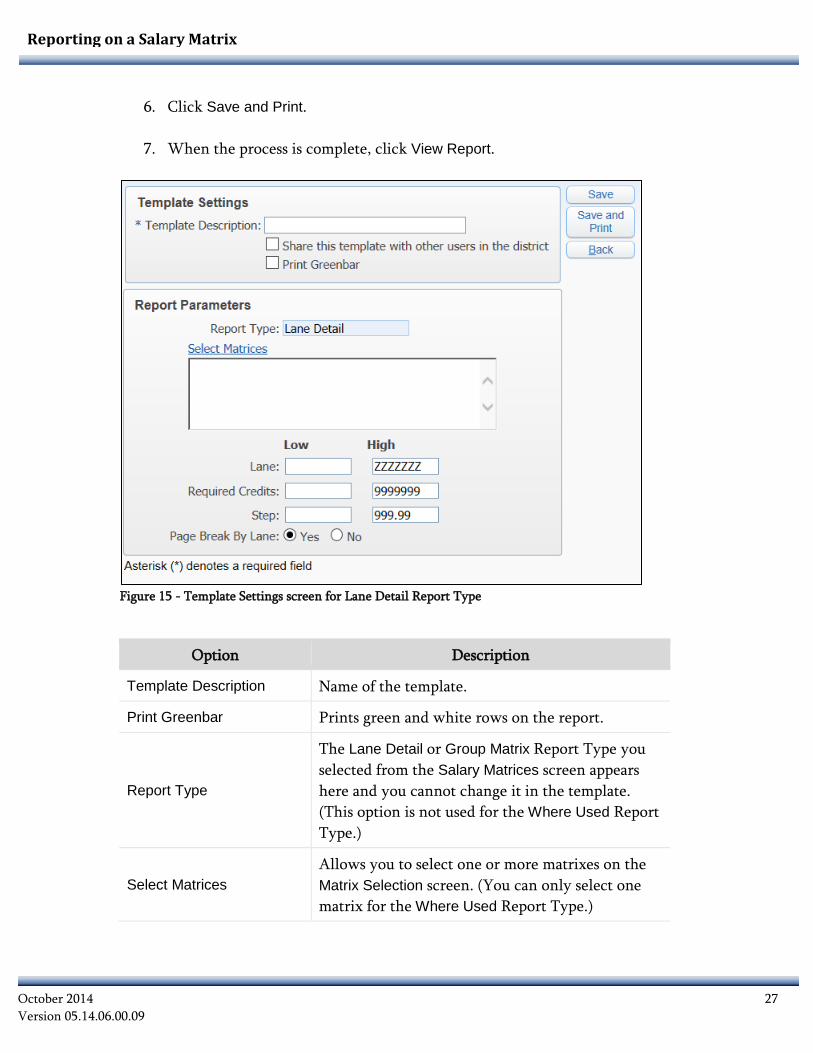
Figure 15 - Template Settings screen for Lane Detail Report Type
Option Description
Template Description Name of the template.
Print Greenbar Prints green and white rows on the report.
Report Type
The Lane Detail or Group Matrix Report Type you selected from the Salary Matrices screen appears here and you cannot change it in the template. (This option is not used for the Where Used Report Type.)
Select Matrices Allows you to select one or more matrixes on the Matrix Selection screen. (You can only select one matrix for the Where Used Report Type.)
October 2014 27 Version 05.14.06.00.09
Reporting on a Salary Matrix
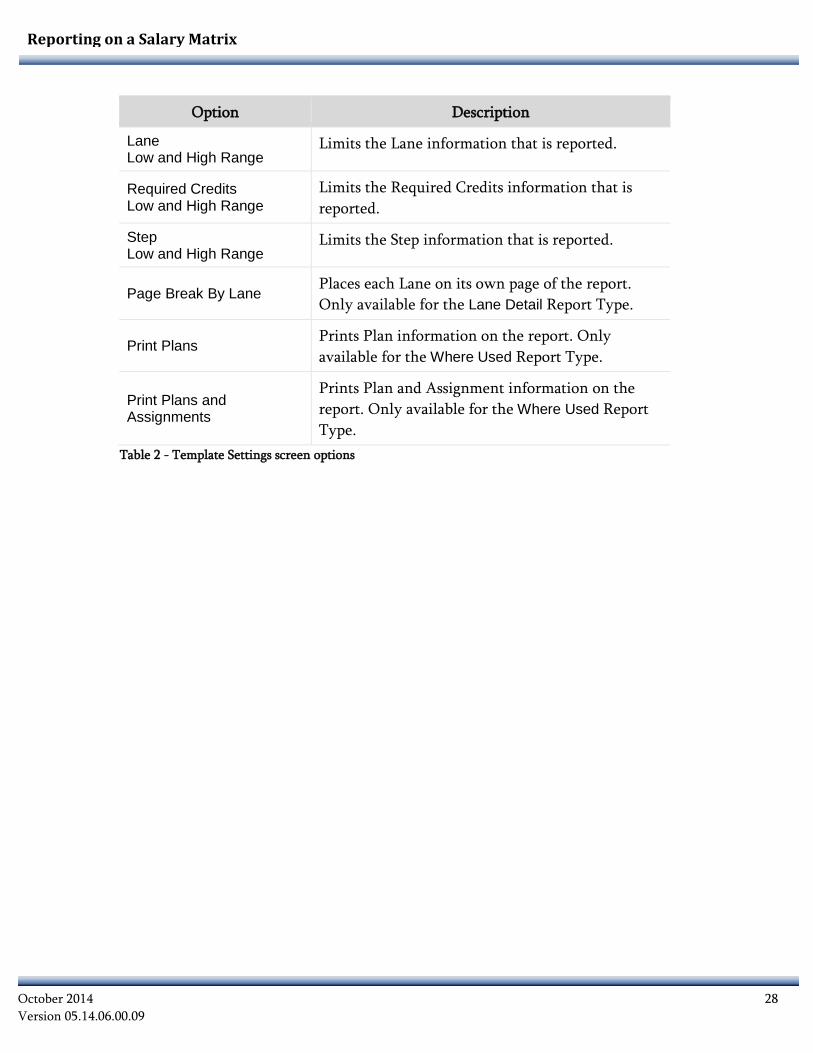
Option Description
Lane Low and High Range
Limits the Lane information that is reported.
Required Credits Low and High Range
Limits the Required Credits information that is reported.
Step Low and High Range
Limits the Step information that is reported.
Page Break By Lane Places each Lane on its own page of the report. Only available for the Lane Detail Report Type.
Print Plans Prints Plan information on the report. Only available for the Where Used Report Type.
Print Plans and Assignments
Prints Plan and Assignment information on the report. Only available for the Where Used Report Type.
Table 2 - Template Settings screen options
October 2014 28 Version 05.14.06.00.09
Reporting on a Salary Matrix
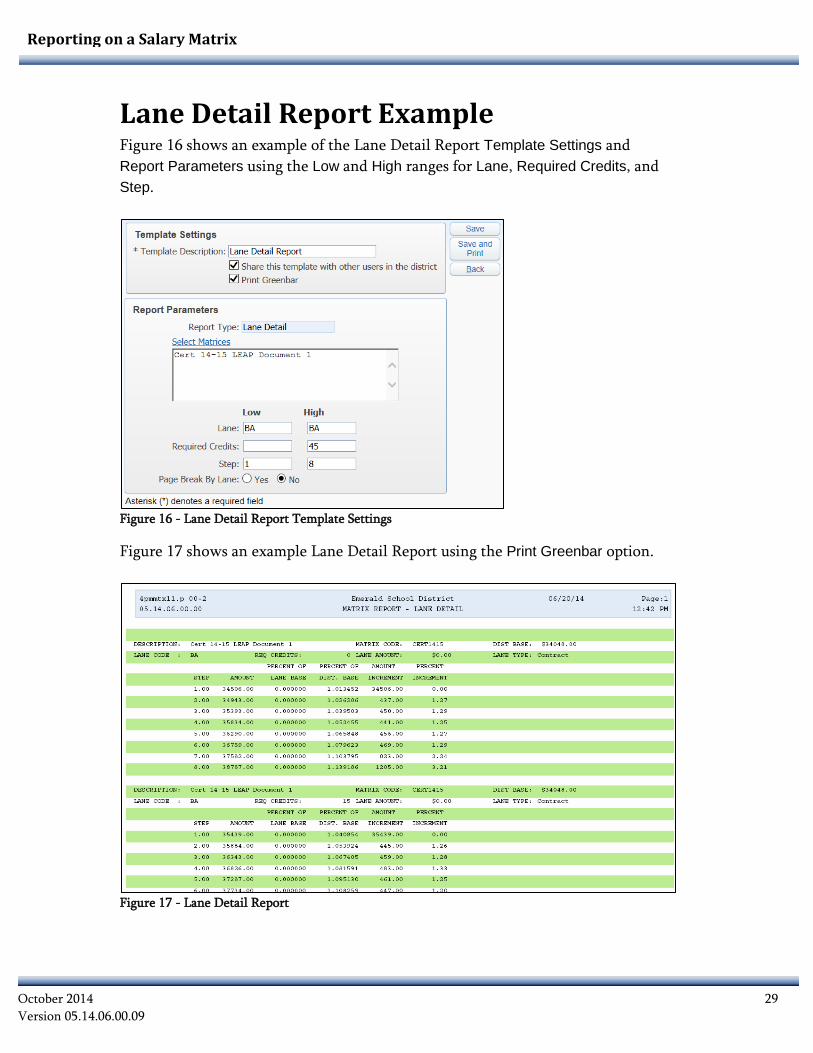
Lane Detail Report Example Figure 16 shows an example of the Lane Detail Report Template Settings and Report Parameters using the Low and High ranges for Lane, Required Credits, and Step.
Figure 16 - Lane Detail Report Template Settings
Figure 17 shows an example Lane Detail Report using the Print Greenbar option.
Figure 17 - Lane Detail Report
October 2014 29 Version 05.14.06.00.09
Reporting on a Salary Matrix
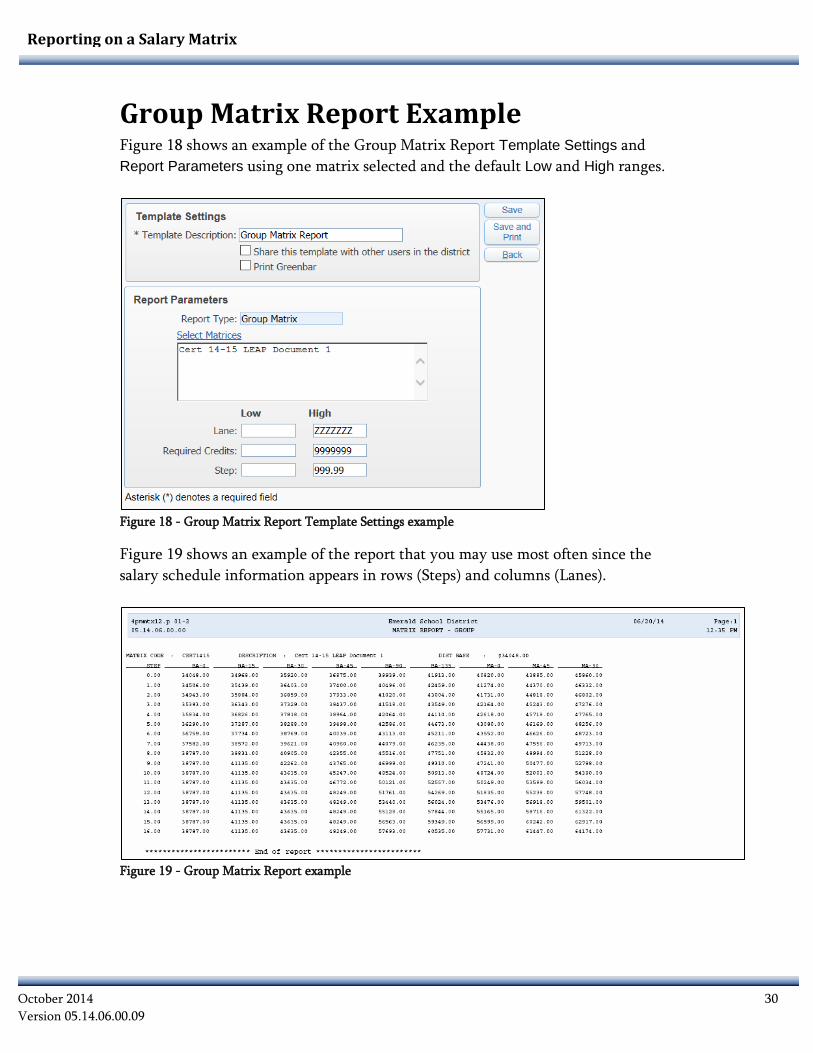
Group Matrix Report Example Figure 18 shows an example of the Group Matrix Report Template Settings and Report Parameters using one matrix selected and the default Low and High ranges.
Figure 18 - Group Matrix Report Template Settings example
Figure 19 shows an example of the report that you may use most often since the salary schedule information appears in rows (Steps) and columns (Lanes).
Figure 19 - Group Matrix Report example
October 2014 30 Version 05.14.06.00.09
Reporting on a Salary Matrix
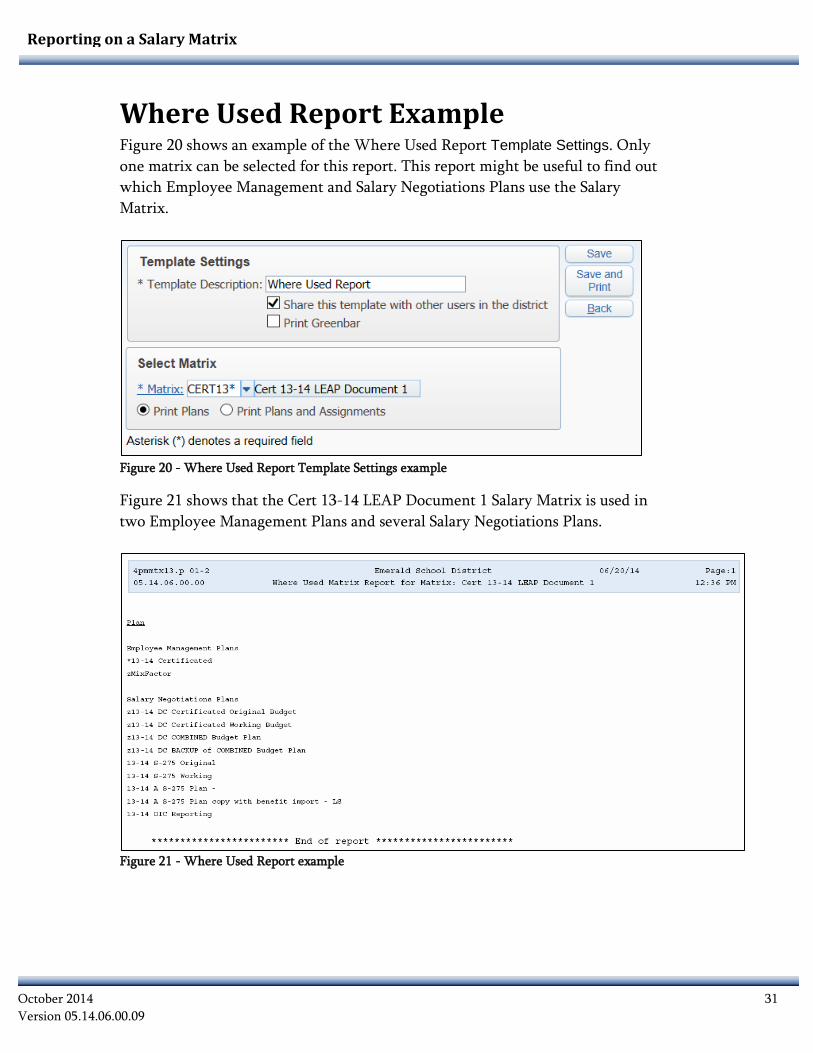
Where Used Report Example Figure 20 shows an example of the Where Used Report Template Settings. Only one matrix can be selected for this report. This report might be useful to find out which Employee Management and Salary Negotiations Plans use the Salary Matrix.
Figure 20 - Where Used Report Template Settings example
Figure 21 shows that the Cert 13-14 LEAP Document 1 Salary Matrix is used in two Employee Management Plans and several Salary Negotiations Plans.
Figure 21 - Where Used Report example
October 2014 31 Version 05.14.06.00.09
Appendix A – Frequently Asked Questions
Appendix A – Frequently Asked Questions
This section provides some questions and answers about Salary Matrixes in alphabetical order.
Can I delete a Salary Matrix from another Plan year? You can delete a Salary Matrix that is no longer in use on any Employee Management or Salary Negotiations Plan. See “Deleting a Salary Matrix” (page 20).
Do not delete a Salary Matrix that is still in use on Plans because you want to maintain the integrity of the historical data.
Can I import a new complete Salary Matrix? No, the software is not currently designed to allow the import of a complete Salary Matrix. The Import process is done for each Lane in a Salary Matrix. See “Import Lane Amounts” (page 22).
Can I update a Salary Matrix after I prepare my new Plans? Yes, you can update Salary Matrixes at a later date, such as following board approval of the new salary amounts. You can clone the current year Salary Matrixes to use in your new year Plans and continue working with your plans. After you have the board-approved salary amounts, you can edit your Salary Matrixes
To learn more about these options, see the following sections in this Guide:
“Clone an Existing Salary Matrix” (page 8)
“Editing a Salary Matrix” (page 15)
October 2014 32 Version 05.14.06.00.09
Appendix A – Frequently Asked Questions
Is there a way to mass add additional Steps to some Lanes in an existing Salary Matrix? No, there is not a mass add option to increase the number of Steps within a Lane or across multiple Lanes. You can edit an individual Lane and add individual Steps in an existing Salary Matrix.
How can I track who changed a Salary Matrix? You can run a report in the User Tracking area of Product Setup for the Menu Path and Program.
1. Go to Product Setup\Skyward Contact Access\UT.
2. On the right side of the screen, click User Tracking Report.
3. Click Add and configure the Template Settings screen in the following boxes only:
Template Description – Enter a title such as Matrix Master Changes
Menu Path – Enter WH\AD\EM\PS\CO\MM.
Program – Enter hemmgedit069.w.
4. Click Save and Print.
The report is a listing of any user who made a change (such as Edit or Clone) to a Salary Matrix.
October 2014 33 Version 05.14.06.00.09
Appendix A – Frequently Asked Questions
How do I fix a Salary Matrix that someone edited and saved changes to in error? You can clone from the incorrect Salary Matrix. See “Cloning Salary Matrixes” (page 6). Then you can edit the cloned-to Salary Matrix to change it back to the correct values. After you’ve made the necessary corrections, use the Position – Assignments Mass Change Utility (Human Resources\Employee Administration\EM Setup or SN Setup\UT\PA) to change Salary Matrix information in selected Plans.
How do I get the Lane Amounts listed on the Salary Matrix Maintenance screen to be the correct amounts? You may have cloned an existing Salary Matrix and updated the Steps, but the Lane Amount column on the Salary Matrix Maintenance screen does not reflect the correct values. See “Use the Step Amount Mass Change Process” (page 18) to update the Lane Amounts.
How do I update a Salary Matrix with new union settled wages? You need to add a new Salary Matrix for the new pay amounts. You do not want to change historical data that is using the current Salary Matrix (prior to settled wages). See “Adding a Salary Matrix” (page 11).
October 2014 34 Version 05.14.06.00.09


