Embed Size (px)
Citation preview

i
Training of health sta� in VIA, HPV detection test and cryotherapy
Trainees’ handbook
Cervical cancer screening and management of cervical pre-cancers

ii
Cervical cancer screening and management of cervical pre-cancers
Package contents• Training of health staff in VIA, HPV detection test and cryotherapy
Trainees’ handbook
Facilitators’ guide
• Training of health staff in colposcopy, LEEP and CKC
Trainees’ handbook
Facilitators’ guide
• Trainees’ handbook and facilitators’ guide
Programme managers' manual
• Trainees’ manual for community health workers
• Counselling cards
• Flip chart
• Teaching aids

iii
Contents
Foreword vii
Acknowledgements viii
Abbreviations ix
Section 1: General guidelines for training 1
1.1 How to use the handbook 2
1.2 Training objectives 2
1.3 Trainees’ profile 3
1.4 Training materials 5
1.5 Duration of training 5
1.6 Ground rules for trainees 5
1.7 Dos and don’ts for trainees 6
1.8 Minimum client practice by trainees 6
Section 2: Session plan 7
Section 3: Modules 21
1 Introduction to cervical cancer screening 22
1.1 Module overview 22
1.2 Module contents 22
1.3 Learning objectives 22
1.4 Key points for discussion 23
2 Anatomy and physiology of the female genital tract 31
2.1 Module overview 31
2.2 Module contents 31
2.3 Learning objectives 31
2.4 Key points for discussion 31
2.5 Group learning activities 37
3 Pathogenesis of cervical cancer with special reference to HPV infection 41
3.1 Module overview 41
3.2 Module contents 41

iv
3.3 Learning objectives 41
3.4 Key points for discussion 41
4 Counselling 48
4.1 Module overview 48
4.2 Module contents 48
4.3 Learning objectives 48
4.4 Key points for discussion 48
4.5 Group learning activities 51
4.6 Skill development 54
5 Screening by visual inspection with acetic acid (VIA) 61
5.1 Module overview 61
5.2 Module contents 61
5.3 Learning objectives 61
5.4 Key points for discussion 62
5.5 Group learning activities 69
5.6 Skill development 72
6 HPV detection test and cervical sample collection technique for HPV test 77
6.1 Module overview 77
6.2 Module contents 77
6.3 Learning objectives 77
6.4 Key points for discussion 77
6.5 Group learning activities 82
7 Management of women with positive VIA or HPV test 87
7.1 Module overview 87
7.2 Module contents 87
7.3 Learning objectives 87
7.4 Key points for discussion 87
7.5 Group learning activities 94
7.6 Skill development 133
8 Treatment of cervical pre-cancers by cryotherapy and follow-up 97
8.1 Module overview 97
8.2 Module contents 97

v
8.3 Learning objectives 97
8.4 Key points for discussion 98
8.5 Group learning activities 102
8.6 Skill development 106
9 Treatment of cervical pre-cancers by cold coagulation and follow-up 111
9.1 Module overview 111
9.2 Module contents 111
9.3 Learning objectives 111
9.4 Key points for discussion 112
9.5 Group learning activities 115
9.6 Skill development 119
10 Infection prevention practices 123
10.1 Module overview 123
10.2 Module contents 123
10.3 Learning objectives 123
10.4 Key points for discussion 123
10.5 Group learning activities 130
11 Ensuring quality of services and programme monitoring in cervical cancer screening 136
11.1 Module overview 136
11.2 Module contents 136
11.3 Learning objectives 136
11.4 Key points for discussion 137
Section 4: Annex 149
4.1 Trainees' feedback form 150
4.2 Sample informed consent form for VIA test 152
4.3 Sample informed consent form for cryotherapy 154
4.4 Sample VIA screening form 156
4.5 Reference chart for VIA 157

vi
vii
Foreword
Cervical cancer is the second most common cancer among women worldwide and causes a significant number of deaths in the South-East Asia Region. Nearly 200 000 new cases of cervical cancer occurred in SEA Region Member States in 2008, giving an incidence of almost 25 per 100 000 and a mortality rate of almost 14 per 100 000. Cervical cancer can be prevented by early screening and vaccination. However, due to poor access to screening and treatment services, the vast majority of these deaths occur in women from nine Member States of the South-East Asia Region which account for more than one third of the global burden of cervical cancer.
In 2015, the WHO Regional Office for South-East Asia, in consultation with Member States, launched a Strategic Framework for the Comprehensive Control of Cervical Cancer in the South-East Asia Region. To strengthen the
capacity of health-care providers, a training package has been developed based on the emerging scientific evidence related to new technologies and novel paradigms in cervical cancer screening and to the safety and efficacy of the vaccines.
A paradigm shift has taken place over the recent years in the understanding of the natural history of the disease, the preventive strategies, and the technologies associated with its early detection and treatment. The availability of effective and safe human papillomavirus (HPV) vaccine has introduced an entire new dimension to the prevention of the disease.
The South-East Asia Region is the first region of WHO to publish a training package on a comprehensive approach to cervical cancer screening and management of cervical pre-cancers. The training package provides strategies for a screen-and-treat programme building upon the existing evidence-based WHO global guidelines.
The training package is intended for programme managers, health-care providers and other professionals who have a responsibility for cervical cancer prevention, detection and treatment at the national and sub-national levels. There are eight separate modules for different target audiences including the facilitator’s guides.
I am convinced that the success of the Sustainable Development Goals and implementation of the Global Strategy on Women’s, Children’s and Adolescents’ Health will depend on strong commitment towards the ‘Survive, Thrive and Transform’ objectives for building healthy societies. This is our vision as we work together for stronger health systems, universal health coverage and scaling-up of life-saving interventions for comprehensive cervical cancer prevention and control. I would urge Member States to strengthen the capacity of health-care providers in the prevention and control of cervical cancer.
Dr. Poonam Khetrapal Singh Regional Director WHO South-East Asia Region
viii
Acknowledgements
The World Health Organization (WHO) would like to thank all experts, partners and reviewers involved in developing this training package on cervical cancer screening and management of pre-cancers. The enormous task of preparing the comprehensive package to train the complete spectrum of providers in a cervical cancer screening program could be completed successfully due to the contributions of several experts from Member States of the WHO South-East Asia Region.
The development of the training package was coordinated by the WHO Collaborating Centre for Human Reproduction at the Department of Obstetrics and Gynaecology, Post-Graduate Institute of Medical Education & Research (PGIMER), Chandigarh, India, under the leadership of Professor Lakhbir Dhaliwal and Professor Vanita Suri, along with team members Professor Rashmi Bagga, Dr Rakhi and Dr Parul. Inputs from consultants who worked on the project, Dr Partha Basu, Screening Group, International Agency for Research on Cancer (WHO), France, and Dr Srabani Mittal, Child in Need Institute, India, were critical.
WHO would like to thank the following experts who contributed and provided technical support to the development and finalization of this publication – Dr Ashrafun Nessa, Bangladesh; Dr Ugyen Tshomo, Bhutan; Dr Suchitra Pandit, Dr Neerja Bhatla, Dr Jerard Maria Selvam, Dr Shuchi Jain, India; Dr Prof Mya Thida, Dr Theingi Myint, Myanmar; Dr Kiran Regmi, Dr Sarita Ghimere, Nepal; Dr Nethanjali Mapitigama, Sri Lanka; Dr Prof. Somchai Niruthisard, Thailand; Dr Abhijeet Pathak, IPPF, India; Dr Rashmi Asif and Dr Geeta Chibber, Jhpiego (an affiliate of Johns Hopkins University), India; Dr Sharad Singh, Population Services International, India; Dr Anchita Patil, UNFPA, India.
Technical support in finalization of this package was provided by Dr Arvind Mathur, Dr Neena Raina, Dr Anoma Jayathilaka, Dr Priya Karna, WHO Regional Office for South-East Asia, New Delhi, India.
The pictures have been taken from IARC and reproduced with permission from IARC.
ix
AbbreviationsAIS adenocarcinoma in situ
CA cancer
C4GEP Comprehensive Cervical Cancer Control: A Guide to Essential Practice
CIN cervical intraepithelial neoplasia
CKC cold knife conization
CTZ congenital transformation zone
DNA deoxyribonucleic acid
HBV hepatitis B virus
HC2 hybrid capture 2
HIV human immunodeficiency virus
HLD high-level disinfection
HPV human papillomavirus
HSIL high-grade squamous intraepithelial lesion
HSV herpes simplex virus
IARC International Agency for Research on Cancer
IUCD intrauterine contraceptive device
LBC liquid based cytology
LEEP loop electrosurgical excision procedure
LMIC low and middle-income countries
LMP last menstrual period
LSIL low grade squamous intraepithelial lesion
N2O nitrous oxide
PID pelvic inflammatory disease
QA quality assurance
QC quality control
RNA ribonucleic acid
SCJ squamocolumnar junction
SEAR South-East Asia Region
SVA single visit approach
TZ transformation zone
VIA visual inspection with acetic acid
VILI visual inspection with Lugol’s iodine
WHO World Health Organization

1
Section 1: General guidelines for training
2
1.1 How to use the handbookThe Trainees’ handbook is designed for paramedical workers, midwives, nurses and clinicians involved in cervical cancer screening to help them acquire the necessary skills to perform VIA, collect samples for HPV test and treat cervical pre-cancers by ablative methods. The publication of the World Health Organization guidance document Comprehensive cervical cancer control: A guide to essential practice, 2nd edition, 2014 has necessitated modifications in the existing training resources for cervical cancer screening and treatment. The new screening recommendations and management algorithms have been incorporated in the present Trainees’ handbook.
The Trainees’ handbook contains guidelines and information intended to be used both by trainees and facilitators while participating in the structured training on cervical cancer screening and treatment. The handbook contains different modules to assist trainees to learn various screening and treatment procedures step- by-step and to comprehend their underlying principles. The modules contain checklists that serve as ready reckoners to develop skills in various procedures during clinical sessions. These checklists are also intended to be used by trainees during their post-training practice.
The structure and methodology of the training have been designed to impart knowledge in the most effective manner and have taken into consideration the overall training objectives, profiles of trainees and the expected learning outcomes. For further information on individual modules, trainees should refer to the corresponding chapter and the practice sheets in the Comprehensive cervical cancer control: A guide to essential practice (C4GEP), 2nd edition, available online from http://apps.who.int/iris/bitstrem/10665/144785/1/9789241548953_eng.pdf. Henceforth, the book will be referred to as the WHO Guidance book.
1.2 Training objectivesThe training on Cervical Cancer Screening and Management of Cervical Pre-cancers aims to enhance the knowledge and skills of paramedical workers, midwives, nurses and clinicians involved in various activities related to cervical cancer screening, early detection and treatment at different tiers of the health system.
After completion of the training, trainees will be able to:
• counsel women before and after cervical cancer screening;
• screen women using VIA and HPV detection test;
• make decisions related to treatment and/or referral of women with pre-cancers of cervix;
• treat pre-cancers of the cervix by ablative methods.
The objectives include both knowledge enhancement and skill development.
Knowledge-based objectives
By the end of the training, trainees will be able to:
• describe the concept of screening for cervical cancer, the necessity, basic principles and different components of the programme;
3
• describe the anatomy and physiology of female genital organs in relation to cervical cancer screening;
• explain the natural history of cervical neoplasia and causal role of HPV infection;
• describe VIA principles, techniques, interpretation of test results;
• explain the management algorithms of VIA positive women;
• describe the HPV test–sample collection and interpretation of results;
• explain the management algorithms for women positive on HPV test results;
• explain principles and techniques of cryotherapy and cold coagulation;
• describe infection prevention practices;
• describe how to ensure quality parameters at each level of services;
• discuss how to maintain a referral system;
• describe record keeping and data management.
Skill-based objectives
By the end of the training, trainees will be able to:
• demonstrate counselling of women for VIA/HPV test;
• perform VIA step-by-step;
• collect cervical samples for HPV testing;
• perform cryotherapy or cold coagulation as appropriate;
• manage women with procedure-related complications;
• conduct follow-up of the women after treatment;
• follow appropriate infection prevention practices;
• provide quality services as per the standard operating procedures.
1.3 Trainees’ pro�le The paramedical workers, midwives, nurses and clinicians designated by the health authorities at the national or the sub-national levels to provide cervical cancer screening services need to be trained. It is preferable that trainees should have the basic knowledge and skills of performing female pelvic examinations.
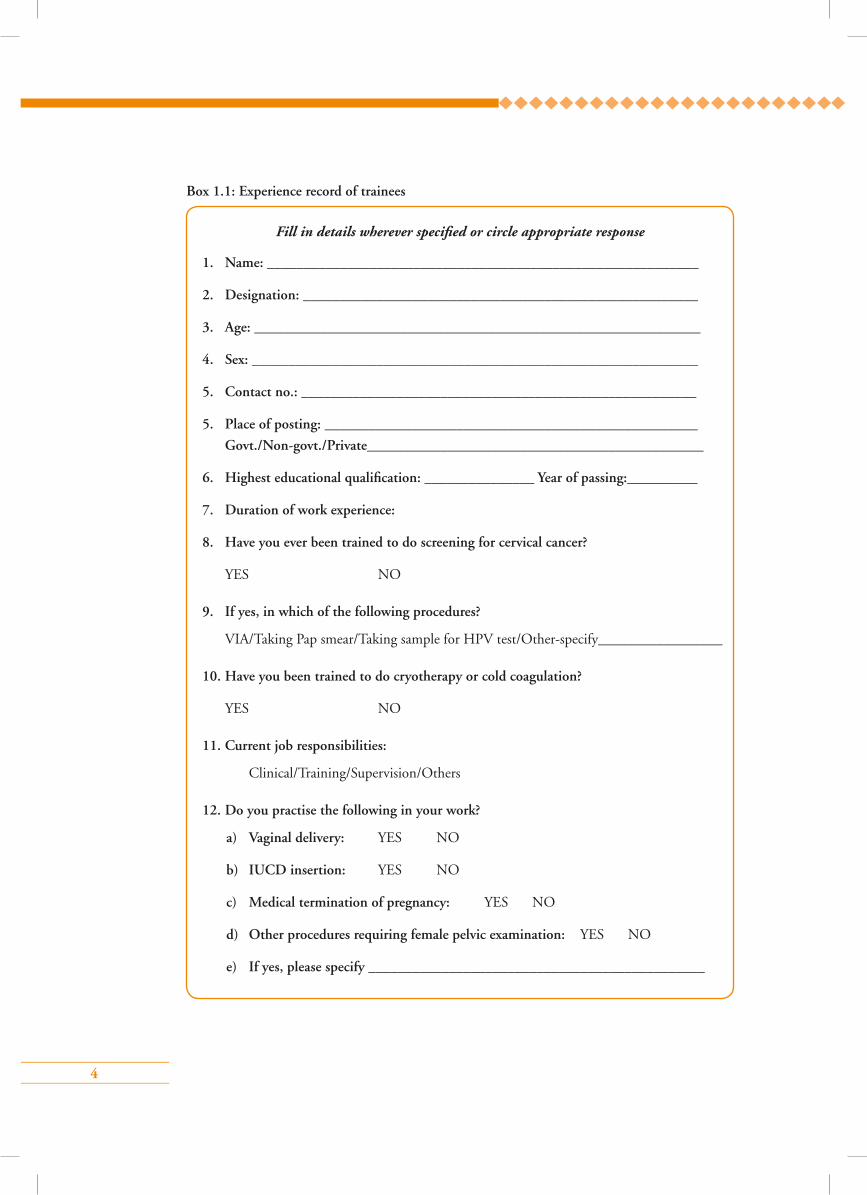
Each trainee has to fill in the experience record (Box 1.1) prior to initiation of the training to help facilitators understand their background and job experience.
4
Box 1.1: Experience record of trainees
Fill in details wherever specified or circle appropriate response
1. Name: ___________________________________________________________
2. Designation: ______________________________________________________
3. Age: _____________________________________________________________
4. Sex: _____________________________________________________________
5. Contact no.: ______________________________________________________
5. Place of posting: ___________________________________________________
Govt./Non-govt./Private______________________________________________
6. Highest educational qualification: _______________ Year of passing:__________
7. Duration of work experience:
8. Have you ever been trained to do screening for cervical cancer?
YES NO
9. If yes, in which of the following procedures?
VIA/Taking Pap smear/Taking sample for HPV test/Other-specify_________________
10. Have you been trained to do cryotherapy or cold coagulation?
YES NO
11. Current job responsibilities:
Clinical/Training/Supervision/Others
12. Do you practise the following in your work?
a) Vaginal delivery: YES NO
b) IUCD insertion: YES NO
c) Medical termination of pregnancy: YES NO
d) Other procedures requiring female pelvic examination: YES NO
e) If yes, please specify ______________________________________________
5
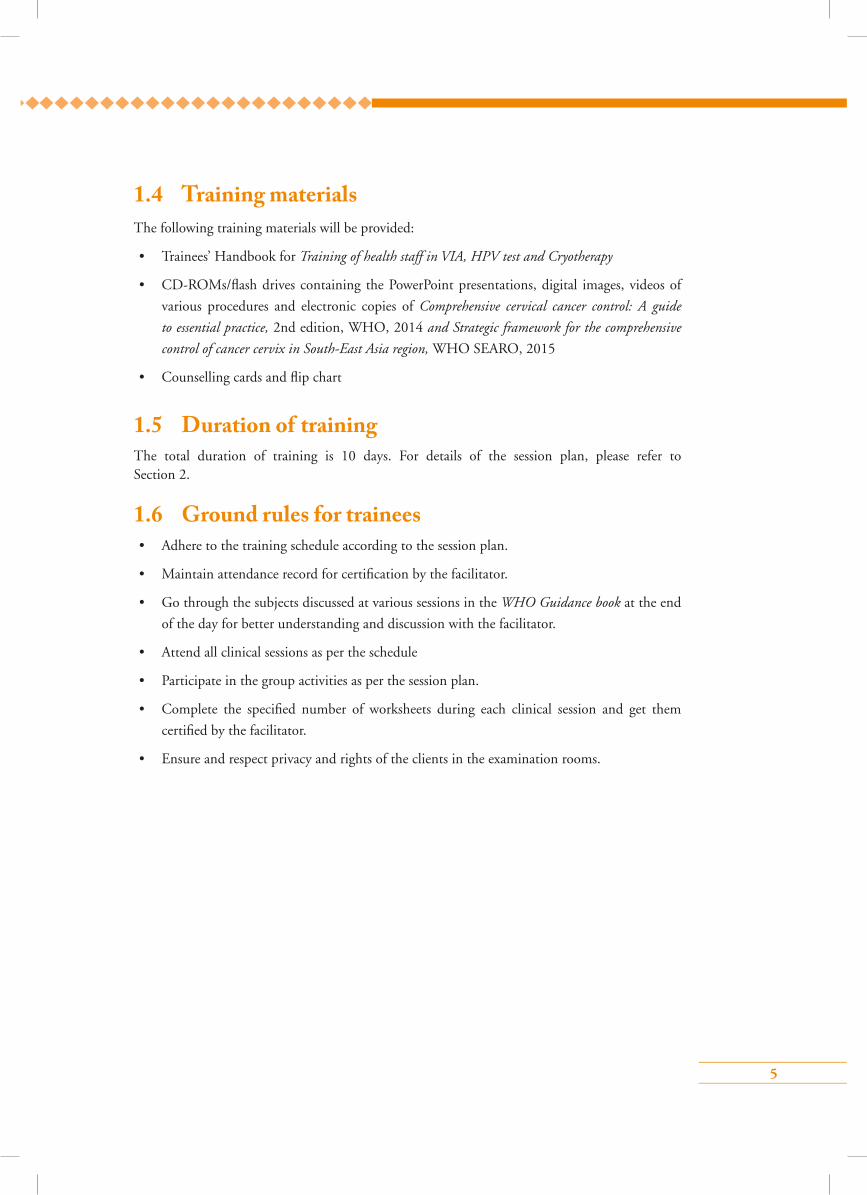
1.4 Training materialsThe following training materials will be provided:
• Trainees’ Handbook for Training of health staff in VIA, HPV test and Cryotherapy
• CD-ROMs/flash drives containing the PowerPoint presentations, digital images, videos of
various procedures and electronic copies of Comprehensive cervical cancer control: A guide
to essential practice, 2nd edition, WHO, 2014 and Strategic framework for the comprehensive
control of cancer cervix in South-East Asia region, WHO SEARO, 2015
• Counselling cards and flip chart
1.5 Duration of trainingThe total duration of training is 10 days. For details of the session plan, please refer to Section 2.
1.6 Ground rules for trainees• Adhere to the training schedule according to the session plan.
• Maintain attendance record for certification by the facilitator.
• Go through the subjects discussed at various sessions in the WHO Guidance book at the end
of the day for better understanding and discussion with the facilitator.
• Attend all clinical sessions as per the schedule
• Participate in the group activities as per the session plan.
• Complete the specified number of worksheets during each clinical session and get them
certified by the facilitator.
• Ensure and respect privacy and rights of the clients in the examination rooms.
6
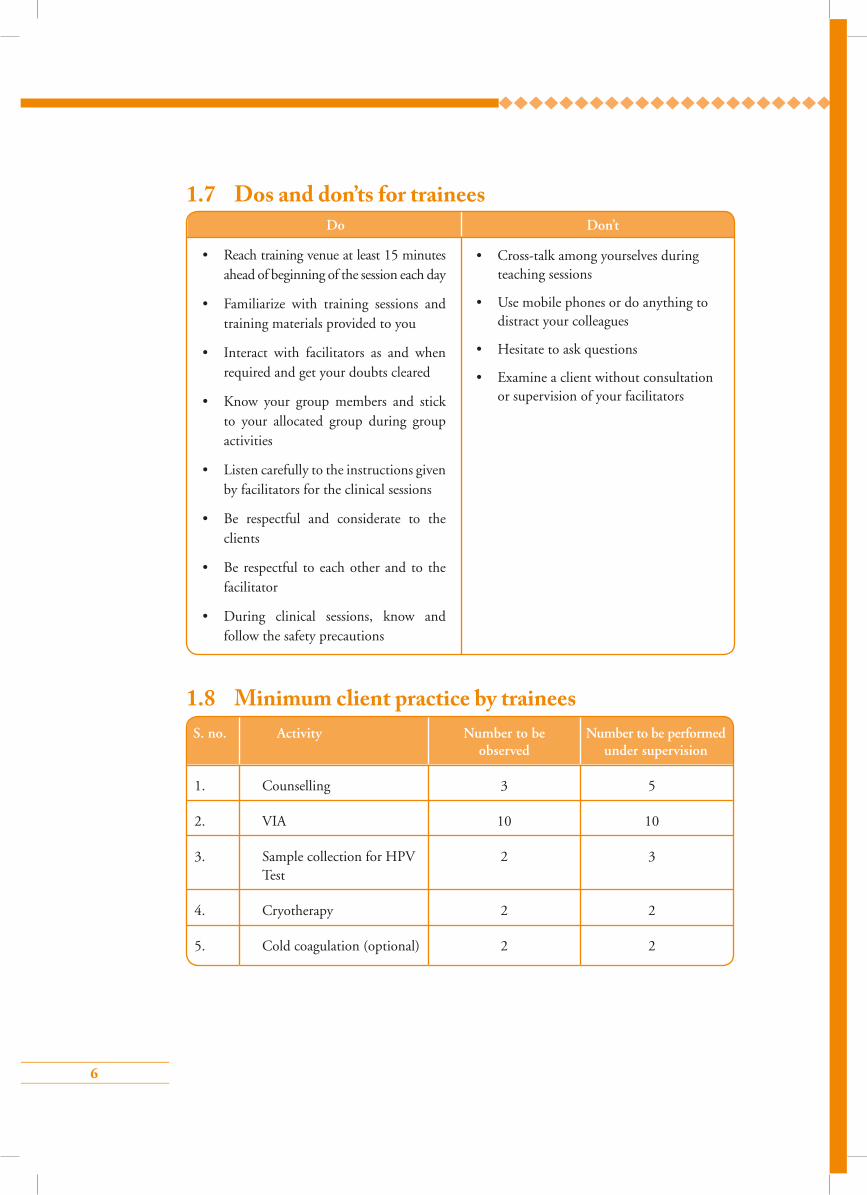
1.8 Minimum client practice by trainees
1.7 Dos and don’ts for trainees
• Reach training venue at least 15 minutes ahead of beginning of the session each day
• Familiarize with training sessions and training materials provided to you
• Interact with facilitators as and when required and get your doubts cleared
• Know your group members and stick to your allocated group during group activities
• Listen carefully to the instructions given by facilitators for the clinical sessions
• Be respectful and considerate to the clients
• Be respectful to each other and to the facilitator
• During clinical sessions, know and follow the safety precautions
•Cross-talk among yourselves during teaching sessions
•Use mobile phones or do anything to distract your colleagues
•Hesitate to ask questions
•Examine a client without consultation or supervision of your facilitators
Do Don’t
S. no. Activity Number to be Number to be performed observed under supervision
1. Counselling 3 5
2. VIA 10 10
3. Sample collection for HPV 2 3 Test
4. Cryotherapy 2 2
5. Cold coagulation (optional) 2 2

7
Section 2: Session plan
8
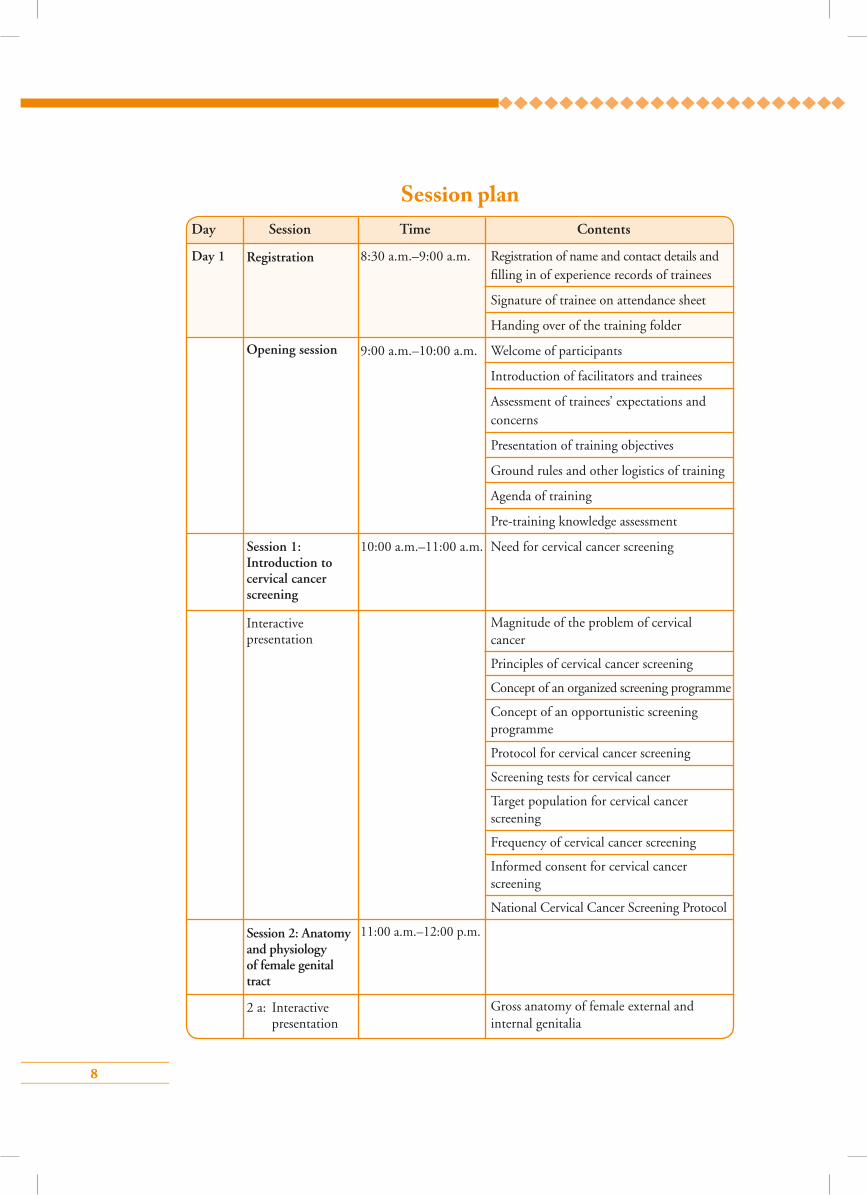
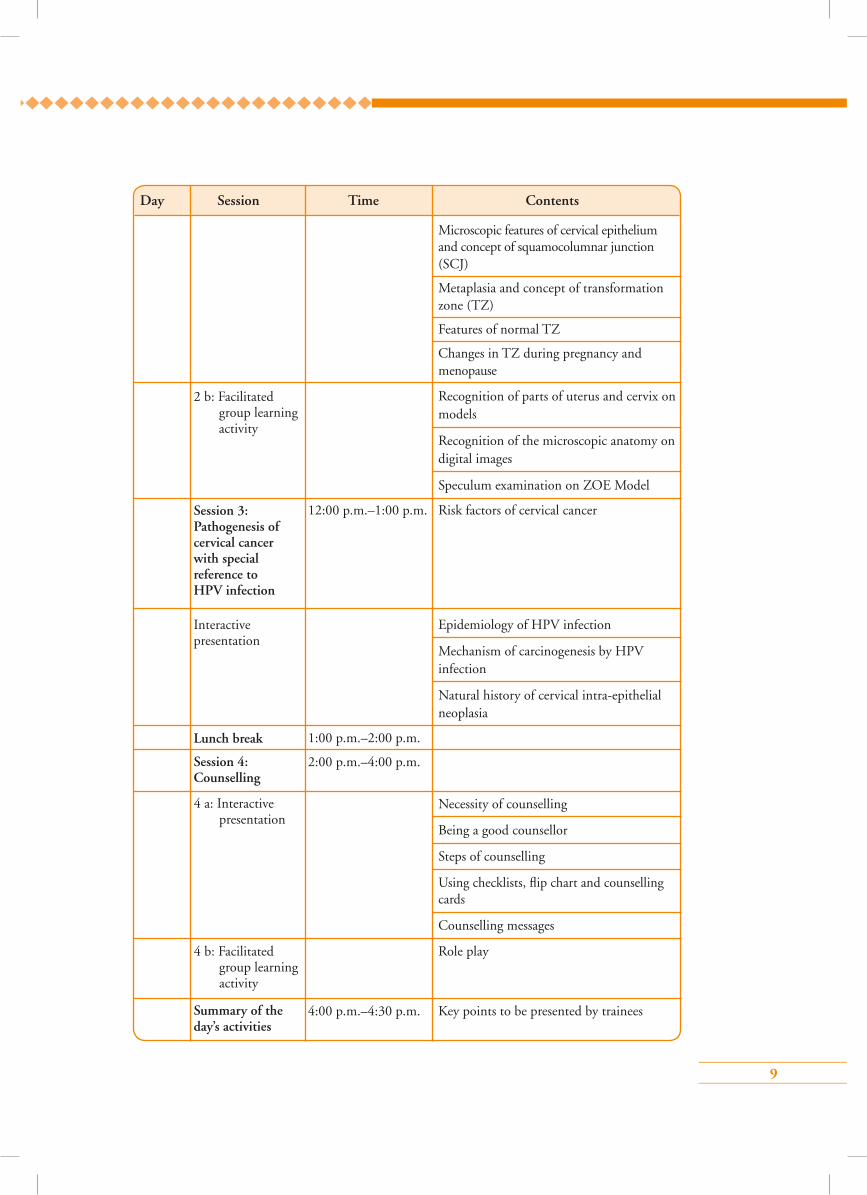
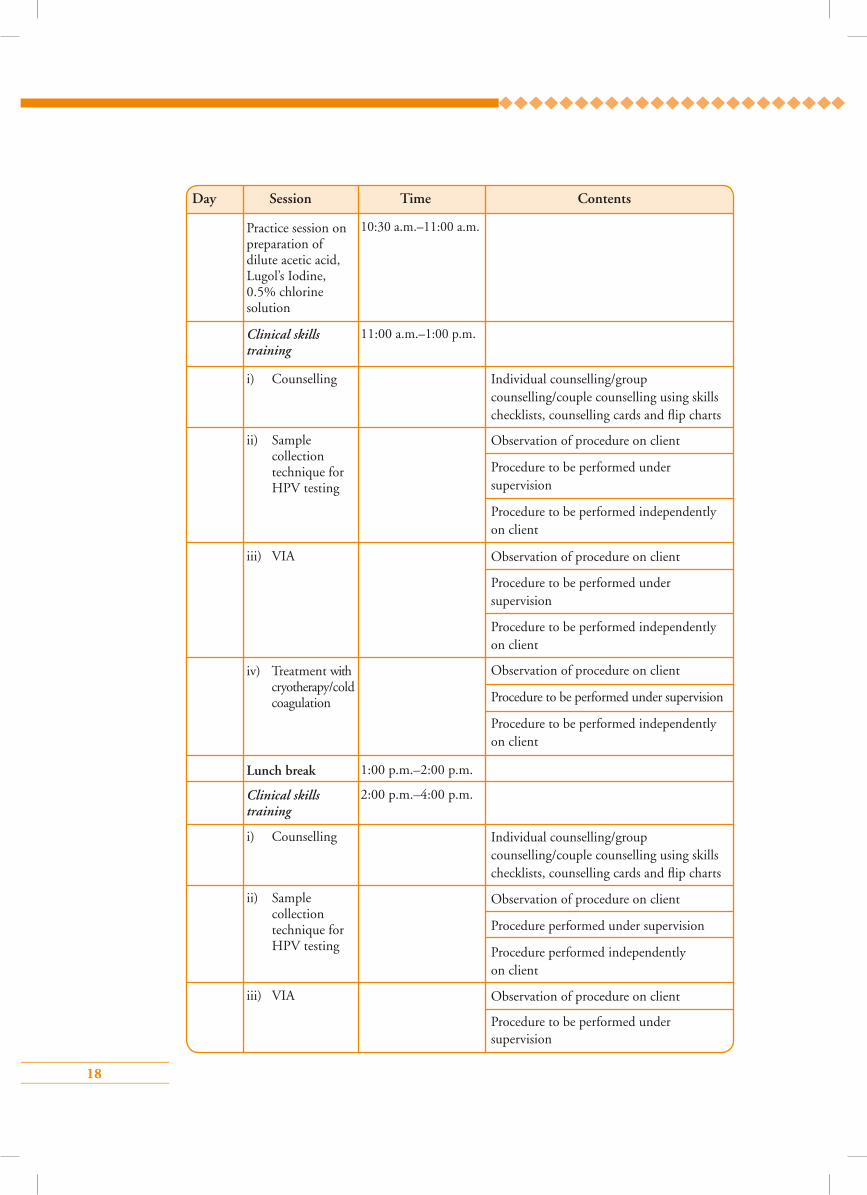
Session planDay Session Time Contents
Day 1 8:30 a.m.–9:00 a.m. Registration of name and contact details and filling in of experience records of trainees
Signature of trainee on attendance sheet
Handing over of the training folder
9:00 a.m.–10:00 a.m. Welcome of participants
Introduction of facilitators and trainees
Assessment of trainees’ expectations and concerns
Presentation of training objectives
Ground rules and other logistics of training
Agenda of training
Pre-training knowledge assessment
10:00 a.m.–11:00 a.m. Need for cervical cancer screening
Magnitude of the problem of cervical cancer
Principles of cervical cancer screening
Concept of an organized screening programme
Concept of an opportunistic screening programme
Protocol for cervical cancer screening
Screening tests for cervical cancer
Target population for cervical cancer screening
Frequency of cervical cancer screening
Informed consent for cervical cancer screening
National Cervical Cancer Screening Protocol
11:00 a.m.–12:00 p.m.
Gross anatomy of female external and internal genitalia
Registration
Opening session
2 a: Interactive presentation
Session 1: Introduction to cervical cancer screening
Session 2: Anatomy and physiology of female genital tract
Interactive presentation
9
Microscopic features of cervical epithelium and concept of squamocolumnar junction (SCJ)
Metaplasia and concept of transformation zone (TZ)
Features of normal TZ
Changes in TZ during pregnancy and menopause
Recognition of parts of uterus and cervix on models
Recognition of the microscopic anatomy on digital images
Speculum examination on ZOE Model
12:00 p.m.–1:00 p.m. Risk factors of cervical cancer
Epidemiology of HPV infection
Mechanism of carcinogenesis by HPV infection
Natural history of cervical intra-epithelial neoplasia
1:00 p.m.–2:00 p.m.
2:00 p.m.–4:00 p.m.
Necessity of counselling
Being a good counsellor
Steps of counselling
Using checklists, flip chart and counselling cards
Counselling messages
Role play
4:00 p.m.–4:30 p.m. Key points to be presented by trainees
Day Session Time Contents
Interactive presentation
2 b: Facilitated group learning activity
4 a: Interactive presentation
Session 3: Pathogenesis of cervical cancer with special reference to HPV infection
Lunch break
Session 4: Counselling
Summary of the day’s activities
4 b: Facilitated group learning activity

10
Day Session Time Contents
4:30 p.m.–5:00 p.m. Discussion to be led by the facilitator
Day 2 9:00 a.m.–9:30 a.m. Presentation of key-points by trainees
Discussion to be led by facilitators for doubt clearance
9:30 a.m.–11:00 a.m.
Principles of VIA
Equipment/Instruments required
Consumables required
Steps of VIA
VIA test outcome categories
Documentation of VIA findings
Common benign conditions of cervix detected at VIA
Common lower genital tract infections detected before VIA
Post-VIA tasks and follow-up
Image recognition skill (flash cards/digital images)
11:00 a.m.–12:00 p.m.
Types of HPV detection tests
Equipment/Instruments required
Consumables required
Steps of cervical sample collection
Sample transportation and storage
Interpretation of test results
Review of the previous day’s activities and doubt clearance
Session 5: Screening by visual inspection using acetic acid (VIA)
Session 6: HPV detection test and cervical sample collection technique for HPV test
5 a: Interactive presentation
5 b: Facilitated group learning activity
6 a: Interactive presentation
Discussion of the next day’s agenda
11
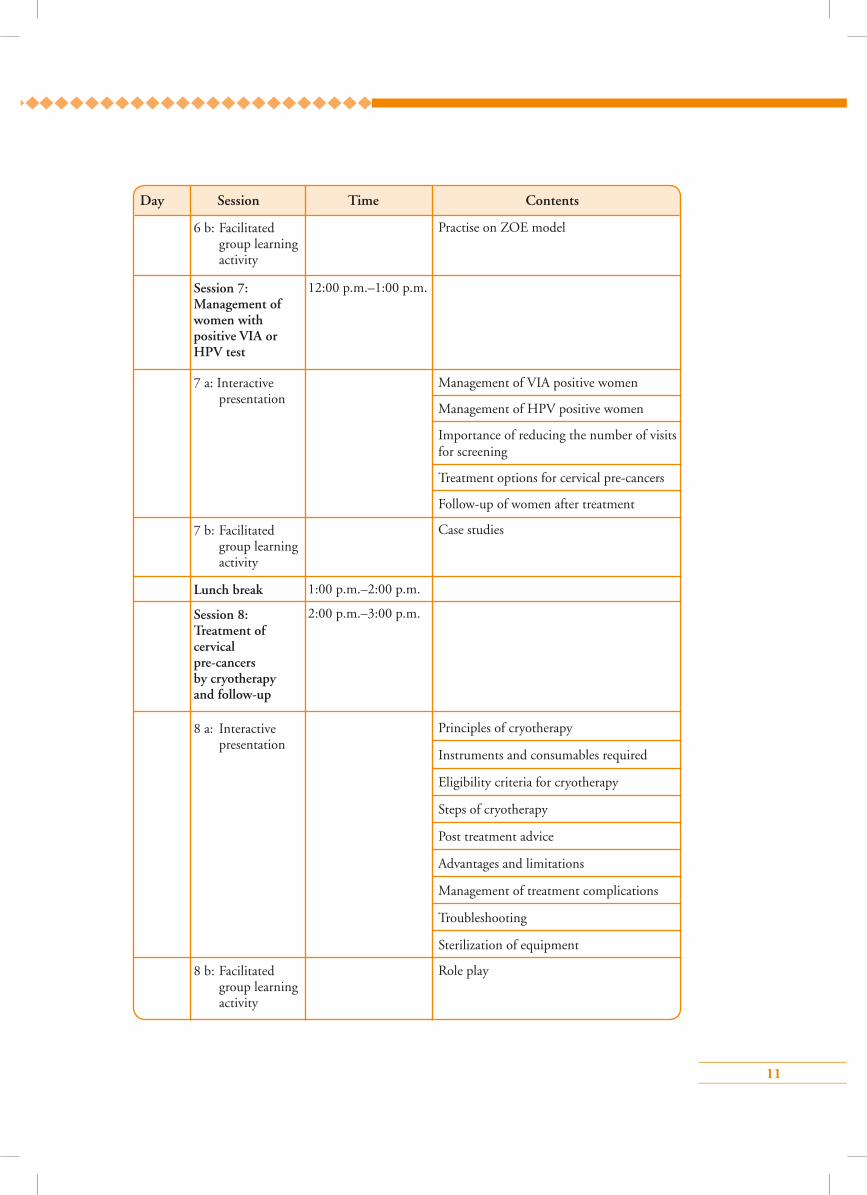
Practise on ZOE model
12:00 p.m.–1:00 p.m.
Management of VIA positive women
Management of HPV positive women
Importance of reducing the number of visits for screening
Treatment options for cervical pre-cancers
Follow-up of women after treatment
Case studies
1:00 p.m.–2:00 p.m.
2:00 p.m.–3:00 p.m.
Principles of cryotherapy
Instruments and consumables required
Eligibility criteria for cryotherapy
Steps of cryotherapy
Post treatment advice
Advantages and limitations
Management of treatment complications
Troubleshooting
Sterilization of equipment
Role play
Day Session Time Contents
Session 7: Management of women with positive VIA or HPV test
Lunch break
Session 8: Treatment of cervical pre-cancers by cryotherapy and follow-up
6 b: Facilitated group learning activity
7 a: Interactive presentation
7 b: Facilitated group learning activity
8 a: Interactive presentation
8 b: Facilitated group learning activity
12
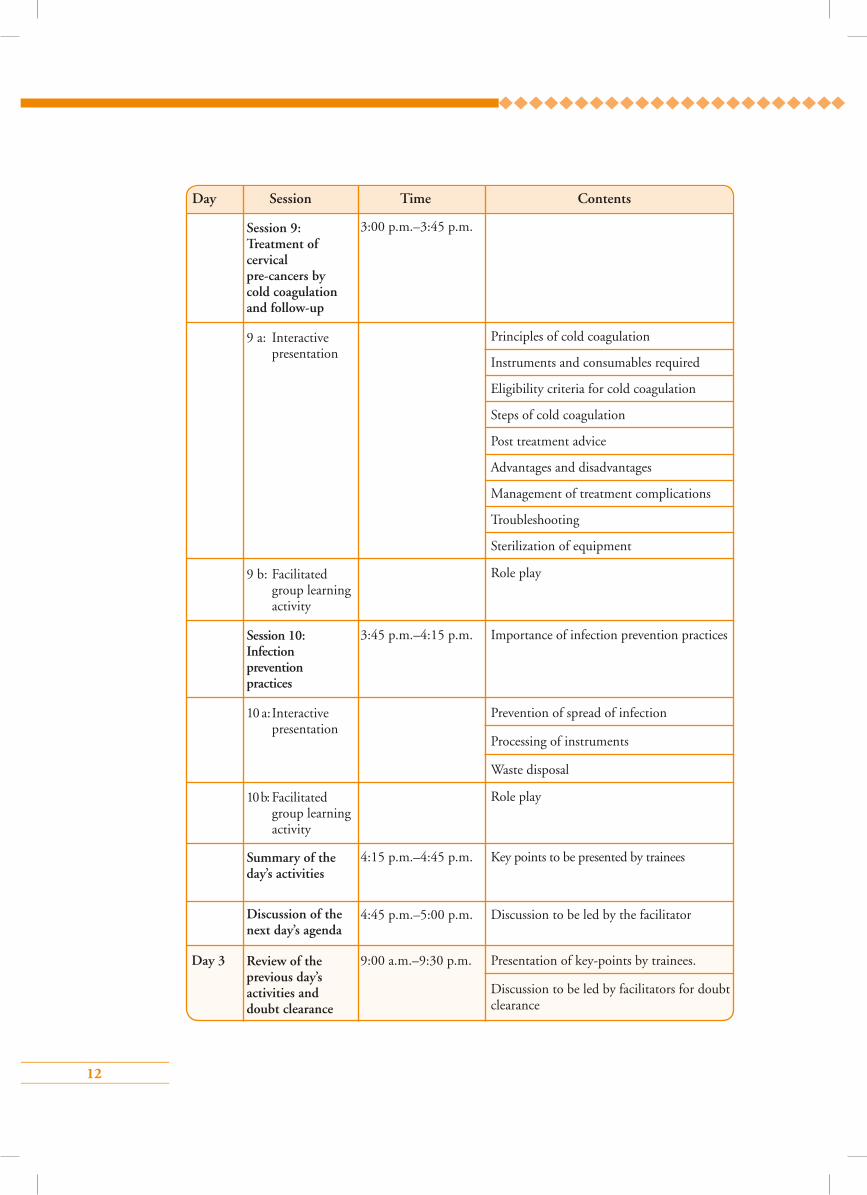
3:00 p.m.–3:45 p.m.
Principles of cold coagulation
Instruments and consumables required
Eligibility criteria for cold coagulation
Steps of cold coagulation
Post treatment advice
Advantages and disadvantages
Management of treatment complications
Troubleshooting
Sterilization of equipment
Role play
3:45 p.m.–4:15 p.m. Importance of infection prevention practices
Prevention of spread of infection
Processing of instruments
Waste disposal
Role play
4:15 p.m.–4:45 p.m. Key points to be presented by trainees
4:45 p.m.–5:00 p.m. Discussion to be led by the facilitator
Day 3 9:00 a.m.–9:30 p.m. Presentation of key-points by trainees.
Discussion to be led by facilitators for doubt clearance
Day Session Time Contents
9 a: Interactive presentation
9 b: Facilitated group learning activity
10 a: Interactive presentation
10 b: Facilitated group learning activity
Session 10: Infection prevention practices
Summary of the day’s activities
Discussion of the next day’s agenda
Review of the previous day’s activities and doubt clearance
Session 9: Treatment of cervical pre-cancers by cold coagulation and follow-up
13
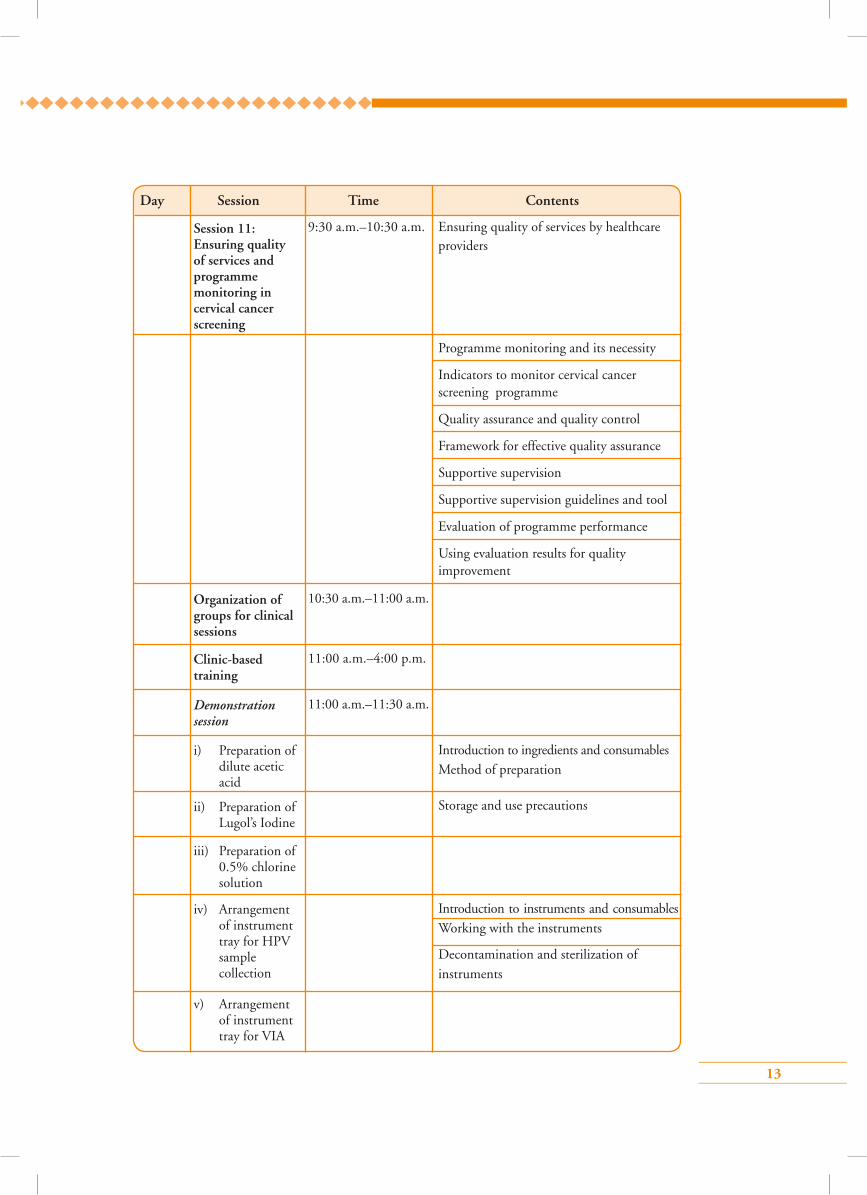
9:30 a.m.–10:30 a.m. Ensuring quality of services by healthcare providers
Programme monitoring and its necessity
Indicators to monitor cervical cancer screening programme
Quality assurance and quality control
Framework for effective quality assurance
Supportive supervision
Supportive supervision guidelines and tool
Evaluation of programme performance
Using evaluation results for quality improvement
10:30 a.m.–11:00 a.m.
11:00 a.m.–4:00 p.m.
11:00 a.m.–11:30 a.m.
Introduction to ingredients and consumables
Method of preparation
Storage and use precautions
Introduction to instruments and consumables
Working with the instruments
Decontamination and sterilization of
instruments
Day Session Time Contents
i) Preparation of dilute acetic acid
ii) Preparation of Lugol’s Iodine
iii) Preparation of 0.5% chlorine solution
Organization of groups for clinical sessions
Clinic-based training
Demonstration session
iv) Arrangement of instrument tray for HPV sample collection
v) Arrangement of instrument tray for VIA
Session 11: Ensuring quality of services and programme monitoring in cervical cancer screening
14
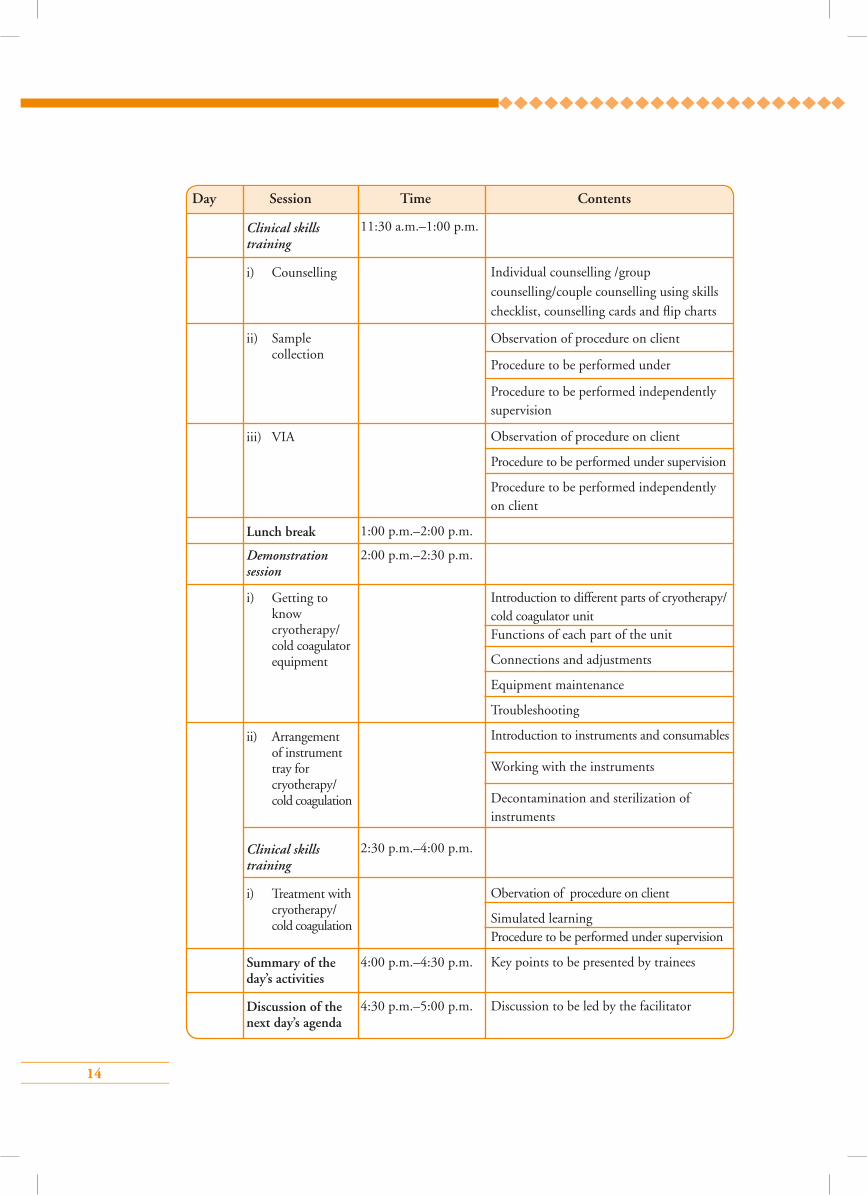
11:30 a.m.–1:00 p.m.
Individual counselling /group
counselling/couple counselling using skills
checklist, counselling cards and flip charts
Observation of procedure on client
Procedure to be performed under
Procedure to be performed independently supervision
Observation of procedure on client
Procedure to be performed under supervision
Procedure to be performed independently on client
1:00 p.m.–2:00 p.m.
2:00 p.m.–2:30 p.m.
Introduction to different parts of cryotherapy/ cold coagulator unit Functions of each part of the unit
Connections and adjustments
Equipment maintenance
Troubleshooting
Introduction to instruments and consumables
Working with the instruments
Decontamination and sterilization of instruments
2:30 p.m.–4:00 p.m.
Obervation of procedure on client
Simulated learning Procedure to be performed under supervision
4:00 p.m.–4:30 p.m. Key points to be presented by trainees
4:30 p.m.–5:00 p.m. Discussion to be led by the facilitator
Day Session Time Contents
ii) Sample collection
iii) VIA
Lunch break
Summary of the day’s activities
Discussion of the next day’s agenda
Demonstration session
Clinical skills training
i) Getting to know cryotherapy/ cold coagulator equipment
ii) Arrangement of instrument tray for cryotherapy/ cold coagulation
i) Treatment with cryotherapy/ cold coagulation
Clinical skills training
i) Counselling
15
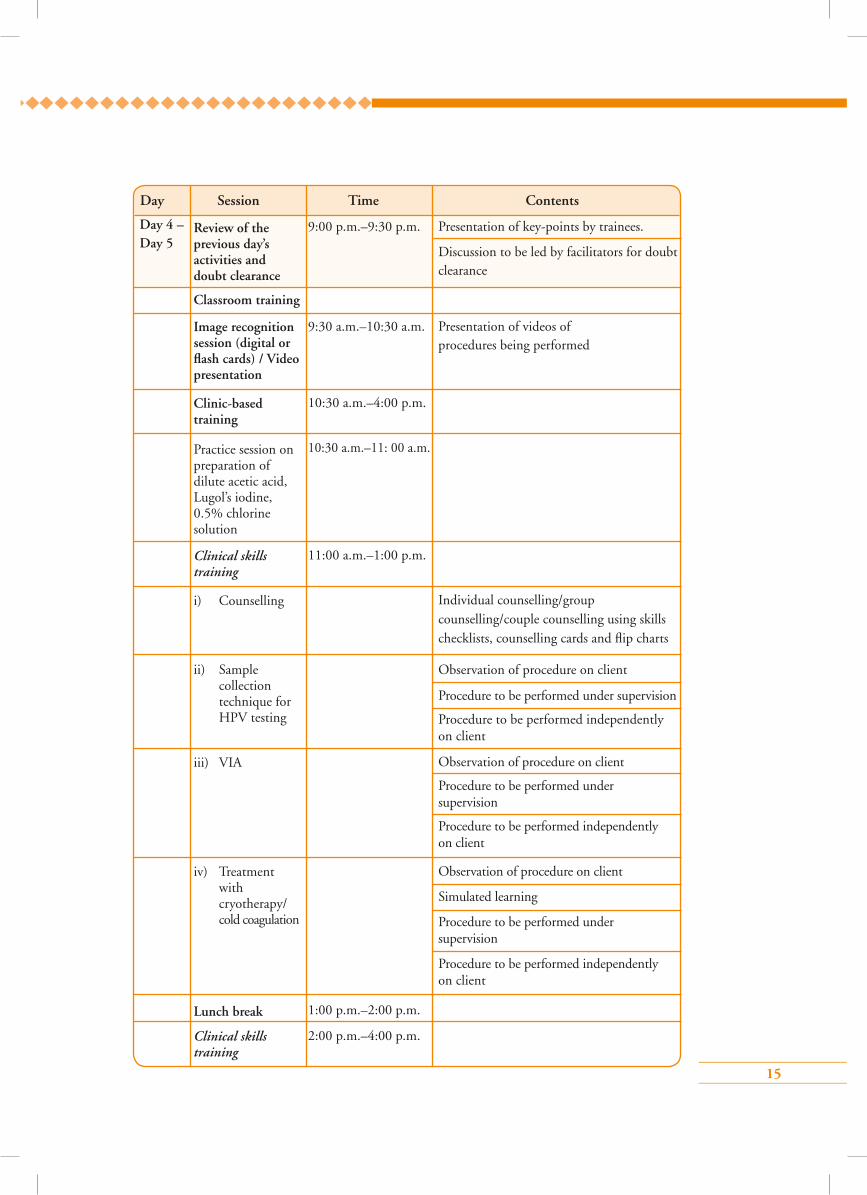
9:00 p.m.–9:30 p.m. Presentation of key-points by trainees.
Discussion to be led by facilitators for doubt clearance
9:30 a.m.–10:30 a.m. Presentation of videos of procedures being performed
10:30 a.m.–4:00 p.m.
10:30 a.m.–11: 00 a.m.
11:00 a.m.–1:00 p.m.
Individual counselling/group counselling/couple counselling using skills checklists, counselling cards and flip charts
Observation of procedure on client
Procedure to be performed under supervision
Procedure to be performed independently on client
Observation of procedure on client
Procedure to be performed under supervision
Procedure to be performed independently on client
Observation of procedure on client
Simulated learning
Procedure to be performed under supervision
Procedure to be performed independently on client
1:00 p.m.–2:00 p.m.
2:00 p.m.–4:00 p.m.
Day Session Time Contents
Review of the previous day’s activities and doubt clearance
Classroom training
Image recognition session (digital or flash cards) / Video presentation
Clinic-based training
Lunch break
Clinical skills training
Clinical skills training
Practice session on preparation of dilute acetic acid, Lugol’s iodine, 0.5% chlorine solution
i) Counselling
ii) Sample collection technique for HPV testing
iii) VIA
iv) Treatment with cryotherapy/ cold coagulation
Day 4 – Day 5
16
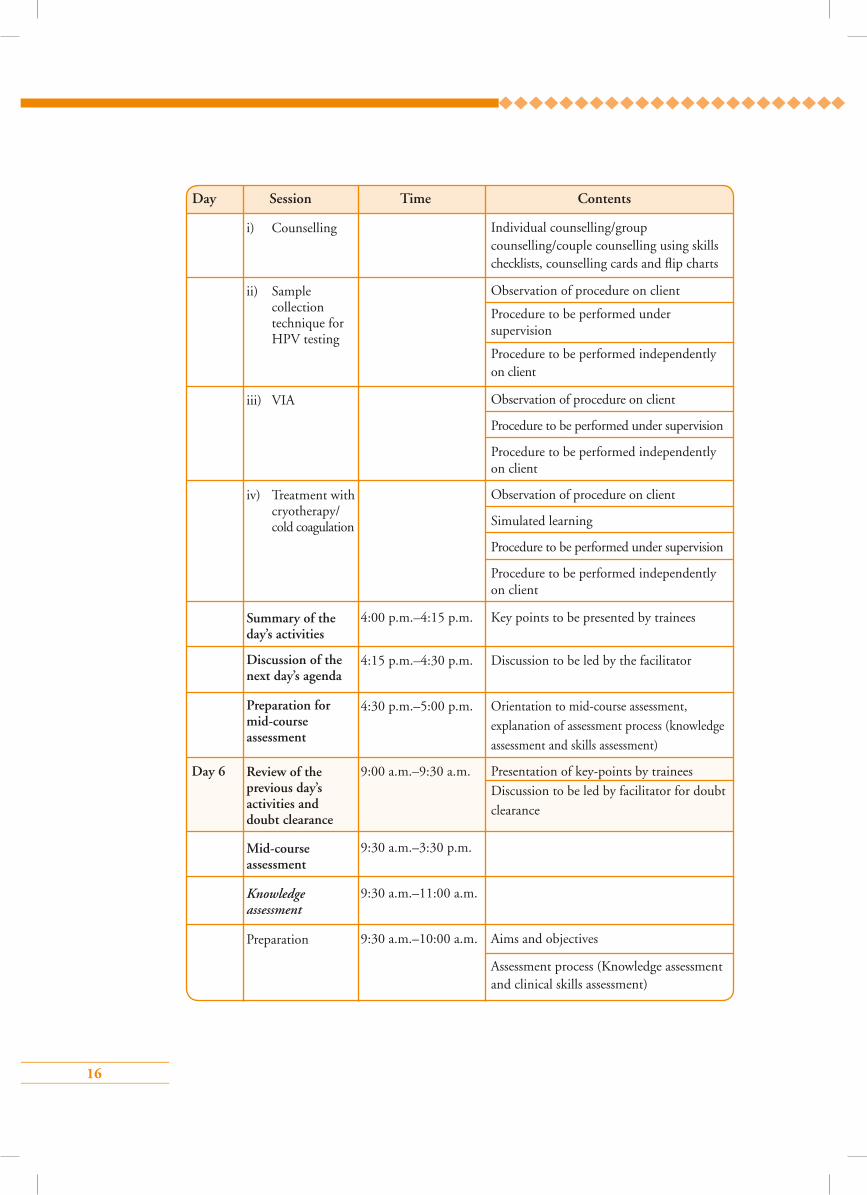
Individual counselling/group counselling/couple counselling using skills checklists, counselling cards and flip charts
Observation of procedure on client
Procedure to be performed under supervision
Procedure to be performed independently on client
Observation of procedure on client
Procedure to be performed under supervision
Procedure to be performed independently on client
Observation of procedure on client
Simulated learning
Procedure to be performed under supervision
Procedure to be performed independently on client
4:00 p.m.–4:15 p.m. Key points to be presented by trainees
4:15 p.m.–4:30 p.m. Discussion to be led by the facilitator
4:30 p.m.–5:00 p.m. Orientation to mid-course assessment, explanation of assessment process (knowledge assessment and skills assessment)
Day 6 9:00 a.m.–9:30 a.m. Presentation of key-points by trainees Discussion to be led by facilitator for doubt clearance
9:30 a.m.–3:30 p.m.
9:30 a.m.–11:00 a.m.
9:30 a.m.–10:00 a.m. Aims and objectives
Assessment process (Knowledge assessment and clinical skills assessment)
Day Session Time Contents
iii) VIA
iv) Treatment with cryotherapy/ cold coagulation
Summary of the day’s activities
Discussion of the next day’s agenda
Preparation for mid-course assessment
Review of the previous day’s activities and doubt clearance
Mid-course assessment
Preparation
Knowledge assessment
i) Counselling
ii) Sample collection technique for HPV testing
17
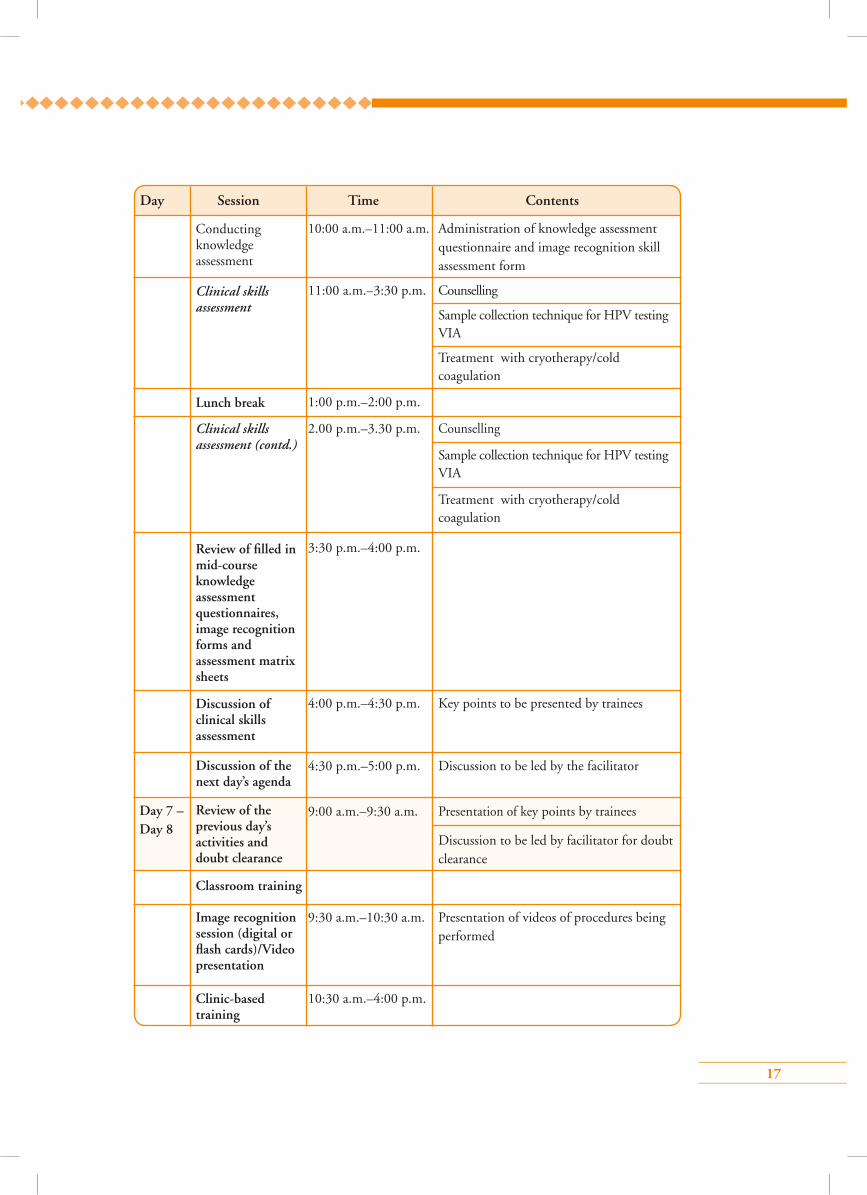
10:00 a.m.–11:00 a.m. Administration of knowledge assessment questionnaire and image recognition skill assessment form
11:00 a.m.–3:30 p.m. Counselling
Sample collection technique for HPV testing VIA
Treatment with cryotherapy/cold coagulation
1:00 p.m.–2:00 p.m.
2.00 p.m.–3.30 p.m. Counselling
Sample collection technique for HPV testing VIA
Treatment with cryotherapy/cold coagulation
3:30 p.m.–4:00 p.m.
4:00 p.m.–4:30 p.m. Key points to be presented by trainees
4:30 p.m.–5:00 p.m. Discussion to be led by the facilitator
9:00 a.m.–9:30 a.m. Presentation of key points by trainees
Discussion to be led by facilitator for doubt clearance
9:30 a.m.–10:30 a.m. Presentation of videos of procedures being performed
10:30 a.m.–4:00 p.m.
Day Session Time Contents
Lunch break
Conducting knowledge assessment
Clinical skills assessment
Review of filled in mid-course knowledge assessment questionnaires, image recognition forms and assessment matrix sheets
Discussion of clinical skills assessment
Discussion of the next day’s agenda
Review of the previous day’s activities and doubt clearance
Clinic-based training
Classroom training
Image recognition session (digital or flash cards)/Video presentation
Clinical skills assessment (contd.)
Day 7 – Day 8
18
10:30 a.m.–11:00 a.m.
11:00 a.m.–1:00 p.m.
Individual counselling/group counselling/couple counselling using skills checklists, counselling cards and flip charts
Observation of procedure on client
Procedure to be performed under supervision
Procedure to be performed independently on client
Observation of procedure on client
Procedure to be performed under supervision
Procedure to be performed independently on client
Observation of procedure on client
Procedure to be performed under supervision
Procedure to be performed independently on client
1:00 p.m.–2:00 p.m.
2:00 p.m.–4:00 p.m.
Individual counselling/group counselling/couple counselling using skills checklists, counselling cards and flip charts
Observation of procedure on client
Procedure performed under supervision
Procedure performed independently on client
Observation of procedure on client
Procedure to be performed under supervision
Day Session Time Contents
i) Counselling
i) Counselling
ii) Sample collection technique for HPV testing
iii) VIA
ii) Sample collection technique for HPV testing
iii) VIA
iv) Treatment with cryotherapy/cold coagulation
Lunch break
Clinical skills training
Clinical skills training
Practice session on preparation of dilute acetic acid, Lugol’s Iodine, 0.5% chlorine solution
19
Procedure to be performed independently on client
Observation of procedure on client
Procedure to be performed under supervision
Procedure to be performed independently on client
4:00 p.m.–4:15 p.m. Key points to be presented by trainees
4:15 p.m.–4:30 p.m. Discussion to be led by the facilitator
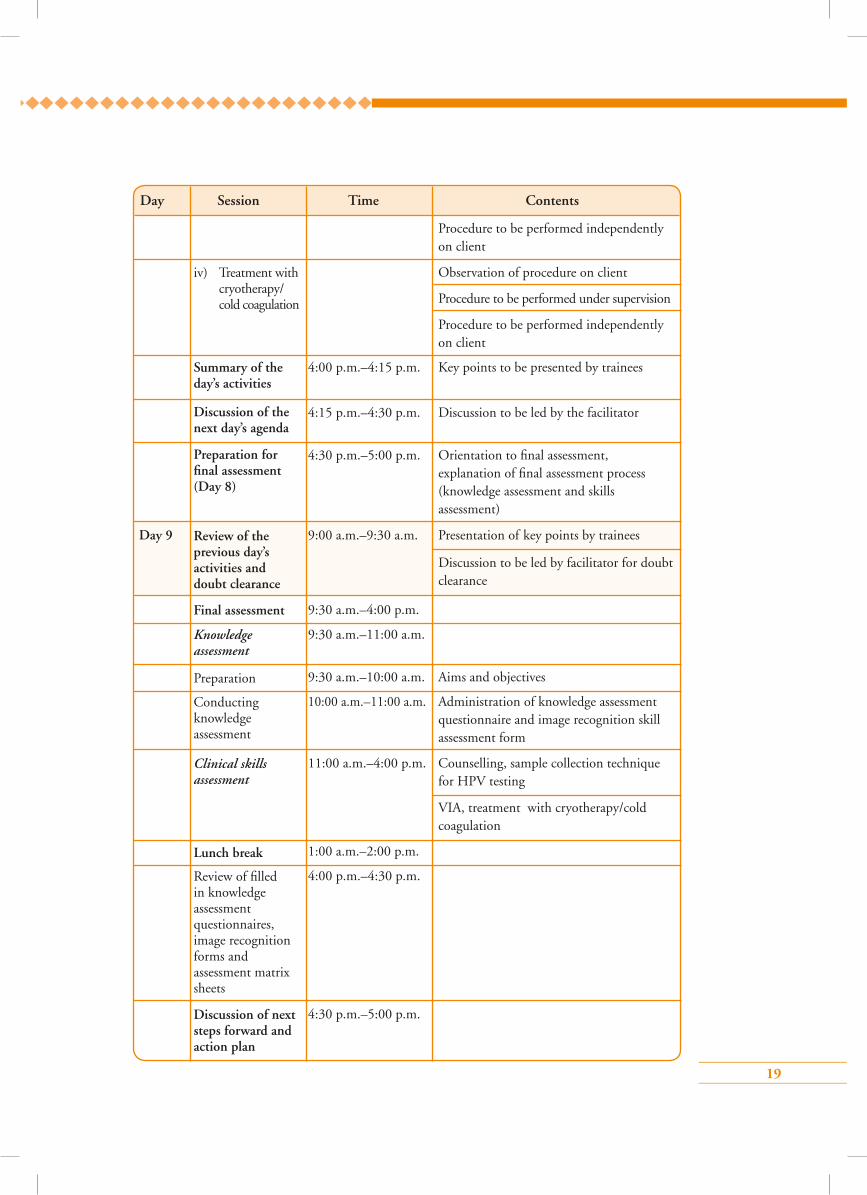
4:30 p.m.–5:00 p.m. Orientation to final assessment, explanation of final assessment process (knowledge assessment and skills assessment)
Day 9 9:00 a.m.–9:30 a.m. Presentation of key points by trainees
Discussion to be led by facilitator for doubt clearance
9:30 a.m.–4:00 p.m.
9:30 a.m.–11:00 a.m.
9:30 a.m.–10:00 a.m. Aims and objectives
10:00 a.m.–11:00 a.m. Administration of knowledge assessment questionnaire and image recognition skill assessment form
11:00 a.m.–4:00 p.m. Counselling, sample collection technique for HPV testing
VIA, treatment with cryotherapy/cold coagulation
1:00 a.m.–2:00 p.m.
4:00 p.m.–4:30 p.m.
4:30 p.m.–5:00 p.m.
Day Session Time Contents
iv) Treatment with cryotherapy/ cold coagulation
Summary of the day’s activities
Discussion of the next day’s agenda
Preparation for final assessment (Day 8)
Review of the previous day’s activities and doubt clearance
Final assessment
Lunch break
Preparation
Conducting knowledge assessment
Knowledge assessment
Clinical skills assessment
Review of filled in knowledge assessment questionnaires, image recognition forms and assessment matrix sheets
Discussion of next steps forward and action plan
20
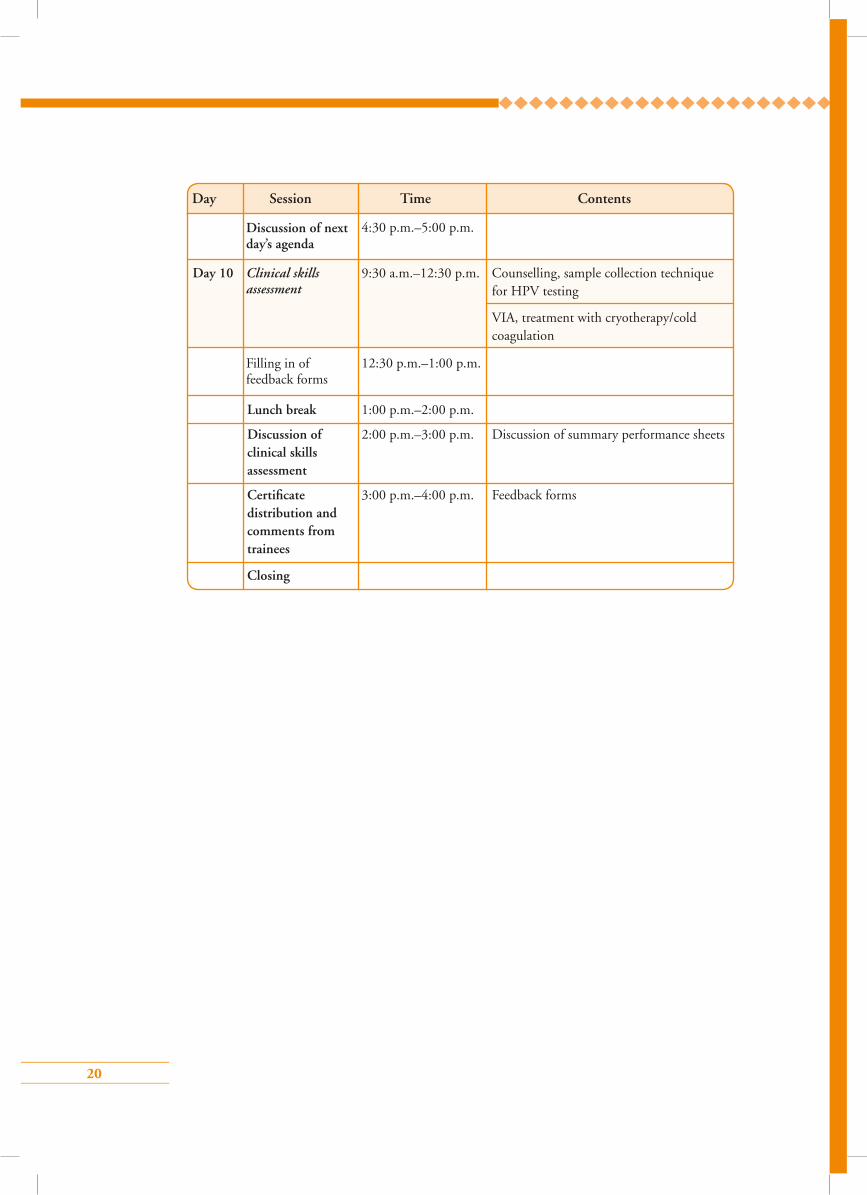
4:30 p.m.–5:00 p.m.
Day 10 9:30 a.m.–12:30 p.m. Counselling, sample collection technique for HPV testing
VIA, treatment with cryotherapy/cold coagulation
12:30 p.m.–1:00 p.m.
Lunch break 1:00 p.m.–2:00 p.m.
Discussion of 2:00 p.m.–3:00 p.m. Discussion of summary performance sheets clinical skills assessment
Certificate 3:00 p.m.–4:00 p.m. Feedback forms distribution and comments from trainees
Closing
Day Session Time Contents
Clinical skills assessment
Filling in of feedback forms
Discussion of next day’s agenda
21
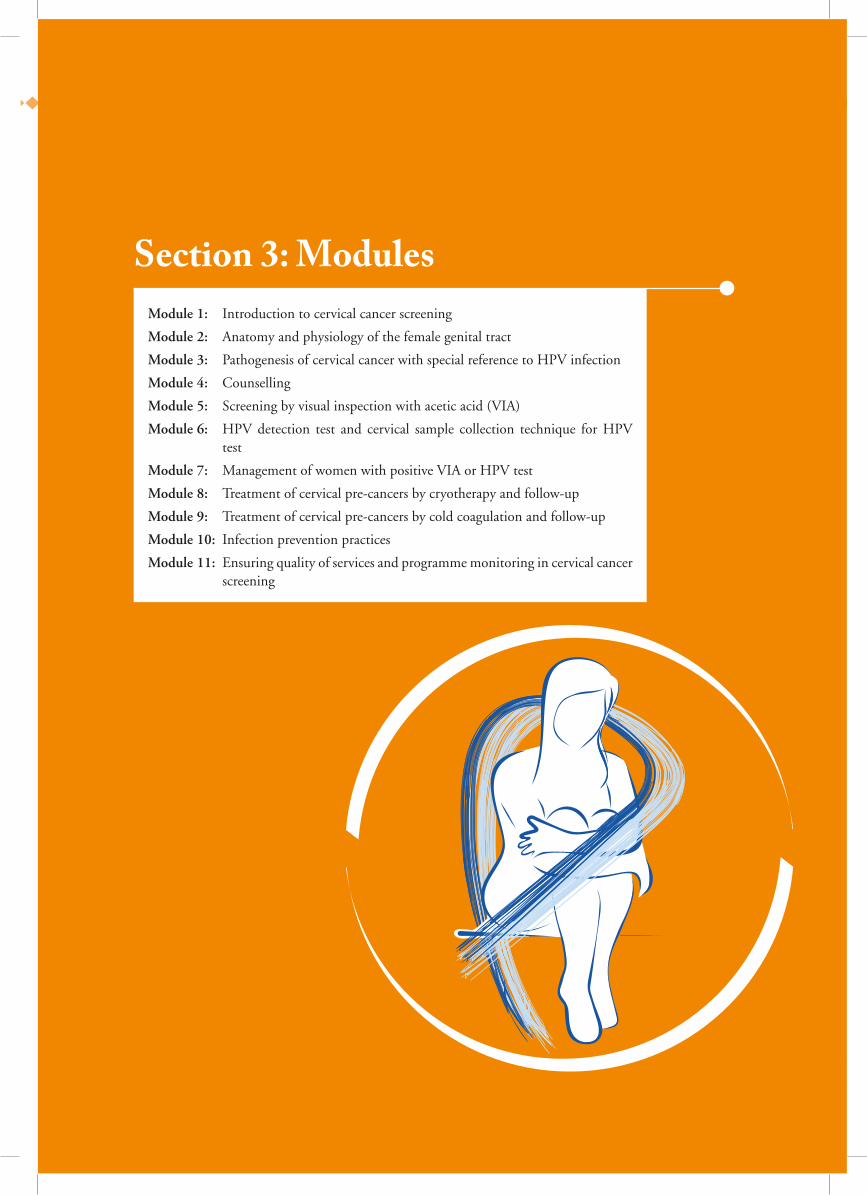
Section 3: ModulesModule 1: Introduction to cervical cancer screening
Module 2: Anatomy and physiology of the female genital tract
Module 3: Pathogenesis of cervical cancer with special reference to HPV infection
Module 4: Counselling
Module 5: Screening by visual inspection with acetic acid (VIA)
Module 6: HPV detection test and cervical sample collection technique for HPV test
Module 7: Management of women with positive VIA or HPV test
Module 8: Treatment of cervical pre-cancers by cryotherapy and follow-up
Module 9: Treatment of cervical pre-cancers by cold coagulation and follow-up
Module 10: Infection prevention practices
Module 11: Ensuring quality of services and programme monitoring in cervical cancer screening
22
Module 1: Introduction to cervical cancer screening
1.1 Module overview This module is designed to help paramedical workers, midwives, nurses and clinicians understand the concept of screening for cervical cancer. The module will also give them an overview of the different techniques of cervical cancer screening and the components of an organized screening programme. The module is meant to be used by trainees in conjunction with the WHO Guidance book (for further reading, refer Chapter 5 – Screening and treatment of cervical pre-cancer; Section 5.2 – Cervical cancer screening)
1.2 Module contents• Need for cervical cancer screening
• Magnitude of the problem of cervical cancer
• Principles of cervical cancer screening
• Concept of an organized screening programme
• Concept of an opportunistic screening programme
• Protocol for cervical cancer screening
• Screening tests for cervical cancer
• Target population for cervical cancer screening
• Frequency of cervical cancer screening
• Informed consent for cervical cancer screening
• National Cervical Cancer Screening Protocol
1.3 Learning objectivesBy the end of this module, trainees will be able to:
• describe the concept of cervical cancer screening;
• state the burden of cervical cancer in the population;
• explain how screening for cervical cancer helps to reduce the burden of the disease
• list out the various components of an organized screening programme;
• describe the advantages and disadvantages of different screening tests for cervical cancer ;
• define the target age group and the frequency of screening;
• describe the protocol for cervical cancer screening of the country.
23
1.4 Key points for discussion
1.4.1 What is screening for cervical cancer?Screening in general is defined as the application of a test on an apparently asymptomatic healthy population to identify those with high-risk of having or developing a particular disease. Screening test positive women need to have further investigations to confirm the diagnosis. To screen for cervical cancer, apparently healthy women belonging to a specified age group are tested routinely, irrespective of whether they have any symptom or not. The tests applied are called the screening tests.
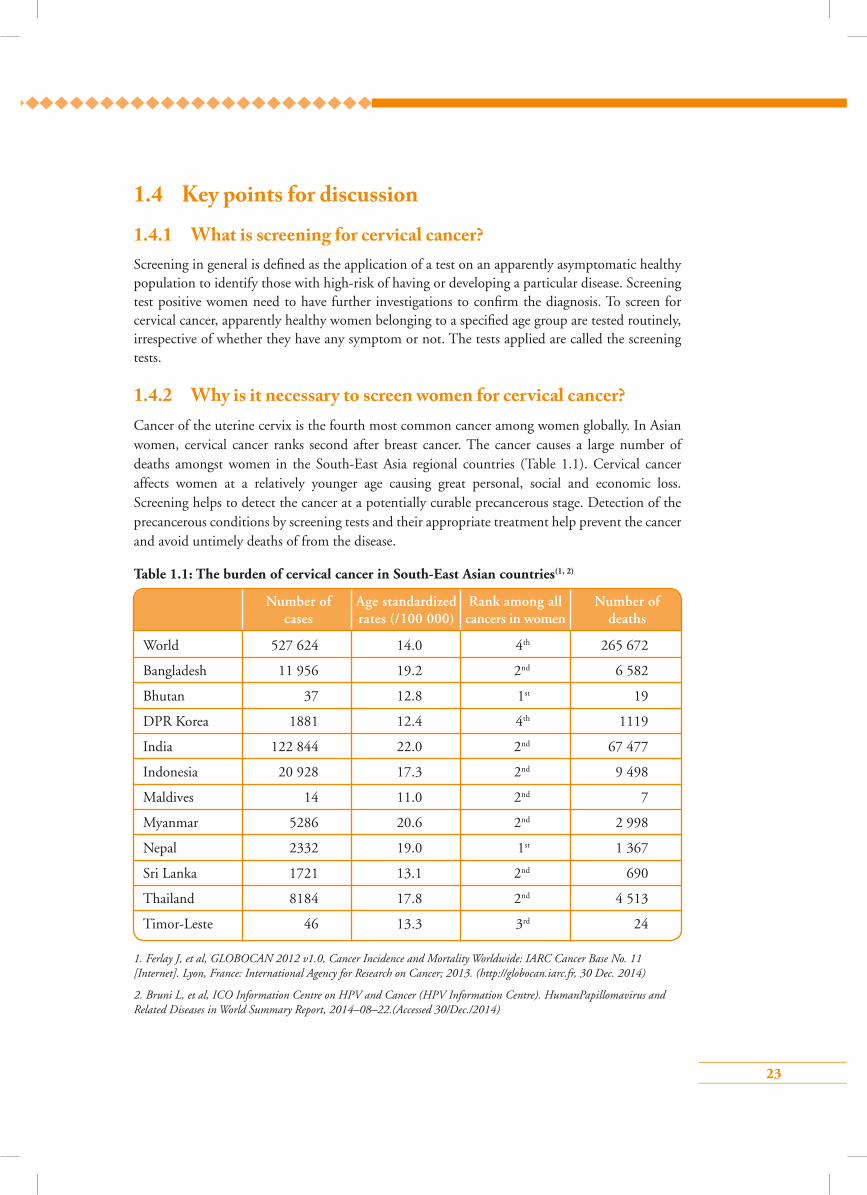
1.4.2 Why is it necessary to screen women for cervical cancer?Cancer of the uterine cervix is the fourth most common cancer among women globally. In Asian women, cervical cancer ranks second after breast cancer. The cancer causes a large number of deaths amongst women in the South-East Asia regional countries (Table 1.1). Cervical cancer affects women at a relatively younger age causing great personal, social and economic loss. Screening helps to detect the cancer at a potentially curable precancerous stage. Detection of the precancerous conditions by screening tests and their appropriate treatment help prevent the cancer and avoid untimely deaths of from the disease.
Table 1.1: The burden of cervical cancer in South-East Asian countries(1, 2)
1. Ferlay J, et al, GLOBOCAN 2012 v1.0, Cancer Incidence and Mortality Worldwide: IARC Cancer Base No. 11 [Internet]. Lyon, France: International Agency for Research on Cancer; 2013. (http://globocan.iarc.fr, 30 Dec. 2014)
2. Bruni L, et al, ICO Information Centre on HPV and Cancer (HPV Information Centre). HumanPapillomavirus and Related Diseases in World Summary Report, 2014–08–22.(Accessed 30/Dec./2014)
Number of Age standardized Rank among all Number of cases rates (/100 000) cancers in women deaths
World 527 624 14.0 4th 265 672
Bangladesh 11 956 19.2 2nd 6 582
Bhutan 37 12.8 1st 19
DPR Korea 1881 12.4 4th 1119
India 122 844 22.0 2nd 67 477
Indonesia 20 928 17.3 2nd 9 498
Maldives 14 11.0 2nd 7
Myanmar 5286 20.6 2nd 2 998
Nepal 2332 19.0 1st 1 367
Sri Lanka 1721 13.1 2nd 690
Thailand 8184 17.8 2nd 4 513
Timor-Leste 46 13.3 3rd 24

24
1.4.3 How does screening for cervical cancer reduce the disease burden?
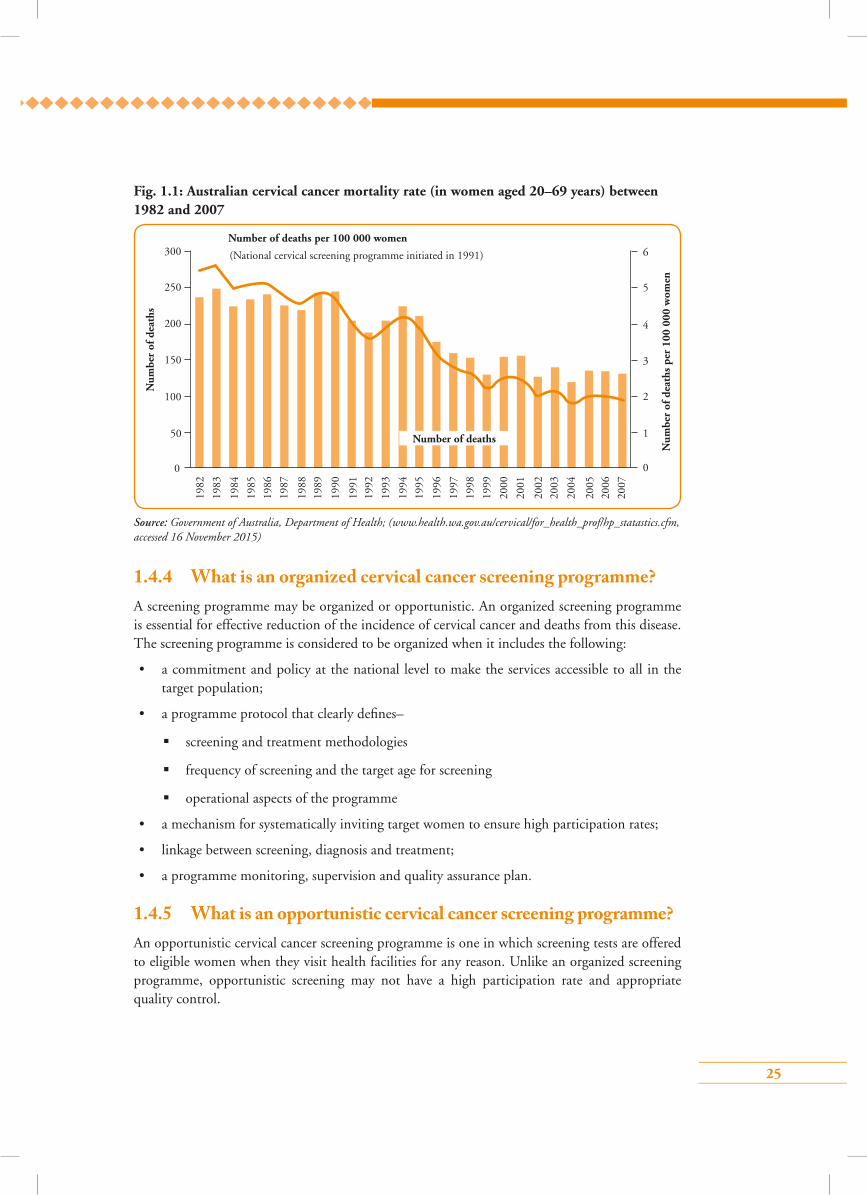
Cervical cancer has a unique natural history that allows its prevention through screening. The cancer is caused by infection from high-risk types of human papillomavirus (HPV). About 10% of Asian women are estimated to harbour cervical HPV infection at any given time, and 65–85% of invasive cancers of cervix detected in Asian women are attributed to HPV types 16 or 18. The details of the virus infection and how it causes cancer are discussed in Module 3. The virus infection induces a precancerous change known as cervical intraepithelial neoplasia (CIN). CIN can be detected by various screening tests and can be treated by simple techniques. Detection and treatment of the disease at the CIN stage prevents development of cervical cancer in the future. Countries that introduced national programmes to systematically screen women for cervical cancer and treat precancerous conditions, observed significant reduction in deaths from cervical cancer over a few years. Fig. 1.1 shows the decline of cervical cancer deaths over time in Australia with the introduction of the National Cervical Screening Programme in 1991. The mortality rates more than halved from 1991 to 2007, from 4.0 to 1.9 deaths per 100 000 women due to systematic screening of the population.
Reasons for high incidence of and mortality from cervical cancer in developing countries
• The disease is detected late as it remains asymptomatic for a long time.
• Lack of awareness of cervical cancer among the population, healthcare providers and policy-makers.
• Cervical cancer prevention is not yet a priority among national public health programmes resulting in inadequate resource allocation.
• Absence or poor quality of cervical cancer screening programmes.
• Limited access to quality healthcare services for early detection and treatment of cervical cancer.
• Lack of a functional referral systems
25
1.4.4 What is an organized cervical cancer screening programme?A screening programme may be organized or opportunistic. An organized screening programme is essential for effective reduction of the incidence of cervical cancer and deaths from this disease. The screening programme is considered to be organized when it includes the following:
• a commitment and policy at the national level to make the services accessible to all in the target population;
• a programme protocol that clearly defines–
screening and treatment methodologies
frequency of screening and the target age for screening
operational aspects of the programme
• a mechanism for systematically inviting target women to ensure high participation rates;
• linkage between screening, diagnosis and treatment;
• a programme monitoring, supervision and quality assurance plan.
1.4.5 What is an opportunistic cervical cancer screening programme?An opportunistic cervical cancer screening programme is one in which screening tests are offered to eligible women when they visit health facilities for any reason. Unlike an organized screening programme, opportunistic screening may not have a high participation rate and appropriate quality control.
Fig. 1.1: Australian cervical cancer mortality rate (in women aged 20–69 years) between 1982 and 2007
Source: Government of Australia, Department of Health; (www.health.wa.gov.au/cervical/for_health_prof/hp_statastics.cfm, accessed 16 November 2015)
1982
1983
1984
1985
1986
1987
1988
1989
1990
1991
1992
1993
1994
1995
1996
1997
1998
1999
2000
2001
2002
2003
2004
2005
2006
2007
00
50
Num
ber
of d
eath
s
Num
ber
of d
eath
s pe
r 10
0 00
0 w
omen
Number of deaths per 100 000 women
100
150
200
250
300
1
2
3
4
5
6
Number of deaths
(National cervical screening programme initiated in 1991)

26
1.4.6 What is a screening protocol?A screening protocol is a set of guidelines that all healthcare providers involved in a screening programme must follow. The protocol specifies the eligible population for screening, the screening test to be used, the frequency of screening and management of screen positive women. The contents of the protocol vary from programme to programme.
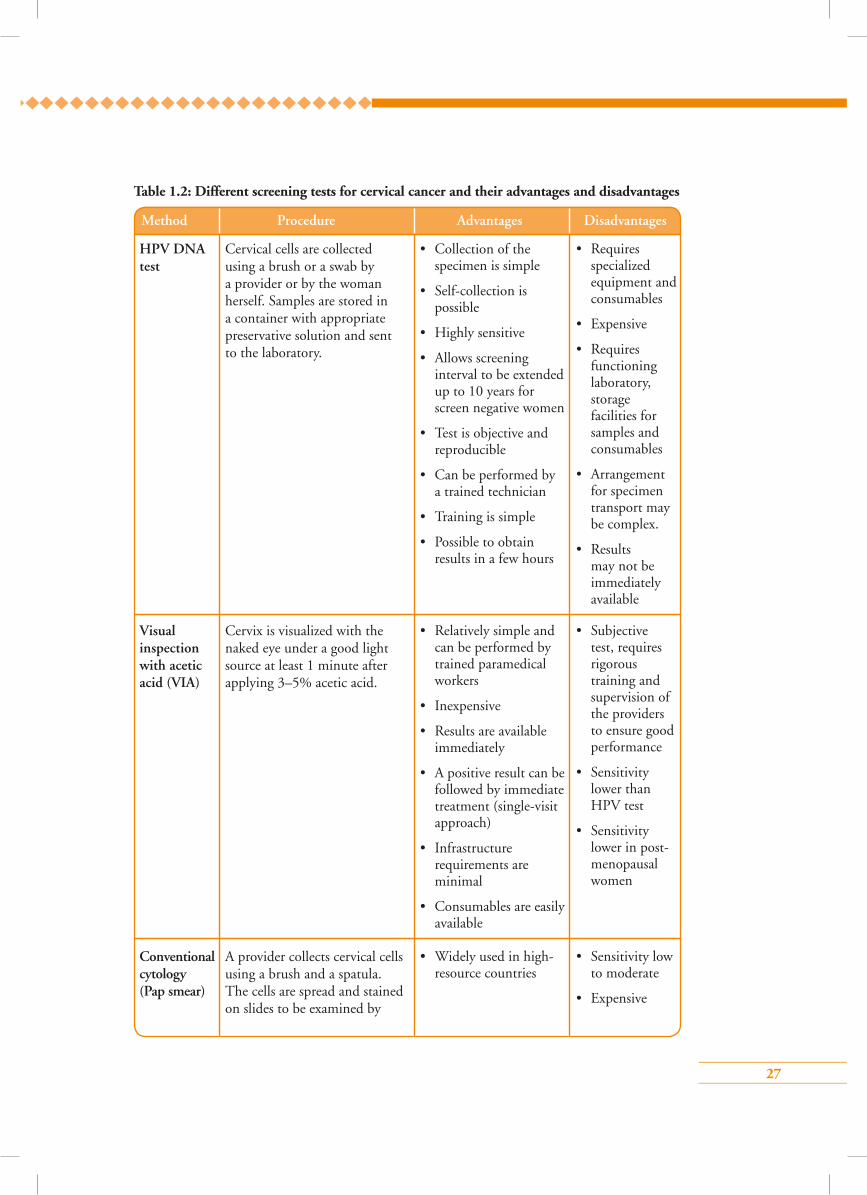
1.4.7 What are the di�erent screening tests for cervical cancer?A screening test is a simple test performed on a large number of people to identify those who already have or are likely to develop a specified disease. An ideal screening test for cervical cancer should be accurate, easy to use on a large number of women, feasible to perform in the particular setting, be able to provide results immediately (point of care), acceptable to the women and inexpensive. There are a number of tests available for cervical cancer screening. (Fig. 1.2). The different screening tests and their advantages and disadvantages are given in Table 1.2.
Fig. 1.2: Screening tests for cervical cancer
A screening programme will be effective if there is:
• high coverage (nearly 80%) of the target population ;
• appropriate follow-up and management of those who are positive on screening;
• effective linkage between programme components (from screening to diagnosis and treatment);
• high quality of screening tests, diagnostic evaluation, treatment and follow-up;
• Adequate infrastructure with trained and dedicated manpower and financial resources.
Screening tests
Cytology
Conventional
Liquid based VILIE6/E7 mRNA
detection
VIA DNA detection
Visual techniques HPV detection
27
Table 1.2: Different screening tests for cervical cancer and their advantages and disadvantages
Method Procedure Advantages Disadvantages
HPV DNA test
Visual inspection with acetic acid (VIA)
Conventional cytology (Pap smear)
Cervical cells are collected using a brush or a swab by a provider or by the woman herself. Samples are stored in a container with appropriate preservative solution and sent to the laboratory.
Cervix is visualized with the naked eye under a good light source at least 1 minute after applying 3–5% acetic acid.
A provider collects cervical cells using a brush and a spatula. The cells are spread and stained on slides to be examined by
• Collection of the specimen is simple
• Self-collection is possible
• Highly sensitive
• Allows screening interval to be extended up to 10 years for screen negative women
• Test is objective and reproducible
• Can be performed by a trained technician
• Training is simple
• Possible to obtain results in a few hours
• Relatively simple and can be performed by trained paramedical workers
• Inexpensive
• Results are available immediately
• A positive result can be followed by immediate treatment (single-visit approach)
• Infrastructure requirements are minimal
• Consumables are easily available
• Widely used in high-resource countries
• Requires specialized equipment and consumables
• Expensive
• Requires functioning laboratory, storage facilities for samples and consumables
• Arrangement for specimen transport may be complex.
• Results may not be immediately available
• Subjective test, requires rigorous training and supervision of the providers to ensure good performance
• Sensitivity lower than HPV test
• Sensitivity lower in post-menopausal women
• Sensitivity low to moderate
• Expensive
28
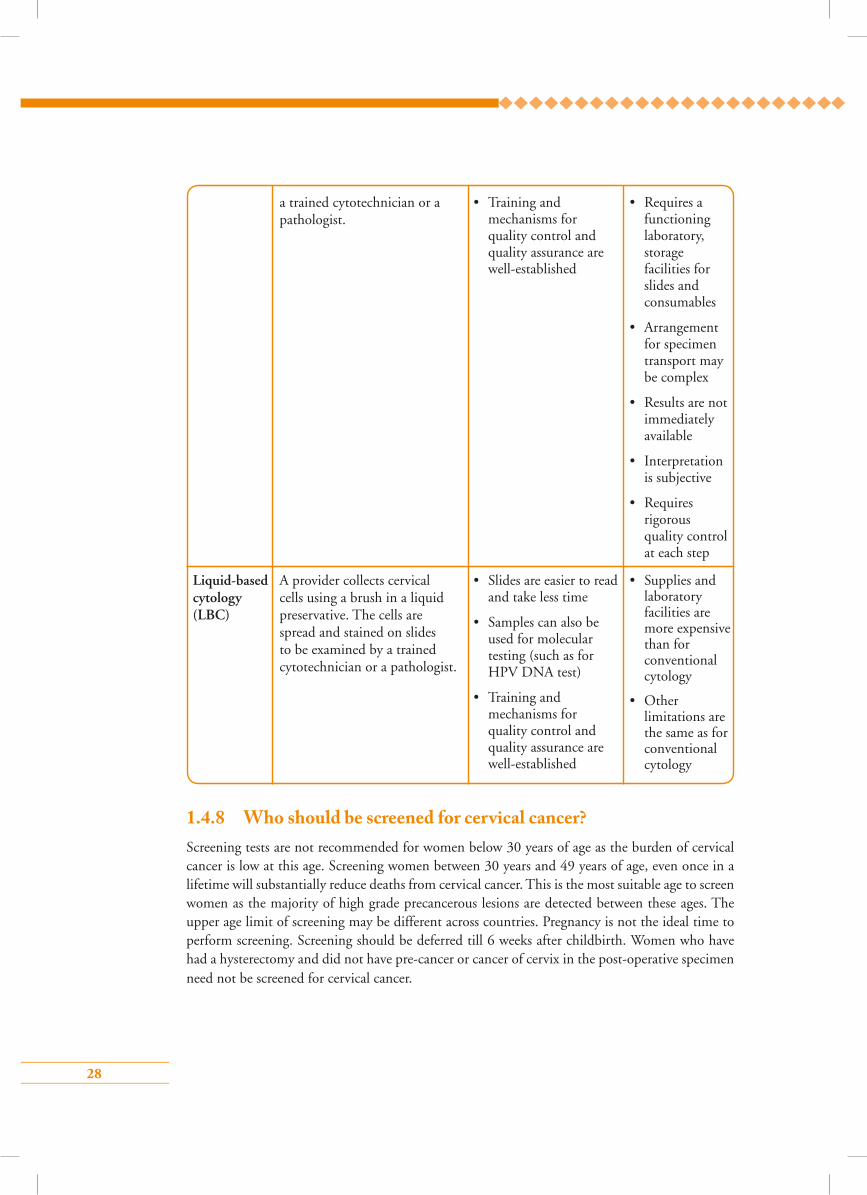
Liquid-based cytology (LBC)
a trained cytotechnician or a pathologist.
A provider collects cervical cells using a brush in a liquid preservative. The cells are spread and stained on slides to be examined by a trained cytotechnician or a pathologist.
• Training and mechanisms for quality control and quality assurance are well-established
• Slides are easier to read and take less time
• Samples can also be used for molecular testing (such as for HPV DNA test)
• Training and mechanisms for quality control and quality assurance are well-established
• Requires a functioning laboratory, storage facilities for slides and consumables
• Arrangement for specimen transport may be complex
• Results are not immediately available
• Interpretation is subjective
• Requires rigorous quality control at each step
• Supplies and laboratory facilities are more expensive than for conventional cytology
• Other limitations are the same as for conventional cytology
1.4.8 Who should be screened for cervical cancer?Screening tests are not recommended for women below 30 years of age as the burden of cervical cancer is low at this age. Screening women between 30 years and 49 years of age, even once in a lifetime will substantially reduce deaths from cervical cancer. This is the most suitable age to screen women as the majority of high grade precancerous lesions are detected between these ages. The upper age limit of screening may be different across countries. Pregnancy is not the ideal time to perform screening. Screening should be deferred till 6 weeks after childbirth. Women who have had a hysterectomy and did not have pre-cancer or cancer of cervix in the post-operative specimen need not be screened for cervical cancer.
29
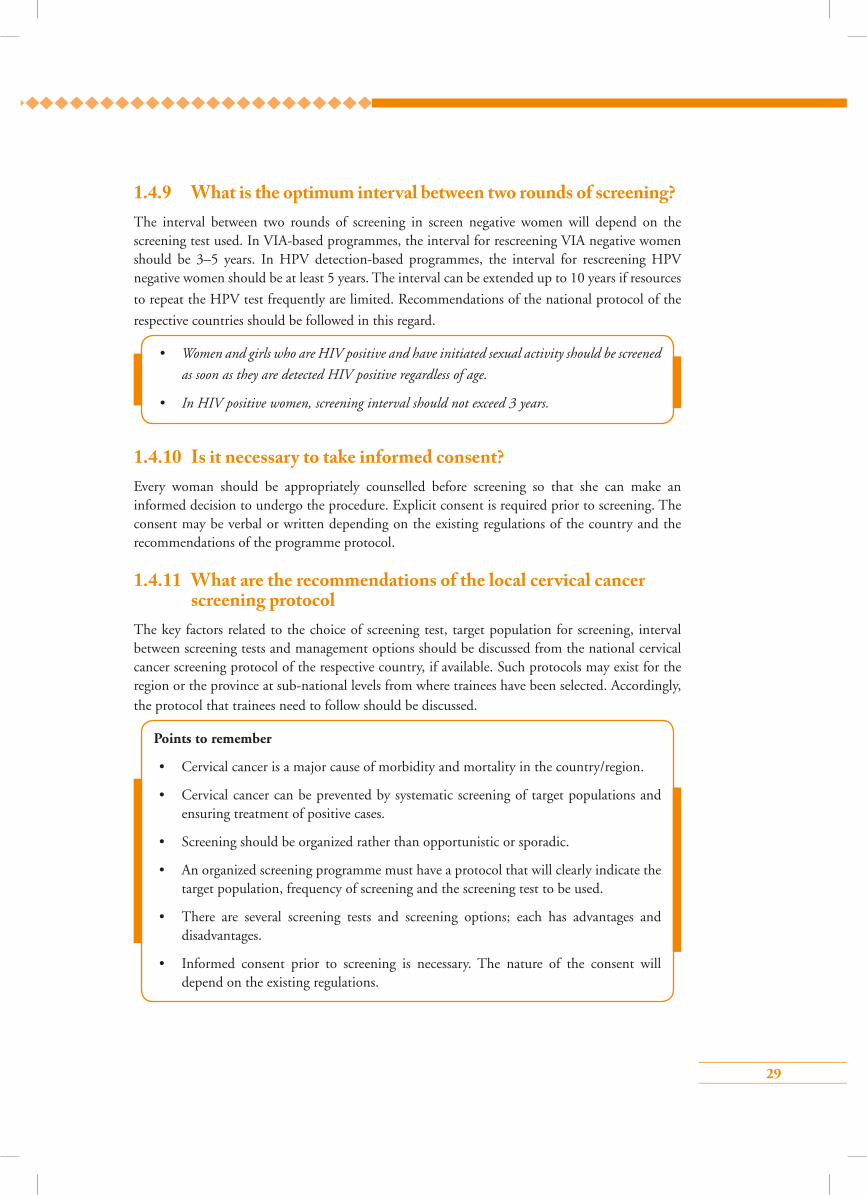
1.4.9 What is the optimum interval between two rounds of screening?The interval between two rounds of screening in screen negative women will depend on the screening test used. In VIA-based programmes, the interval for rescreening VIA negative women should be 3–5 years. In HPV detection-based programmes, the interval for rescreening HPV negative women should be at least 5 years. The interval can be extended up to 10 years if resources
to repeat the HPV test frequently are limited. Recommendations of the national protocol of the
respective countries should be followed in this regard.
1.4.10 Is it necessary to take informed consent?Every woman should be appropriately counselled before screening so that she can make an informed decision to undergo the procedure. Explicit consent is required prior to screening. The consent may be verbal or written depending on the existing regulations of the country and the recommendations of the programme protocol.
1.4.11 What are the recommendations of the local cervical cancer screening protocol
The key factors related to the choice of screening test, target population for screening, interval between screening tests and management options should be discussed from the national cervical cancer screening protocol of the respective country, if available. Such protocols may exist for the region or the province at sub-national levels from where trainees have been selected. Accordingly, the protocol that trainees need to follow should be discussed.
• Women and girls who are HIV positive and have initiated sexual activity should be screened
as soon as they are detected HIV positive regardless of age.
• In HIV positive women, screening interval should not exceed 3 years.
Points to remember
• Cervical cancer is a major cause of morbidity and mortality in the country/region.
• Cervical cancer can be prevented by systematic screening of target populations and ensuring treatment of positive cases.
• Screening should be organized rather than opportunistic or sporadic.
• An organized screening programme must have a protocol that will clearly indicate the target population, frequency of screening and the screening test to be used.
• There are several screening tests and screening options; each has advantages and disadvantages.
• Informed consent prior to screening is necessary. The nature of the consent will depend on the existing regulations.
30
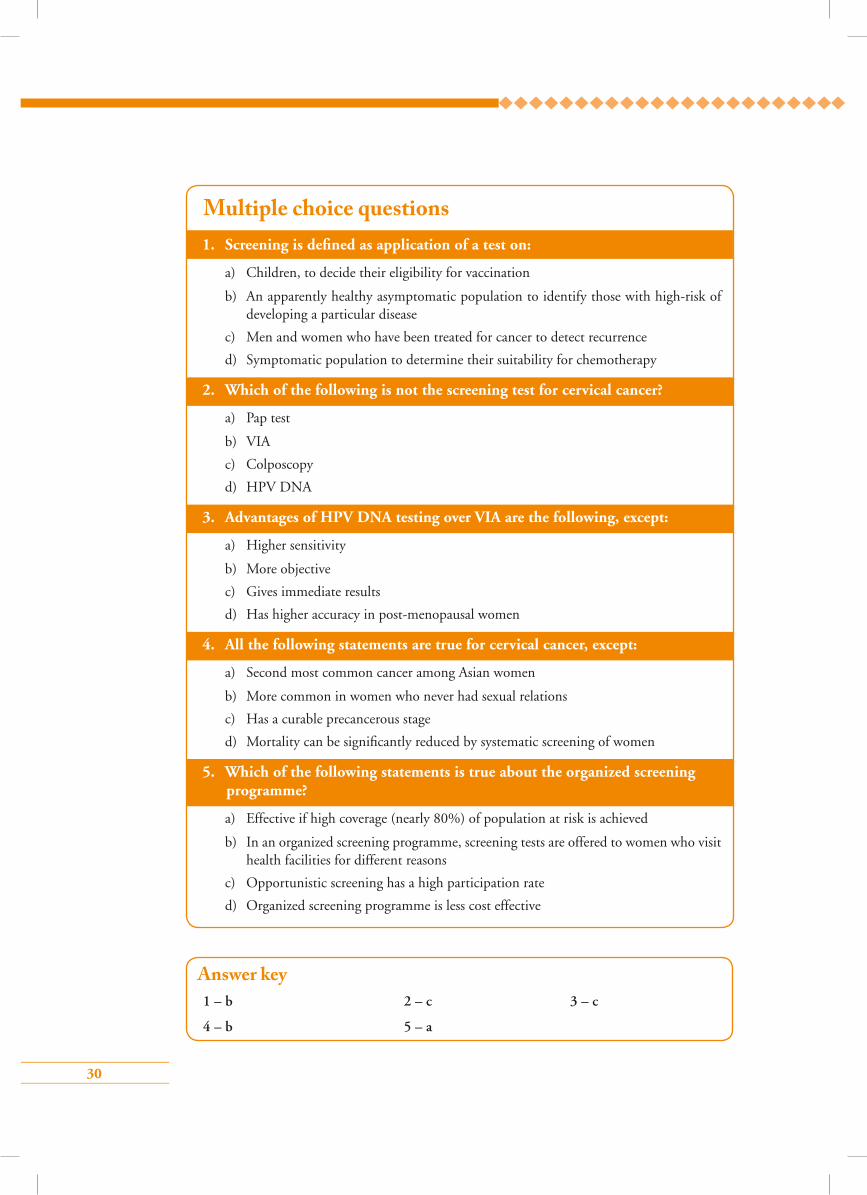
Answer key1 – b 2 – c 3 – c
4 – b 5 – a
Multiple choice questions1. Screening is defined as application of a test on:
a) Children, to decide their eligibility for vaccination
b) An apparently healthy asymptomatic population to identify those with high-risk of developing a particular disease
c) Men and women who have been treated for cancer to detect recurrence
d) Symptomatic population to determine their suitability for chemotherapy
2. Which of the following is not the screening test for cervical cancer?
a) Pap test
b) VIA
c) Colposcopy
d) HPV DNA
3. Advantages of HPV DNA testing over VIA are the following, except:
a) Higher sensitivity
b) More objective
c) Gives immediate results
d) Has higher accuracy in post-menopausal women
4. All the following statements are true for cervical cancer, except:
a) Second most common cancer among Asian women
b) More common in women who never had sexual relations
c) Has a curable precancerous stage
d) Mortality can be significantly reduced by systematic screening of women
5. Which of the following statements is true about the organized screening programme?
a) Effective if high coverage (nearly 80%) of population at risk is achieved
b) In an organized screening programme, screening tests are offered to women who visit health facilities for different reasons
c) Opportunistic screening has a high participation rate
d) Organized screening programme is less cost effective
31
Module 2: Anatomy and physiology of the female genital tract
2.1 Module overview This module is designed to help mid-wives and other paramedical workers, nurses and clinicians
know the anatomy of the female pelvis with special reference to the uterine cervix. The module
describes the physiological changes occurring in the epithelium of the cervix that contribute to the
development of neoplasias of cervix. The module is meant to be used by trainees in conjunction
with the WHO Guidance book for further reading, refer Chapter 1 – Background; Section 1.2 –
Female pelvic anatomy and physiology and Practice Sheet 5.2).
2.2 Module contents• Gross anatomy of female external and internal genitalia
• Microscopic features of cervical epithelium and concept of squamocolumnar junction (SCJ)
• Metaplasia and concept of transformation zone (TZ)
• Features of normal TZ
• Changes in TZ during pregnancy and menopause
• Group learning activities
Identification of parts of the uterus and cervix on ZOE model
Practice speculum examination on ZOE model
Recognition of microscopic anatomy on digital images
2.3 Learning objectivesBy the end of this module, trainees will be able to:
• describe the anatomy of the uterine cervix and its relation with other pelvic organs;
• explain the changes occurring on the lining epithelium of the cervix that are relevant to the
pathogenesis of neoplasias of the cervix;
• describe the physiological changes of the cervix occurring during pregnancy and menopause;
• recognize different parts of the female genitalia to help them perform various procedures.
32
2.4 Key points for discussion
2.4.1 What are the di�erent parts of the female genital tract?
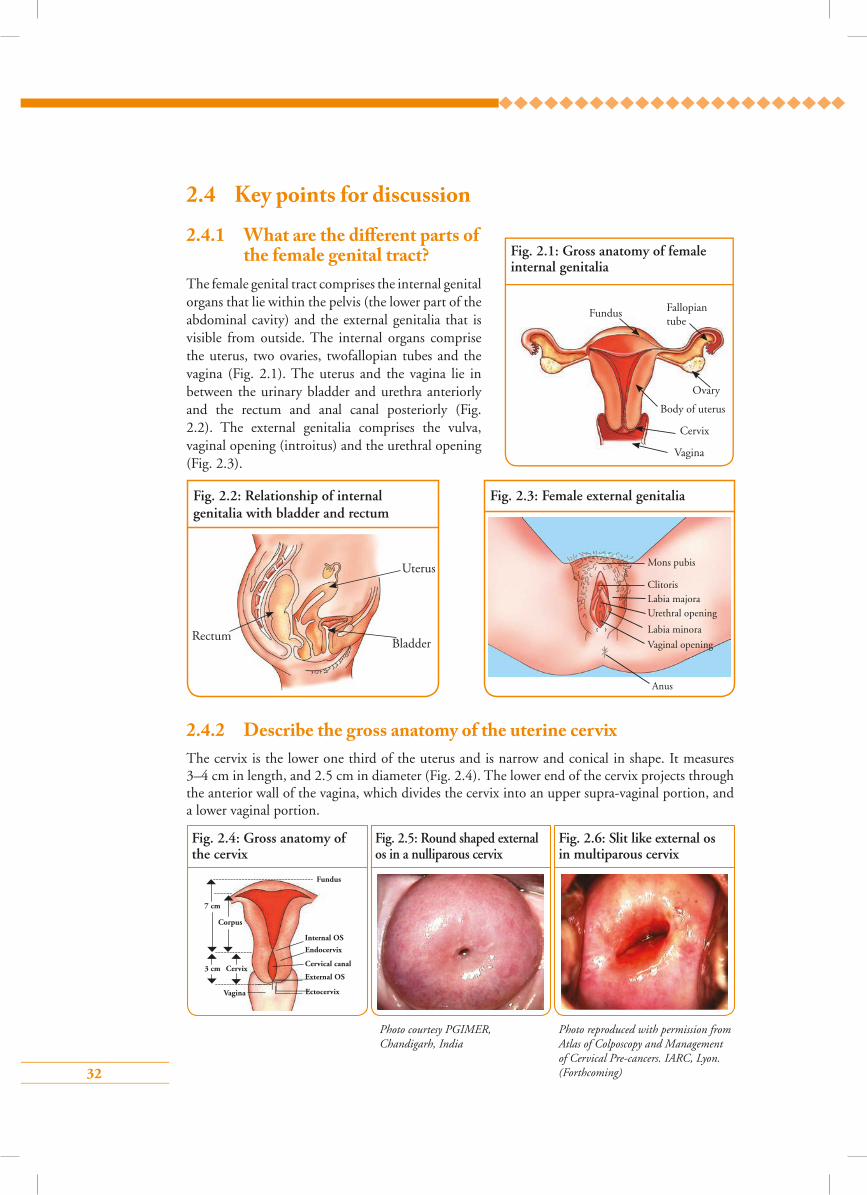
The female genital tract comprises the internal genital organs that lie within the pelvis (the lower part of the abdominal cavity) and the external genitalia that is visible from outside. The internal organs comprise the uterus, two ovaries, twofallopian tubes and the vagina (Fig. 2.1). The uterus and the vagina lie in between the urinary bladder and urethra anteriorly and the rectum and anal canal posteriorly (Fig. 2.2). The external genitalia comprises the vulva, vaginal opening (introitus) and the urethral opening (Fig. 2.3).
2.4.2 Describe the gross anatomy of the uterine cervixThe cervix is the lower one third of the uterus and is narrow and conical in shape. It measures 3–4 cm in length, and 2.5 cm in diameter (Fig. 2.4). The lower end of the cervix projects through the anterior wall of the vagina, which divides the cervix into an upper supra-vaginal portion, and a lower vaginal portion.
Fig. 2.1: Gross anatomy of female internal genitalia
Fundus
Ovary
Fallopian tube
Body of uterus
Cervix
Vagina
Fig. 2.2: Relationship of internal genitalia with bladder and rectum
RectumBladder
Uterus
Fig. 2.3: Female external genitalia
Mons pubis
Clitoris
Anus
Labia majoraUrethral opening
Labia minora
Vaginal opening
Fig. 2.4: Gross anatomy of the cervix
Fig. 2.5: Round shaped external os in a nulliparous cervix
Fig. 2.6: Slit like external os in multiparous cervix
7 cm
3 cm Cervix
Corpus
Fundus
Internal OS
Endocervix
Cervical canal
External OS
EctocervixVagina
Photo reproduced with permission from Atlas of Colposcopy and Management of Cervical Pre-cancers. IARC, Lyon. (Forthcoming)
Photo courtesy PGIMER, Chandigarh, India
33
The vaginal portion (portio vaginalis) of the cervix protrudes into the vagina from its anterior wall. During speculum examination, only this part of the cervix is visible.
The cervical canal or endocervix is situated at the centre of the cervix. The canal opens into the vagina through an opening known as the external os. In nulliparous women, the external os is round in shape (Fig. 2.5) and in parous women it is slit-like (fish mouth appearance) (Fig. 2.6). The portion of the cervix lying beyond the external os is called the ectocervix. This is the portion of the cervix that is readily visible on speculum examination.
2.4.3 Describe the microscopic anatomy of the normal cervix The cervix is composed of epithelium (surface lining) and underlying stroma (deeper fibrous tissue) separated by a thin barrier called basement membrane.
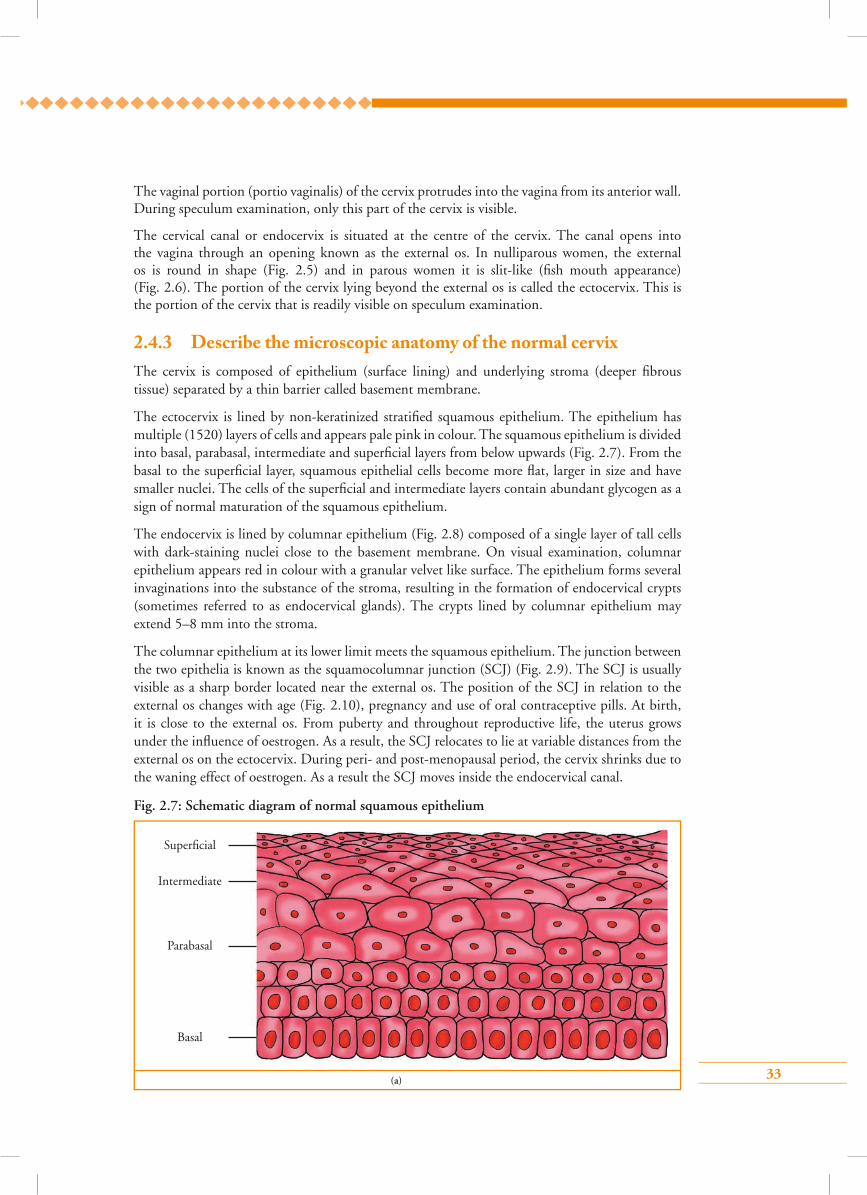
The ectocervix is lined by non-keratinized stratified squamous epithelium. The epithelium has multiple (1520) layers of cells and appears pale pink in colour. The squamous epithelium is divided into basal, parabasal, intermediate and superficial layers from below upwards (Fig. 2.7). From the basal to the superficial layer, squamous epithelial cells become more flat, larger in size and have smaller nuclei. The cells of the superficial and intermediate layers contain abundant glycogen as a sign of normal maturation of the squamous epithelium.
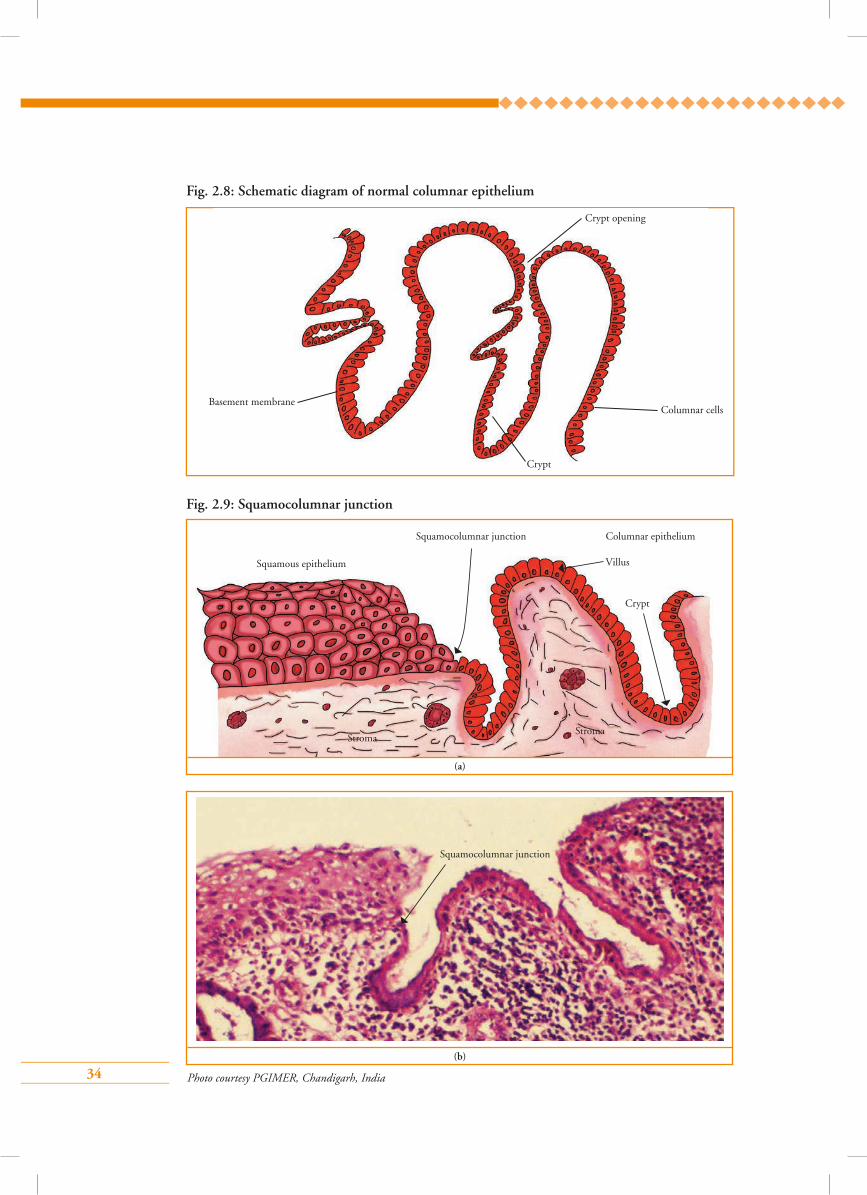
The endocervix is lined by columnar epithelium (Fig. 2.8) composed of a single layer of tall cells with dark-staining nuclei close to the basement membrane. On visual examination, columnar epithelium appears red in colour with a granular velvet like surface. The epithelium forms several invaginations into the substance of the stroma, resulting in the formation of endocervical crypts (sometimes referred to as endocervical glands). The crypts lined by columnar epithelium may extend 5–8 mm into the stroma.
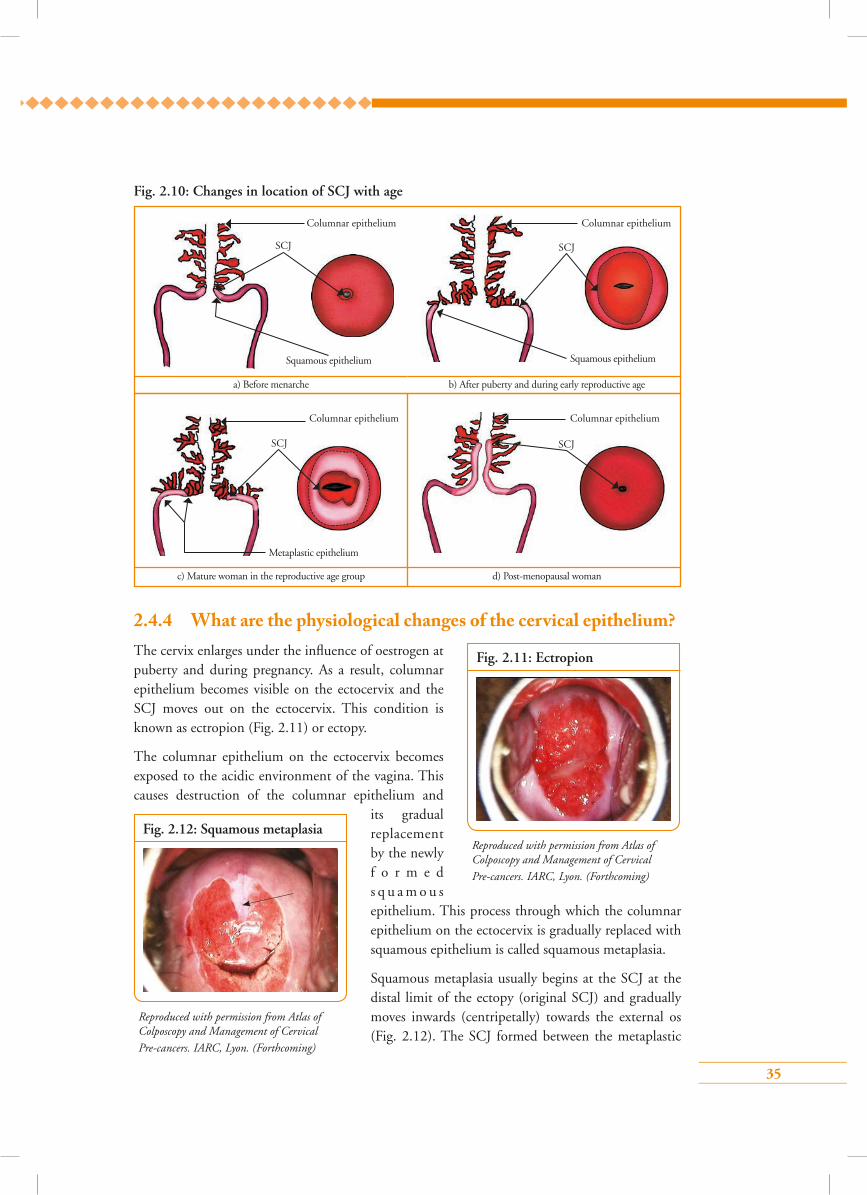
The columnar epithelium at its lower limit meets the squamous epithelium. The junction between the two epithelia is known as the squamocolumnar junction (SCJ) (Fig. 2.9). The SCJ is usually visible as a sharp border located near the external os. The position of the SCJ in relation to the external os changes with age (Fig. 2.10), pregnancy and use of oral contraceptive pills. At birth, it is close to the external os. From puberty and throughout reproductive life, the uterus grows under the influence of oestrogen. As a result, the SCJ relocates to lie at variable distances from the external os on the ectocervix. During peri- and post-menopausal period, the cervix shrinks due to the waning effect of oestrogen. As a result the SCJ moves inside the endocervical canal.
Fig. 2.7: Schematic diagram of normal squamous epithelium
(a)
Superficial
Intermediate
Parabasal
Basal
34
Fig. 2.9: Squamocolumnar junction
Fig. 2.8: Schematic diagram of normal columnar epithelium
Crypt
Crypt opening
Basement membrane Columnar cells
(a)
Squamous epithelium
Squamocolumnar junction
Villus
StromaStroma
Crypt
Columnar epithelium
Photo courtesy PGIMER, Chandigarh, India
(b)
Squamocolumnar junction
35
Fig. 2.10: Changes in location of SCJ with age
2.4.4 What are the physiological changes of the cervical epithelium? The cervix enlarges under the influence of oestrogen at puberty and during pregnancy. As a result, columnar epithelium becomes visible on the ectocervix and the SCJ moves out on the ectocervix. This condition is known as ectropion (Fig. 2.11) or ectopy.
The columnar epithelium on the ectocervix becomes exposed to the acidic environment of the vagina. This causes destruction of the columnar epithelium and
its gradual replacement by the newly f o r m e d s q u a m o u s epithelium. This process through which the columnar epithelium on the ectocervix is gradually replaced with squamous epithelium is called squamous metaplasia.
Squamous metaplasia usually begins at the SCJ at the distal limit of the ectopy (original SCJ) and gradually moves inwards (centripetally) towards the external os (Fig. 2.12). The SCJ formed between the metaplastic
Fig. 2.12: Squamous metaplasia
Reproduced with permission from Atlas of Colposcopy and Management of Cervical Pre-cancers. IARC, Lyon. (Forthcoming)
Fig. 2.11: Ectropion
Reproduced with permission from Atlas of Colposcopy and Management of Cervical Pre-cancers. IARC, Lyon. (Forthcoming)
Columnar epithelium Columnar epithelium
Squamous epithelium Squamous epithelium
a) Before menarche b) After puberty and during early reproductive age
SCJ SCJ
SCJ SCJ
d) Post-menopausal woman c) Mature woman in the reproductive age group
Columnar epithelium Columnar epithelium
Metaplastic epithelium
36
squamous epithelium and the columnar epithelium is
known as the new SCJ. The area between the original
SCJ and the newly formed SCJ as a result of metaplasia
is the transformation zone (TZ).
During the peri-menopausal period and after
menopause, the cervix shrinks due the lack of oestrogen
and consequently, the SCJ moves inside the endocervical
canal from the external os. In post-menopausal women,
the SCJ is often invisible on visual examination
(Fig. 2.13).
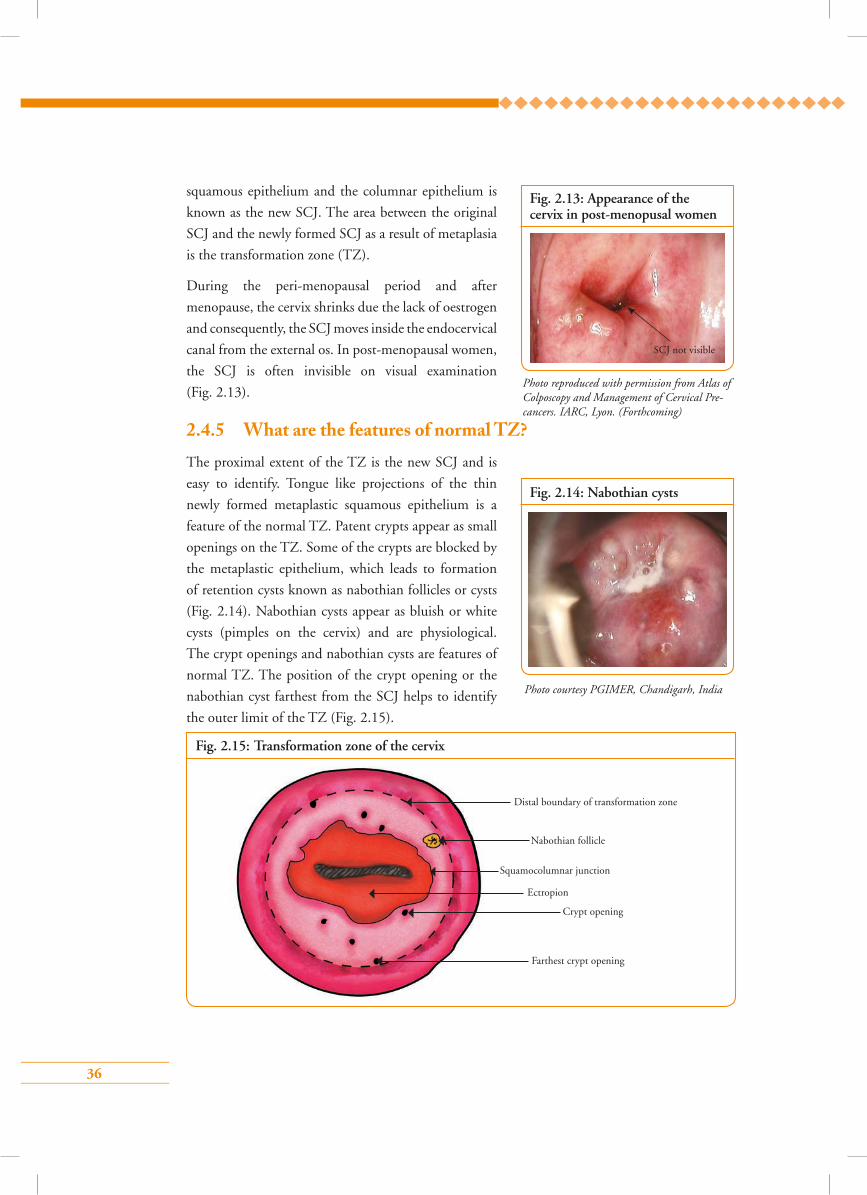
2.4.5 What are the features of normal TZ?The proximal extent of the TZ is the new SCJ and is
easy to identify. Tongue like projections of the thin
newly formed metaplastic squamous epithelium is a
feature of the normal TZ. Patent crypts appear as small
openings on the TZ. Some of the crypts are blocked by
the metaplastic epithelium, which leads to formation
of retention cysts known as nabothian follicles or cysts
(Fig. 2.14). Nabothian cysts appear as bluish or white
cysts (pimples on the cervix) and are physiological.
The crypt openings and nabothian cysts are features of
normal TZ. The position of the crypt opening or the
nabothian cyst farthest from the SCJ helps to identify
the outer limit of the TZ (Fig. 2.15).
Fig. 2.13: Appearance of the cervix in post-menopusal women
SCJ not visible
Photo reproduced with permission from Atlas of Colposcopy and Management of Cervical Pre-cancers. IARC, Lyon. (Forthcoming)
Fig. 2.14: Nabothian cysts
Photo courtesy PGIMER, Chandigarh, India
Fig. 2.15: Transformation zone of the cervix
Distal boundary of transformation zone
Nabothian follicle
Squamocolumnar junction
Ectropion
Crypt opening
Farthest crypt opening

37
2.4.6 What are the changes of TZ in pregnancy and menopause?
During pregnancy the cervix enlarges, becomes
congested and the columnar epithelium extends to
the ectocervix (ectropion). The SCJ is easily visible
on the ectocervix (Fig. 2.16).
During the peri-menopausal period and after
menopause, the cervix shrinks due to the lack
of oestrogen. Due to the shrinkage of the cervix,
SCJ moves inside the endocervical canal from the
external os. In post-menopausal women, the SCJ
is often invisible on visual examination.
2.5 Group learning activities
Fig. 2.16: Appearance of cervix during pregnancy
Photo courtesy PGIMER, Chandigarh, India
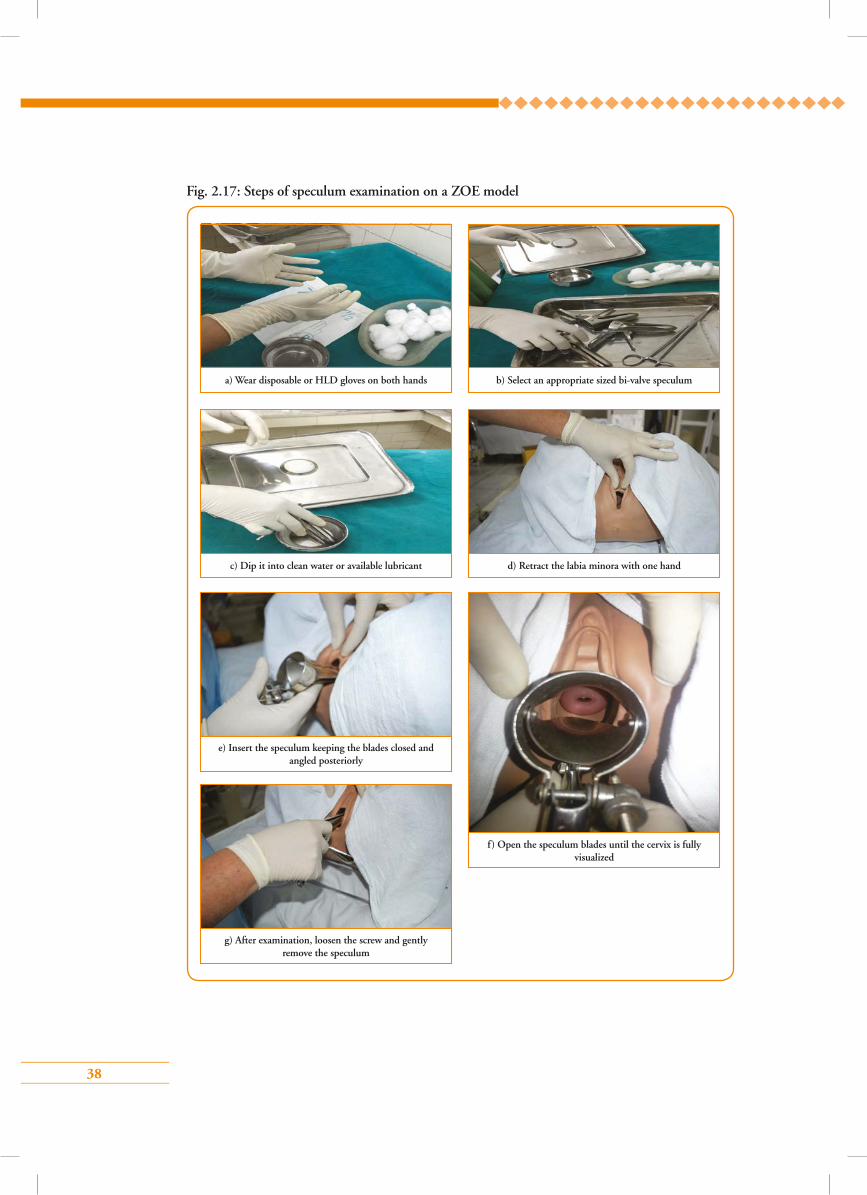
Steps of speculum examination on a ZOE model (Fig. 2.17)
• Wash hands with soap and water
• Wear disposable or high-level disinfected gloves on both hands
• Select an appropriate sized bi-valve speculum
• Dip it into clean water or available lubricant
• Retract the labia minora with one hand
• Insert the speculum keeping the blades closed and angled posteriorly
• Open the blades until the cervix is fully visualized
• Fix the blades of the speculum by tightening the screws
• See the cervix with the oval shaped external os at the centre
• Perform the necessary procedures (collect cervical sample for HPV test or apply probe of cryotherapy on the cervix)
• Loosen the screws and close the blades of the speculum
• Gently remove the speculum
2.5.1 Identi�cation of parts of the uterus and cervix on ZOE model
2.5.2 Practise speculum examination on ZOE model
2.5.3 Recognition of microscopic anatomy on digital images
38
a) Wear disposable or HLD gloves on both hands
c) Dip it into clean water or available lubricant
e) Insert the speculum keeping the blades closed and angled posteriorly
g) After examination, loosen the screw and gently remove the speculum
b) Select an appropriate sized bi-valve speculum
d) Retract the labia minora with one hand
f) Open the speculum blades until the cervix is fully visualized
Fig. 2.17: Steps of speculum examination on a ZOE model
39
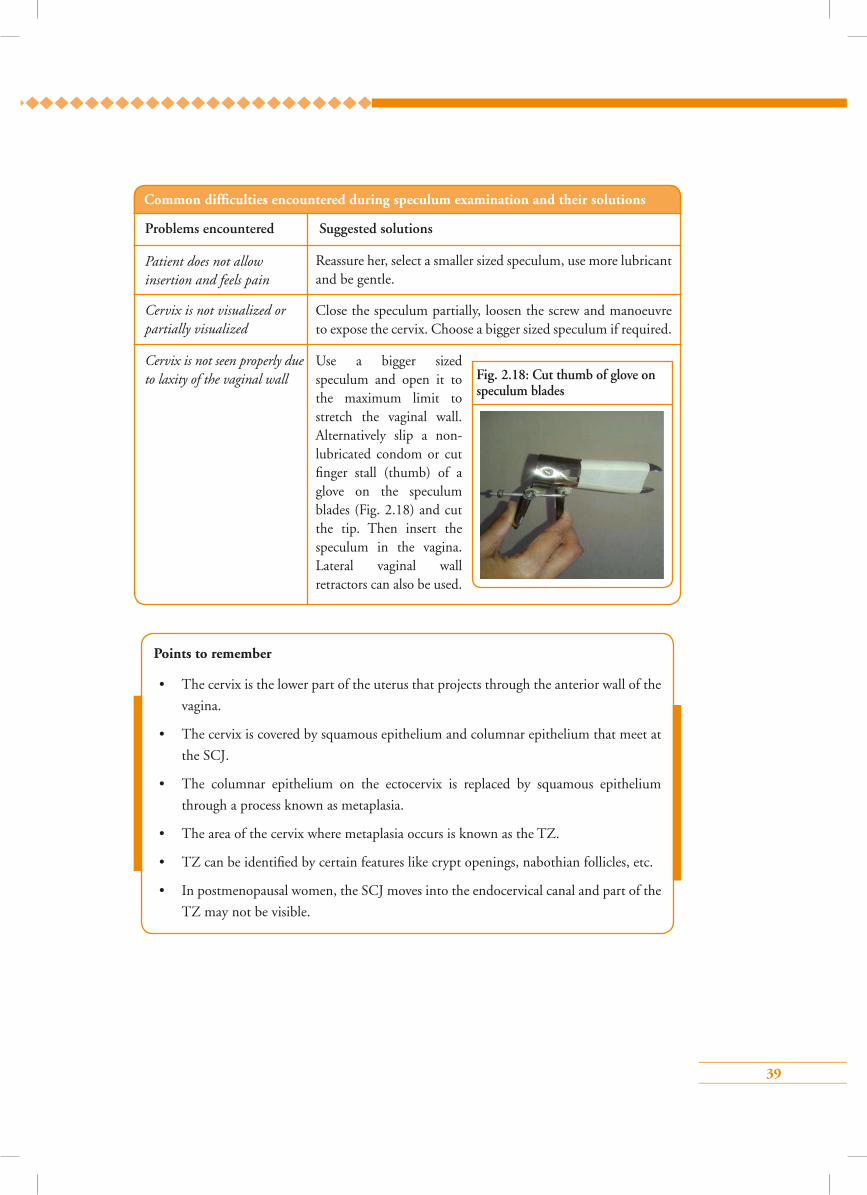
Fig. 2.18: Cut thumb of glove on speculum blades
Common difficulties encountered during speculum examination and their solutions
Patient does not allow insertion and feels pain
Problems encountered Suggested solutions
Cervix is not visualized or partially visualized
Cervix is not seen properly due to laxity of the vaginal wall
Reassure her, select a smaller sized speculum, use more lubricant and be gentle.
Close the speculum partially, loosen the screw and manoeuvre to expose the cervix. Choose a bigger sized speculum if required.
Use a bigger sized speculum and open it to the maximum limit to stretch the vaginal wall. Alternatively slip a non-lubricated condom or cut finger stall (thumb) of a glove on the speculum blades (Fig. 2.18) and cut the tip. Then insert the speculum in the vagina. Lateral vaginal wall retractors can also be used.
Points to remember
• The cervix is the lower part of the uterus that projects through the anterior wall of the
vagina.
• The cervix is covered by squamous epithelium and columnar epithelium that meet at
the SCJ.
• The columnar epithelium on the ectocervix is replaced by squamous epithelium
through a process known as metaplasia.
• The area of the cervix where metaplasia occurs is known as the TZ.
• TZ can be identified by certain features like crypt openings, nabothian follicles, etc.
• In postmenopausal women, the SCJ moves into the endocervical canal and part of the
TZ may not be visible.
40
Answer key1 – d 2 – b 3 – b
4 – a 5 – c
1. The new squamocolumnar junction (SCJ) on the cervix is where the:
a) Vagina meets the cervix
b) Columnar epithelium meets the squamous epithelium
c) Ectocervix meets the cervical os
d) Columnar epithelium meets metaplastic squamous epithelium
2. Abnormal changes of the cervix, such as dysplasia, almost always develop in the:
a) Ectocervix
b) Transformation zone
c) Endocervix
d) Cervical os
3. Which of the following is a false statement for microscopic anatomy of the cervix?
a) Ectocervix is lined by non-keratinized stratified squamous epithelium
b) Ectocervix is lined by single layer squamous epithelium
c) Endocervix is lined by columnar epithelium
d) Squamous epithelium is divided into basal, parabasal, intermediate and superficial layers
4. All the following are true for the anatomy of the cervix, except:
a) Cervix is 1–2 cm in length
b) Cervix is the lower one third of uterus
c) External os is slit like in multiparous women
d) Cervix has supravaginal and infravaginal portions
5. The following is a true statement about the transformation zone:
a) Often invisible during pregnancy
b) Easily visible on the ectocervix in menopausal women
c) Nabothian cysts are features of a normal transformation zone
d) Position of crypt openings help to identify the inner limit of transformation zone
Multiple choice questions
41
Module 3: Pathogenesis of cervical cancer with special reference to HPV infection
3.1 Module overviewThis module is designed to train paramedical workers, midwives, nurses and clinicians about how the HPV infection leads to the development of pre-cancers of the cervix, which may progress to cervical cancer unless treated. Trainees will get an overview of the natural history of cervical cancer that is essential to understand the principles of detection and treatment of cervical precancerous conditions. The module is meant to be used by trainees in conjunction with the WHO Guidance
book (for further reading, refer Chapter 1 – Background; Section 1.3 – Natural history of cervical cancer).
3.2 Module contents• Risk factors for cervical cancer
• Epidemiology of HPV infection
• Mechanism of carcinogenesis by HPV infection
• Natural history of cervical intra-epithelial neoplasia
3.3 Learning objectives By the end of this module, trainees will be able to:
• list the various risk factors for cervical cancer;
• narrate the role of HPV infection in cervical cancer;
• describe the mode of transmission of HPV infection;
• explain the natural history of cervical cancer originating from HPV infection.
3.4 Key points for discussion3.4.1 Which categories of women are at higher risk of developing
cervical cancer?• Women above the age of 40 years who have ever been sexually active
• Women whose sexual debut is at a very young age
• Women who have sex with multiple partners or women whose partners have multiple sex partners
• Women who have too many children, specially at a young age
• Women belonging to the lower socioeconomic strata of society
• Women who have never been screened for cervical cancer
42
• Women who smoke
• Women who have a lower genital tract infection with Chlamydia/HSV
• HIV infected women and women with poor immunity
Most important cause for cervical cancer is persistent infection with human papillomavirus (HPV)
that is transmitted through sexual contact. In fact, high-risk HPV infection is the necessary cause
of cervical cancer which implies that cervical cancer cannot occur without HPV infection.
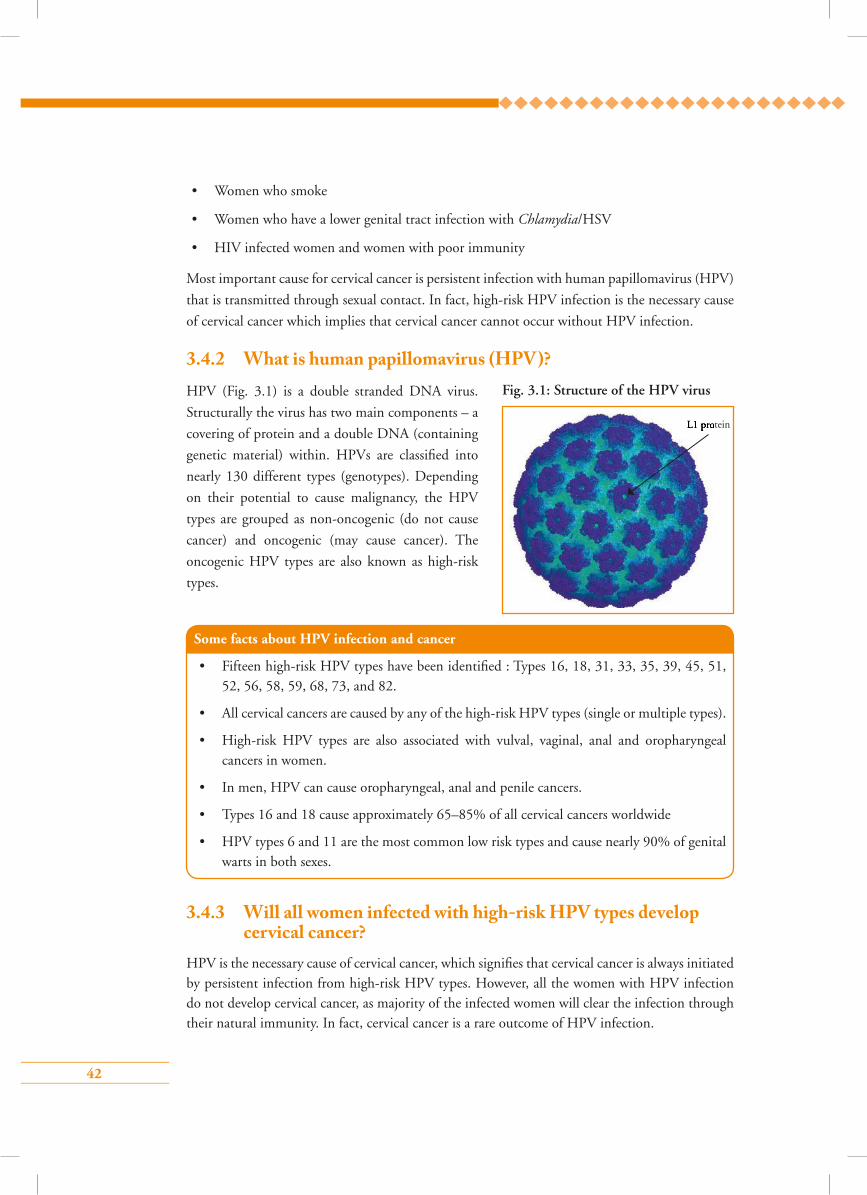
3.4.2 What is human papillomavirus (HPV)?HPV (Fig. 3.1) is a double stranded DNA virus.
Structurally the virus has two main components – a
covering of protein and a double DNA (containing
genetic material) within. HPVs are classified into
nearly 130 different types (genotypes). Depending
on their potential to cause malignancy, the HPV
types are grouped as non-oncogenic (do not cause
cancer) and oncogenic (may cause cancer). The
oncogenic HPV types are also known as high-risk
types.
3.4.3 Will all women infected with high-risk HPV types develop cervical cancer?
HPV is the necessary cause of cervical cancer, which signifies that cervical cancer is always initiated by persistent infection from high-risk HPV types. However, all the women with HPV infection do not develop cervical cancer, as majority of the infected women will clear the infection through their natural immunity. In fact, cervical cancer is a rare outcome of HPV infection.
Some facts about HPV infection and cancer
• Fifteen high-risk HPV types have been identified : Types 16, 18, 31, 33, 35, 39, 45, 51, 52, 56, 58, 59, 68, 73, and 82.
• All cervical cancers are caused by any of the high-risk HPV types (single or multiple types).
• High-risk HPV types are also associated with vulval, vaginal, anal and oropharyngeal cancers in women.
• In men, HPV can cause oropharyngeal, anal and penile cancers.
• Types 16 and 18 cause approximately 65–85% of all cervical cancers worldwide
• HPV types 6 and 11 are the most common low risk types and cause nearly 90% of genital warts in both sexes.
Fig. 3.1: Structure of the HPV virus
L1 proteinL1 protein
43
3.4.4 How does HPV infection spread?HPV infection spreads through sexual contact. It is the most common sexually transmitted infection in men and women. Penetrative sex is not necessary for the virus to be transmitted between sex partners. The virus can be transmitted through genitalia-to-genitalia, skin-to-skin or skin-to-genitalia contact.
Women are at highest risk of acquiring HPV infection when they initiate their sexual life. Majority of the infected women clear the infection due to natural immunity in the body. It takes nearly 1–2 years to clear HPV infection. Women who cannot clear the infection and have pre-cancer infection of the cervix are at the highest risk of developing cervical cancer.
Male circumcision and use of condoms partially prevent transmission of HPV and offer some protection from cervical cancer.
3.4.5 How can a woman know if she has HPV infection?HPV infection by itself does not have any symptoms. Symptoms appear only when the infection causes diseases like genital warts or cancer in its advanced stage.
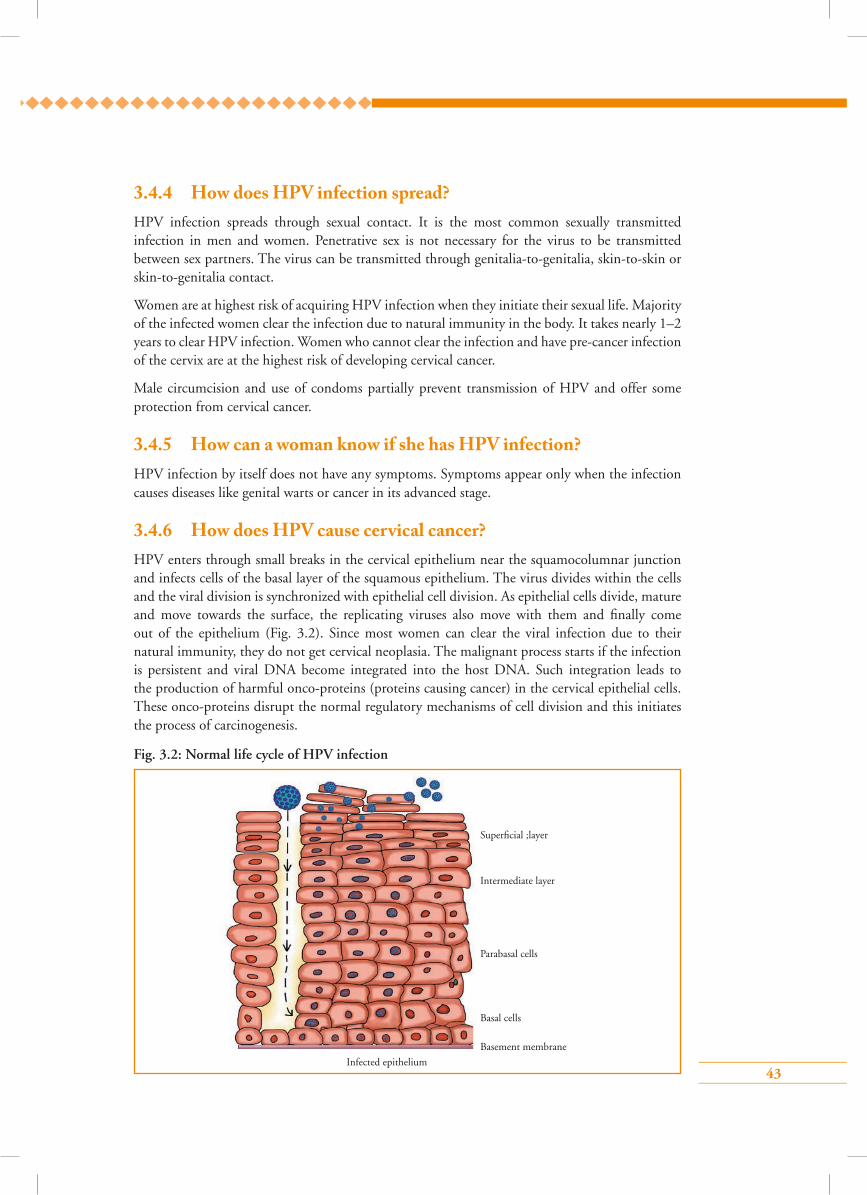
3.4.6 How does HPV cause cervical cancer?HPV enters through small breaks in the cervical epithelium near the squamocolumnar junction and infects cells of the basal layer of the squamous epithelium. The virus divides within the cells and the viral division is synchronized with epithelial cell division. As epithelial cells divide, mature and move towards the surface, the replicating viruses also move with them and finally come out of the epithelium (Fig. 3.2). Since most women can clear the viral infection due to their natural immunity, they do not get cervical neoplasia. The malignant process starts if the infection is persistent and viral DNA become integrated into the host DNA. Such integration leads to the production of harmful onco-proteins (proteins causing cancer) in the cervical epithelial cells. These onco-proteins disrupt the normal regulatory mechanisms of cell division and this initiates the process of carcinogenesis.
Fig. 3.2: Normal life cycle of HPV infection
Superficial ;layer
Intermediate layer
Parabasal cells
Basal cells
Basement membrane
Infected epithelium
44
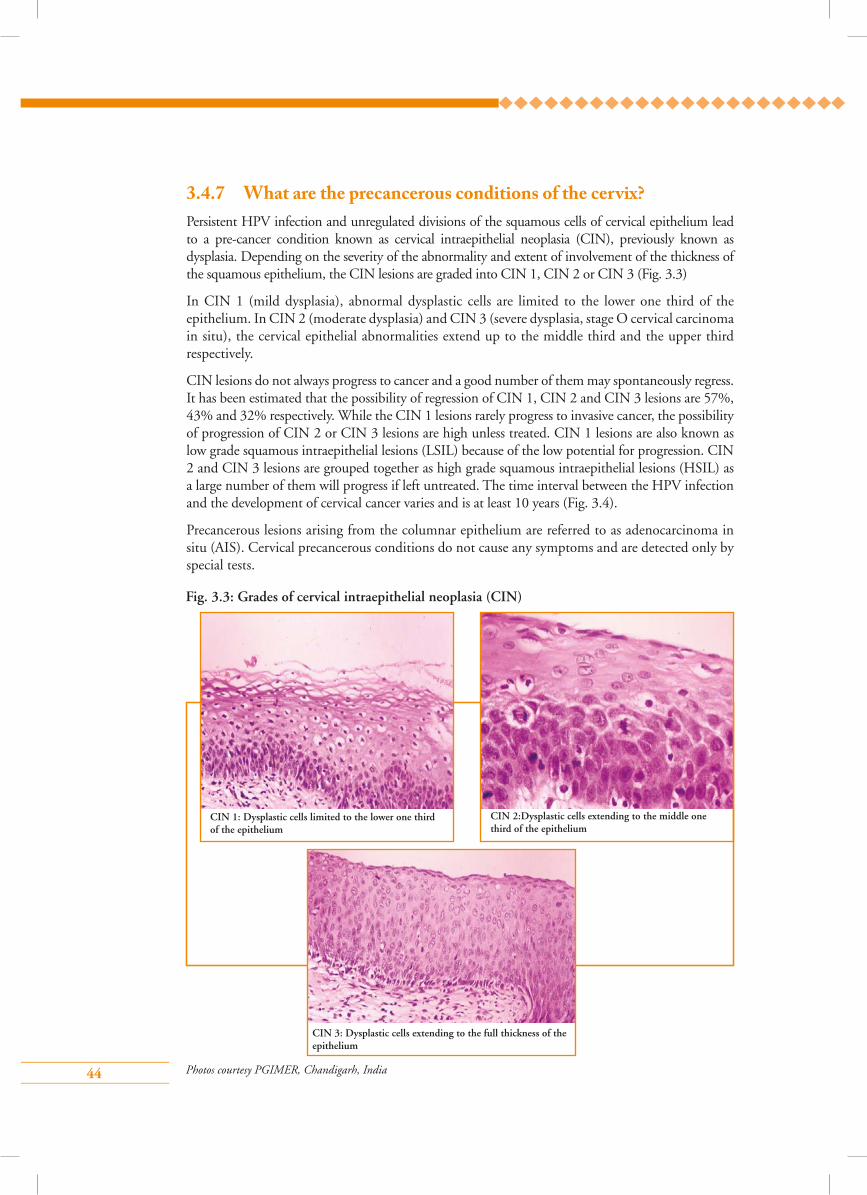
3.4.7 What are the precancerous conditions of the cervix?Persistent HPV infection and unregulated divisions of the squamous cells of cervical epithelium lead to a pre-cancer condition known as cervical intraepithelial neoplasia (CIN), previously known as dysplasia. Depending on the severity of the abnormality and extent of involvement of the thickness of the squamous epithelium, the CIN lesions are graded into CIN 1, CIN 2 or CIN 3 (Fig. 3.3)
In CIN 1 (mild dysplasia), abnormal dysplastic cells are limited to the lower one third of the epithelium. In CIN 2 (moderate dysplasia) and CIN 3 (severe dysplasia, stage O cervical carcinoma in situ), the cervical epithelial abnormalities extend up to the middle third and the upper third respectively.
CIN lesions do not always progress to cancer and a good number of them may spontaneously regress. It has been estimated that the possibility of regression of CIN 1, CIN 2 and CIN 3 lesions are 57%, 43% and 32% respectively. While the CIN 1 lesions rarely progress to invasive cancer, the possibility of progression of CIN 2 or CIN 3 lesions are high unless treated. CIN 1 lesions are also known as low grade squamous intraepithelial lesions (LSIL) because of the low potential for progression. CIN 2 and CIN 3 lesions are grouped together as high grade squamous intraepithelial lesions (HSIL) as a large number of them will progress if left untreated. The time interval between the HPV infection and the development of cervical cancer varies and is at least 10 years (Fig. 3.4).
Precancerous lesions arising from the columnar epithelium are referred to as adenocarcinoma in situ (AIS). Cervical precancerous conditions do not cause any symptoms and are detected only by special tests.
Fig. 3.3: Grades of cervical intraepithelial neoplasia (CIN)
CIN 1: Dysplastic cells limited to the lower one third of the epithelium
CIN 2:Dysplastic cells extending to the middle one third of the epithelium
CIN 3: Dysplastic cells extending to the full thickness of the epithelium
Photos courtesy PGIMER, Chandigarh, India
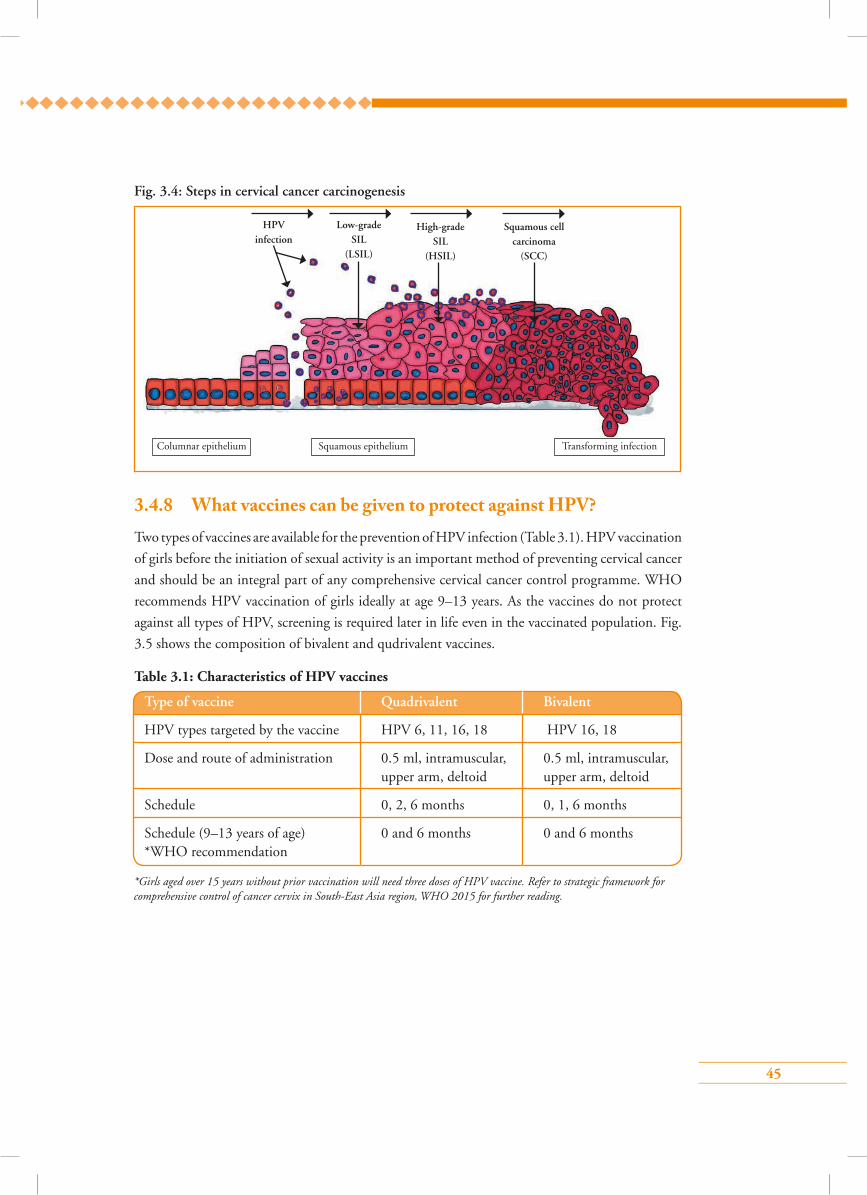
45
Fig. 3.4: Steps in cervical cancer carcinogenesis
Transforming infectionSquamous epithelium
Low-grade SIL
(LSIL)
HPV infection
High-grade SIL
(HSIL)
Squamous cell carcinoma
(SCC)
Columnar epithelium
3.4.8 What vaccines can be given to protect against HPV?Two types of vaccines are available for the prevention of HPV infection (Table 3.1). HPV vaccination
of girls before the initiation of sexual activity is an important method of preventing cervical cancer
and should be an integral part of any comprehensive cervical cancer control programme. WHO
recommends HPV vaccination of girls ideally at age 9–13 years. As the vaccines do not protect
against all types of HPV, screening is required later in life even in the vaccinated population. Fig.
3.5 shows the composition of bivalent and qudrivalent vaccines.
Table 3.1: Characteristics of HPV vaccines
Type of vaccine Quadrivalent Bivalent
HPV types targeted by the vaccine HPV 6, 11, 16, 18 HPV 16, 18
Dose and route of administration 0.5 ml, intramuscular, 0.5 ml, intramuscular, upper arm, deltoid upper arm, deltoid
Schedule 0, 2, 6 months 0, 1, 6 months
Schedule (9–13 years of age) 0 and 6 months 0 and 6 months *WHO recommendation
*Girls aged over 15 years without prior vaccination will need three doses of HPV vaccine. Refer to strategic framework for comprehensive control of cancer cervix in South-East Asia region, WHO 2015 for further reading.
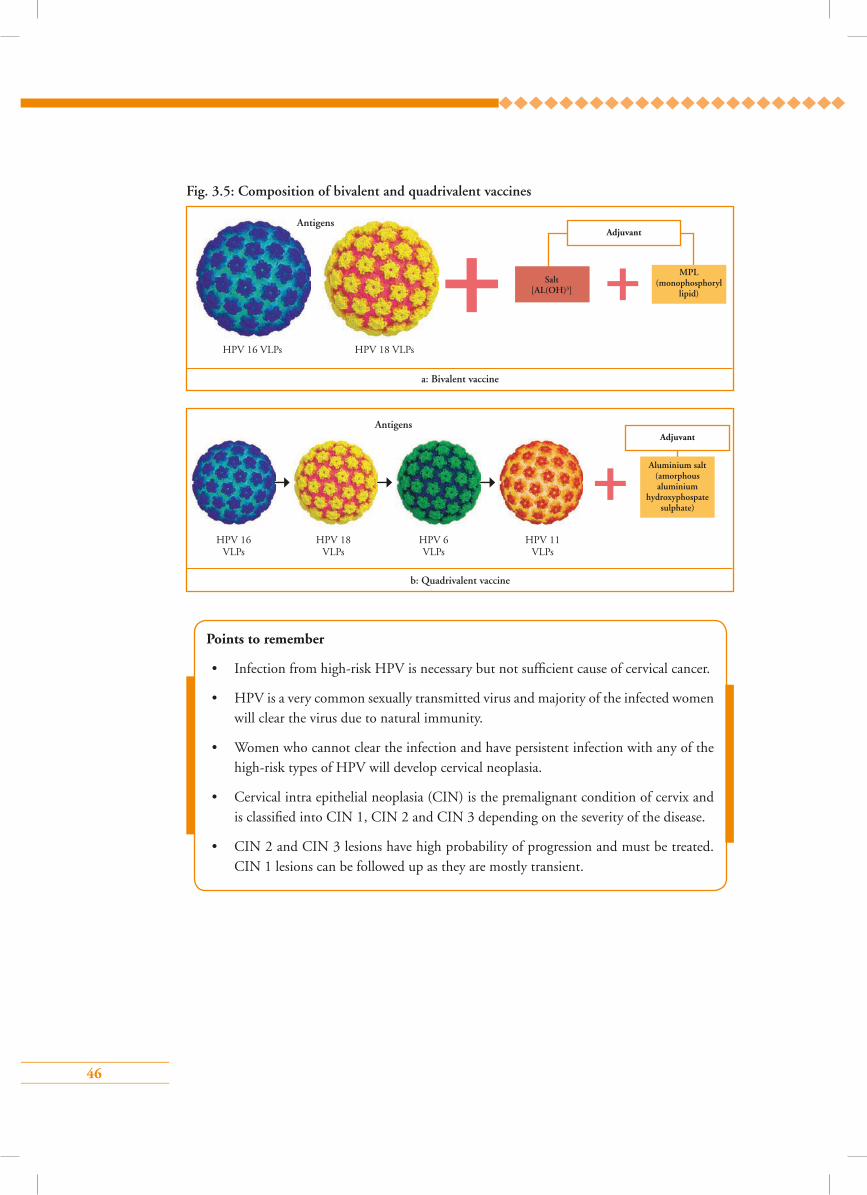
46
Fig. 3.5: Composition of bivalent and quadrivalent vaccines
a: Bivalent vaccine
Adjuvant
Salt [AL(OH)3]
MPL (monophosphoryl
lipid)
HPV 16 VLPs HPV 18 VLPs
Antigens
b: Quadrivalent vaccine
Adjuvant
Aluminium salt (amorphous aluminium
hydroxyphospate sulphate)
HPV 16 VLPs
HPV 18 VLPs
HPV 6 VLPs
HPV 11 VLPs
Antigens
Points to remember
• Infection from high-risk HPV is necessary but not sufficient cause of cervical cancer.
• HPV is a very common sexually transmitted virus and majority of the infected women will clear the virus due to natural immunity.
• Women who cannot clear the infection and have persistent infection with any of the high-risk types of HPV will develop cervical neoplasia.
• Cervical intra epithelial neoplasia (CIN) is the premalignant condition of cervix and is classified into CIN 1, CIN 2 and CIN 3 depending on the severity of the disease.
• CIN 2 and CIN 3 lesions have high probability of progression and must be treated. CIN 1 lesions can be followed up as they are mostly transient.
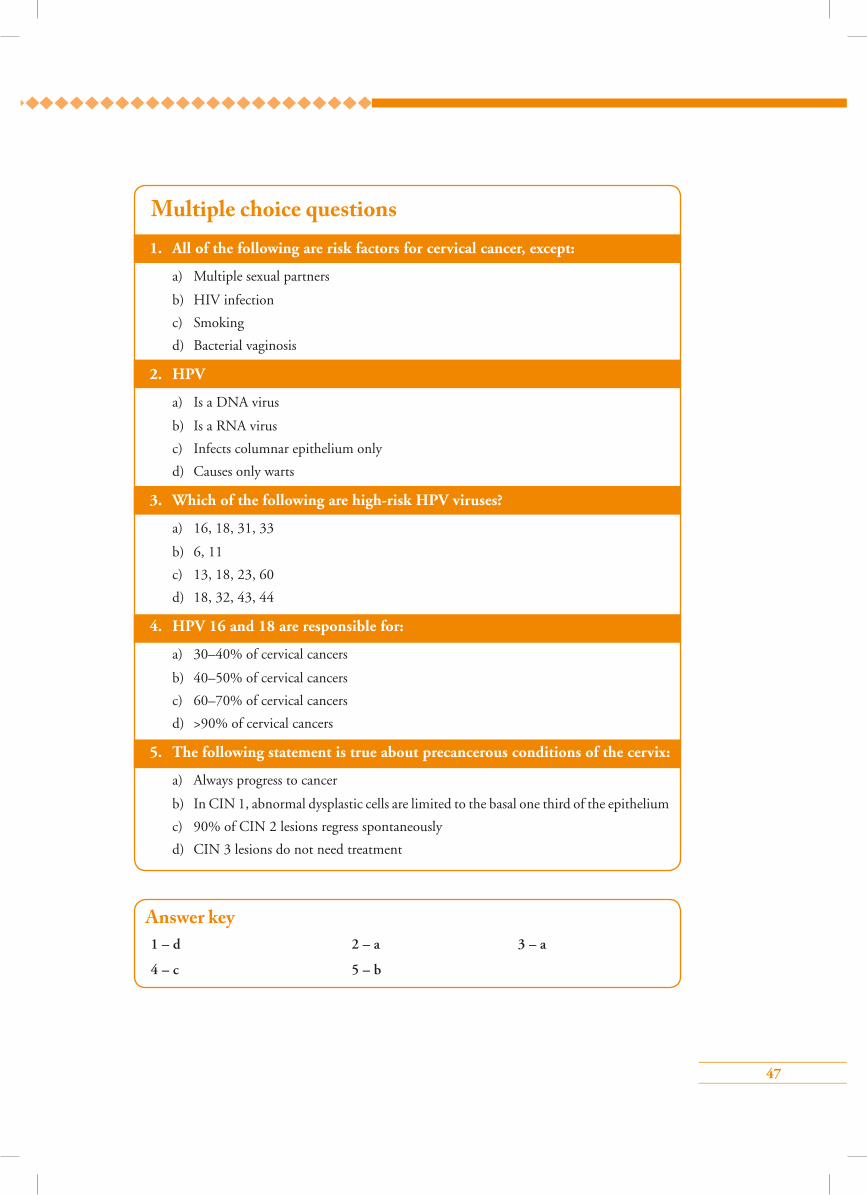
47
Answer key1 – d 2 – a 3 – a
4 – c 5 – b
1. All of the following are risk factors for cervical cancer, except:
a) Multiple sexual partners
b) HIV infection
c) Smoking
d) Bacterial vaginosis
2. HPV
a) Is a DNA virus
b) Is a RNA virus
c) Infects columnar epithelium only
d) Causes only warts
3. Which of the following are high-risk HPV viruses?
a) 16, 18, 31, 33
b) 6, 11
c) 13, 18, 23, 60
d) 18, 32, 43, 44
4. HPV 16 and 18 are responsible for:
a) 30–40% of cervical cancers
b) 40–50% of cervical cancers
c) 60–70% of cervical cancers
d) >90% of cervical cancers
5. The following statement is true about precancerous conditions of the cervix:
a) Always progress to cancer
b) In CIN 1, abnormal dysplastic cells are limited to the basal one third of the epithelium
c) 90% of CIN 2 lesions regress spontaneously
d) CIN 3 lesions do not need treatment
Multiple choice questions
48
Module 4: Counselling
4.1 Module overviewThis module is designed to train paramedical workers, midwives, nurses and clinicians in the art and techniques of counselling women attending cervical cancer screening facilities for screening and treatment. The module is meant to be used by trainees in conjunction with the WHO Guidance book (for further reading, refer Chapter 3 – Community mobilization, education and counselling; Section 3.5 – Counselling and Practice Sheets 3.4, 3.5, 5.1 and 5.7).
4.2 Module contents• Necessity of counselling
• Being a good counsellor
• Steps of counselling
• Counselling messages
• Group learning activities:
Role play
• Checklist for counselling
4.3 Learning objectives By the end of this module, trainees will be able to:
• state the concept and importance of counselling;
• demonstrate counselling of women prior to and after screening;
• demonstrate counselling of women prior to and after treatment of cervical pre-cancers.
4.4 Key points for discussion
4.4.1 What is counselling?Counselling is face-to-face, confidential communication in which the counsellor helps a client to make decisions and then to act on them. Counselling during cervical cancer screening is essential to educate and inform women and help them to make an informed decision to undergo different procedures.
4.4.2. Why is counselling necessary for cervical cancer screening?Women coming for cervical cancer screening need appropriate information about the disease, the tests they have to undergo and the treatment procedures that may be necessary. They need counselling so that they can make an informed decision about participation. Women in developing
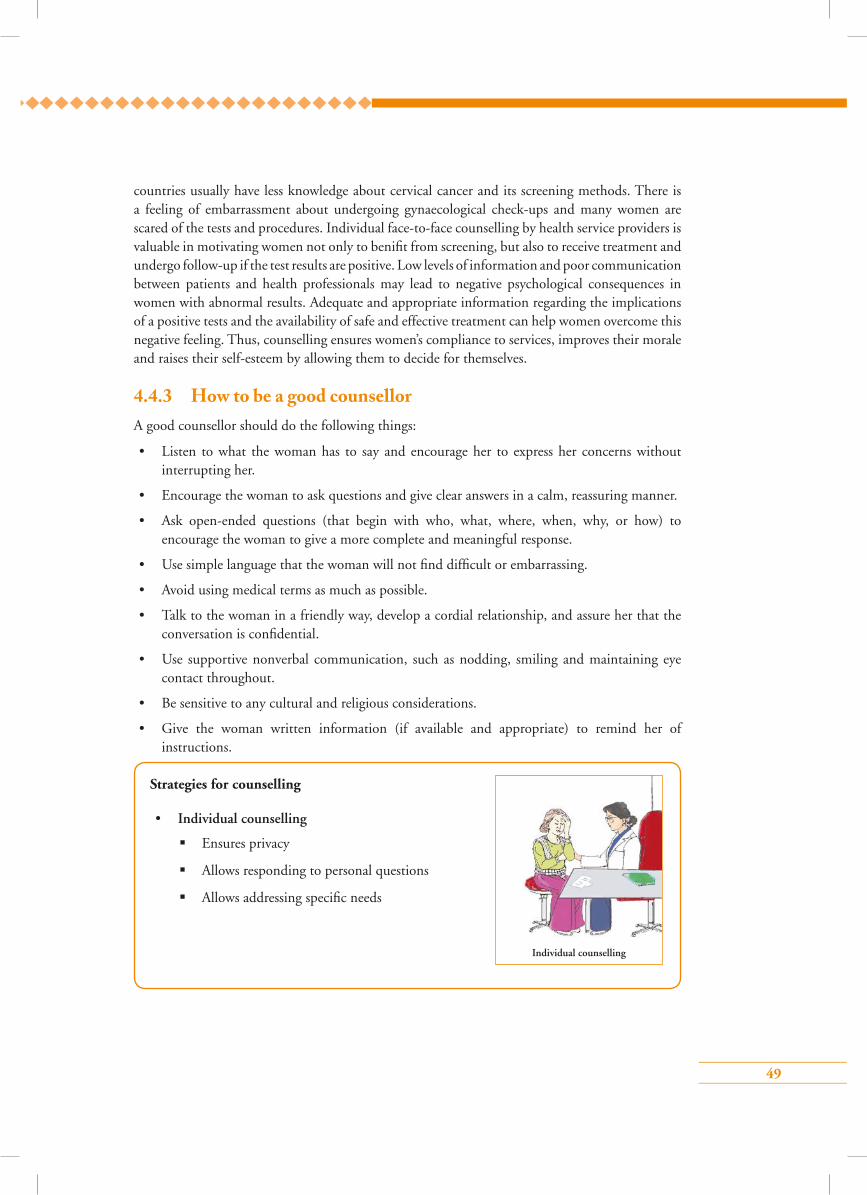
49
countries usually have less knowledge about cervical cancer and its screening methods. There is a feeling of embarrassment about undergoing gynaecological check-ups and many women are scared of the tests and procedures. Individual face-to-face counselling by health service providers is valuable in motivating women not only to benifit from screening, but also to receive treatment and undergo follow-up if the test results are positive. Low levels of information and poor communication between patients and health professionals may lead to negative psychological consequences in women with abnormal results. Adequate and appropriate information regarding the implications of a positive tests and the availability of safe and effective treatment can help women overcome this negative feeling. Thus, counselling ensures women’s compliance to services, improves their morale and raises their self-esteem by allowing them to decide for themselves.
4.4.3 How to be a good counsellorA good counsellor should do the following things:
• Listen to what the woman has to say and encourage her to express her concerns without interrupting her.
• Encourage the woman to ask questions and give clear answers in a calm, reassuring manner.
• Ask open-ended questions (that begin with who, what, where, when, why, or how) to encourage the woman to give a more complete and meaningful response.
• Use simple language that the woman will not find difficult or embarrassing.
• Avoid using medical terms as much as possible.
• Talk to the woman in a friendly way, develop a cordial relationship, and assure her that the conversation is confidential.
• Use supportive nonverbal communication, such as nodding, smiling and maintaining eye contact throughout.
• Be sensitive to any cultural and religious considerations.
• Give the woman written information (if available and appropriate) to remind her of instructions.
Strategies for counselling
• Individual counselling
Ensures privacy
Allows responding to personal questions
Allows addressing specific needs
Individual counselling
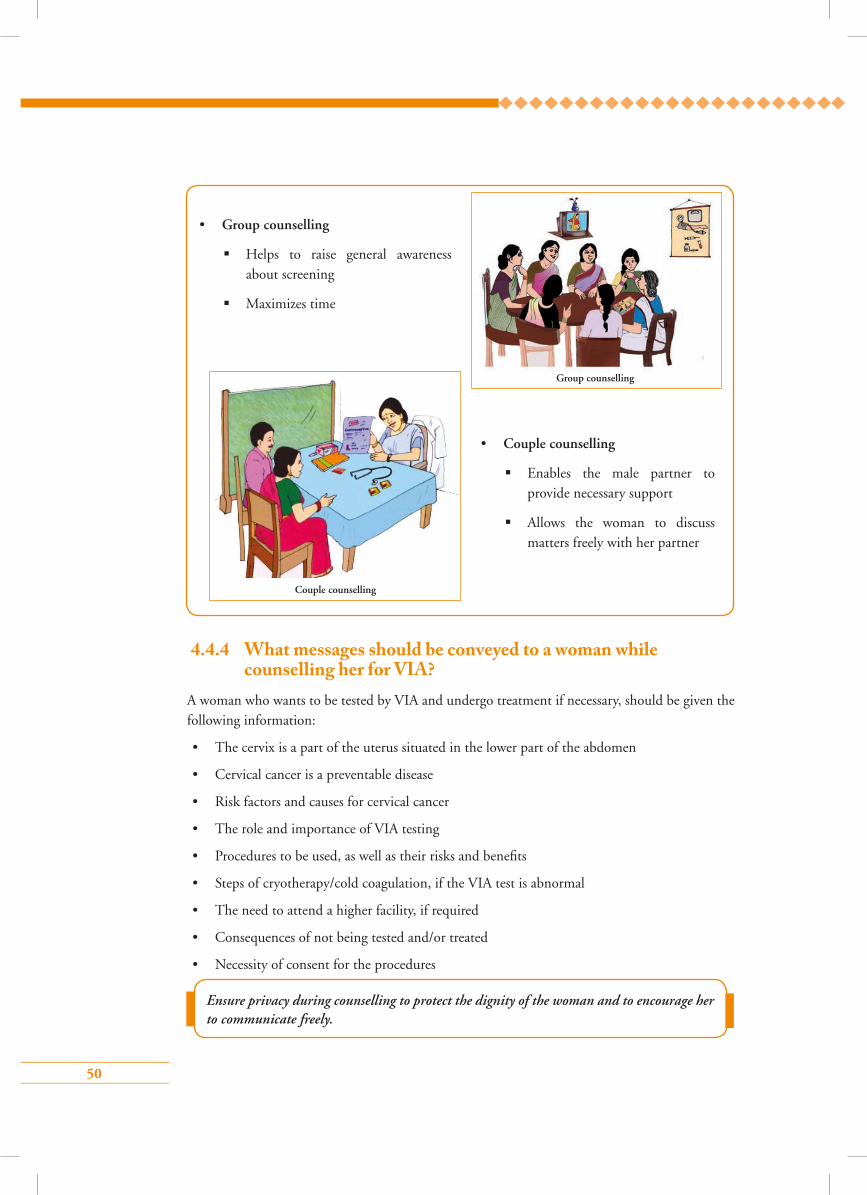
50
4.4.4 What messages should be conveyed to a woman while counselling her for VIA?
A woman who wants to be tested by VIA and undergo treatment if necessary, should be given the following information:
• The cervix is a part of the uterus situated in the lower part of the abdomen
• Cervical cancer is a preventable disease
• Risk factors and causes for cervical cancer
• The role and importance of VIA testing
• Procedures to be used, as well as their risks and benefits
• Steps of cryotherapy/cold coagulation, if the VIA test is abnormal
• The need to attend a higher facility, if required
• Consequences of not being tested and/or treated
• Necessity of consent for the procedures
• Group counselling
Helps to raise general awareness about screening
Maximizes time
• Couple counselling
Enables the male partner to provide necessary support
Allows the woman to discuss matters freely with her partner
Group counselling
Couple counselling
Ensure privacy during counselling to protect the dignity of the woman and to encourage her to communicate freely.
51
4.4.5 What are the steps of counselling?See Skills Checklists 4.6.1, 4.6.2 and 4.6.3,
4.5 Group learning activities
4.5.1 Role playCounselling cards and flip chart should be used for role plays.
Role play 1: Counselling a woman to undergo VIA
Participants and background situation for the role play
• Trainees should be selected from the group to perform the following roles.
– Pushpa, a 40-year-old woman having two children, who attended the OPD of the district hospital as she often had backaches
– Rakhi, a doctor who treats Pushpa for backache and also advises her to take a screening test for cervical cancer
– Sheela, a nurse at the screening clinic
• The entire group, including the role players, should know the following background situation:
Pushpa has been advised by Dr Rakhi to have a cervical cancer screening test known as VIA. Pushpa is not sure if this test will benefit her. She is curious to know more about the test. Dr Rakhi sends her to nurse Sheela, who explains the details of VIA as a screening test.
Focus of the role play
The focus of the role play is the interaction between Pushpa who has been advised to undergo VIA as a screening test for cervical cancer, and nurse Sheela who explains details about the test. While treating Pushpa for backache, Dr Rakhi asks Pushpa whether she knows about a test named VIA and if she ever had the test. When Pushpa tells her that she is not aware of any such a test, Dr Rakhi informs her that all women above 30 years at age should have the test and advises her to go and meet the nurse named Sheela who would provide her with information about the test. Sheela greets Pushpa warmly and makes her sit comfortably. She asks if Pushpa has heard about the disease, cervical cancer, and screening tests such as VIA. Pushpa says that she has never heard of either the disease or the test. Sheela goes on to explain what cervical cancer is, its cause, women who are at risk of getting cervical cancer, and the necessity of screening tests like VIA that can reduce the risk of getting cervical cancer. She explains that it takes approximately 10–15 years for cervical cancer to develop. The disease has a precancerous stage that can be detected by special tests like VIA. She informs Pushpa that even if cervical pre-cancers are detected, they can be treated by very simple methods. Sheela reassures Pushpa that the test is painless, takes only a few minutes and she will be informed of the test results immediately.
Time allotted for the role play: 10 minutes
52
Role play 2: Counselling a woman who has a negative VIA test result
Participants and background situation for the role play
•Trainees should be selected from the group to perform the following roles:
– Kay, a 36-year-old woman having two children, who underwent the VIA test
– Su, the nurse who performed VIA test at the primary health centre
– Thinza, a community health worker who counselled Kay for VIA
– Lwin, Kay’s spouse who accompanies her
• The entire group including the role players should know the following background situation:
Kay underwent VIA test at a primary level health centre. The test was negative. Su explains what a negative VIA test means and what should be done in the future.
Role play 3: Counselling a woman who is positive on VIA test and eligible for cryotherapy
Participants and background situation for the role play
• Trainees should be selected from the group to perform the following roles:
– Mary, a 36-year-old woman having two children, who has a VIA positive test result
– Catherine, the nurse who performed VIA and advised treatment by cryotherapy
– Stephen, Mary’s spouse who accompanies her
Focus of the role play
The focus of the role play is the interaction between Kay, who has tested negative on VIA, and nurse Su, who performed the test on Kay. After completing the VIA test, Su asks Kay to sit in the counselling room. She also asks her to call in her family, if present. Accordingly, Kay calls her spouse, Lwin, in to the counselling room. Su informs them that Kay is doing well and her VIA test result is negative. This means that she does not have cervical cancer or a precancerous condition at present. She also informs them that Kay’s chances of developing cancer in the next 3 years are very minimal. She advises them that Kay should undergo VIA test every 3 years to reduce the risk of getting cervical cancer. Su informs them that if Kay develops symptoms like irregular bleeding, postcoital bleeding or foul smelling discharge per vagina at anytime, she should report early to the hospital and consult a doctor. Thinza, the community health worker who had motivated Kay to attend the screening clinic for VIA, also reassures Kay that she need not worry as she does not have cervical pre-cancer or cancer now. She once more informs Kay of the necessity of repeat VIA test at periodic intervals of 3 years.
Time allotted for the role play: 10 minutes
53
• The entire group including the role players should know the following background situation:
Mary, a 36-year-old woman, has taken the VIA test and is detected to have a positive test result. Catherine, the nurse who did the VIA test, informs Mary that her problem could be easily treated at the same visit by a simple treatment method known as cryotherapy. Catherine informs her about the treatment method, side effects and possible complications. She answers Mary’s questions and helps her to take a decision to undergo the treatment.
Role Play 4: Counselling a woman who is suspicious of invasive cancer on VIA
Participants and background situation for role play
•Trainees should be selected from the group to perform the following roles:
– Rehana, a 45-year-old lady with five children, who has undergone a VIA test at a primary healthcare centre
– Fatima, a nurse at the primary healthcare centre who performs VIA
Focus of the role play
The focus of the role play is the interaction between Mary, whose VIA test is positive, and nurse Catherine, who explains that Mary has a minor problem that can be easily taken care of by a simple treatment method known as cryotherapy.
After completing the VIA test, Catherine asks Mary to sit in the counselling room. She also asks her to call in her family, if present. Accordingly Mary calls her spouse, Stephen, in to the counselling room. Catherine informs that Mary’s VIA test is positive. She reassures the couple that the test result does not mean that Mary has cervical cancer, but she does have a minor problem which could be an early change (pre-cancer) that has a possibility of developing in to cervical cancer later. Catherine explains that this change in Mary’s cervix can be easily treated by a method known as cryotherapy that is very effective in curing these early changes. She informs them that cryotherapy is a very safe procedure and has minimum complications and is not painful. During the treatment Mary will only feel a cold sensation in the vagina. The treatment takes only a few minutes to complete. There is no need of anaesthesia or any other medication before the procedure. She also informs Mary that after treatment, she will have a watery vaginal discharge (that can also be blood-stained) for about 4 weeks. She advises the couple to avoid sexual intercourse for about 4 weeks. She informs them that Mary will have to come for a follow-up visit after 1 year. Mary and Stephen are convinced by Catherine’s information and agree to treatment by cryotherapy. Catherine hands them a consent form that Mary is required to sign before the treatment.
Time for role play: 10 minutes
54
• The entire group, including the role players, should know the following background situation:
Rehana has undergone VIA test at the primary health centre. Her VIA test result is suspicious of invasive cervical cancer. Fatima informs her of the VIA test findings and advises her to attend a specialized centre as soon as possible for further evaluation and treatment. Fatima addresses Rehana’s fear and reassures her that the disease can be successfully treated, if diagnosed at an early stage.
Focus of the role play
The focus of the role play is the interaction between a nurse, Fatima, who performs VIA at a primary health centre and Rehana, who has undergone VIA at the centre. After the procedure, Fatima asks Rehana to accompany her to the counselling room to discuss her VIA test results, thus ensuring Rehana’s right to privacy, and confidentiality. She informs Rehana that she suspects the presence of an abnormality on her cervix that could be a cancer. Fatima explains the necessity of attending a specialized cancer centre where there are adequate facilities for diagnosis and treatment. Fatima briefs her about the investigations that may be done at the centre for diagnosis. She may be examined by colposcope that gives a magnified vision of the cervix and a very small piece of tissue from the affected area may be taken for confirmation of diagnosis. If the test confirms the presence of the disease then the necessary treatment can be done at the specialized centre. Fatima identifies and addresses Rehana’s concerns, doubts and fears regarding the investigation procedures. Fatima then arranges for referral to the designated centre. She gives the referral form to Rehana and tells her about the location, day and time when she should visit the centre for necessary investigation and management.
Time allotted for the role play: 10 minutes
4.6 Skill development
4.6.1 Steps for counselling a woman for VIA (VIA is negative)Skills Checklist: Counselling skills in VIA
Steps Case
Counselling prior to VIA 1 2 3 4
1. Greet the woman respectfully and introduce yourself
2. Provide general information about preventing cancer by early detection
3. Explain the importance of cervical cancer screening
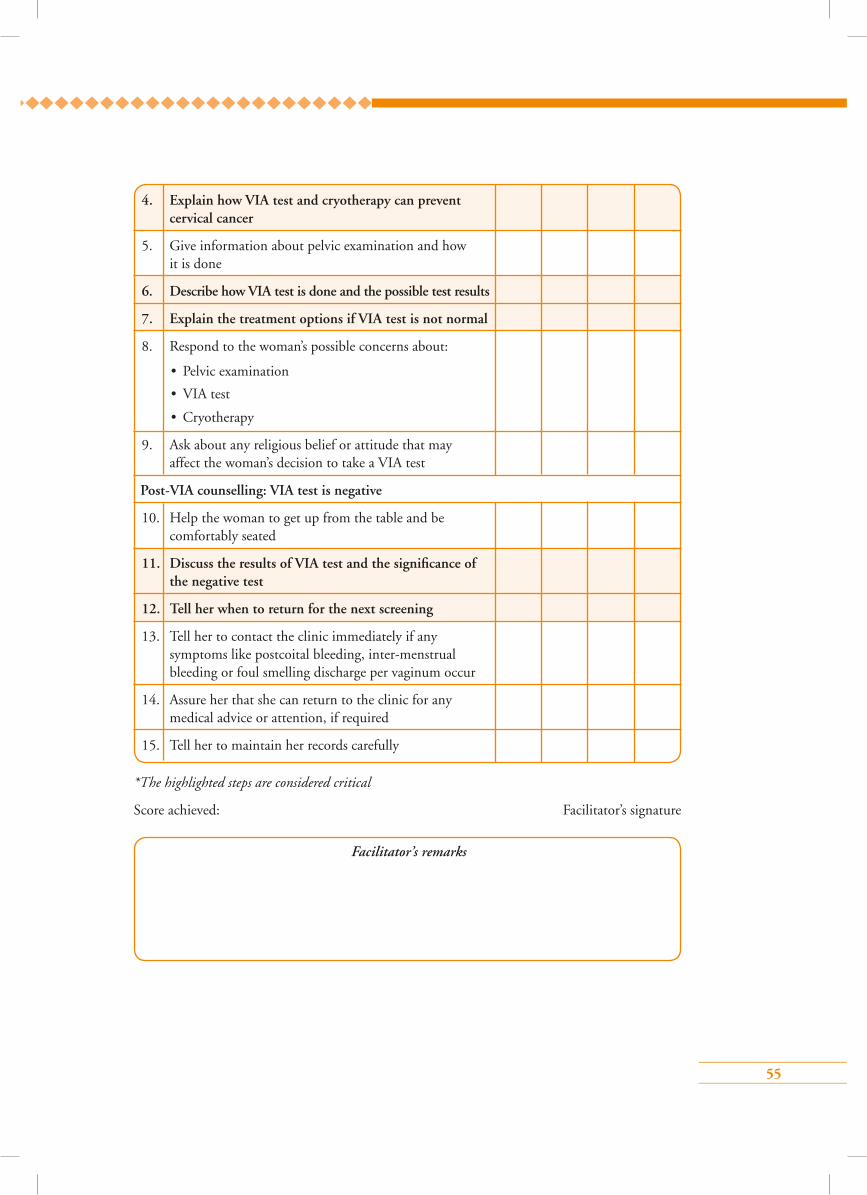
55
Facilitator’s remarks
*The highlighted steps are considered critical
Score achieved: Facilitator’s signature
4. Explain how VIA test and cryotherapy can prevent cervical cancer
5. Give information about pelvic examination and how it is done
6. Describe how VIA test is done and the possible test results
7. Explain the treatment options if VIA test is not normal
8. Respond to the woman’s possible concerns about:
• Pelvic examination
• VIA test
• Cryotherapy
9. Ask about any religious belief or attitude that may affect the woman’s decision to take a VIA test
Post-VIA counselling: VIA test is negative
10. Help the woman to get up from the table and be comfortably seated
11. Discuss the results of VIA test and the significance of the negative test
12. Tell her when to return for the next screening
13. Tell her to contact the clinic immediately if any symptoms like postcoital bleeding, inter-menstrual bleeding or foul smelling discharge per vaginum occur
14. Assure her that she can return to the clinic for any medical advice or attention, if required
15. Tell her to maintain her records carefully

56
4.6.2 Steps for counselling a woman for VIA (VIA is positive and eligible for cryotherapy)
Skills Checklist: Counselling skills in VIA and cryotherapy
Steps Case
Counselling prior to VIA 1 2 3 4
1. Greet the woman respectfully and introduce yourself
2. Provide general information about preventing cancer by early detection
3. Explain the importance of cervical cancer screening
4. Explain how VIA test and cryotherapy can prevent cervical cancer
5. Give information about the pelvic examination and how it is done
6. Describe how VIA test is done and the possible test results
7. Explain the treatment options if VIA test is not normal
8. Respond to the woman’s possible concerns about:
• Pelvic examination
• VIA test
• Cryotherapy
9. Ask about any religious belief or attitude that may affect the woman’s decision to take the VIA test
Post-VIA counselling: VIA test is positive and the woman is eligible for cryotherapy
10. After completing VIA, ask the woman if she is more comfortable discussing the test results while lying down or sitting up on the table
11. Ask her if she would prefer to have her husband/partner or any other family member present with her
12. Inform about the VIA test findings and the significance of a positive test
13. Give her (along with any family member, preferably her husband) detailed information about how treatment will benefit her
14. Tell her how she will be benefit by getting cryotherapy in the same sitting
15. If the woman is not ready to have treatment on the same day, give her the option of coming back on another specified day. Emphasize the need for treatment
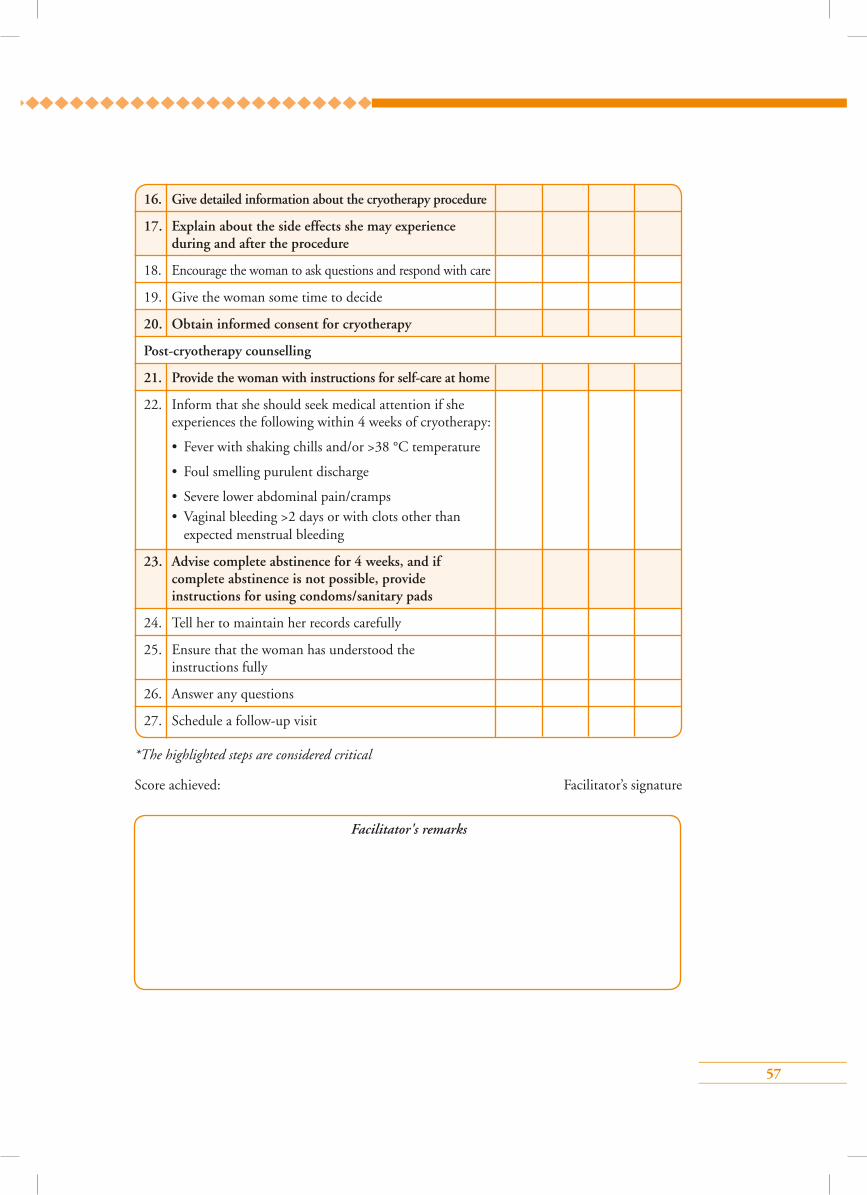
57
16. Give detailed information about the cryotherapy procedure
17. Explain about the side effects she may experience during and after the procedure
18. Encourage the woman to ask questions and respond with care
19. Give the woman some time to decide
20. Obtain informed consent for cryotherapy
Post-cryotherapy counselling
21. Provide the woman with instructions for self-care at home
22. Inform that she should seek medical attention if she experiences the following within 4 weeks of cryotherapy:
• Fever with shaking chills and/or >38 °C temperature
• Foul smelling purulent discharge
• Severe lower abdominal pain/cramps • Vaginal bleeding >2 days or with clots other than
expected menstrual bleeding
23. Advise complete abstinence for 4 weeks, and if complete abstinence is not possible, provide instructions for using condoms/sanitary pads
24. Tell her to maintain her records carefully
25. Ensure that the woman has understood the instructions fully
26. Answer any questions
27. Schedule a follow-up visit
*The highlighted steps are considered critical
Score achieved: Facilitator’s signature
Facilitator's remarks
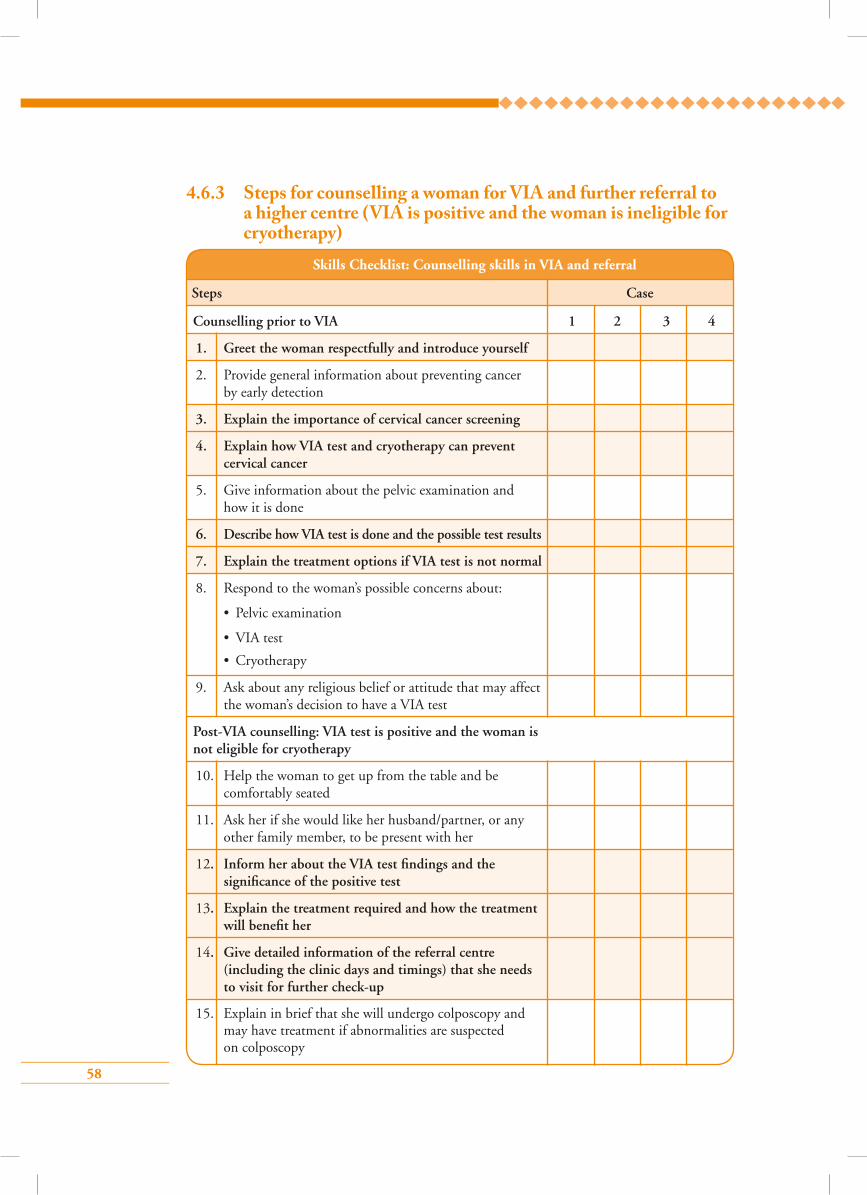
58
4.6.3 Steps for counselling a woman for VIA and further referral to a higher centre (VIA is positive and the woman is ineligible for cryotherapy)
Skills Checklist: Counselling skills in VIA and referral
Steps Case
Counselling prior to VIA 1 2 3 4
1. Greet the woman respectfully and introduce yourself
2. Provide general information about preventing cancer by early detection
3. Explain the importance of cervical cancer screening
4. Explain how VIA test and cryotherapy can prevent cervical cancer
5. Give information about the pelvic examination and how it is done
6. Describe how VIA test is done and the possible test results
7. Explain the treatment options if VIA test is not normal
8. Respond to the woman’s possible concerns about:
• Pelvic examination
• VIA test
• Cryotherapy
9. Ask about any religious belief or attitude that may affect the woman’s decision to have a VIA test
Post-VIA counselling: VIA test is positive and the woman is not eligible for cryotherapy
10. Help the woman to get up from the table and be comfortably seated
11. Ask her if she would like her husband/partner, or any other family member, to be present with her
12. Inform her about the VIA test findings and the significance of the positive test
13. Explain the treatment required and how the treatment will benefit her
14. Give detailed information of the referral centre (including the clinic days and timings) that she needs to visit for further check-up
15. Explain in brief that she will undergo colposcopy and may have treatment if abnormalities are suspected on colposcopy
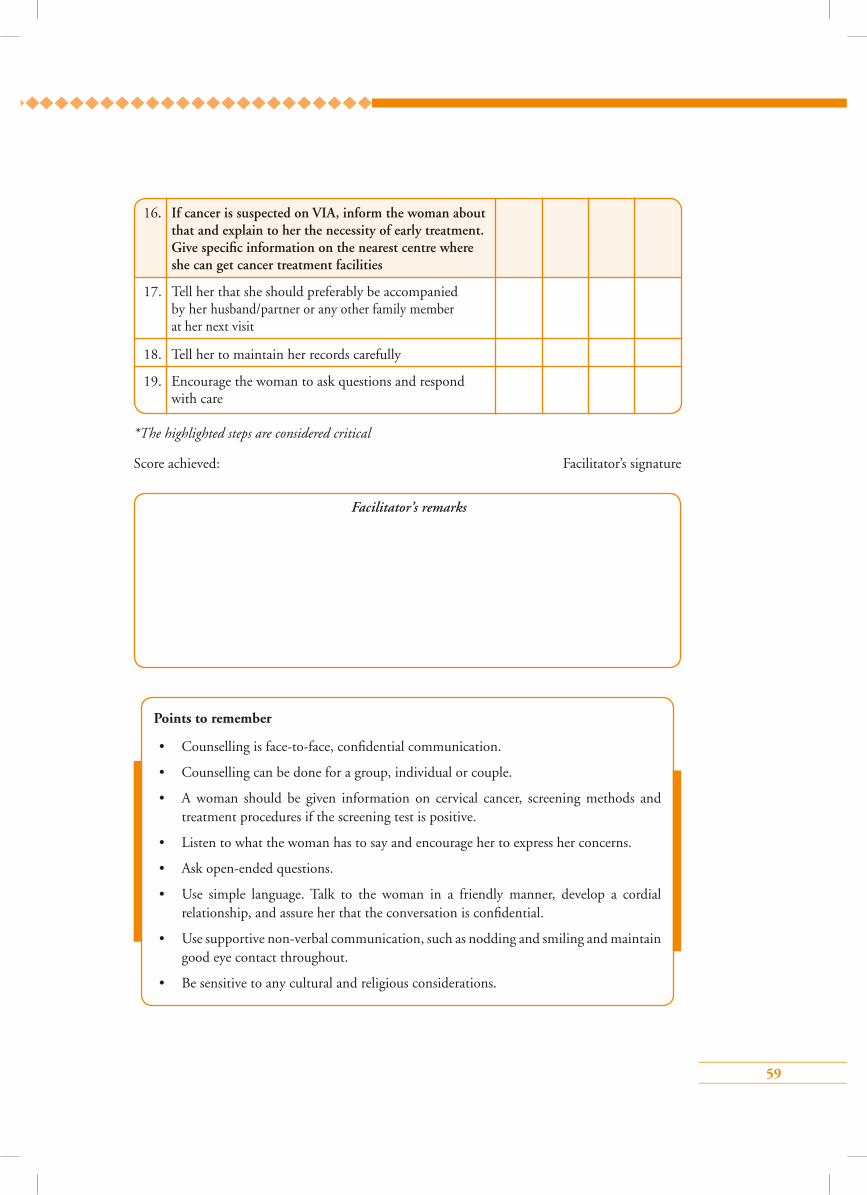
59
Facilitator’s remarks
*The highlighted steps are considered critical
Score achieved: Facilitator’s signature
16. If cancer is suspected on VIA, inform the woman about that and explain to her the necessity of early treatment. Give specific information on the nearest centre where she can get cancer treatment facilities
17. Tell her that she should preferably be accompanied by her husband/partner or any other family member at her next visit
18. Tell her to maintain her records carefully
19. Encourage the woman to ask questions and respond with care
Points to remember
• Counselling is face-to-face, confidential communication.
• Counselling can be done for a group, individual or couple.
• A woman should be given information on cervical cancer, screening methods and treatment procedures if the screening test is positive.
• Listen to what the woman has to say and encourage her to express her concerns.
• Ask open-ended questions.
• Use simple language. Talk to the woman in a friendly manner, develop a cordial relationship, and assure her that the conversation is confidential.
• Use supportive non-verbal communication, such as nodding and smiling and maintain good eye contact throughout.
• Be sensitive to any cultural and religious considerations.
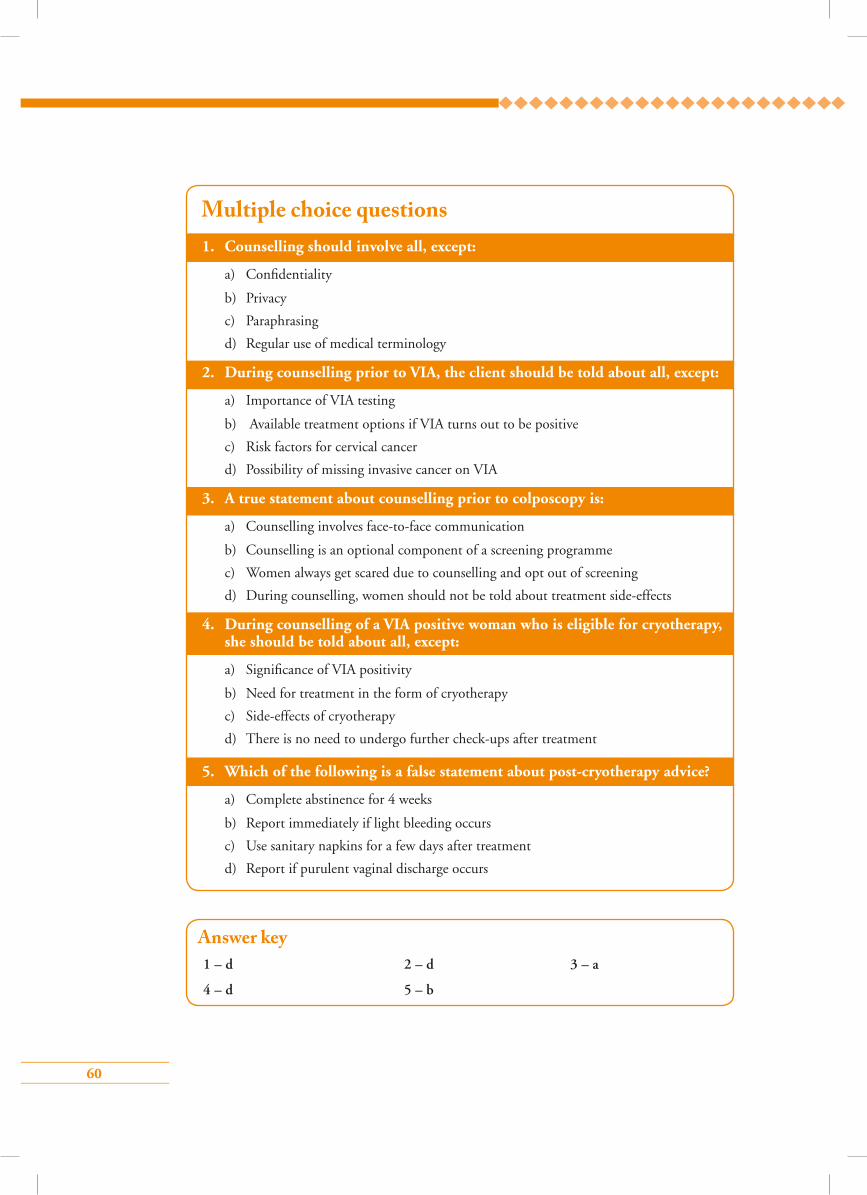
60
Answer key1 – d 2 – d 3 – a
4 – d 5 – b
1. Counselling should involve all, except:
a) Confidentiality
b) Privacy
c) Paraphrasing
d) Regular use of medical terminology
2. During counselling prior to VIA, the client should be told about all, except:
a) Importance of VIA testing
b) Available treatment options if VIA turns out to be positive
c) Risk factors for cervical cancer
d) Possibility of missing invasive cancer on VIA
3. A true statement about counselling prior to colposcopy is:
a) Counselling involves face-to-face communication
b) Counselling is an optional component of a screening programme
c) Women always get scared due to counselling and opt out of screening
d) During counselling, women should not be told about treatment side-effects
4. During counselling of a VIA positive woman who is eligible for cryotherapy, she should be told about all, except:
a) Significance of VIA positivity
b) Need for treatment in the form of cryotherapy
c) Side-effects of cryotherapy
d) There is no need to undergo further check-ups after treatment
5. Which of the following is a false statement about post-cryotherapy advice?
a) Complete abstinence for 4 weeks
b) Report immediately if light bleeding occurs
c) Use sanitary napkins for a few days after treatment
d) Report if purulent vaginal discharge occurs
Multiple choice questions
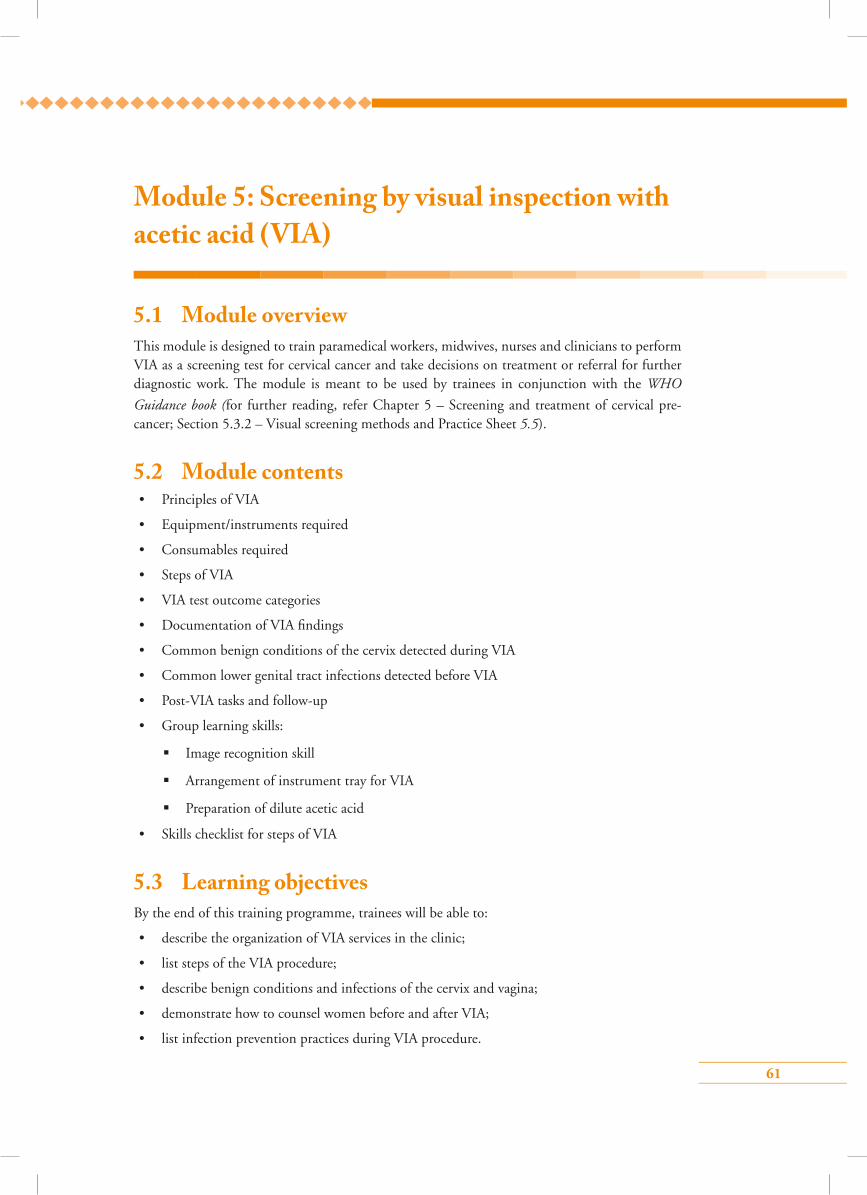
61
Module 5: Screening by visual inspection with acetic acid (VIA)
5.1 Module overviewThis module is designed to train paramedical workers, midwives, nurses and clinicians to perform VIA as a screening test for cervical cancer and take decisions on treatment or referral for further diagnostic work. The module is meant to be used by trainees in conjunction with the WHO
Guidance book (for further reading, refer Chapter 5 – Screening and treatment of cervical pre-cancer; Section 5.3.2 – Visual screening methods and Practice Sheet 5.5).
5.2 Module contents• Principles of VIA
• Equipment/instruments required
• Consumables required
• Steps of VIA
• VIA test outcome categories
• Documentation of VIA findings
• Common benign conditions of the cervix detected during VIA
• Common lower genital tract infections detected before VIA
• Post-VIA tasks and follow-up
• Group learning skills:
Image recognition skill
Arrangement of instrument tray for VIA
Preparation of dilute acetic acid
• Skills checklist for steps of VIA
5.3 Learning objectivesBy the end of this training programme, trainees will be able to:
• describe the organization of VIA services in the clinic;
• list steps of the VIA procedure;
• describe benign conditions and infections of the cervix and vagina;
• demonstrate how to counsel women before and after VIA;
• list infection prevention practices during VIA procedure.
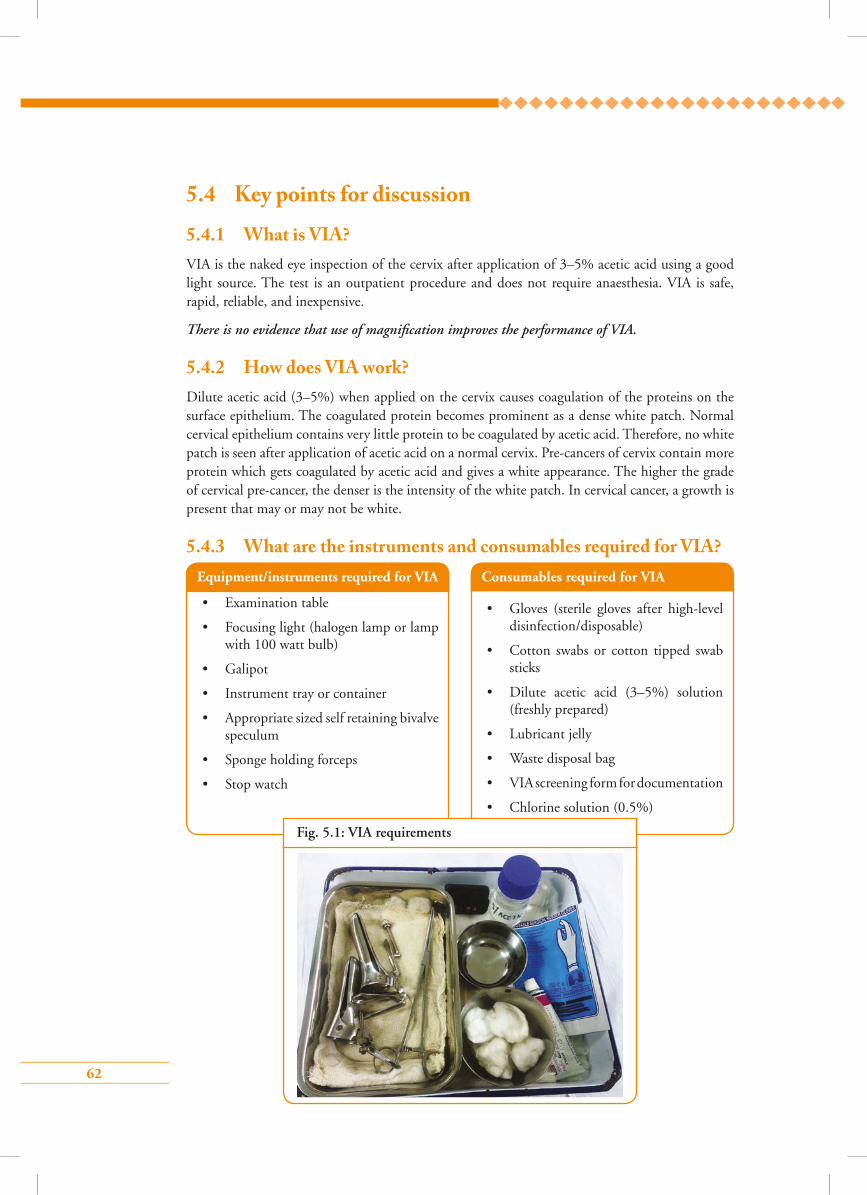
62
5.4 Key points for discussion
5.4.1 What is VIA?VIA is the naked eye inspection of the cervix after application of 3–5% acetic acid using a good light source. The test is an outpatient procedure and does not require anaesthesia. VIA is safe, rapid, reliable, and inexpensive.
There is no evidence that use of magnification improves the performance of VIA.
5.4.2 How does VIA work?Dilute acetic acid (3–5%) when applied on the cervix causes coagulation of the proteins on the surface epithelium. The coagulated protein becomes prominent as a dense white patch. Normal cervical epithelium contains very little protein to be coagulated by acetic acid. Therefore, no white patch is seen after application of acetic acid on a normal cervix. Pre-cancers of cervix contain more protein which gets coagulated by acetic acid and gives a white appearance. The higher the grade of cervical pre-cancer, the denser is the intensity of the white patch. In cervical cancer, a growth is present that may or may not be white.
5.4.3 What are the instruments and consumables required for VIA?Equipment/instruments required for VIA
• Examination table
• Focusing light (halogen lamp or lamp with 100 watt bulb)
• Galipot
• Instrument tray or container
• Appropriate sized self retaining bivalve speculum
• Sponge holding forceps
• Stop watch
Consumables required for VIA
• Gloves (sterile gloves after high-level disinfection/disposable)
• Cotton swabs or cotton tipped swab sticks
• Dilute acetic acid (3–5%) solution (freshly prepared)
• Lubricant jelly
• Waste disposal bag
• VIA screening form for documentation
• Chlorine solution (0.5%)
Fig. 5.1: VIA requirements
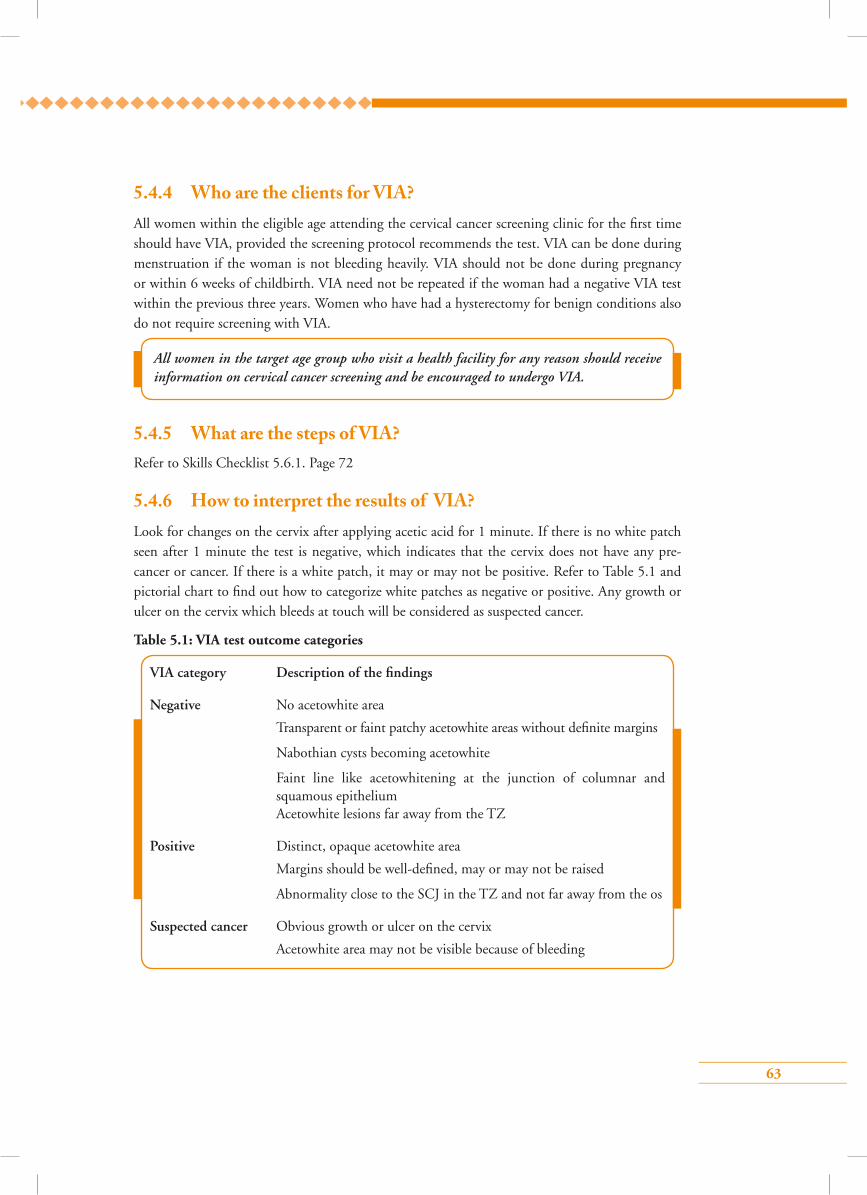
63
5.4.4 Who are the clients for VIA?All women within the eligible age attending the cervical cancer screening clinic for the first time should have VIA, provided the screening protocol recommends the test. VIA can be done during menstruation if the woman is not bleeding heavily. VIA should not be done during pregnancy or within 6 weeks of childbirth. VIA need not be repeated if the woman had a negative VIA test within the previous three years. Women who have had a hysterectomy for benign conditions also do not require screening with VIA.
5.4.5 What are the steps of VIA?Refer to Skills Checklist 5.6.1. Page 72
5.4.6 How to interpret the results of VIA?Look for changes on the cervix after applying acetic acid for 1 minute. If there is no white patch seen after 1 minute the test is negative, which indicates that the cervix does not have any pre-cancer or cancer. If there is a white patch, it may or may not be positive. Refer to Table 5.1 and pictorial chart to find out how to categorize white patches as negative or positive. Any growth or ulcer on the cervix which bleeds at touch will be considered as suspected cancer.
Table 5.1: VIA test outcome categories
All women in the target age group who visit a health facility for any reason should receive information on cervical cancer screening and be encouraged to undergo VIA.
VIA category Description of the findings
Negative No acetowhite area
Transparent or faint patchy acetowhite areas without definite margins
Nabothian cysts becoming acetowhite
Faint line like acetowhitening at the junction of columnar and squamous epithelium Acetowhite lesions far away from the TZ
Positive Distinct, opaque acetowhite area
Margins should be well-defined, may or may not be raised
Abnormality close to the SCJ in the TZ and not far away from the os
Suspected cancer Obvious growth or ulcer on the cervix
Acetowhite area may not be visible because of bleeding

64
5.4.7 How to document VIA �ndings
Fig. 5.2: Documentation of VIA findings
Squamocolumnar junction visible?
(1: Yes, fully 2: Yes, partially 3. No)
VIA findings:
(1: Negative 2: Positive 3: Invasive cancer)
Number of quadrants involved:
(1: 1–2 quadrants 2: 3 quadrants 3: 4 quadrants)
• Space encircled by the outer continuous line indicates ectocervix
• Ectocervix is divided into 4 quadrants (Q1, Q2, Q3, Q4) by intersecting lines
• Innermost circle with continuous line indicates external os
Q1 Q2
Q4 Q3
Document the VIA results as follows:
• Note the visibility of SCJ (fully, partially or not visible)
• Indicate squamocolumnar junction with a dotted line (as shown in Fig. 5.2)
• Indicate any acetowhite area with a continuous line (as shown in Fig. 5.2), if required.
• Note the VIA test outcome (negative, positive or suspected cancer)
• Indicate the number of quadrants involved (1–2 quadrants; 3 quadrants; or 4 quadrants) if there is any acetowhite area
5.4.8 What are the benign conditions of the cervix commonly detected at VIA?
While performing VIA, the provider may encounter various benign conditions of the cervix (and
vagina) that may or may not require treatment. These can be infective or noninfective. Some of
these conditions are confused with cervical pre-cancers or cervical cancer.
Infective conditions of cervix (and vagina) include:
Cervico-vaginal infections
An inflamed cervix (also called cervicitis) appears red and swollen with pus coming out from the external os. Inflamed areas may bleed on contact. The cervix is often tender on movement. A forgotten foreign body like pessary or tampon can induce inflammation of the cervix and vagina. The most common pathological condition of the cervix and vagina is inflammation caused by various microbial agents. The common infective agents are Candida albicans (fungus) (Fig. 5.3a), Trichomonas vaginalis (protozoa) (Fig. 5.3b), Chlamydia trachomatis (bacteria), Neisseria gonorrhea
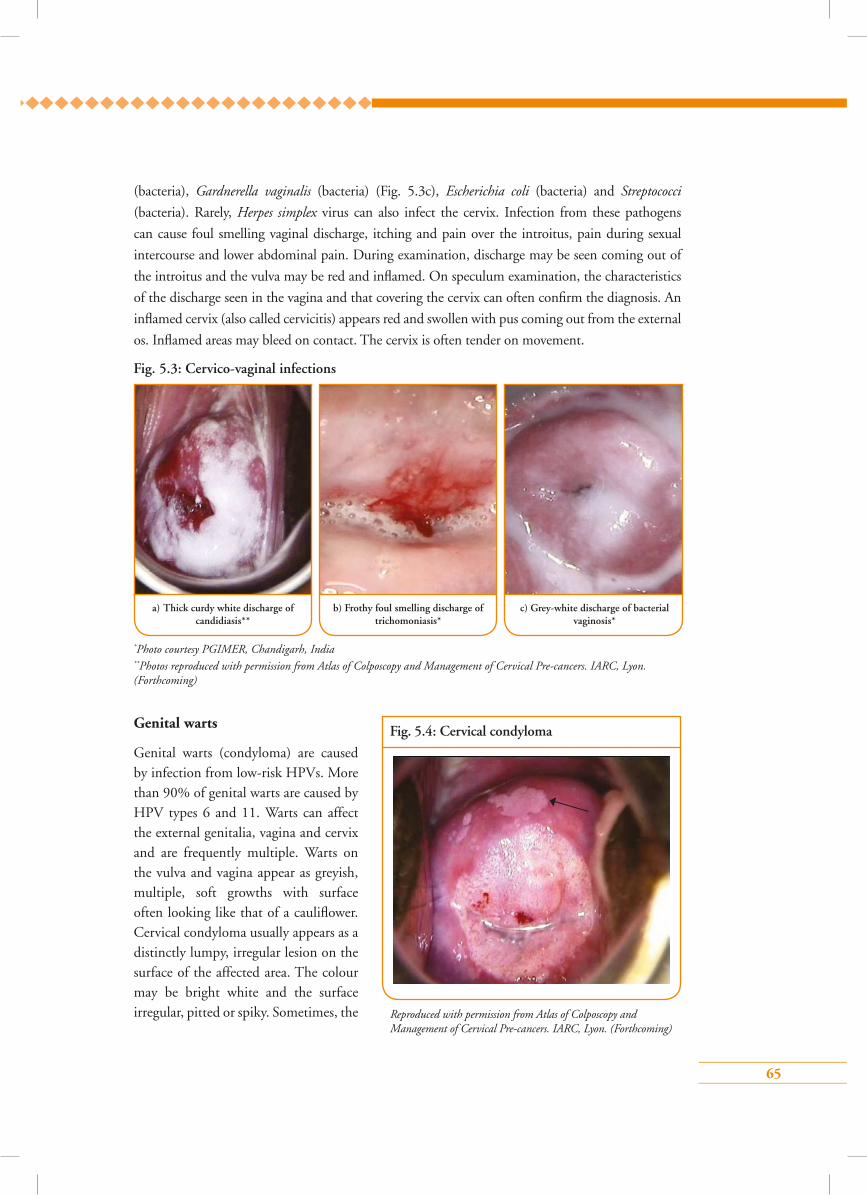
65
(bacteria), Gardnerella vaginalis (bacteria) (Fig. 5.3c), Escherichia coli (bacteria) and Streptococci
(bacteria). Rarely, Herpes simplex virus can also infect the cervix. Infection from these pathogens
can cause foul smelling vaginal discharge, itching and pain over the introitus, pain during sexual
intercourse and lower abdominal pain. During examination, discharge may be seen coming out of
the introitus and the vulva may be red and inflamed. On speculum examination, the characteristics
of the discharge seen in the vagina and that covering the cervix can often confirm the diagnosis. An
inflamed cervix (also called cervicitis) appears red and swollen with pus coming out from the external
os. Inflamed areas may bleed on contact. The cervix is often tender on movement.
a) Thick curdy white discharge of candidiasis**
c) Grey-white discharge of bacterial vaginosis*
b) Frothy foul smelling discharge of trichomoniasis*
Fig. 5.3: Cervico-vaginal infections
*Photo courtesy PGIMER, Chandigarh, India**Photos reproduced with permission from Atlas of Colposcopy and Management of Cervical Pre-cancers. IARC, Lyon. (Forthcoming)
Genital warts
Genital warts (condyloma) are caused by infection from low-risk HPVs. More than 90% of genital warts are caused by HPV types 6 and 11. Warts can affect the external genitalia, vagina and cervix and are frequently multiple. Warts on the vulva and vagina appear as greyish, multiple, soft growths with surface often looking like that of a cauliflower. Cervical condyloma usually appears as a distinctly lumpy, irregular lesion on the surface of the affected area. The colour may be bright white and the surface irregular, pitted or spiky. Sometimes, the
Fig. 5.4: Cervical condyloma
Reproduced with permission from Atlas of Colposcopy and Management of Cervical Pre-cancers. IARC, Lyon. (Forthcoming)
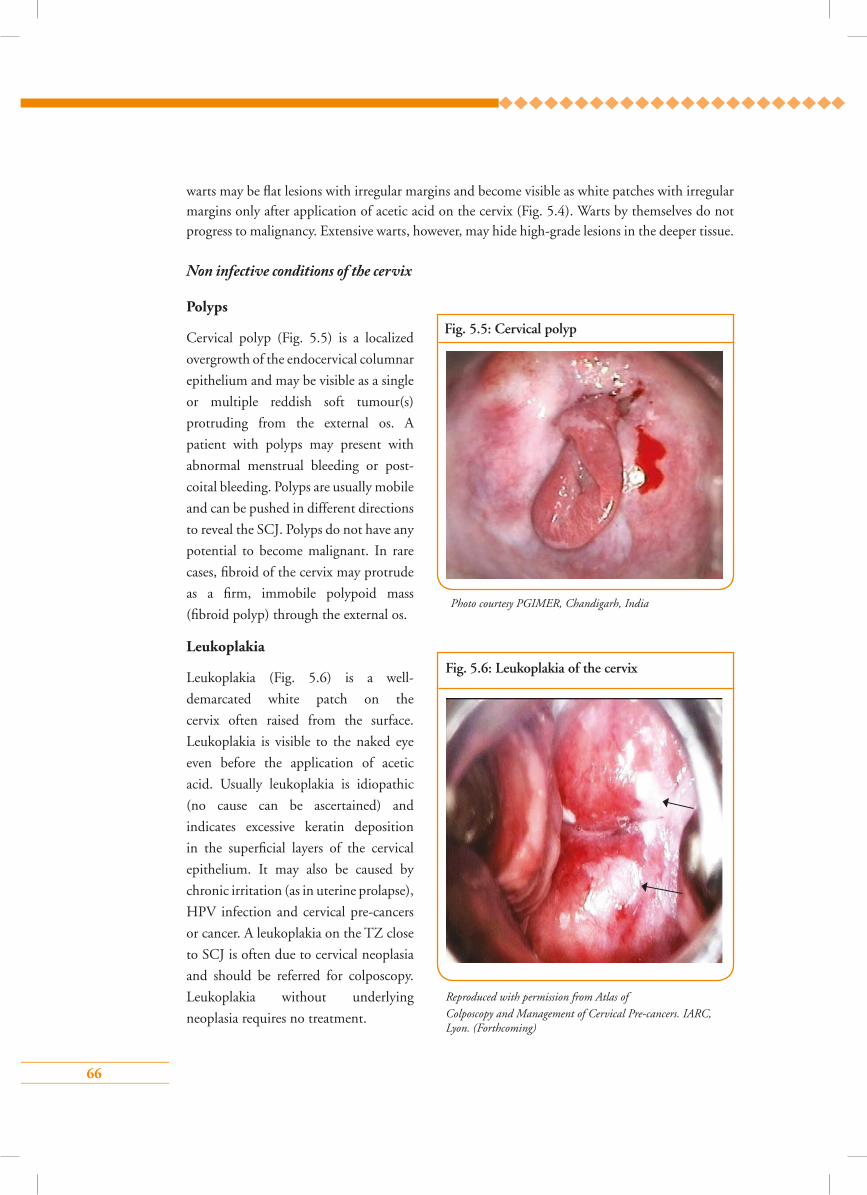
66
warts may be flat lesions with irregular margins and become visible as white patches with irregular margins only after application of acetic acid on the cervix (Fig. 5.4). Warts by themselves do not progress to malignancy. Extensive warts, however, may hide high-grade lesions in the deeper tissue.
Non infective conditions of the cervix
Polyps
Cervical polyp (Fig. 5.5) is a localized
overgrowth of the endocervical columnar
epithelium and may be visible as a single
or multiple reddish soft tumour(s)
protruding from the external os. A
patient with polyps may present with
abnormal menstrual bleeding or post-
coital bleeding. Polyps are usually mobile
and can be pushed in different directions
to reveal the SCJ. Polyps do not have any
potential to become malignant. In rare
cases, fibroid of the cervix may protrude
as a firm, immobile polypoid mass
(fibroid polyp) through the external os.
Leukoplakia
Leukoplakia (Fig. 5.6) is a well-
demarcated white patch on the
cervix often raised from the surface.
Leukoplakia is visible to the naked eye
even before the application of acetic
acid. Usually leukoplakia is idiopathic
(no cause can be ascertained) and
indicates excessive keratin deposition
in the superficial layers of the cervical
epithelium. It may also be caused by
chronic irritation (as in uterine prolapse),
HPV infection and cervical pre-cancers
or cancer. A leukoplakia on the TZ close
to SCJ is often due to cervical neoplasia
and should be referred for colposcopy.
Leukoplakia without underlying
neoplasia requires no treatment.
Fig. 5.5: Cervical polyp
Photo courtesy PGIMER, Chandigarh, India
Fig. 5.6: Leukoplakia of the cervix
Reproduced with permission from Atlas ofColposcopy and Management of Cervical Pre-cancers. IARC, Lyon. (Forthcoming)
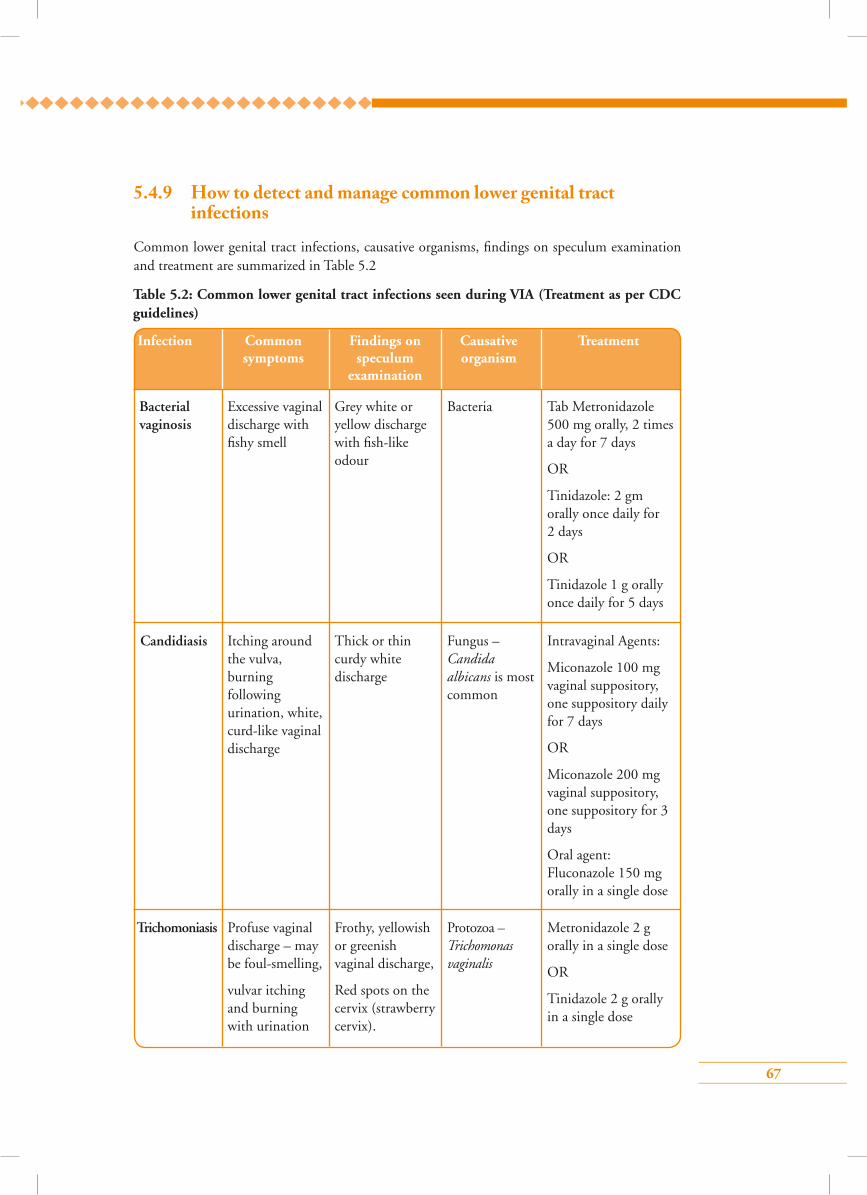
67
5.4.9 How to detect and manage common lower genital tract infections
Common lower genital tract infections, causative organisms, findings on speculum examination and treatment are summarized in Table 5.2
Table 5.2: Common lower genital tract infections seen during VIA (Treatment as per CDC guidelines)
Bacterial vaginosis
Excessive vaginal discharge with fishy smell
Grey white or yellow discharge with fish-like odour
Bacteria Tab Metronidazole 500 mg orally, 2 times a day for 7 days
OR
Tinidazole: 2 gm orally once daily for 2 days
OR
Tinidazole 1 g orally once daily for 5 days
Infection Common Findings on Causative Treatment symptoms speculum organism examination
Trichomoniasis Profuse vaginal discharge – may be foul-smelling,
vulvar itching and burning with urination
Frothy, yellowish or greenish vaginal discharge,
Red spots on the cervix (strawberry cervix).
Protozoa –Trichomonas vaginalis
Metronidazole 2 g orally in a single dose
OR
Tinidazole 2 g orally in a single dose
Candidiasis Itching around the vulva, burning following urination, white, curd-like vaginal discharge
Thick or thin curdy white discharge
Fungus – Candida albicans is most common
Intravaginal Agents:
Miconazole 100 mg vaginal suppository, one suppository daily for 7 days
OR
Miconazole 200 mg vaginal suppository, one suppository for 3 days
Oral agent: Fluconazole 150 mg orally in a single dose
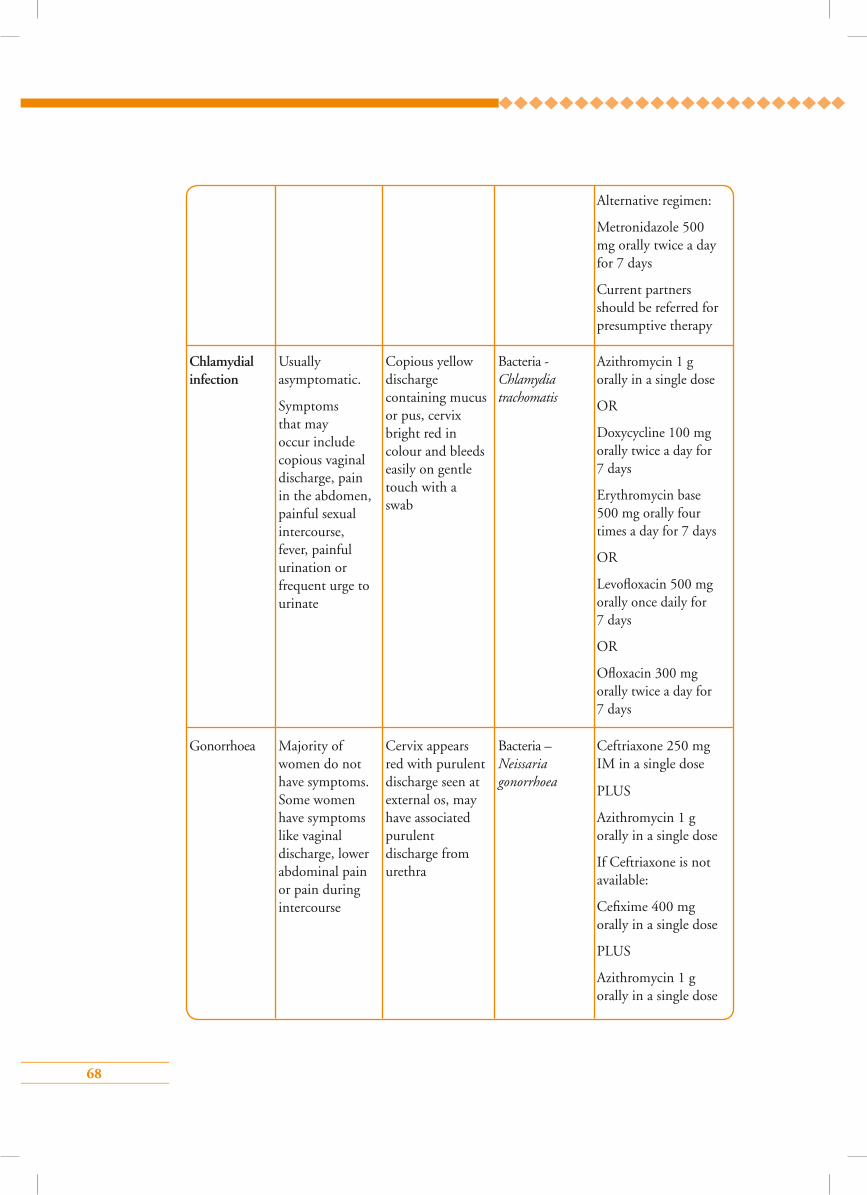
68
Chlamydial infection
Usually asymptomatic.
Symptoms that may occur include copious vaginal discharge, pain in the abdomen, painful sexual intercourse, fever, painful urination or frequent urge to urinate
Copious yellow discharge containing mucus or pus, cervix bright red in colour and bleeds easily on gentle touch with a swab
Bacteria - Chlamydia trachomatis
Azithromycin 1 g orally in a single dose
OR
Doxycycline 100 mg orally twice a day for 7 days
Erythromycin base 500 mg orally four times a day for 7 days
OR
Levofloxacin 500 mg orally once daily for 7 days
OR
Ofloxacin 300 mg orally twice a day for 7 days
Gonorrhoea Majority of women do not have symptoms. Some women have symptoms like vaginal discharge, lower abdominal pain or pain during intercourse
Cervix appears red with purulent discharge seen at external os, may have associated purulent discharge from urethra
Bacteria –Neissaria gonorrhoea
Ceftriaxone 250 mg IM in a single dose
PLUS
Azithromycin 1 g orally in a single dose
If Ceftriaxone is not available:
Cefixime 400 mg orally in a single dose
PLUS
Azithromycin 1 g orally in a single dose
Alternative regimen:
Metronidazole 500 mg orally twice a day for 7 days
Current partners should be referred for presumptive therapy
69
5.4.10 How to advise a woman who has a negative VIA test• Inform the woman that her VIA test is negative, which means that she does not have cervical
cancer and has very low risk of having cervical cancer within the next 5 years.
• She should have the same test done after 5 years or earlier if recommended by the national
screening protocol.
• Inform the woman of the early symptoms of cervical cancer and advise her to consult a
physician if she has any of these symptoms.
• Hand over the card containing the written report and the date for repeat screening and advise
her to keep it carefully and bring it at the next visit.
5.4.11 How to manage and advise a woman who has tested positive on VIA
Please refer to Module 7.
5.4.12 What are the measures to be taken to prevent infection during and after VIA?
Please follow Checklist 5.6.1 and see Module 10 for details.
5.5 Group learning activities5.5.1 Image recognition (¡ash cards/digital images)
Identification of features of normal cervix, TZ and SCJ
Distinguishing between VIA negative and positive cases
5.5.2 Arrangement of instrument tray for VIA
5.5.3 Preparation of dilute acetic acid
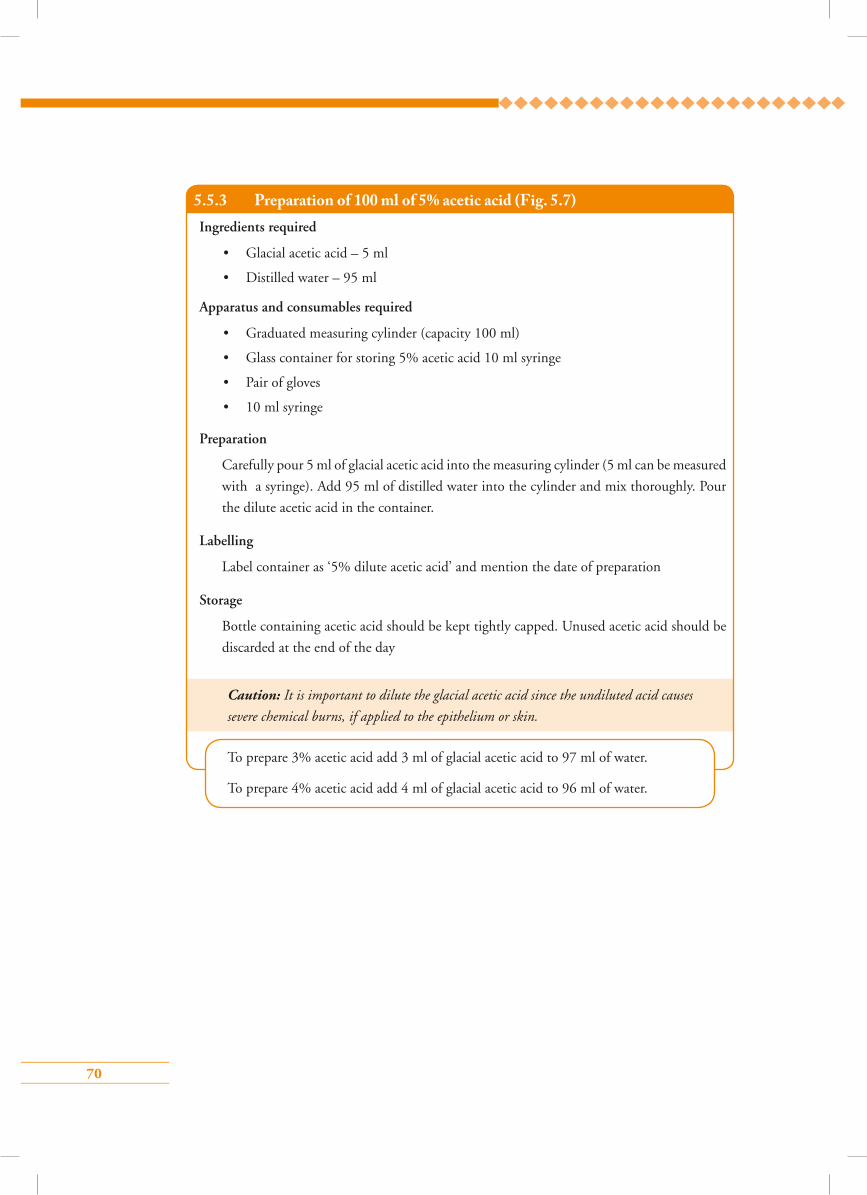
70
5.5.3 Preparation of 100 ml of 5% acetic acid (Fig. 5.7)Ingredients required
• Glacial acetic acid – 5 ml
• Distilled water – 95 ml
Apparatus and consumables required
• Graduated measuring cylinder (capacity 100 ml)
• Glass container for storing 5% acetic acid 10 ml syringe
• Pair of gloves
• 10 ml syringe
Preparation
Carefully pour 5 ml of glacial acetic acid into the measuring cylinder (5 ml can be measured
with a syringe). Add 95 ml of distilled water into the cylinder and mix thoroughly. Pour
the dilute acetic acid in the container.
Labelling
Label container as ‘5% dilute acetic acid’ and mention the date of preparation
Storage
Bottle containing acetic acid should be kept tightly capped. Unused acetic acid should be
discarded at the end of the day
Caution: It is important to dilute the glacial acetic acid since the undiluted acid causes
severe chemical burns, if applied to the epithelium or skin.
To prepare 3% acetic acid add 3 ml of glacial acetic acid to 97 ml of water.
To prepare 4% acetic acid add 4 ml of glacial acetic acid to 96 ml of water.
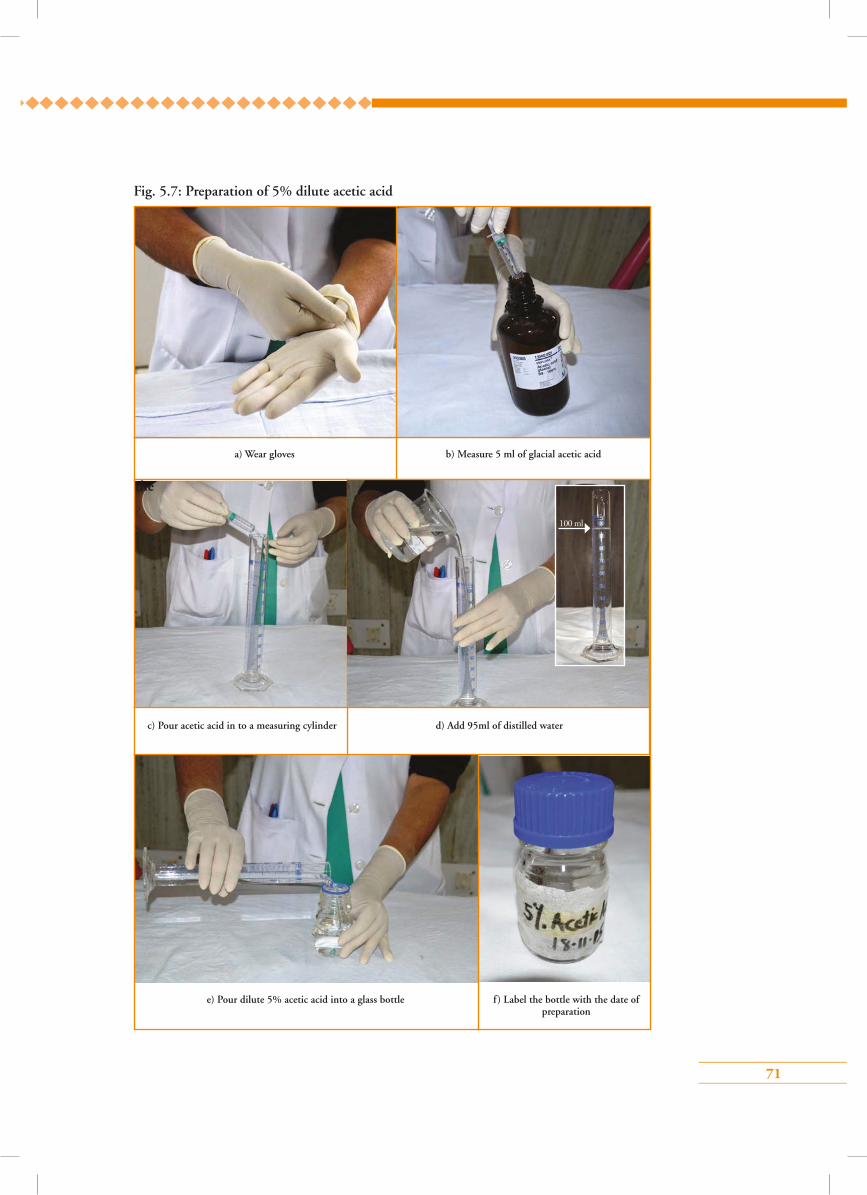
71
Fig. 5.7: Preparation of 5% dilute acetic acid
a) Wear gloves b) Measure 5 ml of glacial acetic acid
c) Pour acetic acid in to a measuring cylinder
f) Label the bottle with the date of preparation
d) Add 95ml of distilled water
e) Pour dilute 5% acetic acid into a glass bottle
the
100 ml

72
5.6 Skill development
5.6.1 Steps of VIA
Skills Checklist: Clinical skills in VIA
Steps Case
Preparation for VIA 1 2 3 4
1. Keep necessary equipment ready (see list of equipment)
2. Check availability of consumables (see list of consumables)
3. Ensure that the light source is ready to use
4. Arrange instruments and supplies on high-level disinfected tray or container
Counselling and consent
5. Follow Checklist 4.6 for counselling
6. History taking (ask questions/check records)
7. Personal information: Name, age, husband’s name, address, telephone number and LMP
• Obstetric history
• History of past illness
8. History of previous cervical cancer screening test
9. Ask for any of the following symptoms: Persistent foul smelling white discharge, post-coital bleeding, post-menopausal bleeding, irregular menstrual bleeding
10. Record all relevant information on case record form
Step-wise VIA procedure
11. Check that the woman has emptied her bladder
12. Help her on to the examining table, help her to undress and drape her
13. Wash hands thoroughly with soap and water and dry with clean, dry cloth or air-dry them

73
14. Put one pair sterile disposable gloves on both hands
15. Inspect external genitalia and check urethral opening for discharge.
16. Select speculum of appropriate size and lubricate the blades with lubricant jelly or saline
17. Insert speculum and adjust it so that the entire cervix can be seen
18. Fix speculum blades in the open position so that the speculum will remain in place with the cervix in view
19. Adjust the light source so that you can see the cervix clearly
20. Examine the cervix for cervicitis, ectropion, nabothian cysts, growth, ulcers or contact bleeding
21. Identify the cervical os, squamocolumnar junction (SCJ) and transformation zone (TZ)
22. Soak a clean swab in 3–5% acetic acid and apply it to the cervix
23. Wait for 1 minute for the acetic acid to be absorbed and any acetowhite change to appear
24. Inspect the SCJ carefully
25. Look for any new white patch (acetowhite area) appearing on the cervix
26. If there is an acetowhite area, look for the following features
• Density
• Margin characteristics
• Location in relation to SCJ or external os
• Number of quadrants involved
27. When visual inspection has been completed, use a fresh swab to remove any remaining acetic acid from the cervix and vagina and dispose-off the swab
28. Remove the speculum
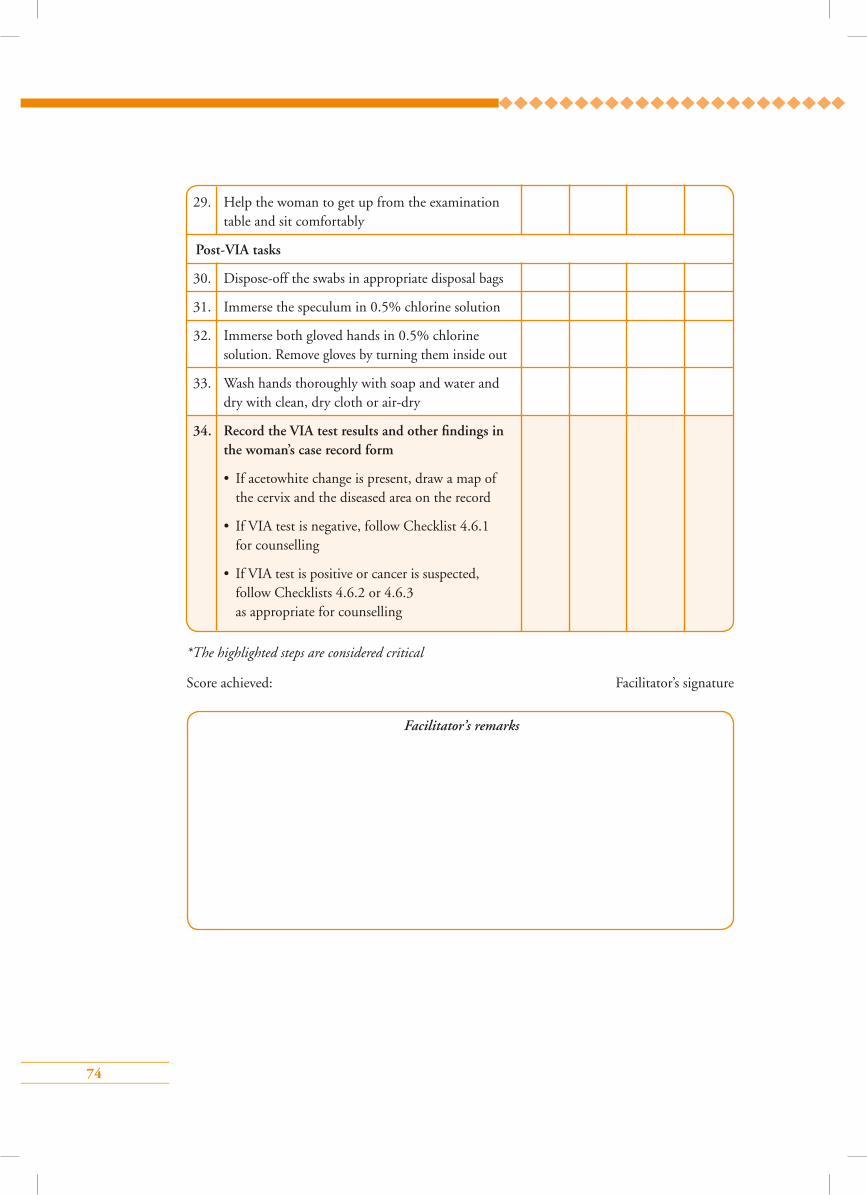
74
29. Help the woman to get up from the examination table and sit comfortably
Post-VIA tasks
30. Dispose-off the swabs in appropriate disposal bags
31. Immerse the speculum in 0.5% chlorine solution
32. Immerse both gloved hands in 0.5% chlorine solution. Remove gloves by turning them inside out
33. Wash hands thoroughly with soap and water and dry with clean, dry cloth or air-dry
34. Record the VIA test results and other findings in the woman’s case record form
• If acetowhite change is present, draw a map of the cervix and the diseased area on the record
• If VIA test is negative, follow Checklist 4.6.1 for counselling
• If VIA test is positive or cancer is suspected, follow Checklists 4.6.2 or 4.6.3 as appropriate for counselling
Facilitator’s remarks
*The highlighted steps are considered critical
Score achieved: Facilitator’s signature
75
Points to remember
• VIA is the naked eye inspection of the cervix after application of 3–5% acetic acid.
• VIA is safe, rapid, reliable and inexpensive.
• Acetic acid acts by coagulating the protein of the surface epithelium.
• Pre-cancers contain more protein which gets coagulated and gives an acetowhite appearance.
• Wait for at least 1 minute for acetic acid to be absorbed and acetowhite area to appear.
• Distinct acetowhite opaque area indicates a positive test.
• Common benign conditions of the cervix include cervicovaginal infections and inflammations, cervical polyp, leukoplakia and genital warts.
• VIA negative women should get a repeat test done after 5 years.
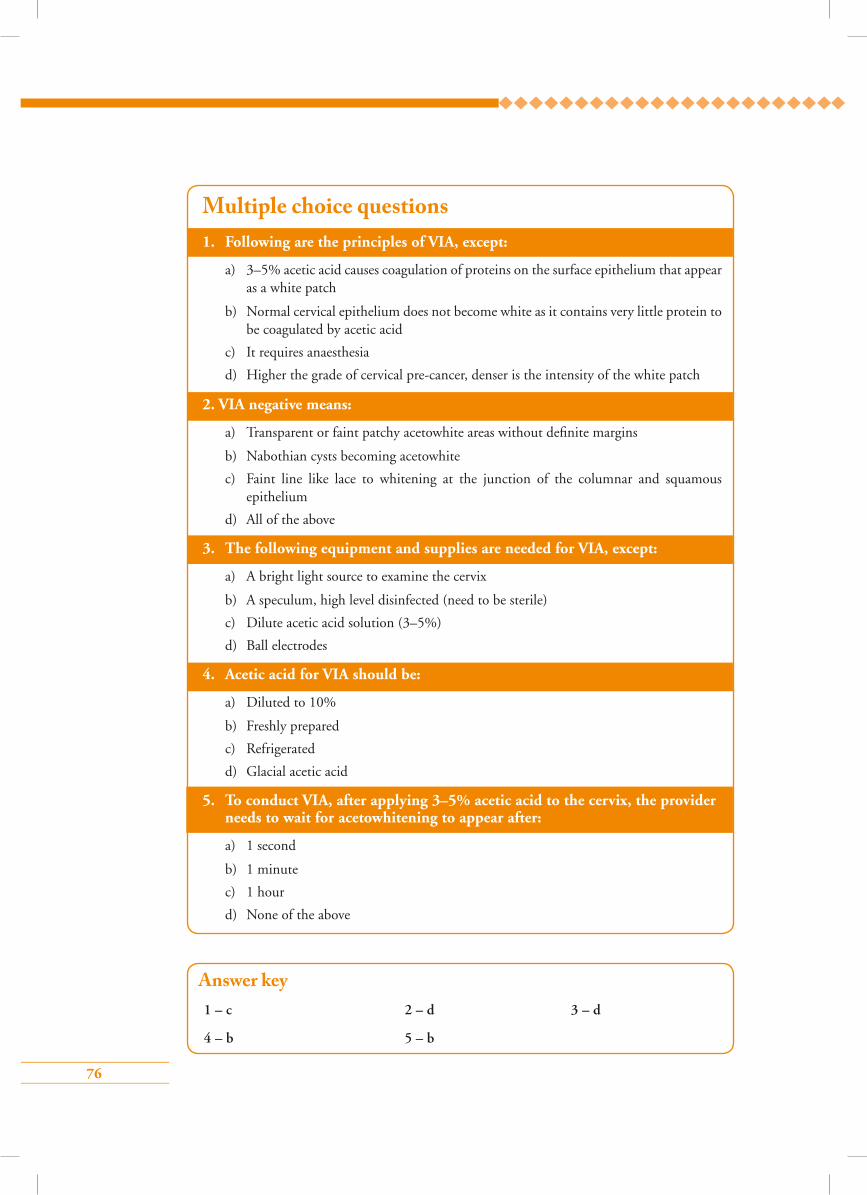
76
1. Following are the principles of VIA, except:
a) 3–5% acetic acid causes coagulation of proteins on the surface epithelium that appear as a white patch
b) Normal cervical epithelium does not become white as it contains very little protein to be coagulated by acetic acid
c) It requires anaesthesia
d) Higher the grade of cervical pre-cancer, denser is the intensity of the white patch
2. VIA negative means:
a) Transparent or faint patchy acetowhite areas without definite margins
b) Nabothian cysts becoming acetowhite
c) Faint line like lace to whitening at the junction of the columnar and squamous epithelium
d) All of the above
3. The following equipment and supplies are needed for VIA, except:
a) A bright light source to examine the cervix
b) A speculum, high level disinfected (need to be sterile)
c) Dilute acetic acid solution (3–5%)
d) Ball electrodes
4. Acetic acid for VIA should be:
a) Diluted to 10%
b) Freshly prepared
c) Refrigerated
d) Glacial acetic acid
5. To conduct VIA, after applying 3–5% acetic acid to the cervix, the provider needs to wait for acetowhitening to appear after:
a) 1 second
b) 1 minute
c) 1 hour
d) None of the above
Answer key1 – c 2 – d 3 – d
4 – b 5 – b
Multiple choice questions
77
Module 6: HPV detection test and cervical sample collection technique for HPV test
6.1 Module overview This module is designed to give an overview of different HPV detection tests commonly used for cervical cancer screening to paramedical workers, midwives, nurses and clinicians. The module also teaches providers to collect samples from the cervix for HPV detection tests and to interpret the test results. The module is meant to be used by trainees in conjunction with the WHO Guidance book (for further reading refer Chapter 5 – Screening and treatment of cervical pre-cancer; Section 5.3 (a–d) and Practice Sheet 5.4).
6.2 Module contents• Types of HPV detection tests
• Equipment/instruments required
• Consumables required
• Steps of cervical sample collection
• Sample transportation and storage
• Interpretation of test results
• Group learning activities:
Practise cervical sample collection for HPV test on ZOE model
• Checklist for steps of cervical sample collection
6.3 Learning objectivesBy the end of this training programme, trainees will be able to:
• describe organization of HPV detection services in the clinic;
• competently describe collection of samples for HPV test;
• describe handling, transport and storage of samples;
• demonstrate counselling women before and after HPV test;
• list infection prevention practices during the sample collection procedure.
6.4 Key points for discussion
6.4.1 What are the di�erent HPV detection tests?For cervical cancer screening, only tests that can detect the presence of high-risk (oncogenic) types of HPV are useful. There are different test methods available. Majority of the tests detect the presence or absence of DNA of the high-risk HPV types. Few tests are available to detect HPV RNA. A positive HPV test indicates the presence of at least one high-risk type of HPV, but most of the tests do not specify which type is present. However, some of the recently available tests identify
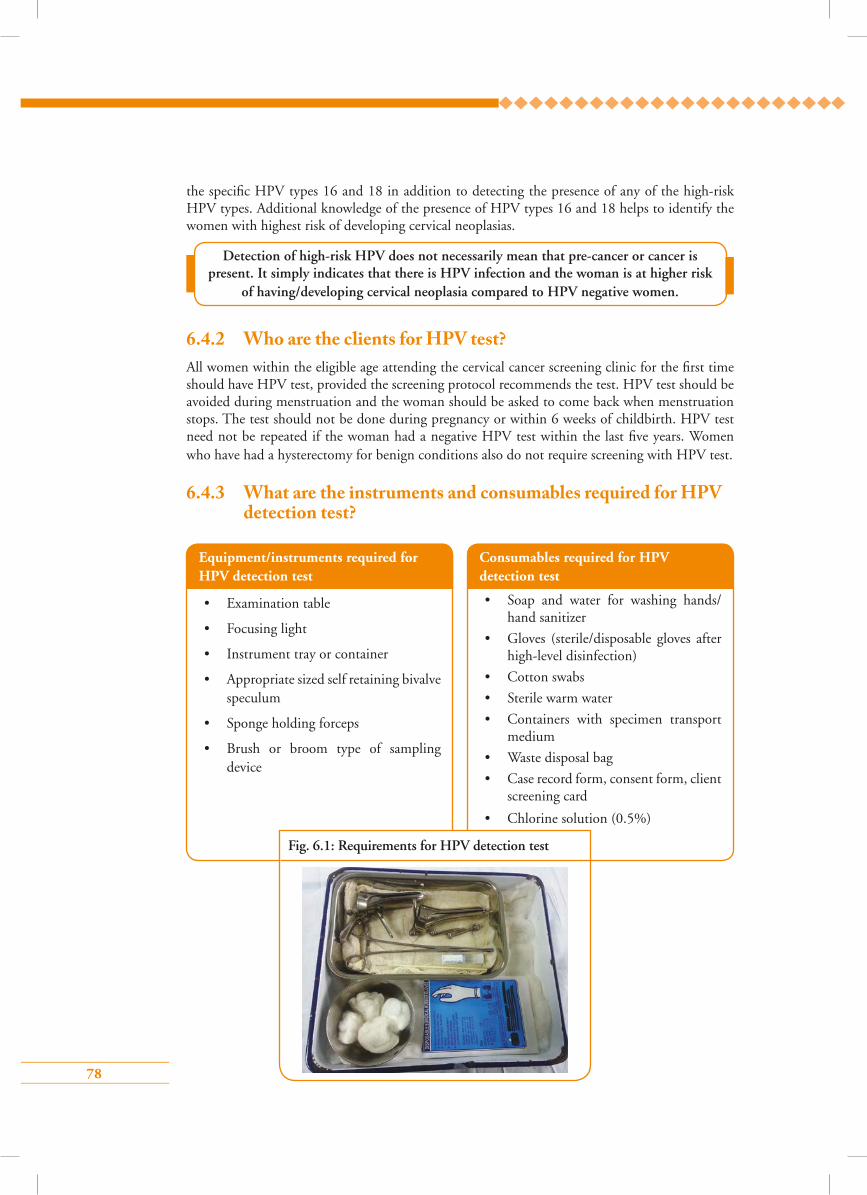
78
the specific HPV types 16 and 18 in addition to detecting the presence of any of the high-risk HPV types. Additional knowledge of the presence of HPV types 16 and 18 helps to identify the women with highest risk of developing cervical neoplasias.
6.4.2 Who are the clients for HPV test?All women within the eligible age attending the cervical cancer screening clinic for the first time should have HPV test, provided the screening protocol recommends the test. HPV test should be avoided during menstruation and the woman should be asked to come back when menstruation stops. The test should not be done during pregnancy or within 6 weeks of childbirth. HPV test need not be repeated if the woman had a negative HPV test within the last five years. Women who have had a hysterectomy for benign conditions also do not require screening with HPV test.
6.4.3 What are the instruments and consumables required for HPV detection test?
Equipment/instruments required for HPV detection test
• Examination table
• Focusing light
• Instrument tray or container
• Appropriate sized self retaining bivalve speculum
• Sponge holding forceps
• Brush or broom type of sampling device
Consumables required for HPV detection test
• Soap and water for washing hands/ hand sanitizer
• Gloves (sterile/disposable gloves after high-level disinfection)
• Cotton swabs
• Sterile warm water
• Containers with specimen transport medium
• Waste disposal bag
• Case record form, consent form, client screening card
• Chlorine solution (0.5%)
Fig. 6.1: Requirements for HPV detection test
Detection of high-risk HPV does not necessarily mean that pre-cancer or cancer is present. It simply indicates that there is HPV infection and the woman is at higher risk
of having/developing cervical neoplasia compared to HPV negative women.
79
6.4.4 What are the steps of cervical sample collection for HPV test?Refer to Skills Checklist 6.6.1.
6.4.5 How to store the cervical sample after collectionPlease check the sample storage instructions written on the bottle containing the sample transport
medium. The sample usually can be stored at room temperature for a few days. However, if the
ambient temperature is high (>300 C) place the bottles in an ice-box or in the refrigerator (not in
the freezer compartment), if available.
6.4.6 How to transport specimens to the laboratorySpecimens can be transported to the laboratory at room temperature. If the ambient temperature
is high (>300 oC), the samples should be transported in a closed ice-box or a vaccine carrier.
The specimens must have the laboratory requisition forms accompanying them. For details of
specimen transfer, please refer to the instructions from the manufacturer of the test kit.
6.4.7 How to interpret the results of the testThe test results delivered from the laboratory are either negative or positive. Negative test result
indicates that the woman does not have high-risk HPV infection or has HPV infection not
sufficient to cause cervical pre-cancer or cancer. The positive result indicates that the woman
has high-risk HPV infection of the cervix that is significant enough to place her at risk of having
cervical neoplasia. Sometimes the test results may show a cut-off level. A cut-off level of 1.0 pg/ml
is taken as the threshold of a positive test. If the test result also mentions the presence of HPV types
16 and/or 18, the woman is at higher risk since these two types are most carcinogenic.
Self-sampling for HPV Test
Women can be taught to collect the sample themselves from the upper vagina for HPV test
using a soft brush. A midwife, paramedical worker or nurse explains the steps to the woman
using a pictorial guide and hands over the labelled container and the brush to her. The woman
collects the sample in the privacy of her house or in the clinic and hands over the container
to the health professional. Self-sampling can improve compliance of eligible women as they
need not visit the health facility for the test. Self-sampling reduces the programme cost as the
requirement for pelvic examination is substantially reduced and fewer health professionals are
engaged.
80
6.4.8 Is there any treatment to be advised for HPV infection?There is no treatment for the virus itself, but the body’s immune system is usually able to fight it
off within a few years. There are treatments, however, for the diseases the virus causes, e.g. warts,
CIN or cervical cancer, etc. Therefore, the woman must be further examined to detect the presence
of any of these diseases and managed accordingly. If the woman does not have any of these diseases
she should be followed-up. The details of the examination and follow-up of HPV positive women
are discussed in Module 7.
6.4.9 How to advise a woman who has tested negative after HPV test• Inform the woman that her HPV test is negative, which means that she does not have cervical
cancer and has very low risk of having cervical cancer within the next 5 years at least.
• She should have the same test done after 5 years or later as recommended by the National
Screening Protocol.
• Inform the woman of the early symptoms of cervical cancer and advise her to consult a
physician if she has any of these symptoms.
• Give her the card containing the written report and advise her to keep it carefully and bring
it to the next visit.
6.4.10 How to manage and advise a woman who has tested positive on HPV test
Please refer to Module 7.
6.4.11 What are the messages to be conveyed to a woman while counselling her for HPV test?
While counselling a woman for HPV test, the following information should be conveyed:
• cervical cancer is a preventable disease;
• common risk factors for cervical cancer;
• HPV infection is the cause of the cancer;
• HPV infection is transmitted sexually and is very common in sexually active men and women;
• need for cervical cancer screening;
• role and importance of HPV testing;
• procedures to be followed while taking samples for the HPV test;
• how and when to get the test results;
• implications of positive and negative tests;
• necessity of further check-up if the test is positive;
• necessity of informed consent.
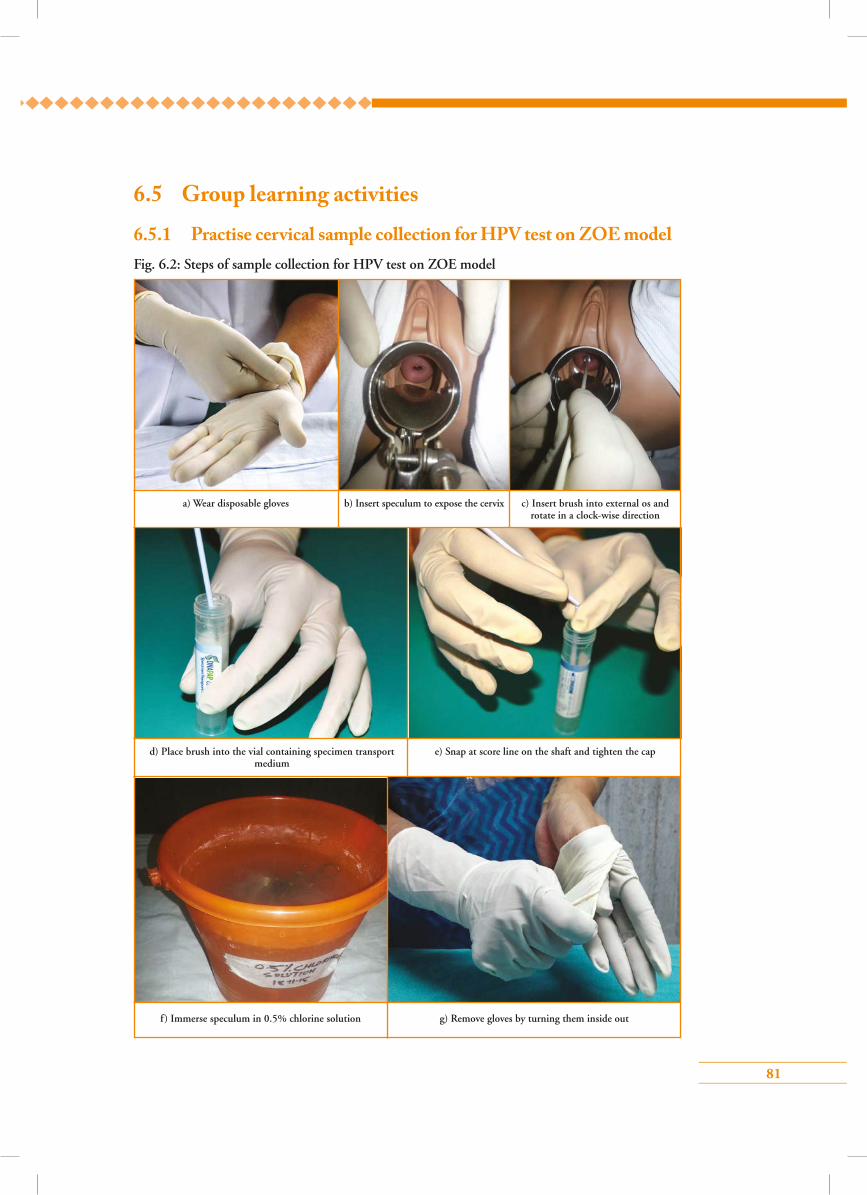
81
Fig. 6.2: Steps of sample collection for HPV test on ZOE model
6.5 Group learning activities
6.5.1 Practise cervical sample collection for HPV test on ZOE model
a) Wear disposable gloves b) Insert speculum to expose the cervix c) Insert brush into external os and rotate in a clock-wise direction
d) Place brush into the vial containing specimen transport medium
f) Immerse speculum in 0.5% chlorine solution
e) Snap at score line on the shaft and tighten the cap
g) Remove gloves by turning them inside out
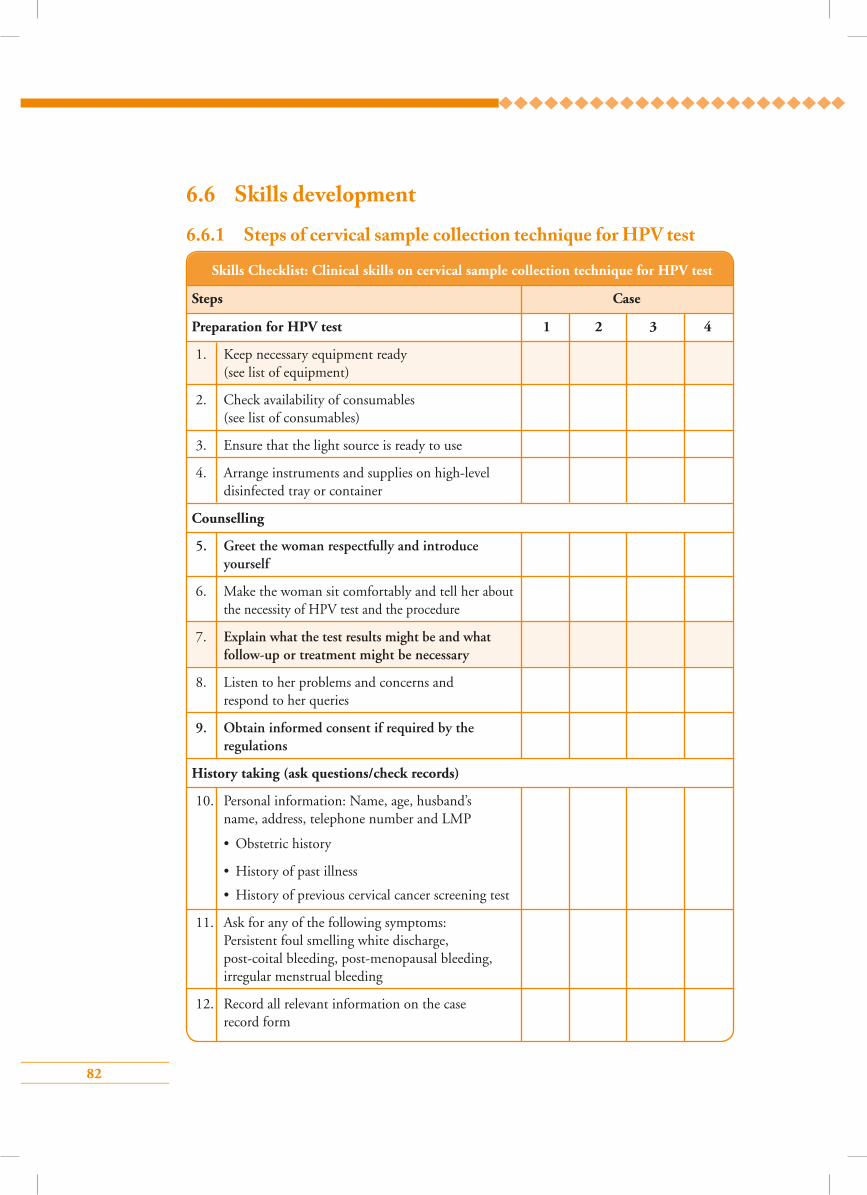
82
6.6 Skills development
6.6.1 Steps of cervical sample collection technique for HPV test
Skills Checklist: Clinical skills on cervical sample collection technique for HPV test
Steps Case
Preparation for HPV test 1 2 3 4
1. Keep necessary equipment ready (see list of equipment)
2. Check availability of consumables (see list of consumables)
3. Ensure that the light source is ready to use
4. Arrange instruments and supplies on high-level disinfected tray or container
Counselling
5. Greet the woman respectfully and introduce yourself
6. Make the woman sit comfortably and tell her about the necessity of HPV test and the procedure
7. Explain what the test results might be and what follow-up or treatment might be necessary
8. Listen to her problems and concerns and respond to her queries
9. Obtain informed consent if required by the regulations
History taking (ask questions/check records)
10. Personal information: Name, age, husband’s name, address, telephone number and LMP
• Obstetric history
• History of past illness
• History of previous cervical cancer screening test
11. Ask for any of the following symptoms: Persistent foul smelling white discharge, post-coital bleeding, post-menopausal bleeding, irregular menstrual bleeding
12. Record all relevant information on the case record form

83
Step-wise cervical sample collection procedure for HPV test
13. Fill in the HPV test requisition form
14. Label the sample collection vial with the patient’s name, screening ID, date of sample collection
15. Check that the woman has emptied her bladder
16. Help her on to the examining table, help her to undress and drape her
17. Wash hands thoroughly with soap and water and dry with clean, dry cloth or air-dry
18. Put one pair of new sterelized disposable gloves on both hands
19. Inspect external genitalia and check urethral opening for discharge
20. Select speculum of appropriate size and lubricate the blades with warm water only and NOT lubricant jelly
21. Insert speculum and adjust it so that the entire cervix can be seen
22. Fix the speculum blades in the open position so that the speculum will remain in place with the cervix in view
23. Adjust the light source so that you can see the cervix clearly
24. Examine the cervix for cervicitis, ectropion, nabothian cysts, growth, ulcers or contact bleeding
25. If a large quantity of discharge or mucus is present, gently remove by dabbing with a dry cotton swab without disturbing the epithelium
26. Identify the external os of the cervix
27. Insert the sample collection brush/broom into the external os until the outer bristles touch the ectocervix (Do not insert the brush/broom completely into the endocervical canal)
28. Gently rotate the brush/broom in a clock-wise direction 3–5 times (check manufacturer’s instructions)

84
29. Remove the brush/broom from the canal while avoiding contact with the outside of the specimen transport tube/vial or any other object
30. Insert the end of the brush/broom into the specimen transport tube/vial
31. If using a brush – snap off the shaft of the brush at the score line, leaving the end of the brush inside the tube
32. If using a broom – detach the broom from the end of the shaft leaving it inside the vial
33. Replace/tighten the cap on the tube/vial securely
34. Place the tube/vial in a specimen bag/container for transport to the laboratory
35. Remove the speculum
36. Help the woman to get up from the examination table and sit comfortably
Post-HPV sample collection tasks
37. Dispose-off the swabs in appropriate disposal bags
38. Immerse the speculum in 0.5% chlorine solution
39. Immerse both gloved hands in 0.5% chlorine solution. Remove gloves by turning them inside out
40. Wash hands thoroughly with soap and water and dry with clean, dry cloth or air-dry
41. Arrange for specimen transfer to the laboratory as per instructions of the test kit manufacturer
42. Inform the woman when (day/time) to collect the test report
43. Discuss the necessity of referral and/or treatment if the test report is positive
Facilitator’s remarks
*The highlighted steps are considered critical
Score achieved: Facilitator’s signature
85
Points to remember
• Majority of the tests detect DNA of high-risk HPV type.
• Only a few tests are available that detect HPV RNA.
• A sample can be stored at room temperature for a few days.
• A negative test indicates that the woman does not have high-risk HPV infection or has
HPV infection insufficient to cause cervical pre-cancers.
• There is no treatment for the virus itself.
• Treatment is available for diseases caused by HPV infection.
• Women with negative tests should have a repeat test done after 5 years.
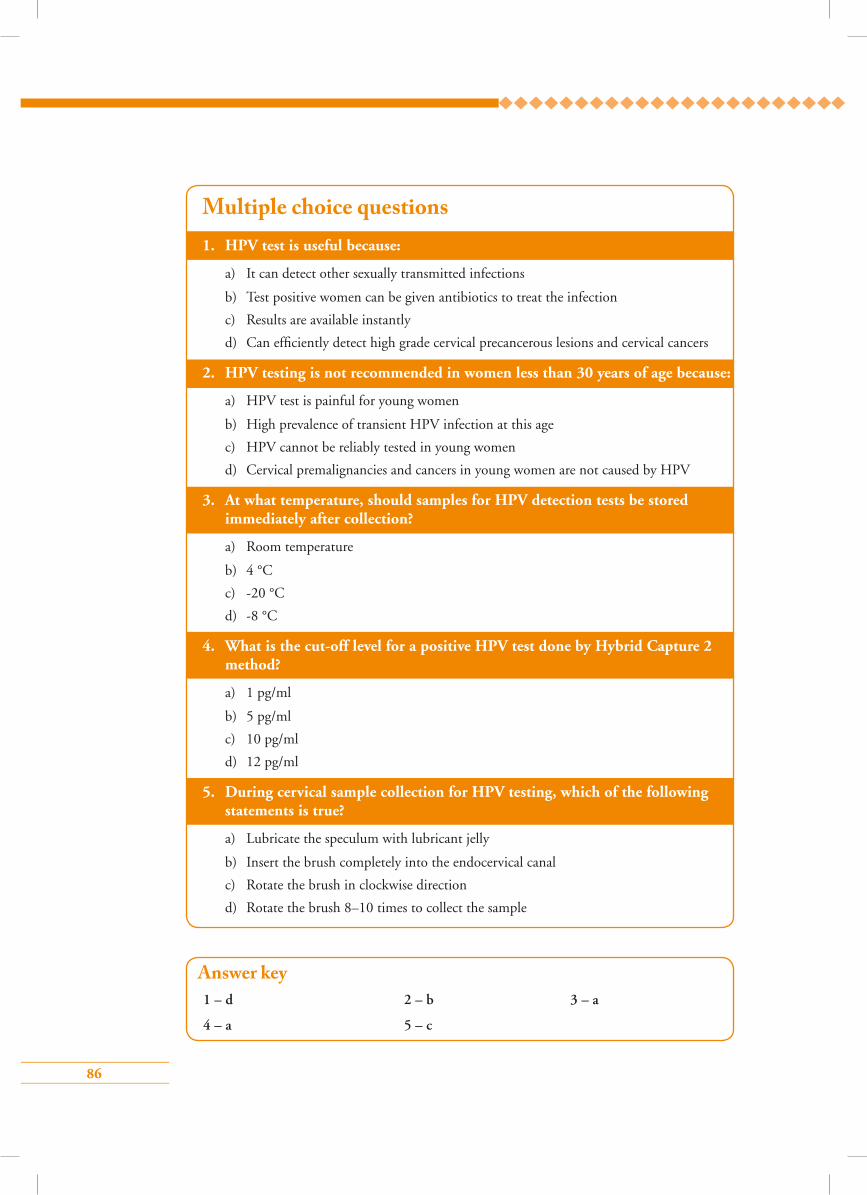
86
Answer key1 – d 2 – b 3 – a
4 – a 5 – c
1. HPV test is useful because:
a) It can detect other sexually transmitted infections
b) Test positive women can be given antibiotics to treat the infection
c) Results are available instantly
d) Can efficiently detect high grade cervical precancerous lesions and cervical cancers
2. HPV testing is not recommended in women less than 30 years of age because:
a) HPV test is painful for young women
b) High prevalence of transient HPV infection at this age
c) HPV cannot be reliably tested in young women
d) Cervical premalignancies and cancers in young women are not caused by HPV
3. At what temperature, should samples for HPV detection tests be stored immediately after collection?
a) Room temperature
b) 4 °C
c) -20 °C
d) -8 °C
4. What is the cut-off level for a positive HPV test done by Hybrid Capture 2 method?
a) 1 pg/ml
b) 5 pg/ml
c) 10 pg/ml
d) 12 pg/ml
5. During cervical sample collection for HPV testing, which of the following statements is true?
a) Lubricate the speculum with lubricant jelly
b) Insert the brush completely into the endocervical canal
c) Rotate the brush in clockwise direction
d) Rotate the brush 8–10 times to collect the sample
Multiple choice questions
87
Module 7: Management of women with positive VIA or HPV test
7.1 Module overview This module is designed to give an outline of management of women with positive VIA test or HPV detection test to paramedical workers, midwives, nurses and clinicians. The module also teaches providers the different options available to treat cervical pre-cancers. The module is meant
to be used by trainees in conjunction with the WHO Guidance book (for further reading, refer Chapter 5 – Screening and treatment of cervical pre-cancer; Section 5.7 – Linking screening and treatment in practice and Annex 7 and 8).
7.2 Module contents• Management of VIA positive women
• Management of HPV positive women
• Importance of reducing the number of visits for screening
• Treatment options for cervical pre-cancers
• Follow-up of women after treatment
• Group learning activities:
Case studies
7.3 Learning objectivesBy the end of this training programme, trainees will be able to:
• make decisions based on VIA findings;
• make decisions based on HPV test results;
• advise test positive and test negative women;
• choose appropriate treatment for screen positive women;
• advise appropriate follow-up after screening or treatment.
7.4 Key points for discussion
7.4.1 What are the di�erent treatment options for cervical pre-cancer?
Cervical pre-cancers can be treated either by ablation of the TZ or by excising the TZ. All CIN 2 and CIN 3 lesions need to be treated. CIN 1 lesions can be followed-up yearly and require
88
treatment if they persist for more than 2 years or progress in size and severity. Ablative treatment
can be performed by cryotherapy or cold coagulation, the details of which have been discussed in
Modules 8 and 9. The excisional treatment is known as loop electrosurgical excision procedure
(LEEP). In this procedure a thin metallic wire (loop) powered by an electro-surgical unit is used
to remove the entire TZ along with the lesion. Confirmation of diagnosis by histopathology is not
essential to treat CIN lesions. Treatment is recommended on the basis of colposcopy diagnosis
(screen, diagnose with colposcopy and treat) or abnormal screening tests (screen and treat).
7.4.2 How to manage a woman with a positive VIA testA woman with a positive VIA test can be treated immediately or she may be referred for colposcopy
for further evaluation and treatment if necessary, depending on the protocol of the programme.
(Fig. 7.1) Women with VIA findings suspicious of invasive cancer should be referred to the
appropriate facility for biopsy and further management without any delay.
7.4.3 What is the screen and treat approach?If the protocol of the programme recommends treating VIA positive women without colposcopy,
every woman tested positive on VIA needs to be assessed for suitability of treatment by cryotherapy.
A woman with lesions suitable for cryotherapy (as per the criteria listed in Chapter 8) should be
treated at the same visit by cryotherapy, if she gives consent for the procedure. This strategy of
screening and treatment at the same visit is known as the screen and treat approach. It is also
known as the single visit approach (SVA). The alternative to SVA is colposcopy for all VIA positive
women and treatment based on colposcopy diagnosis (screen, diagnose and treat).
7.4.4 What are the advantages of the screen and treat approach?Screen and treat reduces the number of visits to the clinic as screening and treatment are completed
at the same sitting. This is very convenient for women and ensures compliance of screen positive
women to treatment. Thus screen and treat approach improves the efficiency of the programme
and also saves resources by reducing referral of women to higher centres.
7.4.5 What are the disadvantages of screen and treat?Some VIA positive women may not have CIN (false positives). These false positive women will
be treated unnecessarily (over treatment). Since cryotherapy as a treatment procedure has very
few complications, over treatment is acceptable. The benefits of ensuring treatment outweigh the
insignificant risk of treatment side effects.
7.4.6 What is to be advised to woman not eligible for cryotherapy?If a woman has a lesion that is not suitable for cryotherapy, she needs further check-up by
colposcopy. She should be referred to a centre where colposcopy facilities are available.

89
7.4.7 How to manage a woman with positive HPV test?A woman with a positive HPV test may be advised immediate treatment or triaging with VIA
depending on the protocol of the programme. In the first algorithm (immediate treatment) the
eligibility for cryotherapy should be checked after applying 3–5% acetic acid to the cervix. Another
option to manage the HPV positive woman may be direct referral to colposcopy, if facilities exist.
(Fig. 7.2)
Fig. 7.1: Flowchart for management of VIA positive women
VIA positive
Check programme guidelines
Recommends SVA Recommends colposcopy
Refer to colposcopy centreCheck for following criteria
Fulfills criteria
VIA after 1 year
Does not fulfill criteria
Cryotherapy
i. Entire lesion is on ectocervix
ii. Does not cover more than 3 quarters of the cervix
iii. All margins of the lesion visible
iv. Lesion can be fully covered by cryoprobe tip
v. No suspicion of cancer
If resources are available and it is programmatically feasible, HPV positive women can have
pap smear cytology (liquid based) or HPV genotyping from the same samples collected for
the HPV test. Women with abnormal cytology or with HPV 16 or HPV 18 detected on
genotyping are referred for colposcopy. Women with normal cytology are recalled after 1
year for repeat HPV test. However, this management algorithm is not feasible in most low
and middle income countries.
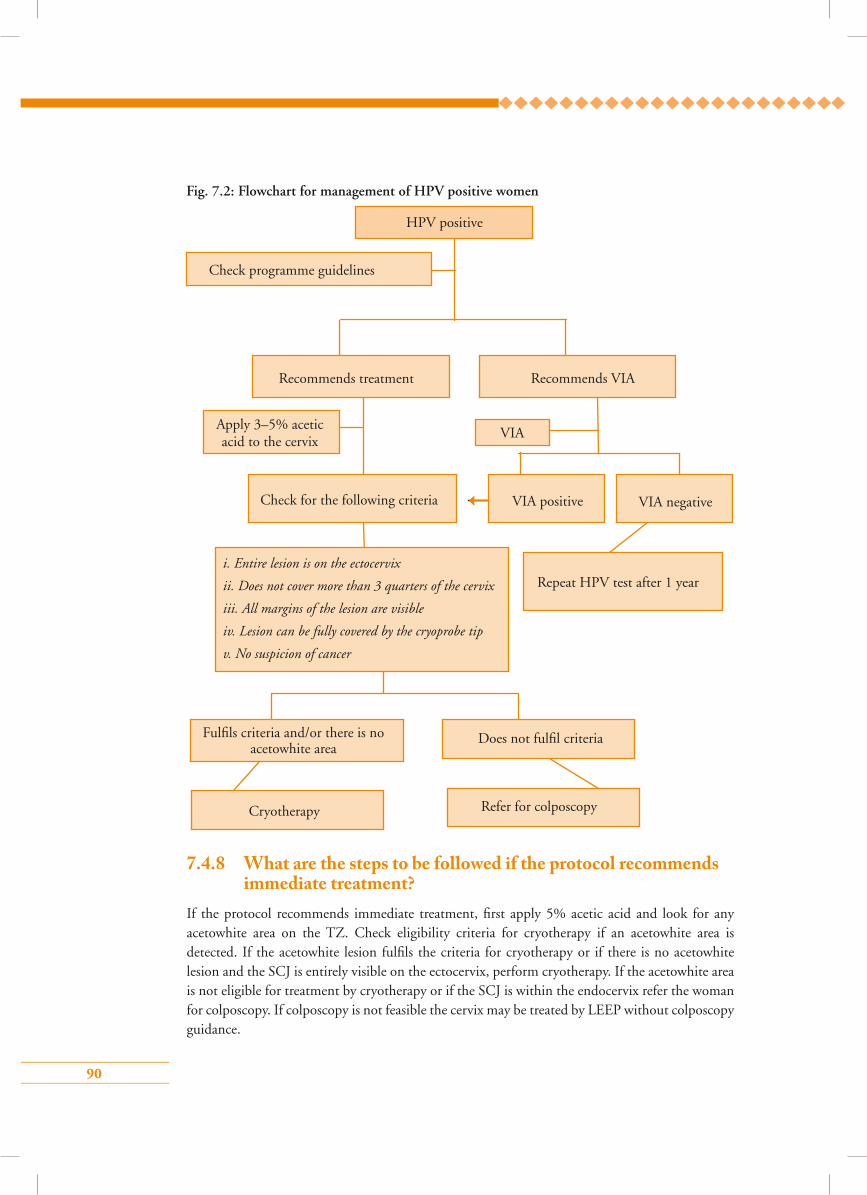
90
7.4.8 What are the steps to be followed if the protocol recommends immediate treatment?
If the protocol recommends immediate treatment, first apply 5% acetic acid and look for any acetowhite area on the TZ. Check eligibility criteria for cryotherapy if an acetowhite area is detected. If the acetowhite lesion fulfils the criteria for cryotherapy or if there is no acetowhite lesion and the SCJ is entirely visible on the ectocervix, perform cryotherapy. If the acetowhite area is not eligible for treatment by cryotherapy or if the SCJ is within the endocervix refer the woman for colposcopy. If colposcopy is not feasible the cervix may be treated by LEEP without colposcopy guidance.
Fig. 7.2: Flowchart for management of HPV positive women
HPV positive
Check programme guidelines
Recommends treatment
Check for the following criteria
Fulfils criteria and/or there is no acetowhite area
Cryotherapy Refer for colposcopy
Does not fulfil criteria
Apply 3–5% acetic acid to the cervix
VIA
VIA positive VIA negative
Recommends VIA
Repeat HPV test after 1 yeari. Entire lesion is on the ectocervix
ii. Does not cover more than 3 quarters of the cervix
iii. All margins of the lesion are visible
iv. Lesion can be fully covered by the cryoprobe tip
v. No suspicion of cancer
91
7.4.9 What are the steps to be followed if the protocol recommends VIA?
Perform VIA on HPV positive women. If VIA is positive, manage according to the flowchart of
management of VIA positive women. The woman should be advised to have a repeat HPV test
after 1 year, if VIA is negative. This strategy is also known as triaging of HPV positive women by
VIA.
7.4.10 Is there any treatment alternative to cryotherapy?Lesions suitable for cryotherapy can also be treated by cold coagulation. The details of the procedure
are described in Module 9. Research studies have observed that cold coagulation is as effective as
cryotherapy and has a similar safety profile. The advantages of cold coagulation over cryotherapy
are that cold coagulation does not require supply of refrigerant gas and the treatment time is less.
However, cold coagulation is not yet recommended for routine use. It may be used if refrigerant
gas is not available for cryotherapy.
7.4.11. How to follow-up women after treatment• Women treated for positive VIA or HPV tests (screen and treat approach) should be
followed-up after 1 year.
• The screening test performed at the initial visit should be used for follow-up.
• Women negative on follow-up screening should be sent for routine screening as per the
programme protocol.
• Women positive on follow-up screening should preferably be re-treated with LEEP (or CKC).
• If the woman has a histology diagnosis of either CIN 3 or adenocarcinoma in situ, screening
should be repeated every year for 3 consecutive years. If all the screening tests are negative,
she should be referred back to the routine screening programme.
In the strategy of immediate treatment, all HPV positive women need to be treated. Acetic
acid is applied only to determine the method of treatment (by cryotherapy or by LEEP).
In the strategy of triaging by VIA, only HPV positive women who are also VIA positive are
treated. In both the strategies women suspected to have invasive cancer need appropriate
referral for biopsy and management without any delay.
Note: VIA or HPV positive women can be treated on the basis of colposcopy and/or
histopathology diagnosis depending on the facilities available. Detailed algorithms of
management are given in Figs. 7.3 and 7.4.
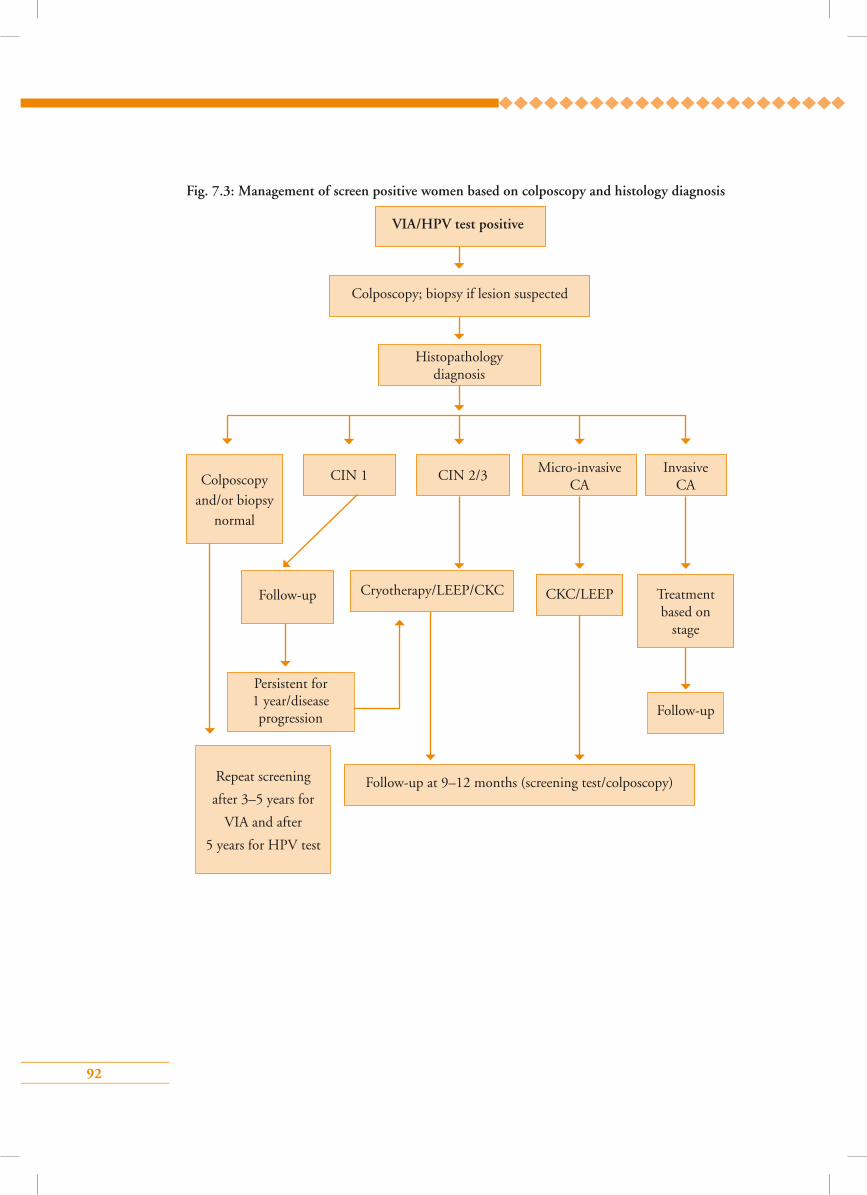
92
Fig. 7.3: Management of screen positive women based on colposcopy and histology diagnosis
VIA/HPV test positive
Histopathology diagnosis
Colposcopy and/or biopsy
normal
CIN 2/3 Micro-invasive CA
Invasive CA
Follow-up
Persistent for 1 year/disease progression
Follow-up at 9–12 months (screening test/colposcopy)Repeat screening
after 3–5 years for
VIA and after
5 years for HPV test
Follow-up
Cryotherapy/LEEP/CKC CKC/LEEP Treatment based on
stage
CIN 1
Colposcopy; biopsy if lesion suspected
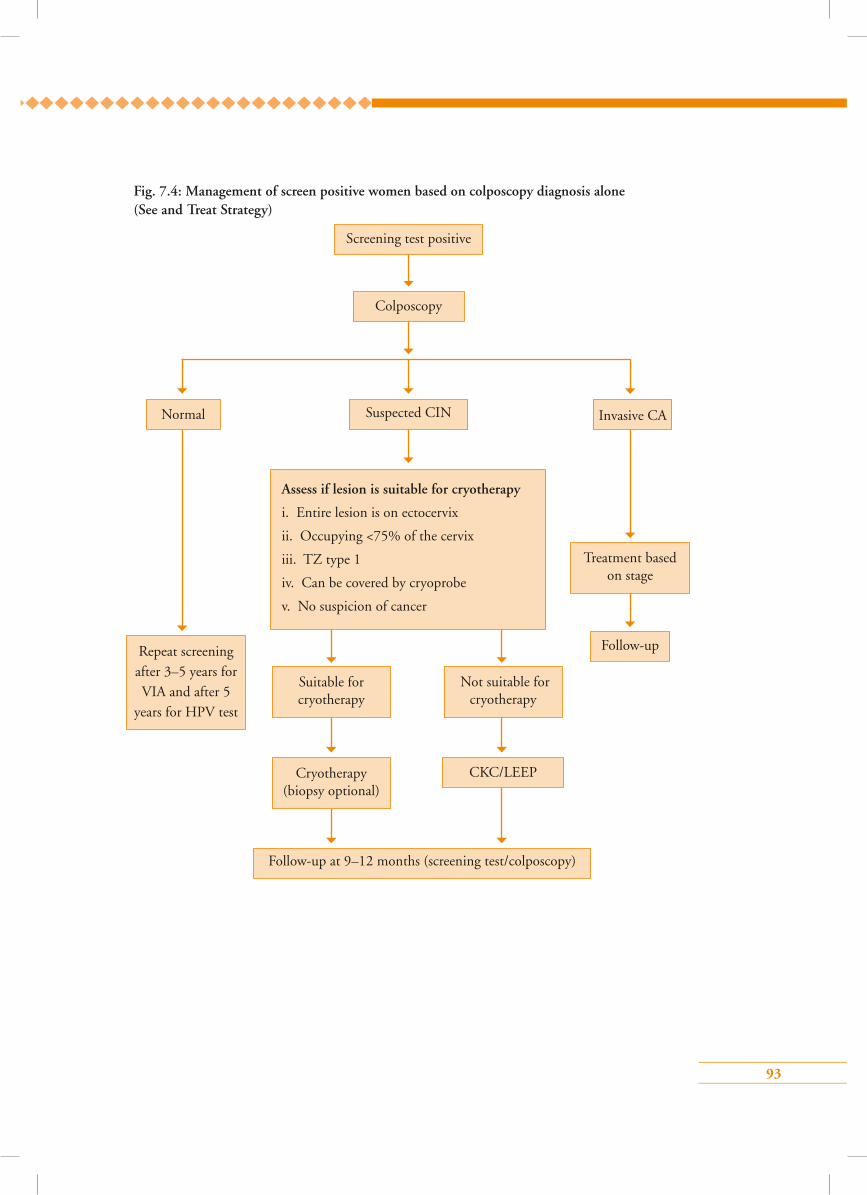
93
Fig. 7.4: Management of screen positive women based on colposcopy diagnosis alone (See and Treat Strategy)
Colposcopy
Suspected CIN
Repeat screening after 3–5 years for VIA and after 5
years for HPV test
Assess if lesion is suitable for cryotherapy
i. Entire lesion is on ectocervix
ii. Occupying <75% of the cervix
iii. TZ type 1
iv. Can be covered by cryoprobe
v. No suspicion of cancer
Suitable for cryotherapy
Not suitable for cryotherapy
Treatment based on stage
Cryotherapy (biopsy optional)
Normal Invasive CA
Follow-up
CKC/LEEP
Follow-up at 9–12 months (screening test/colposcopy)
Screening test positive
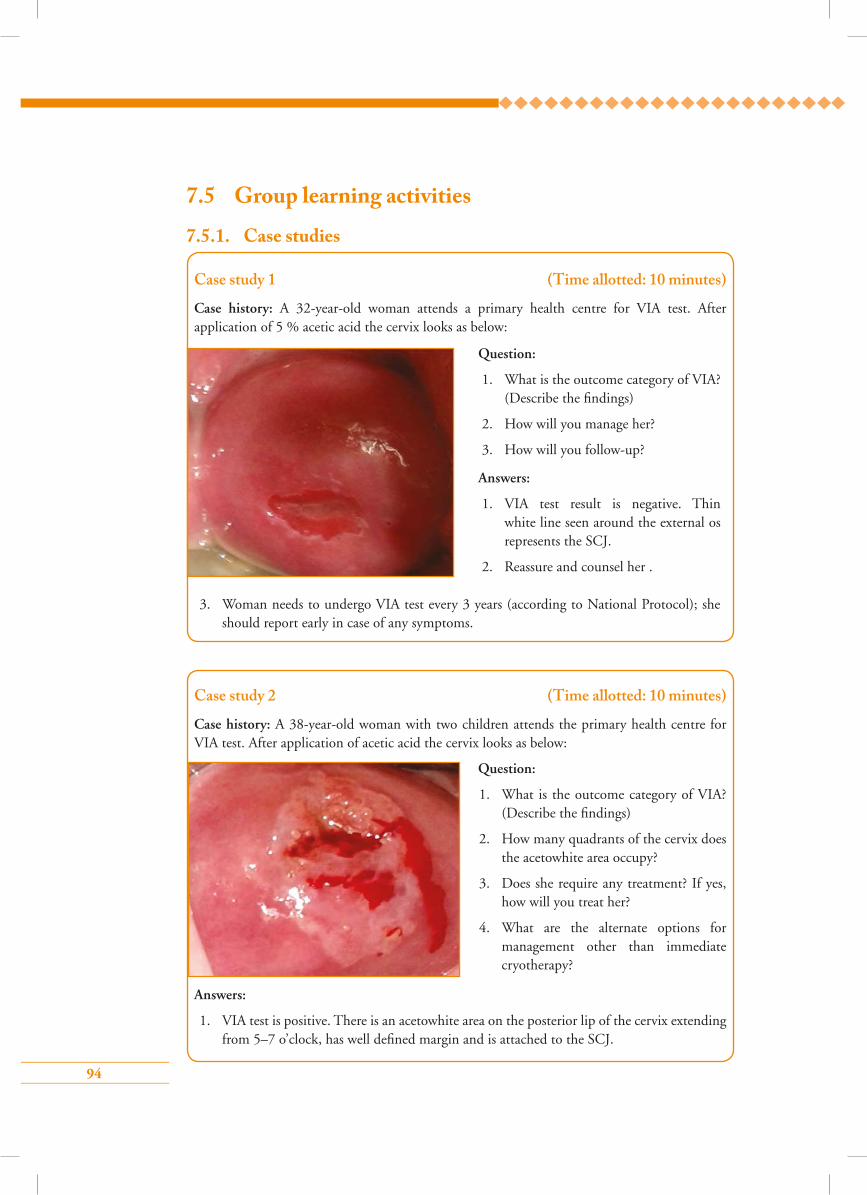
94
7.5 Group learning activities
7.5.1. Case studies
Case study 2 (Time allotted: 10 minutes)
Case history: A 38-year-old woman with two children attends the primary health centre for VIA test. After application of acetic acid the cervix looks as below:
Question:
1. What is the outcome category of VIA? (Describe the findings)
2. How many quadrants of the cervix does the acetowhite area occupy?
3. Does she require any treatment? If yes, how will you treat her?
4. What are the alternate options for management other than immediate cryotherapy?
Answers:
1. VIA test is positive. There is an acetowhite area on the posterior lip of the cervix extending from 5–7 o’clock, has well defined margin and is attached to the SCJ.
Case study 1 (Time allotted: 10 minutes)
Case history: A 32-year-old woman attends a primary health centre for VIA test. After application of 5 % acetic acid the cervix looks as below:
Question:
1. What is the outcome category of VIA? (Describe the findings)
2. How will you manage her?
3. How will you follow-up?
Answers:
1. VIA test result is negative. Thin white line seen around the external os represents the SCJ.
2. Reassure and counsel her .
3. Woman needs to undergo VIA test every 3 years (according to National Protocol); she should report early in case of any symptoms.
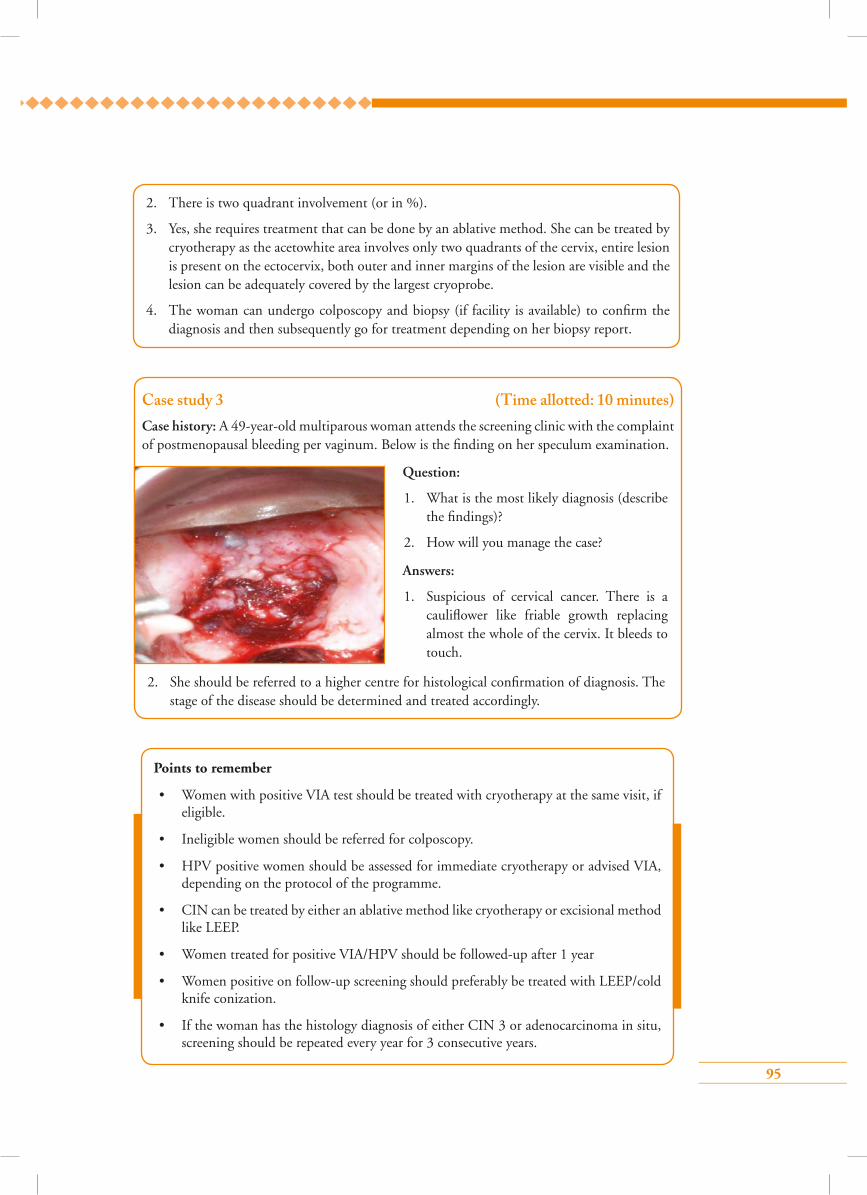
95
2. There is two quadrant involvement (or in %).
3. Yes, she requires treatment that can be done by an ablative method. She can be treated by cryotherapy as the acetowhite area involves only two quadrants of the cervix, entire lesion is present on the ectocervix, both outer and inner margins of the lesion are visible and the lesion can be adequately covered by the largest cryoprobe.
4. The woman can undergo colposcopy and biopsy (if facility is available) to confirm the diagnosis and then subsequently go for treatment depending on her biopsy report.
Case study 3 (Time allotted: 10 minutes)Case history: A 49-year-old multiparous woman attends the screening clinic with the complaint of postmenopausal bleeding per vaginum. Below is the finding on her speculum examination.
Question:
1. What is the most likely diagnosis (describe the findings)?
2. How will you manage the case?
Answers:
1. Suspicious of cervical cancer. There is a cauliflower like friable growth replacing almost the whole of the cervix. It bleeds to touch.
2. She should be referred to a higher centre for histological confirmation of diagnosis. The stage of the disease should be determined and treated accordingly.
Points to remember
• Women with positive VIA test should be treated with cryotherapy at the same visit, if eligible.
• Ineligible women should be referred for colposcopy.
• HPV positive women should be assessed for immediate cryotherapy or advised VIA, depending on the protocol of the programme.
• CIN can be treated by either an ablative method like cryotherapy or excisional method like LEEP.
• Women treated for positive VIA/HPV should be followed-up after 1 year
• Women positive on follow-up screening should preferably be treated with LEEP/cold knife conization.
• If the woman has the histology diagnosis of either CIN 3 or adenocarcinoma in situ, screening should be repeated every year for 3 consecutive years.
96
Answer key1 – d 2 – d 3 – a
4 – a 5 – a
1. Following VIA testing, if the result is negative:
a) Let the woman know that she is free from cervical cancer lifelong
b) Advise the woman to have a HPV test if she can afford it
c) The woman need not be informed about the test results
d) Advise the woman to have VIA after 3–5 years depending on the programme recommendations
2. Management of VIA positive women includes all, except:
a) Cryotherapy at the same visit
b) Colposcopic guided biopsy followed by treatment based on biopsy report
c) Colposcopy followed by LEEP at the same visit if high grade lesions are suspected
d) Cold knife conization at the same sitting
3. HPV positive women can be managed by:
a) Cryotherapy, if there is an acetowhite area on the ectocervix suitable for cryotherapy
b) Cryotherapy, if no acetowhite area is visible and SCJ is on the ectocervix
c) Antibiotics for 1 month
d) Doing VIA and further management based on VIA results
4. When should a VIA positive woman undergoing cryotherapy have repeat screening?
a) At 1 year
b) At 2 years
c) At 3 years
d) At 5 years
5. Disadvantage of screen and treat approach is:
a) Over treatment
b) High complication rate
c) Reduced number of visits to healthcare facilities
d) Reduced referral rate
Multiple choice questions
97
Module 8: Treatment of cervical pre-cancers by cryotherapy and follow-up
8.1 Module overviewThis module is intended to train paramedical workers, midwives, nurses and clinicians on the principles and technique of cryotherapy, which is an ablative method of treatment for cervical pre-cancers. The module is to be used by trainees in conjunction with the WHO Guidance book (for further reading refer Chapter 5 – Screening and treatment of cervical pre-cancer; Section 5.5.1 – Cryotherapy; Practice Sheet 5.10; and Annex 8 ).
8.2 Module contents• Principles of cryotherapy
• Instruments and consumables required
• Eligibility criteria for cryotherapy
• Steps of cryotherapy
• Post-treatment advice and follow-up
• Advantages and disadvantages of cryotherapy
• Management of treatment complications
• Troubleshooting
• Sterilization of equipment
• Group learning activities:
Knowing the cryotherapy unit and its maintenance
Simulated learning
Role play
• Checklist for treatment by cryotherapy
8.3 Learning objectivesBy the end of this module, trainees will be able to:
• describe all the parts of a cryotherapy unit;
• identify eligibility criteria for treatment with cryotherapy;
• perform the technique following the correct steps;
• recognize probable treatment complications;
• offer appropriate management of complications;
• perform appropriate follow-up after treatment;
• follow infection prevention practices during cryotherapy.
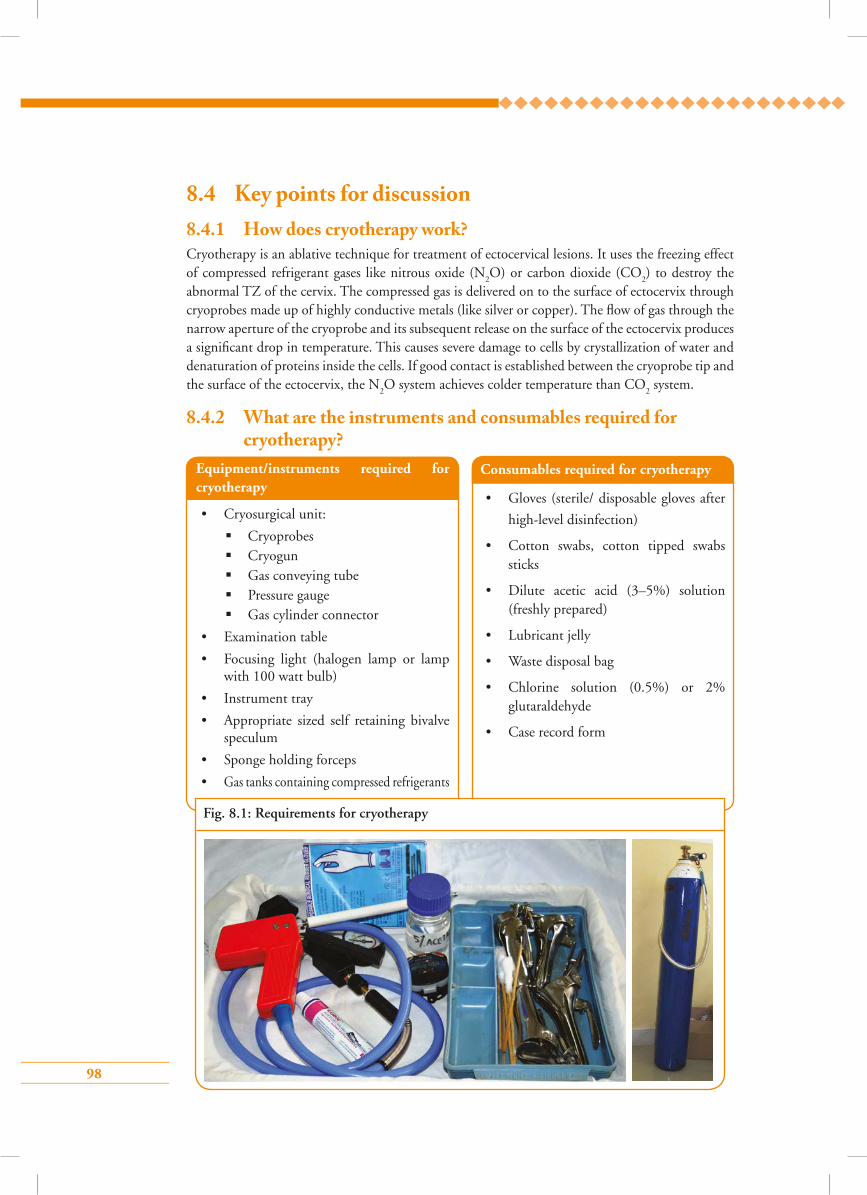
98
8.4 Key points for discussion8.4.1 How does cryotherapy work?Cryotherapy is an ablative technique for treatment of ectocervical lesions. It uses the freezing effect of compressed refrigerant gases like nitrous oxide (N
2O) or carbon dioxide (CO
2) to destroy the
abnormal TZ of the cervix. The compressed gas is delivered on to the surface of ectocervix through cryoprobes made up of highly conductive metals (like silver or copper). The flow of gas through the narrow aperture of the cryoprobe and its subsequent release on the surface of the ectocervix produces a significant drop in temperature. This causes severe damage to cells by crystallization of water and denaturation of proteins inside the cells. If good contact is established between the cryoprobe tip and the surface of the ectocervix, the N
2O system achieves colder temperature than CO
2 system.
8.4.2 What are the instruments and consumables required for cryotherapy?
Equipment/instruments required for cryotherapy
• Cryosurgical unit:
Cryoprobes Cryogun Gas conveying tube Pressure gauge Gas cylinder connector
• Examination table
• Focusing light (halogen lamp or lamp with 100 watt bulb)
• Instrument tray
• Appropriate sized self retaining bivalve speculum
• Sponge holding forceps
• Gas tanks containing compressed refrigerants
Consumables required for cryotherapy
• Gloves (sterile/ disposable gloves after
high-level disinfection)
• Cotton swabs, cotton tipped swabs sticks
• Dilute acetic acid (3–5%) solution (freshly prepared)
• Lubricant jelly
• Waste disposal bag
• Chlorine solution (0.5%) or 2% glutaraldehyde
• Case record form
Fig. 8.1: Requirements for cryotherapy
99
8.4.3 Which lesions can be treated by cryotherapy?Eligibility criteria for cryotherapy
• Entire lesion should be visible on the ectocervix
• Lesion should be adequately covered by the largest cryoprobe
• Lesion should not extend to the endocervical canal or vagina
• Lesion should not occupy more than 75% of the cervix
• No evidence or suspicion of cancer
• No evidence or suspicion of glandular abnormality
• Woman should not be pregnant at the time of treatment
• Woman should not have pelvic inflammatory disease at the time of treatment
• Woman should not be menstruating at the time of treatment
8.4.4 How to perform cryotherapy step-by-step Refer to Skills Checklist 8.6.1.
8.4.5 What are the post-treatment instructions and follow-up plans?• Inform the woman that she may have watery vaginal discharge (that can be blood-stained
also) for about 4 weeks
• Advise her to use sanitary napkins to avoid staining of the clothes
• Advise the woman to avoid sexual intercourse for about 4 weeks (if abstinence is not possible,
advise her to use condoms during intercourse)
• Advise her not to use vaginal tampons or douches for 4 weeks
• Ask the woman to report to the health facility if she suffers from any of the following
symptoms within 4 weeks of treatment:
fever with temperature >38 °C or with chills and rigors
foul smelling purulent vaginal discharge
severe lower abdominal pain/cramps
vaginal bleeding for more than 2 days or with clots (except during the expected time of
menstruation)
• Inform the woman that she should return for follow-up after 1 year
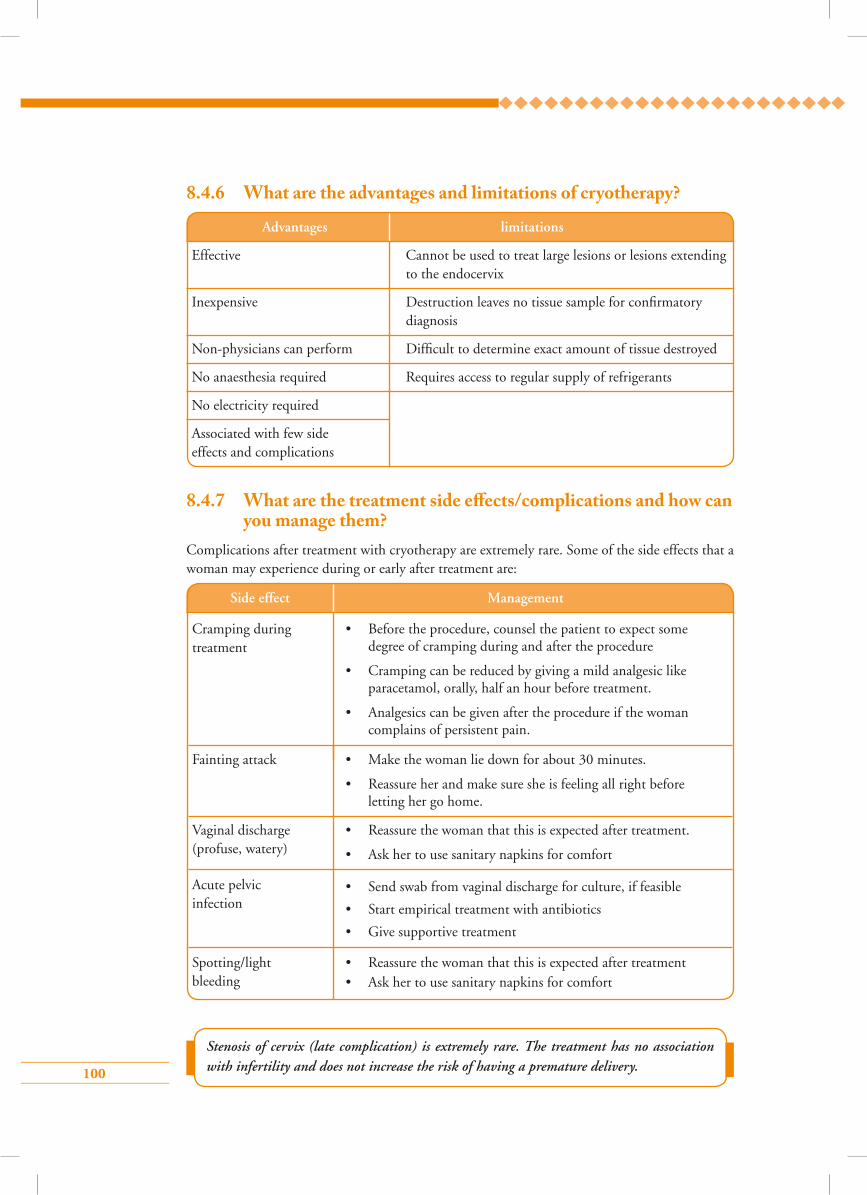
100
8.4.6 What are the advantages and limitations of cryotherapy?
Advantages limitations
Effective Cannot be used to treat large lesions or lesions extending to the endocervix
Inexpensive Destruction leaves no tissue sample for confirmatory diagnosis
Non-physicians can perform Difficult to determine exact amount of tissue destroyed
No anaesthesia required Requires access to regular supply of refrigerants
No electricity required
Associated with few side effects and complications
8.4.7 What are the treatment side e�ects/complications and how can you manage them?
Complications after treatment with cryotherapy are extremely rare. Some of the side effects that a woman may experience during or early after treatment are:
Stenosis of cervix (late complication) is extremely rare. The treatment has no association with infertility and does not increase the risk of having a premature delivery.
Side effect Management
Cramping during treatment
• Before the procedure, counsel the patient to expect some degree of cramping during and after the procedure
• Cramping can be reduced by giving a mild analgesic like paracetamol, orally, half an hour before treatment.
• Analgesics can be given after the procedure if the woman complains of persistent pain.
Fainting attack
Vaginal discharge (profuse, watery)
Acute pelvic infection
Spotting/light bleeding
• Make the woman lie down for about 30 minutes.
• Reassure her and make sure she is feeling all right before letting her go home.
• Reassure the woman that this is expected after treatment.
• Ask her to use sanitary napkins for comfort
• Send swab from vaginal discharge for culture, if feasible
• Start empirical treatment with antibiotics
• Give supportive treatment
• Reassure the woman that this is expected after treatment• Ask her to use sanitary napkins for comfort

101
8.4.8 What are the common problems encountered during cryotherapy and how can you manage them?
Fig. 8.2: Problems encountered during cryotherapy and suggested solutions
a) Dip the nozzle in water and press the trigger to clear blockage
c) Stop cryotherapy if the pressure gauge indicator is in the yellow zone
b) Change the washer to stop gas leakage from the hand unit
d) Put a cut finger of a glove on the speculum to the expose cervix
Problems Reason Suggested solution
Gas stops flowing
Gas leakage from the hand unit
Pressure gauge indicator is in the yellow zone (Fig. 8.2c)
Difficulty in exposing the cervix
Gas tank is empty
The washer/O-ring is either missing or is broken
Inadequate gas in the cylinder
Laxity of vaginal walls
Nozzle is blocked by impurities in the CO
2 gas
Arrange for a new gas cylinder
Change washer/O-ring (usually provided by the manufacturer in the cryo unit) and put in a new appropriate sized washer (Fig. 8.2b)
Stop performing cryotherapy and change the gas cylinder
• Put a condom or the cut finger of a glove on the speculum (Fig. 8.2d)
• Insert lateral vaginal wall retractors
• Use a wooden spatula to push away vagina from between the blades of the speculum
Dip the tip of the nozzle in a small bowl of water and flush it by pressing the trigger of the cryogun until the blockage is cleared (Fig. 8.2a)
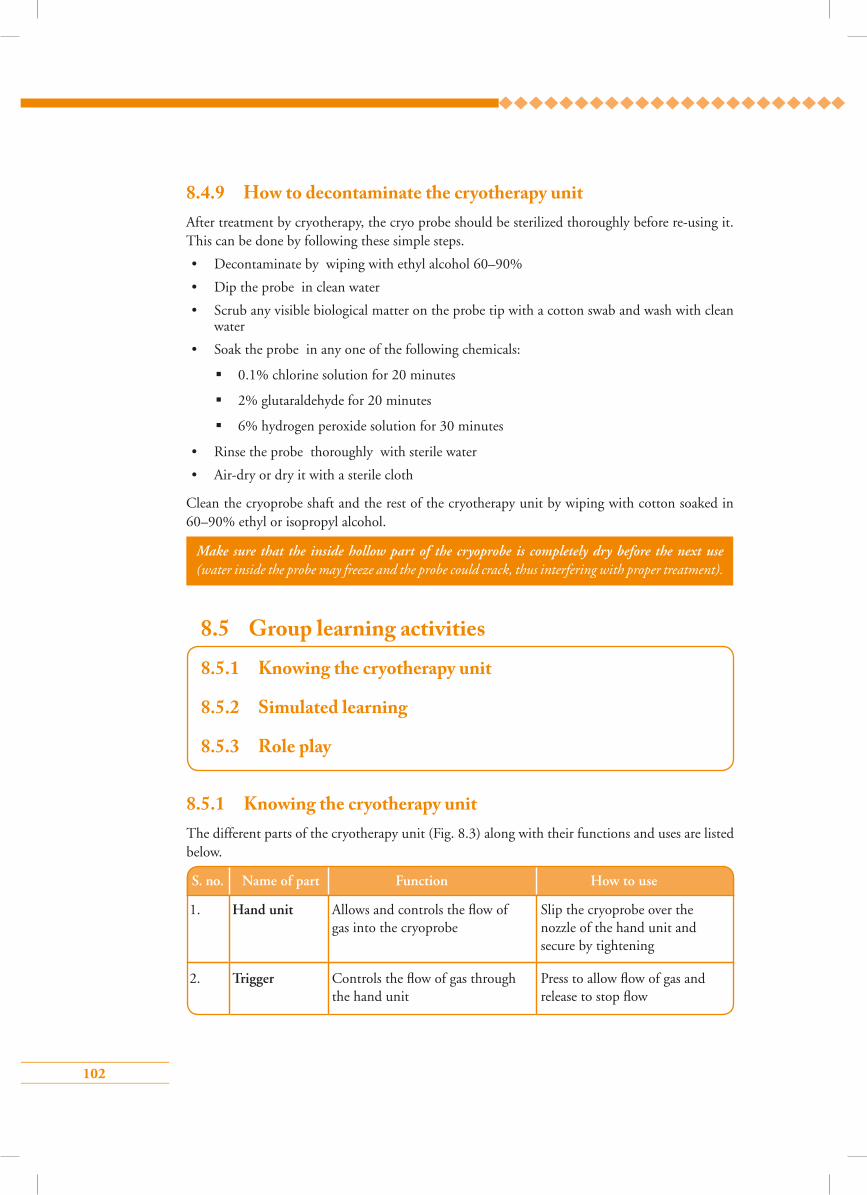
102
8.4.9 How to decontaminate the cryotherapy unitAfter treatment by cryotherapy, the cryo probe should be sterilized thoroughly before re-using it. This can be done by following these simple steps.
• Decontaminate by wiping with ethyl alcohol 60–90%
• Dip the probe in clean water
• Scrub any visible biological matter on the probe tip with a cotton swab and wash with clean water
• Soak the probe in any one of the following chemicals:
0.1% chlorine solution for 20 minutes
2% glutaraldehyde for 20 minutes
6% hydrogen peroxide solution for 30 minutes
• Rinse the probe thoroughly with sterile water
• Air-dry or dry it with a sterile cloth
Clean the cryoprobe shaft and the rest of the cryotherapy unit by wiping with cotton soaked in 60–90% ethyl or isopropyl alcohol.
Make sure that the inside hollow part of the cryoprobe is completely dry before the next use (water inside the probe may freeze and the probe could crack, thus interfering with proper treatment).
8.5.1 Knowing the cryotherapy unit The different parts of the cryotherapy unit (Fig. 8.3) along with their functions and uses are listed below.
8.5 Group learning activities8.5.1 Knowing the cryotherapy unit
8.5.2 Simulated learning
8.5.3 Role play
1.
2.
Hand unit
Trigger
Allows and controls the flow of gas into the cryoprobe
Controls the flow of gas through the hand unit
Slip the cryoprobe over the nozzle of the hand unit and secure by tightening
Press to allow flow of gas and release to stop flow
S. no. Name of part Function How to use

103
5.
7.
8.
Cryoprobe
Cryotip
Cryo shaft
Gas conveying tube
Pressure gauge
Delivers the refrigerant on to the surface of the cervix and has two parts – cryotip and cryo shaft
Metal tip of the cryoprobe that covers the surface of the cervix and induces the freezing effect
Part of the cryoprobe that attaches the cryotip to the hand unit
Connects the hand unit to the pressure gauge and allows the gas to flow
Monitors the pressure of gas flowing to the hand unit. It has an indicator and three colour zones – yellow, green and red.
Apply the cryoprobe connected to the hand unit on the TZ of the cervix for freezing effect
Select the cryotip of appropriate size and shape and press it onto the cervix without touching the vagina
The flexible tube remains connected
On opening the gas cylinder if the indicator moves to:
Green zone – gas pressure is adequate
Yellow zone – pressure too low
Red zone – gas pressure is too high
4.
6.
3. Handle grip Part of the hand unit that is held by the operator
Hold the handle grip during the entire procedure
9.
10.
Gas cylinder connector
Washers or O-rings
Attaches the gas cylinder to the cryotherapy unit
Compressed gas cylinder valves vary from country to country. A suitable type of connector should be selected to fit the gas cylinder valves of the country
Prevent leakage of gas from the system. Washers need to be replaced if they become defective, causing leakage of gas
Insert the inlet of the connector into the slot of the gas cylinder valve. Tighten the attachment by screwing in the tightening knob of the connector
Make sure that the washers are fitted in between the cryoprobe and hand unit and also between the gas cylinder connector and the cylinder
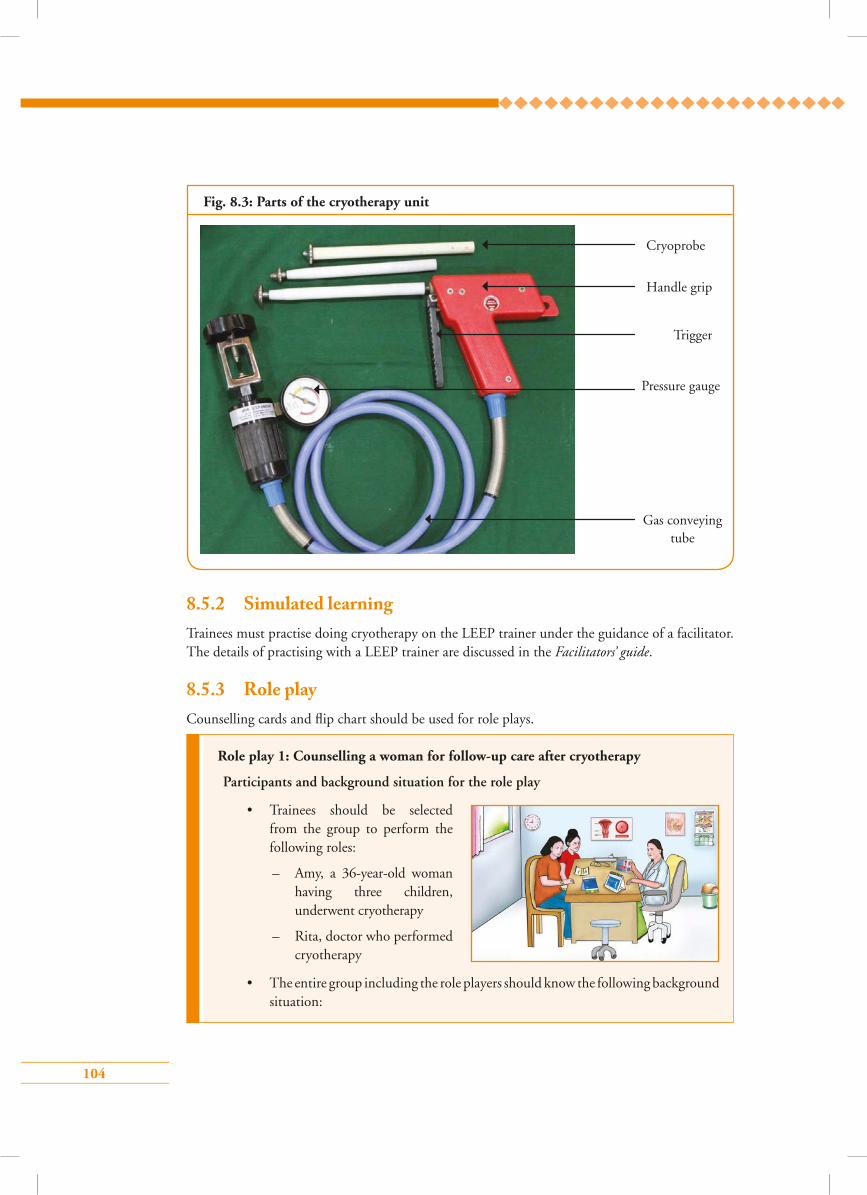
104
Cryoprobe
Trigger
Handle grip
Pressure gauge
Gas conveying tube
8.5.2 Simulated learning Trainees must practise doing cryotherapy on the LEEP trainer under the guidance of a facilitator. The details of practising with a LEEP trainer are discussed in the Facilitators’ guide.
Fig. 8.3: Parts of the cryotherapy unit
Role play 1: Counselling a woman for follow-up care after cryotherapy
Participants and background situation for the role play
• Trainees should be selected from the group to perform the following roles:
– Amy, a 36-year-old woman having three children, underwent cryotherapy
– Rita, doctor who performed cryotherapy
• The entire group including the role players should know the following background situation:
8.5.3 Role playCounselling cards and flip chart should be used for role plays.
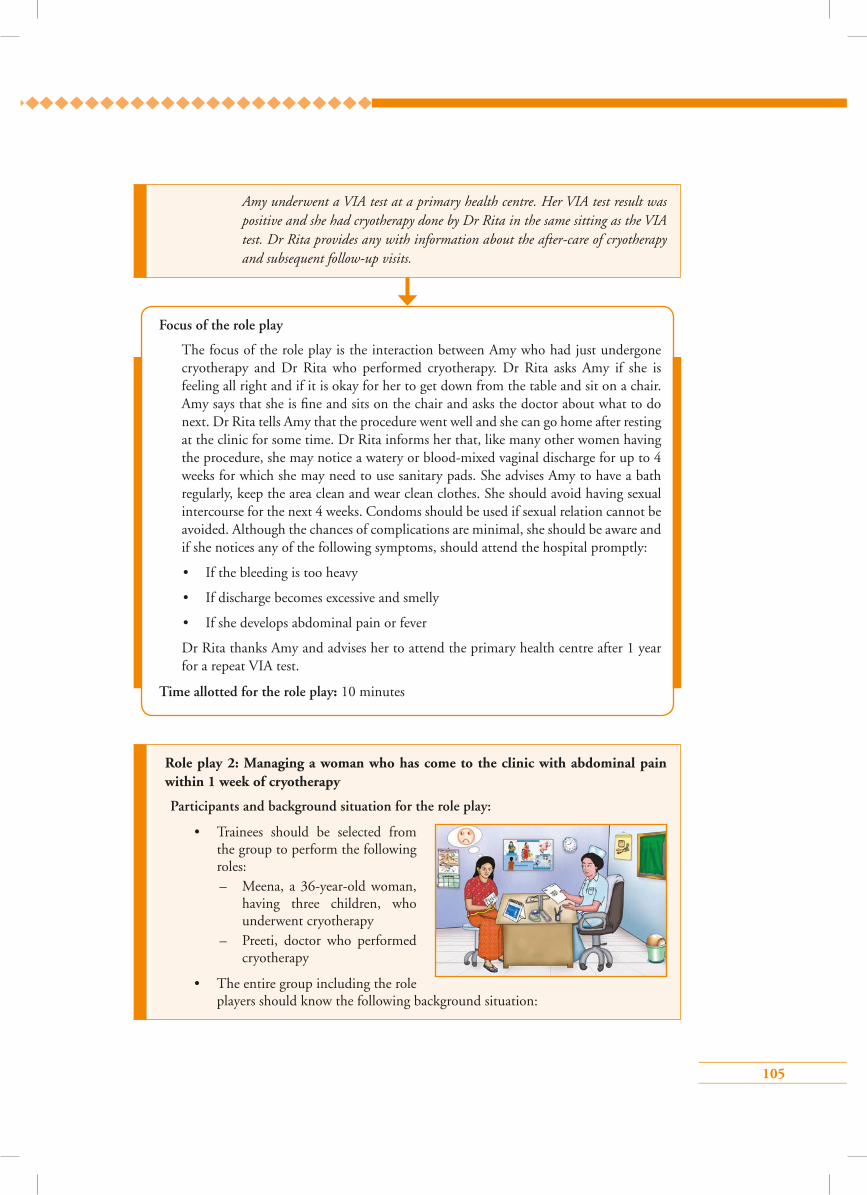
105
Amy underwent a VIA test at a primary health centre. Her VIA test result was positive and she had cryotherapy done by Dr Rita in the same sitting as the VIA test. Dr Rita provides any with information about the after-care of cryotherapy and subsequent follow-up visits.
Role play 2: Managing a woman who has come to the clinic with abdominal pain within 1 week of cryotherapy
Participants and background situation for the role play:
• Trainees should be selected from the group to perform the following roles:– Meena, a 36-year-old woman,
having three children, who underwent cryotherapy
– Preeti, doctor who performed cryotherapy
•The entire group including the role players should know the following background situation:
Focus of the role play
The focus of the role play is the interaction between Amy who had just undergone cryotherapy and Dr Rita who performed cryotherapy. Dr Rita asks Amy if she is feeling all right and if it is okay for her to get down from the table and sit on a chair. Amy says that she is fine and sits on the chair and asks the doctor about what to do next. Dr Rita tells Amy that the procedure went well and she can go home after resting at the clinic for some time. Dr Rita informs her that, like many other women having the procedure, she may notice a watery or blood-mixed vaginal discharge for up to 4 weeks for which she may need to use sanitary pads. She advises Amy to have a bath regularly, keep the area clean and wear clean clothes. She should avoid having sexual intercourse for the next 4 weeks. Condoms should be used if sexual relation cannot be avoided. Although the chances of complications are minimal, she should be aware and if she notices any of the following symptoms, should attend the hospital promptly:
• If the bleeding is too heavy
• If discharge becomes excessive and smelly
• If she develops abdominal pain or fever
Dr Rita thanks Amy and advises her to attend the primary health centre after 1 year for a repeat VIA test.
Time allotted for the role play: 10 minutes
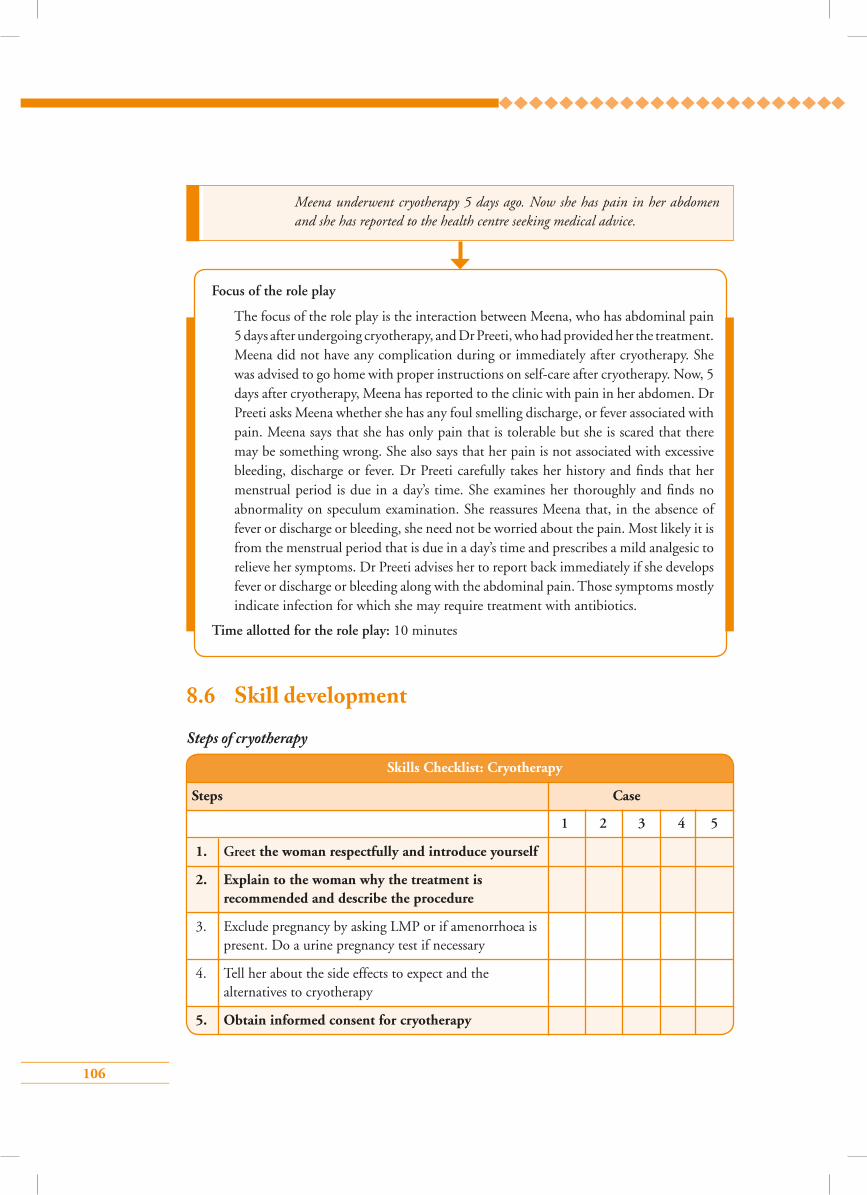
106
8.6 Skill development
Steps of cryotherapy
Skills Checklist: Cryotherapy
Steps Case
1 2 3 4 5
1. Greet the woman respectfully and introduce yourself
2. Explain to the woman why the treatment is recommended and describe the procedure
3. Exclude pregnancy by asking LMP or if amenorrhoea is present. Do a urine pregnancy test if necessary
4. Tell her about the side effects to expect and the alternatives to cryotherapy
5. Obtain informed consent for cryotherapy
Focus of the role play
The focus of the role play is the interaction between Meena, who has abdominal pain 5 days after undergoing cryotherapy, and Dr Preeti, who had provided her the treatment. Meena did not have any complication during or immediately after cryotherapy. She was advised to go home with proper instructions on self-care after cryotherapy. Now, 5 days after cryotherapy, Meena has reported to the clinic with pain in her abdomen. Dr Preeti asks Meena whether she has any foul smelling discharge, or fever associated with pain. Meena says that she has only pain that is tolerable but she is scared that there may be something wrong. She also says that her pain is not associated with excessive bleeding, discharge or fever. Dr Preeti carefully takes her history and finds that her menstrual period is due in a day’s time. She examines her thoroughly and finds no abnormality on speculum examination. She reassures Meena that, in the absence of fever or discharge or bleeding, she need not be worried about the pain. Most likely it is from the menstrual period that is due in a day’s time and prescribes a mild analgesic to relieve her symptoms. Dr Preeti advises her to report back immediately if she develops fever or discharge or bleeding along with the abdominal pain. Those symptoms mostly indicate infection for which she may require treatment with antibiotics.
Time allotted for the role play: 10 minutes
Meena underwent cryotherapy 5 days ago. Now she has pain in her abdomen and she has reported to the health centre seeking medical advice.

107
Getting ready
6. Check that instruments, supplies and light source are available and ready to use
7. Check that cryotherapy instruments and gas tanks are ready for use
8. Tell the woman what is going to be done and encourage her to ask questions
9. Check that the woman recently (not more than 30 minutes earlier) has emptied her bladder
10. Help her on to the examination table and drape her
11. Wash hands thoroughly and air-dry them
12. Put on new sterile examination or high-level disinfected surgical gloves
13. Arrange instruments and supplies on a high-level disinfected tray or container
Cryotherapy
14. Insert an appropriate sized speculum and fix blades so that the entire cervix can be seen clearly
15. Move the light source so that the cervix can be visualized clearly
16. Apply 5% dilute acetic acid and identify:
• SCJ
• TZ and area to treat
• Limits of the lesion
17. Choose a cryotherapy probe of the correct size so that the entire lesion is covered
18. Smear the cryoprobe tip with saline or any lubricant jelly
19. Apply the cryoprobe with the tip of the probe placed on the external os of the cervix
20. Take precautions so that the cryoprobe tip does not inadvertently touch any part of the vagina
21. Check for adequate pressure (40–70 kg per cm2) in the gas tank, indicated by the green zone in most models of the equipment
22. Press the trigger of the cryogun to release gas and keep it pressed for 3 minutes

108
23. Inspect the cervix to ensure that the ice ball forming on the cervix extends outside the rim of the cryoprobe by 4–5 mm
24. Release the trigger and let the ice thaw for 5 minutes
25. Repeat the procedure of freezing for another 3 minutes
26. Release the trigger to stop gas flowing and wait for the cryotip to detach from the cervix on its own
27. Remove cryoprobe from the vagina
28. Remove speculum and place it in 0.5% chlorine solution for 10 minutes
Post-cryotherapy tasks
29. Close the gas cylinder valve
30. Detach the cryoprobe, clean it and put it in chemical disinfectant
31. Decontaminate the cryotherapy unit with alcohol
32. Immerse both gloved hands in 0.5% chlorine solution. Remove gloves by turning them inside out:
• If disposing off the gloves, place them in a leak-proof container or plastic bag.
• If reusing surgical gloves, submerge them in 0.5% chlorine solution for 10 minutes for decontamination
33. Wash hands thoroughly with soap and water and air dry them
34. Check to be sure that the woman is not having excessive cramps
35. Advise about post-treatment care and follow-up instructions
36. Complete the documentations to record the treatment
Facilitator’s remarks
*The highlighted steps are considered critical
Score achieved: Facilitator’s signature
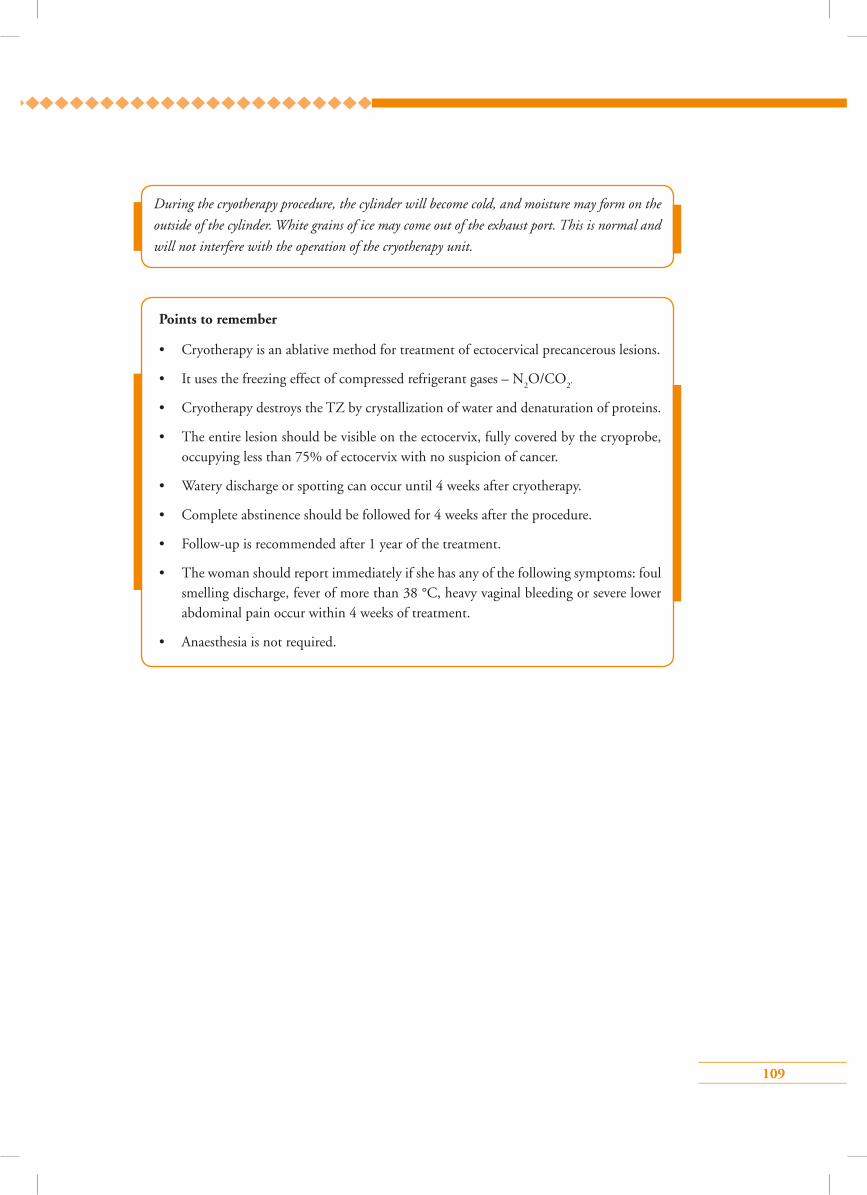
109
During the cryotherapy procedure, the cylinder will become cold, and moisture may form on the
outside of the cylinder. White grains of ice may come out of the exhaust port. This is normal and
will not interfere with the operation of the cryotherapy unit.
Points to remember
• Cryotherapy is an ablative method for treatment of ectocervical precancerous lesions.
• It uses the freezing effect of compressed refrigerant gases – N2O/CO
2'
• Cryotherapy destroys the TZ by crystallization of water and denaturation of proteins.
• The entire lesion should be visible on the ectocervix, fully covered by the cryoprobe, occupying less than 75% of ectocervix with no suspicion of cancer.
• Watery discharge or spotting can occur until 4 weeks after cryotherapy.
• Complete abstinence should be followed for 4 weeks after the procedure.
• Follow-up is recommended after 1 year of the treatment.
• The woman should report immediately if she has any of the following symptoms: foul smelling discharge, fever of more than 38 °C, heavy vaginal bleeding or severe lower abdominal pain occur within 4 weeks of treatment.
• Anaesthesia is not required.
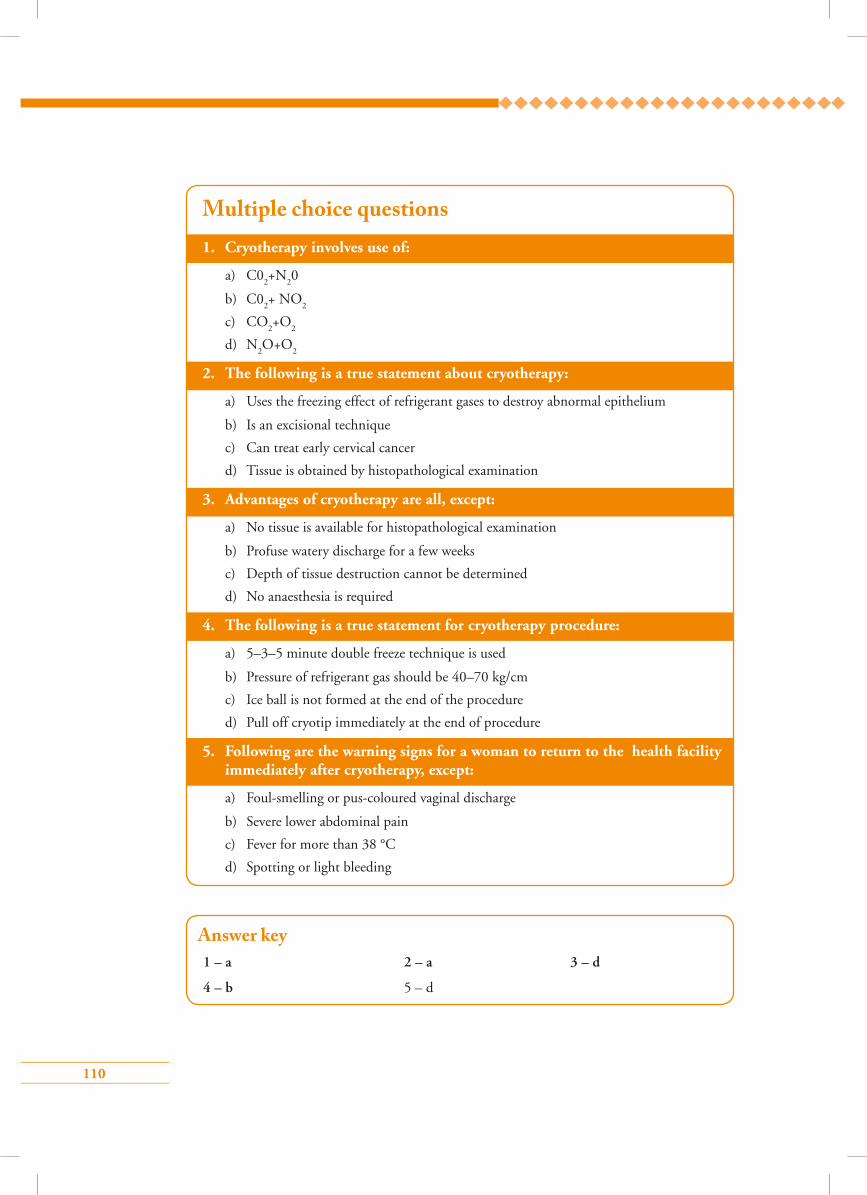
110
1. Cryotherapy involves use of:
a) C02+N
20
b) C02+ NO
2
c) CO2+O
2
d) N2O+O
2
2. The following is a true statement about cryotherapy:
a) Uses the freezing effect of refrigerant gases to destroy abnormal epithelium
b) Is an excisional technique
c) Can treat early cervical cancer
d) Tissue is obtained by histopathological examination
3. Advantages of cryotherapy are all, except:
a) No tissue is available for histopathological examination
b) Profuse watery discharge for a few weeks
c) Depth of tissue destruction cannot be determined
d) No anaesthesia is required
4. The following is a true statement for cryotherapy procedure:
a) 5–3–5 minute double freeze technique is used
b) Pressure of refrigerant gas should be 40–70 kg/cm
c) Ice ball is not formed at the end of the procedure
d) Pull off cryotip immediately at the end of procedure
5. Following are the warning signs for a woman to return to the health facility immediately after cryotherapy, except:
a) Foul-smelling or pus-coloured vaginal discharge
b) Severe lower abdominal pain
c) Fever for more than 38 °C
d) Spotting or light bleeding
Answer key1 – a 2 – a 3 – d
4 – b 5 – d
Multiple choice questions
111
Module 9: Treatment of cervical pre-cancers by cold coagulation and follow-up
9.1 Module overviewThis module is intended to train paramedical workers, midwives, nurses and clinicians on the principles and technique of cold coagulation, which is an ablative method of treatment for cervical pre-cancers.
Cold coagulation as a method of treatment of cervical precancerous conditions is not yet universally approved. However it can be practiced in situations where cryotherapy is not feasible due to non-availability of refrigerants.
9.2 Module contents• Principles of cold coagulation
• Instruments and consumables required
• Eligibility criteria for cold coagulation
• Steps of cold coagulation
• Post-treatment advice and follow-up
• Advantages and disadvantages
• Troubleshooting
• Management of treatment complications
• Sterilization of equipment
• Group learning activities:
Knowing the cold coagulation equipment
Simulated learning
Role play
• Checklist for treatment by cold coagulation
9.3 Learning objectivesBy the end of this module, trainees will be able to:
• describe all parts of the cold coagulator;
• identify eligibility criteria for treatment with cold coagulation;
• perform cold coagulation following correct steps;
• recognize probable treatment complications;
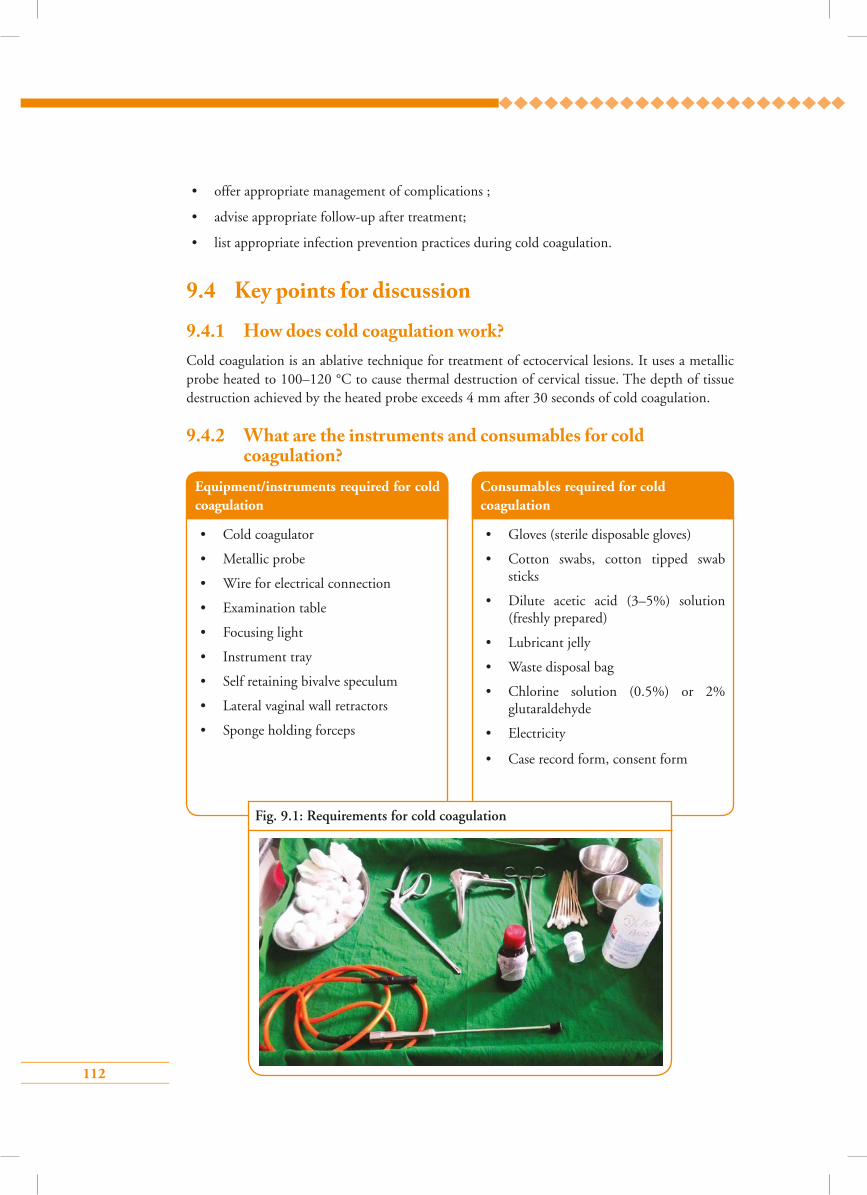
112
• offer appropriate management of complications ;
• advise appropriate follow-up after treatment;
• list appropriate infection prevention practices during cold coagulation.
9.4 Key points for discussion
9.4.1 How does cold coagulation work?Cold coagulation is an ablative technique for treatment of ectocervical lesions. It uses a metallic probe heated to 100–120 °C to cause thermal destruction of cervical tissue. The depth of tissue destruction achieved by the heated probe exceeds 4 mm after 30 seconds of cold coagulation.
9.4.2 What are the instruments and consumables for cold coagulation?
Fig. 9.1: Requirements for cold coagulation
Equipment/instruments required for cold coagulation
• Cold coagulator
• Metallic probe
• Wire for electrical connection
• Examination table
• Focusing light
• Instrument tray
• Self retaining bivalve speculum
• Lateral vaginal wall retractors
• Sponge holding forceps
Consumables required for cold coagulation
• Gloves (sterile disposable gloves)
• Cotton swabs, cotton tipped swab sticks
• Dilute acetic acid (3–5%) solution (freshly prepared)
• Lubricant jelly
• Waste disposal bag
• Chlorine solution (0.5%) or 2% glutaraldehyde
• Electricity
• Case record form, consent form
113
9.4.3 Which lesions can be treated by cold coagulation?Eligibility criteria for cold coagulation
• Entire lesion should be visible on the ectocervix
• Lesion should not extend to the endocervical canal or vagina
• Lesion should not occupy more than 75% of the cervix
• No evidence or suspicion of cancer
• No evidence or suspicion of glandular abnormality
• Woman should not be pregnant at the time of treatment
• Woman should not have pelvic inflammatory disease at the time of treatment
• Woman should not be menstruating at the time of treatment
9.4.4 How to perform cold coagulation step-by-step Refer to Skills Checklist 9.5.1.
9.4.5 What is the post-treatment advice and follow-up plan?• Inform the woman that she may have watery vaginal discharge (that can be blood-stained
also) for about 4 weeks
• Advise her to use sanitary napkins to avoid staining her clothes
• Advise the woman to avoid sexual intercourse for about 4 weeks (if abstinence is not possible,
advise her to use condoms during intercourse)
• Advise her not to use vaginal tampons or douche for 4 weeks
• Ask the woman to report to the health facility if she suffers from any of the following
symptoms within 4 weeks of treatment:
fever with temperature >38 °C with chills and rigors
foul smelling purulent vaginal discharge
severe lower abdominal pain/cramps
vaginal bleeding for more than 2 days or with clots (except during expected time of
menstruation)
• Inform the woman that she should return for follow-up after 1 year
114
9.4.7 What are the treatment side e�ects/complications and how should they be managed?
Complications after treatment with cold coagulation are extremely rare. Some of the side effects that a woman may experience during or immediately after treatment are:
Advantages Limitations
Effective in treating CIN Destruction leaves no tissue sample for confirmatory diagnosis
Non-physicians can perform Difficult to determine the exact amount of tissue destroyed
No anaesthesia or hospitalization required Electricity required
No noise/smoke/smell of burning tissue Expensive equipment during treatment
Multiple applications to cover a big lesion is possible
Does not require continuous supply of refrigerants
Short treatment time
Associated with few side effects and complications
Easy sterilization of the metallic probe
Easy portability as equipment is light weight
Cramping during treatment
Vaginal pain due to inadvertent touching of the vagina with a heated probe
• Counsel the woman before the procedure to expect some degree of cramping during and after the procedure
• Cramping can be reduced by giving a mild analgesic like paracetamol orally half an hour before treatment
• Analgesics can be given after the procedure, if the woman complains of persistent pain
• Make the woman lie down for about 30 minutes
• Give her analgesic tablets like paracetamol or ibuprofen
• Reassure her and make sure she is feeling all right before letting her go
Side effect Management
9.4.6 What are the advantages and limitations of cold coagulation?
115
Vaginal discharge (profuse, watery)
Acute pelvic inflammatory disease
Spotting/light bleeding
• Reassure the woman that this is expected after treatment
• Ask her to use sanitary napkins for comfort
• Send swab from vaginal discharge for culture, if feasible
• Start empirical treatment with antibiotics
• Give supportive treatment
• Reassure the woman that this is expected after treatment
• Ask her to use sanitary napkins for comfort
9.4.8 How to decontaminate and sterilize a cold coagulator probeDecontamination and sterilization of the cold coagulator probe is easy and can be done by
following these simple steps:
• Decontaminate by the probe wiping it with 60–90% ethyl alcohol
• Dip the probe in clean water
• Remove any visible matter on the probe with a cotton swab and wash it with clean water
• Wipe it dry
• Set the cold coagulator at 120 0C and heat the probe for 45 seconds
9.5 Group learning activities9.5.1 Knowing the cold coagulator unit
9.5.2 Simulated learning
9.5.3 Role play
Stenosis of cervix (late complication) is extremely rare. The treatment has no association with
infertility and does not increase the risk of having a premature delivery.
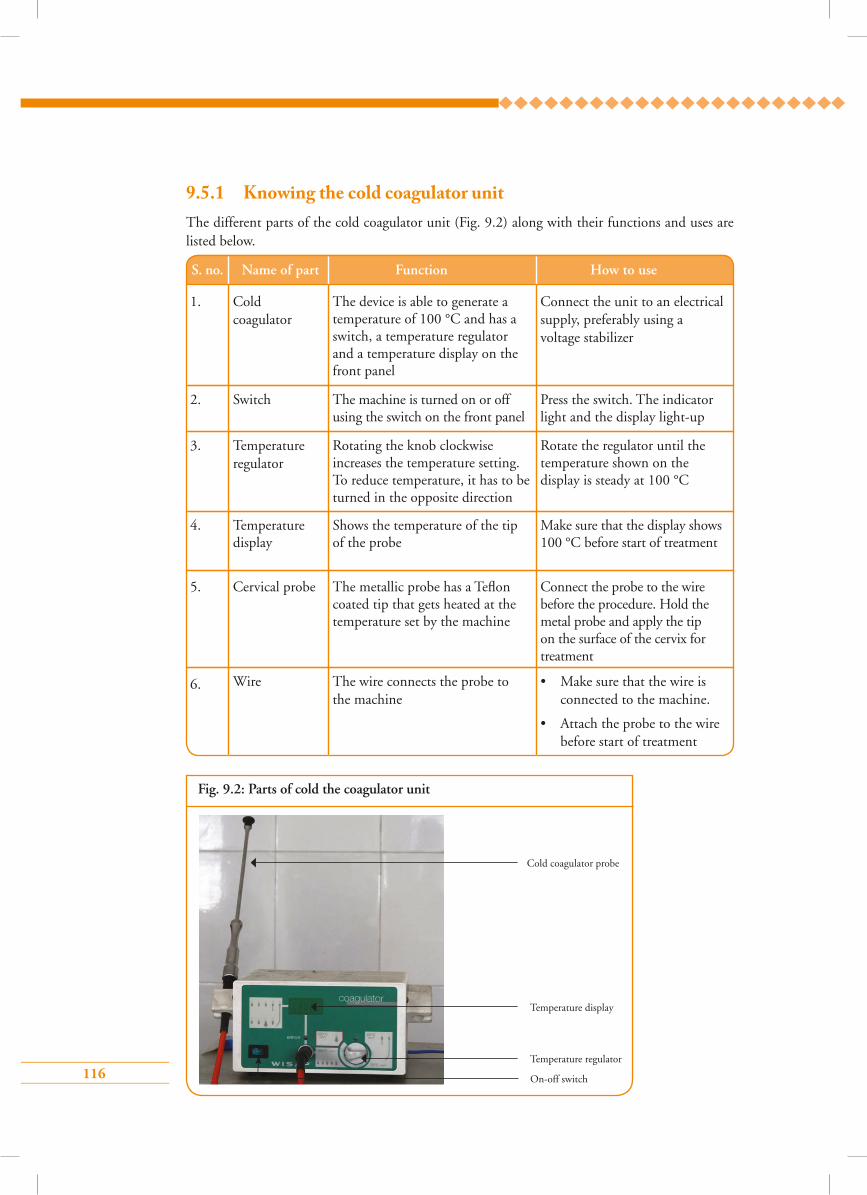
116
Fig. 9.2: Parts of cold the coagulator unit
Cold coagulator probe
Temperature display
Temperature regulator
On-off switch
9.5.1 Knowing the cold coagulator unitThe different parts of the cold coagulator unit (Fig. 9.2) along with their functions and uses are listed below.
S. no. Name of part Function How to use
1. Cold coagulator
Switch
Temperature regulator
The device is able to generate a temperature of 100 °C and has a switch, a temperature regulator and a temperature display on the front panel
The machine is turned on or off using the switch on the front panel
Rotating the knob clockwise increases the temperature setting. To reduce temperature, it has to be turned in the opposite direction
Connect the unit to an electrical supply, preferably using a voltage stabilizer
Press the switch. The indicator light and the display light-up
Rotate the regulator until the temperature shown on the display is steady at 100 °C
2.
3.
5.
6.
Cervical probe
Wire
The metallic probe has a Teflon coated tip that gets heated at the temperature set by the machine
The wire connects the probe to the machine
Connect the probe to the wire before the procedure. Hold the metal probe and apply the tip on the surface of the cervix for treatment
• Make sure that the wire is connected to the machine.
• Attach the probe to the wire before start of treatment
Temperature display
Shows the temperature of the tip of the probe
Make sure that the display shows 100 °C before start of treatment
4.
117
9.5.2 Simulated learning Trainees must practise doing cold coagulation on the LEEP trainer under the guidance of a facilitator. The details of practising with a LEEP-trainer are discussed in the Facilitators’ guide.
9.5.3 Role play Counselling cards and flip chart to be used for role plays
Role play 1: Informed consent procedure and counselling for cold coagulation
Participants and background situation for the role play
• Trainees should be selected from the group to perform the following roles:
– Farzana, a 45-year-old woman, having five children, who has undergone VIA at a primary health centre
– Shirin, a doctor who performs cold coagulation at the primary health centre
– Ahmed, Farzana’s partner who accompanies her
• The entire group, including the role players, should know the following background situation:
Farzana has been advised by Dr Shirin at the primary health centre to have treatment with cold coagulation in view of her VIA test positive result. Dr Shirin explains the necessity of treatment with cold coagulation, how the procedure will be done, benefits and side effects to Farzana and takes informed consent.
Focus of the role play
The focus of the role play is the interaction between Dr Shirin and Farzana, who has undergone VIA test and requires treatment by cold coagulation. Dr Shirin asks Farzana to sit in the counselling room and to call her family, if present. Farzana’s partner, Ahmed, joins them in the counselling room. Dr Shirin explains to the couple that Farzana’s VIA test report is positive as she has a small white patch on the cervix that could be an early change (pre-cancer) of the cervix. She informs them that it is best that this small patch be treated now, so that the future risk of this white patch developing into cancer is prevented. She gives details about the simple treatment procedure called cold coagulation where a small heated probe is applied on the cervix for a few seconds to destroy the abnormal area present on Farzana’s cervix. The procedure is not painful and does not need any anaesthesia. The entire treatment
118
Role play 2: Counselling a woman for follow-up care after cold coagulation
Participants and background situation for the role play
• Trainees should be selected from the group to perform the following roles:
– Joe, a 36-year-old woman, having three children, who underwent cold coagulation
– Catherine, the doctor who performed cold coagulation
• The entire group, including the role players, should know the following background situation:
Joe had VIA test at a primary health centre. Her VIA test result was positive and she had cold coagulation done by Dr Catherine in the same sitting as the VIA test. Dr Catherine provides information to Joe about the after-care of cold coagulation and subsequent follow-up visits.
procedure will take only a few minutes and Farzana will be able to go home the same day. Dr Shirin informs the couple that after the treatment Farzana will have watery vaginal discharge or blood-stained discharge for 2–3 weeks. She advises the couple not to have sexual intercourse for around 1 month to avoid bleeding and infection. Although the treatment complications are minimal, Farzana should report to the hospital if she has foul smelling vaginal discharge, excessive vaginal bleeding with clots and pain of lower abdomen with fever. Ahmed asks about the necessity of further check-ups after the treatment. Dr Shirin informs them that Farzana is required to come for follow-up after 1 year of treatment. She then enquires if Farzana and Ahmed have any other questions and if they agree to for Farzana’s treatment by cold coagulation. They both agree and Farzana signs the consent form.
Time allotted for the role play: 10 minutes
Focus of the role play
The focus of the role play is the interaction between Joe, who has just undergone cold coagulation, and Dr Catherine who performed cold coagulation on Joe. Dr Catherine asks Joe if she is feeling all right and would like to get down from the table and sit on a chair. Joe says that she is feeling fine and sits on the chair and asks the doctor about what she should do next. Dr Catherine tells Joe that the procedure went well and she can go home after resting at the clinic for some time. Dr Catherine informs Joe that like many other women having the procedure, She may notice a watery or blood-mixed vaginal discharge for up to 4 weeks for which she may need to use sanitary pads. She
119
9.6 Skill developmentSkills checklist for treatment by cold coagulation
9.6.1 Steps of cold coagulation
advises Joe to bathe regularly, keep the area clean and wear clean clothes. She should avoid having sexual intercourse for the next 4 weeks. Condoms should be used if sexual relations cannot be avoided. Although the chances of complications are minimum, if she notices any of the following symptoms she should attend the hospital promptly:
• High fever
• Foul smelling vaginal discharge
• Severe lower abdominal pain/cramps
• Vaginal bleeding for more than 2 days or with clots
Dr Catherine thanks Joe and advises her to attend the primary health centre at 1 year for repeat VIA test.
Time allotted for the role play: 10 minutes
Skills Checklist: Cold coagulation
Steps Case
Counselling before cold coagulation 1 2 3 4 5
1. Greet the woman respectfully and introduce yourself
2. Explain to the woman why the treatment is recommended and describe the procedure
3. Exclude pregnancy by asking LMP and do urine pregnancy test if amenorrhoea is present
4. Tell her about the side effects to expect and the alternatives to cold coagulation
5. Obtain informed consent for cold coagulation
Getting ready
6. Check that instruments, supplies and light source are available and ready to use
7. Check for electricity supply
8. Check that cold coagulator is connected to electricity source and is ready for use

120
9. Tell the woman what is going to be done and encourage her to ask questions
10. Check that the woman has recently (not more than 30 minutes earlier) emptied her bladder
11. Help her on to the examination table and drape her
12. Wash hands thoroughly and air-dry them
13. Put on new examination or high-level disinfected surgical gloves
14. Arrange instruments and supplies on a high-level disinfected tray or container
Cold coagulation
15. Insert an appropriate sized speculum and fix the blades so that the entire cervix can be seen clearly
16. Move the light source so that the cervix can be visualized clearly
17. Apply 3–5% dilute acetic acid and identify:
• Squamocolumnar junction
• Limits of the lesion
• TZ and area to treat
18. Set the cold coagulator at 100 °C
19. Apply the cold coagulator probe on the area to be treated on the cervix and heat it for 45 seconds at 100 °C
20. Check if the entire TZ has been treated. If not, then repeat the procedure so as to treat the entire TZ including the lesion on the ectocervix.(1–5 overlapping applications of 45 seconds each can be used)
21. Remove the probe gently taking care not to touch the vulva or vagina with the probe to avoid unnecessary burns
22. Remove the speculum and place it in 0.5% chlorine solution for 10 minutes
Tasks following the cold coagulation procedure
23. Decontaminate the cold coagulator unit by wiping it with alcohol
24. Clean the probe by scrubbing it gently with a cotton swab and washing it with clean water
25. Set coagulator at 120 °C and heat the probe for 45 seconds
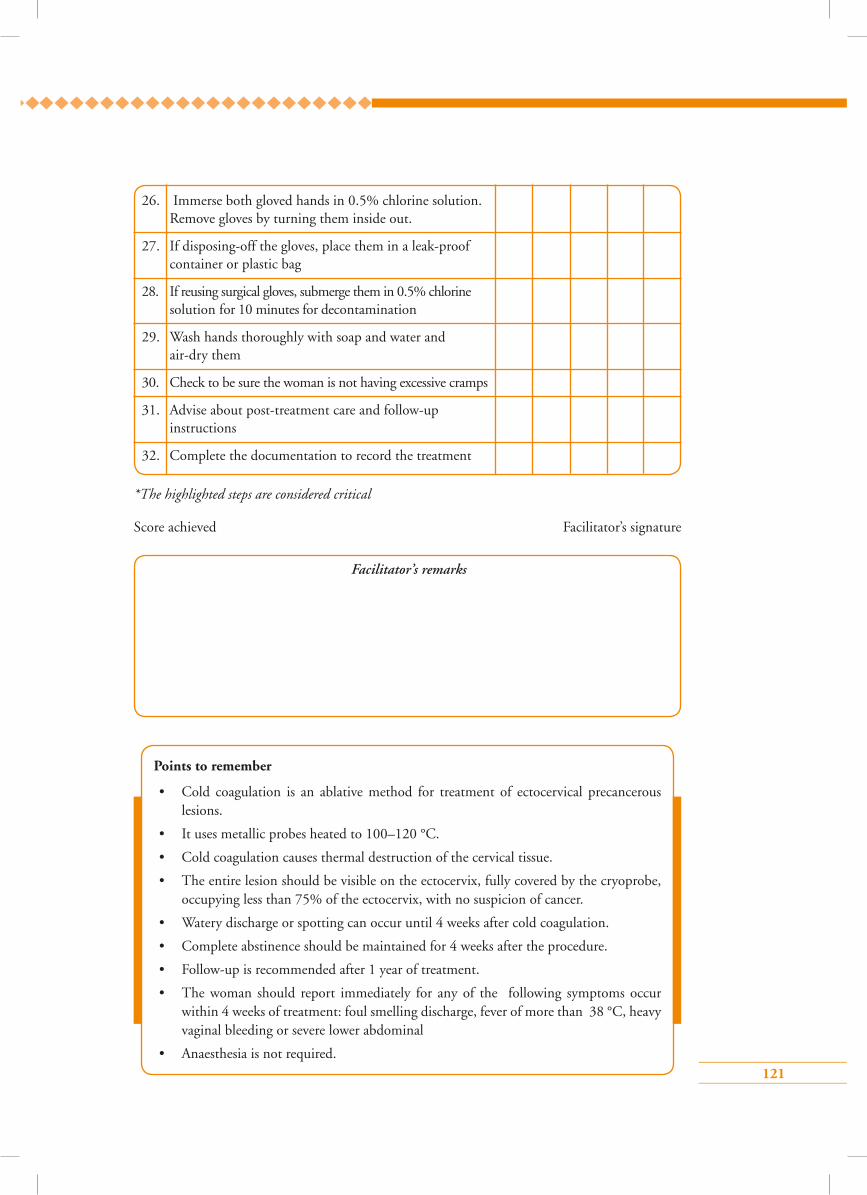
121
26. Immerse both gloved hands in 0.5% chlorine solution. Remove gloves by turning them inside out.
27. If disposing-off the gloves, place them in a leak-proof container or plastic bag
28. If reusing surgical gloves, submerge them in 0.5% chlorine solution for 10 minutes for decontamination
29. Wash hands thoroughly with soap and water and air-dry them
30. Check to be sure the woman is not having excessive cramps
31. Advise about post-treatment care and follow-up instructions
32. Complete the documentation to record the treatment
Facilitator’s remarks
*The highlighted steps are considered critical
Score achieved Facilitator’s signature
Points to remember
• Cold coagulation is an ablative method for treatment of ectocervical precancerous lesions.
• It uses metallic probes heated to 100–120 °C.
• Cold coagulation causes thermal destruction of the cervical tissue.
• The entire lesion should be visible on the ectocervix, fully covered by the cryoprobe, occupying less than 75% of the ectocervix, with no suspicion of cancer.
• Watery discharge or spotting can occur until 4 weeks after cold coagulation.
• Complete abstinence should be maintained for 4 weeks after the procedure.
• Follow-up is recommended after 1 year of treatment.
• The woman should report immediately for any of the following symptoms occur within 4 weeks of treatment: foul smelling discharge, fever of more than 38 °C, heavy vaginal bleeding or severe lower abdominal
• Anaesthesia is not required.
122
Answer key1 – d 2 – a 3 – d
4 – d 5 – d
1. All the statements about cold coagulation are true, except:
a) Ablative technique
b) Causes thermal destruction of tissue at 100–1200 °C
c) Multiple applications to cover a large lesion can be done
d) Requires anaesthesia
2. Woman is eligible for cold coagulation if:
a) Entire lesion is visible on the ectocervix are occupies less than 3 quadrants
b) Lesion occupies 90% of TZ
c) Extension on to vaginal wall
d) Suspicion of invasive cancer
3. If the woman has heavy bleeding post-cold coagulation, advise:
a) Maintain sexual relations
b) Use vaginal tampons/douches
c) Follow-up after 4 weeks
d) Report immediately
4. Advantage of cold coagulation is:
a) Can treat lesions within the endocervical canal
b) Electricity not required
c) Tissue is obtained for confirmation of diagnosis
d) No anaesthesia required
5. The following is a false statement regarding cold coagulation:
a) It has variables cure rates in large lesions
b) It should be avoided during pregnancy
c) It is difficult to determine the exact amount of tissue destroyed
d) Non-physicians cannot perform
Multiple choice questions
123
Module 10: Infection prevention practices
10.1 Module overviewThis module is intended to help gynaecologists and non-specialist clinicians to understand ways of
reducing the risk of infection in colposcopy clinics and preventing transmission of infection from
one woman to another or to the healthcare provider. The module is meant to be used by trainees
in conjunction with the WHO Guidance book (for further reading refer Annexure 3 – Infection
prevention and control).
10.2 Module contents• Importance of infection prevention practices
• Prevention of spread of infection
• Processing of instruments
• Waste disposal
• Group learning activities:
Hand washing
Preparation of 0.5% chlorine solution
10.3 Learning objectivesBy the end of this module, trainees will be able to:
• list various modes of spread of infection in a health facility;
• describe the steps to be taken to prevent transmission of infection;
• follow standard work precautions for prevention of infection.
10.4 Key points for discussion
10.4.1 Why is prevention of infection important?Infection prevention is of paramount importance in all health interventions, especially in cervical
cancer screening as instruments come in contact with body fluids and secretions. Spread of infection
can occur if proper precautions are not taken to prevent transmission of microorganisms from
an infected person or a contaminated object to another person. All microorganisms, including
normal flora, can cause infection or disease. Normal flora may cause infection when introduced
into an area of the body where they are not normally found.
124
10.4.2 How to prevent spread of infectionAs healthcare professionals are frequently exposed to potentially infectious materials, it is
mandatory that appropriate infection prevention procedures are practised to reduce the risk of
infection transmission. The following are standard universal precautions of infection prevention:
• washing hands before and after examining each client;
• wearing of gloves when touching broken skin, mucous membranes, blood or other body
fluids, soiled instruments, gloves and medical waste;
• processing of instruments after use;
• disposal of wastes as per standard guidelines;
• safe work practices;
• maintaining environmental cleanliness.
10.4.3 How to process instruments for cervical cancer screening clinics
Several steps are involved in reducing the risk of infection transmission from used instruments and
other items to healthcare workers and clients. The basic steps for processing instruments, surgical
gloves and other items are as follows:
1. Decontamination is the first step in handling soiled surgical instruments and other items to
make objects safer for handling by healthcare staff. Immediately after use, the instruments
and other items should be placed in a 0.5% chlorine solution for 10 minutes (Fig. 10.1a).
This step rapidly inactivates microorganisms like hepatitis B virus, hepatitis C virus and HIV
and makes items safer to handle. Surfaces of the procedure table and parts of any equipment/
instrument that may have come in contact with body fluids should also be decontaminated
by wiping them with 0.5% chlorine solution or 90% ethyl alcohol before reuse.
2. Cleaning refers to scrubbing the instruments with a brush (an old tooth brush works well),
using detergent and water to remove blood, other body fluids, organic material, tissue and dirt
(Fig. 10.1b). In addition, cleaning greatly reduces the number of microorganisms (including
bacterial endospores) on items. Items should be thoroughly rinsed with water to remove
detergent residue, which can interfere with chemical disinfection. Wear utility gloves while
cleaning. All staff should be careful to protect their eyes from splashing contaminated water.
3. Sterilization eliminates all microorganisms (bacteria, viruses, fungi, and parasites), including
bacterial endospores, from instruments and other items. Sterilization should be performed on
any item or instrument that comes in contact with the bloodstream or tissues under the skin.
It can be performed using steam (autoclaving), dry heat, or chemicals.
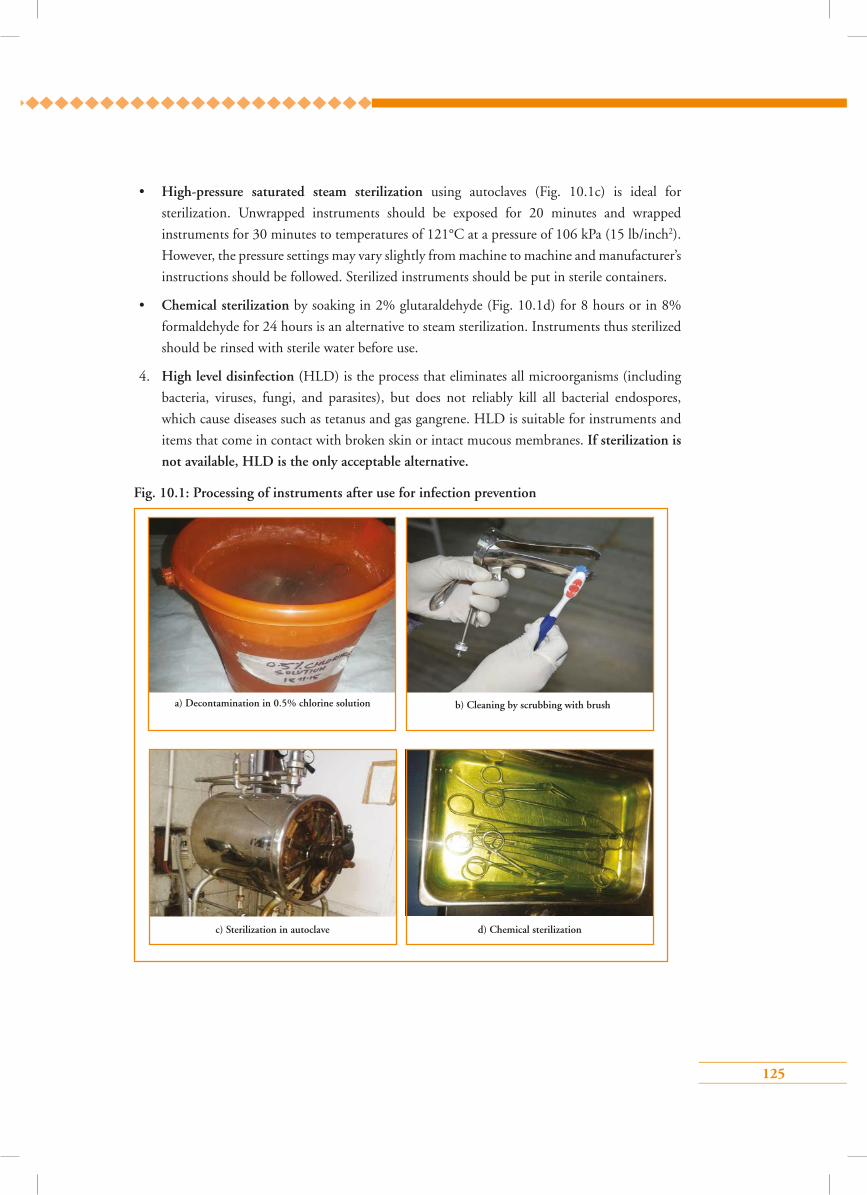
125
• High-pressure saturated steam sterilization using autoclaves (Fig. 10.1c) is ideal for
sterilization. Unwrapped instruments should be exposed for 20 minutes and wrapped
instruments for 30 minutes to temperatures of 121°C at a pressure of 106 kPa (15 lb/inch2).
However, the pressure settings may vary slightly from machine to machine and manufacturer’s
instructions should be followed. Sterilized instruments should be put in sterile containers.
• Chemical sterilization by soaking in 2% glutaraldehyde (Fig. 10.1d) for 8 hours or in 8%
formaldehyde for 24 hours is an alternative to steam sterilization. Instruments thus sterilized
should be rinsed with sterile water before use.
4. High level disinfection (HLD) is the process that eliminates all microorganisms (including
bacteria, viruses, fungi, and parasites), but does not reliably kill all bacterial endospores,
which cause diseases such as tetanus and gas gangrene. HLD is suitable for instruments and
items that come in contact with broken skin or intact mucous membranes. If sterilization is
not available, HLD is the only acceptable alternative.
c) Sterilization in autoclave d) Chemical sterilization
b) Cleaning by scrubbing with brusha) Decontamination in 0.5% chlorine solution
Fig. 10.1: Processing of instruments after use for infection prevention

126
Steps of HLD by boiling
• Submerge the cleaned instruments in water contained in a covered pot or boiler.
• Boil the water for 20 minutes. Timing should begin when the water is at a rolling (bubbling) boil. All items should be submerged (totally covered) in water.
• Do not add or remove any item after the water begins to boil.
• After boiling for 20 minutes, remove the boiled items using high-level disinfected forceps and place them in a high-level disinfected container.
• Allow the items to cool and air dry.
ii) HLD by soaking in a chemical solution
Chemical HLD is used for heat-sensitive items or when a heat source is not available. Instruments can be soaked for 20 minutes in 0.1% chlorine solution or 2% glutaraldehyde solution, then thoroughly rinsed in water and air dried.
• HLD in 0.1% chlorine solution – The solution is very effective against hepatitis B virus (HBV), hepatitis C and human immunodeficiency virus (HIV), inexpensive and readily available. A major disadvantage is that chlorine solutions can discolour metals and cause rust. As chlorine solutions lose their effectiveness with time, fresh solutions should be made at least daily, or more often, if the solution is visibly cloudy. To prepare a high-level disinfected plastic container, fill the container with 0.1% chlorine solution and soak for 20 minutes. Rinse the inside of the container thoroughly with boiled HLD/sterile water. Air dry or dry the disinfected container with a sterile cloth before use.
10.4.4 What are the methods of HLD?HLD by boiling, steaming or using chemicals is acceptable for final processing of instruments and surgical gloves in cervical cancer screening clinics. Two methods of HLD are detailed here:
i) HLD by boiling
Boiling is a simple method of HLD that can be performed in any location that has access to clean water and a source of heating. Using this method, instruments and other items are submerged in a covered pot or boiler and the water is heated for 20 minutes after it reaches boiling point (Fig. 10.2).
Use instruments immediately or keep them in a covered, dry, high-level disinfected container. (The container used for drying the instruments can be used for storage only if there is no water in the bottom of the container). These instruments can be stored for 7 days if the container remains tightly covered and for 24 hours if the lid of the container is opened.
Fig. 10.2: HLD by boiling
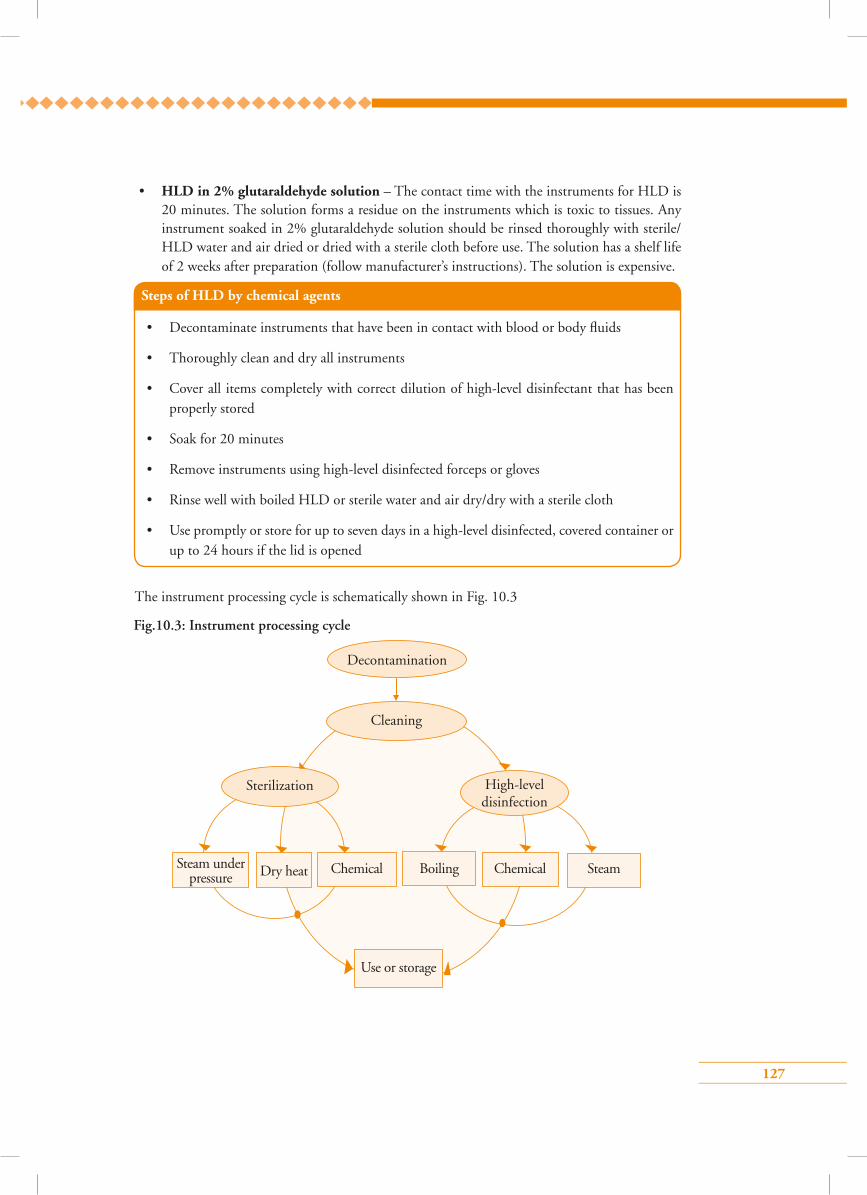
127
• HLD in 2% glutaraldehyde solution – The contact time with the instruments for HLD is 20 minutes. The solution forms a residue on the instruments which is toxic to tissues. Any instrument soaked in 2% glutaraldehyde solution should be rinsed thoroughly with sterile/HLD water and air dried or dried with a sterile cloth before use. The solution has a shelf life of 2 weeks after preparation (follow manufacturer’s instructions). The solution is expensive.
Steps of HLD by chemical agents
• Decontaminate instruments that have been in contact with blood or body fluids
• Thoroughly clean and dry all instruments
• Cover all items completely with correct dilution of high-level disinfectant that has been properly stored
• Soak for 20 minutes
• Remove instruments using high-level disinfected forceps or gloves
• Rinse well with boiled HLD or sterile water and air dry/dry with a sterile cloth
• Use promptly or store for up to seven days in a high-level disinfected, covered container or up to 24 hours if the lid is opened
Decontamination
Cleaning
Sterilization High-level disinfection
Use or storage
Steam under pressure Dry heat Chemical Boiling Chemical Steam
Fig.10.3: Instrument processing cycle
The instrument processing cycle is schematically shown in Fig. 10.3
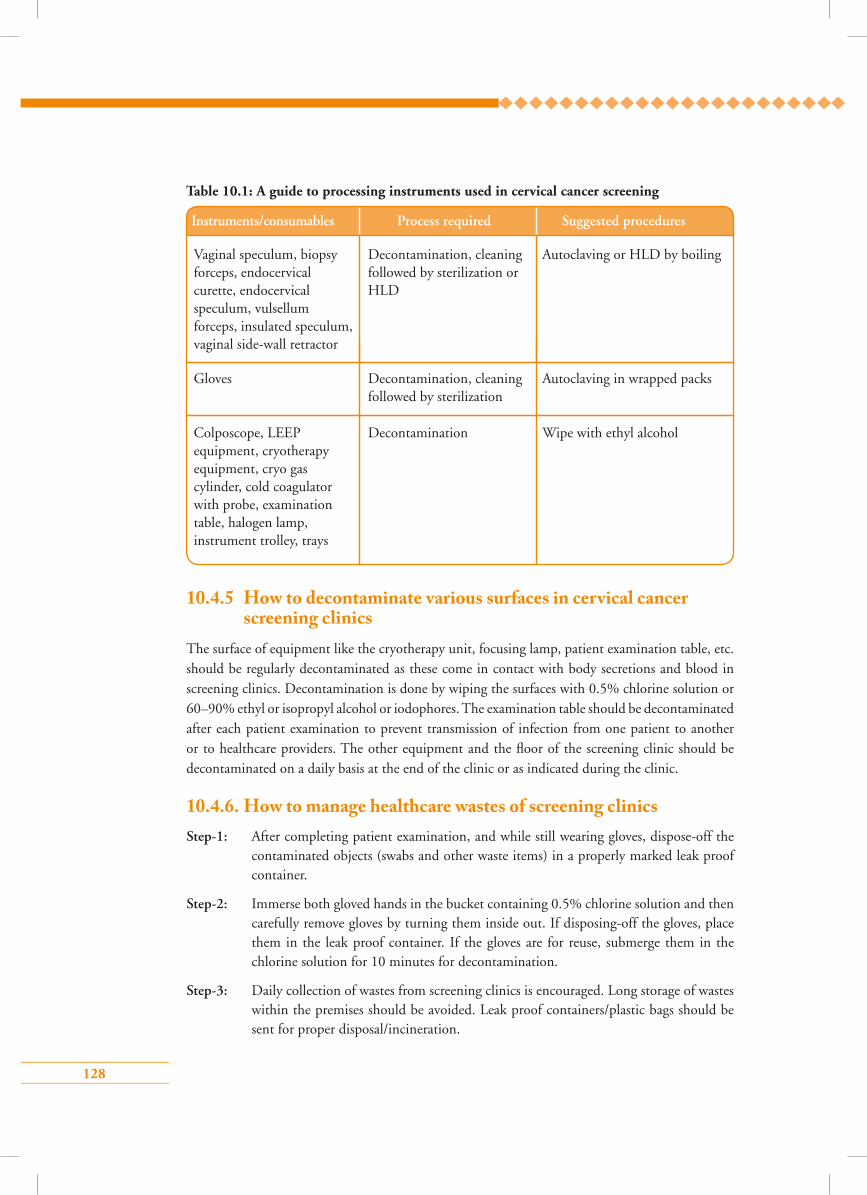
128
Table 10.1: A guide to processing instruments used in cervical cancer screening
10.4.5 How to decontaminate various surfaces in cervical cancer screening clinics
The surface of equipment like the cryotherapy unit, focusing lamp, patient examination table, etc. should be regularly decontaminated as these come in contact with body secretions and blood in screening clinics. Decontamination is done by wiping the surfaces with 0.5% chlorine solution or 60–90% ethyl or isopropyl alcohol or iodophores. The examination table should be decontaminated after each patient examination to prevent transmission of infection from one patient to another or to healthcare providers. The other equipment and the floor of the screening clinic should be decontaminated on a daily basis at the end of the clinic or as indicated during the clinic.
10.4.6. How to manage healthcare wastes of screening clinicsStep-1: After completing patient examination, and while still wearing gloves, dispose-off the
contaminated objects (swabs and other waste items) in a properly marked leak proof container.
Step-2: Immerse both gloved hands in the bucket containing 0.5% chlorine solution and then carefully remove gloves by turning them inside out. If disposing-off the gloves, place them in the leak proof container. If the gloves are for reuse, submerge them in the chlorine solution for 10 minutes for decontamination.
Step-3: Daily collection of wastes from screening clinics is encouraged. Long storage of wastes within the premises should be avoided. Leak proof containers/plastic bags should be sent for proper disposal/incineration.
Wipe with ethyl alcoholDecontaminationColposcope, LEEP equipment, cryotherapy equipment, cryo gas cylinder, cold coagulator with probe, examination table, halogen lamp, instrument trolley, trays
Autoclaving in wrapped packsDecontamination, cleaning followed by sterilization
Gloves
Instruments/consumables Process required Suggested procedures
Autoclaving or HLD by boilingDecontamination, cleaning followed by sterilization or HLD
Vaginal speculum, biopsy forceps, endocervical curette, endocervical speculum, vulsellum forceps, insulated speculum, vaginal side-wall retractor
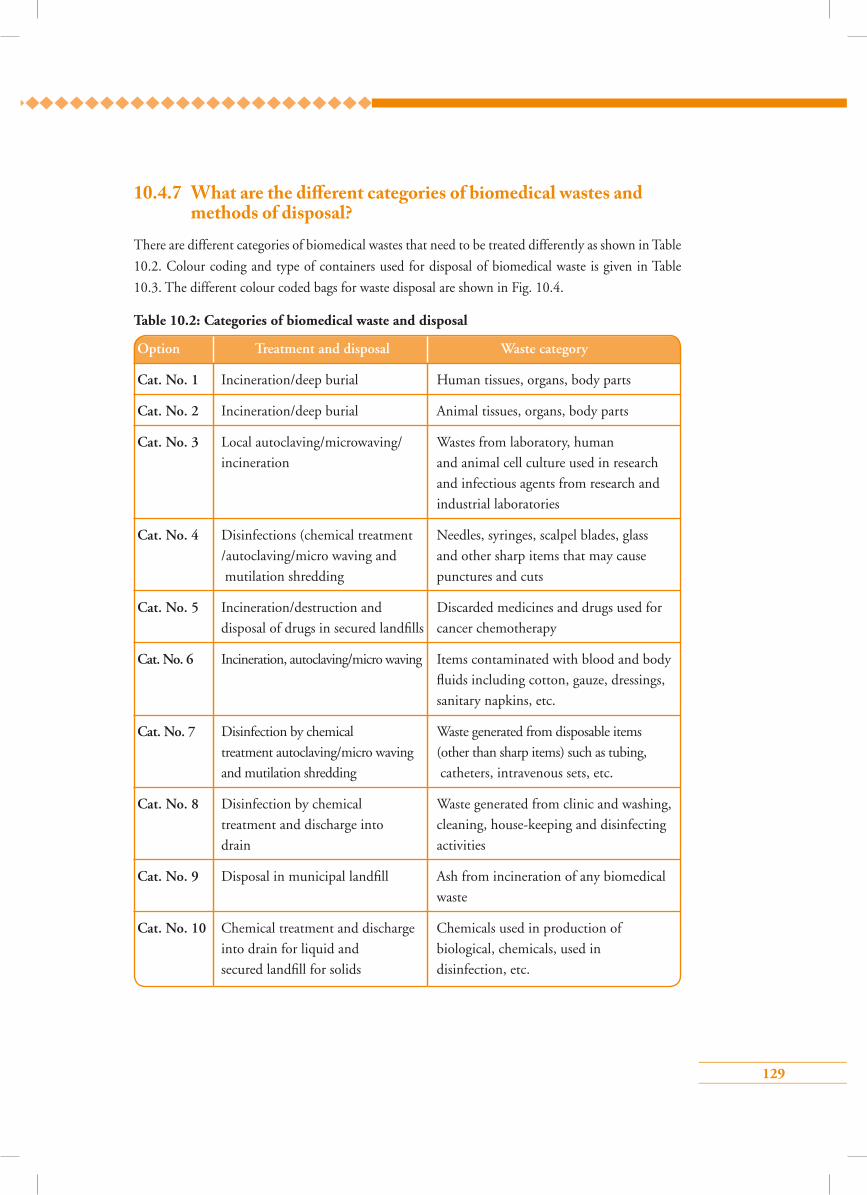
129
10.4.7 What are the di�erent categories of biomedical wastes and methods of disposal?
There are different categories of biomedical wastes that need to be treated differently as shown in Table
10.2. Colour coding and type of containers used for disposal of biomedical waste is given in Table
10.3. The different colour coded bags for waste disposal are shown in Fig. 10.4.
Table 10.2: Categories of biomedical waste and disposal
Option Treatment and disposal Waste category
Cat. No. 1 Incineration/deep burial Human tissues, organs, body parts
Cat. No. 2 Incineration/deep burial Animal tissues, organs, body parts
Cat. No. 3 Local autoclaving/microwaving/ Wastes from laboratory, human
incineration and animal cell culture used in research
and infectious agents from research and
industrial laboratories
Cat. No. 4 Disinfections (chemical treatment Needles, syringes, scalpel blades, glass
/autoclaving/micro waving and and other sharp items that may cause
mutilation shredding punctures and cuts
Cat. No. 5 Incineration/destruction and Discarded medicines and drugs used for
disposal of drugs in secured landfills cancer chemotherapy
Cat. No. 6 Incineration, autoclaving/micro waving Items contaminated with blood and body
fluids including cotton, gauze, dressings,
sanitary napkins, etc.
Cat. No. 7 Disinfection by chemical Waste generated from disposable items
treatment autoclaving/micro waving (other than sharp items) such as tubing,
and mutilation shredding catheters, intravenous sets, etc.
Cat. No. 8 Disinfection by chemical Waste generated from clinic and washing,
treatment and discharge into cleaning, house-keeping and disinfecting
drain activities
Cat. No. 9 Disposal in municipal landfill Ash from incineration of any biomedical
waste
Cat. No. 10 Chemical treatment and discharge Chemicals used in production of
into drain for liquid and biological, chemicals, used in
secured landfill for solids disinfection, etc.
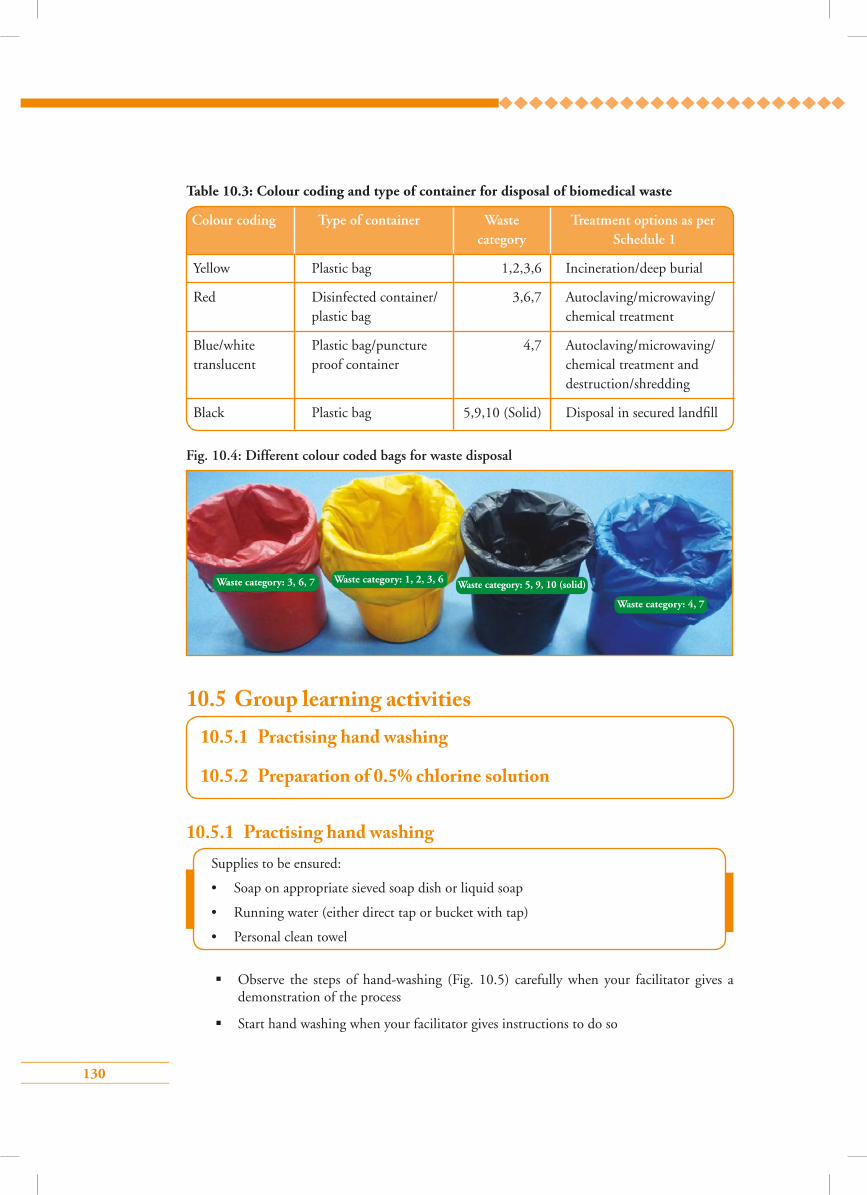
130
Fig. 10.4: Different colour coded bags for waste disposal
Waste category: 3, 6, 7 Waste category: 1, 2, 3, 6 Waste category: 5, 9, 10 (solid)
Waste category: 4, 7
10.5 Group learning activities
Observe the steps of hand-washing (Fig. 10.5) carefully when your facilitator gives a demonstration of the process
Start hand washing when your facilitator gives instructions to do so
10.5.1 Practising hand washing
10.5.1 Practising hand washing
10.5.2 Preparation of 0.5% chlorine solution
Supplies to be ensured:
• Soap on appropriate sieved soap dish or liquid soap
• Running water (either direct tap or bucket with tap)
• Personal clean towel
Colour coding Type of container Waste Treatment options as per category Schedule 1
Yellow Plastic bag 1,2,3,6 Incineration/deep burial
Red Disinfected container/ 3,6,7 Autoclaving/microwaving/ plastic bag chemical treatment
Blue/white Plastic bag/puncture 4,7 Autoclaving/microwaving/ translucent proof container chemical treatment and destruction/shredding
Black Plastic bag 5,9,10 (Solid) Disposal in secured landfill
Table 10.3: Colour coding and type of container for disposal of biomedical waste
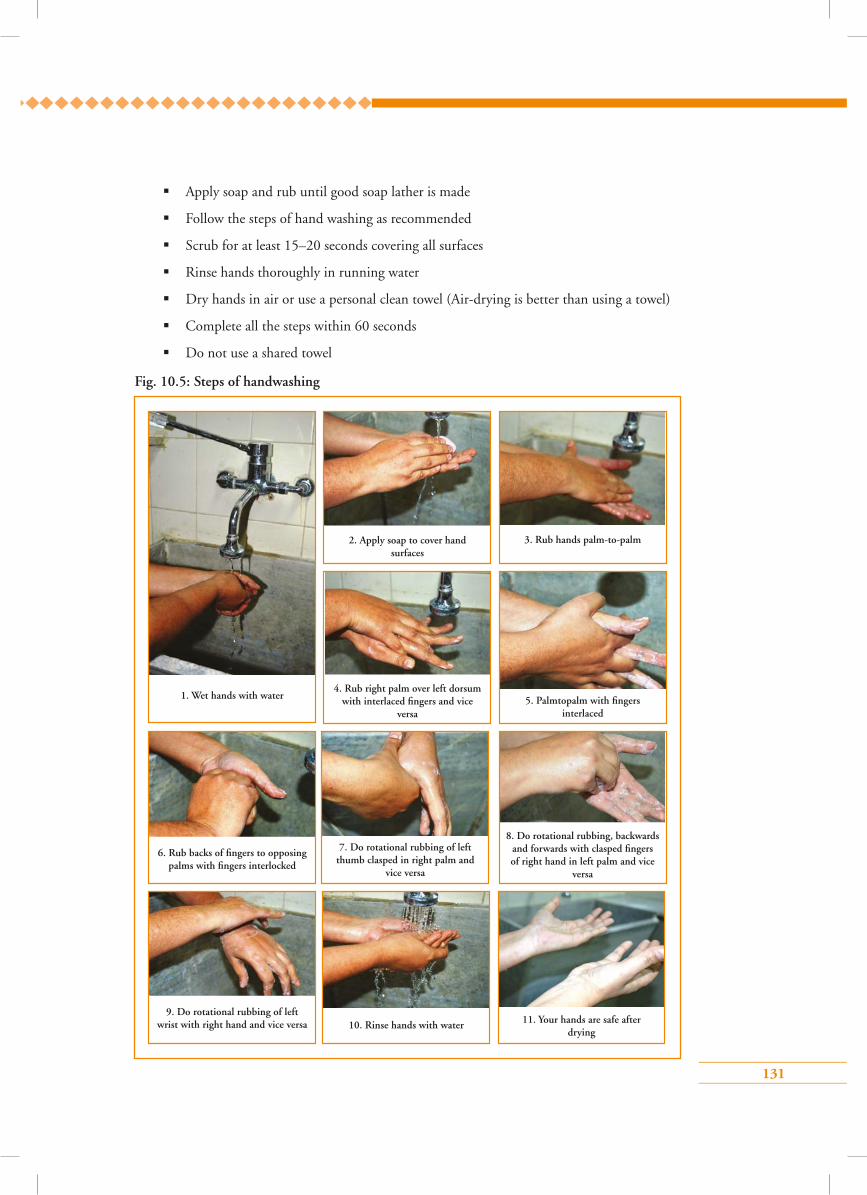
131
Apply soap and rub until good soap lather is made
Follow the steps of hand washing as recommended
Scrub for at least 15–20 seconds covering all surfaces
Rinse hands thoroughly in running water
Dry hands in air or use a personal clean towel (Air-drying is better than using a towel)
Complete all the steps within 60 seconds
Do not use a shared towel
Fig. 10.5: Steps of handwashing
1. Wet hands with water4. Rub right palm over left dorsum
with interlaced fingers and vice versa
7. Do rotational rubbing of left thumb clasped in right palm and
vice versa
8. Do rotational rubbing, backwards and forwards with clasped fingers of right hand in left palm and vice
versa
11. Your hands are safe after drying
10. Rinse hands with water 9. Do rotational rubbing of left
wrist with right hand and vice versa
2. Apply soap to cover hand surfaces
5. Palmtopalm with fingers interlaced
3. Rub hands palm-to-palm
6. Rub backs of fingers to opposing palms with fingers interlocked
132
Preparation of 0.5% chlorine solution (Fig. 10.6)
To prepare chlorine solution of a particular strength, the following formula may be used to calculate the required amount of dry powder (household bleach):
Grams/litre = [% of dilute solution/% of concentrate of active ingredient (calcium hypochlorite) of dry powder] x 1000.
E.g. To make 0.5% chlorine solution from 35% of calcium hypochlorite powder:
[0.5%/35%] x 1000 = 14.2 grams of dry powder will be required to prepare 1 litre of solution.
Preparation of 0.5% chlorine solution
Materials required for preparing 1 litre of 0.5% chlorine solution:
• Plastic bucket (medium size) and mug
• Wooden stirrer
• Tea spoon
• Bleaching powder kept in air tight container
• Water – 1 litre
• Utility gloves and lab apron
Steps of preparation (Fig. 10.6)
1. Put on the lab apron and wear utility gloves
2. Take 1 lit of water in the plastic bucket
3. Take 14.2 gm (approximately 3 teaspoons full) of bleaching powder and put it in the plastic mug
4. Add a little water into the mug and make a thick paste
5. Add this paste to the water in the bucket
6. Stir with the wooden stirrer until a milky white solution is made
7. Keep the solution covered
8. 0.5% chlorine solution is ready for use
Caution
• Chlorine solutions must be prepared daily as it loses strength over time.
• Clean water, free of organic matter, should be used.
• Chlorine solution should be prepared in a well-ventilated area.
• Wearing of gloves and a laboratory apron is necessary to avoid direct contact of chlorine solution with the skin.
• Plastic containers should be used for preparation and storage of the chlorine solution.
*0.1% chlorine solution can be prepared by diluting 0.5% chlorine solution 5 times. HLD water to be used for preparing 0.1% chlorine solution.
10.5.2 Preparation of 0.5% chlorine solution

133
Fig. 10.6: Steps of preparation of 0.5% chlorine solution
a) Wear utility gloves b) Take 1 litre water in a plastic bucket
d) Add a little water to bleaching powder and mix with stirrer to make a thick paste
c) Measure bleaching powder (approximately 3 teaspoons full)
g) Label with date of preparation
f ) Stir till a milky white solution is readye) Add this paste to the water in the bucket
134
Points to remember
• Infection prevention is of paramount importance in all health interventions.
• The basic steps for processing instruments, surgical gloves and other items are:
Decontamination, cleaning and high pressure saturated steam sterilization. HLD is
acceptable as an alternative to steam sterilization.
• HLD can be done either by boiling or by a chemical method using 0.5% chlorine
solution or 2% glutaraldehyde.
• Biomedical wastes should be disposed-off in designated coloured bins.
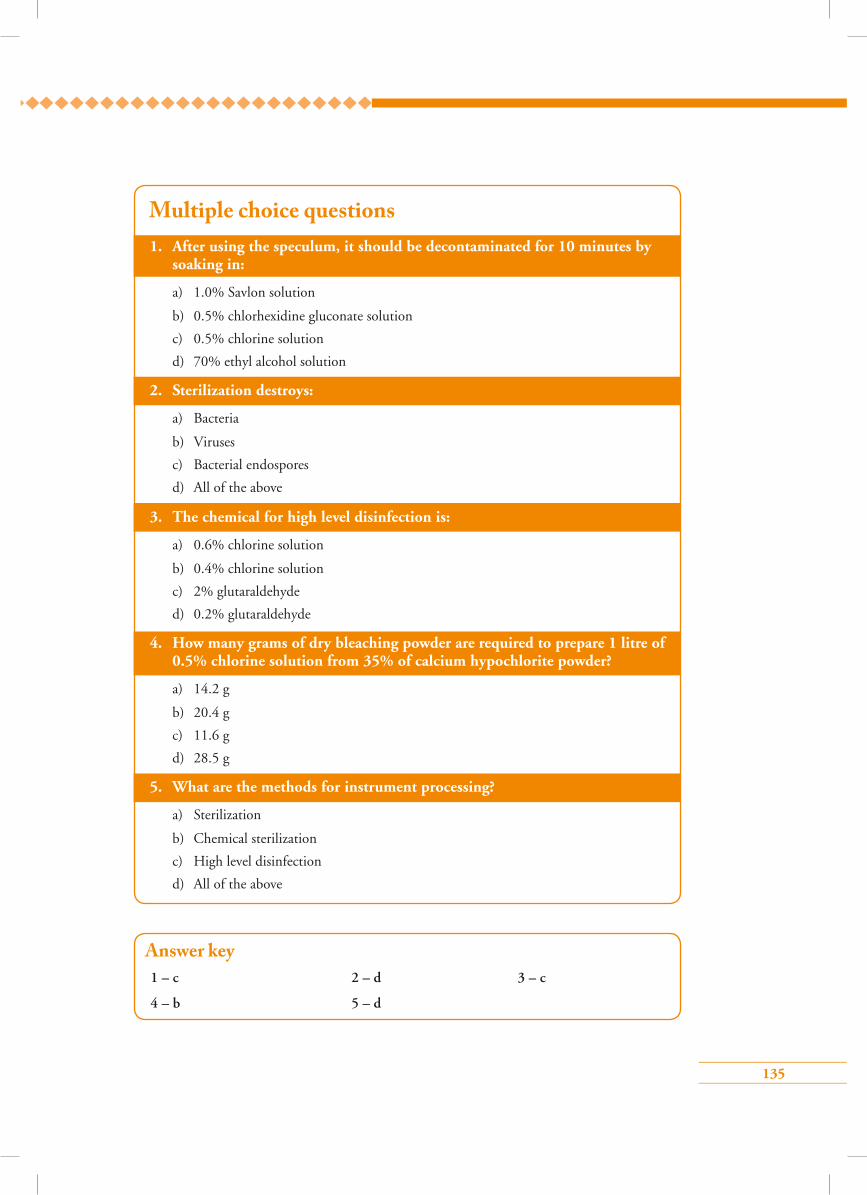
135
Answer key1 – c 2 – d 3 – c
4 – b 5 – d
1. After using the speculum, it should be decontaminated for 10 minutes by soaking in:
a) 1.0% Savlon solution
b) 0.5% chlorhexidine gluconate solution
c) 0.5% chlorine solution
d) 70% ethyl alcohol solution
2. Sterilization destroys:
a) Bacteria
b) Viruses
c) Bacterial endospores
d) All of the above
3. The chemical for high level disinfection is:
a) 0.6% chlorine solution
b) 0.4% chlorine solution
c) 2% glutaraldehyde
d) 0.2% glutaraldehyde
4. How many grams of dry bleaching powder are required to prepare 1 litre of 0.5% chlorine solution from 35% of calcium hypochlorite powder?
a) 14.2 g
b) 20.4 g
c) 11.6 g
d) 28.5 g
5. What are the methods for instrument processing?
a) Sterilization
b) Chemical sterilization
c) High level disinfection
d) All of the above
Multiple choice questions
136
Module 11: Ensuring quality of services and programme monitoring in cervical cancer screening
11.1 Module overviewThis module is intended to help service providers in a cervical cancer screening programme to understand the importance of ensuring quality at each level of services. The module will facilitate learning of standard operating procedures to ensure quality of services and the responsibilities of each service provider in delivering efficient and safe services. The module is meant to be used
by trainees in conjunction with the WHO Guidance book (for further reading refer Chapter 2 – Essentials for cervical cancer prevention and control programmes; Section 2.2.3 – Programme implementation and Section 2.2.4 – Programme monitoring and evaluation, and Practice Sheet 2.2 – Key performance and impact indicators).
11.2 Module contents• Ensuring quality of services by healthcare providers
• Programme monitoring and its necessity
• Indicators to monitor cervical cancer screening programme
• Quality assurance and quality control
• Framework for effective quality assurance
• Supportive supervision
• Supportive supervision guidelines and tools
• Evaluation of programme performance
• Using evaluation results for quality improvement
11.3 Learning objectivesAt the end of this module trainees would be able to:
• understand the importance of quality improvement and monitoring in a cervical cancer screening programme.
• list the different components of programme monitoring to implement efficient and safe service delivery;
• describe how to improve quality of services through programme monitoring and supervision.;
• state the standard operating procedures to ensure quality of services and their individual roles;
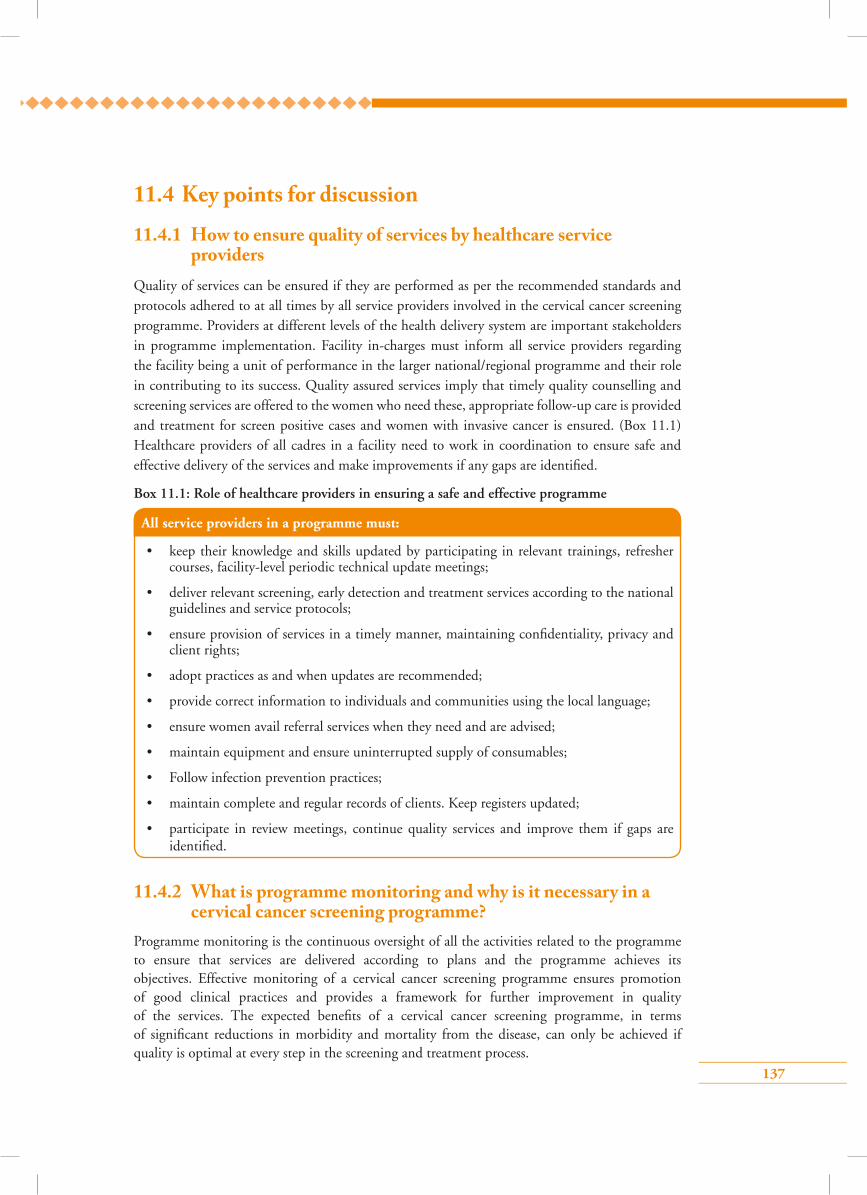
137
11.4 Key points for discussion
11.4.1 How to ensure quality of services by healthcare service providers
Quality of services can be ensured if they are performed as per the recommended standards and protocols adhered to at all times by all service providers involved in the cervical cancer screening programme. Providers at different levels of the health delivery system are important stakeholders in programme implementation. Facility in-charges must inform all service providers regarding the facility being a unit of performance in the larger national/regional programme and their role in contributing to its success. Quality assured services imply that timely quality counselling and screening services are offered to the women who need these, appropriate follow-up care is provided and treatment for screen positive cases and women with invasive cancer is ensured. (Box 11.1) Healthcare providers of all cadres in a facility need to work in coordination to ensure safe and effective delivery of the services and make improvements if any gaps are identified.
Box 11.1: Role of healthcare providers in ensuring a safe and effective programme
All service providers in a programme must:
• keep their knowledge and skills updated by participating in relevant trainings, refresher courses, facility-level periodic technical update meetings;
• deliver relevant screening, early detection and treatment services according to the national guidelines and service protocols;
• ensure provision of services in a timely manner, maintaining confidentiality, privacy and client rights;
• adopt practices as and when updates are recommended;
• provide correct information to individuals and communities using the local language;
• ensure women avail referral services when they need and are advised;
• maintain equipment and ensure uninterrupted supply of consumables;
• Follow infection prevention practices;
• maintain complete and regular records of clients. Keep registers updated;
• participate in review meetings, continue quality services and improve them if gaps are identified.
11.4.2 What is programme monitoring and why is it necessary in a cervical cancer screening programme?
Programme monitoring is the continuous oversight of all the activities related to the programme to ensure that services are delivered according to plans and the programme achieves its objectives. Effective monitoring of a cervical cancer screening programme ensures promotion of good clinical practices and provides a framework for further improvement in quality of the services. The expected benefits of a cervical cancer screening programme, in terms of significant reductions in morbidity and mortality from the disease, can only be achieved if quality is optimal at every step in the screening and treatment process.
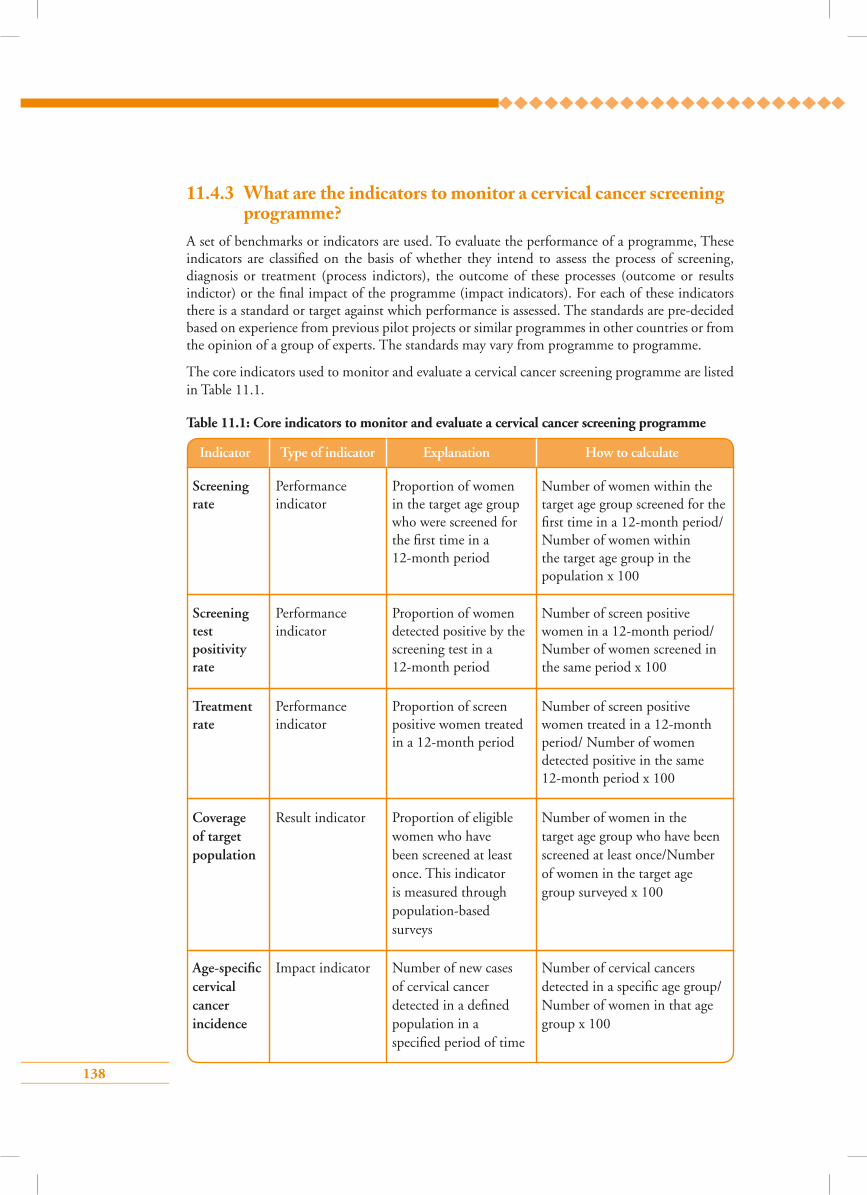
138
11.4.3 What are the indicators to monitor a cervical cancer screening programme?
A set of benchmarks or indicators are used. To evaluate the performance of a programme, These indicators are classified on the basis of whether they intend to assess the process of screening, diagnosis or treatment (process indictors), the outcome of these processes (outcome or results indictor) or the final impact of the programme (impact indicators). For each of these indicators there is a standard or target against which performance is assessed. The standards are pre-decided based on experience from previous pilot projects or similar programmes in other countries or from the opinion of a group of experts. The standards may vary from programme to programme.
The core indicators used to monitor and evaluate a cervical cancer screening programme are listed in Table 11.1.
Table 11.1: Core indicators to monitor and evaluate a cervical cancer screening programme
Indicator Type of indicator Explanation How to calculate
Number of women within the target age group screened for the first time in a 12-month period/Number of women within the target age group in the population x 100
Number of screen positive women in a 12-month period/ Number of women screened in the same period x 100
Number of screen positive women treated in a 12-month period/ Number of women detected positive in the same 12-month period x 100
Proportion of women in the target age group who were screened for the first time in a 12-month period
Proportion of women detected positive by the screening test in a 12-month period
Proportion of screen positive women treated in a 12-month period
Performance indicator
Performance indicator
Performance indicator
Screening rate
Screening test positivity rate
Treatment rate
Number of women in the target age group who have been screened at least once/Number of women in the target age group surveyed x 100
Proportion of eligible women who have been screened at least once. This indicator is measured through population-based surveys
Result indicatorCoverage of target population
Number of cervical cancers detected in a specific age group/ Number of women in that age group x 100
Number of new cases of cervical cancer detected in a defined population in a specified period of time
Impact indicatorAge-specific cervical cancer incidence
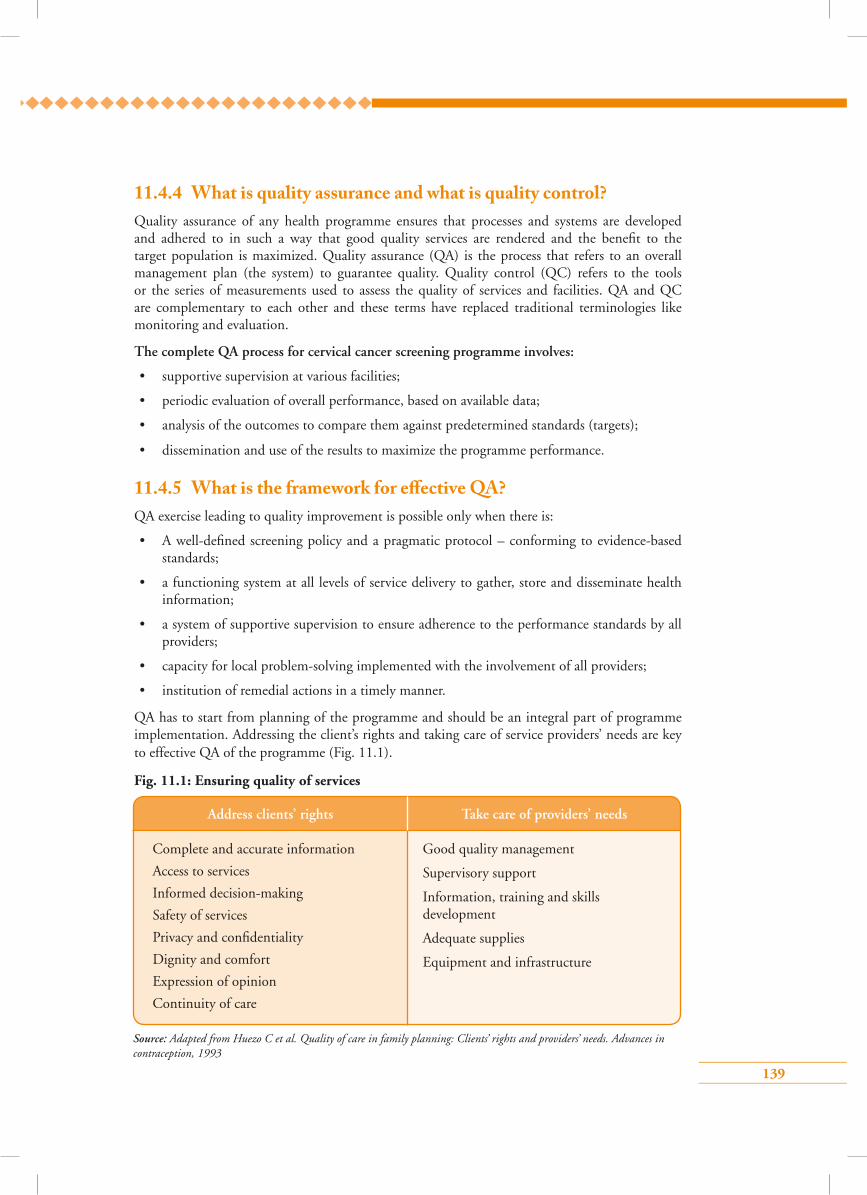
139
11.4.4 What is quality assurance and what is quality control?Quality assurance of any health programme ensures that processes and systems are developed and adhered to in such a way that good quality services are rendered and the benefit to the target population is maximized. Quality assurance (QA) is the process that refers to an overall management plan (the system) to guarantee quality. Quality control (QC) refers to the tools or the series of measurements used to assess the quality of services and facilities. QA and QC are complementary to each other and these terms have replaced traditional terminologies like monitoring and evaluation.
The complete QA process for cervical cancer screening programme involves:
• supportive supervision at various facilities;
• periodic evaluation of overall performance, based on available data;
• analysis of the outcomes to compare them against predetermined standards (targets);
• dissemination and use of the results to maximize the programme performance.
11.4.5 What is the framework for e�ective QA?QA exercise leading to quality improvement is possible only when there is:
• A well-defined screening policy and a pragmatic protocol – conforming to evidence-based standards;
• a functioning system at all levels of service delivery to gather, store and disseminate health information;
• a system of supportive supervision to ensure adherence to the performance standards by all providers;
• capacity for local problem-solving implemented with the involvement of all providers;
• institution of remedial actions in a timely manner.
QA has to start from planning of the programme and should be an integral part of programme implementation. Addressing the client’s rights and taking care of service providers’ needs are key to effective QA of the programme (Fig. 11.1).
Fig. 11.1: Ensuring quality of services
Complete and accurate information
Access to services
Informed decision-making
Safety of services
Privacy and confidentiality
Dignity and comfort
Expression of opinion
Continuity of care
Good quality management
Supervisory support
Information, training and skills development
Adequate supplies
Equipment and infrastructure
Source: Adapted from Huezo C et al. Quality of care in family planning: Clients’ rights and providers’ needs. Advances in contraception, 1993
Address clients’ rights Take care of providers’ needs

140
Persons responsible for supportive supervision
• External supervisors designated by the programme manager
• Staff from other facilities (peer reviews)
• Staff from the same facility
• Staff through self-assessment
Timing of supervision
• Continuously, as part of routine work
• During team meetings
• Periodic visits by external supervisors
11.4.6 What is supportive supervision? Supportive supervision is the sustained process of guiding, supporting and encouraging service
providers to improve their performance so that they meet the defined standards of the programme.
It is not a one time event but a continued process of reviewing site-level data relating to population
coverage, screening and treatment rates, quality of screening tests, loss to follow-ups and non-
compliance rates, rates of complications of treatment, etc. The supervisory team has to work with
staff of the health facility to solve any issues identified about the quality of the services rendered.
The observed deficiencies are corrected by further training and skill development.
The guiding principles of supportive supervision are the following:
• The aim of supervision is to facilitate and improve, not find faults at work.
• Staff should be complimented for work well done before pointing out deficiencies.
• Interaction with the staff should be conducted in such a manner that they are able to see and
understand the same problem that supervisors can see.
• Problems should be analysed with the staff so that both the staff and team members understand
the underlying causes.
• Staff should be encouraged to suggest possible solutions to identified problems. This will
make them accept the solution more promptly.
11.4.7 What are the guidelines for performing supportive supervision?The guidelines for supportive supervision of a facility providing screening/diagnostic/treatment
services in a cervical cancer screening programme are given in Fig. 11.2.
Fig. 11.2: Guidelines to implement supportive supervision
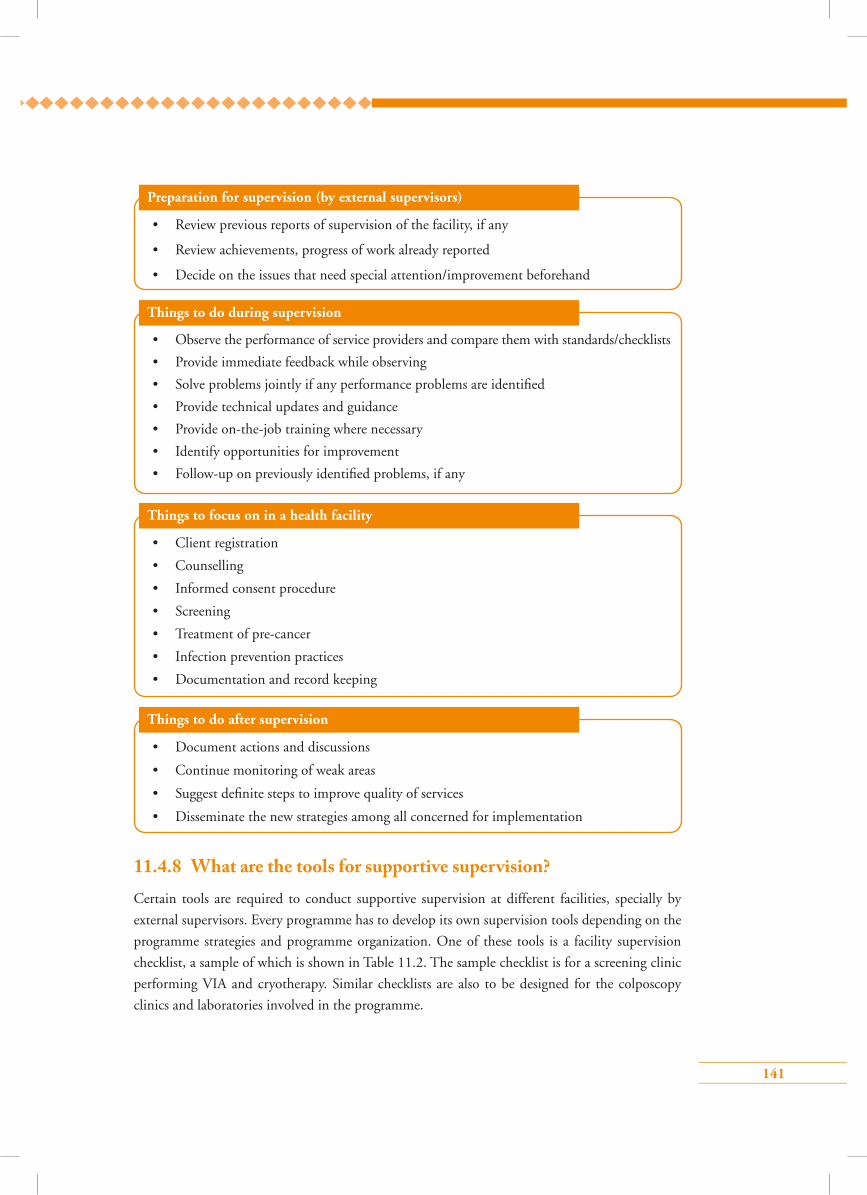
141
Preparation for supervision (by external supervisors)
• Review previous reports of supervision of the facility, if any
• Review achievements, progress of work already reported
• Decide on the issues that need special attention/improvement beforehand
Things to do during supervision
• Observe the performance of service providers and compare them with standards/checklists
• Provide immediate feedback while observing
• Solve problems jointly if any performance problems are identified
• Provide technical updates and guidance
• Provide on-the-job training where necessary
• Identify opportunities for improvement
• Follow-up on previously identified problems, if any
Things to focus on in a health facility
• Client registration
• Counselling
• Informed consent procedure
• Screening
• Treatment of pre-cancer
• Infection prevention practices
• Documentation and record keeping
Things to do after supervision
• Document actions and discussions
• Continue monitoring of weak areas
• Suggest definite steps to improve quality of services
• Disseminate the new strategies among all concerned for implementation
11.4.8 What are the tools for supportive supervision?Certain tools are required to conduct supportive supervision at different facilities, specially by
external supervisors. Every programme has to develop its own supervision tools depending on the
programme strategies and programme organization. One of these tools is a facility supervision
checklist, a sample of which is shown in Table 11.2. The sample checklist is for a screening clinic
performing VIA and cryotherapy. Similar checklists are also to be designed for the colposcopy
clinics and laboratories involved in the programme.
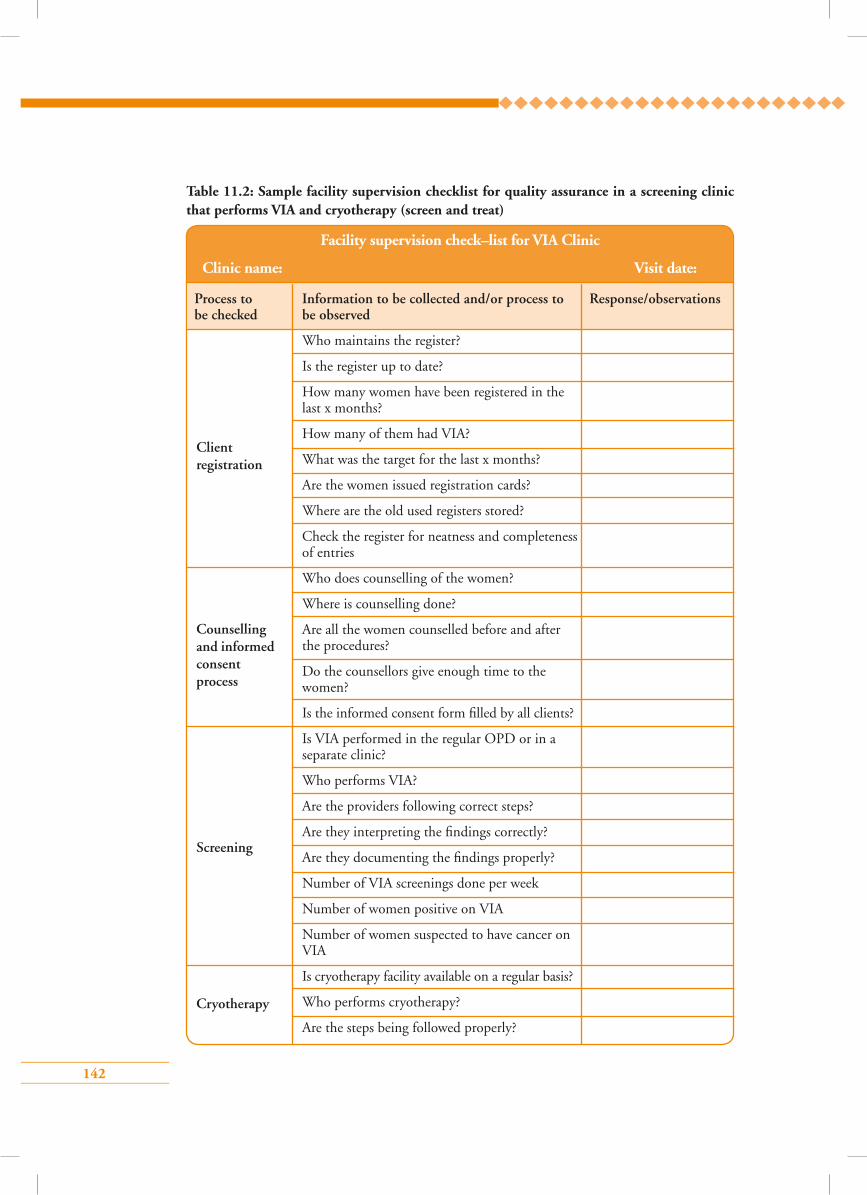
142
Table 11.2: Sample facility supervision checklist for quality assurance in a screening clinic that performs VIA and cryotherapy (screen and treat)
Counselling and informed consent process
Screening
Cryotherapy
Client registration
Facility supervision check–list for VIA Clinic
Clinic name: Visit date:
Process to Information to be collected and/or process to Response/observations be checked be observed
Who maintains the register?
Is the register up to date?
How many women have been registered in the last x months?
How many of them had VIA?
What was the target for the last x months?
Are the women issued registration cards?
Where are the old used registers stored?
Check the register for neatness and completeness of entries
Who does counselling of the women?
Where is counselling done?
Are all the women counselled before and after the procedures?
Do the counsellors give enough time to the women?
Is the informed consent form filled by all clients?
Is VIA performed in the regular OPD or in a separate clinic?
Who performs VIA?
Are the providers following correct steps?
Are they interpreting the findings correctly?
Are they documenting the findings properly?
Number of VIA screenings done per week
Number of women positive on VIA
Number of women suspected to have cancer on VIA
Is cryotherapy facility available on a regular basis?
Who performs cryotherapy?
Are the steps being followed properly?
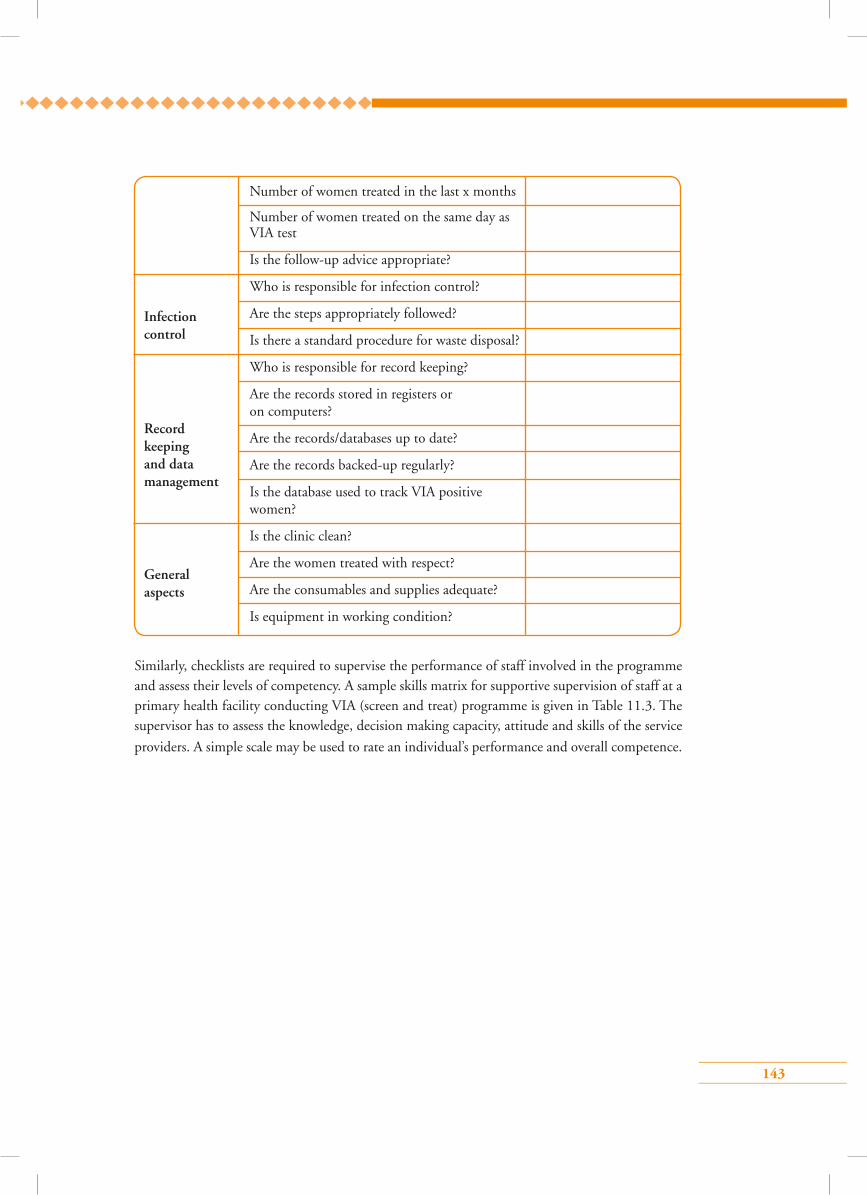
143
Number of women treated in the last x months
Number of women treated on the same day as VIA test
Is the follow-up advice appropriate?
Who is responsible for infection control?
Are the steps appropriately followed?
Is there a standard procedure for waste disposal?
Who is responsible for record keeping?
Are the records stored in registers or on computers?
Are the records/databases up to date?
Are the records backed-up regularly?
Is the database used to track VIA positive women?
Is the clinic clean?
Are the women treated with respect?
Are the consumables and supplies adequate?
Is equipment in working condition?
Infection control
Record keeping and data management
General aspects
Similarly, checklists are required to supervise the performance of staff involved in the programme and assess their levels of competency. A sample skills matrix for supportive supervision of staff at a primary health facility conducting VIA (screen and treat) programme is given in Table 11.3. The supervisor has to assess the knowledge, decision making capacity, attitude and skills of the service
providers. A simple scale may be used to rate an individual’s performance and overall competence.
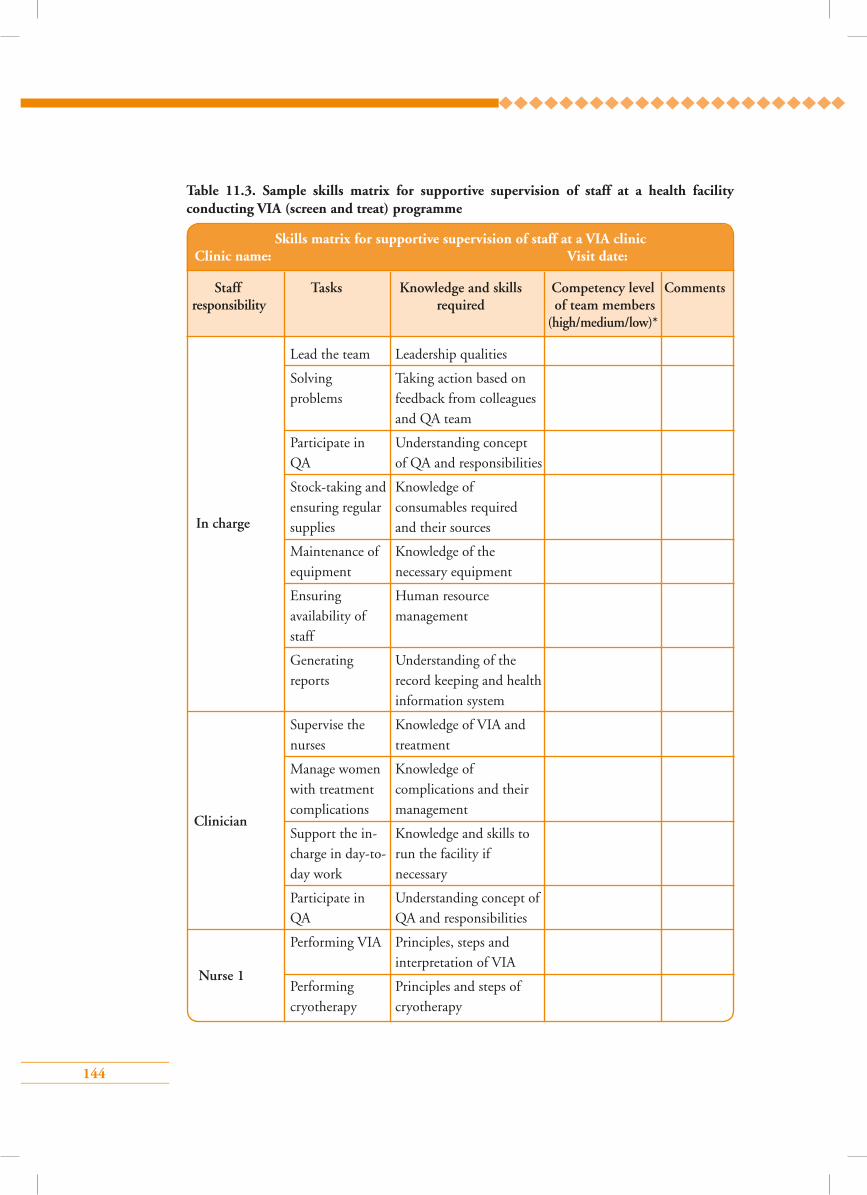
144
Table 11.3. Sample skills matrix for supportive supervision of staff at a health facility conducting VIA (screen and treat) programme
Skills matrix for supportive supervision of staff at a VIA clinic Clinic name: Visit date:
Staff Tasks Knowledge and skills Competency level Comments responsibility required of team members (high/medium/low)*
In charge
Clinician
Lead the team Leadership qualities
Solving Taking action based on problems feedback from colleagues and QA team
Participate in Understanding concept QA of QA and responsibilities
Stock-taking and Knowledge of ensuring regular consumables required supplies and their sources
Maintenance of Knowledge of the equipment necessary equipment
Ensuring Human resource availability of management staff
Generating Understanding of the reports record keeping and health information system
Supervise the Knowledge of VIA and nurses treatment
Manage women Knowledge of with treatment complications and their complications management
Support the in- Knowledge and skills to charge in day-to- run the facility if day work necessary
Participate in Understanding concept of QA QA and responsibilities
Performing VIA Principles, steps and interpretation of VIA
Performing Principles and steps of cryotherapy cryotherapy
Nurse 1
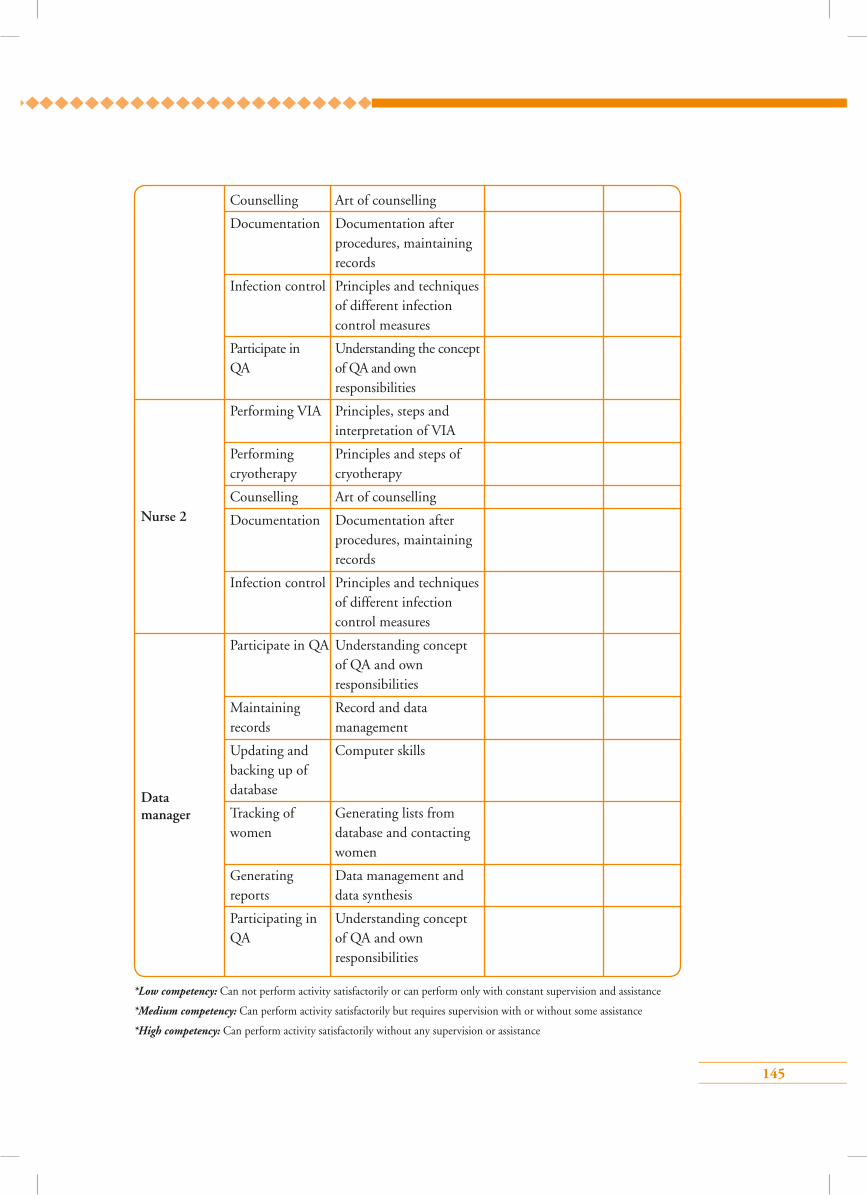
145
Nurse 2
Data manager
Counselling Art of counselling
Documentation Documentation after procedures, maintaining records
Infection control Principles and techniques of different infection control measures
Participate in Understanding the concept QA of QA and own responsibilities
Performing VIA Principles, steps and interpretation of VIA
Performing Principles and steps of cryotherapy cryotherapy
Counselling Art of counselling
Documentation Documentation after procedures, maintaining records
Infection control Principles and techniques of different infection control measures
Participate in QA Understanding concept of QA and own responsibilities
Maintaining Record and data records management
Updating and Computer skills backing up of database
Tracking of Generating lists from women database and contacting women
Generating Data management and reports data synthesis
Participating in Understanding concept QA of QA and own responsibilities
*Low competency: Can not perform activity satisfactorily or can perform only with constant supervision and assistance
*Medium competency: Can perform activity satisfactorily but requires supervision with or without some assistance
*High competency: Can perform activity satisfactorily without any supervision or assistance
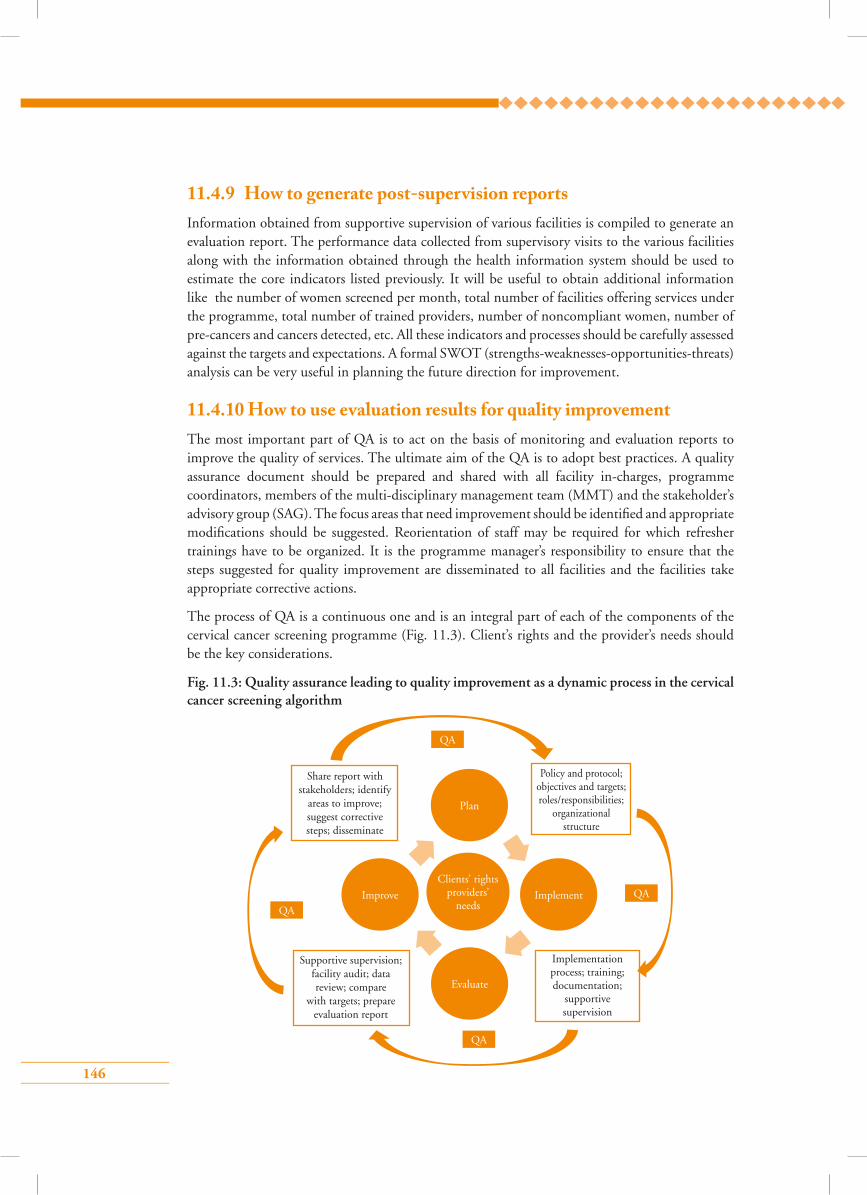
146
11.4.9 How to generate post-supervision reportsInformation obtained from supportive supervision of various facilities is compiled to generate an evaluation report. The performance data collected from supervisory visits to the various facilities along with the information obtained through the health information system should be used to estimate the core indicators listed previously. It will be useful to obtain additional information like the number of women screened per month, total number of facilities offering services under the programme, total number of trained providers, number of noncompliant women, number of pre-cancers and cancers detected, etc. All these indicators and processes should be carefully assessed against the targets and expectations. A formal SWOT (strengths-weaknesses-opportunities-threats) analysis can be very useful in planning the future direction for improvement.
11.4.10 How to use evaluation results for quality improvementThe most important part of QA is to act on the basis of monitoring and evaluation reports to improve the quality of services. The ultimate aim of the QA is to adopt best practices. A quality assurance document should be prepared and shared with all facility in-charges, programme coordinators, members of the multi-disciplinary management team (MMT) and the stakeholder’s advisory group (SAG). The focus areas that need improvement should be identified and appropriate modifications should be suggested. Reorientation of staff may be required for which refresher trainings have to be organized. It is the programme manager’s responsibility to ensure that the steps suggested for quality improvement are disseminated to all facilities and the facilities take appropriate corrective actions.
The process of QA is a continuous one and is an integral part of each of the components of the cervical cancer screening programme (Fig. 11.3). Client’s rights and the provider’s needs should be the key considerations.
Fig. 11.3: Quality assurance leading to quality improvement as a dynamic process in the cervical cancer screening algorithm
Policy and protocol; objectives and targets; roles/responsibilities;
organizational structure
QA
QA
QA
QA
Plan
Improve Implement
Evaluate
Share report with stakeholders; identify
areas to improve; suggest corrective steps; disseminate
Supportive supervision; facility audit; data review; compare
with targets; prepare evaluation report
Implementation process; training; documentation;
supportive supervision
Clients’ rights providers’
needs
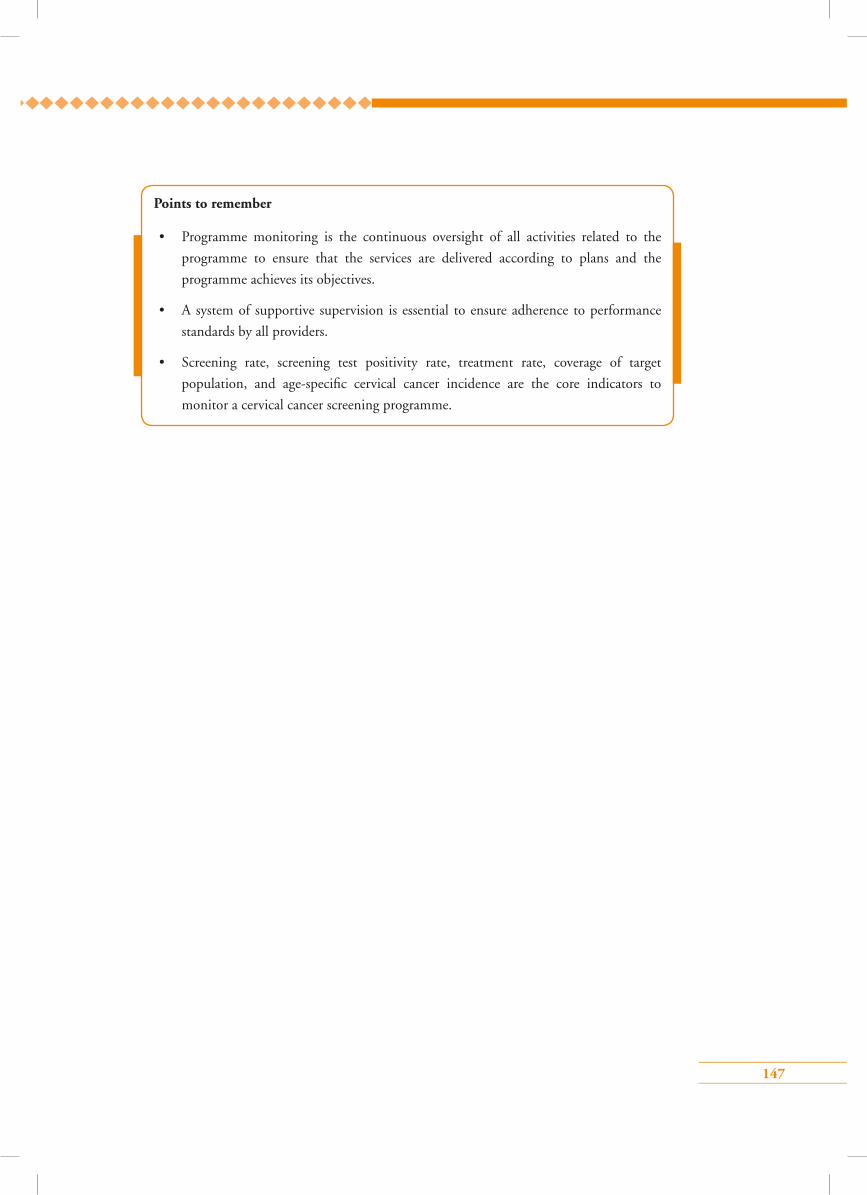
147
Points to remember
• Programme monitoring is the continuous oversight of all activities related to the
programme to ensure that the services are delivered according to plans and the
programme achieves its objectives.
• A system of supportive supervision is essential to ensure adherence to performance
standards by all providers.
• Screening rate, screening test positivity rate, treatment rate, coverage of target
population, and age-specific cervical cancer incidence are the core indicators to
monitor a cervical cancer screening programme.
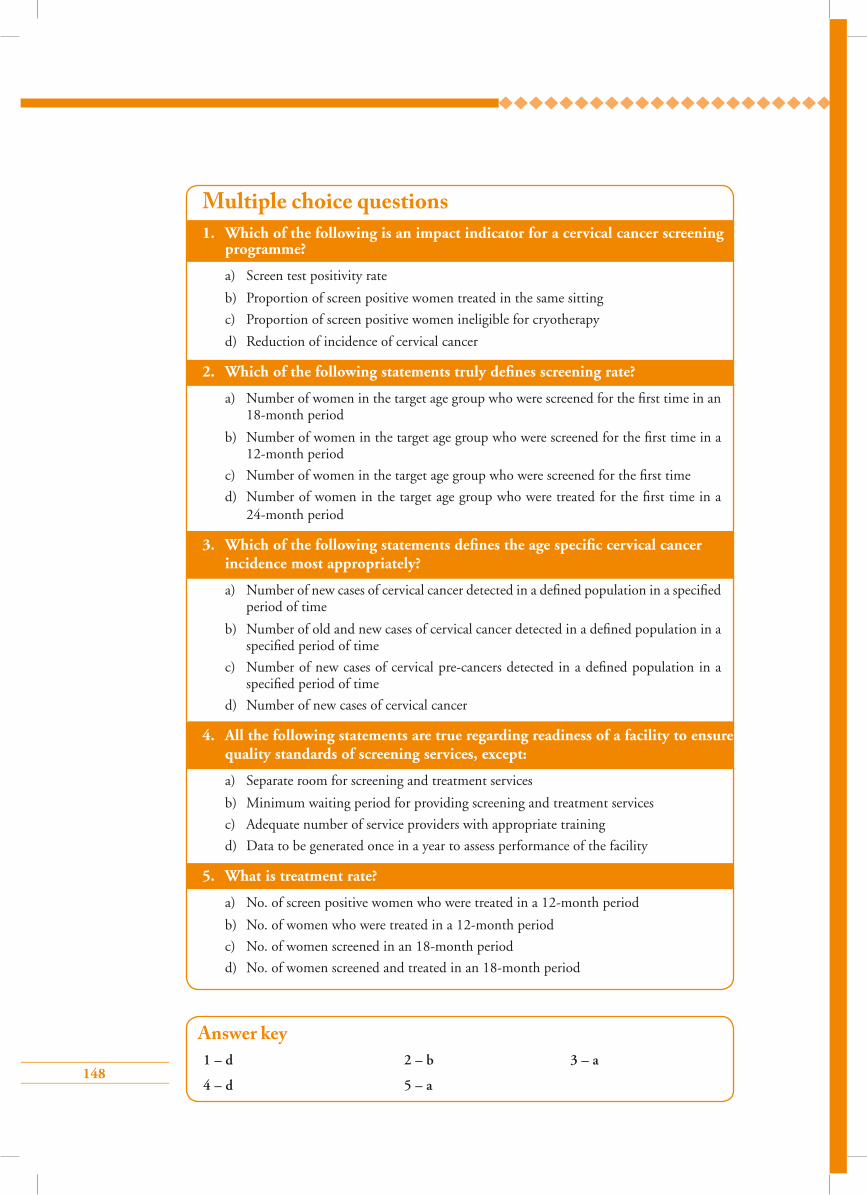
148
1. Which of the following is an impact indicator for a cervical cancer screening programme?
a) Screen test positivity rate
b) Proportion of screen positive women treated in the same sitting
c) Proportion of screen positive women ineligible for cryotherapy
d) Reduction of incidence of cervical cancer
2. Which of the following statements truly defines screening rate?
a) Number of women in the target age group who were screened for the first time in an 18-month period
b) Number of women in the target age group who were screened for the first time in a 12-month period
c) Number of women in the target age group who were screened for the first time
d) Number of women in the target age group who were treated for the first time in a 24-month period
3. Which of the following statements defines the age specific cervical cancer incidence most appropriately?
a) Number of new cases of cervical cancer detected in a defined population in a specified period of time
b) Number of old and new cases of cervical cancer detected in a defined population in a specified period of time
c) Number of new cases of cervical pre-cancers detected in a defined population in a specified period of time
d) Number of new cases of cervical cancer
4. All the following statements are true regarding readiness of a facility to ensure quality standards of screening services, except:
a) Separate room for screening and treatment services
b) Minimum waiting period for providing screening and treatment services
c) Adequate number of service providers with appropriate training
d) Data to be generated once in a year to assess performance of the facility
5. What is treatment rate?
a) No. of screen positive women who were treated in a 12-month period
b) No. of women who were treated in a 12-month period
c) No. of women screened in an 18-month period
d) No. of women screened and treated in an 18-month period
Answer key1 – d 2 – b 3 – a
4 – d 5 – a
Multiple choice questions

149
Section 4: Annex

150
Annex 1
Trainees’ feedback form Training of paramedical workers, midwives, nurses and clinicians in VIA, HPV test and
cryotherapy
We value your comments to evaluate and improve our training programme. Please take time to complete the feedback form
Part A:
Rate the following as per the scale starting from 1 (sub-standard) to 9 (excellent)
Training contents and materials
1. Relevance and quality of presentations and
printed materials 1 2 3 4 5 6 7 8 9
2. Quality of practical demonstrations 1 2 3 4 5 6 7 8 9
3. Adequate exposure to clinical procedures 1 2 3 4 5 6 7 8 9
4. The number of cases for clinical procedures 1 2 3 4 5 6 7 8 9
5. Time spent for demonstration of procedures 1 2 3 4 5 6 7 8 9
6. Overall time for the sessions and course 1 2 3 4 5 6 7 8 9
Comments.
__________________________________________________________________________
Facilitators
7. Expertise on the topic 1 2 3 4 5 6 7 8 9
8. Facilitator’s ability to stay focused on the topic 1 2 3 4 5 6 7 8 9
9. Time allowed for me to ask all my questions 1 2 3 4 5 6 7 8 9
10. My questions were appropriately answered 1 2 3 4 5 6 7 8 9
11. Assistance during the demonstration of 1 2 3 4 5 6 7 8 9
procedures
Comments.
__________________________________________________________________________
151
Training venue
12. The cleanliness and comfort of the venue 1 2 3 4 5 6 7 8 9
13. Air conditioning or cooling heating settings 1 2 3 4 5 6 7 8 9
14. Projection equipment settings (focus and view) 1 2 3 4 5 6 7 8 9
15. The provision of food and drinks 1 2 3 4 5 6 7 8 9
16. Clinical training facility adequately equipped 1 2 3 4 5 6 7 8 9
Comments.
__________________________________________________________________________
Part B:
List 3 skills (or knowledge) you have improved upon during this training
1.
2.
3.
How do you propose to apply the skills learnt during training at your own facility?
(Encircle the appropriate response/s)
1. I am already working at the screening/colposcopy services at my facility and my quality
of work will improve
2. I will join the existing screening/colposcopy services at my facility
3. I will initiate the screening/colposcopy services at my facility
4. I will train my colleagues and support staff at my facility
Suggestions for making this training more effective in the future
1.
2.
3.
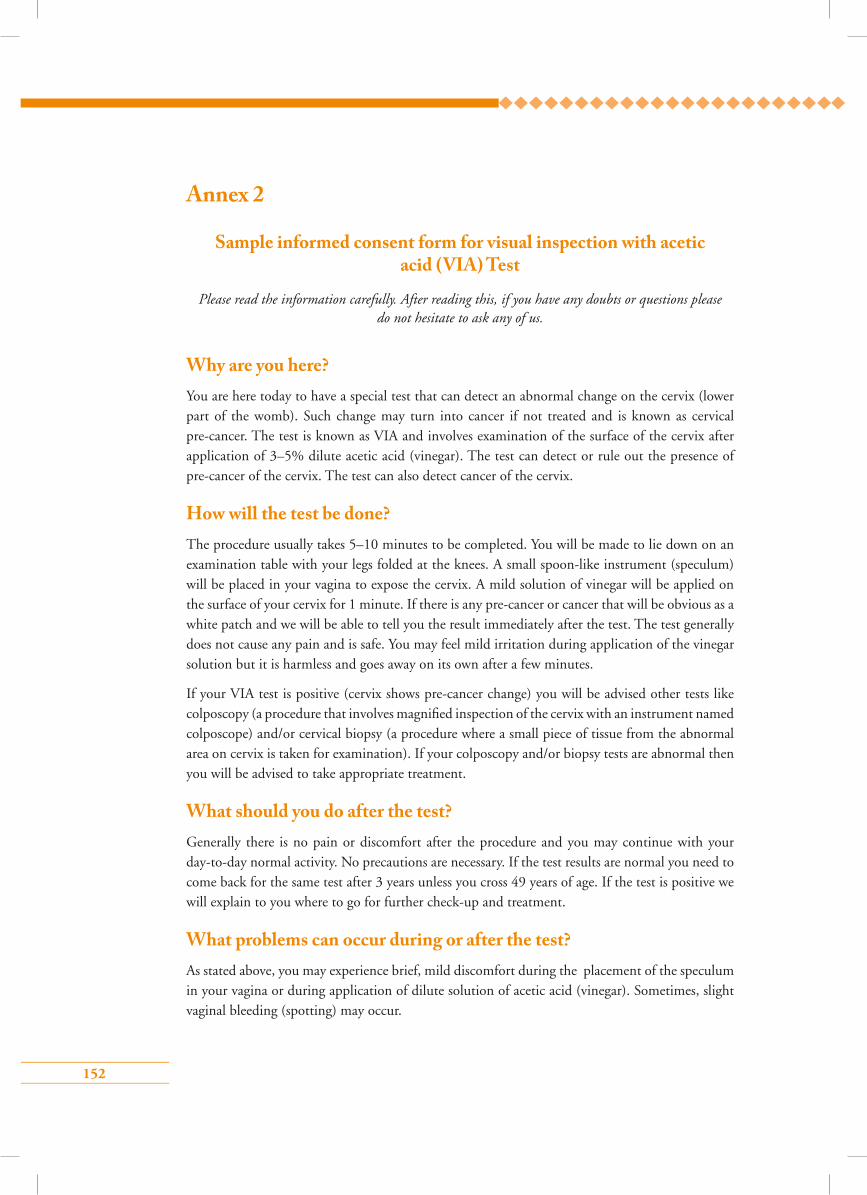
152
Why are you here?You are here today to have a special test that can detect an abnormal change on the cervix (lower part of the womb). Such change may turn into cancer if not treated and is known as cervical pre-cancer. The test is known as VIA and involves examination of the surface of the cervix after application of 3–5% dilute acetic acid (vinegar). The test can detect or rule out the presence of pre-cancer of the cervix. The test can also detect cancer of the cervix.
How will the test be done?The procedure usually takes 5–10 minutes to be completed. You will be made to lie down on an examination table with your legs folded at the knees. A small spoon-like instrument (speculum) will be placed in your vagina to expose the cervix. A mild solution of vinegar will be applied on the surface of your cervix for 1 minute. If there is any pre-cancer or cancer that will be obvious as a white patch and we will be able to tell you the result immediately after the test. The test generally does not cause any pain and is safe. You may feel mild irritation during application of the vinegar solution but it is harmless and goes away on its own after a few minutes.
If your VIA test is positive (cervix shows pre-cancer change) you will be advised other tests like colposcopy (a procedure that involves magnified inspection of the cervix with an instrument named colposcope) and/or cervical biopsy (a procedure where a small piece of tissue from the abnormal area on cervix is taken for examination). If your colposcopy and/or biopsy tests are abnormal then you will be advised to take appropriate treatment.
What should you do after the test?Generally there is no pain or discomfort after the procedure and you may continue with your day-to-day normal activity. No precautions are necessary. If the test results are normal you need to come back for the same test after 3 years unless you cross 49 years of age. If the test is positive we will explain to you where to go for further check-up and treatment.
What problems can occur during or after the test?As stated above, you may experience brief, mild discomfort during the placement of the speculum in your vagina or during application of dilute solution of acetic acid (vinegar). Sometimes, slight vaginal bleeding (spotting) may occur.
Annex 2
Sample informed consent form for visual inspection with acetic acid (VIA) Test
Please read the information carefully. After reading this, if you have any doubts or questions please do not hesitate to ask any of us.
153
Consent for VIAI acknowledge that Dr/Mr/Ms .…………………………… has explained the proposed procedure
to me and has answered questions to my satisfaction. The risks and consequences of the test have
been explained to me.
I hereby consent to the VIA test.
…………………………… ………………………………… ………………………
Name Signature Date
…………………………… ………………………………… ………………………
Witness’ name Witness’ signature Date
154
Why are you here?You are here today to have a special test that can detect an abnormal change on the cervix (lower part of the womb). Such change may turn into cancer if not treated and is known as cervical pre-cancer. The test is known as VIA and involves examination of the surface of the cervix after application of 3–5% dilute acetic acid (vinegar). The test can detect or rule out the presence of pre-cancer of the cervix. The test can also detect cancer of the cervix. If the test suspects pre-cancer you may also choose to have your treatment done today.
How will the test be done?The procedure usually takes 5–10 minutes to be completed. You will be made to lie down on examination table with your legs folded at the knees. A small spoon-like instrument (speculum) will be placed in your vagina to expose the cervix. A mild solution of vinegar will be applied on the surface of your cervix for 1 minute. If there is any pre-cancer or cancer that will be obvious as a white patch and we will be able to tell you the result immediately after the test. The test generally does not cause any pain and is safe. You may feel mild irritation during application of the vinegar solution but it is harmless and goes away on its own after few minutes.
What problems can occur during or after the test?As stated above, you may experience brief, mild discomfort during the placement of the speculum in your vagina or during application of dilute solution of acetic acid (vinegar). Sometimes slight vaginal bleeding (spotting) may occur after the test.
What should you do if the test is normal?If your VIA test is normal (cervix does not show an pre-cancer change or cancer) you will be advised to have the same test repeated every 3 years till you cross the age of 49 years. Generally there is no pain or discomfort after the procedure and you may continue with your day-to-day normal activity. No precautions are necessary.
What happens if the test is positive?If the test is positive your doctor/nurse will first assess if you can be treated here today. Treatment of pre-cancer is done wing a special technique called cryotherapy. The surface of your cervix will be cooled to freezing temperature using a special machine. Sometimes a the change on the cervix is big in size and cryotherapy may not be the right method to treat such condition. In that case you will be asked to visit a centre where further check-up and treatment will be done.
Annex 3
Sample informed consent form for VIA test and cryotherapy
Please read the information carefully. After reading this, if you have any doubts or questions please do not hesitate to ask any of us.
155
How will cryotherapy be done?Cryotherapy will be done immediately after the VIA test. The doctor or nurse who will be doing
the test will let you know about the test result. If you agree to continue with the treatment, the
equipment will be set-up. This may take a few minutes. Once the treatment starts you may hear
a hissing sound as the gas passes through the machine. The whole procedure will be completed
in approximately 15 minutes. After the treatment is over you will be asked to lie down for 5–10
minutes.
What problems can you expect during or after cryotherapy?During treatment you may have mild cramp in your lower abdomen. You can go back home and
continue with your day-to-day work. Sometimes you may feel a little dizzy immediately after
the treatment and you may have to lie down for another 10–15 minutes. You will have a watery
vaginal discharge that may last for 2–3 weeks. This is expected and not to be worried about. Please
use a sanitary napkin as long as necessary. Very rarely, you may have infection or bleeding. You
must contact us or any other doctor if you have high fever, lot of foul smelling vaginal discharge,
moderate to severe lower abdominal pain or bleeding more than your average menstrual flow
within a month. If you do not have any problems, you should come back for the test after 1 year.
Do you have to take any precautions to prevent complications?You should not perform vaginal douching or use tampons for 1 month after the treatment. You
need to avoid sexual intercourse for 1 month. You must ask your partner to use condoms in case
sexual contact is unavoidable.
Consent for VIA and cryotherapyI acknowledge that Dr/Mr/Ms..…………………………… has explained the proposed procedure
to me and has answered any questions that I have to my satisfaction. The risks and consequences
of the test and the treatment have been explained to me.
I hereby consent to the VIA test and also to cryotherapy, if necessary.
…………………………… ………………………………… ………………………
Name Signature Date
…………………………… ………………………………… ………………………
Witness’ name Witness’ signature Date

156
Personal details and contact information
1. Date of registration (day/month/year): [ ] [ ] / [ ] [ ] / [ ] [ ] [ ] [ ]
2. Last name:
3. First name:
4. Husband’s name
5. Age: [ ] [ ]
6. Date of birth (day/month/year): [ ] [ ] / [ ] [ ] / [ ] [ ] [ ] [ ]
7. Address:
8. Telephone number: [ ] [ ] [ ] [ ] [ ] [ ] [ ] [ ] [ ] [ ]
9. Registration number
VIA procedure
1. SCJ visible: (1. Fully visible; 2. Partially visible; 3. Not visible) [ ]
2. Findings of VIA: (1. Not done; 2. Negative; 3. Positive; 4. Suspicious for cancer) [ ]
3. If positive, size of the acetowhite area: (1.< 25% of cervix; 2. 25%-50%; 3. 50%-75%; 4. >75%) [ ]
4. Can the lesion be covered by a cry–probe? (1. Yes; 2. No) [ ]
5. Is the lesion suitable for cryotherapy? (1. Yes; 2. No) [ ]
VIA procedure
1. Cryotherapy: (1. Not required; 2. Not suitable; 3. Performed; 4. Refused; 5; Not done due to other reasons) [ ]
2. Problem during cryotherapy: (1. None; 2. Pain; 3. Other; 4. Could not be completed) [ ]
3. Next follow-up date [ ] [ ] / [ ] [ ] / [ ] [ ] [ ] [ ]
Reproductive history
1. Age at marriage (in years): [ ] [ ]
2. Total number of pregnancies: [ ] [ ]
3. Last menstruation: (1. Less than 1 year; 2. More than 1 year; 9. Unknown) [ ]
4. Date of last menstruation [ ] [ ] / [ ] [ ] / [ ] [ ] [ ] [ ]

157
Annex 5
Reference chart for visual inspection with acetic acid (VIA)
157