Embed Size (px)
Citation preview
0 Copyright ©2018 KYOCERA Document Solutions America, Inc. All rights reserved.
KYOCERA
ACCUSENDER® POWERED BY BISCOM
Version 1.2
October 2018
KYOCERA Document Solutions America, Inc.
Software Solutions Group
© 2018 KYOCERA Document Solutions America, Inc.
Copyright ©2018 KYOCERA Document Solutions America, Inc. All rights reserved. 1
Table of Contents Introduction .......................................................................................................................................... 3
1.1 Software........................................................................................................................................ 3
1.2 This Guide ..................................................................................................................................... 3
1.3 Supported MFP Models ................................................................................................................ 3
1.4 Licensing ....................................................................................................................................... 3
1.5 NFR (Not for Resale) Version ........................................................................................................ 3
1.6 Biscom........................................................................................................................................... 3
Operation .............................................................................................................................................. 4
2.1 Typical Workflow .......................................................................................................................... 4
2.2 Starting AccuSender ..................................................................................................................... 4
2.3 Selecting a Sending Method ......................................................................................................... 4
2.4 Selecting Destinations .................................................................................................................. 5
2.4.1 MFP Address Book ................................................................................................................. 5
2.4.2 LDAP Address Book ................................................................................................................ 6
2.4.3 Recently Used List .................................................................................................................. 6
2.4.4 Entering Addresses at the Panel ............................................................................................ 6
2.5 Presets .......................................................................................................................................... 6
2.6 Scanning ........................................................................................................................................ 8
2.7 Confirmation ................................................................................................................................. 8
2.8 Using Barcode Routing Sheets ...................................................................................................... 9
2.8.1 Easily Print Barcode Routing Sheets ...................................................................................... 9
2.8.2 Send Documents Using Routing Sheets ............................................................................... 10
2.9 Sending through Biscom Secure File Transfer Service ................................................................ 10
2.9.1 How to Login to Biscom ....................................................................................................... 11
2.10 Job Status .................................................................................................................................... 12
2.11 Sending Confirmation ................................................................................................................. 12
2.12 Send to Self ................................................................................................................................. 13
2.13 Send Fax ...................................................................................................................................... 13
Installation .......................................................................................................................................... 15
3.1 MFP Setup ................................................................................................................................... 15
3.2 Installation on HyPAS-Capable MFPs .......................................................................................... 15
3.3 Installation on HyPAS-Enabled MFPs .......................................................................................... 17
2 Copyright ©2018 KYOCERA Document Solutions America, Inc. All rights reserved.
4. Configuration ...................................................................................................................................... 18
4.1 AccuSender Configuration Web Page ......................................................................................... 18
4.2 System Settings ........................................................................................................................... 19
4.2.1 Delivery Method .................................................................................................................. 20
4.2.2 Biscom Server Settings ......................................................................................................... 20
4.2.3 SMTP .................................................................................................................................... 21
4.2.4 LDAP ..................................................................................................................................... 21
4.3 Presets ........................................................................................................................................ 22
4.4 Stamps ........................................................................................................................................ 23
4.5 Cover Pages ................................................................................................................................ 24
4.6 Printing Routing Sheets .............................................................................................................. 26
4.7 Import / Export Settings ............................................................................................................. 27
4.8 Placeholders ............................................................................................................................... 27
Security Certificate Installation ........................................................................................................... 28
5.1 Cloud Based Biscom Servers ....................................................................................................... 28
5.2 On-Premise Biscom Servers ........................................................................................................ 28
5.3 Extracting a Security Certificate from a Web server .................................................................. 28
5.4 MFP Certificate Installation ........................................................................................................ 28
6 Troubleshooting .................................................................................................................................. 31
6.1 Unable to login to AccuSender configuration page .................................................................... 31
6.2 Unable to select Email option on panel ...................................................................................... 31
6.3 Unable to select Biscom option on panel ................................................................................... 31
6.4 Unable to create Biscom Account .............................................................................................. 31
6.5 Unable to register HID card with Biscom account ...................................................................... 32
6.6 Unable to select Automatic Routing option on panel ................................................................ 32
6.7 Unable to select destination from LDAP address book .............................................................. 32
6.8 Unable to make changes to preset defaults on the panel ......................................................... 32
6.9 Recipient did not receive the email ............................................................................................ 33
6.10 Automatic Routing fails to send the email ................................................................................. 33
6.11 Document sent cannot be opened without a password ............................................................ 33
7 Support ............................................................................................................................................... 34
Copyright ©2018 KYOCERA Document Solutions America, Inc. All rights reserved. 3
Introduction
1.1 Software Kyocera’s AccuSender powered by Biscom application alleviates the pain of sending large hardcopy files
by allowing users to scan and send those documents quickly and easily with no size limitations from
their Kyocera MFP through one intuitive application using Biscom Secure File Transfer, Email, or Fax.
NOTE: Biscom integration requires Biscom Secure File Transfer Cloud Service or an on-premise server.
1.2 This Guide This document describes the components, functions, installation requirements and setup procedures
needed to deploy AccuSender powered by Biscom.
Since AccuSender offers multiple configuration options, it is essential to understand the workflow and
configuration options to deploy this solution correctly.
The installation and set-up of AccuSender is the responsibility of a trained technician.
1.3 Supported MFP Models For a full list of support MFP models, please refer to the Solutions Compatibility Chart on
KDACentral.com.
1.4 Licensing AccuSender requires the purchase of a software license from an authorized Kyocera or Copystar
dealership.
You can evaluate the software, free of charge, for two 30-day trial periods. AccuSender will be disabled
when the two trial periods expire, and you will be required to purchase a license key to be entered to
continue using the application.
1.5 NFR (Not for Resale) Version Available is a NFR (Not for Resale) version of AccuSender powered by Biscom. This version is intended
for demo purposes only and places a watermark “stamp” in the background of all documents scanned
through the application. Because of the watermark “stamp”, the stamp function will not be available in
the NFR version of the application.
1.6 Biscom AccuSender may be setup to deliver documents using Biscom Secure File Transfer service.
NOTE: Document recipients need not register or purchase access to Biscom, however, a Biscom account
is required to send secure files. Biscom accounts can be set up through an authorized Biscom reseller.
In no event shall Kyocera be liable for any special, punitive, incidental, indirect or consequential
damages of any kind, or any damages whatsoever, including without limitation, those resulting from the
loss of use, data, profits, and on any theory of liability, arising out of or in connection with the use of the
Biscom service.
4 Copyright ©2018 KYOCERA Document Solutions America, Inc. All rights reserved.
Operation
2.1 Typical Workflow
*Preset is a collection of document processing, email options and delivery options.
2.2 Starting AccuSender a. Press ‘Application’ button on MFP panel
b. Press ‘AccuSender’ button
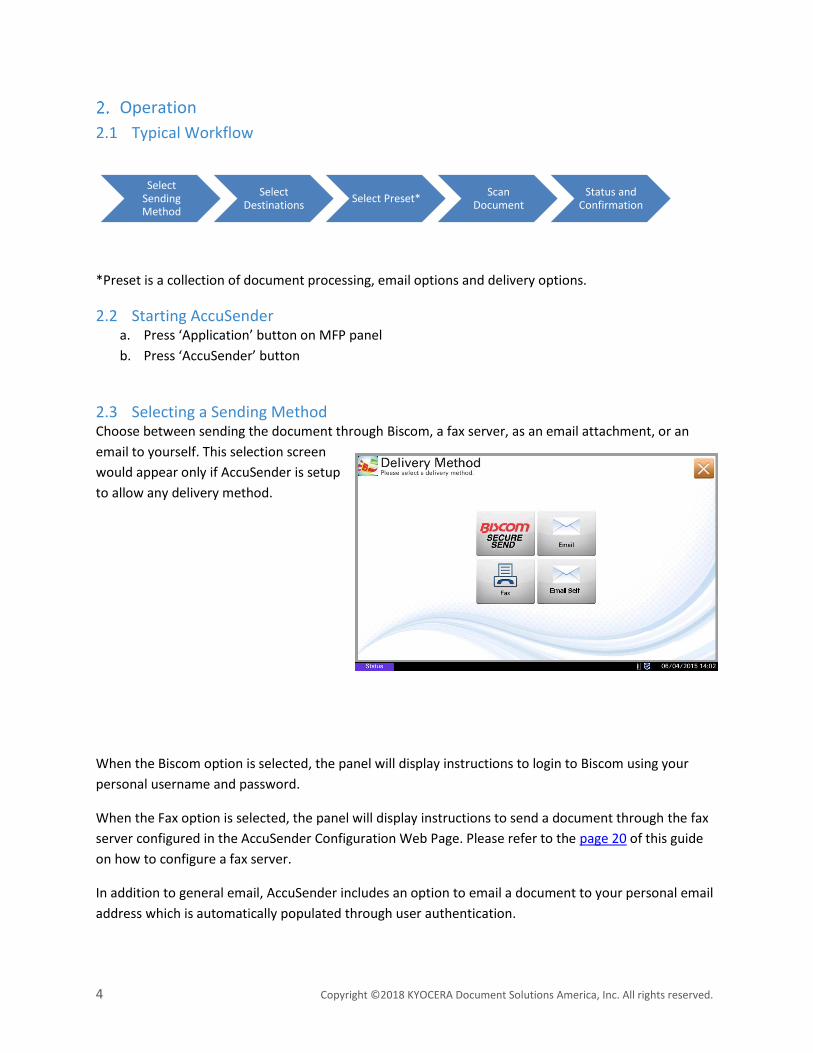
2.3 Selecting a Sending Method Choose between sending the document through Biscom, a fax server, as an email attachment, or an
email to yourself. This selection screen
would appear only if AccuSender is setup
to allow any delivery method.
When the Biscom option is selected, the panel will display instructions to login to Biscom using your
personal username and password.
When the Fax option is selected, the panel will display instructions to send a document through the fax
server configured in the AccuSender Configuration Web Page. Please refer to the page 20 of this guide
on how to configure a fax server.
In addition to general email, AccuSender includes an option to email a document to your personal email
address which is automatically populated through user authentication.
Select Sending Method
Select Destinations
Select Preset*Scan
DocumentStatus and
Confirmation
Copyright ©2018 KYOCERA Document Solutions America, Inc. All rights reserved. 5
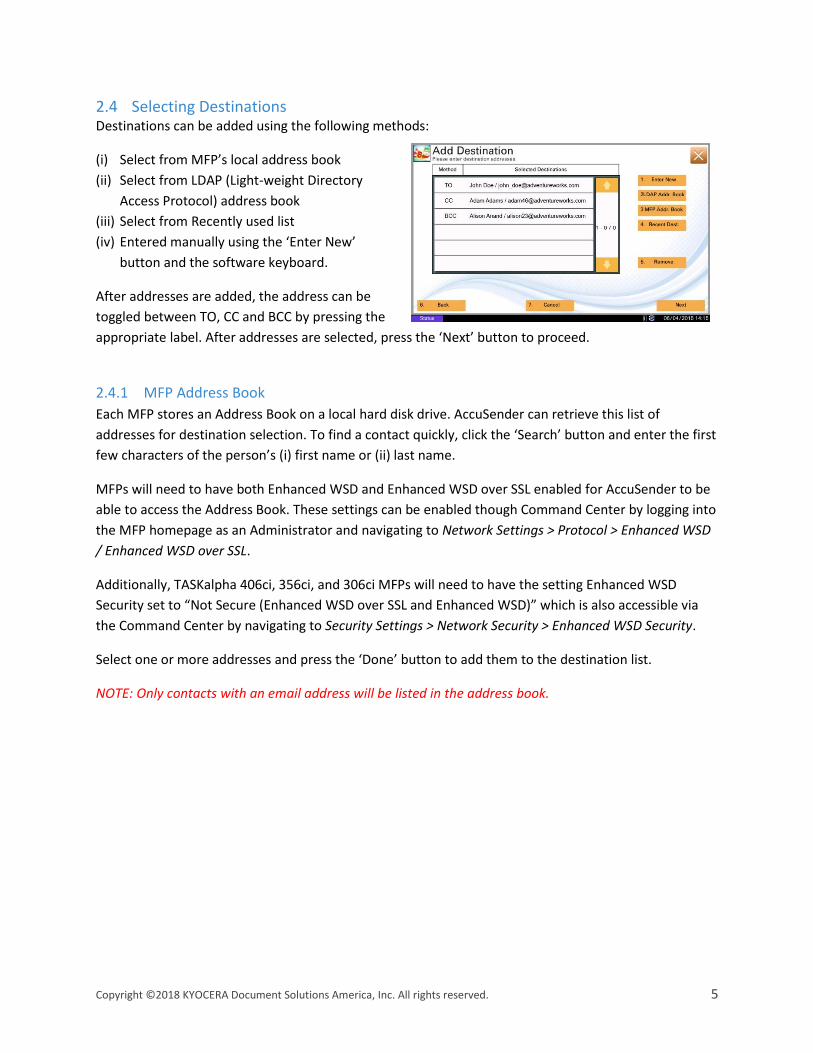
2.4 Selecting Destinations Destinations can be added using the following methods:
(i) Select from MFP’s local address book
(ii) Select from LDAP (Light-weight Directory
Access Protocol) address book
(iii) Select from Recently used list
(iv) Entered manually using the ‘Enter New’
button and the software keyboard.
After addresses are added, the address can be
toggled between TO, CC and BCC by pressing the
appropriate label. After addresses are selected, press the ‘Next’ button to proceed.
2.4.1 MFP Address Book
Each MFP stores an Address Book on a local hard disk drive. AccuSender can retrieve this list of
addresses for destination selection. To find a contact quickly, click the ‘Search’ button and enter the first
few characters of the person’s (i) first name or (ii) last name.
MFPs will need to have both Enhanced WSD and Enhanced WSD over SSL enabled for AccuSender to be
able to access the Address Book. These settings can be enabled though Command Center by logging into
the MFP homepage as an Administrator and navigating to Network Settings > Protocol > Enhanced WSD
/ Enhanced WSD over SSL.
Additionally, TASKalpha 406ci, 356ci, and 306ci MFPs will need to have the setting Enhanced WSD
Security set to “Not Secure (Enhanced WSD over SSL and Enhanced WSD)” which is also accessible via
the Command Center by navigating to Security Settings > Network Security > Enhanced WSD Security.
Select one or more addresses and press the ‘Done’ button to add them to the destination list.
NOTE: Only contacts with an email address will be listed in the address book.
6 Copyright ©2018 KYOCERA Document Solutions America, Inc. All rights reserved.
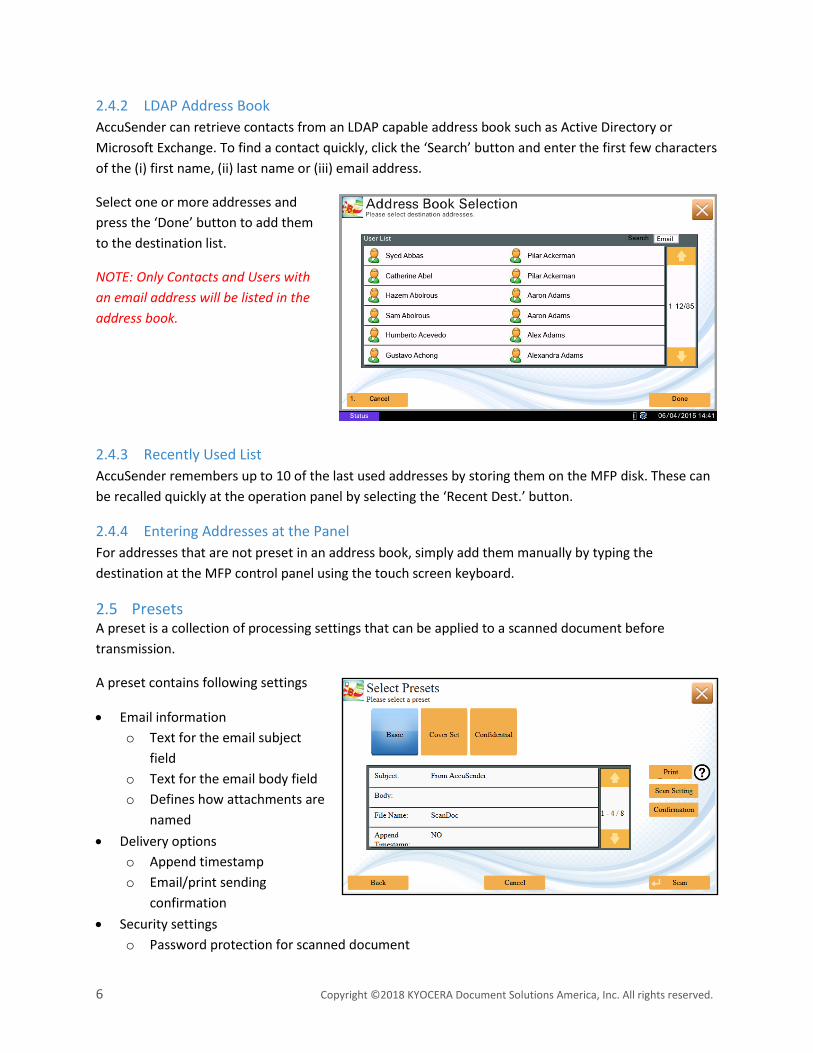
2.4.2 LDAP Address Book
AccuSender can retrieve contacts from an LDAP capable address book such as Active Directory or
Microsoft Exchange. To find a contact quickly, click the ‘Search’ button and enter the first few characters
of the (i) first name, (ii) last name or (iii) email address.
Select one or more addresses and
press the ‘Done’ button to add them
to the destination list.
NOTE: Only Contacts and Users with
an email address will be listed in the
address book.
2.4.3 Recently Used List
AccuSender remembers up to 10 of the last used addresses by storing them on the MFP disk. These can
be recalled quickly at the operation panel by selecting the ‘Recent Dest.’ button.
2.4.4 Entering Addresses at the Panel
For addresses that are not preset in an address book, simply add them manually by typing the
destination at the MFP control panel using the touch screen keyboard.
2.5 Presets A preset is a collection of processing settings that can be applied to a scanned document before
transmission.
A preset contains following settings
• Email information
o Text for the email subject
field
o Text for the email body field
o Defines how attachments are
named
• Delivery options
o Append timestamp
o Email/print sending
confirmation
• Security settings
o Password protection for scanned document
Copyright ©2018 KYOCERA Document Solutions America, Inc. All rights reserved. 7
• Cover pages
• Stamps
• Scan Settings
o Color Selection
o Resolution
o Duplex ON/OFF
• Confirmation
o View
▪ Every time
▪ First time
▪ Never
o Download
▪ Every time
▪ First time
▪ Never
Select a preset by pressing its respective button. You can view the preset settings in the list that appears
below it. You can also press the ‘Print’ button to print a barcode routing sheet. For a full explanation on
printing barcode routing sheets, please see page 9. Press ‘Next’ button to proceed to the next screen.
Preset configuration may allow editing values at the MFP panel. If prompted, you can edit values for the
following fields:
• Subject
• Body
• File name
• Timestamp option
• Confirmation options
• File protection options
• Cover page selection
• Stamp selection
8 Copyright ©2018 KYOCERA Document Solutions America, Inc. All rights reserved.
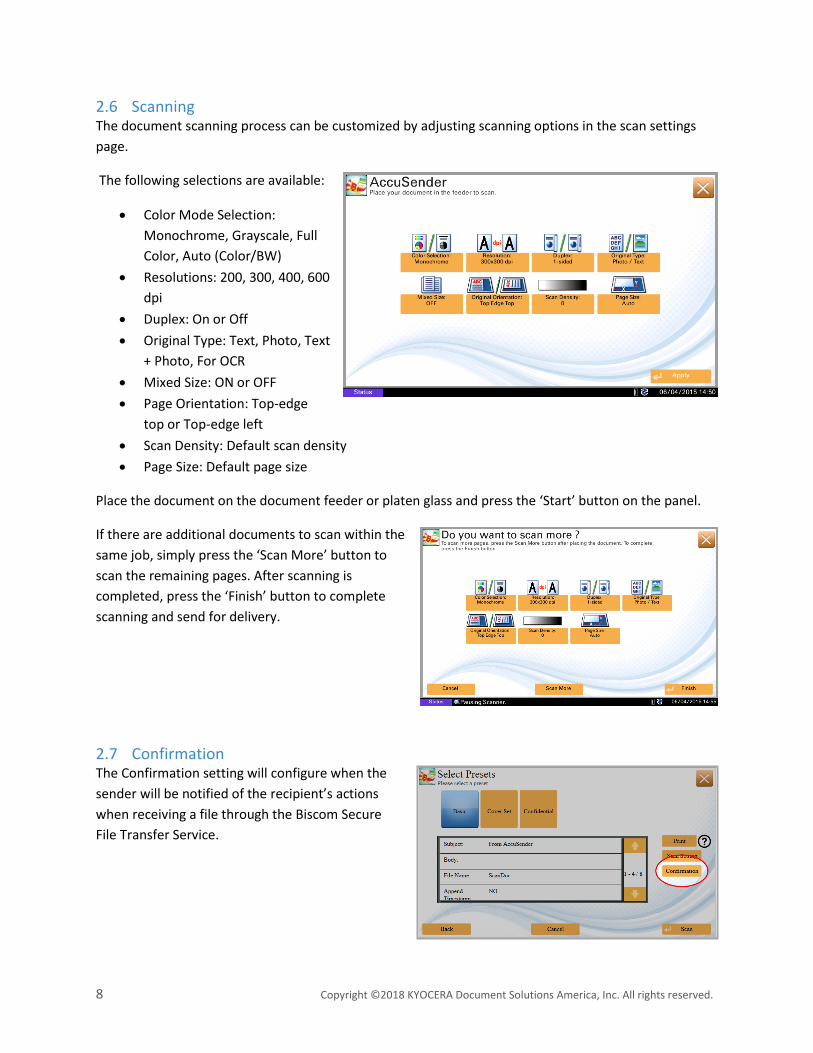
2.6 Scanning The document scanning process can be customized by adjusting scanning options in the scan settings
page.
The following selections are available:
• Color Mode Selection:
Monochrome, Grayscale, Full
Color, Auto (Color/BW)
• Resolutions: 200, 300, 400, 600
dpi
• Duplex: On or Off
• Original Type: Text, Photo, Text
+ Photo, For OCR
• Mixed Size: ON or OFF
• Page Orientation: Top-edge
top or Top-edge left
• Scan Density: Default scan density
• Page Size: Default page size
Place the document on the document feeder or platen glass and press the ‘Start’ button on the panel.
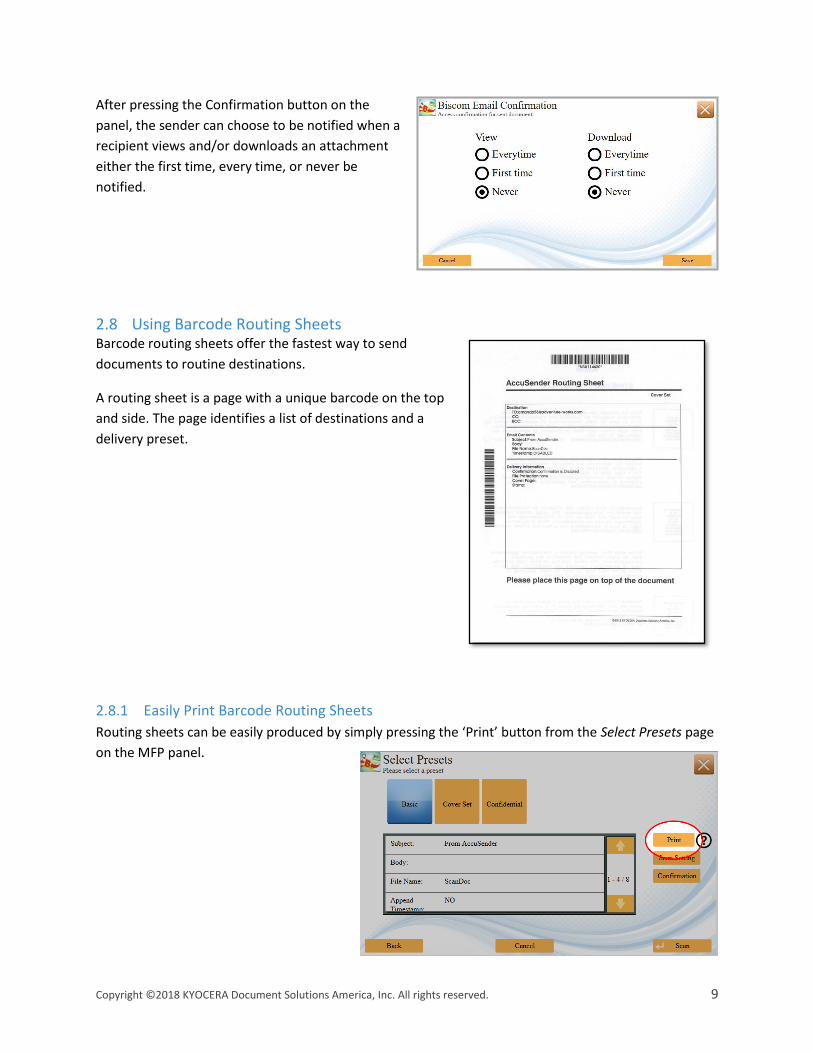
If there are additional documents to scan within the
same job, simply press the ‘Scan More’ button to
scan the remaining pages. After scanning is
completed, press the ‘Finish’ button to complete
scanning and send for delivery.
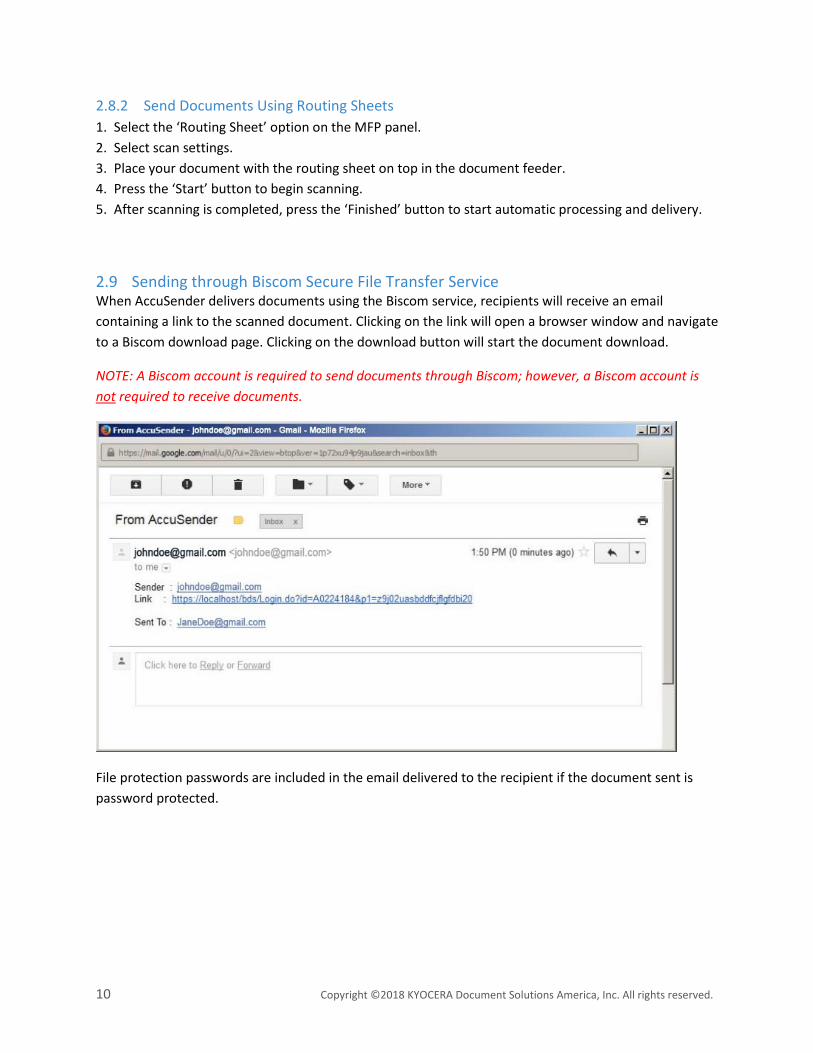
2.7 Confirmation The Confirmation setting will configure when the
sender will be notified of the recipient’s actions
when receiving a file through the Biscom Secure
File Transfer Service.
Copyright ©2018 KYOCERA Document Solutions America, Inc. All rights reserved. 9
After pressing the Confirmation button on the
panel, the sender can choose to be notified when a
recipient views and/or downloads an attachment
either the first time, every time, or never be
notified.
2.8 Using Barcode Routing Sheets Barcode routing sheets offer the fastest way to send
documents to routine destinations.
A routing sheet is a page with a unique barcode on the top
and side. The page identifies a list of destinations and a
delivery preset.
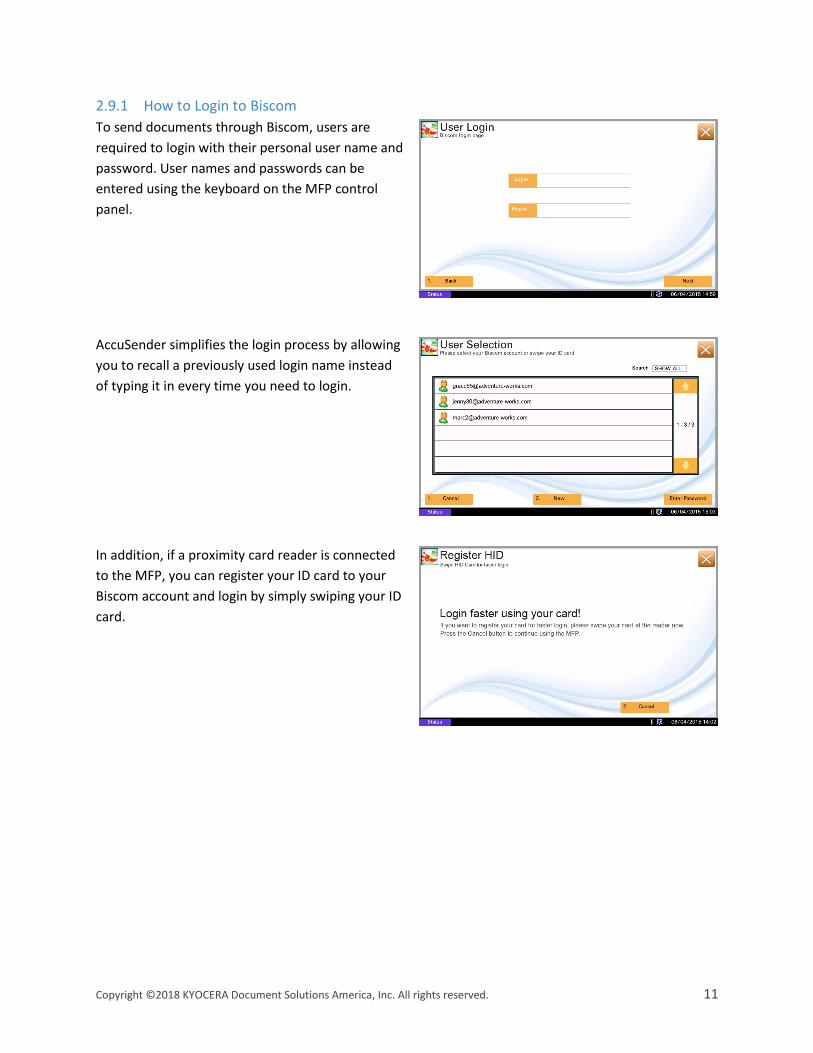
2.8.1 Easily Print Barcode Routing Sheets
Routing sheets can be easily produced by simply pressing the ‘Print’ button from the Select Presets page
on the MFP panel.
10 Copyright ©2018 KYOCERA Document Solutions America, Inc. All rights reserved.
2.8.2 Send Documents Using Routing Sheets
1. Select the ‘Routing Sheet’ option on the MFP panel.
2. Select scan settings.
3. Place your document with the routing sheet on top in the document feeder.
4. Press the ‘Start’ button to begin scanning.
5. After scanning is completed, press the ‘Finished’ button to start automatic processing and delivery.
2.9 Sending through Biscom Secure File Transfer Service When AccuSender delivers documents using the Biscom service, recipients will receive an email
containing a link to the scanned document. Clicking on the link will open a browser window and navigate
to a Biscom download page. Clicking on the download button will start the document download.
NOTE: A Biscom account is required to send documents through Biscom; however, a Biscom account is
not required to receive documents.
File protection passwords are included in the email delivered to the recipient if the document sent is
password protected.
Copyright ©2018 KYOCERA Document Solutions America, Inc. All rights reserved. 11
2.9.1 How to Login to Biscom
To send documents through Biscom, users are
required to login with their personal user name and
password. User names and passwords can be
entered using the keyboard on the MFP control
panel.
AccuSender simplifies the login process by allowing
you to recall a previously used login name instead
of typing it in every time you need to login.
In addition, if a proximity card reader is connected
to the MFP, you can register your ID card to your
Biscom account and login by simply swiping your ID
card.
12 Copyright ©2018 KYOCERA Document Solutions America, Inc. All rights reserved.
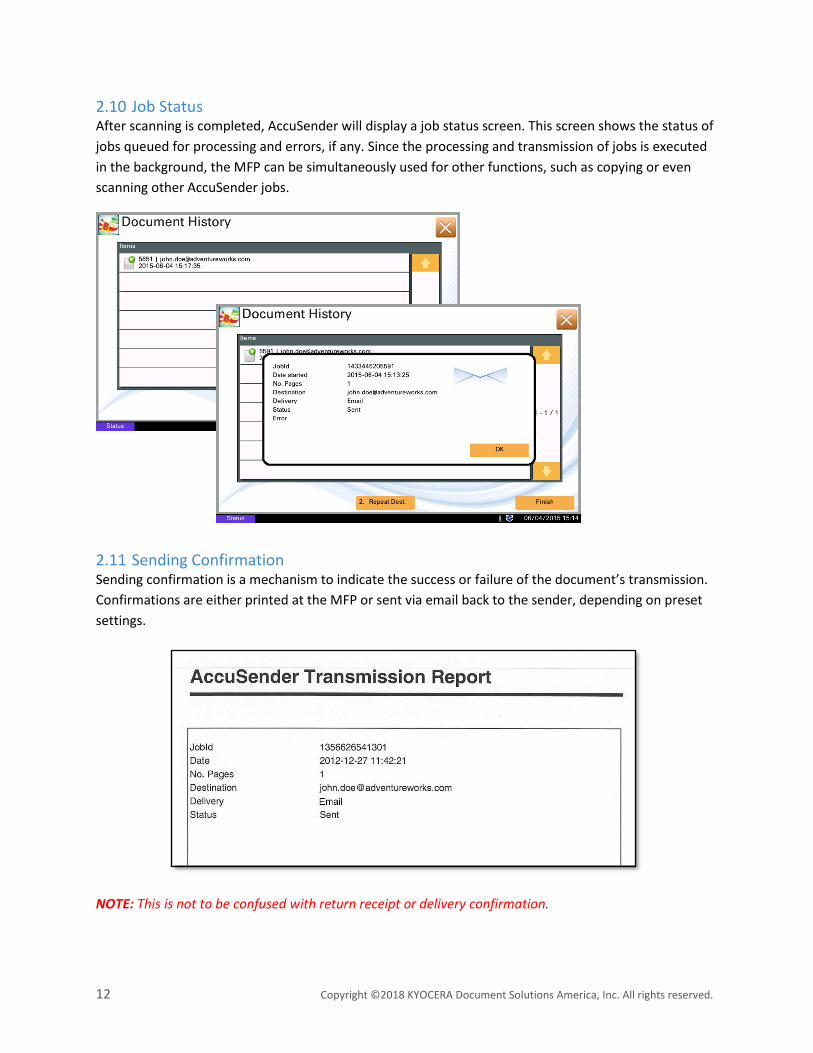
2.10 Job Status After scanning is completed, AccuSender will display a job status screen. This screen shows the status of
jobs queued for processing and errors, if any. Since the processing and transmission of jobs is executed
in the background, the MFP can be simultaneously used for other functions, such as copying or even
scanning other AccuSender jobs.
2.11 Sending Confirmation Sending confirmation is a mechanism to indicate the success or failure of the document’s transmission.
Confirmations are either printed at the MFP or sent via email back to the sender, depending on preset
settings.
NOTE: This is not to be confused with return receipt or delivery confirmation.
Copyright ©2018 KYOCERA Document Solutions America, Inc. All rights reserved. 13
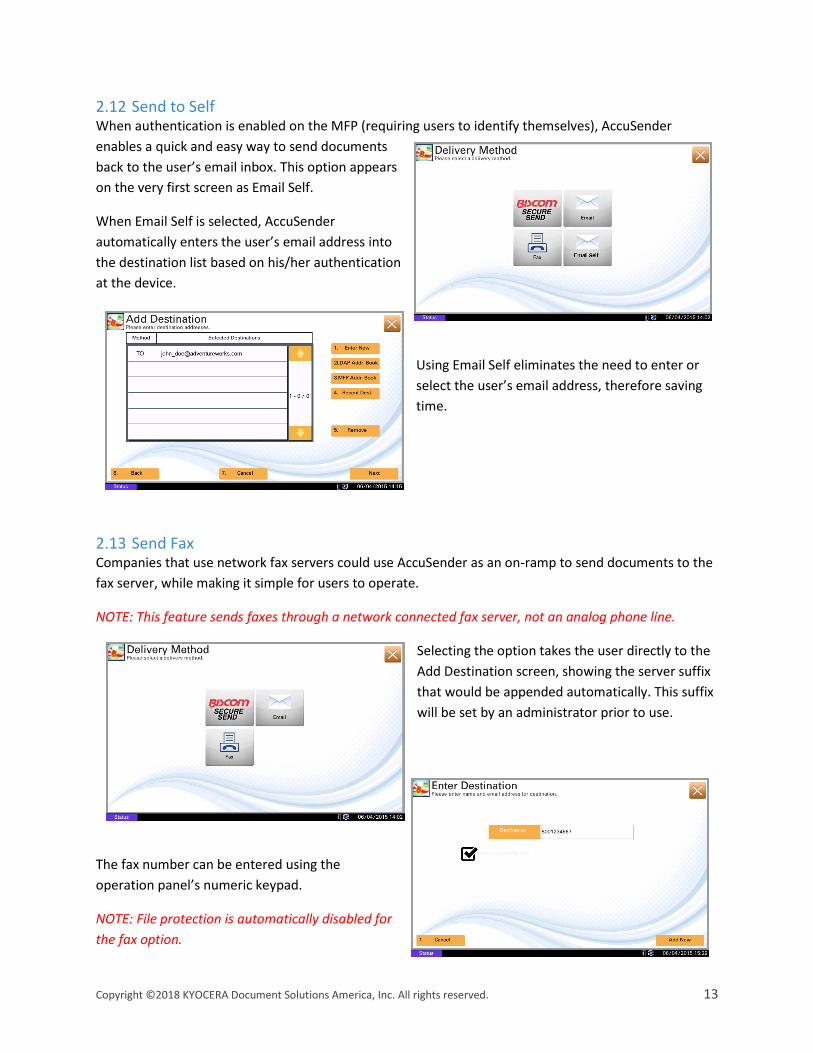
2.12 Send to Self When authentication is enabled on the MFP (requiring users to identify themselves), AccuSender
enables a quick and easy way to send documents
back to the user’s email inbox. This option appears
on the very first screen as Email Self.
When Email Self is selected, AccuSender
automatically enters the user’s email address into
the destination list based on his/her authentication
at the device.
Using Email Self eliminates the need to enter or
select the user’s email address, therefore saving
time.
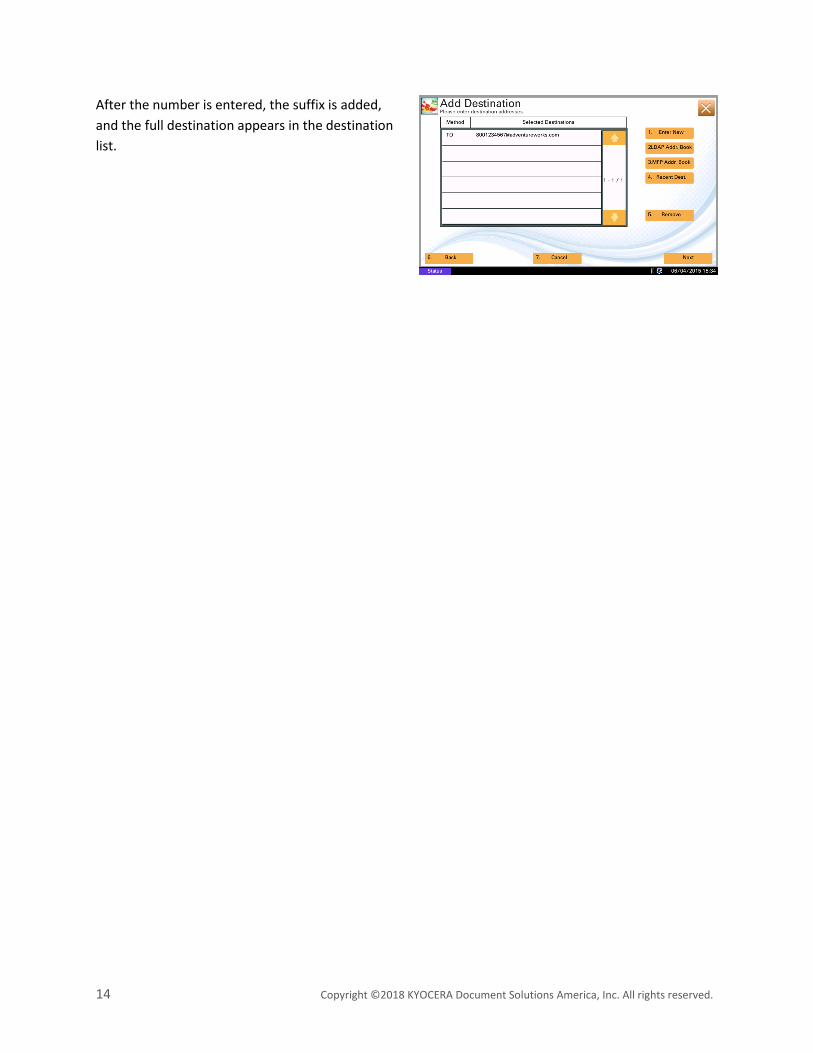
2.13 Send Fax Companies that use network fax servers could use AccuSender as an on-ramp to send documents to the
fax server, while making it simple for users to operate.
NOTE: This feature sends faxes through a network connected fax server, not an analog phone line.
Selecting the option takes the user directly to the
Add Destination screen, showing the server suffix
that would be appended automatically. This suffix
will be set by an administrator prior to use.
The fax number can be entered using the
operation panel’s numeric keypad.
NOTE: File protection is automatically disabled for
the fax option.
14 Copyright ©2018 KYOCERA Document Solutions America, Inc. All rights reserved.
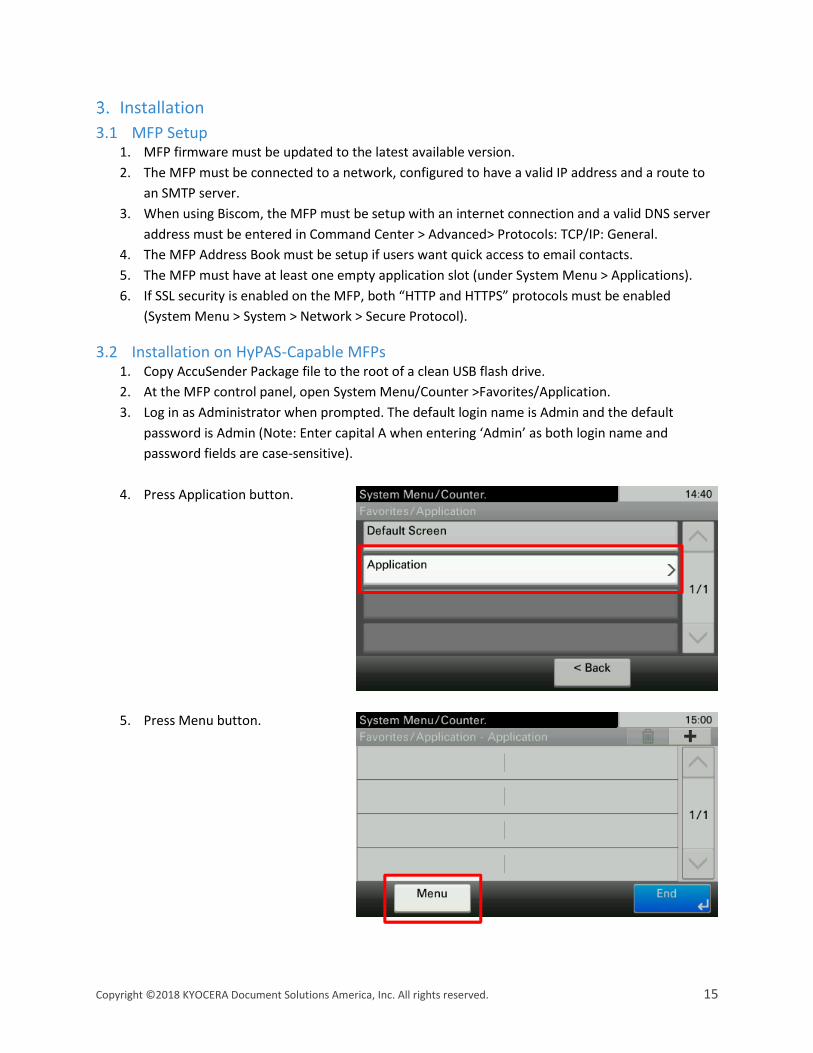
After the number is entered, the suffix is added,
and the full destination appears in the destination
list.
Copyright ©2018 KYOCERA Document Solutions America, Inc. All rights reserved. 15
Installation
3.1 MFP Setup 1. MFP firmware must be updated to the latest available version.
2. The MFP must be connected to a network, configured to have a valid IP address and a route to
an SMTP server.
3. When using Biscom, the MFP must be setup with an internet connection and a valid DNS server
address must be entered in Command Center > Advanced> Protocols: TCP/IP: General.
4. The MFP Address Book must be setup if users want quick access to email contacts.
5. The MFP must have at least one empty application slot (under System Menu > Applications).
6. If SSL security is enabled on the MFP, both “HTTP and HTTPS” protocols must be enabled
(System Menu > System > Network > Secure Protocol).
3.2 Installation on HyPAS-Capable MFPs 1. Copy AccuSender Package file to the root of a clean USB flash drive.
2. At the MFP control panel, open System Menu/Counter >Favorites/Application.
3. Log in as Administrator when prompted. The default login name is Admin and the default
password is Admin (Note: Enter capital A when entering ‘Admin’ as both login name and
password fields are case-sensitive).
4. Press Application button.
5. Press Menu button.
16 Copyright ©2018 KYOCERA Document Solutions America, Inc. All rights reserved.
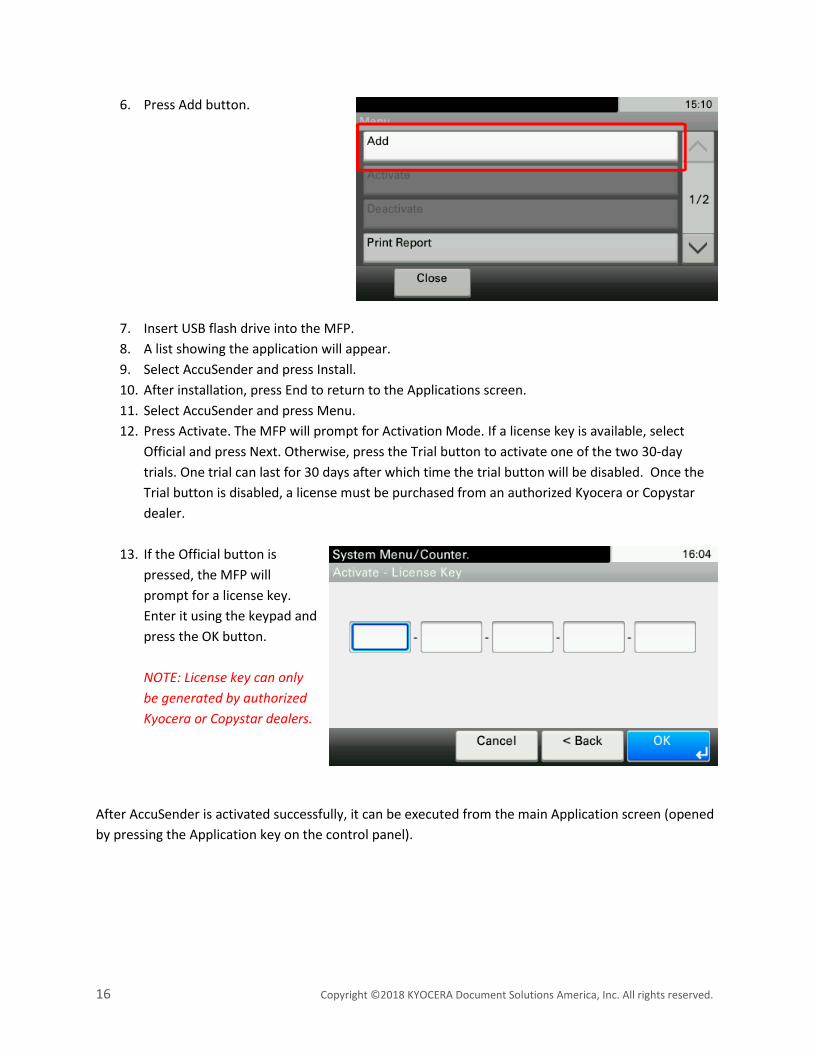
6. Press Add button.
7. Insert USB flash drive into the MFP.
8. A list showing the application will appear.
9. Select AccuSender and press Install.
10. After installation, press End to return to the Applications screen.
11. Select AccuSender and press Menu.
12. Press Activate. The MFP will prompt for Activation Mode. If a license key is available, select
Official and press Next. Otherwise, press the Trial button to activate one of the two 30-day
trials. One trial can last for 30 days after which time the trial button will be disabled. Once the
Trial button is disabled, a license must be purchased from an authorized Kyocera or Copystar
dealer.
13. If the Official button is
pressed, the MFP will
prompt for a license key.
Enter it using the keypad and
press the OK button.
NOTE: License key can only
be generated by authorized
Kyocera or Copystar dealers.
After AccuSender is activated successfully, it can be executed from the main Application screen (opened
by pressing the Application key on the control panel).
Copyright ©2018 KYOCERA Document Solutions America, Inc. All rights reserved. 17
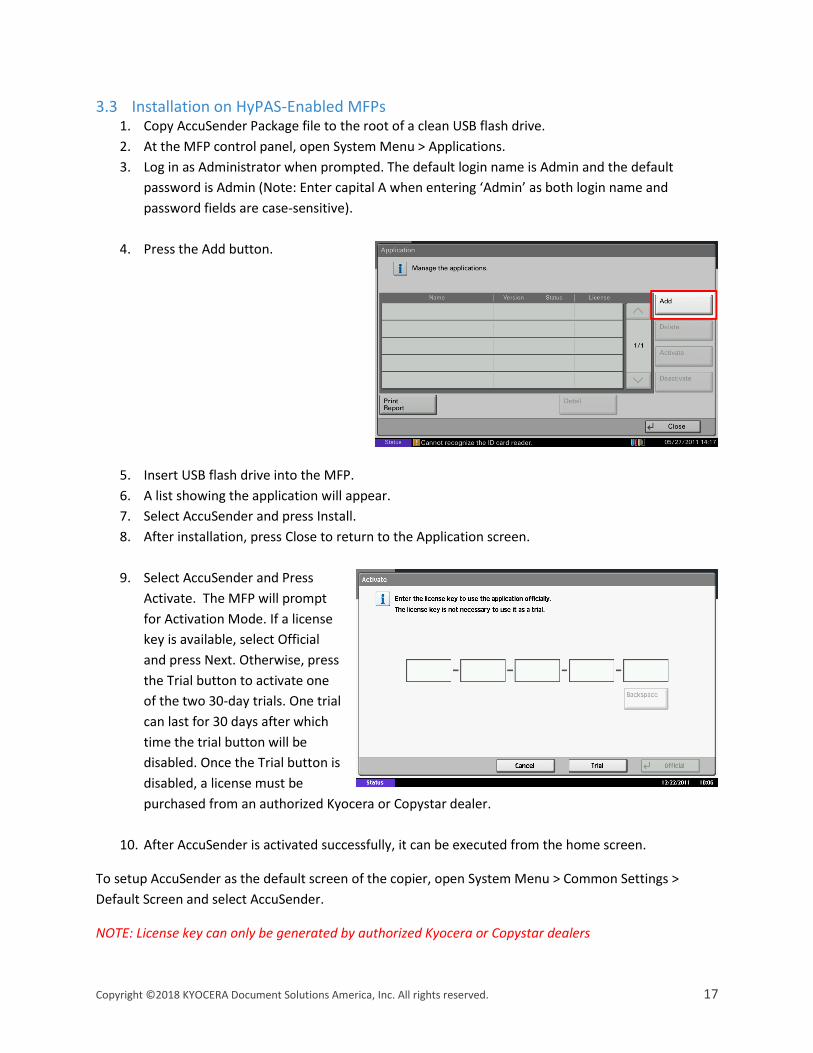
3.3 Installation on HyPAS-Enabled MFPs 1. Copy AccuSender Package file to the root of a clean USB flash drive.
2. At the MFP control panel, open System Menu > Applications.
3. Log in as Administrator when prompted. The default login name is Admin and the default
password is Admin (Note: Enter capital A when entering ‘Admin’ as both login name and
password fields are case-sensitive).
4. Press the Add button.
5. Insert USB flash drive into the MFP.
6. A list showing the application will appear.
7. Select AccuSender and press Install.
8. After installation, press Close to return to the Application screen.
9. Select AccuSender and Press
Activate. The MFP will prompt
for Activation Mode. If a license
key is available, select Official
and press Next. Otherwise, press
the Trial button to activate one
of the two 30-day trials. One trial
can last for 30 days after which
time the trial button will be
disabled. Once the Trial button is
disabled, a license must be
purchased from an authorized Kyocera or Copystar dealer.
10. After AccuSender is activated successfully, it can be executed from the home screen.
To setup AccuSender as the default screen of the copier, open System Menu > Common Settings >
Default Screen and select AccuSender.
NOTE: License key can only be generated by authorized Kyocera or Copystar dealers
18 Copyright ©2018 KYOCERA Document Solutions America, Inc. All rights reserved.
4. Configuration
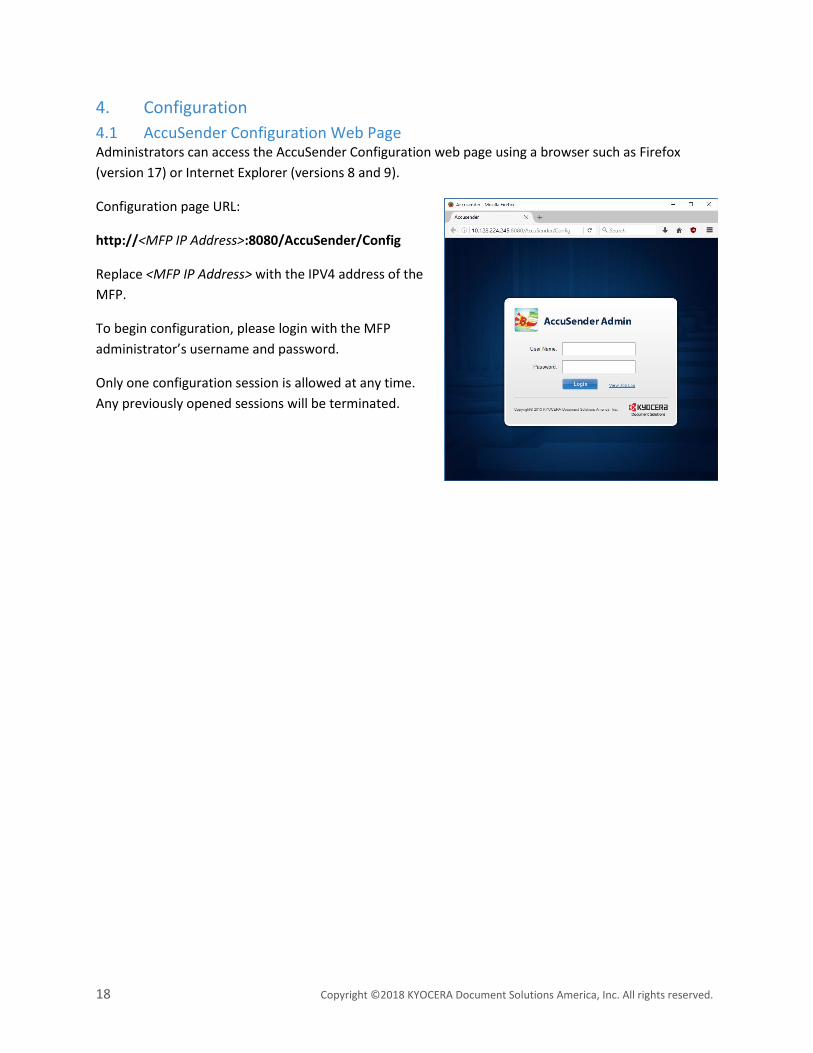
4.1 AccuSender Configuration Web Page Administrators can access the AccuSender Configuration web page using a browser such as Firefox
(version 17) or Internet Explorer (versions 8 and 9).
Configuration page URL:
http://<MFP IP Address>:8080/AccuSender/Config
Replace <MFP IP Address> with the IPV4 address of the
MFP.
To begin configuration, please login with the MFP
administrator’s username and password.
Only one configuration session is allowed at any time.
Any previously opened sessions will be terminated.
Copyright ©2018 KYOCERA Document Solutions America, Inc. All rights reserved. 19
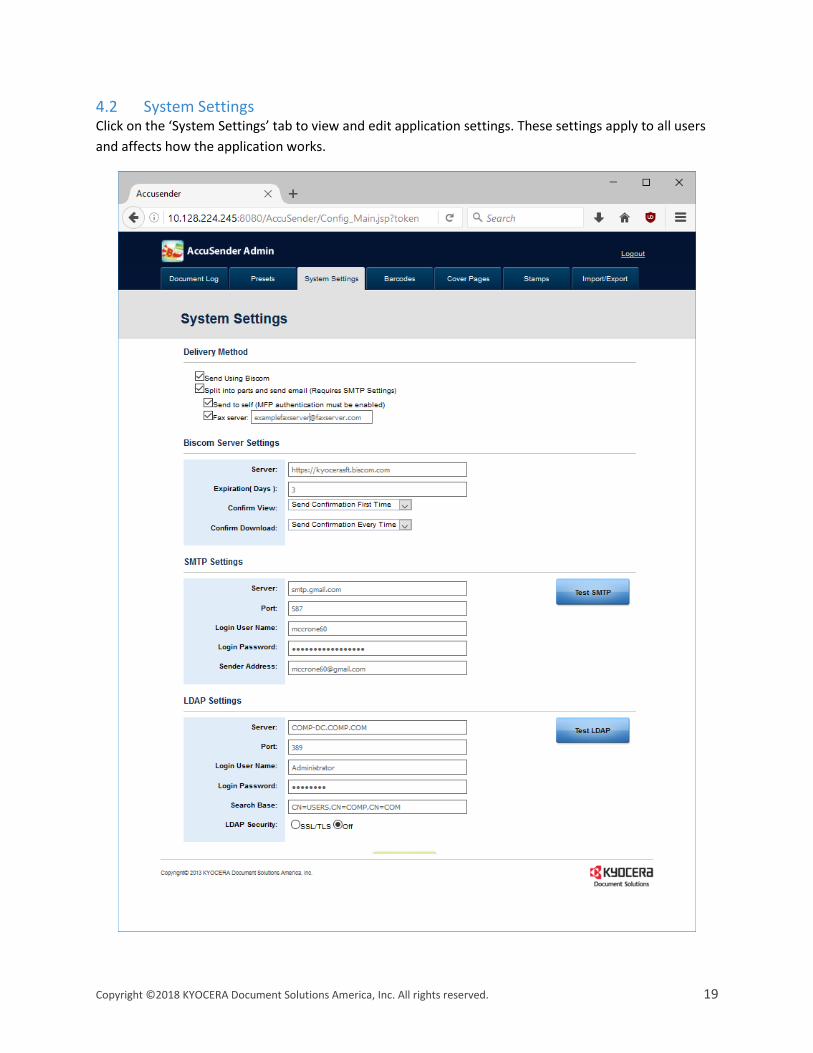
4.2 System Settings Click on the ‘System Settings’ tab to view and edit application settings. These settings apply to all users
and affects how the application works.
20 Copyright ©2018 KYOCERA Document Solutions America, Inc. All rights reserved.
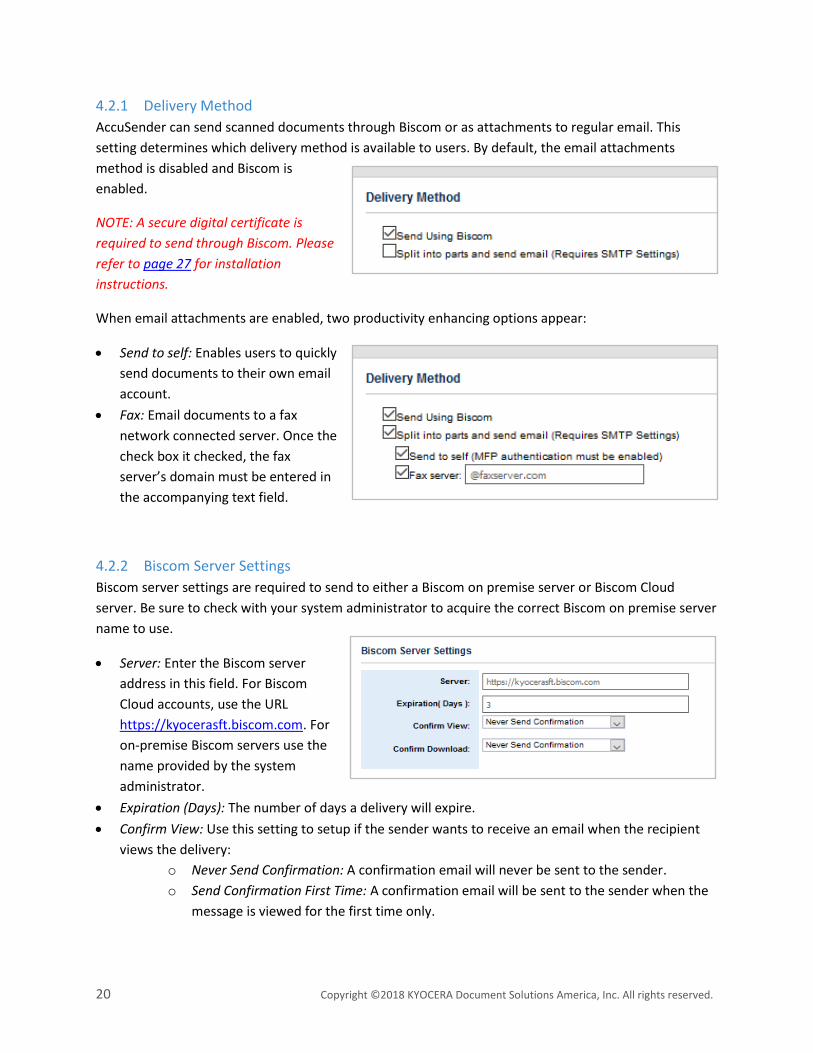
4.2.1 Delivery Method
AccuSender can send scanned documents through Biscom or as attachments to regular email. This
setting determines which delivery method is available to users. By default, the email attachments
method is disabled and Biscom is
enabled.
NOTE: A secure digital certificate is
required to send through Biscom. Please
refer to page 27 for installation
instructions.
When email attachments are enabled, two productivity enhancing options appear:
• Send to self: Enables users to quickly
send documents to their own email
account.
• Fax: Email documents to a fax
network connected server. Once the
check box it checked, the fax
server’s domain must be entered in
the accompanying text field.
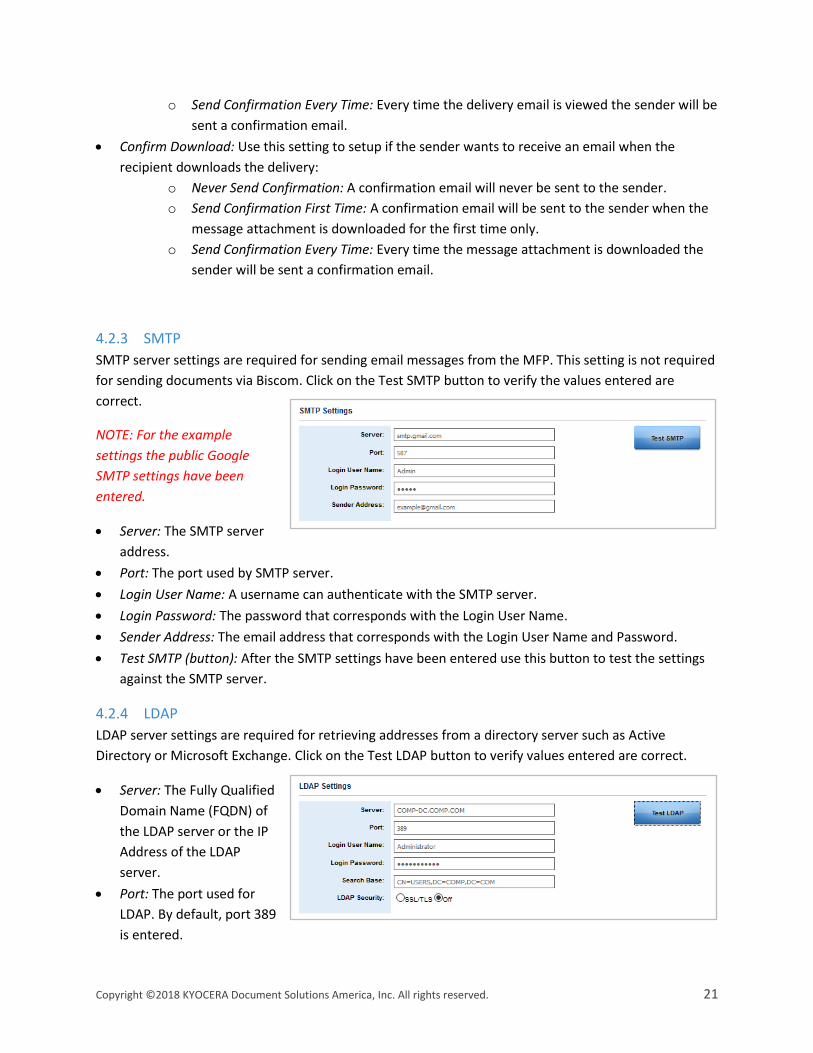
4.2.2 Biscom Server Settings
Biscom server settings are required to send to either a Biscom on premise server or Biscom Cloud
server. Be sure to check with your system administrator to acquire the correct Biscom on premise server
name to use.
• Server: Enter the Biscom server
address in this field. For Biscom
Cloud accounts, use the URL
https://kyocerasft.biscom.com. For
on-premise Biscom servers use the
name provided by the system
administrator.
• Expiration (Days): The number of days a delivery will expire.
• Confirm View: Use this setting to setup if the sender wants to receive an email when the recipient
views the delivery:
o Never Send Confirmation: A confirmation email will never be sent to the sender.
o Send Confirmation First Time: A confirmation email will be sent to the sender when the
message is viewed for the first time only.
Copyright ©2018 KYOCERA Document Solutions America, Inc. All rights reserved. 21
o Send Confirmation Every Time: Every time the delivery email is viewed the sender will be
sent a confirmation email.
• Confirm Download: Use this setting to setup if the sender wants to receive an email when the
recipient downloads the delivery:
o Never Send Confirmation: A confirmation email will never be sent to the sender.
o Send Confirmation First Time: A confirmation email will be sent to the sender when the
message attachment is downloaded for the first time only.
o Send Confirmation Every Time: Every time the message attachment is downloaded the
sender will be sent a confirmation email.
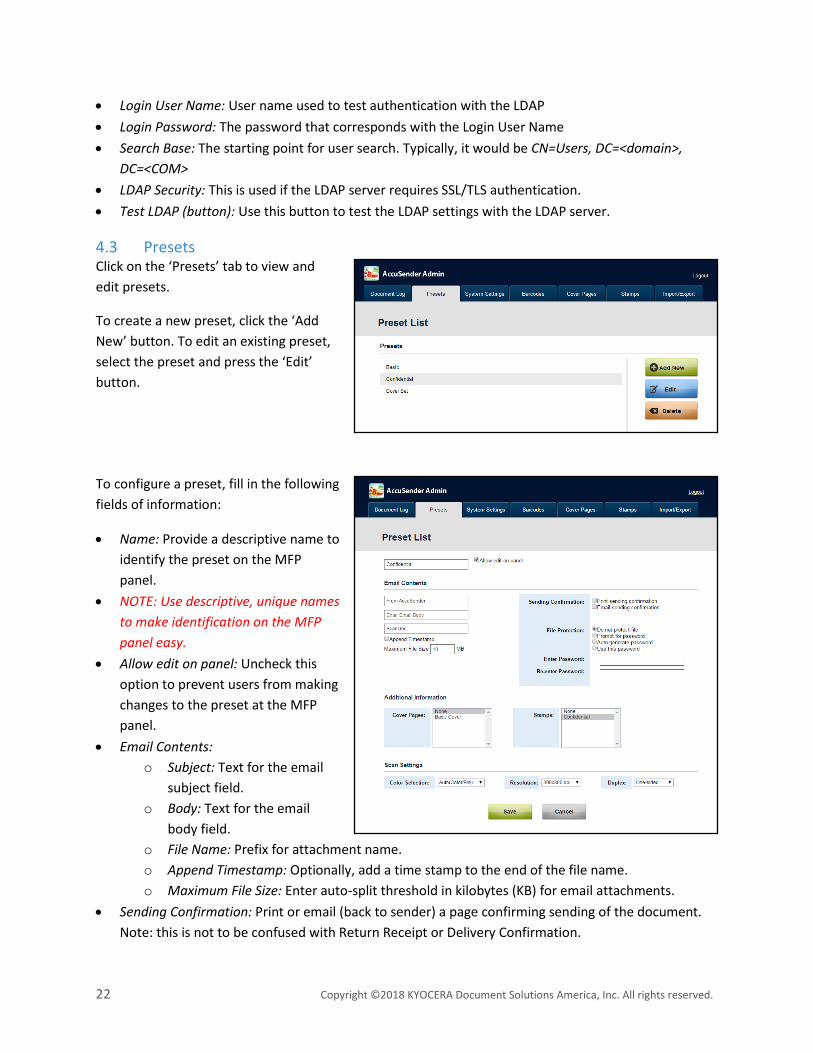
4.2.3 SMTP
SMTP server settings are required for sending email messages from the MFP. This setting is not required
for sending documents via Biscom. Click on the Test SMTP button to verify the values entered are
correct.
NOTE: For the example
settings the public Google
SMTP settings have been
entered.
• Server: The SMTP server
address.
• Port: The port used by SMTP server.
• Login User Name: A username can authenticate with the SMTP server.
• Login Password: The password that corresponds with the Login User Name.
• Sender Address: The email address that corresponds with the Login User Name and Password.
• Test SMTP (button): After the SMTP settings have been entered use this button to test the settings
against the SMTP server.
4.2.4 LDAP
LDAP server settings are required for retrieving addresses from a directory server such as Active
Directory or Microsoft Exchange. Click on the Test LDAP button to verify values entered are correct.
• Server: The Fully Qualified
Domain Name (FQDN) of
the LDAP server or the IP
Address of the LDAP
server.
• Port: The port used for
LDAP. By default, port 389
is entered.
22 Copyright ©2018 KYOCERA Document Solutions America, Inc. All rights reserved.
• Login User Name: User name used to test authentication with the LDAP
• Login Password: The password that corresponds with the Login User Name
• Search Base: The starting point for user search. Typically, it would be CN=Users, DC=<domain>,
DC=<COM>
• LDAP Security: This is used if the LDAP server requires SSL/TLS authentication.
• Test LDAP (button): Use this button to test the LDAP settings with the LDAP server.
4.3 Presets Click on the ‘Presets’ tab to view and
edit presets.
To create a new preset, click the ‘Add
New’ button. To edit an existing preset,
select the preset and press the ‘Edit’
button.
To configure a preset, fill in the following
fields of information:
• Name: Provide a descriptive name to
identify the preset on the MFP
panel.
• NOTE: Use descriptive, unique names
to make identification on the MFP
panel easy.
• Allow edit on panel: Uncheck this
option to prevent users from making
changes to the preset at the MFP
panel.
• Email Contents:
o Subject: Text for the email
subject field.
o Body: Text for the email
body field.
o File Name: Prefix for attachment name.
o Append Timestamp: Optionally, add a time stamp to the end of the file name.
o Maximum File Size: Enter auto-split threshold in kilobytes (KB) for email attachments.
• Sending Confirmation: Print or email (back to sender) a page confirming sending of the document.
Note: this is not to be confused with Return Receipt or Delivery Confirmation.
Copyright ©2018 KYOCERA Document Solutions America, Inc. All rights reserved. 23
• File Protection:
o Do not protect file: File can be opened by anyone.
o Prompt for password: User must enter password on the MFP panel prior to scanning.
o Generate password: AccuSender will automatically generate a secure password. Note: This
option is not available when barcode routing sheets are used.
o Use this password: Use a specified password
• Cover pages: Select one of the cover pages defined in the system. Cover pages will be inserted as the
first page in a document.
• Stamps: Select one or more stamps defined in the system. Every page will be stamped with the
selected stamp.
• Scan Settings:
o Color Selection: Monochrome, Grayscale, Auto (Color/BW), Auto (Color/Gray)
o Resolution: 200x200 dpi, 300x300 dpi, 400x400 dpi
o Duplex: One-sided, two-sided
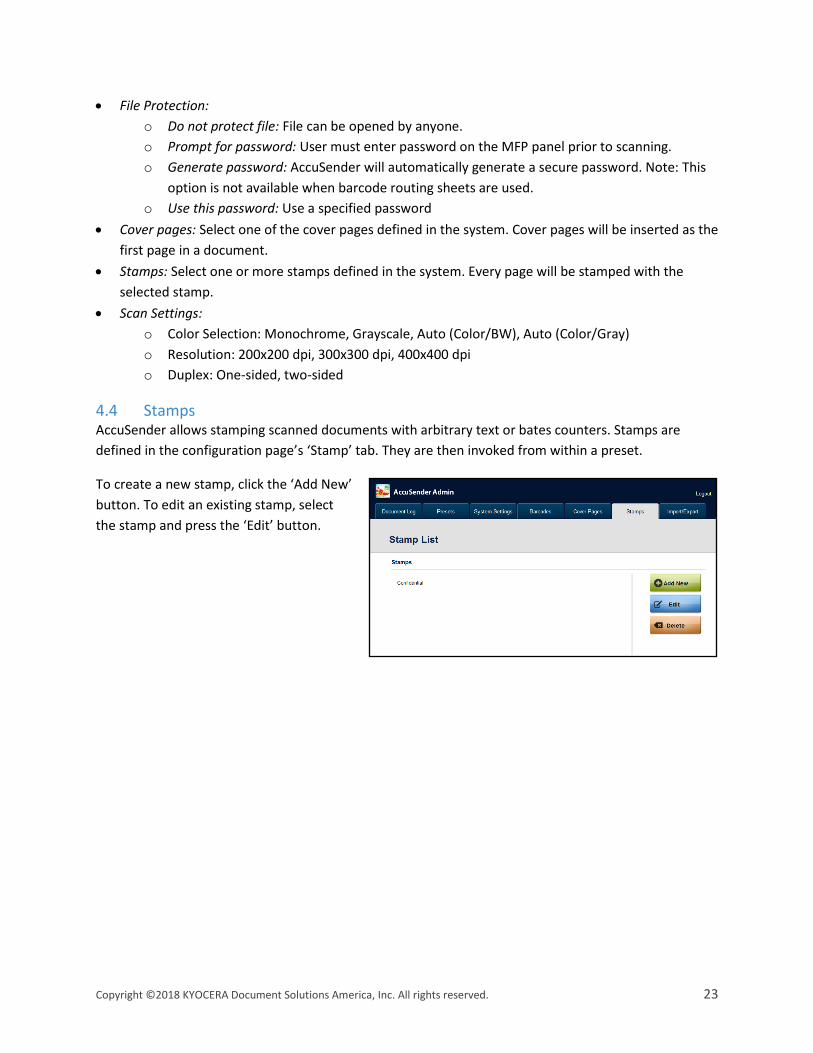
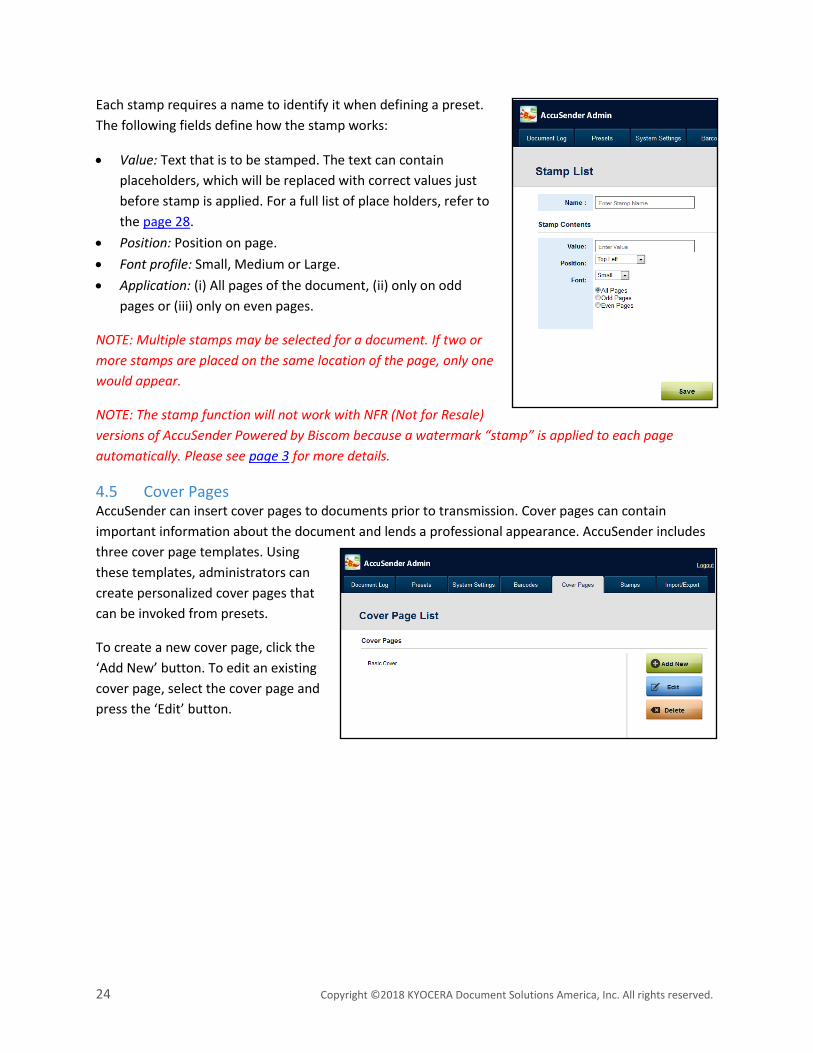
4.4 Stamps AccuSender allows stamping scanned documents with arbitrary text or bates counters. Stamps are
defined in the configuration page’s ‘Stamp’ tab. They are then invoked from within a preset.
To create a new stamp, click the ‘Add New’
button. To edit an existing stamp, select
the stamp and press the ‘Edit’ button.
24 Copyright ©2018 KYOCERA Document Solutions America, Inc. All rights reserved.
Each stamp requires a name to identify it when defining a preset.
The following fields define how the stamp works:
• Value: Text that is to be stamped. The text can contain
placeholders, which will be replaced with correct values just
before stamp is applied. For a full list of place holders, refer to
the page 28.
• Position: Position on page.
• Font profile: Small, Medium or Large.
• Application: (i) All pages of the document, (ii) only on odd
pages or (iii) only on even pages.
NOTE: Multiple stamps may be selected for a document. If two or
more stamps are placed on the same location of the page, only one
would appear.
NOTE: The stamp function will not work with NFR (Not for Resale)
versions of AccuSender Powered by Biscom because a watermark “stamp” is applied to each page
automatically. Please see page 3 for more details.
4.5 Cover Pages AccuSender can insert cover pages to documents prior to transmission. Cover pages can contain
important information about the document and lends a professional appearance. AccuSender includes
three cover page templates. Using
these templates, administrators can
create personalized cover pages that
can be invoked from presets.
To create a new cover page, click the
‘Add New’ button. To edit an existing
cover page, select the cover page and
press the ‘Edit’ button.
Copyright ©2018 KYOCERA Document Solutions America, Inc. All rights reserved. 25
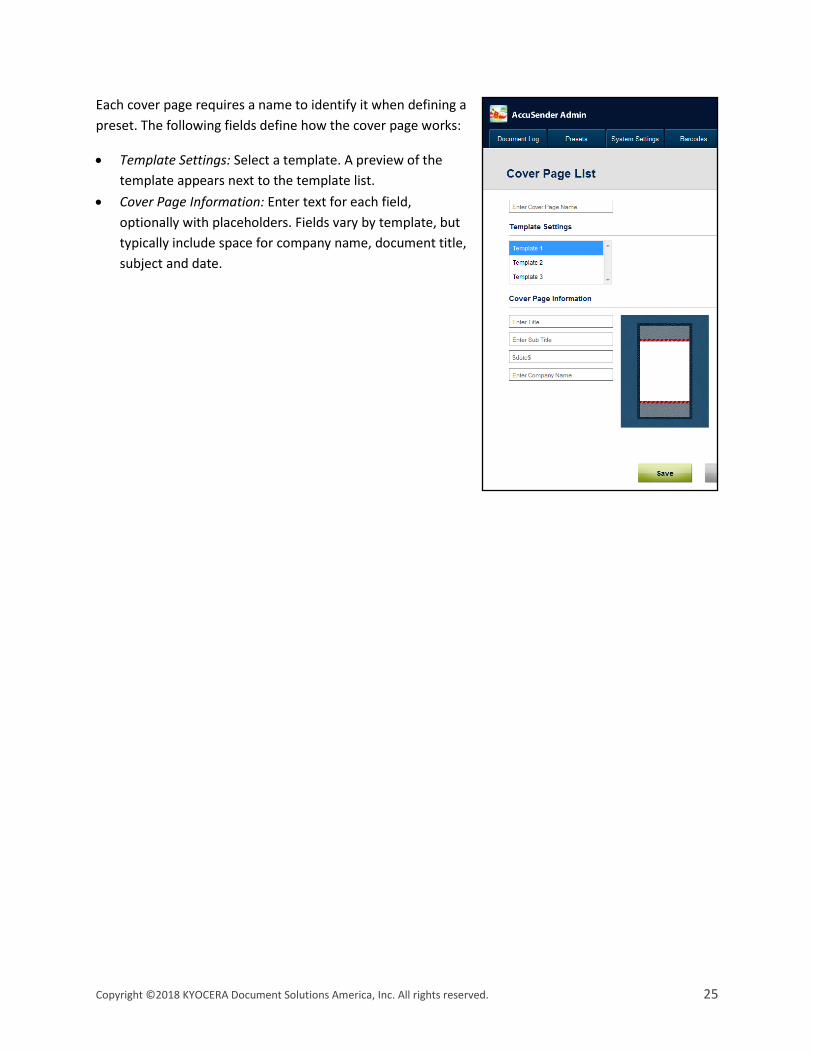
Each cover page requires a name to identify it when defining a
preset. The following fields define how the cover page works:
• Template Settings: Select a template. A preview of the
template appears next to the template list.
• Cover Page Information: Enter text for each field,
optionally with placeholders. Fields vary by template, but
typically include space for company name, document title,
subject and date.
26 Copyright ©2018 KYOCERA Document Solutions America, Inc. All rights reserved.
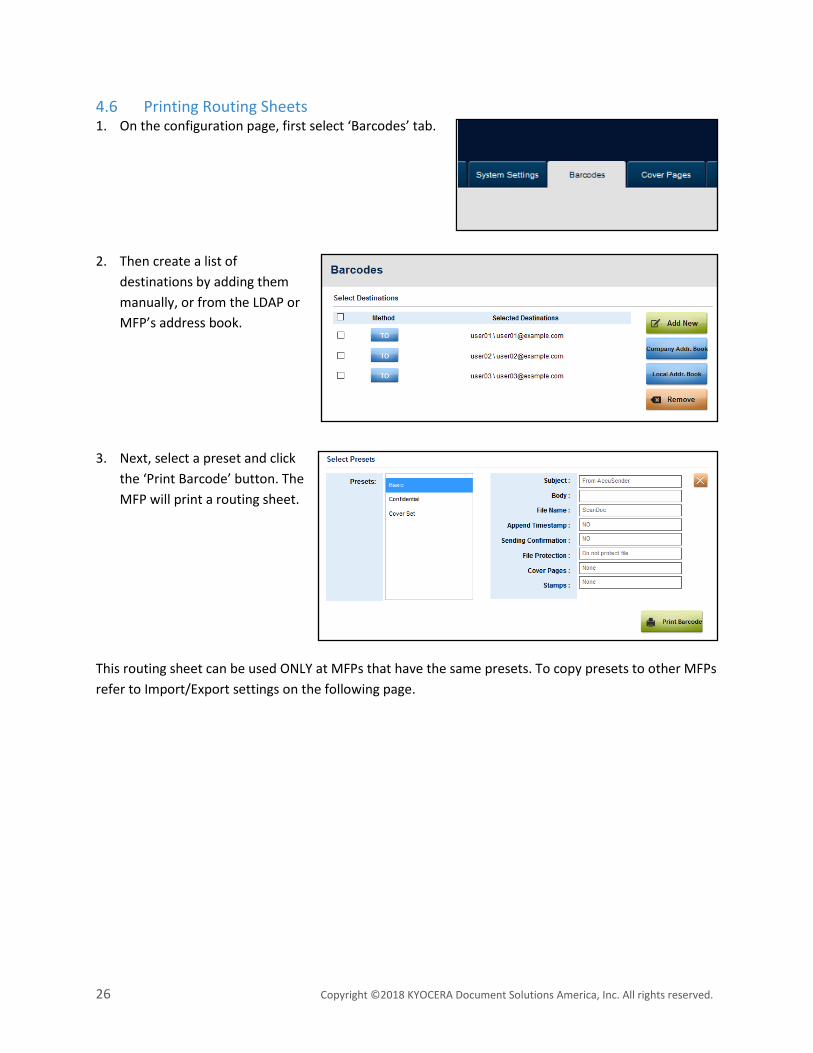
4.6 Printing Routing Sheets 1. On the configuration page, first select ‘Barcodes’ tab.
2. Then create a list of
destinations by adding them
manually, or from the LDAP or
MFP’s address book.
3. Next, select a preset and click
the ‘Print Barcode’ button. The
MFP will print a routing sheet.
This routing sheet can be used ONLY at MFPs that have the same presets. To copy presets to other MFPs
refer to Import/Export settings on the following page.
Copyright ©2018 KYOCERA Document Solutions America, Inc. All rights reserved. 27
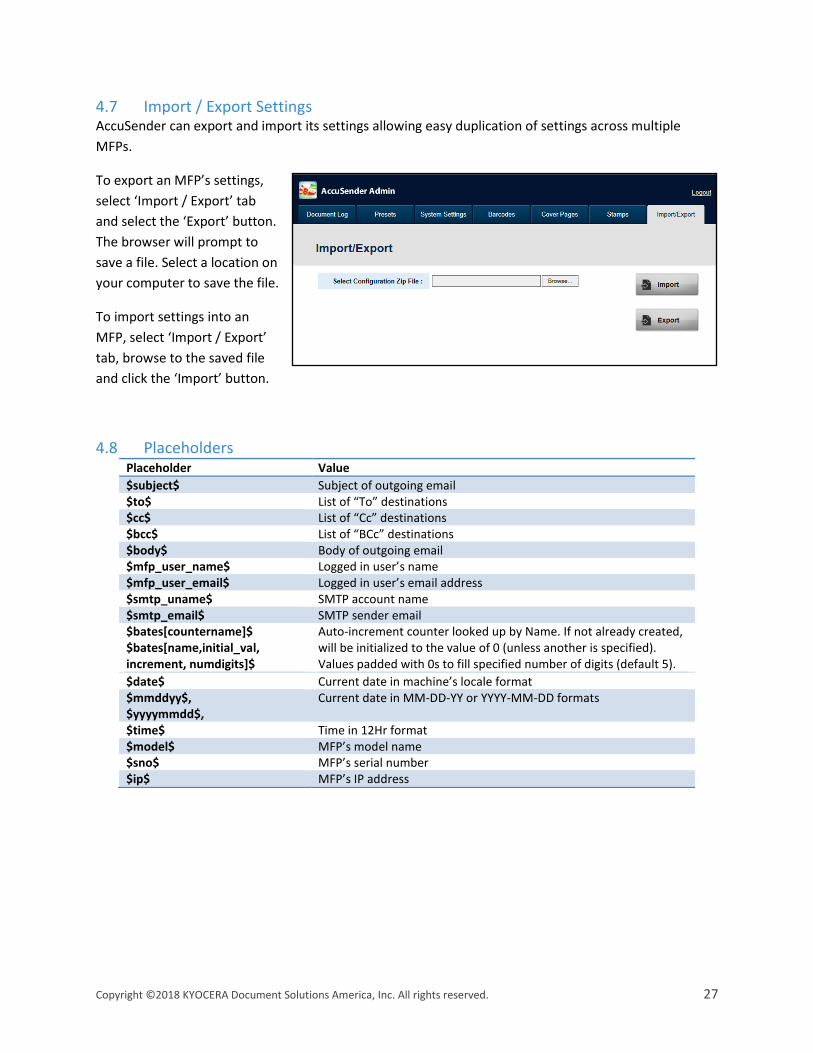
4.7 Import / Export Settings AccuSender can export and import its settings allowing easy duplication of settings across multiple
MFPs.
To export an MFP’s settings,
select ‘Import / Export’ tab
and select the ‘Export’ button.
The browser will prompt to
save a file. Select a location on
your computer to save the file.
To import settings into an
MFP, select ‘Import / Export’
tab, browse to the saved file
and click the ‘Import’ button.
4.8 Placeholders Placeholder Value
$subject$ Subject of outgoing email $to$ List of “To” destinations $cc$ List of “Cc” destinations $bcc$ List of “BCc” destinations $body$ Body of outgoing email $mfp_user_name$ Logged in user’s name $mfp_user_email$ Logged in user’s email address $smtp_uname$ SMTP account name $smtp_email$ SMTP sender email $bates[countername]$ $bates[name,initial_val, increment, numdigits]$
Auto-increment counter looked up by Name. If not already created, will be initialized to the value of 0 (unless another is specified). Values padded with 0s to fill specified number of digits (default 5).
$date$ Current date in machine’s locale format $mmddyy$, $yyyymmdd$,
Current date in MM-DD-YY or YYYY-MM-DD formats
$time$ Time in 12Hr format $model$ MFP’s model name $sno$ MFP’s serial number $ip$ MFP’s IP address
28 Copyright ©2018 KYOCERA Document Solutions America, Inc. All rights reserved.
Security Certificate Installation A security certificate is necessary when sending through Biscom on either a cloud-based server or an on-
premise server.
5.1 Cloud Based Biscom Servers The AccuSender powered by Biscom package file has the security certificate embedded in it for a cloud-
based server, so no further steps are required.
5.2 On-Premise Biscom Servers An on premise Biscom server will need a self-signed server certificate to be exported from the IIS Web
server or through the server’s Biscom website itself and installed onto the MFP.
5.3 Extracting a Security Certificate from a Web server 1. Log into the Web server’s Biscom site through a web browser.
2. After successful log in, click the padlock icon next to the address bar and click the More Information
button.
3. Navigate to the Security tab and click the View Certificate button.
4. Under the details page, click the Export button and save the certificate to the desktop or another
easily accessible folder.
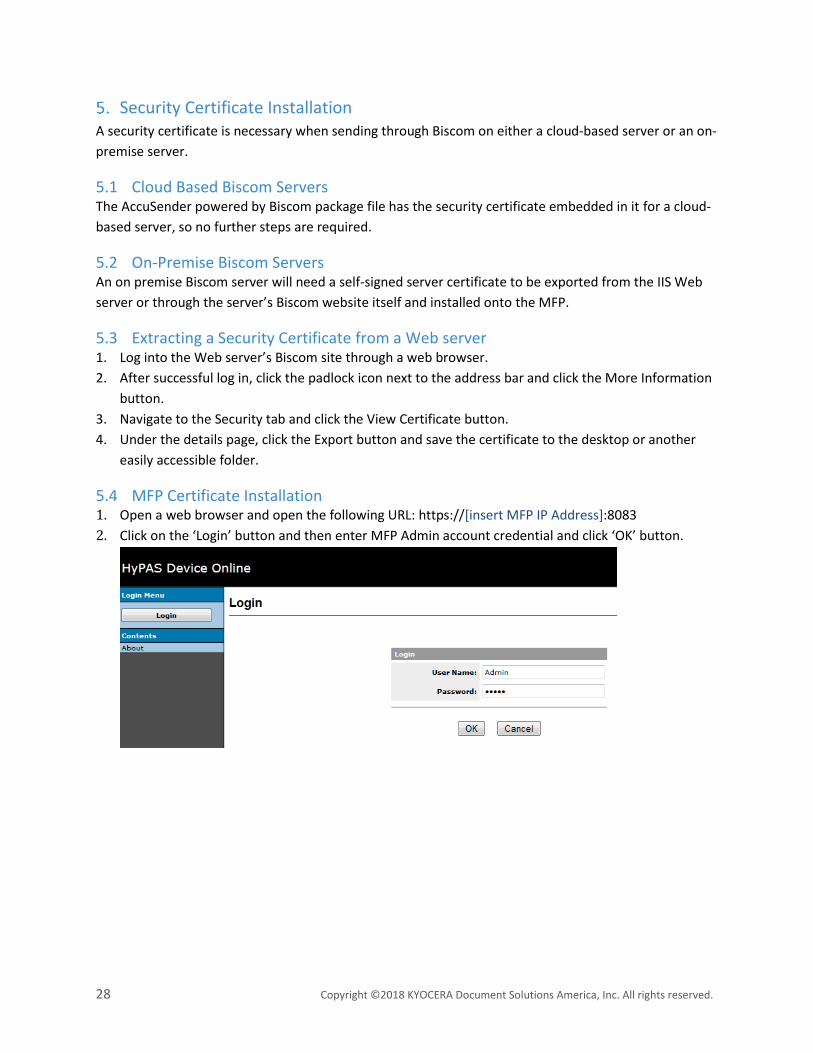
5.4 MFP Certificate Installation 1. Open a web browser and open the following URL: https://[insert MFP IP Address]:8083
2. Click on the ‘Login’ button and then enter MFP Admin account credential and click ‘OK’ button.
Copyright ©2018 KYOCERA Document Solutions America, Inc. All rights reserved. 29
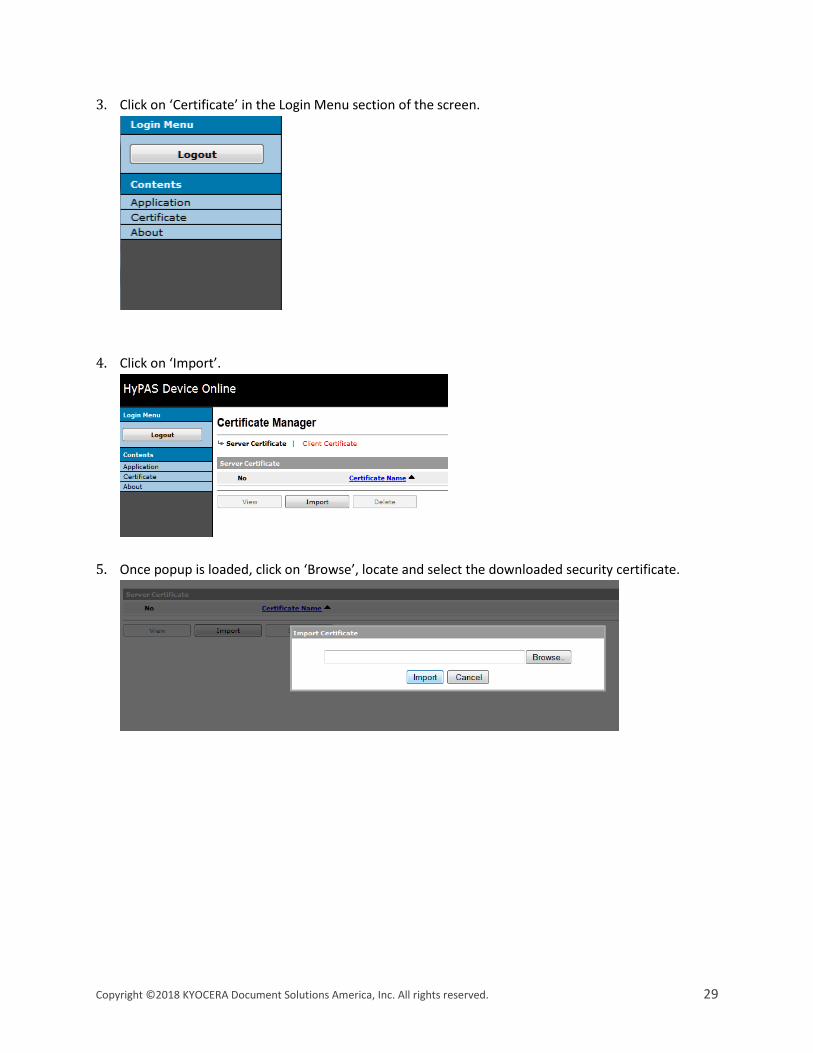
3. Click on ‘Certificate’ in the Login Menu section of the screen.
4. Click on ‘Import’.
5. Once popup is loaded, click on ‘Browse’, locate and select the downloaded security certificate.

30 Copyright ©2018 KYOCERA Document Solutions America, Inc. All rights reserved.
6. After selecting a file, click on ‘Import’.
7. Logout and restart the MFP.
NOTE: The MFP must be restarted for the security certificate to be recognized.
Copyright ©2018 KYOCERA Document Solutions America, Inc. All rights reserved. 31
6 Troubleshooting
6.1 Unable to login to AccuSender configuration page
Symptom:
Attempts to Login fail with “Login failed. Please enter username and password again”.
Try:
Enter the username and password of a valid MFP administrator account. The login for default
Administrator account is: User name = Admin, Password = Admin (Note the capital ‘A’).
6.2 Unable to select Email option on panel
Symptom:
When AccuSender is started, the first menu is the ‘Biscom user selection’ screen. Users are unable to
send documents as regular email attachments.
Check:
Ensure ‘Split into parts and send email’ option is checked on System Settings menu.
6.3 Unable to select Biscom option on panel
Symptom:
When AccuSender starts, the ‘Add Destination’ screen appears. Users are unable to login to Biscom.
Check:
Ensure ‘Send Using Biscom’ option is checked on System Settings menu.
6.4 Unable to create Biscom Account
Symptom:
When ‘2. New…’ button is selected on ‘Biscom user selection’ page, it does not create a new Biscom
Account.
Try:
‘New’ button adds a previously created Biscom account to the MFP’s list. It does not create a new
account with Biscom. To create new Biscom accounts, please visit http://www.Biscom.com.
32 Copyright ©2018 KYOCERA Document Solutions America, Inc. All rights reserved.
6.5 Unable to register HID card with Biscom account
Symptom:
When a new Biscom user is added, AccuSender did not ask to register ID card.
Check:
Ensure that a compatible proximity card reader is connected to MFP and the Card Authentication Kit (B)
is activated.
6.6 Unable to select Automatic Routing option on panel
Symptom:
AccuSender does not display the menu for selecting ‘Automatic Routing’.
Check:
Ensure at least one barcode sheet is created through configuration page, or, a configuration zip is
imported from an MFP that had printed routing sheets.
Try:
Access AccuSender configuration page and create barcode sheets from the ‘Barcodes’ tab.
6.7 Unable to select destination from LDAP address book
Symptom:
When ‘2. LDAP Addr.Book’ is selected, it displays a connection error message.
Check:
Ensure LDAP settings are configured on System Settings.
Try:
Click ‘Test LDAP’ to ensure LDAP settings are valid.
6.8 Unable to make changes to preset defaults on the panel
Symptom:
Unable to modify preset fields when preset field is selected on panel.
Check:
Ensure the ‘Allow edit on panel’ option is checked for the selected preset.
Copyright ©2018 KYOCERA Document Solutions America, Inc. All rights reserved. 33
6.9 Recipient did not receive the email
Symptom:
After scanning is completed, the recipient did not receive the email.
Check:
Ensure SMTP Settings are configured on System Settings.
Try:
Click ‘Test SMTP’ to ensure SMTP settings.
Try:
Use preset option ‘Sending Confirmation’.
Check:
See document log (in AccuSender Configuration page) for details on the transmission error.
6.10 Automatic Routing fails to send the email
Symptom:
When Automatic Routing scan is completed, recipient did not receive the email.
Check:
See document log (in AccuSender Configuration page) for details on the transmission error.
Try:
Re-print the barcode routing sheet from AccuSender configuration.
6.11 Document sent cannot be opened without a password
Symptom:
Recipient receives a password protected PDF file.
Check:
Email sent to recipient will contain the PDF’s password.
Check:
To disable password protection, turn off file protection option in preset configuration.
34 Copyright ©2018 KYOCERA Document Solutions America, Inc. All rights reserved.
7 Support
For AccuSender Support:
Contact your authorized Kyocera or Copystar Dealer.
For a listing of authorized Kyocera Dealers:
https://usa.kyoceradocumentsolutions.com/en/where-to-buy.html
For a listing of authorized Copystar Dealers:
https://copystar.com/en/where-to-buy.html
or
Contact Kyocera Technical Support
Phone Monday - Friday 9 am - 6 pm EST 1-800-255-6482 Web https://usa.kyoceradocumentsolutions.com/en/about-us/contact-us.html
KYOCERA is a registered trademark of Kyocera Corporation in the United States and/or other countries. All other trademarks are property of their respective owners.
HyPAS is a registered trademark of Kyocera Corporation in the United States and/or other countries.
Microsoft and Windows are registered trademarks of Microsoft Corporation in the United States and/or other countries.
Biscom is a trademark of Biscom, Inc. or its affiliates in the United States or other countries.
Other products and company names in this guide are trademarks of their respective owners.
Copyright © 2018 KYOCERA Document Solutions America, Inc.
All rights reserved.
Rev. 1.0


