Embed Size (px)
Citation preview

Understanding Design
Traditional Stream

Course Creators:
Carmen Gray [email protected]
Kaylene Butler [email protected]
This course has been prepared by CQUniversity 2017

Contents Introduction ............................................................................................................................. 4Course content ........................................................................................................................ 5The Elements of Design ............. .........................................................................................10Design and colour ..................................................................................................................10Elements and Principles of Design .......................................................................................14The Colour Wheel ..................................................................................................................14Emotional Properties of Colour ............................................................................................18 What is the creative process? ............................................................................................... 30The Structure of the Creative Process ................................................................................... 30Steps in the Creative Process .............................................................................................. 31How to think creatively ...........................................................................................................37De Bono's Thinking Hats .................................................................................... .....................39 Creativity by Design - Quiz ....................................................................................................40Identity Exercise ....................................................................................................................43Collage Exercise ..................................................................................................................50Copyright basics ...................................................................................................................58
BSBDES201 – Follow a design process ..............................................................................64CUAATS101 Develop understanding of own Aboriginal or Torres Strait Islander identity ....66CUARES202 – Source and use information relevant to own arts practice . ..........................68

Introduction Welcome to Understanding Design! We are thrilled you have decided to participate in
this course.
We must begin by acknowledging the Traditional Owners of the land that we are on,
along with our elders, past, present and future.
This is a free, non-assessed course and is available to anyone for educational
purposes. It has been written based on three of the nine units required within a
Certificate II in Visual Art:
• BSBDES201 – Follow a design process
• CUAATS101 Develop understanding of own Aboriginal or Torres Strait Islander identity
• CUARES202 – Source and use information relevant to own arts practice
Before you begin, you need to decide if you would like to be:
• Not assessed; or
• Assessed
You do not need to submit any tasks in this course or even complete them if you don’t
want to be assessed, however, if you would like to be assessed, you must document
your work as you go (by taking photos or keeping digital files of all completed
assessment items). When you have completed the course content, you may apply for a
Recognition of Prior Learning (RPL). In most cases, there will be a fee associated with
this; however, you can discuss this with a qualified teacher from CQUniversity before
enrolling to learn more (see the contacts listed above).
If you are unsure whether you would like to be assessed, it is best to save yourwork just in case. You can always make the decision later but without evidenceof your completed tasks, you cannot be assessed.

Course content You will find all the information and content you need to complete this course on this
website. The best way to complete the program is to work through the content as it
appears. Some activities will remain hidden until other activities are completed.
You may select one of the following:
Traditional art stream; or
Digital art stream
Traditional art stream – use traditional art materials and processes to create
artworks. You can tailor your work toward the type of art that interests you (painting,
printmaking, photography) however you will need to do some drawing. You will also
need to have access to a space where you can work, along with the materials you’ll
need to create your pieces. Some of these materials may include:
• Charcoal
• Pencils
• Pens
• Paper
• Paint
• Printmaking ink
• Camera
Digital art stream – use the supplied art program to experiment with various types of
digital art. In this stream, you’ll create moving collages, manipulate photographs, play
with special effects and construct simple animations. To select the digital option for this
course, you will need:
• Access to a computer
• Internet connection
• Some computer knowledge (how to log on, save a file and use email)

Traditional stream Handprint Activity - Allow 20- 30mins Subject: Creating a Handprint
Materials Select your medium from the list below
• Watercolour paints
• Ochre pigments
• Acrylic paints
• Graphite pencils
• Coloured pencils
• Coloured pastels
• Eraser
• Sponges
• Brushes to suit the type of paint you select
• Pallet, lids or ice-cube tray (especially useful for watercolour) to mix your colours
• Paper – For this piece, it’s best a heavy weight paper. You can buy a sheet or
two of this from any art store. Good brands that will not collapse when paint is applied
include anything with a weight of around 250gsm or above. Brands to consider are:
Reeves, Windsor and Newton and Arches although there are many brands that would
be suitable. Your paper should be no smaller than A4 in size. It is best to get more than
one sheet so you can keep a small piece for testing colours as you work.
• Cardboard

Setting Up You may choose to create an image using paint or by tracing around your hand with a
pencil or pen. You might like to fill your handprint in with designs or to create multiple
views of your hand.
Traditional Creating a Handprint
For this task, it’s best to sit at a table or desk, not an easel. Arrange your materials so
they’re easy to reach. The instructions below show the artist using paints, but you can
apply this to whatever materials you’re using.
First, you will need to pour out our paints onto a flat surface like a palette or an ice-
cream lid (only a small amount is needed)

Apply the colour to your hand with a dry sponge or brush.
Blend colours by dabbing them until your entire hand is covered.
When you’re happy with the arrangement and coverage of colours, press your painted
hand on to the paper, leaving a print.

Leave your handprint to dry and if you like, you can then draw on it, outline it or
add patterns, text and other designs. If you’d like to be assessed, make sure you
take a photo of your finished image.
Further research
Handprints are often used in Aboriginal art. To find out more about Aboriginal
and Torres Strait Island art, conduct your own research. Some good sites
include ‘The Story of Aboriginal Art’ and the 'Australian Art Network'.
Notable Australian Aboriginal artists include: Albert (Elea) Namatjira; Rover
Thomas; and Emily Kame Kngwarreye.
Well known Torres Strait Islander artists include: Ken Thaiday Snr; Destiny
Deacon; Ellen Jose; and Alick Tipoti.

Elements and Principles of Design
What are the elements and principles of design?
Design and colour
The elements and principles of design are the building blocks used to create works of
art.
As visual creators, we must consider these elements and principles of design when
creating our work. Even if it isn’t our goal to create something ‘attractive’ or visually
appealing, it’s still helpful to understand how to read visual information.
The Elements of Design (John Lovett)
LINE
Line can be considered in two ways. The linear marks made with a pen or brush or the
edge created when two shapes meet.
SHAPE
A shape is a self-contained defined area of geometric or organic form. A positive shape
in a painting automatically creates a negative shape.
DIRECTION
All lines have direction - Horizontal, Vertical or Oblique. Horizontal suggests calmness,
stability and tranquillity. Vertical gives a feeling of balance, formality and alertness.
Oblique suggests movement and action.
SIZE
Size is simply the relationship of the area occupied by one shape to that of another.
The elements of design are the visual qualities of the objects in a particular design. These include colour, line, shape, texture, space and form.
The principles of design are the way these objects are arranged together. These principles include harmony, balance, hierarchy, composition, proportion, perspective,
emphasis, movement, repetition and variety.

TEXTURE
Texture is the surface quality of a shape - rough, smooth, soft hard glossy etc. Texture
can be physical (tactile) or visual.
COLOUR
Also called ‘ Hue’
VALUE
Value is the lightness or darkness of a colour. Value is also called ‘Tone’
The Principles of Design Balance
BALANCE
Balance in design is similar to balance in physics
A large shape close to the centre can be balanced by a small shape close to the edge.
A large light-toned shape will be balanced by a small dark-toned shape (the darker the
shape the heavier it appears to be)
GRADATION
Gradation of size and direction produce linear perspective. Gradation of colour from
warm to cool and graduation of tone from dark to light produce aerial perspective.
Gradation can add interest and movement to a shape. A gradation from dark to light will
cause the eye to move along a shape.

REPETITION
Repetition with variation is interesting, without variation repetition can become
monotonous.
The five squares above are all the same. They can be taken in and understood with a
single glance.
When variation is introduced, the five squares, although similar, are much more
interesting to look at. They can no longer be absorbed properly with a single glance.
The individual character of each square needs to be considered.
If you wish to create interest, any repeating element should include a degree of
variation.
CONTRAST
Contrast is the juxtaposition of opposing elements e.g. opposite colours on the colour
wheel - red / green, blue / orange etc. Contrast in tone or value - light / dark. Contrast
in direction - horizontal / vertical.
The major contrast in a painting should be located at the centre of interest. Too much
contrast scattered throughout a painting can destroy unity and make a work difficult to
look at. Unless a feeling of chaos and confusion are what you are seeking, it is a good
idea to carefully consider where to place your areas of maximum contrast.
HARMONY
Harmony in painting is the visually satisfying effect of combining similar, related
elements e.g. adjacent colours on the colour wheel, similar shapes etc.

DOMINANCE
Dominance gives a painting interest, counteracting confusion and monotony.
Dominance can be applied to one or more of the elements to give emphasis.
UNITY
Relating the design elements to the idea being expressed in a painting reinforces the
principal of unity.eg. a painting with an active aggressive subject would work better with
a dominant oblique direction, course, rough texture, angular lines etc. whereas a quiet
passive subject would benefit from horizontal lines, soft texture and less tonal contrast.
Unity in a painting also refers to the visual linking of various elements of the work.

The Colour Wheel
The colour wheel is a means of organizing the colours in the spectrum and consists of
12 sections, each containing one hue.
A hue is a name of a colour on the colour wheel.
This lesson will discuss each of the colours, colour harmonies and how they are
created.
The Primary Colour Triad
The primary colours are red, yellow and blue and are
the purest and most intense of all the colours.
The intensity of a colour is the brightness or dullness
of a colour.
They form a triangle on the colour wheel and are
colours that cannot be mixed from any other colours.
These are the only colours that can be found in nature.
The Secondary Colour Triad
The secondary colours are orange, green and violet
and are duller than the primaries because they have
been mixed together.
They form a triangle on the colour wheel and are
colours that are mixed from the primary colours.
• Red + yellow=orange
• Blue + yellow= green
• Red + blue= violet

The Intermediate (Tertiary) Colours
These colours are yellow-orange, yellow-green, blue-
green, blue-violet, red-orange, red-violet and are
even duller than the secondary colours because the
primary has been mixed with a secondary.
These 6 colours are formed by mixing a primary and a
secondary colour.
• yellow + orange=yellow-orange
• red + orange = red-orange
• red + violet =red-violet
• blue + violet = blue-violet
• blue + green =blue-green
• yellow + green = yellow-green
The Analogous Colour Scheme
Analogous colours are at least 3 colours that sit side by
side on a colour wheel and have one common hue.
Example- yellow, yellow-orange, orange
An analogous colour cannot have two primary colours in
its scheme because the primary colours have nothing in
common
The colour scheme creates a sense of harmony and is
similar in appearance because the colours have a common yellow hue.
The Complementary Colour Scheme
Complementary colours are colours that are opposite each
other on the colour wheel.
Imagine the colour wheel as a clock. Pick the colour
directly opposite that number and you will have your
complementary colours. (2 green and 8 red)
A complement absorbs all the light waves the other colour
reflects and is the strongest contrast to the colour.

The Split Complementary Colour Scheme
Split Complementary colours are 3 colours that are
combined by one hue plus the hues on each side of its
complement.
As an example: Choose the colour yellow
Take yellow’s complement which is violet and take the
hues on each side of the complement (red-violet and
blue-violet) but not the complement, and combine with
the yellow.
• Yellow, blue-violet and red-violet
The Double-Split Complementary Colour Scheme
Double-Split Complementary schemes consist of 4
colours, two on either side of the two complements, but
not the original set of colours.
The Monochromatic Colour Scheme
Monochromatic colours are one colour(hue) with the tints and shades of that colour.
Tint: adding white to the colour
Shade: adding black to the colour
Value: lights and darks of an object
Tone: adding grey to a colour

The Warm and Cool Colour Scheme
Warm colours:
• Range from yellow to Violet
• Appear to come forward to push out of the picture
Cool colours:
• Range from green to violet
• Appear to recede or go back into the picture
Grayscale
A value scale is a scale of greys running from black to white.
Neutral Colours
Neutral Colours are those colours not found on the colour wheel but are mixed by other
colours on the colour wheel.
White
Brown
Grey
Black

Emotional Properties of Colour
Colours are often associated with emotions.
Most people have a favourite colour, probably stemming from long traditions and
impressions of colour. The feelings one has about certain colours may come from the
association we have with warm and cool colours in nature.
Often associated with evil, danger, energy, vitality, speed and courage. It is dynamic
when used in a design.
Often associated with evil, danger, energy, vitality,
speed and courage. Its dynamic when used in a
design.
A calm, soothing, and tranquil colour, harmony and
serenity, of divine inspiration, sometimes associated
with sadness or depression.
A cheery colour that embodies light and warmth. Is
the colour of the mind. A creative energy, which is
joyful and uplifting.
Associated with bad luck, mournful, stark, and
dramatic.
A symbol for royalty or wealth and stands for the
purest and highest ideal. Is sophisticated and
creative.
Signifies life or hope. Is nature’s most abundant
colour. It is the balance between warm and cool and
the symbol of friendship.
Blends with the physical energy of red with the
intellectual influence of yellow.
Symbolises purity, truth, innocence

Elements and Principles of Design – Allow 3 – 6 hours
Subject: Various
You will create a number of images using your new knowledge about the elements and
principles of design. If you’d like to be assessed, you’ll need to create at least three
images.
Materials Various materials are required for each activity. These are listed at the beginning of the
activity.
Setting Up Each activity will require a different setup. This is detailed at the beginning of each
activity.

Leaf art (Line, colour, shape & composition)
Materials
• Leaves or leaf shapes (any other repeating shape is fine)
• Coloured pencils, felt-tips or sharpies
• Paper
Setting up Sit at a table or desk. Have a scrap piece of paper in front of you along with the paper
you’ll be working on. Your pencils or pens should be within easy reach.
Activity Begin by lightly drawing the leaves across the page. Don’t overlap too many as it can
get confusing later as there will be many overlapping lines. Consider the composition of
your image and position the leaves according to what
you feel is comfortable. When you’ve finished drawing
the shape of the leaves, select a coloured pencil or pen
and add stems. Draw in lines from the stem to the edge
of the leaves. Don’t outline the leaves. Be patient and
try not to rush – this will take a while but the more
carefully you work, the better your result will be.
Consider your colour choices: you may wish to use
complementary colours or analogous colours. Refer
back to the information on colour if you’re unsure of
what this means.

Continue the process until all leaves are filled. Add more leaves if you like, then carefully erase
the pencil lines around the outside of the leaves.
Variations on the activity You can experiment with different
variations on this activity. Try using a
single colour and emphasising the
form/shape of the leaves:

You could also use positive and negative space along
with line to create an interesting composition.
Another idea is to draw lines around the outside of the
leaves.

Circle art (Colour, shape & composition)
Materials
• Paper: 1 square sheet of white (approx. A4 size)
1 square sheet of any colour
• Coloured pencils
• Glue
• Scissors
• Compass or round plate
Setting up Sit at a table or desk. Have a scrap piece of paper in front of you (the same colour as
the coloured one if that’s what you’re using) along with the paper you’ll be working on.
Your pencils should be within easy reach.
Activity Fold your paper in half then fold it in half
again.
Draw a quarter circle on the folded square
using the saucer or compass.

Cut along the drawn line.
Draw a design on the circle using the
coloured pencils. Consider the elements and
principles of design as you do this,
particularly colour, shape and composition.
Cut the circle into four equal quarters.

These quarters can be arranged onto the second piece of paper in a variety of
compositions. Notice the shape the white, negative space makes. When you are
satisfied with your composition, glue the pieces of your circle down.
This project works well if you are in a group of people or if you repeat the process a
few times. All the works can be attached to a larger sheet of paper.

Frottage (or rubbings) (Colour and texture)
Materials • Paper: several sheets of paper (thin, light or tracing paper works best)
• Waxy pastels, crayons or graphite pencils
Setting up For this activity, you’ll need to gather
together a number of textured items.
Things you might like to try are:
• Leaves
• Bubble wrap
• Doilies
• Textured paper/cardboard
• Coins
• Bark or timber
• Gravestones
(It may be easier to travel to some
items – such as bark or gravestones – rather than try to bring them into your
workspace.)

Activity Arrange your textured items on a flat surface. Place your paper over them. Pressing
relatively firmly, rub the side of your pastel, crayon or graphite over the paper. The
texture of the item will appear. Try using different colours and overlaying the rubbings.

Tape your paper up if you need to work on a vertical surface.
Try arranging your items into a composition first before doing the rubbing.

With the addition of a few details, interesting landscape images can be created.
Further research
The technique of frottage was invented by the German artist Max Ernst in
1925. Have a closer look at Ernst here or conduct your own research into his
practice.

What is the creative process?
No doubt you’ve heard terms like ‘thinking creatively’ and ‘being in the flow’ and ‘design
process’ before. But what do they really mean?
In this session, we’ll examine how people think creatively. We’ll identify the steps that
are taken by artists and designers, whether consciously or unconsciously, to arrive at
a meaningful creative solution and we’ll begin to develop our own creative process. By
practicing this process, you’ll find it gets easier and quicker and eventually, automatic.
You may find that you apply this process to other areas of your life, unrelated to your
practice as an artist/designer.
The Structure of the Creative Process
Most creative processes deal with similar issues and manage them in similar ways.
These processes can usually be broken down into a logical series of steps and are
quite simple, which can seem counter intuitive – we assume that something as
esoteric as ‘being creative’ should be achieved in a complicated or vague manner. In
fact, having a clear structure around being creative allows the necessary support to
help us manage the unwieldy and unpredictable nature of creativity.

Steps in the Creative Process
The following diagram shows a typical creative process.
Define the problem
Brainstorm and Analyse Ideas
Research
Rough Ideas
Production
Refinement
Solution
Let’s have a quick look at what these process steps may mean for a visual
artist or designer.

1 Define the problem
You can’t find a solution until you have a clear idea of what the problem is.
This may also be described as Understanding the Design Purpose. This is the point
at which the creator must define and understand the work they are about to undertake.
Designers sometimes call this ‘the brief’. What’s important here is really clarifying the
key ideas to be included. Some questions you might ask at this stage in the creative
process are: who is my audience? How do I want my audience to engage with my
creation? How and why will they use my creative work?
Considering these questions helps prevent the common mistake of exploring too
many different possibilities. This can lead to a work that gets tripped up by trying to
do too much at once. A good design process will help you to explore some of the
possibilities quickly and early so that you can clearly see which approach is the
best way forward. Eliminating a range of ideas and focusing on only a few, will
make the production of the work much easier.
2 Brainstorm and Analyze Ideas
Begin to sketch, make, and study so you can start to understand how all the date
and information you’ve collected may impact your design.
Now is the time to start brainstorming possible design solutions. Word and idea
associations are useful here. They can help generate fresh and unique starting points
for your subject. It’s best to avoid using clichés or common associations. Choose one
or two of the most interesting words from your list of brainstormed ideas to help
identify what is most important and where you will begin focusing your creative
efforts.

3 Research & Collect Information
Collect sketches, take photographs and gather data to start giving you inspiration.
Now you can start to do some research. Don’t underestimate how useful this stage
of the process can be – especially when you feel the urge to just get started making
your artwork. Further research is often helpful and can lead to some interesting
insights. You need to become an armchair expert in your chosen subject.
Because we are engaged in the visual arts, this stage is an important opportunity to
gather support material to help you visualise your design solution. With this in mind
it’s essential that you consider copyright issues, especially if your work is going to be
seen by other people in an exhibition or online. Taking your own photos or doing
your own drawings will help you avoid any future copyright issues.
4 Rough Ideas
Take your preliminary ideas and form multiple small-scale design solutions.
With this expanded understanding of your subject, you may begin to sort through
the best approaches to your ideas. It may be useful to write more lists so you can
evaluate the pros and cons of various ideas. Only you can determine what are likely
to be the best options. It might help if you reflect on the personal experiences and
associations that led you to the ideas in the first place. Don’t be afraid to use your
‘gut’. What feels right can be just as useful as a thoughtful evaluation.
During this stage, you can also begin to flesh out how your solution might look.
Thumbnail sketches will help you to visualise the best option. They can also assist
you to identify and resolve compositional issues.

In thumbnail drawings, you should mostly explore:
• positive and negative space
• tone
• important details
The Australian artist Jeffrey Smart often completed a number of drawings along with
a painted study before beginning one of his final, painted works. For visual artists,
the completion of rough drawings is often critical to the creative design process.
5 Production
During the production of the final work, there are still many important design
decisions to be made, but by this point, you should be able to navigate more easily
through these decisions. Different artists work differently here: some may do more
work as they prepare to create the final piece. Alternately, other artists may find that
too much preparation removes vital creativity from the work, leaving it lifeless and
contrived.
Each artist is best to determine, through experience, how many of the creative
decisions are made before production of the final object begins. The fewer decisions
there are to make during the actual creation of the piece, the more the artist can
focus on crafting the selected materials.
6 Refinement
Even after you’ve made most of the design decisions, there are always more
questions you need to resolve during the production of the work. As the work begins
to form, you’ll be able to make decisions around the smaller details. In
printmaking, the completion of printed proofs is important to this process. In
painting, artists layer the paint so that what is seen by the viewer can be modified
right up until the work is complete. There shouldn’t be major structural changes at this

point as these are too difficult to modify, but smaller details are fine. You may wish
to get feedback from a mentor or your peers at this stage. Their suggestions can
also be incorporated. This is especially important when someone is paying for the
work (graphic design for example). Brands like Apple or Nike leave no design stone
unturned as they are well aware that a poor or even average design will have a
dramatic impact on the success of the company.
7 Solution
Through the refinement process, the artist or designer can eliminate the less
successful elements, and focus on how the overall design harmonises. When you
arrive at a solution, it should satisfy all of the considerations of the original design
brief. This is because the whole process should allow you to consider details you
wouldn’t be able to imagine when you were at the first stage in the creative process.
When you begin to initially follow this creative process, it’s best to think of it as a
series of steps. But when you’ve been applying these steps for some time, it is
possible for some of them to run together as one inclusive and comprehensive stage.
Further research
The works of Australian artist Jeffery Smart are planned down to the smallest
detail. His work can be seen here or you can conduct your own research.

Creative thinking is:
… a way of looking at problems or situations from a fresh perspective
that suggests unorthodox solutions (which may look unsettling at first).
Creative thinking can be stimulated both by an
unstructured process such as brainstorming, and by a structured process
such as lateral thinking
Design is:
… a plan, sketch, or preliminary drawing. The
arrangement or pattern of elements or features of an artistic or
decorative work: ‘The design of the desk is Chippendale’. A finished
artistic or decorative creation. (Dictionary.com)
The design process is:
…an approach for breaking down a large project into manageable
chunks. Architects, engineers, scientists, artists, designers and other
thinkers use the design process to solve a variety of problems.
2D art is:
… art limited in composition to the dimensions of depth and height. This
includes paintings, drawings and photographs and excludes three-
dimensional forms such as sculpture and architecture.

How to think creatively
Creative thinking is also sometimes described as:
… a way of looking at problems or situations from a fresh perspective that suggests unorthodox solutions (which may look unsettling at first). Creative thinking can be stimulated both by an unstructured process such as brainstorming, and by a structured process such as lateral thinking.
Thinking creatively is about looking at the world differently. People use
words like ‘fresh’, ‘new’ or ‘original’ to describe something creative.
Producing something ‘new’ and ‘original’ sounds like a big ask, but these
terms may not necessarily mean new or entirely original to the world at
large. They may simply mean new to you and your experiences.
Our normal way of thinking – following an idea on a train of thought to some
sort of conclusion – is typically quite conventional. These conventions are
determined by our broader culture. Idea associations are often logical,
rational and culturally determined and thus are shared and not particularly
fresh so they offer little in the way of surprises.
Thinking creatively often means exploring relationships that are not
conventional. To do this we can use a process that is designed to upset
conventional associations and sequences of ideas. It’s important to think
about your own, very personal experiences for real, relevant, and fresh
relationships. In this context, employing creative thinking is sometimes
referred to as divergent thinking.

Divergent thinking has been described as:
• Thinking of many ideas (fluency)
• Thinking of varied ideas (flexibility)
• Thinking of unusual ideas (originality)
• Adding to ideas to make them better (elaboration)

De Bono’s Thinking Hats
De Bono is well-known for his unique approaches to lateral and creative thinking. He is probably most famous for his 6 Thinking Hats.
The 6 Thinking Hats are
designed to help us
consider ideas from
multiple points of view.
When thinking about how
to solve a design problem
for example, we can ‘put
on’ each hat in turn to help
us find the best solution.
This approach can guide
us toward new ideas or
unusual connections
between ideas.

Creativity by Design – Quiz
1 What creative thinking techniques do you like to use to help you generate ideas? (KE1)
2 What are the key steps in your design process? (KE2)
3 What are some sources of new ideas for your design work? (KE 3)
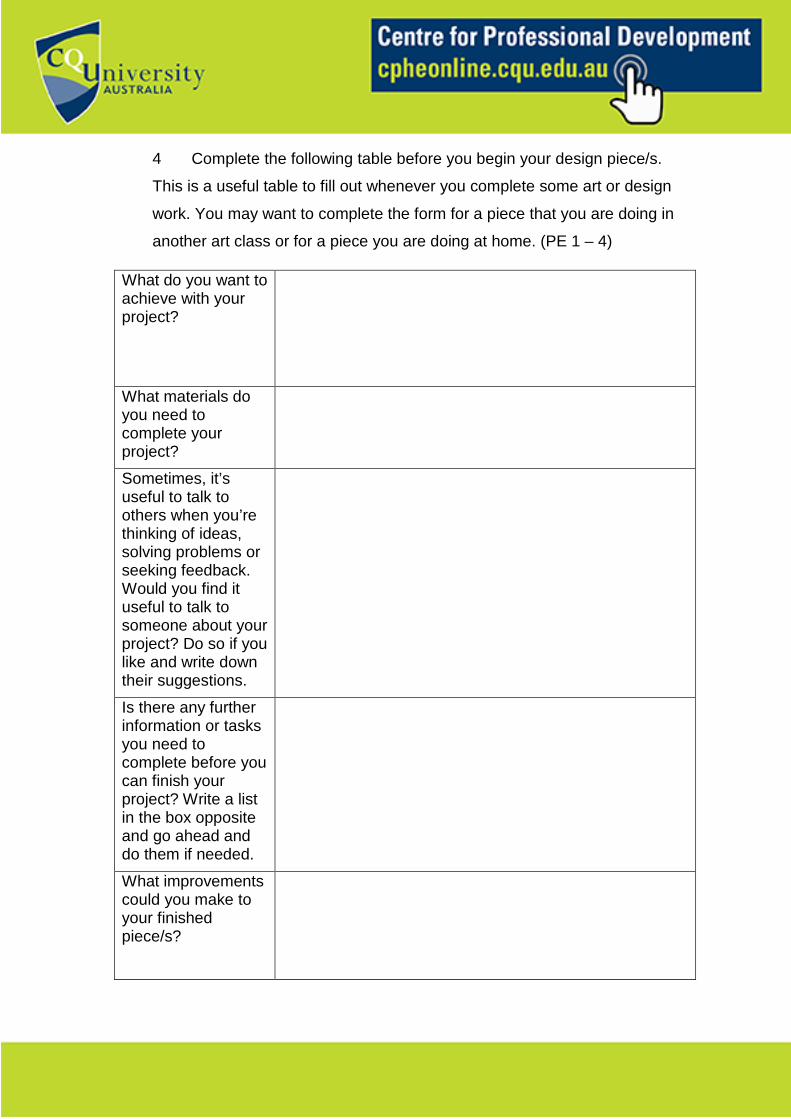
4 Complete the following table before you begin your design piece/s.
This is a useful table to fill out whenever you complete some art or design
work. You may want to complete the form for a piece that you are doing in
another art class or for a piece you are doing at home. (PE 1 – 4)
What do you want to achieve with your project?
What materials do you need to complete your project?
Sometimes, it’s useful to talk to others when you’re thinking of ideas, solving problems or seeking feedback. Would you find it useful to talk to someone about your project? Do so if you like and write down their suggestions.
Is there any further information or tasks you need to complete before you can finish your project? Write a list in the box opposite and go ahead and do them if needed.
What improvements could you make to your finished piece/s?

Sometimes you may be faced with a design challenge that is very large or
involves working in a team. In this situation, a more detailed list like the one
below can be useful. (PC 1.1 – 5.3)
1.1 Confirm the project with your team (or decide on it by yourself). 1.2 Decide on your objectives – what do you want to achieve with this project?
1.3 Determine the problems or limitations you might face that will impact the design process.
1.4 Identify and source relevant supporting information and assistance.
2.1 Generate a range of design ideas (thumbnail sketches are good for this!).
2.2 Explore different options and ideas. 2.3 Involve others in the process if you like. 3.1 Reflect on different ideas and feedback and select a preferred solution.
3.2 Present your solution to your team (if you’re working with one). 3.3 Make sure you have permission to go ahead (if you need permission).
4.1 Write a list of everything you need to do. 4.2 Carry out testing of the proposed solution (this is the time to try new materials or software to see if it behaves how you expect).
4.3 Keep a copy of all your records. 4.4 Identify problems and seek advice and guidance from others 5.1 Check success of the solution based on original objectives 5.2 Seek feedback from appropriate stakeholders 5.3 Review both the solution and the process undertaken to develop the solution as part of an ongoing learning process

Identity Exercise - Allow 2 – 4 hours
Subject: Your own cultural identity
Identity Folder – Create a folder full of items that are relevant to your identity (see the
list of materials for ideas about what you’ll include in this). These need to be:
• In 2D form (for example, you’ll need to print photos of objects rather than use
the objects themselves)
• Copies rather than originals (especially for photos, certificates etc).
Materials
• Camera and printer and/or photocopier so you can print copies of your images
• Items you can use in your collection including things like:
o Photos of:
o Items that you use every day such as keys, phone, remote etc
o Objects that are important to you or that have sentimental value
o Swatches of fabric
o Pages of text (book pages, letters, certificates, poems etc)
o Drawings
o Newspaper articles
o Plans or maps
Setting Up You’ll need technical equipment to enable you to print out copies of your items.
Your identity Gather together items that relate to your identity; photos, swatches of fabric, text,
newspaper articles, drawings or any other item you like. You may wish to include

copies of the images you’ve already created in the previous activities while
completing this study. Take photos of them or scan these items as JPEGS then print
out copies.
Some ideas to include are photos of the things you handle every day like keys,
telephone, remotes and bags. You could also include information about where you
live, like a map of your town, a plan of your house, or photos of the objects in your
bedroom. You could write a list of your usual daily activities or the schools you’ve
attended or the addresses where you’ve lived. Whatever has contributed to making
you the person you are can be included.
If you don’t have access to a printer, camera, scanner or photocopier, you’ll have to
generate all the items yourself. These will be used later in a collage so shouldn’t be
things you need to keep. Instead, create drawings, write lists, gather photos you
don’t need to keep, find pictures in newspapers and magazines etc. Just remember,
that all these items need to relate to you somehow. Imagine that you had to tell
someone all about yourself but they can’t understand your language. What would
you show them?
Your Cultural Heritage If you identify as Indigenous, you may want to include information about your family
clan or nation, or perhaps the individual animal, plant or element (wind, fire, water
earth) that depicts your people and your culture. If you’re not Indigenous, you may
want to research where your ancestors came from and include information about that
country.
It’s also important to explore and research the Indigenous culture where you live.
You may not identity as Indigenous, and even if you do, you may not be from that
particular clan, however, it’s still important to know about the original inhabitants of
the land where you live.
The Aboriginal Language Map is a good place to start researching your local
Indigenous people. Conduct your own further research to learn more about them and
include this information in your file.

Taking Photographs When you’re taking photos of your work, it’s important to avoid ‘keystoning’. This
occurs when you photograph images from an angle instead of directly above them.
Camera viewfinder
Avoid keystoning when photographing your work by either propping it up against a
wall or else standing directly over it and holding your camera so the art is in the
middle of the viewfinder.
Saving your work When you’ve gathered your work, print out each item, ensuring you’ve got copies of
all important certificates and irreplaceable documents. You’ll be using these images
in another assessment task, so it’s important the photos or scans are in focus and
are of a reasonable size (not too large/not too small). The artwork you’ll create using
these items will be at least A3 in size, so that should give you some idea of how big
your printed items need to be.
Notice how there is more space between the artwork and the edge of the viewfinder at the top than the bottom of the image.

Your Cultural Heritage – Quiz As you work through the questions in this quiz, the following checklist may be useful. (CUAATS101 PC1.1 – 3.3) 1.1 Identify and consult with appropriate persons to obtain knowledge of own region or country
1.2 Identify relevant sources of information on own region or country
1.3 Access information and people in culturally appropriate way 2.1 Correctly identify holders of information and consult with appropriate persons in relation to kinship and family
2.2 Identify other relevant sources of information on family and kinship
2.3 Collect appropriate information on family and kinship with respect for local Aboriginal or Torres Strait Islander culture and customs
3.1 Examine information to determine own Aboriginal or Torres Strait Islander identity in relation to country and kinship
3.2 Consider how concept of ‘belonging to country’ in relation to culture, family and kinship may inform work practice
3.3 Use information in culturally appropriate way at all times, including identification of how and with whom information can be shared

1 What country and region are you from? (CUAATS101 KE1) 2 Explain the customs and ceremonies that are important to your culture. This may include your relationship to the place or the land where you were born. List the source of this information. (CUAATS101 KE1, CUARES202 PE 1, 2, KE 1) 3 Describe your own family (kinship). This may include your immediate family or your extended family. (CUAATS101 KE2)

4 What is the clan name of the Aboriginal or Torres Strait Islander society where you live? What are some of the protocols for accessing information from or communicating with different members of this community? (CUAATS101 KE3, KE4, CUARES202 KE3)
5 How can cultural knowledge be used and with whom can you share it? (CUAATS101 KE5)
6 Describe two different ways that Aboriginal or Torres Strait Islander protocols and cultural values can impact on work practices. (CUAATS101 KE6)

7 How will you organise this information? Is it a good idea to use a system when deciding on names for your folders and files? (CUARES202 KE2)

Collage Exercise - Allow 3 – 6 hours
Subject: Your identity
A collage made up of the images you’ve collected (in previous Identity Folder
exercise)
Materials
• Printed copies of all documents relating to your identity
• A large sheet of heavyweight paper (at least A3 in size)
• Glue
• Any other media you’d like to use (pens, pencils, paint, ink etc)
Setting Up Ensure you have all the materials you’ll need handy including the images in your
Identity Folder. It’s useful to have a couple of copies of each item within your folder
in case you decide to use something more than once. For this task, you’ll need a
table or desk and plenty of room to work.
Identity Collage There are many ways to approach your collage. Over the following pages, you’ll see
various designs and approaches. Take a moment to look through them now.

Some collages are based around a single subject. This image features a bird. Notice
how it is sitting in the middle of the page and is ‘framed’ by the black areas on either
side of it.
Here’s another picture of a bird. Again, the animal is in the middle of the page.

Another option is to spread items across
the entire page. Here, the main subject
isn’t quite so obvious. The cows are
dominant because they are black against
a light background (high-contrast). This
probably makes them the most important
element in the composition.
Can you see the most important
element/s in this composition?

Sometimes artists add other items to
a collage, not just images.
You can see the artist has printed
over the stack of papers with text.

This artist has added buttons and machine-
stitched lines around the outside of the paper.
Sewing is an interesting way to join together
collage items.
In this approach, the artist has tucked lots of
different paper items into an envelope.

Some artists put their items together in
such a way that other images are
formed.
Here the artist has used a black outline
to draw in the dog’s shape and features.
If you want to do something similar, take
a photo of the object that interests you
then enlarge it on a photocopier until it is
the right size. You can then trace the
outline along with any important details
onto your collage paper.

There are many ways you can assemble your image.
The best approach is to try lots of options. Move the
pieces around on your collage paper. Take photos of
different arrangements without glueing anything
down so you can review them before making a
decision.
Conduct your own research if you’d like to investigate
more collages before beginning your own.

When you’re ready, start assembling your collage. Take photos as you progress. As
you’re creating your collage, keep in mind the elements and principles of design.
The Elements (this relates to the elements you include in your image – what shape
and size are the images you add? Are they transparent? Brightly coloured?)
• Line
• Shape
• Direction
• Size
• Texture
• Colour
• Value The Principles (this relates to the way these elements arranged – are your images
layered? Are they in a grid pattern? Is your composition balanced?)
• Balance
• Graduation
• Repetition
• Contrast
• Harmony
• Dominance
• Unity As you work, step back to observe the piece from a distance. Are you happy with the
composition? Continue assembling the piece until you’re finished. Make sure you
take photos of your final work if you want to be assessed.

Copyright basics
Be aware that all images are copyright whether they include the copyright
symbol or not. This means that you own the copyright to any work you
create or photos you take. It also means that other people own the
copyright to their images. Any images you download online are protected
by copyright (unless you select images that are in the 'public domain' or not
subject to copyright law). Generally, you can't download or use an image
that belongs to someone else without breaching copyright.
Some people believe that to comply with copyright law, you only need to
change an image by 10% and then it is safe to reuse. This is not true and is
a confusing rumour that may have begun because anyone can photocopy
10% of a book without breaching copyright. An image has to be changed
significantly – in other words, it should be unrecognisable – before it can be
used in a work unless the artist has permission from the owner of that
image.
Copyright relating to artwork expires (in Australia) 70 years after the death
of the original creator. This means that 70 years after a creator’s death,
their work may be copied, transmitted and sold without royalties being paid
to their estate. The reason for this is so that creative work can eventually
be accessed by everyone. Of course the artist or creator has to benefit
from their work too, so they can be paid for their time and continue to make
more work, and that’s who copyright law seeks to protect.
It’s important that we, as fellow creative practitioners, follow these laws too
by not infringing on the copyright rights of others. To do this we can:
• Only use photos and other reference material we have generatedourselves
• Have a written agreement/contract with other artists if we’d like to use theirwork

• Only use images that are already in the public domain or that aren’t protected by copyright
To locate images you are able to use, follow these instructions:
Type a search term into your browser:
Select the ‘settings’ option below the search window on the right.
A drop down menu will appear.
Select the ‘Advanced Search’ option. A new page will open.
Scroll down until you see the ‘Usage Rights’ option.

Click on the drop down menu and several options will appear. These allow
you to choose pictures that fulfil certain criteria. For example, you can select
an option that says ‘free to use, share or modify’. Make your selection then
press the blue ‘Advanced Search’ button.
Your search results will now only include images that fit the criteria you have
set.
Another way to find images which are royalty free, is to explore one of the
many sites dedicated to providing these images. Some of these include:
Vintage printable
Pixabay
Freerange
Unsplash
Pexe
Flickr
Life of Pix
Even though these sites offer free images, it’s still courteous to attribute
credit to the original creator of the image. This rule applies even if the work
is old and the artist has died.

Conducting Research – Quiz
Conduct research into the subject of copyright in Australia. Complete the
following checklist. (CUARES202 PC1.1 – 3.4)
1.1 Find sources of information on history and theory relevant to own arts practice
1.2 Check reliability of information sources with other people 1.3 Follow copyright and cultural requirements when accessing information
1.4 Gather and organise information 2.1 Review information related to arts practice 2.2 Select information relevant to own area of work 2.3 Use information appropriately to enhance own arts practice 3.1 Keep information sources up to date 3.2 Store information in accessible formats 3.3 Share information with others 3.4 Use feedback from others to improve information collection processes
When you’ve completed your research, answer the following questions.

1 How does copyright (intellectual property principles and legislation)
relate to your work? (What images can you use in your work and how can
others use your images?)
2 If there was any feedback from others regarding your information
collection processes or your research, respond to it. (Responding to the
feedback means considering it and deciding if the suggestions are useful.
You may choose not to act on these suggestions.)
Further research
Conduct further research by downloading this PDF about copyright:
An Introduction to Australian Copyright Law

You have now completed the digital stream of this program. For further
information on receiving an RPL for the units listed in the following pages,
please contact Carmen Gray: [email protected]

This course is based on three units from CUA20715 – Certificate II in Visual Art
BSBDES201 – Follow a design process
This unit describes the skills and knowledge required to follow a design process at a basic level, incorporating an element of problem solving to identify and resolve challenges that may hinder the process. It applies to individuals who work under direct supervision and respond to specific issues or changes which may relate to product and service requirements. Performance Evidence Evidence of the ability to:
• determine project objectives, possible constraints and required supportmaterials
• collaborate with others when generating ideas, solving problems, andseeking approvals and feedback
• schedule tasks and create project documentation to support proposedsolutions
• review work to determine future improvements.Note: If a specific volume or frequency is not stated, then evidence must beprovided at least once.Knowledge EvidenceTo complete the unit requirements safely and effectively, the individual must:
• describe creative thinking techniques that can be used to generate ideas
• summarise the key steps in the design process as a way of thinking andsolving problems
• list potential sources of information for new ideas, relevant to specificcontext.

ELEMENT PERFORMANCE CRITERIA Elements describe the essential outcomes.
Performance criteria describe the performance needed to demonstrate achievement of the element.
1 Clarify the challenge
1.1 Confirm the nature and scope of the challenge with stakeholders 1.2 Agree on specific objectives with stakeholders 1.3 Identify constraints that may impact the design process 1.4 Identify and source relevant supporting information and assistance
2 Explore different ideas and solutions
2.1 Generate a range of ideas to respond to the challenge 2.2 Explore different options and ideas for meeting objectives 2.3 Involve others in the process of developing ideas and solutions
3 Select and present a solution
3.1 Reflect on different ideas and feedback, and select a preferred solution 3.2 Summarise the key ideas in the solution and present to stakeholders in appropriate format 3.3 Obtain any required approvals to take the solution to the next stage
4 Implement solution
4.1 Schedule key tasks and organise resources to support implementation 4.2 Carry out testing, prototyping or trialling of the proposed solution 4.3 Maintain any required documentation 4.4 Identify problems and seek advice and guidance from others
5 Evaluate solution
5.1 Check success of the solution based on original objectives 5.2 Seek feedback from appropriate stakeholders 5.3 Review both the solution and the process undertaken to develop the solution as part of an ongoing learning process

CUAATS101 Develop understanding of own Aboriginal or Torres Strait Islander identity
This unit describes the skills and knowledge required to develop an understanding of the cultural and intellectual properties of one’s own cultural identity. The local cultural knowledge necessary to achieve competency in this unit may only be accessible to Aboriginal or Torres Strait Islander peoples. This unit also reflects the fact that there is no single Aboriginal or Torres Strait Islander culture. It applies to Aboriginal and Torres Strait Islander people in areas of work that include arts practice and cultural tourism. They could be preparing for work or further learning to pursue a career in the visual or performing arts, or as a tour guide in local communities. This learning and work would be closely guided by appropriate members of Aboriginal or Torres Strait Islander communities. Performance Evidence Evidence of the ability to:
• identify and gather information relevant to own region, family and kinship,using culturally appropriate communication practices
• use information, in a culturally appropriate way, to develop a concept of ownAboriginal or Torres Strait Islander identity.Note: If a specific volume or frequency is not stated, then evidence must beprovided at least once.Knowledge EvidenceTo complete the unit requirements safely and effectively, the individual must:
• explain own country and region, including customs, ceremonies andrelationship to land
• describe own family and kinship
• explain matters of protocol within Aboriginal or Torres Strait Islandersocieties
• list protocols for accessing information and communicating with differentcommunity members
• outline ways in which knowledge can be used, how it should be used andwith whom it can be shared
• explain ways in which Aboriginal or Torres Strait Islander protocols andcultural values impact on work practices in different contexts.

ELEMENT PERFORMANCE CRITERIA Elements describe the essential outcomes.
Performance criteria describe the performance needed to demonstrate achievement of the element.
1. Seek information on own region or country
1.1 Identify and consult with appropriate persons to obtain knowledge of own region or country 1.2 Identify relevant sources of information on own region or country 1.3 Access information and people in culturally appropriate way
2. Seek information on family and kinship
2.1 Correctly identify holders of information and consult with appropriate persons in relation to kinship and family 2.2 Identify other relevant sources of information on family and kinship 2.3 Collect appropriate information on family and kinship with respect for local Aboriginal or Torres Strait Islander culture and customs
3. Use information to develop concept of identity
3.1 Examine information to determine own Aboriginal or Torres Strait Islander identity in relation to country and kinship 3.2 Consider how concept of ‘belonging to country’ in relation to culture, family and kinship may inform work practice 3.3 Use information in culturally appropriate way at all times, including identification of how and with whom information can be shared

CUARES202 – Source and use information relevant to own arts practice
This unit describes the skills and knowledge required to access relevant historical and theoretical information relevant to one’s own area of creative work. It applies to individuals developing their skills in any area of arts practice. Supervision and guidance would usually be provided. Performance Evidence Evidence of the ability to:
• source general history and theory information
• identify and use information related to own area of work in compliance withcultural and copyright requirements
• organise and update information
• initiate and respond to feedback.Note: If a specific volume or frequency is not stated, then evidence must beprovided at least once.Knowledge EvidenceTo complete the unit requirements safely and effectively, the individual must:
• list sources of general information on history and theory arts practice andspecific information related to own area of practice
• outline techniques for organising history and theory information andinformation specific to own area of work
• identify protocols to be observed when gathering information of a culturallysensitive nature
• explain intellectual property principles and legislation related to collectionand use of information in own work.

ELEMENT PERFORMANCE CRITERIA Elements describe the essential outcomes.
Performance criteria describe the performance needed to demonstrate achievement of the element.
1. Locate information
1.1 Find sources of information on history and theory relevant to own arts practice 1.2 Check reliability of information sources with other people 1.3 Follow copyright and cultural requirements when accessing information 1.4 Gather and organise information
2. Review information
2.1 Review information related to arts practice 2.2 Select information relevant to own area of work 2.3 Use information appropriately to enhance own arts practice
3. Update and maintain information sources
3.1 Keep information sources up to date 3.2 Store information in accessible formats 3.3 Share information with others 3.4 Use feedback from others to improve information collection processes


