Embed Size (px)
Citation preview
© B62‑1866‑40 (M)09 08 07 06 05 04
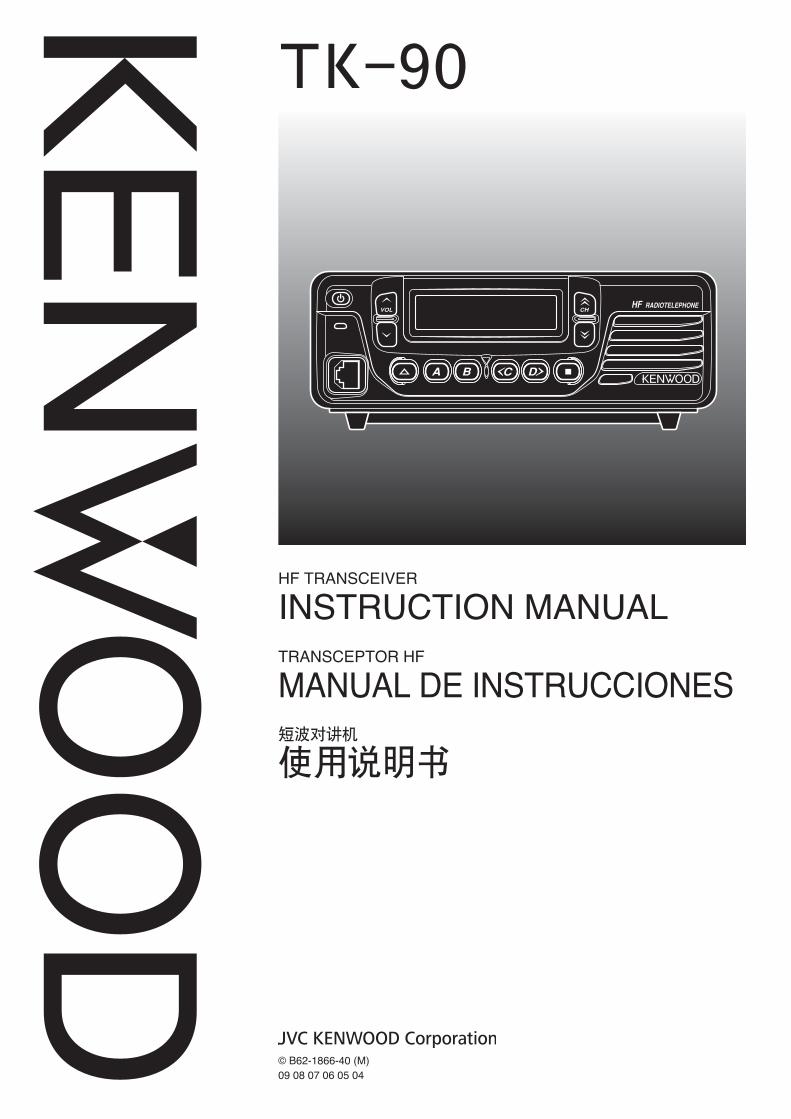
TK-90
HF TRANSCEIVER
INSTRUCTION MANUALTRANSCEPTOR HF
MANUAL DE INSTRUCCIONES短波对讲机
使用说明书


HF TRANSCEIVER
TK‑90INSTRUCTION MANUAL
EN
GLI
SH

i
THANK YOUThank you for choosing KENWOOD for your radiotelecommunication applications. We believe thiseasy-to-use transceiver will provide dependablecommunications to keep vehicles and personneloperating at peak efficiency.
KENWOOD transceivers incorporate the latest inadvanced technology. As a result, we feel stronglythat you will be pleased with the quality and featuresof this product.
NOTICES TO THE USER Government law prohibits the operation of unlicensed
transmitters within the territories under government control. Illegal operation is punishable by fine and/or imprisonment. Refer service to qualified technicians only.
SAFETY: It is important that the operator is aware of,and understands, hazards common to the operationof any transceiver.
EXPLOSIVE ATMOSPHERES (GASES, DUST, FUMES,etc.)Turn OFF your transceiver while taking on fuel or while parked ingasoline service stations. Do not carry spare fuel containers inthe trunk of your vehicle if your transceiver is mounted in thetrunk area.
INJURY FROM RADIO FREQUENCY TRANSMISSIONSDo not operate your transceiver when somebody is eitherstanding near to or touching the antenna, to avoid thepossibility of radio frequency burns or related physical injury.
DYNAMITE BLASTING CAPSOperating the transceiver within 150 m (500 feet) of dynamiteblasting caps may cause them to explode. Turn OFF yourtransceiver when in an area where blasting is in progress, orwhere “TURN OFF TWO-WAY RADIO” signs have beenposted. If you are transporting blasting caps in your vehicle,make sure they are carried in a closed metal box with apadded interior. Do not transmit while the caps are beingplaced into or removed from the container.
PRECAUTIONSObserve the following precautions to prevent fire,personal injury, and transceiver damage.• Do not attempt to configure the transceiver while driving;
it is too dangerous.
• Do not disassemble or modify the transceiver for anyreason.
• Do not expose the transceiver to long periods of directsunlight, nor place it near heating appliances.
• Do not place the transceiver in excessively dusty, humid,or wet areas, nor on unstable surfaces.
• If an abnormal odor or smoke is detected coming fromthe transceiver, switch the transceiver power offimmediately, and contact your KENWOOD dealer.
• Use of the transceiver while you are driving may beagainst traffic laws. Please check and observe thevehicle regulations in your area.
• Do not use options not specified by KENWOOD.
The transceiver operates in 12 V negative ground systemsonly! Check the battery polarity and voltage of the vehiclebefore installing the transceiver.
Use only the supplied DC power cable or a KENWOODoptional DC power cable.
Do not insert metal objects into the cooling fan.
Do not cut and/or remove the fuse holder on the DC powercable. Improper connections and/or current surges maycause smoke or fire.
For passenger safety, install the transceiver securely usingthe supplied mounting bracket and screw set so thetransceiver will not break loose in the event of a collision.
TK-90 E 0i-ii 07.9.28, 6:29 PM1
ii
CONTENTS
PREPARATION / INSTALLATION ............................. 1UNPACKING AND CHECKING EQUIPMENT...... 1
SUPPLIED ACCESSORIES ......................................... 1BASE STATION INSTALLATION .......................... 1
FOOT PADS ......................................................... 1ANTENNA CONNECTION........................................... 1GROUND CONNECTION ........................................... 1DC POWER SUPPLY CONNECTION ............................ 2
MOBILE INSTALLATION ...................................... 2INSTALLING THE TRANSCEIVER .................................. 2ANTENNA CONNECTION........................................... 2GROUND CONNECTION ........................................... 3DC POWER CABLE CONNECTION ............................. 3
GETTING ACQUAINTED .......................................... 4FRONT PANEL ..................................................... 4REAR PANEL ....................................................... 4DISPLAY ............................................................... 5MICROPHONE (OPTIONAL) ............................... 6PROGRAMMABLE FUNCTIONS ......................... 7
BASIC OPERATIONS ................................................ 8SWITCHING POWER ON/OFF ............................ 8ADJUSTING THE VOLUME ................................. 8SELECTING A CHANNEL .................................... 8
DIRECT FREQUENCY ENTRY ................................... 8SELECTING A MODE........................................... 8
DATA OPERATION .................................................. 8TRANSMITTING ................................................... 9
VOX (VOICE-OPERATED TRANSMISSION) ................ 9CW KEYING ........................................................ 9CHANGING THE TRANSMIT POWER .......................... 9TIME-OUT TIMER ................................................. 9OVERHEATING ...................................................... 9
SQUELCH/ MONITOR ....................................... 10SQUELCH LEVEL ................................................ 10CHANNEL MONITORING ........................................ 10
MENU SETUP ......................................................... 11ACCESSING THE MENU ................................... 11MENU CONFIGURATION .................................. 11
SCAN ....................................................................... 12BUSY FREQUENCY STOP ................................ 12
SCAN RESUME TYPE .......................................... 12PREFERRED SCAN........................................... 12ADD TO SCAN/ REMOVE FROM SCAN ........... 12SCAN REVERT CHANNEL ................................ 12
SELECTIVE CALLS ................................................. 13ACTIVATING SELCALL MODE .......................... 13MANUAL SELCALLS .......................................... 13
SELECTING A STATION USING THE TRANSCEIVER KEYS .. 13SELECTING A STATION USING A MICROPHONE KEYPAD ... 13
DIRECT SELCALLS ........................................... 13RECEIVING A SELCALL .................................... 13MEMORY CALLS ............................................... 13
SELECTING A MEMORY CALL USING THE
TRANSCEIVER KEYS ............................................. 13
SELECTING A MEMORY CALL USING AMICROPHONE KEYPAD .......................................... 14
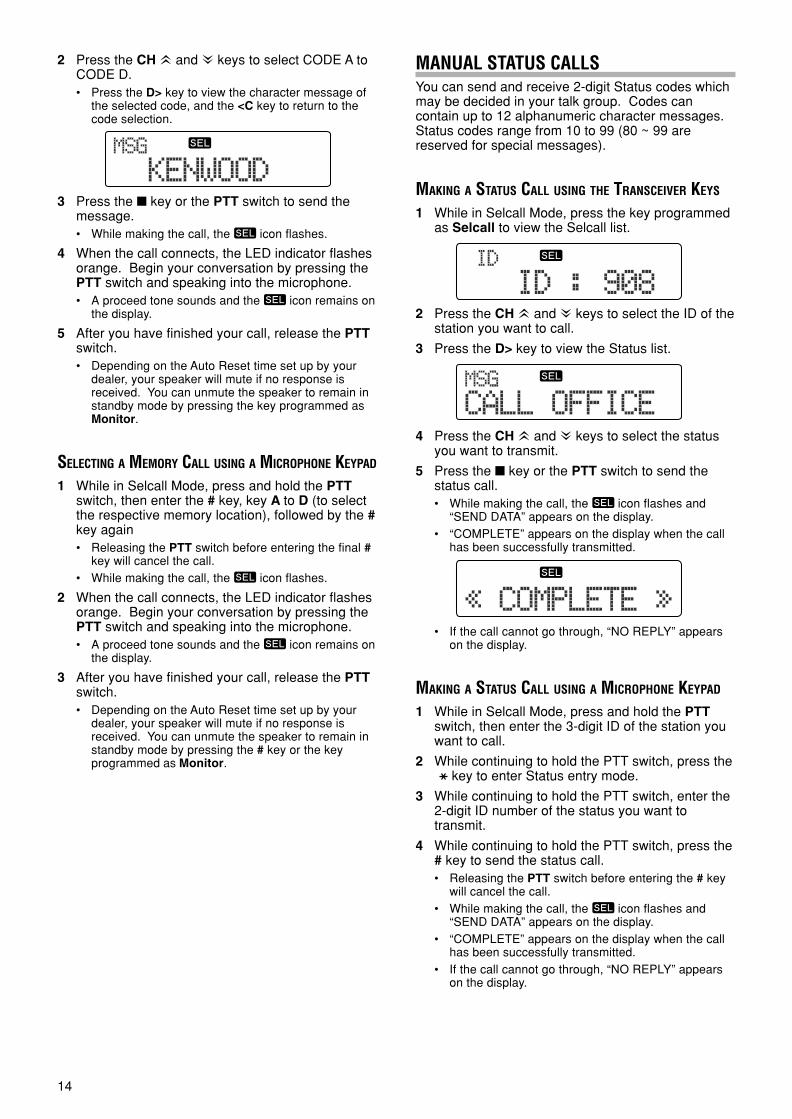
MANUAL STATUS CALLS .................................. 14MAKING A STATUS CALL USING THE
TRANSCEIVER KEYS ............................................. 14MAKING A STATUS CALL USING AMICROPHONE KEYPAD .......................................... 14
DIRECT STATUS CALLS ................................... 15OPTIONAL VOICE MESSAGES ........................ 15RECEIVING A STATUS CALL ............................ 15
REVIEWING MESSAGES IN THE STACK MEMORY ......... 15SEND THE GPS DATA ....................................... 16
MANUALLY SENDING THE GPS DATA .................... 16GPS POLLING................................................... 16
SHORT TEXT MESSAGES ................................ 16
ADVANCED OPERATIONS ..................................... 17DIRECT CHANNEL ............................................ 17SCRAMBLER ..................................................... 17
CHANGING THE SCRAMBLER CODE ........................ 17VOX (VOICE-OPERATED TRANSMIT)SETUP ................................................................ 17
VOX GAIN ....................................................... 17ANTI-VOX GAIN ............................................... 17VOX DELAY TIME .............................................. 18
ANTENNA TUNER ............................................. 18EMERGENCY ..................................................... 18CLARIFIER ......................................................... 18NOISE BLANKER ............................................... 19LCD BRIGHTNESS ............................................ 19POWER-ON TEXT.............................................. 19DISPLAY NAME/ FREQUENCY ......................... 19PRE-AMPLIFIER/ ATTENUATOR ...................... 19AUXILIARY ......................................................... 19
VGS-1 OPTIONAL VOICE GUIDE &STORAGE UNIT ...................................................... 20
VOICE MEMOS .................................................. 20RECORDING A VOICE MEMO .................................. 20PLAYING BACK A VOICE MEMO .............................. 20DELETING A VOICE MEMO ..................................... 20
VOICE MESSAGES ........................................... 20RECORDING A VOICE MESSAGE .............................. 20PLAYING BACK A VOICE MESSAGE .......................... 21TRANSMITTING A VOICE MESSAGE........................... 21DELETING A VOICE MESSAGE ................................ 21
AUTO RECORDING ........................................... 21PLAYING BACK AN AUTO RECORDING ...................... 21DELETING AN AUTO RECORDING ............................. 21
VOICE GUIDE .................................................... 21APPENDIX ............................................................... 22
KEY FUNCTIONS ............................................... 22
TK-90 E 0i-ii 07.9.28, 6:29 PM2
1
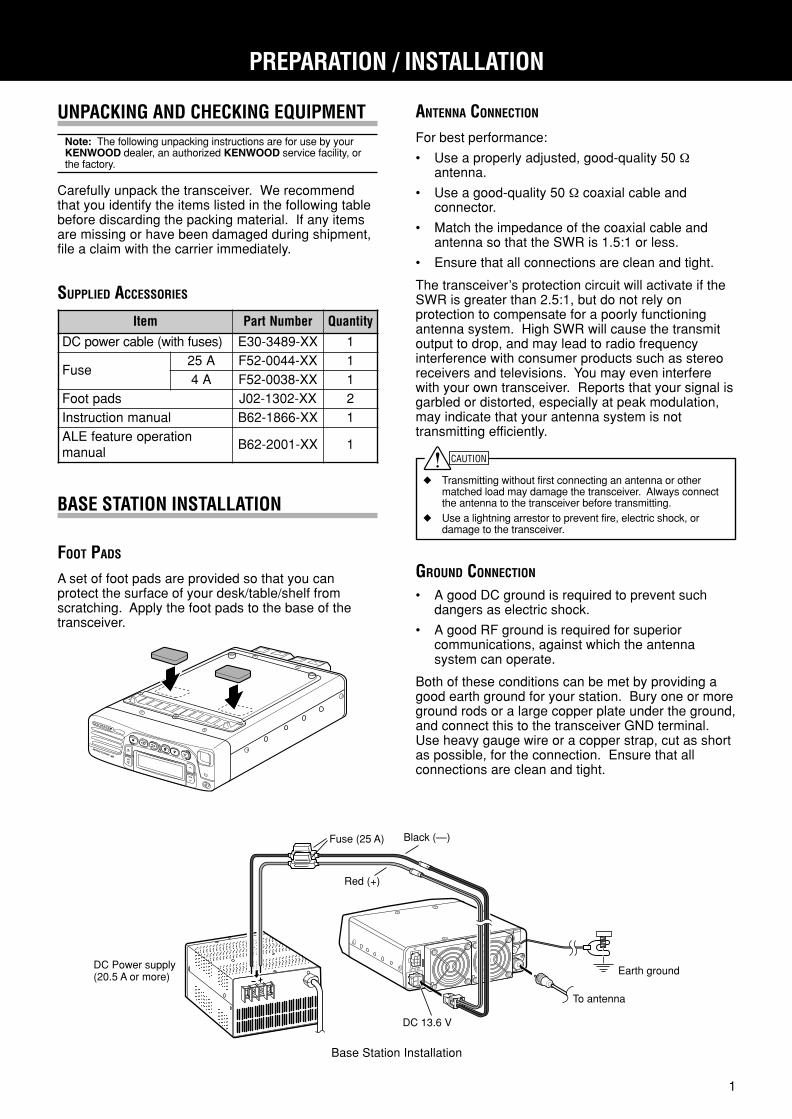
UNPACKING AND CHECKING EQUIPMENTNote: The following unpacking instructions are for use by yourKENWOOD dealer, an authorized KENWOOD service facility, orthe factory.
Carefully unpack the transceiver. We recommendthat you identify the items listed in the following tablebefore discarding the packing material. If any itemsare missing or have been damaged during shipment,file a claim with the carrier immediately.
SUPPLIED ACCESSORIES
PREPARATION / INSTALLATION
metI rebmuNtraP ytitnauQ)sesufhtiw(elbacrewopCD XX-9843-03E 1
esuFA52 XX-4400-25F 1A4 XX-8300-25F 1
sdaptooF XX-2031-20J 2launamnoitcurtsnI XX-6681-26B 1
noitarepoerutaefELAlaunam
XX-1002-26B 1
ANTENNA CONNECTION
For best performance:
• Use a properly adjusted, good-quality 50 Ωantenna.
• Use a good-quality 50 Ω coaxial cable andconnector.
• Match the impedance of the coaxial cable andantenna so that the SWR is 1.5:1 or less.
• Ensure that all connections are clean and tight.
The transceiver’s protection circuit will activate if theSWR is greater than 2.5:1, but do not rely onprotection to compensate for a poorly functioningantenna system. High SWR will cause the transmitoutput to drop, and may lead to radio frequencyinterference with consumer products such as stereoreceivers and televisions. You may even interferewith your own transceiver. Reports that your signal isgarbled or distorted, especially at peak modulation,may indicate that your antenna system is nottransmitting efficiently.
Transmitting without first connecting an antenna or othermatched load may damage the transceiver. Always connectthe antenna to the transceiver before transmitting.
Use a lightning arrestor to prevent fire, electric shock, ordamage to the transceiver.
GROUND CONNECTION
• A good DC ground is required to prevent suchdangers as electric shock.
• A good RF ground is required for superiorcommunications, against which the antennasystem can operate.
Both of these conditions can be met by providing agood earth ground for your station. Bury one or moreground rods or a large copper plate under the ground,and connect this to the transceiver GND terminal.Use heavy gauge wire or a copper strap, cut as shortas possible, for the connection. Ensure that allconnections are clean and tight.
BASE STATION INSTALLATION
FOOT PADS
A set of foot pads are provided so that you canprotect the surface of your desk/table/shelf fromscratching. Apply the foot pads to the base of thetransceiver.
Earth ground
Black (—)
Red (+)
Fuse (25 A)
DC 13.6 V
DC Power supply (20.5 A or more)
To antenna
Base Station Installation
TK-90 E 01-22 09.3.11, 4:52 PM1
2
DC POWER SUPPLY CONNECTION
In order to use this transceiver as a base station, youwill need a separate 13.6 V DC power supply with acurrent capacity of 20.5 A or higher (purchasedseparately).
Do not directly connect the transceiver to an AC outlet. Do not substitute the supplied DC power cable with a cable
with smaller gauge wires. Before connecting the DC power supply to the transceiver, be
sure to switch the DC power supply OFF. Do not plug the DC power supply into an AC outlet until you
make all connections.
1 Connect the supplied DC power cable to theregulated DC power supply and check that thepolarities are correct (Red: positive, Black:negative).
2 Connect the connectorized end of the DC powercable to the DC 13.6 V powerconnector on therear of the transceiver.• Press the DC power cable connector firmly into the
connector on the radiotelephone until the locking tabclicks.
REPLACING FUSES
If the fuse blows, determine the cause then correctthe problem. After the problem is resolved, onlythen replace the fuse. If newly installed fusescontinue to blow, disconnect the power plug andcontact your dealer for assistance.
Following are the ratings for fuses used with thistransceiver:
Transceiver: 4 A (for KAT-1 antenna tuner)
DC cable: 25 A
When replacing any fuse, be sure to replace it with a fuseof the same value. Never replace a fuse with a fuse thathas a higher value.
Replace blown fuses only after investigating andcorrecting the cause of the failed fuse.
MOBILE INSTALLATION
Various electronic equipment in your vehicle may malfunction ifthey are not properly protected from the radio frequency energywhich is present while transmitting. Electronic fuel injection,anti-skid braking, and cruise control systems are typical examplesof equipment that may malfunction. If your vehicle contains suchequipment, consult the dealer for the make of vehicle and enlisthis/her aid in determining if they will perform normally whiletransmitting.
Note: The following preparation instructions are for use by yourKENWOOD dealer, an authorized KENWOOD service facility, orthe factory.
INSTALLING THE TRANSCEIVER
For passenger safety, install the transceiver securely using anoptional mounting bracket so the transceiver will not break loosein the event of a collision.
1 Mark the position of the holes in the dash by usingthe mounting bracket as a template. Drill theholes, then attach the mounting bracket usingself-tapping screws supplied with the bracket.• Be sure to mount the transceiver in a location where
the controls are within easy reach of the user andwhere there is sufficient space at the rear of thetransceiver for cable connections.
2 Connect the antenna and the supplied powercable to the transceiver page 3.
3 Slide the transceiver into the mounting bracketand secure it.
4 Mount the microphone hanger in a location whereit will be within easy reach of the user.• The microphone and microphone cable should be
mounted in a place where they will not interfere withthe safe operation of the vehicle.
ANTENNA CONNECTION
For best performance:
• Use a properly adjusted, good-quality 50 Ωantenna.
• Use a good-quality 50 Ω coaxial cable andconnector.
Coupling the antenna to the transceiver via feed lineshaving an impedance other than 50 Ω reduces theefficiency of the antenna system and can causeinterference to nearby broadcast television receivers,radio receivers, and other electronic equipment.
Transmitting without first connecting an antenna or other matchedload may damage the transceiver. Always connect the antenna tothe transceiver before transmitting.
TK-90 E 01-22 09.3.11, 4:52 PM2
3
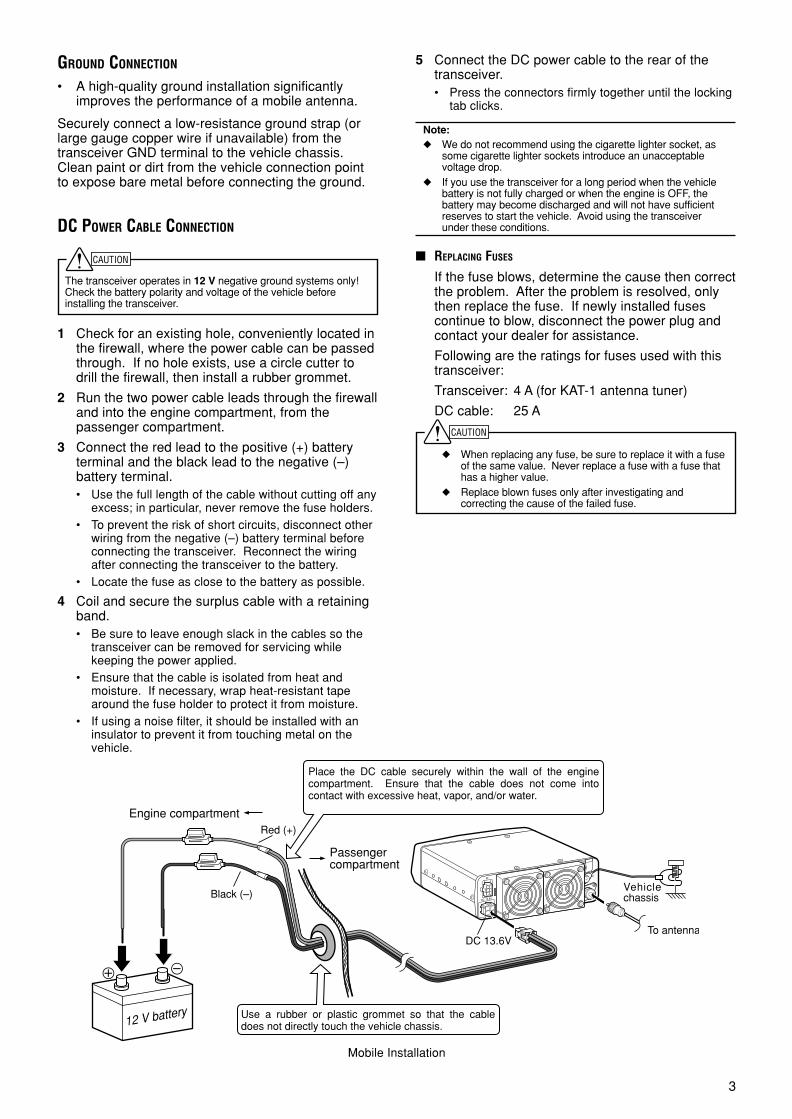
GROUND CONNECTION
• A high-quality ground installation significantlyimproves the performance of a mobile antenna.
Securely connect a low-resistance ground strap (orlarge gauge copper wire if unavailable) from thetransceiver GND terminal to the vehicle chassis.Clean paint or dirt from the vehicle connection pointto expose bare metal before connecting the ground.
DC POWER CABLE CONNECTION
The transceiver operates in 12 V negative ground systems only!Check the battery polarity and voltage of the vehicle beforeinstalling the transceiver.
1 Check for an existing hole, conveniently located inthe firewall, where the power cable can be passedthrough. If no hole exists, use a circle cutter todrill the firewall, then install a rubber grommet.
2 Run the two power cable leads through the firewalland into the engine compartment, from thepassenger compartment.
3 Connect the red lead to the positive (+) batteryterminal and the black lead to the negative (–)battery terminal.• Use the full length of the cable without cutting off any
excess; in particular, never remove the fuse holders.• To prevent the risk of short circuits, disconnect other
wiring from the negative (–) battery terminal beforeconnecting the transceiver. Reconnect the wiringafter connecting the transceiver to the battery.
• Locate the fuse as close to the battery as possible.
4 Coil and secure the surplus cable with a retainingband.• Be sure to leave enough slack in the cables so the
transceiver can be removed for servicing whilekeeping the power applied.
• Ensure that the cable is isolated from heat andmoisture. If necessary, wrap heat-resistant tapearound the fuse holder to protect it from moisture.
• If using a noise filter, it should be installed with aninsulator to prevent it from touching metal on thevehicle.
5 Connect the DC power cable to the rear of thetransceiver.• Press the connectors firmly together until the locking
tab clicks.
Note: We do not recommend using the cigarette lighter socket, as
some cigarette lighter sockets introduce an unacceptablevoltage drop.
If you use the transceiver for a long period when the vehiclebattery is not fully charged or when the engine is OFF, thebattery may become discharged and will not have sufficientreserves to start the vehicle. Avoid using the transceiverunder these conditions.
REPLACING FUSES
If the fuse blows, determine the cause then correctthe problem. After the problem is resolved, onlythen replace the fuse. If newly installed fusescontinue to blow, disconnect the power plug andcontact your dealer for assistance.
Following are the ratings for fuses used with thistransceiver:
Transceiver: 4 A (for KAT-1 antenna tuner)
DC cable: 25 A
When replacing any fuse, be sure to replace it with a fuseof the same value. Never replace a fuse with a fuse thathas a higher value.
Replace blown fuses only after investigating andcorrecting the cause of the failed fuse.
Mobile Installation
Vehicle chassis
12 V battery
Red (+)
Black (–)
Passengercompartment
Engine compartment
Place the DC cable securely within the wall of the engine compartment. Ensure that the cable does not come into contact with excessive heat, vapor, and/or water.
Use a rubber or plastic grommet so that the cable does not directly touch the vehicle chassis.
DC 13.6VTo antenna
TK-90 E 01-22 09.3.11, 4:52 PM3
4
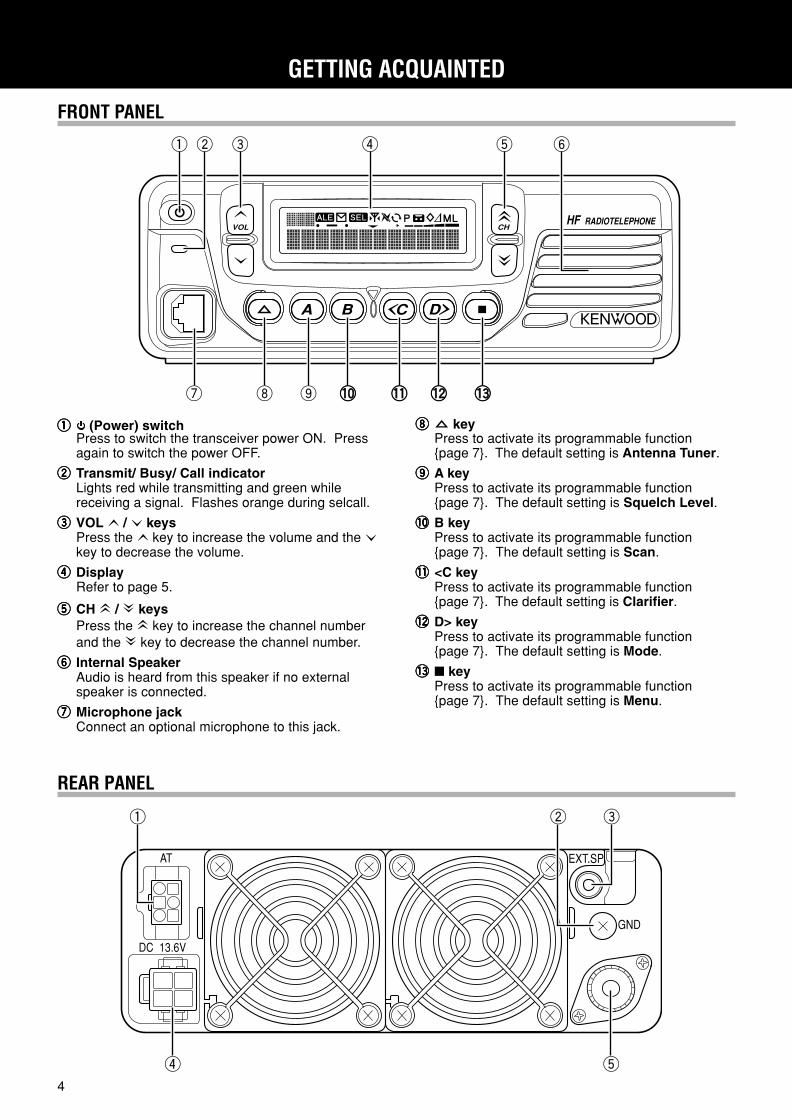
FRONT PANEL
qqqqq (Power) switchPress to switch the transceiver power ON. Pressagain to switch the power OFF.
wwwww Transmit/ Busy/ Call indicatorLights red while transmitting and green whilereceiving a signal. Flashes orange during selcall.
eeeee VOL / keysPress the key to increase the volume and the key to decrease the volume.
rrrrr DisplayRefer to page 5.
ttttt CH / keysPress the key to increase the channel numberand the key to decrease the channel number.
yyyyy Internal SpeakerAudio is heard from this speaker if no externalspeaker is connected.
uuuuu Microphone jackConnect an optional microphone to this jack.
GETTING ACQUAINTED
q
u i o !0!0 !1!1 !2!2 !3!3
w e r t y
iiiii keyPress to activate its programmable functionpage 7. The default setting is Antenna Tuner.
ooooo A keyPress to activate its programmable functionpage 7. The default setting is Squelch Level.
!0!0!0!0!0 B keyPress to activate its programmable functionpage 7. The default setting is Scan.
!1!1!1!1!1 <C keyPress to activate its programmable functionpage 7. The default setting is Clarifier.
!2!2!2!2!2 D> keyPress to activate its programmable functionpage 7. The default setting is Mode.
!3!3!3!3!3 keyPress to activate its programmable functionpage 7. The default setting is Menu.
REAR PANEL
q
r t
w e
TK-90 E 01-22 09.3.11, 4:52 PM4
5
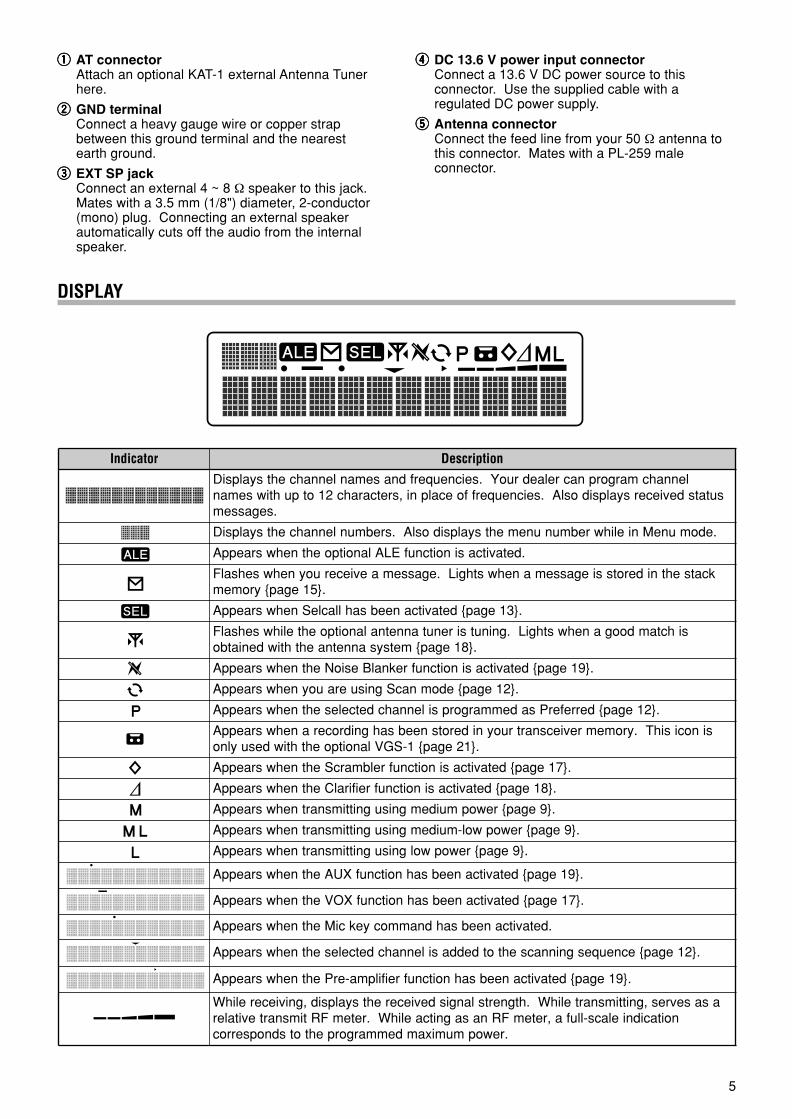
DISPLAY
qqqqq AT connectorAttach an optional KAT-1 external Antenna Tunerhere.
wwwww GND terminalConnect a heavy gauge wire or copper strapbetween this ground terminal and the nearestearth ground.
eeeee EXT SP jackConnect an external 4 ~ 8 Ω speaker to this jack.Mates with a 3.5 mm (1/8") diameter, 2-conductor(mono) plug. Connecting an external speakerautomatically cuts off the audio from the internalspeaker.
rrrrr DC 13.6 V power input connectorConnect a 13.6 V DC power source to thisconnector. Use the supplied cable with aregulated DC power supply.
ttttt Antenna connectorConnect the feed line from your 50 Ω antenna tothis connector. Mates with a PL-259 maleconnector.
rotacidnI noitpircseDlennahcmargorpnacrelaedruoY.seicneuqerfdnasemanlennahcehtsyalpsiD
sutatsdeviecersyalpsidoslA.seicneuqerffoecalpni,sretcarahc21otpuhtiwseman.segassem
.edomuneMnielihwrebmununemehtsyalpsidoslA.srebmunlennahcehtsyalpsiD
.detavitcasinoitcnufELAlanoitpoehtnehwsraeppA
kcatsehtniderotssiegassemanehwsthgiL.egassemaevieceruoynehwsehsalF.51egapyromem
.31egapdetavitcaneebsahllacleSnehwsraeppA
sihctamdooganehwsthgiL.gninutsirenutannetnalanoitpoehtelihwsehsalF.81egapmetsysannetnaehthtiwdeniatbo
.91egapdetavitcasinoitcnufreknalBesioNehtnehwsraeppA
.21egapedomnacSgnisuerauoynehwsraeppA
.21egapderreferPsademmargorpsilennahcdetcelesehtnehwsraeppA
sinocisihT.yromemreviecsnartruoyniderotsneebsahgnidroceranehwsraeppA.12egap1-SGVlanoitpoehthtiwdesuylno
.71egapdetavitcasinoitcnufrelbmarcSehtnehwsraeppA
.81egapdetavitcasinoitcnufreifiralCehtnehwsraeppA
.9egaprewopmuidemgnisugnittimsnartnehwsraeppA
.9egaprewopwol-muidemgnisugnittimsnartnehwsraeppA
.9egaprewopwolgnisugnittimsnartnehwsraeppA
.91egapdetavitcaneebsahnoitcnufXUAehtnehwsraeppA
.71egapdetavitcaneebsahnoitcnufXOVehtnehwsraeppA
.detavitcaneebsahdnammocyekciMehtnehwsraeppA
.21egapecneuqesgninnacsehtotdeddasilennahcdetcelesehtnehwsraeppA
.91egapdetavitcaneebsahnoitcnufreifilpma-erPehtnehwsraeppA
asasevres,gnittimsnartelihW.htgnertslangisdeviecerehtsyalpsid,gniviecerelihWnoitacidnielacs-llufa,retemFRnasagnitcaelihW.retemFRtimsnartevitaler
.rewopmumixamdemmargorpehtotsdnopserroc
TK-90 E 01-22 09.3.11, 4:52 PM5
6
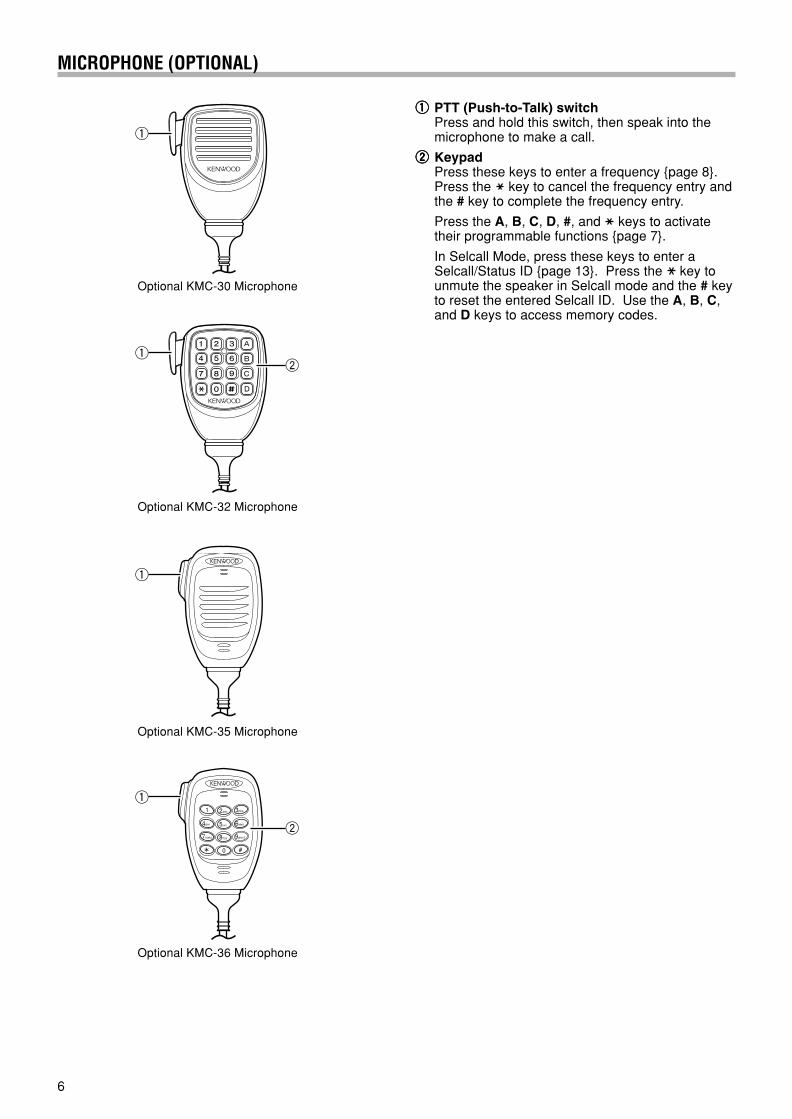
MICROPHONE (OPTIONAL)
q
qw
q
q
w
qqqqq PTT (Push-to-Talk) switchPress and hold this switch, then speak into themicrophone to make a call.
wwwww KeypadPress these keys to enter a frequency page 8.Press the key to cancel the frequency entry andthe # key to complete the frequency entry.
Press the A, B, C, D, #, and keys to activatetheir programmable functions page 7.
In Selcall Mode, press these keys to enter aSelcall/Status ID page 13. Press the key tounmute the speaker in Selcall mode and the # keyto reset the entered Selcall ID. Use the A, B, C,and D keys to access memory codes.
Optional KMC-30 Microphone
Optional KMC-32 Microphone
Optional KMC-35 Microphone
Optional KMC-36 Microphone
TK-90 E 01-22 09.3.11, 4:52 PM6
7
PROGRAMMABLE FUNCTIONSThe , A, B, <C, D>, , and optional microphone A,B, C, and D keys can be programmed with thefunctions listed below. The microphone # and keyscan be programmed only with the Channel Up/Downand Volume Up/Down functions. Please contact yourdealer for further details on these functions.
• ALE 1
• ALE Direct Call 1 ~ 4 1
• ALE Operation Mode 1
• Antenna Tuner
• Anti-VOX Gain
• Auto Recording 2
• AUX
• Call Type
• Channel Down
• Channel Up
• Clarifier
• Direct Call 1 ~ 4
• Direct CH 1 ~ 4
• Direct Status Call 1 ~ 4
• Display Character
• Emergency 3
• LCD Brightness
• Menu
• Mode
• Monitor
• Noise Blanker
• None
• Playback 1 ~ 4 2
• Pre-amplifier/ Attenuator
• Scan
• Scan Delete/Add
• Scrambler
• Selcall
• Squelch Level
• Transmit Power
• VFO
• Volume Down
• Volume Up
• VOX
• VOX Delay
• VOX Gain1 “ALE”, “ALE Direct Call 1 ~ 4” and “ALE Operation Mode” can be
programmed only when the optional KPE-2 unit has beeninstalled.
2 “Auto Recording” and “Playback 1 ~ 4” can be programmed onlywhen the optional VGS-1 unit has been installed.
3 “Emergency” can be programmed only on the key.
TK-90 E 01-22 09.3.11, 4:52 PM7
8
SWITCHING POWER ON/ OFFPress and hold the switch to switch the transceiverON.
• A beep sounds and the power-on messagemomentarily appears.
BASIC OPERATIONS
2 Enter your desired frequency using a microphonekeypad (0 ~ 9).• Direct entry only allows you to enter down to the 10’s
value; 0 is automatically selected for the 1’s value.
USB
DATA
LSB
FSK
CW
AM
Press and hold the switch again to switch thetransceiver OFF.
ADJUSTING THE VOLUMEPress the VOL key to increase the volume and theVOL key to decrease the volume.
• Additionally, you can press and hold the VOL / keys to continuously change the volume level,
rather than adjusting it by only 1 step at a time.
SELECTING A CHANNELPress the CH key to increase the channel numberand the CH key to decrease the channel number.
• Additionally, you can press and hold the CH / keys to continuously change the channel number,rather than changing it by only 1 step at a time.
DIRECT FREQUENCY ENTRY
Besides using the CH / keys to select yourpre-programmed memory channels, you can directlyenter a VFO station frequency using an optionalmicrophone keypad.
1 Press and hold the key programmed as VFO forapproximately 1 second.• The frequency of the currently selected channel
appears on the display along with the selectedoperating mode.
3 After entering a frequency using the microphonekeypad, press the # key.• To cancel the frequency entry, press the key; the
frequency will return to the original frequency beforeyou started to enter your new frequency.
4 To exit VFO mode and return to yourpreprogrammed memory channels, press and holdthe VFO key again.
VFO STEP VALUE
When using the CH / keys to select afrequency in VFO mode, the frequency is adjustedby a pre-determined step value. You can adjustthis step value as follows:
1 Press the key programmed as VFO.
2 Press the <C and D> keys to select the desireddigit (10’s, 100’s, 1000’s, etc.).
3 Press the CH / keys to select the desiredvalue for the digit you selected in the previousstep.• The default step value is 10 Hz.
4 Press the key to store the new step valueand exit the VFO step value adjustment.
SELECTING A MODEThe mode stored with each channel can betemporarily changed. To change the operating mode:
1 Press the key programmed as Mode.
2 Continuously press the Mode key to cycle throughthe various available operation modes asdisplayed below:
3 After selecting your desired mode, perform nooperations for 1 second to return to save theoperation mode and exit.
DATA OPERATION
Your dealer can program various settings for FSK andDATA modes. Ask your dealer for details.
TK-90 E 01-22 09.3.11, 4:52 PM8
9
TRANSMITTINGNote: You cannot transmit on channels that have only a receivefrequency stored.
1 Select the desired channel or frequency.
2 Press microphone PTT switch and speak into themicrophone. Release the PTT switch to receive.• For best sound quality at the receiving station, hold
the microphone approximately 3 ~ 4 cm (1.5 inches)from your mouth.
VOX (VOICE-OPERATED TRANSMISSION)VOX eliminates the need of manually switching totransmit mode each time you want to make a call.The transceiver automatically switches to transmitwhen the VOX feature senses that you have begunspeaking into the microphone.• When VOX is activated, the VOX icon
( ) appears on the display.
To properly use the VOX feature, you must properlyset up the VOX Gain, VOX Anti-Gain, and VOX DelayTime for your environment page 17.
CW KEYING
1 Select a CW channel.
2 With a CW key connected to the transceiver, begintransmitting by keying.• In order to use CW keying, your dealer must have
enabled the CW break-in function on yourtransceiver. The default setting for CW break-in isdisabled.
• When CW break-in is enabled, pressing the PTTswitch will not allow transmission. When CWbreak-in is disabled, pressing the PTT switch willallow transmission.
3 To end the transmission, stop keying.• After keying has stopped, the transceiver will remain
in transmit mode momentarily before returning toreceive mode.
CHANGING THE TRANSMIT POWER
If your call is too weak (or is using unnecessarily highpower), you can adjust the transmit power for yourchannel/frequency.
1 Press the key programmed as Transmit Power.
High Medium Medium-Low Low
2 Continuously press the Transmit Power key tocycle through the various power settings asdisplayed below:
• Your dealer may have set a power limit on somechannels. In this case, the settings available may belimited. Additionally, if a channel is set up asreceive-only, you will be unable to set a transmitpower for that channel.
• When using Low power, “L” appears on the display.When using Medium-Low power, “ML” appears onthe display. When using Medium power, “M” appearson the display. When using High power, no iconappears on the display.
TIME-OUT TIMER
If you continuously transmit for a period of time thatexceeds the programmed time set by your dealer (defaultis OFF), the transceiver will stop transmitting and an alerttone will sound. To stop the tone, return the transceiver toreceive mode.Your dealer can program the TOT time in the range of 3 to30 minutes.
OVERHEATING
The internal fan operates automatically to keep thetransceiver cool, especially during extendedtransmissions and extended operation using highpower. However, if the temperature rises too high, aninternal protection circuit will activate, reducing thetransceiver power.
• “HIGH–TEMP” appears on the display.
Note: When “HIGH–TEMP” appears on the display, ensure thatthe transceiver cooling fan is functioning.
TK-90 E 01-22 09.3.11, 4:52 PM9
10
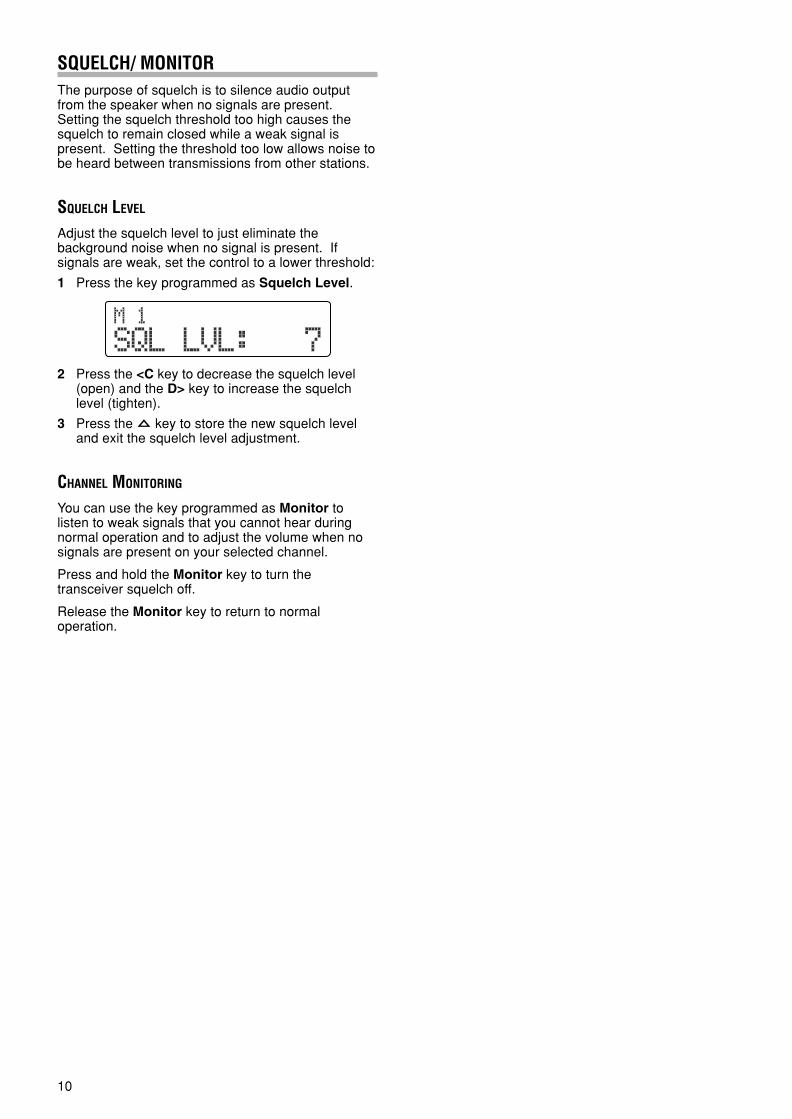
SQUELCH/ MONITORThe purpose of squelch is to silence audio outputfrom the speaker when no signals are present.Setting the squelch threshold too high causes thesquelch to remain closed while a weak signal ispresent. Setting the threshold too low allows noise tobe heard between transmissions from other stations.
SQUELCH LEVEL
Adjust the squelch level to just eliminate thebackground noise when no signal is present. Ifsignals are weak, set the control to a lower threshold:
1 Press the key programmed as Squelch Level.
2 Press the <C key to decrease the squelch level(open) and the D> key to increase the squelchlevel (tighten).
3 Press the key to store the new squelch leveland exit the squelch level adjustment.
CHANNEL MONITORING
You can use the key programmed as Monitor tolisten to weak signals that you cannot hear duringnormal operation and to adjust the volume when nosignals are present on your selected channel.
Press and hold the Monitor key to turn thetransceiver squelch off.
Release the Monitor key to return to normaloperation.
TK-90 E 01-22 09.3.11, 4:52 PM10
11
MENU CONFIGURATION
Menus 11 and 12 appear only if the Call Type (Menu 10)is set to ALE.
Following is a list of “Direct Access” keys that can beprogrammed for each of the Menus.
Many functions of this transceiver are selected orconfigured via a software-controlled Menu rather thanusing physical controls on the transceiver. Oncefamiliar with the Menu system, you will appreciate theversatility it offers.
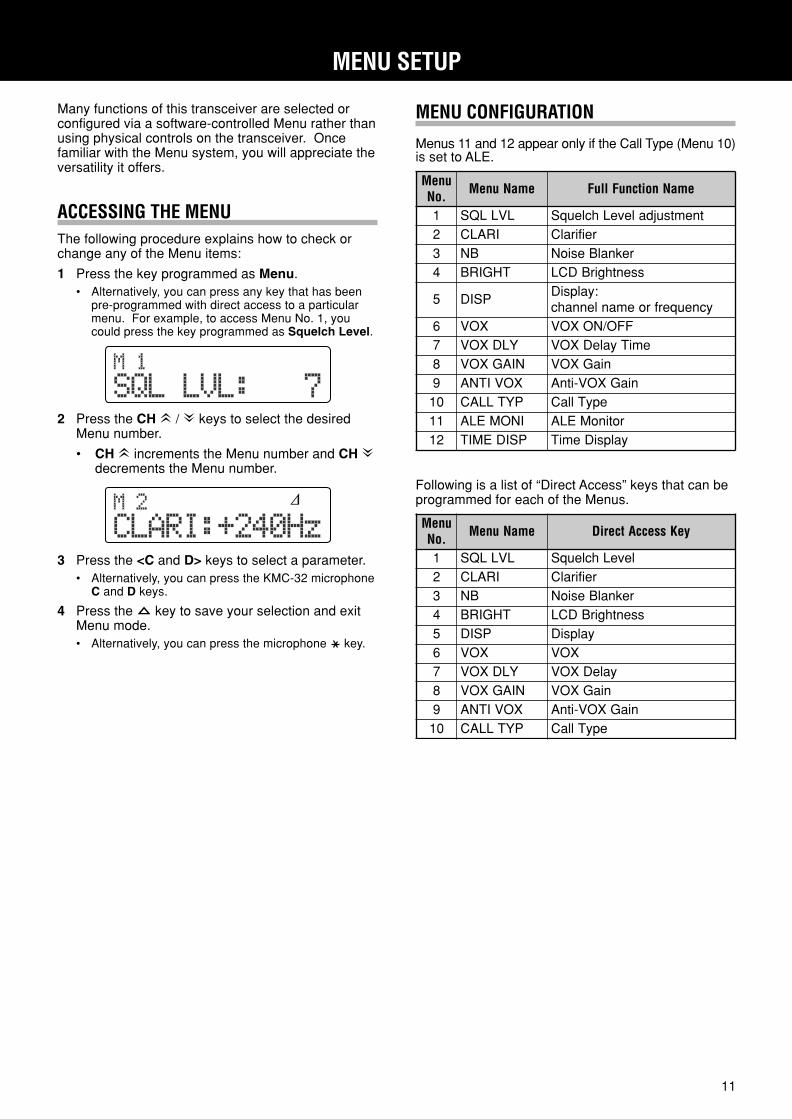
ACCESSING THE MENUThe following procedure explains how to check orchange any of the Menu items:
1 Press the key programmed as Menu.• Alternatively, you can press any key that has been
pre-programmed with direct access to a particularmenu. For example, to access Menu No. 1, youcould press the key programmed as Squelch Level.
MENU SETUP
uneM.oN emaNuneM emaNnoitcnuFlluF
1 LVLLQS tnemtsujdaleveLhcleuqS2 IRALC reifiralC3 BN reknalBesioN4 THGIRB ssenthgirBDCL
5 PSID:yalpsiD
ycneuqerfroemanlennahc6 XOV FFO/NOXOV7 YLDXOV emiTyaleDXOV8 NIAGXOV niaGXOV9 XOVITNA niaGXOV-itnA01 PYTLLAC epyTllaC11 INOMELA rotinoMELA21 PSIDEMIT yalpsiDemiT
uneM.oN emaNuneM yeKsseccAtceriD
1 LVLLQS leveLhcleuqS2 IRALC reifiralC3 BN reknalBesioN4 THGIRB ssenthgirBDCL5 PSID yalpsiD6 XOV XOV7 YLDXOV yaleDXOV8 NIAGXOV niaGXOV9 XOVITNA niaGXOV-itnA01 PYTLLAC epyTllaC
2 Press the CH / keys to select the desiredMenu number.
• CH increments the Menu number and CH decrements the Menu number.
3 Press the <C and D> keys to select a parameter.• Alternatively, you can press the KMC-32 microphone
C and D keys.
4 Press the key to save your selection and exitMenu mode.• Alternatively, you can press the microphone key.
TK-90 E 01-22 09.3.11, 4:52 PM11
12
Scan allows each of the channels that has a receivefrequency stored to be automatically monitored foractivity. Channels must be added to the scanningsequence in order to be scanned.
To activate Scan, press the key programmed asScan.• The icon appears on the display.• The channel add indicator ( ) will appear
on the display when the selected channel is added tothe scan sequence.
• If only one channel is added to the scan sequence orhas a frequency stored, pressing the Scan key causesan error tone to sound and Scan does not operate.
To stop scanning, press the Scan key again.
BUSY FREQUENCY STOPThe transceiver will automatically pause on a channelwhen a signal is detected. The transceiver willremain on the busy channel for either a short time oruntil the signal drops out, depending on which ScanResume type your dealer has set up (see below).• The squelch must be adjusted to the noise threshold
point with no signals present for Busy Frequency Stop tooperate.
When the transceiver has paused on a channel, youcan transmit by pressing the microphone PTT switch.Depending on your dealer settings, Scan may eitherend when you transmit or continue to operate. IfScan is set to continue even after transmitting, then itwill remain on the current channel for apredetermined time before continuing. This time isset so that if a signal re-appears on the channel, or ifyou transmit again, Scan will remain on the currentchannel until the signal either drops out or you stoptransmitting.
SCAN RESUME TYPE
Scan Resume controls when the transceivercontinues scanning after stopping due on a busychannel.
• Time-Operated Scan: After stopping on a busychannel, Scan resumes after a predeterminedtime (set by your dealer) whether or not the signalis still present on the channel.
• Carrier-Operated Scan: The transceiver remainson the busy channel until the signal ends. Scanresumes after a predetermined time (set by yourdealer) after the signal has dropped out.
SCAN
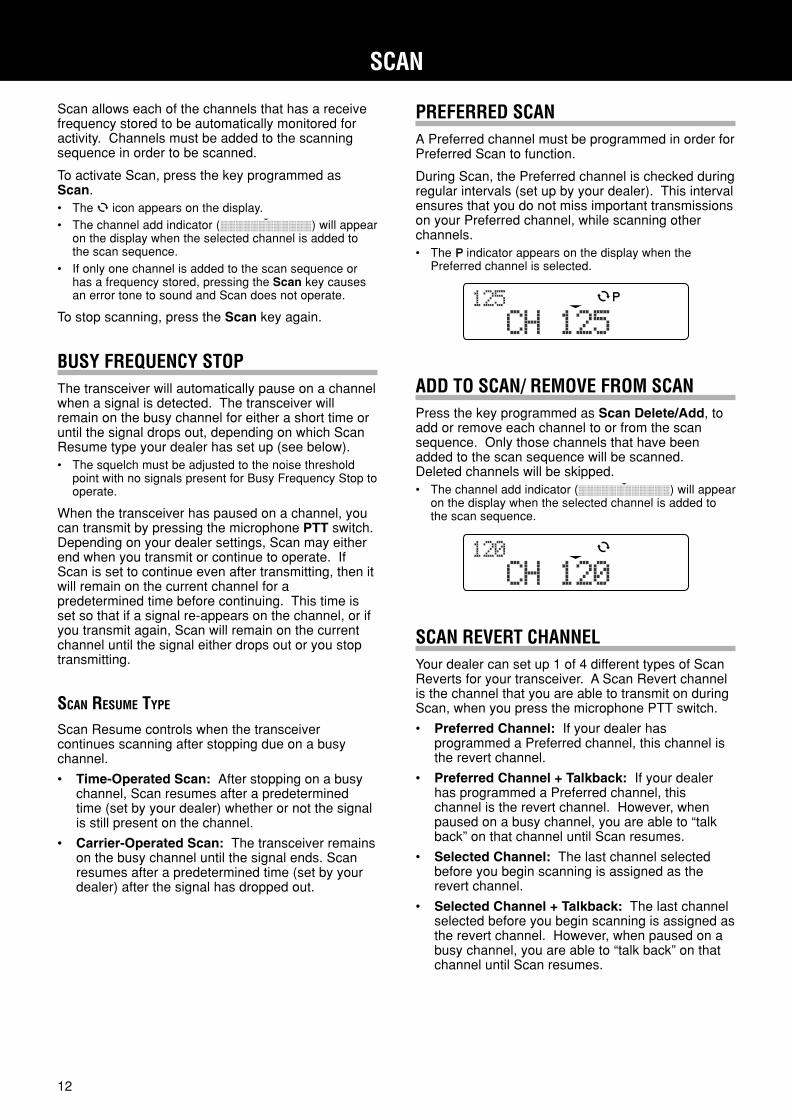
PREFERRED SCANA Preferred channel must be programmed in order forPreferred Scan to function.
During Scan, the Preferred channel is checked duringregular intervals (set up by your dealer). This intervalensures that you do not miss important transmissionson your Preferred channel, while scanning otherchannels.• The indicator appears on the display when the
Preferred channel is selected.
ADD TO SCAN/ REMOVE FROM SCANPress the key programmed as Scan Delete/Add, toadd or remove each channel to or from the scansequence. Only those channels that have beenadded to the scan sequence will be scanned.Deleted channels will be skipped.• The channel add indicator ( ) will appear
on the display when the selected channel is added tothe scan sequence.
SCAN REVERT CHANNELYour dealer can set up 1 of 4 different types of ScanReverts for your transceiver. A Scan Revert channelis the channel that you are able to transmit on duringScan, when you press the microphone PTT switch.
• Preferred Channel: If your dealer hasprogrammed a Preferred channel, this channel isthe revert channel.
• Preferred Channel + Talkback: If your dealerhas programmed a Preferred channel, thischannel is the revert channel. However, whenpaused on a busy channel, you are able to “talkback” on that channel until Scan resumes.
• Selected Channel: The last channel selectedbefore you begin scanning is assigned as therevert channel.
• Selected Channel + Talkback: The last channelselected before you begin scanning is assigned asthe revert channel. However, when paused on abusy channel, you are able to “talk back” on thatchannel until Scan resumes.
TK-90 E 01-22 09.3.11, 4:52 PM12
13
SELECTIVE CALLS
A Selective Call, or Selcall, is a voice call to aparticular station or group of stations.
ACTIVATING SELCALL MODETo activate Selcall Mode, access Menu No. 10 (CallType) page 11 and set the call type to Selcall.
MANUAL SELCALLSIf your dealer has programmed your transceiver witha list of stations, you can manually select a station tosend a selcall.
SELECTING A STATION USING THE TRANSCEIVER KEYS
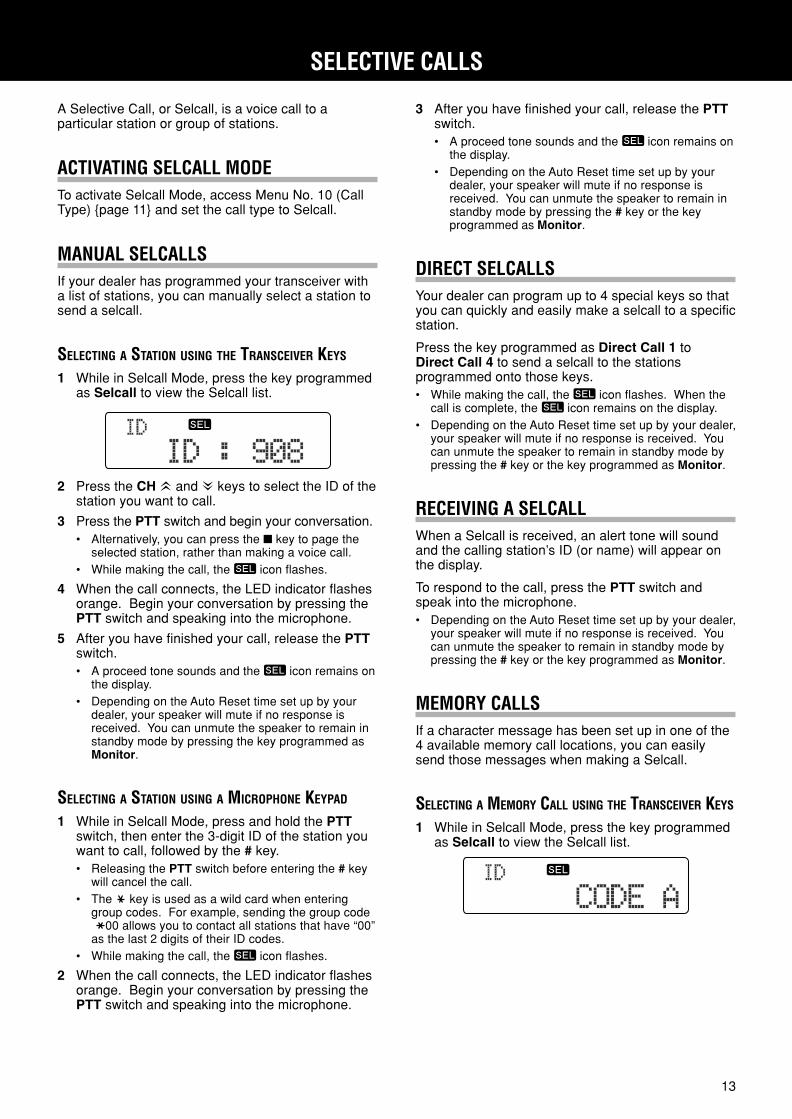
1 While in Selcall Mode, press the key programmedas Selcall to view the Selcall list.
3 After you have finished your call, release the PTTswitch.• A proceed tone sounds and the icon remains on
the display.• Depending on the Auto Reset time set up by your
dealer, your speaker will mute if no response isreceived. You can unmute the speaker to remain instandby mode by pressing the # key or the keyprogrammed as Monitor.
DIRECT SELCALLSYour dealer can program up to 4 special keys so thatyou can quickly and easily make a selcall to a specificstation.
Press the key programmed as Direct Call 1 toDirect Call 4 to send a selcall to the stationsprogrammed onto those keys.• While making the call, the icon flashes. When the
call is complete, the icon remains on the display.• Depending on the Auto Reset time set up by your dealer,
your speaker will mute if no response is received. Youcan unmute the speaker to remain in standby mode bypressing the # key or the key programmed as Monitor.
RECEIVING A SELCALLWhen a Selcall is received, an alert tone will soundand the calling station’s ID (or name) will appear onthe display.
To respond to the call, press the PTT switch andspeak into the microphone.• Depending on the Auto Reset time set up by your dealer,
your speaker will mute if no response is received. Youcan unmute the speaker to remain in standby mode bypressing the # key or the key programmed as Monitor.
MEMORY CALLSIf a character message has been set up in one of the4 available memory call locations, you can easilysend those messages when making a Selcall.
SELECTING A MEMORY CALL USING THE TRANSCEIVER KEYS
1 While in Selcall Mode, press the key programmedas Selcall to view the Selcall list.
2 Press the CH and keys to select the ID of thestation you want to call.
3 Press the PTT switch and begin your conversation.• Alternatively, you can press the key to page the
selected station, rather than making a voice call.• While making the call, the icon flashes.
4 When the call connects, the LED indicator flashesorange. Begin your conversation by pressing thePTT switch and speaking into the microphone.
5 After you have finished your call, release the PTTswitch.• A proceed tone sounds and the icon remains on
the display.• Depending on the Auto Reset time set up by your
dealer, your speaker will mute if no response isreceived. You can unmute the speaker to remain instandby mode by pressing the key programmed asMonitor.
SELECTING A STATION USING A MICROPHONE KEYPAD
1 While in Selcall Mode, press and hold the PTTswitch, then enter the 3-digit ID of the station youwant to call, followed by the # key.• Releasing the PTT switch before entering the # key
will cancel the call.• The key is used as a wild card when entering
group codes. For example, sending the group code00 allows you to contact all stations that have “00”
as the last 2 digits of their ID codes.• While making the call, the icon flashes.
2 When the call connects, the LED indicator flashesorange. Begin your conversation by pressing thePTT switch and speaking into the microphone.
TK-90 E 01-22 09.3.11, 4:52 PM13
14
2 Press the CH and keys to select CODE A toCODE D.• Press the D> key to view the character message of
the selected code, and the <C key to return to thecode selection.
MANUAL STATUS CALLSYou can send and receive 2-digit Status codes whichmay be decided in your talk group. Codes cancontain up to 12 alphanumeric character messages.Status codes range from 10 to 99 (80 ~ 99 arereserved for special messages).
MAKING A STATUS CALL USING THE TRANSCEIVER KEYS
1 While in Selcall Mode, press the key programmedas Selcall to view the Selcall list.
4 Press the CH and keys to select the statusyou want to transmit.
5 Press the key or the PTT switch to send thestatus call.• While making the call, the icon flashes and
“SEND DATA” appears on the display.• “COMPLETE” appears on the display when the call
has been successfully transmitted.
• If the call cannot go through, “NO REPLY” appearson the display.
MAKING A STATUS CALL USING A MICROPHONE KEYPAD
1 While in Selcall Mode, press and hold the PTTswitch, then enter the 3-digit ID of the station youwant to call.
2 While continuing to hold the PTT switch, press thekey to enter Status entry mode.
3 While continuing to hold the PTT switch, enter the2-digit ID number of the status you want totransmit.
4 While continuing to hold the PTT switch, press the# key to send the status call.• Releasing the PTT switch before entering the # key
will cancel the call.• While making the call, the icon flashes and
“SEND DATA” appears on the display.• “COMPLETE” appears on the display when the call
has been successfully transmitted.• If the call cannot go through, “NO REPLY” appears
on the display.
3 Press the key or the PTT switch to send themessage.• While making the call, the icon flashes.
4 When the call connects, the LED indicator flashesorange. Begin your conversation by pressing thePTT switch and speaking into the microphone.• A proceed tone sounds and the icon remains on
the display.
5 After you have finished your call, release the PTTswitch.• Depending on the Auto Reset time set up by your
dealer, your speaker will mute if no response isreceived. You can unmute the speaker to remain instandby mode by pressing the key programmed asMonitor.
SELECTING A MEMORY CALL USING A MICROPHONE KEYPAD
1 While in Selcall Mode, press and hold the PTTswitch, then enter the # key, key A to D (to selectthe respective memory location), followed by the #key again• Releasing the PTT switch before entering the final #
key will cancel the call.• While making the call, the icon flashes.
2 When the call connects, the LED indicator flashesorange. Begin your conversation by pressing thePTT switch and speaking into the microphone.• A proceed tone sounds and the icon remains on
the display.
3 After you have finished your call, release the PTTswitch.• Depending on the Auto Reset time set up by your
dealer, your speaker will mute if no response isreceived. You can unmute the speaker to remain instandby mode by pressing the # key or the keyprogrammed as Monitor.
2 Press the CH and keys to select the ID of thestation you want to call.
3 Press the D> key to view the Status list.
TK-90 E 01-22 09.3.11, 4:52 PM14
15
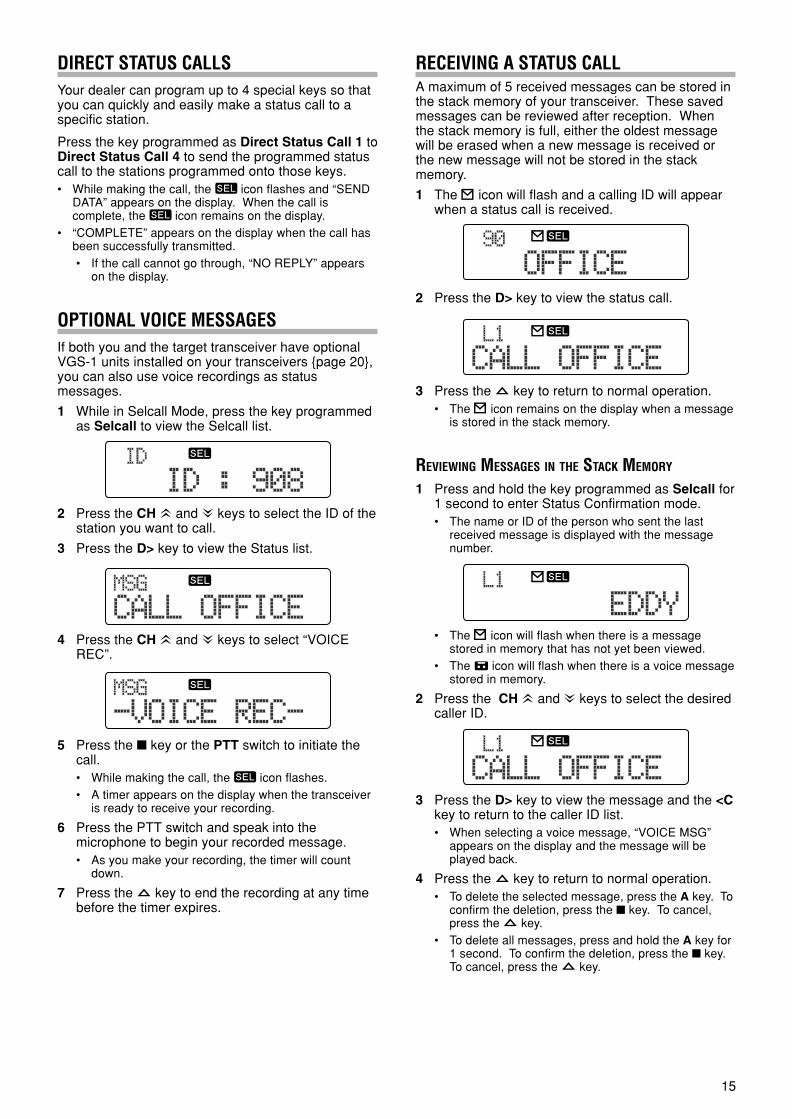
RECEIVING A STATUS CALLA maximum of 5 received messages can be stored inthe stack memory of your transceiver. These savedmessages can be reviewed after reception. Whenthe stack memory is full, either the oldest messagewill be erased when a new message is received orthe new message will not be stored in the stackmemory.
1 The icon will flash and a calling ID will appearwhen a status call is received.
DIRECT STATUS CALLSYour dealer can program up to 4 special keys so thatyou can quickly and easily make a status call to aspecific station.
Press the key programmed as Direct Status Call 1 toDirect Status Call 4 to send the programmed statuscall to the stations programmed onto those keys.• While making the call, the icon flashes and “SEND
DATA” appears on the display. When the call iscomplete, the icon remains on the display.
• “COMPLETE” appears on the display when the call hasbeen successfully transmitted.• If the call cannot go through, “NO REPLY” appears
on the display.
OPTIONAL VOICE MESSAGESIf both you and the target transceiver have optionalVGS-1 units installed on your transceivers page 20,you can also use voice recordings as statusmessages.
1 While in Selcall Mode, press the key programmedas Selcall to view the Selcall list.
4 Press the CH and keys to select “VOICEREC”.
3 Press the key to return to normal operation.• The icon remains on the display when a message
is stored in the stack memory.
REVIEWING MESSAGES IN THE STACK MEMORY
1 Press and hold the key programmed as Selcall for1 second to enter Status Confirmation mode.• The name or ID of the person who sent the last
received message is displayed with the messagenumber.
2 Press the CH and keys to select the ID of thestation you want to call.
3 Press the D> key to view the Status list.
5 Press the key or the PTT switch to initiate thecall.• While making the call, the icon flashes.• A timer appears on the display when the transceiver
is ready to receive your recording.
6 Press the PTT switch and speak into themicrophone to begin your recorded message.• As you make your recording, the timer will count
down.
7 Press the key to end the recording at any timebefore the timer expires.
2 Press the D> key to view the status call.
• The icon will flash when there is a messagestored in memory that has not yet been viewed.
• The icon will flash when there is a voice messagestored in memory.
2 Press the CH and keys to select the desiredcaller ID.
3 Press the D> key to view the message and the <Ckey to return to the caller ID list.• When selecting a voice message, “VOICE MSG”
appears on the display and the message will beplayed back.
4 Press the key to return to normal operation.• To delete the selected message, press the A key. To
confirm the deletion, press the key. To cancel,press the key.
• To delete all messages, press and hold the A key for1 second. To confirm the deletion, press the key.To cancel, press the key.
TK-90 E 01-22 09.3.11, 4:52 PM15

16
SEND THE GPS DATAIf a GPS unit has been installed and is set up by yourdealer, your transceiver may automatically transmityour GPS data.
MANUALLY SENDING THE GPS DATA
1 While in Selcall Mode, press the key programmedas Selcall to view the Selcall list.
2 Press the CH and keys to select the ID of thestation you want to call.
3 Press the D> key to view the Status list.
4 Press the CH and keys to select “GPSDATA”.
5 Press the key or the PTT switch to send theGPS data.• While making the call, the icon flashes and
“SEND DATA” appears on the display.• “COMPLETE” appears on the display when the call
has been successfully transmitted.
GPS POLLING
If your transceiver receives a GPS Polling request, itwill automatically transmit your GPS data to therequesting station.• “SEND DATA” appears on the display until the data has
been transmitted.
SHORT TEXT MESSAGESTo send and receive short text messages, you mustconnect the transceiver to a PC. Ask your dealer fordetails.• Short text messages can contain a maximum of 48
characters.
TK-90 E 01-22 09.3.11, 4:52 PM16
17
ADVANCED OPERATIONS
DIRECT CHANNELYour dealer can program up to 4 keys to allow you toquickly and easily jump to a frequently used channel.Press the keys programmed as Direct CH 1 to DirectCH 4 to select the memory channels they have beenprogrammed to access.
SCRAMBLERIf your dealer has installed an optional scramblerboard, you can make private calls to others. Althoughthe scrambler function does not offer completeprivacy with your calls, it does prevent others fromeasily listening in on your calls. When activated, thetransceiver distorts your voice so that anybodylistening to your conversation will be unable to clearlyhear what you are saying.
In order for members of your own group to clearlyhear your call while you are using the scrambler, allother members must have the same scrambler codeset up on their transceivers. This distorts everybody’svoice while transmitting and corrects the voicemessage on your own transceiver when you receivethe call.
To activate the scrambler, press the key programmedas Scrambler.• The icon appears on the display while the scrambler
is active.
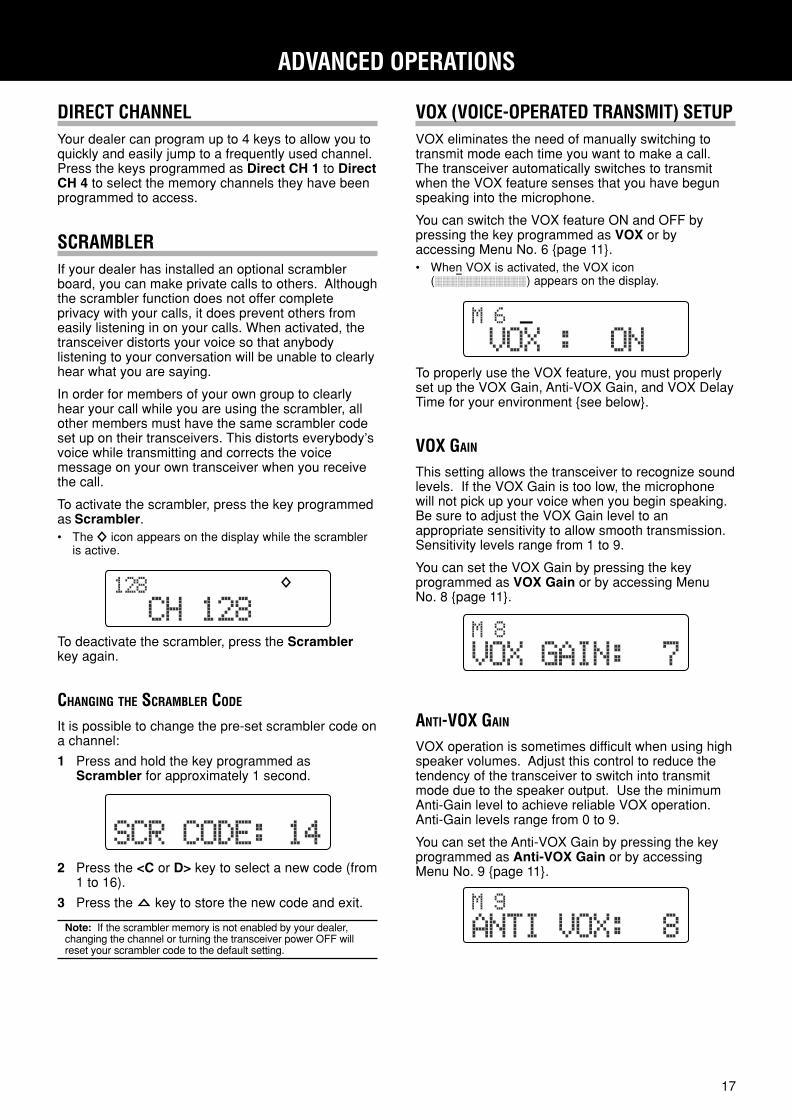
VOX (VOICE-OPERATED TRANSMIT) SETUPVOX eliminates the need of manually switching totransmit mode each time you want to make a call.The transceiver automatically switches to transmitwhen the VOX feature senses that you have begunspeaking into the microphone.
You can switch the VOX feature ON and OFF bypressing the key programmed as VOX or byaccessing Menu No. 6 page 11.• When VOX is activated, the VOX icon
( ) appears on the display.
To deactivate the scrambler, press the Scramblerkey again.
CHANGING THE SCRAMBLER CODE
It is possible to change the pre-set scrambler code ona channel:
1 Press and hold the key programmed asScrambler for approximately 1 second.
2 Press the <C or D> key to select a new code (from1 to 16).
3 Press the key to store the new code and exit.
Note: If the scrambler memory is not enabled by your dealer,changing the channel or turning the transceiver power OFF willreset your scrambler code to the default setting.
To properly use the VOX feature, you must properlyset up the VOX Gain, Anti-VOX Gain, and VOX DelayTime for your environment see below.
VOX GAIN
This setting allows the transceiver to recognize soundlevels. If the VOX Gain is too low, the microphonewill not pick up your voice when you begin speaking.Be sure to adjust the VOX Gain level to anappropriate sensitivity to allow smooth transmission.Sensitivity levels range from 1 to 9.
You can set the VOX Gain by pressing the keyprogrammed as VOX Gain or by accessing MenuNo. 8 page 11.
ANTI-VOX GAIN
VOX operation is sometimes difficult when using highspeaker volumes. Adjust this control to reduce thetendency of the transceiver to switch into transmitmode due to the speaker output. Use the minimumAnti-Gain level to achieve reliable VOX operation.Anti-Gain levels range from 0 to 9.
You can set the Anti-VOX Gain by pressing the keyprogrammed as Anti-VOX Gain or by accessingMenu No. 9 page 11.
TK-90 E 01-22 09.3.11, 4:52 PM17

18
2 Within 20 seconds, tuning will complete.• A tone sounds, the transmit indicator turns off, and
the icon stops blinking and remains on thedisplay.
• If tuning does not complete within 20 seconds, thetuning action will stop, an error tone will sound, andthe antenna will not be tuned to the selectedchannel.
If set up by your dealer, each time you press the PTTswitch to transmit, the tuning process will begin if theantenna has not been tuned to the selected channel.• To cancel the tuning process, press the Antenna Tuner
key at any time.
EMERGENCYIf your transceiver has been programmed with theEmergency function, you can make emergency calls.Your dealer can set up the transceiver Emergencyfunction to be accessed via voice, CW, or selcall.Refer to the appropriate section below, depending onhow your transceiver has been set up.
Note: The Emergency feature can be set up onto a foot switch,attached to the AUX terminal, for vehicle use.
1 Press and hold the key programmed asEmergency.• Depending on the delay time programmed into your
transceiver, the length of time you must hold theEmergency key will vary.
• When the transceiver enters Emergency mode, thetransceiver will change to the Emergency channeland begin transmitting based on how the transceiveris set up by your dealer. Transmit periods are alsoset by your dealer.
• Depending on your transceiver settings, the displaymay either remain unchanged when you enterEmergency mode, or a new display with apreprogrammed text message will appear.
2 To exit Emergency mode, press and hold theEmergency key again.• If the Emergency mode completes the preset
number of cycles, Emergency mode willautomatically end and the transceiver will return tothe channel that was in use before Emergency modewas entered.
Note: Your dealer can set a beginning of transmit and end of
transmit tone for the transceiver. Your dealer can set the transceiver to emit tones and received
signals as normal or mute the speaker during Emergencyoperation.
CLARIFIERThe Clarifier control changes the receive frequency,without affecting the transmit frequency, by up to±400 Hz.
You can set the Clarifier by pressing the keyprogrammed as Clarifier or by accessing MenuNo. 2 page 11.• The Clarifier value can be set between –400 Hz and
+400 Hz in steps of 10 Hz.• The icon appears on the display while the Clarifier is
set to a value other than 0 Hz.
VOX DELAY TIME
Set this duration to change the amount of time thatthe transceiver remains in transmit mode after youstop speaking. Set the duration long enough so thatit does not cut off the end of your call. Delay timesrange from 200 milliseconds to 3000 milliseconds(3 seconds), in steps of 200 milliseconds. You canalso set the VOX Delay Time to OFF.
You can set the VOX Delay Time by pressing the keyprogrammed as VOX Delay or by accessing MenuNo. 7 page 11.
ANTENNA TUNERIn order to use the Antenna Tuner function, you mustfirst attach an optional external KAT-1 antenna tunerto your transceiver.
1 Press and hold the key programmed as AntennaTuner for approximately 1 second to start tuning.• The transmit indicator lights red and the icon
appears on the display and blinks.• To cancel the tuning, press the Antenna Tuner key
at any time.
TK-90 E 01-22 09.3.11, 4:52 PM18
19
POWER-ON TEXTYour dealer may have programmed your transceiverto display a text message when the transceiver isturned on. This message will appear on the displaymomentarily before reverting to your regular channel/frequency operation display.
Pre-amp On Pre-amp/ ATT Off ATT On
PRE-AMPLIFIER/ ATTENUATORThe pre-amplifier allows you to boost the power of thereceived signal, and the attenuator attempts to cutout any interfering signals you may be receiving.
You can turn the pre-amplifier/ attenuator on or offusing the key programmed as Pre-amplifier/Attenuator. Depending on how each channel hasbeen set up by your dealer, pressing thePre-amplifier/ Attenuator key will cycle to the nextsetting, as displayed below.
• When the pre-amplifier is ON, the pre-amp icon( ) appears on the display. (When thepre-amp/ ATT is OFF or when ATT is ON, the icon doesnot appear on the display.)
• Changing the channel or frequency reverts the settingback to the programmed setting.
NOISE BLANKERThe Noise Blanker is effective in reducing oreliminating ignition and/or pulse-type noises.
You can turn the Noise Blanker ON or OFF bypressing the key programmed as Noise Blanker orby accessing Menu No. 3 page 11.• The icon appears on the display while the Noise
Blanker is ON.
LCD BRIGHTNESSYou can set the brightness of the display backlightand the key illumination by pressing the keyprogrammed as LCD Brightness or by accessingMenu No. 4 page 11.• The brightness levels can be set as High, Low, and Off.• The key illumination can be set only as on or off.
DISPLAY NAME/ FREQUENCYYou can select whether you want to show a channelname or the frequency of that channel on yourtransceiver display. You can change the displaysettings by pressing the key programmed as DisplayCharacter or by accessing Menu No. 5 page 11.• If your dealer has not set up a name for a particular
channel, the channel number will appear instead.
AUXILIARYIf a key has been programmed with the AUX function,you can press that key to turn the Auxiliary Port onand off. Ask your dealer for details.• When the Auxiliary Port is activated, the AUX indicator
( ) appears on the display.
TK-90 E 01-22 09.3.11, 4:52 PM19
20
VGS-1 OPTIONAL VOICE GUIDE & STORAGE UNIT
When using the optional VGS-1 voice guide &storage unit, you gain access to the transceiver’svoice recorder and voice announcement functions.Ask your dealer for details.
VOICE MEMOS
RECORDING A VOICE MEMO
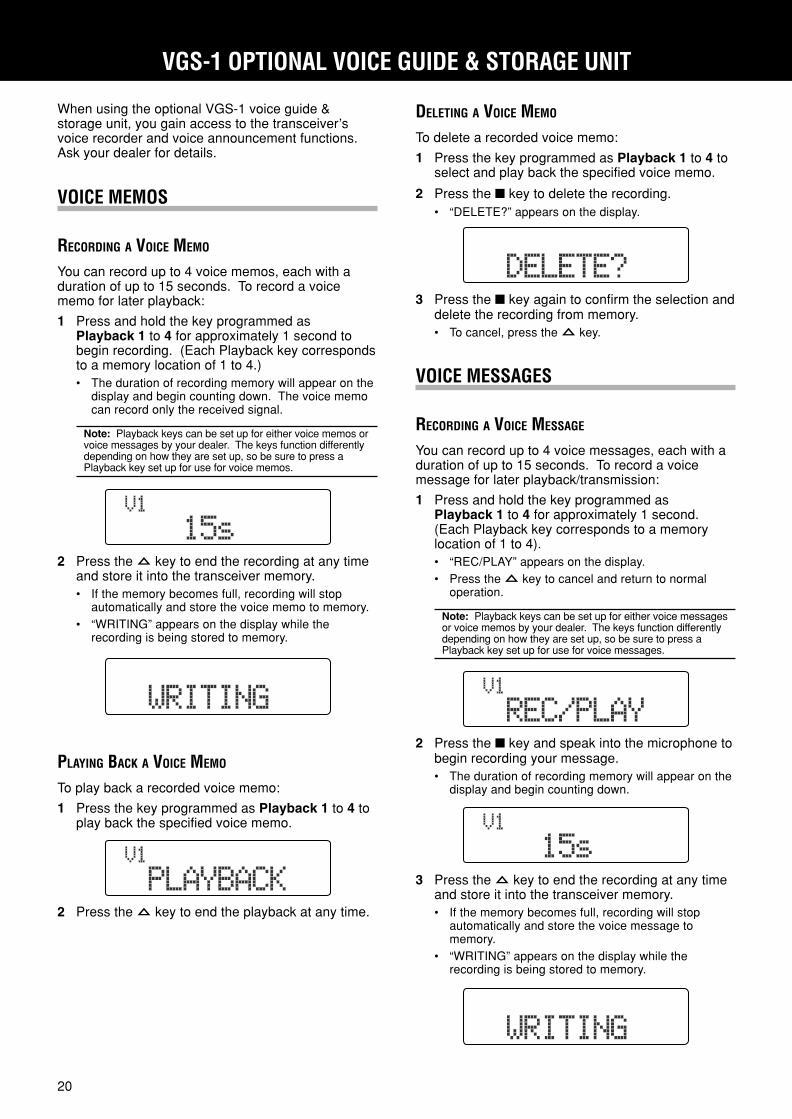
You can record up to 4 voice memos, each with aduration of up to 15 seconds. To record a voicememo for later playback:
1 Press and hold the key programmed asPlayback 1 to 4 for approximately 1 second tobegin recording. (Each Playback key correspondsto a memory location of 1 to 4.)• The duration of recording memory will appear on the
display and begin counting down. The voice memocan record only the received signal.
Note: Playback keys can be set up for either voice memos orvoice messages by your dealer. The keys function differentlydepending on how they are set up, so be sure to press aPlayback key set up for use for voice memos.
3 Press the key again to confirm the selection anddelete the recording from memory.• To cancel, press the key.
VOICE MESSAGES
RECORDING A VOICE MESSAGE
You can record up to 4 voice messages, each with aduration of up to 15 seconds. To record a voicemessage for later playback/transmission:
1 Press and hold the key programmed asPlayback 1 to 4 for approximately 1 second.(Each Playback key corresponds to a memorylocation of 1 to 4).• “REC/PLAY” appears on the display.• Press the key to cancel and return to normal
operation.
Note: Playback keys can be set up for either voice messagesor voice memos by your dealer. The keys function differentlydepending on how they are set up, so be sure to press aPlayback key set up for use for voice messages.
2 Press the key to end the recording at any timeand store it into the transceiver memory.• If the memory becomes full, recording will stop
automatically and store the voice memo to memory.• “WRITING” appears on the display while the
recording is being stored to memory.
PLAYING BACK A VOICE MEMO
To play back a recorded voice memo:
1 Press the key programmed as Playback 1 to 4 toplay back the specified voice memo.
2 Press the key to end the playback at any time.
DELETING A VOICE MEMO
To delete a recorded voice memo:
1 Press the key programmed as Playback 1 to 4 toselect and play back the specified voice memo.
2 Press the key to delete the recording.• “DELETE?” appears on the display.
2 Press the key and speak into the microphone tobegin recording your message.• The duration of recording memory will appear on the
display and begin counting down.
3 Press the key to end the recording at any timeand store it into the transceiver memory.• If the memory becomes full, recording will stop
automatically and store the voice message tomemory.
• “WRITING” appears on the display while therecording is being stored to memory.
TK-90 E 01-22 09.3.11, 4:52 PM20
21
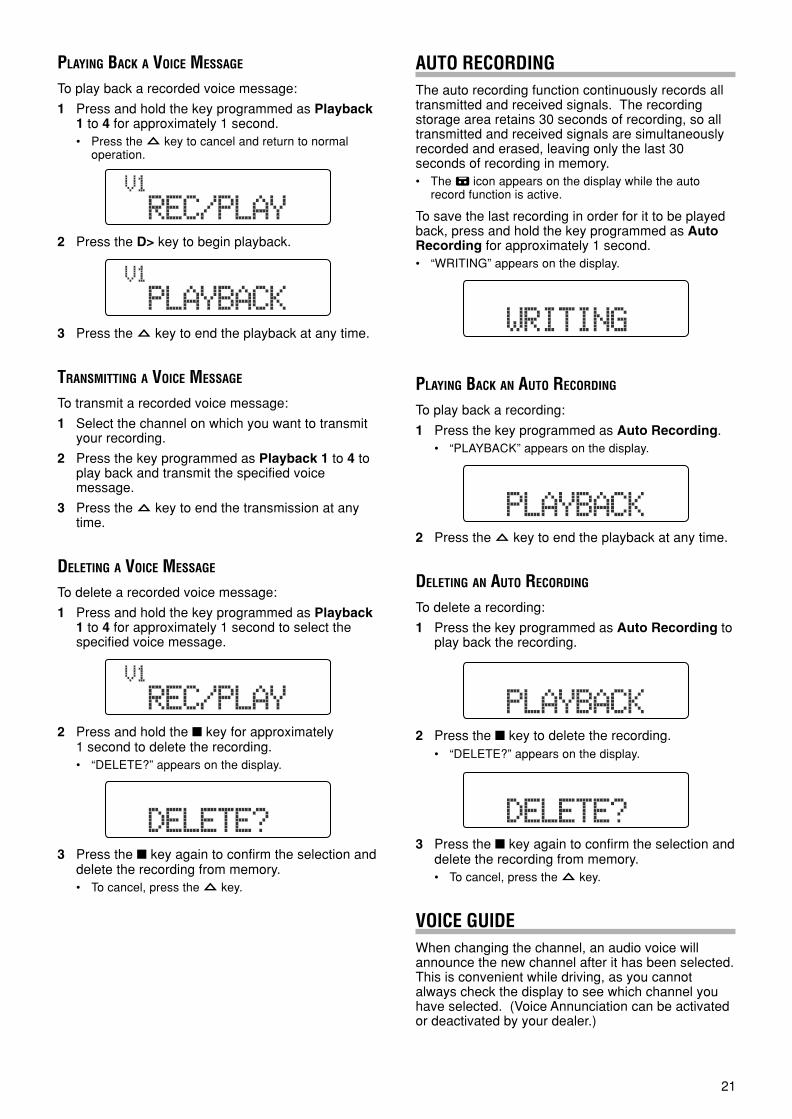
3 Press the key to end the playback at any time.
TRANSMITTING A VOICE MESSAGE
To transmit a recorded voice message:
1 Select the channel on which you want to transmityour recording.
2 Press the key programmed as Playback 1 to 4 toplay back and transmit the specified voicemessage.
3 Press the key to end the transmission at anytime.
DELETING A VOICE MESSAGE
To delete a recorded voice message:
1 Press and hold the key programmed as Playback1 to 4 for approximately 1 second to select thespecified voice message.
AUTO RECORDINGThe auto recording function continuously records alltransmitted and received signals. The recordingstorage area retains 30 seconds of recording, so alltransmitted and received signals are simultaneouslyrecorded and erased, leaving only the last 30seconds of recording in memory.• The icon appears on the display while the auto
record function is active.
To save the last recording in order for it to be playedback, press and hold the key programmed as AutoRecording for approximately 1 second.• “WRITING” appears on the display.
PLAYING BACK A VOICE MESSAGE
To play back a recorded voice message:
1 Press and hold the key programmed as Playback1 to 4 for approximately 1 second.• Press the key to cancel and return to normal
operation.
2 Press the D> key to begin playback.
2 Press and hold the key for approximately1 second to delete the recording.• “DELETE?” appears on the display.
3 Press the key again to confirm the selection anddelete the recording from memory.• To cancel, press the key.
PLAYING BACK AN AUTO RECORDING
To play back a recording:
1 Press the key programmed as Auto Recording.• “PLAYBACK” appears on the display.
2 Press the key to end the playback at any time.
DELETING AN AUTO RECORDING
To delete a recording:
1 Press the key programmed as Auto Recording toplay back the recording.
2 Press the key to delete the recording.• “DELETE?” appears on the display.
3 Press the key again to confirm the selection anddelete the recording from memory.• To cancel, press the key.
VOICE GUIDEWhen changing the channel, an audio voice willannounce the new channel after it has been selected.This is convenient while driving, as you cannotalways check the display to see which channel youhave selected. (Voice Annunciation can be activatedor deactivated by your dealer.)
TK-90 E 01-22 09.3.11, 4:52 PM21
22
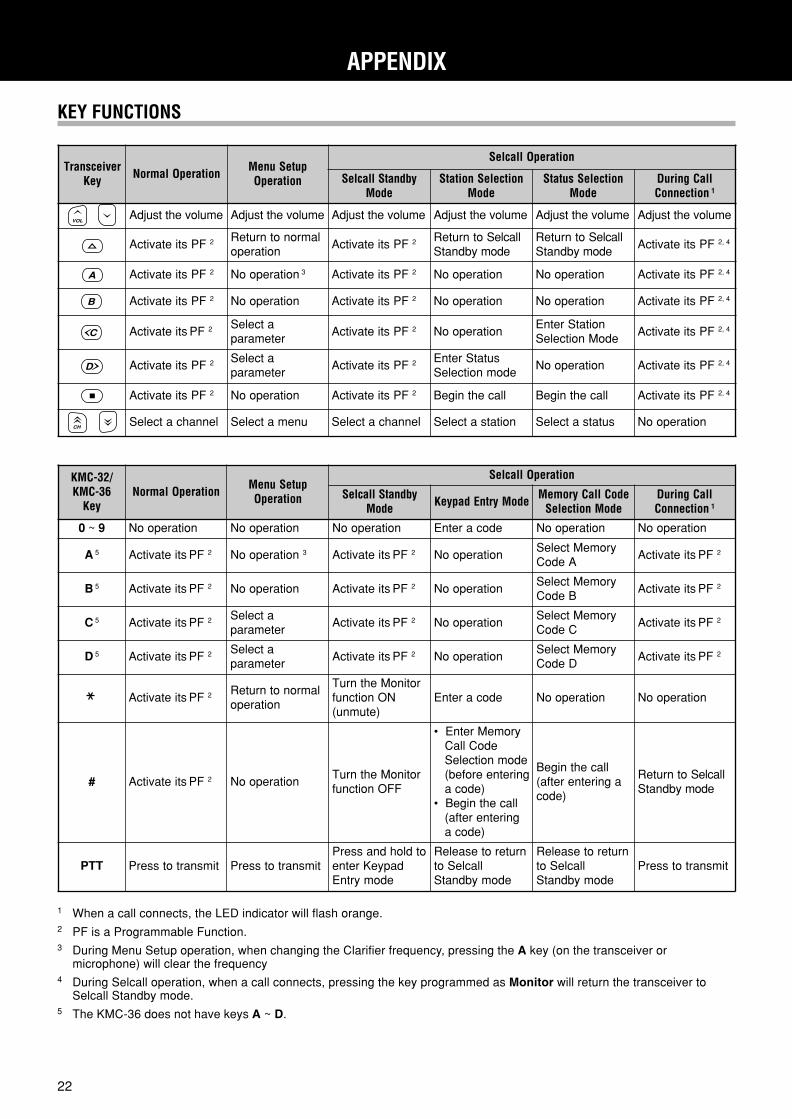
APPENDIX
KEY FUNCTIONS
reviecsnarTyeK noitarepOlamroN puteSuneM
noitarepO
noitarepOllacleS
ybdnatSllacleSedoM
noitceleSnoitatSedoM
noitceleSsutatSedoM
llaCgniruDnoitcennoC 1
emulovehttsujdA emulovehttsujdA emulovehttsujdA emulovehttsujdA emulovehttsujdA emulovehttsujdA
FPstietavitcA 2 lamronotnruteRnoitarepo
FPstietavitcA 2 otnruteR acleS llybdnatS edom
otnruteR acleS llybdnatS edom
FPstietavitcA 4,2
FPstietavitcA 2 noitarepooN 3 FPstietavitcA 2 noitarepooN noitarepooN FPstietavitcA 4,2
FPstietavitcA 2 noitarepooN FPstietavitcA 2 noitarepooN noitarepooN FPstietavitcA 4,2
stietavitcA FP 2 atceleSretemarap
FPstietavitcA 2 noitarepooNnoitatSretnE
edoMnoitceleSFPstietavitcA 4,2
FPstietavitcA 2 atceleSretemarap
FPstietavitcA 2 sutatSretnEedomnoitceleS
noitarepooN FPstietavitcA 4,2
FPstietavitcA 2 noitarepooN FPstietavitcA 2 llacehtnigeB llacehtnigeB FPstietavitcA 4,2
lennahcatceleS unematceleS lennahcatceleS noitatsatceleS sutatsatceleS noitarepooN
/23-CMK63-CMK
yeKnoitarepOlamroN puteSuneM
noitarepO
noitarepOllacleS
ybdnatSllacleSedoM edoMyrtnEdapyeK edoCllaCyromeM
edoMnoitceleSllaCgniruD
noitcennoC 1
0 ~ 9 noitarepooN noitarepooN noitarepooN edocaretnE noitarepooN noitarepooN
A 5 stietavitcA FP 2 noitarepooN 3 stietavitcA FP 2 noitarepooNyromeMtceleS
AedoCstietavitcA FP 2
B 5 stietavitcA FP 2 noitarepooN stietavitcA FP 2 noitarepooNyromeMtceleS
BedoCstietavitcA FP 2
C 5 stietavitcA FP 2 atceleSretemarap
stietavitcA FP 2 noitarepooNyromeMtceleS
CedoCstietavitcA FP 2
D 5 stietavitcA FP 2 atceleSretemarap
stietavitcA FP 2 noitarepooNyromeMtceleS
DedoCstietavitcA FP 2
stietavitcA FP 2 lamronotnruteRnoitarepo
rotinoMehtnruTNOnoitcnuf
)etumnu(edocaretnE noitarepooN noitarepooN
# stietavitcA FP 2 noitarepooNrotinoMehtnruT
FFOnoitcnuf
yromeMretnE•edoCllaC
edomnoitceleSgniretneerofeb(
)edocallacehtnigeB•gniretneretfa(
)edoca
llacehtnigeBagniretneretfa(
)edoc
otnruteR acleS llybdnatS edom
TTP timsnartotsserP timsnartotsserPotdlohdnasserP
dapyeKretneedomyrtnE
nruterotesaeleRllacleSot
edomybdnatS
nruterotesaeleRllacleSot
edomybdnatStimsnartotsserP
1 When a call connects, the LED indicator will flash orange.2 PF is a Programmable Function.3 During Menu Setup operation, when changing the Clarifier frequency, pressing the A key (on the transceiver or
microphone) will clear the frequency4 During Selcall operation, when a call connects, pressing the key programmed as Monitor will return the transceiver to
Selcall Standby mode.5 The KMC-36 does not have keys A ~ D.
TK-90 E 01-22 09.3.11, 4:52 PM22

TRANSCEPTOR HF
TK‑90MANUAL DE INSTRUCCIONES
ES
PA
ÑO
L

E-i
MUCHAS GRACIASGracias por elegir KENWOOD para sus aplicaciones detelecomunicación por radio. Creemos que este transceptorde fácil manejo le permitirá realizar comunicacionesseguras para que sus vehículos funcionen y su personaltrabaje con la mayor eficiencia posible.
Los transceptores KENWOOD incorporan lo último entecnología avanzada. Estamos seguros de que ustedquedará plenamente satisfecho de la calidad y lascaracterísticas de este producto.
AVISOS AL USUARIO La ley gubernamental prohíbe la operación de transmisores no
autorizados dentro de los territorios que se encuentren bajo el controldel gobierno.
La operación ilegal se castigará con multa y/o encarcelamiento.
Solicite la reparación solamente a un técnico cualificado.
SEGURIDAD: Es importante que el operador conozca yentienda los peligros comunes derivados del uso decualquier transceptor.
AMBIENTES EXPLOSIVOS (GASES, POLVO, HUMOS, etc.)Desconecte la alimentación del transceptor mientras manejecombustibles, o cuando haya estacionado en una gasolinera. Notransporte contenedores con combustible de reserva en el portaequipajesde su vehículo si lleva montado el transceptor en el área delportaequipajes.
LESIONES POR TRANSMISIONES DE RADIOFRECUENCIASNo opere su transceptor cuando haya alguna persona cerca o encontacto con la antena para evitar la posibilidad de que se produzcanquemaduras por alta frecuencia o lesiones físicas relacionadas.
CARTUCHOS DE DINAMITAOperar el transceptor a menos de 150 m (500 pies) de cartuchos dedinamita puede provocar su explosión. Desconecte la alimentación deltransceptor cuando se encuentre en un área donde se esténrealizando detonaciones o existan señales de “DESCONECTARRADIOS DE 2 VÍAS”. Si transporte cartuchos de detonación en suvehículo, asegúrese de que vayan encerrados en una caja metálicacon el interior acolchado. No transmita mientras se estén colocandolos cartuchos en el contenedor o se estén extrayendo de él.
PRECAUCIONESRespete las siguientes precauciones para evitar incendios,lesiones personales y daños en el transceptor.
• No intente configurar el transceptor mientras conduce; esdemasiado peligroso.
• No desmonte ni modifique el transceptor bajo ningún concepto.
• No exponga el transceptor a la luz directa del sol duranteperiodos de tiempo prolongados, ni lo coloque cerca decalefactores.
• No coloque el transceptor en zonas excesivamentepolvorientas, húmedas o mojadas, ni sobre superficiesinestables.
• Si se detecta un humo o olor anormales proveniente deltransceptor, desconecte la alimentación del transceptorinmediatamente y póngase en contacto con su proveedor deKENWOOD.
• El uso del transceptor mientras conduce puede infringir lasleyes de tráfico. Consulte y respete el reglamento de tráfico desu país.
• No utilice opciones no indicadas por KENWOOD.
¡El transceptor funciona sólo en sistemas de tierra negativos de 12 V!Compruebe la polaridad de la batería y el voltaje del vehículo antes deinstalar el transceptor.
Utilice únicamente el cable de alimentación CC suministrado o uncable de alimentación CC opcional de KENWOOD.
No introduzca objetos metálicos en el ventilador de refrigeración.
No corte ni extraiga el porta fusible del cable de alimentación CC. Unaconexión inadecuada y/o subida de tensión puede provocar humo oun incendio.
Para la seguridad de los pasajeros, instale el transceptor firmementeutilizando el soporte de montaje y el tornillo de forma que eltransceptor no se suelte en caso de colisión.
ADVERTENCIA
PRECAUCIÓN
ADVERTENCIA
TK-90 S 0i-ii 07.9.28, 6:59 PM1
E-ii
CONTENIDO
PREPARACIÓN / INSTALACIÓN ....................................... 1DESEMBALAJE Y COMPROBACIÓN DEL EQUIPO ... 1
ACCESORIOS SUMINISTRADOS .......................................... 1INSTALACIÓN DE LA ESTACIÓN BASE ...................... 1
ALMOHADILLAS PARA LA BASE .......................................... 1CONEXIÓN DE ANTENA ................................................... 1CONEXIÓN A TIERRA ...................................................... 1CONEXIÓN DE LA FUENTE DE ALIMENTACIÓN CC ................. 2
INSTALACIÓN MÓVIL................................................... 2INSTALACIÓN DEL TRANSCEPTOR ....................................... 2CONEXIÓN DE ANTENA ................................................... 2CONEXIÓN A TIERRA ...................................................... 3CONEXIÓN DEL CABLE DE ALIMENTACIÓN CC ..................... 3
DISPOSICIÓN FÍSICA ........................................................ 4PANEL FRONTAL.......................................................... 4PANEL TRASERO ......................................................... 4PANTALLA..................................................................... 5MICRÓFONO (OPCIONAL) .......................................... 6FUNCIONES PROGRAMABLES .................................. 7
OPERACIONES BÁSICAS ................................................. 8ENCENDIDO Y APAGADO ........................................... 8AJUSTE DEL VOLUMEN .............................................. 8SELECCIÓN DE UN CANAL ........................................ 8
ENTRADA DE FRECUENCIA DIRECTA .................................. 8SELECCIÓN DE UN MODO ......................................... 8
OPERACIÓN DE DATOS ................................................... 8TRANSMISIÓN ............................................................. 9
VOX (TRANSMISIÓN ACTIVADA POR VOZ) .......................... 9ÉMISIÓN CW ............................................................... 9CAMBIO DE LA POTENCIA DE TRANSMISIÓN ......................... 9TEMPORIZADOR DE TIEMPO LÍMITE .................................... 9SOBRECALENTAMIENTO ................................................... 9
SILENCIAMIENTO/ MONITOR ................................... 10NIVEL DE SILENCIAMIENTO .............................................10ESCUCHA DE CANAL .....................................................10
CONFIGURACIÓN DE MENÚ ........................................... 11ACCESO AL MENÚ...................................................... 11CONFIGURACIÓN DEL MENÚ ................................... 11
EXPLORACIÓN ................................................................ 12DETENCIÓN DE LA FRECUENCIA OCUPADA ......... 12
TIPO DE REANUDACIÓN DE EXPLORACIÓN ........................ 12EXPLORACIÓN PREFERIDA ..................................... 12AÑADIR A LA EXPLORACIÓN/ BORRAR DE LAEXPLORACIÓN .......................................................... 12CANAL DE REVERSIÓN DE EXPLORACIÓN ........... 12
LLAMADAS SELECTIVAS ................................................ 13ACTIVACIÓN DEL MODO DE SELCALL .................... 13SELCALLS MANUALES ............................................. 13
SELECCIÓN DE UNA EMISORA CON LAS TECLAS DEL
TRANSCEPTOR .............................................................13SELECCIÓN DE UNA EMISORA USANDO EL TECLADO DE UN
MICRÓFONO ................................................................13SELCALLS DIRECTAS ............................................... 13RECEPCIÓN DE UNA SELCALL ................................ 13LLAMADAS EN MEMORIA ......................................... 13
SELECCIÓN DE UNA LLAMADA EN MEMORIA CON LAS TECLAS DEL
TRANSCEPTOR .............................................................13
SELECCIÓN DE UNA LLAMADA EN MEMORIA USANDO EL TECLADO
DE UN MICRÓFONO .......................................................14LLAMADAS DE ESTADO MANUALES ....................... 14
HACER UNA LLAMADA DE ESTADO CON LAS TECLAS DEL
TRANSCEPTOR .............................................................14HACER UNA LLAMADA DE ESTADO USANDO EL TECLADO DE UN
MICRÓFONO ................................................................14LLAMADAS DE ESTADO DIRECTAS ......................... 15MENSAJES DE VOZ OPCIONALES .......................... 15RECEPCIÓN DE UNA LLAMADA DE ESTADO.......... 15
CONSULTA DE LOS MENSAJES GUARDADOS EN LA MEMORIA DE
PILA ..........................................................................15ENVIAR LOS DATOS GPS ......................................... 16
ENVIAR MANUALMENTE LOS DATOS GPS ........................ 16TRANSMISIÓN DIFERIDA DE GPS ................................... 16
MENSAJES CORTOS DE TEXTO .............................. 16
OPERACIONES AVANZADAS .......................................... 17CANAL DIRECTO ....................................................... 17CODIFICADOR ........................................................... 17
CAMBIO DEL CÓDIGO DE CODIFICACIÓN ........................... 17CONFIGURACIÓN DE VOX (TRANSMISIÓNACTIVADA POR VOZ)................................................. 17
GANANCIA VOX ..........................................................17ANTIGANANCIA VOX ....................................................17TIEMPO DE RETARDO VOX ...........................................18
SINTONIDADOR DE ANTENA.................................... 18EMERGENCIA ............................................................ 18CLARIFICADOR .......................................................... 18SUPRESOR DE RUIDOS ........................................... 19BRILLO DE LCD ......................................................... 19MENSAJE DE ENCENDIDO ....................................... 19MOSTRAR NOMBRE/ FRECUENCIA ........................ 19PREAMPLIFICADOR/ ATENUADOR .......................... 19AUXILIAR .................................................................... 19
UNIDAD DE GUÍA DE VOZ Y GRABADORA OPCIONALVGS-1 ............................................................................... 20
RECORDATORIOS DE VOZ....................................... 20GRABACIÓN DE RECORDATORIOS DE VOZ ......................... 20REPRODUCCIÓN DE UN RECORDATORIO DE VOZ ................ 20ELIMINACIÓN DE UN RECORDATORIO DE VOZ ..................... 20
MENSAJES DE VOZ ................................................... 20GRABACIÓN DE UN MENSAJE DE VOZ .............................. 20REPRODUCCIÓN DE UN MENSAJE DE VOZ ........................ 21TRANSMISIÓN DE UN MENSAJE DE VOZ ............................ 21ELIMINACIÓN DE UN MENSAJE DE VOZ ............................. 21
GRABACIÓN AUTOMÁTICA....................................... 21REPRODUCCIÓN DE UNA GRABACIÓN AUTOMÁTICA ............. 21ELIMINACIÓN DE UNA GRABACIÓN AUTOMÁTICA .................. 21
GUÍA DE VOZ ............................................................. 21
APÉNDICE ........................................................................ 22FUNCIONES DE LAS TECLAS................................... 22
TK-90 S 0i-ii 07.9.28, 6:59 PM2
E-1
DESEMBALAJE Y COMPROBACIÓN DELEQUIPO
Nota: las siguientes instrucciones de desembalaje son para su proveedorKENWOOD, un centro de reparaciones autorizado KENWOOD o lafábrica.
Desembale el transceptor con cuidado. Recomendamosque antes de tirar el material de embalaje, identifique loselementos indicados en la tabla siguiente. Si falta algo o seha producido algún daño durante el transporte, presenteinmediatamente una reclamación a la empresa detransporte.
ACCESORIOS SUMINISTRADOS
PREPARACIÓN / INSTALACIÓN
olucítrA edoremúNazeip daditnaC
CCnóicatnemilaedelbaC)selbisufnoc(
XX-9843-03E 1
elbisuFA52 XX-4400-25F 1
A4 XX-8300-25F 1
esabalarapsallidahomlA XX-2031-20J 2
senoiccurtsniedlaunaM XX-6681-26B 1
alednóicarepoedlaunaMELAnóicnuf
XX-1002-26B 1
CONEXIÓN DE ANTENA
Para conseguir el mejor rendimiento:
• Utilice una antena de 50 Ω y buena calidad,correctamente ajustada.
• Utilice un conector y un cable coaxial de 50 Ω de buenacalidad.
• Utilice una impedancia en cable coaxial y antena deforma que el SWR (relación de ondas estacionarias)sea 1,5:1 o inferior.
• Asegúrese de que todas las conexiones estén firmes ylimpias.
El circuito de protección del transceptor se activará si elSWR es superior a 2,5:1, pero no confíe en la protecciónpara compensar el mal funcionamiento del sistema deantena. Un SWR alto provocará una caída en la salida dela transmisión y puede causar interferencias deradiofrecuencia con productos domésticos comotelevisiones y receptores estéreo. Puede que inclusointerfiera con su propio transceptor. Si su señal esdistorsionada o equivocada, sobre todo en modulaciónmáxima, puede ser indicativo de que su sistema de antenano transmita eficientemente.
Transmitir sin conectar antes una antena u otra carga igual puedecausar daños al transceptor. Conecte siempre la antena al transceptorantes de transmitir.
Use un protector de rayos para evitar incendios, descargas eléctricaso daños en el transceptor.
CONEXIÓN A TIERRA
• Se requiere una buena conexión CC a tierra para evitarriesgos como los de descargas eléctricas.
• Se requiere una buena conexión a tierra RF paracomunicaciones superiores, contra las cuales puedaoperar el sistema de antena.
Estas dos condiciones pueden satisfacerseproporcionando una buena conexión a tierra a su emisora.Entierre bajo tierra una o varias conexiones de tierra o unaplaca grande de cobre y conéctela a la terminal de tierradel transceptor. Use alambre de calibre grueso o unaabrazadera de cobre, lo más corta posible, para laconexión. Asegúrese de que todas las conexiones esténfirmes y limpias.
PRECAUCIÓN
INSTALACIÓN DE LA ESTACIÓN BASE
ALMOHADILLAS PARA LA BASE
Se proporciona un conjunto de almohadillas para la basede forma que pueda proteger la superficie de su mesa/consola/estante y no se arañe. Coloque las almohadillasen la base del transceptor.
Conexión a tierra
Negro (–)
Rojo (+)
Fusible (25 A)
CC 13,6 V
Fuente de alimentación CC (20,5 A o más)
A antena
Instalación de la estación base
TK-90 S 01-22 07.9.28, 6:32 PM1
E-2
PRECAUCIÓN
PRECAUCIÓN
CONEXIÓN DE LA FUENTE DE ALIMENTACIÓN CCPara usar este transceptor como estación base, necesitaráuna fuente de alimentación CC de 13,6 V con unacapacidad de corriente de 20,5 A o superior (adquirida porseparado).
No conecte directamente el transceptor a una toma de corriente CA.
No sustituya el cable de alimentación CC proporcionado por otro cablecon alambres de calibre más pequeño.
Antes de conectar la fuente de alimentación CC al transceptor,asegúrese de apagarla.
No enchufe la fuente de alimentación CC a una toma de corriente CAhasta que haya realizado todas las conexiones.
1 Conecte el cable de alimentación CC suministrado a lafuente de alimentación CC regulada y compruebe quelas polaridades son correctas (Rojo: positivo, Negro:negativo).
2 Conecte el extremo conectorizado del cable dealimentación CC al conector de alimentación CC de13,6 V en la parte posterior del transceptor.• Introduzca el conector del cable de alimentación CC
firmemente en el conector del radioteléfono hasta quehaga clic la pestaña de bloqueo.
SUSTITUCIÓN DE FUSIBLES
Si se funde un fusible, determine la causa y, acontinuación, solucione el problema. Una vez resueltoel problema, y sólo entonces, sustituya el fusible. Si losfusibles recién instalados siguen fundiéndose,desconecte el enchufe de alimentación y póngase encontacto con su proveedor para obtener asistencia.
A continuación se encuentran los límites de potencia delos fusibles usados en este transceptor:
Transceptor: 4 A (para el sintonizador de antena KAT-1)
Cable CC: 25 A
Cuando sustituya algún fusible, asegúrese de sustituirlo por unfusible que tenga el mismo valor. No reemplace nunca un fusiblepor otro que tenga un valor superior.
Sustituya los fusibles fundidos sólo después de haber investigadoy solucionado la causa del fallo del fusible.
INSTALACIÓN MÓVIL
Hay varios equipos electrónicos de su vehículo que podrían funcionarincorrectamente si no se protegen adecuadamente de la energía deradiofrecuencia presente durante la transmisión. Los sistemas de inyecciónelectrónica, antibloqueo de frenos, y control de velocidad son ejemplostípicos de equipos que podrían funcionar incorrectamente. Si su vehículocontiene alguno de estos equipos, consulte al proveedor el modelo devehículo y pida que le ayuden a determinar si funcionarán correctamentemientras realiza una transmisión.
Nota: Las siguientes instrucciones de preparación son para su proveedorKENWOOD, un centro de reparaciones autorizado KENWOOD o lafábrica.
INSTALACIÓN DEL TRANSCEPTOR
Para la seguridad de los pasajeros, instale el transceptor firmementeutilizando un soporte de montaje opcional de forma que el transceptor nose suelte en caso de colisión.
1 Marque la posición de los agujeros en el salpicaderousando el soporte de montaje como plantilla. Perforelos agujeros, y a continuación une el soporte demontaje usando los tornillos autorroscantesproporcionados con el soporte.• Asegúrese de montar el transceptor en un lugar en el que
los controles se encuentren fácilmente al alcance delusuario y de forma que haya espacio suficiente en la parteposterior del transceptor para las conexiones de los cables.
2 Conecte la antena y el cable de alimentaciónproporcionado al transceptor página 3.
3 Deslice el transceptor por el soporte de montaje y fíjelo.
4 Monte el gancho para micrófono en algún lugar queesté fácilmente al alcance del usuario.• El micrófono y el cable del micrófono deben montarse en
algún lugar en el que permitan manejar el vehículo deforma segura.
CONEXIÓN DE ANTENA
Para conseguir el mejor rendimiento:
• Utilice una antena de 50 Ω y buena calidad,correctamente ajustada.
• Utilice un conector y un cable coaxial de 50 Ω de buenacalidad.
Enganchar la antena al transceptor a través de los cablesde alimentación que tengan una impedancia distinta a 50Ω reduce la eficiencia del sistema de antena y puedeprovocar interferencias en receptores cercanos de emisiónde televisión, receptores de radio y otros equiposelectrónicos.
Transmitir sin conectar antes una antena u otra carga igual puede causardaños al transceptor. Conecte siempre la antena al transceptor antes detransmitir.
ADVERTENCIA
ADVERTENCIA
PRECAUCIÓN
TK-90 S 01-22 07.9.28, 6:32 PM2
E-3
CONEXIÓN A TIERRA
• Una instalación de tierra de alta calidad mejorasignificativamente el rendimiento de una antena móvil.
Conecte firmemente una abrazadera de tierra de bajaresistencia (o alambre de cobre de calibre ancho, si nodispone de ella) desde la terminal de tierra del transceptoral chasis del vehículo. Limpie la suciedad o la pintura delpunto de conexión del vehículo para dejar al descubierto elmetal antes de poner la conexión de tierra.
CONEXIÓN DEL CABLE DE ALIMENTACIÓN CC
¡El transceptor funciona sólo en sistemas de tierra negativos de 12 V!Compruebe la polaridad de la batería y el voltaje del vehículo antes deinstalar el transceptor.
1 Compruebe si hay algún agujero cómodamente situadoen el cortafuegos por donde se pueda pasar el cable dealimentación. Si no hay ningún agujero, use unacortadora circular para perforar el cortafuegos y, acontinuación, instale una arandela aislante de goma.
2 Pase los dos cables de alimentación por el cortafuegoshacia dentro del compartimento del motor, desde elhabitáculo de pasajeros.
3 Conecte el cable rojo a la terminal positiva (+) de labatería y el cable negro a la terminal negativa (–) de labatería.• Use toda la longitud del cable sin cortar lo que sobra, y
sobre todo, no quite los porta fusibles.
• Para evitar el riesgo de cortocircuitos, desconecte otroscables de la terminal negativa (–) de la batería antes deconectar el transceptor. Vuelva a conectar los cablesdespués de conectar el transceptor a la batería.
• Sitúe el fusible lo más cerca posible de la batería.
4 Enrosque y fije el cable que sobra con una banda desujeción.• Asegúrese de dejar suficiente cable suelto de forma que se
pueda extraer el transceptor para su mantenimiento con laalimentación conectada.
• Asegúrese de que el cable quede aislado del calor y lahumedad. Si fuera necesario, envuelva el porta fusible concinta resistente al calor para protegerlo de la humedad.
• Si usa un filtro de ruido, debe instalarlo con un aislantepara evitar que entre en contacto con el metal del vehículo.
5 Conecte el cable de alimentación CC a la parteposterior del transceptor.• Una los conectores firmemente hasta que la pestaña de
bloqueo haga clic.
Notas: No recomendamos el uso de la toma del encendedor del automóvil,
puesto que algunas de ellas producen caídas de tensión inaceptables.
Si usa el transceptor durante un período largo cuando la batería delvehículo no está cargada completamente o cuando el motor estáapagado, la batería podría descargarse y quedarse sin reservasuficiente para arrancar el vehículo. Evite usar el transceptor en estascondiciones.
SUSTITUCIÓN DE FUSIBLES
Si se funde un fusible, determine la causa y, a continuación,solucione el problema. Una vez resuelto el problema, y sóloentonces, sustituya el fusible. Si los fusibles recién instaladossiguen fundiéndose, desconecte el enchufe de alimentación ypóngase en contacto con su proveedor para obtener asistencia.
A continuación se encuentran los límites de potencia delos fusibles usados en este transceptor:
Transceptor: 4 A (para el sintonizador de antena KAT-1)
Cable CC: 25 A
Cuando sustituya algún fusible, asegúrese de sustituirlo por unfusible que tenga el mismo valor. No reemplace nunca un fusiblepor otro que tenga un valor superior.
Sustituya los fusibles fundidos sólo después de haber investigadoy solucionado la causa del fallo del fusible.
Instalación móvil
PRECAUCIÓN
PRECAUCIÓN
Batería de
12 V
Rojo (+)
Negro (–)
Habitáculo de pasajeros
Compartimiento del motor
Coloque el cable CC firmemente en la pared del compartimento del motor. Asegúrese de que el cable no entre en contacto de forma excesiva con calor, vapor y/o agua.
Use una arandela aislante de goma o plástico para que el cable no toque directamente el chasis del vehículo.
CC 13,6 VA antena
Chasis del vehículo
TK-90 S 01-22 07.9.28, 6:32 PM3
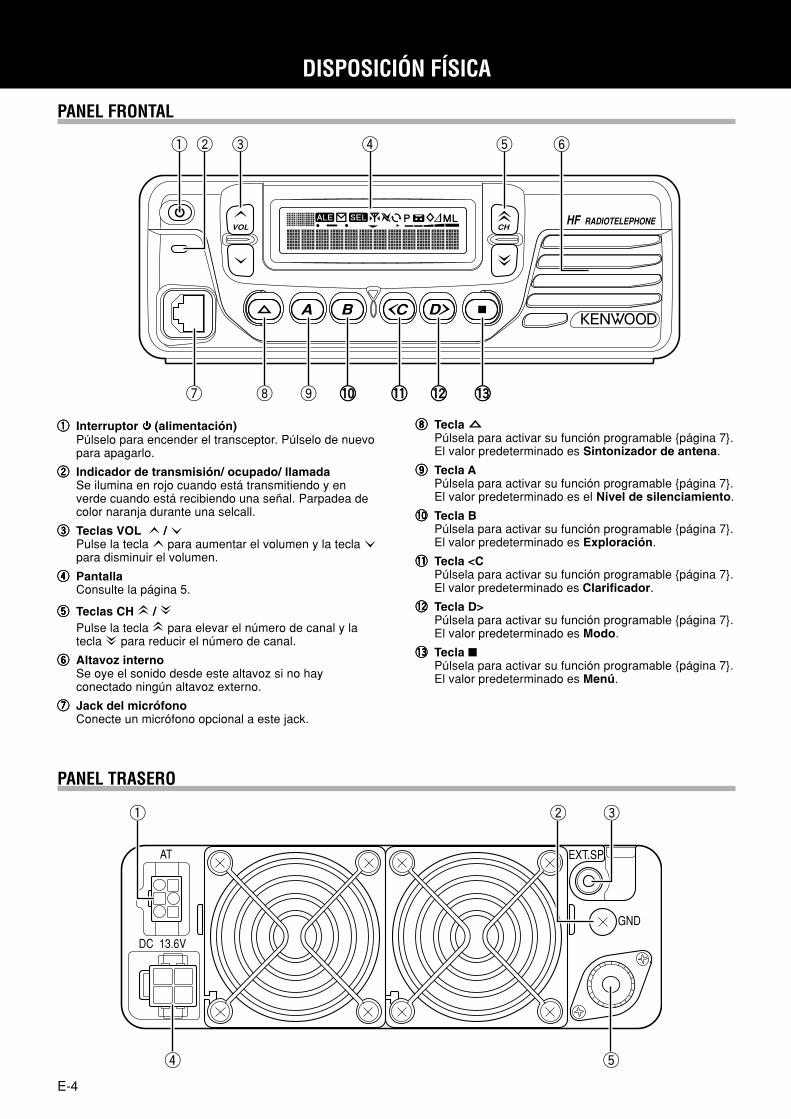
E-4
PANEL FRONTAL
qqqqq Interruptor (alimentación)Púlselo para encender el transceptor. Púlselo de nuevopara apagarlo.
wwwww Indicador de transmisión/ ocupado/ llamadaSe ilumina en rojo cuando está transmitiendo y enverde cuando está recibiendo una señal. Parpadea decolor naranja durante una selcall.
eeeee Teclas VOL / Pulse la tecla para aumentar el volumen y la tecla para disminuir el volumen.
rrrrr PantallaConsulte la página 5.
ttttt Teclas CH / Pulse la tecla para elevar el número de canal y latecla para reducir el número de canal.
yyyyy Altavoz internoSe oye el sonido desde este altavoz si no hayconectado ningún altavoz externo.
uuuuu Jack del micrófonoConecte un micrófono opcional a este jack.
DISPOSICIÓN FÍSICA
q
u i o !0!0 !1!1 !2!2 !3!3
w e r t y
iiiii Tecla Púlsela para activar su función programable página 7.El valor predeterminado es Sintonizador de antena.
ooooo Tecla APúlsela para activar su función programable página 7.El valor predeterminado es el Nivel de silenciamiento.
!0!0!0!0!0 Tecla BPúlsela para activar su función programable página 7.El valor predeterminado es Exploración.
!1!1!1!1!1 Tecla <CPúlsela para activar su función programable página 7.El valor predeterminado es Clarificador.
!2!2!2!2!2 Tecla D>Púlsela para activar su función programable página 7.El valor predeterminado es Modo.
!3!3!3!3!3 Tecla Púlsela para activar su función programable página 7.El valor predeterminado es Menú.
PANEL TRASERO
q
r t
w e
TK-90 S 01-22 07.9.28, 6:32 PM4
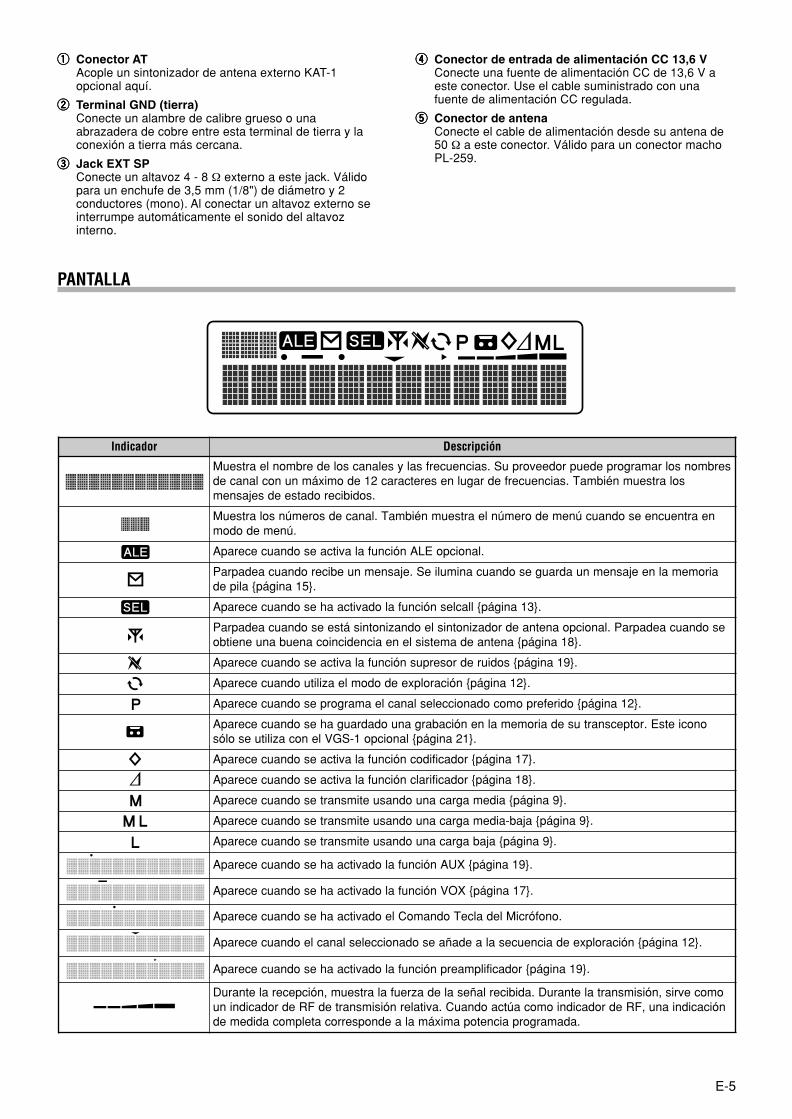
E-5
PANTALLA
qqqqq Conector ATAcople un sintonizador de antena externo KAT-1opcional aquí.
wwwww Terminal GND (tierra)Conecte un alambre de calibre grueso o unaabrazadera de cobre entre esta terminal de tierra y laconexión a tierra más cercana.
eeeee Jack EXT SPConecte un altavoz 4 - 8 Ω externo a este jack. Válidopara un enchufe de 3,5 mm (1/8") de diámetro y 2conductores (mono). Al conectar un altavoz externo seinterrumpe automáticamente el sonido del altavozinterno.
rrrrr Conector de entrada de alimentación CC 13,6 VConecte una fuente de alimentación CC de 13,6 V aeste conector. Use el cable suministrado con unafuente de alimentación CC regulada.
ttttt Conector de antenaConecte el cable de alimentación desde su antena de50 Ω a este conector. Válido para un conector machoPL-259.
rodacidnI nóicpircseD
serbmonsolramargorpedeuprodeevorpuS.saicneucerfsalyselanacsolederbmonleartseuMsolartseumnéibmaT.saicneucerfedragulneseretcarac21edomixámnunoclanaced
.sodibicerodatseedsejasnem
neartneucneesodnaucúnemedoremúnleartseumnéibmaT.lanacedsoremúnsolartseuM.únemedodom
.lanoicpoELAnóicnufalavitcaesodnaucecerapA
airomemalneejasnemnuadraugesodnaucanimulieS.ejasnemnuebicerodnaucaedapraP.51anigápaliped
.31anigápllaclesnóicnufalodavitcaahesodnaucecerapA
esodnaucaedapraP.lanoicpoanetnaedrodazinotnisleodnazinotnisátseesodnaucaedapraP.81anigápanetnaedametsisleneaicnedicniocaneubanueneitbo
.91anigápsodiuredroserpusnóicnufalavitcaesodnaucecerapA
.21anigápnóicarolpxeedodomleazilituodnaucecerapA
.21anigápodireferpomocodanoicceleslanacleamargorpesodnaucecerapA
onocietsE.rotpecsnartusedairomemalnenóicabarganuodadraugahesodnaucecerapA.12anigáplanoicpo1-SGVlenocazilituesolós
.71anigáprodacifidocnóicnufalavitcaesodnaucecerapA
.81anigáprodacifiralcnóicnufalavitcaesodnaucecerapA
.9anigápaidemagracanuodnasuetimsnartesodnaucecerapA
.9anigápajab-aidemagracanuodnasuetimsnartesodnaucecerapA
.9anigápajabagracanuodnasuetimsnartesodnaucecerapA
.91anigápXUAnóicnufalodavitcaahesodnaucecerapA
.71anigápXOVnóicnufalodavitcaahesodnaucecerapA
.onofórciMledalceTodnamoCleodavitcaahesodnaucecerapA
.21anigápnóicarolpxeedaicneucesalaedañaesodanoicceleslanacleodnaucecerapA
.91anigáprodacifilpmaerpnóicnufalodavitcaahesodnaucecerapA
omocevris,nóisimsnartaletnaruD.adibicerlañesaledazreufalartseum,nóicpeceraletnaruDnóicacidnianu,FRedrodacidniomocaútcaodnauC.avitalernóisimsnartedFRedrodacidninu
.adamargorpaicnetopamixámalaednopserrocatelpmocadidemed
TK-90 S 01-22 09.3.13, 10:12 AM5
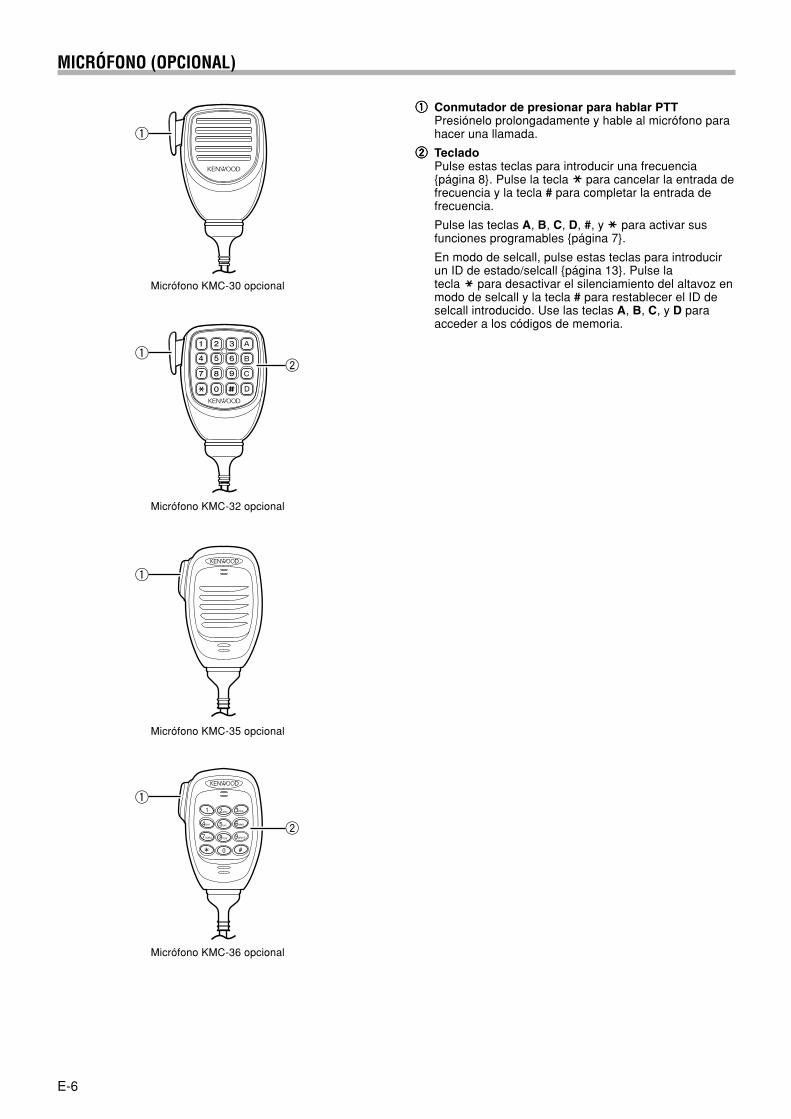
E-6
MICRÓFONO (OPCIONAL)
q
qw
q
q
w
qqqqq Conmutador de presionar para hablar PTTPresiónelo prolongadamente y hable al micrófono parahacer una llamada.
wwwww TecladoPulse estas teclas para introducir una frecuenciapágina 8. Pulse la tecla para cancelar la entrada defrecuencia y la tecla # para completar la entrada defrecuencia.
Pulse las teclas A, B, C, D, #, y para activar susfunciones programables página 7.
En modo de selcall, pulse estas teclas para introducirun ID de estado/selcall página 13. Pulse latecla para desactivar el silenciamiento del altavoz enmodo de selcall y la tecla # para restablecer el ID deselcall introducido. Use las teclas A, B, C, y D paraacceder a los códigos de memoria.
Micrófono KMC-30 opcional
Micrófono KMC-32 opcional
Micrófono KMC-35 opcional
Micrófono KMC-36 opcional
TK-90 S 01-22 07.9.28, 6:33 PM6
E-7
FUNCIONES PROGRAMABLESLas teclas , A, B, <C, D>, , y A, B, C y D del micrófonoopcional se pueden programar con las funciones que seindican a continuación. Las teclas # y del micrófono sepueden programar sólo con las funciones canal arriba/canal abajo y subir volumen/bajar volumen. Consulte a suproveedor para obtener más información acerca de estasfunciones.
• ALE 1
• Llamada directa ALE 1 - 4 1
• Mode de functionamiento ALE 1
• Sintonizador de antena
• Antiganancia VOX
• Grabación automática 2
• AUX
• Tipo de llamada
• Canal abajo
• Canal arriba
• Clarificador
• Llamada directa 1 - 4
• Canal directo 1 - 4
• Llamada de estado directa 1 - 4
• Carácter de visualización
• Emergencia 3
• Brillo de LCD
• Menú
• Modo
• Monitor
• Supresor de ruidos
• Ninguno
• Reproducción 1 - 4 2
• Preamplificador/ atenuador
• Exploración
• Borrar/añadir a exploración
• Codificador
• Selcall
• Nivel de silenciamiento
• Potencia de transmisión
• VFO
• Bajar volumen
• Subir volumen
• VOX
• Retardo VOX
• Ganancia VOX1 “ALE”, “Llamada directa ALE 1 - 4” y “Mode de functionamiento
ALE” solo pueden programarse cuando se ha instalado la unidadKPE-2 opcional.
2 “Grabación automática” y “Reproducción 1 - 4” solo puedenprogramarse cuando se ha instalado la unidad VGS-1 opcional.
3 “Emergencia” solo puede programarse en la tecla .
TK-90 S 01-22 07.9.28, 6:33 PM7
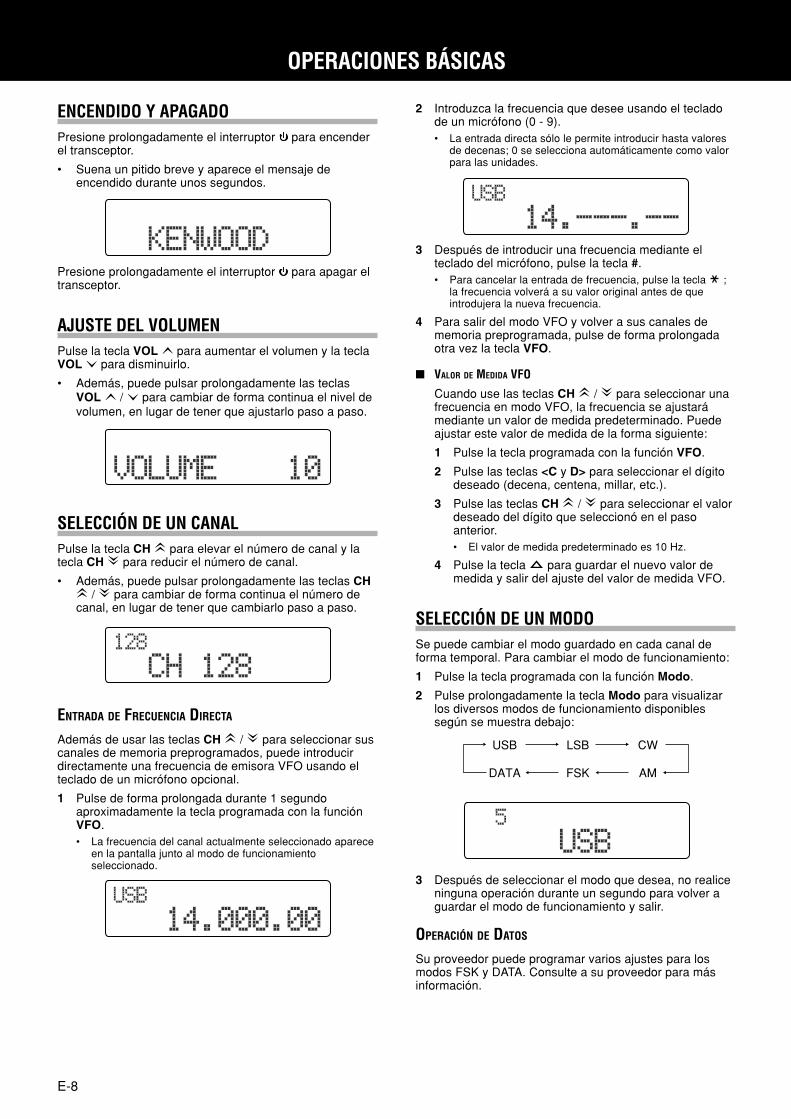
E-8
ENCENDIDO Y APAGADOPresione prolongadamente el interruptor para encenderel transceptor.
• Suena un pitido breve y aparece el mensaje deencendido durante unos segundos.
OPERACIONES BÁSICAS
2 Introduzca la frecuencia que desee usando el tecladode un micrófono (0 - 9).• La entrada directa sólo le permite introducir hasta valores
de decenas; 0 se selecciona automáticamente como valorpara las unidades.
Presione prolongadamente el interruptor para apagar eltransceptor.
AJUSTE DEL VOLUMENPulse la tecla VOL para aumentar el volumen y la teclaVOL para disminuirlo.
• Además, puede pulsar prolongadamente las teclasVOL / para cambiar de forma continua el nivel devolumen, en lugar de tener que ajustarlo paso a paso.
SELECCIÓN DE UN CANALPulse la tecla CH para elevar el número de canal y latecla CH para reducir el número de canal.
• Además, puede pulsar prolongadamente las teclas CH / para cambiar de forma continua el número de
canal, en lugar de tener que cambiarlo paso a paso.
ENTRADA DE FRECUENCIA DIRECTA
Además de usar las teclas CH / para seleccionar suscanales de memoria preprogramados, puede introducirdirectamente una frecuencia de emisora VFO usando elteclado de un micrófono opcional.
1 Pulse de forma prolongada durante 1 segundoaproximadamente la tecla programada con la funciónVFO.• La frecuencia del canal actualmente seleccionado aparece
en la pantalla junto al modo de funcionamientoseleccionado.
3 Después de introducir una frecuencia mediante elteclado del micrófono, pulse la tecla #.• Para cancelar la entrada de frecuencia, pulse la tecla ;
la frecuencia volverá a su valor original antes de queintrodujera la nueva frecuencia.
4 Para salir del modo VFO y volver a sus canales dememoria preprogramada, pulse de forma prolongadaotra vez la tecla VFO.
VALOR DE MEDIDA VFO
Cuando use las teclas CH / para seleccionar unafrecuencia en modo VFO, la frecuencia se ajustarámediante un valor de medida predeterminado. Puedeajustar este valor de medida de la forma siguiente:
1 Pulse la tecla programada con la función VFO.
2 Pulse las teclas <C y D> para seleccionar el dígitodeseado (decena, centena, millar, etc.).
3 Pulse las teclas CH / para seleccionar el valordeseado del dígito que seleccionó en el pasoanterior.• El valor de medida predeterminado es 10 Hz.
4 Pulse la tecla para guardar el nuevo valor demedida y salir del ajuste del valor de medida VFO.
SELECCIÓN DE UN MODOSe puede cambiar el modo guardado en cada canal deforma temporal. Para cambiar el modo de funcionamiento:
1 Pulse la tecla programada con la función Modo.
2 Pulse prolongadamente la tecla Modo para visualizarlos diversos modos de funcionamiento disponiblessegún se muestra debajo:
USB
DATA
LSB
FSK
CW
AM
3 Después de seleccionar el modo que desea, no realiceninguna operación durante un segundo para volver aguardar el modo de funcionamiento y salir.
OPERACIÓN DE DATOS
Su proveedor puede programar varios ajustes para losmodos FSK y DATA. Consulte a su proveedor para másinformación.
TK-90 S 01-22 07.9.28, 6:33 PM8
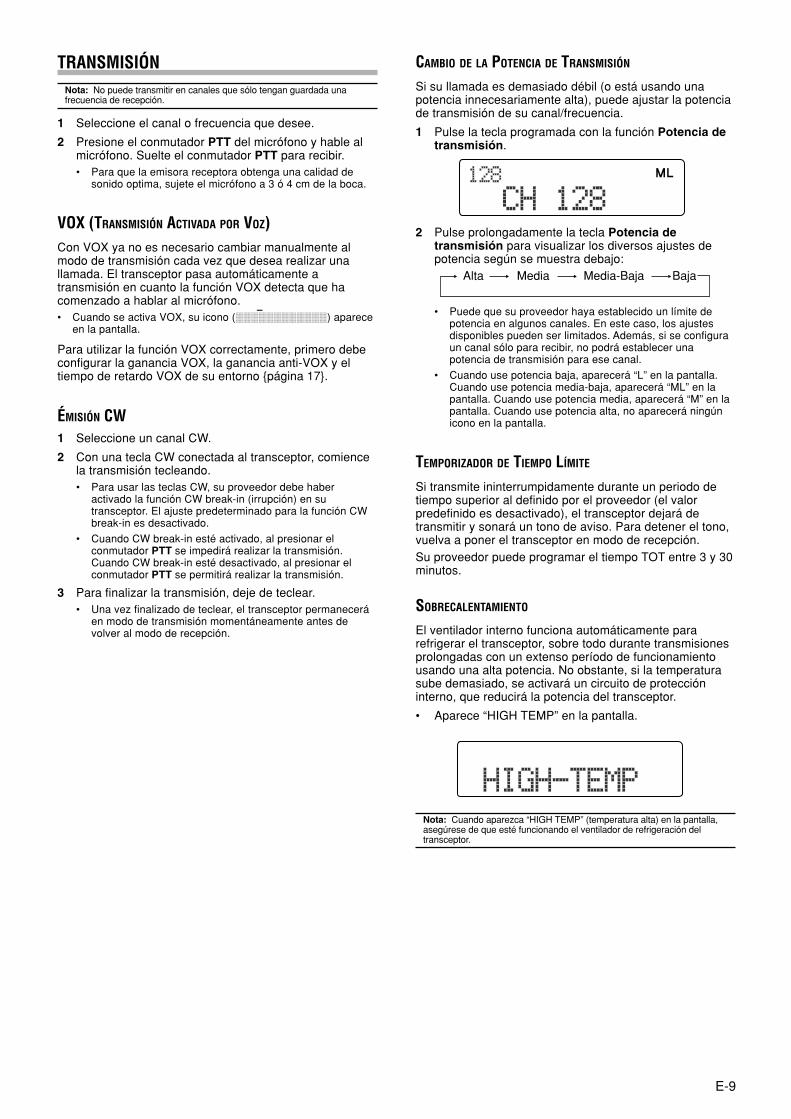
E-9
TRANSMISIÓNNota: No puede transmitir en canales que sólo tengan guardada unafrecuencia de recepción.
1 Seleccione el canal o frecuencia que desee.
2 Presione el conmutador PTT del micrófono y hable almicrófono. Suelte el conmutador PTT para recibir.• Para que la emisora receptora obtenga una calidad de
sonido optima, sujete el micrófono a 3 ó 4 cm de la boca.
VOX (TRANSMISIÓN ACTIVADA POR VOZ)Con VOX ya no es necesario cambiar manualmente almodo de transmisión cada vez que desea realizar unallamada. El transceptor pasa automáticamente atransmisión en cuanto la función VOX detecta que hacomenzado a hablar al micrófono.• Cuando se activa VOX, su icono ( ) aparece
en la pantalla.
Para utilizar la función VOX correctamente, primero debeconfigurar la ganancia VOX, la ganancia anti-VOX y eltiempo de retardo VOX de su entorno página 17.
ÉMISIÓN CW1 Seleccione un canal CW.
2 Con una tecla CW conectada al transceptor, comiencela transmisión tecleando.• Para usar las teclas CW, su proveedor debe haber
activado la función CW break-in (irrupción) en sutransceptor. El ajuste predeterminado para la función CWbreak-in es desactivado.
• Cuando CW break-in esté activado, al presionar elconmutador PTT se impedirá realizar la transmisión.Cuando CW break-in esté desactivado, al presionar elconmutador PTT se permitirá realizar la transmisión.
3 Para finalizar la transmisión, deje de teclear.• Una vez finalizado de teclear, el transceptor permanecerá
en modo de transmisión momentáneamente antes devolver al modo de recepción.
CAMBIO DE LA POTENCIA DE TRANSMISIÓN
Si su llamada es demasiado débil (o está usando unapotencia innecesariamente alta), puede ajustar la potenciade transmisión de su canal/frecuencia.
1 Pulse la tecla programada con la función Potencia detransmisión.
2 Pulse prolongadamente la tecla Potencia detransmisión para visualizar los diversos ajustes depotencia según se muestra debajo:
• Puede que su proveedor haya establecido un límite depotencia en algunos canales. En este caso, los ajustesdisponibles pueden ser limitados. Además, si se configuraun canal sólo para recibir, no podrá establecer unapotencia de transmisión para ese canal.
• Cuando use potencia baja, aparecerá “L” en la pantalla.Cuando use potencia media-baja, aparecerá “ML” en lapantalla. Cuando use potencia media, aparecerá “M” en lapantalla. Cuando use potencia alta, no aparecerá ningúnicono en la pantalla.
TEMPORIZADOR DE TIEMPO LÍMITE
Si transmite ininterrumpidamente durante un periodo detiempo superior al definido por el proveedor (el valorpredefinido es desactivado), el transceptor dejará detransmitir y sonará un tono de aviso. Para detener el tono,vuelva a poner el transceptor en modo de recepción.Su proveedor puede programar el tiempo TOT entre 3 y 30minutos.
SOBRECALENTAMIENTO
El ventilador interno funciona automáticamente pararefrigerar el transceptor, sobre todo durante transmisionesprolongadas con un extenso período de funcionamientousando una alta potencia. No obstante, si la temperaturasube demasiado, se activará un circuito de proteccióninterno, que reducirá la potencia del transceptor.
• Aparece “HIGH TEMP” en la pantalla.
Nota: Cuando aparezca “HIGH TEMP” (temperatura alta) en la pantalla,asegúrese de que esté funcionando el ventilador de refrigeración deltransceptor.
Alta Media Media-Baja Baja
TK-90 S 01-22 07.9.28, 6:34 PM9
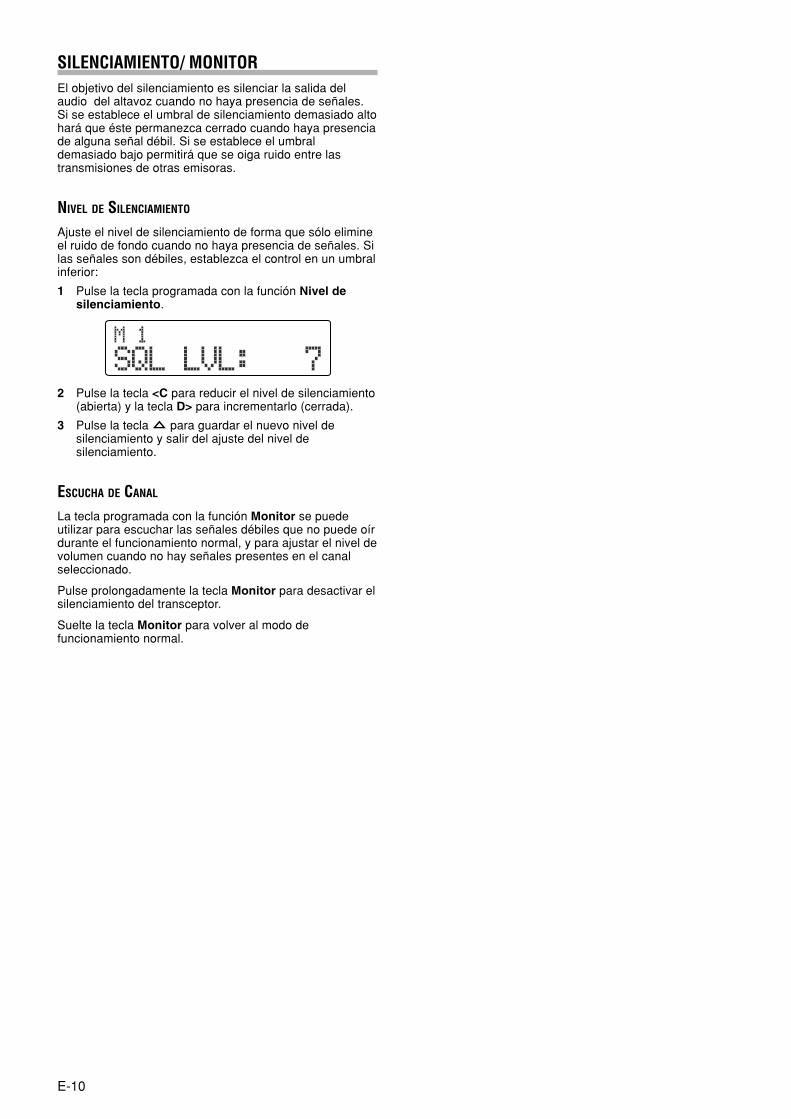
E-10
SILENCIAMIENTO/ MONITOREl objetivo del silenciamiento es silenciar la salida delaudio del altavoz cuando no haya presencia de señales.Si se establece el umbral de silenciamiento demasiado altohará que éste permanezca cerrado cuando haya presenciade alguna señal débil. Si se establece el umbraldemasiado bajo permitirá que se oiga ruido entre lastransmisiones de otras emisoras.
NIVEL DE SILENCIAMIENTO
Ajuste el nivel de silenciamiento de forma que sólo elimineel ruido de fondo cuando no haya presencia de señales. Silas señales son débiles, establezca el control en un umbralinferior:
1 Pulse la tecla programada con la función Nivel desilenciamiento.
2 Pulse la tecla <C para reducir el nivel de silenciamiento(abierta) y la tecla D> para incrementarlo (cerrada).
3 Pulse la tecla para guardar el nuevo nivel desilenciamiento y salir del ajuste del nivel desilenciamiento.
ESCUCHA DE CANAL
La tecla programada con la función Monitor se puedeutilizar para escuchar las señales débiles que no puede oírdurante el funcionamiento normal, y para ajustar el nivel devolumen cuando no hay señales presentes en el canalseleccionado.
Pulse prolongadamente la tecla Monitor para desactivar elsilenciamiento del transceptor.
Suelte la tecla Monitor para volver al modo defuncionamiento normal.
TK-90 S 01-22 07.9.28, 6:34 PM10
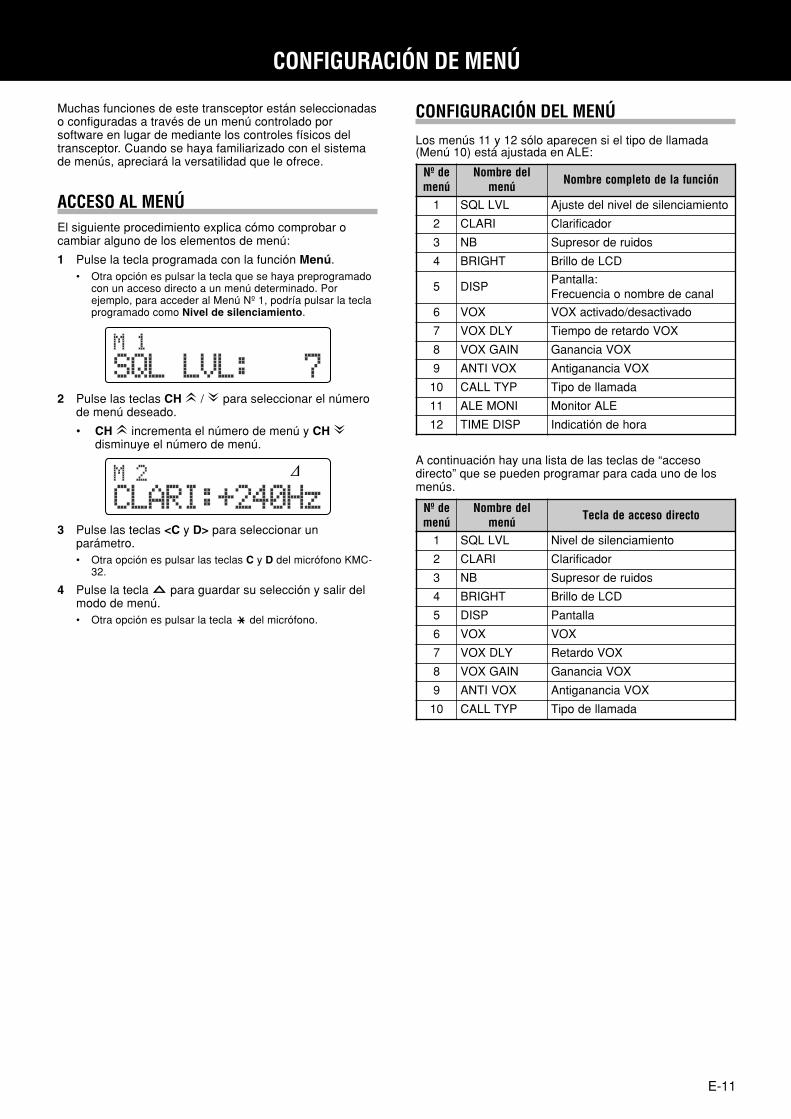
E-11
CONFIGURACIÓN DEL MENÚ
Los menús 11 y 12 sólo aparecen si el tipo de llamada(Menú 10) está ajustada en ALE:
A continuación hay una lista de las teclas de “accesodirecto” que se pueden programar para cada uno de losmenús.
Muchas funciones de este transceptor están seleccionadaso configuradas a través de un menú controlado porsoftware en lugar de mediante los controles físicos deltransceptor. Cuando se haya familiarizado con el sistemade menús, apreciará la versatilidad que le ofrece.
ACCESO AL MENÚEl siguiente procedimiento explica cómo comprobar ocambiar alguno de los elementos de menú:
1 Pulse la tecla programada con la función Menú.• Otra opción es pulsar la tecla que se haya preprogramado
con un acceso directo a un menú determinado. Porejemplo, para acceder al Menú Nº 1, podría pulsar la teclaprogramado como Nivel de silenciamiento.
CONFIGURACIÓN DE MENÚ
edºNúnem
lederbmoNúnem nóicnufaledotelpmocerbmoN
1 LVLLQS otneimaicnelisedlevinledetsujA
2 IRALC rodacifiralC
3 BN sodiuredroserpuS
4 THGIRB DCLedollirB
5 PSID:allatnaP
lanacederbmonoaicneucerF
6 XOV odavitcased/odavitcaXOV
7 YLDXOV XOVodrateredopmeiT
8 NIAGXOV XOVaicnanaG
9 XOVITNA XOVaicnanagitnA
01 PYTLLAC adamalledopiT
11 INOMELA ELArotinoM
21 PSIDEMIT arohednóitacidnI
edºNúnem
lederbmoNúnem otceridoseccaedalceT
1 LVLLQS otneimaicnelisedleviN
2 IRALC rodacifiralC
3 BN sodiuredroserpuS
4 THGIRB DCLedollirB
5 PSID allatnaP
6 XOV XOV
7 YLDXOV XOVodrateR
8 NIAGXOV XOVaicnanaG
9 XOVITNA XOVaicnanagitnA
01 PYTLLAC adamalledopiT
2 Pulse las teclas CH / para seleccionar el númerode menú deseado.
• CH incrementa el número de menú y CH disminuye el número de menú.
3 Pulse las teclas <C y D> para seleccionar unparámetro.• Otra opción es pulsar las teclas C y D del micrófono KMC-
32.
4 Pulse la tecla para guardar su selección y salir delmodo de menú.• Otra opción es pulsar la tecla del micrófono.
TK-90 S 01-22 07.9.28, 6:34 PM11
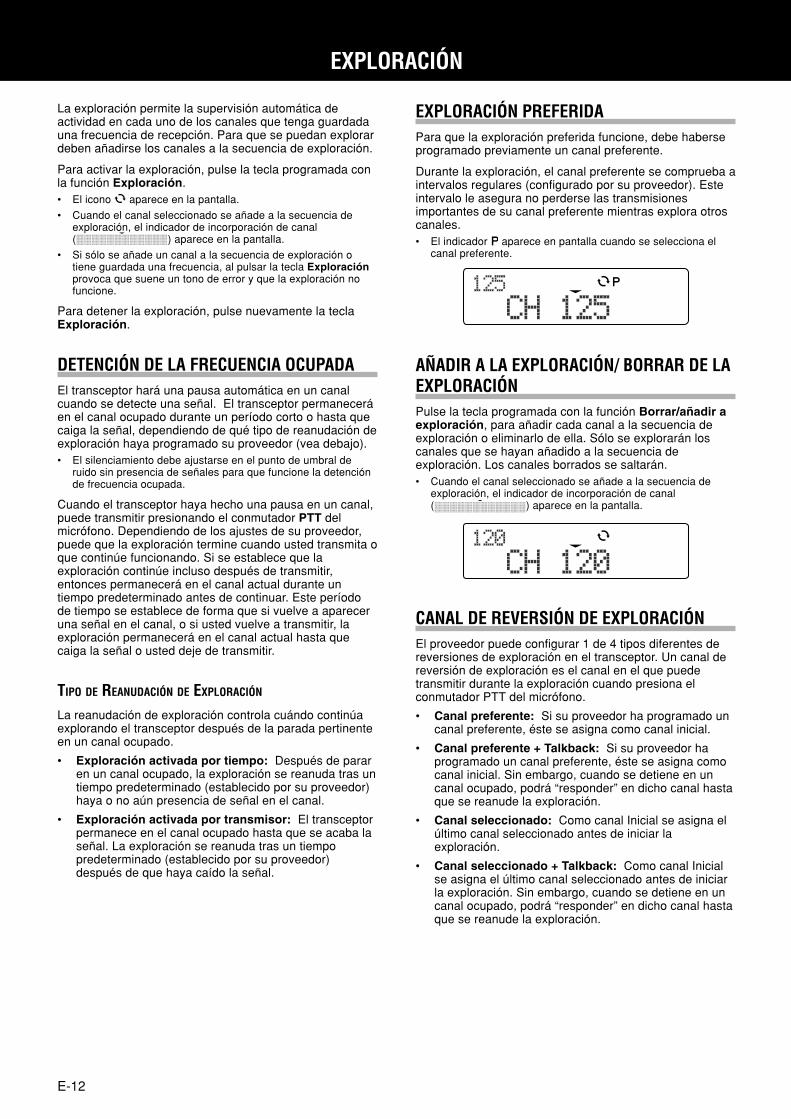
E-12
La exploración permite la supervisión automática deactividad en cada uno de los canales que tenga guardadauna frecuencia de recepción. Para que se puedan explorardeben añadirse los canales a la secuencia de exploración.
Para activar la exploración, pulse la tecla programada conla función Exploración.• El icono aparece en la pantalla.
• Cuando el canal seleccionado se añade a la secuencia deexploración, el indicador de incorporación de canal( ) aparece en la pantalla.
• Si sólo se añade un canal a la secuencia de exploración otiene guardada una frecuencia, al pulsar la tecla Exploraciónprovoca que suene un tono de error y que la exploración nofuncione.
Para detener la exploración, pulse nuevamente la teclaExploración.
DETENCIÓN DE LA FRECUENCIA OCUPADAEl transceptor hará una pausa automática en un canalcuando se detecte una señal. El transceptor permaneceráen el canal ocupado durante un período corto o hasta quecaiga la señal, dependiendo de qué tipo de reanudación deexploración haya programado su proveedor (vea debajo).• El silenciamiento debe ajustarse en el punto de umbral de
ruido sin presencia de señales para que funcione la detenciónde frecuencia ocupada.
Cuando el transceptor haya hecho una pausa en un canal,puede transmitir presionando el conmutador PTT delmicrófono. Dependiendo de los ajustes de su proveedor,puede que la exploración termine cuando usted transmita oque continúe funcionando. Si se establece que laexploración continúe incluso después de transmitir,entonces permanecerá en el canal actual durante untiempo predeterminado antes de continuar. Este períodode tiempo se establece de forma que si vuelve a apareceruna señal en el canal, o si usted vuelve a transmitir, laexploración permanecerá en el canal actual hasta quecaiga la señal o usted deje de transmitir.
TIPO DE REANUDACIÓN DE EXPLORACIÓN
La reanudación de exploración controla cuándo continúaexplorando el transceptor después de la parada pertinenteen un canal ocupado.
• Exploración activada por tiempo: Después de pararen un canal ocupado, la exploración se reanuda tras untiempo predeterminado (establecido por su proveedor)haya o no aún presencia de señal en el canal.
• Exploración activada por transmisor: El transceptorpermanece en el canal ocupado hasta que se acaba laseñal. La exploración se reanuda tras un tiempopredeterminado (establecido por su proveedor)después de que haya caído la señal.
EXPLORACIÓN
EXPLORACIÓN PREFERIDAPara que la exploración preferida funcione, debe haberseprogramado previamente un canal preferente.
Durante la exploración, el canal preferente se comprueba aintervalos regulares (configurado por su proveedor). Esteintervalo le asegura no perderse las transmisionesimportantes de su canal preferente mientras explora otroscanales.• El indicador aparece en pantalla cuando se selecciona el
canal preferente.
AÑADIR A LA EXPLORACIÓN/ BORRAR DE LAEXPLORACIÓNPulse la tecla programada con la función Borrar/añadir aexploración, para añadir cada canal a la secuencia deexploración o eliminarlo de ella. Sólo se explorarán loscanales que se hayan añadido a la secuencia deexploración. Los canales borrados se saltarán.• Cuando el canal seleccionado se añade a la secuencia de
exploración, el indicador de incorporación de canal( ) aparece en la pantalla.
CANAL DE REVERSIÓN DE EXPLORACIÓNEl proveedor puede configurar 1 de 4 tipos diferentes dereversiones de exploración en el transceptor. Un canal dereversión de exploración es el canal en el que puedetransmitir durante la exploración cuando presiona elconmutador PTT del micrófono.
• Canal preferente: Si su proveedor ha programado uncanal preferente, éste se asigna como canal inicial.
• Canal preferente + Talkback: Si su proveedor haprogramado un canal preferente, éste se asigna comocanal inicial. Sin embargo, cuando se detiene en uncanal ocupado, podrá “responder” en dicho canal hastaque se reanude la exploración.
• Canal seleccionado: Como canal Inicial se asigna elúltimo canal seleccionado antes de iniciar laexploración.
• Canal seleccionado + Talkback: Como canal Inicialse asigna el último canal seleccionado antes de iniciarla exploración. Sin embargo, cuando se detiene en uncanal ocupado, podrá “responder” en dicho canal hastaque se reanude la exploración.
TK-90 S 01-22 07.9.28, 6:34 PM12
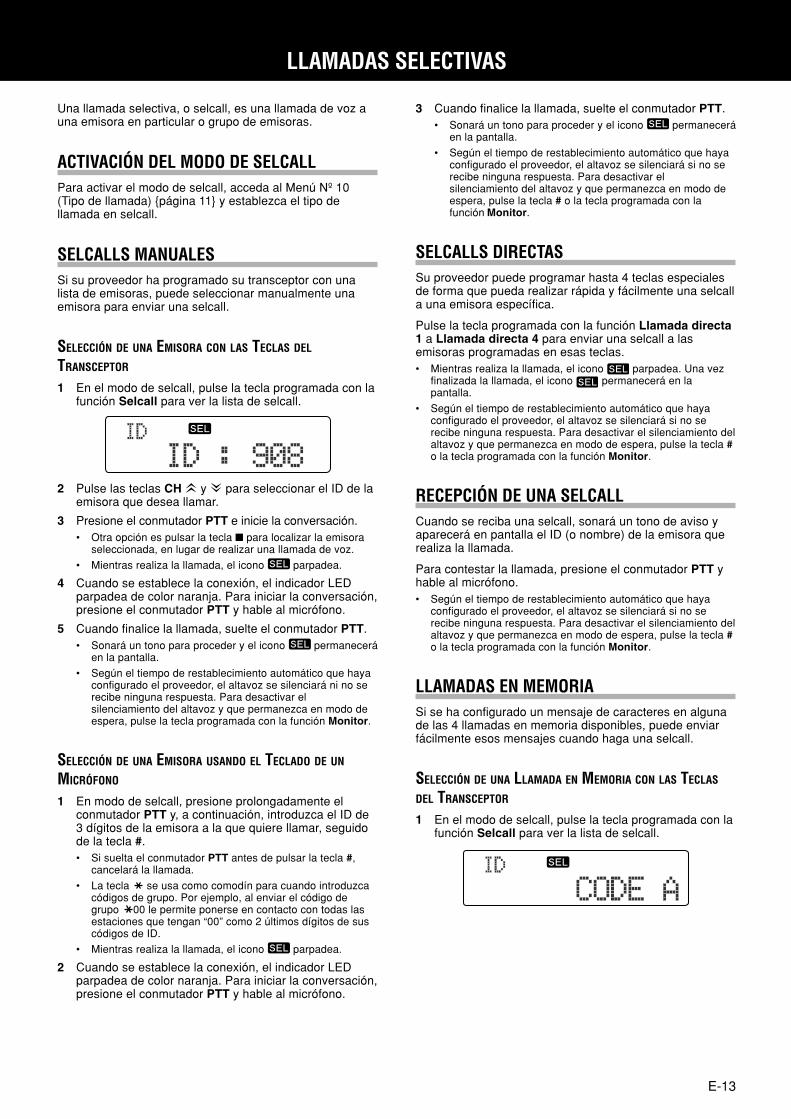
E-13
LLAMADAS SELECTIVAS
Una llamada selectiva, o selcall, es una llamada de voz auna emisora en particular o grupo de emisoras.
ACTIVACIÓN DEL MODO DE SELCALLPara activar el modo de selcall, acceda al Menú Nº 10(Tipo de llamada) página 11 y establezca el tipo dellamada en selcall.
SELCALLS MANUALESSi su proveedor ha programado su transceptor con unalista de emisoras, puede seleccionar manualmente unaemisora para enviar una selcall.
SELECCIÓN DE UNA EMISORA CON LAS TECLAS DEL
TRANSCEPTOR
1 En el modo de selcall, pulse la tecla programada con lafunción Selcall para ver la lista de selcall.
3 Cuando finalice la llamada, suelte el conmutador PTT.• Sonará un tono para proceder y el icono permanecerá
en la pantalla.
• Según el tiempo de restablecimiento automático que hayaconfigurado el proveedor, el altavoz se silenciará si no serecibe ninguna respuesta. Para desactivar elsilenciamiento del altavoz y que permanezca en modo deespera, pulse la tecla # o la tecla programada con lafunción Monitor.
SELCALLS DIRECTASSu proveedor puede programar hasta 4 teclas especialesde forma que pueda realizar rápida y fácilmente una selcalla una emisora específica.
Pulse la tecla programada con la función Llamada directa1 a Llamada directa 4 para enviar una selcall a lasemisoras programadas en esas teclas.• Mientras realiza la llamada, el icono parpadea. Una vez
finalizada la llamada, el icono permanecerá en lapantalla.
• Según el tiempo de restablecimiento automático que hayaconfigurado el proveedor, el altavoz se silenciará si no serecibe ninguna respuesta. Para desactivar el silenciamiento delaltavoz y que permanezca en modo de espera, pulse la tecla #o la tecla programada con la función Monitor.
RECEPCIÓN DE UNA SELCALLCuando se reciba una selcall, sonará un tono de aviso yaparecerá en pantalla el ID (o nombre) de la emisora querealiza la llamada.
Para contestar la llamada, presione el conmutador PTT yhable al micrófono.• Según el tiempo de restablecimiento automático que haya
configurado el proveedor, el altavoz se silenciará si no serecibe ninguna respuesta. Para desactivar el silenciamiento delaltavoz y que permanezca en modo de espera, pulse la tecla #o la tecla programada con la función Monitor.
LLAMADAS EN MEMORIASi se ha configurado un mensaje de caracteres en algunade las 4 llamadas en memoria disponibles, puede enviarfácilmente esos mensajes cuando haga una selcall.
SELECCIÓN DE UNA LLAMADA EN MEMORIA CON LAS TECLAS
DEL TRANSCEPTOR
1 En el modo de selcall, pulse la tecla programada con lafunción Selcall para ver la lista de selcall.
2 Pulse las teclas CH y para seleccionar el ID de laemisora que desea llamar.
3 Presione el conmutador PTT e inicie la conversación.• Otra opción es pulsar la tecla para localizar la emisora
seleccionada, en lugar de realizar una llamada de voz.
• Mientras realiza la llamada, el icono parpadea.
4 Cuando se establece la conexión, el indicador LEDparpadea de color naranja. Para iniciar la conversación,presione el conmutador PTT y hable al micrófono.
5 Cuando finalice la llamada, suelte el conmutador PTT.• Sonará un tono para proceder y el icono permanecerá
en la pantalla.
• Según el tiempo de restablecimiento automático que hayaconfigurado el proveedor, el altavoz se silenciará ni no serecibe ninguna respuesta. Para desactivar elsilenciamiento del altavoz y que permanezca en modo deespera, pulse la tecla programada con la función Monitor.
SELECCIÓN DE UNA EMISORA USANDO EL TECLADO DE UN
MICRÓFONO
1 En modo de selcall, presione prolongadamente elconmutador PTT y, a continuación, introduzca el ID de3 dígitos de la emisora a la que quiere llamar, seguidode la tecla #.• Si suelta el conmutador PTT antes de pulsar la tecla #,
cancelará la llamada.
• La tecla se usa como comodín para cuando introduzcacódigos de grupo. Por ejemplo, al enviar el código degrupo 00 le permite ponerse en contacto con todas lasestaciones que tengan “00” como 2 últimos dígitos de suscódigos de ID.
• Mientras realiza la llamada, el icono parpadea.
2 Cuando se establece la conexión, el indicador LEDparpadea de color naranja. Para iniciar la conversación,presione el conmutador PTT y hable al micrófono.
TK-90 S 01-22 07.9.28, 6:34 PM13
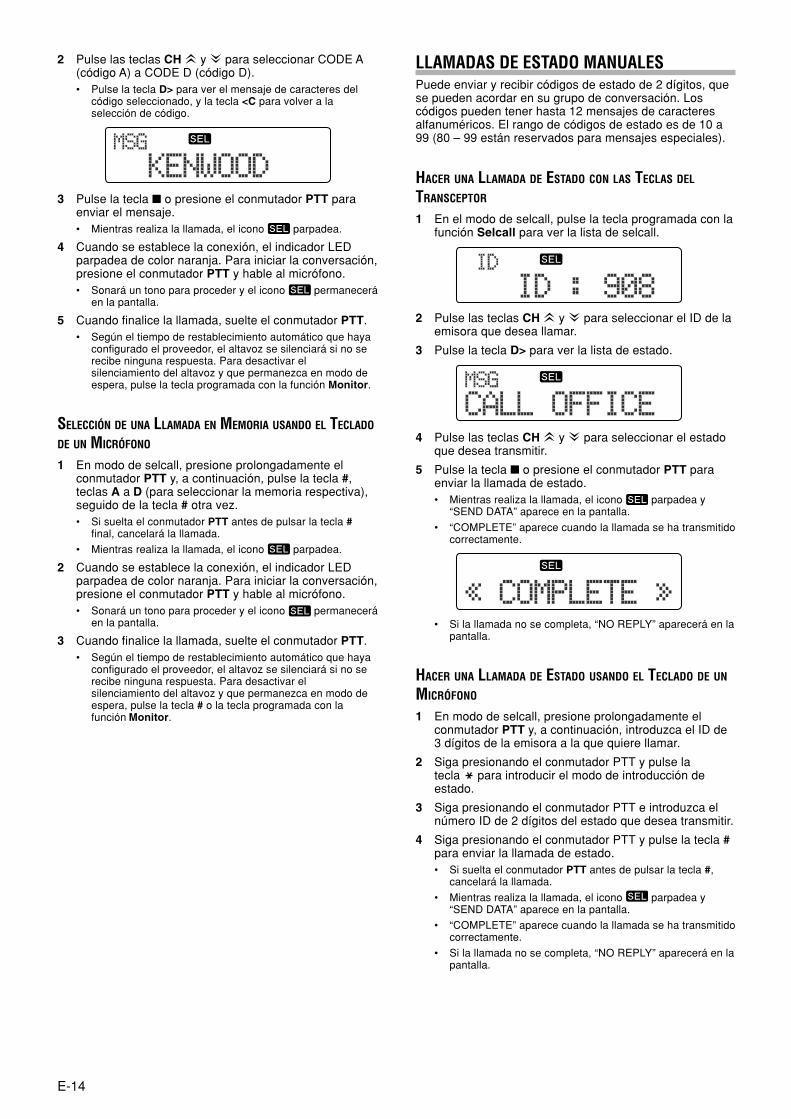
E-14
2 Pulse las teclas CH y para seleccionar CODE A(código A) a CODE D (código D).• Pulse la tecla D> para ver el mensaje de caracteres del
código seleccionado, y la tecla <C para volver a laselección de código.
LLAMADAS DE ESTADO MANUALESPuede enviar y recibir códigos de estado de 2 dígitos, quese pueden acordar en su grupo de conversación. Loscódigos pueden tener hasta 12 mensajes de caracteresalfanuméricos. El rango de códigos de estado es de 10 a99 (80 – 99 están reservados para mensajes especiales).
HACER UNA LLAMADA DE ESTADO CON LAS TECLAS DEL
TRANSCEPTOR
1 En el modo de selcall, pulse la tecla programada con lafunción Selcall para ver la lista de selcall.
4 Pulse las teclas CH y para seleccionar el estadoque desea transmitir.
5 Pulse la tecla o presione el conmutador PTT paraenviar la llamada de estado.• Mientras realiza la llamada, el icono parpadea y
“SEND DATA” aparece en la pantalla.
• “COMPLETE” aparece cuando la llamada se ha transmitidocorrectamente.
• Si la llamada no se completa, “NO REPLY” aparecerá en lapantalla.
HACER UNA LLAMADA DE ESTADO USANDO EL TECLADO DE UN
MICRÓFONO
1 En modo de selcall, presione prolongadamente elconmutador PTT y, a continuación, introduzca el ID de3 dígitos de la emisora a la que quiere llamar.
2 Siga presionando el conmutador PTT y pulse latecla para introducir el modo de introducción deestado.
3 Siga presionando el conmutador PTT e introduzca elnúmero ID de 2 dígitos del estado que desea transmitir.
4 Siga presionando el conmutador PTT y pulse la tecla #para enviar la llamada de estado.• Si suelta el conmutador PTT antes de pulsar la tecla #,
cancelará la llamada.
• Mientras realiza la llamada, el icono parpadea y“SEND DATA” aparece en la pantalla.
• “COMPLETE” aparece cuando la llamada se ha transmitidocorrectamente.
• Si la llamada no se completa, “NO REPLY” aparecerá en lapantalla.
3 Pulse la tecla o presione el conmutador PTT paraenviar el mensaje.• Mientras realiza la llamada, el icono parpadea.
4 Cuando se establece la conexión, el indicador LEDparpadea de color naranja. Para iniciar la conversación,presione el conmutador PTT y hable al micrófono.• Sonará un tono para proceder y el icono permanecerá
en la pantalla.
5 Cuando finalice la llamada, suelte el conmutador PTT.• Según el tiempo de restablecimiento automático que haya
configurado el proveedor, el altavoz se silenciará si no serecibe ninguna respuesta. Para desactivar elsilenciamiento del altavoz y que permanezca en modo deespera, pulse la tecla programada con la función Monitor.
SELECCIÓN DE UNA LLAMADA EN MEMORIA USANDO EL TECLADO
DE UN MICRÓFONO
1 En modo de selcall, presione prolongadamente elconmutador PTT y, a continuación, pulse la tecla #,teclas A a D (para seleccionar la memoria respectiva),seguido de la tecla # otra vez.• Si suelta el conmutador PTT antes de pulsar la tecla #
final, cancelará la llamada.
• Mientras realiza la llamada, el icono parpadea.
2 Cuando se establece la conexión, el indicador LEDparpadea de color naranja. Para iniciar la conversación,presione el conmutador PTT y hable al micrófono.• Sonará un tono para proceder y el icono permanecerá
en la pantalla.
3 Cuando finalice la llamada, suelte el conmutador PTT.• Según el tiempo de restablecimiento automático que haya
configurado el proveedor, el altavoz se silenciará si no serecibe ninguna respuesta. Para desactivar elsilenciamiento del altavoz y que permanezca en modo deespera, pulse la tecla # o la tecla programada con lafunción Monitor.
2 Pulse las teclas CH y para seleccionar el ID de laemisora que desea llamar.
3 Pulse la tecla D> para ver la lista de estado.
TK-90 S 01-22 07.9.28, 6:34 PM14

E-15
RECEPCIÓN DE UNA LLAMADA DE ESTADOLa memoria de pila del transceptor permite guardar unmáximo de 5 mensajes recibidos. Estos mensajesguardados se pueden revisar tras su recepción. Cuando lamemoria de pila está llena y se recibe un mensaje nuevo,o bien se borra el mensaje más antiguo o bien el mensajenuevo no se guarda en la memoria.
1 Cuando se recibe una llamada de estado, el icono parpadea y aparece un ID de llamada.
LLAMADAS DE ESTADO DIRECTASSu proveedor puede programar hasta 4 teclas especialesde forma que pueda realizar rápida y fácilmente unallamada de estado a una emisora específica.
Pulse la tecla programada con la función Llamada deestado directa 1 a Llamada de estado directa 4 paraenviar la llamada de estado programada a las emisorasprogramadas en esas teclas.• Mientras realiza la llamada, el icono parpadea y “SEND
DATA” aparece en la pantalla. Una vez finalizada la llamada, elicono permanecerá en la pantalla.
• “COMPLETE” aparece cuando la llamada se ha transmitidocorrectamente.
• Si la llamada no se completa, “NO REPLY” aparecerá en lapantalla.
MENSAJES DE VOZ OPCIONALESSi tanto usted como el transceptor de destino tieneninstaladas las unidades VGS-1 opcionales en sustransceptores página 20, podrá usar también grabacionesde voz como mensajes de estado.
1 En el modo de selcall, pulse la tecla programada con lafunción Selcall para ver la lista de selcall.
4 Pulse las teclas CH y para seleccionar “VOICEREC”.
3 Pulse la tecla para volver al modo defuncionamiento normal.• El icono permanece en la pantalla cuando se guarda un
mensaje en la memoria de pila.
CONSULTA DE LOS MENSAJES GUARDADOS EN LA MEMORIA DE
PILA
1 Pulse prolongadamente la tecla programada con lafunción Selcall durante 1 segundo para introducir elmodo de confirmación de estado.• Aparece el nombre o ID de la persona que envió el último
mensaje recibido con el número de mensaje.
2 Pulse las teclas CH y para seleccionar el ID de laemisora que desea llamar.
3 Pulse la tecla D> para ver la lista de estado.
5 Pulse la tecla o el conmutador PTT para iniciar lallamada.• Mientras realiza la llamada, el icono parpadea.
• Aparecerá un temporizador en la pantalla cuando eltransceptor esté preparado para recibir su grabación.
6 Presione el conmutador PTT y hable al micrófono paracomenzar la grabación de su mensaje.• Durante la grabación, el temporizador realizará una cuenta
regresiva.
7 Pulse la tecla para finalizar la grabación encualquier momento antes de que se acabe el tiempo enel temporizador.
2 Pulse la tecla D> para ver la llamada de estado.
• El icono parpadeará cuando haya un mensajeguardado en memoria que no se haya visto aún.
• El icono parpadeará cuando haya un mensaje de vozguardado en la memoria.
2 Pulse las teclas CH y para seleccionar el ID depersona que llama que desee.
3 Pulse la tecla D> para ver el mensaje y la tecla <C paravolver a la lista de ID de personas que llaman.• Cuando seleccione un mensaje de voz, aparecerá “VOICE
MSG” en la pantalla y se reproducirá el mensaje.
4 Pulse la tecla para volver al modo defuncionamiento normal.• Para borrar el mensaje seleccionado, pulse la tecla A. Para
confirmar la eliminación, pulse la tecla . Para cancelar,pulse la tecla .
• Para borrar todos los mensajes, pulse prolongadamente latecla A durante 1 segundo. Para confirmar la eliminación,pulse la tecla . Para cancelar, pulse la tecla .
TK-90 S 01-22 07.9.28, 6:35 PM15
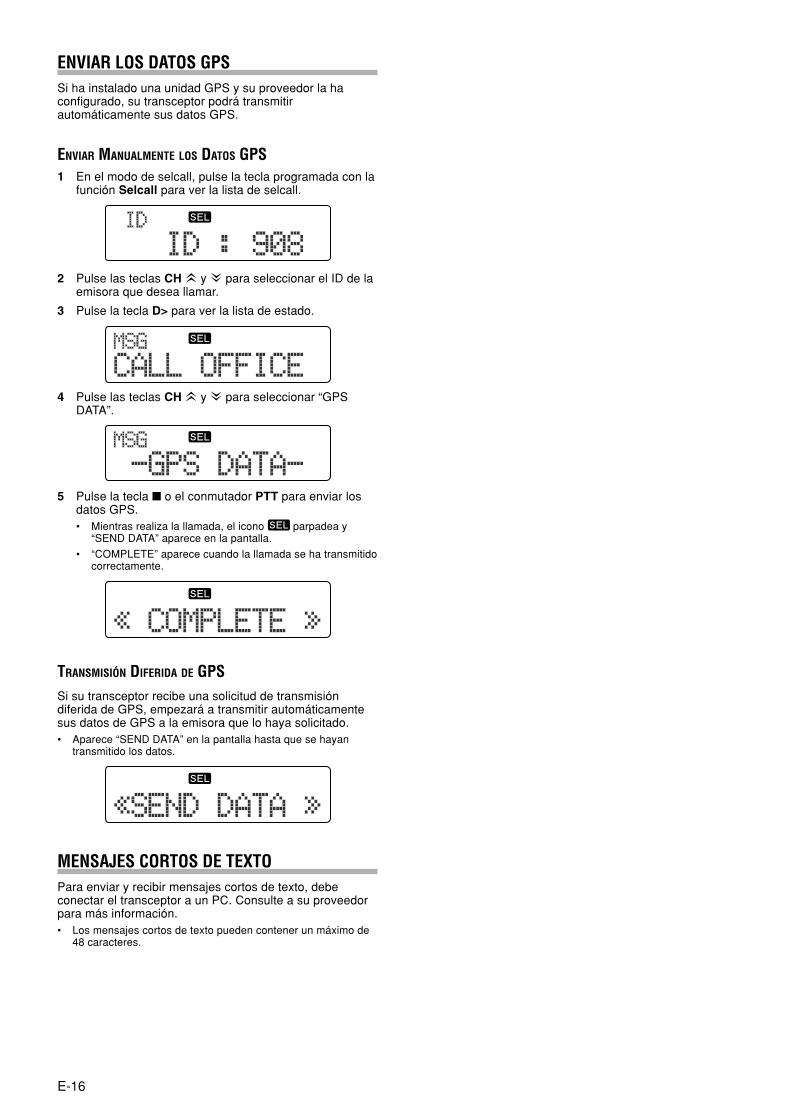
E-16
ENVIAR LOS DATOS GPSSi ha instalado una unidad GPS y su proveedor la haconfigurado, su transceptor podrá transmitirautomáticamente sus datos GPS.
ENVIAR MANUALMENTE LOS DATOS GPS1 En el modo de selcall, pulse la tecla programada con la
función Selcall para ver la lista de selcall.
2 Pulse las teclas CH y para seleccionar el ID de laemisora que desea llamar.
3 Pulse la tecla D> para ver la lista de estado.
4 Pulse las teclas CH y para seleccionar “GPSDATA”.
5 Pulse la tecla o el conmutador PTT para enviar losdatos GPS.• Mientras realiza la llamada, el icono parpadea y
“SEND DATA” aparece en la pantalla.
• “COMPLETE” aparece cuando la llamada se ha transmitidocorrectamente.
TRANSMISIÓN DIFERIDA DE GPSSi su transceptor recibe una solicitud de transmisióndiferida de GPS, empezará a transmitir automáticamentesus datos de GPS a la emisora que lo haya solicitado.• Aparece “SEND DATA” en la pantalla hasta que se hayan
transmitido los datos.
MENSAJES CORTOS DE TEXTOPara enviar y recibir mensajes cortos de texto, debeconectar el transceptor a un PC. Consulte a su proveedorpara más información.• Los mensajes cortos de texto pueden contener un máximo de
48 caracteres.
TK-90 S 01-22 07.9.28, 6:35 PM16
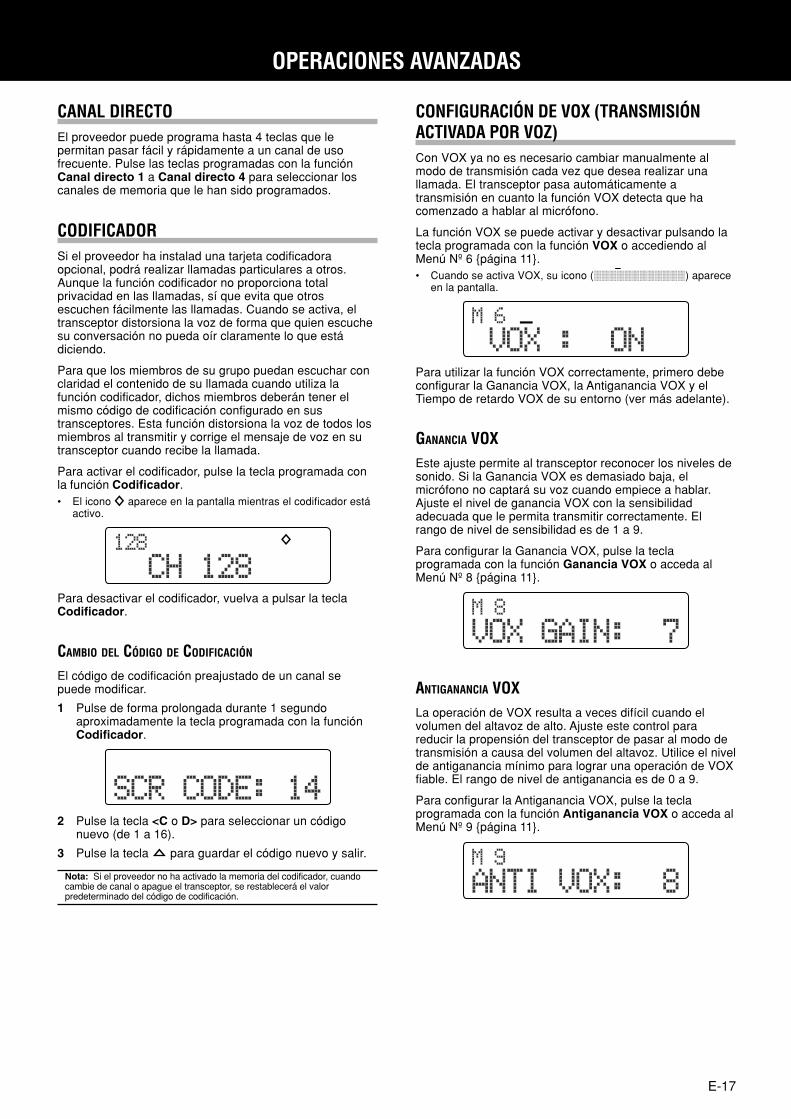
E-17
OPERACIONES AVANZADAS
CANAL DIRECTOEl proveedor puede programa hasta 4 teclas que lepermitan pasar fácil y rápidamente a un canal de usofrecuente. Pulse las teclas programadas con la funciónCanal directo 1 a Canal directo 4 para seleccionar loscanales de memoria que le han sido programados.
CODIFICADORSi el proveedor ha instalad una tarjeta codificadoraopcional, podrá realizar llamadas particulares a otros.Aunque la función codificador no proporciona totalprivacidad en las llamadas, sí que evita que otrosescuchen fácilmente las llamadas. Cuando se activa, eltransceptor distorsiona la voz de forma que quien escuchesu conversación no pueda oír claramente lo que estádiciendo.
Para que los miembros de su grupo puedan escuchar conclaridad el contenido de su llamada cuando utiliza lafunción codificador, dichos miembros deberán tener elmismo código de codificación configurado en sustransceptores. Esta función distorsiona la voz de todos losmiembros al transmitir y corrige el mensaje de voz en sutransceptor cuando recibe la llamada.
Para activar el codificador, pulse la tecla programada conla función Codificador.• El icono aparece en la pantalla mientras el codificador está
activo.
CONFIGURACIÓN DE VOX (TRANSMISIÓNACTIVADA POR VOZ)Con VOX ya no es necesario cambiar manualmente almodo de transmisión cada vez que desea realizar unallamada. El transceptor pasa automáticamente atransmisión en cuanto la función VOX detecta que hacomenzado a hablar al micrófono.
La función VOX se puede activar y desactivar pulsando latecla programada con la función VOX o accediendo alMenú Nº 6 página 11.• Cuando se activa VOX, su icono ( ) aparece
en la pantalla.
Para desactivar el codificador, vuelva a pulsar la teclaCodificador.
CAMBIO DEL CÓDIGO DE CODIFICACIÓN
El código de codificación preajustado de un canal sepuede modificar.
1 Pulse de forma prolongada durante 1 segundoaproximadamente la tecla programada con la funciónCodificador.
2 Pulse la tecla <C o D> para seleccionar un códigonuevo (de 1 a 16).
3 Pulse la tecla para guardar el código nuevo y salir.
Nota: Si el proveedor no ha activado la memoria del codificador, cuandocambie de canal o apague el transceptor, se restablecerá el valorpredeterminado del código de codificación.
Para utilizar la función VOX correctamente, primero debeconfigurar la Ganancia VOX, la Antiganancia VOX y elTiempo de retardo VOX de su entorno (ver más adelante).
GANANCIA VOXEste ajuste permite al transceptor reconocer los niveles desonido. Si la Ganancia VOX es demasiado baja, elmicrófono no captará su voz cuando empiece a hablar.Ajuste el nivel de ganancia VOX con la sensibilidadadecuada que le permita transmitir correctamente. Elrango de nivel de sensibilidad es de 1 a 9.
Para configurar la Ganancia VOX, pulse la teclaprogramada con la función Ganancia VOX o acceda alMenú Nº 8 página 11.
ANTIGANANCIA VOXLa operación de VOX resulta a veces difícil cuando elvolumen del altavoz de alto. Ajuste este control parareducir la propensión del transceptor de pasar al modo detransmisión a causa del volumen del altavoz. Utilice el nivelde antiganancia mínimo para lograr una operación de VOXfiable. El rango de nivel de antiganancia es de 0 a 9.
Para configurar la Antiganancia VOX, pulse la teclaprogramada con la función Antiganancia VOX o acceda alMenú Nº 9 página 11.
TK-90 S 01-22 07.9.28, 6:35 PM17
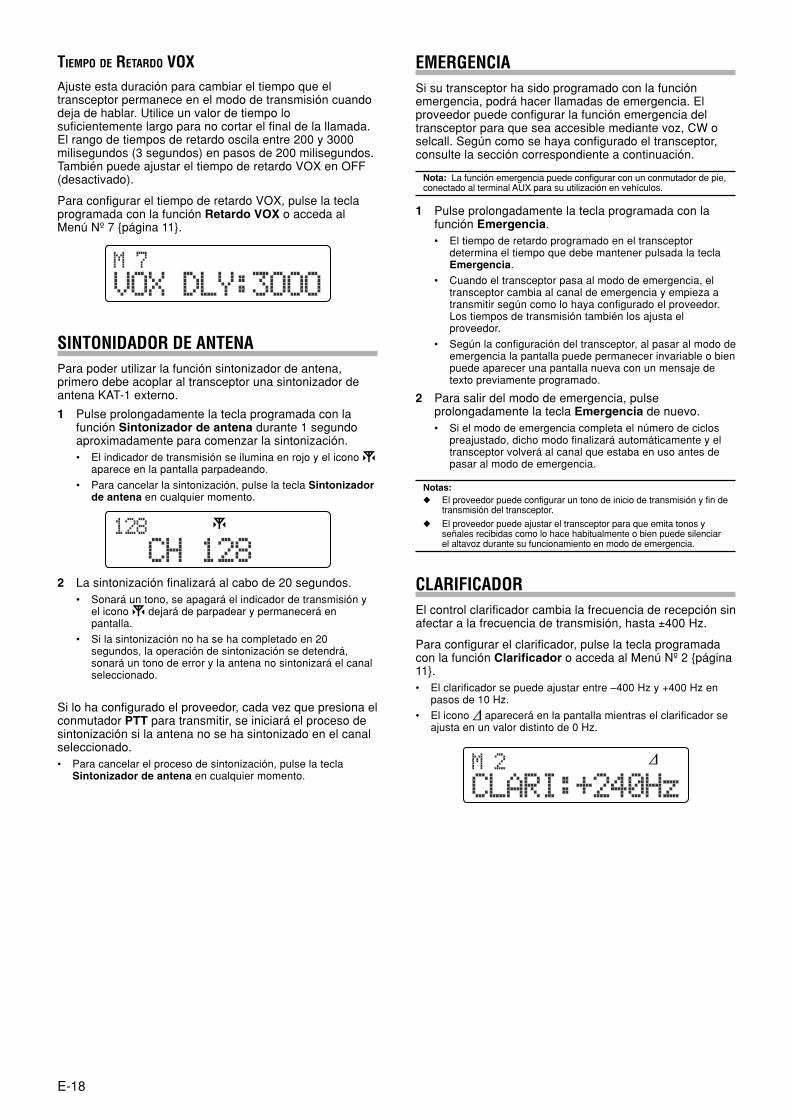
E-18
2 La sintonización finalizará al cabo de 20 segundos.• Sonará un tono, se apagará el indicador de transmisión y
el icono dejará de parpadear y permanecerá enpantalla.
• Si la sintonización no ha se ha completado en 20segundos, la operación de sintonización se detendrá,sonará un tono de error y la antena no sintonizará el canalseleccionado.
Si lo ha configurado el proveedor, cada vez que presiona elconmutador PTT para transmitir, se iniciará el proceso desintonización si la antena no se ha sintonizado en el canalseleccionado.• Para cancelar el proceso de sintonización, pulse la tecla
Sintonizador de antena en cualquier momento.
EMERGENCIASi su transceptor ha sido programado con la funciónemergencia, podrá hacer llamadas de emergencia. Elproveedor puede configurar la función emergencia deltransceptor para que sea accesible mediante voz, CW oselcall. Según como se haya configurado el transceptor,consulte la sección correspondiente a continuación.
Nota: La función emergencia puede configurar con un conmutador de pie,conectado al terminal AUX para su utilización en vehículos.
1 Pulse prolongadamente la tecla programada con lafunción Emergencia.• El tiempo de retardo programado en el transceptor
determina el tiempo que debe mantener pulsada la teclaEmergencia.
• Cuando el transceptor pasa al modo de emergencia, eltransceptor cambia al canal de emergencia y empieza atransmitir según como lo haya configurado el proveedor.Los tiempos de transmisión también los ajusta elproveedor.
• Según la configuración del transceptor, al pasar al modo deemergencia la pantalla puede permanecer invariable o bienpuede aparecer una pantalla nueva con un mensaje detexto previamente programado.
2 Para salir del modo de emergencia, pulseprolongadamente la tecla Emergencia de nuevo.• Si el modo de emergencia completa el número de ciclos
preajustado, dicho modo finalizará automáticamente y eltransceptor volverá al canal que estaba en uso antes depasar al modo de emergencia.
Notas: El proveedor puede configurar un tono de inicio de transmisión y fin de
transmisión del transceptor.
El proveedor puede ajustar el transceptor para que emita tonos yseñales recibidas como lo hace habitualmente o bien puede silenciarel altavoz durante su funcionamiento en modo de emergencia.
CLARIFICADOREl control clarificador cambia la frecuencia de recepción sinafectar a la frecuencia de transmisión, hasta ±400 Hz.
Para configurar el clarificador, pulse la tecla programadacon la función Clarificador o acceda al Menú Nº 2 página11.• El clarificador se puede ajustar entre –400 Hz y +400 Hz en
pasos de 10 Hz.
• El icono aparecerá en la pantalla mientras el clarificador seajusta en un valor distinto de 0 Hz.
TIEMPO DE RETARDO VOXAjuste esta duración para cambiar el tiempo que eltransceptor permanece en el modo de transmisión cuandodeja de hablar. Utilice un valor de tiempo losuficientemente largo para no cortar el final de la llamada.El rango de tiempos de retardo oscila entre 200 y 3000milisegundos (3 segundos) en pasos de 200 milisegundos.También puede ajustar el tiempo de retardo VOX en OFF(desactivado).
Para configurar el tiempo de retardo VOX, pulse la teclaprogramada con la función Retardo VOX o acceda alMenú Nº 7 página 11.
SINTONIDADOR DE ANTENAPara poder utilizar la función sintonizador de antena,primero debe acoplar al transceptor una sintonizador deantena KAT-1 externo.
1 Pulse prolongadamente la tecla programada con lafunción Sintonizador de antena durante 1 segundoaproximadamente para comenzar la sintonización.• El indicador de transmisión se ilumina en rojo y el icono
aparece en la pantalla parpadeando.
• Para cancelar la sintonización, pulse la tecla Sintonizadorde antena en cualquier momento.
TK-90 S 01-22 07.9.28, 6:35 PM18
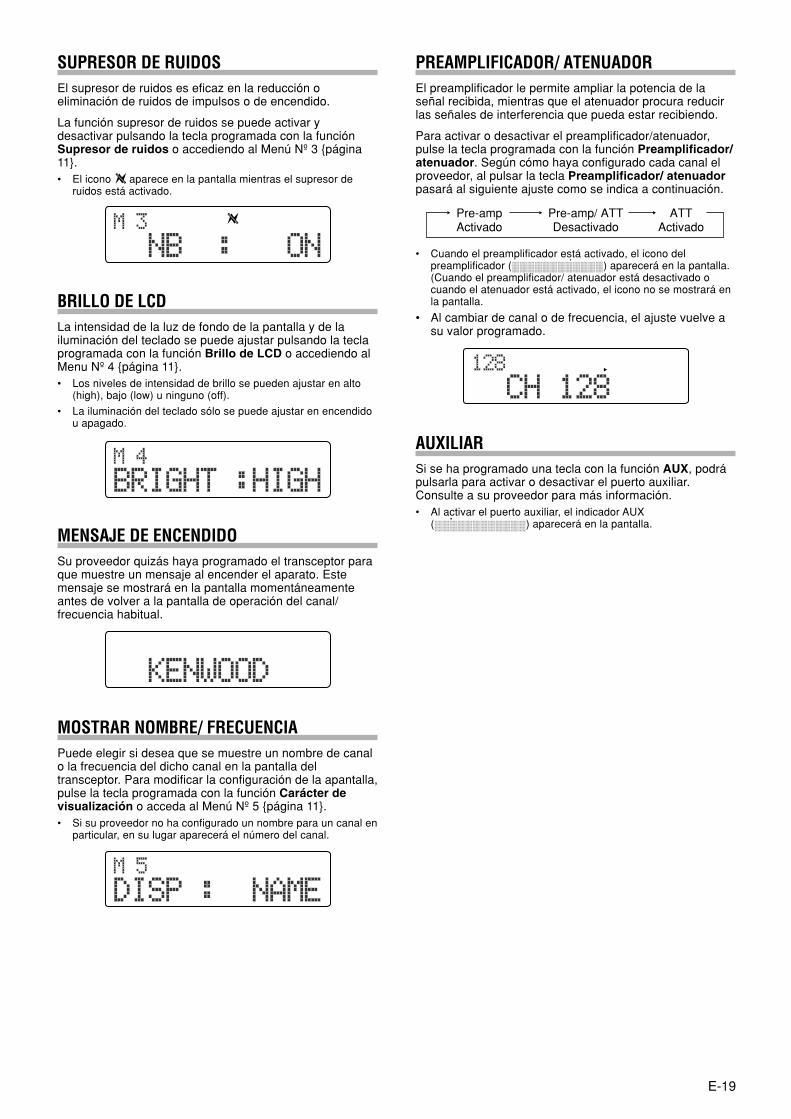
E-19
MENSAJE DE ENCENDIDOSu proveedor quizás haya programado el transceptor paraque muestre un mensaje al encender el aparato. Estemensaje se mostrará en la pantalla momentáneamenteantes de volver a la pantalla de operación del canal/frecuencia habitual.
PREAMPLIFICADOR/ ATENUADOREl preamplificador le permite ampliar la potencia de laseñal recibida, mientras que el atenuador procura reducirlas señales de interferencia que pueda estar recibiendo.
Para activar o desactivar el preamplificador/atenuador,pulse la tecla programada con la función Preamplificador/atenuador. Según cómo haya configurado cada canal elproveedor, al pulsar la tecla Preamplificador/ atenuadorpasará al siguiente ajuste como se indica a continuación.
• Cuando el preamplificador está activado, el icono delpreamplificador ( ) aparecerá en la pantalla.(Cuando el preamplificador/ atenuador está desactivado ocuando el atenuador está activado, el icono no se mostrará enla pantalla.
• Al cambiar de canal o de frecuencia, el ajuste vuelve asu valor programado.
SUPRESOR DE RUIDOSEl supresor de ruidos es eficaz en la reducción oeliminación de ruidos de impulsos o de encendido.
La función supresor de ruidos se puede activar ydesactivar pulsando la tecla programada con la funciónSupresor de ruidos o accediendo al Menú Nº 3 página11.• El icono aparece en la pantalla mientras el supresor de
ruidos está activado.
BRILLO DE LCDLa intensidad de la luz de fondo de la pantalla y de lailuminación del teclado se puede ajustar pulsando la teclaprogramada con la función Brillo de LCD o accediendo alMenu Nº 4 página 11.• Los niveles de intensidad de brillo se pueden ajustar en alto
(high), bajo (low) u ninguno (off).
• La iluminación del teclado sólo se puede ajustar en encendidou apagado.
MOSTRAR NOMBRE/ FRECUENCIAPuede elegir si desea que se muestre un nombre de canalo la frecuencia del dicho canal en la pantalla deltransceptor. Para modificar la configuración de la apantalla,pulse la tecla programada con la función Carácter devisualización o acceda al Menú Nº 5 página 11.• Si su proveedor no ha configurado un nombre para un canal en
particular, en su lugar aparecerá el número del canal.
AUXILIARSi se ha programado una tecla con la función AUX, podrápulsarla para activar o desactivar el puerto auxiliar.Consulte a su proveedor para más información.• Al activar el puerto auxiliar, el indicador AUX
( ) aparecerá en la pantalla.
Pre-ampActivado
Pre-amp/ ATTDesactivado
ATTActivado
TK-90 S 01-22 07.9.28, 6:35 PM19
E-20
UNIDAD DE GUÍA DE VOZ Y GRABADORA OPCIONAL VGS-1
Cuando utiliza la unidad de guía de voz y grabadora VGS-1 opcional, puede acceder a las funciones grabadora devoz y anuncio de voz del transceptor. Consulte a suproveedor para más información.
RECORDATORIOS DE VOZ
GRABACIÓN DE RECORDATORIOS DE VOZ
Se pueden grabar hasta 4 recordatorios de voz, cada unode hasta 15 segundos de duración. Para grabar unrecordatorio de voz y reproducirlo más tarde:
1 Pulse prolongadamente la tecla programada con lafunción Reproducción 1 – 4 durante 1 segundoaproximadamente para iniciar la grabación. (Cada teclade reproducción corresponde a una memoria de 1 a 4.)• La duración de la memoria de grabación aparecerá en la
pantalla con cuenta regresiva. El recordatorio de voz sólopuede grabar la señal recibida.
Nota: Su proveedor puede configurar las teclas de reproducción tantopara recordatorios de voz como para mensajes de voz. Las teclasfuncionan de forma distinta según como se hayan configurado; portanto procure pulsar una tecla de reproducción configurada pararecordatorios de voz
3 Pulse la tecla de nuevo para confirmar la selección yborrar la grabación de la memoria.• Para cancelar, pulse la tecla .
MENSAJES DE VOZ
GRABACIÓN DE UN MENSAJE DE VOZ
Se pueden grabar hasta 4 mensajes de voz, cada uno dehasta 15 segundos de duración. Para grabar un mensajede voz y reproducirlo/transmitirlo más tarde:
1 Pulse prolongadamente la tecla programada con lafunción Reproducción 1 – 4 durante 1 segundo. (Cadatecla de reproducción corresponde a una memoria de 1a 4.)• “REC/PLAY” aparece en la pantalla.
• Pulse la tecla para cancelar la operación y volver almodo de funcionamiento normal.
Nota: Su proveedor puede configurar las teclas de reproducción tantopara mensajes de voz como para recordatorios de voz. Las teclasfuncionan de forma distinta según como se hayan configurado; portanto procure pulsar una tecla de reproducción configurada paramensajes de voz.
2 Pulse la tecla para finalizar la grabación encualquier momento y guardarla en la memoria deltransceptor.• Si se llena memoria, la grabación se detendrá
automáticamente y el recordatorio de voz se guardará enla memoria.
• Mientras la grabación se guarda en la memoria, en lapantalla aparece “WRITING”.
REPRODUCCIÓN DE UN RECORDATORIO DE VOZ
Para reproducir un recordatorio de voz grabado:
1 Pulse la tecla programada con la funciónReproducción 1 – 4 para reproducir el recordatorio devoz especificado.
2 Pulse la tecla para finalizar la reproducción encualquier momento.
ELIMINACIÓN DE UN RECORDATORIO DE VOZ
Para borrar un recordatorio de voz grabado:
1 Pulse la tecla programada con la funciónReproducción 1 – 4 para seleccionar el recordatoriode voz especificado y reproducirlo.
2 Pulse la tecla para borrar la grabación.• “DELETE?” aparece en la pantalla.
2 Pulse la tecla y hable al micrófono para comenzar lagrabación de su mensaje.• La duración de la memoria de grabación aparecerá en la
pantalla con cuenta regresiva.
3 Pulse la tecla para finalizar la grabación encualquier momento y guardarla en la memoria deltransceptor.• Si se llena la memoria, la grabación se detendrá
automáticamente y el mensaje de voz se guardará en lamemoria.
• Mientras la grabación se guarda en la memoria, en lapantalla aparece “WRITING”.
TK-90 S 01-22 07.9.28, 6:36 PM20
E-21
3 Pulse la tecla para finalizar la reproducción encualquier momento.
TRANSMISIÓN DE UN MENSAJE DE VOZ
Para transmitir un mensaje de voz grabado:
1 Seleccione el canal en el que desea transmitir lagrabación.
2 Pulse la tecla programada con la funciónReproducción 1 – 4 para reproducir y transmitir elmensaje de voz especificado.
3 Pulse la tecla para finalizar la transmisión encualquier momento.
ELIMINACIÓN DE UN MENSAJE DE VOZ
Para borrar un mensaje de voz grabado:
1 Pulse prolongadamente la tecla programada con lafunción Reproducción 1 – 4 durante 1 segundoaproximadamente para seleccionar el mensaje de vozespecificado.
GRABACIÓN AUTOMÁTICALa función de grabación automática graba de formacontinua todas las señales transmitidas y recibidas. Lazona de almacenamiento de grabaciones guarda 30segundos de grabación, de modo que todas las señalestransmitidas y recibidas se graban y borransimultáneamente, dejando únicamente en la memoria losúltimos 30 segundos de grabación.• El icono aparece en la pantalla mientras la función
grabación automática está activa.
Para guardar la última grabación para reproducirla, pulseprolongadamente la tecla programada con la funciónGrabación automática durante 1 segundoaproximadamente.• “WRITING” (grabando) aparece en la pantalla.
REPRODUCCIÓN DE UN MENSAJE DE VOZ
Para reproducir un mensaje de voz grabado:
1 Pulse prolongadamente la tecla programada con lafunción Reproducción 1 – 4 durante 1 segundo.• Pulse la tecla para cancelar la operación y volver al
modo de funcionamiento normal.
2 Pulse la tecla D> para comenzar la reproducción.
2 Pulse prolongadamente la tecla durante 1 segundoaproximadamente para borrar la grabación.• “DELETE?” aparece en la pantalla.
3 Pulse la tecla de nuevo para confirmar la selección yborrar la grabación de la memoria.• Para cancelar, pulse la tecla .
REPRODUCCIÓN DE UNA GRABACIÓN AUTOMÁTICA
Para reproducir una grabación:
1 Pulse la tecla programada con la función Grabaciónautomática.• “PLAYBACK” aparece en la pantalla.
2 Pulse la tecla para finalizar la reproducción encualquier momento.
ELIMINACIÓN DE UNA GRABACIÓN AUTOMÁTICA
Para borrar una grabación:
1 Pulse la tecla programada con la función Grabaciónautomática para reproducir la grabación.
2 Pulse la tecla para borrar la grabación.• “DELETE?” aparece en la pantalla.
3 Pulse la tecla de nuevo para confirmar la selección yborrar la grabación de la memoria.• Para cancelar, pulse la tecla .
GUÍA DE VOZAl cambiar de canal, un sonido de voz anunciará el canalnuevo cuando se haya seleccionado. Esto resulta muy útilmientras conduce ya que no siempre se puede consultar lapantalla para ver qué canal ha seleccionado. (Suproveedor puede activar o desactivar esta función.)
TK-90 S 01-22 07.9.28, 6:36 PM21
E-22
APÉNDICE
FUNCIONES DE LAS TECLAS
ledalceTrotpecsnart
otneimanoicnuFlamron
nenóicarepOednóicarugifnoc
únem
llaclesednóicarepO
edarepseedodoMllacles
nóiccelesedodoMarosimeed
nóiccelesedodoModatseed
aletnarudnóixenoCadamall 1
nemulovleratsujA nemulovleratsujA nemulovleratsujA nemulovleratsujA nemulovleratsujA nemulovleratsujA
edalcetusravitcAnóicnuf 2
edodomlarevloVlamronnóicarepo
edalcetusravitcAnóicnuf 2
edodomlarevloVllaclesedarepse
edodomlarevloVllaclesedarepse
edalcetusravitcAnóicnuf 4,2
edalcetusravitcAnóicnuf 2
anugniNnóicarepo 3
edalcetusravitcAnóicnuf 2 nóicarepoanugniN nóicarepoanugniN edalcetusravitcA
nóicnuf 4,2
edalcetusravitcAnóicnuf 2 nóicarepoanugniN edalcetusravitcA
nóicnuf 2 nóicarepoanugniN nóicarepoanugniN edalcetusravitcAnóicnuf 4,2
edalcetusravitcAnóicnuf 2
nuranoicceleSortemárap
edalcetusravitcAnóicnuf 2 nóicarepoanugniN
edodomnerartnEednóicceles
arosime
edalcetusravitcAnóicnuf 4,2
edalcetusravitcAnóicnuf 2
nuranoicceleSortemárap
edalcetusravitcAnóicnuf 2
edodomnerartnEednóicceles
arosimenóicarepoanugniN edalcetusravitcA
nóicnuf 4,2
edalcetusravitcAnóicnuf 2 nóicarepoanugniN edalcetusravitcA
nóicnuf 2 adamallalraicinI adamallalraicinI edalcetusravitcAnóicnuf 4,2
nuranoicceleSlanac
nuranoicceleSúnem
nuranoicceleSlanac
anuranoicceleSarosime
nuranoicceleSodatse nóicarepoanugniN
-CMKalceT63-CMK/23
otneimanoicnuFlamron
nenóicarepOednóicarugifnoc
únem
llaclesednóicarepO
edarepseedodoMllacles
adartneedodoModalcetetnaidem
nóiccelesedodoMedogidóced
airomemneadamall
aletnarudnóixenoCadamall 1
0 – 9 nóicarepoanugniN nóicarepoanugniN nóicarepoanugniN ogidócnuricudortnI nóicarepoanugniN nóicarepoanugniN
A 5 edalcetusravitcAnóicnuf 2
anugniNnóicarepo 3
edalcetusravitcAnóicnuf 2 nóicarepoanugniN ogidócleranoicceleS
AairomemededalcetusravitcA
nóicnuf 2
B 5 edalcetusravitcAnóicnuf 2 nóicarepoanugniN edalcetusravitcA
nóicnuf 2 nóicarepoanugniN ogidócleranoicceleSBairomemed
edalcetusravitcAnóicnuf 2
C 5 edalcetusravitcAnóicnuf 2
nuranoicceleSortemárap
edalcetusravitcAnóicnuf 2 nóicarepoanugniN ogidócleranoicceleS
CairomemededalcetusravitcA
nóicnuf 2
D 5 edalcetusravitcAnóicnuf 2
nuranoicceleSortemárap
edalcetusravitcAnóicnuf 2 nóicarepoanugniN ogidócleranoicceleS
DairomemededalcetusravitcA
nóicnuf 2
edalcetusravitcAnóicnuf 2
edodomlarevloVlamronnóicarepo
nóicnufalravitcAravitcased(rotinom
)otneimaicnelisogidócnuricudortnI nóicarepoanugniN nóicarepoanugniN
# edalcetusravitcAnóicnuf 2 nóicarepoanugniN alravitcaseD
rotinomnóicnuf
edodomarasaP•ednóicceles
edogidócneadamall
setna(airomemnuricudortnied
)ogidócadamallalraicinI•nuricudortnisart(
)ogidóc
adamallalraicinInuricudortnisart(
)ogidóc
edodomlarevloVllaclesedarepse
TTP arapranoiserPritimsnart
arapranoiserPritimsnart
rasluPetnemadagnolorp
odomlarasaparapadartneed
.odalcetetnaidem
larevlovarapratloSedarepseedodom
llacles
revlovarapratloSarepseedodomla
llaclesed
arapranoiserPritimsnart
1 Cuando se establece una conexión, el indicador LED parpadea de color naranja.2 Función programable3 Si durante la operación de configuración de menú cambia de frecuencia del clarificador y pulsa la tecla A (en el transceptor o el
micrófono), se borrará la frecuencia.4 Durante la operación de selcall, si al establecerse una conexión pulsa la tecla programada con la función Monitor, el transceptor volverá
al modo de espera de selcall.5 El KMC-36 no tiene las teclas A - D.
TK-90 S 01-22 07.9.28, 6:36 PM22

短波对讲机
TK‑90使用说明书
中文

i
感谢
感谢您选择了 KENWOOD 产品作为您的无线电通信应用设备。我们相信,这一易于使用的对讲机将为您提供可靠的通讯,可使您达到最高的工作效率。
KENWOOD 对讲机结合了最新的先进技术。因此,我们坚信您会对本产品的质量和性能感到满意。
用户注意事项 政府法律禁止在政府控制的区域内使用未经当局许可的发射机。
非法使用将会受到罚款或监禁处罚。
只能由有资格的技术人员进行维修。
安全性:操作人员应该知道并了解对讲机操作的一般危险。
爆炸性的空气(气体、粉尘、烟雾等)
加油或在加油站停车时请关闭对讲机。如果对讲机安装在行李箱区域,则请勿在汽车的行李箱中携带备用燃油容器。
射频发射的伤害
当有人靠近或接触天线时,请勿操作对讲机,以避免可能的射频灼伤或其他的身体伤害。
爆破雷管
在距爆破雷管150m的距离范围内操作对讲机可能引起雷管爆炸。在正在进行爆破的区域内或在贴有“关闭双向无线电”标志的地方,请关闭对讲机。如果您的汽车正在运输雷管,请确认雷管装在箱内四周设置软垫的密闭金属箱内。将雷管装入容器,或从容器中取出雷管时,请勿发射。
注意事项
请遵守以下的注意事项,以防止起火、造成人身伤害和引起对讲机故障。
• 行车时请勿配置对讲机,这样做太危险。
• 请勿因任何理由拆卸或改装对讲机。
• 请勿将对讲机长期暴露于直射的阳光下,或将其放在加热设备附近。
• 请勿将对讲机放置在多尘、多湿或潮湿的地方以及不平稳的表面上。
• 如果对讲机发出异常气味或冒烟,请立即关闭对讲机的电源,并与 KENWOOD 经销商联系。
• 驾车时使用对讲机可能违反交通方面的法律。请查阅并遵守您所在地区的驾车法规。
• 请勿使用非 KENWOOD 指定的选购件。
本对讲机只能工作于12V负极接地的电气系统!安装对讲机前先检查汽车蓄电池的极性和电压。
请只使用提供的DC电源电线或KENWOOD的选购DC电源电线。
请勿将金属物体插入冷却风扇中。
请勿切断和/或拆下DC电源电线上的保险丝盒。错误的连接和/或电流浪涌可能导致冒烟或着火。
为了乘客的安全,请用提供的安装支架和螺丝套件可靠地安装对讲机,这样万一汽车发生碰撞,对讲机也不会松脱。
注意
ii
目录
准备工作/安装 ................................................................... 1拆开包装箱并检查设备 .............................................. 1提供的附件 ............................................................. 1
基站安装 ...................................................................... 1脚垫 ......................................................................... 1天线连接 ................................................................. 1接地连接 ................................................................. 1直流电源安装 ......................................................... 2
汽车安装 ...................................................................... 2安装对讲机 ............................................................. 2天线连接 ................................................................. 2接地连接 ................................................................. 3DC电源电线的连接 ............................................... 3
熟悉 .................................................................................... 4前面板 .......................................................................... 4后面板 .......................................................................... 4显示屏 .......................................................................... 5麦克风(选购) .......................................................... 6可编程功能 .................................................................. 7
基本操作 ............................................................................ 8打开/关闭电源 ............................................................. 8音量调节 ...................................................................... 8选择信道 ...................................................................... 8直接频率输入 ......................................................... 8
选择模式 ...................................................................... 8数据操作 ................................................................. 8
发射 .............................................................................. 9VOX(声控发射) ................................................ 9CW键控 .................................................................. 9更改发射功率 ......................................................... 9超时定时器 ............................................................. 9过热 ......................................................................... 9
静噪/监听 ................................................................... 10静噪电平 ............................................................... 10信道监听 ............................................................... 10
菜单设置 .......................................................................... 11访问菜单 .................................................................... 11菜单配置 .................................................................... 11
扫描 .................................................................................. 12繁忙频率停止 ............................................................ 12扫描恢复类型 ....................................................... 12
首选扫描 .................................................................... 12添加到扫描/从扫描中删除 ....................................... 12扫描返回信道 ............................................................ 12
选择呼叫 .......................................................................... 13激活选择呼叫模式 .................................................... 13手动选择呼叫 ............................................................ 13使用对讲机按键选择电台 ................................... 13使用麦克风键盘选择电台 ................................... 13
直接选择呼叫 ............................................................ 13接收选择呼叫 ............................................................ 13存储器呼叫 ................................................................ 13使用对讲机按键选择存储器呼叫 ....................... 13使用麦克风键盘选择存储器呼叫 ....................... 14
手动状态呼叫 ............................................................ 14使用对讲机按键进行状态呼叫 ........................... 14使用麦克风键盘进行状态呼叫 ........................... 14
直接状态呼叫 ............................................................ 15选件的语音信息 ........................................................ 15接收状态呼叫 ............................................................ 15查看堆栈存储器中的信息 ................................... 15
发送GPS数据 ............................................................. 16手动发送GPS数据 ............................................... 16GPS轮询 ............................................................... 16
短文本信息 ................................................................ 16
高级操作 .......................................................................... 17直接信道 .................................................................... 17扰频器(语音加密) ................................................ 17更改扰频器代码 ................................................... 17
VOX(声控发射)设置 ............................................ 17VOX增益 .............................................................. 17防VOX增益 .......................................................... 17VOX延迟时间 ...................................................... 18
天线调谐器 ................................................................ 18紧急报警 .................................................................... 18微调 ............................................................................ 18噪声消隐器 ................................................................ 19液晶显示屏亮度 ........................................................ 19开机文本 .................................................................... 19显示名称/频率 ........................................................... 19前置放大器/衰减器 ................................................... 19辅助 ............................................................................ 19
选购的VGS-1语音指导和存储装置 ............................... 20语音备忘 .................................................................... 20录制语音备忘 ....................................................... 20播放语音备忘 ....................................................... 20删除语音备忘 ....................................................... 20
语音信息 .................................................................... 20录制语音信息 ....................................................... 20播放语音消息 ....................................................... 21发射语音消息 ....................................................... 21删除语音消息 ....................................................... 21
自动录音 .................................................................... 21播放自动录音 ....................................................... 21删除自动录音 ....................................................... 21
语音指导 .................................................................... 21
附录 .................................................................................. 22按键功能 .................................................................... 22
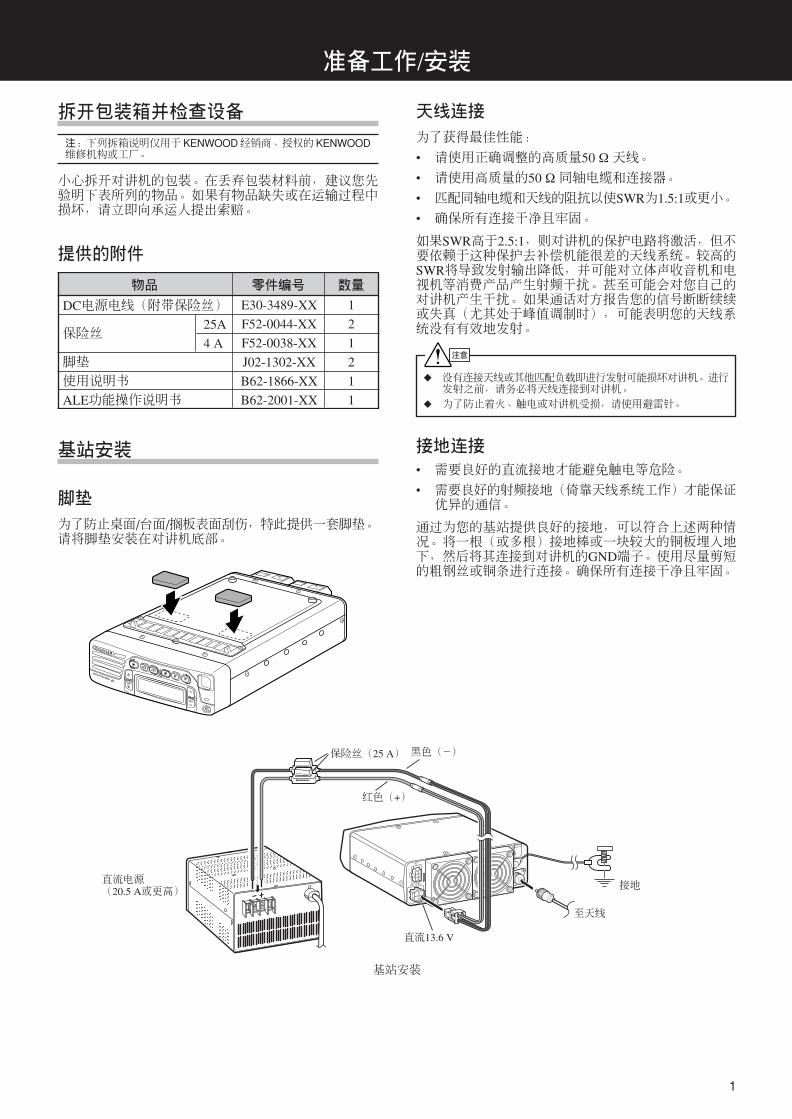
1
拆开包装箱并检查设备
注:下列拆箱说明仅用于 KENWOOD 经销商、授权的 KENWOOD维修机构或工厂。
小心拆开对讲机的包装。在丢弃包装材料前,建议您先验明下表所列的物品。如果有物品缺失或在运输过程中损坏,请立即向承运人提出索赔。
提供的附件
准备工作/安装
DC电源电线(附带保险丝)
保险丝
脚垫
使用说明书
ALE功能操作说明书
E30-3489-XX
F52-0044-XX
F52-0038-XX
J02-1302-XX
B62-1866-XX
B62-2001-XX
1
2
1
2
1
1
物品 零件编号 数量
25A
4 A
天线连接
为了获得最佳性能:
• 请使用正确调整的高质量50 Ω 天线。
• 请使用高质量的50 Ω 同轴电缆和连接器。
• 匹配同轴电缆和天线的阻抗以使SWR为1.5:1或更小。
• 确保所有连接干净且牢固。
如果SWR高于2.5:1,则对讲机的保护电路将激活,但不要依赖于这种保护去补偿机能很差的天线系统。较高的SWR将导致发射输出降低,并可能对立体声收音机和电视机等消费产品产生射频干扰。甚至可能会对您自己的对讲机产生干扰。如果通话对方报告您的信号断断续续或失真(尤其处于峰值调制时),可能表明您的天线系统没有有效地发射。
没有连接天线或其他匹配负载即进行发射可能损坏对讲机。进行发射之前,请务必将天线连接到对讲机。
为了防止着火、触电或对讲机受损,请使用避雷针。
接地连接
• 需要良好的直流接地才能避免触电等危险。
• 需要良好的射频接地(倚靠天线系统工作)才能保证优异的通信。
通过为您的基站提供良好的接地,可以符合上述两种情况。将一根(或多根)接地棒或一块较大的铜板埋入地下,然后将其连接到对讲机的GND端子。使用尽量剪短的粗钢丝或铜条进行连接。确保所有连接干净且牢固。
注意
基站安装
脚垫
为了防止桌面/台面/搁板表面刮伤,特此提供一套脚垫。请将脚垫安装在对讲机底部。
接地
黑色(-)
红色(+)
保险丝(25 A)
直流13.6 V
直流电源(20.5 A或更高)
至天线
基站安装
2
注意
注意
直流电源安装
为了将本对讲机用作基站使用,您将需要电流容量为20.5 A或更高的独立13.6 V直流电源(另购)。
请勿将对讲机直接连接到交流插座。
请勿使用较细的钢丝替代随附的DC电源电线。
将直流电源连接到对讲机之前,请确保直流电源关闭。
完成所有连接之前,请勿将直流电源插入交流插座。
1 将随附的DC电源电线连接到额定的直流电源并确保正负极性正确(红色:正极;黑色:负极)。
2 将DC电源电线的连接端连接到对讲机后部的直流13.6V电源连接器上。• 将DC电源电线连接器牢牢地按入对讲机上的连接器,直到锁定凸起卡嗒一声到位。
更换保险丝
如果保险丝烧断,请确定原因并解决问题。只能在问题解决后更换保险丝。如果刚刚安装的保险丝继续烧断,请断开电源插头并联系经销商寻求帮助。
本对讲机使用的额定保险丝如下:
对讲机: 4 A(适用于 KAT-1天线调谐器)
DC电源电线:25 A
更换保险丝时,请确保使用相同值的保险丝进行更换。决不能用高于额定值的保险丝进行更换。
只能在查明并解决保险丝故障原因后才能更换烧断的保险丝。
汽车安装
汽车中的各种电子设备,如果不能正常防护射频能量,那么在发射射频时它们可能会出现故障。电子燃油喷射、防抱死制动装置和巡航控制系统是可能出现故障的典型设备。如果您的汽车配备以上的设备,请与汽车制造商联系,向其咨询以确定发射射频时这些设备能否正常工作。
注:下列准备说明仅用于 KENWOOD 经销商、授权的 KENWOOD维修机构或工厂。
安装对讲机
为了乘客的安全,请用选购的安装支架可靠地安装对讲机,这样万一汽车发生碰撞,对讲机也不会松脱。
1 用安装支架作为样板在仪表板上定出孔位。钻孔,然后用安装支架随附的自攻螺丝固定安装支架。
• 请务必将对讲机固定在用户易于操作的位置,对讲机后部应有足够的空间,以便于电缆的连接。
2 将天线和提供的电源电线连接到对讲机上{第3页}。
3 将对讲机滑入安装支架并将其固定。
4 在用户易于够到位置安装麦克风吊架。
• 麦克风和麦克风电缆应安装在不妨碍汽车安全操作的位置。
天线连接
为了获得最佳性能:
• 请使用正确调整的高质量50 Ω 天线。
• 请使用高质量的50 Ω 同轴电缆和连接器。
通过50 Ω 阻抗以外的馈线连接天线和对讲机时,会降低天线系统的效率并可能对附近的广播电视接收机、收音机和其他电子设备产生干扰。
没有连接天线或其他匹配负载即进行发射可能损坏对讲机。进行发射之前,请务必将天线连接到对讲机。
注意
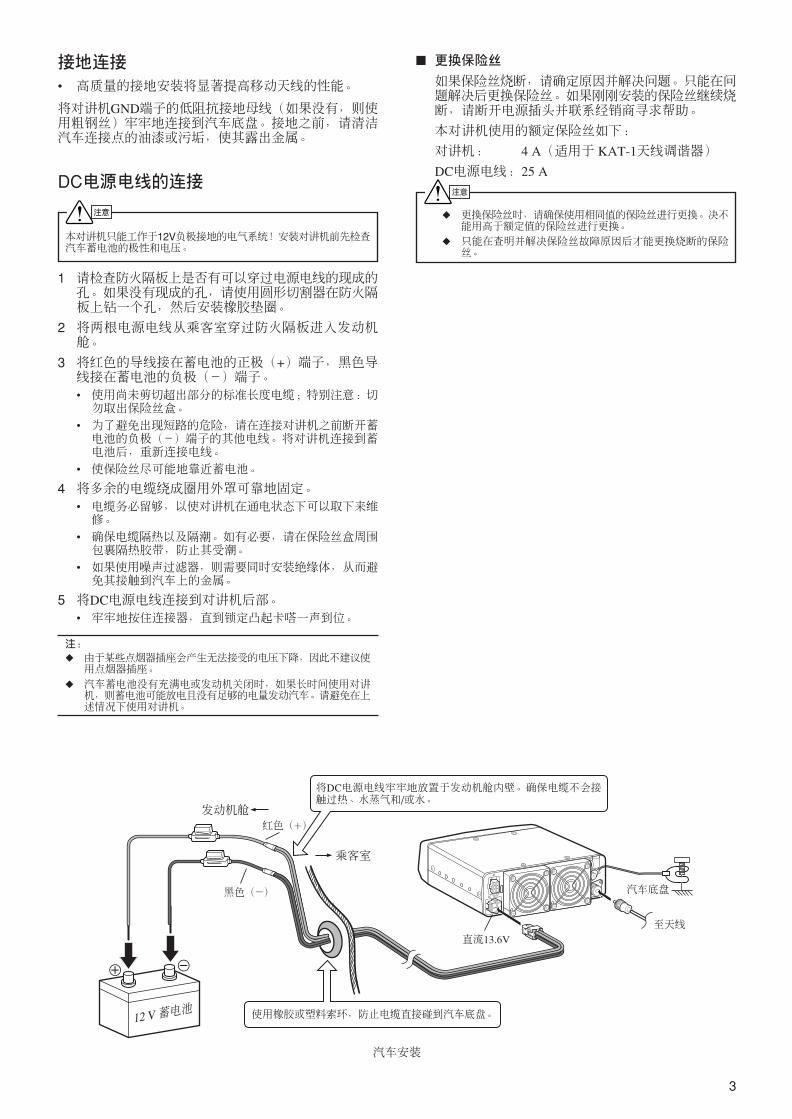
3
接地连接
• 高质量的接地安装将显著提高移动天线的性能。
将对讲机GND端子的低阻抗接地母线(如果没有,则使用粗钢丝)牢牢地连接到汽车底盘。接地之前,请清洁汽车连接点的油漆或污垢,使其露出金属。
DC电源电线的连接
本对讲机只能工作于12V负极接地的电气系统!安装对讲机前先检查汽车蓄电池的极性和电压。
1 请检查防火隔板上是否有可以穿过电源电线的现成的孔。如果没有现成的孔,请使用圆形切割器在防火隔板上钻一个孔,然后安装橡胶垫圈。
2 将两根电源电线从乘客室穿过防火隔板进入发动机舱。
3 将红色的导线接在蓄电池的正极(+)端子,黑色导线接在蓄电池的负极(-)端子。
• 使用尚未剪切超出部分的标准长度电缆;特别注意:切勿取出保险丝盒。
• 为了避免出现短路的危险,请在连接对讲机之前断开蓄电池的负极(-)端子的其他电线。将对讲机连接到蓄电池后,重新连接电线。
• 使保险丝尽可能地靠近蓄电池。
4 将多余的电缆绕成圈用外罩可靠地固定。
• 电缆务必留够,以使对讲机在通电状态下可以取下来维修。
• 确保电缆隔热以及隔潮。如有必要,请在保险丝盒周围包裹隔热胶带,防止其受潮。
• 如果使用噪声过滤器,则需要同时安装绝缘体,从而避免其接触到汽车上的金属。
5 将DC电源电线连接到对讲机后部。• 牢牢地按住连接器,直到锁定凸起卡嗒一声到位。
注:
由于某些点烟器插座会产生无法接受的电压下降,因此不建议使用点烟器插座。
汽车蓄电池没有充满电或发动机关闭时,如果长时间使用对讲机,则蓄电池可能放电且没有足够的电量发动汽车。请避免在上述情况下使用对讲机。
更换保险丝
如果保险丝烧断,请确定原因并解决问题。只能在问题解决后更换保险丝。如果刚刚安装的保险丝继续烧断,请断开电源插头并联系经销商寻求帮助。
本对讲机使用的额定保险丝如下:
对讲机: 4 A(适用于 KAT-1天线调谐器)
DC电源电线:25 A
更换保险丝时,请确保使用相同值的保险丝进行更换。决不能用高于额定值的保险丝进行更换。
只能在查明并解决保险丝故障原因后才能更换烧断的保险丝。
汽车安装
注意
注意
12 V 蓄电池
红色(+)
发动机舱
乘客室
黑色(—)
使用橡胶或塑料索环,防止电缆直接碰到汽车底盘。
汽车底盘
至天线
直流13.6V
将DC电源电线牢牢地放置于发动机舱内壁。确保电缆不会接触过热、水蒸气和/或水。
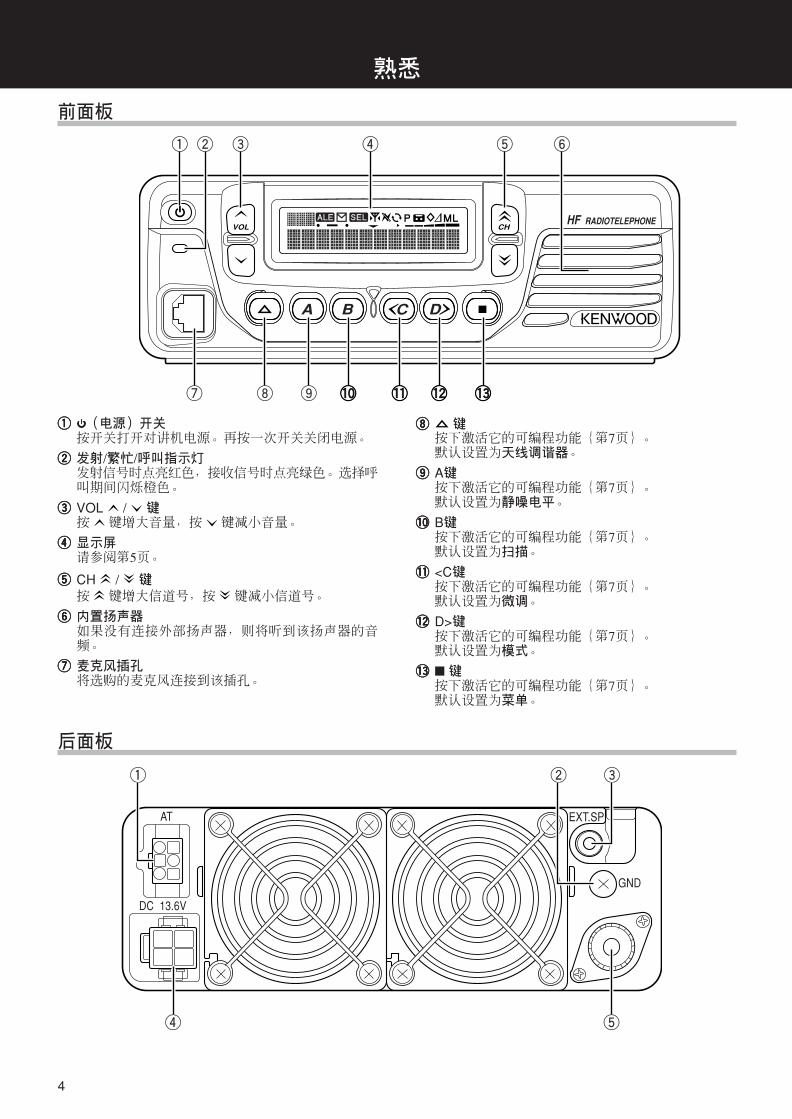
4
前面板
qqqqq (电源)开关按开关打开对讲机电源。再按一次开关关闭电源。
wwwww 发射/繁忙/呼叫指示灯发射信号时点亮红色,接收信号时点亮绿色。选择呼叫期间闪烁橙色。
eeeee VOL / 键按 键增大音量,按 键减小音量。
rrrrr 显示屏请参阅第5页。
ttttt CH / 键按 键增大信道号,按 键减小信道号。
yyyyy 内置扬声器如果没有连接外部扬声器,则将听到该扬声器的音频。
uuuuu 麦克风插孔将选购的麦克风连接到该插孔。
熟悉
q
u i o !0!0 !1!1 !2!2 !3!3
w e r t y
iiiii 键按下激活它的可编程功能{第7页}。默认设置为天线调谐器。
ooooo A键按下激活它的可编程功能{第7页}。默认设置为静噪电平。
!0!0!0!0!0 B键按下激活它的可编程功能{第7页}。默认设置为扫描。
!1!1!1!1!1 <C键按下激活它的可编程功能{第7页}。默认设置为微调。
!2!2!2!2!2 D>键按下激活它的可编程功能{第7页}。默认设置为模式。
!3!3!3!3!3 键按下激活它的可编程功能{第7页}。默认设置为菜单。
后面板
q
r t
w e
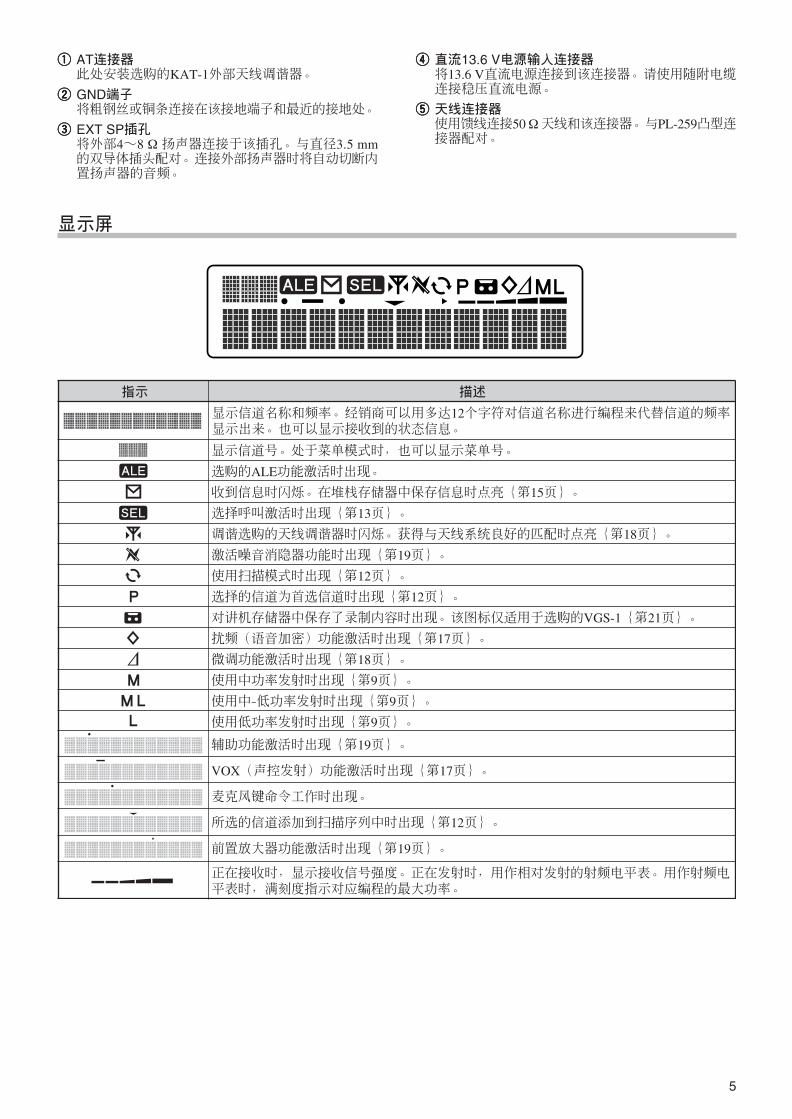
5
显示屏
qqqqq AT连接器此处安装选购的KAT-1外部天线调谐器。
wwwww GND端子将粗钢丝或铜条连接在该接地端子和最近的接地处。
eeeee EXT SP插孔将外部4~8 Ω 扬声器连接于该插孔。与直径3.5 mm的双导体插头配对。连接外部扬声器时将自动切断内置扬声器的音频。
rrrrr 直流13.6 V电源输入连接器将13.6 V直流电源连接到该连接器。请使用随附电缆连接稳压直流电源。
ttttt 天线连接器使用馈线连接50 Ω 天线和该连接器。与PL-259凸型连接器配对。
指示 描述
显示信道号。处于菜单模式时,也可以显示菜单号。
选购的ALE功能激活时出现。
收到信息时闪烁。在堆栈存储器中保存信息时点亮{第15页}。
选择呼叫激活时出现{第13页}。
调谐选购的天线调谐器时闪烁。获得与天线系统良好的匹配时点亮{第18页}。
激活噪音消隐器功能时出现{第19页}。
使用扫描模式时出现{第12页}。
选择的信道为首选信道时出现{第12页}。
对讲机存储器中保存了录制内容时出现。该图标仅适用于选购的VGS-1{第21页}。
扰频(语音加密)功能激活时出现{第17页}。
微调功能激活时出现{第18页}。
使用中功率发射时出现{第9页}。
使用中-低功率发射时出现{第9页}。
使用低功率发射时出现{第9页}。
显示信道名称和频率。经销商可以用多达12个字符对信道名称进行编程来代替信道的频率显示出来。也可以显示接收到的状态信息。
正在接收时,显示接收信号强度。正在发射时,用作相对发射的射频电平表。用作射频电平表时,满刻度指示对应编程的最大功率。
辅助功能激活时出现{第19页}。
VOX(声控发射)功能激活时出现{第17页}。
麦克风键命令工作时出现。
所选的信道添加到扫描序列中时出现{第12页}。
前置放大器功能激活时出现{第19页}。
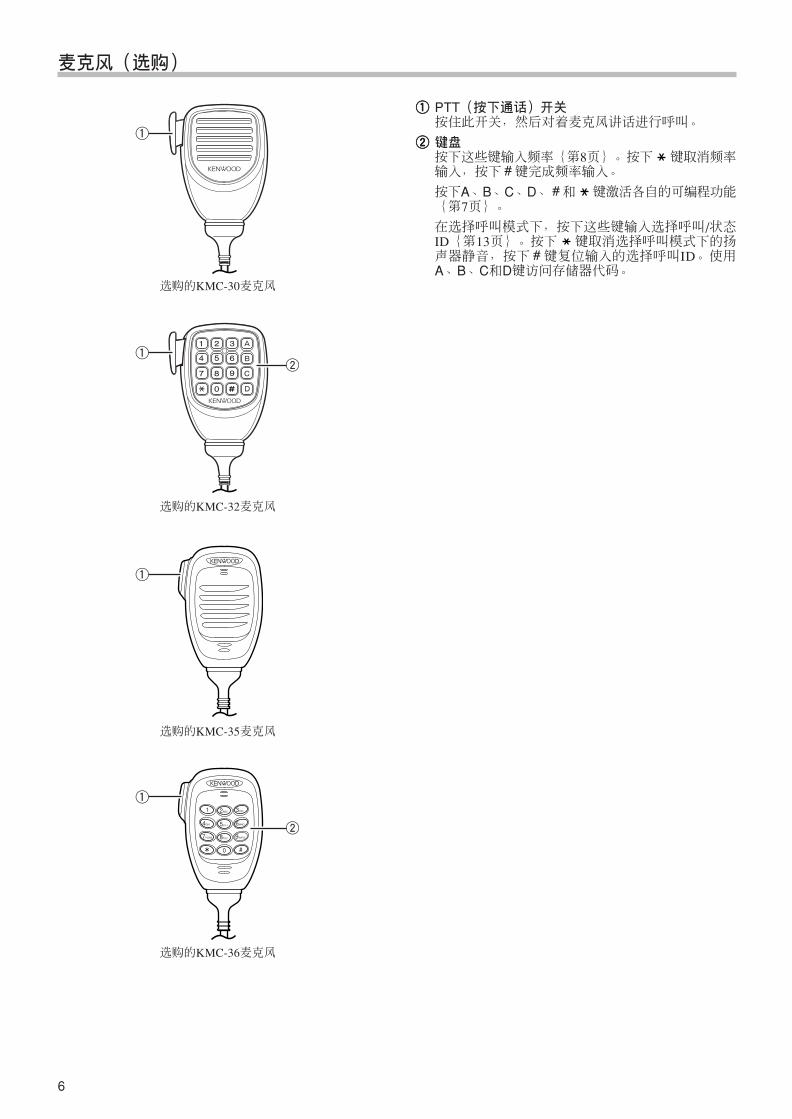
6
麦克风(选购)
q
qw
q
q
w
qqqqq PTT(按下通话)开关按住此开关,然后对着麦克风讲话进行呼叫。
wwwww 键盘按下这些键输入频率{第8页}。按下 键取消频率输入,按下#键完成频率输入。
按下A、B、C、D、#和 键激活各自的可编程功能{第7页}。
在选择呼叫模式下,按下这些键输入选择呼叫/状态ID{第13页}。按下 键取消选择呼叫模式下的扬声器静音,按下#键复位输入的选择呼叫ID。使用A、B、C和D键访问存储器代码。
选购的KMC-30麦克风
选购的KMC-32麦克风
选购的KMC-35麦克风
选购的KMC-36麦克风
7
可编程功能
、A、B、<C、D>、 以及选购的麦克风A、B、C和D键可以编程下面所列的功能。麦克风#和 键仅可以编程信道上调/下调和音量增大/音量减小功能。有关这些功能的更多详情,请与经销商联系。
• ALE 1
• ALE直接呼叫1 ~ 4 1
• ALE操作模式 1
• 天线调谐器
• 防VOX增益
• 自动录音 2
• 辅助
• 呼叫类型
• 信道下调
• 信道上调
• 微调
• 直接呼叫1~4
• 直接信道1~4
• 直接状态呼叫1~4
• 显示字符
• 紧急报警 3
• 液晶显示屏亮度
• 菜单
• 模式
• 监听
• 噪音消隐器
• 无
• 播放1~4 2
• 前置放大器/衰减器
• 扫描
• 扫描删除/添加
• 扰频器(语音加密)
• 选择呼叫
• 静噪电平
• 发射功率
• VFO(可变频率振荡器)
• 音量减小
• 音量增大
• VOX(声控发射)
• VOX延迟
• VOX增益1 安装选购的KPE-2装置,才可以编程“ALE”,“ALE直接呼叫
1~4”和“ALE操作模式”。2 安装选购的VGS-1装置,才可以编程“自动录音”和“播放1~
4”。3 只能在 键上编程“紧急报警”。
8
打开/关闭电源按住 开关打开对讲机。
• 响起哔音并暂时出现开机消息。
基本操作
2 使用麦克风键盘(0~9)输入想要的频率。• 直接输入仅允许您输入10 Hz以上的值;对于个位以下的值,将自动选择0。
USB
DATA
LSB
FSK
CW
AM
再次按住 开关关闭对讲机。
音量调节
按VOL 键增大音量,按VOL 键减小音量。
• 此外,您可以按住VOL / 键持续改变音量,而非只是一次调节一个步进。
选择信道
按CH 键增大信道号,按CH 键减小信道号。
• 此外,您可以按住CH / 键持续改变信道号,而非只是一次更改一个步进。
直接频率输入
除了使用CH / 键选择预编程存储器信道以外,您还可以使用选购的麦克风键盘直接输入VFO电台频率。
1 按住编程为VFO的键并保持约1秒钟。• 显示屏上出现当前所选信道的频率以及所选操作模式。
VFO步进值
在VFO模式中,使用CH / 键选择的频率时,频率将根据预定的步进值进行调节。您可以如下调节该步进值:
1 按编程为VFO的键。
2 按<C和D>键选择想要的数字(10、100、1000等)。
3 按CH / 键选择上一步所选数字的数值。• 默认步进值为10 Hz。
4 按 键保存新的步进值并退出VFO步进值调节。
选择模式
通过各个信道保存的模式可以暂时更改。要更改操作模式:
1 按编程为模式的键。
2 连续按模式键,各个可用操作模式循环显示如下:
3 使用麦克风键盘输入频率后,请按#键。
• 要取消频率输入,请按 键;频率将自动返回到开始输入新频率之前的原始频率。
4 要退出VFO模式并返回到预编程的存储器信道,请再次按住VFO键。
3 选择想要的模式后,1秒钟内不进行任何操作即可保存操作模式并退出。
数据操作
您的经销商可以对FSK和DATA模式进行各种设置编程。有关详情请向经销商询问。
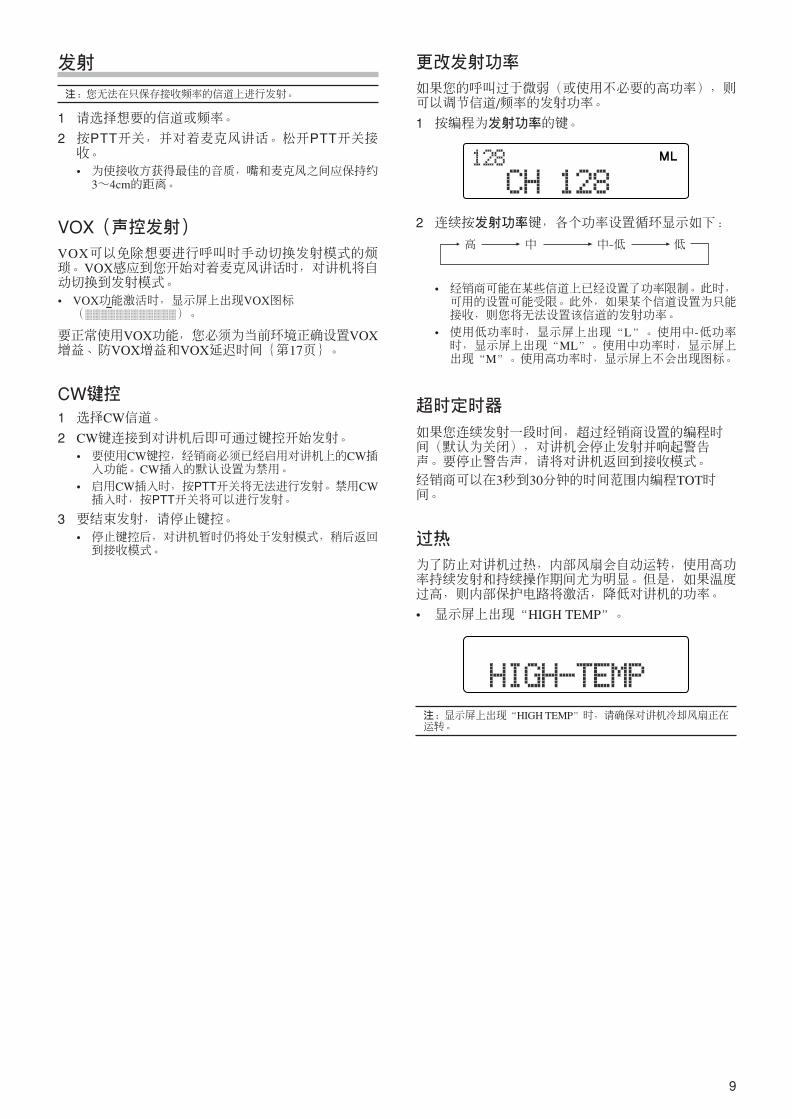
9
发射
注:您无法在只保存接收频率的信道上进行发射。
1 请选择想要的信道或频率。
2 按PTT开关,并对着麦克风讲话。松开PTT开关接收。
• 为使接收方获得最佳的音质,嘴和麦克风之间应保持约3~4cm的距离。
VOX(声控发射)VOX可以免除想要进行呼叫时手动切换发射模式的烦琐。VOX感应到您开始对着麦克风讲话时,对讲机将自动切换到发射模式。
• VOX功能激活时,显示屏上出现VOX图标( )。
要正常使用VOX功能,您必须为当前环境正确设置VOX增益、防VOX增益和VOX延迟时间{第17页}。
CW键控1 选择CW信道。
2 CW键连接到对讲机后即可通过键控开始发射。• 要使用CW键控,经销商必须已经启用对讲机上的CW插入功能。CW插入的默认设置为禁用。
• 启用CW插入时,按PTT开关将无法进行发射。禁用CW插入时,按PTT开关将可以进行发射。
3 要结束发射,请停止键控。
• 停止键控后,对讲机暂时仍将处于发射模式,稍后返回到接收模式。
更改发射功率
如果您的呼叫过于微弱(或使用不必要的高功率),则可以调节信道/频率的发射功率。
1 按编程为发射功率的键。
2 连续按发射功率键,各个功率设置循环显示如下:
• 经销商可能在某些信道上已经设置了功率限制。此时,可用的设置可能受限。此外,如果某个信道设置为只能接收,则您将无法设置该信道的发射功率。
• 使用低功率时,显示屏上出现“L”。使用中-低功率时,显示屏上出现“ML”。使用中功率时,显示屏上出现“M”。使用高功率时,显示屏上不会出现图标。
超时定时器
如果您连续发射一段时间,超过经销商设置的编程时间(默认为关闭),对讲机会停止发射并响起警告声。要停止警告声,请将对讲机返回到接收模式。
经销商可以在3秒到30分钟的时间范围内编程TOT时间。
过热
为了防止对讲机过热,内部风扇会自动运转,使用高功率持续发射和持续操作期间尤为明显。但是,如果温度过高,则内部保护电路将激活,降低对讲机的功率。
• 显示屏上出现“HIGH TEMP”。
注:显示屏上出现“HIGH TEMP”时,请确保对讲机冷却风扇正在运转。
高 中 中-低 低
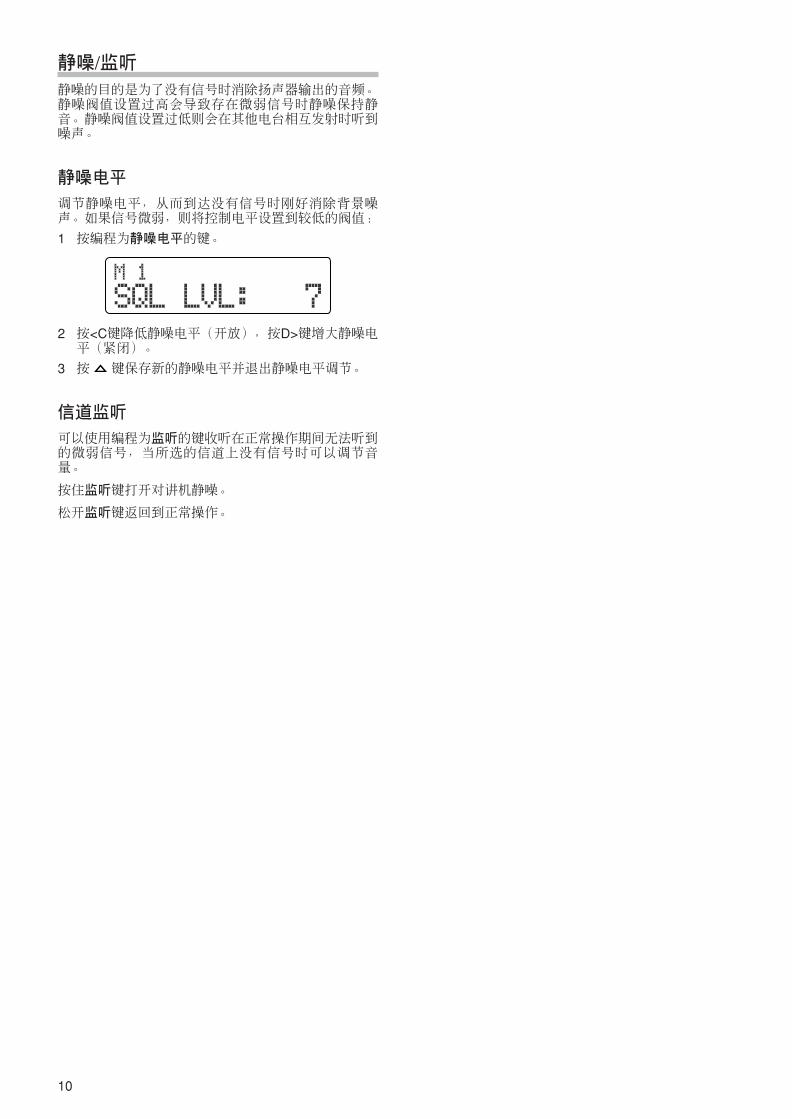
10
静噪/监听静噪的目的是为了没有信号时消除扬声器输出的音频。静噪阀值设置过高会导致存在微弱信号时静噪保持静音。静噪阀值设置过低则会在其他电台相互发射时听到噪声。
静噪电平
调节静噪电平,从而到达没有信号时刚好消除背景噪声。如果信号微弱,则将控制电平设置到较低的阀值:
1 按编程为静噪电平的键。
2 按<C键降低静噪电平(开放),按D>键增大静噪电平(紧闭)。
3 按 键保存新的静噪电平并退出静噪电平调节。
信道监听
可以使用编程为监听的键收听在正常操作期间无法听到的微弱信号,当所选的信道上没有信号时可以调节音量。
按住监听键打开对讲机静噪。
松开监听键返回到正常操作。
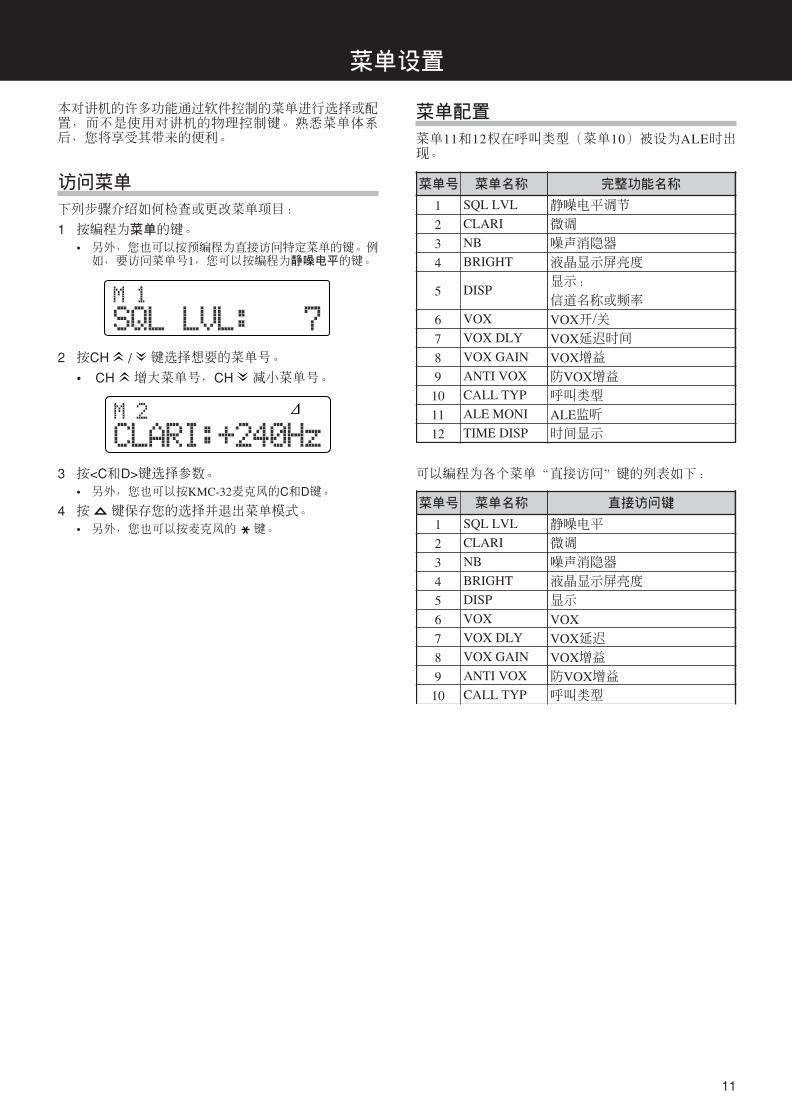
11
菜单配置
菜单11和12权在呼叫类型(菜单10)被设为ALE时出现。
可以编程为各个菜单“直接访问”键的列表如下:
本对讲机的许多功能通过软件控制的菜单进行选择或配置,而不是使用对讲机的物理控制键。熟悉菜单体系后,您将享受其带来的便利。
访问菜单
下列步骤介绍如何检查或更改菜单项目:
1 按编程为菜单的键。
• 另外,您也可以按预编程为直接访问特定菜单的键。例如,要访问菜单号1,您可以按编程为静噪电平的键。
菜单设置
菜单号 菜单名称 完整功能名称
静噪电平调节
微调
噪声消隐器
液晶显示屏亮度
显示:
信道名称或频率
VOX开/关
VOX延迟时间
VOX增益
防VOX增益
呼叫类型
ALE监听
时间显示
1
2
3
4
5
6
7
8
9
10
11
12
SQL LVL
CLARI
NB
BRIGHT
DISP
VOX
VOX DLY
VOX GAIN
ANTI VOX
CALL TYP
ALE MONI
TIME DISP
菜单号 菜单名称 直接访问键
静噪电平
微调
噪声消隐器
液晶显示屏亮度
显示
VOX
VOX延迟
VOX增益
防VOX增益
呼叫类型
1
2
3
4
5
6
7
8
9
10
SQL LVL
CLARI
NB
BRIGHT
DISP
VOX
VOX DLY
VOX GAIN
ANTI VOX
CALL TYP
2 按CH / 键选择想要的菜单号。
• CH 增大菜单号,CH 减小菜单号。
3 按<C和D>键选择参数。• 另外,您也可以按KMC-32麦克风的C和D键。
4 按 键保存您的选择并退出菜单模式。• 另外,您也可以按麦克风的 键。
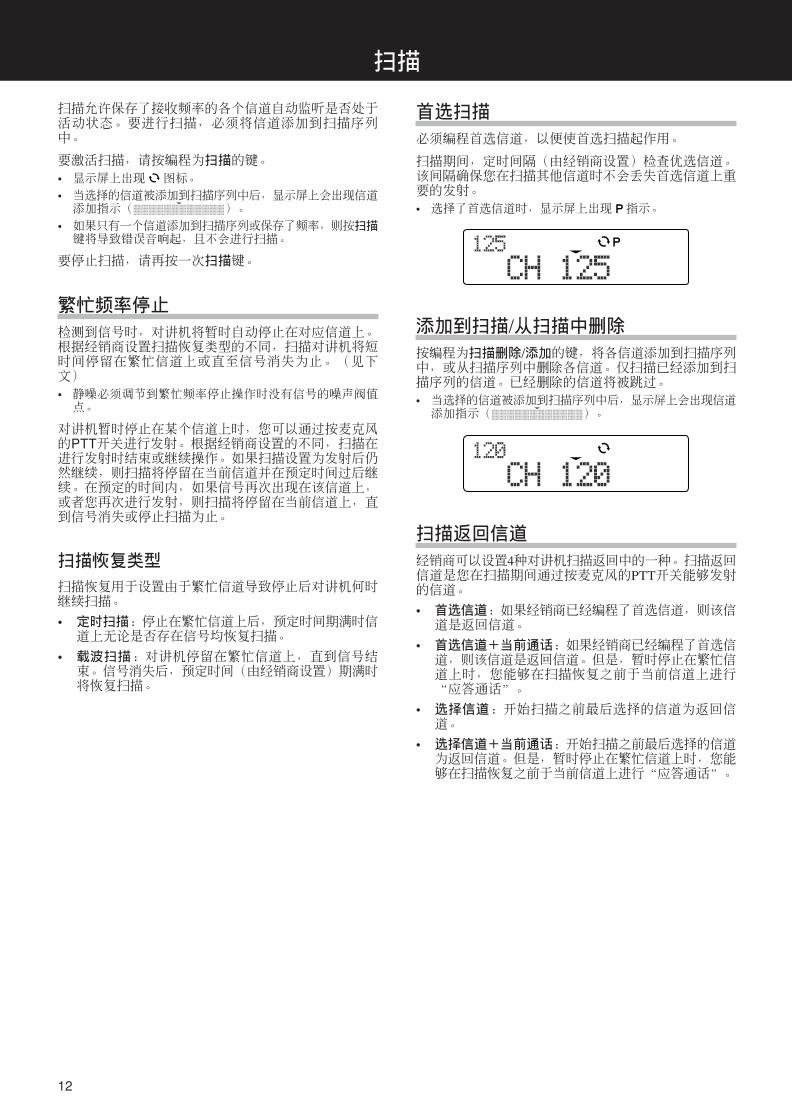
12
扫描允许保存了接收频率的各个信道自动监听是否处于活动状态。要进行扫描,必须将信道添加到扫描序列中。
要激活扫描,请按编程为扫描的键。
• 显示屏上出现 图标。
• 当选择的信道被添加到扫描序列中后,显示屏上会出现信道添加指示( )。
• 如果只有一个信道添加到扫描序列或保存了频率,则按扫描键将导致错误音响起,且不会进行扫描。
要停止扫描,请再按一次扫描键。
繁忙频率停止
检测到信号时,对讲机将暂时自动停止在对应信道上。根据经销商设置扫描恢复类型的不同,扫描对讲机将短时间停留在繁忙信道上或直至信号消失为止。(见下文)
• 静噪必须调节到繁忙频率停止操作时没有信号的噪声阀值点。
对讲机暂时停止在某个信道上时,您可以通过按麦克风的PTT开关进行发射。根据经销商设置的不同,扫描在进行发射时结束或继续操作。如果扫描设置为发射后仍然继续,则扫描将停留在当前信道并在预定时间过后继续。在预定的时间内,如果信号再次出现在该信道上,或者您再次进行发射,则扫描将停留在当前信道上,直到信号消失或停止扫描为止。
扫描恢复类型
扫描恢复用于设置由于繁忙信道导致停止后对讲机何时继续扫描。
• 定时扫描:停止在繁忙信道上后,预定时间期满时信道上无论是否存在信号均恢复扫描。
• 载波扫描:对讲机停留在繁忙信道上,直到信号结束。信号消失后,预定时间(由经销商设置)期满时将恢复扫描。
扫描
首选扫描
必须编程首选信道,以便使首选扫描起作用。
扫描期间,定时间隔(由经销商设置)检查优选信道。该间隔确保您在扫描其他信道时不会丢失首选信道上重要的发射。
• 选择了首选信道时,显示屏上出现 指示。
添加到扫描/从扫描中删除按编程为扫描删除/添加的键,将各信道添加到扫描序列中,或从扫描序列中删除各信道。仅扫描已经添加到扫描序列的信道。已经删除的信道将被跳过。
• 当选择的信道被添加到扫描序列中后,显示屏上会出现信道添加指示( )。
扫描返回信道
经销商可以设置4种对讲机扫描返回中的一种。扫描返回信道是您在扫描期间通过按麦克风的PTT开关能够发射的信道。
• 首选信道:如果经销商已经编程了首选信道,则该信道是返回信道。
• 首选信道+当前通话:如果经销商已经编程了首选信道,则该信道是返回信道。但是,暂时停止在繁忙信道上时,您能够在扫描恢复之前于当前信道上进行“应答通话”。
• 选择信道:开始扫描之前最后选择的信道为返回信道。
• 选择信道+当前通话:开始扫描之前最后选择的信道为返回信道。但是,暂时停止在繁忙信道上时,您能够在扫描恢复之前于当前信道上进行“应答通话”。
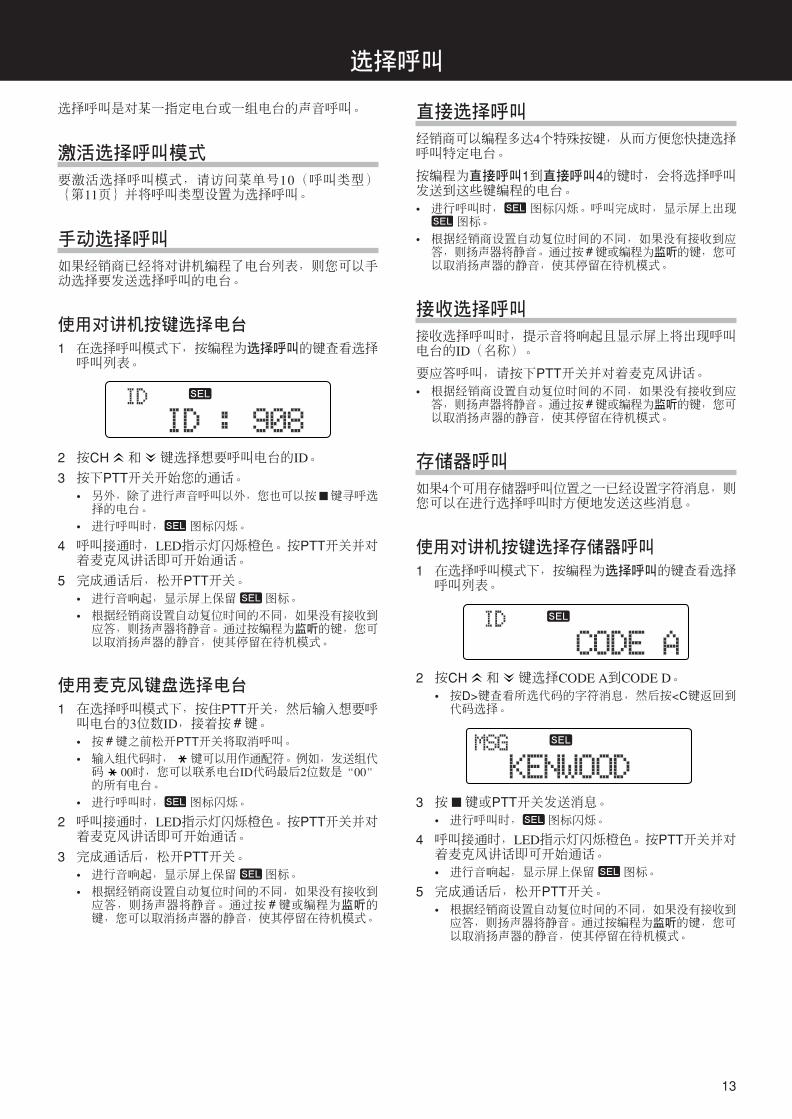
13
选择呼叫
选择呼叫是对某一指定电台或一组电台的声音呼叫。
激活选择呼叫模式
要激活选择呼叫模式,请访问菜单号10(呼叫类型){第11页}并将呼叫类型设置为选择呼叫。
手动选择呼叫
如果经销商已经将对讲机编程了电台列表,则您可以手动选择要发送选择呼叫的电台。
使用对讲机按键选择电台
1 在选择呼叫模式下,按编程为选择呼叫的键查看选择呼叫列表。
直接选择呼叫
经销商可以编程多达4个特殊按键,从而方便您快捷选择呼叫特定电台。
按编程为直接呼叫1到直接呼叫4的键时,会将选择呼叫发送到这些键编程的电台。
• 进行呼叫时, 图标闪烁。呼叫完成时,显示屏上出现 图标。
• 根据经销商设置自动复位时间的不同,如果没有接收到应答,则扬声器将静音。通过按#键或编程为监听的键,您可以取消扬声器的静音,使其停留在待机模式。
接收选择呼叫
接收选择呼叫时,提示音将响起且显示屏上将出现呼叫电台的ID(名称)。
要应答呼叫,请按下PTT开关并对着麦克风讲话。• 根据经销商设置自动复位时间的不同,如果没有接收到应答,则扬声器将静音。通过按#键或编程为监听的键,您可以取消扬声器的静音,使其停留在待机模式。
存储器呼叫
如果4个可用存储器呼叫位置之一已经设置字符消息,则您可以在进行选择呼叫时方便地发送这些消息。
使用对讲机按键选择存储器呼叫
1 在选择呼叫模式下,按编程为选择呼叫的键查看选择呼叫列表。
2 按CH 和 键选择想要呼叫电台的ID。
3 按下PTT开关开始您的通话。• 另外,除了进行声音呼叫以外,您也可以按 键寻呼选择的电台。
• 进行呼叫时, 图标闪烁。
4 呼叫接通时,LED指示灯闪烁橙色。按PTT开关并对着麦克风讲话即可开始通话。
5 完成通话后,松开PTT开关。• 进行音响起,显示屏上保留 图标。
• 根据经销商设置自动复位时间的不同,如果没有接收到应答,则扬声器将静音。通过按编程为监听的键,您可以取消扬声器的静音,使其停留在待机模式。
使用麦克风键盘选择电台
1 在选择呼叫模式下,按住PTT开关,然后输入想要呼叫电台的3位数ID,接着按#键。• 按#键之前松开PTT开关将取消呼叫。• 输入组代码时, 键可以用作通配符。例如,发送组代码 00时,您可以联系电台ID代码最后2位数是“00”的所有电台。
• 进行呼叫时, 图标闪烁。
2 呼叫接通时,LED指示灯闪烁橙色。按PTT开关并对着麦克风讲话即可开始通话。
3 完成通话后,松开PTT开关。• 进行音响起,显示屏上保留 图标。
• 根据经销商设置自动复位时间的不同,如果没有接收到应答,则扬声器将静音。通过按#键或编程为监听的键,您可以取消扬声器的静音,使其停留在待机模式。
2 按CH 和 键选择CODE A到CODE D。• 按D>键查看所选代码的字符消息,然后按<C键返回到代码选择。
3 按 键或PTT开关发送消息。• 进行呼叫时, 图标闪烁。
4 呼叫接通时,LED指示灯闪烁橙色。按PTT开关并对着麦克风讲话即可开始通话。
• 进行音响起,显示屏上保留 图标。
5 完成通话后,松开PTT开关。• 根据经销商设置自动复位时间的不同,如果没有接收到应答,则扬声器将静音。通过按编程为监听的键,您可以取消扬声器的静音,使其停留在待机模式。
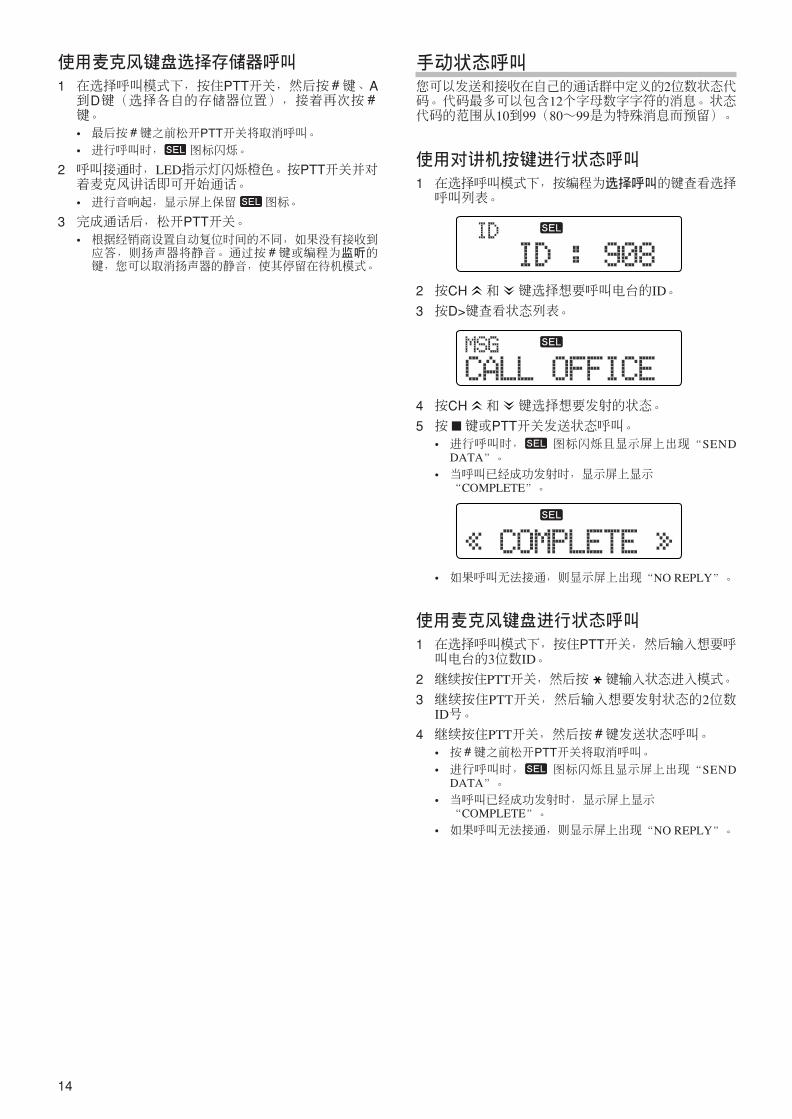
14
使用麦克风键盘选择存储器呼叫
1 在选择呼叫模式下,按住PTT开关,然后按#键、A到D键(选择各自的存储器位置),接着再次按#键。
• 最后按#键之前松开PTT开关将取消呼叫。• 进行呼叫时, 图标闪烁。
2 呼叫接通时,LED指示灯闪烁橙色。按PTT开关并对着麦克风讲话即可开始通话。
• 进行音响起,显示屏上保留 图标。
3 完成通话后,松开PTT开关。• 根据经销商设置自动复位时间的不同,如果没有接收到应答,则扬声器将静音。通过按#键或编程为监听的键,您可以取消扬声器的静音,使其停留在待机模式。
手动状态呼叫您可以发送和接收在自己的通话群中定义的2位数状态代码。代码最多可以包含12个字母数字字符的消息。状态代码的范围从10到99(80~99是为特殊消息而预留)。
使用对讲机按键进行状态呼叫
1 在选择呼叫模式下,按编程为选择呼叫的键查看选择呼叫列表。
4 按CH 和 键选择想要发射的状态。
5 按 键或PTT开关发送状态呼叫。• 进行呼叫时, 图标闪烁且显示屏上出现“SEND
DATA”。
• 当呼叫已经成功发射时,显示屏上显示“COMPLETE”。
• 如果呼叫无法接通,则显示屏上出现“NO REPLY”。
使用麦克风键盘进行状态呼叫
1 在选择呼叫模式下,按住PTT开关,然后输入想要呼叫电台的3位数ID。
2 继续按住PTT开关,然后按 键输入状态进入模式。
3 继续按住PTT开关,然后输入想要发射状态的2位数ID号。
4 继续按住PTT开关,然后按#键发送状态呼叫。• 按#键之前松开PTT开关将取消呼叫。• 进行呼叫时, 图标闪烁且显示屏上出现“SEND
DATA”。
• 当呼叫已经成功发射时,显示屏上显示“COMPLETE”。
• 如果呼叫无法接通,则显示屏上出现“NO REPLY”。
2 按CH 和 键选择想要呼叫电台的ID。
3 按D>键查看状态列表。
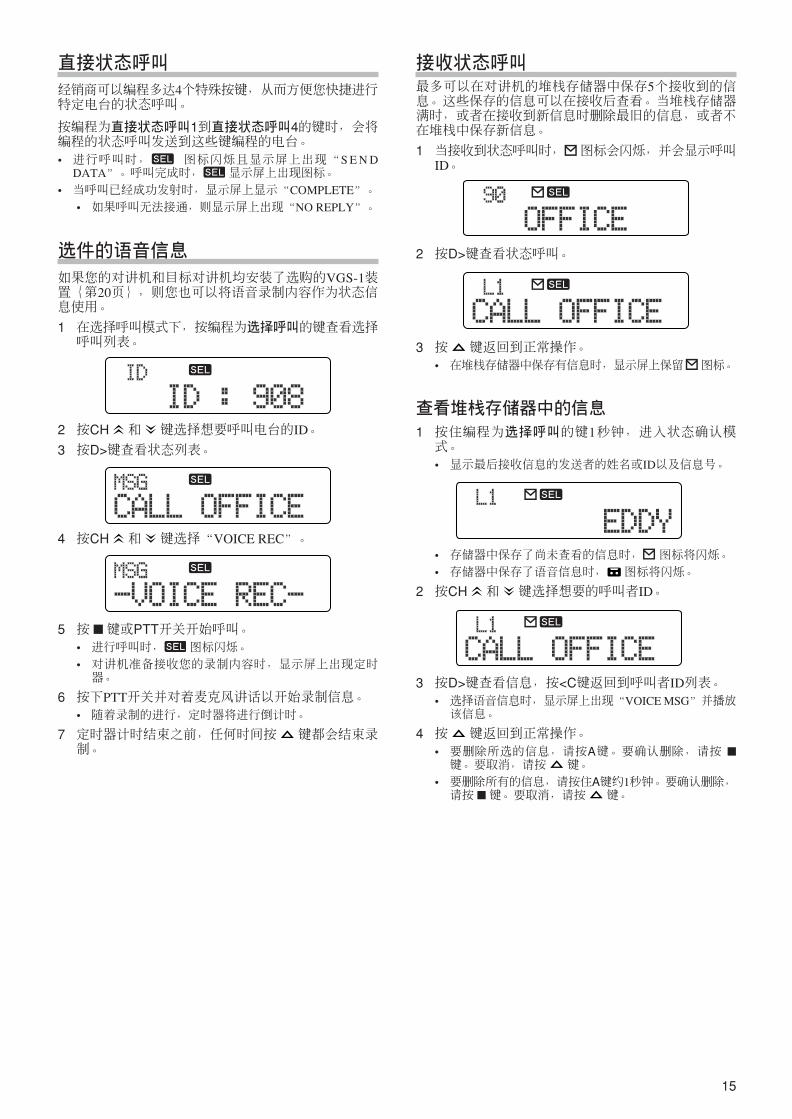
15
接收状态呼叫最多可以在对讲机的堆栈存储器中保存5个接收到的信息。这些保存的信息可以在接收后查看。当堆栈存储器满时,或者在接收到新信息时删除最旧的信息,或者不在堆栈中保存新信息。
1 当接收到状态呼叫时, 图标会闪烁,并会显示呼叫ID。
直接状态呼叫
经销商可以编程多达4个特殊按键,从而方便您快捷进行特定电台的状态呼叫。
按编程为直接状态呼叫1到直接状态呼叫4的键时,会将编程的状态呼叫发送到这些键编程的电台。
• 进行呼叫时, 图标闪烁且显示屏上出现“S E N DDATA”。呼叫完成时, 显示屏上出现图标。
• 当呼叫已经成功发射时,显示屏上显示“COMPLETE”。
• 如果呼叫无法接通,则显示屏上出现“NO REPLY”。
选件的语音信息
如果您的对讲机和目标对讲机均安装了选购的VGS-1装置{第20页},则您也可以将语音录制内容作为状态信息使用。
1 在选择呼叫模式下,按编程为选择呼叫的键查看选择呼叫列表。
4 按CH 和 键选择“VOICE REC”。
3 按 键返回到正常操作。• 在堆栈存储器中保存有信息时,显示屏上保留 图标。
查看堆栈存储器中的信息
1 按住编程为选择呼叫的键1秒钟,进入状态确认模式。
• 显示最后接收信息的发送者的姓名或ID以及信息号。
2 按CH 和 键选择想要呼叫电台的ID。
3 按D>键查看状态列表。
5 按 键或PTT开关开始呼叫。• 进行呼叫时, 图标闪烁。
• 对讲机准备接收您的录制内容时,显示屏上出现定时器。
6 按下PTT开关并对着麦克风讲话以开始录制信息。• 随着录制的进行,定时器将进行倒计时。
7 定时器计时结束之前,任何时间按 键都会结束录制。
2 按D>键查看状态呼叫。
• 存储器中保存了尚未查看的信息时, 图标将闪烁。
• 存储器中保存了语音信息时, 图标将闪烁。
2 按CH 和 键选择想要的呼叫者ID。
3 按D>键查看信息,按<C键返回到呼叫者ID列表。• 选择语音信息时,显示屏上出现“VOICE MSG”并播放该信息。
4 按 键返回到正常操作。• 要删除所选的信息,请按A键。要确认删除,请按 键。要取消,请按 键。
• 要删除所有的信息,请按住A键约1秒钟。要确认删除,请按 键。要取消,请按 键。
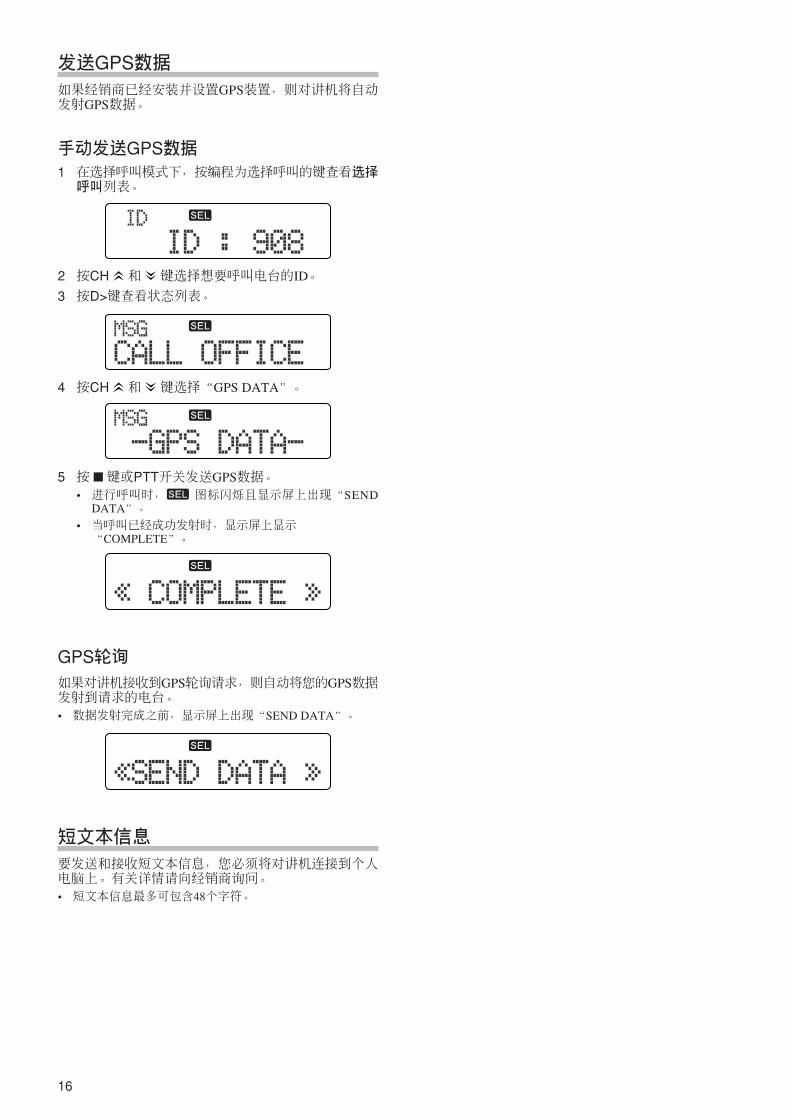
16
发送GPS数据如果经销商已经安装并设置GPS装置,则对讲机将自动发射GPS数据。
手动发送GPS数据1 在选择呼叫模式下,按编程为选择呼叫的键查看选择呼叫列表。
2 按CH 和 键选择想要呼叫电台的ID。
3 按D>键查看状态列表。
4 按CH 和 键选择“GPS DATA”。
5 按 键或PTT开关发送GPS数据。• 进行呼叫时, 图标闪烁且显示屏上出现“SEND
DATA”。
• 当呼叫已经成功发射时,显示屏上显示“COMPLETE”。
GPS轮询如果对讲机接收到GPS轮询请求,则自动将您的GPS数据发射到请求的电台。
• 数据发射完成之前,显示屏上出现“SEND DATA”。
短文本信息
要发送和接收短文本信息,您必须将对讲机连接到个人电脑上。有关详情请向经销商询问。
• 短文本信息最多可包含48个字符。
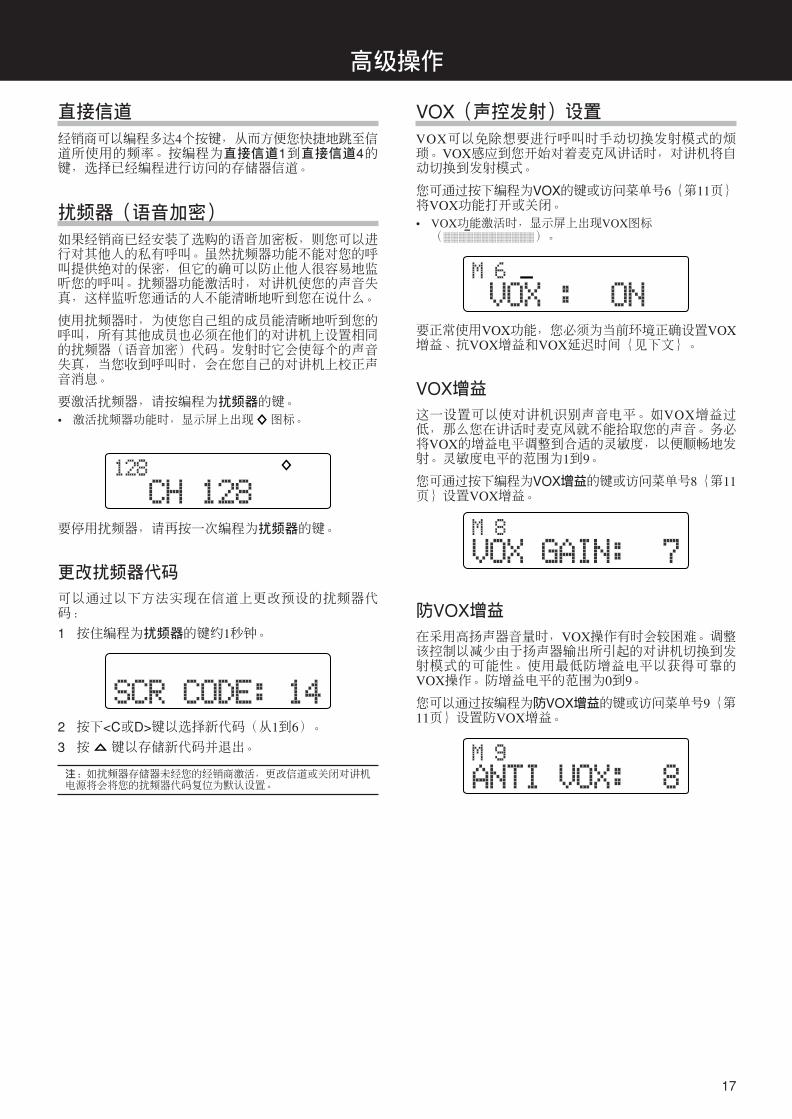
17
高级操作
直接信道
经销商可以编程多达4个按键,从而方便您快捷地跳至信道所使用的频率。按编程为直接信道1到直接信道4的键,选择已经编程进行访问的存储器信道。
扰频器(语音加密)
如果经销商已经安装了选购的语音加密板,则您可以进行对其他人的私有呼叫。虽然扰频器功能不能对您的呼叫提供绝对的保密,但它的确可以防止他人很容易地监听您的呼叫。扰频器功能激活时,对讲机使您的声音失真,这样监听您通话的人不能清晰地听到您在说什么。
使用扰频器时,为使您自己组的成员能清晰地听到您的呼叫,所有其他成员也必须在他们的对讲机上设置相同的扰频器(语音加密)代码。发射时它会使每个的声音失真,当您收到呼叫时,会在您自己的对讲机上校正声音消息。
要激活扰频器,请按编程为扰频器的键。
• 激活扰频器功能时,显示屏上出现 图标。
VOX(声控发射)设置VOX可以免除想要进行呼叫时手动切换发射模式的烦琐。VOX感应到您开始对着麦克风讲话时,对讲机将自动切换到发射模式。
您可通过按下编程为VOX的键或访问菜单号6{第11页}将VOX功能打开或关闭。• VOX功能激活时,显示屏上出现VOX图标( )。
要停用扰频器,请再按一次编程为扰频器的键。
更改扰频器代码
可以通过以下方法实现在信道上更改预设的扰频器代码:
1 按住编程为扰频器的键约1秒钟。
2 按下<C或D>键以选择新代码(从1到6)。
3 按 键以存储新代码并退出。
注:如扰频器存储器未经您的经销商激活,更改信道或关闭对讲机电源将会将您的扰频器代码复位为默认设置。
要正常使用VOX功能,您必须为当前环境正确设置VOX增益、抗VOX增益和VOX延迟时间{见下文}。
VOX增益这一设置可以使对讲机识别声音电平。如VOX增益过低,那么您在讲话时麦克风就不能拾取您的声音。务必将VOX的增益电平调整到合适的灵敏度,以便顺畅地发射。灵敏度电平的范围为1到9。
您可通过按下编程为VOX增益的键或访问菜单号8{第11页}设置VOX增益。
防VOX增益在采用高扬声器音量时,VOX操作有时会较困难。调整该控制以减少由于扬声器输出所引起的对讲机切换到发射模式的可能性。使用最低防增益电平以获得可靠的VOX操作。防增益电平的范围为0到9。
您可以通过按编程为防VOX增益的键或访问菜单号9{第11页}设置防VOX增益。
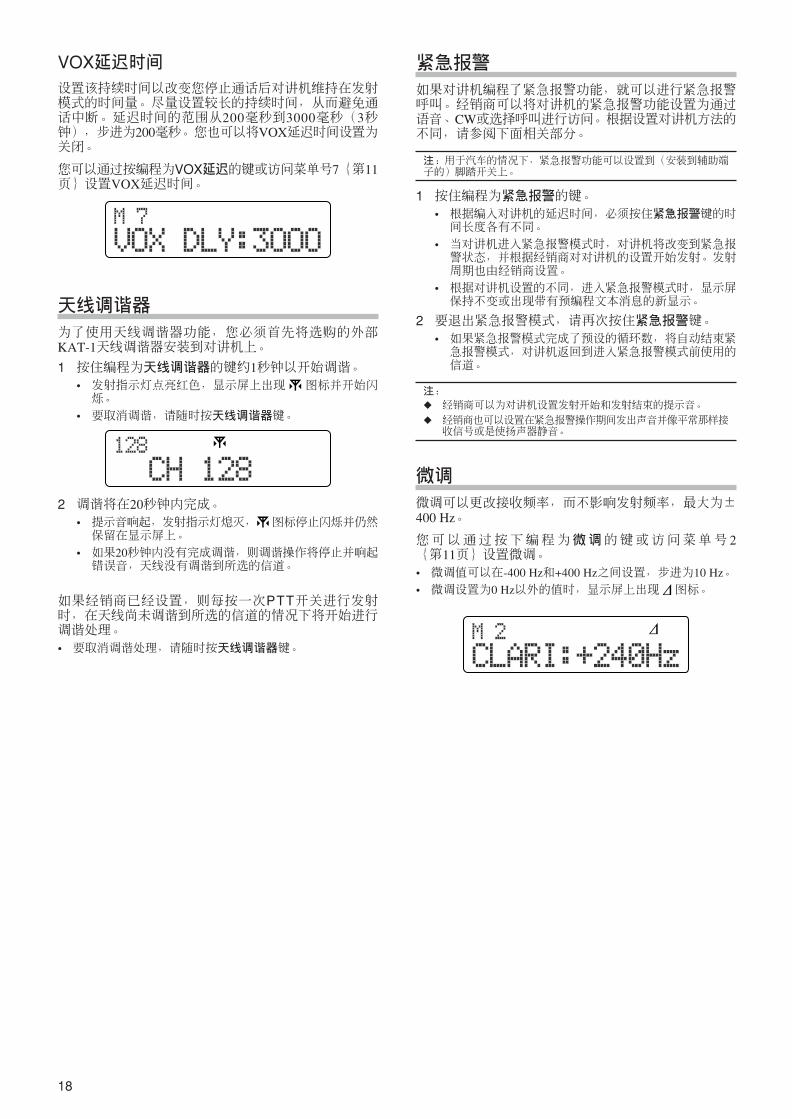
18
2 调谐将在20秒钟内完成。• 提示音响起,发射指示灯熄灭, 图标停止闪烁并仍然保留在显示屏上。
• 如果20秒钟内没有完成调谐,则调谐操作将停止并响起错误音,天线没有调谐到所选的信道。
如果经销商已经设置,则每按一次PTT开关进行发射时,在天线尚未调谐到所选的信道的情况下将开始进行调谐处理。
• 要取消调谐处理,请随时按天线调谐器键。
紧急报警
如果对讲机编程了紧急报警功能,就可以进行紧急报警呼叫。经销商可以将对讲机的紧急报警功能设置为通过语音、CW或选择呼叫进行访问。根据设置对讲机方法的不同,请参阅下面相关部分。
注:用于汽车的情况下,紧急报警功能可以设置到(安装到辅助端子的)脚踏开关上。
1 按住编程为紧急报警的键。
• 根据编入对讲机的延迟时间,必须按住紧急报警键的时间长度各有不同。
• 当对讲机进入紧急报警模式时,对讲机将改变到紧急报警状态,并根据经销商对对讲机的设置开始发射。发射周期也由经销商设置。
• 根据对讲机设置的不同,进入紧急报警模式时,显示屏保持不变或出现带有预编程文本消息的新显示。
2 要退出紧急报警模式,请再次按住紧急报警键。
• 如果紧急报警模式完成了预设的循环数,将自动结束紧急报警模式,对讲机返回到进入紧急报警模式前使用的信道。
注:
经销商可以为对讲机设置发射开始和发射结束的提示音。
经销商也可以设置在紧急报警操作期间发出声音并像平常那样接收信号或是使扬声器静音。
微调
微调可以更改接收频率,而不影响发射频率,最大为±400 Hz。
您可以通过按下编程为微调的键或访问菜单号 2{第11页}设置微调。• 微调值可以在-400 Hz和+400 Hz之间设置,步进为10 Hz。
• 微调设置为0 Hz以外的值时,显示屏上出现 图标。
VOX延迟时间设置该持续时间以改变您停止通话后对讲机维持在发射模式的时间量。尽量设置较长的持续时间,从而避免通话中断。延迟时间的范围从200毫秒到3000毫秒(3秒钟),步进为200毫秒。您也可以将VOX延迟时间设置为关闭。
您可以通过按编程为VOX延迟的键或访问菜单号7{第11页}设置VOX延迟时间。
天线调谐器
为了使用天线调谐器功能,您必须首先将选购的外部KAT-1天线调谐器安装到对讲机上。
1 按住编程为天线调谐器的键约1秒钟以开始调谐。• 发射指示灯点亮红色,显示屏上出现 图标并开始闪烁。
• 要取消调谐,请随时按天线调谐器键。
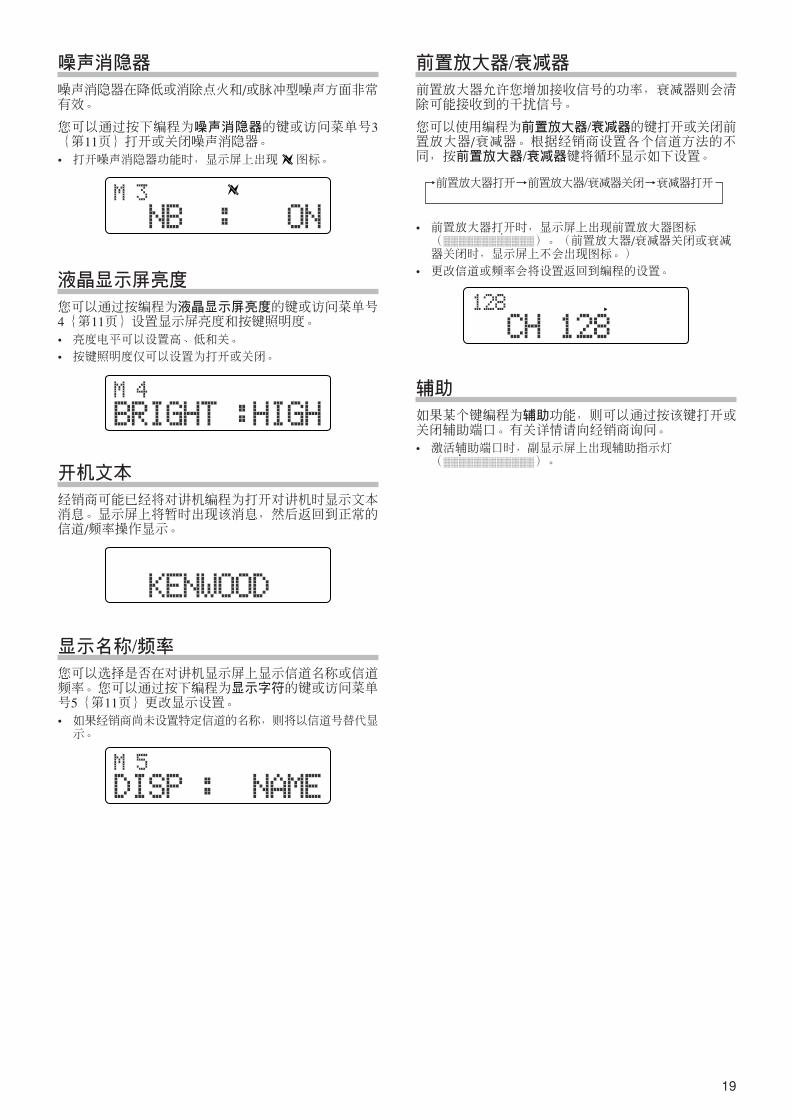
19
开机文本
经销商可能已经将对讲机编程为打开对讲机时显示文本消息。显示屏上将暂时出现该消息,然后返回到正常的信道/频率操作显示。
前置放大器/衰减器前置放大器允许您增加接收信号的功率,衰减器则会清除可能接收到的干扰信号。
您可以使用编程为前置放大器/衰减器的键打开或关闭前置放大器/衰减器。根据经销商设置各个信道方法的不同,按前置放大器/衰减器键将循环显示如下设置。
• 前置放大器打开时,显示屏上出现前置放大器图标( )。(前置放大器/衰减器关闭或衰减器关闭时,显示屏上不会出现图标。)
• 更改信道或频率会将设置返回到编程的设置。
噪声消隐器
噪声消隐器在降低或消除点火和/或脉冲型噪声方面非常有效。
您可以通过按下编程为噪声消隐器的键或访问菜单号3{第11页}打开或关闭噪声消隐器。• 打开噪声消隐器功能时,显示屏上出现 图标。
液晶显示屏亮度
您可以通过按编程为液晶显示屏亮度的键或访问菜单号4{第11页}设置显示屏亮度和按键照明度。• 亮度电平可以设置高、低和关。
• 按键照明度仅可以设置为打开或关闭。
显示名称/频率您可以选择是否在对讲机显示屏上显示信道名称或信道频率。您可以通过按下编程为显示字符的键或访问菜单号5{第11页}更改显示设置。• 如果经销商尚未设置特定信道的名称,则将以信道号替代显示。
辅助
如果某个键编程为辅助功能,则可以通过按该键打开或关闭辅助端口。有关详情请向经销商询问。
• 激活辅助端口时,副显示屏上出现辅助指示灯( )。
前置放大器打开 前置放大器/衰减器关闭 衰减器打开
20
选购的VGS-1语音指导和存储装置
使用选购的VGS-1语音指导和存储装置时,您可以访问对讲机的声音录音机和声音通告功能。有关详情请向经销商询问。
语音备忘
录制语音备忘
您最多可以录制4条语音备忘,每条长度为最长15秒钟。要录制便于稍候播放的语音备忘:
1 按住编程为播放1到4的键约1秒钟,开始录制。(每个播放键对应存储器位置1到4。)• 显示屏上将出现存储器录制的长度,然后开始倒计时。语音备忘只能录制接收信号。
注:播放键由经销商设置为语音备忘或语音消息。按键功能取决于如何设置按键,因此请按设置为用于语音备忘的播放键。
3 再次按 键确认选择并从存储器中删除录制内容。• 要取消,请按 键。
语音信息
录制语音信息
您最多可以录制4条语音信息,每条长度为最长15秒钟。要录制便于稍候播放/发射的语音信息:
1 按住编程为播放1到4的键并保持约1秒钟。(每个播放键对应存储器位置1到4。)• 显示屏上出现“REC/PLAY”。
• 按 键取消并返回到正常操作。
注:播放键由经销商设置为语音信息或语音备忘。按键功能取决于如何设置按键,因此请按设置为用于语音信息的播放键。
2 按 键结束录制并将其保存到对讲机存储器中。• 如果存储器已满,则录制将自动停止并将语音备忘保存到存储器。
• 正在将录制内容保存到存储器时,显示屏上出现“WRITING”。
播放语音备忘
要播放录制的语音备忘:
1 按编程为播放1到4的键播放指定的语音备忘。
2 在任何时候按 键均可结束播放。
删除语音备忘
要删除录制的语音备忘:
1 按编程为播放1到4的键选择并播放指定的语音备忘。
2 按 键删除录制内容。• 显示屏上出现“DELETE?”。
2 按下 键并对着麦克风讲话以开始录制信息。• 显示屏上将出现存储器录制的长度,然后开始倒计时。
3 按 键结束录制并将其保存到对讲机存储器中。• 如果存储器已满,则录制将自动停止并将语音消息保存到存储器。
• 正在将录制内容保存到存储器时,显示屏上出现“WRITING”。
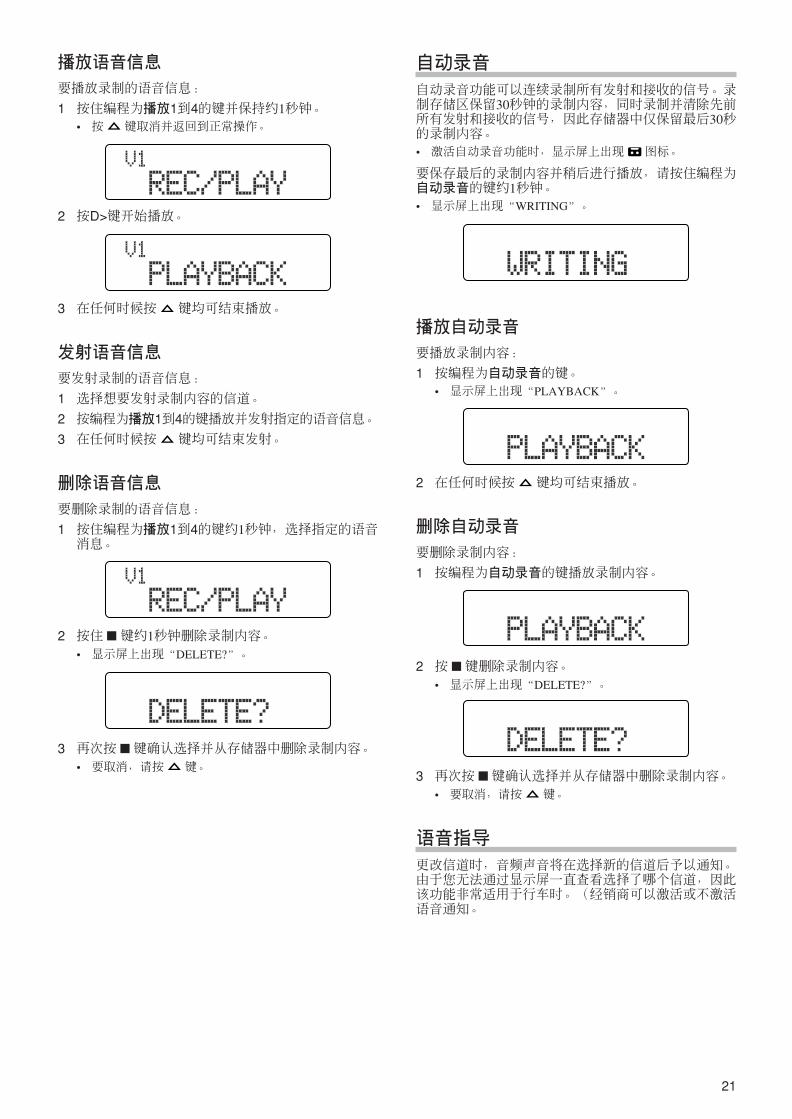
21
3 在任何时候按 键均可结束播放。
发射语音信息
要发射录制的语音信息:
1 选择想要发射录制内容的信道。
2 按编程为播放1到4的键播放并发射指定的语音信息。
3 在任何时候按 键均可结束发射。
删除语音信息
要删除录制的语音信息:
1 按住编程为播放1到4的键约1秒钟,选择指定的语音消息。
自动录音
自动录音功能可以连续录制所有发射和接收的信号。录制存储区保留30秒钟的录制内容,同时录制并清除先前所有发射和接收的信号,因此存储器中仅保留最后30秒的录制内容。
• 激活自动录音功能时,显示屏上出现 图标。
要保存最后的录制内容并稍后进行播放,请按住编程为自动录音的键约1秒钟。• 显示屏上出现“WRITING”。
播放语音信息
要播放录制的语音信息:
1 按住编程为播放1到4的键并保持约1秒钟。• 按 键取消并返回到正常操作。
2 按D>键开始播放。
2 按住 键约1秒钟删除录制内容。• 显示屏上出现“DELETE?”。
3 再次按 键确认选择并从存储器中删除录制内容。• 要取消,请按 键。
播放自动录音
要播放录制内容:
1 按编程为自动录音的键。
• 显示屏上出现“PLAYBACK”。
2 在任何时候按 键均可结束播放。
删除自动录音
要删除录制内容:
1 按编程为自动录音的键播放录制内容。
2 按 键删除录制内容。• 显示屏上出现“DELETE?”。
3 再次按 键确认选择并从存储器中删除录制内容。• 要取消,请按 键。
语音指导
更改信道时,音频声音将在选择新的信道后予以通知。由于您无法通过显示屏一直查看选择了哪个信道,因此该功能非常适用于行车时。(经销商可以激活或不激活语音通知。
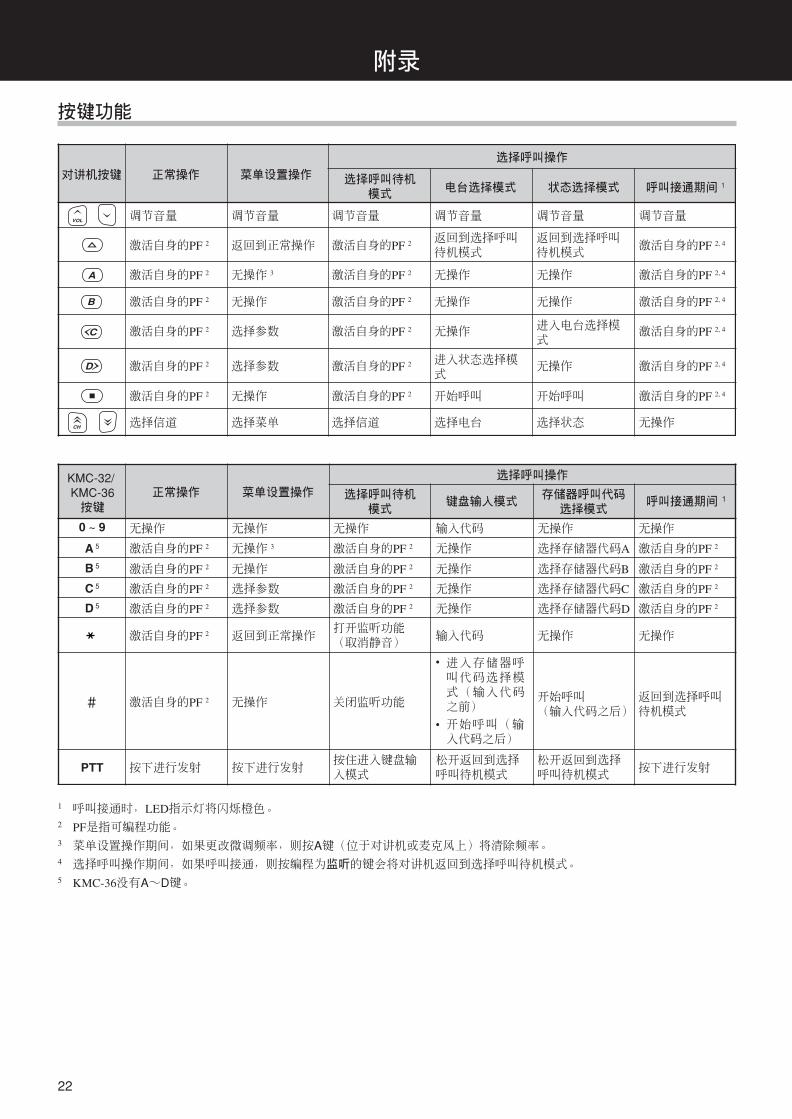
22
附录
按键功能
对讲机按键 正常操作
调节音量
激活自身的PF 2
激活自身的PF 2
激活自身的PF 2
激活自身的PF 2
激活自身的PF 2
激活自身的PF 2
选择信道
菜单设置操作
调节音量
返回到正常操作
无操作 3
无操作
选择参数
选择参数
无操作
选择菜单
选择呼叫操作
选择呼叫待机模式
调节音量
激活自身的PF 2
激活自身的PF 2
激活自身的PF 2
激活自身的PF 2
激活自身的PF 2
激活自身的PF 2
选择信道
电台选择模式
调节音量
返回到选择呼叫待机模式
无操作
无操作
无操作
进入状态选择模式
开始呼叫
选择电台
状态选择模式
调节音量
返回到选择呼叫待机模式
无操作
无操作
进入电台选择模式
无操作
开始呼叫
选择状态
呼叫接通期间 1
调节音量
激活自身的PF 2, 4
激活自身的PF 2, 4
激活自身的PF 2, 4
激活自身的PF 2, 4
激活自身的PF 2, 4
激活自身的PF 2, 4
无操作
0 ~ 9
A 5
B 5
C 5
D 5
#
•
•
TTP
KMC-32/ KMC-36按键
正常操作
无操作
激活自身的PF 2
激活自身的PF 2
激活自身的PF 2
激活自身的PF 2
激活自身的PF 2
激活自身的PF 2
按下进行发射
菜单设置操作
无操作
无操作 3
无操作
选择参数
选择参数
返回到正常操作
无操作
按下进行发射
选择呼叫操作
选择呼叫待机模式
无操作
激活自身的PF 2
激活自身的PF 2
激活自身的PF 2
激活自身的PF 2
打开监听功能(取消静音)
关闭监听功能
按住进入键盘输入模式
键盘输入模式
输入代码
无操作
无操作
无操作
无操作
输入代码
进入存储器呼叫代码选择模式(输入代码之前)
开始呼叫(输入代码之后)
松开返回到选择呼叫待机模式
存储器呼叫代码选择模式
无操作
选择存储器代码A
选择存储器代码B
选择存储器代码C
选择存储器代码D
无操作
开始呼叫(输入代码之后)
松开返回到选择呼叫待机模式
呼叫接通期间 1
无操作
激活自身的PF 2
激活自身的PF 2
激活自身的PF 2
激活自身的PF 2
无操作
返回到选择呼叫待机模式
按下进行发射
1 呼叫接通时,LED指示灯将闪烁橙色。2 PF是指可编程功能。3 菜单设置操作期间,如果更改微调频率,则按A键(位于对讲机或麦克风上)将清除频率。4 选择呼叫操作期间,如果呼叫接通,则按编程为监听的键会将对讲机返回到选择呼叫待机模式。5 KMC-36没有A~D键。