Embed Size (px)
Citation preview
.... , ., .... o. vu.,
Instiat.iona Oklaboa state Urd.Tend.f.r
locations stUlntar, Okl abcna
Title of Stucf7s 1 Buie Coarse 1n Pbot.ogratm7 for High School
Naber of papas )9
Under Dinction or lhat Dapartaent,
Scb>ol of Indutrial Art.a F.dacat.icm
§pp 2! Stu4J1 !hia ~ deala with pb,wgrapby aa an aid or out.line tor the 1natrvctor of a ooune in buic photognpil7 either 1n junior or aerdor high achool. A ~ - µ~ o{ ~,-nl~~d to.r a claea ia al8o giflll'l. SUggestiona aa to topic. the inlrt.ractor shoQl.d include 1n tl'-.e leeturaa and ~tiona are al80 included, along with brief deHrij'tiona of pm~_a, •te~l~, and ~cu••- ~~ ~ed. A ~Lhk~l'I ot the early diecoYeriea in photograpb:T 1a included, as well aa infonaation pertaining to preNDt-day pmtograpby ..
Finding ei! Ooncl.uion: The writer finds a course in photography offers .llflD7 object.1Tea ot general education thlough t.he uae of •teriala and Jm)ceases. Pbotogral'b1' is unl 1m1 ted: 1n presenting a challenge fro• the til1Nt a atuden\ cocpoaea the pictUl"e until it is a finished p:odw:t. The basic counae in pbotognphy is onl.J the beginnini or introduction to photography. The writer baa included a recomended liet of diviaions in pmtography to be offered ae equipll8tlt and student. capabilities permit.
A BASIC COURSE IN PHOTOGRAPHY
FOR HIGH SCHOOL
1958
A BASIC COURSE IN PHOTOGRAPHY
FOR HIGH SCHOOL
by
JAMES G. UTLEY II
Bachelor of Science
Northeastern State College
Tahlequah, Oklahoma
1953
Submitted to the Faculty of the Graduate School of the Oklahoma State University of Agriculture and
Applied Sciences in partial fulfillment of the requirements
for the degree of Master of Science
1958
REPORT APPROVED:
A BASIC COURSE IN PHOTOGRAPHY
FOR HIGH SCHOOL
JAMES G. UTLEY
MASTER OF SCIENCE
Associate Professor and Acting Head, School of Industrial Arts Education
406558
OKLAHOMA STATE UNIVERS
LIBRARY
AUG 20 195,

ACKNOWLEIXxMENT
I wish to express my appreciation and gratitude to the following
persons for their encouragement, aid, and advice in making this report
possible. First, to Mr. L. H. Bengtson, Associate Professor, School of
Industrial Arts Education, Oklahoma State University, for his assistance
and guidance given during the preparation of this report. Secondly,
to Mr. C. L. Hill, Acting Head, School of Industrial Arts Education,
Oklahoma State University, for his time and efforts in helping with my
plan of study for the Master of Science Degree.
J. G. U.
iii
Chapter
I.
II.
III.
TABLE OF CONTENT
INTRODUCTION TO BASIC PHOTCXJ-R.APHY
Photography in School •••• Need for the Study •••••• Methods Used in the Research Similar Studies ••••••• Objectives of Basic Photography Definition of Terms • • •• Recommended Equipment Contents of Report
A BRIEF HISTORY OF PHOTOGRAPHY
Early Discoveries The Camera The Lens . • • • • Portable Camera First Photography Niepce Daguerre Dry Plates Roll Film The Last Half of Century
PHOTOGRAPHY AS AN INDUSTRIAL ARTS SUBJECT
Photography as a Hobby ••••. Industrial Photography ••••• Medical Photo graphy Photography in Natural History Aerial Photography •••• Printing •••• Cameras •••••• Ebx Cameras Folding Cameras Miniature Camera Single Lens Reflex Cameras Twin Lens Reflex Cameras •••• Press Camera Outdoor Pictures Marine Scenes Distant Landscapes Portraits Contact Printing
iv
. . .
1
1 1 2 2 2 3 6 7
9
9 9
10 10 10 11 11 13 13 13
1.5
1.5 1.5 16 16 17 17 19 19 20 20 20 20 21 21 21 22 22 23
Chapter Page
J Developing Roll FiJm Using the Tank Method. 25 Washing and Drying a Print . . . . 27 Mounting a Print. . . . . 28 Composition . . . . . . . . . 29 Enlarging 32 Portraits . . . . 33 Lighting . . . . 34 Background . . . . . . . . . 34 Posing 35 .Fbcusing . . . . 35 Time and Exposure . . . . . . . . . . 35
IV. CONCLUSIONS AND RECOMMENDATIONS . . . . 37
Photography in the High School 37 Recommendations . . . . . . . . . . . . . 38
V
CHAPTER I
INTRODUCTION TO BASIC PHOTOGRAPHY
Photo graphy has become a necessity to the modern way of life. The
television, through photo graphy, plays a great role in entertaining,
education, news, and advertising . The school of to day is expected to
use audio-visual material consisting of movies, film strips, and slides,
as aids in teaching. Textbooks with many pictures are beco ming more in
demand. Photography is being used by the government as well as business
in the keeping of important records. History is being compiled in the
form of pictures. Basic photography is one of the leading hobbies of
today.
Photography in School. The purpose of schools is to educate indi
viduals in the ways of life. Photo graphy has become so important in
many ways t hat some unders t anding of basic photo graphy should be taught
in the schools.
Need for the Study. This study of photo graphy is being made as an
aid or outline for the instructor of a course in basic photo graphy either
in junior or senior high school. The study will give a minimum list of
equipment needed for a class of twelve to sixteen students. It will also
give some important suggestions as to topics the instructor should in
clude in the lectures and demonstrations. Suggested assignments for the
students will also be included. The study is not to be considered as a
complete detailed course in basic photo graphy.
2
Methods Used in the Research. Several sources of material were used ----- ----in obtaining information for this report. Books from the library of the
Oklahoma State University, and photography magazines gave the more recent
information on materials, supplies, and procedures. Photographers and
teachers of photography contributed a great deal of valuable information.
Many books are written with the word elementary in their titles but are
really unsuited for the student because of technical terms and advanced
chemistry formulas. For this reason several sources were used in trying
to make this course an elementary one.
Similar Studies. In 1954 Mr. W. G. Harris wrote a similar report
entitled: PHOTOGRAPHY AS AN INDUSTRIAL ARTS ACTIVITY. This report has
fifty-six pages including several pictures used for explanations.
Mr. Norman A. Scibetta also wrote a similar report in 1948 entitled: A
UNIT OF ELEMENTARY PHOTOGRAPHY TO BE TAUGHT IN THE INDUSTRIAL ARTS
GENERAL SHOP. In 1955 Mr. John E. Watkins wrote a detailed thesis
entitled: THE HISTORY OF PHOTOGRAPHY AND PHOTOGRAPHY IN THE HIGH SCHOOLS
OF OKLAHOMA. This thesis would be enjoyed by photographers and would be
of great benefit to those teaching photography.
Objectives of Basic Photography. A number of lists could be made
of objectives to basic photo graphy, but the field of industri al arts
offers some of the most important objectives for a student in school.
These are listed below with a short explanation of how photo graphy will
aid in carrying out the objectives:
1. Industrial Knowledge. Photo graphy is very widely used in indus-
try. This course will give the student a better understanding
of how and why it is used.
3
2. Problem Solving. Problems will arise in the course of photography
due to the many processes necessary in completing the work.
3. Home Mechanics. After the basic course in photography the
student will be able to develop and print pictures in a home
dark-room.
4. Exploration. The field of exploration offers the student many
opportunities in this field.
5. Skills. Skills of a wide variety are a requirement in turning
out good work in photography.
6. Consumer Knowledge. Since a large percent of the people own and
operate a camera, a basic course in photography would help these
consumers in choosing a camera to fit certain needs.
7. Social Values. No work can be carried out in a darkroom without
the full cooperation of all involved. The camera will also
enable the student to make new friends through interest in pho-
tography.
8. Interest. Photography seems to create a strong interest in its
many processes.
9. Guidance. Photography, like any doing subject, offers oppor-
tunities for guidance in many ways.
10. Safety. The use of chemicals, working with others, and working
in close quarters would all contribute toward lessons in safety.
The above list of objectives would be reason enough to offer a basic
course in photography, but there are many more that could be added to
these. Photography could be related to other subjects offered in school.
Definition of Terms. Photography has a language of its own that
must be understood by the students. Listed below are the more common
terms that may need an explanation:
1. Agitation. The procedure used in p:rocessing to insure an interchange of solution over the surface of either a negative or a print. Agitation may either be constant or intermittent. It is a recommended procedure to assure uniform development results. (4, page 3549)
2. Bag, Changing. A lightproof bag equipped with openings only for the hands, in which f ilms can be loaded. (4, page 3550)
3. Bromide Paper. A light-sensitive photo graphic paper used in making enlargements. The term "bromide" is derived from the use of silver bromide in emulsion manufacture. There are few actual bromide papers on the market, the majority being chloromide with varying amounts of both silver chloride and silver bromide. If there is a predominance of the latter compound, the paper is commonly called a bromide paper. (4, page 3551)
4. Camera Obscura. An early optical instrument used by painters in reducing three-dimensional objects to a twodimensional plane. It was composed of a box equipped with a lens and a hooded groundglass on which the image was observed. The camera obscura was essentially a true camera except no light-sensitive material was used to retain the image. The pursuance of this end led eventually to the discovery of photography in 1839. (4, page 3551)
5. Choride Paper. A photographic printing paper in which the emulsion is made sBnsitive largely through silver chloride. Usually chloride papers are printed by contact and require a comparatively longer exposure than bromide or chlorobromide enlarging papers. (4, :p3.ge 3552)
6. Condenser. A lens whose function is to concentrate a light beam. Condensing lens are commonly found in microscopes, enlargers, projectors, etc. (4, page 3553)
7. Gontnast. The difference between minimum and maximum photographic densities. This term is not to be confused with gradation, as a print can possess high contrast yet have either "soft" or 11 hard11 gradation. (4, page 3553)
8. Crop. To trim or cut away the superfluous portions of a print in order to improve its appearance. (4, page 3553)
9. Daguerreotype. The first successful practical process of photography. It was discovered and named after Louis Daguerre who made the process public in 1839. (4, page 3553)
4
10. Density. This term is defined as the natural logarithm of the opacity. Density in a photograph is usually determined by the amount of metallic silver. (4, page 3553)
11. DeptE_ of Field. The portion of the object space which is in critical focus. (4, page 3553)
12. Easel, Enlarging. A device for holding photographic enlarging paper flat and for providing white print margins of the desired dimension. (4, 3554)
13. Emulsion. The gelatin coating containing the lightsensitive silver salts. (4, page 3554)
14. Exposure. This term is defined as the product of the time and the intensity of illumination acting upon the photographic material. (4, page 3554)
15. Film. The support for present-day photographic emulsions. The first flexible, transparent roll film was invented by a minister, Reverend Hannibal Goodwin. (4, page 3554)
16. Film, Orthochromatic. A film which has an ortho sensitivity is sensitive to all colors except deep orange and red. (4, page 3555)
17. Film, Panchromatic. A film which has panchromatic sensitivity is sensitive to all colors of the visible spectrum. (4, page 3555)
18. Fixing. The fixing process makes permanent the photographic image by dissolving out any undeveloped silver halide from the negative or print emulsion. The most widely used fixing agent is sodium thiosulphate (hypo). (4, page 3555)
19. Groundglass. The glass at the back of view cameras used to compose and focus the image. Groundglass is manufactured by treating plain glass with an abrasive until it has a matte surface. (4, page 3556)
20. Infinity. A distance so far removed from an observer that the rays of light reflected from a point at that distance may be regarded as parallel. A distance setting on a camera focusing scale beyond which all objects are in focus. (4, page 3557)
21. Leader. The strip of film at the beginning of a roll of film which is used in threading the camera without wasting actual film. (4, page 3557)
5
22. Parallax. The apparent displacement of an object seen from different points. Commonly encountered in photography in the difference between the image seen by the camera finder and that actually taken by the lens. (4, page 3559)
23. Safelight. A light to provide darkroom illumination of the proper type. Color safelight filters are available for use with different types of light-sensitive materials, such as contact paper, enlarging paper, orthochromatic and panchromatic films. (4, page 35t:O)
24. TalbotYPe· An early photographic paper negative process invented by an Englishman, William Henry Fox Talbot, who made successful experiments in photography as early as 1835. (4, page 3561)
25, Tungsten. A metallic element of extremely high melting point used in the manufacture of incandescent electric lamps. In photography, tungsten is used to refer to artificial illumination as contrasted to daylight. For example, film emulsion speeds are given both in tungsten and daylight. (4, page 3562)
Recommended Equipment. In setting up a course in basic photography
a certain amount of equipment is required to carry out a successful pro-
gram. A beginner will advance quite rapidly to the point of developing,
contact printing, and enlarging. There are several limitations as to
what different schools can afford, as well as different ideas as to t he
needs of the program. There is no limit as to the amount of equipment
that can be purchased, but there would be a minimum amount needed to
start the program. A classroom with a darkroom connected or built in
6
would provide the space required. The darkroom must have electrical out-
lets and running water . List ed below ar e the pieces of equipment to be
purchased f:rum a photography supply store:
Quantity Article
1. 3 camera, reflex, 2! x 2t negati ve size
2. 1 camera, 35 mm
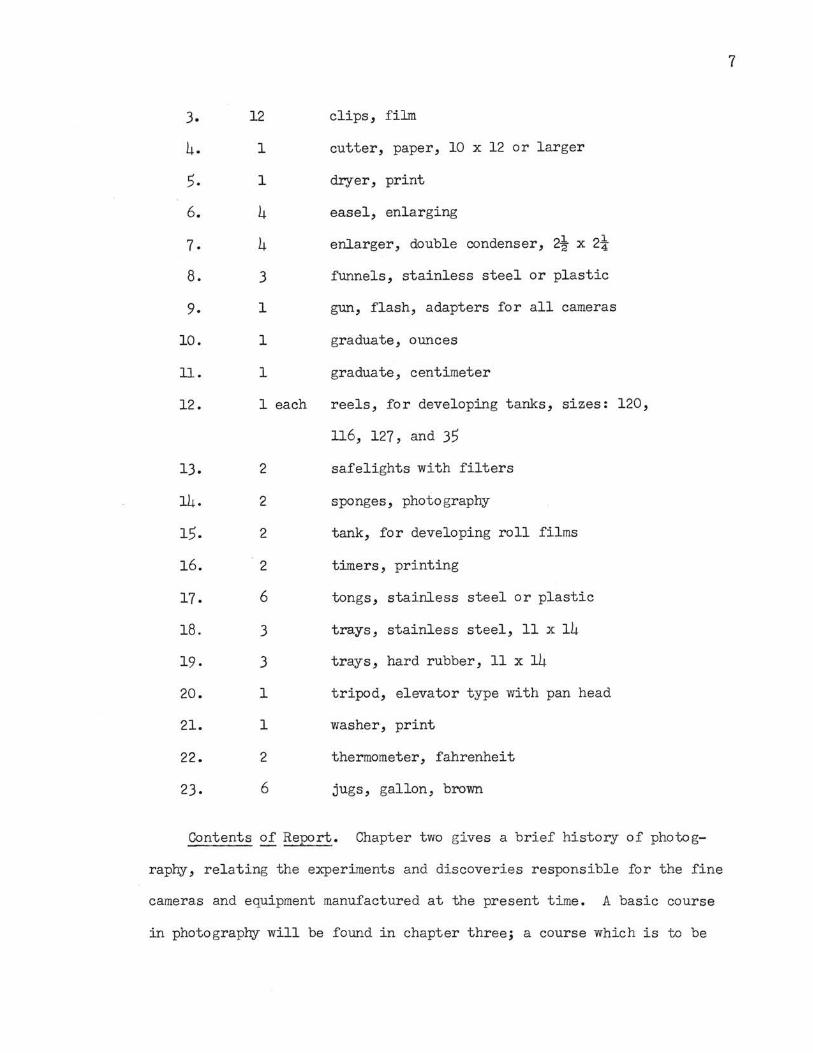
3. 12 clips, film
4. 1 cutter, paper, 10 x 12 or larger
5. 1 dryer, print
6. 4 easel, enlarging
7. 4 enlarger, double condenser, 2! x 2t 8. 3 funnels, stainless steel or plastic
9. 1 gun, flash, adapters for all cameras
10. 1 graduate, ounces
11. 1 graduate, centimeter
12. 1 each reels, for developing tanks, sizes: 120,
116, 127, and 35
13. 2 safelights with filters
14. 2 sponges, photography
15. 2 tank, for developing roll films
16. 2 timers, printing
17. 6 tongs, stainless steel or plastic
18. 3 trays, stainless steel, 11 x 14
19. 3 trays, hard rubber, 11 x 14
20. 1 tripod, elevator type with pan head
21. 1 washer, print
22. 2 thermometer, fahrenheit
23. 6 jugs, gallon, brown
Contents of Report. Chapter two gives a brief history of photo g
raphy, relating the experiments and discoveries responsible for the fine
cameras and equipment manufactured at the present time . A basic course
in photography will be found in chapter three; a course which is to be
7

offered in junior or senior high school. Chapter three includes brief
descriptions of procedure, material, and processes to be used by the
instructor and assignments for the students. The conclusions and recom
mendations of this report are found in chapter four.
8

CHAPTER II
A BRIEF HISTORY OF PHOTOGRAPHY
It would be difficult to designate the time photography was actually
discovered because so many discoveries led up to what we consider photog
raphy to day.
Early Discoveries. Traces and discoveries as far back as 350 B. C.
led up to photography, but the most important discoveries were made in
about 1839 when a Frenchman by the name of Daguerre discovered daguerro
typy as a direct positive made on a piece of copper covered with silver.
Another discovery called talbotypy was made by an Englishman by the
name of Talbot. It was a process of making paper positives from paper
negatives. Even these two discoveries could not be called gr eat with
out the aid of others.
The Camera. The camera obscura was needed to expose any kind of
film that might be made . The camer a was not developed as a means of
taking pictures but as an aid to artists .
The camera obscura, in its earliest form, consisted of a darkened
room that light could enter only through a small opening in the wall.
The light rays passed through a prism and were projected onto a white
piece of paper . The artist then copied or drew the outline projected
by the camera obscura . Artists and painters soon felt the need for a
sharper image . After doing their best with the prism and mirrors a new
invention, the lens, was introduced.
10
The Lens. Jerome Cardon, in 1550, describes what seems to have been
the first use of a lens in the camera obscura. (1, page 14) Since the
idea of a lens was conceived and put into practice, it has had many
improvements. The camera obscura with the lens began to arouse atten-
tion, as more people were finding a use for it, such as studying sun
spots and eclipses. This was made possible by long extension tubes so
some adjustment could be made. Use of the camera by astronomers created
a desire for a portable camera obscura.
Portable Camera. The portable camera began to make its appearance
soon after the lens was added. Instead of a large darkroom a portable
tent which could be moved with quite a lot of trouble was used. Later,
it was condensed to a large wooden box with poles on each side to aid
in carrying it from place to place. These were not readily portable,
but in the early 1700 1 s a box about two feet long was devised with a
hinged hood in the back of the ca~era obscura. Thus the camera obscura
became portable. At this point, it was still being used chiefly by
artists.
First Photography. "Thomas Wedgewood (1771-1805), an English
scientist, was first to visualize the camera obscura as a means to
obtain a permanent image." (2, page 139) He first devoted his study
to methods of reproduction of designs of glass. "In 1802, a publication
appeared that described a process of copying paintings on glass and of
making profiles by the use of light." (1, page 136) Thomas Wedgewood
worked with Sir Humphrey Davy (1778-1829) in making contact prints and
shadowgraphs of flat objects on leather soaked with silver nitrate or
silver chloride solutions. There is no record of their ever finding
11
an;y fixing process, so none of their prints were permanent.
Niepce . Niepce, corn to weal thy parents, first was trained for the
priesthood but became an officer in the French army during the revolution.
Due to ill health, Niepce served only a few months . Soon after his dis-
charge he became interested in printing and sought a method to make
direct positives. The following is an account of one of Niepce's first
experiments as written by Beaumont Newhall:
Nicephore Niepce (1765-1833), a Frenchman, carried out similar experiments a few years later. Using a crude miniature camera--an old jewel box with the lens of a microscope-he made negatives on silver chloride paper in 1816. He did not call his results negatives, however, nor did he recognize them as such. He sent a number of his 11 gravures11 to his brother, complaining of their reversal of tones. Had he been aware of Wedgewood's work he might have made positive prints from his first results, and thus have stumbled on the negativepositive theory. Instead he abandoned the use of silver chloride paper and sought a way to make direct positives. By 1827 he had succeeded in the quest. Pewter, covered with asphaltum, was exposed behind a translucent drawing or print or in the camera. It was then bathed in lavender oil, which dissolved only those areas untouched by light. These plates still exist in London. (2, page 1996)
The report on Niepce shows photography to be a little over one
hundred years old. The amateur photographer today should be proud
of the home developing kits available.
Daguerre. Jacques Louis Mande Daguerre (1787-1851) was a Parisian
scenic artist. Daguerre heard of the experiments made by Niepce and
contacted him. In 1829 they formed a partnership. Four years later,
Niepce died. Daguerre perfected Niepce's work and took a picture of
one corner of his studio. Daguerre kept the entire process strictly
secret. He planned to market the camera and process through public
appearances, but met with failure. The patent was sold to the government
of England, with the aid of the testimony of a few painters. Scientists
from all over the world were interested in this process. Pictures were
taken on the streets of Paris by August, 1839. This was the first pub-
lie use made of the camera and film. The Daguerreotype is as follows:
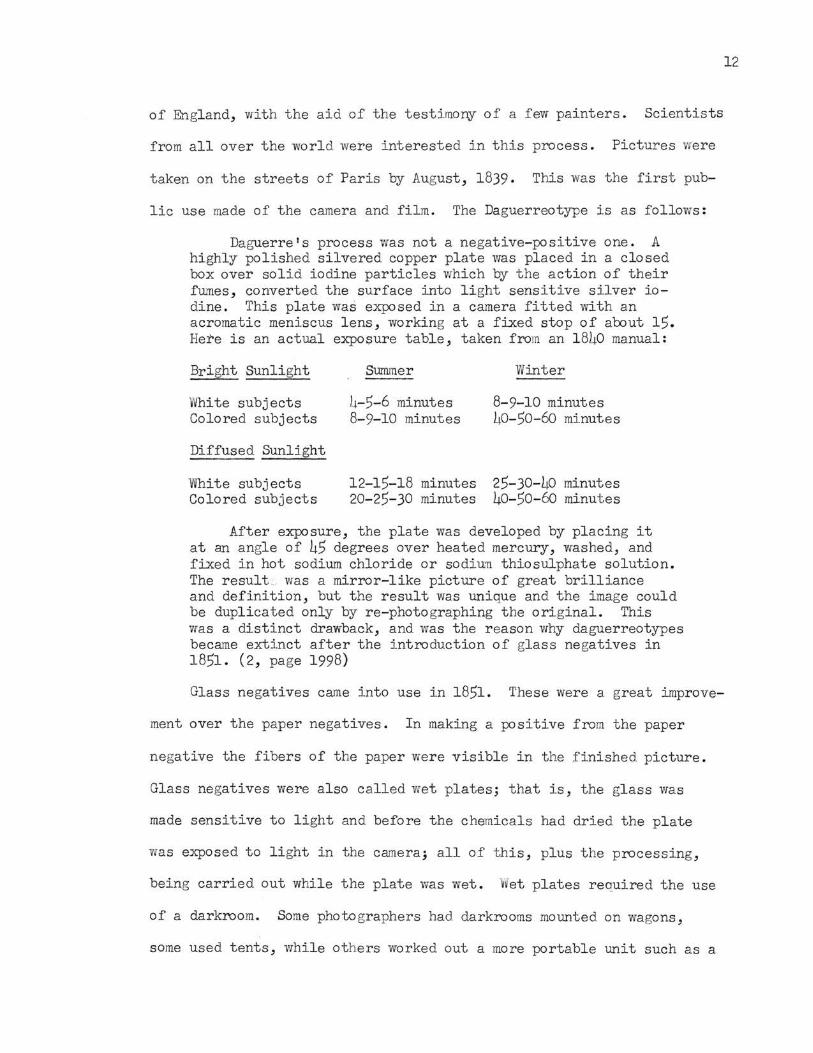
Daguerre's process was not a negative-positive one. A highly polished silvered copper plate was placed in a closed box over solid iodine particles which by the action of their fumes, converted the surface into light sensitive silver iodine. This plate was exposed in a camera fitted with an acromatic meniscus lens, working at a fixed stop of about 15. Here is an actual exposure table, taken from an 1840 manual :
Bright Sunlight
White subjects Colored subjects
Diffused Sunlight
White subjects Colored subjects
Summer
h-5-6 minutes 8- 9-10 minutes
12-15-18 minutes 20-25-30 minutes
Winter
8-9-10 minutes 40-50-60 minutes
25-30-40 minutes 40-50-60 minutes
After exposure, the plate was developed by placing it at an angle of 45 degrees over heated mercury, washed, and fixed in hot sodium chloride or sodiuTI thiosulphate solution. The result_ was a mirror-like picture of great brilliance and definition, but the result was unique and the image could be duplicated only by re-photographing the original. This was a distinct drawback, and was the r eason why daguerreotypes became extinct after the introduction of glass negatives in 1851. (2, page 1998)
Glass negatives came into use in 1851. These were a gr eat improve-
ment over the paper negatives. In making a positive from the paper
negative the fibers of the paper were visible in t he finished picture.
Glass negatives were also called wet plates; that is, the gl ass wa s
made sensitive to light and before the chemicals had dried the plate
was exposed to light in the camera; all of this, plus t he processing,
being carried out while t he plate was wet . Wet plates required the use
of a da r kroom. Some photogr apher s had dar krooms mounted on wagons ,
some used tents, while others worked out a more portable unit such as a
12
13
box or bag that could be kept dark while in use.
Dry Plates. The wet plate method was made obsolete when in 1871,
an English physician and amateur photographer , R. L. Maddox (1816-1902),
used gelatin as an adhesive for joining sensitive silver salts to the
glass surface. In 1873 Richard Kennett patented a solution of cadmium
bromide and gelatin, added to silver nitrate. This solution was spread
on the glass plates by the photographer. The plates enabled the photog-
rapher to take pictures, and develop the plates at a later time.
Roll Film. The first roll film was marketed by George Eastman
(1854-1932) in 1888. This was similar to the roll film in use at the
present time. The first roll film was paper covered with emulsion
loaded into a camera. The photographer received the camera from the
Eastman Kodak Company, loaded with film to take one hundred pictures.
After the film had been exposed, the camera and film were returned to
the company for processing. Within the next year Eastman patented a
transparent flexible film. This new film made it possible for the photog-
rapher to load and develop his own film.
This new film was so sensitive to light that the photographers were
inclined to over-expose the film. At this time there was no shutter,
the light being controlled by removing the lens cap for a few seconds
and then replacing it.
The Last Half of Century. During the last fifty years photography
has progressed at unusual speed, cameras and film having been continually
improved to such a degree that within a two or three year period, new
models have been put on the market that are superior to cameras a few
years old.
14
Today there is a competitive market for cameras. The United States,
Japan, and Germany, are all manufacturing cameras and darkroom supplies
in large quantities. The average person has a camera, and many process
and develop their own film at a nominal cost. The camera of today is
a very fine instrument compared to the camera used fifty years ago. The
manufacturers have developed cameras simple to operate for the beginner,
and cameras with many correction adjustments for the professional photog
rapher. Chapter three is devoted to a course in basic photo graphy to
help the amateur understand more about cameras and the processing to
produce a pleasing picture.
CHAPTER III
PHOTOGRAPHY AS AN INDUSTRIAL ARTS SUBJECT
Orientation is the first meeting of the class at which the instructor
gives the students a comprehensive view of the subject to be studied by
telling of the many applications of photography. An exhibit of a pictor
ial character would add considerably to the effect of this session.
Photography as~ Hobby. Every person should have a hobby or some
thing of interest to occupy leisure time. Photography can be interesting
and at the same time give the person a valuable product. The following
are the most corrnnon types of subjects:
1. friends 5. family groups
2. pets 6. school
3. vacations 7. activities
4. hobbies 8. scenes
Industrial Photo graphy. Industry today uses photography to such
an extent that most firms employ photographers and maintain darkroom
facilities. The purpose is to have a photographer available to make a
picture when a situation arises that would serve as an illustration .
These pictures are for use in public relations, and for instruction and
advertising purposes. Where a great many pictures are used in a company's
pro gram the expense is lessened in this manner. Listed below is t he
t ype of pi ctures used:
16
1. employees at work 5. employees at play
2. safety posters 6. hobbies of employees
3. instruction 7. product
4. service 8. materials
Medical Photography. Today doctors are using photography so much
that courses are being taken in night school to learn a phase of photog-
raphy that will help in the field of medicine. Photography has been a
great aid to medical advancement. Listed below are the most common
pictures used in the field of medicine:
1. instruction 5. progress of treatment
2. dentist work 6. types of patients
3. case records 7. surgical
4. X-ray 8. recreation
Photography in Natural History. Photo graphy is an aid to scientists
working in the field of natural history. The importance is shown in the
following statement by C. B. Neblett:
As in medical photography, success in a career in natural history photography is based on adequate scientif ic training. The need of science for accurate photo graphs taken in the field or in the laboratory is never ending, and the person with a scientific mind will find this vocation interesting. (6, page 133)
The above statement shows how photography is combined with another
vocation. Below is a list of uses fo r pictures i n natural science :
1. illustrations 4. research
2. entomology 5. pathology
3. study 6. instruction
Aerial Photography. Aerial photo graphy dates back nearly one
hundred years, but was developed during World War I from a relatively
minor area of activity into an indispensable field, within three or
four years. The following list will give the more common uses for
aerial photography:
1. war 5. exploration
2. oil companies 6. mapping
3. highway survey 7. traffic
4. advertising 8. pipeline
17
These are only a few of the instances where aerial photography is
used, but will illustrate how photography can fit into educational plans.
Student Assignment
Objective: to show relation of photography
to several occupations
Material: pencil and paper
Equipment: none
Procedure:
1. make study of photography in
relation to occupations
2. collect pictures pertaining to
occupations
3. write several pages showing how
the pictures aid in occupations
Printing. It is a good idea to start the student in the course of
photography under favorable conditions. Introduce him to the essentials
of the photographic process by a demonstration and darkroom work in

printing. Have the student bring his own negatives to help create
interest, and have the chemicals and darkroom ready for a demonstration
on printing. Use the student's negative for a contact print, explaining
the kinds of paper used and the mechanical steps in the producing of the
picture. If possible give each student a print. Detailed explanations
need not be given at this time but will be covered as the course con
tinues.
18
After two or three days of orientation and a demonstration, the
student should be put to work in the darkroom. The instructor should
give a detailed demonstration on how to develop a roll of film, using
trays. Then give work assignment to the student. The students can shar-e
equipment depending on the amount on hand.
Student Assignment
Objective: to develop a roll of film using trays
Material: film, running water, developer, stop,
and hypo
Equipment: two photo clips, three 5 x 7 developing
trays, tray thermometer, and timer
Reference: text
Procedure:
1. prepare developer, stop bath, and fixing
solution
2. arrange trays, timer and clips in darkroom
J. pour solution into trays and check
temperature 68 degrees
4. turn out light and check for light leaks
5. separate film from paper backing and attach
photo clip to each end of film
6. check time, and begin passing film back and
forth through the developer. Be sure the
emulsion side is down
7. transfer film to stop bath at end of specified
developing time. Pass the film through the
stop bath four or five times
8. transfer film to hypo tray for ten to twelve
minutes
9. turn on white light that is needed
10. wash film in 68 degree fahrenheit running
water for at least thirty minutes
11. hang film to dry and remove excess moisture
12. when completely dry file negative to make
print in later assignment
19
Cameras. Information on the different kinds of cameras should be
given and demonstrated to the students. Any photo may be taken with
nearly any camera, the price of the camera having very little to do with
the quality of pictures. Each camera has its own characteristics and
advantages; therefore, when buying a camera it will be up to the individ
ual to choose one that will fit his needs, capabilities, and budget.
Listed below are six types of cameras:
Box Cameras. Box cameras are made for the beginner. They are very
simple in construction and use. There is nothing to adjust and no
settings to be made. These cameras are the most economical to purchase.
20
Folding Cameras. Folding cameras may be found in a slightly higher
price bracket than the box cameras, or may be priced with the most expen-
sive, depending on the lenses, shutters, and other equipment wanted.
They are quite compact and may extend a full six inches unfolded and yet,
when folded, be only one inch thick.
Miniature Cameras. The miniature cameras have very fast lenses
that will help in getting pictures when the light is extremely poor.
The shutter speeds are usually from one second to one three-hundredth of
a second, and will reproduce most motion to where it is in sharp focus.
The miniature camera is chiefly used for color transparencies which are
economical in the thirty-five millimeter size of film. Compactness and
ease of handling are advantages. There are many accessories to aid in
taking a wide variety of pictures.
Single Lens Reflex Cameras. With the single lens reflex type of
camera the viewing lens is the same lens used to expose the film so the
picture will be the very same as seen through the viewer. There is no
parallax problem with this type of camera, due to the single lens .
Usually, this camera is of the thirty-five millimeter class, making i t
very reasonable to operate. ·
Twin Lens Reflex Cameras. The twin lens reflex camera has two
lenses, one mounted above the other, the top lens being used to focus
the picture, the lower lens to expose the film. The subject is focused
on the ground glass mounted in the top of the camera, giving the photog-
r apher a clear picture of his subject. This camer a takes twelve exposures
to the roll of f ilm, 21 x 21 in size .
21
Press Camera. The press camera has a great variety of uses, such as,
portrait, close-up, action picture, scenic, and architectural work.
Many adjustments may be made for arry problem the photographer may find.
The press camera, with a few accessories, can use roll film, film packs,
photographic plates, and sheet film.
With this list of cameras the instructor can help the student to
decide the type of camera needed to do the job required. It will also
give the student an idea of the different types of cameras on the market.
Outdoor Pictures. Pictures may be taken outdoors with minimum
expenses and offer unlimited possibilities. We shall list a few subjects
of outdoor pictures to help the student decide which may be of more
interest.
1. marine and beach 5. buildings
2. distance landscapes 6. groups of people
J. portraits 7. sports
4. animals 8. still objects
Marine Scenes. Marine scenes around water involve scenery, boats,
bathers, and fishermen. Marine shots will challenge even the advanced
amateur on the settings for the camera as water acts as a mirror and
will reflect the light. The light meter should be used, if possible.
If not, the lens should be set one stop lower than usual.
Marine scenes can be made quite interesting, but it is necessary to
remember some rules of composition and use them. If people are included
in the picture do not have them looking at the camera, but have them
doing something so their interest will appear the same as the viewer's.
People should appear as though they belong in the picture and not as
though they had been added.
Distance Landscapes. Distant landscapes should have a central
point of interest such as an old barn, house, or some other object. If
possible, the picture should be framed by including leaves and branches
of near-by trees or bushes as this will tend to give the picture depth
and feeling.
Portraits. A portrait taken out-of-doors must be well planned as
to background, light ing , and composition.
The background should be plain, such as the sky or other plain and
smooth background. Many people use the side of a house as a background,
but the lines of the siding will prove distracting . Another common
mistake is in the use of trees, as sometimes the limbs appear to be
growing from the person's head.
Lighting can be a hazard so the subject shoul d be placed in a
shaded area to give a softer appearance, rather than in the bright sun
light which will cause extreme contrast. The subject should be checked
from several positions in relation to the main light source. Shadows
will have to be controlled also.
In composing the picture props may be added or unwanted objects
removed. As many rules as possibl e shoul d be followed .
Objective:
Material :
Equipment :
Reference :
Student Assignment
to make out-of-door pictures
film
camera and light meter
class notes
22
23
Procedure:
1. locate subject
2. compose picture
3. check and set camera
4. snap shutter
5. develop film, make prints 4 x 5
6. mount prints in assignment folder
Contact Printing. Contact printing should be the amateur's first
attempt at printing. Contact printing means just that, the negative
and printing paper being in direct contact with each other. There seems
to be little contact printing due to the increase in the use of the
miniature camera. The picture made from contact printing will be
exactly the same size as the negative. The picture will also be just
as sharp as the negative because there is no focusing or enl ar ging.
These pictures make good prints t o file or check before enlarging.
Equipment needed is a small problem according to Siman Nathan.
With as little equipment as a 10 x 12 inch pi ece of good quality plate glass you can make high quality contact prints. An 8 x 10 printing frame with a spring back is at least as good, and the choice will be one of personal preference.
Raise the head of your enlarger just high enough that the area of light passing through the wide-open lens covers the whole of your plate glass or printing frame without any cut-off at the corners . Using just a piece of plate glass, first place a sheet of enlarging paper on the baseboard of the enlarger (the room lights are off now and you are doing this under the same safe lights used for enlarging). Face the emulsion side upward toward the lamp house. Place your strips of roll film directly onto the paper, their emulsion in contact with the emulsion of the enlarging paper . Place the glass on top .
There are bound to be some uneven exposures in a roll of ei ght or twelve negatives unless you have just shot twelve pictures of the same subject at the same exposure and wit hout
any fluctuation on the part of old Sol above. This means that over-all printing exposure will make certain prints either too light and/or too dark. Be not discouraged, all you have to do is to see to it that those negatives which didn't receive enough light in the camera don't get too much light during the overall exposure for the sheet of contacts. If the dense negatives in the group are bothersome, arrange for these to have additional exposure from the light of the enlarger. This might be expressed as dodging or burning-in, for that is essentially what it is, except whole negatives are involved rather than sections of a single negative as in the enlarging process.
To do this select a grade of paper of contrast suitable for most of the exposures on the sheet. Cut little squares of cardboard the size of a negative frame; lay one over a thin negative right on top of the plate glass for that part of the exposure you wish to dodge, and then reach in and flick it from its position. Burning-in can be accomplished with a hole the dimensions of a single negative centered in a sheet of lightweight cardboard. Two 1-shaped arms of cardboard may prove even more versatile, and you'll eventually notice that you can simplify the dodging or burning-in by placing the strip of negatives needing the most attention in either top or bottom position rather than as the center row. Use the diaphragm of the enlarger to control the light so that you provide long enough exposures to make the above corrections as required. (5, page 33)
After having worked in the darkroom for a short time the terms and
methods Simon Nathan has used will become familiar. As progress is made
a commercial contact print box may be used, but with limited equipment
the method of using plate glass will do a good job.
Student Assignment
Objective: to make a contact print
Material: film, paper, developer, stop, and hypo
Equipment: regular darkroom equipment
Reference: text
Procedure:
1. prepare darkroom for work
2. prepare developer, stop, and hypo
24

25
3. check negative for contrast
4. clean plate glass used for printing frame
5. turn out all lights except safety light
6. place negatives on paper and cover with
plate glass
7. adjust printing frame under enlarger
8. expose negatives from light of enlarger
9. develop and dry prints
10. file prints in assignment folder
Developing Roll Film Using the Tank Method. The instructor should
have several developing tanks on hand for the students as a complete
demonstration of this method. There are two new pieces of equipment to
explain and demonstrate; the bag and the developing tank. It is necessary
to have several rolls of film to be used in loading the reel, dif ferent
sizes giving practice in adjusting the reel, and several minutes spent
loading the reel in daylight can save time and film in the darkroom.
The instructor should, at all times, stress good clean work in all phases
of photo graphy. Fingerprints can be very damaging to the film and prints.
The film should always be handled with care touched only on the edges or
ends. Even after it has dried and has been cut into individual negatives
it should be handled by the edges. Only after the instructor has given
a complete demonstration and checked with the students during the prac
tice session should the assignment be given.
Objective:
Material:
Student Assignment
to develop film using the tank method
roll of exposed film, running water,
developer, stop bath, and hypo
Equipment: developing tank, liquid graduation
measure, thermometer, changing bag,
and an automatic tray syphon
Reference: text
Procedure:
1. prepare developer, stop bath, and fixer
2. arrange reel, tank, and tank cover on
darkroom bench
3. check reel with size of film
4. use the darkroom or place the equipment
in the changing bag
5. separate film from paper backing
6. carefully load film into reel
7. insert film into tank being sure cover fits
8. turn on lights or remove tank from changing
bag
9. check temperature of solution for 68 degrees
fahrenheit
10. check time
11. pour developer into developing tank carefully
12. agitate several times during development
13. pour developer from tank at the end of
specified time
14. fill tank with stop bath and agitate for
twenty to thirty seconds before pouring
out the solution
26
lS. pour hypo into tank and agitate several
times and empty tank after about twenty
minutes
16. wash film for thirty to forty-five minutes
17. hang film to dry and remove excess water
with clean damp sponge or chamois
18. cut film into separate negatives for use
in next assignment
27
Washing and Drying ~,Print. Washing and drying a print is often
mishandled, and discolored prints are the result. Washing the prints is
important and time consuming, but it is necessary to do it carefully in
order to turn out prints that will not fade in later years. There are
several methods for washing the prints, all of them quite similar except
for the equipment. One of the most common ways is to have a tray 11 x 14
inches or larger, depending upon the amount and size of the prints, with
an automatic syphon attached. This combination keeps running water cir
culating through the pictures, at the same time draining the tray. The
most simple way is to put the prints in a tray and change the water
every five minutes for a total time of one hour. The prints must be
circulated and separated during the washing process.
Objective:
Material:
Equipment:
Student Assignment
to wash and dry prints
running water
automatic tray syphon, ferretype plate
with or without heating element
Procedure:
1. remove prints from tray of hypo and pre-
wash in tray of water for a few minutes to
get surplus hypo removed
2. put prints into tray changing the water
at five minute intervals
3. after prints have washed for a full sixty
minutes, remove from washer and place on
ferretype
4. using a print photo roller, roll out all
surplus water being sure the prints do
not have any wrinkles. Time spent in
drying will depend on the type of dryer
used. Under no circumstances peel the
print from the ferretype. The prints
should fall off or come loose on their
own when dry
Mounting ~ Print. All prints should be mounted in one form or
another. The following suggestions by Aaron Sussman are practical and
economical:
The best way to mount prints is with dry tissue. It forms a permanent bond between print and mount and, most important, it does not stain or discolor the print. The semi-transparent tissue, impregnated with wax or plastic, melts under heat and welds the print to the mount. If you cannot afford a mounting press, use a flat iron, but keep it about 140 degrees fahrenheit (just hot enough to sizzle to a wet finger), and cover the print with a sheet of heavy paper to keep from scorching it. The tissue is first tacked to the untrimmed print at several spots, using tip of iron, then trim print to size, arrange on mount, cover with protective paper
28
(avoiding shifting ~osition) and smoothly and carefully iron. (8, page 298)
By using Aaron Sussman's idea, one common household iron would be
sufficient for a photography class in school.
Student Assignment
Objective: to dry mount a print
Material: print, mounting tissue and board
Equipment: dry mounting press or household iron
Reference: text
Procedure:
1. plug in iron and allow to heat
2. cut tissue to approximate print size
3. tack tissue to print in several places
4. trim the print and tissue
5. place trimmed print in desired position
on mounting board
6. place a heavy piece of plain paper over
the print and seal by ironing over the
entire print
?. use India ink and draw a border one-fourth
inch around print except for the bottom
side where you use three-eighths of an inch
8. print name and class hour in lower right
hand corner of mounting board
29
Composition. Composition is arranging the contents of a picture to
please the eye. How many times has a picture been taken and then the
photographer wished something had been added to or taken away from it?
30
That is where composition enters photography. A good picture is one
that represents something; this sounds easy but take a few pictures and
study them. Ib the pictures tell a story? Are words needed to explain
the pictures? The most common mistake amateurs make is trying to include
too much in a picture. There should be only one subj ect. An aid to
composition is cropping. This is the act of composing the picture af ter
it has been taken by only printing parts of the negative. Not much can
be added but a lot can be taken away by blocking out sections of the
negative. There is no set rule to f ollow in composing, but Aaron Sussman
has made a study of this subject. This is his list:
1. lb not place the main object at dead center. 2. Keep the main object away f rom the outside edges of the
picture. 3. Arrange your light and shade so t hat t he greatest con
trast falls at the point of gr eatest interest. 4. Divide the picture space into thirds, horizontally and
vertically, draw imaginary lines separating t hese portions. Where the lines cross are four magical points near which t the main or subsidiary objects should be pl aced.
5. The closer an obj ect is to the dead center, t he less it catches the eye; the nearer the edge the more it attracts.
6. Lines intersecti ng at angles draw the eye; the nearer the angle is to a right angle, the stronger the pull.
7. Parallel lines that run across a picture area tend to carry t he eye right out of t he picture .
8. For gr eat est interest divide the picture ar ea into unequal divisions; do the same wi th the area around the main object.
9. Ibn't include too much in t he picture. Artists rarely show more on a canvas than can be seen from angles of view of about 30 to 40 degrees. Wide angle pictures, with an angl e view of between 80 t o 100 degr ees seem unreal f or that r eason. The eye has an angle of view of about SO degr ees .
10. If the object does not l ook interesting when photo graphed head on, try taking it from an angle. This applies to bui ldings as well as peopl e , or to objects as well as subjects.
11. Everyt hing in the pictur e must be i n some sor t of har mony with t he main i dea or obj ect . A vase of f lowers and a kippered herring, fo r example , would not be in harmony .
12. Never l et a line cut your picture exactly in half , either horizontally or ver t ically .
13. Never let an uninterrupted line run parallel to any side of your picture.
14. Eliminate useless foreground or sky. 15. Remember that every spot in the picture attracts the eye;
the force of this attraction depends upon the size of the spot, its shape, its position, and the contrast it creates with its surroundings.
16. The main object should be the most conspicious by size, contrast, and position.
17. The various elements of a picture should be so arranged that the eye is led in orderly progression from one element to another, vesting longest on the principle subject.
18. The skyline should never be in the center of the picture; place it a t hird of the way from either the top or bottom.
19. The eye naturally follows light, glancing across a picture it goes from the dark areas to the light ones. A white spot on a black background pulls the eye more than a black spot on a white background, and a small white spot on a dark background pulls more than a large white spot on the same background.
20. If there are people in the picture, give them plenty of room to move about in, or they will seem cramped.
21. If a picture shows people moving, leave more space in front than behind them. Similarly, leave more room in the direction in which people are facing or looking.
22. If the picture seems spotty, cover each spot in turn with a finger and notice what this does to the picture . If this improves it, remove or subdue the spot. lb this to all the offending spots.
23, Light and dark masses in a picture should always be unequal.
24. A continuous series of spots act like a line. 25. Small spots, either light or dark, away from the
principle object, only tend to distract the eye . The same is true for spots of unusual shape, or those placed in corners.
26. Long lines that run right out of the picture should be interrupted before they leave the picture area . This will help keep the eye within the picture .
27. Arrange the pattern of the picture so that the eye enters from the lower left or right hand corner .
28. To test the composition of any picture , turn it upside down.
29. Finally keep in mind what St . Exupery, that extra-0rdinary author, artist, and aviator said in Wind, Sand and Stars : 11 It seems that perfection is att ained, not when there is nothing more to add, but when there is nothing more to take away . 11
( 8, page 164)
31
32
These rules should come to mind automatically after they have been
put into practice for some time. After reading the above, an amateur
can see there is more to taking a picture than just snapping the shutter.
Student Assignment
Make a collection of pictures from magazines rep-
resenting these rules. One picture could incorporate
several rules. Mark on the picture the number of the
rule, and indicate with an arrow where the rule has
been followed.
Enlarging. Enjoyment in the darkroom will begin with enlarging
your pictures as it will incorporate all the other steps you have learned
up to this point. Enlargement combines proper exposure, good focusing,
developing, good composition, and many other techniques. A good nega-
tive does not assure the photographer of a good print, but it is one of
the necessities. The important thing is to have a good enlarger.
These come in two types, designated as condenser and reflector, the difference being in the light system. In condenser enlargers, diffused light is collected by one or two condensing lenses and projected toward the negatives to the enlarger lens in a more or less straight line. This produces prints with sharp detail and distinct tonal separations, and enlargers of this type are generally preferred for negatives 2i x Ji inches or smaller.
In a reflector enlarger, the light passes through a diffusing screen to the negative and thus to the enlarger lens. Loss of detail and graduation are not great enough to be objectionable where the degree of enlargement is not more than S to 1, therefore, enJargers of this t~e are satisfactory for negatives larger than the 2i x 34 inch size. (5, page 39)
The same procedure is used after the paper has been exposed to light
as was used when making contact prints. The instructor should give a
full lecture and demonstration about enlarging paper and its characteristics.
Student Assignment
Objective: to make an enlargement
Material: negative (self-developed), enlarging
paper, 4 x 5 in size; 2, 3, and 4 in
contrast; developer, stop bath, and
hypo
Equipment: enlarger, easel, timer, and syphon
Reference: text
Procedure :
1. set up darkroom for enlarging
2. prepare solutions; developer, stop bath,
and hypo at 68 degrees fahrenheit
3. clean lens, carrier, and negative
4. put negative in enlarger r emembering the
rule--emulsion to emulsion
5. adjust easel to desired size
6. turn on safelight and turn off all
white light
7. turn on the light of the enl ar ger and
adjust for close focusing
8 . prepare and make t est strips of negative
9. mount paper in easel and expose
10. process and file in assignment folder
Portraits. The word portrait comes from the Latin word protrayal,
meaning to portray or represent a person . To make a natural portrait
the surroundings and props must f it in with the subject ' s personality .
33
34
To make good portraits there are five main factors to be considered; they
are : lighting the subject, proper background, posing the subject, focus
ing the image, and exposure. These factors would apply to indoor or out
side photography.
Lighting. The lighting for portrait work should be diffused to the
extent that it will give a soft lighting affect. In out-of-door portraits
care must be taken not to use direct sunlight, which will give a con
trasting print, and will cause the subject to have a harsh appearance.
For the best results take the portraits in the shade, as under a tree
which provides full diffusion, or on the north side of a building giving
only the northern exposure for a light source. Cloudy days are not to be
passed by for any picture by those who use the high speed film and fast
lens of today. Portraits can be made all seasons of the year, day or
night, and all can be most pleasing . A reflector is an aid to lighting
indoors or out of doors. It is used to put a soft reflected light on
the side where deep shadows appear. The shadows are not eliminated but
only softened, and this will give the finished product a pIDfessional
look.
Background. As nearly as possible find the background suitable for
the subject, as it can add or distract from the portrait; if this is
impossible, use a plain background. Keep in mind that the person is the
subject, so the background must not distract from it. One method of
eliminating distractions is to open the camera to the extent that the
background is out of focus.
35
Posing. Posing introduces quite a problem for the amateur photo grapher.
to do good work a study will have to be made and then plenty of practice
and experimenting will be required to solve this problem. Aaron Sussman
gives one good example which follows:
A Stout Problem. If your model is on the plump side, he represents a special problem. The trick is to place and light the model in such a way that the obesity is subdued. Dark clothes instead of light, da:rkbackground instead of light to minimize contrast between figure and background, use of less of the figure, by turning it sideways or by showing more of the head and less of the body--these are some of the ways to overcome the problems presented by the portly poser. (8, page 298)
This will give the amateur some idea of the problems to be worked
out in the taking of portraits.
Focusing. Good sharp focusing is needed. Sharp features can be
diffused in the darkroom with the enlarger. Focusing should not include
just the part wanted, but should include at least one-half of the body;
there will be less distortion with this method. Compose the subject in
the darkroom on the easel.
Time and Exposure. Time and exposure adjustments should be made ,
being sure to double check both, so as to obtain a good, workable nega-
tive.
Student Assignment
Objective: to make a portrait
Material : film and model
Equipment: camera, light meter, tripod, and
ref1.ector
Reference : text
36
Procedure:
1. select location
2. check lighting
3. pose subject
4. check angles for shooting
5. set adjustments of camera and take picture
6. develop and print picture
7. file in assignment folder
CHAPTER IV
CONCLUSIONS AND RECOMMENDATION
This report has been prepared to give the :instructor in photography
a general outline and some techniques in presenting the course. Brief
descriptions, definitions, and a list of equipment are the aids given ..
and with the help of this report the instructor will give the students
a general basic knowledge of photography, and show the relation of
photography to occupations and recreation. A camera of some description,
whether it be a simple box camera or a camera with a fine lens and many
adjustments, may be found in mo st homes. With so many people owning
cameras and equipment some instructions should be given in basic terms ~ - - - ----:;.
showing how a camera Ol)~ates, and information and demonstrations should
be given showing the various steps :in processing a picture from the time _..,- --. - - - r - '
it has been taken until the picture is completed as a print.
Photography in the High School. Photography as other industrial
arts subjects offers much more than might be expected from reading the
title. It is the duty of high schools to develop social sensitivity
and in photography this is taught through the students working together
and considering various ideas. Developing cooperativeness is among the
top problems of high schools . The photography program provides contin-
uous opportunities for the student s to work together toward common goals .
Another aim of the school is to develop creativeness :in the students .
Photography is unlimited in presenting this type of problem, as it of fers
a challenge from the time the student composes the picture until it is a
finished product. Skills are also very important in the process of
learning, and no photo graphy course can be presented without involving
many skills. In studying photography many objectives enter into the
course other than photography.
Recommendation. The basic course in photo graphy is only the begin
ning or introduction to photo graphy. The writer would suggest the
following divisions to be introduced as equipment and student capabili
ties permit:
1. operations of press and view camera
2. studio procedure
3. color photography
4. oil coloring
5. advanced study of film, lens, lighting, and
darkroom procedures
38
A SELECTED BIBLIOGRAPHY
1. Eder, Josef Maria, History of Photography, Translated by Edward Epstean, Columbia University Press, New York, 1945, 86o pages.
2. Morgan, Willard D., The Complete Photographer, Vol. 6, page 2360, New York National Educational Alliance Inc., 1943.
3. Morgan, Willard D., The Complete Photographer, Vol. 2, page 406, New York National Educational Alliance Inc., 1943.
4. Morgan, Willard D., The Complete Photographer, Vol. 10, page 36oo, New York National Educational Alliance Inc., 1943,
5. Nathan, Simon, Good Photography's Darkroom Guide, Fawcett Publications, Greenwich, Connecticut, 1957, 144 pages.
6. Neblette, C. B., Careers in Photography, Ziff-Davis Publishing, Chicago, Illinois; New York, New York, 1946, 182 pages.
7. Potonniee, George, The History of The Discovery of Photography, Translated by Edward Epstean, Tennant and Ward, New York, 1936, 272 pages.
8. Sussman, Aaron, The Amateur Photographer's Handbook, Thomas Y. Crowell Company, New York, Fourth edition, 1952, 400 pages.
39
VITA
James G. Utley Candidate for the Legree of
Master of Science
Report: A BASIC COURSE IN PHOTOGRAPHY FDR HIGH SCHOOL
Major: Industrial Arts Education
Biographical and Other Items:
Born: May 6, 1921, at Tulsa, Oklahoma.
Undergraduate Study: Northeastern State College, Tahlequah, Oklahoma, 1940-41, 51-52-53.
Graduate Study: Entered Oklahoma State University in June, 1953; completed the requirements for the Master of Science degree in August, 1958.
Experiences: Five years teaching, Tulsa, Oklahoma, 1953 to 1958; six years as a carpenter; three years, three months in the United States Navy, 1942-45.
Organizations: Oklahoma Education Association, National Education Association, Tulsa Classroom Teachers Association, Oklahoma Industrial Arts Association, and Iota Lambda Sigma.
Date of Final Examination: July, 1958
REPORT TITLE: A BASIC COURSE IN PHOTOGRAPHY FOR HIGH SCHOOL
AUTHOR: JAMES G. UTLEY
REPORT ADVISOR: L. H. BENGTSON, Associate Professor School of Industrial Arts Education
The content and form have been checked and approved by the author and report advisor. Changes or corrections in the report are not made by the Graduate School office or by any committee. The copies are sent to the bindery just as they are approved by the author and faculty advisor.
TYPIST: Carolyn Laverde


